Printable Version of Topic
Click here to view this topic in its original format
914World.com _ 914World Garage _ Rotary 914!
Posted by: gabeurgelles Jun 11 2015, 07:01 PM
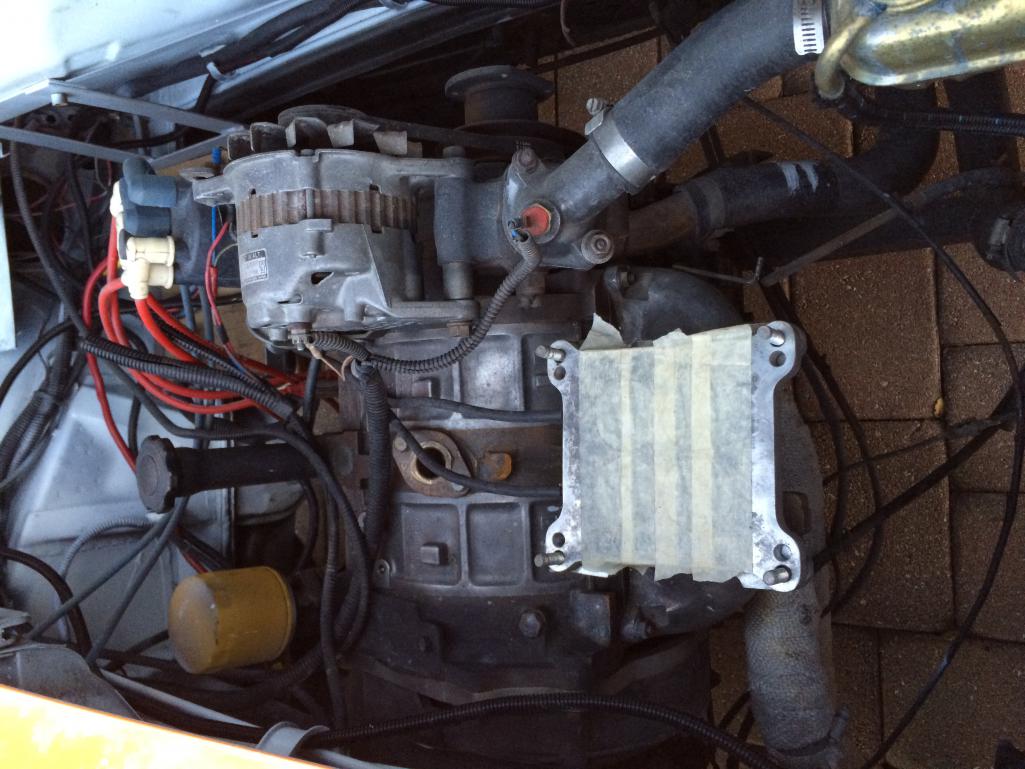
I recently purchased a 73' 914 with a Mazda 13b already swapped into it. I am the second owner of the car, previous owner was from Arizona. It has NO RUST at all and the swap was done properly. The motor mount and radiator frame were both very well done. As well as the plumbing from the radiator to the engine. The car also has an interesting exhaust system, which I found out although it looked cool, was not the right type of exhaust for the rotary. The passenger side rear brake caliper bleeder was broken. The swap was never completed and the car never drove under rotary power. The only thing left was fabricating a new shift linkage, since the old one would go right through the oil pan.
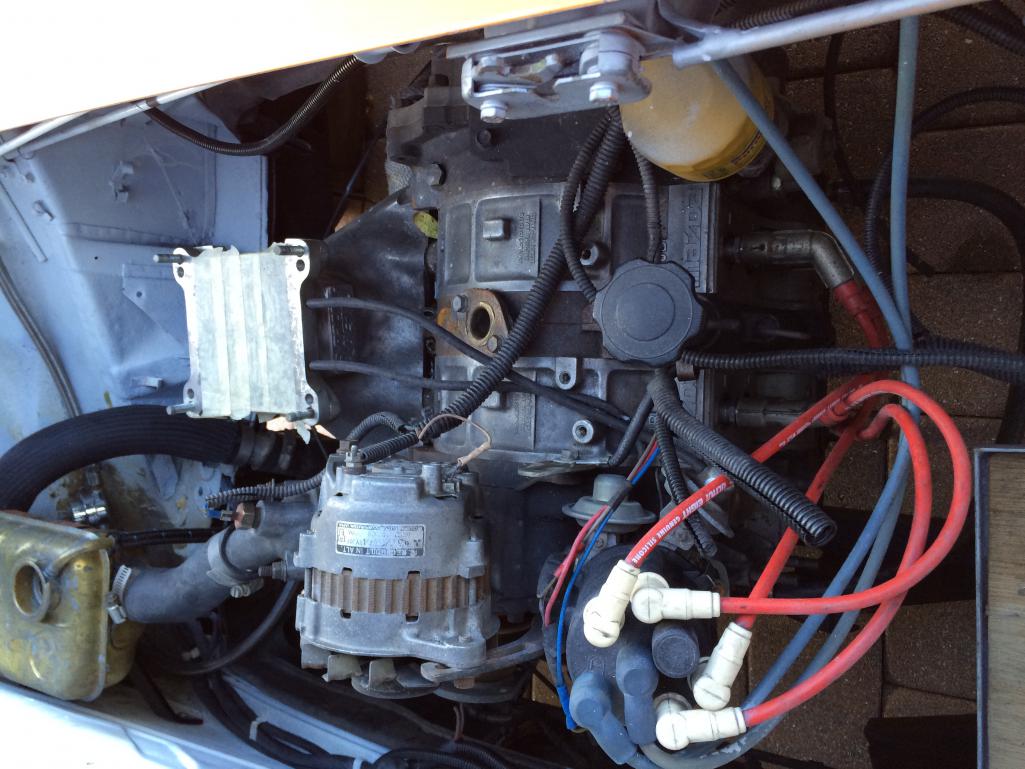
I bought the car purely for the condition of the body and wasnt really counting on a good engine or transmission but after messing around with it in the garage I got it running. I discovered the engine was streetported and in decent condition. The engine only had hours on it from the rebuild but it suffered from sitting for all that time. 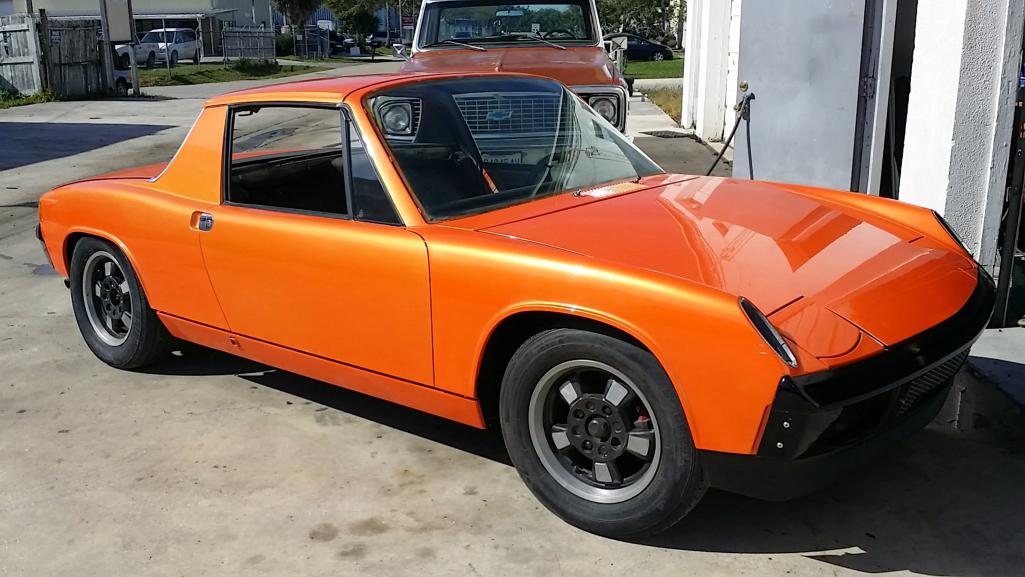
Posted by: gabeurgelles Jun 11 2015, 07:03 PM
Posted by: gabeurgelles Jun 11 2015, 07:04 PM
Posted by: db9146 Jun 11 2015, 07:10 PM
I was given a ride in a 914 with a stock F.I. 13B rotary and it was great. The "rev-ability" of the engine really suited the gearing of the 901 and the car was quick. I really liked it. One of my favorite 914 conversions.
Posted by: 76-914 Jun 11 2015, 07:16 PM
There are a couple of others here that have a rotary conversion. They're peppy at higher rev's. I won't say gas hog because everyone of us that does a conversion could give a rat's ass about MPG.  Post pic's of your progress.
Posted by: Rotary'14 Jun 11 2015, 07:31 PM

Nice to have another running rotary around! Well it was running,,,  Yours is really clean.
after you get the carb rebuilt and put back in,,,, be sure to keep an eye on the temp guages. Although your cooling system looks sound,, you have to make sure it can handle it. And really watch out on hot days.
Nothing revs quite like a rotary,, and a street port revs and pulls strongly up to 8.5k!
I think you have a good combination.
-Robert
Posted by: Mueller Jun 11 2015, 07:47 PM
Nice car...never driven a rotary..been stuck behind a few at Thunderhill...so glad I was in something that could pass them so I didn't have to suffer with all that noise they make! hahaha
INB4 Mike Bellis 
Posted by: Mike Bellis Jun 11 2015, 08:36 PM

INB4 Mike Bellis

I've blown up enough rotaries. I'm sticking with the Audi...

Post some more pics of the radiator setup. Rotaries run hot when flogged.
Posted by: GeorgeRud Jun 11 2015, 09:33 PM
My friend won the IMSA RS Championship back in the day with a rotary Mazda RX2, so we had a lot of fun running the rotaries. My ears have never recovered from the noise of an unmuffled Wankel!
Posted by: PanelBilly Jun 11 2015, 09:52 PM
How much did the car get chopped up for the conversion? Just wondering if you still have the option of sticking an aircooled engine back in, if the rotary conversion gets to be too much of a headache. The car looks pretty nice.
Posted by: Andyrew Jun 11 2015, 11:38 PM
INB4 Mike Bellis
I've blown up enough rotaries. I'm sticking with the Audi...
Post some more pics of the radiator setup. Rotaries run hot when flogged.
Looks to me like its not shrouded.

But its fixable!!!
Posted by: Porschef Jun 12 2015, 06:16 AM
I had an Rx7 in CA twenty something years ago, drove it cross country back to NY. Not great mileage around town but was pretty good on the highway. More than once with the music up I found myself in third at 75 or so, it was that smooth. The 8k redline made it very elastic... I'd think the 901 would work well with the 13b. Plus it's so darn small.
Piston engine goes boing boing boing
But the Mazda...
Posted by: gabeurgelles Jun 12 2015, 02:46 PM
Since I got the car about a month ago, Ive fabricated the shift link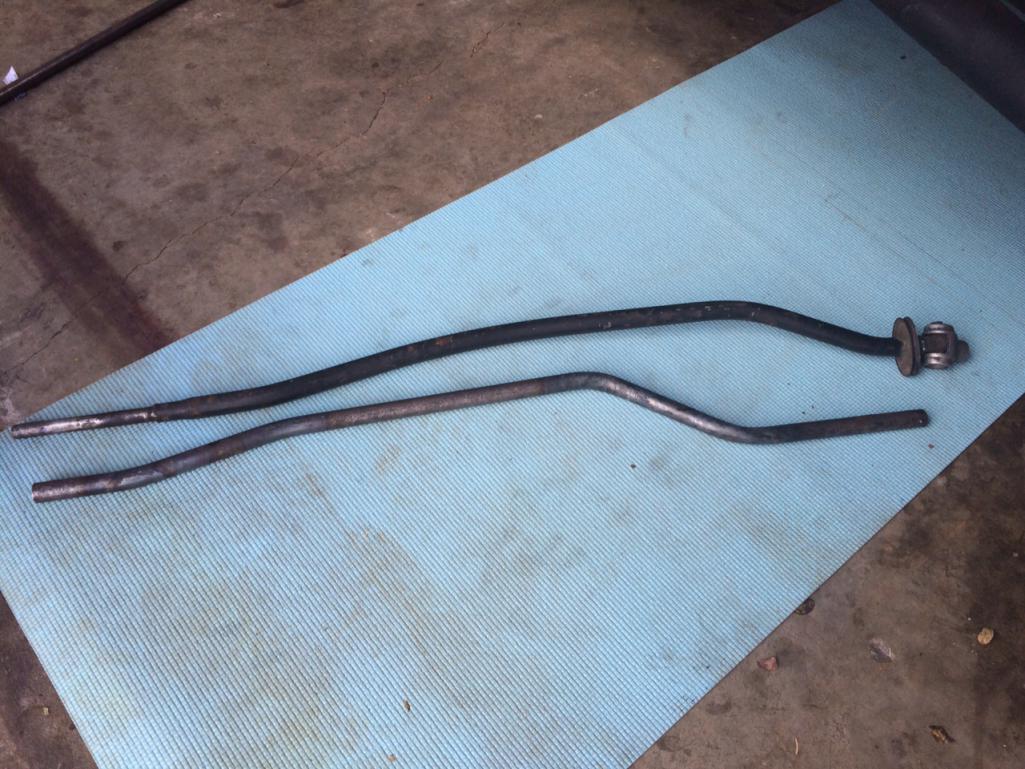
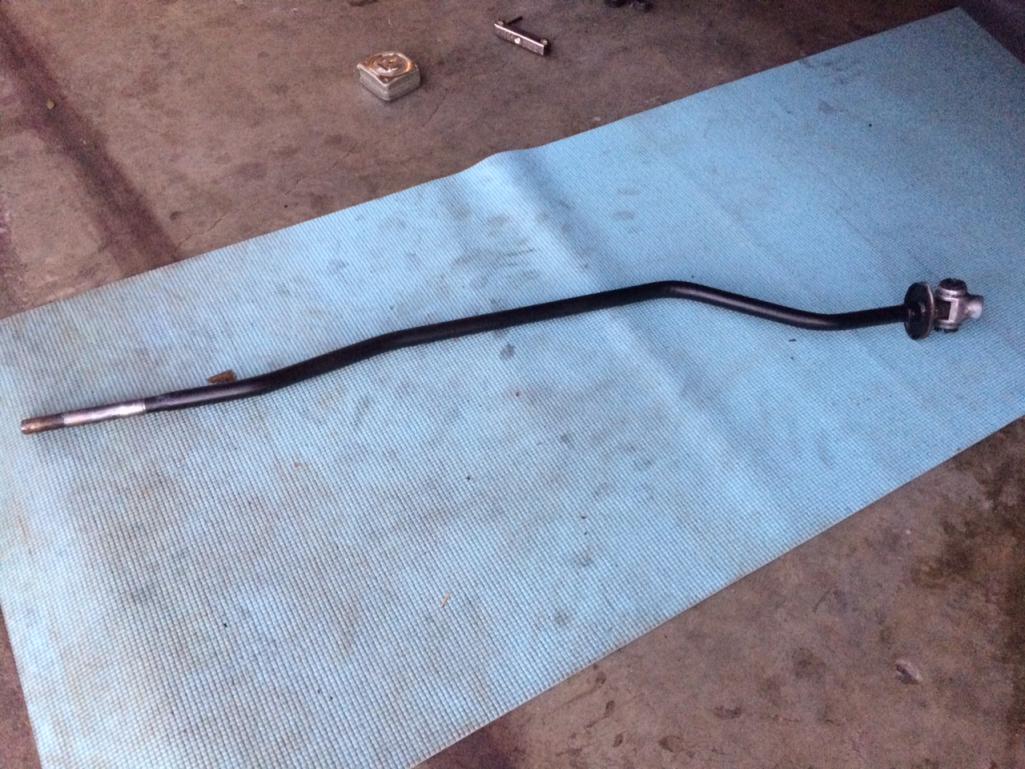
and rebuilt the engine because it was smoking A LOT.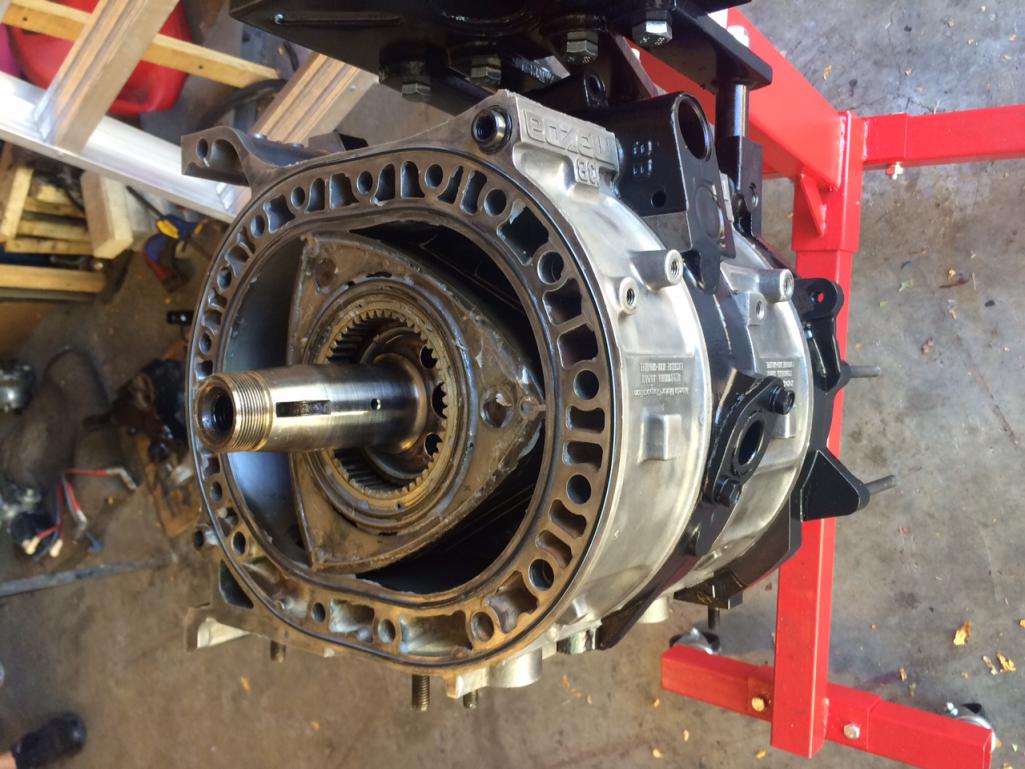
Posted by: gabeurgelles Jun 12 2015, 02:57 PM
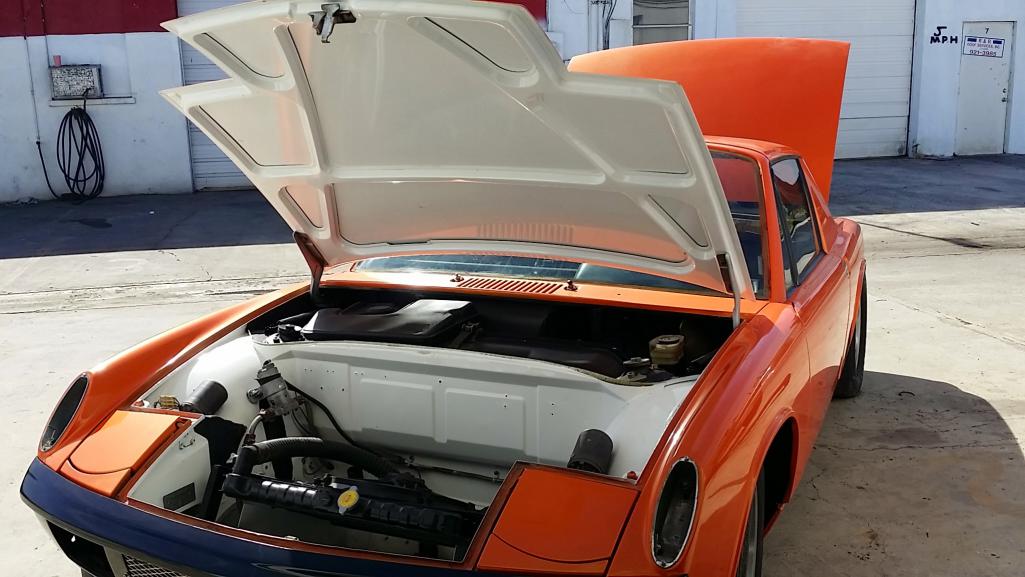
I also had to add an oil cooler to help with the overheating issue. Made a scoop for it and mounted it in the front left corner of the engine bay area. Now I have to make a shroud for the radiator and then I'll be running nice and cool.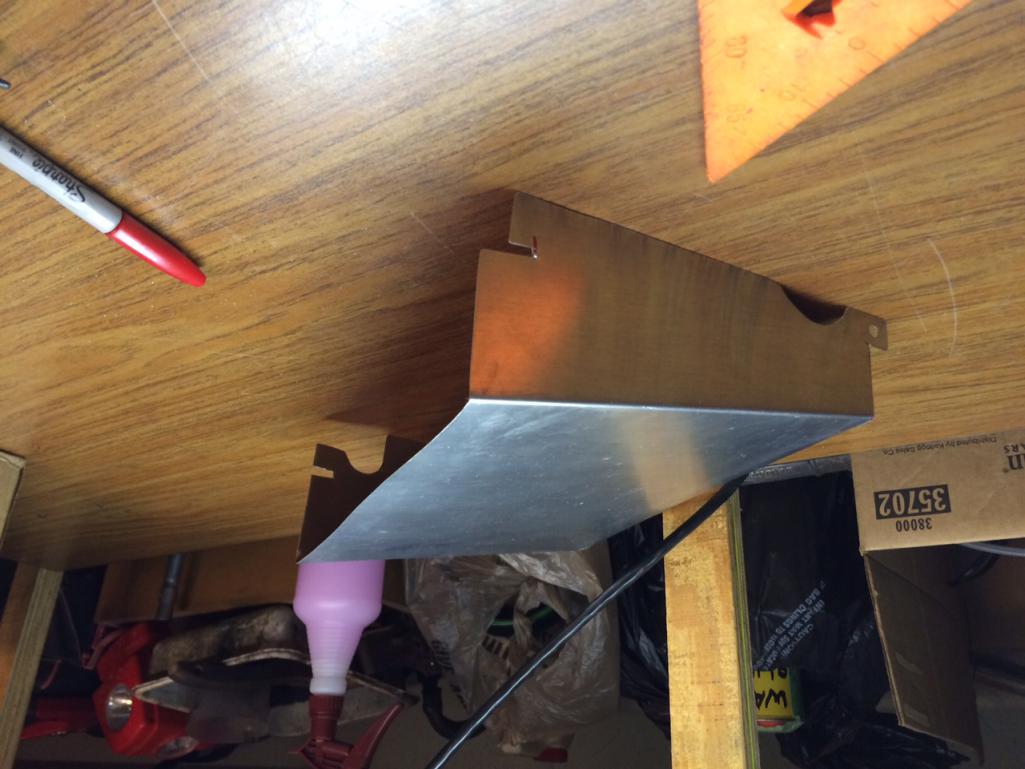
Posted by: gabeurgelles Jun 12 2015, 02:59 PM
How much did the car get chopped up for the conversion? Just wondering if you still have the option of sticking an aircooled engine back in, if the rotary conversion gets to be too much of a headache. The car looks pretty nice.
The front trunk has a nice big hole in it and the wheel wells have a slot for the air to escape. I don't think Ill be going air-cooled again unfortunately
Posted by: steuspeed Jun 12 2015, 03:55 PM
Neat! ![popcorn[1].gif](style_emoticons/default/popcorn[1].gif)
Posted by: KELTY360 Jun 12 2015, 06:12 PM
Great color!
Posted by: Mike Bellis Jun 12 2015, 06:20 PM
The boy has skills! 
Posted by: gabeurgelles Sep 21 2015, 06:59 PM
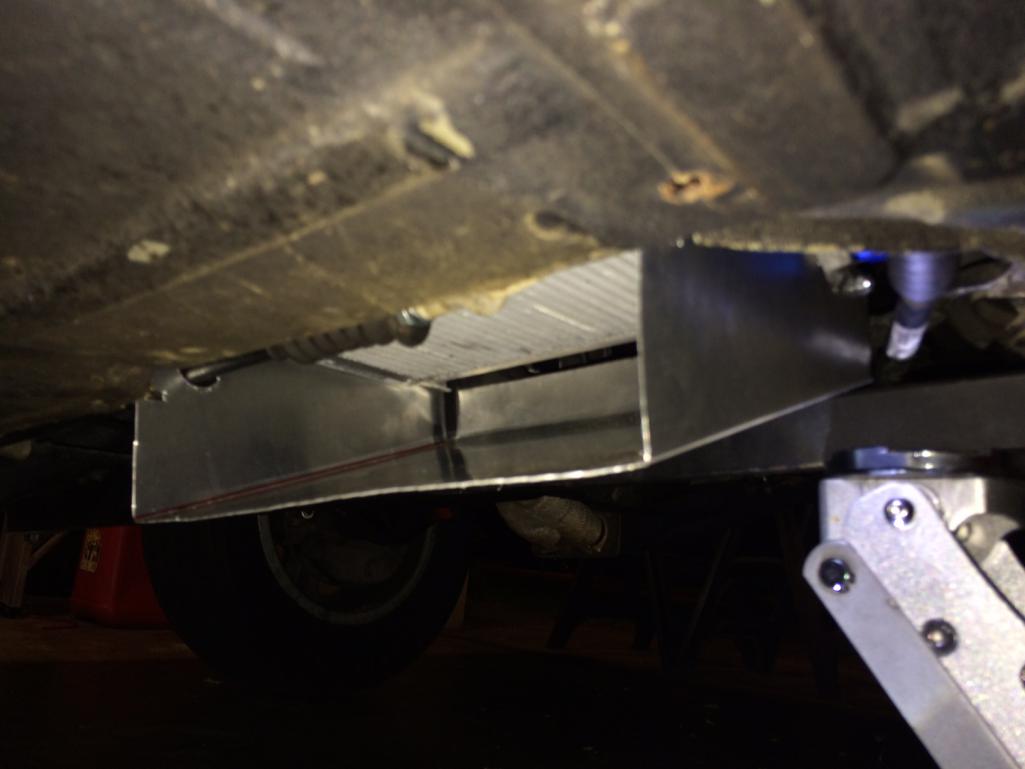
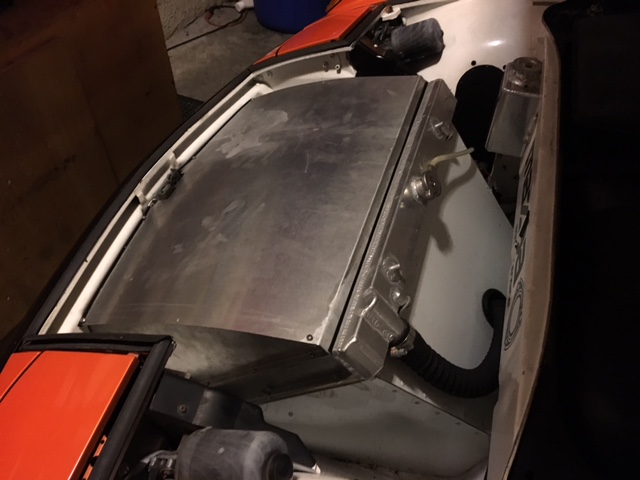
So its been a while since I've updated this thread, but since then i,ve done so much. Fist off I ended up changing the whole radiator setup that it had when I bought it. The problem I was having was that not only was the engine overheating after a high way drive but the gas was boiling as well. This was due to the angle of the radiator and lack of shrouding. Since a figured this was not ideal I decided to switch to a bigger 2 row aluminum radiator and mount it differently. 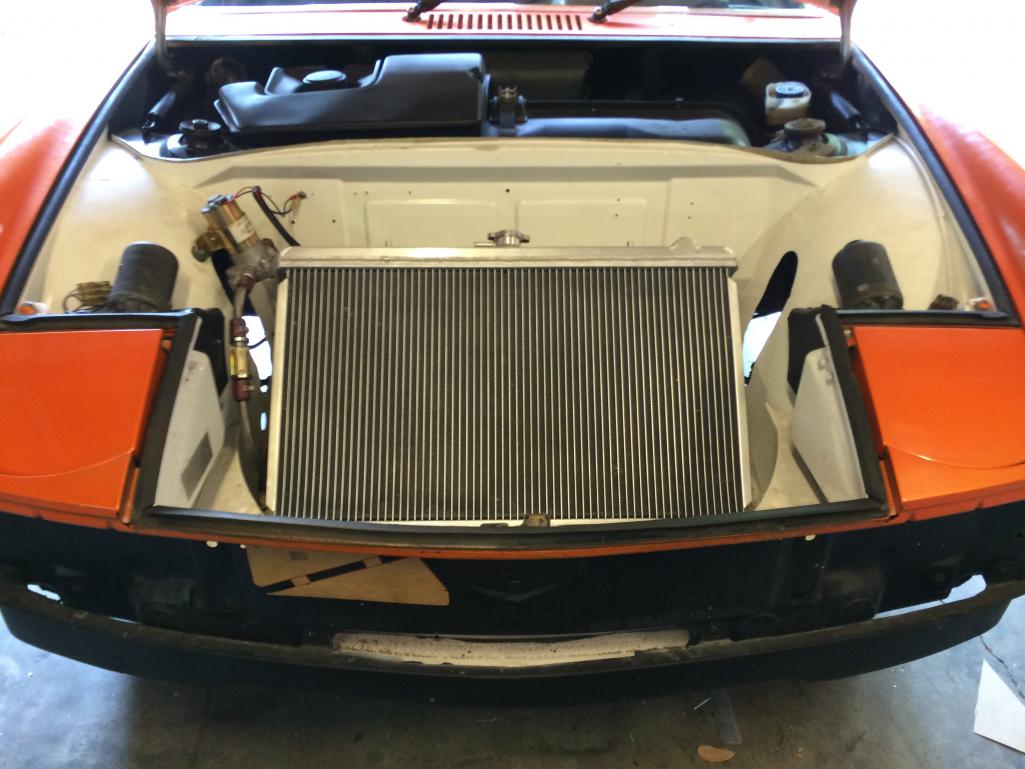
Posted by: gabeurgelles Sep 21 2015, 07:03 PM
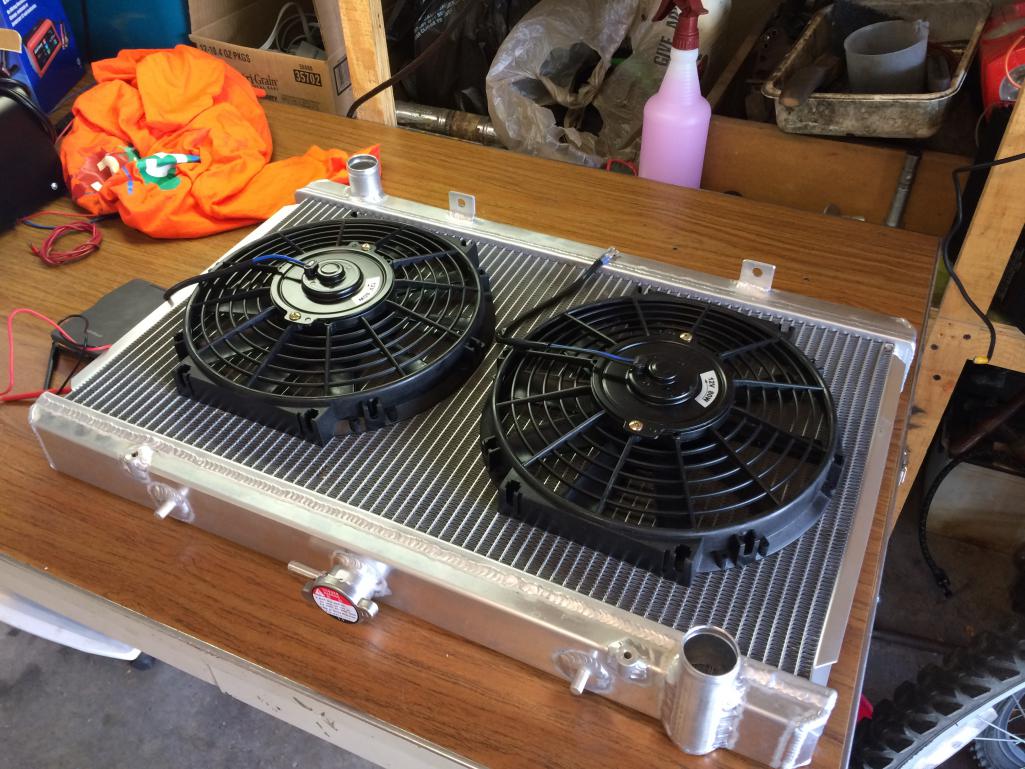
I shrouded the back of the radiator so that the air can escape through the hole in the floor. And made a fan shroud for the twin fans.
The radiator is flipped in this picture, the fans pull, not push!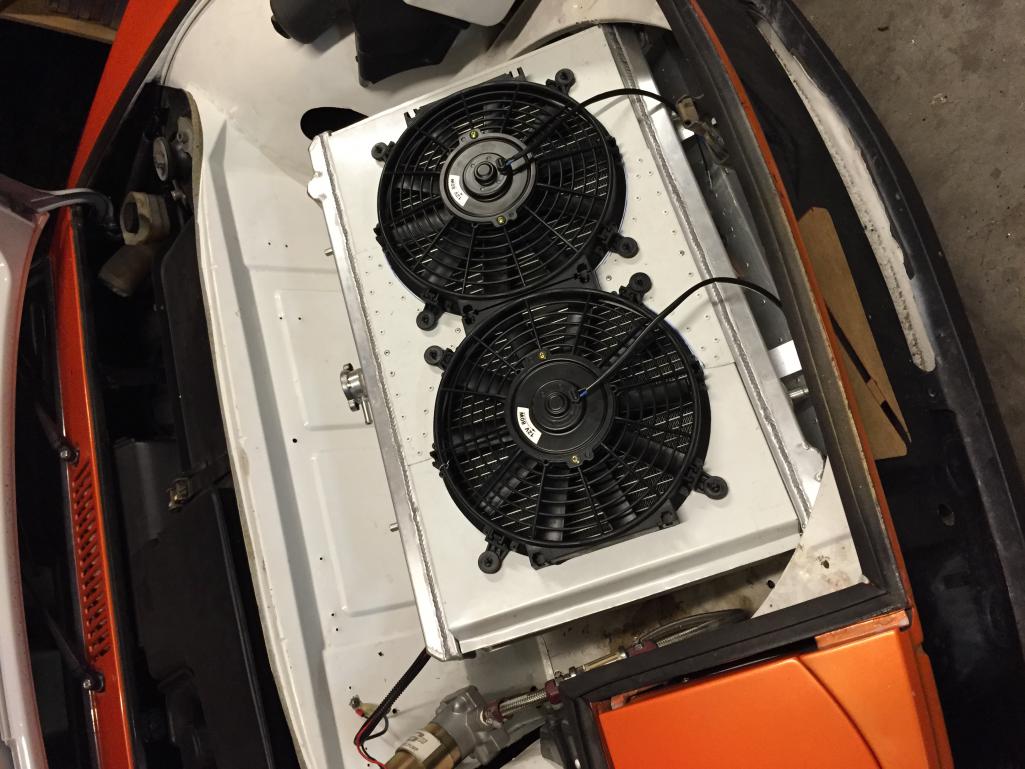
Posted by: gabeurgelles Sep 21 2015, 07:05 PM
Ever since I switched over to the aluminum radiator I've been having no problems cooling at all. My temp stays between 175-185 degrees F. Even during spirited driving 
Posted by: Stacks914 Sep 21 2015, 07:20 PM
Man this thing is looking good would love a rotary powered one!!
Posted by: gabeurgelles Sep 21 2015, 07:20 PM
On top of the radiator, I also worked on the exhaust. The issue I faced was that the whole system was too restrictive for the rotary. I ended up switching over to a 2" to 3" Y-pipe. And switched from a cahmbered muffler, which did not produce a pleasant exhaust note, to a Hushpower Pro Series muffler by flowmaster. This new exhaust is much less restrictive and gives the car a pretty nice sound in general.

Posted by: gabeurgelles Sep 22 2015, 06:01 PM
This is the finished exhaust, with the new flowmaster muffler.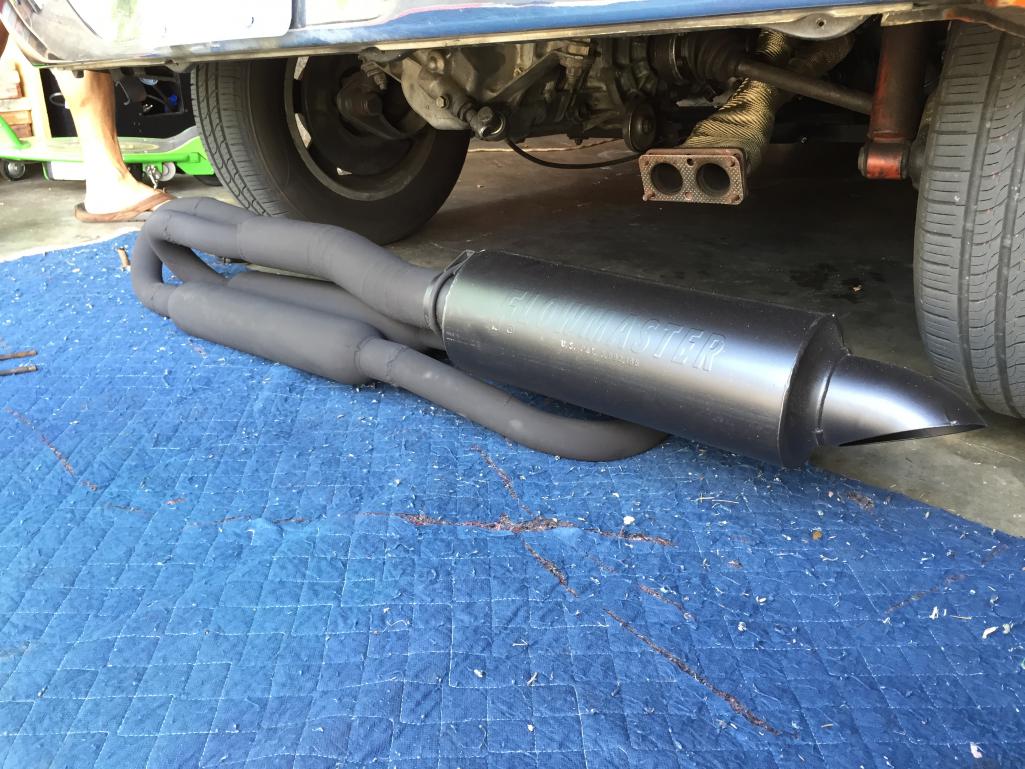
Posted by: tscrihfield Sep 22 2015, 08:02 PM
Nice handy work you got there.
Only owned one rotary. Was fun while it lasted is how I like to describe it. But it had a huge turbo on it nothing like this. Seems to be a really neat car there! Look forward to the progress.
Posted by: gabeurgelles Sep 23 2015, 05:52 PM
Quick video of the new exhaust at 3/4 throttle.
https://www.youtube.com/watch?v=K9EEYwkJAx8
Posted by: oldschool Sep 24 2015, 09:09 AM
WOW that's sound nice!

Posted by: oldschool Sep 24 2015, 09:15 AM
BTW I still have a Kennedy plate and motor mount set-up for a Rotary to put in your 914 if anyone wants to make me a offer  ....sorry for the hijack PM me.
Posted by: relentless Sep 24 2015, 11:26 AM
Neat looking car! Back in the day I had a '93 RX-7 twin turbo and that car was quick. Take good care of those apex seals. I think Pettit Racing sells a lube that you put in the gas, which extends apex seal life.
Posted by: BillC Sep 24 2015, 01:55 PM
Neat looking car! Back in the day I had a '93 RX-7 twin turbo and that car was quick. Take good care of those apex seals. I think Pettit Racing sells a lube that you put in the gas, which extends apex seal life.
Standard 2-cycle oil is all you need. Add it to the gas at the normal ratio and it'll protect the apex seals. We race a '79 RX-7 in LeMons, and we removed the stock oil injection system (because it tends to fail with catastrophic consequences) and just pre-oil the gas -- works great and no problems! We use one ounce of oil per gallon of fuel.
Posted by: gabeurgelles Sep 24 2015, 04:31 PM
yeah, i bypassed the oil metering system and run premix. It gets annoying at times, having to put oil every time I put gas but its well worth the protection!
Posted by: gabeurgelles Sep 26 2015, 08:56 PM
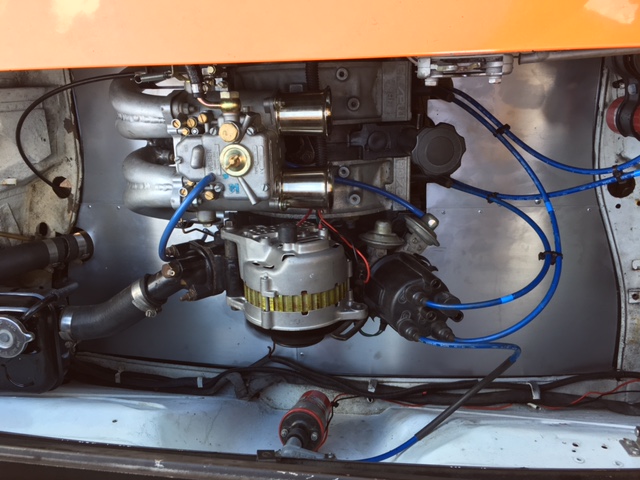
Heres a current picture of the engine bay, finally chose a spot for the coils. 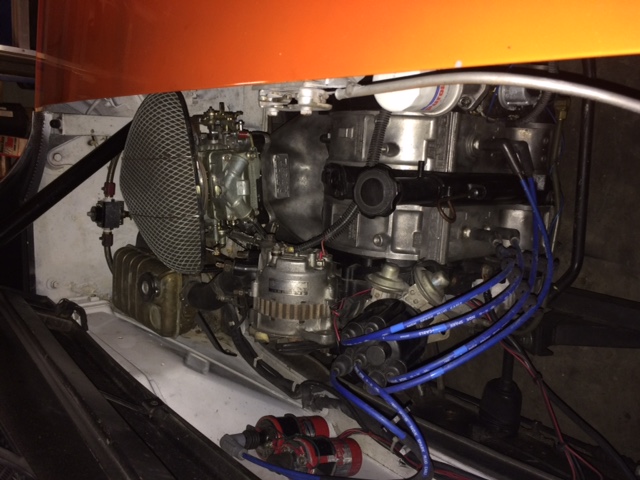
And heres my lithium ion battery. Weighs in at just about a pound!!!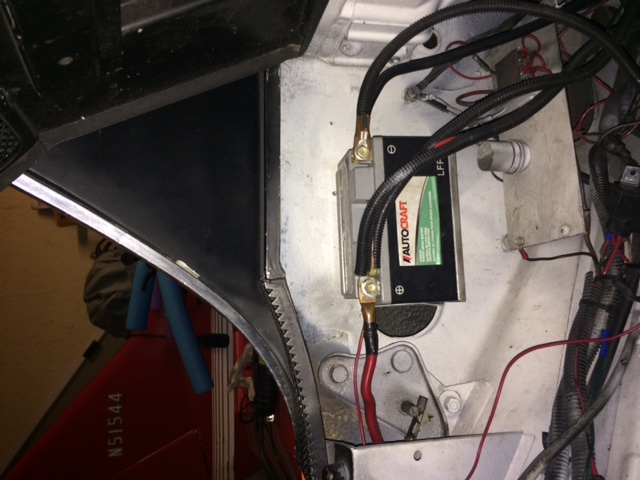
Posted by: Mike Bellis Sep 26 2015, 09:46 PM
I used to run premix in mine too. I used Red Line smokeless and marine measuring cup. I would buy it by the case so i always had some available. I still have a case and a blown 13B... I now use the Red Line in my chain saw.
Posted by: gabeurgelles Oct 7 2015, 07:57 PM
I have recently found what I believe to be the swaybar for the car in the piles of stuff I received when I bought it. The only problem is that I dont have all the parts to install it and dont know exactly whats missing.
Posted by: gabeurgelles Oct 7 2015, 08:04 PM
This is what I have
Can it be?
Posted by: mepstein Oct 7 2015, 08:05 PM
I have recently found what I believe to be the swaybar for the car in the piles of stuff I received when I bought it. The only problem is that I dont have all the parts to install it and dont know exactly whats missing.
One just sold on the classifieds. The pic shows all the parts.
Posted by: gabeurgelles Nov 18 2015, 04:21 PM
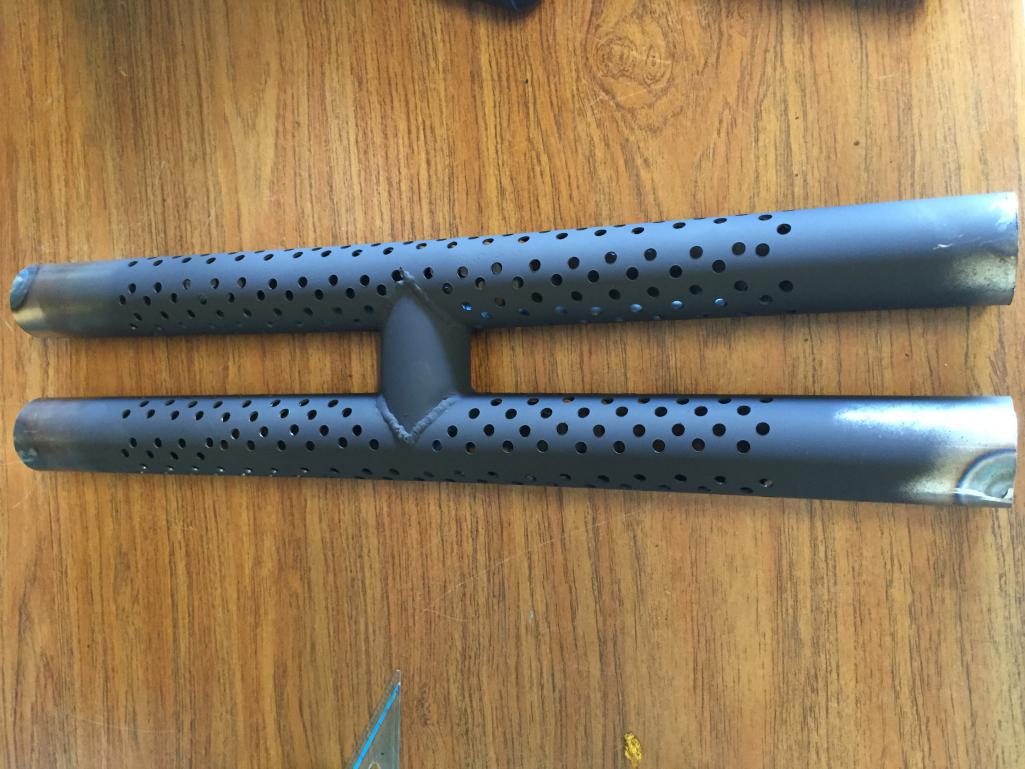
Been working on perfecting the exhaust system on the car. The cars previous exhaust had two glasspacks going into another muffler but the heat of rotary exhaust proved to be too much. I decided to make my own muffler using the shells of the glasspacks and combining them to make one muffler with two inputs and two outputs. Here is the perforated H-pipe that I made to go inside of the muffler.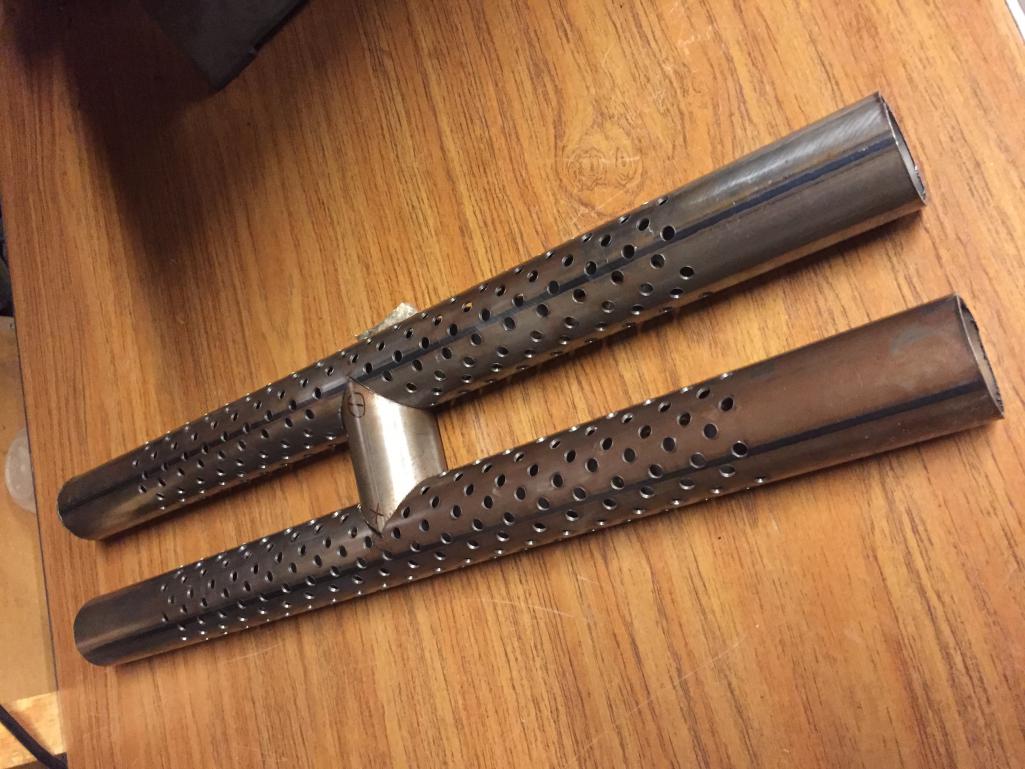
Posted by: gabeurgelles Nov 18 2015, 04:26 PM
This is the plan for casing the h-pipe with the shells of the old glasspacks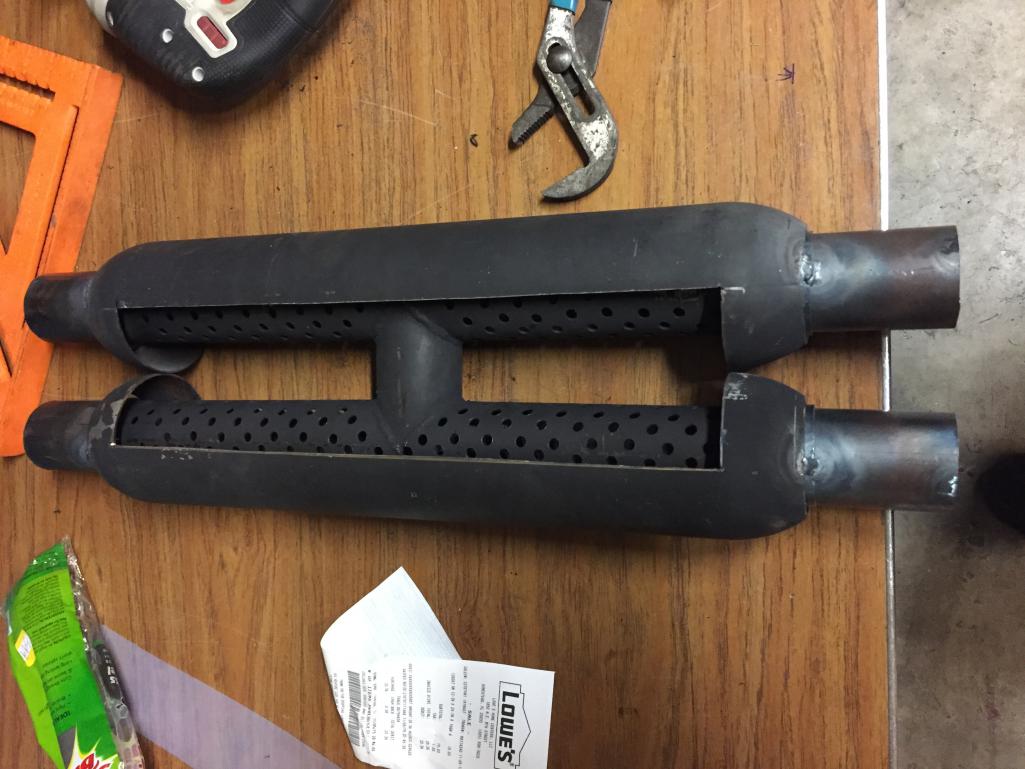
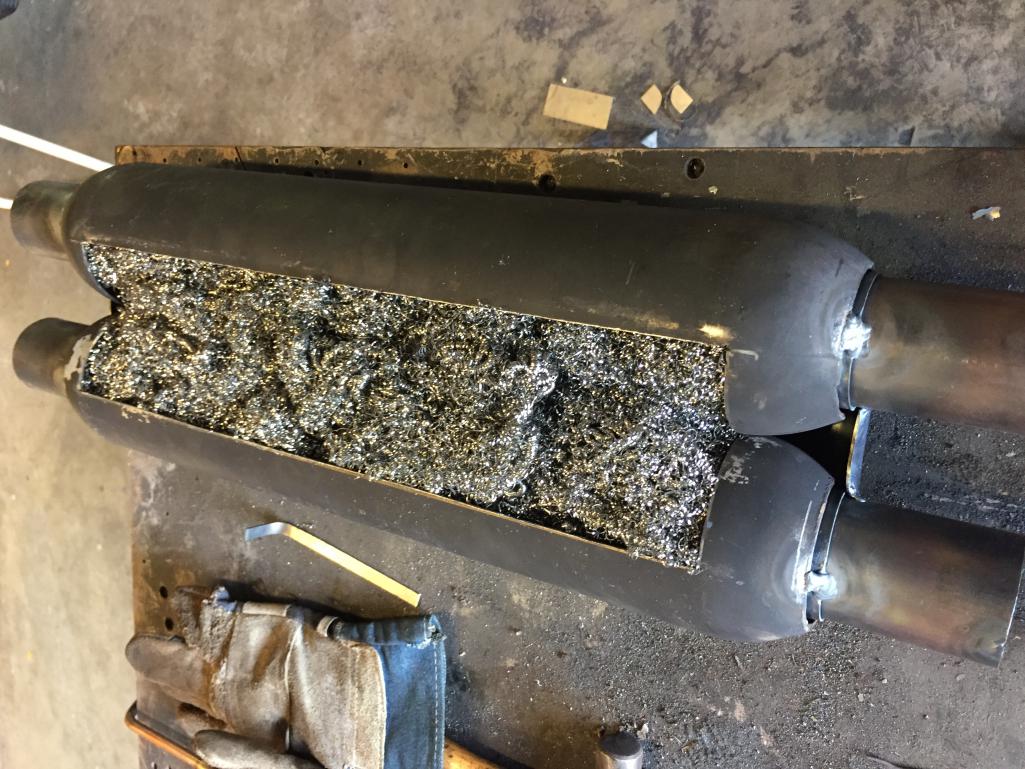
And I'm gonna go with coarse stainless steel wool as my absorbing material to hopefully last the heat of the rotary.
Posted by: gabeurgelles Nov 18 2015, 04:27 PM
Posted by: gabeurgelles Nov 18 2015, 04:28 PM
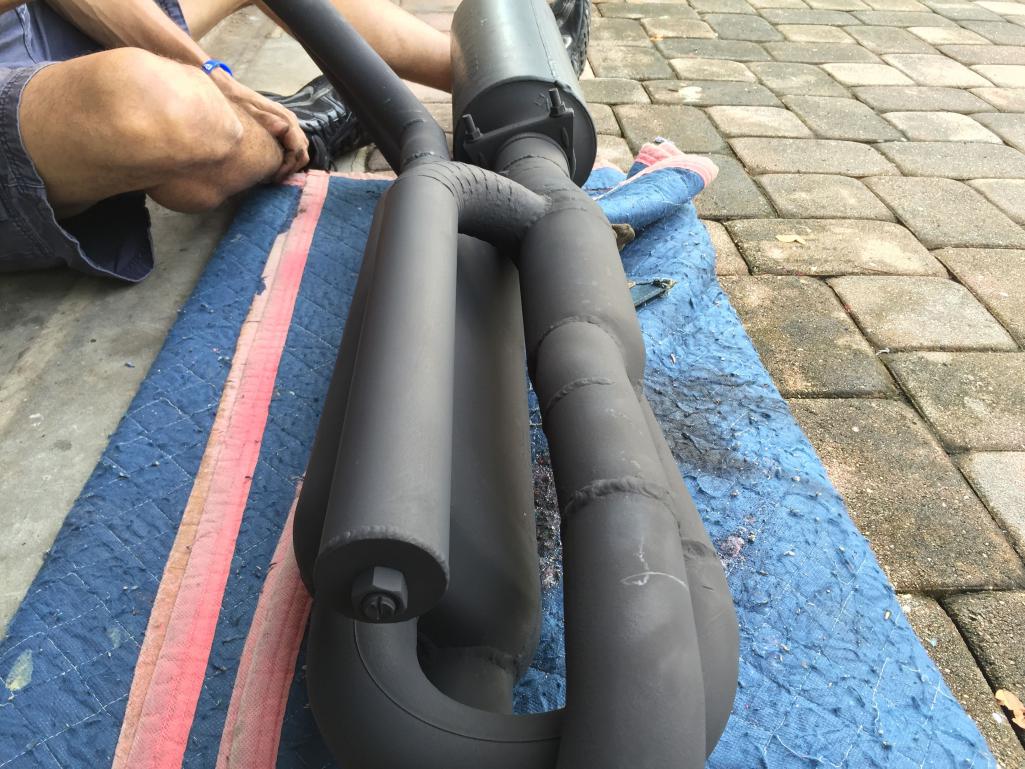
Here is the final product!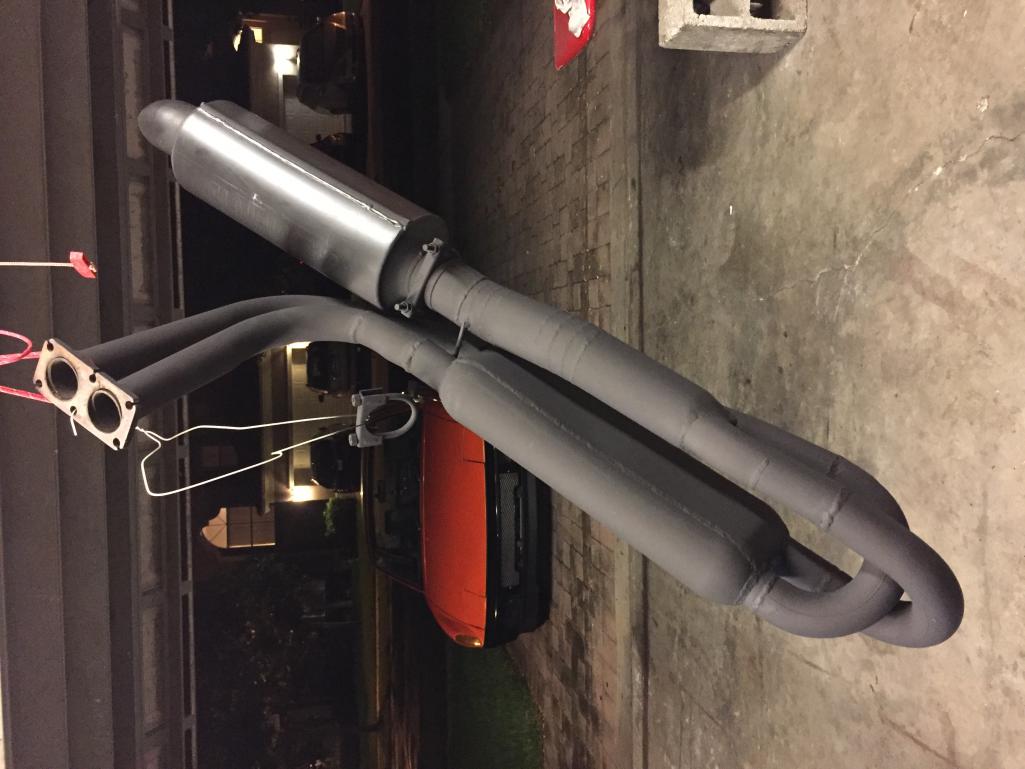
Posted by: gabeurgelles Nov 18 2015, 04:39 PM
I also wanted to try out the helmholtz chamber exhaust system, but since there is WAY too much math involved with that, i just made it adjustable to find the perfect chamber length and then just lock it.
Surprisingly this little chamber changes the tone of the exhaust drastically! The theory behind it being that the chamber will create pulses that will cancel out the unwanted frequencies of the exhaust tone. Normally used to eliminate drone.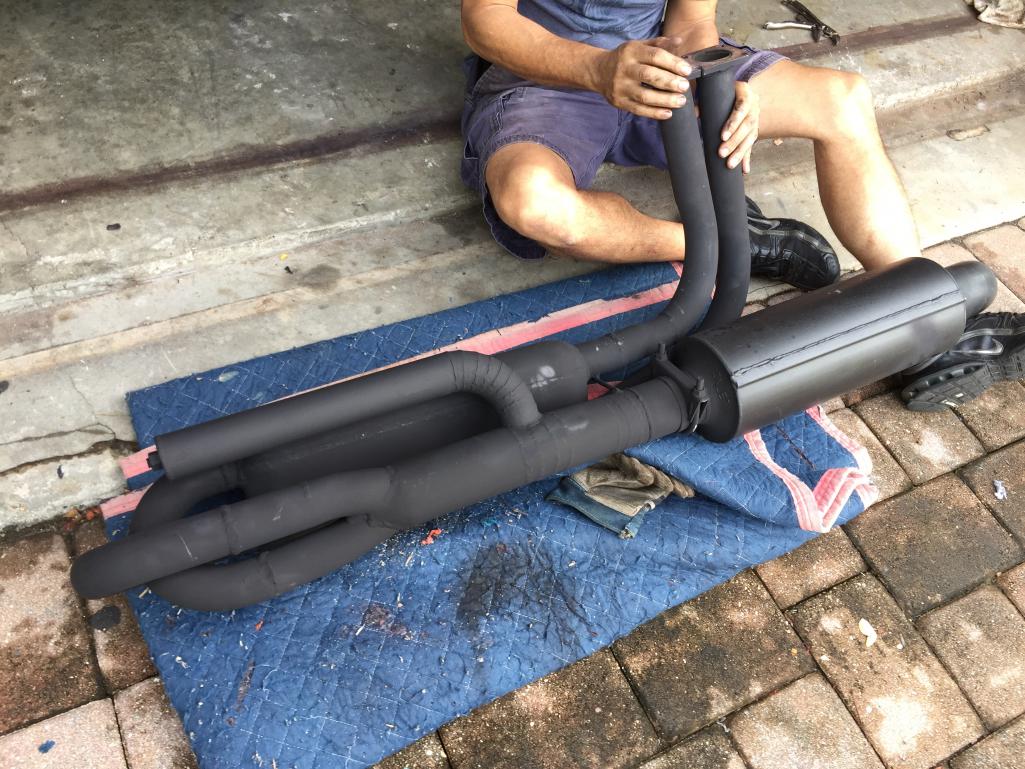
Posted by: Andyrew Nov 18 2015, 06:35 PM
Looks great! Do you have before and after clips?
Posted by: gabeurgelles Nov 18 2015, 07:06 PM
Here is a clip of the new exhaust.
https://www.youtube.com/watch?v=V3x7qZJfIeU
Posted by: mgp4591 Nov 18 2015, 07:07 PM
With the engine running it almost sounds like a small, single cylinder motorcycle engine. But man, that TONE is just killer! That's really a great job and good idea to make the chamber adjustable until you've got it just right. Nice job!
Posted by: gabeurgelles Nov 18 2015, 07:11 PM
With the engine running it almost sounds like a small, single cylinder motorcycle engine. But man, that TONE is just killer! That's really a great job and good idea to make the chamber adjustable until you've got it just right. Nice job!
Thank You! The motorcycle engine sound is what I was trying to go for
Posted by: gabeurgelles Feb 6 2016, 08:01 PM
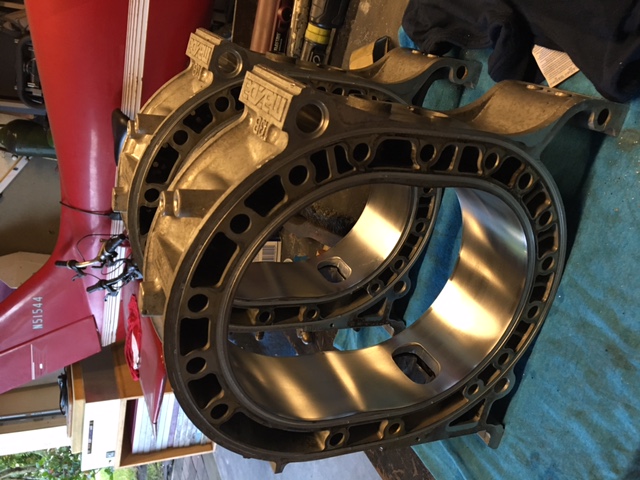
Well, the engine came out again and this time it took longer than expected. Pulled the engine out to finally eliminate the smoking on idle due to worn oil control rings and oil control ring springs. Once apart I realized that I should just replace everything on the motor that would give me any problems in the near future. After taking them to a very knowledgable rotary engine builder in my area, I was told that I needed new rotor housings! Definitely not an expected cost. Old school housings put me back almost $1,000. While newer generation housings were only about $300. The difference between the housings being that there is a groove cut in old school housings for the water jacket seals while newer ones have grooves on the intermediate plates. Now I could probably find a complete 86+ engine for just over 1k but the old school (Pre-85) make the most power and are built better. So I just had to keep my old school, now the issue was how to make newer housings without a groove work. There IS one guy in all of south florida that can cut grooves into the newer housings but he charges $400 per side. Two sides per rotor, two rotors per engine... Basically not worth it, so I found a way to do it myself.
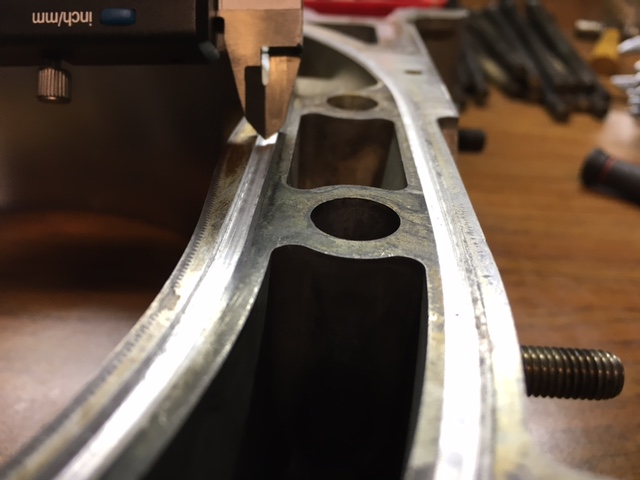
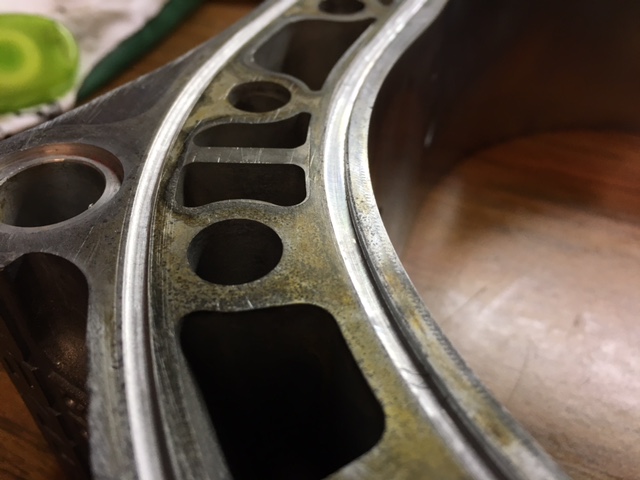
I made a template of the seal groove and used that to make a router template. After 5 discouraging attempts I pulled the trigger and purchased some very good condition housings and cut some grooves into them. They came out PERFECT and I was ready to assemble. Then came the idea to port the engine even further. The port timing was already maxed out for a street engine but the runner could have been bigger, so I maxed those out too! Before this rebuild I took the car, not tuned or in perfect time, to the dyno. Made 165 whp and around 117 lb/ft with an a/f mixture under 10 (extremely rich). This was before the bigger ports, and once I get the mixture down and the timing correct I was told I can expect between 220-230 whp naturally aspirated.
As of today the engine is back together and in the car and broken in. I am in the re-tuning stages, trying to dial in the carburetion. The plan is to eventually ditch the Holley and go to a 48 DCOE Weber as I was told that this combo is amazing for the street/autox. Looking forward to some autocross within the next couple months and maybe even some HPDE and Homestead Speedway or Palm Beach.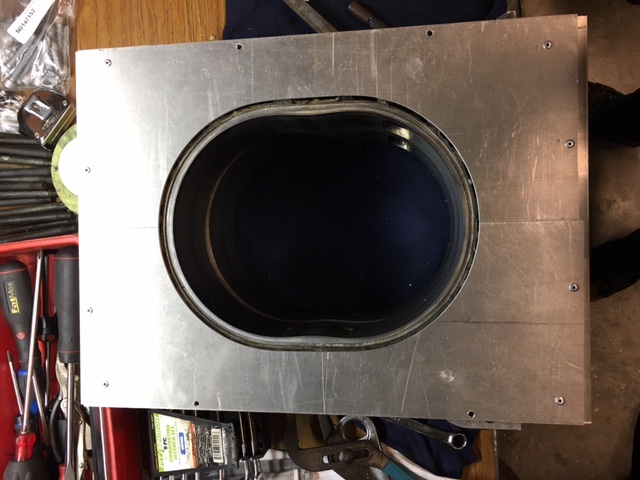
Posted by: gabeurgelles Feb 6 2016, 08:09 PM
Posted by: jimkelly Feb 7 2016, 08:32 AM
sounds so sweet
Posted by: RickS Feb 7 2016, 08:58 AM
Absolutely amazing. What a sweet ride. Did you get rwh stats?
Posted by: gabeurgelles Feb 7 2016, 10:53 AM
Absolutely amazing. What a sweet ride. Did you get rwh stats?
165 rwh and 117ft/lbs running extremely rich (a/f under 10). This was before the last rebuild, in which I ported the motor further and will fix the air/fuel mixture. Shooting for around 220 rwh on the next pull
Posted by: WLD419 Feb 7 2016, 01:06 PM
Absolutely amazing. What a sweet ride. Did you get rwh stats?
165 rwh and 117ft/lbs running extremely rich (a/f under 10). This was before the last rebuild, in which I ported the motor further and will fix the air/fuel mixture. Shooting for around 220 rwh on the next pull
Wow nice skills Gabe, I just read this post complete , I wasn't aware you did all this work
to the 914 back in Nov. when we met at cars & coffee , for some of you that don't know
this young man is still in High School , I wish I had half your skills when I was your age ,
I'm planning on going to cars & coffee this sat. feb 13th, hope to see you there.
take care Bill D.
PS were's this dyno place located & what do they charge, I need to find a new place to
test tune my 914 , thanks in advance
Posted by: vw505 Feb 7 2016, 05:31 PM
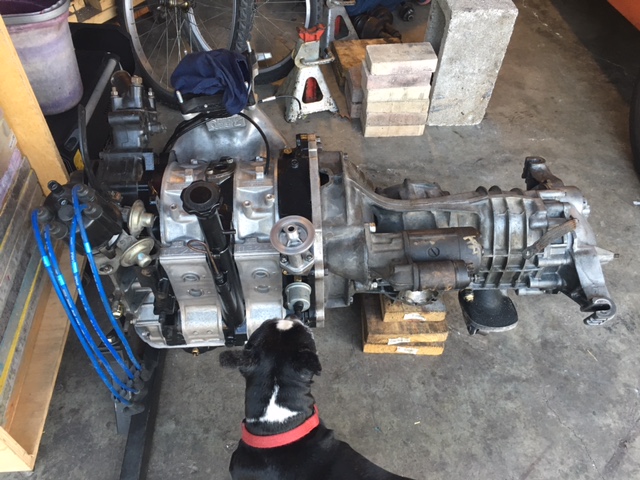
I have a 901 trans that has an adapter for a full size 13B fly wheel and clutch. I want to build a wide body car some day, or sell it.
Posted by: tygaboy Feb 7 2016, 05:54 PM
If I ever get an electric car and there's an option for having it play an engine sound, I demand you sell me a sample of that dyno run! That is such a bad ass engine note!

Good on you, great work.
Posted by: gabeurgelles Feb 7 2016, 05:55 PM
Absolutely amazing. What a sweet ride. Did you get rwh stats?
165 rwh and 117ft/lbs running extremely rich (a/f under 10). This was before the last rebuild, in which I ported the motor further and will fix the air/fuel mixture. Shooting for around 220 rwh on the next pull
Wow nice skills Gabe, I just read this post complete , I wasn't aware you did all this work
to the 914 back in Nov. when we met at cars & coffee , for some of you that don't know
this young man is still in High School , I wish I had half your skills when I was your age ,
I'm planning on going to cars & coffee this sat. feb 13th, hope to see you there.
take care Bill D.
PS were's this dyno place located & what do they charge, I need to find a new place to
test tune my 914 , thanks in advance
Thanks Bill, the shop with the Dyno is RotaryWerks right by tamiami airport. They host Dyno days where you get three pulls for $35
Posted by: gabeurgelles Mar 9 2016, 07:47 AM
So now it's time for suspension, I've been looking into my options but would like to get some opinions. The car is going to be used on the street (going to and from events) for autocross events (maybe some DE). Right now the front and rear shocks are gone, and have begun to leak. I was thinking about going bilstein sport shocks front and rear and running a 22mm torsion bar. I have a sway bar laying around that measures 20.8mm but I don't have the drop links to attach it so I have to find those. The rear springs are #180. Would this be a decent setup for autocross and occasional drivers education? Any suggestions would be appreciated.
Posted by: Andyrew Mar 9 2016, 08:00 AM
I prefer koni yellows due to their adjustability.
22mm torsion bars are very stiff, you wouldnt need to run a sway bar with that combo and 180lb springs.
Posted by: gabeurgelles Mar 9 2016, 09:33 AM
I prefer koni yellows due to their adjustability.
22mm torsion bars are very stiff, you wouldnt need to run a sway bar with that combo and 180lb springs.
Being adjustable is definitely a big bonus. What if I keep my stock torsion bar and use the sway bar?
Posted by: Andyrew Mar 9 2016, 10:46 AM
Pretty common setup there to stay with the stock T bars or 19mm t bars and use a sway bar.
Shocks will help stiffen things up as well.
Posted by: tomrev Mar 9 2016, 12:20 PM
Pretty common setup there to stay with the stock T bars or 19mm t bars and use a sway bar.
Shocks will help stiffen things up as well.
Very nice fab skills! Second the stock T bar sizes, and 180 rear springs. Good shocks will allow a lot of tuning, and keep it happy for both street and racing. Nice thing about the Bilsteins is the adjust. spring perch at a reasonable price in rear.
Posted by: gabeurgelles Mar 17 2016, 08:01 AM
Well this last weekend I took the car to the dyno to see how much power this 13b could make. To be honest, I had no idea what kind of number to expect once tuned. I was hoping for 190hp, but wasnt really sure. The first pull right off the bat, untuned, was 181whp and about 120ft/lbs. After a couple more pulls and jet sizes later, the car was at 198whp and 129ft/lbs. Seeing this number made me determined to reach 200. With some small timing changes, I was able to achieve this. The final numbers were 200.44whp and 131.87ft/lbs at 9500rpm
Posted by: Andyrew Mar 17 2016, 08:12 AM
Awesome! Do you have a dyno chart? 200whp is a fantastic number!
Posted by: gabeurgelles Mar 17 2016, 03:49 PM
Awesome! Do you have a dyno chart? 200whp is a fantastic number!
I do have the chart but I am having an issue uploading any pictures.
Posted by: gabeurgelles Mar 20 2016, 08:10 AM
Here is the Dyno sheet for the last three pulls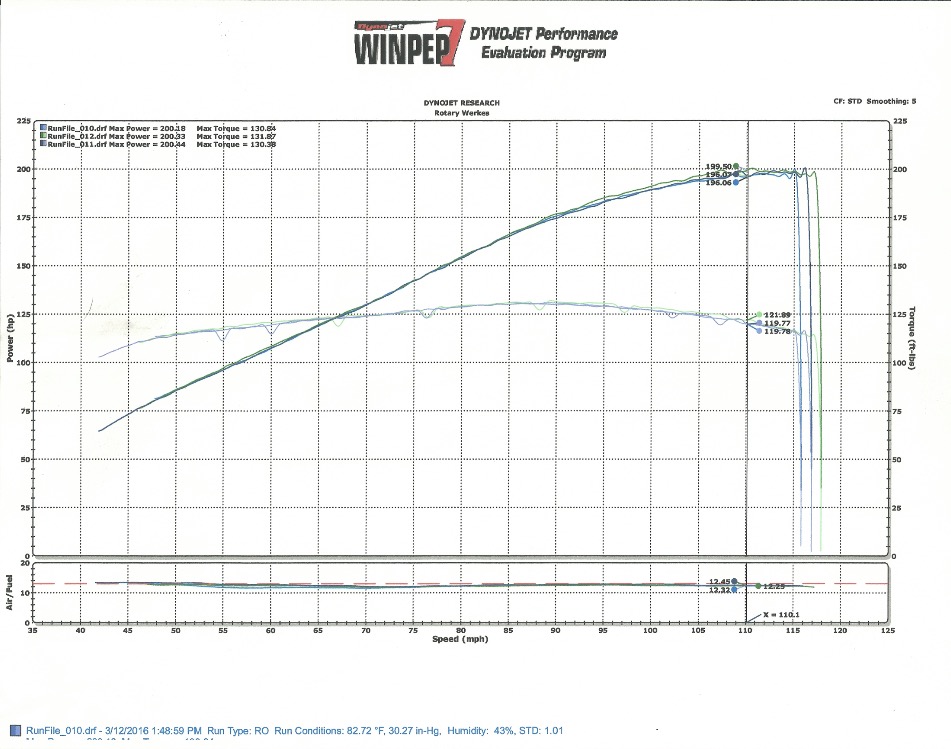
Posted by: zambezi Mar 20 2016, 10:07 AM
Great numbers and very consistent.
Posted by: gabeurgelles Mar 30 2016, 06:00 PM
So now it's time for suspension. I ordered Koni yellows for the front and then I'll probably end up getting the ground control kit for the rear. But looking at the front shocks, do I have touch the rubber bump stop. I know you can cut them for cars that are low and bottom out easily but is this a problem on 914s? Or is this just and easy swap of the old ones?
Planning on doing this soon so any help would be appreciated!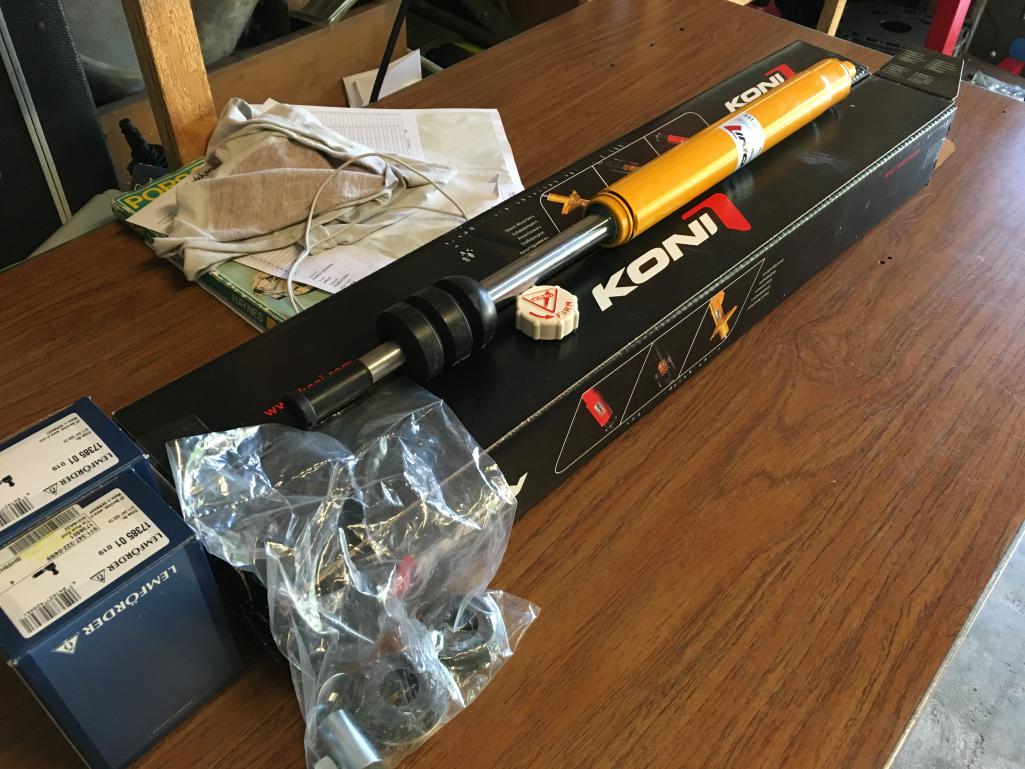
Posted by: Andyrew Mar 30 2016, 07:44 PM
Here is the Dyno sheet for the last three pulls
Wow, Thats a great chart!! Extremely flat torque curve.
Posted by: 76-914 Mar 31 2016, 08:06 AM
![]()
Posted by: gabeurgelles Mar 31 2016, 07:32 PM
So now it's time for suspension. I ordered Koni yellows for the front and then I'll probably end up getting the ground control kit for the rear. But looking at the front shocks, do I have touch the rubber bump stop. I know you can cut them for cars that are low and bottom out easily but is this a problem on 914s? Or is this just and easy swap of the old ones?
Planning on doing this soon so any help would be appreciated!
Or if there is any thread already out there that details the installation process?
Posted by: matthepcat Mar 31 2016, 09:09 PM
Do you plan to pull the whole assemblies out and do any rebuilding or replacing of brake lines, or do you want to try and just swap out struts?
Posted by: gabeurgelles Apr 1 2016, 04:08 AM
Do you plan to pull the whole assemblies out and do any rebuilding or replacing of brake lines, or do you want to try and just swap out struts?
I'm just replacing the struts and changing the tie rods.
Posted by: sb914 Apr 1 2016, 05:23 AM
![]()
Posted by: matthepcat Apr 1 2016, 06:43 PM
It really is a pretty straight forward process.
I would suggest ordering new ball joints, brake lines ( if they are needed) and pull the whole assembly out.
Otherwise here is something i stole from another thread:
The 911, 914 and some 944’s featured a rebuildable front McPherson Strut. Instead of having to replace the entire strut unit, you will be able to merely replace the strut insert that is on the inside of the strut housing. You will know that your strut is rebuildable by looking in the area where the shiny piston rod goes into the lower strut housing. On rebuildable struts, a screw on cap (gland nut) is used to hold the insert into the lower strut housing. You will know the gland nut is removable because you will likely see a few threads sticking up on the cap. 1965-83 cars used a male threaded gland nut, and 84-89 cars used a female threaded gland nut.
Jack the front of the car and secure with jack stands. Remove both front wheels. Remove the top-mounting nut (inside the front hood, 22mm) and lower the shock out of the tower housing. If the shock shaft begins to spin before the 22mm nut loosens, you can hold the big washer under the nut with a pair of channel locks. This nut has a “tooth” that fits inside a groove on the shock shaft. Once you are holding this washer, you will be able to loosen and remove the 22mm nut. Some shock shafts will have a 8mm allen head end which can also be utilized to prevent the shock shaft from spinning. Once the nut is removed, reach in the wheel well and grab the upper dust cover that protects the shock shaft from dirt and grime. Pull down, this will extract the piston from the upper strut bearing. Carefully tilt the strut out past the fender lip and slide the dust cover off the shock shaft being careful to not put your brake line in too much of a bind. If you are removing a gas insert, you may need to compress the shock shaft a bit to enable you to tilt it past the fender lip. Once the dust cover is removed, pivot the shock back and push the shock shaft back up into the upper strut bearing and finger tighten the top 19mm nut. This will hold the assembly in position while we loosen the gland nut. I usually like to use a big pipe wrench or a large pair of channel locks (cheater pipe optional ;-). As you try to unscrew the gland nut the strut will want to turn. Use a small piece of 2x4 to brace the spindle to the inner fender well to keep it from turning. Now loosen the gland nut…. remember lefty loosey, righty tighty. Once the gland nut is loose, reach up and remove the 19mm nut on the top of the shock shaft. Once again, tilt the strut out past the fender lip (watch the brake line) and remove the gland nut and insert.
You are now ready to install your new inserts. Remove any rust or corrosion that may be present on the threaded portion of the strut tube. Some strut housings may be full of hydraulic oil. You can either remove this oil by using paper towels to “wick” it up, or you can reuse it as a “coolant” for your insert. Another popular coolant is anti-freeze. Either will work, but remember, it won’t take much liquid because the insert will displace most of the area in the strut tube. Koni recommends 50ml of fluid, but I usually just use the dipstick method and try to get the coolant to ride about 2/3 up the side of the insert. Once your coolant level is set, slide your new insert into the strut housing. Koni supplies new male thread gland nuts for the 65-83 cars. Place some Blue Loctite on the gland nut threads and finger tighten it down. 84-89 cars utilize a female threaded gland nut. When using this type of nut, Koni has supplied a special washer that sits on top of the insert prior to installing the gland nut. This washer centers the insert in the strut housing, a job that had been performed by the male type gland nut. Position the shock rod back up into the body and once again, finger tighten the 19mm nut. You may need to place a floor jack under the A Arm to assist in moving the shock shaft up into the upper strut bearing. Use your piece of 2x4 to block the spindle and really tighten the gland nut with your pipe wrench or channel locks…. I mean REALLY tighten it. Gland nuts have been known to back off so your muscles and the Loctite will insure this doesn’t happen. Once the gland nut is tight, remove the top 22mm nut and retract the shock rod from the piston. You will need to install 2 items on the shock piston prior to installing the dust cover. First is a small plastic washer. This washer prevents the bump rubber from pulling a vacuum on the strut housing when the shock goes into full compression. Probably would never happen, but that’s what it’s for. After the plastic washer, install the bump rubber. Koni’s standard bump rubber looks kind of like a tootsie roll. The curved portion will face down. Koni’s competition bump rubber is made out of a more advanced material and is correctly installed with the angled portion facing down. If the car has been lowered you can shorten the bump rubber to regain some shock travel but you ALWAYS want to run a bump rubber. Failure to do so will destroy your shocks. Now, install the dust cover on the shock shaft and slide the piston up into the upper strut bearing. Install the new top washer and nut. Once again, the shock shaft may turn as you attempt to tighten the top nut so have your channel locks handy. Never use the adjusting tab on Koni insert as your “holding” mechanism, it WILL break off.
You are now ready to reinstall the wheel/tire assembly, do the other side, and enjoy your new added level of performance! - Jason Burkett
Application: 911 65-73, 911 74-89, 914 all
Tools: 22mm socket, 8mm hex, Pipe Wrench, Large Channel Locks, floor jack, cheater pipe, 50ml anti-freeze
Credits: Jason Burkett"
Do you plan to pull the whole assemblies out and do any rebuilding or replacing of brake lines, or do you want to try and just swap out struts?
I'm just replacing the struts and changing the tie rods.
Posted by: Steve Apr 2 2016, 07:56 AM
I'm running 21mm torsion bars with a 22mm front sway bar. Great for street/autocross. Been running this combo for over 20 years. Rear springs depends on how much oversteer you want. I run 140 lb rear springs, but most people like 175 or greater for autocross.
140 lb springs are nice for street and will under steer at the limit. Bigger springs are better for autocross but make the car feel every bump on the street. I'm also running Bilstein shocks front and rear.
Posted by: gabeurgelles Apr 14 2016, 06:01 PM
Thank You for the instructions. The front struts went on without any major issues. The biggest issue I had was taking off the wheel bolts that the tire shop tightened. I never knew those bolts could be that tight, it broke my 3/8 ratchet, my 1/2 ratchet, and my folding tire iron!! But eventually they came off and he rest went on without an issue.
The difference that those shocks made was unbelievable. The old ones had collapsed as soon as I bought the car so I never knew what it was supposed to feel like. The rear is coming soon because I can definitely feel the back extra loose now that the font is the way it should be.
Posted by: gabeurgelles Aug 30 2016, 08:05 AM
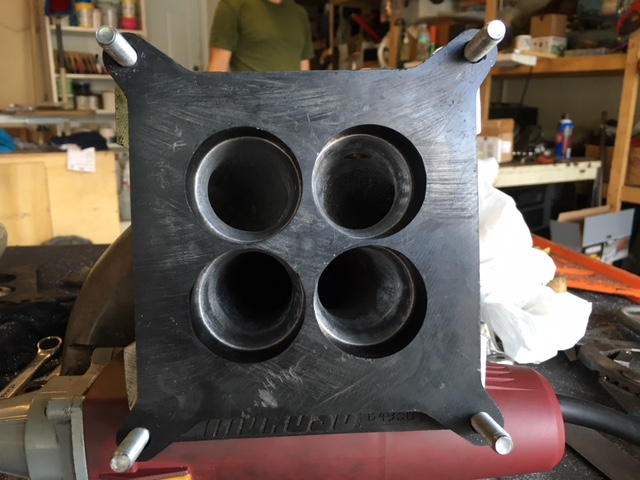
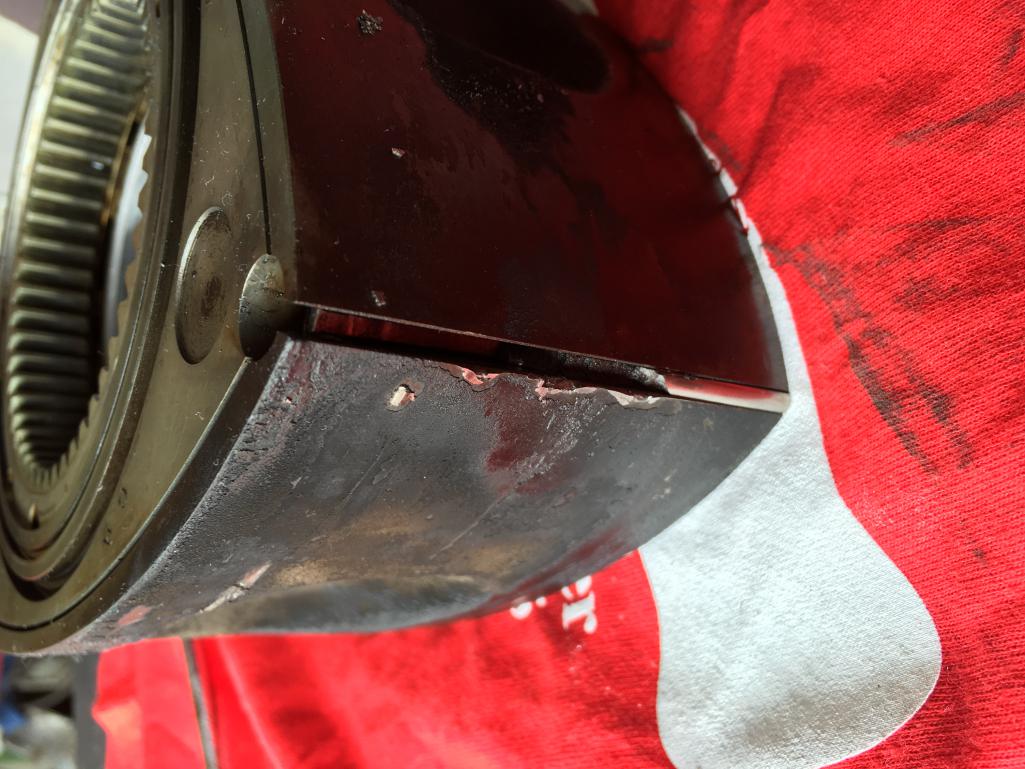
Well it's been a long time since this has been updated and so much has happened since then. I attended my first autocross with PCA and it was such a great experience. The car handled beautifully.... for the first 3 runs. On my fourth run, I was taking a turn and the Holley carb I had leaned out and I blew the motor. Apex deal was shattered and it scratched up the rotor housing badly. Had to get it towed home. As soon as he car arrived, I began the tear down and the search for parts. The Holley carb was the reason the engine blew since on the 13b it sits 90 degrees to where it should. Meaning that hard cornering sloshes the fuel in a way that leans out one rotor and floods the other. So basically I had to get another carb. 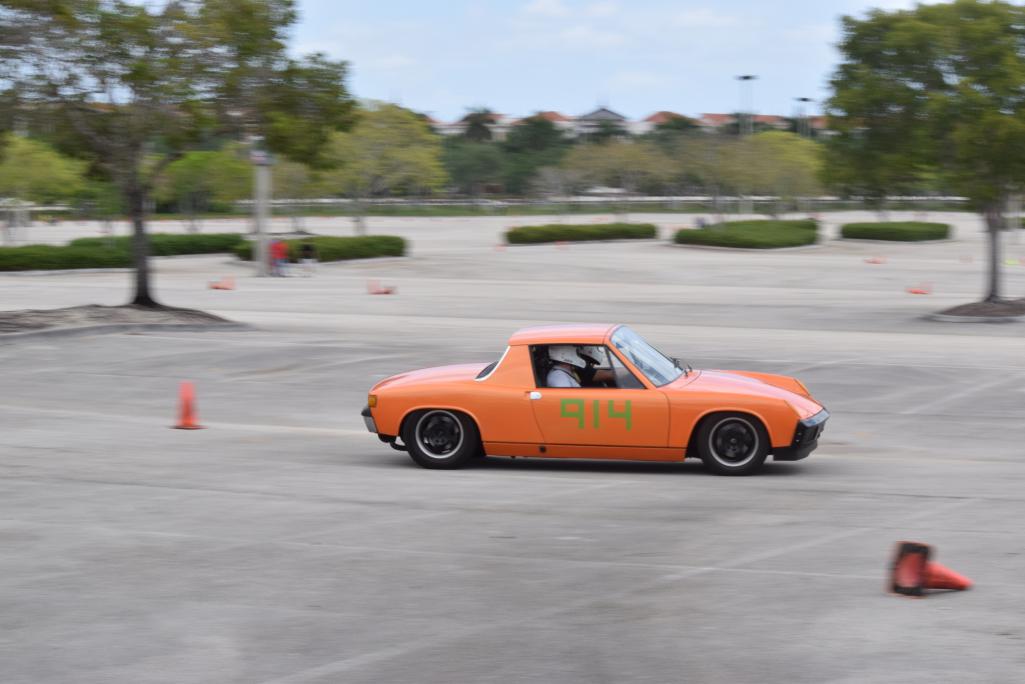
Posted by: gabeurgelles Aug 30 2016, 08:06 AM
Posted by: gabeurgelles Aug 30 2016, 08:07 AM

Posted by: Mueller Aug 30 2016, 08:13 AM
Seems like EFI would solve those pesky carb problems
Bummer about the motor
Posted by: gabeurgelles Aug 30 2016, 08:16 AM
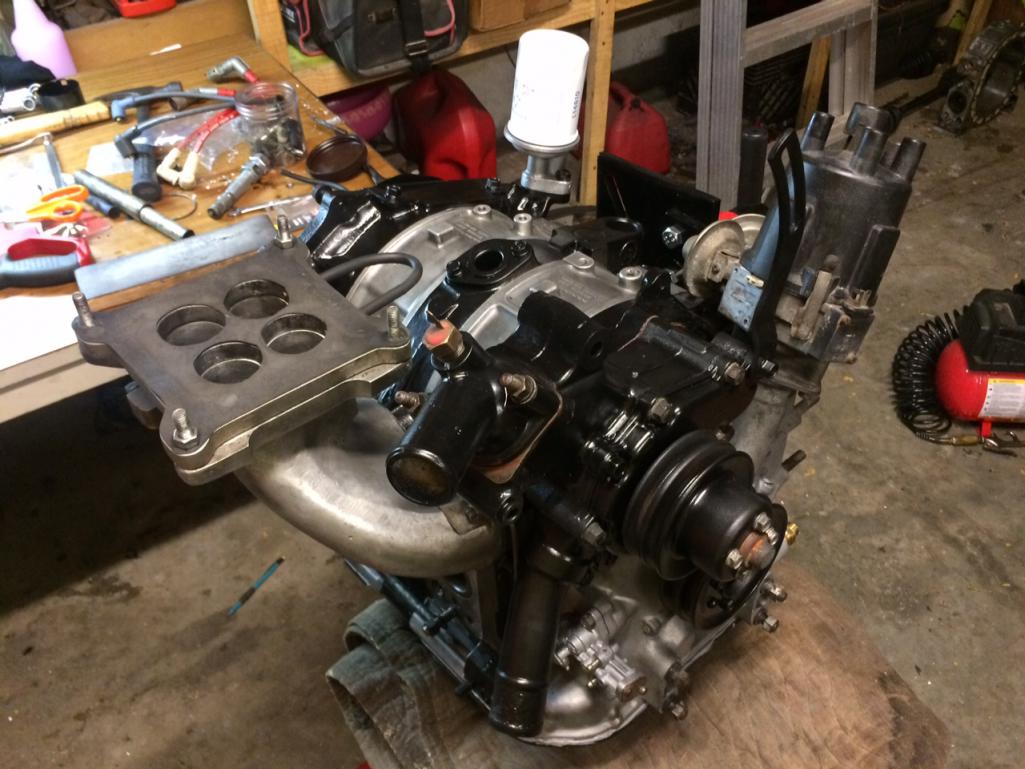
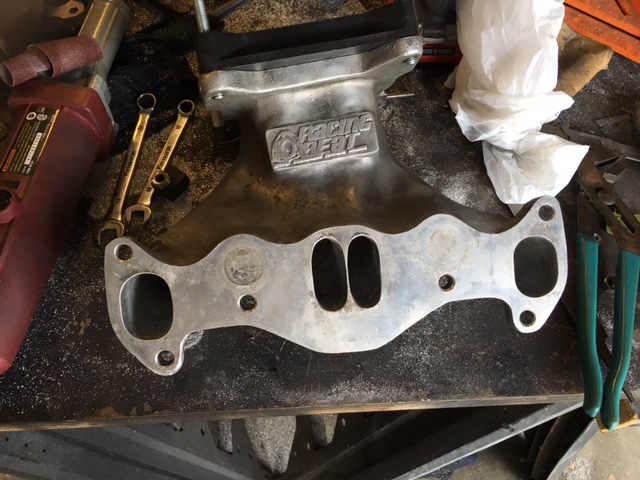
This led to the purchase of a 48mm Weber DCOE carb, manifold, and adaptor plate (since I had to get a 12a manifold). I was told this weber would drastically improve throttle response and fuel economy and that I would have no issues with leaning out on turns. 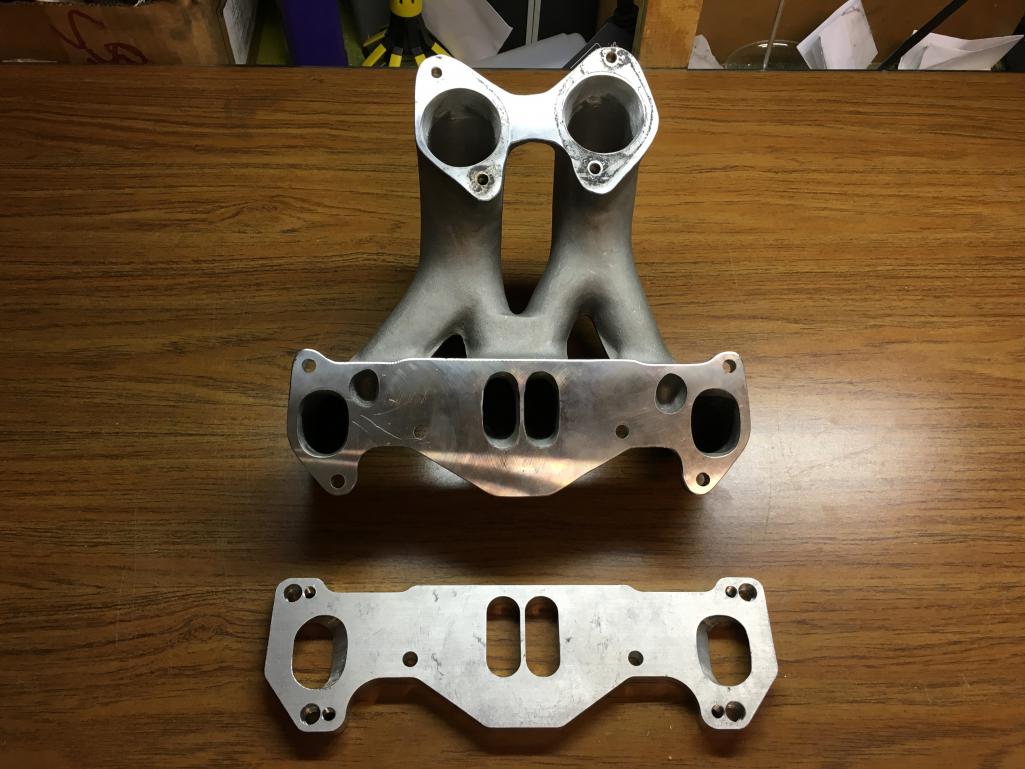
Posted by: gabeurgelles Aug 30 2016, 08:21 AM
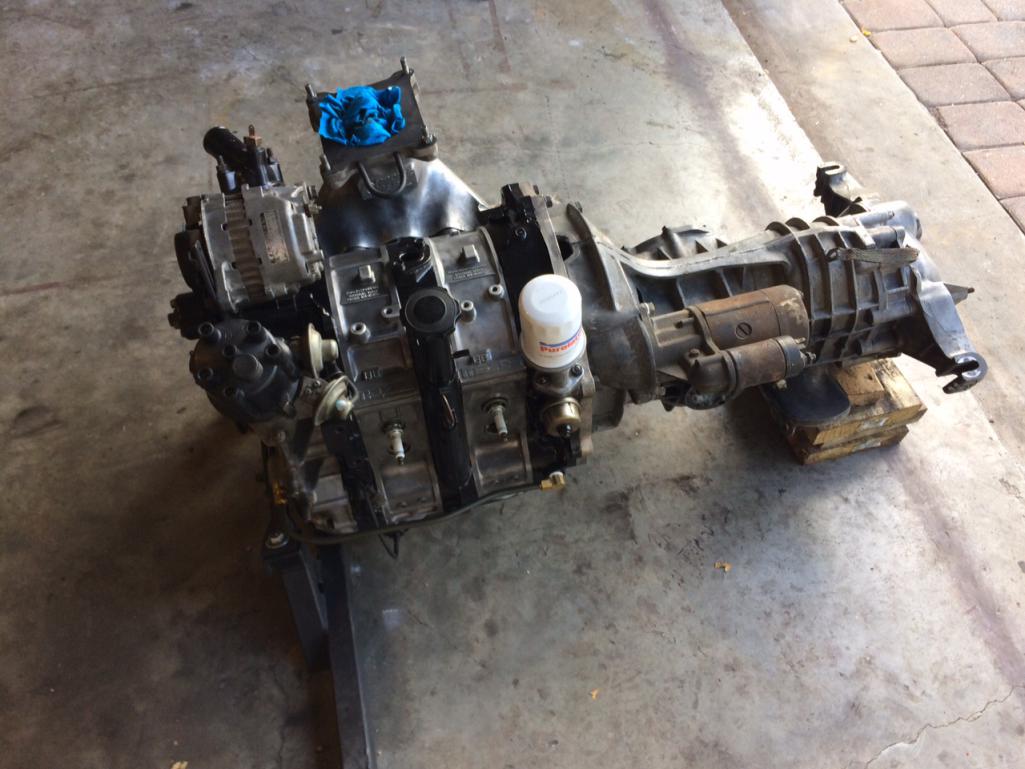
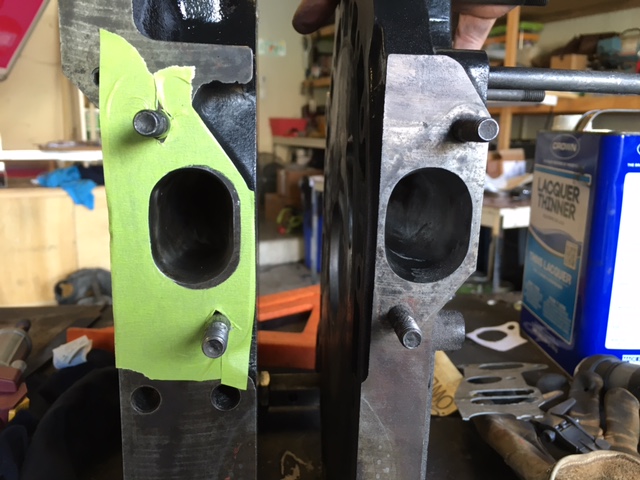
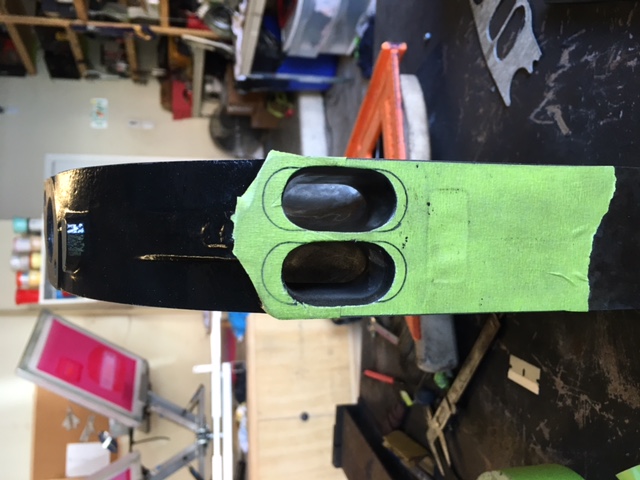
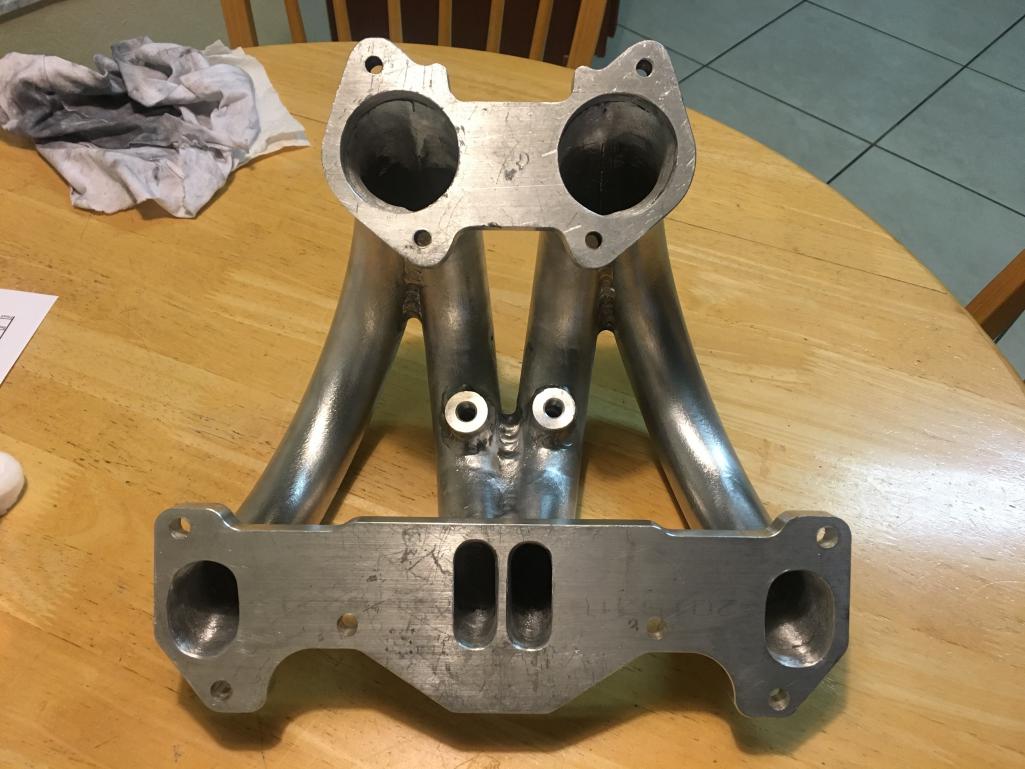
So engine was rebuilt, everything was replaced and new carb installed. The only issue now was that on an rx7 the engine and transmission assembly sits at a 5 degree angle but on the 914 it sits dead level. So not the weber was sitting 5 degrees tilted forward which did not allow for correct tuning. If the fuel level was set correctly for one barrel, the other would either be flooding over or starving for gas. So I had two options, either tilt the engine and transmission on the 914 or make a custom manifold that would provide better flow and perfect placement for the carb. 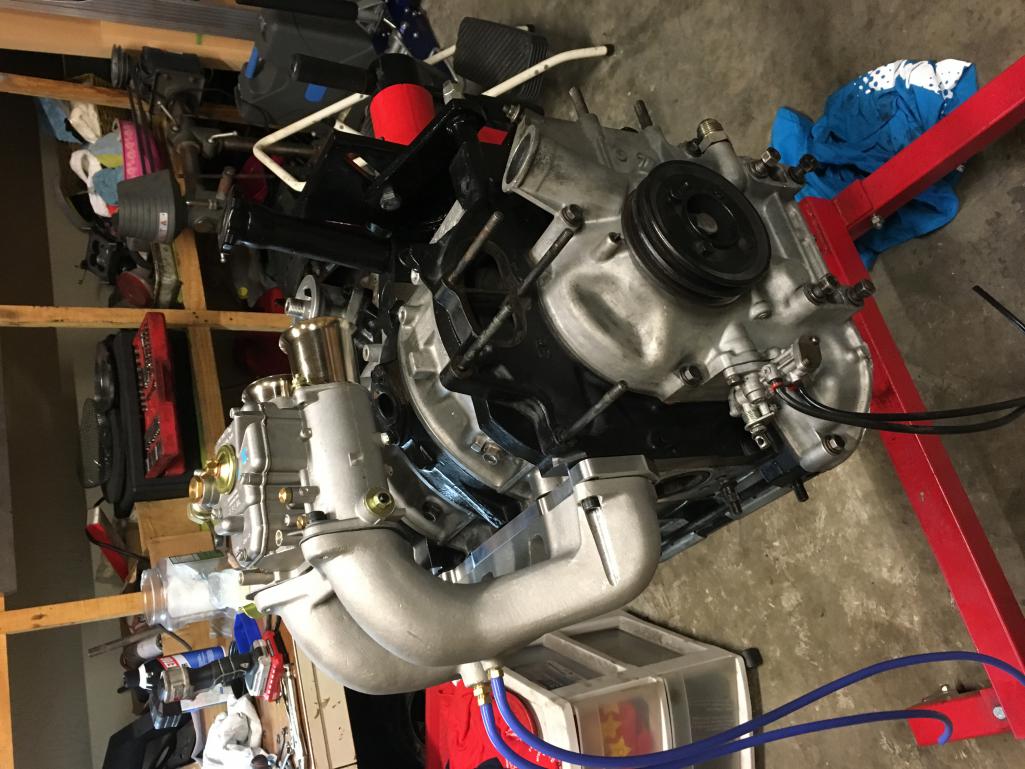
Posted by: gabeurgelles Aug 30 2016, 08:38 AM
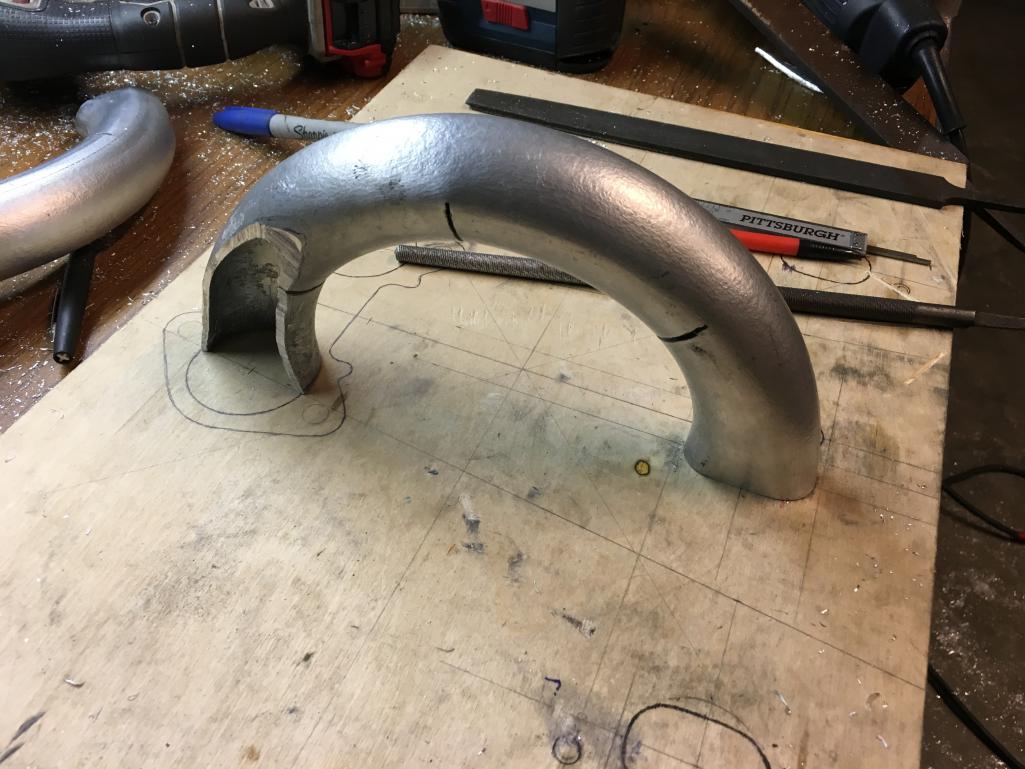
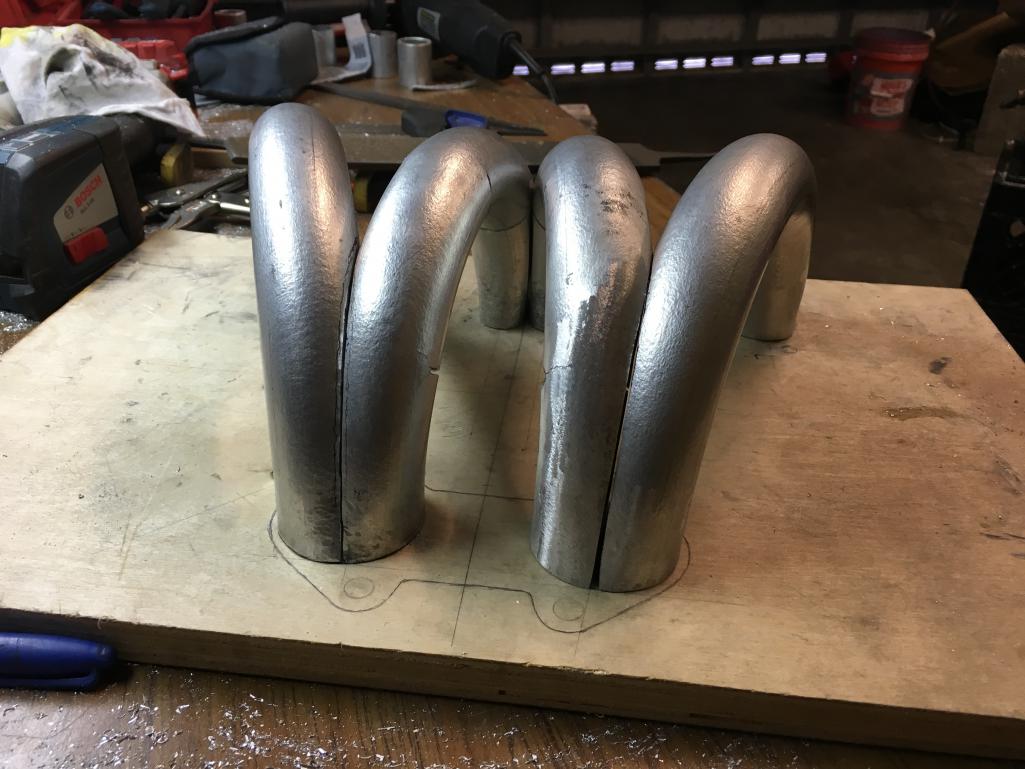
So it was time to build an intake manifold. I started by finding some 180 degree bends with the correct radius. After a lot of looking I found what I was looking for and ended up paying around $90 for 5 bends. Since I don't have access to a machine shop, all the fabrication had to take place in my garage with everyday tools. I was able to shape the pipes by hand with a hammer and a jigsaw. I made a template/jig for the manifold of a piece of wood and shaped everything to fit that.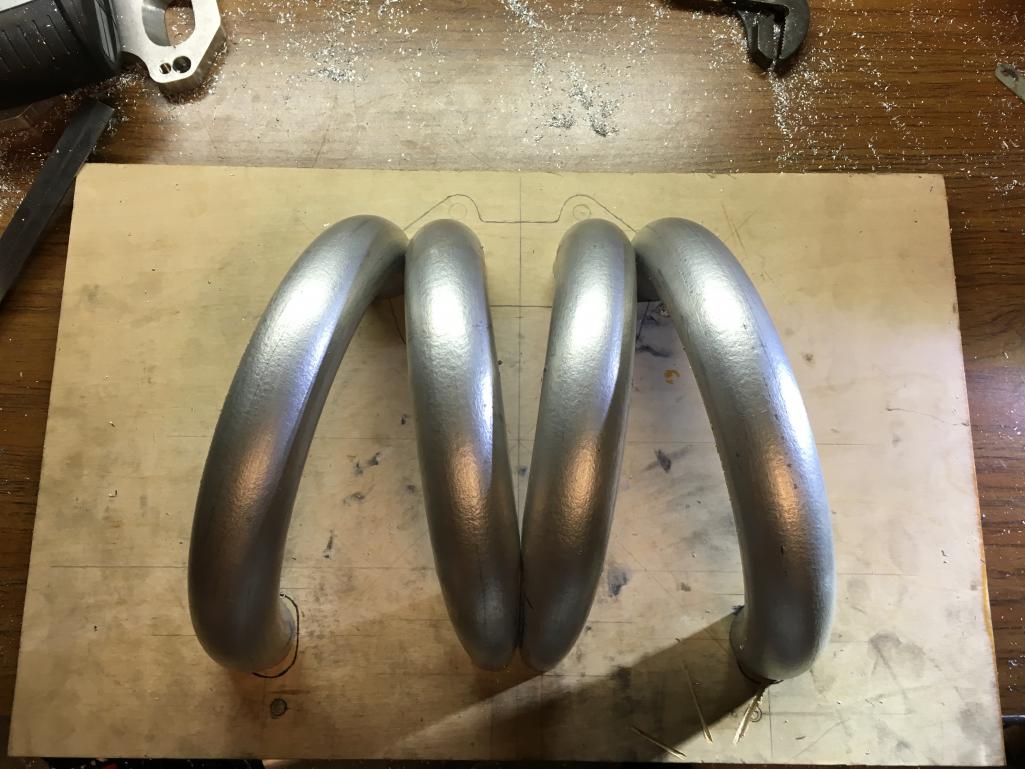
Posted by: gabeurgelles Aug 30 2016, 08:39 AM
Posted by: gabeurgelles Aug 30 2016, 08:40 AM
Posted by: Rotary'14 Aug 30 2016, 08:55 AM
So engine was rebuilt, everything was replaced and new carb installed. The only issue now was that on an rx7 the engine and transmission assembly sits at a 5 degree angle but on the 914 it sits dead level. So not the weber was sitting 5 degrees tilted forward which did not allow for correct tuning. If the fuel level was set correctly for one barrel, the other would either be flooding over or starving for gas. So I had two options, either tilt the engine and transmission on the 914 or make a custom manifold that would provide better flow and perfect placement for the carb.
Building a manifold can be difficult in your garage without all the cool tools. (but I encourage you to expand your skills!) I bet you can get the 5 degrees you want by shimming the engine mount or the trans mount to get the tilt you want for your carb,,, or just slap on a weber throttle body onto your car the way it sits now? I love your project.
Posted by: gabeurgelles Aug 30 2016, 01:25 PM
Well, I was able to pull it off with what I had and here is the final product. Still needs to be cleaned up and made to look pretty but that us all in preparation for the drive up to Okteenerfest.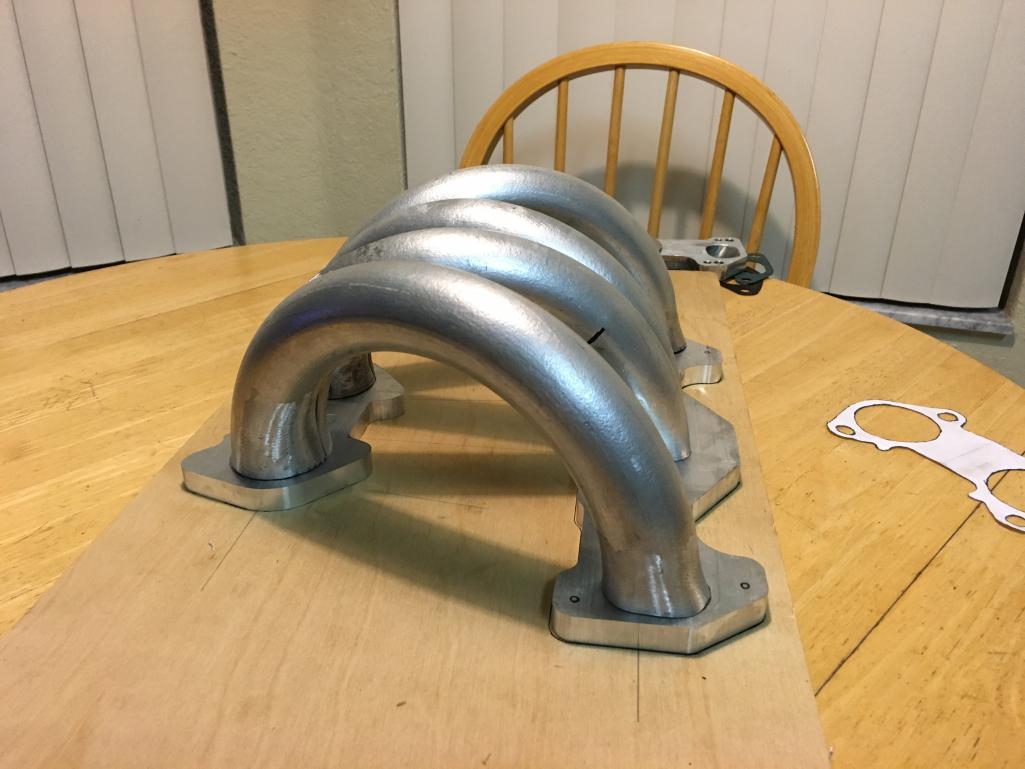
Posted by: gabeurgelles Aug 30 2016, 01:26 PM
And here it is with the carb mounted...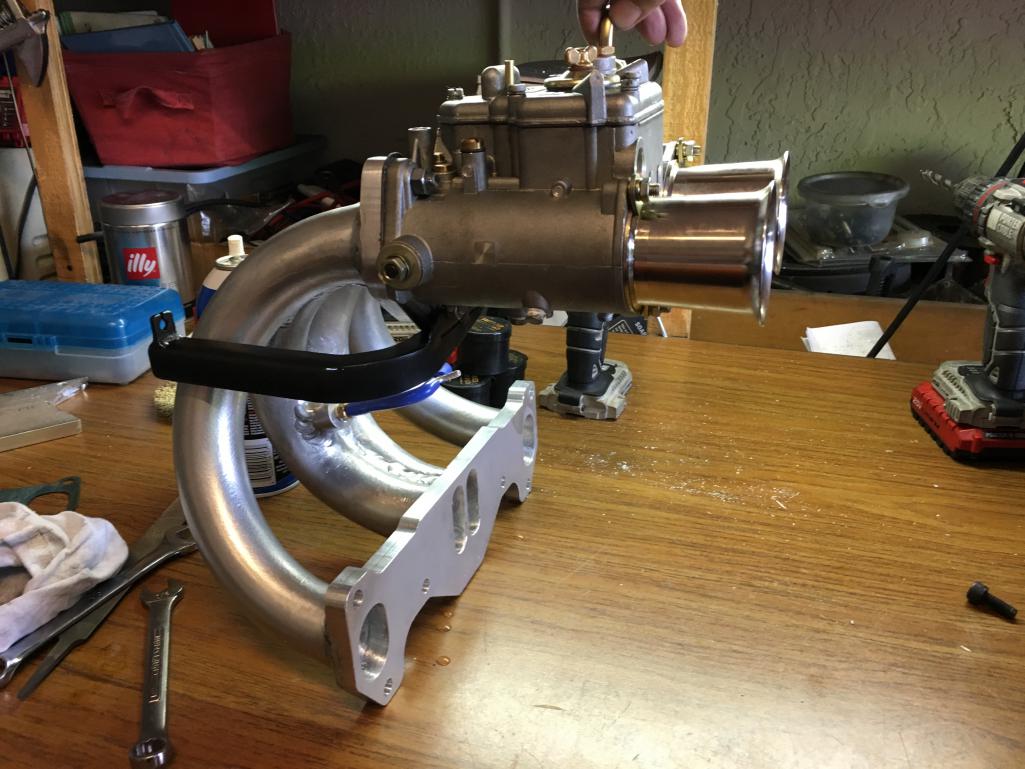
Posted by: gabeurgelles Aug 30 2016, 01:27 PM
and on the car... some stuff has changed since this picture was taken so I'll try to update that as soon as I can.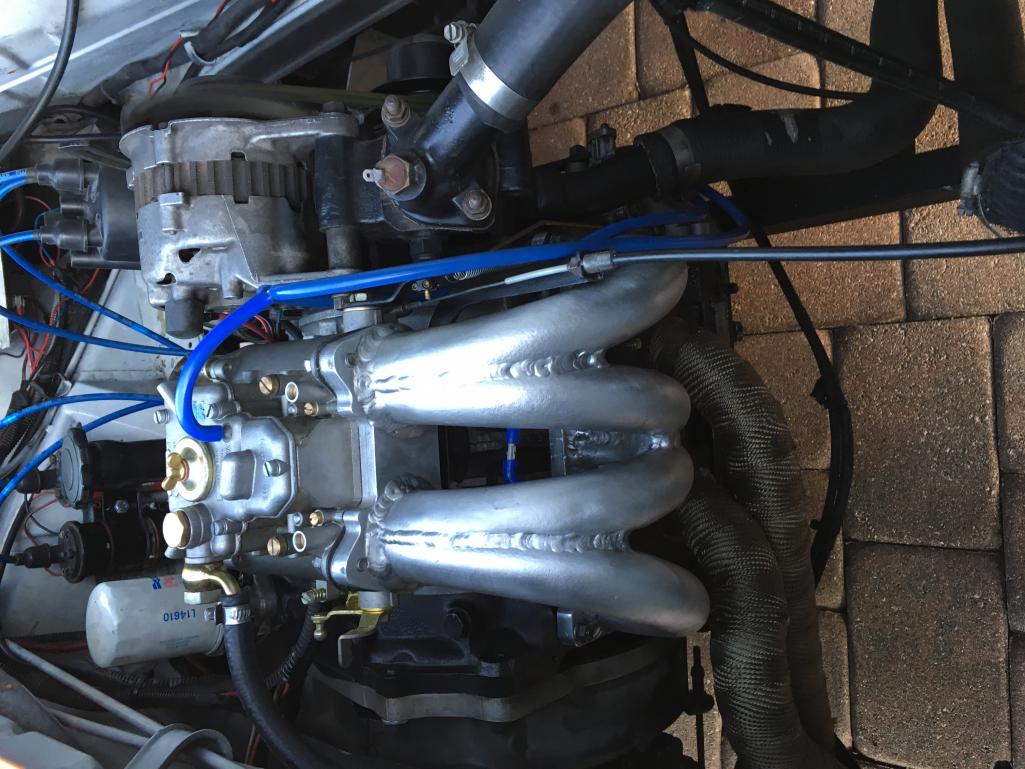
Posted by: matthepcat Aug 30 2016, 01:48 PM
Interesting set-up. Looks cool.
I have a heavily ported Nikki carb on mine. I have never experienced mid-corner fuel starvation, but I suppose I have not run a track day yet ( just aggressive mountain roads).
These little rotaries are so fun. Like a sport bike engine.
Posted by: Rotary'14 Aug 30 2016, 02:00 PM
Well your manifold is done,,, Your aluminum welding skills coming along nicely there.
Posted by: Andyrew Aug 30 2016, 02:57 PM
Great looking intake!!
Posted by: mbseto Aug 31 2016, 12:35 PM
Awesome! Love seeing fabbed headers and manis, not sure why.
Posted by: Mueller Aug 31 2016, 01:55 PM
Interesting set-up. Looks cool.
I have a heavily ported Nikki carb on mine. I have never experienced mid-corner fuel starvation, but I suppose I have not run a track day yet ( just aggressive mountain roads).
These little rotaries are so fun. Like a sport bike engine.
I've never driven a rotary motor, are they pricey to rebuild?
Posted by: matthepcat Aug 31 2016, 03:37 PM
Next time I see you at an event you can drive mine.
Master rebuild kits are about $1,000 in parts. If no machining is required, its not too bad.
Interesting set-up. Looks cool.
I have a heavily ported Nikki carb on mine. I have never experienced mid-corner fuel starvation, but I suppose I have not run a track day yet ( just aggressive mountain roads).
These little rotaries are so fun. Like a sport bike engine.
I've never driven a rotary motor, are they pricey to rebuild?
Posted by: Mike Bellis Aug 31 2016, 06:40 PM
Looks great! Only one suggestion... Add a phenolic spacer between the carb and manifold to reduce heat soak in the carb. You don't need your fuel boiling off.
Posted by: gabeurgelles Sep 1 2016, 08:09 AM
Looks great! Only one suggestion... Add a phenolic spacer between the carb and manifold to reduce heat soak in the carb. You don't need your fuel boiling off.
yeah I'll definitely be looking into those spacers!
Posted by: porschetub Sep 2 2016, 03:16 AM
INB4 Mike Bellis
I've blown up enough rotaries. I'm sticking with the Audi...
Post some more pics of the radiator setup. Rotaries run hot when flogged.
Why do they blow up so much Mike ....never had a thing to do with them but have heard the noise a
 and heard they drink fuel like a elephant drinks water
  .
.Posted by: Mike Bellis Sep 2 2016, 02:18 PM
INB4 Mike Bellis
I've blown up enough rotaries. I'm sticking with the Audi...
Post some more pics of the radiator setup. Rotaries run hot when flogged.
Why do they blow up so much Mike ....never had a thing to do with them but have heard the noise a
and heard they drink fuel like a elephant drinks water .Heat and pre-ignition and the weak links on a rotary. If you can control those, they run and drive wonderfully.
Posted by: ablesnead Sep 2 2016, 02:33 PM
I have driven and raced against 12 a and 13 B. Rotaries for many years....In ITS trim , 180 to 200 hp they were by a factor of 3 the most reliable engine available...I have no experience with turbomotors....if you are looking for that range of HP in a 914....they are worthy of real consideration, should
Be very 901 friendly with their torque characteristics.....
Posted by: andys Sep 2 2016, 02:43 PM
So it was time to build an intake manifold. I started by finding some 180 degree bends with the correct radius. After a lot of looking I found what I was looking for and ended up paying around $90 for 5 bends. Since I don't have access to a machine shop, all the fabrication had to take place in my garage with everyday tools. I was able to shape the pipes by hand with a hammer and a jigsaw. I made a template/jig for the manifold of a piece of wood and shaped everything to fit that.
Where did you find the aluminum 180's? Source?
Thanks,
Andys
Posted by: gabeurgelles Sep 4 2016, 04:50 PM
So it was time to build an intake manifold. I started by finding some 180 degree bends with the correct radius. After a lot of looking I found what I was looking for and ended up paying around $90 for 5 bends. Since I don't have access to a machine shop, all the fabrication had to take place in my garage with everyday tools. I was able to shape the pipes by hand with a hammer and a jigsaw. I made a template/jig for the manifold of a piece of wood and shaped everything to fit that.
Where did you find the aluminum 180's? Source?
Thanks,
Andys
Sharpe Products, they supply aluminum for hand rails and they come in many different radius'. The ones I used were 1.5" OD, 4 inch radius and .125" wall thickness.
Posted by: gabeurgelles Sep 4 2016, 05:07 PM
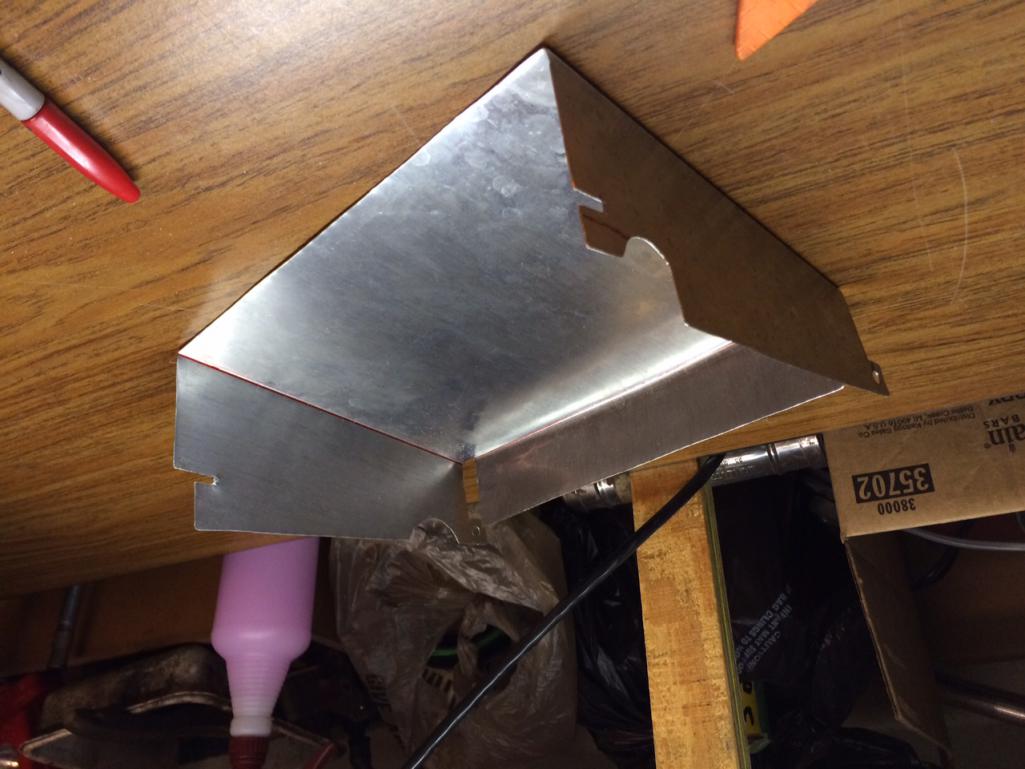
I also finished the radiator shroud to keep high pressure from forming under the front trunk while at speed. The air is forced into the radiator and then pushed out the bottom where the spare tire well used to be. As for the engine bay, I wanted to make it look cleaner so I thought of putting a "shroud" like the engine tin on the original engines. I was able to use the grooves already in the car to secure the 1/16" aluminum sheet used. It also acts as a heat shield from the headers, located directly under the intake manifold.
And I had this windshield banner made for the long trip up to NC for Okteenerfest since I dont have sun visors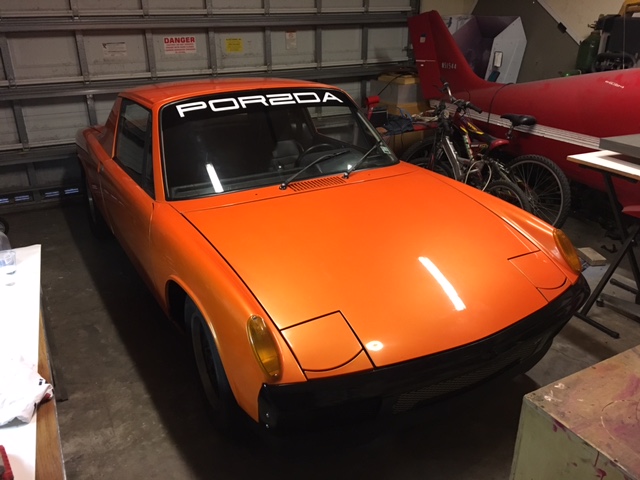
Posted by: Cracker Sep 4 2016, 06:56 PM
Good work Gabe...looking forward to meeting you and seeing your car.
Tony
Posted by: Mike Bellis Sep 4 2016, 07:59 PM
I want to encourage you to vent the radiator out the wheel wells and not under the car.
1) Air under the car is not good for high speed stability.
2) On a dirt road or driveway at lower speeds, as the fans kick on, a cloud of dust will encapsulate your car.
3) Radiator hot air is still cooler than the heat coming from the brakes.
#2 really sucks when the top is off and the windows are down... Ask me how I know... 
Posted by: Cracker Sep 4 2016, 08:10 PM
I second that suggestion...even better through the hood but that's not to everyone's liking.
Tony
I want to encourage you to vent the radiator out the wheel wells and not under the car.
1) Air under the car is not good for high speed stability.
2) On a dirt road or driveway at lower speeds, as the fans kick on, a cloud of dust will encapsulate your car.
3) Radiator hot air is still cooler than the heat coming from the brakes.
#2 really sucks when the top is off and the windows are down... Ask me how I know...
Powered by Invision Power Board (http://www.invisionboard.com)
© Invision Power Services (http://www.invisionpower.com)