Printable Version of Topic
Click here to view this topic in its original format
914World.com _ 914World Garage _ Blue Porscheru Conversion
Posted by: R_u_dd Jul 25 2015, 11:09 PM
Blue Porscheru Conversion
I started this project back in May of 2014 and wanted to share the journey with my friends and family.
There's something appealing to people about taking a left-for-dead vehicle and bringing it back to life.
I hope this build thread is a bit different than the others. It's a Subaru conversion which is not as common.
I am/was a newbie. This is my first car restoration, if you can call it that.
My welds are not pretty, but I've improved and learned throughout this process.
This is a great car for a first restoration. It's light, simple, and very cool- mid engine with a targa top.
This is the plan- We are starting with a 1971 tangerine 914 with light to moderate rust, nothing too serious.
The original engine was a 1.7. Like so many other 914's it ran but has been sitting for a long time.
The engine seems too far gone to try to rebuild it= lots of rust and corrosion.
Powerplant: 2003 Subaru Impreza TS 2.5 SOHC, Natuaral- No Turbo, Why? Plenty of Power for me and no turbo lag. http://www.914world.com/bbs2/index.php?showtopic=250878&hl=
Transmission: Subaru 5MT 2003 Impreza TS
ECU from: 2003 Subaru Impreza TS
Electronics: Wiring Harness simplified by Small Car Performance
Axles: 944 axles and CV's with Subaru inside CV- 4 lug for now.
914 suspension.
No fender flares
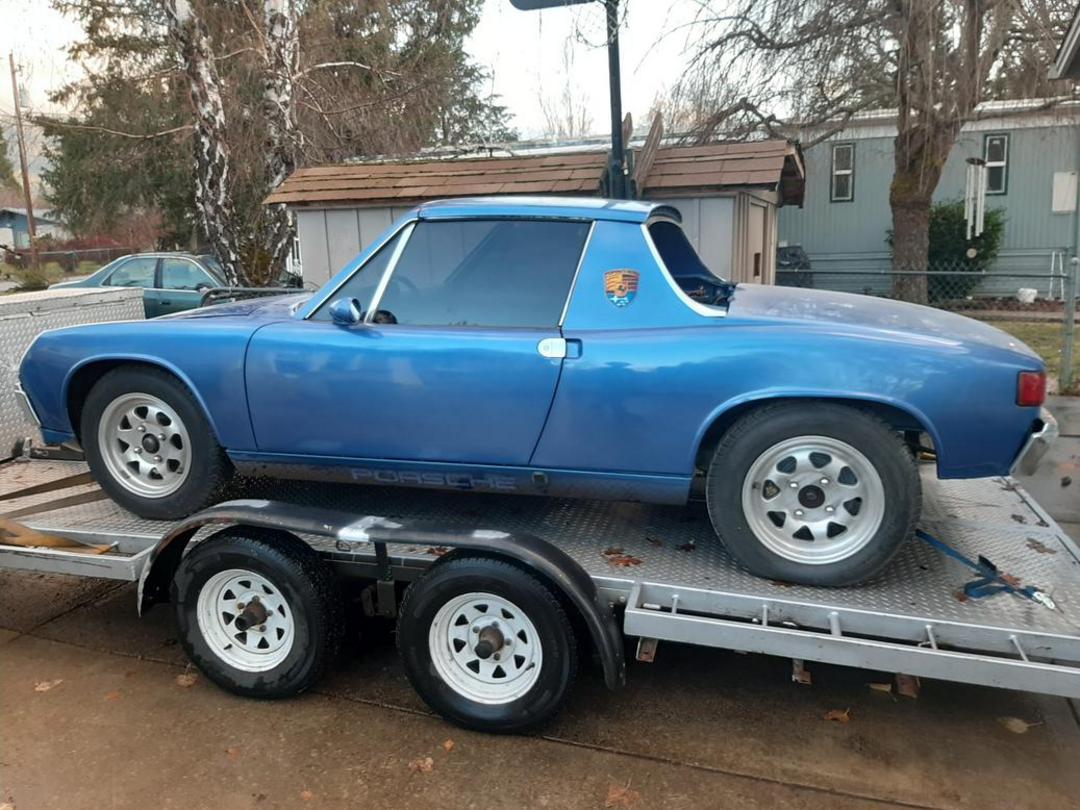
Voltage Blue Metallic: (Honda color), Painted Sail Panels.
http://s1301.photobucket.com/user/Christopher_Rudd/914/story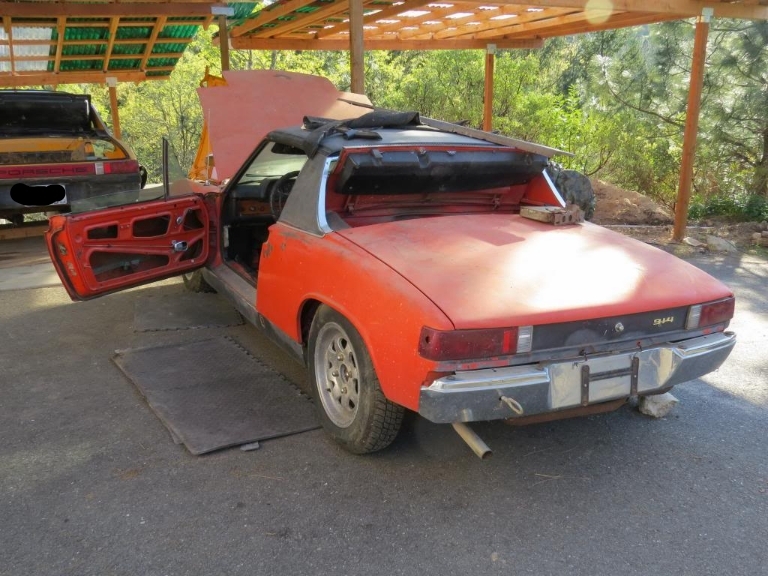
The Future Look- http://s1301.photobucket.com/user/Christopher_Rudd/914/Concepts/story
http://www.eggscollective.org/914visualizer/914_visualizer.html, a very cool app.
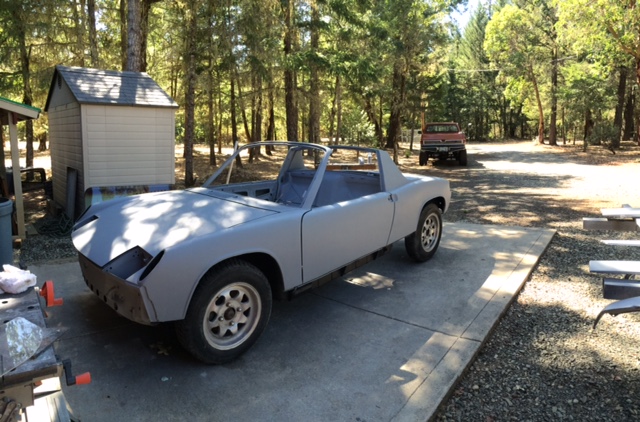
Current Look: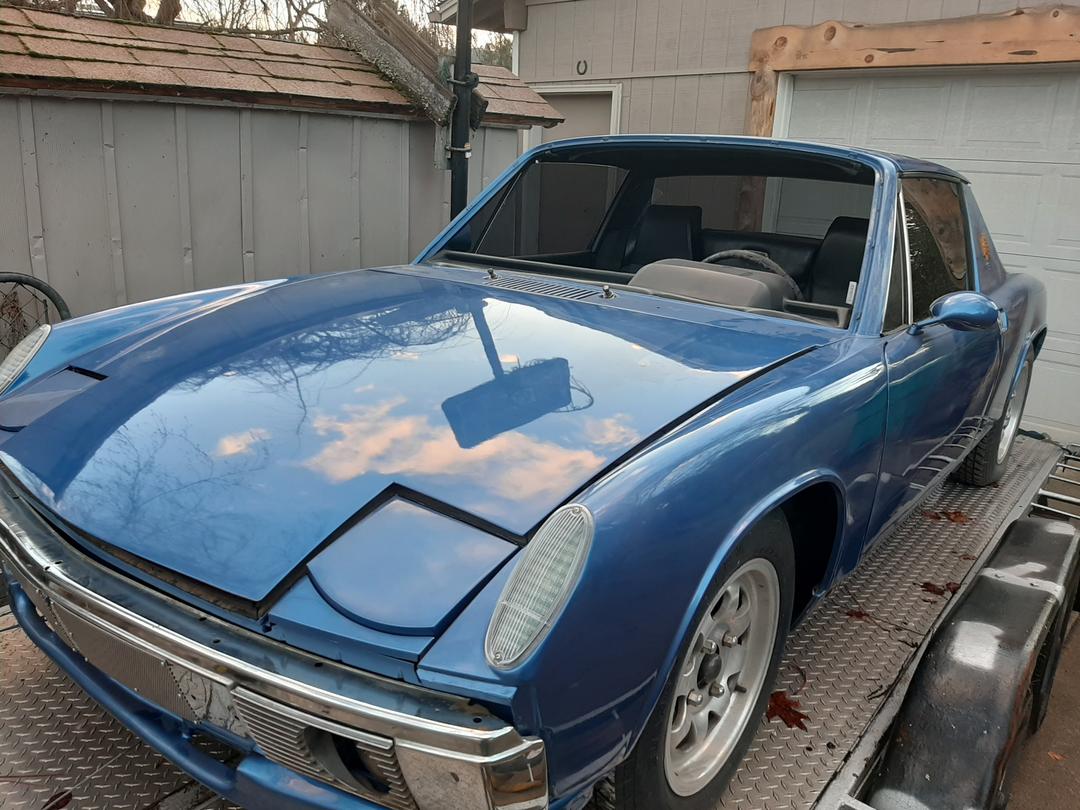


Contents
http://www.914world.com/bbs2/index.php?s=&showtopic=260642&view=findpost&p=2265037
http://www.914world.com/bbs2/index.php?s=&showtopic=260642&view=findpost&p=2216554
http://www.914world.com/bbs2/index.php?s=&showtopic=260642&view=findpost&p=2217371
http://www.914world.com/bbs2/index.php?s=&showtopic=260642&view=findpost&p=2451421
http://www.914world.com/bbs2/index.php?s=&showtopic=260642&view=findpost&p=2215011
http://www.914world.com/bbs2/index.php?s=&showtopic=260642&view=findpost&p=2442478
http://www.914world.com/bbs2/index.php?s=&showtopic=260642&view=findpost&p=2302675
http://www.914world.com/bbs2/index.php?s=&showtopic=260642&view=findpost&p=2442424
http://www.914world.com/bbs2/index.php?s=&showtopic=260642&view=findpost&p=2215244
http://www.914world.com/bbs2/index.php?s=&showtopic=260642&view=findpost&p=2214816
http://www.914world.com/bbs2/index.php?s=&showtopic=260642&view=findpost&p=2243427
http://www.914world.com/bbs2/index.php?s=&showtopic=260642&view=findpost&p=2216565
http://www.914world.com/bbs2/index.php?s=&showtopic=260642&view=findpost&p=2215036
http://www.914world.com/bbs2/index.php?s=&showtopic=260642&view=findpost&p=2514271
http://www.914world.com/bbs2/index.php?s=&showtopic=260642&view=findpost&p=2219462
http://www.914world.com/bbs2/index.php?s=&showtopic=260642&view=findpost&p=2236189
http://www.914world.com/bbs2/index.php?s=&showtopic=260642&view=findpost&p=2309148
http://www.914world.com/bbs2/index.php?s=&showtopic=260642&view=findpost&p=2243793
http://www.914world.com/bbs2/index.php?s=&showtopic=260642&view=findpost&p=2302697
http://www.914world.com/bbs2/index.php?s=&showtopic=260642&view=findpost&p=2302793
Transmission
http://www.914world.com/bbs2/index.php?s=&showtopic=260642&view=findpost&p=2250238t
http://www.914world.com/bbs2/index.php?s=&showtopic=260642&view=findpost&p=2217495
This thread is for entertainment purposes only. I am not a certified mechanic.
There are many that have pioneered the suby conversion before me, but this
is my story.
Hope you enjoy this thread!
Chris 
Posted by: R_u_dd Jul 25 2015, 11:56 PM
Favorite Subaru Conversion Threads:
http://www.914world.com/bbs2/index.php?showtopic=110990&hl= - Ultimate How-to
http://www.914world.com/bbs2/index.php?showtopic=94994- What's Been Done- Basics of What's Needed
http://www.914world.com/bbs2/index.php?showtopic=31579- EJ 2.5- Tried radiator in engine bay
http://www.914world.com/bbs2/index.php?showtopic=94994- EJ2.5 and Subaru 5MT transmission
http://www.914world.com/bbs2/index.php?showtopic=105407- Engine Only
http://www.914world.com/bbs2/index.php?showtopic=83031- Suby 2.2 Turbo- great thread
http://www.914world.com/bbs2/index.php?showtopic=87326&hl=small%20%20car%20%20cradle&st=0- Green Car- Subaru Engine and Transmission
http://www.914world.com/bbs2/index.php?showtopic=78501&st=280- Suby engine and transmission.
http://www.914world.com/bbs2/index.php?s=&showtopic=201776&view=findpost&p=1799620
http://www.914world.com/bbs2/index.php?showtopic=102887
http://www.914world.com/bbs2/index.php?showtopic=220569
http://www.914world.com/bbs2/index.php?showtopic=274166 Subaru EJ205 Turbo and Suby Transmission
914-6 Builds:
Signal Orange, flared- Beautiful car (by iamchappy):
http://www.914world.com/bbs2/index.php?showtopic=75381&st=0
http://www.914world.com/bbs2/index.php?showtopic=298790
Posted by: R_u_dd Jul 26 2015, 12:52 AM
Subaru Engine Choices - Notes from various posters
From another's Post "What you need to decide is what level of power you want. A 6 cylinder makes the car VERY quick and fast compared to stock.
Lots of fun as long as you are ready for the car to become a completely different animal. If you want the feel of an enhanced version of a stock 914 go with a 2.5."
Subaru EJ Engine Wikipedia:https://en.wikipedia.org/wiki/Subaru_EJ_engine
Engines:
HP Weight lbs/hp
EJ22 130-160 265 1.96
EJ25 165-200 298 1.81
Ej20tt 240 275
EZ30DR 216-245 315 1.85
EG33 225-275 0.00
EJ18: Found in Imprezas from 1993-1997. Rated at 110hp and 120 ft-lbs
EJ22 Phase I: Found in Legacies from 1990-1998 and Imprezas from 1995-1998.
Comes rated at 130hp and 137 ft-lbs, 135hp and 140 ft-lbs, or 137hp and 145 ft-lbs.
EJ22 Phase II: Found in Legacies in 1999 and Imprezas from 1999-2001. Rated at 142hp and 149 ft-lbs.
EJ22-T Phase I: Found in Sport Sedan and Touring Wagons (Legacies) from 1990-1994.
Turbocharged and non-intercooled. Rated at 160hp and 181 ft-lbs. Closed
Closed deck, cast pistons, forged rods, oil squirters: turbo motor. Poor flowing heads.
EJ25 DOHC Phase I: Found in Legacies from 1996-1999, Imprezas in 1998, and Foresters in 1998.in 1997-1999.
Rated at either 155hp and 140 ft-lbs in 1996 or 165hp and 162 ft-lbs in 1997-1999.
EJ25 SOHC Phase II: Found in Legacies from 2000+, Imprezas from 1999+, and Foresters from 1999+.
Rated at 165hp and 166 ft-lbs. There was a slight compression ratio change from 1999-2000 where it went from 9.7:1 to 10.0:1.
USDM EJ20: US Domestic Market WRX. Found in 2002+ WRXs. Rated at 227hp and 217 ft-lbs. Turbocharged, intercooled, open deck, and decent heads.
EJ25T DOHC: Available in 2004 in the Forester XT. Rated at 210hp and 235 ft-lbs. Turbocharged, intercooled, VVTi (Variable Valve Timing), and drive by wire.
EJ25T-STi DOHC: Available in 2004 in the WRX STi. Rated at 300hp and 300 ft-lbs.
Turbocharged, intercooled, AVCS (Active Valve Control System), drive by wire, intercooler sprayer, and semi-closed design.
EZ30R: Canbus Electronics require an aftermarket ECU for $2,000 (Not)
Found in the 2005–2009 Legacy 3.0R, Outback 3.0R and 2006–2008 Tribeca.
EZ30D: found in 2000-2003 outback and legacy’s. At roughly 212 chp from the factory, it seems to have the lowest hp number of the bunch.
You can tell the difference between the others by the aluminum intake and its single exhaust port heads (looks like a long slot or oval)
as compared the later 6’s or the metal timing cover/size when compared to the eg33. It has two plus sides when compared to the latter EZ’s,
cheap drive by cable, non CANBUS and you can pick this up for around $1-2k. Furthermore the 212hp mark is deceiving, both the intake
and exhaust is extremely constricting on the donor car and from the swaps that have been done/dyno’d (in the Subaru world) just
upgrading to something less restrictive will put power up to 230-240 CHP.
The EZ30D (according to Ian from Coldwater914.com) ranks motor highest in comparison to the other options in this category. Due to its more modern design and timing chain
(that does not need to be service for the life of the engine) it is smaller/lighter and more reliable than the eg33. On the other hand the ECU
on the EZ30D substantially less expensive than the EZ30R and EZ36R. However to clarify it does not have the VVT or AVCS of the later EZ’s.
More on the EJ22..
The EJ22 engine is part of Subaru's EJ series that was intended to replace the EA series of engines. This particular engine was first used in 1990 in
the Subaru Legacy. It also saw use in the Outback from 1995 to 1996 and in the Impreza from 1995 to 2001. There are two generations of EJ22
available through the large inventory on eBay. The EJ221 is the first model and featured 135 boiler horsepower at 5,800 rpm. The EJ222 is the
second, starting production in 1999, and it featured 142 boiler horsepower at 5,600 rpm. All EJ series engines are horizontal flat-four cylinders
with 16 valves and both single and dual overhead camshaft configurations were produced. These engines feature two rows of two horizontally
opposed cylinders that help to balance one another while the engine is running. This makes for a smoother ride and a lighter engine as additional
balancing components are not required to keep the engine from knocking around while in operation. The EJ22 engine is efficient, reliable, and
contributes to the long life of many Subaru vehicles.
There are actually a couple different varients of EJ22's in terms of actual parts. Ive counted 4, each with different HP numbers.
Anyway, the single port heads are actually in the more recent models... 99-01 I believe. And there was discussion before about how the MY96 EJ22
had lighter weight rocker arms that might add horsepower to other model EJ22's, but thats kind of off topic...
Here are the HP/Torque numbers for various years:
99-01: Horsepower: 142 hp Max Horsepower: 5600 rpm Torque: 149 ft-lbs. Max Torque: 3600 rpm
97-98: Horsepower: 137 hp Max Horsepower: 5400 rpm Torque: 145 ft-lbs. Max Torque: 4000 rpm
95-96: Horsepower: 135 hp Max Horsepower: 5400 rpm Torque: 140 ft-lbs. Max Torque: 4400 rpm
93-94: Horsepower: 130 hp Max Horsepower: 5400 rpm Torque: 137 ft-lbs. Max Torque: 4400 rpm
The bore and stroke are same on the 93-96 2.2's, 3.82x2.95 but the compression ratio is 9.7:1 for the 95-96 as opposed to 9.5:1 for the 93-94. T
he camshaft elevation is different between the two as well as the valve spring height. The main bearing journal diameter is different along
with the connecting rod journal diameter (slightly, .0001 difference). The piston ring gap bottom compression is different between the two.
I cant tell if any part numbers are different though, im just looking at specification numbers from my chiltons guide. Sucks there isnt a newer
guide for the other models though... Cant help past MY96
Links:
http://forums.nasioc.com/forums/showthread.php?t=2141800
http://forums.nasioc.com/forums/showthread.php?t=631527
http://legacygt.com/forums/showthread.php/frankenmotor-buildi-benifitsi-179587.html- (2.2L heads on 2.5L Block)
http://www.ultimatesubaru.org/forum/topic/141278-franken-motor-shoping-list/ 2.5 block with 2.2 heads
http://forums.nasioc.com/forums/showthread.php?t=1022154
http://www.914world.com/bbs2/index.php?showtopic=250093
http://forums.nasioc.com/forums/showthread.php?t=1301065
http://forums.nasioc.com/forums/showthread.php?t=1435733
http://forums.nasioc.com/forums/showthread.php?t=1301065
http://forums.nasioc.com/forums/showthread.php?t=1301065
http://forums.nasioc.com/forums/showthread.php?t=1301065
Posted by: aircooledtechguy Jul 26 2015, 06:42 AM
Good stuff in here. Thanks.
I look forward to watching your car progress. . .
Posted by: Andyrew Jul 26 2015, 08:03 AM
Great starter thread! Cant wait to see the work!
Posted by: R_u_dd Jul 26 2015, 02:17 PM
Budget Planning 2015 costs
A good friend told me not to add up the costs. That was good advice. I think the cost is inversely proportional to a couple of things. Do you want a show car- probably not if your are converting to a suby? How much can you do yourself? How much time do you have, or how quick do you want it. Because, I find myself skipping some of the more difficult processes and farming them out, but that's expensive. I had my wiring harness done by the pro's. That's one I don't have the time, or is too important to get wrong. The other is paining. I want the paint and body work to look right, so that's going to the pros as well. Also, the brakes and electronics- I'm going to get help with those. Here's a spreadsheet that I put together with most costs I anticipate at this point. My path is in the left column, but depending on the transmission and engine, costs vary. These are not completely accurate, ie the engine rebuild would be more expensive. But, I wanted to do a relative comparison, so the numbers compare within the various systems chosen. Also, this is not a show car, just something that will be reliable, fun and look nice.
Edit 2017: I'm now $16,000 into this project and still have not started the car. Soon though. Just goes to prove the theory about doubling your budget to get the real cost over the expected cost.
Posted by: mepstein Jul 26 2015, 02:25 PM
Paint for $1000 - ? Missing a "0"? Just curious.
Posted by: R_u_dd Jul 26 2015, 03:21 PM
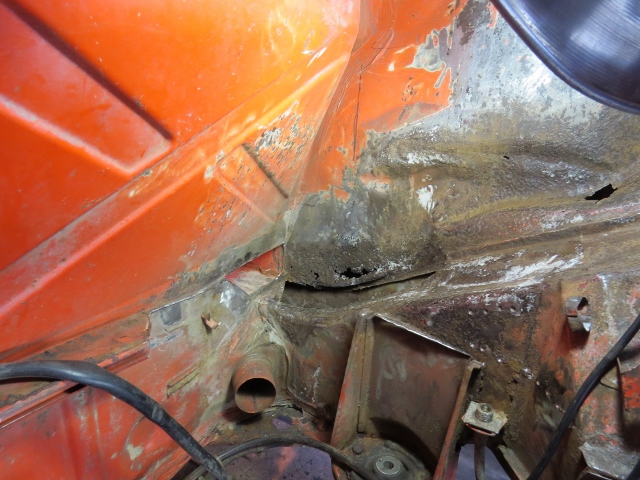
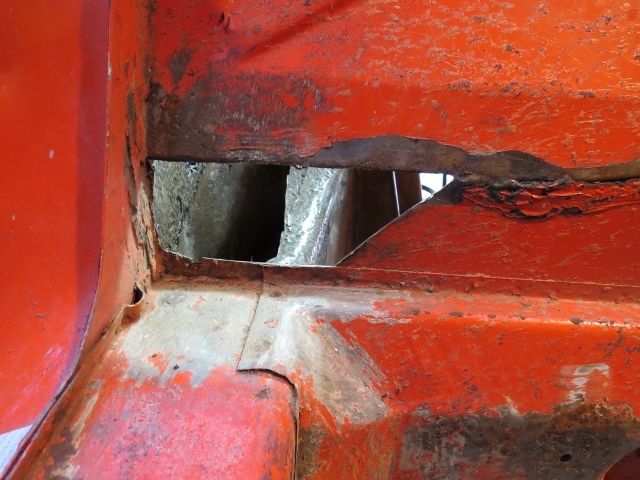
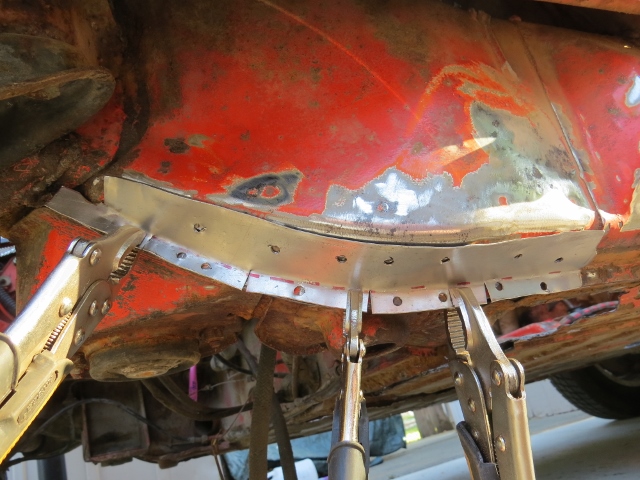
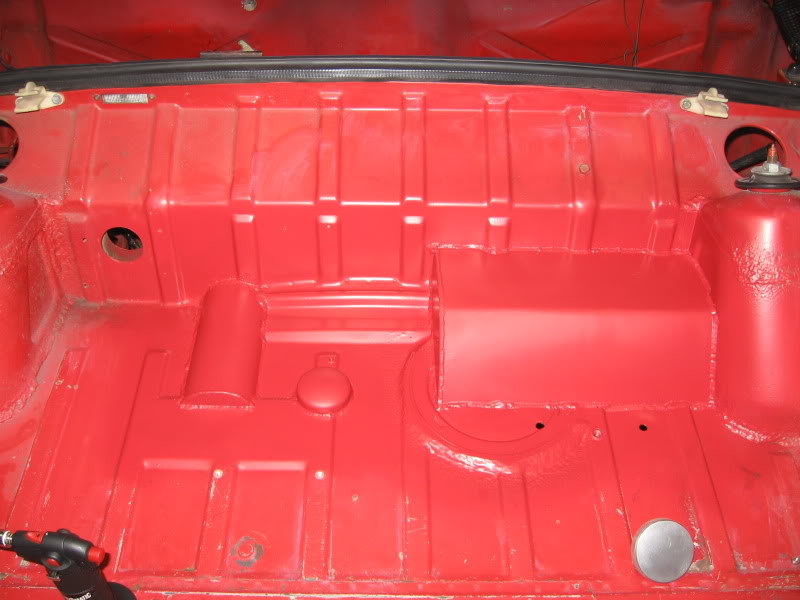
Floor Pans
One of the first tasks was to replace the floor pans. I tried to save the old ones, but they were just too far gone. Some of the parts were usable, like the pedal cluster support and the jack stand supports. Those were removed and welded to the new floor pans. This was all done on my back underneath floor jacks, not recommended. If you want to dive right in and build your car without building a rotisserie, you are saving time now but will work much harder and lose time in the end...
The left side- worst part
The cabin. Tried cutting out portions, but the cancer kept showing up in pinholes everywhere. Sound familiar?
View from below:
I sprayed the floor pans with epoxy paint. They were purchased in front and back halves because I had trouble finding a single piece and I thought it would be easier to install- not having a rotisserie. Not a bad move looking back, but more welding.
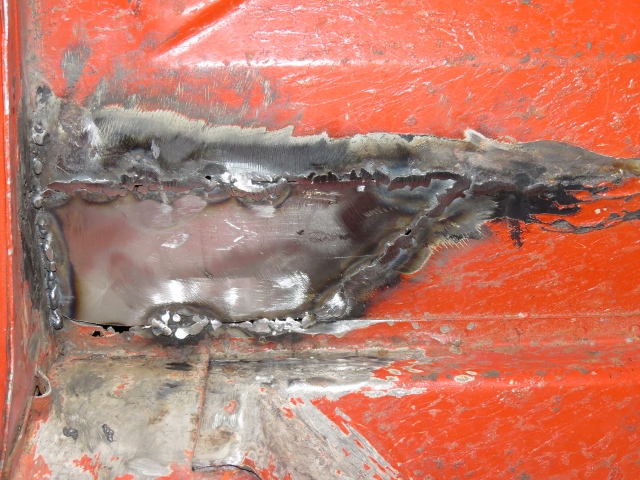
Saved some old parts and strengthened with extra metal.
Looking back, these welds are so embarrassing. Not hot enough. I have learned a lot since. 
This piece keeps you from punching through the floor with your foot
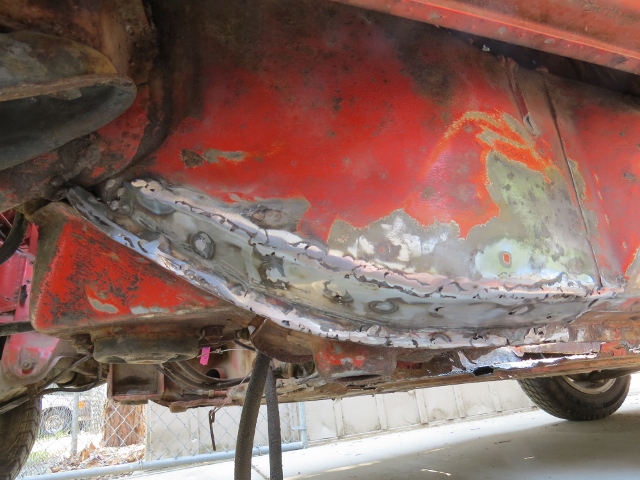
Ugly welds, I know. I thought about an ugly weld thread contest. Who makes the ugliest welds. Getting better though.
Epoxy primer, etching primer, and seem sealer oh my! Incidently, I had to grind this back off, redrill the holes and weld it back because I was off just enough that the pedal cluster did not line up correctly. Recommend welding this on after the floor pans are welded to the car. Measure thrice, cut once.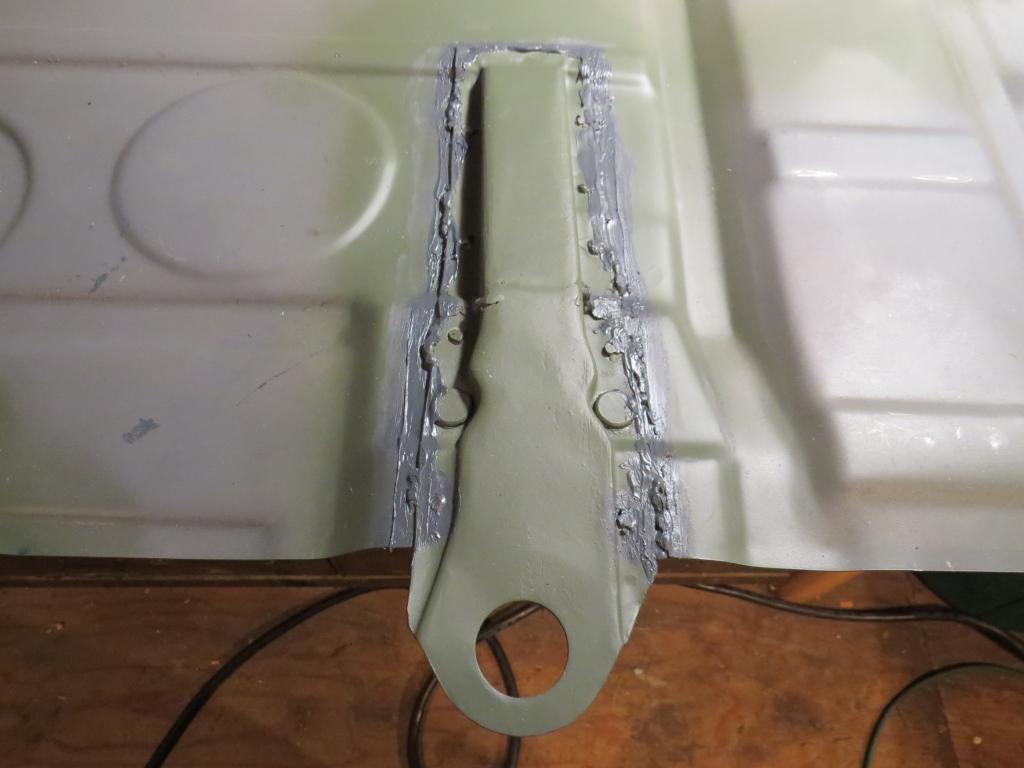
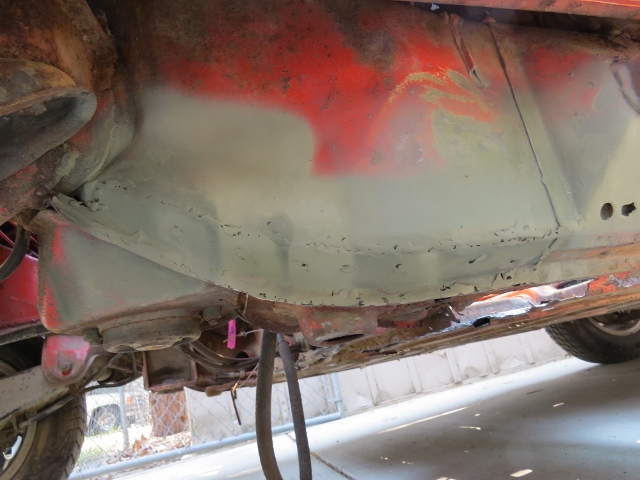
Rear panel in and Engman Kit with new metal braces sleeved over the old ones. Hope the seats still fit.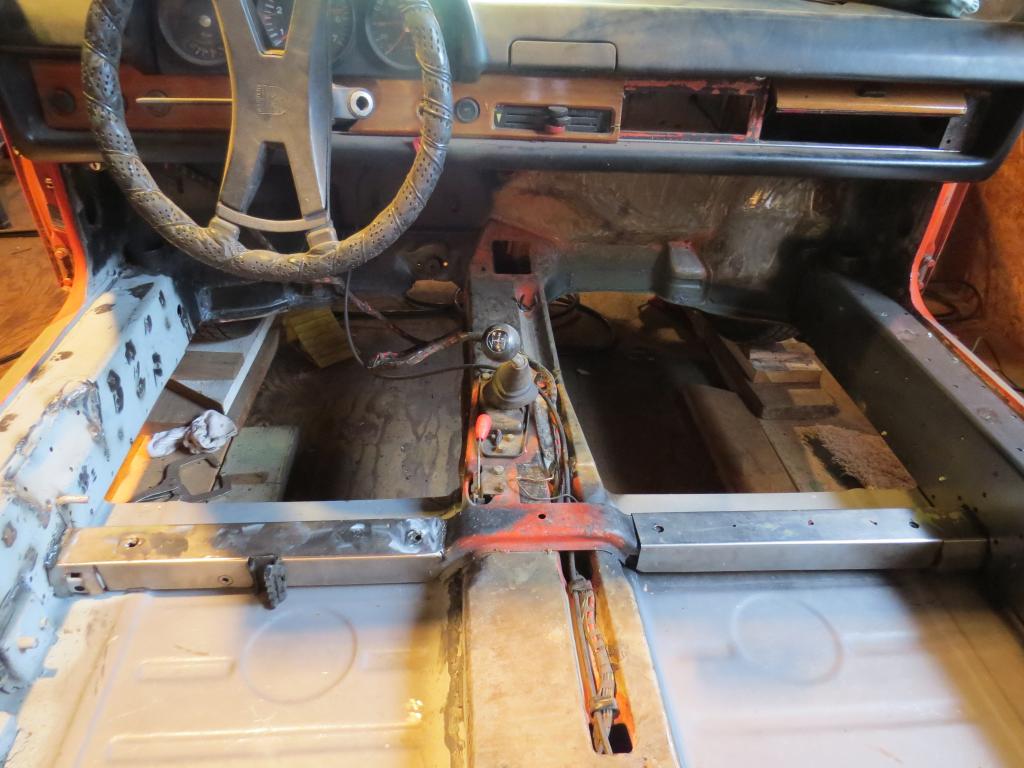
It helps to have small helpers. 
And he does good work: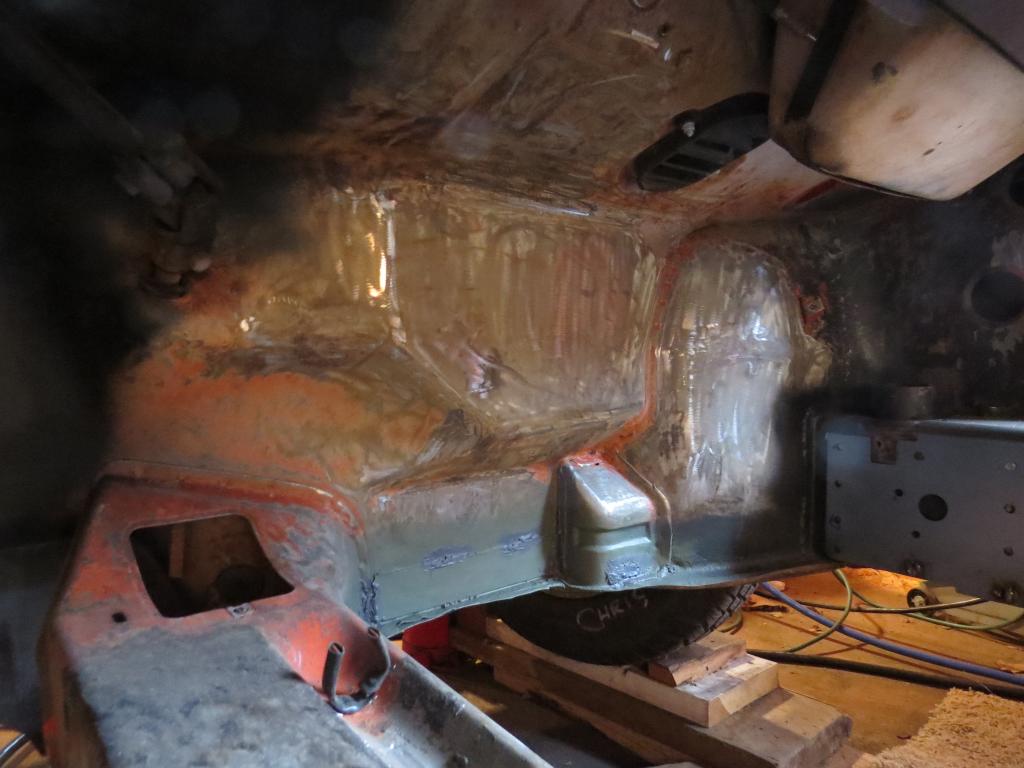
The firewall behind the seat was a chore with the gummy glue adhering the sound barrier. Bead blasting is the way to go- cheap, great results, fast... 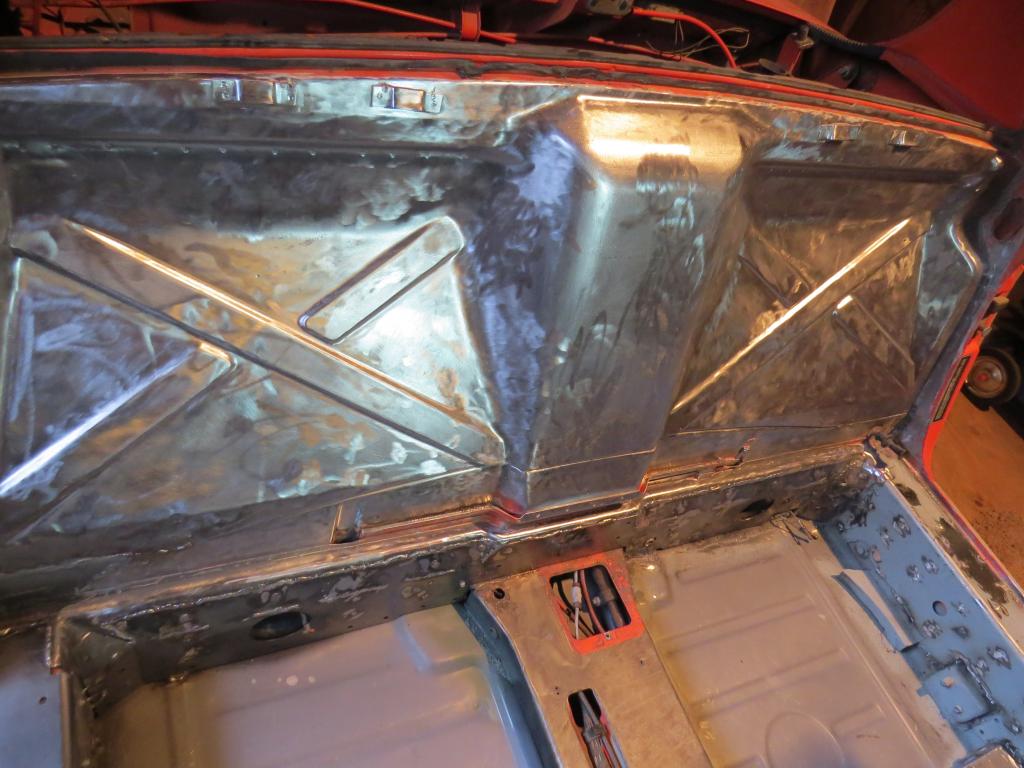
A few extra brackets to tie the Engman kit to the floor pan for added strength. Already much better welds although I did not need to weld the entire length of those brackets. It's better to leave open spots for flexing. Otherwise, the metal can crack.
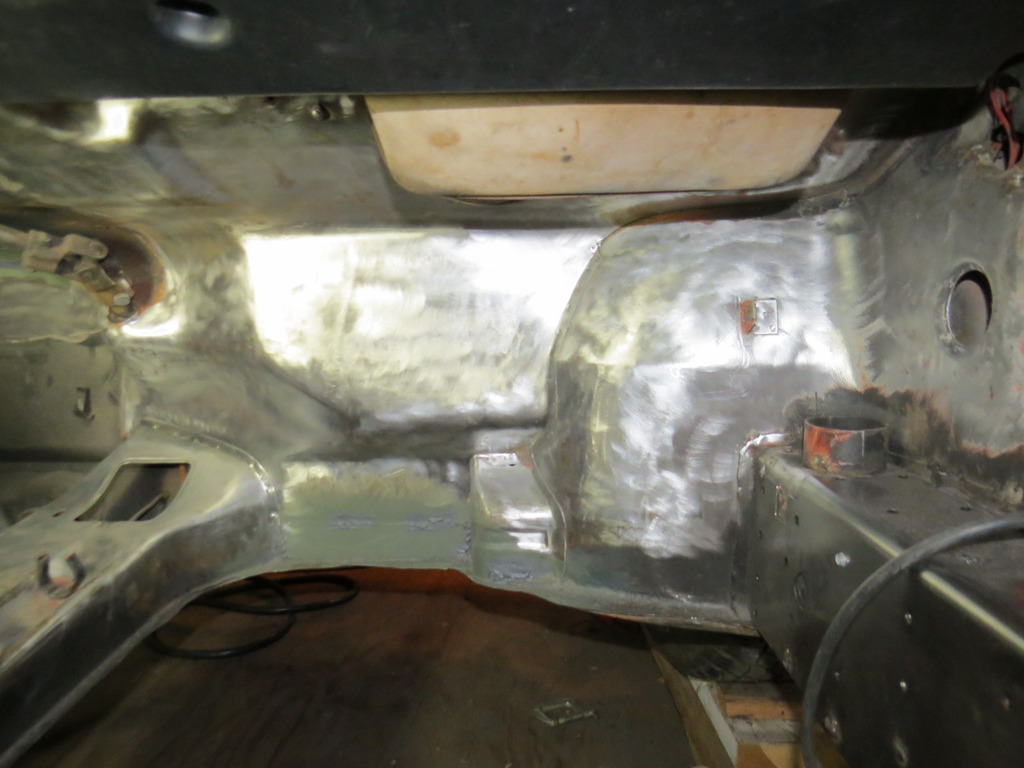
Jumping ahead a few months, the finished floor pans with car torn down for painting after bead blasting and first coat of epoxy primer, but we'll get to that. 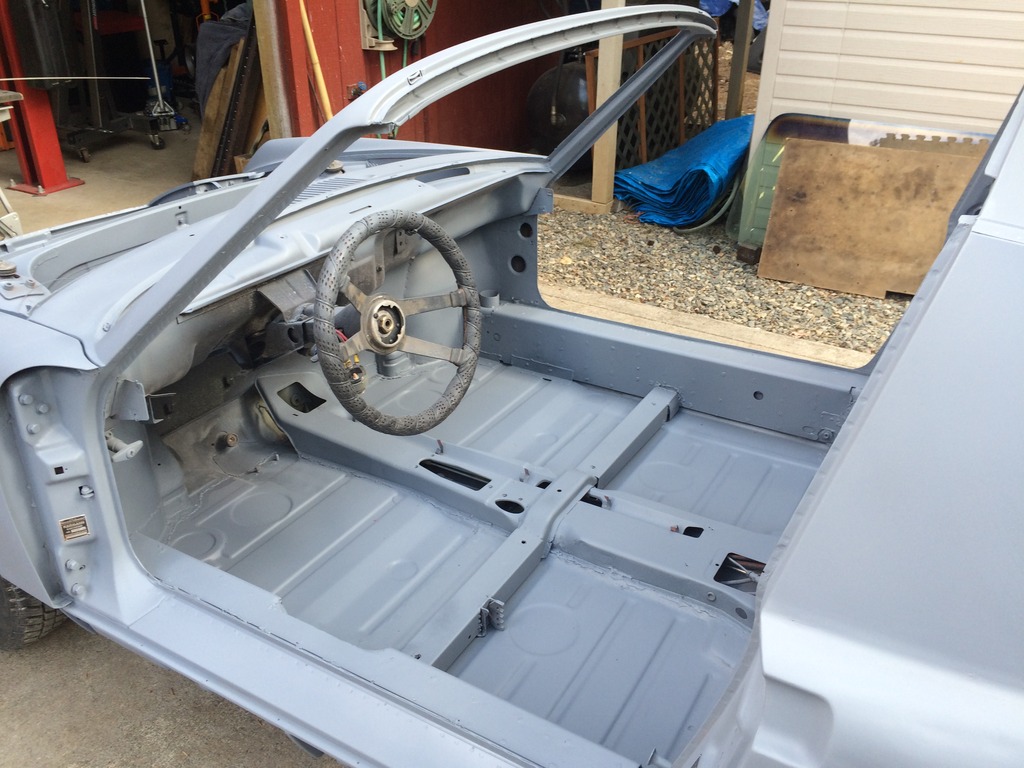
Posted by: R_u_dd Jul 26 2015, 03:35 PM

Paint for $1000 - ? Missing a "0"? Just curious.
If you do everything yourself, paints only about $300. You will notice that I used $1000 across the board. It's a relative comparison between using the type 4 engine with 901 tranny compared to the suby with 901 and suby with 5MT, so what I wanted to know was the difference in the paths I take to get there.
In reality, I am spending $1070 on bead blasting and first primer, $1,300 on finishing body work, and final priming, and will receive the bid shortly for the painting labor.
Some people spend $4,000 on just the paining step, but that's a lotta dough.
CR
Posted by: R_u_dd Jul 26 2015, 11:28 PM
Electronics
When you think about it...
 |
| it's pretty crazy to mate two wiring harnesses together to try to make the 914 work. |
 |
People keep telling me it's not that hard when you get the wiring diagrams together and separate the fuel injection and ecu from the 914 wiring.
We will see. At this point I have collected the wiring diagrams from the 914 and the Chilton's guides from each car.
Useful Links:
http://www.pelicanparts.com/914/914_electrical_diagrams.htm
Jeff Bowlsby http://bowlsby.net/914/WiringHarnesses/ on wiring harnesses,
diagrams, and sketches. He also rebuilds 914 harnesses.
http://bowlsby.net/914/Classic/TechNotebook.htm, an amazing resource for diagrams/sketches.
The guys at http://outfrontmotorsports.com/engine_management.htm will build custom harnesses with the EMS stinger.
Small Car Performance stripped my Subaru harness and provided me with the shortened oil pan and engine mount.
https://www.smallcar.com/index.php?type=extended&search_performed=Y&match=all&q=harness+modification&pname=N&pname=Y&cid=0&pcode=&price_from=&price_to=&weight_from=&weight_to=&dispatch%5bproducts.search.
Small Car Performance https://www.smallcar.com/index.php?dispatch=products.view&product_id=29894
Small Car https://www.smallcar.com/index.php?dispatch=pages.view&page_id=55. Which have immobilizers, which to choose when
deciding on a donor engine.
http://www.914world.com/bbs2/index.php?showtopic=100836&hl=subaru++wiring
How to rhttp://www.914world.com/bbs2/index.php?showtopic=246801&hl=sub++wiring.
For the do-it-yourselfer, I have found portions of these threads very useful:
- http://www.914world.com/bbs2/index.php?s=&showtopic=83031&view=findpost&p=1722516
- http://www.914world.com/bbs2/index.php?s=&showtopic=31579&view=findpost&p=439165
- More to come...
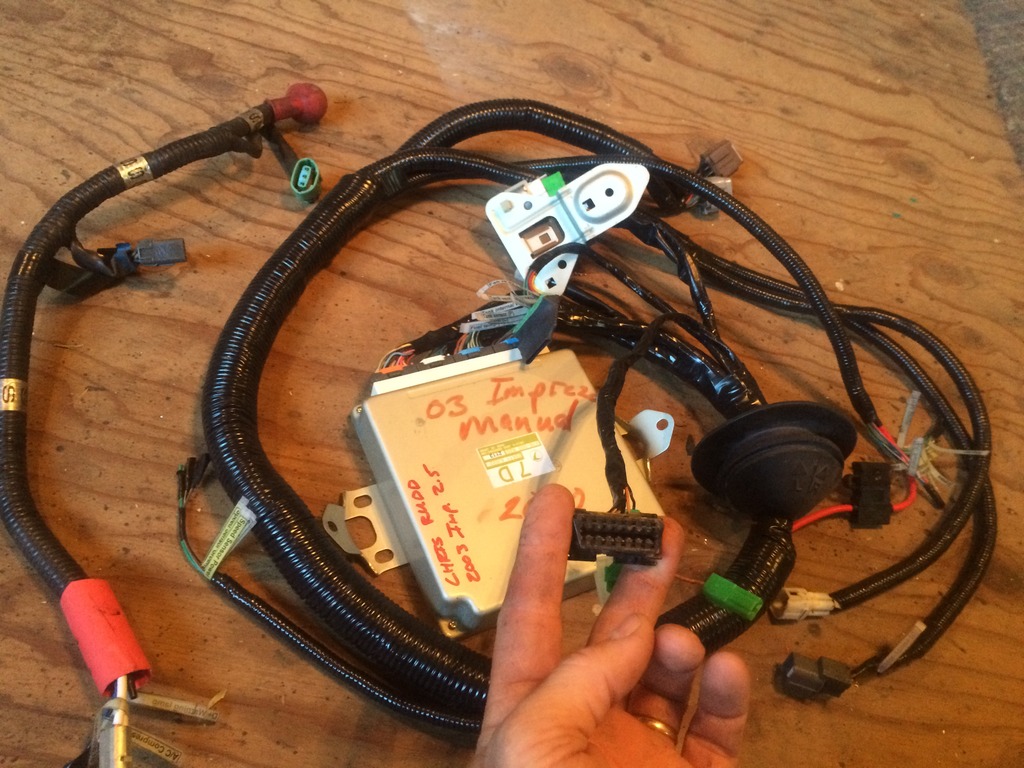
This ECU is programmable and can plug into a computer (term).
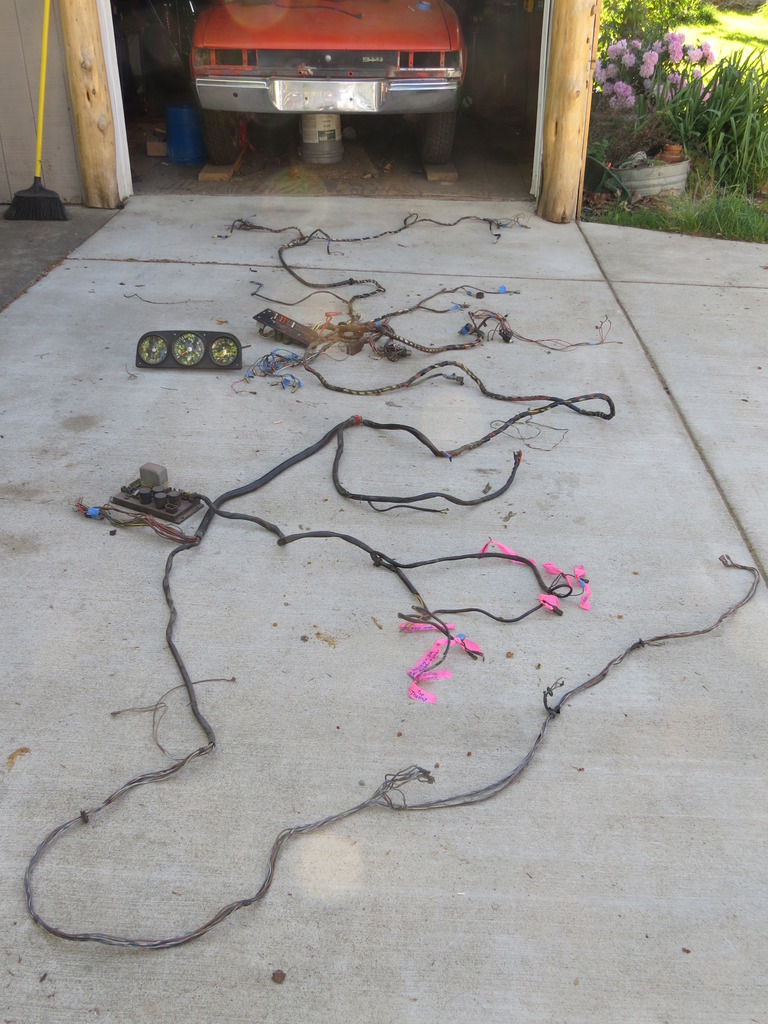
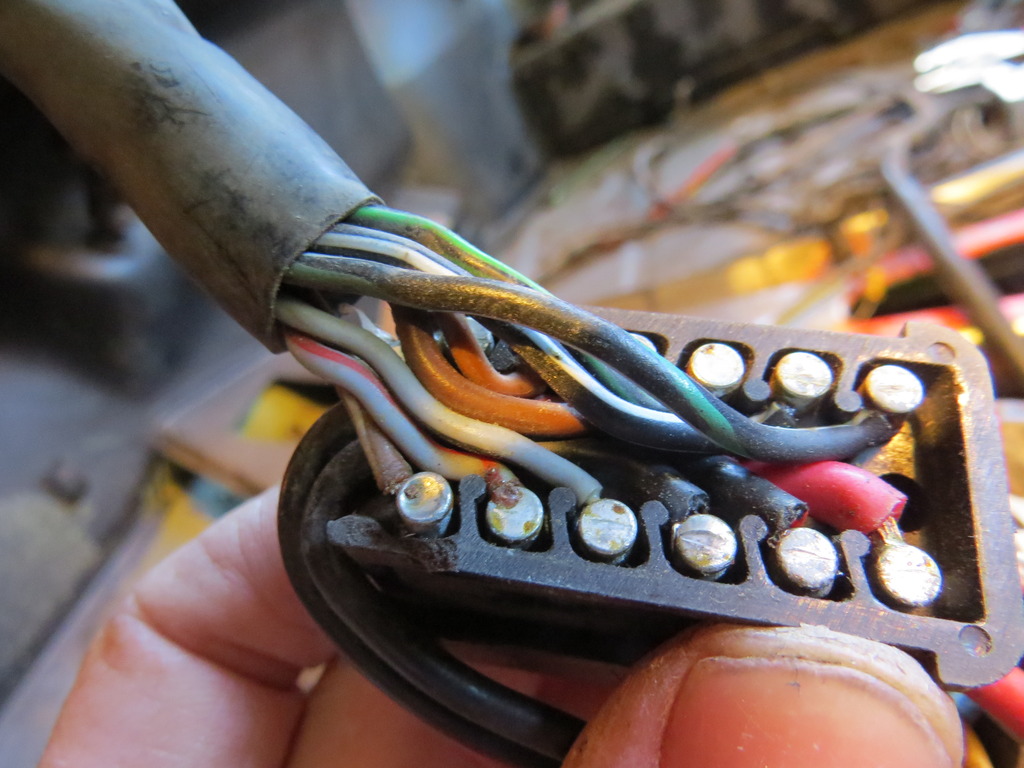
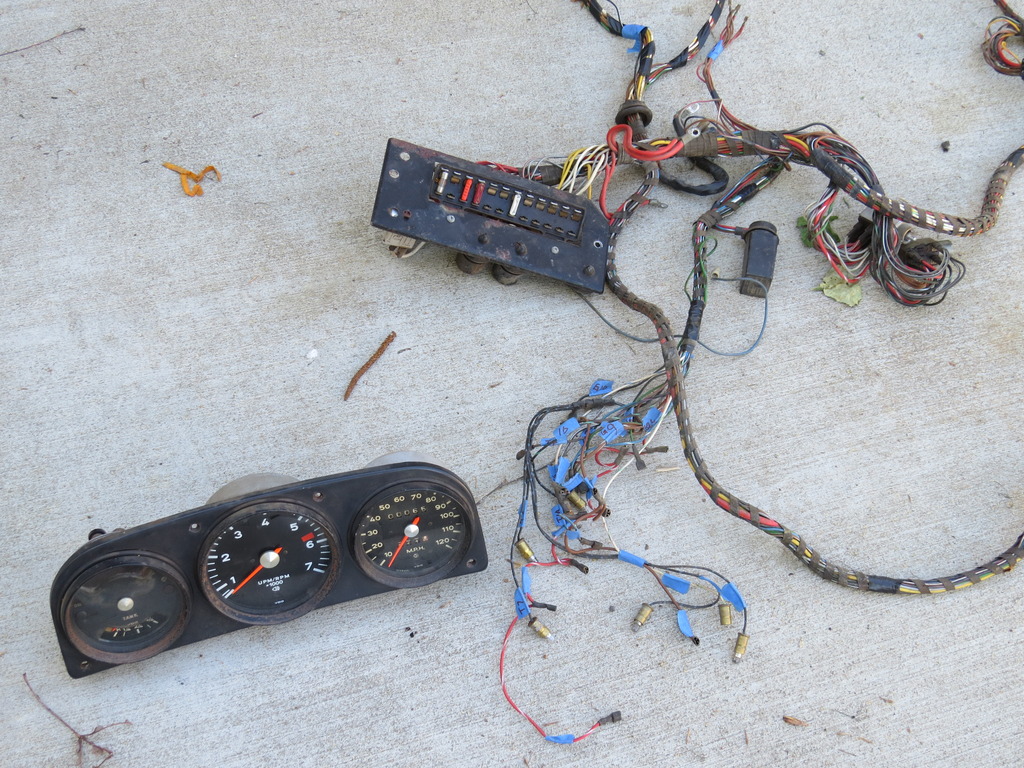
Here's some pictures of my wiring stripped out of the Porsche.
At the time, I had no idea how much of this I would be using
with the Subaru harness. Beside the 914 ECU and wires to the
engine, I will be using most of this wiring with the stripped down
Suby harness.
Subaru Harness. I wonder how many feet of wires go into this?
Speedo labeled. Unfortunately, using the Suby tranny, I won't be able to reuse the classic speedometer, although there is a guy who converts these to use the Subaru.
(Look for Link)
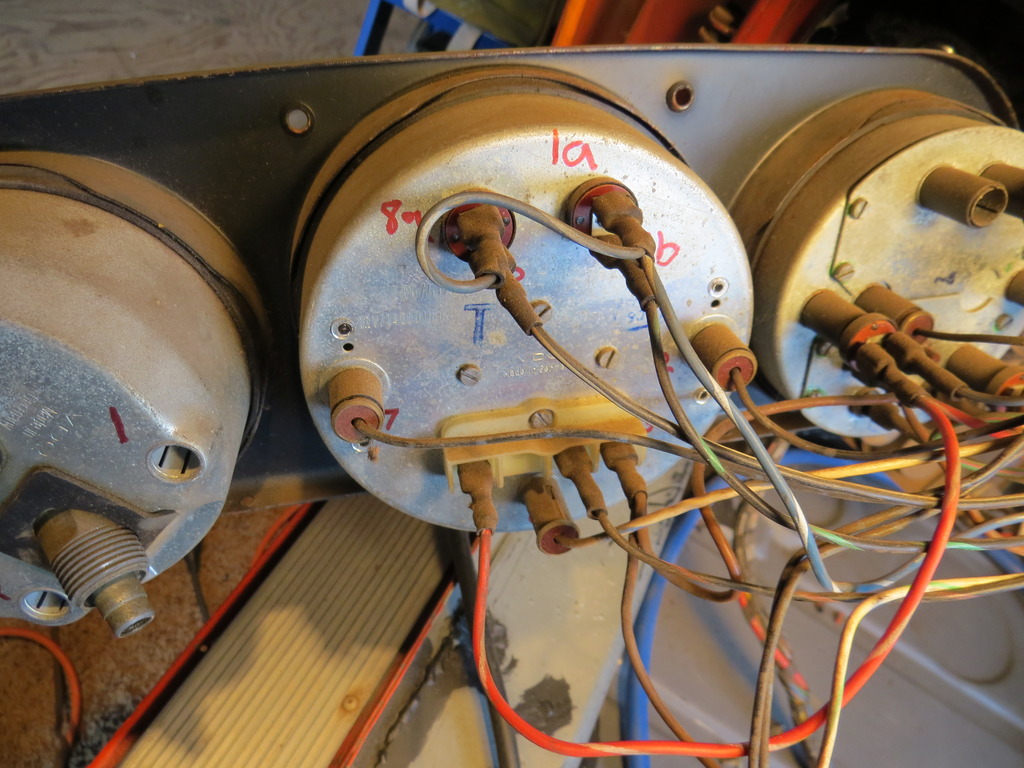
Another Speedo Pic. Look for Jeff Bowlsby's Tech notes linked above
for some sketches of the wiring diagrams for this.
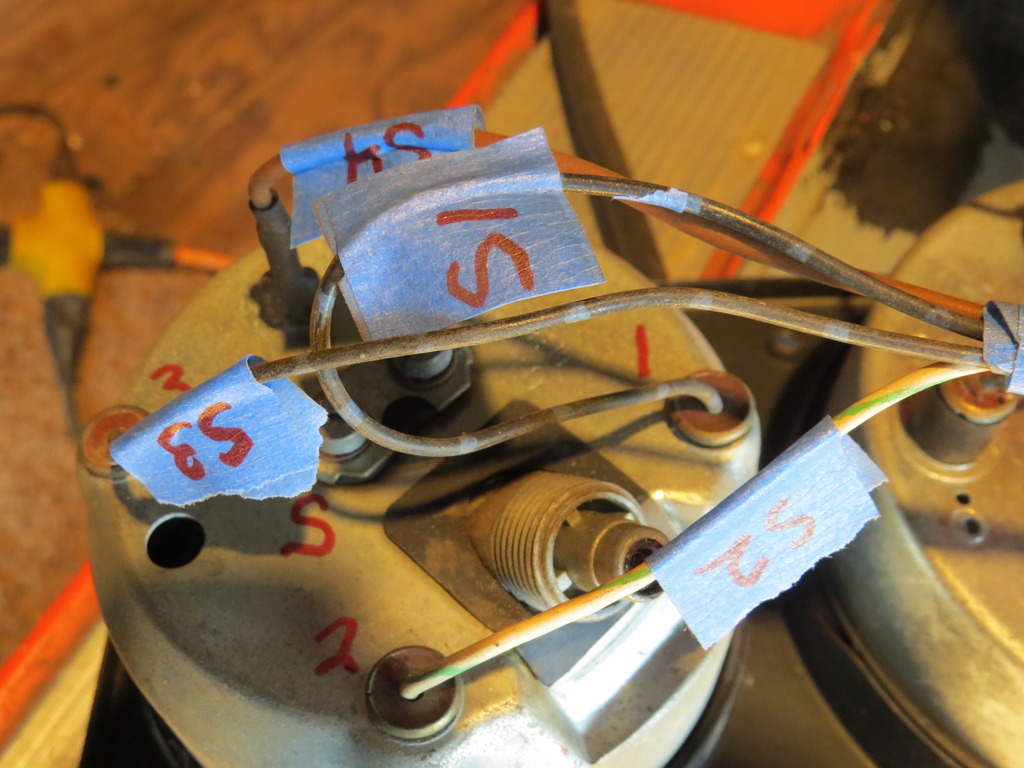
Again, Jeff has these all sketched out.
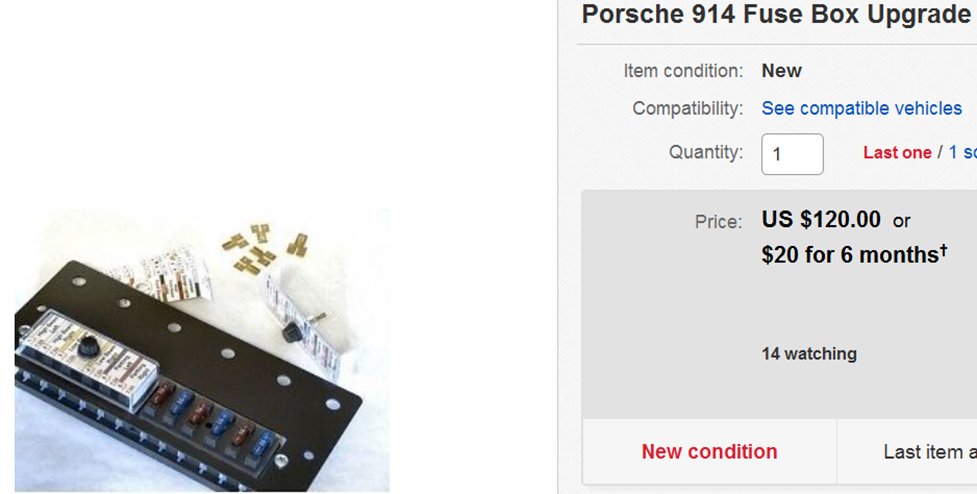
The plan is to update the corroded fuse box...
Update to something like this:
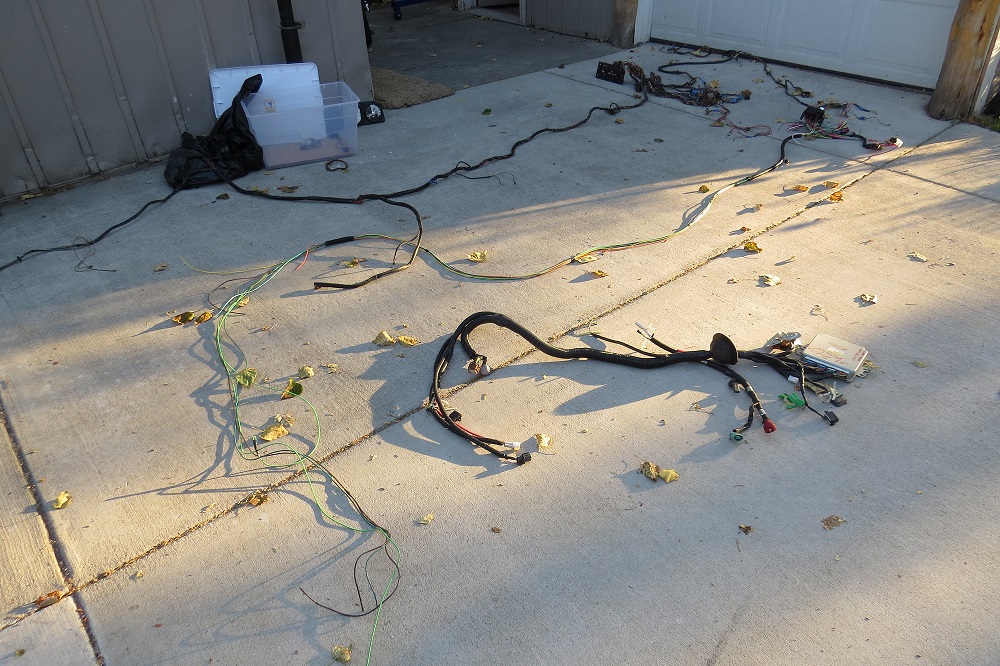
I worked with Mao of Small Car Performance for the Subaru wiring harness.
First I ordered the harness from Ebay, which came in a large box, weighing
about 40 pounds. It was shipped to Small Car in Washington State and returned
in about a week, weighing maybe 10 pounds, and everything labeled. I had shipped
them the ECU with the harness.
Update:
It's time to get back to the wiring. We are going to replace the 914 portion of the wiring harness with new wiring and new technology. The fuse box will be replaced with blade fuses. The old wiring features multiple grounds where it's not necessary, multiple fuses for the lights and poses other issues. We thought it easier to start over. The speedometer will be replaced internally with a new VDO speedo run electronically. Here's a picture of three harnesses, the old 914, new harness, and Subaru portion.
Posted by: Andyrew Jul 27 2015, 09:40 AM
Paint for $1000 - ? Missing a "0"? Just curious.
Mayco will do it for that, or its more than enough for supplies for a diy job with cheap paint (tcpglobal)
Posted by: 76-914 Jul 27 2015, 05:58 PM
 Another frigging Subarite! Welcome to the Fraternal Order of Blasphemous Conversions. BTW, you can paint that thing for < $300 if you like any of the single stage that Tractor Supply sells. It's decent paint but no Porsche colours. Your way over priced on a few items (shifter and cooling comes to mind) but that is good because you will need it elsewhere. I like the 2.5 and almost went that route so I will be watching your build with interest. It should be WRX fast when done. You'll absolutely love the big alternator, cable shift and the reliability of modern electronics. Did Mel (Mao's American name) give you the OBD port with his harness? He wasn't making then when I made mine. You may have saved your marriage and 1/2 of your sanity by farming that out. Good call. FWIW, you may want to look at one of these which run 355's. http://losangeles.craigslist.org/lac/pts/5108058296.html. I'm still thinking about one. My TY7554VN2A is running 411's but If I had 355's I could idle at 50mph.
Posted by: rhodyguy Jul 27 2015, 06:14 PM
Wow! Great thread. Warrants a trip to the 'classic' when it wraps up. You have know idea how much time you have saved me when it's new engine time for the outback. Could be October. Who knows.
Posted by: R_u_dd Jul 27 2015, 06:53 PM
Another frigging Subarite! Welcome to the Fraternal Order of Blasphemous Conversions. BTW, you can paint that thing for < $300 if you like any of the single stage that Tractor Supply sells. It's decent paint but no Porsche colours. Your way over priced on a few items (shifter and cooling comes to mind) but that is good because you will need it elsewhere. I like the 2.5 and almost went that route so I will be watching your build with interest. It should be WRX fast when done. You'll absolutely love the big alternator, cable shift and the reliability of modern electronics. Did Mel (Mao's American name) give you the OBD port with his harness? He wasn't making then when I made mine. You may have saved your marriage and 1/2 of your sanity by farming that out. Good call. FWIW, you may want to look at one of these which run 355's. http://losangeles.craigslist.org/lac/pts/5108058296.html. I'm still thinking about one. My TY7554VN2A is running 411's but If I had 355's I could idle at 50mph. Thanks for the encouragement and suggestions.
As for the transmission, I went for the matching transmission pulled from the same 2003 Impreza TS shipped from Canada with the original ECU. I was concerned about the rpm's on the freeway being too high, but I think I will be alright. Calculating the rpm speed and gear ratios is another post in itself... maybe for the future.
One of the points of the budget is to see where you beat the budget, so hopefully everything comes in cheaper. The problem is there is a lot of stuff not on the list, like LED light upgrades. My budget is just that. If I want to use tractor paint, that's fine, but it's just a way to organize, a suggestion of the way others may want to set theirs up.
Check out the engine in my http://www.914world.com/bbs2/index.php?showtopic=254000&hl= thread.
I too like the 2.5. Hopefully with headers, I can get 175 HP.
Looks like the OBD was saved out of the Suby Harness. Peace...
Posted by: Mike Bellis Jul 27 2015, 07:04 PM
Grafting two electrical systems is not that hard if you know how. I did it but I was an aircraft electrician in the Marine Corps and working in the trade for 25 years.
Admittedly mine was German to German and that's a little easier. But I have the donor dash cluster, ODBII and drive by wire throttle.
Posted by: JRust Jul 27 2015, 07:50 PM
Just for a reference. I bought the Sawtooth build from Dean. It has a 2001 SOHC NA 2.5 with a performance build & performance heads. Running an aftermarket Stinger ECU from Outfront. Equal length header to a single exhaust. It dyno'd at 158 to the rear wheels. It pulls great & I love driving it. So just wanted to get realistic HP numbers for you. It's fine seeing it on paper in places. It always seems to drop in the real world application though.
On all your welding of your floors & long kit. I have not seen any type of door brace. It's pretty easy to get a twist in your chassis or mess up your door gaps. Just hoping you did in fact have it braced with all your welding. If not I'll keep my fingers crossed it is all good. Looks like you did a good job installing the floors. Really great progress on your car bud. Following your thread closely 
Posted by: Andyrew Jul 28 2015, 08:11 AM
Read the first half of my progress thread for painting tips and expeced costs. I typically budget about 750 for supplies. Thats a gallon of paint, 2-3 gallons of primer, 2 gallons of plastic filler, 2 quarts of glazing putty, about 100 in sandpaper and consumables for rubbing it out. Actual paint is less than 200 single stage shipped.
http://www.tcpglobal.com/Restoration-Shop/
Click the color you want then click "AU Urethane" then single stage kit.
Shipping is like 50 bucks though because its hazardous. When I get to the pojnt of ordering I go through the site and load up on everything I need as its quality as as cheap as it comes. I also think you get a shipping break over a certain $$$.
Posted by: R_u_dd Jul 29 2015, 08:28 AM
Just for a reference. I bought the Sawtooth build from Dean. It has a 2001 SOHC NA 2.5 with a performance build & performance heads. Running an aftermarket Stinger ECU from Outfront. Equal length header to a single exhaust. It dyno'd at 158 to the rear wheels. It pulls great & I love driving it. So just wanted to get realistic HP numbers for you. It's fine seeing it on paper in places. It always seems to drop in the real world application though.
On all your welding of your floors & long kit. I have not seen any type of door brace. It's pretty easy to get a twist in your chassis or mess up your door gaps. Just hoping you did in fact have it braced with all your welding. If not I'll keep my fingers crossed it is all good. Looks like you did a good job installing the floors. Really great progress on your car bud. Following your thread closely
The HP should be double the original car regardless of what I end up with at the wheels. If the original engine was rated at 80, and the new engine is rated at 165. I would assume both engines would lose a proportional amount of horsepower in the drive lines.
I was very careful on the welding. The car had bigger issues though to start with since it had been hit a couple times (and covered with bondo). The gaps are definitely off, but it's not a show car. My body guy has some tricks up his sleeve to fix this though...
My gaffes are worse then my gaps though...
Posted by: R_u_dd Jul 29 2015, 08:31 AM
Read the first half of my progress thread for painting tips and expeced costs. I typically budget about 750 for supplies. Thats a gallon of paint, 2-3 gallons of primer, 2 gallons of plastic filler, 2 quarts of glazing putty, about 100 in sandpaper and consumables for rubbing it out. Actual paint is less than 200 single stage shipped.
http://www.tcpglobal.com/Restoration-Shop/
Click the color you want then click "AU Urethane" then single stage kit.
Shipping is like 50 bucks though because its hazardous. When I get to the pojnt of ordering I go through the site and load up on everything I need as its quality as as cheap as it comes. I also think you get a shipping break over a certain $$$.
We're probably going to go with a local paint store and 2 stage paint. Paint will come in about $500.
I really like your thread (http://www.914world.com/bbs2/index.php?showtopic=114780). Taking interest in your radiator mounting. Where's the fill cap?
Posted by: DBCooper Jul 29 2015, 09:21 AM
You're going to be in for a pleasant surprise. Engine's have evolved a lot since the 60's but transmissions have evolved as much or more. Manufacturers are looking for better MPG anywhere they can find it, so drive-line losses that used to be to 25 percent or more are now down to 15 percent or less. Better mileage is good, of course, but more important is that it'll feel like almost triple the horsepower instead of double. So it's going to be even more fun than you thought! Bonus!!
Posted by: Andyrew Jul 29 2015, 01:10 PM
I really like your thread (http://www.914world.com/bbs2/index.php?showtopic=114780). Taking interest in your radiator mounting. Where's the fill cap?
Fill will be similar to the Audi setup, its going to be in the engine bay and will be run on a loop system so it constantly removes air from the system. Check out Mike Bellis's setup. or the below post
http://www.914world.com/bbs2/index.php?s=&showtopic=114780&view=findpost&p=2174608
Posted by: R_u_dd Jul 29 2015, 10:46 PM
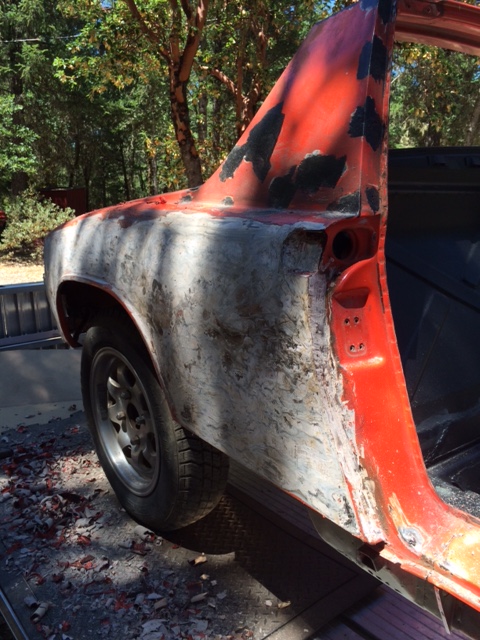
Blasting
After hours of sanding and slow progress, I looked into other methods of paint removal. Sand Blasting can warp the metal and leave sand in the crevices . The acid bath is not too convenient where I live. Talking to a friend, he recommended these guys with a mobile bead blaster. In this method, they use tiny glass beads in water with a rust inhibitor. They will come to your home and blast your car. Here's a video of them doing my car and the website if you are in the Southern Oregon area.
www.green-cleanblasting.com http://www.green-cleanblasting.com/
https://www.youtube.com/watch?v=CE9URMdOf0o
https://www.youtube.com/watch?v=bTOA89WR7PY
This process only takes a few hours and they are able to get in the crevices that are real tough to clean. Once the car is blasted, the rust inhibitor will prevent flash rust for a few days giving you time to clean the car and apply primer- we used epoxy primer. The epoxy primer hardens in about a week, so we then coated it with a urethane primer.
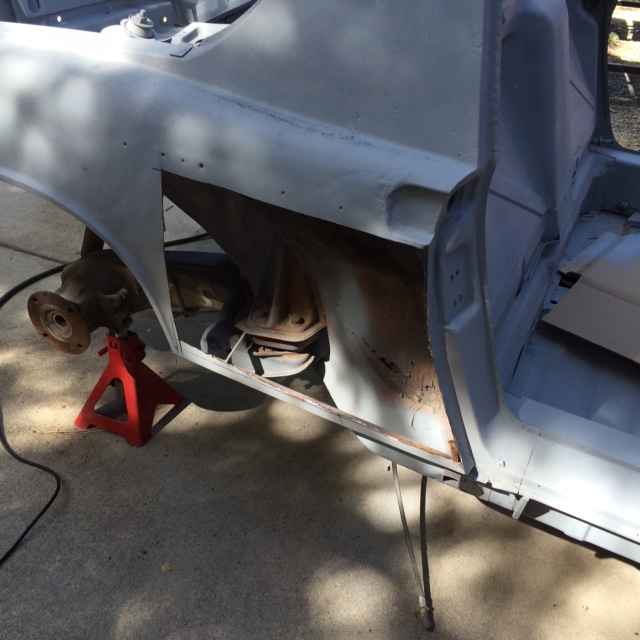
Blasting the car was quite revealing. The left rear quarter panel had quite a bit of bondo. In fact all the panels needed work...
Posted by: R_u_dd Jul 30 2015, 12:11 AM
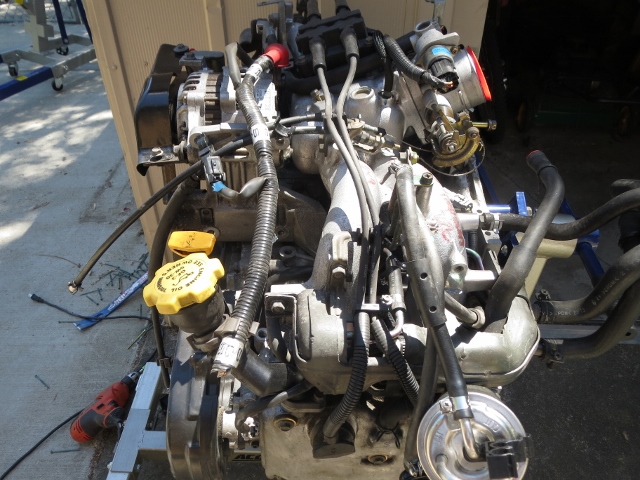
Engine Work
Related Threads:
http://www.914world.com/bbs2/index.php?showtopic=254000&hl=
http://www.914world.com/bbs2/index.php?showtopic=237025&hl=
http://www.914world.com/bbs2/index.php?showtopic=250878&hl=
http://www.914world.com/bbs2/index.php?showtopic=250925&hl=
Out with the old and in with the ru...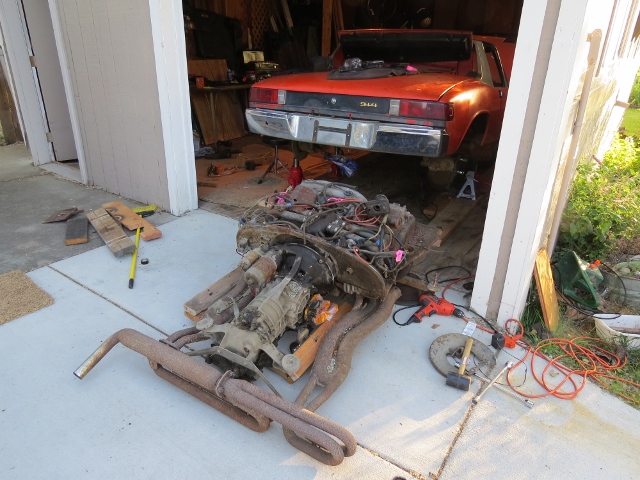
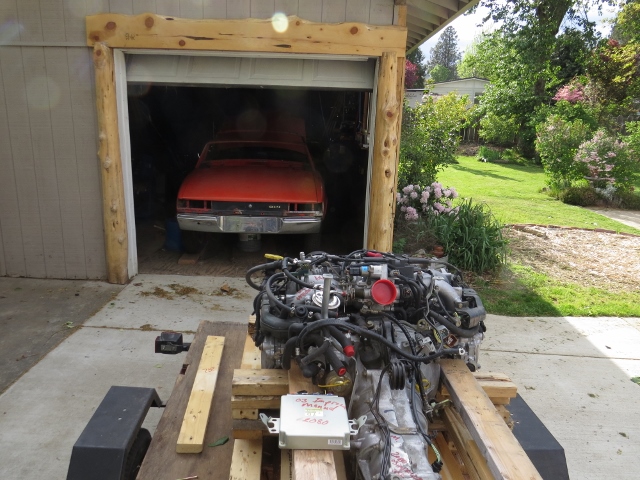
The original 1.7 has been sitting for at least a decade. It ran before it sat... sound familiar. I decided that it was not worth it to rebuild the 1.7, but to go the suby route.
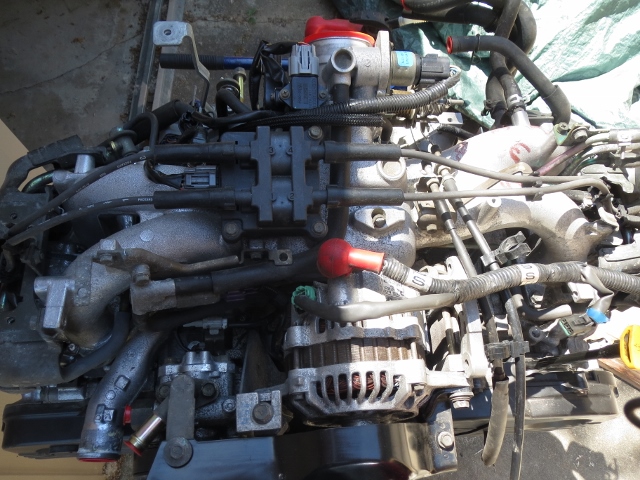
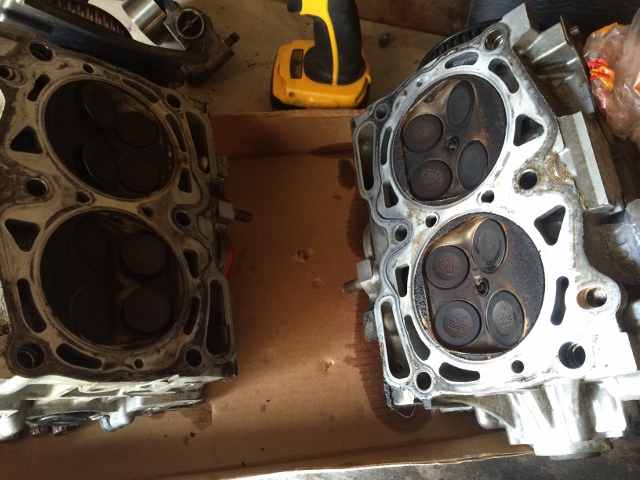
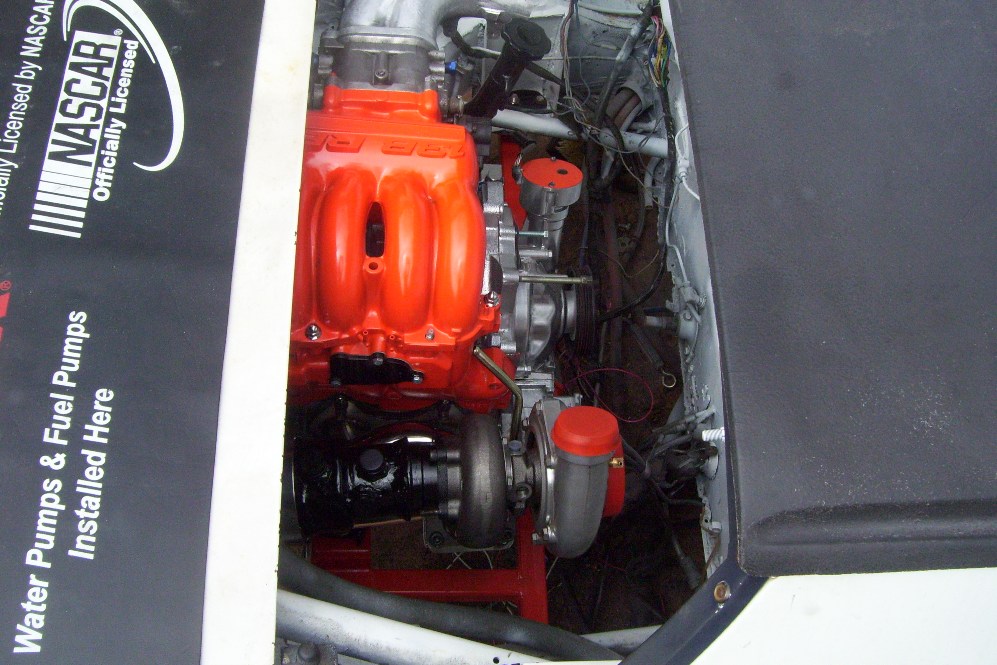
All the parts you see came from the same Subaru Impreza TS (2003). I got the ECU, engine, tranny from the same car. I am replacing the head gaskets, clutch, water pump and timing belt.
SOHC NA - No Turbo, 2.5 litre, 165 HP, 164 Torque
Engine Work Videos
https://www.youtube.com/playlist?list=PLaRuYYPxjXI3O4qo86qj-xT_HEzwYLKwB
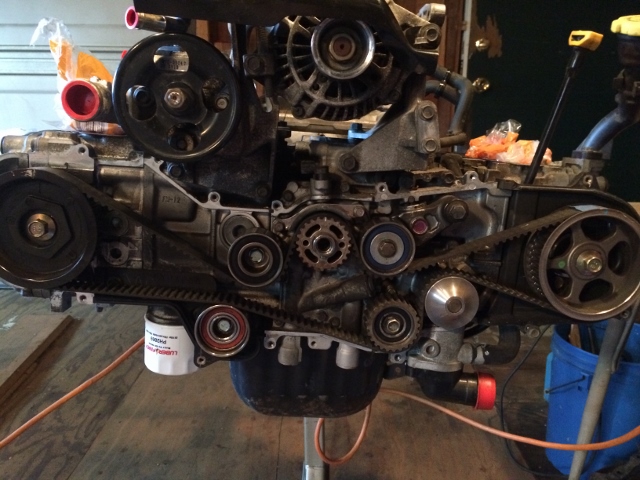
Timing Belt Removal / Timing Belt Replacement (Timing marks at 3:50)
https://www.youtube.com/watch?v=27egytbdxUQ
https://www.youtube.com/watch?v=rgTQGko3SZM
Here's the engine- arrived from Canada in April of 2015- http://www.914world.com/bbs2/index.php?s=&showtopic=254000&view=findpost&p=2177149.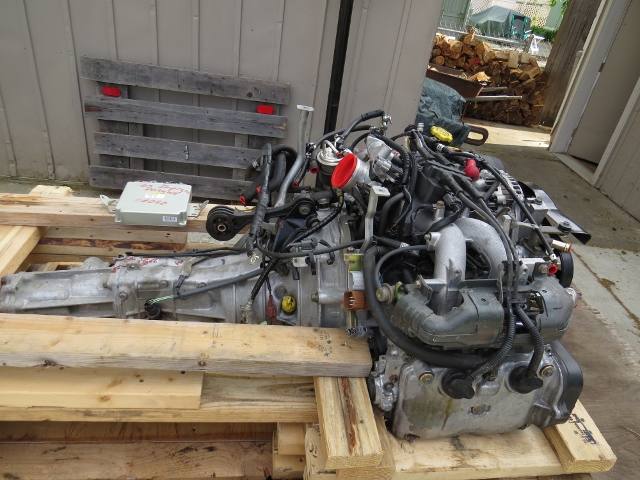
Small Car Performance oil pan is low profile yet increases oil capacity to 5 quarts. I like that it's flat and designed to be strong enough to support the engine in needed. Engine mount is also from Small Car. It will be welded up against the stock engine bracket/brace.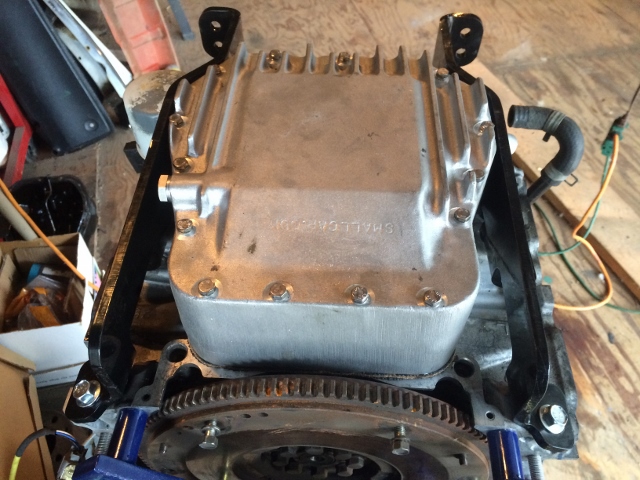
Side view of the oil pan and engine mount. Notice the oil dipstick tube goes through the engine mount. Cool design.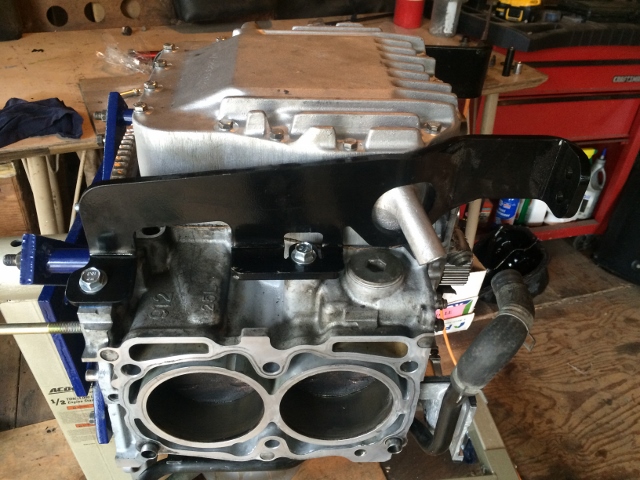
Shiny flywheel back from the machine shop. I had the same shop machine the heads, install the head gaskets and adjust the valves.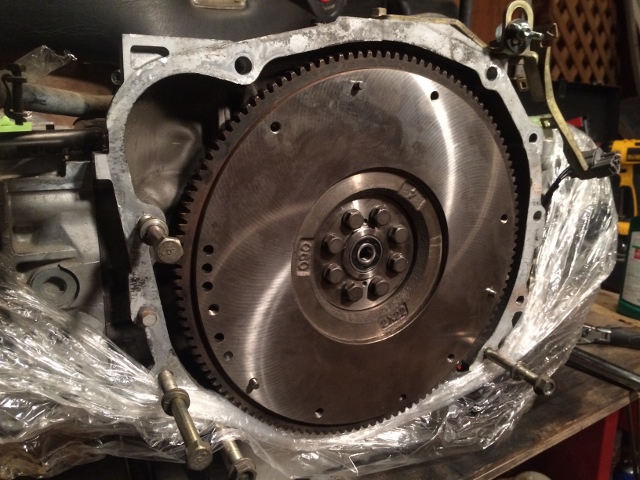
Nest steps...
Replace timing belt and cover.
Replace manifold.
Convert transmission to 2wd- waiting for Bremar locking socket to arrive in the mail.
Mate the engine to the transmission
Fit the engine in place to weld the engine mount to the bracket.
Measure the axles to cut and respline.
Posted by: mgp4591 Jul 30 2015, 12:28 AM
Do you have the cast engine bracket or the other style? I've seldom seen the cast style weld up strong enough to the brackets to be safe enough for my tastes- not pointing fingers or anything, just curious as to what others are doing for the Subie mounting situation... Thanks! ![popcorn[1].gif](style_emoticons/default/popcorn[1].gif)
Posted by: 914forme Jul 30 2015, 11:19 AM
The Small Car mounts are pretty robust steel. If that part fails you have bigger problems!!
I used it on mine, as have a few others, and, it works great especially if you want modify it. Mine was cut, sectioned, welded, to move my EG33 forward, worked great
Keep up the great build.
Posted by: sean_v8_914 Jul 30 2015, 12:53 PM
that blue 914 pic is at my shop...many years ago. cool memories there
Posted by: whitetwinturbo Jul 30 2015, 12:55 PM
Pictures!
Posted by: R_u_dd Jul 30 2015, 10:18 PM
Do you have the cast engine bracket or the other style? I've seldom seen the cast style weld up strong enough to the brackets to be safe enough for my tastes- not pointing fingers or anything, just curious as to what others are doing for the Subie mounting situation... Thanks!
Looks like it's welded steel to me. The cast mount is used in the later models with the pass-through hole for the shift rod on the side shifter transmission.
The plan is to follow the design of Amenson in his http://www.914world.com/bbs2/index.php?s=&showtopic=58431&view=findpost&p=749985.
He drills through and bolts onto the bracket rather than welding directly to it. My goal is to try to mount the engine forward as much as possible to center the engine in the engine bay and avoid cutting the trunk. Since there is no turbo, I should have enough clearance to avoid cutting the trunk even if it has to be mounted further back than I would like. The axles will need to be aligned at a slight angle for proper lubrication of the CV joints. It will be a critical step to mount the engine correctly. It is also important to get the transmission level to keep 4th and 5th gear oiled properly.
Posted by: mgp4591 Jul 30 2015, 10:29 PM
Do you have the cast engine bracket or the other style? I've seldom seen the cast style weld up strong enough to the brackets to be safe enough for my tastes- not pointing fingers or anything, just curious as to what others are doing for the Subie mounting situation... Thanks!
The plan is to follow the design of Amenson in his http://www.914world.com/bbs2/index.php?s=&showtopic=58431&view=findpost&p=749985.
He drills through and bolts onto the bracket rather than welding directly to it. My goal is to try to mount the engine forward as much as possible to center the engine in the engine bay and avoid cutting the trunk. Since there is no turbo, I should have enough clearance to avoid cutting the trunk even if it has to be mounted further back than I would like. The axles will need to be aligned at a slight angle for proper lubrication of the CV joints. It will be a critical step to mount the engine correctly. It is also important to get the transmission level to keep 4th and 5th gear oiled properly.
I thought I'd studied that thread over and over- somehow I missed that bit right there! That's exactly what I was looking for, and the other comments give me confidence to use that for my EG33 swap- thanks for the help!
Posted by: R_u_dd Jul 30 2015, 10:29 PM
Pictures!
The blue car on post #1
http://s1301.photobucket.com/user/Christopher_Rudd/914/Concepts/story
Posted by: R_u_dd Jul 30 2015, 10:31 PM
that blue 914 pic is at my shop...many years ago. cool memories there
Please tell me the story behind it!
Posted by: mgp4591 Jul 30 2015, 10:32 PM
The Small Car mounts are pretty robust steel. If that part fails you have bigger problems!!
I used it on mine, as have a few others, and, it works great especially if you want modify it. Mine was cut, sectioned, welded, to move my EG33 forward, worked great
Keep up the great build.
 Thanks!
Posted by: R_u_dd Aug 1 2015, 12:52 AM
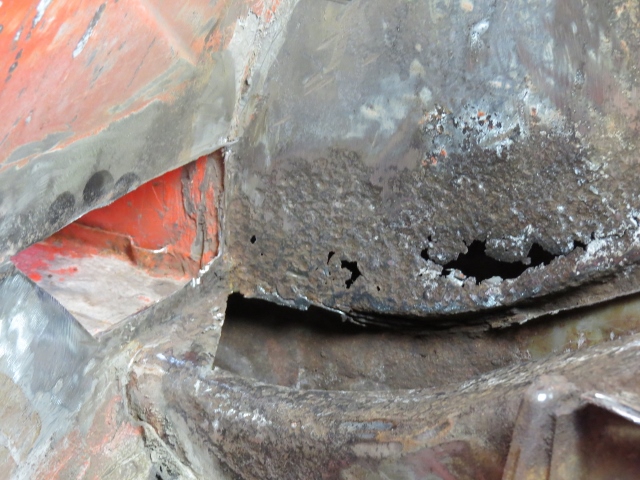
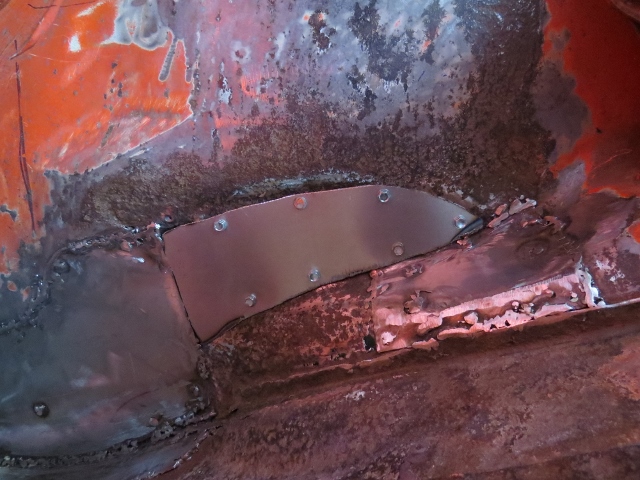
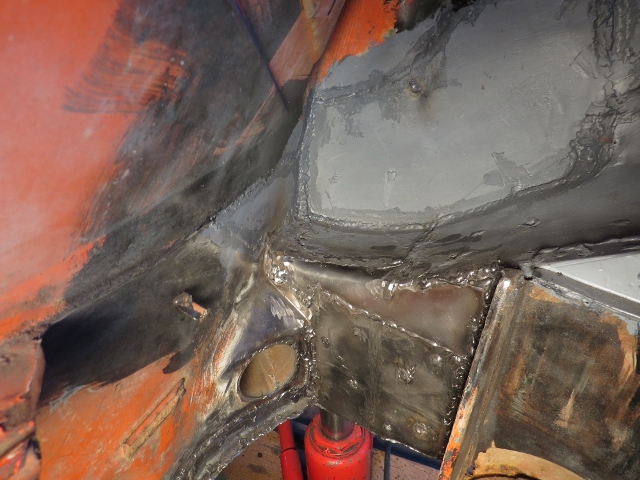
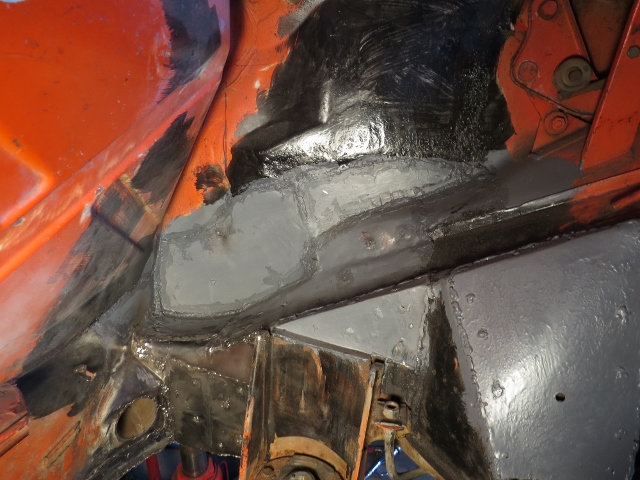
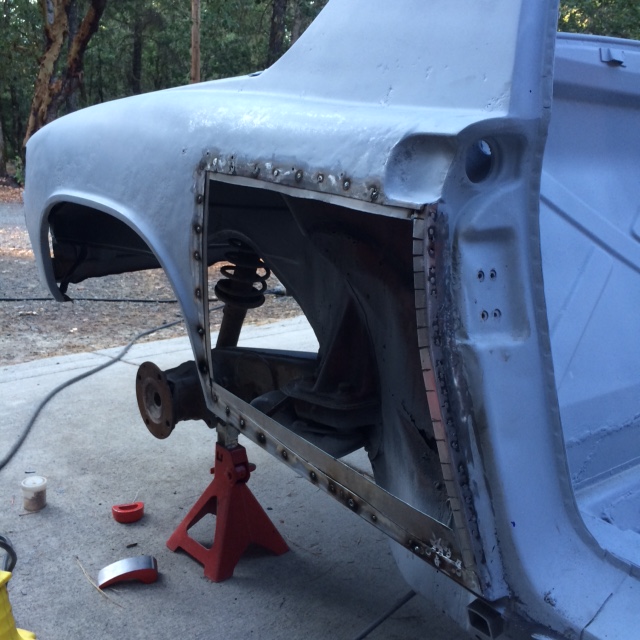
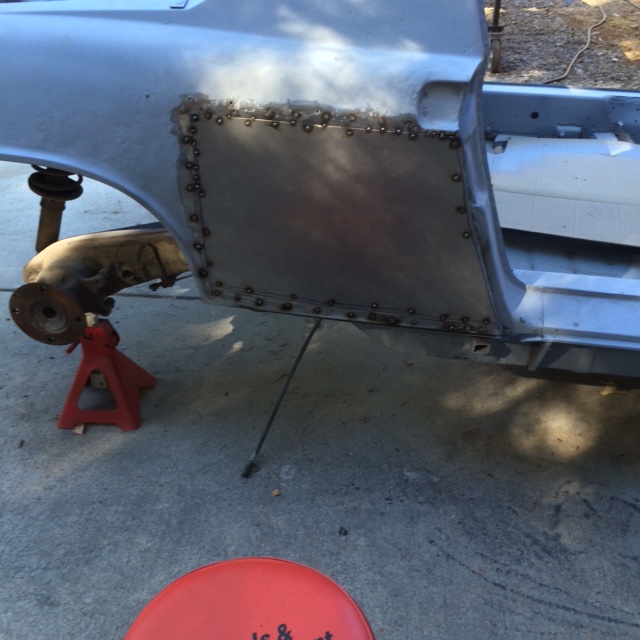
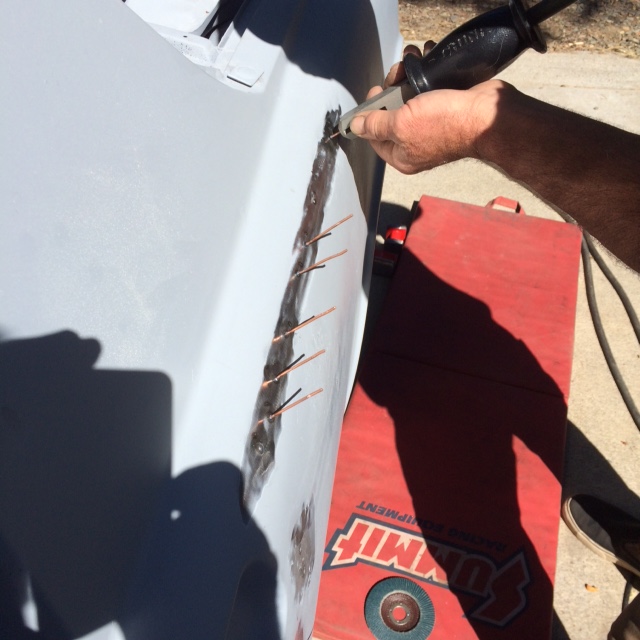
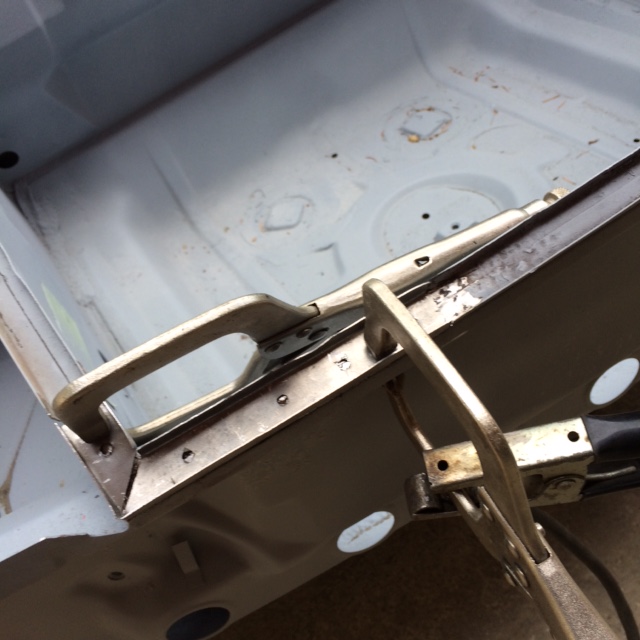
Battery Tray Area Rehab
Most people might consider this a donor car, but I have seen them restored in worse condition. Under the battery tray it had rusted through at the top and the bottom. I cut out the hole in the top and butt welded a piece in and the covered it with a second layer. So, most of it is lap welded. The rust was treated with phosphates, rust converter. I used the Eastwood Rust encapsulator, epoxy primer, and seem sealer. Eastwood makes great products and has very helpful how-to videos. A better method would have been to cut the side panel off and replace the longs.
http://www.azlyrics.com/lyrics/rodneyatkins/ifyouregoingthroughhell.html
"If you're goin' through hell keep on going
Don't slow down if you're scared don't show it
You might get out before the devil even knows you're there"
Here's some good examples of repairs:
http://www.914world.com/bbs2/index.php?s=&showtopic=83031&view=findpost&p=1067938
http://www.914world.com/bbs2/index.php?s=&showtopic=94994&view=findpost&p=1161704
Pix of mine: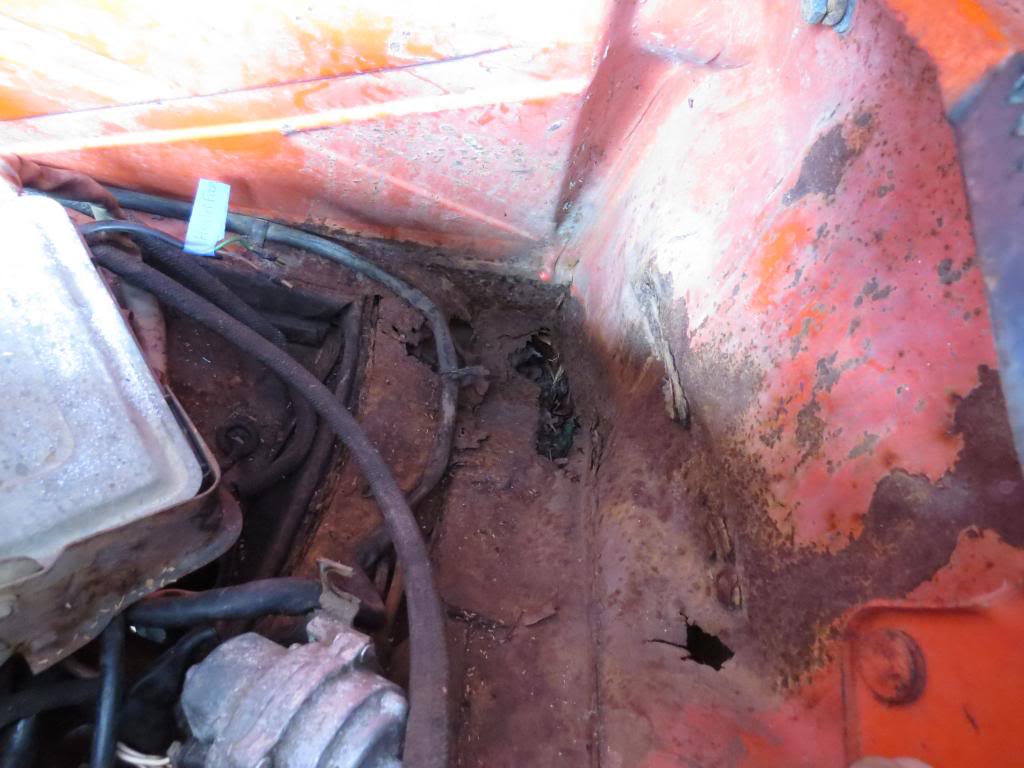

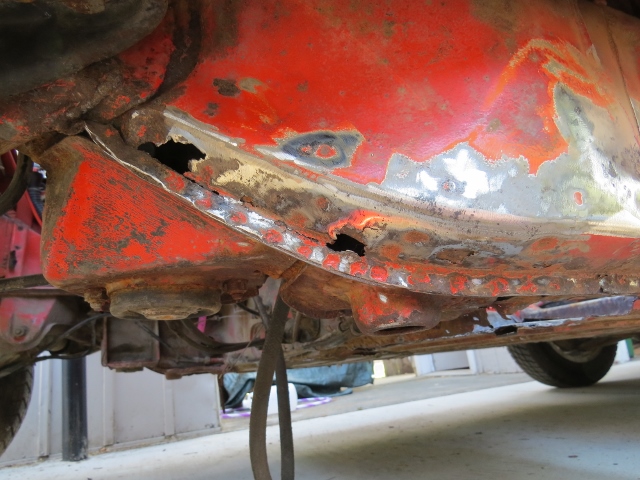
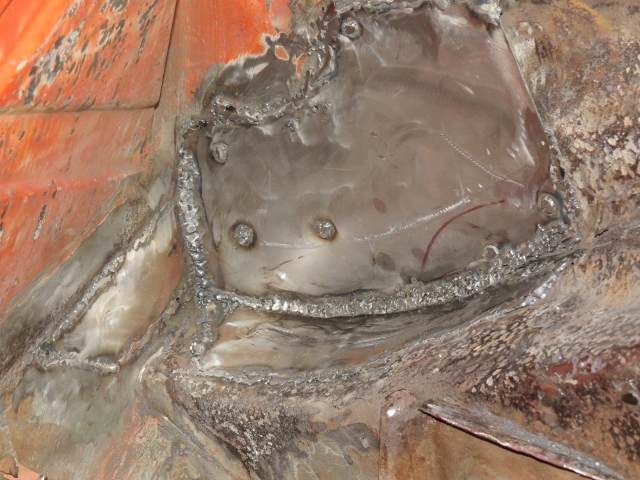
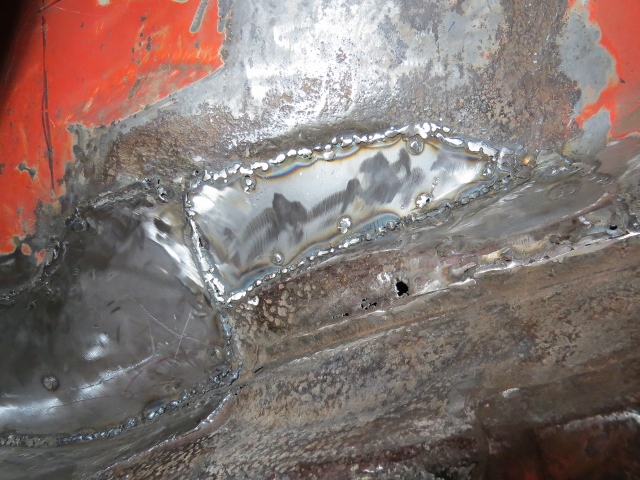
First layer underneath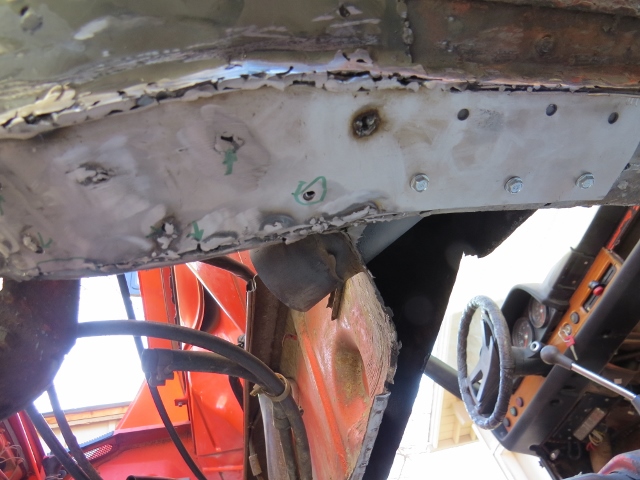
2nd Layer sleeved for added strength. No finesse here.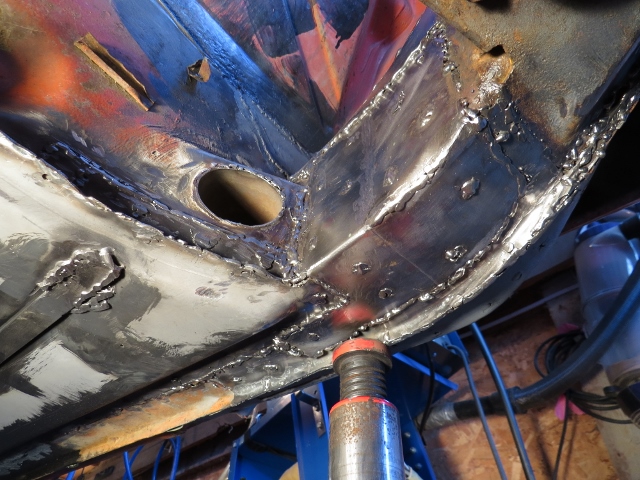
Car was not jacked up during repairs.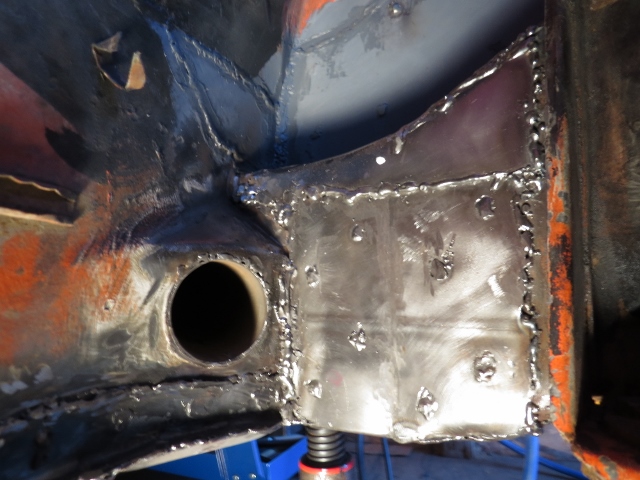
Well I hope it holds together. Another reason for 2.5 NA power rather than a big six.
Posted by: 914forme Aug 1 2015, 07:08 AM
I thought I'd studied that thread over and over- somehow I missed that bit right there! That's exactly what I was looking for, and the other comments give me confidence to use that for my EG33 swap- thanks for the help!
I had one issue with small car mount on my swap. Oil filter clearance. Got the darn thing all welded up, and could not get the filter on the mount. Its a little tight. I will be running a Accusump so my plan is to run remote oil filters, and a cooler, with the Accusump. I should just dryjsump this thing, but then I would be into it for way more than a 911 swap.
 If you read my thread, I think you will get an idea of how far the engine can go forward with the small car mount. I have almost no trunk floor cutting. Except for the clutch slave, and well that hole could have been a lot smaller.
 realized I never took pics of the mount its self and the issue I was having. Could have sworn I did
Posted by: DBCooper Aug 1 2015, 07:55 AM
If you read my thread, I think you will get an idea of how far the engine can go forward with the small car mount. I have almost no trunk floor cutting. Except for the clutch slave, and well that hole could have been a lot smaller. realized I never took pics of the mount its self and the issue I was having. Could have sworn I did I also got the Smallcar mount but ended up not able to use it. It's really well-made and and compact, works well for non-turbo cars, but isn't compatible with a turbo setup where the exhaust from the left side has to cross over to the right across the front of the engine. That's right where the Smallcar mount goes. It's possible, I suppose, but would mean you'd have to relocate the turbo and do a lot of custom plumbing.
I've never seen anyone put it on their list, but one of the nice things about the non-turbo engines is that you'll end up with an equal-length exhaust, which gets rid of the typical Subaru exhaust burble. With an equal-length exhaust they sound really good when they get into the upper RPM range. My son joked about driving his 914/WRX to work and for weeks a WRX owner kept trying to spot the other turbo Subaru he was sure he was hearing come into the parking lot, never thinking it was the 914. Was startled when he finally figured it out.
By the way, with an Accusump you won't need it, but the Killerbee windage tray works pretty well to prevent oil starvation, and not too expensive.
Posted by: R_u_dd Aug 1 2015, 11:19 AM
I thought I'd studied that thread over and over- somehow I missed that bit right there! That's exactly what I was looking for, and the other comments give me confidence to use that for my EG33 swap- thanks for the help!
I had one issue with small car mount on my swap. Oil filter clearance. Got the darn thing all welded up, and could not get the filter on the mount. Its a little tight. I will be running a Accusump so my plan is to run remote oil filters, and a cooler, with the Accusump. I should just dryjsump this thing, but then I would be into it for way more than a 911 swap.
If you read my thread, I think you will get an idea of how far the engine can go forward with the small car mount. I have almost no trunk floor cutting. Except for the clutch slave, and well that hole could have been a lot smaller. realized I never took pics of the mount its self and the issue I was having. Could have sworn I did Looks like you http://www.914world.com/bbs2/index.php?s=&showtopic=220712&view=findpost&p=2147844. I was considering the Subaru tranny mount underneath my hanger bracket to use the rubber bumpers for vibration. Looks like most people mount the rubber bumpers up top like the stock position. Better Clearance?
I had no problem with oil filter clearance. My oil filter is a small one though. I'm going with stock oil filterage- no accusump.
Would like to see some pictures of the engine mount if you don't mind taking some.
The http://www.eggscollective.org/914visualizer/914_visualizer.html in your post is very cool.
Posted by: R_u_dd Aug 1 2015, 01:41 PM
Cool Videos
Porsche 914-6 Race Practice At Targa Florio 1970 | 1969 Porsche 914 period official promotional footage
https://www.youtube.com/watch?v=PkojP5Dyj5Y
https://www.youtube.com/watch?v=WcNBlaFqiL4
Topspeed Petrolicious http://www.topspeed.com/cars/car-news/video-tribute-to-1970-porsche-914-6-ar163630/videos.html | Porsche 914 International Meeting 2015 - Bad Gögging
https://www.youtube.com/watch?v=VFlIjomJStQ
https://www.youtube.com/watch?v=2T74PHs8oTs
Brodi 914's Gone Wild Subaru Conversion SVX | vintage! The VW-Porsche 914 | drive it!
https://www.youtube.com/watch?v=1G1a7fd3Ph0
https://www.youtube.com/watch?v=Ad2qOUUSHTY
1994 HSR Savannah Georgia. 914 25 year anniversary.
https://www.youtube.com/watch?v=gjKvXKJ_Lmw
Link to_http://www.oldpicz.com/porsche-factory-zuffenhausen-july-29-1970/
http://www.914world.com/bbs2/index.php?showtopic=261307
Posted by: R_u_dd Aug 5 2015, 11:42 PM
Electrolysis Gas Tank Cleaning.
Like so many other 914's mine had a rusty fuel tank. Cleaning the inside of the gas tank is tricky since you can't reach in and sand it, so after some research I tried lots of different suggestions to try to clean it. One could combine weight training with car antiquing and shake a chain or nails or whatever inside the tank. I tried acid ie apple vinegar. None of these things seemed to work until I came across electrolysis. This is a very interesting technique. Anyone who has tried precipitating silver in chemistry class might be familiar with this technique. You take a piece of steel and suspend it in water in your gas tank with some baking soda as catalyst and it moves the rust from your tank into the water. It's pulling electrons and iron from the metal and combining it with the rust metal to create a liquid suspended iron.
My stepfather, professor emeritus in chemistry at St. Mary's College in CA explains electrolysis thus:
"Some of us used it as an introduction to electrolysis in early classes – and I believe it is still used in museums as a conservation process to “clean” up relics to remove rust without losing the underlying metal."
"You first of all have to understand the rusting process. In overall terms it is simply, iron + water + oxygen -----~ rust. However, the first step is Fe (solid) + 2 water +1 oxygen -----~2 Fe(+2) + 4OH(-). Depending on the environment, additional reactions take place, leading to the observation that most forms of rust are basically 2Fe(+3)3O(-2).xwater; this is a hard material which binds to the unoxidized metal."
"Essentially what has happened overall is the removal of electrons from the iron; that is in chemical terms you have oxidized it. To remove the rust you can reduce it; that is, give the electrons back. These set-ups that you’re working with seem to work, but the exact mechanism isn’t clear. In your case the electrons will move from the anode Fe (i.e. the steel chunk) over to the tank which needs them to convert the Fe(+3) to Fe. The chemical reactions that occur during electrolyis are complicated since both iron oxides and water can be reduced (to hydrogen in the case of water), so specific reactions can’t be written but the appearance of bubbles is usually a sign of hydrogen. The iron from the steel chunks slowly disappears over a period of time as Fe is converted to Fe (+3) and the rust should flake off the cathode as a dusty material which probably has metallic iron mixed in. Make sure your anode (+) has a good connection to your steel chunk."
Links:
http://www.914world.com/bbs2/index.php?showtopic=245229&hl=electrolysis
Cleaning the tank. I used a trickle charger for a couple weeks, but it was only 2 amps of power. If I did this again I would get a battery charger and try different settings for a faster process, but I was not in a big hurry. This process works great for removing rust, especially with odd shaped pieces like the pedal cluster and gas tank.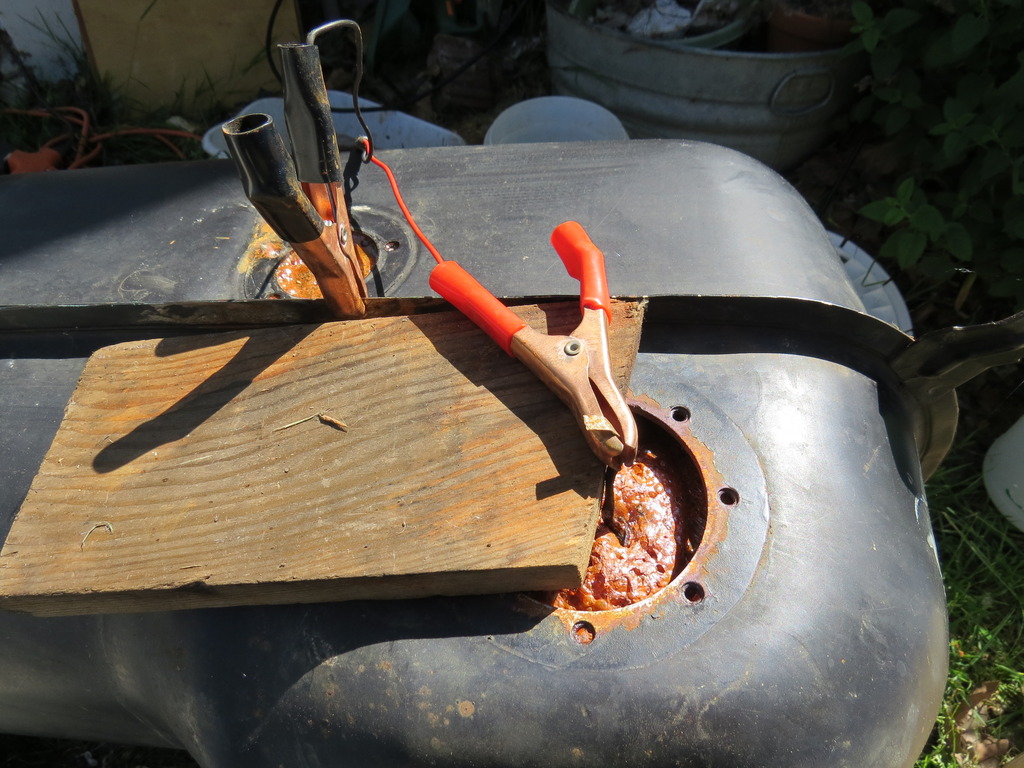
Here's another shot of the tank: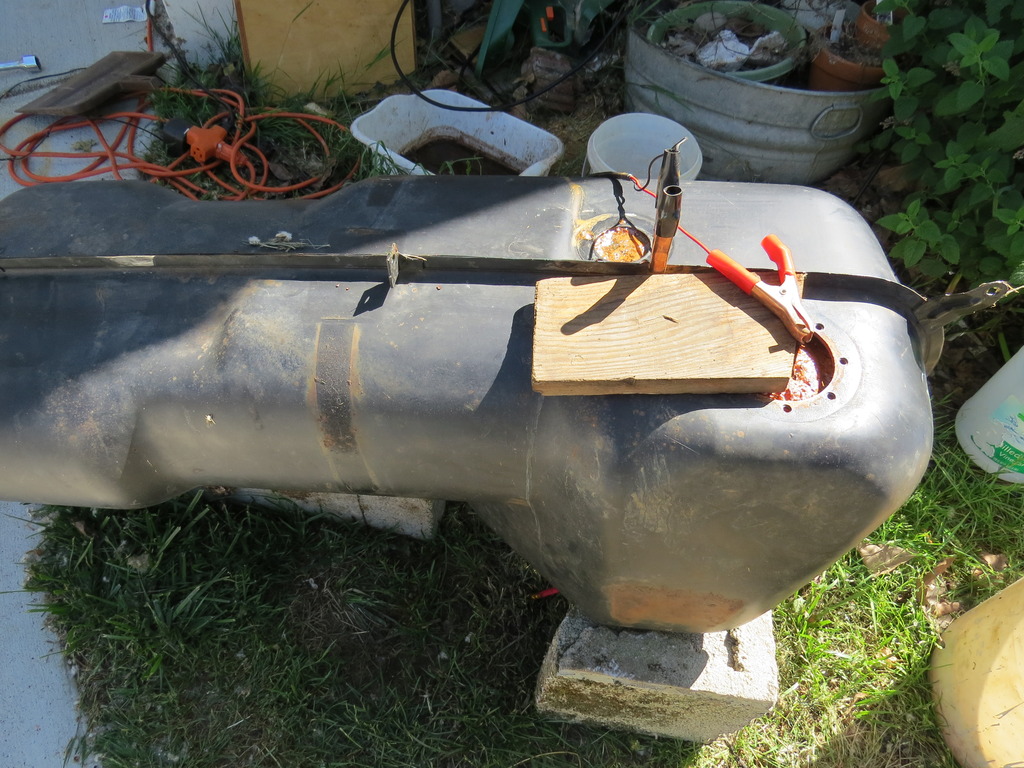
I was also able to use electolysis on the pedal cluster. In this case I dumped the cluster into a 5 gallon bucket of water and hooked up the leeds, negative to the pedal and positive to some scrap suspended into the water. Add baking soda and wait, rinse and repeat. Works great.
Maybe I will try some plating which is shown in some of those videos. Anyone have experience with plating or electolysis??
Posted by: mgp4591 Aug 5 2015, 11:57 PM
If you read my thread, I think you will get an idea of how far the engine can go forward with the small car mount. I have almost no trunk floor cutting. Except for the clutch slave, and well that hole could have been a lot smaller. realized I never took pics of the mount its self and the issue I was having. Could have sworn I did I also got the Smallcar mount but ended up not able to use it. It's really well-made and and compact, works well for non-turbo cars, but isn't compatible with a turbo setup where the exhaust from the left side has to cross over to the right across the front of the engine. That's right where the Smallcar mount goes. It's possible, I suppose, but would mean you'd have to relocate the turbo and do a lot of custom plumbing.
I've never seen anyone put it on their list, but one of the nice things about the non-turbo engines is that you'll end up with an equal-length exhaust, which gets rid of the typical Subaru exhaust burble. With an equal-length exhaust they sound really good when they get into the upper RPM range. My son joked about driving his 914/WRX to work and for weeks a WRX owner kept trying to spot the other turbo Subaru he was sure he was hearing come into the parking lot, never thinking it was the 914. Was startled when he finally figured it out.
By the way, with an Accusump you won't need it, but the Killerbee windage tray works pretty well to prevent oil starvation, and not too expensive.
Did you sell your Smallcar engine mount after you decided not to use it or is it for sale? Long shot but I figured it's worth a try...

Posted by: DBCooper Aug 6 2015, 07:45 AM
Did you sell your Smallcar engine mount after you decided not to use it or is it for sale? Long shot but I figured it's worth a try...
I'm pretty sure they're in a bin somewhere. I've moved twice since then and during that last move hurt my back, back's still not good so still have bins stacked everywhere. How patient are you?
Posted by: R_u_dd Sep 11 2015, 08:33 PM
Paint Prep and Final Metal Work
After the Bead Blasting the car was primed with a coat of epoxy primer while the final metal work was being done. After the prep work a coat of high build Urethane Primer from Eastwood was sprayed on. 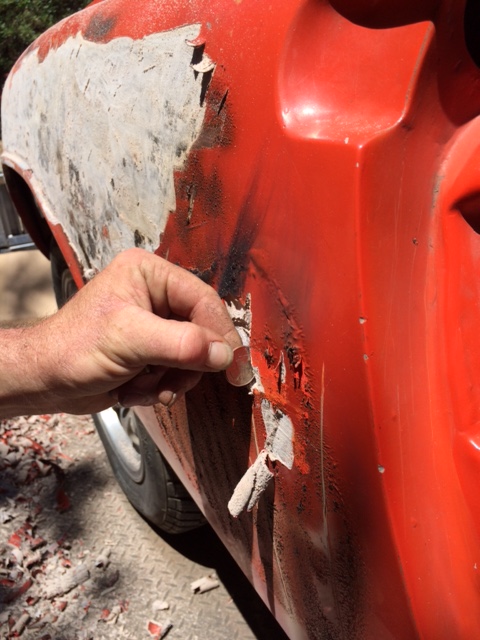
About 3/8" of Primer had to be removed from the right rear quarter panel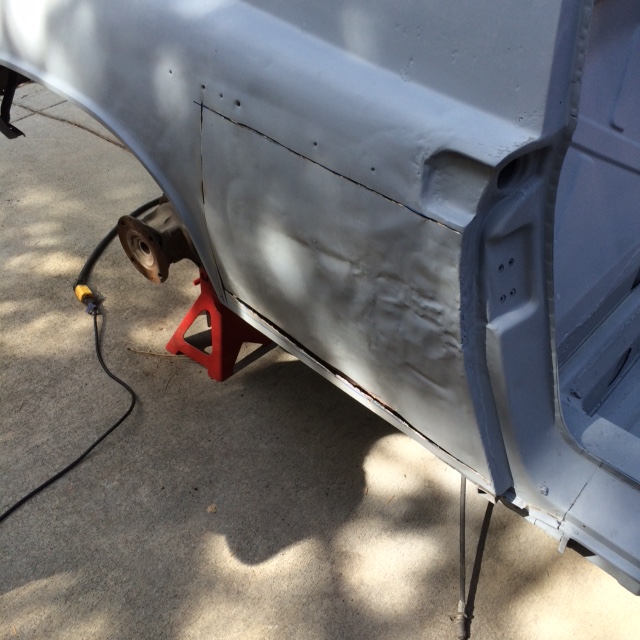
Before and After Pix

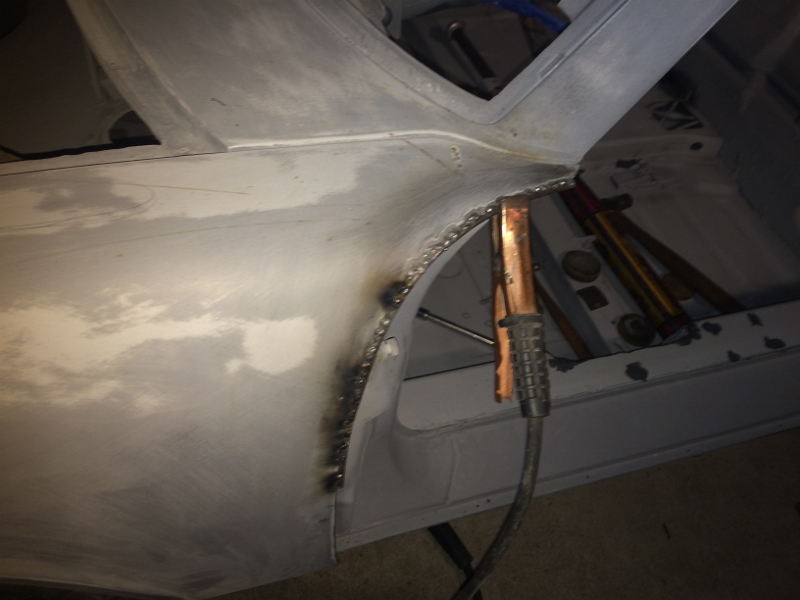
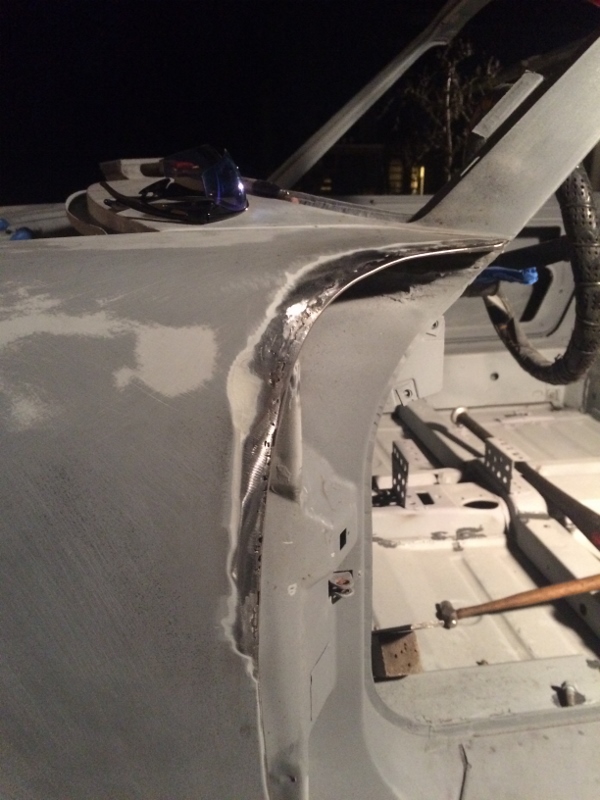
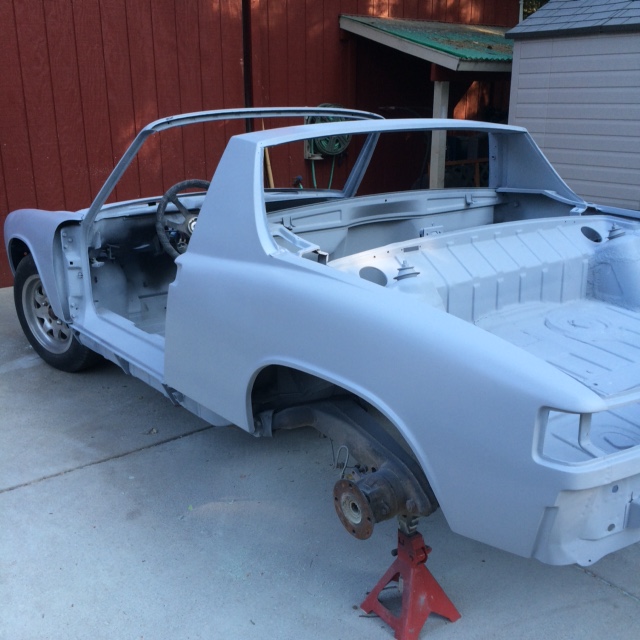
This is about where we are with the car at this point- 2 coats of primer. Time to do some final metal work like fitting the radiator in the front and new hydraulic trunk shox.
Posted by: DBCooper Sep 11 2015, 09:00 PM
You're doing great work. That's a really lucky car.
Posted by: zambezi Sep 12 2015, 09:10 AM
should have fixed the rust on the inside wheel well on the pass. side before the outer panel got welded on.
Posted by: R_u_dd Sep 26 2015, 11:41 AM
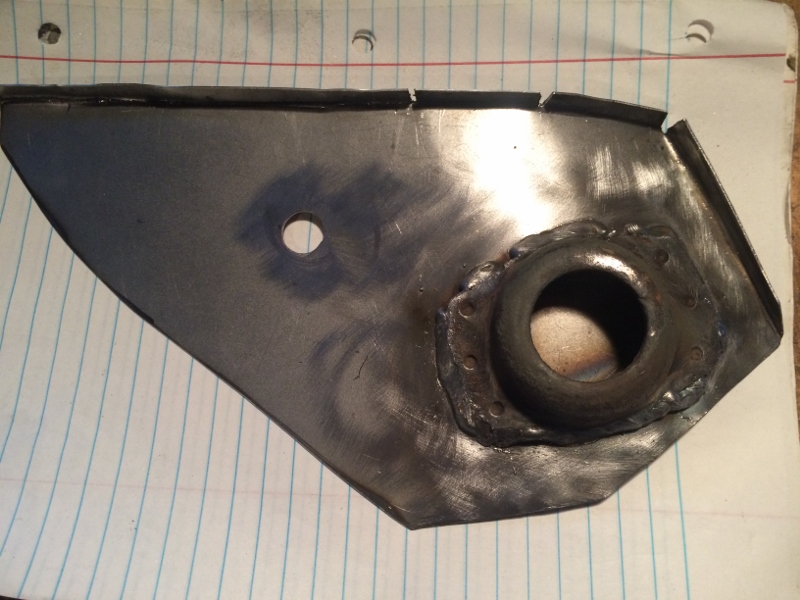
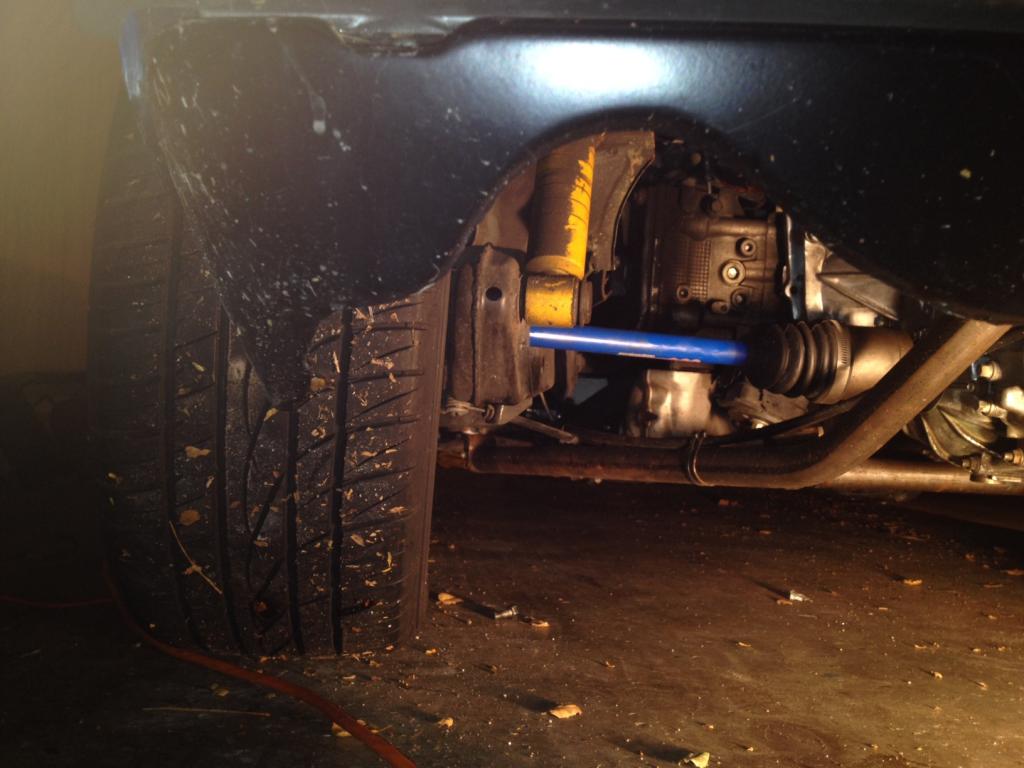
Engine Mount
The inspiration for the engine mount design comes from http://www.914world.com/bbs2/index.php?showtopic=58431&hl=. I am using the Smallcar engine mount which is designed to mount a Subaru engine into a Vanagan. I am also using their oil pan which is designed together with the mount. This is a nice oil pan, aluminum, increases oil capacity to 5 Qt and yet is shorter in profile. It also provides a jack point or flat place to set your engine on the ground or a work bench.
The front part of the mount has to be cut off in order to move the engine forward in the engine bay. I flipped my Porsche engine bracket upside down to lower the engine about an inch.
I am using the Subaru Transmission which is different then Amenson's thread. He has a side shifting Porsche transmission which is really desirable. With that setup he has to put the engine in the right place to also utilize the transmission mounts and thus four mounting points for the setup. My bracket is for my 1971 with a tail shifter where the shift rods go around the bar rather than through the engine bracket bar. Which allows me to flip the bar.
Since I will be using the Subaru transmission it is important to get the transmission bracket the right height so the transmission is level to properly lube the fourth and fifth gear. Trying to get the engine in the right place to:
-avoid cutting the trunk,
-level the transmission,
-give enough clearance in front of the engine, and behind,
-align the axles properly (they need some angle, but not too much.
-measure for custom fit axles. It's a lot easier to use the Porsche tranny).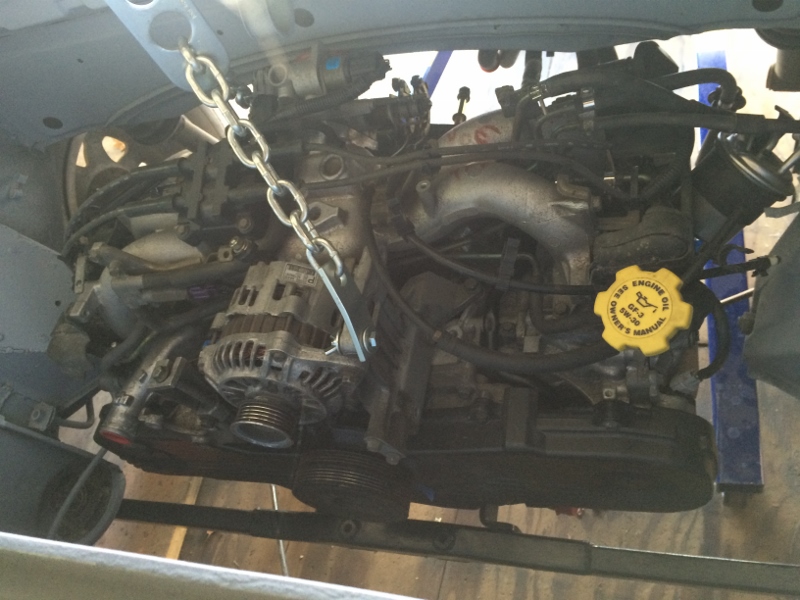
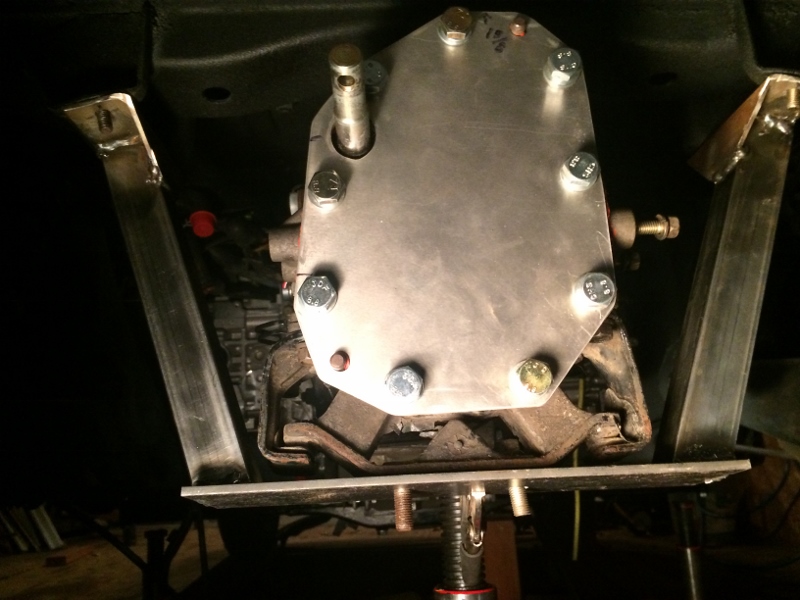
In this picture, the Porsche bracket bar is not flipped yet and you can just see the curl of the Smallcar mount touching it. The engine is still too far back. The final mount will be 2" more forward and 1" lower.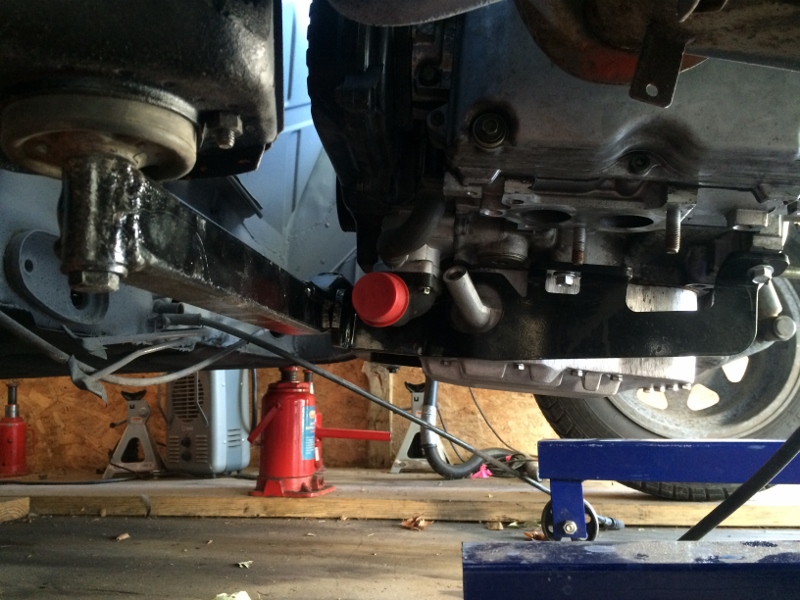
Lower side view showing the Porsche bracket and better view of the Smallcar mount. The engine is not level in this shot, or in its final position. Still assessing the position. That curved tube is for the dipstick. Once the mount is welded together, the oil pan comes with it when it is removed. You will see this in later pictures.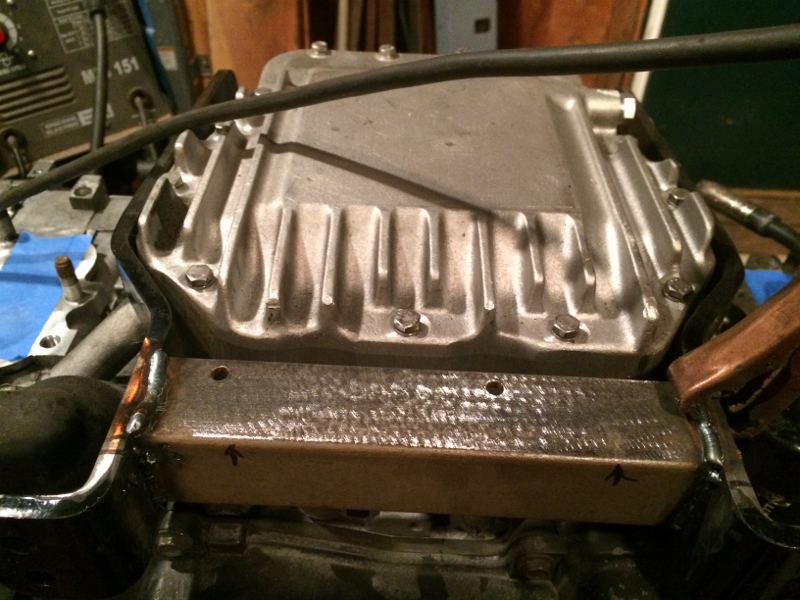
Welded angle iron across the mount first while the mount is still on the engine, to insure that there's no movement. Now to finish the mount, I had to remove the mount and oil pan from the engine. At this point the oil pan stays with the mount.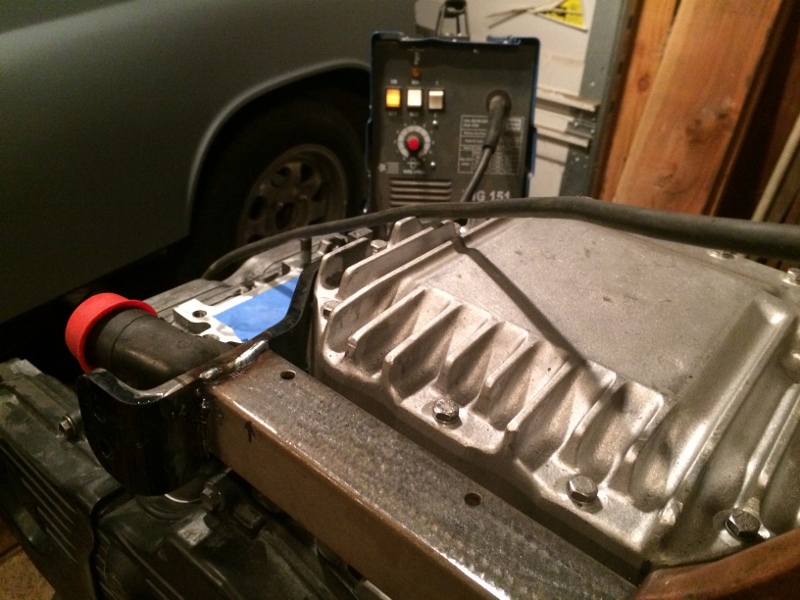
Notice the waterpump tube to the left. The bracket bar will need to clear that by 1/4" to get the hose on. Also, the bracket bar needs to clear the oil filter with enough room to change the filter. This required some careful fitting. 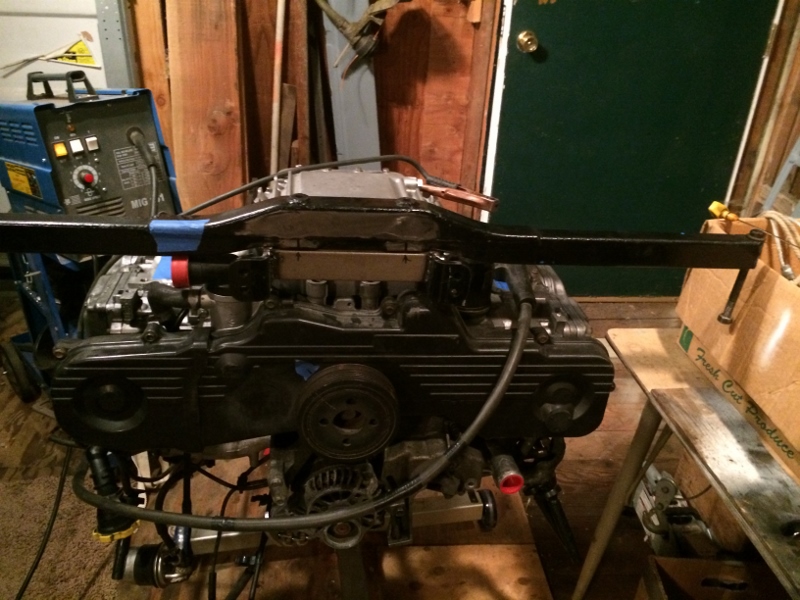
Fitting the bracket bar onto the engine mount. The waterpump tube on the left does not have the clearance yet by the blue tape. The oil filter is on the opposite side barely visible and needs as much space as possible.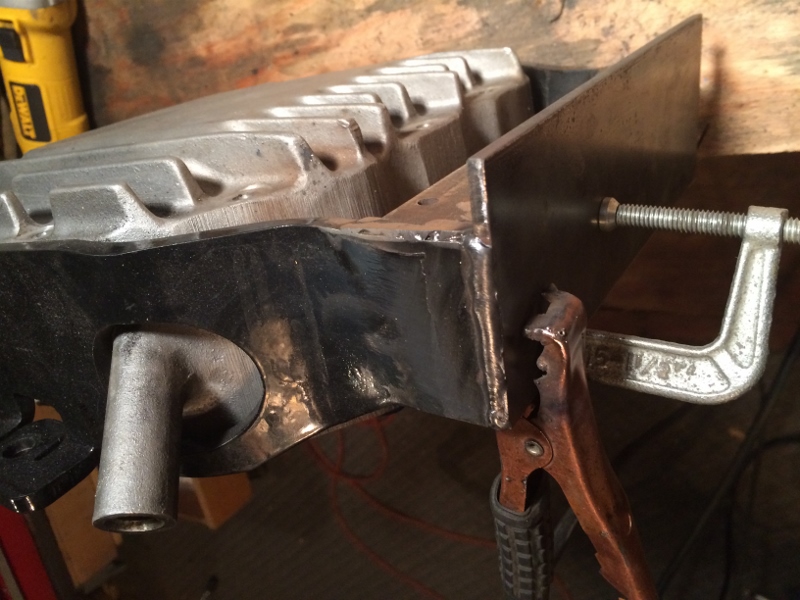
Here, the mount has been removed with the oil pan. I cut the front of the mount off and welded a piece of flat steel on the front which will provide a lip for the bracket bar. I welded another piece of angle iron for the back lip, greater strength across the bottom, and to give the bar more clearance from the water pump tube.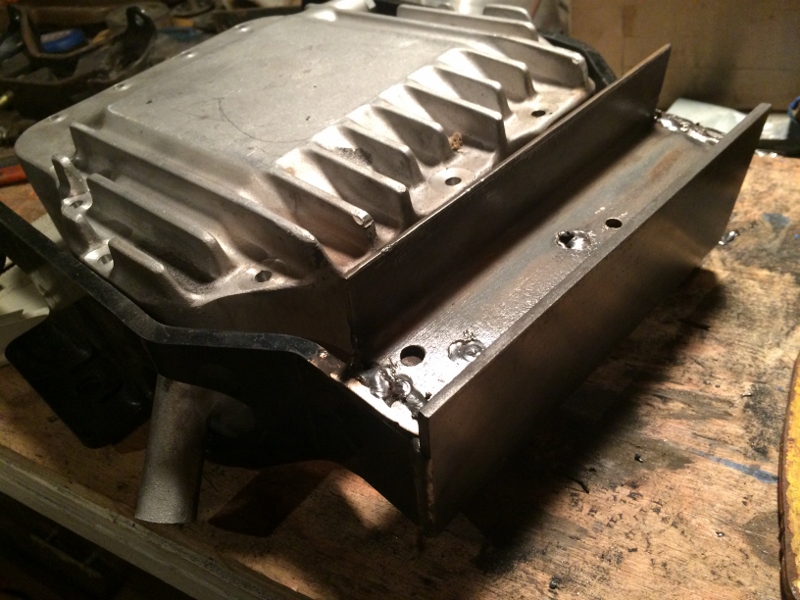
The holes were rosette welded and new holes were drilled for the bracket. I considered welding the bracket bar to the mount, but keeping them separate is a better design as long as it is strong enough. Having the lip on each side should keep it from moving.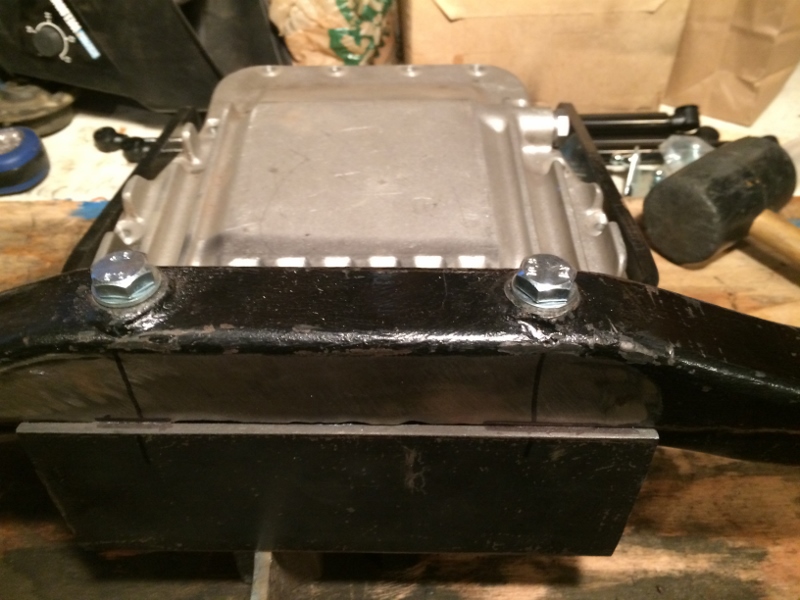
I welded the nuts onto the backside of the mount because they will not be accessible to the socket wrench once the mount is back on the engine. Cool design, hah? Hopefully everything fits in the right place, because I don't want to do this all over again!
Next up, fit the transmission on the engine and measure for the transmission bracket...
Posted by: mgp4591 Sep 26 2015, 01:59 PM
Did you sell your Smallcar engine mount after you decided not to use it or is it for sale? Long shot but I figured it's worth a try...
I'm pretty sure they're in a bin somewhere. I've moved twice since then and during that last move hurt my back, back's still not good so still have bins stacked everywhere. How patient are you?
Turns our I'm pretty patient- your answer came in while I was still in the hospital so it got buried for two months until I was back and dug through stuff. If you've still got your mount I'd be interested in buying it if you think that it would a fit the EG33...
Posted by: shoguneagle Sep 27 2015, 04:16 AM
HOW DID THIS THREAD ESCAPE ME? I thought I kinda knew of all the 914s generally in the Grants Pass area. This one came out of the "blue" suddenly.
I am going to have to read in more detail later. The information thus far is great and gives great information on the Subie transformation including engine selection and why. The rust/body/paint work is great giving good information on what the builder was doing at different stages.
I am going to have to see this "bad boy".
Incidentally, I have a 1974 914 converted to 3.2 Sixer which is finally titled and registered in Oregon. My project has been going on for 8-10 years and should be completed ready to start the painting side by the end of 2015/2016. As you can see I am very flexible on my project.
I live in Grants Pass and would like to see your project. Can we meet sometime?
Great working project and another 914 is surviving. Keep going, Tiger!
Steve Hurt
shogun 
 eagle
eagle
Posted by: R_u_dd Sep 27 2015, 06:12 AM
HOW DID THIS THREAD ESCAPE ME? I thought I kinda knew of all the 914s generally in the Grants Pass area. This one came out of the "blue" suddenly.
I live in Grants Pass and would like to see your project. Can we meet sometime?
Great working project and another 914 is surviving. Keep going, Tiger!
Steve Hurt
shogun
eagleI sent you a pm .... Thanks for the encouragement.
Posted by: R_u_dd Sep 27 2015, 07:20 AM
Radiator
Some background and research:
http://www.914world.com/bbs2/index.php?showtopic=132273&hl=radiator&st=0
http://www.914world.com/bbs2/index.php?showtopic=230473&hl=radiator
http://www.914world.com/bbs2/index.php?showtopic=74117&st=0?
http://www.914world.com/bbs2/index.php?showtopic=230622&hl=radiator
http://www.pirate4x4.com/tech/billavista/Cooling/
http://www.914world.com/bbs2/index.php?showtopic=265474/
It seems there are a lot of ways to put a radiator in the front trunk. Very few people have successfully put the radiator anywhere else. I hate to lose the trunk, but possibly I can limit the damage by putting a smaller radiator between the front lights. This requires a radiator of 11" x 31" or less. Jeep Cherokee makes a radiator that is a double pass and that size. The double pass, I am assuming affectively doubles your cooling surface area.
Since my engine is a non-turbo 2.5, it's not a v8 or a turbo, and won't require nearly the same cooling capacity. The original radiator for my car is 13.38" x 27" X 0.63" or approximately 361 square inches of cooling area. Notice that it is very thin. The Scirocco style is 11" x 20" X 1.5" or affectively 440 square inches of cooling area since it is double the thickness. When I got the radiator in the mail it seems very small, which is what I wanted, but now I am second guessing myself as to whether this will really cool the engine. What do people think in this regard. Advice needed. It seems that people are running these Scirocco radiators, so they must work.
Here's some pictures of my progress so far. You can see just how small this radiator is.
This is a real simple bracket made of angle steel with two holes for the pegs on the radiator. 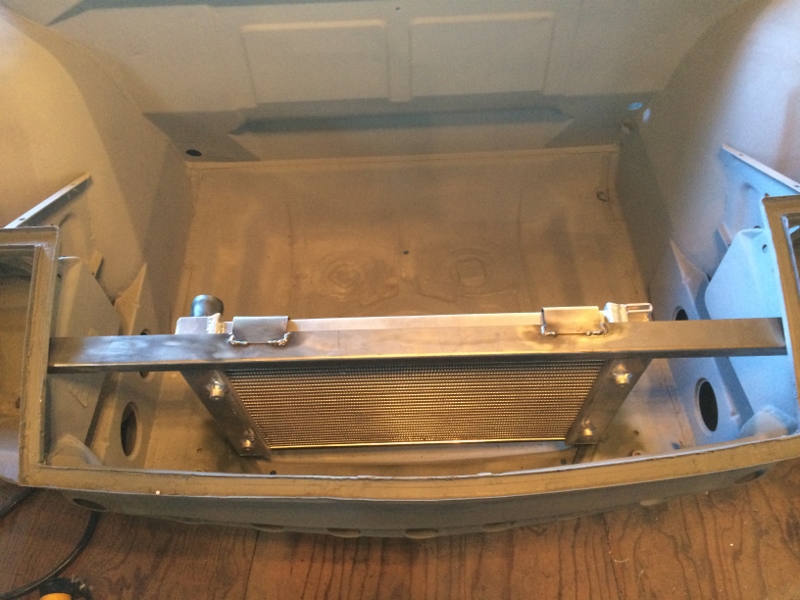
Another piece of angle steel (about 18-20 gauge) brackets the top of the radiator. I am intentionally not securing the radiator tightly. It needs to move in the mount because of the flex in the front of the car. If you bolt it in tight, the radiator can crack.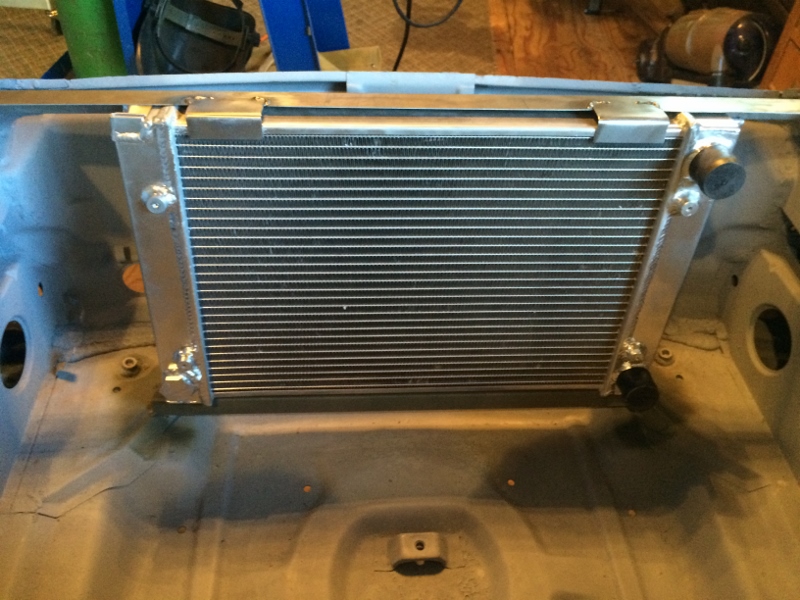
Picture from the back. Lot's of room in there. Hopefully not too much...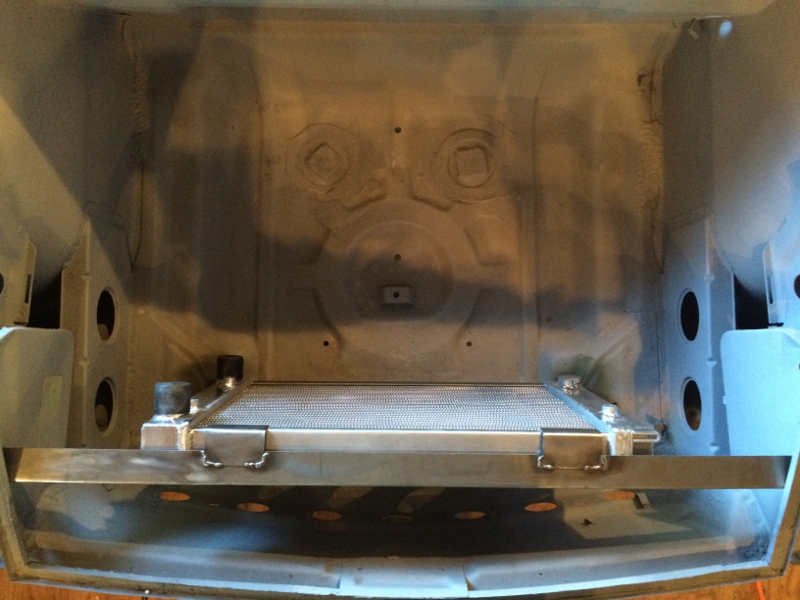
Working on the shroud. Kind of a PITA, but getting there...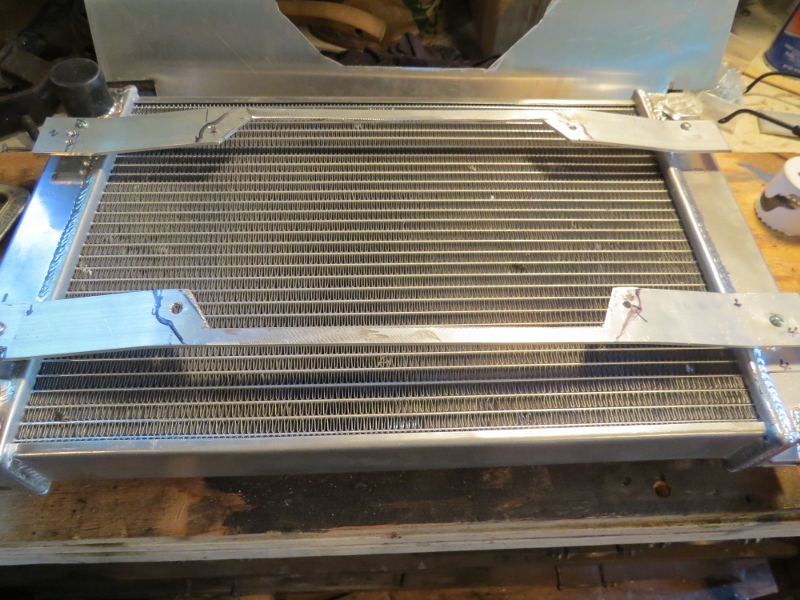

This is how I decided to handle the vents. 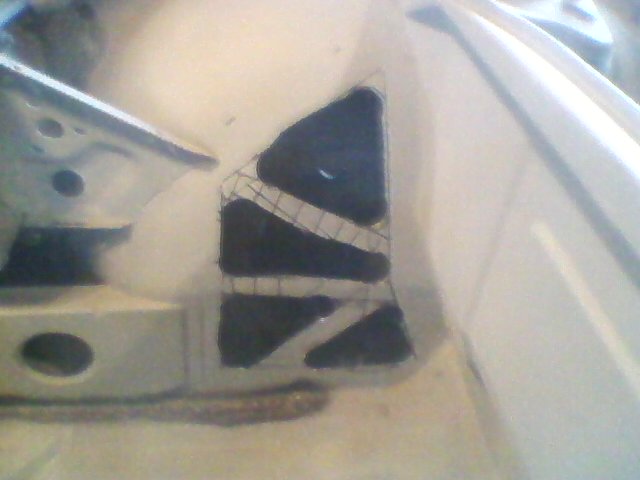
I am planning on covering the vents with something like this to retain strength.
This is one made at 914sgonewild.com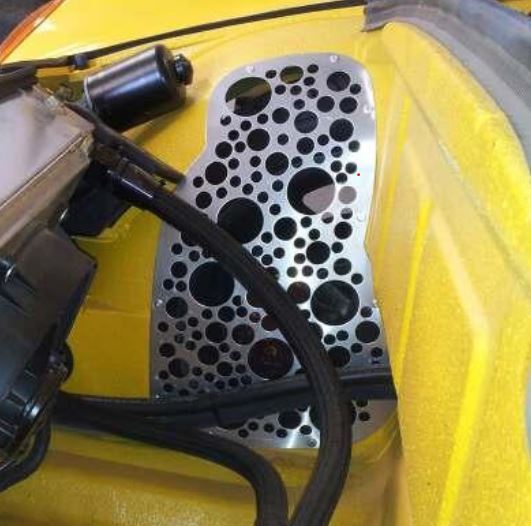
Here it is the final cutout covers. Can you still see the triangles?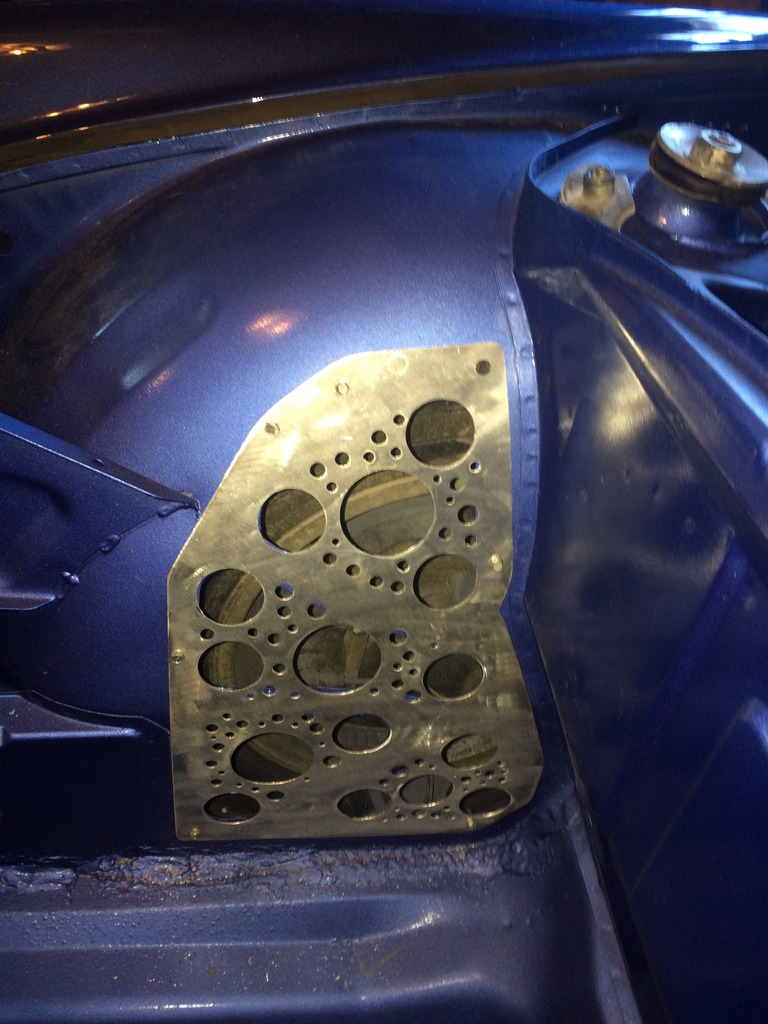
And, a shot of both:
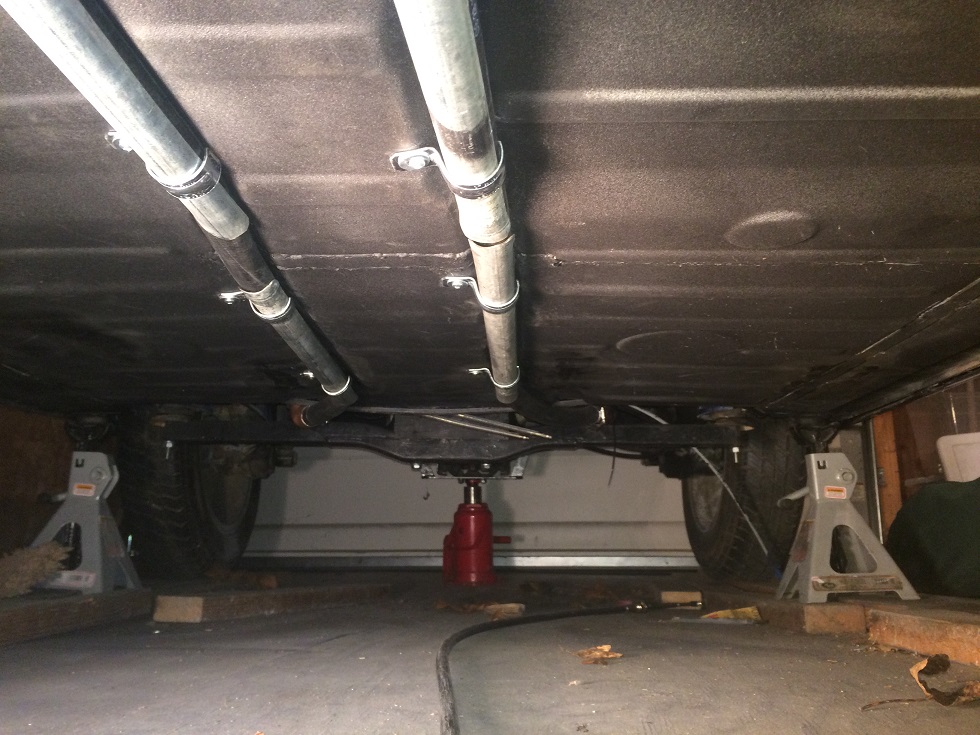
Protected radiator hoses. These are conduit pipes split down the middle.
I finished off the radiator with an overflow tank and in-line fill.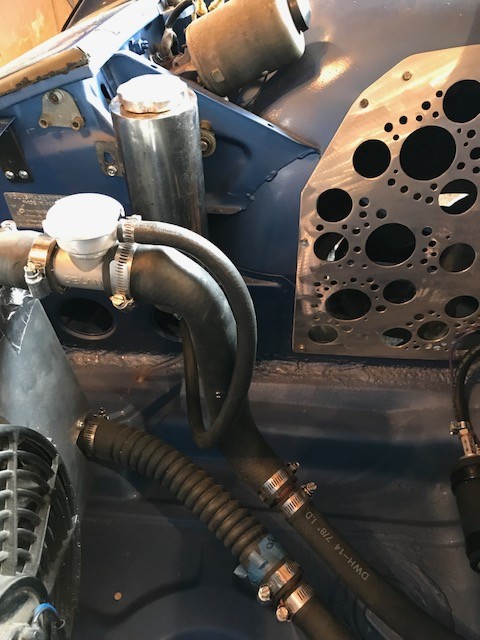
Posted by: JRust Sep 27 2015, 04:58 PM
Wow that radiator does look really small. I've been rethinking the front radiator lately. Saw a guy on FB with a suby conversion. Guy had put the radiator in front where the bumper goes. Had a 916 bumper with the fan in front of the radiator. So you saw the fan. Looked like crap but I didn't have close up pics. Since then it has had me rethinking how to do it up front. Possibly having the radiator come through the bottom of the cutout up front behind the bumper. Literally having the top of the radiator right behind the front trunk latch. It would keep 90% of the front trunk open. Since seeing that weird setup it has had me turning over ideas up front I had never considered before
Posted by: R_u_dd Sep 27 2015, 05:03 PM
Wow that radiator does look really small. I've been rethinking the front radiator lately. Saw a guy on FB with a suby conversion. Guy had put the radiator in front where the bumper goes. Had a 916 bumper with the fan in front of the radiator. So you saw the fan. Looked like crap but I didn't have close up pics. Since then it has had me rethinking how to do it up front. Possibly having the radiator come through the bottom of the cutout up front behind the bumper. Literally having the top of the radiator right behind the front trunk latch. It would keep 90% of the front trunk open. Since seeing that weird setup it has had me turning over ideas up front I had never considered before
I was wondering about my math. The radiator has less surface area than the stock radiator, but since it is twice as thick and double pass, you would think that it would work. Does the math work on this?
Posted by: 914forme Sep 27 2015, 05:28 PM
Griffen rates that rad at 600HP with their electric fan, 400HP if your doing your own thing. I am guessing you can do your own thing, and cool 600HP, its just they do not want to take the liability hit, for our stupidity.
Posted by: Chris H. Sep 27 2015, 07:25 PM
Wow that radiator does look really small. I've been rethinking the front radiator lately. Saw a guy on FB with a suby conversion. Guy had put the radiator in front where the bumper goes. Had a 916 bumper with the fan in front of the radiator. So you saw the fan. Looked like crap but I didn't have close up pics. Since then it has had me rethinking how to do it up front. Possibly having the radiator come through the bottom of the cutout up front behind the bumper. Literally having the top of the radiator right behind the front trunk latch. It would keep 90% of the front trunk open. Since seeing that weird setup it has had me turning over ideas up front I had never considered before
I've wanted to figure out a way to build a rad INTO the front bumper (or an aftermarket one) too. Take back the whole front trunk. Not quite enough room...
Posted by: Mike Bellis Sep 27 2015, 07:36 PM
I'm worried about your engine mount. My rotary mount was very similar and started to sag after a couple months of driving. My new cradle ties the front to the rear so no sagging is possible.
Posted by: R_u_dd Sep 27 2015, 08:16 PM
I'm worried about your engine mount. My rotary mount was very similar and started to sag after a couple months of driving. My new cradle ties the front to the rear so no sagging is possible.
The factory bracket bar is very heavy. Feels pretty stout to me. Did you build yours like I did? What page is it on in your thread?
Posted by: R_u_dd Sep 27 2015, 08:17 PM
Griffen rates that rad at 600HP with their electric fan, 400HP if your doing your own thing. I am guessing you can do your own thing, and cool 600HP, its just they do not want to take the liability hit, for our stupidity.
Only doing 165 HP, so I'm good?
Posted by: Mike Bellis Sep 27 2015, 08:33 PM
I'm worried about your engine mount. My rotary mount was very similar and started to sag after a couple months of driving. My new cradle ties the front to the rear so no sagging is possible.
The factory bracket bar is very heavy. Feels pretty stout to me. Did you build yours like I did? What page is it on in your thread?
Here is my rotary build thread. http://www.914world.com/bbs2/index.php?showtopic=113156
Although not exactly the same, the forces applied to the square bar are the same. My bar is made from 1.5", 0.120 wall square tubing. The rotary engine is also lighter than a Subie. The rear mounts sagged a full inch. Yours may not sag as much but the twist force is similar on the main bar. V8 motors are heavier but the angled motor mount bars lean toward the main bar mounts sending more load to the 914 mounting point and not the center of the main bar.
Posted by: R_u_dd Oct 10 2015, 12:48 PM
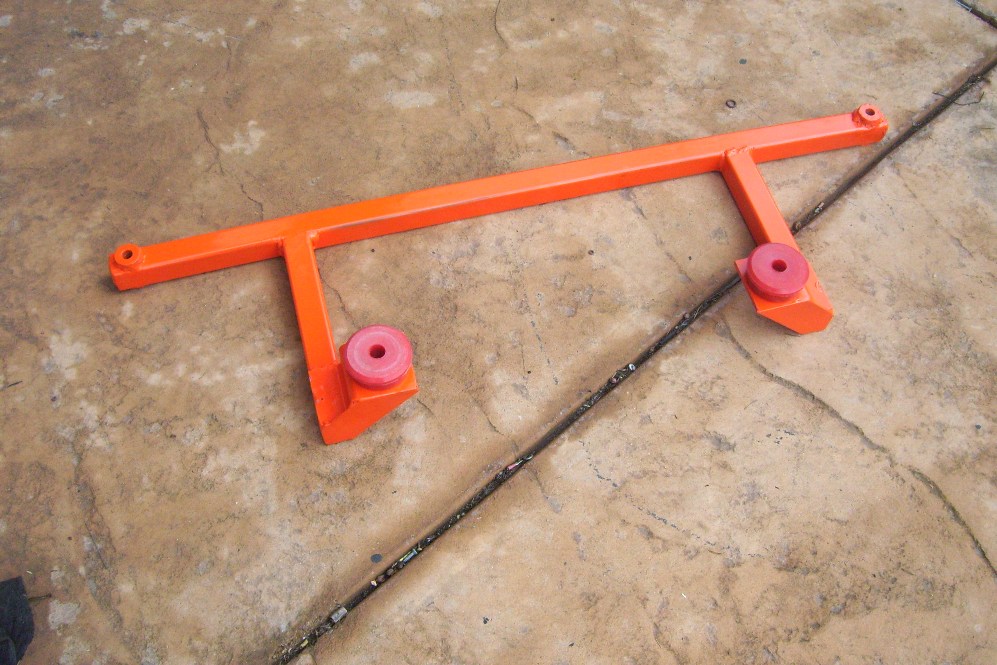
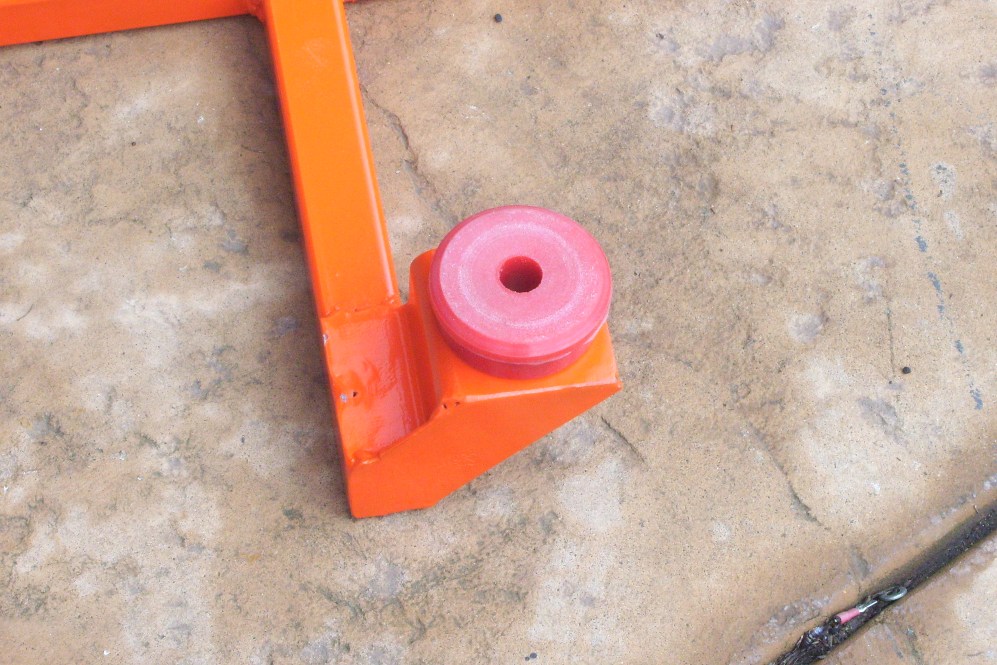
Transmission Mount
From the Subaru 5MT Transmission out of a 2002 Impreza TS, I saved the transmission mount and integrated into the design to mount onto the Porsche. The rubber stoppers are stout and will prevent vibration. It was also easier to fabricate than using the circular Porsche mounts. I deliberated whether to use the circular mounts because they seem to provide a full range of motion to the transmission, but I was concerned there might be too much flex. In the end I went with the Subaru mount which also allows some movement front to back and up and down. 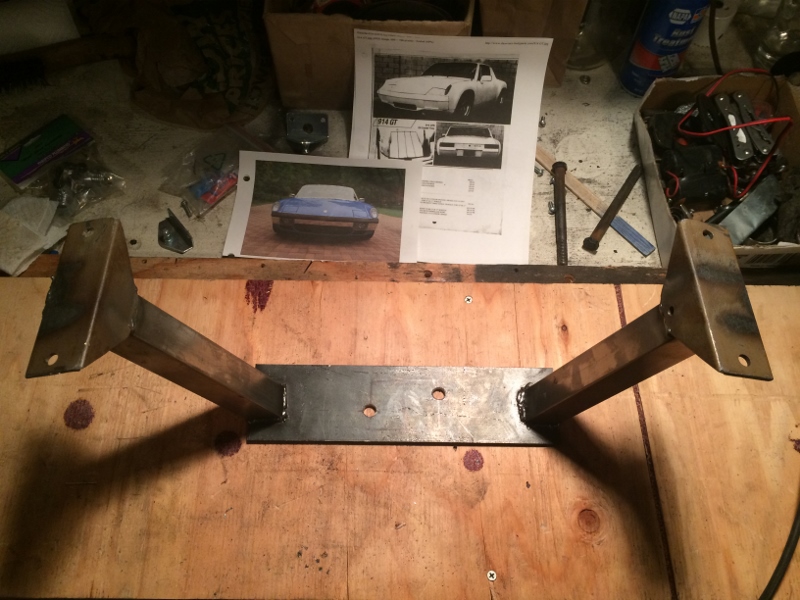
Posted by: 76-914 Oct 10 2015, 06:02 PM
Smart move. Your moving right along. Looks like your having fun too!
Posted by: R_u_dd Nov 14 2015, 05:48 PM
Axles 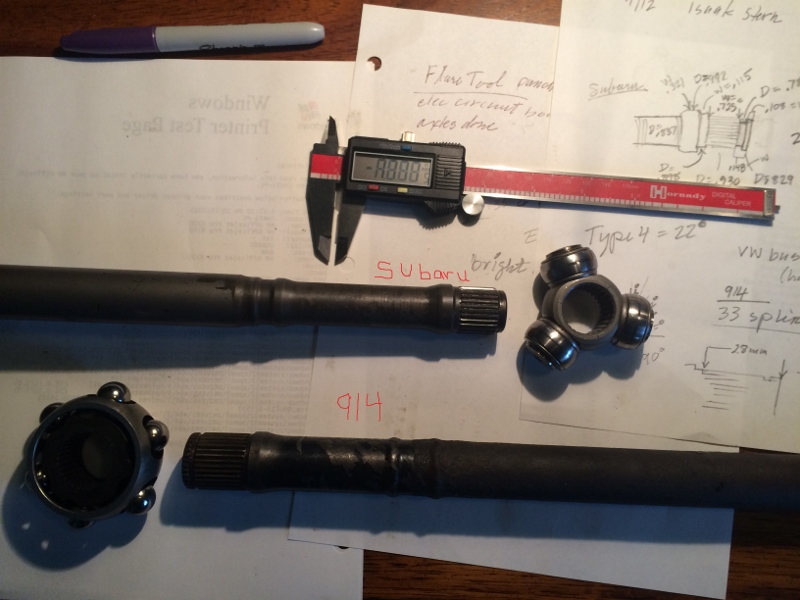
Subaru on top and 914 on the bottom. The Subaru is a 29 spline and the 914/bug axle is a 33 spline.
My axles will need to be shortened because the engine is set forward slightly from the designs of other cradles such as Ian's. I set the engine farther forward to avoid cutting the trunk and flipping the manifold (for now). Note that there is 4 inches of offset from the transmission to the wheel hubs.
There should be some bend in the axles and CV's for proper lubrication of the CV's, but how much is too much? According to the Blind Chicken, the maximum angle for the Type 1 CV (bug CV measures the same as the 914) is 12 Degrees. For this reason, I may have to go with the 944 CV's (22 degrees offset capability), on the 914 axles and do a 5 lug conversion while I am at it.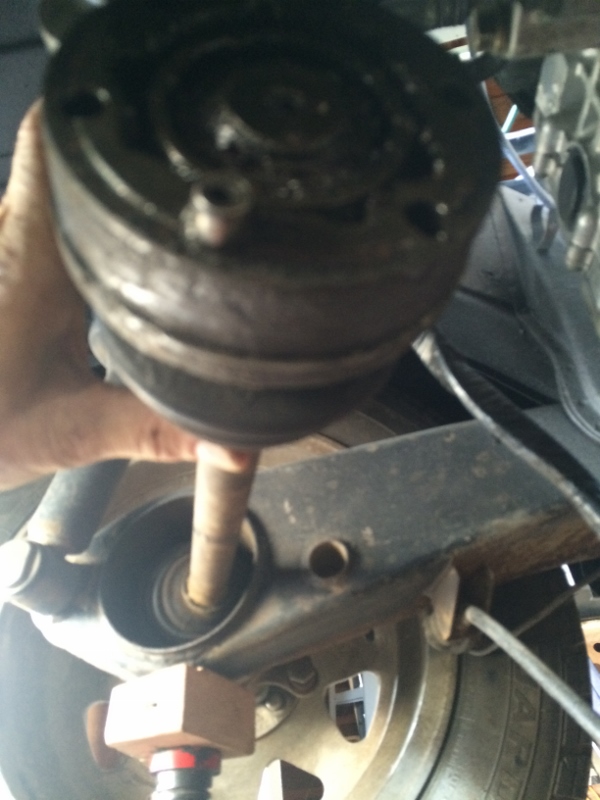
Sawtooth shortened his axles to 18" from 20.25". When I called Dutchman, they suggested doing a mock up by cutting the Subaru axle off and using angle iron to splint the axles together, which would work fine if I had an extra axle to cut up. Anyone? I am going to have to mock up some temporary axles to make sure the CV's will handle the offset and to get the right measurements before I cut the axles down to size.
Otherwise, I am concerned about getting the measurements right for the axle length. One positive (with Dutchman) is that you don't need to send all the measurements if you have a sample Subaru axle end to use as an example of what you want, so the only real measurement you need is the axle length- with no other modifications (ie. 911/944 CV's). I would like to keep it simple and use the 914 axles and CV's if possible.
This is similar to what I plan to do here:
http://www.914world.com/bbs2/index.php?showtopic=109522&hl=
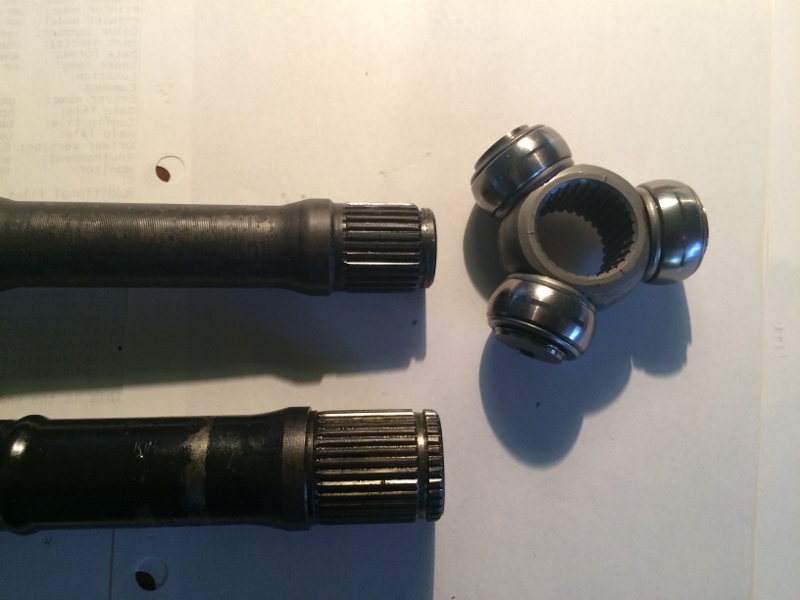
Update: The plan is to use 914 stub axles, Renegade conversion plate, 944 CV and axle, resplined on the inside for the Subaru CV to the 5MT transmission. The following discussion is me trying to learn what to do.
Axle Info and Threads:
http://blindchickenracing.com/How_to/CVJoints_Axles/axles_and_cvs.htm
http://www.performanceforum.com/wesvann/914a/know-cv-axle/know-cv-axle.html
http://www.dutchmanaxles.com/
http://www.914world.com/bbs2/index.php?showtopic=108808&hl=
http://www.914world.com/bbs2/index.php?showtopic=218865&hl=
http://www.914world.com/bbs2/index.php?showtopic=270712
5 Lug Axle Conversion:
Sir Andy- http://www.914world.com/bbs2/index.php?showtopic=80641
Eric Shea- http://www.914world.com/bbs2/index.php?showtopic=91963
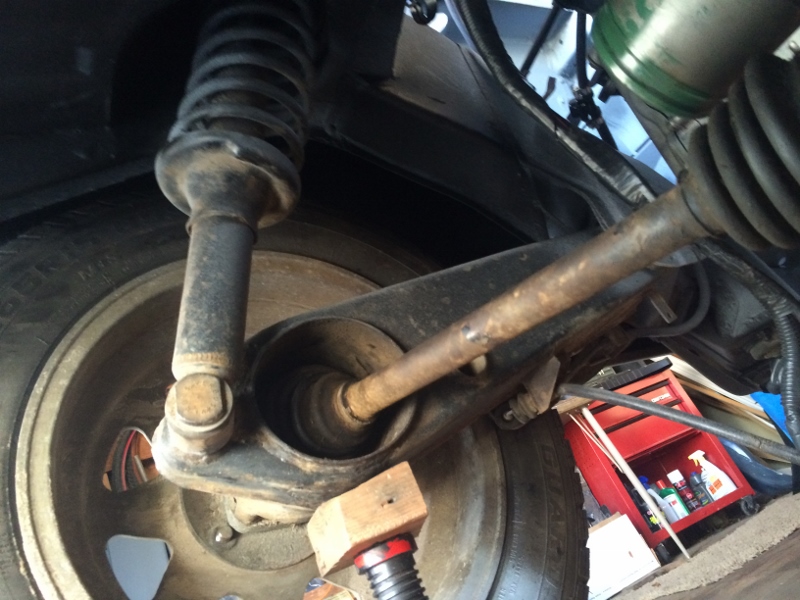
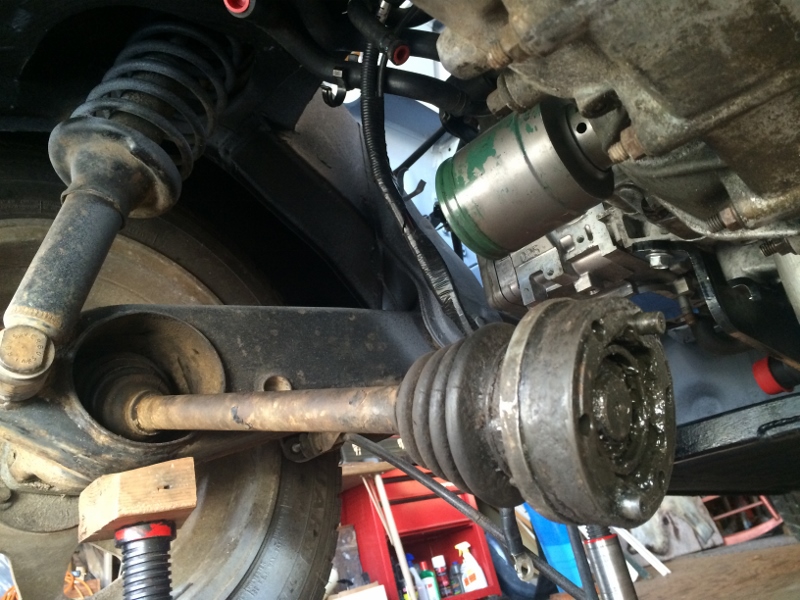
I went out and took some measurements with the 914 axles. It looks like I am close to 22 degrees which is the max for a 944 CV. (Update- At 12 degrees) Hmmm. This is a critical decision here. The 914 CV is supposed to max out at 12 degrees. So, I may have to find some 944 CV's but that is fine since it allows me to switch to a 5 lug wheel.
Take a look at these pictures. I am curious and need opinions here on this angle. The wheel and CV seem to turn without much friction, but apparently I am past the angle that these CV's can handle. If this angle is too steep (even if I go with the 944 CV), I have to stop here and redesign my cradle and likely cut the trunk.
What do you think?
More pix-
The 944 axles and conversion plates have arrived. I purchased the plates from Renegade Hybrids. They are about a half inch thick and bolt into the 914 stub hub on one side and the 944 cv on the other. This gives a much stronger CV threshold and a larger angle of travel, now up to 22 degrees. This should prevent me from having to redo the engine cradle and flip the manifold.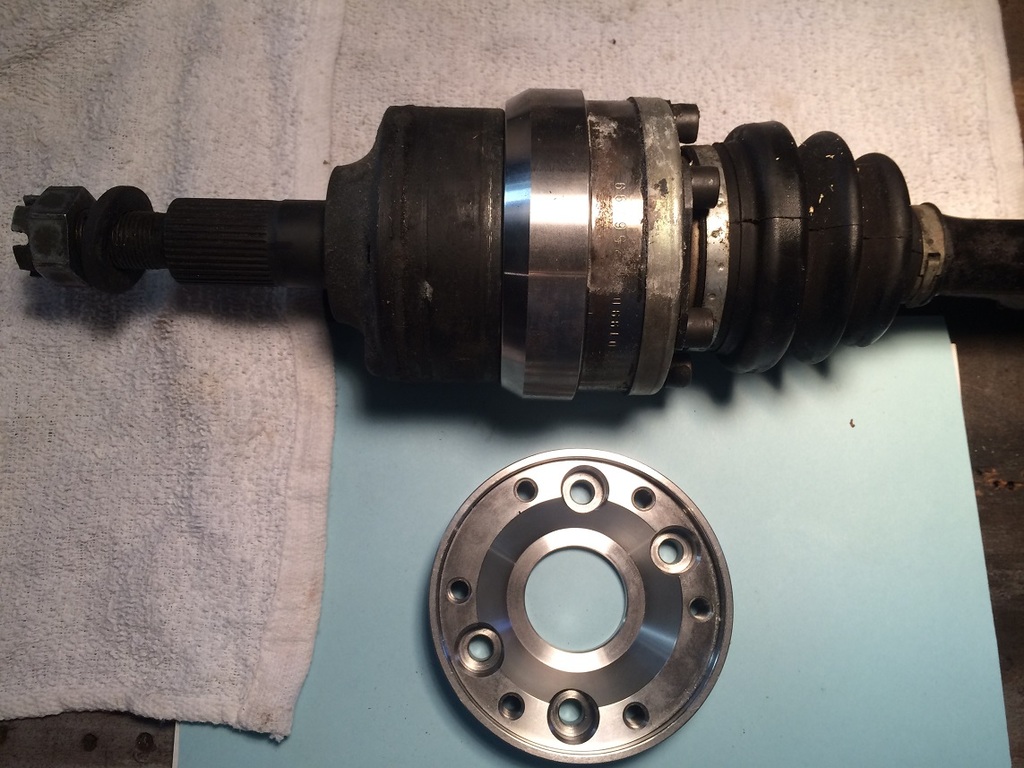
Posted by: DBCooper Nov 14 2015, 06:24 PM
I'd say you're too far. You say it's 22 degrees now? At ride height? Then what's the angle get to at top and bottom of the suspension travel? That should add a few degrees. Also it's true that not being at zero degrees is preferable for lubrication of the CV's, but I don't think that running at the maximum angle all the time is going to work for very long. That's a LOT of movement inside the CV each revolution.
Posted by: R_u_dd Nov 14 2015, 09:04 PM
I'd say you're too far. You say it's 22 degrees now? At ride height? Then what's the angle get to at top and bottom of the suspension travel? That should add a few degrees. Also it's true that not being at zero degrees is preferable for lubrication of the CV's, but I don't think that running at the maximum angle all the time is going to work for very long. That's a LOT of movement inside the CV each revolution.
Yeah, giving this some thought. I might just have to scoot the engine/tranny back a couple inches. If I flip the manifold, I might not have to cut the trunk. The problem with using the Suby tranny is that the stubs are forward of the 901 which pushes the engine back and the weight is pushed from the mid-engine arrangement closer to the back.
Another idea is to try the 930 CV's which will go up to a 25 degree angle. Those are 28 spline though and I would have to respline both ends of the axles. The dollars start to add up fast.
I am still curious if anyone has run their axles at this angle for some miles?????
Posted by: DBCooper Nov 14 2015, 10:28 PM
That's my trunk, to fit a WRX engine with flipped manifold. The big bump up on the right is for the turbo, which you wouldn't have. The freeze plug in the middle is for the clutch slave fluid fitting, and the left bump is for the starter. I saw that someone else used a different starter so was able to avoid that clearance problem. It's is quite a bit of extra work to flip the manifold, but probably cheaper than 930 CV's and you don't have to worry about CV longevity because of that angle. There are some other photos in my thread showing how the engine could actually come back even further except for the plumbing for the turbo.
To know about max angles give Sway-a-Way a call. They've done lots of off-road cars with extreme axle angles for maximum suspension travel so they should be able to tell you what's possible and what's too much.
Posted by: R_u_dd Nov 14 2015, 11:37 PM
To know about max angles give Sway-a-Way a call. They've done lots of off-road cars with extreme axle angles for maximum suspension travel so they should be able to tell you what's possible and what's too much.
http://www.914world.com/bbs2/index.php?showtopic=102887 I have looked at it many times, especially for the cable shifter design.
It looks like these CV's on your photobucket have a bit of an angle as well:
What's the story there?
Posted by: DBCooper Nov 15 2015, 08:16 AM
That's my son's car. It uses a Coldwater cradle and the axle angle is about 10 degrees front to rear (by sight) so not too radical. Also a WRX but unfortunately the previous owner didn't flip the manifold, instead hacked out a big section of the trunk, so it's not easy to tell how much the engine would have intruded. And those Sway-a-ways were later swapped out for re-splined OEM axles.
One other thing I forgot to mention is that at greater angles the CV is weaker, so you'll break them more often. If you don't change the angle that fact might tip things more towards the stronger 930's.
Posted by: R_u_dd Nov 15 2015, 09:40 AM
Also a WRX but unfortunately the previous owner didn't flip the manifold, instead hacked out a big section of the trunk, so it's not easy to tell how much the engine would have intruded.
I am curious in shifting the engine back a few inches from the original setup if you notice a difference in weight shift. Does it still retain its mid engine feel.? It would be pointless to do all this if I end up with a rear weighted car like a bug. I still have the 901 transmission, but think it best to use the 'ru tranny.
Posted by: DBCooper Nov 15 2015, 09:54 AM
Also a WRX but unfortunately the previous owner didn't flip the manifold, instead hacked out a big section of the trunk, so it's not easy to tell how much the engine would have intruded.
I am curious in shifting the engine back a few inches from the original setup if you notice a difference in weight shift. Does it still retain its mid engine feel.? It would be pointless to do all this if I end up with a rear weighted car like a bug. I still have the 901 transmission, but think it best to use the 'ru tranny.
There's absolutely no difference that I could tell, and we've done two cars now, first the engine and then later the transmission on both cars. You HAVE to do the Subaru transmission. I think anyone who's done it will tell you that the Subaru transmission was almost as significant an improvement as the Subaru engine, huge in both performance and drivability, and the gears are matched. It just works.
Posted by: 76-914 Nov 15 2015, 05:03 PM

Posted by: R_u_dd Nov 15 2015, 07:42 PM
And those Sway-a-ways were later swapped out for re-splined OEM axles.
Do you remember the length of the axles? I should be able to figure it out once the engine is in place bycreating a mock up, but 18" seems to be about right?
Posted by: R_u_dd Nov 15 2015, 10:18 PM
Calculating the Angle of the CV joint.
https://www.carbidedepot.com/formulas-trigright.asp
Good News. It pays to know your math. Or, to enlist your daughter to remind you how. So my angle is only at 12.84 degrees which should be within the 944 CV joint tolerance (22 degrees) when upgrading to the 5 lug wheel. Here's the calculation with angle A being the critical angle and 4 inches of offset with the 18 inch axle: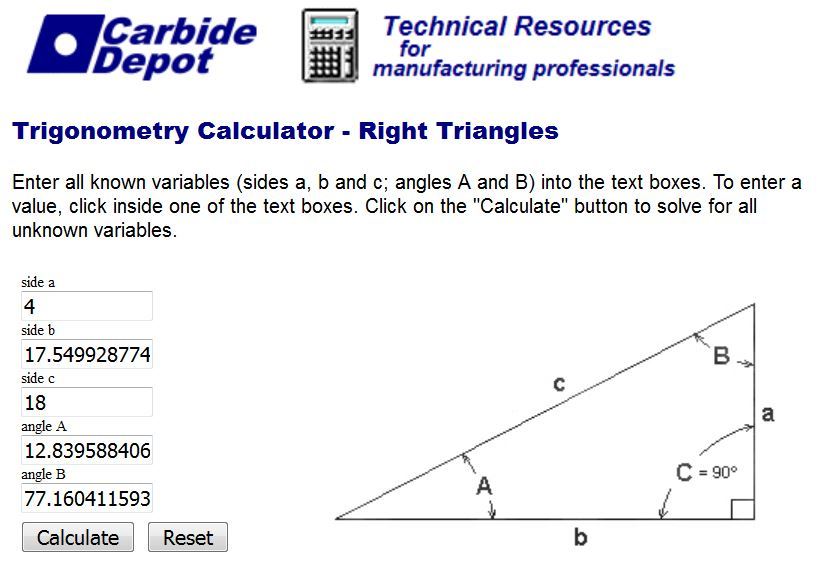

So, I don't have to move the engine back!!!!!!!!!!!!!!!
Math is fun. And saves time and money!!!!
Posted by: R_u_dd Feb 13 2016, 04:12 PM
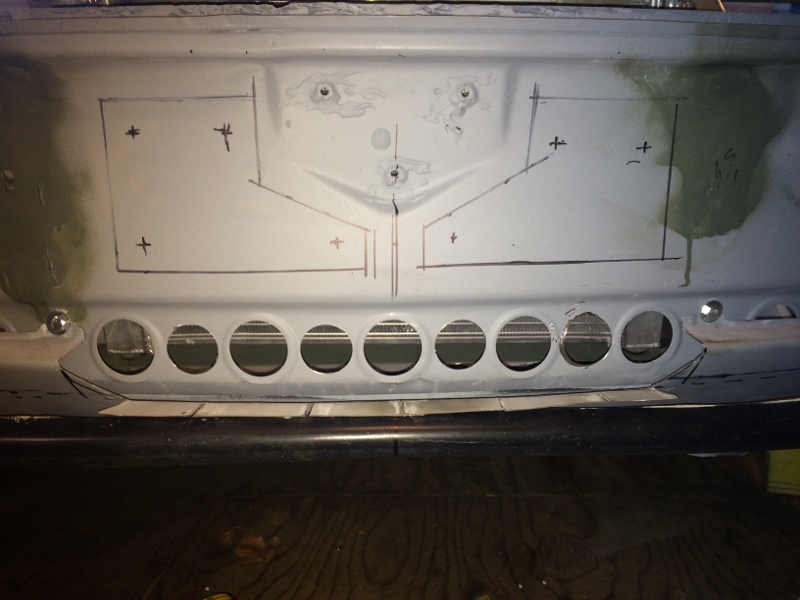
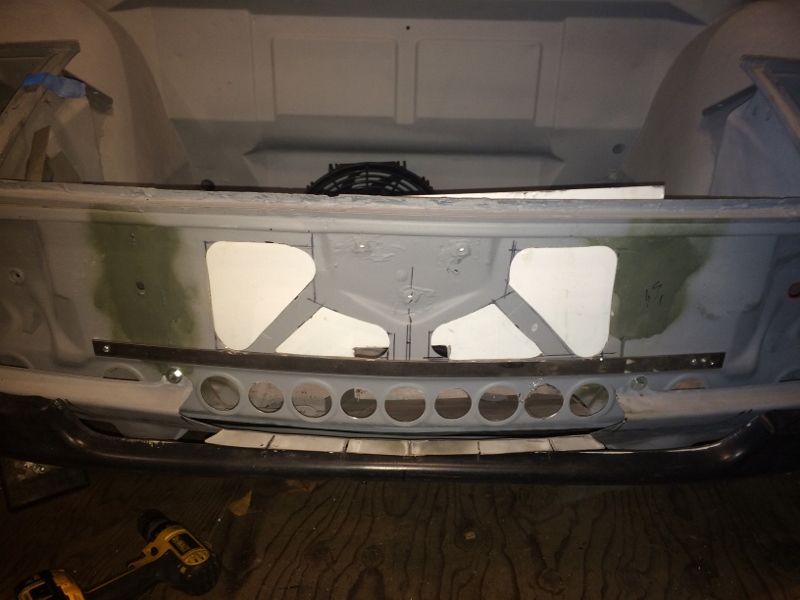
Bumper
The idea with the bumper was to deflect air into the radiator. I am going for the look below. I used the stock valence, cut out a portion and welded tabs to mount an aftermarket valence from a Honda Civic from the junkyard for $35.
I love the look of http://www.914world.com/bbs2/index.php?s=&showtopic=75381&view=findpost&p=948311 from iamchappy.
Aiming for this look from member veekry9: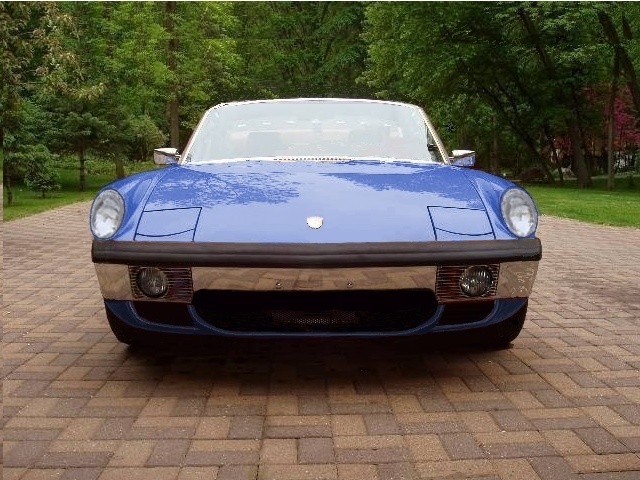
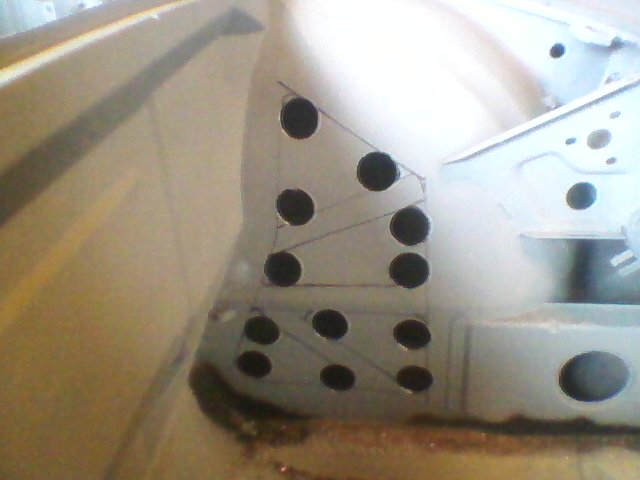
Started by welding on some tabs and the plastic bumper. 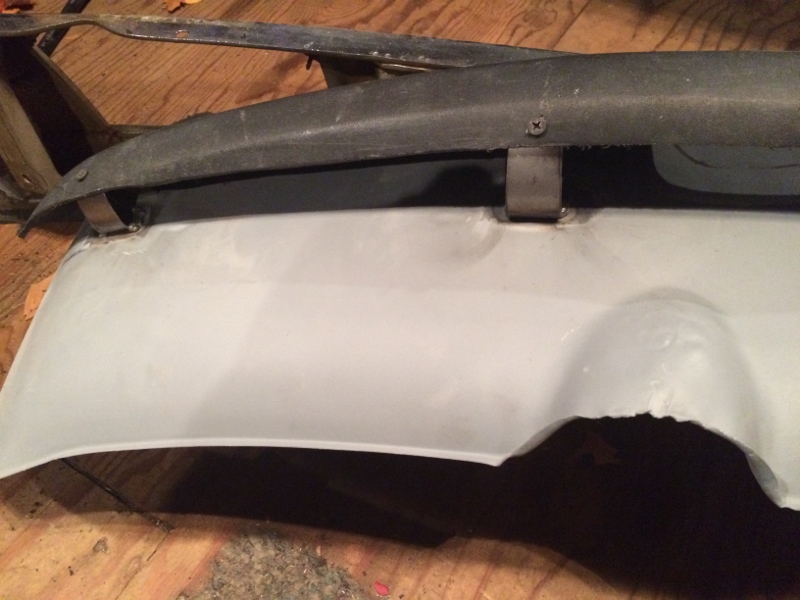
Cut along the line...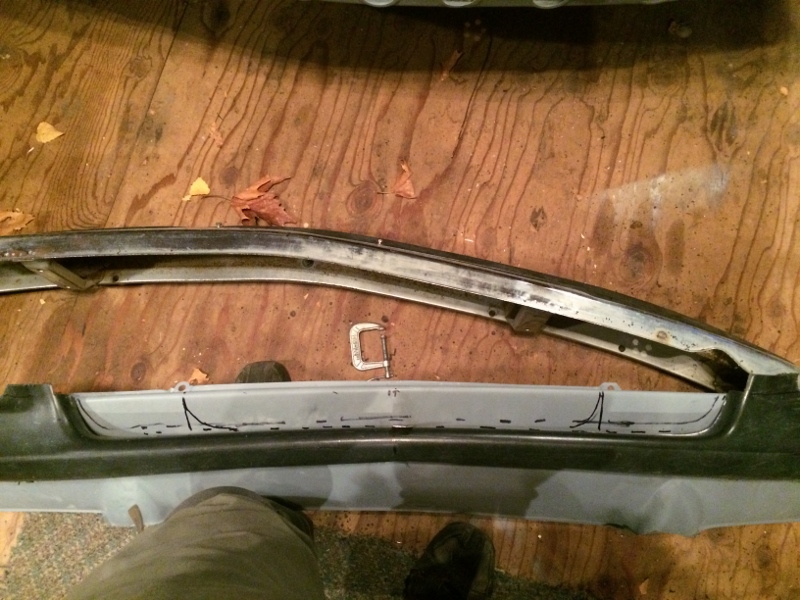
Metal tabs support the plastic civic valence.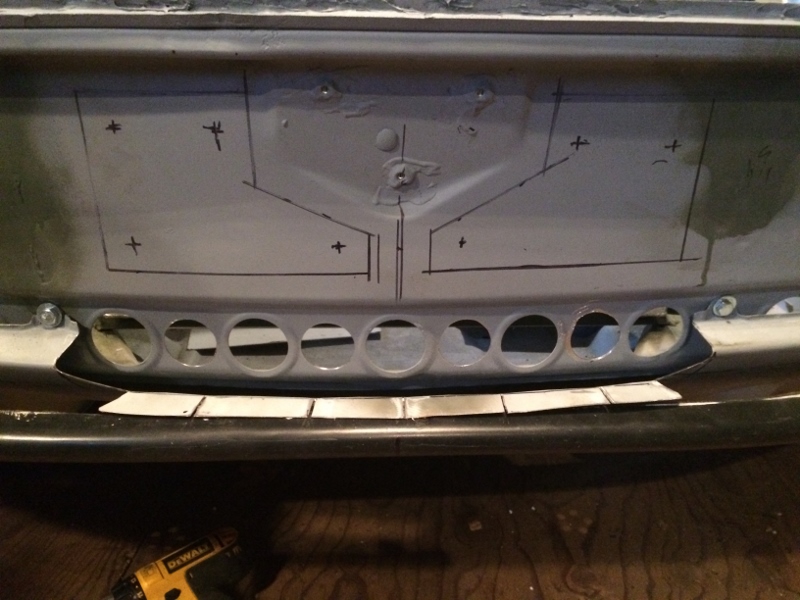
Fiberglass covering the metal tabs. This part will scoop the air through
these holes and into the radiator.
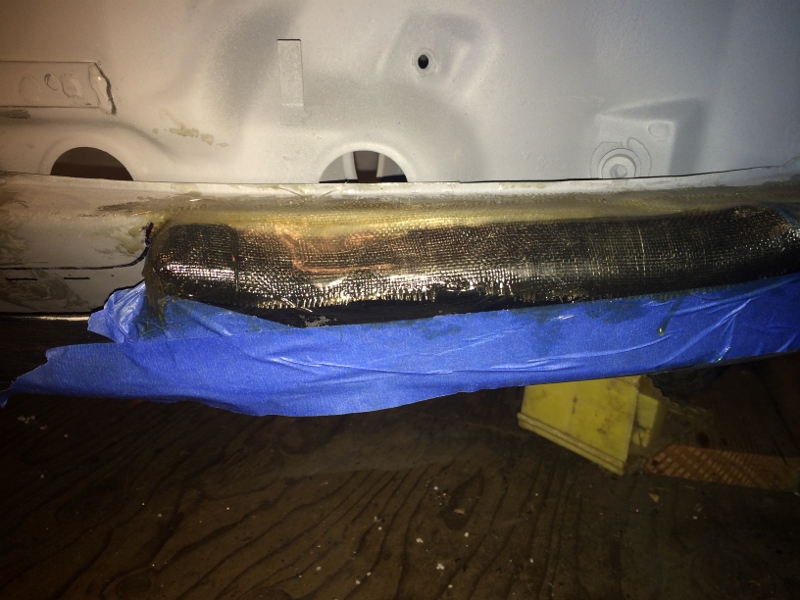
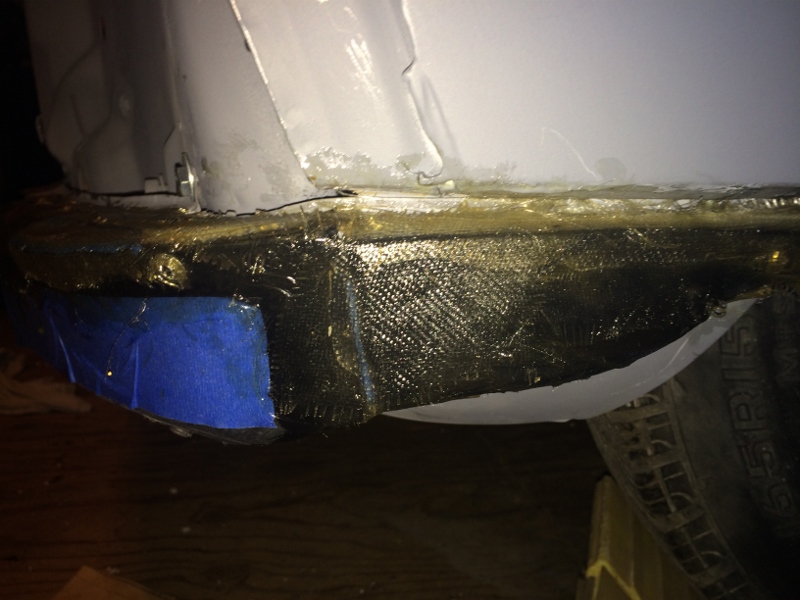
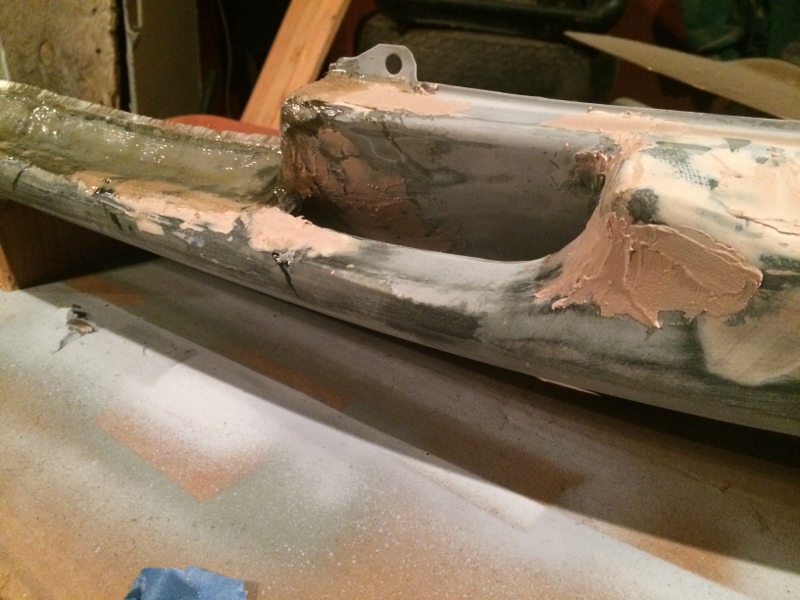
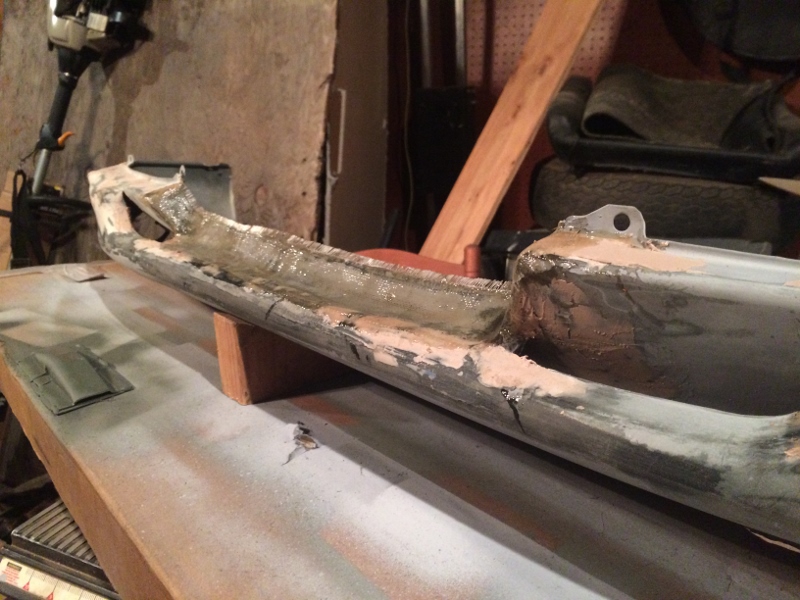
Finally, the final product:
Hard to get a good perspective shot, but here it is. The valence is designed to scoop air underneath the bumper. This will need to be tested to see if we get enough air into the radiator to keep it cool. If not, expect the bumper to get cut out significantly.
Posted by: R_u_dd Feb 13 2016, 04:59 PM
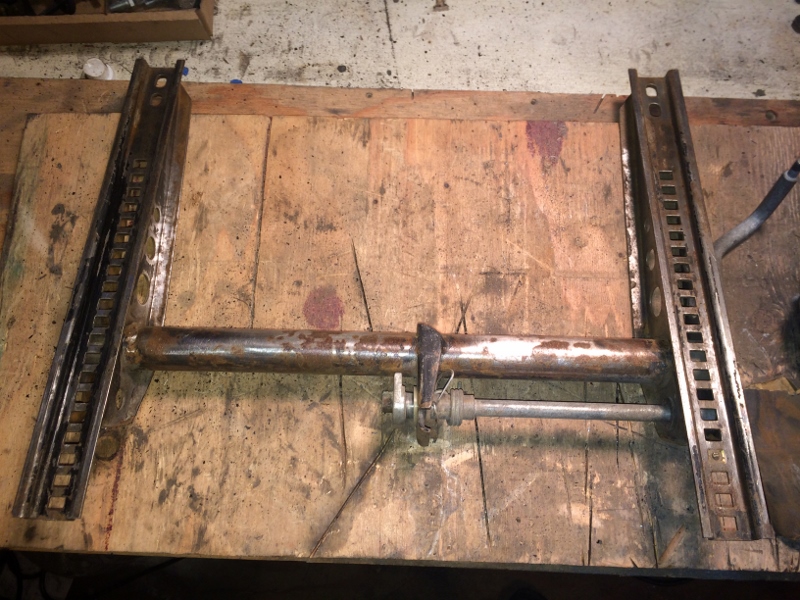
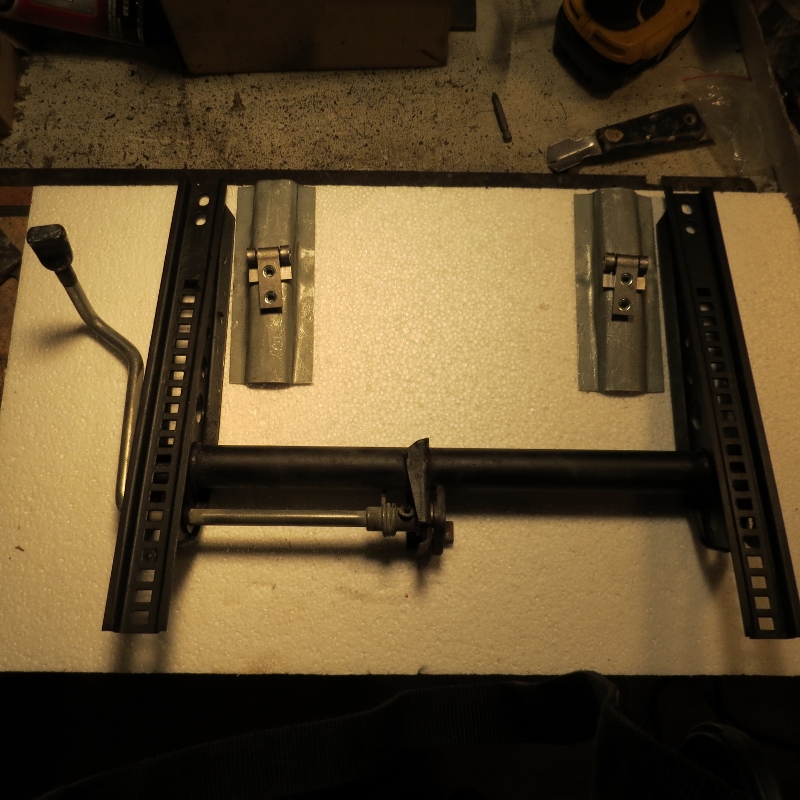
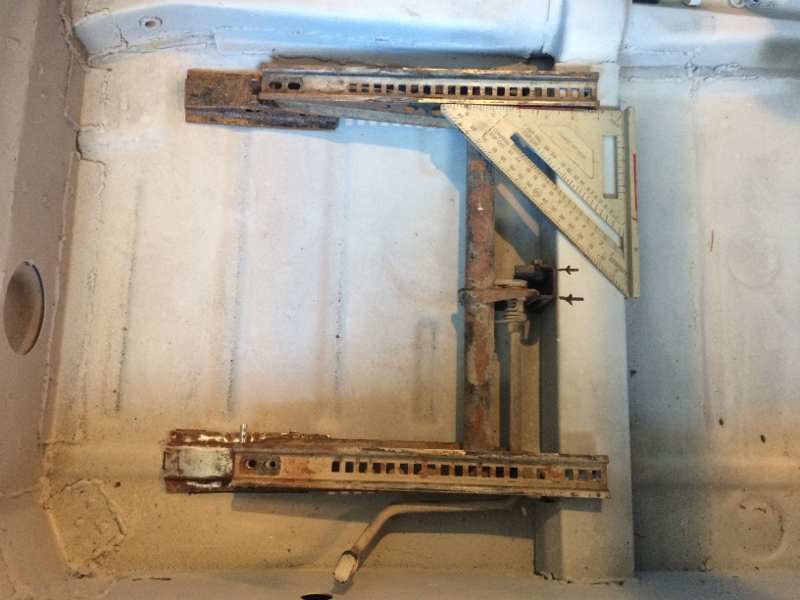
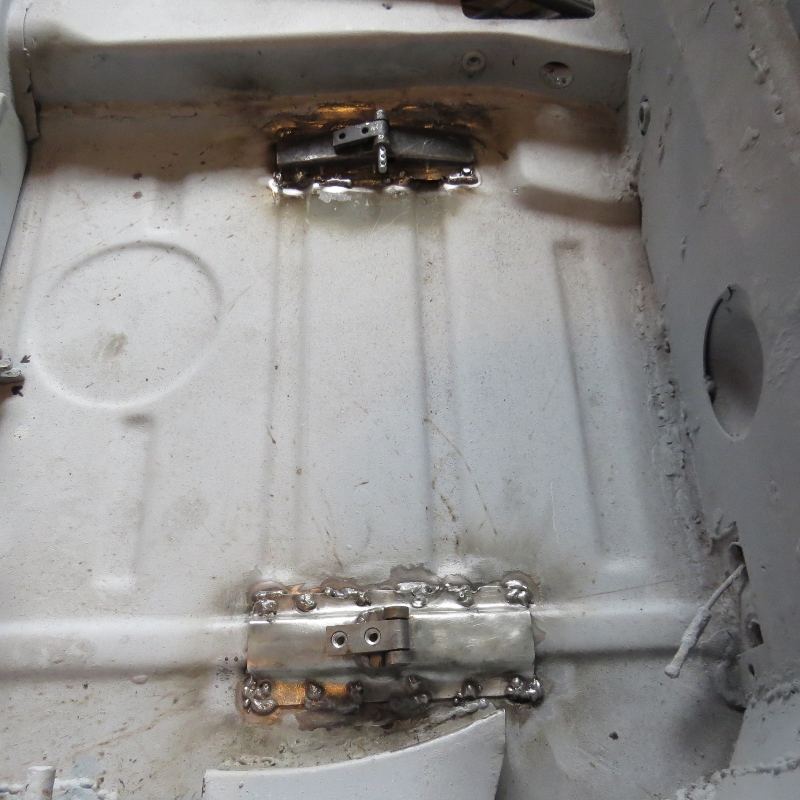
Seats and Interior
After much deliberation, I have decided to go stock with the seats and upgade the passenger seat from the '71 fixed to an adjustable. My floorpans were rusted badly and I could not save the seat hinges, so thanks to mrihop I was able to get some newer parts, seat brackets, risers and hinges. Still, I had to break down and buy a couple newer hinges and risers. It's just not worth trying to save them out if they are rusted. There's a great video on how to align the hinges and weld everything together from restorationdesign.com
https://youtu.be/PWgt8AaqnUI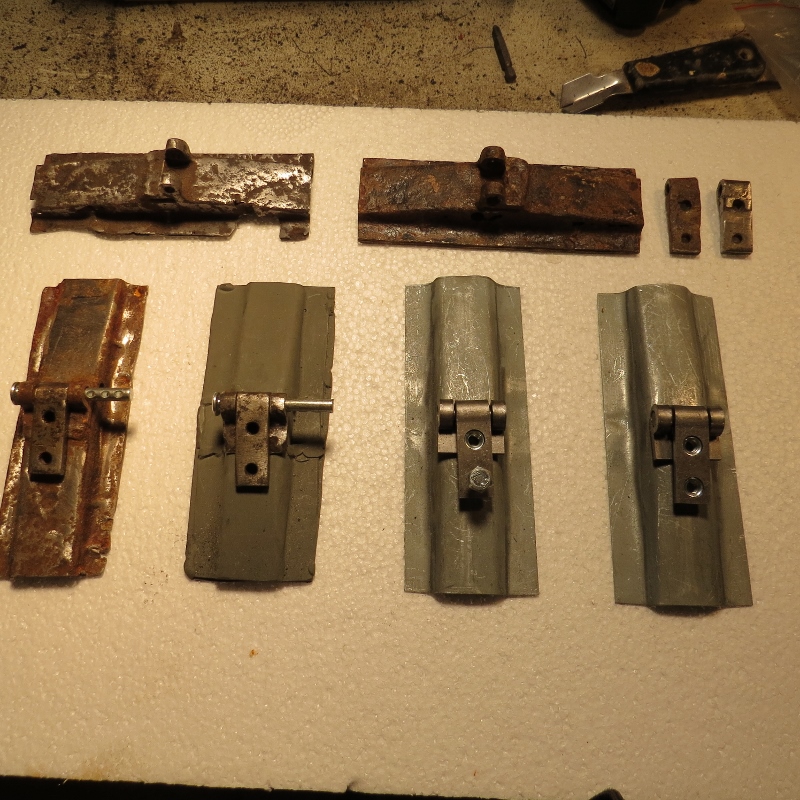
___________________
I decided to reupholster my seats at least partly. I got tow seats on 914world for $75 bucks each and cushion covers for another $70 bucks each. Went down to Joe (Women's fabric shop) and bought a yard of vinyl for $20 and some glue. Here's some before and after shots. These are not concourse seats but I think they look pretty good and they're certainly a lot cheaper than new.
Before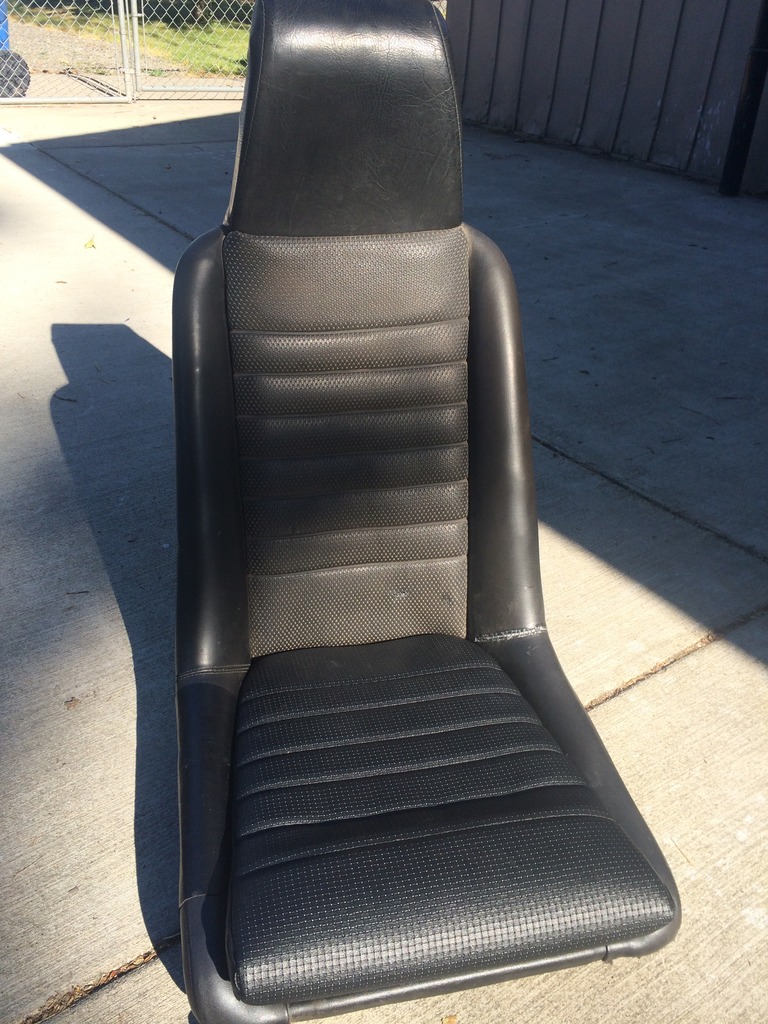
After
My door panels were not serviceable, so I decided to redo the inside panel and re-upholster the vinyl. I used thin plywood, about 1/4 inch birch. The old panel was used as a template which worked great. I used bubble insulation for padding and noise reduction. The most important part is to use a good glue. In my case, I used weather strip adhesive- GREAT STUFF!.
The wood cutout from the original template: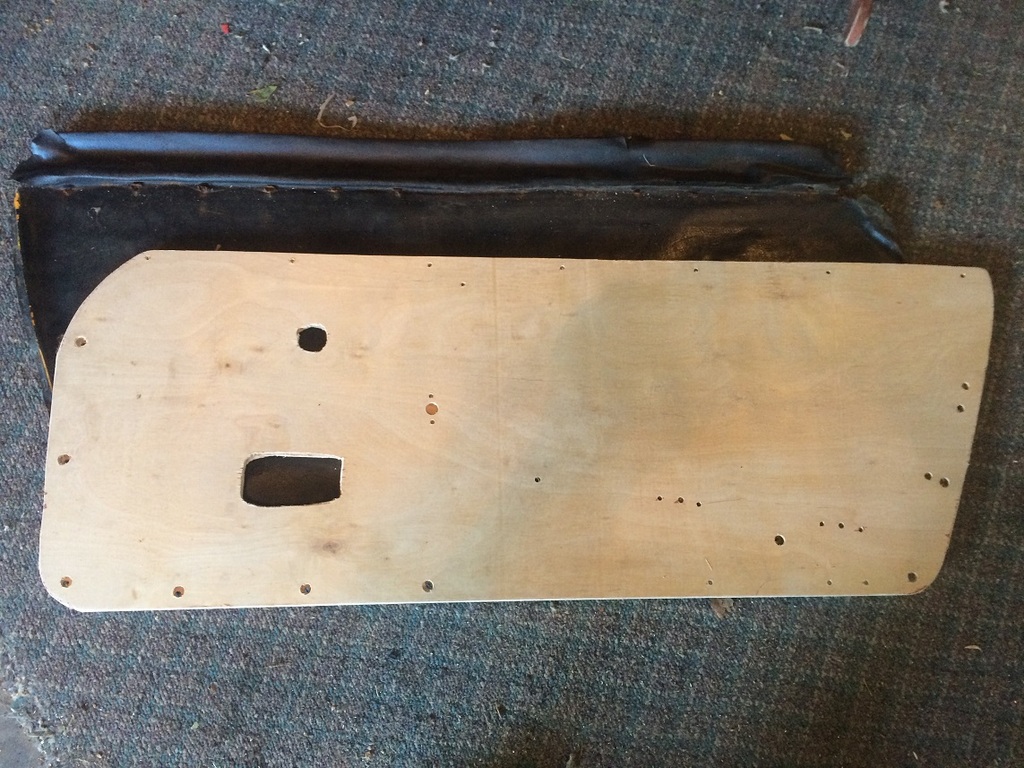
Funky backing: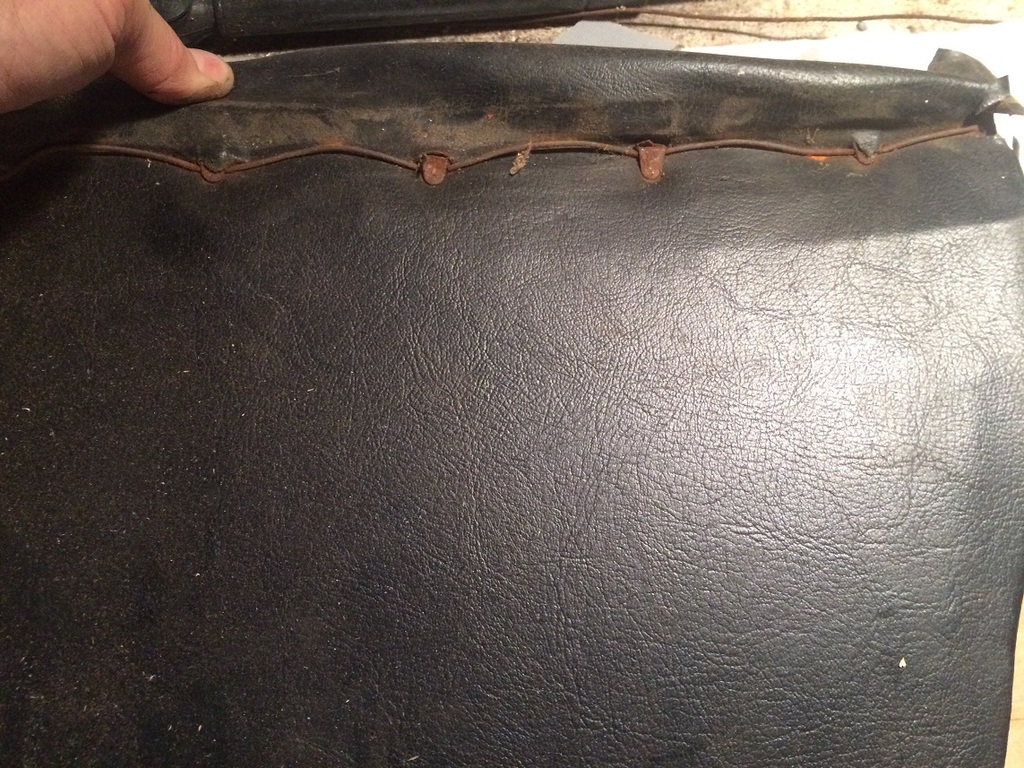
Bubble Wrap padding:
Posted by: R_u_dd Feb 13 2016, 09:54 PM
Seats and Re-Upholstery info:
http://www.914world.com/bbs2/index.php?showtopic=71844
http://www.914world.com/bbs2/index.php?s=&showtopic=270789&view=findpost&p=2277031
http://www.classiccarseats.com/Lemans-seats.php
http://www.worlduph.com/porsche/914_916/
http://www.914world.com/bbs2/index.php?showtopic=277933
http://shop.914rubber.com/914-seat-base-Early-or-late-Black-914SB.htm;jsessionid=7EC05223D03A7CB6F38597F090B55324.m1plqscsfapp01?categoryId=-1
http://www.914world.com/bbs2/index.php?showtopic=196752&hl= See http://www.914world.com/bbs2/index.php?s=&showtopic=196752&view=findpost&p=1757592. Interesting information on bolsters
http://www.914world.com/bbs2/index.php?showtopic=66752&hl=
https://www.lakewell.com/en/porsche/914/front-seat-restoration-kit-porsche-914-69-76 UK - Has tan interiors
http://www.914world.com/bbs2/index.php?showtopic=149932&hl=.
http://www.camp914.com/products/lemans.html
http://www.autoatlanta.com/Porsche-914-Seat--Covers-srch.html
http://shop.914rubber.com/914-Back-Pad-Vinyl-Kit-Set-of-3-Pieces-914BPV3.htm
Posted by: veekry9 Feb 14 2016, 12:48 PM
I'm glad you like it.
I drew this largemouth look to emulate the '50-60s Vette.
An older brother had a convertible from that era,I liked it in '59,still do.
The details are a little deceiving,as the car is much wider than stock.
The inner sponson is pretty much normal,the width of the lites is of course wider and therefore the fender too.
That was the purpose of using the larger lite,the method of achieving the new width is a filler strip at the top of the sponson.
A lot of planning,mapping and hammer and dolly work,for the wide narrowbody look.
How it would look without new doorskins is up for debate,the stepout being up to 6".
Note too that the bumper is widened the same amount.
http://www.914world.com/bbs2/index.php?showtopic=222522&st=51
Just flogging some ideas around,seeing what fits.
Posted by: R_u_dd Feb 14 2016, 04:31 PM
Yes, I really like that look for the form and function of it. It looks like a nice design to pull air through a front radiator. What can you tell me about that car? Is it pure animation, or is it a real car? What is the color? Perhaps you have more pictures. What software did you use to change the look?
Posted by: veekry9 Feb 14 2016, 11:01 PM
https://www.gimp.org/
Some people can use a camera properly,this was a 'front' pix.
The pix was from the most immaculate 914-6-Turbo you will ever see.
'iamchappy' here on board.
Drawing is from 2008,when I first sampled the pix.
The auto sector had taken a dump,and some 20k people had been laid off.
Had some spare time and tried sketching a few things.
The methodology today is a little different than days of old.
https://www.youtube.com/watch?v=mbrq2fDN8bA
This panel is the traditional aluminum hand beaten method.
Light,beautiful,difficult.
A panel man from Illinois made it.
http://imgur.com/gallery/lnluh
/
Posted by: ahycaramba Feb 16 2016, 03:39 AM
I can't wait to see your finished product on the front valance panel. It is one of the best alternate designs I have seen as of yet. make sure to keep a mold. you have potential of making so dough from this community alone. I would buy one if the price is not over the top.
Posted by: R_u_dd Feb 28 2016, 10:52 AM
Paint Prep Continued...
The metal work and preparations for final paining are at the point where I could call Scott, my painter, back into the game. We started doing some final paint prep before we go to paint. The whole process is new to me and it's great to learn from a veteran. These are the steps that we are taking:
Metal work to remove rust.
http://www.914world.com/bbs2/index.php?s=&showtopic=260642&view=findpost&p=2216554. Similar to sand blasting, but the beads are much smaller.
http://www.914world.com/bbs2/index.php?s=&showtopic=260642&view=findpost&p=2236189
Primed within one week with high build primer
Primed with Urethane Primer over the top
Rust encapsulator in key locations, like over the battery tray area.
Most of this was done several months ago. I then worked on some final metal work like the radiator mount, front valence, rear jack point.
Now we are ready for final prep work which included block sanding with 80 and 180 grit. We used foot long blocks made of a flexible rubber, with velcro on the sides. Scott also uses a metal file to knock off the high points. Scott marks the low spots with a circle and the high spots with an "X". The low spots are then filled with glazing compound, a very thin filler, and sanded with 180 grit. He also used an air sander. 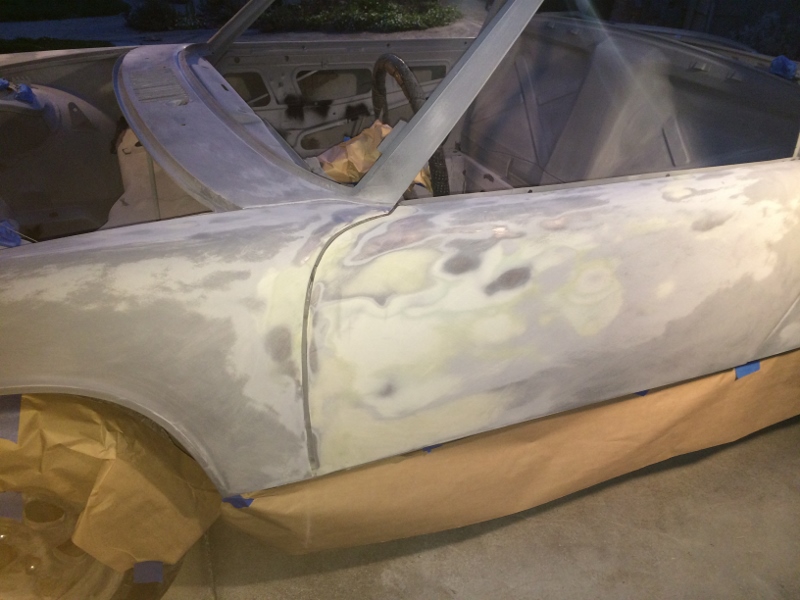
One of the steps we took was to roll the fenders to give them a better shape. We only moved the fenders a quarter inch, but rolled the lips and got rid of the funky inward curve of the shape when looking overtop the fenders. It is amazing what a subtle change like this can do to the aesthetics and functionality.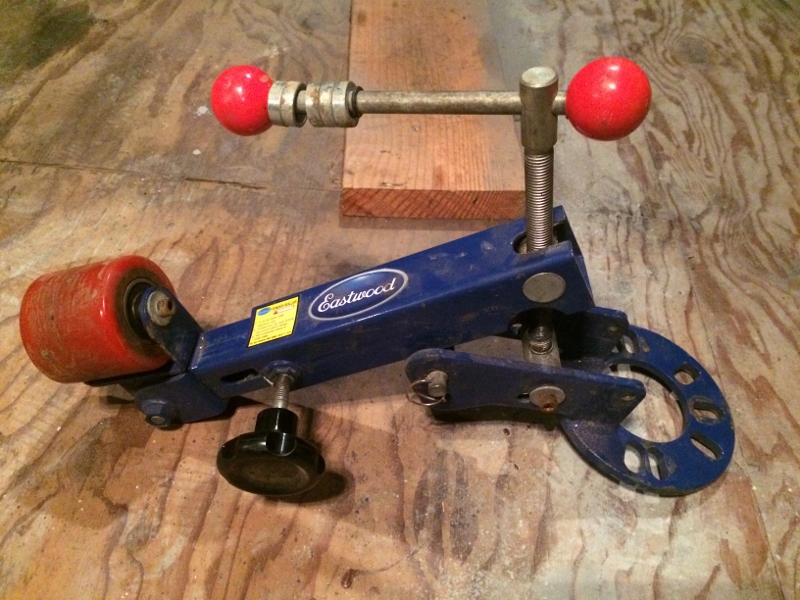
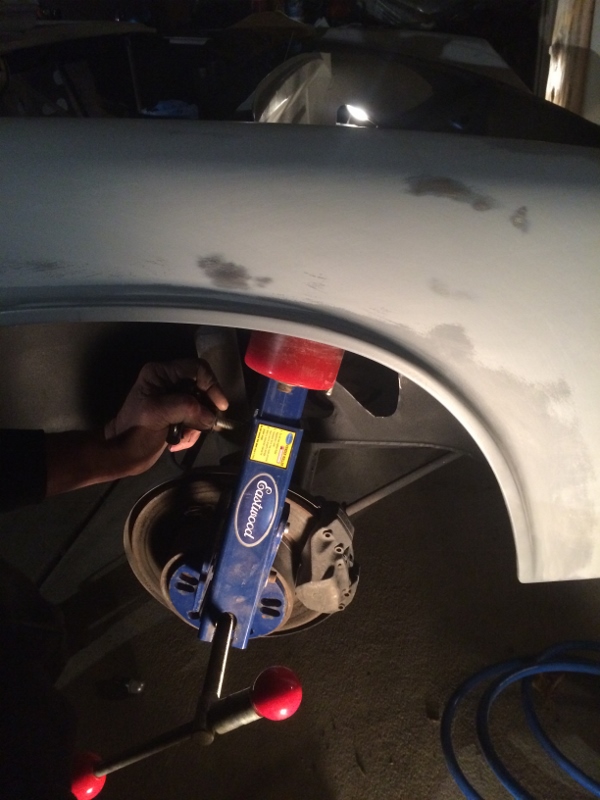
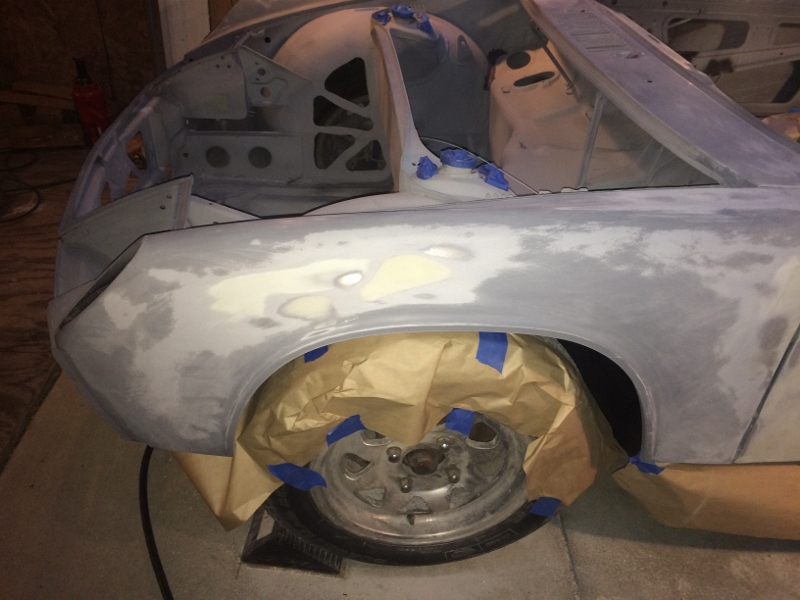
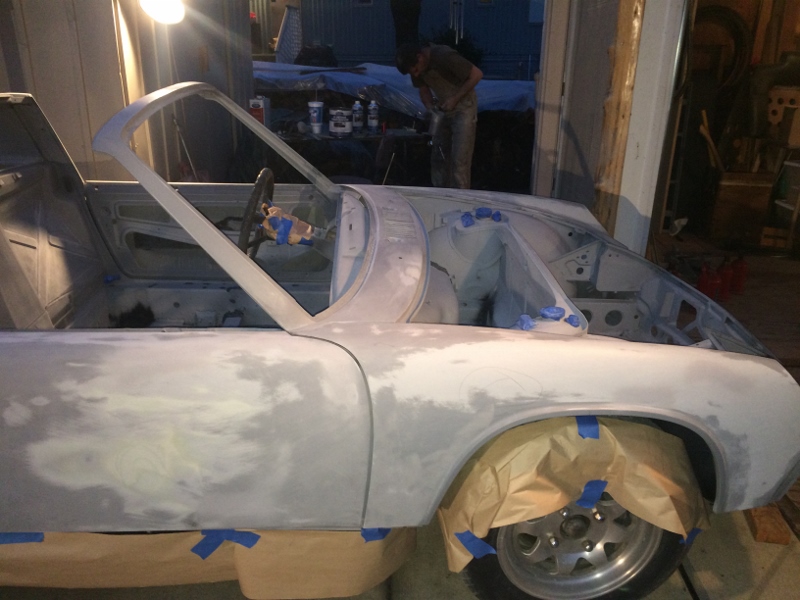
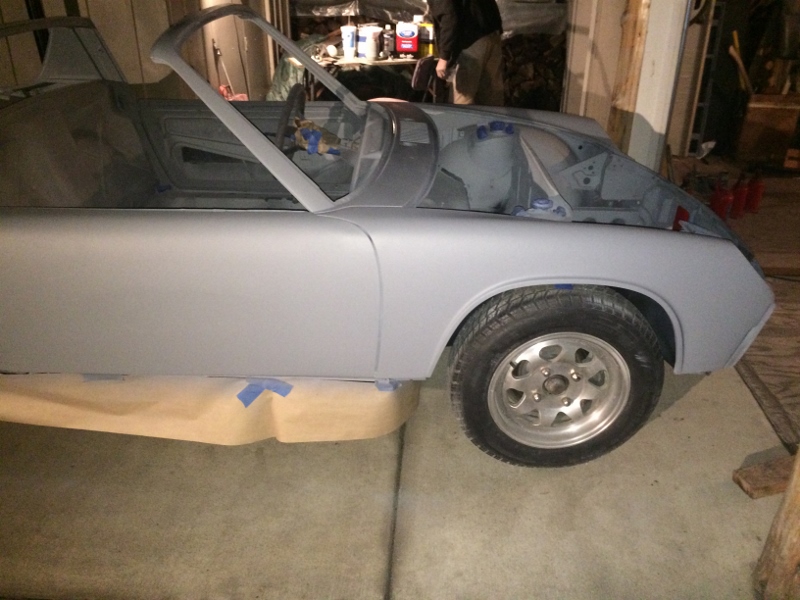
This is what the primed car looks like. This is "two laps around" the vehicle, or two coats of Urethane primer separated by 10 minutes of drying.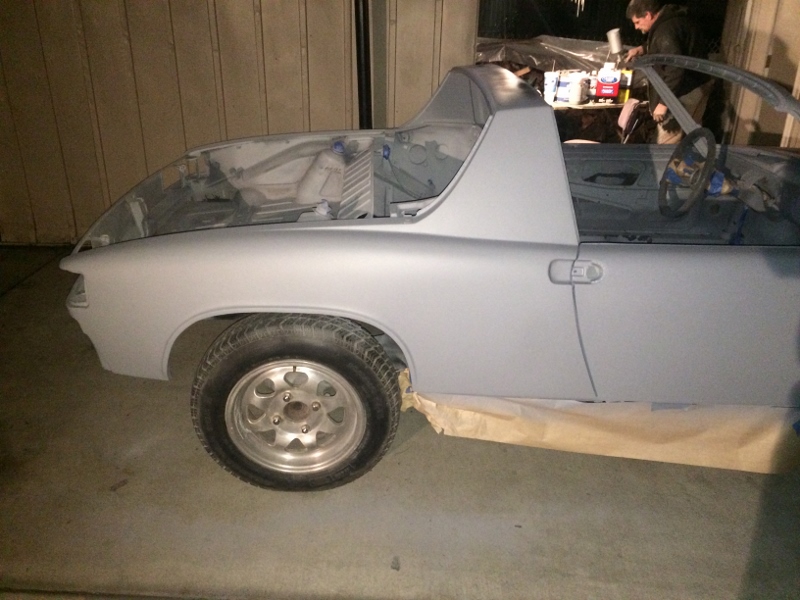
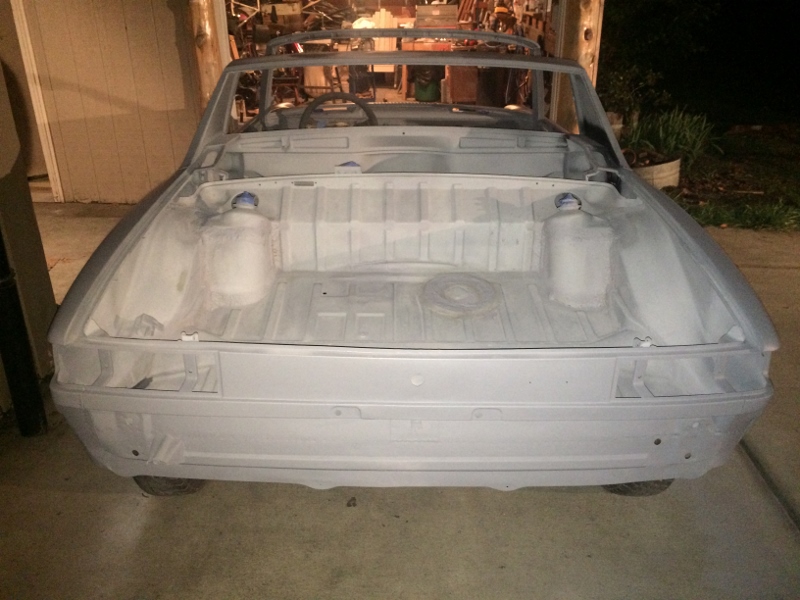
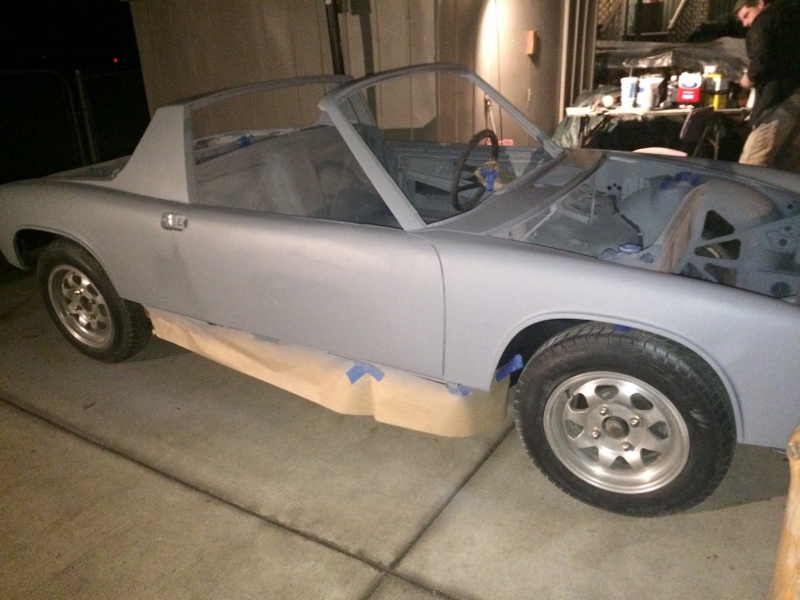
Next up, sanding with 400 and 600 grit, some final prep and then Painting!!!
Posted by: 914forme Mar 1 2016, 08:01 PM
Interesting fender cut outs, I like them
Posted by: R_u_dd Mar 2 2016, 11:40 PM
Yes the radiator vent holes. I figured that the triangles would retain more strength.
http://www.914world.com/bbs2/index.php?s=&showtopic=260642&view=findpost&p=2243793
Posted by: whitetwinturbo Mar 2 2016, 11:58 PM
Posted by: R_u_dd Mar 27 2016, 11:01 AM
Painting Begins
I can't wait to post these photos. We are half-way through the painting process doing the interior first, two coats paint and two coats clear-coat. We decided on a non-stock color, a Honda Integra B97M code color. It's a pearl, which is mica rock, in the old days, it was made with fish scales, much easier to paint with the modern paint, but still shows every flaw. I am starting to see bumps I didn't know were there.
Blue Color survey http://www.914world.com/bbs2/index.php?showtopic=278747&st=0
Painting Notes/Tips
- The guide coat is very important throughout the paint prep process. This is a thin coat of mist sprayed over the primer to create dots or texture that reveals low spots and where you've sanded. It's particularly important for wet sanding. We used 400 grit 3M paper for wet sanding and could get away with it because of the high solids in the paint.
- Foam sanding blocks work very well.
- Use the green masking tape. The glue withstands the chemicals in the paint better than blue. blue is ok for priming, but must be changed out for the paining. Better to use the green.
- Put a little dawn dish soap in the water when wet sanding. Dawn is a great cleaner for the painting process.
- Spray water down on the ground before priming and paining to remove static discharge and keep the paint from sticking to the cement.
- Use lacquer thinner for solvent.
- Mix hardeners exactly, but reducers are up to the painter.
- Buy a small amount of test paint and spray it out with one, two, and three coats, with clear coat over the top, because the paint varies considerably with the number of coats and methods of spray. Also, photos on the internet vary widely depending on lighting conditions.
- There is a face coat and side cote tone that varies between light and shadow. The difference in tones is important as you will see it in the curves of the car.
- More to follow as I remember them (Feel free to add your painting tips)
Pictures:
Our color trials. The lower colors are a candy version that we will use for the rocker panels.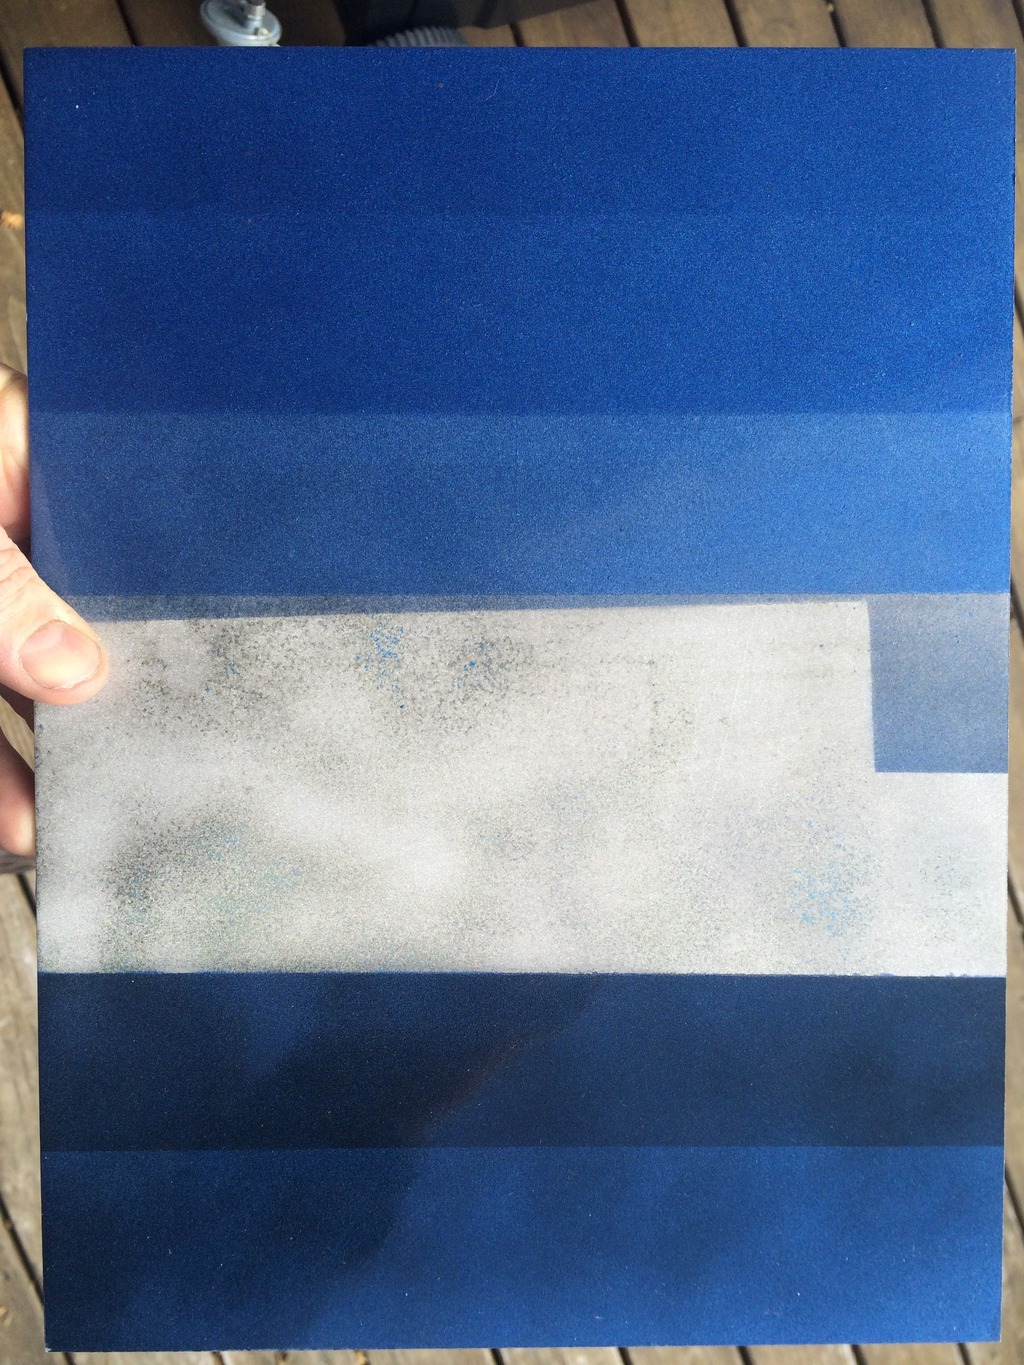
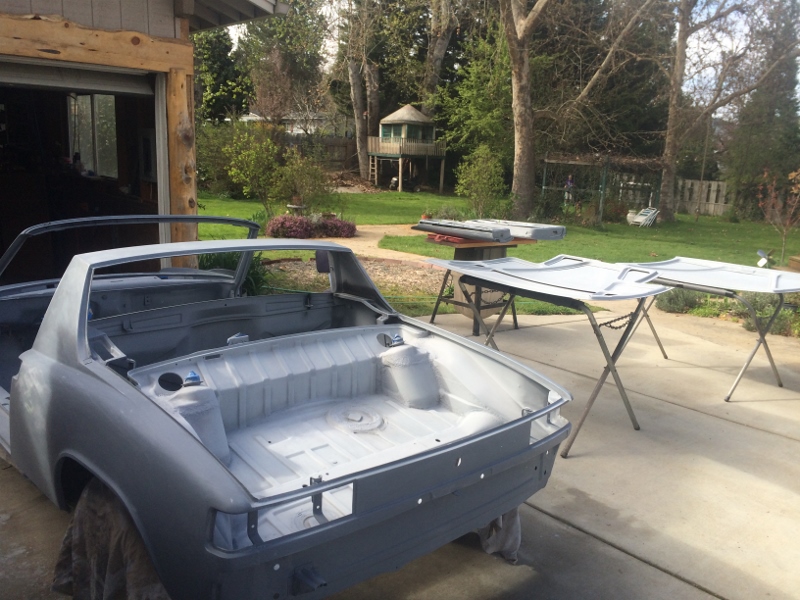
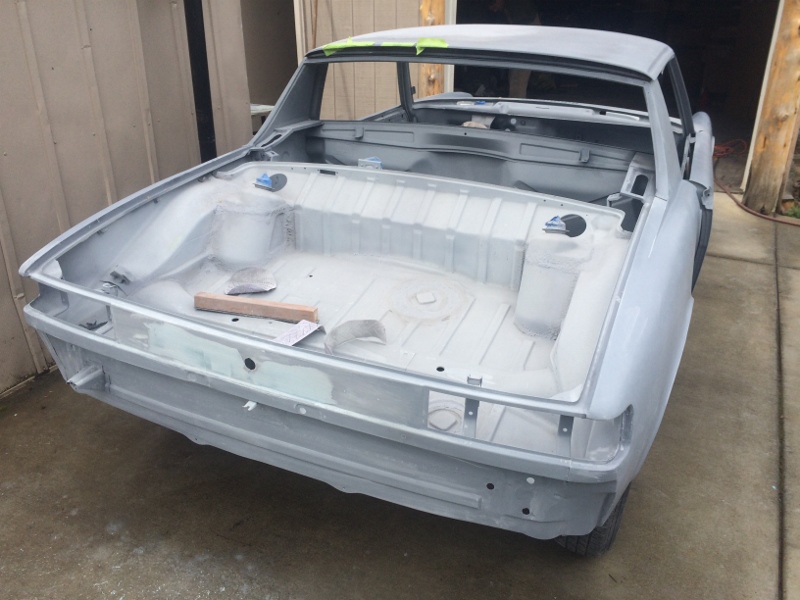
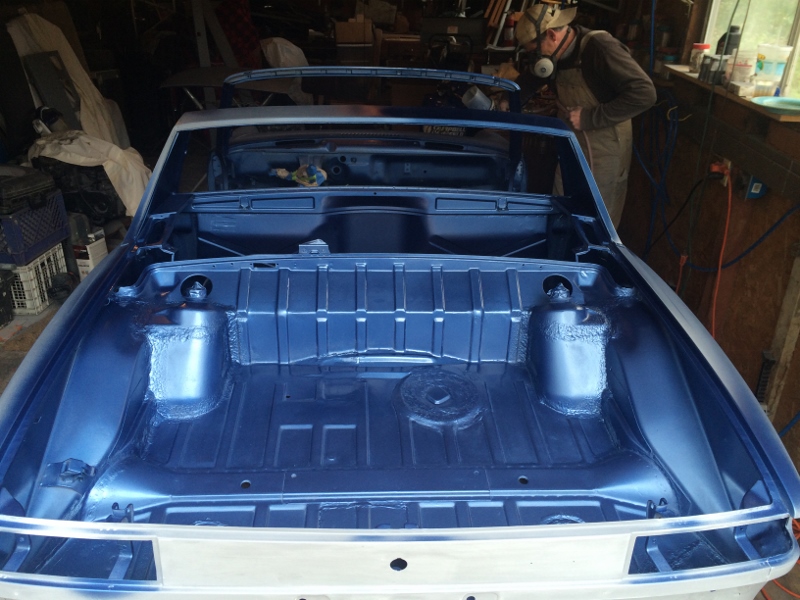
These pictures were taken before the clear coat was applied, which really makes the paint pop.
Posted by: R_u_dd Apr 2 2016, 11:27 PM
We got some paint on the panels yesterday and clear coat today. Two coats paint, one coat pearl, 4 coats clear. We need to do some cutting and buffing yet. There's still orange peel and quite a bit of texture to be buffed. But, again, I can't wait to post pix, so here they are...
The color is amazing, but you can't see it as well with these pictures taken inside. I will have to push it out there for pix when the pollen stops flying and we are done with the paint.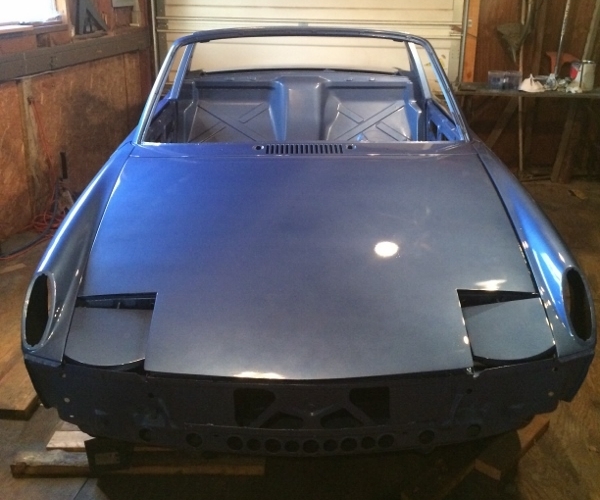
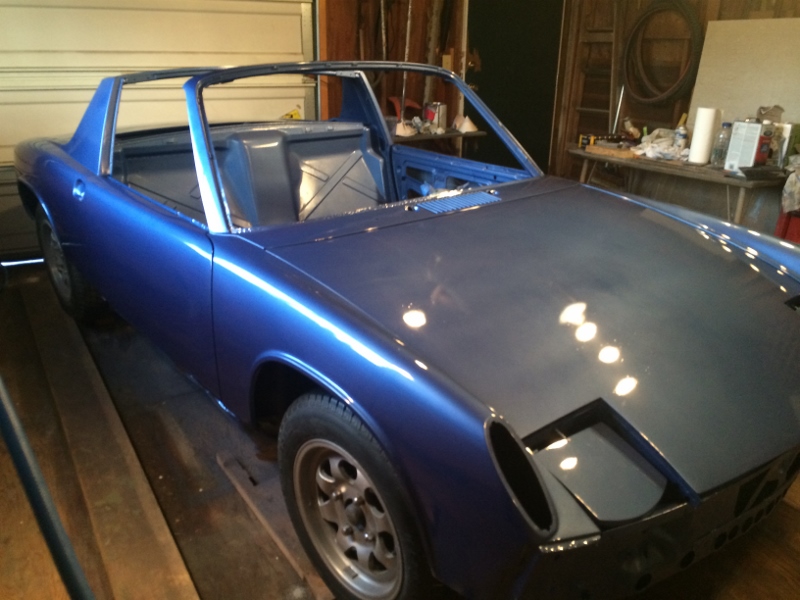
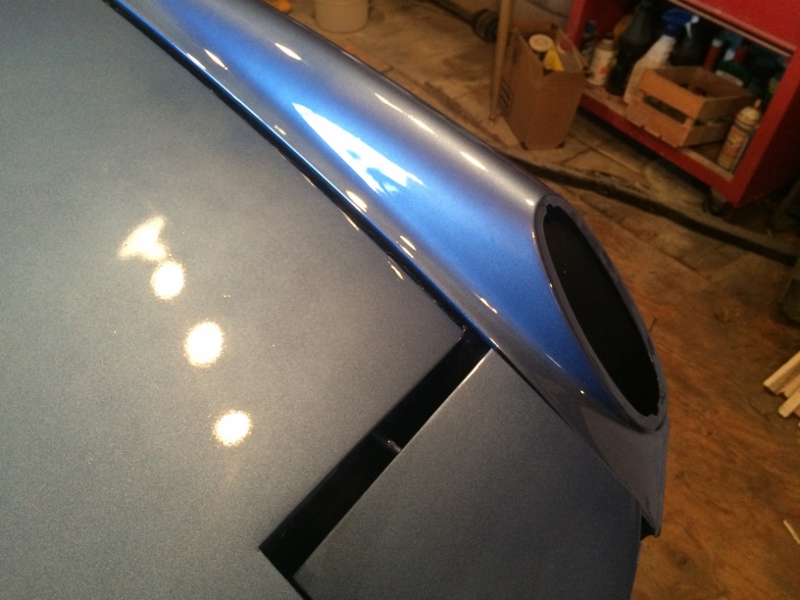
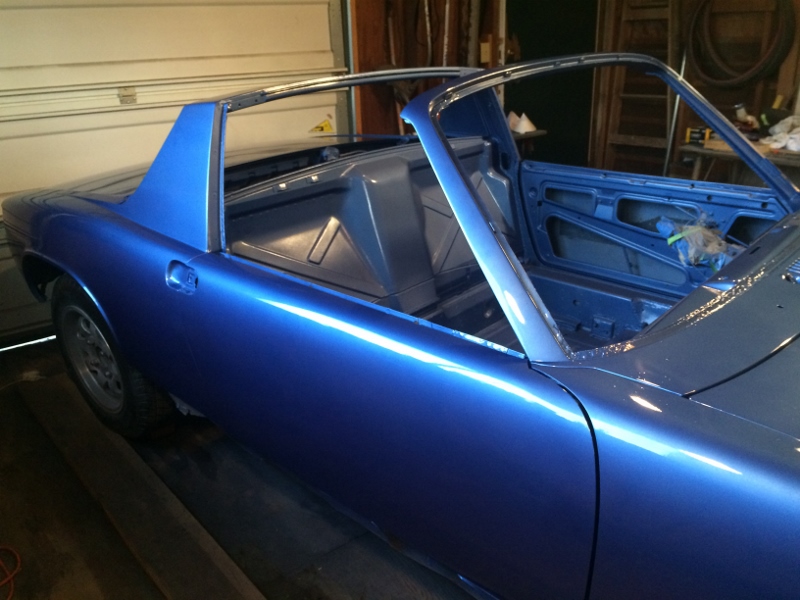
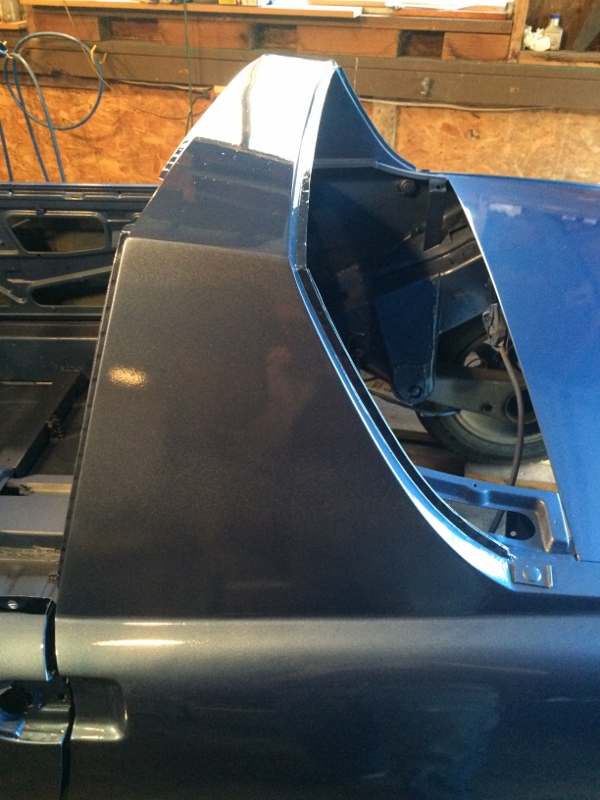
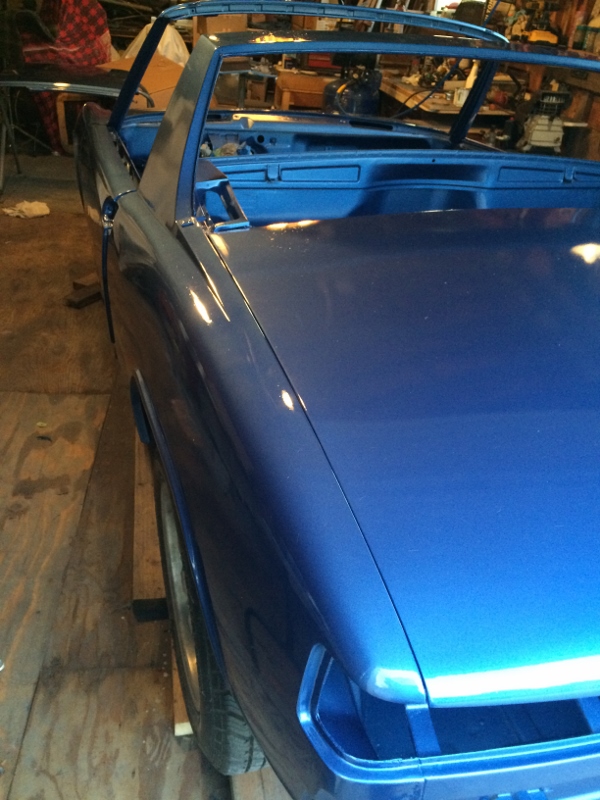
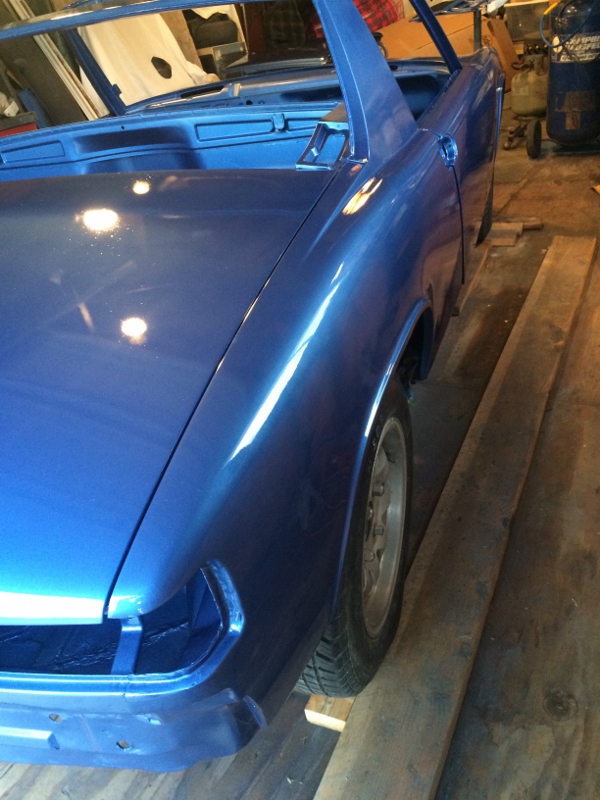
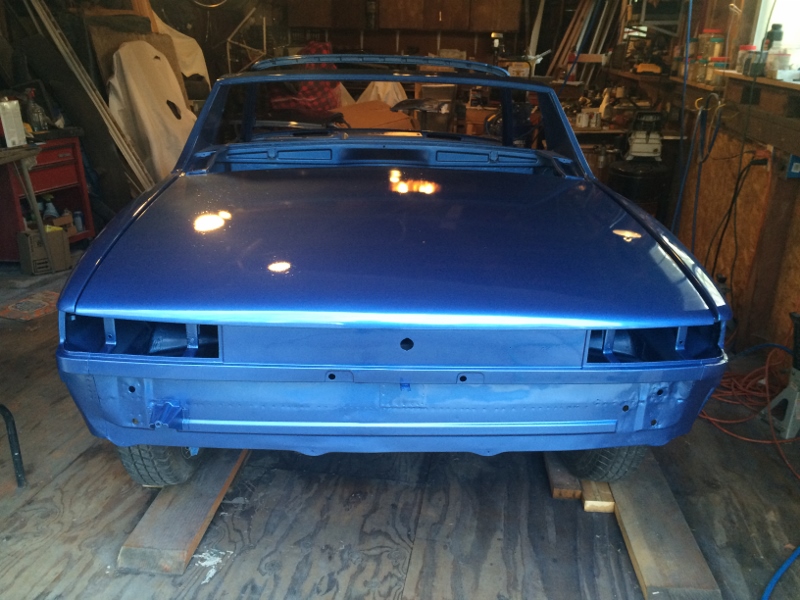
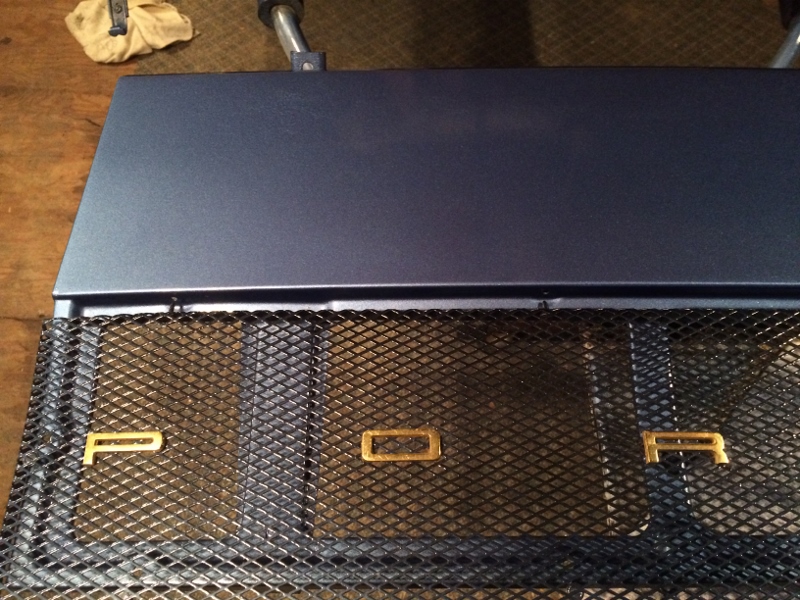
And a surprise on the way ...
Posted by: ahycaramba Apr 2 2016, 11:34 PM
Great progress!!! Looking good!!! How about some shots of the front bumper and air dam.
Posted by: R_u_dd Apr 2 2016, 11:45 PM
Great progress!!! Looking good!!! How about some shots of the front bumper and air dam.
We are going to paint the lower portion (original valence) in a candied blue black and the upper portion (custom civic part) in the voltage blue. Scott has it at his shop because he was doing some final glazing work. I can hardly wait to get it back myself. He also has the rocker panels which will be done in the candy blue black fading from dark to light with a "Porsche" negative stencil. So, I am hoping to get those back on Monday. The grate over the engine is in the candied blue black. Looks sweet. The photos don't do it justice.
Posted by: whitetwinturbo Apr 3 2016, 01:46 PM
Posted by: R_u_dd Apr 6 2016, 10:53 PM
The big reveal today. Scott finished the logo. He painted this by hand with an aribrush. It's on the sail panel.
It's not a sticker believe it or not. The pictures are a little larger than life size.


Posted by: whitetwinturbo Apr 6 2016, 11:15 PM

Posted by: 914forme Apr 7 2016, 08:43 AM
The big reveal today.
Ho WOW that thing rocks!
Love that, I would use that crest and do a 3D printed badge. Is it copyrighted?
Posted by: Andyrew Apr 7 2016, 09:15 AM
That looks great!!!
Posted by: R_u_dd Apr 24 2016, 11:53 PM
The painting is almost finished. We cut and buffed this weekend. There's still some fine finishing work and small pieces, bumper and rockers to paint.
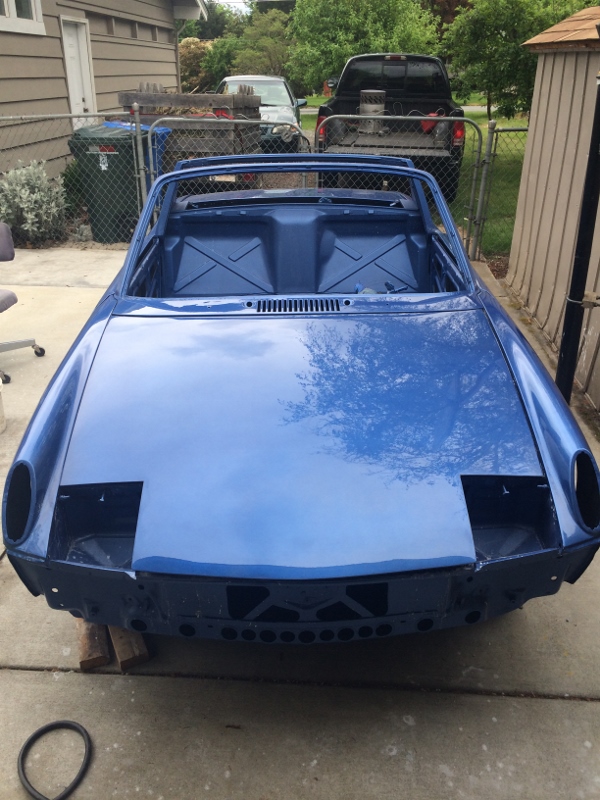
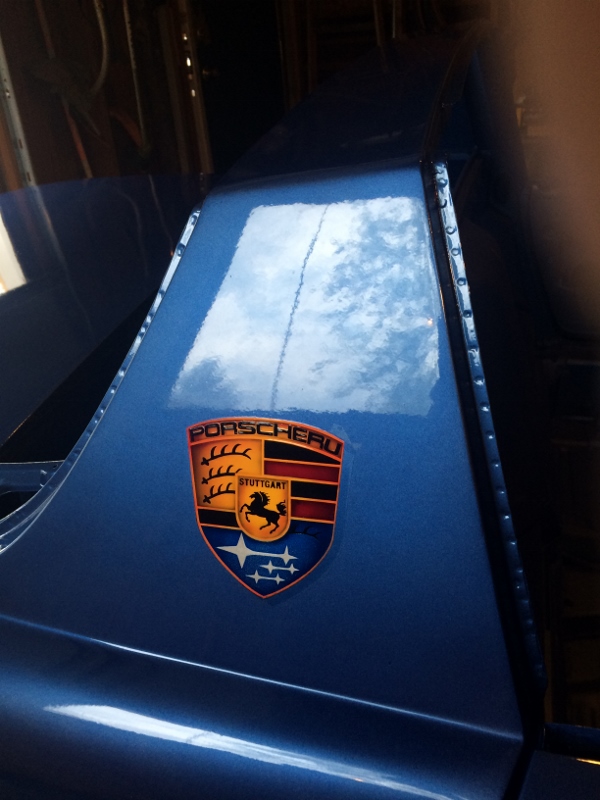
High Resolution - cell phone
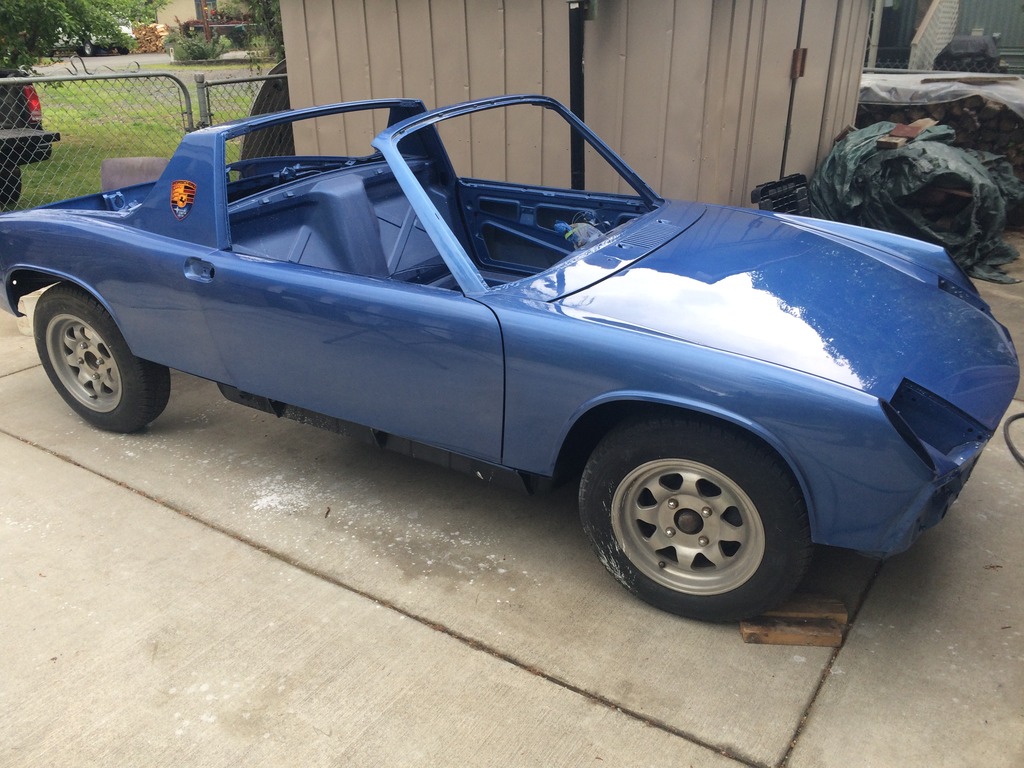
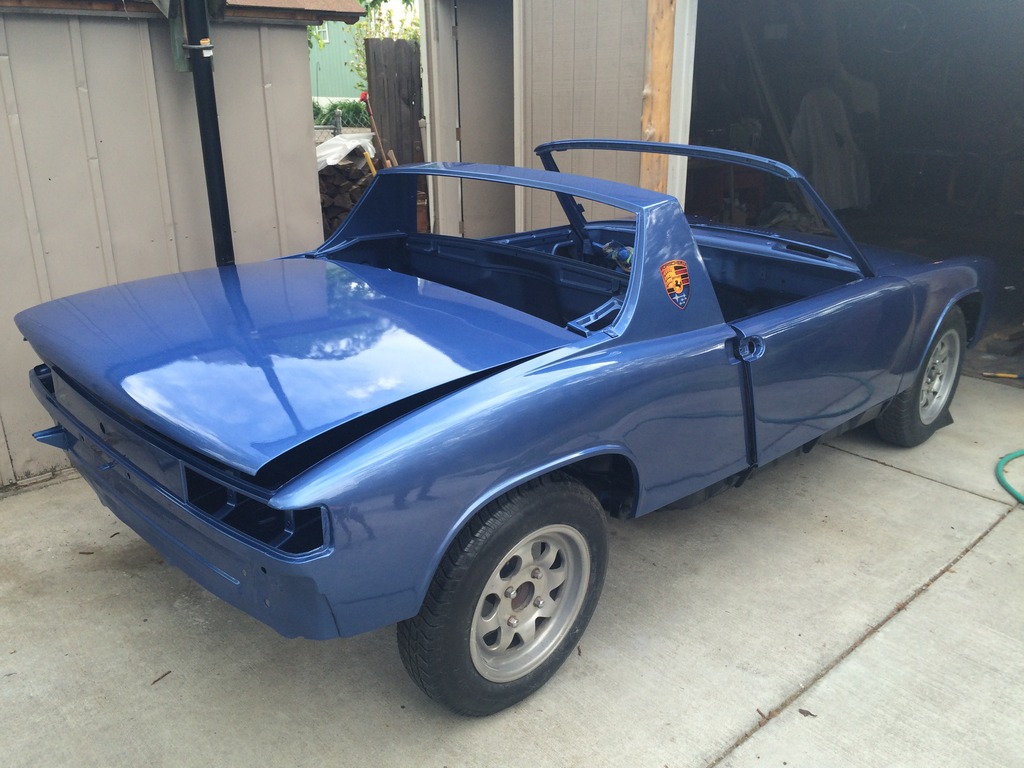
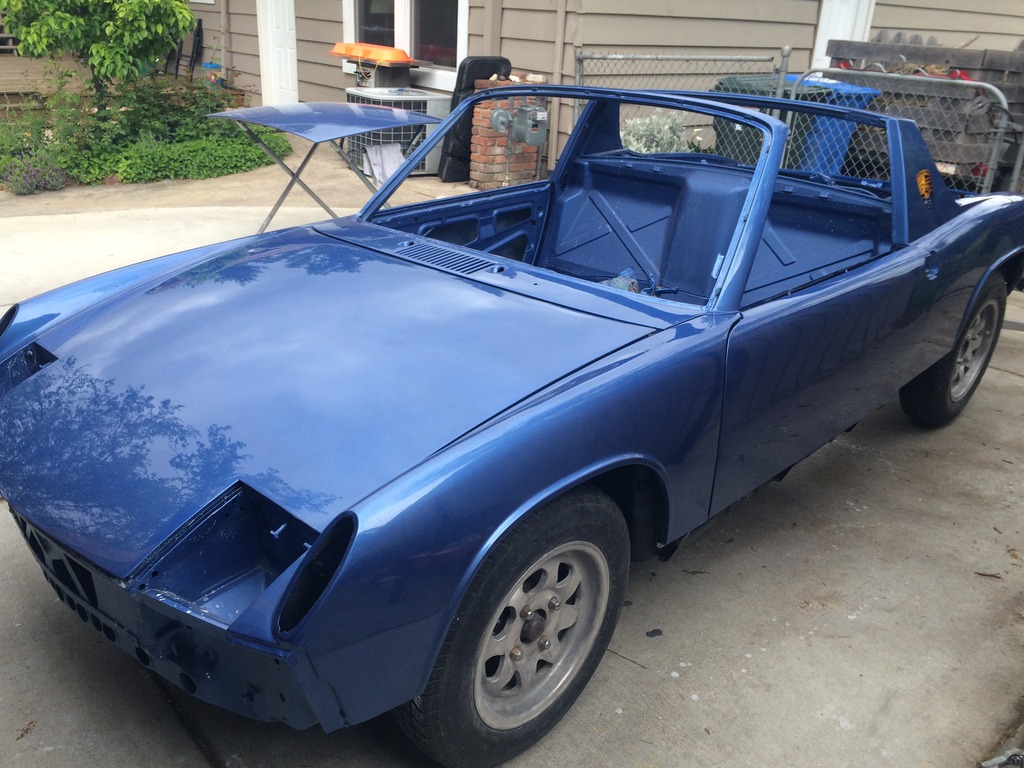
Posted by: R_u_dd Apr 25 2016, 09:50 PM
Posted by: JRust Apr 25 2016, 10:07 PM
Love the blue bud. I even like the logo you made up. Not sure I like it on the sail panel. It's your car though & all that matters is you like it. You got a little work to do to have it ready for WCR. It is looking great though. Can't wait to see it in person.
Posted by: R_u_dd Apr 25 2016, 10:59 PM
Love the blue bud. I even like the logo you made up. Not sure I like it on the sail panel. It's your car though & all that matters is you like it. You got a little work to do to have it ready for WCR. It is looking great though. Can't wait to see it in person.
You know we thought about putting the logo behind the front wheel on the quarter panel- taped a paper copy in both locations and the logo just looked better on the sail panel. The original idea was to put the logo- a single logo only on the front hood where the badge goes, but it would have looked like two eyeballs and a nose, so that didn't work. The sail panel logo grows on you after a short while. I like the checkerboard sail panel on the blue autocross car that is out there- the inspiration for dressing up the sail panel.
Posted by: JRust Apr 25 2016, 11:29 PM
Hey it's looking great man. I like the logo like I said. I don't think I would have put it there but who cares. It's your car & what matters is you like it. I am sure there are plenty who will love it. Now show me some pics of that suby drivetrain going in 
You know we thought about putting the logo behind the front wheel on the quarter panel- taped a paper copy in both locations and the logo just looked better on the sail panel. The original idea was to put the logo- a single logo only on the front hood where the badge goes, but it would have looked like two eyeballs and a nose, so that didn't work. The sail panel logo grows on you after a short while. I like the checkerboard sail panel on the blue autocross car that is out there- the inspiration for dressing up the sail panel.
Posted by: R_u_dd Jun 28 2016, 12:53 AM
Progress on the Blue Porscheru over the last couple months:
Radiator Cutouts See bottom of Post http://www.914world.com/bbs2/index.php?s=&showtopic=260642&view=findpost&p=2243793
Another shot of the Rocker Panels:
Seat reupholstery: Not too difficult and very rewarding:
See post http://www.914world.com/bbs2/index.php?s=&showtopic=260642&view=findpost&p=2302697
And finally the long awaited bumper reveal. Also see post http://www.914world.com/bbs2/index.php?s=&showtopic=260642&view=findpost&p=2302675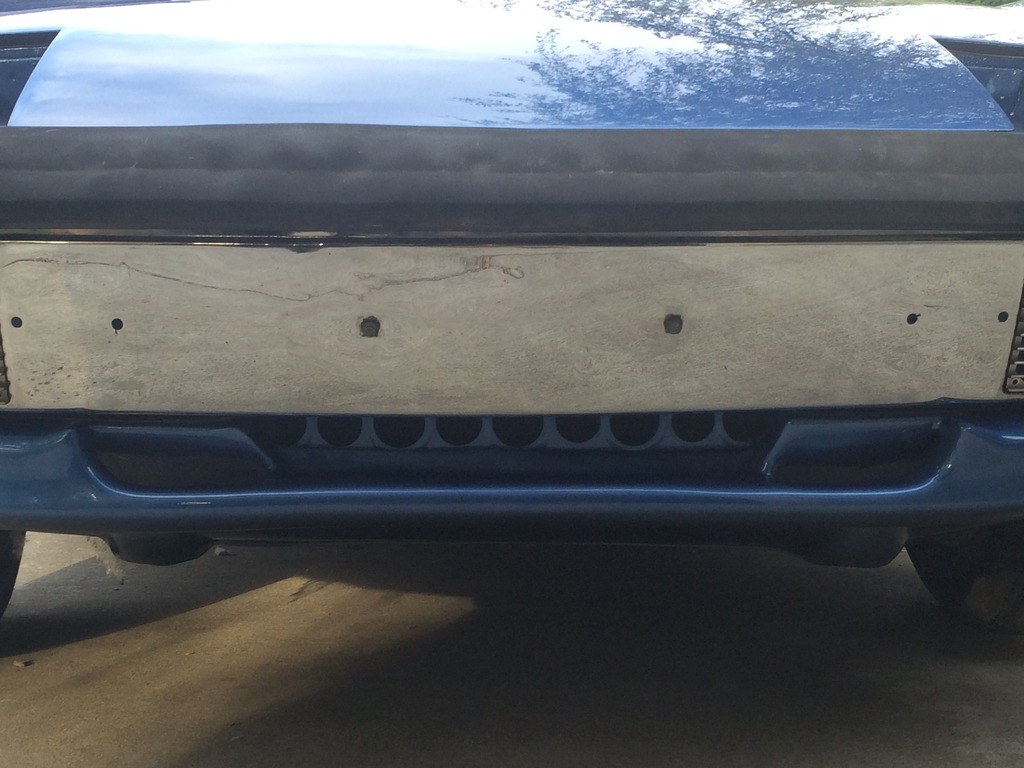
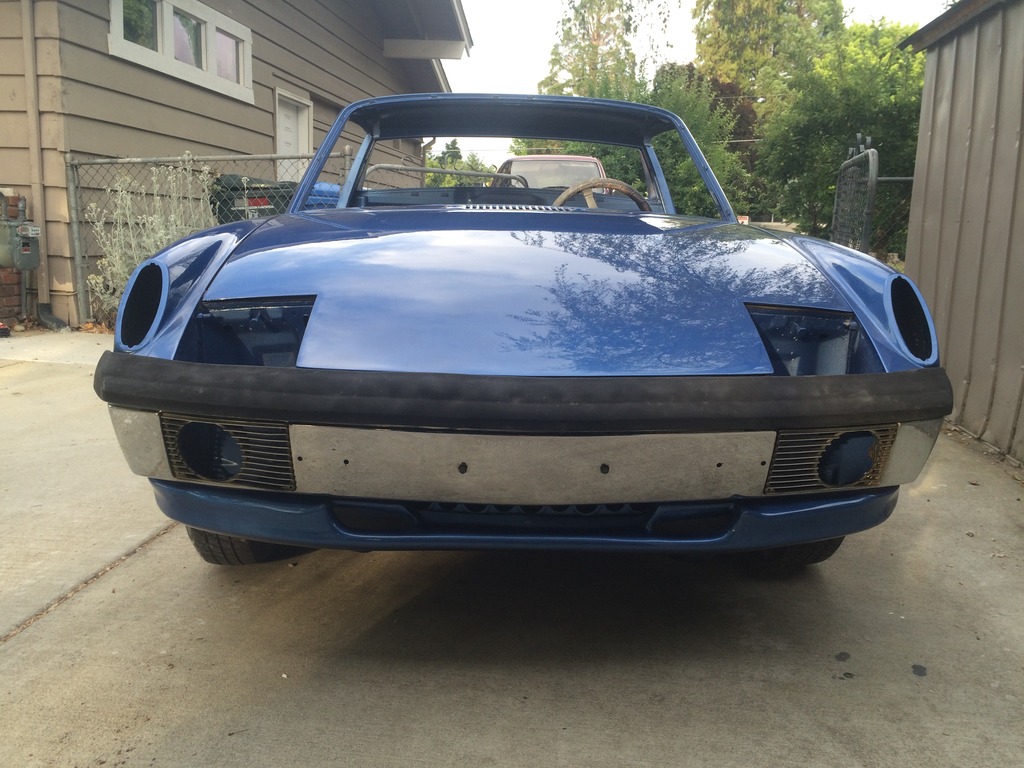
Posted by: falcor75 Jun 28 2016, 01:12 AM
That looks great, love the badge details and the choise of blue. Keep up the good work!
Posted by: 914forme Jun 28 2016, 09:37 AM
Cars coming together nicely
Posted by: R_u_dd Oct 2 2016, 02:04 PM
Gauges, Gauges and More Gauges
The original look of the gauges is great. In a concourse or restored 914 with original engine and transmission the best thing is to restore the original gauges. But for me, a Suberite, one has to use the digital speedometer rather than the cable speedo. Questions to think about: Should I rebuild the speedometer and save the faceplate and recalibrate? Should I just start over with new gauges? Which of the other gauges are usable? After a lot of web searching and pricing, what I decided to do is replace the gauges entirely with some original look VDO gauges.
Here is some background material that I found while trying to make an informed decision:
Everything you need to know about your model year http://www.p914.com/p914_gauges_cluster.htm
http://www.914world.com/bbs2/index.php?showtopic=249482&hl=gauges&st=0, thread by Cairo94507
Gauges by timothy_nd28:
http://www.914world.com/bbs2/index.php?showtopic=216719&st=0
http://www.914world.com/bbs2/index.php?showtopic=212130&hl=
http://www.914world.com/bbs2/index.php?showtopic=217100
http://www.914world.com/bbs2/index.php?showtopic=216719
Vendors:
http://www.paspeedo.com/porsche.htm
And from:
Ideas for Dash Board Layout (Pictures from forum member cars)-
Link to: http://www.914world.com/bbs2/index.php?showtopic=97826&hl=
Pictures from another interior. Not sure the year.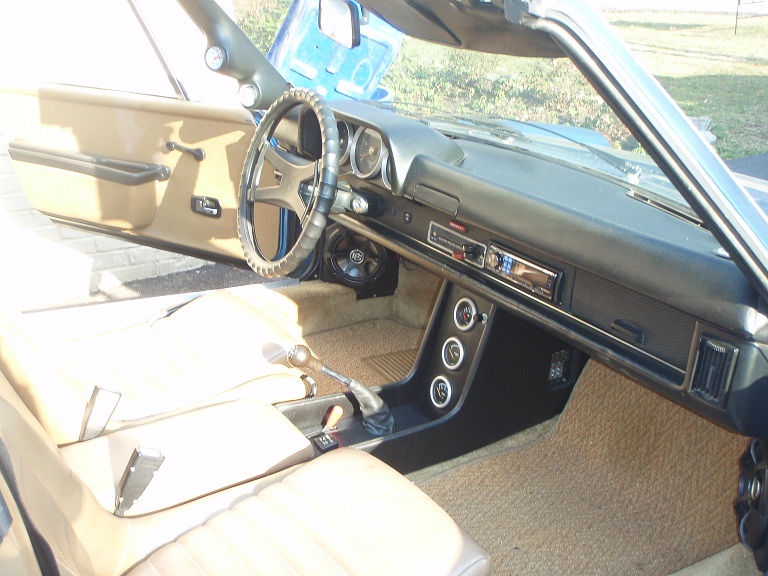
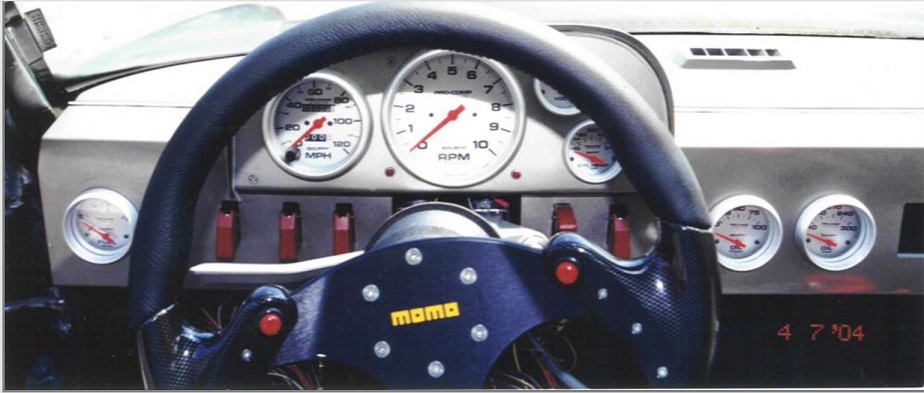

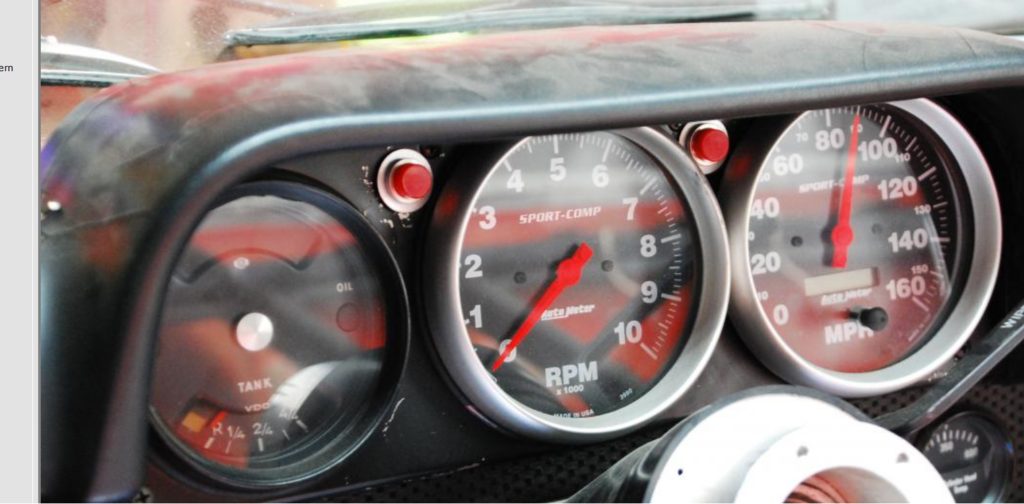
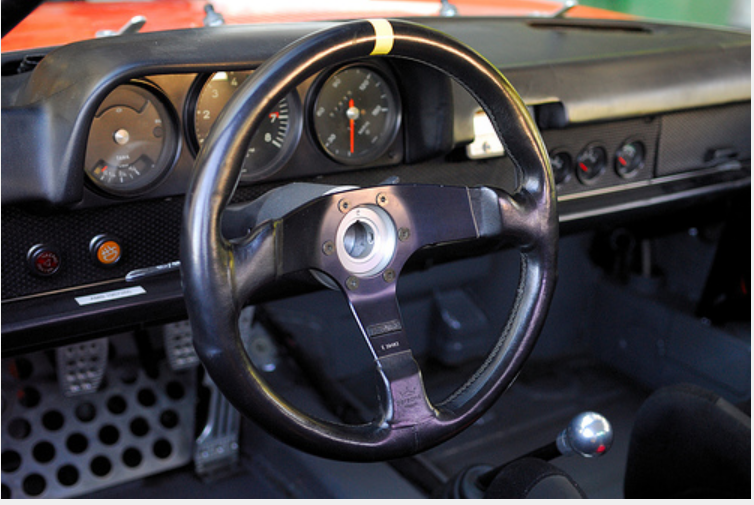
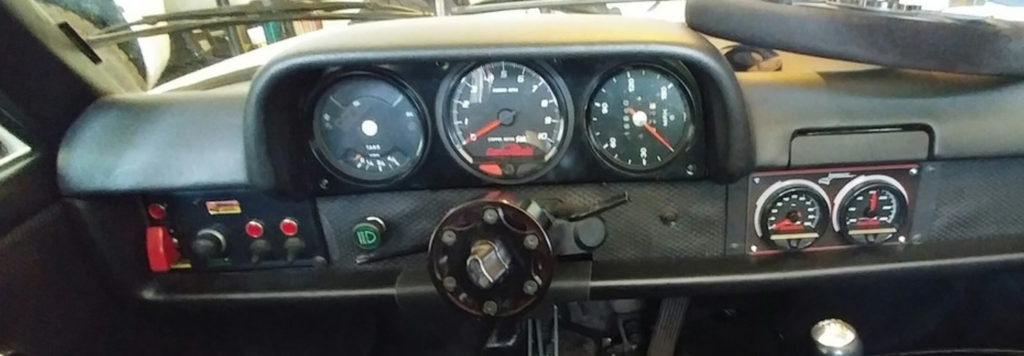
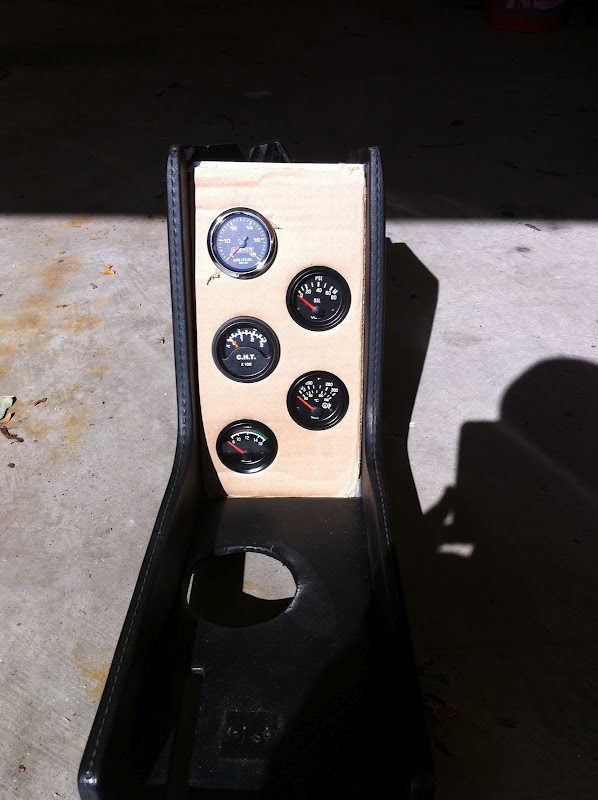
I bought a 6 gauge set of genuine VDO gauges off ebay for $280 bucks plus a clock for another $40. The small gauges are 2 1/16 inch and the two large gauges are 3 3/8". They are a bit small, but that allows them to be put into the main dashboard. I tried six gauge clusters and five gauge clusters above the steering wheel and decided on the five plus two in the ash tray area. The center console looks very nice, but in the end, I think I might feel confined in the cockpit with it there.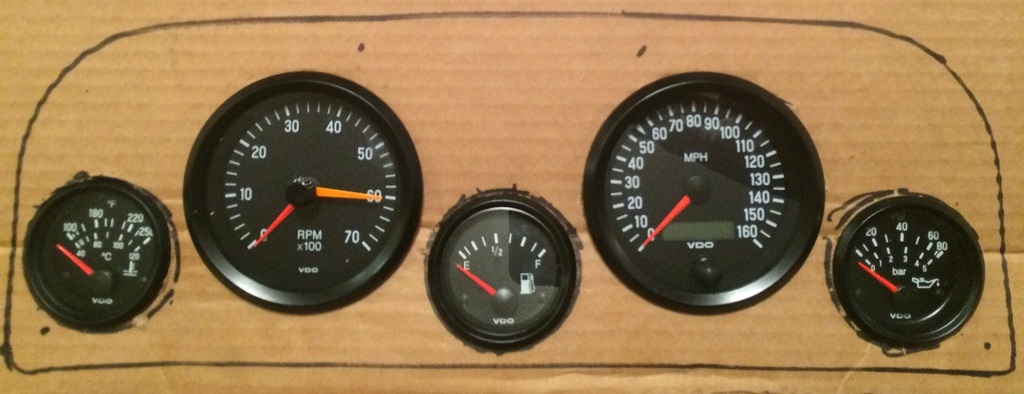
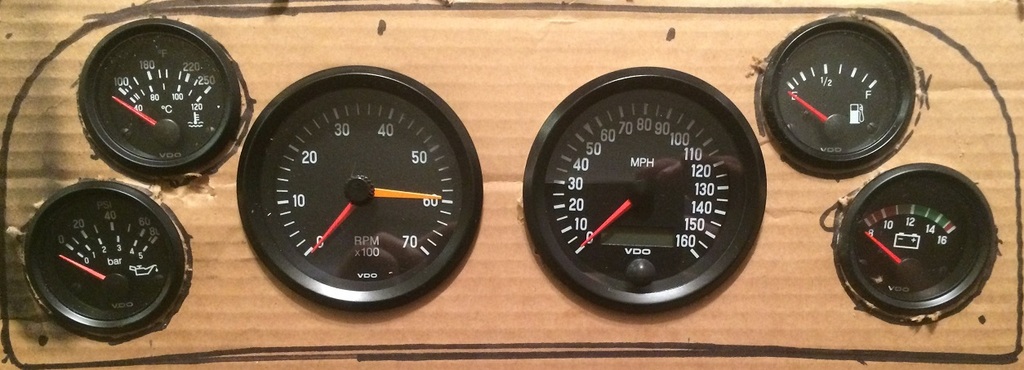
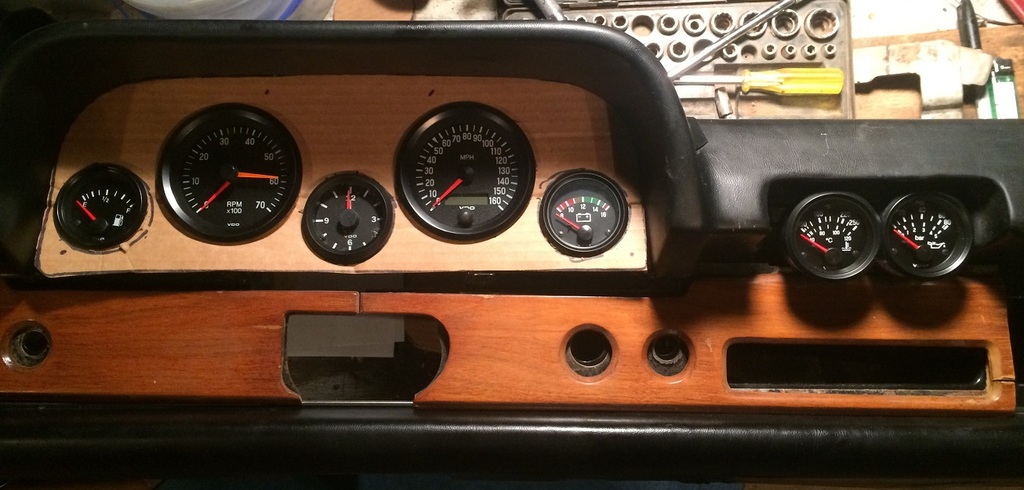
I learned that the 2" hole cutter actually creates a larger hole when you don't use a drill press. Cutting by hand, there is just enough wobble to make the hole a bit larger. The 2 1/16 inch measurement is for the outside of the gauge. The hole needs to be 2". Since my hole was just slightly larger, I put a rubber bumper around the outside of the gauge (cut from a bicycle inner tube). Worked perfectly, and I have a snug fit now. I cut the larger holes very carefully with a jigsaw and got the fit nice and snug.
I screwed the aluminum sheet metal to the back of the original to use for a template to cut the outside perimeter and mark the location of the screw holes.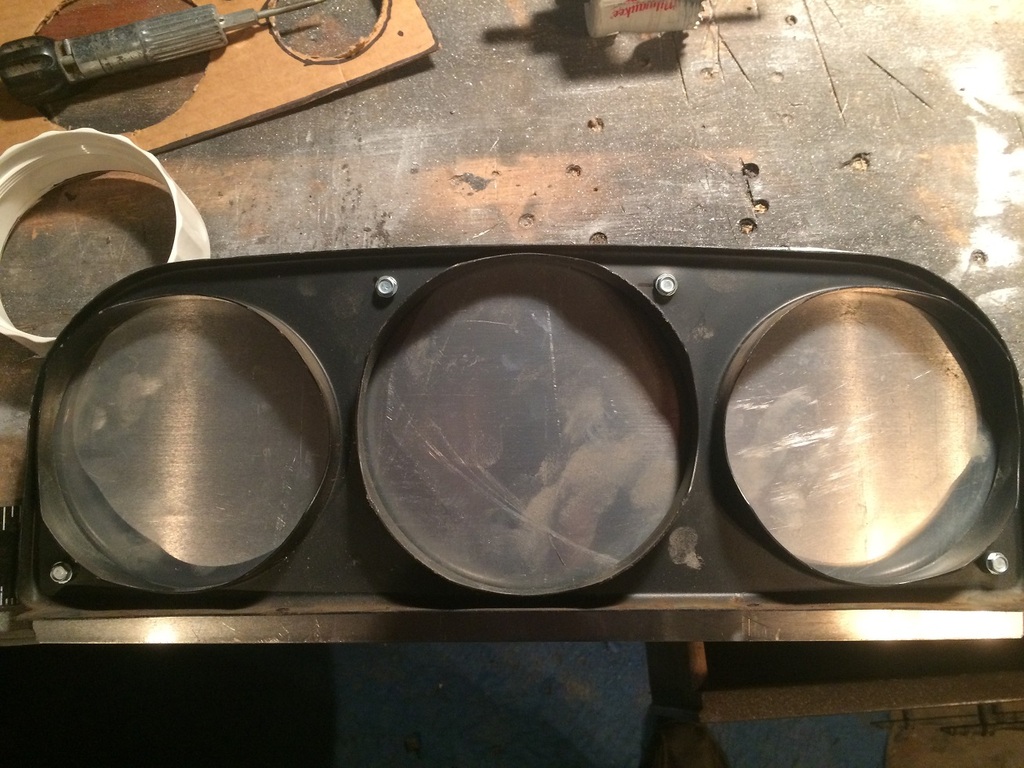
I saw this technique somewhere to create a pattern in the aluminum. If you make the swirls, here's a few tips. Use a drill press. Take your time. Go the same direction with your swirls. Cut half the previous circle with your bit. You can't very well redo your swirls, because it creates a different reflection. Keep your lines straight. I did mine by hand with my drill and a brass brush from a dremel kit. Seems to work fairly well, but if you look closely, my pattern is not that precise. The lines could be straighter and pattern more precise. They should all look like Japanese fans. Usually only the artist notices their own flaws. I like the swirls though. It gives the dashboard more depth and covers up the fact that the gauges are slightly off center. 
The board with the gauges in them. The lower part will be folded down.
Posted by: veekry9 Oct 2 2016, 02:33 PM
Very nice indeed.
/
I like this treatment,tho a dark matte coating or anodizing would avoid reflections in the windscreen.
Still,a nice effect,fighter jet.I worked in cnc punching and diemaking in the early '90s,mil spec enclosures.
https://www.google.ca/search?q=sheet+metal+enclosure+manufacturers&espv=2&biw=960&bih=478&source=lnms&tbm=isch&sa=X&ved=0ahUKEwjUyarcjb3PAhVH04MKHYceCsoQ_AUIBigB
https://www.google.ca/search?q=cnc+sheet+metal+punch&espv=2&biw=960&bih=478&source=lnms&tbm=isch&sa=X&ved=0ahUKEwi9_P6Tjr3PAhVl54MKHQZvAtYQ_AUIBygC#tbm=isch&q=cnc+sheet+metal+punch+amada&imgrc=c895zk1M9p6w0M%3A
For those sheetmetal and monocoque needs,a perfectly folded and punched fabrication.
Plasma cutters,lasers,waterjets too.
Like sheetmetal origami.
A local guy with a hobby cnc router could cut that metal in a jiffy,and at good quality.
/
Posted by: 76-914 Oct 3 2016, 07:59 AM
Gauges, Gauges and More Gauges
The original look of the gauges is great. In a concourse or restored 914 with original engine and transmission the best thing is to restore the original gauges. But for me, a Suberite, one has to use the digital speedometer rather than the cable speedo. Questions to think about: Should I rebuild the speedometer and save the faceplate and recalibrate? Should I just start over with new gauges? Which of the other gauges are usable? After a lot of web searching and pricing, what I decided to do is replace the gauges entirely with some original look VDO gauges.
That looks vaguely familiar.
Posted by: R_u_dd Oct 9 2016, 06:43 PM
Engine Install
Engine is now back in and mounted. The good news is that the axles are going to work fine. We put up the 944 CV joint and it seems to work fine with 3" of offset and about 12 degrees of angle. This means the trunk won't have to be cut up or the manifold flipped. The starter and clutch slave all clear the trunk. 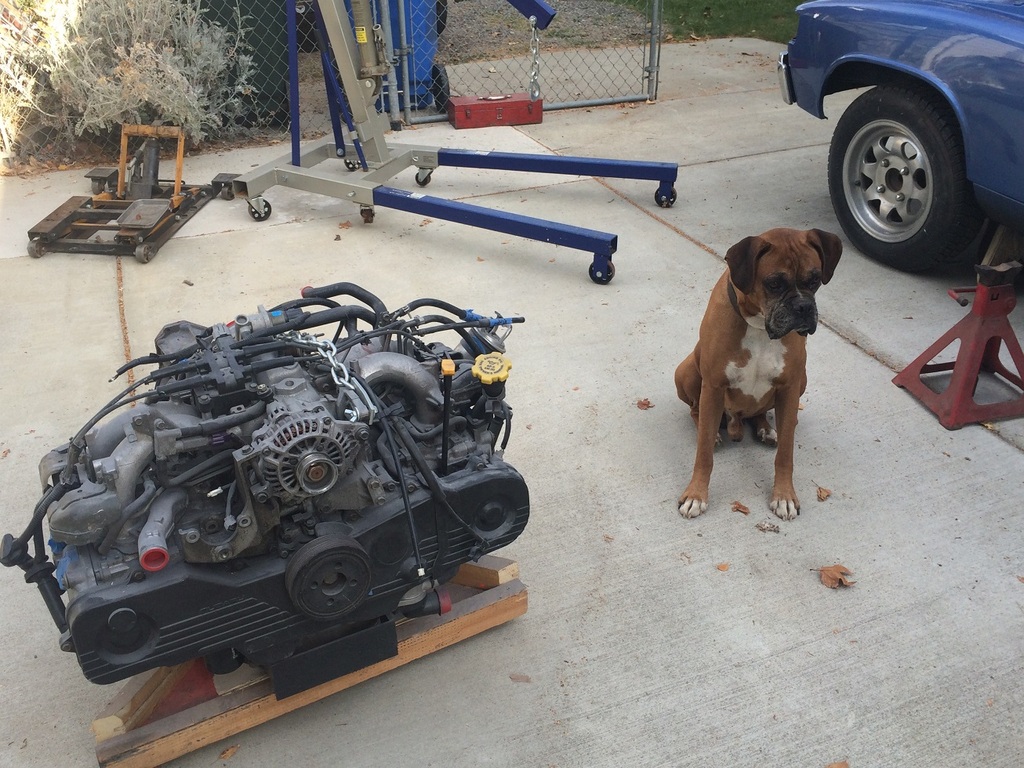
Dozer is ready for the engine and that new cat of ours. We used a transmission lift for the engine and two hydraulic lifts to jack up the car. Bye the way, Dozer recently fathered 13 boxer pups!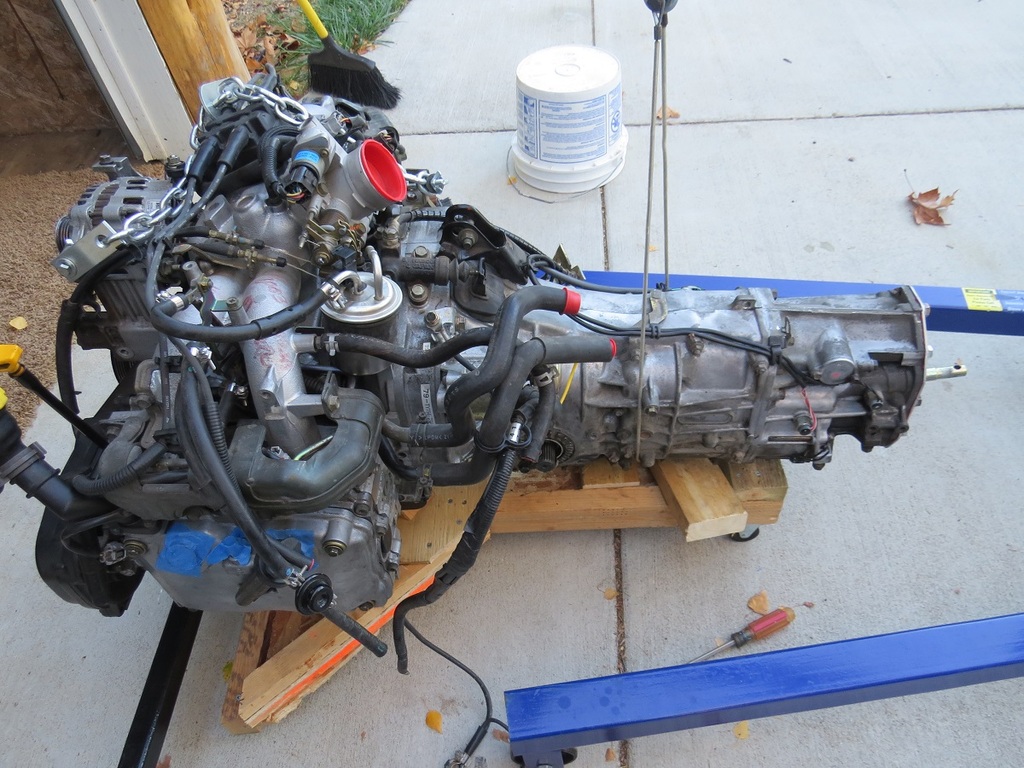
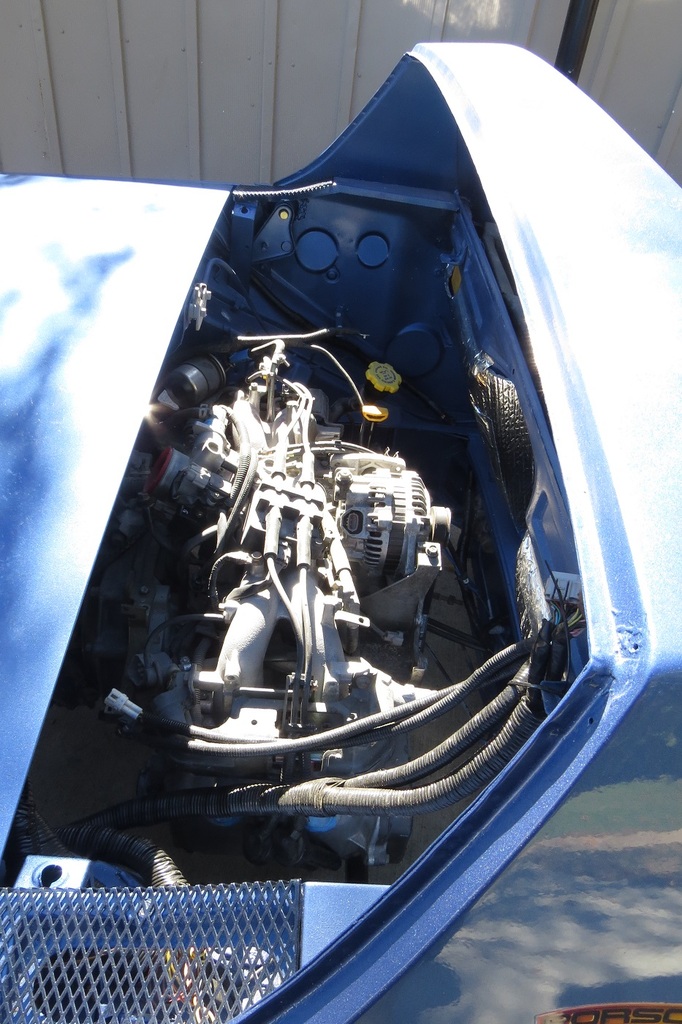
Here it is in the car. It's really a pretty small engine. Lot's of room in there for it.
Posted by: R_u_dd Oct 9 2016, 06:51 PM
Header and Exhaust
I got this header in the mail. It's a nice looking piece of pipe, but doesn't fit under my engine mount. It hits at the upper line.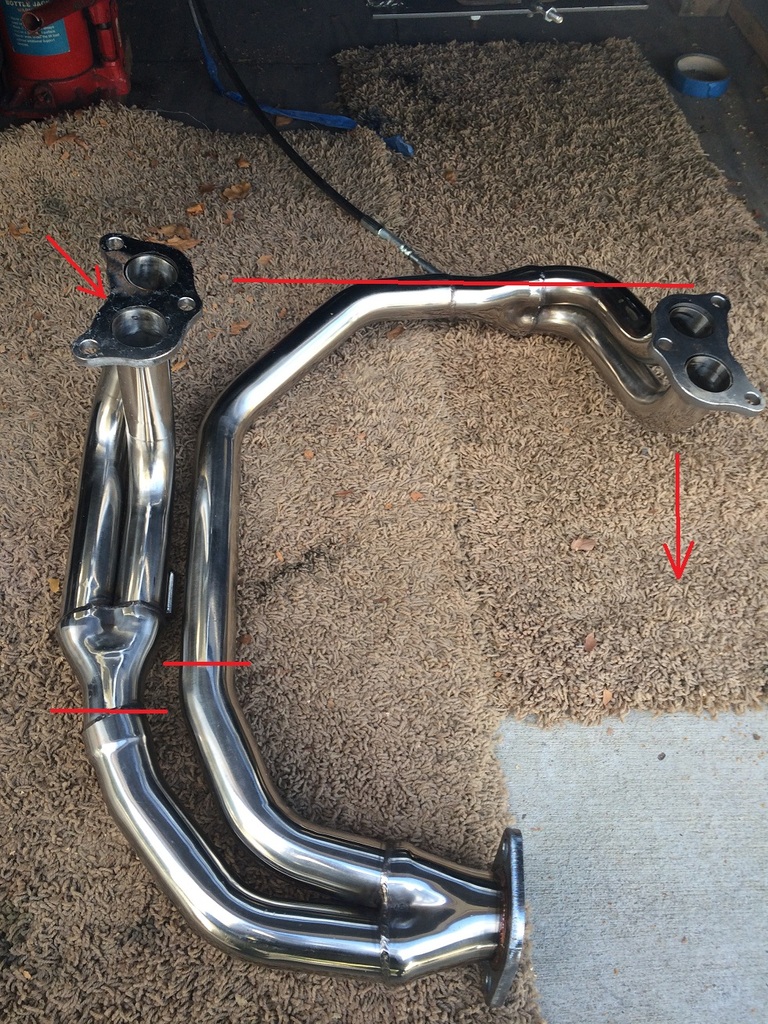
So the plan is to make a couple cuts on the lines, and flip the left and right sides. The upper left arrow is where we would cut the flange in order to flip it and point the pipes to the back of the car.
If we weld it all carefully, it should still function as a header. Does this sound like a good strategy?
I was not able to find a lot on what people have done with their headers, so if you have any pictures, that would be great!
Posted by: R_u_dd Oct 9 2016, 07:35 PM
Shifter Linkage Bracket
The shifter linkage has been weighing on my mind for some time. I finally got around to welding it all together. There's a funny story about some of the pieces here. I am a forester and come across some very beautiful sights in the woods. Sometimes I find useful things. The other day I found a lawnmower handle that has just the right bend in it for this application. So, I scrounged it on home and you see it here with the square hole.
I used a couple great established threads here with lots of pictures to size these pieces up. I felt like this was an easy enough design that I could make myself. Ian's design is a lot more compact, but this one is a little simpler to design.
It is for the MR2 shifter:
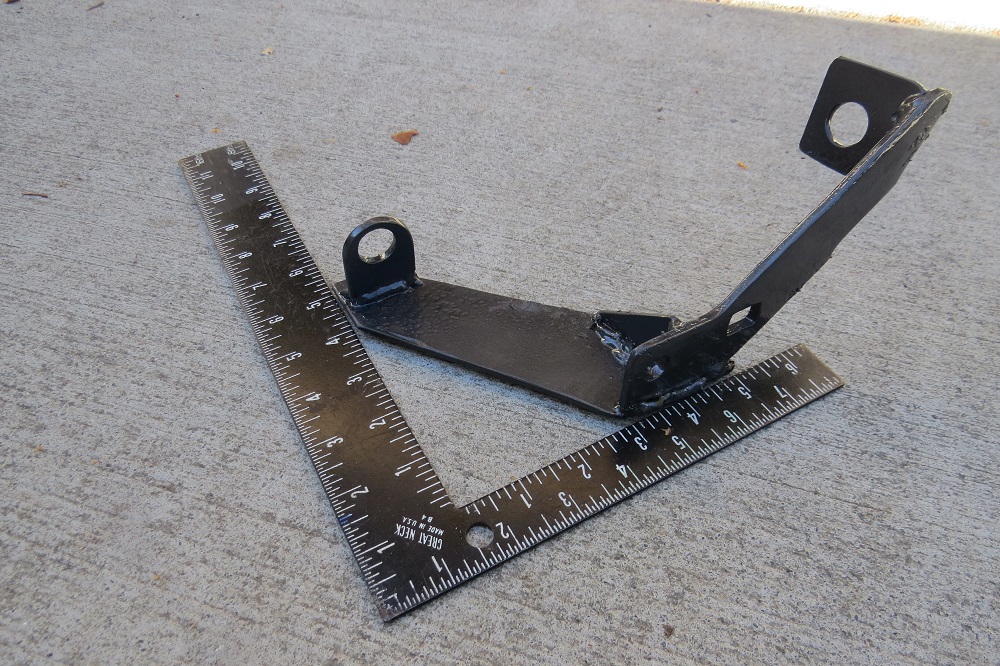
The finished piece.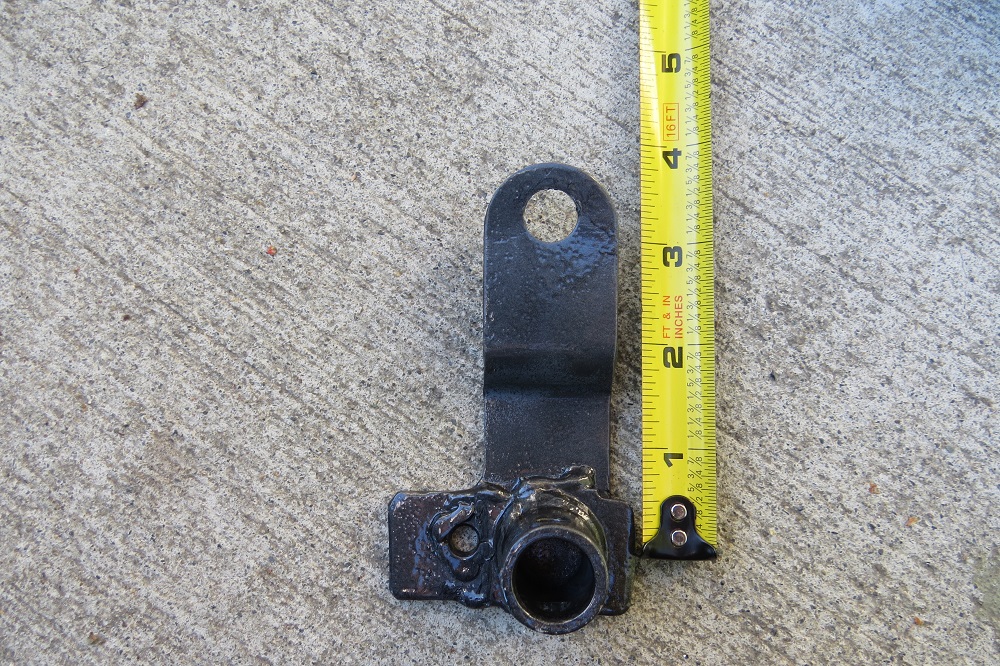
End Cap. My hole was too big and I had to weld it again. Needs to be the same diameter as the cable threading.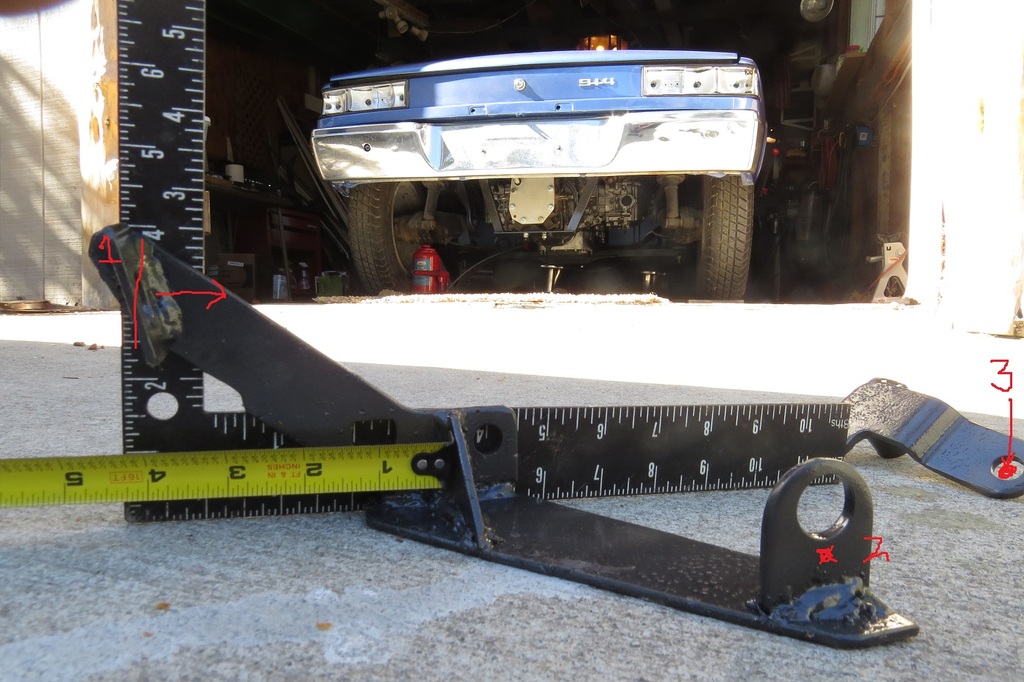
1. This piece needs to be more perpendicular. Rewelded it. Now the cable takes a straight path to where it needs to be.
2. Hole center moved down a bit to line up cables straighter.
3. Hole made smaller to cable diameter threading. (Less play in the shifting).
http://www.914world.com/bbs2/index.php?s=&showtopic=221682&view=findpost&p=1936650 seems to be the first to design this linkage bracket. The measurements are very helpful.
http://www.914world.com/bbs2/index.php?s=&showtopic=94994&view=findpost&p=1394139
http://www.914world.com/bbs2/index.php?showtopic=83031&view=findpost&p=1218036
Posted by: R_u_dd Oct 9 2016, 07:38 PM
The current look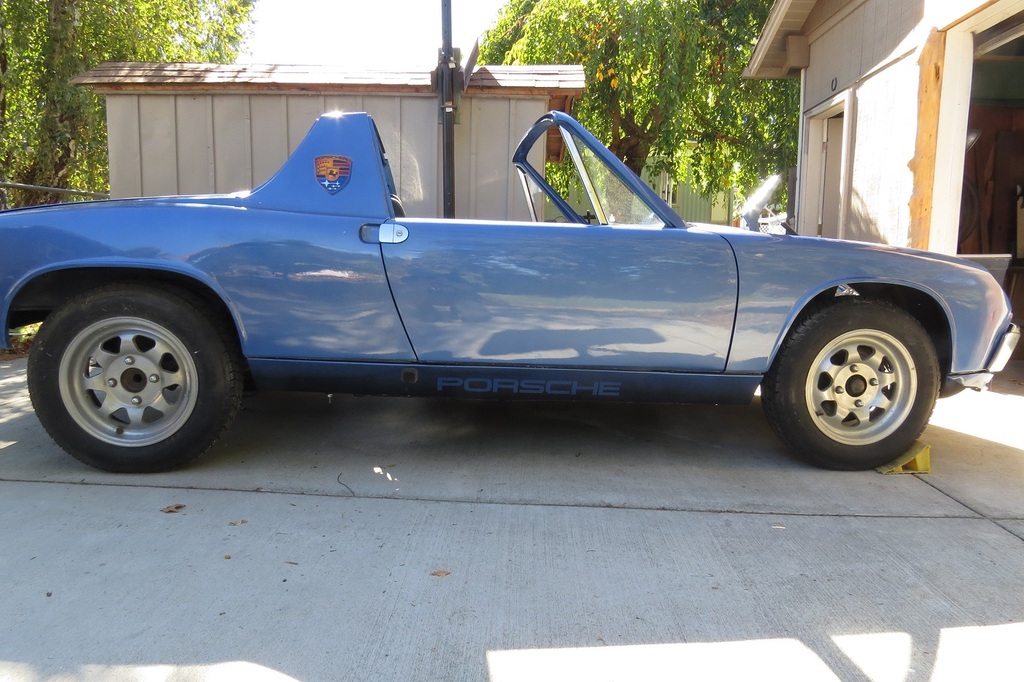
The ride height looks about right with the engine in.
It was a beautiful day in Oregon yesterday. There's nothing like rolling the car out into the fresh air and shiny weather for an afternoon.
Posted by: 914forme Oct 10 2016, 01:37 PM
That looks very tall to me
Posted by: JRust Oct 10 2016, 02:23 PM
That looks very tall to me
I don't think that pic has the drivetrain in it
Posted by: 914forme Oct 10 2016, 06:19 PM
That looks very tall to me
I don't think that pic has the drivetrain in it
My point I just towed another conversion and it was sitting just as high. Luckily, the perches can be lowered, and it should bring it down to a more decent hight.
Posted by: R_u_dd Oct 10 2016, 08:57 PM
That looks very tall to me
I don't think that pic has the drivetrain in it
It does. The last picture is the ride height with the engine installed. There's probably a good 100 pounds of stuff to put back in the car: ie, axles, gas tank, lights, wiper moter (is heavy), seats, people, dash, glass, etc. The ride height does look a little high though. I imagine once it goes bumping along the road that it will settle a little. It's the original suspension and I'm not sure but the car probably has 100k miles on it. It's not my main concern though now. I've got wiring, cooling systems, break systems, hydraulic clutch shifter, and on and on, seemingly endless work before this car is done and yet, most of the work is behind me. Just doesn't seem like it.
Posted by: mepstein Oct 10 2016, 09:12 PM
That looks very tall to me
I don't think that pic has the drivetrain in it
It does. The last picture is the ride height with the engine installed. There's probably a good 100 pounds of stuff to put back in the car: ie, axles, gas tank, lights, wiper moter (is heavy), seats, people, dash, glass, etc. The ride height does look a little high though. I imagine once it goes bumping along the road that it will settle a little. It's the original suspension and I'm not sure but the car probably has 100k miles on it. It's not my main concern though now. I've got wiring, cooling systems, break systems, hydraulic clutch shifter, and on and on, seemingly endless work before this car is done and yet, most of the work is behind me. Just doesn't seem like it.
You need to adjust the spring height on the rear and the torsion bars on the front.
Posted by: R_u_dd Oct 10 2016, 10:26 PM
[/quote]
You need to adjust the spring height on the rear and the torsion bars on the front.
[/quote]
Thanks for the advice. I did not know they were adjustable.
Posted by: mbseto Oct 11 2016, 09:30 AM
This whole thread is a fantastic read. Car's looking great, bet you can't wait to drive it!
Posted by: 914forme Oct 11 2016, 05:54 PM
That looks very tall to me
I don't think that pic has the drivetrain in it
It does. The last picture is the ride height with the engine installed. There's probably a good 100 pounds of stuff to put back in the car: ie, axles, gas tank, lights, wiper moter (is heavy), seats, people, dash, glass, etc. The ride height does look a little high though. I imagine once it goes bumping along the road that it will settle a little. It's the original suspension and I'm not sure but the car probably has 100k miles on it. It's not my main concern though now. I've got wiring, cooling systems, break systems, hydraulic clutch shifter, and on and on, seemingly endless work before this car is done and yet, most of the work is behind me. Just doesn't seem like it.
Depends on your shocks some adjustable perches IE. Bilstiens. Some no so much.IE KYB, if they are KYB, scrape up the funds to buy anything else you can find.
also great work the linkage
Posted by: JRust Oct 11 2016, 09:21 PM
Holy cow yes you need to bring that sucker down quite a bit. I thought for sure that was without the drivetrain. Unless of course you were going for that rally car build . Looking good besides that bud. Bummer your going to have it drivable just in time for winter . Still your going to have it drivable . Seriously cool
Posted by: R_u_dd Oct 12 2016, 07:57 AM
also great work the linkage
[/quote]
I put the linkage together last night and still need some adjustments. The cable that goes at a 90 degree angle from the back needs to be much longer than the cable that adjusts up and down and faces straight to the front. I currently have two 90 inch cables. One of them will have to be replaced with a 102 to 112 inch cable. Also, they don't come with all the nuts they need.
Anyone have ideas on the header? Does it look like I've got a good plan-> ie cut, move and reweld?
Posted by: R_u_dd Dec 23 2016, 01:25 AM
We've been slowly working away at the wiring, radiator lines and clutch plate. The radiator hose was plumbed with 1" line under the car with rubber hose and galvanized pipe for armor against rocks and other stuff bouncing around. Since the hose at the radiator an engine is different sized, I had to use some copper pipe fitting from the hardware store to make it all work.
Scott is under the hood with the wiring now. I made a dash board out of brushed aluminum that matches the gauge cluster. I worked out a bracket for the master brake cylinder and the clutch master. The axles are done.
Now I have a bunch of questions for you guys:
What size hydraulic clutch lines work with the Suby? I found some 3/8 inch (4.8mm) at the parts store which actually thread into the Suby Clutch master, but not tightly. Looks like they need to by metric fittings 5mm?
Battery threads? Looking at all the batteries people use with the 914 between Optima and Odyssey, which is best? I am leaning toward a smaller lead acid battery, because I won't be driving this car in the rain. The Odyssey batteries people are using, the 680 and 925 don't seem to have enough juice. I think I need about 500 CCA but the battery sites recommend a 650 CCA battery for the 2.5 engine.
What are you guys using for an accelerator cable that goes from the 914 pedal to the Suby engine?
On the fuel lines, I've got the stainless 8mm hard lines in the tunnel. What do you recommend for the rest?
Anyone have a good mirror recommendation- something small for the top of the A pillar? Does that seem crazy?
This thing is coming together fast and I am just trying to button up all of the systems. Thanks for your replies, Chris...
Posted by: Chris H. Dec 23 2016, 09:36 AM
We've been slowly working away at the wiring, radiator lines and clutch plate. The radiator hose was plumbed with 1" line under the car with rubber hose and galvanized pipe for armor against rocks and other stuff bouncing around. Since the hose at the radiator an engine is different sized, I had to use some copper pipe fitting from the hardware store to make it all work.
Scott is under the hood with the wiring now. I made a dash board out of brushed aluminum that matches the gauge cluster. I worked out a bracket for the master brake cylinder and the clutch master. The axles are done.
Now I have a bunch of questions for you guys:
What size hydraulic clutch lines work with the Suby? I found some 3/8 inch (4.8mm) at the parts store which actually thread into the Suby Clutch master, but not tightly. Looks like they need to by metric fittings 5mm?
Battery threads? Looking at all the batteries people use with the 914 between Optima and Odyssey, which is best? I am leaning toward a smaller lead acid battery, because I won't be driving this car in the rain. The Odyssey batteries people are using, the 680 and 925 don't seem to have enough juice. I think I need about 500 CCA but the battery sites recommend a 650 CCA battery for the 2.5 engine.
What are you guys using for an accelerator cable that goes from the 914 pedal to the Suby engine?
On the fuel lines, I've got the stainless 8mm hard lines in the tunnel. What do you recommend for the rest?
Anyone have a good mirror recommendation- something small for the top of the A pillar? Does that seem crazy?
This thing is coming together fast and I am just trying to button up all of the systems. Thanks for your replies, Chris...
Replied to your PM on the clutch lines Chris. Many/most of us have been using -3AN. Fits in the clutch tube. Sent the part #s for the parts that you definitely need. You might want to consider the Honda Civic clutch. Really a nice fit for the Subaru setup. whether you go that way or not we can help you with the Subaru end. DO NOT use something that sort of fits. We'll find the right thread size.
The only difference on the accelerator cable is the engine end. You just need a cable stop that fits the car you are swapping to. I think Kent said the 914 stop worked fine. Otherwise you can look it up online and buy the Subaru cable stop or just go to a flaps and buy an assortment. If you need a longer cable call terry cable and they will make you a custom length cable. If you flipped the intake yours is probably fine.
Posted by: R_u_dd Dec 23 2016, 12:17 PM
From Chris H.
What you want for the pressurized lines is -3AN. Best bet is to buy it from Summit Racing. I'll pass on a recommendation I heard to only buy Aeroquip.
The hose I used is this:
AER-FCC0310
This fits INSIDE the clutch tube preventing flex for a good portion of the run. It's also a litttle long in case you forget to undo it when removing the engine/trans someday.
Banjo fitting for Subaru trans end:
AER-FBM3091
What master are you using? I would use the Civic. Let me know and I can give you some pointers on the other fittings.
Chris
Posted by: 914forme Dec 23 2016, 12:37 PM
I am using a battery out of a  Miata Sealed, Gel Mat and small plenty of cranking amps. And not that expensive.
Though the idea of using a small array of laptop batteries running under the floor has caught my attention and building a 914 das 914, but then I am full of ideas and some of them are 
Scott has one in his car, tucked in the lower gas tank area, seems to work fine for him. Never seen him have an issue firing up that beast. It is a 2.5L also with some extra  I am not sure which battery he is using looks like an Odyssey to me.
Posted by: rhodyguy Dec 23 2016, 12:46 PM
Do you guys do the timing belt, and that goes with it, before the final install of these engines?
Posted by: 914forme Dec 23 2016, 12:47 PM
Yes
Posted by: R_u_dd Dec 23 2016, 05:08 PM
Do you guys do the timing belt, and all that goes with it, before the final install of these engines?
See post 23 on page 2. http://www.914world.com/bbs2/index.php?showtopic=260642&hl=Porscheru&st=20# work
Posted by: R_u_dd Jan 9 2017, 10:01 PM
Clutch
I decided to go with the Subaru clutch master cylinder. There has been a lot of discussion about clutch travel and which master cylinder to buy. Some guys are going with the civic master cylinder. Some advantages with the Civic are the remote fill reservoir since you can't fit the fill reservoir under the pedals and the firewall. I am still working on plumbing a remove reservoir to the approximate location of the brake fill reservoir. This will take some doing as there are no threads in the master clutch cylinder where the reservoir is mounted.
Having decided on a master cylinder, I built a bracket for under the pedals similar to those who have gone before.
The next mystery is a hose for the clutch line to take the fluid from the master to the slave. You've probably done this before: I went down to the local auto store and sifted through a bunch of brake lines that might fit. I bought 4.8 mm hard lines with 3/8ths ends. I tried them at the store and they seemed to fit... When I brought them home, I noticed they were not quite the right size...
Again, after a lot of time on the net I have learned a bit about hoses. What I should have bought at first was 10mm fittings with 3AN line. 10mm and 3/8 ends will thread together, but won't tightly seal and will probably strip the threads. I found a website for Pegasus Auto and had a line custom made.
So this is the winning formula for the Porscheru Clutch Line:
#3 Stainless Steel Braided PTFE Brake/Clutch Hose 10 feet long. (A little extra).
-3 Swaged Hose End. 10 mm Banjo Straight Steel. The 10 mm Banjo fits but is a bit thick. Notice that your Subaru Banjo is fairly narrow.
-3 Swaged Hose End. 3AN Female 90 Degree, Steel.
Male 10 x 1 mm Metric Concave Seat to 3AN Male, Steel. (The concave inside seat is very important). All for about $100.
Clocking is not necessary with the banjo on the far end and the length of line, plus the swivel on the 90. Clocking allows the fittings to be set so that when tightened the line points in a given direction.
Otherwise the closest thing I could find that is not custom would be a Honda Accord clutch line, but they are only 60" long.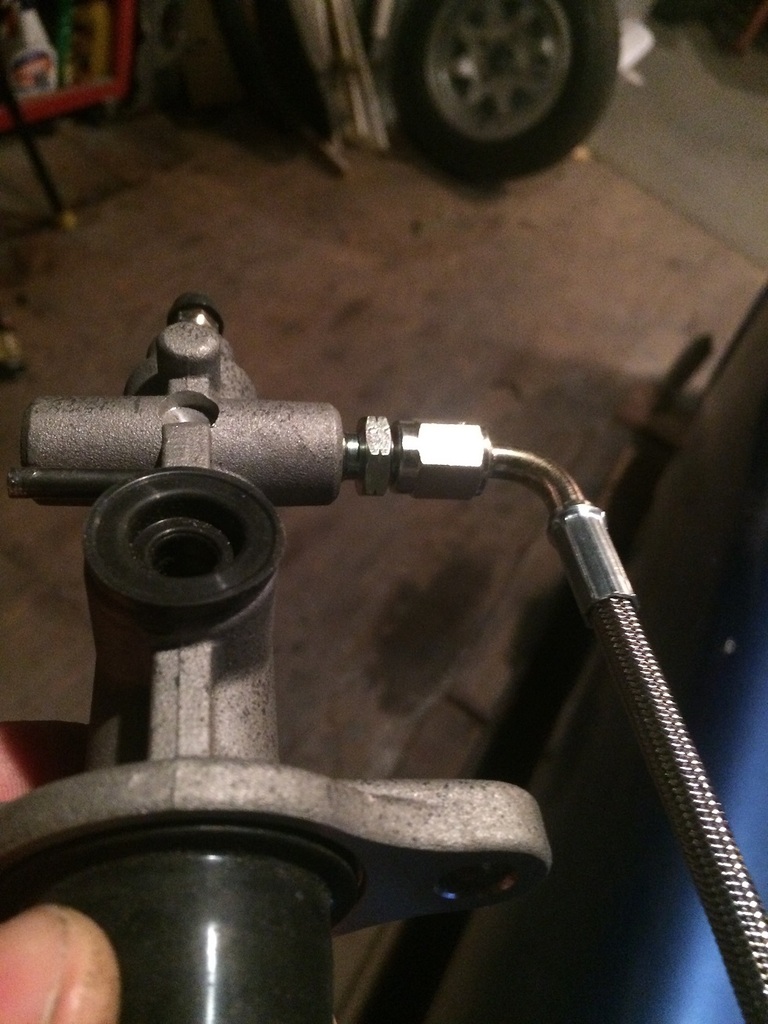
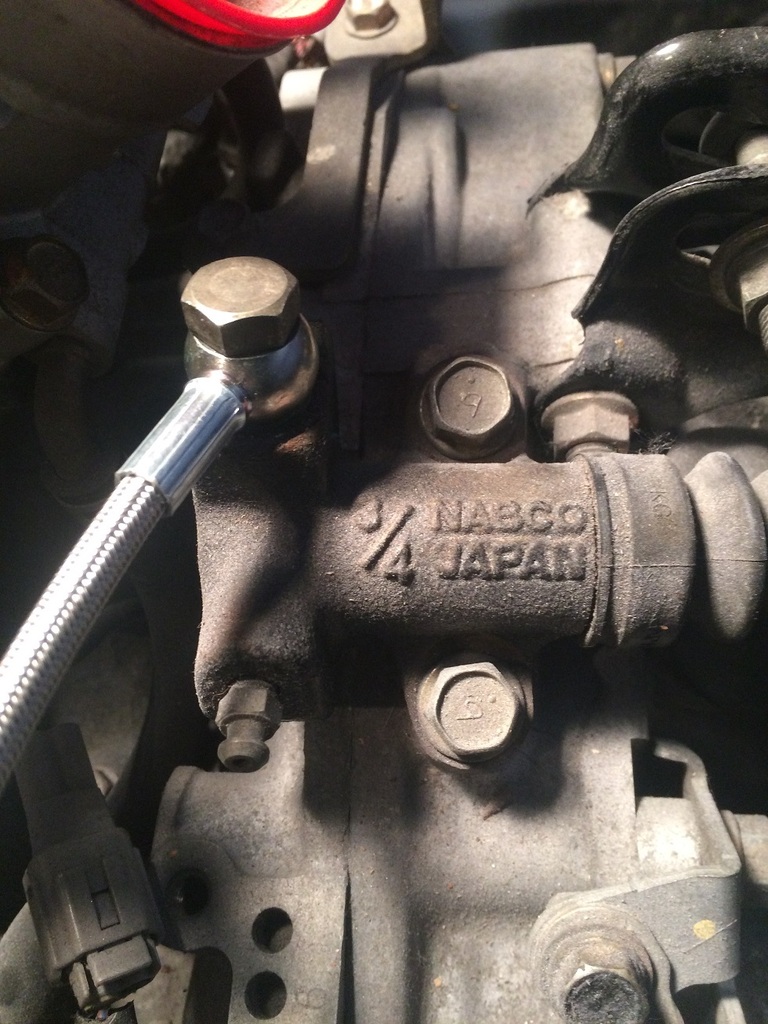
Posted by: R_u_dd Jan 10 2017, 01:31 AM
Brakes
The plan is to keep the brakes stock. According to Shae, the brakes guru at PMB, stock brakes in good condition work very well. I am going to do a couple minor upgrades with improved brake pads and slotted front rotors. My front right caliper is stuck and possibly others, so the calipers will get rebuilt and the soft lines replaced. The master brake cylinder is being replaced with a 19mm cylinder.
That's the plan and so the adventure in brake repair begins.
http://www.914world.com/bbs2/index.php?showtopic=207700&hl=rotor++thickness 914/4:
Front rotors- new are 11mm or 0.433", Minimum 10mm or 0.394" for turning, and wear to 9.5mm or 0.374". Unfortunately, mine are 0.36" and need to be replaced.
Rear rotors- new 9.6mm or 0.374", after turning min. 8.9mm or 0.350, wear to 8.5mm or 0.335"
Links:
http://www.914world.com/bbs2/index.php?showtopic=262589&hl=brakes
http://www.914world.com/bbs2/index.php?showtopic=90625&hl=brakes
http://www.914world.com/bbs2/index.php?showtopic=24229&hl=brakes
Videos:
Front Caliper Rebuild on Bus Part 1 and 2:
https://www.youtube.com/watch?v=PLXLKzhA5mY
https://www.youtube.com/watch?v=KXqVzsqIRJs
https://www.youtube.com/watch?v=dm_DnizKOZM
So here's my work. Started with the front calipers. And, learned not to split them before removing the pistons. Lot's of great videos out there on how to do this. There are many creative ways to get the stuck pistons out. 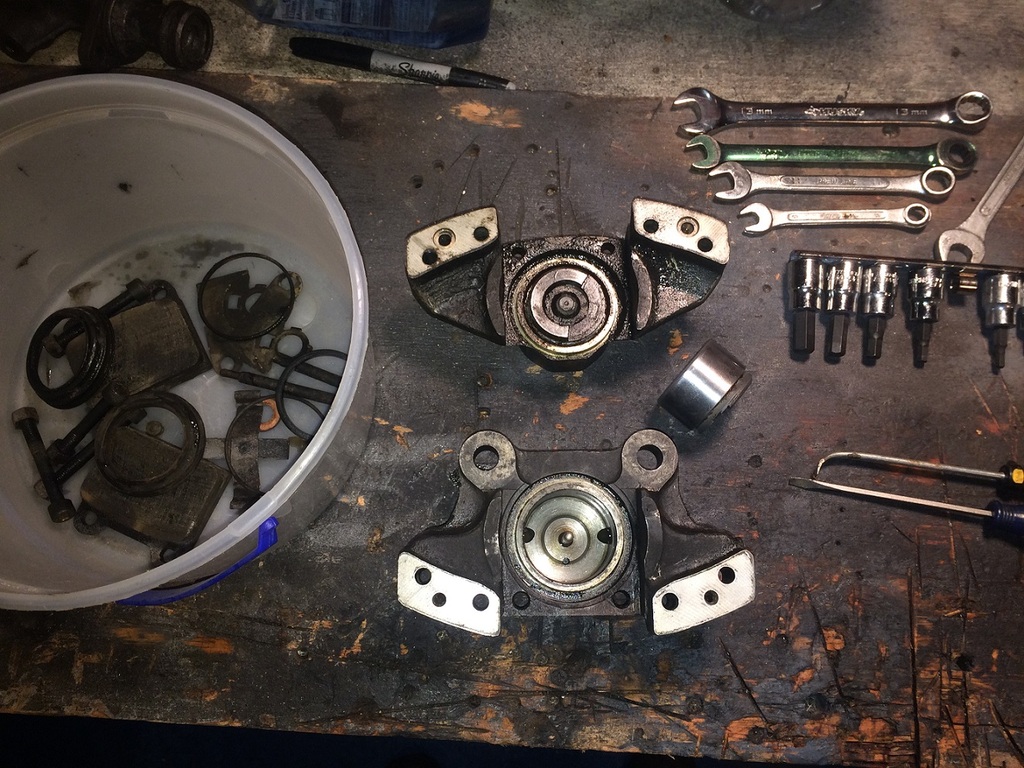
My piston pusher contraption. Using a clutch master to push out the piston. Works pretty well, but put on your goggles and shower cap!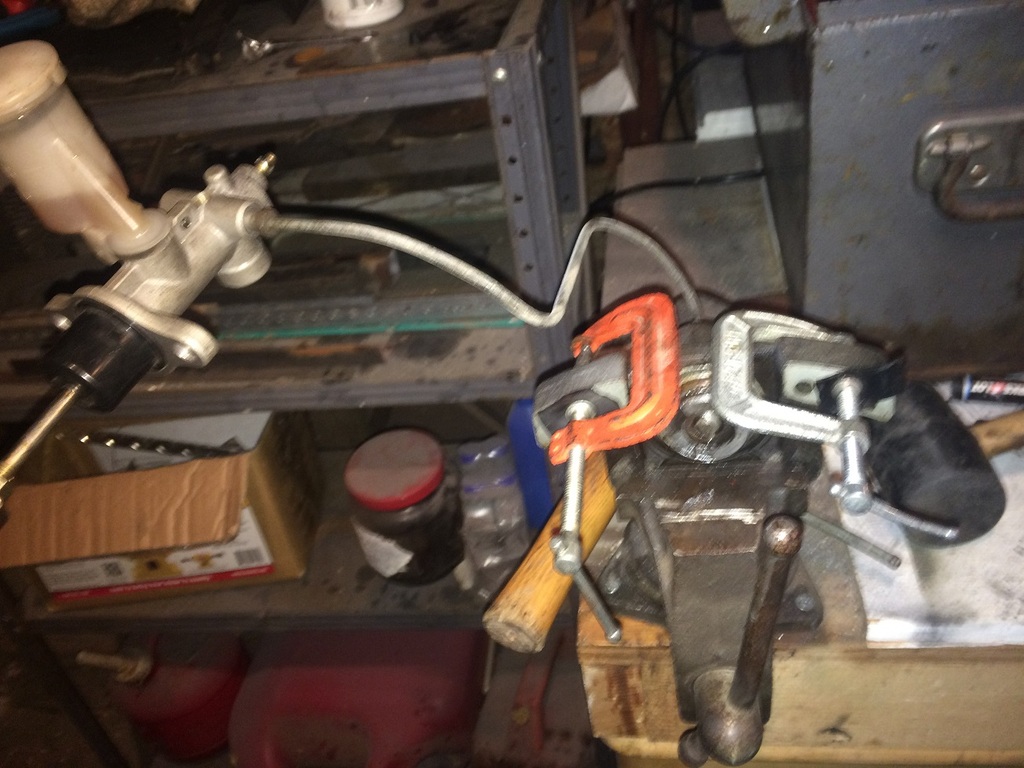
Piston is on the way out. The c-clams with some rubber protecting the bases are covering the holes that transfer fluid from each side of the caliper. 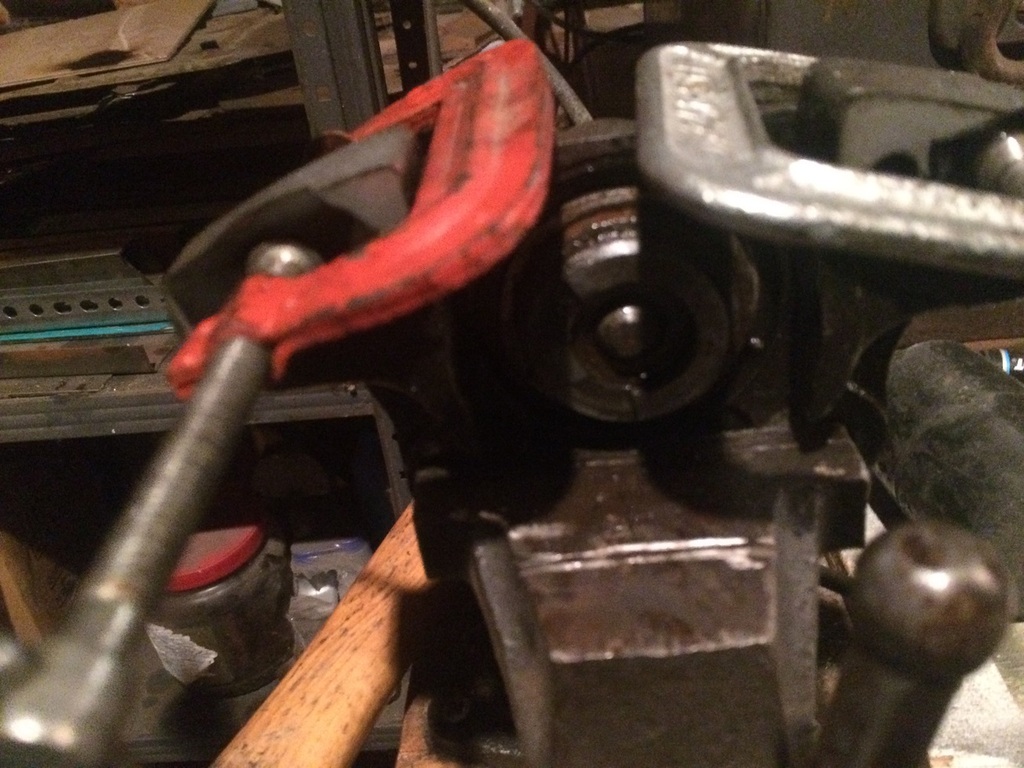
Posted by: R_u_dd Feb 4 2017, 04:46 PM
Accelerator Cable
The Subaru engine has two accelerator cables attached that are about two feet long. One is for the cruise control and the other for your foot. The conversion requires a 100" cable to run the length of the car. The closest recycled cable I could find was for a Honda Accord which is too short at 60" long. Most of the custom accelerator cables are not long enough. Finally I came across the Venhill Universal Throttle Cable Kit for $50 bucks. Sold. It's got multiple fasteners and the hard to find barrel end which fits on the Subaru side.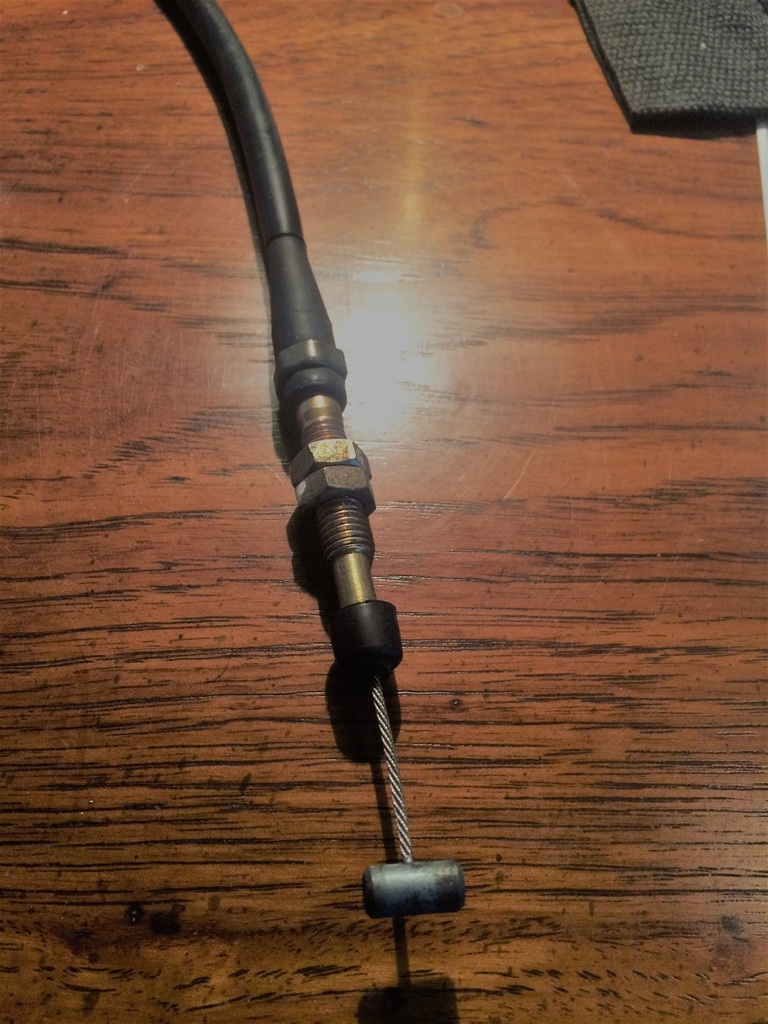
Subaru End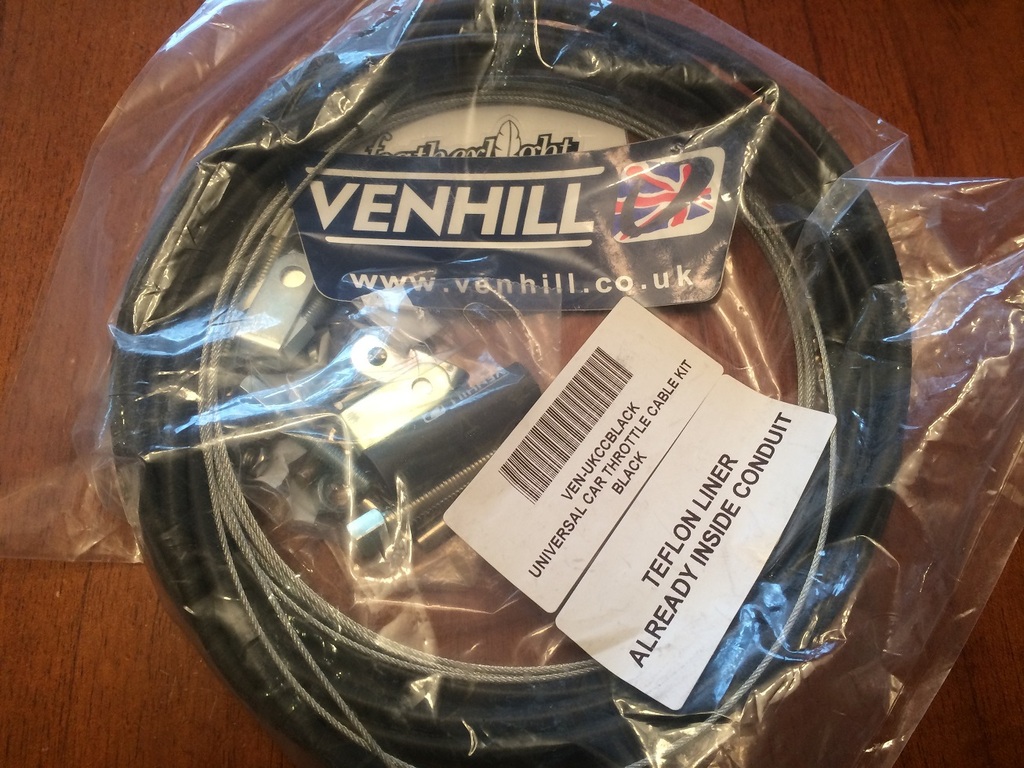
Venhill Universal Throttle Kit
Posted by: R_u_dd Feb 4 2017, 09:38 PM
Battery and Tray
After considering an Optima battery and an Odyssey, I decided on a plain old sealed lead battery. It's on the small side, so it's not too heavy and it's sealed. This battery is rated at 450/650 amps. The two deciding factors - weight and cost.
The tray was an adventure in design. There are many angles to overcome. Not sure it's worth trying to save money building your own versus the stock tray. I wanted something very sturdy though. It has several attachments points and will be strapped on the backside of the fender.
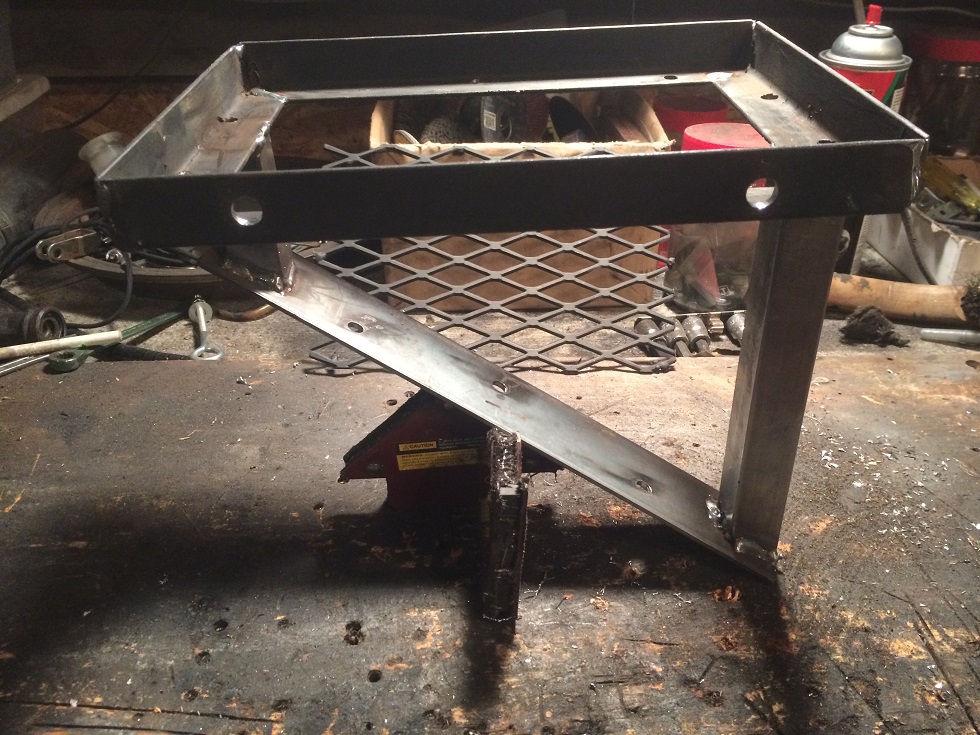
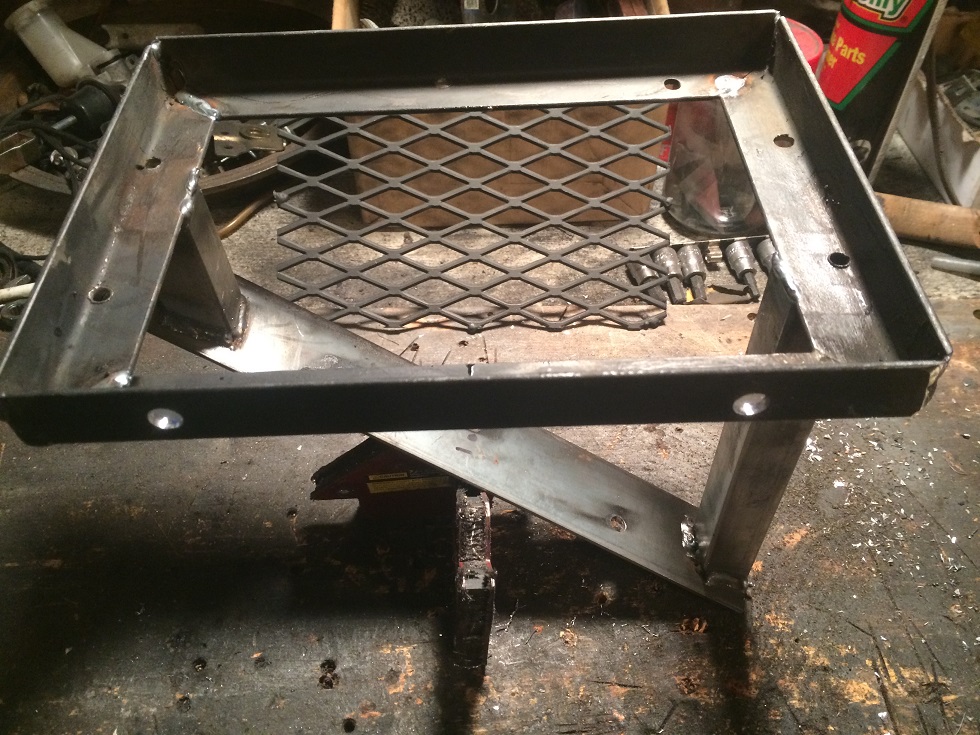
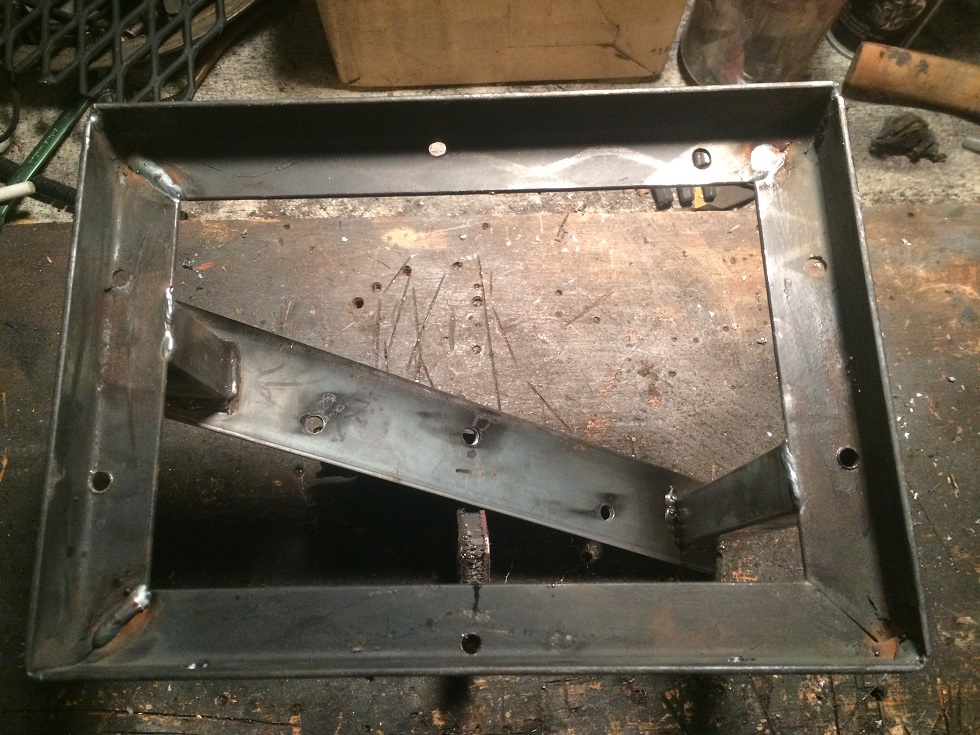
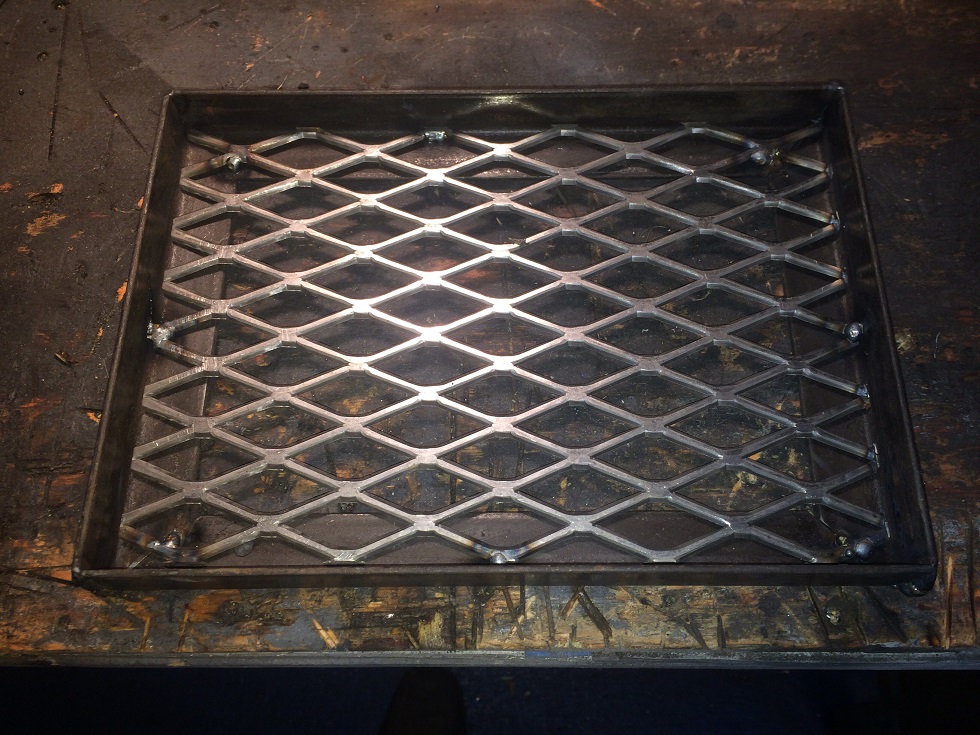
Posted by: R_u_dd Aug 6 2017, 08:58 PM
Fuel Pump and Fuel Level Sender
After a lot of research on the fuel pump, I went with the http://walbrofuelpumps.com/walbro-gsl392-inline-fuel-255lph-pump.html like a couple other guys on the forum. At 140 psi and 255lph, It compares roughly to the Subaru fuel pump specs. The Subaru pump for my 2003 2.5 Impreza TS runs at 80-109 psi. Sometimes the pumps are rated in bars. The conversion is 1 bar =14.5 psi. Interestingly, the Subaru fuel injection system maintains a pressure of 43.5 psi and the return line is used for excess flow above the 43.5 psi.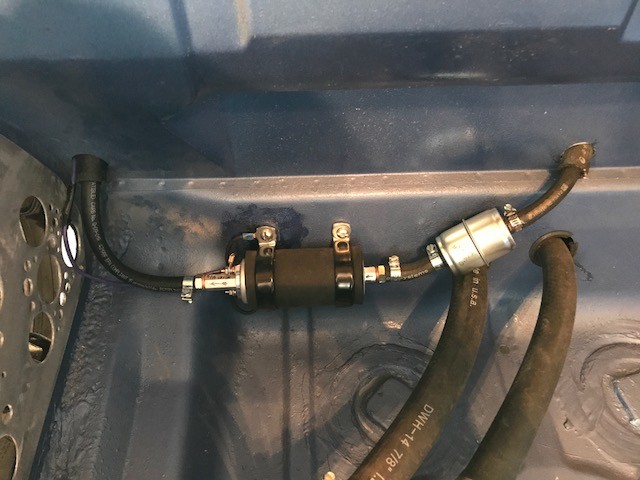
The Subaru has two fuel lines, an intake and return. These lines are 5/16 or 7.9mm. My Porsche has stainless lines that I bought from Tangerine. They are bent to the left where they leave the tunnel to meet the fuel lines on the left side of the Subaru 2.5. I purchased 10' of 5/16 Barricade fuel injection line rated at 225 PSI which is about double the fuel pump pressure.
Cheesy drawing of what's going on.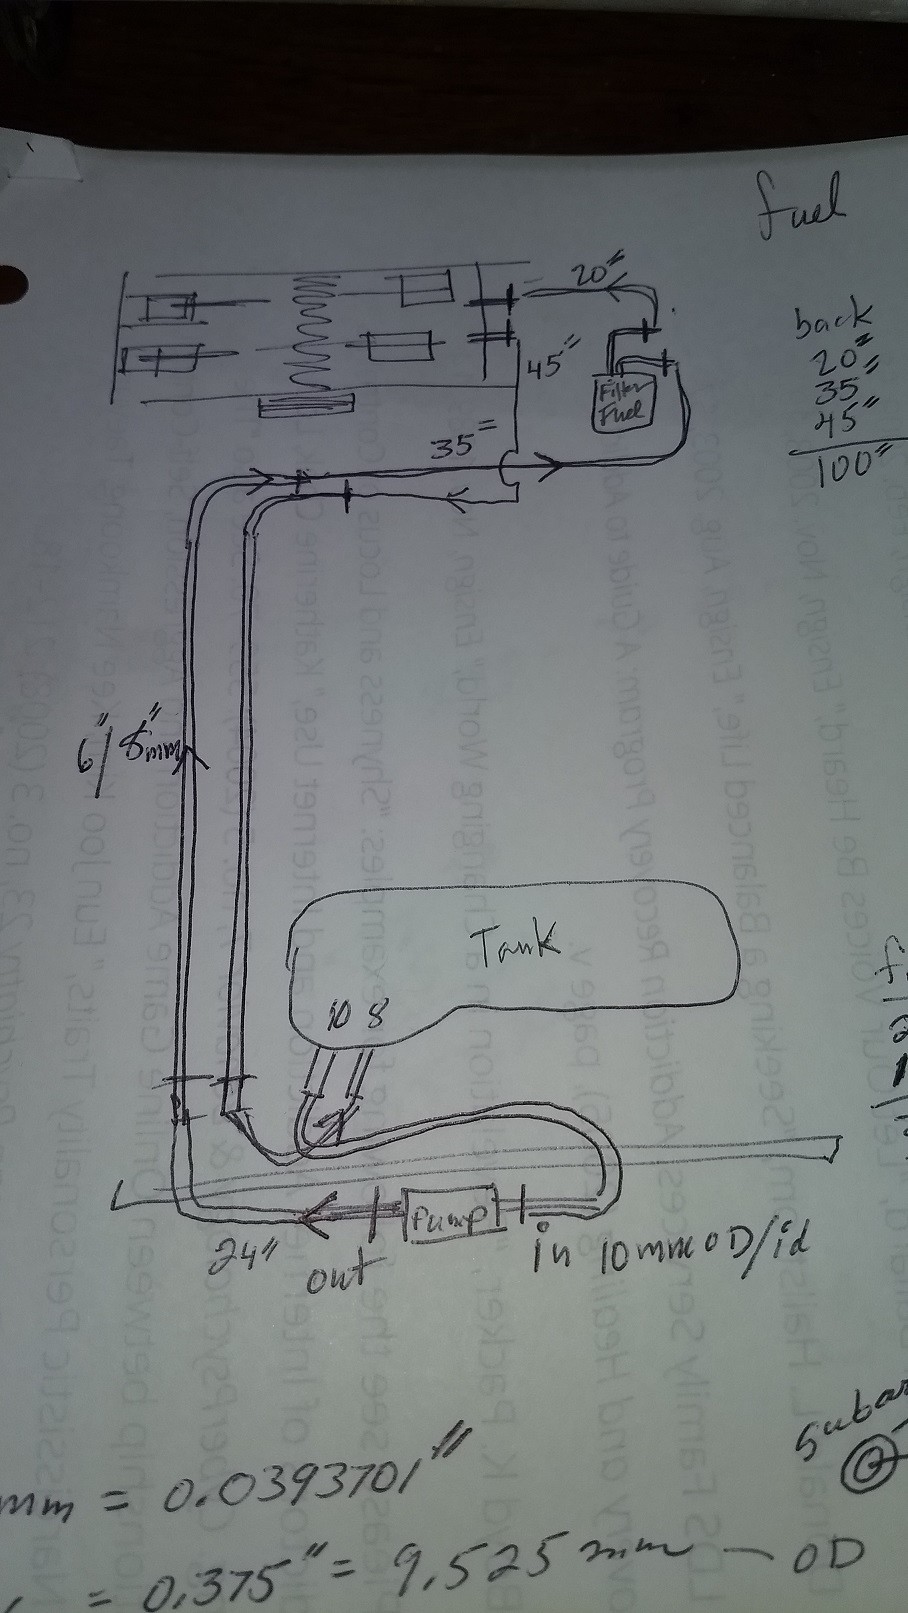
There's three lines that come out of the left side of the engine, two of them are fuel and one is an evaporation line. The return line has a damper valve. The evap line has a light clamp on the fuel line whereas the fuel lines have solid fuel injection clamps. It's tough to find a drawing of these lines, but they are available. I found one at opposedforces.com.
I mounted the fuel pump as low as possible in the frunk with a 20 micron filter in front of it. It is gravity fed with a 3/8" hose inlet (9.5 mm) which matches the Porsche fuel line at the tank. On the outlet side of the fuel pump, I switch over to 5/16" (7.9mm) line.
The relay for the pump is 30 amps and the fuse for the pump is 20 amps. Go figure.
My VDO fuel gauge is rated at 10-184 ohms which was a bit of a problem since I bought that first and most of the aftermarket fuel senders are rated at 240-30 ohms, especially the fuel level senders in tube form. The porsche sender is rated at 0-70 and mine is broken. The solution was an $18 swing arm float that needed to be trimmed and shortened, but it worked... 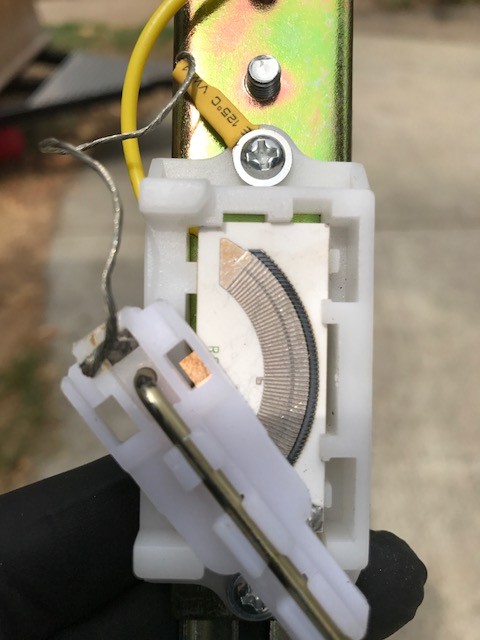
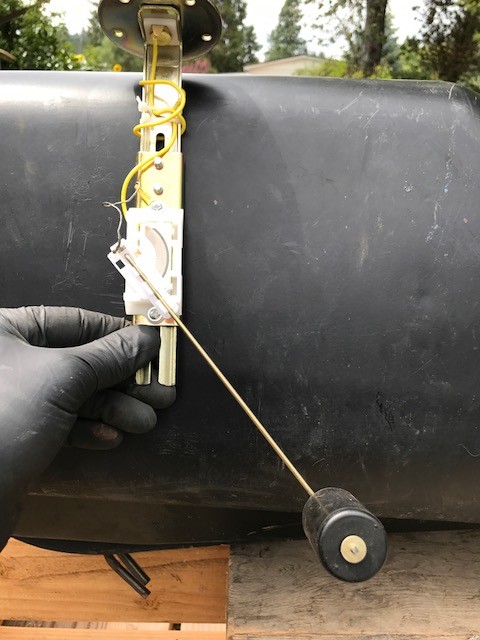
Posted by: R_u_dd Aug 7 2017, 08:31 PM
Brakes Part II
Brakes are important. If you can't stop, it's an unsafe situation. Based on discussions on this forum, especially contributions from PMB, I thought it best to restore the stock brakes as well as possible and keep the four bolt pattern for now. I sent the rear brakes and the pressure valve to PMB to restore and did the fronts myself since they were not as complicated. Here's the great work done by the folks at PMB: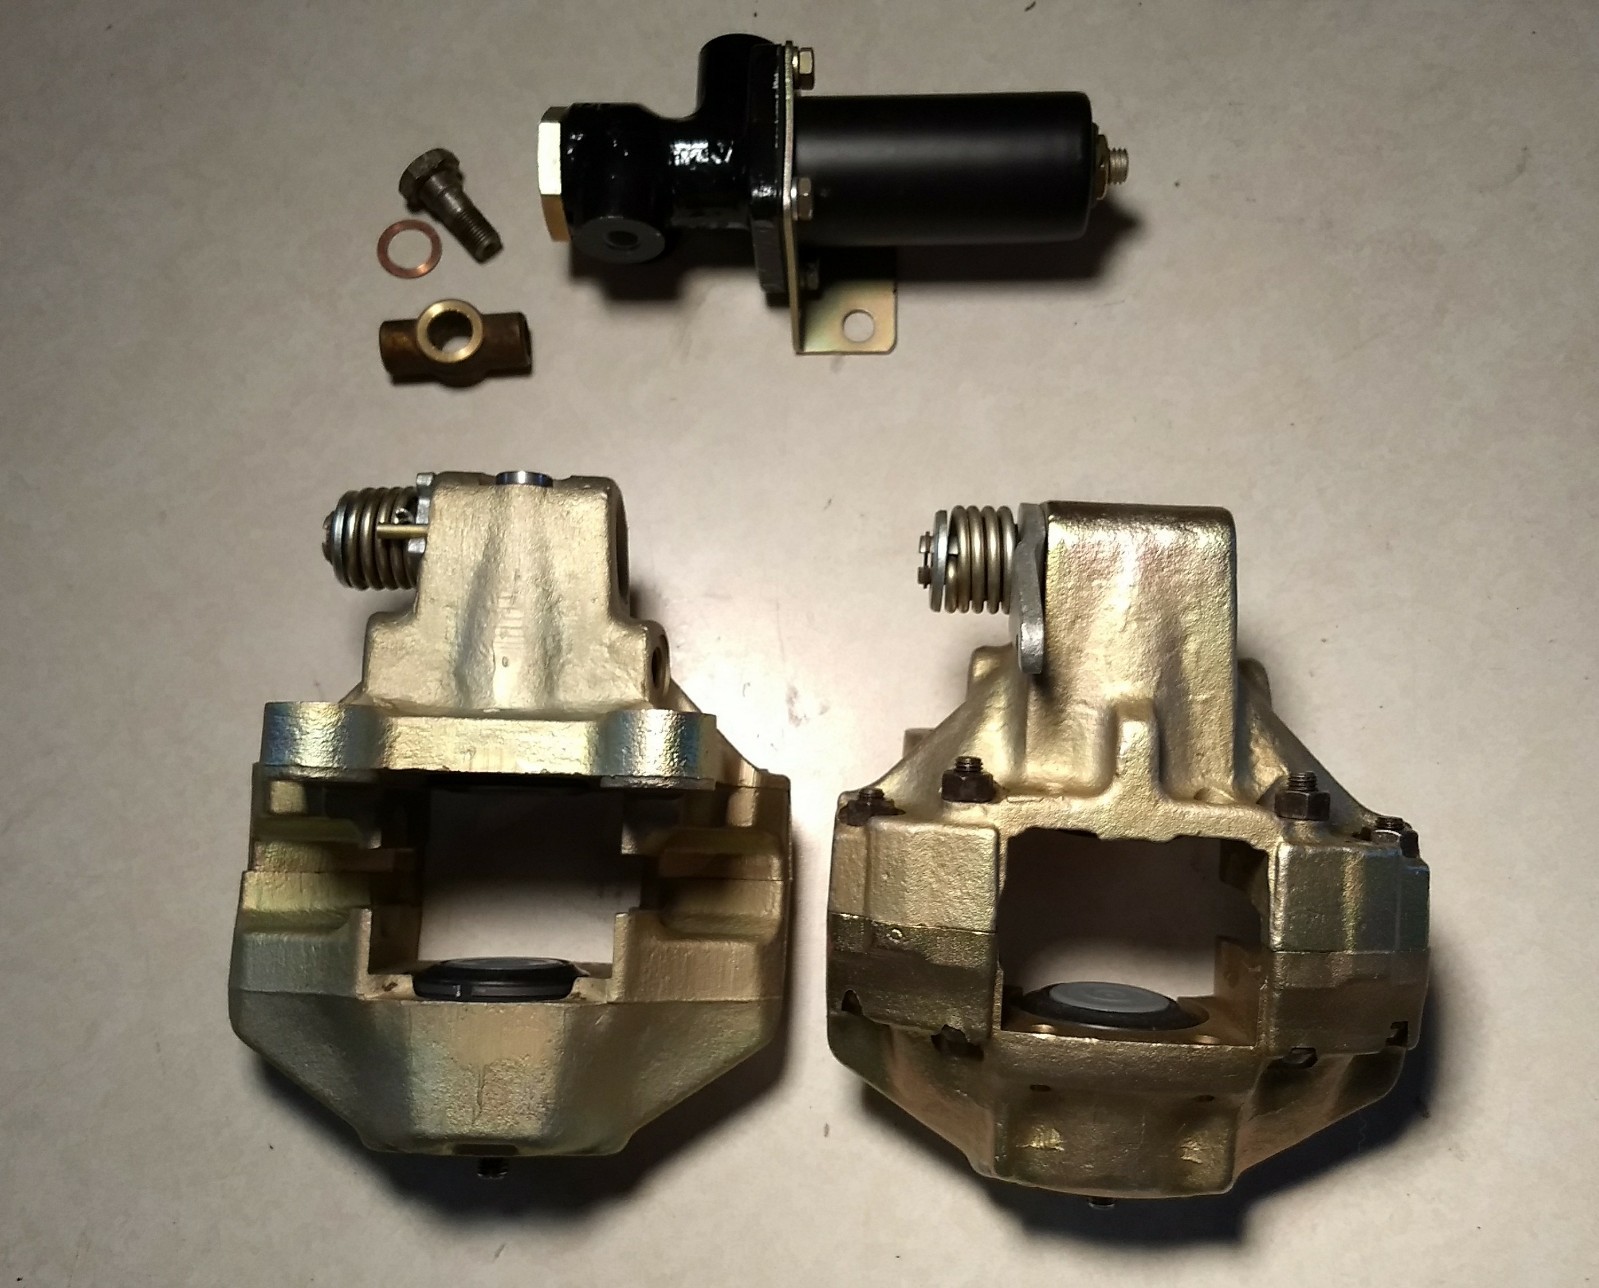
Parts:::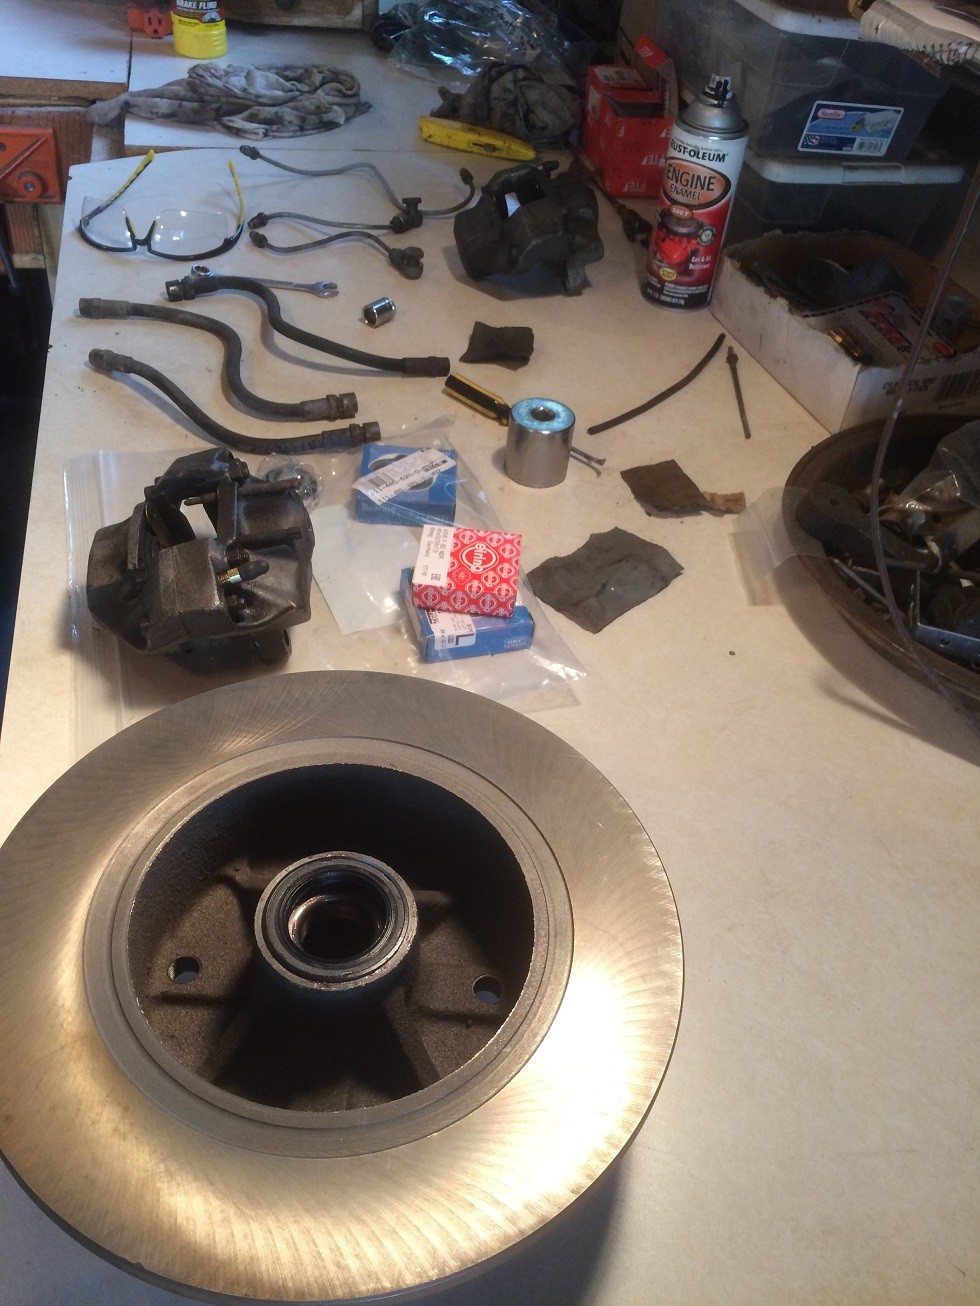
More Parts Pix:::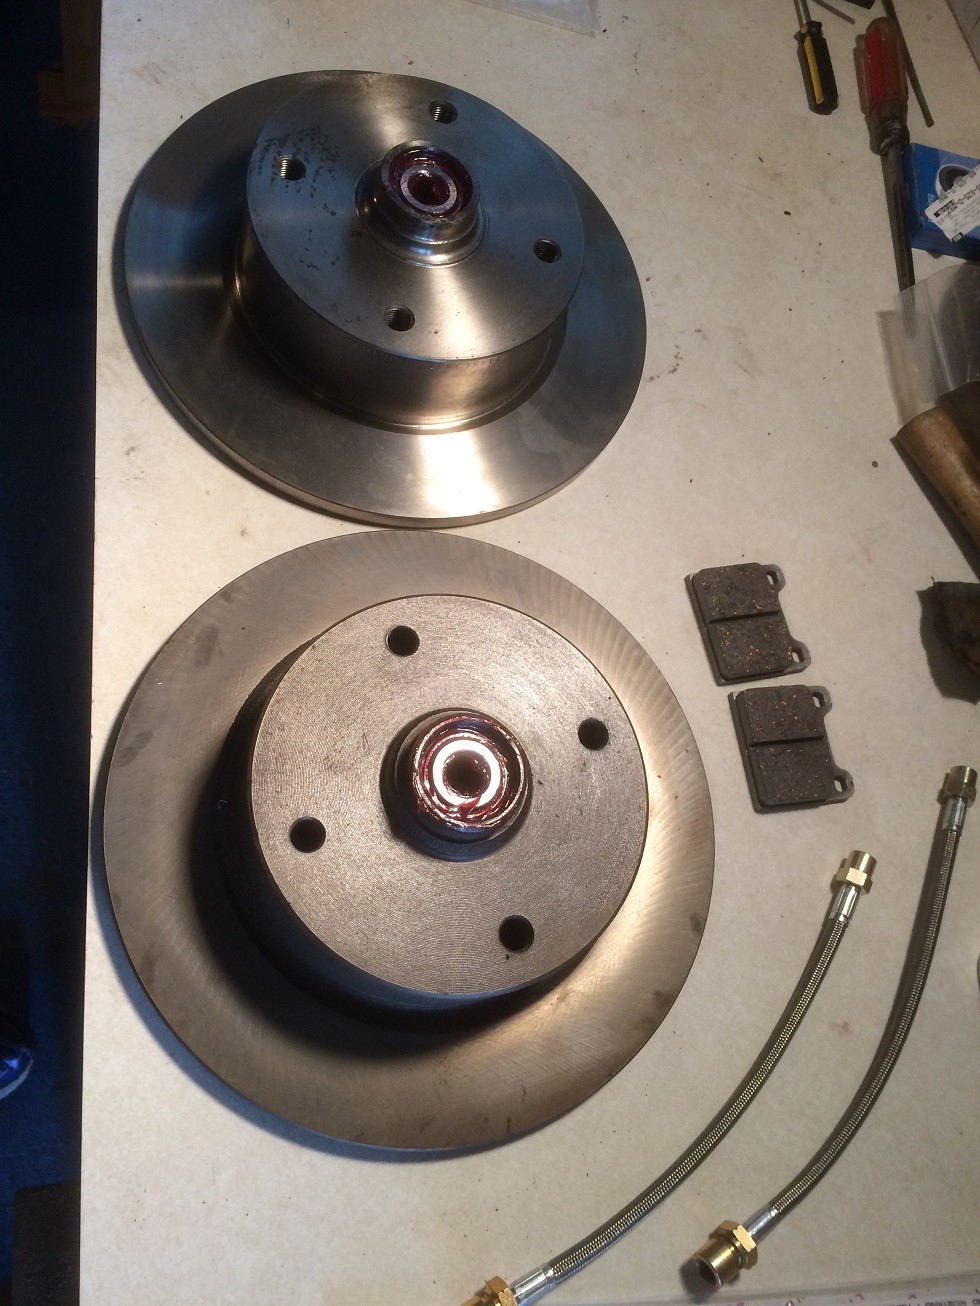
In order to get the rear hubs out and replace the bearings I used a pusher of my own construction with a large bolt and socket that was the same diameter as the hub. From this picture you can see my setup fairly well. There's another nut on the inside of the socket to keep it from sliding when you pound on the hammer. My hubs were tight, so I used a sledge hammer to coax them out. A long handled sledge is much safer if your car is on jack stands!!!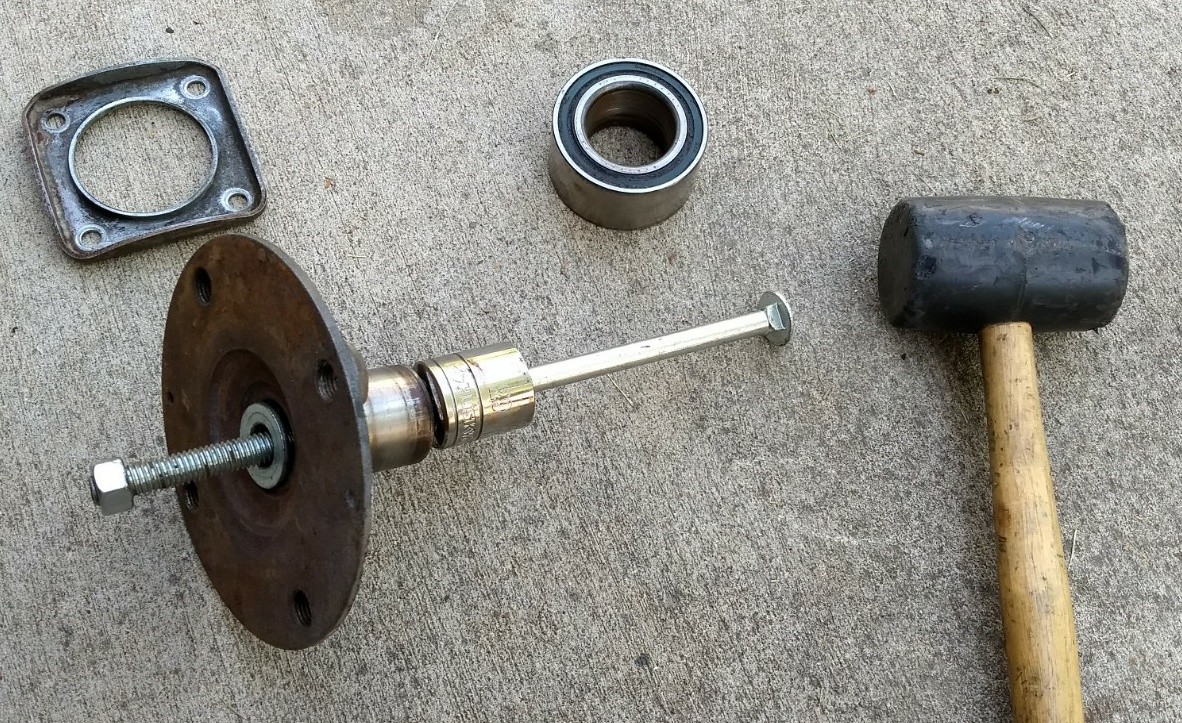
Here's a shot of the inside:
Here's a shot of the outside: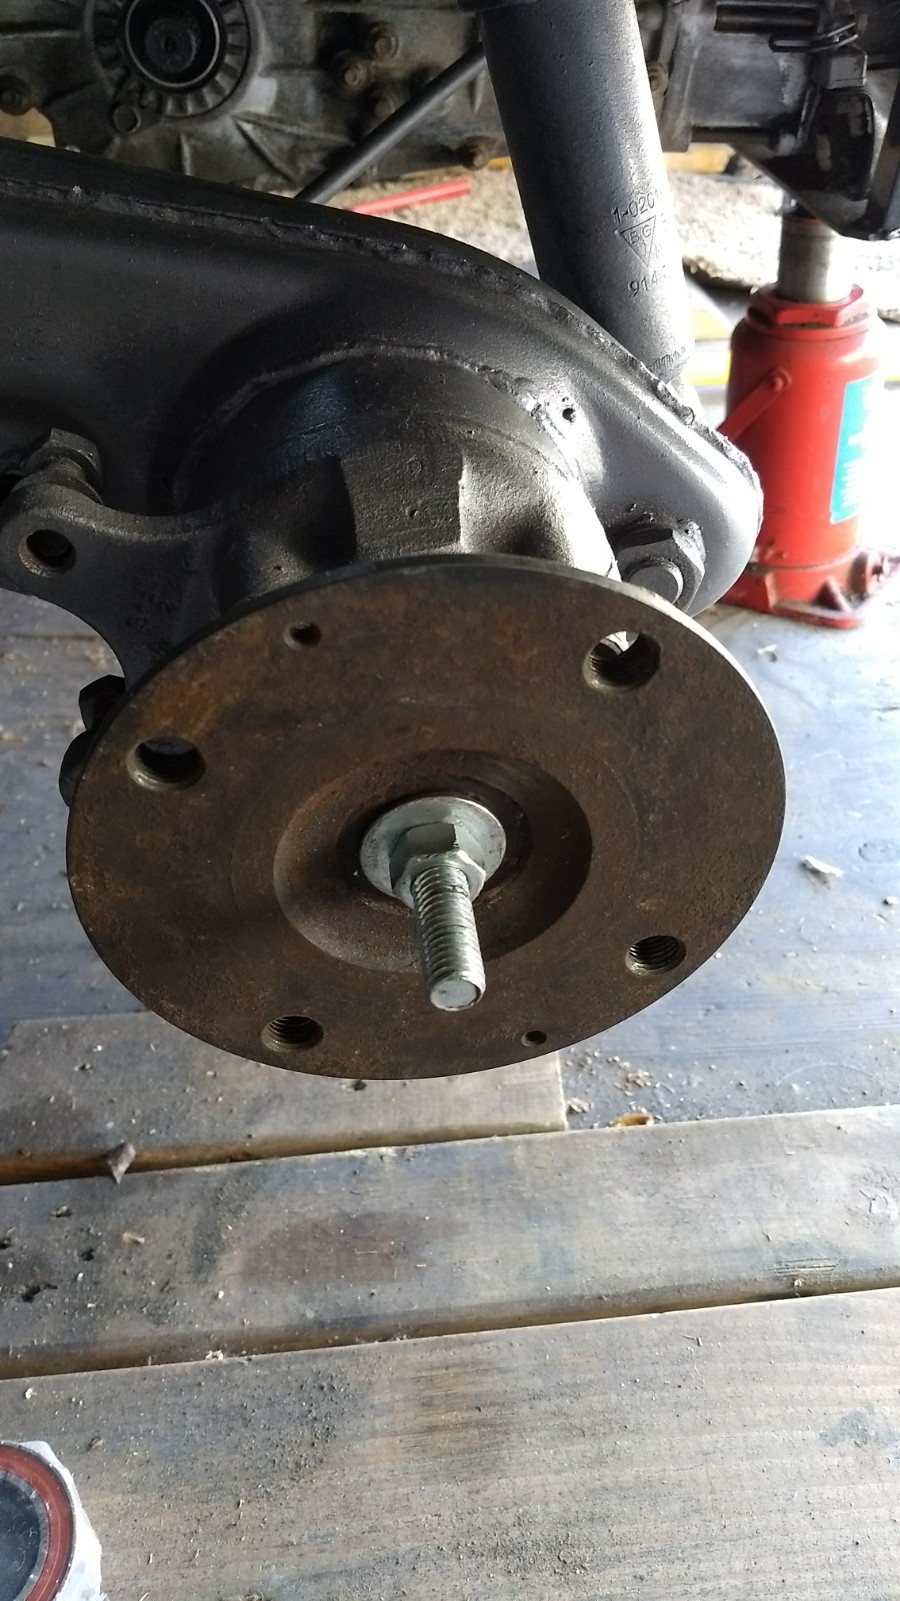
And, the hubs while they are out. Good time to do a five lug conversion, but I am going to wait on that for a while...
Front brakes installed. New disks and braided brake lines. My old ones were rotten.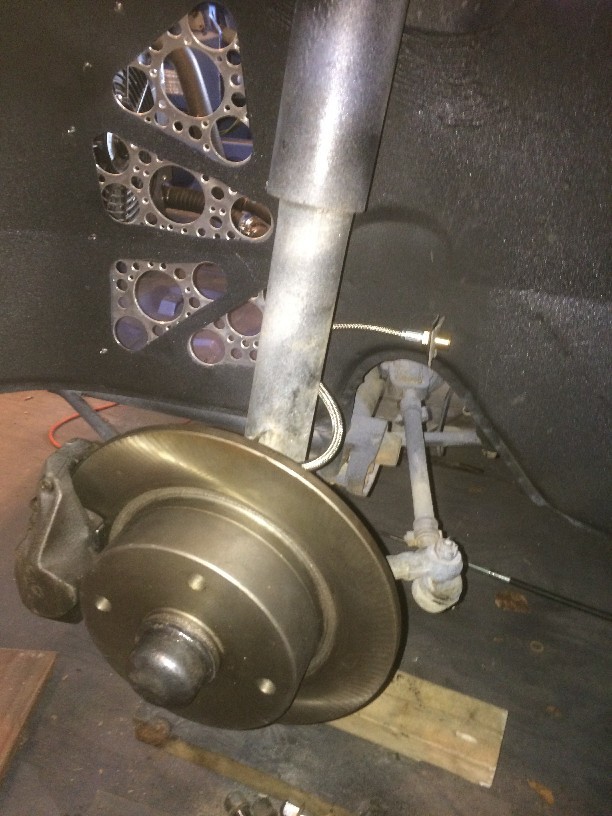
Rear brakes and new disks all around. 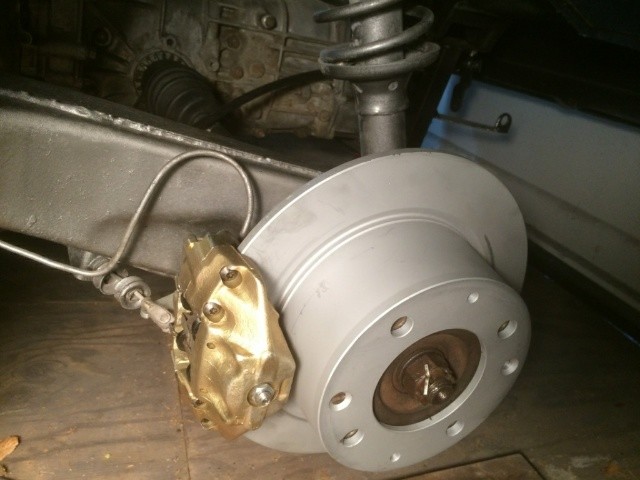
Purdy hah!!
Posted by: R_u_dd Jun 17 2019, 09:39 AM
The Successful Startup
Last year, we started the engine and it ran for about 30 seconds and threw a bearing. It was apparently rebuilt improperly by the PO. So, I dropped the engine out and brought it to a Subaru specialist in Grants Pass and had it rebuilt. It now has new internals, rings, bearings, seals, Delta cams - torque grind. The block is out of a forester, with heads from the original Impreza TS.
Pull the engine again: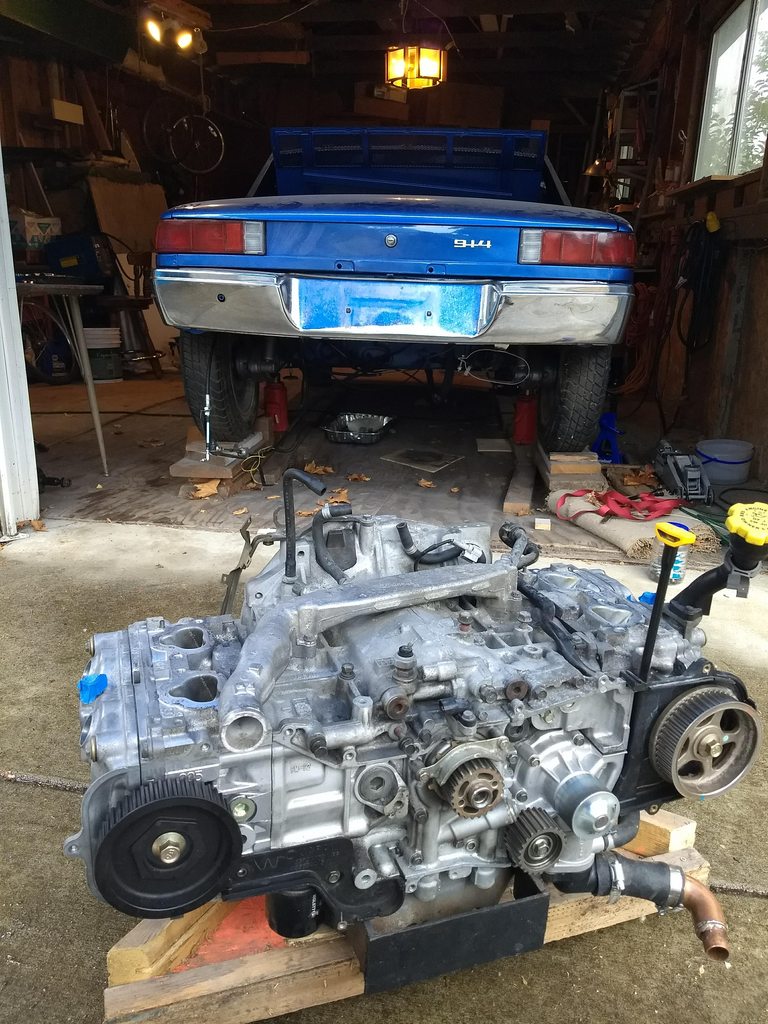
Back from the shop 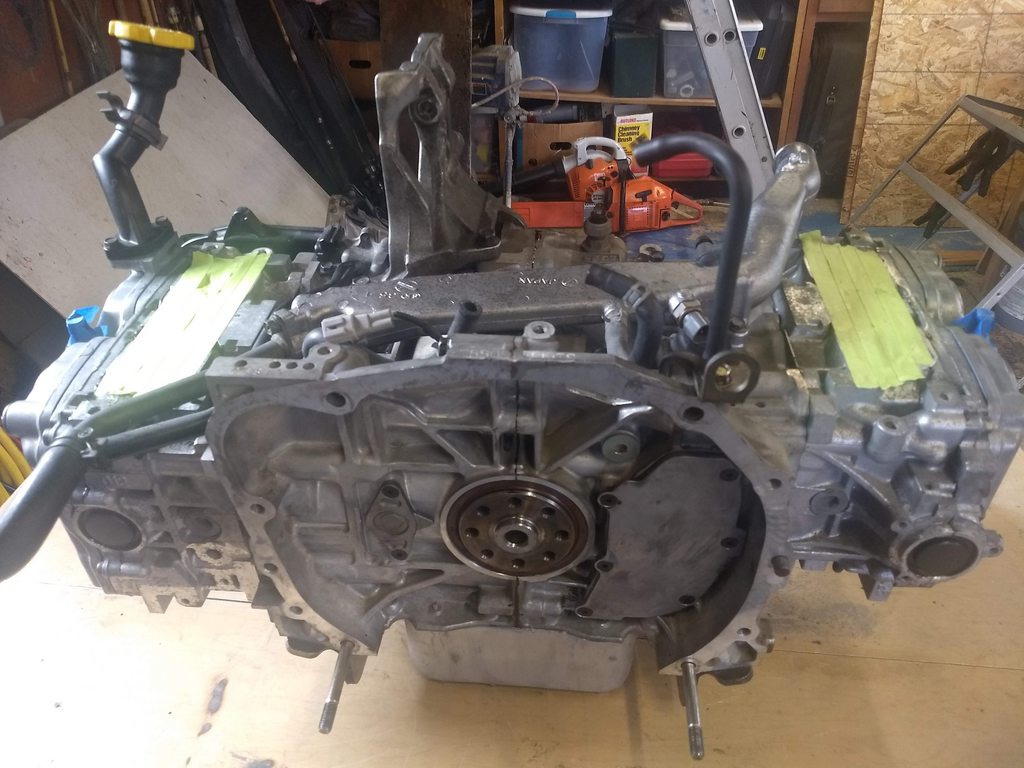
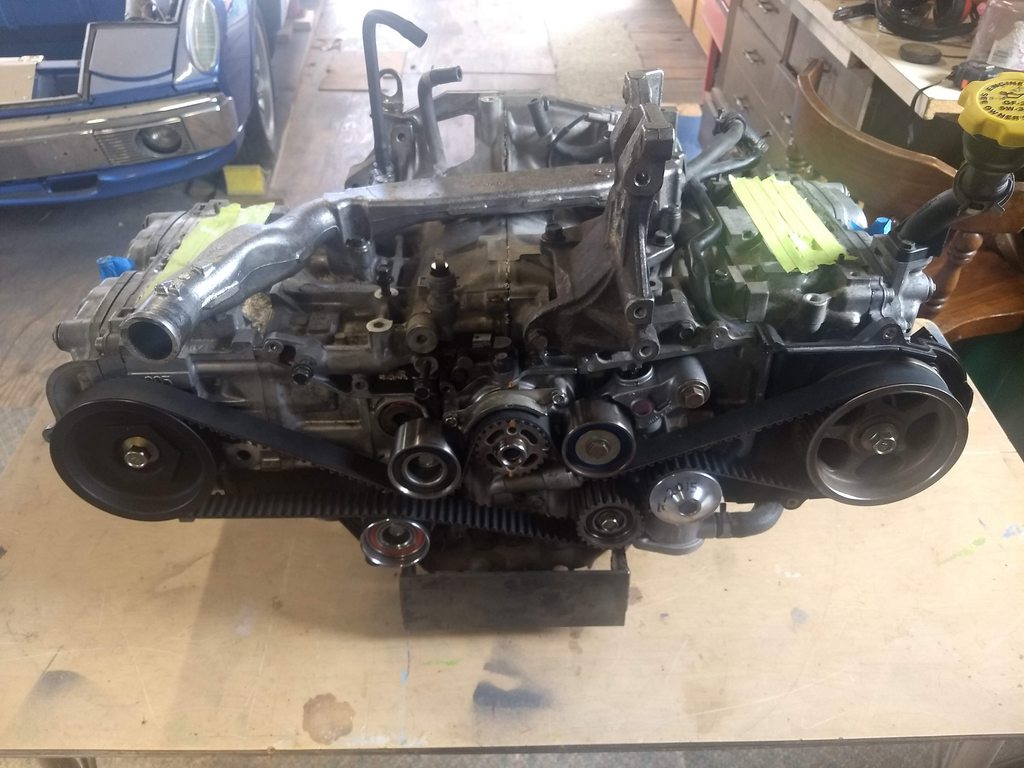
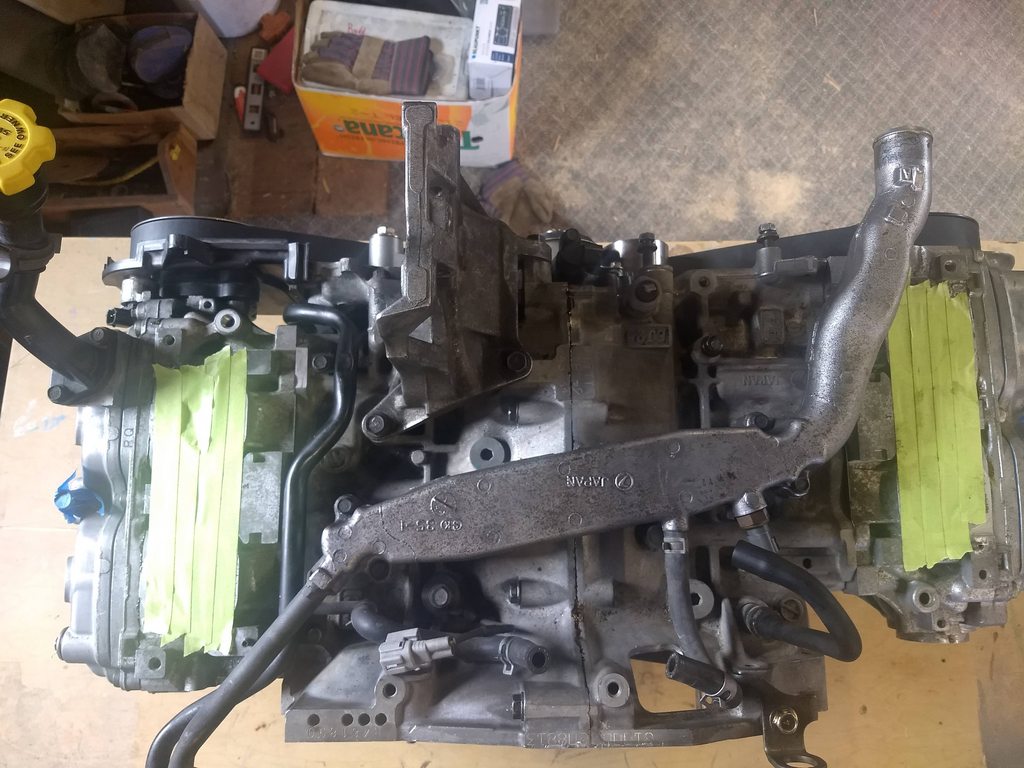
Alternator back on: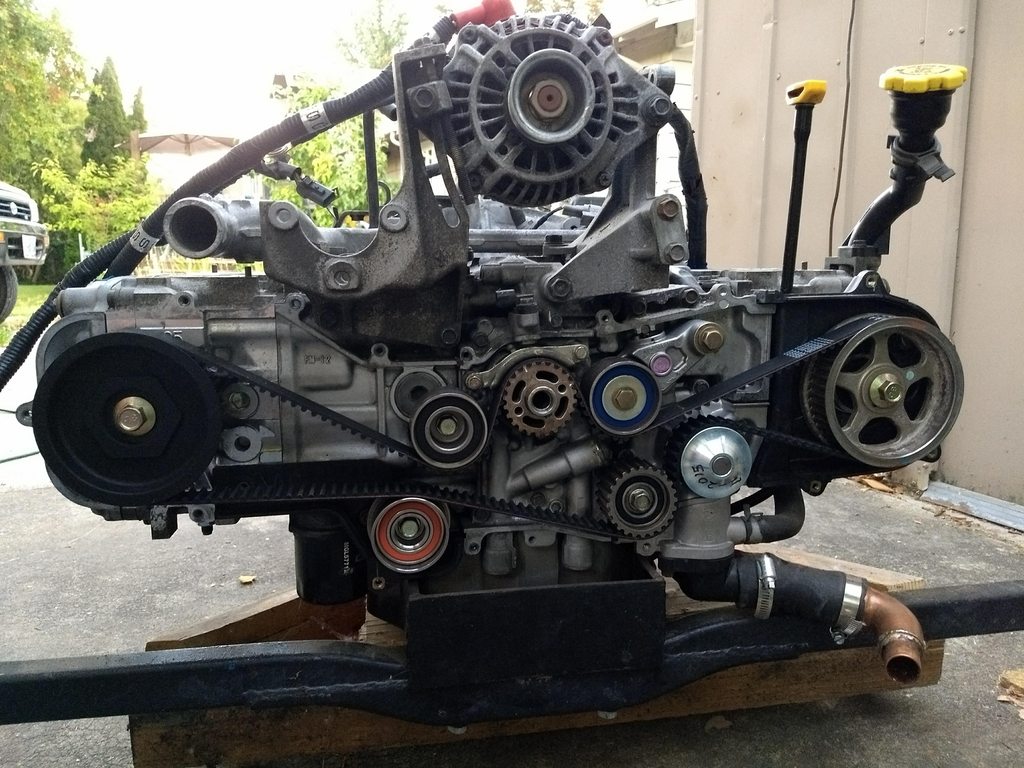
Ready to join the engine to the transmission again.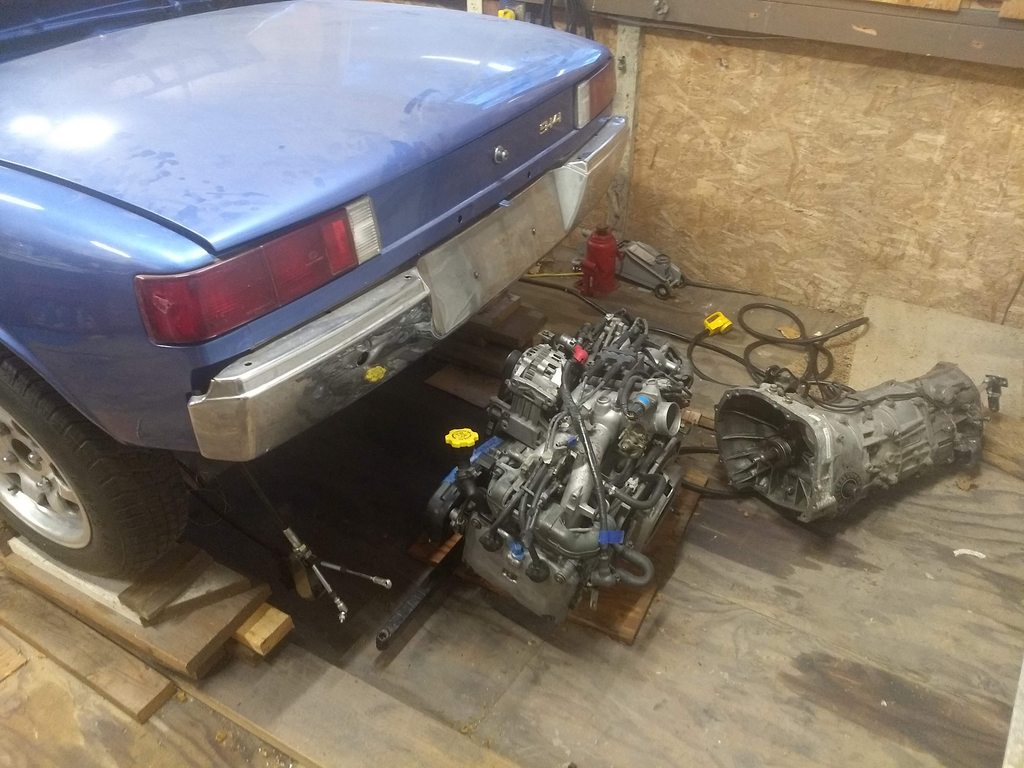
Happily married back together with new starter: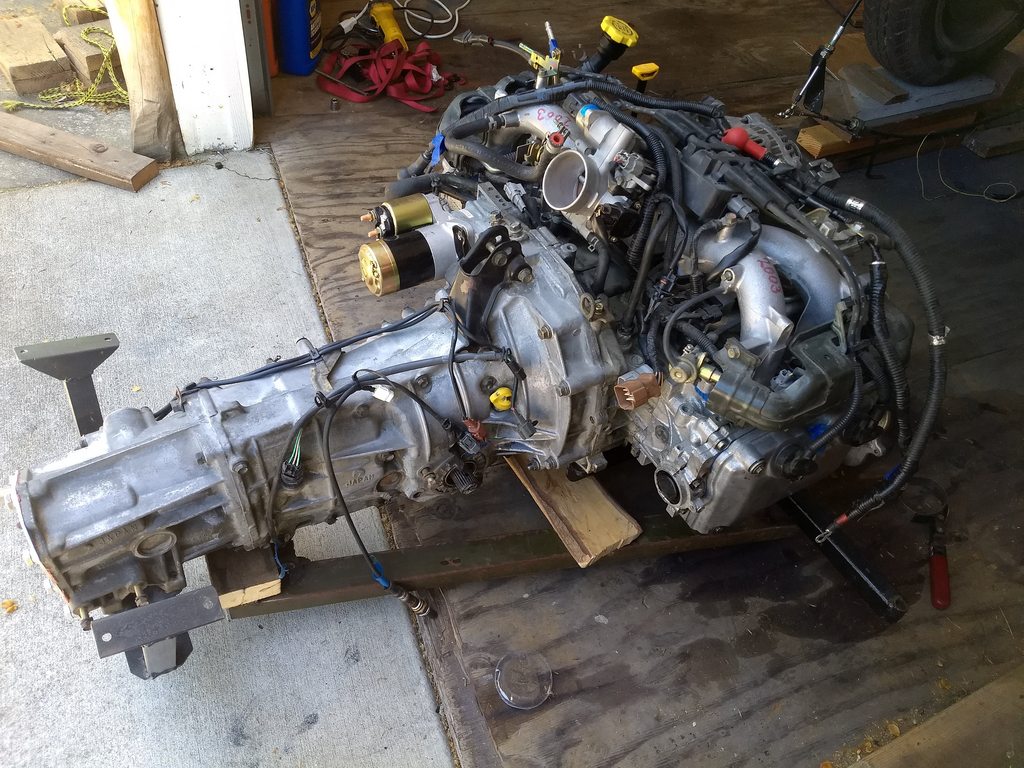
Startup Videos:
https://www.youtube.com/watch?v=NM7ynOv9gSo
https://www.youtube.com/watch?v=ZPOpW-Pmfso
What if feels like to have the car finally running:
https://www.youtube.com/watch?v=g5MYYolzmT0
There's still a little rain on the parade though. Anyone have advice for a subaru clutch not disengaging. I've got the Subaru master and slave cylinders. The throwout fork seems to be moving about an inch or so. I hope I don't have to tear this bugger apart again, but I'm not currently able to shift it into gear while the car is running, but I am able to shift it while its off.
Posted by: 76-914 Jun 17 2019, 11:13 AM
The Successful Startup
Last year, we started the engine and it ran for about 30 seconds and threw a bearing. It was apparently rebuilt improperly by the PO. So, I dropped the engine out and brought it to a Subaru specialist in Grants Pass and had it rebuilt. It now has new internals, rings, bearings, seals, Delta cams - torque grind. The block is out of a forester, with heads from the original Impreza TS.
Pull the engine again:
Back from the shop
Alternator back on:
Ready to join the engine to the transmission again.
Happily married back together with new starter:
Startup Videos:
https://www.youtube.com/watch?v=NM7ynOv9gSo
https://www.youtube.com/watch?v=ZPOpW-Pmfso
What if feels like to have the car finally running:
https://www.youtube.com/watch?v=g5MYYolzmT0
There's still a little rain on the parade though. Anyone have advice for a subaru clutch not disengaging. I've go the Subaru master and slave cylinders. The throwout fork seems to be moving about an inch or so. I hope I don't have to tear this bugger apart again, but I'm not currently able to shift it into gear while the car is runner, but I am able to shift it while its off.
First, congratulations. You won't regret the conversion. As I tell Suby conversionists; You'll love it and the purists will hate it. The pull clutch only moves about an inch so that's normal. @http://www.914world.com/bbs2/index.php?showuser=22446 will know
Posted by: Cairo94507 Jun 17 2019, 11:47 AM
I have always loved the Subaru boxer engine. It just sounds great. I am sure you will get the clutch sorted and then be able to enjoy driving that baby. Oh.....don't shoot me....but the Porsche/Subaru crest decals on the sail panels, though creative, do nothing to improve the look of the car. Maybe just one on the engine lid?
Posted by: Andyrew Jun 17 2019, 11:58 AM

Posted by: ValcoOscar Jun 17 2019, 03:16 PM


Terrific Job
Oscar
Posted by: theer Jun 17 2019, 03:46 PM
There's still a little rain on the parade though. Anyone have advice for a subaru clutch not disengaging. I've go the Subaru master and slave cylinders. The throwout fork seems to be moving about an inch or so. I hope I don't have to tear this bugger apart again, but I'm not currently able to shift it into gear while the car is runner, but I am able to shift it while its off.
I am having the exact same problem on Grey Matter. The clutch pressure plate (PP) is a pull-type set up, which means the throw out bearing (TOB) pulls on the PP fingers to release the clutch, rather than pushing.
First thing to check is that all the air is out of the system. If you're sure that's been done, then one of two things is happening:
1) The TOB is not properly snapped into the PP. Remove the slave cylinder from the trans housing and push the clutch fork back as far as possible. This should snap the TOB into the locking ring on the PP and you're good to go. This is part of the normal Subi clutch install process, after the trans is mated to the motor. It's tight, but should be able to do this with everything still in the car.
2) There is interwebs wisdom that says some of the aftermarket clutch sets are not keeping the TOB locked in place. The PP is apparently defective. Trans has to come out.
I tried the clutch fork step on mine, but couldn't get it to engage. I'm going to try one more time before I drop the trans and check the PP & TOB.
Posted by: R_u_dd Jun 17 2019, 08:20 PM
IOh.....don't shoot me....but the Porsche/Subaru crest decals on the sail panels, though creative, do nothing to improve the look of the car. Maybe just one on the engine lid?
The design is airbrushed. They look great in person.
Posted by: Chi-town Jun 17 2019, 11:07 PM
You should see a bit more movement than 1".
The Subaru system is pain to bleed and doesn't care for vacuum or pressure bleeders much.
One of the big things to check for is that the clutch master is completely unloaded when the pedal is up (did you remove the 914 clutch spring?)
Posted by: theer Jun 19 2019, 09:49 PM
You should see a bit more movement than 1".
The Subaru system is pain to bleed and doesn't care for vacuum or pressure bleeders much.
One of the big things to check for is that the clutch master is completely unloaded when the pedal is up (did you remove the 914 clutch spring?)
Spent an hour or so getting mine to finally work. Here’s what I did:
1) Removed slave cylinder and jammed on the clutch fork trying to get it to engage the TOB into the PP. Seemed tighter after I did that.
2) using a ratchet strap, pulled in the clutch fork to test whether the TOB had engaged in the PP. yes!! The clutch released and I could roll it while in gear.
3) With the strap still connected, reinstalled the slave and pressure bled the system. No air came out, but now the slave push rod was fully extended and pushing against the fork (being held by the strap).
4) released the strap... still not enough movement to fully disengage the clutch.
5) Adjusted the push rod on the pedal into the master to make it as long as possible and that did the trick.
The pedal has a bit of play up high, and clutch now releases at the very bottom of the pedal stroke. If the push rod was a 1/2 inch longer it would be better. But it works and I didn’t have to take out the trans!
Hope that helps. Good luck,
Tom
Posted by: R_u_dd Jun 20 2019, 11:57 AM
You should see a bit more movement than 1".
The Subaru system is pain to bleed and doesn't care for vacuum or pressure bleeders much.
One of the big things to check for is that the clutch master is completely unloaded when the pedal is up (did you remove the 914 clutch spring?)
Spent an hour or so getting mine to finally work. Here’s what I did:
1) Removed slave cylinder and jammed on the clutch fork trying to get it to engage the TOB into the PP. Seemed tighter after I did that.
2) using a ratchet strap, pulled in the clutch fork to test whether the TOB had engaged in the PP. yes!! The clutch released and I could roll it while in gear.
3) With the strap still connected, reinstalled the slave and pressure bled the system. No air came out, but now the slave push rod was fully extended and pushing against the fork (being held by the strap).
4) released the strap... still not enough movement to fully disengage the clutch.
5) Adjusted the push rod on the pedal into the master to make it as long as possible and that did the trick.
The pedal has a bit of play up high, and clutch now releases at the very bottom of the pedal stroke. If the push rod was a 1/2 inch longer it would be better. But it works and I didn’t have to take out the trans!
Hope that helps. Good luck,
Tom
Thanks for the advice. I used a ratchet strap myself and did not have any luck but I will try again. As far as extending the push rod. I have a friend with a C n C machine that would be able to extend it. I used some aluminum and made a makeshift extender myself. I will see how this goes and get back to you. Thanks. Cr.
Posted by: 76-914 Jun 20 2019, 12:30 PM
What is the bore on the MC? How is the AN-3 line routed? Have any picos how your MC push rod ties into the clutch pedal? Lots of pics will help figure this out.
EDIT: I'm running the same trans and never had to use a strap to make it work. It should only take just a few minutes to bleed. My clutch pedal releases about 1/2 way down. I cut off the top portion of the clutch arm ( the part where the spring attaches-not needed) for clearance at the trunk floor.
Posted by: R_u_dd Dec 13 2020, 11:39 PM
Hurah, First ride is July 4th 2020
Update - Have resolved the clutch issue and have since driven home from the mechanics shop. Have been stuck on this for several months and busy with work, but now back to work to finish up.
https://www.youtube.com/watch?v=CMkpS7SimBg
https://youtu.be/CMkpS7SimBg
Posted by: Mueller Dec 13 2020, 11:45 PM
Hurah, First ride is July 4th 2020
Update - Have resolved the clutch issue and have since driven home from the mechanics shop. Have been stuck on this for several months and busy with work, but now back to work to finish up.
https://www.youtube.com/watch?v=CMkpS7SimBg
https://youtu.be/CMkpS7SimBg
Looks and sounds great!
Posted by: 76-914 Dec 14 2020, 06:47 PM
Posted by: 2mAn Dec 15 2020, 10:07 PM
What an awesome thread. I was hoping you would start doing donuts in the grass haha
Posted by: Larmo63 Dec 15 2020, 11:35 PM
The Porsche crests on the sails look awful.
Everything else is super cool.
Okay, I said it.
Posted by: Cairo94507 Dec 16 2020, 07:16 AM
Yeah, not a fan either. 
Posted by: 76-914 Dec 17 2020, 09:09 PM
The Porsche crests on the sails look awful.
Everything else is super cool.
Okay, I said it.
Yeah, not a fan either.
To quote a Captain Hook line from the movie Hook; "Bad form" (gentlemen)! Remember what your parents taught you. If you can't say something nice.......

Powered by Invision Power Board (http://www.invisionboard.com)
© Invision Power Services (http://www.invisionpower.com)