Printable Version of Topic
Click here to view this topic in its original format
914World.com _ 914World Garage _ newbie 74 1.8 project
Posted by: jmitro Jul 30 2015, 08:48 PM
Hey guys, what's up?
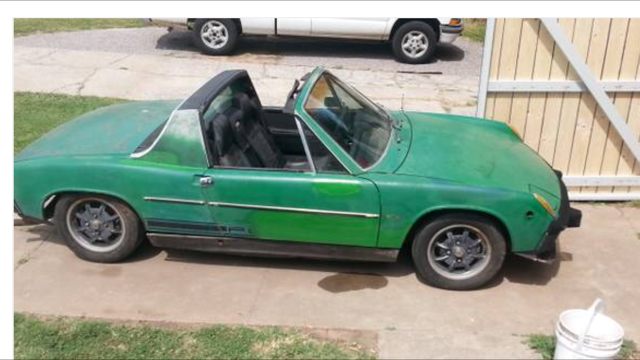
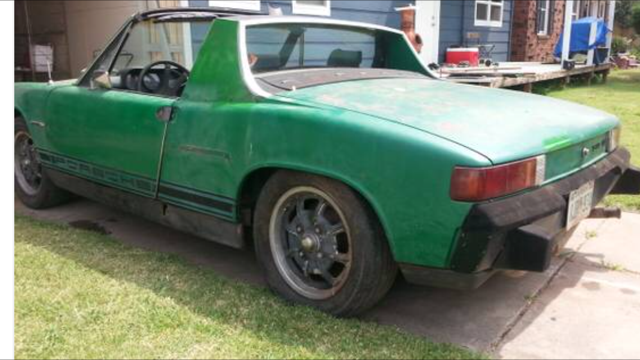
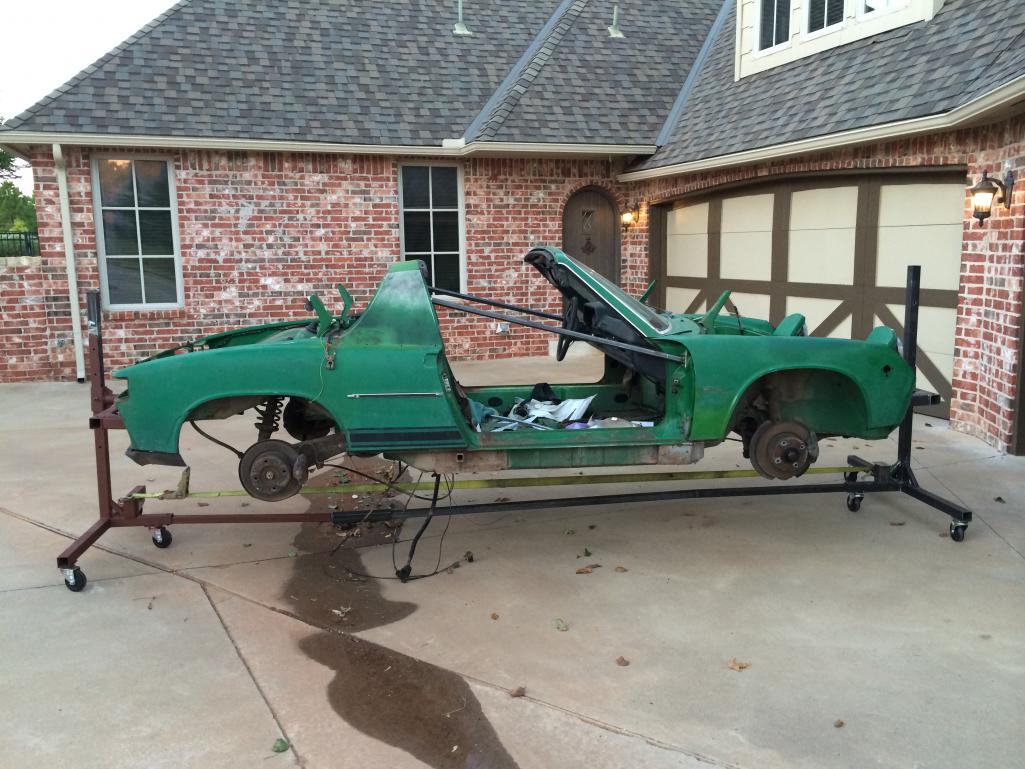
Newbie checking in; been tinkering with & racing cars for 20 years; lots of BMWs and Porsches (944, 996, 912, 911SC). My newest project is this 74 914 1.8; picked it up for $1500US. Looks like it has factory air conditioning and option wheels.
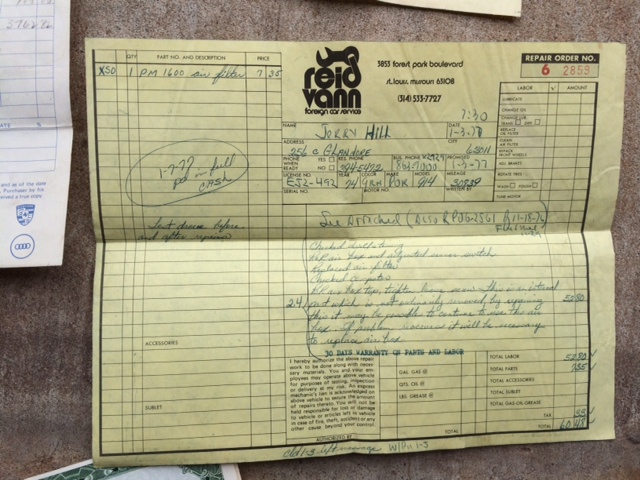
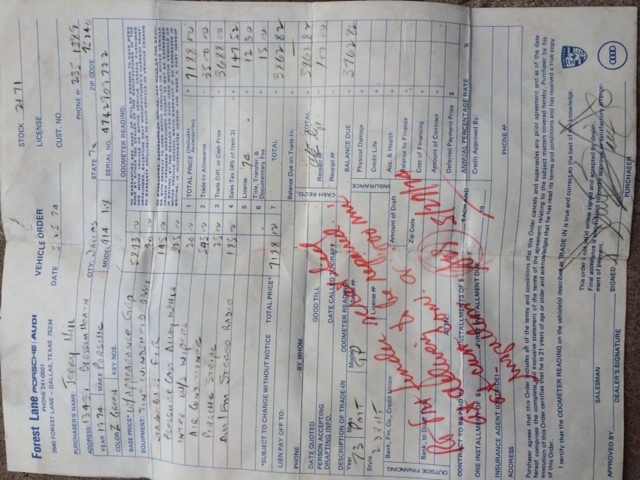
From my initial look it appears complete and almost rust free; it hasn't been registered for almost 20 years, so probably hasn't run for that long either. Cool thing is the car still has the ORIGINAL purchase invoice from Forest Lane Porsche in Dallas, Texas.
EFI has been replaced by some sort of carb setup. This will be my first experience with a carb engine. Any suggestions on how to get the motor going? I need to make sure it turns by hand first.
Anyhow, this board looks like a wealth of knowledge and I will be reading often. 

Posted by: iwanta914-6 Jul 30 2015, 09:06 PM
I came across that car on craigslist, should be a good (perhaps challenging) project! Enjoy!

Posted by: Jeff Bowlsby Jul 30 2015, 09:20 PM
Engine pics please, lets see this carb.
Air conditioning in 914s was installed at dealerships - not a factory option.
Posted by: Chris Pincetich Jul 31 2015, 12:26 PM
One option to get the engine running, that I share often, is to replace it. 
Seriously. The expense and time to remove and replace with a proven engine is often way less. Running 1.7 TIVs can be bought for $500, often much less. Going to a 2.0 TIV is 3-4x more $$. Some parts places offer a 90 day "warranty" on their used engines.
Also, you will find the "search" function on this site (upper right) very useful.
Have fun!
Posted by: jmitro Aug 2 2015, 08:54 AM
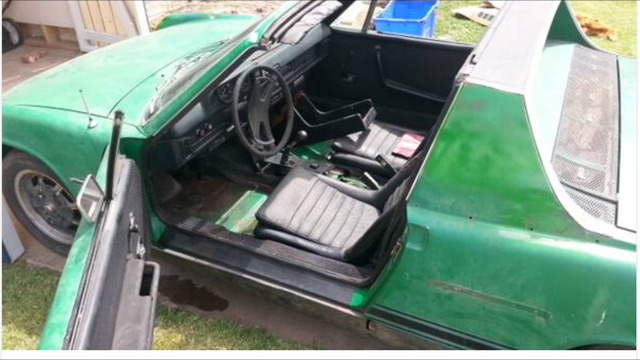
Thanks guys; I'm excited about digging into it. I just picked the car up yesterday. It had been apparently sitting in a field awhile as there is grass growing all into the engine bay.
Long term plans will be to rebuild and hotrod the engine, or even transplant with a 6 (dream wish) but short term just to get the car moving. So I'll consider a cheap engine. Need to make sure the brakes and electricals all work, but I sense the car is so neglected it will need a full teardown and restoration. I don't think this car is anything special, so authenticity is not all that important. I don't like green so I'll probably repaint it white or maybe signal orange, add flares and 5lug conversion.
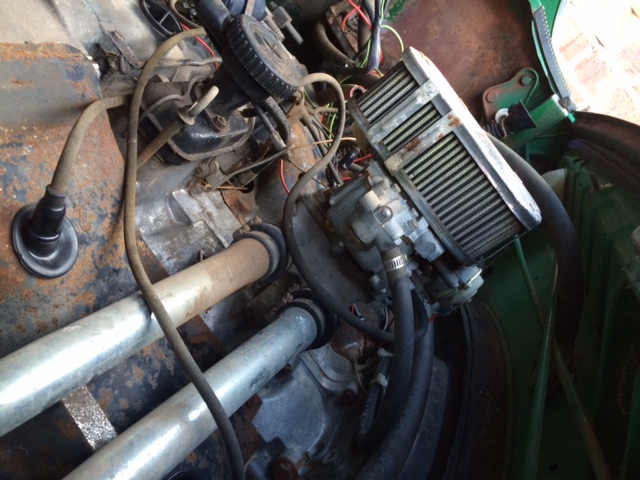
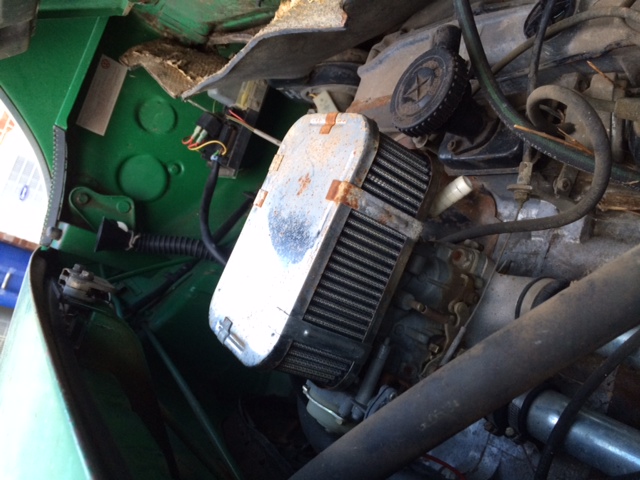
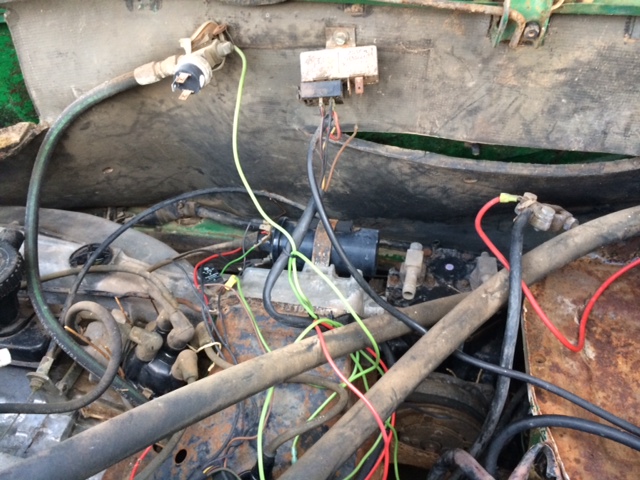
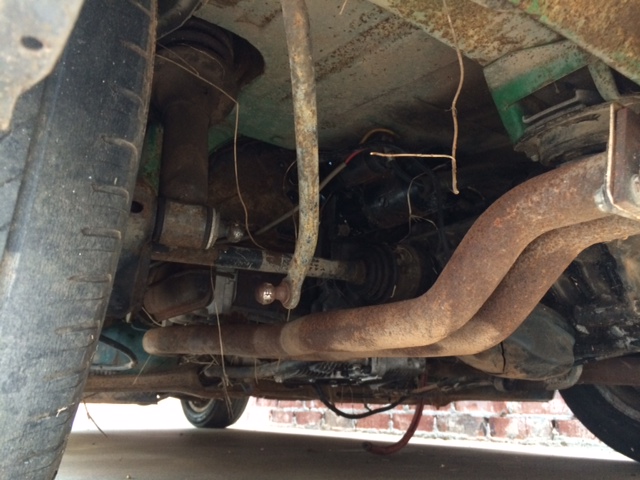
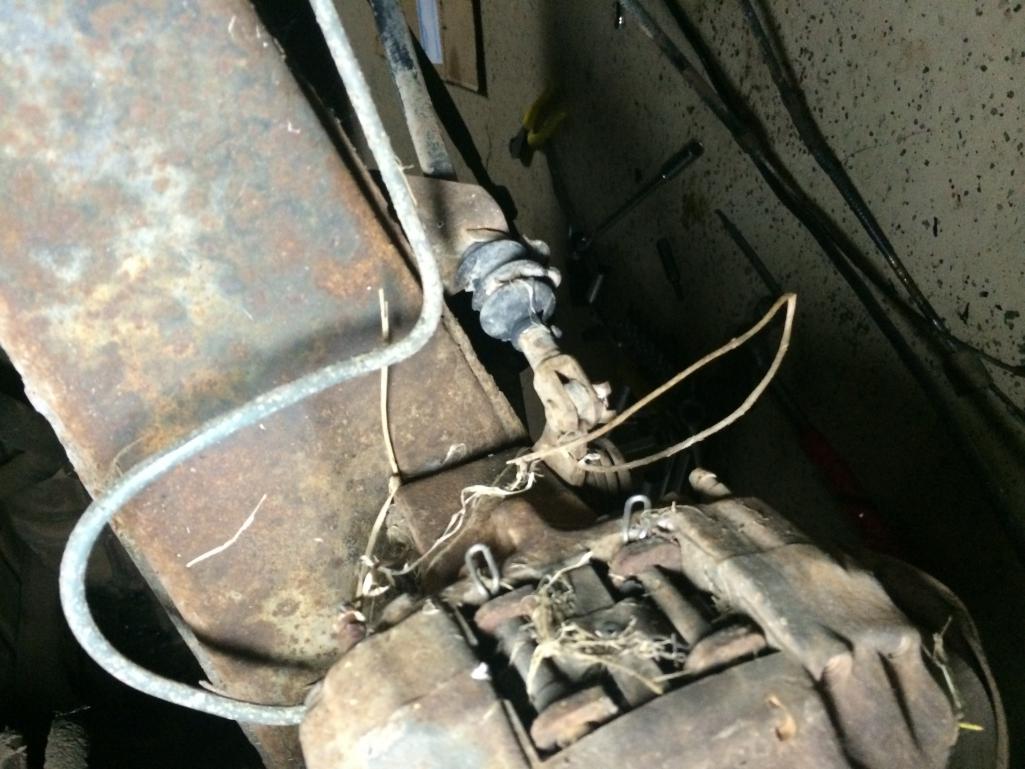
Here's engine pics and the hornets nest of PO wiring that I have to mess with.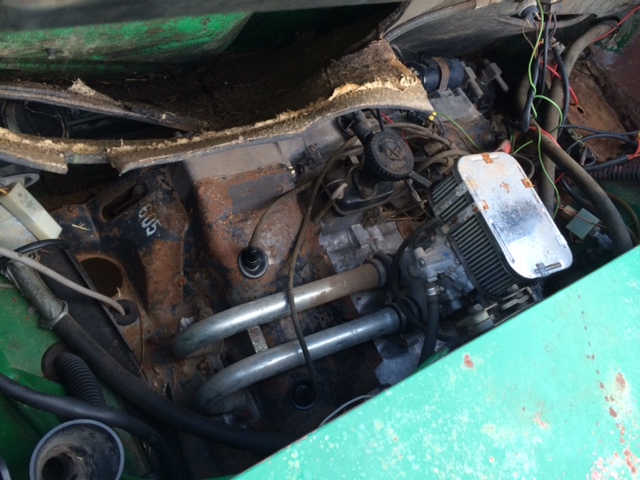
Posted by: Shadowfax Aug 2 2015, 09:43 AM
Posted by: JawjaPorsche Aug 2 2015, 10:16 AM
Long list:
Clean fuel tank
Replace fuel lines
Replace fuel filter
New plugs, wires, points, etc.
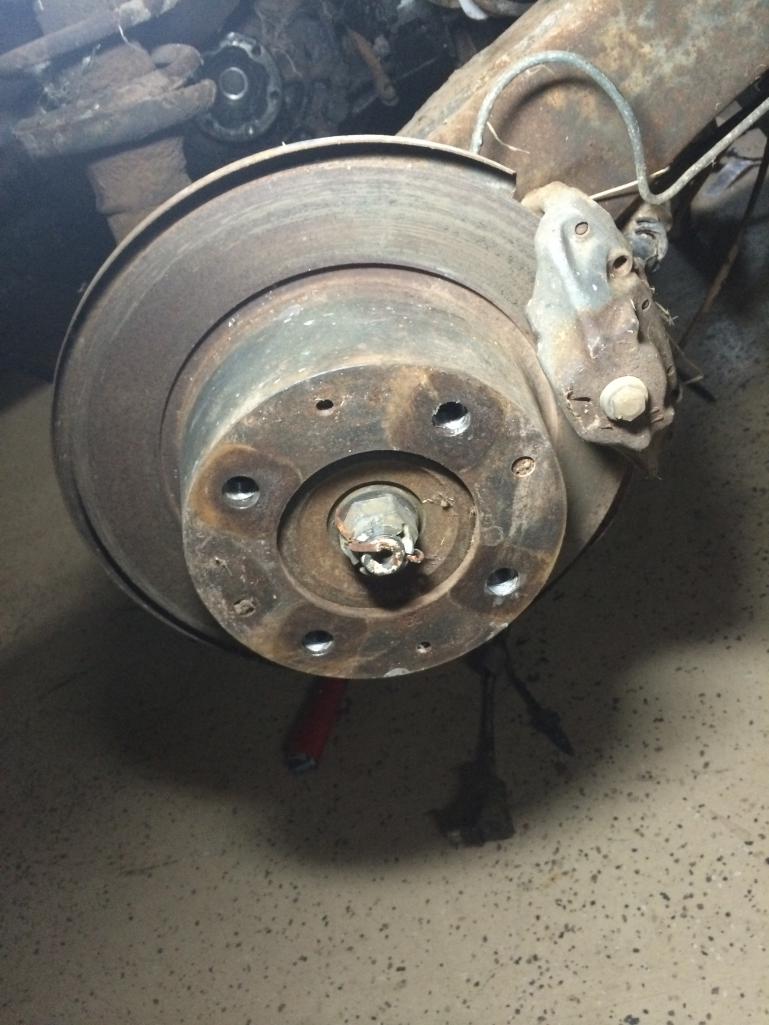
Your brakes probably will need an overhaul.
Your rear sway bar is missing the dog bone bushing.
This is just a start. But have fun!
I am sure others can add much more.
Posted by: Spoke Aug 2 2015, 10:40 AM

Looks like a nice barn field find. That single carb will get the engine running but long term think of dual carbs or fuel injection.
If your rear swaybar is missing links on both sides, you'd be best off to remove the swaybar so it doesn't swing down and hit the road and do damage.
Going off the list above, you should prioritize repairs to make. If you start digging into everything at once, you'll never drive the car. Get the engine running; make sure the brakes work; new tires; focus on the things that are most important first.
Also if you're going to try to get this engine running, when you change spark plugs, try to peek under the tins to make sure no rodents or other creatures had made a home of it like the engine I'm working on. Also check the heater ducts in the longitudinals for creature habitats or even creatures.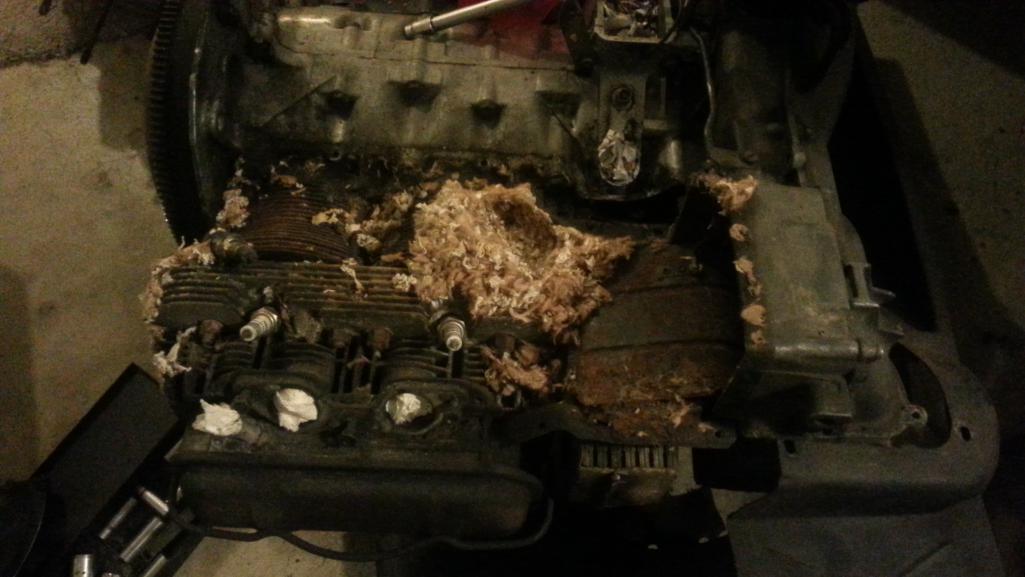
Posted by: jcd914 Aug 2 2015, 10:44 AM
Posted by: rhodyguy Aug 2 2015, 12:14 PM
my guess is when the fi was taken off for the single and that the cam is probably FOR the ljet system. cheapest and easiest? buy a ljet system. i'm sure there are lots of complete, inexpensive packages (relatively. cheaper than a set of carbs, intakes, filters, linkage, new fuel pump, etc. 40% or less than what you're going to have in the dual carb setup.) out there. i wouldn't buy any other carbs until you know what your final needs will be. long run, the ljet system should be worth what you paid for it to a person in the same situation you're in.
Posted by: jmitro Aug 2 2015, 12:56 PM
cool thanks for the information.
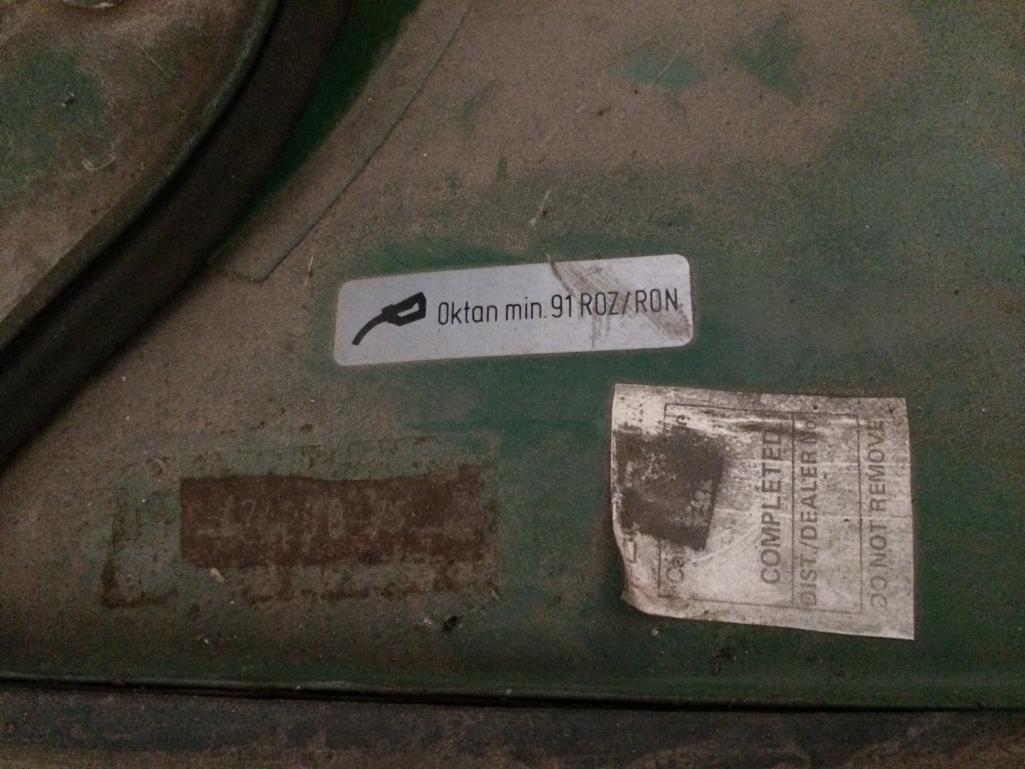
For sure, first thing on the list is brakes, but I seriously doubt this car is moving under it's own power anytime soon. Kinda cool papers that came with the car: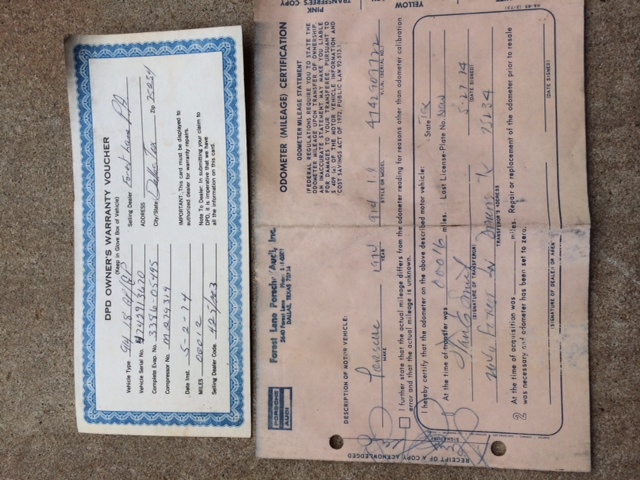

Posted by: rhodyguy Aug 2 2015, 01:05 PM
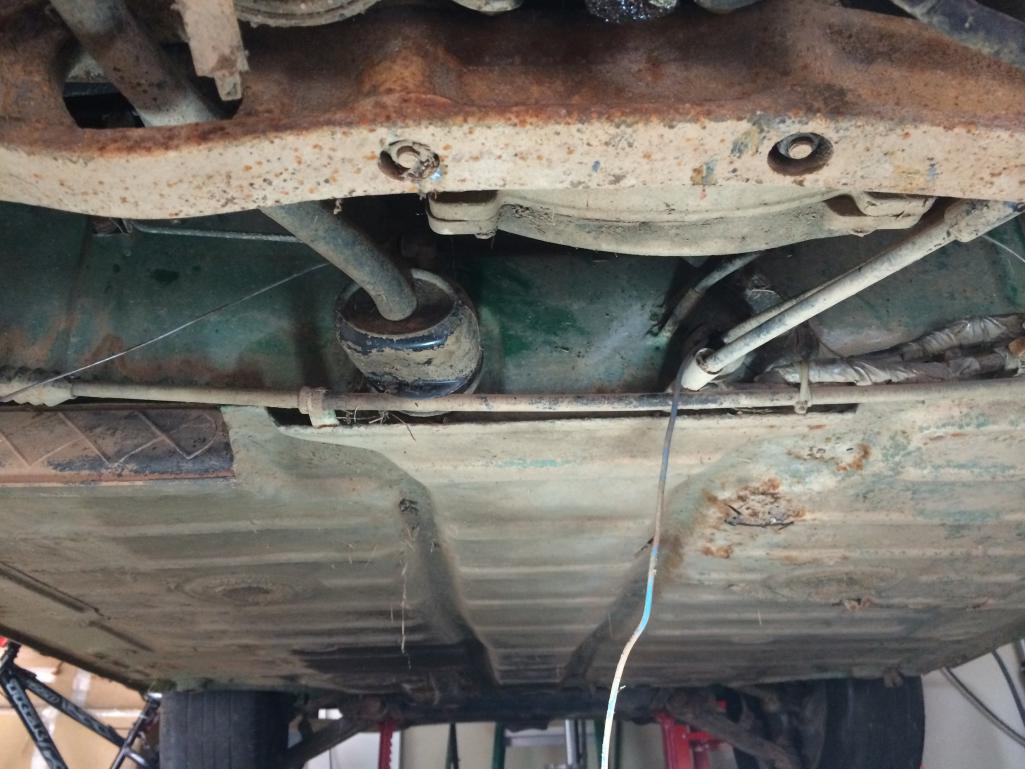
You'll find you need a patch piece for the pass side engine shelve and one for the pretty good sized hole in the frt trunk floor. Lots of other holes for the coolant lines too.
Posted by: jmitro Sep 17 2015, 10:37 AM
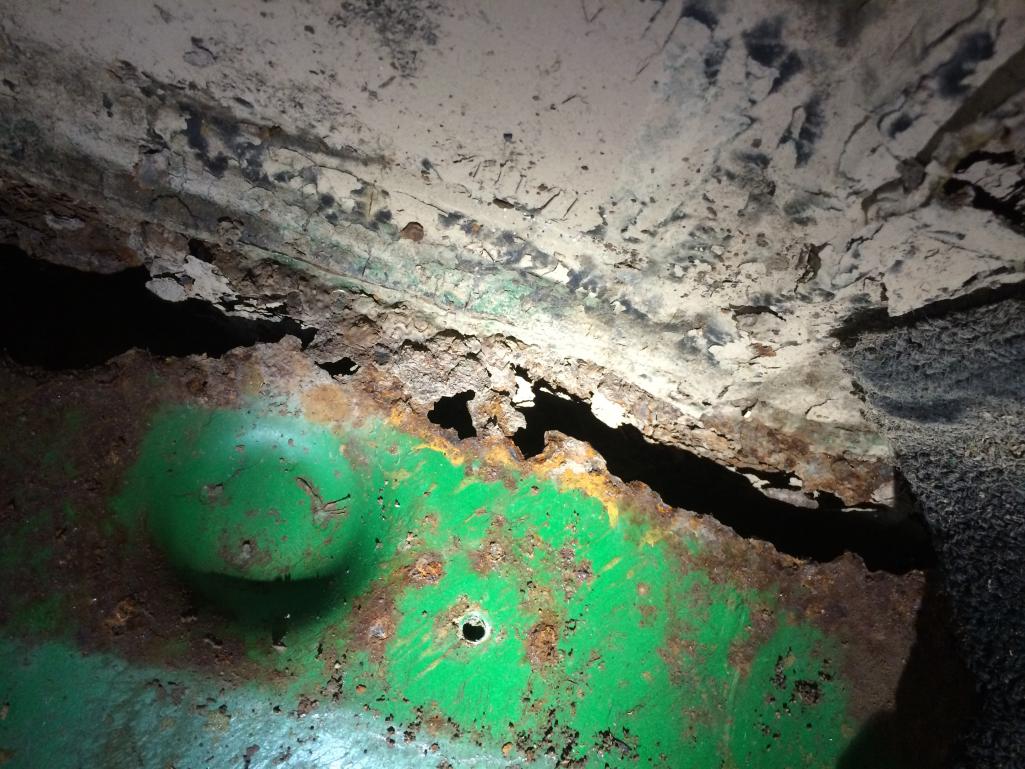
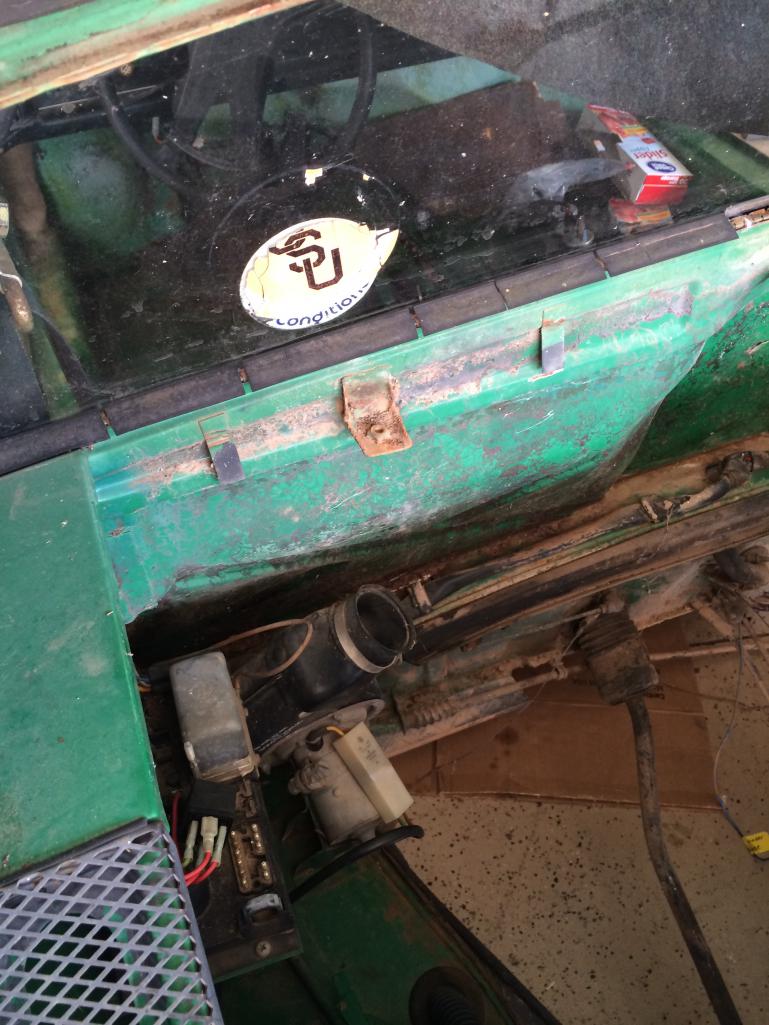
Well the car has become a full restoration of sorts. Body, chassis, suspension, brakes, engine, interior.......all areas need work, so I began stripping the car. Battery tray and hell hole look pretty crusty.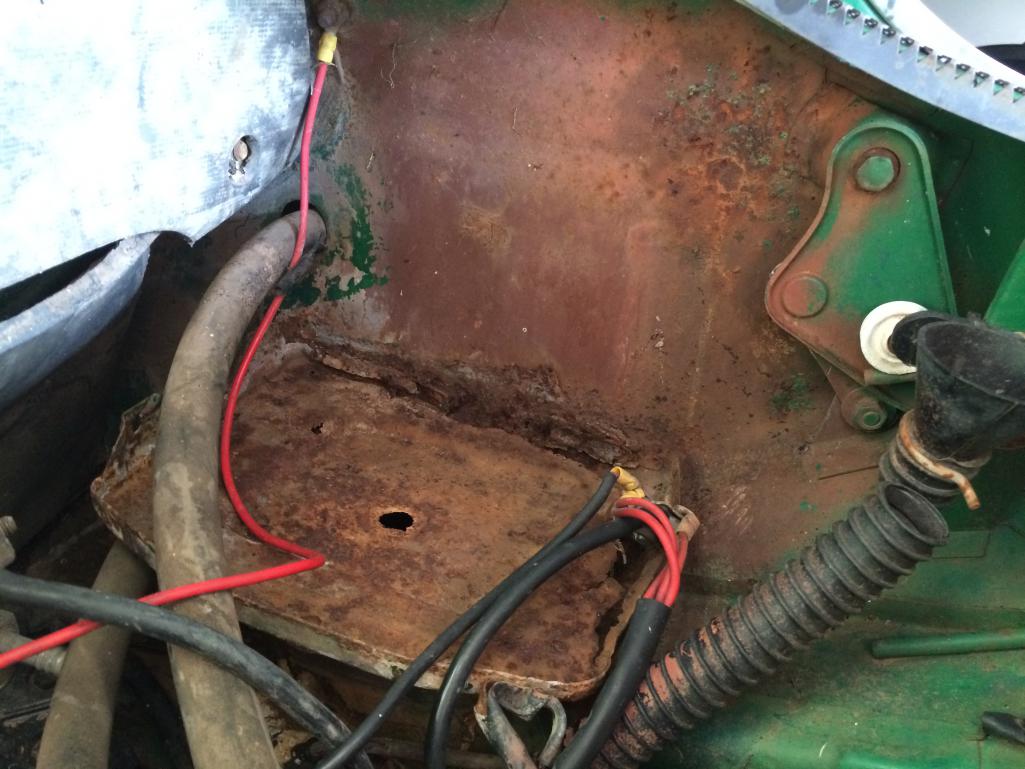
Previous owner had a creative idea using angle iron and square tubing to repair the rotting jack post. 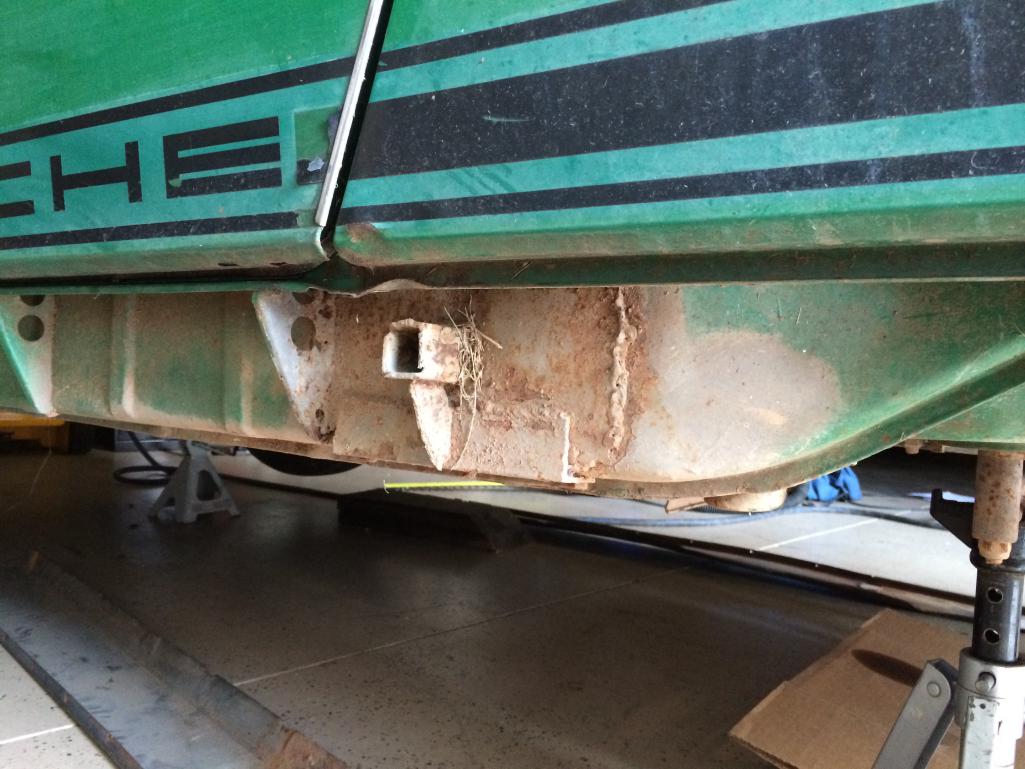
Posted by: jmitro Sep 17 2015, 10:40 AM
Floor pans looking pretty crusty, especially passenger side. Seat mounts basically ripped right off, and floor pan is peeling away from the longitudinals.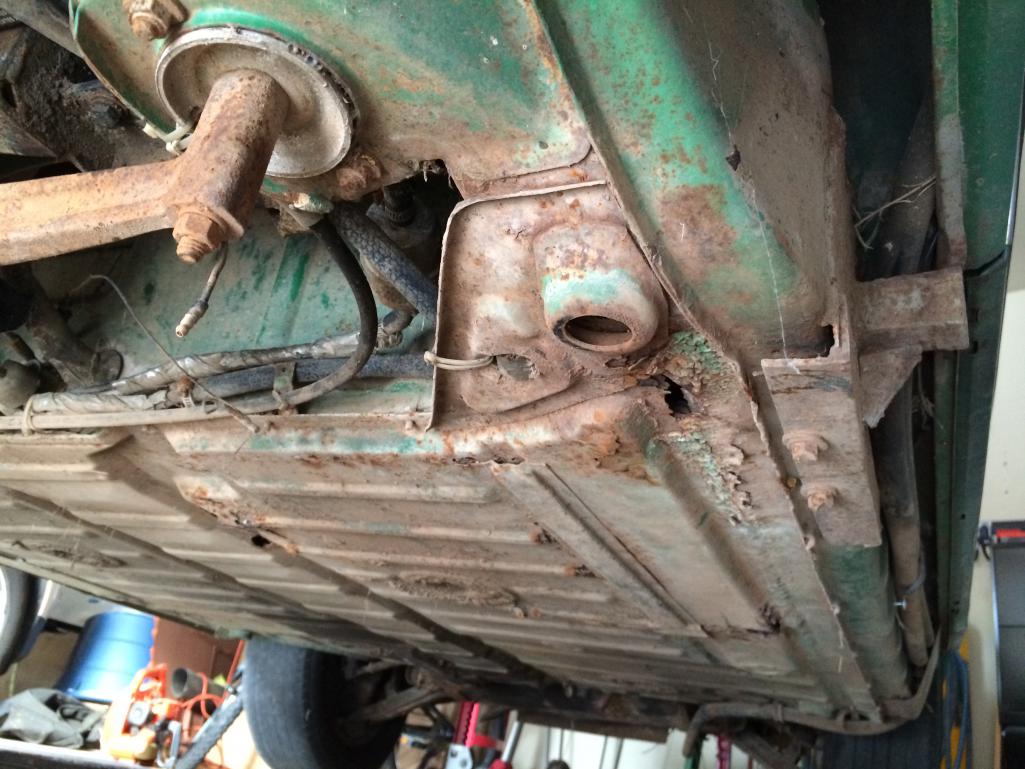
Posted by: jmitro Sep 17 2015, 10:53 AM
Pretty dirty everywhere, indicating a long period of neglect.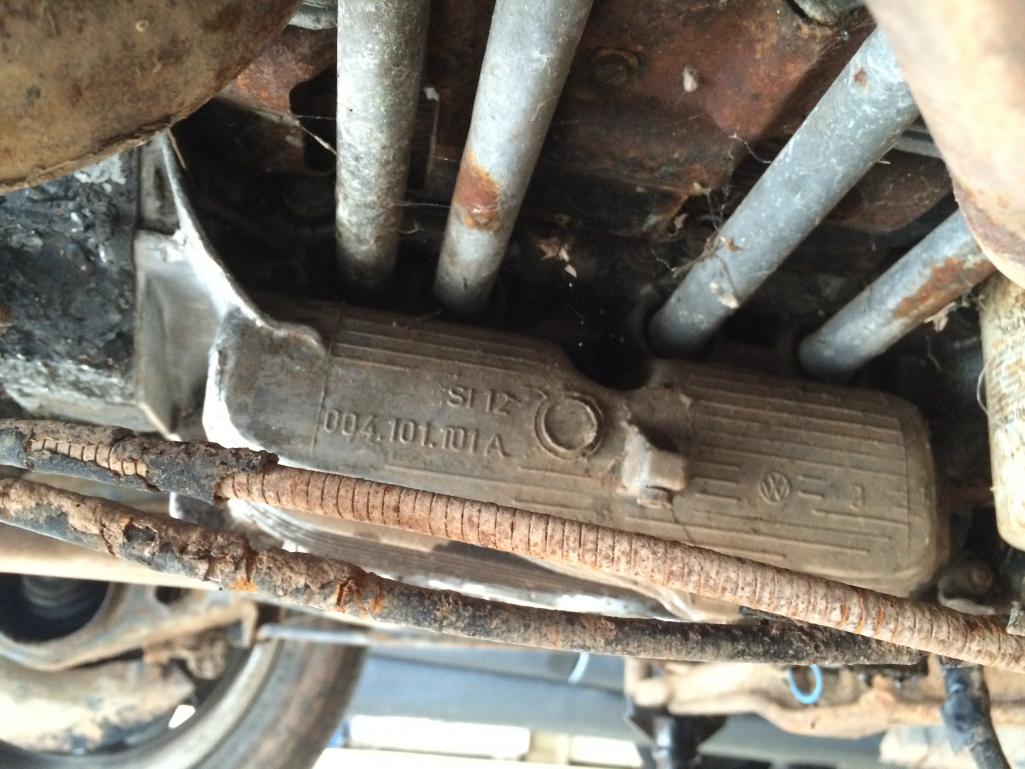
Posted by: jmitro Sep 17 2015, 10:57 AM
More dirt, rust and neglect.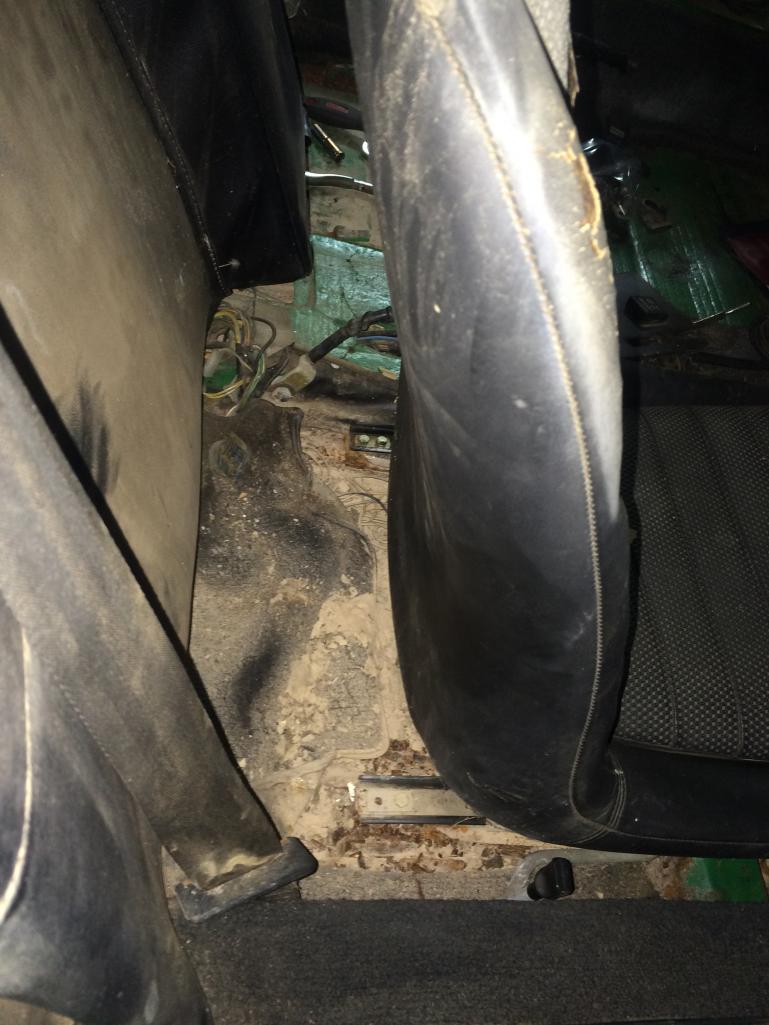
Posted by: jmitro Sep 17 2015, 11:03 AM
Air conditioning condensor, drier, compressor, hoses, console all going in the trash.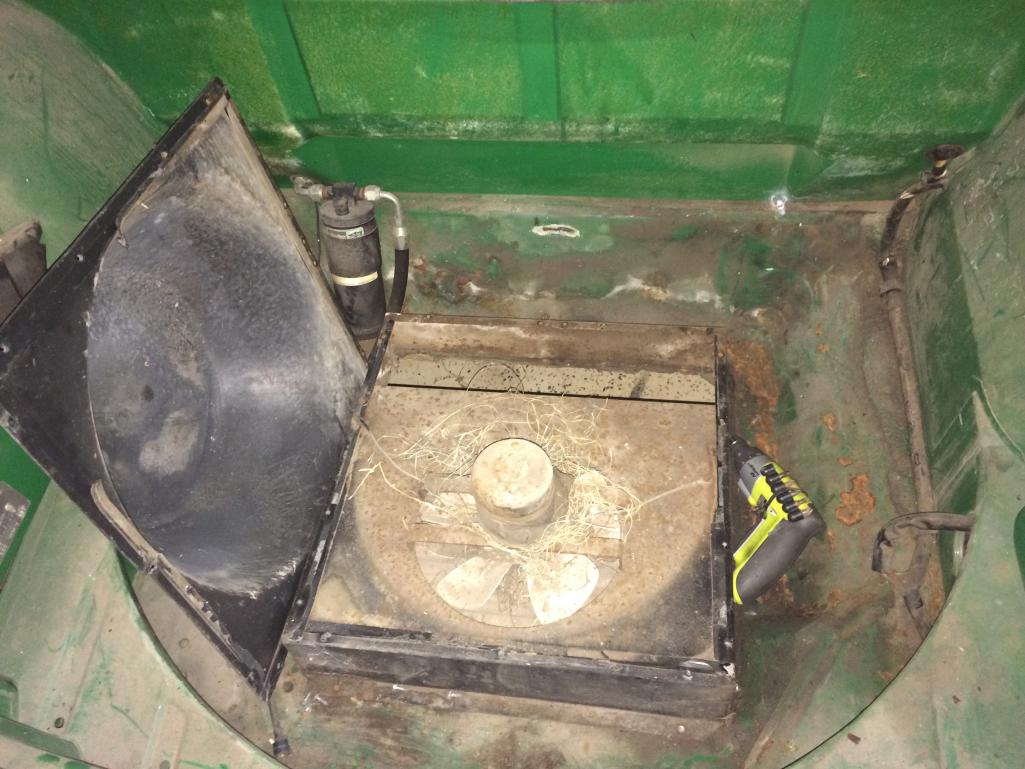
Passenger floorpan under the seat was a cesspool of dirt, rust, trash, screws, old carpet, etc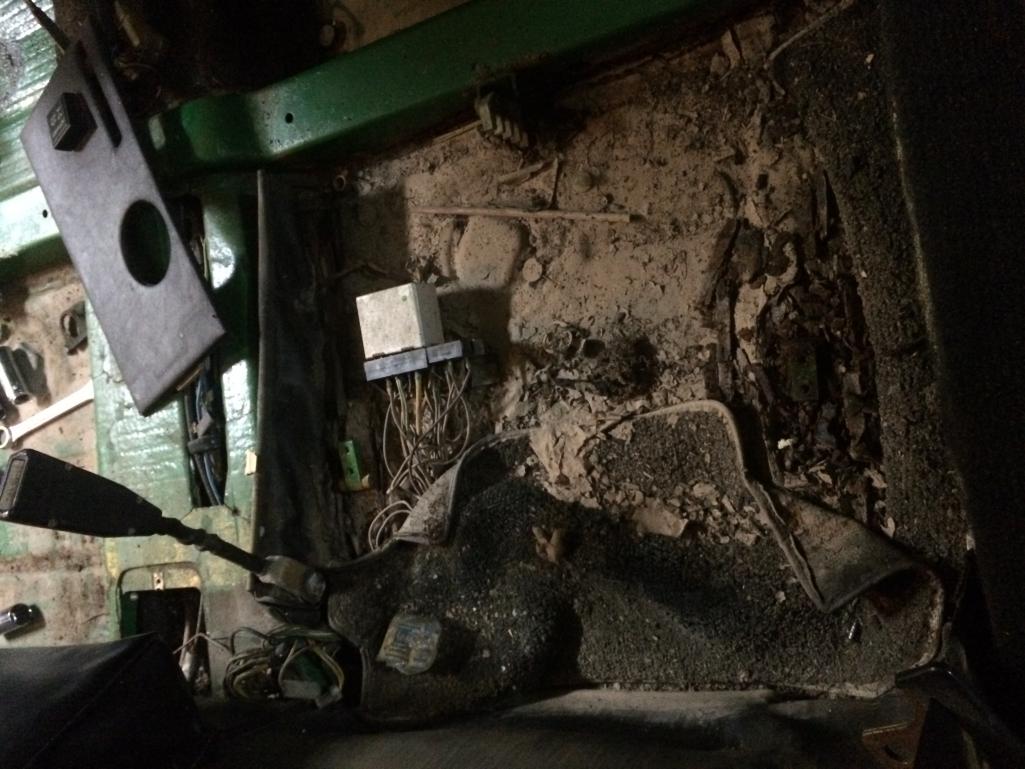
Posted by: Stacks914 Sep 17 2015, 11:04 AM
Looks like a nice start!
Posted by: jmitro Sep 17 2015, 11:07 AM
lots of rust along the rear lower firewall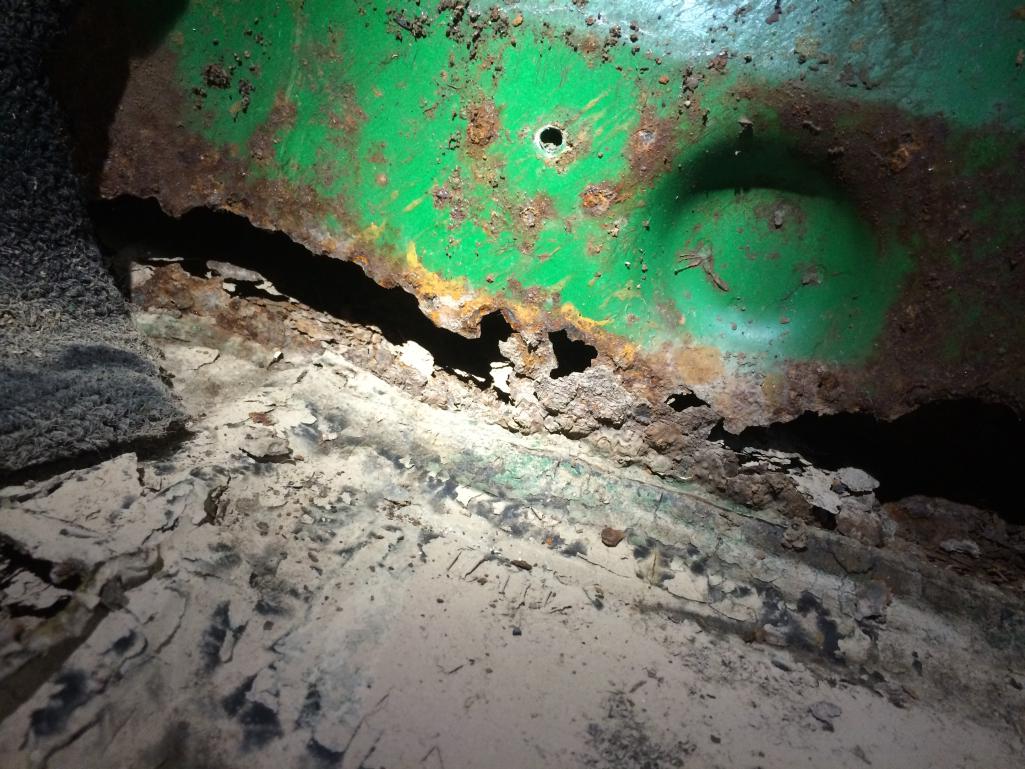
Posted by: jmitro Sep 17 2015, 11:08 AM
Posted by: jmitro Sep 17 2015, 11:11 AM
some of the sheetmetal is in decent shape. 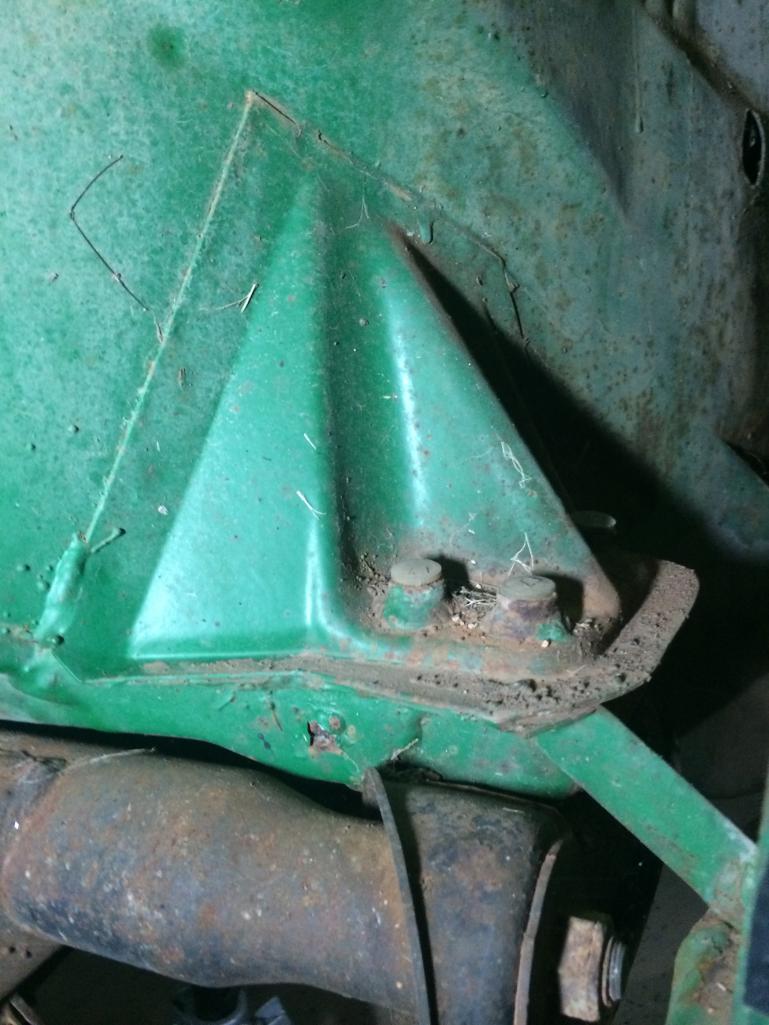
Planning on a 5lug swap using the PMB drilling method. 
Posted by: jmitro Sep 17 2015, 11:13 AM
Posted by: jmitro Sep 17 2015, 11:17 AM
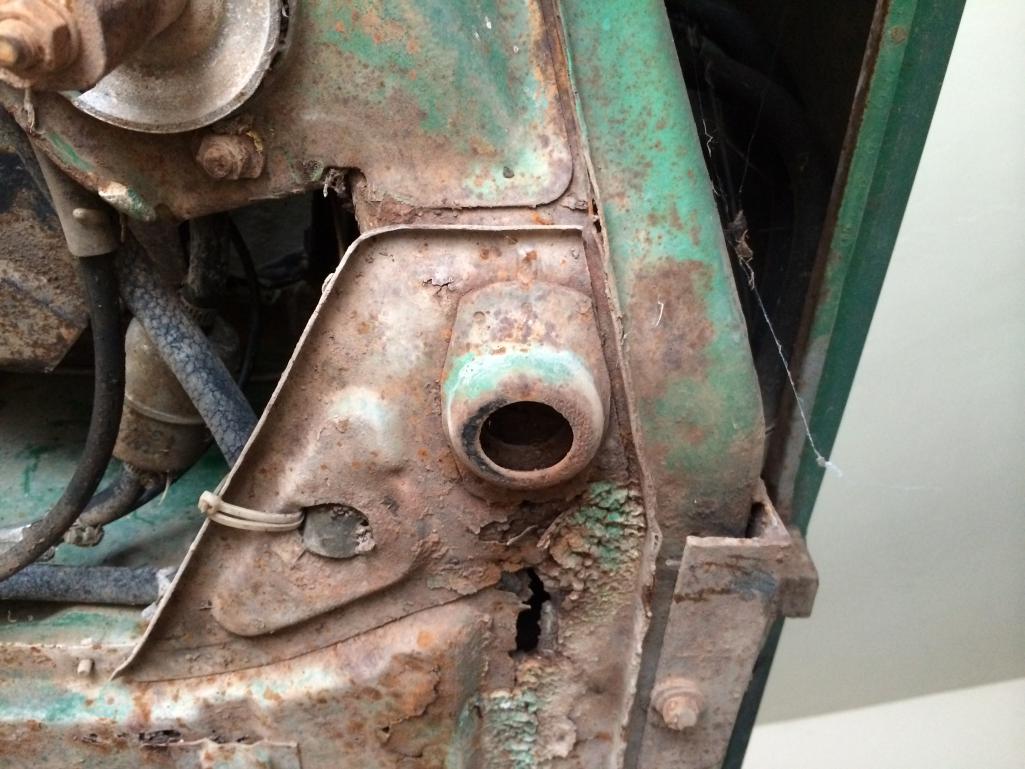
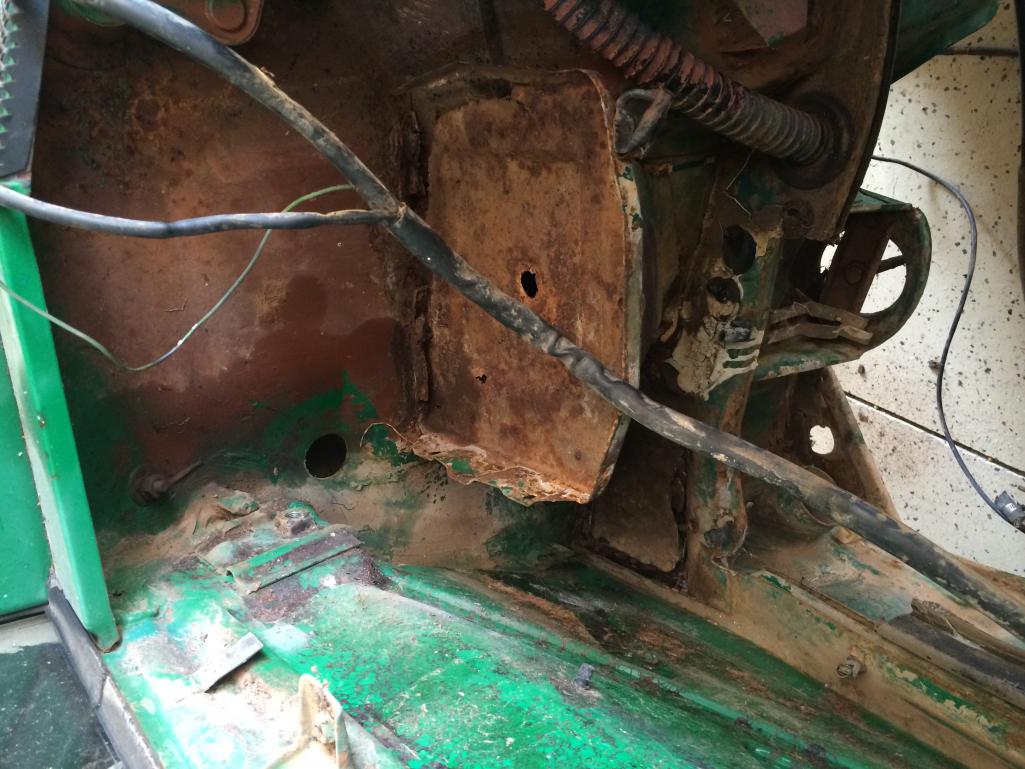
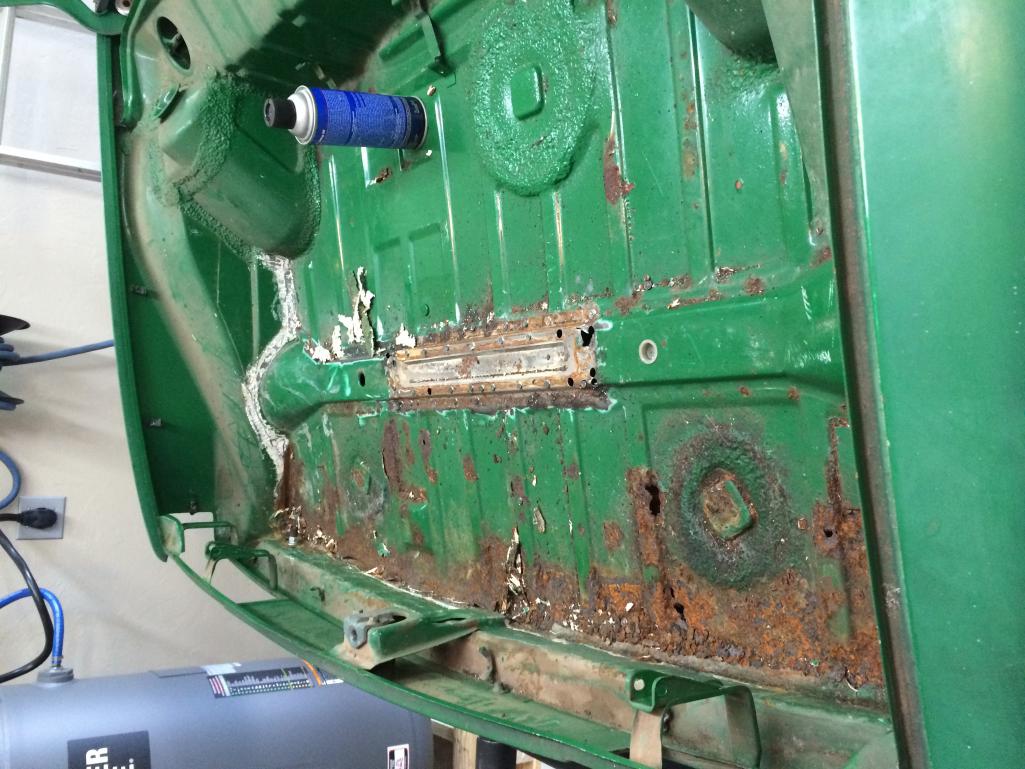
Hell hole will need some thorough inspection and probably a lot of work.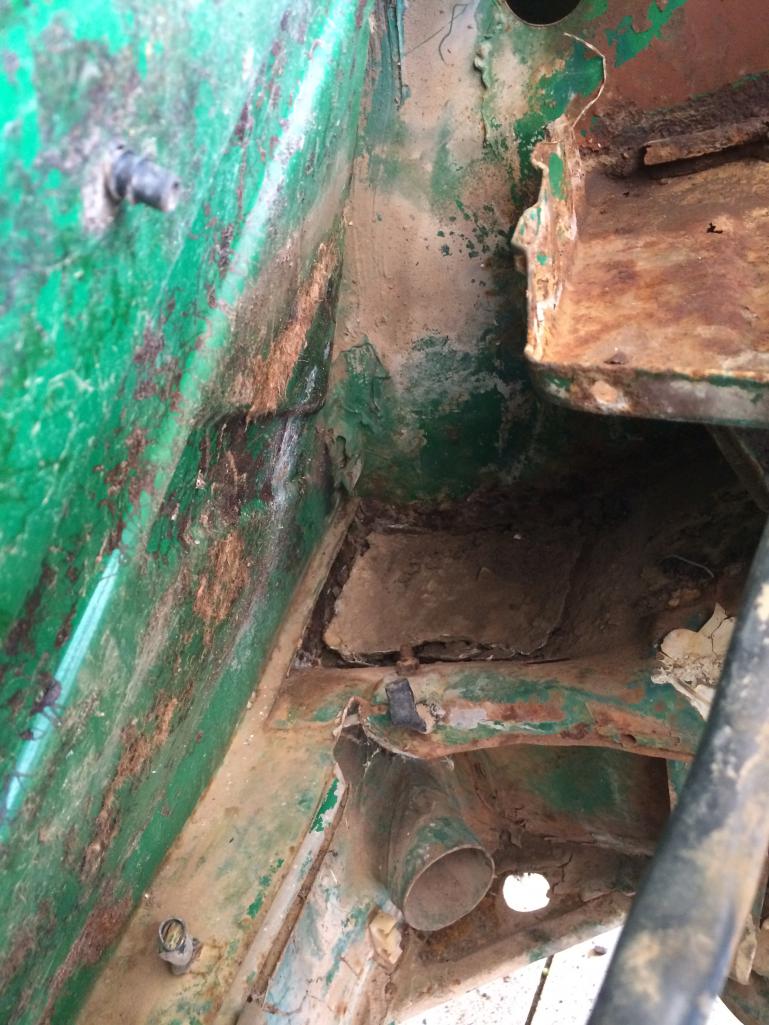
Front bumper mounts are rusty; sheetmetal attached to them has rusted through and will need to be cut out and patched at least.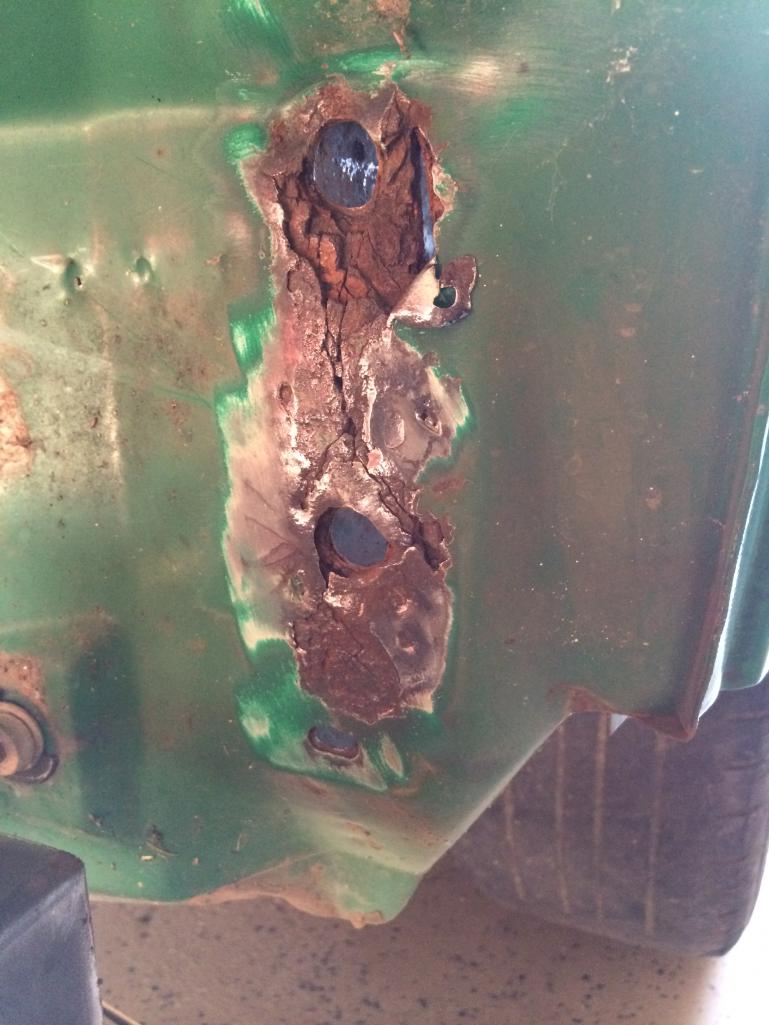
Posted by: jmitro Sep 17 2015, 11:20 AM
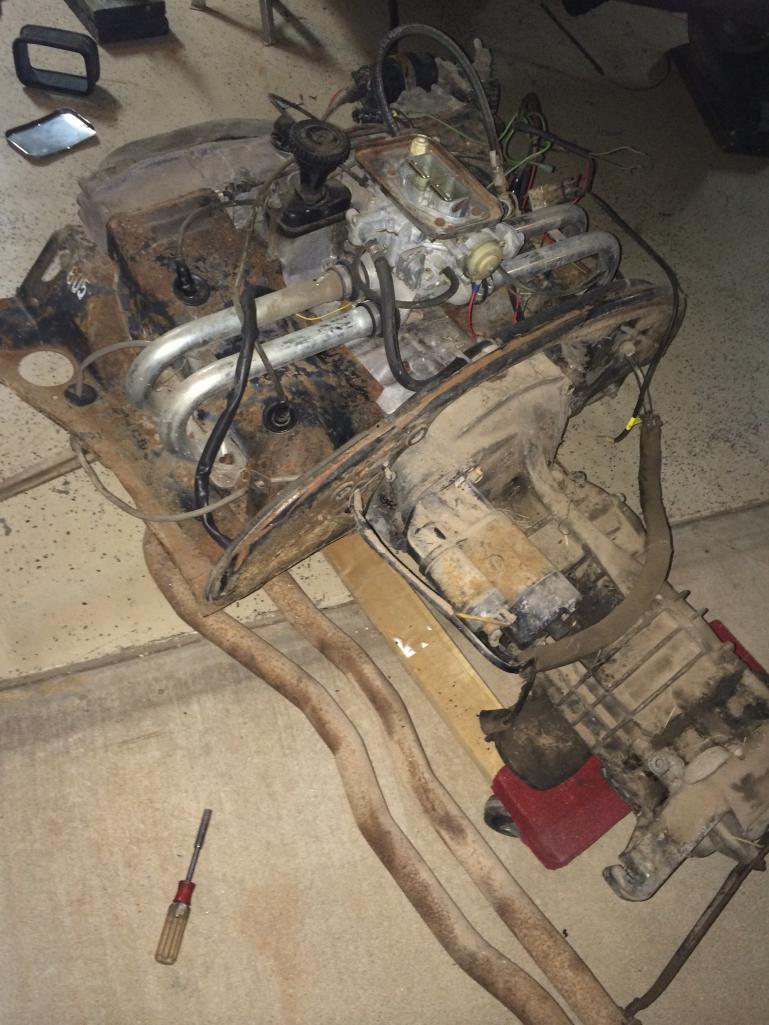
pulled the engine and transmission
Posted by: jmitro Sep 17 2015, 11:37 AM
found a dead rat and lots of hornets nests; I won't post a photo of the rat like socalandy did LOL 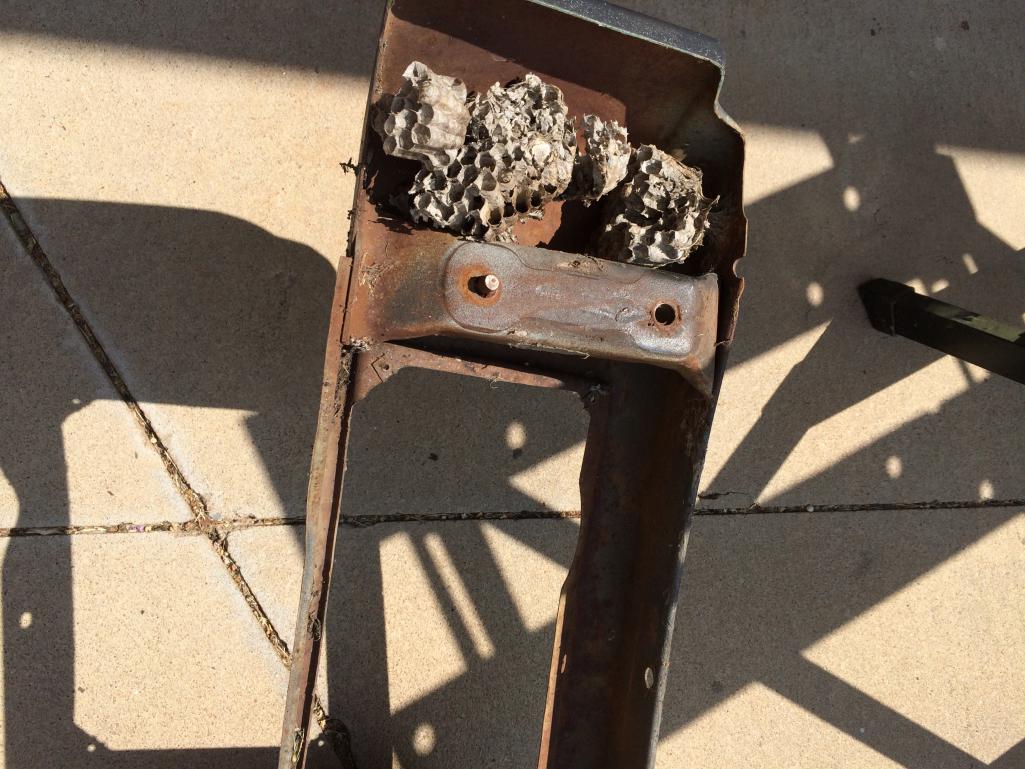
Posted by: jmitro Sep 17 2015, 11:39 AM
Broken headlight lens and Lots of really crusty rubber. Fiberglass bumper dam is so severely damaged it probably cannot be saved. Foglights appear to be in good shape, however.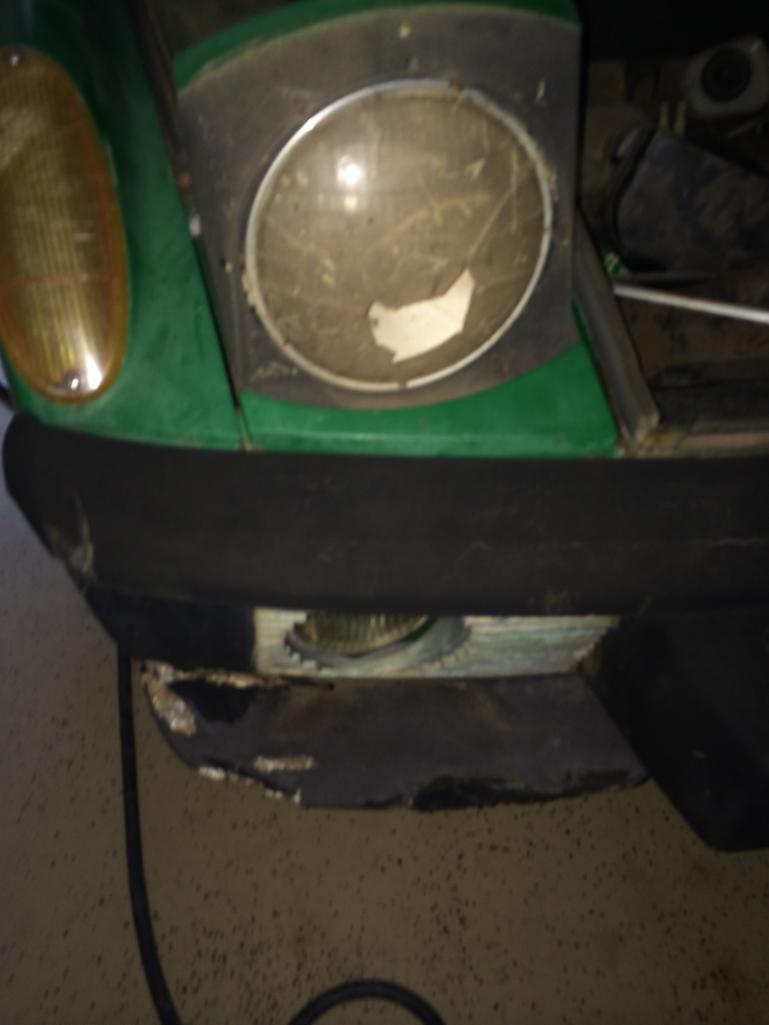
Posted by: jmitro Sep 17 2015, 11:41 AM
Spent the last 4 weeks fabricating my own rotisserie. Finally got the car mounted last night, now will remove the suspension pieces, windshield, and start drilling out spot welds and replacing bad metal.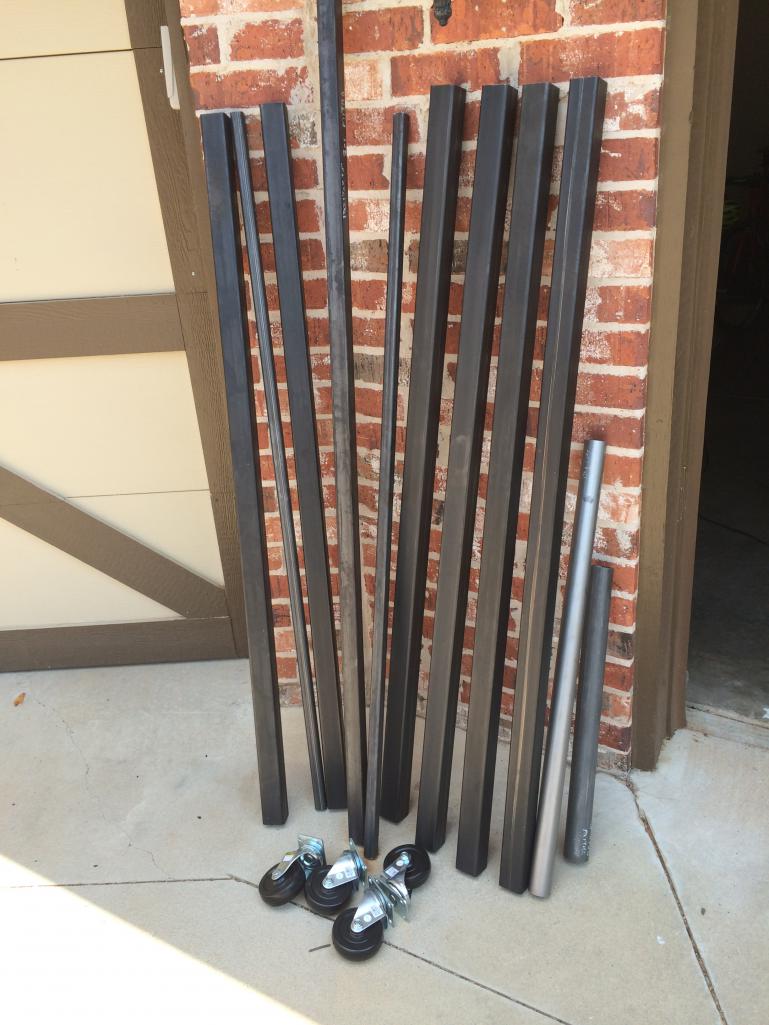
Posted by: jmitro Sep 17 2015, 11:41 AM
Posted by: Dave_Darling Sep 17 2015, 11:47 AM
Do future-you a favor: Pull off the plastic caps on top of the outboard rear suspension mounting point bolts, and spray some PB Blaster or Kroyl into them. Then put the caps back on. That will help save future-you (and future-wheel-alignment folks) a whole lot of aggravation later.
--DD
Posted by: Ed_F Sep 22 2015, 03:45 PM

Air conditioning condensor, drier, compressor, hoses, console all going in the trash.
Passenger floorpan under the seat was a cesspool of dirt, rust, trash, screws, old carpet, etc
You might try selling the console on the classifieds here. AC consoles seem to be hard to come by. There is a member here who rebuilt consoles and sold them for charity. Even the AC bits could put extra cash back in your pocket. Good luck!

Posted by: Chris H. Sep 22 2015, 04:43 PM
Great work on that rotisserie. So far the rust isn't too bad at all. Definitely a keeper (except for the single carb).
Posted by: jmitro Oct 8 2015, 01:31 PM
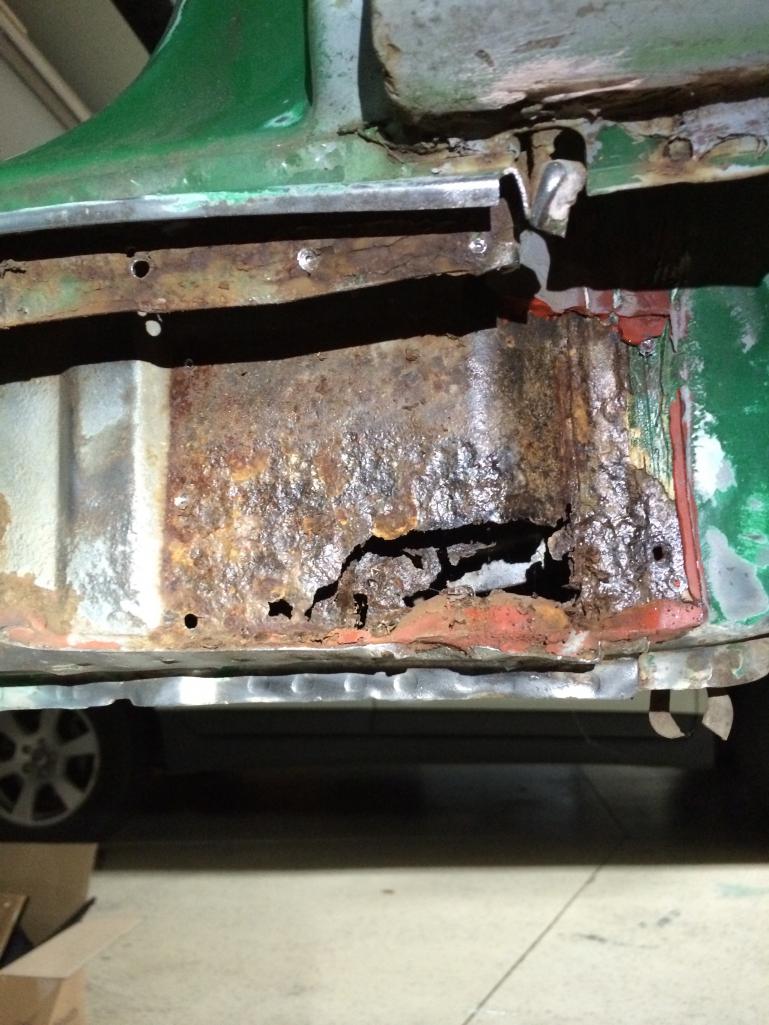
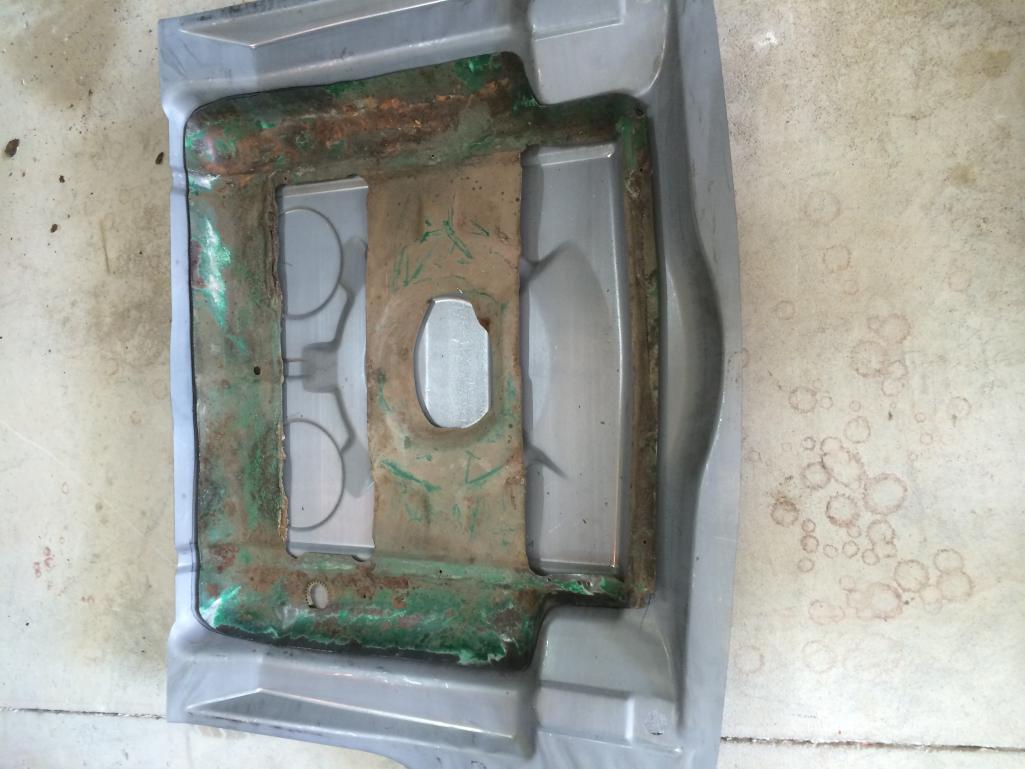
Like I Previously mentioned, the PO had some creative methods of hiding rust with some stock sheetmetal. This piece was riveted to the outer long sheetmetal. After removing it, look what was underneath: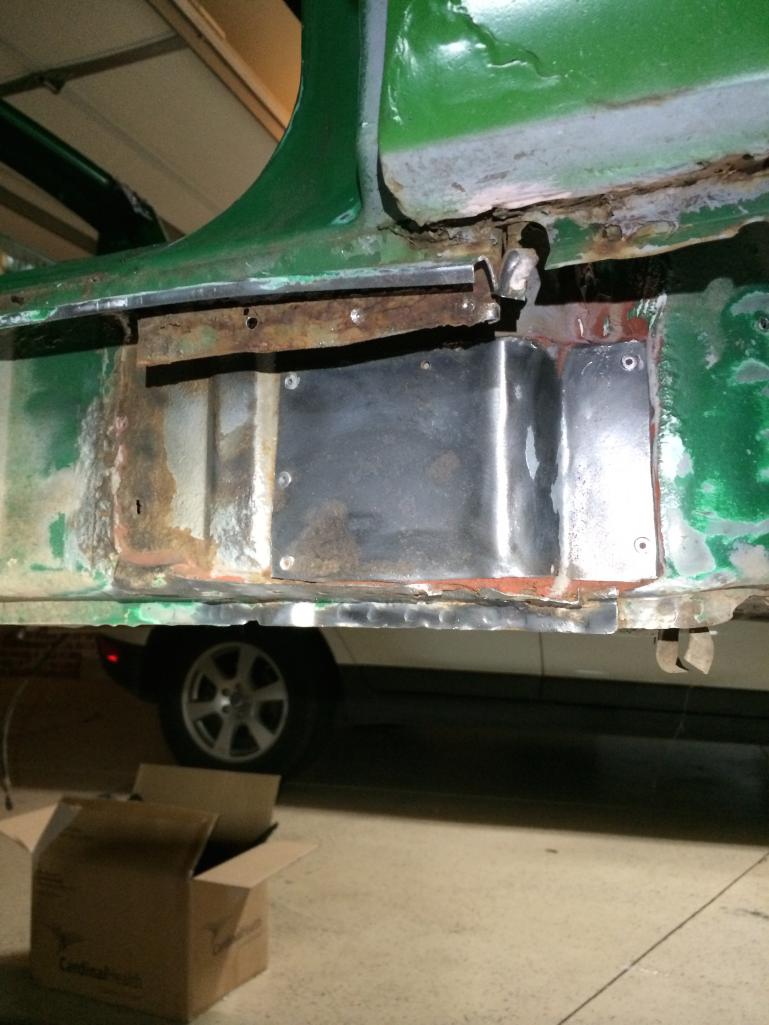
Posted by: VWTortuga336 Oct 8 2015, 07:48 PM

Posted by: jmitro Oct 9 2015, 09:56 PM
Rocker cover removed to reveal the underlying cancer in the hellhole. This is going to take a lot of work
Removed the rotten passenger side rear floorpan. Yuck!!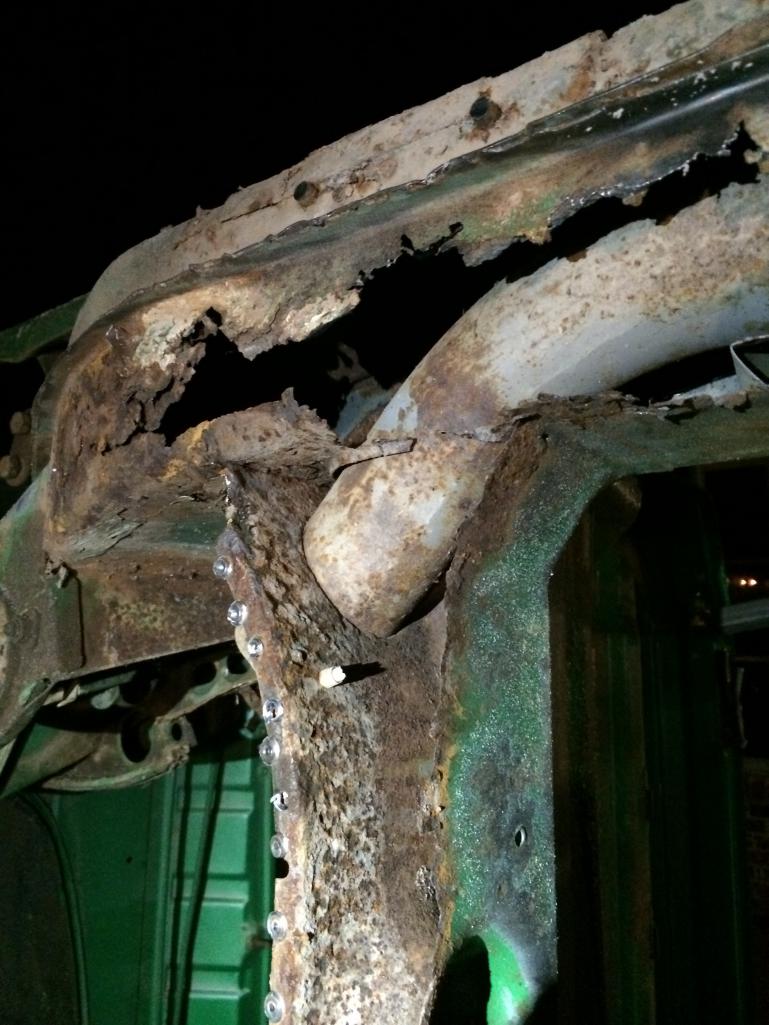
Posted by: jmitro Oct 9 2015, 10:00 PM
Rotisserie finally completed and the car can be rotated 360 degrees. For now it's on the side so I can access the floorpans and hellhole.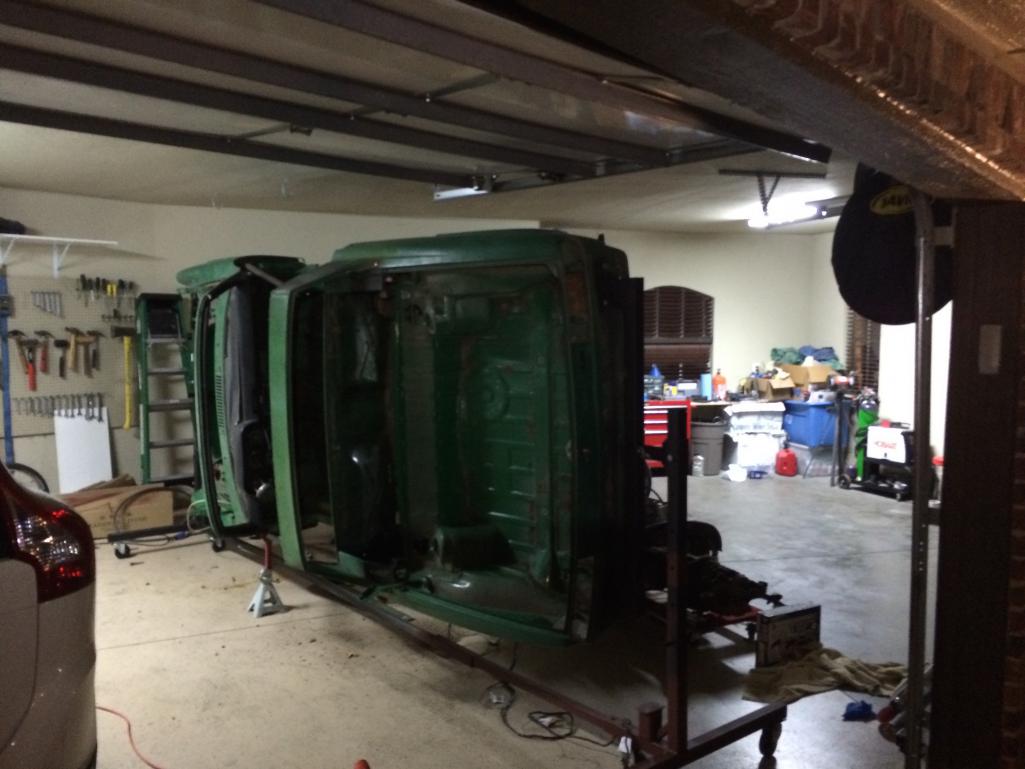
with the passenger rear floorpan cut out, you can see just how rotten the bottom edge of the firewall really is. I'll cut this out and graft in some fresh metal.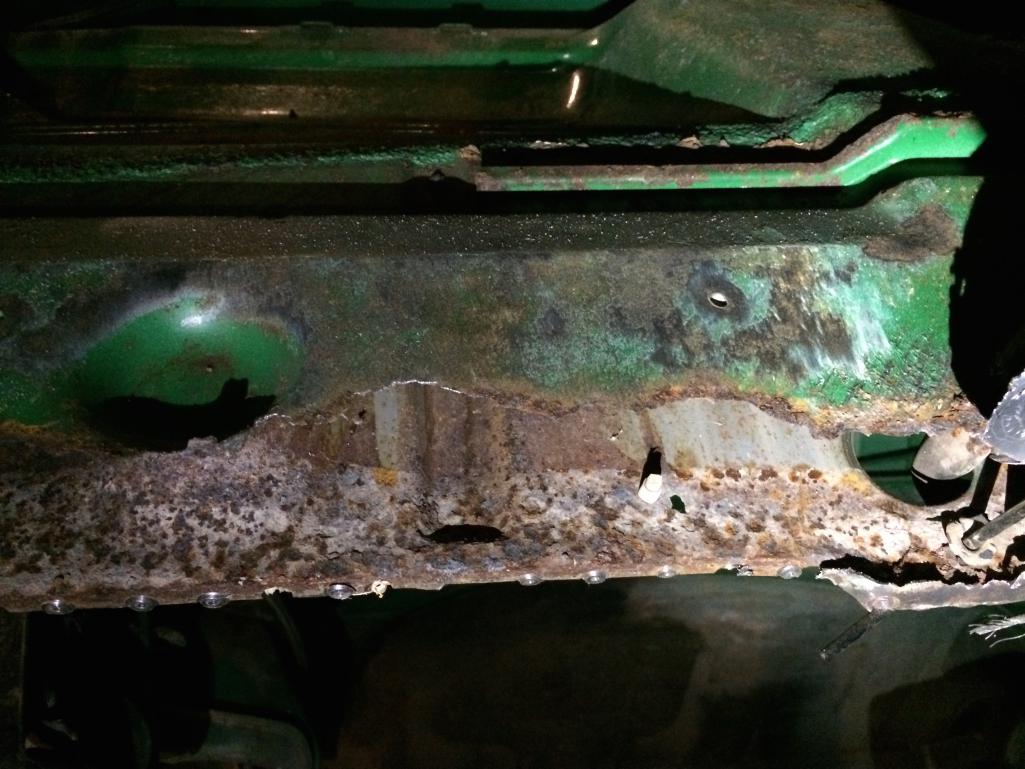
Posted by: jmitro Oct 9 2015, 10:06 PM
Passenger front fender had a rust hole at the bottom corner that was filled with literally gobs of bondo. Haha. Another patch to be done.....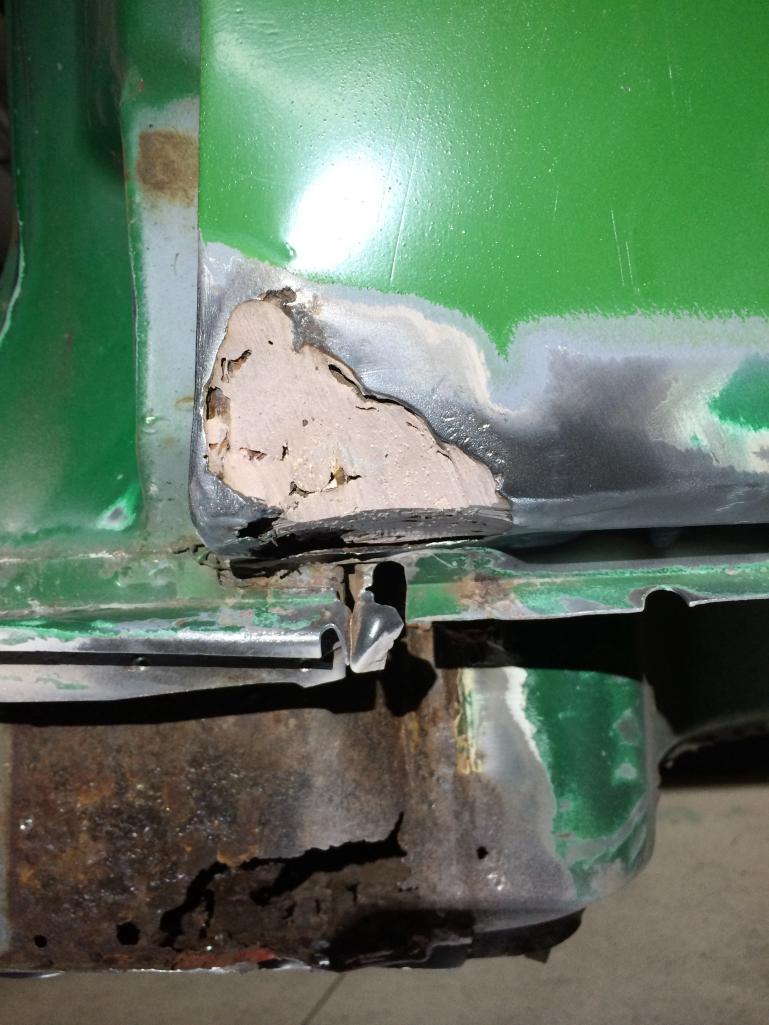
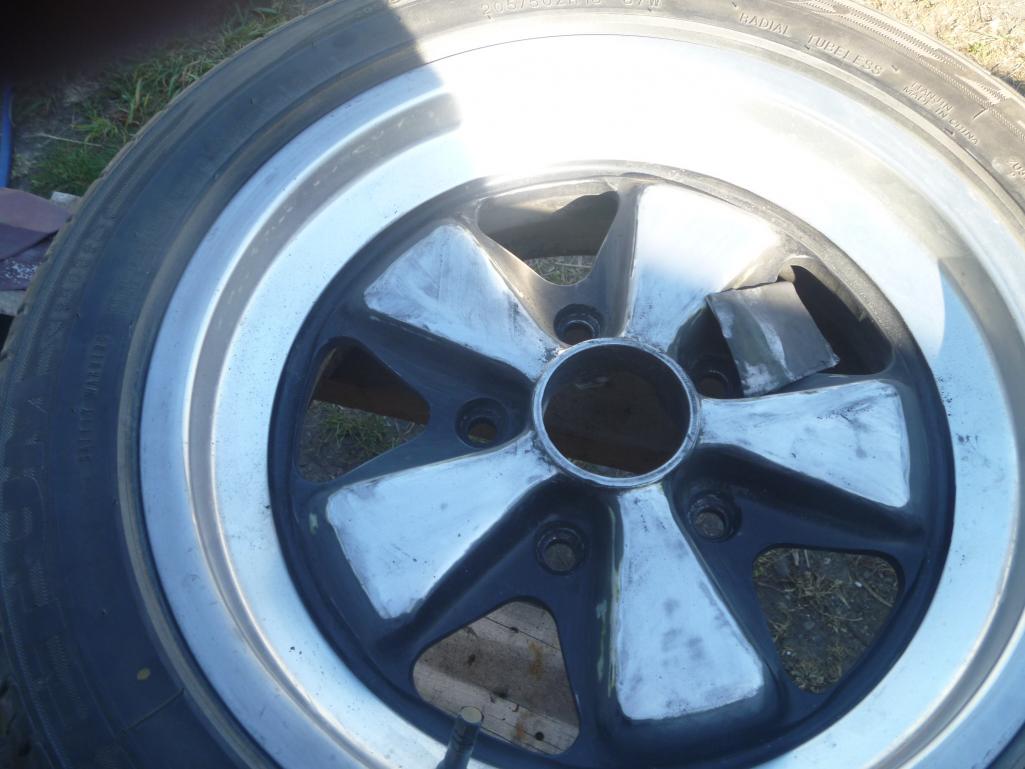
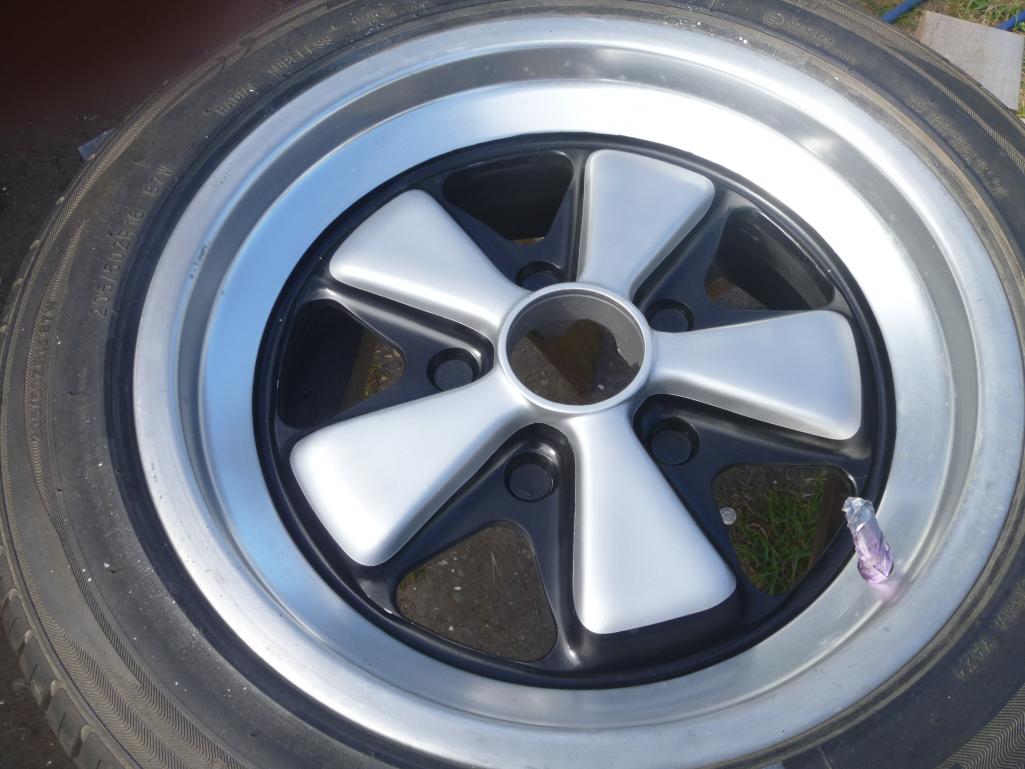
To begin my parts collection, the first parts of the "new" car came today. 15x7/8 Fuchs reps.
Thanks John!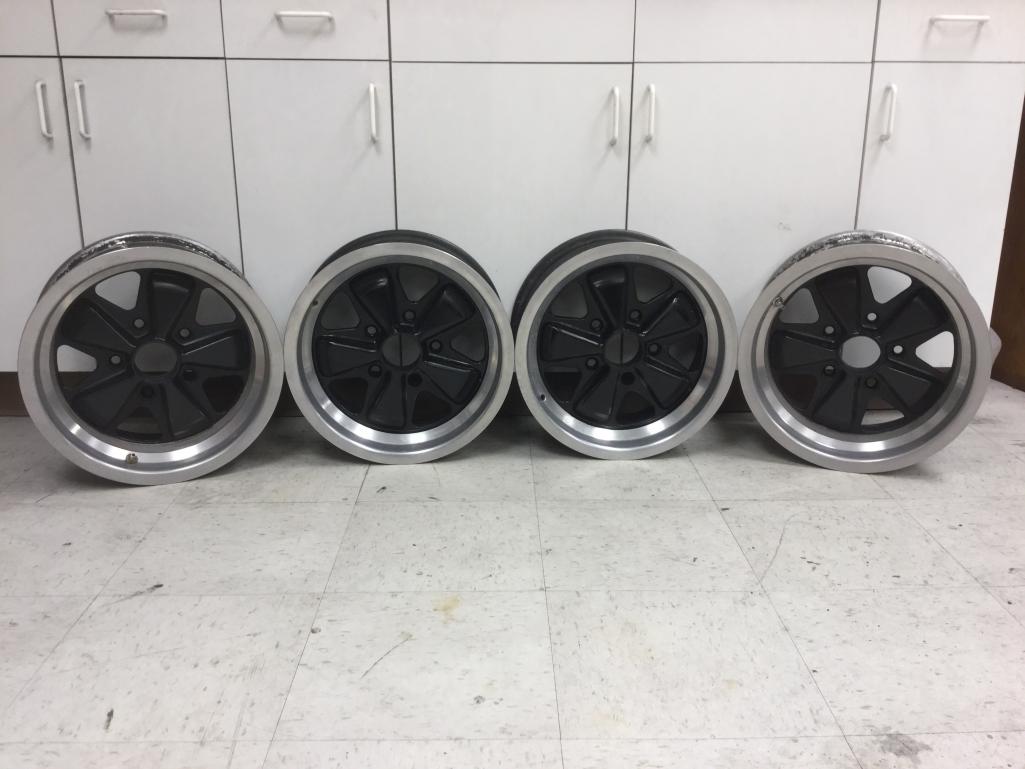
Posted by: bigkensteele Oct 9 2015, 10:33 PM
I have to ask - are you sure that you want to continue with this tub? From years of personal experience and reading threads on this board, you would most likely be much better off finding a better tub in SoCal or AZ and having it shipped to you. Perhaps you enjoy welding and grinding, but I fear that you have only discovered the tip of a very big iceberg.
However you proceed, good luck! It looks like you have some talent, so this should be a fun thread!
Posted by: jmitro Oct 9 2015, 11:02 PM
I have to ask - are you sure that you want to continue with this tub? From years of personal experience and reading threads on this board, you would most likely be much better off finding a better tub in SoCal or AZ and having it shipped to you. Perhaps you enjoy welding and grinding, but I fear that you have only discovered the tip of a very big iceberg.
However you proceed, good luck! It looks like you have some talent, so this should be a fun thread!
believe it or not, I looked for a car that needed work. I enjoy the cutting, grinding, welding, and making something new out of this old tired chassis. It will be a long process to fully restore this car, but I enjoy the restoration journey as much as the end result
Oh yeah, I'm also training for the Houston Marathon in January. With a family and full time job. I'm living life to the fullest!
Posted by: jmitro May 18 2016, 12:38 PM
Past few months have been busy moving, setting up my new workshop, running the Houston Marathon, and finally getting back to work on the 914.
I was lucky enough to buy a nearly new house with a 9000lb two post lift in the second garage. Here the car is upside down on the rotisserie, working on the front trunk floor
Posted by: jmitro May 18 2016, 12:46 PM
New front trunk floorpan welded in place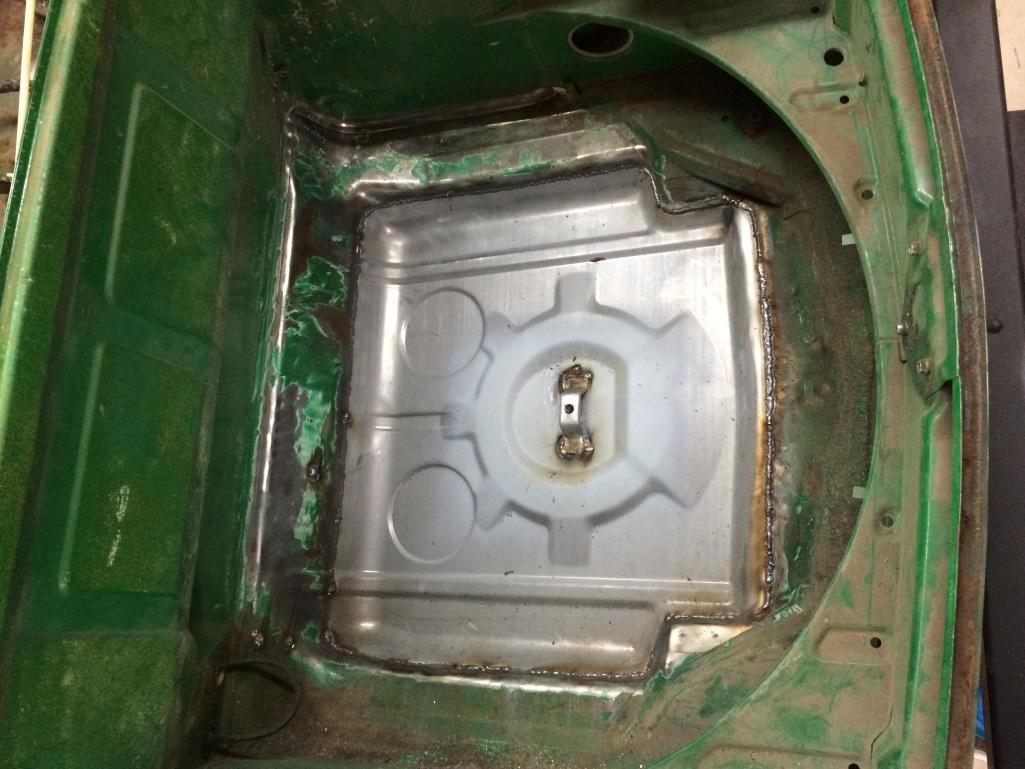
Posted by: jmitro May 18 2016, 12:50 PM
Started repairing the rusted out right front Apillar support and pedestal. Basically three layers of metal to repair. First layer was completed, overlaid with POR15, and second layer shown here. Final external pedestal still in the works:
http://s75.photobucket.com/user/jmitro2000/media/2016-04-23%2016.01.01_zpsjqc7f9od.jpg.html
Next I fabricated a new front bumper mount completely from scratch (both need to be done but I've only completed one so far). It's a huge amount of work due to the bracket being welded to the inner fender wells which were also rusted. So I had to cut out a large section of the inner structure as well as part of the external body sheetmetal.
http://s75.photobucket.com/user/jmitro2000/media/2016-04-23%2016.02.09_zpsh7hrmkbk.jpg.html
Started adding the chassis stiffening braces from Mad Dog Motorsports:
http://s75.photobucket.com/user/jmitro2000/media/2016-04-23%2016.02.54_zpsqb2nqdfl.jpg.html
Posted by: jmitro May 18 2016, 12:52 PM
started working on the rear trunk floorpan: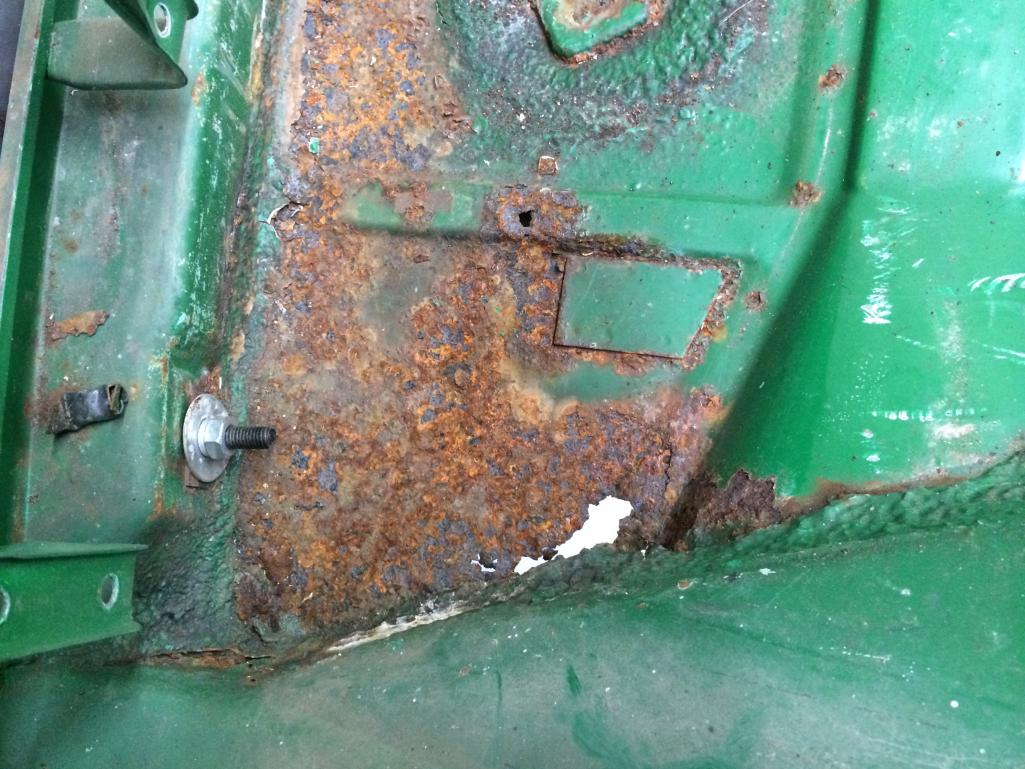
Posted by: jmitro May 18 2016, 12:54 PM
Posted by: jmitro May 18 2016, 12:57 PM
Cutting the entire section out while leaving the good metal intact turned out to be very tedious. But it got done.
http://s75.photobucket.com/user/jmitro2000/media/2016-05-08%2015.12.03_zpszdudauil.jpg.html
http://s75.photobucket.com/user/jmitro2000/media/2016-05-08%2015.32.15_zpsvpdogvjf.jpg.html
http://s75.photobucket.com/user/jmitro2000/media/2016-05-08%2015.32.23_zpsewiyuect.jpg.html
Posted by: jmitro May 18 2016, 01:00 PM
surfaces cleaned down to bare metal in preparation for welding. The inner chanel got POR15 but I forgot to photograph it before welding in the new trunk floorpan
http://s75.photobucket.com/user/jmitro2000/media/2016-05-08%2015.32.45_zpslu04f9i8.jpg.html
http://s75.photobucket.com/user/jmitro2000/media/2016-05-14%2016.41.56_zpszf5yhb4b.jpg.html
Posted by: jmitro May 18 2016, 01:03 PM
Here is where I stand now: about to weld in the trunk pan reinforcement after shooting it with weld-thru primer. The Car is getting fully media blasted this weekend, then continue the rust repair/replacement.
http://s75.photobucket.com/user/jmitro2000/media/2016-05-14%2017.27.35_zps6hjizq33.jpg.html
http://s75.photobucket.com/user/jmitro2000/media/2016-05-14%2016.43.05_zpswdudqdmt.jpg.html
Sway bar mount reinforcements:
http://s75.photobucket.com/user/jmitro2000/media/2016-05-14%2016.42.55_zpsyd2nzyrc.jpg.html
http://s75.photobucket.com/user/jmitro2000/media/2016-05-14%2016.43.02_zps7drbczzm.jpg.html
Posted by: mb911 May 18 2016, 01:41 PM
I have to ask - are you sure that you want to continue with this tub? From years of personal experience and reading threads on this board, you would most likely be much better off finding a better tub in SoCal or AZ and having it shipped to you. Perhaps you enjoy welding and grinding, but I fear that you have only discovered the tip of a very big iceberg.
However you proceed, good luck! It looks like you have some talent, so this should be a fun thread!
believe it or not, I looked for a car that needed work. I enjoy the cutting, grinding, welding, and making something new out of this old tired chassis. It will be a long process to fully restore this car, but I enjoy the restoration journey as much as the end result
Oh yeah, I'm also training for the Houston Marathon in January. With a family and full time job. I'm living life to the fullest!
I am with you .. I like welding, grinding, making new.. It's the soothing part of the project.. I have done so many cars over the years. The current 914 might be my last but it could take another year to complete welding and metal work and then still another year or 2 to finish from there but again soothing.. Looks good keep up the good work.
Posted by: DavidSweden May 18 2016, 02:13 PM
I agree, working on the cars is a great distraction, stops one thinking about the futility of life....I found a lot of rust and my first thought was this is going to be fun
I guess I am sick, anyone else think this way?
Posted by: jmitro May 28 2016, 11:01 AM
Finally got the chassis media blasted. I was fortunate enough to find a local company that does MOBILE blasting so I had it done in my driveway. Very convenient!! Here's the before photos:
http://s75.photobucket.com/user/jmitro2000/media/2016-05-21%2009.17.49_zpsep716qxi.jpg.html
http://s75.photobucket.com/user/jmitro2000/media/2016-05-21%2009.17.40_zpsjhgas1b5.jpg.html
And the after......
http://s75.photobucket.com/user/jmitro2000/media/2016-05-22%2019.32.26_zpsm4pukbol.jpg.html
http://s75.photobucket.com/user/jmitro2000/media/2016-05-22%2019.32.12_zpseiobrncz.jpg.html
http://s75.photobucket.com/user/jmitro2000/media/2016-05-22%2019.32.03_zpsnl4phsqm.jpg.html
Posted by: jmitro May 28 2016, 11:06 AM
It was interesting to find bondo on several areas of the car, including the right rear corner, right door, and rear panel. Otherwise the car is straight except for the massive rust damage.
http://s75.photobucket.com/user/jmitro2000/media/2016-05-22%2019.32.33_zpszyvfhl1g.jpg.html
firewall damage behind the left seat:
http://s75.photobucket.com/user/jmitro2000/media/2016-05-21%2022.25.55_zpss70yotrh.jpg.html
http://s75.photobucket.com/user/jmitro2000/media/2016-05-22%2019.33.42_zpsrwjbetnz.jpg.html
http://s75.photobucket.com/user/jmitro2000/media/2016-05-22%2019.32.57_zpskf6vb2vb.jpg.html
http://s75.photobucket.com/user/jmitro2000/media/2016-05-24%2019.30.04_zps5mnxvhse.jpg.html
http://s75.photobucket.com/user/jmitro2000/media/2016-05-22%2019.33.48_zpszehbieyw.jpg.html
http://s75.photobucket.com/user/jmitro2000/media/2016-05-22%2019.33.56_zpsl5f9wkfn.jpg.html
some inner rust damage on the sail panels:
http://s75.photobucket.com/user/jmitro2000/media/2016-05-22%2019.34.12_zpsznowrq7o.jpg.html
but probably an easy fix:
http://s75.photobucket.com/user/jmitro2000/media/2016-05-24%2022.53.23_zpspawp8oz9.jpg.html
http://s75.photobucket.com/user/jmitro2000/media/2016-05-24%2022.53.29_zpsiy2lnsc8.jpg.html
Posted by: jmitro May 28 2016, 11:16 AM
Hell hole will need replacement on both sides, then on to the longitudinals.
http://s75.photobucket.com/user/jmitro2000/media/2016-05-22%2019.34.45_zpsqecfonfc.jpg.html
Mad Dogs Motorsports hell hole repair kit is on the way:
http://s75.photobucket.com/user/jmitro2000/media/2016-05-22%2019.34.49_zpsw9ohygun.jpg.html
Left side is nearly as bad (blast media is the white powdery substance - hadn't cleaned it as of this photo)
http://s75.photobucket.com/user/jmitro2000/media/2016-05-22%2019.35.24_zpsrhpbssn0.jpg.html
So now begins patchwork of rusty areas, and installation of Mad Dogs Motorsports chassis reinforcements. This is the front side of the left firewall. This area will need quite a bit of work.
http://s75.photobucket.com/user/jmitro2000/media/2016-05-25%2017.52.54_zps17poktpr.jpg.html
Rusty area in the front bulkhead was cut out and replacement sheetmetal scavenged from the fenders to form a patch.
http://s75.photobucket.com/user/jmitro2000/media/2016-05-27%2017.04.33_zps4yeyozps.jpg.html
Weld thru primer on the backside of all chassis reinforcement plates:
http://s75.photobucket.com/user/jmitro2000/media/2016-05-24%2022.53.11_zpsz2xu5ump.jpg.html
Three of the five plates completed on the right side (still need to weld the plate perimeters):
http://s75.photobucket.com/user/jmitro2000/media/2016-05-27%2020.54.30_zpsm77aighj.jpg.html
Posted by: jmitro May 28 2016, 11:45 AM
Strangely, I found a crack in the driver's side inner longitudinal. I suspect it developed as a result of the structure weakening from all the rust damage.
http://s75.photobucket.com/user/jmitro2000/media/2016-05-22%2019.37.15_zpsnnz7sgsr.jpg.html
Front trunk rubber channels aren't too bad and easily repaired:
http://s75.photobucket.com/user/jmitro2000/media/2016-05-22%2019.32.38_zpskrwx0nqa.jpg.html
Headlight buckets in pretty good shape:
http://s75.photobucket.com/user/jmitro2000/media/2016-05-22%2019.32.45_zpst8nq1pvr.jpg.html
Inside the left rear fender flare, looking upwards. Trying to put most of the weld bead inside to avoid grinding too much on the outside of the fenders:
http://s75.photobucket.com/user/jmitro2000/media/2016-05-22%2019.34.20_zpse9suafrd.jpg.html
Posted by: Claus Graf May 28 2016, 12:09 PM
Great Job! Keep forging through!
Posted by: jmitro Jul 9 2016, 05:07 PM
More progress. I cut off the rotten lower edges of the hell hole, inner firewall, and passenger side longitudinals. I'm finally progressing to the point of adding metal back to the car instead of taking it off.
http://s75.photobucket.com/user/jmitro2000/media/IMG_3614_zpsjkmloixo.jpg.html
http://s75.photobucket.com/user/jmitro2000/media/IMG_3613_zps97kem1xo.jpg.html
http://s75.photobucket.com/user/jmitro2000/media/IMG_3616_zpsnru2txuv.jpg.html
I cut off the rotten part of the central tunnel and grafted in a new section.
http://s75.photobucket.com/user/jmitro2000/media/IMG_3720_zpsrsj0gakz.jpg.html
I bit the bullett and cut off the right rear fender so I could adequately remove and repair the hell hole. For orientation, the car is upside on the rotisserie.
http://s75.photobucket.com/user/jmitro2000/media/IMG_4510_zps2fbbcetw.jpg.html
http://s75.photobucket.com/user/jmitro2000/media/IMG_4511_zpsjosp23by.jpg.html
http://s75.photobucket.com/user/jmitro2000/media/IMG_4514_zpse59vxrdl.jpg.html
http://s75.photobucket.com/user/jmitro2000/media/IMG_4512_zpsnyci9ztk.jpg.html
http://s75.photobucket.com/user/jmitro2000/media/IMG_4513_zpsnfe1g6f4.jpg.html
Posted by: jmitro Jul 9 2016, 05:11 PM
Free formed the pedestal for the Apillar, as the original was rotten.
http://s75.photobucket.com/user/jmitro2000/media/IMG_4338_zpsaktpz8hk.jpg.html
http://s75.photobucket.com/user/jmitro2000/media/IMG_4339_zpsh5mnfivd.jpg.html
http://s75.photobucket.com/user/jmitro2000/media/IMG_4341_zpsnpqroguo.jpg.html
http://s75.photobucket.com/user/jmitro2000/media/IMG_4340_zpsiwu3as3z.jpg.html
On another note, I also bead-blasted the rear control arms, removed the bearings, and welded on the reinforcement plates from Mad Dogs Motorsports. Next is a few coats of epoxy primer.
http://s75.photobucket.com/user/jmitro2000/media/IMG_4336_zpsl1az1jwn.jpg.html
http://s75.photobucket.com/user/jmitro2000/media/IMG_4337_zpspbxe2tsr.jpg.html
Posted by: mb911 Jul 10 2016, 06:08 AM
Looking good we are in similar stages.
Posted by: jmitro Jul 27 2016, 10:13 PM
I know to most of you this may be boring but I'm making really nice progress, and in any event this documents the rebuild for future vehicle buyers to see.
I'm fairly proud of the jack point rebuild. If you recall, the car had some angle iron (which itself was pretty rusty) welded to the underside of the long to substitute for the original jack point.
http://s75.photobucket.com/user/jmitro2000/media/2015-08-09%2019.02.39_zpsj8feiztj.jpg.html
I carefully teased out each layer of metal (see photo above), excised the rotten jack point, and hand-fabricated a new base layer (with dimple die) then welded on the new jack points.
http://s75.photobucket.com/user/jmitro2000/media/2016-07-17%2015.54.09_zpsug2mxg7c.jpg.html
http://s75.photobucket.com/user/jmitro2000/media/2016-07-17%2015.54.20_zpsu6ltawbg.jpg.html
http://s75.photobucket.com/user/jmitro2000/media/2016-07-17%2017.06.10_zps0gxeslri.jpg.html
http://s75.photobucket.com/user/jmitro2000/media/2016-07-17%2018.00.14_zps8vqggn3u.jpg.html
Posted by: Cuda911 Jul 27 2016, 10:22 PM
Very much enjoying your posts. I am very jealous of your skills. Also, it is wonderful to see yet another 914 saved from the great scrap heap in the sky. Great work!!!
Posted by: jmitro Jul 27 2016, 10:35 PM
Thanks Mike! Replacing the rust is not as sexy as building a monster engine, but to me it's very gratifying and it will give me a strong chassis for whatever future powerplant I have.
Posted by: mark04usa Jul 27 2016, 10:55 PM
Great project saving another one! Press on....
Posted by: DirtyCossack Jul 28 2016, 09:26 AM
Great work. I think the rust repair stuff is cooler than engine building.
Posted by: mbseto Jul 28 2016, 10:52 AM
Great work. I think the rust repair stuff is cooler than engine building.
I agree, great work and fun to watch. I'm going to thing rust repair is cooler than engine building right up to the point where I start rebuilding my engine...
Posted by: Dave_Darling Jul 28 2016, 03:35 PM
BTW, the crack at the end of the handbrake "dimple" in the longitudinal is fairly common. That's a stress riser at a spot that sees a fair amount of stress.
--DD
Posted by: mb911 Jul 28 2016, 05:20 PM
It's kind of funny I am at a similar point with my car every time I check into this thread so no reason for me to post my updates☺
Posted by: jmitro Aug 22 2016, 07:35 PM
Thanks for the comments.
BTW, the crack at the end of the handbrake "dimple" in the longitudinal is fairly common. That's a stress riser at a spot that sees a fair amount of stress.
--DD
Hm, that's interesting.
More updates. I finally got the trunk, rear end, and rear fenders cleaned up and epoxy primered for rust protection. The trunklid, hood, and doors are also epoxy primered. I removed the factory seam sealer to clean up the appearance, and to stitch weld the seams (not yet completed)
http://s75.photobucket.com/user/jmitro2000/media/2016-08-22%2020.23.29_zps1czz4cfg.jpg.html
http://s75.photobucket.com/user/jmitro2000/media/2016-08-22%2020.23.45_zpsspqsmsdv.jpg.html
http://s75.photobucket.com/user/jmitro2000/media/2016-08-22%2020.24.06_zpsfe1g1iqg.jpg.html
http://s75.photobucket.com/user/jmitro2000/media/2016-08-22%2020.23.36_zps3mibgkt1.jpg.html
Finally getting the hell hole repaired, along with reinforcement plates and new sheetmetal from Restoration Design. Still have a little more to do on the passenger side, but it's close to being done

http://s75.photobucket.com/user/jmitro2000/media/2016-08-22%2020.24.24_zpseb0al0ld.jpg.html
http://s75.photobucket.com/user/jmitro2000/media/2016-08-22%2020.24.40_zpswma9w9np.jpg.html
And finally, here's a close up of fender flare grafting; the welds have been ground down but no filler has been added. For a first time metal-working, I think it's not half bad! A little body filler will smooth it out well.
http://s75.photobucket.com/user/jmitro2000/media/2016-08-22%2020.23.55_zps0qds9yov.jpg.html
Posted by: Dion Aug 24 2016, 04:15 PM
Looks absolutely fantastic. Very nice work.
Hmm, I'll have to check my driverside long now..... Didn't like seeing that
stress crack.
Keep going Joseph!
Posted by: jmitro Aug 25 2016, 12:11 PM
Thanks Dion, I look forward to getting the body done and installing your engine
Posted by: jmitro Aug 28 2016, 08:39 AM
finally almost finished on the hell hole and entire passenger side longitudinal. Used the kit from Mad Dogs Motorsports.
http://s75.photobucket.com/user/jmitro2000/media/2016-08-27%2020.39.24_zpslxcshmfc.jpg.html
The top of the long is fairly pitted but no holes and feels solid. I'm debating whether to cut this out and put in new metal, overlay a new piece of metal and plug weld it to the original metal, or leave it as is. Thoughts???
http://s75.photobucket.com/user/jmitro2000/media/2016-08-27%2020.40.09_zpsnaqgscue.jpg.html
http://s75.photobucket.com/user/jmitro2000/media/2016-08-27%2020.39.58_zpsbeit5jdg.jpg.html
The C channel for the rubber seal was hand fabricated then stitch welded to the new engine compartment tray. Turned out pretty well I think.
http://s75.photobucket.com/user/jmitro2000/media/2016-08-27%2020.40.36_zpslpque3cn.jpg.html
Engine compartment sidewall as seen looking upwards from the bottom of the fender towards the B-pillar. Bottom of the fender has been cut out for access. The engine compartment sidewall took a lot of hand fabrication but turned out pretty well.
http://s75.photobucket.com/user/jmitro2000/media/2016-08-27%2020.39.42_zpsyslobd2w.jpg.html
Posted by: jmitro Oct 6 2016, 06:37 AM
while working on the chassis, I'm also accumulating parts for the final product. Huge thanks to Dion R for the 2056 engine, SS heat exchangers, and Turbo Thomas muffler. Can't wait to install it! Here it is packed and ready to go.
http://s75.photobucket.com/user/jmitro2000/media/2016-09-15%2023.17.39_zpst4cob2fu.jpg.html
http://s75.photobucket.com/user/jmitro2000/media/2016-09-15%2022.37.32_zpsqgnnxq9h.jpg.html
Got my 5 lug conversion from PMB performance and my powdercoated rear trailing arms from bdstone (thanks guys)
http://s75.photobucket.com/user/jmitro2000/media/2016-10-06%2007.19.18_zpsh45lryh2.jpg.html
And finally, genuine 7/8x15 Fuchs (thanks to Brian in Colorado). Plan is to refinish them in RSR style
http://s75.photobucket.com/user/jmitro2000/media/582f618f-04eb-4296-a8ab-84092c00454f_zpscxziom5x.jpg.html
Posted by: jmitro Oct 6 2016, 06:44 AM
Getting close to finished with the rust removal and new sheetmetal replacement. Passenger long is done. Driver long close to done. Then it's just replacing the bottom edge of the firewall, installing the rear floorpan, and welding in the chassis stiffening kit.
Inside of passenger side firewall/long repaired:
http://s75.photobucket.com/user/jmitro2000/media/853029e3-0ddf-48b8-b467-3bdc589ad330_zpseleeg19w.jpg.html
Passenger fender welded back in place:
http://s75.photobucket.com/user/jmitro2000/media/2016-09-18%2014.10.37_zpsygdoqvcj.jpg.html
Driver fender cut out to repair the long and jack point
http://s75.photobucket.com/user/jmitro2000/media/2016-09-18%2014.11.11_zpszlun3i92.jpg.html
http://s75.photobucket.com/user/jmitro2000/media/2016-09-18%2014.11.17_zpsolpamvmg.jpg.html
Making progress: (for orientation, car is upside down on rotisserie)
http://s75.photobucket.com/user/jmitro2000/media/2016-10-06%2007.11.58_zpsoxzipz6f.jpg.html
Posted by: jmitro Oct 6 2016, 06:50 AM
Detail of the removal and installation of the bracing component tying the suspension console to the long. This was very labor intensive.
Before:
http://s75.photobucket.com/user/jmitro2000/media/2016-09-05%2014.54.12_zpsznr0t4zv.jpg.html
During: (had to cut away part of the original due to rust damage)
http://s75.photobucket.com/user/jmitro2000/media/2016-09-05%2017.20.54_zpsddth5fv5.jpg.html
After: (I sprayed black Eastwood internal chassis coating inside the holes so it looks messy, but will protect against rust)
http://s75.photobucket.com/user/jmitro2000/media/2016-10-06%2007.52.13_zps7gho3gkr.jpg.html
And a different orientation of the other side:
http://s75.photobucket.com/user/jmitro2000/media/2016-10-06%2007.13.08_zpswccnojpj.jpg.html
Posted by: jmitro Nov 13 2016, 07:05 PM
15 months after purchasing the car, I'm finally done with replacing all the rusty sheetmetal, welding on the flares, and adding the GT stiffening kit and chassis box kit.
Repair of the crack in the drivers longitudinal. First pic shows the floorpan pulled back so I could fully access the crack:
http://s75.photobucket.com/user/jmitro2000/media/2016-10-23%2018.41.08_zpsjjltfdrk.jpg.html
http://s75.photobucket.com/user/jmitro2000/media/2016-10-30%2011.40.32_zpsz1zuqhg0.jpg.html
http://s75.photobucket.com/user/jmitro2000/media/2016-10-30%2012.05.24_zpsyljeu1to.jpg.html
New E-brake pivot point welded on; Weld Through primer prep prior to welding on the Mad Dogs Motorsports stiffening kit:
http://s75.photobucket.com/user/jmitro2000/media/2016-11-05%2016.03.48_zpsxu1mdqjc.jpg.html
http://s75.photobucket.com/user/jmitro2000/media/2016-11-05%2016.03.33_zpsqumvfziv.jpg.html
Posted by: jmitro Nov 13 2016, 07:09 PM
And finally, added the new rear floorboard half back in place.
http://s75.photobucket.com/user/jmitro2000/media/2016-11-09%2018.14.20_zpsjgn1sahz.jpg.html
http://s75.photobucket.com/user/jmitro2000/media/2016-11-06%2017.20.44_zps5vwynbxr.jpg.html
http://s75.photobucket.com/user/jmitro2000/media/2016-11-09%2018.13.44_zpsxmdmwskq.jpg.html
Stitch welded the floorpan to the longitudinals:
http://s75.photobucket.com/user/jmitro2000/media/2016-11-09%2018.13.52_zpsckkskhwe.jpg.html
New Right Rear triangle welded back on:
http://s75.photobucket.com/user/jmitro2000/media/2016-11-09%2020.28.15_zpses4pbwlz.jpg.html
Seat rails welded on and reinforced with stitch welds:
http://s75.photobucket.com/user/jmitro2000/media/2016-11-09%2020.28.22_zpsk90zvbge.jpg.html
Posted by: jmitro Nov 13 2016, 07:18 PM
And finally some detail shots of the floorpan welded to the interior tunnel, crossmember, and lower firewall.
http://s75.photobucket.com/user/jmitro2000/media/2016-11-13%2017.05.30_zpszdrroeic.jpg.html
http://s75.photobucket.com/user/jmitro2000/media/2016-11-13%2017.05.40_zpsrdiodcai.jpg.html
http://s75.photobucket.com/user/jmitro2000/media/2016-11-13%2017.05.58_zpssvjjjyhz.jpg.html
http://s75.photobucket.com/user/jmitro2000/media/2016-11-13%2018.39.05_zpsmobzhpjf.jpg.html
http://s75.photobucket.com/user/jmitro2000/media/2016-11-13%2018.39.09_zpsgbpxoezt.jpg.html
Thumbs up!!  Interestingly, I used 5lbs of 0.025 welding wire, 5 bottles of Argon/CO2 gas, and untold numbers of grinding wheels and flap disks.
Now time to POR15 the bottom of the car, and start the external body work.
http://s75.photobucket.com/user/jmitro2000/media/2016-11-13%2018.39.30_zpsocxu7xq7.jpg.html
Posted by: mbseto Nov 14 2016, 09:24 AM
Nice progress! Stackin' dimes!
Posted by: jmitro Dec 3 2016, 01:49 PM
Last bit of rust repair on the rollover bar:
http://s75.photobucket.com/user/jmitro2000/media/2016-11-26%2014.25.42_zpsh2anfyjs.jpg.html
http://s75.photobucket.com/user/jmitro2000/media/2016-11-26%2014.25.52_zps04vatwrk.jpg.html
http://s75.photobucket.com/user/jmitro2000/media/2016-11-26%2015.13.32_zpstbqsnz3i.jpg.html
http://s75.photobucket.com/user/jmitro2000/media/2016-11-26%2015.13.39_zpsxrefsphr.jpg.html
http://s75.photobucket.com/user/jmitro2000/media/2016-11-27%2015.39.52_zpsfxgdbuan.jpg.html
http://s75.photobucket.com/user/jmitro2000/media/2016-11-27%2015.47.33_zps9xbjmjdf.jpg.html
And finally......prepping the bottomside for POR15. Metal prep coated the entire bottom side, engine bay, inside the fenders with Metal Prep, washed with water, then blow dry until bone dry.
http://s75.photobucket.com/user/jmitro2000/media/2016-12-02%2016.44.35_zpssa1sqabk.jpg.html
Posted by: jmitro Dec 3 2016, 01:53 PM
At long last, the entire underside of the car is coated with POR15. This car should be practically impervious to rusting from now on.
http://s75.photobucket.com/user/jmitro2000/media/2016-12-03%2012.44.34_zps2tiqqflf.jpg.html
http://s75.photobucket.com/user/jmitro2000/media/1fb0cf32-e1ec-4d21-a21b-965c123b4e78_zpsk5ngrjko.jpg.html
http://s75.photobucket.com/user/jmitro2000/media/2016-12-03%2012.44.44_zpswkzqmtkg.jpg.html
http://s75.photobucket.com/user/jmitro2000/media/2016-12-03%2012.45.05_zps6g8bc9pu.jpg.html
http://s75.photobucket.com/user/jmitro2000/media/2016-12-03%2012.45.27_zpsgvrjp2kn.jpg.html
http://s75.photobucket.com/user/jmitro2000/media/2016-12-03%2012.45.34_zpsq78h29ym.jpg.html
http://s75.photobucket.com/user/jmitro2000/media/2016-12-03%2012.46.02_zpsvoo0iysd.jpg.html
Looking under driver side front fender towards the rear of the car, front door jamb/ Apillar:
http://s75.photobucket.com/user/jmitro2000/media/2016-12-032012.45.44_zpsnmvgb2zd.jpg.html
http://s75.photobucket.com/user/jmitro2000/media/2016-12-032012.44.55_zpsl4rvw0jc.jpg.html
Looking under the driver side rear fender upwards to view the door latch:
http://s75.photobucket.com/user/jmitro2000/media/2016-12-03%2012.46.42_zps9wdp9r0b.jpg.html
Posted by: siverson Dec 29 2016, 12:52 PM
Looks great!
Posted by: jmitro Jan 7 2017, 09:20 AM
Seam sealer applied under the fenders. Will then coat with rubberized undercoating, finally paint. The black substance is POR15 paste to fill any pinholes in the welding.
http://s75.photobucket.com/user/jmitro2000/media/2017-01-06%2018.43.43_zpsdtrbbrek.jpg.html
http://s75.photobucket.com/user/jmitro2000/media/2017-01-06%2018.44.30_zpsdrvnnwew.jpg.html
http://s75.photobucket.com/user/jmitro2000/media/2017-01-06%2018.44.46_zps7mbjy0sk.jpg.html
http://s75.photobucket.com/user/jmitro2000/media/2017-01-06%2018.44.16_zpsuyuwhrwh.jpg.html
http://s75.photobucket.com/user/jmitro2000/media/2017-01-06%2018.44.03_zpsxeelu0gz.jpg.html
Posted by: jmitro Feb 13 2017, 09:34 PM
I seam sealed pretty much every possible seam in the car after priming with epoxy primer. then coated again with primer.
http://s75.photobucket.com/user/jmitro2000/media/2017-02-05%2011.57.06_zpscfyvrif8.jpg.html
http://s75.photobucket.com/user/jmitro2000/media/2017-02-05%2011.57.24_zpscgcmngy2.jpg.html
http://s75.photobucket.com/user/jmitro2000/media/2017-02-05%2011.57.34_zpsy75wha48.jpg.html
http://s75.photobucket.com/user/jmitro2000/media/2017-02-12%2013.59.49_zps466vlutr.jpg.html
http://s75.photobucket.com/user/jmitro2000/media/2017-02-12%2013.59.52_zpsataot5sb.jpg.html
Posted by: jmitro Feb 13 2017, 09:38 PM
And, well......I couldn't leave well enough alone. The more I work on this chassis, the closer it gets to a GT replica, so I decided to add a bolt-in rollcage similar to the factory cars. Ordered a hoop and baseplates from Chris at Tangerine Racing. The fit was perfect. Not a centimeter to tall. I can still latch the targa top with the rollbar in place. Nice job Chris!!
http://s75.photobucket.com/user/jmitro2000/media/2017-02-05%2010.25.00_zps6tgbb6nb.jpg.html
http://s75.photobucket.com/user/jmitro2000/media/2017-02-05%2015.54.54_zps0lzbx4fa.jpg.html
http://s75.photobucket.com/user/jmitro2000/media/2017-02-05%2015.55.00_zpsnz8wyxyd.jpg.html
http://s75.photobucket.com/user/jmitro2000/media/2017-02-05%2015.55.19_zpsntfqfcgx.jpg.html
http://s75.photobucket.com/user/jmitro2000/media/2017-02-08%2019.12.36_zps0vxfggp0.jpg.html
http://s75.photobucket.com/user/jmitro2000/media/2017-02-11%2015.36.15_zps1muuafin.jpg.html
http://s75.photobucket.com/user/jmitro2000/media/2017-02-11%2016.37.05_zpsnsmrsir8.jpg.html
Posted by: jmitro Feb 13 2017, 09:42 PM
YES!! Finally got some color and clearcoat on the interior and front trunk!! Ravenna Green
http://s75.photobucket.com/user/jmitro2000/media/2017-02-12%2019.08.47_zpsjfczcwij.jpg.html
http://s75.photobucket.com/user/jmitro2000/media/2017-02-12%2019.08.39_zpsjbpzbj1z.jpg.html
http://s75.photobucket.com/user/jmitro2000/media/2017-02-12%2019.09.02_zpscm8w24rj.jpg.html
http://s75.photobucket.com/user/jmitro2000/media/2017-02-12%2019.08.52_zpsv2i8chti.jpg.html
Next is the exterior bodywork, final paint, and reassembly
Posted by: jmitro Jul 29 2017, 03:17 PM
the last 5 months have been lots of bodywork; sand/fill/sand and repeat. Had to source a new passenger side door due to a big dent.
Attached thumbnail(s)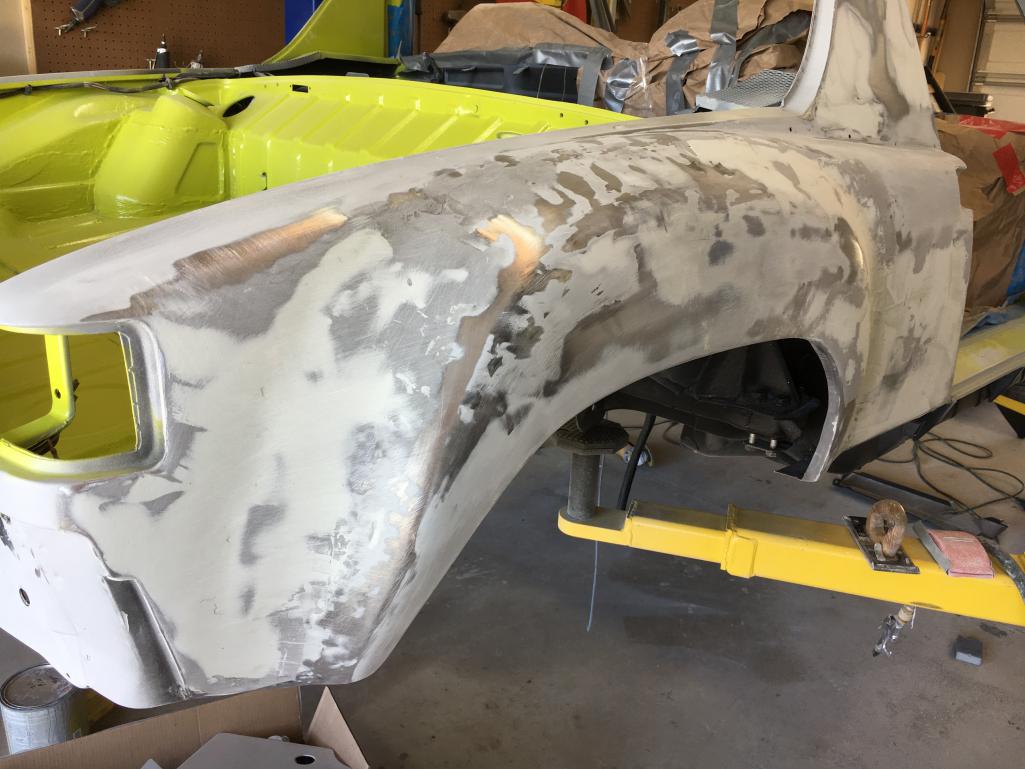
Posted by: jmitro Jul 29 2017, 03:31 PM
more body work; new (used) passenger side door.
After getting almost finished with body filler on the flares, I realized I probably didn't do it correctly, so it all came off and I started all over again.
First layers with metal-impregnated filler, then regular filler, then featherweight.
Sounds like a lot of filler but in truth it's 1/8" at the deepest and in most places much less.
Attached thumbnail(s)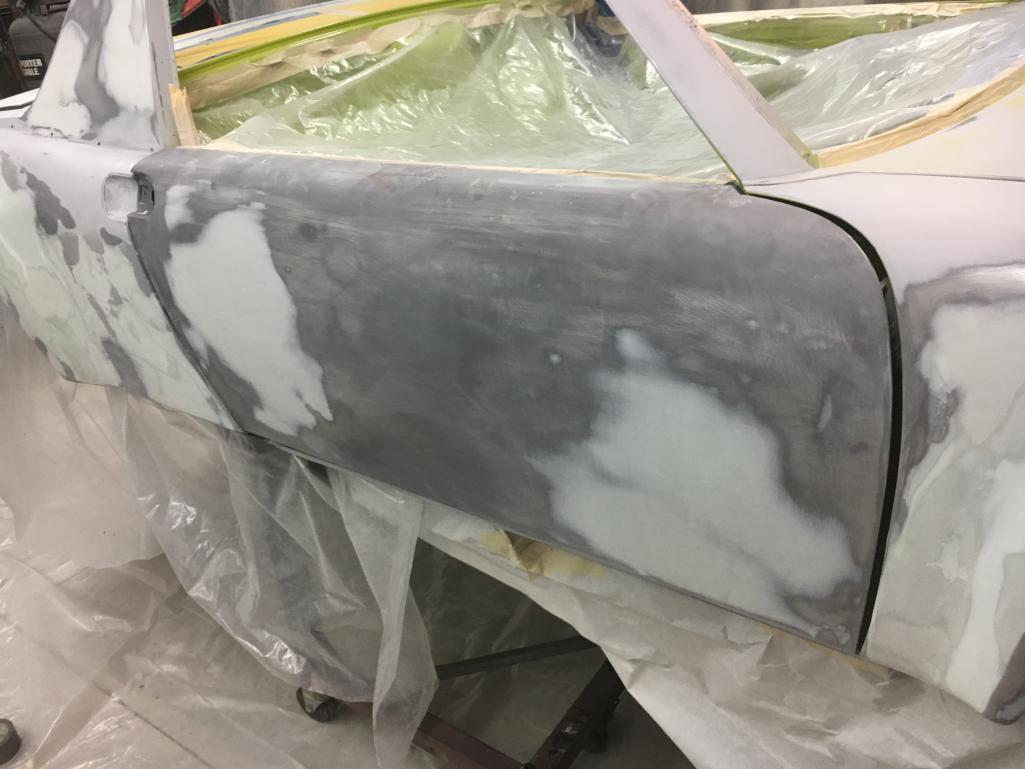

Posted by: jmitro Jul 29 2017, 03:33 PM
high build primer. Several coats required to get it perfectly straight (correction, I actually sprayed some parts of the body with 4-5 coats, sanded, then REPEATED the process again). Needless to say this was a lot of work for a one man job; then add in the masking and prepping. Many many hours represented here.
Attached thumbnail(s)
Posted by: jmitro Jul 29 2017, 03:37 PM
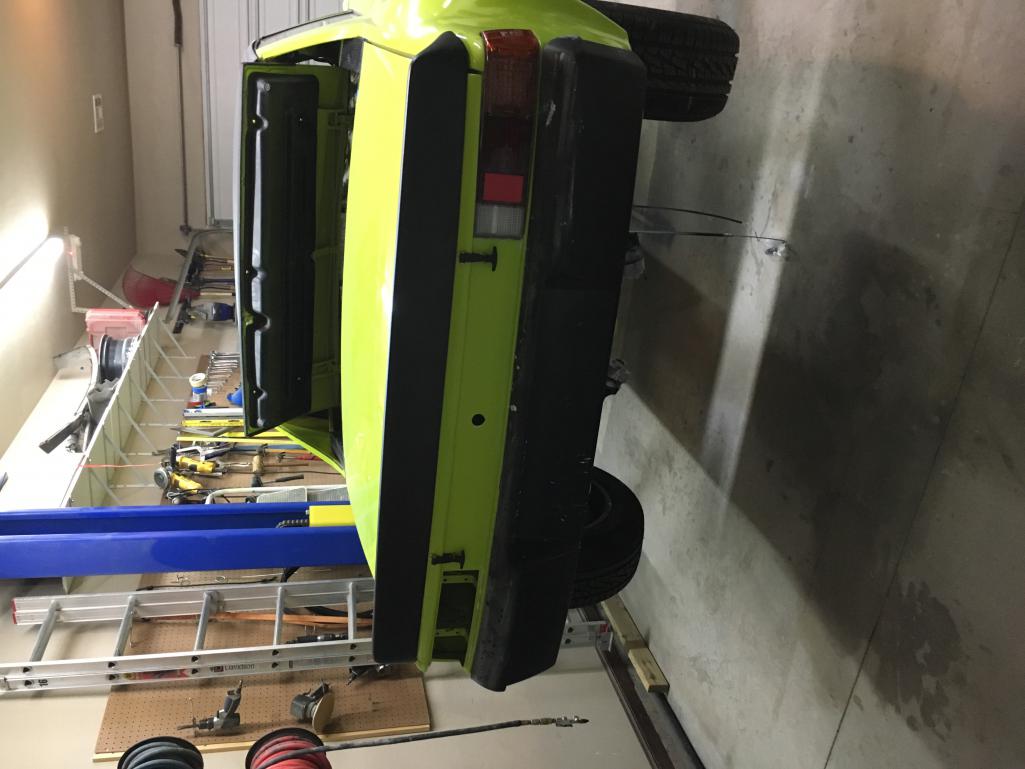
And FINALLY, nearly two years to the month since buying the car, I have the body finally painted. Three coats of Ravenna Green followed by 3-5 coats of urethane clearcoat.
The body came out really straight. Needs a good wetsanding from small crap in the air that adhered to the clear coat, but I'm happy with it.
Hood, trunk, front and rear bumpers and the rocker panel covers are all fiberglass. Valances too if I use them. Hopefully that will save a small amount of weight to compensate for the chassis stiffening.
Attached thumbnail(s)
Posted by: Larmo63 Jul 29 2017, 03:42 PM
Damn, that roll bar looks great.
I suppose you could still use the top seatbelt holes for the seatbelt end and just bolt it in over those roll bar tabs?
Or no?
Posted by: 74ravenna Jul 29 2017, 03:44 PM
Looking great!
Posted by: jmitro Jul 29 2017, 04:17 PM
Damn, that roll bar looks great.
I suppose you could still use the top seatbelt holes for the seatbelt end and just bolt it in over those roll bar tabs?
Or no?
Yes, that's my plan.
credits to Chris at Tangerine for making a perfectly bent hoop.
Posted by: simonjb Jul 30 2017, 09:23 PM
Fantastic build story ! Thanks for sharing
Posted by: jmitro Jan 22 2018, 11:33 PM
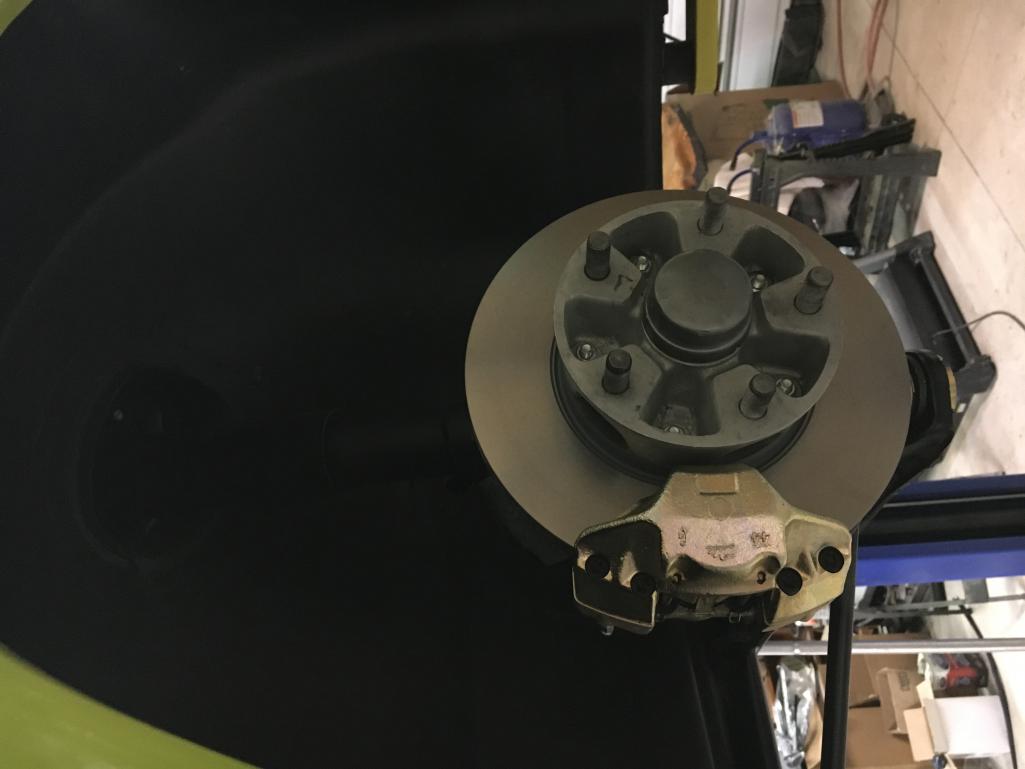
Seems like slow progress, but a lot of work has happened in the last 8 months. Basically all suspension is installed, all brakes are installed, fuel tank installed with fuel lines, pump relocation, filter, and stainless steel tunnel and engine compartment lines.
Suspension:
Front - stock torsion bars, stock sway bar, stock A arms, new Elephant Racing rubber bushings, new ball joints, 19mm raised spindle 911T strut bodies with new Bilstein inserts; polyurethane upper strut mounts, 914 Rubber rebuilt steering rack, Rebel Racing spherical tie rod ends with adjustable bump steer and double sheer mounts
Rear - Bilstein yellow shocks, 140 Weltmeister springs, stock rear sway bar, Elephant Racing rubber rear bushings and upper mounts
Brakes
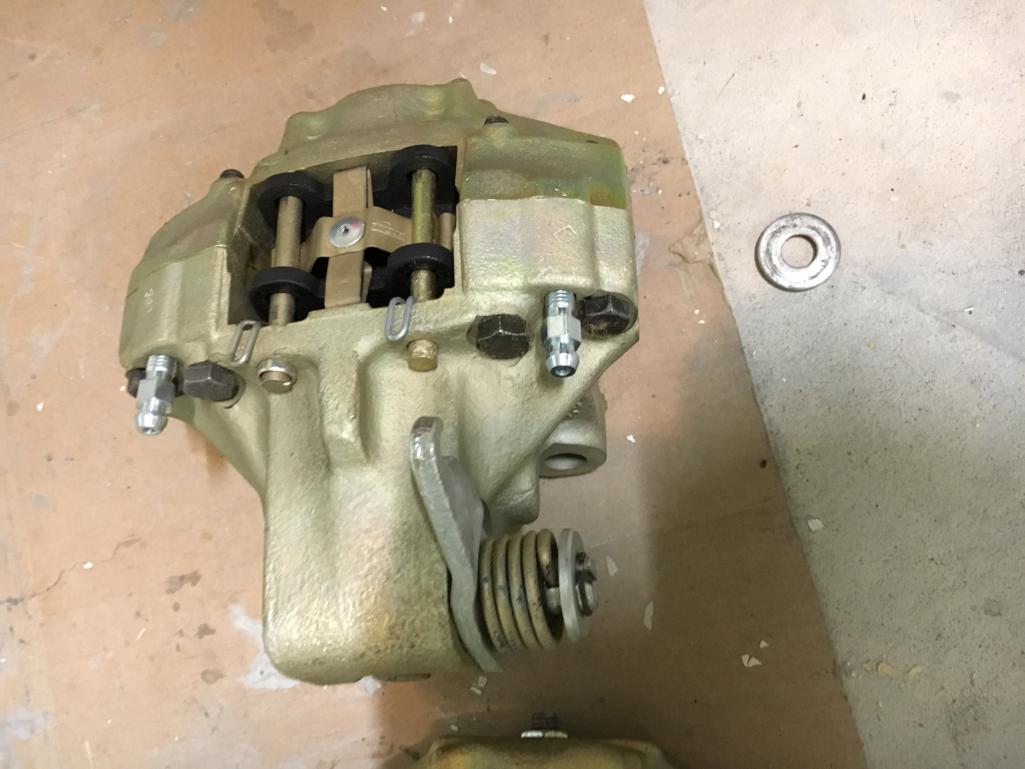
PMB rebuilt 914 rear calipers, 911 M front calipers, new lines and hoses, new 19mm master cylinder and reservoir lines, PMB rebuilt proportioning valve, new Ebrake cables,
Porterfield R4S pads F/R; new solid R rotors (PMB 5 lug conversion), new vented 20mm F rotors, new inner/outer bearings
Attached thumbnail(s)
Posted by: jmitro Jan 22 2018, 11:35 PM
19mm MC with grommets and rebuilt 914 rear caliper
Attached thumbnail(s)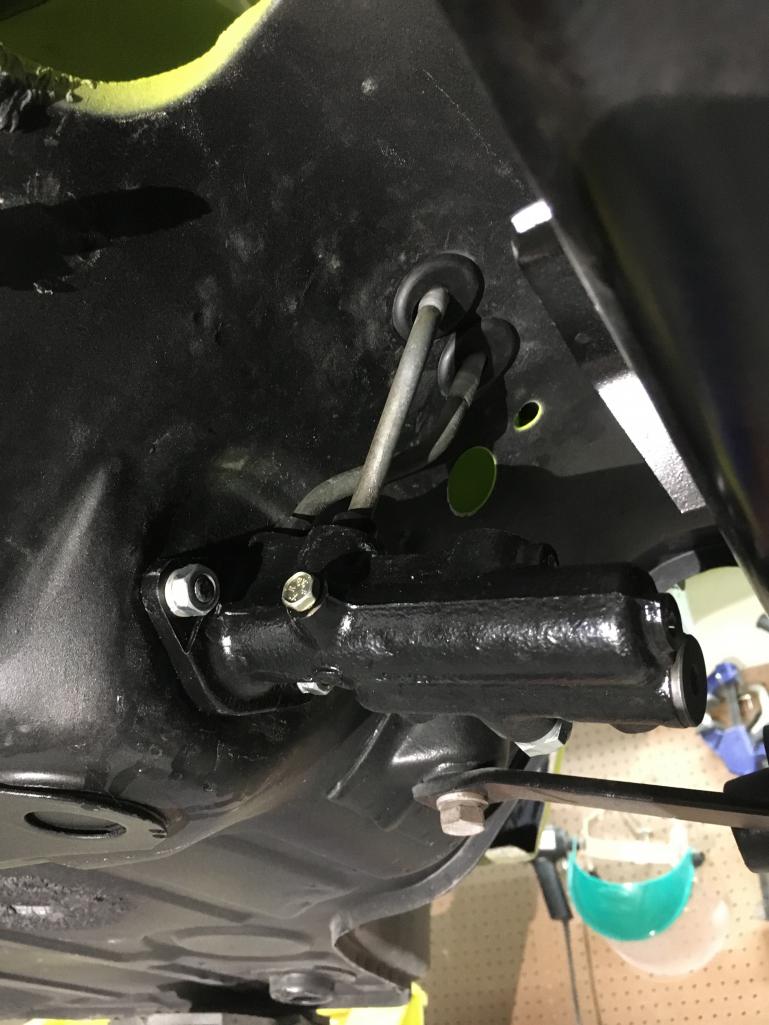
Posted by: jmitro Jan 22 2018, 11:39 PM
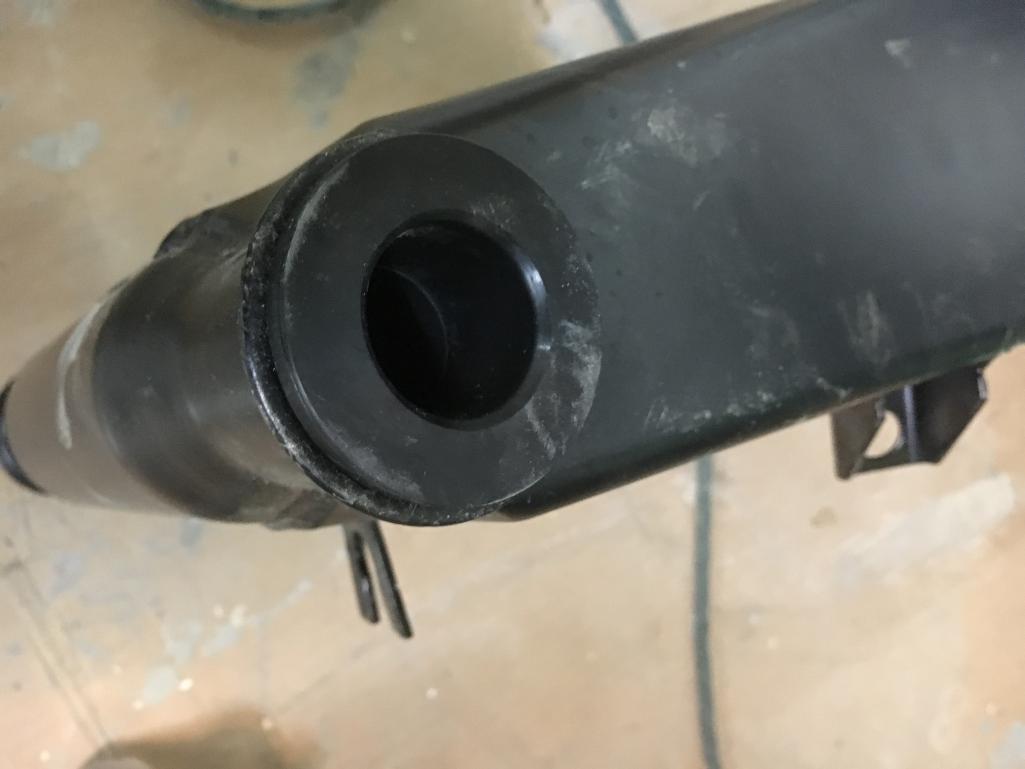
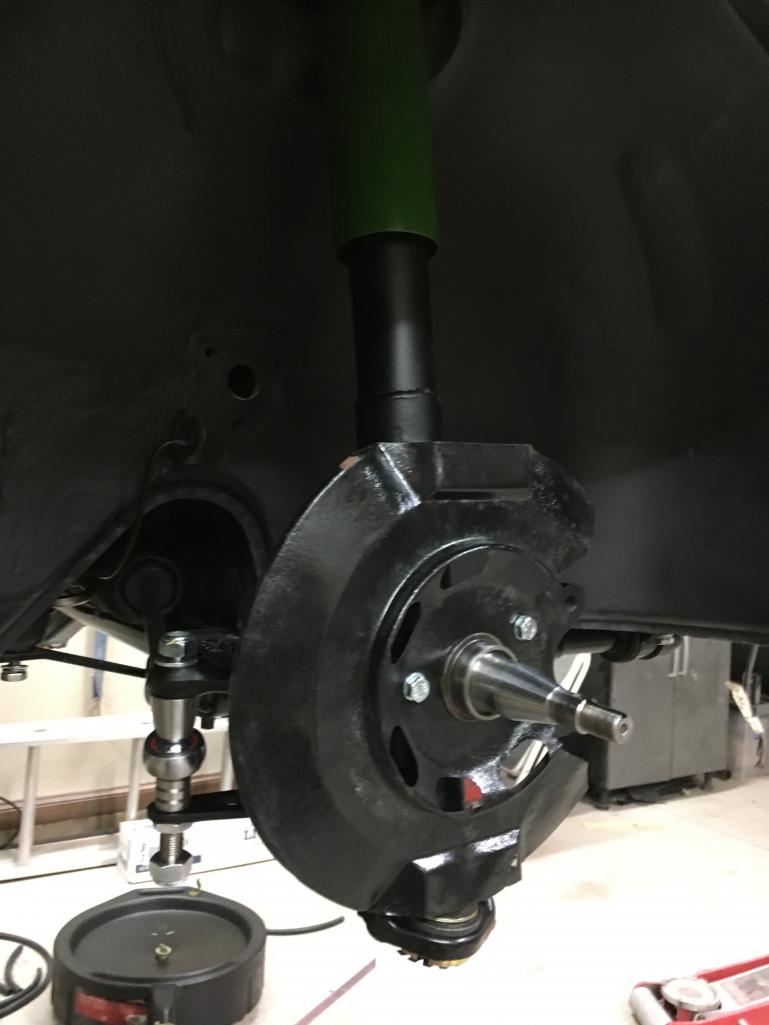
19mm DIY raised spindle 911 struts with Bilstein inserts and double sheer steering arm mounts; installed in place with 911 rotor dust shields in place.
It's notable in this photo the bump steer has not been set and therefore the nuts remain loose. Credits to Rebel Racing for their bump steer kit.
Attached thumbnail(s)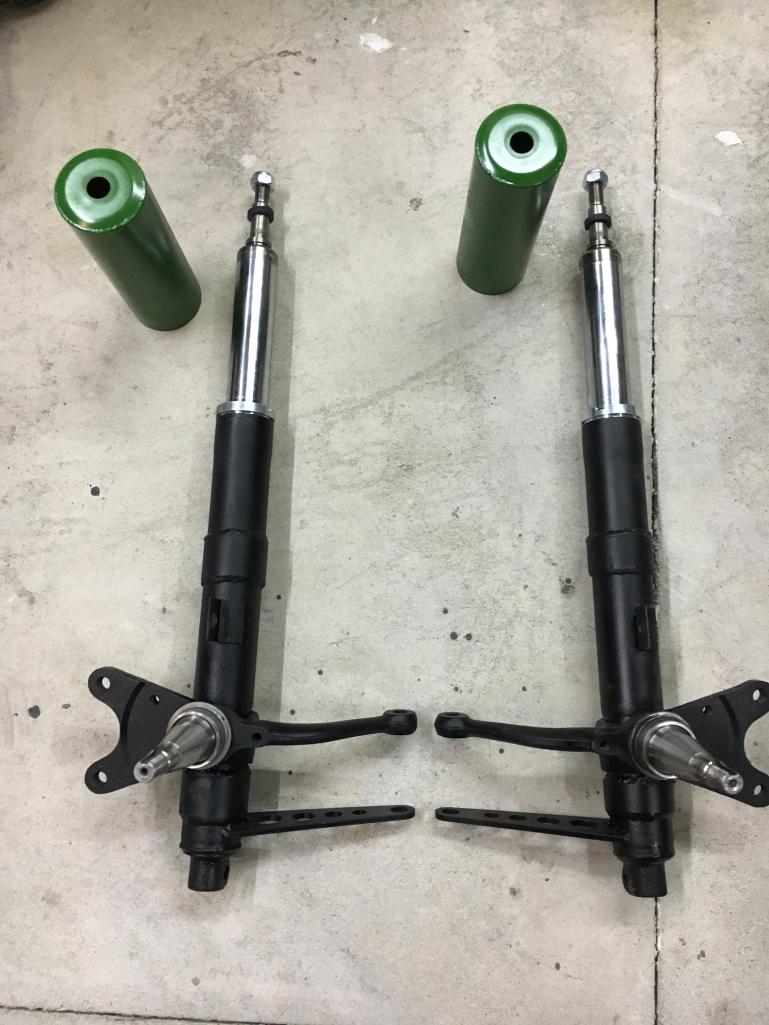
Posted by: jmitro Jan 22 2018, 11:42 PM
I also managed to get the fuel tank installed with SS fuel lines. This was a PITA.
Also ordered the full rubber seal package from 914 rubber and have started installing a few such as the bulkhead seals here
Attached thumbnail(s)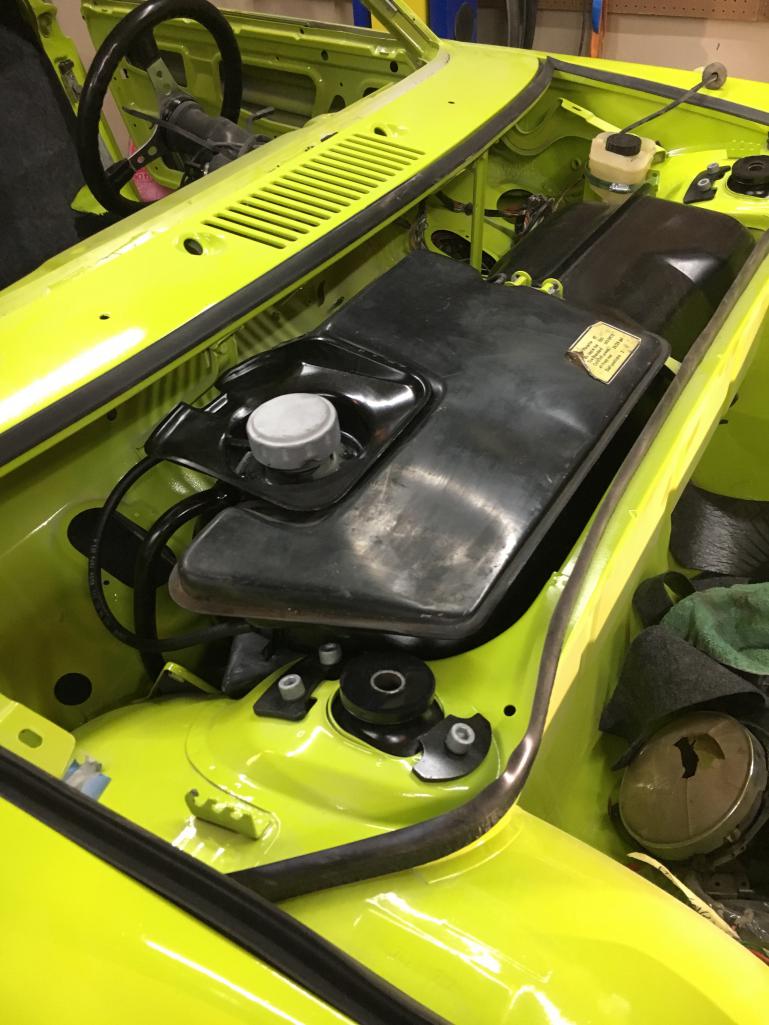
Posted by: jmitro Jan 22 2018, 11:44 PM
new LED front turn signals, rear turn signals, and rear brake lights from "spoke". I debated about using the original halogen style bulbs and maintaining the car's classic character, but decided that safety and high visibility was justification for altering the original classic character of the car.
Attached thumbnail(s)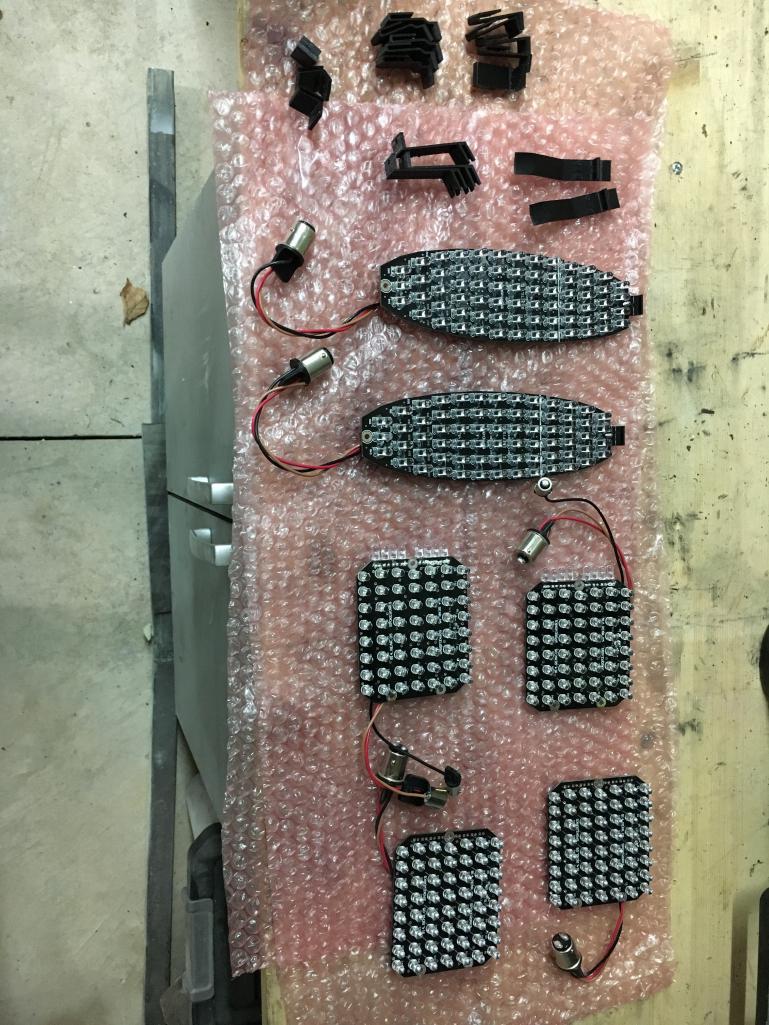
Posted by: jmitro Jan 22 2018, 11:45 PM
LED tails
Attached thumbnail(s)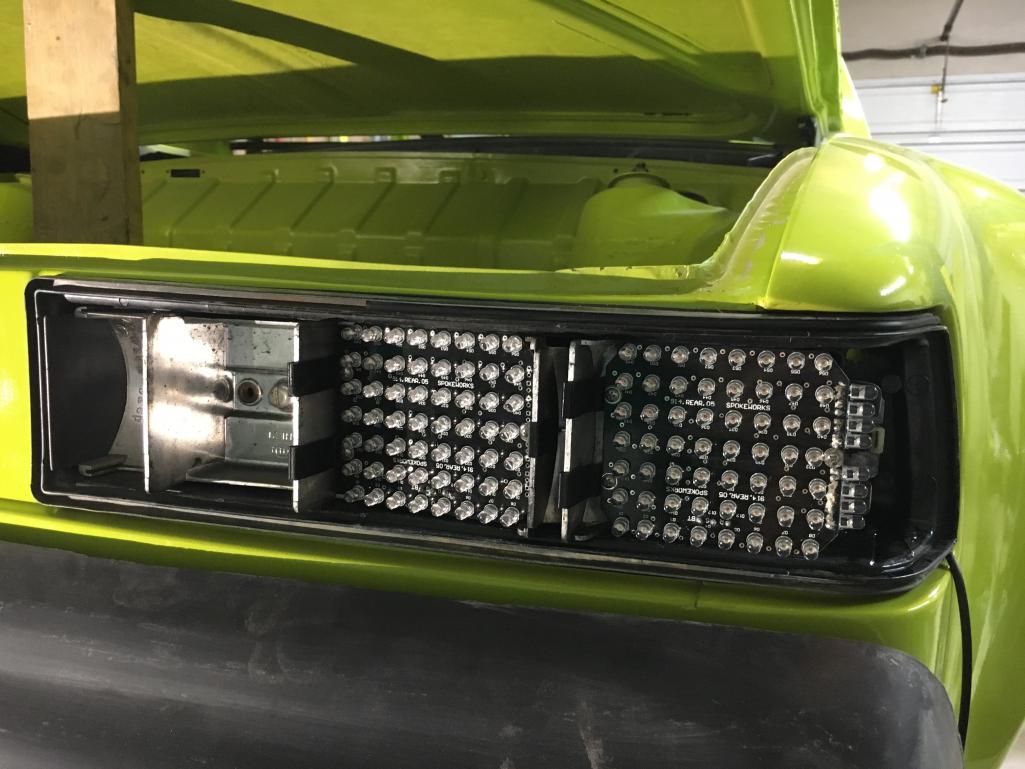
Posted by: pete000 Jan 22 2018, 11:46 PM
Looking great !
Posted by: jmitro Jan 22 2018, 11:47 PM
914 rubber lenses and seals
Attached thumbnail(s)
Posted by: jmitro Jan 22 2018, 11:58 PM
The fun part is putting all the new parts back on!
Attached thumbnail(s)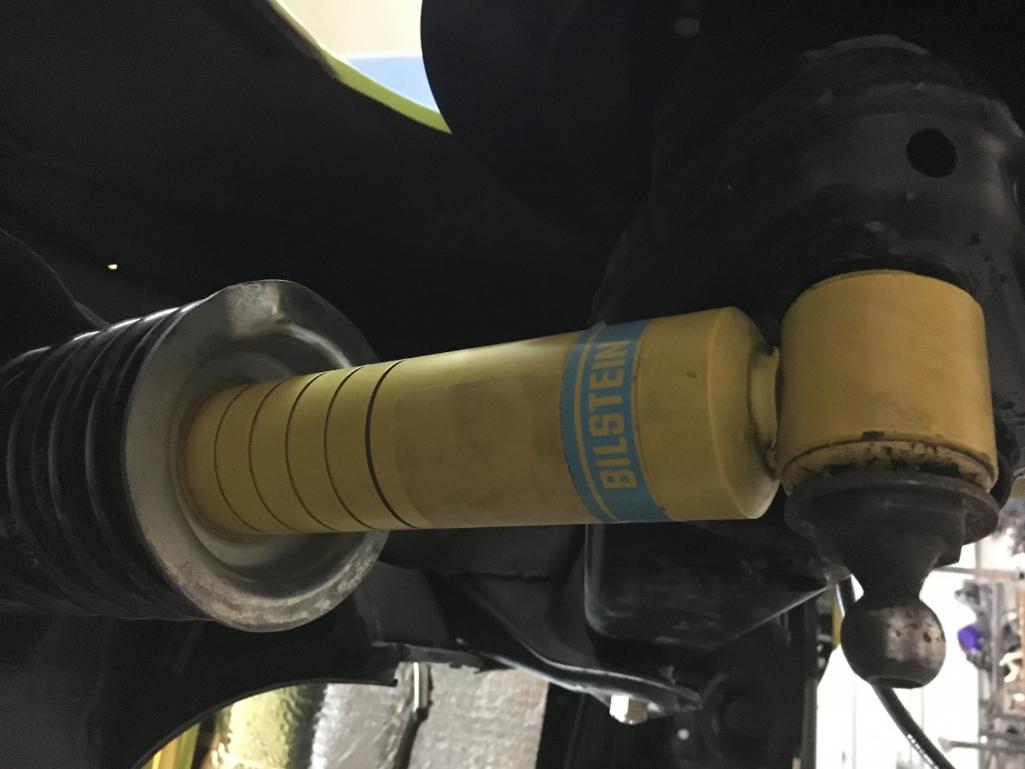
Posted by: jmitro Jan 22 2018, 11:59 PM
Rear brakes
Attached thumbnail(s)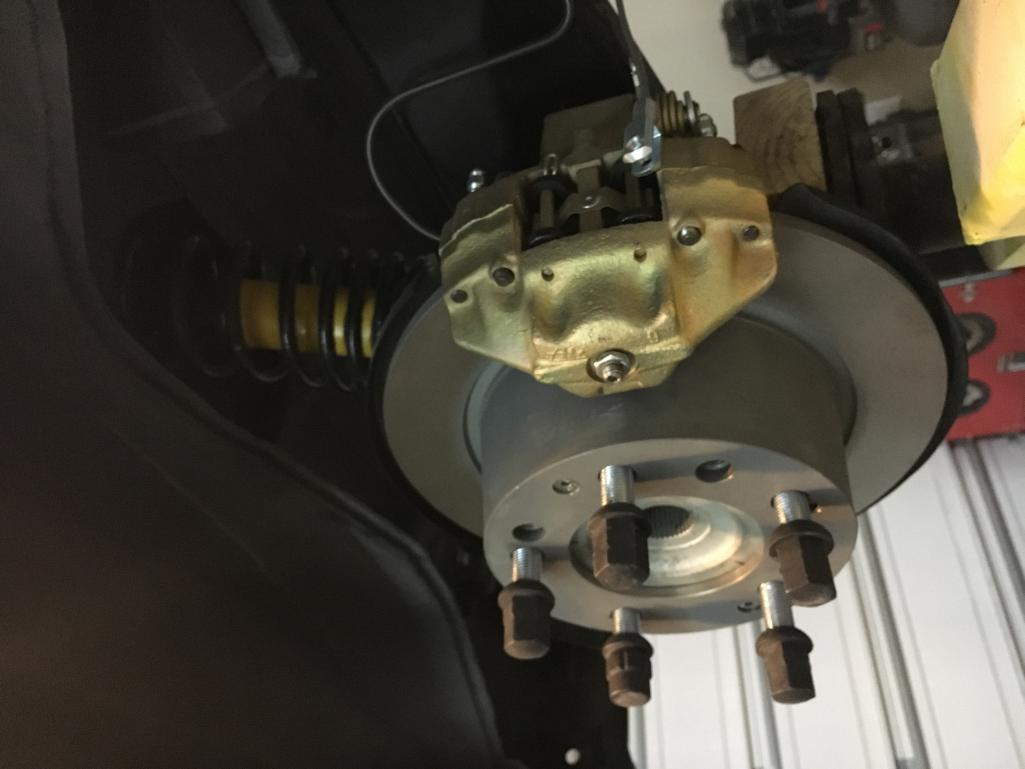
Posted by: Mueller Jan 23 2018, 01:10 PM
Car is looking great.... I couldn't find that GT bar on Tangerines site, mind sharing the price?
Posted by: jmitro Jan 23 2018, 01:18 PM
thanks!
I asked Chris to bend the hoop and send a couple of tubes and baseplates. I think it was around $275 shipped IIRC
Posted by: Mueller Jan 23 2018, 04:39 PM
thanks!
I asked Chris to bend the hoop and send a couple of tubes and baseplates. I think it was around $275 shipped IIRC
thanks, I have access to a few tube benders, however it might still be more cost effective to have someone that knows what they are doing make it with all the scrap I'd create.

Posted by: jmitro Jan 23 2018, 07:46 PM
LOL I know what you mean. I love making things but it usually ends up costing as much or more as buying the professionally made parts
Posted by: jmitro Mar 10 2018, 08:56 AM
Genuine Fuchs 15x7/8” soda blasted, painted silver and masked for highlight
Attached thumbnail(s)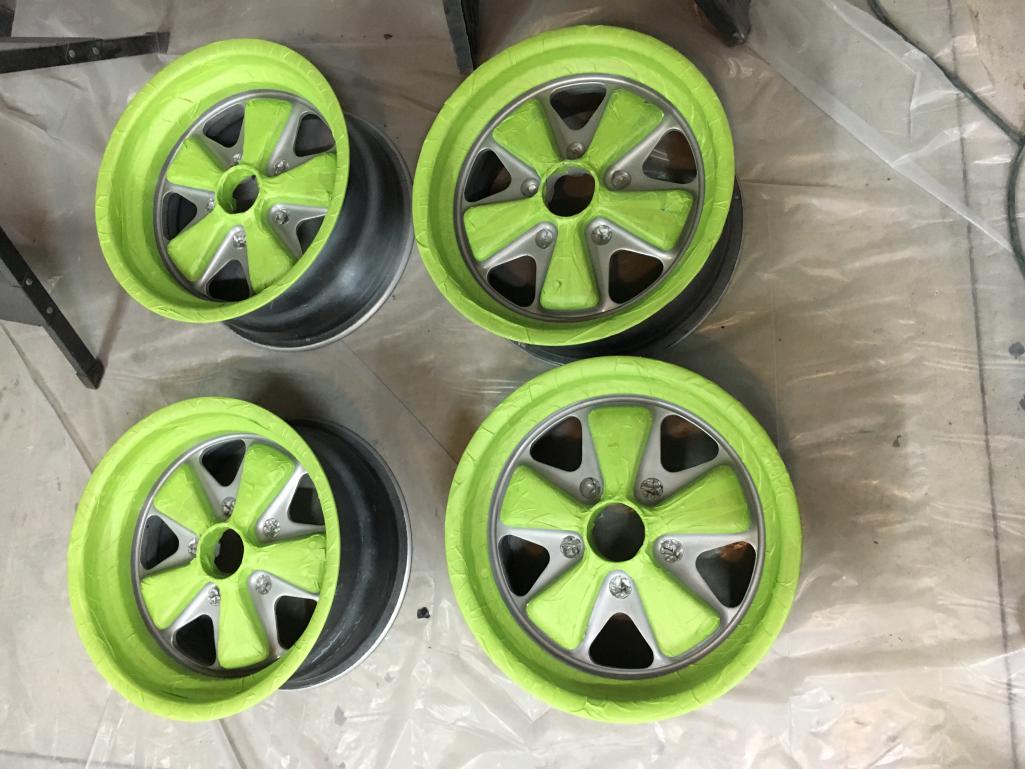
Posted by: jmitro Mar 10 2018, 08:56 AM
Refinished
Attached thumbnail(s)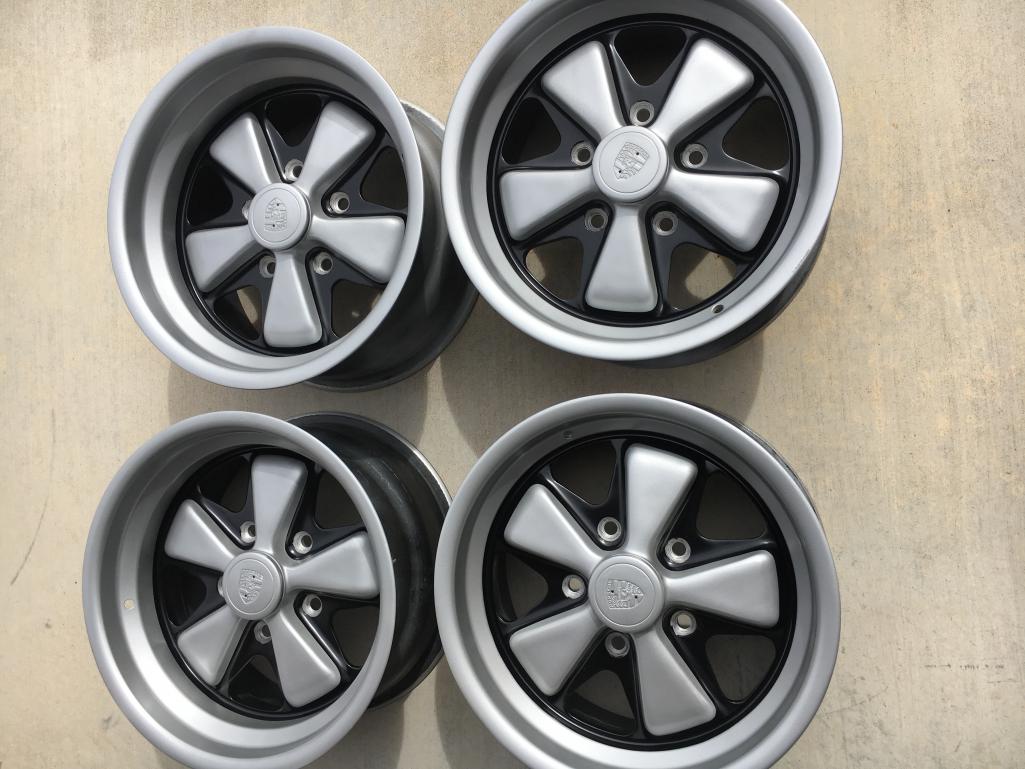
Posted by: jmitro Mar 10 2018, 08:58 AM
Rear glass installed with butyl tape. Perlon carpet glued to the firewall. Roll bar installed.
Dynamat on the floorboard and 914Rubber.com carpet kit partially installed
Attached thumbnail(s)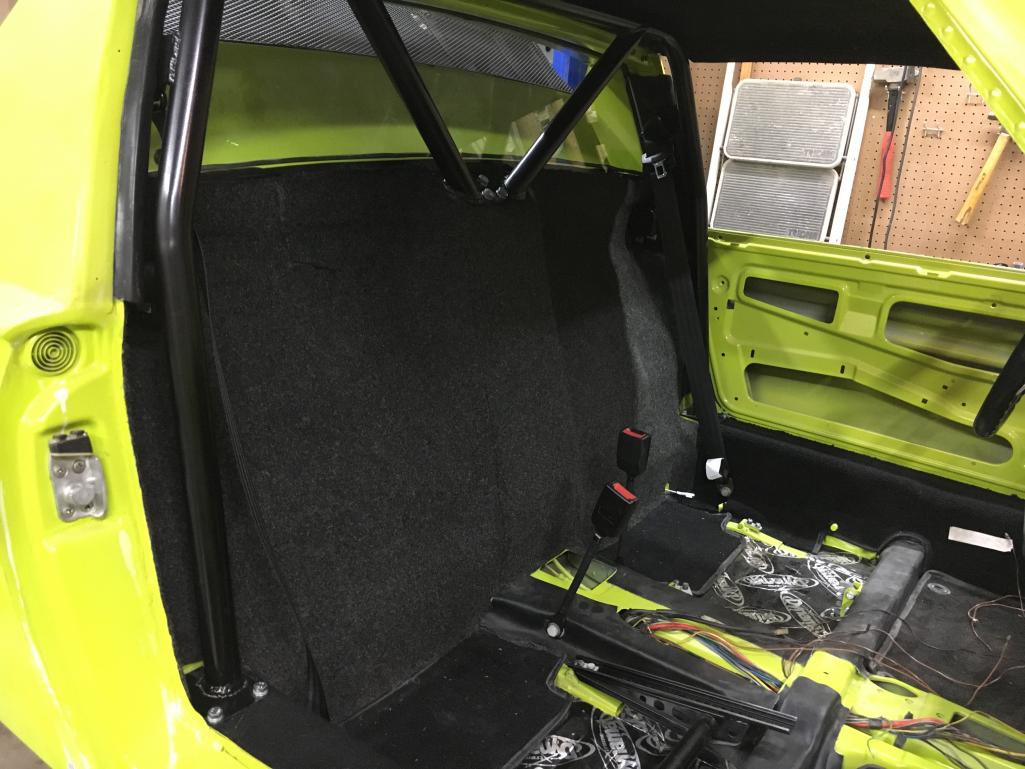
Posted by: jmitro Mar 10 2018, 08:59 AM
New Seatbelts from seatbeltplanet.com
Attached thumbnail(s)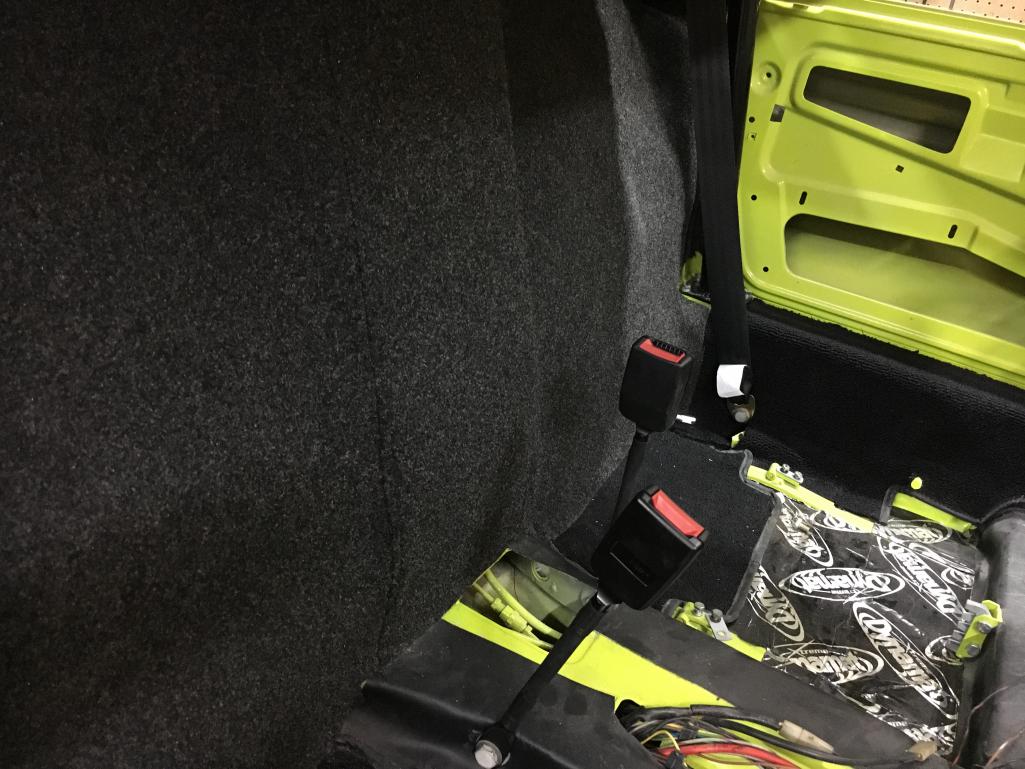
Posted by: jmitro Mar 10 2018, 09:05 AM
Rollbar easily removes. It’s just bolt-in
Attached thumbnail(s)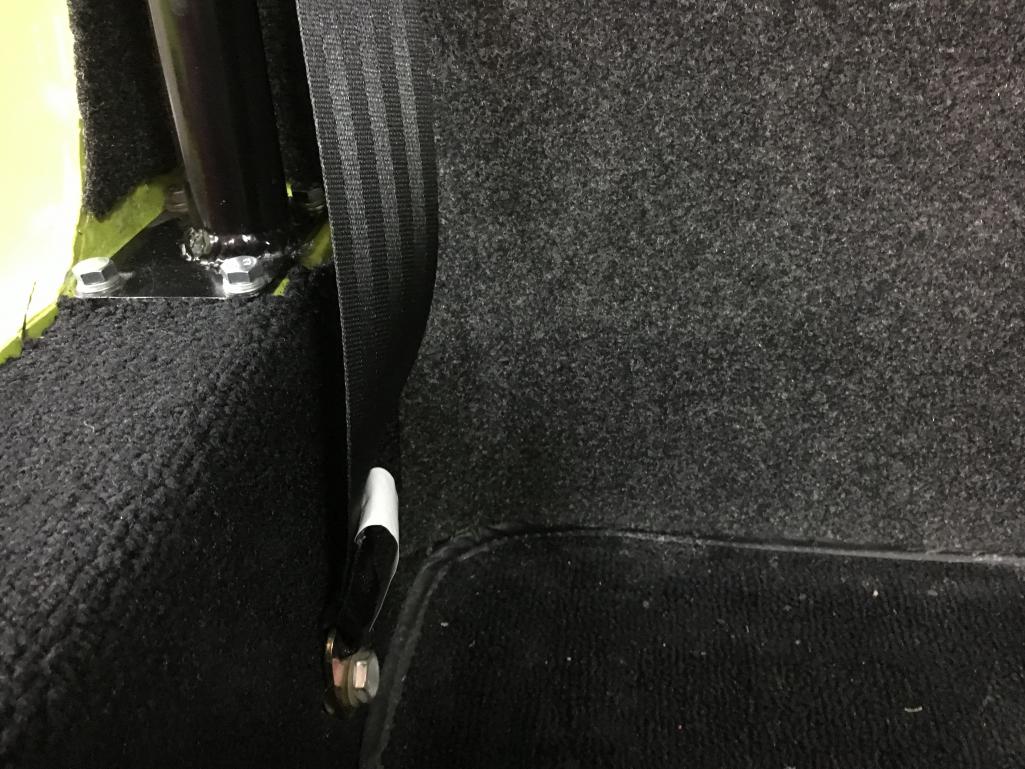
Posted by: mb911 Mar 11 2018, 07:26 AM
Refinished
I think that's what I am going to do with mine to save money.. I can always have anodized later.. I think your end results look great..
Posted by: jmitro Mar 15 2018, 05:59 PM
Thanks. I used vht silver and black wheel paint over epoxy primer after soda blasting. Baked for 20 minutes at 200 degrees. Finish is decent. Not sure about long term durability. Finally got tires mounted and standing on its own feet for the first time.
Attached thumbnail(s)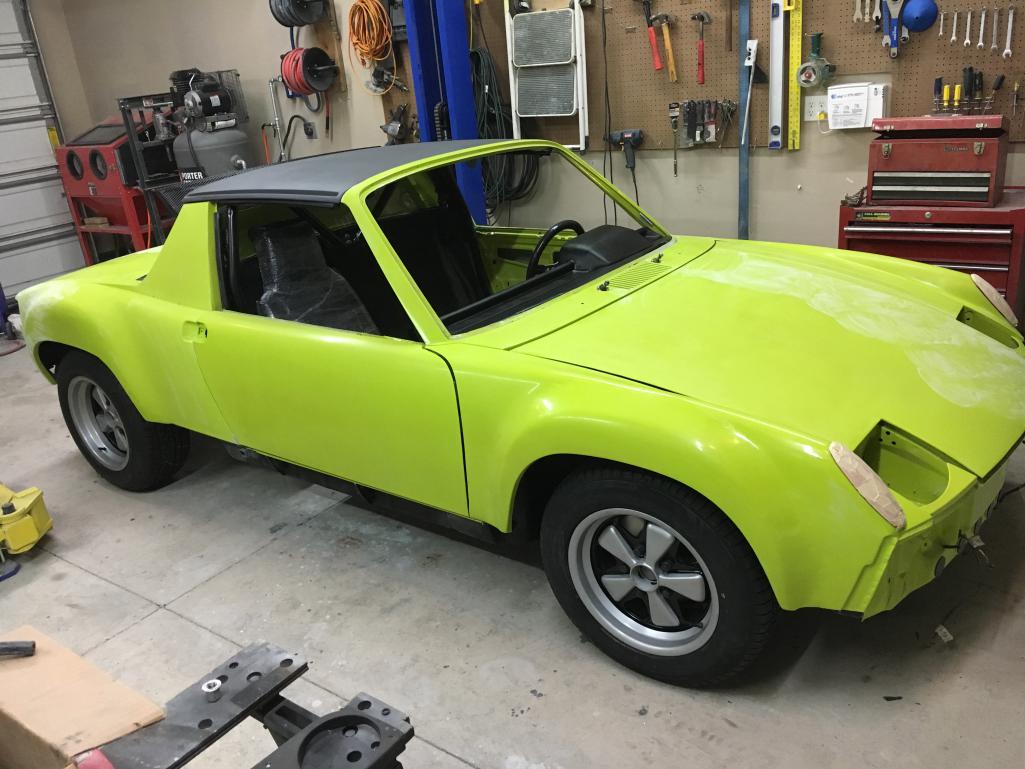
Posted by: jmitro Mar 15 2018, 06:00 PM
914rubber dash repair pad and dash top
Attached thumbnail(s)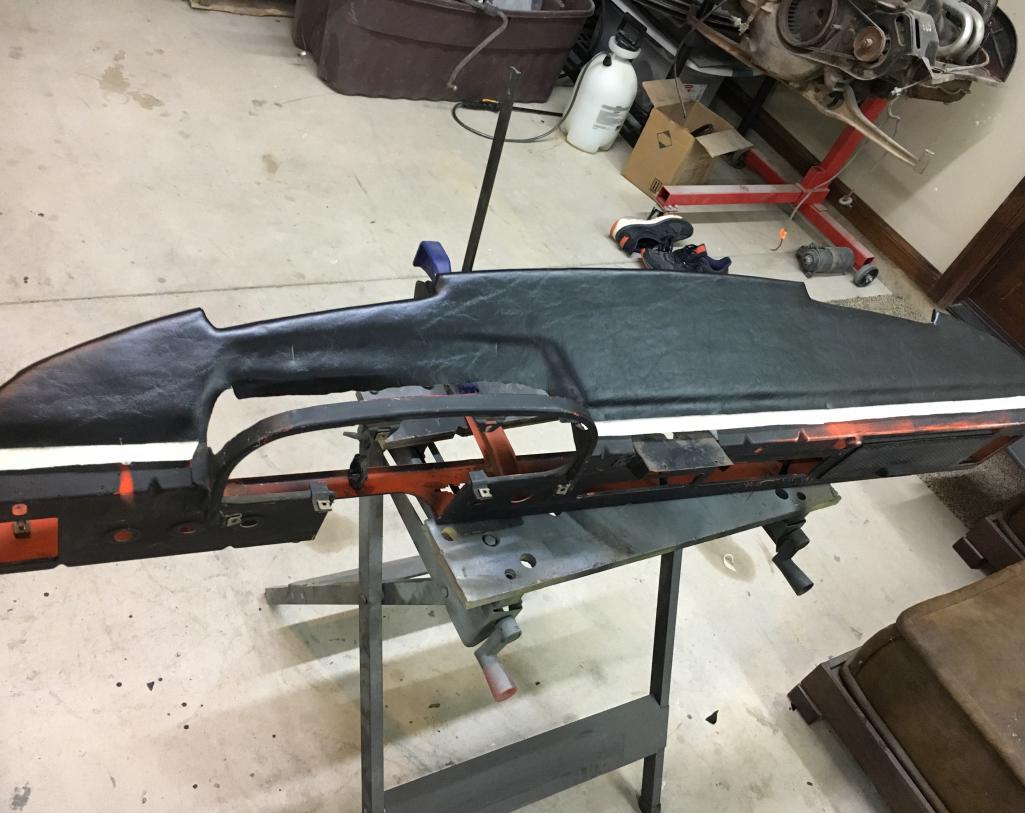
Posted by: jmitro Mar 15 2018, 06:01 PM
Installed
Attached thumbnail(s)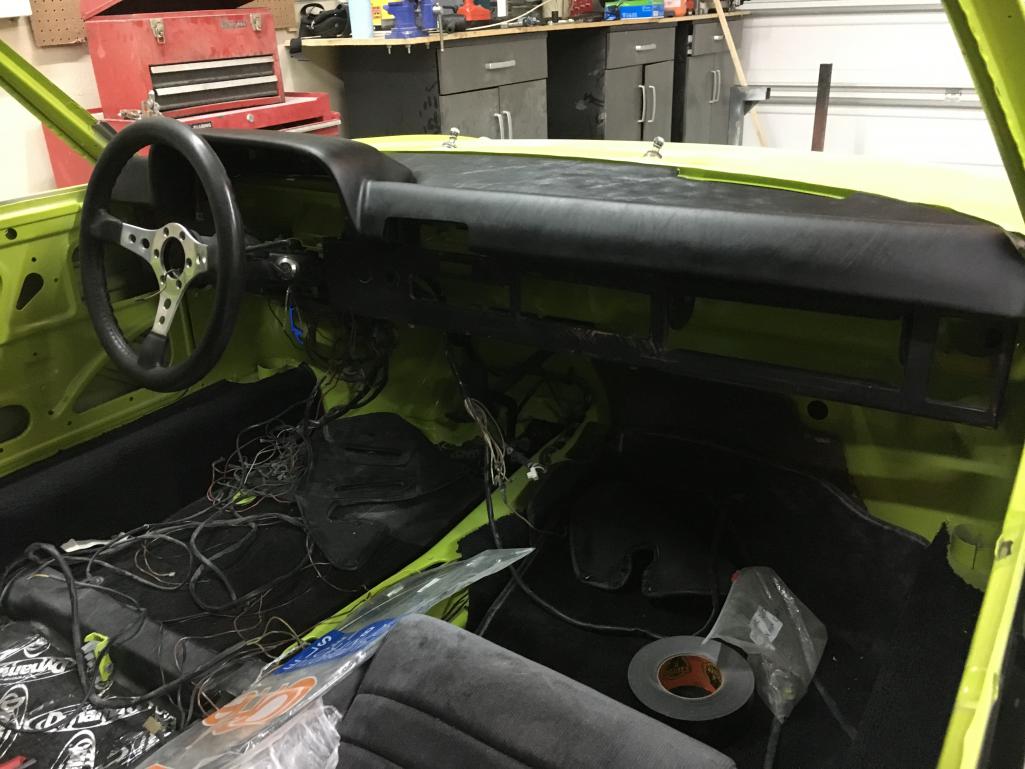
Posted by: David Billo Jun 6 2018, 08:25 AM
And FINALLY, nearly two years to the month since buying the car, I have the body finally painted.
Three coats of Ravenna Green followed by 3-5 coats of urethane clearcoat...Looking good! What about orange peel? Did you end up with much?
I'm at the front end of that process. Would be nice if it only takes 2 years. My car is originally Ravenna, repainted grey in '87 by two misguided youngsters (who shall remain nameless), but I want to go back to Ravenna, and thinking of doing it myself.
Tell me more about your painting setup, if you don't mind. Did you install any sort of ventilation system? What are specs on your compressor and gun?
Thanks!
db
Posted by: jmitro Jun 6 2018, 07:27 PM
thanks. I had to repaint most of the exterior because the fender flares didn't match the rocker panel covers so I had to redo the bottom of each flare. I'm just finishing up the repaint and in the process of wet sanding.
yes I had a lot of orange peel. I just painted the car in my climate controlled garage; no ventilation except opening the garage door.
I have an 80 gallon air compressor and bought a 3M PPS paint gun and disposable paint cups. your best bet if your new at this is to find a good local shop who can walk you through all the setup. that's what I did
Posted by: porschetub Jun 7 2018, 11:21 PM
Refinished
I think that's what I am going to do with mine to save money.. I can always have anodized later.. I think your end results look great..
I used VHT high temp wheel silver and Plasticote black,happy as ,at the end of the day happy to recoat if needed.
The VHT wheel silver has a nice frosted look which is close enough for me.
Masking is a PITA but you peel off the tape and go wow
 .
.
Posted by: jmitro Sep 18 2018, 05:42 PM
Update:
Wiring installed. Most of wet sanding done. Fiberglass bumpers and rocker panels and rear spoiler painted and installed. Driving lights installed. It’s beginning to look like a 914.
901 gearbox rebuilt at a cost of $3500!!
Attached thumbnail(s)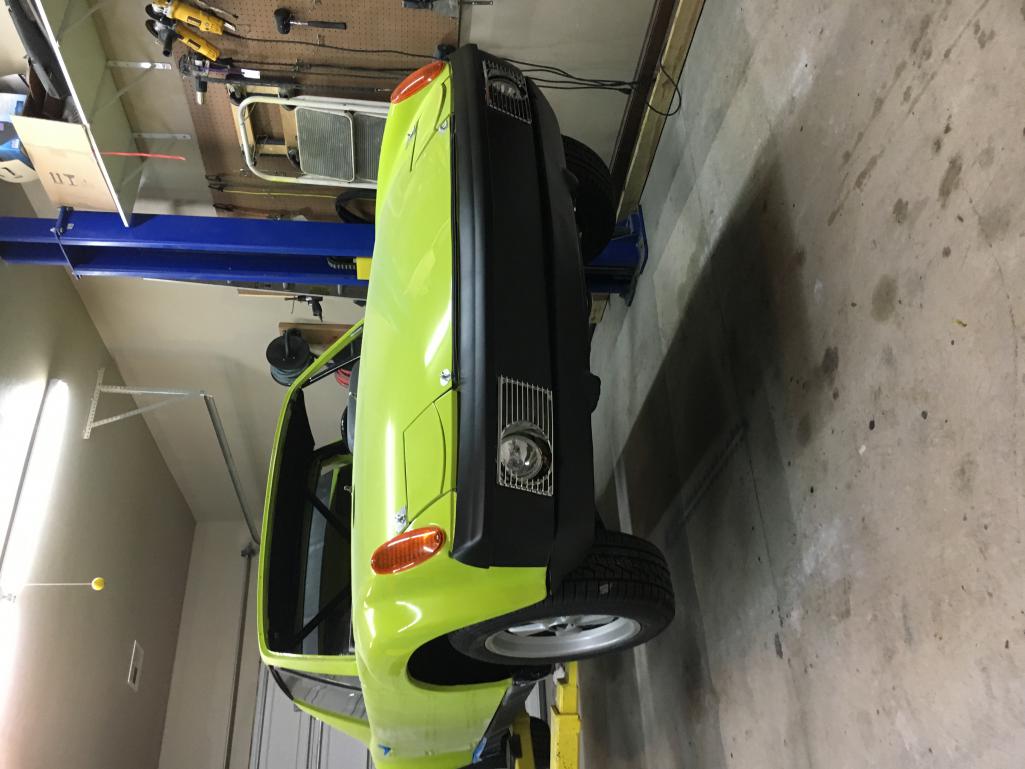
Posted by: jmitro Oct 7 2018, 10:51 AM
Finally uncrated the 2056 type IV I bought from Dion two years ago. He did a great job crating the engine, documenting the build, and gave me a great deal with the included CIS conversion, stainless heat exchangers, extra oil cooler, and dual outlet muffler. I had my 901 gearbox completely rebuilt by my local Indy Porsche shop to the tune of $3500.
Repurposed my rotisserie into an engine stand and bolted gearbox to engine with a new throw out bearing.
Attached thumbnail(s)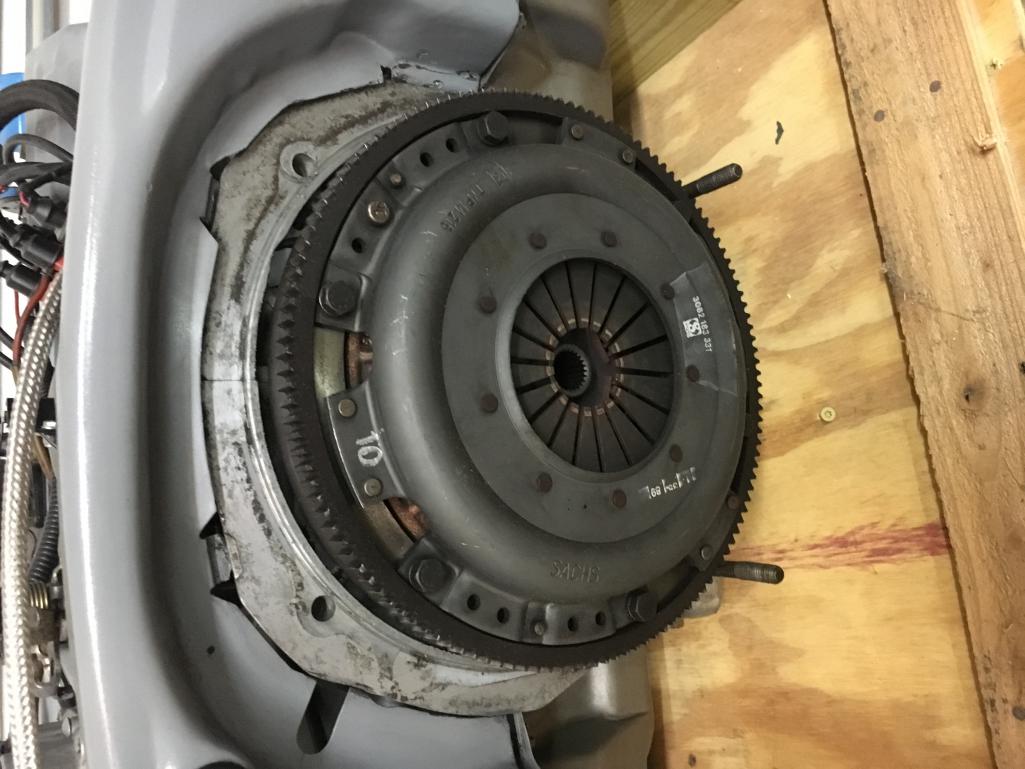
Posted by: jmitro Oct 7 2018, 10:53 AM
From here things are moving quickly. I had my Bosch starter rebuilt. Installed the battery.
Attached thumbnail(s)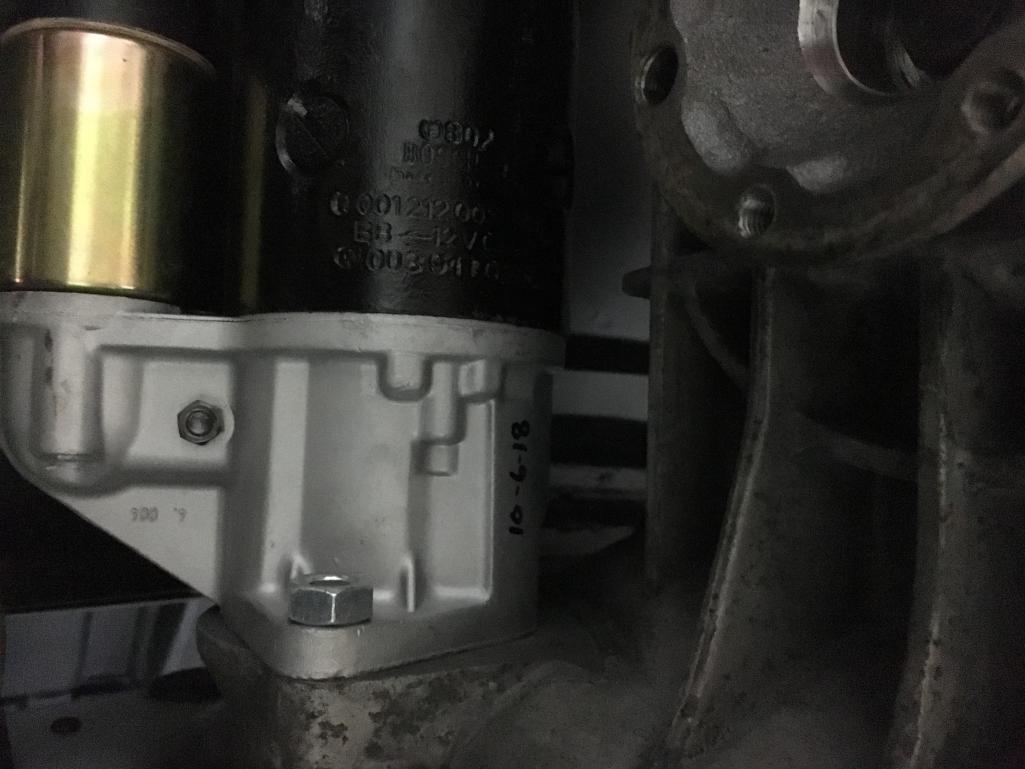
Posted by: jmitro Oct 7 2018, 10:55 AM
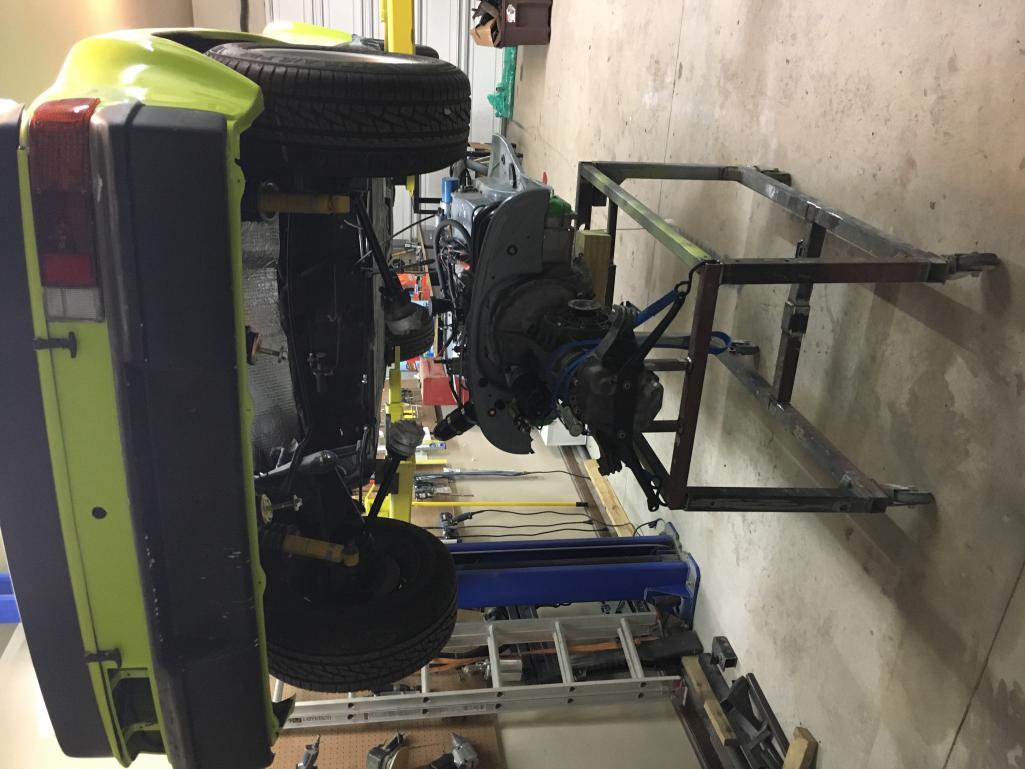
Put the car on the lift, raised it up and prepared to drop it down onto engine and gearbox
Attached thumbnail(s)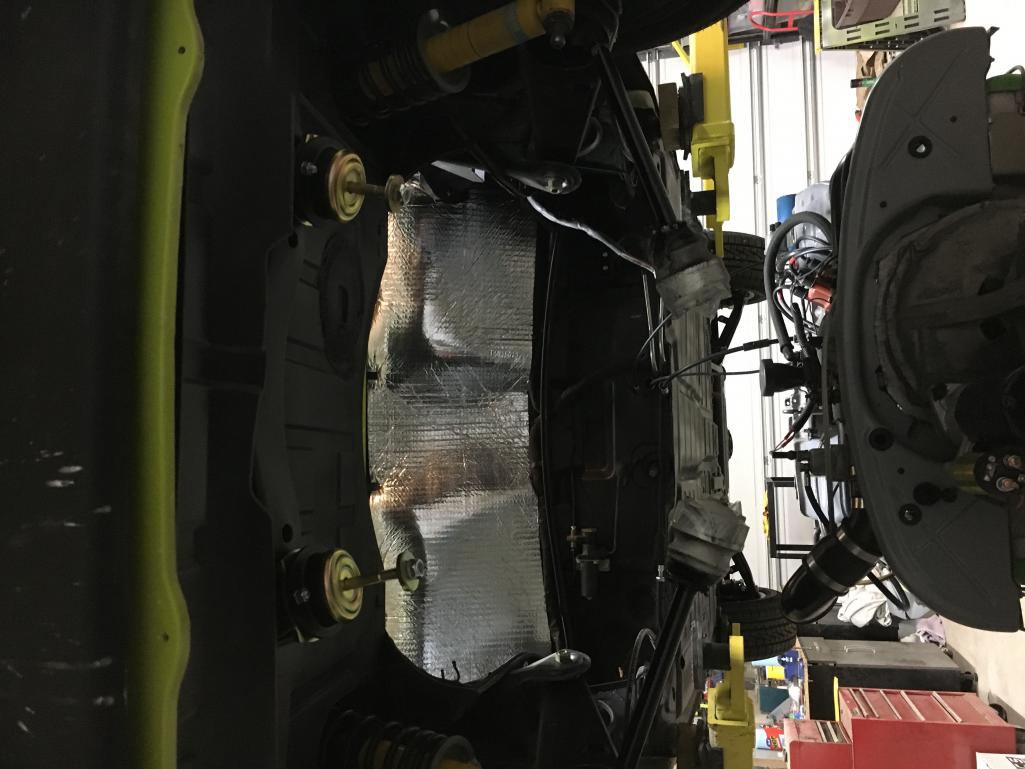
Posted by: jmitro Oct 7 2018, 11:00 AM
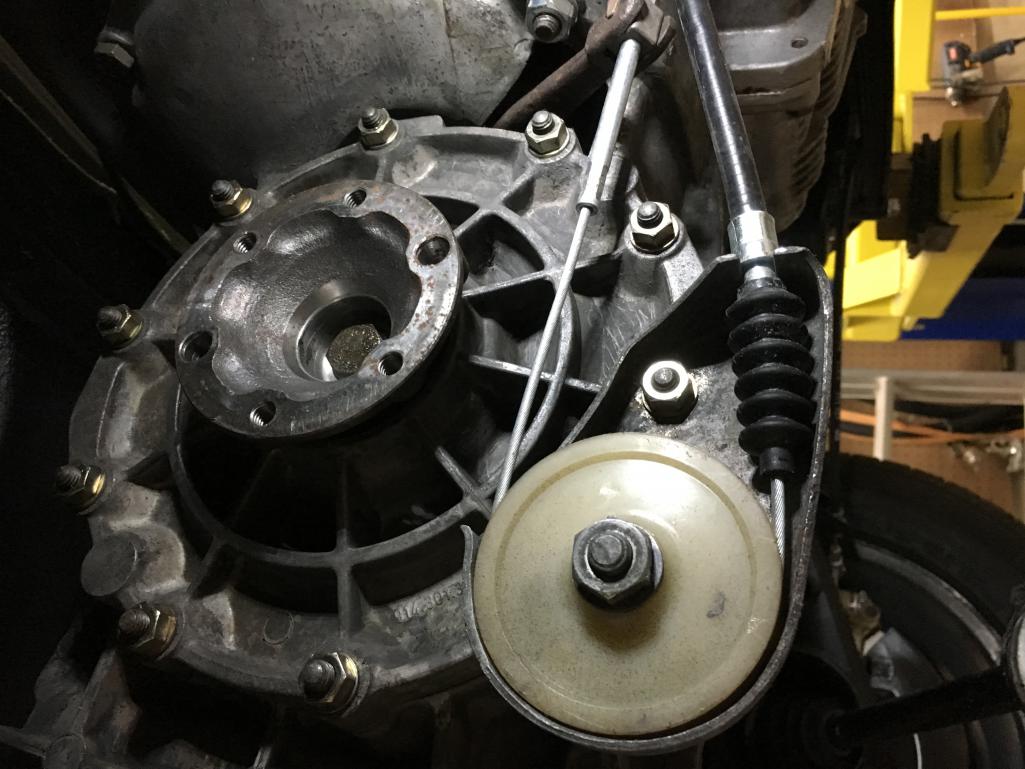
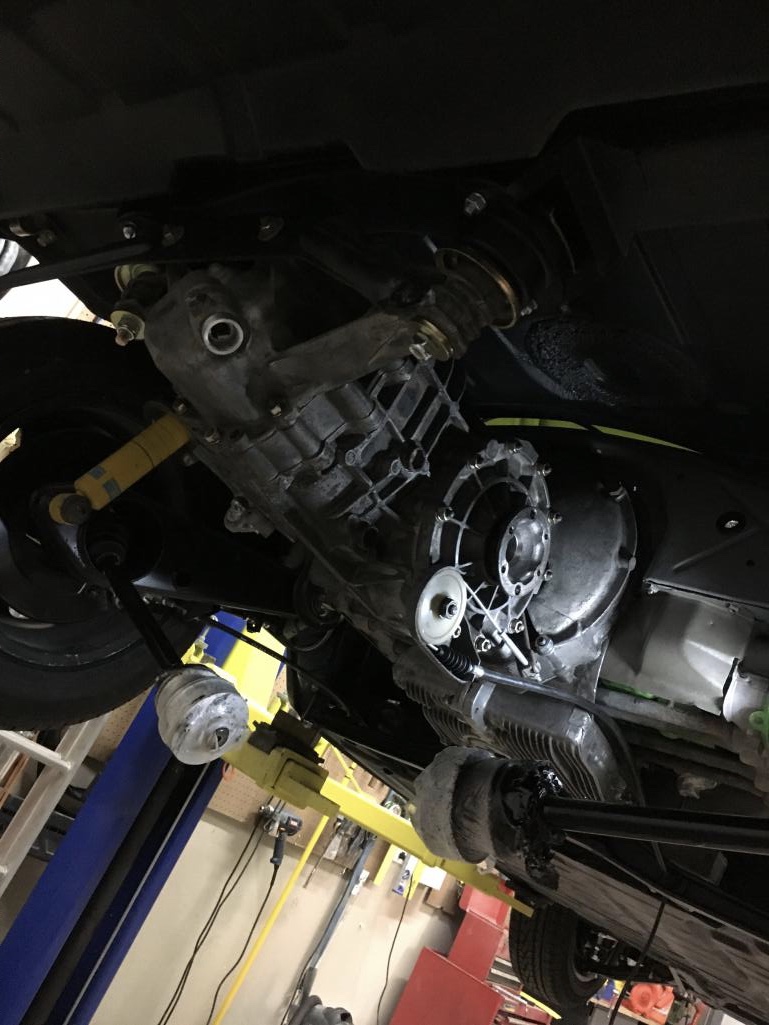
Engine bar and shifter rod from my old engine were bead blasted, epoxy primed, and painted yesterday. Today - Major milestone reached!! Engine and gearbox installed into the chassis.
Pretty much everything is new - motor and transmission mounts, clutch cable, all new shifter bushings, inboard and outboard CV joints rebuilt, new speedometer cable.
After a break for brief lunch and quick 4 mile run, I'll install the SSI heat exchangers and muffler; then reinstall the engine tin and figure out where to mount the CIS intake bits.
It's coming together quick now.
Attached thumbnail(s)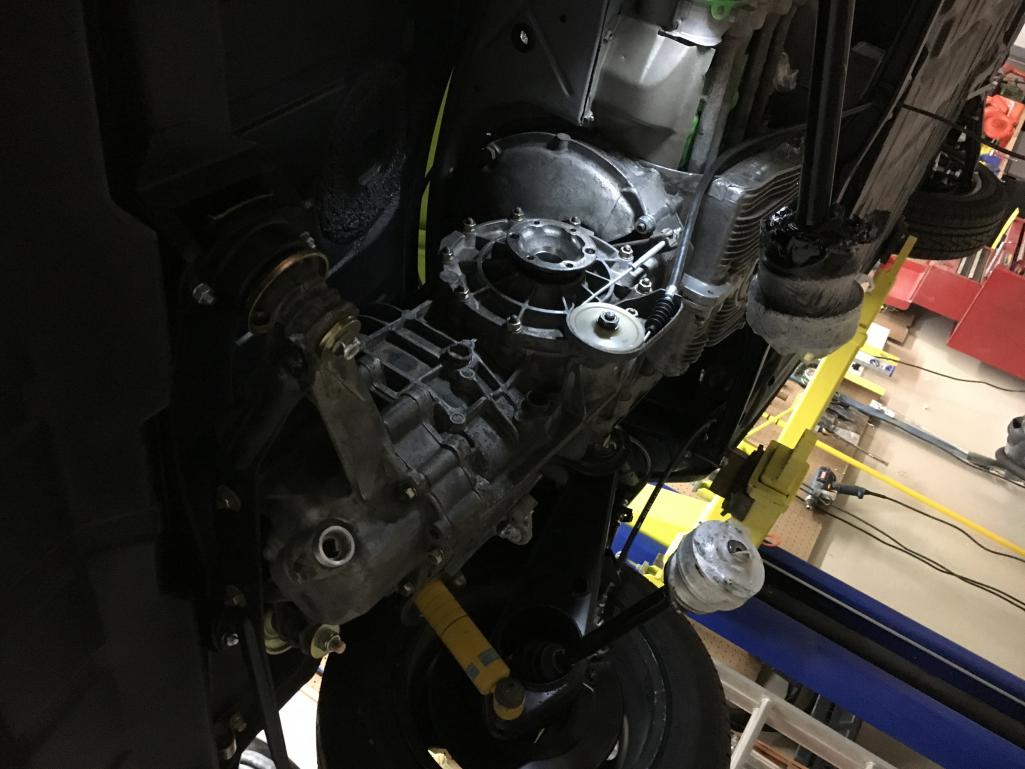
Posted by: jmitro Oct 7 2018, 11:03 AM
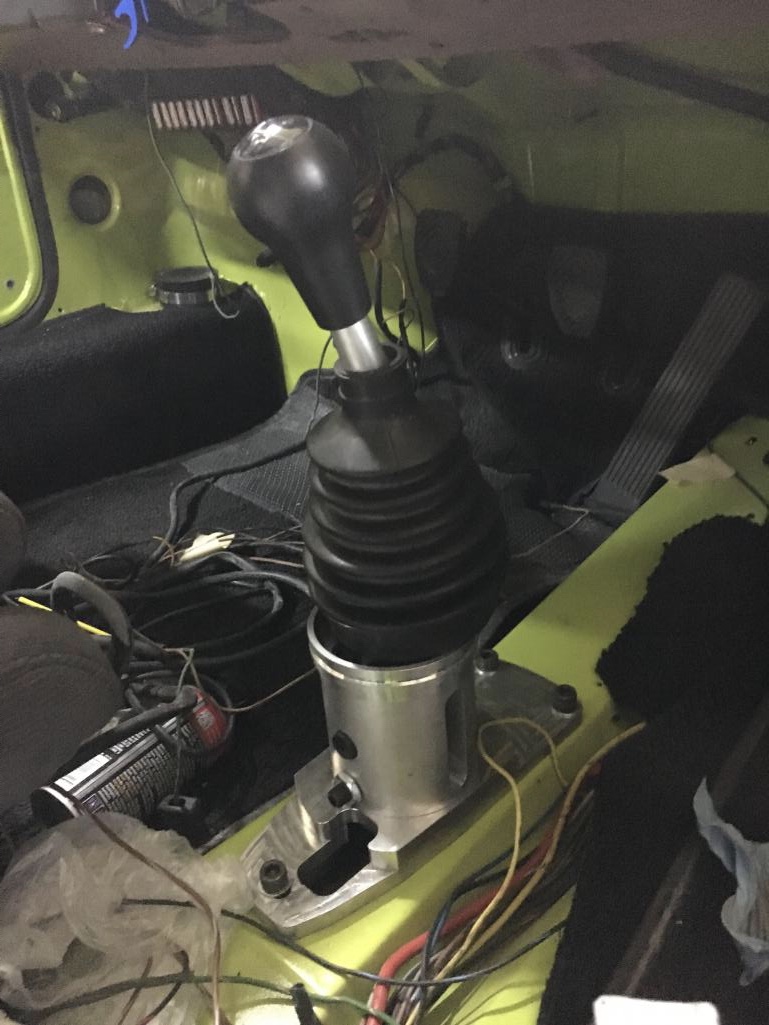
And a rennshift courtesy of the World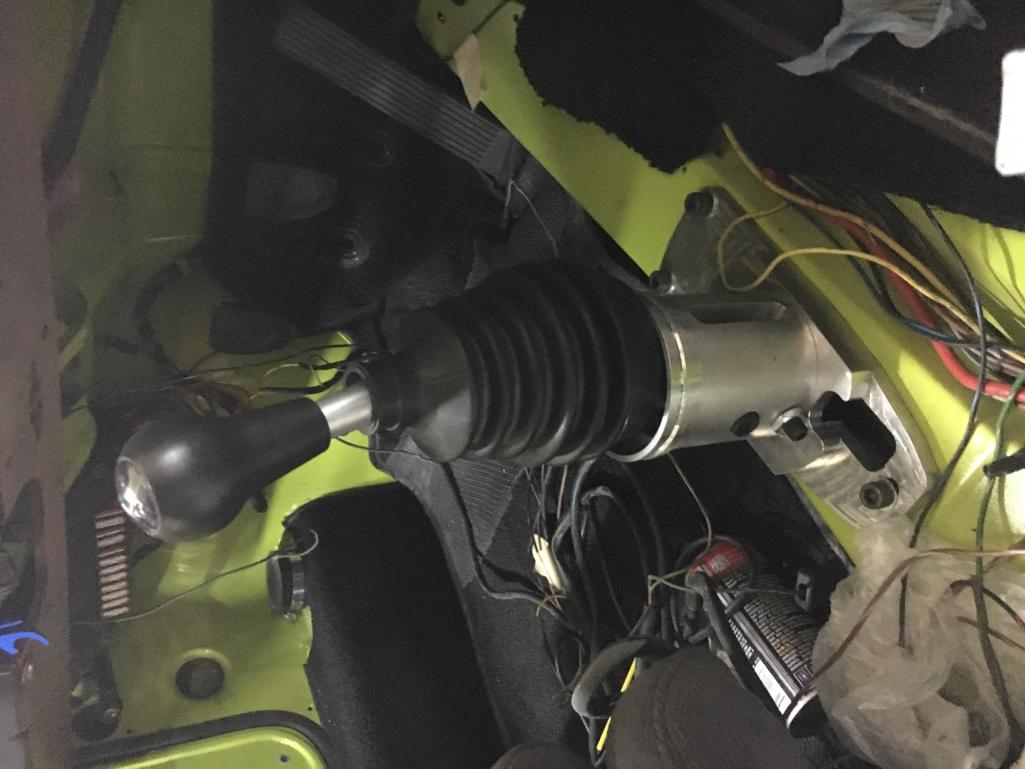
Posted by: jmitro Mar 31 2019, 02:39 PM
so a lot of progress has been made although I haven't updated in a while.
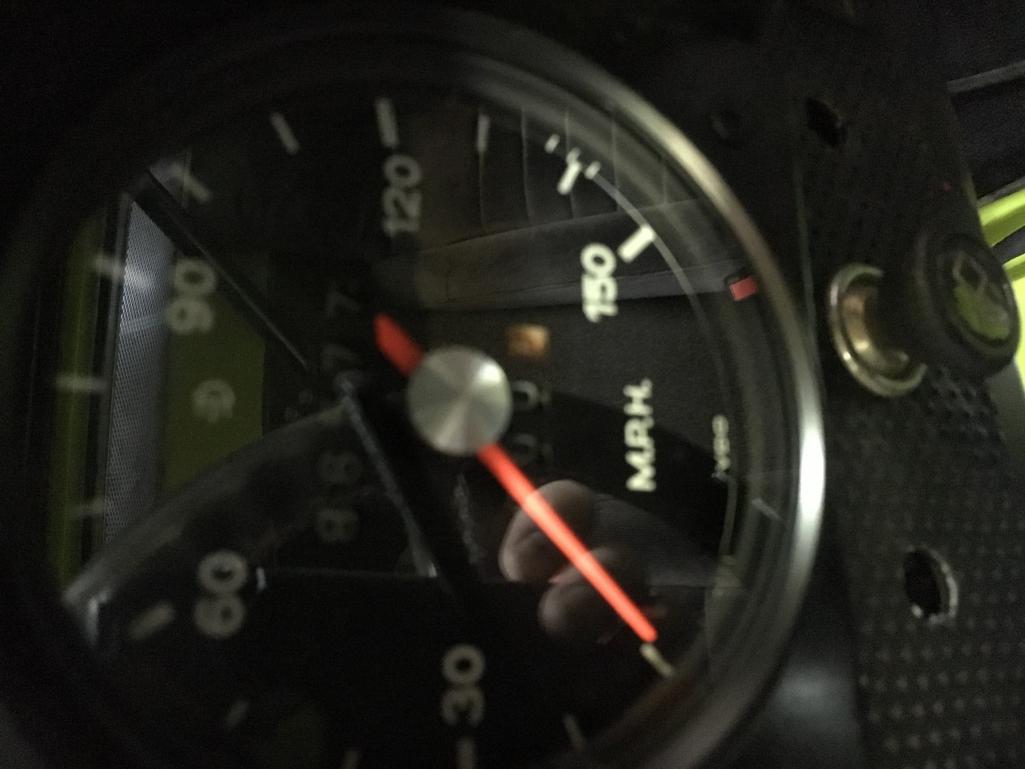
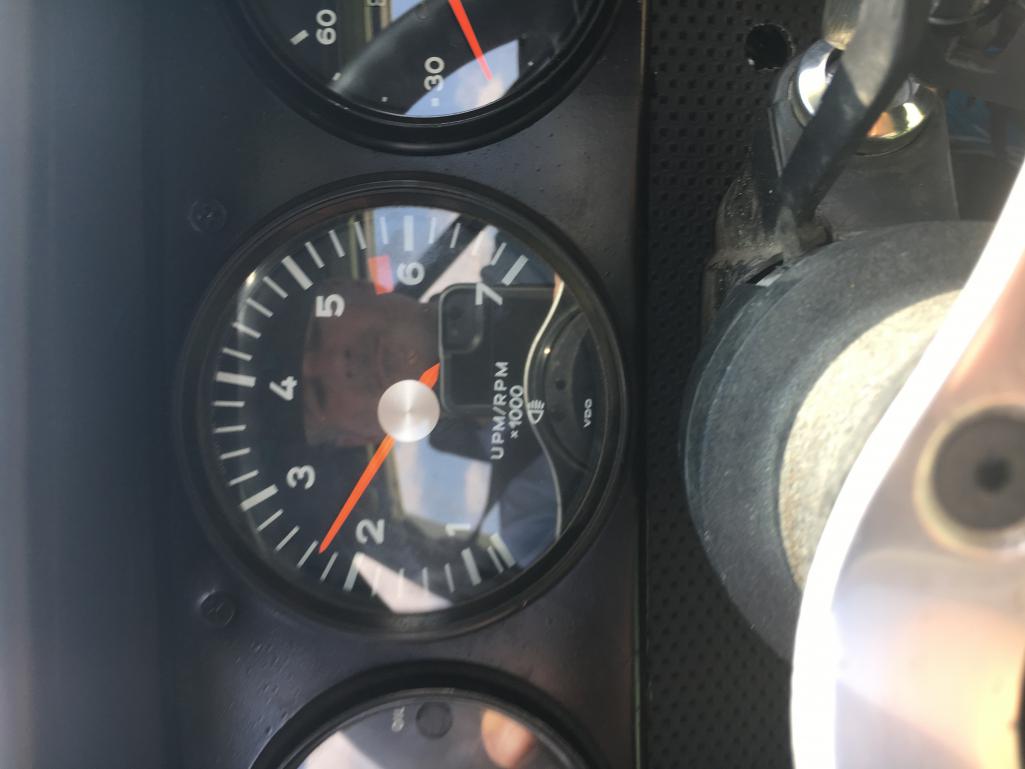
Original odometer rebuilt at North Hollywood speedo and needle swapped out for a silver dot version. (freakin $$$)
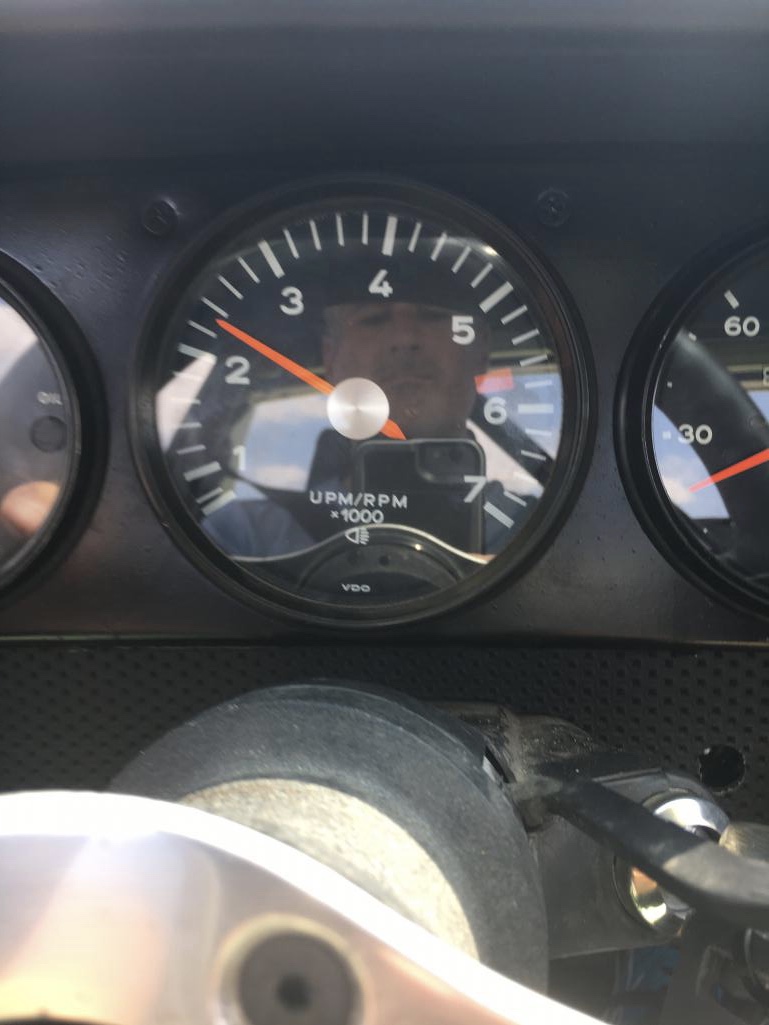
All gauges installed. Speedometer cable installed.
Engine lid pull cable installed.
Wiring harness sorted out, spliced, cleaned up, and installed with new fuses
Relay board installed with all new relays, all circuits tested
Battery cable run to starter, oil pressure sender hooked up
Engine filled with oil, cranked over until oil pressure built up
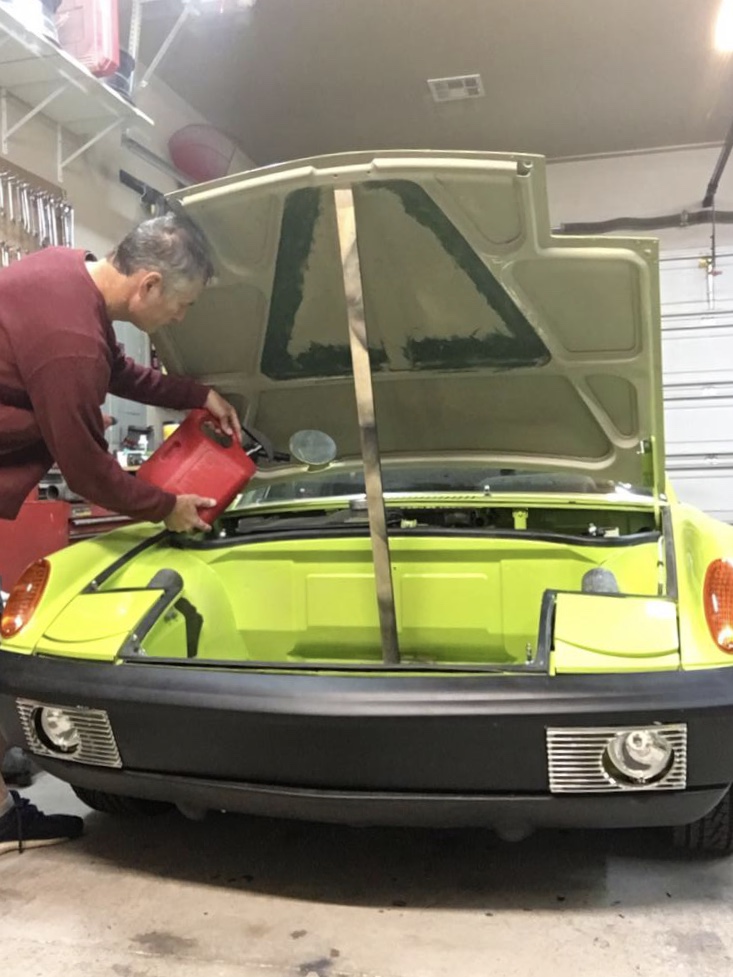
Fuel tank filled and then.....I noticed fuel leaking from the inline fuel filter 
So close to getting it sorted out, but soon it will be running.
Attached thumbnail(s)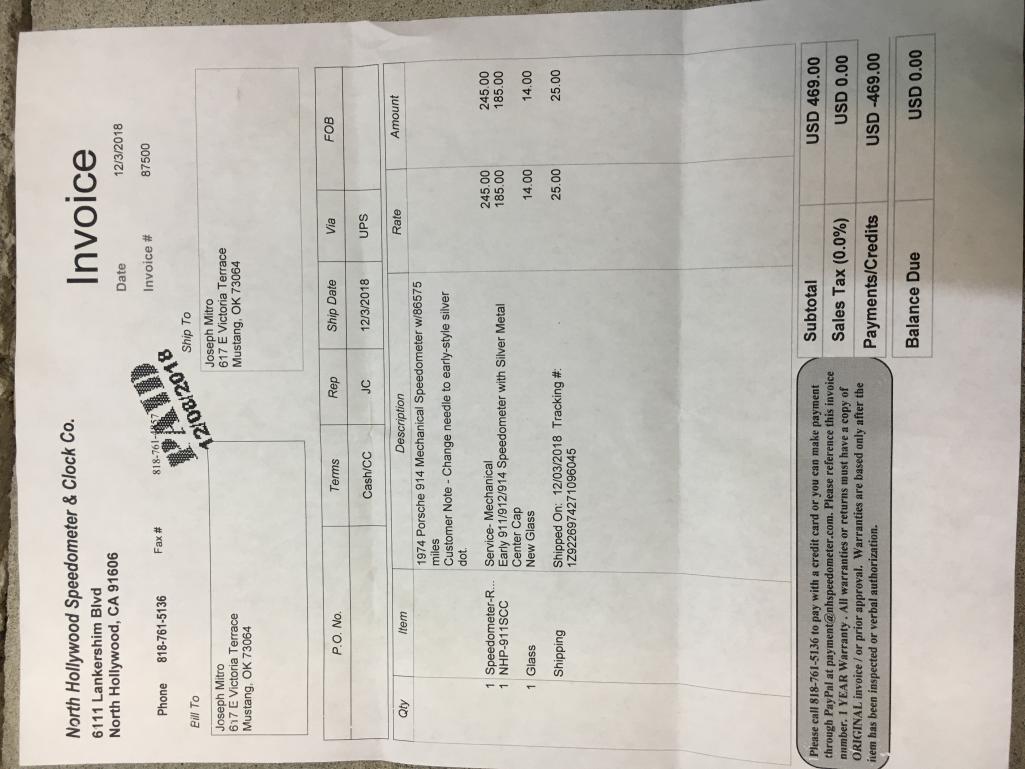
Posted by: jmitro Mar 31 2019, 02:41 PM
I only filled the tank about 1/3 gallon before I saw the leak.
Fortunately the filter and fuel pump are in the front trunk so I saw it quickly.
Not sure if it's a bad (brand new) filter, or if the connection was too loose. I tightened the fuel hose clamps as tight as I could but still leaked on the outflow side of the filter.
Attached thumbnail(s)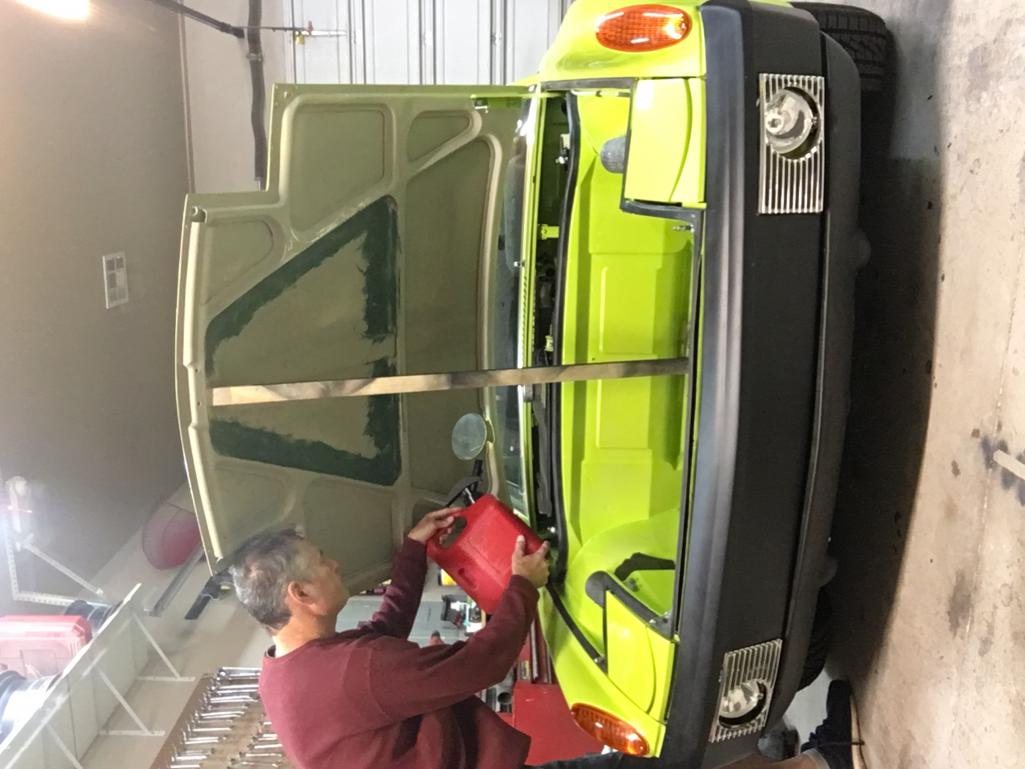
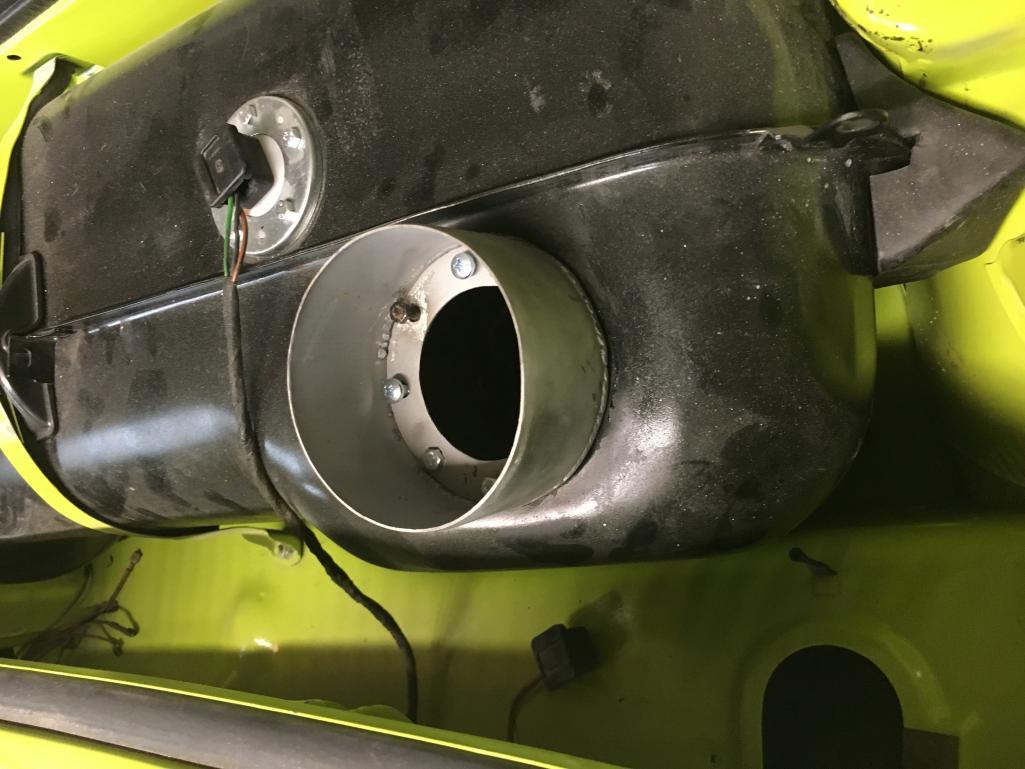
Posted by: jmitro Jul 4 2019, 07:34 AM
after a hiatus with repairing a wrecked Boxster, I'm finally back to the 914.
built a replica of the GT style fuel filler using some of the original fuel tank parts and a top purchased off ebay
Attached thumbnail(s)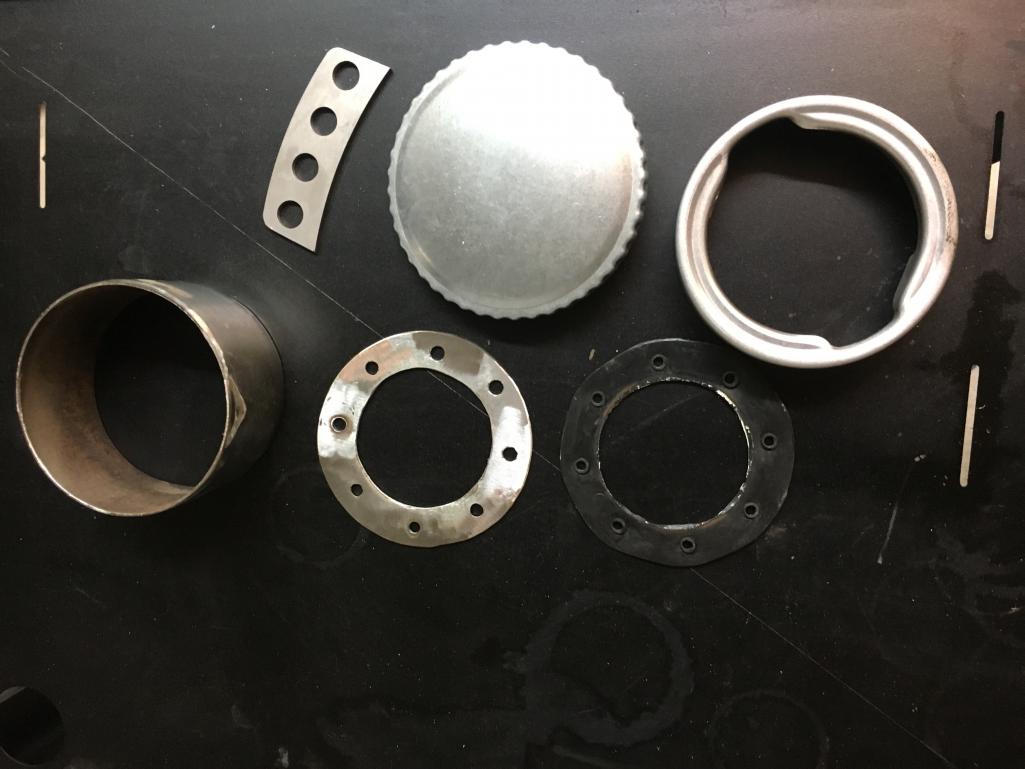
Posted by: jmitro Jul 4 2019, 07:39 AM
Finally, I'm sending the car to my local indy Porsche shop to troubleshoot the non-start and have an alignment done.
Car should be back on the road soon 
Attached thumbnail(s)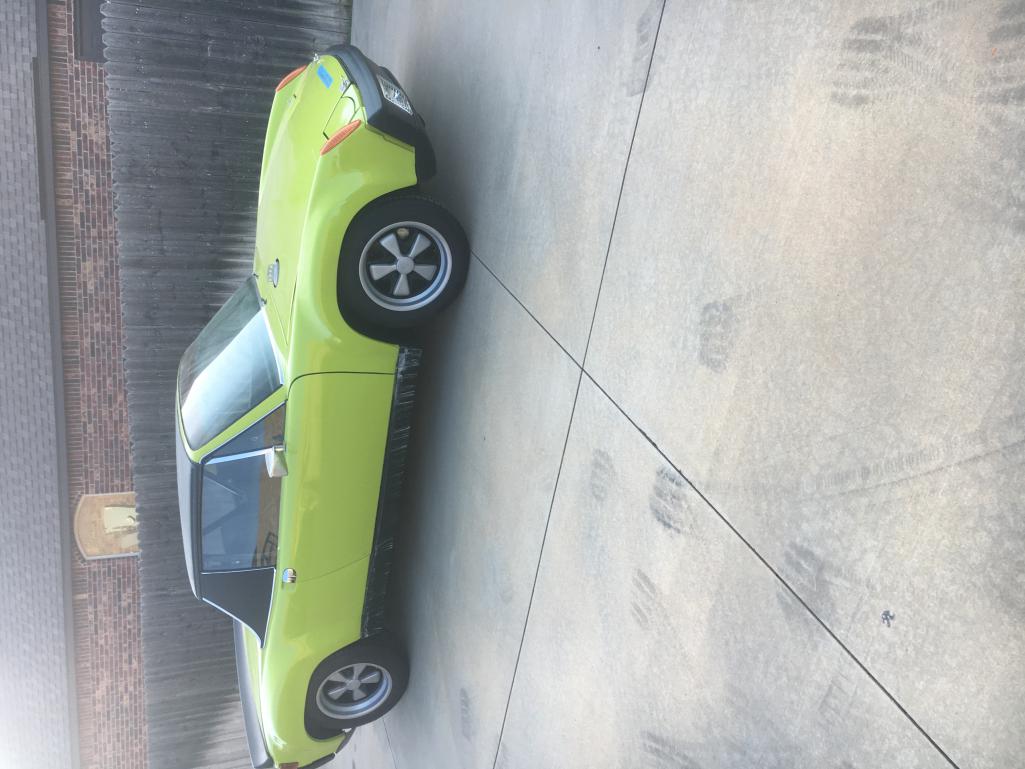
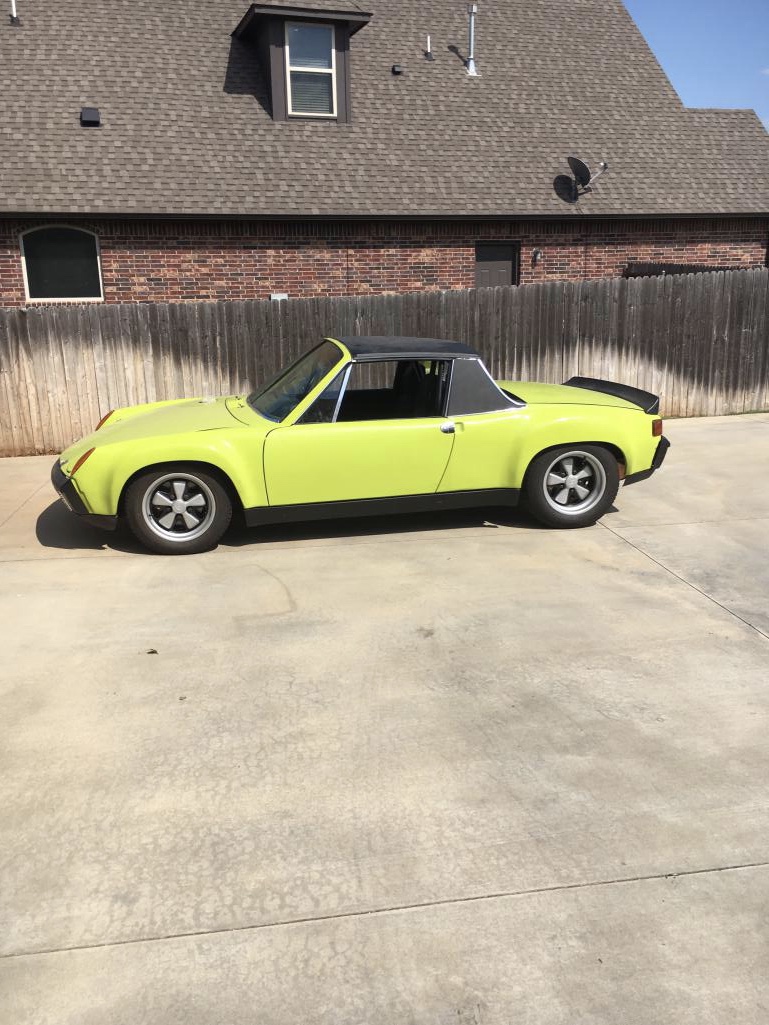
Posted by: jmitro Aug 28 2019, 06:32 PM
Dammit I cannot get these photos to load straight...
anyway, finally it lives! Took the car to my local indy Porsche shop for final troubleshooting and fine tuning, and they got the 2056 running and sorted out some electrical problems.
I drove the car home today. What a vintage experience! My anxiety was increased when I realized I had no rear view mirrors and no license plate! Not to mention driving in rush hour traffic.
Fortunately OKC has minimal rush hour traffic compared to the bigger cities.
Attached thumbnail(s)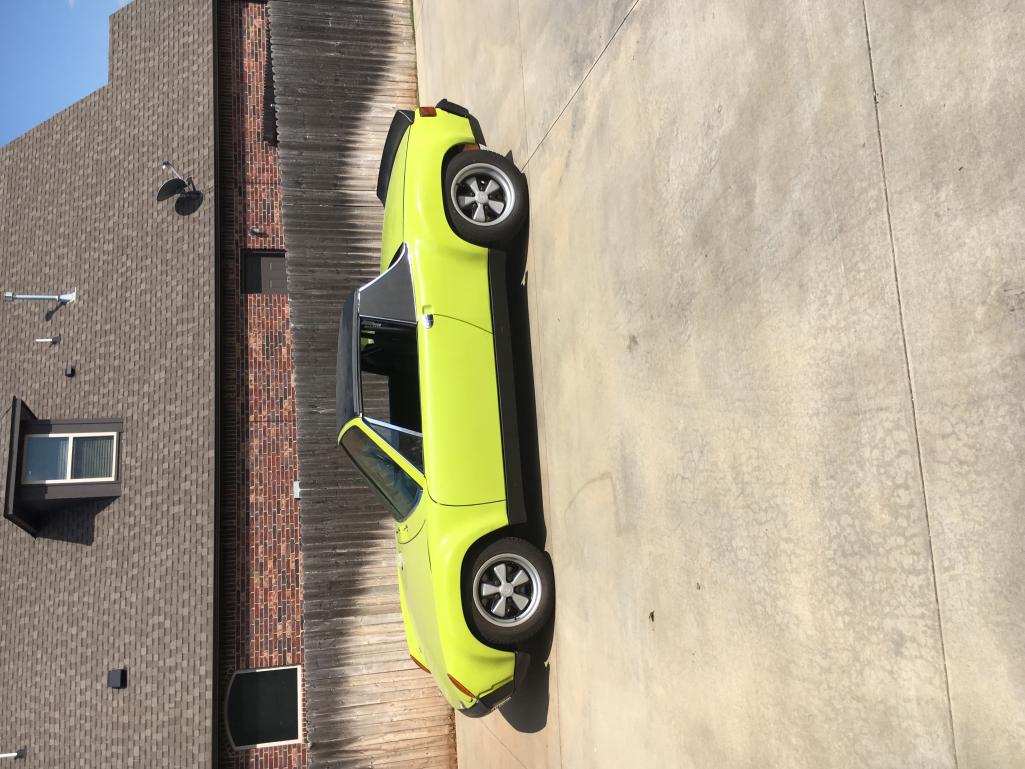
Posted by: jmitro Aug 28 2019, 06:49 PM
A little pensive driving home without license plate, insurance, rear view mirrors, or fire extinguisher. But I made it 
Posted by: ndfrigi Aug 28 2019, 07:44 PM
Fixed the pics for you @http://www.914world.com/bbs2/index.php?showuser=18986
hope I can also start my 74 bahia red with 2056 dual weber carb soon.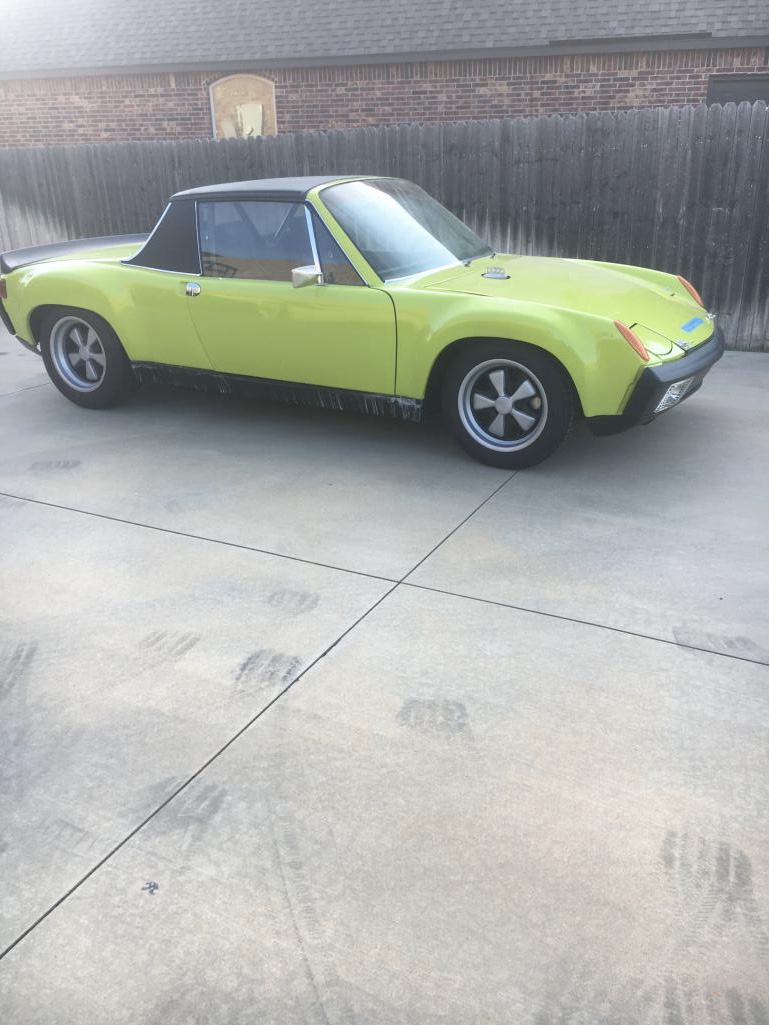

Posted by: jmitro Aug 30 2020, 07:46 AM
I'm a little late for this replay, but wanted to add a link to the for sale ad which has a link to all the photos and some final finished photos of the car.
http://www.914world.com/bbs2/index.php?showtopic=344287&hl=raised
While the restoration process was fun and challenging at times, the car would not have been driven, as I have a Cayman for the track and a 924 Carrera GT project. The car has now been sold to a buyer who saw it here on 914 World, adding to his collection of 914s. This forum was an invaluable source in my rebuild journey, for both information and parts. Thanks to all that contributed with help, encouragement, services, and products.
Powered by Invision Power Board (http://www.invisionboard.com)
© Invision Power Services (http://www.invisionpower.com)