Printable Version of Topic
Click here to view this topic in its original format
914World.com _ 914World Garage _ jim kelly's 1975 914 suby build
Posted by: jimkelly Sep 26 2015, 10:40 AM
i have a 1975 914 roller and a a few ej22 engines and a couple of suby 5 spd transaxles
https://www.diyautotune.com/shop/megasquirt-assembled/microsquirt/
microsquirt with 8" harness $370
GM clt sensor 3/8 npt $17
GM iat sensor 3/8 npt $22
GM map sensor $75
3/8 npt tap $10
18x1.5 tap $12
18x1.5 bung for aem o2 sensor $4
AEM 30-4110 $165
Set of 6 Pcs Spark Plug Ignition Wire Lead For 2.8L VW Passat $30
VW bug Beetle golf oem 2.0 ignition coil pack assembly 032905106b $20
Subaru WRX OEM Crankshaft Timing Sprocket pn-13021AA141 $30
celica radiator 2 row - $170 (see post #2 and my v8 thread)
exhaust header - $35 ebay (see post #152) (decided to go with wrx oem stock header for compactness)
stainless fuel lines - $99 tangerine - 8mm supply and 8mm return
stopper drive pinion - made myself
http://www.914world.com/bbs2/index.php?showtopic=104513
stock 914 axles machined on one end - $150 Dutchman
tires - 185x50x15 - $300+-[/b]
engine cradle and trans hangars - mepstein $550 (see post #32)
mr2 shifter - $35 ebay
shift knob ebay $12 (see post #170)
front bumper grills - $35 dflesburg
stock style fuses - ebay $13
set of speed bleeders - $30 pelican
brake peddle switch - $24 pelican
ebrake handle assy with cable and equalizer - $56 bdstone914
lug bolts to roll car around my garage - free mark epstein
set of nice complete late model doors - $150 (thanks lorin, series9, rat rod charlie)
center section of fuse box - free mark epstein
a front steel bumper - free mark epstein
late model tach with single directional indicator - cabinetmaker $40 shipped : )
two pair front amber lens bought from 914rubber for both my cars.
https://weddleindustries.com/products/1000186/1001853 - flange $50 shipped type 1 to type 2/4
starter 23300AA560 - http://www.914world.com/bbs2/index.php?showtopic=303903
///////////////////////////////////////////////////////////////////////////////////////////
looking forward to...
good fuel mileage
modern fuel injection
modern 5spd transaxle - useable 1st gear for taking off from dead stop & in traffic
light weight car
big space in engine bay
running some low profile 15 inch tires on 5.5" wheels - maybe 185x50x15
//////////////////////////////////////////////////////////////////////////////////////////
reference materials and links...
http://www.shoptalkforums.com/viewtopic.php?t=136053
http://www.surrealmirage.com/subaru/swap/electrical.html
http://legacycentral.org/
http://www.northursalia.com/modifications/misc/wiring/91legacyelectricalschematics.pdf
http://www.main.experiencetherave.com/subaru_manual_scans/
vanagon related links...
http://subaruvanagon.com/conversion_services_Wiring.htm
https://smallcar.com/vanagon/subaru-vanagon-conversion-parts/harness-modification-kit.html
http://www.kennedyenginc.com/Pages/SubaruVanagonGen.aspx
http://www.rockymountainwesty.com/v/vspfiles/assets/images/removing%20wiring%20harness%20instructions.pdf
http://www.weidefamily.net/vanagon/HTML/05/main.html
http://www.ultimatesubaru.org/forum/topic/100038-ej22-wiring-diagrams/
http://www.numbchuxconversions.com/Files/Harness%20info.pdf
http://consumerguide.com/used/1990-94-subaru-legacy/
pulling ej22 harness from subaru (Tim Seward) per tim 90 and 91 harnesses are same
https://www.youtube.com/watch?v=GfQJnZBljsw
be sure to watch all (busaru) segments
https://www.youtube.com/watch?v=ENm6S3WkKJc
Subaru engine test stand (Jeff Robenolt)
https://www.youtube.com/watch?v=_IN5rfK9a_8
Posted by: jimkelly Sep 29 2015, 02:30 PM
this ebay radiator was mentioned by a member. the price is right, so it may be what i will use?
update 19dec2015: I recently put one in my v8 car using a&p mech's mounting style and it is working fine.
Attached thumbnail(s)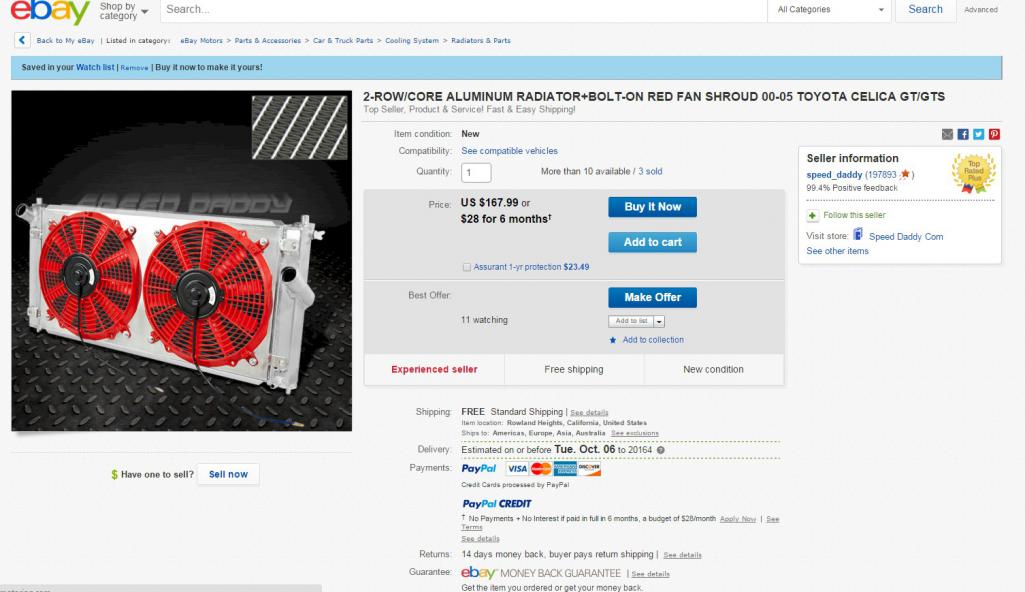
Posted by: jimkelly Sep 29 2015, 02:32 PM
some sensor fake output info... from tonyakavw and scott914...
Okay, so I THINK I WILL NEED TO fake/simulate the following sensors depending on which Subaru donaor car I buy..
Fuel level sender (0.12 to 4.95 volts)
Fuel Temp sender (2.5 to 3.8 volts)
Fuel Tank Pressure sender (2.3 to 2.7 volts)
Rear O2 sensor signal (0 - 0.9 volts)
Neutral position sensor (+12 in neutral, 0 when in gear)
Rear O2 heater sensor signal (0-1.0 volts)
Power Steering oil pressure sender (open/close)
There may be one more, I'm still finalizing the wiring...
Most of these wil use small 10-turn potentiometers to set the desired signal voltage, but I may end up using real metal-film resistors in the end, as they are a bit more reliable.
-Tony
Regardnig the sensor simulator, I won't be simulating the front O2 sensor. That is used by the ECU to run the enigne, whereas the second sensor is there just to verify the cat is working. Since I'm not going to be running a cat, I have to simulate the second sensor.
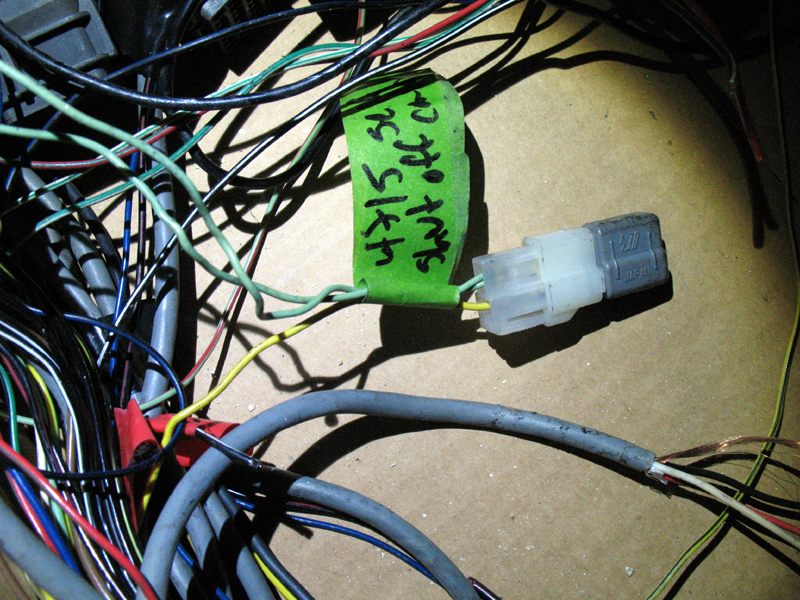
that looks like you are mising a few plugs, but i cant see it all very well. dont tape it up too much you will probably have to open it up once to fix something.
all the plugs i can think of are :
brain
2 o2 plugs
3 for engine connection
fuel pump relay
main realy
ignitor
obd connector
purge and pressure switching solinoids ( 2 plugs )
connection to relay board
then loose wires are :
power
ground
speed sensor
temp sensor if you go stock
then you need wires from the alt
Attached image(s)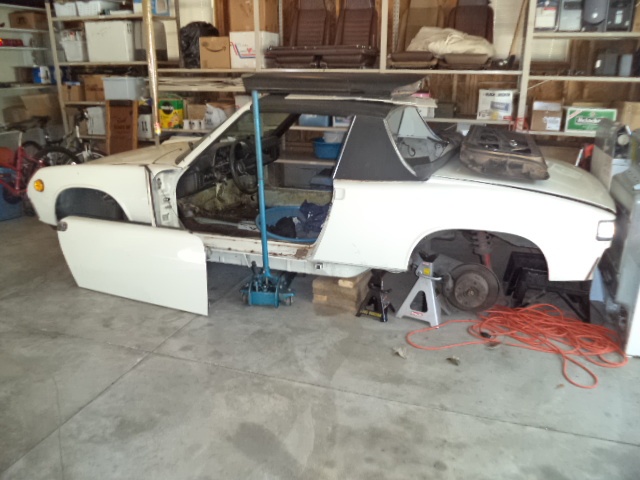
Posted by: r_towle Sep 29 2015, 04:04 PM
Wait, what?
Don't you have a v8?
Posted by: Smallblockbug Sep 29 2015, 04:31 PM
Im pretty sure this is his other car. But yes he has a v8 car to.
Posted by: jimkelly Sep 29 2015, 06:31 PM
i have a wife, 2 boys, and two 914s. that is about it BUT that is all i need 
have we ever concluded whether or not this subaru spool ( pn - 498427100 )is a part that will work in our conversions?
$134
https://subaru.service-solutions.com/Detail.aspx?id=86
vs $229
http://www.bremarauto.com/products/subaru-2wd-conversion-kit/
vs $200
http://www.subarugears.com/Pricing/Pricing.html
Attached image(s)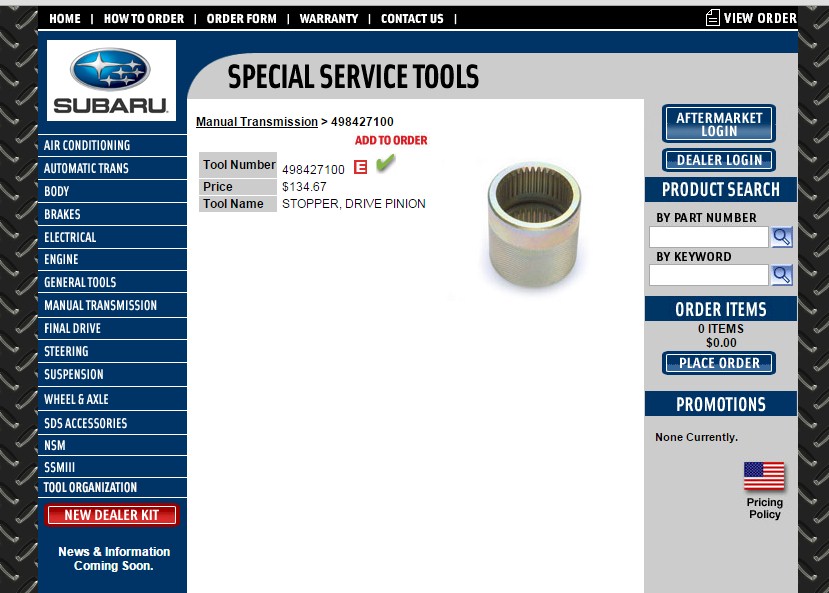
Posted by: Stacks914 Sep 30 2015, 01:48 AM
I am sorry did you mention fuel mileage??? LOL jk man looking good!!
Posted by: jimkelly Sep 30 2015, 07:01 AM
YES, yes i did. it will be my daily driver once complete.
Posted by: mepstein Sep 30 2015, 07:09 AM

YES, yes i did. it will be my daily driver once complete.
Same here

Posted by: 76-914 Sep 30 2015, 09:21 AM
When does the build start? Not a fan of acquisition threads, so much. Onward thru the Fog! 
Posted by: mepstein Sep 30 2015, 09:39 AM
When does the build start? Not a fan of acquisition threads, so much. Onward thru the Fog!
There's a lot of stuff to acquire before the build.
Posted by: 76-914 Sep 30 2015, 04:00 PM
When does the build start? Not a fan of acquisition threads, so much. Onward thru the Fog!
There's a lot of stuff to acquire before the build.
If you want to complete the build in one week, yes. Or someone that is paying a 3rd party, as in your case. JMHO
Posted by: mepstein Sep 30 2015, 05:52 PM
When does the build start? Not a fan of acquisition threads, so much. Onward thru the Fog!
There's a lot of stuff to acquire before the build.
If you want to complete the build in one week, yes. Or someone that is paying a 3rd party, as in your case. JMHO
I'm going to get some help from my shop on the Suby build but I'm the one building the car. The Porsche build is getting done by scotty b. If I had the money, I would have both cars built 3rd party. I will say that for me, a non mechanic, just getting the parts together is a struggle, not a bad one and the people on this site are great and I'm having fun but for me, a lot of this stuff is pretty confusing.
Posted by: jimkelly Sep 30 2015, 06:53 PM
i'll try to blend ACQUISITION with ACTUAL BUILD photos and text.
my car needs some welding, but the rest will mostly be bolt in. nothing too fancy, that is for sure. super low dollar build. planning on frankenstein axles or have dutchman machine some.
http://www.dutchmanaxles.com/
Posted by: jimkelly Oct 1 2015, 06:33 PM
$35 ebay
actual unit as received
Attached image(s)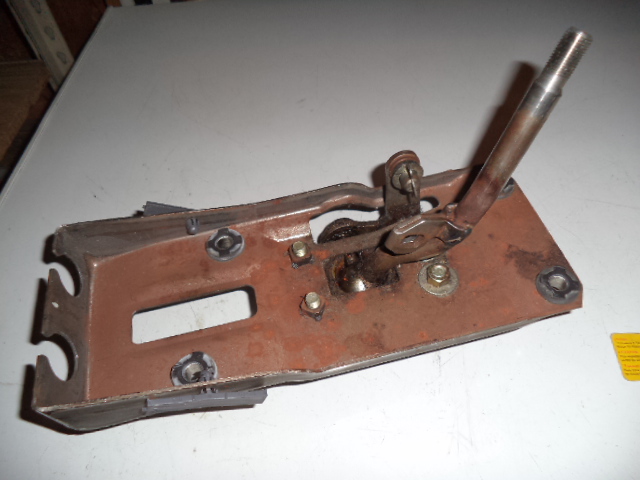
Posted by: A&P Mech Oct 1 2015, 06:50 PM
All those pieces and parts look familiar. What motor are you planning on using?
Posted by: mgp4591 Oct 1 2015, 09:06 PM
i'll try to blend ACQUISITION with ACTUAL BUILD photos and text.
my car needs some welding, but the rest will mostly be bolt in. nothing too fancy, that is for sure. super low dollar build. planning on frankenstein axles or have dutchman machine some.
http://www.dutchmanaxles.com/
Do you know of anyone here or elsewhere using these axles or any idea of the cost?
Posted by: jimkelly Oct 2 2015, 08:52 AM
Dutchman has been recommended by bigkat_83 who is amazing resourceful and a phenominal fabricator.
as I understand it, not all conversions can use the same axle length but I have to recheck but I think bigkat had Dutchman machine stock 914 axles to work with his suby conversion. I think the cost is about $150 for the machining on one end. one end would retain the 914 cv spline, the other end would get a suby spline machined in, I believe.
you (and I) need to read every suby thread, I have several listed in my signature.
Posted by: 76-914 Oct 2 2015, 09:47 AM
Dutchman has been recommended by bigkat_83 who is amazing resourceful and a phenominal fabricator.
as I understand it, not all conversions can use the same axle length but I have to recheck but I think bigkat had Dutchman machine stock 914 axles to work with his suby conversion. I think the cost is about $150 for the machining on one end. one end would retain the 914 cv spline, the other end would get a suby spline machined in, I believe.
you (and I) need to read every suby thread, I have several listed in my signature.
Yep, it's all covered.
Posted by: mgp4591 Oct 2 2015, 10:38 PM
Sweet idea for the axles- I may just send my SVX axles and have the other end reworked for heavy duty Porsche cv joint ends. Which cvs are the strongest that match up with our rear hubs once they've been modified for 5 lug?
Posted by: jimkelly Oct 3 2015, 06:12 AM
sawtooths axles
>> has anyone used this dimension with a coldwater cradle ??
Attached thumbnail(s)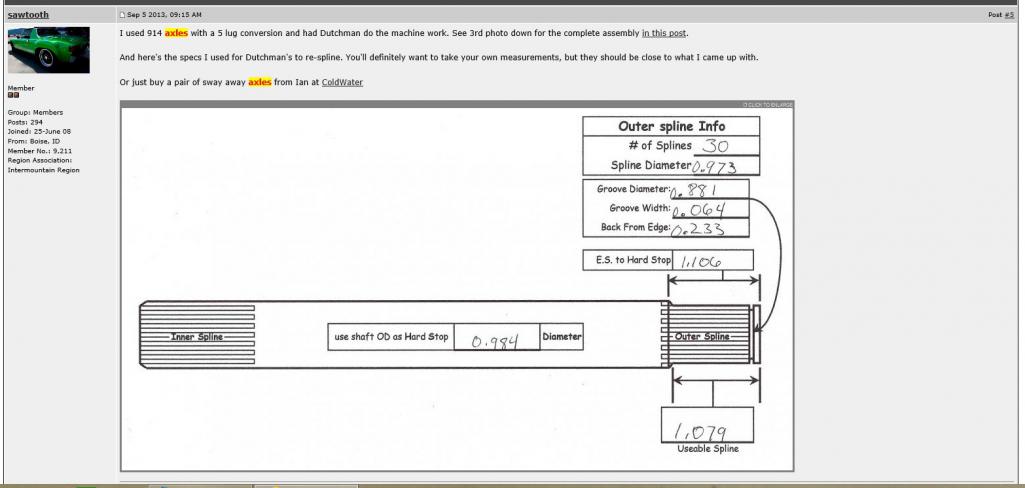
Posted by: jimkelly Oct 3 2015, 06:15 AM
why I MUST HAVE a Subaru engine and trans 
https://www.youtube.com/watch?v=ALwR2Fj91Co
and
https://www.youtube.com/watch?v=yor2_4Acqlo
Posted by: 76-914 Oct 3 2015, 08:20 AM
sawtooths axles
>> has anyone used this dimension with a coldwater cradle ??
Your getting way ahead of yourself. You'll need to measure those once your drive train is in. These cars vary dimensionally. Don't be surprised if there is a 2-10mm difference between sides. You will want these cut as long as possible. They should just barely squeeze in to place with very little room to spare. BTW, when do you plan to start working on the conversion?
Posted by: jimkelly Oct 3 2015, 10:24 AM
your conversion was epic - others can see it here.
http://www.914world.com/bbs2/index.php?showtopic=201776&hl=subaru++tool
mine will be primarily a bolt in affair. mine will only be of some interest to those that have my very limited skill set. sorry 
thanks though regarding your comments related to axles. 
I am trying to find anyone who is using a coldwater cradle and a 914 cv at wheel and suby cv at trans. cause we should all be in same boat.
jim
sawtooths axles
>> has anyone used this dimension with a coldwater cradle ??
Your getting way ahead of yourself. You'll need to measure those once your drive train is in. These cars vary dimensionally. Don't be surprised if there is a 2-10mm difference between sides. You will want these cut as long as possible. They should just barely squeeze in to place with very little room to spare. BTW, when do you plan to start working on the conversion?
Posted by: Chris H. Oct 3 2015, 01:34 PM
why I MUST HAVE a Subaru engine and trans
That red one looks familiar...but then again there are a lot of red ones...

https://www.youtube.com/watch?v=s6JxpYwqUMs
Ross is using the setup you describe Jim (rnellums), or something similar. He is 5 lug I think.
Posted by: jimkelly Oct 7 2015, 12:56 PM
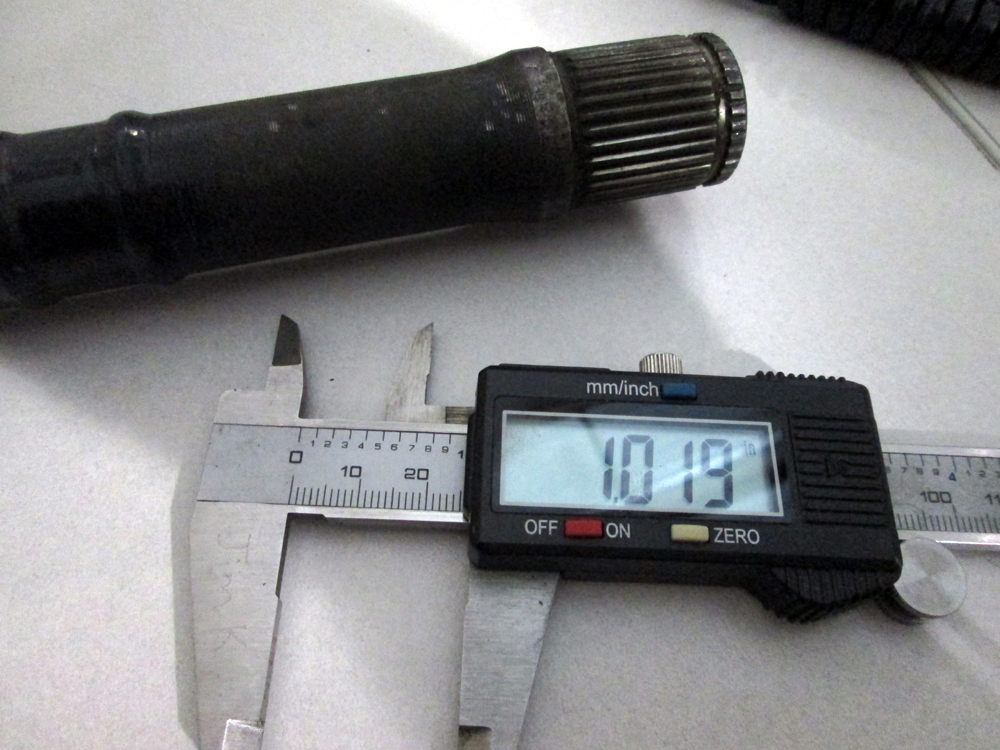
OD of splined end of stock 914 axle is 1.066.
what i am confused about in sawtooth's machining drawing is that the end with all the measurements looks like the 914 end that should have remained untouched i thought. is the CV ID of a suby larger or smaller than the CV ID of a 914 stock cv. i assume smaller otherwise how else could a stock 914 axles be machined to accept a suby cv ????
Attached image(s)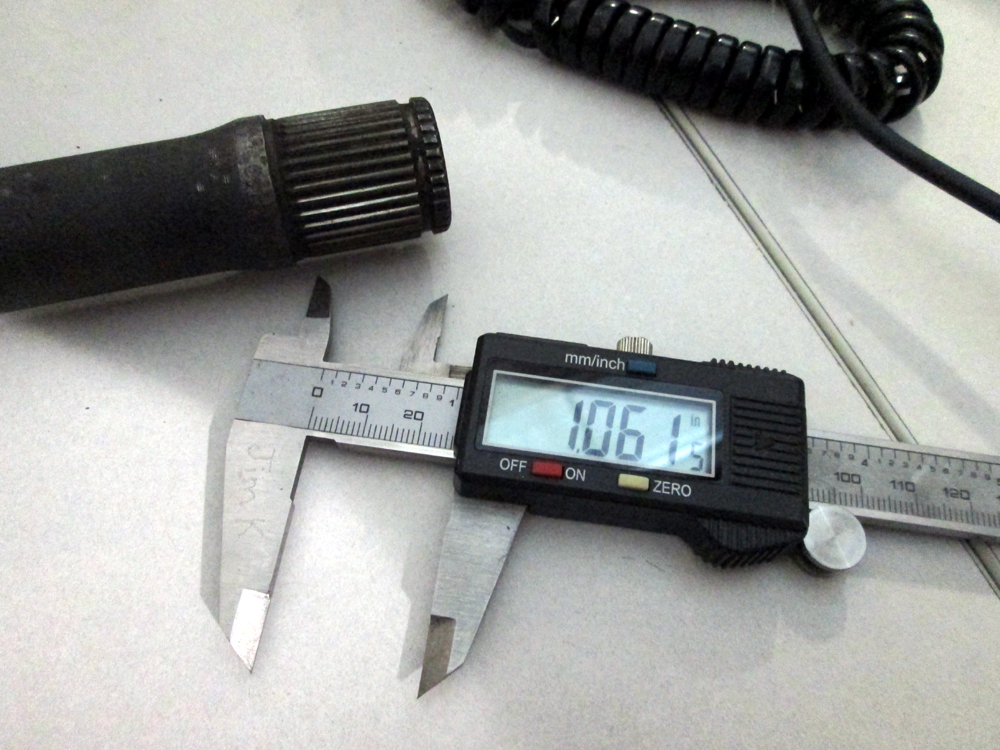
Posted by: mepstein Oct 7 2015, 03:59 PM
Jim - if you or someone will tell me how to remove the Suby axles from cv's, you can have my axles for free.
Posted by: jimkelly Oct 7 2015, 04:03 PM
once upon a time, i had a legacy parts car and removed an axle for poscharu, not sure they are all the same but there may be a pin thru the cv and thru the stub axle on the trans side. on the wheel side i think there is a big nut holding it to that side, not sure.
https://www.youtube.com/watch?v=9xuCzM2GEcU
be sure the drain all fluid from trans before disconnecting it from engine, when you get to that point.
Posted by: mgp4591 Oct 7 2015, 04:53 PM
Jim - if you or someone will tell me how to remove the Suby axles from cv's, you can have my axles for free.
The inners come free when you cut the inner boot completely off, locate the large inner snap ring that's just inside the lip. Then the inner tripod should pull right out of the cup end. So far as the outer joint goes, once again pull the outer boot completely off and taking a REALLY large mallett (so no metal breaks off and injures someone), smack the hell out of the cv joint, away from the shaft. After a whack or two, it should come right off. Done it hundreds of times, it's not too hard.
Posted by: jimkelly Oct 7 2015, 05:10 PM
Posted by: mepstein Oct 7 2015, 06:08 PM
Thanks guys.
I'll probably cheat and have one of my mechs do it. They're young. I can own them with a cheeseburger.
Posted by: jimkelly Oct 9 2015, 11:34 AM
decided to drive the pickup truck to mark's shop and get me a sweet engine cradle and trans hangars thanks mark
Attached thumbnail(s)
Attached image(s)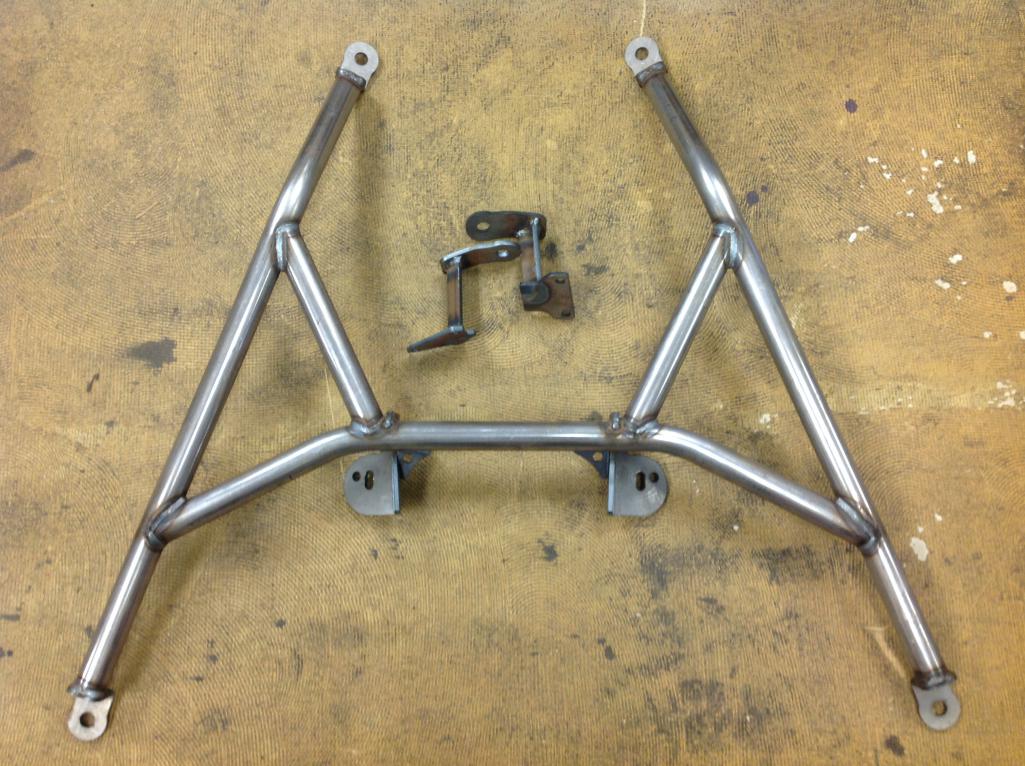
Posted by: jimkelly Oct 10 2015, 04:10 PM
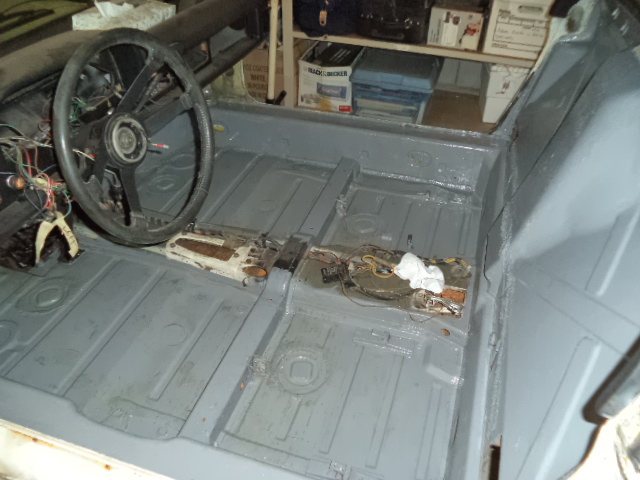
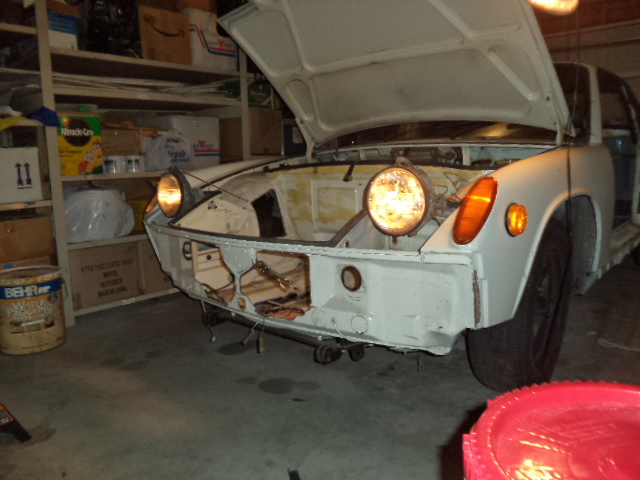
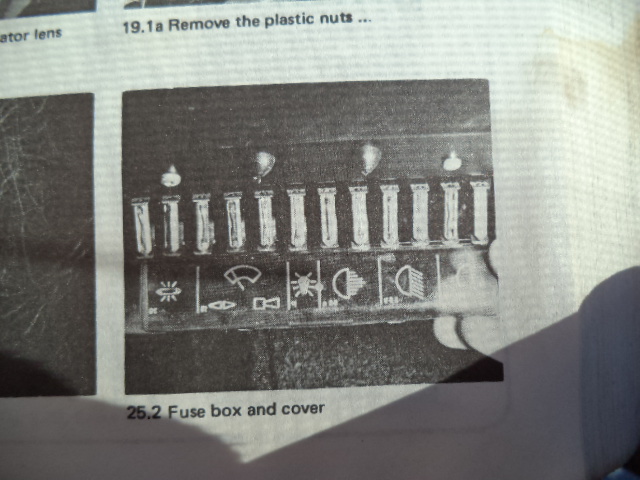
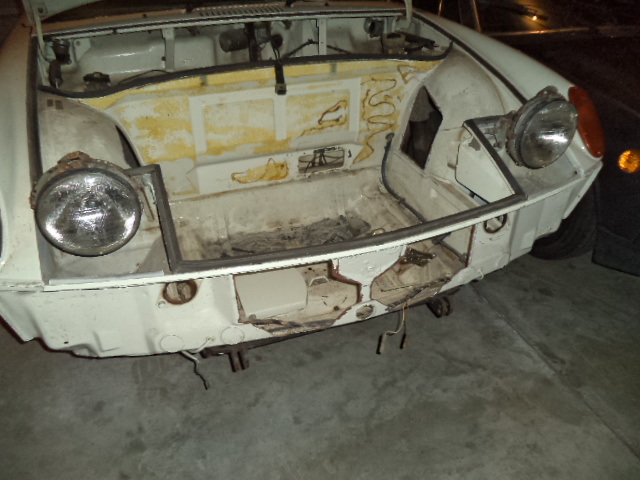
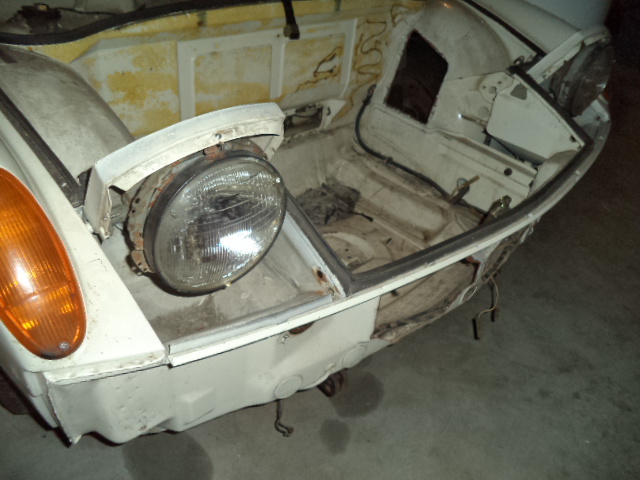
finally got my 1975 back onto some wheels and tires, so I can roll it around. passenger side brakes were locked up, finally pushed it real hard a few times and now it rolls again. went to remount my fuse panel and noticed it had a cracked ear, so I need to replace it. reinstalled the rusty peddle cluster too. might bleed the brakes tomorrow. basically it is a roller that needs doors and a drivetrain.
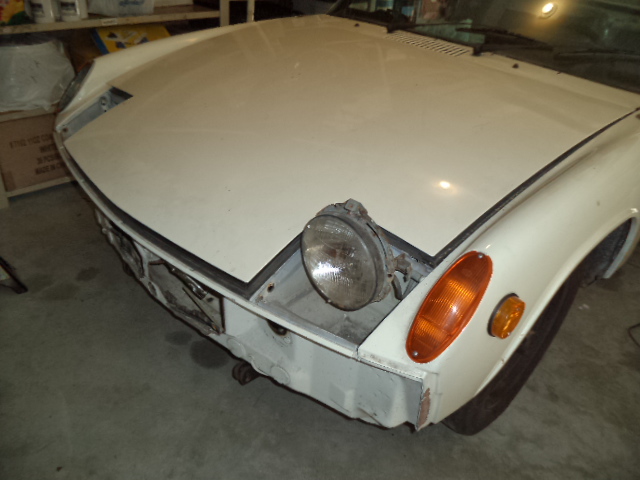
giving the interior its first coat of rustoleum, from a can I had laying around. popped in both rear lenses, not in the best of shape. reinstalling headlights, they will be permanently up. off to ace to get some allen screws, somehow I lost 4 of them  got the screws and got both headlights in, now to figure out how to fix them up solidly.
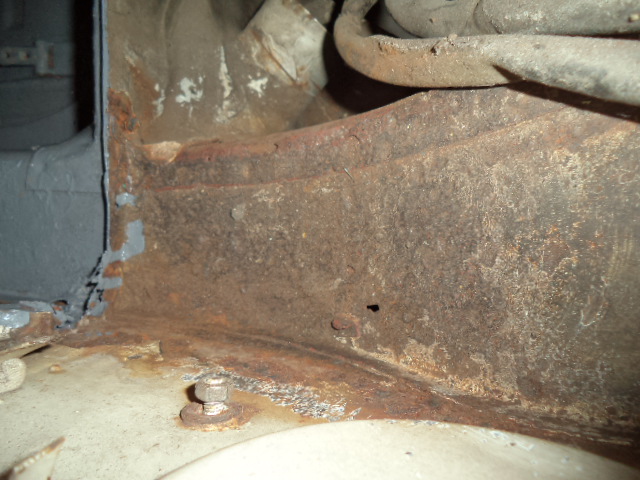
this car has some rust, need to weld in 3 patch panels, and longs ain't so pretty either.
Attached image(s)
Posted by: jimkelly Oct 12 2015, 11:07 AM
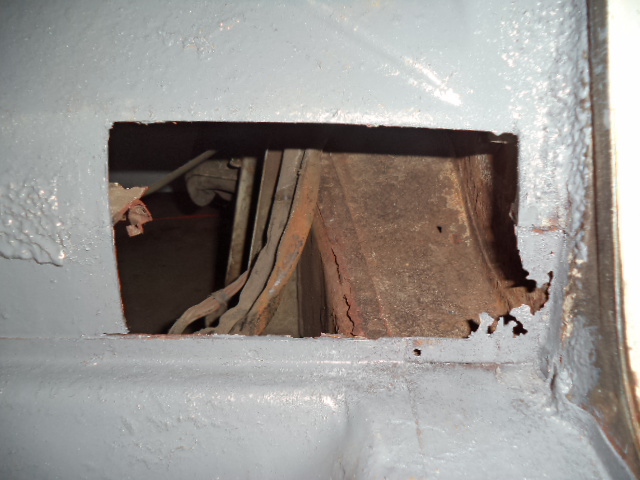
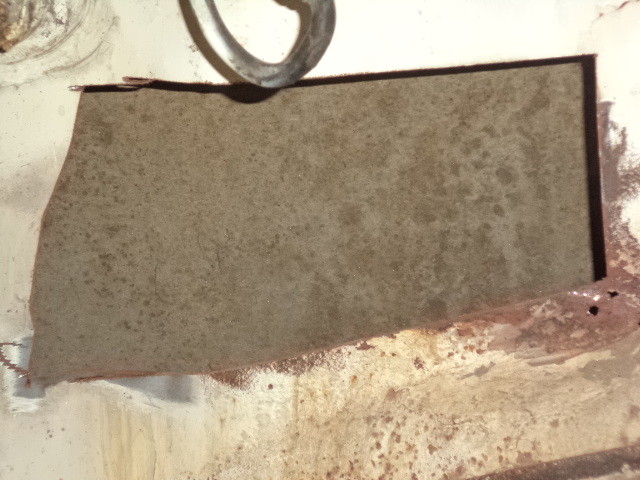
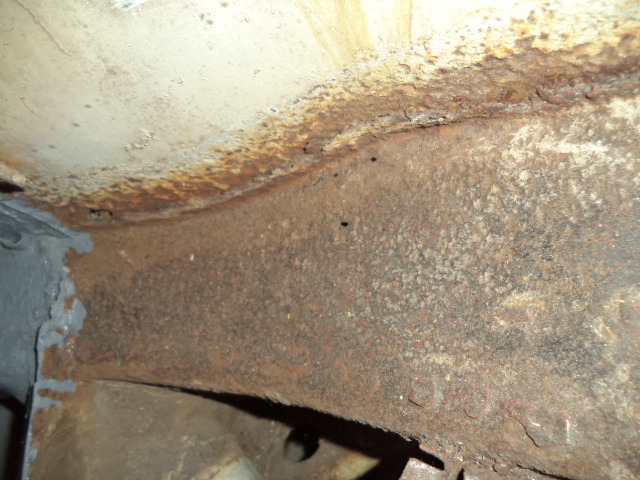
how could i best protect these pin holed longs without welding new metal in ??
i'm thinking phospho, then rise, a primer, then a skin of bondo, then rustoleum.
or maybe just rustoleum primer, skim of bondo, then a coat of rustoleum paint.
Attached thumbnail(s)
Posted by: jimkelly Oct 12 2015, 03:38 PM
my buddy - rat rod charlie - is on his way to daytona for bike week with his harley and his trailer. while he is down there, he is going to visit series9 for me and pick up a pair of late model ARIZONA doors from ablesnead whose car is at joe's shop
Attached image(s)
Posted by: 76-914 Oct 12 2015, 08:20 PM
OD of splined end of stock 914 axle is 1.066.
what i am confused about in sawtooth's machining drawing is that the end with all the measurements looks like the 914 end that should have remained untouched i thought. is the CV ID of a suby larger or smaller than the CV ID of a 914 stock cv. i assume smaller otherwise how else could a stock 914 axles be machined to accept a suby cv ????
Read right past this the first time but yes, you are correct. Plenty of meat.
Posted by: jimkelly Oct 15 2015, 02:51 PM
got me some doors coming via series9's shop.
Attached thumbnail(s)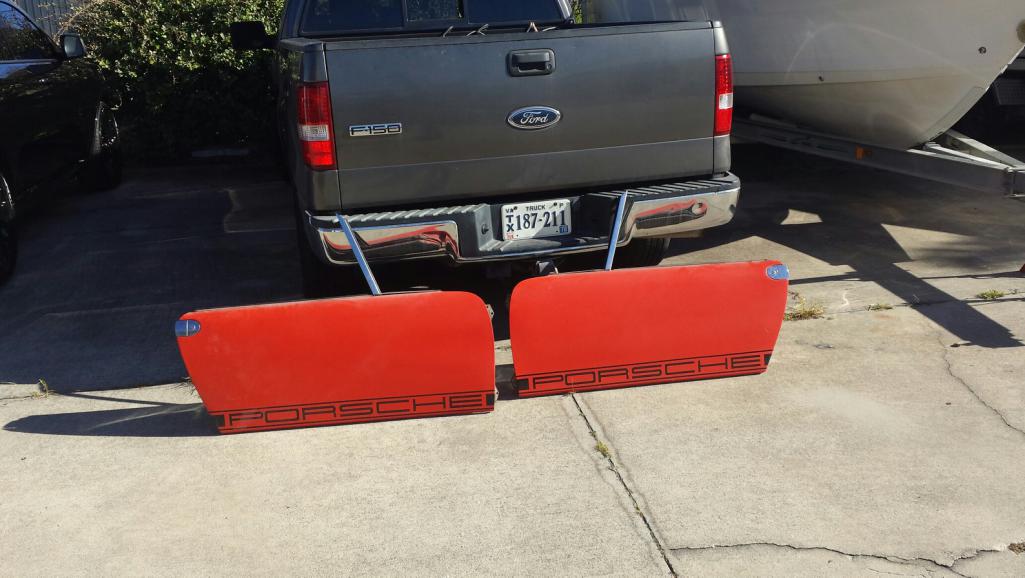
Posted by: Andyrew Oct 15 2015, 04:15 PM
how could i best protect these pin holed longs without welding new metal in ??
i'm thinking phospho, then rise, a primer, then a skin of bondo, then rustoleum.
or maybe just rustoleum primer, skim of bondo, then a coat of rustoleum paint.
What happens when you stab it with a screwdriver? If it goes through I would replace it...Mine looked like that and I patched it.. You have a fairly easy job there. Sure it'll set you back maybe 2 weeks but its the right thing to do... If you dont have a welder you can rent them fairly cheap.
Posted by: jimkelly Oct 16 2015, 12:00 PM
my head light question thread at this link... pics below.
http://www.914world.com/bbs2/index.php?showtopic=267076
Attached image(s)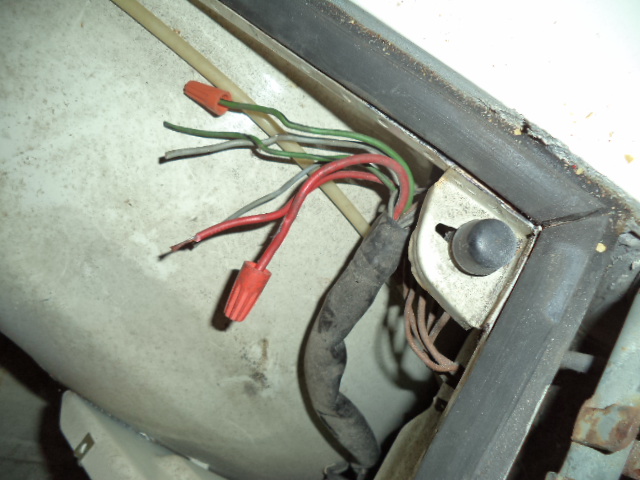


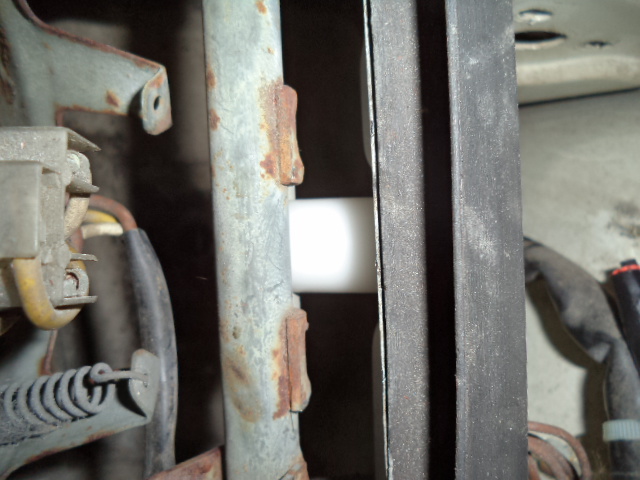
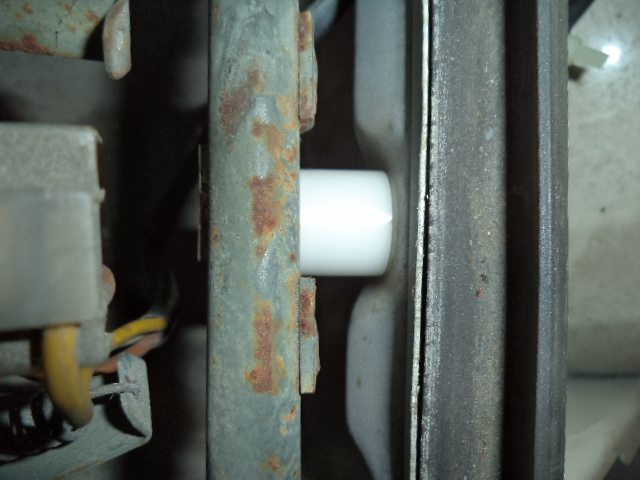
Posted by: jimkelly Oct 18 2015, 05:54 AM
decided that I will just put a delrin spacer here to keep headlights in UP position, permanently.
the idea is less demand on electrical system and less weight. and I always drive with headlights on anyway.
rcvd my ebay fuses and a knob for my V8 car.
Attached image(s)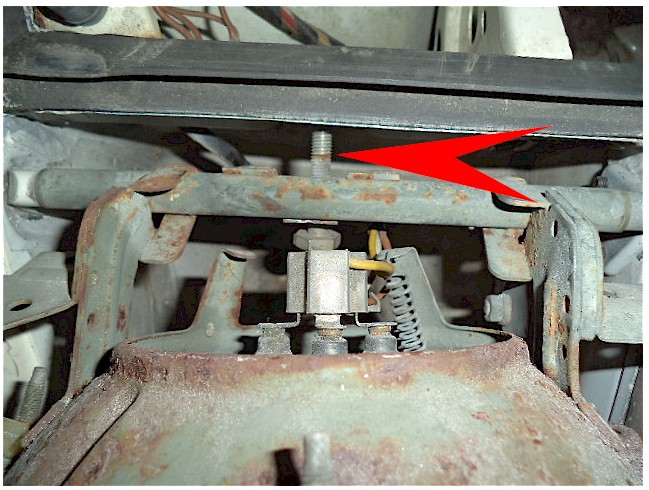
Posted by: jimkelly Oct 30 2015, 02:56 PM
new doors coming home today. guess i'll put white doors back on white car and my black car will get the NEW TO ME red doors. i know i saved some triangle door glass, hope i saved the caps that hold them in place? gonna stop by mepstein's shop to pick up a front bumper and a fuse box. slow progress is still progress ![popcorn[1].gif](style_emoticons/default/popcorn[1].gif)
Attached image(s)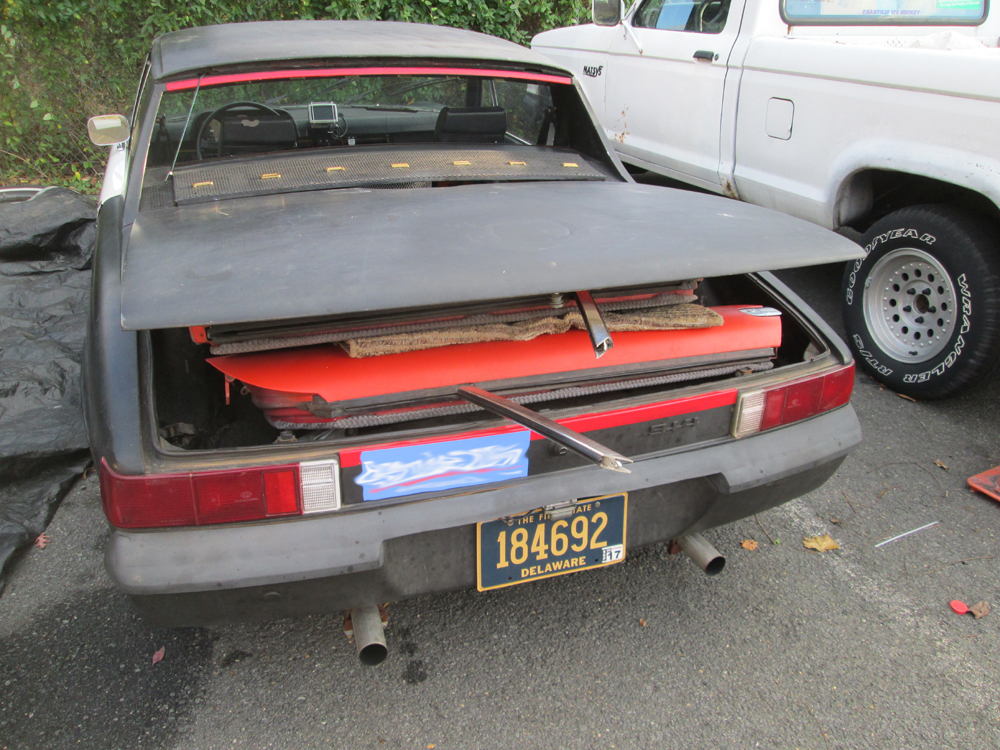
Posted by: flmont Oct 30 2015, 10:12 PM
Jim,..how do U intend to run the water lines under car or thru the longs,..?? Frank
Posted by: jimkelly Oct 30 2015, 10:36 PM
under - it is tried and true - but thru longs gives more ground clearance I suppose.
Posted by: rightpedal Oct 31 2015, 05:16 AM
Jim I laugh every time I see the "pickup" in action. I'm so getting you ratchet straps for Christmas. (to increase the load dimension capability)
Wait now i want to make the red one onto a porcamino!!!!
Sorry the deep end comes quickly for those of us in the shallow end of the gene pool.
Just wanted to say I like that you use your car.
Steve
porcamino....it has a ring to it
Posted by: jimkelly Oct 31 2015, 04:37 PM
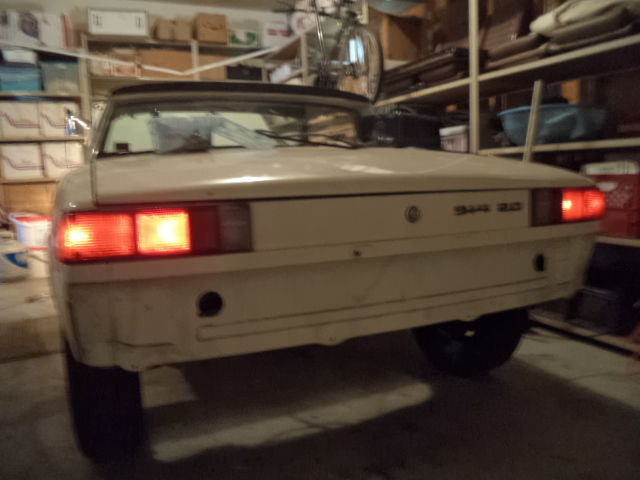
white doors are back on my 1975 and red doors are now on my 1972. having an issue with the caps for the triangle windows though.
Attached thumbnail(s)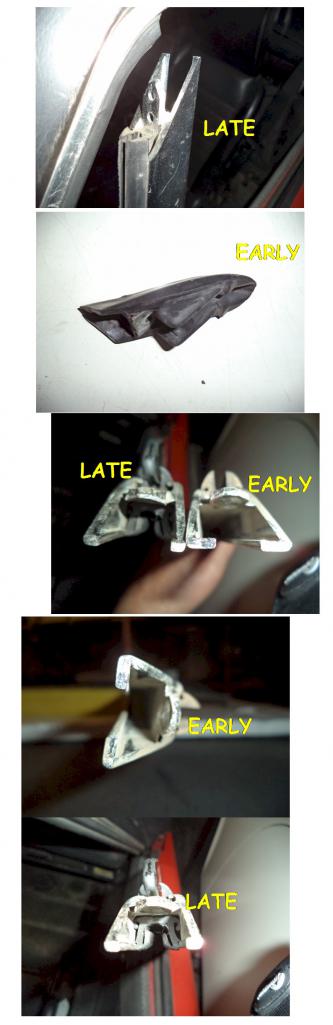
Attached image(s)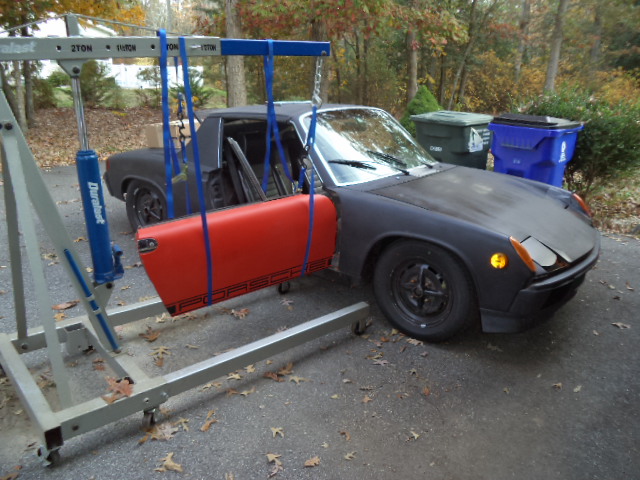

Posted by: 914forme Oct 31 2015, 05:09 PM
And to think I just man handle doors in place, put them on my legs, with my wheelie stool, and then make up new words for all the frustration I cause myself.
Posted by: jimkelly Oct 31 2015, 06:50 PM
thank god I had the hoist... no way could I have installed 4 doors without it... would have had to ask the wife for help/muscle
got the caps on, seems all years are the same.
I have some sort of radiator leak, its slow. will investigate this further.
bushings to keep headlights permanently up are in.
Attached image(s)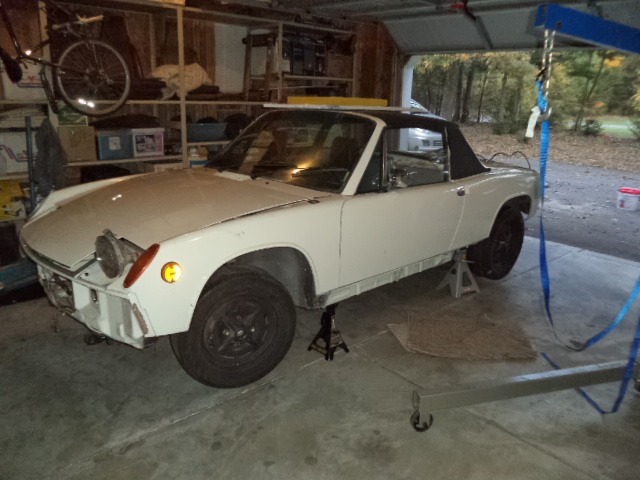
Posted by: jimkelly Nov 1 2015, 08:03 AM
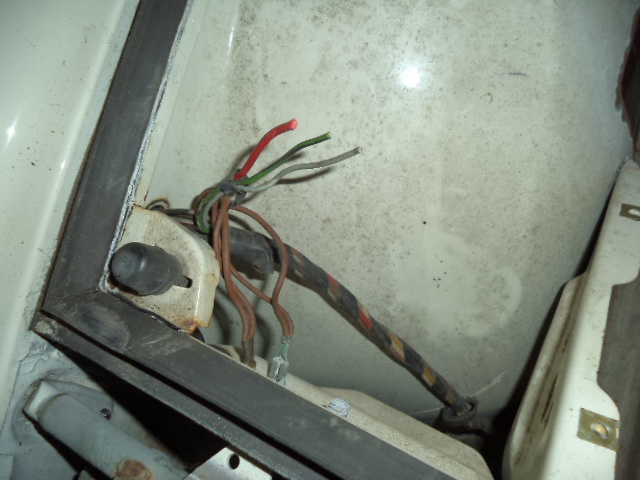
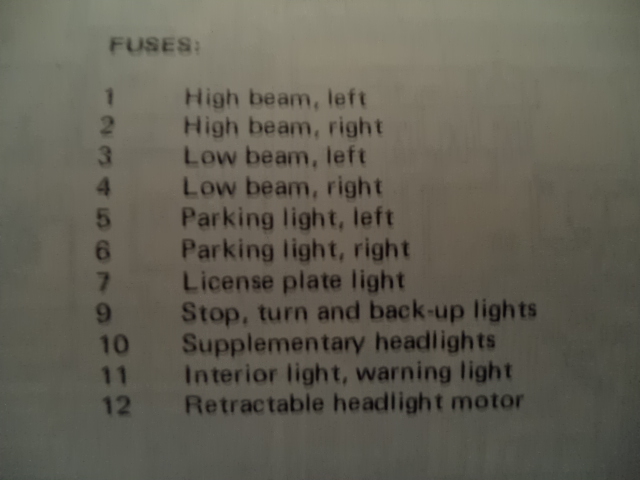
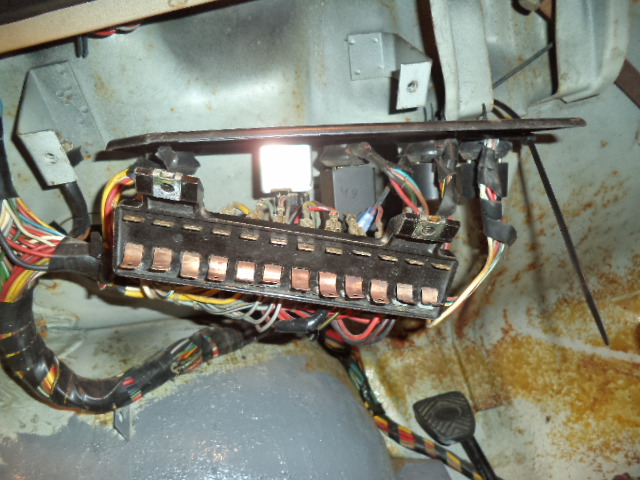
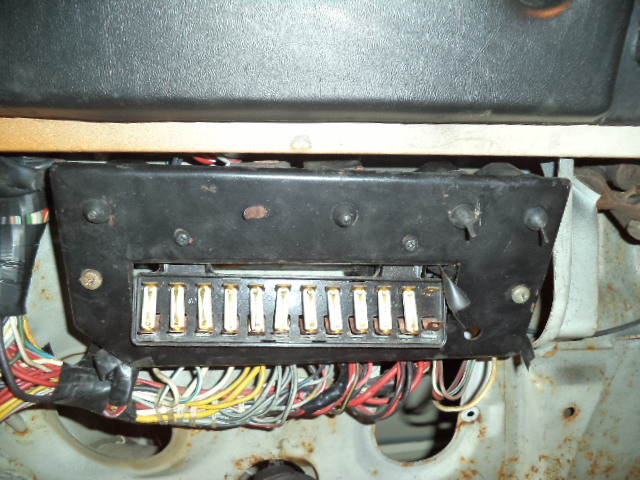
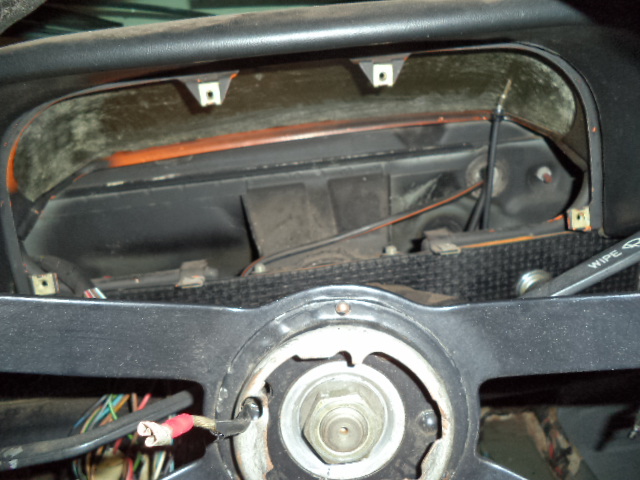
yesterday I picked up a fuse box section and a front bumper from mark Epstein (thanks mark!). my center fuse box section had a broken ear, so I replaced it today (one wire at a time). I put white fuses in all for now, but will replace with higher amp fuses as required asap. so far I can see I have, headlights low and high beams, marker lights, brake lights, wipers. I think I have a faulty horn relay?
I do not have my dash gauges in and am wondering if this could be stopping my directionals and hazards from functioning?
Attached image(s)
Posted by: mepstein Nov 1 2015, 09:07 AM
Save your old fuse panel in case you or someone else needs to harvest more metal clips in the future.
I do admire the way you make progress on your car.
Another edit - looking at your list, I have a couple more parts. I think the battery that came in the California car is almost new. Your welcome to it. I'm going to try one of the new super small, super light lithium batteries.
Posted by: jimkelly Nov 1 2015, 09:23 AM
mark - that is awesome - I am so glad I got a kid that goes to school up in your area which requires me to pass by your shop every few weeks
I think I am short a few door hinge screws and a horn, gonna add these to my list.
Posted by: mepstein Nov 1 2015, 09:33 AM
mark - that is awesome - I am so glad I got a kid that goes to school up in your area which requires me to pass by your shop every few weeks
I think I am short a few door hinge screws and a horn, gonna add these to my list.
I'm sure I have those from a car I cut up.
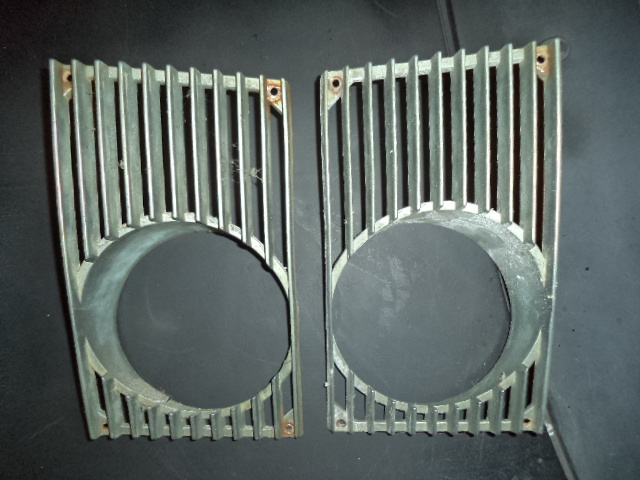
Posted by: jimkelly Nov 1 2015, 10:26 AM
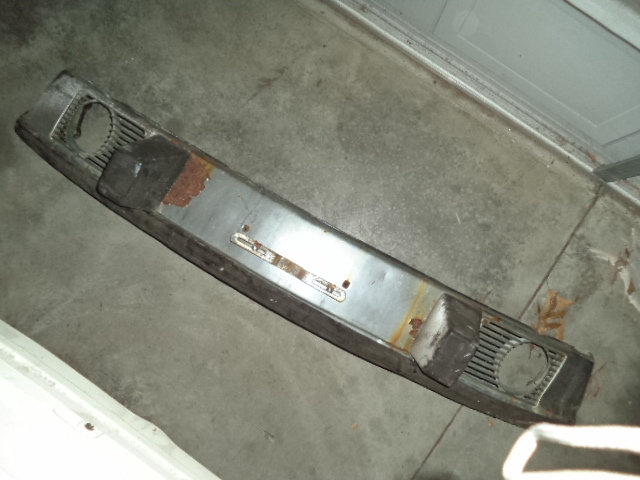
just stripped down the bumper. i'll be returning these fog light grills to mark as one is perfect and the other has only one crack.
Attached image(s)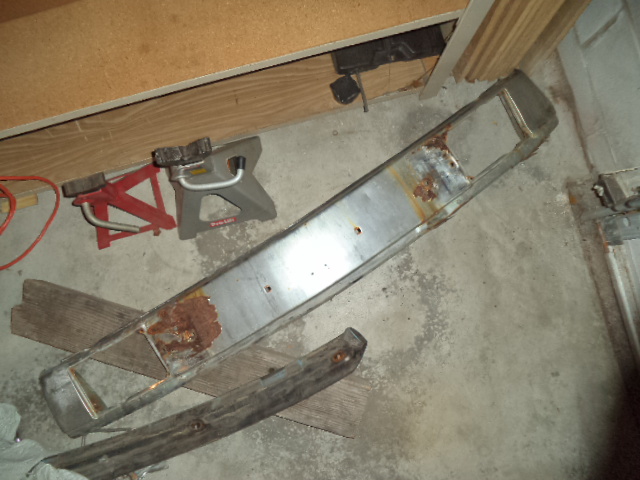
Posted by: jimkelly Nov 7 2015, 08:27 AM
well, I still don't understand how you guys access the outer headlight cover screw? remove front marker lens?
well, my new spacers work ok
but I do need some clip nuts 
gonna slap the guage cluster in today.
Attached image(s)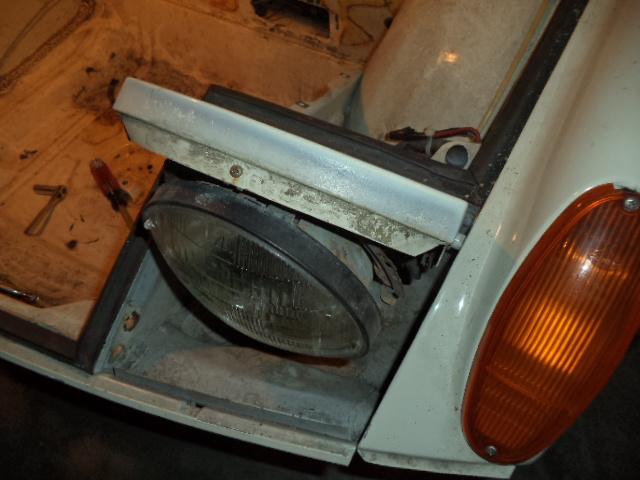
Posted by: mepstein Nov 7 2015, 08:49 AM
Pm me your address and I'll send down some clips
Posted by: jimkelly Nov 7 2015, 08:58 AM
mark, how about I visit next week, I need to bring you the remaining fuse box parts and the fog light grills, anyway.
things you may have for me...
targa vertical trim
battery
clip nuts
to all, while you may think you will be able to remember what screws go where, you won't, label every single screw/nut/bolt/washer 
Posted by: mepstein Nov 7 2015, 09:09 AM
mark, how about I visit next week, I need to bring you the remaining fuse box parts and the fog light grills, anyway.
things you may have for me...
targa vertical trim
battery
clip nuts
to all, while you may think you will be able to remember what screws go where, you won't, label every single screw/nut/bolt/washer
Sure. I'll get the stuff together.
Posted by: Andyrew Nov 7 2015, 11:18 AM
well, I still don't understand how you guys access the outer headlight cover screw? remove front marker lens?
Yup, remove the whole turn signal bucket. and you'll see the bracket backing being held by 3 screws IIRC.
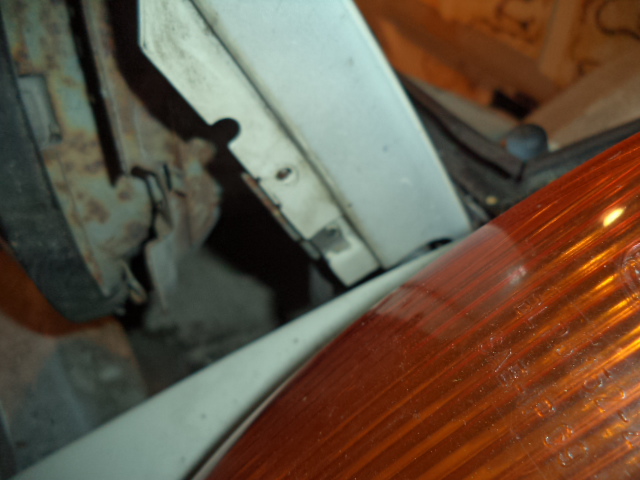
Posted by: jimkelly Nov 7 2015, 11:46 AM
guess if I just remove lens, maybe I would have a lesser angle on screw driver to install this last screw?
Attached image(s)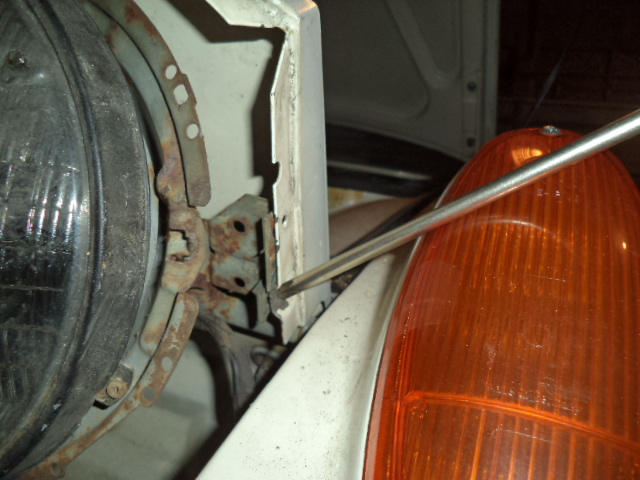
Posted by: 914forme Nov 7 2015, 02:03 PM
Small bit and bit holder does the trick also, remove the turns signals 
Or take a bit and put it the proper size socket, and put it in 
I'm a tool whore so I am sure I can find about 10 different ways to do this with out taking out the turn signal buckets.
Hold the bit in a pair of vice grips
Hold the bit in your fingers
Hold the bit it a socket
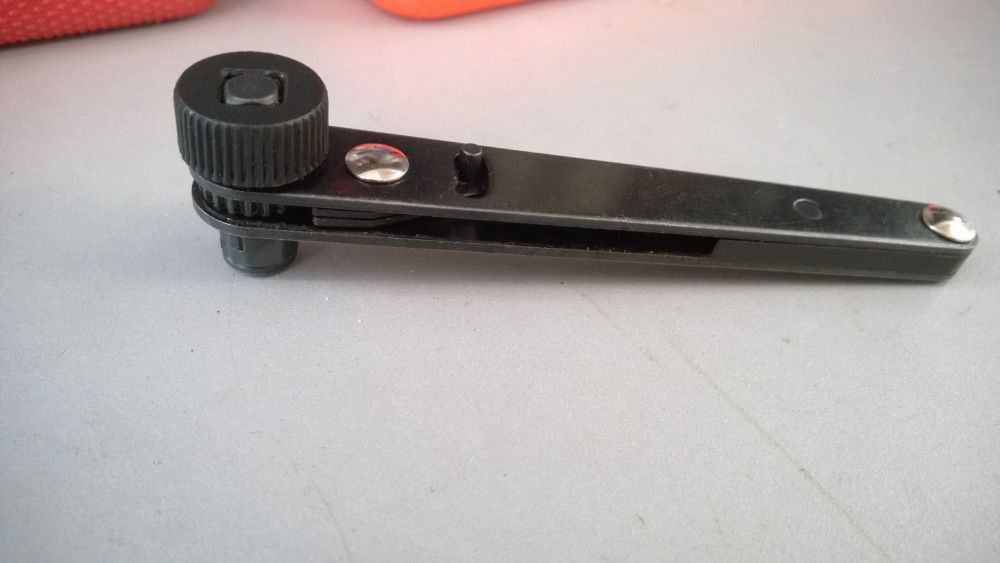
Hold the bit in the tool shown above
Bit in the flex thing
Right angle screw driver
Goto autozone, have them replace your light bulb. Have your wife do this it works out better. Have her tell them she took the cover off thinking thats how the bulb got changed.
Drive it up to Mark's shop and ask to borrow the proper tool, and do it there.
Go to any tool store buy the proper tool, and promptly bring it back.
Get a 12" long 1/4" bit, drill a hole from the outside fender through everything that gets in your way to the screw. start the screw take a 12 inch long #2 philips screw driver and screw it in. Problem solved.
Sorry not trying to be an arse about it, just can't believe taking the turn signal bucket out is the favored way.
Carry on 
Posted by: jimkelly Nov 7 2015, 02:19 PM
(( driver bit in fingers seems like a decent solution to me - thanks ))
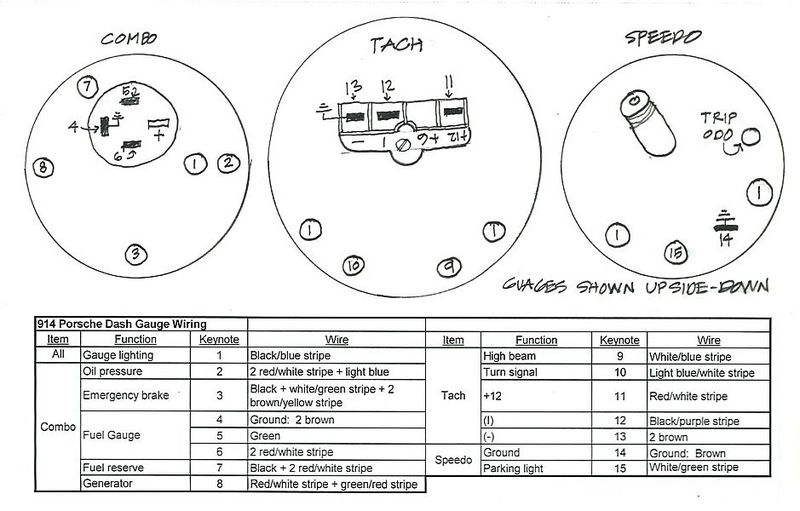
so, got gauges mostly installed but have a few EXTRA wires
red/white with 2 small connectors on it
blk/yel - with 1 small connector on it
blue/green - with 1 small connector on it
and it seems I do not have enough metal light fixtures? calling mark
my recommendation is everyone should have a parts car rusting away in their back yard 
Attached thumbnail(s)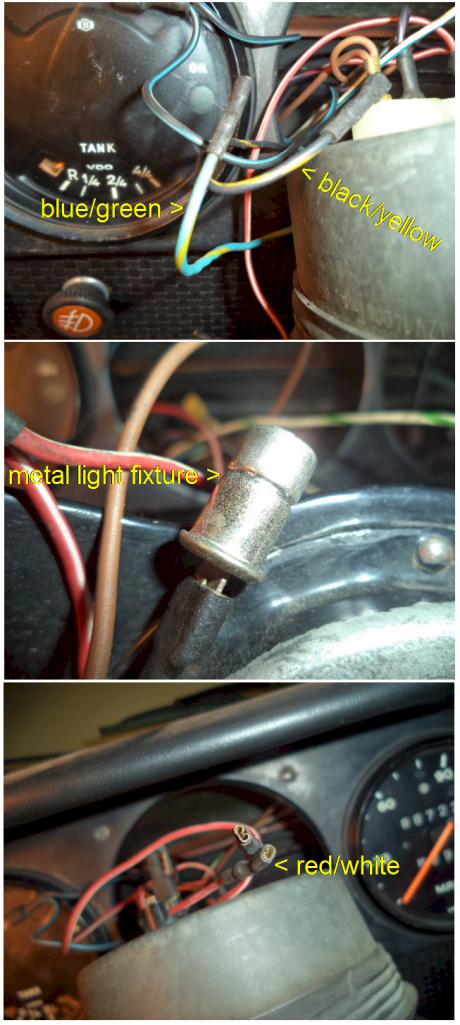
Posted by: jimkelly Nov 9 2015, 04:37 PM
since i have been getting my lights and guages reinstalled USING A BATTERY CHARGER to test, my buddy said that possibly my battery charger does not have enough power to make my flasher relay operate properly. so maybe i am premature thinking it is bad because it buzzes. i also have no dash lights, need to look into this further but i know i am missing a few bulb fixtures.
Attached image(s)
Posted by: jimkelly Nov 11 2015, 10:22 AM
it turns out that my car has dash wiring for EGR and CAT.
thanks dave, jeff and ed.
http://www.914world.com/bbs2/index.php?showtopic=269036
Posted by: jimkelly Nov 14 2015, 09:45 AM
tested my buddy's theory that my battery charger was not supplying enough power for my hazards/directional flasher to function properly. so I used jumper cables from my other car to my 1975, and sure enough, my hazards and blinkers work fine.
my lack of dash lights is probably a case of bad and missing bulbs. maybe some grounds missing too?
ok... I definitely have a short in the circuit protected by fuse #7, blowing fuses
Attached image(s)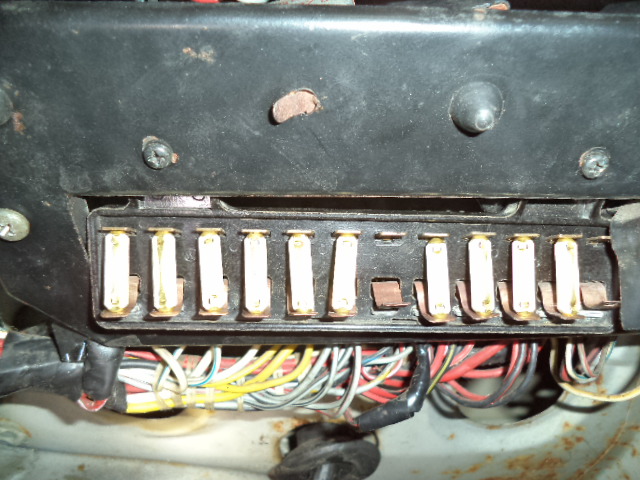
Posted by: jimkelly Nov 15 2015, 05:39 PM
did a loose bolt/wire check and found 3 nuts at bottom of my trans loose on my other car, oops, wrong thread, my bad.
Attached image(s)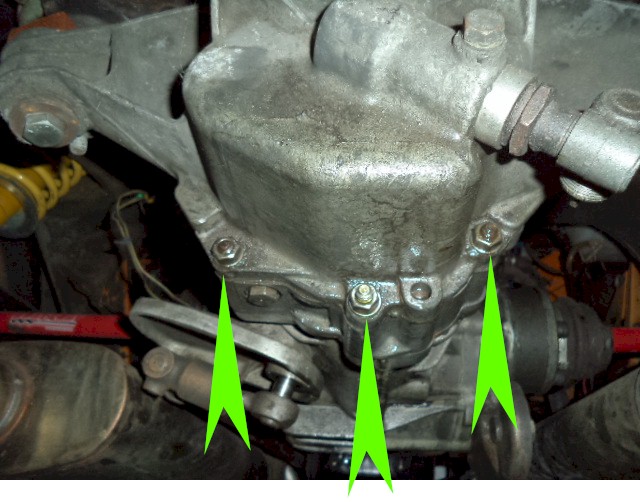
Posted by: jimkelly Nov 25 2015, 09:41 PM
got me some stuff from 914rubber
Attached image(s)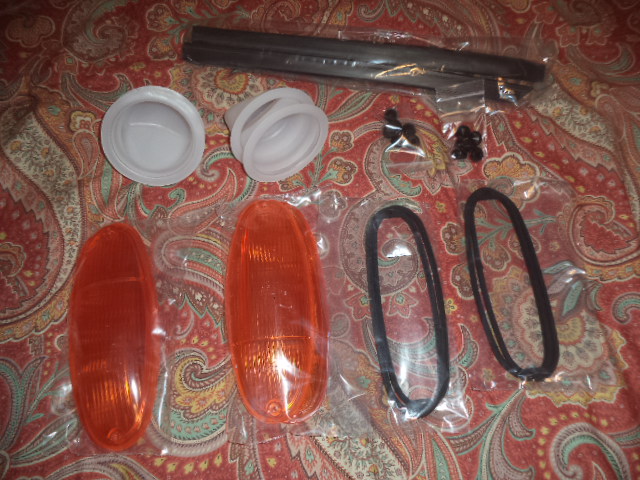
Posted by: jimkelly Nov 29 2015, 12:27 PM
did a little something on my 75 today. got some speed nuts from home depot and put my headlight covers on. also moved my crappy turn light lenses from my 72 over to my 75 as well.
Attached image(s)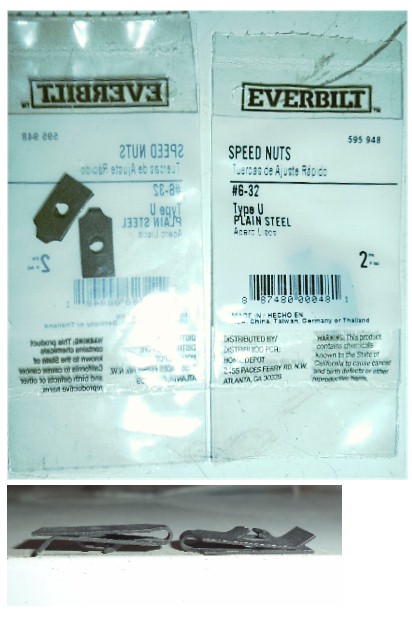
Posted by: jimkelly Mar 31 2016, 02:18 PM
think i found my parts car, a lowly ej22 in need of love going to pick it up at 8pm. at worst it will get me a trans and a bunch of spare parts. engine needs something, not sure what yet. i've decided i wanted a non interference engine, thus 1990 to 1996.
http://www.scoobyenthusiast.com/subaru-faq/which-subaru-engines-are-interference-what-subaru-engines-are-non-interference/
Attached image(s)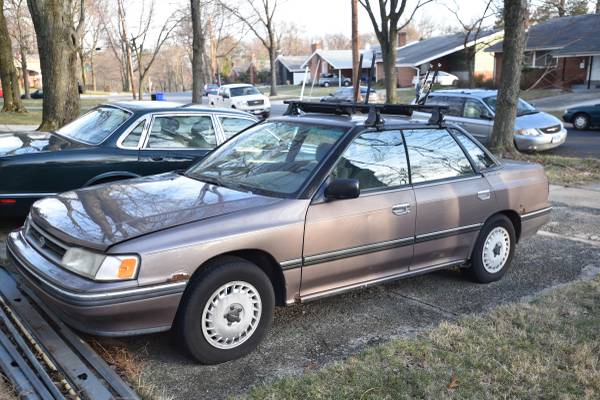
Posted by: matthepcat Mar 31 2016, 02:47 PM
^^That motor has a factory forged crank ^^
You can swap out the pistons for EJ22t versions or run run an EJ22d head to lower compression and then run a turbo.
Just for future reference:
http://www.ultimatesubaru.org/forum/topic/140914-im-wanting-to-turbo-my-ej22/
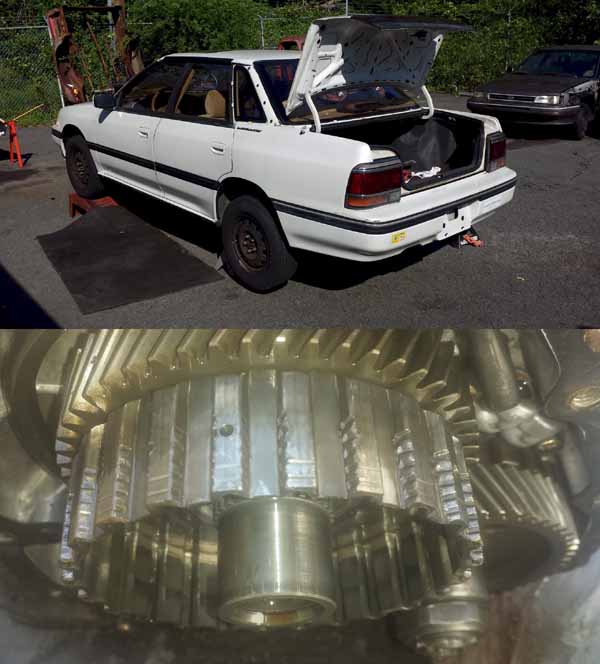
Posted by: jimkelly Mar 31 2016, 08:26 PM
one step closer... with a 1990 subaru legacy awd...
BUT NOT TO TURBO
time to watch some subaru engine removal videos on youtube
Attached thumbnail(s)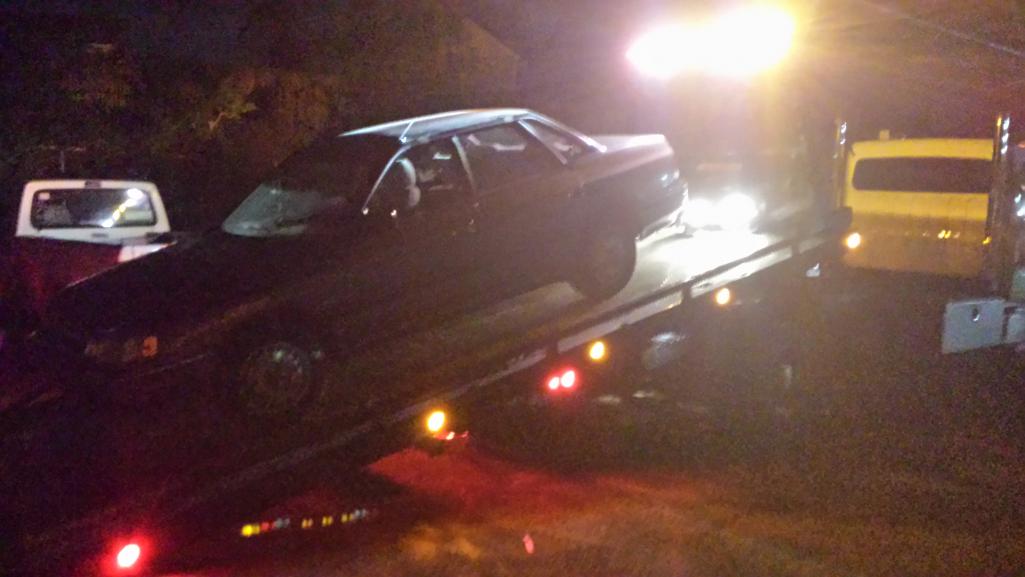
Posted by: 76-914 Apr 1 2016, 08:41 AM
one step closer...
BUT NOT TO TURBO
time to watch some subaru engine removal videos on youtube
 You've got to be excited.
Posted by: jimkelly Apr 1 2016, 01:10 PM
i'm concerned. i knew the engine has some issue.. but in neutral, hand brake off, i can VERY BARELY push it by myself? is awd hard to push?
i'd like to get this engine and trans running and into my car but worse case scenario, i got a bunch of spare parts. and i get to get familiar with the subaru ej22 bits and all.
Posted by: zipedadoo Apr 1 2016, 01:54 PM
What year is the subaru? I used a 1996 ej22. I found out that that was the first year for OBD2 support. The 96 has a few issues that the latter years don't. For example...
The wire harness is different than a pre 96 and a post 96.
The Speed sensor is in the speedometer head . Not on the transmission.
Speedometer is cable driven.
Not really a big deal and we are happy with our conversion. My son has been driving every day to high school for about a year now and so far no problems.
We even put the radiator in the engine bay and the air scoop is still intact, runs about 190 all the time.
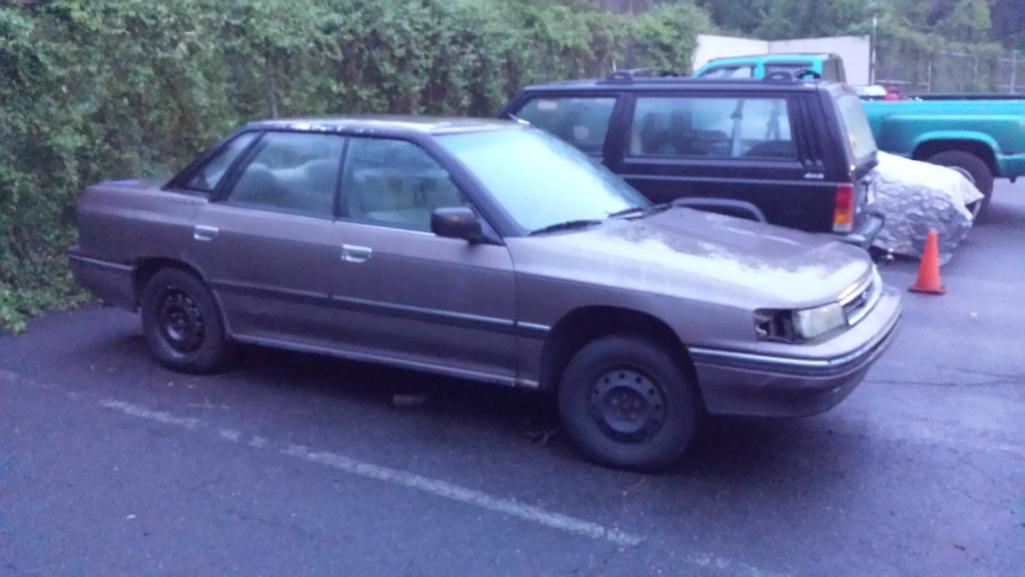
Posted by: jimkelly Apr 1 2016, 02:29 PM
1990 subaru legacy awd.. must have been sitting for a while and battery is dead.. trying to charge it now.. basically i locked myself into an ej22.. had to do it because eg33 kept calling my name but i want an, as empty as possible, engine bay
thanks for that info about 1996, as i have been looking at one of those too. so basically i am mostly interested in 1990 to 1995 it seems.
we just pushed it into a parking space and the whole time i can hear a brake dragging.
put some gas in the car, hooked jumper cables to my other 914, and it started right up, but, it shook like crazy, when i applied gas it either stalled out or smoothed out some. got to check for codes.
Attached thumbnail(s)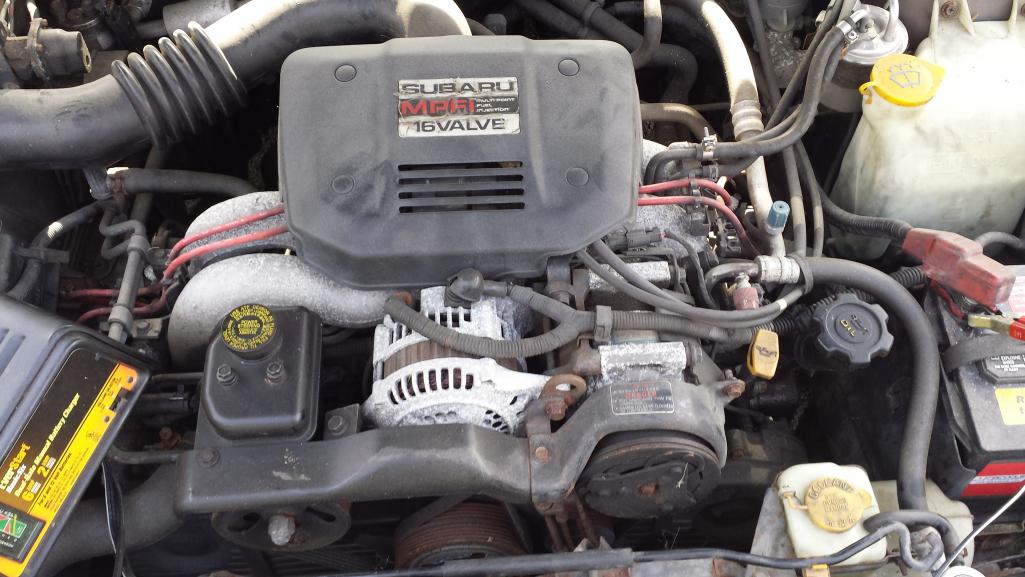
Posted by: Justinp71 Apr 1 2016, 05:37 PM
why I MUST HAVE a Subaru engine and trans
That red one looks familiar...but then again there are a lot of red ones...
https://www.youtube.com/watch?v=s6JxpYwqUMs
Ross is using the setup you describe Jim (rnellums), or something similar. He is 5 lug I think.
Sorry I know this is a couple pages back, but wow go Subaru 914. I like how the mustang took a super long time to do a burnout then the 914 smokes him. Was this a flat six subaru motor?
I remember racing these fox body mustangs in my chevelle days, they were fast!
Posted by: Chris H. Apr 1 2016, 10:21 PM
No the car in that clip is a 4 cylinder turbo car. Not mine. There's a GTO video with similar results.
Jim, what did the PO say was wrong with the car? Anything specific?
Posted by: jimkelly Apr 2 2016, 05:57 AM
all he said was that he stopped running it cause he thought it was about to seize. he also said there was a problem with a cylinder. I do not think he knew, all I know is battery is dead and gas was empty but with a jump and some gas it idles very rough. we will check codes on mon/tues.
oil on stick and coolant in radiator looked ok from quick check.
http://legacycentral.org/library/literature/codes.htm
Posted by: jimkelly Apr 6 2016, 06:45 AM
ok, engine runs but weak. seems spark is ok but no compression on #3 cylinder. so now we will pull engine trans and all else. i am about to go and pick up another ej22 1990. we'll pull all heads and decide which parts to use.
what is a good lubricant to spray on engine bay harness plugs to loosen the up, they are all a bitch to get disconnected.
Posted by: jimkelly Apr 6 2016, 06:02 PM
got me second ej22 today $100.
Attached image(s)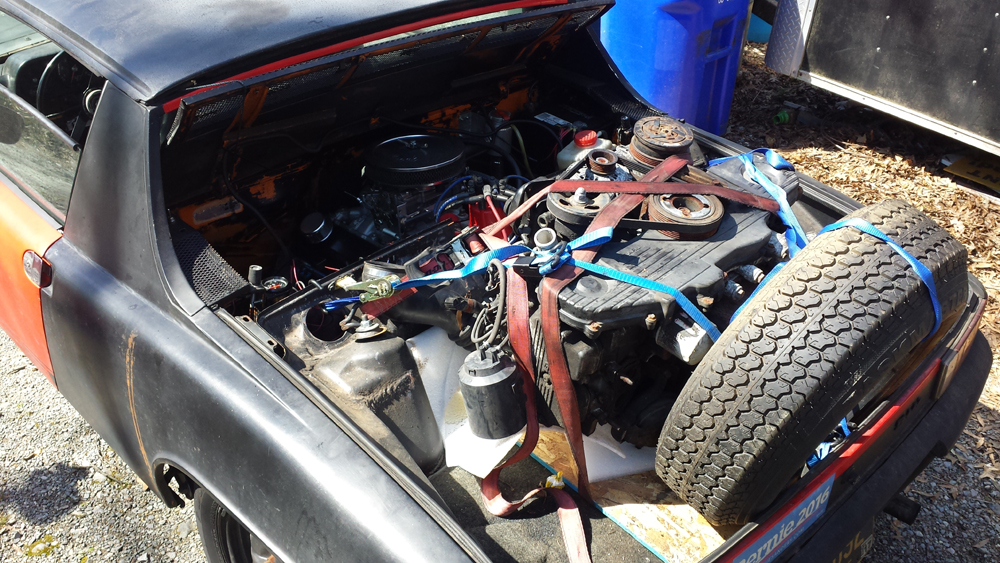
Posted by: jimkelly Apr 12 2016, 03:06 PM
my 1990 subaru legacy 5spd awd, pulling harness, then power plant.
this video is my guide...
https://www.youtube.com/watch?v=GjsTug7X0Bg
Attached thumbnail(s)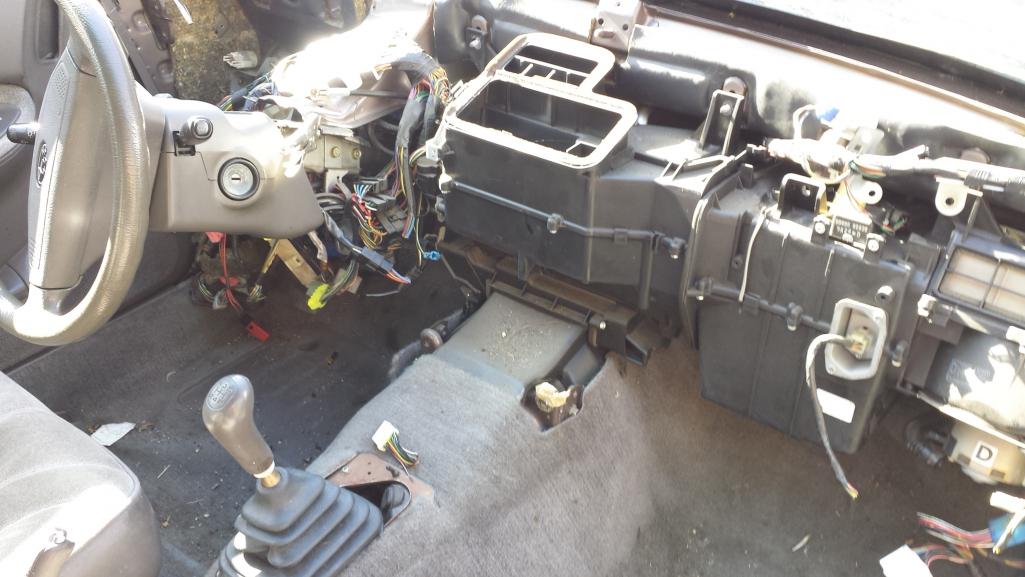
Posted by: Andyrew Apr 12 2016, 03:34 PM
got me second ej22 today $100.
You and your truck amaze me!
Posted by: jimkelly Apr 12 2016, 04:11 PM
thank you andy
at a gas station on the way back from picking up engine, a guy asked me what kind of engine is that, i asked, the one in the trunk or the one in the car  and another guy told me about ferdinand porsche having a flat 8 cylinder car.
harness and ecu OUT
with only two small cuts to body, one one to finger and one to wrist 
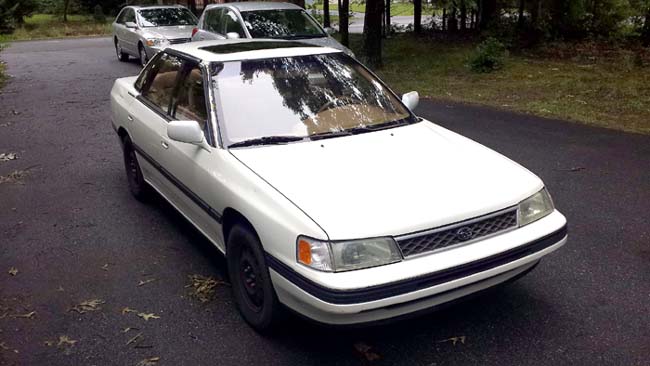
and my hopefully to be driver 1990 subaru legacy auto awd white
wire harness question thread..
http://www.914world.com/bbs2/index.php?showtopic=282396
thinking about driving the white one for a while but it has TRANS BINDING which means it probably needs a new DUTY C SOLENOID, thus i am pulling the exhaust and drive shaft, so i can pull rear housing off auto awd trans, so i can get to solenoid a clutch pack. see thread about this...
http://forums.nasioc.com/forums/showthread.php?t=2501432&highlight=binding
Attached thumbnail(s)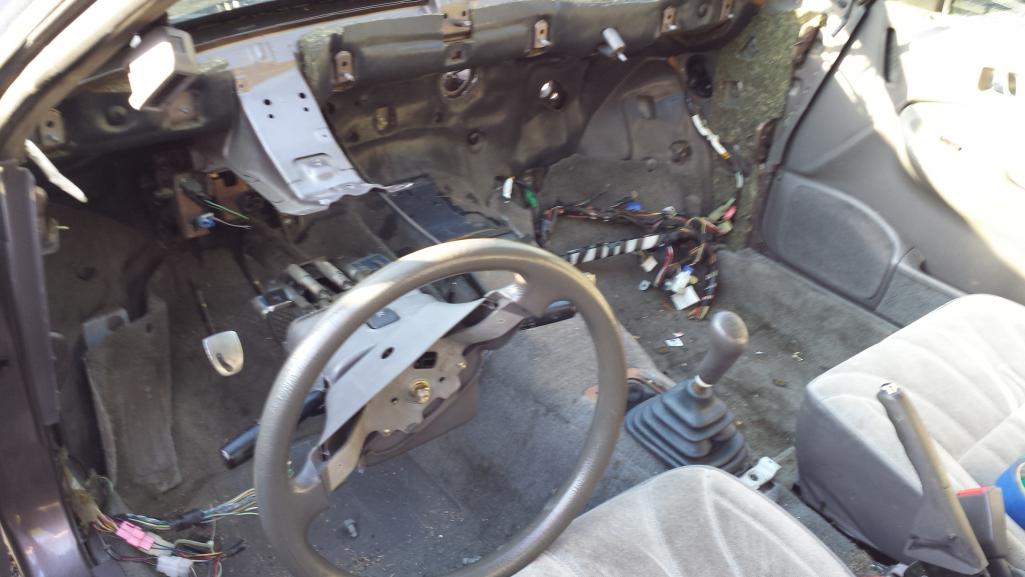

Attached image(s)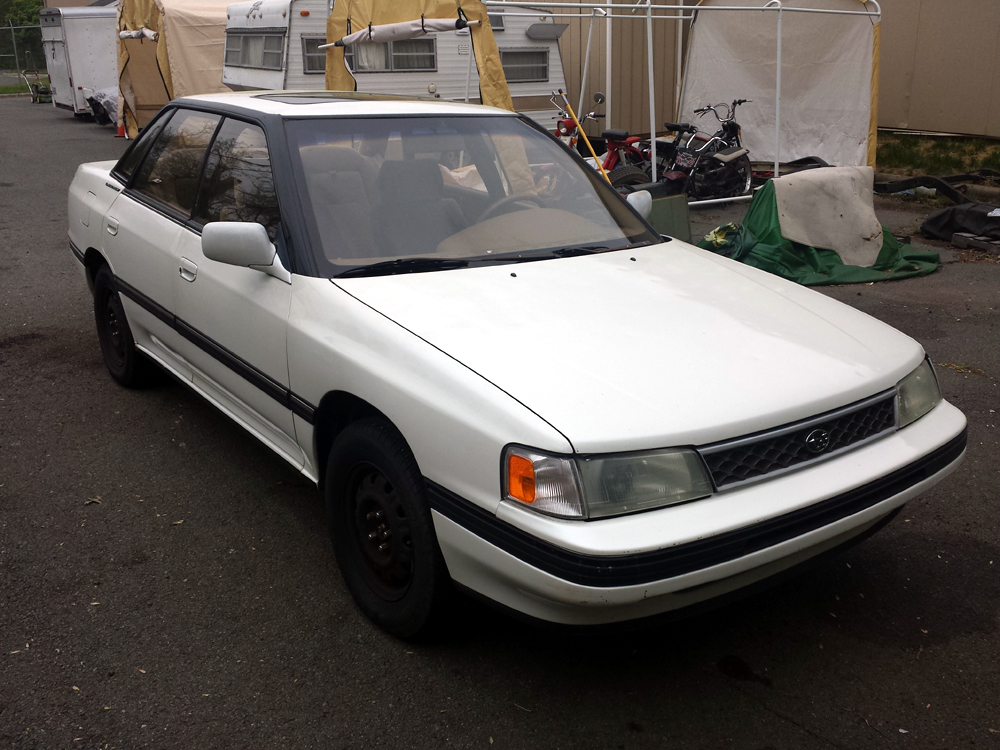
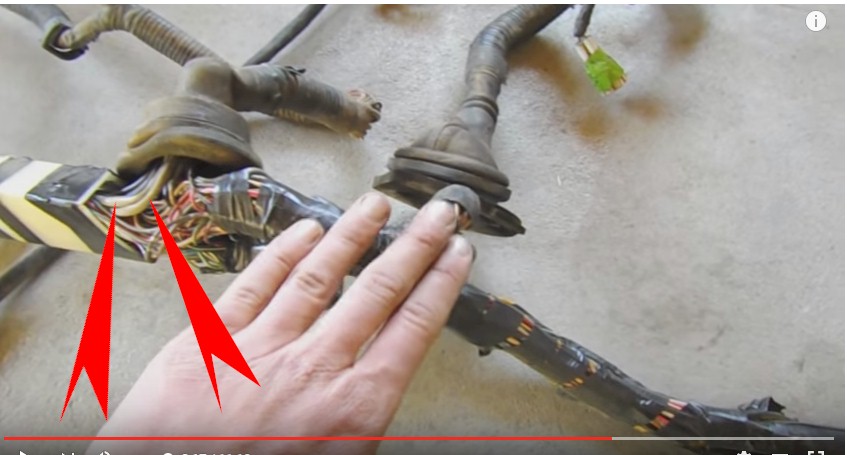
Posted by: jimkelly May 29 2016, 10:27 AM
great thread on repairing shielded suby wires.
http://bbs.legacycentral.org/viewtopic.php?f=25&t=40398&start=425
and another
http://personal.press.psu.edu/res122/cars/03Outback/WireRepair/
and another
http://forums.nasioc.com/forums/showthread.php?t=2474560
pins thread
http://www.shoptalkforums.com/viewtopic.php?t=136053&start=60
http://www.corsa-technic.com/search.php (SEACRH MT OR HW)
http://forums.nasioc.com/forums/showthread.php?t=2474560
and
http://www.easternbeaver.com/Main/Elec__Products/Connectors/Sealed/SMHW/smhw.html
flatback bug
http://www.thesamba.com/vw/forum/viewtopic.php?p=6147650
numbchux
http://www.numbchuxconversions.com/home.htm
Attached thumbnail(s)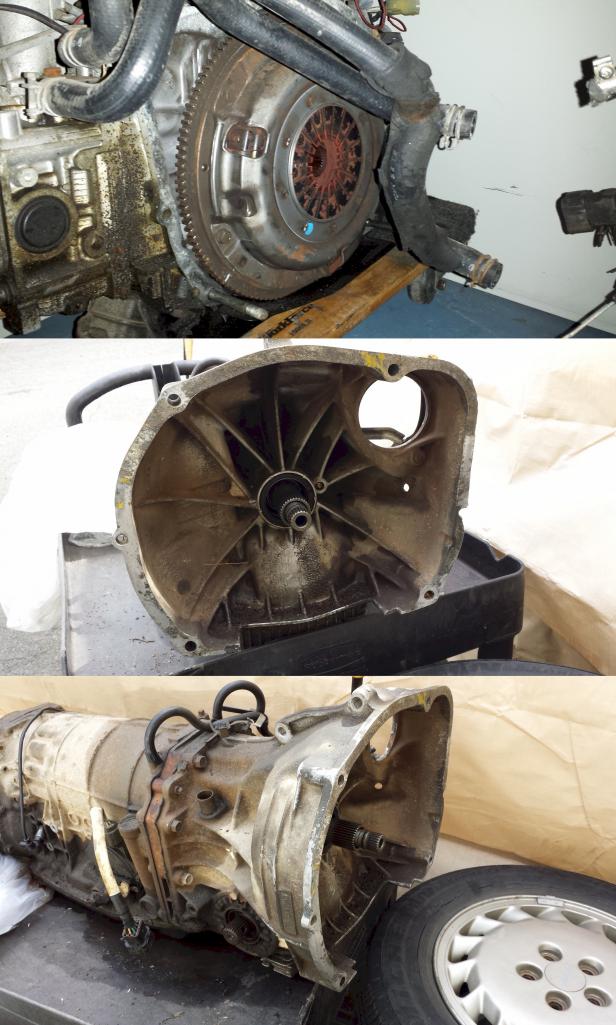
Attached image(s)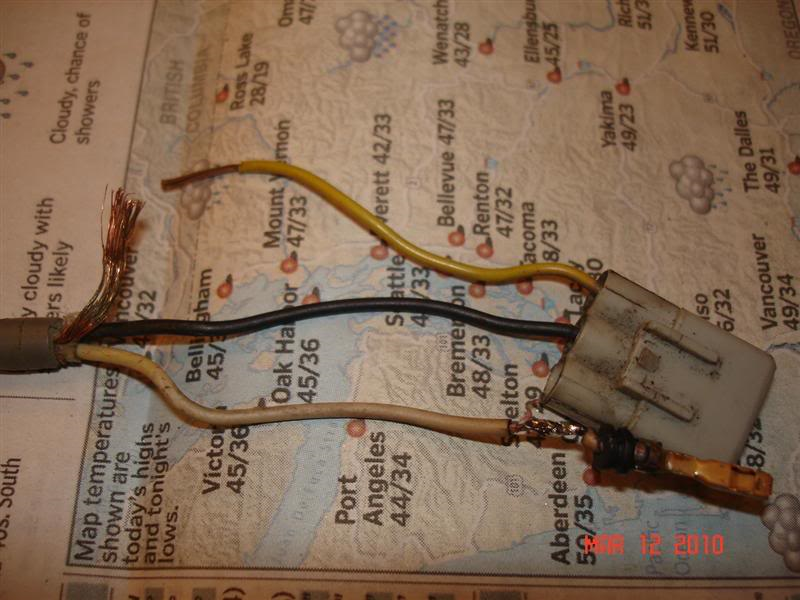

Posted by: jimkelly Jun 10 2016, 06:07 PM
pulled engine and trans last night. made a cradle for running engine out of car today. this engine has one cylinder with very low compression but will be fine for testing STOCK ecu and wiring for FI. i removed hoist and am keeping trans and wood blocks in place with a ratchet strap, for now. 2.5 hrs of fabricating/welding and $10 harbour freight furniture dolly.
Attached thumbnail(s)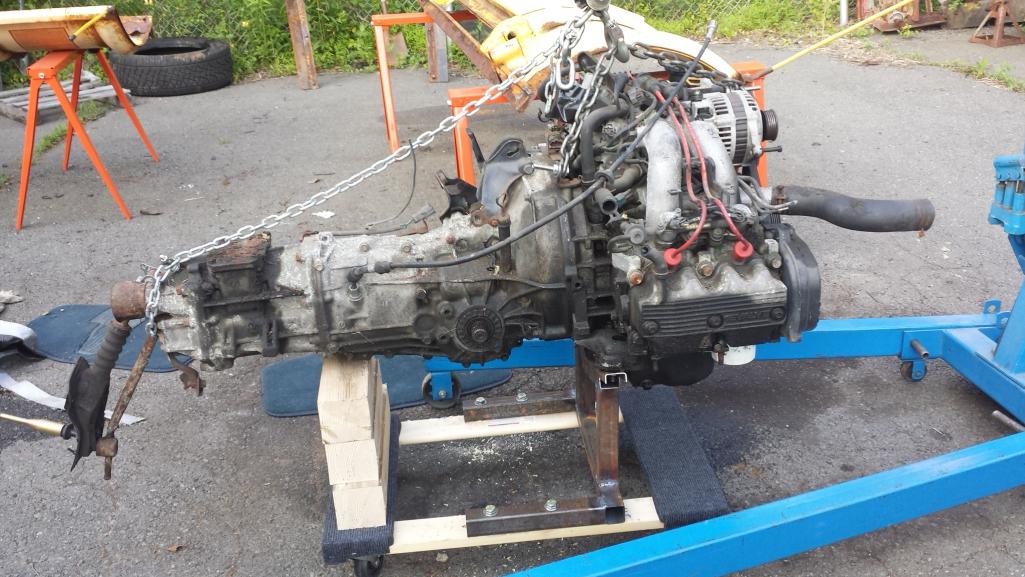
Posted by: 76-914 Jun 10 2016, 06:24 PM
The Fun begins Jim. You may need a few aspirin after you cut down that harness.
Posted by: arkitect Jun 10 2016, 10:37 PM
got me second ej22 today $100.
Cool use of your teener to pick up the subaru engine.......
Dave
Posted by: jimkelly Jun 11 2016, 03:16 PM
thanks
got me second ej22 today $100.
Cool use of your teener to pick up the subaru engine.......
Dave
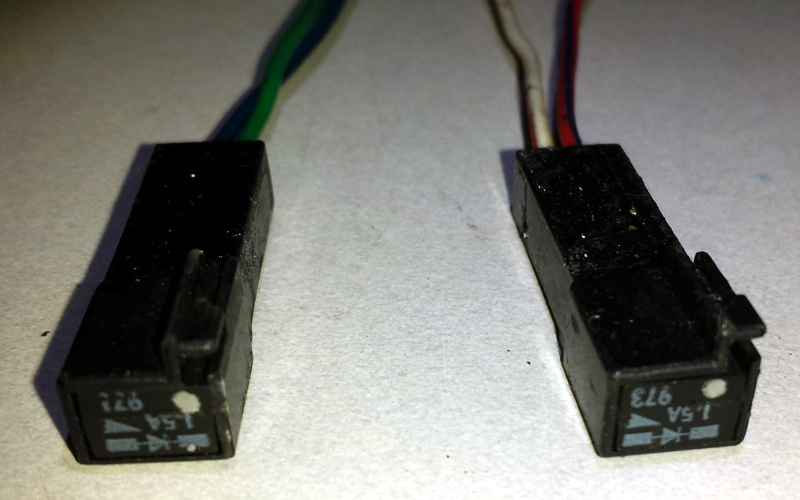
Posted by: jimkelly Jun 11 2016, 03:19 PM
I have several wires to fix on my harness. somehow I cut several grey sheathed wires. I also need to verify what the diode looks like and find out if it is on my harness. just ordered some suby pins male/female from http://www.corsa-technic.com/category.php?category_id=105
need to weld up a metal trans cradle for my stand and a way to mount radiator. then set up something to hold battery and fuel pump and a small gas tank.
jim
The Fun begins Jim.
You may need a few aspirin after you cut down that harness. Posted by: mepstein Jun 11 2016, 03:43 PM
I have several wires to fix on my harness. somehow I cut several grey sheathed wires. I also need to verify what the diode looks like and find out if it is on my harness. just ordered some suby pins male/female from http://www.corsa-technic.com/category.php?category_id=105
need to weld up a metal trans cradle for my stand and a way to mount radiator. then set up something to hold battery and fuel pump and a small gas tank.
jim
The Fun begins Jim.
You may need a few aspirin after you cut down that harness. Jim - you're way more ambitious than me. I sent my harness out for mods. I hope to see it back in a couple weeks - a couple pounds lighter.
Posted by: jimkelly Jun 11 2016, 04:35 PM
ambitious, no.  poking myself
frugal and on a tight budget, yes. 
Posted by: 76-914 Jun 12 2016, 03:24 PM
ambitious, no.
poking myself frugal and on a tight budget, yes.
Don't shy away from saving $$$ Jim. $750 is nothing to sneeze at. You can also build your own cradle and save enough to buy a nice used Miller Mig w/ tank, a pipe bender and a tube notcher. Weld up your own shift mechanism and save ~$200.
Posted by: mepstein Jun 12 2016, 05:46 PM
ambitious, no.
poking myself frugal and on a tight budget, yes.
Don't shy away from saving $$$ Jim. $750 is nothing to sneeze at. You can also build your own cradle and save enough to buy a nice used Miller Mig w/ tank, a pipe bender and a tube notcher. Weld up your own shift mechanism and save ~$200.
My guy is charging me $550 but for me, it's money well spent. A major electrical event in my house was changing out the bathroom fan for an identical unit.
Posted by: rightpedal Jun 12 2016, 07:00 PM
I might be able to help with the cradle. Want to shoot for next weekend on the v8 car?
Posted by: jimkelly Jun 12 2016, 07:21 PM
I already have the suby cradle and trans hangers from coldwater and it is very nicely designed and made. glad to have it.
sunday for v8 car sounds good, got to check with wife but it think sunday is clear, I will place my summit order for gaskets/etc tomorrow.
thanks
jim
ps: i've been posting some misc suby pics here so i can share them with suby guys on other threads asking for help with my auto trans binding issue.
I might be able to help with the cradle. Want to shoot for next weekend on the v8 car?
Attached thumbnail(s)
Posted by: jimkelly Jun 27 2016, 05:58 AM
i bit off topic but i am making my recently bought 1990 legacy with ej22 my daily driver for a while. it needs structs and springs. i want to lower it. i the meanwhile i have an ej22 on a stand and am getting ready to get it running our of car.
this is how: http://bbs.legacycentral.org/viewtopic.php?f=6&t=51784
Attached thumbnail(s)
Attached image(s)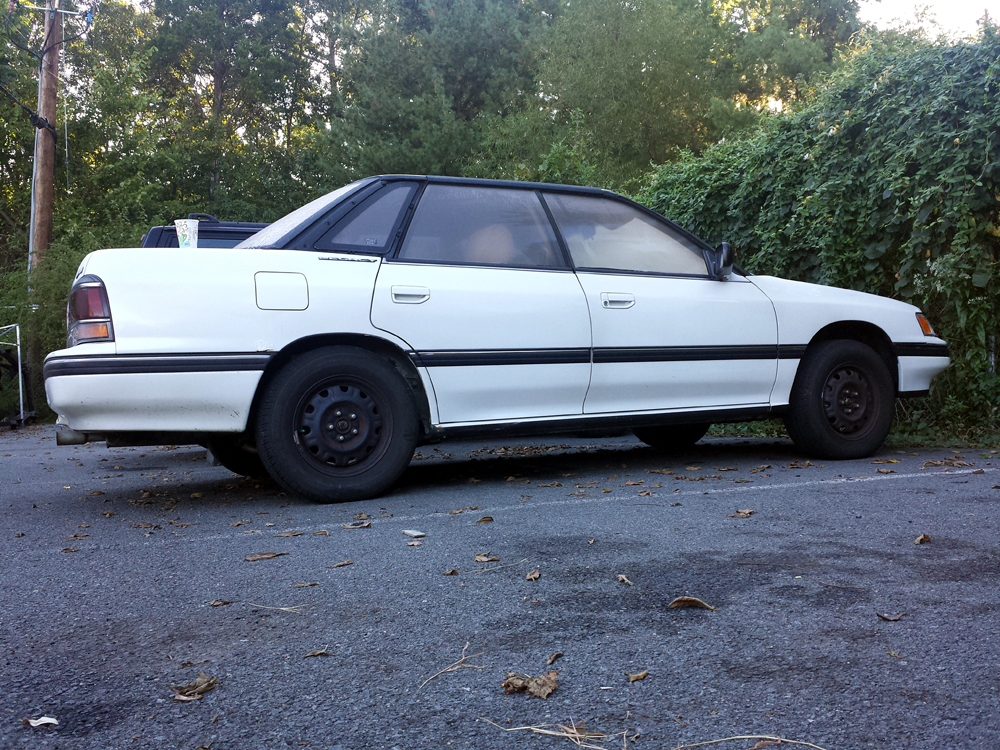
Posted by: jimkelly Jul 1 2016, 09:10 PM
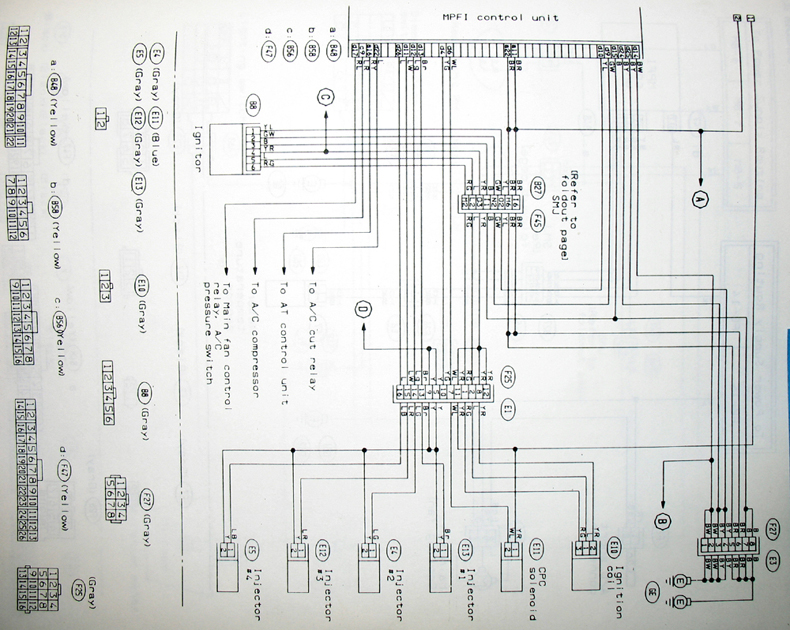
engine stand getting closer to finished and closer to letting me start on wiring FI. engine and radiator and trans are now all part of the stand
engine plugs f25 and f26 schematics for 3 engine plug type ej22.
Attached thumbnail(s)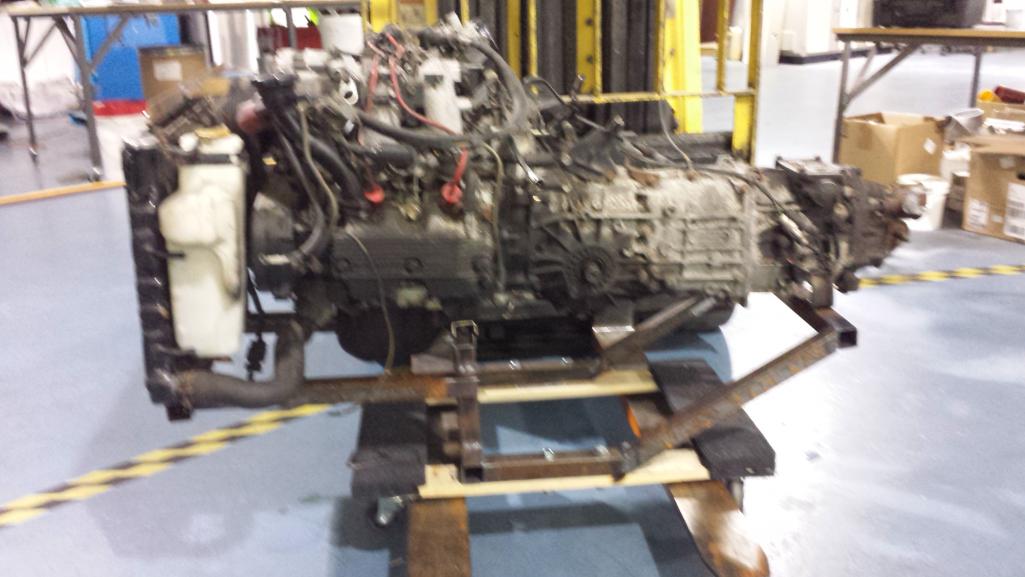
Attached image(s)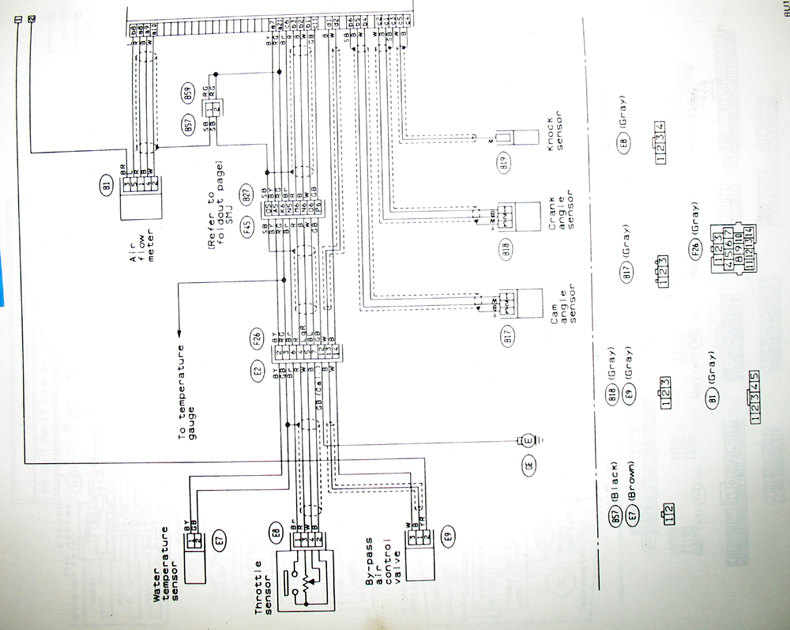
Posted by: jimkelly Jul 13 2016, 04:51 PM
latest of engine on stand... amnd video of harness i need to button up.
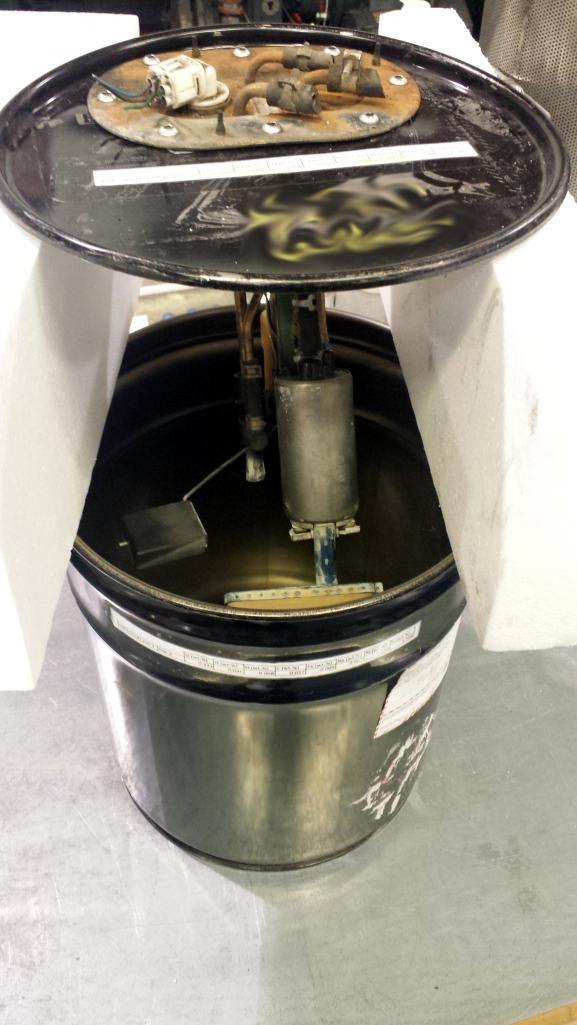
and my steel can gas tank with fuel pump mounted to lid.
https://www.youtube.com/watch?v=6bgDtMq89qM
Attached thumbnail(s)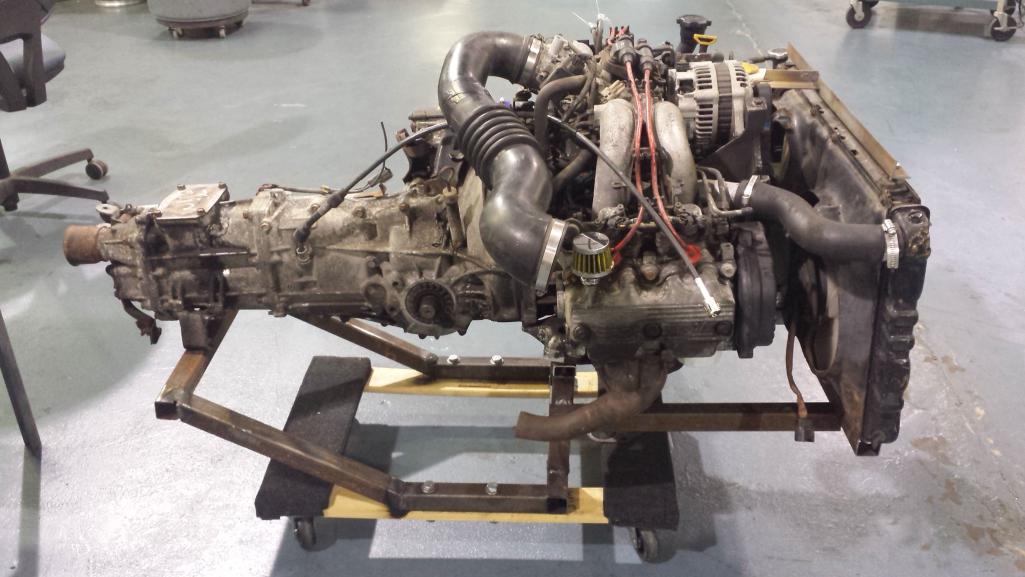

Posted by: jimkelly Apr 5 2017, 06:15 AM
decided to try a microsquirt based on many youtube vids. seems i need to swap out my 6/7 crank sprocket for a 36-2-2-2 crank sprocket. this one.
based on this thread and below youtube vid.
https://www.thesamba.com/vw/forum/viewtopic.php?p=5365250
spencer suggested this coil. coil 032906106b. it combines coil and exciter in one unit
https://www.youtube.com/watch?v=wcek255pXHI
http://www.tasteslikepetrol.net/2017/02/speeduino-coil-mount-cad/
ms coil info
http://www.msextra.com/doc/pdf/html/Microsquirt_Hardware-3.4.pdf/Microsquirt_Hardware-3.4-62.html
Attached thumbnail(s)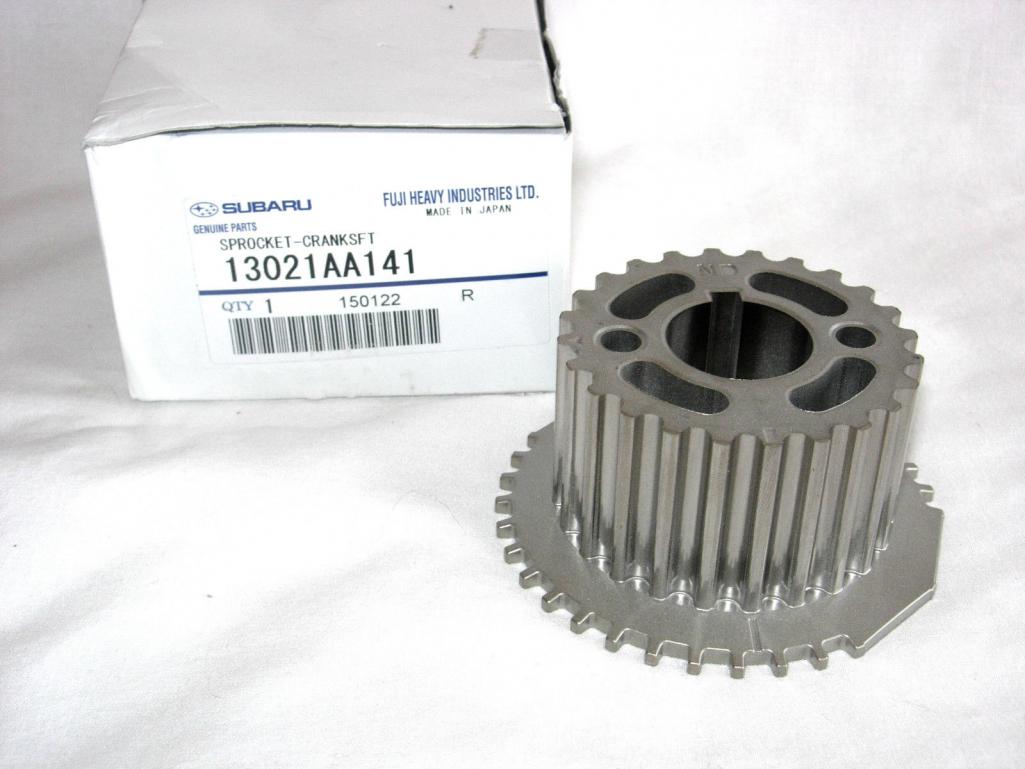
Attached image(s)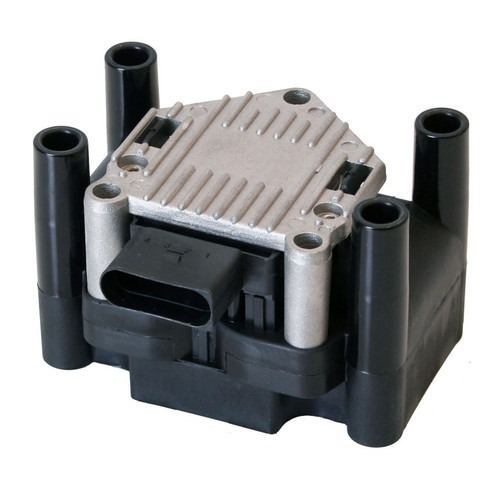
Posted by: 76-914 Apr 5 2017, 07:59 AM
Good to see you haven't given up. MS is easier to wire. Do you have a map to emulate or will you be paying a tuner.
Posted by: jimkelly Apr 5 2017, 10:46 AM
guess i'll cross that bridge if i ever get there
but thanks for the encouragement
i got 4 early ej22s, it would be ridiculous for me not to get one running using stand alone ecu. gonna spring for a microsquirt in next few weeks.
very few sensors needed:
throttle position sensor
crank sensor
coolant sensor
intake air sensor
gm 3 bar map sensor
tach signal
2 banks of injectors
a few relays
fuel pump
http://www.microsquirt.info/uswiring.htm
a nice intake piece that might come in handy.
http://www.atpturbo.com/mm5/merchant.mvc?Screen=PROD&Store_Code=tp&Product_Code=ATP-SIL-251&Category_Code=
LS V8 info but decent explanation of relays in glove box
https://www.youtube.com/watch?v=U_y4xuIVajQ
Attached image(s)
Posted by: jpnovak Apr 5 2017, 02:48 PM
MS2 ECU board fits nicely inside a stock Suby ECU case. This is what I ran on my EJ20TT motor in my old Suby conversion. Should have never sold that car. Anyway...
Just clip the stock connector and run jumper wires to the DB37 connector. Better capability than the microsquirt for boosted applications. for NA the microsquirt works just fine.
Posted by: Chris H. Apr 5 2017, 02:52 PM
Yeah the MS should work great. I just bought a Megasquirt 3 system. Should be here tomorrow  . The 2.2 and 3.3 are easy to set up.
So Jim.... ...you gonna use all 4 of those 2.2's ? I need something for my Vanagon.
Posted by: jimkelly Apr 5 2017, 04:01 PM
mine will be NA. baby steps for me.
i WAS thinking one engine at a time but who knows
i have one known good, one known bad, and two unknown condition, mostly for spare parts. pretty certain the one 5spd trans i have is good.
hopefully i will have some sort of update in the next month or so
Posted by: 76-914 Apr 5 2017, 04:10 PM
hopefully i will have some sort of update in the next month or so
[/quote]
You'd better or we're going to drag you out of the house and make you finish it. 
Posted by: jimkelly Apr 15 2017, 06:14 AM
got gm iat sensor, gm clt sensor, on order. plan to tap the pcv valve hole for the iat and tap the coolant manifold for the clt senor.
https://www.youtube.com/watch?v=-sXdjRlBUnE
seems like aem uego is a decent buy and about $100 less than innovate lm2.
https://www.youtube.com/watch?v=HoXTz2aDBqw
Posted by: Andyrew Apr 15 2017, 11:22 AM
got gm iat sensor, gm clt sensor, on order. plan to tap the pcv valve hole for the iat and tap the coolant manifold for the clt senor.
https://www.youtube.com/watch?v=-sXdjRlBUnE
seems like aem uego is a decent buy and about $100 less than innovate lm2.
https://www.youtube.com/watch?v=HoXTz2aDBqw
https://www.amazon.com/gp/product/B004MDT8MW/ref=oh_aui_detailpage_o09_s00?ie=UTF8&psc=1
I have this one. I like it a lot, I have it plugged into my boost controller. Really easy to read and pretty bright.
Posted by: jimkelly Apr 17 2017, 08:03 PM
pulled intake and coolant manifold off test engine. made blanking plate for the IACV and plate to mount vw coil. ordered some m6 bolts to mount it all.
i assume next to coolant sensor is a sensor for a coolant dummy light (one wire)?
what do you guys think about drilling and tapping the pcv bung in the manifold for the install of a iat sensor. or should i just add another bung for the iat and keep pcv valve in place?
Attached thumbnail(s)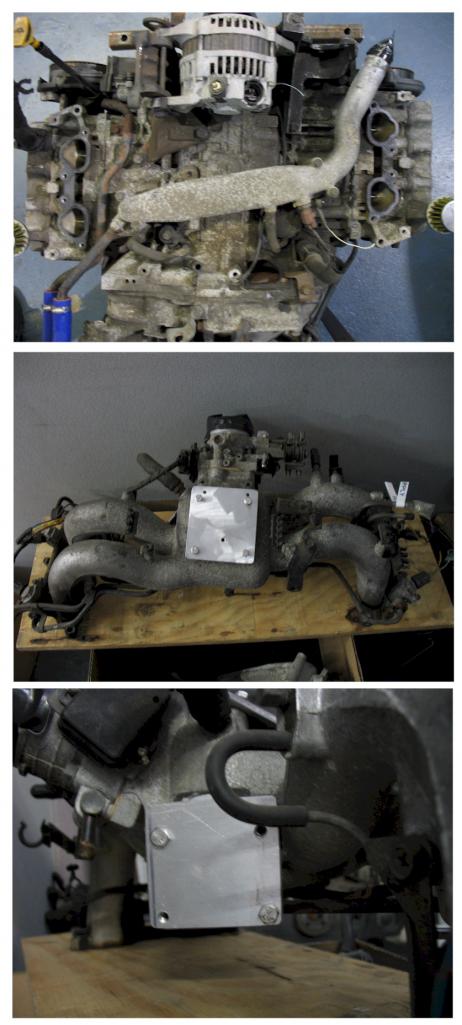
Attached image(s)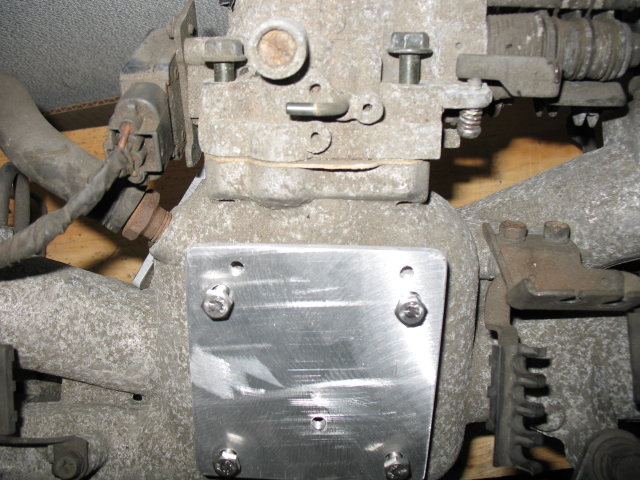
Posted by: Chris914n6 Apr 18 2017, 01:43 AM
pulled intake and coolant manifold off test engine. made blanking plate for the IACV and plate to mount vw coil. ordered some m6 bolts to mount it all.
i assume next to coolant sensor is a sensor for a coolant dummy light (one wire)?
what do you guys think about drilling and tapping the pcv bung in the manifold for the install of a iat sensor. or should i just add another bung for the iat and keep pcv valve in place?
There are 2 temp sensors. 2 wire for the ecu and 1 wire for the gauge.
You need the pvc valve.
Other note, I thought MS3 could be setup for different sensors. The benefit is the Subaru sensors already bolt in and fit the harness.
If you are not boosted then the iat can go anywhere. Most factory locations are the airbox after the filter.
Posted by: jimkelly Apr 18 2017, 09:59 AM
my coworker suggested i put the iat sensor thru the iacv block off plate. sounds reasonable.
the nice thing about gm senors is they are cheap, like $15 $20 new each. iat and clt.
https://www.diyautotune.com/shop/sensors-data-logging/temperature-and-pressure-sensors/
i'm not using subaru harness, just microsquirt harness to sensor pigtails.
Posted by: jimkelly Apr 18 2017, 10:21 AM
as for pcv removal.
i have one breather on each head. shouldn't that suffice?
fwiw - the thread on subaru iat and clt sensors is M12-1.5
Posted by: jimkelly Apr 19 2017, 07:50 AM
my latest confusion. seems coil does not line up with cylinder location on engine.
http://www.msextra.com/doc/pdf/html/Microsquirt_Hardware-3.4.pdf/Microsquirt_Hardware-3.4-62.html
ej22 clockwise starting front left, 1,3,4,2
coil 2,3,4,1
i thought banks mattered with batch spark?
i realize most won't understand my question, in fact i am not sure i understand it myself
Attached thumbnail(s)
Posted by: 914forme Apr 19 2017, 08:35 AM
You only have 17 possible combinations.
Yes that is me being a smart arse.
And four of them will work, but we will make this easy as we can.
Spark plug 1 goes to coil plug 1
Spark Plug 3 goes to coil plug 2
Spark Plug 2 goes to Coil plug 3
Spark Plug 4 goes to coil plug 4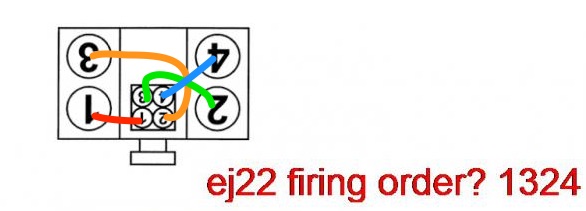
That solution makes the wires cross over each other. What a mess so this while logically more strain is easier on the eye.
So Spark plug 1 to coil plug 3
Spark Plug 2 to coil plug 1
Spark Plug 3 to Coil plug 4
Spark Plug 4 to coil plug 2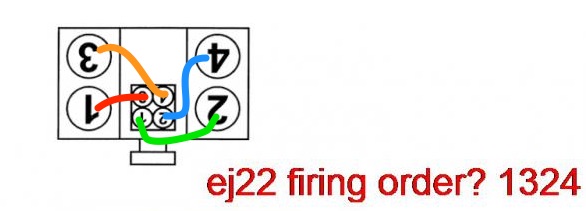
Much easier with coil on plug, or individual coils.
BTW, re-lable the coil to match your final working solution.
Hope that helps if I missed the question o the description, let me know I will modify my post not to steer anyone wrong.
Posted by: jimkelly Apr 19 2017, 09:28 AM
stephen, very awesome, thank you! jim
Posted by: jimkelly Apr 19 2017, 09:36 AM
i am being told that this is the firing order.
Attached thumbnail(s)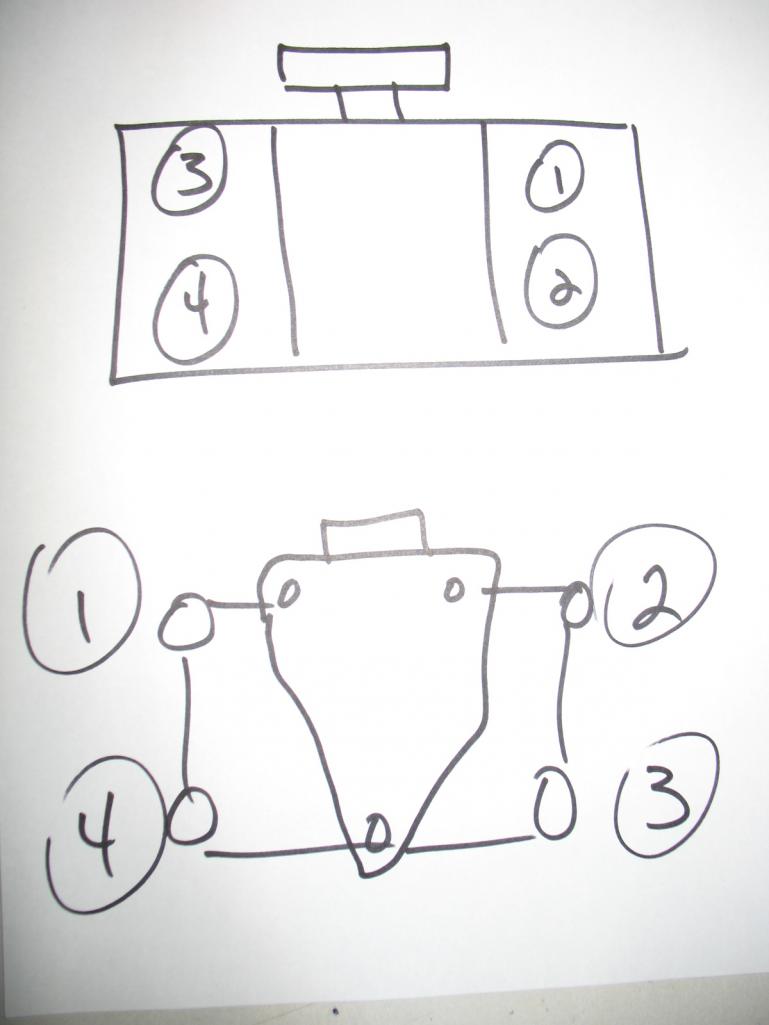
Posted by: 914forme Apr 19 2017, 10:38 AM
Mount the coil upside down. 
If you make your pickup 180 degrees out it also has the same effect as mounting the coil upside down. 
Your now running with crazy, the key to the entire thing is pretty simple you want to fire on alternating coil packs. In a 6 cylinder you just add a third so coil pack 1, 2, 3, 1, ,2, 3.
V8
1,2,3,4,1,2,3,4
V10
1,2,3,4,5,1,2,3,4,5
V12
1,2,3,4,5,6,1,2,3,4,5,6 or 1,2,3,1,2,3
Dual plugs you just run multiple coil packs in redundancy.
1a&1b,2a&2b, you get the idea.
This is all wasted spark setups, once you go with sequential, things get so much easier Then you have to figure out the logic to drive the coils in the order you want them to fire. I am now taking this beyond your question and sorry for that.
Maybe I should do a mini school on EFI logic, and wiring. We are getting into so many engine combinations it is not longer just a discussion type-IV, and -6 engines. Even -6s with twin plugs makes things just a tad worse. Luckily your Subaru 2.2 is about as basic of an EFI engine as you can get, so a MicroSquirt unit should be pretty simple. Being said we have not gotten into doing anything the EFI input sides.
Back off my mad ramblings the firing order of the engine 1-3-2-4.
In your drawing you have the order correctly as that is the firing order, but your cylinder numbers or as I called spark plug is not.
1 in your drawing is cylinder or spark plug number 1 hook it up to coil side 1/4
2 in your drawing is cylinder or spark plug number 3 hook it up to coil side 2/3
3 in your drawing is cylinder or spark plug number 2 hook it up to coil side 1/4
4 in your drawing is cylinder or spark plug number 4 hook it up to coil side 2/3
Makes it any clearer than the mud it is?
Posted by: jimkelly Apr 19 2017, 11:45 AM
stephen
your last 4 lines are GOLD, pure gold : )
except for cylinder 2.
got my coil mounted
thanks
Attached thumbnail(s)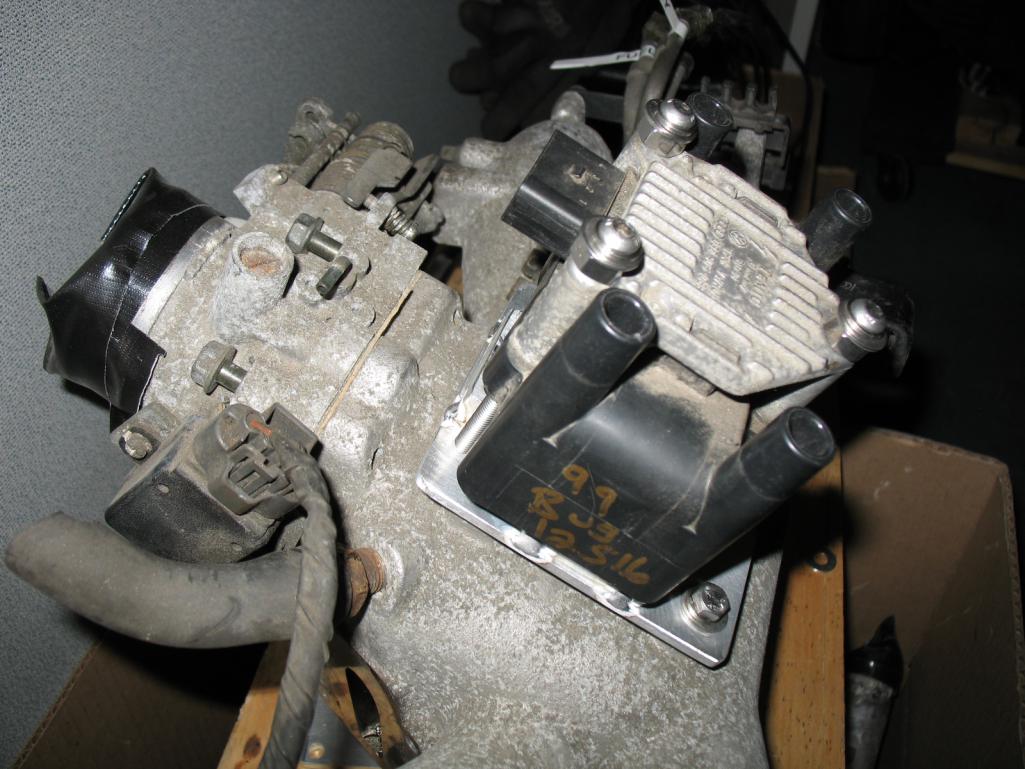
Posted by: 914forme Apr 19 2017, 12:34 PM
Fixed that is what I get for copy and pasting my work load
Posted by: jimkelly Apr 19 2017, 01:16 PM
thanks - big help
Posted by: jimkelly Apr 19 2017, 04:18 PM
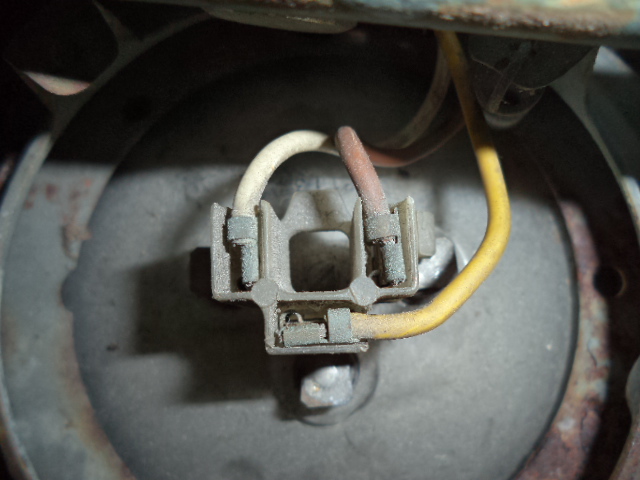
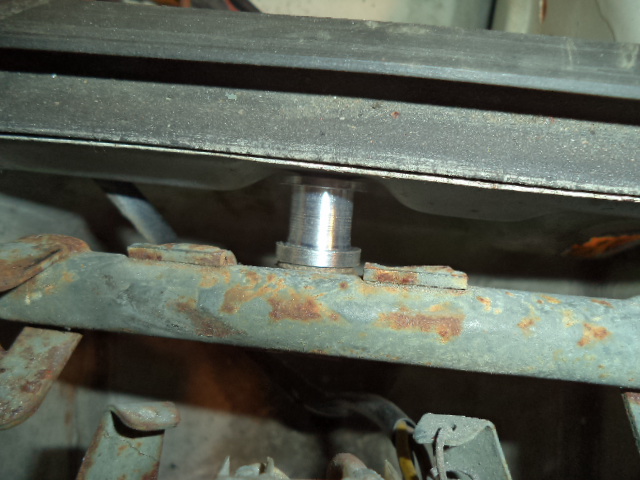
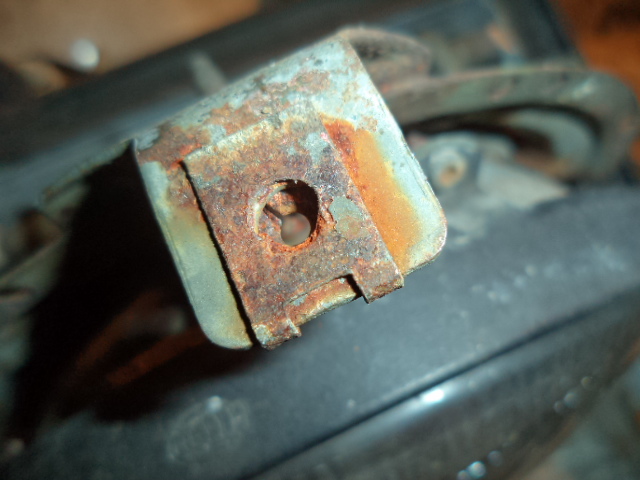
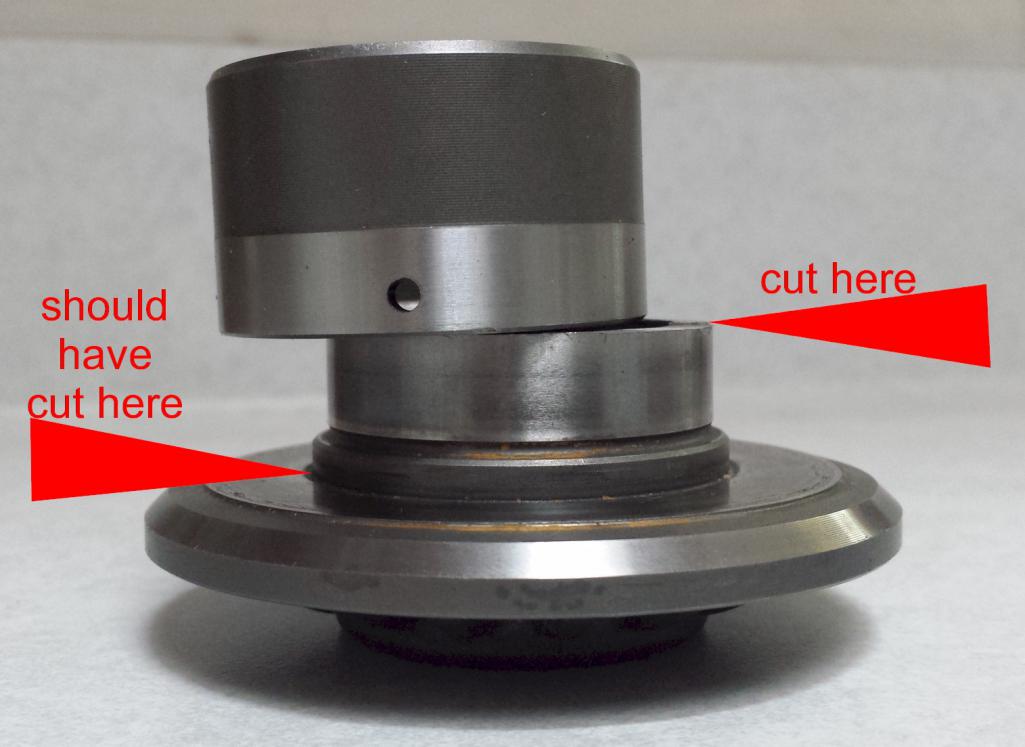
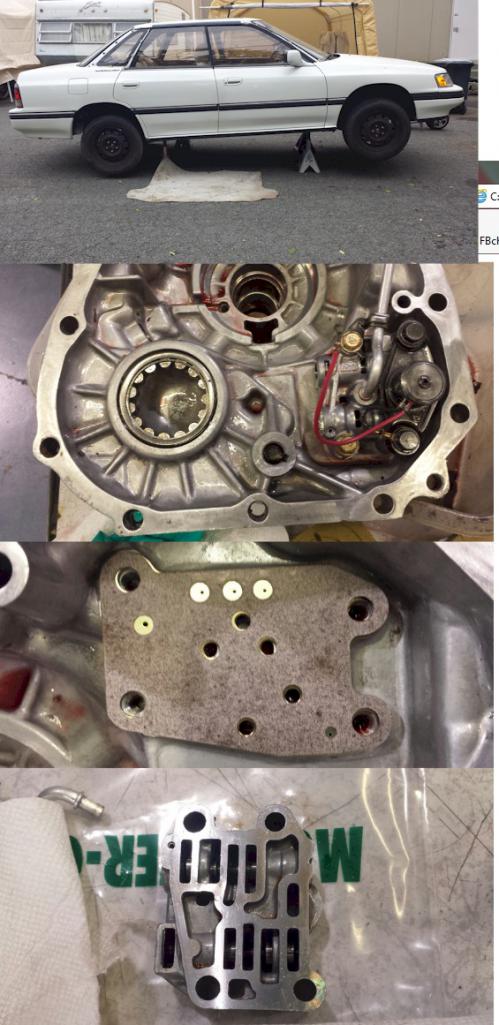
trying to remove my trans tail cover to convert to 2wd. but roll pin came put but shifter piece won't come off, rusty. also does this piece normally have protrusions where the roll pin goes in. see last pic.
nevermind, answered my own question, there was more roll pin left, outter section.
might have to use cut wheel and angle grinder to remove this piece though
gonna try soaking with pb blaster first.
need to get a puller to remove 6/7 crank sprocket, so i can install 36-2-2-2 sprocket.
Attached thumbnail(s)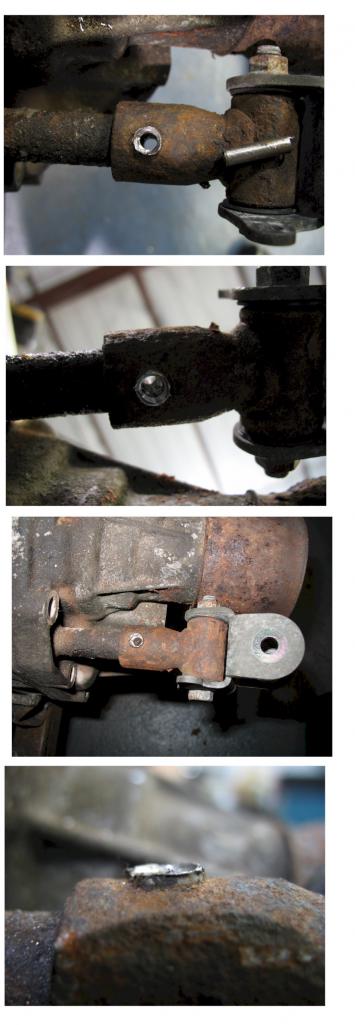
Posted by: jimkelly Apr 19 2017, 08:17 PM
episode 39.
https://www.youtube.com/watch?v=qJ07FeP3Zng
seems spark plug wires go like this.
Attached thumbnail(s)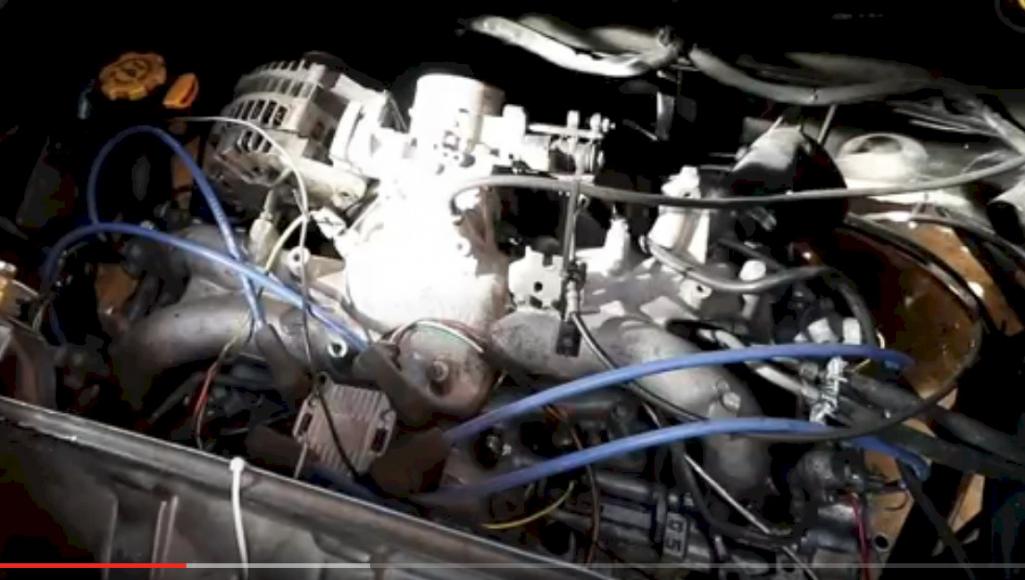
Attached image(s)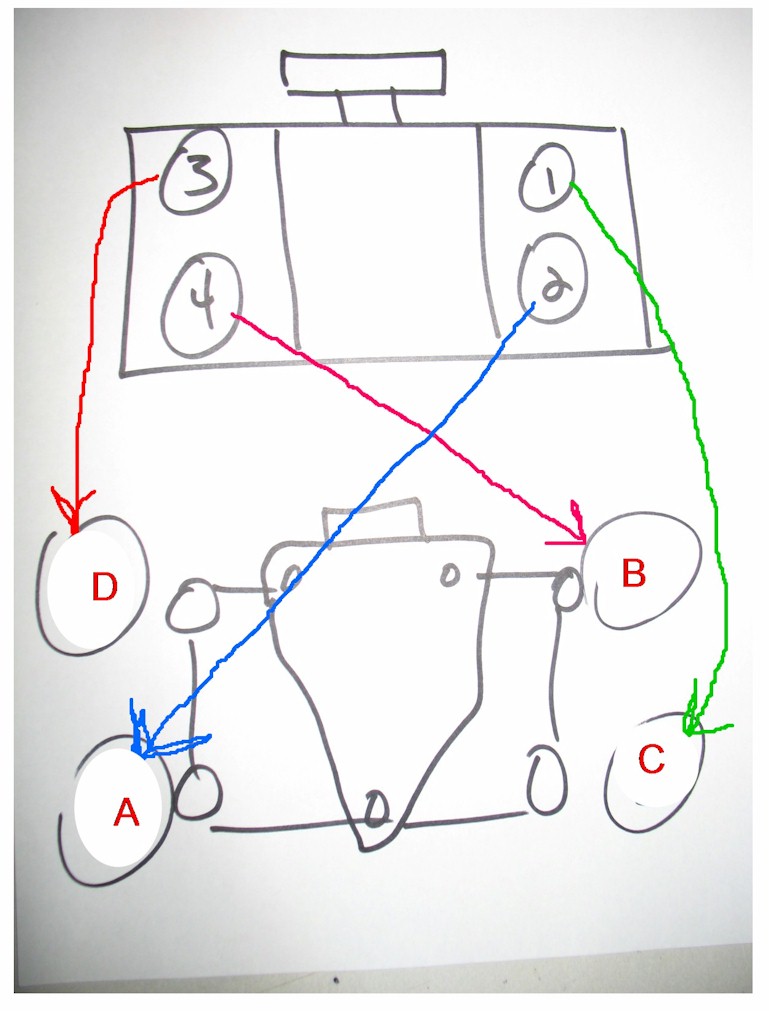
Posted by: jimkelly Apr 20 2017, 08:11 AM
guys, how to i order and make spark plug wires for subaru spark plugs and 1999 vw bug coil plugs?
Attached image(s)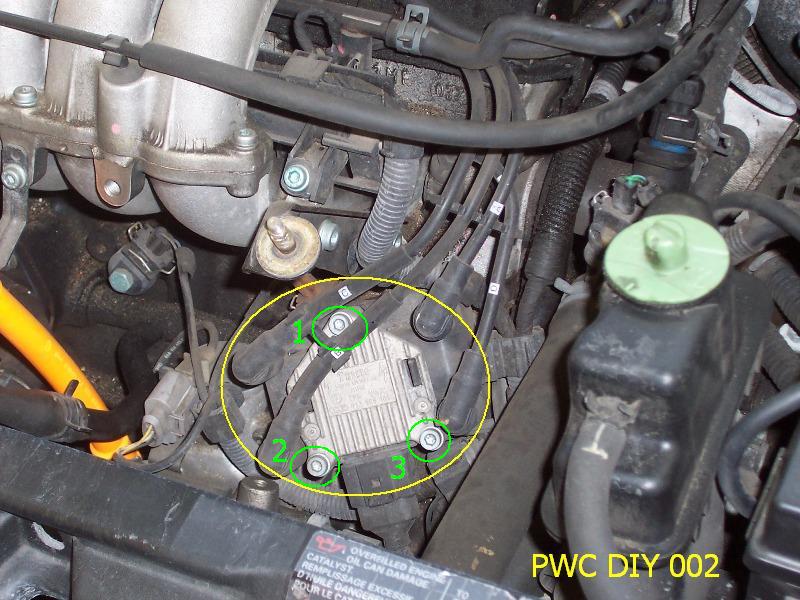
Posted by: 914forme Apr 20 2017, 09:04 AM
VW coil pack, wow your picture threw me for a minute, but yes that is a VW 2.0L engine out of a golf or jetta, based on the pwoersteering fluid resivor, I would say 1999 - 2001 time frame.
As far as the plug wires, It is a standard on the one end and the other. Most V8 plug wires should work you can get them nice custom ones that you make up, or just go wit a generic set that gets you where your going.
https://www.msdperformance.com/products/spark_plug_wires/universal_super_conductor_wire_sets/
Posted by: jimkelly Apr 20 2017, 10:32 AM
the vw coil is different than most as it has a pin in the center, see pic. and pic of vw coil mounted on my suby intake manifold.
i'm thinking about these audi wires from ebay: Set of 6 Pcs Spark Plug Ignition Wire Lead For 2.8L VW Passat Audi A4 A6 Quattro
Attached thumbnail(s)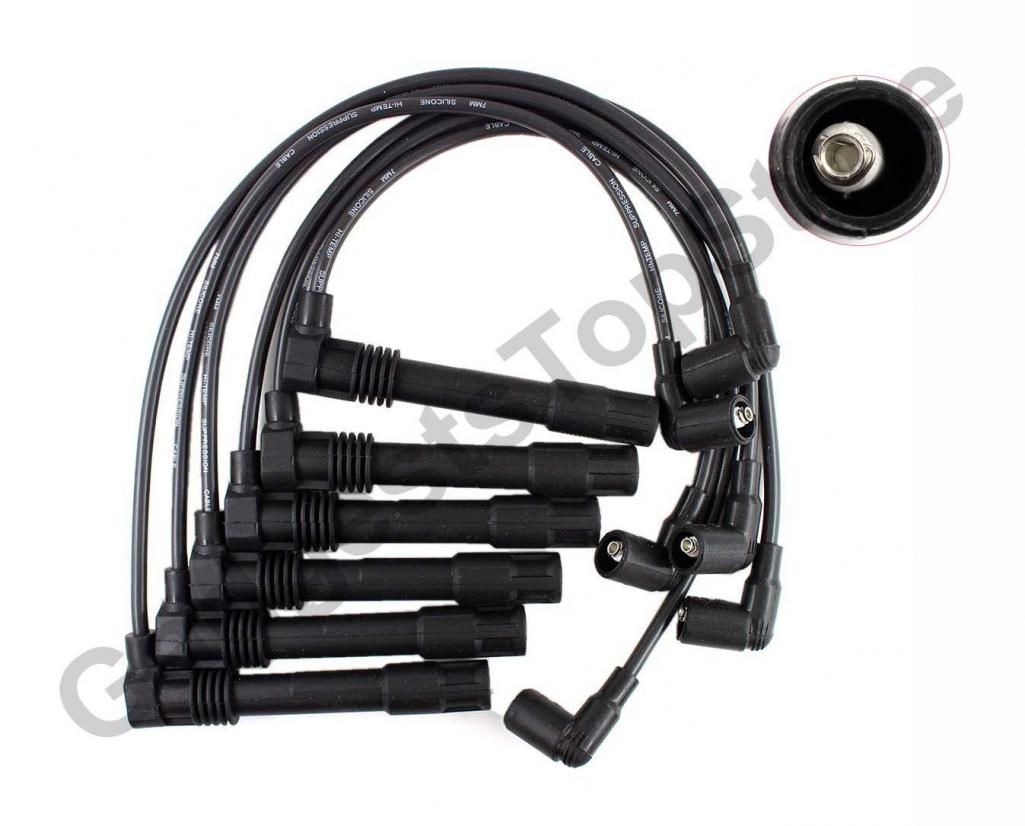
Posted by: jimkelly Apr 20 2017, 05:11 PM
ok, as usual, i am confused. i just installed 36-2-2-2 crank wheel after making the belt at all 3 timing marks. i removed idlers and belt. removed old sprocket and installed new sprocket, lined up the belts 3 marks with the marks on the 2 pulleys and the new sprocket, but after all buttoned up, i noticed that when the cams are lined up and paint marker marks are lined up too, the sprocket mark lines up with my paint marker line, but i about 1 inch counter clockwise of its timing mark.
the odd thing is if i reinstall belt with cam pulleys and sprocket aligned with their timing marks, i expect my paint marker lines won't. i just checked an image of a new 36-2-2-2 sprocket and my old sprocket and they both have their timing mark 180 degrees from the keyway.
guess i'll never know how my paint mark is off
Attached thumbnail(s)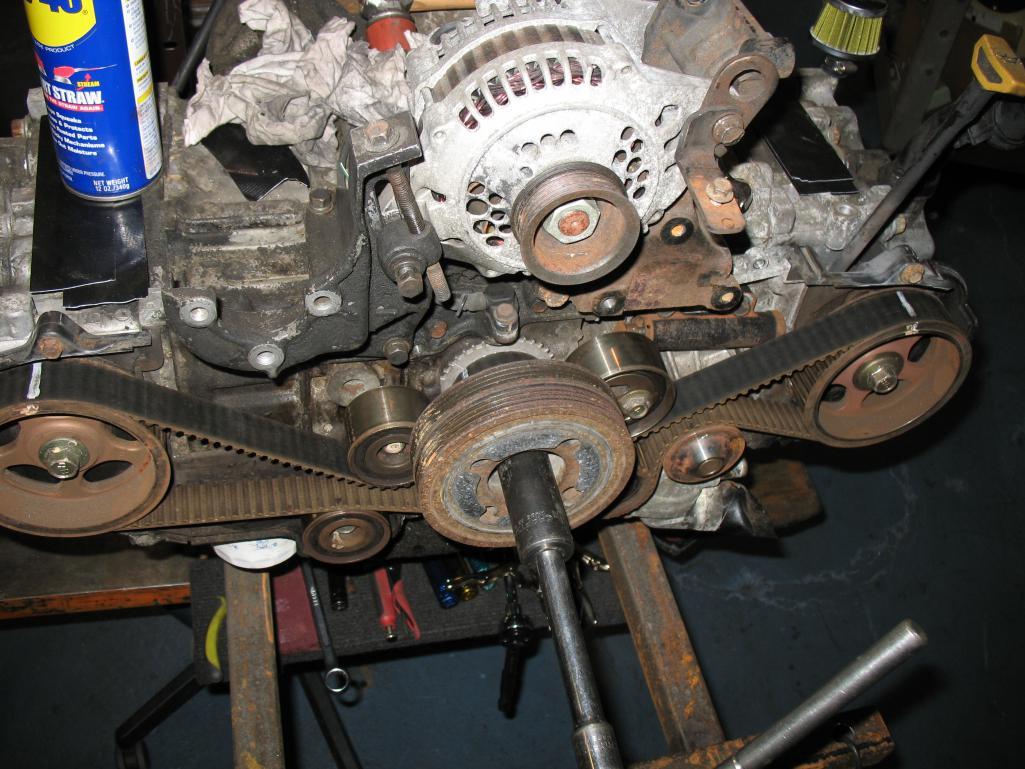
Posted by: 914forme Apr 20 2017, 06:31 PM
Might be a tad short, don't know, I forgot about the pin / never paid attention to it. I only had one car with that igniter, it was a 1999 very early production Jetta. Thing had more electrical issues than all the Lucas cars combined. It was possessed, so I gladly push it out of my memory banks ever chance I get. Everything else I own VW either uses Coil on plug, or does not use spark plugs at all.
I honestly prefer the latter, love my TDIs, and will be getting another one very soon.
Posted by: 914forme Apr 20 2017, 06:35 PM
Chris H mentioned the same issue in his build thread I think it was Chris. Getting older but I recall he ir someone resembling him in my mind had this issue when they did their timing belt. Reason it sticks out in my mind is that I figured I would have fallen for the same Subaru magic trick. Seems odd and that is how Subaru will do the trick, I could be completely off base here also, what the F do I really know
Posted by: jimkelly Apr 20 2017, 06:51 PM
i just turned 53 yesterday. few on this planet can talk to me about old age 
Posted by: jimkelly Apr 24 2017, 05:15 PM
reinstalled timing belt and think i got it pretty close this time.
also cut off the top of the alternator bracket so i can swing alt to drivers side, so i can install intake facing rear.
tomorrow night i will do some tapping for clt and iat sensors.
got to make a bracket for alternator adjustment. might use some threaded rod ends.
Attached thumbnail(s)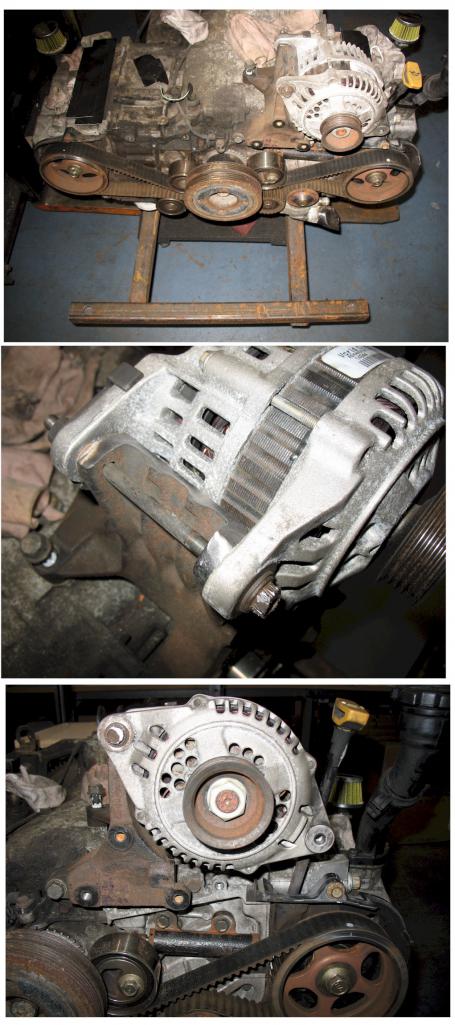
Posted by: 914forme Apr 24 2017, 06:10 PM
That is looking good
Posted by: 76-914 Apr 24 2017, 07:12 PM
Jim, is your engine a "0" clearance style? You might want to remove the plugs to spin the motor by hand. You want to be sure a valve doesn't embed itself in the top of a piston once started.
Posted by: Chris914n6 Apr 24 2017, 07:56 PM
guess i'll never know how my paint mark is off
On a Nissan that means the belt is backwards. The mark is off 3 teeth or so on one side for some Japanese logic reason
Also, a new belt will have the marks on it if you don't feel 100% with yours.
Posted by: jimkelly Apr 25 2017, 05:43 AM
i made the marks on my belt MYSELF and could have certainly installed back on flipped?
the earlier ej22 are NON interference and is one of the reasons i like them.
http://www.scoobyenthusiast.com/subaru-faq/which-subaru-engines-are-interference-what-subaru-engines-are-non-interference/
waiting on a U bend of 1.75" so i can merge my exhaust and put a bung in place for the o2 sensor.
getting the belt right was a little tricky, had to make sure all lined up and all the slack in the belt was in the area of the tensioner.
got to make an alternator adjuster like this. from this thread.
https://www.thesamba.com/vw/forum/viewtopic.php?p=5365250
question, does threaded part between two tie rods have a right hand thread on one side and a left hand thread on the other?
Attached image(s)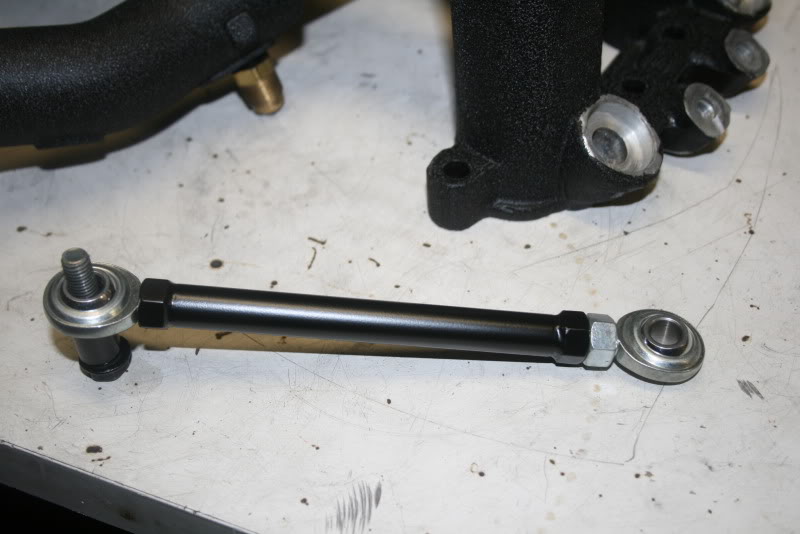
Posted by: jimkelly Apr 25 2017, 05:40 PM
alternator bracket version 1 done. may interfere with timing covers?
now i gotta find a 5 rib belt to turn it.
was gonna install my intake manifold flipped but had one metal fuel line IN THE WAY.
will need to cut the line and put some inches of rubber line.
next up is to merge exhaust for 02 bung.
down the road is shift linkage.
https://www.youtube.com/watch?v=KOgNXNUn8zI
Attached image(s)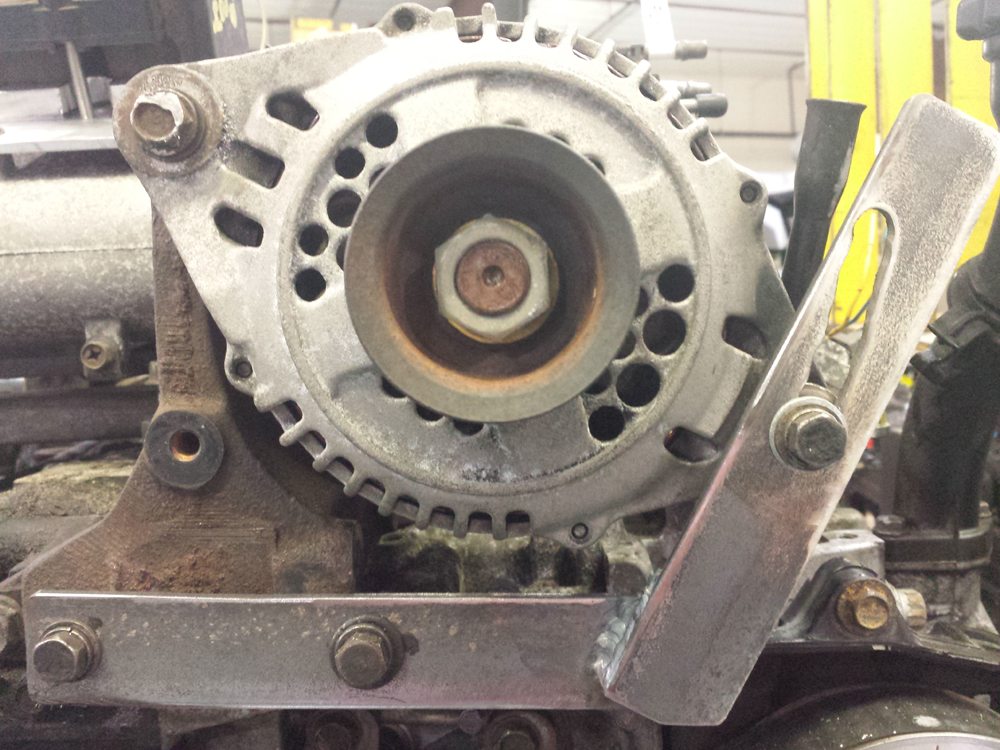
Posted by: jimkelly Apr 26 2017, 02:11 PM
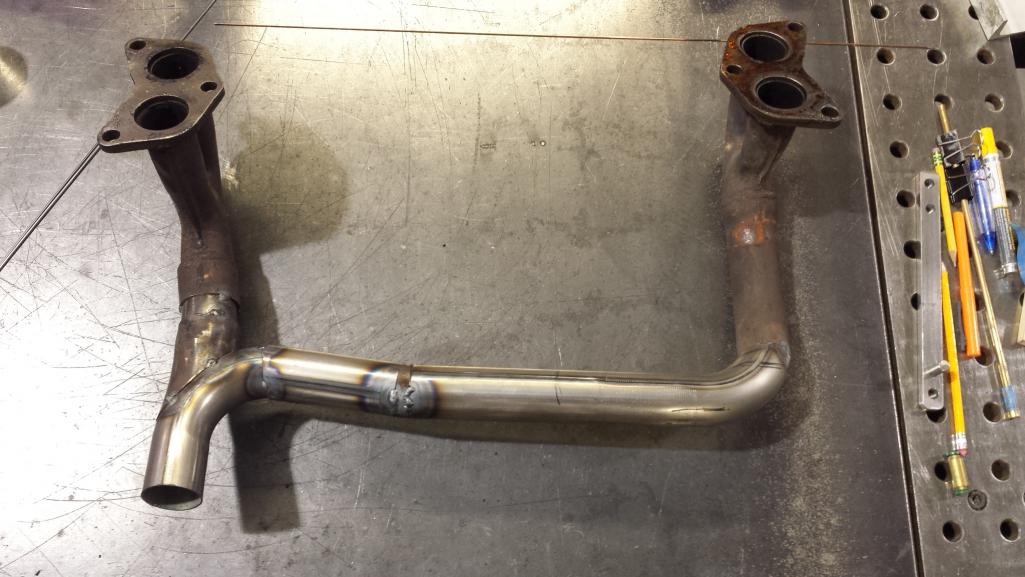
got to fab a run stand exhaust that is 2 into one. did some test cuts on pcv to figure what would be involved.
Attached thumbnail(s)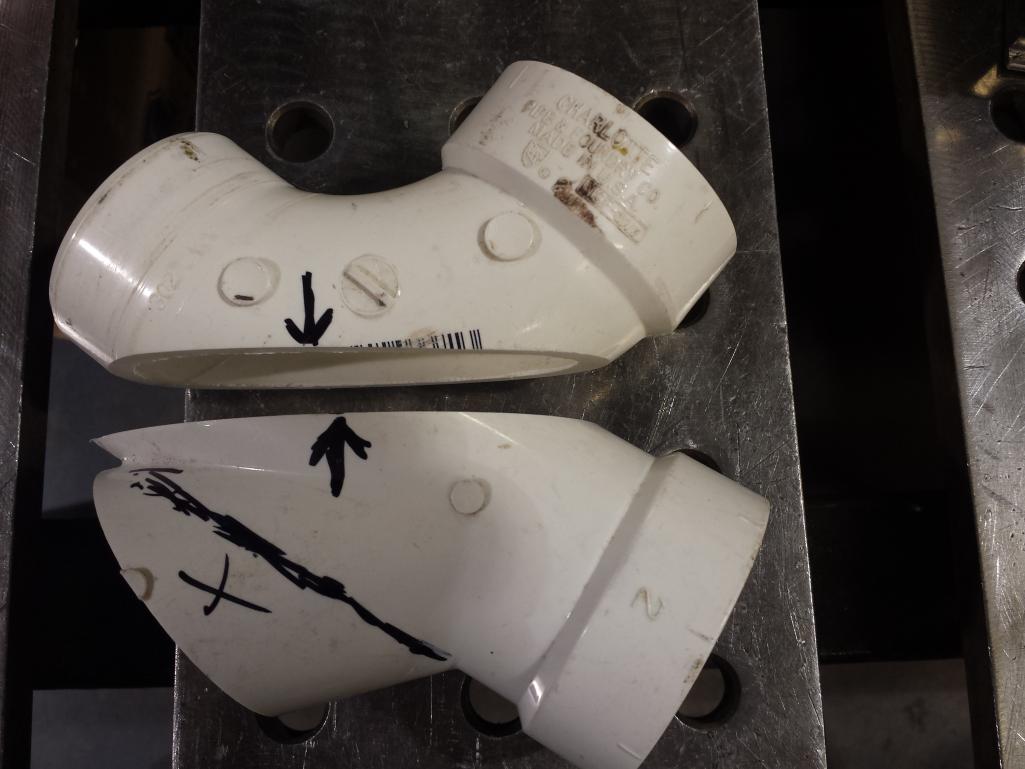
Posted by: Chris914n6 Apr 26 2017, 04:27 PM
Belts are measured in mm. Use a "cloth tape" to measure max and min for the alt adjustment as the belt will be in 5mm or 10mm increments. 5K### or ###K5
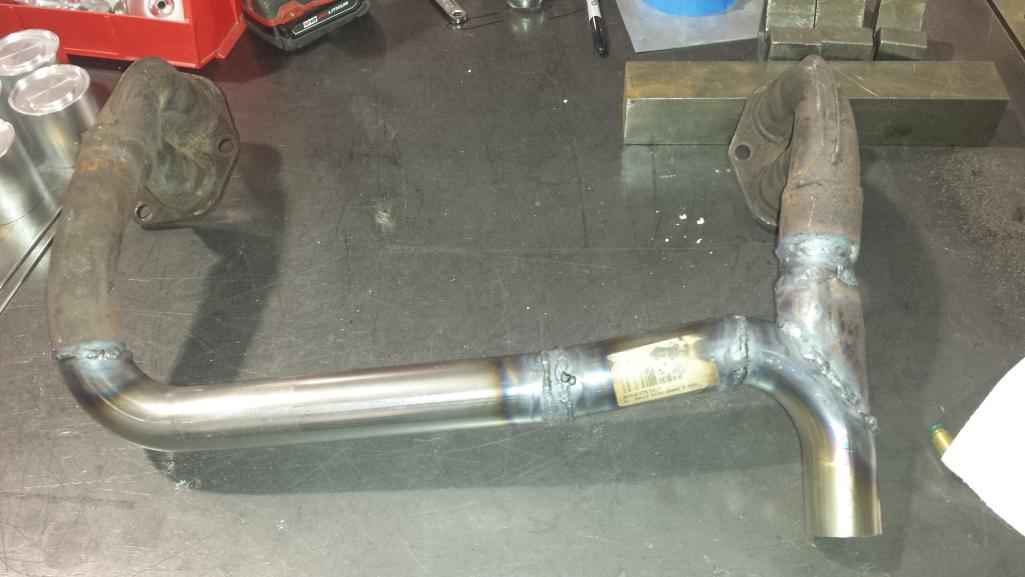
Posted by: jimkelly Apr 26 2017, 06:12 PM
thanks, good info that i did not know.
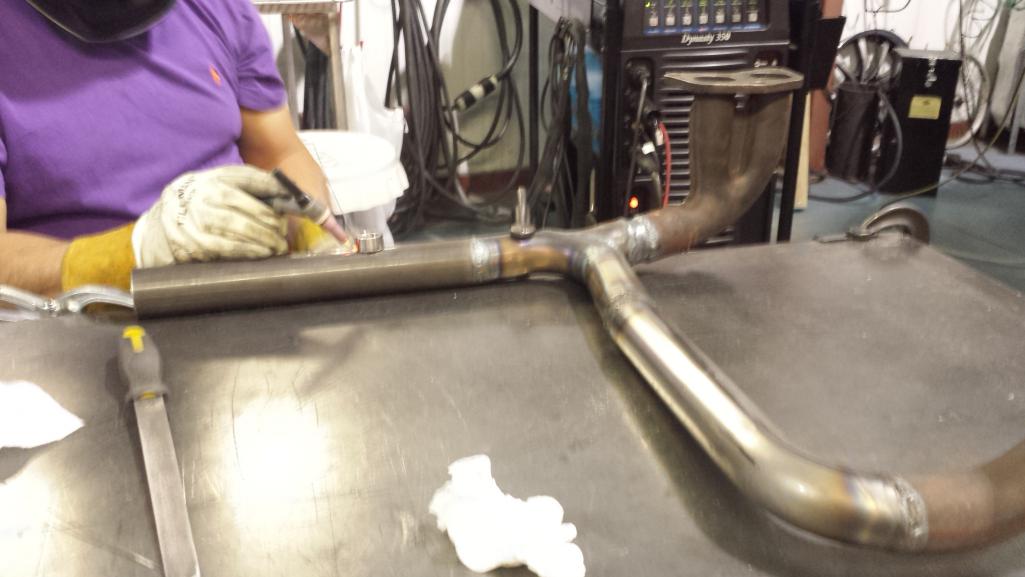
got test stand exhaust mostly completely tacked up. gonna ask pro welder to finish it up.
got to add a bit more tail pipe and put a bung in it somewhere.
decided to go ahead and weld it up and let pro welder fix my blow thrus/etc and yes that is TIG but most could never tell
Attached thumbnail(s)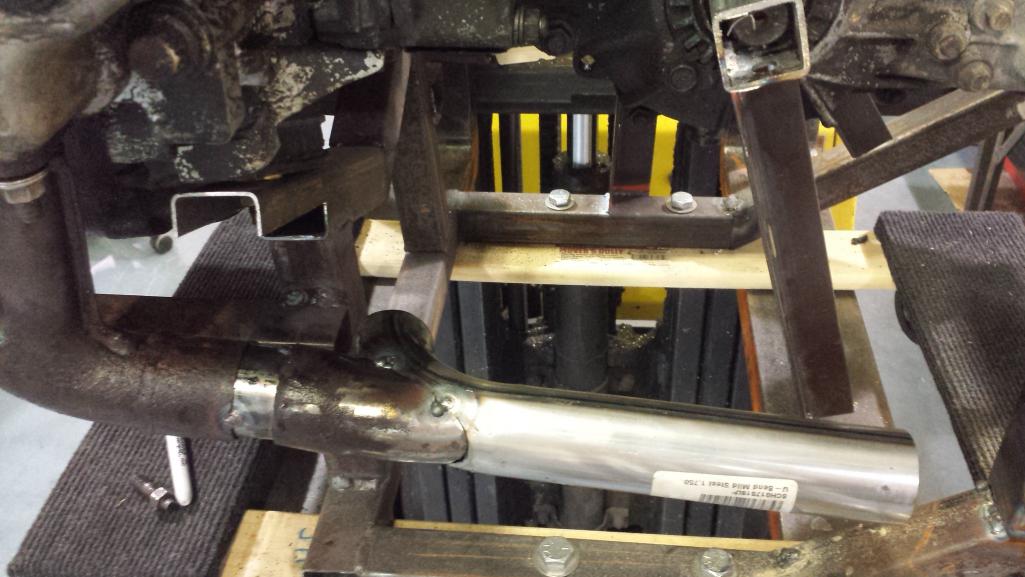
Posted by: jimkelly Apr 27 2017, 03:57 PM
popped the trans open and will make the conversion coupler.
like these fellas done did.
http://www.914world.com/bbs2/index.php?showtopic=104513
https://www.youtube.com/watch?v=qmPTNe0D-Uc
Attached thumbnail(s)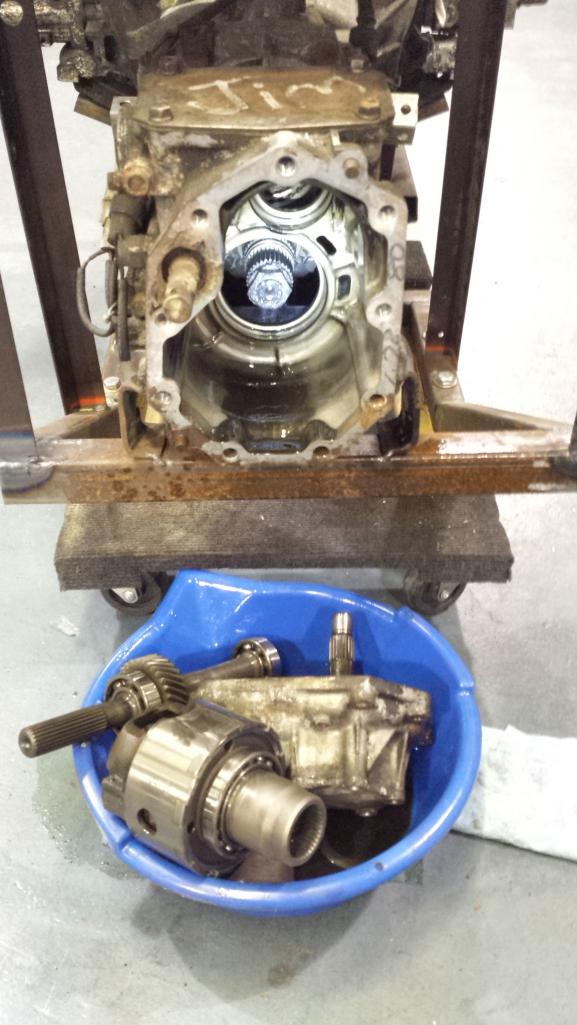
Posted by: 76-914 Apr 27 2017, 04:24 PM
thanks, good info that i did not know.
got test stand exhaust mostly completely tacked up. gonna ask pro welder to finish it up.
got to add a bit more tail pipe and put a bung in it somewhere.
decided to go ahead and weld it up and let pro welder fix my blow thrus/etc
and yes that is TIG but most could never tell Looks OK, Jim. I doubt it will blow loose on those welds. No one can say that you didn't get it hot enough. You can fill that with water to test before installing. Keep 'em coming. You'll be there in no time.
Posted by: jimkelly Apr 27 2017, 05:04 PM
waiting on a 1' piece of 1.75 od exhaust tubing to add to the end and add the bung.
Posted by: jimkelly May 2 2017, 07:26 AM
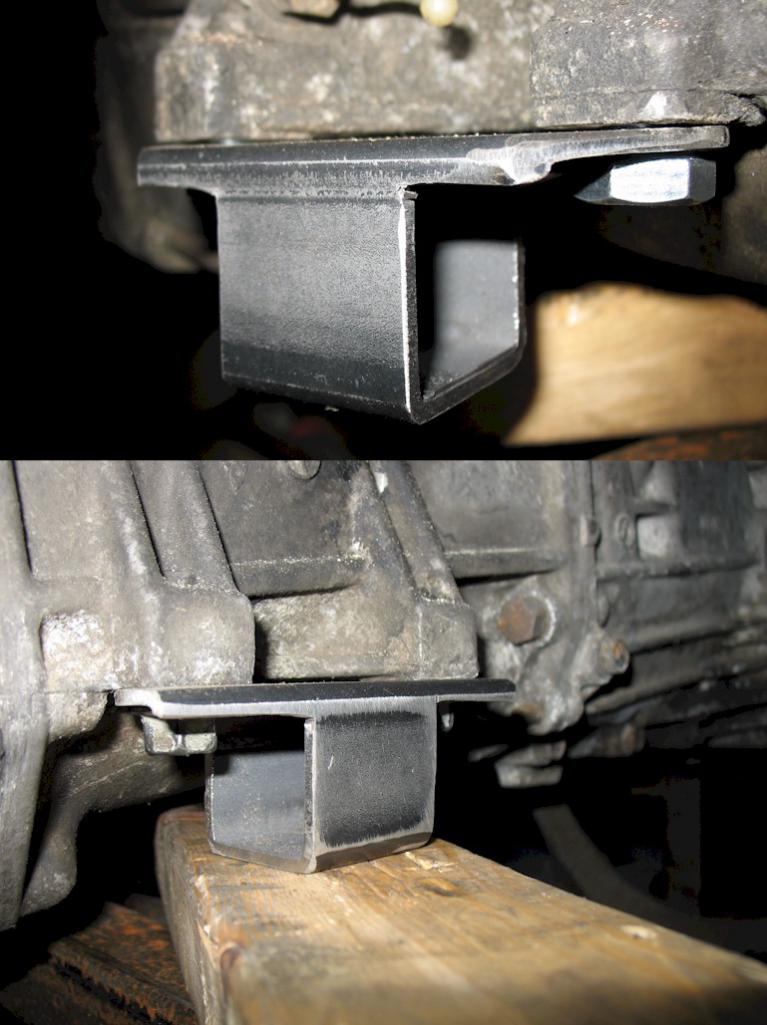
my coupler, 2" tall about. hope it holds together.
Attached thumbnail(s)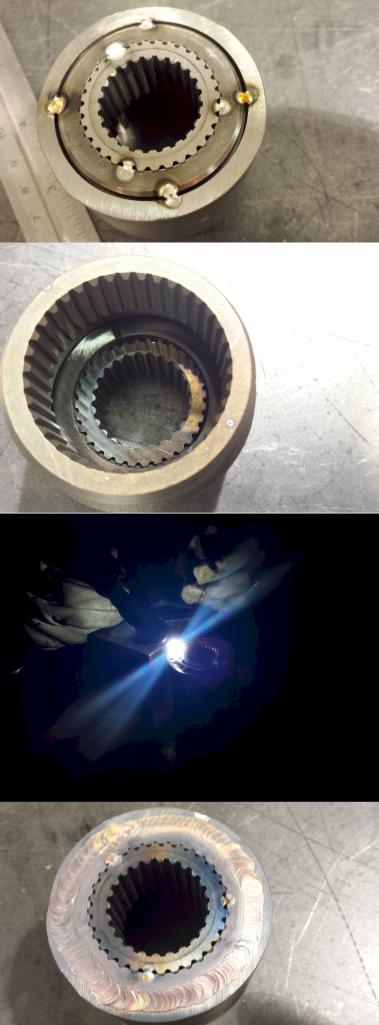
Posted by: jimkelly May 2 2017, 08:25 AM
side pic
if anyone is going ther bremar coupling route and have these parts left over, i'll take them
Attached thumbnail(s)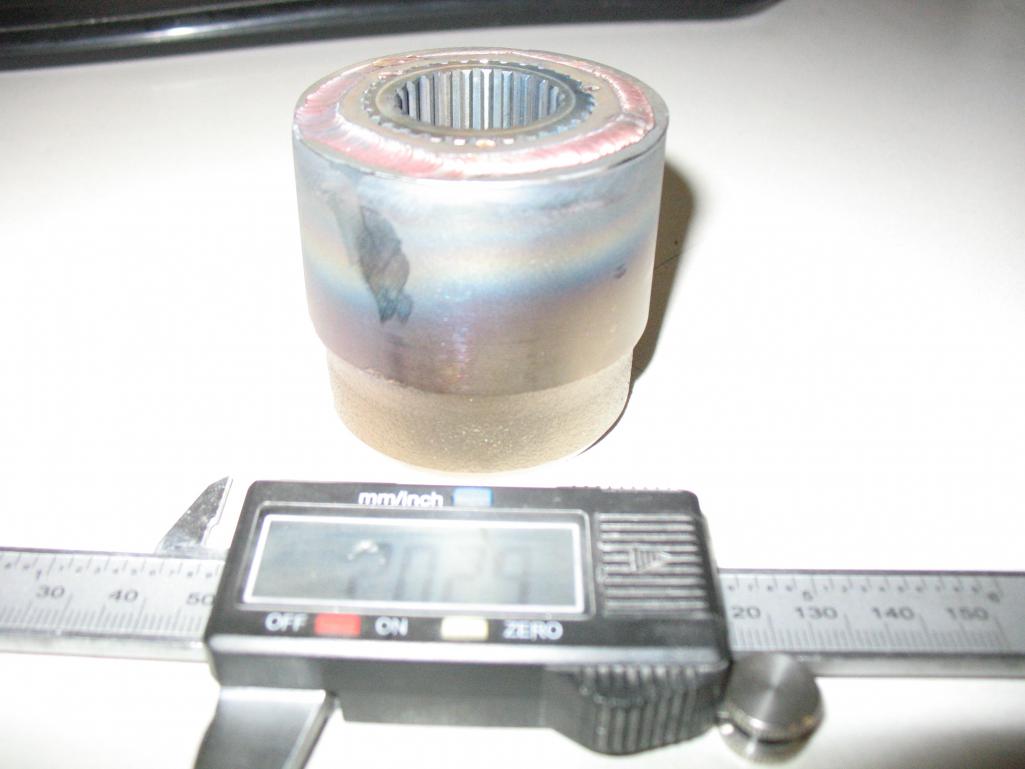
Attached image(s)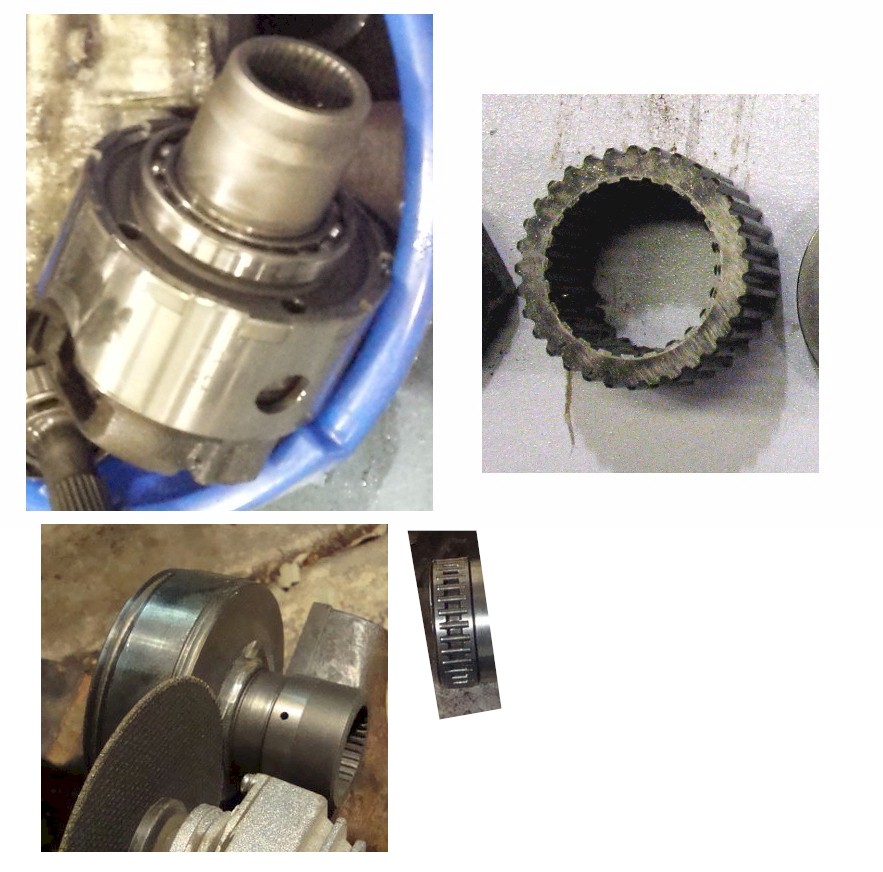
Posted by: jimkelly May 2 2017, 12:51 PM
well. i added the 12" piece of exhaust pipe and then decided to ATTEMPT TO weld the bung on. bad idea. ordered a tap.
Attached thumbnail(s)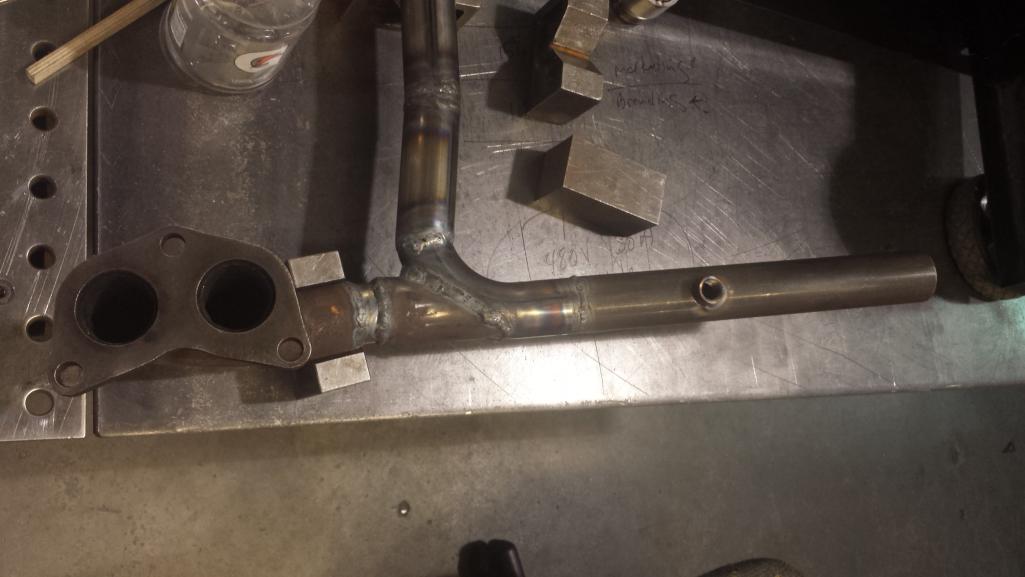
Posted by: jimkelly May 2 2017, 07:09 PM
a downside of making the coupler yourself is that it will UNLIKELY slide right on with no pressure. thus getting it off one day could be a bitch. a bremar for $175 beans might be easily removable.
wanted to button up trans but realized i never order 10-1.25 20mm bolts for thin cover
Posted by: jimkelly May 7 2017, 07:55 AM
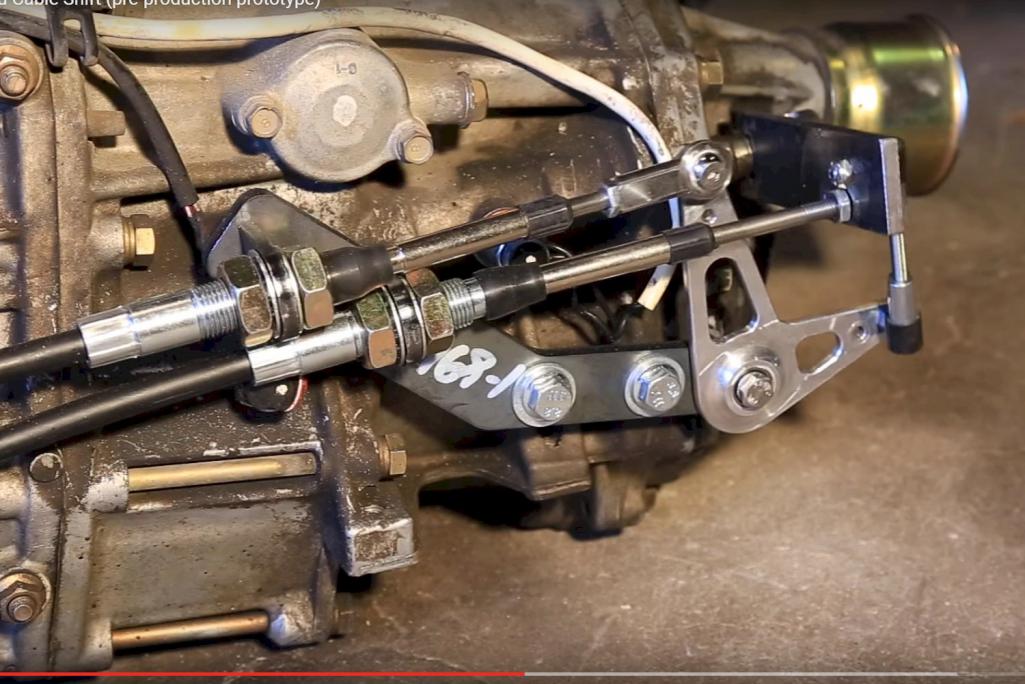
so the consensus is to not use a bell crank?
and to go at the trans from the side for side to side motion.
I think the bell crank version allows for 2 the same length cables, attractive to me.
https://www.youtube.com/watch?v=S_e9jk6z83k
https://www.youtube.com/watch?v=ncmaxYd1WNI
and another version
https://www.youtube.com/watch?v=E1DyhcQuiJQ
Posted by: jimkelly May 10 2017, 04:04 PM
SOB, my trans does not have the threaded bungs on it, like ian designed his set up for, which i was attempting to recreate. now i need to fab up something quite different.
only realized this when i pull out trans to measure holes to drill holes in braket to final size
i guess i'll make a plate that attached with 4 trans cover plate bolts, that wraps around the side of the trans?
or maybe i will weld a bracket onto the coldwater trans hanger drivers side?
Attached thumbnail(s)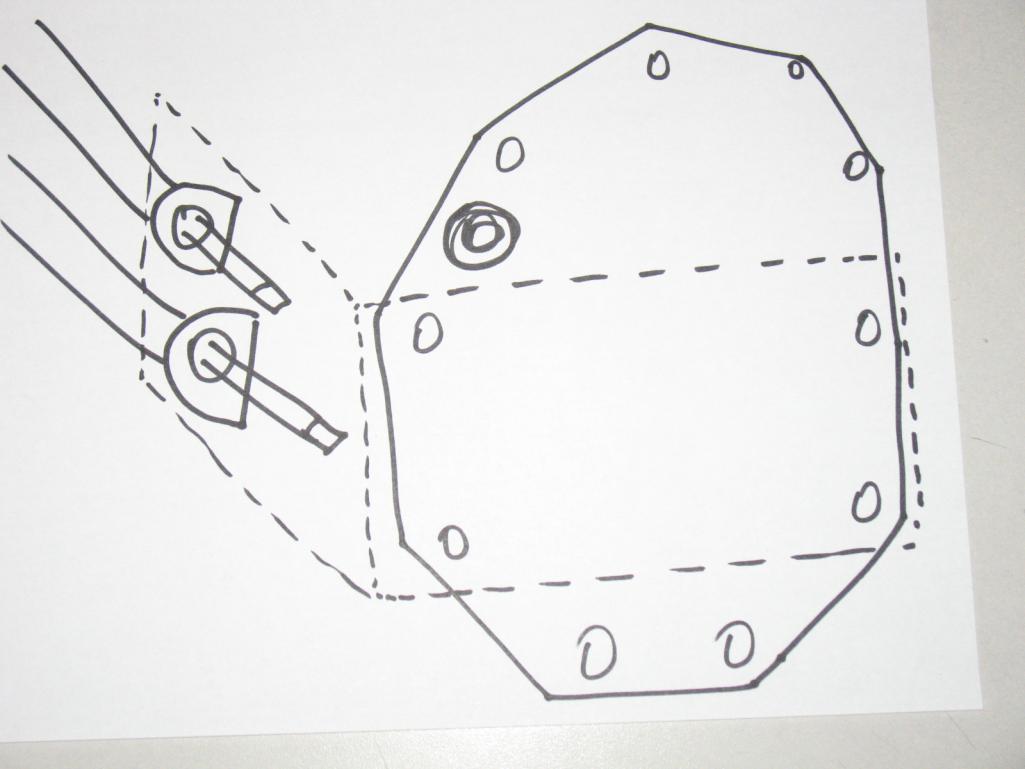
Attached image(s)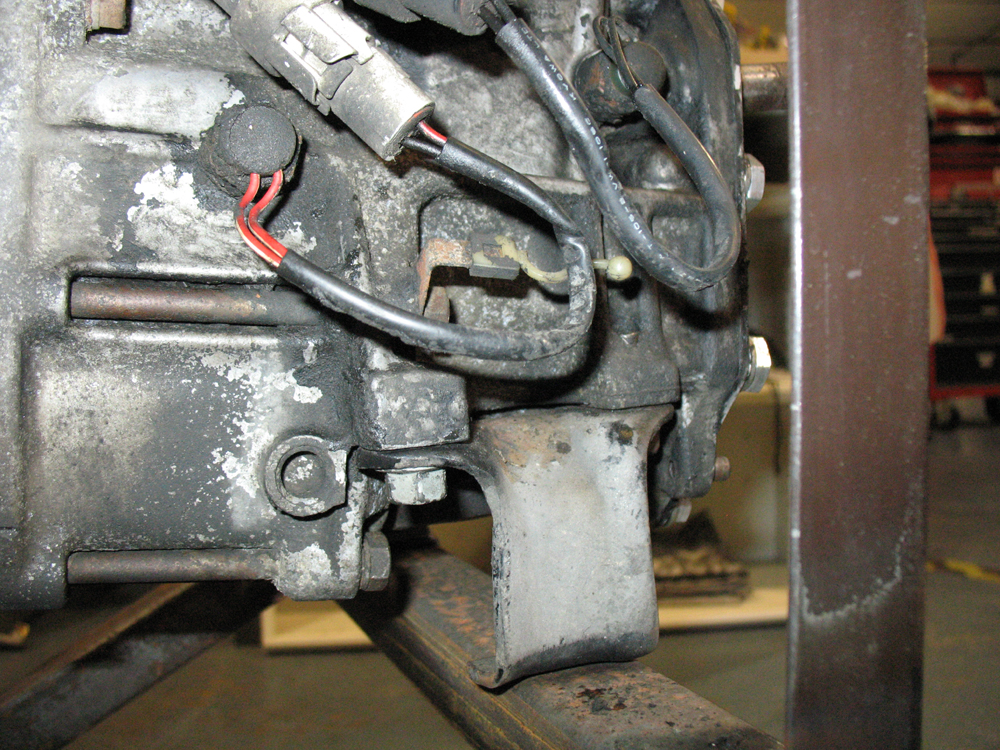

Posted by: 76-914 May 10 2017, 06:52 PM
.........or you could chunk the bell cranks and go with 2 different length cables! And does your wife know that you find the same length cables attractive? 
Posted by: jimkelly May 13 2017, 12:11 PM
she has always suspected
also, at my work they have/had two 90" push pull cables 1/4-28 that have been in deep dusty storage for years. I just dusted them off for my project and thus will go with bell crank, at least initially.
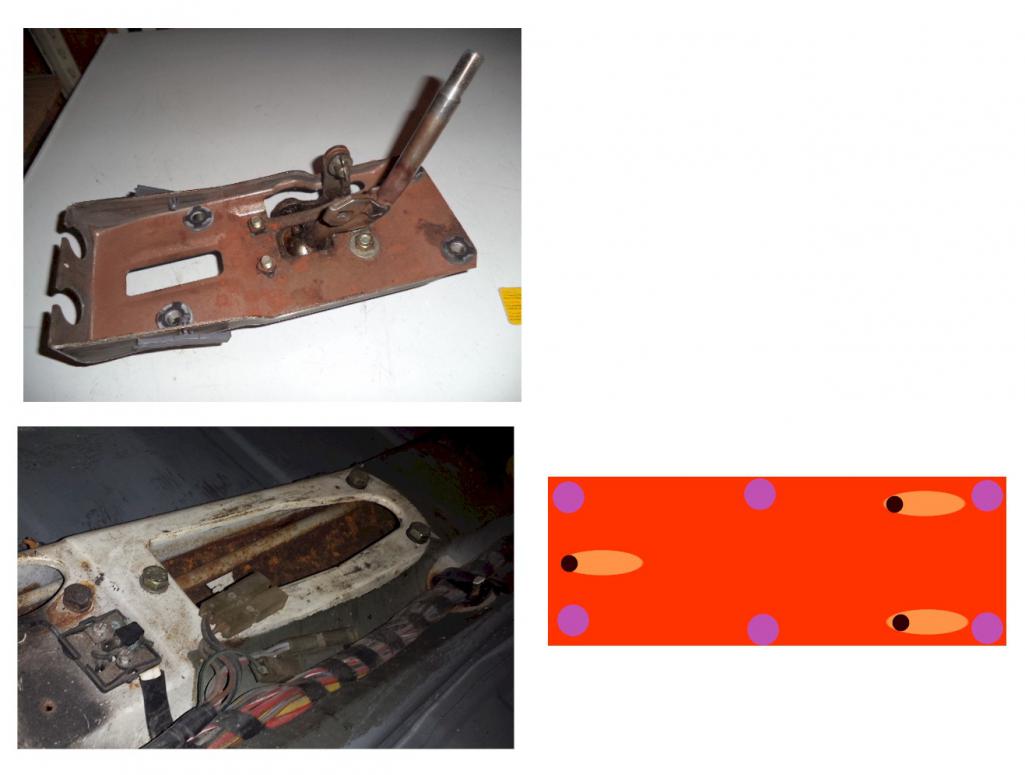
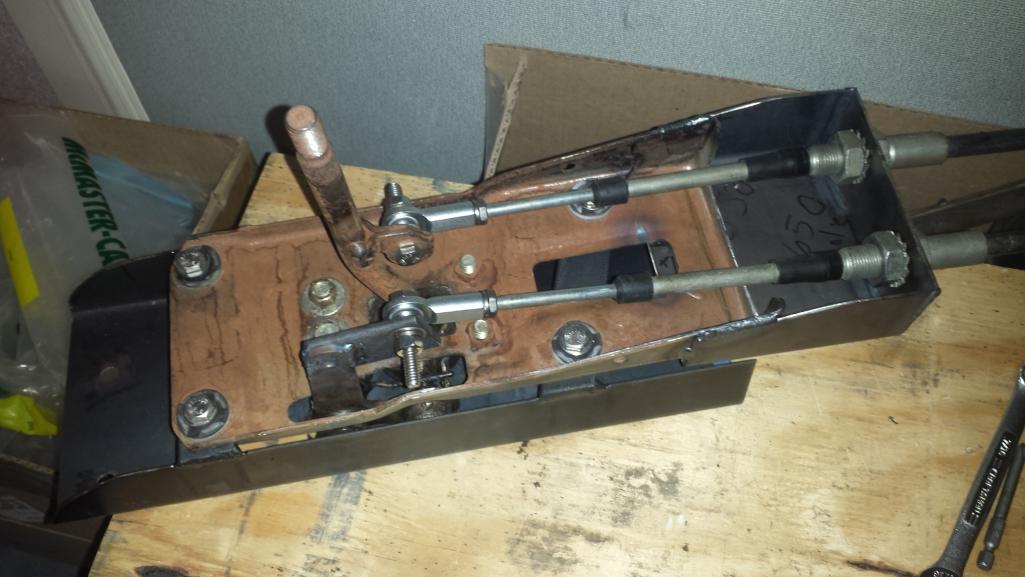
lastly, my plan for a mr2 shifter mount. bottom flat steel plate with slots for forward backward movement using the 3 stock 914 mounting holes, and this plate will have 2" offsets that the shifter will be bolted or welded to.
.........or you could chunk the bell cranks and go with 2 different length cables! And does your wife know that you find the same length cables attractive?
Attached thumbnail(s)
Posted by: jimkelly May 15 2017, 01:51 PM
obviously a chnge of plan, decide to bend thinner metal instead.
i need to now add the 3 slots.
needless to say, needed a bunch o changes.
correct sized bung 18x1.5 on exhaust.
Attached thumbnail(s)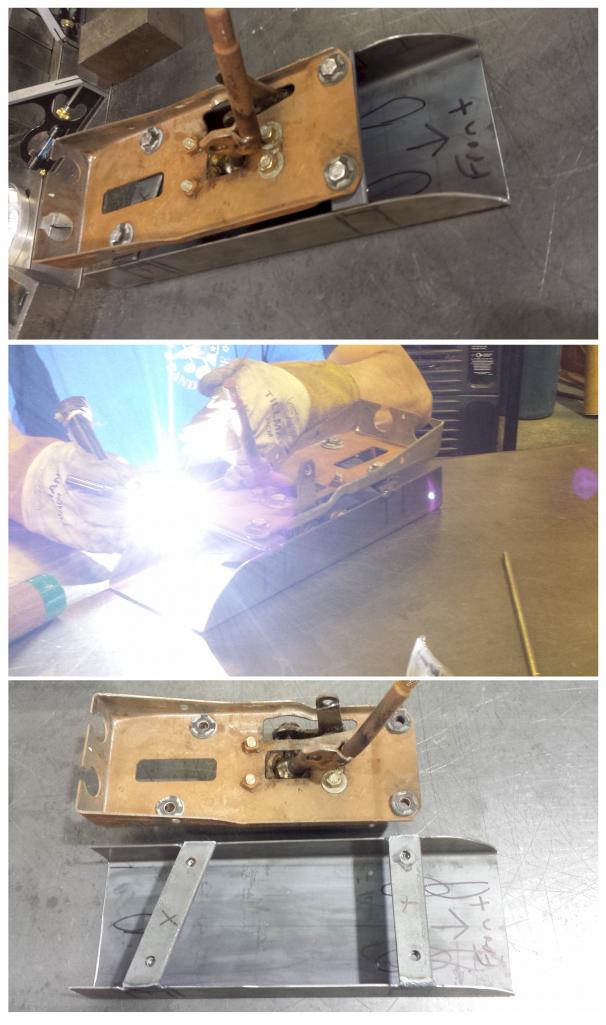
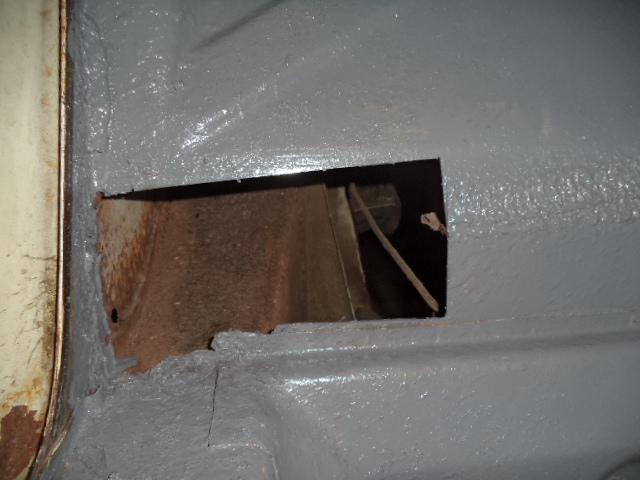
Posted by: jimkelly May 18 2017, 02:03 PM
so kent (76-914) ran his push pull cables right thru the big hole, hum : )
Attached image(s)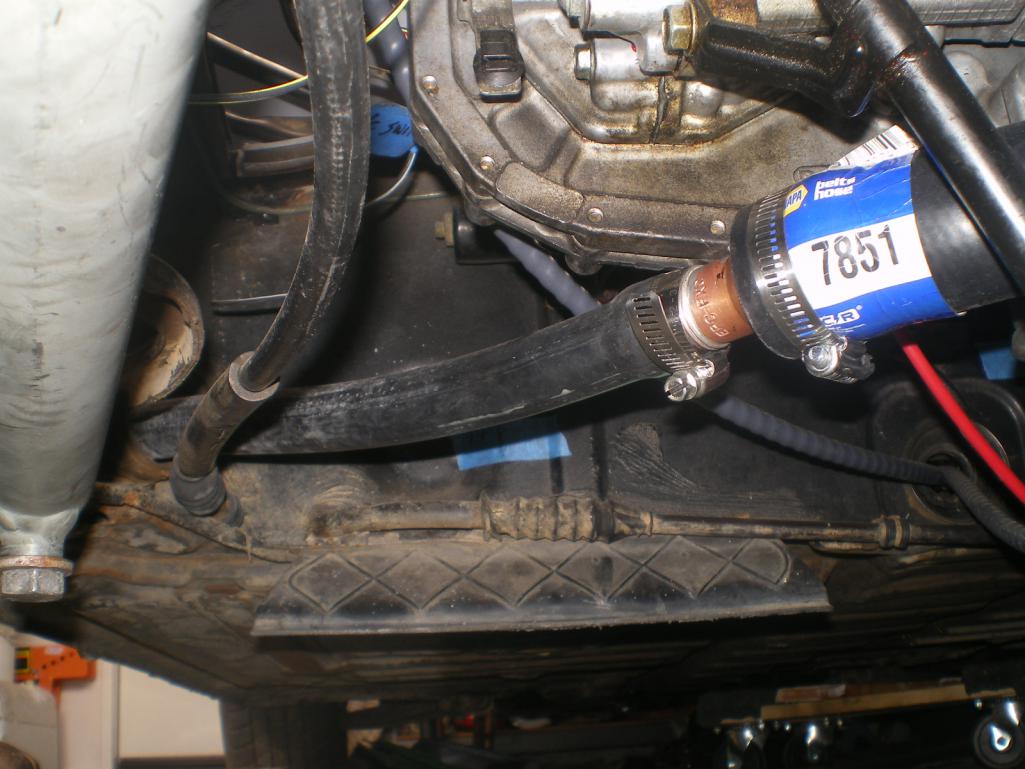
Posted by: 76-914 May 18 2017, 02:17 PM
so kent (76-914) ran his push pull cables right thru the big hole, hum : )
What was I supposed to do? It winked at me!
Posted by: Andyrew May 18 2017, 04:04 PM
so kent (76-914) ran his push pull cables right thru the big hole, hum : )
What was I supposed to do? It winked at me!
I did the same thing
I mean it is the shifter hole isnt it?
Posted by: jimkelly May 19 2017, 11:01 AM
just found this helpful pic
and another
and the original
and a custom version of coldwater's
http://www.914world.com/bbs2/index.php?showtopic=274166&hl=coldwater
http://www.914world.com/bbs2/index.php?showtopic=220569&hl=subaru&st=100
http://www.914world.com/bbs2/index.php?showtopic=258603&hl=
Attached thumbnail(s)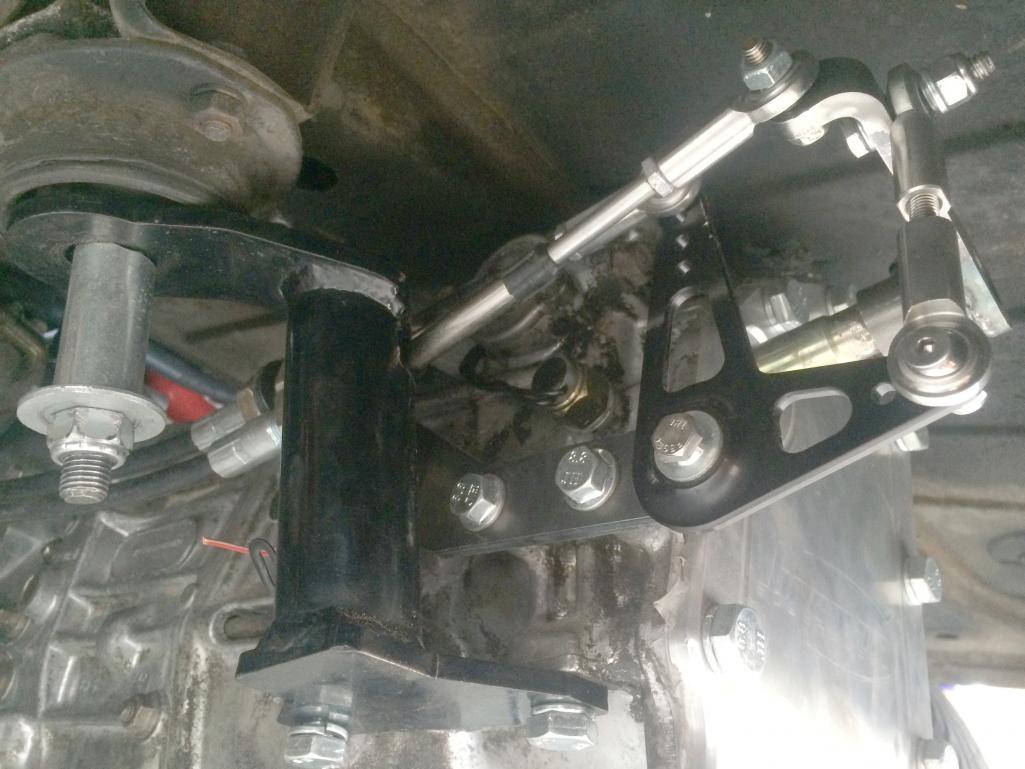
Attached image(s)
Posted by: jimkelly May 20 2017, 05:15 AM
and for then I get to exhaust for engine IN CAR it seems apmech used a header like this with coldwater cradle.
http://www.914world.com/bbs2/index.php?showtopic=220569&hl=subaru&st=100
Attached thumbnail(s)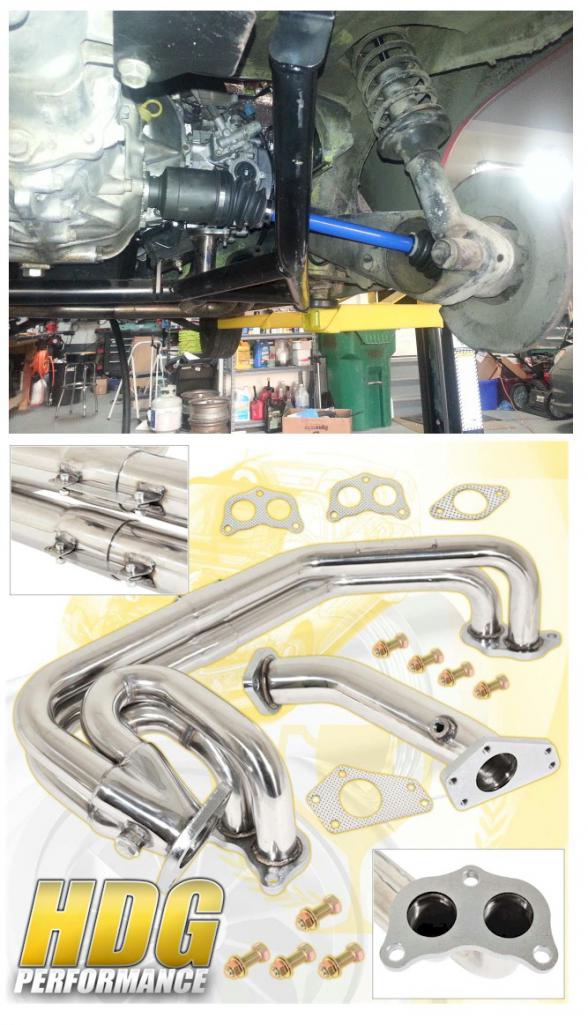
Attached image(s)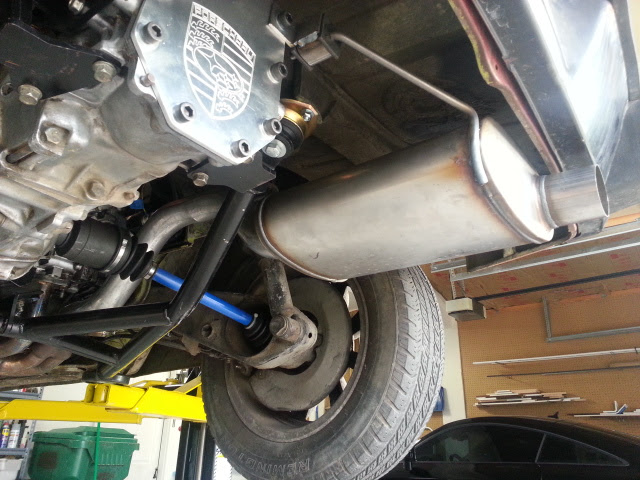
Posted by: jimkelly May 20 2017, 07:36 AM
ok. laid my shifter assy in my car and sat down next to it. seems I will want to mount it another 2-3" rearward. time to weld on another piece of steel and drill 2 new holes.
Attached thumbnail(s)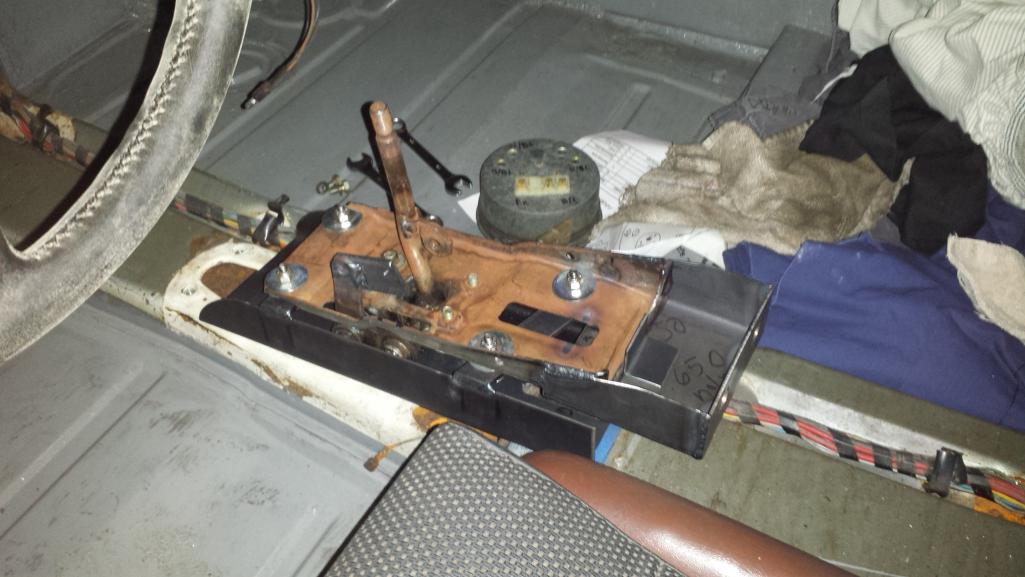
Posted by: 76-914 May 20 2017, 07:56 AM
Jim, you might look at heating and bending it back a bit, first. Your already rear of the original shifter location. Personally, I like the short throw. IIRC, Chris used an extension to meet his needs.
Posted by: JRust May 20 2017, 09:17 AM
ok. laid my shifter assy in my car and sat down next to it. seems I will want to mount it another 2-3" rearward. time to weld on another piece of steel and drill 2 new holes.
I would consider raising it up as well. When you sat in the car & shifted. Did it seem to be height wise in position. I had changed mine from it original spot which was right next to my knee for shifting. I brought it up 3" & it was better but when I reinstall with my new setup. I think it will be closer to 5-6" higher. Makes for quick steering to shift transition. Plus you get to make your center console higher. Which makes the arm rest in an actual comfortable spot. Anyway my 2 cents which is about all its worth

Posted by: jimkelly May 22 2017, 10:42 AM
getting me a new tool
Attached image(s)
Posted by: jimkelly May 22 2017, 05:34 PM
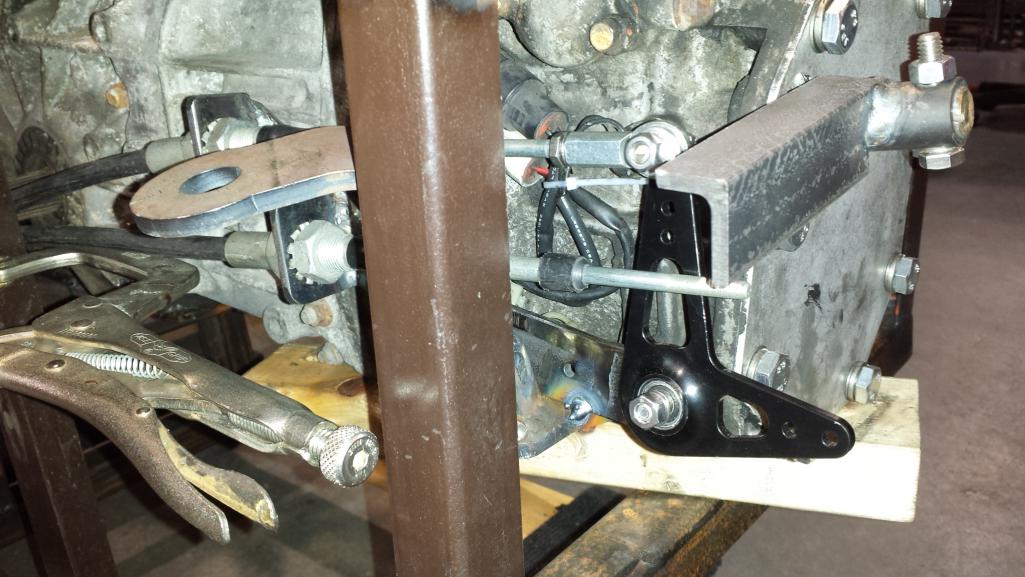
making some linkage progress.
another variable are the cables being different from brand to brand. clearly i need to lengthen my bracket cause once i add rod ends, i will need more length in bracket.
Attached image(s)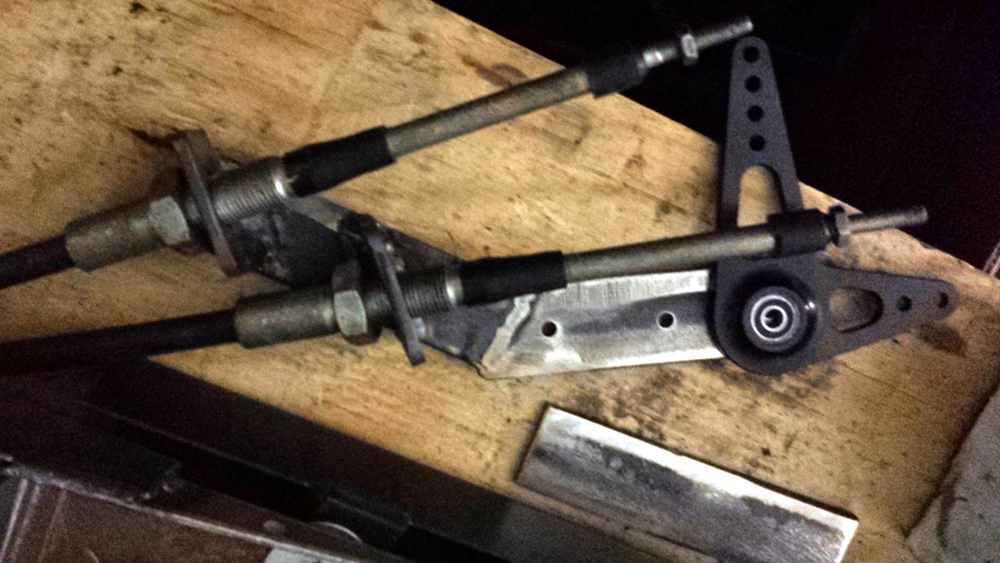
Posted by: Andyrew May 22 2017, 08:02 PM
getting me a new tool
Got one, Wish I got it way earlier!!
Posted by: jimkelly May 23 2017, 08:33 PM
making a little more shifter progress. should be able to test tomorow. see that one little tack holding the rear assy to the trans hanger which is obscurred by a leg of my test stand.
i have to say, i should work slower and check for straightness far more often and i would would love to use more stainless steel but mild steel is so much easier to cut and drill. fwiw.
oh yeah, seems many push pull cables are threaded for 1/4-28 and a few couplers and rod ends will be needed of same thread.
lastly i have to say HOLY SHIT to ian at coldwater for his amazing talent to develop the system he did. truly stunning craftsmanship  my craftsmanship is more like craftsmanshit compared
Attached thumbnail(s)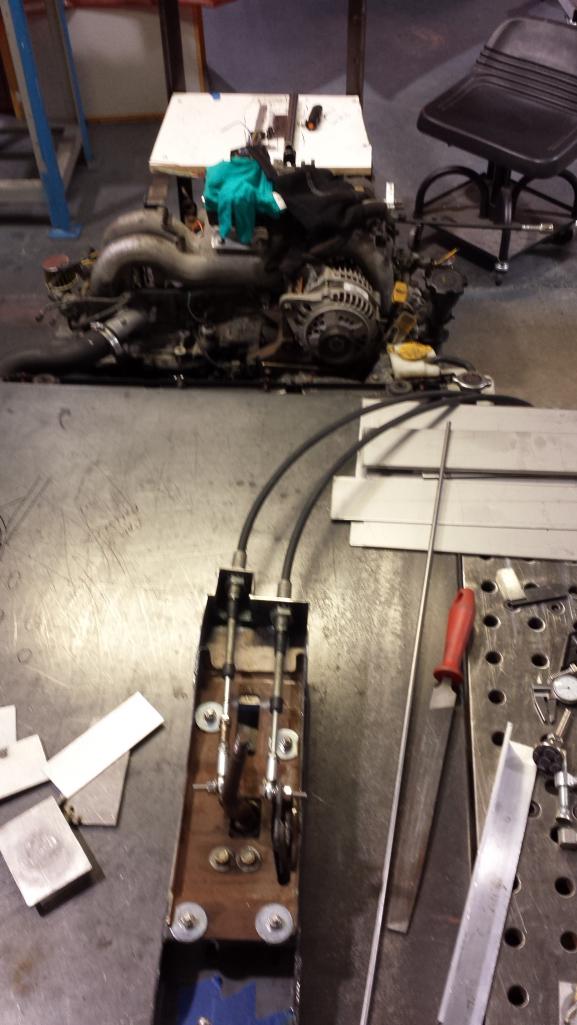
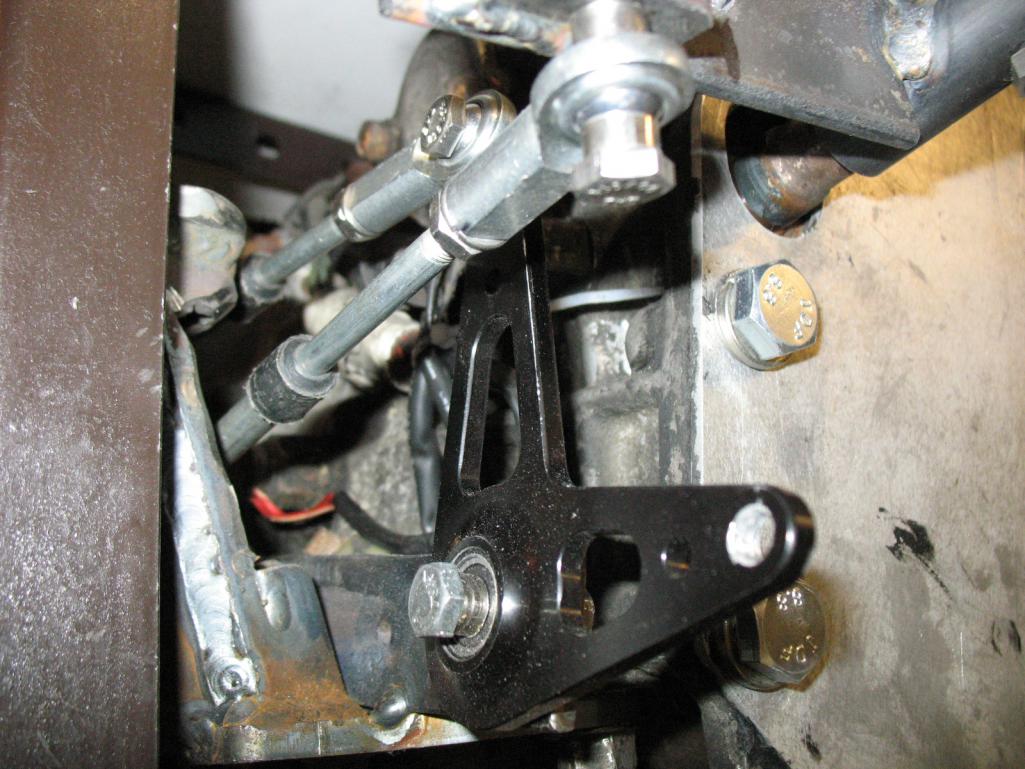
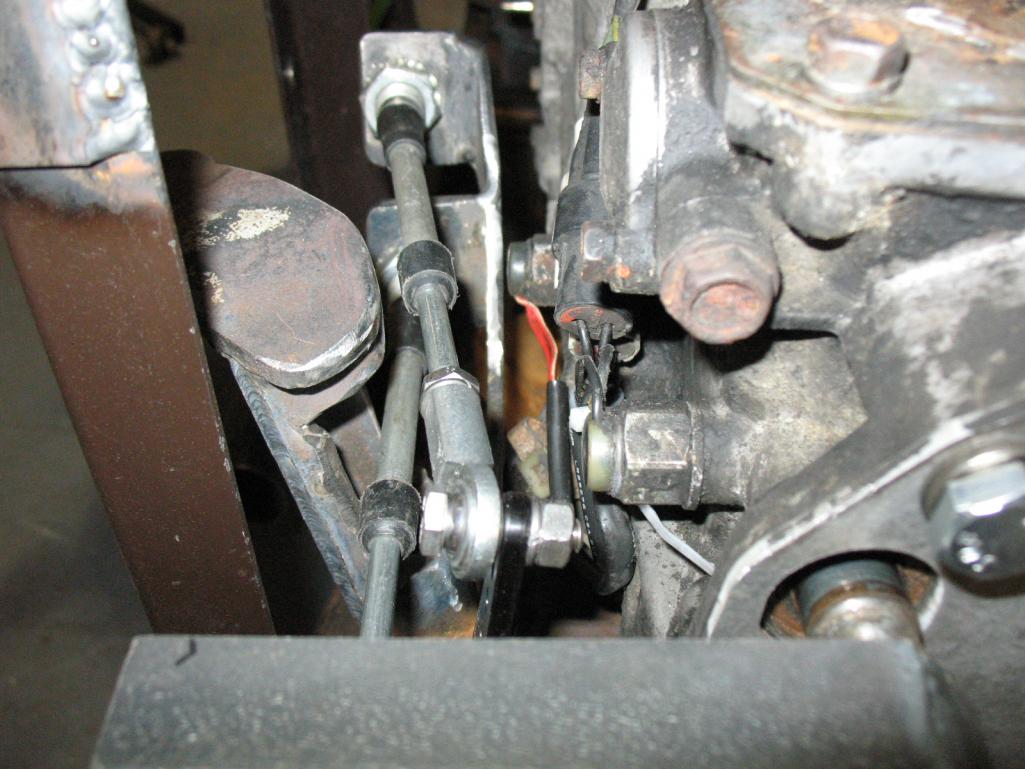
Posted by: jimkelly May 24 2017, 05:13 PM
i am one rod end away from testing the shifter OUT OF CAR.
i will have a video for you guys (NO GIRLS) tomorrow : )
Attached thumbnail(s)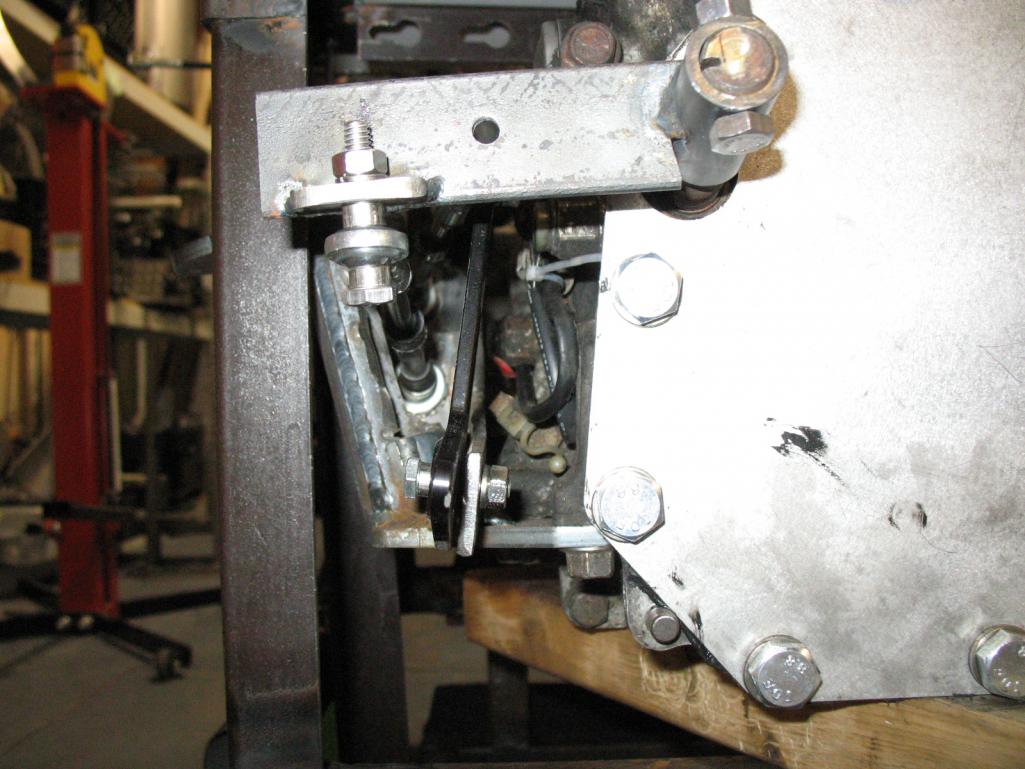
Posted by: mepstein May 24 2017, 08:38 PM
I just came across this - http://zerodecibelmotorsports.com/products/bell-crank-mechanism-5spd/
Not cheap at $300 but an option if coldwater isn't going to make more shifter kits.
Attached image(s)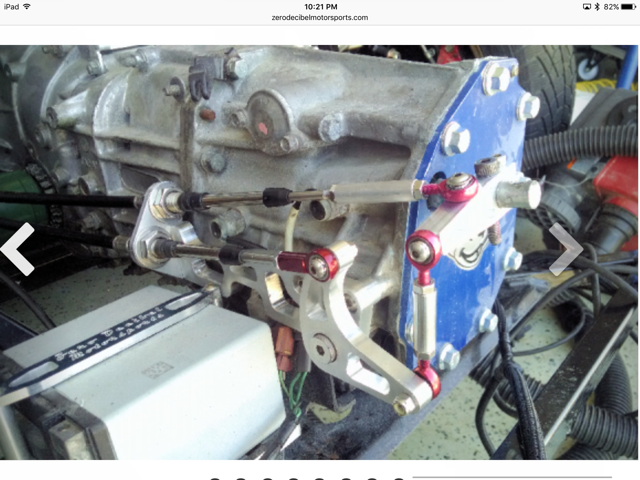
Posted by: jimkelly May 24 2017, 08:55 PM
wow, nice.
seems gate for 5th and reverse is spring loaded,and i am having some issues.
1st and 2nd not.
not sure i was really in 5th and reverse.
pushing forward on shifter feels better engagement, than pulling back.
also feels like it wants to jump past neutral and on to next gear in same gate but maybe it is just a matter of getting used to it?
https://www.youtube.com/watch?v=zE_UYPzY8Ss
Posted by: jimkelly May 26 2017, 04:24 PM
seems like a good price for push pull cables on ebay.
I mention this cause there seems to be empirical data suggesting that shifting the gates is done much better using a long cable coming to trans from the side. ie: dbcooper and many others. so I think one 90" and one 120" are probably the best cable lengths to use.
ref: http://www.914world.com/bbs2/index.php?showtopic=102887
search this:
Steinjager Shifter Cables, Push-Pull 1/4-28 90 Inches Long Bulkhead Style
or
Steinjager Shifter Cables, Push-Pull 1/4-28 120 Inches Long Bulkhead Style
Attached image(s)
Posted by: 76-914 May 26 2017, 07:35 PM
Jim, if your going this route check my build thread. I listed the lengths there, Maybe it was 9' & 7.5' but I'm not sure. Less moving parts = reliability!
Posted by: Amenson May 27 2017, 08:01 AM
wow, nice.
seems gate for 5th and reverse is spring loaded,and i am having some issues.
1st and 2nd not.
not sure i was really in 5th and reverse.
pushing forward on shifter feels better engagement, than pulling back.
also feels like it wants to jump past neutral and on to next gear in same gate but maybe it is just a matter of getting used to it?
https://www.youtube.com/watch?v=zE_UYPzY8Ss
There is a lockout for reverse so you can't go from fifth to reverse until returning to the 3/4 location. Looks like that was your issue.
Posted by: jimkelly May 27 2017, 08:00 PM
son of a gun thanks
Posted by: jimkelly May 28 2017, 01:30 PM
i'm starting to wonder if this cradle (sawtooth's) could be made even simpler with long sections reaching all the way to the trans hanger section. I also wonder if the cross bar needs some amount of bump up to allow easier passage for exhaust.
http://www.914world.com/bbs2/index.php?showtopic=87326&st=0&p=1404662&#entry1404662
though I see lots of guys doing turbo thus turbo routed exhausts. though sawtooth's header solution seems to fit beautifully.
Attached image(s)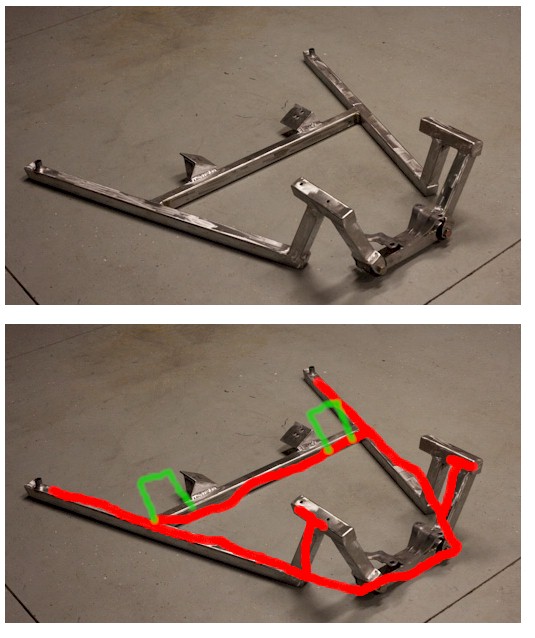
Posted by: jimkelly May 29 2017, 08:17 PM
picked up a 1997 legacy 5spd awd trans today for $100. it has the 2 bungs on its side.
Posted by: jimkelly May 30 2017, 02:35 PM
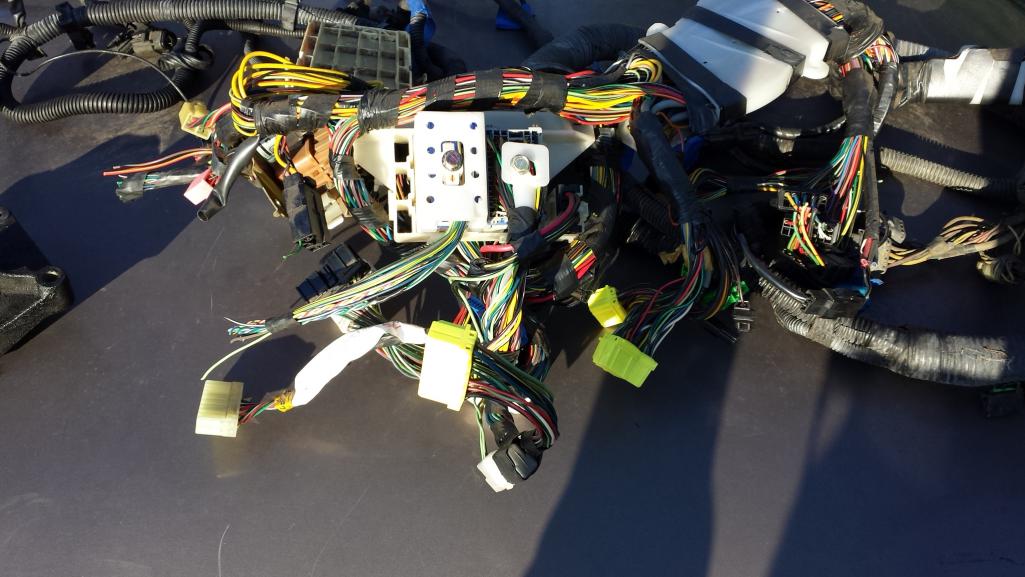
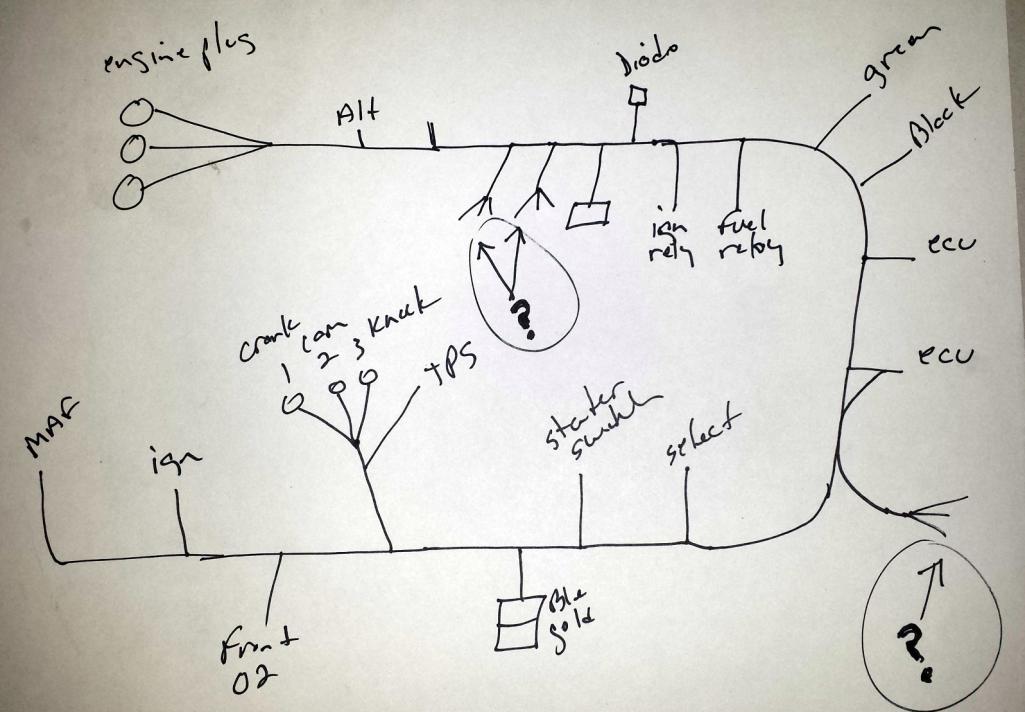
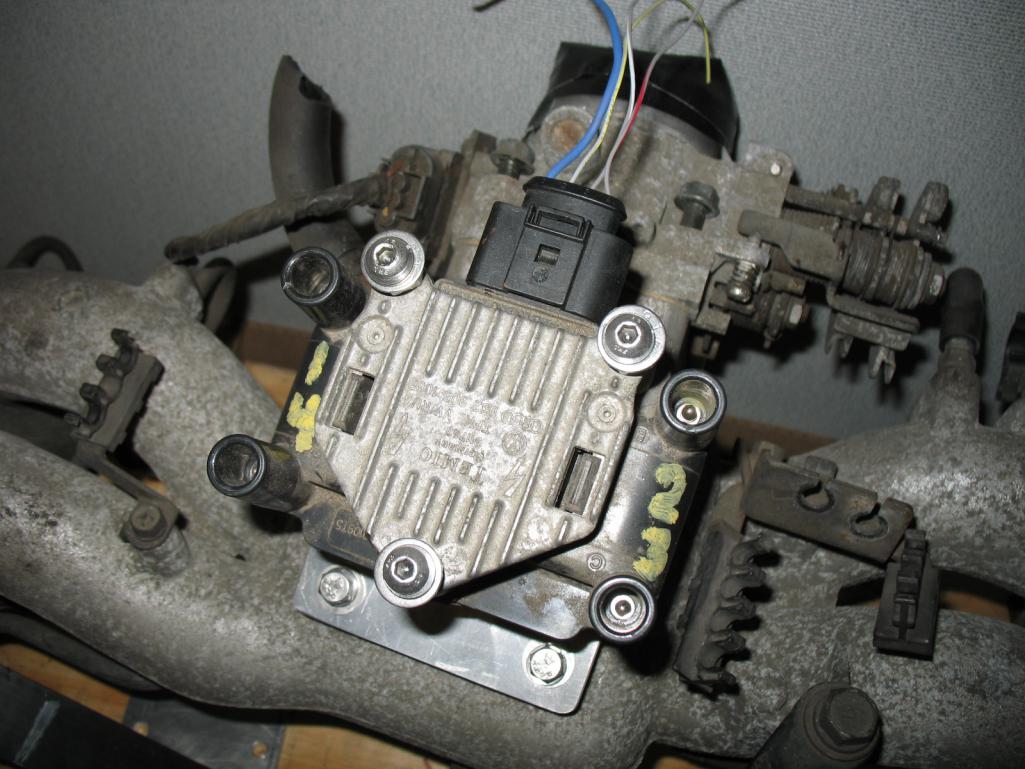
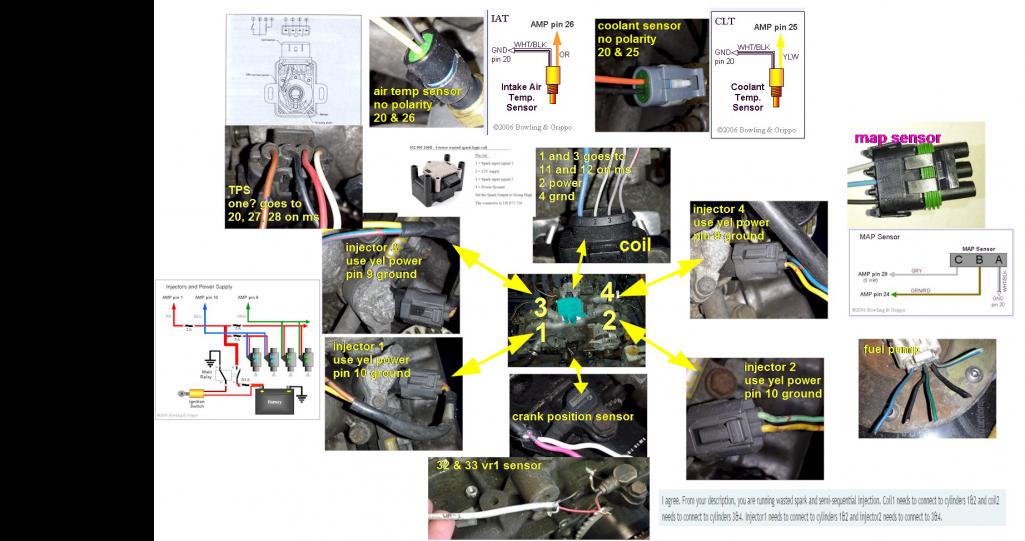
guess i'll buy a microsquirt harness and start wiring it up. relays and ignition switch and all. guess i'll start by writing down all the colors of the wires that come out of all my sensors, injectors, etc, and figure out what goes where.
here is an image of many of my plugs.
Attached thumbnail(s)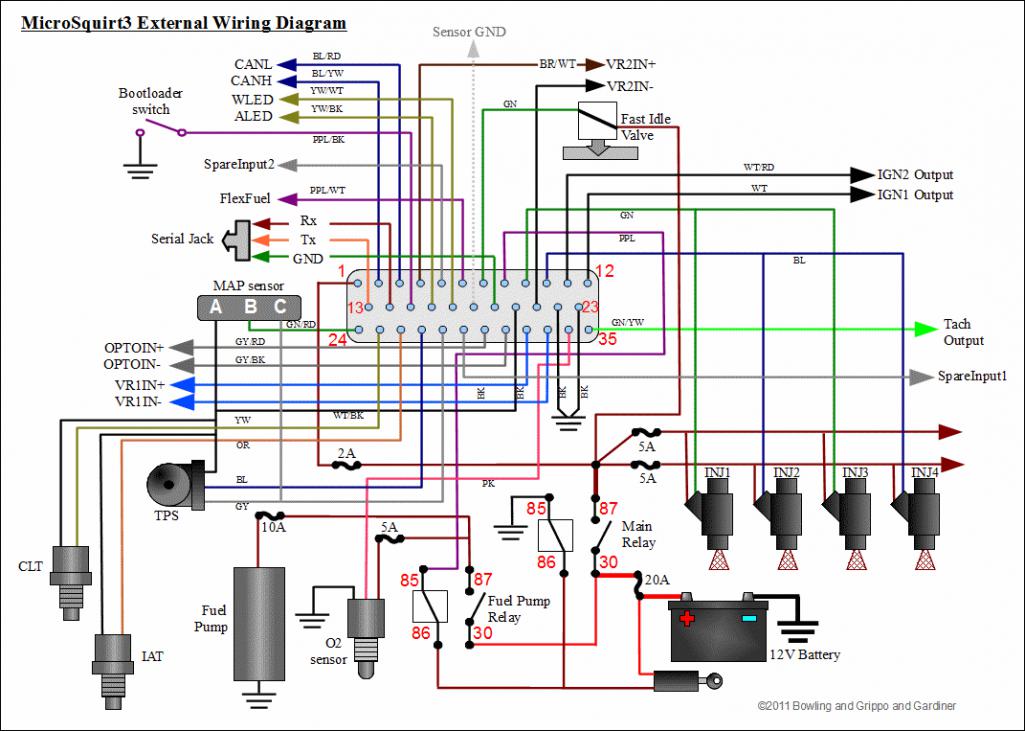
Posted by: jimkelly May 31 2017, 04:55 PM
i think this brit is giving me the correct firing order of the coil?
https://www.youtube.com/watch?v=XgJy-mJ2xyE
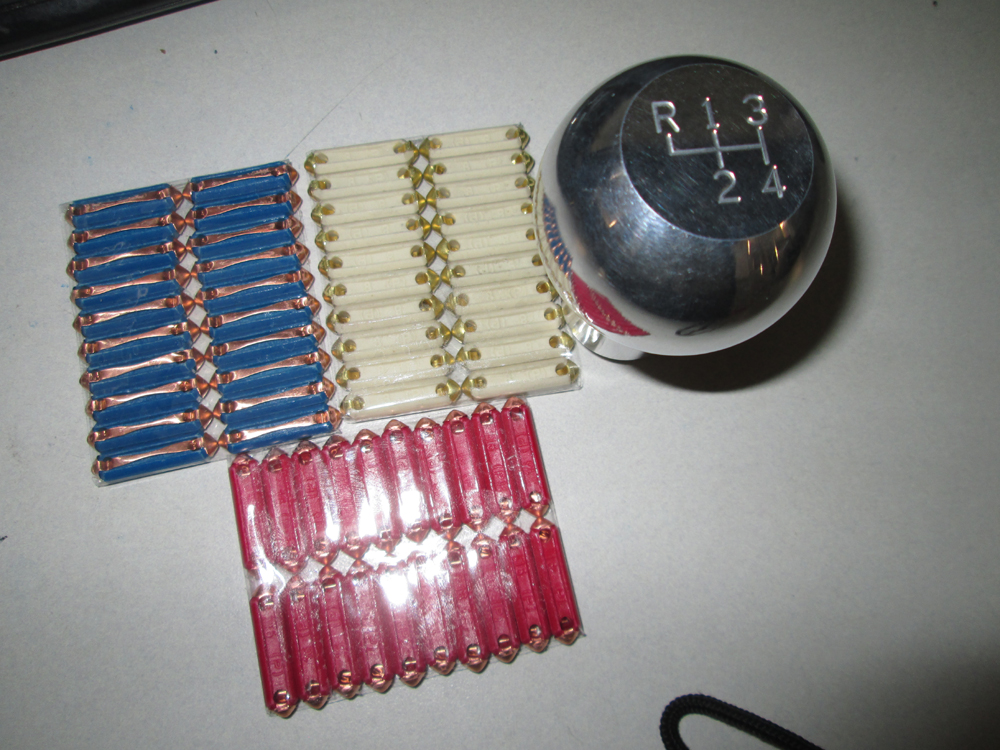
and ordered a shift knob 12mm 1.25 $12 ebay
Attached image(s)
Posted by: jimkelly Jun 7 2017, 11:23 AM
guys. i know you are some smart fellas. how do i check this vw coil to figure out what spark plug wire holes are on each bank and figure out what electrical pins are for each bank?
is there some sort of continuity test i can do that won't cause possible damage to the coil?
also, my plug to the coil has one fat wire NOT at the 12v supply pin. i should probably move it to the 12v supply pin, right?
Attached thumbnail(s)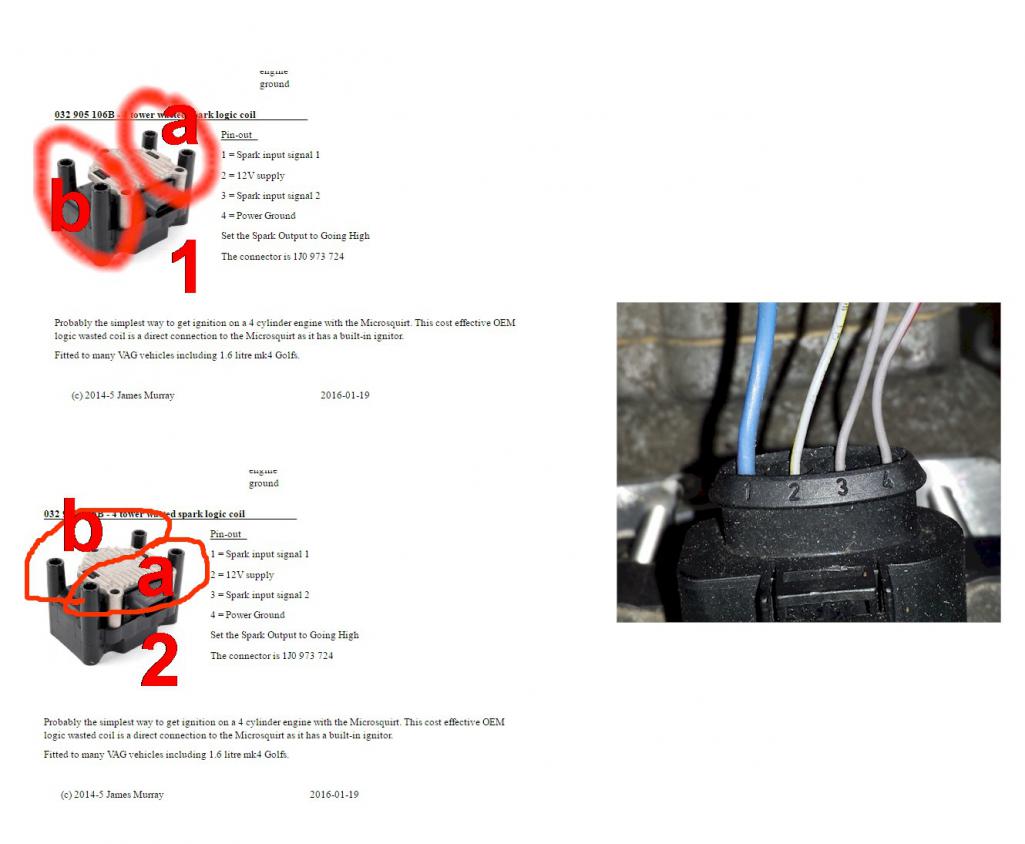
Posted by: jimkelly Jun 9 2017, 11:42 AM
with or without you guys, i am gonna figure out, the pin out, of my tps. then i need to figure out the pin out and the spark out of my vw coil
Attached thumbnail(s)
Posted by: timothy_nd28 Jun 9 2017, 12:43 PM
Looks like the TPS pin 2 ties to the microsquirts gnd and pin 3 ties to the microsquirts 5v ref. That leaves you with pin 4 that goes to the microsquirts TPS signal wire. Looks like pin 1 will not be used, its a idle switch that the microsquirt doesn't support.
Toward the ignition coil, I would bench test this to see what's what. It looks like the coil needs a pull up signal to fire a certain bank. I would use a car battery to supply the 12volts to the coil, and also have the microsquirt powered up so you could temporarily borrow its 5volt ref voltage to tap either bank 1 or bank 2 signal input, then observe which banks fire.
Posted by: jimkelly Jun 9 2017, 12:56 PM
thank you
Attached thumbnail(s)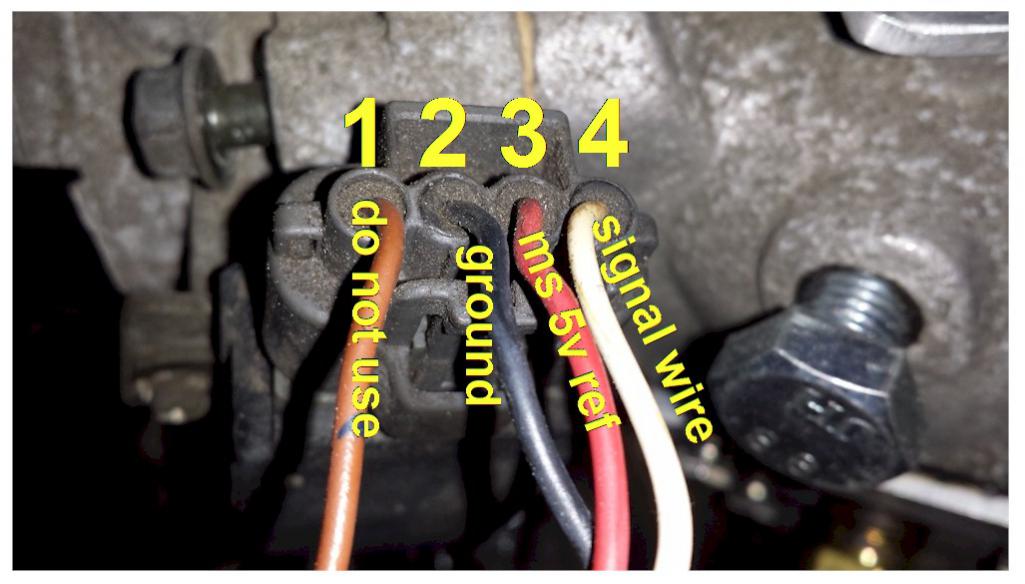
Posted by: timothy_nd28 Jun 9 2017, 01:07 PM
TPS pin 1---not used
TPS pin 2 ties to Microsquirts pin 20 (GND)
TPS pin 3 ties to Microsquirts pin 28 (5v ref)
TPS pin 4 ties to Microsquirts pin 27 (tps signal)
You may want to verify this by following the instructions here:
Posted by: jimkelly Jun 9 2017, 01:23 PM
tim, i will.
next up, the vw coil.
diy provides this for pin out put i don't know which two spark holes are paired and i don't know which two are 1-3 and 3-4.
MY BAD, DIY DOES PROVIDE MORE INFO ON COIL.
http://www.msextra.com/doc/pdf/html/Microsquirt_Hardware-3.4.pdf/Microsquirt_Hardware-3.4-62.html
http://www.msextra.com/doc/pdf/html/Microsquirt_Hardware-3.4.pdf/Microsquirt_Hardware-3.4-63.html
Attached thumbnail(s)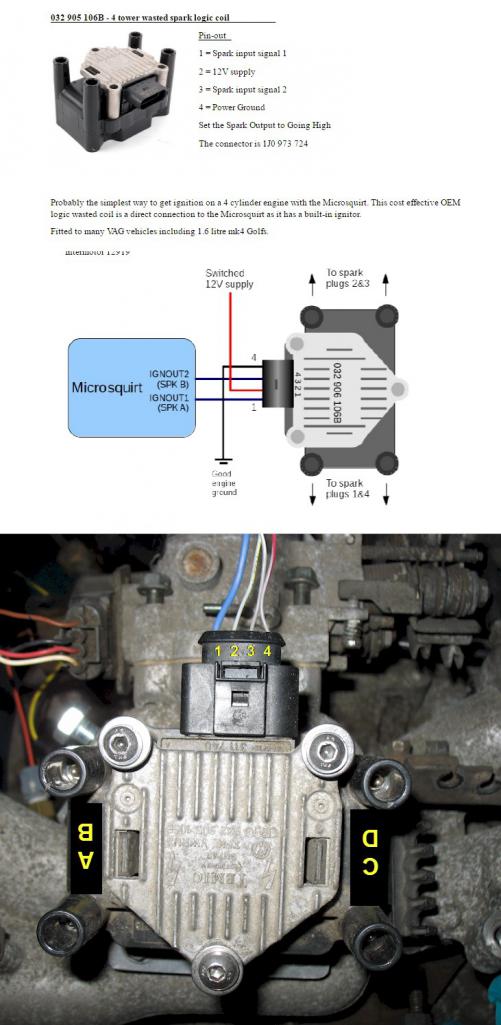
Posted by: jimkelly Jun 9 2017, 02:29 PM
revised collage
Attached thumbnail(s)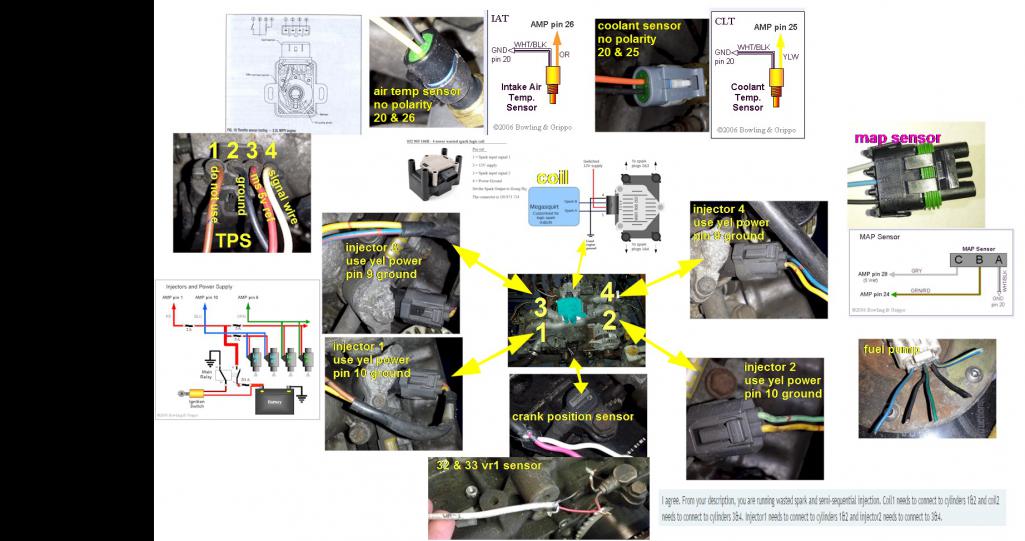
Posted by: timothy_nd28 Jun 9 2017, 02:47 PM
are you setting up both crank and cam signals? Does microsquirt allow both functions?
Posted by: jimkelly Jun 9 2017, 02:59 PM
not sure if it allows for both but i am not using a cam sensor. not needed as i understand it.
i did just notice a conflict on what pins to use for the cylinders on diy microsquirt page.
http://www.useasydocs.com/details/wire.htm
Attached image(s)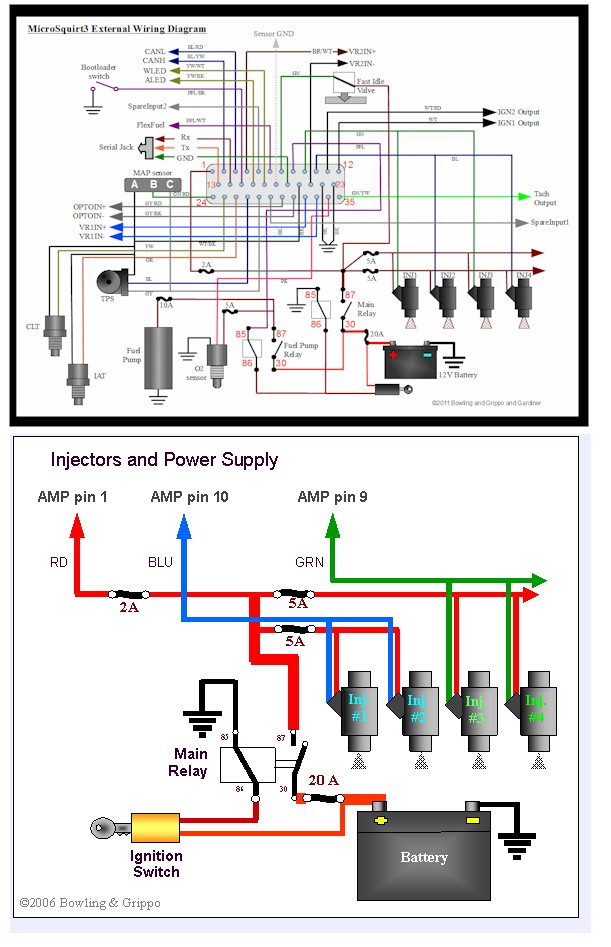
Posted by: timothy_nd28 Jun 9 2017, 03:11 PM
you can solve this discrepancy by buying the sequential injection upgrade kit
Posted by: jimkelly Jun 9 2017, 03:14 PM
next week i will start wiring it up using wire nuts at all connections. a base map will be the last issue unless it is not needed and the autotune will create one.
Posted by: jimkelly Jun 14 2017, 02:29 PM
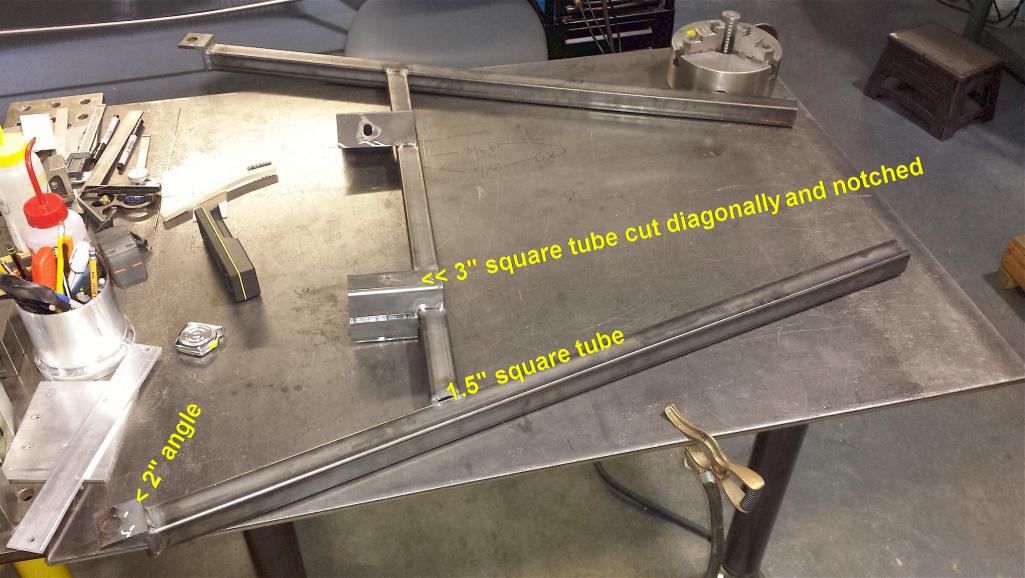
toying with the idea of making cradles that include trans hangers and maybe cable shift brackets too.
trying to keep it simple with a minimum of different materials. should be able to make most pieces from 1.5" mild steel square tube 1/8" thick, and a tiny bit of 2" angle for the ends, and a little bit of 3" square tube for engine mounts.
the scraps used in my pic are 1" and 2", so ignore them sizewise
stealing ideas from ian, sawtooth, and japnovak.
Attached thumbnail(s)
Attached image(s)
Posted by: Piledriver Jun 16 2017, 12:52 AM
Looks like you are well along with things...
For the uS install...
Do consider the sequential fuel kit.
It matters... Not hugely, but it matters, and the uS can use two inputs, or use a cam speed missing tooth wheel as a single input, supports sequential.
Sequential spark NBD. Fuel makes a difference, and you have the trim and timing adjustment in MS2E/uS.
If it was a MS3 you would have per cylinder timing trim etc, but really no reason to go sequential spark on MS2.
Skip the wire nuts and pick up a good, adjustable ratcheting crimper with NON-insulated crimp dies, and a few boxes of various sizes 50pk of the hot-melt glue lined splices and terminals.
I like the Paladin crimper with the angled handle, YMMV.
The insulation is very thin on those splices so the non-insulated die work very well.
The hot melt glue takes care of sealing the possible hole from the bump in the die, and you get a solid crimp every time.
If you are crimping on the "F" type pins and inserting into the connectors, rather than slicing pigtails, you need WAY fewer splices, and need the matching die... A decent quality stand alone crimper for GM Weatherpak (with multiple nests) may be cheaper than the die, and may actually work better.
Why is it showing I only have two posts???? Has been awhile since i logged in here...
Posted by: jimkelly Jun 19 2017, 07:33 PM
piledriver
way to go with those 2 whole posts : )
and thanks for chiming in.
no budget for any extras and the wire nuts are just to get my test engine running on test stand. i plan on all kinds of nice connections when the thing finally goes in a car.
need to get a few more fuse panels.
Attached thumbnail(s)
Posted by: jimkelly Jun 19 2017, 10:43 PM
some progress
Attached thumbnail(s)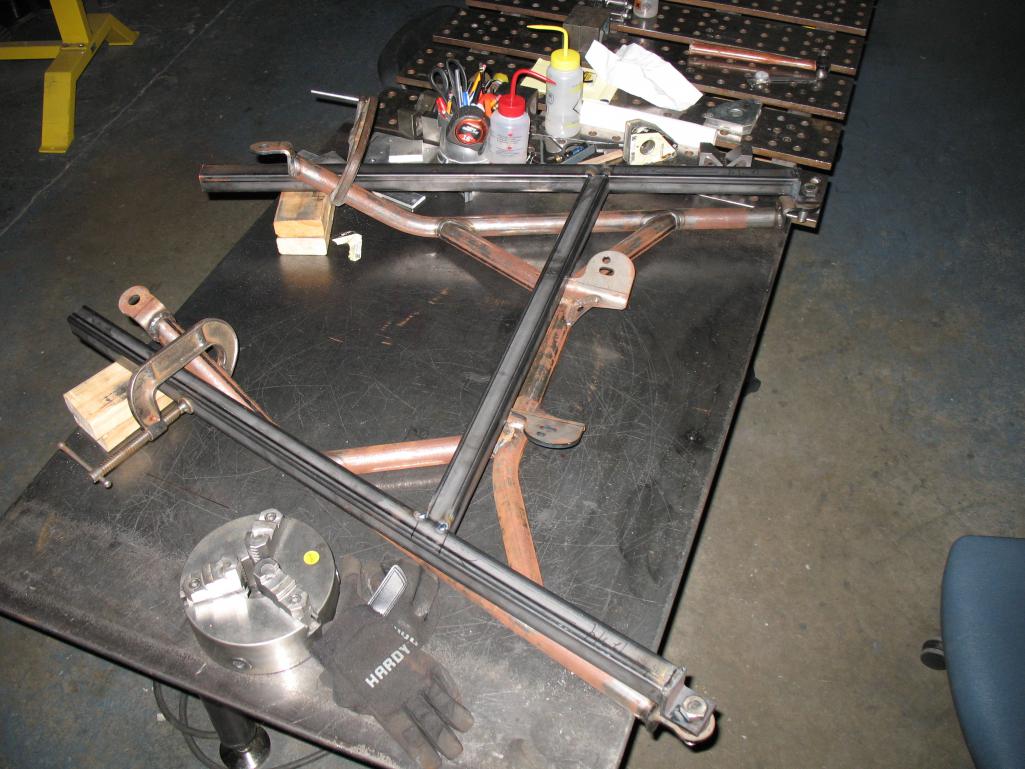
Posted by: jimkelly Jun 20 2017, 09:05 AM
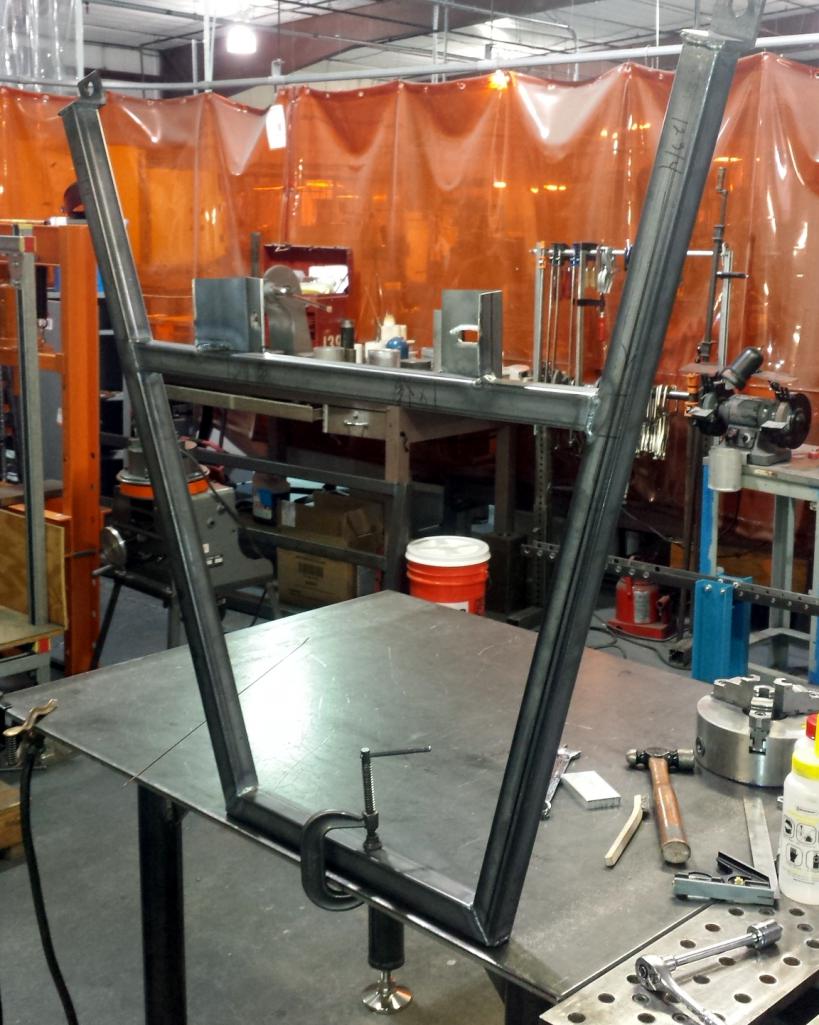
update - 22 degrees +-
gonna mate it to engine tonight (hope my engine mount holes are rightish) and try to establish location of trans area cross over tube.
rear cross bar oriented and welded on. everything in pics in now fully welded.
need to weld bar to brackets i made for trans.
Attached thumbnail(s)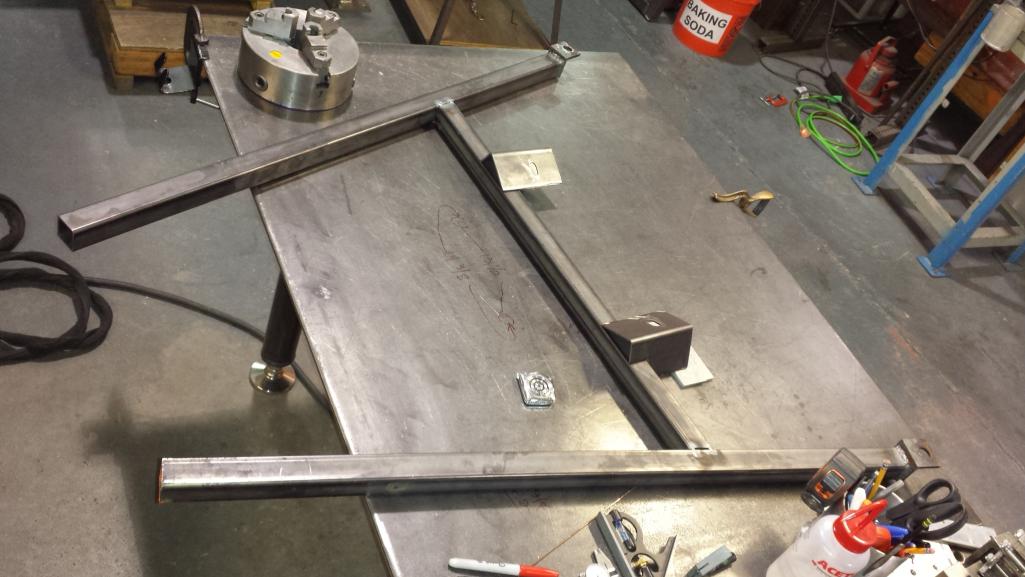
Attached image(s)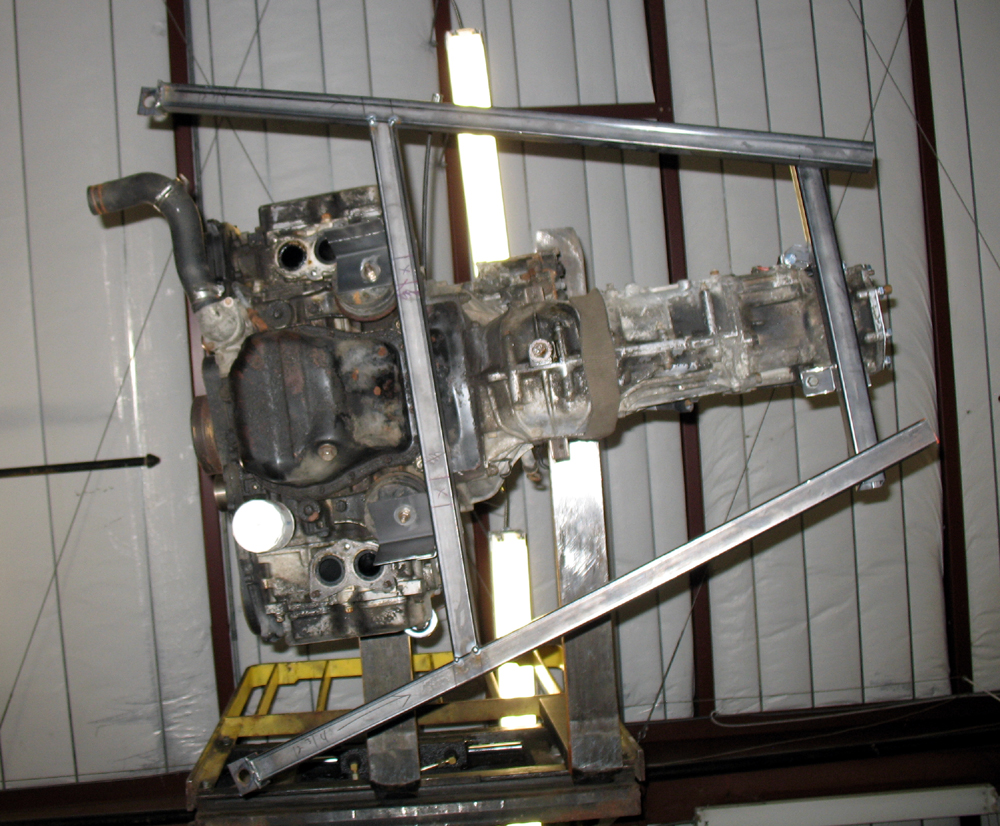
Posted by: jimkelly Jun 21 2017, 06:34 AM
my design will incorporate trans hangers for suby trans and,
i am thinking about incorporating push pull cable brackets into the cradle as well.
my thought was that a specific design would allow buyers to know:
exactly which cables to buy, Steinjager Shifter Cables on ebay, $60 each +-
exactly what to cut stock 914 axles to, by dutchman, for $150 or so.
any thoughts ???
i was thinking of making the mass produced version out of stainless, but stainless is more money and machining is more work, but wouldn't need paint or powder coating.
Posted by: mepstein Jun 21 2017, 07:23 AM
my design will incorporate trans hangers for suby trans and,
i am thinking about incorporating push pull cable brackets into the cradle as well.
my thought was that a specific design would allow buyers to know:
exactly which cables to buy
exactly what to cut axles to by dutchman
any thoughts ???
i was thinking of making the mass produced version out of stainless, but stainless is more money and machining is more work, but wouldn't need paint or powder coating.
Ask Ben / MB911 he knows a thing or two about stainless.
Posted by: jimkelly Jun 23 2017, 09:46 AM
it weights 28 lbs +-
i'm gonna see how it fits in my car tomorrow.
my boss is riding my ass for not using ROUND tube but i feel square tube makes fabrication easier.
Attached image(s)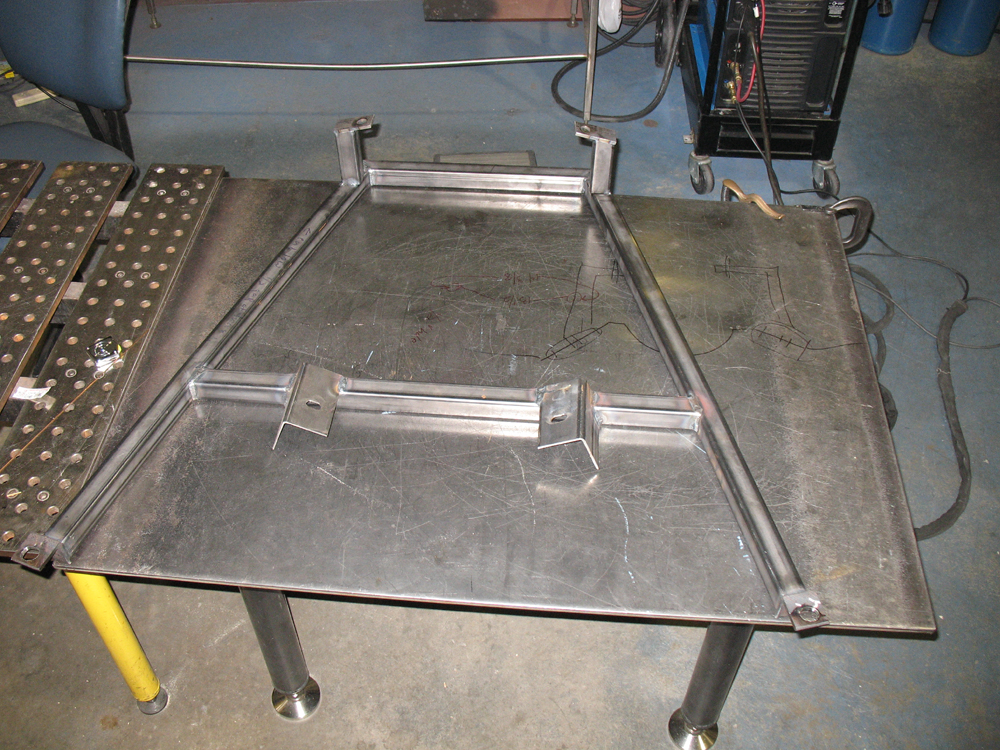
Posted by: jd74914 Jun 23 2017, 10:33 AM
my boss is riding my ass for not using tube but i feel square tube makes fabrication easier.
Nothing wrong with square tube. It's stiffer in the vertical direction where most load is being carried anyways.
Posted by: mgp4591 Jun 23 2017, 12:54 PM
I like the idea of the "kit" type development - it offers a lot to the new conversion (or should I say, converted!) projects by taking the guesswork out of it with proven designs. With a few modifications it will fit every engine in the Suby lineup and as long as the tranny stays in the same spot the axles will work. Nice job!
Posted by: jimkelly Jun 24 2017, 10:57 AM
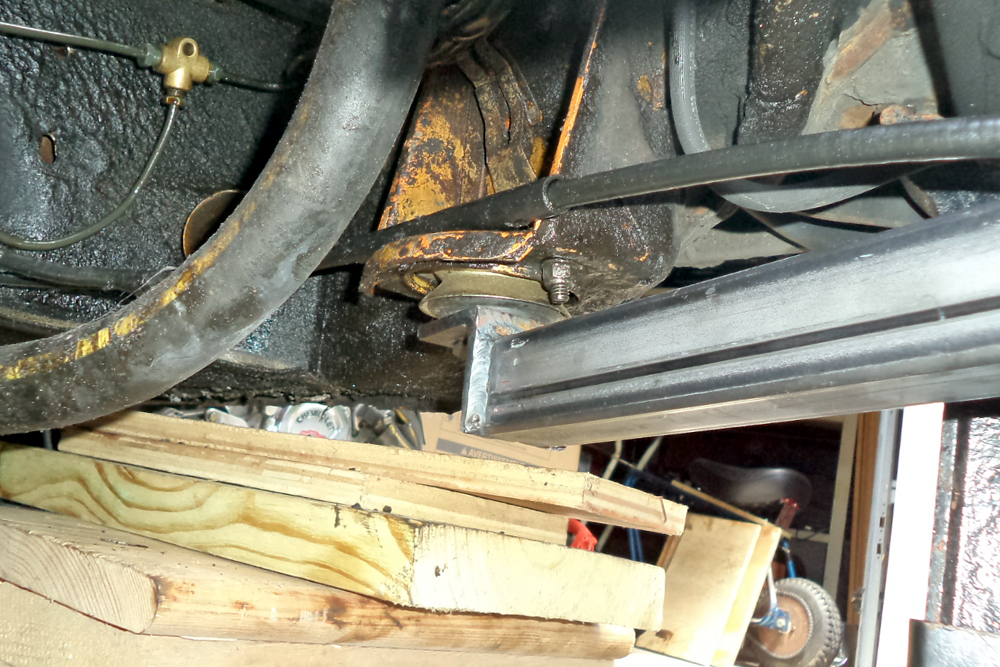
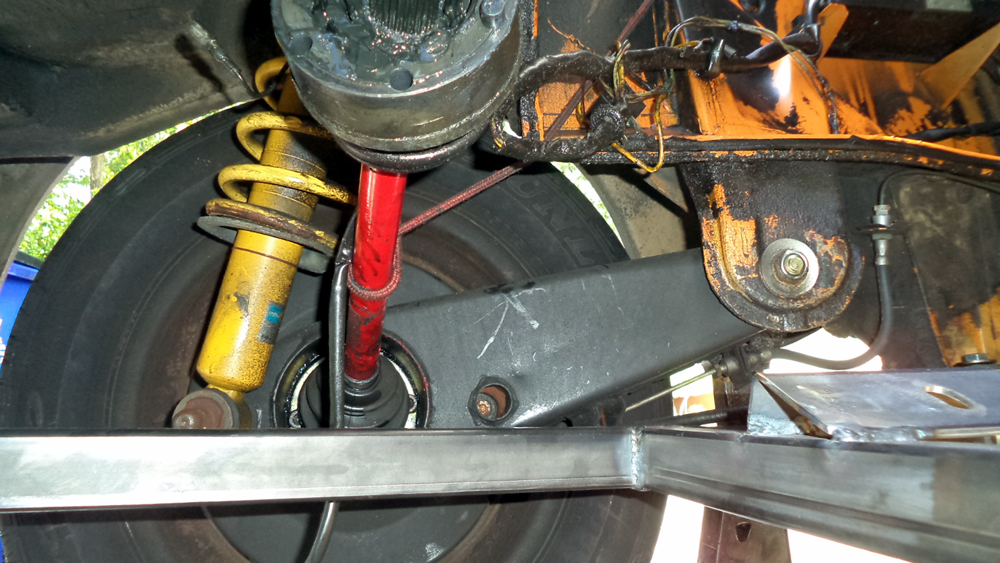
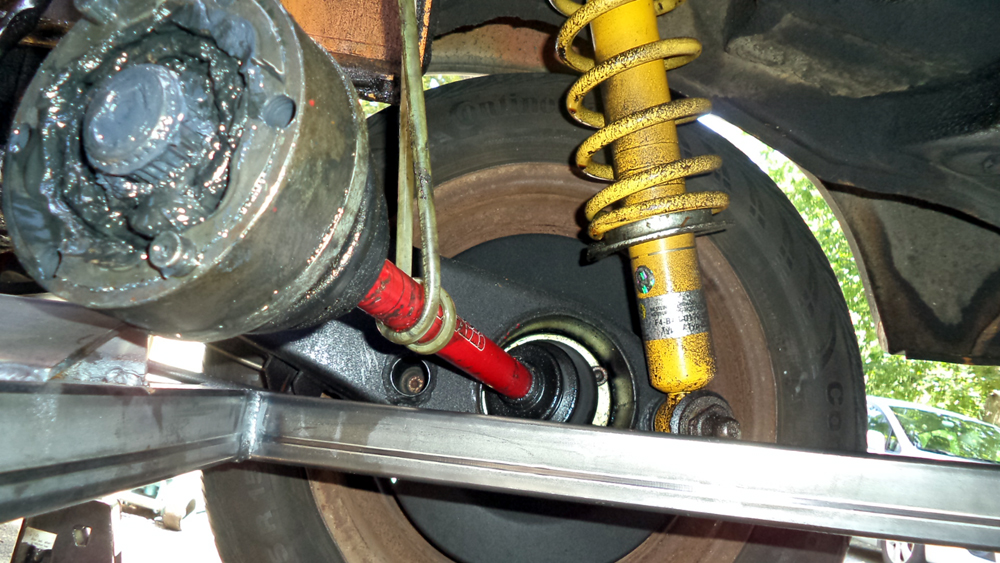
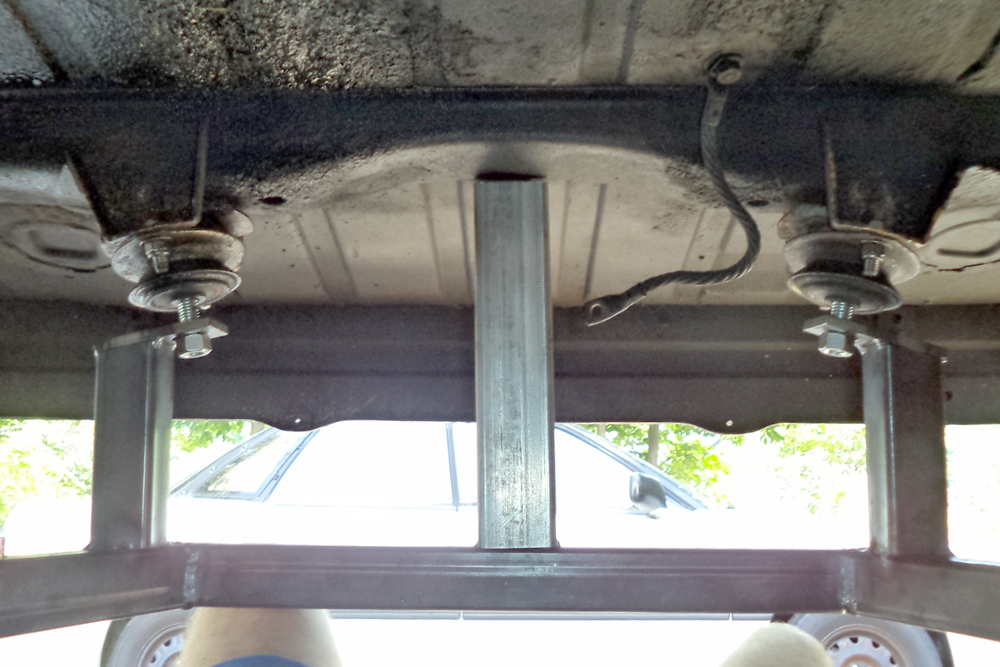
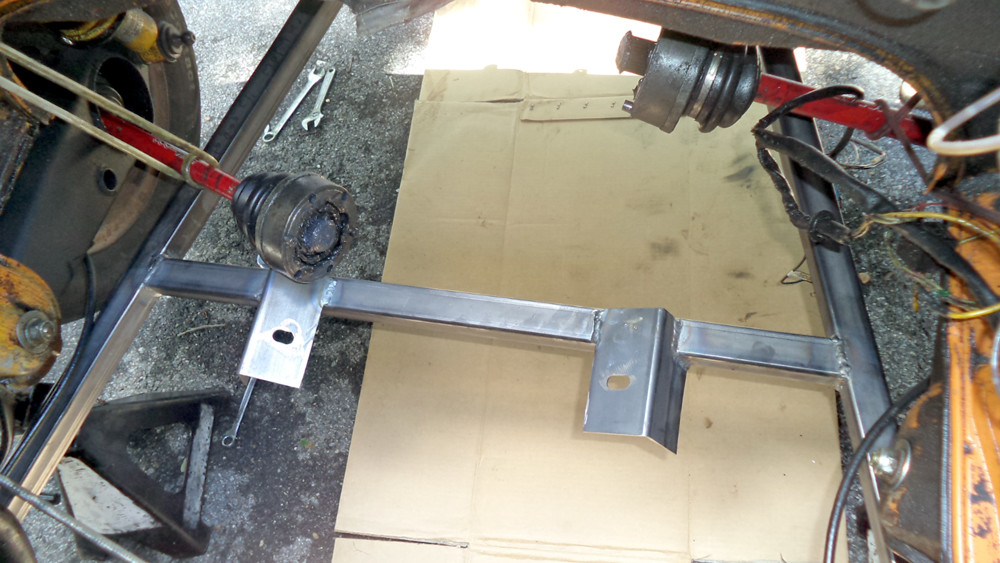
just tested cradle in my car and found trans hangers are about 1" short. other than that, all seems pretty good.
did have to install the rear motor style mounts for trans and did end up using shorter fatter bolts, as long bolts blocked install.
the 2' x 2' stainless steel bar you see, is temporary, it is tacked to where trans should be, I tacked there to take up the height the trans would take if it were installed.
if I ever begin to mass produce these I will take greater care to keep my electrode pointy and make my metal clean. these two things improve the welds dramatically.
next up I will redo rear hangers 1" taller. and then look at designing shift linkage brackets that can be welded to cradle.
Attached image(s)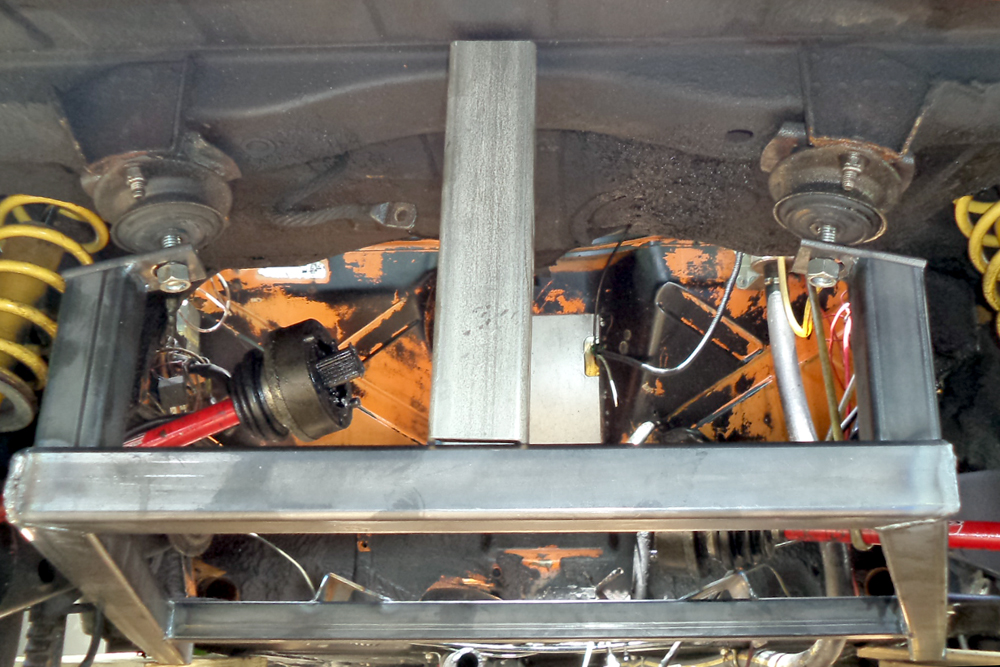

Posted by: jimkelly Jun 24 2017, 01:38 PM
Posted by: jimkelly Jun 25 2017, 06:06 PM
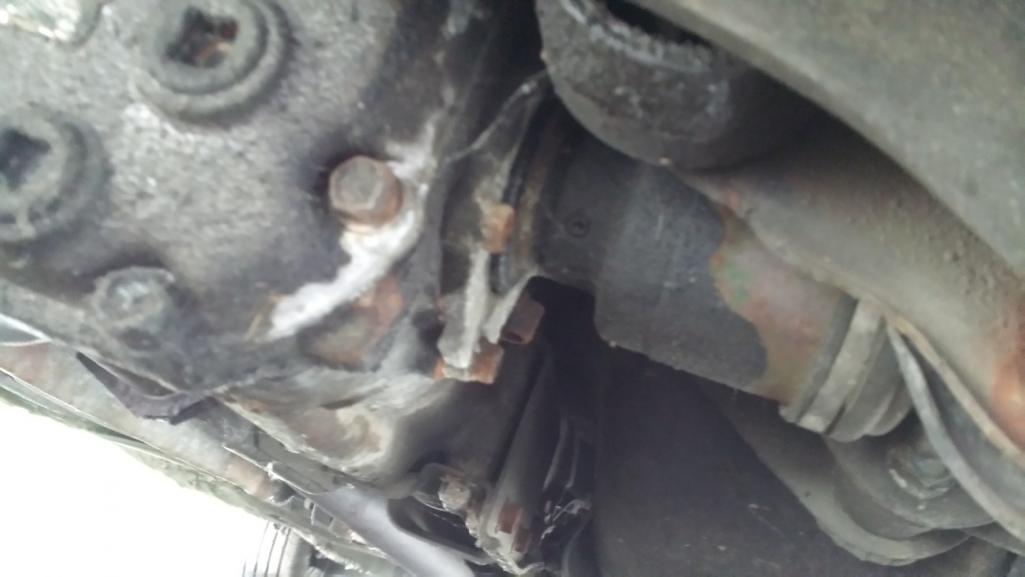
the engine on my test stand has 2 bad cylinders, so my son and I attempted to remove the good engine from my 1990 legacy automatic (bad auto trans), but the thing I thought would be the easiest, turned out to stump us. I think trans was getting caught up on cross member. so saving final pull out for an upcoming weekend.
need to find out is removing the 4 or so bolts on trans, release it from engine or if there are bolts, like the svx has on flexplate that hold it too to engine?
also, it seems, from what I read on WWW, I can use an early 1990s flywheel clutch etc to mate my 1990 engine to my 1998 trans?
http://www.ultimatesubaru.org/forum/topic/97981-transmission-removal/
car is available - for free.
Attached image(s)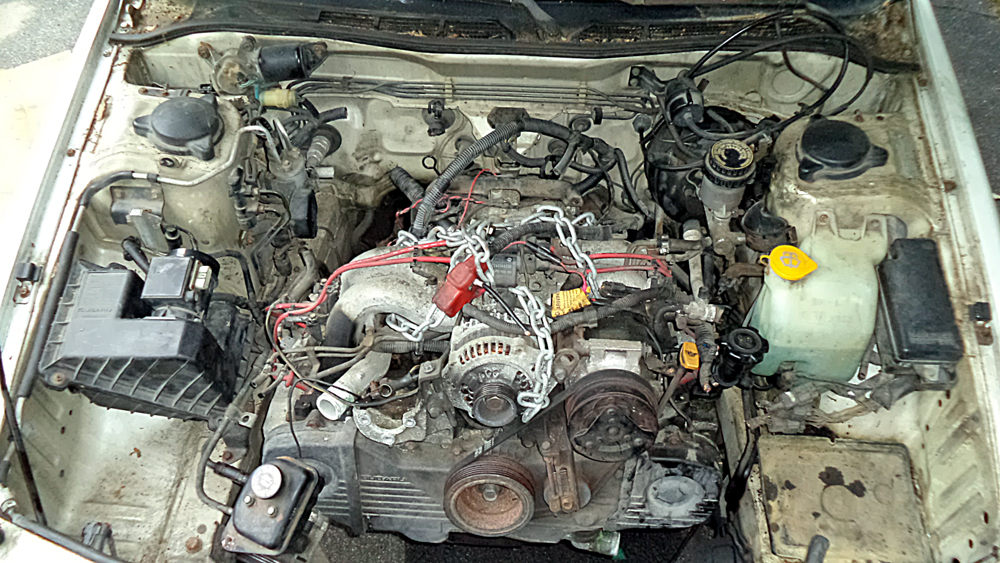
Posted by: jimkelly Jun 27 2017, 03:23 PM
it turns out that shipping a fully welded cradle, 40x48x8 33 lbs costs $200 from va to az.
now i'm thinking of mabe offering them unwelded in four places, and shipping them in four pieces, to save on shipping costs. i assume most of us have a buddy who can weld 
started making a jig and getting my angles correct. as my first one had room for improvement
i am also considering welding a flat plate here, a gusset of sorts. see yellow lines.
Attached thumbnail(s)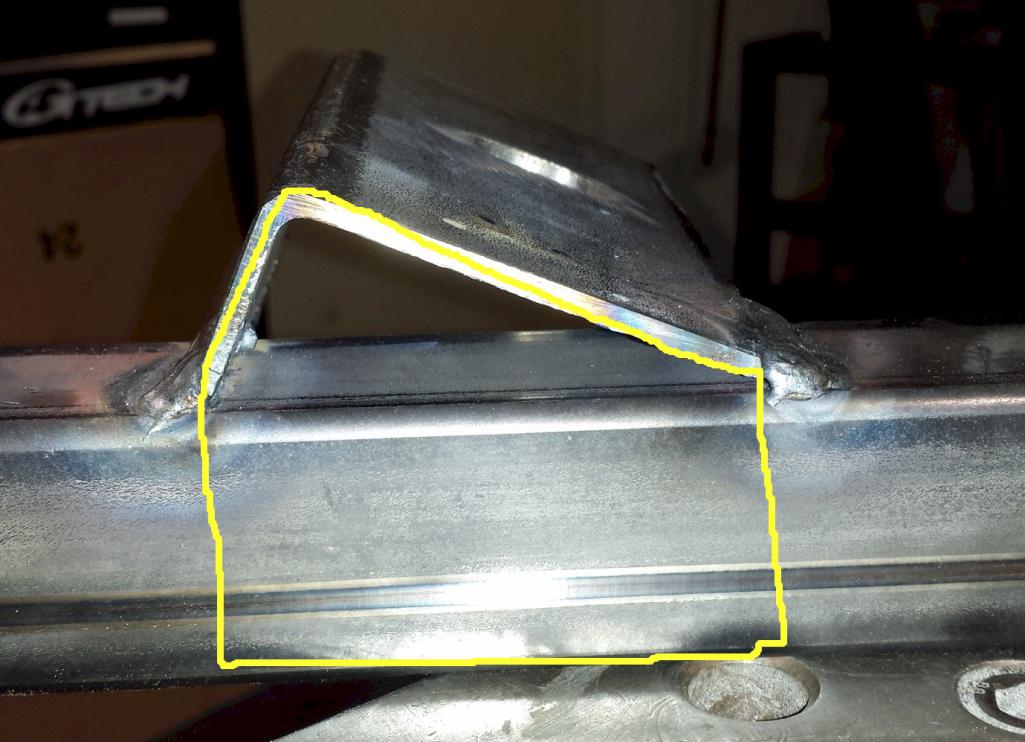
Attached image(s)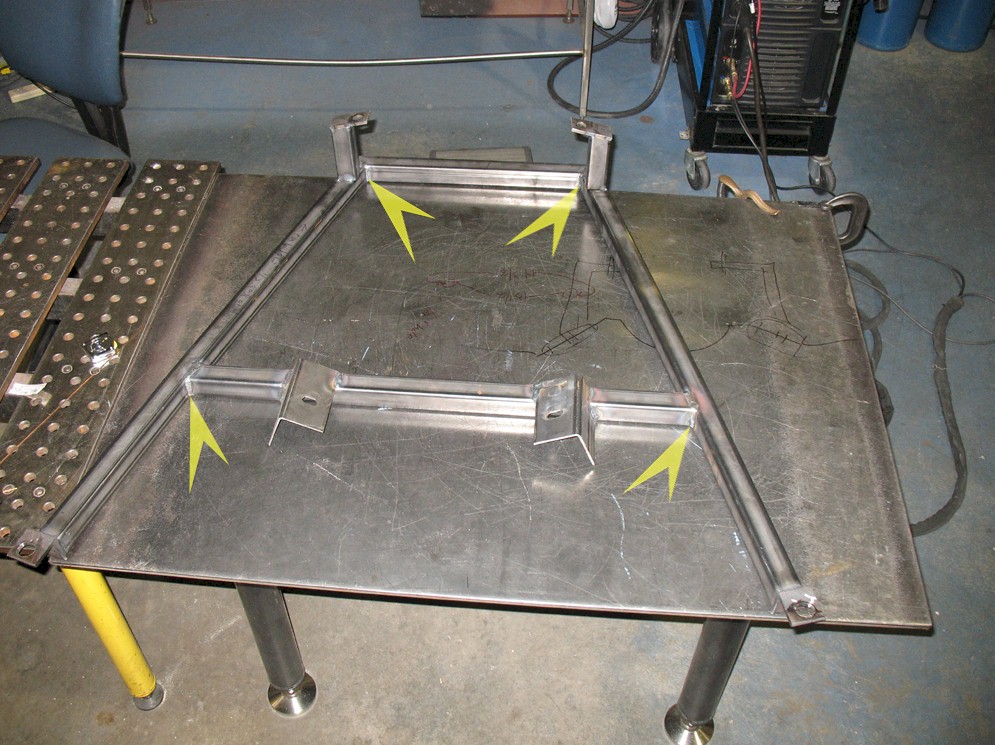
Posted by: flmont Jun 27 2017, 07:25 PM
Renegade bolts the motor mount cross member to the side runner's so there's would ship in a long tube configuration I would guess
Posted by: jimkelly Jun 27 2017, 07:41 PM
renegade site says the don't sell kit parts separately but i do not know if that is an actual fact?
but my understanding is that it is bolted together.
here is a pic of it i think.
http://www.914world.com/bbs2/uploads/post-129-1432868008.jpg
Posted by: flmont Jun 27 2017, 08:16 PM
That's it,..Iam not sure I would like to rely on that many bolts,But it may have its advantages,it does not seem that sturdy ??
Posted by: flmont Jun 27 2017, 08:18 PM
they are also willing to sell there upgraded axel's for the 901
Posted by: Costa05 Jun 27 2017, 08:22 PM
Add four detachable casters to it and you can roll it right out from under your car after unbolting it from chassis. My home made contraption worked great on my seized engine I just pulled. I roll it right back under car for storage when i want it out of way.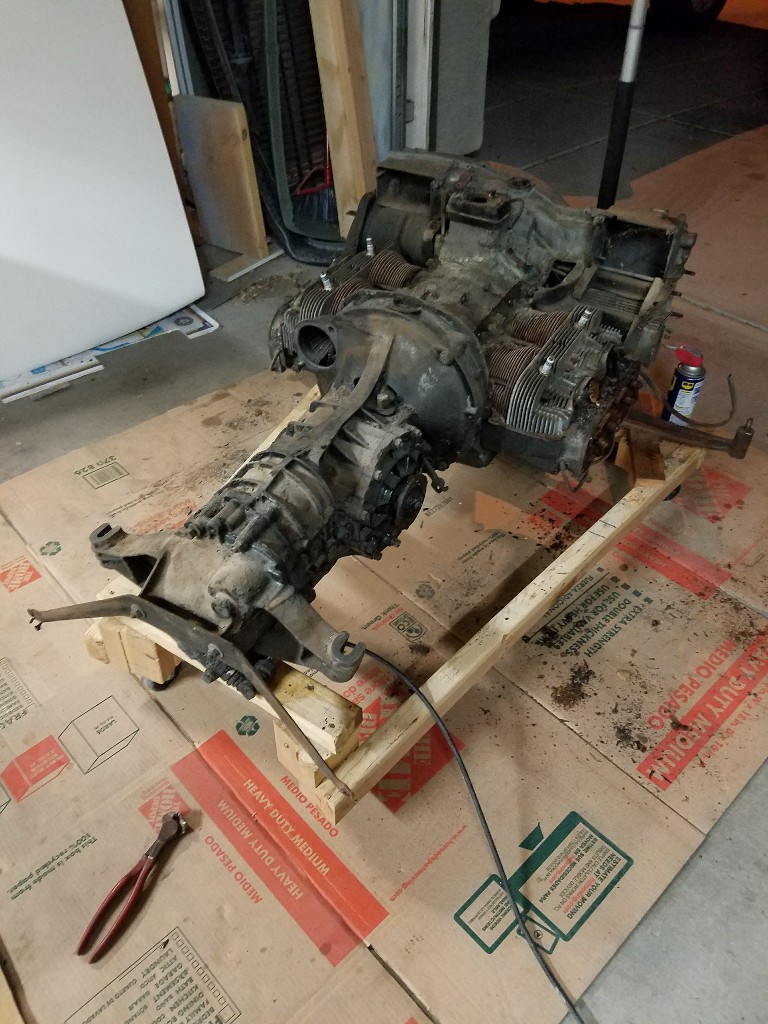
Posted by: okieflyr Jun 27 2017, 08:29 PM
Jim I see that you are building like a mad man these days. I own Subaru's but I don't have the knowledge depth that this brain trust has been sharing.
I will agree that the fewer moving parts on the cable shifter linkage the better, and unless it is proven, some throw adjustability will be nice to have for fine tuning.
Do you still have Rod on your tech team? The shop looks he might be
Posted by: jimkelly Jun 28 2017, 10:45 AM
rod's on my team BUT he is stubbornly opposed to water cooling a 914 and motorcycles. we are in competition as to who can get on the road first, my subaruized 914 or his vintage triumph.
needless to say i am running behind : )
https://www.youtube.com/watch?v=4rYX2JipppY
Posted by: jimkelly Jul 5 2017, 03:00 PM
you are absolutely correct. i have always used a furniture dolly in the past but this will change : )
Add four detachable casters to it and you can roll it right out from under your car after unbolting it from chassis. My home made contraption worked great on my seized engine I just pulled. I roll it right back under car for storage when i want it out of way.
Attached thumbnail(s)
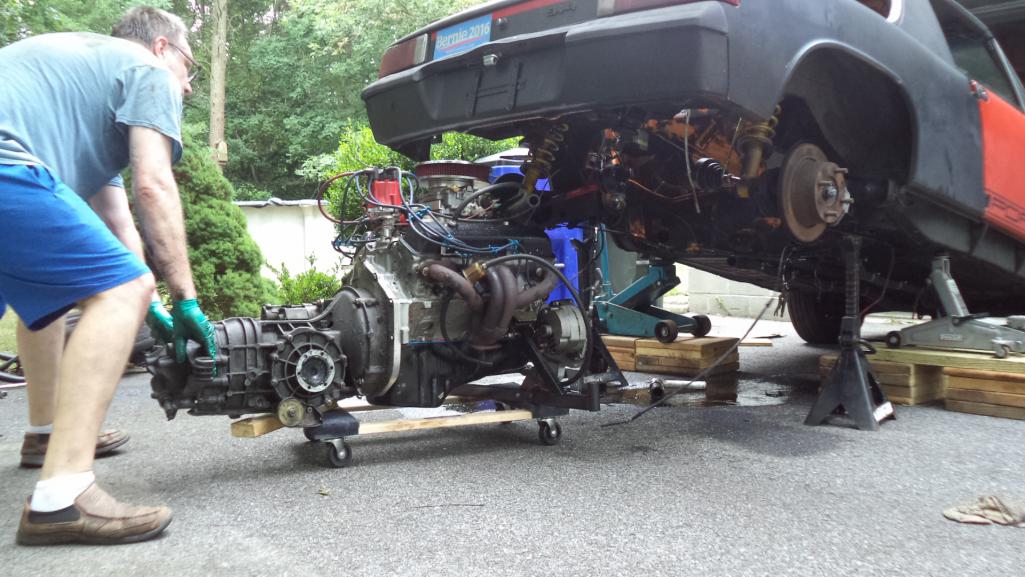
Posted by: jimkelly Jul 5 2017, 03:56 PM
i missed this, what a dope : )
Attached thumbnail(s)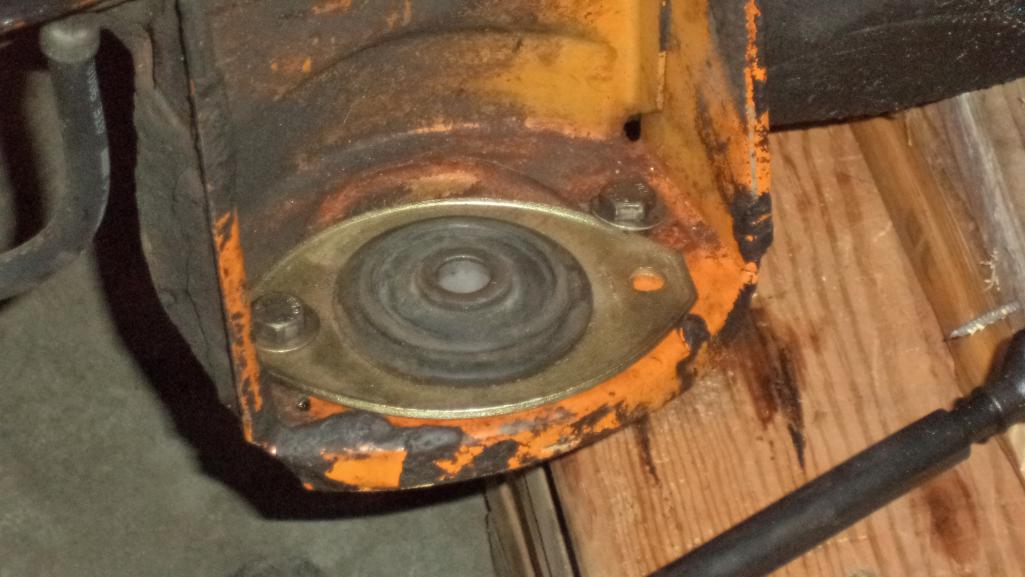
Posted by: 76-914 Jul 6 2017, 07:57 AM
i missed this, what a dope : )
That kinda shit usually happens at the end of a long day. Keep after it!
Posted by: 914forme Jul 6 2017, 08:44 AM

Posted by: jimkelly Jul 6 2017, 09:56 AM
my cut suby axles waiting for a test fit. i expect to test fit axles in late july.
i'll need to start scrounging up free and dirt cheap stock 914 axles.
Attached thumbnail(s)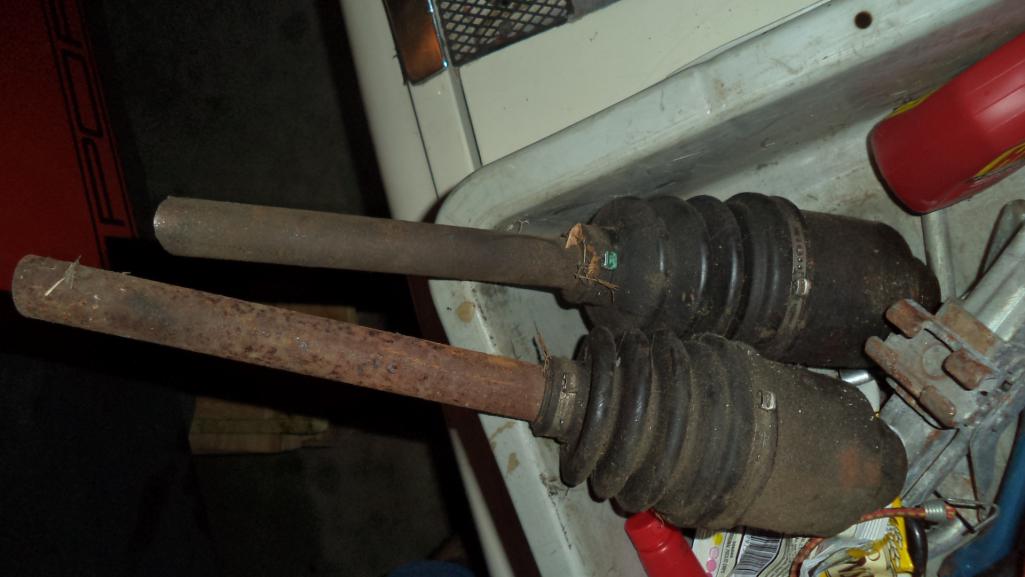
Posted by: jimkelly Jul 8 2017, 04:10 AM
i will start off with a 914 cv at the wheel, cheapest alternative, but who knows what in the future.
my latest thought is to machine a flange like pms sells for 901 to 930 cvs but machine them for 901 to 100mm cvs.
thinking back, the magic flanges were pretty sweet but a little pricey at $400 a pair.
a new idea got in my head. to weld one axle stub to another and have the inner resplined for suby cv. along with having a 914 axles resplined on both sides for suby cvs. so i can use 4 suby cvs versus a combo of cvs.
lastly, weddle sells a type 1 to type 2&4 drive flange $40 ea. see pic below. weld one to a second and flipped stub axle, and weld one to the subaru cv housing. the question is can a bus axle assy be used 18-3/4" without modification of axle. cost of this is flange $40 x 4, bus axle assys $100 x 2, 2 axle stubs $100 = $460 in parts (plus cutting and welding).
Attached thumbnail(s)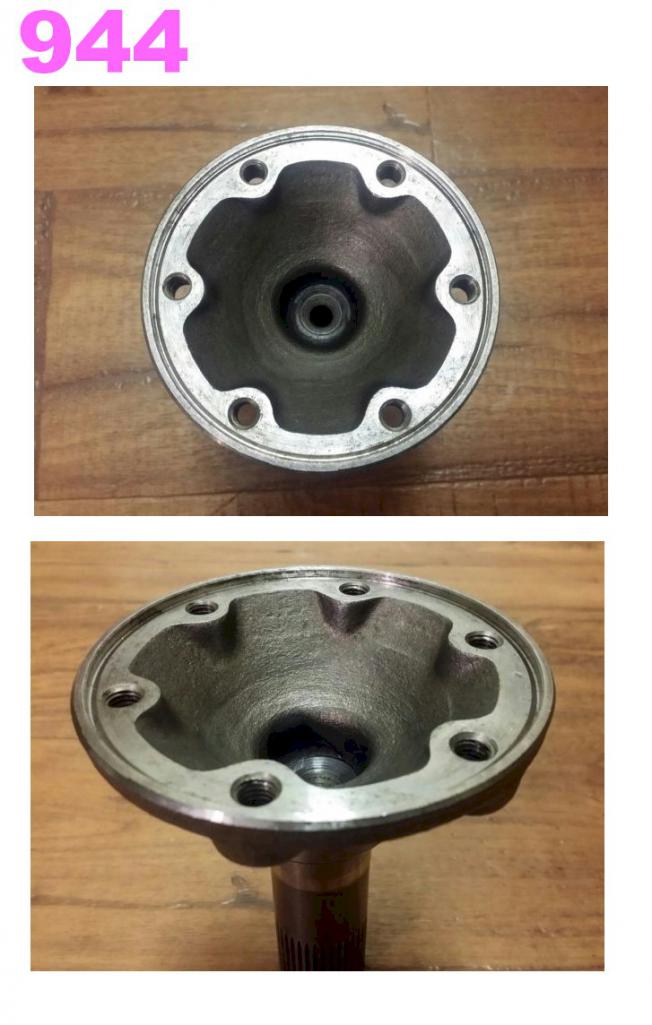
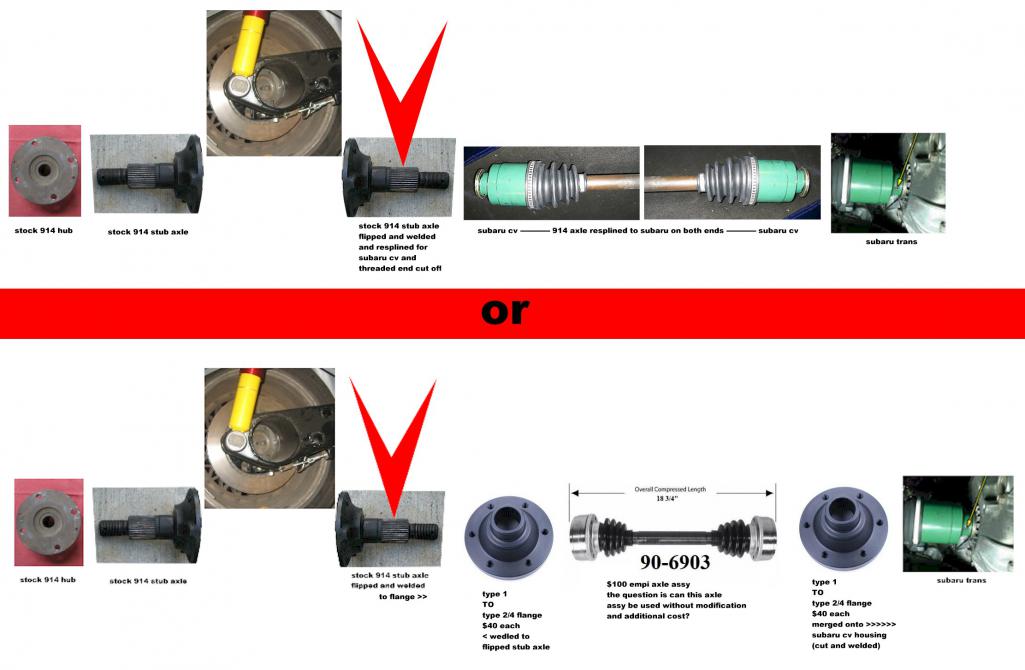
Attached image(s)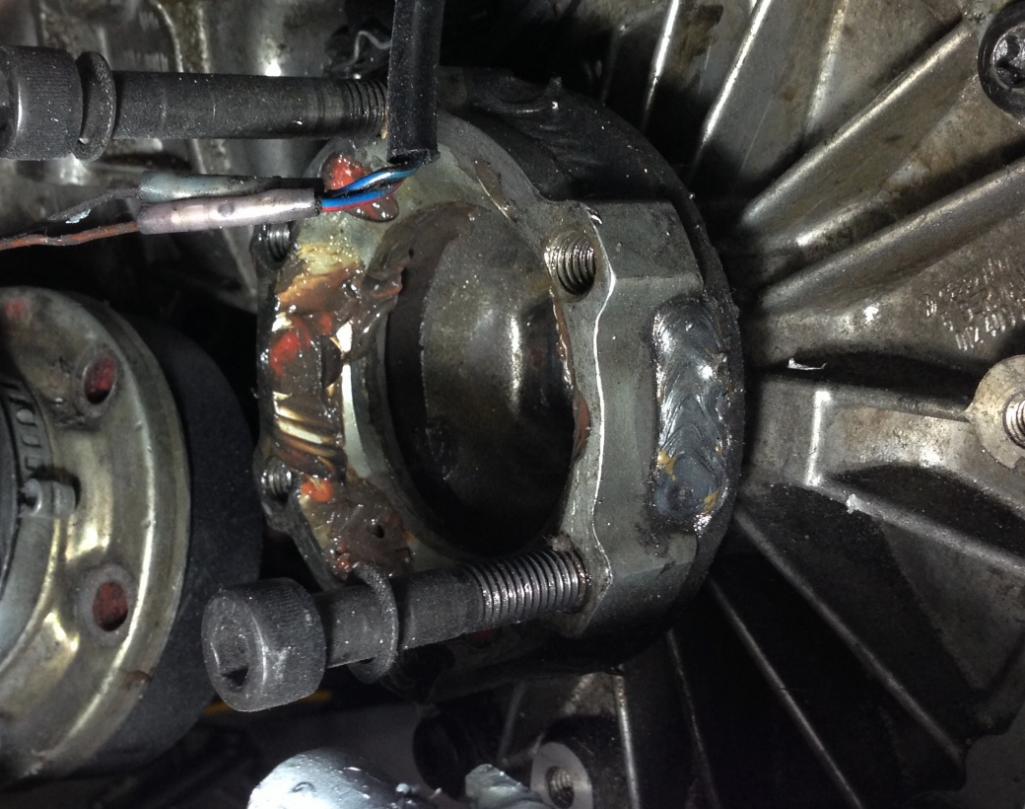
Posted by: jimkelly Jul 9 2017, 06:24 PM
based on jpnavak's thread, i will weld up a suby to 914 axle to make a frankenaxle.
http://www.914world.com/bbs2/index.php?showtopic=99619&hl=subaru%20%20grassroots%20%20welded&st=20
his advice "I would make sure that you sleeve the OD and that the sleeve is long enough to be outside the root joint HAZ. I think it took 7 passes to fill the axle. You also need to straighten them after each pass. I rolled them on the floor and would tap them if they did not roll concentric."
today i disassembled my suby axle halfs for the job. and lost one suby c clip in the grass. why do i still do disassembly on the GRASS
Posted by: mepstein Jul 9 2017, 08:51 PM
based on jpnavak's thread, i will weld up a suby to 914 axle to make a frankenaxle.
http://www.914world.com/bbs2/index.php?showtopic=99619&hl=subaru%20%20grassroots%20%20welded&st=20
his advice "I would make sure that you sleeve the OD and that the sleeve is long enough to be outside the root joint HAZ. I think it took 7 passes to fill the axle. You also need to straighten them after each pass. I rolled them on the floor and would tap them if they did not roll concentric."
today i disassembled my suby axle halfs for the job. and lost one suby c clip in the grass. why do i still do disassembly on the GRASS
Magnet
Posted by: jimkelly Jul 11 2017, 06:55 PM
got first and second cradle made. i will use the trans brackets I MADE from 1.5" square stock, on mine (left), and used part of the oem subaru bracket on my second cradle (right) which is sold.
looking forward to getting started on third
Attached image(s)
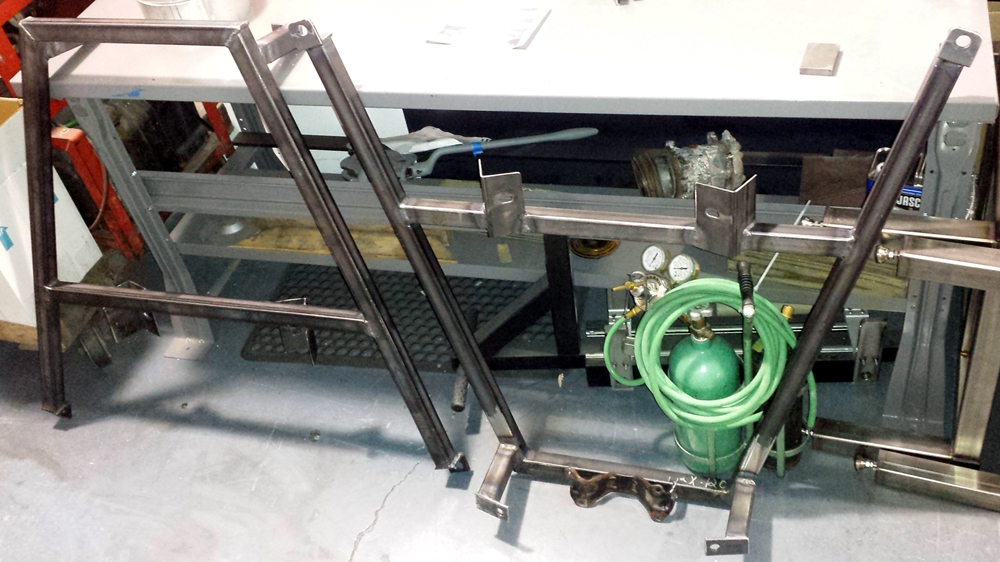
Posted by: jimkelly Jul 12 2017, 05:50 PM
this is how i did mine, trans area.
but i am going to do my best to source used subaru oem bracket for any i build, as they are much nicer looking and much easier to weld in place. and it seems subaru used the same bracket for like, 20 years, which should make finding them used on ebay reasonable.
Attached thumbnail(s)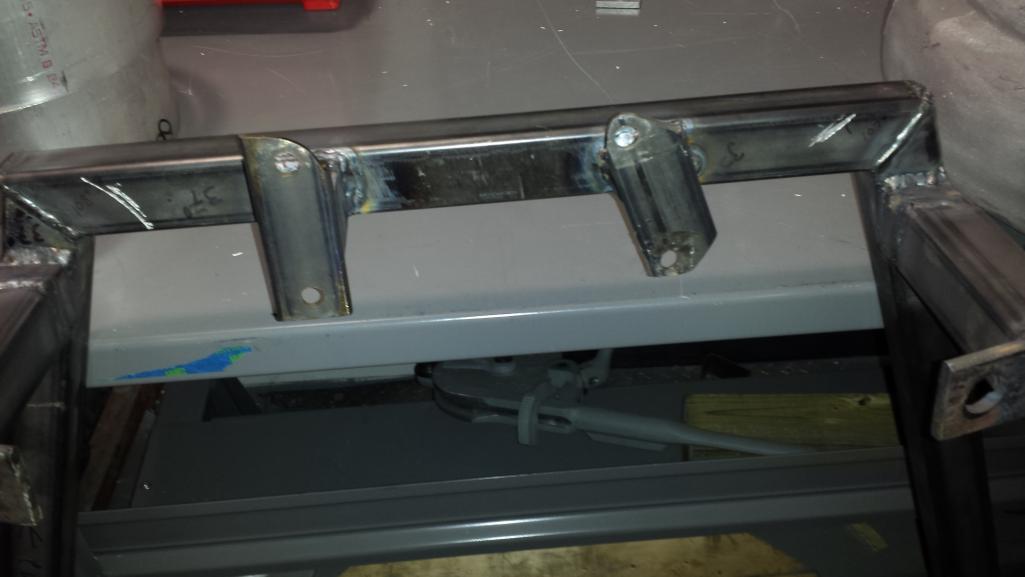
Posted by: jpnovak Jul 13 2017, 02:17 AM
Keep building those cradles and then fill in with a cable shift. This will probably prompt me to build another Suby 914...
I have been looking for another donor roller for a while.
If I was not about to go to paint on my 72 911 coupe project I would have already started on one.
Posted by: JRust Jul 13 2017, 07:50 AM
got first and second cradle made. i will use the trans brackets I MADE from 1.5" square stock, on mine (left), and used part of the oem subaru bracket on my second cradle (right) which is sold.
looking forward to getting started on third
Hey Jim I am missing something on the cradle. How are you attaching to the transmission car mount? The back end 2 bars don't look tall enough to reach them. Maybe it just visually screwing with my head as the tranny isn't seated all the way in your pic
Posted by: jimkelly Jul 13 2017, 08:24 AM
when i first test fitted my first cradle in my car with a 9" spacer tacked on, see post 192 first pic, i was about an inch short. i since then added an inch to mine, so at worst i may need a thick washer or two. but thanks for your input
but i did use the subaru oem mount on my second which probably lost me about 1/4" extra.
and here is another reason i am certain i am real close. this is a pic of coldwaters trans hanger next to mine.
Attached thumbnail(s)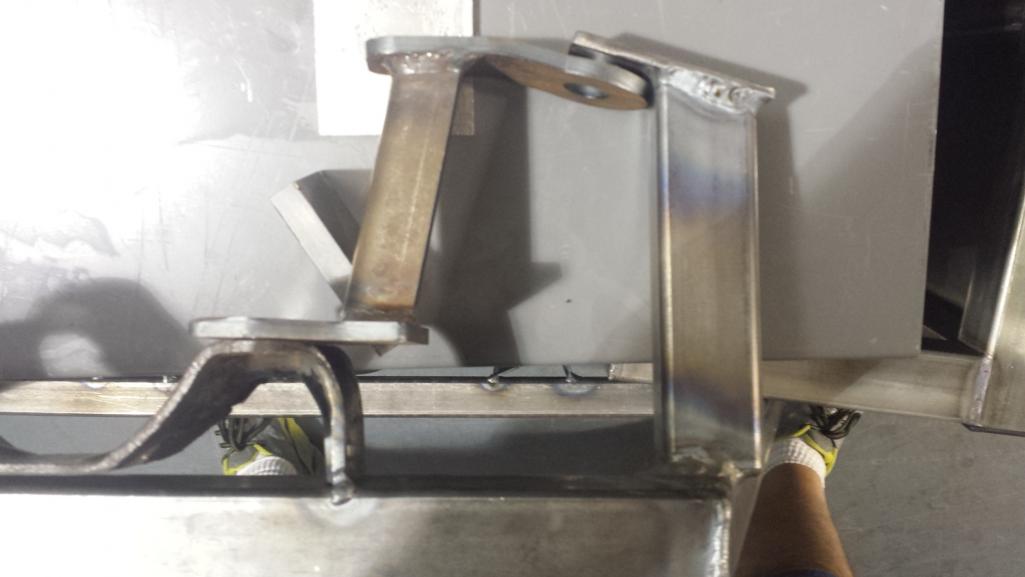
Posted by: Costa05 Jul 13 2017, 10:07 AM
when i first test fitted my first cradle in my car with a 9" spacer tacked on, see post 192 first pic, i was about an inch short. i since then added an inch to mine, so at worst i may need a thick washer or two. but thanks for your input
but i did use the subaru oem mount on my second which probably lost me about 1/4" extra.
Jim,
As a fellow subie swapper in progress, I have enjoyed following your post. Thanks for sharing. Great forum.
Posted by: jimkelly Jul 14 2017, 02:03 PM
based on my other thread, it seems that 911 cupped washers are best to use with 911 sport mounts.
http://www.914world.com/bbs2/index.php?act=ST&f=2&t=313192&st=0#entry2506419
and i am leaning heavily on using a oem wrx header, instead of an aftermarket header as price is the same but oem unit is more compact it seems.
Attached thumbnail(s)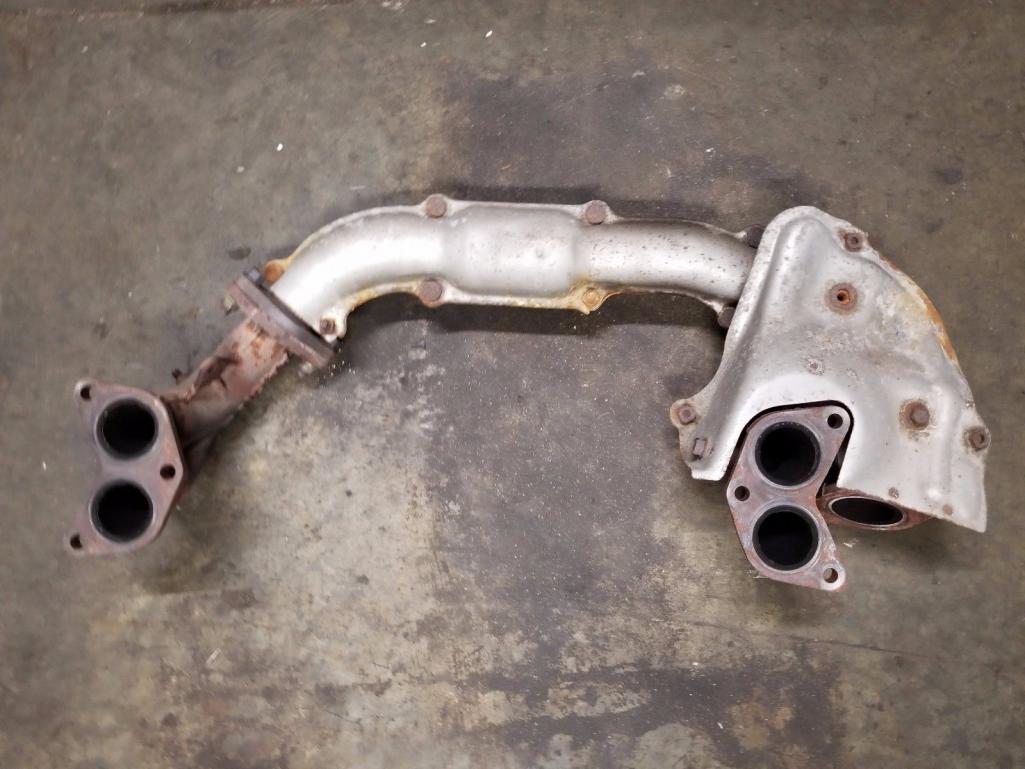
Attached image(s)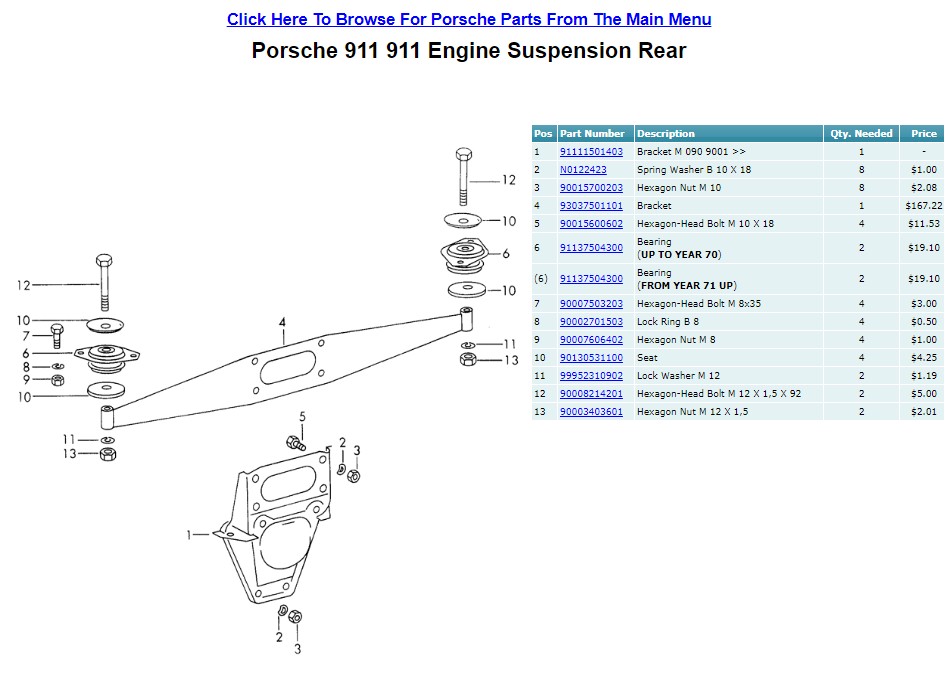
Posted by: jimkelly Jul 17 2017, 02:46 PM
my axle related thread
http://www.914world.com/bbs2/index.php?showtopic=313396
Attached image(s)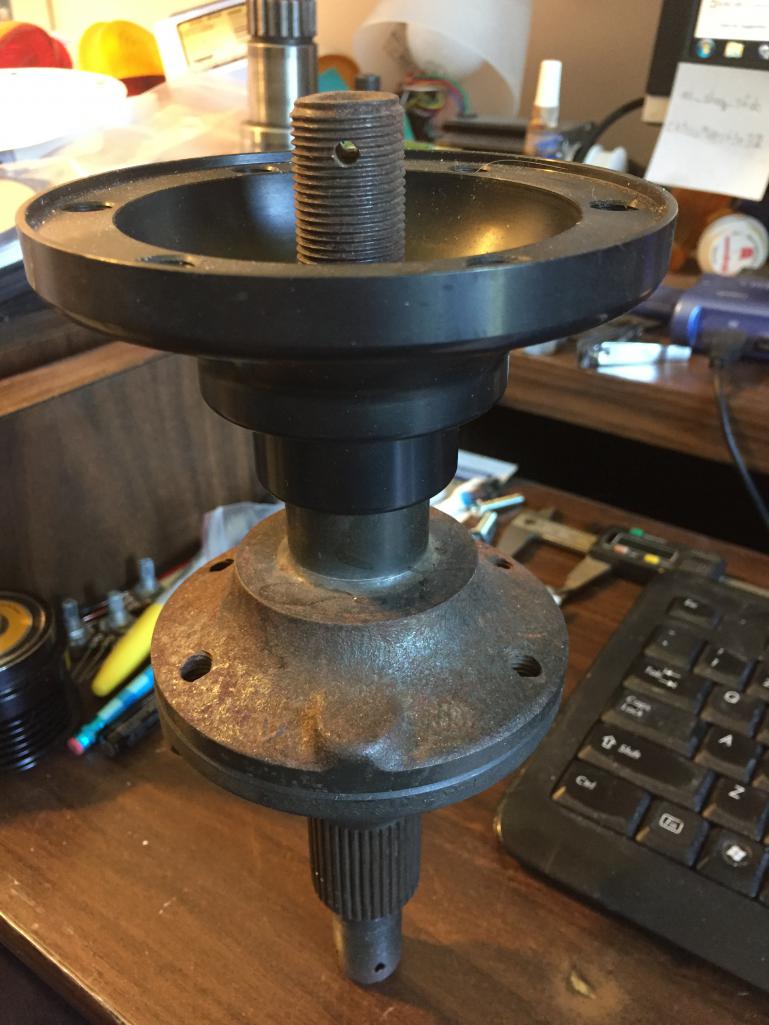
Posted by: 914forme Jul 18 2017, 10:03 AM
If your going to all this problem why not just machine up and outer stub that access the subaru CV and bolts into the 914 -4 flange, or 911 flange. I would go with the 911 flange, late model with the hub centric pieces on the flange. Strong, OEMs work and you could make it a bolt on affair.
Just me and the odd ideas I have running through my head at times.
You would still need to get the axle lengths set and resplinded.
I would go 944 outer - Dutchman axels and Subbie inner on transide, easily done and repeatable.
You could also use the bolt on adapters for the 930 CV to stock 914 CV flange.
So stock 914 stub on training arm, CV Adapter, 930 CV, Dutchman axle resplinded Subbie CV on trans side.
All that being said I am and went all 930, so I could find something besides CVs to keep off the road. Which is truly all bolt on.
If history teaches us nothing what will keep me off the road is myself, as when I get the car done, I will tear it apart in short order to fabricate something else.  Now if I can get it recognized as a disorder, I would have the ability to do it when ever I wanted, and just say ..|. .|.. I got it bad, leave me be.
quote the Chili Peppers "I got a bad disease"
Posted by: jimkelly Jul 18 2017, 12:16 PM
i'll most likely start with 914 cv and suby cv and a replined 914 axle.
but then i was thinking 924/944 cv for strength.
i like the idea of brand new axles and cvs that dont need any modification. though this would require flanges adapted to the wheel side and trans side in some sort of way.
seems to be no sub $400 solution. $150 pair axles, $150 4 flanges, etc etc.
Posted by: jimkelly Jul 18 2017, 09:09 PM
just messing with a shifting revision on my TEST MULE cradle.
getting all gears now and no more bell crank.
sorry to take up so much page one space with my abomination
just realized i forgot to use my ball joint rod ends : (
so i plan to redo the trans arm because without ball joints, the threads on the cable will get messed up very quickly.
some pics of the oem header i ordered (it's rough $60) and of the clearance i have around my cradle and motor.
https://www.youtube.com/watch?v=lPfsolJjJT4
Attached thumbnail(s)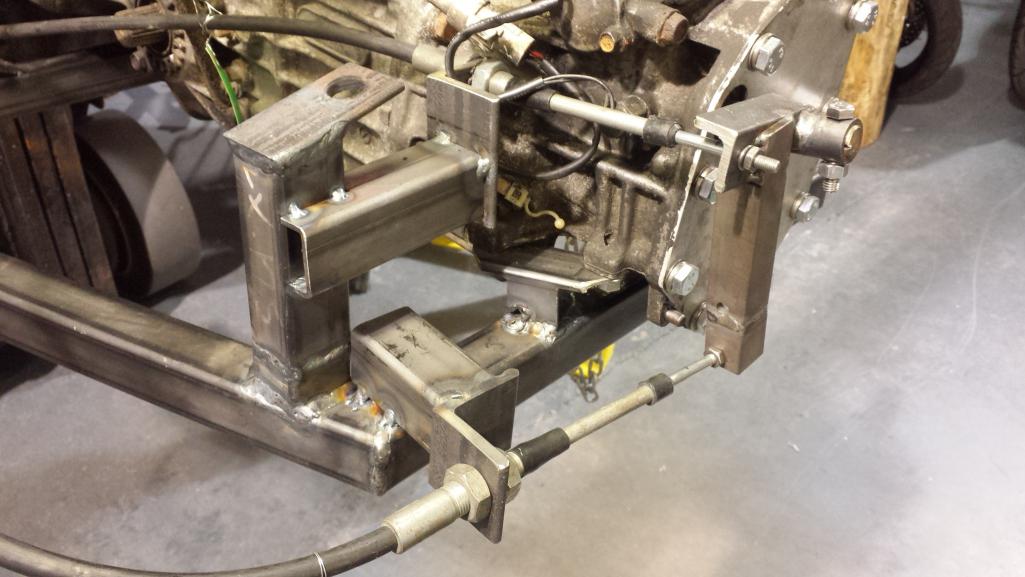
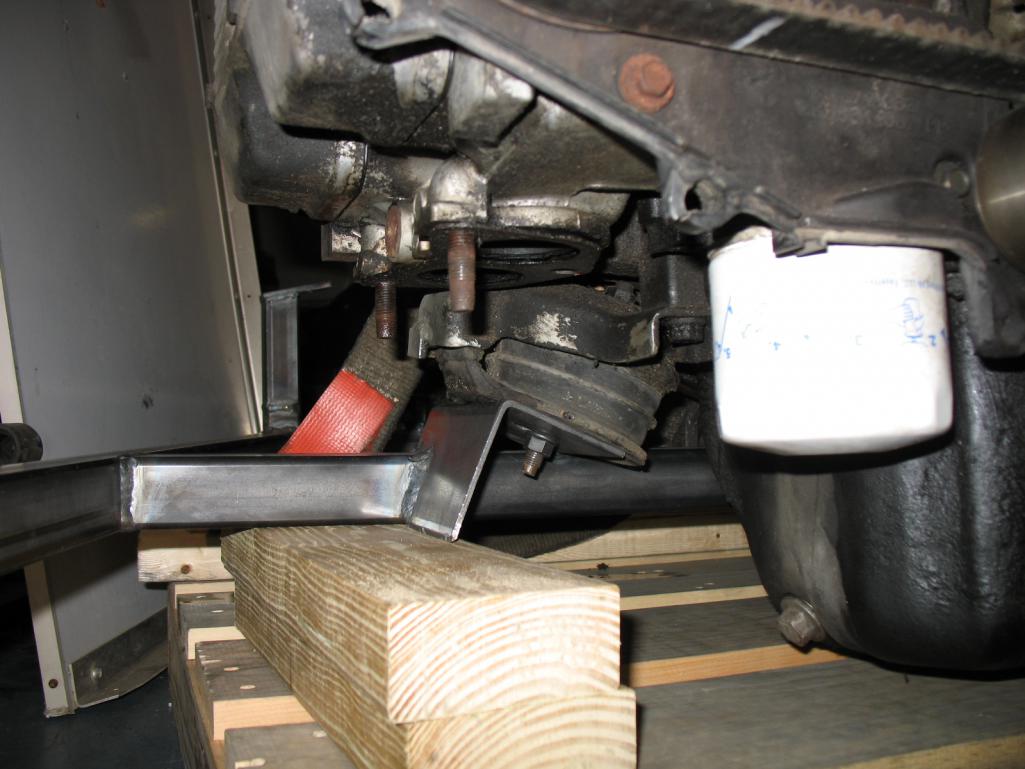
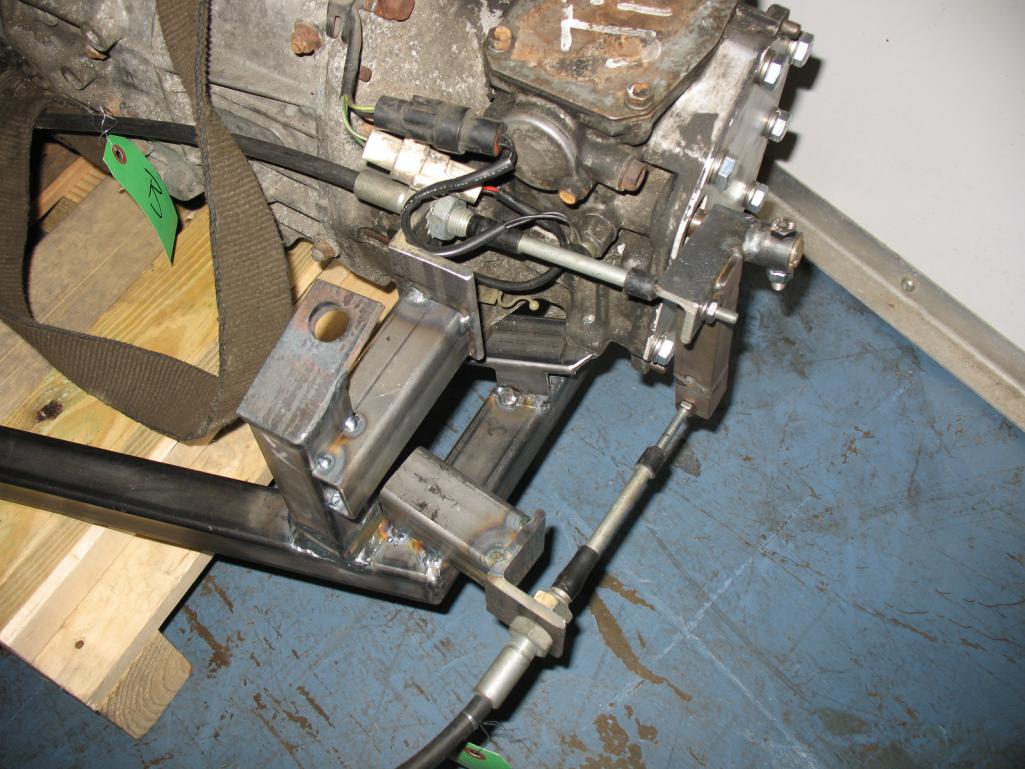
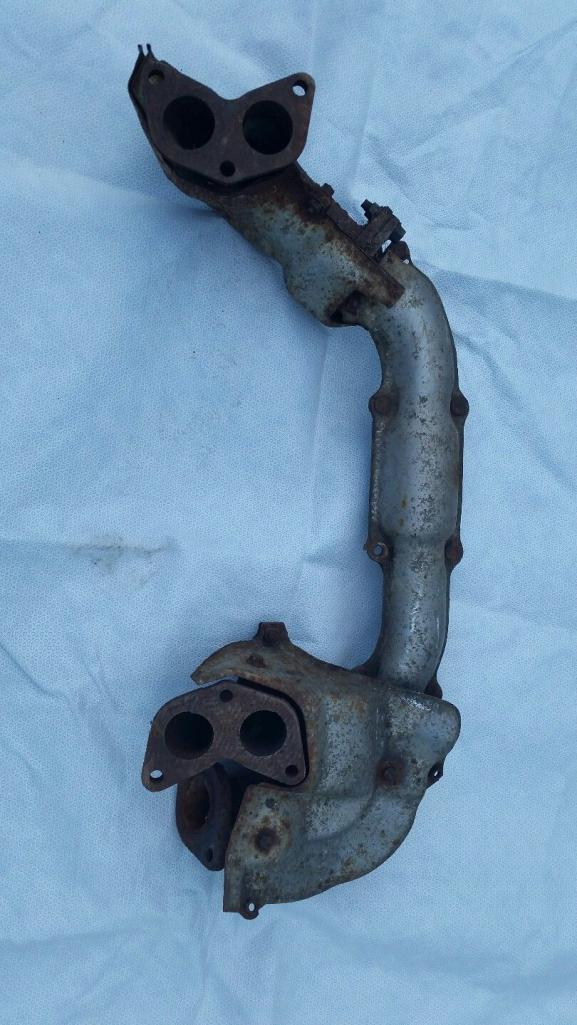
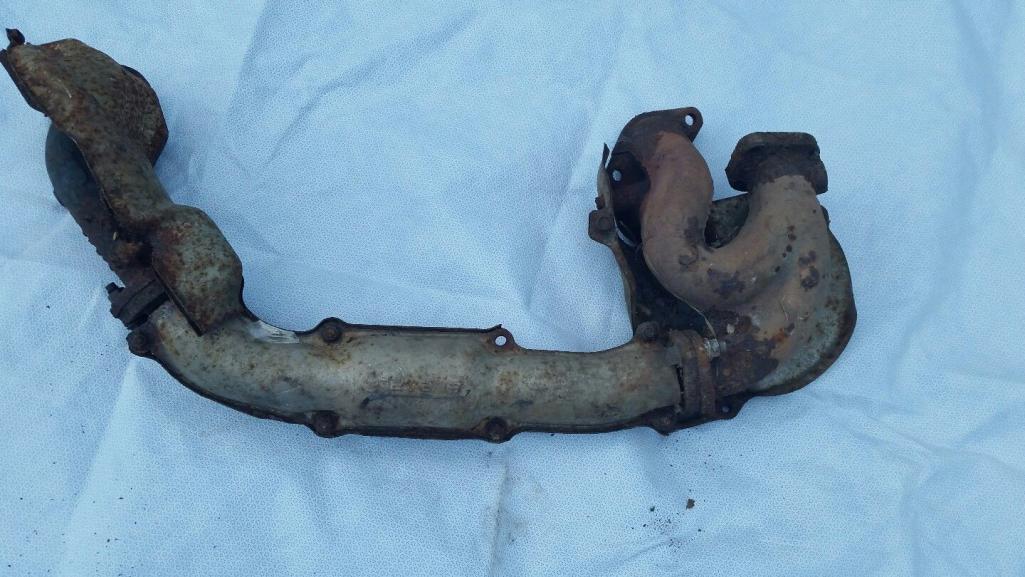
Posted by: jimkelly Jul 20 2017, 05:34 PM
revised my trans arm to allow me to use, as i should have originally, bearing ends.
see me shift thru the gears in no particular order
https://www.youtube.com/watch?v=jThij_uAoXA
Attached image(s)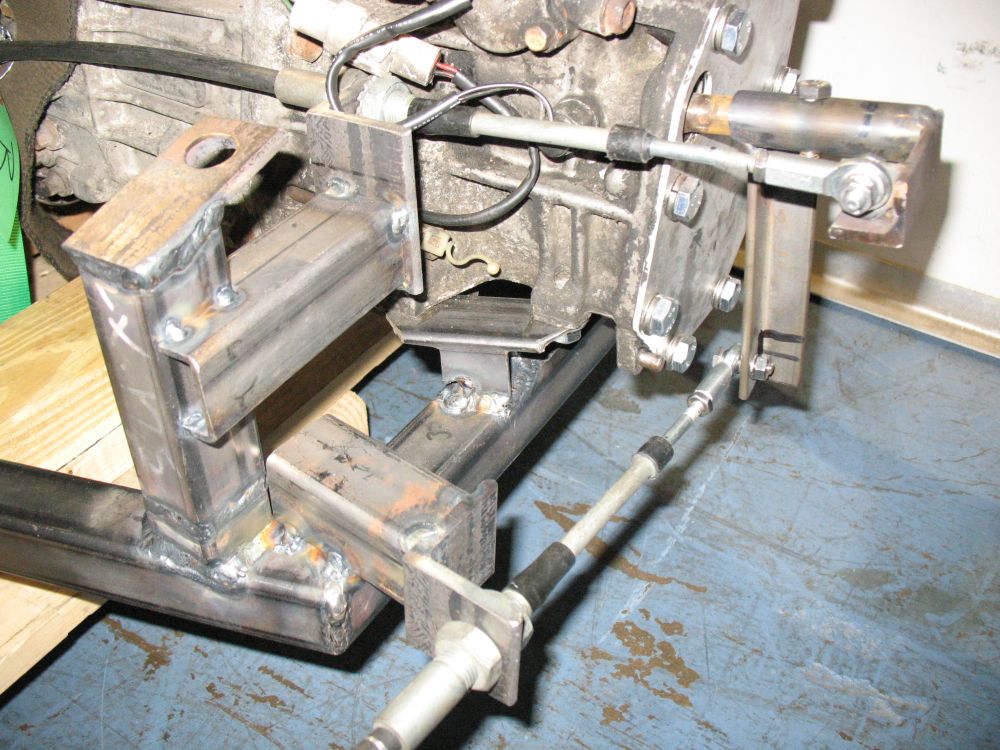
Posted by: 914forme Jul 21 2017, 05:44 PM
i'll most likely start with 914 cv and suby cv and a replined 914 axle.
but then i was thinking 924/944 cv for strength.
i like the idea of brand new axles and cvs that dont need any modification. though this would require flanges adapted to the wheel side and trans side in some sort of way.
seems to be no sub $400 solution. $150 pair axles, $150 4 flanges, etc etc.
The cheapest way out is to cut and sleeve the the axles. Subbie on trans side, 914-4 on outside. That is a sub $100 fix. Only issue is your weakest link in the drive line is in the worst place for service.
Posted by: jimkelly Jul 21 2017, 09:18 PM
meaning the 914 cv on the wheel side?
that said, mine will be powered by a 1990 legacy 2.2 with barely 120-130 hp at best.
doubt i'll be breaking anything
greatest ever 914 suby conversion video collection
https://www.youtube.com/playlist?list=PLG2dG3vtdxbzflV-ITygddDy7lEoCK8pN
next up is making a bracket for my clutch push pull cable.
https://www.youtube.com/watch?v=OiT8eFejDBc&list=PLG2dG3vtdxbzflV-ITygddDy7lEoCK8pN&index=39
Posted by: jimkelly Jul 22 2017, 10:39 AM
holy shit, finally got the engine and auto trans out of my 1990 legacy. could not separate them but know it is because of the bolts that hold the torque converter to the flexplate. cut one axle and did some things with the drive shaft, and engine/trans came out.
my driveway is now a brownfield : ( even after draining oil and trans fluid, i had a good amount still come out during removal of the later.
pics to come.
Attached thumbnail(s)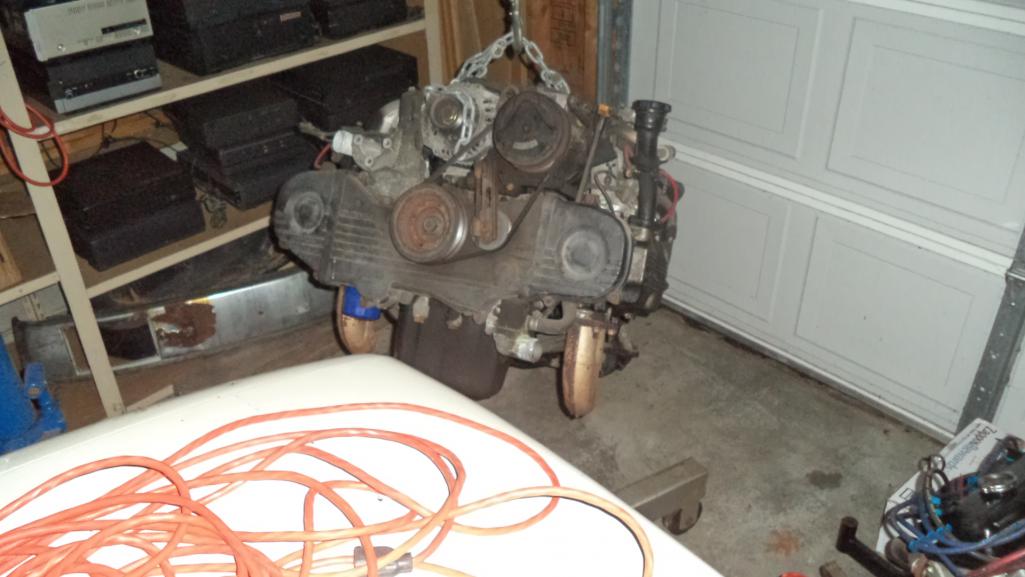

Posted by: jimkelly Jul 23 2017, 12:29 PM
the guy that is taking my legacy away needed me to remove the drive shaft today so his dad can come get the car with a tow dolly. drive shaft out and both axles cut so i have cv housings for modification.
tried to disconnect auto trans from ej22 and found that those bolts between flex plate and torque converter and low profile and a bit of a bitch to remove. got to get me a nice 5 point long 12 mm box wrench
Posted by: mgp4591 Jul 23 2017, 12:39 PM
i'll most likely start with 914 cv and suby cv and a replined 914 axle.
but then i was thinking 924/944 cv for strength.
i like the idea of brand new axles and cvs that dont need any modification. though this would require flanges adapted to the wheel side and trans side in some sort of way.
seems to be no sub $400 solution. $150 pair axles, $150 4 flanges, etc etc.
The cheapest way out is to cut and sleeve the the axles. Subbie on trans side, 914-4 on outside. That is a sub $100 fix. Only issue is your weakest link in the drive line is in the worst place for service.
But if it's done by a competent shop, driveline issues shouldn't be a problem, right? I've seen some sleeved and was wondering how many folks have done that too but pretty much all that I've seen here is the more expensive (and possibly stronger) solutions.
Posted by: okieflyr Jul 23 2017, 12:43 PM
Jim if you tie that engine cradle to the front chassis as well, you'll never have a rust sag car again
Posted by: jimkelly Jul 23 2017, 12:49 PM
do i hear overkill its mostly 1/8 steel with some 1/4 steel thrown in. mine is not much heavier than coldwater's and his was .90 tube mostly.
Posted by: jimkelly Jul 23 2017, 12:50 PM
i'm gonna try some cut and sleeved axles and will report on longevity.
Posted by: jd74914 Jul 23 2017, 01:55 PM
The cheapest way out is to cut and sleeve the the axles. Subbie on trans side, 914-4 on outside. That is a sub $100 fix. Only issue is your weakest link in the drive line is in the worst place for service.
But if it's done by a competent shop, driveline issues shouldn't be a problem, right? I've seen some sleeved and was wondering how many folks have done that too but pretty much all that I've seen here is the more expensive (and possibly stronger) solutions.
IMHO sleeved axles are a time bomb for any higher powered cars. Jim may very well be ok with his 120 hp, but my experience is that lots of torque/launches and sleeves don't mix well. In a pinch I've sleeves axles together on formula-style cars and had them last for just a bit. Those cars used hardened 4340 axles and the sleeves were made from 4340. They we turned to press onto each side of the axle (strong interference fit) and the TIG welded with appropriate filler, and torch annealed to prevent brittle fracture. Unfortunately, due to time constraints we didn't get to re-heat treat. I think set #1 lasted about 4 hrs of hard driving. Set #2 was made with a wave pattern weld to maximize weld shear area and lasted maybe 6 hrs. That was under pretty hard use, but just something to think about. The good thing is that when they break the sleeve keeps everything together so you don't have to worry about flying axle halves. Sorry to sound negative but BTDT a few times.
Posted by: 914pipe Jul 23 2017, 10:35 PM
This is what I did. Send the axles to the machine shop to cut them to 18 inches total lenght (should have them cut to 17.5 inches for easier installation). Have one end re-splided to subaru transmission end. Total cost was $180.00 dollars.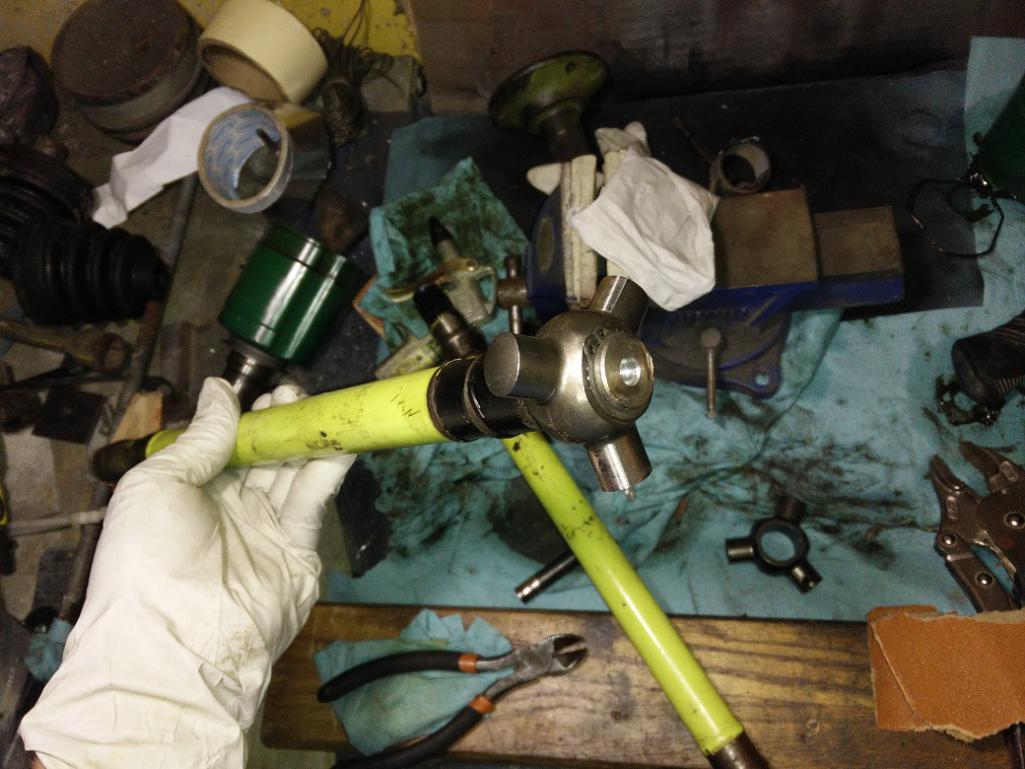
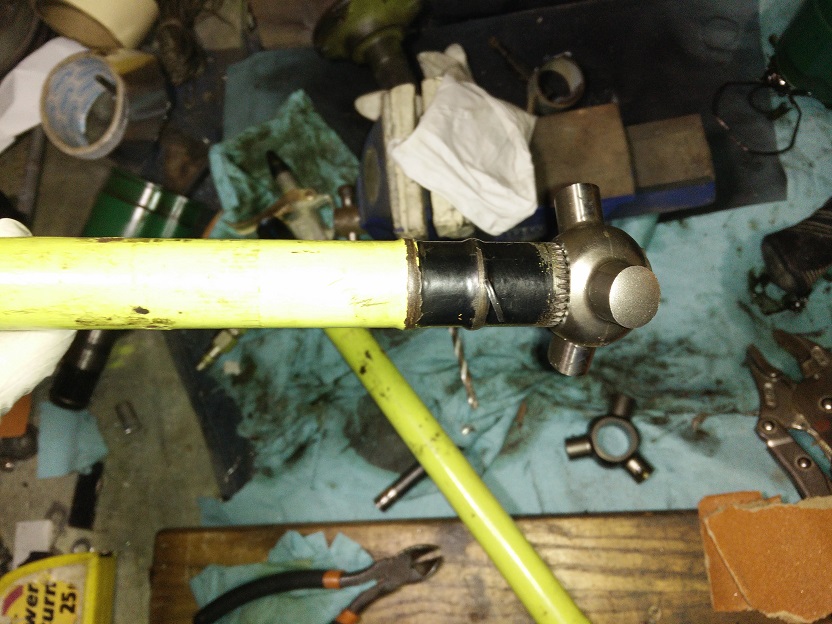
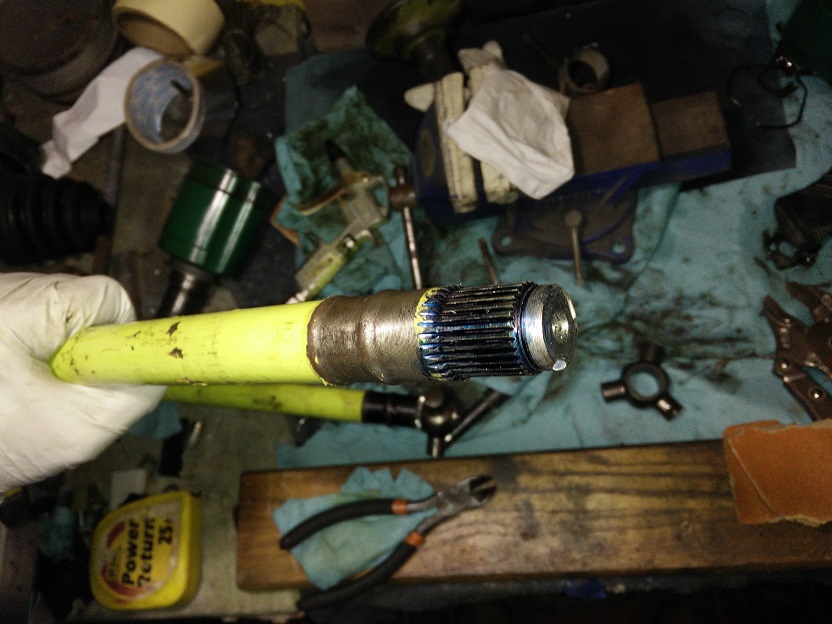
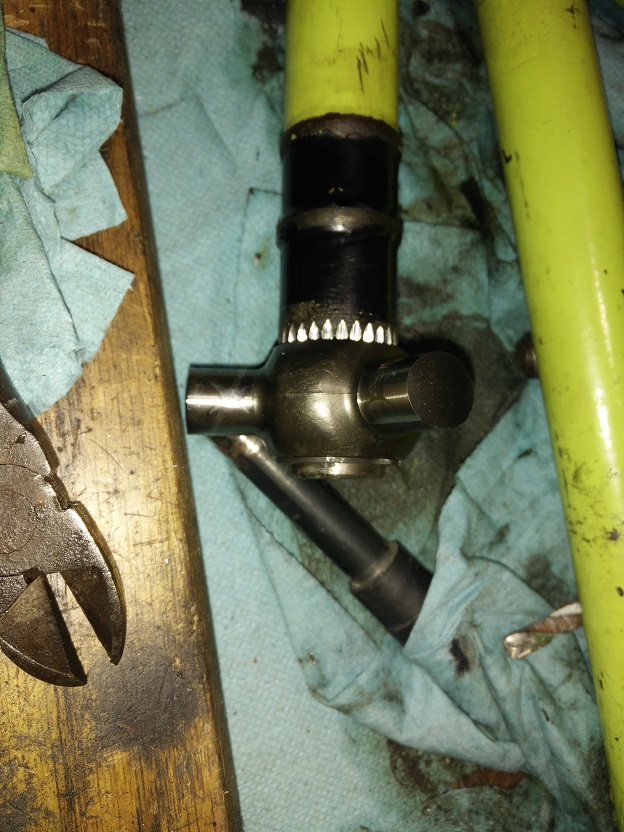
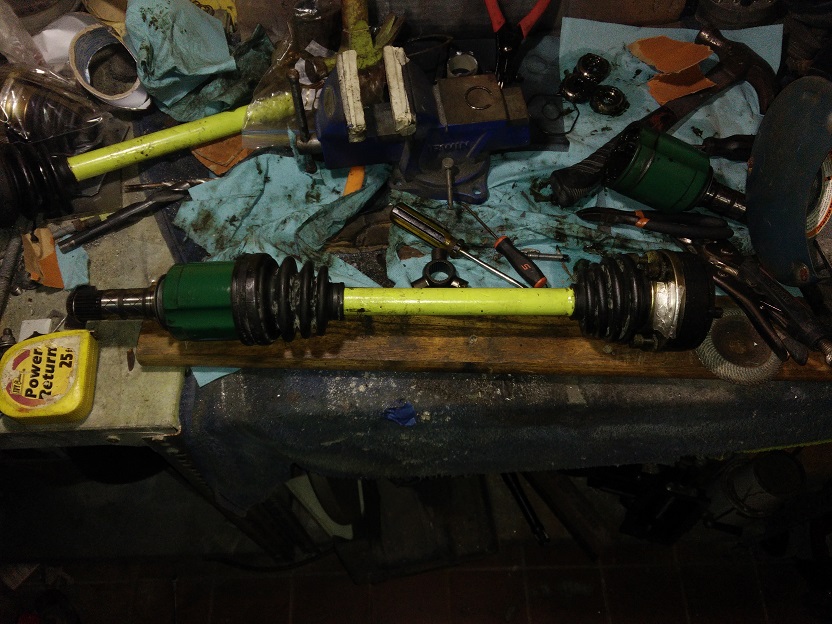
Posted by: jimkelly Jul 24 2017, 05:24 AM
that looks good
my suby trans has the female cvs and my understanding is the axle length is different depending on if the suby female or male cv is used.
i will be able to measure for what i need only after my engine and trans are mounted in my car.
subaru is gone.
Attached thumbnail(s)
Posted by: jimkelly Jul 25 2017, 05:28 PM
i just whipped up a bracket for my clutch cable.
Attached thumbnail(s)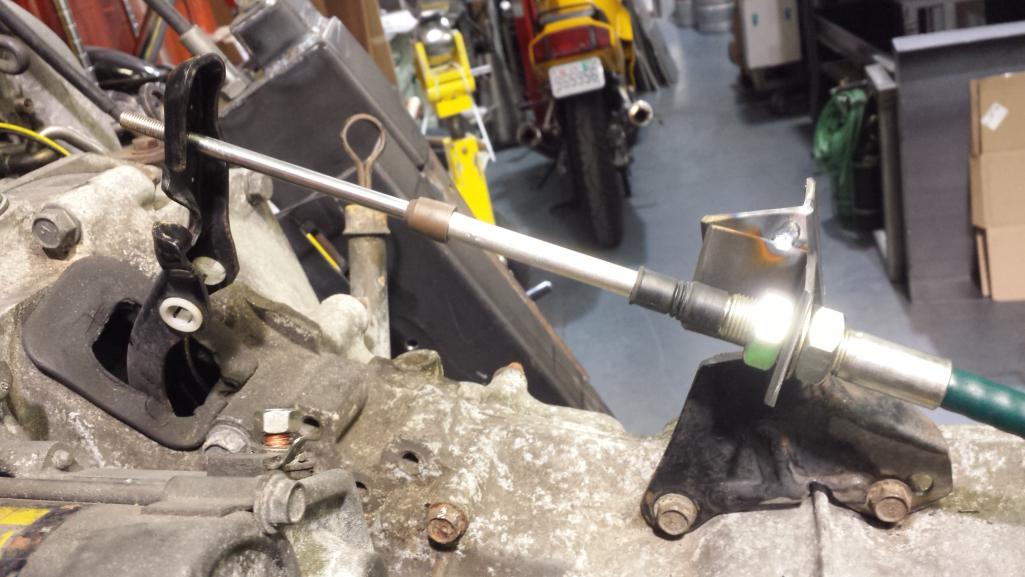
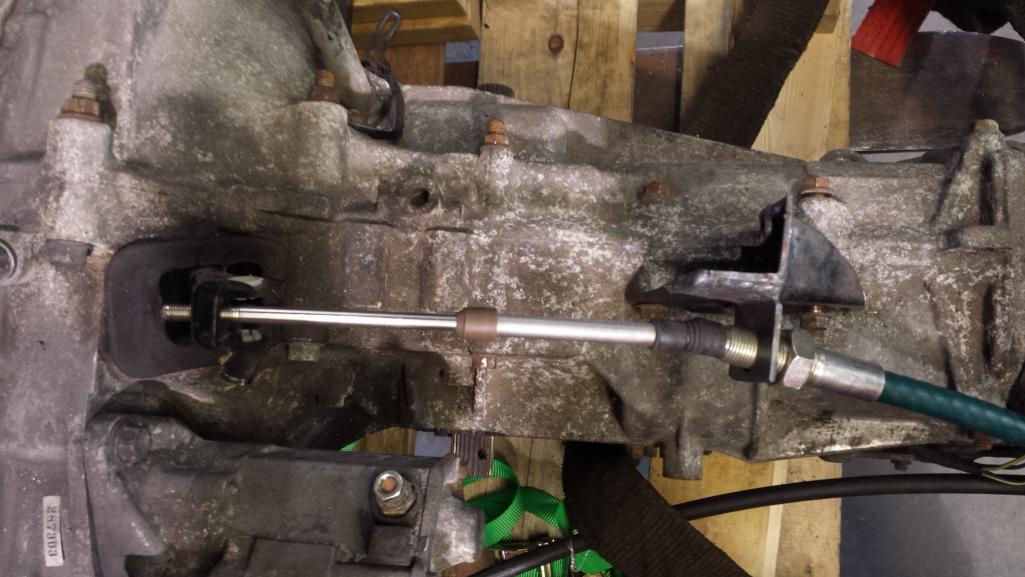
Posted by: A&P Mech Jul 25 2017, 09:57 PM
Jim,
Why not do a hydraulic clutch? It is super easy and works great.
Posted by: mgp4591 Jul 26 2017, 02:31 AM
"my suby trans has the female cvs and my understanding is the axle length is different depending on if the suby female or male cv is used."
How can you use the male end of the cv? The plunge joint (tulip) is the side that fits in the trans - the male end only fits the hub side... I think.
Posted by: jimkelly Jul 26 2017, 09:15 AM
pics
my cv is not the tulip type, mine has a cage and balls inside like 914 cv.
as for hydraulic, maybe i'll upgrade down the road. simply trying to use what i GOT
last pic is amenson's, like mine.
Attached thumbnail(s)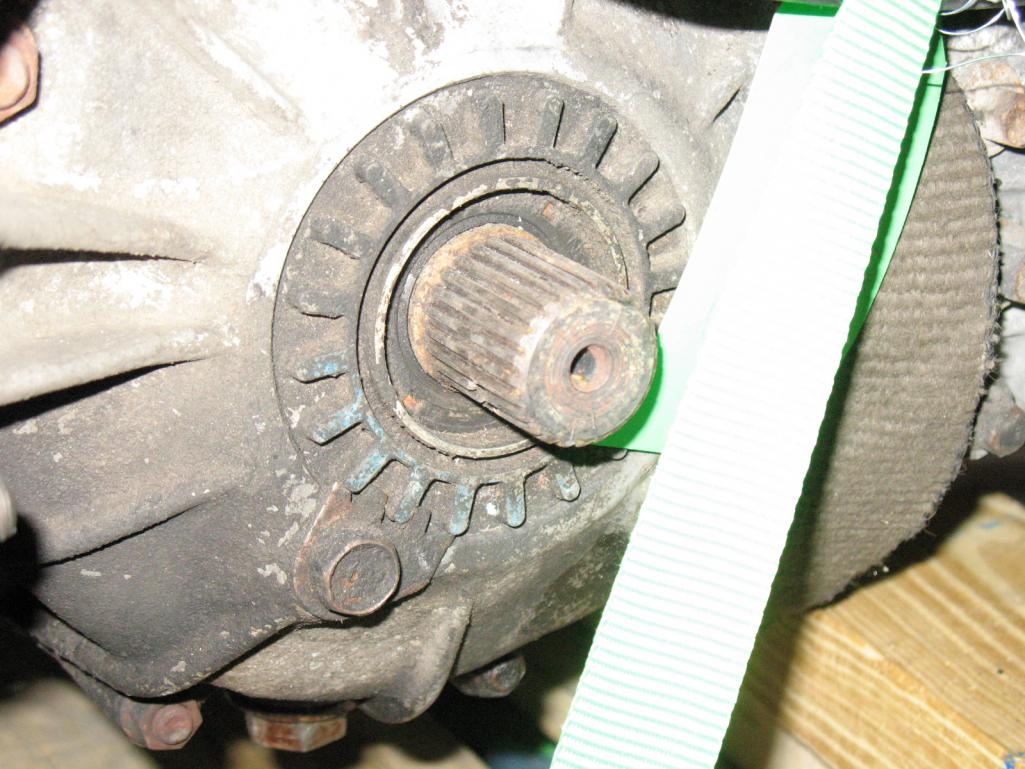
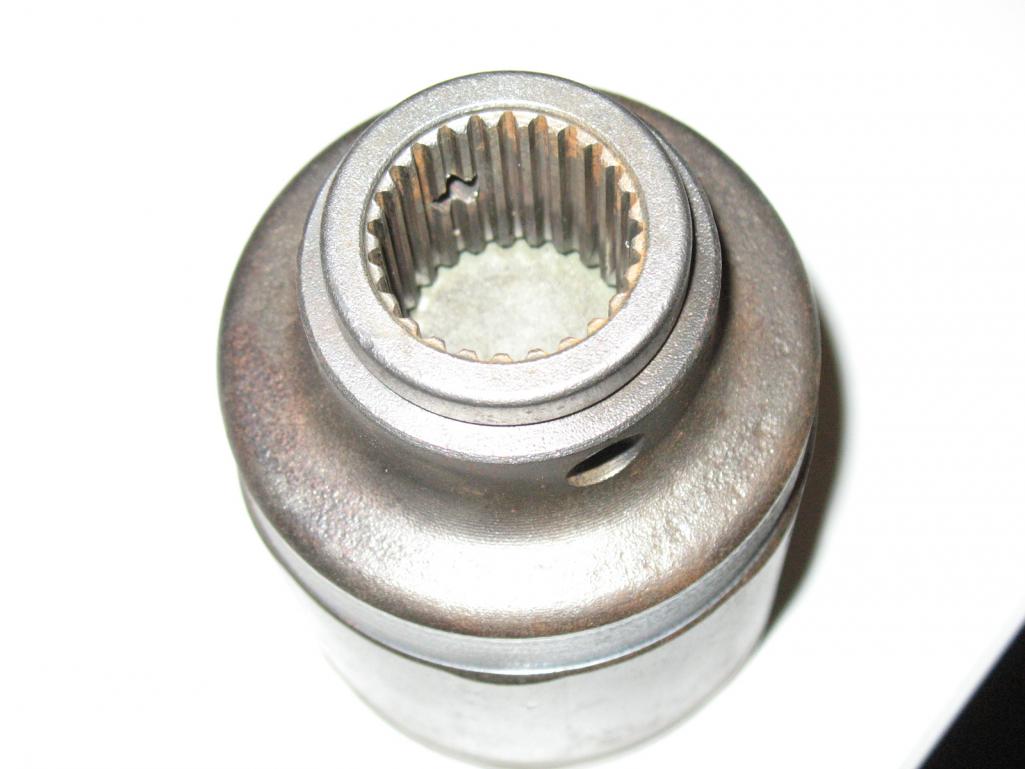
Attached image(s)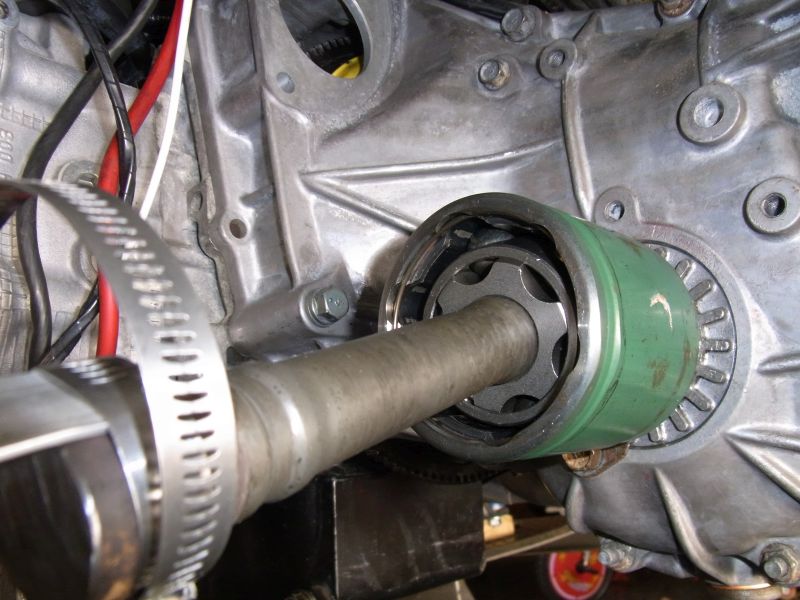
Posted by: jimkelly Jul 26 2017, 04:57 PM
cradle done.
one issue i found is with wrx header oem style. it seems to interfere with water pump housing. though i tested with no gasket, but it seems a thickish gasket may solve the problem though i think maybe there is a different housing i should be using vs stock 2.2 housing?
when i removed the housing the header went together fine.
relieved to see that oil filter is far from header
looks like my answer is here
http://www.ultimatesubaru.org/forum/topic/125313-turbo-headers-on-a-na-motor/
http://www.rs25.com/forums/f7/t71668-turbo-water-pump.html
http://turbotimer.org/so-you-want-to-turbo-an-ej22e/
https://www.thesamba.com/vw/forum/archive/index.php/o-t--t-487340--start-100--index.html
Attached thumbnail(s)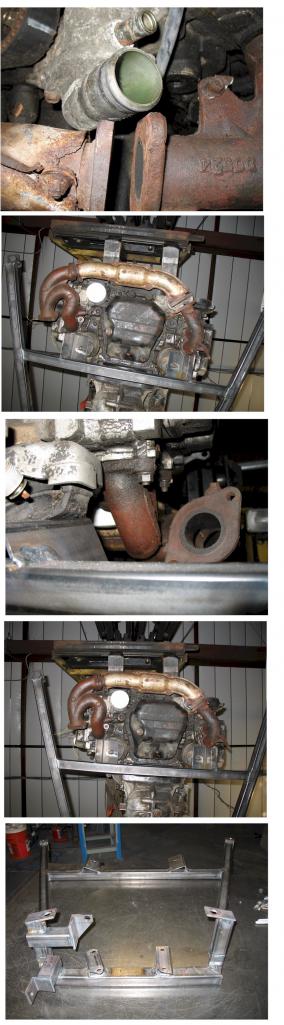
Posted by: mgp4591 Jul 26 2017, 11:52 PM
That is a plunge joint, just not a tripod type. As opposed to the 914 stock axle or a 911 type. It makes it lots easier to remove the axle when the inside joint can travel into the housing.
Posted by: Andyrew Jul 27 2017, 08:15 AM
Are you using the stock water pump? Any hose that close to the header will melt or crack within a short timeframe.
Sounds like a turbo water pump is certainly the answer there. Another option is a remote water pump, but the flanges will probably be difficult to fit.
Posted by: jimkelly Jul 27 2017, 09:16 AM
thanks guys for chiming in, very appreciated
yes, seems i will have to change to a turbo water pump. still this will be a hose pretty dang close to a exhaust manifold.
Attached image(s)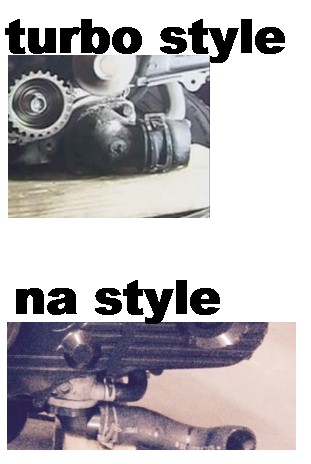
Posted by: jimkelly Jul 27 2017, 09:31 AM
i'll size up my axle like this member did.
and use dutchman.
914 cv wheel end and suby cv trans end.
nice a dry too, no grease
Attached image(s)

Posted by: jimkelly Jul 27 2017, 03:56 PM
what the hell, i added wheels, not sure my oil pan won't touch the ground
i don't know about you guys, but when i pull an engine, i drop the car down low with wheels off, undo engine/trans mounts, a let eng/trans rest on furniture dolly, THEN, i lift car up crazy high, so i can roll assy out from under car.
i know some lift engine into lifted car.
Attached thumbnail(s)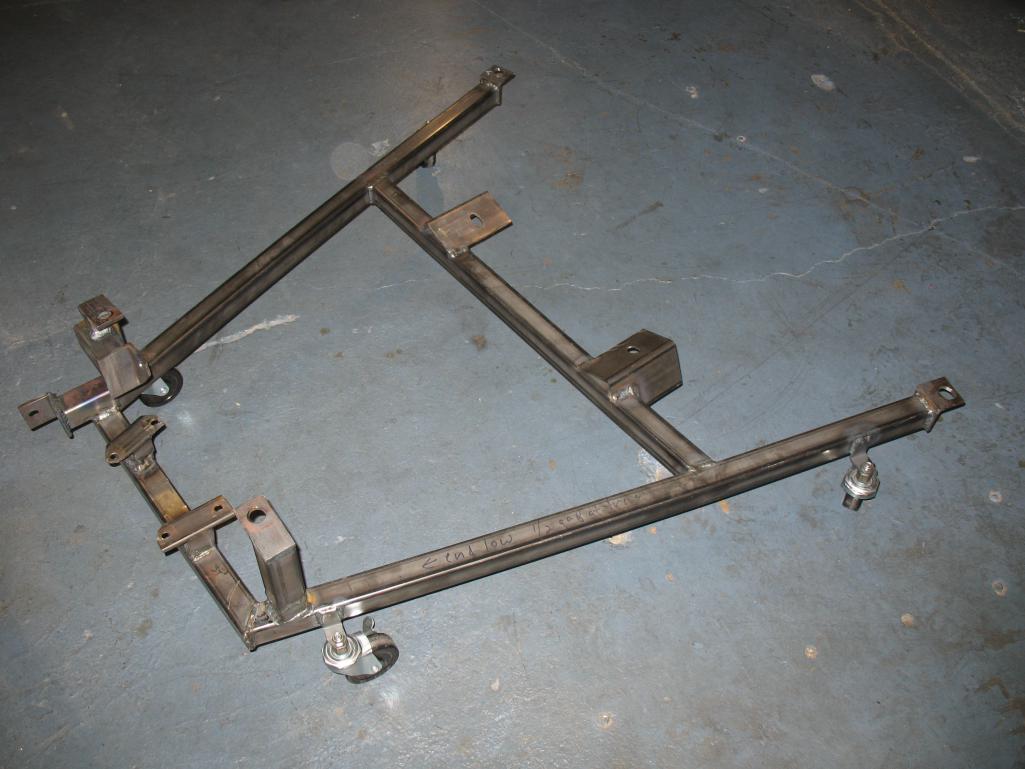
Posted by: Andyrew Jul 27 2017, 04:16 PM
what the hell, i added wheels, not sure my oil pan won't touch the ground
i don't know about you guys, but when i pull an engine, i drop the car down low with wheels off, undo engine/trans mounts, a let eng/trans rest on furniture dolly, THEN, i lift car up crazy high, so i can roll assy out from under car.
i know some lift engine into lifted car.
Better put some gussets on those wheel brackets... Those wheels are going to fold up pretty easy.
Posted by: Andyrew Jul 27 2017, 04:19 PM
thanks guys for chiming in, very appreciated
yes, seems i will have to change to a turbo water pump. still this will be a hose pretty dang close to a exhaust manifold.
That looks like it would be easy to either build a custom housing or rotate possibly 90deg on either one to move it away from the exhaust. I say 3/16" plate, template, drill holes and cut out shape, then weld in some tubing in your desired direction. Plane the metal flat when your done and powdercoat and add gasket.
Posted by: jimkelly Jul 27 2017, 04:31 PM
gussets, fuck, shit. should have used 1/4 thickness vs 1/8.
though i don't see a way around using a turbo pump and i don't mind as long at it is simply a bolt on swap.
Attached image(s)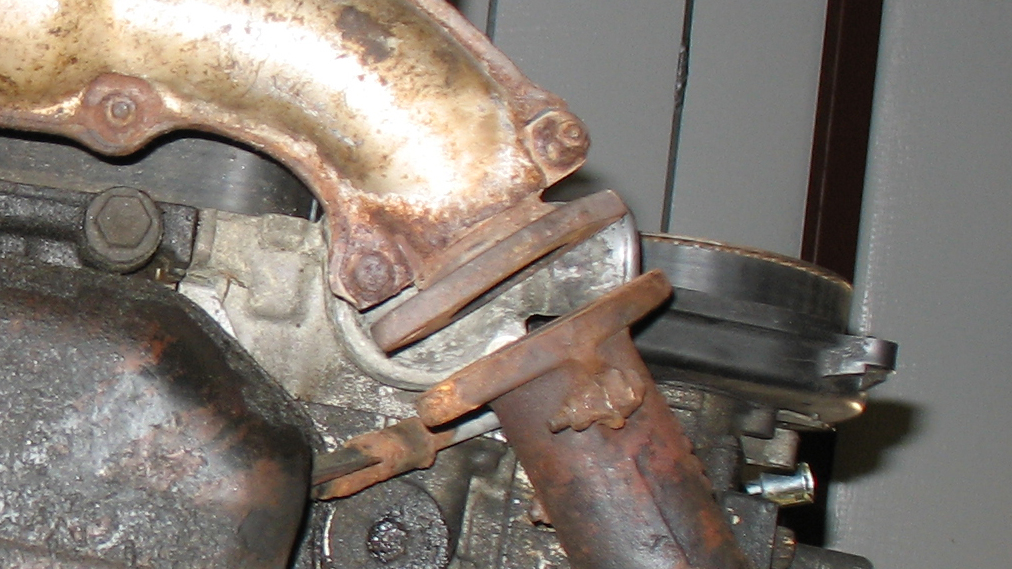
Posted by: jimkelly Jul 27 2017, 05:53 PM
alright. i redid redonedid the wheel mounts and used 1/4 angle
short welds mostly bottom to top, but i prefer welding right to left, horizontally, sitting comfortably, with hand supported
Attached image(s)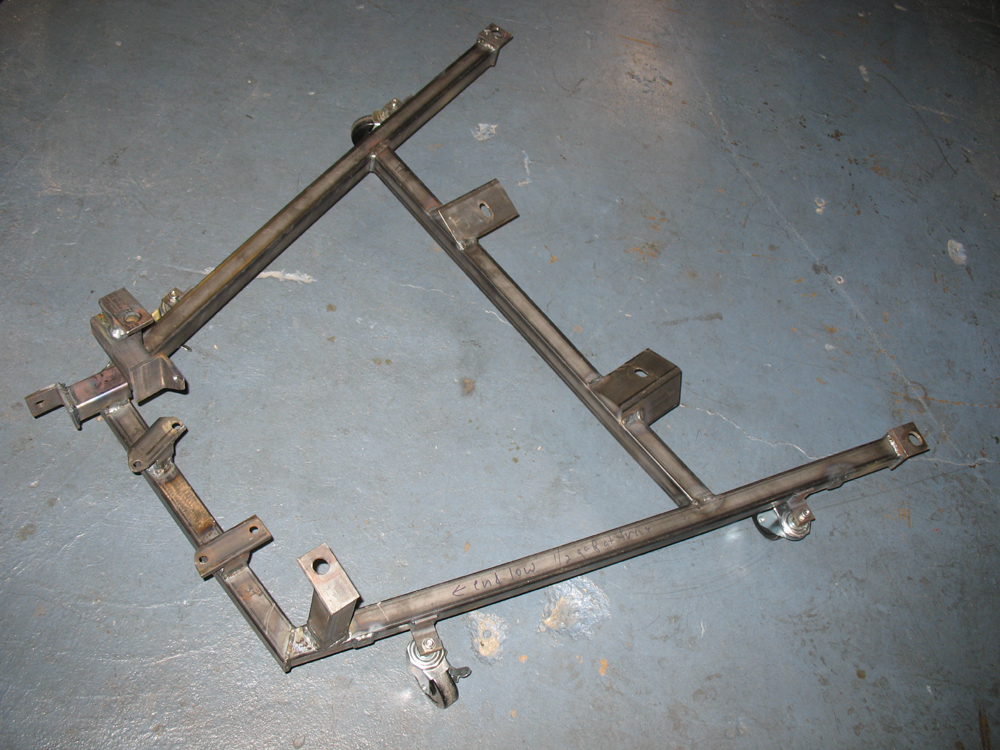
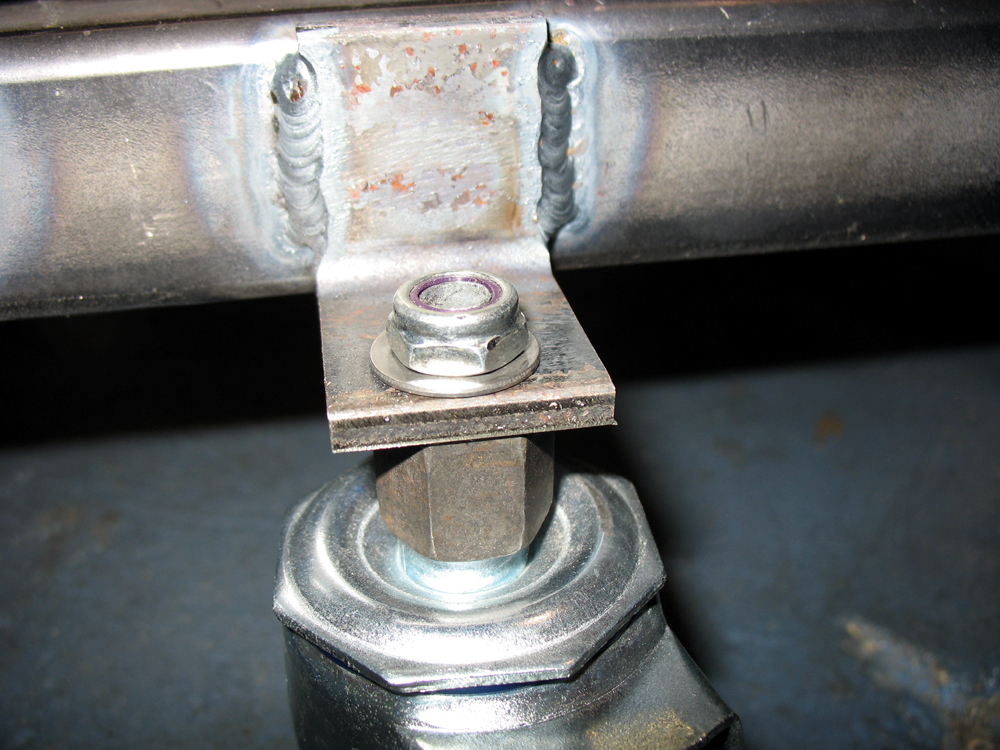
Posted by: A&P Mech Aug 1 2017, 08:52 PM
Jim,
I didn't use the stock header. I used an aftermarket header. You did track down the manufacturer and post a picture of the header in my thread. It was post 386. It was HDG Performance.
I am not sure if it is less expensive and easier to change the water pump or buy a new header?
Ray
Posted by: jimkelly Aug 2 2017, 05:22 AM
i decided against an aftermarket header in favor of a subaru oem turbo header. for compactness and $9.99 on ebay + $25 shipping.
but now i need to change water pump to turbo style also.
this at least will force me to replace old water pump
thanks
Posted by: 76-914 Aug 2 2017, 07:49 AM
what the hell, i added wheels, not sure my oil pan won't touch the ground
i don't know about you guys, but when i pull an engine, i drop the car down low with wheels off, undo engine/trans mounts, a let eng/trans rest on furniture dolly, THEN, i lift car up crazy high, so i can roll assy out from under car.
i know some lift engine into lifted car.
Better put some gussets on those wheel brackets... Those wheels are going to fold up pretty easy.
I see 6 other places that I would add gusset's. How much does that thing weigh, Jim?
Posted by: jimkelly Aug 2 2017, 08:00 AM
31 LBS. what u thinkin 76-914?
and here is a pic that shows the turbo water pump with my header better. amazing clearance with turbo water pump. maybe 1.5"
Attached image(s)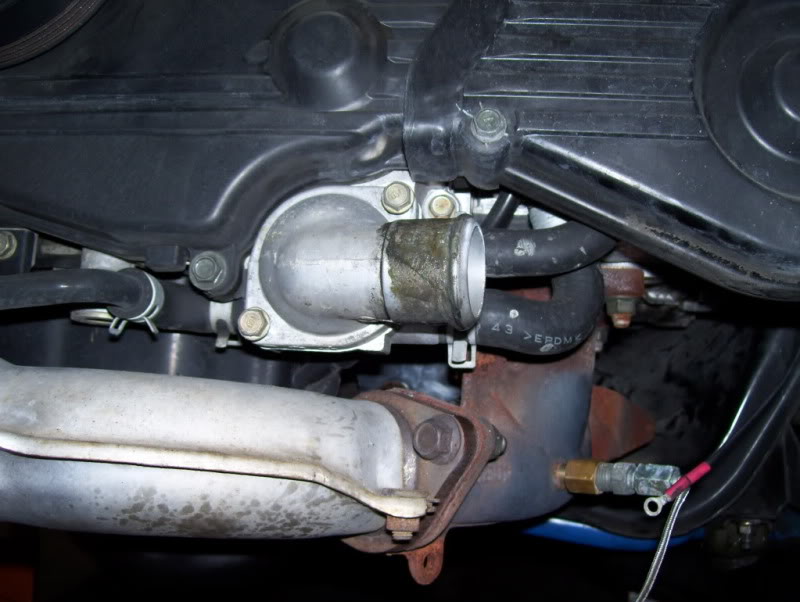
Posted by: jd74914 Aug 2 2017, 08:19 AM
Looking good Jim!
You might already be planning on it, but I would spend a little time with an angle grinder to take down the sharp points just to protect yourself. It sucks getting cut on a sharp edge when you're working on something else entirely.
Posted by: jimkelly Aug 2 2017, 08:56 AM
you know, the guys here at work have been gettin on my ass about that too. seems like you guys might be right about SHARP EDGES.
i did gouge the rear bumper on my honda fit the other day when removing it from my car
Posted by: jd74914 Aug 2 2017, 09:05 AM
you know, the guys here at work have been gettin on my ass about that too. seems like you guys might be right about SHARP EDGES.
i did gouge the rear bumper on my honda fit the other day when removing it from my car
The bumper gouge sucks. Yeah, I've got a few scars from sharp plate edges so I'm always extra cautious.
Posted by: 76-914 Aug 2 2017, 09:06 AM
31 LBS. what u thinkin 76-914?
and here is a pic that shows the turbo water pump with my header better. amazing clearance with turbo water pump. maybe 1.5"
Just curious. Wanted to compare our weights. You still thinking about mfg cradles?
I'd starve to death making these things for a living. Did you track the materials cost? I had about $160 in materials but I used 4130 which ain't cheap.
Posted by: jimkelly Aug 2 2017, 09:24 AM
i think i was about $50 in matls, mild steel, mostly 1/8" and some 1/4".
shipping is the KILLER for a buyer. fedex and ups charge about $170 or so, regardless if its going 6hrs away or 16 hrs away.
i've only made 2 so far, one for myself (1st one) and sold one.
got to find a way around high shipping cost. size is about 40x30x8 at 31lbs if i recall correctly.
Posted by: jimkelly Aug 2 2017, 05:43 PM
fwiw..
Scott <scott@renegadehybrids.com>
6:59 PM (41 minutes ago)
to me, travis
Yes, I have the adapters for a 901/914 transaxle output flange to a 100mm (86mm x 8mm six bolt threaded pattern) CV joint. $100 each. Thanks for asking.
Sincerely,
Scott >>> Renegade Hybrids
www.renegadehybrids.com
702-739-8011
Attached image(s)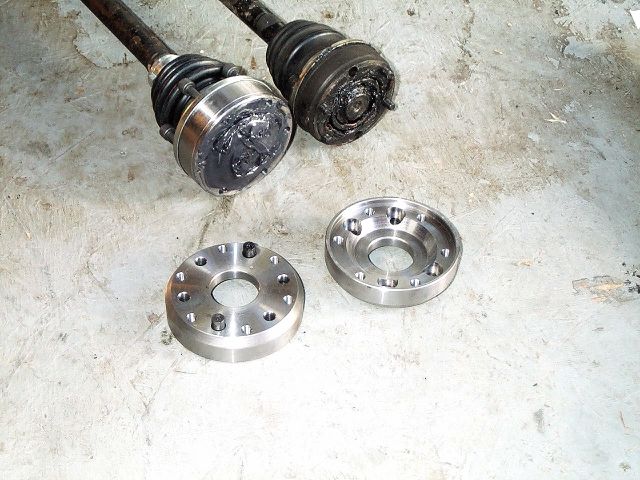
Posted by: Andyrew Aug 3 2017, 08:10 AM
So 400 for a set of 4. Or 200 for a pair if you do it like I did. Not that bad.
Posted by: jimkelly Aug 3 2017, 11:18 AM
see andyrew's post #498 and his whole awesome thread
http://www.914world.com/bbs2/index.php?showtopic=114780&st=400
Posted by: mepstein Aug 3 2017, 11:38 AM
i think i was about $50 in matls, mild steel, mostly 1/8" and some 1/4".
shipping is the KILLER for a buyer. fedex and ups charge about $170 or so, regardless if its going 6hrs away or 16 hrs away.
i've only made 2 so far, one for myself (1st one) and sold one.
got to find a way around high shipping cost. size is about 40x30x8 at 31lbs if i recall correctly.
When I bought mine, it was shipped from Ohio for $55. FedEx
Posted by: jimkelly Aug 3 2017, 12:05 PM
$55 to $100 nationwide would be great. i need to figure out how coldwater did it.
Posted by: jimkelly Dec 30 2017, 02:52 PM
complete lack of energy and funds to proceed but plan to get back on it soon. thought i'd at least share info about the cradle i made based on coldwater's cradle's dimensions. for subaru ej series engine and 5 spd trans. you'll noticed some ovaled holes and such, this is my first draft which i took these measurements from. i have more notes at work that i will compare these to. i would have liked to fine tune this design and sell them but shipping (fully welded) is cost prohibitive.
Attached thumbnail(s)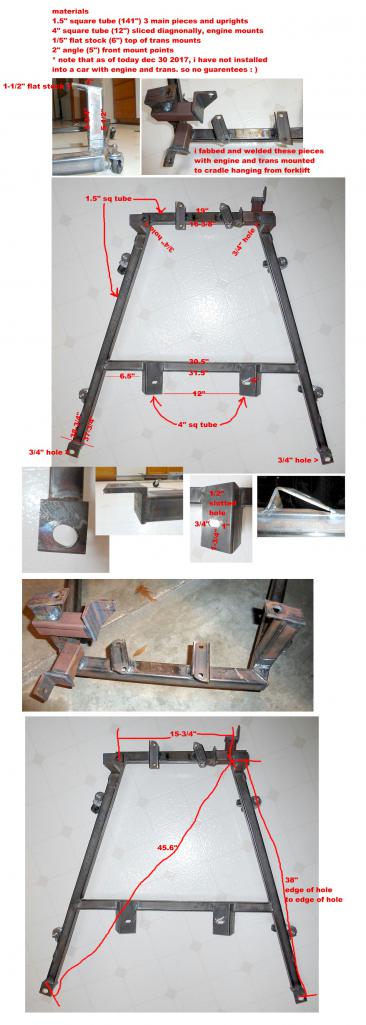
Attached image(s)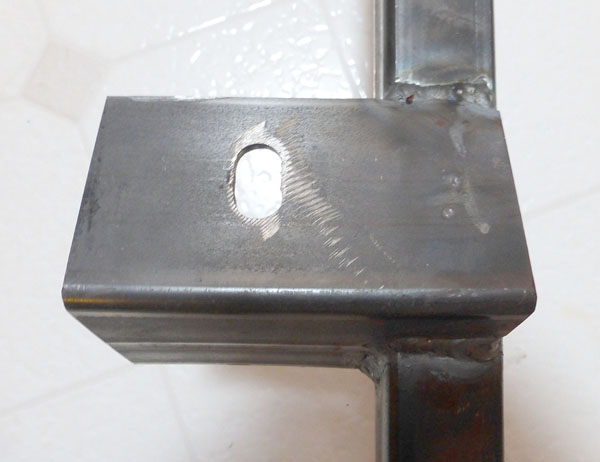
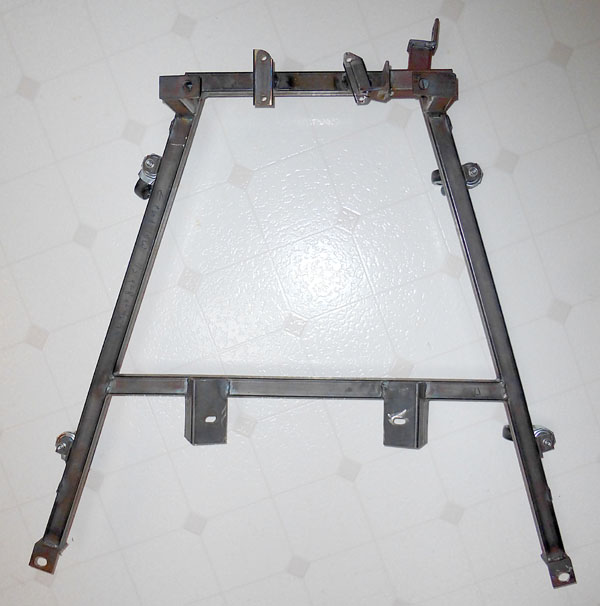
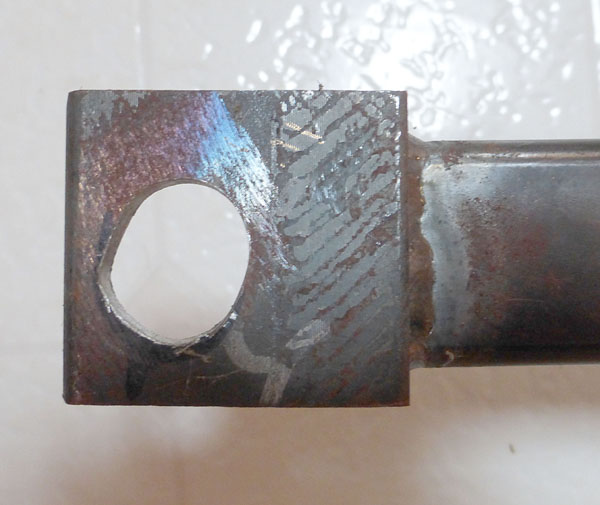

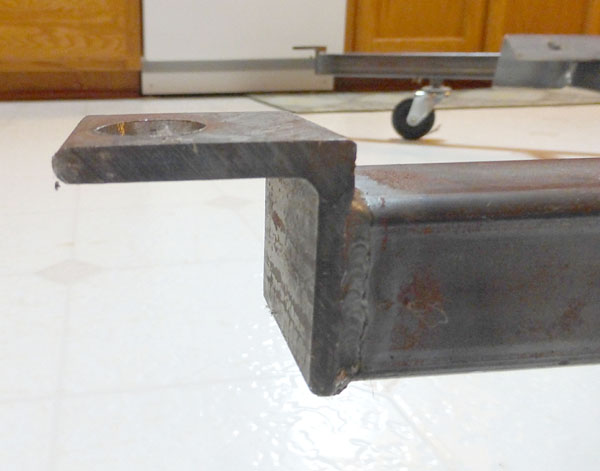
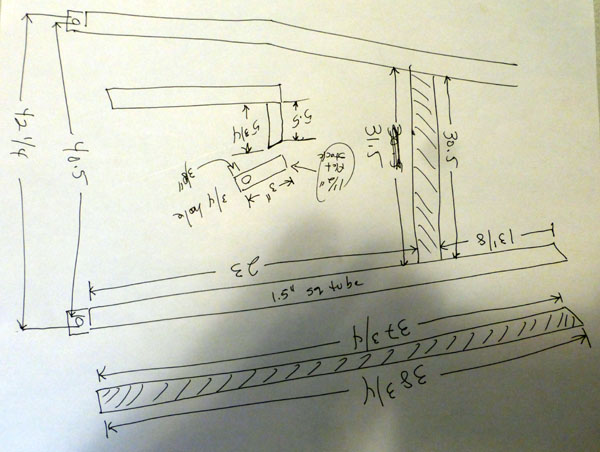

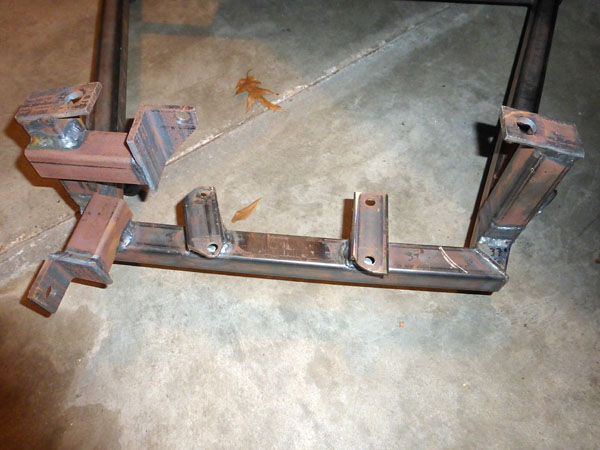
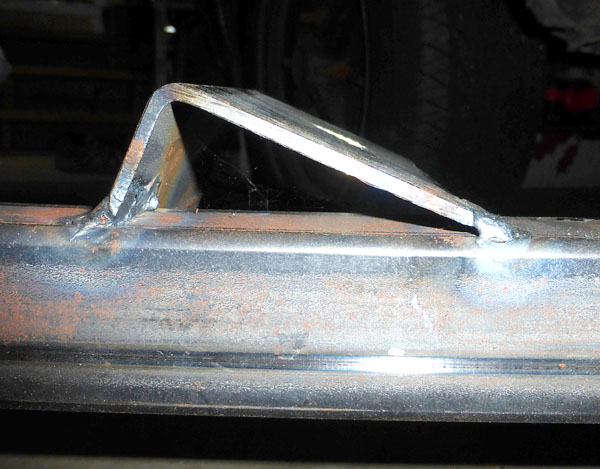
Posted by: BeatNavy Dec 30 2017, 03:35 PM
Jim, was wondering how you were doing. Hadn't seen an update in a while.
Happy New Year, though
Posted by: hockeymutt Dec 30 2017, 06:41 PM
Great looking mount! if you could soft mount everything and see it works I would totally pick one up from you! I could even come down and give you a hand with it.
Posted by: jimkelly Dec 30 2017, 07:27 PM
i'd like to think that 4 porsche rubber mounts would be adequate. but i have complete suby trans mounts at work and will look into this. some random pics.
Attached thumbnail(s)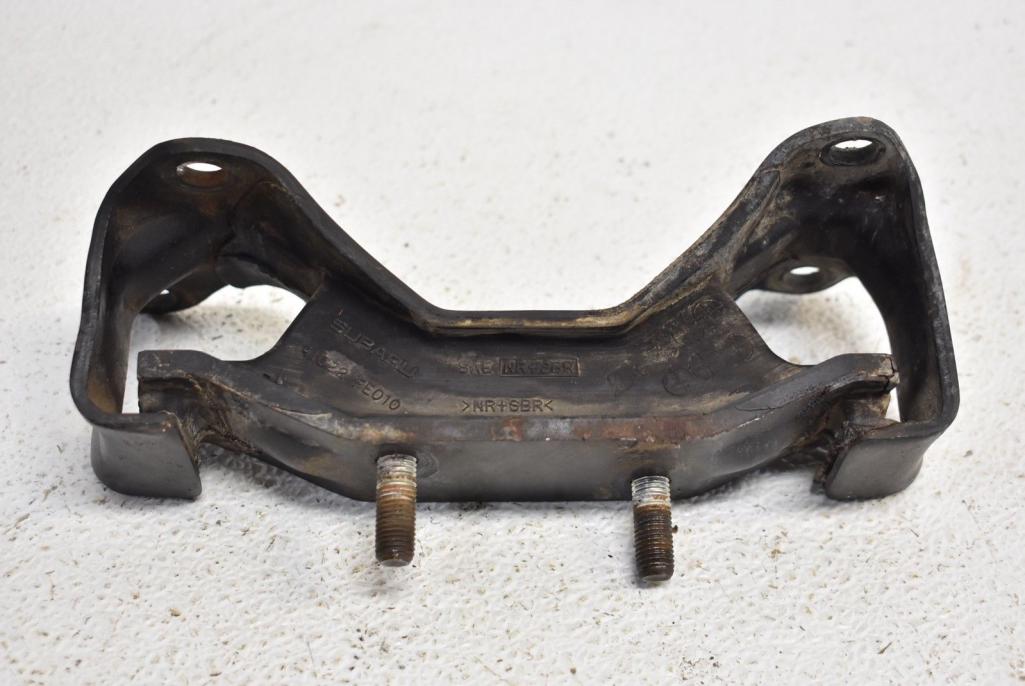
Attached image(s)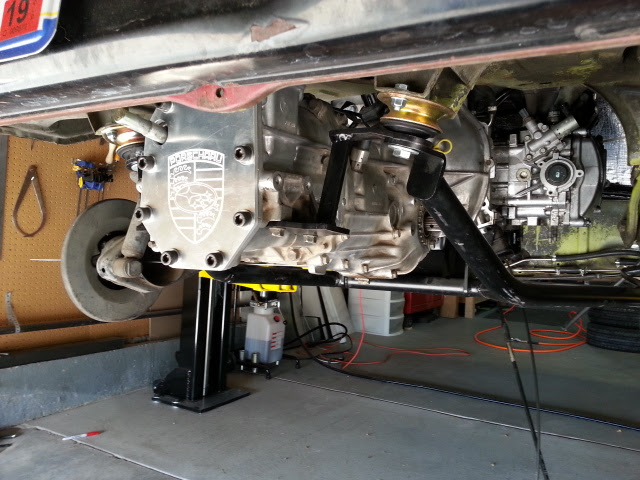

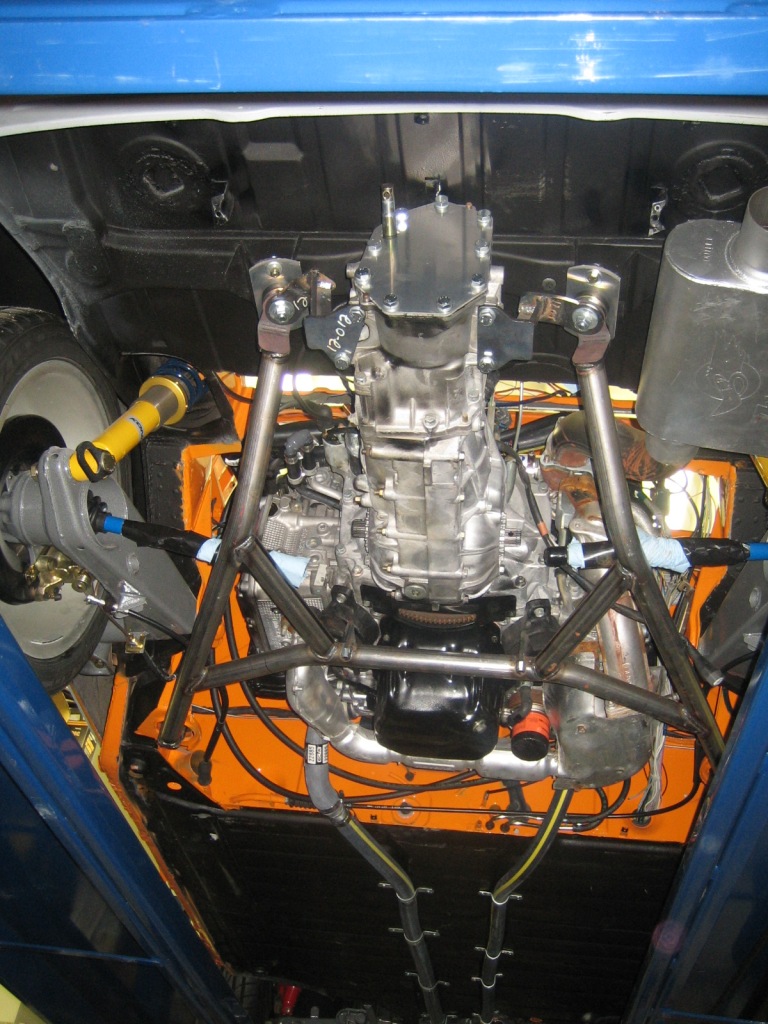
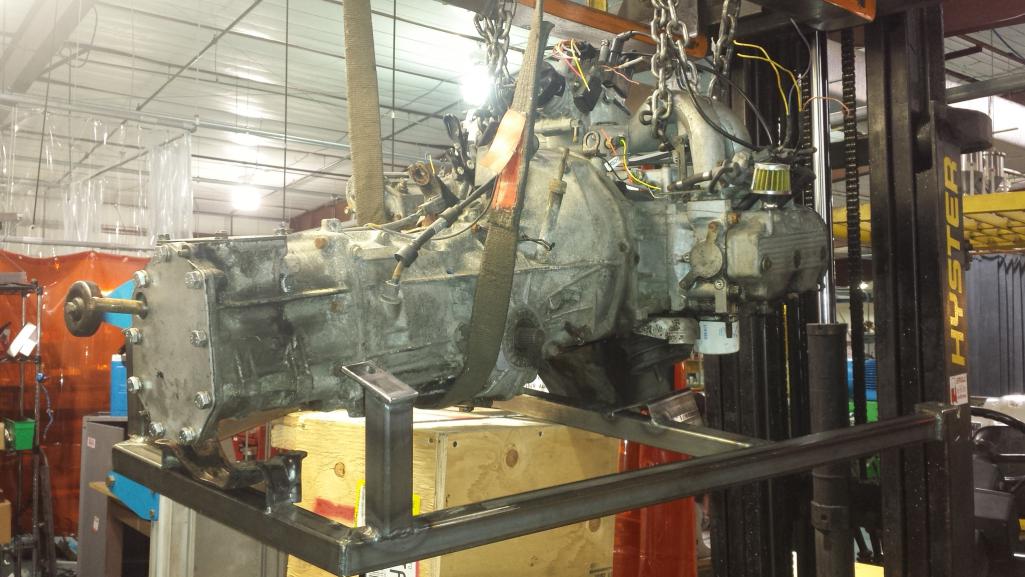
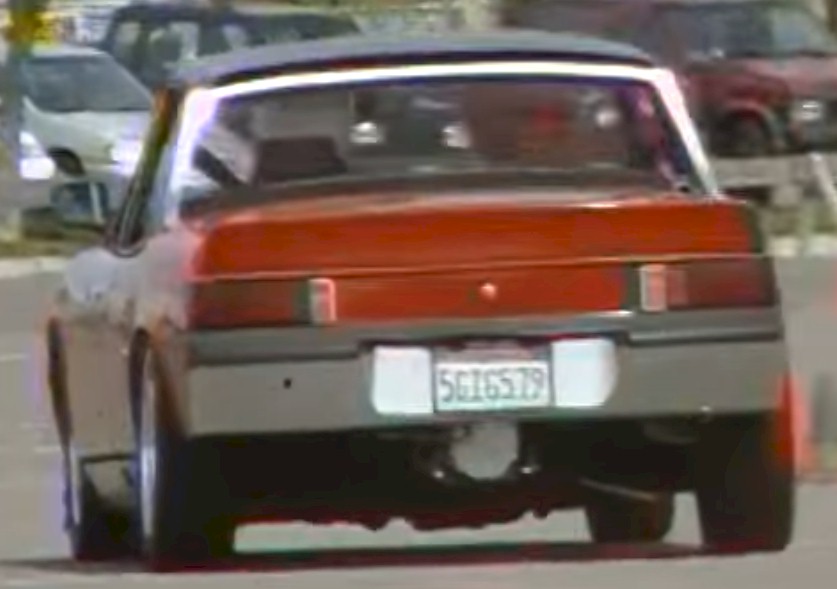
Posted by: 76-914 Dec 31 2017, 10:40 AM
The Suby stock mounts are fine. One day I'll need to replace one and I want to be able to source one easily i.e. a Subaru dealer. I wouldn't remember remember where I bought a custom engine/trans mount. Stay after it and it will happen.
Posted by: jimkelly Jan 1 2018, 10:45 AM
flmont's thread gave me a little boost of motivation : )
i corrected one engine mount i had in crooked and quickly installed engine mount in order to measure height between mount and body where trans occupies at trans mounts area. 9-3/4" space i have. time to double check if this is enough. then i'll replace half assed trans brackets with a real subaru bolt in trans mount. 14 degrees in delaware today, burr.
guess i could cut out section with half assed mounts and weld in a piece of angle iron so i have a flat at the bottom side for 2 bolts bolts for suby trans mount.
based on spare subaru 5 spd trans in my garage, about 10" of clearance is needed. so i am almost ON THE MONEY as it stands, using spacers as needed should suffice?
Attached image(s)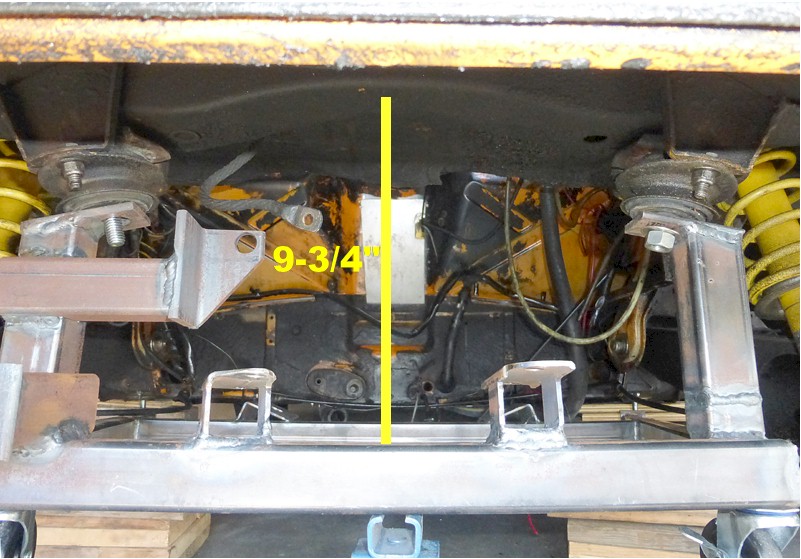
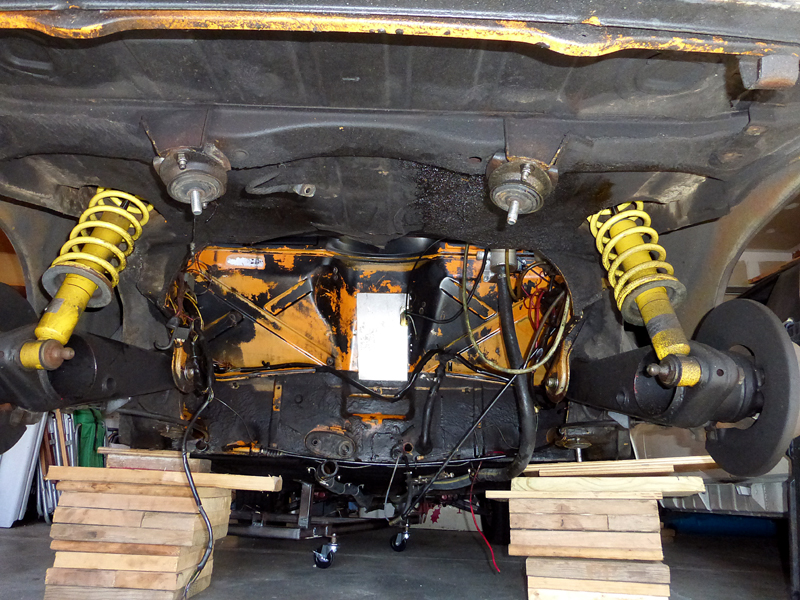
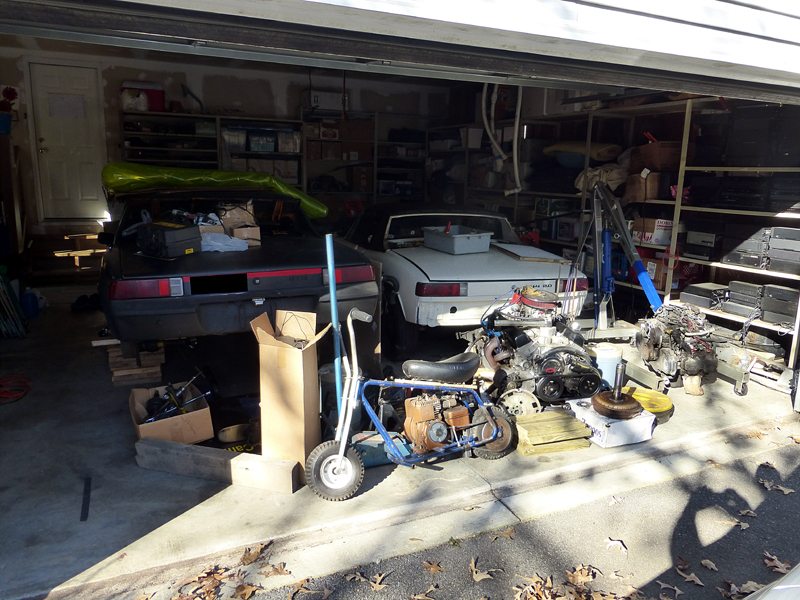
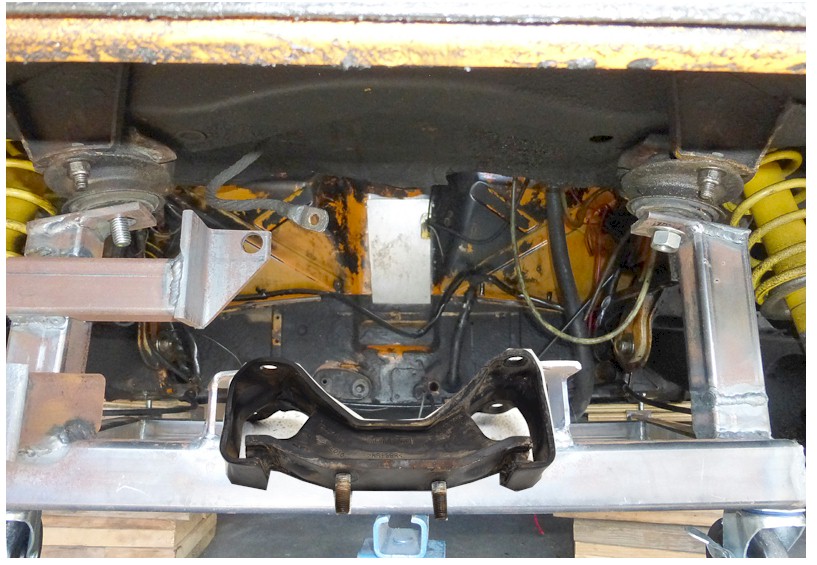
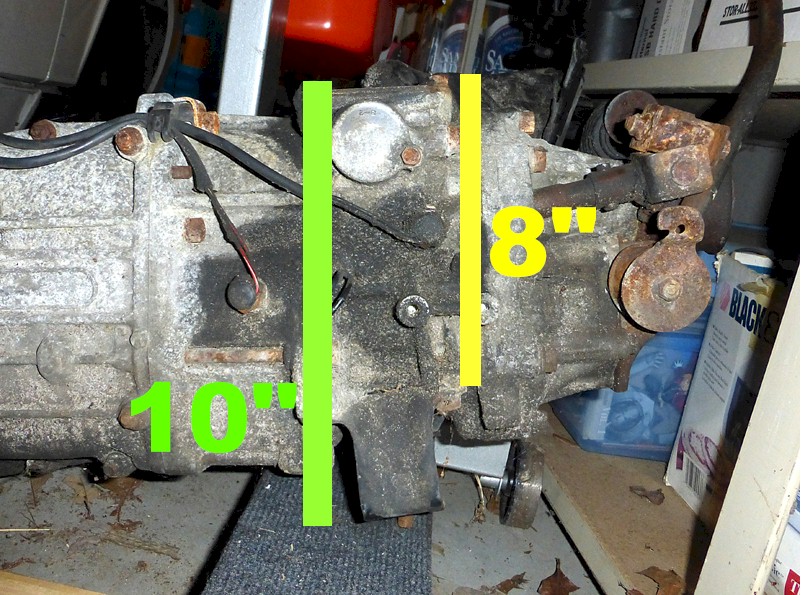
Posted by: jimkelly Jan 2 2018, 08:25 PM
ok, i cut out section with homemade mounts and drilled for subaru mount. now i need to weld a piece of rectangular tube 1x3 i'm thinking underneath to get strength back. this piece will have holes for suby mount on top side and holes large enough for the nuts that hold mount secure.
well i am on hold till my machine shop orders some steel and includes my 20" piece of 1"x3" .125 wall rectangle tube.
Attached thumbnail(s)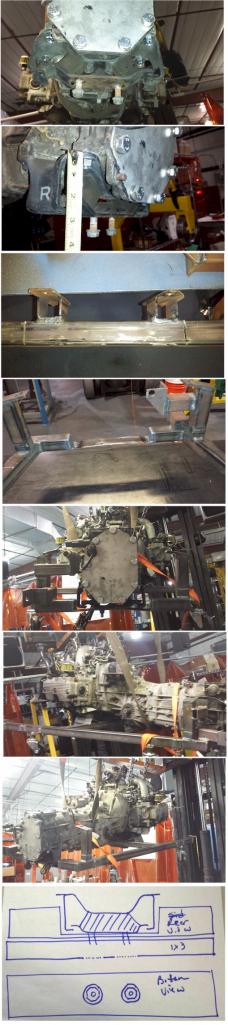
Posted by: jimkelly Jan 17 2018, 05:47 PM
finally got my cradle revised to use oem subaru trans mount : )
looking forward to mounting it my car one day ; )
the cross bar is 1 x 3 and it has small holes on top to receive the subaru mount's studs and big 1" holes on bottom to allow for the flanged nuts to pass thru.
Attached image(s)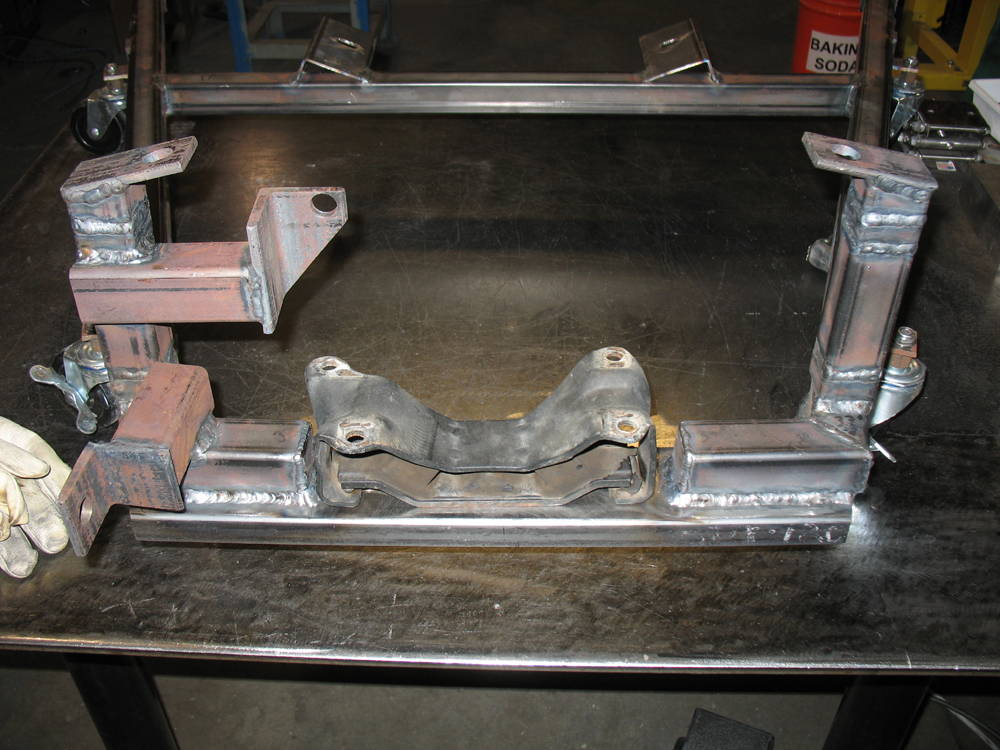
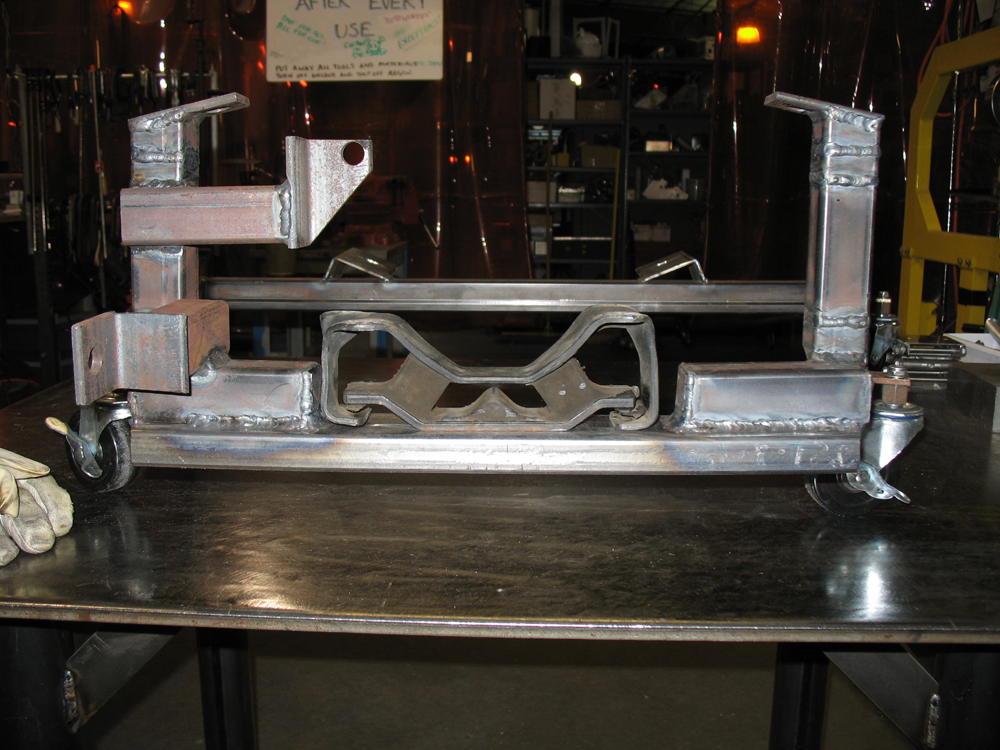
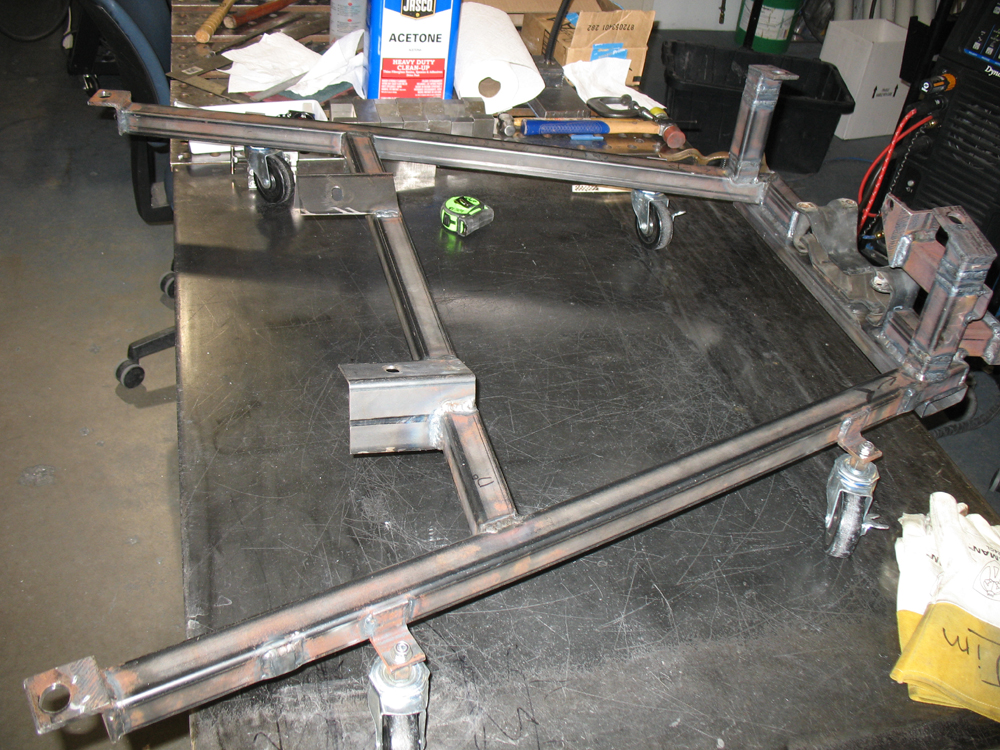
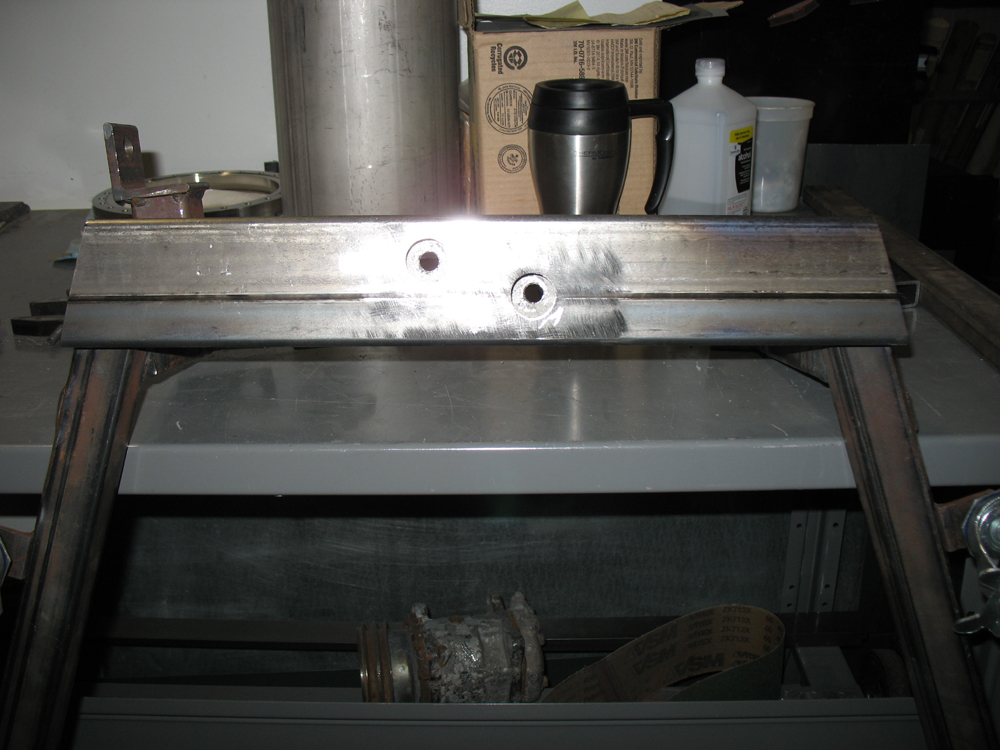
Posted by: 914forme Jan 17 2018, 06:53 PM
Great but all I can say was you where correct the first time. Hard mount the engine and trans and shift linkage as one unit. And then use mounts in the factory locations. This keeps everything together in a really nice way.
So what it does for you is keeps the shifting, all nice and tight as it does with the trans and engine. Everything that can move does as one unit. Solves so many little detail problems.
Best of luck in your venture.
Posted by: jimkelly Jan 17 2018, 07:02 PM
connundrum.
i'll have 914 mounts in all four corners but i HAD them and the rubber subaru motor mounts prior to this change. thus the engine could move and only the trans was ACTUALLY hard mounted to cradle.
though i did not think about how this added allowance for movement will effect shifting
i saved this in case i need it for my frankenstein cradle
Attached image(s)
Posted by: 76-914 Jan 17 2018, 09:30 PM
Have you weighed that cradle yet?
Posted by: jimkelly Jan 21 2018, 03:13 PM
http://www.ausubaru.com/forum/showthread.php?t=8756
https://www.youtube.com/watch?v=WScRBmKsV3U
https://www.youtube.com/watch?v=LyW71RGKcpA
https://shoptalkforums.com/viewtopic.php?f=19&t=125689
https://shoptalkforums.com/viewtopic.php?t=132524
https://prachapter34.com/converting_engines.htm
http://forum.britishv8.org/read.php?6,8510,8552
read replies
https://www.youtube.com/watch?v=1H9YVh3FIoI
http://www.gofastforless.com/ignition/tfi.htm
http://offroadingsubarus.com/forum/index.php?topic=1247.20
https://www.youtube.com/watch?v=HuR33yu-x7k
38 lbs, plus subaru trans mount 3 lbs.
Attached thumbnail(s)
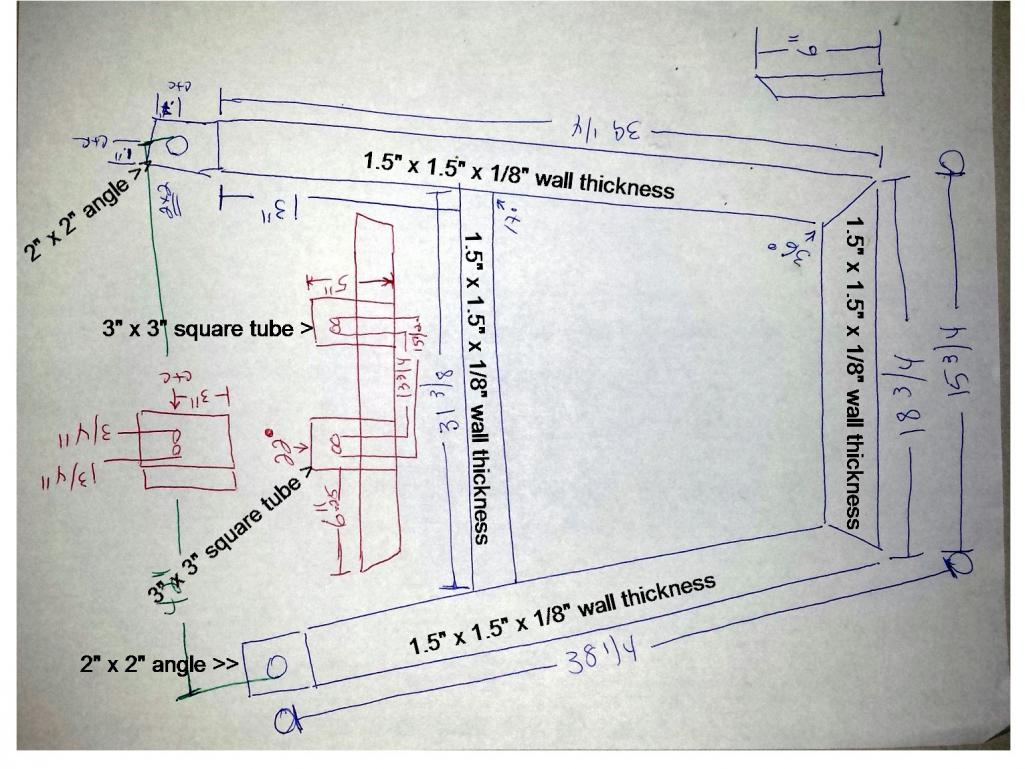
Posted by: Chi-town Sep 10 2018, 06:51 PM
I think you need to get these into production
Posted by: jimkelly Feb 19 2019, 06:59 PM
interum distraction : )
and some pics of the 1993 e4od trans i just got for my 1995 f150 2wd 4.9L
http://www.914world.com/bbs2/lofiversion/index.php?t31515.html
https://www.thesamba.com/vw/forum/viewtopic.php?t=383212&postdays=0&postorder=asc&start=0
http://www.dunebuggyarchives.com/forum/topic_show.pl?tid=1491
https://www.facebook.com/groups/864424797008986/
https://www.facebook.com/groups/subaruvolkswagens/
https://www.shoptalkforums.com/viewforum.php?f=19&sid=e53c22019192f730a01419db50a8a608
Attached thumbnail(s)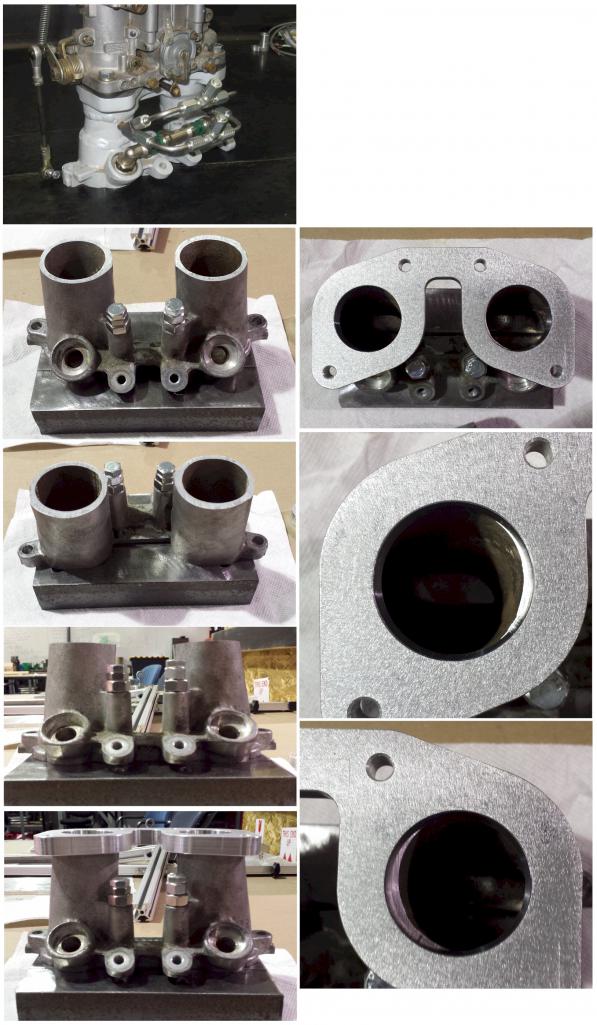
Attached image(s)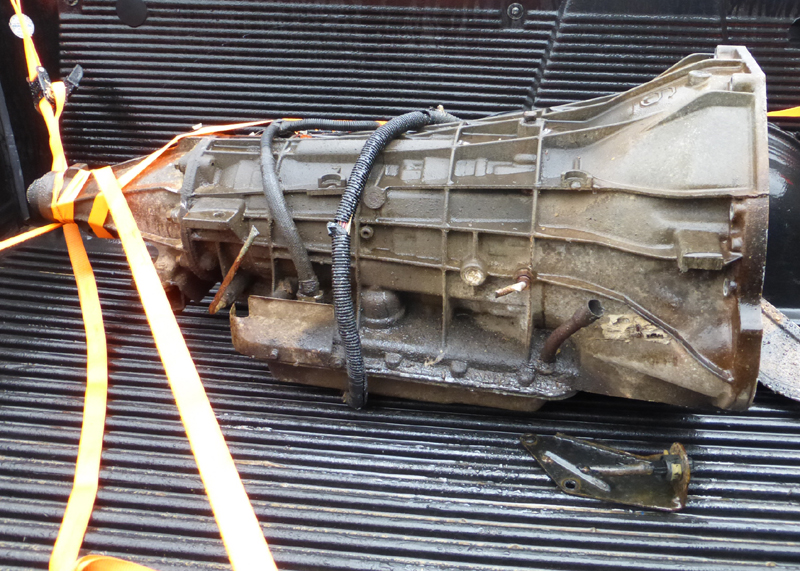
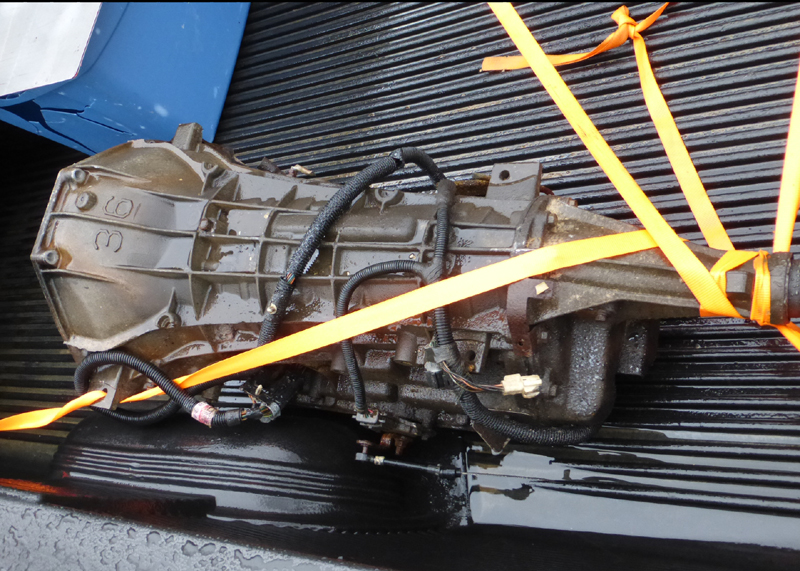
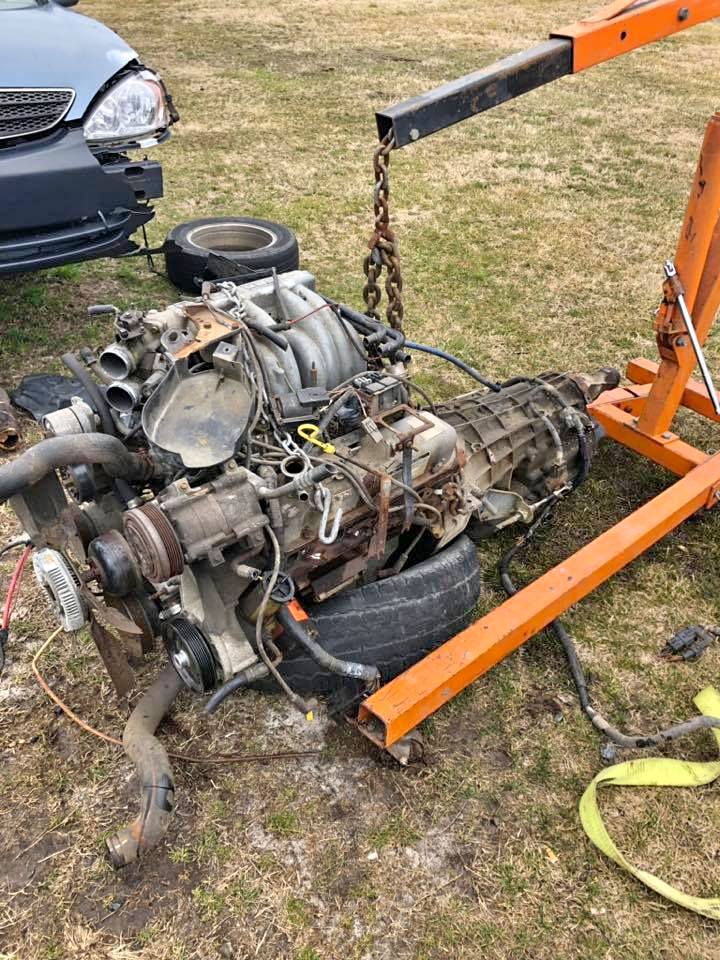
Posted by: Chi-town Feb 19 2019, 08:44 PM
At our age we're supposed to have less carbs in our life 
There are some rather inexpensive itb options for 4 cylinder Subaru engines
https://www.ebay.com/itm/OBX-Red-Individual-Throttle-Body-ITB-Fits-Subaru-Impreza-WRX-EJ20-EJ25-/201807196159
Posted by: jimkelly Apr 23 2019, 06:54 AM
i agree. just F N around mostly.
Attached thumbnail(s)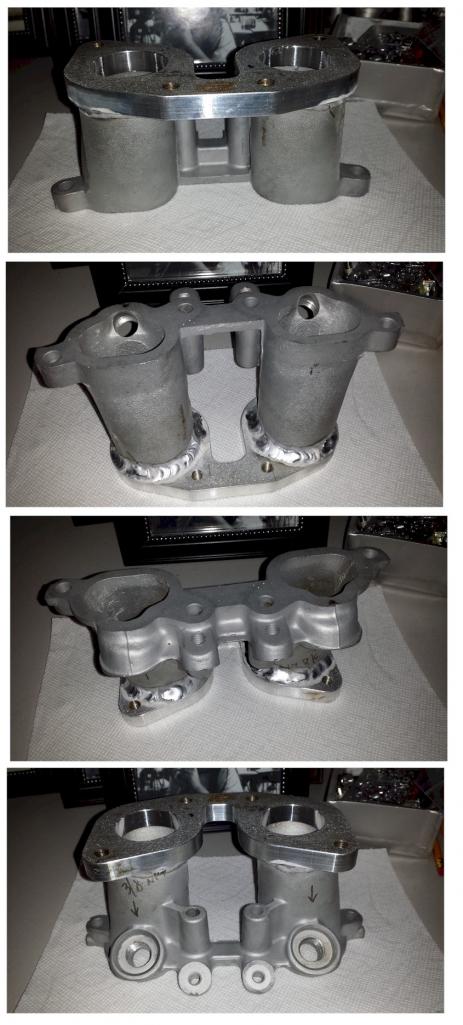
Posted by: rhodyguy Apr 23 2019, 08:42 AM
Any idea what the induction system on the bug is?
Posted by: jimkelly Apr 24 2019, 09:24 AM
here is the link to the carbed subaru bug
https://www.shoptalkforums.com/viewtopic.php?f=19&t=125689&sid=0b761508f7635486945bfc358f949886
Posted by: jpnovak Sep 25 2019, 02:44 PM
Any update on your project or availability of a cradle?
Powered by Invision Power Board (http://www.invisionboard.com)
© Invision Power Services (http://www.invisionpower.com)