Printable Version of Topic
Click here to view this topic in its original format
914World.com _ 914World Garage _ BUILD-OFF CHALLENGE: Dirty Cossack's Build
Posted by: DirtyCossack Sep 30 2015, 07:40 PM
I had every intention of making an introduction video, but I found that I had ruined my wide angle lens trying to film some cool shots of grinding. So while I'm waiting for the new lens to be delivered, I will go with this novel:
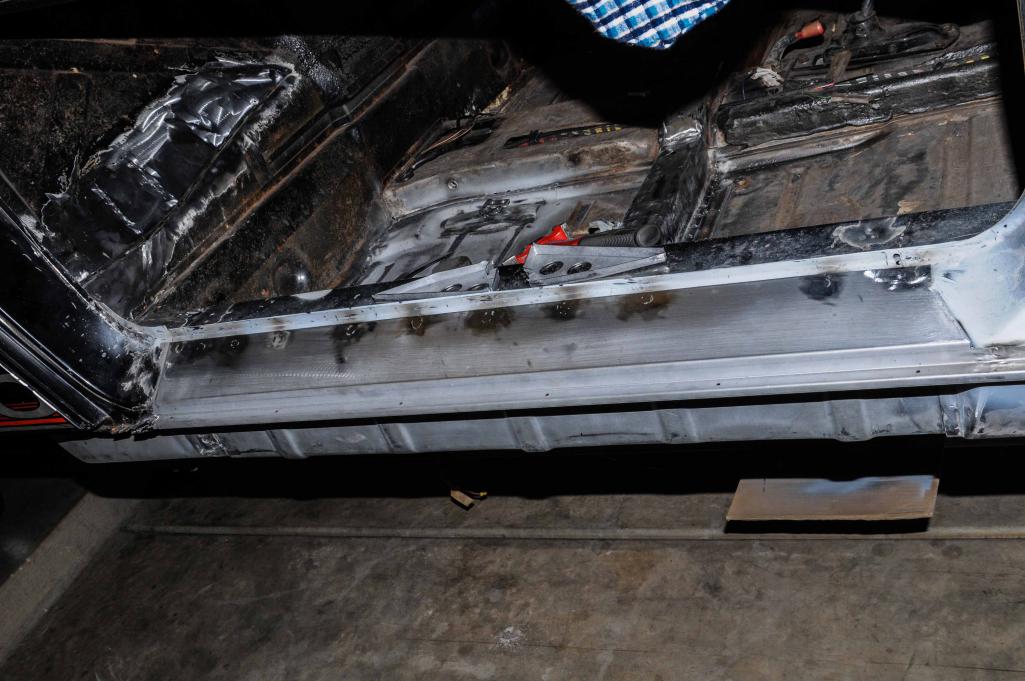
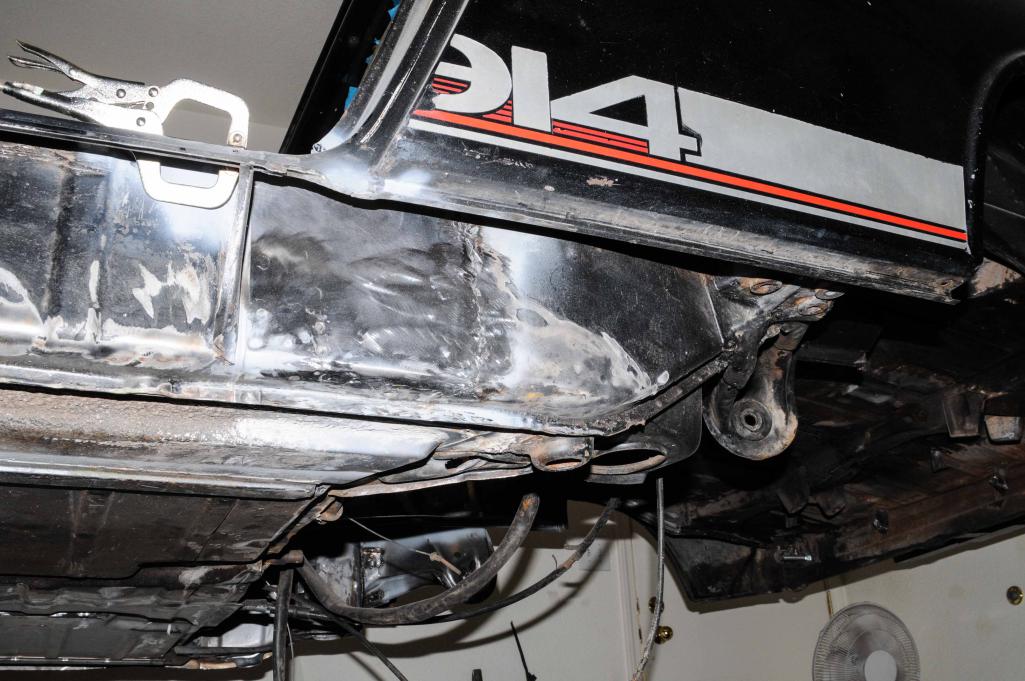
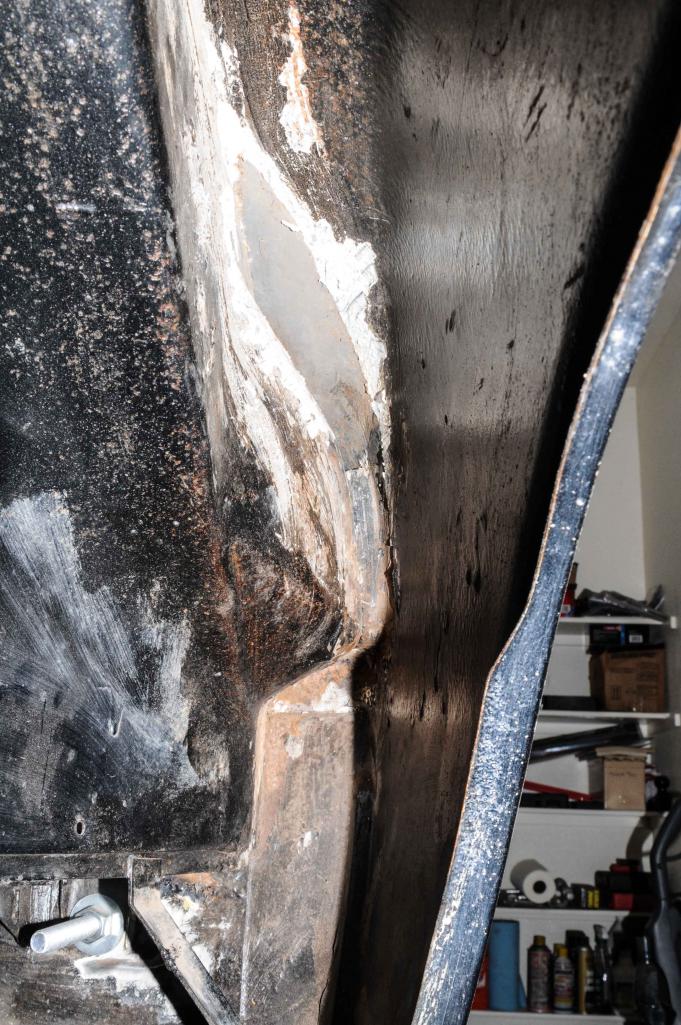
I bought the car about a year ago with the shortsighted intention of throwing it back together and having a driver until its turn came for rustoration. I bought the car and a carload of parts from a guy in Dallas who did some really shady work and an incredible job hiding other rust; magician style he distracted with his obvious poor work. The drivetrain was out of the car and registration said it had been sitting for 12 years, so I don’t know what made me think I could get it driving in a month… Soon after buying the car, my daily driver VW went down and needed a bunch of work and Uncle Sam gave me orders to move 800 miles. I fiddled with the 914 now and then, mostly just probing for rust, but focused my attention on prepping my other projects and VW for sale, knowing I could only bring one car with me and it had to be rolling so I couldn’t really tear into it. I’ve been here in the new, much smaller shop since June and have been slowly tearing into the 914 between honey-do new house projects, new job training, and getting the new shop in order.
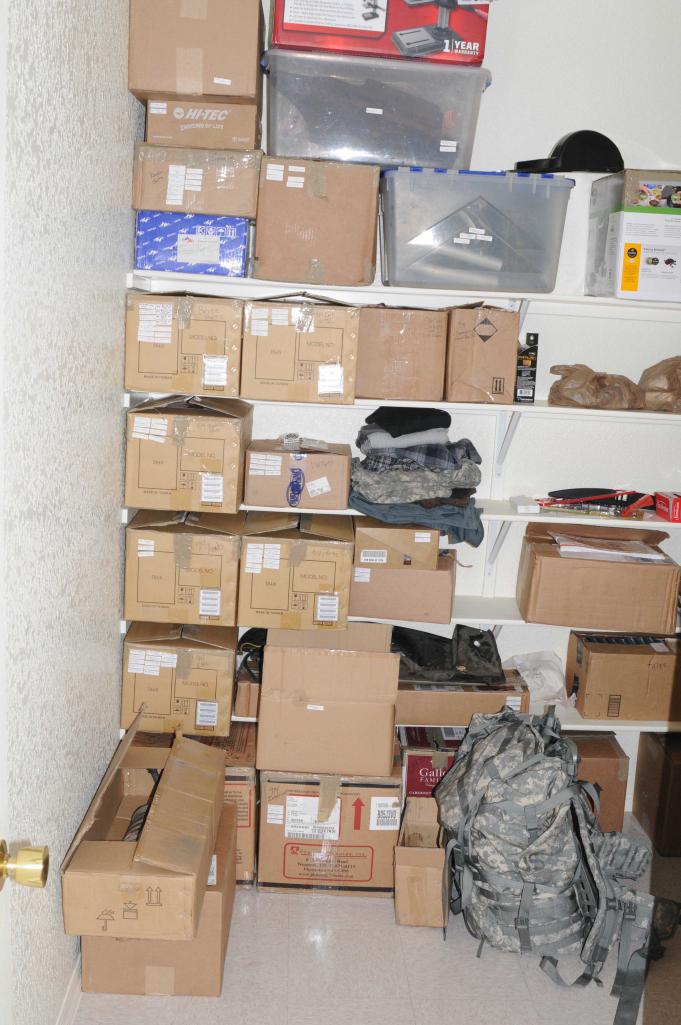
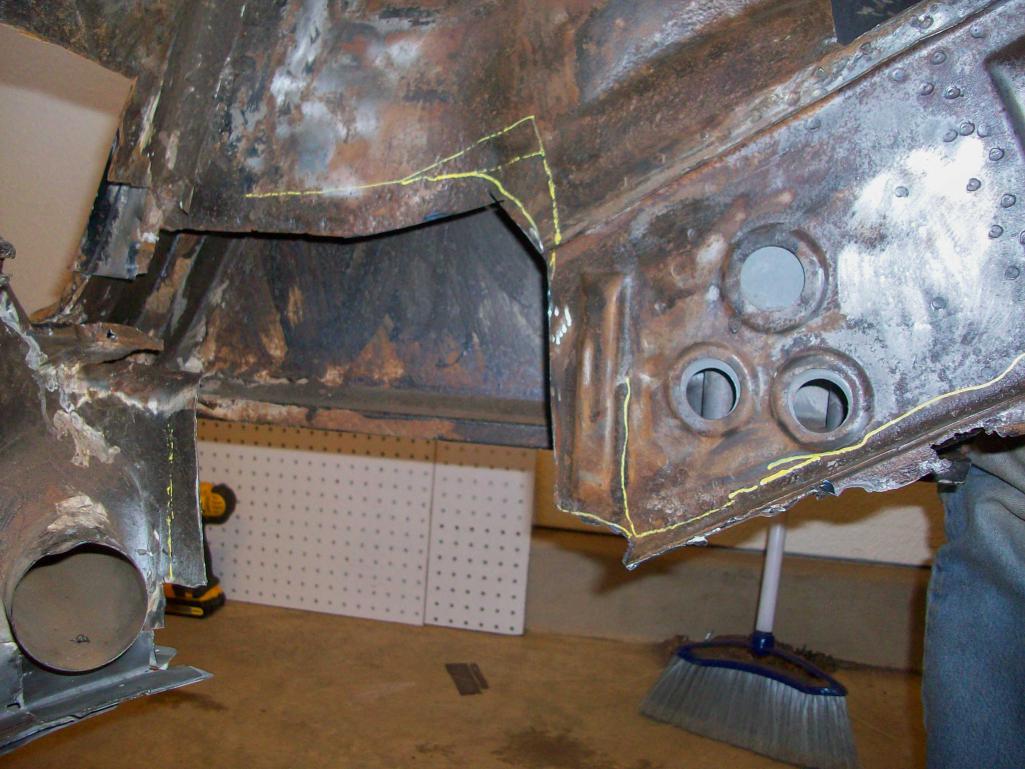
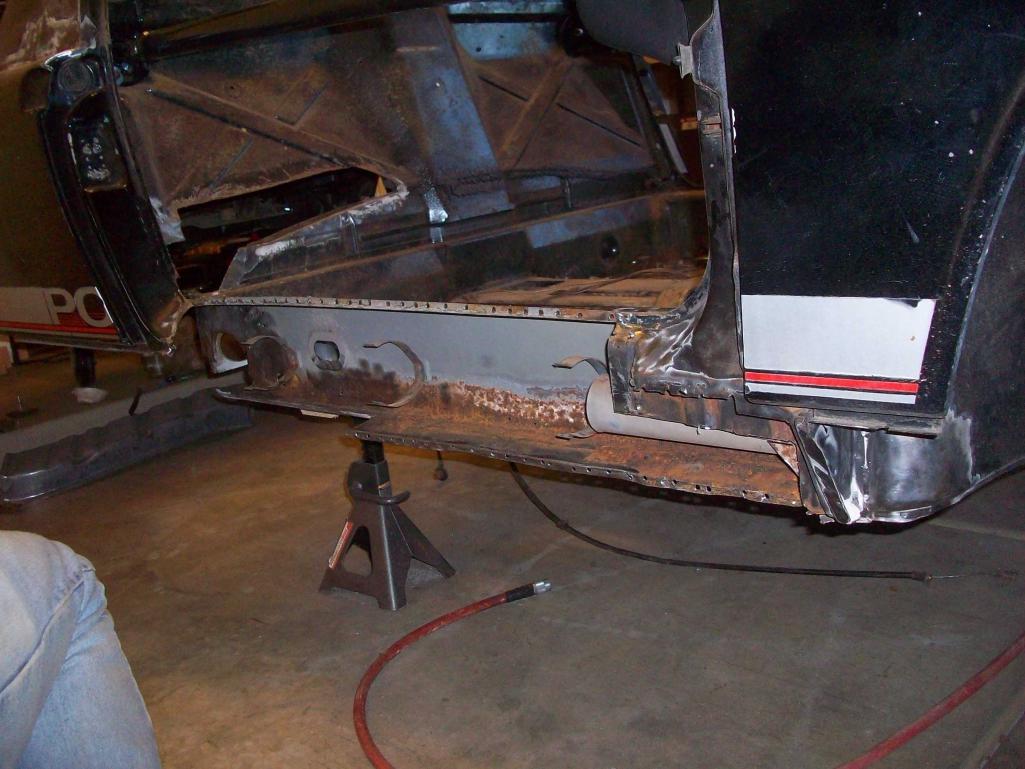
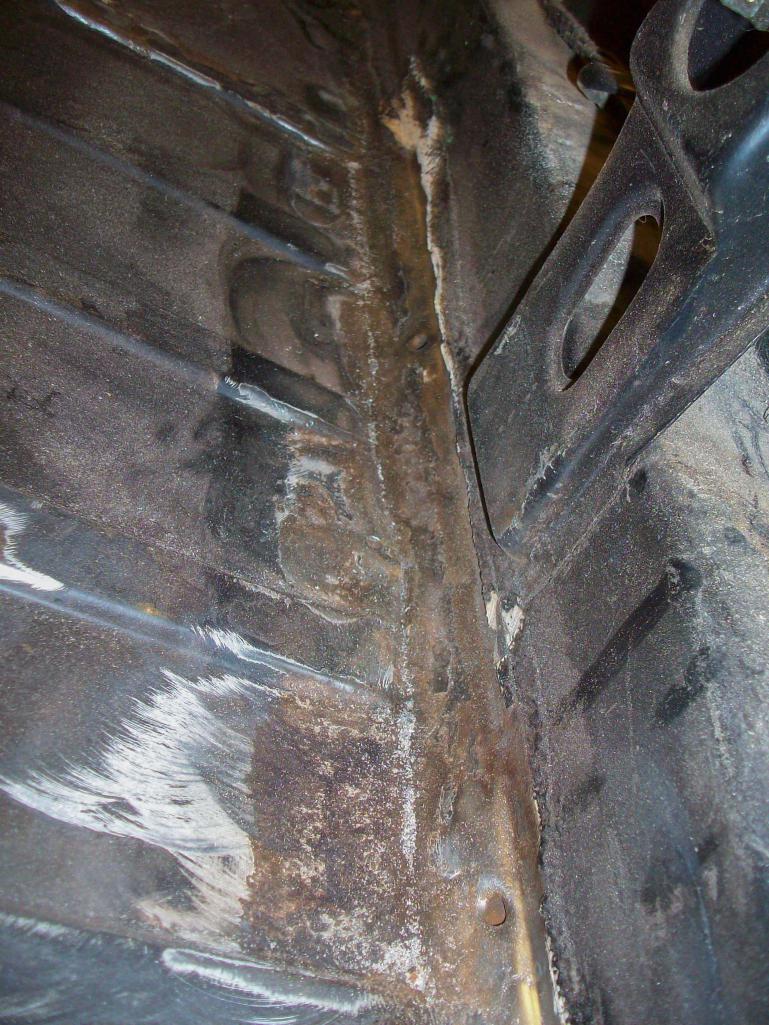
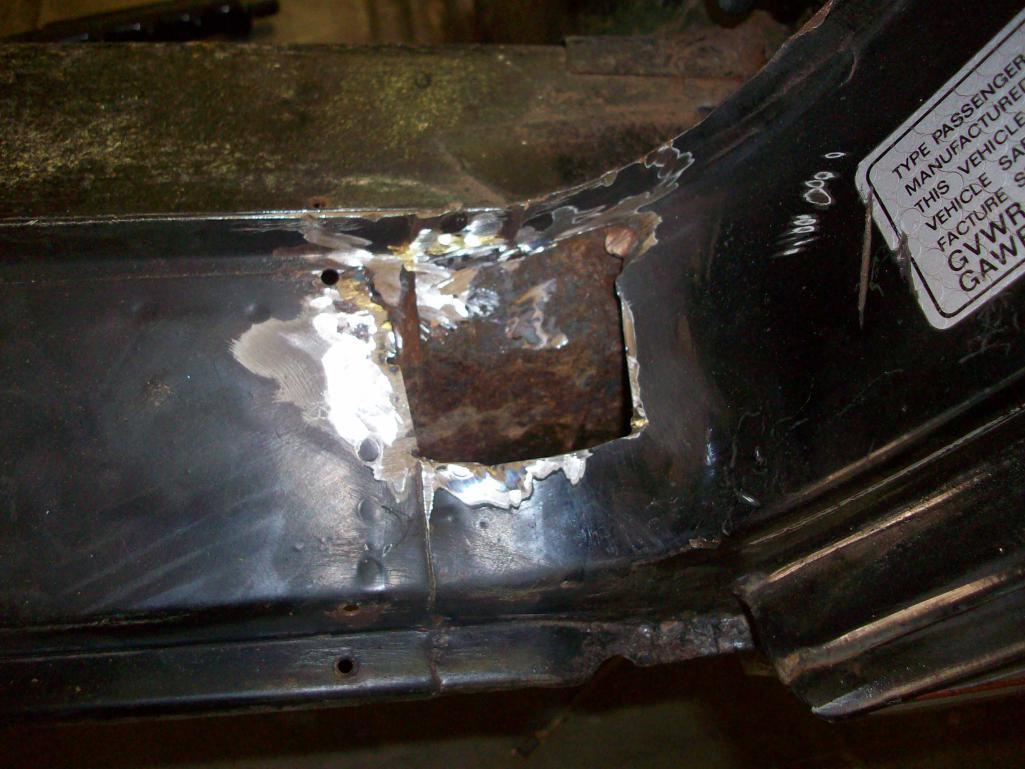
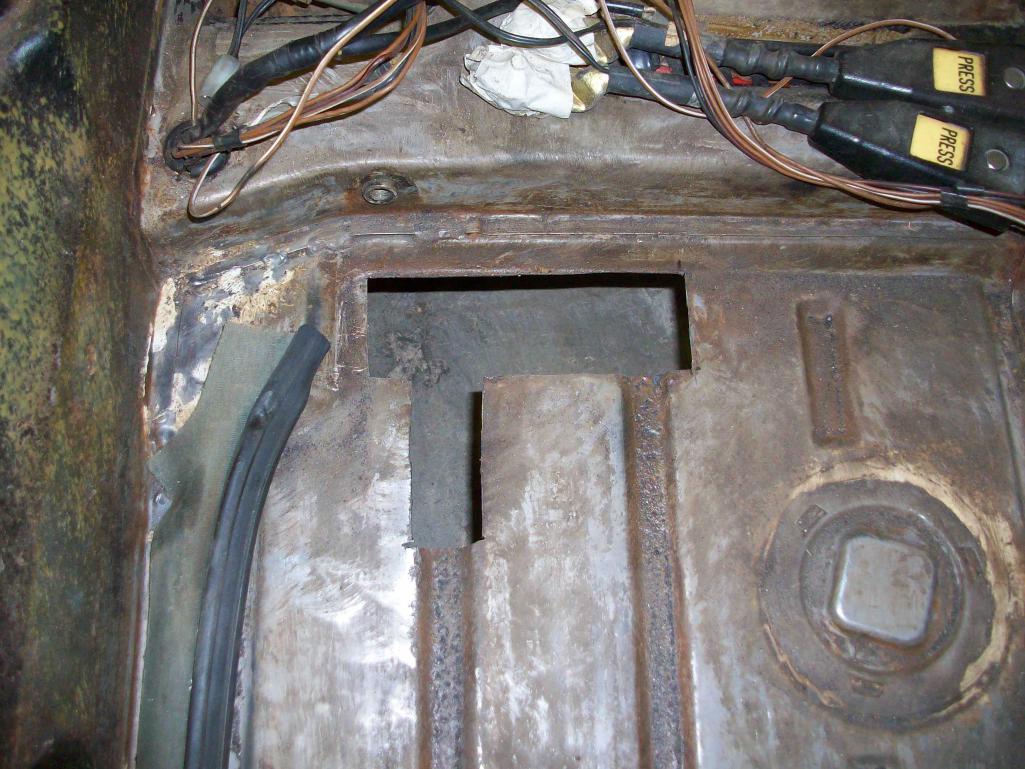
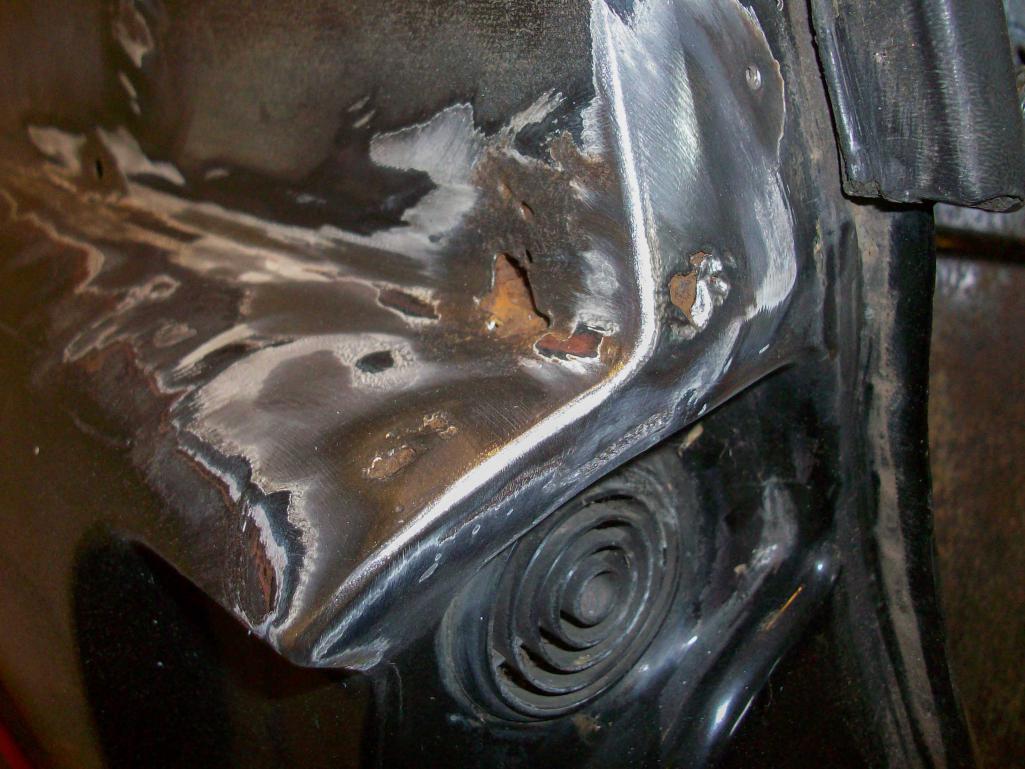
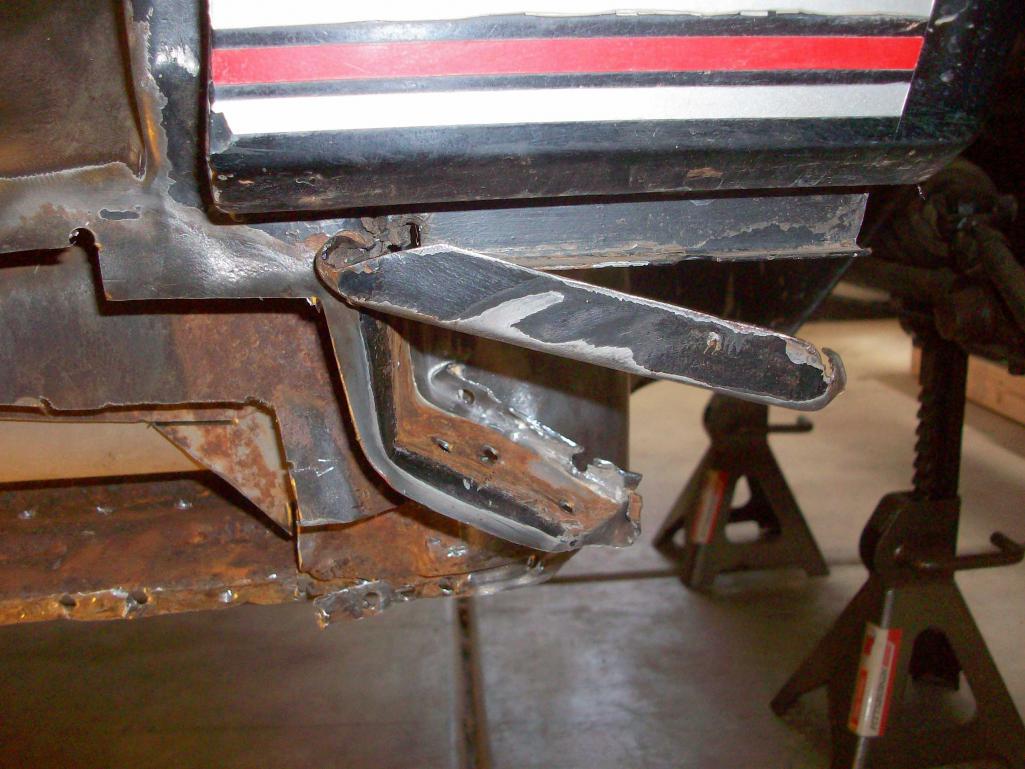
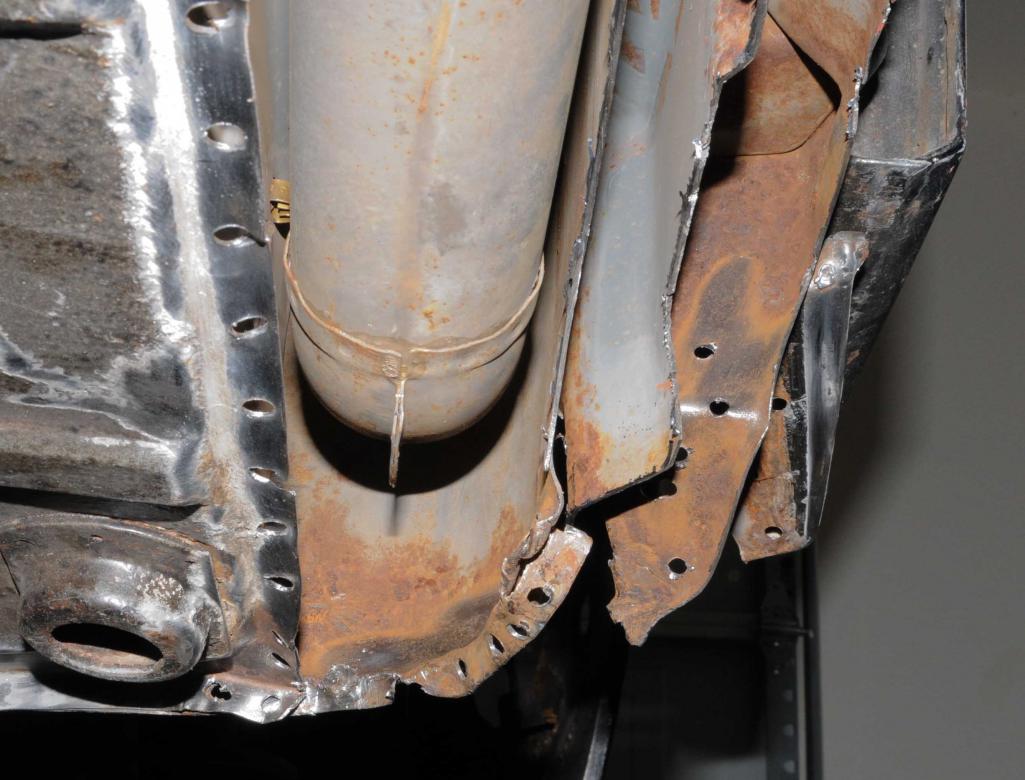
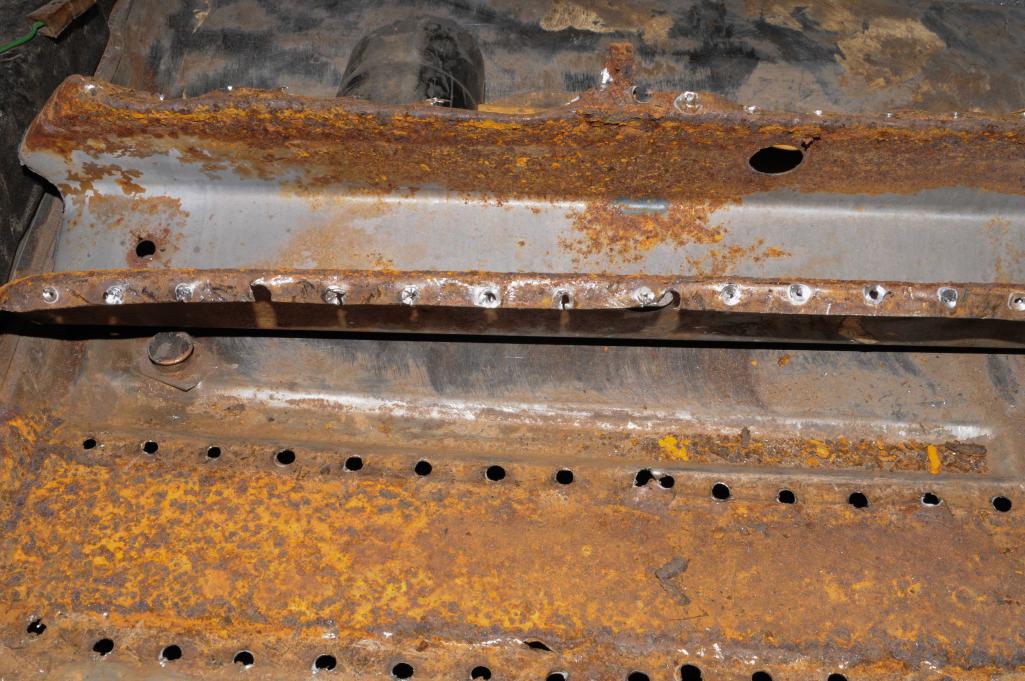
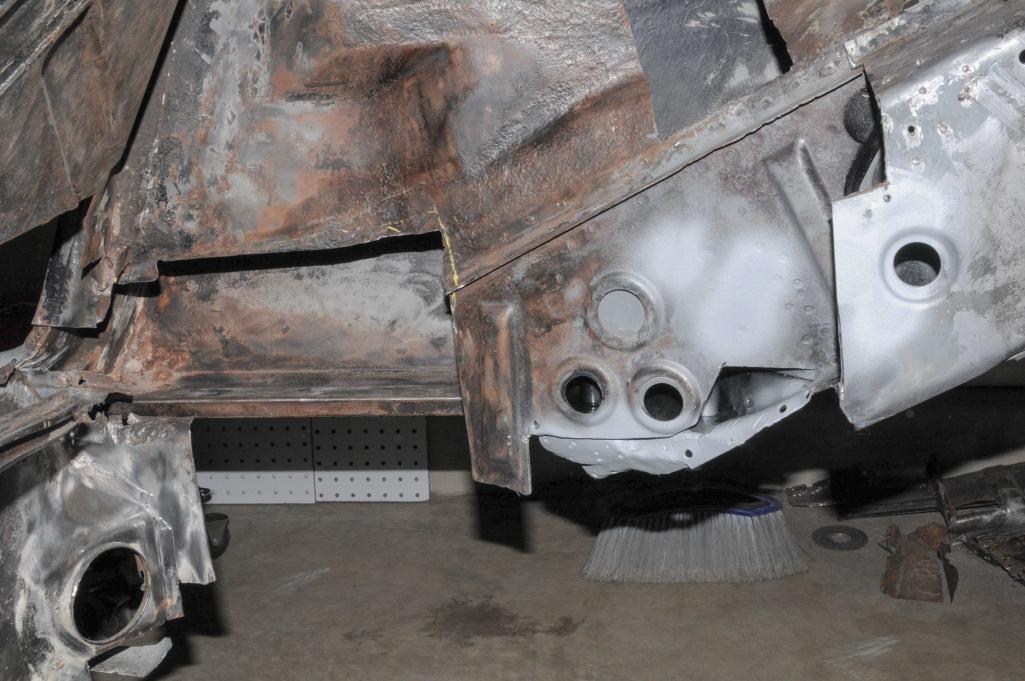
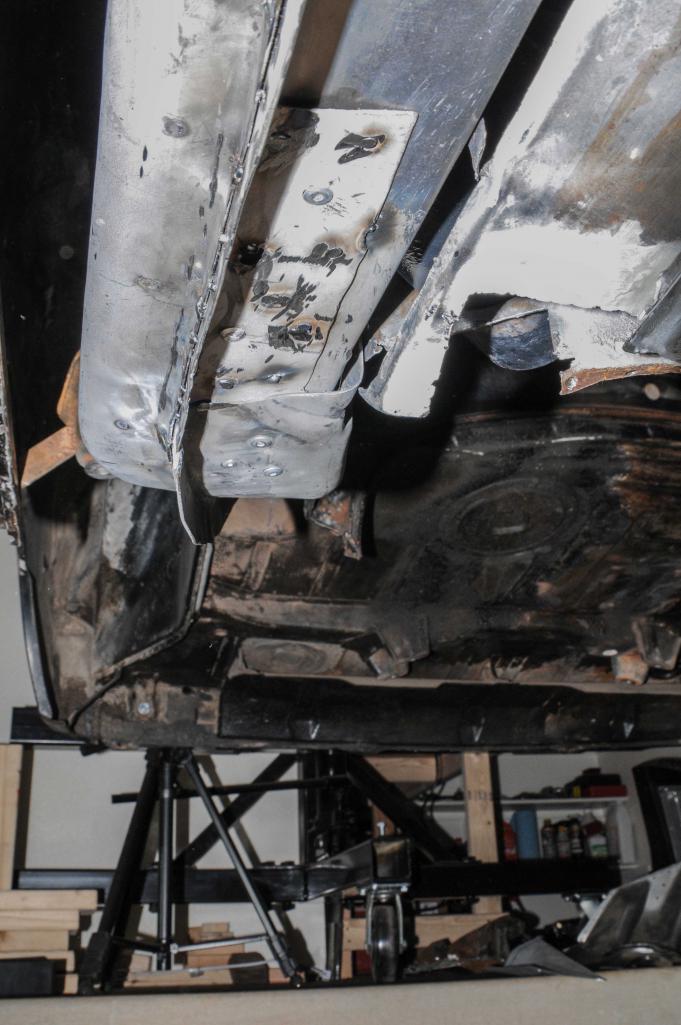
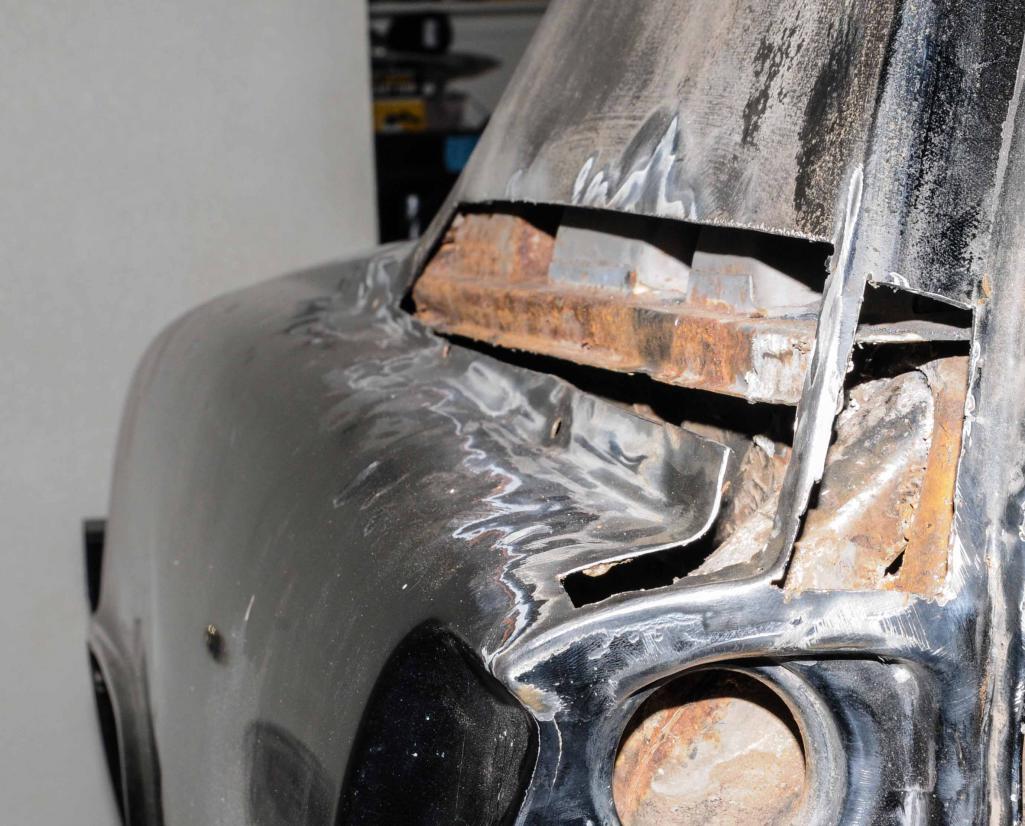
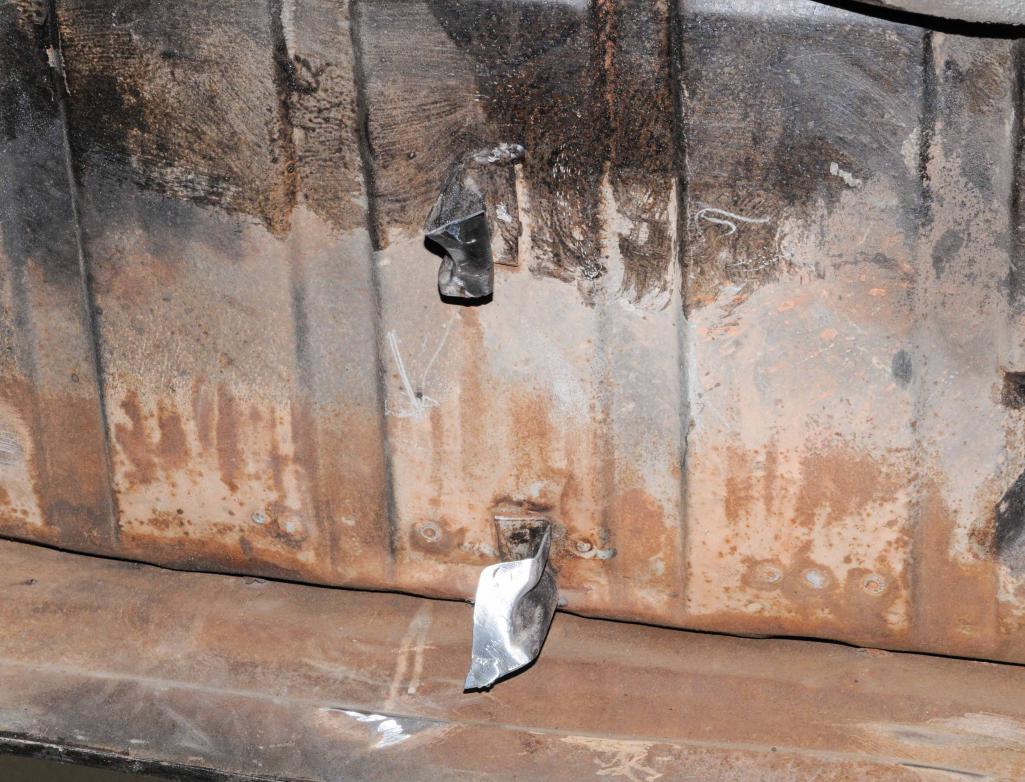
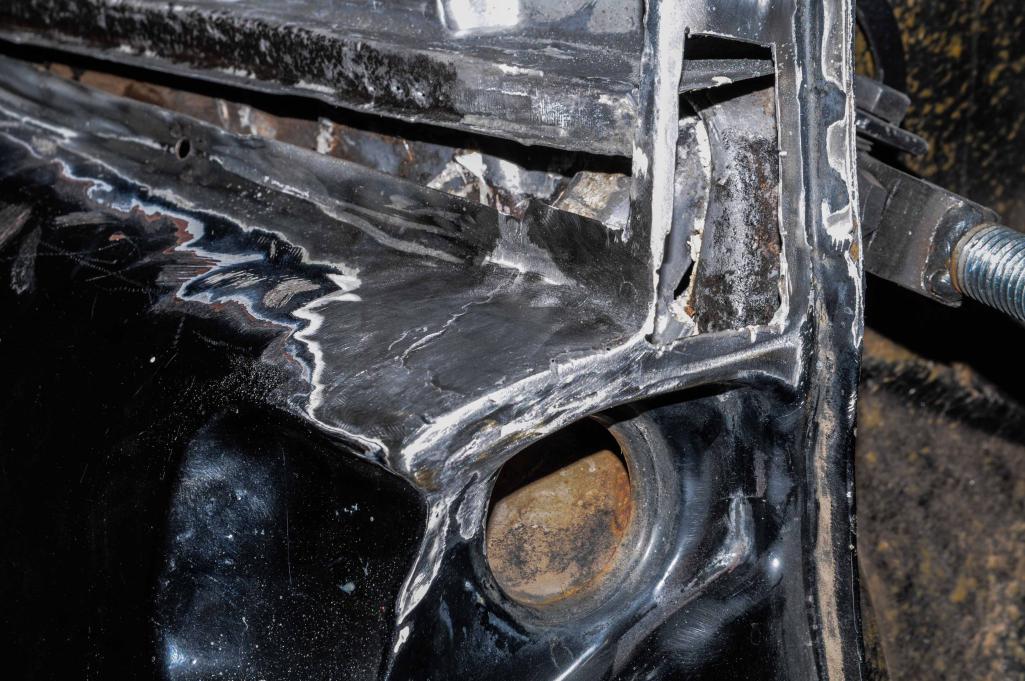
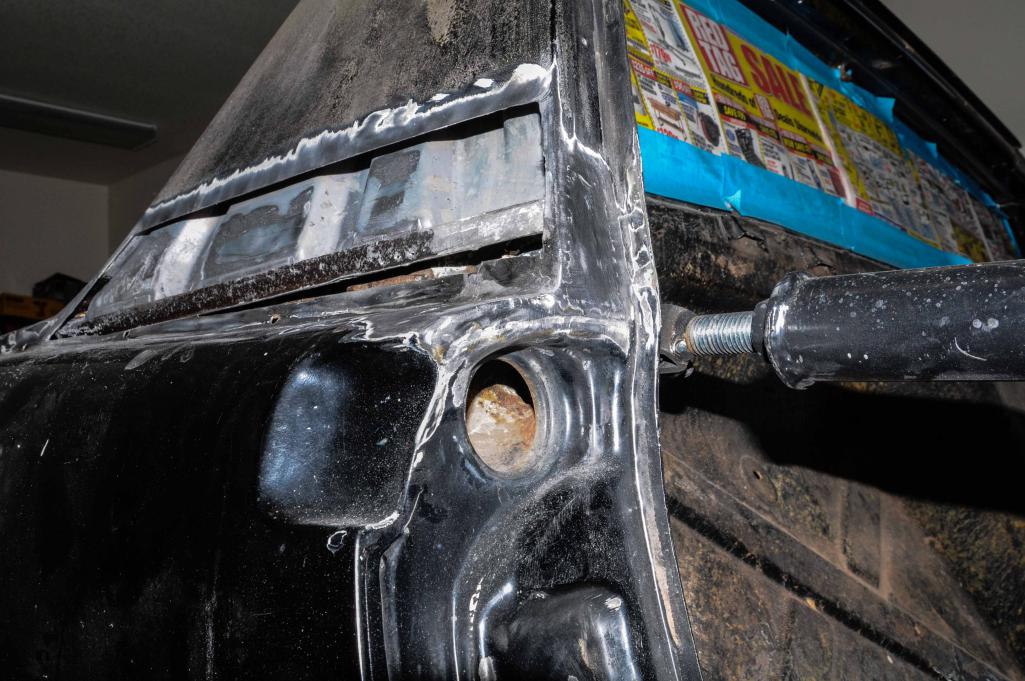
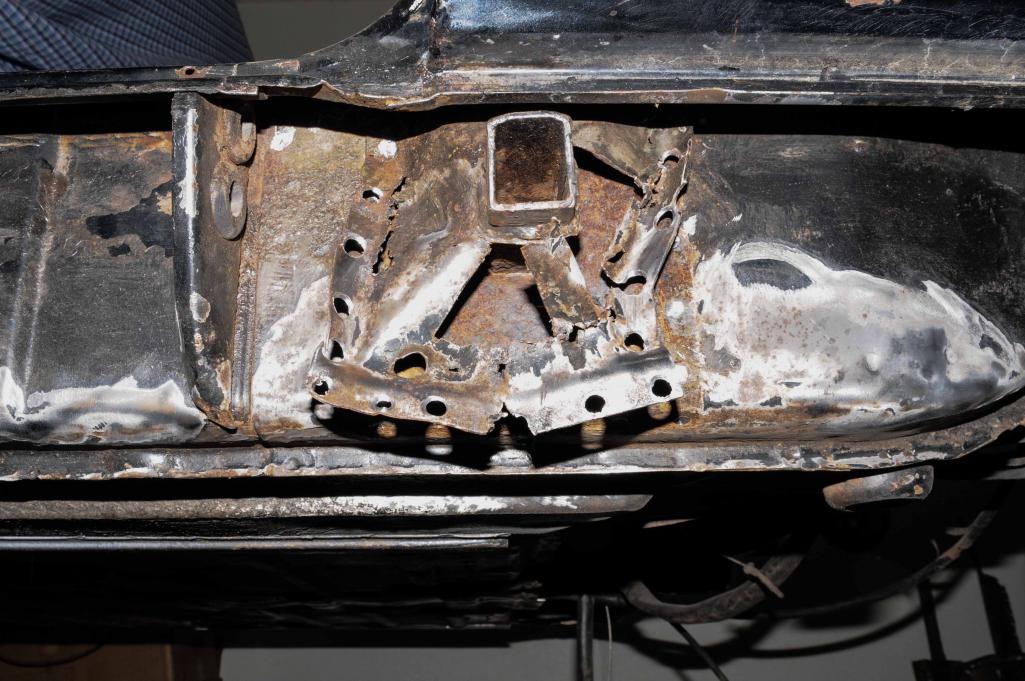
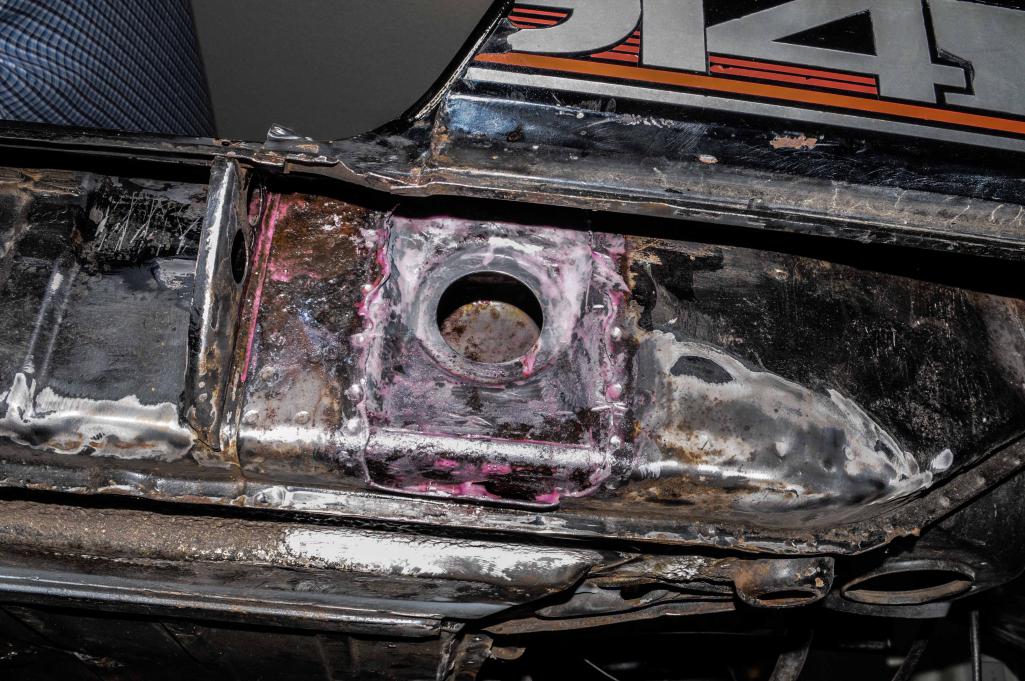
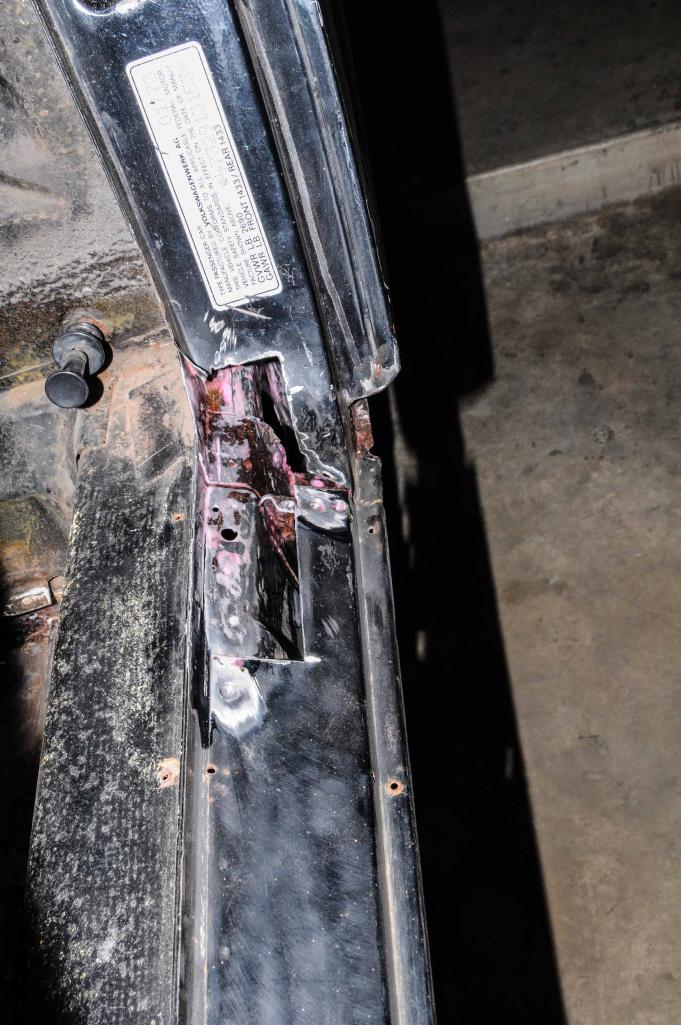
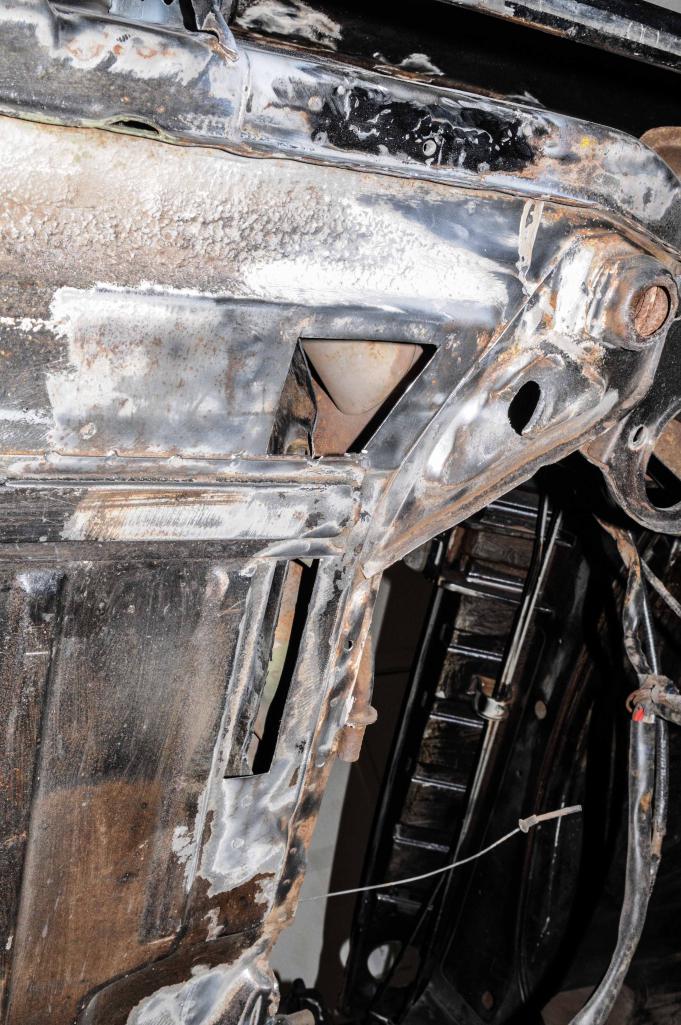
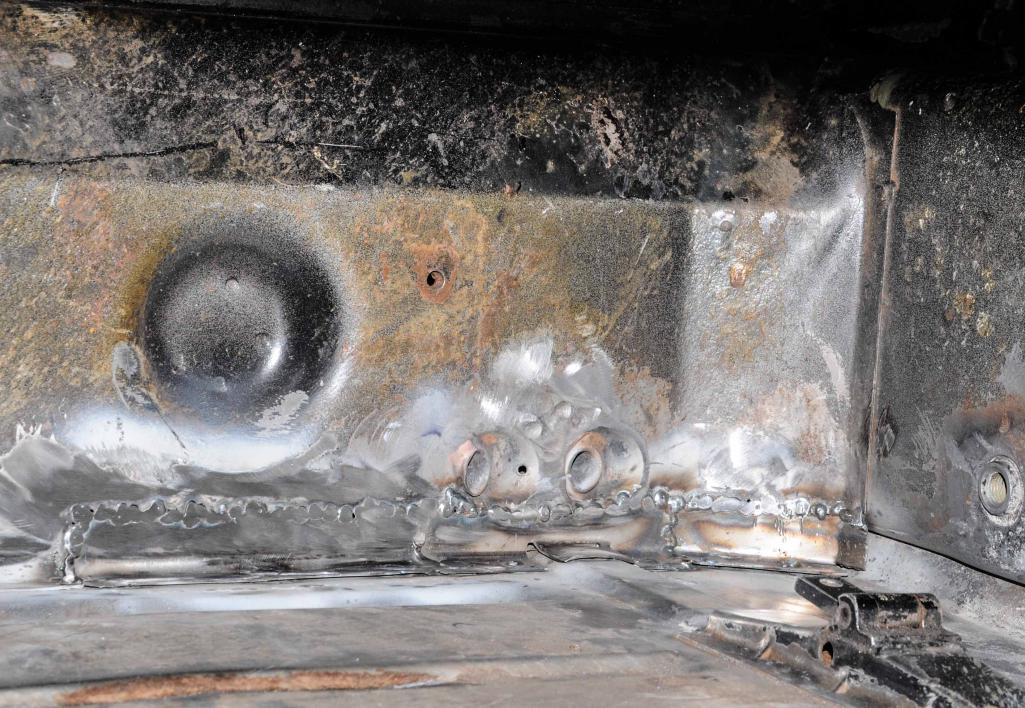
As we sit now, the car is on jackstands with the rotisserie acting as additional bracing, the engine and trans are under a workbench, the bigger pieces of the car are using the extra bedroom (the one my wife says needs to be vacated when we get pregnant) and others in boxes in my closet. Tearing the car down, I’ve found almost everything worse than I expected. The gas tank is pretty nasty with rust, all 4 calipers are locked up and the wheel bearing grease congealed. Removing the bumpers I found some evidence of prior damage and filler. Further probes into the longs found some rust on the driver side, and the passenger side nearly shot. The hellhole was a known problem, and turned into a chasm. I haven’t really dove to much into the floor, but found rust around the firewall and under a seat mount. The good news seems to be in a relatively dry trunk and pedal area.
My project’s Big 5 jobs are: 1) Rust repair. 2) Body work and a complete repaint. 3) Complete overhaul of the brake system, bearings, CVs, getting the window to work and stuff like that. 4) Engine rebuild. 5) Customization: wart removal, interior work, and an attempt at making custom made bumper tops.
In this build off challenge I face multiple fronts of challenges: 1) I grew up helping my Dad fix VWs, redid a Triumph Spitfire in my early 20s with his help, and have done numerous small projects over the years, but this is my first full rustoration on my own. 2) I have a severely limited budget. I am active duty Army, and everybody knows that NCO paychecks leave much to be desired. 3) I’m often short on time. My current assignment is as an instructor requiring me to work 10-12 hour days and 50-60 hour weeks. 4) I have a bum knee that makes it almost impossible to crouch and am fighting a shoulder issue that makes working overhead painful (praying for no surgery). 5) Nothing but the windshield and fine machine work like the heads and crank will be farmed out, I’m doing this on my own.
Well this is where we are starting, and honestly, who knows where we’ll end up. I haven’t really decided on color, engine, or upgrades, though I’m leaning towards keeping the 1.7 Liter Fuel Injection unless a good deal on another engine arises. I’m also thinking of keeping the car black but going minimal chrome, but who knows what the good idea fairy will deliver. I hope you enjoy the journey as much as I do.
Attached thumbnail(s)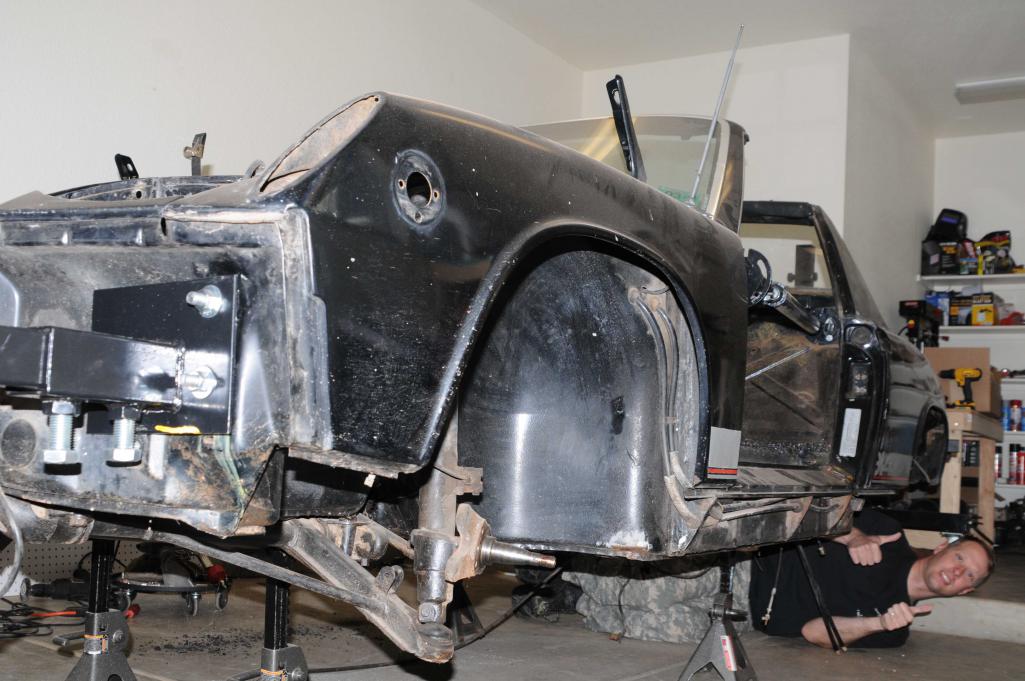
Posted by: DirtyCossack Sep 30 2015, 07:44 PM
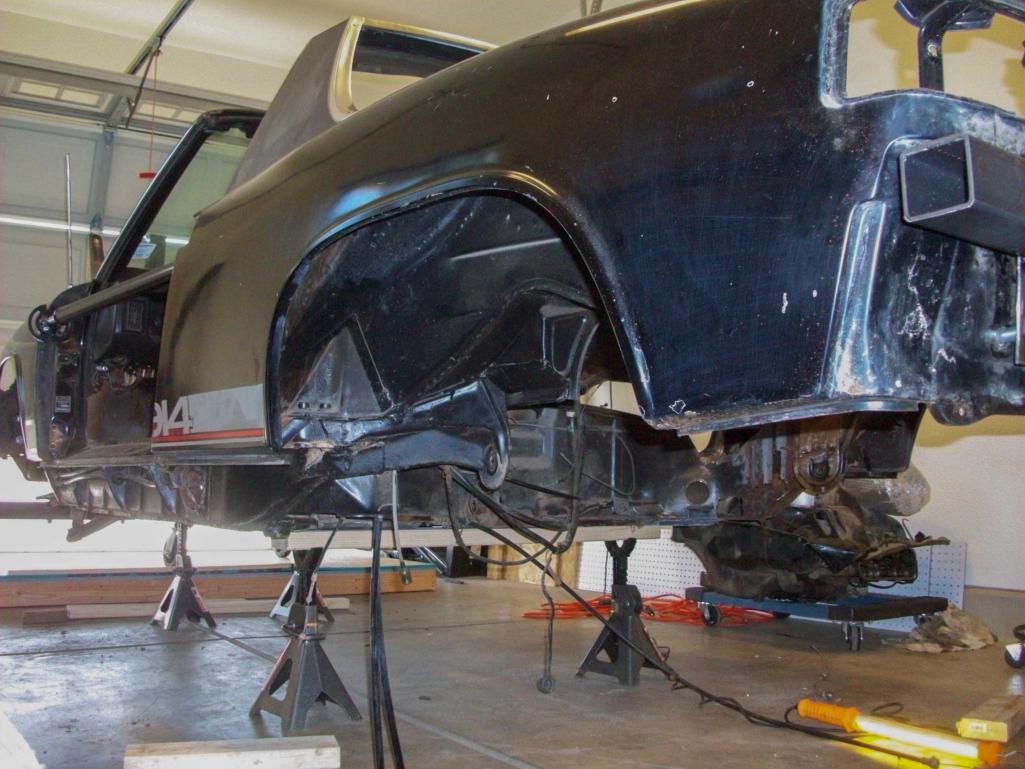
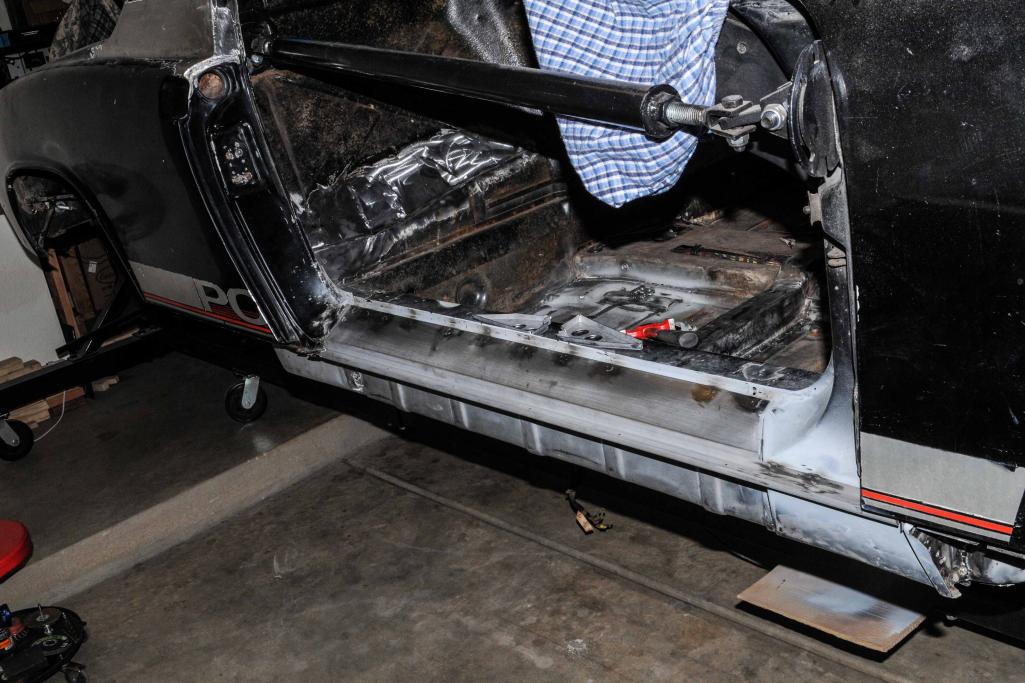
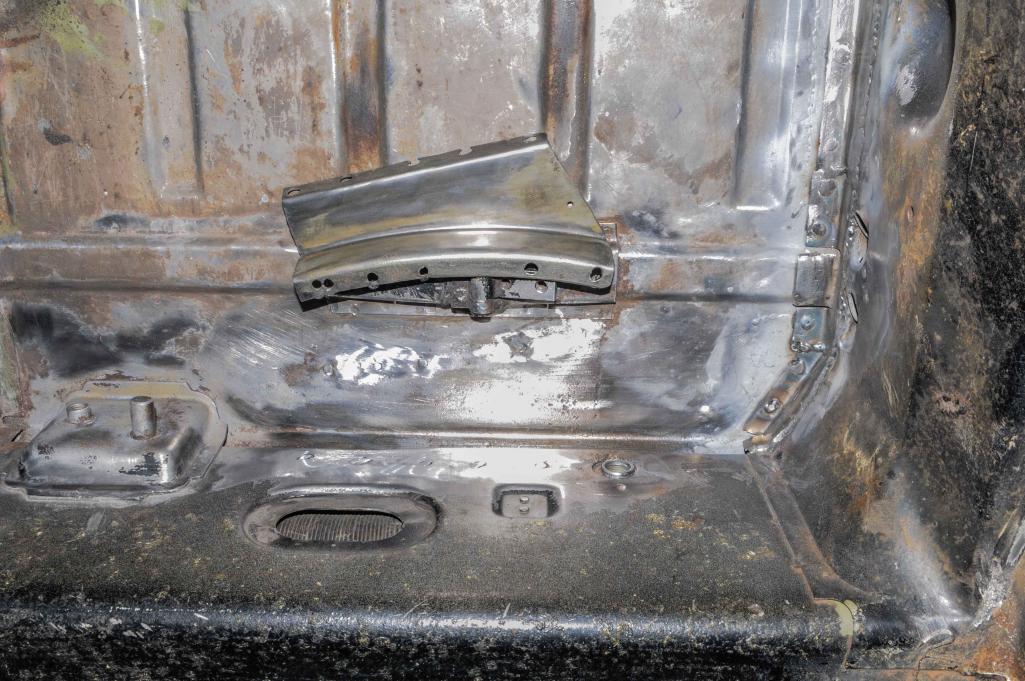
Some more pics to show where we are starting. Yeah, I have a month's head start on the challenge, but I don't think it'll help. I will also say that if anyone has any requests for photos, stories, explanations, or what not, just let me know and I will do my best to oblige.
Attached thumbnail(s)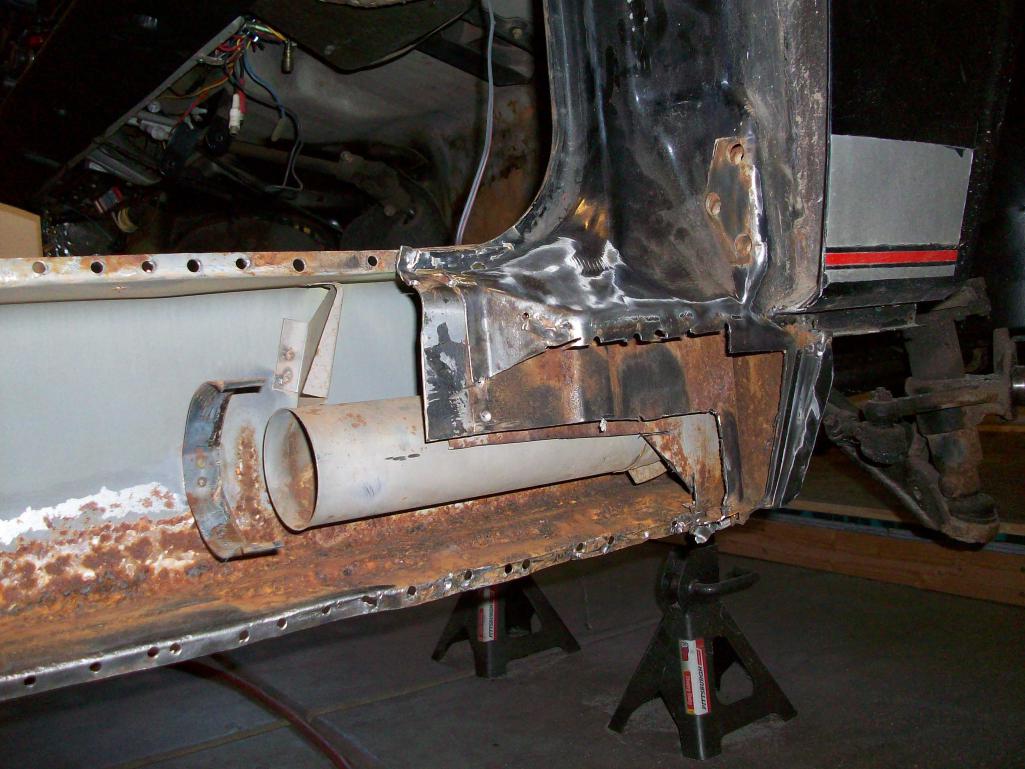
Posted by: VWTortuga336 Sep 30 2015, 08:27 PM
First, thank you for your service, it is greatly appreciated!
Hang in there. My car was in similar state when she got dropped off in my driveway. I have put a ton of time into the project so far and I feel like I am far from getting her back on the road. BUT, just gotta take it one step at a time. Looks like you are doing a lot more invasive body/rust repair work than I am - I'm just too impatient and want to get the car back on the road  Keep up the good work
Posted by: DirtyCossack Sep 30 2015, 09:14 PM

First, thank you for your service, it is greatly appreciated!
Hang in there. My car was in similar state when she got dropped off in my driveway. I have put a ton of time into the project so far and I feel like I am far from getting her back on the road. BUT, just gotta take it one step at a time. Looks like you are doing a lot more invasive body/rust repair work than I am - I'm just too impatient and want to get the car back on the road
Keep up the good workThanks! It's a lot more invasive than I ever intended...
Posted by: 914werke Oct 1 2015, 10:31 AM
its unfortunate but true that MANY car's are in similar state as yours 
the owners dont yet know or arent brave enought to poke around under OE tar and below that "surface rust" 

Looks like a good start.
It can all be fixed.
Posted by: DirtyCossack Oct 1 2015, 02:11 PM
its unfortunate but true that MANY car's are in similar state as yours
the owners dont yet know or arent brave enought to poke around under OE tar and below that "surface rust"
Looks like a good start.
It can all be fixed.
This guy filled, undercoated and PORed the shit out of places that were heavily rusted. Not so bad that your quick screwdriver probe poked through, but bad enough to need cut out.
Posted by: Cairo94507 Oct 1 2015, 02:59 PM
Call me optimistic.... but the rust does not look that bad  . It also looks like you have a good start on it.
I like the list you came up with and your priorities seem right. I think you are going to be fine. Keep posting the pictures - we love seeing them come together.
Posted by: DirtyCossack Oct 5 2015, 04:58 PM
Call me optimistic.... but the rust does not look that bad
. It also looks like you have a good start on it. I like the list you came up with and your priorities seem right. I think you are going to be fine. Keep posting the pictures - we love seeing them come together.
I agree, the rust isn't too bad at all. Every time I think the rust is bad, a new thread pops up that makes my car look mint. There are definitely competitors in this build off with way more work ahead of them than I have.
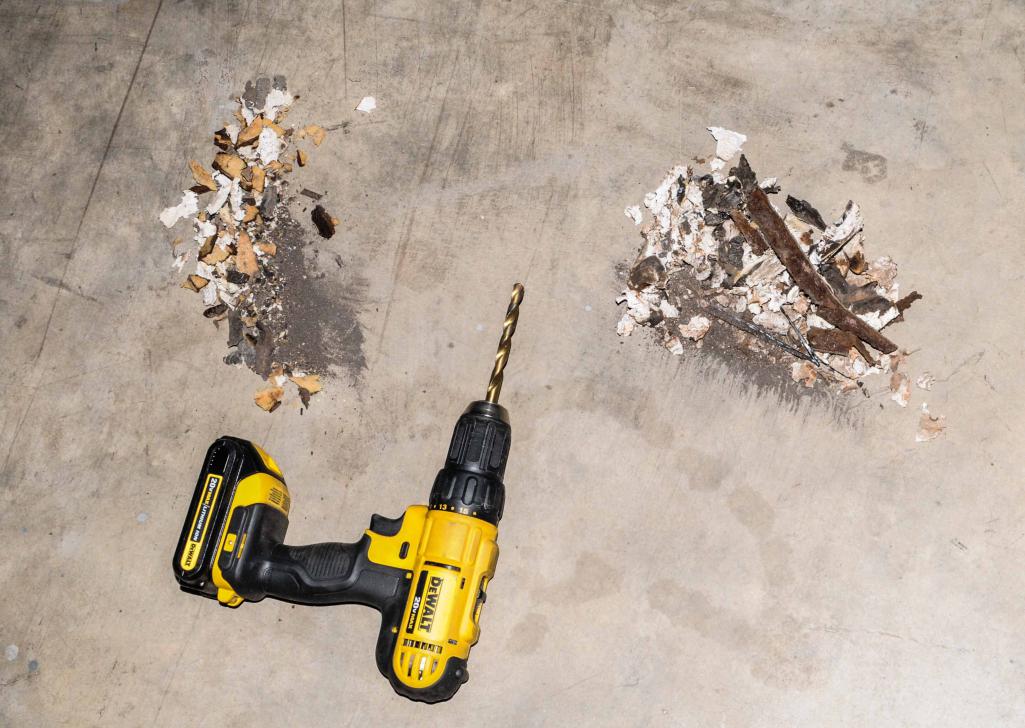
And my list of challenges proved accurate this weekend. On Saturday I drilled out 30-50 spotwelds, and on Sunday my right arm was almost nonfunctional... I just need to start using my left hand more and save the right for precision work.
Posted by: cary Oct 6 2015, 06:47 AM
Subcribe
Posted by: mbseto Oct 6 2015, 07:21 AM
I double up a pair of cheap cotton gloves and a pair of leather gloves over that to help deaden the vibration and keep my hands from going numb. Helps a little. I'll be commiserating with you on this build!
Posted by: AndyB Oct 6 2015, 07:26 AM
No need to worry about a head start. Just keep leaning forward in your foxhole and you will be fine.
Posted by: DirtyCossack Oct 11 2015, 06:39 PM
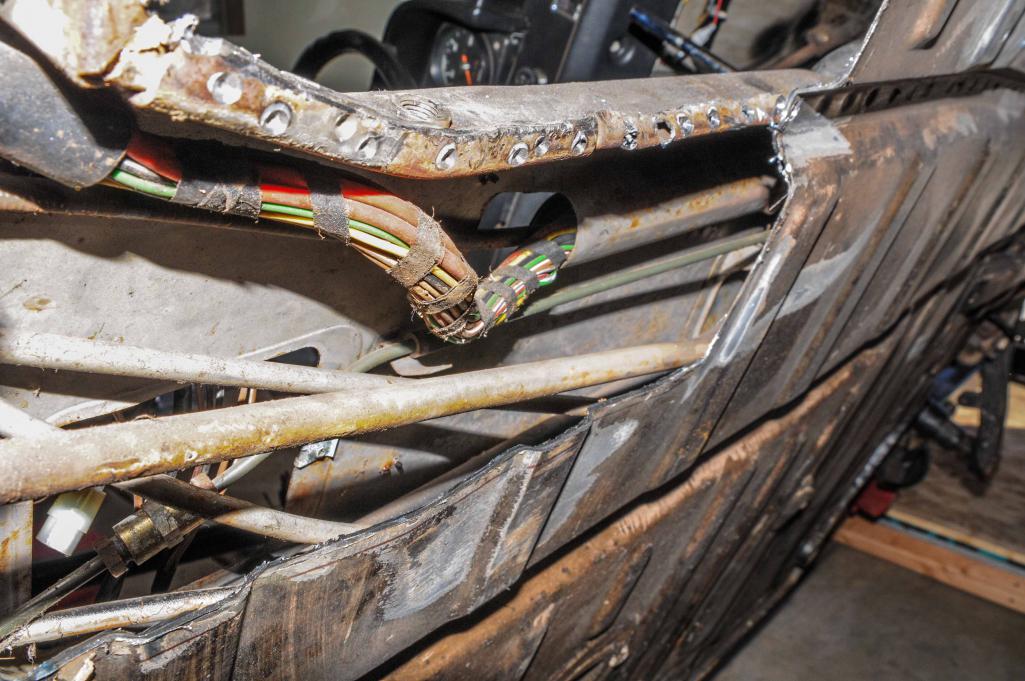
It wasn't the most productive long weekend, though I still have another day... Friday I spent the whole day waiting for UPS, Saturday I taught my wife some of my family's secret recipes and worked on my own kvass recipe. Then today I worked to cut out the rusty parts of the inner long. Getting it detached without destroying the stuff up at the front was way trickier than I thought it would be. I'm trying something tricky up towards the front and hope it works. I'm trying to just move some stuff out of the way so I can slide the segment of the new piece into place and put it all back...
Attached thumbnail(s)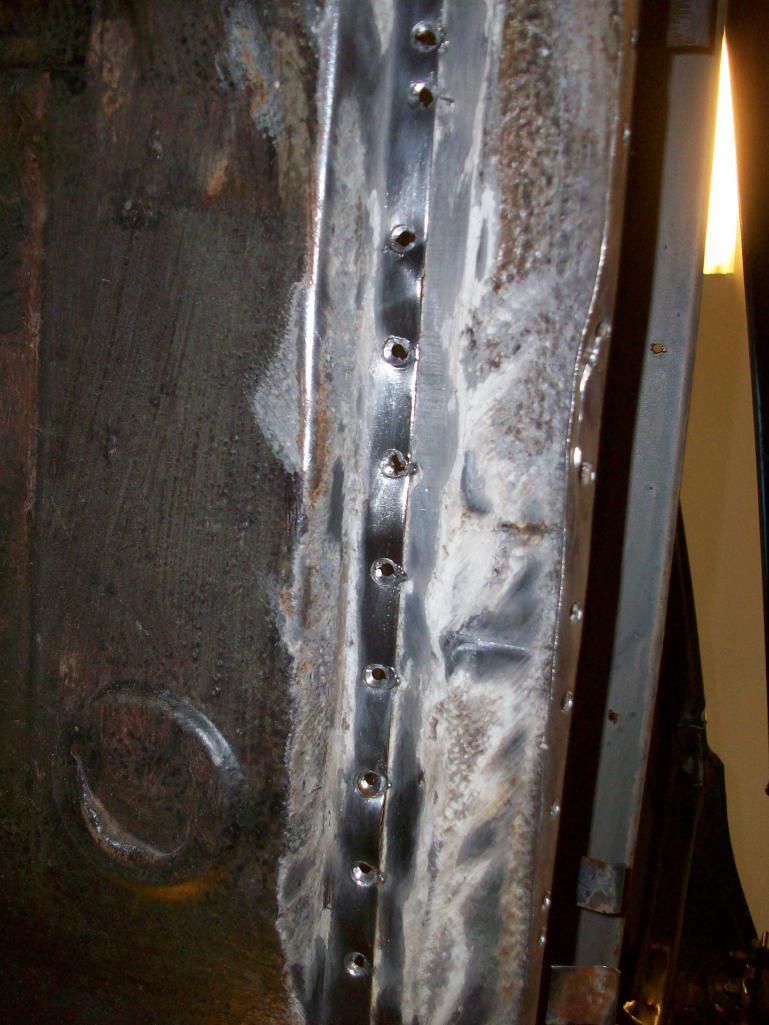
Posted by: DirtyCossack Oct 11 2015, 06:44 PM
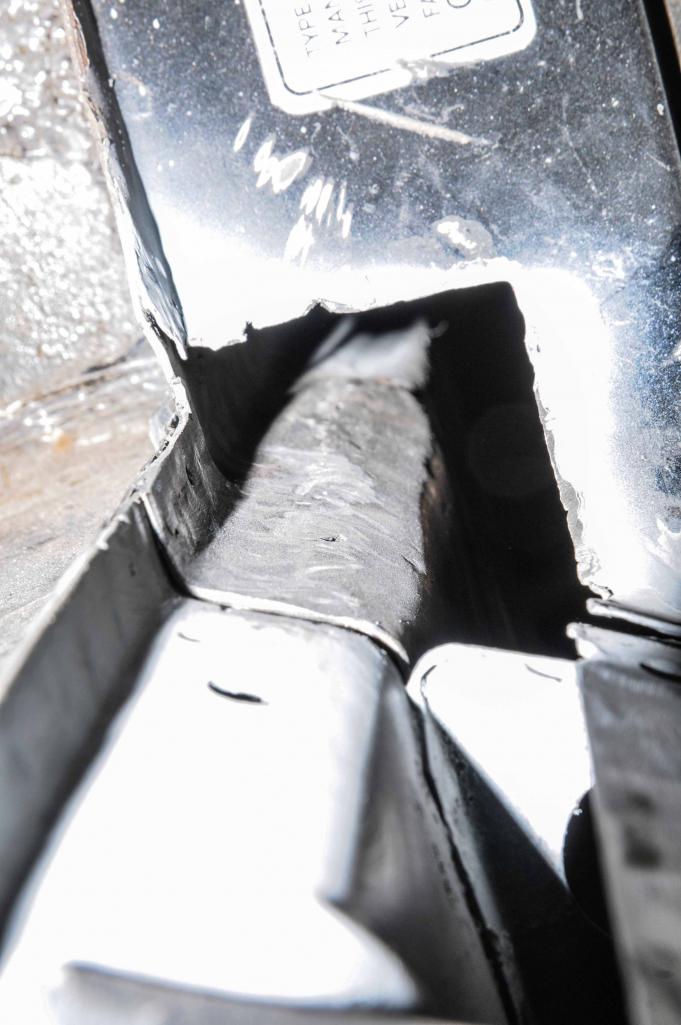
I just noticed in the pictures (then ran out to verify), but it's pretty rusty inside that cross member... what to do...
Tomorrow is wire wheel, some sandblasting, primer and begin to fab the pieces.
Posted by: DirtyCossack Oct 18 2015, 09:27 PM
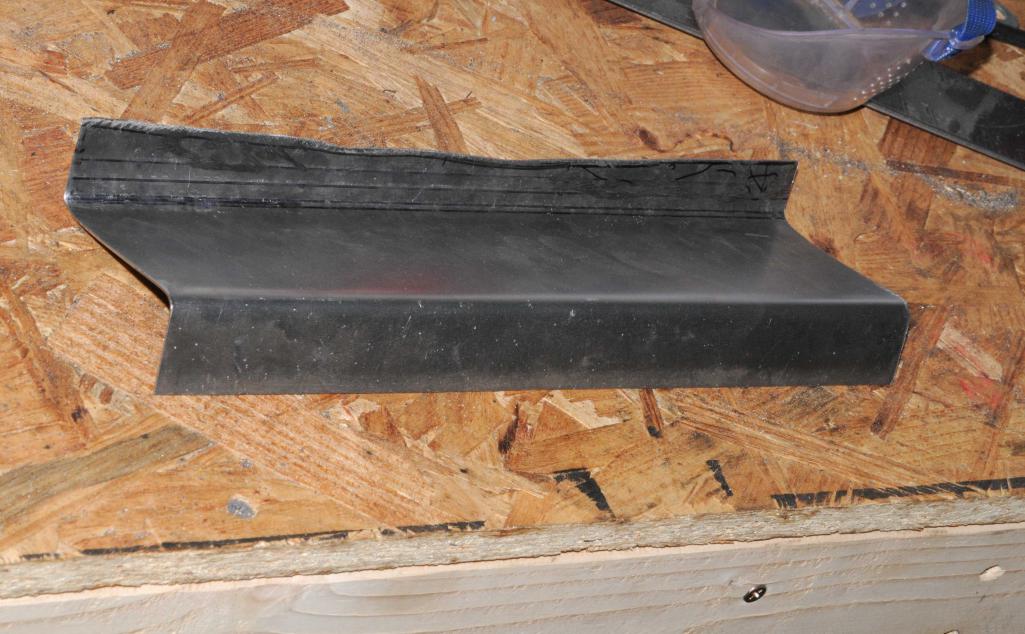
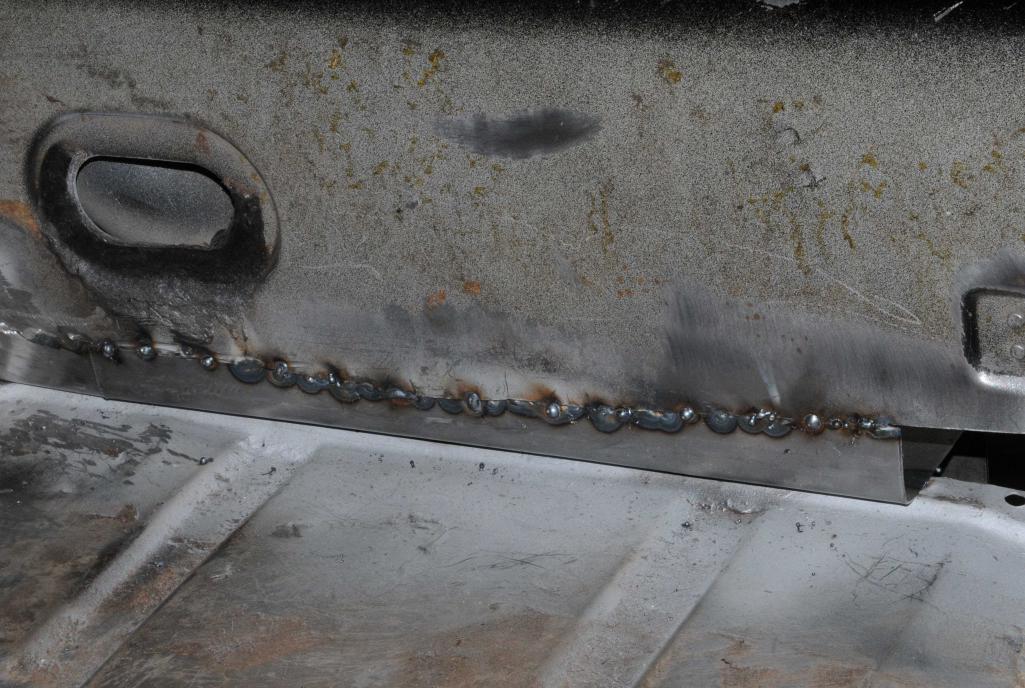
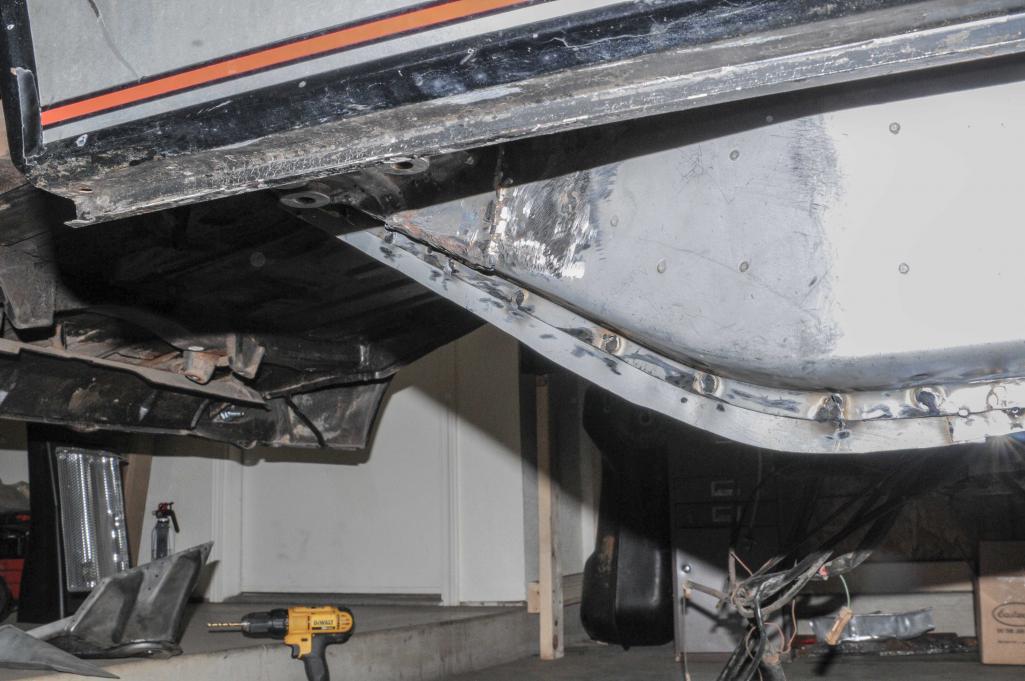
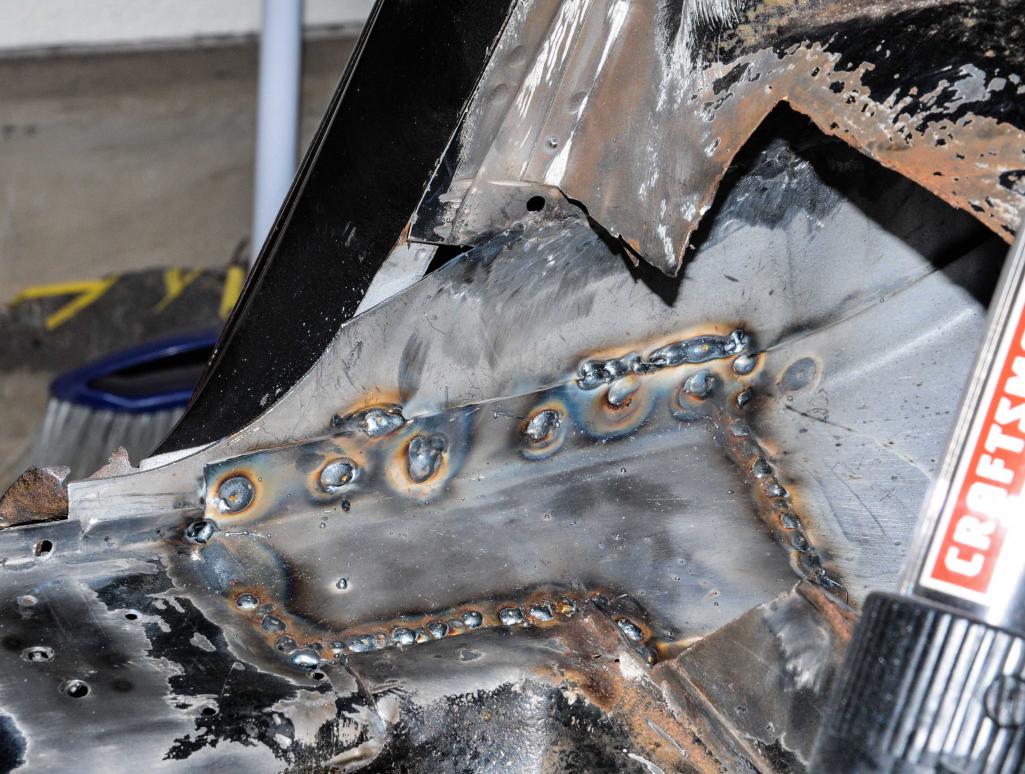
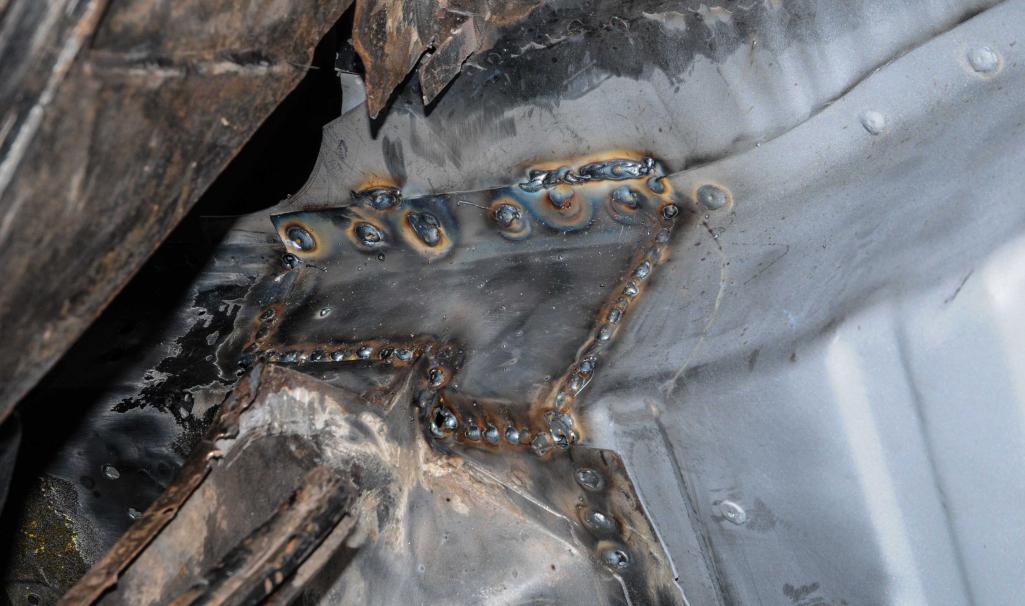
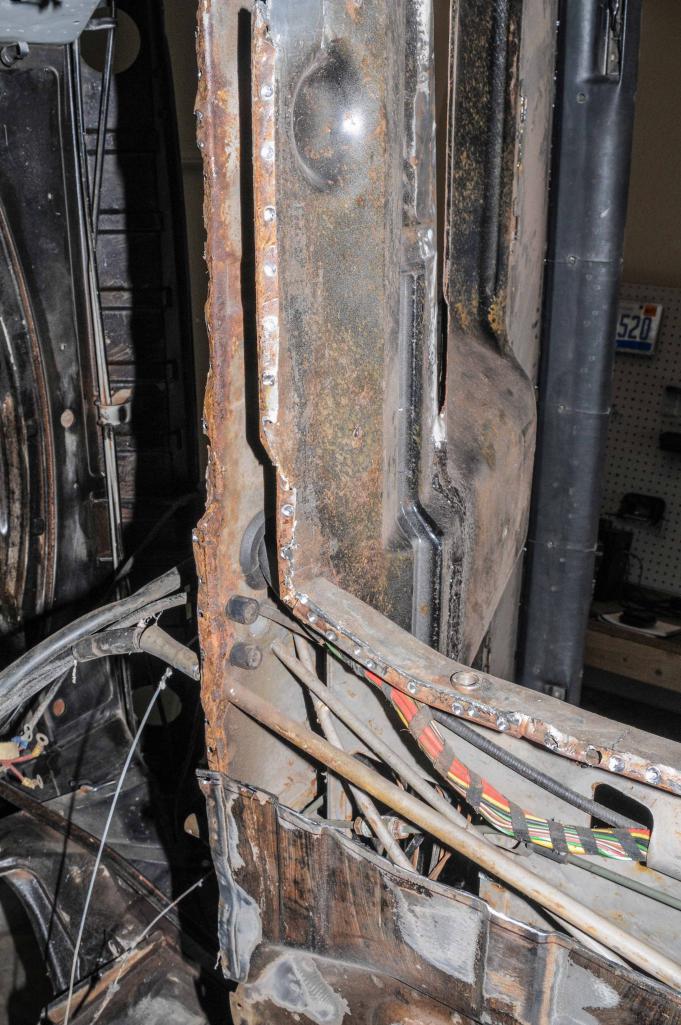
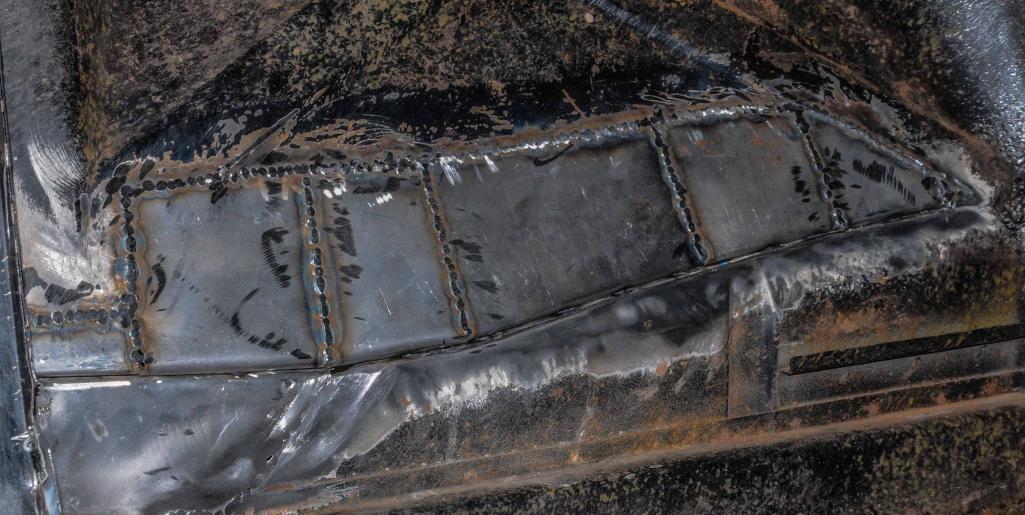
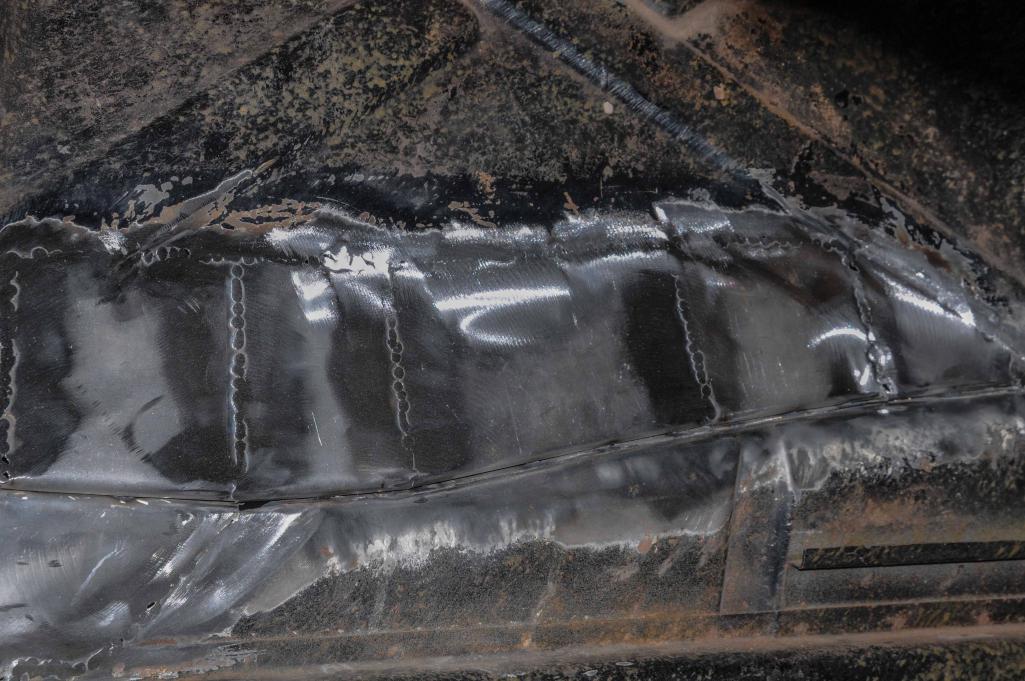
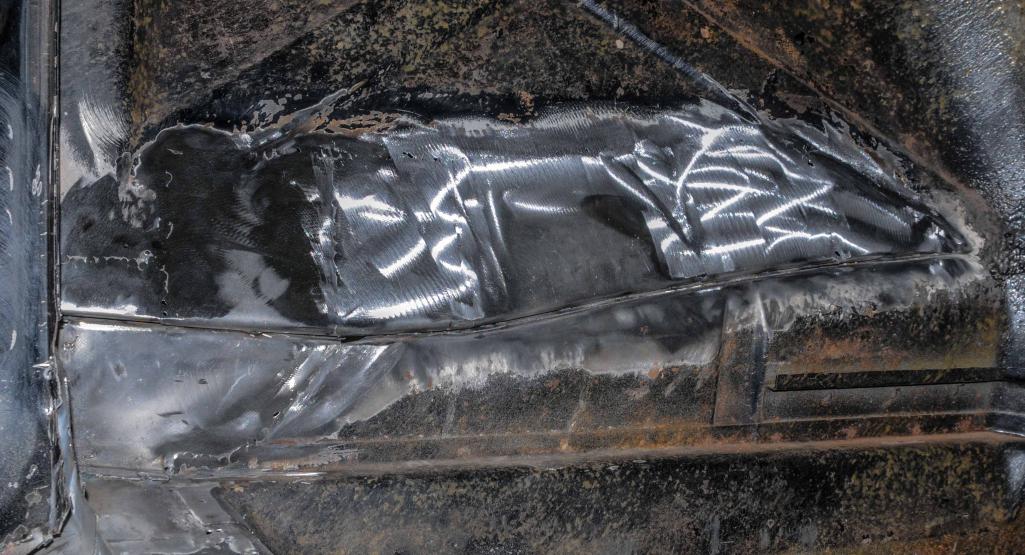
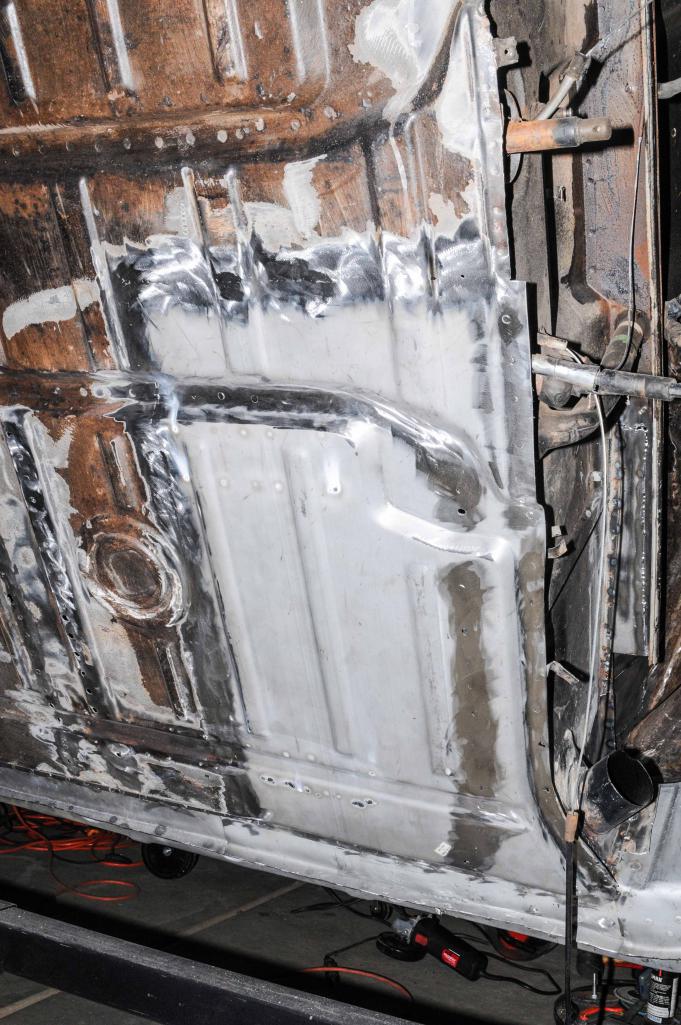
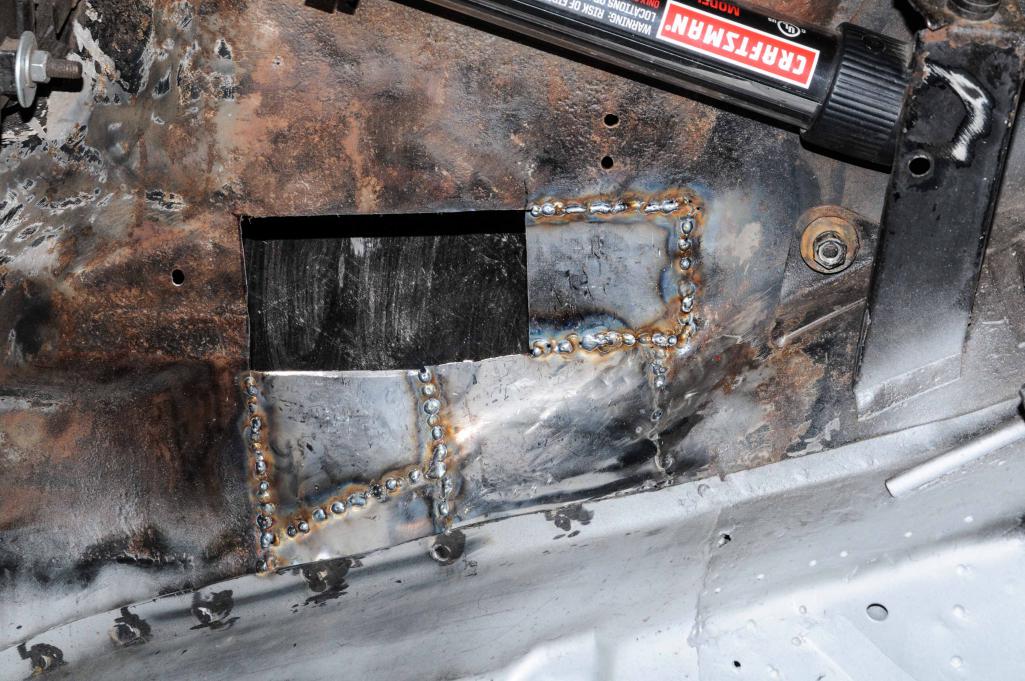
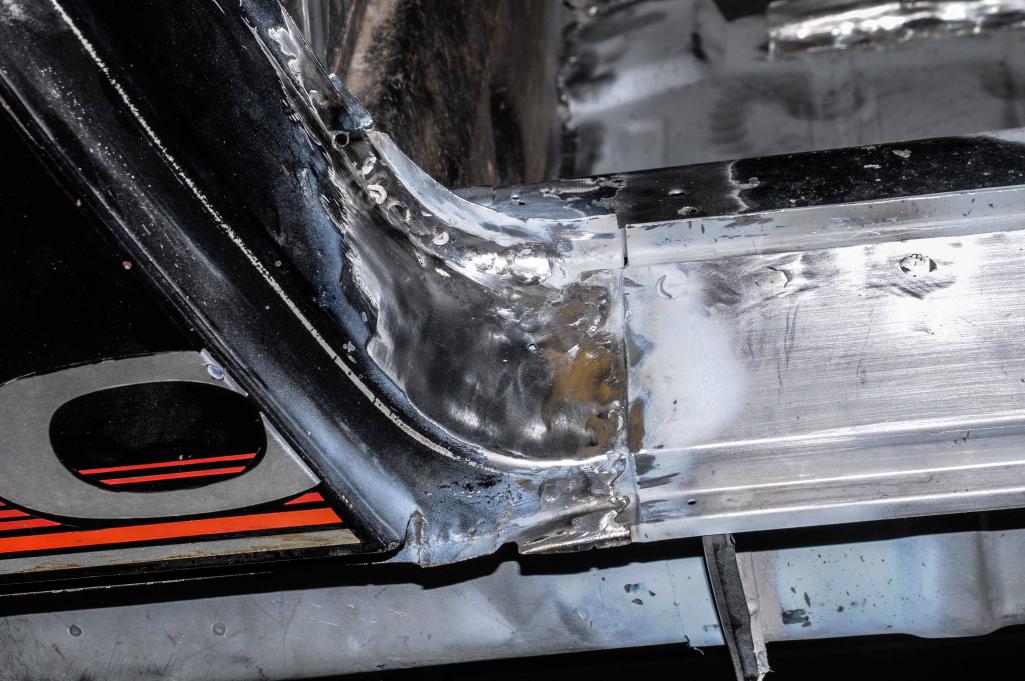
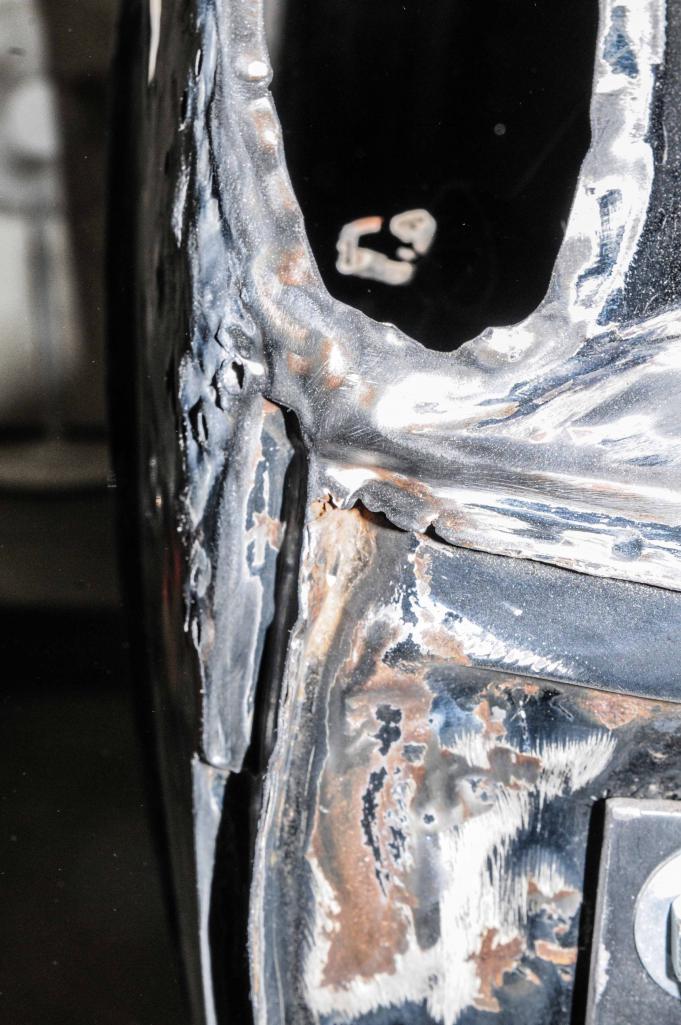
Felt extremely productive this weekend fabbing and welding in some pieces. I've ordered the internal rocker panel from Restoration Design, but the inner long piece is $300 and would be a huge blow to my budget, not to mention that I really only needed 20% of the panel... So here I am bending, cutting, grinding, and welding some 18 gauge sheet metal. The front piece has more curvature to it than you can see in the pic, but the weekend's biggest trick was the twisty piece that handles the spot where the floorpan has a little slope. I'm a bit concerned about the fabbed area not having the slopes and textures of the stock piece, but I guess even the factory slathered and covered the whole area with sealer...
Random extra info: My old, cheapo digital camera seems to have bought the farm, so I have to use the biggun. Some of these welds had to be done with my left (non-dominant) hand, I'll let you guess which...because I can see no increase/decrease in quality with either hand. I hope to go back and do some stitching this week. And note to others and future self: welding on the inside under the tube makes it impossible to grind... Raw video is currently being uploaded and I hope to make a video of the long's progress soon...
Attached thumbnail(s)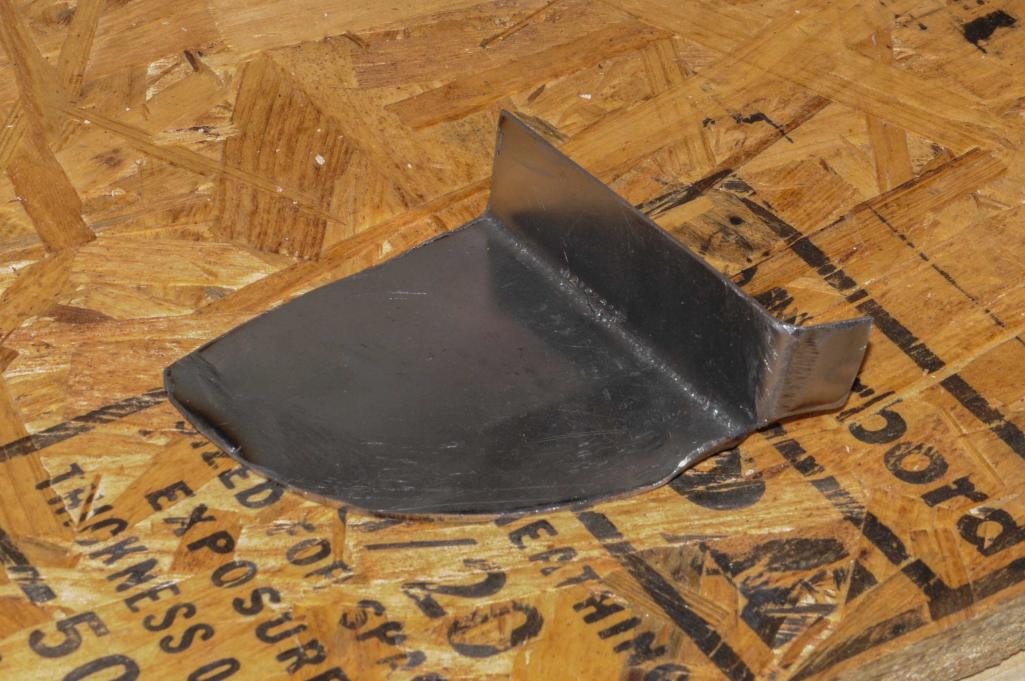
Posted by: DirtyCossack Oct 18 2015, 09:32 PM
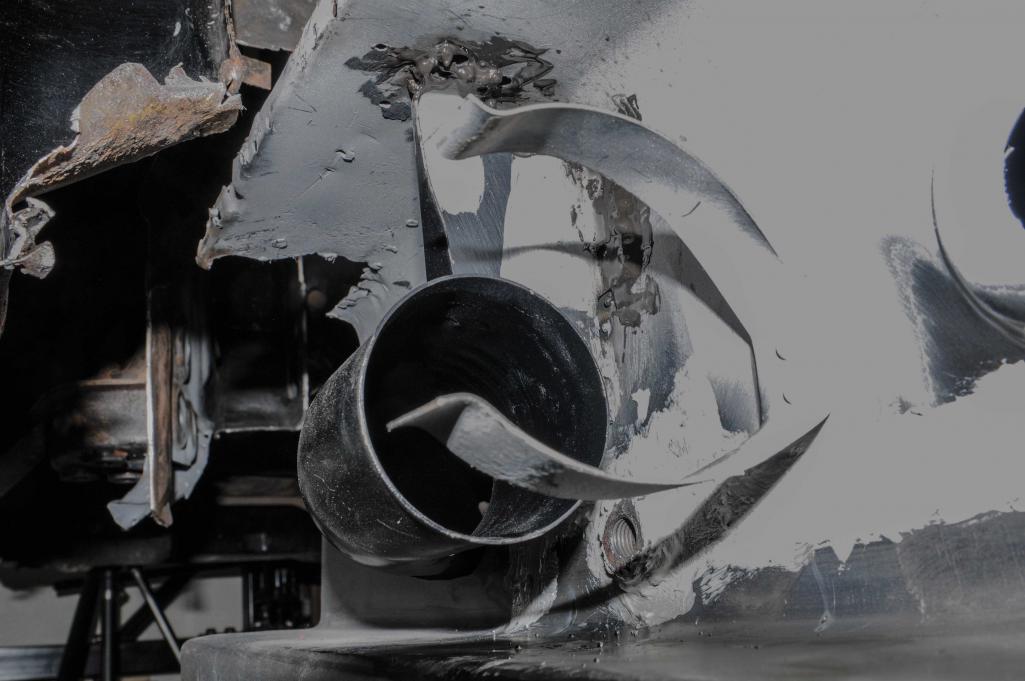
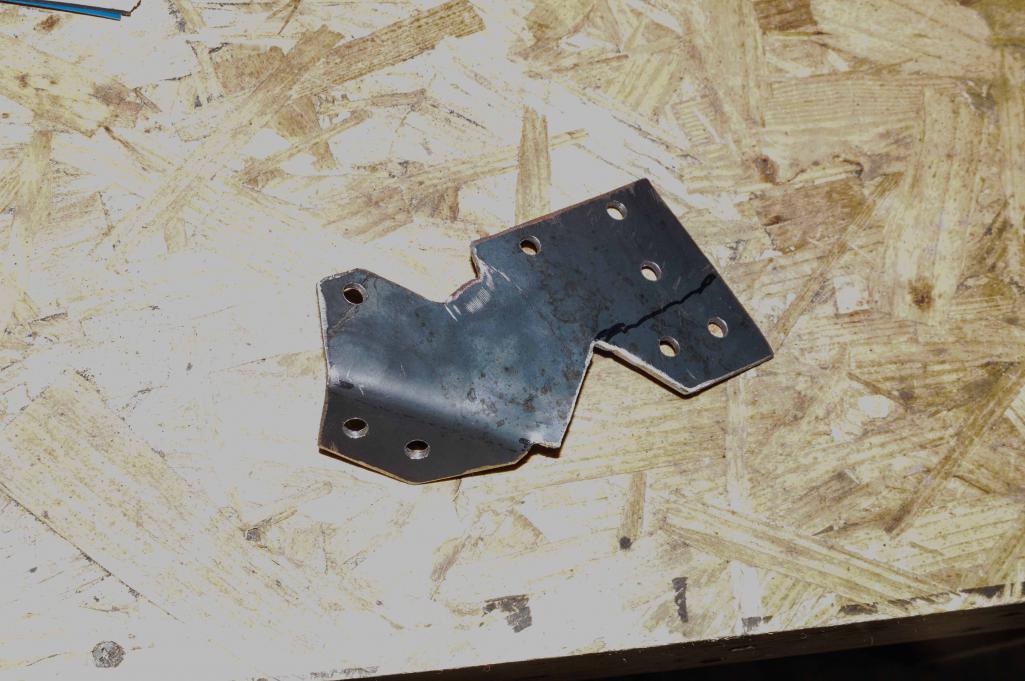
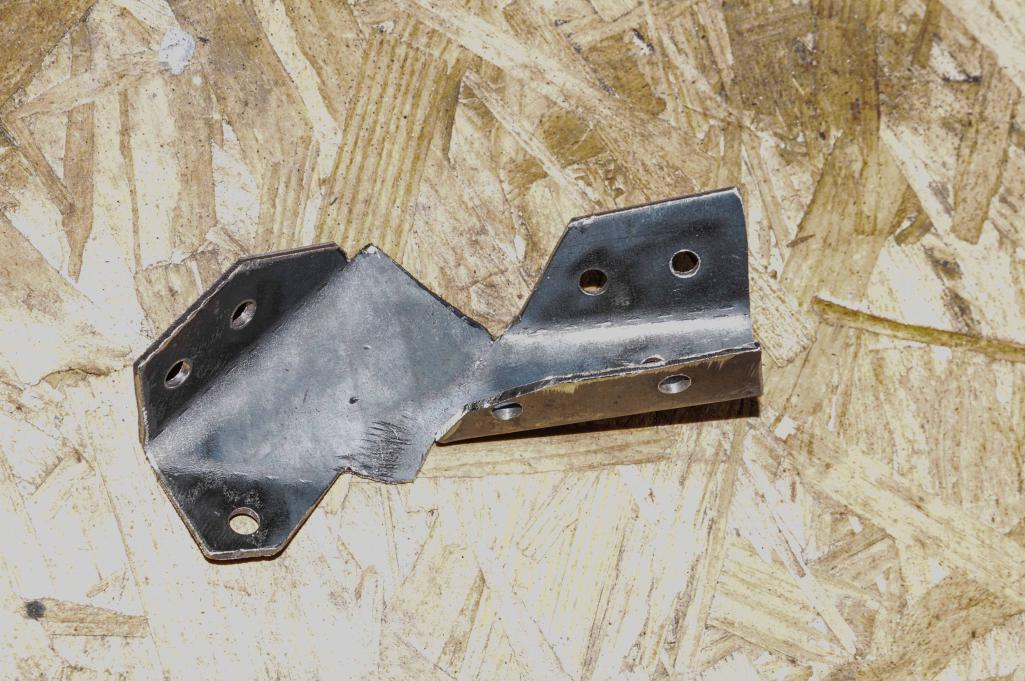
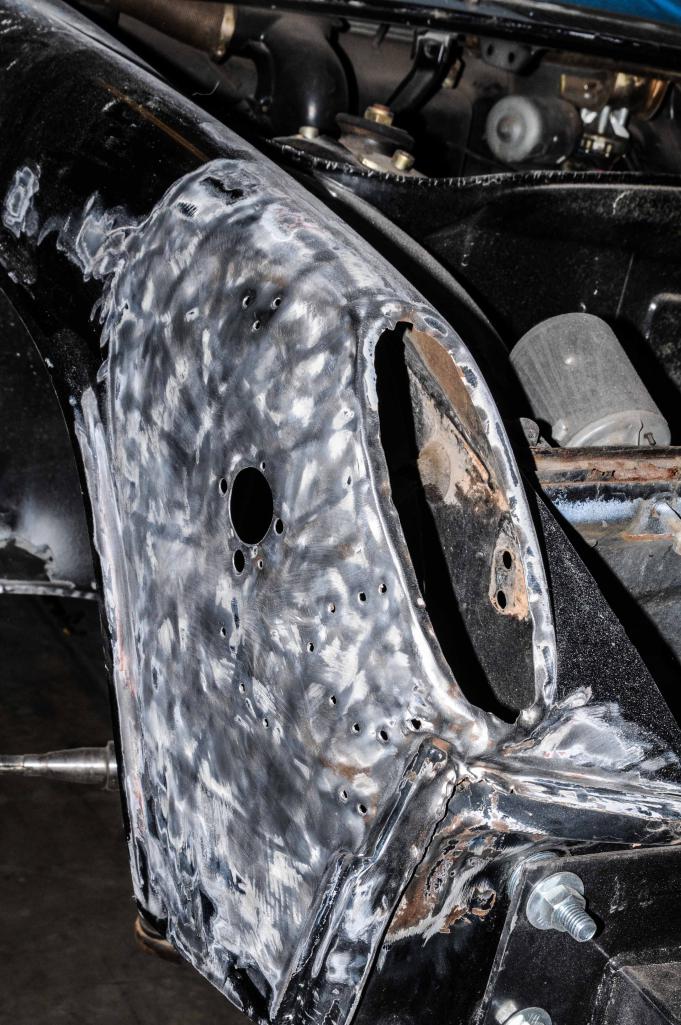
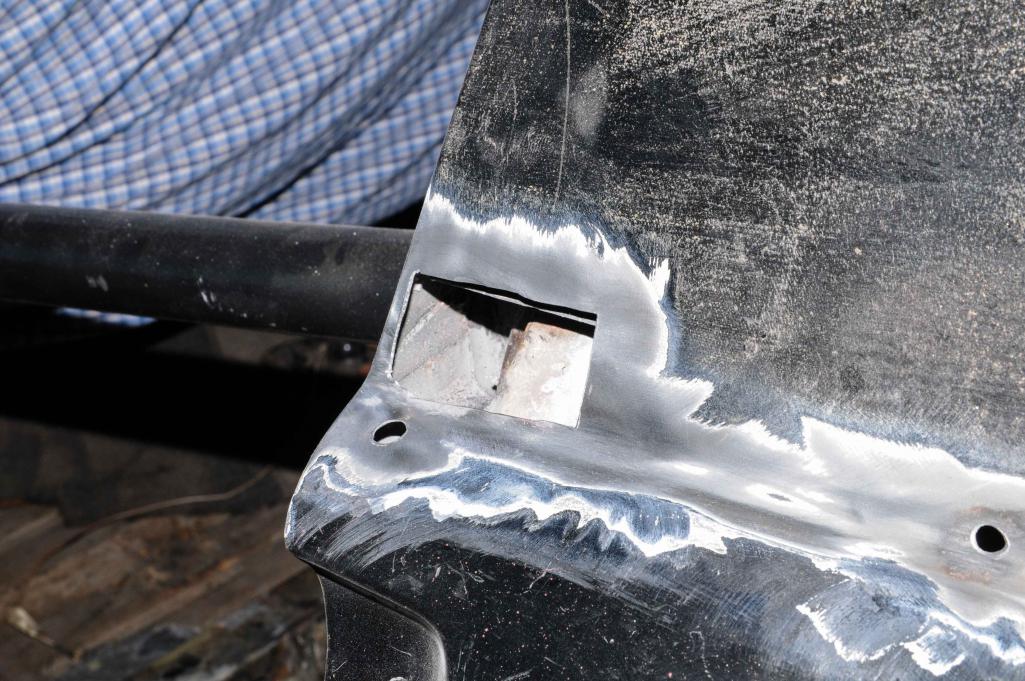
And on the front piece I drilled/ground out the oddly patterned rust that was part of the inner fender and used the subsequent holes to plug weld the new piece. I figured this killed 2 birds with one stone.
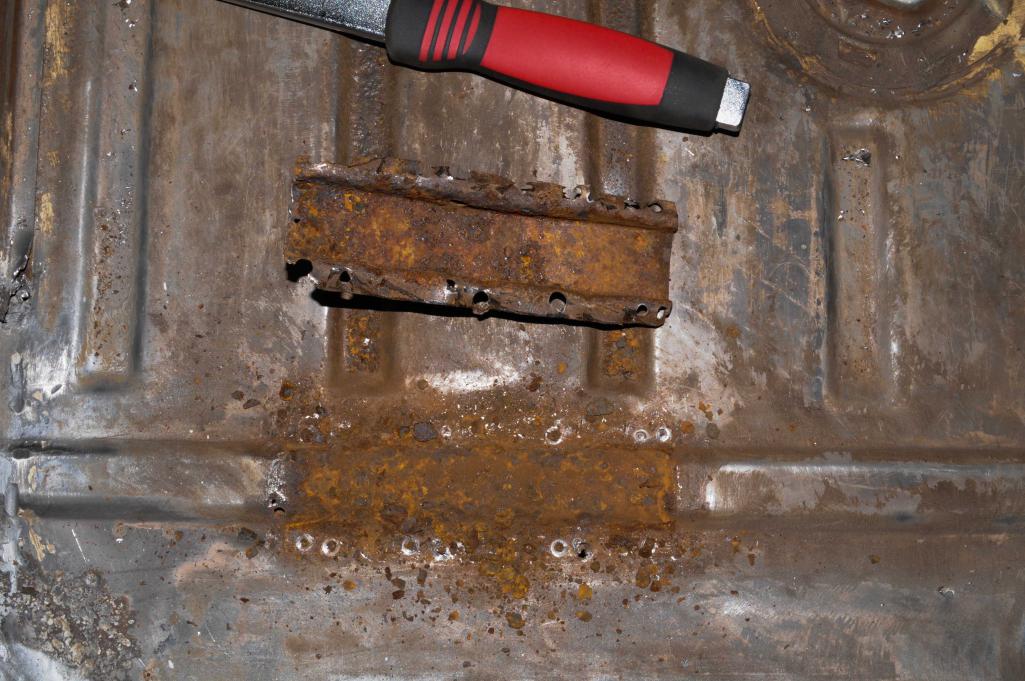
Posted by: DirtyCossack Oct 25 2015, 09:26 PM
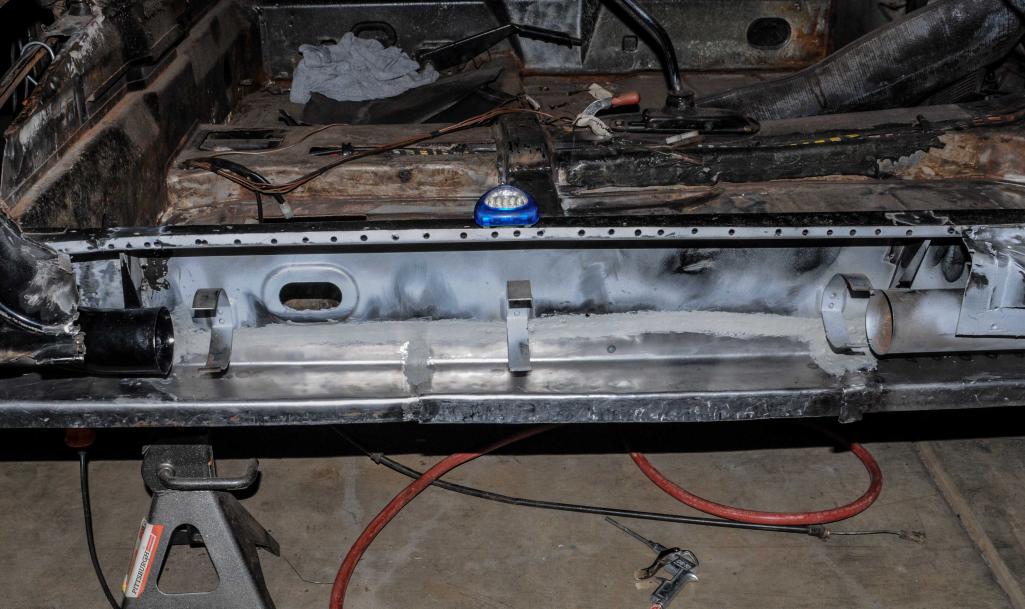
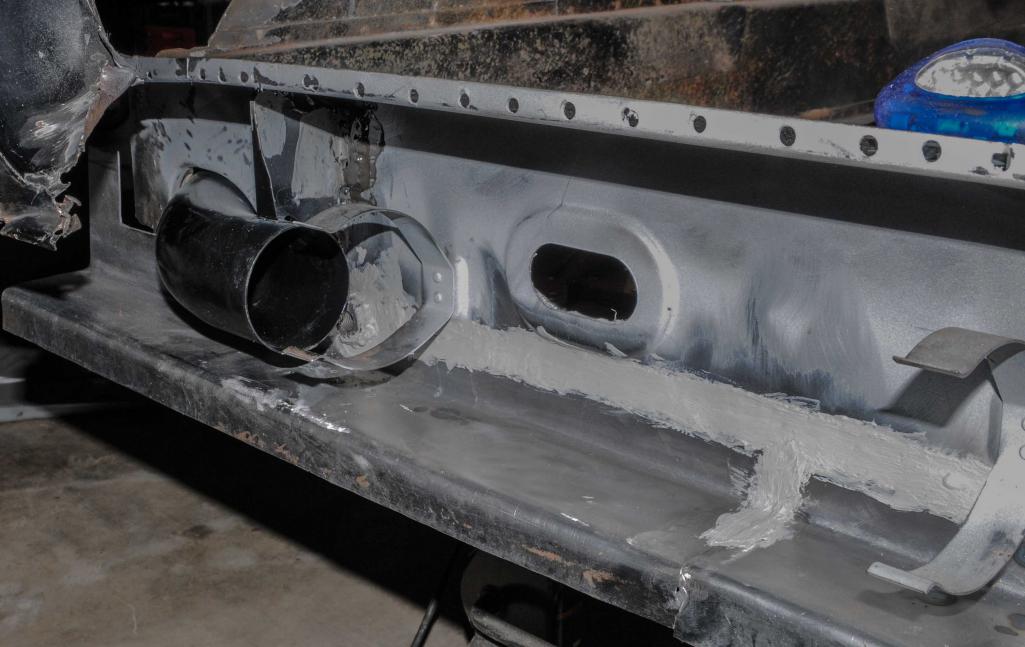
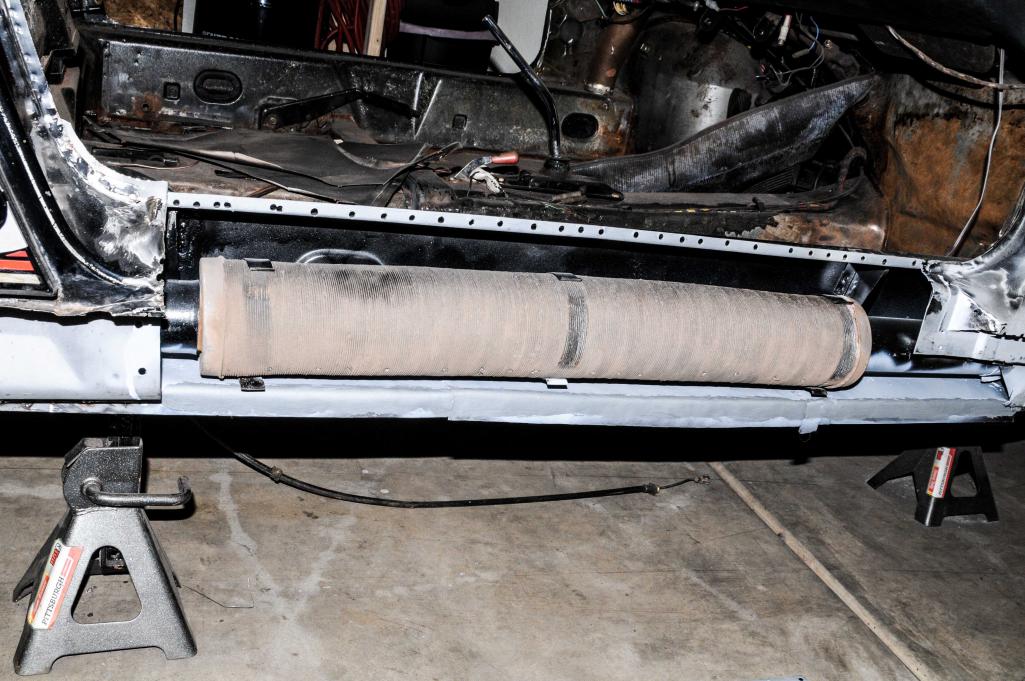
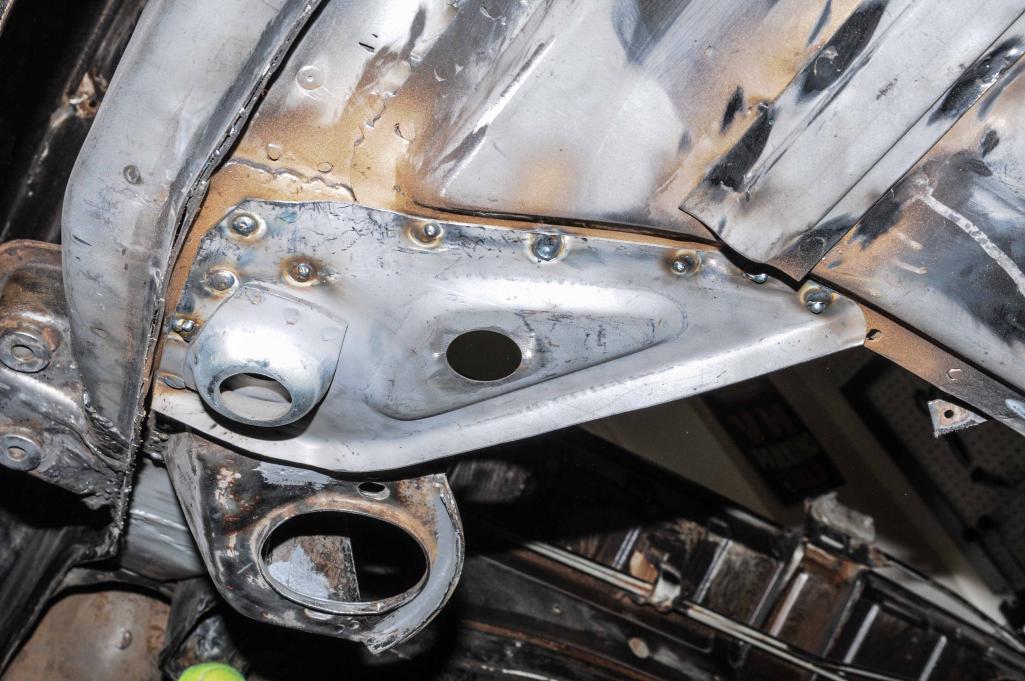
I thought I was to the point of putting pieces back on the car, but instead I removed and cut out more stuff! Pulled the cross member and seat mount to clean up some flaky stuff. It made me realize that I will need to buy a floor section from Restoration Design, but I'm going to try and finish up the long first so I can utilize the rotisserie for the floor. You can't see it in the pic, but the floor section where the triangle would be is gone, there are holes under the far right seat mount, and the other passenger seat mount was cut out...so another RD order is forthcoming.
Attached thumbnail(s)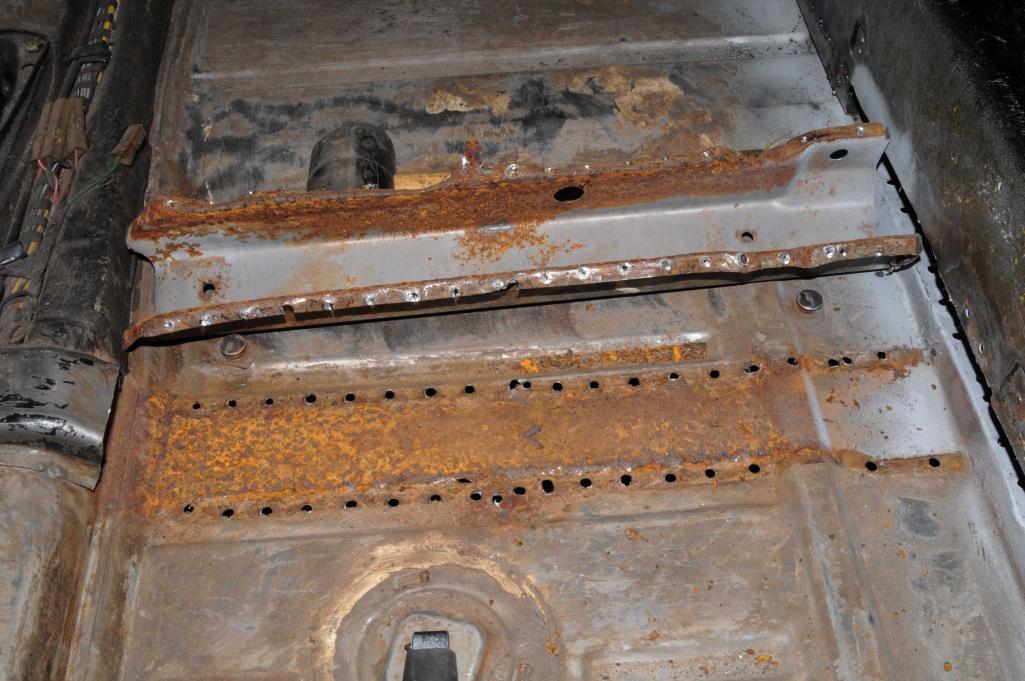
Posted by: DirtyCossack Oct 25 2015, 09:28 PM
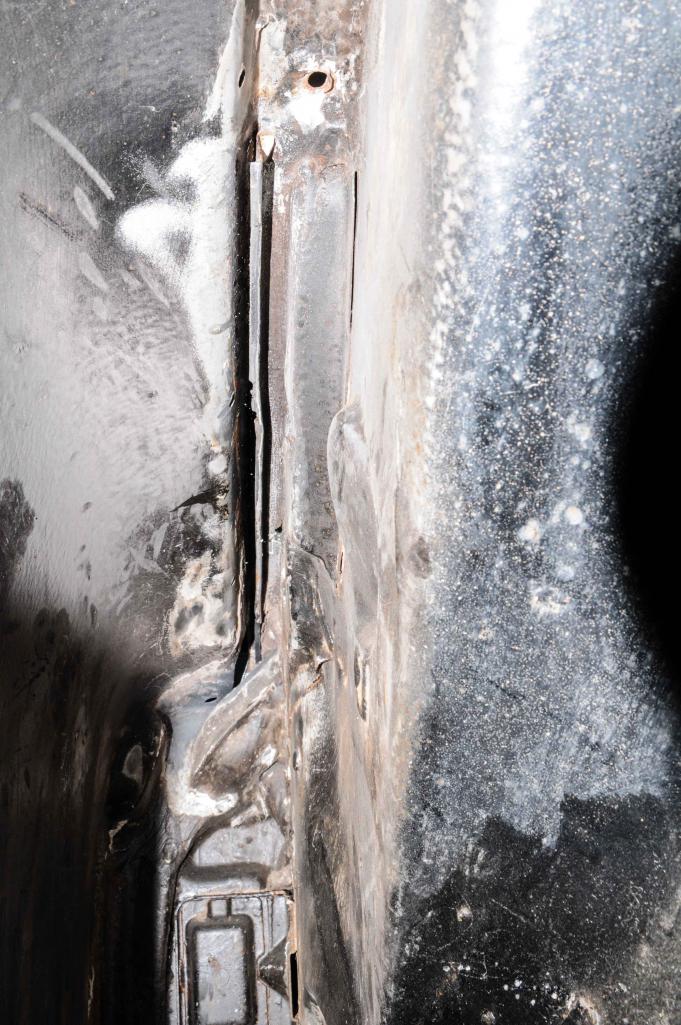
And since I was in the spirit of cutting, grinding, wire-wheeling, and sand-blasting, I worked to prep the wheelhouse area for its replacement next month.
Attached thumbnail(s)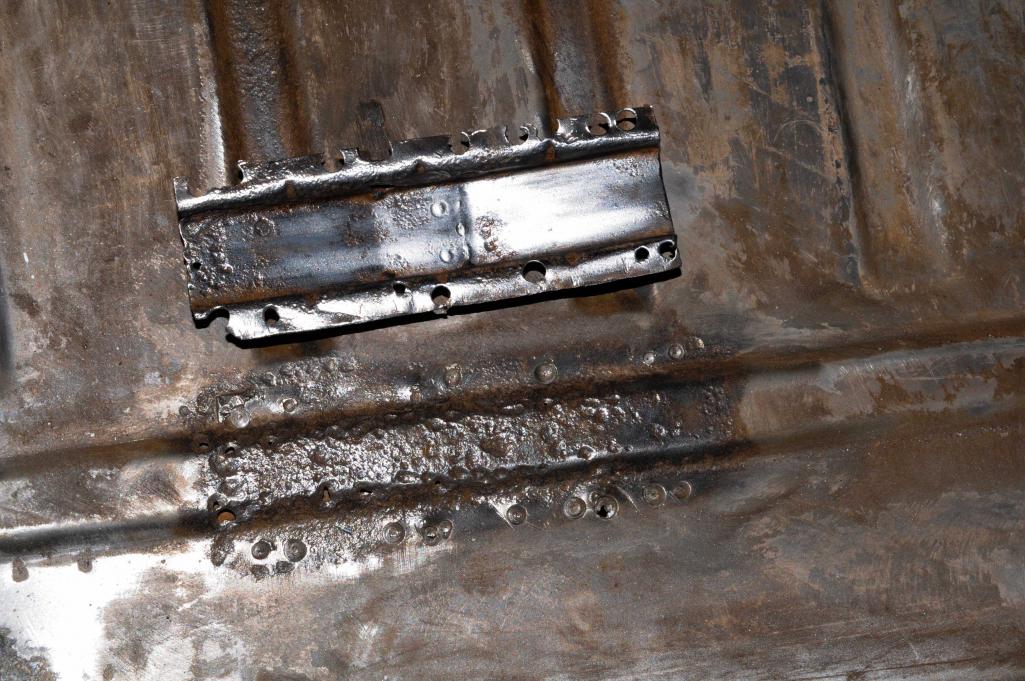
Posted by: DirtyCossack Nov 15 2015, 07:45 PM
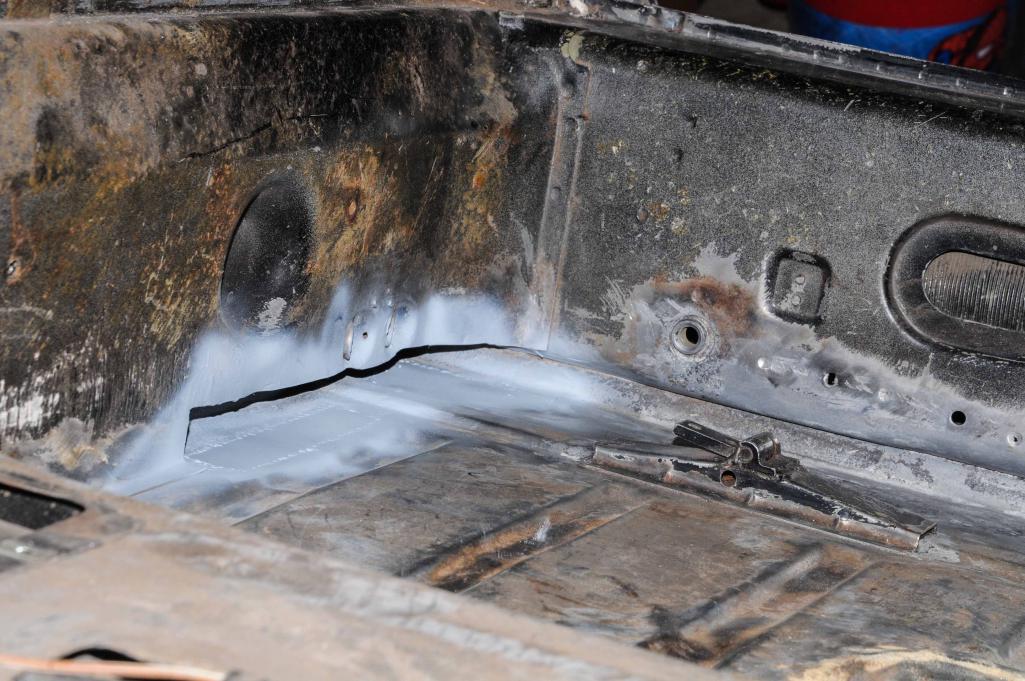
It was one of those tedious weekends of prep work that make you feel like nothing was done. But after looking at the last post I realize that the last 2 weekends were productive, even though my "2nd weekend" (2 days off midweek for Veterans' Day) was spent car shopping (we bought a 2009 Honda Fit with 55k miles for our 2nd, gas-saver, car).
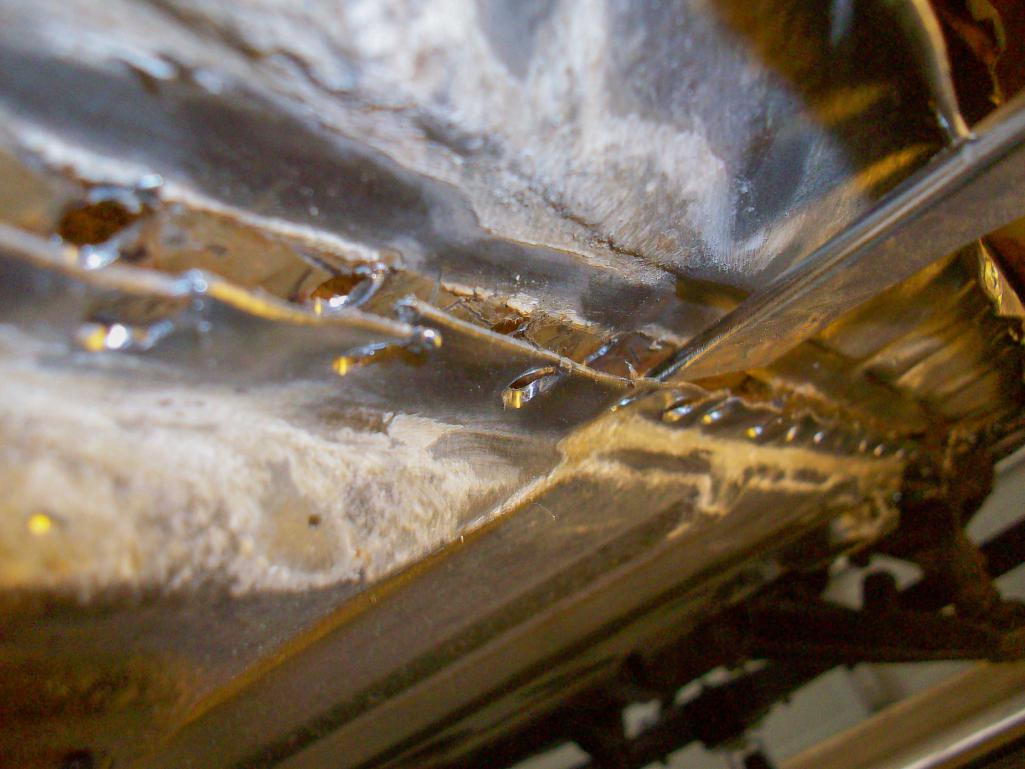
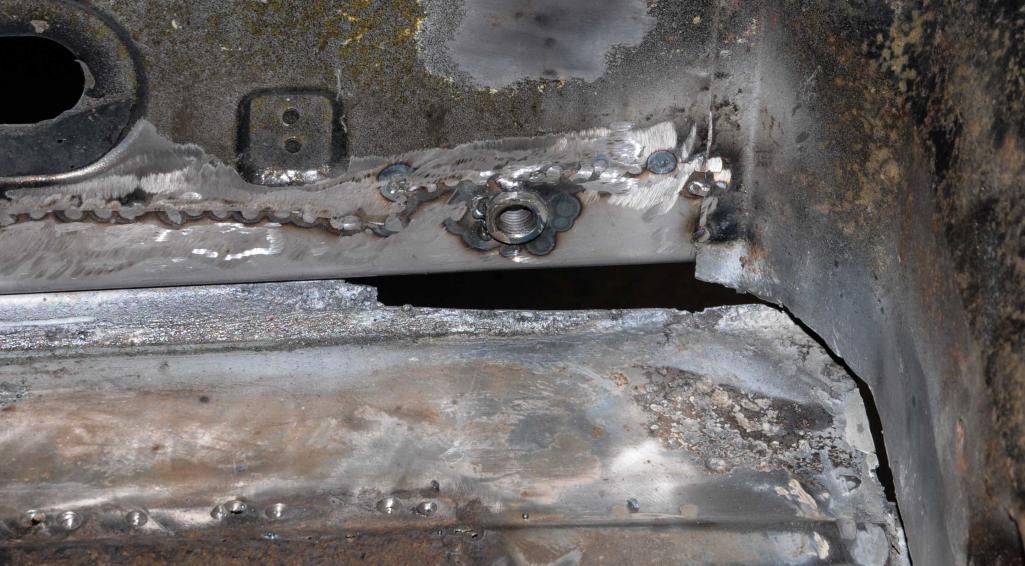
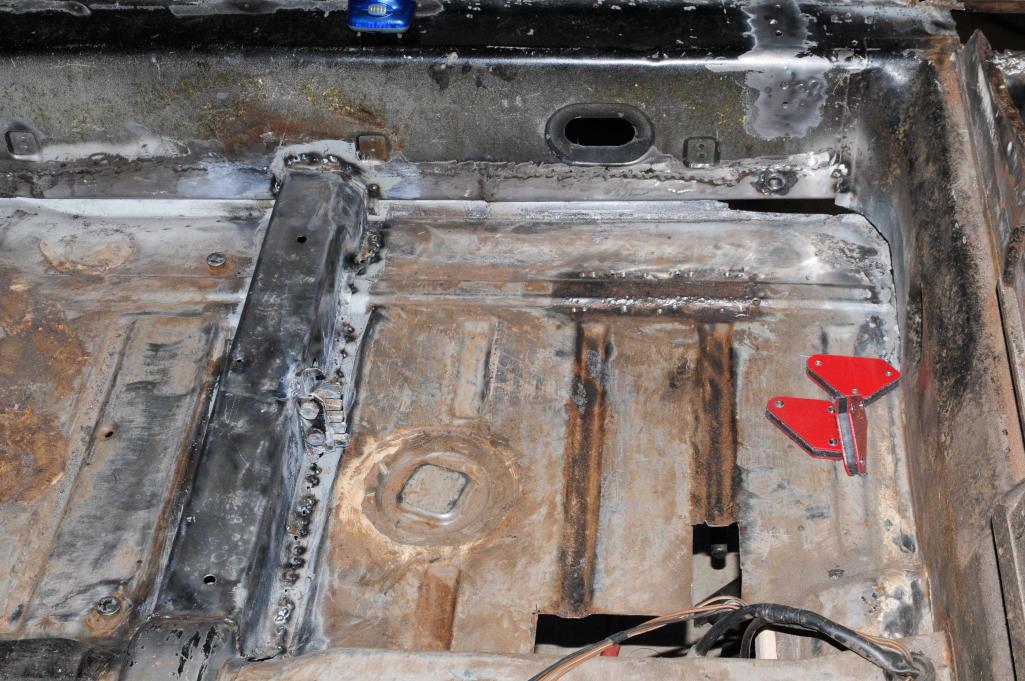
Last weekend was spent getting the last piece of that inner-long made and welded in and some grinding. This whole week had the old seatbelt mount soaking in rust dissolver since I couldn't find the right sized nut. This Saturday was more grinding, some more little welds, trimming and welding in the seatbelt mount, and more grinding before a lot of cleaning. Today involved the panic moment that the cross-member and heater tube thing needed welding in before I could I could seam seal. So the tube got wire brushed and naval jellied before a painting and a hole patched with JB Weld.The cross-member got prepped and tack-welded in (I kept the floor part mostly loose for a future part of the project). I used wait times to seam seal stuff way inside the front part and stuff.
The inside of the long isn't pretty, but I figure it doesn't really need to be...The part in the passenger side could have and should have turned out better, but it's not too bad and won't need more than a skim of filler to make smooth. Carpet covers it anyways...right?!? haha
Attached thumbnail(s)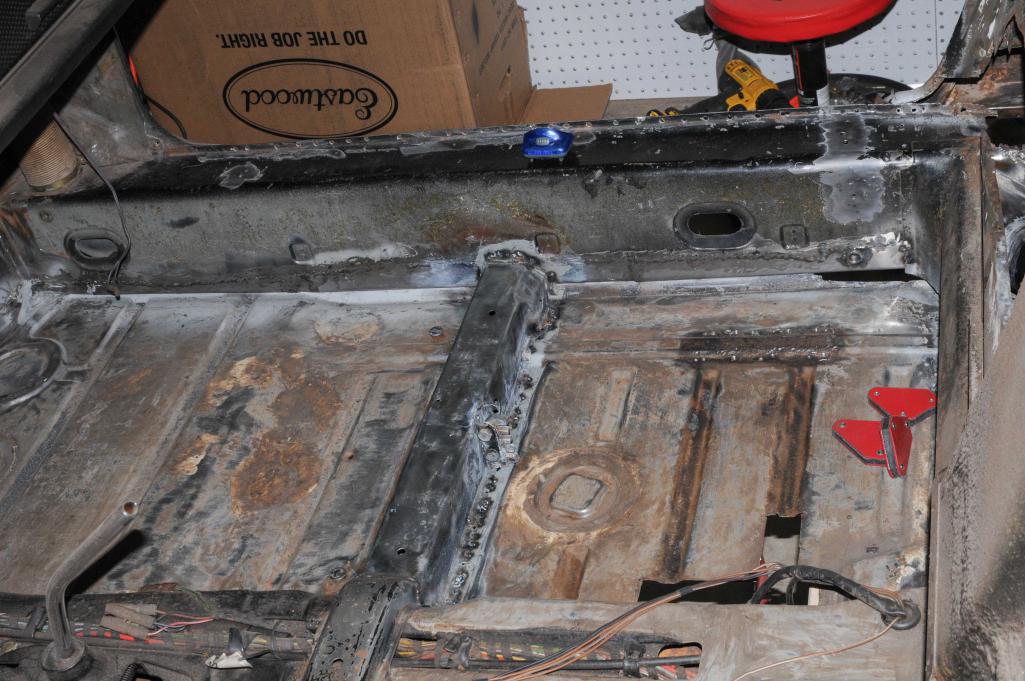
Posted by: DirtyCossack Nov 15 2015, 07:48 PM
It's weird how parts of the heater tube look like overspray, but it's solid black except in the weldy areas which will need painted later. I also found that it's mounts were kinda weak and thin, so I took some JB Weld to assist the real welds in their job.
Attached thumbnail(s)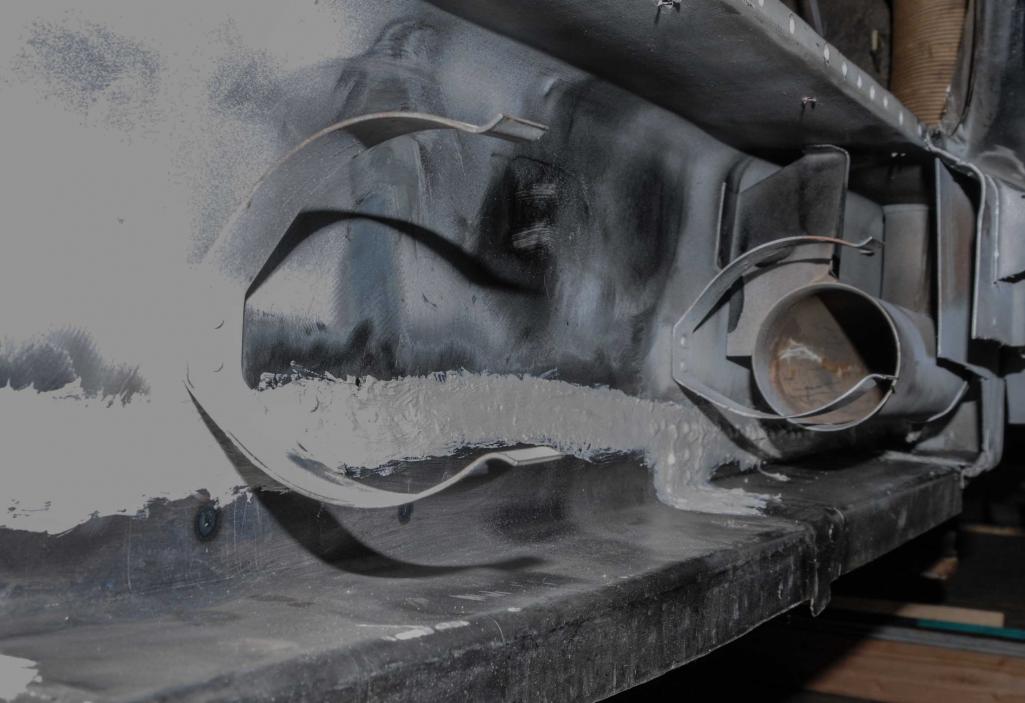
Posted by: DirtyCossack Nov 15 2015, 07:51 PM
Also, word of advice to future me: Weld the long from inside the car and not inside the long under the front heater tube. You can't grind behind that pipe. Actually, just get a better paying job and just buy that whole piece from RD instead of making your fancy little patch panels.
Posted by: DirtyCossack Nov 22 2015, 07:48 PM
I spent the whole weekend measuring and thinking. The next step is welding in the wheelhouse, so I figure there is no such thing as too much welding or thinking. I did trim little bits of the new RD wheelhouse (little bits at a time, kinda like digging a trench with a spoon) so as to compare how the pieces are going to go together.
I've found where the new pieces go... but I'm finding some of my confusion is on where exactly the passenger compartment's long piece ends and where exactly the long starts with its turn towards the inside.
Does the passenger compartment long ever angle? Or does it stay straight and then that turn is all on the engine compartment long piece?
Posted by: Andyrew Nov 23 2015, 07:36 AM
Your going to support the doors prior to starting your welding right????
That chassis is going to be aeverely twisted if you dont...
Posted by: DirtyCossack Nov 23 2015, 03:42 PM
Doors are braced, but I'm still concerned with some twist and droop. This weekend I developed a system of adjusting jacks, braces, rotisserie, etc to get the thing square on all 10 measurements I've taken. I'm still super nervous about welding time though. I'll prolly measure and adjust 1000 times.
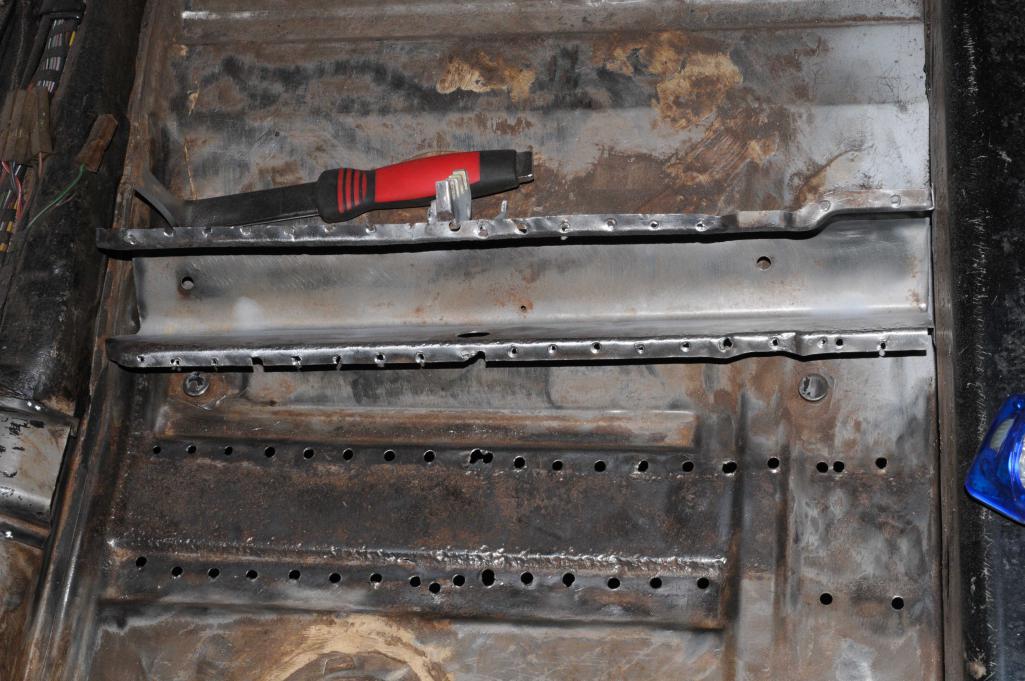
Posted by: DirtyCossack Dec 6 2015, 07:26 PM
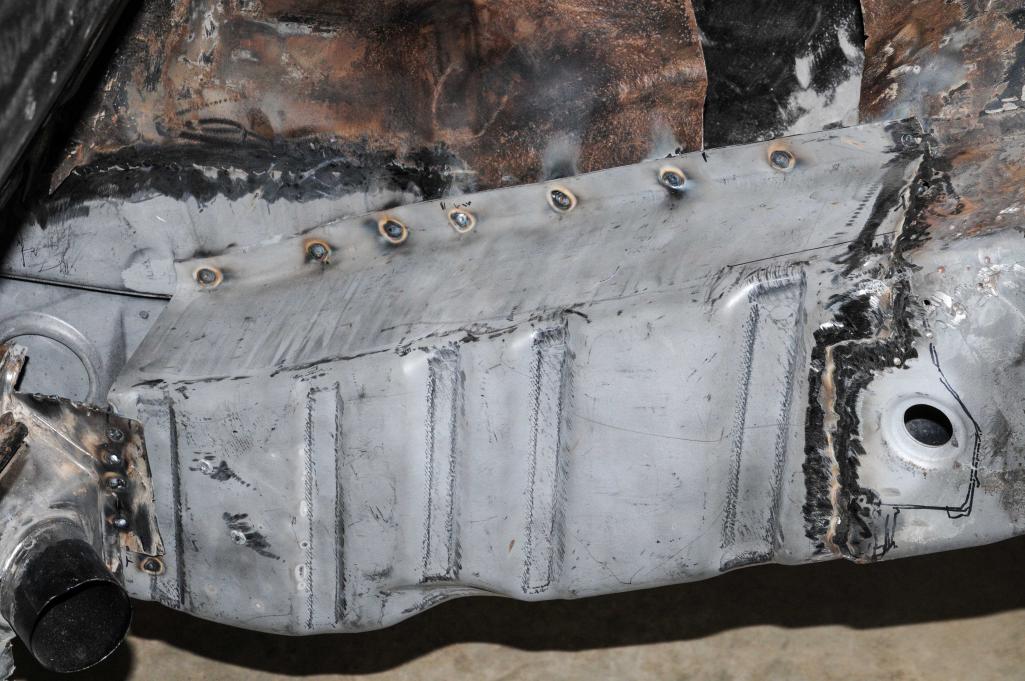
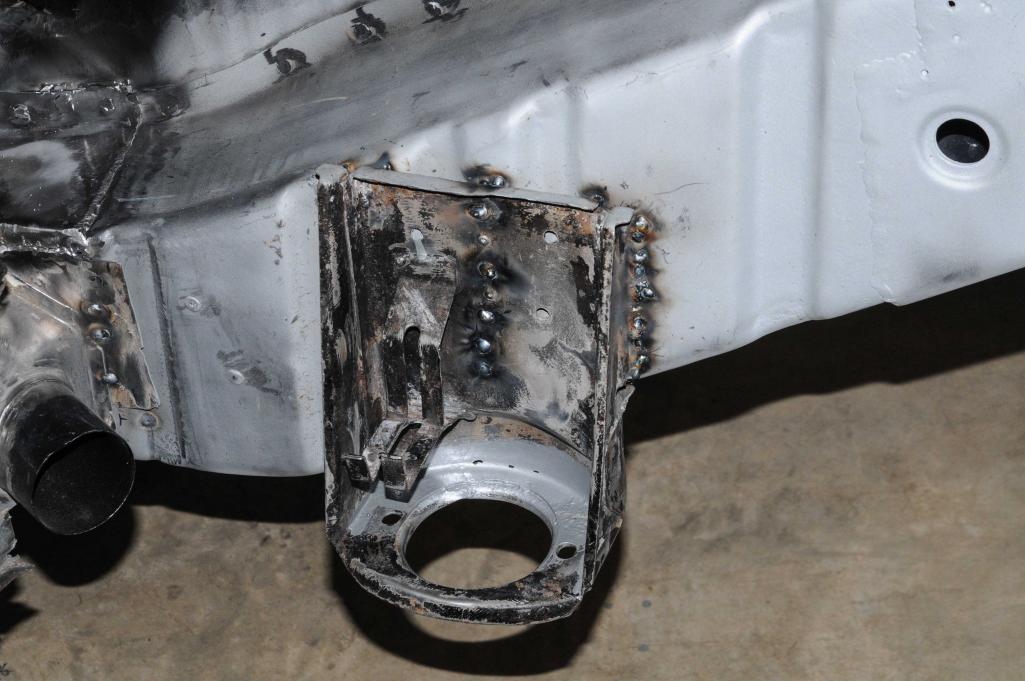
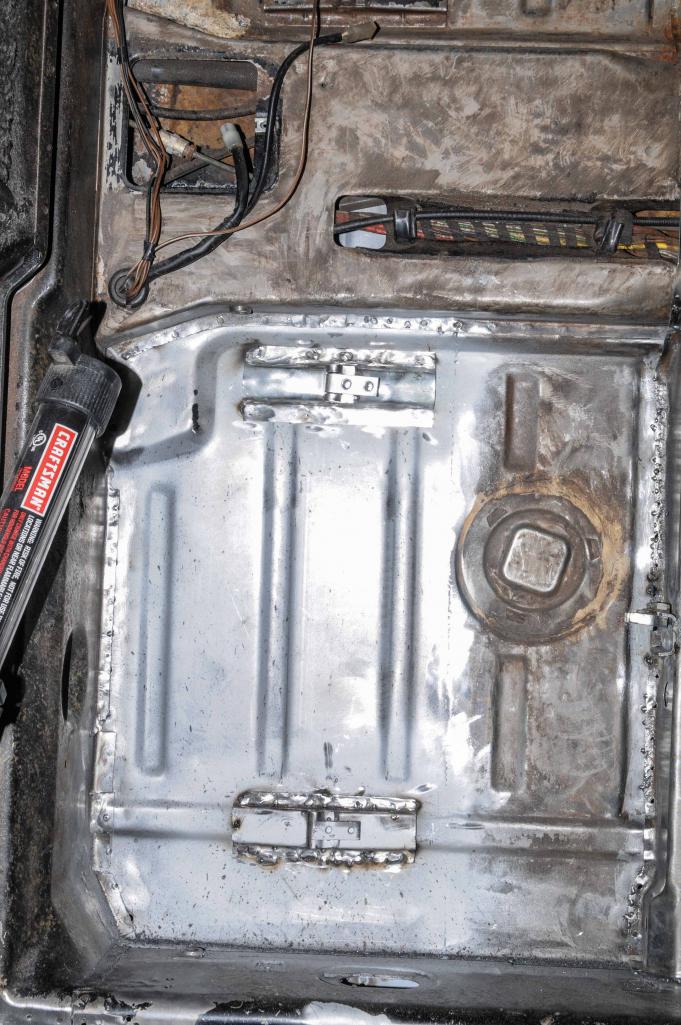
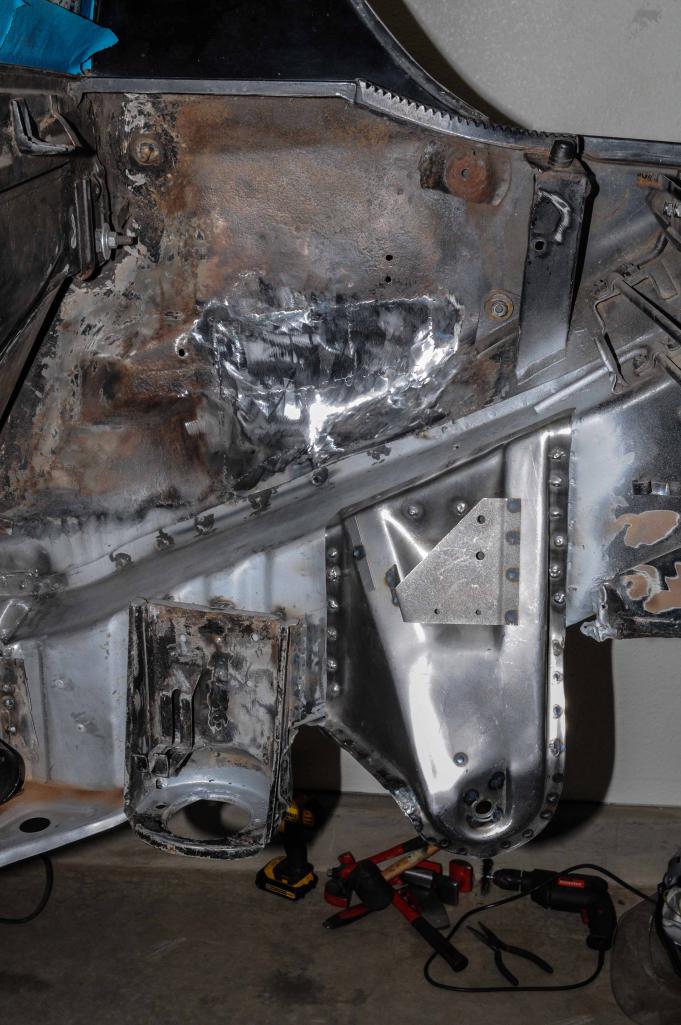
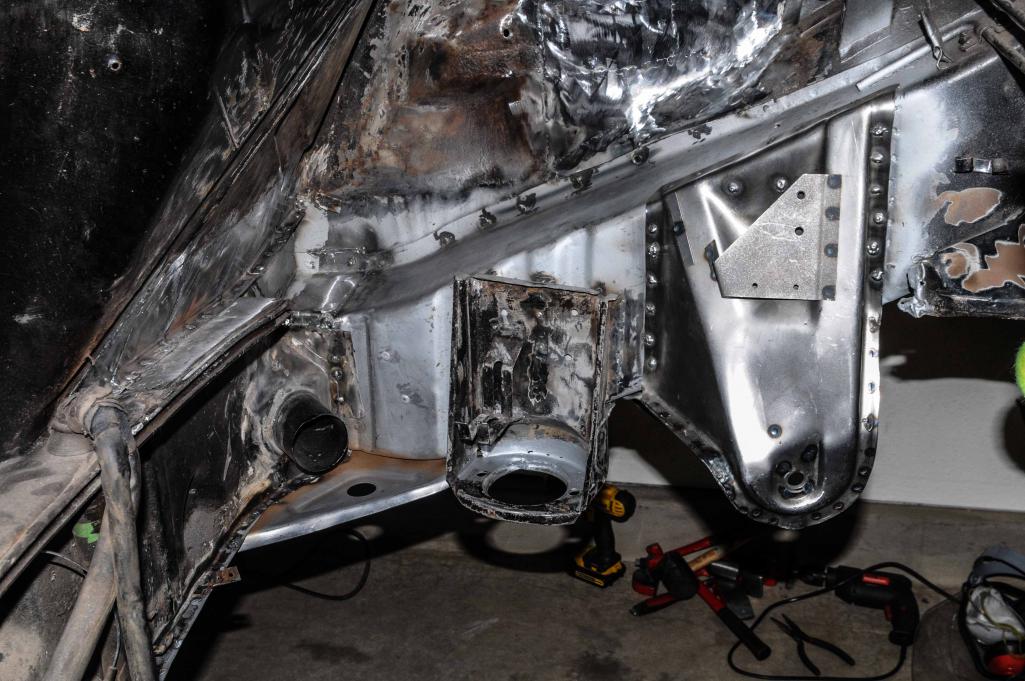
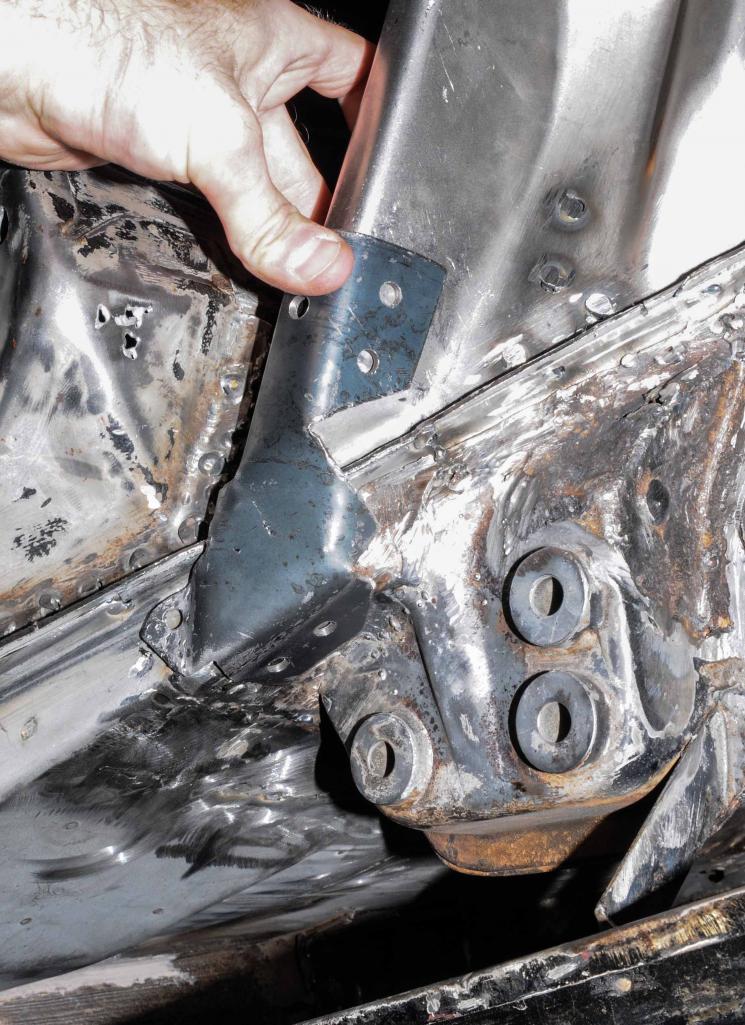
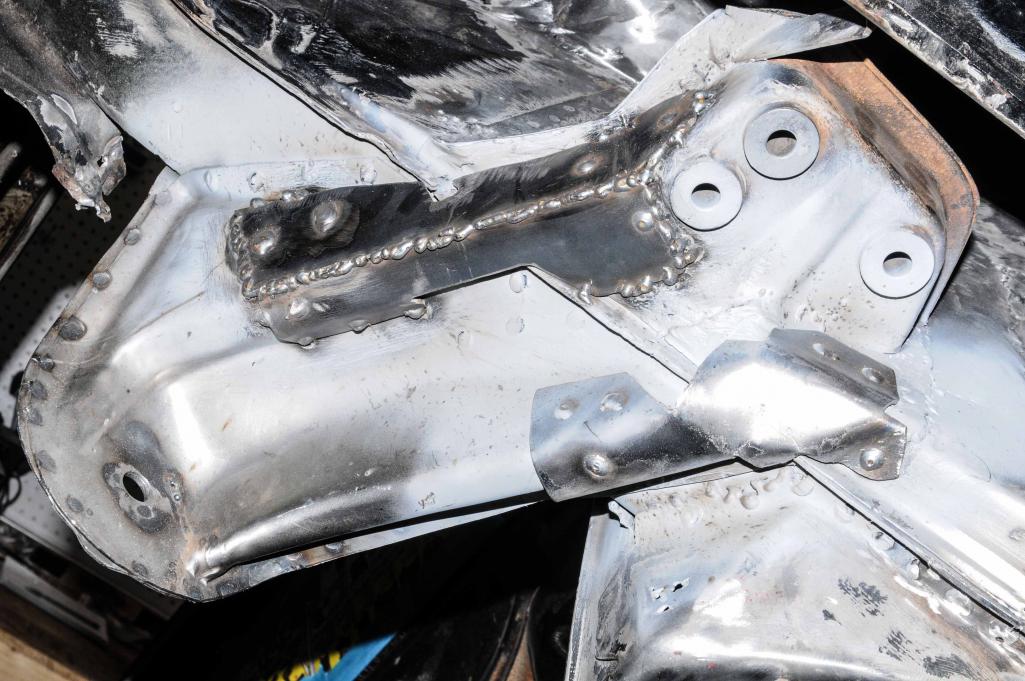
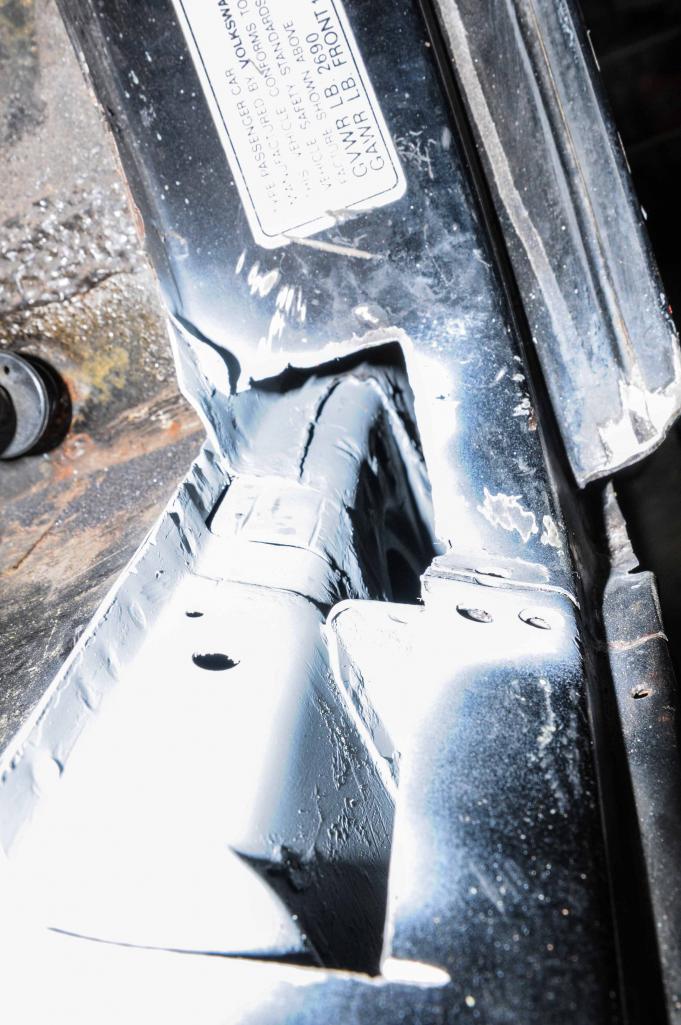
After a weekend or two of measuring, fitting, and bracing, I finally welded a major piece in: the wheelhouse. It fit up pretty well and welded in well, though I definitely affirmed that I am more of a grinder than a welder. I really slacked on taking pictures...but on the other side of this picture is the outer suspension console welded back on. The other picture is the motor mount console being soaked with naval jelly or whatever it's called; I figure it's time to start prepping some parts...
Next weekend my mother-in-law comes to town, so I figure minimal progress will be made the next 2 weekends, but who knows.
I'm pretty nervous about welding in this upper long, this wheelhouse had plenty of surface areas for a solid installation, but for the upper long I'm really trying to find extra bracing ideas. I have so overlap things made for the bottom, but worry my welds could fail at the top. In some way I guess the suspension console will strengthen/stiffen the joint since the seam will be under it, but I'm thinking about adding some what will be ugly overlappers... I'm also trying to figure out if it will be necessary to add the cover to the RD piece like the factory...
Attached thumbnail(s)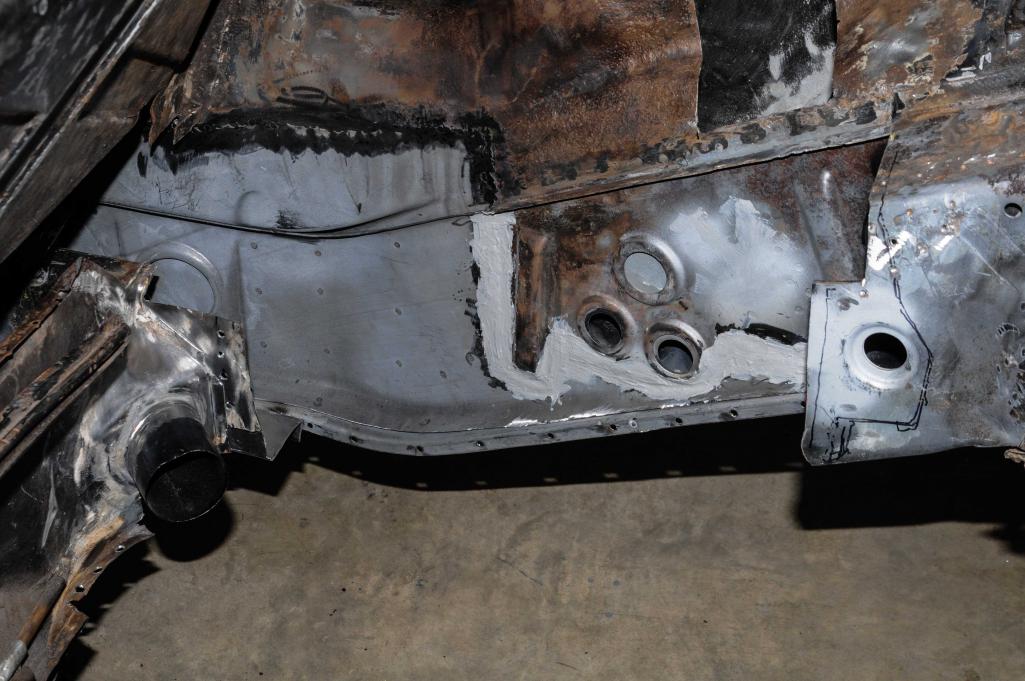
Posted by: DirtyCossack Dec 27 2015, 07:35 PM
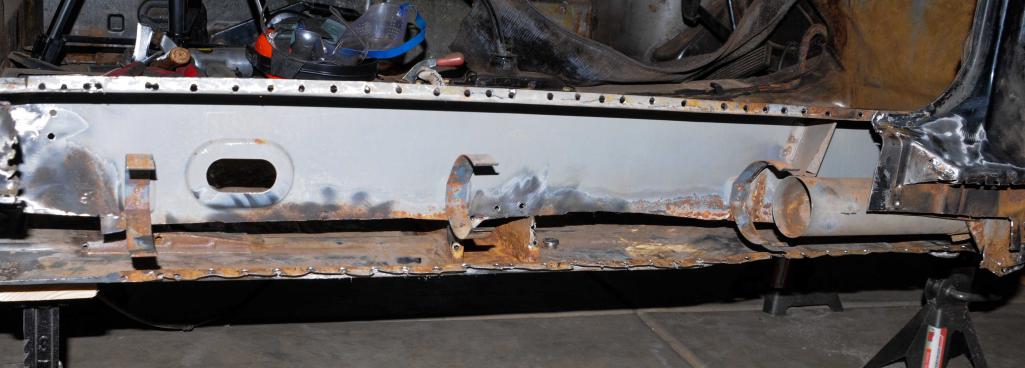
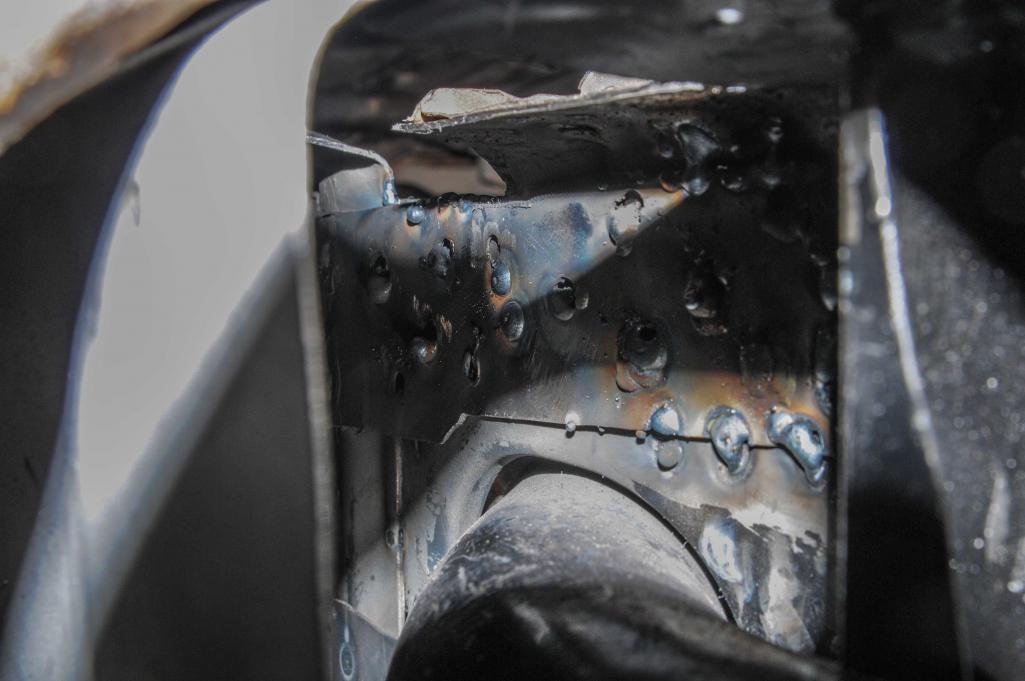
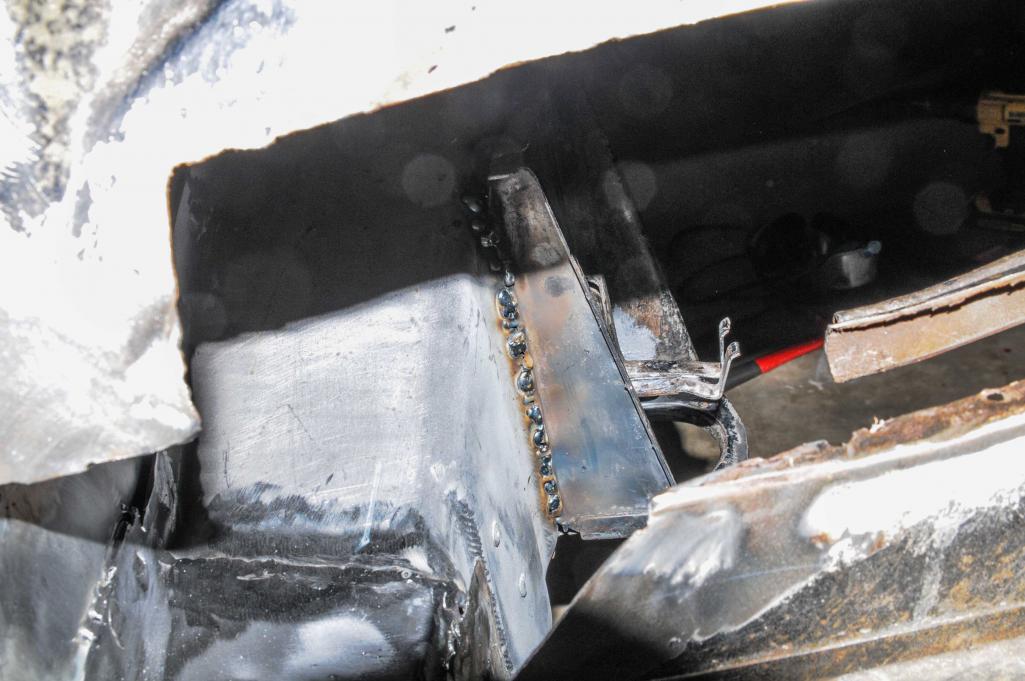
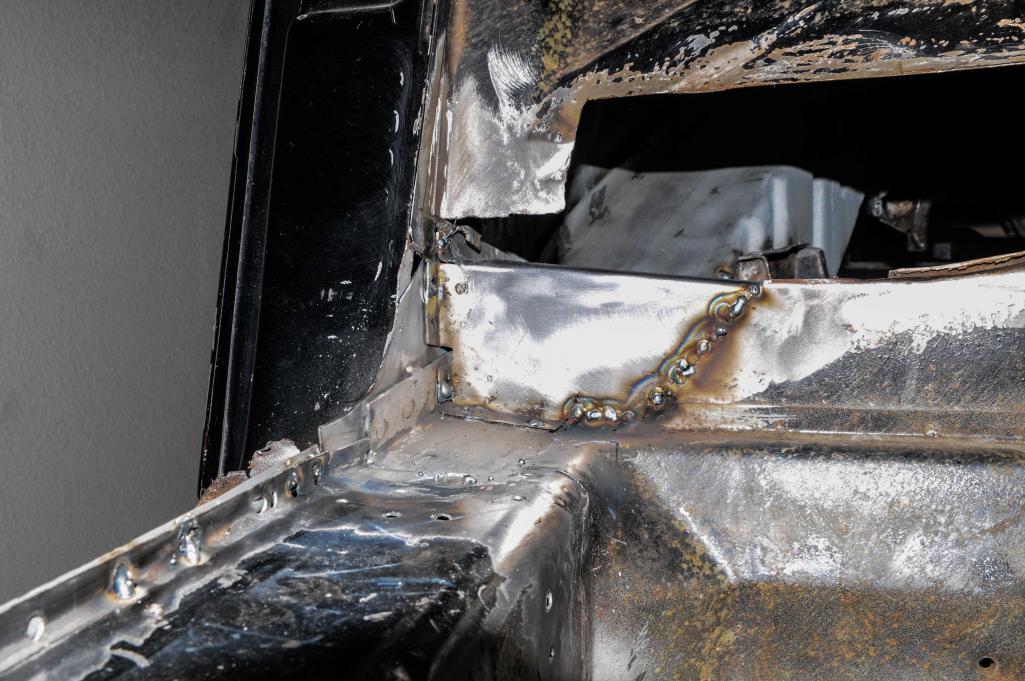
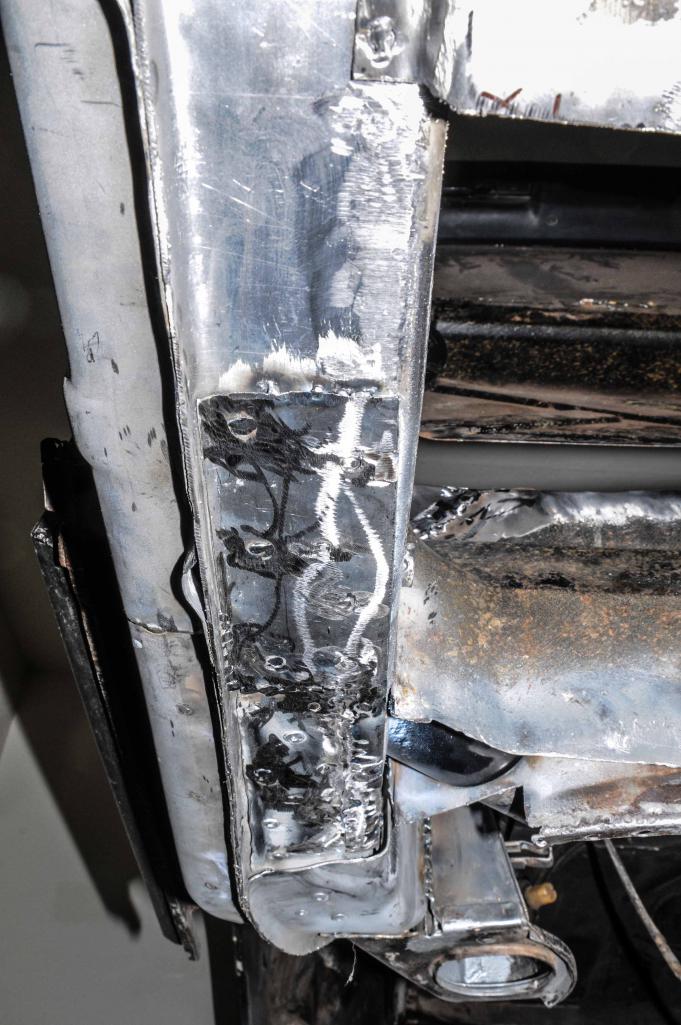
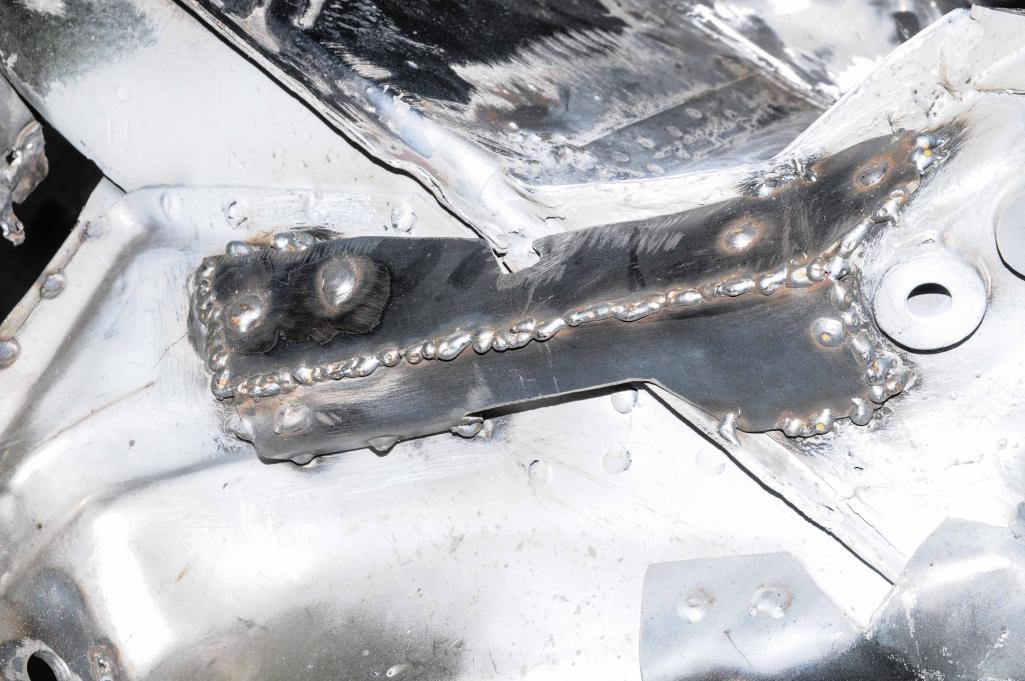
I am disappointed in myself that I worked half days all last week and had a 4-day weekend but only managed to work on the 914 one day... My excuses are that I got an injection in my knee one day, spent 2 doing Christmas stuff with the wife (Die Hard marathon included), was sick 1 and straight up lazy another. So today was spent welding the scariest part back into the car after 8,000 measurements to ensure squareness and one of those half days at work spent talking to a coworker who was a licensed welder before he enlisted. So here it is, the engine compartment long welded in after welding in the wheelhouse without cutting the fender! The welds were ugly, but had perfect penetration, and welding in my little brace/strengthener/stiffener thing was mostly blind and done as a contortionist exercise (I missed a few of the holes). I also decided to use some pop-rivets on the underside one (it kinda weaves over and under) to hold the piece down where I couldn't get a good clamp on.
On another note, you can see where I made my zig-zag cut. I did this to keep as much original metal as possible and also because I theorized that the added edge area allowed for greater seam strength.
Next week is another week of 3 day workweek of half days (another knee injection Wednesday though) and then another 4-day weekend that I hope is productive...
Attached thumbnail(s)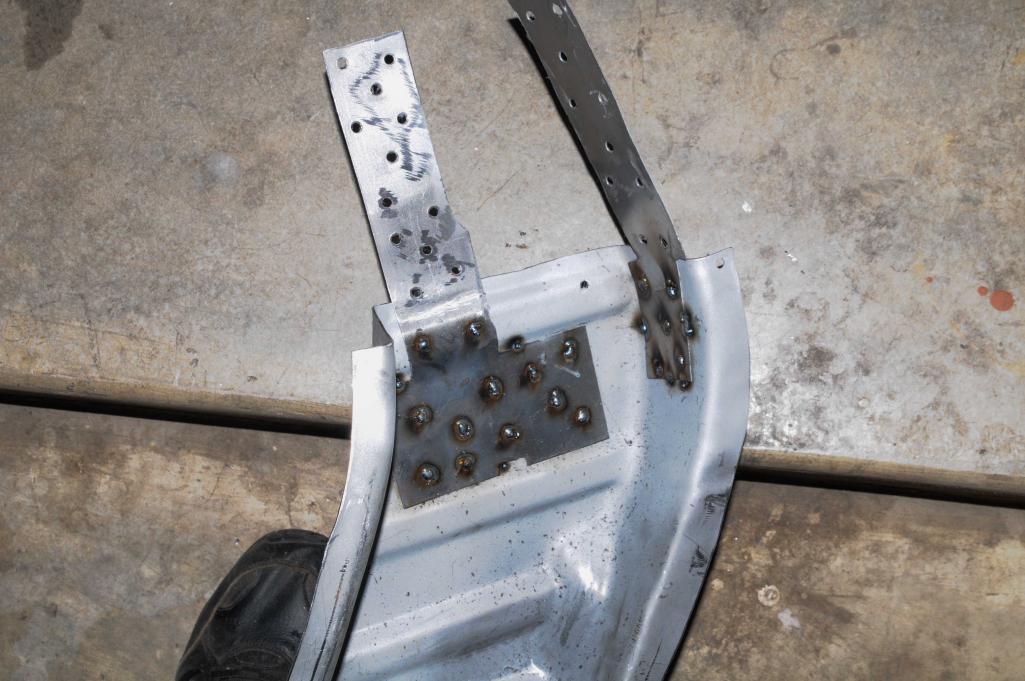
Posted by: mbseto Dec 28 2015, 10:28 AM
So here it is, the engine compartment long welded in after welding in the wheelhouse without cutting the fender!
Bravo! I've been sitting in my engine compartment trying to decide if this was possible. What I'm hung up on is whether I'll be able to weld on the outer suspension console. Either way, any advice for posterity?
Posted by: DirtyCossack Dec 28 2015, 01:58 PM
The outer suspension console would take some serious contortionist skills; I just had the bottom half pulled off and the topmost part of that was a little rough.
The biggest piece of advice I'd give (and wish I'd done) is that you want the inner long (passenger compartment side) to be perfect and solid where it will meet the engine compartment long. I also wish I had waited to put the metal heater tube in, that work room would have been invaluable.
Posted by: DirtyCossack Dec 28 2015, 06:10 PM
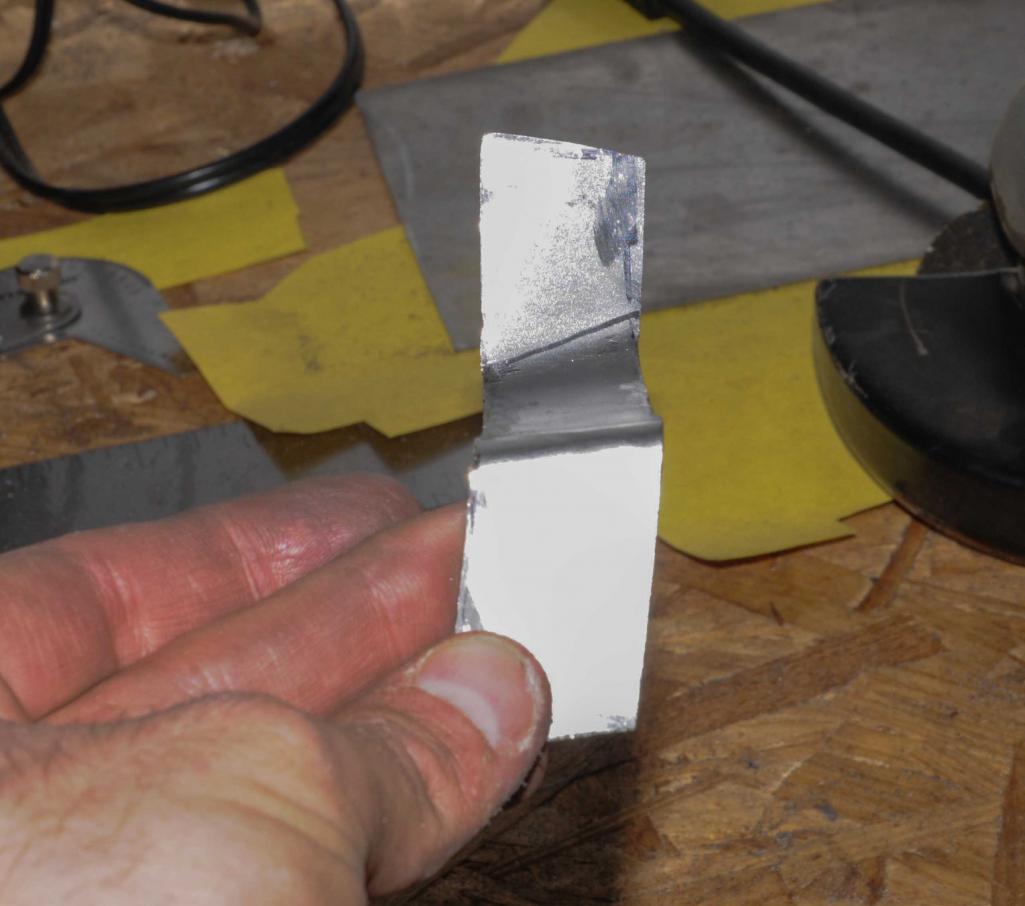
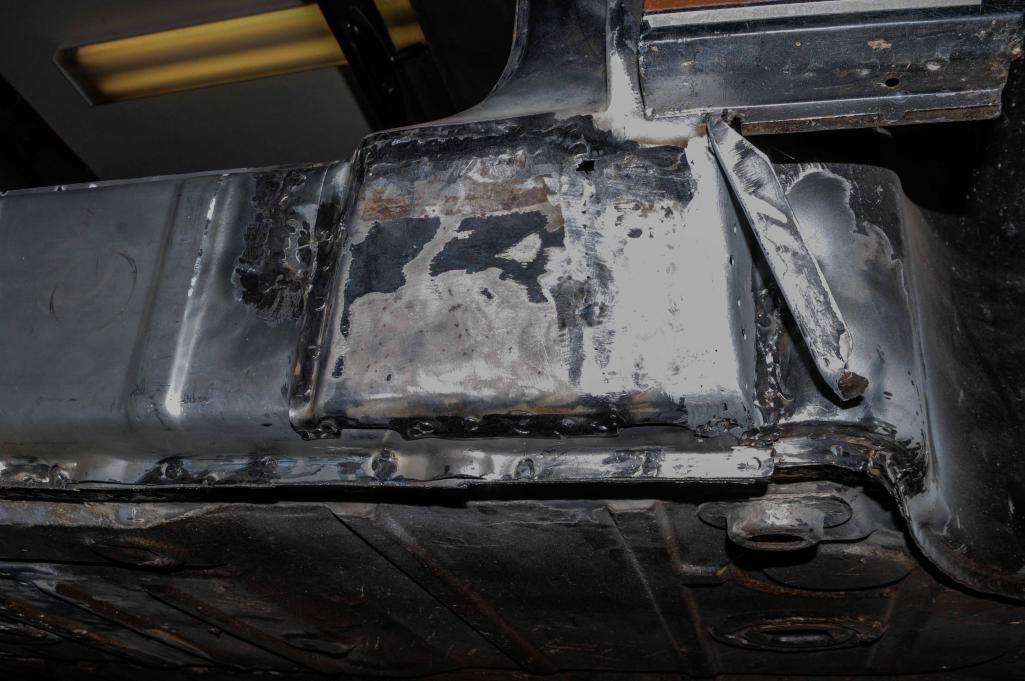
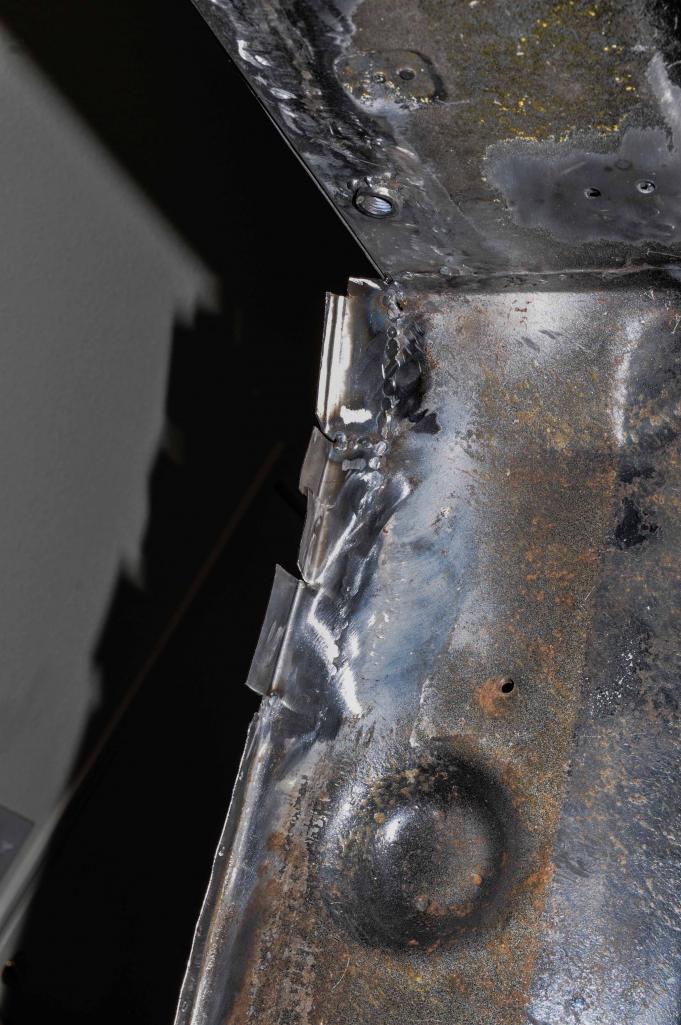
So today's short work was spent making a little patch piece from 16 ga steel and then welding it into the long area where it meets at the firewall. I got a little overconfident with heat (some warpage), especially where I ran the little bead. I got great if not perfect penetration in my ugly welds with only a few burn throughs (exactly where I expected them) by the firewall's remains. At the top edge you can see my aborted "big idea" of welding along that edge...I realized it'll be really hard to grind there...
I feel pretty confident in the strength of these welds and the long in general, I guess the first real test will be when I hoist the girl up onto the rotisserie in the coming weeks.

I also finished up prepping the engine mount console and suspension console for their installations later this week. That will be followed by closing up the long/inner rocker; and then ??? probably a day playing with the rotisserie as a 914 merry-go-round.
This project feels like it is rolling now! I even priced my paint and primer today ($460), but know I still have a long way to go before that.
Attached thumbnail(s)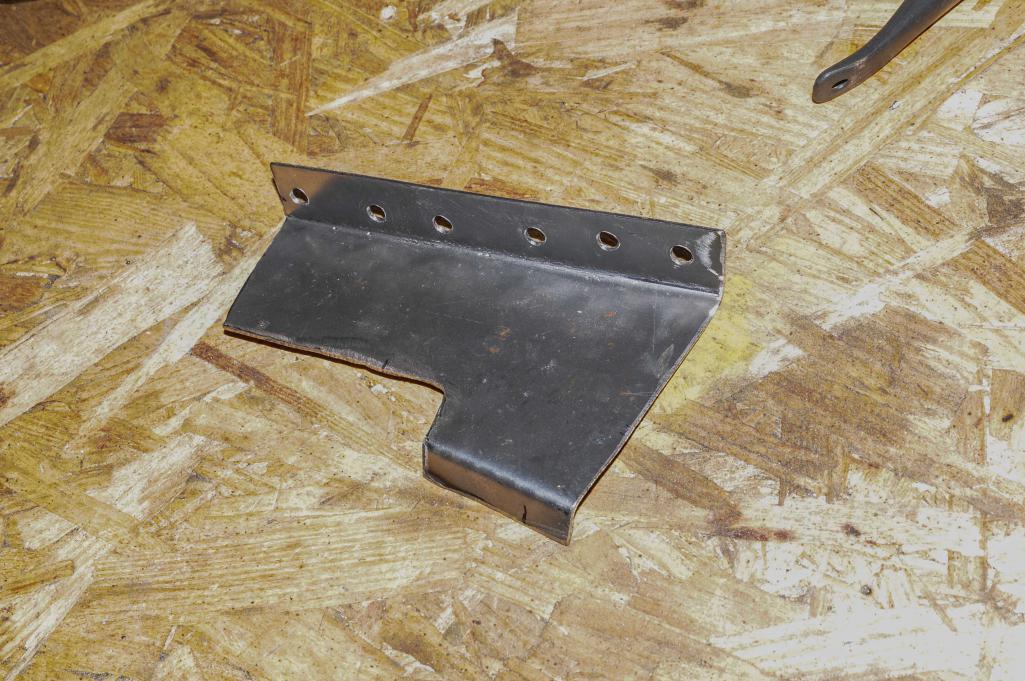
Posted by: DirtyCossack Dec 29 2015, 05:09 PM
Question for the gurus:
When installing the motor mount console shelf thing onto the RD corrugated long, what did you do about the dead space divots?
Posted by: DirtyCossack Dec 29 2015, 07:21 PM
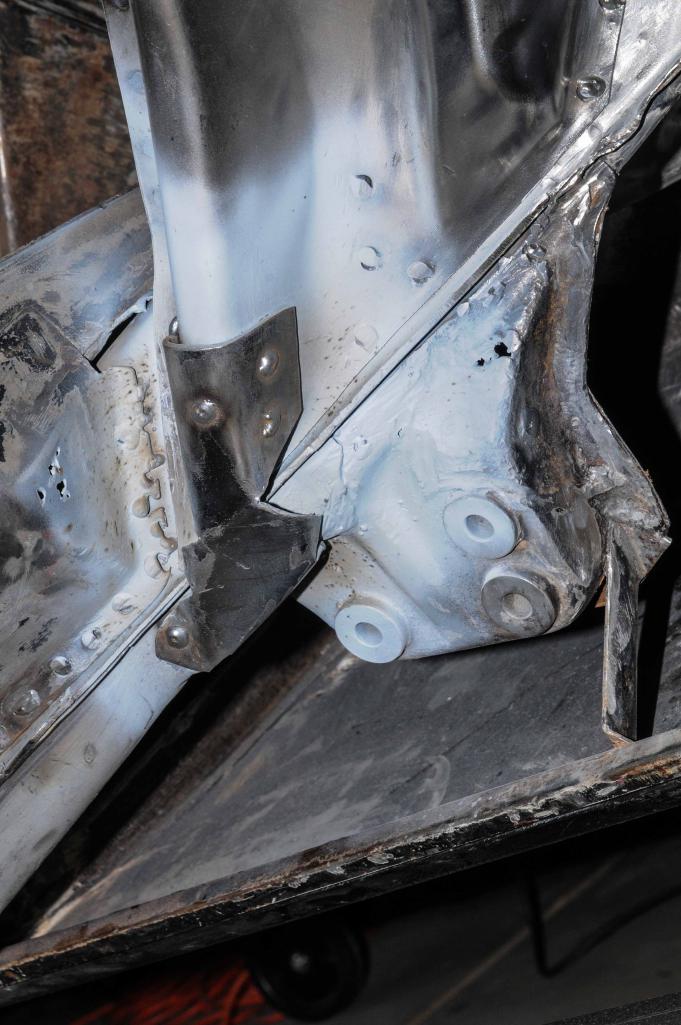
It took a while to get it measured out and then held in place (I used little pop-rivets to hold it in place), but I put the motor mount console thing on. Super ugly welds (par for the course) but I was really surprised at the ones on the firewall side, which were done half blind with my left hand...
Attached thumbnail(s)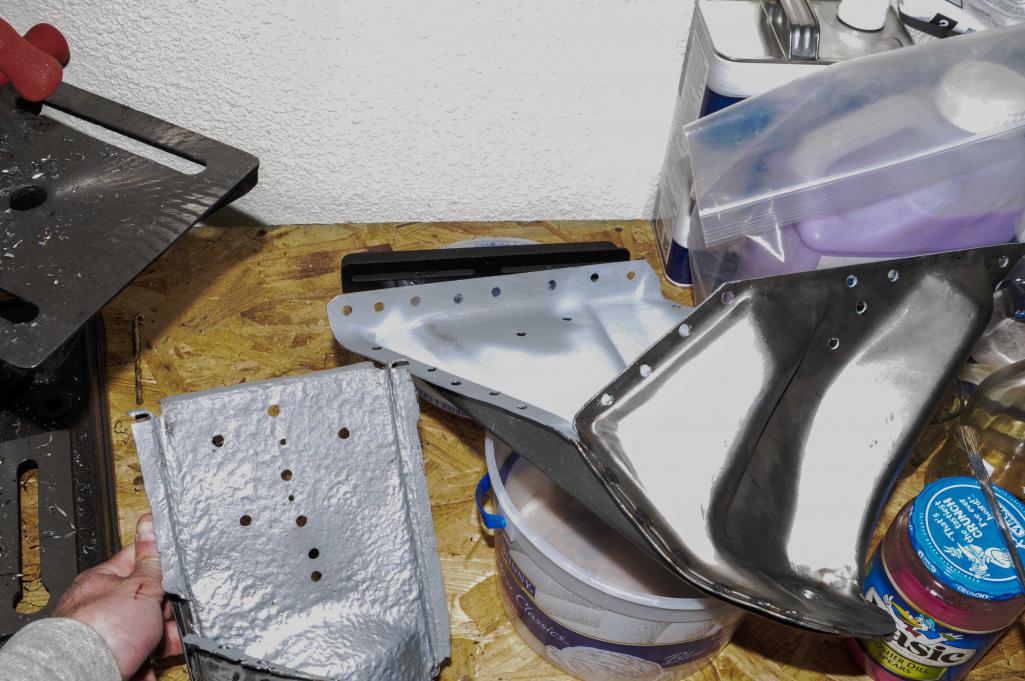
Posted by: DirtyCossack Dec 31 2015, 06:32 PM
I spent the day off fitting and prepping the inner rocker panel for welding and fabbing/prepping a piece of the firewall. I was planning to weld them in, but elected to knock off early and watch some college football playoffs. Which means I will kick-off the new year with some welding and finally hoisting the 914 up onto the merry-go-round. I'm excited and can't wait! Next year will see a lot of the tedious work, but this is where the build really kicks in. I meet my surgeon about my shoulder on Monday and hope it doesn't take me out of the garage too long... It'll really suck having something around a month off work and not be able to spend it in the garage...hopefully I can pull some light duty. Serious pics to come tomorrow, a major corner will have been turned!
Posted by: mbseto Jan 1 2016, 12:27 PM
Looks like you decided not to make a layer to go over the inner wheelhouse. How did you decide?
Hope the shoulder mends up well. Doesn't look like it's slowing you down much.
Posted by: DirtyCossack Jan 1 2016, 08:10 PM
I debated it for a while and wondered how sturdy I could get it regarding the mounting of the motor mount console and suspension console, but the decider was that I saw Cary didn't so figured I was good to save some time, worry, and sheet metal.
Posted by: DirtyCossack Jan 1 2016, 09:01 PM
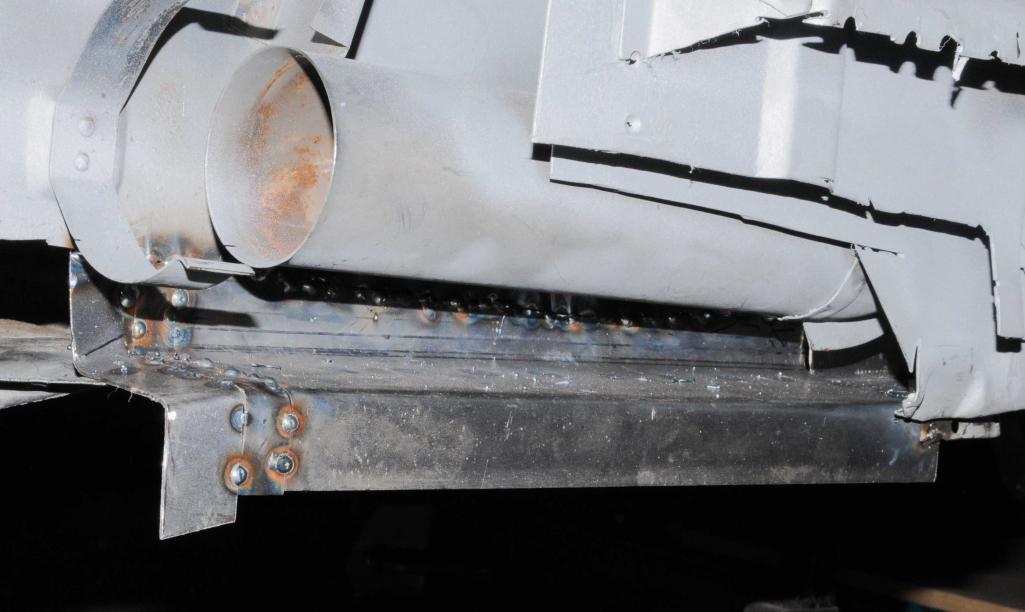
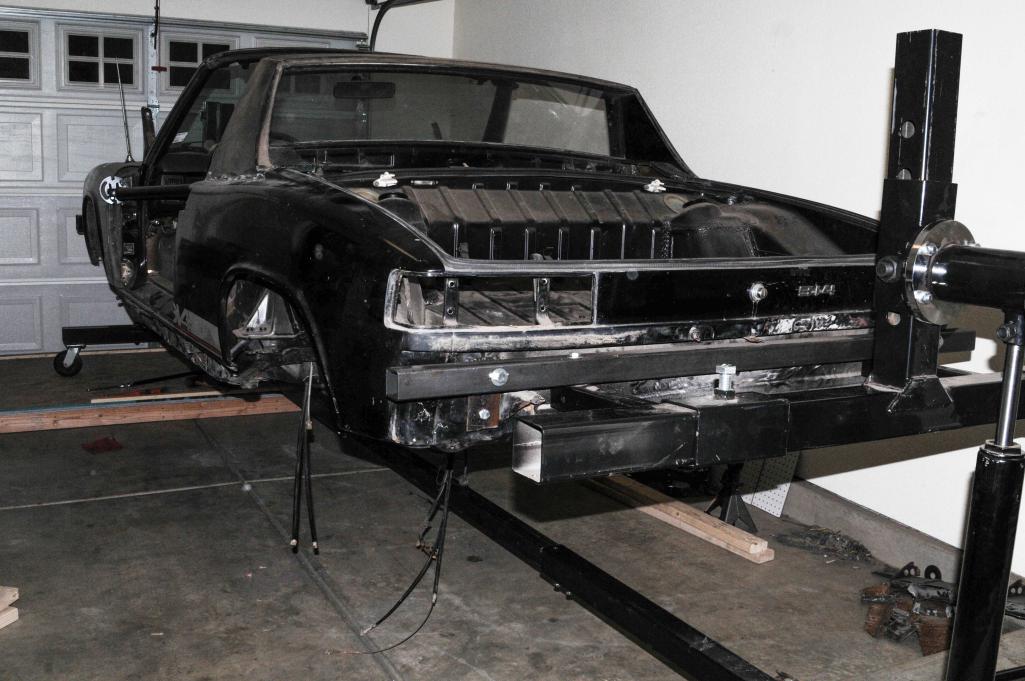
Today was a big day in that I closed up the passenger side long! I tried a different weld-thru primer and had some splatter issues, and some burn through problems... I think I was a little excited.
But the really exciting news is that I got the dude up on the rotisserie and it didn't break in half! I then had to enlist the wife's help and we spent 4 hours trying to get the whole thing balanced. It's almost there so I haven't got to go full loop yet, only about 60 degrees each way, but after one or two more adjustments tomorrow it will be on like Donkey Kong. I can already tell that the rotisserie is going to make this job waaaay easier than my previous experiences.
Attached thumbnail(s)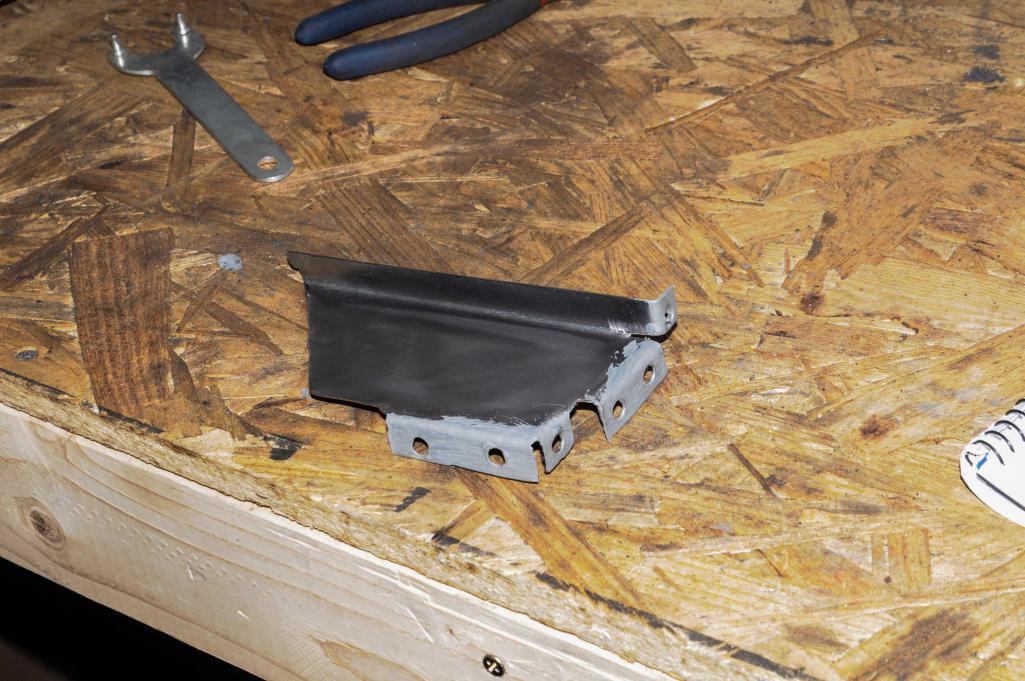
Posted by: DirtyCossack Jan 1 2016, 09:03 PM
Funniest part of the day was that I almost forgot to put the heater tube back in!
Attached thumbnail(s)
Posted by: DirtyCossack Jan 4 2016, 08:11 PM
Non-car update:
No shoulder surgery to keep me out of the garage on the calendar yet! I Saw the specialist about my shoulder today. He doesn't think the chronic instability, weakness, lack of mobility, and dislocations are due to the labral detachments, but rather that the detachments are due to the instability and dislocations. He thinks I have some weird form of dhakjsdhlfkajhdg (some big word I didn't catch) nerve palsy that causes certain muscles and muscle parts to not work and therefore let my shoulder (mainly shoulderblade) go haywire. It could be worsening and partially intermittent, which is why sometimes my arm doesn't swing when I walk etc. (After physical therapy or heavy work it won't swing) I have a bunch of crazy tests coming up, and from the talk I'm extra glad I have full health coverage.
Posted by: r_towle Jan 4 2016, 08:14 PM
Get a second opinion so you don't waste a lot of time and money going down the wrong road for your shoulder.
Rich
Posted by: DirtyCossack Jan 4 2016, 08:26 PM
I'm active duty Army so it won't cost me a thing except my actual arm! hahahaha
But seriously, I'm really glad I'm at a small post and get referred to civilian doctors; everybody's heard the stories about Army doctors.
Posted by: rick 918-S Jan 31 2016, 10:37 PM
Nice to see your working through the process in spite of the arm.
Posted by: DirtyCossack Feb 1 2016, 05:54 PM
This was the month of health chaos. First I missed a weekend of work because I was sick, then a weekend because the wife was sick, and then I missed a Sunday and another weekend with the eye injury. I think I only actually had about 3 days working in the garage. In those days I got the inner rocker panel welded in (as seen above), got the 914 fully up on the rotisserie and stripped some more stuff off of her, cleaned off some surface rust, roughly trimmed the excess on the rocker/floor/long seam (pictured below), and rehabbed and welded the whatever that thing is called back into place (pictured below) using some scraps of trimmings where needed--this is whose grinding tried to take my eye. Here's hoping for a better February.
Attached thumbnail(s)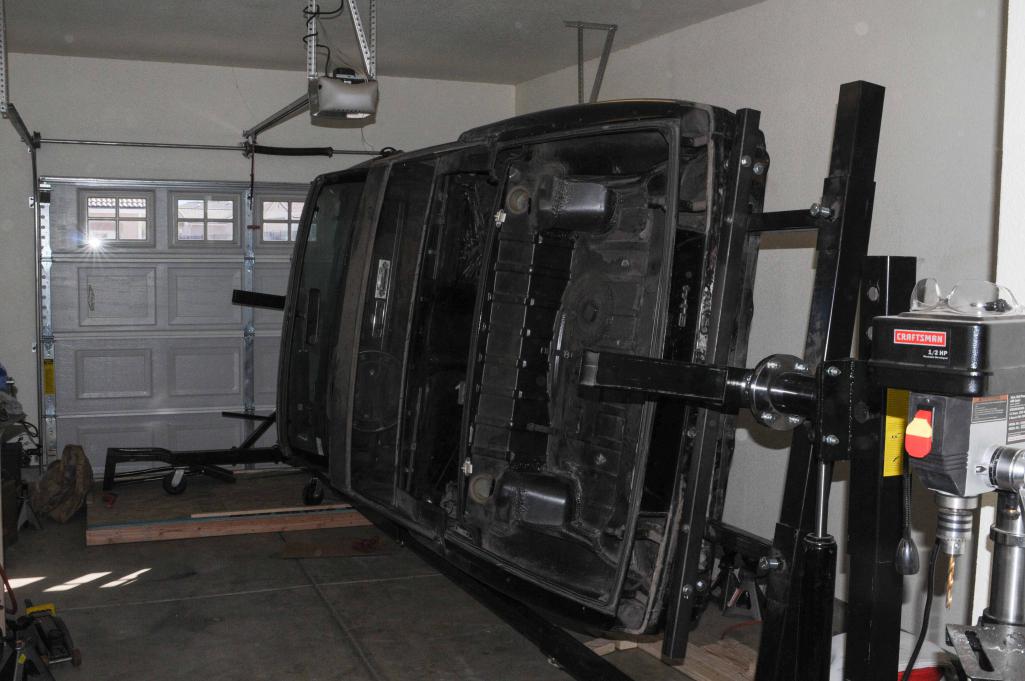

Posted by: DirtyCossack Feb 15 2016, 11:36 AM
It was a long weekend but more in-laws were in town... but I still found some time to hit the workshop. It still wasn't the most productive time because I realized after it was too late to buy more that I was extremely low on welding gas. So I used my little bit of gas to weld the little piece on the long to flush it up, and the little piece on the front engine shelf. Then I got the floor cut out and all sized up to receive the new panel from RD, cleaned up the pictured rust and did some other random cleaning up around the car. This made days 2, 3, and 4 that I actually got to work on the car in 2016 since illness and an eye injury sidelined me... But the best 914 news of the year was finding that the inside of the tunnel was clean and 99% clear of rust!
Funniest moment was that the only thing I screwed up when cutting were both of the old fuel lines, which were rotted and needed replaced anyways.
Attached thumbnail(s)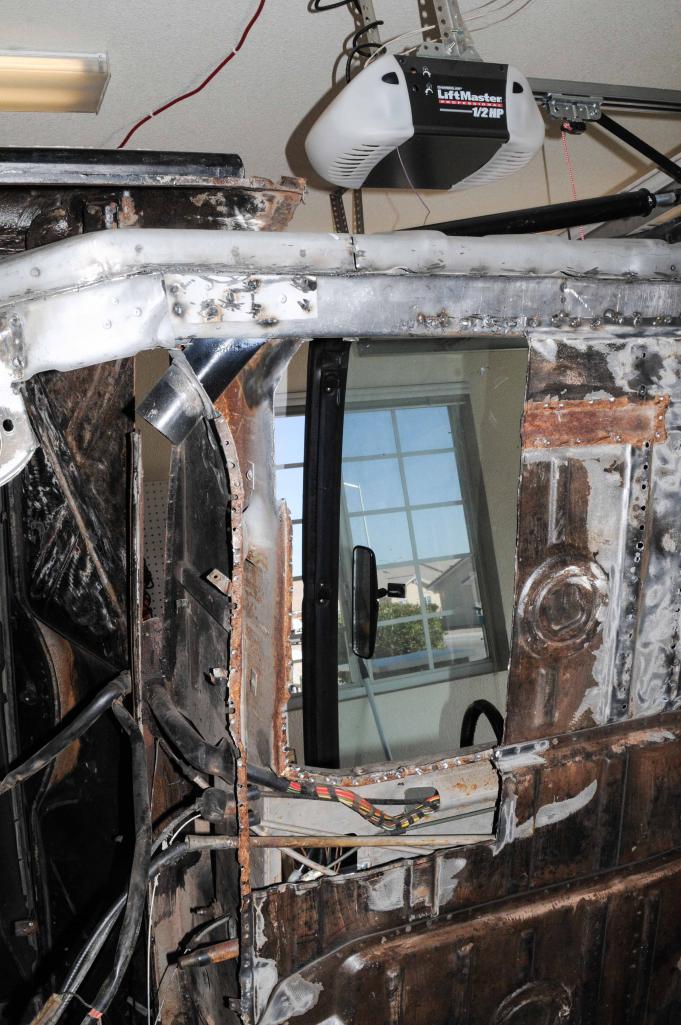

Posted by: DirtyCossack Feb 15 2016, 11:37 AM
Other pics
Attached thumbnail(s)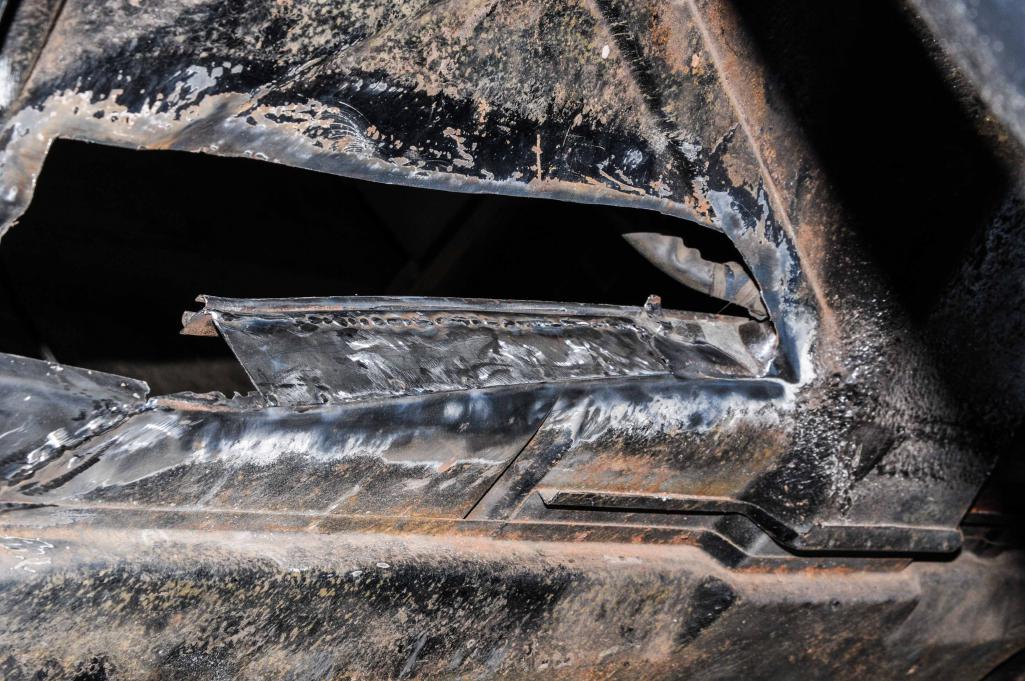
Posted by: DirtyCossack Feb 21 2016, 07:32 PM
We picked up a new class of students this week so it was a short, 1 day weekend. So I spent it getting the floor piece ready to weld in, but then realized it would be easier to fix the lower firewall pieces with the big hole there, so I fabbed and welded in some pieces. Just a note and a question: My plan is to get the pieces welded in and a quick, rough grinds, I'll then go back for finishing/cleaning/prettying during paint prep--one area at a time. Is that a bad idea?
Attached thumbnail(s)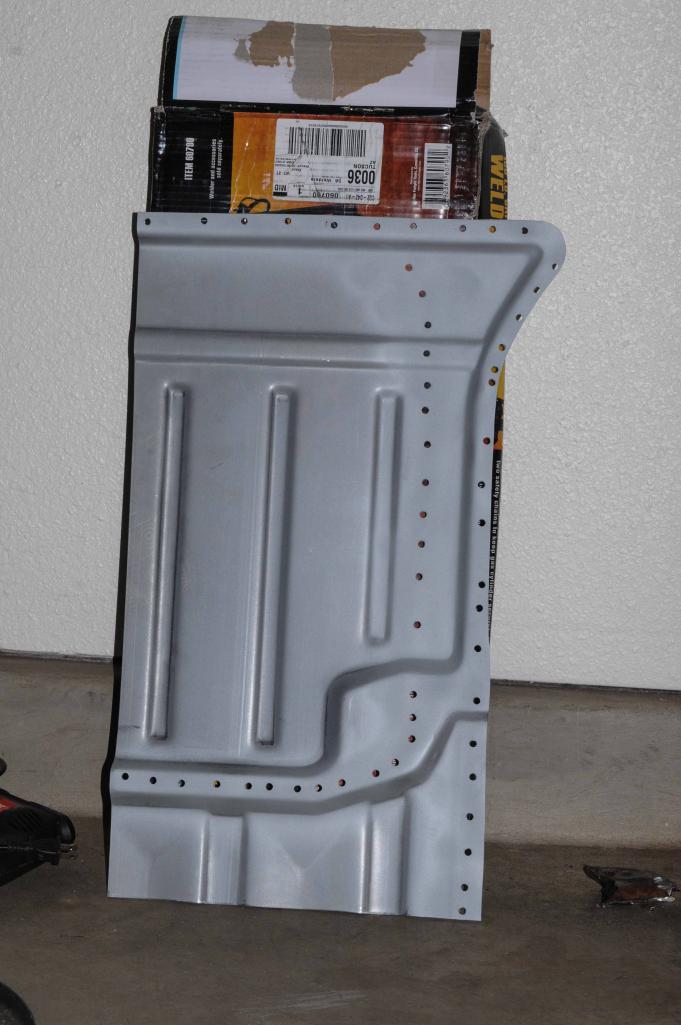
Posted by: DirtyCossack Feb 28 2016, 07:58 PM
This weekend's goal was to tack the floor section in and finish making the firewall. I actually met my goal. Due to the curve at the bottom of the upper firewall, I found it easier to make it in sections rather than one big piece. I decided to make a photo sequence of my grinding technique: I first hit it with the grinder to get the tallest, toughest spots, then I switch to a rough grit flap disc and work my way to smoother discs. There are still some holes to be filled and grinding to be done, but that will come later when it's time for finishing/paint prep.
Attached thumbnail(s)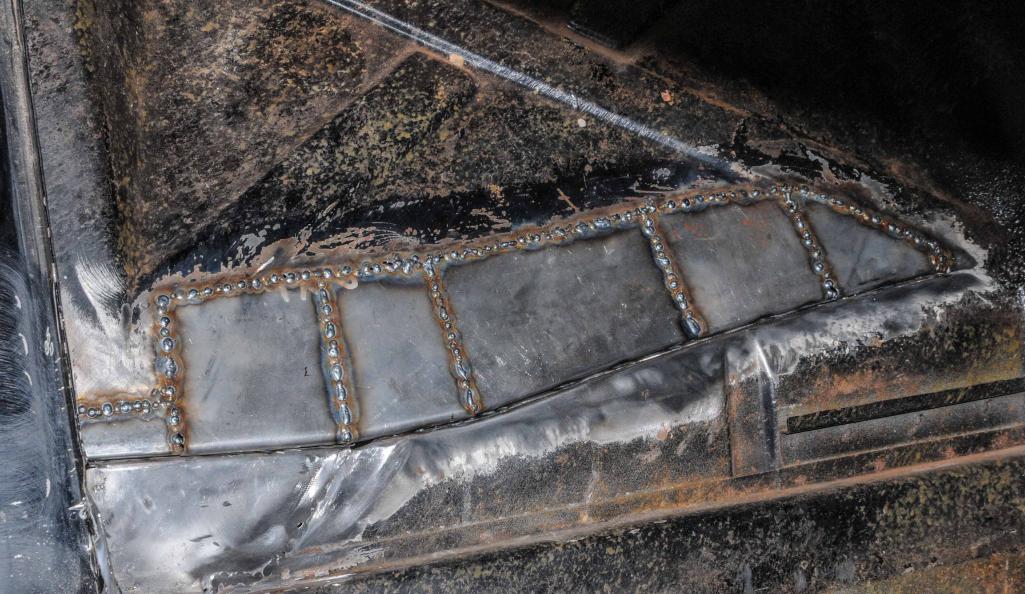
Posted by: DirtyCossack Feb 28 2016, 08:02 PM
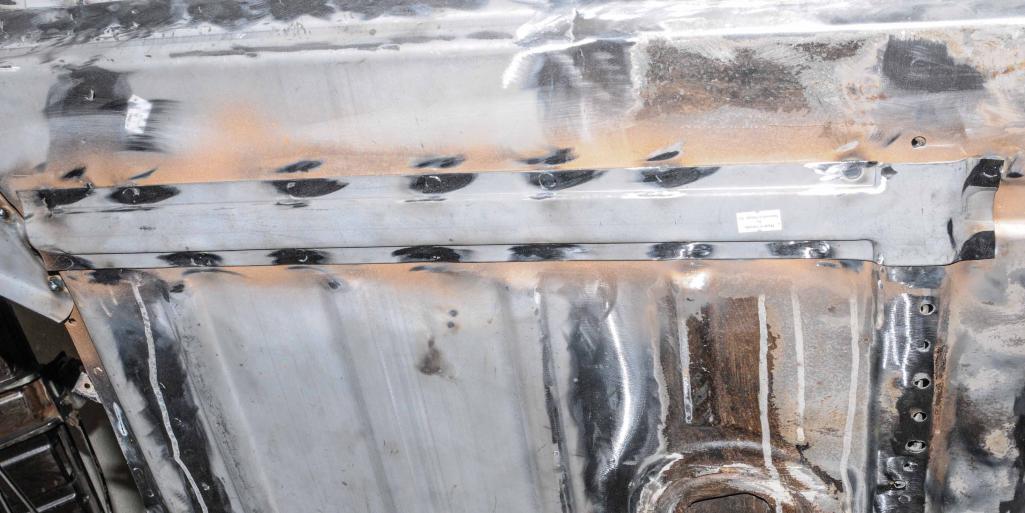
But the big event of the weekend was getting the floor section welded in. I had it fit and ready to go from last weekend, so it was just a matter of lining it all up, getting the edges even, etc. The big task was at the corner where the triangle will go; it stuck up a few mms and almost a cm at the corner. However, starting the plug welds at the other end I found I could hit the next hole's area a couple times with the hammer and it would go down flush all the way down the line. For some reason I threw a couple extra welds at the edge...and wish I didn't..they're extra ugly.
Attached thumbnail(s)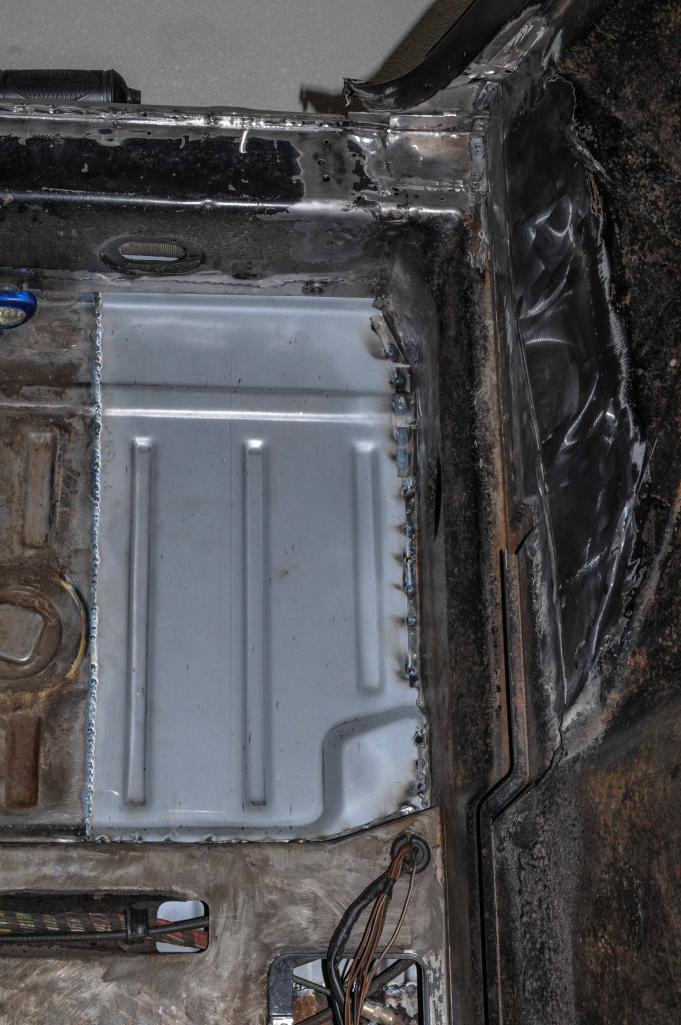
Posted by: DirtyCossack Mar 20 2016, 01:21 PM
The story begins 2 weeks ago... I spent that Saturday grinding the welds that hold the new floor section in, and it went wonderfully. So I decided to weld the seat mounts in, which worked out well too. I then decided the next logical step was to weld in the little reinforcement plate underneath. It was now Sunday and I had been in the garage for about 20 minutes fitting the piece in place when I noticed a completely separate area could use some grinding... 2 seconds into grinding my bad shoulder gave out causing me to drop the grinder which caught my finger on the way down, taking an enormous chunk of it with it. Over an hour later I still couldn't get the bleeding to stop so we went to the ER where they had to cauterize the wound since there was no flesh to stitch.
The real horror was upon arriving home to find that our 11 year old dog had lost the use of her back legs (she spent a night at the vet's the week before and had been having all sorts of issues) it seemed that she had another stroke... She died peacefully a few hours later and only a few hours after that I was taking my students to their field training exercises.
Cutting to the chase, spending a week in the field with my wound was a bad idea and I developed a rather wild infection deep in the finger (but luckily not the bone). So here I sit with a well healing but oddly swollen finger and antibiotics that give me explosive diarrhea watching March Madness. I may not even be allowed in the garage next weekend, which would mean 3 weekends in a row. After the eye injury and now this, added to the fact that I'm taking the entire month of April as vacation to visit family; this build is waaay off schedule, but better late than never right? Bonus picture of the dog.
Attached thumbnail(s)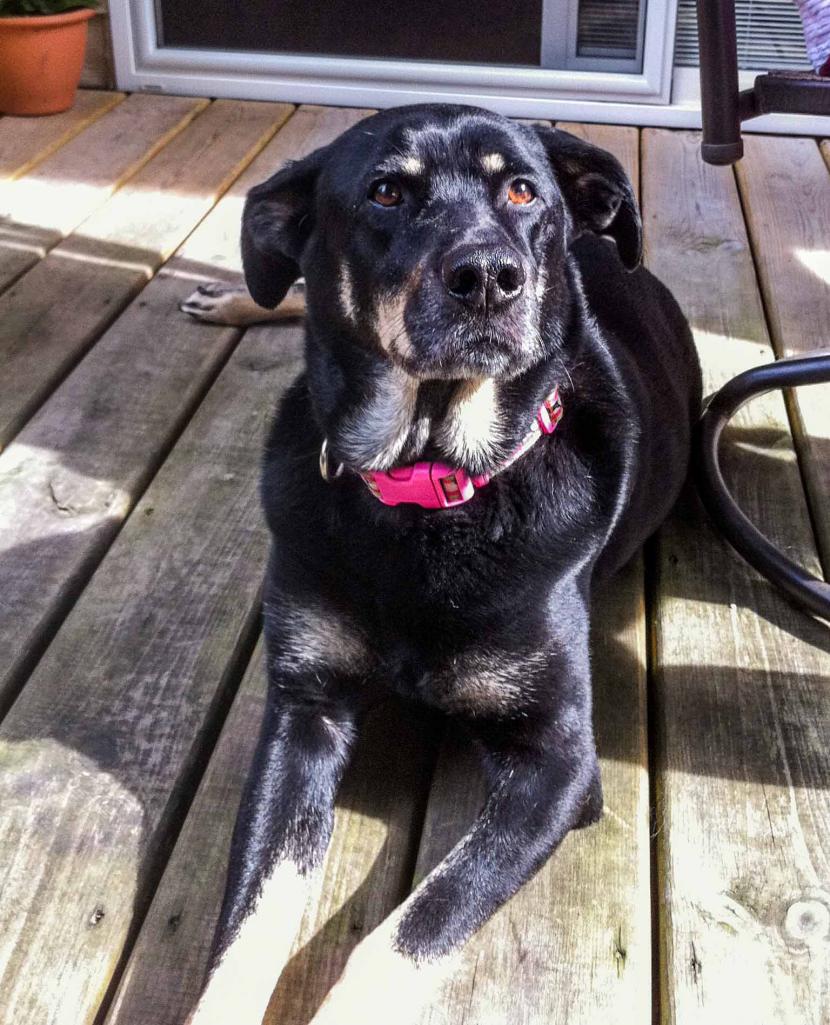
Posted by: Andyrew Mar 20 2016, 04:35 PM
Really sorry to hear about your dog! Looks like a really loyal part of the family.
Hope your infection heals soon!
Best wishes! (Your metal progress thus far has been fantastic!)
Posted by: trojanhorsepower Mar 20 2016, 05:47 PM
Sorry about the loss of your dog. I have one that has been on her last leg for over a year now. Every time I wake her up in the morning, am surprised when she gets up!
Keep plugging away.
Posted by: DirtyCossack May 8 2016, 08:21 PM
So it's been a long time... After the finger injury's infection caused a bout of pneumonia, and then the going on vacation for the entire month of April, it was really nice being home in the garage the last 2 weekends.
Last weekend, APR 30-MAY 1 was only a one day in the garage weekend. That Saturday was spent with the newest addition to our family: a little girl we found at the dog pound named Muttley. She's an interesting mix: German shepherd and greyhound... Then Sunday I finally got the little floor support piece welded in, a job I started in early March which almost claimed my finger. Then I welded in the little jackstand triangle thing. All of this was pretty straightforward work so I feel like I had to have done something else too...
Attached thumbnail(s)
Posted by: DirtyCossack May 8 2016, 08:41 PM
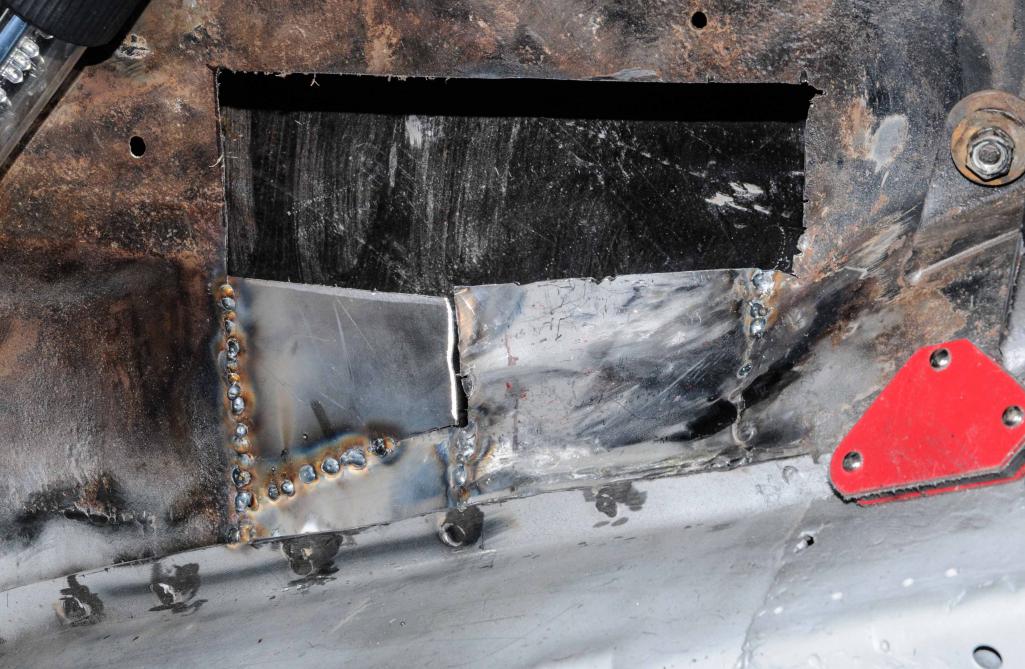
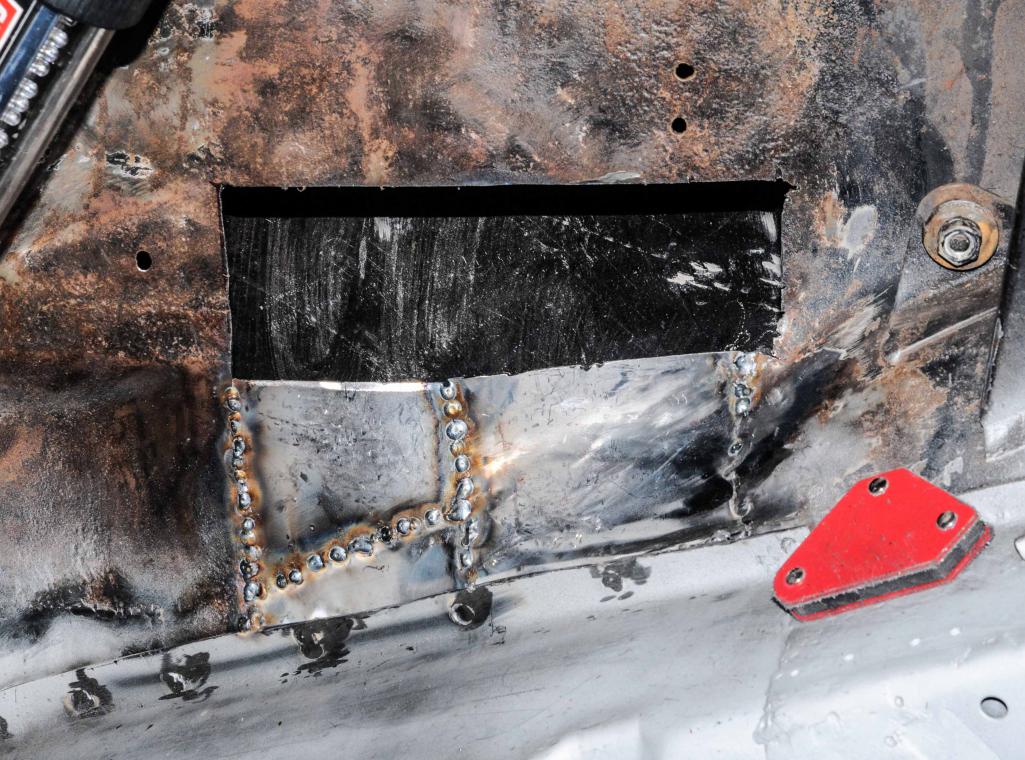
This weekend was spent on one major job, a job I thought was going to be minor. I had about a 4" x 4" hole, but when I went to weld in the piece that was part of my RD replacement panel I found that its bends and shapes didn't really fit and the surrounding metal was unweldable and I had to cut a lot more out. I salvaged some of the piece, but the rest needed to be fabbed. I'm extremely proud of the work and the technique and wish the photos could better show the compound curves accomplished. Here's how I did it: I would weld one edge of a small piece, then bang another edge to meet its mate, weld it, then bang the next, etc, one piece and one edge at a time. I used no hammers, but only dollies for the banging since they were easier to wield in the small spaces.
It was kinda funny that on Saturday I ran out of welding wire, and then today (Sunday) I ran out of gas, so I did some work organizing the garage, removing the heat shield and targa pad, and other little jobs that would eventually need done anyways... It's just funny that what I thought would be an easy, 2 hour job turned out to be a crazy, 2 day job. It still needs some finishing, but that will come later when it's time for primer prep.
Attached thumbnail(s)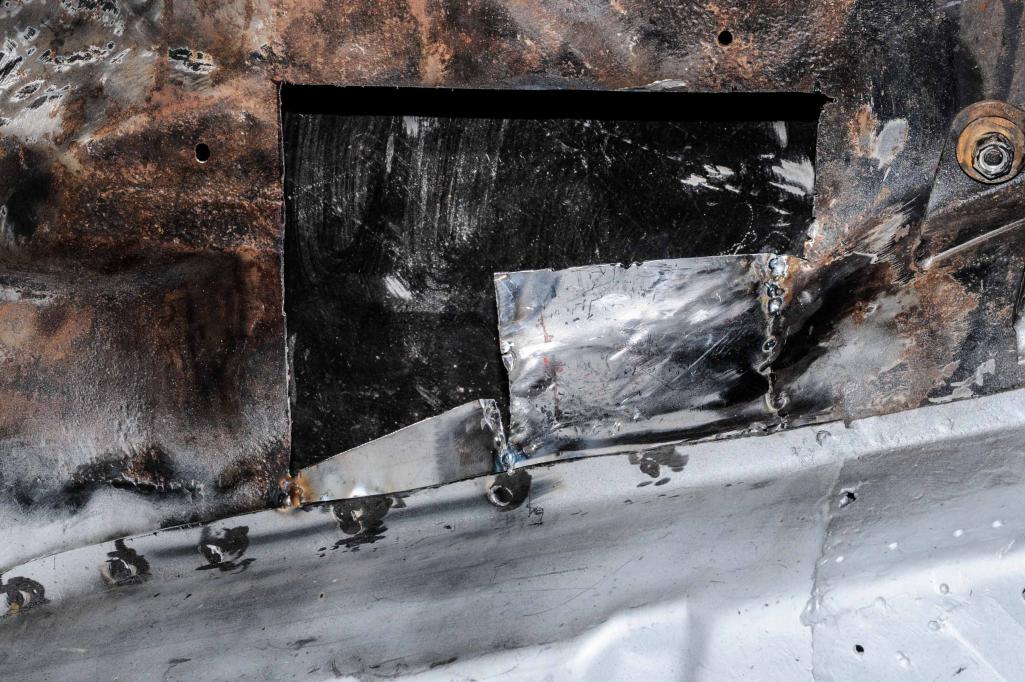
Posted by: jkb944t May 9 2016, 10:26 AM
Looks like you are making some good progress despite some unfortunate setbacks!
Jeff B
Posted by: mbseto May 9 2016, 11:25 AM
Just catching up on your thread, quite a month... Sorry about your loss... Good to see you can still grip a torch!
Posted by: DirtyCossack May 9 2016, 05:10 PM
Thanks! My only handicap (from the finger) I've noticed is that I can't really grip things with my forefinger, such as hand tightening nuts, so I have to use my middle finger...
But a serious question: walking through the garage today I noticed that the bottom, passenger side corner of the windshield trim has popped off. I have no idea when it happened, but could this be a bad sign of something? I checked all of my gaps and they meet the measurements I made both before and after the long surgery. What could have caused this? Temperature/pressure change? All of my recent bangings on the car?
Posted by: DirtyCossack May 15 2016, 09:05 AM
The "build off challenge" has turned into a "life challenge," and this weekend will be remembered as the one spent sitting bolt upright but crooked, and doped up. If you recall my shoulder issue, the newest doctor's theory is that the minor neck issue I'd complained about for 2 years was actually pinching a nerve that caused certain muscles to not function properly which resulted in the shoulder instability/dislocations and subsequent labral tears and detachments. So in the Army's style, they began a treatment program on the neck (physical therapy, chiropractor, etc) without ever imaging the neck. Fast forward to Friday; the damn neck locked up and is stuck in a weird position with shooting pains down and across my chest, back, and shoulders, but mostly the left/good shoulder and arm with a weakness in the arm that won't let met even hold a coffee mug... On Friday they just sent me home with drugs and told me to wait until Monday, so hopefully this will finally result in an MRI and a referral to a specialist.
It's a terrible thought, but I'm starting to make contingency plans for how to quickly and easily get the car ready for travel home to KY in the event of a medical retirement/discharge... I think it's inevitable at this point, the only questions are when and what medical procedures will come first.
I'm not giving up on the 914 or the challenge, but I know there is no chance this thing will be done by 9/14/16... In the spirit of the challenge's fun, I'm hoping there's an extension contest for those of us who don't finish.. haha
Posted by: Darren C May 15 2016, 10:21 AM
Shit Joe, I'm real sorry to hear your news. I hope the specialist can get to the bottom of the issue and sort it out.
I wish you a speedy recovery. If its any consolation I am really enjoying your build and have marked you high in the last two votes. What's important now is your health, don't worry about deadlines on the car. I'm a Gulf War veteran myself who was invalided out of the Uk Armed Forces following injuries sustained during Operation Desert Storm many years ago. I know first hand how once your on that Military injury runaway train your career and life is turned upside down. I imagine its the same stateside as it is here in UK. Lets hope they can fix you up and not worry about discharge.
Best regards
Darren
Posted by: DirtyCossack May 15 2016, 10:37 AM
Thank you, I'm confident I'll be fine. This whole thing has just been annoying.
Posted by: Andyrew May 15 2016, 11:31 AM
Really sorry to hear about your health issues! I hope you get better soon!!
Posted by: DirtyCossack May 21 2016, 07:31 PM
Apparently I didn't "add" the post I wrote last week, but you guys were my heroes when I was a kid. I was 11 during Desert Storm and used to run home from school to watch the coverage on CNN. I had "support our troops" t-shirts and hats, had my dad take me to a homecoming parade and all that jazz. Even my Cincinnati Reds who won the World Series only months before took a backseat to my obsession with Gulf War vets. Given this and that my parents were both Vietnam vets, it's really amazing I waited until I was 31 to join.
Posted by: DirtyCossack May 21 2016, 07:44 PM
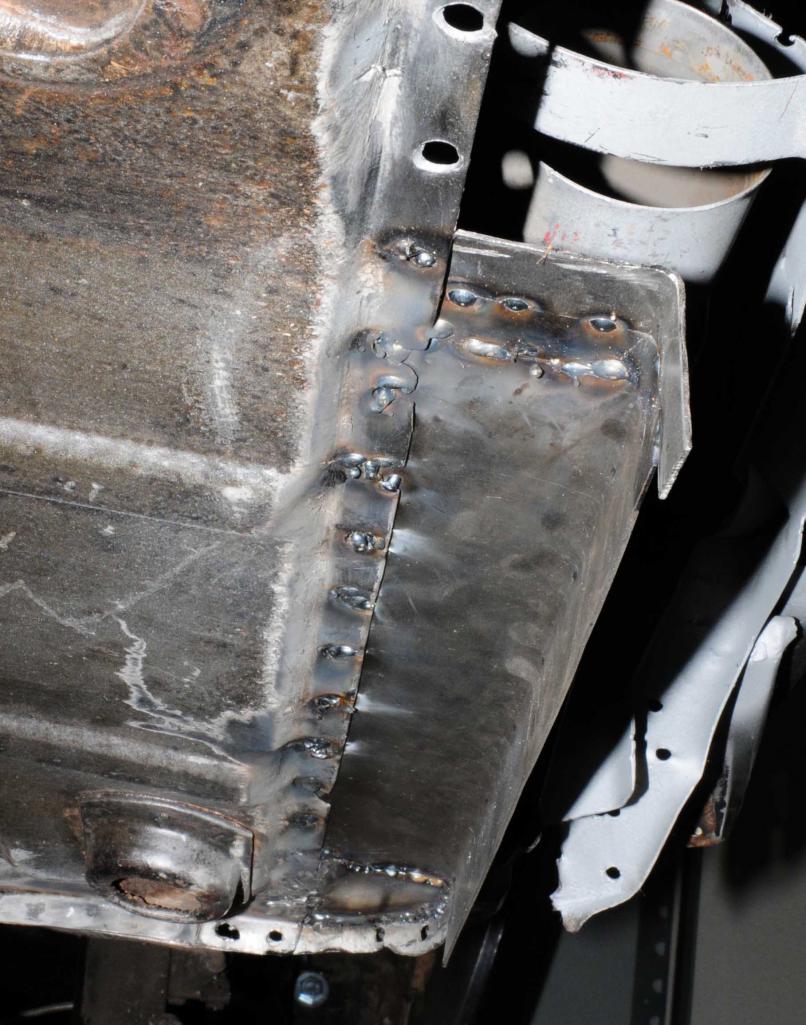
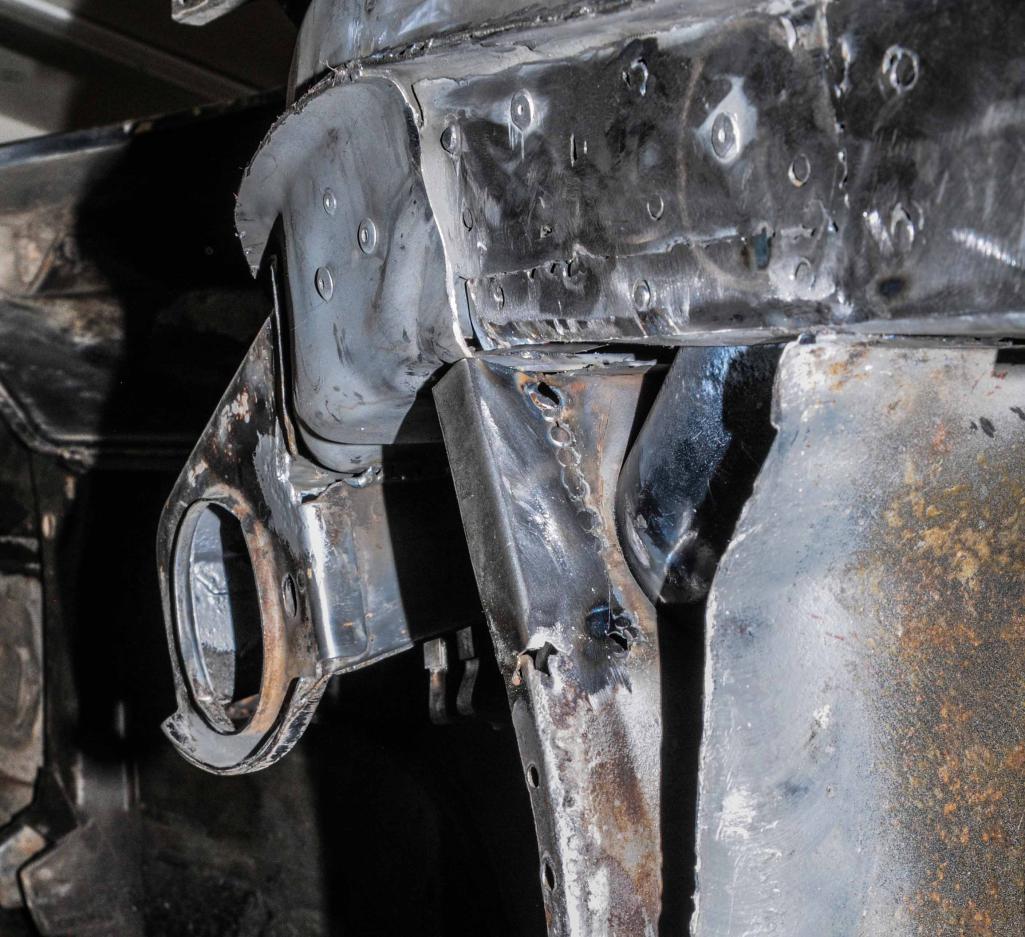
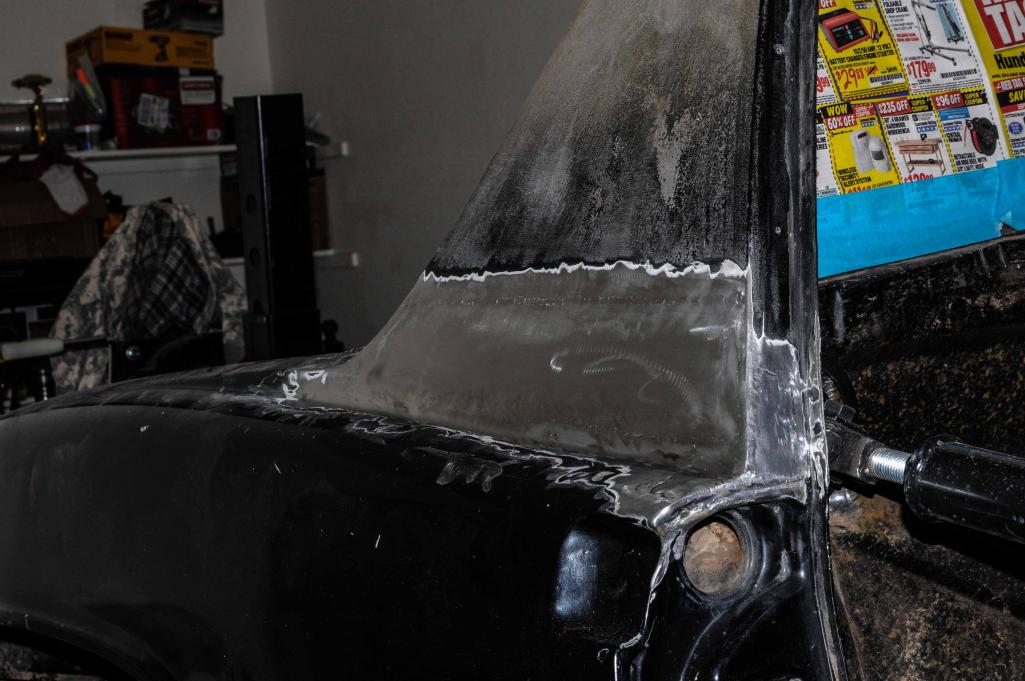
Still fighting Army doctors for an MRI and referral to a spine specialist, but I managed a bunch of time in the garage today. I had a couple miracles in that I got out of work early Thursday and Friday so I played around pulling the foam out of the right rear fender corner and some cleaning up. Today I dissected my right sail panel removing rusted metal, foam, and seam sealer (total pain in the ass-the factory was obsessed with seeing how dense they could get this stuff). After I took the pics I cut out some more metal before hitting the area with the wire wheel, sandblaster (which made my day of cleaning up pointless), and treated the whole area with rust converter stuff afterwards. And since I had some time left on the clock I decided to weld up the holes on the heat shield stands in preparation for the day when I drill holes and make it removable.I also realized that I am really dreading/avoiding that daunting task of welding the suspension console on...
Attached thumbnail(s)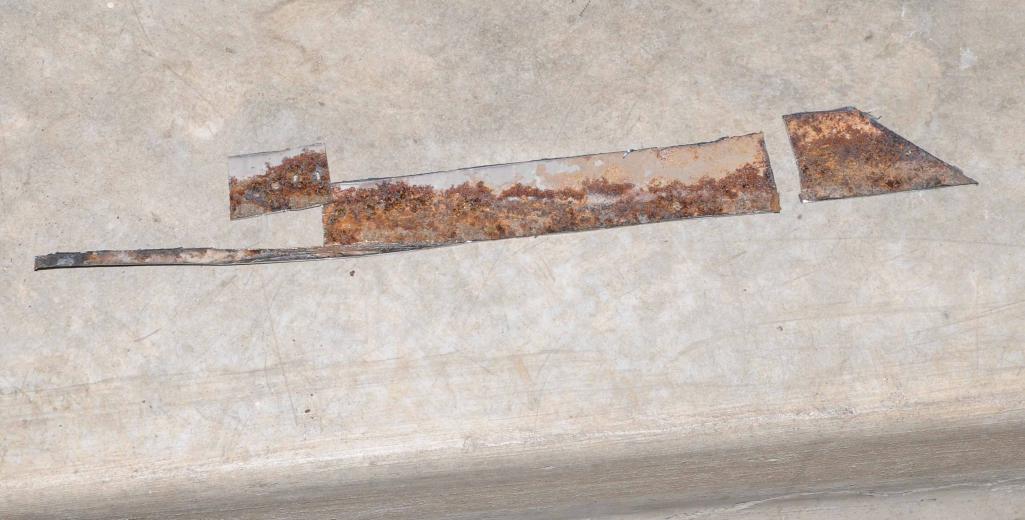
Posted by: 2mAn May 22 2016, 12:08 AM
man, that thing is collecting a lot of rust.... and yet it doesnt seem like much for a 914 haha keep it up
Posted by: DirtyCossack May 22 2016, 08:52 PM
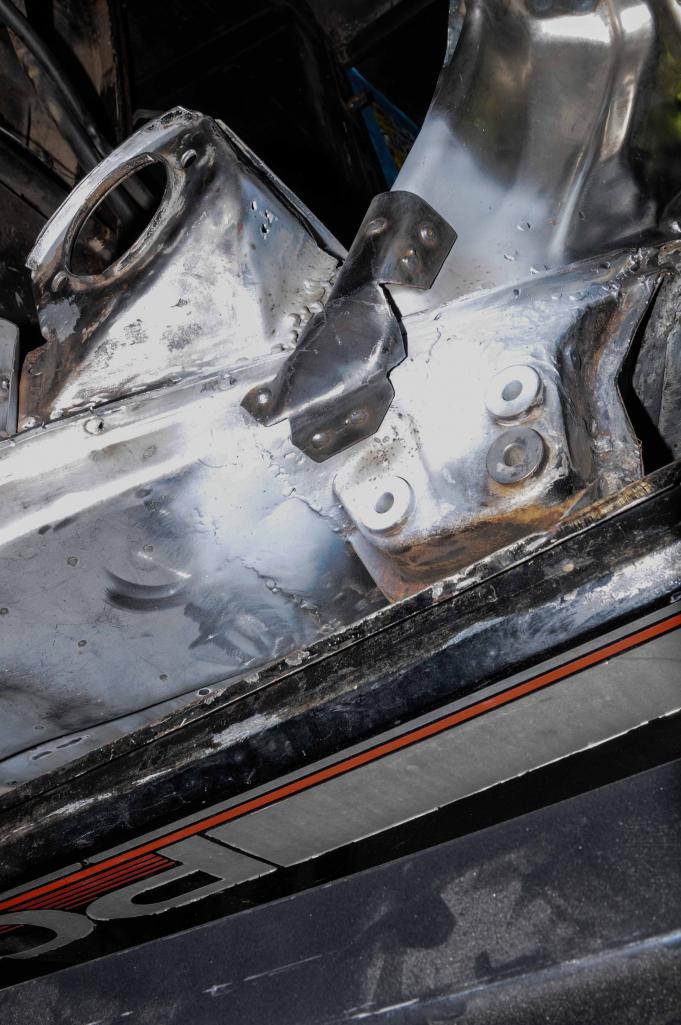
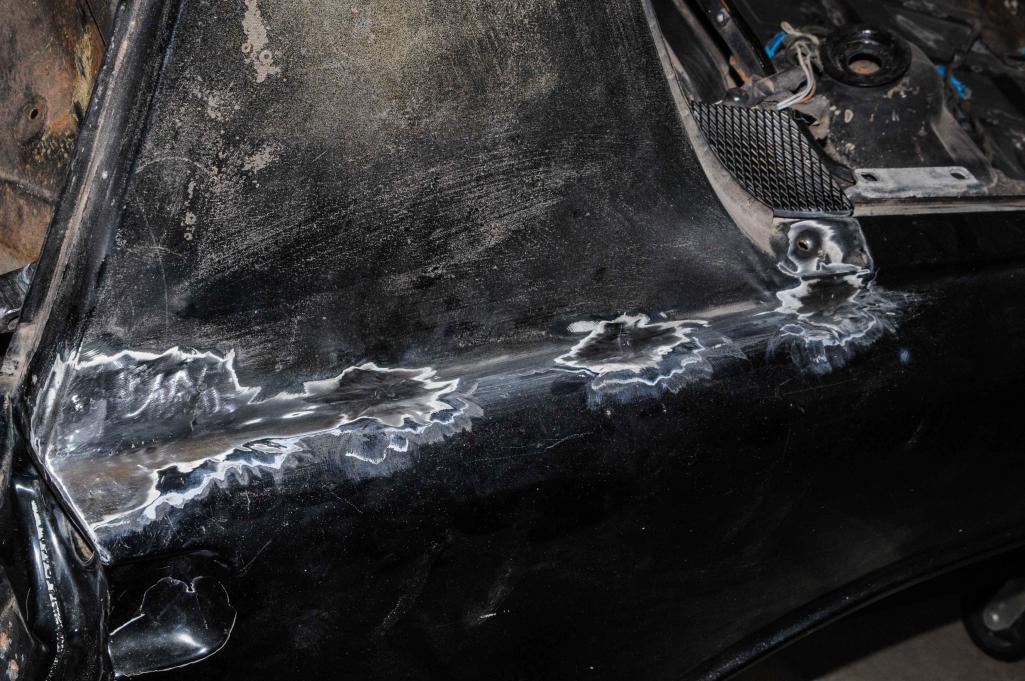
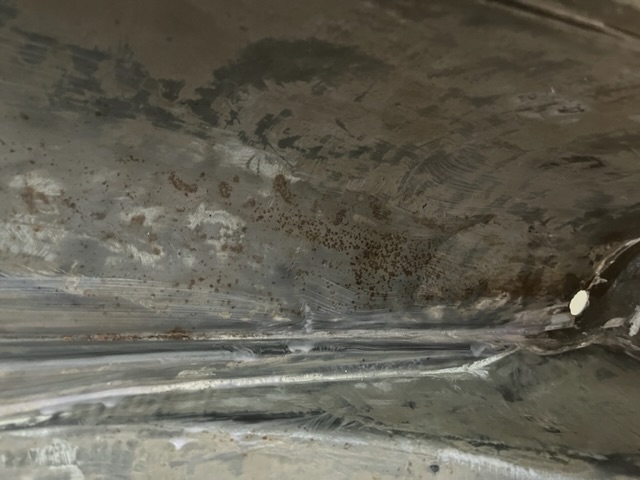
What you see is 6 hours of work. This was probably the most difficult fabrication I've done so far, not just because of the shapes/curves, but because of the personal pressure knowing that it is a seen and on a blatantly obvious part of the car. These 3 little patches were a pain in the ass, the first was tough to get the curve right, at the correct angle with the line of the car, etc. The 2nd one sucked because it is such a subtle curve, but mostly because welding next to that edge of the door jamb was absurd. The 3rd one had an odd little angled part, but once again was on that jamb edge. I had to weld these really slowly, welding spots on opposite corners and then letting it completely cool to prevent warpage. As you can see there is a definite low spot on top of the fender, but the worst (most annoying) thing is that I kept blowing out/overgrinding that damn edge. I should have taken more pics, but that edge is comprised completely of weld and then shaped with the grinder; there's still another spot that needs some metal, and unfortunately this entire area will need a little thicker skim of filler than I had hoped, and I'm half thinking about some fiberglass on the underside as reinforcement (overgrinding that edge has me a little paranoid that I've overgrinded elsewhere). I keep looking at it thinking I should have done better, but really, I should be satisfied with the work.
Attached thumbnail(s)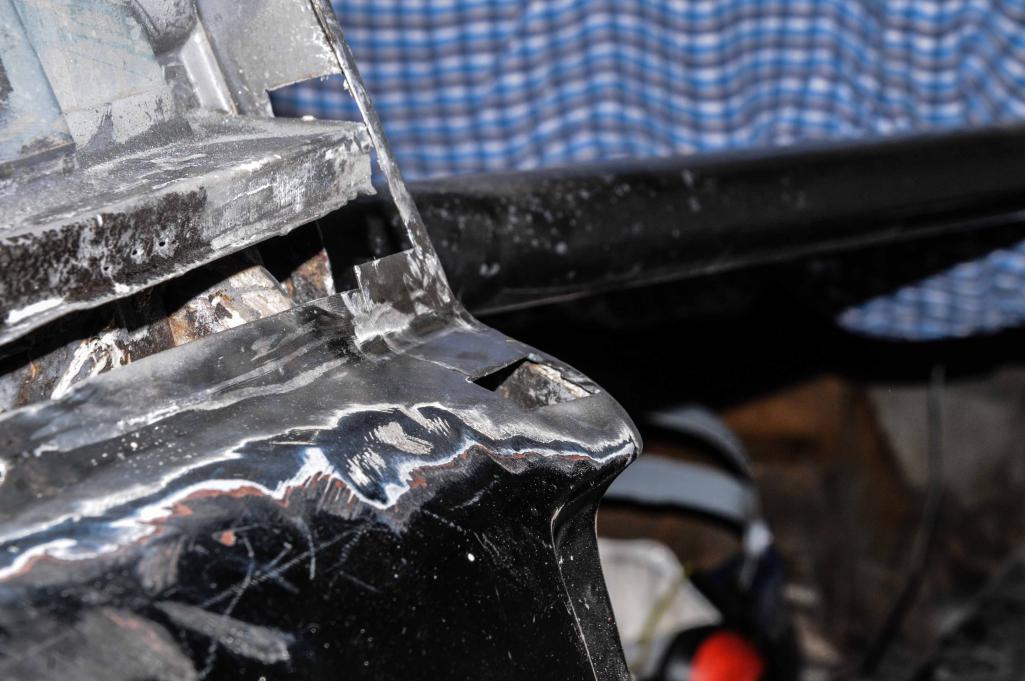
Posted by: DirtyCossack May 22 2016, 08:57 PM
You can also see in the pics (not really this one) that this fender has had a respray. I've found some evidence of a wreck on the right front corner, but not the rear outside of a ding or two, I guess they just sprayed this whole side, because the driver side is still original paint...
But here's another look at that edge.
Attached thumbnail(s)
Posted by: Garland May 22 2016, 09:05 PM
Nice work, attention to detail will pay off.
Posted by: DirtyCossack May 29 2016, 09:41 PM
Post for Friday 27 May:
Shop soundtrack: my Iron Maiden Pandora station
The day's plan was to get a bunch done in the garage on my day off, but as I was taking the garbage to the street I happened to notice an odd, white spot on my DD Honda Fit's tire. Of course it was a nail. I had been planning on replacing the tires towards the end of summer anyways, hoping to milk a thousand more miles out of them; the previous owner didn't drive the car much so they had minor dry rot along with wear. The funny part is that twice over the last 2 weeks the tire went a little low but on inspection I saw nothing (could it really be possible that the nail was down both times I inspected?). Anyways, I spent quite a bit of the day dealing with this. NOTE: If you buy a Honda Fit for its incredible affordability and such, get the basic model and not the "sport," the sport's 16" wheels have a weird 185 55 tire that cost me $100+ more to replace and the ride is a little louder and worse.
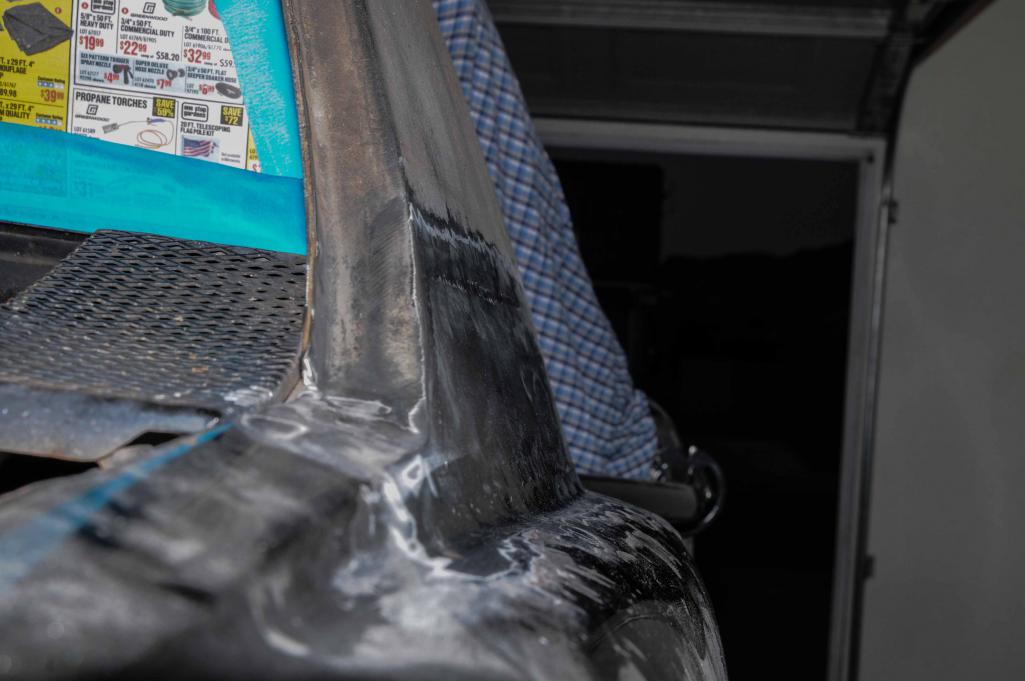
But the time I did spend in the shop was spent welding up the sail panel. The piece was a little tricky in that it has a minor curvature that I think I managed to get right, but I was worried about warpage on such a broad, flattish sheet so I welded really slowly. I'm not sure if it was a heat warp or what, but the top welded edge did manage to sink and there's a bit of a low spot I think filler will fix without violating my 1/8ths inch rule (filler will be no thicker than 1/8th inch). I tried to show the low spot in the pics, but it's hard to see; though you can see the low spot on the fender top. I guess it's also worth mentioning that I filled in the little trim holes and reworked (welded a fat line and grinded) that jamb edge too. Overall it was a good day in the garage.
Attached thumbnail(s)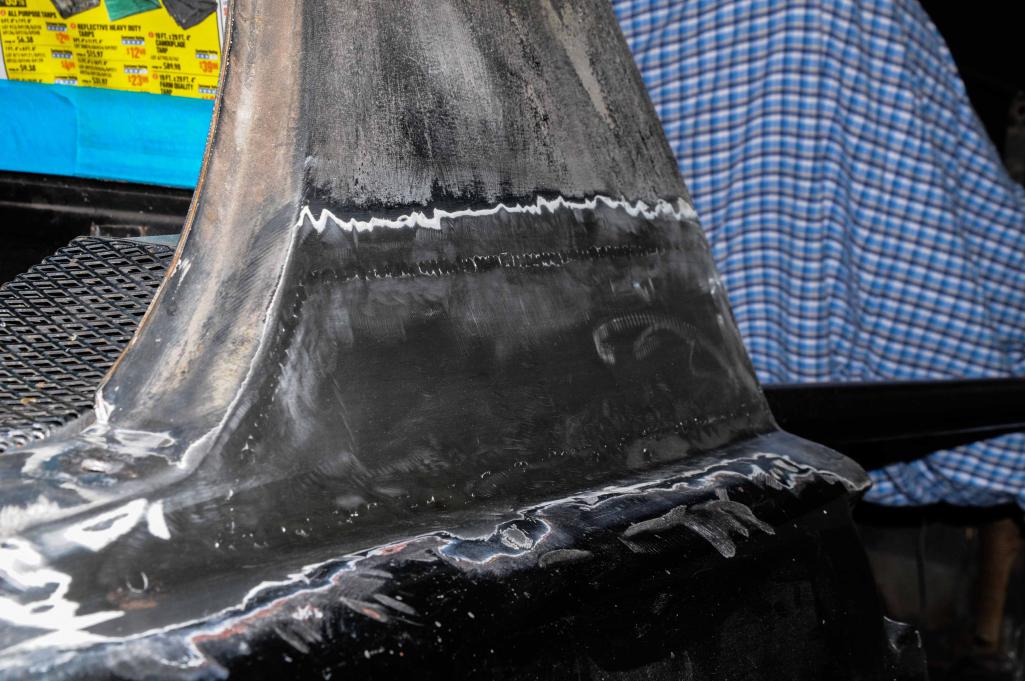
Posted by: DirtyCossack May 29 2016, 09:59 PM
Post for Saturday 28 May:
Shop soundtrack: my Willie Nelson Pandora station:
Another shorter day in the shop... My plastic lawn chair kinda broke so I spent some time trying to fix it with fiberglass filler stuff, didn't really work. But it did give me the idea to use that to reinforce and back the little patches at the top of the door jamb now instead of later. It kinda sucked getting up in there, but the fact that it squeezed out a few pinholes was a good sign.
I then moved on to the door sill in an obvious attempt to avoid that suspension console. The door sill fit really well and went on easily, but as I went to install the little triangles and grind the welds I noticed that I screwed up and the thing wasn't straight. It was kinda weird drilling out my own welds... but I managed to get them broken with the help of a little hacksaw underneath. The sill then went on straight and easy without damage and the triangles fit perfectly. NOTE: IF you're asking my opinion, or if I were to weld another sill on, I would either figure a way to do it with the triangles pre-welded, or at least use them as a guide (as I did the 2nd time) to keep the gap straight and what not. After the error I was paranoid, so I checked and double checked this thing at least 50 times. Overall it was a good day in the garage, and great that I got away with an error without permanent damage/costing $$$.
Attached thumbnail(s)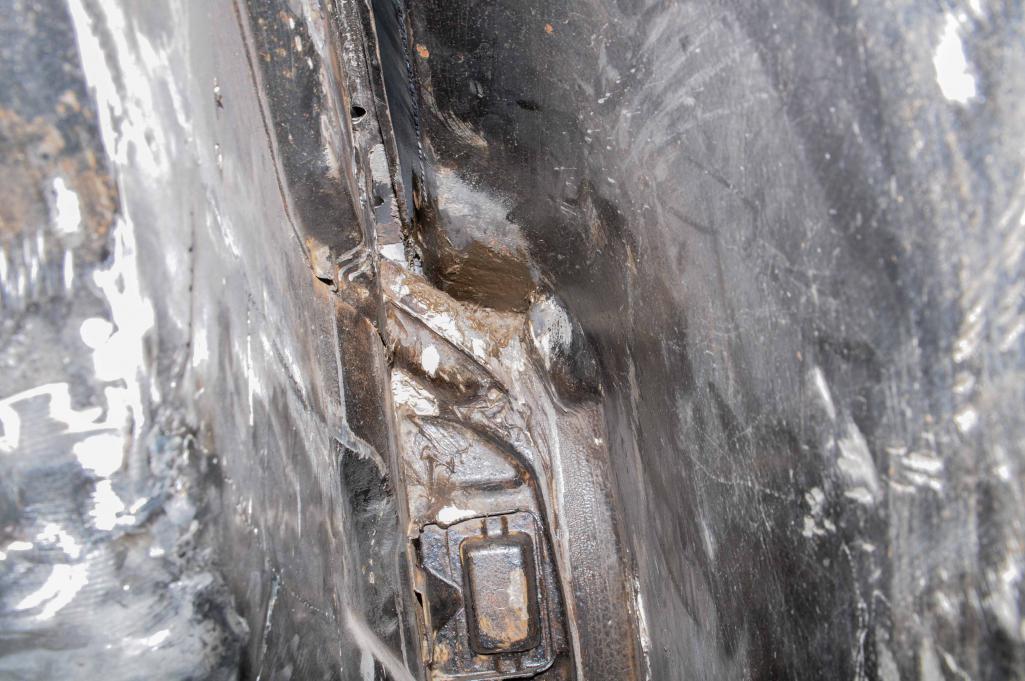
Posted by: DirtyCossack May 29 2016, 10:49 PM
Post for Sunday 29 May:
Shop soundtrack: my Little Richard Pandora station
JUDGEMENT DAY HATH COME!!! ie I finally had the nerve (read no choice on further procrastination) to weld in the suspension console, but only because I finished the other jobs tasks early.
A full day in the garage. I started out welding the triangles under the sill, went on easily. I then decided to play with the door jamb and determine whether it was worth the RD replacement piece for just the bottom 4 inches... So as a test (after wirewheel, sandblasting, ospho, etc) I played around with the hammers and dollies and got the thing well within personal tolerance so I rolled with it. Yeah, there is some metal missing at the bottom edge, but I think I can make this work and still stay on the good side of the 1/8ths inch rule (no filler thicker than an 1/8th inch-but will that still count if I have filler on the underside too?). After more fiddling and welding I decided to waste some time applying seam sealer on the underside, on the triangles' welds, and up in the fender, but when I looked at the clock it was waaay too early to quit, so I turned to the suspension console.
I figured it would take hours to figure out its exact position, adjustments, mounting, and what not and I wouldn't have to deal with the stress of welding on a piece with such exacting tolerances and financial implications. However, the next thing I know,
I have the thing in the perfect position, clamps on and only welding to be done. So I measured a few hundred more times, cracked open another beer, and realized that I had to weld...
As for measuring, I used a triple attack: measuring tape, string, and sticks. As for welding, I was paranoid, so I'd make 2 welds on the opposite ends of each other to prevent heat issues, then measure the thing about 60 times while waiting for it to cool completely. This technique resulted in far more Chuck Berry air guitar singalongs, beer, and cigarettes than planned, but in the end I ended up with a suspension console far within my personal tolerance. From ear to ear I have the perfect 33.5 inches, and from the firewall hole thing to the console ear I'm 1/16th of an inch off, sitting at 28 5/16" instead of the prescribed 28 1/4"! I even added a measurement in which I checked the console's angle and it seemed on the money.
I was completely paranoid of this thing, and whether it was luck or miracle, it really wasn't that bad with rock n roll and paranoid, OCD procedures. This was an extremely fulfilling day, and I feel even better knowing that I can throw suspension, wheels, whatnot on this little car rather quickly and move it if I have to. Maybe I was right in putting off the suspension console so long, or maybe I'm ridiculous for it, who knows? Overall it was a wonderful day in the garage.
Attached thumbnail(s)
Posted by: 914forme May 30 2016, 03:45 AM
Wow looking good
Posted by: cary May 30 2016, 06:41 AM
Looks very nice. Always a great since of accomplishment.
Now comes the hard part. Tying the inside to the outside.
This might help.
http://www.performanceforum.com/wesvann/914a/rust-diary/rd-9-1-08.html
We're going to actually cowboy up this time. Plan is to use a forge to soften the 14 gauge so it's easier to form. Like they do when the do a tire change on a horse.
Super In Law says there's one down in the chicken house. Chicken house : that will be another entire OT thread some day. 600 sq. ft building that Mike and Frank from American Pickers would enjoy going thru.
Posted by: trojanhorsepower May 30 2016, 08:04 AM
Looks good!
Posted by: DirtyCossack May 30 2016, 09:44 AM
Looks very nice. Always a great since of accomplishment.
Now comes the hard part. Tying the inside to the outside.
This might help.
http://www.performanceforum.com/wesvann/914a/rust-diary/rd-9-1-08.html
We're going to actually cowboy up this time. Plan is to use a forge to soften the 14 gauge so it's easier to form. Like they do when the do a tire change on a horse.
Super In Law says there's one down in the chicken house. Chicken house : that will be another entire OT thread some day. 600 sq. ft building that Mike and Frank from American Pickers would enjoy going thru.
Yeah I'm dreading this too...hahaha I was really hoping that if I put it off this long somebody would have produced some...
Posted by: jmitro May 30 2016, 04:00 PM
nice job especially with fabricating patches from scratch. I'm where you are in terms of the progress of my project......still lots of rusty sheetmetal to cut out and replace.
Posted by: DirtyCossack May 30 2016, 07:35 PM
nice job especially with fabricating patches from scratch. I'm where you are in terms of the progress of my project......still lots of rusty sheetmetal to cut out and replace.
Thank you everyone for the kind words.
You know it's weird, but I realized today while at the bar for my wife's birthday dinner, that I think I am over the hill when it comes to welding and rust repair. I feel I have finished far more than I still have left to do. It's a really weird feeling thinking that the welder will go to the sidelines and other tools will hit the field in a starting role.
Posted by: Darren C May 30 2016, 11:23 PM
Looking good Joe, rest that shoulder up, lift your beer glass with your other arm!
Posted by: DirtyCossack Jun 12 2016, 09:19 PM
Shop soundtrack: Euro 2016 matches and then Harry Belafonte and other stuff.
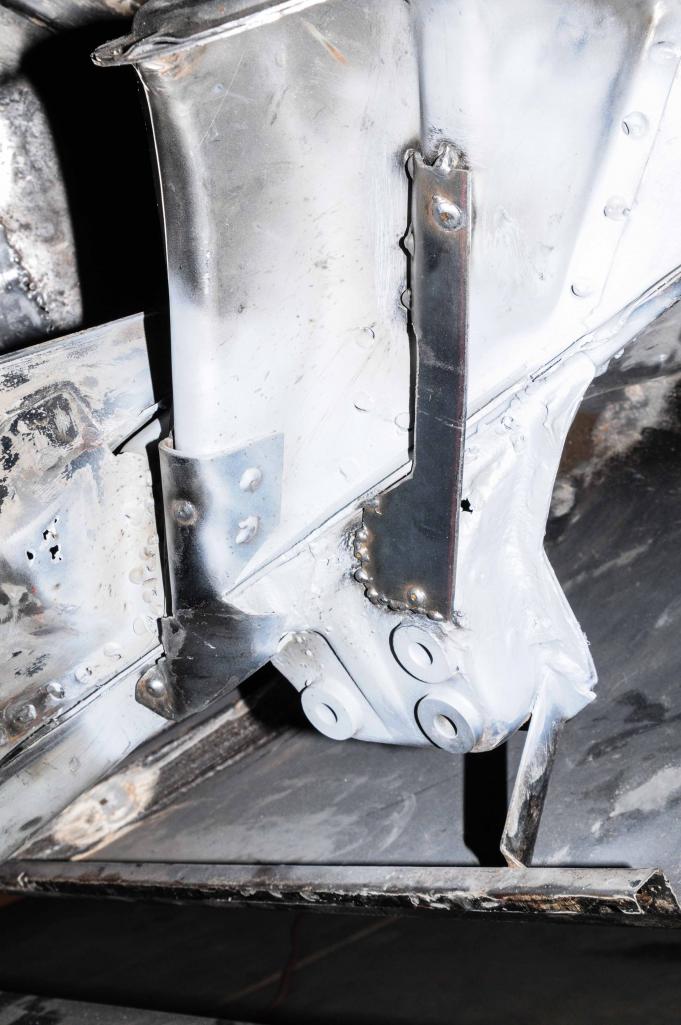
Took last weekend off because it was over 100 degrees in my garage and I was avoiding the task of making the suspension ties. But this weekend I got right down to it. I was really dreading this and was super worried about trying to get the little one done in one piece with 12 gauge steel. I bought a scrap sheet from a local fabrication place for $5 and had about 5x what I needed. My method was to make cardboard models and then cut the metal from it. I also made some test and experimental pieces from 20 gauge to test the feasibility of the project. I elected to drill the holes while the piece was flat because it made it easier in the drill press. A bigass hammer and a vice were the primary tools, and I used a blowtorch to heat up areas that were tougher to bend. On bend at a time, and a lot of test fits and I got it. All of the minor bends, twists and whatnot made the process crazy, but it really wasn't as bad as I thought it would be. My one regret is that I should have made it a little bit longer towards the inside, but that may have just made it impossible...who knows.
Attached thumbnail(s)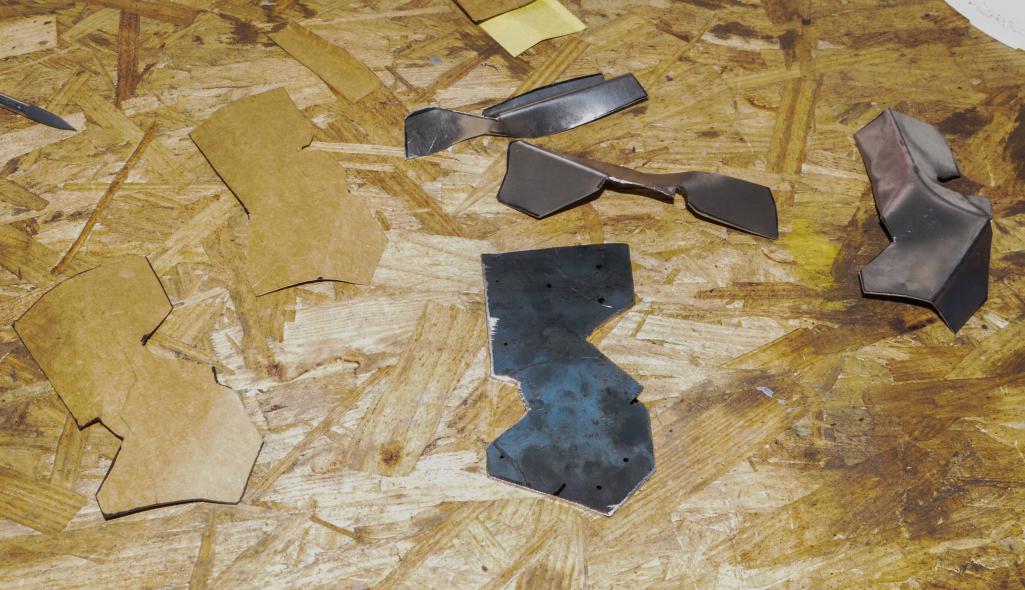
Posted by: DirtyCossack Jun 12 2016, 09:27 PM
For the second tie, I used the method from the above link. It was far easier to make, but somehow harder to weld. I guess because I designed the little one to be primarily plug welded. I still need to grind them all pretty like.
Attached thumbnail(s)
Posted by: DirtyCossack Jun 12 2016, 09:29 PM
On 2 other notes:
Those are some ugly ass welds... and
My measurements regarding the suspension console didn't change!
Posted by: DirtyCossack Jun 26 2016, 09:39 PM
I'll start with a medical update: Physical therapy has given up and referred me back to the surgeon. In January the surgeon wouldn't touch it because muscles weren't working, now they kinda are... So the surgeon can do 3 things: convince my primary care doctor that my neck needs checked by a specialist, operate, or refuse to cut again which would mean that I would be medically discharged. The medical discharge is practically inevitable at this point, but I need to make it to next May because it will give me a magic number and allow me to walk into my next career as a teacher instead of doing a bunch of extra stuff.
Now the car.
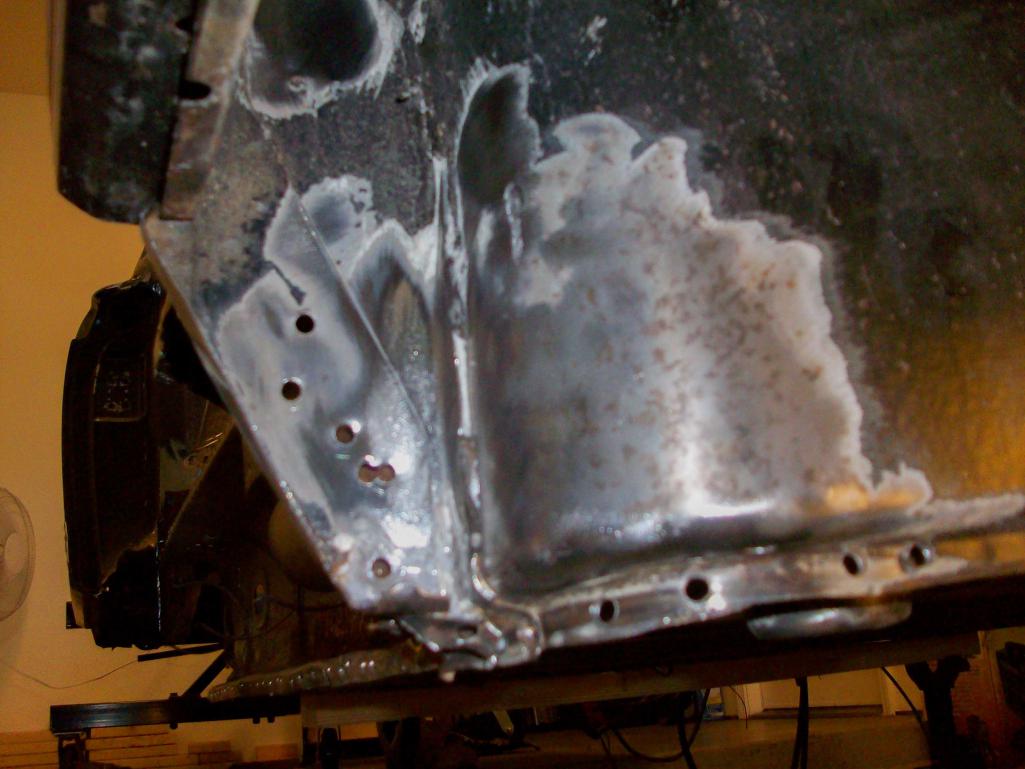
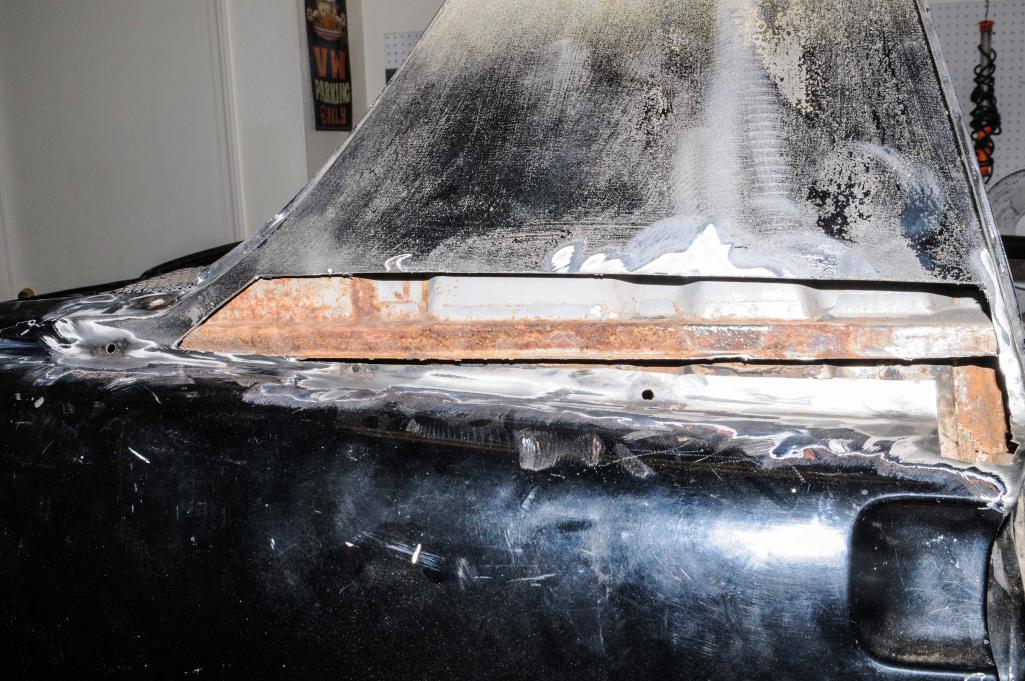
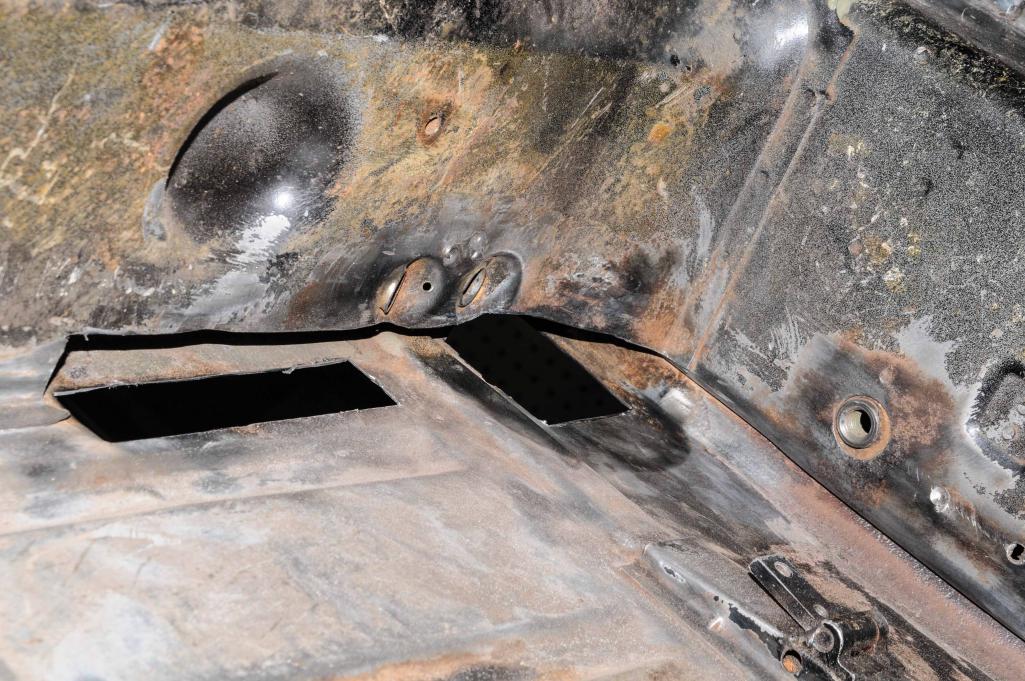
It's been way to hot to really work on this thing, and I've sat out a weekend or 2; and the new job involved the craziest work week of my life so on Saturday I just lounged around drinking. Sunday I had the intention of installing the engine shelf and battery tray but I was getting frustrated by the terrible fitment of the AA engine shelf (came with the car) so I moved on the front corner and the idea of deleting the warts. I knew there was some body filler up there, but no idea how much. I first suspected a problem when I removed the bumper and saw some crinkle and got really scared when I first looked under the fender and saw the filler-seep through holes. I was tempted to keep the warts and this previous fix because it looked good, but I guess I love pain so I explored...
I am currently under investigation by UNESCO and pending trial at The Hague for destroying a previously unknown Michelangelo. But seriously, somebody was a very talented sculptor to do what they did. Now I've got to figure out what to do. I have several options: 1. Play Rodin myself with the filler. 2. Cut and patch the really lumpy areas. 3. Shop for a new fender. 4. Chalon (j/k. No way). I'm totally leaning towards 3.
Here are my concerns/questions: If I go with a new fender, how much do I use? The whole thing or just partial? If I'm going through this trouble, should I address that front clip too? Look at pics 1 and 8, see the crinkle and the improper lines below the light hole? Can I bang it right with the fender off for replacement, or does it need replaced too? This is a major issue--biggest since the long repair, if not bigger.
Let's hear some ideas on how to approach this. Meanwhile, I'm gonna be going back to that stupid engine shelf while I figure this out.
Attached thumbnail(s)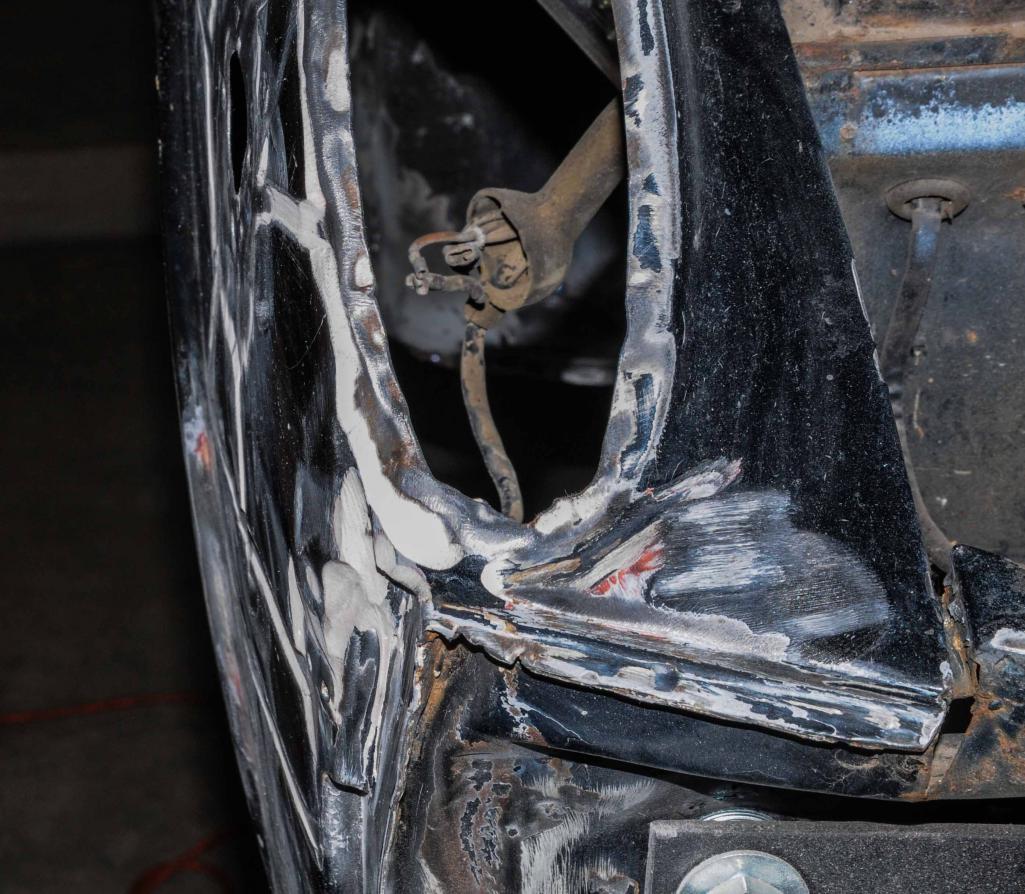

Posted by: Olympic 1.7 Jun 27 2016, 09:12 AM
Great job on the fabrication.
I feel your pain, my front fender looked similar, without the holes. I straightened it a little with a hammer and dolly before putting on the bondo. Much less work than cutting off the fender.
JMHO
Posted by: DirtyCossack Jun 27 2016, 01:27 PM
I posted a WTB ad in the classifieds in case somebody has one on the cheap, but in the meantime I'm going to experiment with the hammer.
Posted by: DirtyCossack Jul 4 2016, 09:06 PM
It was a long weekend but that did not equate to a lot of work.
Friday was one of those days where nothing seemed to go right. I tried dealing with a greyhound rescue to adopt a dog. Arizona banned dog racing so something like 100+ orphans hit the system, but the local group won't adopt to Soldiers because their policies and Army policies conflict. Then in the garage I decided that I need to build a car dolly for repairing that front end since the rotisserie will be in the way. It'll also help with other things, like taking it off the rotisserie so I can put it back on the rotisserie outside for pressure washing or turning the car around (my garage is stupid and has a curb in it so one side is on that, the other on a box to bring it level). Anyways, I went to Lowe's and bought the supplies but came up a 2x4 short.
Saturday I went back to Lowe's for the wood but forgot the nuts to go to the bolts, so I had to go back. Eventually I finished the dolly, only to decide that I didn't feel like tackling the front when I still had other repairs to make, so I took it apart and stored it. I then tried to go back to that engine shelf, it still wouldn't fit... so I fixed the little spot of damage/hole on the floor.
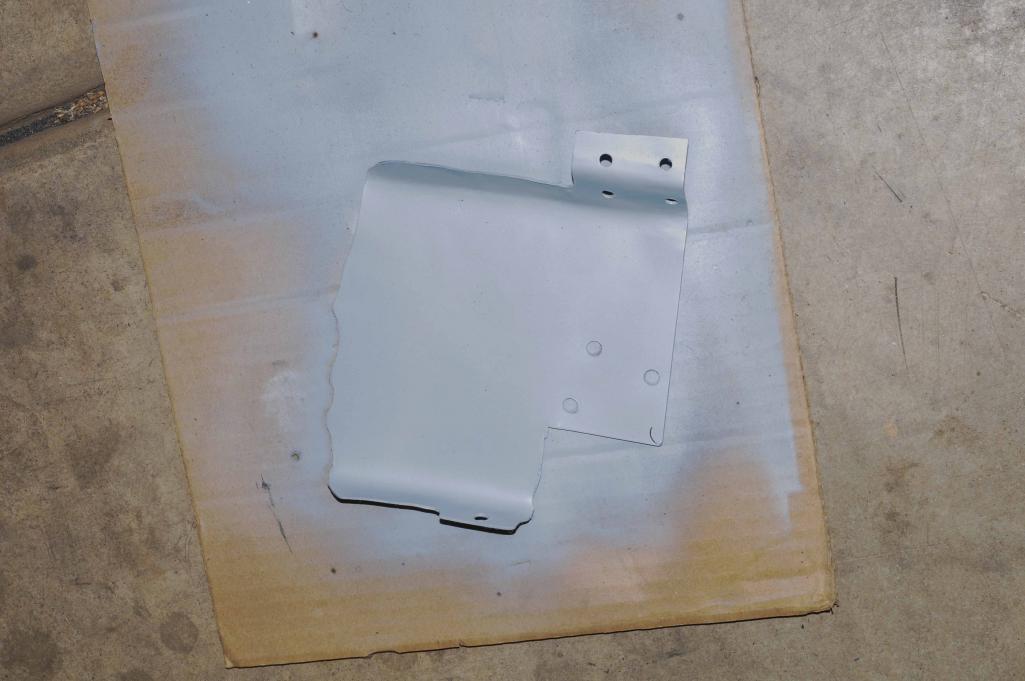
Sunday things began to turn around, I went back to the engine shelf, this time completely determined, only to find the thing went perfectly into place the first try without even trying. Go figure, then I had to make the little patch at the rear there and the brake line holder. The brake line holder was fun to make: drilled a hole in steel and bored it out with the dremel to the right size, drilled another hole for a plug weld, bent the thing, then rounded and shaped the end as well as shaping the weld side so it would saddle into the recess between engine mount and suspension console. It was all too easy on Sunday, I even got an email back from the dog people saying we might be able to make something happen if I work my end.
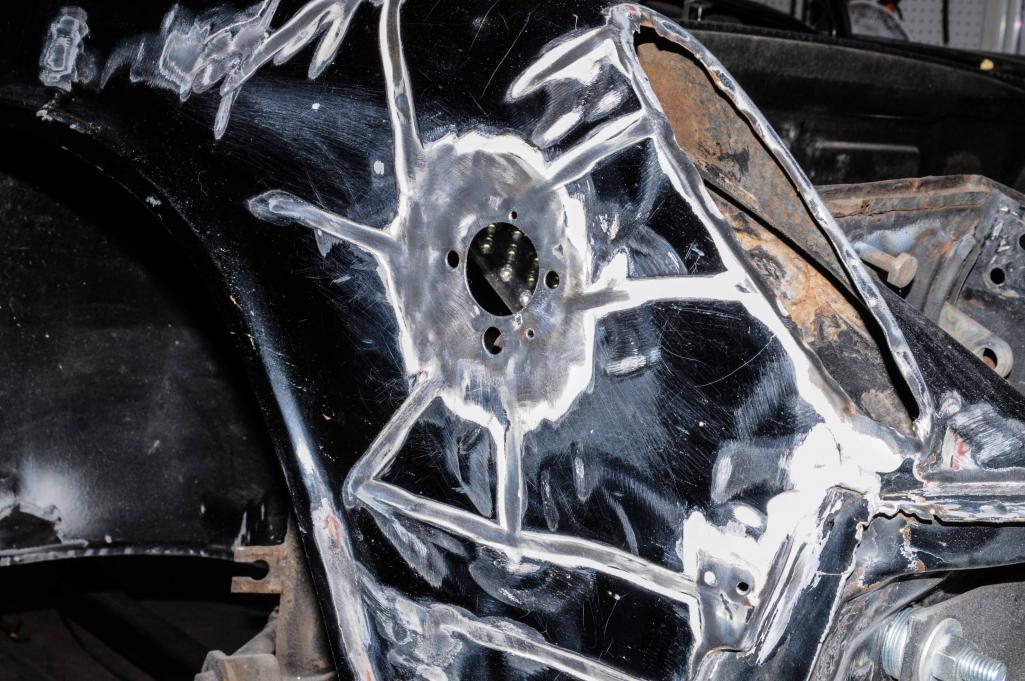
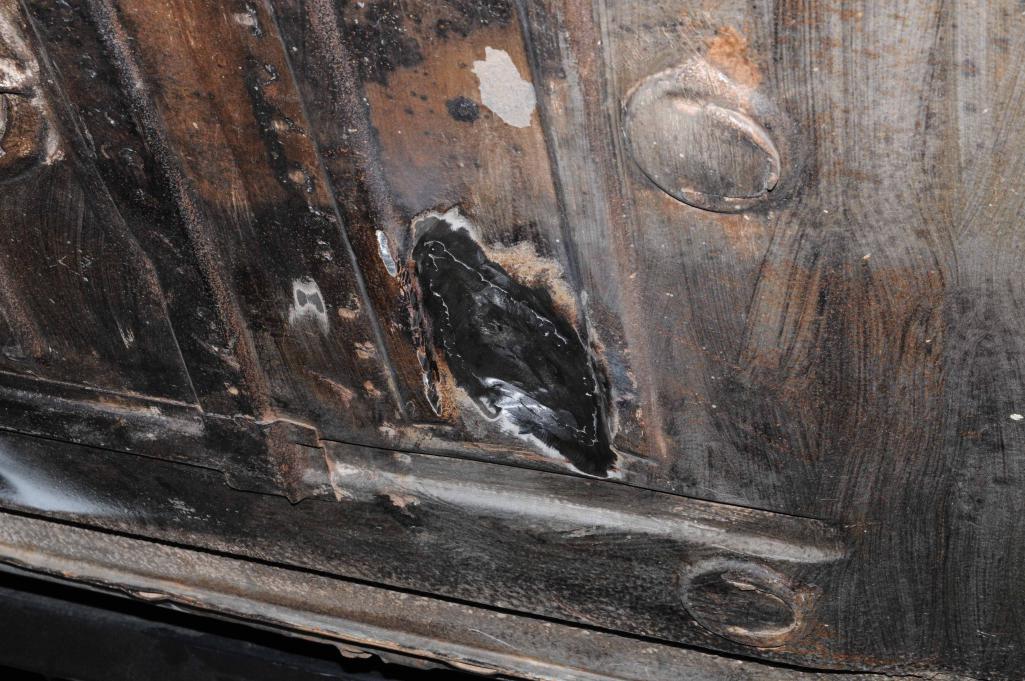
Monday I figured it was time to hit the driver's side since I was done melting on the passenger side! (I've decided to hold off on the battery tray--it's fitment is confusing me...Anyone ever have problems getting the RD tray support to line up? And the other thing needed is the front damage, which I'm putting off) So it's the driver's side! Which is a lot worse than I thought. The jack point is jacked, which I knew, but the top layer of the long there is/was pretty rusted so I've worked to strip it off. I keep having to expand my area, even up to cutting out a portion of the sill near the back triangle. I used an old webcam to look inside the long and it doesn't look too bad. The Eastwood green stuff and some antirust paint should do the trick. This side's rust is way different than the other. The passenger side rusted from the inside out, but this is going outside in--which is good. But getting this first layer of rust off has been quite the trick. I've used an angle grinder with 3 attachments, a drill with 3 attachments, a sawzall, and a dremel with 3 attachments... and I still have metal to remove but ran out of dremel cutting discs. So I slathered the area in naval jelly and called it a weekend. I made a particular point of raising the top layer edges up and getting the jelly up in there. Hopefully I can finish up the area next weekend.
Medical update: I had the MRI on my neck (finally) and it found issues that are probably at the root of my shoulder issues and the arm pains, etc. The problem is that this may complicate or make repairing my shoulder impossible, which would end my Army career. So I have to start thinking of when, how and at what point is it best to stop the build and prep the car for moving. I haven't been to the doctor yet, so this is just speculating, but I figure I have 9 months left here. I figure I need to finish the metalwork, prime anything bare, then start putting the necessary parts back on. But we'll see what the future holds when it gets here, meanwhile I'll keep working on the car, working to adopt a greyhound, and just working.
Attached thumbnail(s)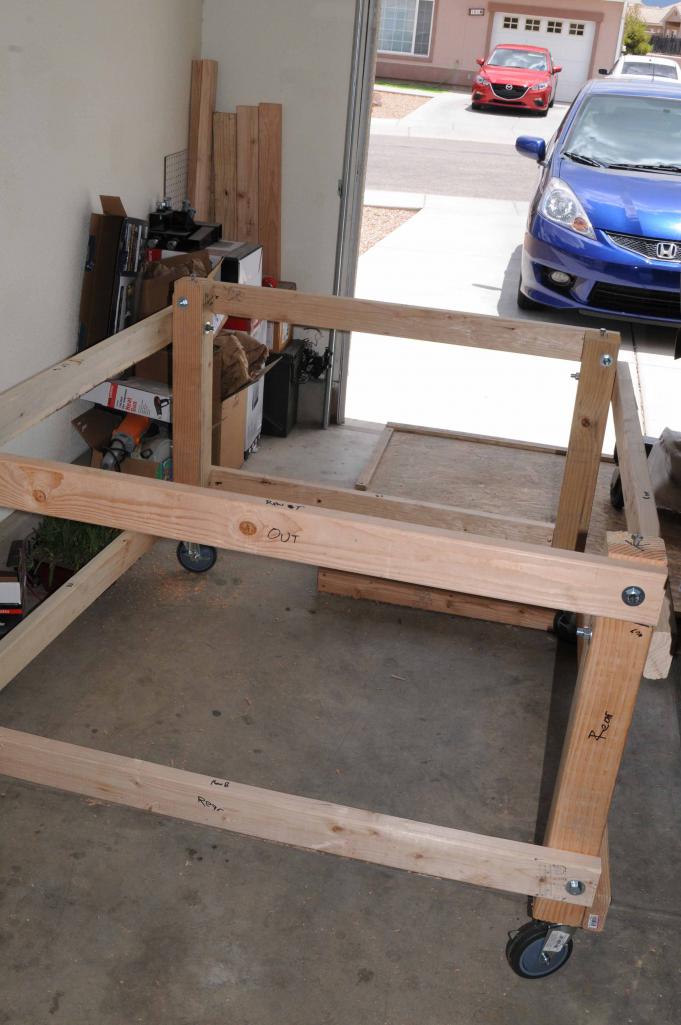

Posted by: DirtyCossack Jul 4 2016, 09:09 PM
Pics of the other side of hell.
Attached thumbnail(s)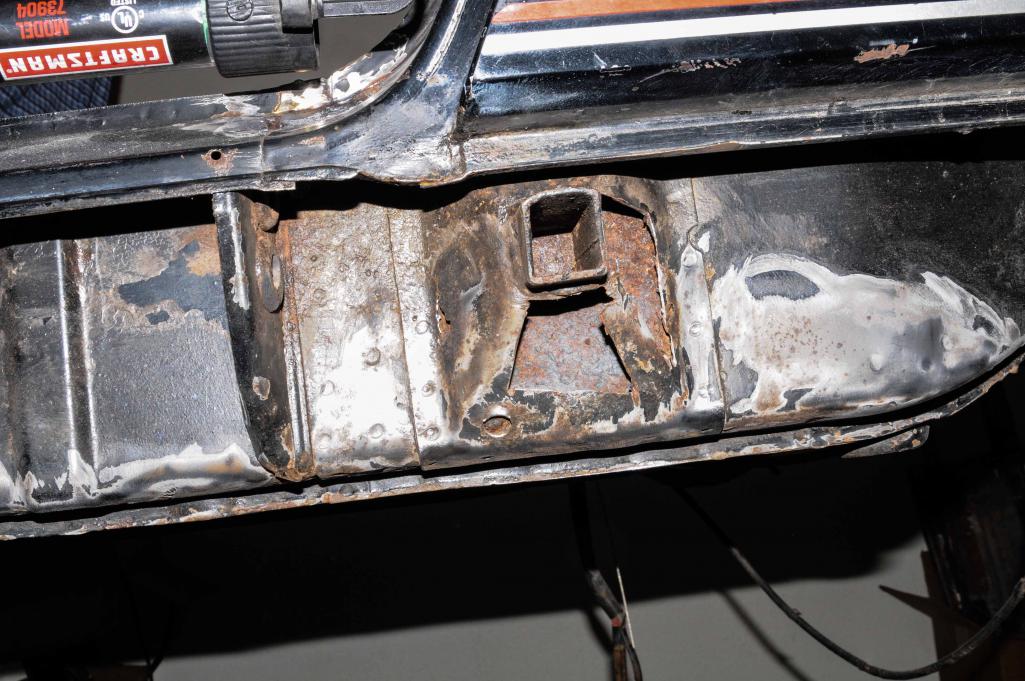
Posted by: DirtyCossack Jul 4 2016, 09:38 PM
Is it crazy that after I drilled out and cut around the cover, the post ripped off wih a few quick blows with the rubber mallet?
Attached thumbnail(s)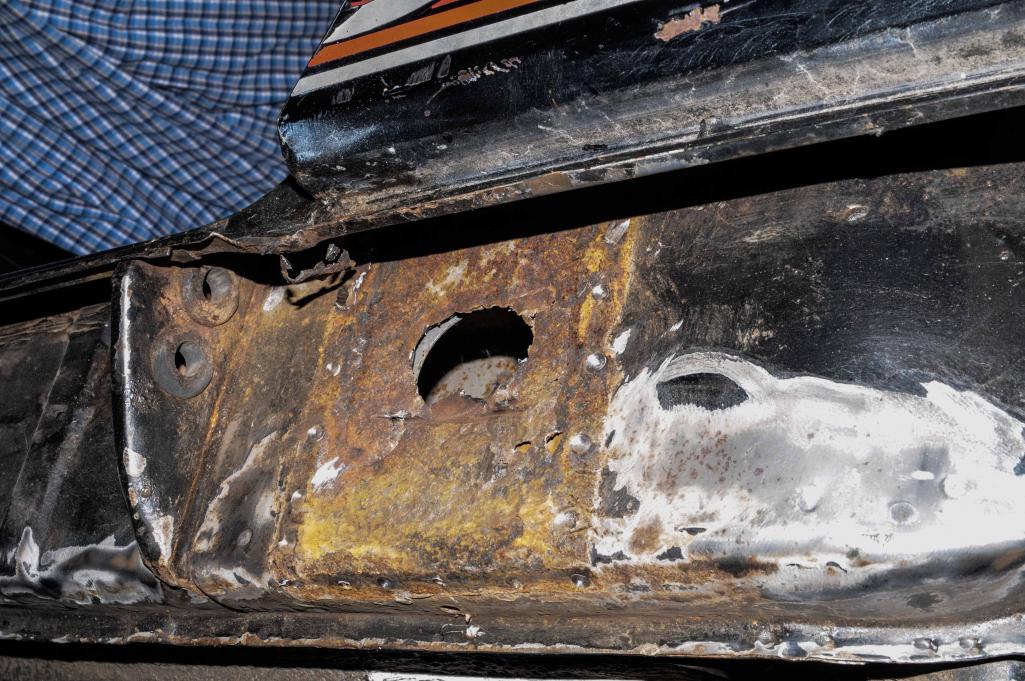
Posted by: Andyrew Jul 4 2016, 09:49 PM
Sorry to hear about your health issues! Hopefully it doesnt impact your career...
Posted by: mbseto Jul 5 2016, 10:35 AM
Shelf looks good. Hope they can do something good with the shoulder.
Posted by: DirtyCossack Jul 10 2016, 08:19 PM
Shop soundtrack: Euro 2016 Final (Sunday), some MLB, and my rockabilly Pandora station.
Doesn't seem like the most productive weekend if you just go by picture quantity, but I think it was a good one none the less. I had some more cancerous metal to remove on the driver side jack point, and since I knew I was removing a layer at a seam I decided to install my car dolly to use as support to prevent sagging: the dolly in the center + rotisserie holding ends + door braces seemed to hold it square, not that I think I really removed enough to truly endanger a sag. I started by using that Eastwood green stuff inside the longs (that shit is nasty, wear long sleeves, gloves, and a face shield), then went into cutting out a difficult area. Treated some rust with naval jelly, weld thru primed etc wasting time before I used the under-coating gun and hose to spray the eastwood heavy duty anti-rust in the long (see note above about nasty and getting everywhere). My pre-inspection with an old web cam showed very minimal rust, and my post inspection shows I got good coverage.
Sunday started with taking the dog to the dogpark since she was running like a nut in the house and backyard, but when we got there she chilled...then when we got home it was back to crazy...a harbinger of the day to come... In the garage I used Saturday's paper model and 18 gauge sheet to finish fabricating the patch. It took a while because some areas were almost impossible to reach and the cuts on the car were all kinds of crooked. Got it fit, plug weld holes drilled, cleaned, prepped and weld-thru primed (I turn into a really impatient kid while I wait the prescribed time for that stuff to dry) and welded on little bits at a time to prevent heat warping the area. Due to the cuts' nature and old metal removal style, not to mention trying an experimental welding technique that in some areas was a cross between plug and seam I didn't get the prettiest of seam at the rear or bottom (should have waited and done the bottom after bringing it back on the rotisserie--who likes overhead welding?) but I got good penetration and strong welds so whatever. In the crazy category I got great penetration and a good weld seam at the top where I had to play contortionist, line up a spot and close my eyes and turn my head since I couldn't get the helmet into that fender space area and still have the reach and depth perception to line up a weld. One really little spot at a time and good to go. I even had to half blindly grind that weld with the little Dremel grinding disk yet somehow it turned out looking pretty good. The whole area was awkward to grind and part turned out really nice and the other needing a little filler...whatever, better than overgrinding here. As you can see I have fully committed to deleting the jack posts: both sides now.
Now for the weird: with just minutes left before family dinner time I decided to start on that door sill patch. I reached into the scrap metal box and pulled out a little rectangle, perfect fit. It needed a centimeter trimmed off the end, one edge was the natural edge of the sheet (read: straight cut) but the other two were a little crooked/wobbly/whatever you call it, just so happens that these previous crooked cuts were the exact crookedness of the doorsill's crooked cuts!!! Go figure. Worked about 5 minutes drilling the plugweld holes and shaping the end for the jamb overlap (more serendipity in that the little crook was the exact size of a little crook on the anvil so super easy to shape); cleaned it up and sprayed the weld thru just as dinner was served. So welding will be job #1 next weekend.
Random product note: I got sick of paying $30 a can for weld-thru primer that always clogged up, sprayed poorly or whatnot so I thought I'd try the Eastwood stuff. Had it for at least the last month's worth of work and the can still sprays perfectly and it seems to weld-thru at least as good as the 3M or Copperweld. I'll recommend.
Attached thumbnail(s)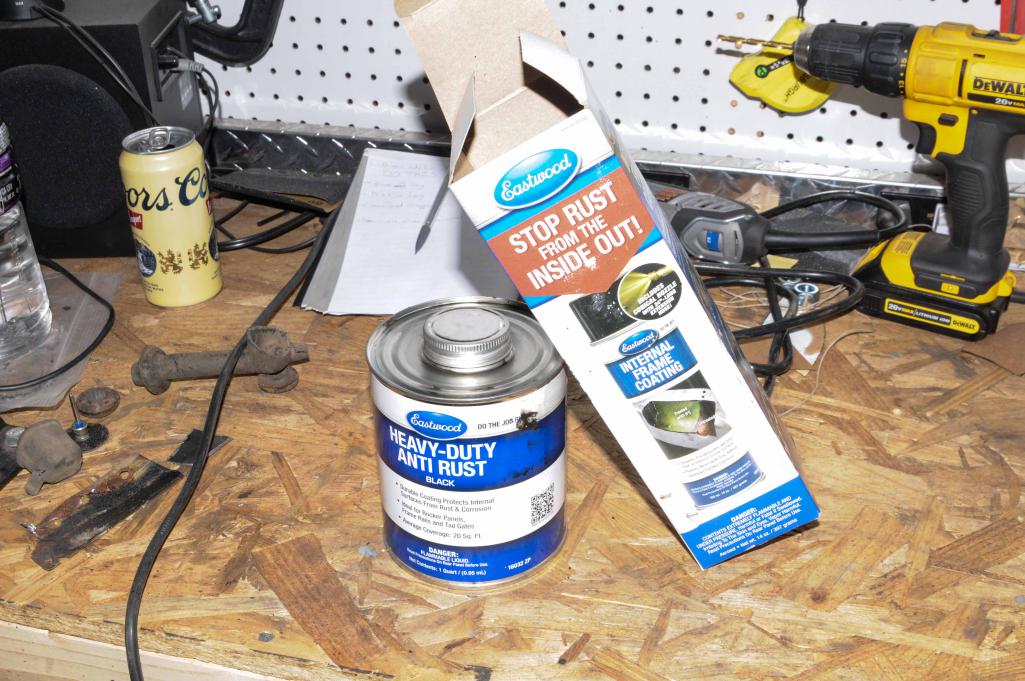
Posted by: DirtyCossack Jul 17 2016, 06:53 PM
Saturday 16 July.
A good day in the shop. I started the day figuring I would quickly fix up the door sill, then fab the jamb, fix a little rust spot on the firewall, and then remove all that nasty foam and seam sealer up in the sail and rear quarter. Like I thought, the door sill was a quick and easy fix and the fabrication of the jamb took some thinking and work due to the nature of the curves. However, I hit a wall with that "little rust hole" in the firewall. As you can see from the photos, I had to do some cutting. Now I will admit that I cut a little more than necessary, but why not. Finished the day playing with wire wheels and rust treatments, leaving the fabrication and welding for the next day.
Attached thumbnail(s)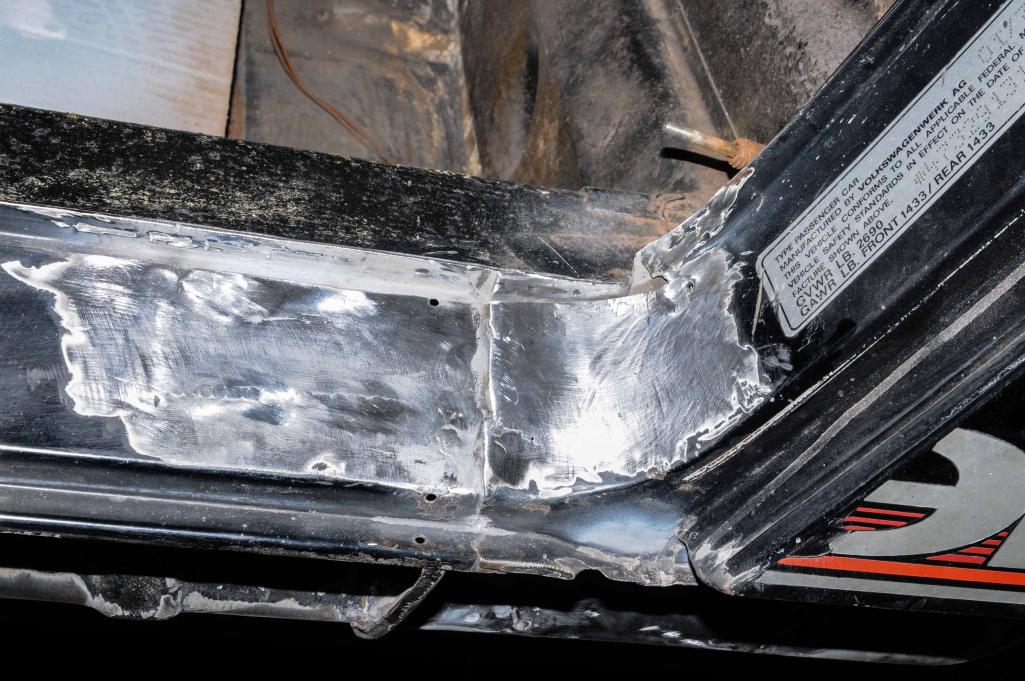
Posted by: DirtyCossack Jul 17 2016, 07:15 PM
Sunday. Shop soundtrack: Ramones discography.
It was a really straightforward day, the biggest challenge was using scrap pieces of sheetmetal prudently. Step 1 was just cutting some metal and welding it into the holes in the floor. Step 2 was to make the 3 firewall patch pieces. 3 was the weld-thru primer. 4 welds. 5 be lazy grinding.
The floor stuff was simple, and the firewall pieces weren't that bad considering I learned the tricks when I did the other side, but this side was harder since I had to work around the e-brake cable holes, and I had the floor in. At some point in the afternoon my soundtrack ran out as did my patience so I gave up on the grinding. It's a really tough area and may require the Dremel to really get the welds ground down, but I also know that I didn't get the pieces perfectly lined up so it will never be perfect. I figure I'll reevaluate next week and decide what to do...because my attitude today is thinking: "it'll all be slathered in seamsealer and hidden behind the backpad anyways..." Attention to detail, just didn't have it today.
I also didn't get around to the foam removal, which considering my attitude is probably a good thing.
I forgot to mention that Saturday's rust discovery resulted in also having to remove the e-brake cable guide. It's not really rusted but the stuff behind it had a little surface rust killed by the wire wheel.
Attached thumbnail(s)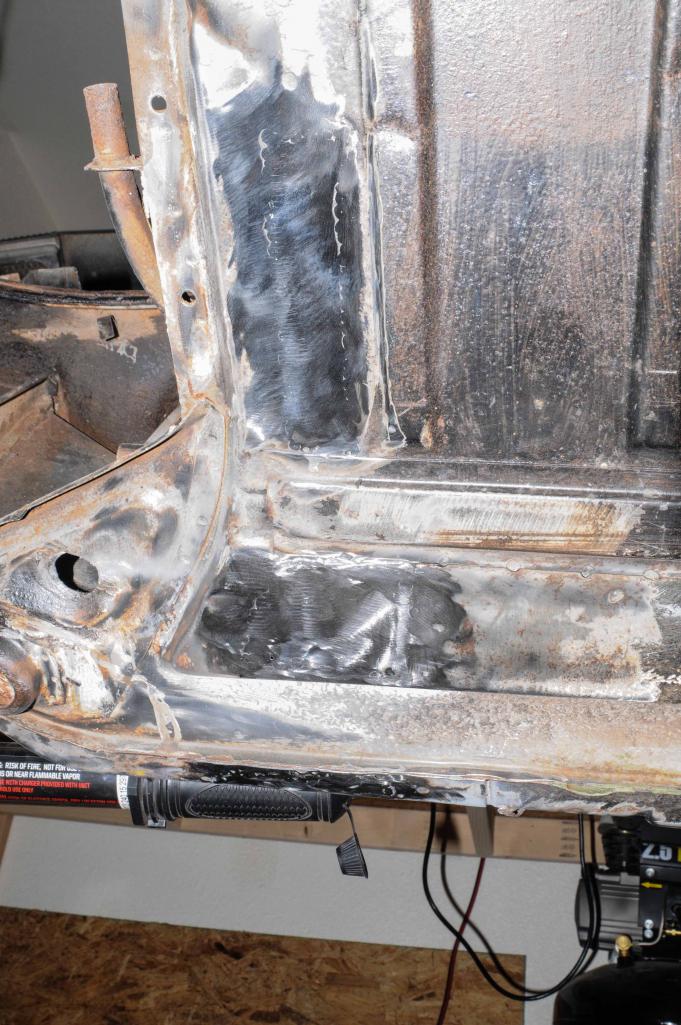
Posted by: 914forme Jul 18 2016, 11:04 AM
Sunday. Shop soundtrack: Ramones discography.

Looking good, keep it up, I am shocked your jack post as all wormed up, but the logs behind faired pretty well.
How was the Eastwood stuff to shoot into the inner logs, worth doing or just made a huge mess?
Posted by: DirtyCossack Jul 18 2016, 11:50 AM
It was a huge mess but seemed to spread and cover pretty well. It wasn't too hard to feed the little hose into the long either. Honestly, that green stuff in the rattle can was 100x easier than the undercoating gun. I guess I'd recommend it.
Posted by: DirtyCossack Jul 23 2016, 08:43 PM
Shop soundtrack: My Pandora psychobilly station
It was a good but painful day in the shop--this shoulder is killing me.
I started the day welding up the dimples and holes from when I drilled out the spotwelds on the parking brake cable guide. I then cleaned the area up some more and applied Rust Bullet where I won't be welding and not be able to get later; and after it dried I applied some weld-thru primer where I will weld. Tomorrow will be some seam sealer on the floor/long lip underneath the cable guide and maybe welding (I realized today that I am extremely low on welding gas so who knows).
While waiting for the paint I kept myself busy removing the foam and seam sealer from the rear corner (it looks good back in there!) And then started to remove the stuff up in the jamb/sail panel. This is where it killed my shoulder chipping it out. I couldn't quite get it all and my shoulder was throbbing so I thought about just quitting and leaving a bunch there, but I noticed some rust peaking out. I knew the only real option I had was to cut an exploratory hole in the sail--and I hit pay dirt (rust). I used the hole to get the seam sealer out of there and found that I also had to drill a hole on top of the fender to really get all of it out. The rust I found required the sail panel hole to be cut a little more but it allowed me to use the sand blaster to get the surface stuff that was left in there. I sanded the surface rust that dwelled where that long strip of foam was, and when I was satisfied with the results I osphoed the whole region.
The plan moving forward is to clean up the ospho residue, weld up the holes and trim holes, get some paint up in there and eventually seal up the seams. My lack of welding gas may delay the process, so tomorrow will be welding prep and maybe the removal of some other random car pieces or moving on to the frunk seal channel.
Attached thumbnail(s)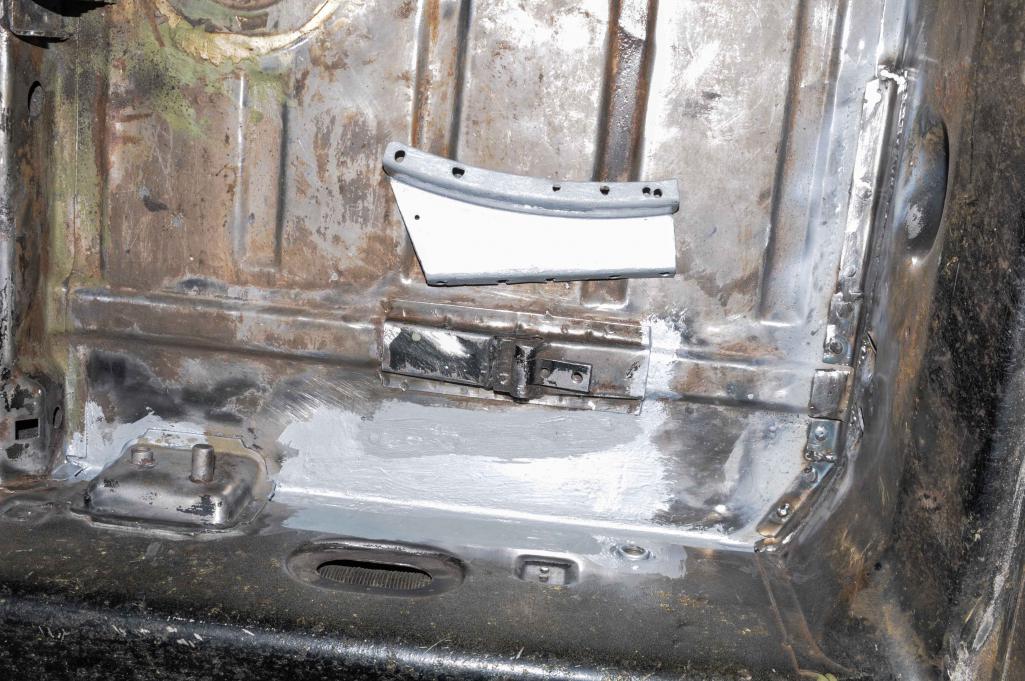
Posted by: DirtyCossack Jul 23 2016, 08:50 PM
Whoa, I just noticed that the angle on the first pic shows that the one end of my firewall patch wasn't exactly lined up... I guess that really was a bad day.
Posted by: 914forme Jul 24 2016, 07:37 AM
I did not see that until you pointed it out. We love to judge our own work to a level higher than most others would hold us accountable for.
Keep up the great work, if that is the worse thing you did while saving this 914 then well, I can easily turn a blind eye to it.
Posted by: DirtyCossack Jul 24 2016, 08:05 PM
Shop soundtrack: 3M: Motorhead, Metallica, Megadeth.
Nothing really picture worthy today. I applied that seam sealer to the area under the e-brake cable guide, fabricated the pieces I'll weld in next weekend, took the wire wheel to the frunk seal channel, removed the shifter/shift rod, heat control lever, remaining brake lines, all of the cables but speedo, and explored the driver-side hell-hole (I think I got this car just in time, it's starting to rust in there, but not bad enough that I'll need to do any cutting/welding).
After that stuff I stopped and started thinking (yeah I know that's where trouble starts). Tuesday is judgement day of sorts; I go back to the ortho surgeon for my shoulder and essentially learn whether it will get fixed or if it's a lost cause. This news is even bigger than just that because it decides my employment future in that inoperable = medical discharge (there's a whole lot more to that and how it affects moving and getting certified to teach high school---okay it's a long story of if thens). If I'm getting surgery, that shuts down the shop for a while. You can see how complicated and big Tuesday is. It means I have either 6-9 or 11 months before I move. I'll have a lot of decisions to make next week regarding the build: do I shut down the build and start prepping it to move on my trailer? Do I double down on the build and strip everything that's left: dash, front suspension, windshield, harness and blast the entire car (hell, I've already gone way farther in this build than I planned to) or do I wait to do that after I move? When I move should I plan on my open trailer or stick it in a uhaul? Should I push to get paint on it before moving, or prime and wait to paint? If I go for blasting, do I buy a big blaster and make a tent, or use the place in town?
As you can see I'm rife with questions going into this appointment. And may the lesson be heard, this is what happens on a shop day when you run out of welding gas... so keep an eye on that gauge.
Posted by: Vysoc Jul 25 2016, 07:32 PM
Love the music thing, Mega Bands yesterday.
Keep up the good work, my favorite work album is Terapin Station / Grateful Dead!!!
Hope your shoulder starts to give you a break!
Vysoc 
Posted by: DirtyCossack Jul 26 2016, 07:29 PM
Well, the surgeon still won't touch the shoulder... so we'll see what happens at my primary care follow up.
Posted by: DirtyCossack Jul 30 2016, 03:22 PM
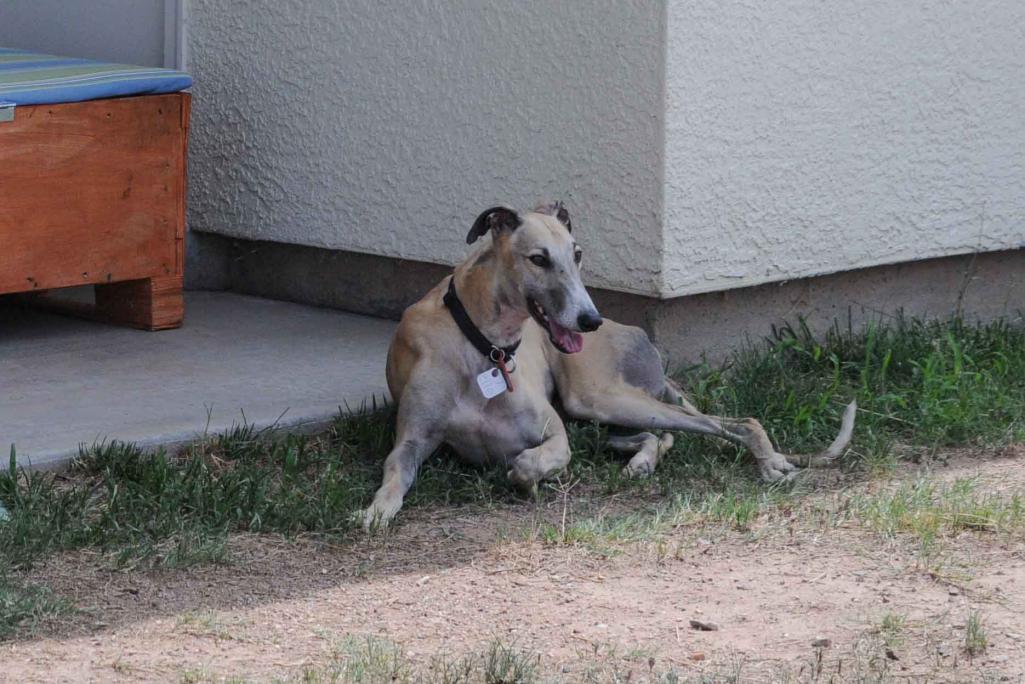
I'm taking the weekend off to hang out with the new dog and get her and the cat to get along. This is Laika:
Attached thumbnail(s)
Posted by: tygaboy Jul 30 2016, 03:25 PM
I'm taking the weekend off to hang out with the new dog and get her and the cat to get along. This is Laika:
Whippet (real good!)

Cool pups, them.
Posted by: Vysoc Aug 10 2016, 09:20 AM
Is that a whippet or a retired Greyhound?
Vysoc
Posted by: DirtyCossack Aug 10 2016, 03:29 PM
She's a retired racer with many races and wins under her belt, but I think she may have to go back to the rescue. We absolutely cannot get her to get along with the cat. They told us she was cat friendly, but she just want to chase and eat.
Posted by: DirtyCossack Aug 10 2016, 05:31 PM
I guess it's as good of a time as any to make the announcement: This build may be on a long-term hold...
Long story short: Our dog Muttley (not the greyhound) got sick and spent a week at the vet. She was first at one vet who then recommended us to another larger facility in Tucson. After several negative tests for Valley Fever a doggy neurologist got involved and x-rays, CT scans and a spinal tap finally found that she is suffering from meningitis. Treatment involves a long term regimen of steroids. She finally came home yesterday and her prognosis is good for recovery. BTW, a dog high on a fentanyl patch is funny. Anyways, the experience has cost us a little over 2 months pay, resulting in the near draining of our primary (emergency) savings account, selling some stocks from our long-term (future house downpayment) savings, and sadly the draining of my 914 account, all with more bills for the medicine on the horizon. So I have no money to really continue, though I guess I can weld until I run out of gas/wire, grind until the disks are dead, etc. But as far as buying anything, I'm done until we replenish the savings account. I'm also thinking it best to wait until the dog recovers some before I start getting loud in the garage again. I've got some stuff to do to the 914, but most likely I will finish the metal work, spray some of the cheap primer over the bare spots and prep the car for next year's move since I won't be able to paint it for a while and it will be easier to paint at my old Kentucky home anyways.
The stress and hardships have also exacerbated the above hinted at issues with the new greyhound. The other dog's illness put a serious dent in the critical time period for the proper cat-dog intros and getting them to live together. The sick dog has also affected the greyhound's socialization with the family and she is extremely jealous of the necessary attention the invalid is getting and won't let the already non-eating dog eat. This is why my wife wants to exchange her for a more cat friendly and laid-back greyhound. I want to keep working with her, but convincing the wife to do so is hard.
Posted by: DirtyCossack Aug 21 2016, 05:14 PM
I figure that even with a $0 budget for the foreseeable future I can trudge on using the supplies I have on hand (luckily I have a full tank of weld gas). So today I found a couple hours to weld in the e-brake guide, the little thing over the cable guides, the sail panel patch and even fill in the trim holes. I also discovered that in the weeks out of the garage, the monsoon season played its game and gave me some minor surface rust on the bare surfaces... even in AZ these cars try to rust! So I did a little sanding on random metal around the car.
Next weekend we will most likely be trying out another greyhound (depending on how the other dog is feeling), so I may have another couple weeks out of the garage, though I plan to find some time to hit the bare areas with some more sandpaper and ospho, and maybe some rattlecan primer to stop this flash rust.
I guess I'm not out of the game yet considering I have metal, welding supplies, filler, seam sealer, sandpaper, blast media, stripper, etc, and even the gallon of epoxy primer... Should hold me over until tax returns anyways.
Attached thumbnail(s)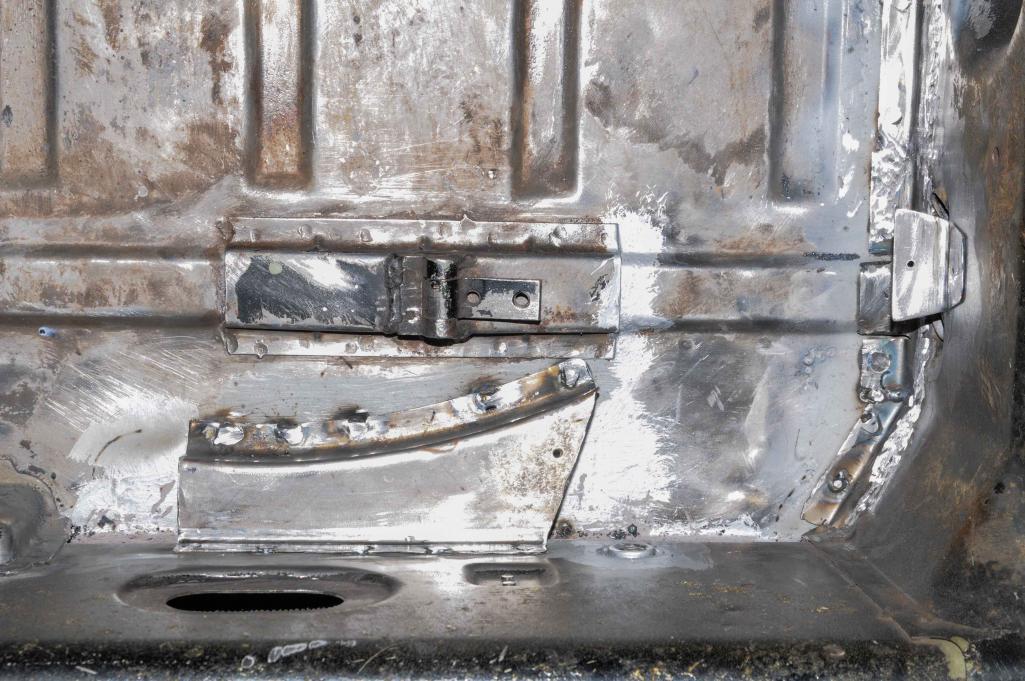
Posted by: JoeDees Jul 4 2017, 11:55 AM
I'm back in the fold! I finished my Army time and am now a civilian about to begin working as a high school social studies teacher in Northern Kentucky. I towed the teener 1800 miles from Arizona and into its new garage, but have to get the house and garage sorted out before work can resume. I'm looking at selling my trailer and VW bus so as to feed the car account and get the show on the road without all of the budget restraints... So if anyone near Cincinnati is looking for a 2014 16' Big Tex car hauler with electric brakes and 5 brand new tires for $1500; or a 1970 VW bus that runs and drives but needs a lot of cosmetic and electric work for $2500, let me know.
Posted by: kafermeister Jul 5 2017, 07:12 AM
Welcome to the area. Good to have another teener close by. You will have to get to the Cincy VW/Porsche/Audi Family Reunion this Sept.
Posted by: mbseto Jul 5 2017, 07:43 AM
Welcome back! I'm up on the east side of Cinci, let me know when you get settled in.
Posted by: JoeDees Jul 3 2023, 06:09 PM
It only took 6 years to get the house sorted and garage set up! It’s been a struggle with my aging father’s health problems, fixing his dilapidating house, a bajillion side projects, and trying to figure out the idiotic world of education. But in the last couple of months, after deciding to leave my job for another, I’ve been motivated to reorganize the garage and work on the car again. I finished the last welds and have been getting the filler done (worst part of that being stripping the protective rattle can primer I put there 6 years ago and ensuring no fresh rust), and sealing up all the enclosed areas with the Eastwood sealer stuff. I have purchased the epoxy primer, primer, and paint and have every intention of painting this thing (doors, hoods, etc will be done later) by the end of the month. I still need to remove a garage window to build a frame mount for a window AC for climate control and create my ventilation system though. The plan is to paint the bottom side on the rotisserie before building a dolly to paint the top half. I am very close to the point of slowly putting it back together!
Anything I should install on the bottom side while still on the rotisserie? Brake lines and master cylinder? Suspension? Do I put it back on the rotisserie after painting for installation or is it easy enough on a tallish dolly?
Posted by: JoeDees Jul 3 2023, 06:13 PM
Here’s a peek at my new garage, I’ll take new photos of the car soon.
Attached thumbnail(s)
Posted by: Cairo94507 Jul 4 2023, 07:23 AM
Maybe apply whatever you are going to put on the bottom of the car and if you are going to paint it, paint that bottom. Make it a roller, install brakes lines, wiring harness, etc. while it is on the rotisserie. Shoot the interior, trunks and under the targa bar at the same time. Lots easier when you can spin the chassis. 
Posted by: JoeDees Jul 7 2023, 04:05 PM
That sounds like a good idea. I think I will paint everything I can on the rotisserie, paint and reinstall the suspension and brake lines before going to the dolly. I can paint the ends with the hoods and doors.
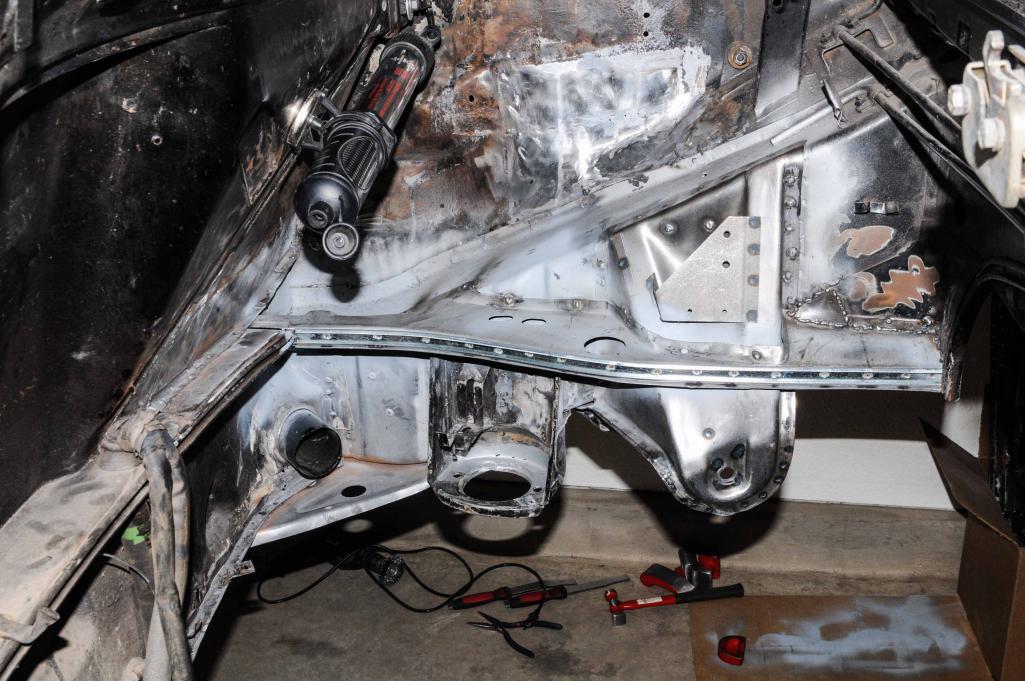
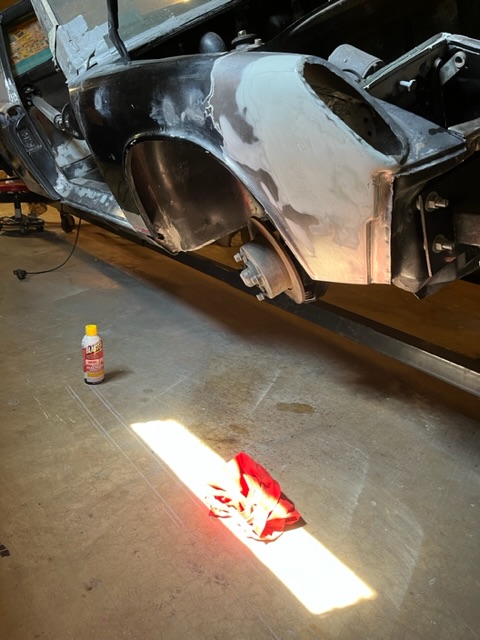
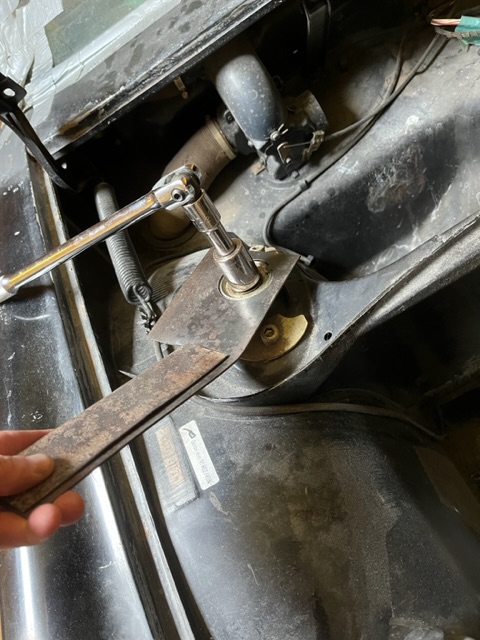
As to recent work. Finished the body filler on the floor and got the first application on the old hell hole area. Finally got the last of the super grease off the area around the transmission mounts and removed the front suspension after finally getting around to making the tool for the upper lock washer from a piece of old sheet metal.
Next up is finishing the filler on the hell hole and firewall and the disgusting process of stripping the underside of bad undercoating and paint prep.
Attached image(s)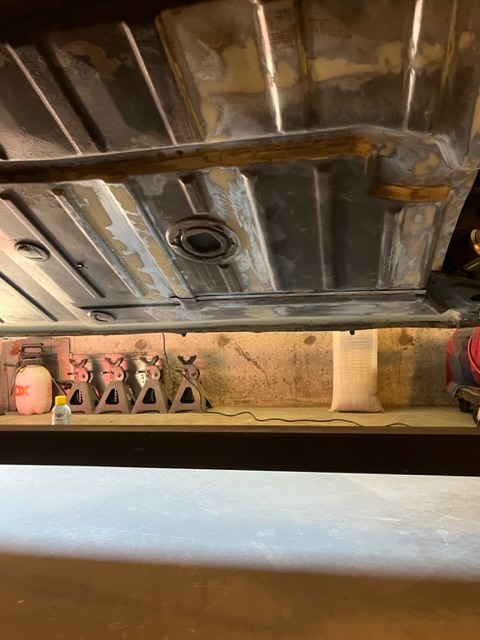

Posted by: JoeDees Jul 16 2023, 09:01 AM
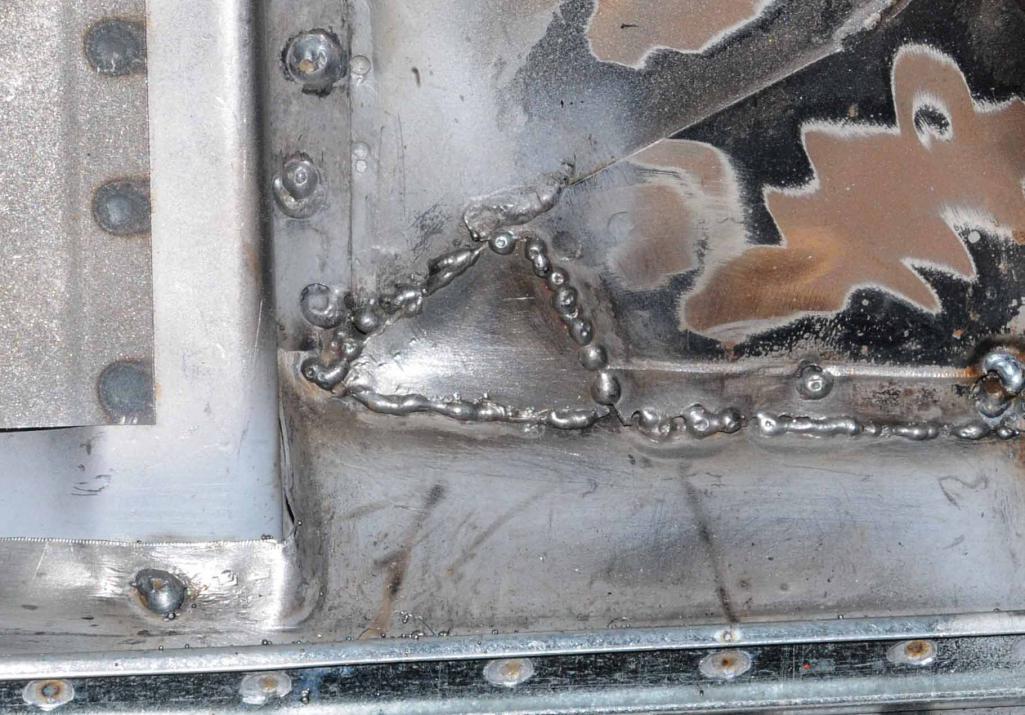
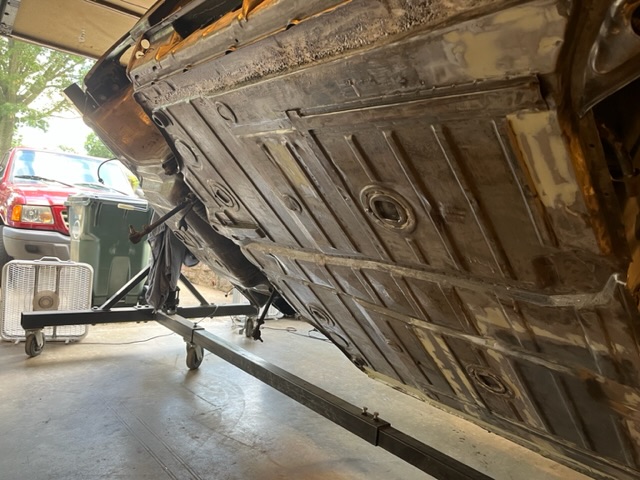
Divided the car into zones for painting. First up are the front inner fenders, longs/under the sills and floor. Stripping has been a major job! Using the Eastwood Dekote, various scrapers, wire wheels and brushes over 3 days and am almost there. This car had several different rubberized undercoatings, some other weird coatings and of course seam sealer. I was hoping to leave most of the seam sealer, but there were too many areas that peeled too easy, meaning some rust developing underneath. Nothing too bad, just some dusty surface stuff, but it still adds time and effort. Also purchased a new DeVilbiss HVLP gun for motivation. I am determined to have this car fully epoxy primed by the end of the month, but it’s looking more and more daunting.
Attached image(s)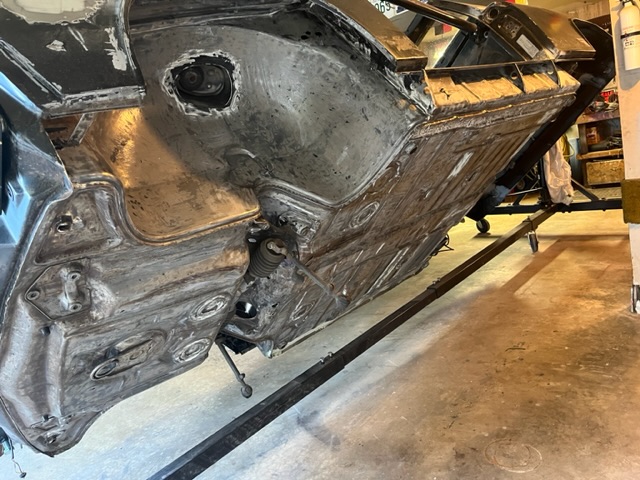
Posted by: Cairo94507 Jul 16 2023, 12:44 PM
![popcorn[1].gif](style_emoticons/default/popcorn[1].gif)

Posted by: JoeDees Jul 19 2023, 06:14 AM
This stripping process is exhausting and tedious. I have a mini blaster I planned to use for the tough, little areas, but after watching it make quick work of some nasty stuff, I’m debating dropping the cash on a full size blaster unit. It may make a mess of the garage, but it will need a major cleaning before painting anyways. So the new questions are: stick with the slow process, the less slow mini-blaster, or upgrade? Soda or standard media?
Posted by: Dion Jul 19 2023, 08:23 AM
Great to see you back! What an adventure you've been on the past few years. The 914 is coming along. Keep doing what your doing. i found just having a sit down and scanning the car and taking it all in led me to decisions of what order to tackle different tasks. Common sense approaches. I think you are doing fantastic. Look forward to more updates.
Cheers
Posted by: JoeDees Jul 29 2023, 09:17 AM
The first adventure in epoxy primer was a nightmare. First go tried to clump and run at the same time. I cleaned the gun, restirred and remixed the primer and tried again. Better, but I could not get the gun calibrated to my liking and the inability to shoot at odd angles resulted in some runs. I’m going back today with my old siphon feed primer gun. I don’t know if I just need more experience with the HVLP DeVillbiss or what, but if the siphon works better, I will be trying to return the fancy new ones. Im not saying I’m an expert by any means, or even that I’m good in the least, but my dad taught me to spray at the age of 8 with a Binks 7 and I’ve never had as many problems and issues as I did yesterday. It would be quite funny if I end up painting this thing with the 50 year old Binks since the old man acquired it in the same year my teener was built. He used it first to paint big transformer boxes for work and then on a constant rotation of old Volkswagens and a couple Triumphs that came through our garage for the next 30 years.
Posted by: East coaster Jul 29 2023, 09:42 AM
The first adventure in epoxy primer was a nightmare. First go tried to clump and run at the same time. I cleaned the gun, restirred and remixed the primer and tried again. Better, but I could not get the gun calibrated to my liking and the inability to shoot at odd angles resulted in some runs. I’m going back today with my old siphon feed primer gun. I don’t know if I just need more experience with the HVLP DeVillbiss or what, but if the siphon works better, I will be trying to return the fancy new ones. Im not saying I’m an expert by any means, or even that I’m good in the least, but my dad taught me to spray at the age of 8 with a Binks 7 and I’ve never had as many problems and issues as I did yesterday. It would be quite funny if I end up painting this thing with the 50 year old Binks since the old man acquired it in the same year my teener was built. He used it first to paint big transformer boxes for work and then on a constant rotation of old Volkswagens and a couple Triumphs that came through our garage for the next 30 years.
I’m sure you’ve done your research, but the new guns require very different pressures than the old siphon feeds.
Posted by: JoeDees Jul 29 2023, 01:44 PM
Took another look and found it’s not as bad as I thought. Definitely wouldn’t fly if not on the underside and epoxy. We’ll see how this second round goes and worry about the runs when it’s high build primer and sanding time. Some may stay our little secret…
Posted by: JoeDees Jul 29 2023, 04:23 PM
I think it was user error on the new HVLP gun, but maybe I’m just old school. Used the Campbell-Hausfeld siphon primer gun and got it dialed-in in a minute, sprayed the whole thing and cleaned up in less time than it took to calibrate my fan yesterday.
Wednesday (the greyhound) was extremely interested in the noises coming from the garage.
Attached image(s)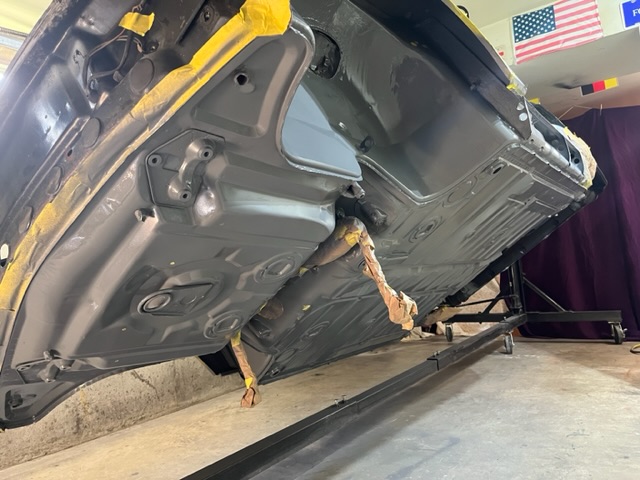
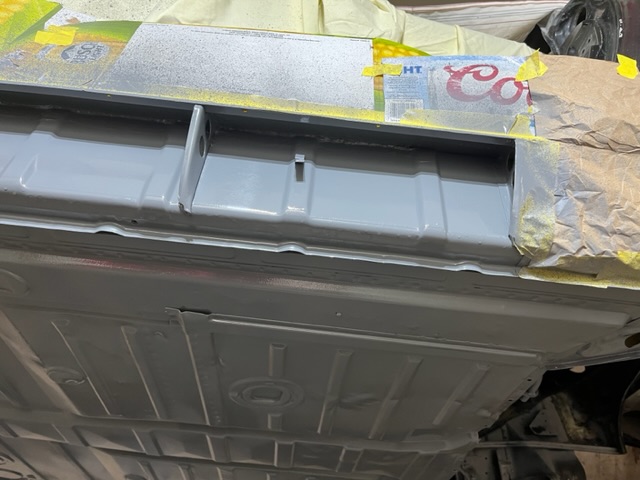
Powered by Invision Power Board (http://www.invisionboard.com)
© Invision Power Services (http://www.invisionpower.com)