Printable Version of Topic
Click here to view this topic in its original format
914World.com _ 914World Garage _ BUILD-OFF CHALLENGE: Olympic Blue Resurrection
Posted by: Olympic 1.7 Oct 1 2015, 07:59 AM
2016 BUILD-OFF CHALLENGE Contender ... Olympic Blue Resurrection.
Purchased my 914 in 1979. It’s a 1973 base model 1.7 I’m the second owner. Original owner drove it for about 75K.
In ’80 I slid off the road and went into a hillside, taking out the driver’s side fender. While in for that repair I decided to have some minor rust issues taken care of and had the whole car repainted. Back then lacquer was the hot set-up and it looked fantastic. Later while sitting in traffic a big Lincoln didn’t quite stop and pushed in the rear panel. Another trip to the body shop.. Then another time while driving home from work in the rain I hydroplaned coming out from under a bridge and clipped a jersey barrier. Minor damage to the pass. side, but again back to the body shop. So this car has seen its share of incidents over the years.
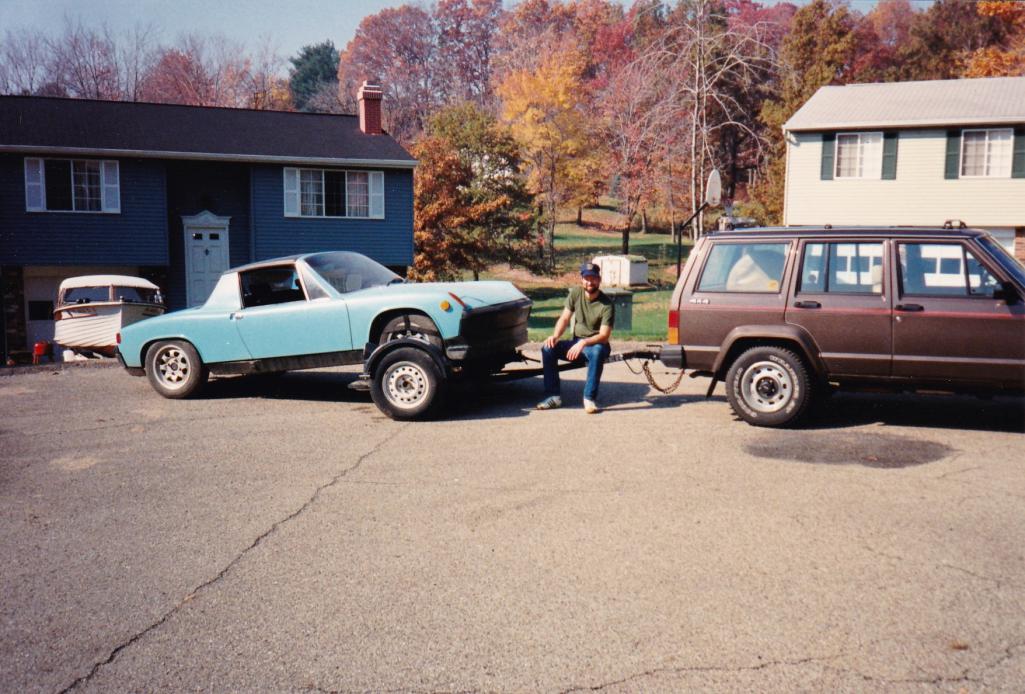
I drove it for 10 years with only minor mechanical problems until the clutch went out 1989 and the engine had 137K on it. Then I was faced with low funds and engine that when removed will need rebuilding. So I put it in storage in a limestone mine in Bradys Bend PA. Figuring I would get it back out and get it running again one day.
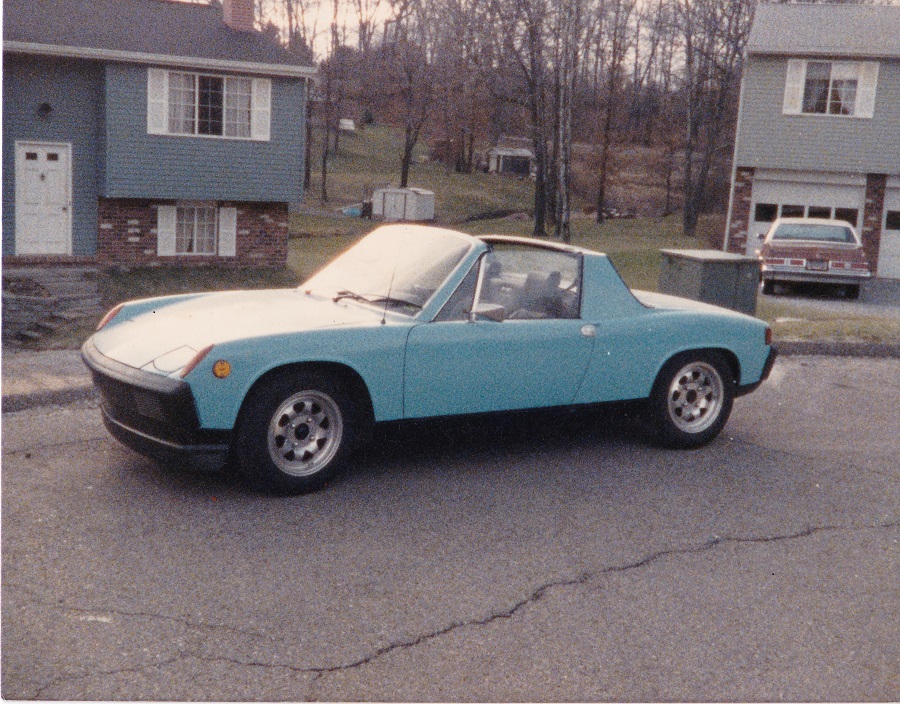
Here are the earliest pictures I could find.
And the day I was taking it to the mines
It wasn't supposed to be here this long.. 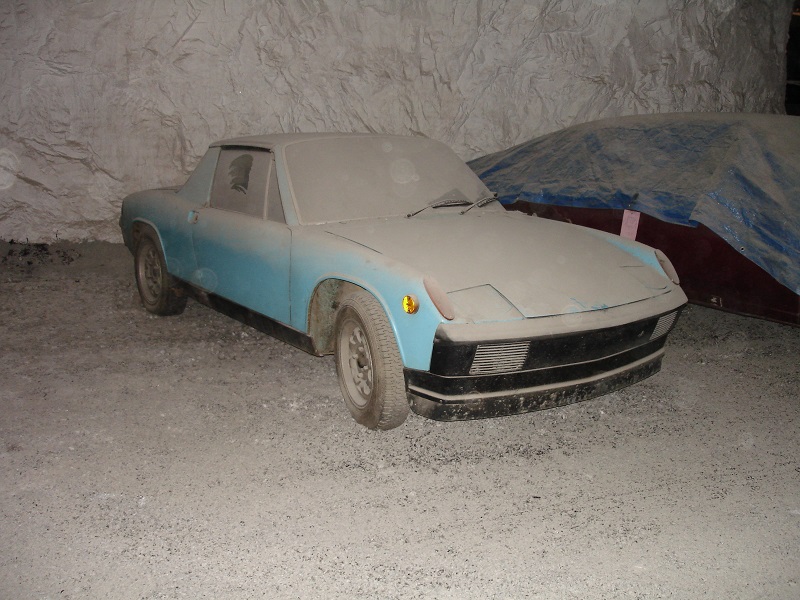
Fast forward to 2010 -- Coming home. First daylight in 20+ years...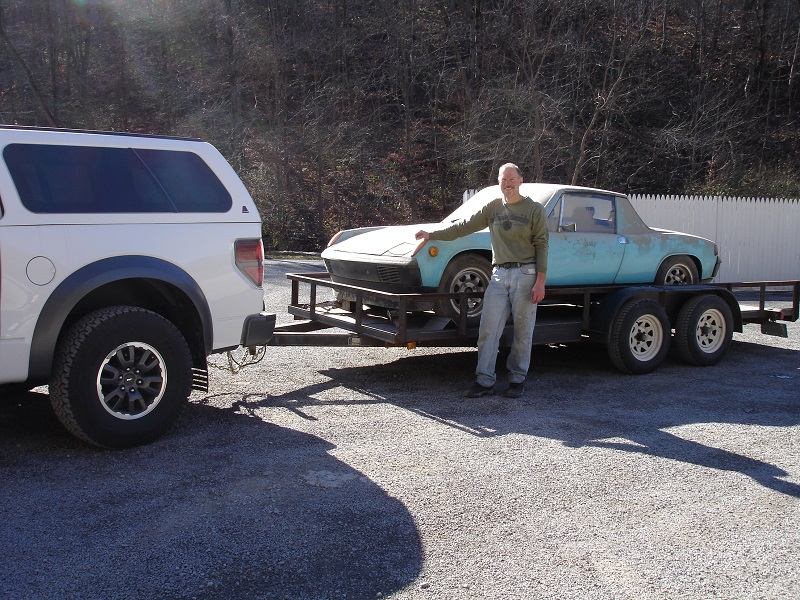
I brought it home to a new 14 X20 SHED I had built just to work on the car. complete with 220V, phone and cable. 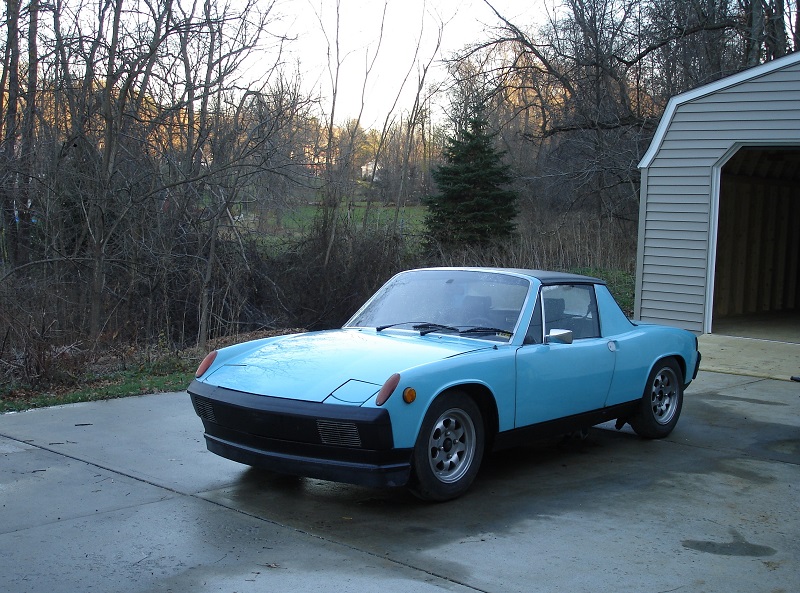
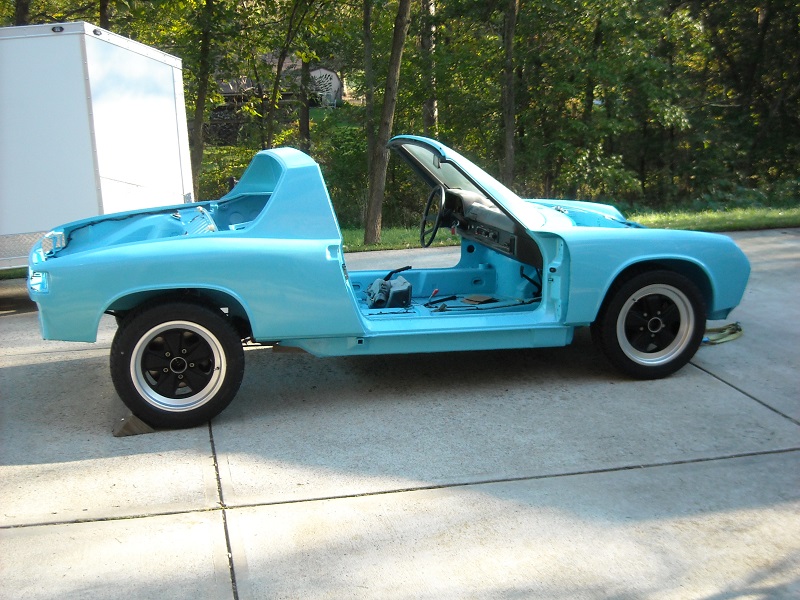
After its first bath it doesn't look too bad. But in spite of being buried over 1 mile inside a mountain AND being in a temperature and humidity controlled storage the rust worms were still at work. albeit a little slower.
Since that time I have had the extensive rust issues taken care of by Chris at Tangerine and also had the fenders flared for the 5 bolt Fuchs I will be running.
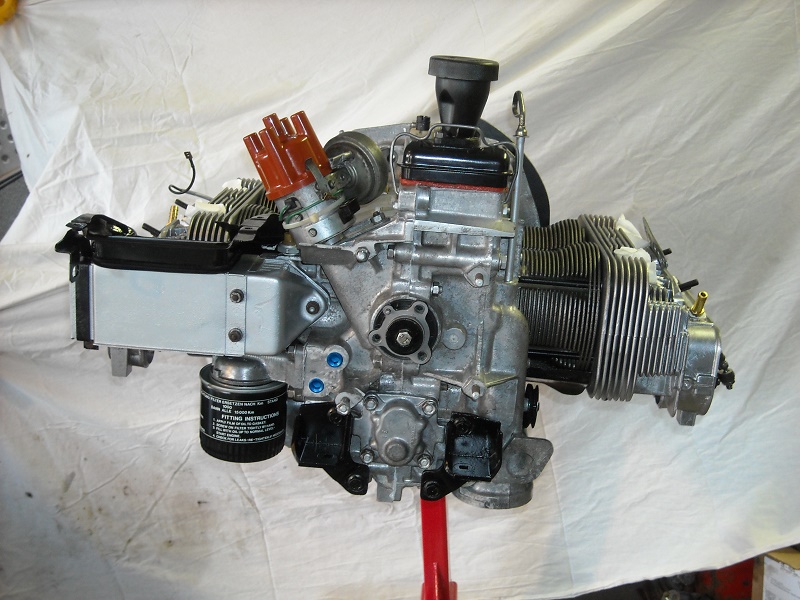
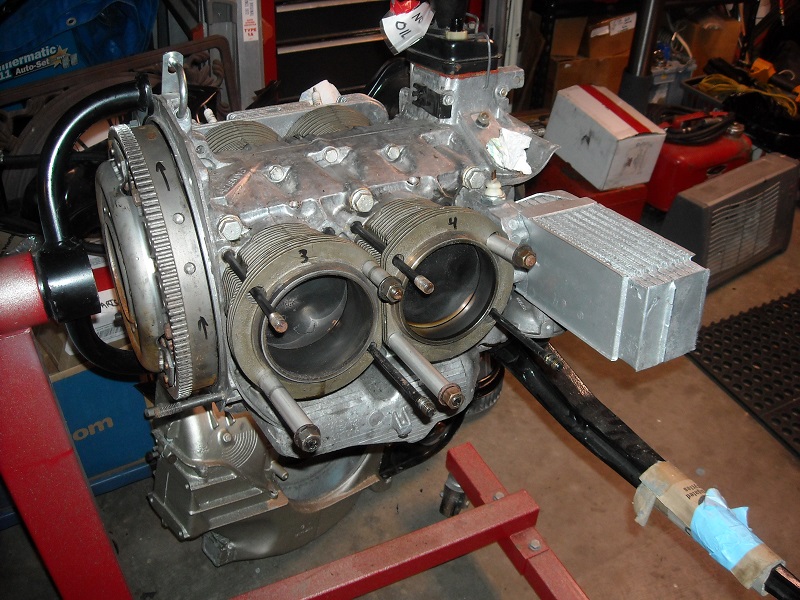
I have completed the engine rebuild myself going from 1.7 into a 2056 with heads by HAM and a Raby 9590 cam, I am keeping the D-jet FI.
I am now working on the body doing body work and paint. I AM NOT A BODY MAN. I really don’t even like body work but think I am capable.
This is the hardest part for me. I would rather build engines. Most of my experience has been with Harley engines though and there just like big lawnmowers anyway...
Along the way I am learning to weld, machine small parts and paint and acquiring many new tools.
My own self-imposed goal was to drive it to 2016 Pittsburgh Vintage Grand Prix. Not sure if it will happen but without a goal it definitely WON’T happen.
I will post more pictures of the progress I have already made on the car.
This Build off Challenge will be just a little more incentive get out in the shed and work on the car.
Wouldn't it be great to get 30 Teeners back on the road?
Good luck to all participants and I welcome any interest and questions about how or why I did something
Tom
BTW did I mention I don't like body work..
Posted by: RobW Oct 1 2015, 08:28 AM
Good back story Tom. I'm a big fan of Olympic Blue (Dad's car). Good luck with realizing your dreams!
Posted by: dangerranger01 Oct 1 2015, 07:53 PM
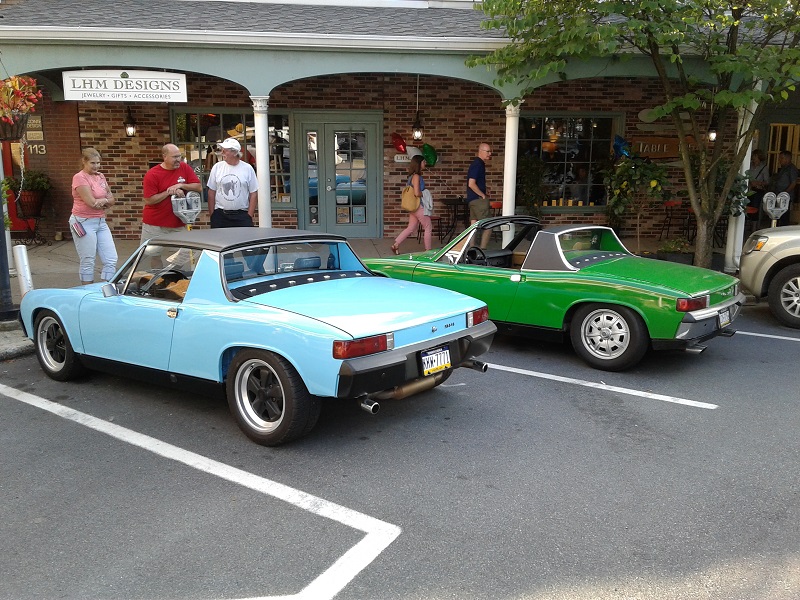
Cool story. I love Olympic Blue....it's my cars orginal color and what I want to respray it as.
Also, don't think i have any flared OB cars in my cars folder. Sounds like you have a good plan.
Posted by: Mueller Oct 1 2015, 07:58 PM
Yep, cool story , I love the storage unit!
How many other cars down there?
Posted by: 914forme Oct 1 2015, 08:02 PM
I used to work in a Limestone mine, not for limestone mining,  so I am very familiar with that dust. Very good story, can't wait to see this one come back to life, love the color.
Posted by: Olympic 1.7 Oct 1 2015, 08:42 PM

Yep, cool story , I love the storage unit!
How many other cars down there?
couldn't count them.
There is a couple hundred miles of roadways inside the mountain. usually someone takes you in. cause you don't want to get lost in there.
someone elses video. > https://www.youtube.com/watch?v=IV_gTbs75Zk
And another, this shows more cars there.
https://www.youtube.com/watch?v=QH4YZm5U89k
every thing is in there boats, fire trucks, RVs, classic cars, you name it.
Posted by: Mueller Oct 1 2015, 08:50 PM
Yep, cool story , I love the storage unit!
How many other cars down there?
couldn't count them.
There is a couple hundred miles of roadways inside the mountain. usually someone takes you in. cause you don't want to get lost in there.
someone elses video. > https://www.youtube.com/watch?v=IV_gTbs75Zk
every thing is in there boats, fire trucks, RVs, classic cars, you name it.
NO THANK YOU, I will stay outside!
Posted by: PlantMan Oct 1 2015, 11:11 PM
Good story for sure. Good luck! Looking forward to the build.
Who would have thought....limestone mine.
Posted by: Olympic 1.7 Oct 2 2015, 07:12 AM
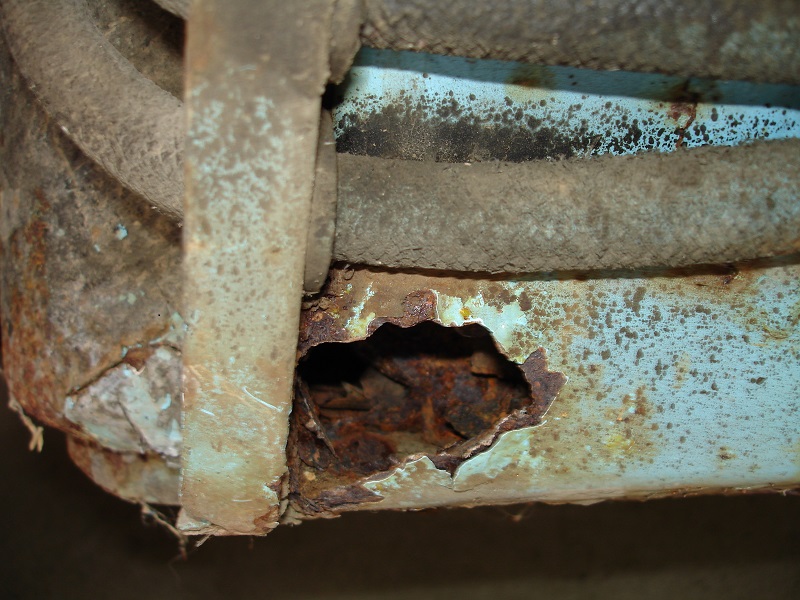
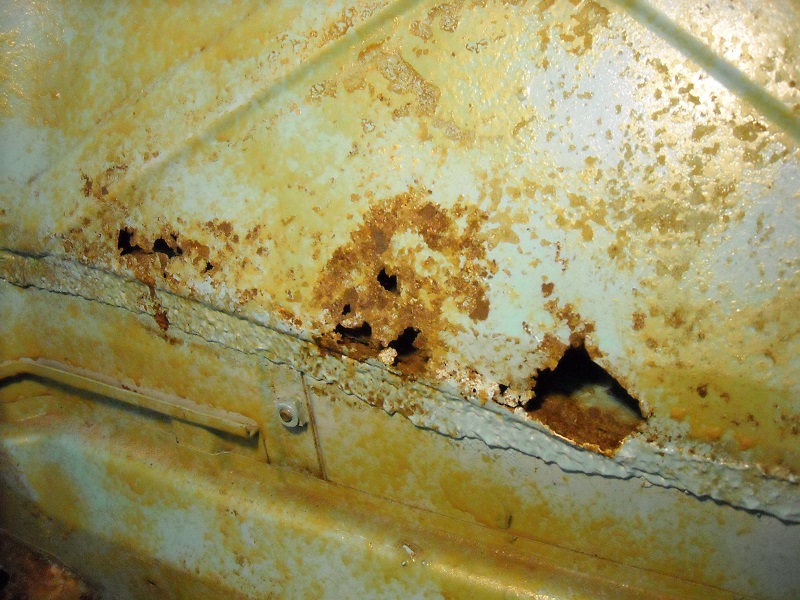
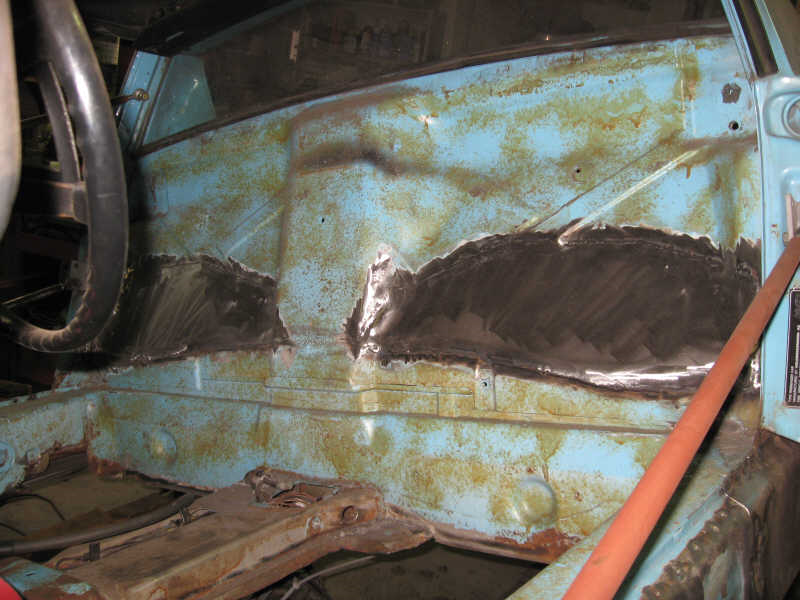
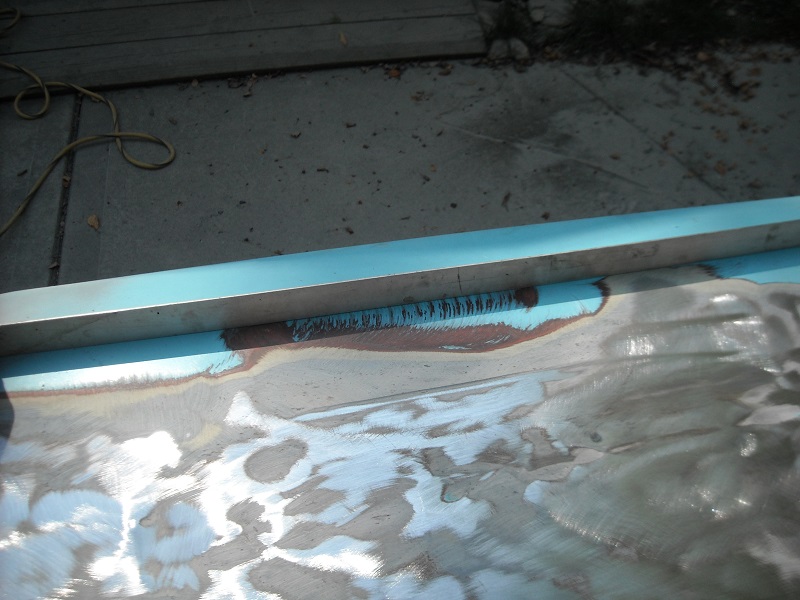
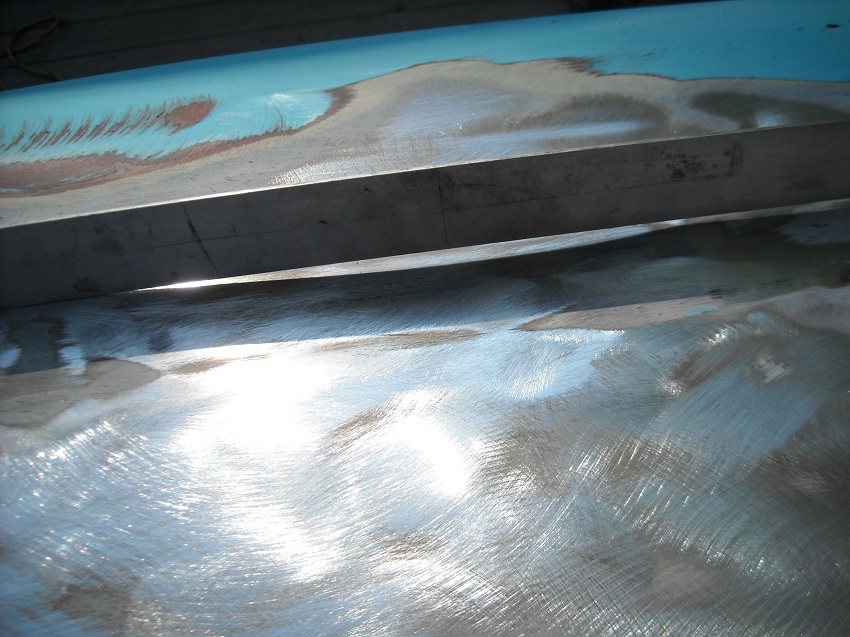
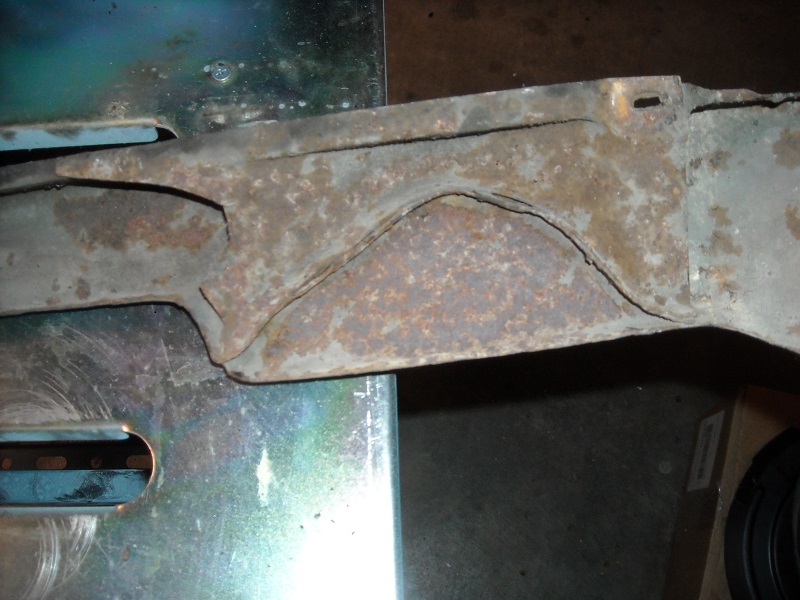
Next a couple pictures of the rust.
I knew it was bad when I started jacking up the car to remove the engine and the doughnut jackpoints just crushed and collapsed INTO the longs... every time I worked on it I had a dustpan full of rusty pieces to sweep up.
Caution pics not suitable for the squeamish.
Crushed jack points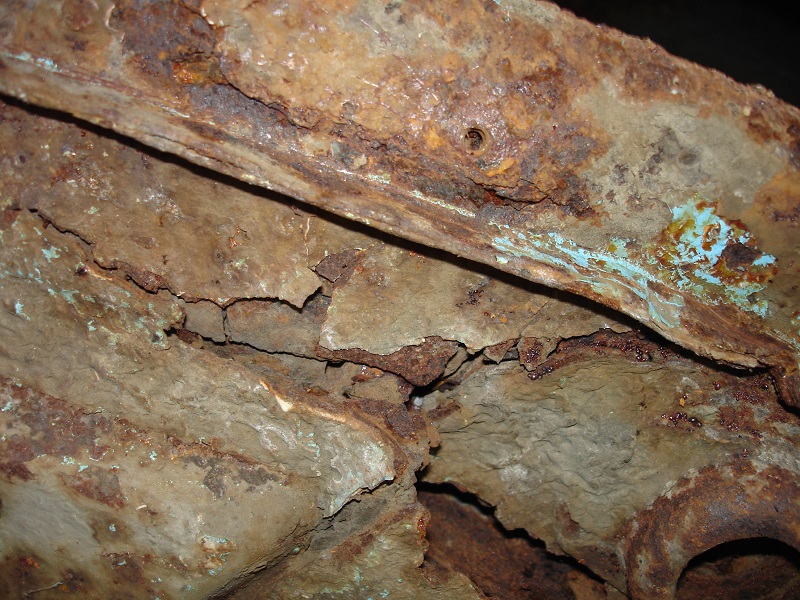
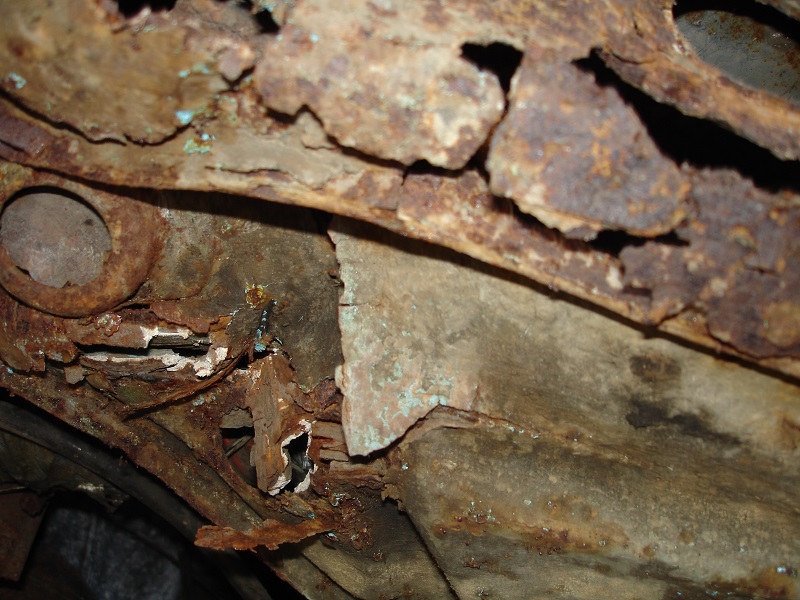
Longs 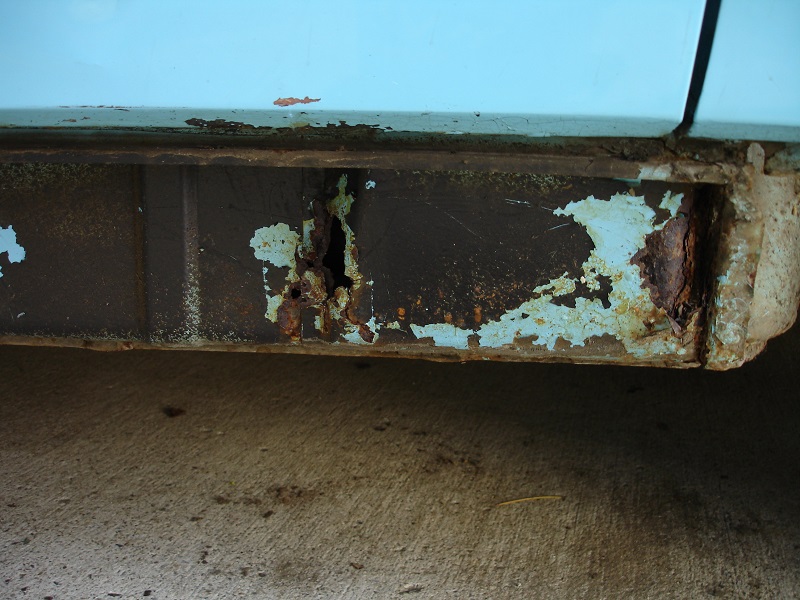
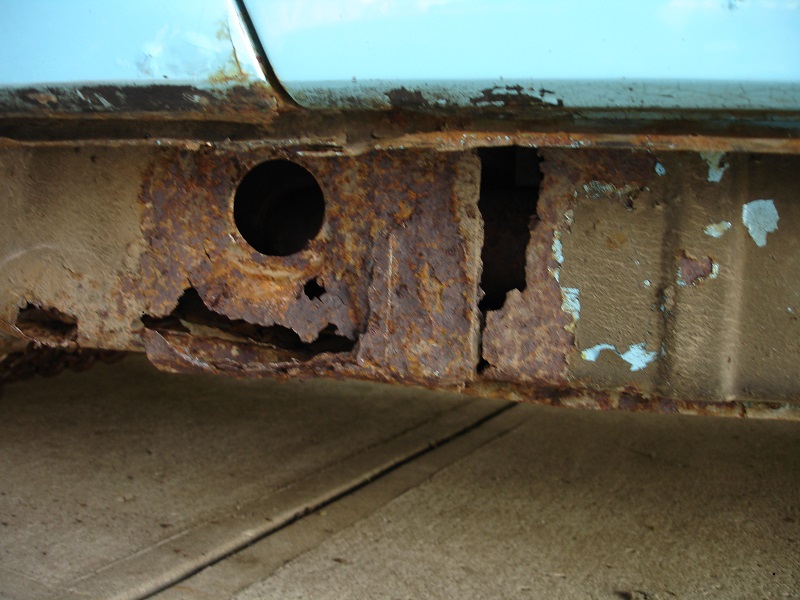
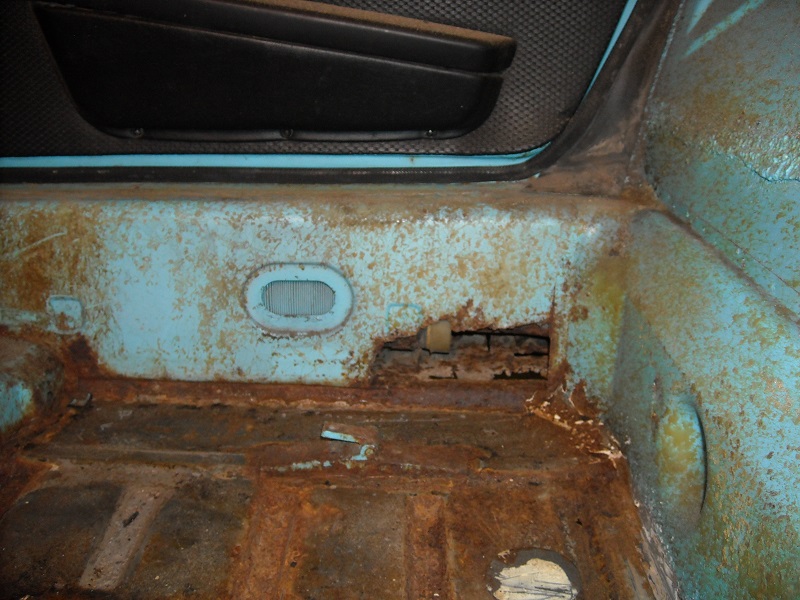
More
You are now excused to  for few minutes. I did..
If this was a west coast car it would have just been parted out..
Do you remember all the cool cars you used to have that you wish you never had sold? I had many. but I still had this one.... AND I had just got it out of the mines after 20 years of someday planning on getting it going again. What a dilemma. As the years passed I had decided it would be my retirement project. And when it was done the GF and I would drive off to many sunsets far away.
So in May '13 I retired and started on it in earnest. 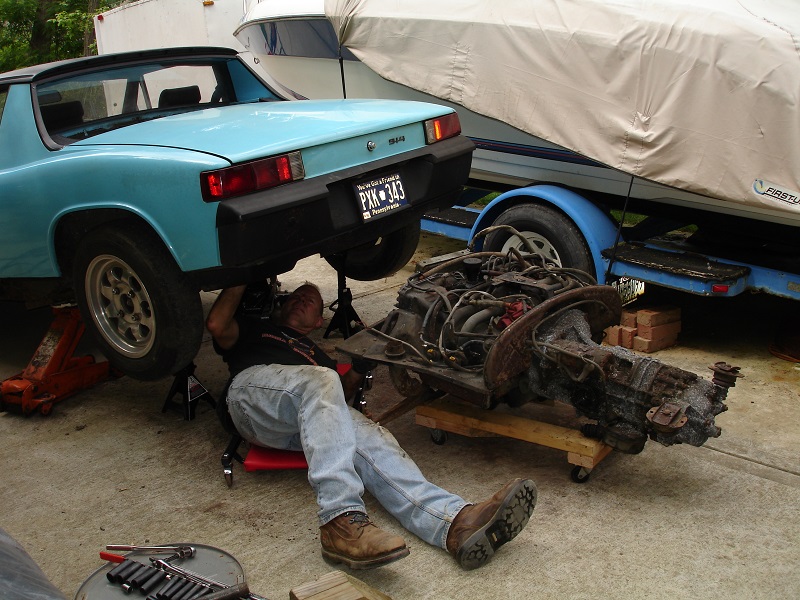
Having NO welding experience, and really not believing anyone local would have the necessary skill to take this on and do a quality job I contacted Chris Foley at Tangerine.
I also sent Chris many of these same pictures and after much discussion he agreed to tackle the project.
So I borrowed a buddy's race car trailer and headed to Connecticut.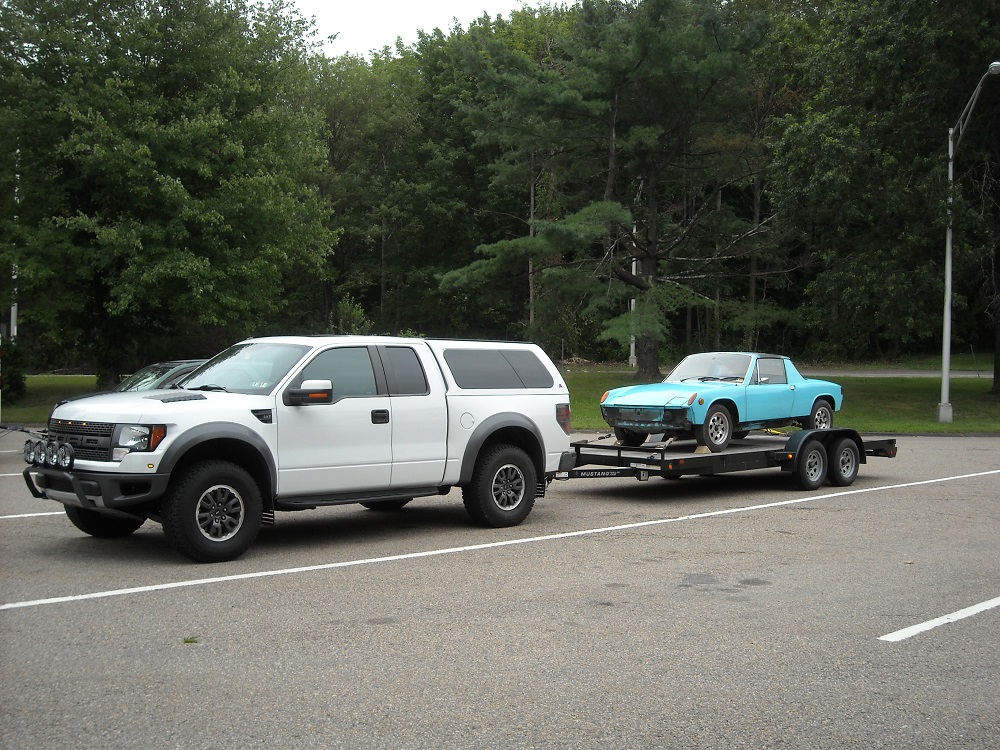
Stay tuned folks... more to come...
Posted by: madmax914 Oct 2 2015, 09:23 AM
Great story Tom, I look forward to following your build.
Posted by: Jeff Bowlsby Oct 2 2015, 09:32 AM
Looks like your car may be one of the 73 1.7Ls without the appearance group. The rawest most basic 914 made.
Posted by: Andyrew Oct 2 2015, 10:26 AM
Ouch
That rust is serious!!
Posted by: Olympic 1.7 Oct 2 2015, 10:29 AM
Looks like your car may be one of the 73 1.7Ls without the appearance group. The rawest most basic 914 made.
Yep, no extras on this one.
Its an early '73 Build date 9/72. #2387
No door bars, not sure about the roof yet. and as I found out yesterday, early rain tray. didn't know there was a difference.
mine got a little cracked up and warped in storage and a friend has an'74 parts car I thought I could use the rain tray from. no such luck.
I did manage to straighten my rain tray out with a heat gun, and repaired the cracked using epoxy. looks to be holding so far. Time will tell.
Posted by: Olympic 1.7 Oct 3 2015, 10:14 AM
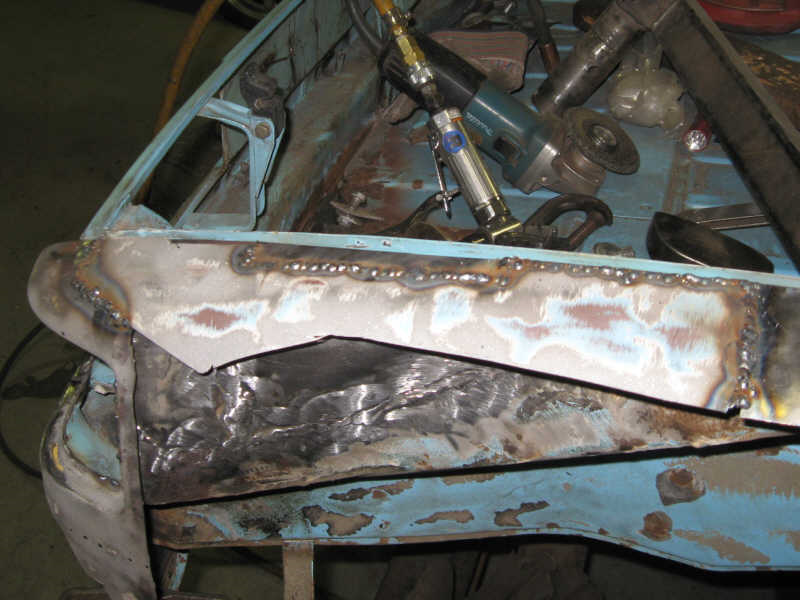
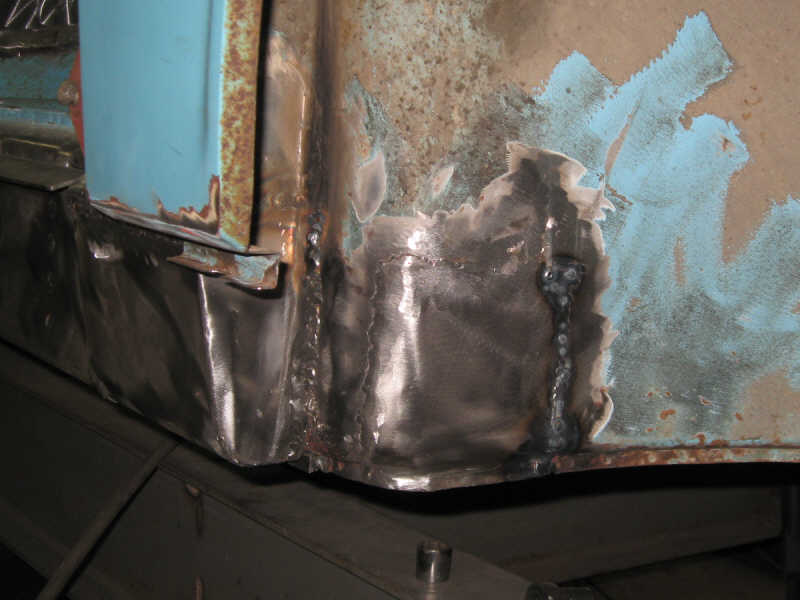
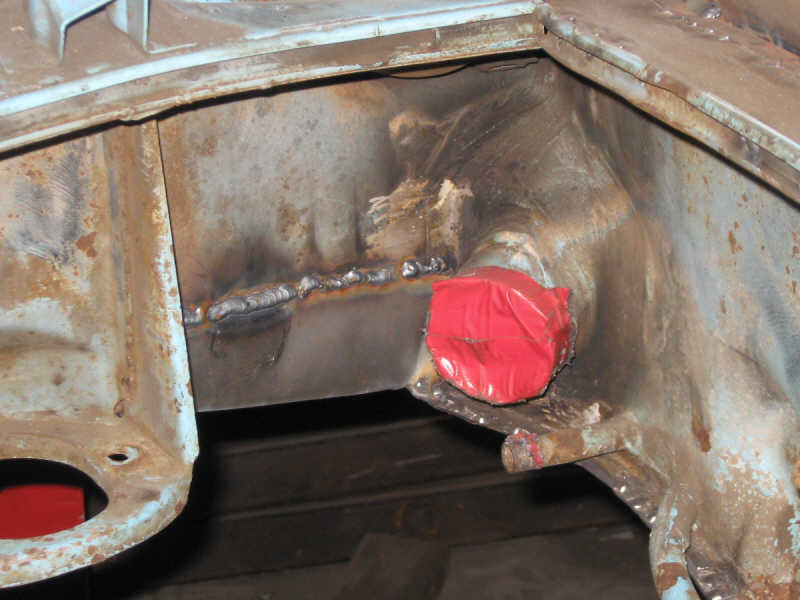
This is the work that was completed by the guys at Tangerine Racing.
as usual things are worse once you start tearing into them than you thought.


Posted by: Olympic 1.7 Oct 3 2015, 10:17 AM
Couple more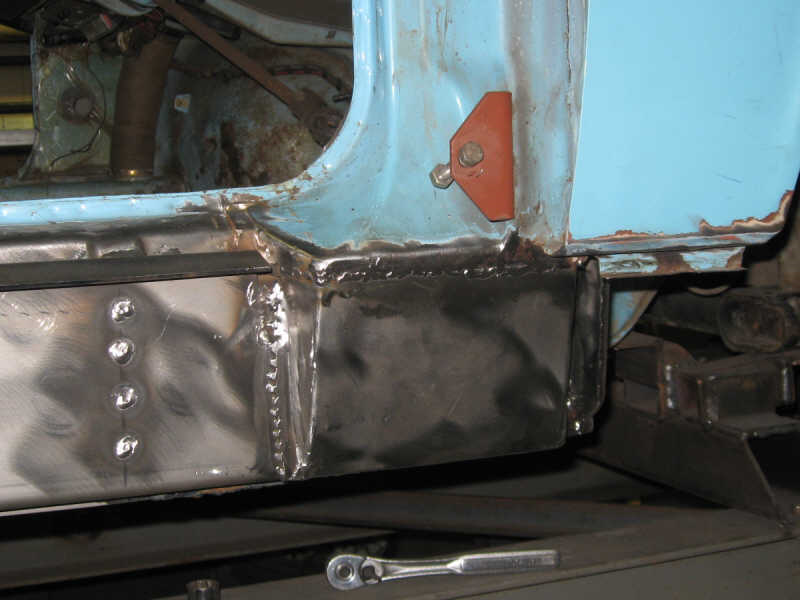

Posted by: Olympic 1.7 Oct 3 2015, 10:37 AM
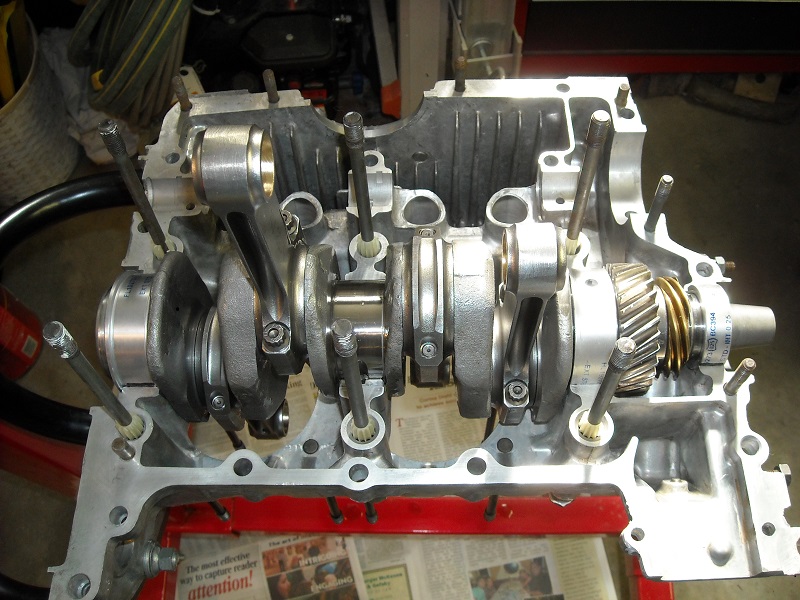
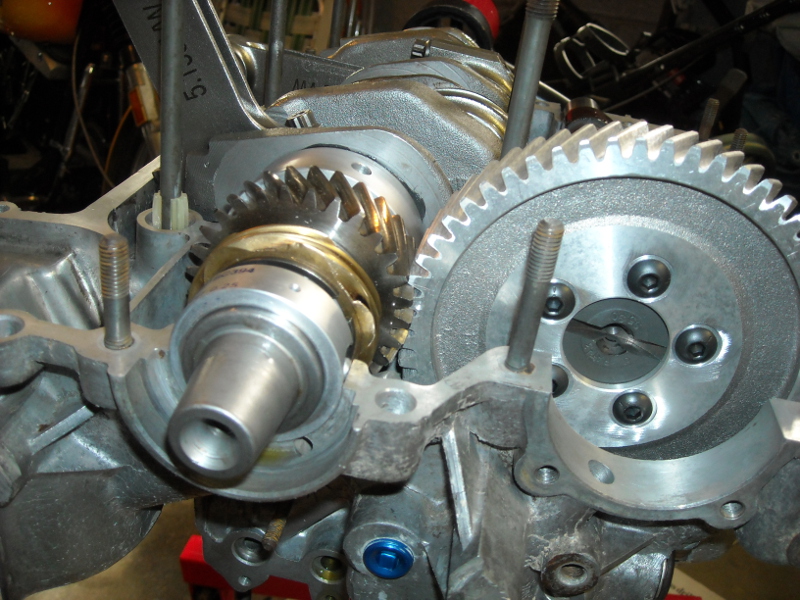
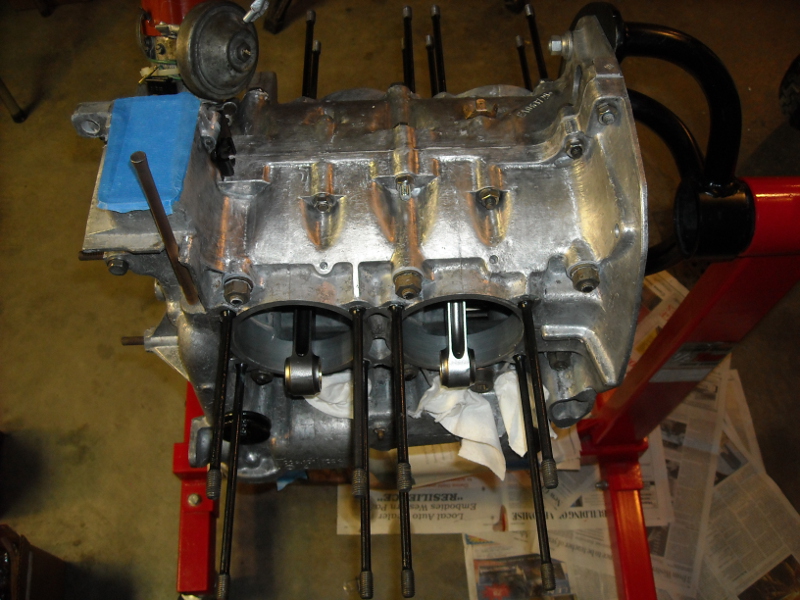
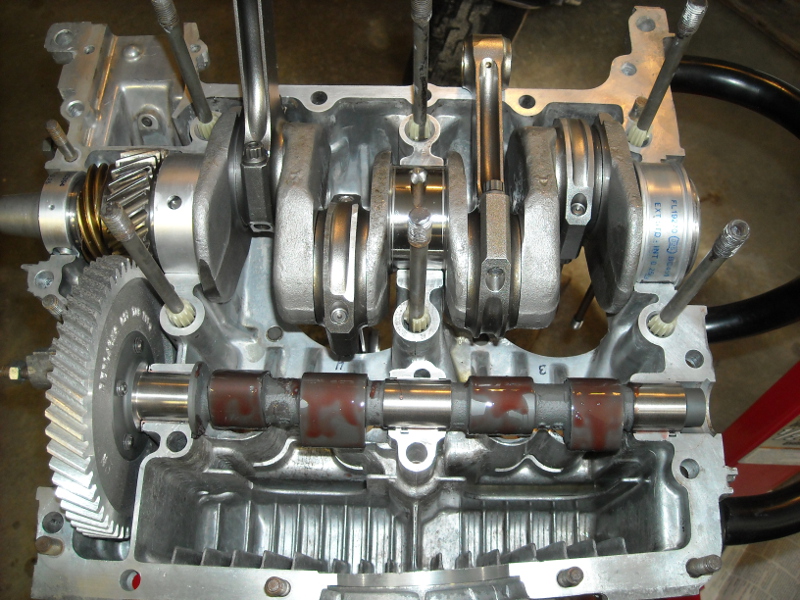
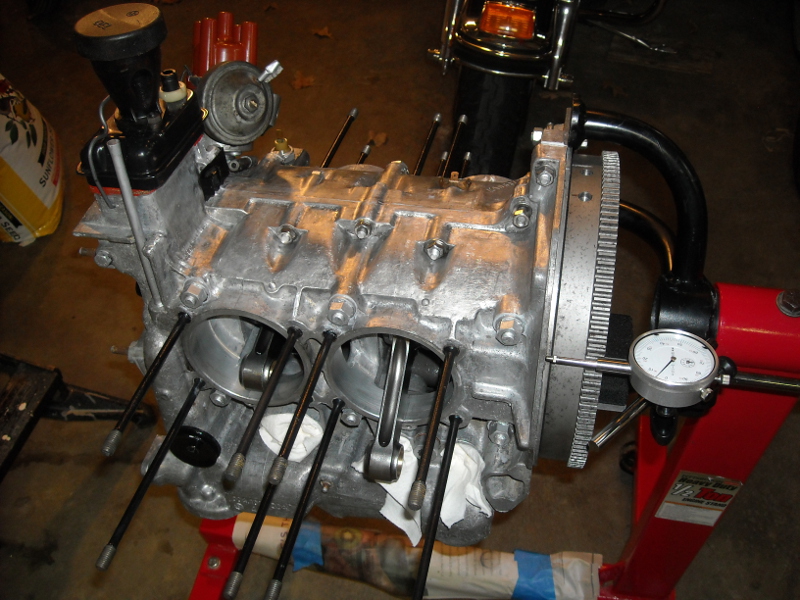
While Tangerine was working on the body I started to work on the engine..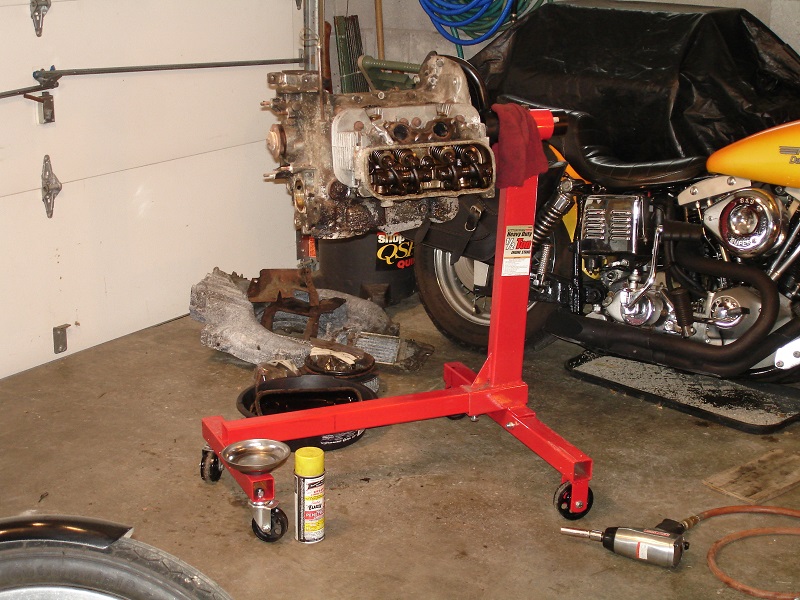
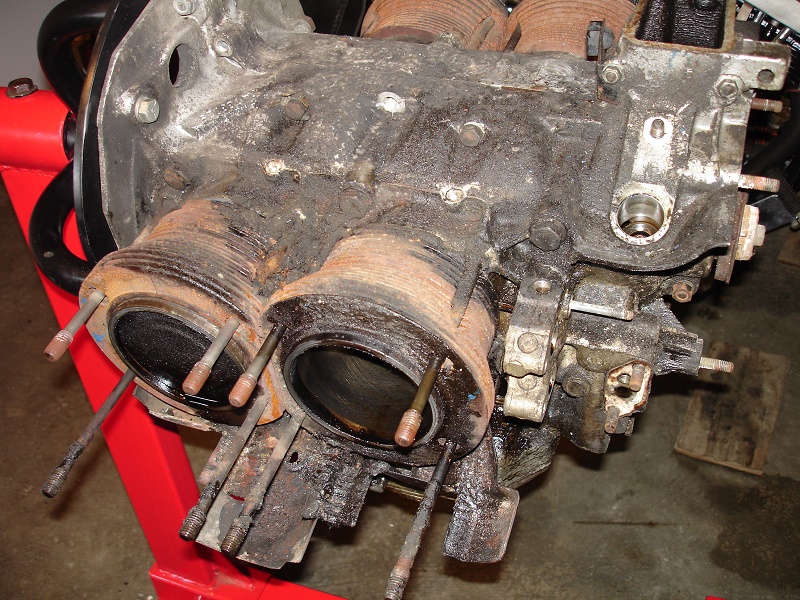
Case all cleaned up 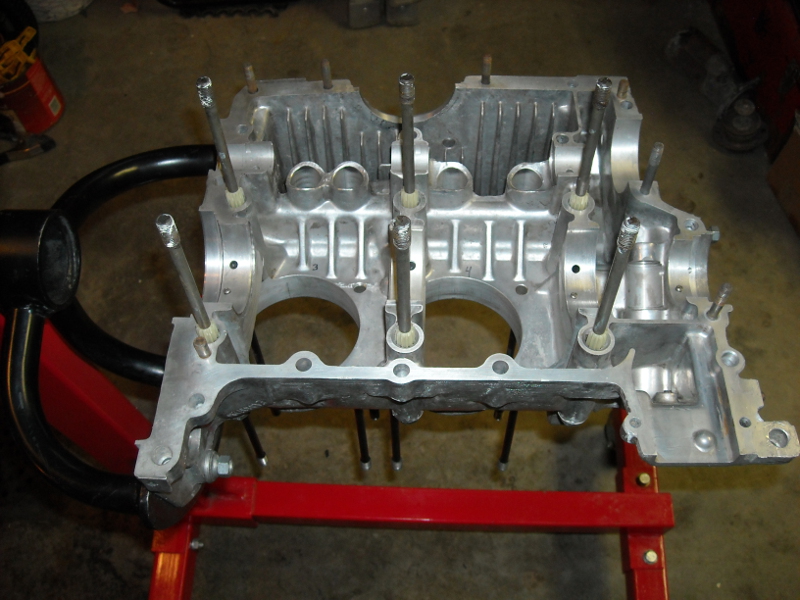
Crank built... 71mm crank 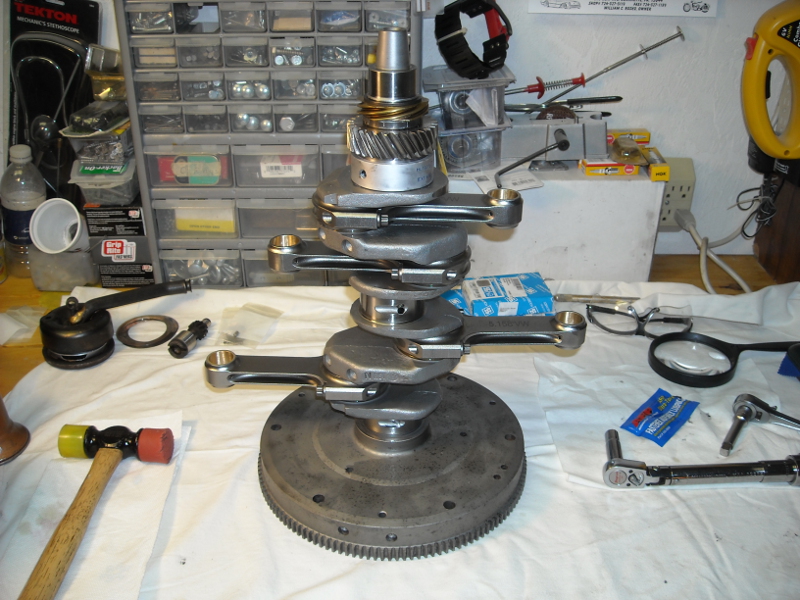
Posted by: dangerranger01 Oct 4 2015, 08:08 PM
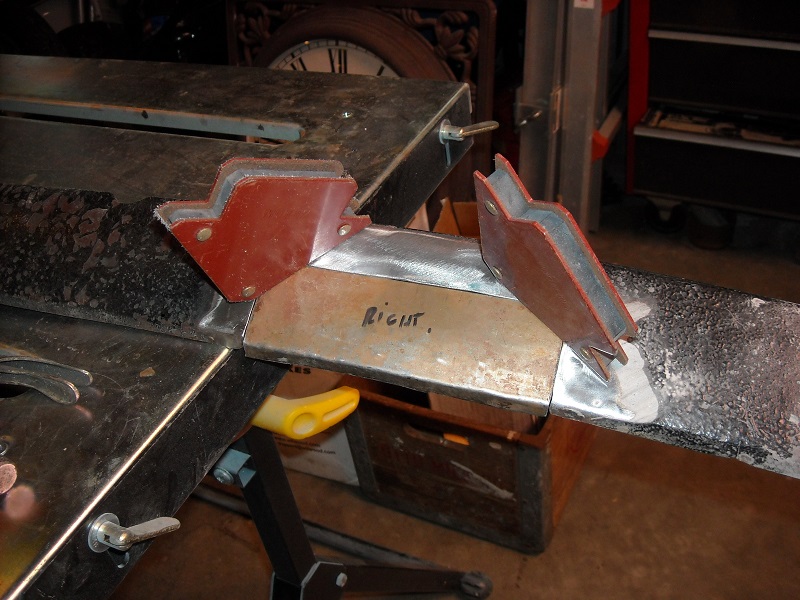
Curious on what kind of long stiffening Tangerine did? Looks like some sort of outside (like 914ltd), and also something on the inside (like the Engam kits). They don't sell anything directly like that from what I can find on their site....
Posted by: mbseto Oct 5 2015, 07:30 AM
Curious on what kind of long stiffening Tangerine did? Looks like some sort of outside (like 914ltd), and also something on the inside (like the Engam kits). They don't sell anything directly like that from what I can find on their site....
I'm curious on that too... From those rosette welds on the outer long, I'm guessing it's actually a stiffener welded to the existing outer on the ribs?
Posted by: Olympic 1.7 Oct 5 2015, 09:53 AM
Curious on what kind of long stiffening Tangerine did? Looks like some sort of outside (like 914ltd), and also something on the inside (like the Engam kits). They don't sell anything directly like that from what I can find on their site....
I believe they welded the outer pieces to what was left of my outer longs. after cutting away the bad parts.
and the passenger side inside long was pieced in.
My guess is these parts were made in house, Maybe Chris will chime in.
I know it is heavy duty stuff. it looks to be 1/8" at least on the outers.
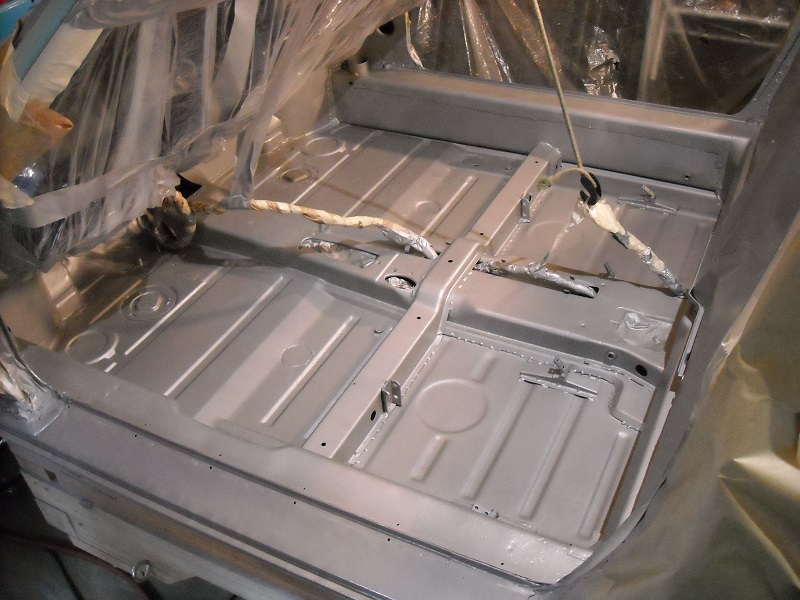
Built a cart to move the car around and work on it. sandblasting in the driveway. Mostly the stuff I couldn't easily get at with a sanding wheel or disc.
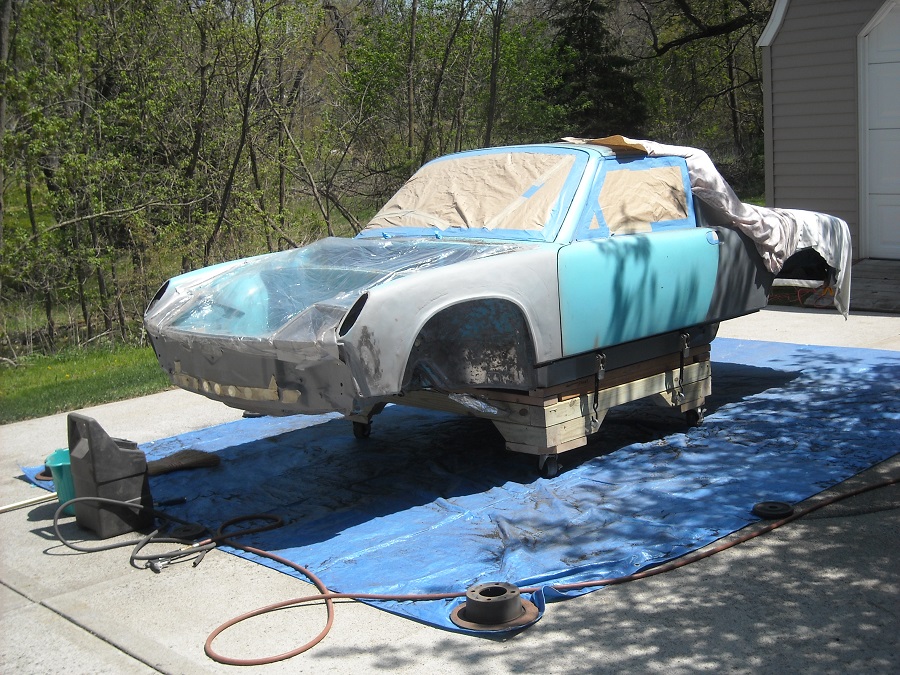
Prepped the trunk for paint, Figure this is a good place to practice painting
And my first attempt at paint.
Posted by: Racer Chris Oct 5 2015, 10:40 AM
Those are the 914LTD long stiffening kit.
Posted by: 914forme Oct 5 2015, 11:09 AM
And I will Say the 914LTD log kit is a great item. Even if you don't have log issues they stiffen the chassis up significantly. I love the set I aded to my car. I think it does more than the Engmann kit.
Posted by: Olympic 1.7 Oct 5 2015, 06:23 PM
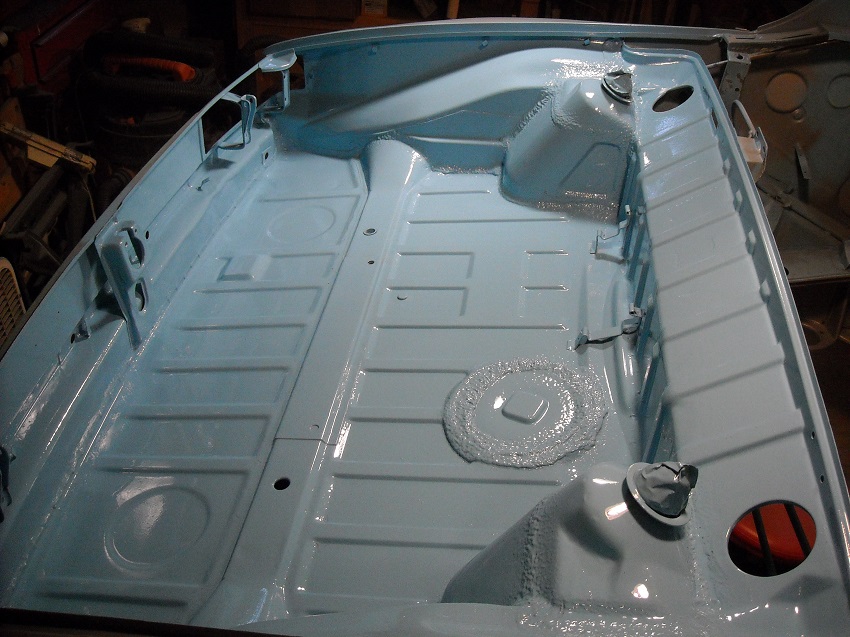
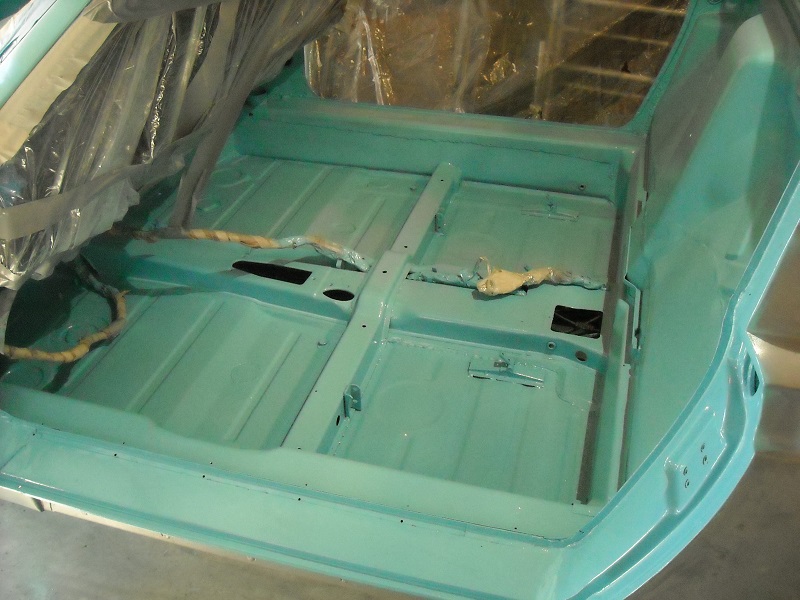
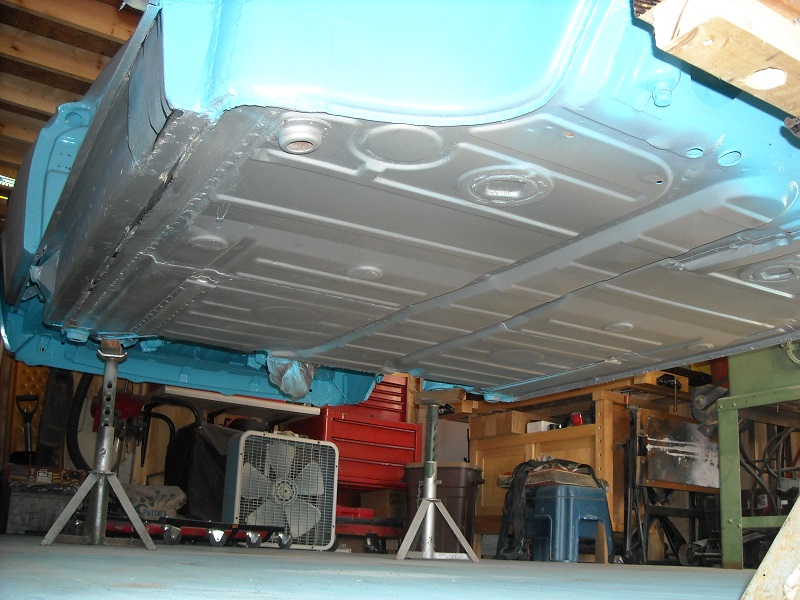
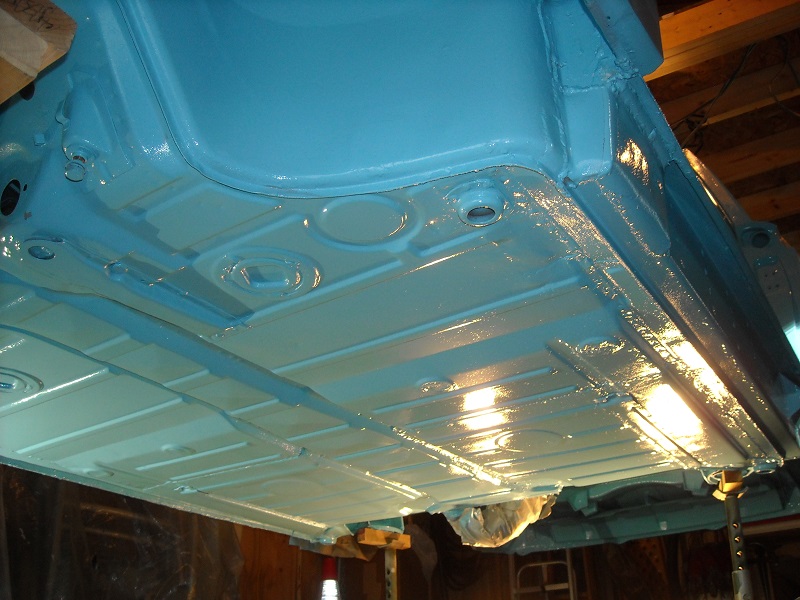
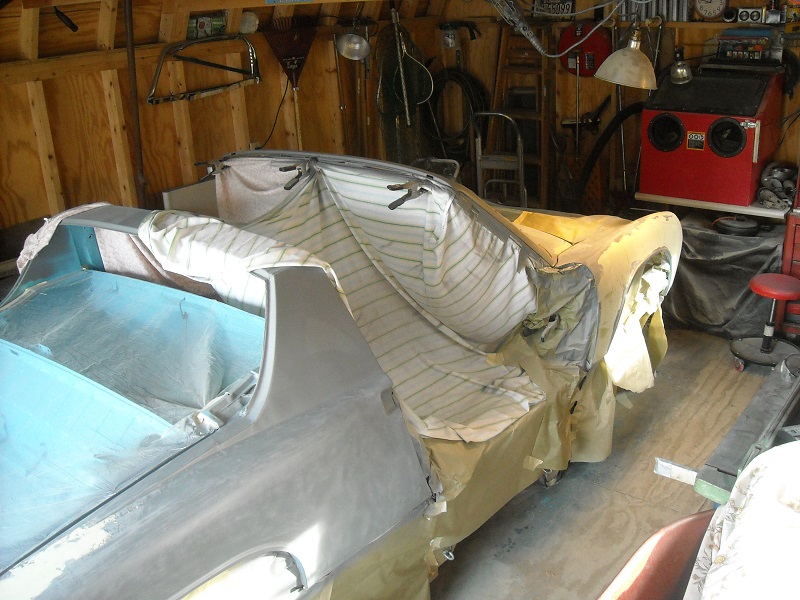
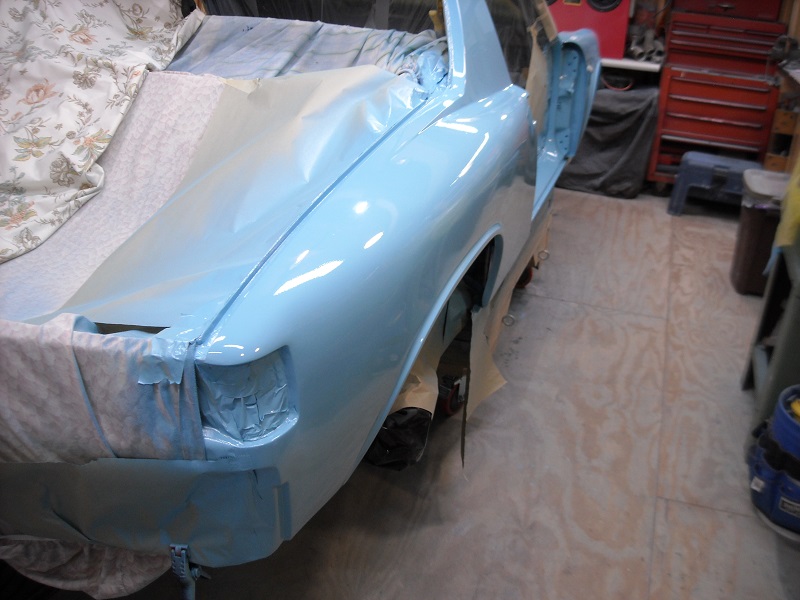
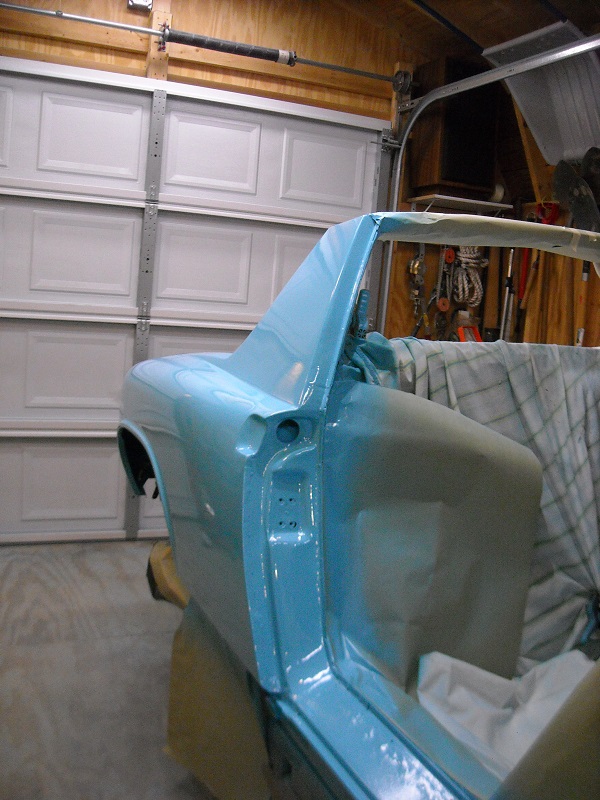
Got some more paint on it. finished the undersides. Everything no one will see. Just trying to get good with a spray gun.
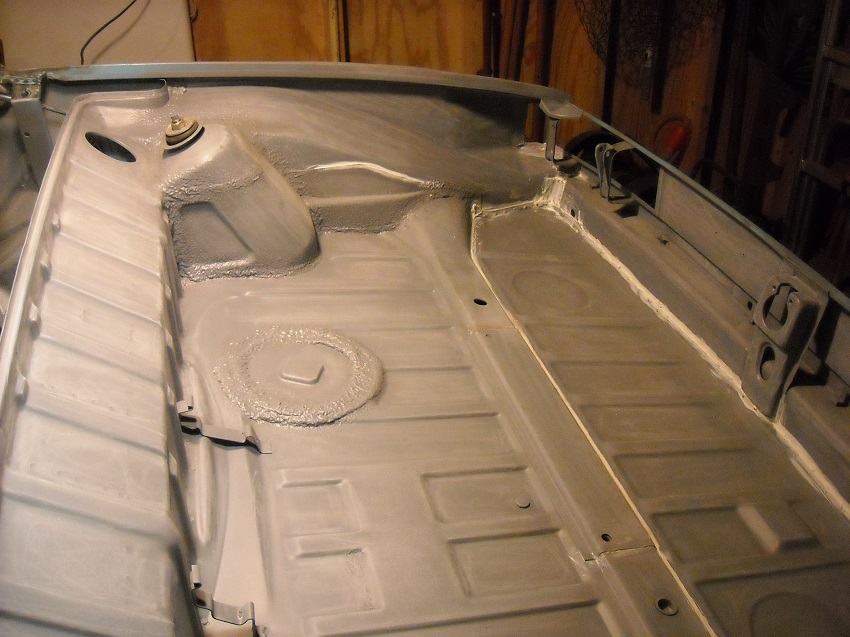
all the undersides, inner fenders, under the trunks etc. got two coats of Rust Bullet. I like this stuff because it is hard as a rock. I didn't put it on any rusty metal like they say you can though. I blasted and sanded everything first. the two coats go on about 2-4 hours apart then the next day I would hit it with two coats of epoxy primer and two coats of urethane. I used PPG paint for the epoxy and PPG JAU for the color.
Same for the interior and engine compartment. all these surfaces have 6 coats of paint on them now.
Just got the underside of the pan and the engine compartment finished in epoxy and color today. I still have to reshoot the rear trunk because I burned up the paint there welding in the rear sway bar mounts.
What a pain lying on your back spraying with the car literally 12 inches from your face. The rotisserie would be REALLY nice....
Guess I have to start working on the fenders again..
Attached image(s)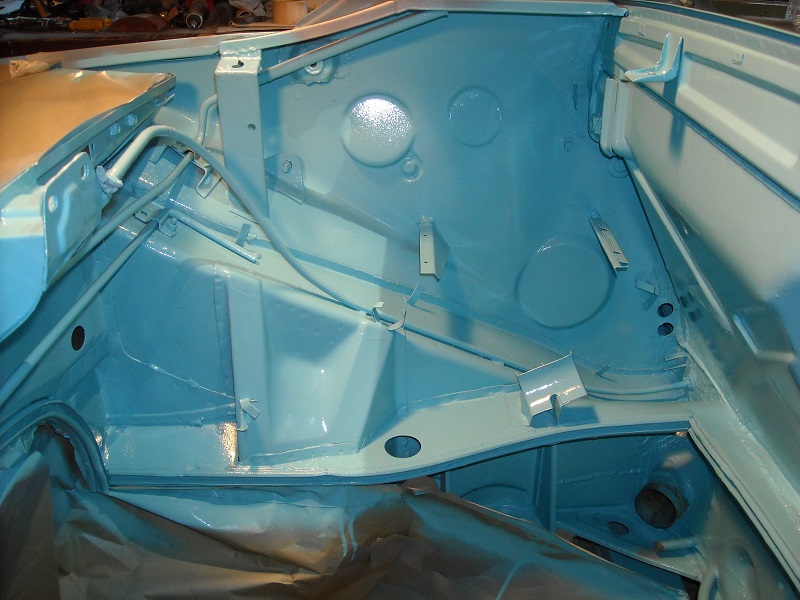
Posted by: stevegm Oct 5 2015, 06:30 PM
It looks great. I always love to see fresh paint go on. I makes me imagine that must have been how it looked coming off of the assembly line.
Posted by: Racer Chris Oct 6 2015, 06:38 AM

Posted by: cary Oct 6 2015, 06:46 AM
Subscibe
Posted by: francar Oct 11 2015, 11:16 AM

Posted by: Olympic 1.7 Oct 16 2015, 12:10 PM
Big setback today....
There is a guy I spoke with last week about plastic media blasting the doors, F+ R trunk lids and my spare roof.
So I got my parts out of the storage facility and stripped everything out of the doors. and off the roof. Loaded them up in the truck and thought I would call before I drove down there.
He tells me he is going out of town for a job and won't be back until the 2nd week of November. DAMN DAMN DAMN. 
I made a bunch of calls and couldn't find anyone else in the Pittsburgh area that does this. found a guy that does soda but he is mobile and has do it at your place.
that really won't work for me, and I am not real interested in the water that they use to clean off the soda.
Guess I just wait until he gets back. and the weather gets colder by the day here. not great for painting.
its not like I don't have other things too work on, it just screws up the plan... 
Rant over..
Posted by: brettrarnold Oct 19 2015, 03:06 PM
Big setback today....
There is a guy I spoke with last week about plastic media blasting the doors, F+ R trunk lids and my spare roof.
So I got my parts out of the storage facility and stripped everything out of the doors. and off the roof. Loaded them up in the truck and thought I would call before I drove down there.
He tells me he is going out of town for a job and won't be back until the 2nd week of November. DAMN DAMN DAMN.
I made a bunch of calls and couldn't find anyone else in the Pittsburgh area that does this. found a guy that does soda but he is mobile and has do it at your place.
that really won't work for me, and I am not real interested in the water that they use to clean off the soda.
Guess I just wait until he gets back. and the weather gets colder by the day here. not great for painting.
its not like I don't have other things too work on, it just screws up the plan...
Rant over..
Paint looks fantastic and the engine work you are doing is amazing. Love that light blue color. Am currently trying to decide whether or not to paint my car. It has a custom paintjob that I love but since I have to cut into the body so not sure matching the existing paint color will possible.
How much do you anticipate it costing to paint it yourself?
-Brett
Posted by: Olympic 1.7 Nov 10 2015, 08:17 AM
Still doing body work on the Pass side fenders. not much to show there.
Picked up some parts from the powder coaters, more stuff no one will see. 
On the seat mounts I had to devise a way to remove the spring for the tilt mechanism, This is what I came up with. It worked good for both disassembly and reassembly, without damaging my new powder coat.
I put a couple screws in to hold the seat mount and the turnbuckle worked beautifully to pull the spring so I could drive in the pin... 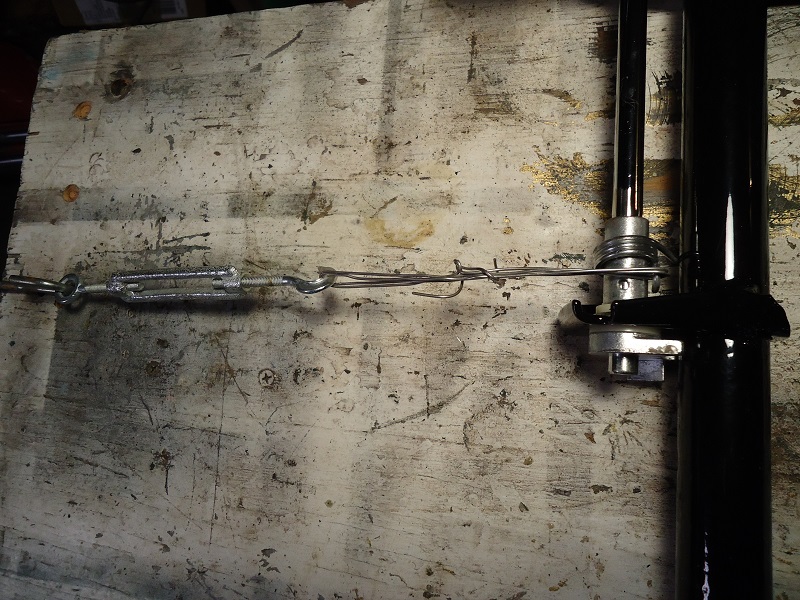
And finished.....
Yeah, I had the tilt levers CHROMED... a good friend runs a chrome shop. I couldn't help myself... 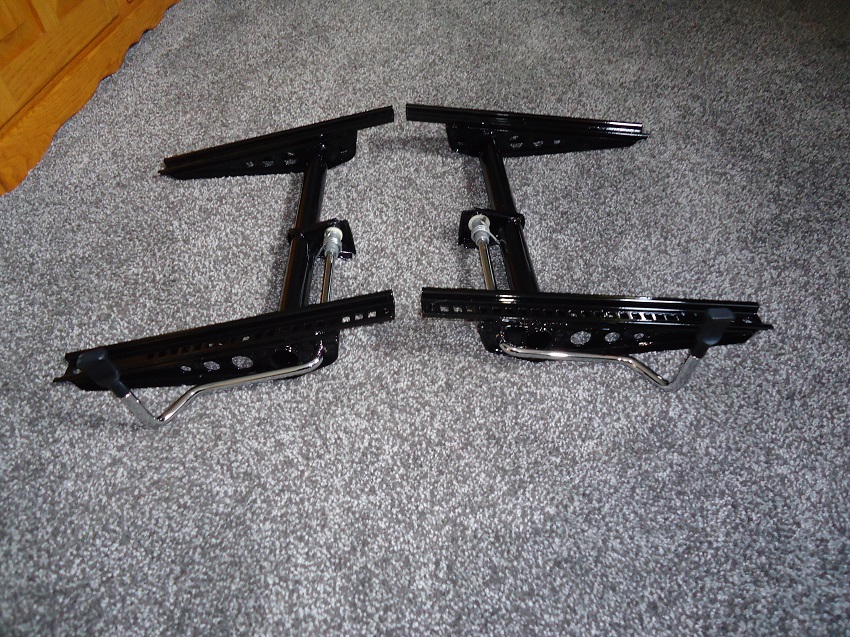
Like I said, More stuff no one will see....
Posted by: Darren C Nov 10 2015, 04:22 PM
Looking good Tom!
Just a quick bit of advice. I did exactly like you and had my seat runners powder coated. I fitted them back in my car and then put the seats back in only to find they jammed up solid. I then had to figure a way to get at the runners to unbolt them off the floor still stuck to the seats so I could flip over the seats and drift the runners off with a hammer and block of wood.
My advice is take the 2 runners off the base of the seats and check them on your newly powder coated frames before you've fitted them in the car and got the seats stuck!
I had to sand down the mating surfaces of the powder coat to get them to slide easy before I put it all back in the car.
Good luck. (They do look nice)
regards
Darren
Posted by: Olympic 1.7 Nov 10 2015, 04:29 PM
Looking good Tom!
Just a quick bit of advice. I did exactly like you and had my seat runners powder coated. I fitted them back in my car and then put the seats back in only to find they jammed up solid. I then had to figure a way to get at the runners to unbolt them off the floor still stuck to the seats so I could flip over the seats and drift the runners off with a hammer and block of wood.
My advice is take the 2 runners off the base of the seats and check them on your newly powder coated frames before you've fitted them in the car and got the seats stuck!
I had to sand down the mating surfaces of the powder coat to get them to slide easy before I put it all back in the car.
Good luck. (They do look nice)
regards
Darren
Thanks for the heads up... I did have to ream out the tilt arm bushings because of the chrome, but hadn't thought about the seat runners.
Posted by: dangerranger01 Nov 24 2015, 10:16 PM
Updates? Love this build so much....
Posted by: Olympic 1.7 Nov 27 2015, 12:43 PM
Started doing the bodywork on the Pass side, Trying to get out there on the warmer days. easier to heat up the shed. 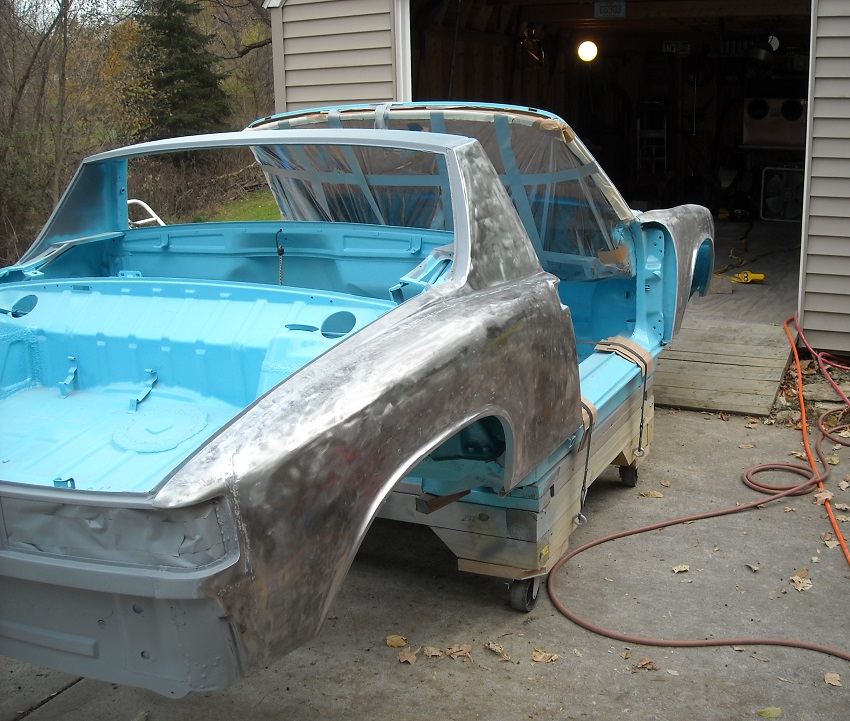
Then I got a pretty nasty cut across the knuckle of my right hand middle finger. took 7 stiches to close....
Slowed me down a little, was supposed to have a brace on it for 2 weeks.... I didn't think about how much you use that finger. other than for waving at foolish motorists.
anyways every time I started working with it. I would open it back up.
I know excuses are like assholes.....
but in spite of that I did get a couple things accomplished..
stripped the old bearings / races out of my hubs and bead blasted them.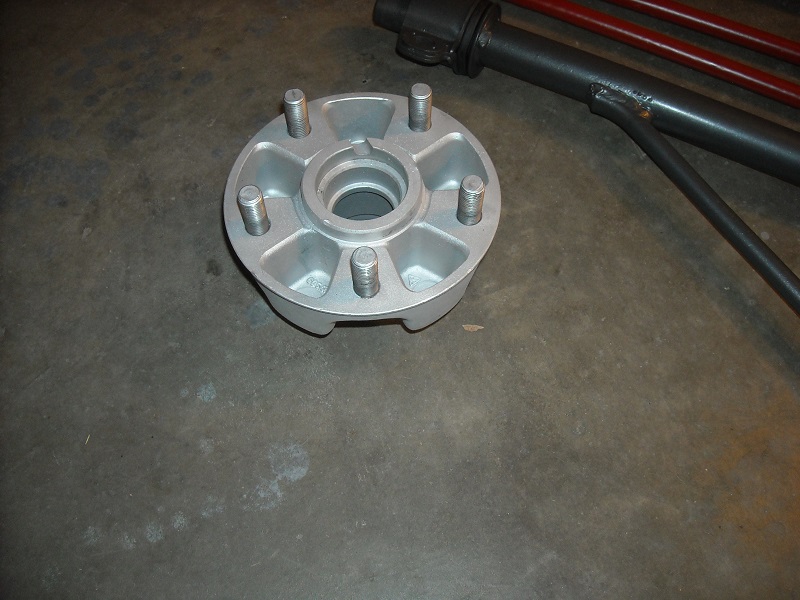
and installed my Elephant Racing rubber bushings in to my front control arms. Not as easy as in the video ( especially with this finger ) but still went pretty smoothly. 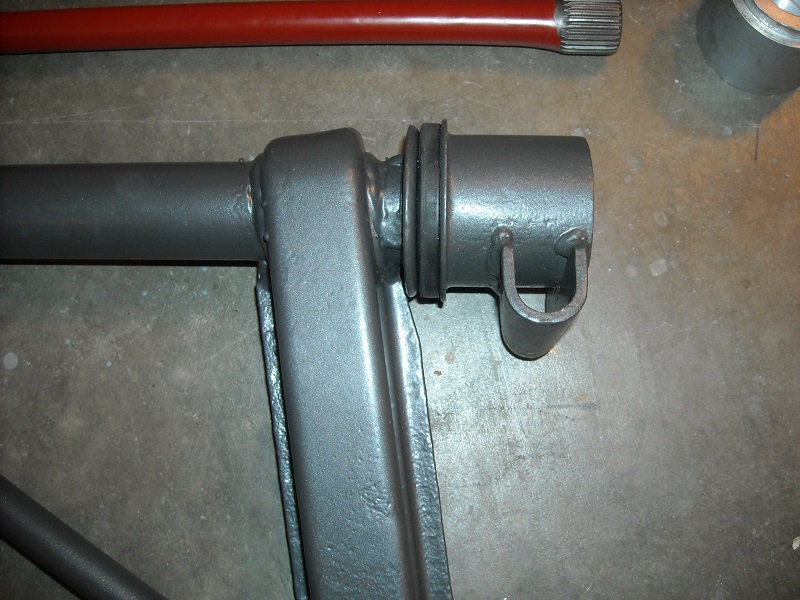

Question on the torsion bars, do the L /R markings go in front or in back?
Vendors
I took advantage of 914 Rubbers Black Friday sale and put in an order, even though I won't need the stuff for a little while. price ~ 500
I sent my front A calipers to PMB for a rebuild, and ordered the rest of my brake needs price ~ 2000
Hope to get these damn stiches out in time for Pennsylvania Deer hunting on Monday.... 
Later..
Posted by: Olympic 1.7 Jan 20 2016, 05:14 PM
Time for an update to this.
the bodywork is coming along.
front fender shaping up.
from this.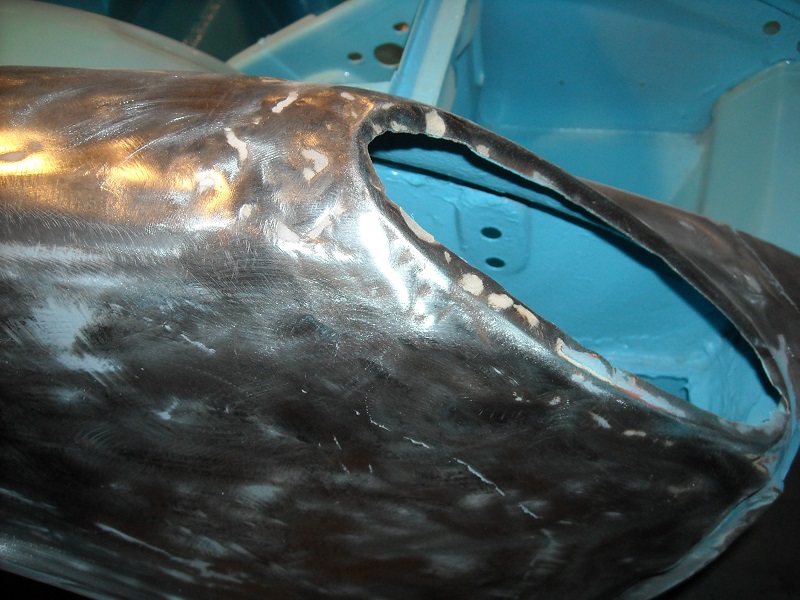
to this, the flares are very subtle. I like the way its turning out
Still not perfect though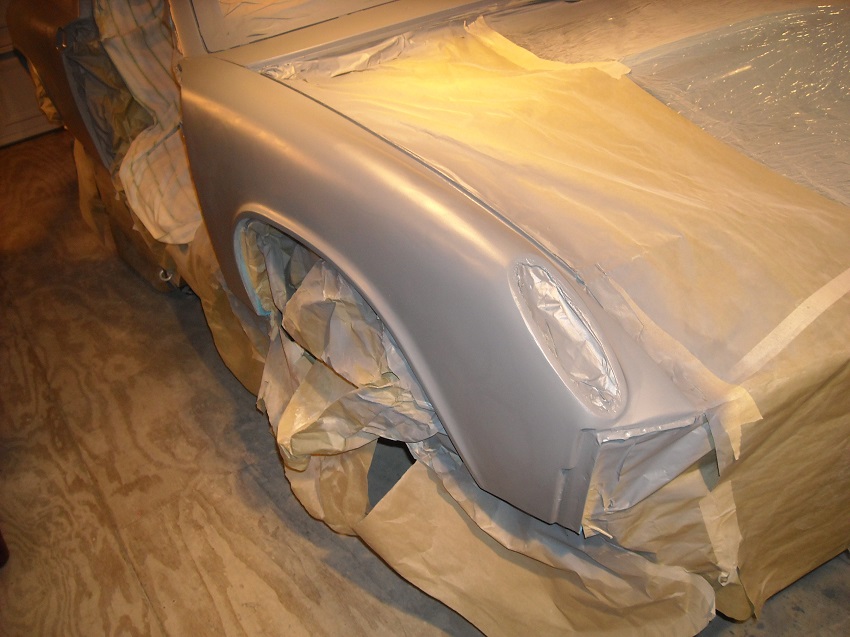
and the rear quarter is shaping up also. this is just rough shaping.
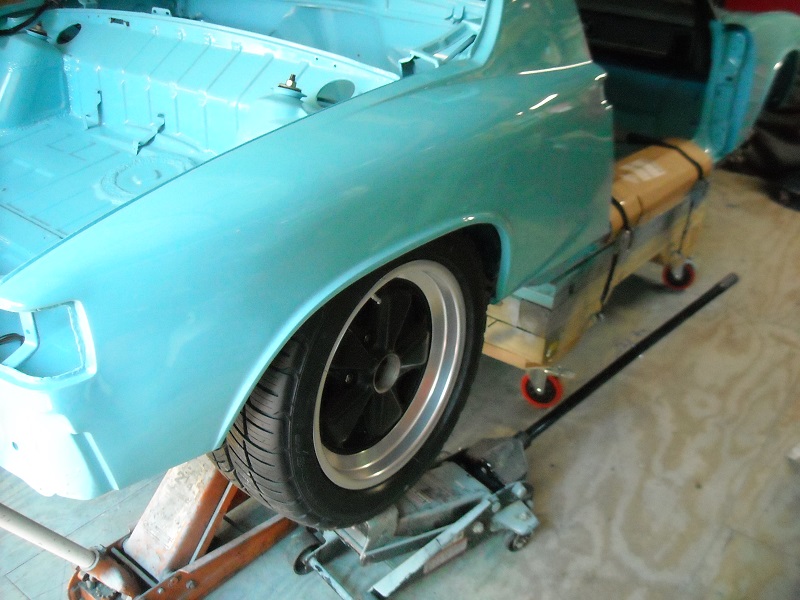
from this angle you can see how much it flares out. I'll be fitting 8'" Fuchs under here.
still working on getting the fender lips right though.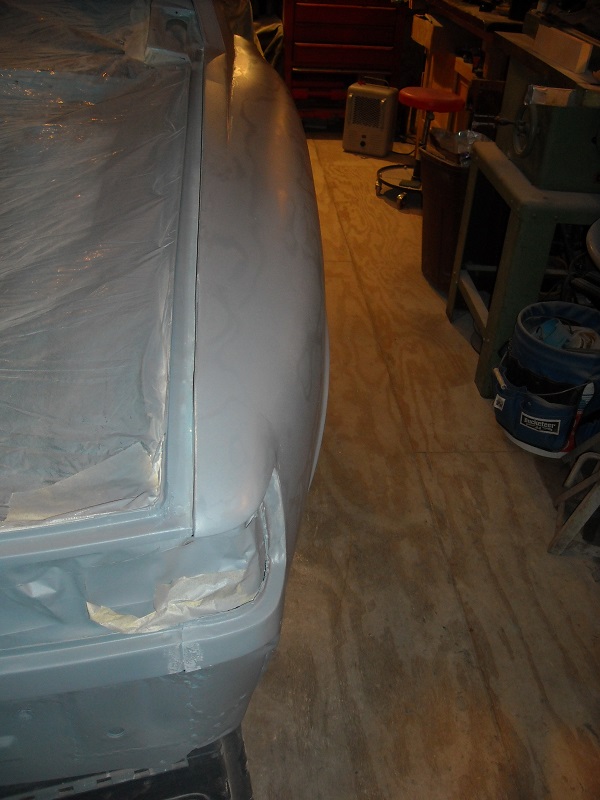
Along the way I am accumulating a lot of body work tools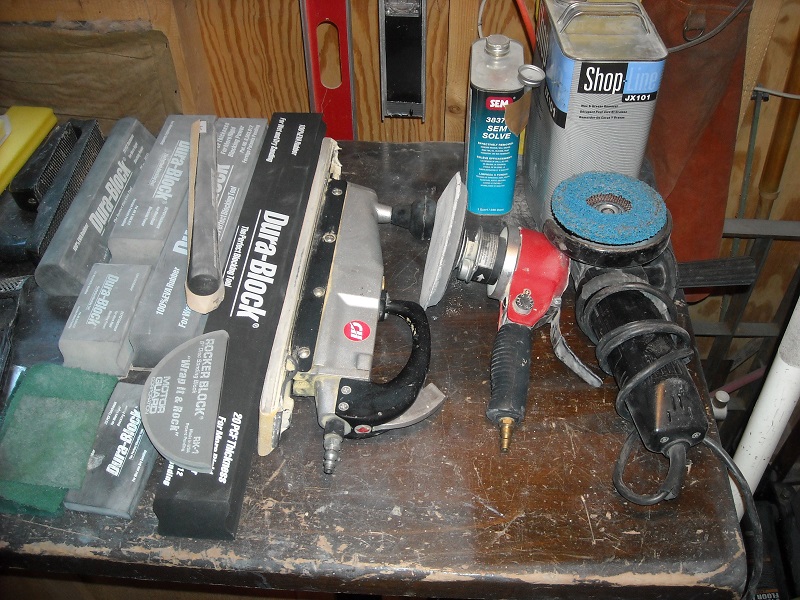
a bunch of Dura blocks and soft blocks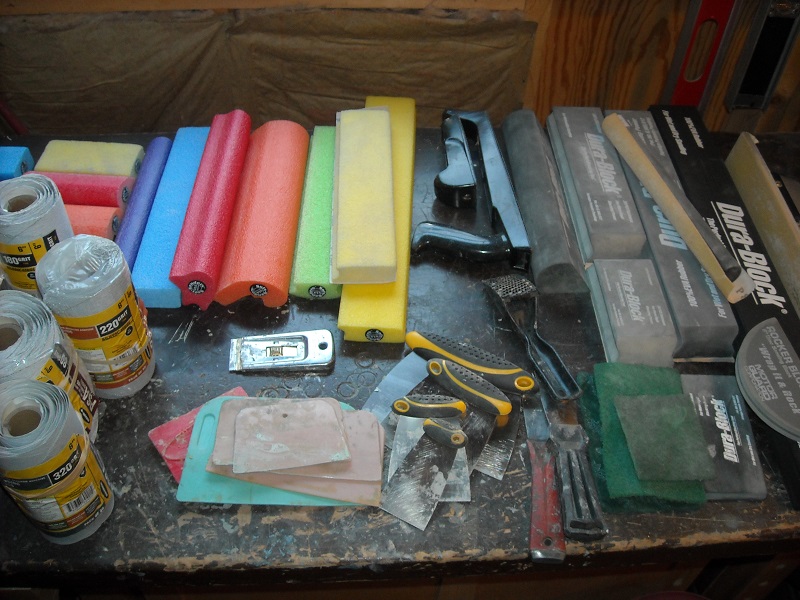
and a shitload of sandpaper. 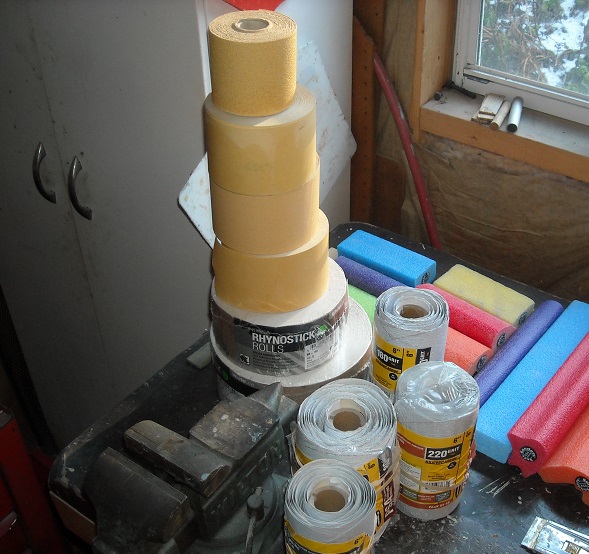
too bad the tools don't have magic built into them. you still have to know how to do it.
I am sure a lot of experienced bodymen could do a better job with kitchen utensils though.

Posted by: Andyrew Jan 20 2016, 05:21 PM
Great progress on the bodywork!
I find I spent most of my time with a flexible/firm 17" board. Occasionally you grab the 6" block or a small roll to get the narrow spots.
You definitely have the tools to do the job now!
Posted by: Olympic 1.7 Jan 20 2016, 05:40 PM
with the cold weather I am now working on some mechanicals.
stuff I am more comfortable with.
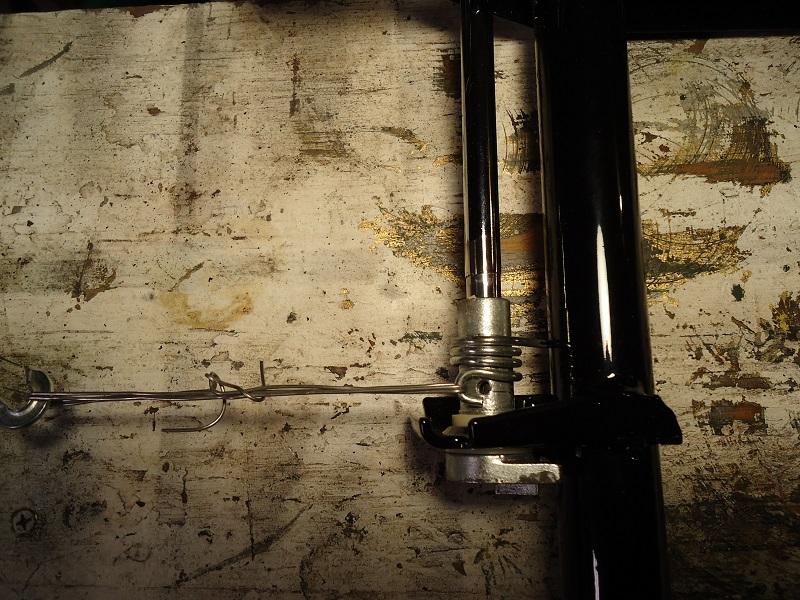
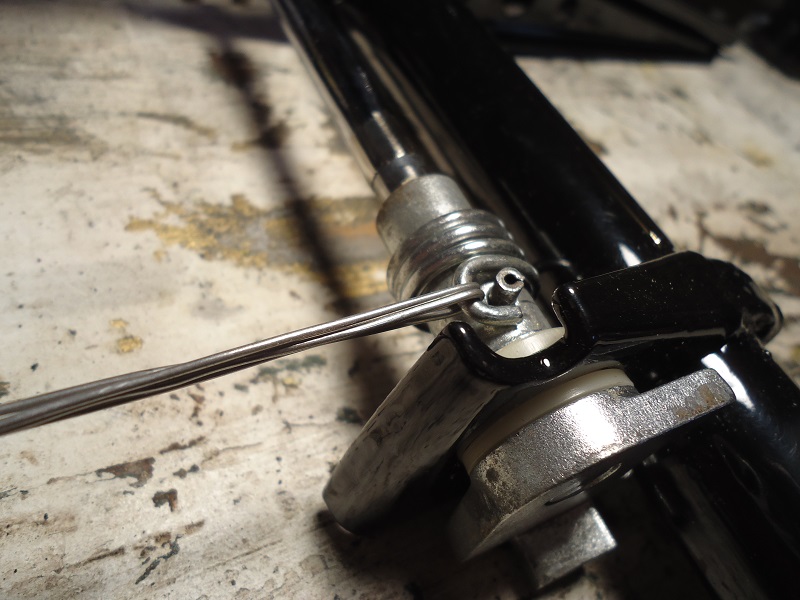
went to put on the turbo tie rod ends and found out that the one side steering rack bushing was really stuck on there. looks like some moisture got in there and rusted it up ( Imagine that, Rust. )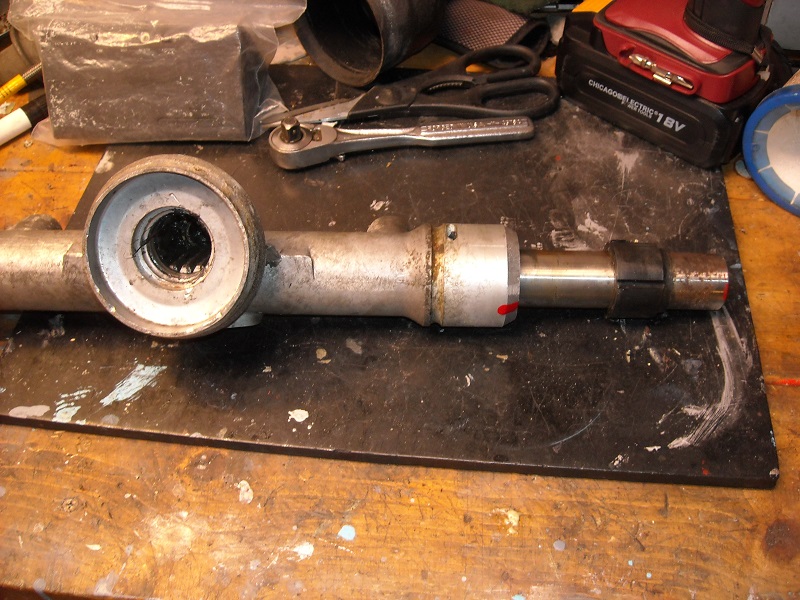
after a bunch of PB blaster, and a soak in kerosene, I decided to try a little heat.
after carefully heating up the rack rod, and some persuasion with a deadblow hammer, not wanting to ruin the NLA end bushings I finally got it to move off the rack. the lathe and some emery cloth to polish the rack helped a lot. 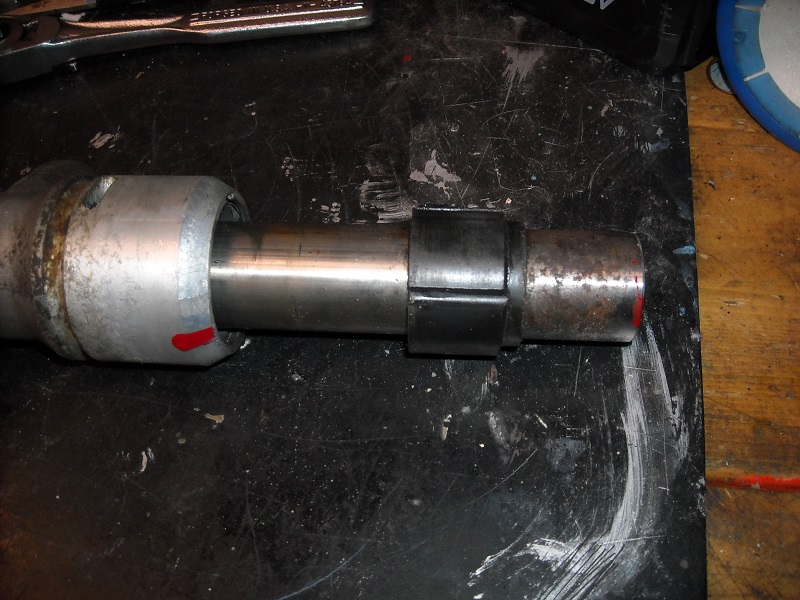
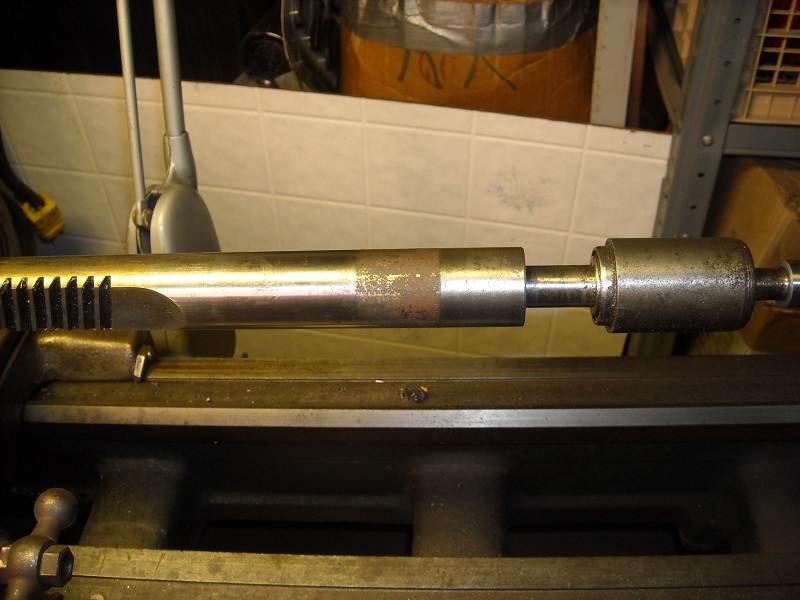
It cleaned up pretty nicely, also put the emery cloth to the rack end bushings.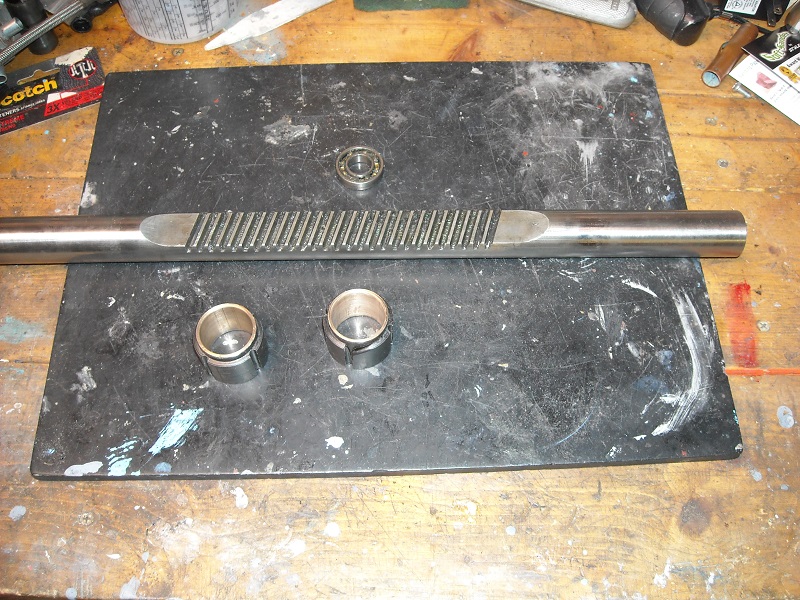
it all looks good now. just waiting on the bearings I ordered to come in and I can put every thing back together. 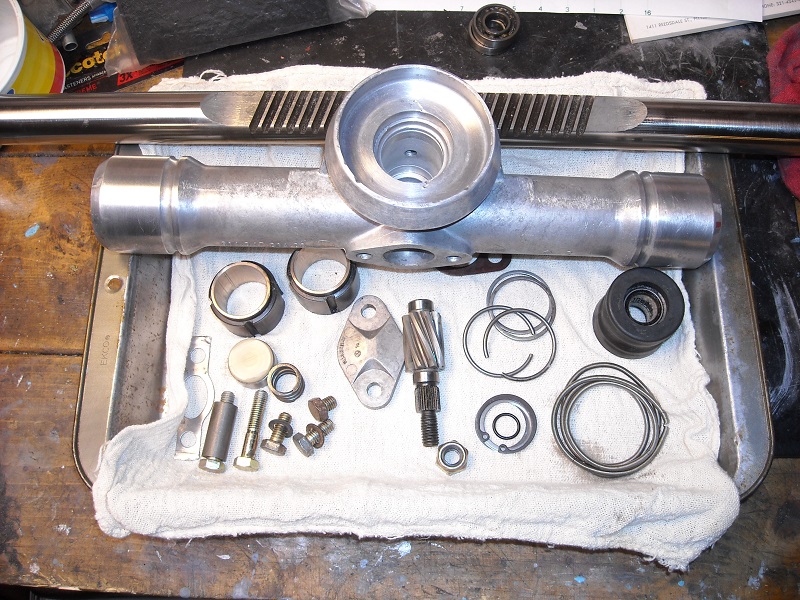
Posted by: Larmo63 Jan 20 2016, 06:42 PM
Don't do too good of a job on the body work, or all of your 914 friends will want to "un-retire" you!!
Great job you are doing!!!!
Posted by: Olympic 1.7 Jan 20 2016, 07:04 PM
Don't do too good of a job on the body work, or all of your 914 friends will want to "un-retire" you!!
Great job you are doing!!!!
Retirement is great... I don't know how I ever had time to work.
Funny though, you think it looks good and then shoot another coat of primer and all the flaws just jump right out at you....
almost makes me dread putting color on it..
Posted by: JTdevine Jan 20 2016, 08:11 PM
Don't do too good of a job on the body work, or all of your 914 friends will want to "un-retire" you!!
Great job you are doing!!!!
Retirement is great... I don't know how I ever had time to work.
Funny though, you think it looks good and then shoot another coat of primer and all the flaws just jump right out at you....
almost makes me dread putting color on it..
Looks like your are doing a good job. Just wanted to mention using guide coat when you sand that way it will show you all the low spots, ive been a bodyman and painter for many years and still use it.good luck, and take your time.
Posted by: 76-914 Jan 21 2016, 12:16 PM
Alright, another bodyman on the board. Oh, your build is looking great, too. 
Posted by: rick 918-S Jan 31 2016, 10:19 PM
Nice progress.
Posted by: Olympic 1.7 Feb 8 2016, 08:16 PM
January...
What happened to that month??
Little body work done.
Got my bearings and finished the steering rack.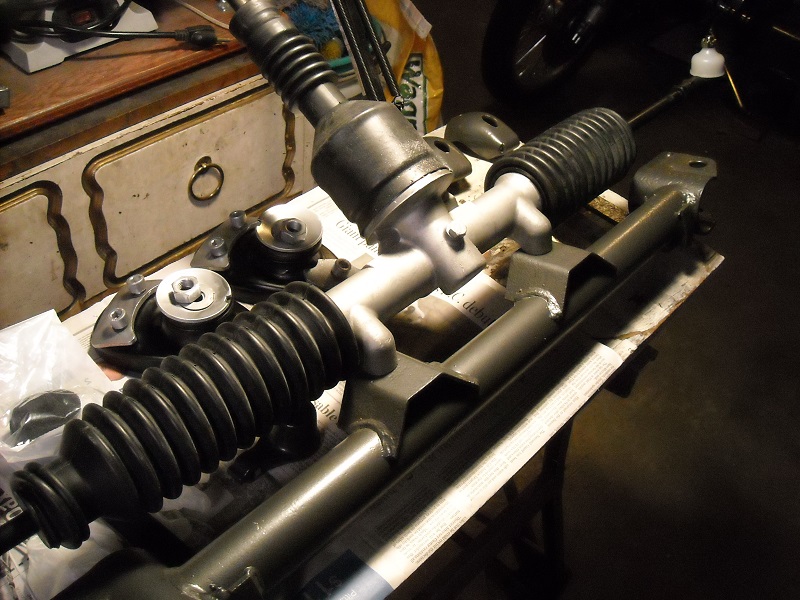
http://www.914world.com/bbs2/index.php?showtopic=273545
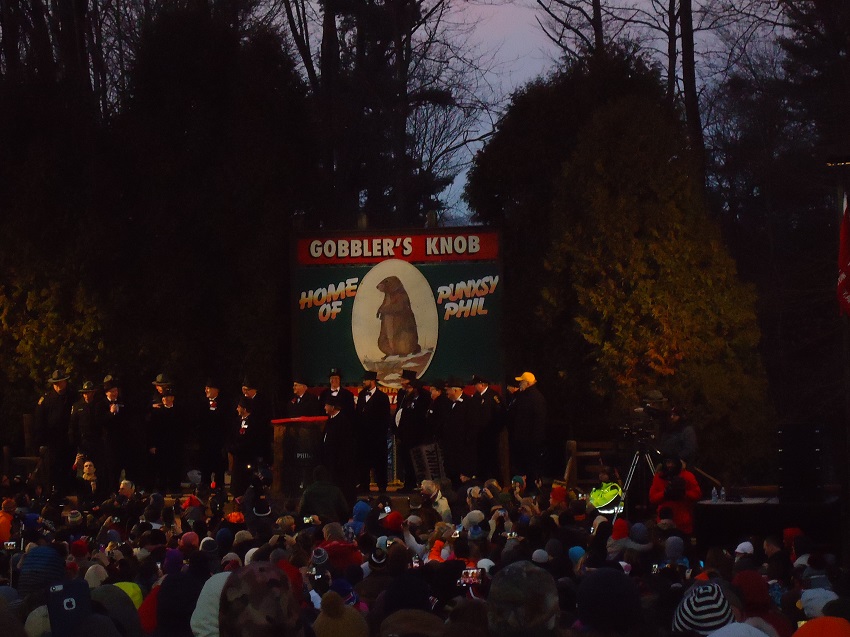
Then Feb 2 went to Punxsutawney for Phil's prognostication. 130 yrs. anniversary.
and for only the 18th time in 130 years Phil did not see his shadow. portending an early spring instead of the usual 6 more weeks of Winter...Yeah !! 
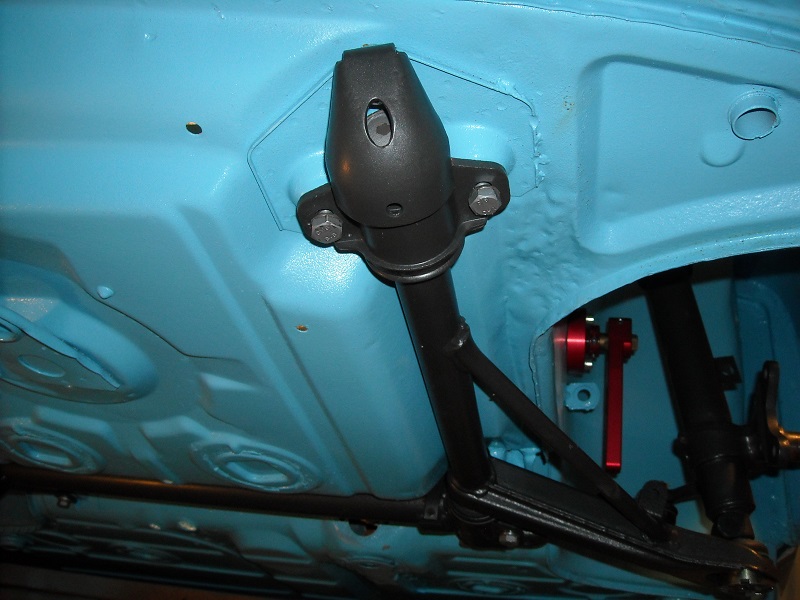
Since then I got most of the front suspension installed. still have to connect the sway bar. think I will start it at 1/4 from the soft position. 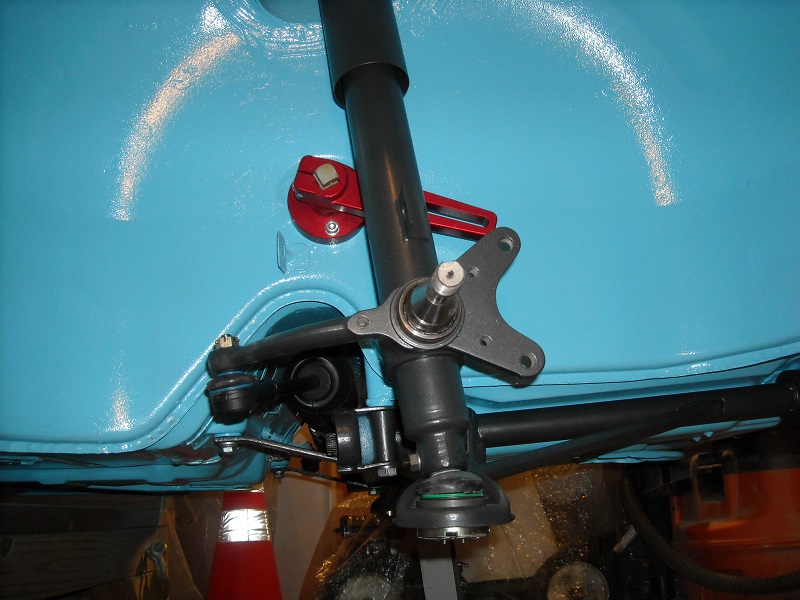
I know most people would finish the body work before starting to put stuff on. 
I like to do some mechanical work to get away from the bodywork for a little...
Not my plan, but the car will be able to drive even if its still in primer...and with the early spring that Phil predicted I should have plenty of time to get the bodywork done and paint it....
.
Posted by: Olympic 1.7 Feb 11 2016, 12:04 PM
Cold out this morning.... 15 deg. to cold to work in an unheated shed..
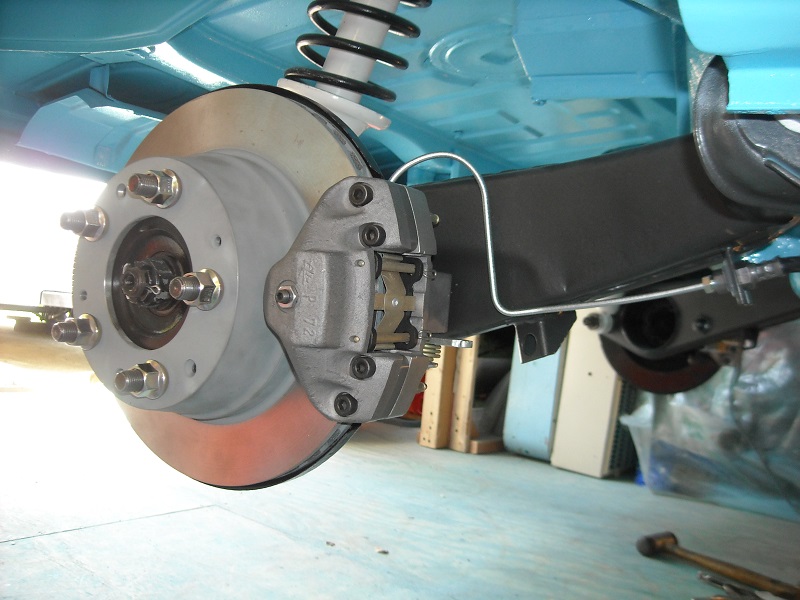
Good time to unbox and inspect my new parts from PMB.
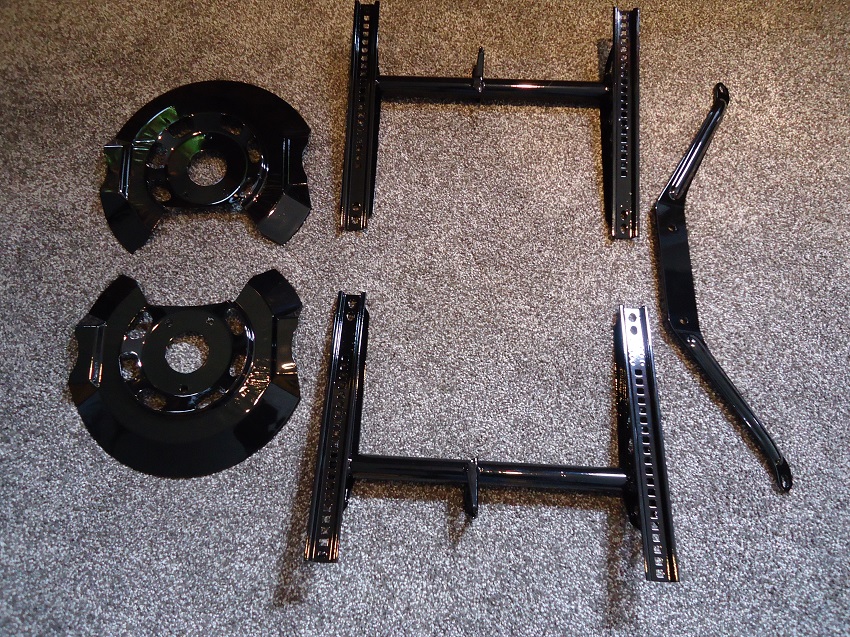
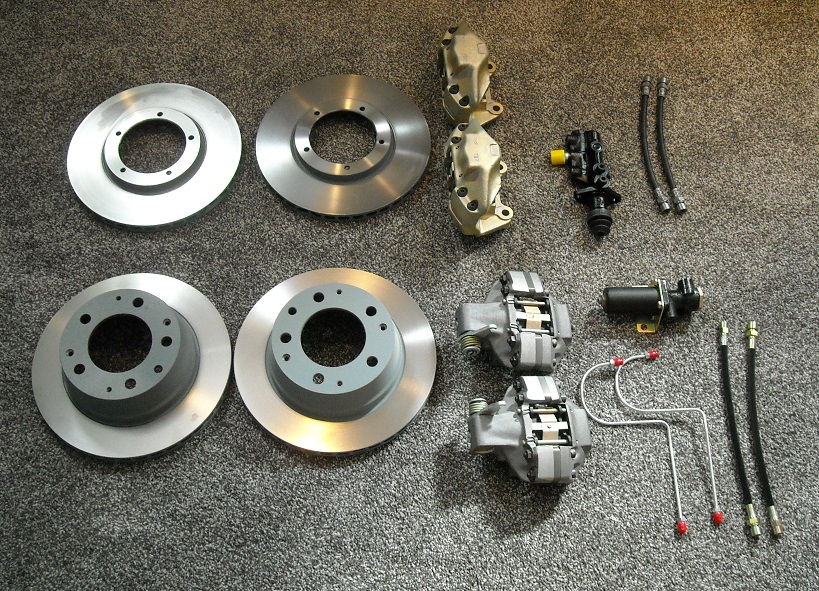
rebuilt 911 A front calipers, PMB repro 914 GT rear calipers.
Sebro vented rotors front and back.
rebuilt pressure regulator, new 19mm ATE master cylinder.
Damn those A calipers sure are heavy....
Posted by: Darren C Feb 11 2016, 01:00 PM
Real nice Tom,
I'm very impressed with your quality of work, the cars going to be fabulous when it's done.
Posted by: Olympic 1.7 Feb 26 2016, 10:05 AM
Continuing with some mechanical work.
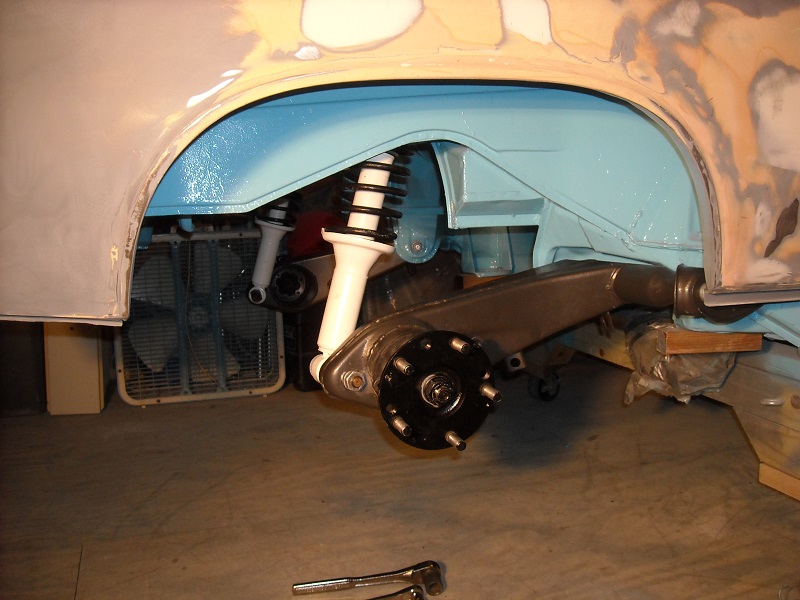
I installed the new bearings into the rear control arms. also installed the Elephant racing Rubber bushings. 
YES it is as big a PITA as others have said. No pictures of the installation..
But a good friend had just bought a HF 20 ton press and that gave me an excuse to go visit and spend a couple hours. No problem getting your hands clean after all the liquid soap we had slathered around. eventually we got the shafts pushed in nicely.
I whipped up this tool out of plumbing supplies to support the rear of the wheel bearing when we pushed the hubs in with the press.
2" pipe with a floor flange. worked great , don't know how often I will use it again though.. 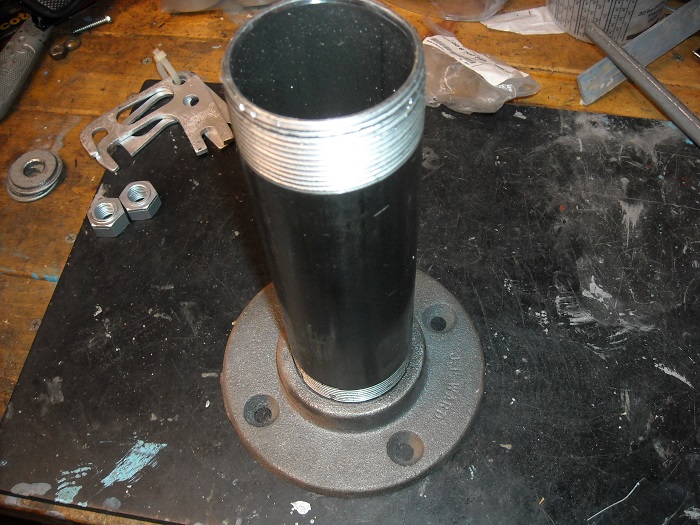
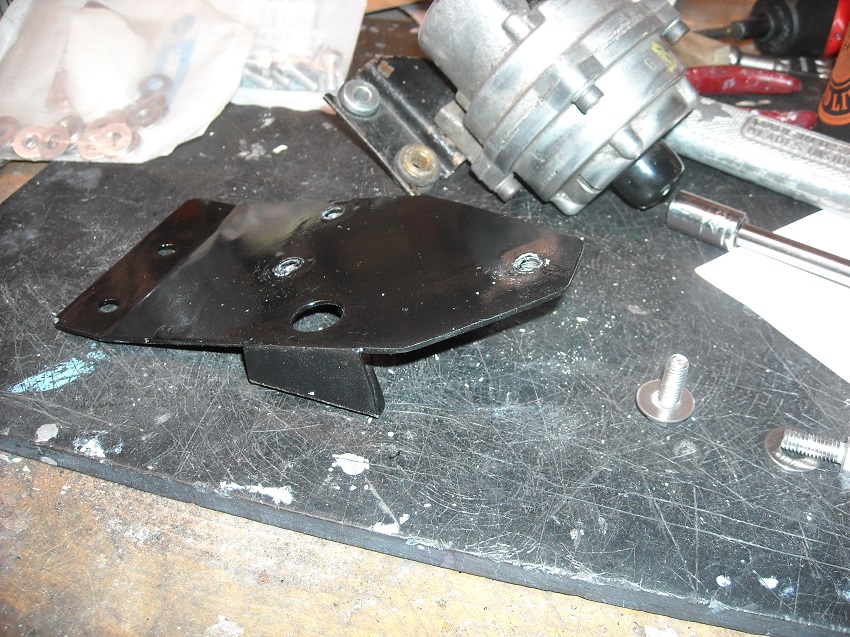
Installed the Tangerine shift rod bushing into the firewall and then installed the SS fuel lines. both operations went smoothly. 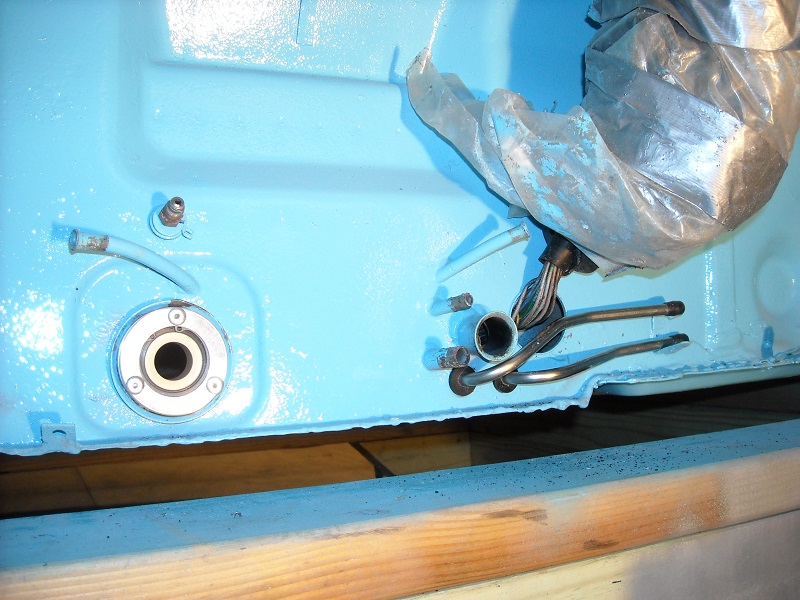
needed new nuts for the rear control arms and after an exhaustive internet search came up with a BMW part that I like more than the stock original parts. they are flanged all steel locking nuts. 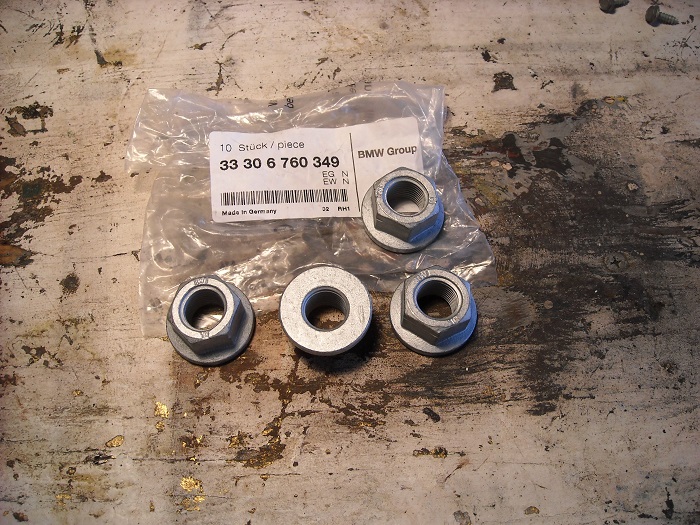
got the rear control arms bolted up and you can see the new flanged nuts in this pic. also the other tangerine SS lines. installed just so I don't lose them.
Yes they are KYB shocks.... I know they are not the favored shock around here but I got a good deal on the set from a friend that only had them on a little while then upgraded to Konis all the way around...
I figure they are an easily replaced item if I don't like them.. 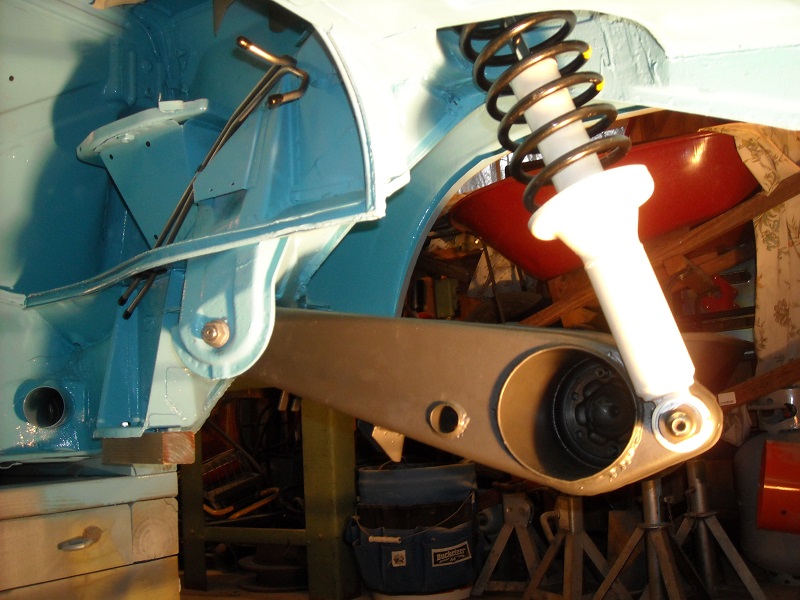
I think I will work on replacing the tunnel brake lines next and after I gather the rest of the lines up start to bend new ones. One of my first purchases when I started this project was a line set from AA, it is supposed to have all the lines precut to the correct length with ends already installed. we shall see how that works. Had I know earlier I would have gotten the prebent set from PMB and just been done with it.
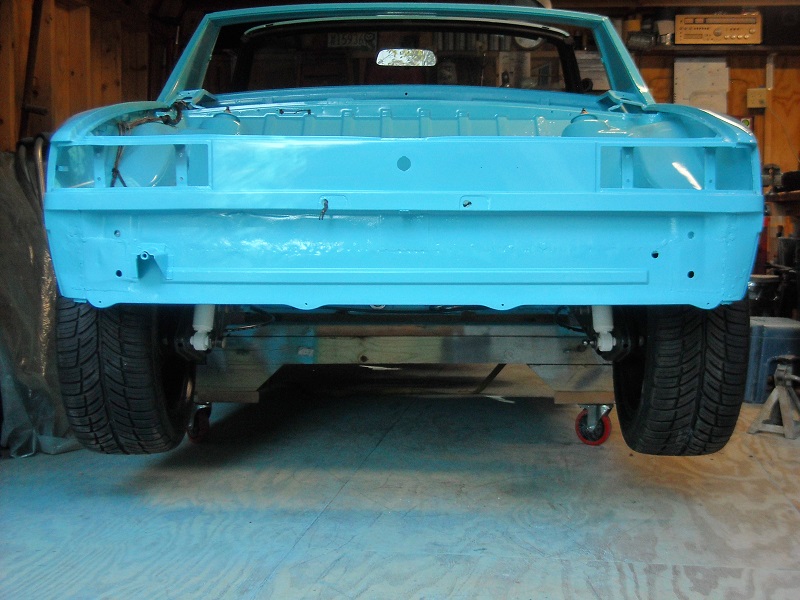
So now I have suspension. 
moving along...
Posted by: Racer Chris Feb 26 2016, 11:34 AM
When I saw your updated subtitle I thought you had been suspended from the build-off challenge. 
Posted by: Cracker Feb 26 2016, 11:51 AM
LOL! Me too...car looks GREAT!
Tony
When I saw your updated subtitle I thought you had been suspended from the build-off challenge.
Posted by: Olympic 1.7 Feb 26 2016, 12:07 PM
When I saw your updated subtitle I thought you had been suspended from the build-off challenge.
Yeah.. I was going for that..

Posted by: stevegm Feb 26 2016, 12:23 PM
When I saw your updated subtitle I thought you had been suspended from the build-off challenge.
Yeah.. I was going for that..
Nice subtitle. You got me. I thought you were throwing in the towel for a second. Then I thought - No, not Tom.
Posted by: Olympic 1.7 Mar 31 2016, 07:25 AM
March 16 progress report.
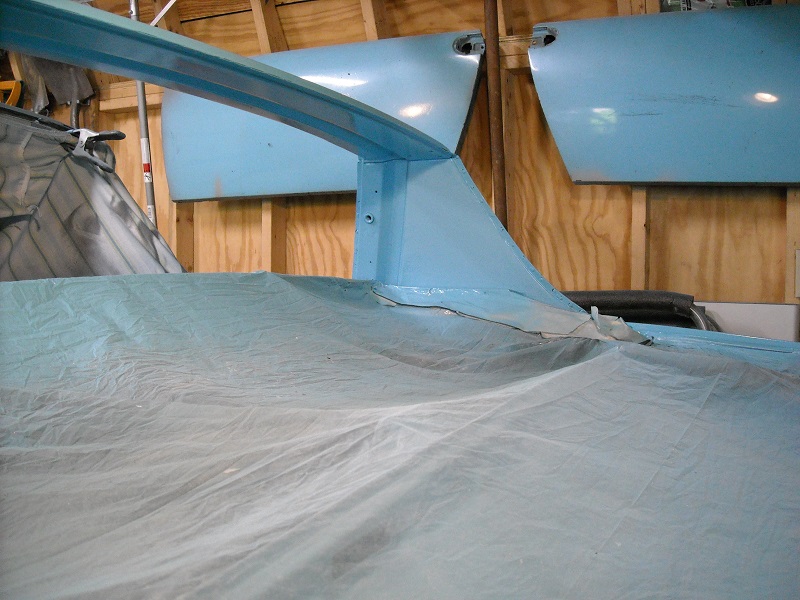
Still doing body work. I have the pass side in good shape now, at least to my untrained eye.
I have gone from the raw pieced together quarter panel, the result of flaring the fenders.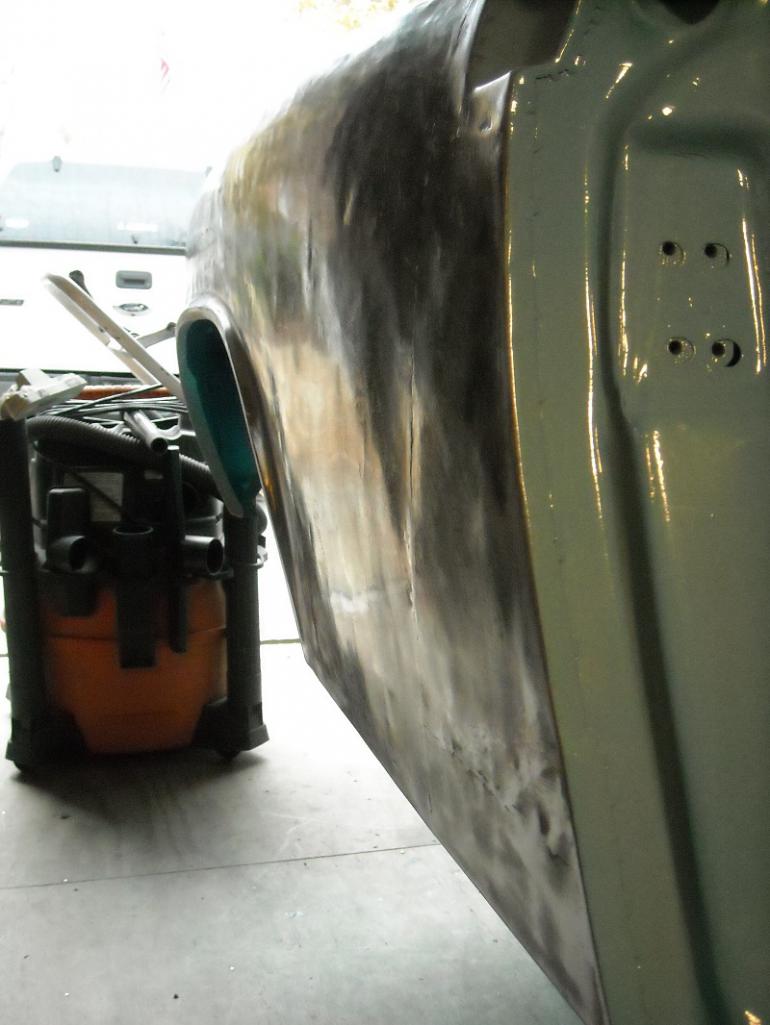
worked it to this mottled looking mess.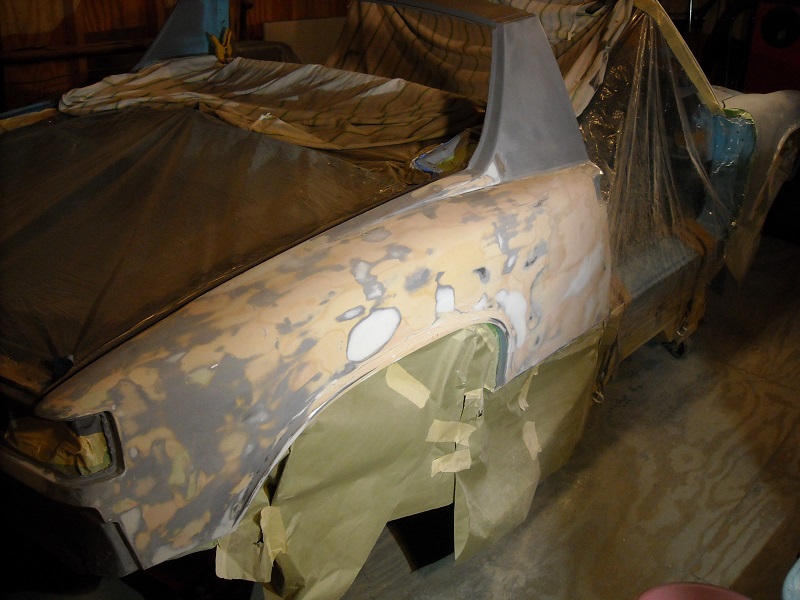
and finally to this much sexier looking shape. 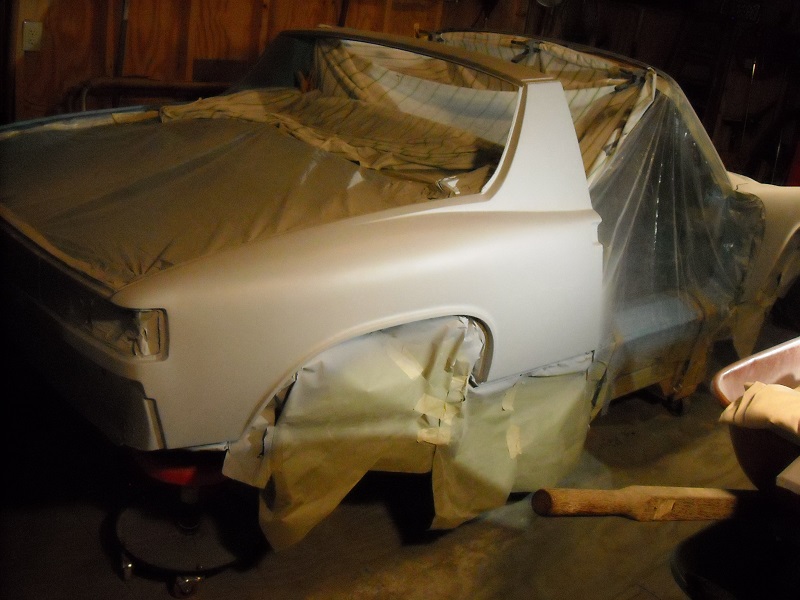
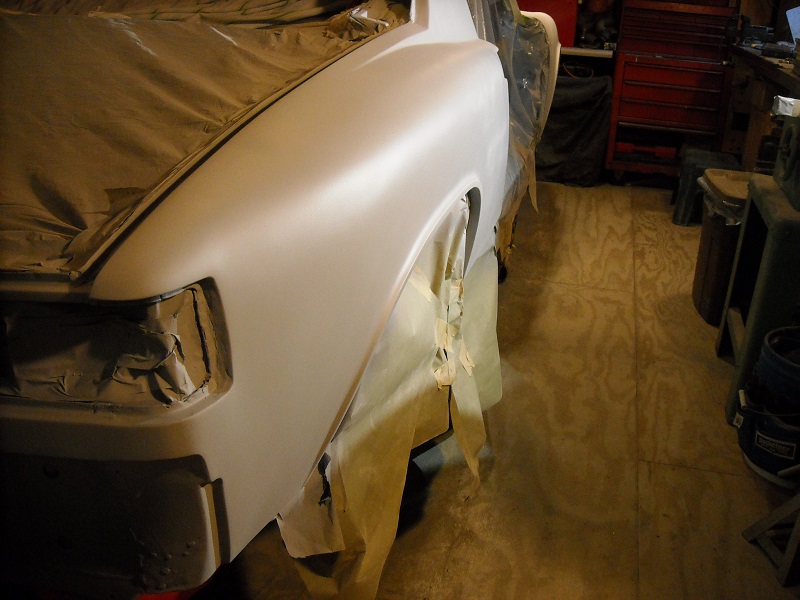
So body work on the pass side is pretty much done. hope it looks good when I get the final paint on it. I still need to revisit the drivers side and do a little more shaping on the fender lips. Many, many hours into this.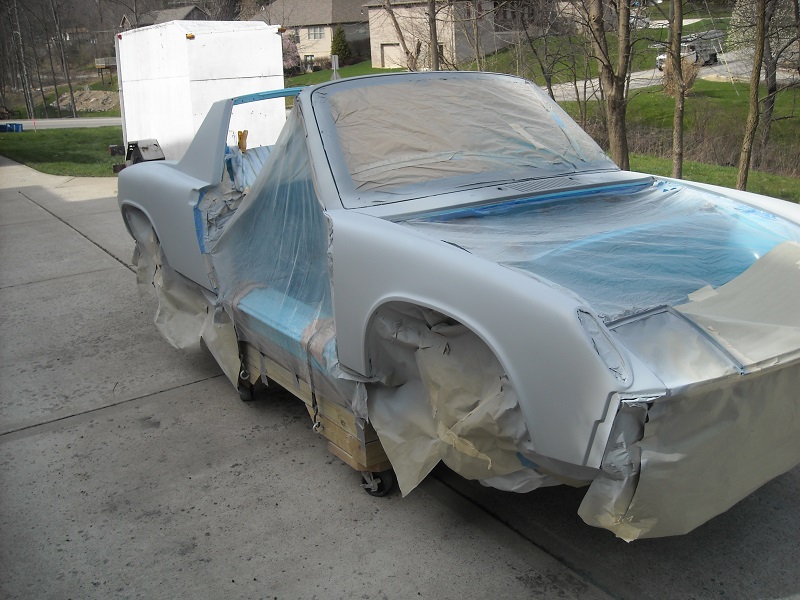
Stripped the 35 year old acrylic lacquer paint off of the rear trunk lid, it looks good underneath. only a little work needed here.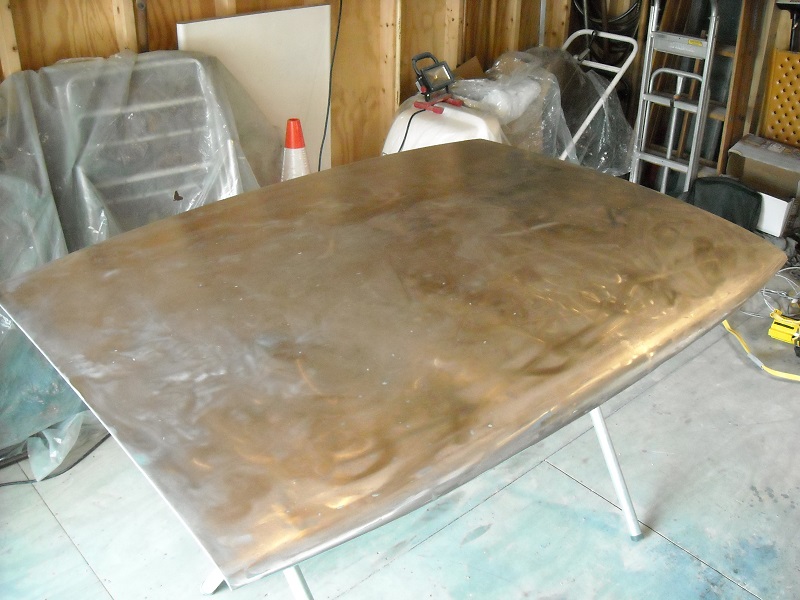
shot some epoxy on it before I start.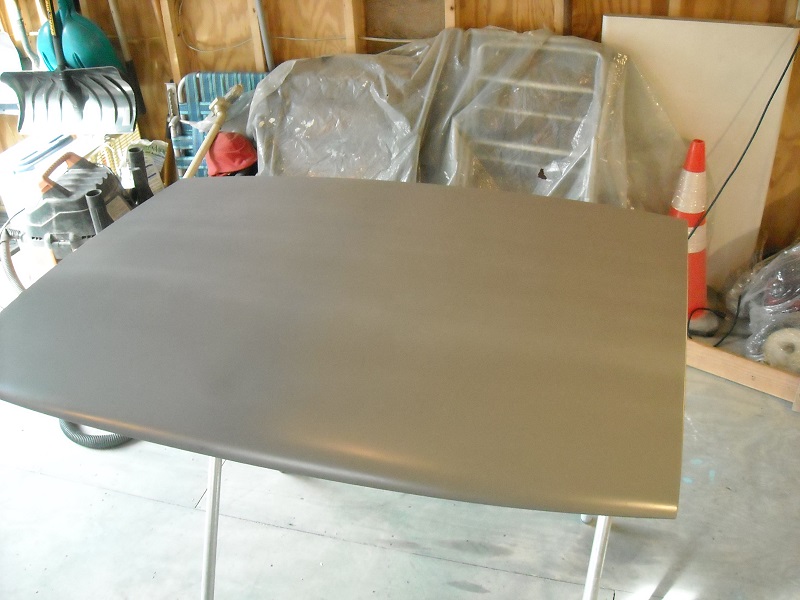
Have the doors stripped out and will be having them blasted, I know there is a bit of previous bodywork hiding under there, still have to scrap out the old sound deadener before blasting.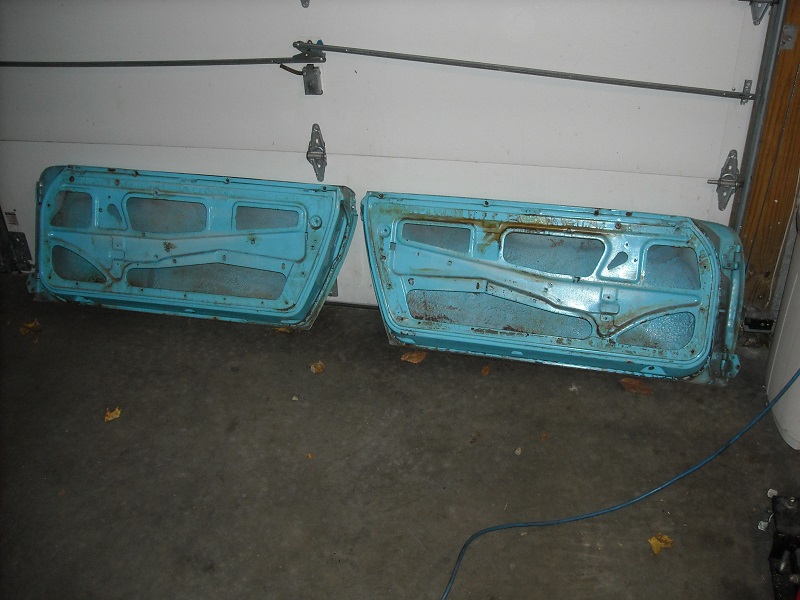
After much internal debate I finally decided on what type of paint I am going to use. I am going with PPG Concept, Single stage
So I bit the bullet and purchased my paint. $$$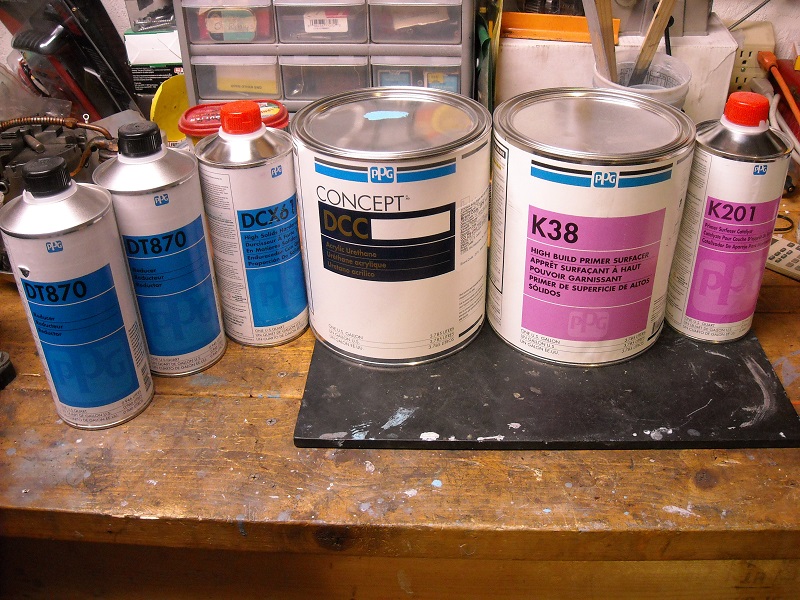
And decided on a big boy spray gun to go with it. DeVilbiss 670+. I don't want to shoot this paint with a HF gun.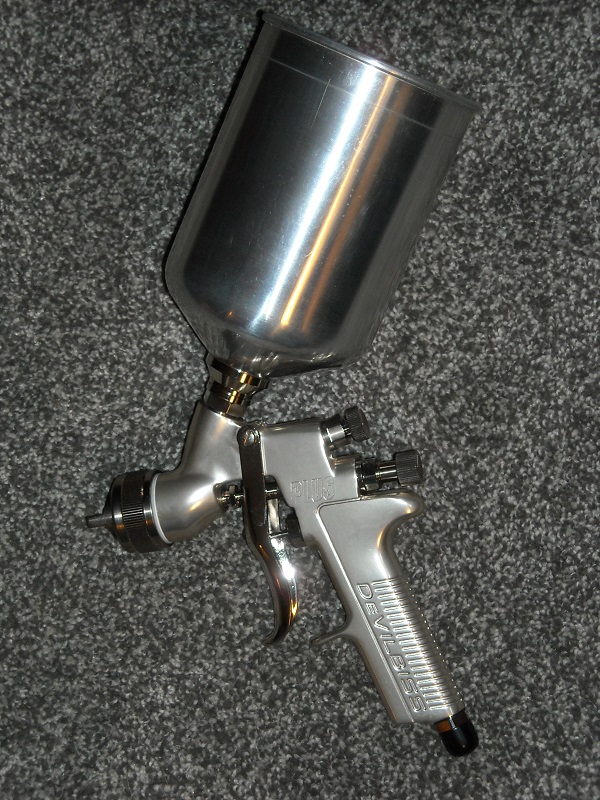
Vendors used.
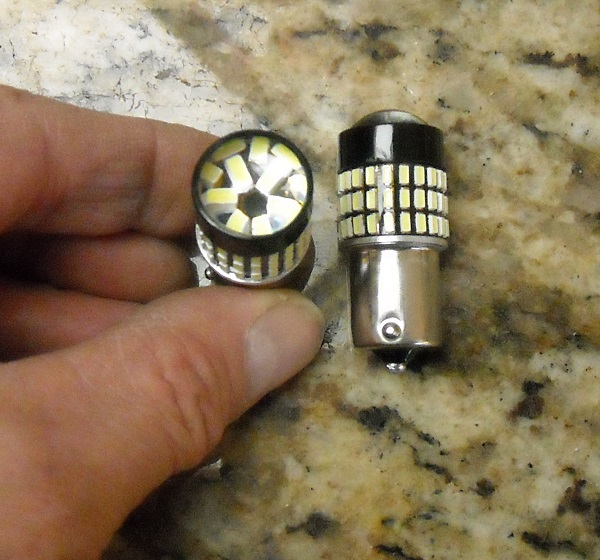
Spoke for the LED front and rear lights. Thanks Jerry.
also refinished my turn signal buckets and bought new lens for them. and grabbed these LEDs for the reverse lights.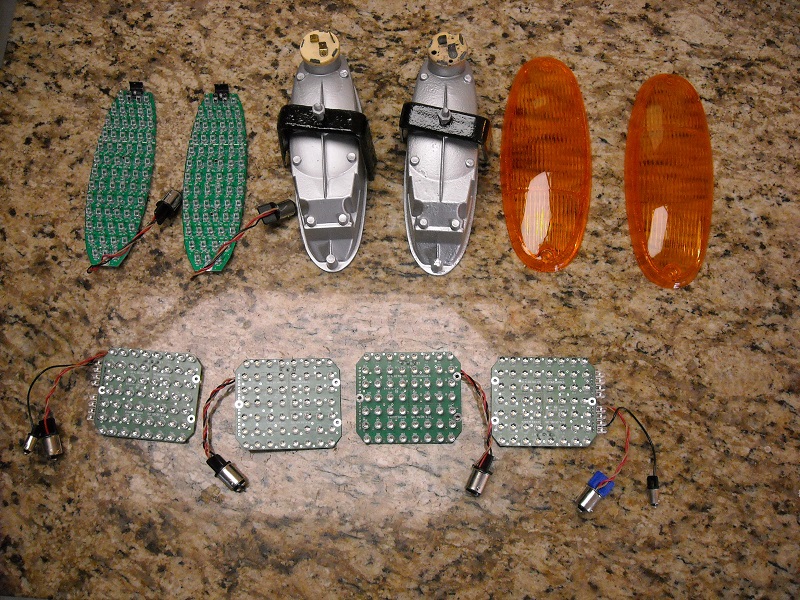
Had Bruce Stone redo my pedal set, and the turn around time was fantastic!! Thanks Bruce.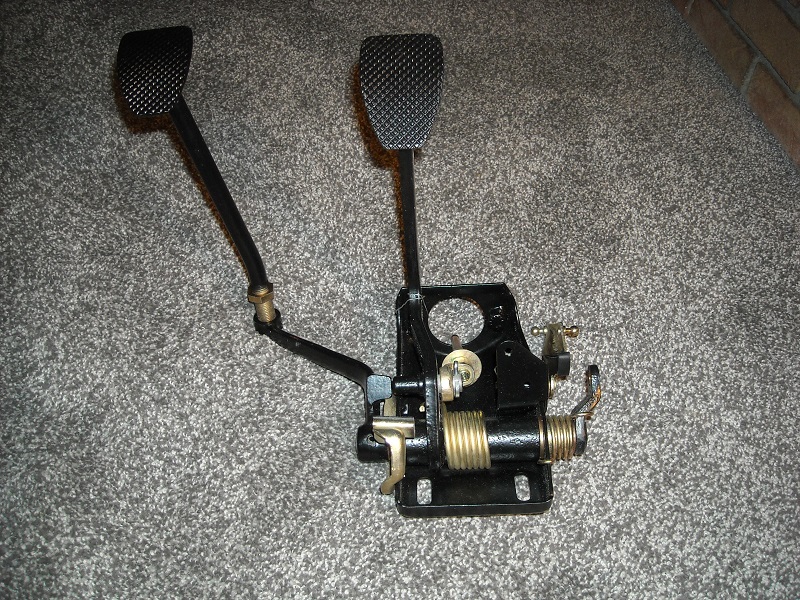
That's it for now...
I am coming to Hershey for the first time and am looking forward to meeting all of Yinz, I am sure seeing all the running Teeners should be an inspiration. See you in two weeks.
Posted by: whitetwinturbo Mar 31 2016, 09:59 PM

![popcorn[1].gif](style_emoticons/default/popcorn[1].gif)
Posted by: Olympic 1.7 Jun 26 2016, 04:14 PM
April / May update
More work required on the trunk lid than I thought there would be.
it turned out pretty good.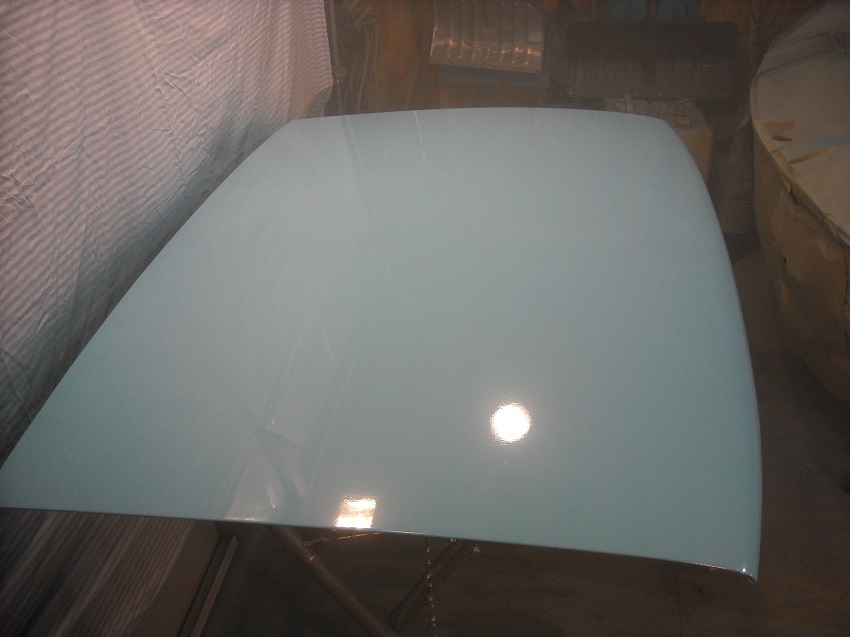
But I found that even with a bunch of clamp-on lights I still couldn’t see well enough. (the haze in the air is paint , need better ventilation, more on that later. )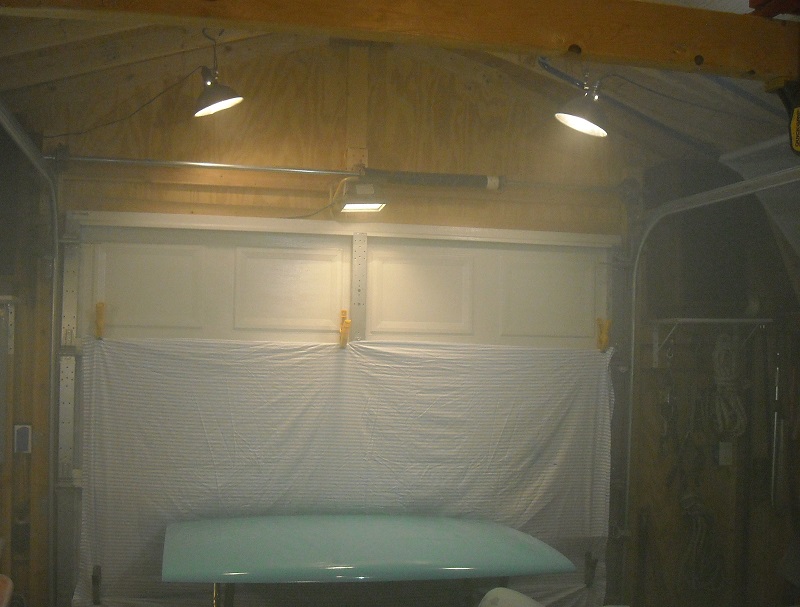
So I wired a few switched quad receptacles and put up a bunch of 4000 lumen LED shop lights, seven so far. And I can click them all on or off easily. Now with these and a couple more strategically placed clamp on lights I can see to paint without shadows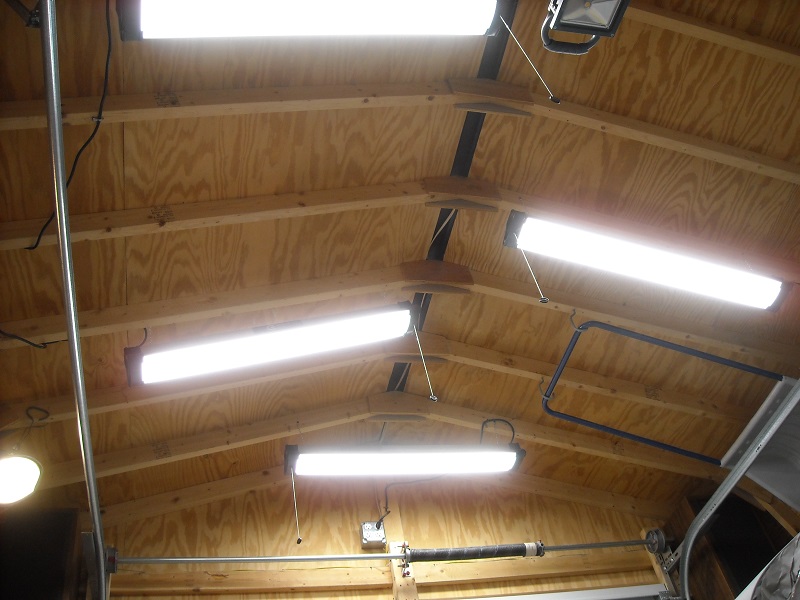
Next up was ventilation. Using a couple box fans in the doorway I put wooden/cardboard fillers on each side and attached a piece of heavy construction plastic sheeting across the top of the doorway, to keep dust from being sucked back in. 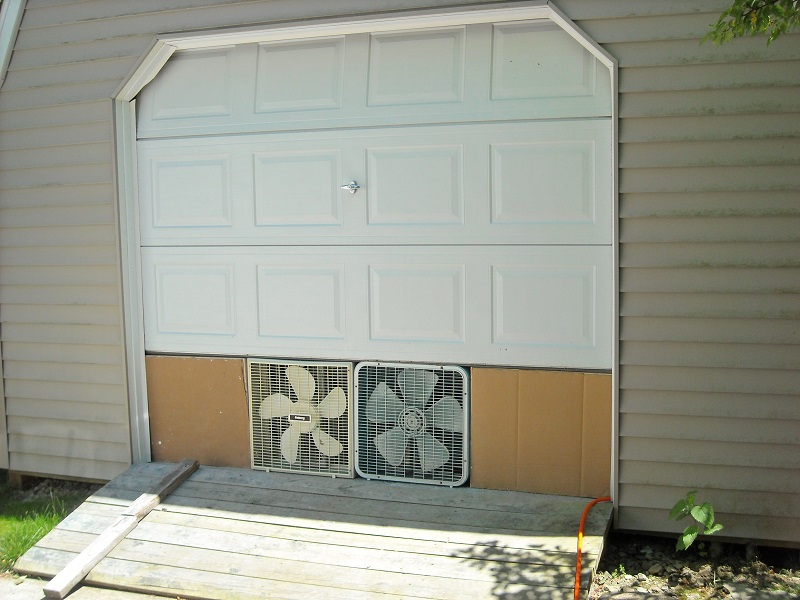
And put furnace filters into the windows, taped around the edges to give me some filtered fresh air. 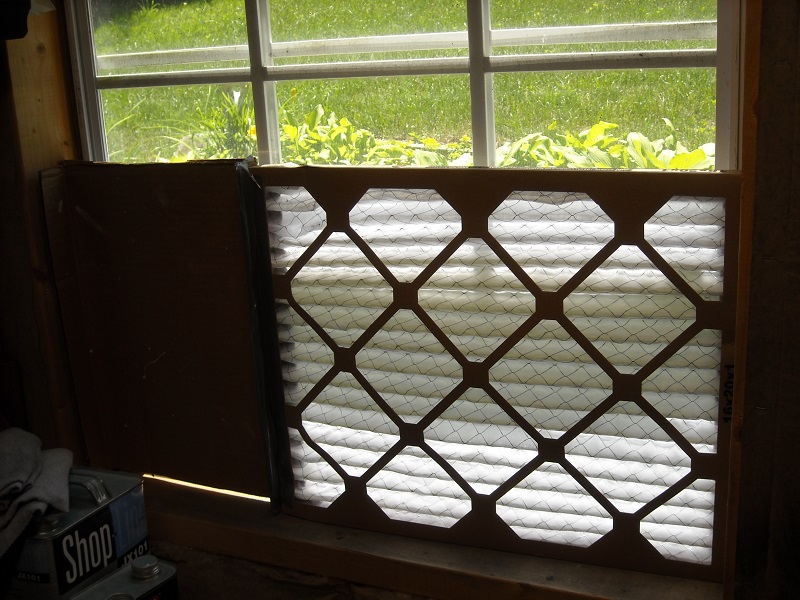
Now I am ready to do some painting in my Shed/Custom Paint Booth.
Posted by: Olympic 1.7 Jun 26 2016, 04:25 PM
June 2016 update
Back to the drivers side to finalize the work on the fenders and lips. One last wet sanding with 600.
And I shot the cowl, windshield frame and top and inside of the Targa bar. The inside of the Targa bar sail panels were a real PITA to get with a HVLP spray gun, I had some bad runs here and painted one side twice and the other side three times. I finally got a good job after digging out an old siphon feed touch-up gun I hadn’t used for about ten years. I was able to get in there with it and lay down some nice paint. 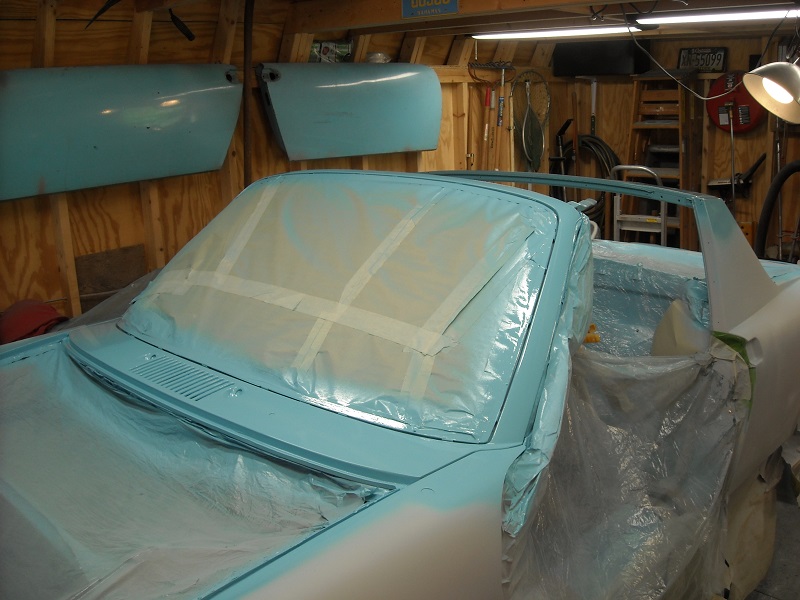
And FINALLY I get to put some color on the fenders. I have been working to this end for what seems like forever.

Still not done yet though. Since my shed workspace is kind of limited I can only work on or paint one side at a time. So now I have to finish the passenger side. Another round of wet sanding and fixing anything that pops up during that. With my new lights installed I have already found a couple, three spots that need some more attention. 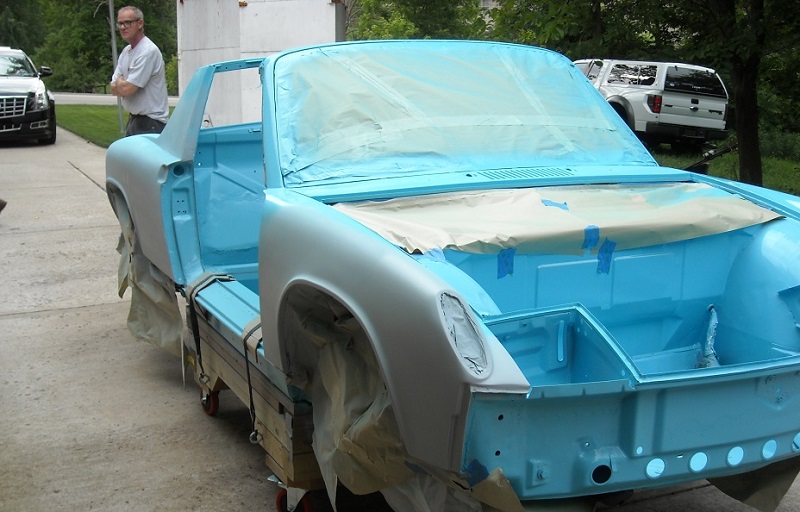
If you have a favorite bodyman that does good work for you, you should take time to go buy him a bottle of Crown. Cause this shit is hard, I would hate to have to do it for a living. Especially as picky a bunch as we are…
Posted by: Andyrew Jun 26 2016, 07:25 PM
Paint looks fantastic!! Congrats!
Posted by: 914forme Jun 26 2016, 07:27 PM
Looking great
Posted by: jmitro Jun 26 2016, 08:08 PM
Really really nice work! Going to be a great looking car when done!
Posted by: 3d914 Aug 1 2016, 01:25 PM
Tom, Thanks for sharing all your painting details. It looks great. I'm curious how much difference the single stage makes in getting the results you're after? Not sure how much painting experience you have. I'd like to take on the painting myself (also using single stage), but with little experience at this I wouldn't want to do it twice.
Any insights you can offer?
Posted by: Andyrew Aug 1 2016, 02:45 PM
Tom, Thanks for sharing all your painting details. It looks great. I'm curious how much difference the single stage makes in getting the results you're after? Not sure how much painting experience you have. I'd like to take on the painting myself (also using single stage), but with little experience at this I wouldn't want to do it twice.
Any insights you can offer?
Single stage is a great step into painting.
You can read the first part of my build thread for more details on painting with single stage, or my other paint thread in my signature for me painting Peters car as well as the issues we had with bad paint.
Painting with single stage can easily be done in the garage for a nice driver quality paint job.
Posted by: Olympic 1.7 Aug 1 2016, 05:37 PM
Tom, Thanks for sharing all your painting details. It looks great. I'm curious how much difference the single stage makes in getting the results you're after? Not sure how much painting experience you have. I'd like to take on the painting myself (also using single stage), but with little experience at this I wouldn't want to do it twice.
Any insights you can offer?
Single stage is a great step into painting.
You can read the first part of my build thread for more details on painting with single stage, or my other paint thread in my signature for me painting Peters car as well as the issues we had with bad paint.
Painting with single stage can easily be done in the garage for a nice driver quality paint job.
Andyrew
I just went back and looked at your body work.... Damn, I though I took a lot of pictures.. Ha-Ha.
That's pretty much what I went through also. Your car turned out nice. I hope mine buffs out that good
3d914
This is the first car I have painted. I have done paint and moulding on a my motorcycles and some bodywork on an old Mustang but that was in my teen years.
I chose the single stage PPG because I thought it would be easier to fix any flaws or mistakes. rather than having to go through a layer of clear coat. Also in the future I could shoot a clear coat or a single stage / clear coat mix. so I'm not locked into this.
Same as Andyrew I used a combination of glass fiber, and polyester body filler, I used Rage Gold. and some evercoat glazing putty then sprayable body filler - Slick Sand. I shot the Slick Sand with a 2.5 tip spray gun. it really lays it on but get it out of the gun quick because it sets up fast and will plug up your spraygun. Same with the high build primer. I used a 1.8 tip with the PPG K38 High build primer, and you get 20-30 min at best before it quits spraying and you have to hurry to clean it out of your spraygun.
Read the sheets on the paint and primers and keep very close to those times and mixes. Temperature is also very important, I used a digital IR HF thermometer to make sure of the body temp. and match the reducer temp range to that.
Not being a bodyman I found it hard to determine what was good enough and probably did too much prep work, if you can. you really need kind of an artists eye to get the lines right. I struggled with this a lot.
I think you have to accept that 99% of the people that look at your car. (bodymen excepted) will never see the little things you work so hard to get just right. Just try to keep yourself from pointing out to people the tiny flaws that you know are there.
Posted by: Olympic 1.7 Aug 1 2016, 06:48 PM
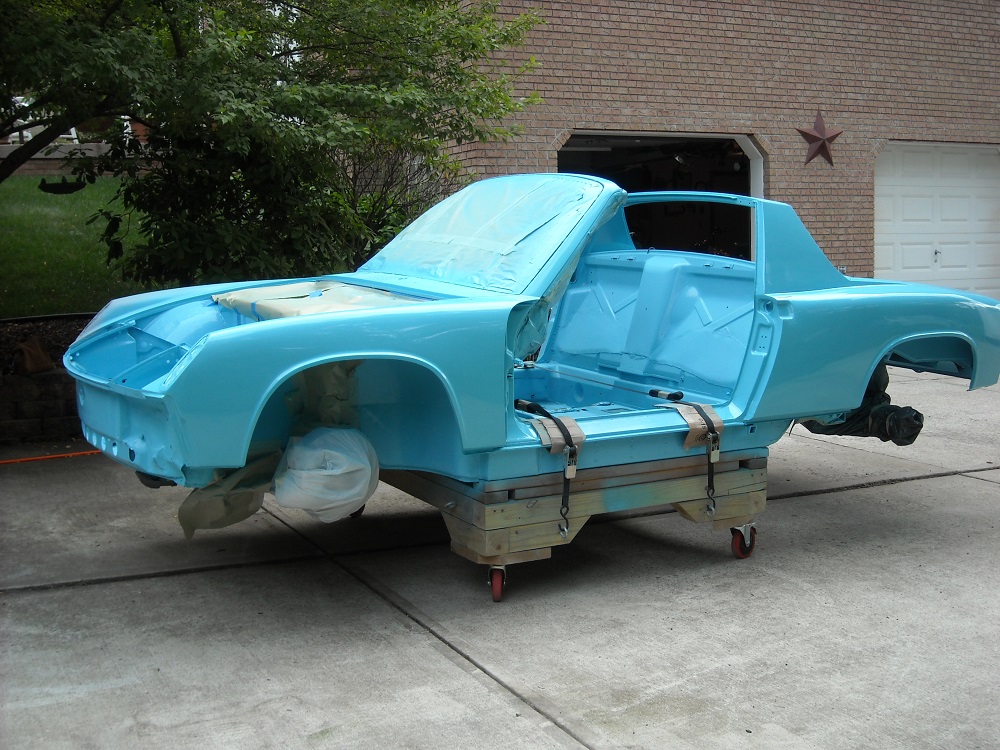
July 2016 update.
Got the final paint on the passenger side. so the tub is painted. still have to do the doors and front hood.
now I can start putting some parts back on. Also have to paint a bunch of little parts like the hinges, and the headlight covers.
Here are some update pics. I'll post some more after I get it pushed outside, hard to get a good pic inside the shed. 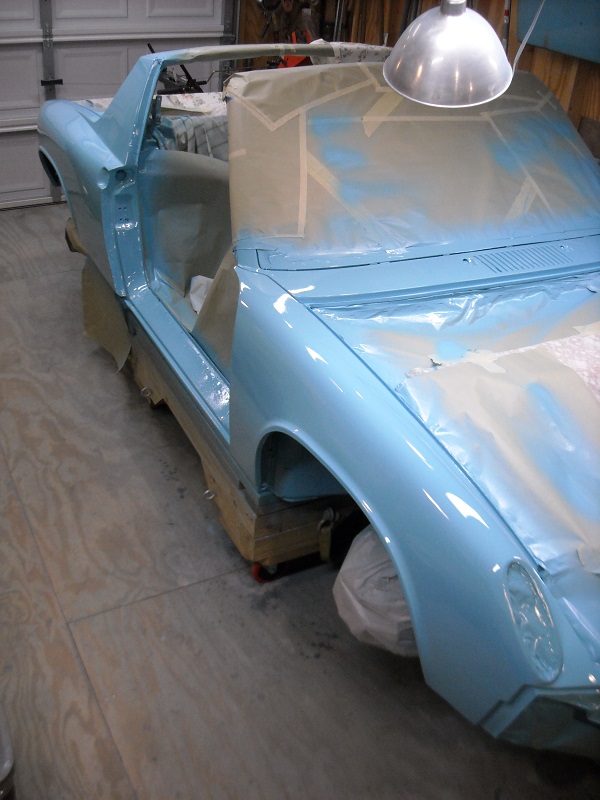
And this is my Happy Face at getting to this point.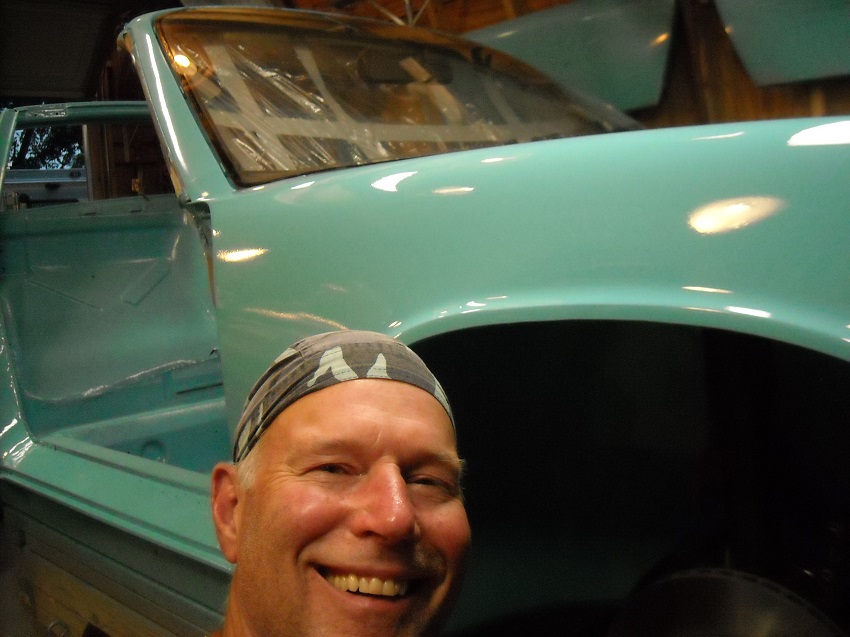
Posted by: Darren C Aug 2 2016, 02:34 PM
Hey Tom,
Looking Goooooooooooooooood :-)
Posted by: Olympic 1.7 Aug 2 2016, 06:42 PM
Hey Tom,
Looking Goooooooooooooooood :-)
Thanks .. If I had your drive it would be done in no time...
Posted by: Olympic 1.7 Aug 23 2016, 08:01 PM
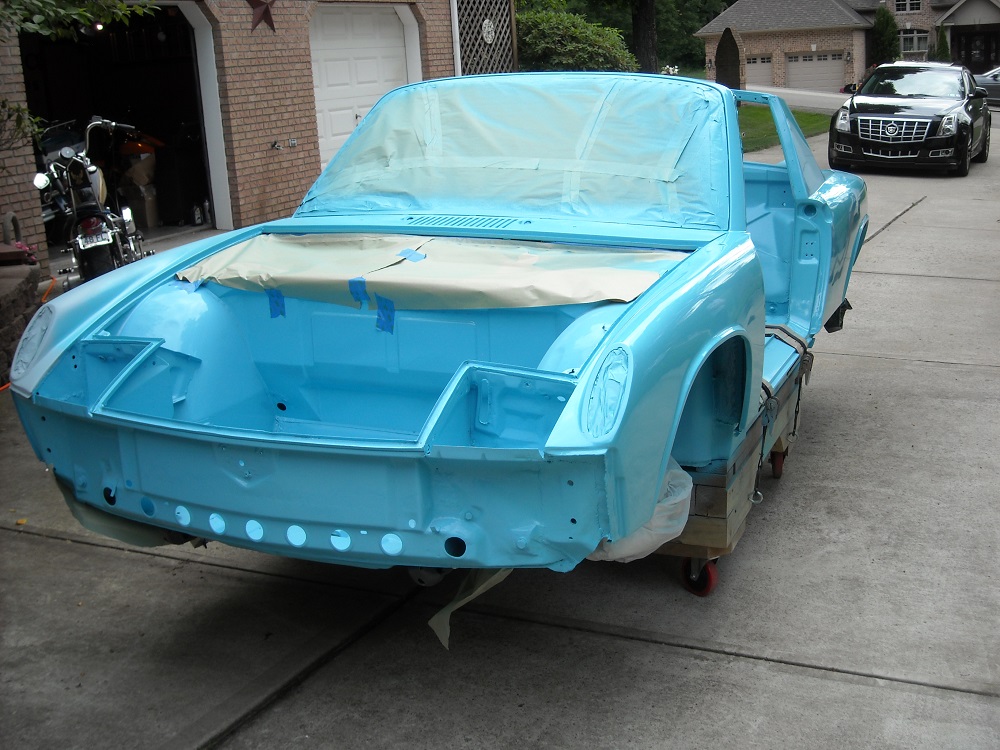
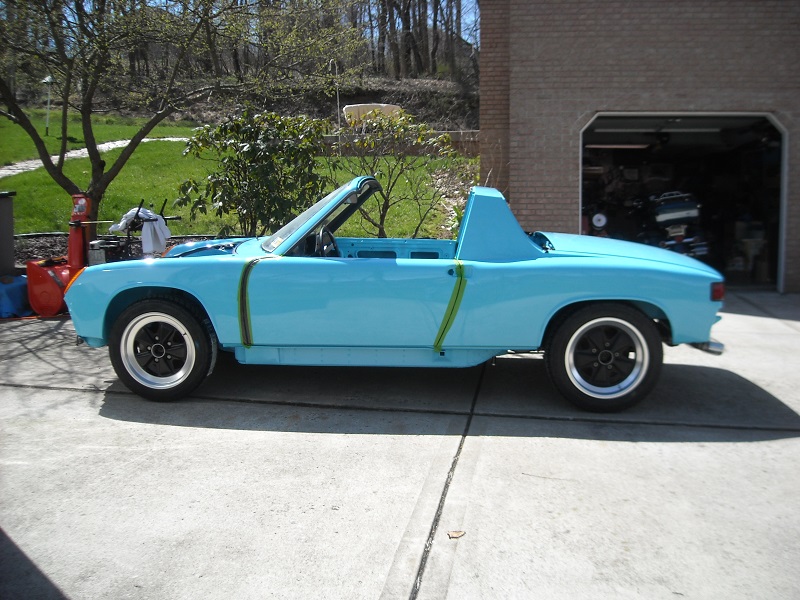
Moved it outside for some pictures. paint turned out good. still will need a cut and buff.
And starting to put stuff back on... 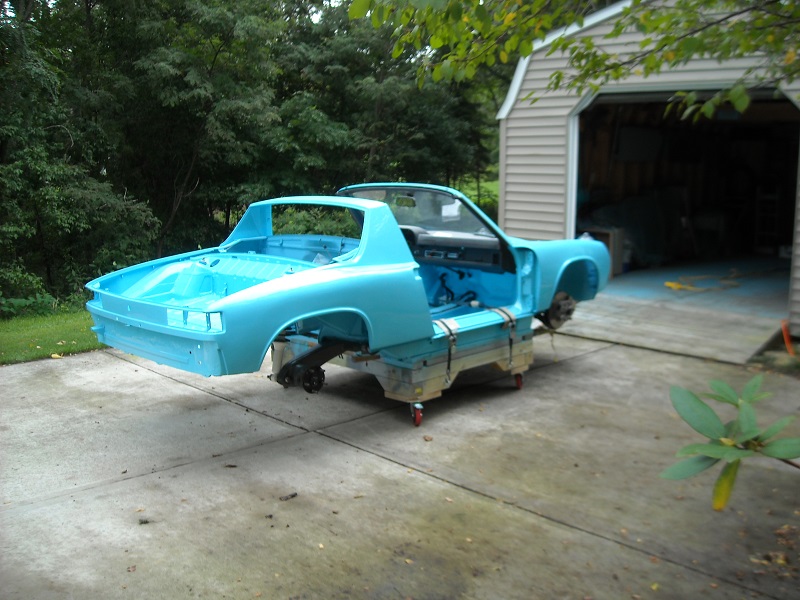

Refinished the headlight mechanisms and got them installed. Had to hunt down some little parts, Thanks for friends with parts cars... I need to get one of those..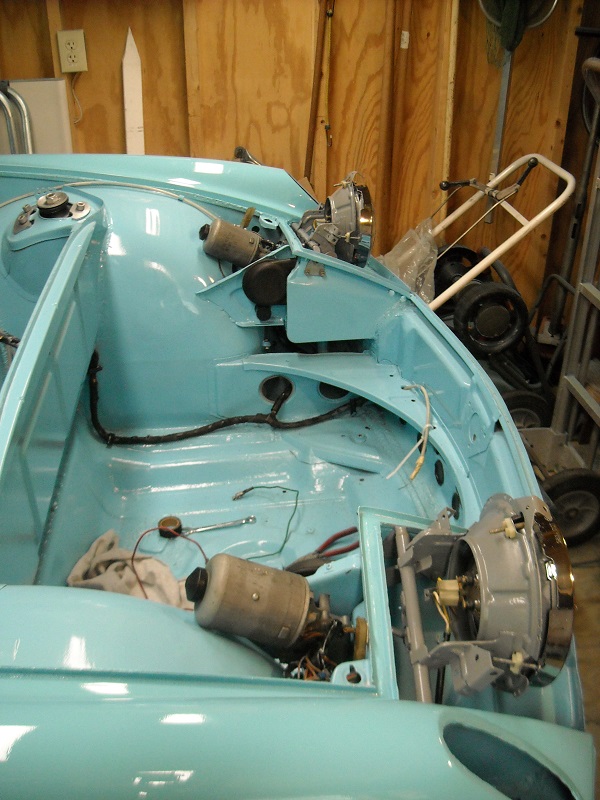
Installed the PMB 914/6 GT rear calipers and the vented rotors. also got all the hydraulic lines and hoses installed , glad I kept the old lines to use as a pattern. still need a couple little parts for the parking brake
those rear calipers should play nice with the with the A calipers and vented rotors on the front.
PMB also rebuilt my pressure regulator... Thanks Eric..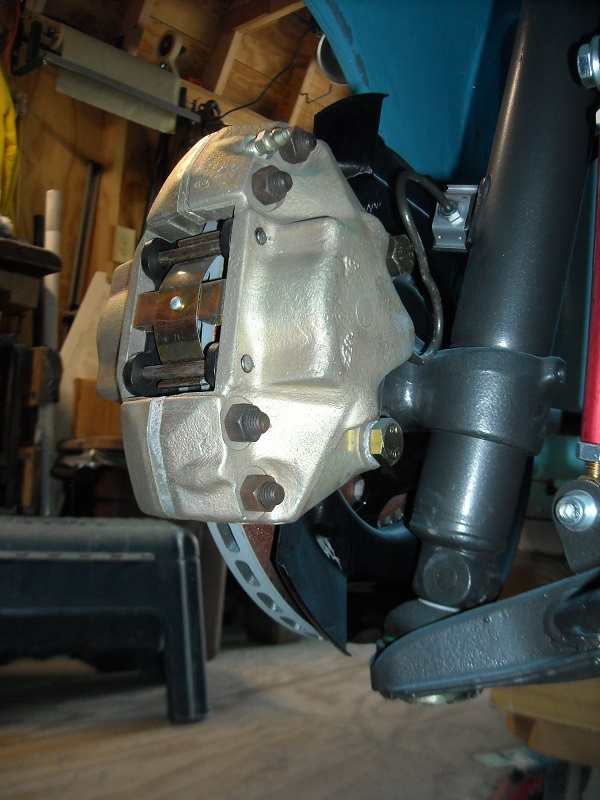
It is really great to empty out some boxes and get parts on the car...
Posted by: 914forme Aug 24 2016, 12:25 PM
It is really great to empty out some boxes and get parts on the car...
 only wish I was at that stage
 Keep up the great work
Posted by: jkb944t Aug 26 2016, 10:48 AM
Moved it outside for some pictures. paint turned out good. still will need a cut and buff.
And starting to put stuff back on...
Refinished the headlight mechanisms and got them installed. Had to hunt down some little parts, Thanks for friends with parts cars... I need to get one of those..
Installed the PMB 914/6 GT rear calipers and the vented rotors. also got all the hydraulic lines and hoses installed , glad I kept the old lines to use as a pattern. still need a couple little parts for the parking brake
those rear calipers should play nice with the with the A calipers and vented rotors on the front.
PMB also rebuilt my pressure regulator... Thanks Eric..
It is really great to empty out some boxes and get parts on the car...
You are making some huge progress!
Jeff B
Posted by: DirtyCossack Aug 26 2016, 07:59 PM
I imagine I'm not the only one sitting here on a Friday night, drinking a beer, looking at this thread with an intense melancholic jealousy.
Great work!
Posted by: Valy Aug 26 2016, 10:11 PM
Looking very good!
Great job with the paint!
Posted by: rgalla9146 Aug 27 2016, 12:08 PM
Are they aluminum alloy rear calipers ?
Posted by: Olympic 1.7 Aug 28 2016, 06:19 PM
Are they aluminum alloy rear calipers ?
Yes, Aluminum calipers
Working on bleeding the system now.
And starting to think about tires....
Posted by: Olympic 1.7 Sep 19 2016, 08:29 PM
OK, well 9-14 day has come and gone and I am still not running yet, so that puts me out of contention for the win. For me it wasn't about the win anyways, I just liked the push to get some work done worthy of sharing with the 914 community.
Congratulations to those that did get their cars running
Andrew, Darren, Garland, Jeff and Philip. great job.
I worked through a few more setbacks. First when I finally started to strip off the doors to get them ready to take and be blasted I discovered that the drivers door was hammered. someone did a pretty good job of hiding the work and it stayed hidden for the 37 years I owned the car. but I didn't think it was worth my time to try and fix this mess. These are some of those rare doors, 9-72 thru 12-72 late window mechanism and no door bars. didn't think I was going to find another of those so.... 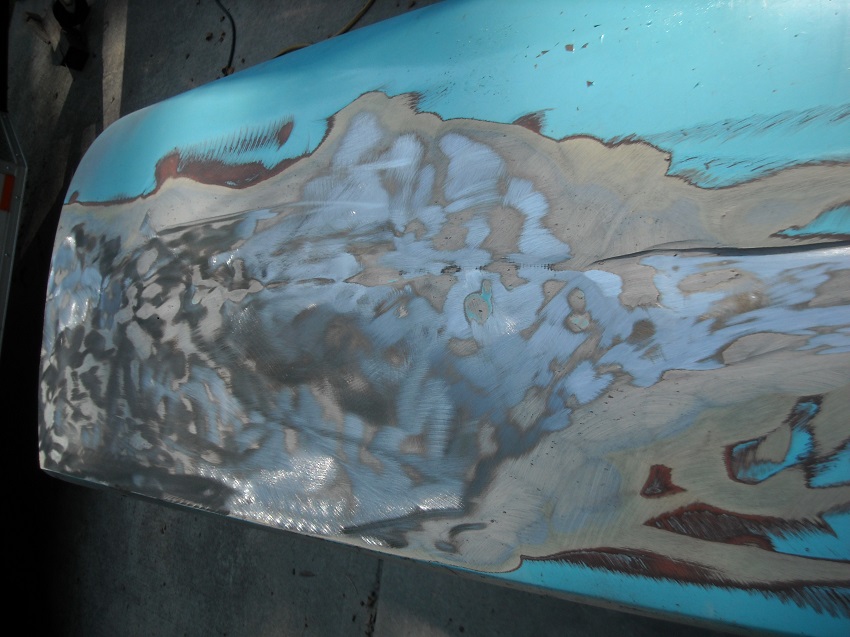
so after checking out a couple doors a friend had, I contacted Garold and he picked me out a nice one.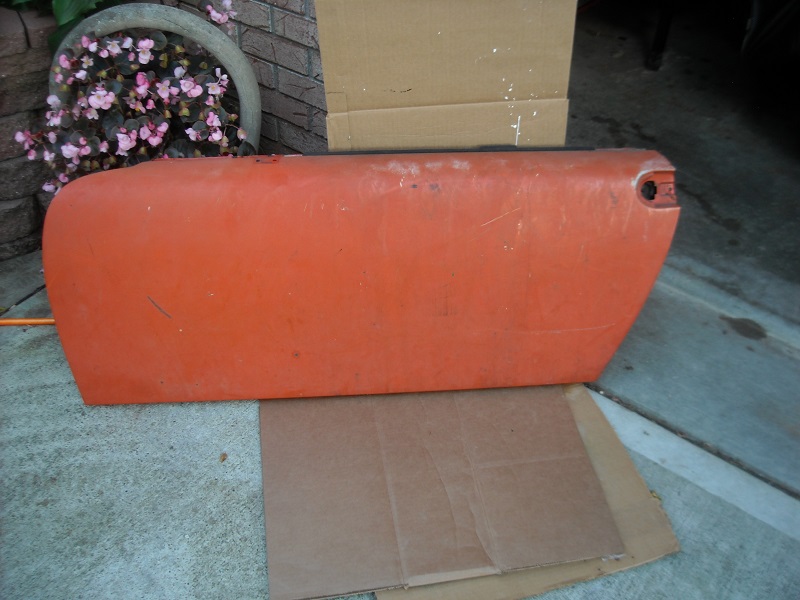
they are at the blasters now then I will go to work on them.
I wanted to get it on the ground and started to look at tires to fit the 7 and 8 in Fuchs I wanted to run. Well in spite of getting the fenders flared it looks like the 8 inchers may not work, even with 225 / 50 -16.
I really like these wheels though........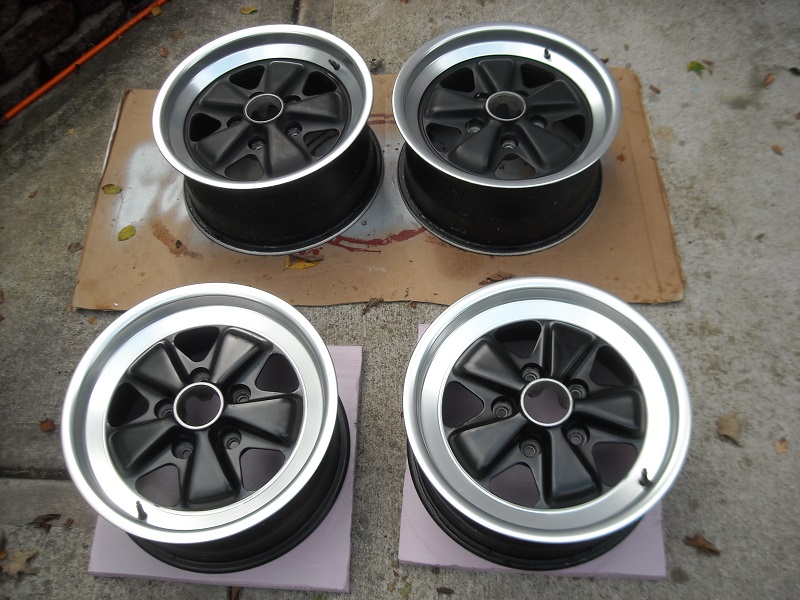

I have another idea but I will do a little more research before I decide what to run. But this will have to happen soon. I want to get it on the ground before I put the engine back in.
Spent 4 days working on the brakes. two days to finally get the system bled and two more to get the venting clearance tight and have a working parking brake. The brakes feel good now ( at least pressing on them in the garage) so I think I am good to go with that.
I got the rear sway bar mounted and picked up a new creeper... this thing is like a Magic Carpet the way it slides around, No more fighting with my old creeper to roll around, or it eating my shirt....
This really helped while working on the brakes. 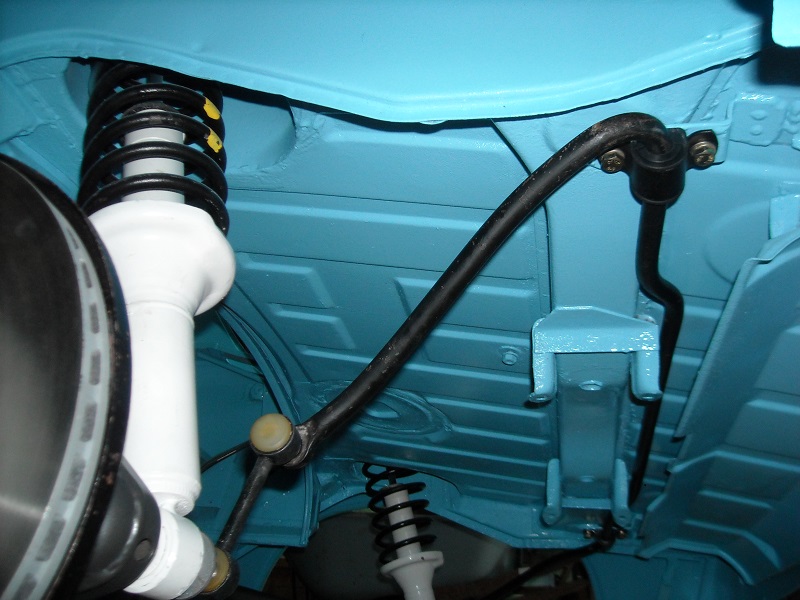

Still Moving along.
Tom
Posted by: raynekat Sep 19 2016, 08:36 PM
Hard to believe those wheels won't fit under GT flares?
Or are you talking under the stock fenders?
Car is looking great BTW!
Posted by: jmitro Sep 19 2016, 09:04 PM
man, very nice work!
Posted by: barefoot Sep 20 2016, 04:51 AM
I wanted to get it on the ground and started to look at tires to fit the 7 and 8 in Fuchs I wanted to run. Well in spite of getting the fenders flared it looks like the 8 inchers may not work, even with 225 / 50 -16.
I really like these wheels though........
I have another idea but I will do a little more research before I decide what to run. But this will have to happen soon. I want to get it on the ground before I put the engine back in.
Still Moving along.
Tom
[/quote]
The way the trailing arm rotates will bring the wheel inboard slightly under load. Disconnect the Spring/shock with the wheel on and lift it up to a loaded position to see if fender clearance improves
Posted by: jd74914 Sep 20 2016, 05:38 AM
The way the trailing arm rotates will bring the wheel inboard slightly under load. Disconnect the Spring/shock with the wheel on and lift it up to a loaded position to see if fender clearance improves
 Your camber goes very positive as the suspension droops so if you jack up on that wheel it might tuck in nicely. Also, have you checked your toe? If it is very negative your wheel will also move outward.
Posted by: jkb944t Sep 20 2016, 05:43 AM
OK, well 9-14 day has come and gone and I am still not running yet, so that puts me out of contention for the win. For me it wasn't about the win anyways, I just liked the push to get some work done worthy of sharing with the 914 community.
Congratulations to those that did get their cars running
Andrew, Darren, Garland, Jeff and Philip. great job.
Tom
Thanks! Awesome looking wheels but I agree 8" might be too tight. You made great progress so far so you should be very proud.
It is a lot of work but it is worth it once it is running. Keep at it and you will have a great looking 914 on the road very soon!
Jeff B
Posted by: Olympic 1.7 Sep 20 2016, 05:46 AM
The way the trailing arm rotates will bring the wheel inboard slightly under load. Disconnect the Spring/shock with the wheel on and lift it up to a loaded position to see if fender clearance improves
Your camber goes very positive as the suspension droops so if you jack up on that wheel it might tuck in nicely. Also, have you checked your toe? If it is very negative your wheel will also move outward.I will take a look at this today. easy enough to unbolt the shock and see where it pivots to.
I haven't done any type of rough alignment, tough to do without the weight of an installed engine and other parts (or tires)
Posted by: jd74914 Sep 20 2016, 06:03 AM
I will take a look at this today. easy enough to unbolt the shock and see where it pivots to.
I haven't done any type of rough alignment, tough to do without the weight of an installed engine and other parts (or tires)
Yeah, I know it's tough to do. With the shocks unbolted you could put the wheels on the back and try doing a rough string alignment (or even just visual toe check would be enough) to rule that out too.
Those are beautiful wheels-I really hope they fit!
Posted by: Olympic 1.7 Sep 20 2016, 06:04 AM
Another little bit I spent too much time on.......
dug out the heater control lever and thought. I can't run this crusty looking thing.
I guess the carpet holds moisture against the lever.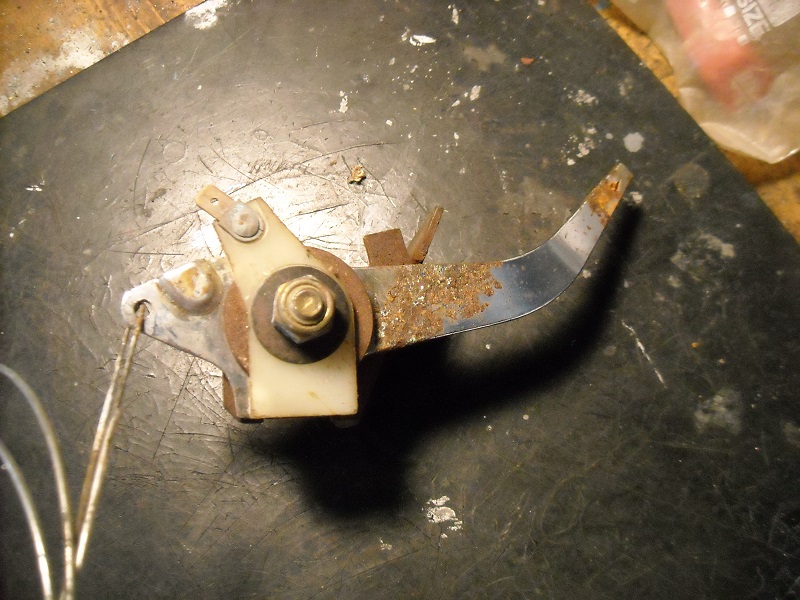
So off to the chrome shop with it... A good friend runs the chrome shop, so he usually can get little parts through for me quickly. this piece took a LOT of sanding to get rid of all the pits and then he had it in the nickel tank for over 4 hours to build it up. then on to the chrome tank.
Looks much better now.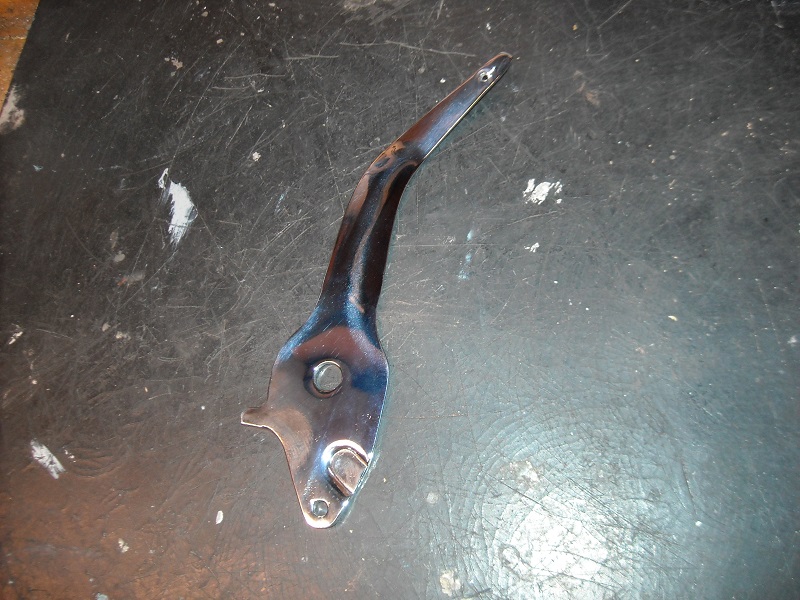
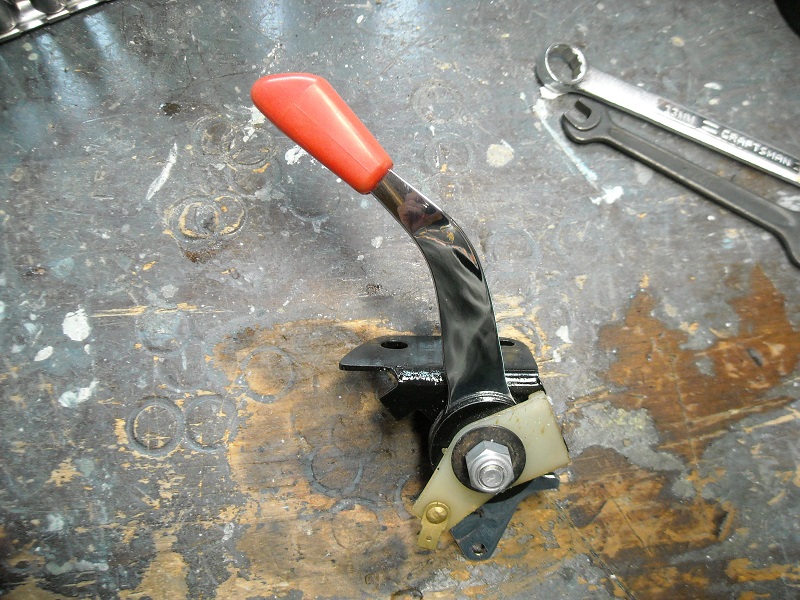
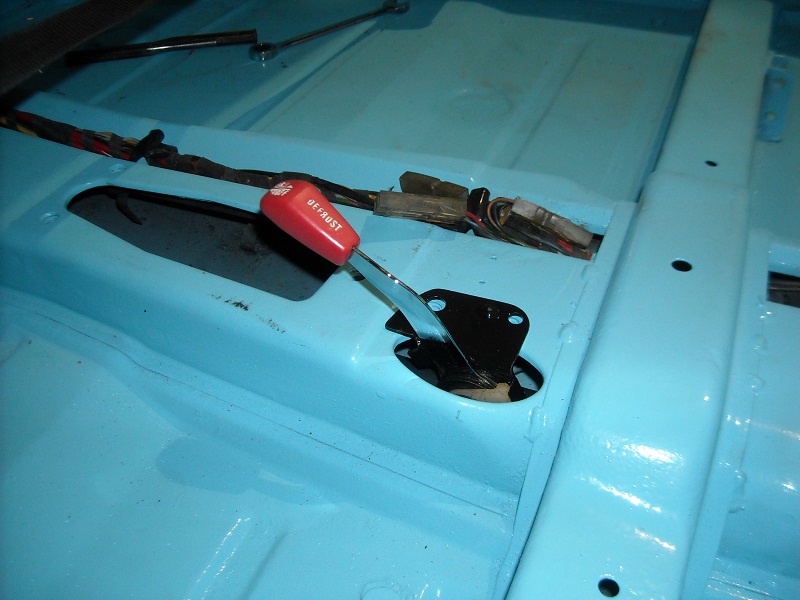
I could have just painted it but that wouldn't be right....
This is just an example of why it takes me so long when working on this car.... OCD.. Maybe..
Posted by: Racer Chris Sep 20 2016, 07:46 AM
The 8s with 225s should fit fine.
Posted by: mbseto Sep 20 2016, 08:20 AM
Another little bit I spent too much time on.......
Looks much better now.
I could have just painted it but that wouldn't be right....
This is just an example of why it takes me so long when working on this car.... OCD.. Maybe..
Good workmanship pays off. You and others will appreciate those details when you're driving it around. Keep up the good work!
Posted by: Olympic 1.7 Sep 20 2016, 09:51 AM
[quote name='barefoot' date='Sep 20 2016, 06:51 AM' post='2400755']
I wanted to get it on the ground and started to look at tires to fit the 7 and 8 in Fuchs I wanted to run. Well in spite of getting the fenders flared it looks like the 8 inchers may not work, even with 225 / 50 -16.
I really like these wheels though........
I have another idea but I will do a little more research before I decide what to run. But this will have to happen soon. I want to get it on the ground before I put the engine back in.
Still Moving along.
Tom
[/quote]
The way the trailing arm rotates will bring the wheel inboard slightly under load. Disconnect the Spring/shock with the wheel on and lift it up to a loaded position to see if fender clearance improves
[/quote]
Ok, This may work....
I leveled out my cart and disconnected the shock to enable it to move up to more of a running position and the clearance did increase. from 3/16 to about 3/4 inch. that should be enough to clear the 225/ 50 - 16 s
This is with 2 inch vertical from rim to fender lip. I really just guessed on the ride height. 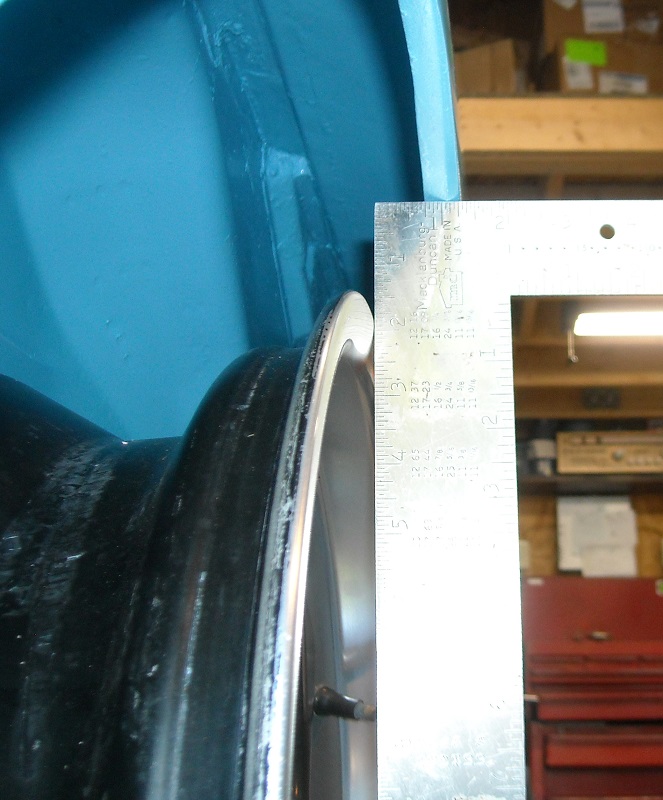
presently there is a 2mm shim installed and my rough measurement shows it to be around 2 deg negative camber 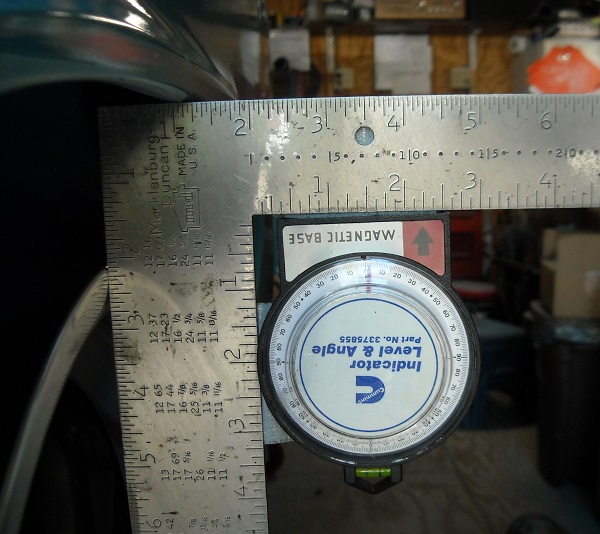
So I may be able to stay with Plan A ,
Plan B involves different wheels and it would be better if I didn't have to go there...
Posted by: Andyrew Sep 20 2016, 09:55 AM
Go to a tire store and ask them to mount a used 225/50/16 because you want to check fitment. Tell them not to put any weights on it or anything and they can even write on the tire not for road use.
Then put the wheel on, take the shock off, and move it through the wheel arch. You should have 1/2" play on the inside and outside on a 50 series tire to prevent rubbing on load.
Posted by: Andyrew Sep 20 2016, 09:57 AM
Quick note. You CAN mount 205's on 8's if you need it. it'll have a little of the modern "Stretch" look to it, but it'll function all the same. If you have any stretch to those fenders then 225's might work.
Posted by: Olympic 1.7 Oct 7 2016, 06:45 PM
So I took a leap of faith and ordered the tires. BF Goodrich G-Force Comp 2
Fronts 205 50 16 on 7" rims
Rear 225 50 16 on 8" rims
The 8s with 225s should fit fine.
And they do.


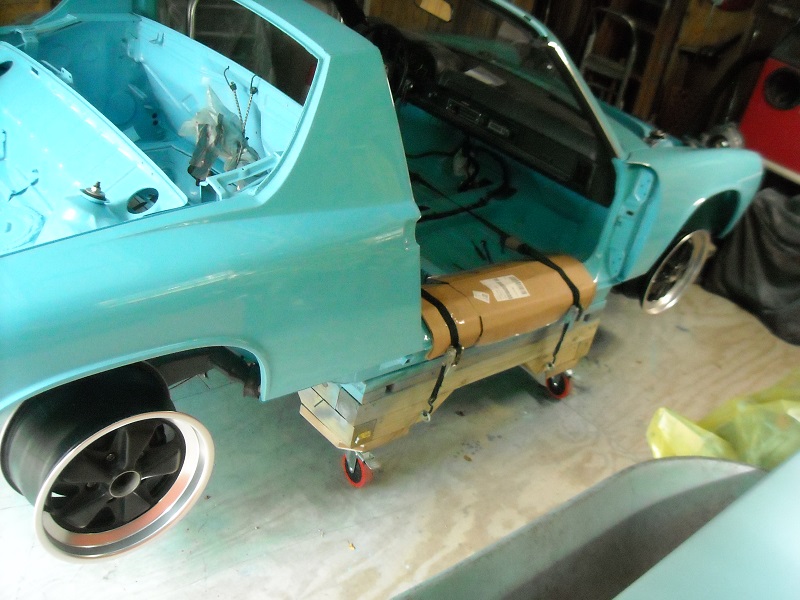
Still need an alignment to see where they really end up, But looking good now.
So its OFF of the cart and finally gets to stand on its own four feet.
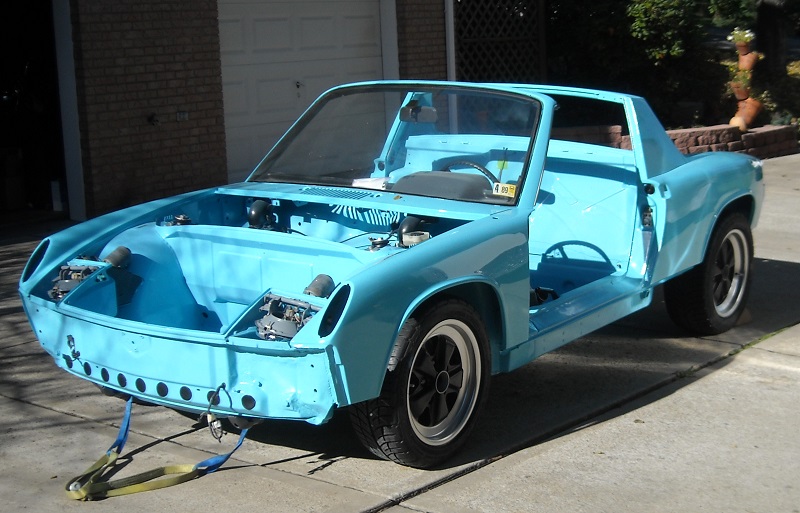
It starting to look like a car again.
Just got the doors back from the blasters, So now I can start the bodywork on them.
Painted up the hinge hardware too. So I can mount the rear trunk lid, the front lid still needs paint. I will do that when I get the doors ready.
Little more progress....
Posted by: Olympic 1.7 Jan 31 2017, 08:37 AM
Well its been a while since I updated this thread, but I haven't quit on it.
In the last installment I had painted up the hinge hardware. then after mounting them with the new rollers I noticed a crack on the passenger side trunk lid mount. I had already repaired the drivers side before painting it and had looked at the pass side then and it looked ok. ..... Well it wasn't. Fortunately I found it while I could still get in there, unfortunately it was previously repaired by brazing it 
So I had to grind out all the brass and get in there with the mig to fix it right. I am still learning with this mig but did manage to get in there, it should hold up now. Then I had to fix the paint I just burned up with the mig.... 
Since I had just picked up the doors from a local restoration shop that I had taken them to be blasted inside and out. I started on these.
then found that the shop had added some warp to my doors when blasting them.
so they were going to need some more bodywork. They are ready now just waiting on some warmer temps to paint them (might be a couple months now)
Worked on mounting the fuel pump and filter. not a lot of room with the sway bar there. 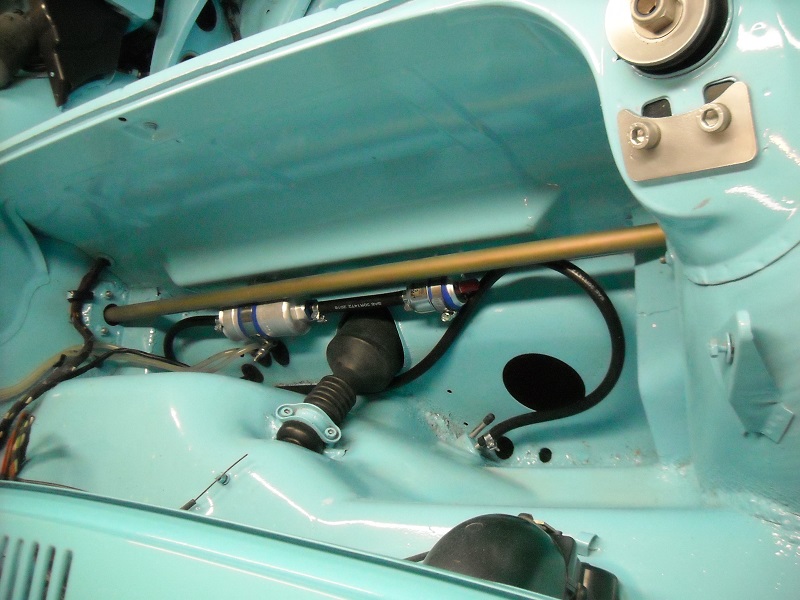
After joining the engine and trans and strapping it to a cart, it started on its journey from the garage to the shed.
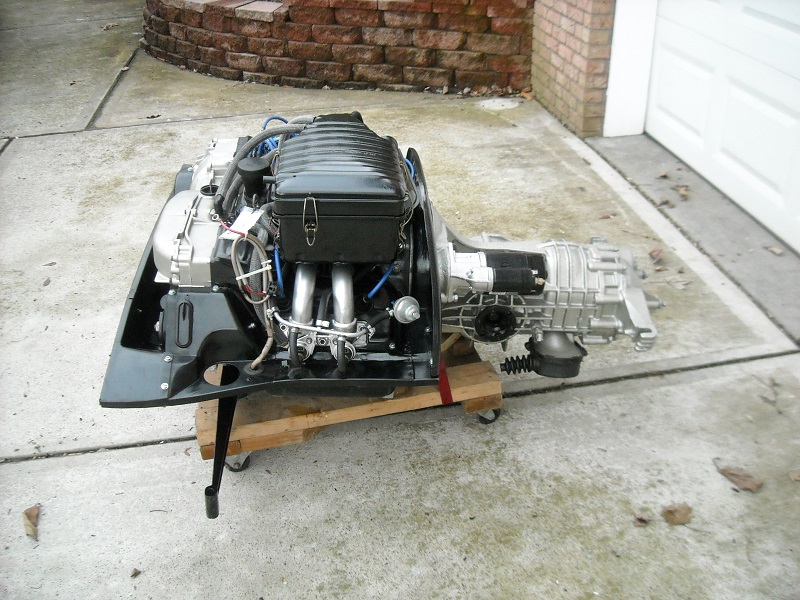
I had to use the winch to pull the combo up the ramp into the shed, and into place under the car. 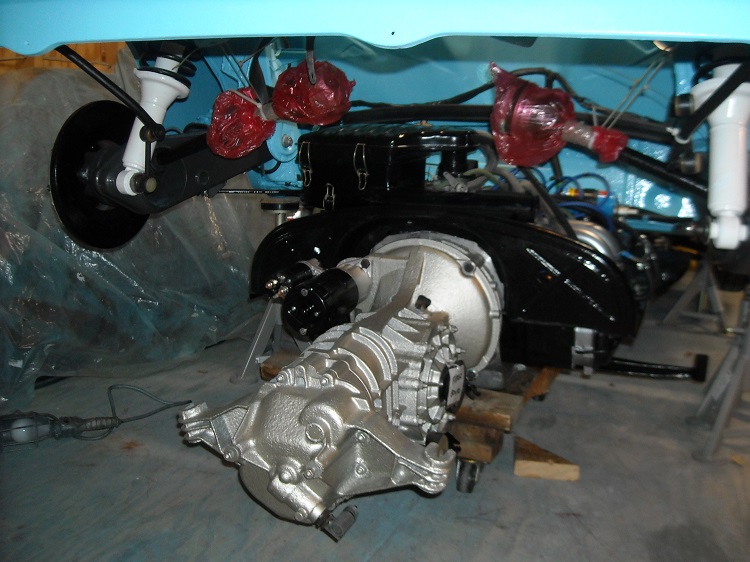
Using a couple pieces of allthread on the front motor mounts and a floor jack under the trans, I was able to get the engine raised into place without damaging anything.
although this is a slow method it gave me a lot of opportunity to make sure everything was clearing. I angled up one side first to clear the fuel injector lines and clear the tins on the suspension bolts. 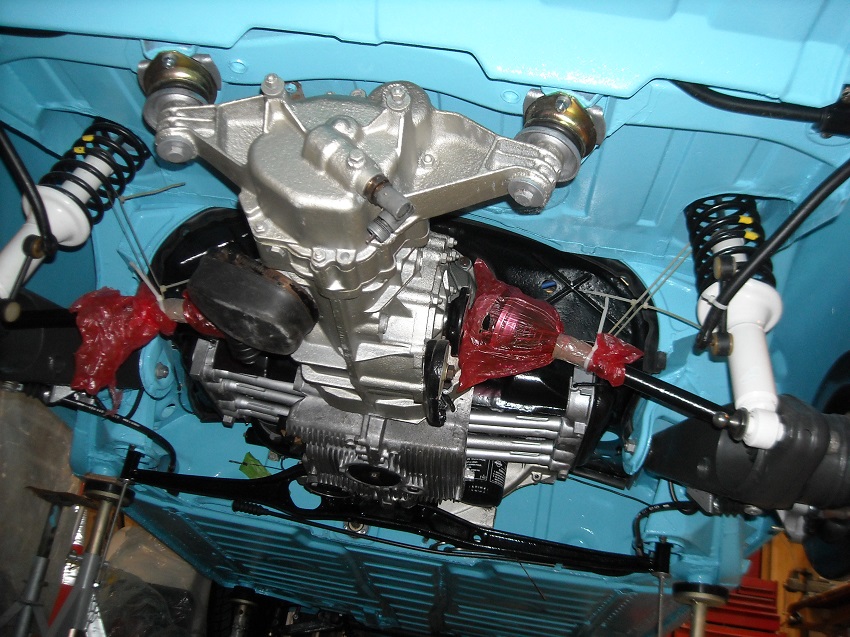
You can see the allthread still in place this picture above. It worked great..
Posted by: Olympic 1.7 Jan 31 2017, 11:00 AM
After much parts cleaner, elbow grease and a liberal dose of Barkeepers Friend my once cruddy looking Heat Exchangers shined up nicely. 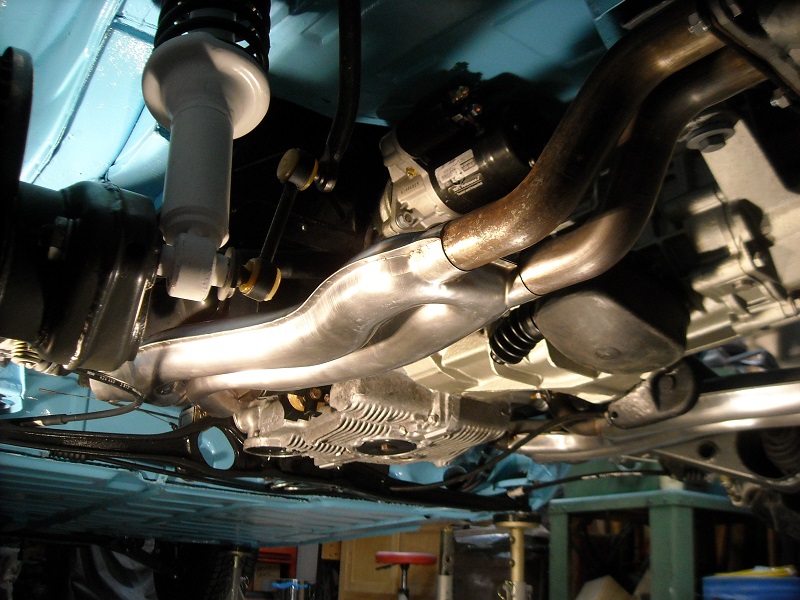
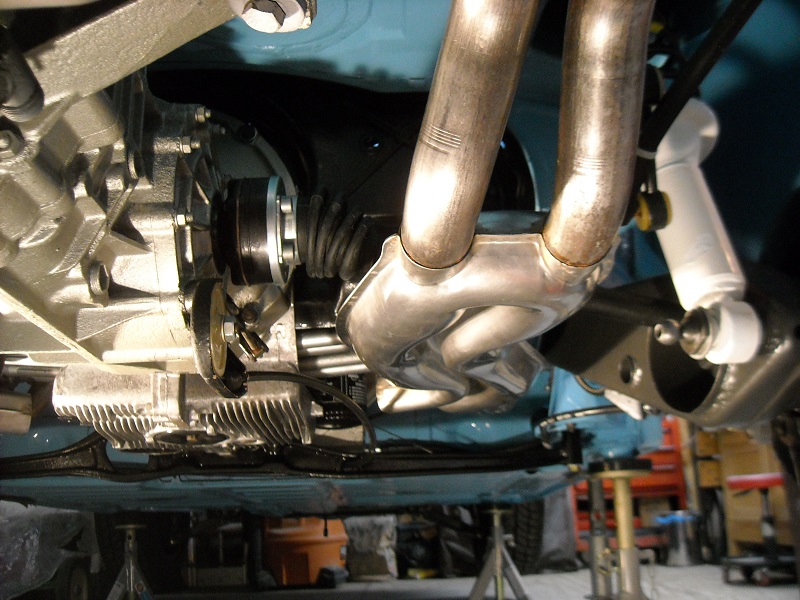
To keep the copper exhaust gaskets in place while I installed the HE's I sprayed them with some of this. it provided just enough stickiness to keep them in while I fitted the HE's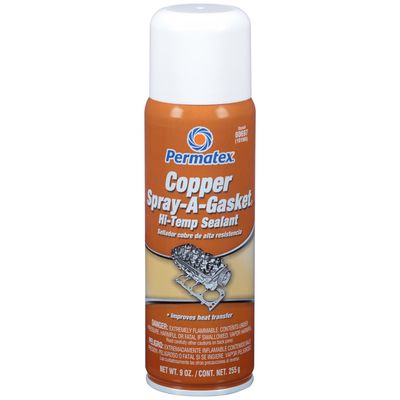
Then I could put on the Custom Deluxe Triad Exhaust System.
I had a bung added for an AFR gauge.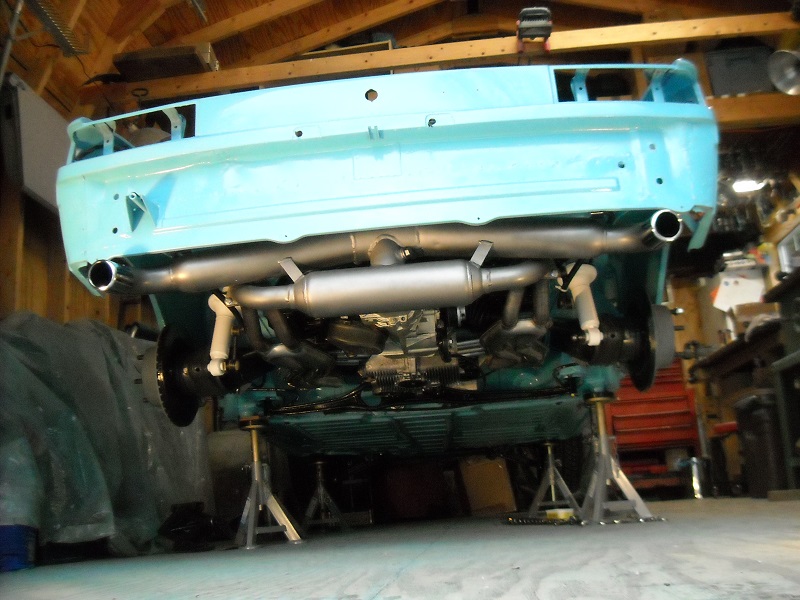
And some Chrome tips for a little extra Bling.
These pipes fit up PERFECTLY. Thanks Dave.
very high quality, can't wait to hear how they sound.
Just dropped off a couple heater parts for powder coat yesterday, and can finish up that stuff once I have everything back..
I keep putting off tackling the front airbox installation, having read what a PITA that job is. But know I will have to get to sometime. Still have to put the wiper motor and linkage in first of course. and dream up something for the windshield washers.
But that all for now folks.
Posted by: Curbandgutter Feb 1 2017, 08:54 AM
This is looking really clean. Great job. Keep it up.
Posted by: ndfrigi Feb 1 2017, 11:55 AM
beautiful!
Posted by: AZBanks May 23 2017, 10:56 AM
Updates?
Posted by: Olympic 914 May 23 2017, 03:32 PM
Updates?
Well its time I brought this thread up to date.
So in preparation for the dreaded airbox install I decided to inspect, test, clean and lube the wiper mechanism. The lube part went ok but getting the wipers to park was another story. The instructions in both the Haynes and Clymer manual will not work to get the wiper into a park position for a bench test.
I found I had rig a switch to mimic the column switch to get them into park.
http://www.914world.com/bbs2/index.php?showtopic=304921&hl=
Then on to the air box install. The teener gods were with me that day as it only took about 1 ½ hours to get the airbox in. I admit I had to cheat a little and elongated the mounting holes. But it went in much better than I expected.
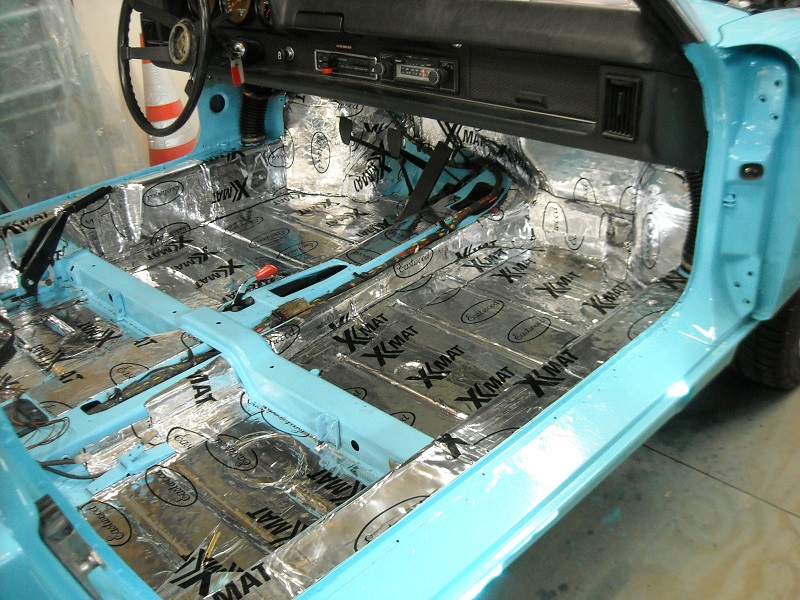
Moving to the interior I installed some Xmat sound deadner from Eastwood. Using paper I first made patterns and after getting a good fit transfer that to Xmat. It cuts easily with sharp scissors. Before putting it in place I waved it over my heater for a couple seconds to warm up the butyl rubber backing making it more flexible and stickier.
Then after waiting on a warm day I got the doors finally painted.
And had a friend help with the install. I put the tape on the edges to prevent nicks in the new paint while we were handling them.
its coming along.
Posted by: Olympic 914 May 25 2017, 08:32 AM
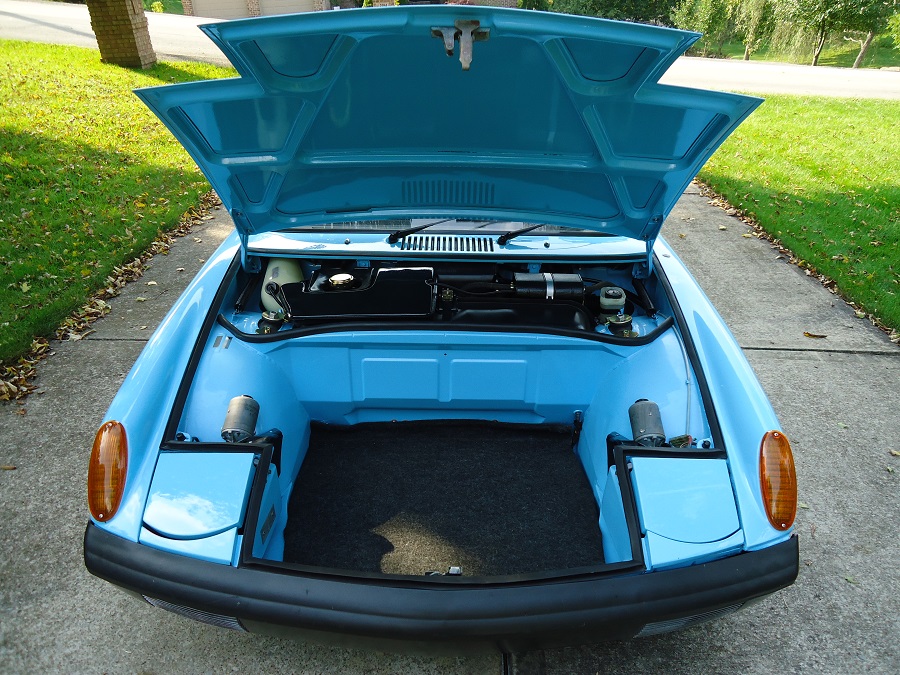
With the airbox in place now I can work on the gas tank stuff.
I had already installed the fuel pump, moving it to the front. its a tight fit with the front sway bar but everything clears nicely
the gas tank was pretty clean inside with just a little rust at the very bottom and when scraping this I uncovered a couple pin holes. so after having this professionally repaired at a local Tank Renew place and pressure tested it was ready for a coat of paint and install. 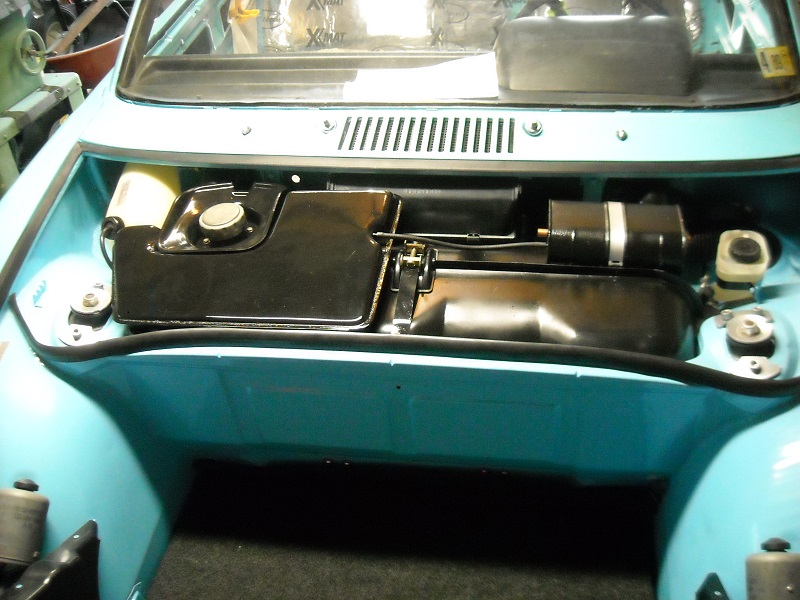
With the fuel taken care of it was time to move on to shifting.
next up was the installation of this beautiful piece .
Jwest Rennshifter. 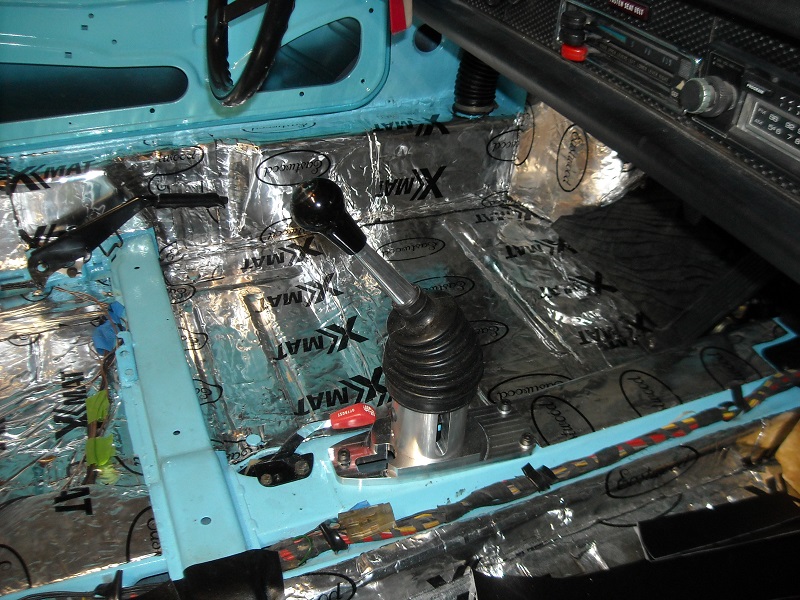
I think I have it adjusted correctly but won't really know until I try to move it under its own power.
That day is coming soon.
Still have a couple things left to paint and the front hood is the largest of these. also need to paint the headlight doors and the eyebrows.
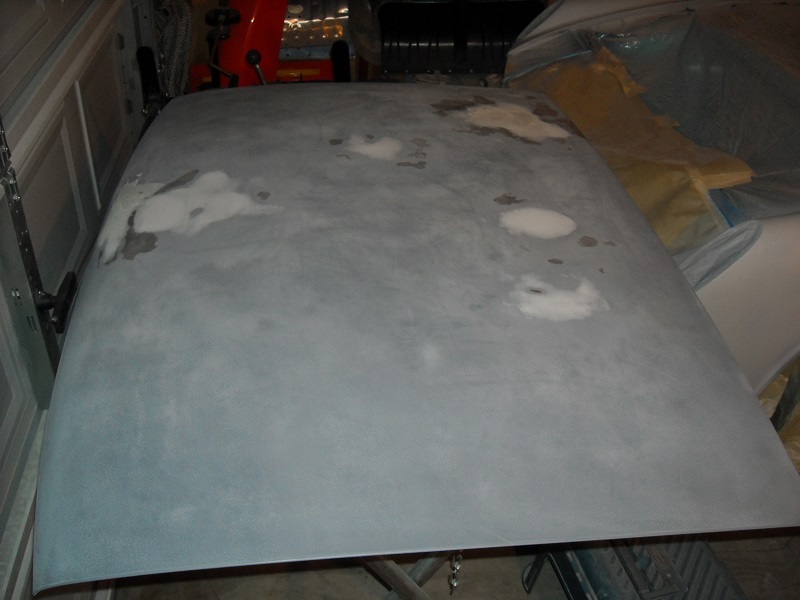
Since the hood still had the 30+ year old acrylic lacquer paint job on it I decided to strip it totally down and start from scratch. It looks good but I can feel some imperfections that will need to be leveled out.
when cleaning up the underside I used my sandblaster and sand just KEPT ON coming out from under the ribs on the bottom.
using a combination of air pressure and vacuum I managed to get most of it out, but I still find a couple pieces of black beauty creeping out.
Little Hood humor > http://www.914world.com/bbs2/index.php?showtopic=311019&hl=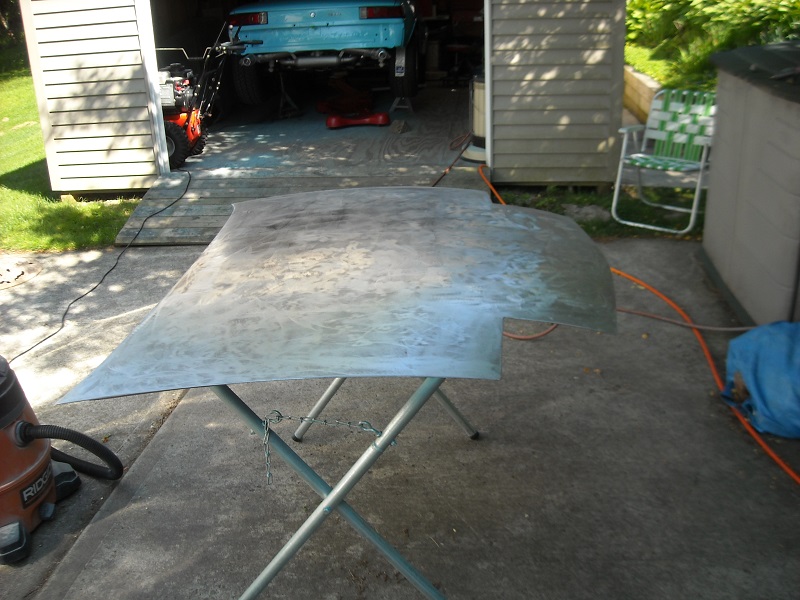
Posted by: Garland May 25 2017, 08:43 AM
Looking great!
Posted by: Olympic 914 Jun 16 2017, 06:41 AM

Drove the car yesterday. 
First time it has moved under its own power for 27+ years.
After chasing a couple vacuum leaks that held the idle above 3000 and doing the cam break-in. I got the idle to settle down around 1100-1200 then after a little clutch adjustment I drove it up and down the driveway a few times. Then took it down the street, and when all went good ventured around the block. 3.1 miles
Finally getting past the 137,000 mile mark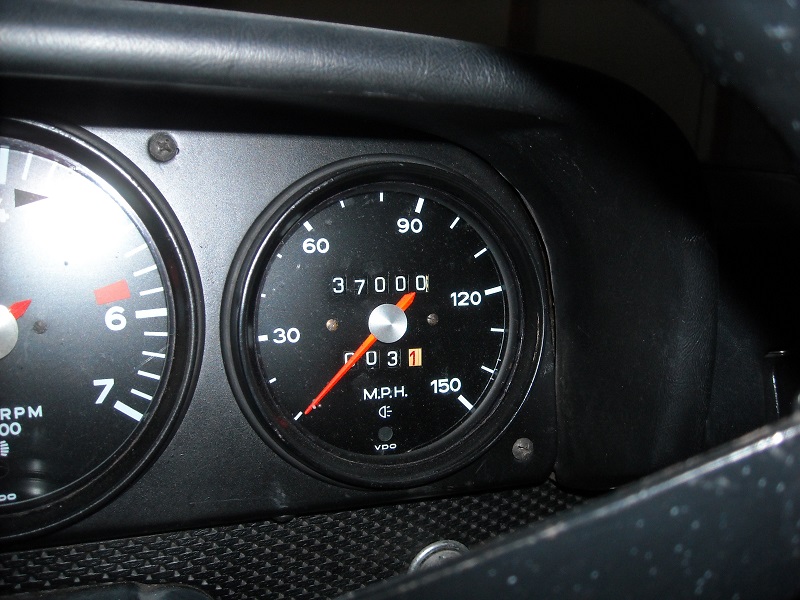
No hood, bumpers, rocker panels, or valences installed and just the drivers seat bolted in, no carpets, door panels, etc. I have a lot to finish. all the window mechanisms are lubed and installed and work smoothly. 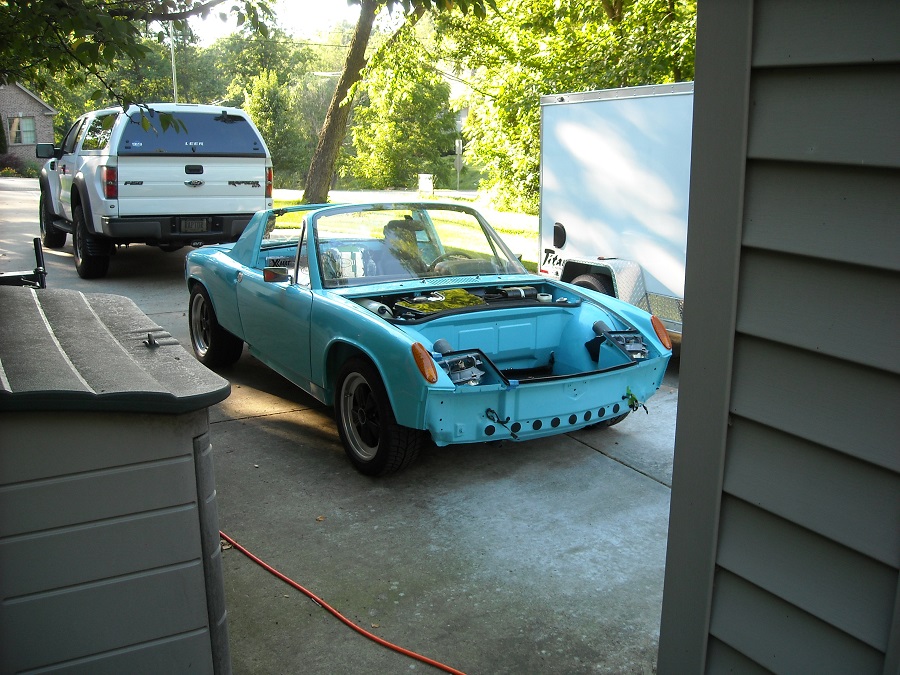
for the legal weenies out there, I do have new plates and insurance (they were in the trunk )
Unbelievably I seemed to have gotten the Rennshifter adjusted correctly the first time as I was easily able to shift. I don't think I took it past 3rd gear, there were too many things to try to monitor.
It was a momentous day.
Now back to work..... get sanding on that hood.
Posted by: gereed75 Jun 16 2017, 07:47 AM
Congrats on getting rolling. Great looking car. Mine will never look that good.
Where in the burgh are yinz?? I am in the south hills.
Posted by: 76-914 Jun 16 2017, 07:58 AM
A Big Congratulations. You earned it. Very clean work. 
Posted by: Andyrew Jun 16 2017, 08:03 AM
Congrats!!!! Sure is looking great!
Posted by: Olympic 914 Jun 16 2017, 10:42 AM
After blocking the hood, painted it along with the headlight doors and eyebrows.
Then did some work on the bumpers, I built a couple wooden frames to hold the bumpers while I worked on them, they clamped securely into the workmate stands it made it a lot easier hammering and sanding on them. The rear needed some massaging from being hit by a Lincoln years ago. Put paint on them also. Used SEM euro black trim paint. If I would do it again I would use the SPI black epoxy and add acetone to get the satin look. the good thing about the SEM paint is you can just buy another quart or spray can and it will still match. I will be using it on all the other trim pieces, and the rocker covers.
Congrats on getting rolling. Great looking car.
Where in the burgh are yinz?? I am in the south hills.
Thanks.
Irwin now, bout 20 miles east of Da Burgh.
Born a Yinzer, always a Yinzer.
Posted by: 3d914 Jun 17 2017, 03:28 PM
So I took a leap of faith and ordered the tires. BF Goodrich G-Force Comp 2
Fronts 205 50 16 on 7" rims
Rear 225 50 16 on 8" rims
The 8s with 225s should fit fine.
And they do.
Tom, you're going to love those tires. I put a set on my LS400 and it now sticks to the road great. Hard to even squeel tires now they grab so good. Looking for the same wheel/tire combo for my project.
Enjoy!
Posted by: pete000 Jun 17 2017, 04:32 PM
What a great build !
Posted by: trojanhorsepower Jun 17 2017, 04:38 PM
Wow congrats! That is fantastic. The car looks great to.
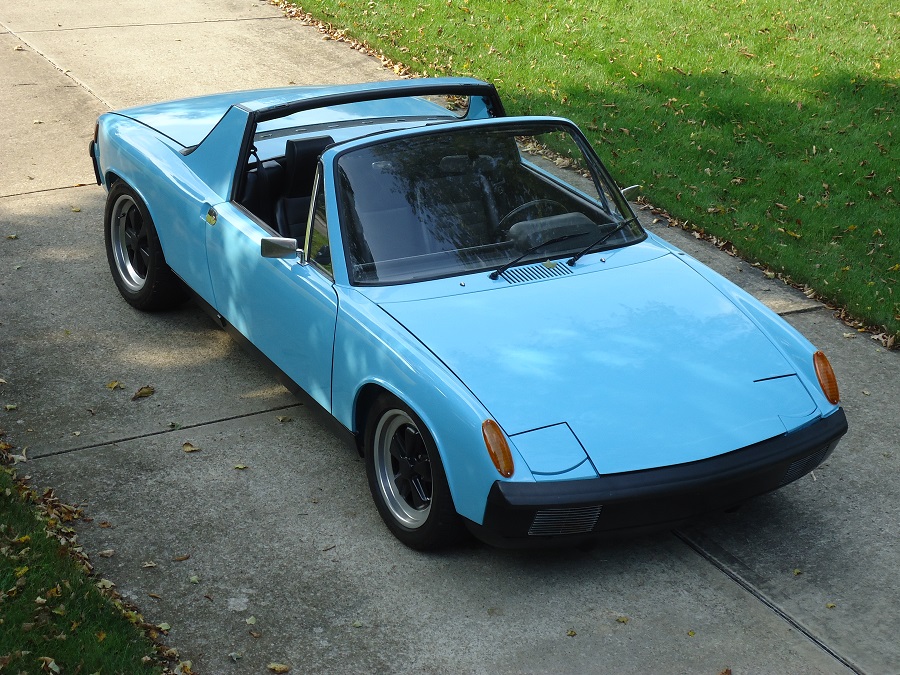
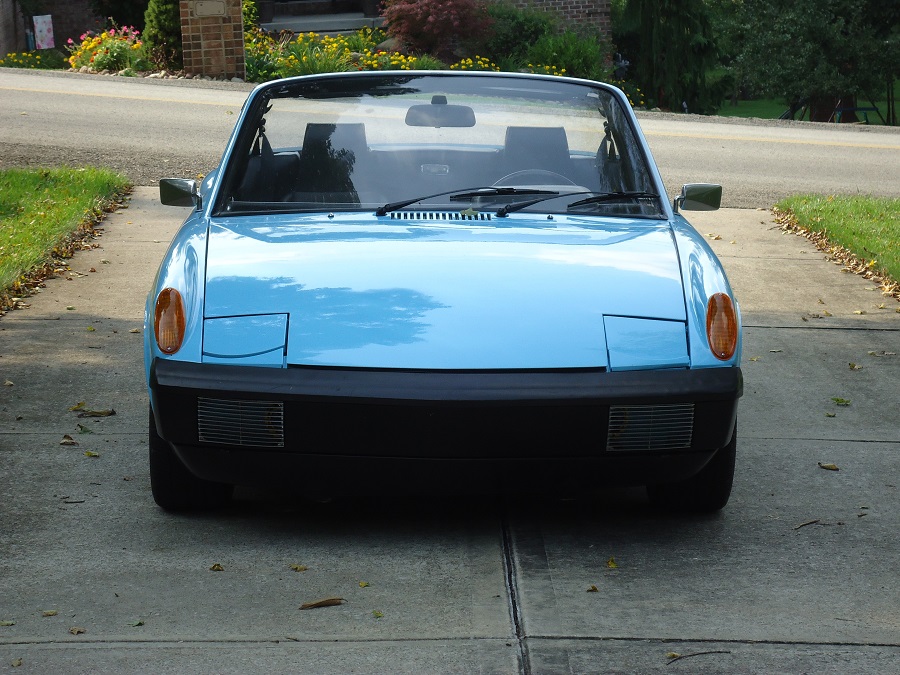
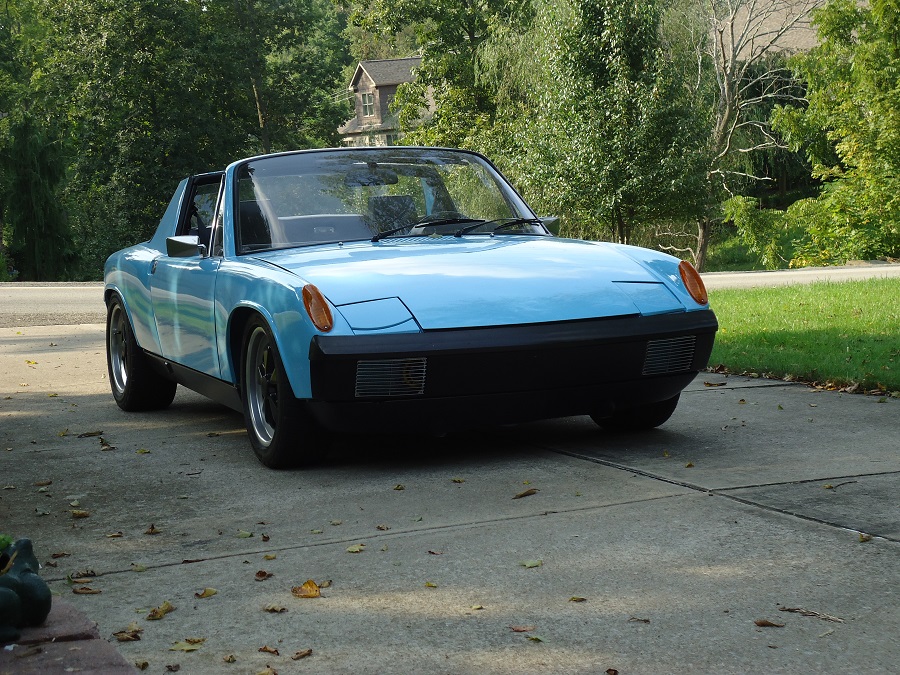
Posted by: Olympic 914 Sep 5 2017, 09:41 AM
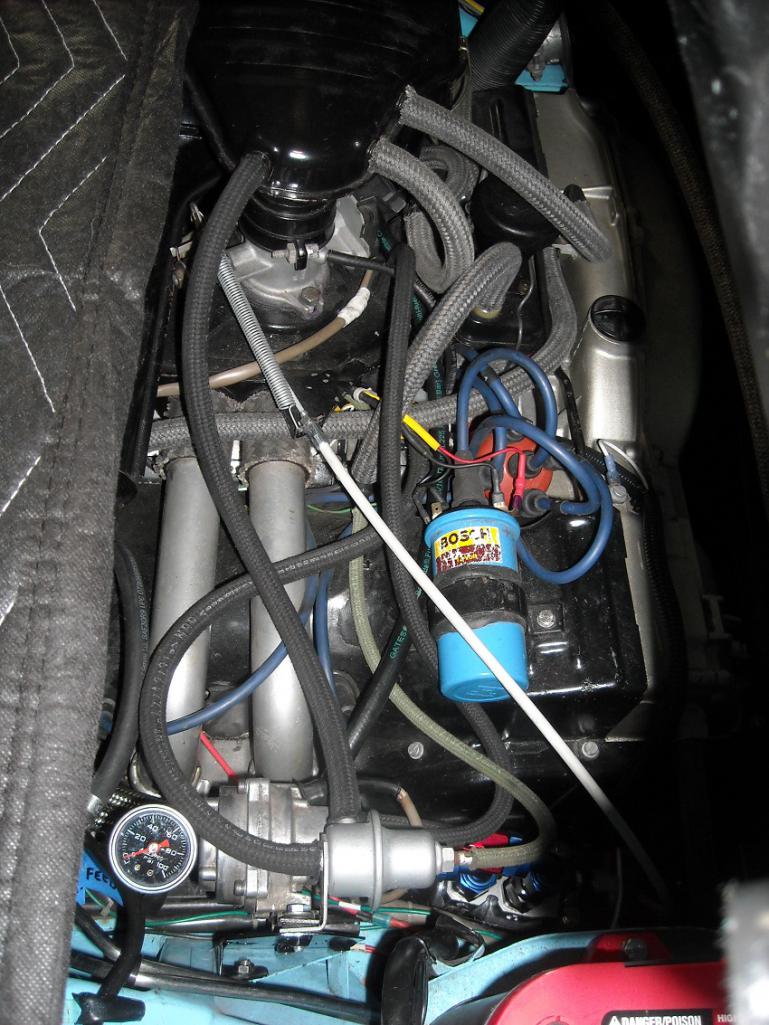
Installed the hood and bumpers and did some more tuning to the MPS. Then out for state inspection and alignment and we are ready to drive. 
I had set up the MPS using the figures for a 037 MPS on Anders site. This ended up being Waaay too lean for my engine configuration. I was obsessing over getting the readings accurate when I happened to call Chris Foley to ask about another thing and mentioned this. He told me to just back out the inner screw 1 turn or more. Since my previous adjustments were like a few degrees at a time one full turn seemed crazy.. But hey what do I know….
I went 1 ¼ turns for good measure and got a mixture that was too rich. Good, change in the right direction.
One more adjustment and I think its PERFECT. I don’t even want to touch it again.
Great AFR numbers cruising and the head temps are right where they should be. It’s a little rich on start-up with AFR at around 10.8 – 11.2 and doesn’t idle real smooth, but after about two miles it warms up enough to be in the low 13s. and idles nice then, I’m fine with that.
Did my first oil change from the Brad Penn break in oil at 450 mile and put in Brad Penn 20-50. I now have 675 miles on the rebuilt engine and it runs great.
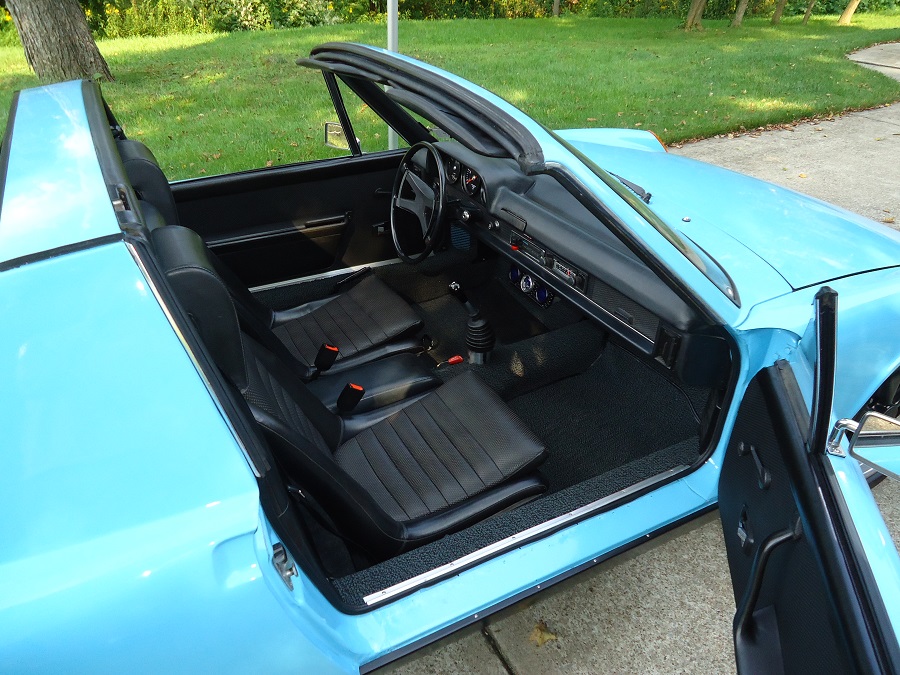
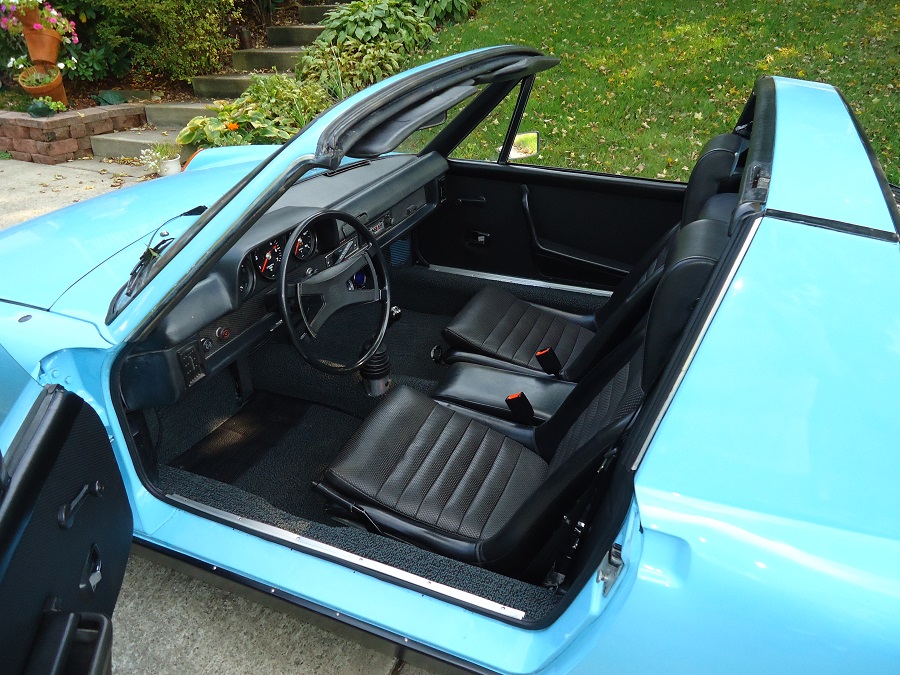
Got the new carpet installed and the rest of the interior. Replacing all the door seals and new door panels from 914Rubber.
Could not be happier, I am driving it a good bit and had forgotten how much fun it was. The motorcycles will be getting jealous.
I still have a couple little things to do, like the rear valence which I will be putting on, and getting a radio hooked up. But for now…
I am calling it DONE. !!!
It took just over four years to get from something that for most would be a lost cause and just a parts car to something that turns heads anytime I drive it. 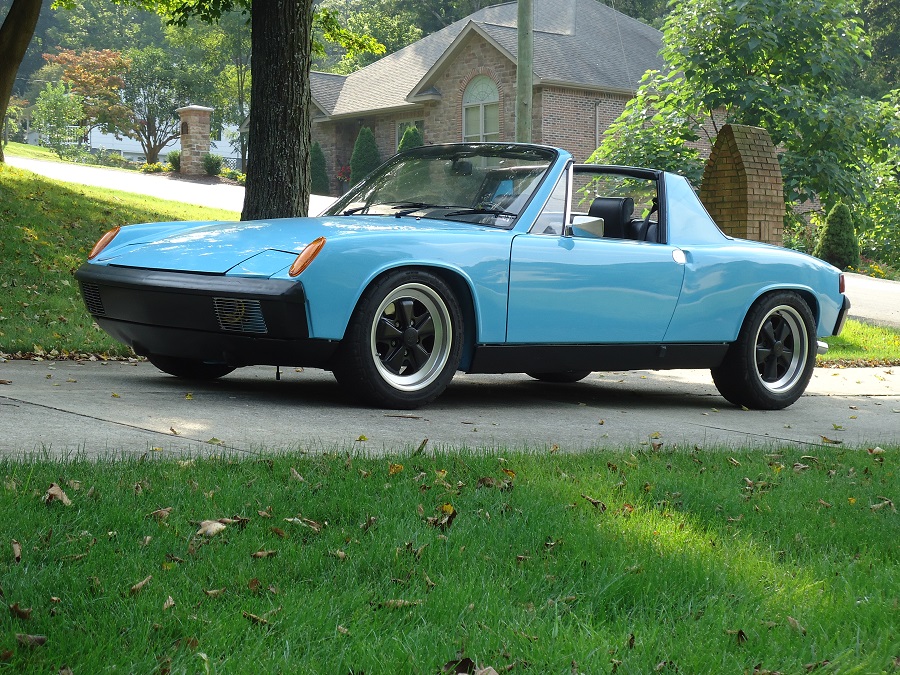

Posted by: tygaboy Sep 5 2017, 10:20 AM
That.
Is.
So.
BEAUTIFUL!
Wow, just fabulous. 
Posted by: Matty900 Sep 5 2017, 11:06 AM
 Beautiful car, great job!!
Posted by: JoeD Sep 5 2017, 11:34 AM
Congratulations! It's an awesome feeling to get it back out on road. Car looks great!
Posted by: Rleog Sep 5 2017, 12:21 PM
Fantastic job. Your skills are superb. The paint work is great. I can appreciate how difficult that is to get right.
Well done. Have fun.
Posted by: Andyrew Sep 5 2017, 01:46 PM
Congrats!! Looks fantastic!
Posted by: burton73 Sep 5 2017, 01:54 PM
Very nice job. Love the color and the contrast of the black to the blue.
Enjoy
Bob B
Posted by: Olympic 914 Sep 5 2017, 02:48 PM
Thanks for all your kind words. this would have been much harder without the 914World brain trust to help out. and along the way I learned many things that may help others down the road..
During one of my "test drives" we went to Ligonier PA, a friend owns an Ice Cream shop on the Diamond. we were fortunate to get a parking spot on the diamond near the shop, and when I opened the door to get out after parking, there was a guy standing there. He said "Nice car" and all and I was only really half listening to him when I heard him say "I have one" Now I am paying closer attention. I said this was a '73. so was his. So now we start talking a bit more, him telling me it was his fathers car and it was passed down to him. After a bit my GF decides to go into the ice cream shop and about 5 or so minutes later I join her. We were just finishing up our ice cream and headed out to show our friend Dave the car, when the guy walks into the shop. He said "I thought you might want to see it" Well it turns out he only lives a couple minutes away and not only did he go home, get his car to bring it down but somehow also got a parking spot on the diamond RIGHT NEXT TO ME! Unbelivable.. he had introduced himself to me as Russ but turns out his nickname is Rusty. 

His car wasn't rusty though. '73 1.7 still had the djet. it was like we had our own little car show going on with all the people walking up admiring the cars and asking questions.
Dave the ice cream shop owner was incredulous, what are the chances of someone around even owning another one of these cars let alone bringing it down and parking next to me....
Fun Times.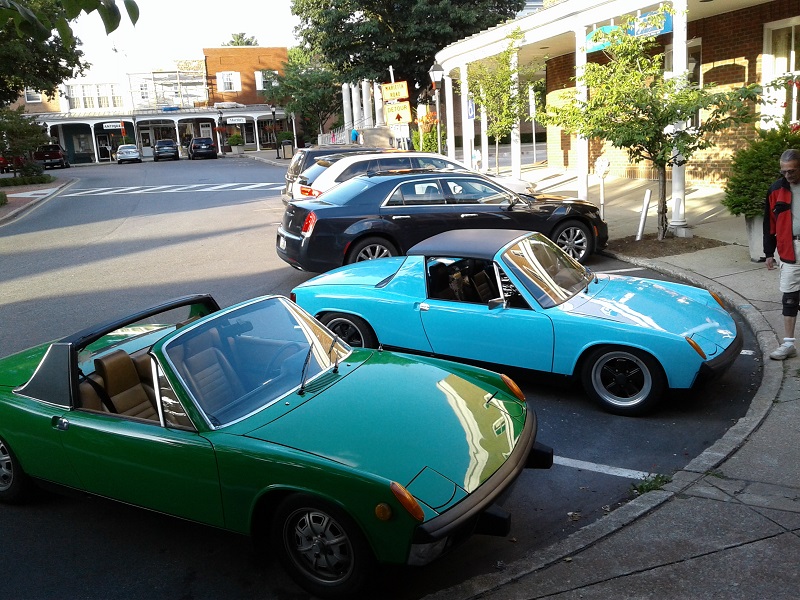
Posted by: tygaboy Sep 5 2017, 03:01 PM
Ice cream, 914s and new friends. What could be better?
Posted by: Olympic 914 Mar 20 2018, 05:00 PM
Since finishing the car I have been taking small trips increasing the mileage each time, I had racked up about 1600 miles on the rebuilt engine and in October 2017 we were heading to Niagara Falls Canada for a little vacation. Well things were running good rolling along at about 70-75 until I heard an unusual ticking noise. So I got off the interstate about a ½ mile later and limped into a little shop with a VW Beetle and a 928 sitting outside. The owner came out smiling and pointed out a 914 sitting on the side. I knew then this was a good place to be. Anyways after poking around and pulling some plug wires we determined that #3 was dead. That explained the CHT gauge reading so low. So onto the flatbed it went. 
After getting it home and pulling the valve cover off I discovered that one of the rocker arm studs on #3 had busted and the other had come loose. So the engine had to come out to fix it. To pull the head you have to take off most of the cooling tins and I felt like I had really gone backwards.
Took the head to a machine shop I use regularly but it didn’t work out so well this time. It’s a one man shop and he had a lot of other things going on, after 7 weeks of “it will be ready next Tuesday or Wednesday” I picked up the head and took it somewhere else for the repair. But now we are into December, and really at the end of the driving season.
While the engine was out I bought into the 123 Ignition GB and installed that. Also the CV’s were making some noise and when I disassembled them I discovered that a couple snap rings had come loose and was allowing the axle to walk back and forth and rub on the trans flanges. Since I had seen CuddyK’s video of him unboxing the new axles available from Porsche, I ordered a set of these. Mine looked to be probably still usable but with 137K miles on them I figured new ones should be the last ones I would have to buy.
By February I had everything back together and the engine reinstalled.
I am now going through the same process of taking small trips and keeping an eye on the head temps, AFR and oil temps. Everything seems to be running smoothly and within recommended ranges. It has about 2000 miles on it so far, but still feels a little tight.
Planning to bring it to Hershey this year and let it see some other running 914s
Keeping my fingers crossed.
Posted by: raynekat Mar 21 2018, 05:17 PM
Just about my favorite narrow body car on this website....a stud of a car. The color, all the attention to detail, etc. Hope it's a small problem easily fixed. Still jealous as hell with your rear calipers you dog. Best of luck with everything.
Posted by: Olympic 914 Mar 23 2018, 01:26 PM
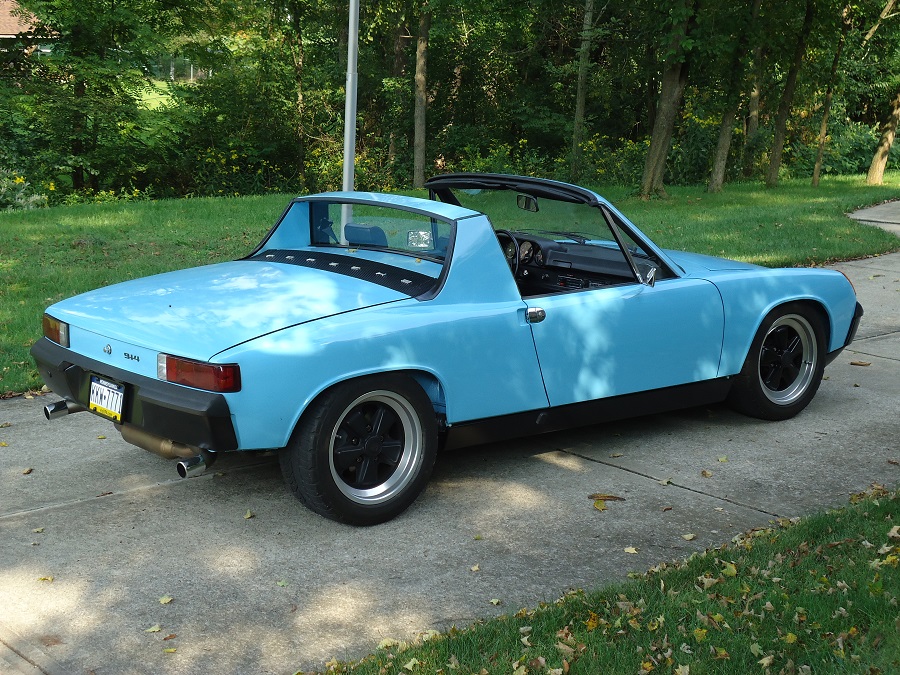
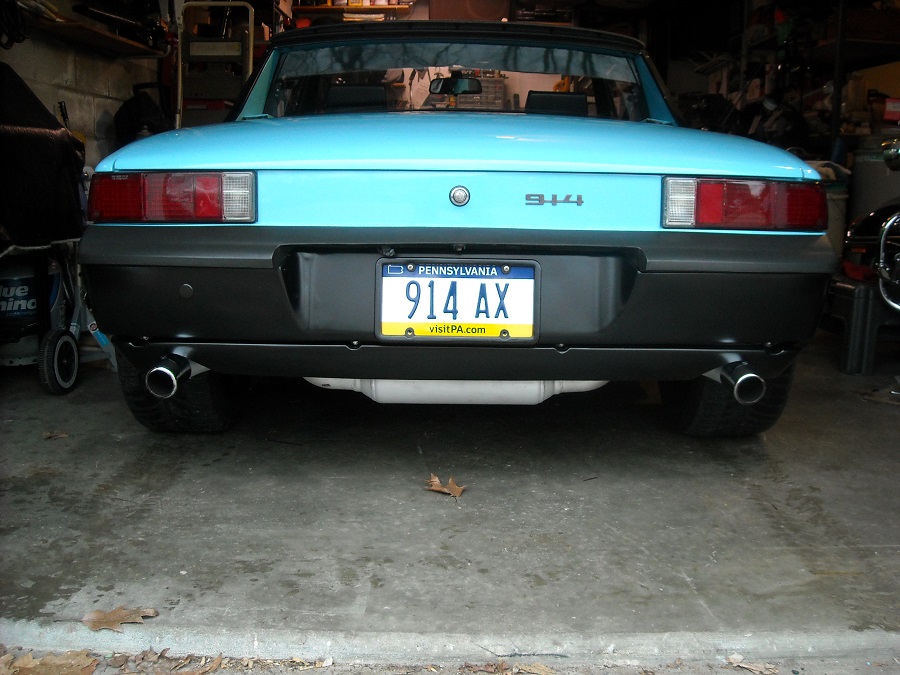
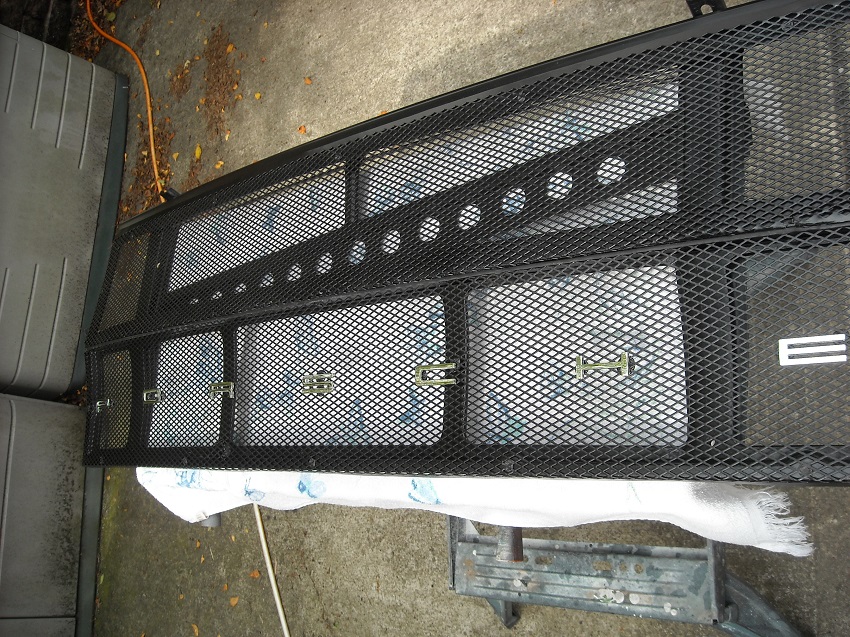
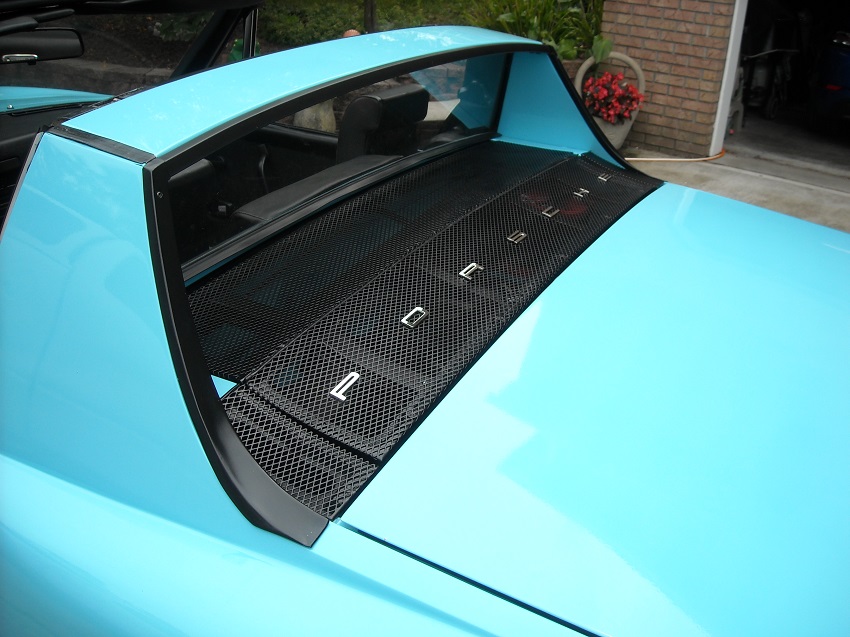
Right now I am running without a rear valence. I kind of like the Hot-rod look of it. And even though the Triad muffler looks cool, it does seem to be missing something.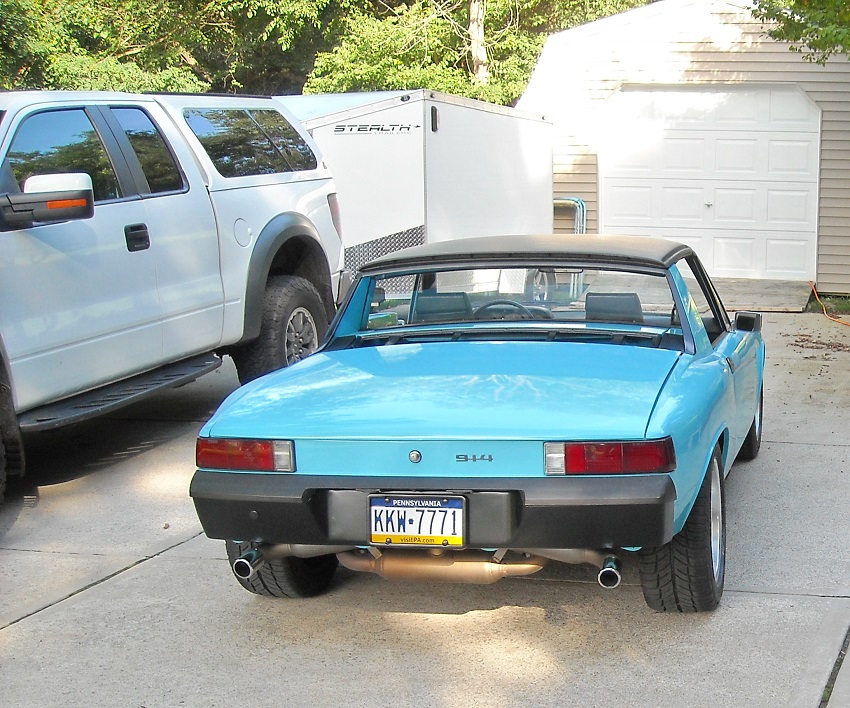
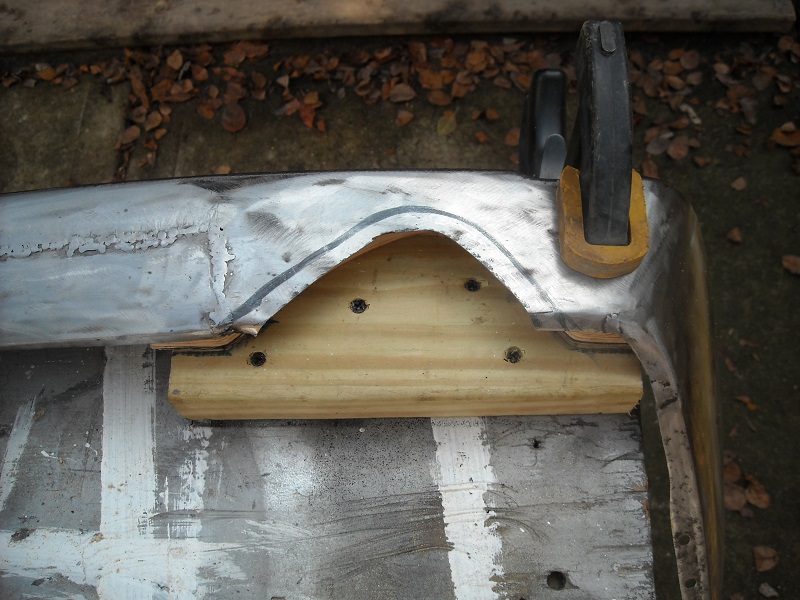
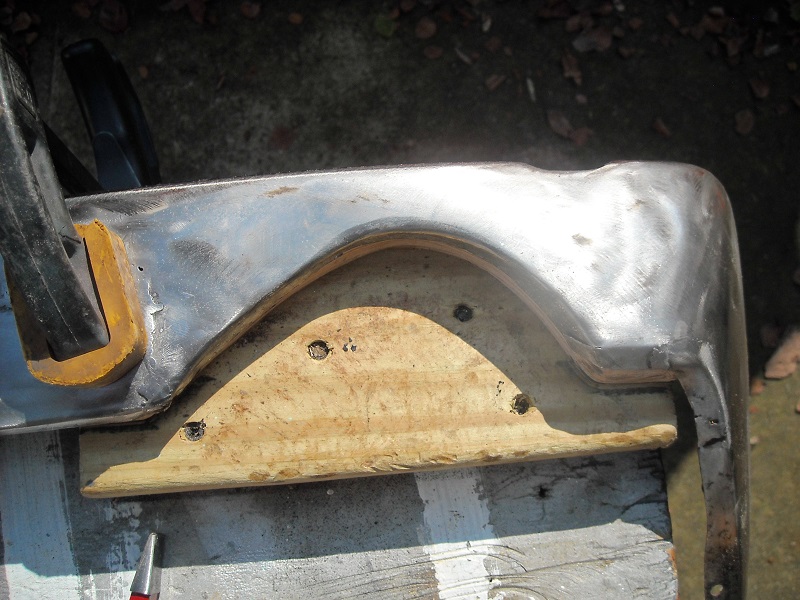
My old valence had cut-outs for the Monza type muffler I used to run. And it was well done. But now of course that will not work. I picked up a nice stock rear valence at Hershey and had planned to modify that to fit the Triad muffler, since the one side already had the correct cut-out. But now I think that I would rather not modify a good stock part. So I dug out the old valence and found it really wasn’t in bad shape. And I was looking for a welding project to help me learn to use the MIG.
So I decided to do some welding. 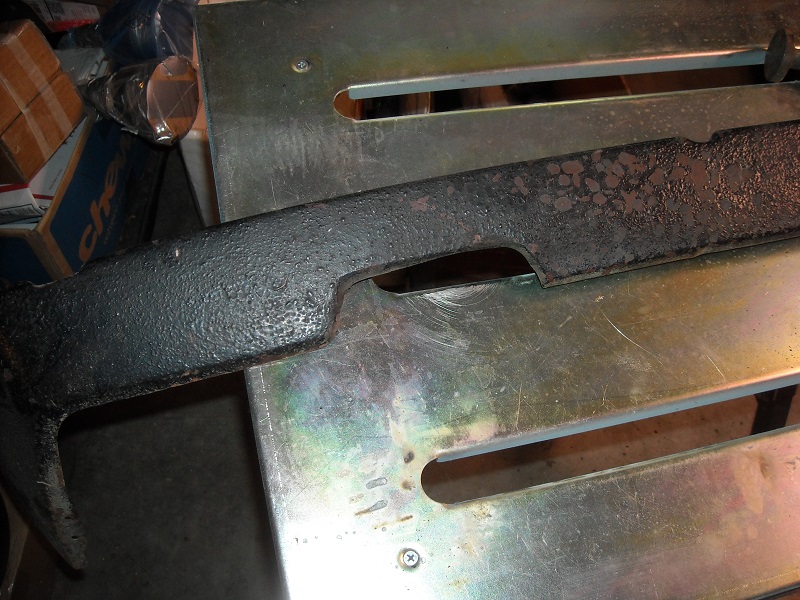
The old cut-out was just covered with a piece of sheet metal and spot welded on so I had to take that off. 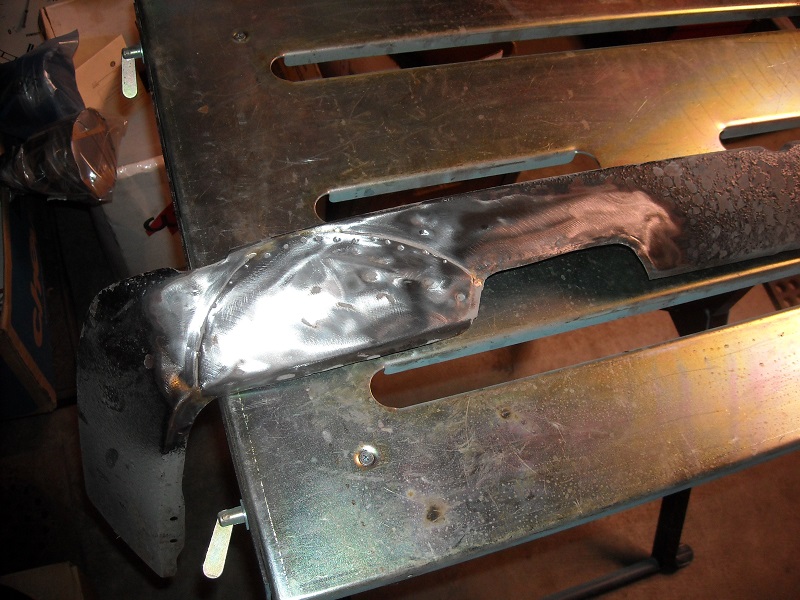
Then I formed a couple pieces to fill in the old notches and used them as a pattern to cut out the valence.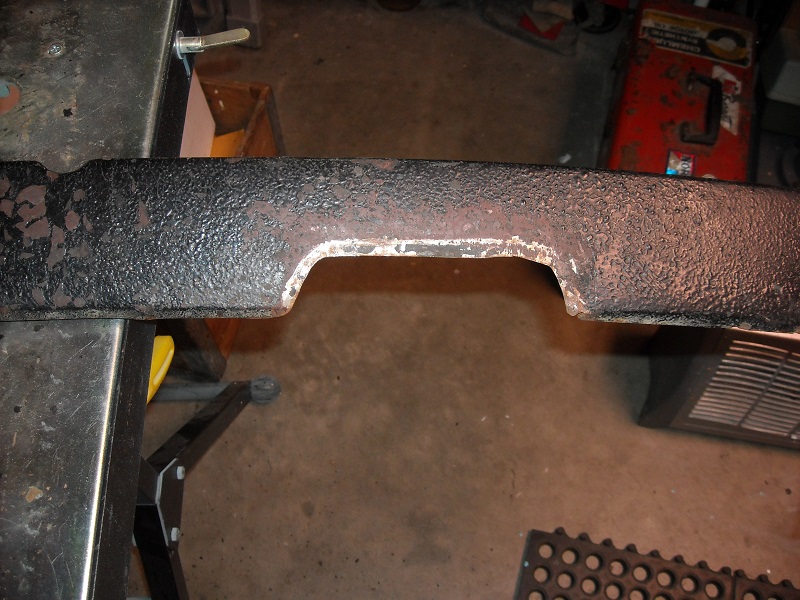
Welding these in was tricky because the only metal I had around that was close was 22 ga .
You might as well be trying to weld tinfoil. I used a big hunk of copper for a heat sink to help prevent burn through. And a HF copper welding backer for places I couldn’t get the big piece into. 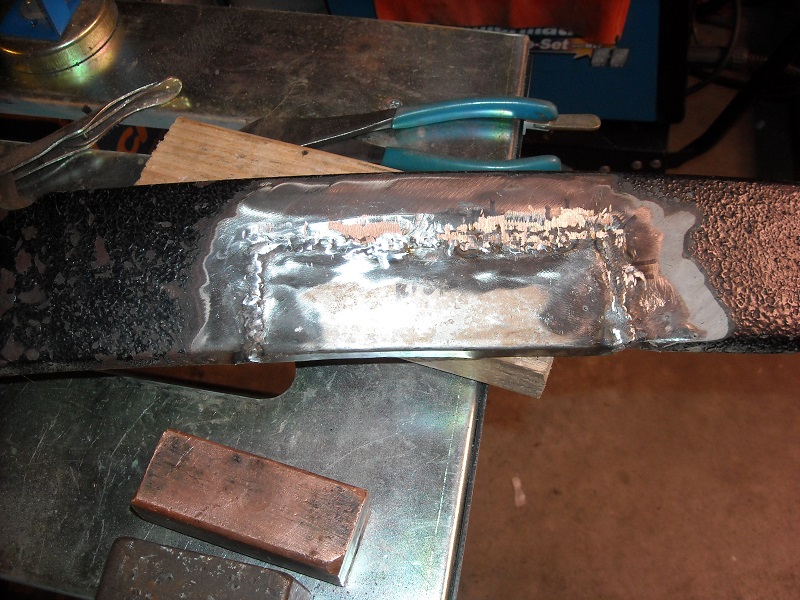
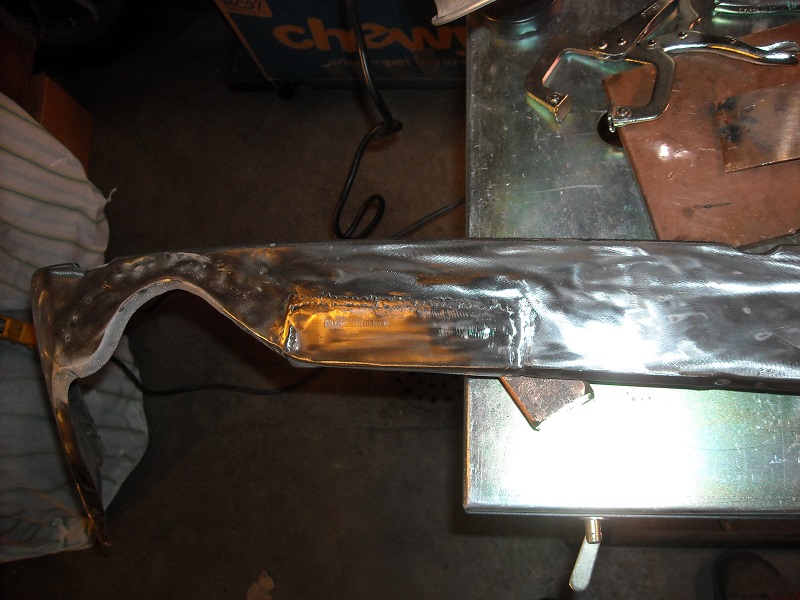
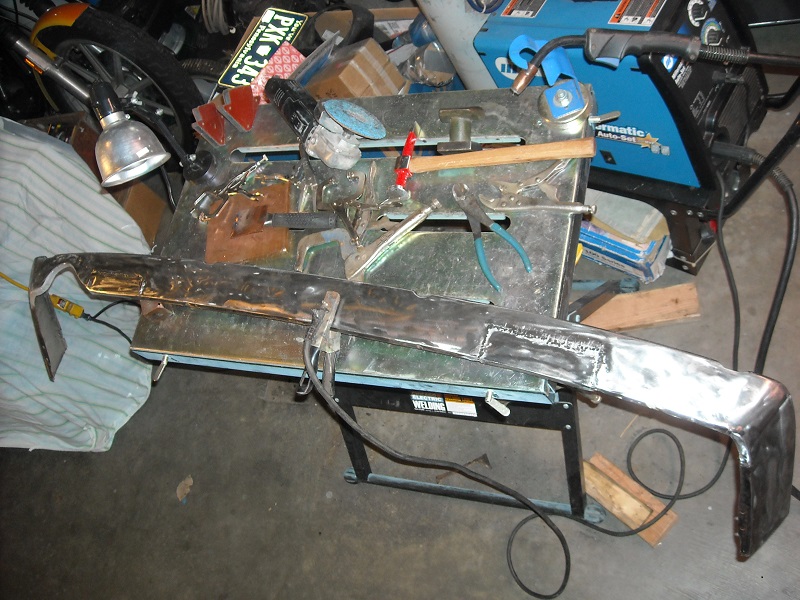
Not a pretty as the Metal Surgeon work but no pin holes, and I don’t care about a little body work on it. When it’s mounted you would have to be on your knees to critique my work anyways.
Next I have to make a pattern of the cut-out and transfer it to the other side, leaving enough to fold under. I might have to cut a couple splits to get it to fold under right but time will tell. And I may get to do more practice welding.
I am kind of hoping it looks like it was meant to be this way.
Posted by: tygaboy Mar 23 2018, 01:42 PM
You might have a go at making a hammer form to use when creating the other side opening. It's amazing how much you can get metal to move and what a nice finish you can get. Best of all is no welding/distorting/grinding of the metal (assuming your hammer form is a good fit.)
No matter the method, I'm looking forward to seeing the finished product.
And I agree: This is one of the prettiest cars on the World. Great job!
Posted by: Dion Oct 3 2018, 05:40 PM
Just bumping this back up to say, I don’t know how I missed this resto Tom.
That’s a beautiful 914. Well done. Hope it’s running well for you
& how did the valence turn out?
Hope to see ya at Hershey one day or Carlisle!
Posted by: Olympic 914 Feb 17 2019, 05:38 PM
You might have a go at making a hammer form to use when creating the other side opening. It's amazing how much you can get metal to move and what a nice finish you can get. Best of all is no welding/distorting/grinding of the metal (assuming your hammer form is a good fit.)
No matter the method, I'm looking forward to seeing the finished product.
And I agree: This is one of the prettiest cars on the World. Great job!
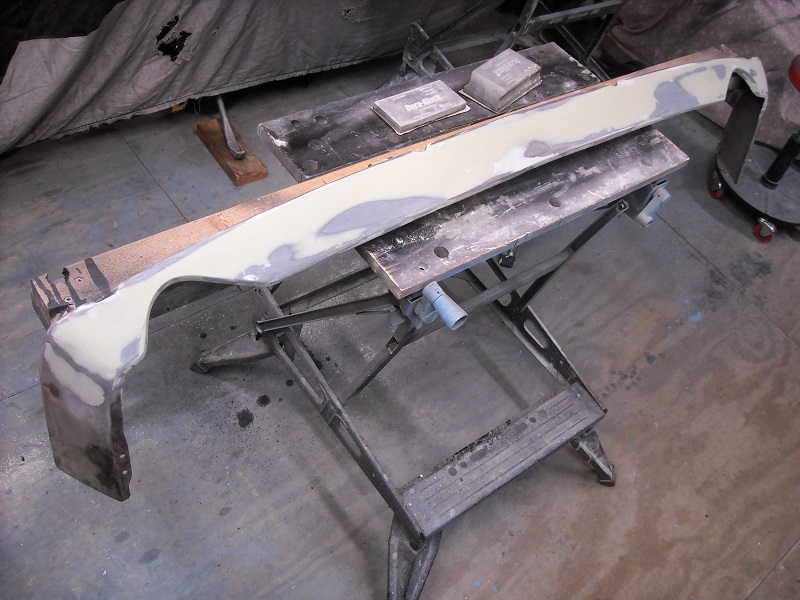
Did some more work on this, Decided to follow tygaboys suggestion of making a hammer form.

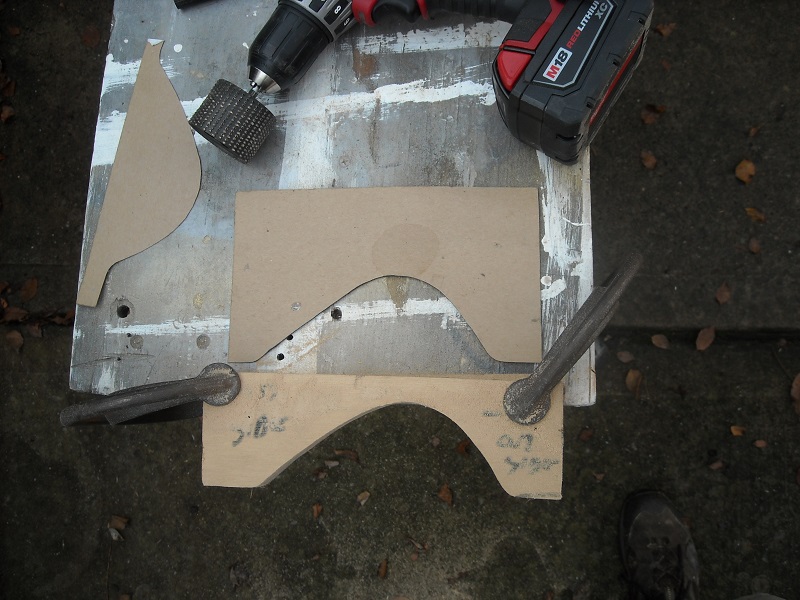
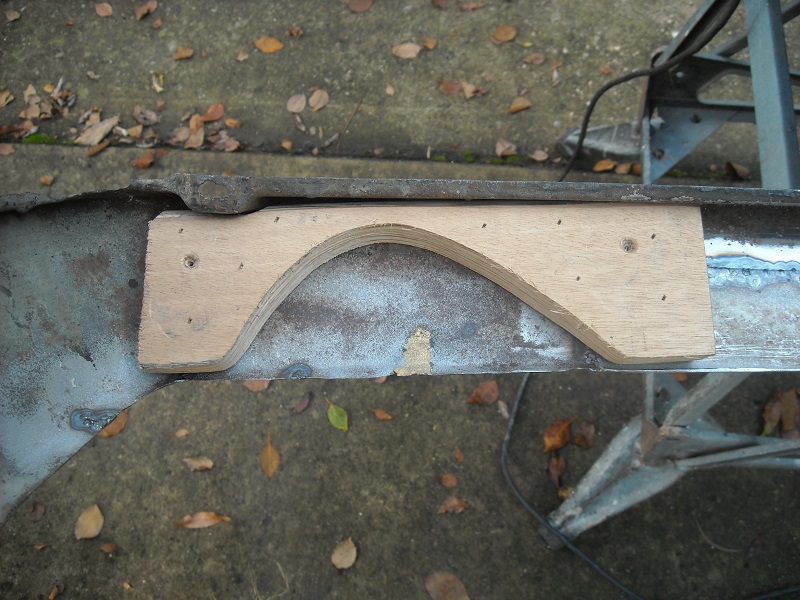
And after some bodywork and paint it is installed.
Posted by: Olympic 914 Feb 17 2019, 06:31 PM
So some time had passed before finishing the rear valence because I had other things to deal with like the broken trunk hinge. Decided to pull the engine out to make it easier to repair and using the lathe cut a grease grove in the hinge bolts to prevent it from happening again. (I hope)
Details of that repair are here> http://www.914world.com/bbs2/index.php?showtopic=334897&hl=
Of course there are always some "while you're in there" things to do.
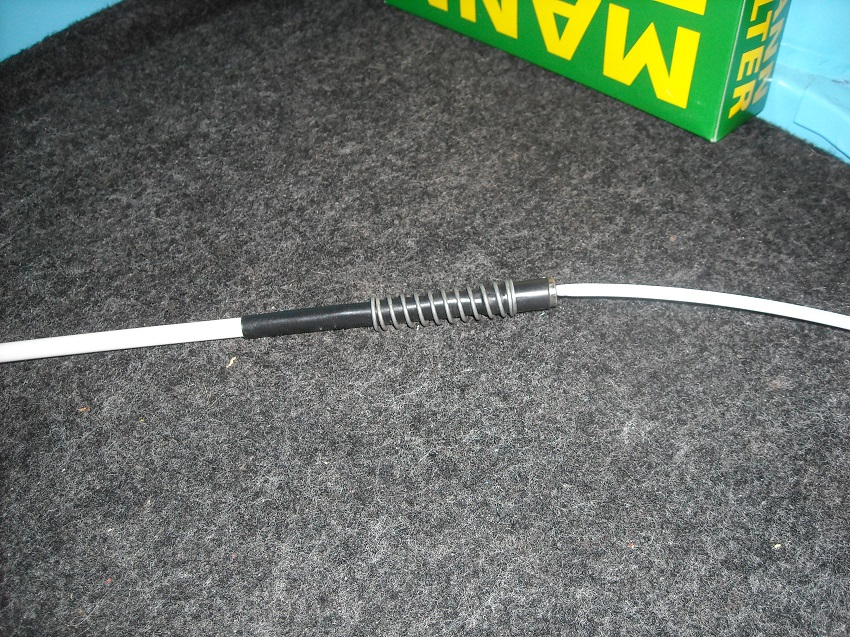
like fixing the leaking oil temp sender taco plate, setting the valves and replacing the throttle cable. The throttle cable had cracked at the ferrule so to help support it I put some heat shrink over the ferrule / cable and dug a spring out of the stash that just fit tight.
Then I always thought it sat a little too high and the KYB shocks were just a stopgap measure to get me on the road.
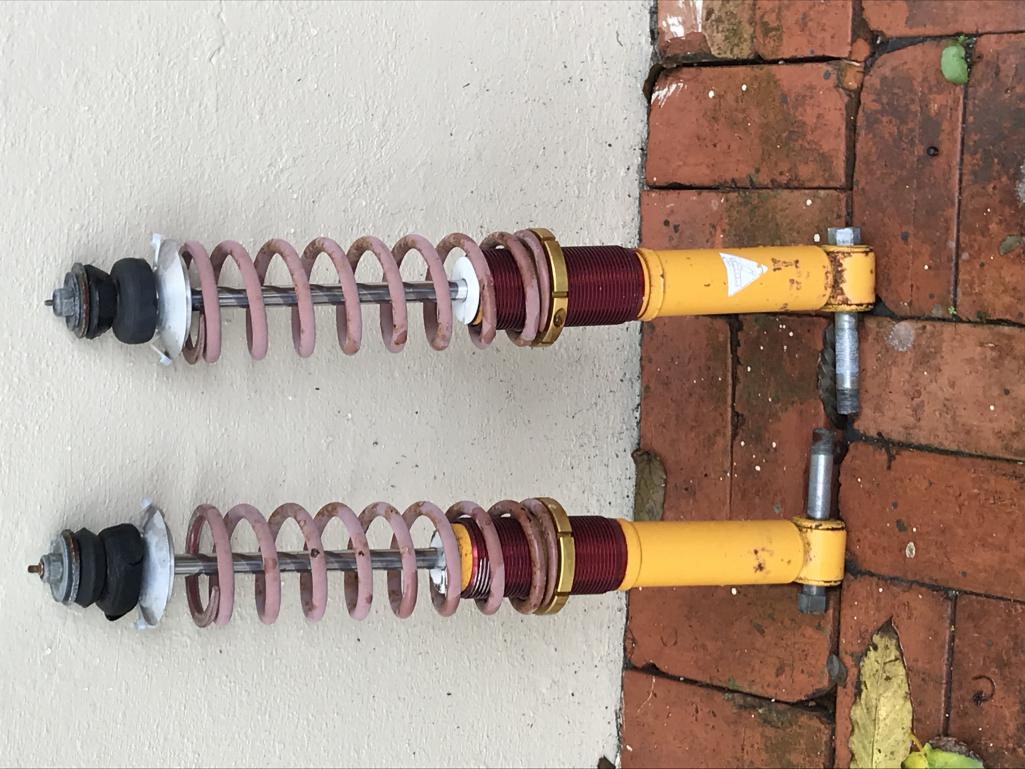
Time for some proper Koni's
Ground Control fixed me up with a package that included the shocks, springs and adjustable sleeves. since this is mainly a street car I decided to go with the 125# springs for the ride, my old springs were 100 or 110# so not much of a change there.
If I don't like it.... springs are not too expensive or hard to change. 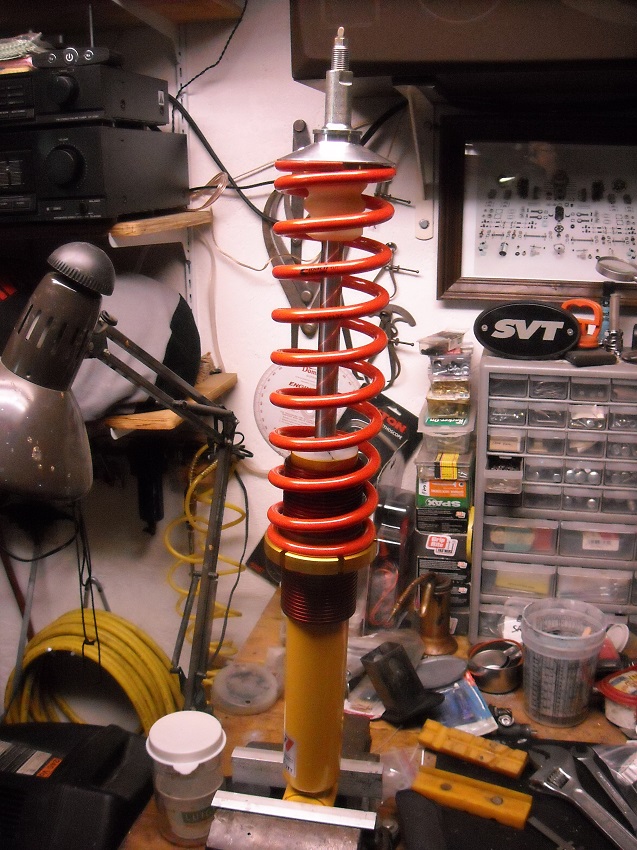
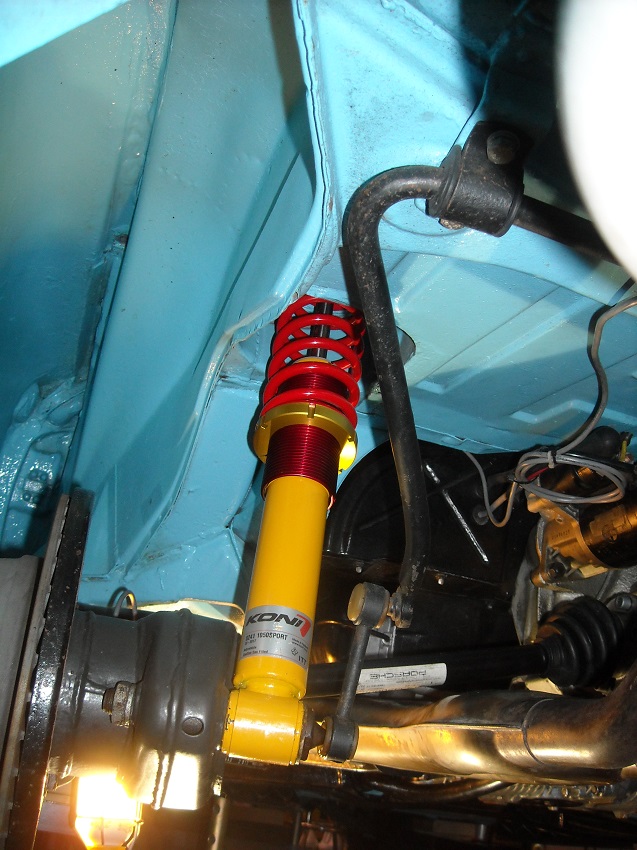
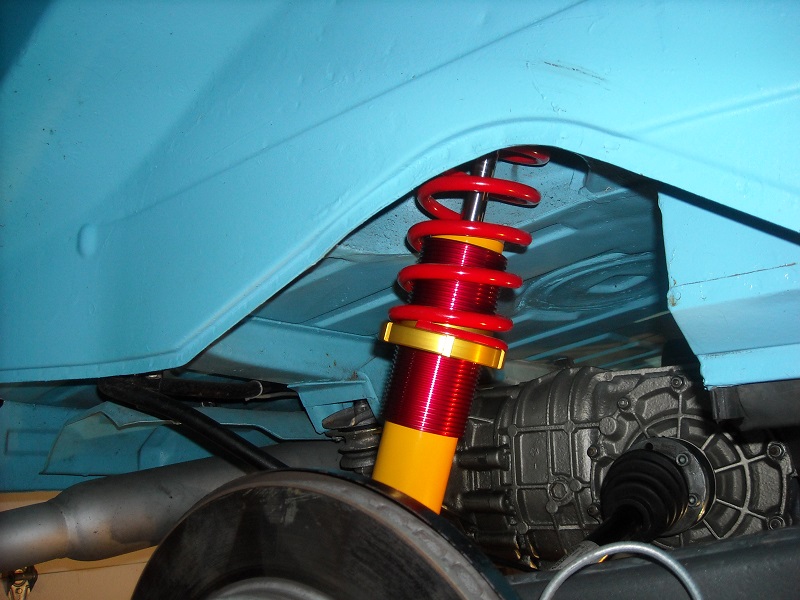
So now its sitting at a much nicer height. AND will probably ride better.
I can't wait for better weather to try them out on the local twisties.
Posted by: mepstein Feb 17 2019, 07:59 PM
You will be thrilled with the ride.
Posted by: steuspeed Feb 17 2019, 09:29 PM
This looks like a cool set-up with these Koni Ground Control coil over shocks.
Posted by: Olympic 914 Mar 9 2020, 07:18 PM
2019 Winter projects.
During some of my drives I noticed the oil temps getting high, into the 240-250 range on hot days. So adding an aux oil cooler seemed to be a good idea. Guess the 2056 makes a little more heat than the stock 1.7.
Mentioned this at Okteenerfest and Danny @http://www.914world.com/bbs2/index.php?showuser=6509 sent me a sandwich adapter he wasn’t using, giving me some more incentive.
I used a Setrab 119 fanpack cooler and their 180 deg cooler thermostat, I added the 190 deg switch to trigger the fan. Looking through other oil cooler threads I liked the routing of lines above the tins so as not to block the valve cover.
Pictures of the brackets, everything fits in there nice.
It helps to have a friend with a bandsaw and bending brake. 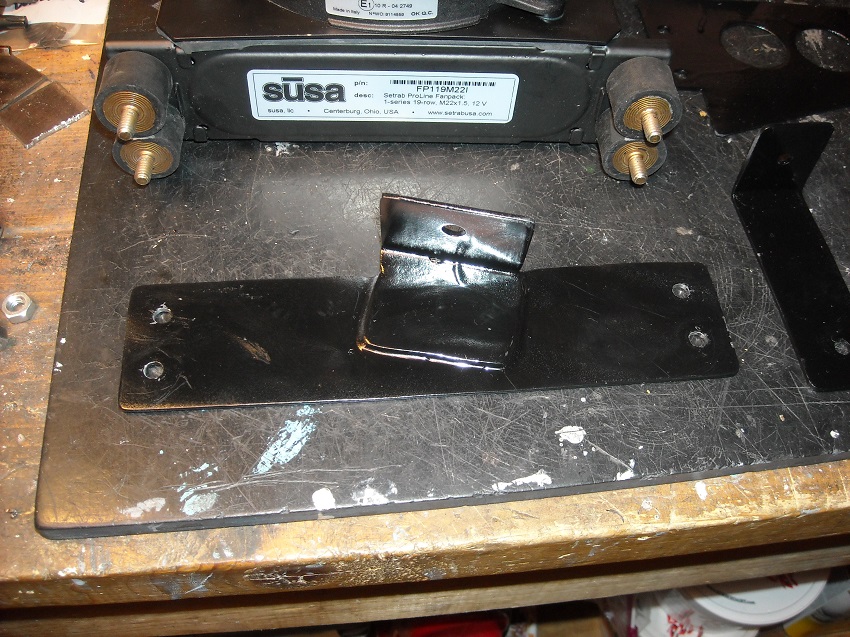
With this short of a run from the adapter to the thermostat the AN10 lines may as well be rigid. So I had to have the lines determine the position of the thermostat.
I used the hole that the J tube used to go into. I was getting plenty of heat with just the one hose from the blower anyways. I capped the S pipe. 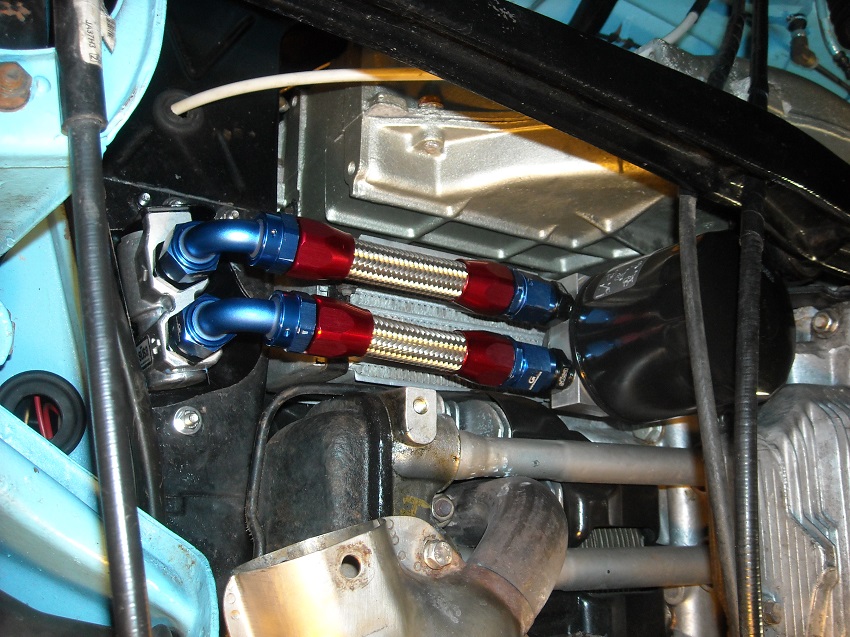
the fan thermostat is mounted in the black piece in this picture It also allowed me to stack the lines vertically on their way to the cooler.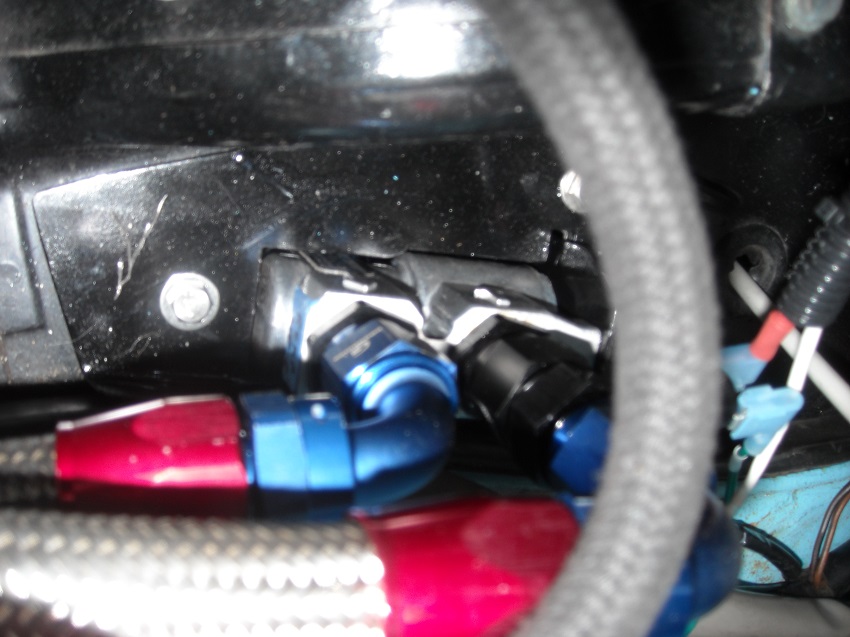
The fan is a pull through type, with shroud.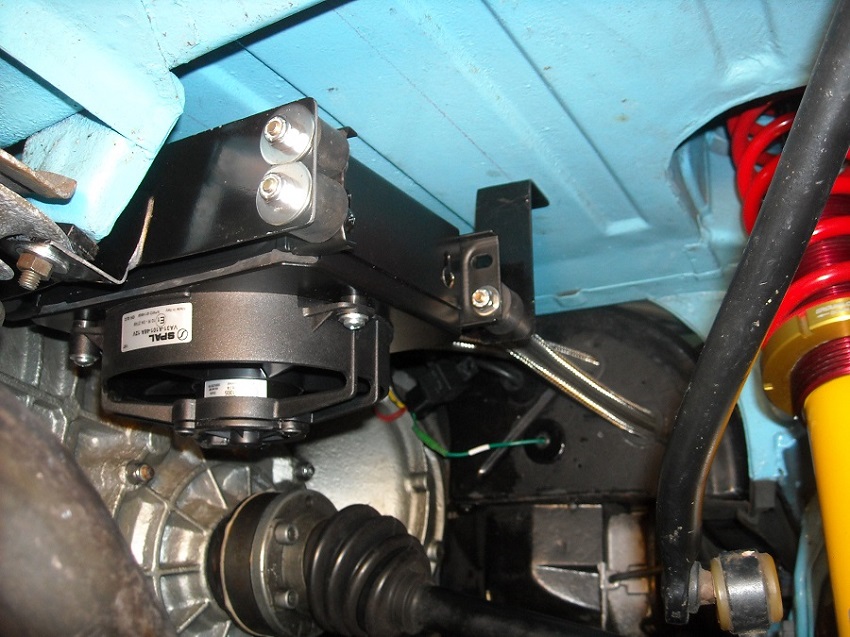
Space is a premium in this area and I had to make a standoff to move the MPS a couple inches so everything would clear.
Used AN10 lines to give enough flow. Things are pretty crowded in this area now, I was worried about clearing the injectors. But everything clears. it isn't easy getting your fingers down in there to work though. 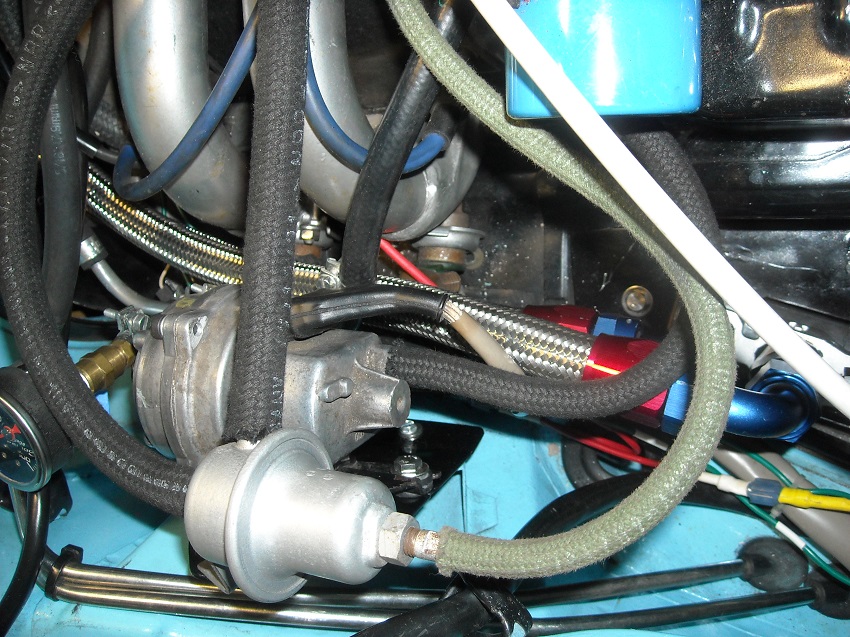
The best part is I didn't have to remove the engine to install everything.
Being March, the temps are not yet hot enough for a real test but a speed run down the turnpike today, a 60 deg day, I only saw the oil temps hit 205 and it moves back down much quicker than it used to.
Posted by: bahnzai Mar 9 2020, 08:04 PM
Tom,
What a nice clean job! Congrats. That should give you nice results this summer!
Posted by: get off my lawn Mar 11 2020, 02:13 PM
Wait, you started a 914 project and actually finished it and drove it?
Shame on you, that's that's not allowed.
You are supposed to work on it for the rest of your natural life and "almost" get it running or almost ready for paint.
BTW great looking car, I like.
Posted by: ndfrigi Mar 11 2020, 03:14 PM
So some time had passed before finishing the rear valence because I had other things to deal with like the broken trunk hinge. Decided to pull the engine out to make it easier to repair and using the lathe cut a grease grove in the hinge bolts to prevent it from happening again. (I hope)
Details of that repair are here> http://www.914world.com/bbs2/index.php?showtopic=334897&hl=
Of course there are always some "while you're in there" things to do.
like fixing the leaking oil temp sender taco plate, setting the valves and replacing the throttle cable. The throttle cable had cracked at the ferrule so to help support it I put some heat shrink over the ferrule / cable and dug a spring out of the stash that just fit tight.
Then I always thought it sat a little too high and the KYB shocks were just a stopgap measure to get me on the road.
Time for some proper Koni's
Ground Control fixed me up with a package that included the shocks, springs and adjustable sleeves. since this is mainly a street car I decided to go with the 125# springs for the ride, my old springs were 100 or 110# so not much of a change there.
If I don't like it.... springs are not too expensive or hard to change.
So now its sitting at a much nicer height. AND will probably ride better.
I can't wait for better weather to try them out on the local twisties.
Received my triad also for 1.7/1.8 HE and also bought same as your rear shocks, which is still missing in action since Feb 27 by USPS. It was shipped last Feb 18 from Florida and arrived LA facility last Feb. 23. Seller (member here) called usps and I emailed them but same status that it is at Belle Garden facility until now. Hope I can still get them.
Posted by: Olympic 914 Jul 31 2020, 06:58 AM
Just COOLIN' it
Was pretty happy with the results of the oil cooler installation (See post #119)
Driving it quite a bit and the oil temps rarely get over 220. even on the hottest days, and we have had a run of 90+ deg days lately.
But I remember a situation when I had a Thermostat flap issue, and pulled over in traffic to let it cool down. I had popped the engine lid to cool things off and pulled back out onto the highway forgetting to close it again. I was surprised at how much of a difference it made. I do have a rain tray fitted.
This got me thinking about the GT lids that Sergio makes. @http://www.914world.com/bbs2/index.php?showuser=1219 Since he has acquired a lot of lids to work with, I wouldn't have to give up my original lid as a core.
Definite plus.
So I finally ordered one and after getting a set of letters from Mark I installed it yesterday.
Took a few tweeks to get it fit my car right, but I like it.
And now in the late fall I can put the regular lid with rain tray back on. then switch it out when the weather gets hotter.
drove it around yesterday for about 30 miles, it was in the low 80s so not as hot as it has been.
CHT numbers were noticeably down. I expect that it will help reduce the oil temps also.
Maybe I will get a temp gauge like @http://www.914world.com/bbs2/index.php?showuser=15565 has and do a back to back comparison with GT lid vs stock lid +raintray.
Under Trunk Temp thread. > http://www.914world.com/bbs2/index.php?showtopic=347282
It would be interesting to see how much the GT lid affects the other temps, like oil and CHT. It may even drop the under trunk temps.
The real test will be the drive to Teenerpaluza, I wanted to have this installed before the ride down.
See Yinz there.

Posted by: PCA7GGR Jul 31 2020, 07:43 AM
Damn, your '14 looks great - drive on!
Posted by: GregAmy Jul 31 2020, 08:12 AM
And now in the late fall I can put the regular lid with rain tray back on. then switch it out when the weather gets hotter.
I like that idea! It would certainly address my concerns about water intrusion in the Spring and Fall...are these things a PITA to remove/replace?
I dropped my IATs by 25-30F with this chintzy test setup (IAT probe screwed into the bottom of the airbox.)
Haven't decided how I'm going to incorporate it permanently, as I need a way for water to collect and drain out before the airbox. Honda uses a plastic resonator in the fenderwell with a drain hole at its bottom, I may do something like that. I suppose I could drill a small drain hole at the lowest part of the metal airbox and that would do the same thing...after all, the air is pulling UP through the filter there so water ingestion is highly unlikely...and I think I'll modify one of the side grills to pull air from permanently.
Edit: as an aside, this car really really really should have been designed with side air intakes, similar to what the first-gen Toyota MR2 had. It was a good thing for that mid-engine car, and they weren't even cooling the engine with that air! If we had side scoops on both sides then the engine compartment would get flooded with cooler ambient air instead of trying to pull both induction, oil, and engine cooling air around a plastic/covered grill located in a low-pressure area.
Attached image(s)
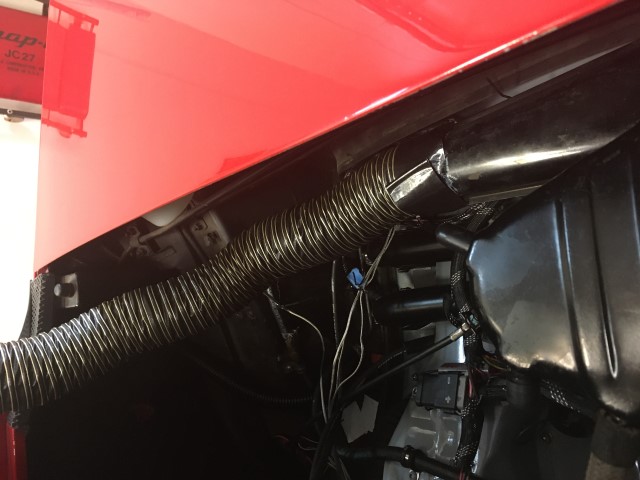
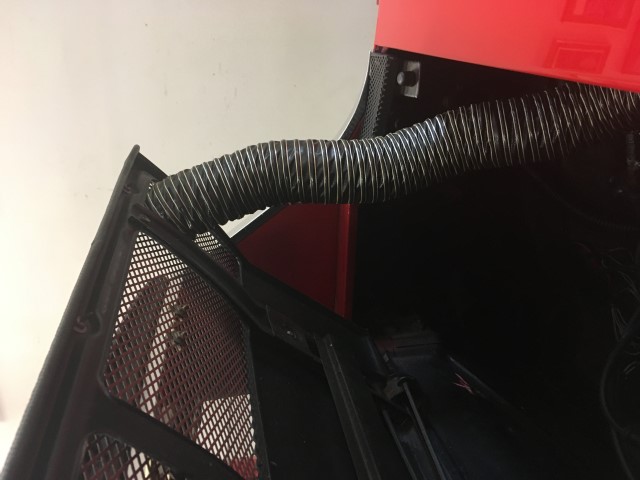
Posted by: Olympic 914 Jul 31 2020, 08:20 AM
I like that hose setup. I had an idea bouncing around in my head of pulling air from the little side screen and directing it down to the oil cooler.
Maybe using a marine bilge blower. they are small enough and already set up for hose attachments.
I don't know if they would hold up to continual use though.
More food for thought.....
Posted by: PCA7GGR Jul 31 2020, 08:37 AM
If you plan to swap your GT lid with the "stock" on for the rainy season, cut slots on the engine lid hinges. This will enable you to loosen (instead of removing) the 10mm bolts and slide the lids on and off.
Posted by: djway Aug 1 2020, 12:41 AM
And now in the late fall I can put the regular lid with rain tray back on. then switch it out when the weather gets hotter.
I like that idea! It would certainly address my concerns about water intrusion in the Spring and Fall...are these things a PITA to remove/replace?
I dropped my IATs by 25-30F with this chintzy test setup (IAT probe screwed into the bottom of the airbox.)
Haven't decided how I'm going to incorporate it permanently, as I need a way for water to collect and drain out before the airbox. Honda uses a plastic resonator in the fenderwell with a drain hole at its bottom, I may do something like that. I suppose I could drill a small drain hole at the lowest part of the metal airbox and that would do the same thing...after all, the air is pulling UP through the filter there so water ingestion is highly unlikely...and I think I'll modify one of the side grills to pull air from permanently.
Edit: as an aside, this car really really really should have been designed with side air intakes, similar to what the first-gen Toyota MR2 had. It was a good thing for that mid-engine car, and they weren't even cooling the engine with that air! If we had side scoops on both sides then the engine compartment would get flooded with cooler ambient air instead of trying to pull both induction, oil, and engine cooling air around a plastic/covered grill located in a low-pressure area.
How about placing a box inline, drain out bottom, hose out to intake from top or something similar
Posted by: brcacti Aug 1 2020, 06:45 AM
It is truly amazing to me how skillfull good body men are are at bringing back the rusted dead cars. Hard to believe what they do. On a car like this I would have thought there is no way before I came on this forum. Makes me believe man can do almost anything when he puts his mind to it. "A mind is a terrible thing to waste."
Posted by: Olympic 914 Nov 18 2020, 12:20 PM
Well all of my work got some National recognition.
Panorama did a feature on my car. 
Back in October I received a cryptic email.
14 Pages -----
That’s all the email said. It was from Rich Chenet, A photographer I met on the way back from Hershey in 2019.
I was driving the 914 and had just pulled into a rest stop on the PA turnpike. I parked Waay down the lot, away from everyone.
Then a Saab station wagon pulls up and parks right in front of me. WTF.
This guy gets out and says “Hey, You wanna RACE?” I laughed and said “No I don’t want to race, I’m just happy to make up these hills without overheating.”
Then he proceeds to tell me about how fast his Saab wagon was, with its big Turbo. …blah blah blah.
Turns out he was also on his way back from the Hershey Swap meet. He had been taking pictures there. He is a photographer for Panorama and other automotive magazines. So we are talking and he is checking out the car.
And then he takes a few pictures, with his Phone. He has all this high end equipment and he’s taking pictures of my car with his phone….
We bullshit a bit more and I tell him a little about the car.
Then we exchange numbers and emails and off I go.
Couple months later I get a phone call from him, He says Pano is interested in my car and wanted some background story.
It turns out Rich is a really cool guy but just likes to mess with you.
In July 2019 we get together to take some pictures.
This time he has all the high end gear and takes about 700+ pictures.
More time passes and a Pano writer Ted West contacts me and we spend a couple hours on the phone talking about the car. What I did to it, How long I had it, Funny stories etc.
And time kept rolling on.
Finally I get a message that it was going to be in the Nov. 2020 issue.
So if you get Porsche Panorama magazine be sure to check out the 14 Page ... article this month on my Olympic Blue 1973 914.
Rich Chenet did a great job with the pictures and Ted West wrote a humorous and informative story.
Guess this will be my Fifteen Minutes of Fame that Andy Warhol predicted everyone will have once in their life.
Its great to see our little cars getting some attention, Even though I am obviously biased.
Link to thread > http://www.914world.com/bbs2/index.php?act=ST&f=2&t=349948&st=0#entry2867382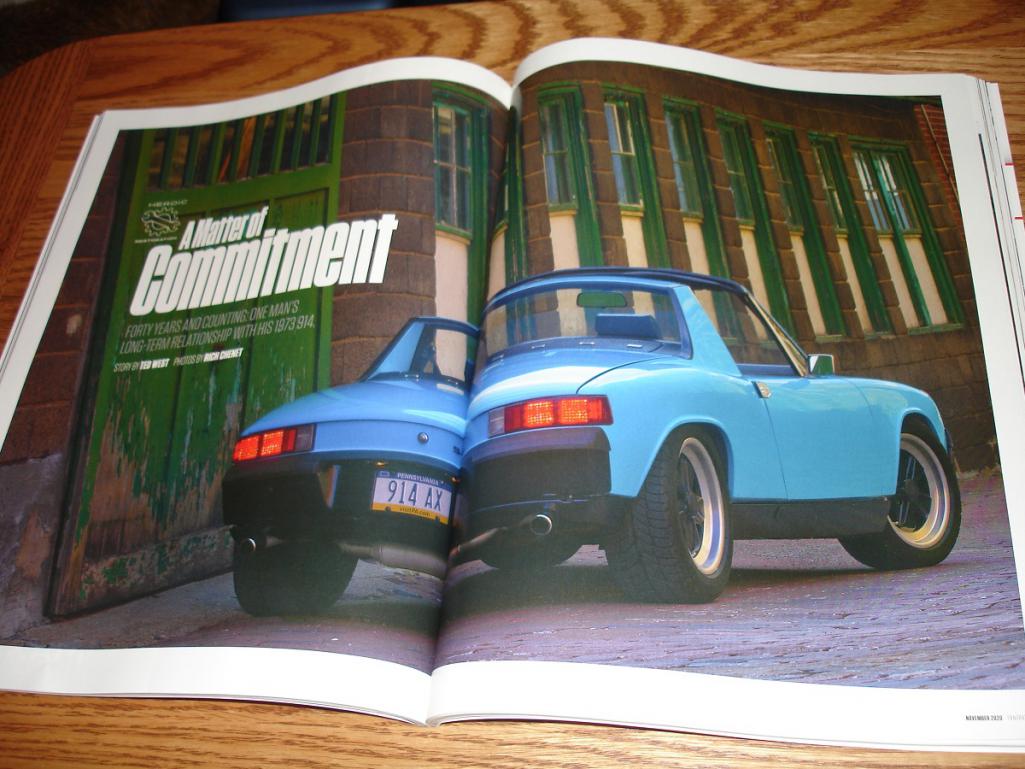
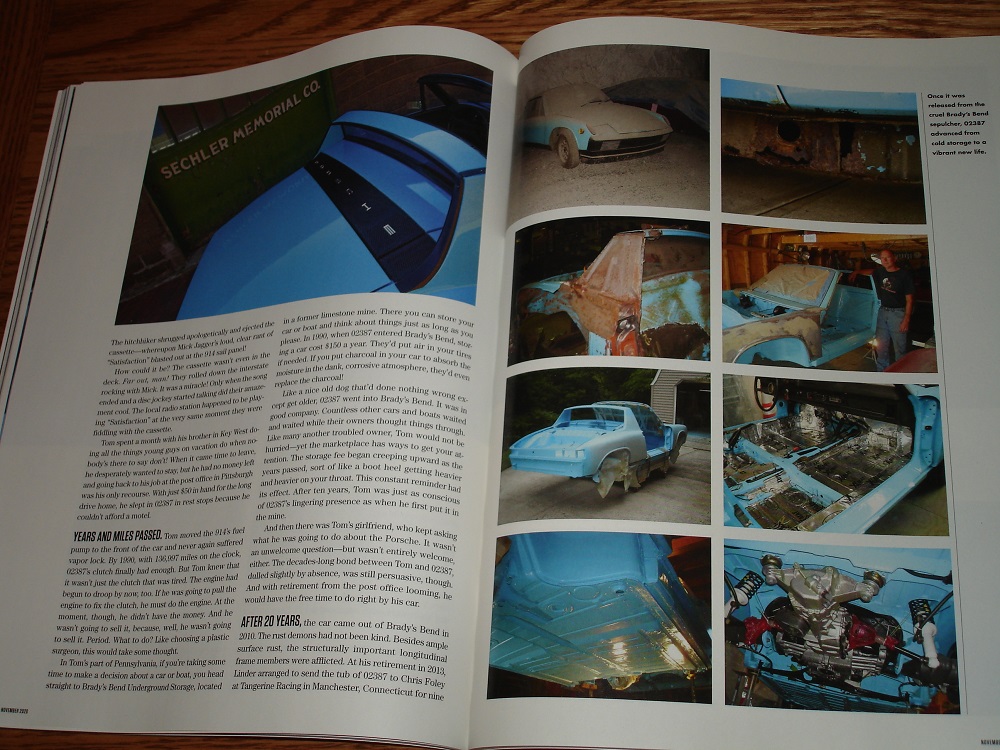
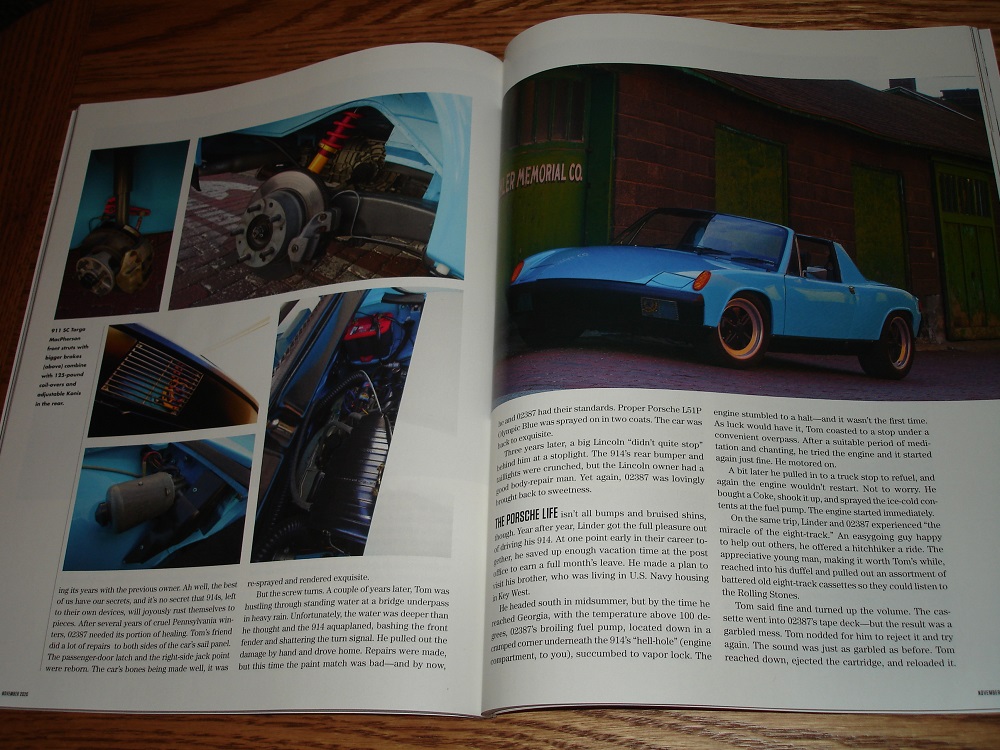
Photographer Rich Chenet.
Posted by: Jamie Nov 18 2020, 03:06 PM
The Pano story caught my attention at how loyal an owner can be to a quirky little car like ours. I just finished reading through the entire build thread, and it is an amazing story. Congratulations for a job really well done!
Posted by: nivekdodge Oct 22 2021, 07:45 PM
Tom
Beautiful job! DO you still have it? I am new and just starting, building a rotisserie to do my floors. Good to see another yinzer here. Maybe I'll catch you at the PVGP
Kevin
Posted by: Olympic 914 Feb 18 2022, 05:24 PM
Put the bullet nosed studs on the rear last February.
I saw these on a buddy's drag car, thought they really looked good.
and will let me add some spacers.
Got around to doing the fronts this week.
Was getting some rubbing with the 225-50 x16s on the inside fender of the Pass side so I put 2mm spacers on to try and reduce that some.
Not much space there, I tried 3mm spacers and it rubbed on the outer lip.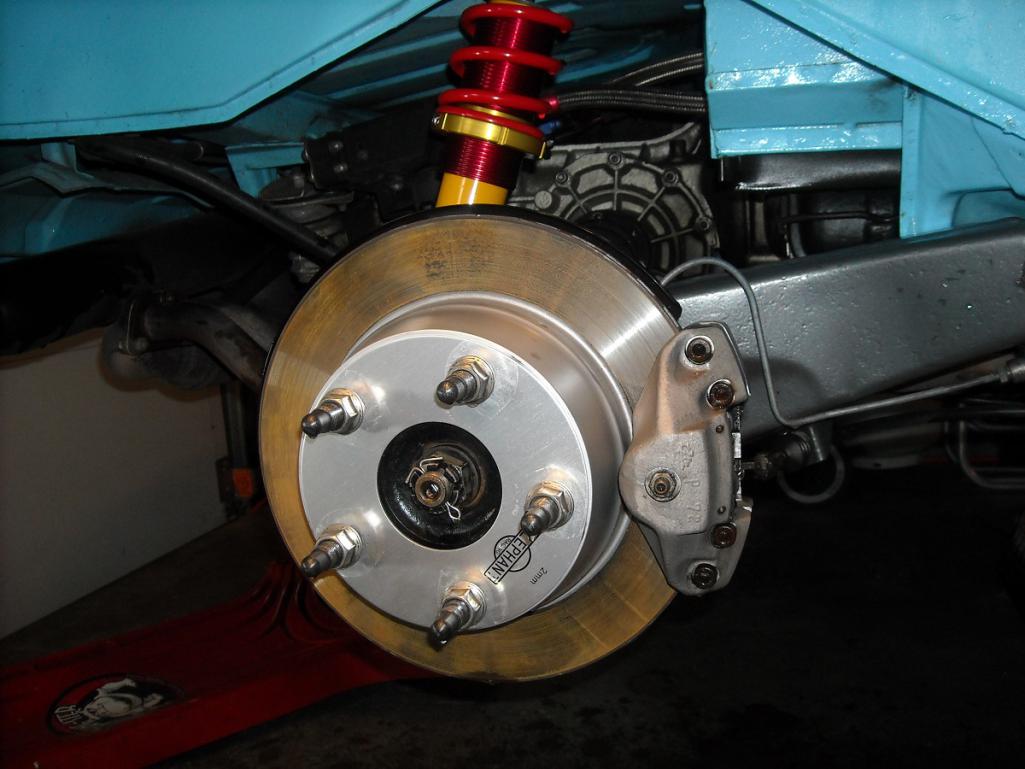
I'll be running 7mm spacers on the front, to bring them out a little, lots of room on the front.
Painted the A calipers with VHT caliper paint, They were getting a little cruddy looking.
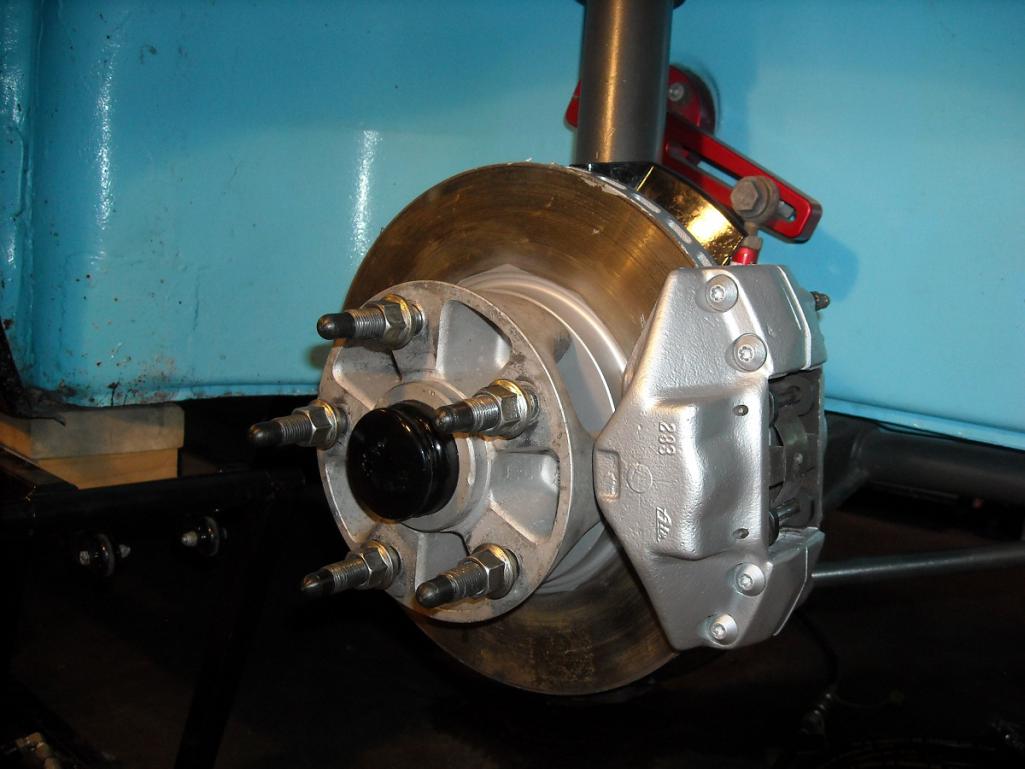
And with the Fuchs mounted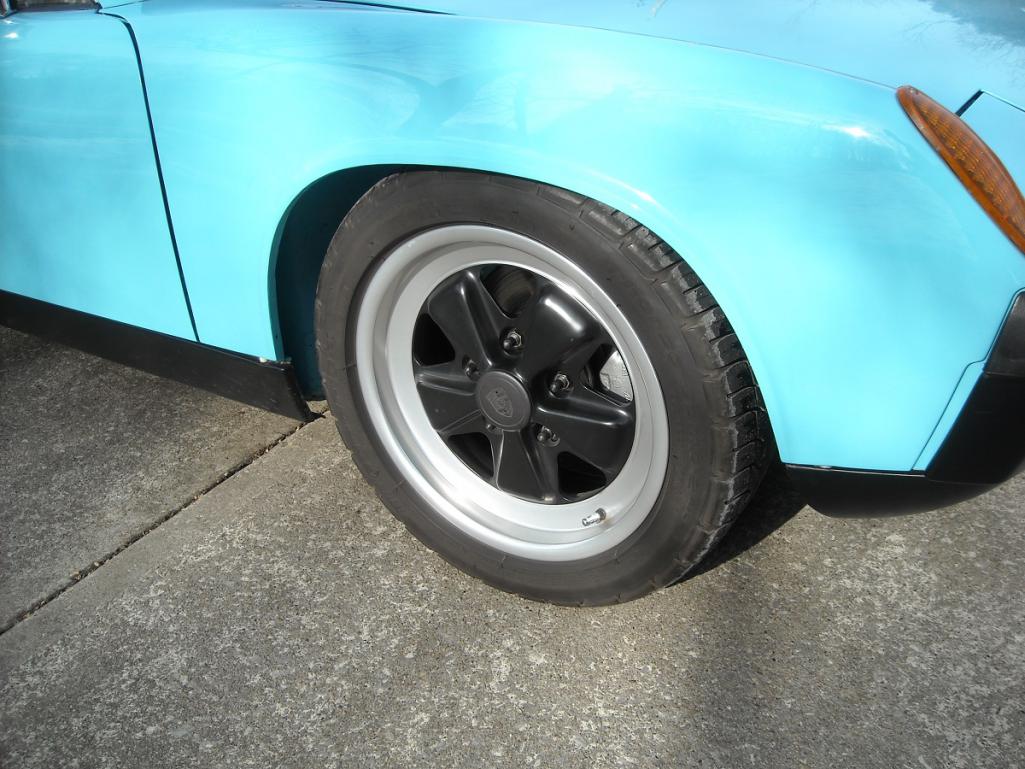

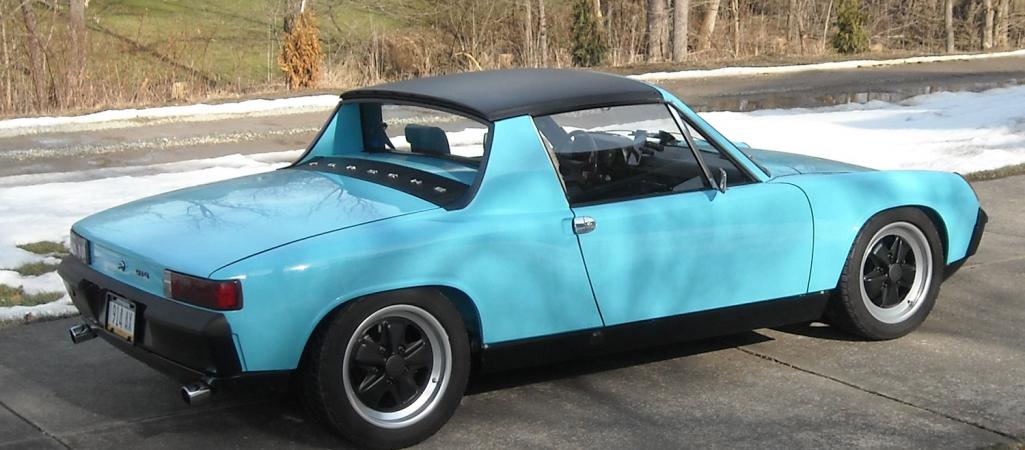
Posted by: Olympic 914 Feb 18 2022, 05:58 PM
Another February project
Was FINALLY doing a cut and buff on the paint, PPG Single stage that was put on 4 years ago and really got hard.
It looked pretty good but I had put 6 coats on and had some marks on the trunk lid I didn't like. So the time was right. 
Started out blocking with 1200g on a Durablock, went to 1500, and 2000. Then got the DA and did 3000 gr and 5000gr.
Pictures of this process are hard to see the difference.
Then using 3M system of 3 different buffing compunds.
Took a LONG time but the results are worth it.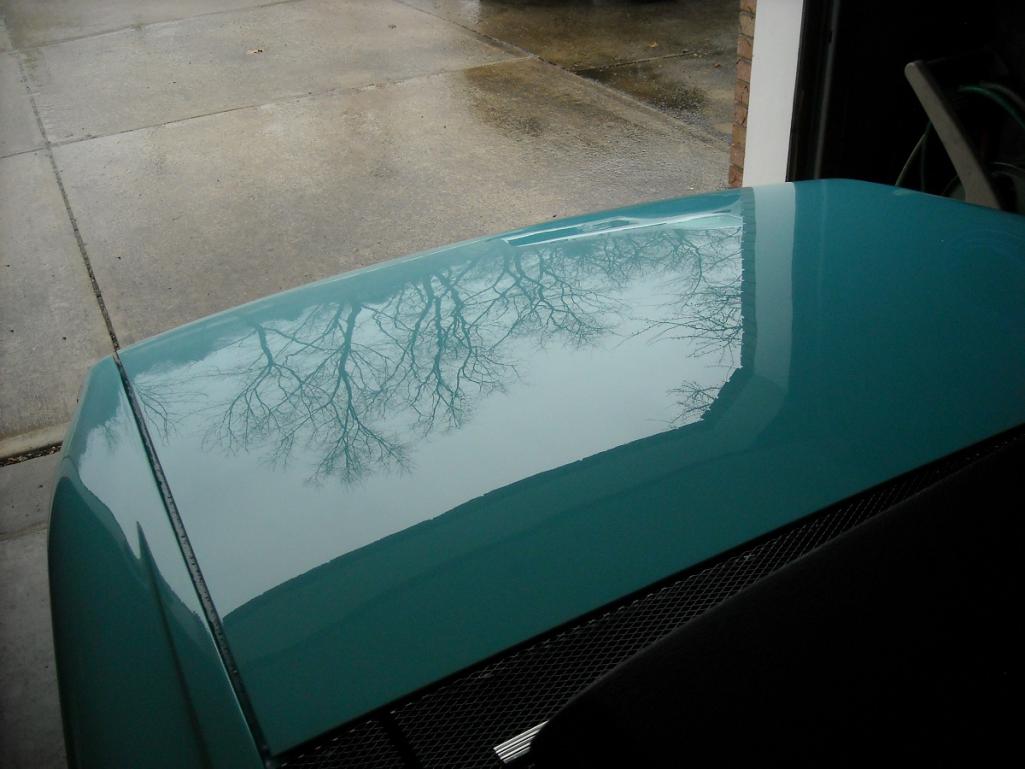
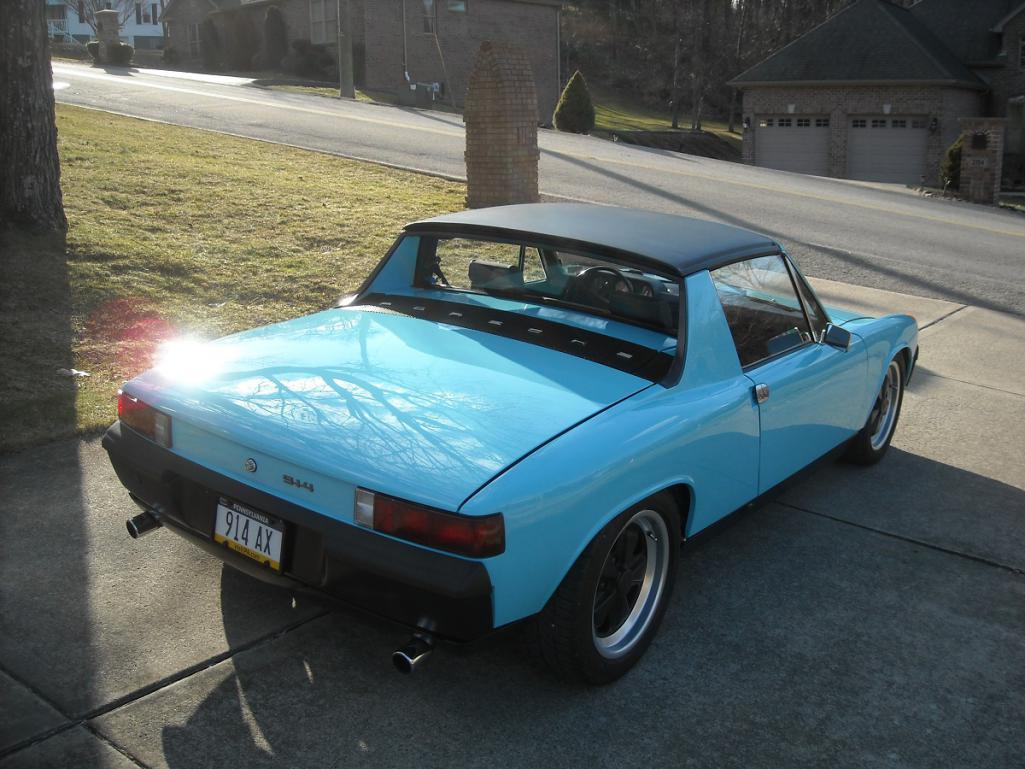
Posted by: Shivers Feb 18 2022, 06:07 PM
Righteous car, nice work. Congrats on the spread
Posted by: nivekdodge Feb 19 2022, 09:24 PM
Tom
3m has 8000 gr now. You can make the jump from 3000-8000. Once you hit 8 it's nothing to buff. Looks sweet either way
Kevin
Posted by: Olympic 914 Feb 20 2022, 08:47 AM
3m has 8000 gr now. You can make the jump from 3000-8000. Once you hit 8 it's nothing to buff. Looks sweet either way
I still have a bunch of the 3M 5000, I see they are discontinuing that.
Can't imagine how fine the 8000 would be.
Interesting thought.
Posted by: 930cabman May 2 2022, 12:23 PM
Just read the entire thread, great project and story. Thank you for documenting your work.
Just one ? how does anyone find the time for these builds??
Posted by: Olympic 914 Feb 19 2025, 01:53 PM
Looks like I only update this thread in February, and here we are again.
Couple years back I had installed Koni adj shocks in the rear with the Ground control sleeves and Eibach 125# springs. I was running Bilstiens in the front and sometimes they seemed a little too harsh. They came with the 911 struts I had initially installed so I just left them. until now. picked up a set of Koni adj for the front, cant wait to see how these play out. No pictures of the installation but it was pretty straight forward. Now i have the Konis front and rear. 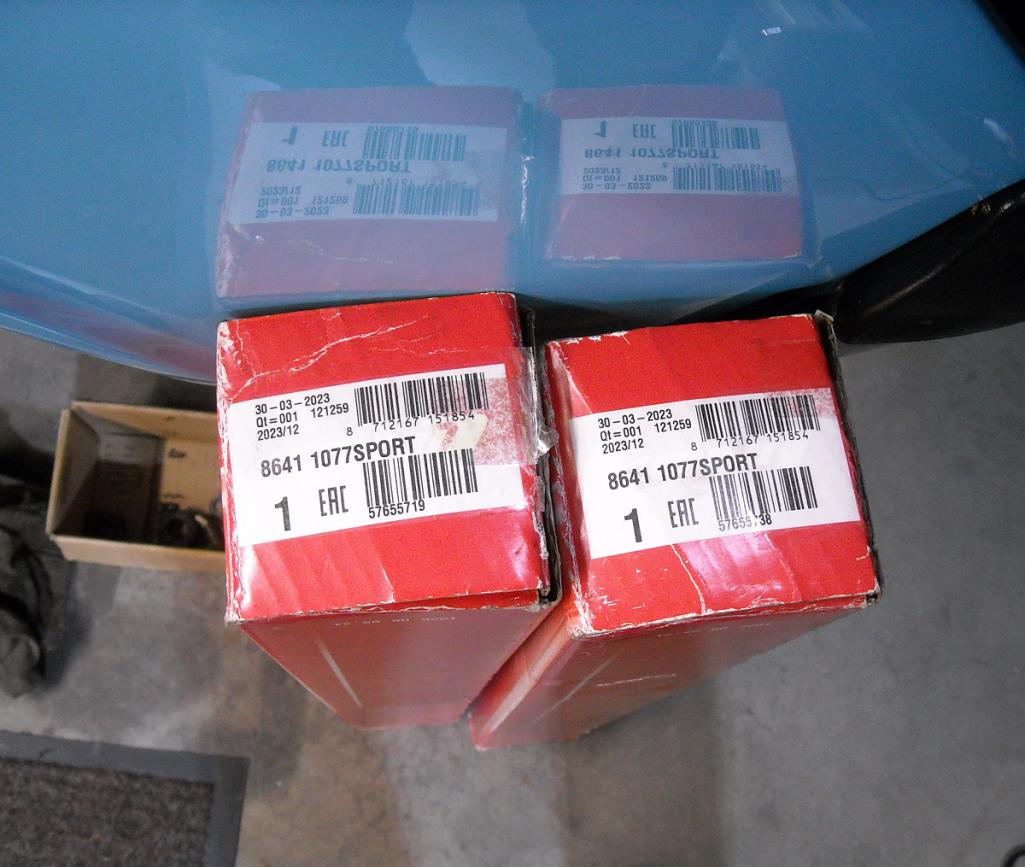
I had been considering an upgrade to Boxster front calipers for a while now, and I finally came across a set locally for a good price. So here we go.
Not that I really needed this brake upgrade, The A calipers worked fine but I had a really hard pedal with the 19mm master cyl.
Before picture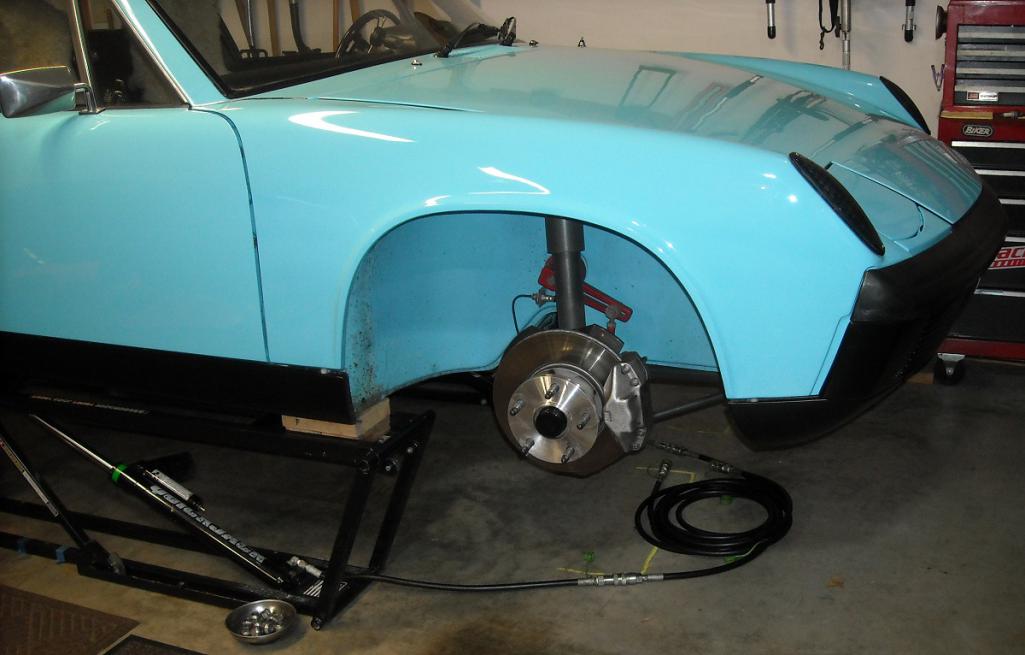
And since when did NEED ever come into the equation.
Picked these up and they didn't seem bad for the price. And no Shipping 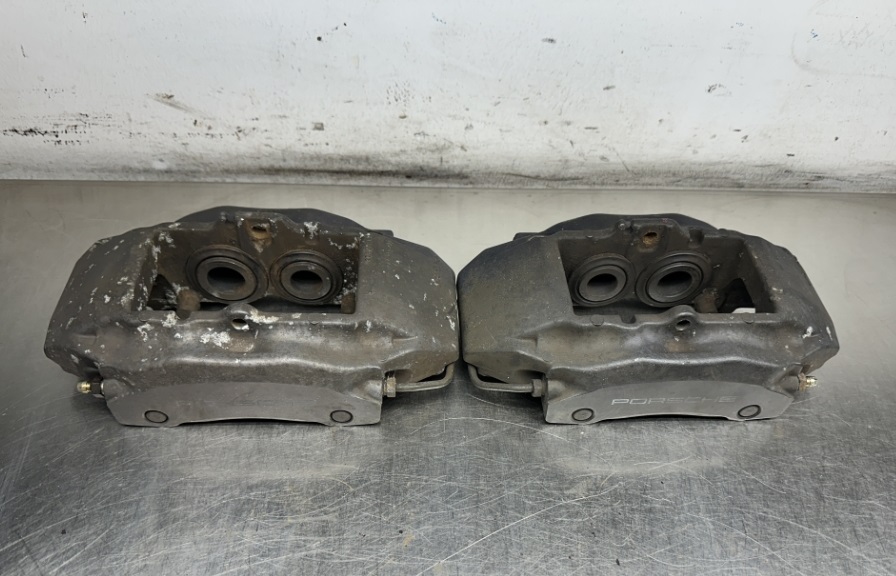
Sent them off to PMB for a rebuild and as usual they did an Excellent job.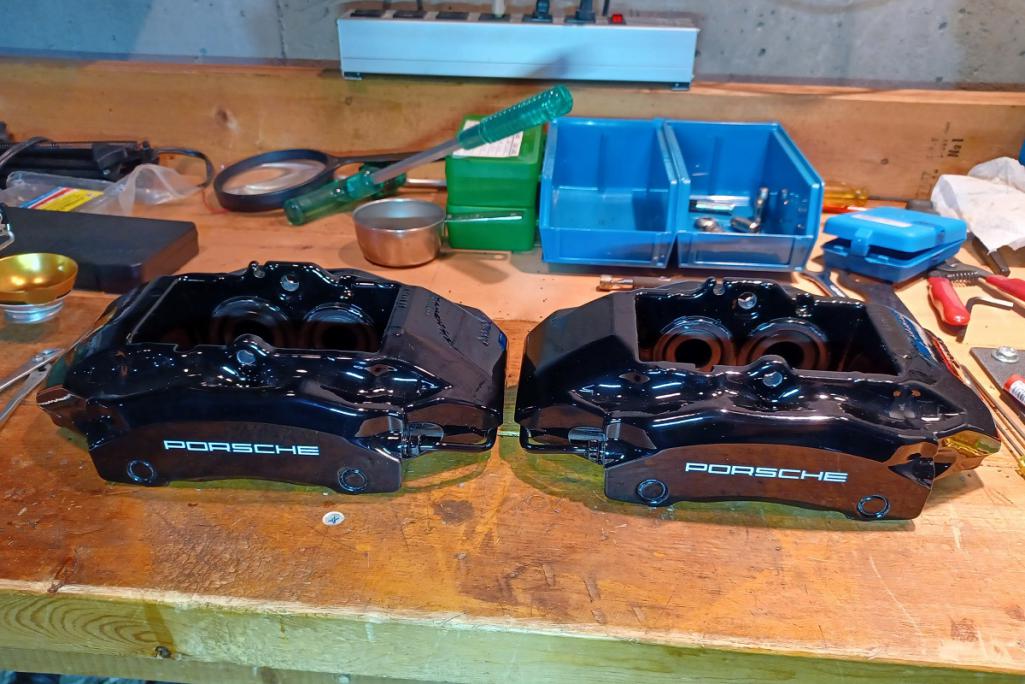
Next were the adapters from Elephant Racing, the kit came with bolts needed, new flex lines and hard lines. I cut a couple pieces of coat hanger to mock up the bends for the hard lines before attempting to form them. that worked out pretty good. 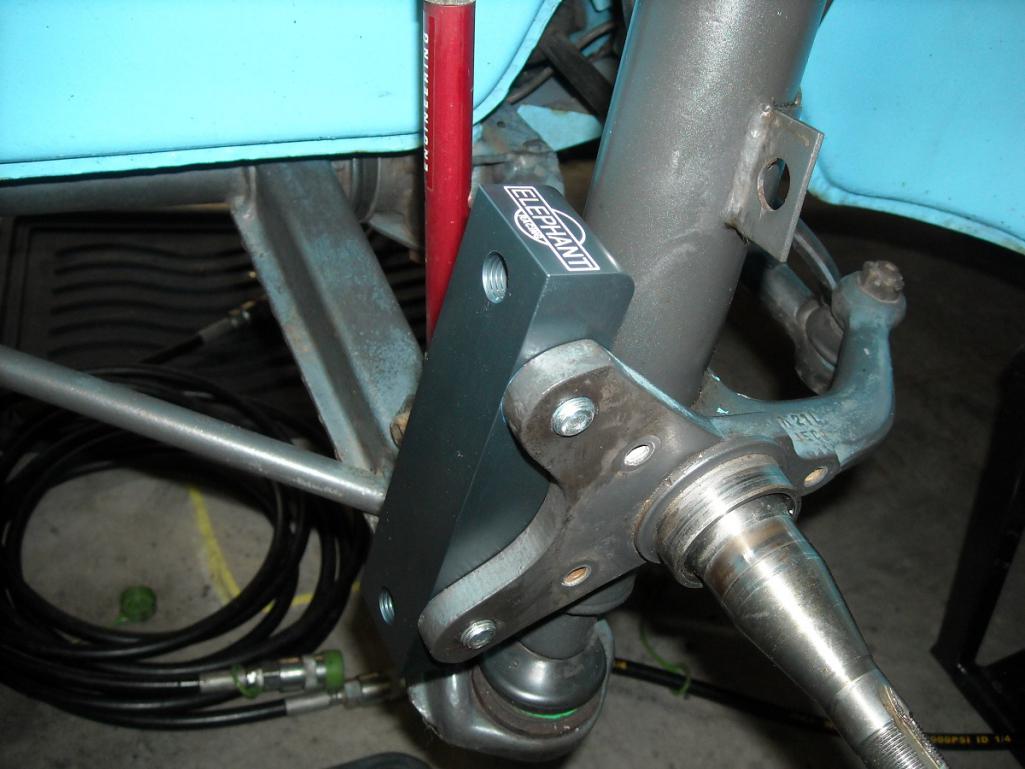
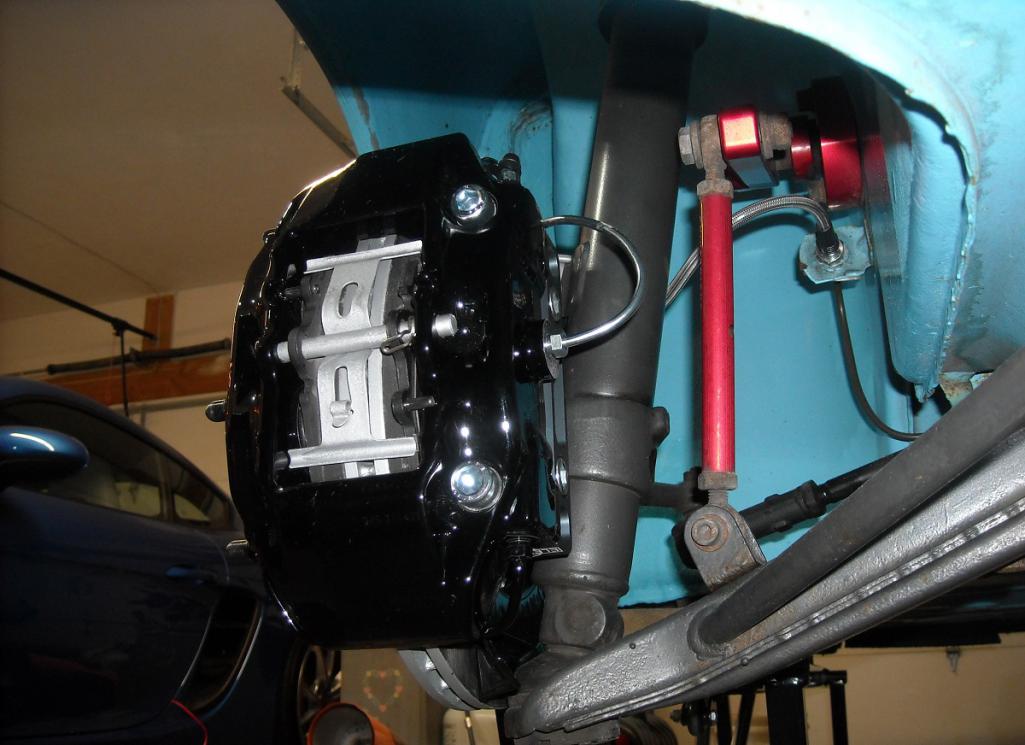
Although my old 20mm rotors would have worked, Decided to go with Sebro drilled vented rotors, Also from PMB, along with the Porterfield R4-S pads same as in the rear.
Got everything bled with the Motive pressure bleeder, the pedal seems a little softer but still locks up, just further down. But that is what I wanted. I haven't road tested it yet, so I really don't know how well it all will work. I will bleed it again after I get some miles on it.
And of course, While I was in there., I touched up a spot that had the paint chipped off, probably from stone chips.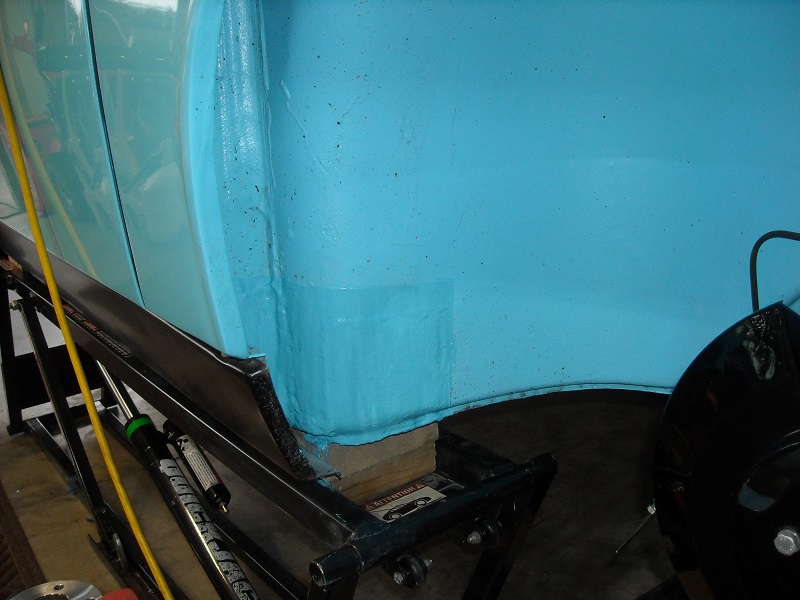
At the old house I had a detached garage to do my painting in, keeping the smell out of the living area. Well I heard complaints about the paint smell in this house for TWO DAYS!!
Oh well....
Till next February ....
Posted by: bahnzai Feb 19 2025, 08:06 PM
Thanks for the update Tom. Always love to see what you are doing with the car. I think you will like the Boxster brakes. I went down that same path, as I had a 23 mm master cylinder, so a very firm pedal…
Danny
Posted by: Cairo94507 Feb 20 2025, 04:47 PM
With the Boxster front calipers, the 23MM master cylinder should be just right. You need to move more brake fluid with the 4-piston calipers...at least I believe those are 4-piston. Car looks amazing Tom.
Posted by: Dion Feb 22 2025, 10:47 AM
Tom, car looks fabulous! Good choice on the braking system. That will make those Pittsburgh hills more tolerable 
Hope to see ya out there this driving season.
Posted by: Olympic 914 Mar 5 2025, 03:39 PM
So after a couple of rains to wash the salt off the roads and a bit of a warm day, I got to take the car out to test drive the brakes..
I took it out on two drives on some of my favorite local winding roads for about 60 miles. No traffic so I had many opportunities to make hard stops from speed.
They are GREAT! The pedal feel is EXACTLY what I wanted, although some recommended the 23mm Master, I stayed with the 19mm master cylinder. And IMHO it is perfect. I like the amount of travel and I don’t have to stand on the brakes to stop. It is Almost like power brakes. 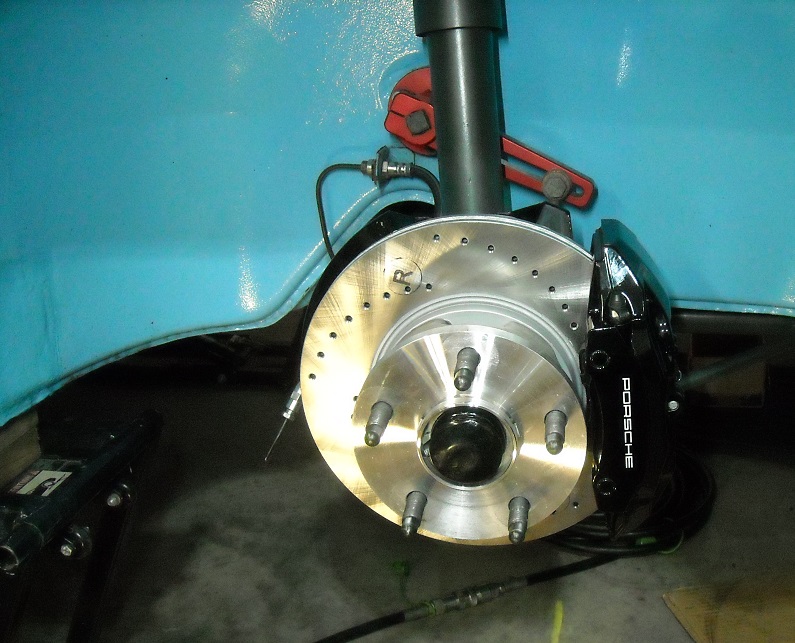
My rear sway bar bushings were looking a little worn, and I have had a new set in my parts stash for a bunch of years now. Good time to put them on. Did the boiling water trick to soften them up and pushed them in with a screwdriver Tried using the vice but the screwdriver worked better. To install them on the sway bar I used a big C-clamp and they popped right on. Tried my biggest C-clamp on the end of the swing arm but couldn’t get it too work. So I got a 3 ft piece of scrap wood and jammed it up into the shock tower. With this I was able to keep the bushing oriented correctly and had enough leverage to pop them on. 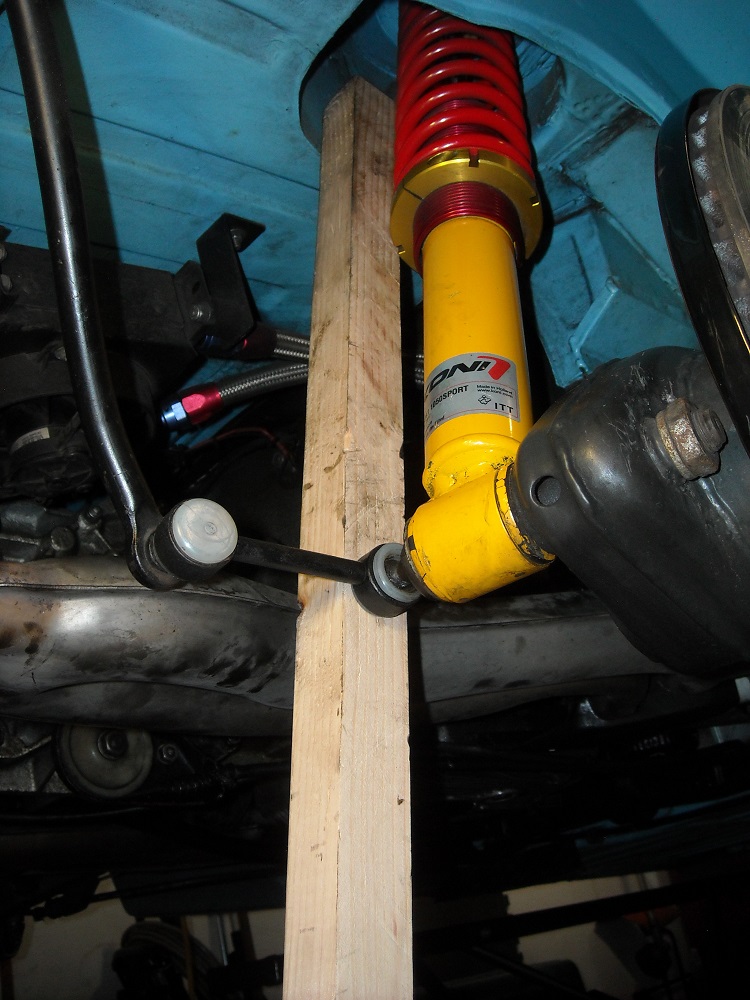
When on my way to Okteenerfest last year, we pulled in to a rest stop and when leaving, I got NOTHING from the starter. Crawled underneath with my remote starter button and got the starter to spin but not engage. A couple bangs with a wrench on the solenoid solved that problem. It didn’t give me any problems the rest of the trip, OR since then but it left me a little spooked So I pulled the starter out to think about rebuilding it. And found you have to unsolder the wires to the solenoid to dismantle it.
That led to me buying this 1.4K hi-torque gear reduction starter. I didn’t have to give up my old starter for a core, so I may still think about opening it up in the future. I was running the Ford starter relay mod. But left it off of this starter.
Funny little aside, during last years Okteenerfest drive, Jim and Terry,
that had the other Olympic Blue 914 there, Had the exact same starter problem. While parked right next to me. Terry knew what to do immediately, and crawled underneath with a big crescent wrench to bang on the starter, and it started right up.
Which contributed to me just replacing my starter. 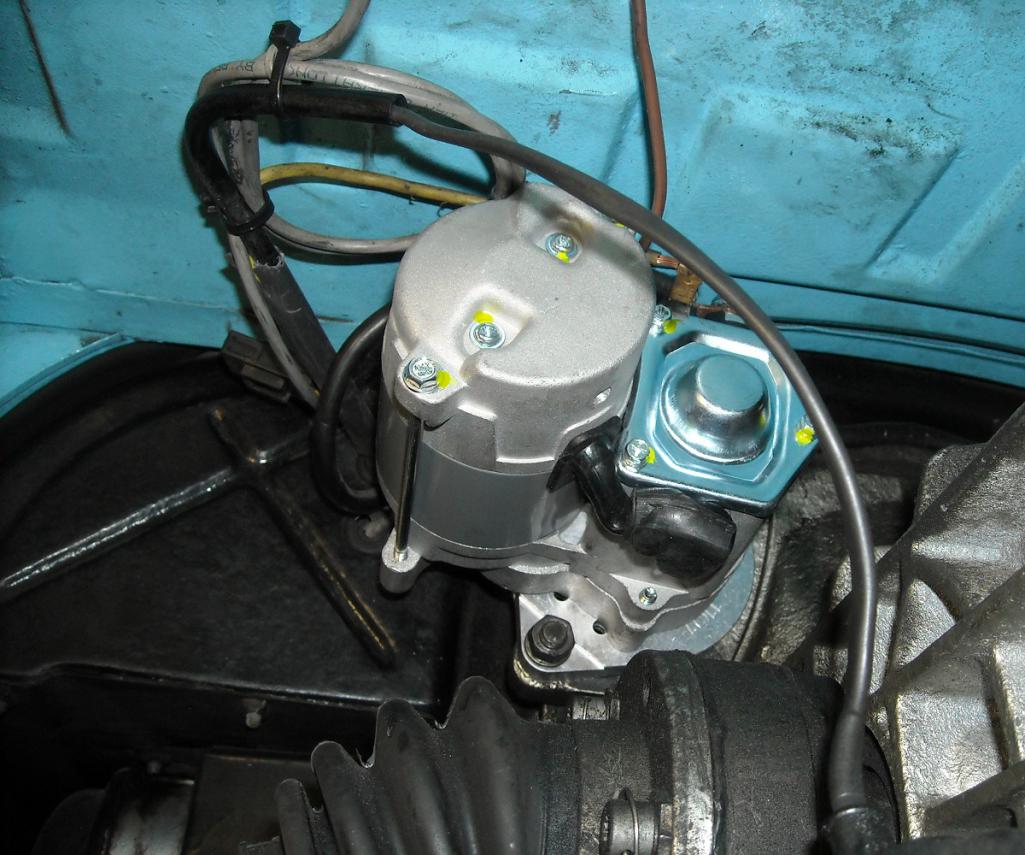
I think I am ready for this years drives.
See you guys at the NEG and Okteenerfest 2025.
Powered by Invision Power Board (http://www.invisionboard.com)
© Invision Power Services (http://www.invisionpower.com)