Printable Version of Topic
Click here to view this topic in its original format
914World.com _ 914World Garage _ Just another Factory 6 being fixed up
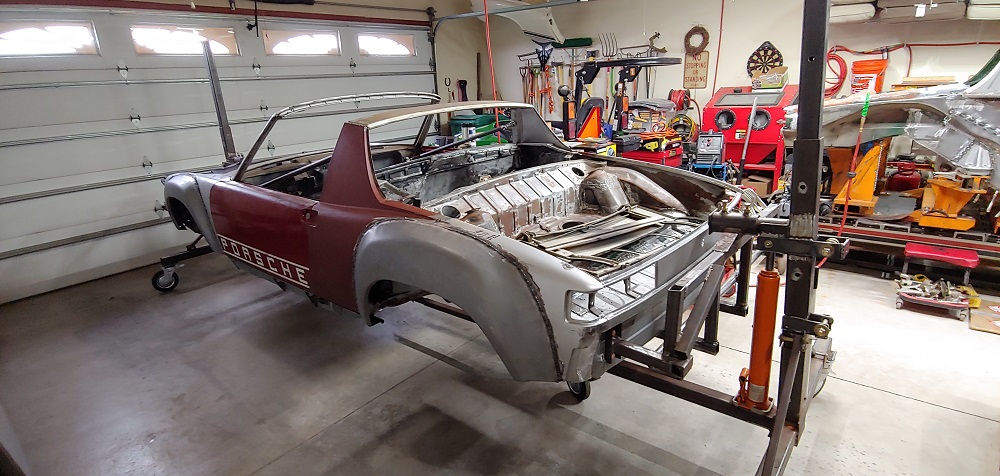
Posted by: Luke M Oct 23 2015, 12:26 PM
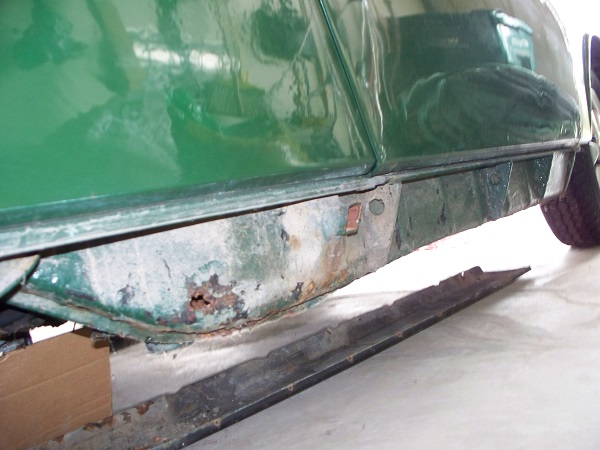
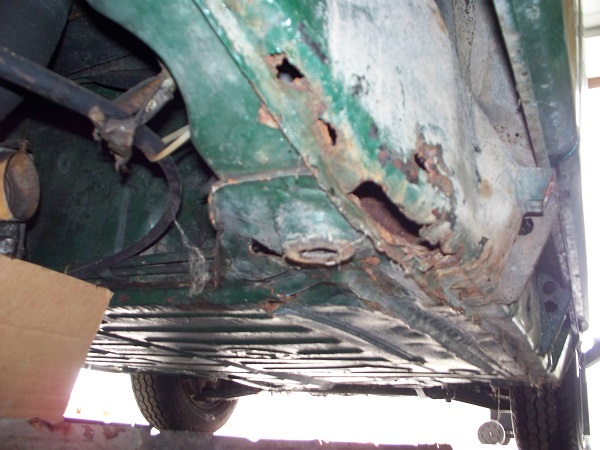
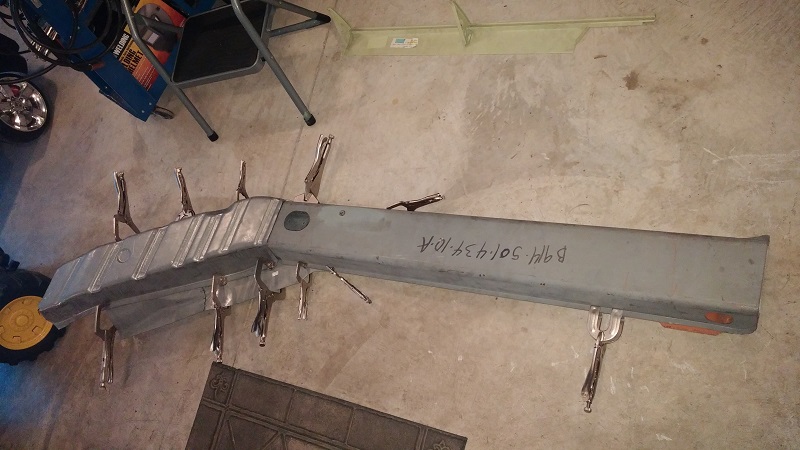
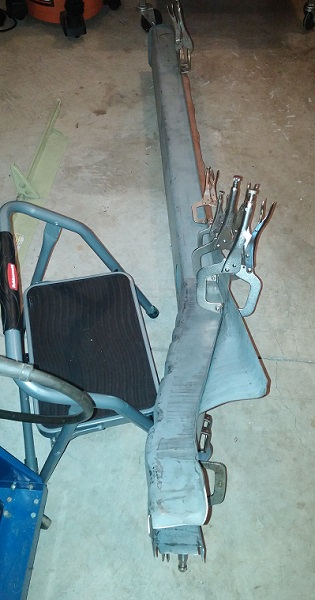
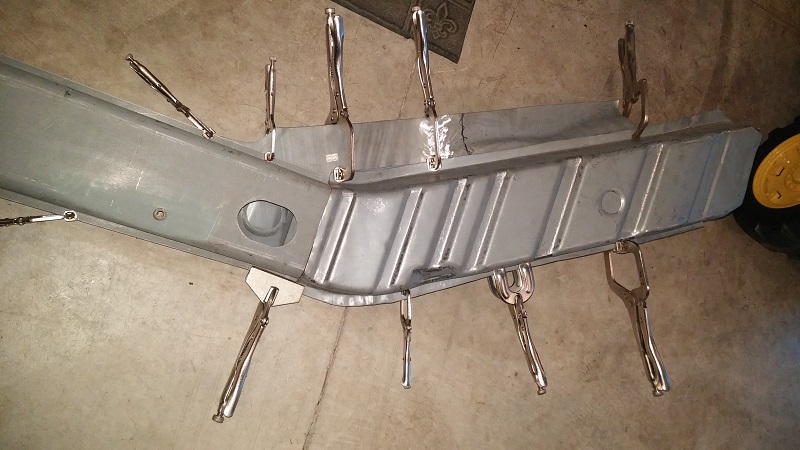
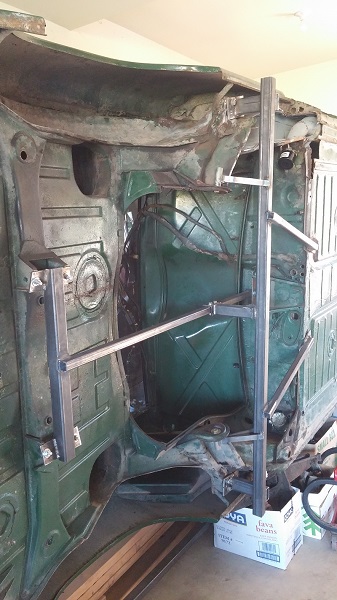
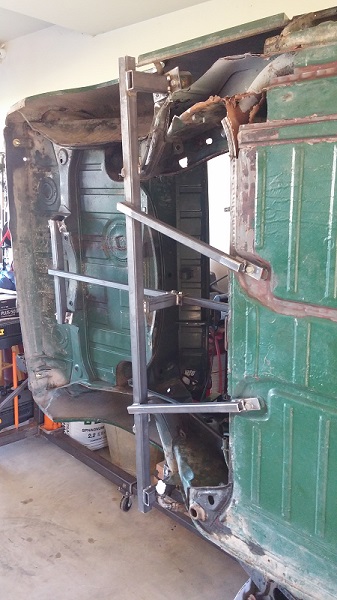
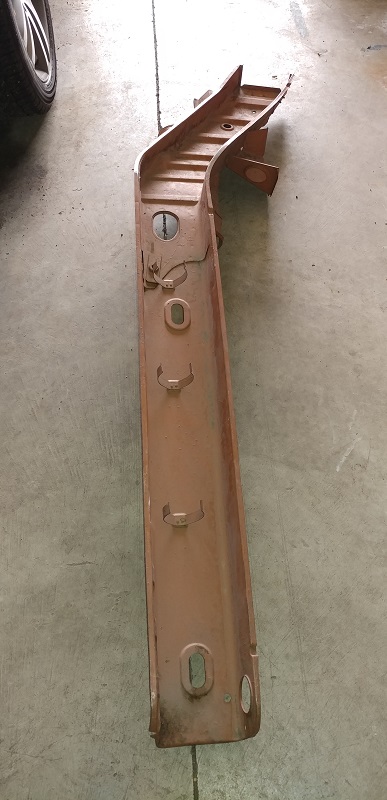
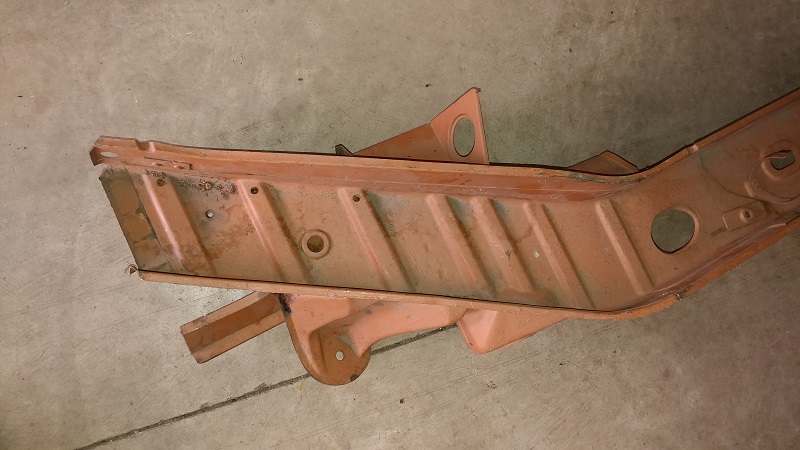
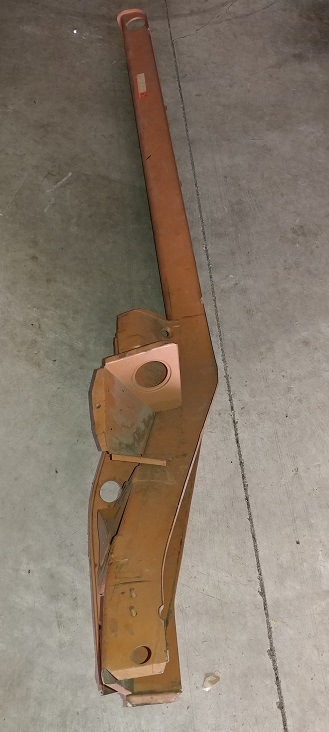
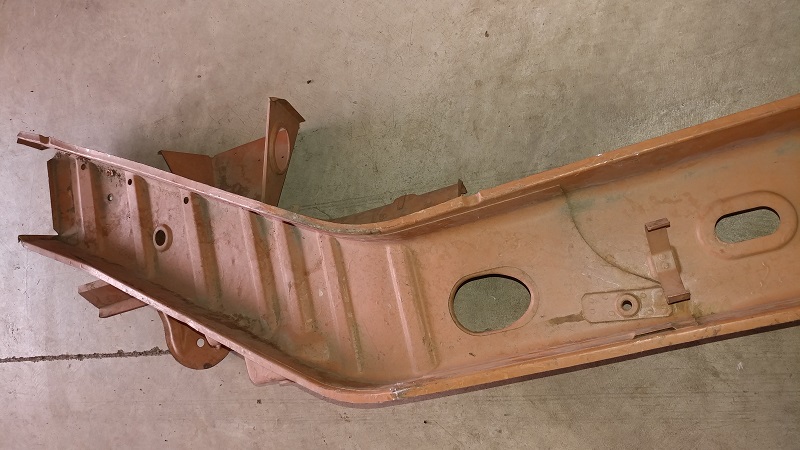
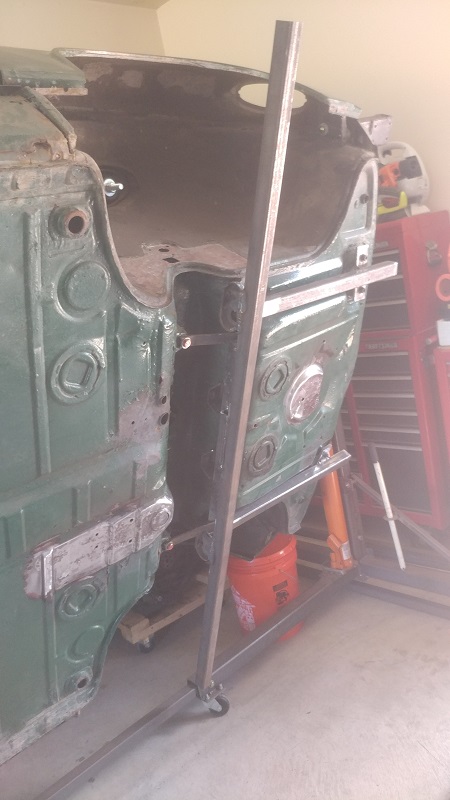
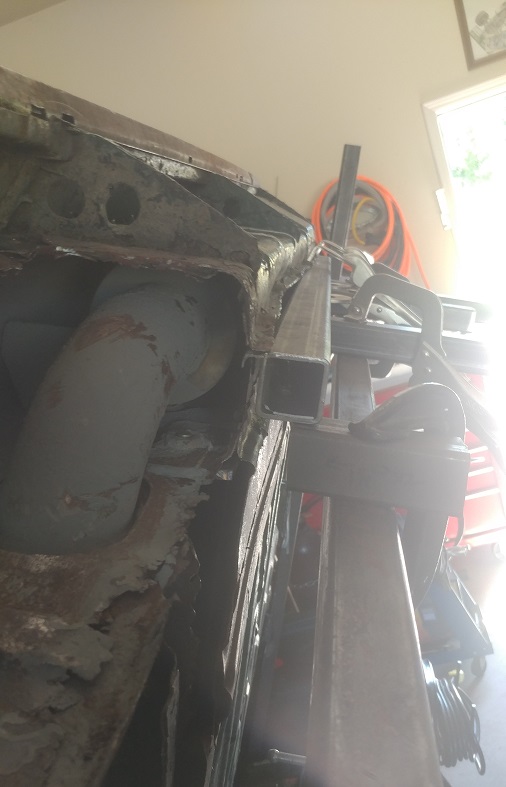
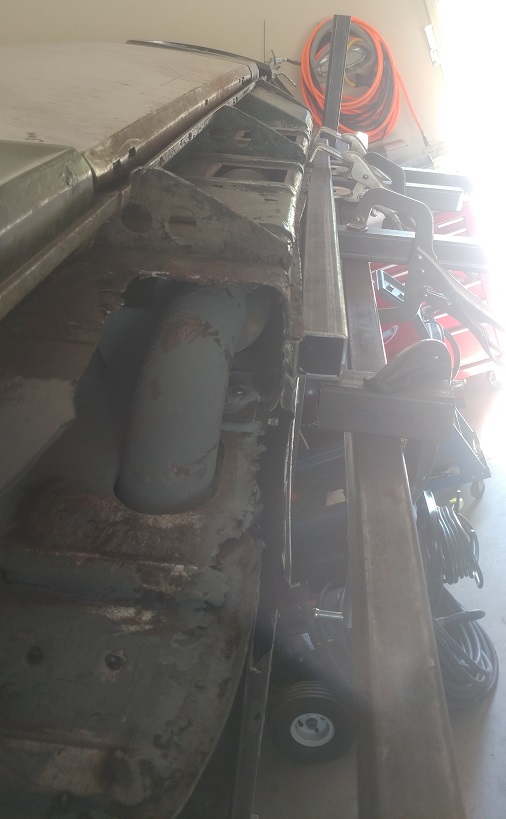
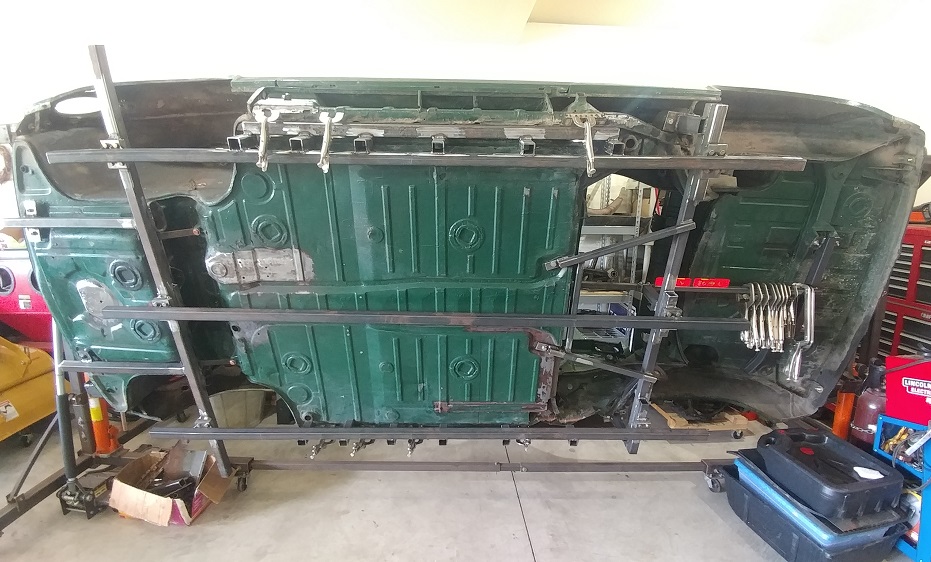
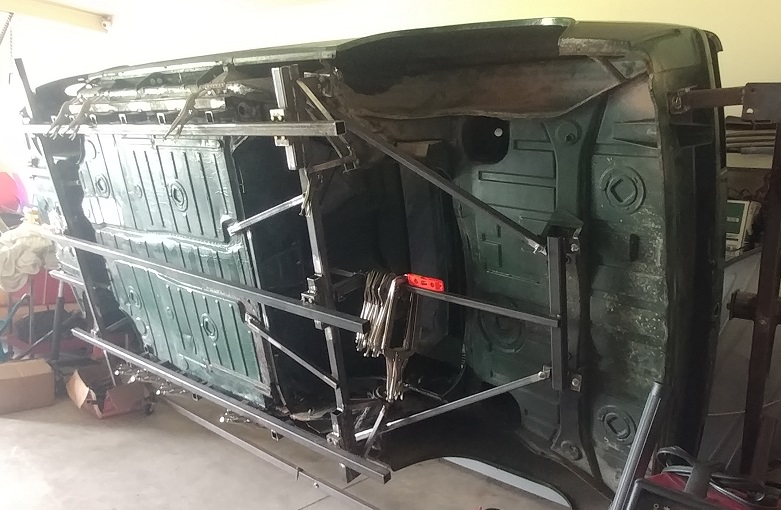
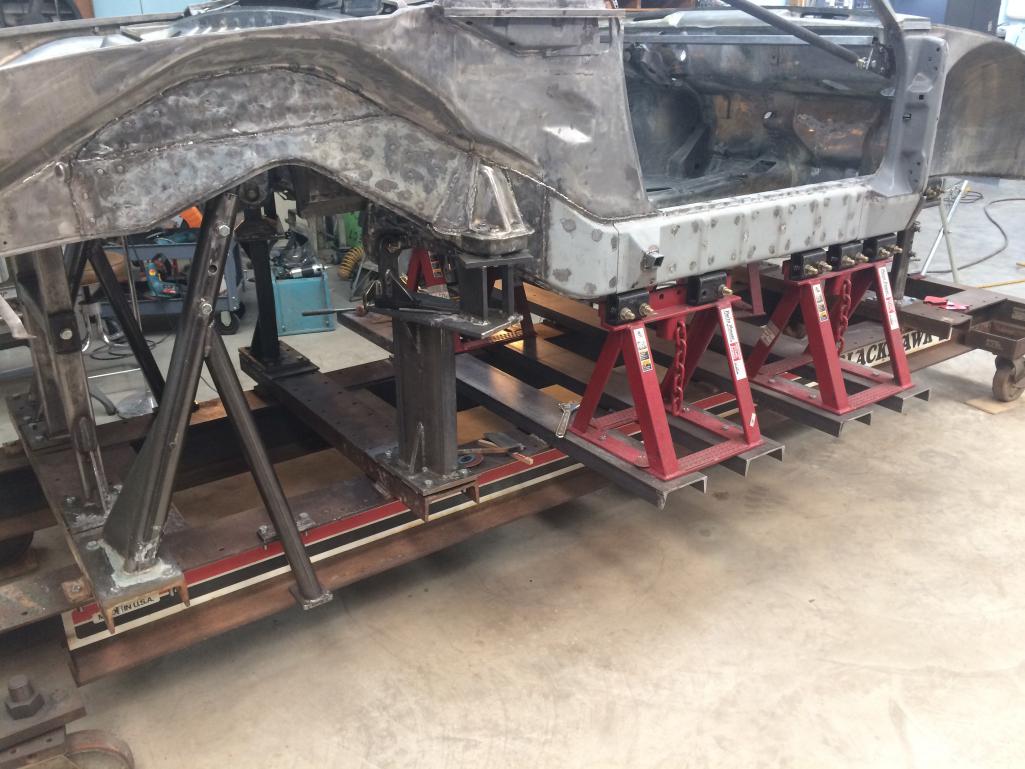
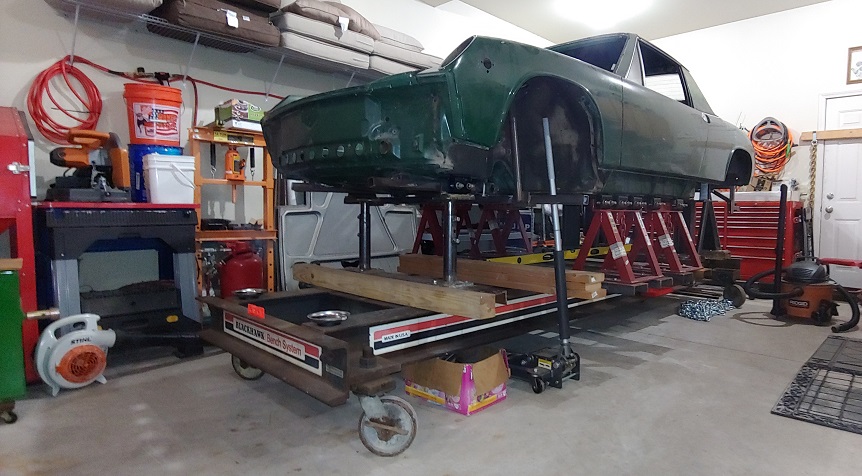
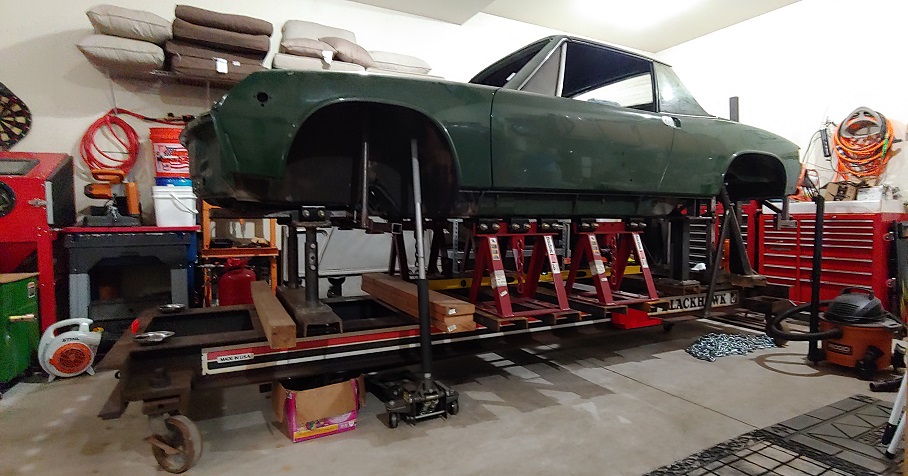
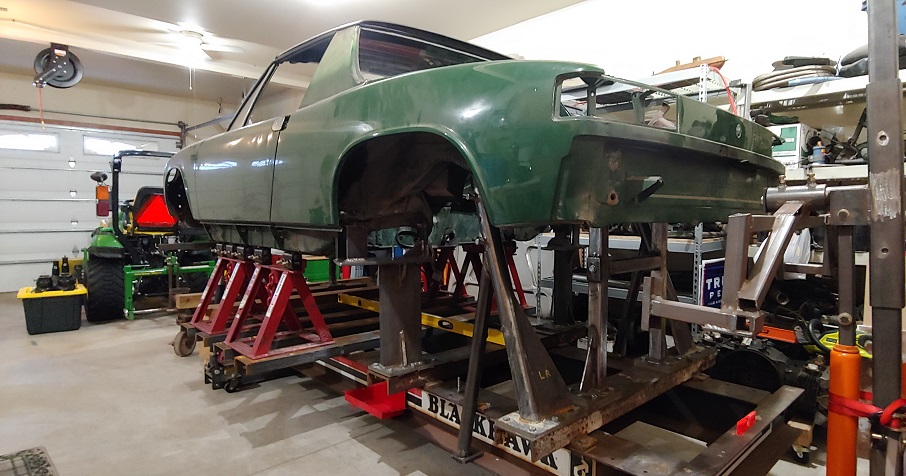
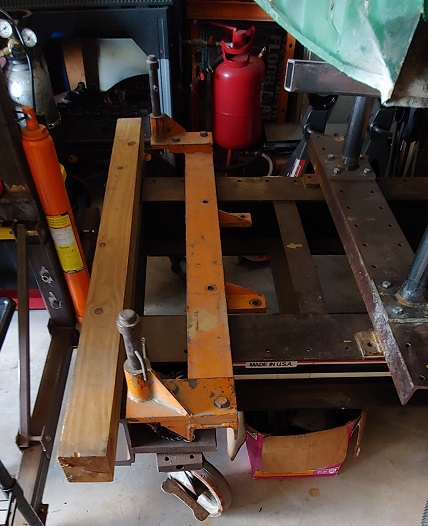
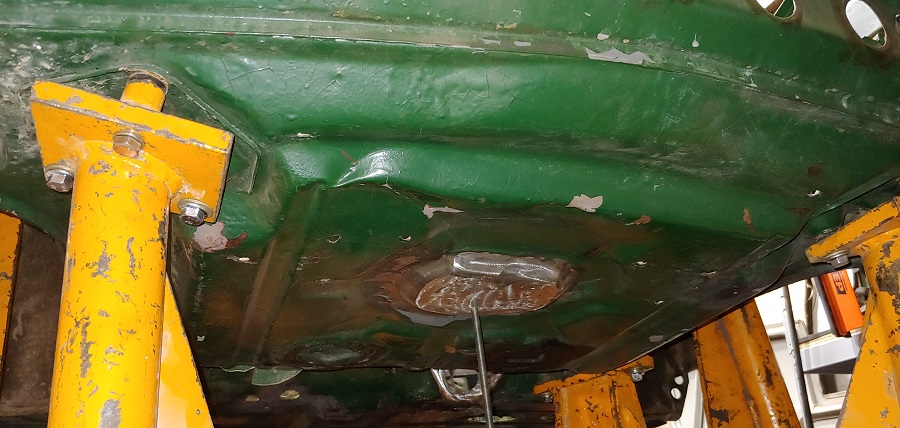
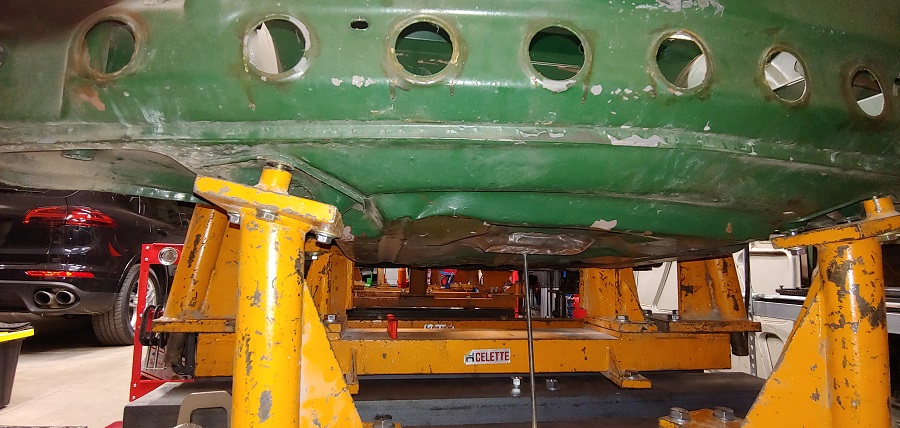
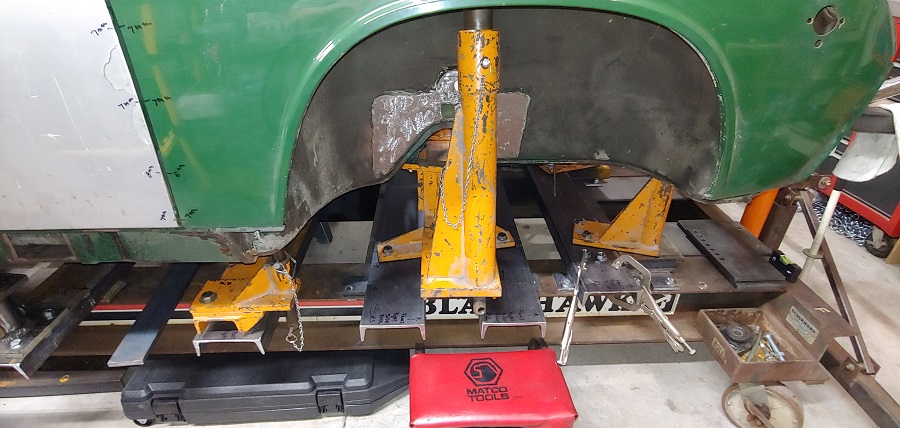
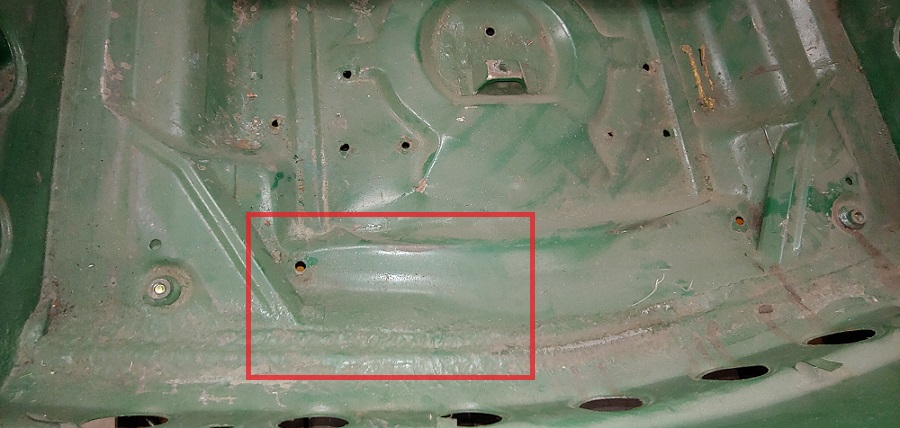
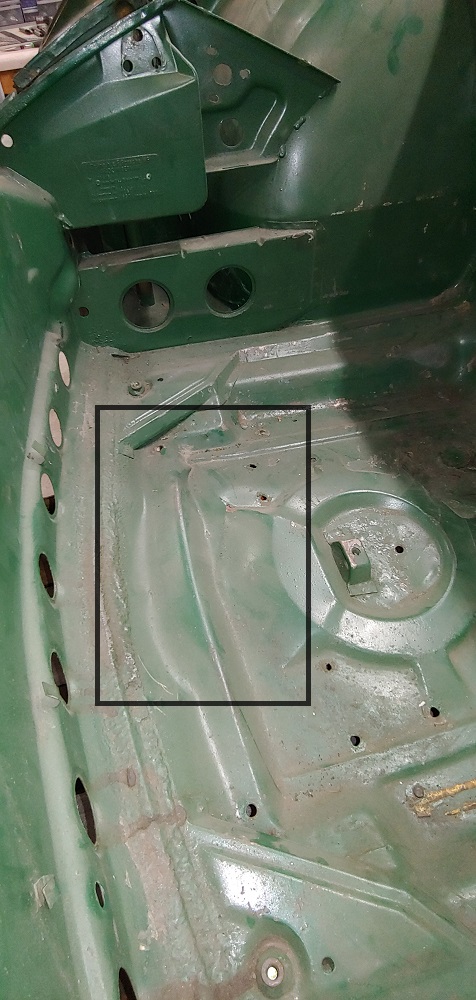
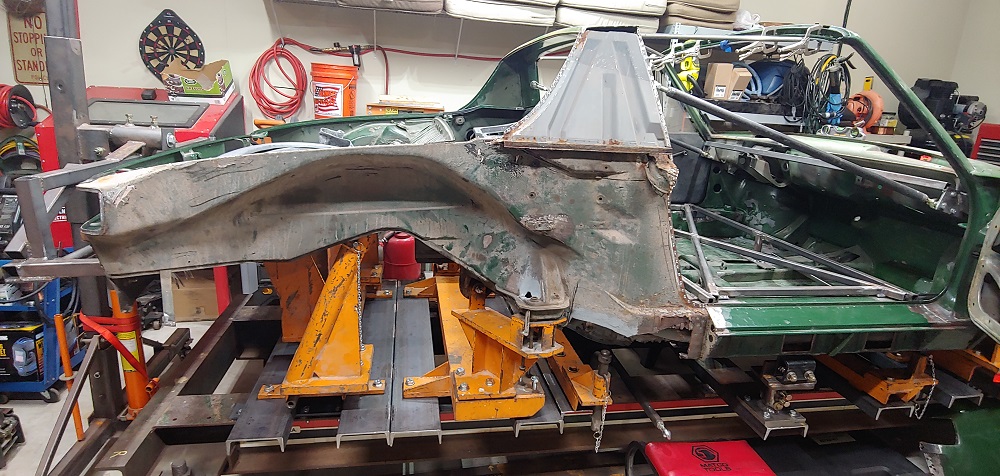
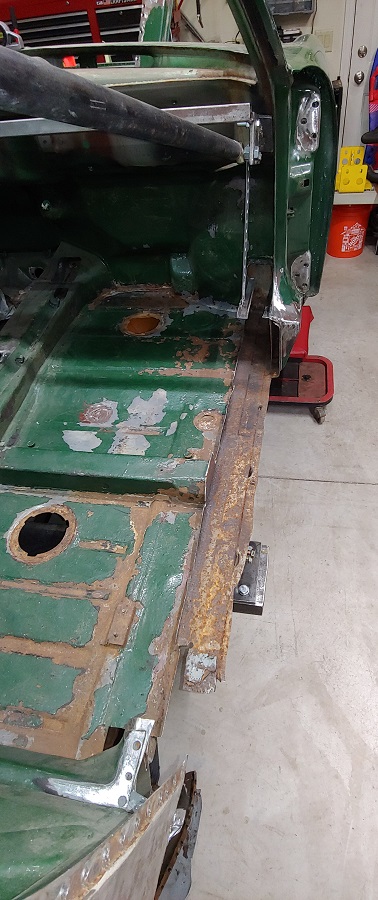
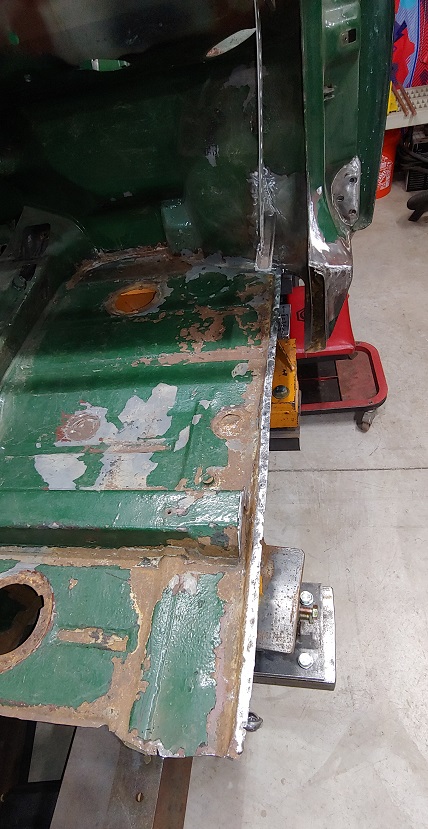
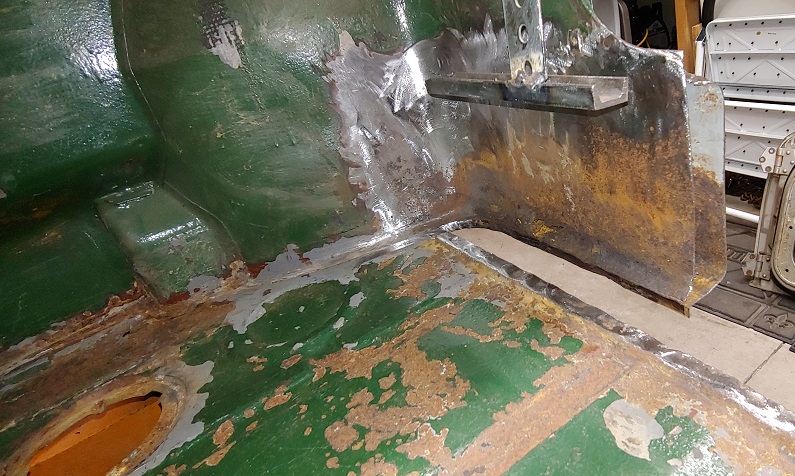
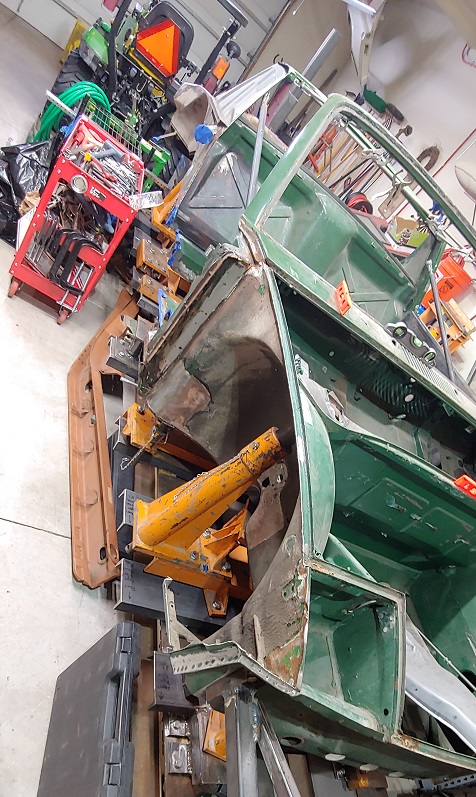
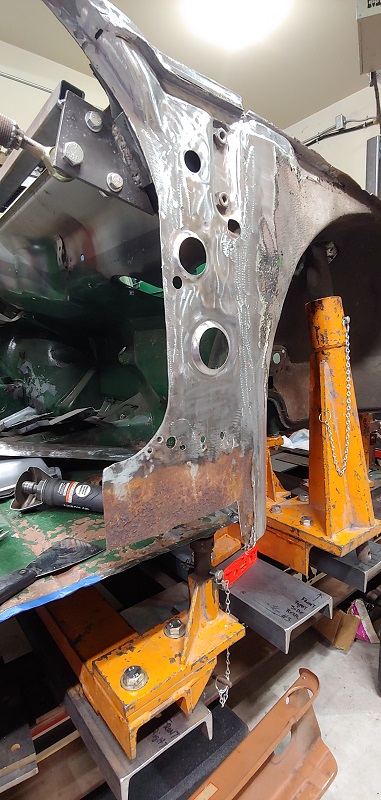
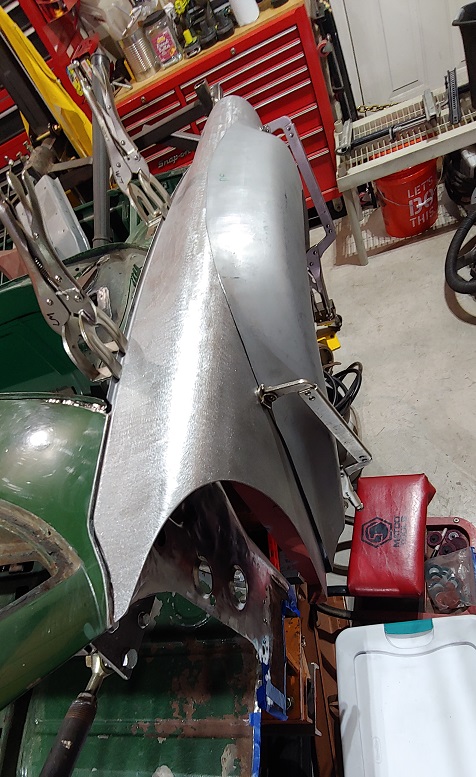
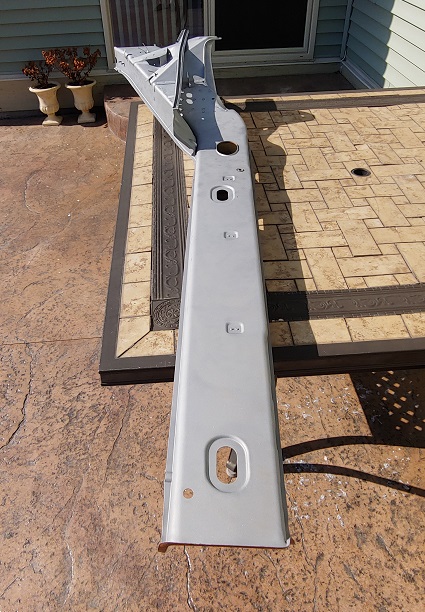
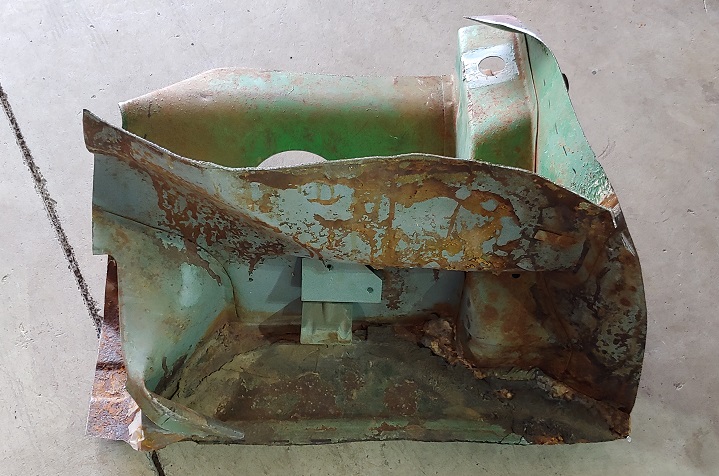
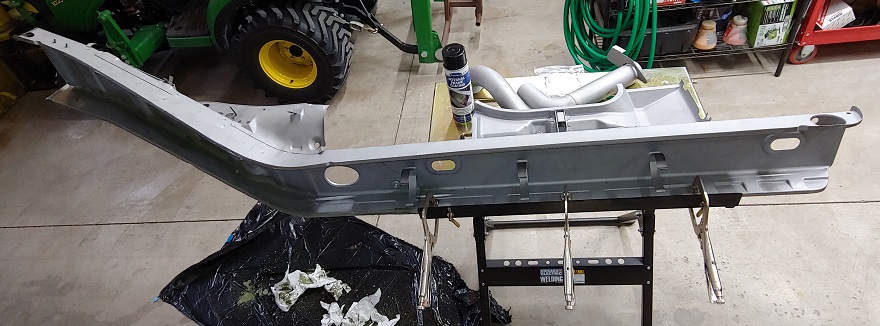
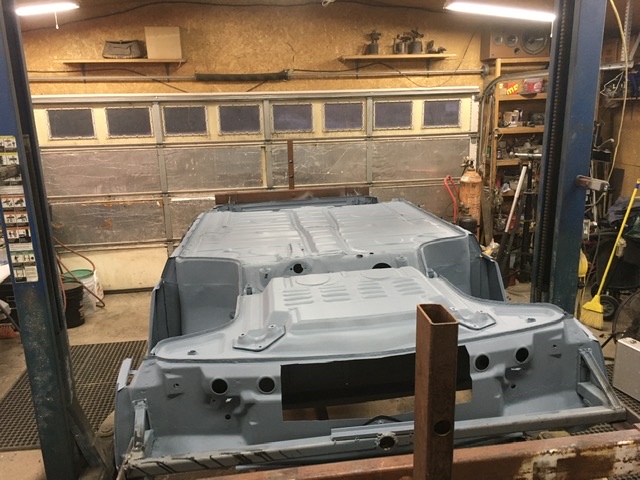
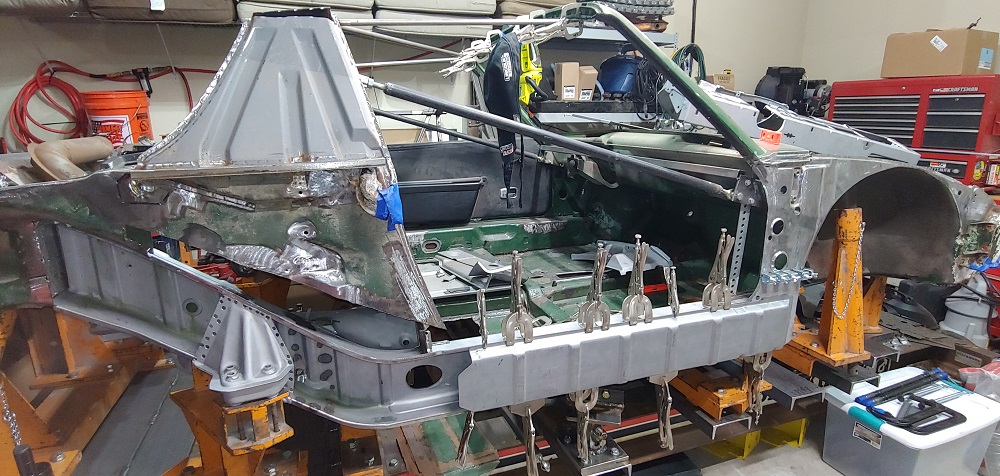
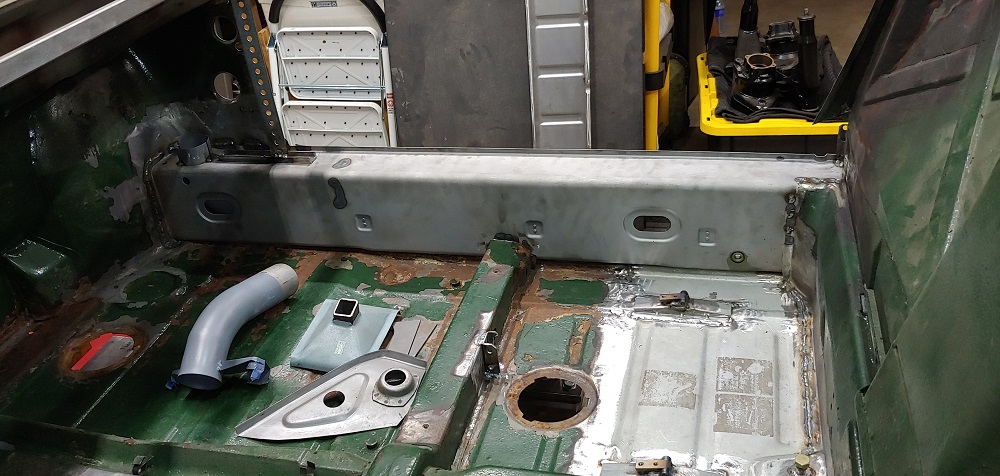
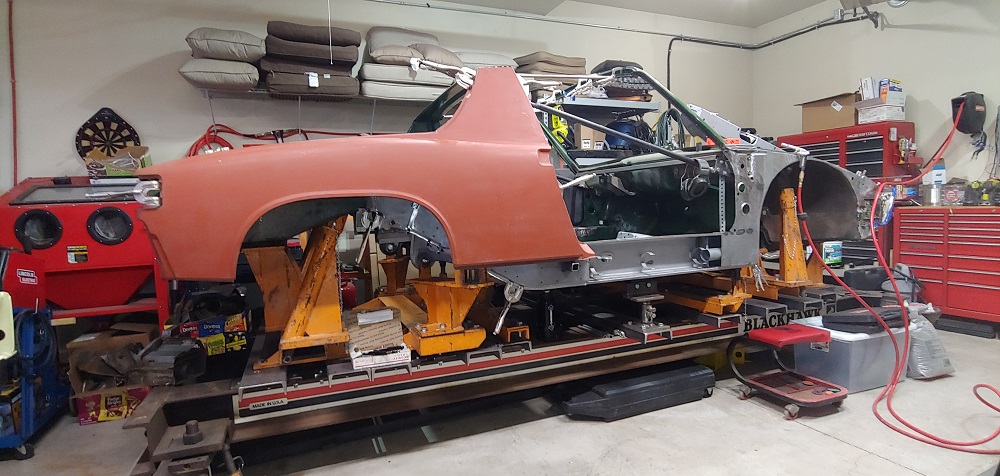
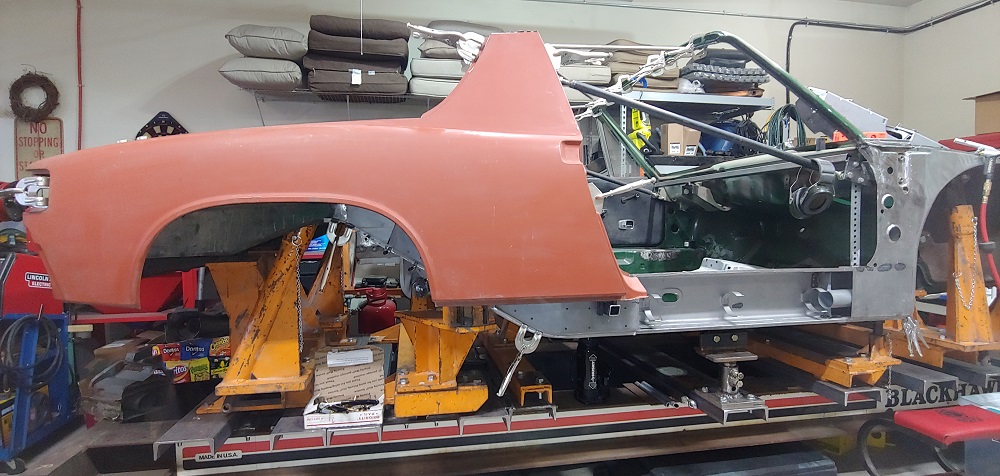
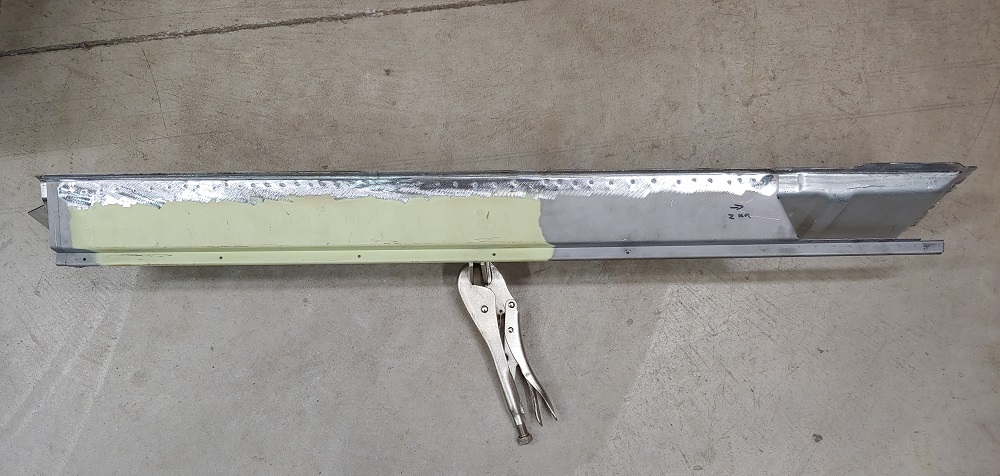
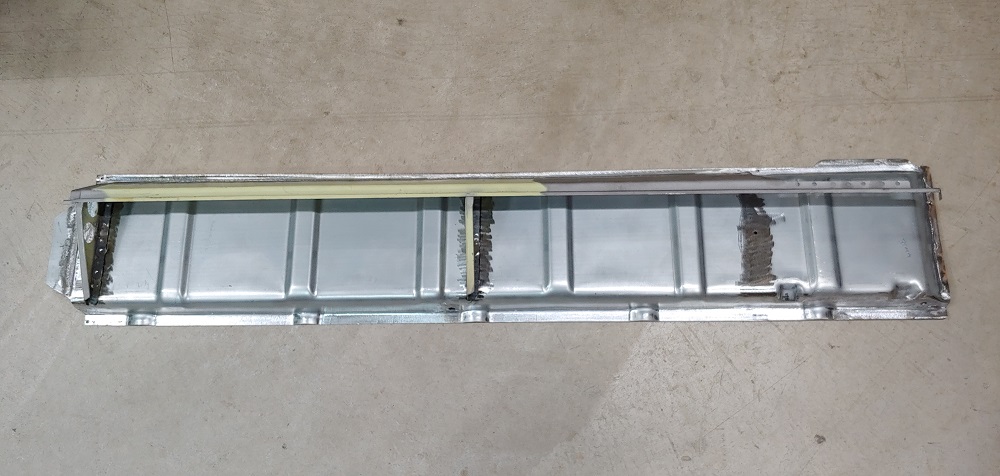
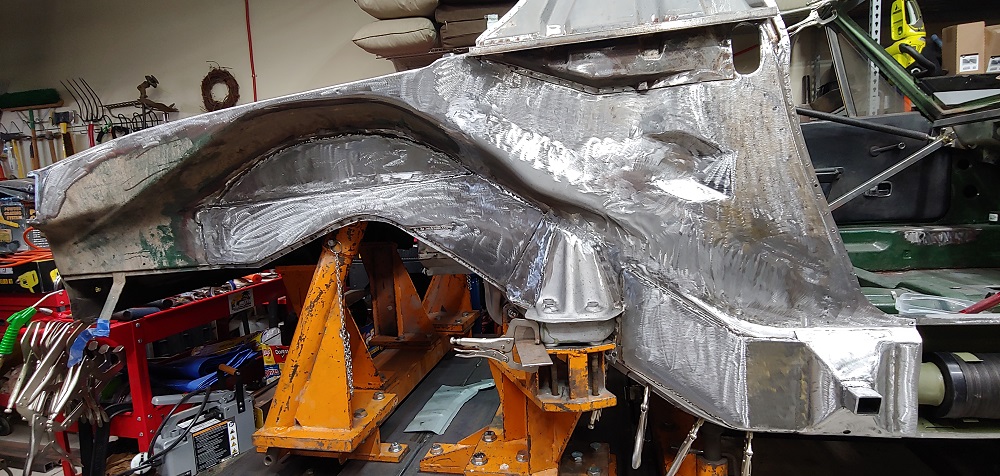
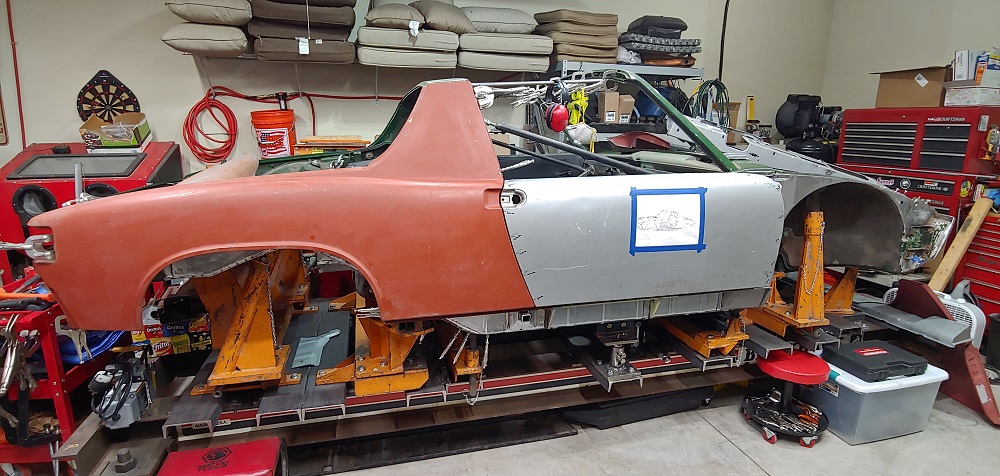
Well it's gotten to be that time finally. I've been collecting parts to do the repair on my 914-6 and now the work starts. The main issue is the hell hole/inner engine long, inner pass long, pass inner rocker panels are rusted out. The last part I was trying to source seams to be NLA. I sourced most of the parts from the good guys at Restoration Design. I received my order today for the last batch of things. Based on a few threads that I've looked over the outer shell to the inner engine long is currently not being made by RD. A few guys have made their own which looks like a real pain in the rear to do. I laid out all the new metal to see how things lined up. By the looks of things it will need some fine tuning to mate things properly. Before I start cutting into the chassis I'll build a few braces to keep things true.
Time for the pics...
Attached image(s)

Posted by: stevegm Oct 23 2015, 02:14 PM

![popcorn[1].gif](style_emoticons/default/popcorn[1].gif)
Posted by: wndsnd Oct 23 2015, 02:20 PM
Is that the car that Kirk sold?
Posted by: Mueller Oct 23 2015, 02:36 PM
Good luck...I hope mine isn't as bad once I start digging into it!
Posted by: Cairo94507 Oct 23 2015, 03:05 PM
Excellent. It looks like you have matters well in hand. Keep the pictures coming.
Posted by: Luke M Oct 23 2015, 03:20 PM

Is that the car that Kirk sold?
Nope.. I've owned this car going on 6 years now.
Purchased it from a local guy that didn't want to deal with fixing it. It was parked in a garage after the engine locked up and sat there from 1983 to 2009.
Posted by: wndsnd Oct 23 2015, 03:31 PM
Big project for sure, but the fact that it is on a rotiserrie, should make it manageable. Measure twice, cut once. Enjoy.
Posted by: rick 918-S Oct 23 2015, 03:41 PM
Nice.
Posted by: Kansas 914 Oct 23 2015, 03:53 PM
Worth saving for sure.
Posted by: Krieger Oct 23 2015, 05:10 PM
Yea!
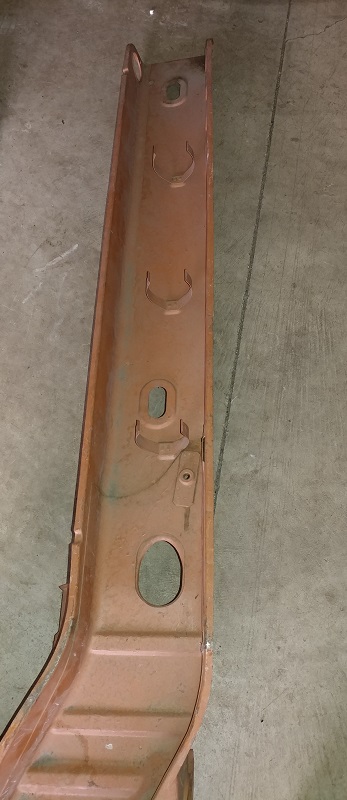
Posted by: Luke M Feb 20 2018, 11:12 AM
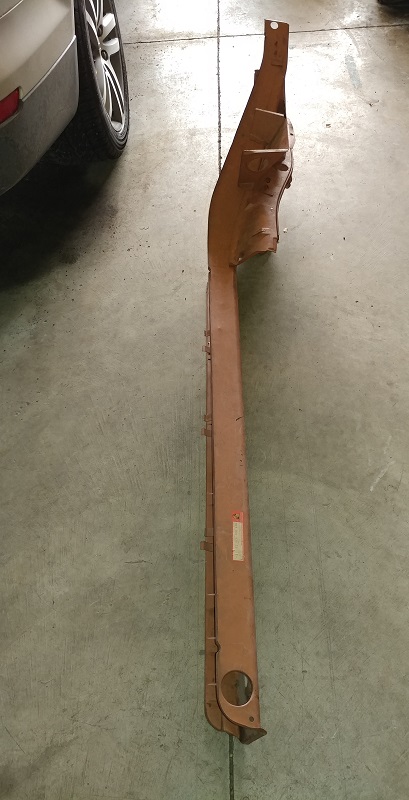
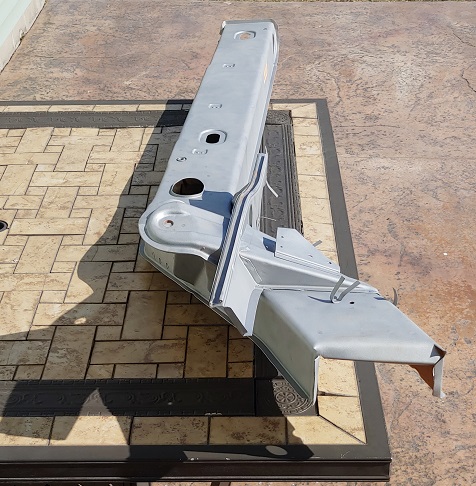
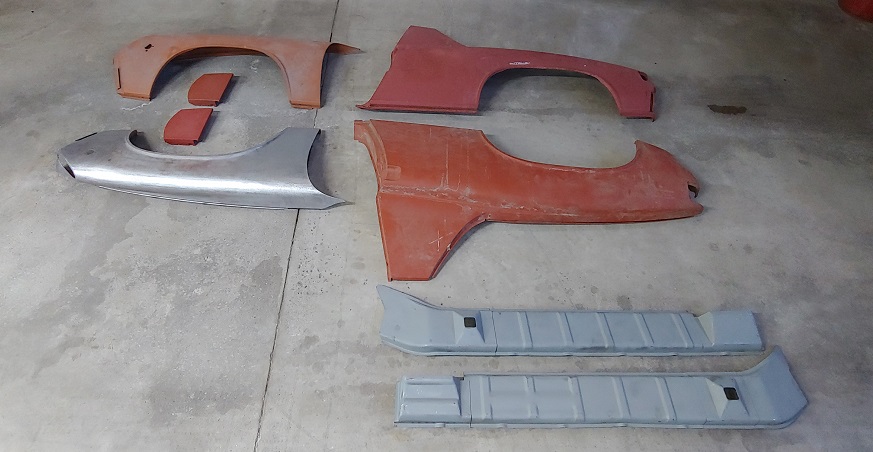
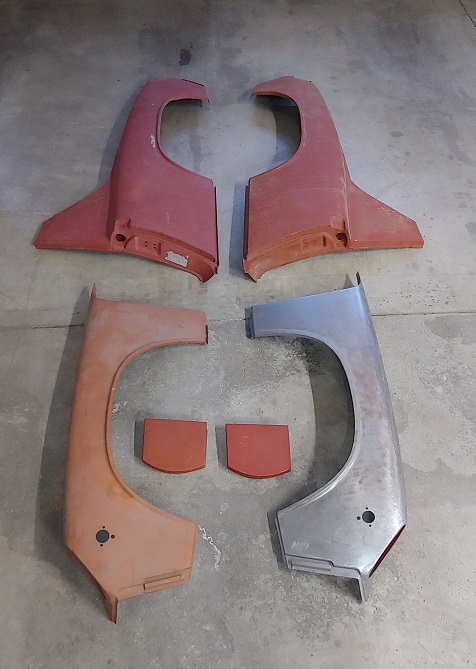
Well after nearly three years of searching for a NOS right long I was able to source and buy one. Probably the last one in the US that's for sale ( watch now two will pop up for sale ). I should have it in my hands by late Weds and will post pics once it's here. So with that said, I have a few questions on how to tackle this job.
I know Kent replaced the drivers side of Jim's 6 seen here :
http://www.914world.com/bbs2/index.php?showtopic=244443&st=100
I see Kent has made a jig to align things which I also made.
If you see this Kent how did you attach the rear most section to the rear trunk/shock tower area? Did you weld from the inside as well as the outer portions?
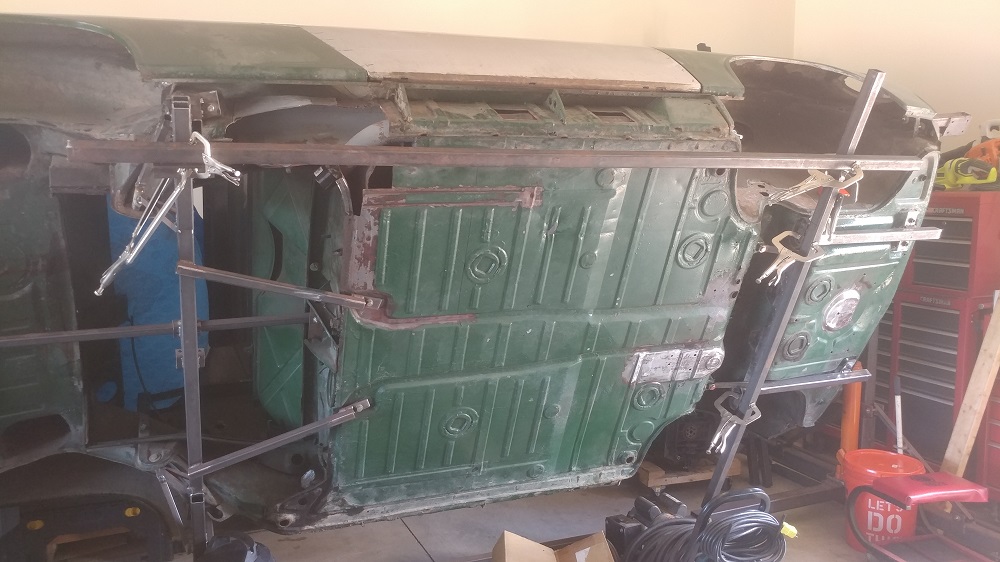
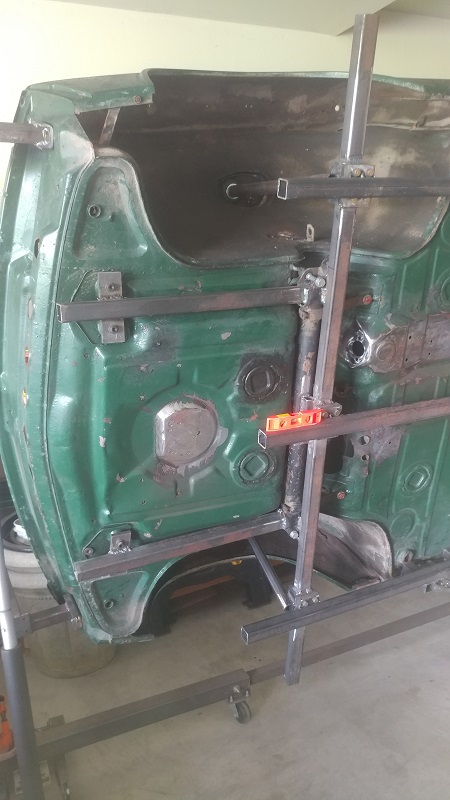
I plan to brace the living heck out of the chassis prior to cutting into it.
Any area worth more bracing then others? I plan on checking the door gaps and all of the specs prior to/while welding in place.
Stay tuned...
Posted by: bbrock Feb 20 2018, 11:32 AM
Yeah Man! A lot of work, but also very satisfying. Looks like you've already got a handle on it, but brace the doors very well with an adjustable brace so you can adjust your gaps prior to and during welding. Once a long comes off, you'll be amazed how rubbery the car becomes, and also how easy it is to dial in the gaps precisely. I'm looking forward to watching this.
Posted by: rgalla9146 Feb 20 2018, 02:37 PM
Hey Luke
Excellent !
Now's the time. Take it one day at a time. It'll get done.
Be careful.
Rory
Posted by: bigkensteele Feb 20 2018, 05:30 PM
Why did you decide not to use everything you pieced together above?  Looks like you had it well underway.
Posted by: Luke M Feb 20 2018, 07:16 PM
Why did you decide not to use everything you pieced together above?
Looks like you had it well underway.I wanted an NOS part for the repair to begin with. It's just hard to come by the pass side now a days. I found one and will be using it to make the repair. I will sell the other parts that I will not be using.
Posted by: Luke M Feb 20 2018, 07:17 PM
Hey Luke
Excellent !
Now's the time. Take it one day at a time. It'll get done.
Be careful.
Rory
Hi Rory,
Yes, I'll be taking my time and making sure it gets done correctly .
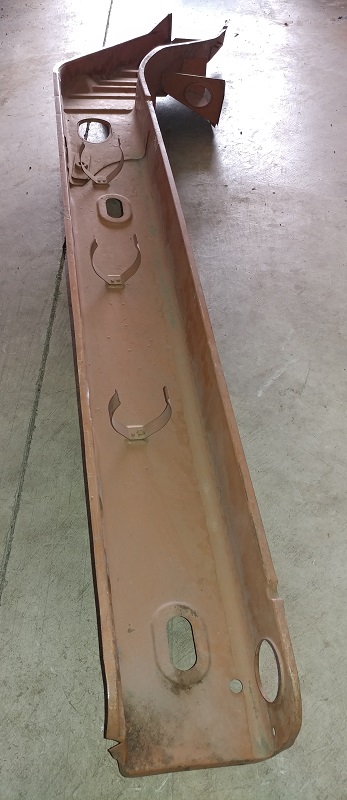
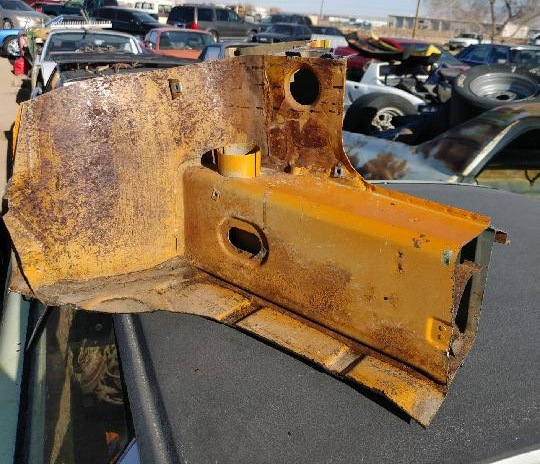
Posted by: Luke M Feb 21 2018, 12:29 PM
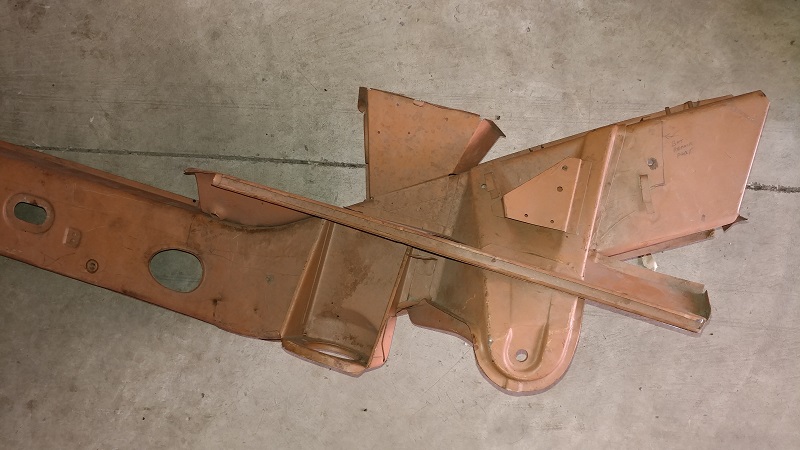
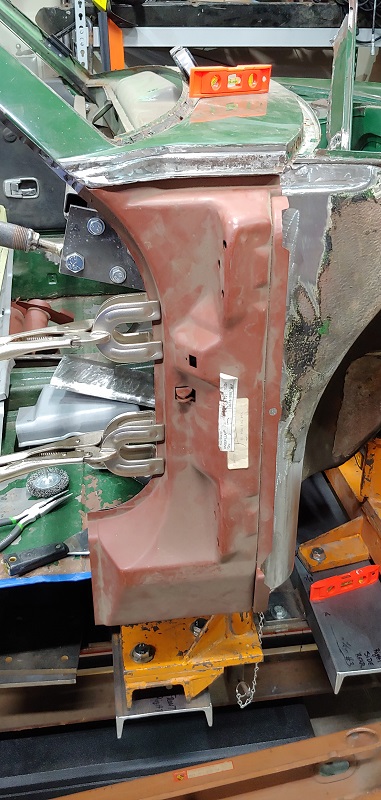
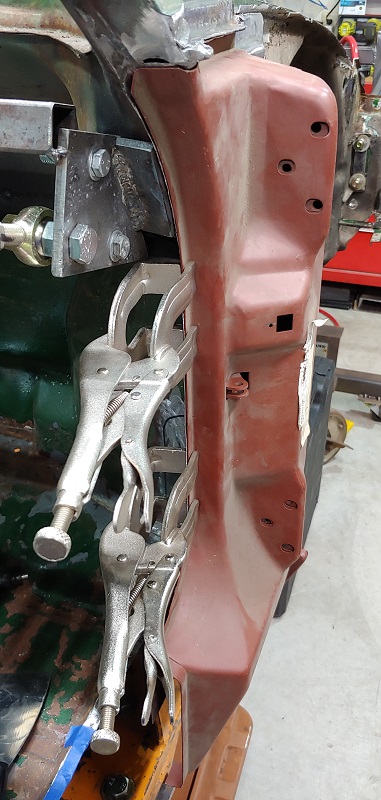
Look what showed up today... 
I'll be removing the 4 cyl mount as this is going into a factory 6.
I'll be posting it for sale once I remove it.
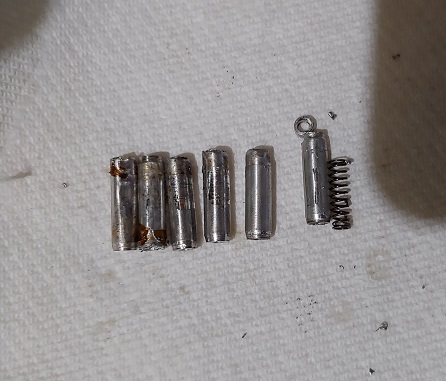
The pics of this rare NOS item.
Attached image(s)
Posted by: rhodyguy Feb 21 2018, 12:37 PM
WOW! Platinum.
Posted by: mepstein Feb 21 2018, 12:38 PM

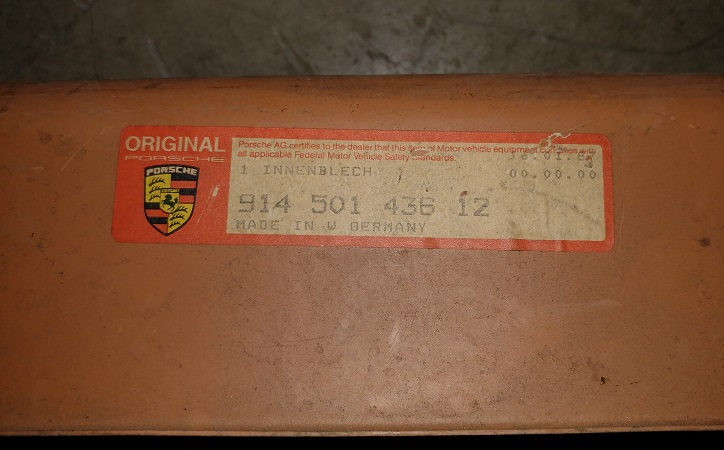
Posted by: David Billo Feb 21 2018, 04:34 PM
Wow, did that come all welded together like that as one complete inner long, including the battery pylon?
Posted by: bbrock Feb 21 2018, 06:21 PM
That's awesome!  I'm trying not to think about how many weeks of fabricating and piecing together that would have saved. Definitely a great way to go.
Posted by: Luke M Feb 21 2018, 07:22 PM
Wow, did that come all welded together like that as one complete inner long, including the battery pylon?
Yes, it came that way from the factory. I would say that it will make the install a lot easier so I hope.
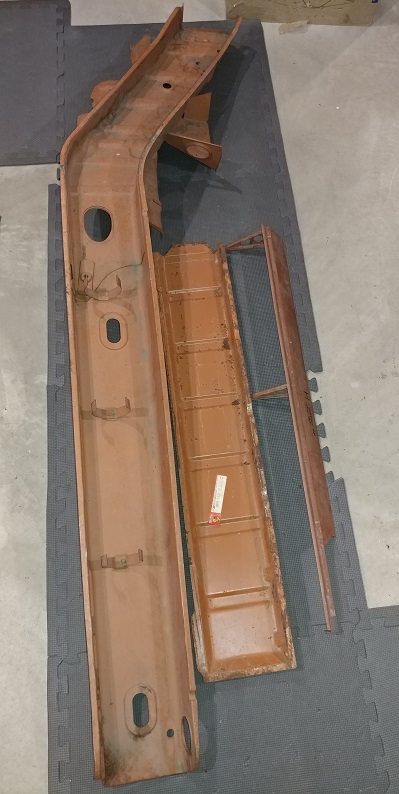
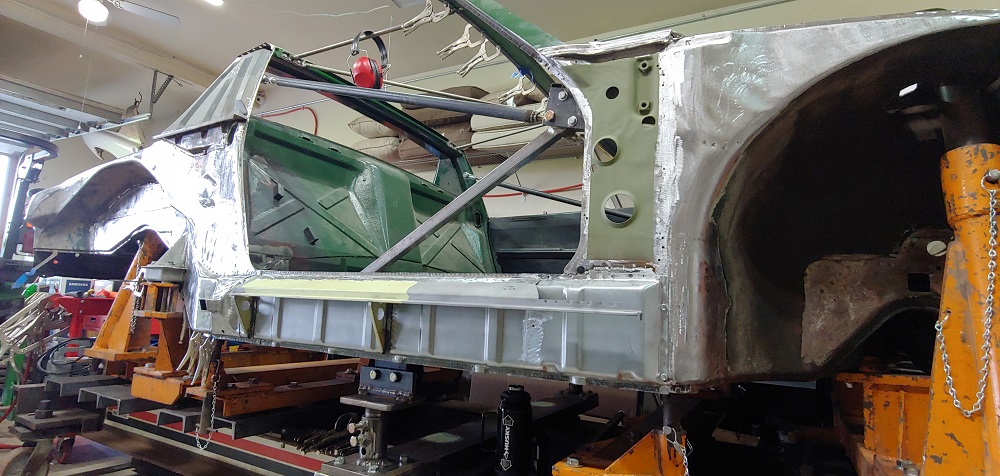
Posted by: Luke M Jul 14 2018, 05:38 PM
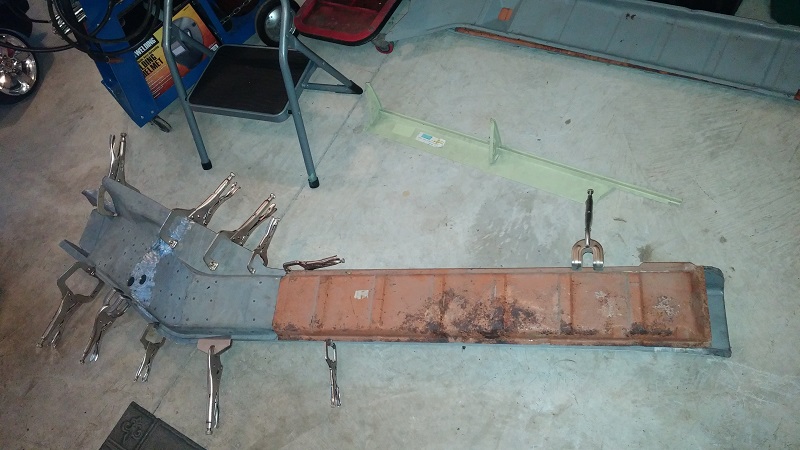
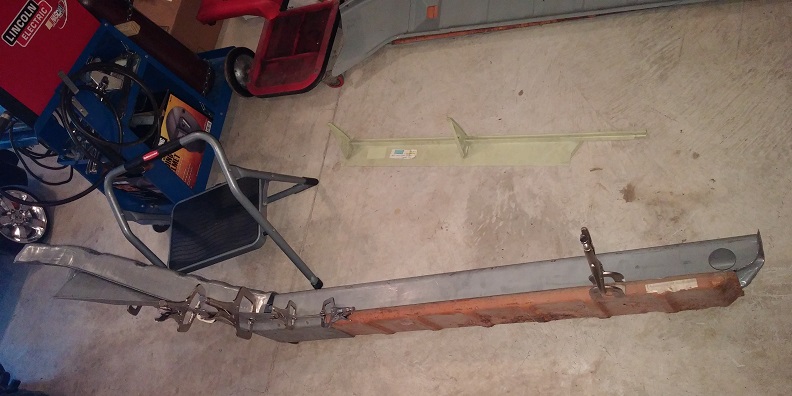
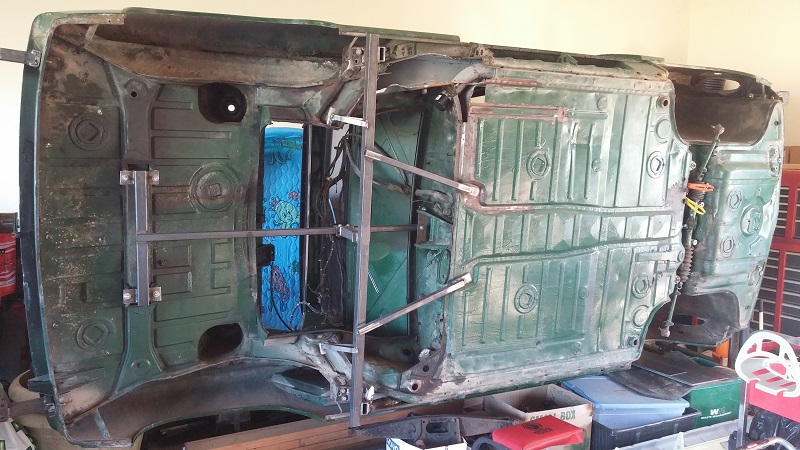
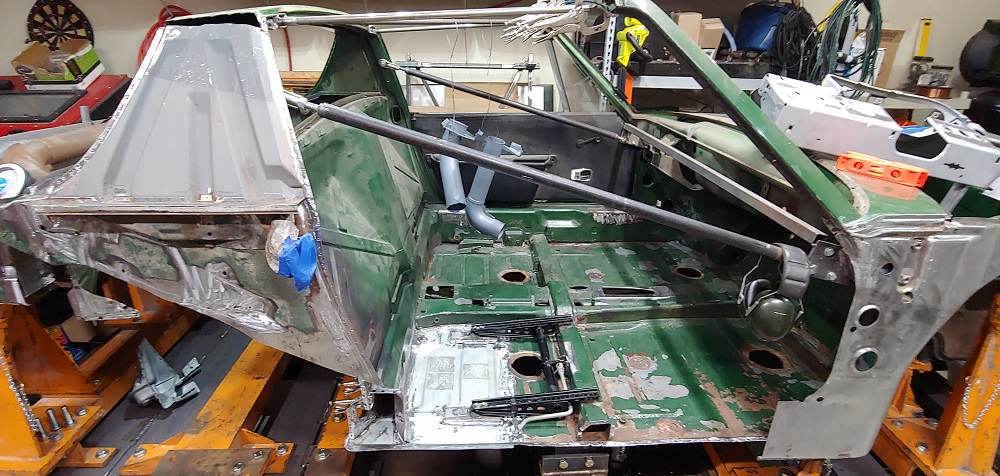
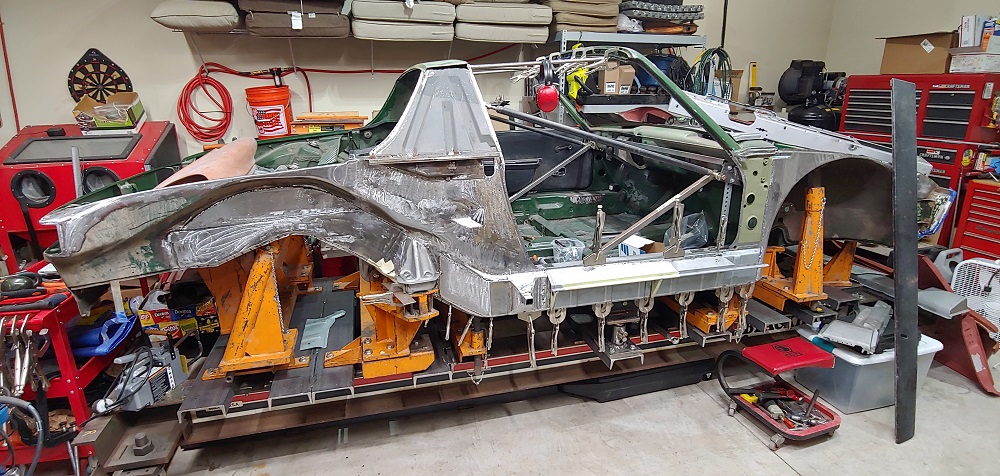
Fabricating the interior brace which is now done. I need to take a few more chassis measurements then roll it belly up. From there finish the lower chassis support, and add a few attaching points.


Attached image(s)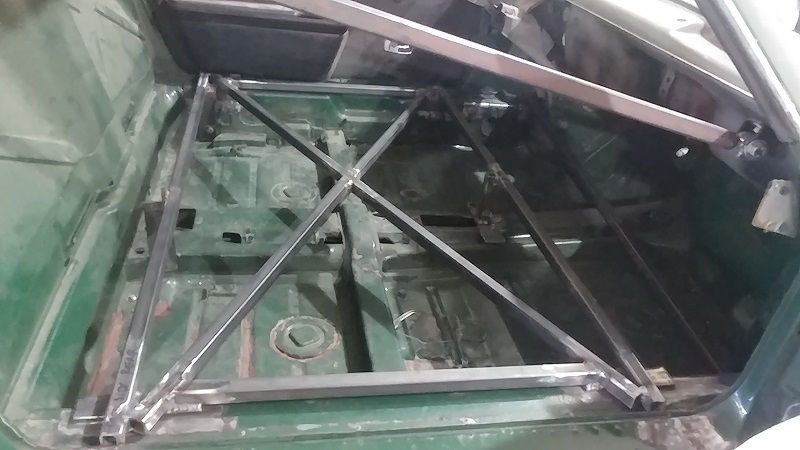
Posted by: rgalla9146 Jul 15 2018, 06:24 PM
Great work !
Good to see progress.
Push on !
Posted by: Luke M Jul 16 2018, 11:33 AM
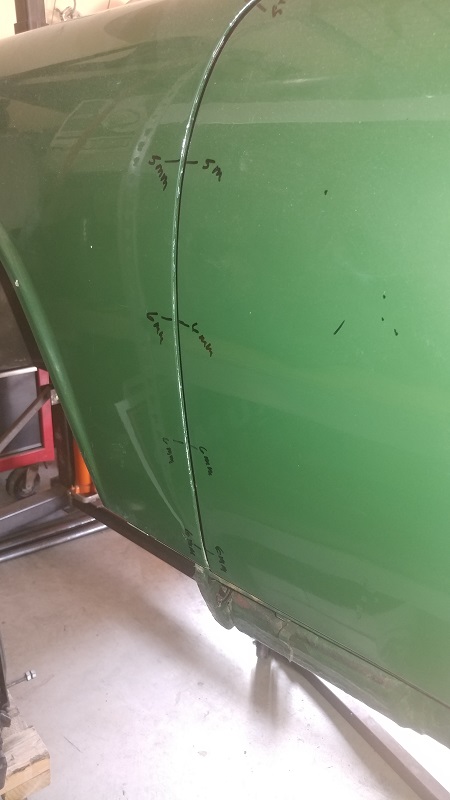
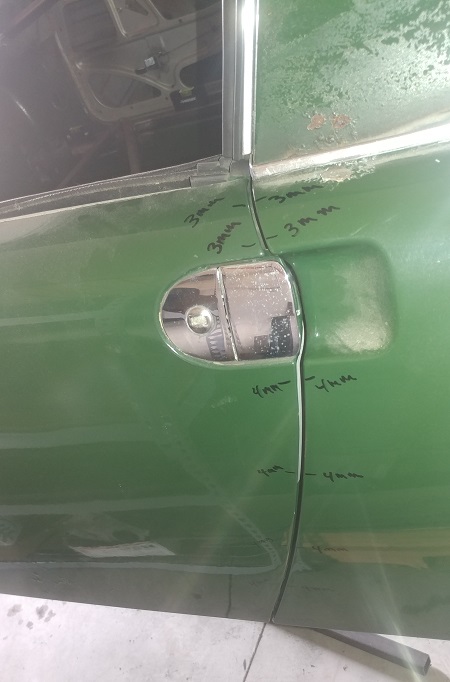
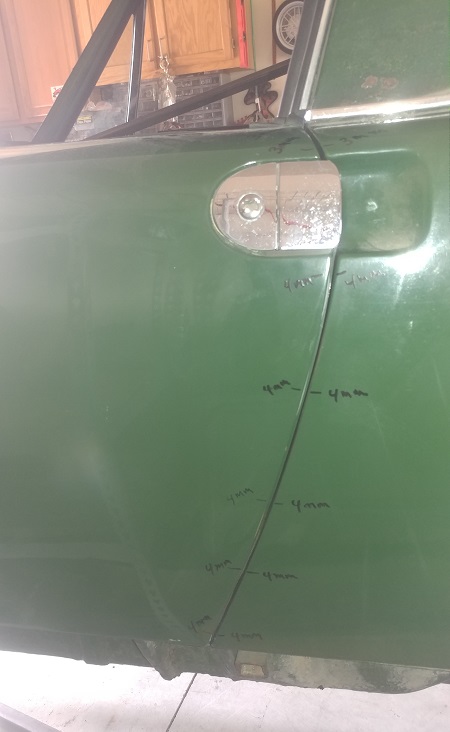
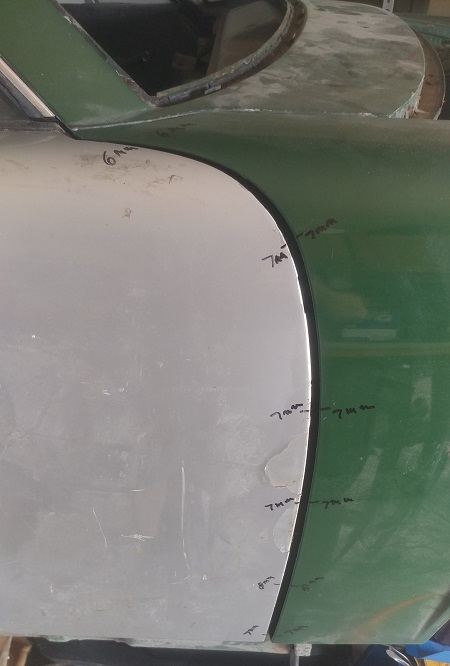
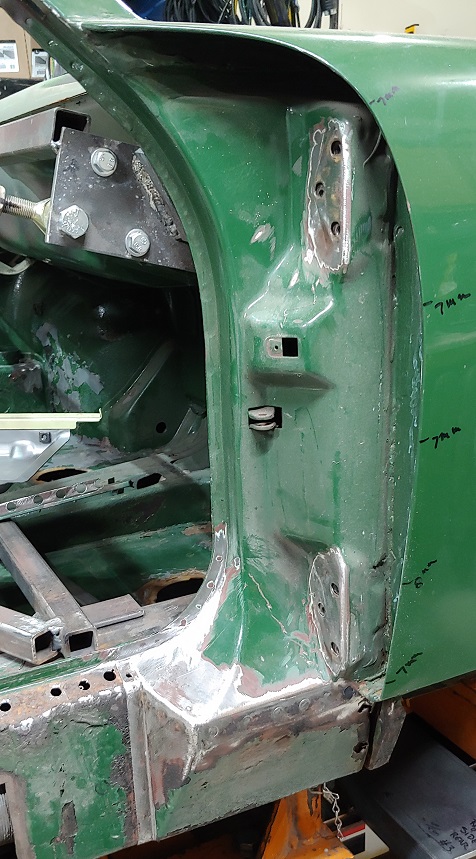
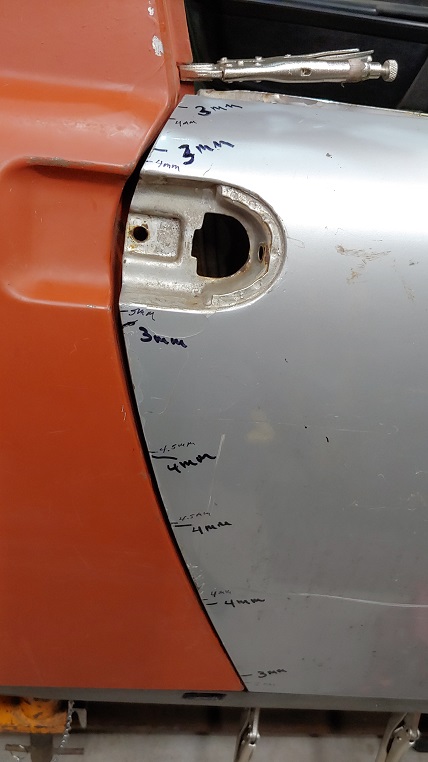
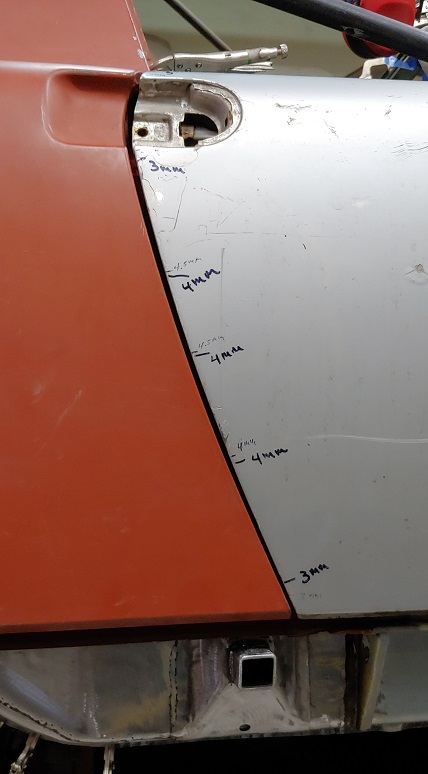
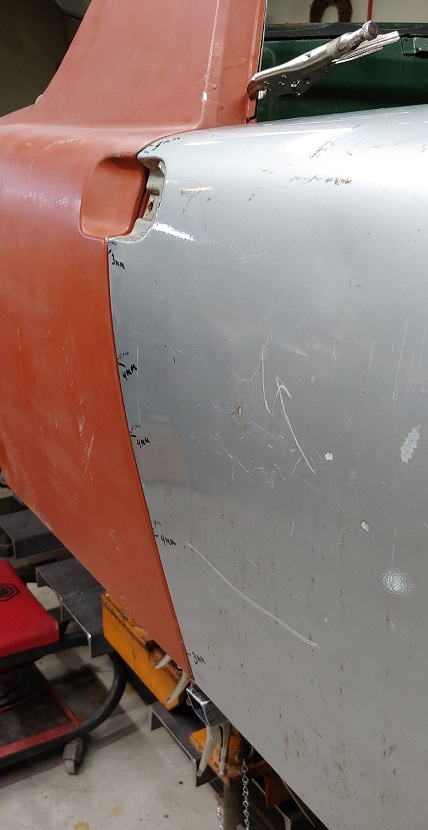
Started to check the door gaps and adjusting them. I can't seam to close the front door gap at all. Must be the new to the car doors as my old set seamed to fit better.
I currently have the pass door at 3 mm at the top with 4 mm towards the middle.
The front half is 6 mm top to 7 mm on down.
I checked my drivers side and have 3 mm at the top, 4 mm towards the bottom.
At the front of the drivers side I have 5 mm at the top and 6 mm towards the bottom.
Anyone have any idea what the door gaps should be set at ?
Need to figure this out before I move to the next step..
Attached image(s)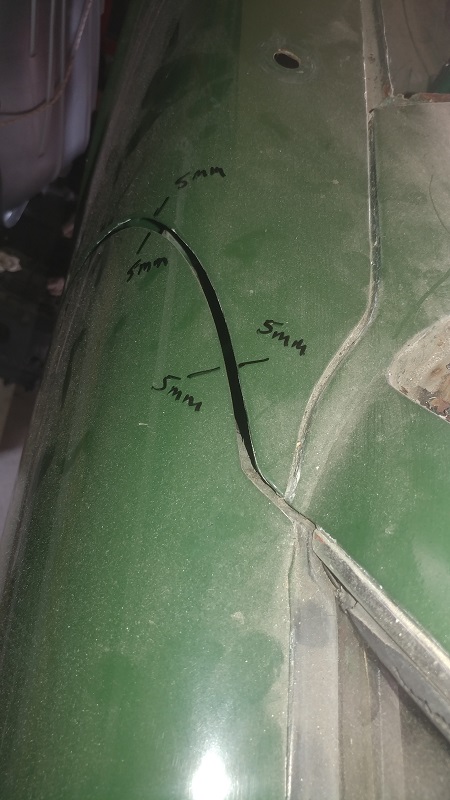

Posted by: mb911 Jul 16 2018, 03:23 PM
I will have to tackle this shortly. I am not sure what it should be but I have never seen a 914 with consistent gaps..
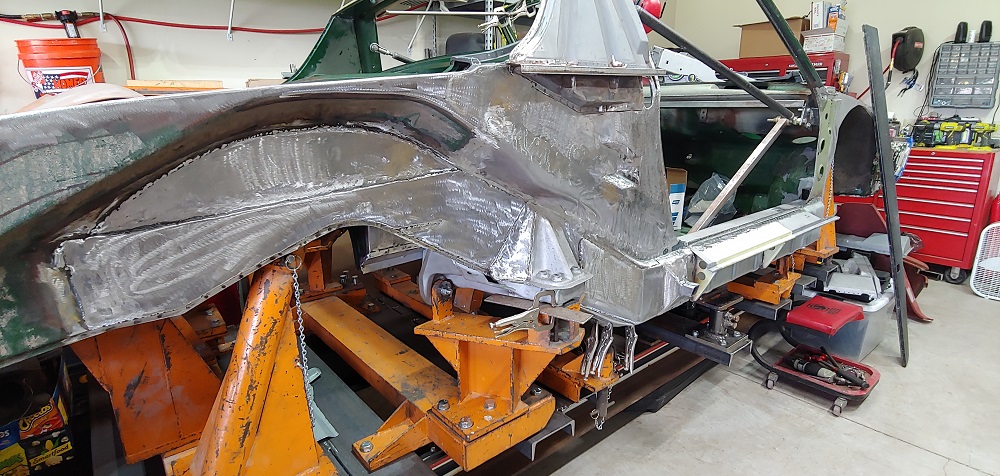
Posted by: Luke M Jul 23 2018, 01:44 PM
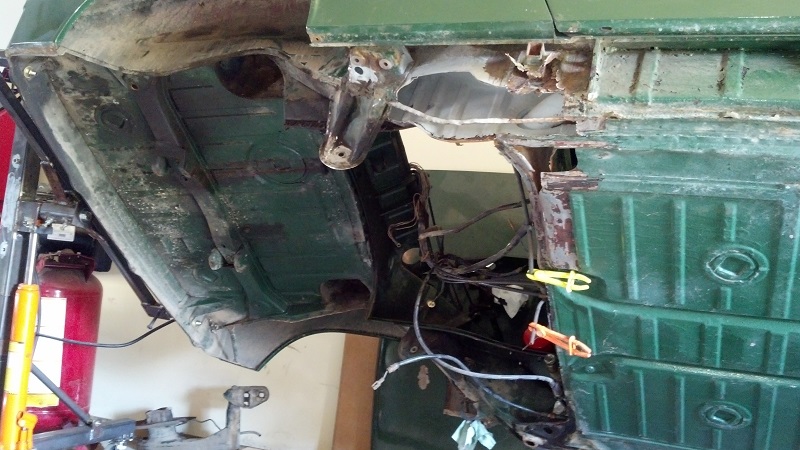
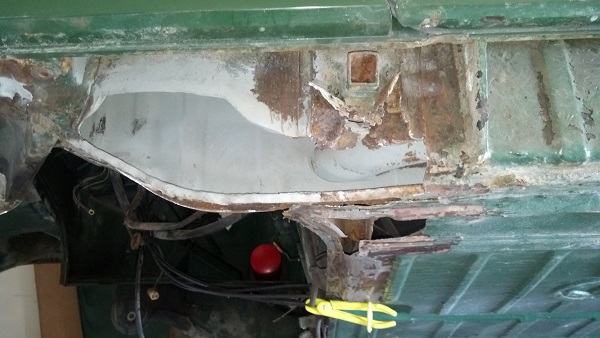
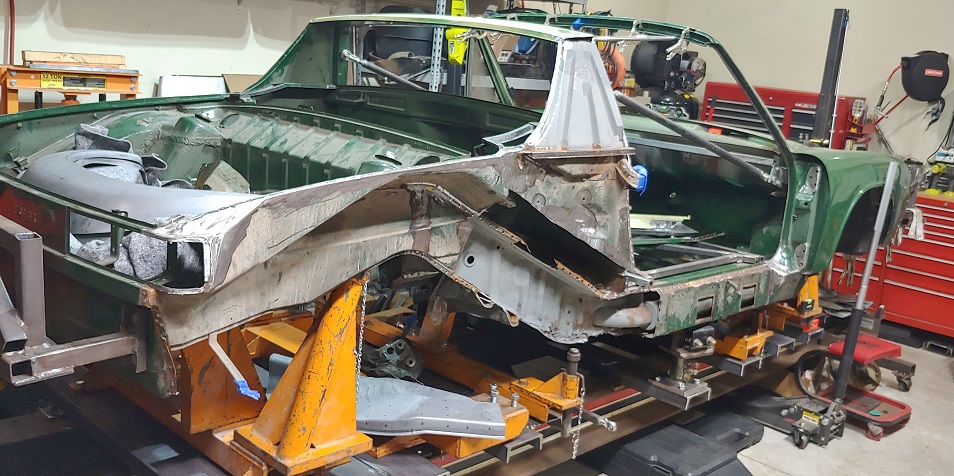
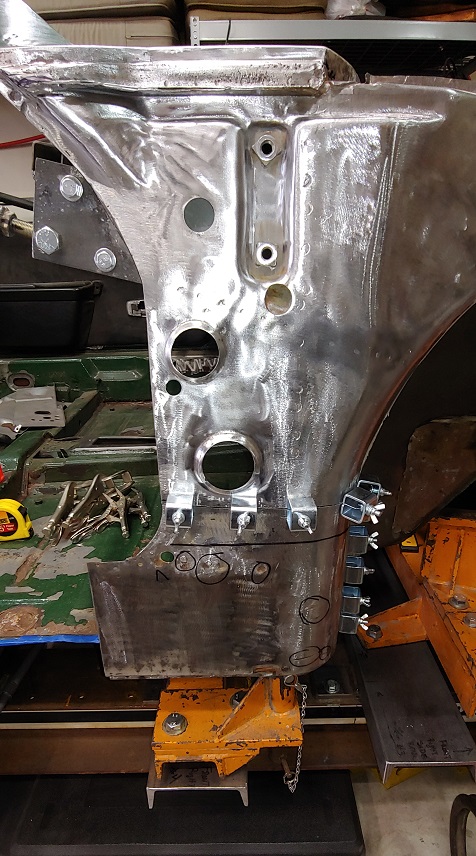
I got started on the lower bracing and found a little problem. At some point the car was raised on the longs vs the jacking donuts. It bent both the drivers and pass side outer rockers. It looks like the pass side got the worse of it but I won't know for sure until I start to fab the drivers side brace. Need to take a trip to the steel supply store for a few more pieces then weld it all up.
Attached image(s)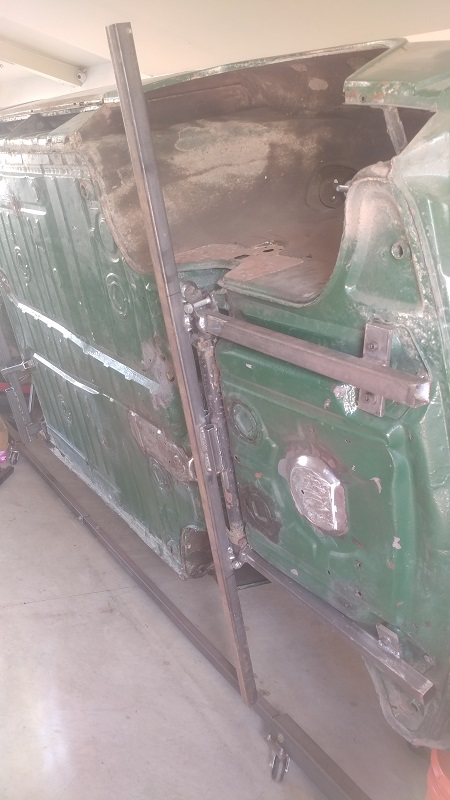

Posted by: rgalla9146 Jul 24 2018, 02:56 PM
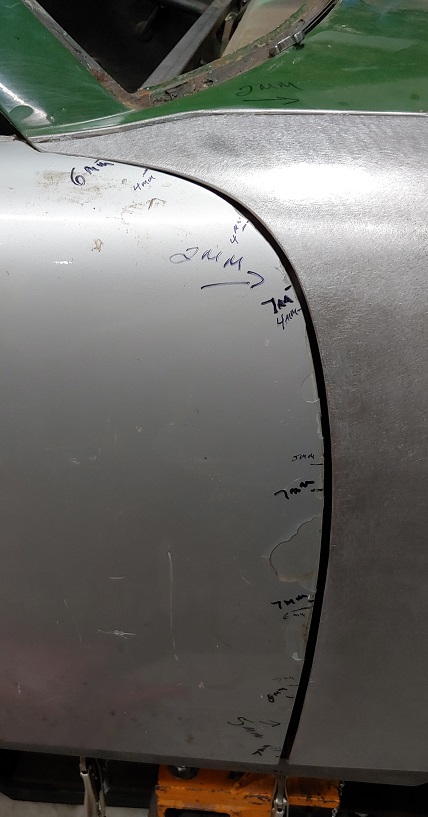
Started to check the door gaps and adjusting them. I can't seam to close the front door gap at all. Must be the new to the car doors as my old set seamed to fit better.
I currently have the pass door at 3 mm at the top with 4 mm towards the middle.
The front half is 6 mm top to 7 mm on down.
I checked my drivers side and have 3 mm at the top, 4 mm towards the bottom.
At the front of the drivers side I have 5 mm at the top and 6 mm towards the bottom.
Anyone have any idea what the door gaps should be set at ?
Need to figure this out before I move to the next step..
It looks (broadly) like both doors need to be moved forward to even out a big
gap at front and tight gap at rear.
~ 5mm at each gap seems possible
moving the door forward ?
I hope a professional here will describe how to accomplish that.
Posted by: Perry Kiehl Jul 24 2018, 03:27 PM
I've seen a lot of cars where the front door gap is wider
Posted by: rgalla9146 Jul 24 2018, 09:04 PM
I've seen a lot of cars where the front door gap is wider
I agree it is common for the front gap to be slightly wider but......
Luke has to deal with very little room to spare.
Posted by: ottox914 Jul 24 2018, 09:09 PM
That looks like a ton of work, but the right work to do, saving a car like that.
Keep up the good work.
Posted by: Luke M Jul 25 2018, 09:32 AM
I've seen a lot of cars where the front door gap is wider
I agree it is common for the front gap to be slightly wider but......
Luke has to deal with very little room to spare.
I tried a few different things and I can't get the front to close up anymore then what it is. I still have to install the replacement drivers door yet so I'm sure that gap will also change. I can get the rear to change and think I may tweek it a little more.
What's the variable that's been seen on these gaps? Rory sent me measurements from his 6 but would like to see/hear from a few more people.
Edit: After looking at a few build threads it looks like 5 mm rear/ front door gaps is the way to go. I maybe able to get 5 mm at the door handle side but the front fender/door is gonna be though. Only way I can see that gap getting smaller would be to cut the front fender off and repositioning it.
I'm gonna pm Mr. Kent on this one.
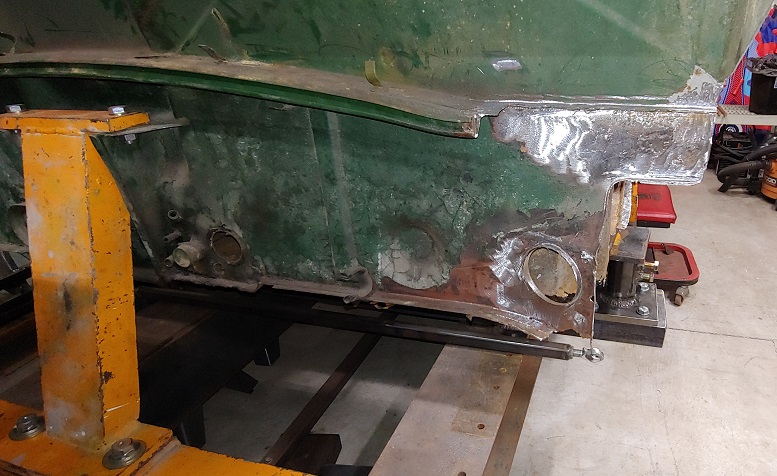
Posted by: Luke M Aug 2 2018, 03:29 PM
Getting there... drivers side is now done.
I need to fab up a couple more cross braces then I should be good to start cutting into the pass long.
Attached image(s)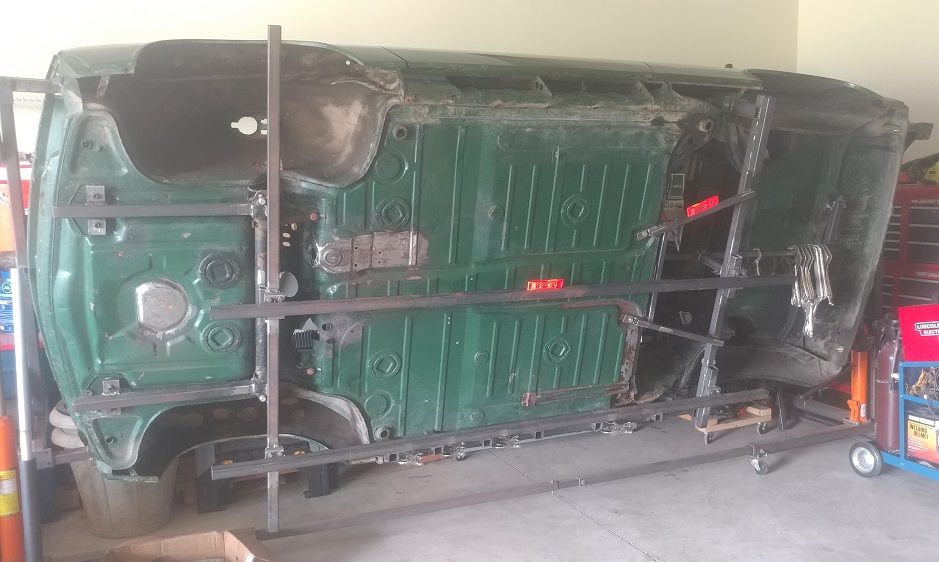
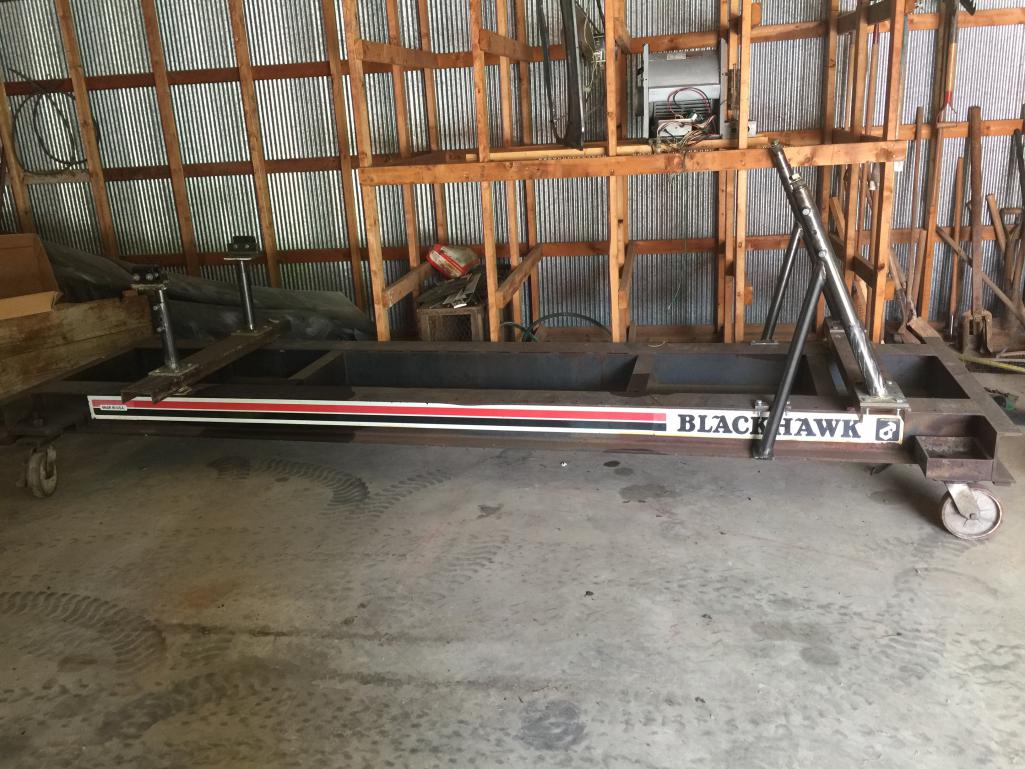
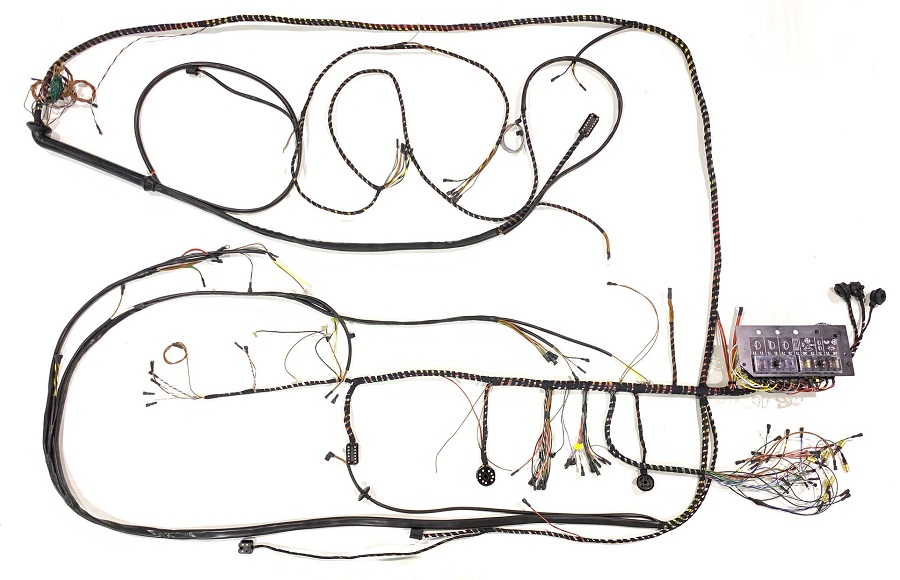
Posted by: Luke M Sep 29 2019, 08:59 AM
Well it has been awhile since I updated this..
Change of plans on the chassis jig. I purchased a frame bench form Perry and I will use that to fix the chassis. I've been collecting more chassis parts along the way so hopefully once I start cutting it will make the re assembly a little faster.
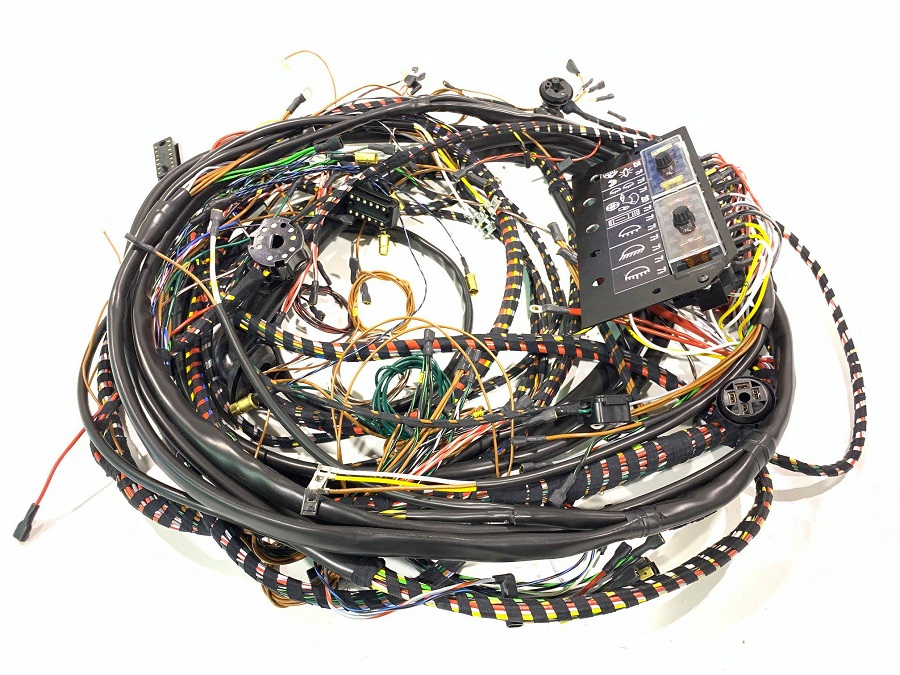
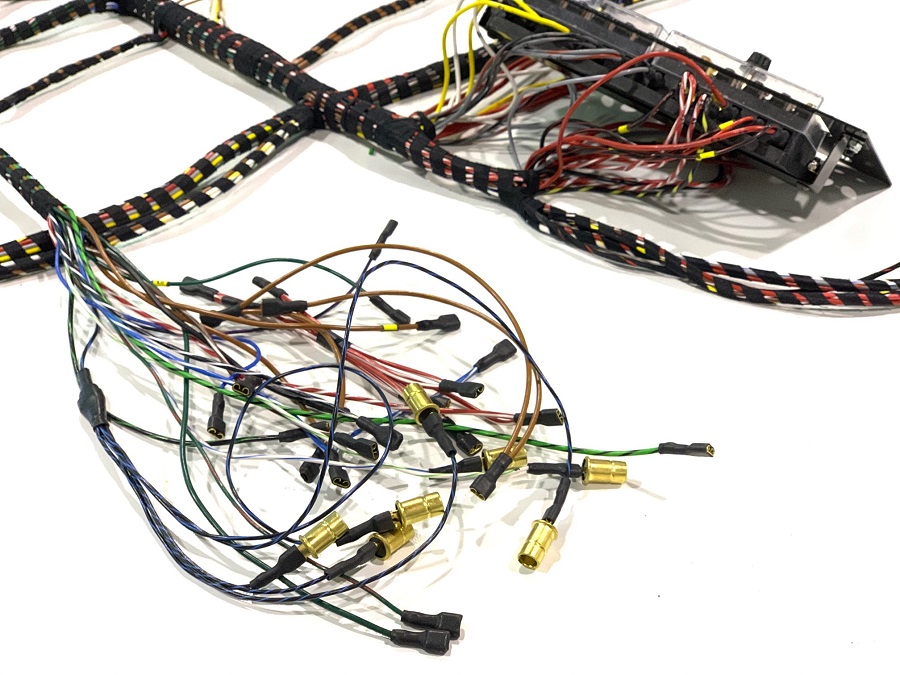
Kroon wire harness co. sent me an email that my new chassis harness is done and ready to be shipped. I should see that in about two weeks. Gerard sent me a few pic of it so enjoy. 
Attached image(s)


Posted by: sixnotfour Sep 29 2019, 10:53 AM
Great buy on the Perry Black Hawk...
Posted by: ClayPerrine Sep 30 2019, 06:30 AM
Looking at this thread has me in Awe. I can do engine and drivetrain work with no issues. Suspension and brakes, no problems. Electrical and electronics, piece of cake.
But body work like this scares the living  out of me. I have to take my cars to a paint and body shop to get them right. I can't imagine being able to do something like this.....

Posted by: Cairo94507 Sep 30 2019, 06:50 AM
Just incredible skills.
Posted by: Luke M Nov 21 2019, 07:58 AM
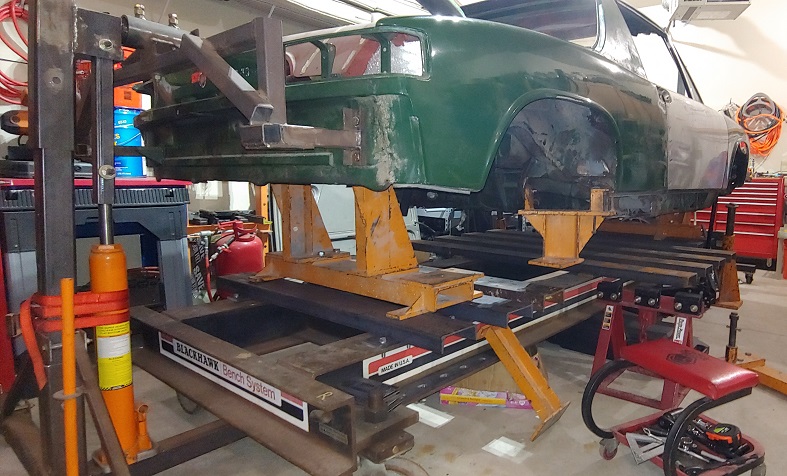
Finally got the bench under the 6. This weekend we will get the fixtures mounted between the two.
Attached image(s)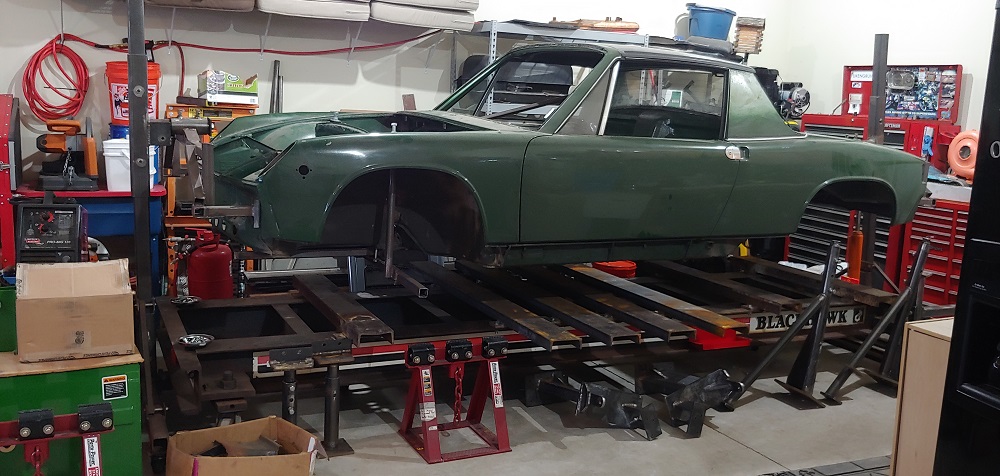
Posted by: Cairo94507 Nov 21 2019, 08:22 AM
Posted by: rgalla9146 Nov 21 2019, 04:45 PM
Holy Cow !
I think this car will be very straight.
Great work Luke.
Posted by: IronHillRestorations Nov 22 2019, 08:35 AM

Posted by: Luke M Nov 22 2019, 12:51 PM
Holy Cow !
I think this car will be very straight.
Great work Luke.
Hi Rory,
You know how I am. I went back and forth on how to do the right long replacement for sometime. When Perry posted the bench for sale I had to jump on it. Thanks again Perry for making it an easy transaction. It's the only way to do this job right and not worry if things are out of alignment. With the bench I have control of the repair and I can take my time to make sure everything is correct. Once I have the current fixtures attached I will work on making some for the front end. Then the spot drilling and cutting will start.
Stay tuned...
Posted by: Jamie Nov 22 2019, 02:36 PM
It never ceases to amaze me seeing the skills and desire that some teeners show doing these rustorations.
Posted by: Tdskip Nov 24 2019, 08:00 AM
Fantastic - thanks for all of the updates.
Posted by: Superhawk996 Nov 24 2019, 09:46 AM
I will have to tackle this shortly. I am not sure what it should be but I have never seen a 914 with consistent gaps..

@http://www.914world.com/bbs2/index.php?showuser=6113
@http://www.914world.com/bbs2/index.php?showuser=9892
5-6mm gaps (and inconsitent) were not at all uncommon in any 1970's era cars domestic or imported.
I could write a dissertation on how body dies used to be cut in the Pre-CNC era. Basically, it was done by a Keller Tracing Mill that basically carved metal by tracing a cutting path on a 3-D master which was usually a Kirksite (Zinc based alloy that cuts sort of like Aluminum) prototype die that would only be suitable for low volume use. As the path was traced on the Kirksite die, a production die was simultaneously being cut out of cast iron. Think of a pantograph but cutting cast iron instead of tracing a drawing on paper.
Needless to say, accuracy wasn't what it is today.
Don't kill yourself trying to get a consistent 3-4 mm gap that you would expect today. It isn't going to happen without welding door edges.
Posted by: mb911 Nov 24 2019, 10:18 AM
I have seen allot of cars with welded edges..
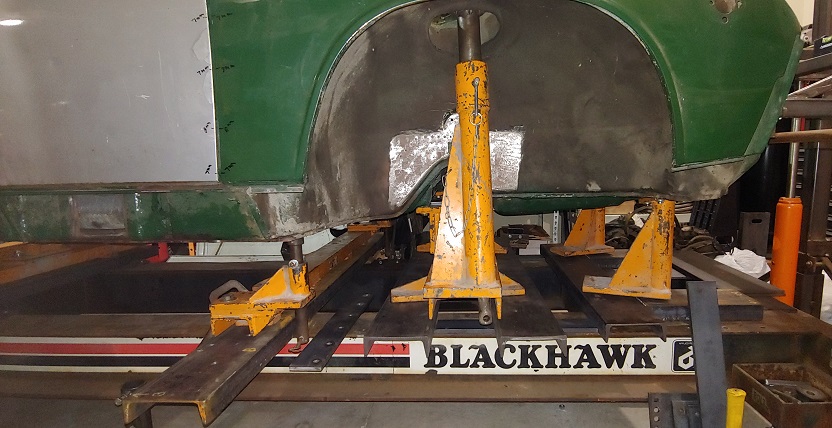
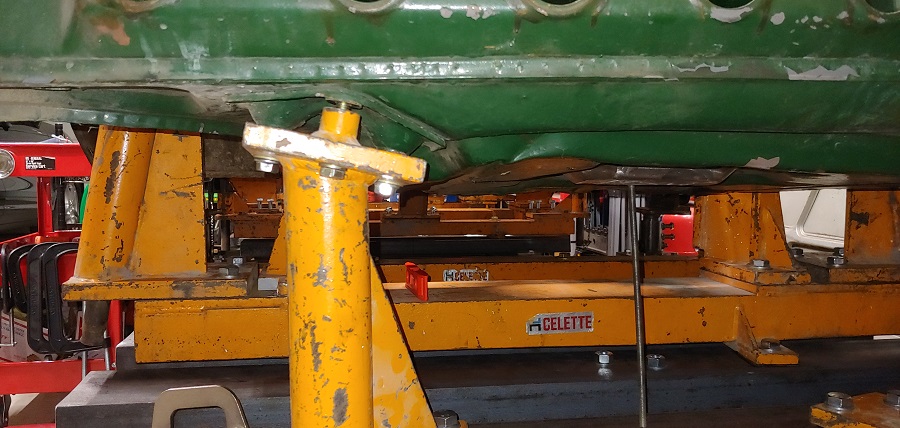
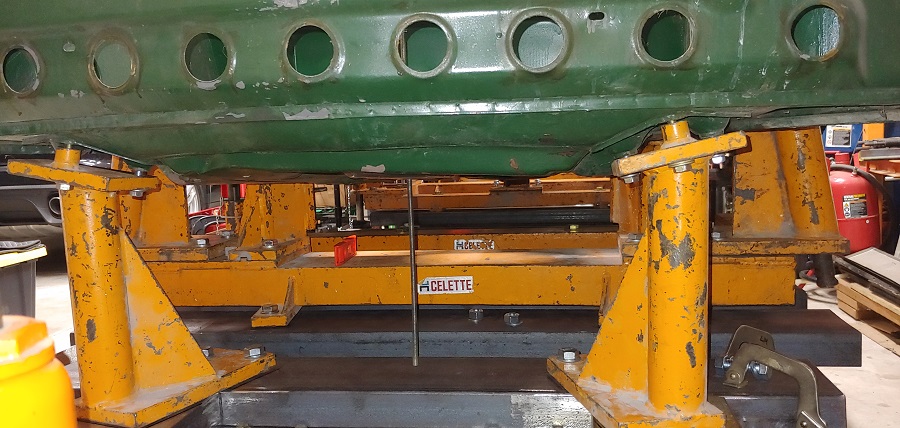
Posted by: Luke M Dec 5 2019, 12:43 PM
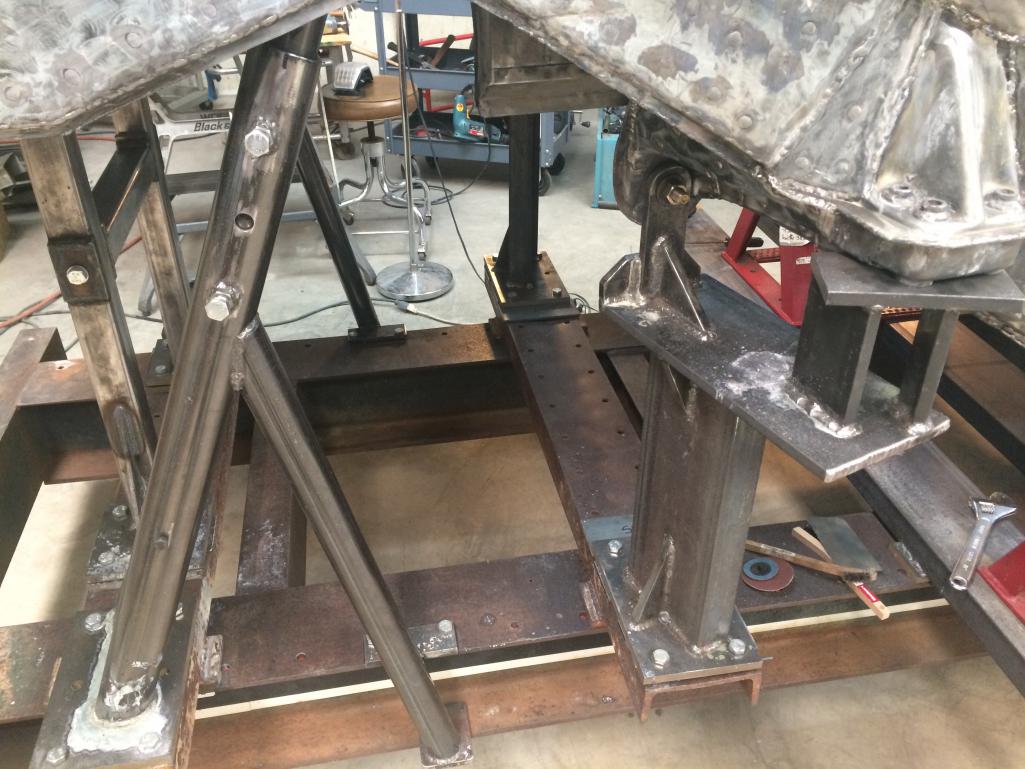
Got all the fixtures attached between the chassis and bench. The right side inner suspension console required some minor adjustment to fit into the fixture. I kinda figured it was going to be an issue seeing how all of the rust damage is around that area.
Otherwise other fixtures bolted right up. I need to level out the bench as it's off just a touch but need to go buy a huge wrench first.
Attached image(s)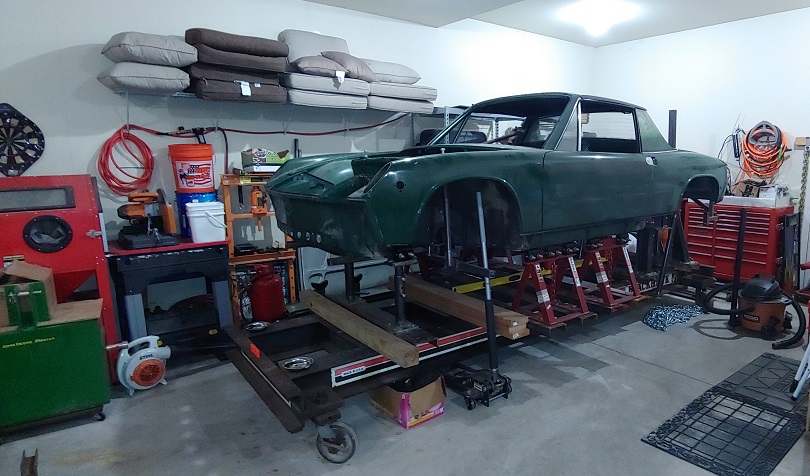
Posted by: Cairo94507 Dec 5 2019, 02:07 PM
That, in and of itself, is impressive.
Posted by: Luke M Apr 26 2020, 04:22 PM
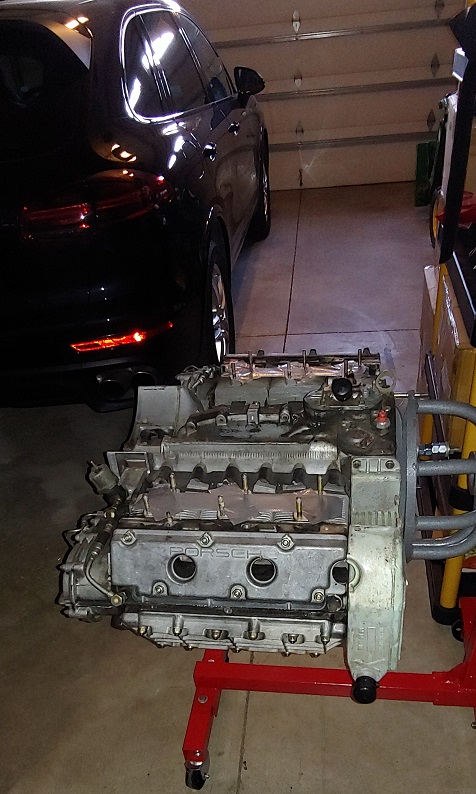
With this covid thing going around it has set my project back. I had plans to have the chassis blasted and epoxy primed before I started cutting into it. The blaster emailed me and said per rules under the NY PAUSE act that my project is not essential and he couldn't do it until the state relaxed the rules. So now it's a waiting game there. I can do a few other things on the chassis before it goes. Got the new to me 3.2 in and started working on that. Apart she comes. Going with a 3.4 Mahle MS p/c's while doing the rebuild. Also in the works is a late model 3.2 915 with a Bott 916 shift kit. Stay tuned kids as I'll be working away when I can.
Be safe out there...
Attached image(s)
Posted by: porschetub Apr 26 2020, 05:04 PM
Top overhaul or full build ?,will be a quick car with those plans
Posted by: Luke M Apr 26 2020, 05:45 PM
Top overhaul or full build ?,will be a quick car with those plans
Going all in.. Bottom to top end.
Posted by: Luke M May 1 2020, 09:16 AM
Started the tear down on the 3.2. I'm gonna remove the head studs then split the case.
Supertech head studs are going in so these need to be removed. I hope none of them snap like my brothers 3.0.
3.4 MMS p/c's and a bunch of other parts are on order. It should all be here next week..
Attached image(s)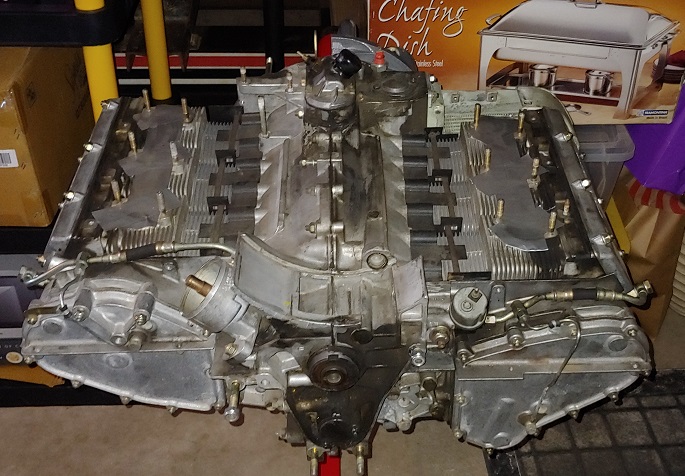

Posted by: Mark Henry May 1 2020, 10:49 AM
For the Supertec head studs you'll need a thread reformer tap. Don't use a regular tap as it will cut too much of the threads.
I had to do this on my 3.0 or the studs wouldn't go in far enough.
Posted by: mepstein May 1 2020, 11:31 AM
I removed studs from about 25 engine cases when I worked at the shop. If you have 2 people, one heats up the case right at the register where the stud descends into the case. The other is removing pre heated studs from the case. I always hit it with map gas for 2-3 minutes before twisting the stud. My feeling is it not only helped to keep the stud from breaking but it was easier on the aluminum and especially magnesium threads in the case. If the stud wasn't easy to turn after a couple minutes of heat, it got another minute or 2 and would always come out easily.
Divlar studs are strange. I watched someone reuse them because they looked perfect and the next morning we came in to a couple broken studs on the floor. While we were standing there, we heard a ping, watched a broken stud with the nut on top, jump out of the head and fall to the ground. The engine got all new studs...
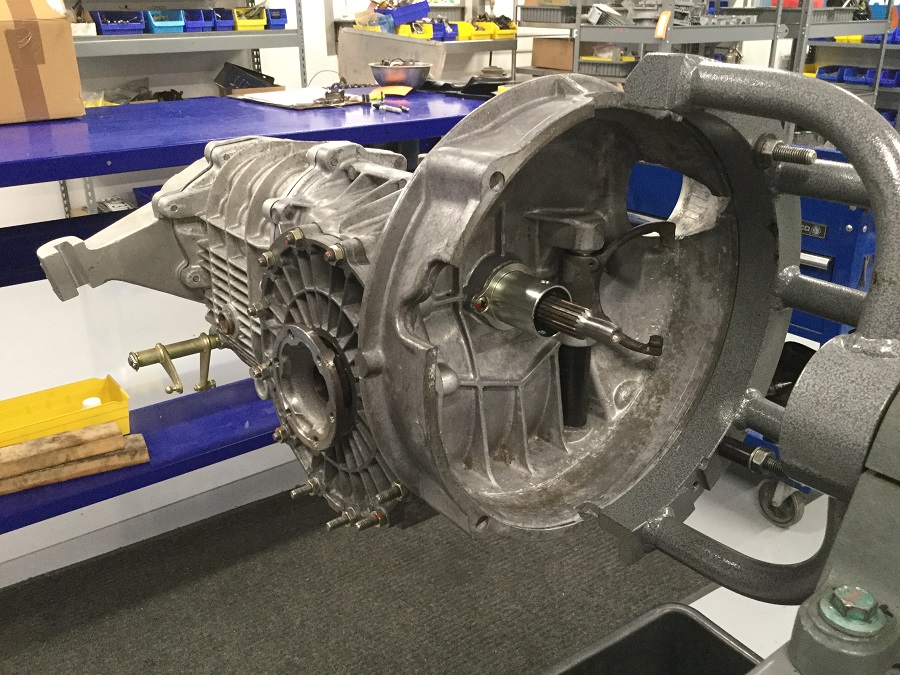
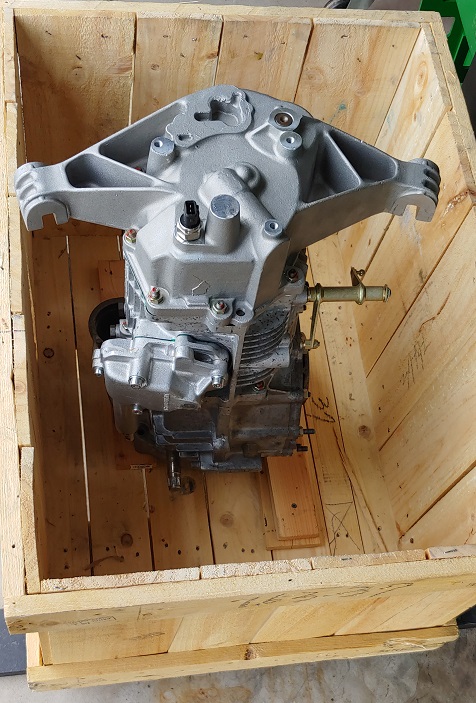
Posted by: Luke M May 2 2020, 02:47 PM
Got the head studs all off without any issues..
Gonna split the case on Sunday.
I did get an update from PMS on the 915/Bott 916 trans. The tech was wrapping it up on Friday so it should be shipped out this coming week.
Attached thumbnail(s)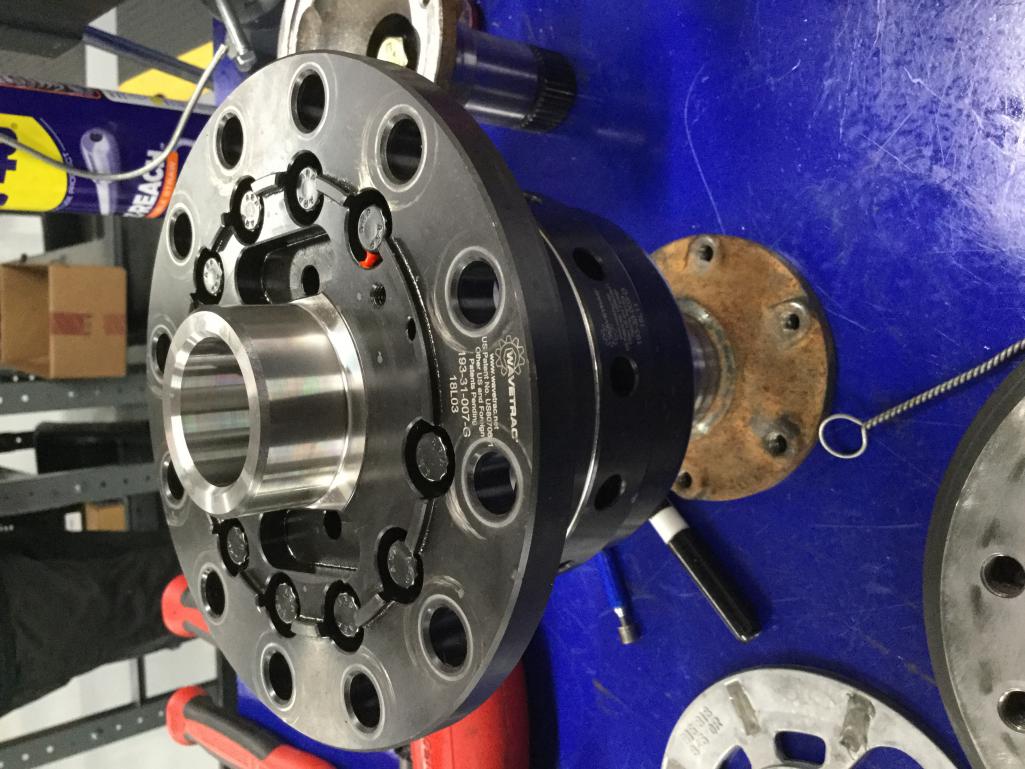
Attached image(s)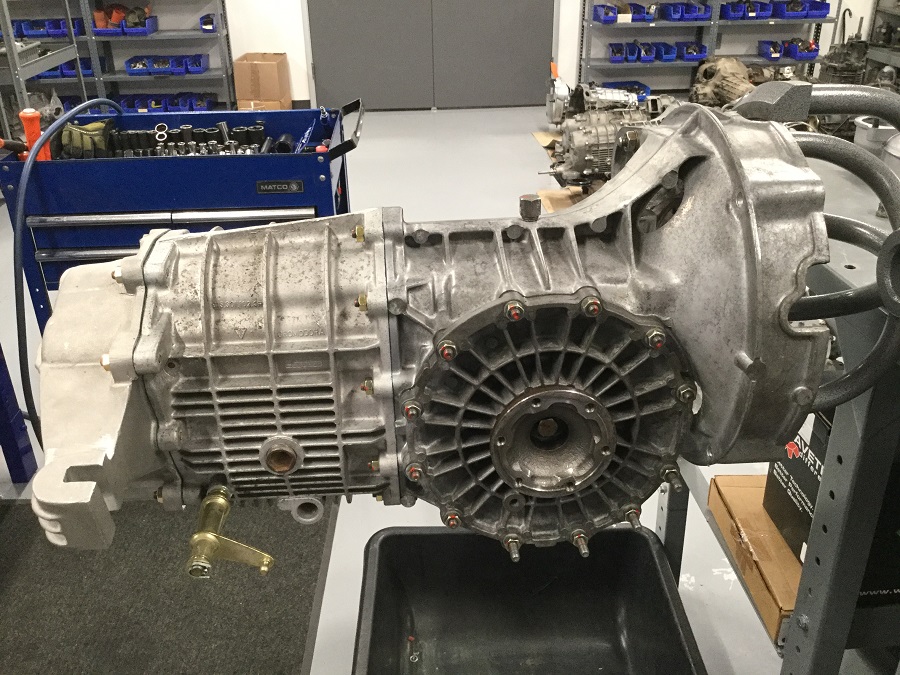
Posted by: Cairo94507 May 2 2020, 04:26 PM
Luke - I am loving that transaxle 
Posted by: rgalla9146 May 2 2020, 06:58 PM
Looking good Luke
Make hay while the sun shines !
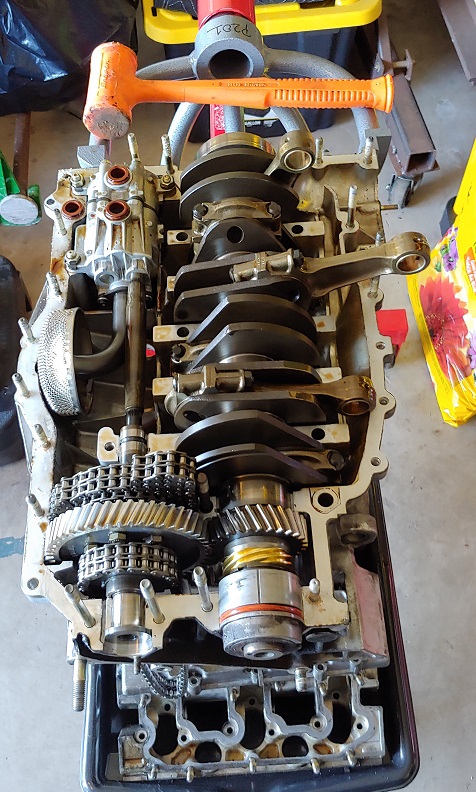
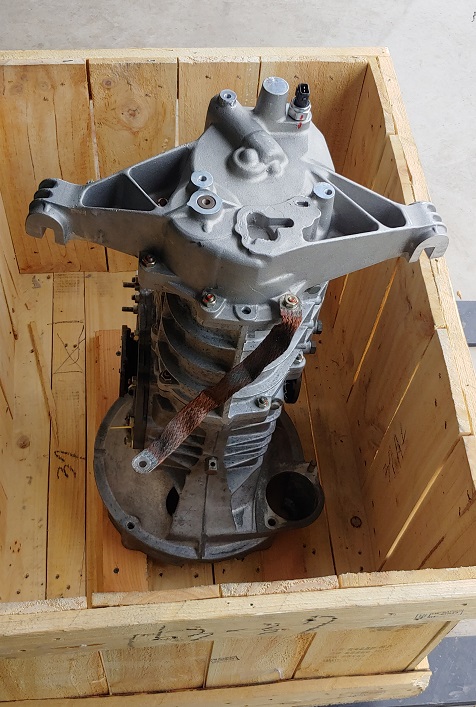
Posted by: Luke M May 3 2020, 01:19 PM
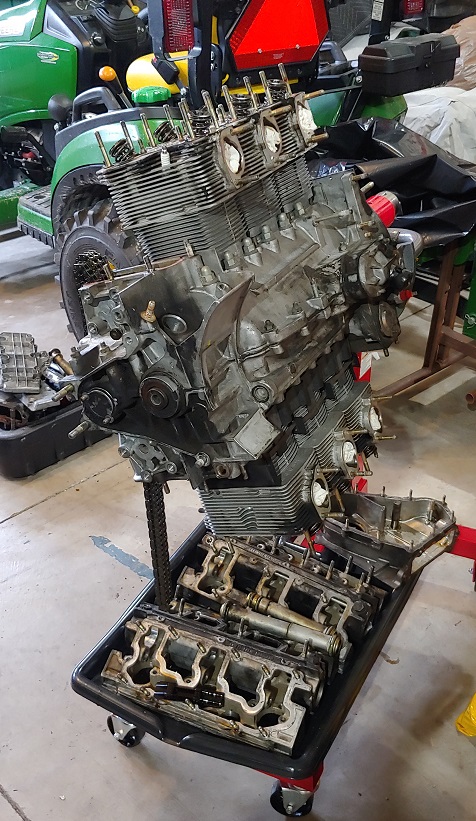
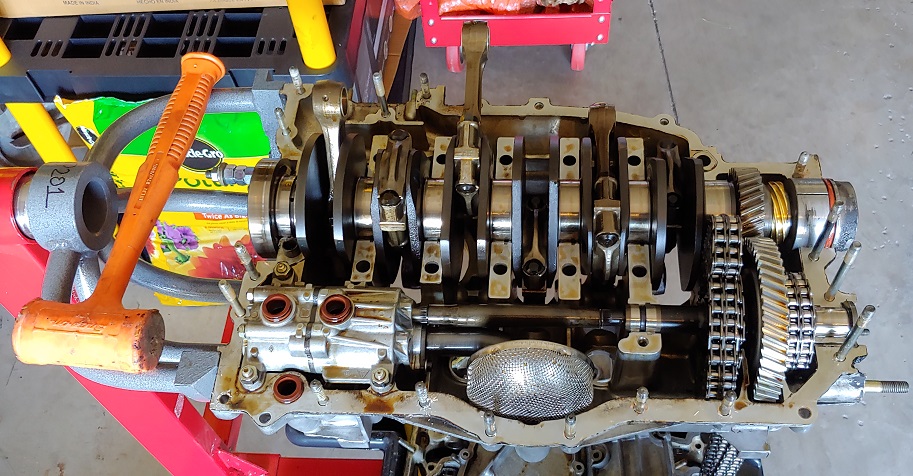
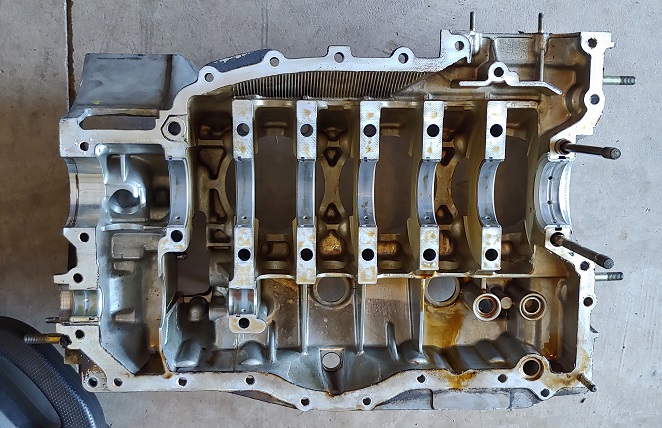
I split the case today.. Main bearings looked good but the lay shaft bearings are showing wear. I need to get the rods removed from the crank then all parts off to the machine shop.
Attached image(s)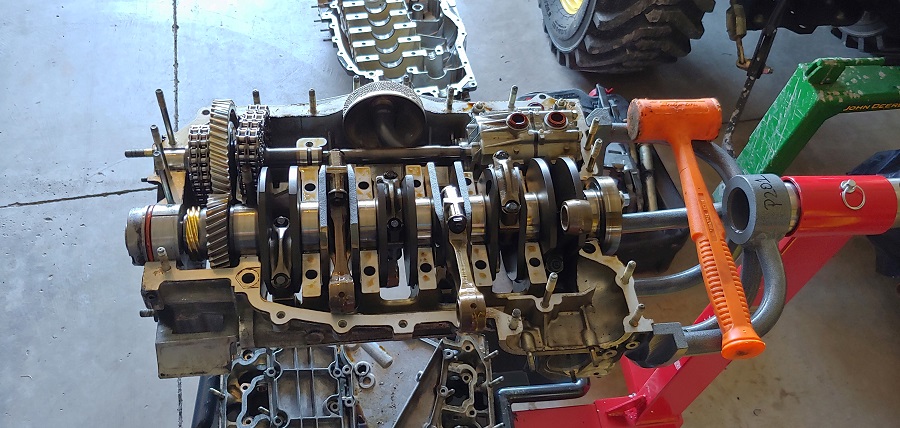
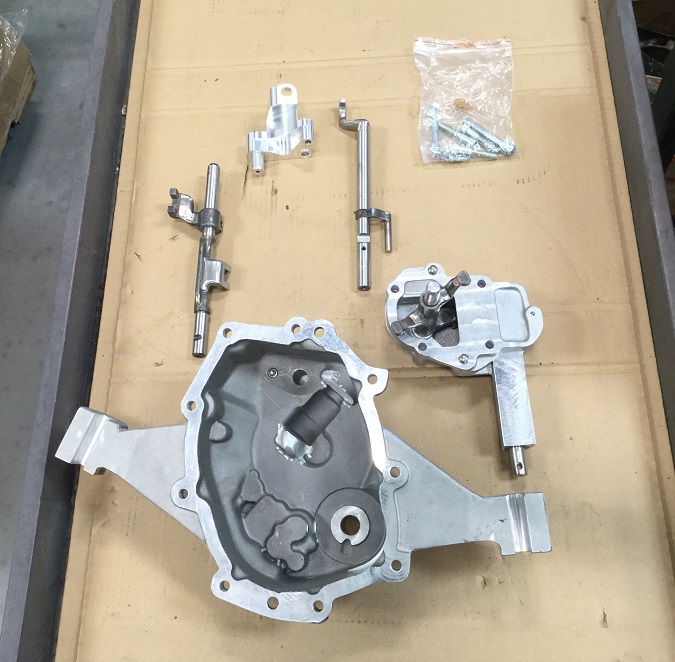
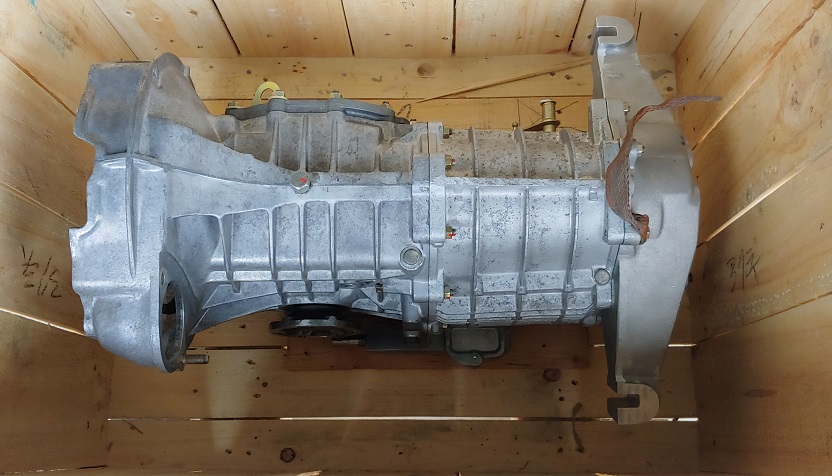
Posted by: Luke M May 19 2020, 01:35 PM
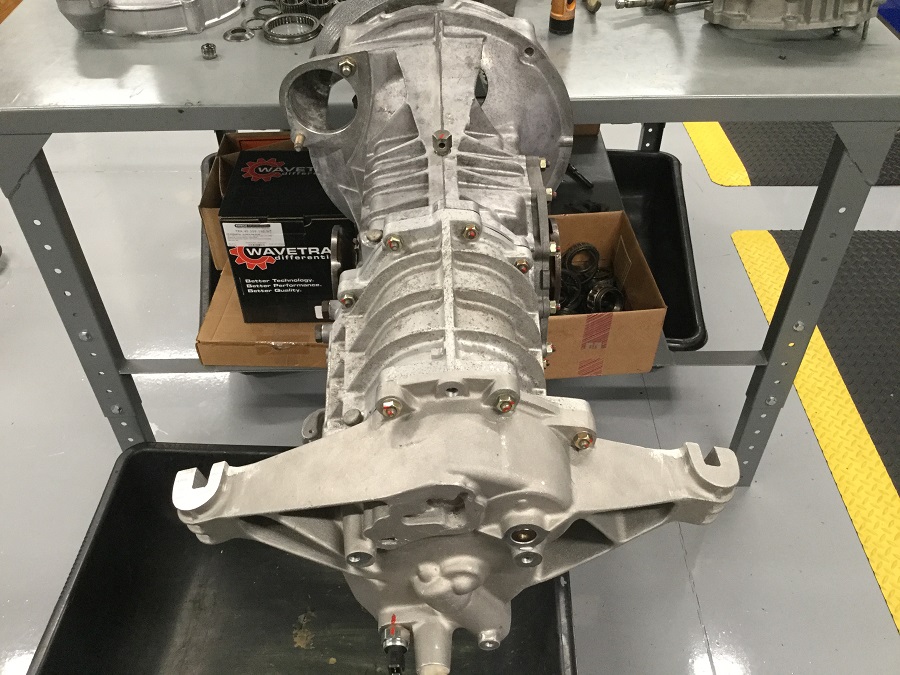
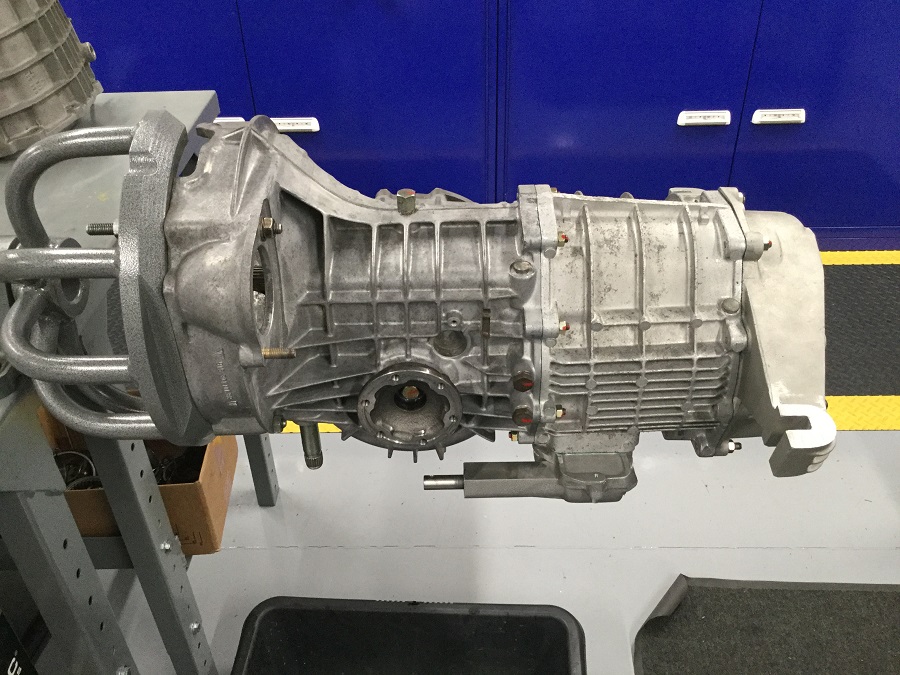
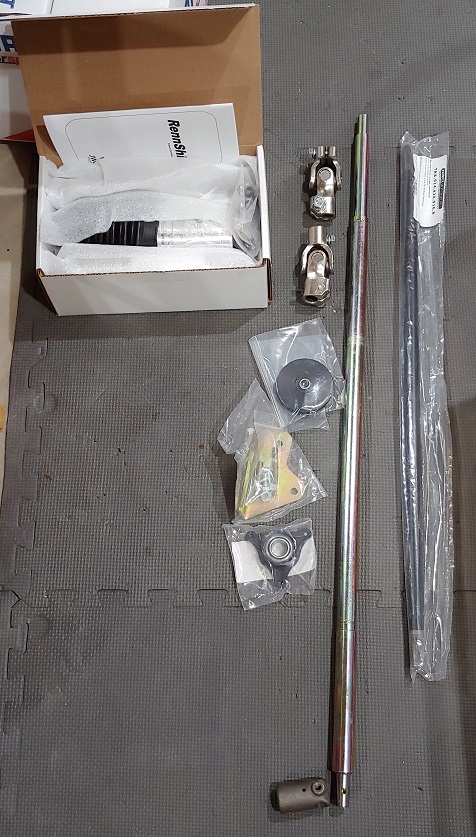
I received my converted 915/916 Bott trans back from PMS today.
I also purchased the PMS shift linkage kit to work with the new setup.
Attached image(s)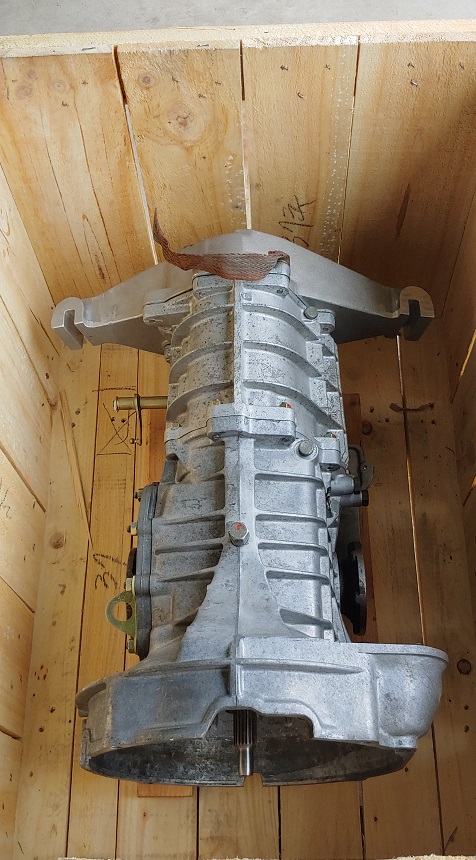
Posted by: gms May 19 2020, 01:58 PM
Nice addition to the build

Posted by: raynekat May 19 2020, 09:01 PM
Kroon wire harness co. sent me an email that my new chassis harness is done and ready to be shipped. I should see that in about two weeks. Gerard sent me a few pic of it so enjoy.
That Kroon replacement chassis harness will be killer.
Expensive buy worth it on your project without question.

Posted by: Luke M May 20 2020, 08:11 AM
It's a nice wire harness for sure but there maybe a wiring issue that Kroon was not aware of. I need to check it out to confirm. RD is now making a replacement 914-6 harness as well. I believe the price is about the same.
Posted by: IronHillRestorations May 20 2020, 01:03 PM
Pretty sure RD harness is much less
Posted by: bigkensteele May 20 2020, 07:12 PM
Are you sending the machine work to Ollies?
Posted by: Luke M May 20 2020, 08:20 PM
Are you sending the machine work to Ollies?
Machine work is being done by a local Porsche shop. www.ekstens.com
Ollies was a 6 to 8 week turnaround when I called.
Posted by: Luke M Jul 14 2020, 05:33 PM
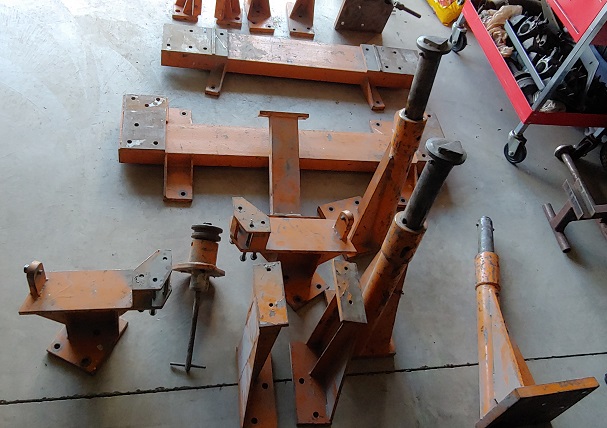
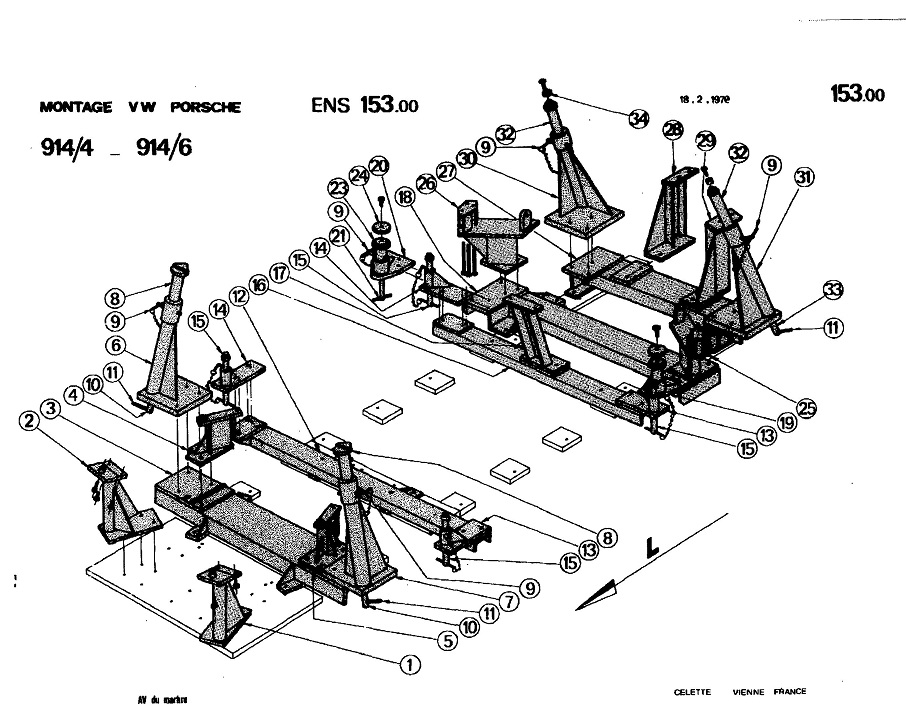
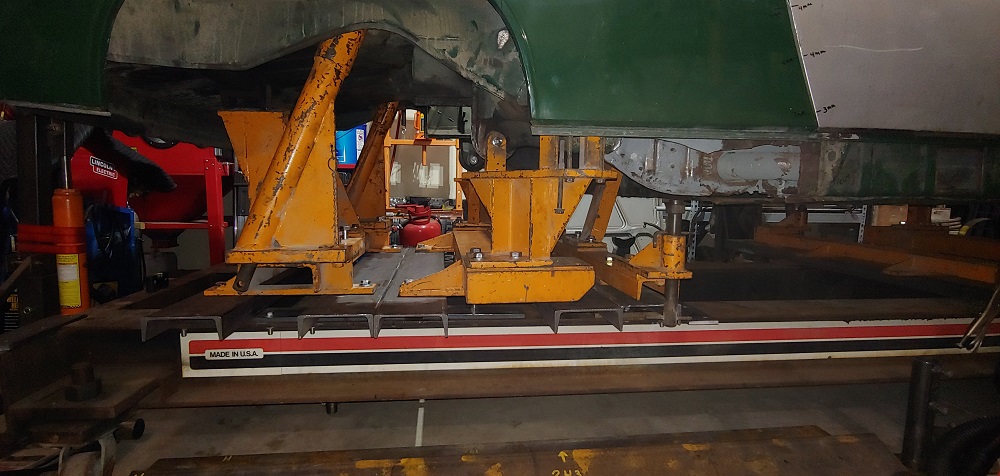
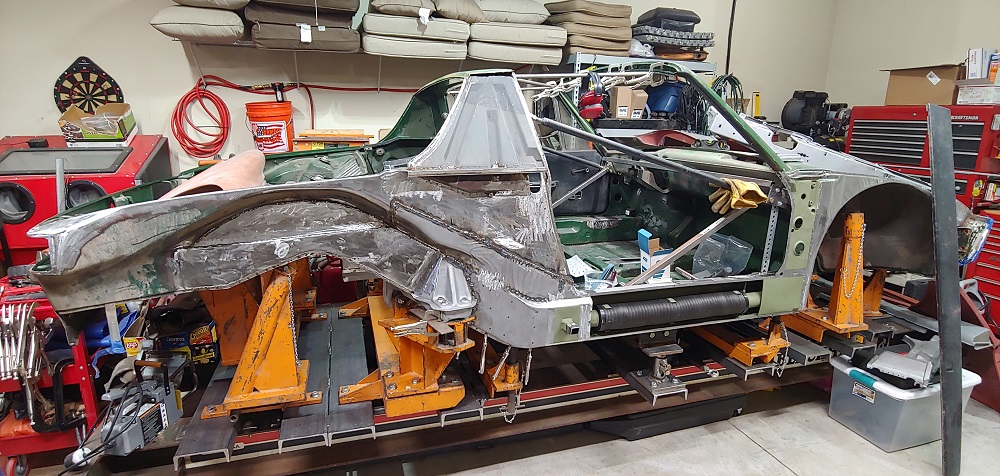
Well after months of waiting (thanks to covid) I finally received my Celette 914 bench fixtures. I'm going to get the 6 off the current fixtures and back on the rotisserie for blasting. Once the blasting is done then it'll be on these Celette fixtures for the chassis repairs.
Attached image(s)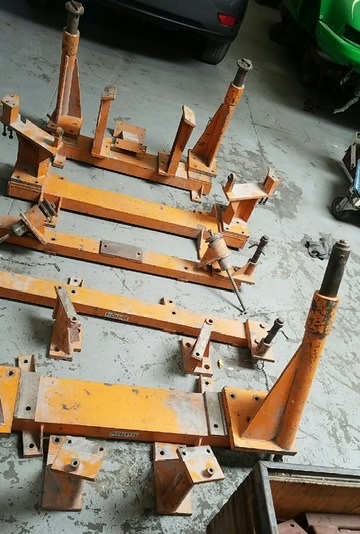

Posted by: mepstein Jul 14 2020, 06:54 PM
What type of blasting are you having done?
Posted by: sixnotfour Jul 14 2020, 10:44 PM
Well after months of waiting (thanks to covid) I finally received my Celette 914 bench fixtures. I'm going to get the 6 off the current fixtures and back on the rotisserie for blasting. Once the blasting is done then it'll be on these Celette fixtures for the chassis repairs.
Holy Grail...…..I got a nos left rear fender..pm me an offer..or trade for a right
Posted by: rgalla9146 Jul 15 2020, 05:25 AM
Well after months of waiting (thanks to covid) I finally received my Celette 914 bench fixtures. I'm going to get the 6 off the current fixtures and back on the rotisserie for blasting. Once the blasting is done then it'll be on these Celette fixtures for the chassis repairs.
WOW.
Luke, thats a lot of equipment !
I see parts that are easy to understand for our cars and others that must be
bases or mounts.
Are there 911 parts too ?
Great way to go.
Unbelievable score.
Be careful, that is some heavy equipment.
Get to it.
Posted by: IronHillRestorations Jul 15 2020, 05:41 AM
Well after months of waiting (thanks to covid) I finally received my Celette 914 bench fixtures. I'm going to get the 6 off the current fixtures and back on the rotisserie for blasting. Once the blasting is done then it'll be on these Celette fixtures for the chassis repairs.
Posted by: Luke M Jul 15 2020, 07:28 AM
Well after months of waiting (thanks to covid) I finally received my Celette 914 bench fixtures. I'm going to get the 6 off the current fixtures and back on the rotisserie for blasting. Once the blasting is done then it'll be on these Celette fixtures for the chassis repairs.
WOW.
Luke, thats a lot of equipment !
I see parts that are easy to understand for our cars and others that must be
bases or mounts.
Are there 911 parts too ?
Great way to go.
Unbelievable score.
Be careful, that is some heavy equipment.
Get to it.
Hi Rory,
All of the fixtures are for the 914 and 914-6. Only difference for the 6 is the special firewall engine mount bracket which is here as well. The front end fixtures could be used for the 911 up to 89 I believe. The cross beams are what the fixtures mount to then to the bench. I need to remove the 6 and current fixtures to figure it all out. I'm missing some mounting bolts but I should be able to pick those up locally. Yes they are heavy pieces and definitely a two person job setting it all up.
As far as blasting goes, the blast co says a few different media will be used. Harder grit for chassis vs panels which gets lighter so panels do not warp. Then all gets epoxy coated. I need to get all of the seam sealer out prior to blasting. That's gonna be a fun day.
Posted by: Gint Oct 11 2020, 11:39 AM
And that issue is that? Inquiring minds would like to know.
Looks great so far.
Subscribed
Posted by: Luke M Oct 11 2020, 05:22 PM
And that issue is that? Inquiring minds would like to know.
Looks great so far.
Subscribed
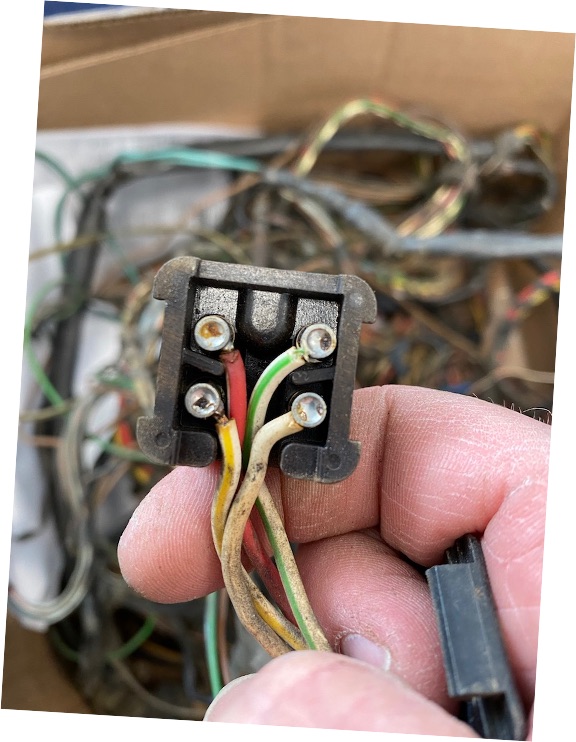
Glenn and I did check over my Kroon harness to see if it had the same issues as the one he installed. My harness seams to be wired correctly. I wouldn't hesitate to buy the RD harness but I already have the Kroon harness on hand.
Posted by: gerakroo Oct 19 2020, 12:49 PM
It's a nice wire harness for sure but there maybe a wiring issue that Kroon was not aware of. I need to check it out to confirm. RD is now making a replacement 914-6 harness as well. I believe the price is about the same.
Hi Luke, can you explain about the "possible wiring issue" in the fan connector ? We just checked the pictures and 5 other original 914-6 harnesses but they're all the same and identical to the new one we produce ?, Red , top left, white-green top right, white-yellow, under left, white, under right ?. Many 914-6's around the world are equipped with a new wiring loom delivered by us and this is the first time we hear about this ?
Posted by: gerakroo Oct 19 2020, 12:58 PM
Pretty sure RD harness is much less
How much less ? I think that a comparison can only be made if you put both sets next to each other and compare them in detail. I wonder if RD delivers exactly the same as what we do? I would love to see some more detailed pictures of the RD 914-6 harness set ?
Posted by: Luke M Oct 20 2020, 09:34 AM
It's a nice wire harness for sure but there maybe a wiring issue that Kroon was not aware of. I need to check it out to confirm. RD is now making a replacement 914-6 harness as well. I believe the price is about the same.
Hi Luke, can you explain about the "possible wiring issue" in the fan connector ? We just checked the pictures and 5 other original 914-6 harnesses but they're all the same and identical to the new one we produce ?, Red , top left, white-green top right, white-yellow, under left, white, under right ?. Many 914-6's around the world are equipped with a new wiring loom delivered by us and this is the first time we hear about this ?
Hi Gerard,
My harness that you made seams to be ok. There was an issue with the harness that Glenn put in for a customer. Guess there were some wires not located in the proper pins for the ignition. Another member was asking for the fan housing wiring and after looking into it my kroon harness seams correct. My factory 6 harness was tampered with prior to me owning it. That's where the confusion set in but got all worked out.
Looks like the RD 6 harness sells for $2500.00 USD.
http://www.restoration-design.com/store/product/914-612-019-10
Attached image(s)

Posted by: IronHillRestorations Oct 20 2020, 11:18 AM
Pretty sure RD harness is much less
How much less ? I think that a comparison can only be made if you put both sets next to each other and compare them in detail. I wonder if RD delivers exactly the same as what we do? I would love to see some more detailed pictures of the RD 914-6 harness set ?
I’ll get pictures of the RD 6 chassis harness in the next week or so. Nothing against Kroon at, looks like you make a fine product. I’ve been buying from RD prior to the new ownership which is one of a few reasons I went with them
Posted by: gerakroo Oct 21 2020, 12:32 AM
It's a nice wire harness for sure but there maybe a wiring issue that Kroon was not aware of. I need to check it out to confirm. RD is now making a replacement 914-6 harness as well. I believe the price is about the same.
Hi Luke, can you explain about the "possible wiring issue" in the fan connector ? We just checked the pictures and 5 other original 914-6 harnesses but they're all the same and identical to the new one we produce ?, Red , top left, white-green top right, white-yellow, under left, white, under right ?. Many 914-6's around the world are equipped with a new wiring loom delivered by us and this is the first time we hear about this ?
Hi Gerard,
My harness that you made seams to be ok. There was an issue with the harness that Glenn put in for a customer. Guess there were some wires not located in the proper pins for the ignition. Another member was asking for the fan housing wiring and after looking into it my kroon harness seams correct. My factory 6 harness was tampered with prior to me owning it. That's where the confusion set in but got all worked out.
Looks like the RD 6 harness sells for $2500.00 USD.
http://www.restoration-design.com/store/product/914-612-019-10
Thank you for your reply Luke, i'm just curious if this price also includes a new engine harness, wiper harness, dash harness, new relay sockets , etc ? (our set does)
Posted by: peteyd Oct 21 2020, 06:42 AM
Our chassis harness sells separately from our engine harness. We do include the relay sockets and the dash harness. We list all our pricing, stock at least one of every item listed on the web shop and shipping of your wiring will usually happen within 2 days of the order.
Gerard, we know you do great work. But we also hold our work to a very high standard. We stand behind our product. Competition breads excellence.
Pete
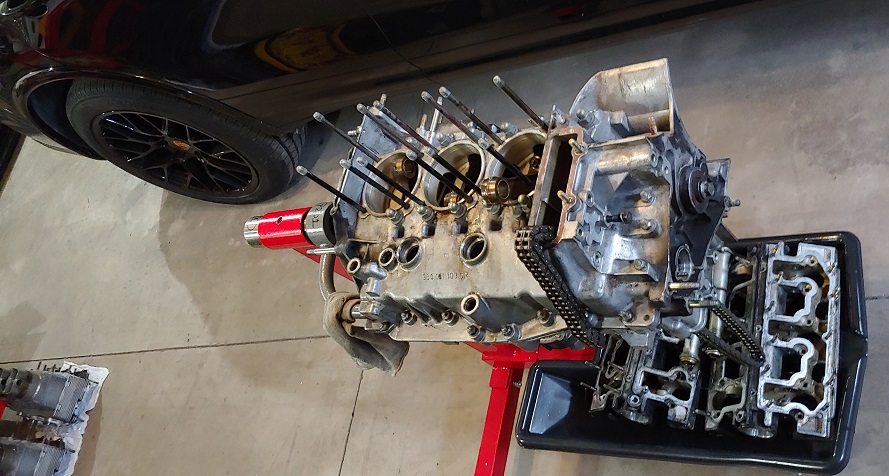
Posted by: Luke M Oct 24 2020, 01:45 PM
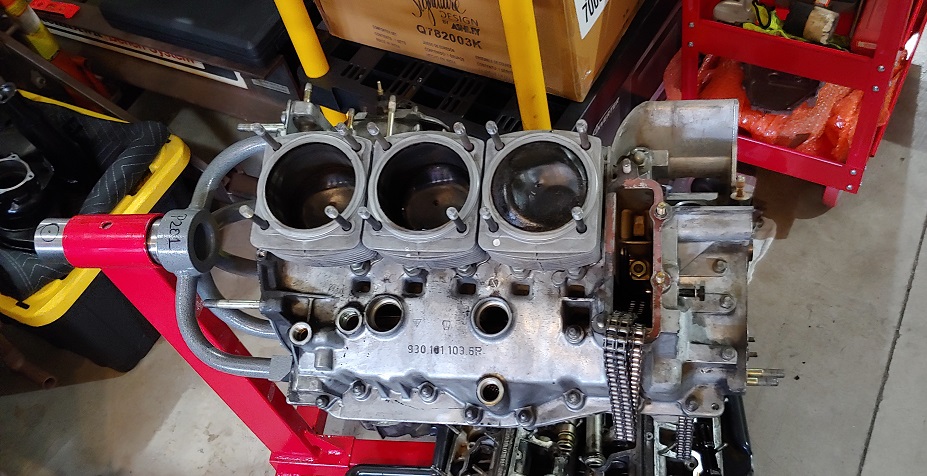
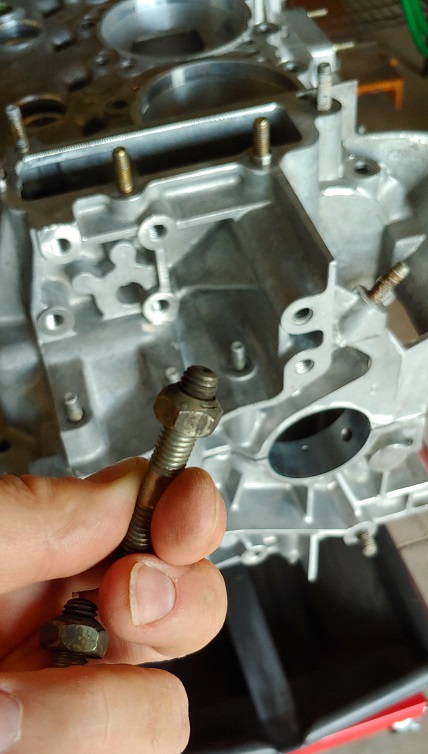
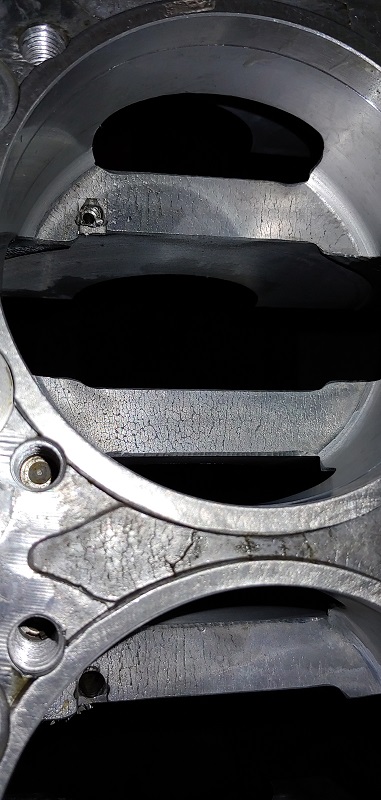
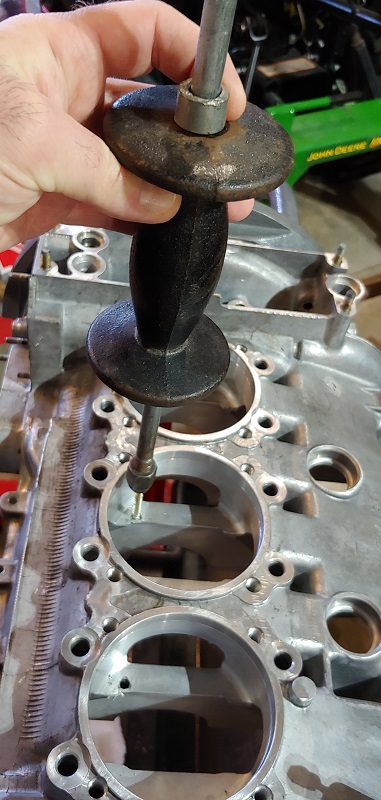
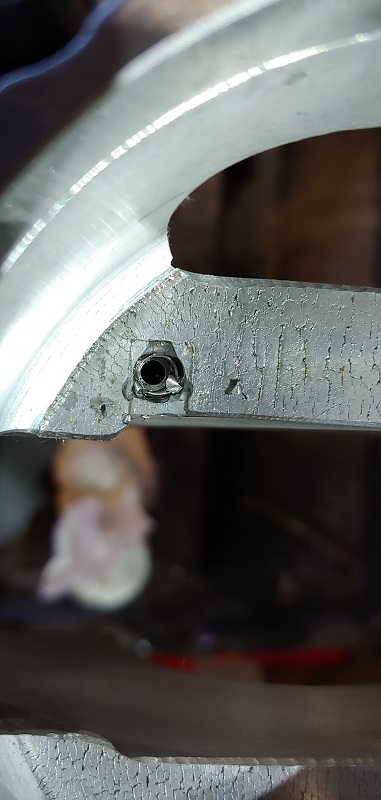
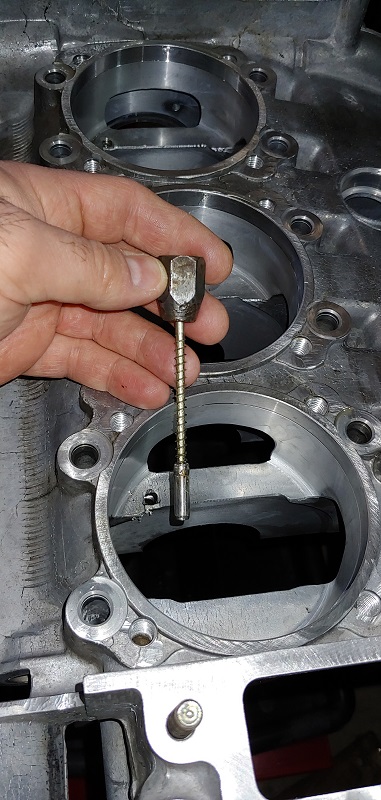
Getting the case ready to assemble. I have all the parts back from the machine shop and last of the back ordered parts are in. I didn't want to remove the outer perimeter case studs to clean the case halves mating surfaces.So I checked a few studs and they came off easily. The case cleaning must have compromised the loctite so all are coming off now to be safe and while I'm at it cleaning the mating surfaces.
Anyone know why Porsche went with the oval locking nuts on the later engines?
I have the nylon lock nuts but not the oval lock style.
Attached image(s)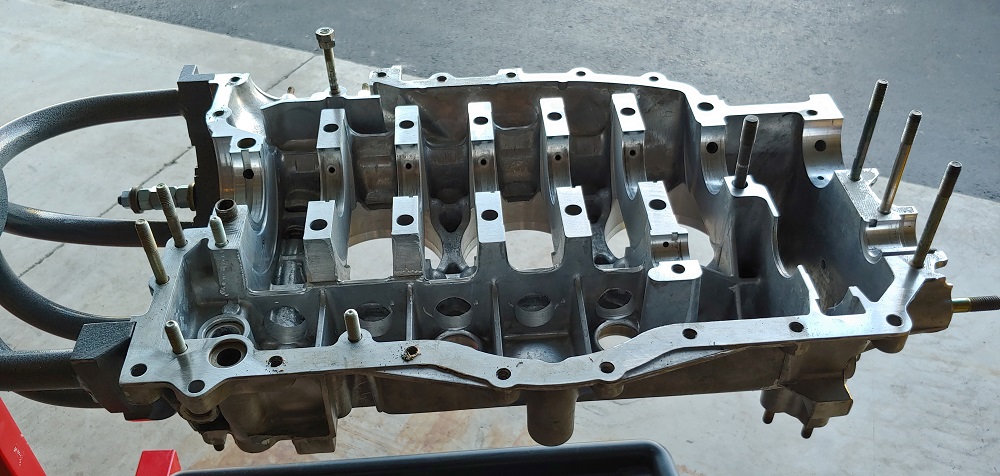
Posted by: altitude411 Oct 24 2020, 03:35 PM
Anyone know why Porsche went with the oval locking nuts on the later engines?
I have the nylon lock nuts but not the oval lock style.
Oval locking nuts are better with heat/cool cycles and are less likely to back out. Also not chemically degrading
Posted by: Luke M Jan 23 2021, 08:27 AM
Back at it here... I had to put the engine build on pause while I wait for some piston squirters. I've been working here and there on the Celette to Blachawk fixture issue.
I came up with a fix and pretty much have it squared away. Hopefully I can get it all done this weekend so I can start cutting away by next weekend. I did find an issue with the right front A-arm mounting area. It looks like the car was bottomed out or struck something. That caused the front mounting point to be pushed up between 5 and 8 mm. Looks like I'll need to pull that down before I can mount that fixture. Getting there slowly but surely.
Attached image(s)

Posted by: Luke M Jan 23 2021, 08:30 AM
Work on mating fixtures to bench..
Attached image(s)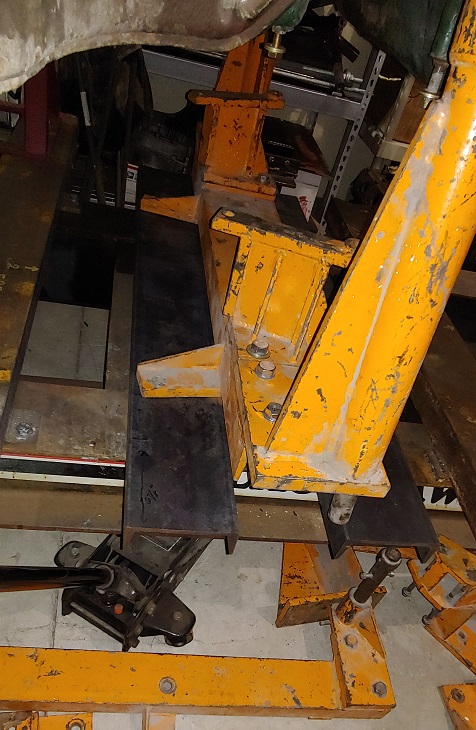
Posted by: Luke M Jan 23 2021, 08:38 AM
Right A-arm mount issue to be addressed. 5-8 mm upward hit. You can see where it took the hit on the front trunk pan. I need to cut away some of the pan for the cooler install but I'll wait a little to do that. Time to straighten the mount first.
Attached image(s)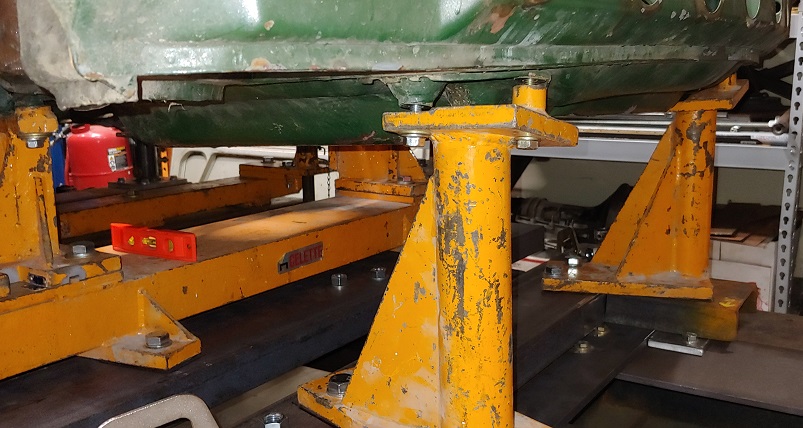
Posted by: Cairo94507 Jan 23 2021, 09:10 AM
Very nice table. This is going to be a nice Six.
Posted by: Luke M Jan 24 2021, 06:56 AM
Front end fixtures are done. I need to rework the mounting plates on the rear before welding those up. I also need to go buy a hydraulic pull style ram to fix the issue at the front A-arm mount. 
Attached image(s)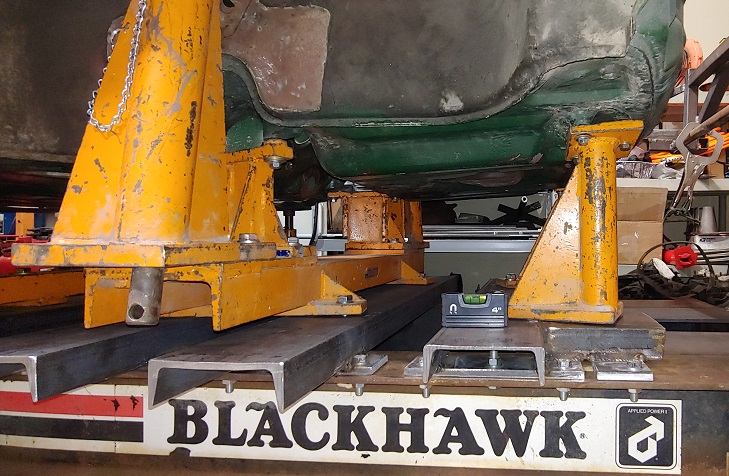
Posted by: Luke M Jan 25 2021, 10:51 AM
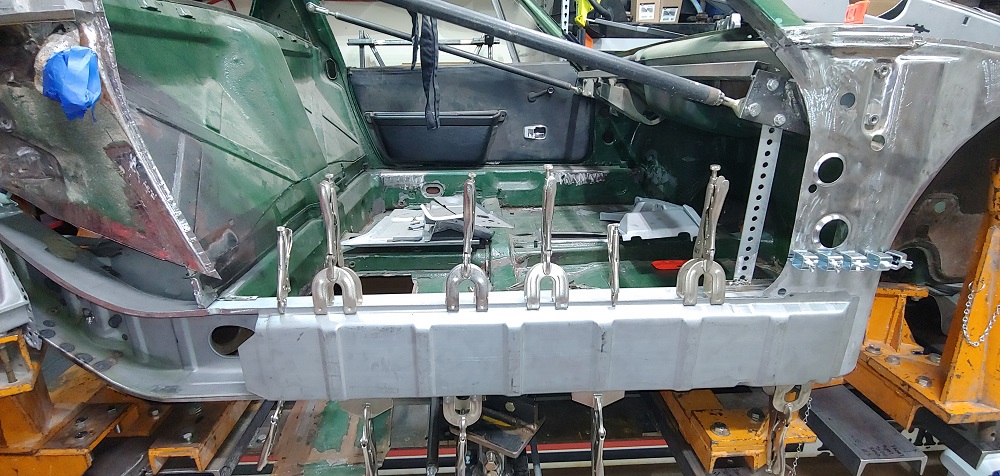
Got some new tools... I need to wrap up these rear fixtures and build some braces for the targa to windshield frame.
Attached image(s)
Posted by: Luke M Jan 26 2021, 10:11 AM
Targa to windshield frame brace is in and got the R/R Q-panel off.
Measurements are dead on so hopefully it'll stay that way.
I'd like to start cutting out the right long by the end of the week.
Anyone have a NOS R/R inner panel???
Now would be the time to replace this otherwise I'll use the RD one.
Attached image(s)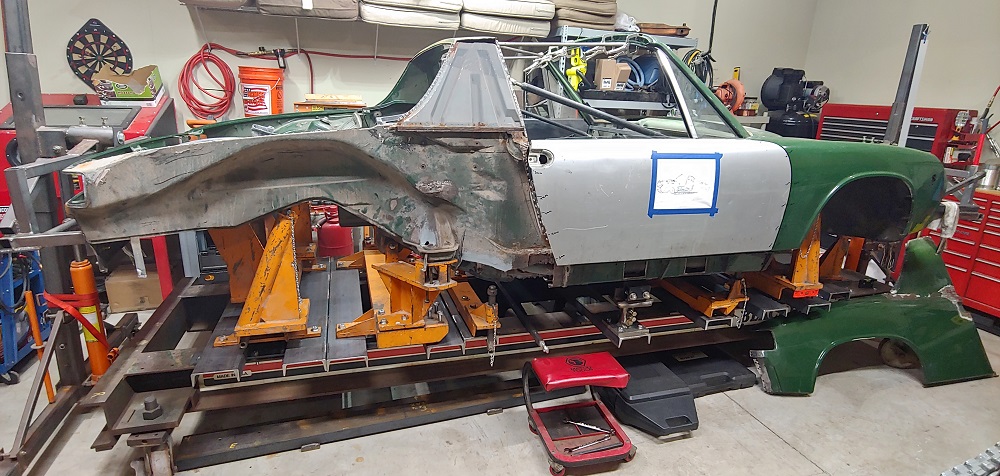
Posted by: Root_Werks Jan 27 2021, 10:32 AM
What a great project! This is some serious time and effort put into a 914 and it shows. Thanks for sharing the progress!
Posted by: Cairo94507 Jan 27 2021, 01:40 PM
Love seeing them stripped down and restored to live a new life.
Posted by: Luke M Jan 27 2021, 08:10 PM
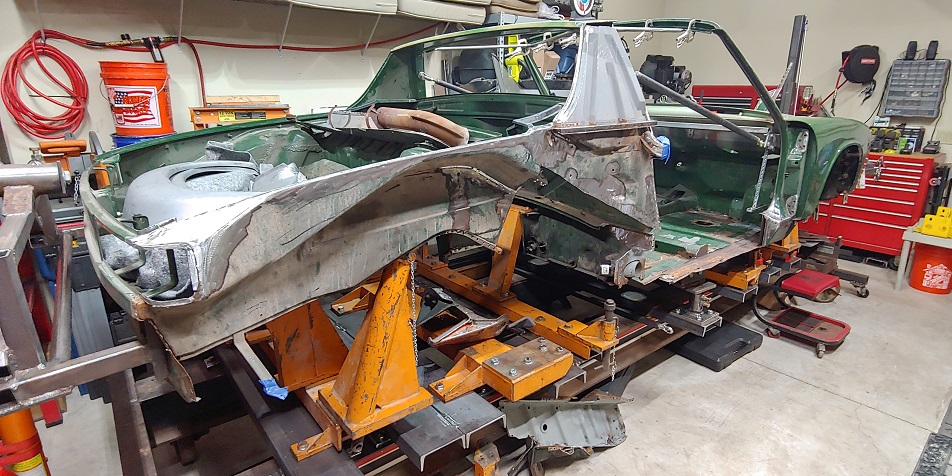
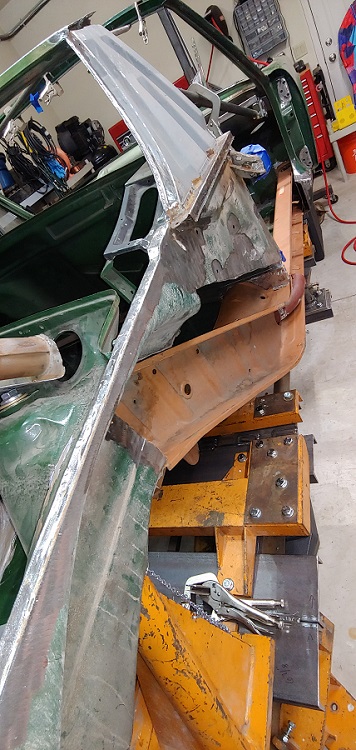
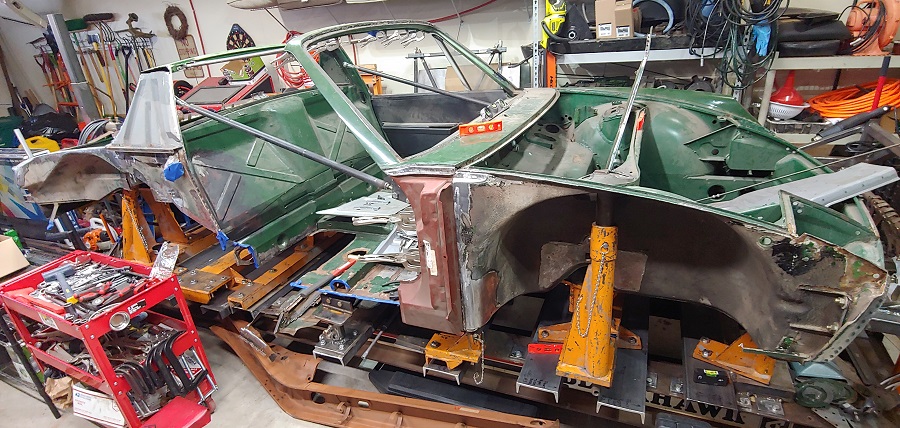
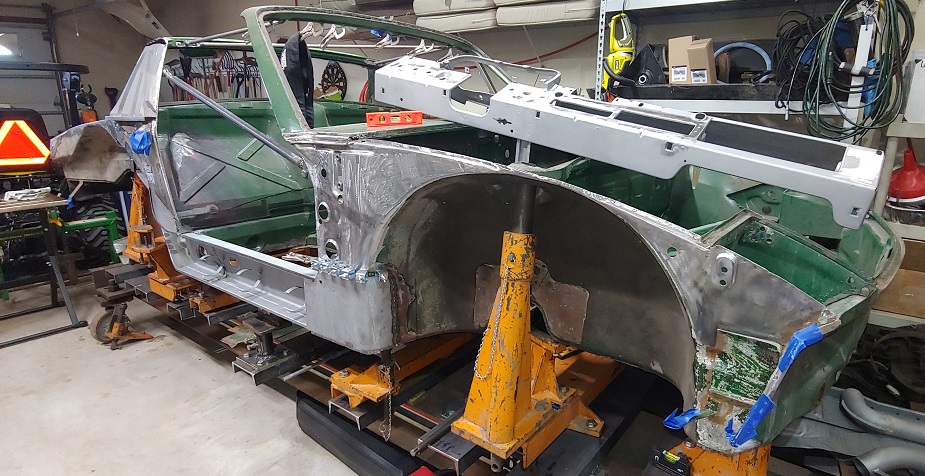
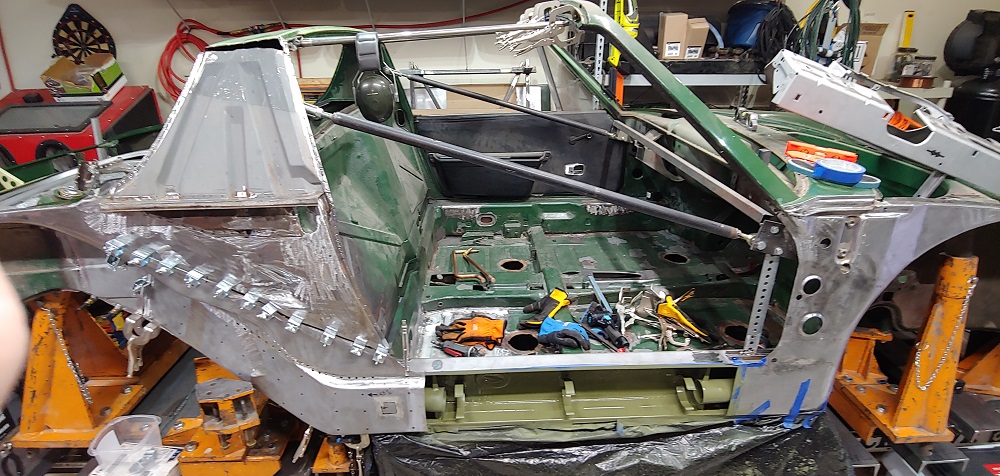
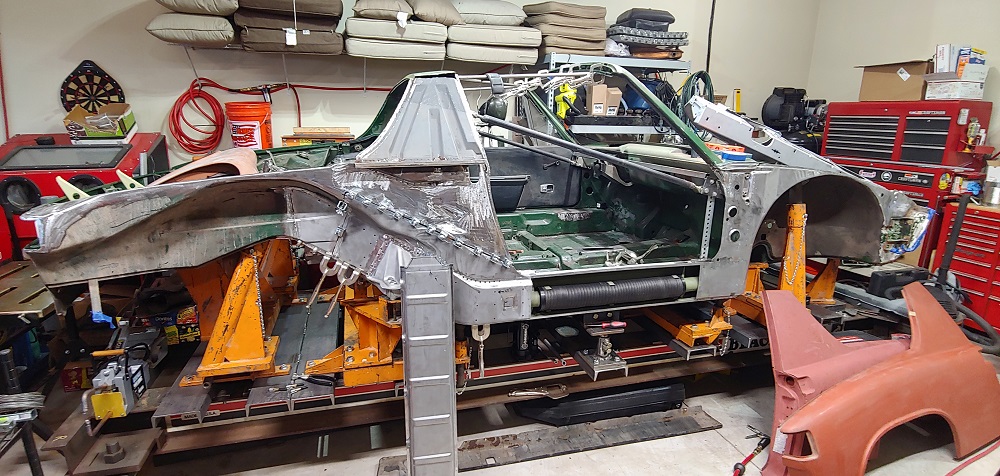
The chassis is now locked down on the fixtures and the cutting has begun.
Attached image(s)
Posted by: watsonrx13 Jan 28 2021, 04:36 PM
You sir are insane and a true craftsman.
Posted by: Luke M Jan 28 2021, 06:47 PM
Did a rough cutout of the right long. Now to cut and grind away all of the old long section.
Attached image(s)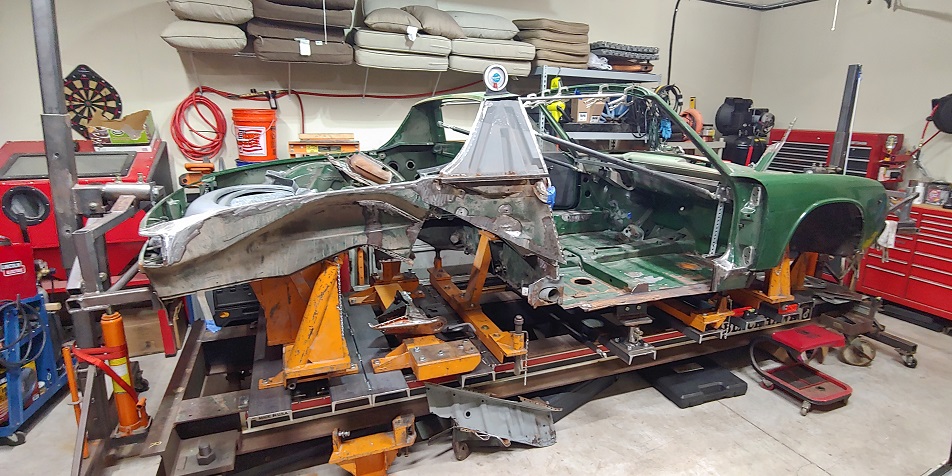
Posted by: djway Jan 28 2021, 10:58 PM
WOW
Tools are the best ......
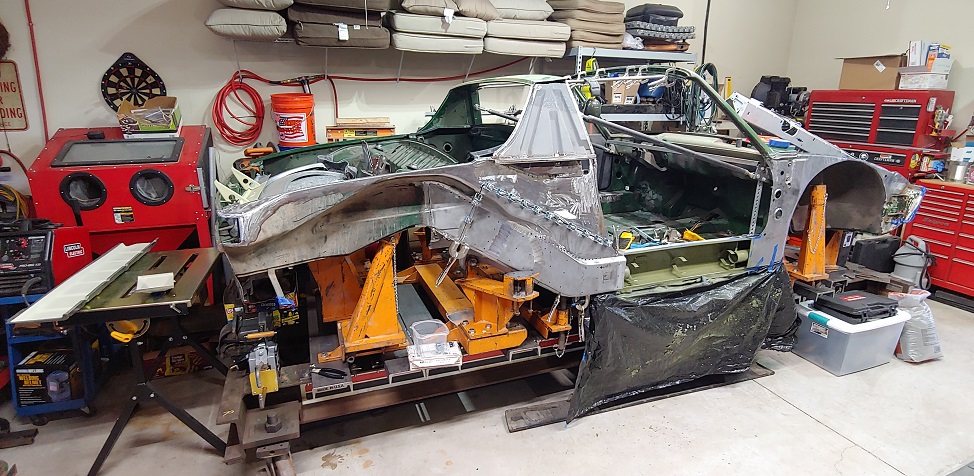
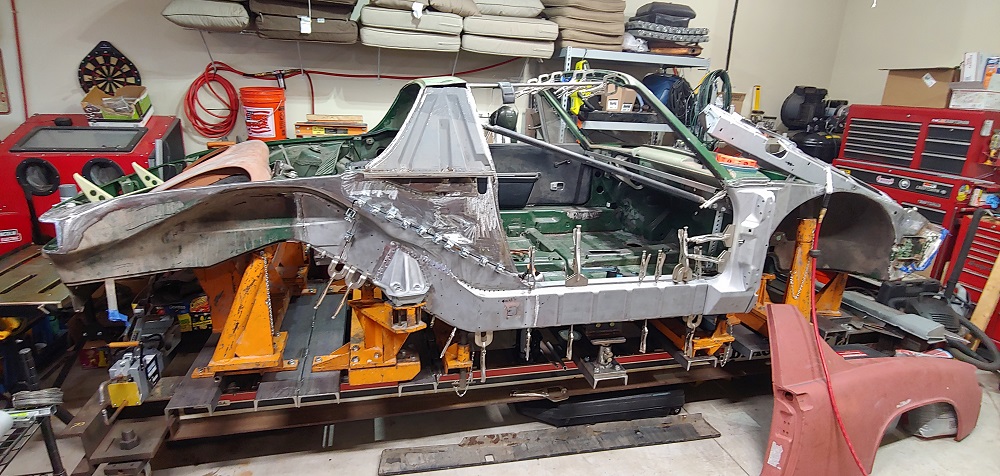
Posted by: Luke M Jan 30 2021, 07:11 AM
I spent all of Friday afternoon drilling out spot weld, cutting, and grinding away all of the old long section. What a PITA. Got it all cleaned up and ready so I can test fit the new NOS long today. I have some other work to get done before I can install it for good. I need to get a few more parts from RD. I also need to track down a plug end for the spot welder and rework the spot welder arms. I'm gonna try and use the spot welder as much as I can then finish with plug welds.
Attached image(s)

Posted by: mate914 Jan 30 2021, 07:56 AM
I spent all of Friday afternoon drilling out spot weld, cutting, and grinding away all of the old long section. What a PITA. Got it all cleaned up and ready so I can test fit the new NOS long today. I have some other work to get done before I can install it for good. I need to get a few more parts from RD. I also need to track down a plug end for the spot welder and rework the spot welder arms. I'm gonna try and use the spot welder as much as I can then finish with plug welds.
Floppy disk for grinders are simple the best. I'm not sure if your using one or not.
They blend welds and remove material fast.
I see your doing a lot of work, but your pictures are always clean?
Looks very good.
Matt
Posted by: rgalla9146 Jan 30 2021, 08:20 AM
Luke you certainly don't shy away from hard work.
WOW! .... what a project.
You've prepared well with tools and parts for the job too.
One step at a time, you'll get it done. You've done plenty already.
Too bad you're so far away. I'd like to visit and lend a hand.
Be careful.
One word of caution about grinding, protect your eyes, ears, the other cars and
glass in the area. The damage often isn't noticed untill it's too late.
Forge on.
Posted by: Luke M Jan 30 2021, 12:02 PM
Hi Rory,
Working away for sure. I'd like the car in paint by May. I know I can , I know I can...lol..
I move the Cayenne outside when I grind/weld. And yes I make a pretty good mess but I also like my garage as clean as possible..lol..
Test fitted the long. Needs some fine tuning but overall fits well.
Taking a lunch break then back to it. 
Attached image(s)
Posted by: IronHillRestorations Jan 30 2021, 05:25 PM
Posted by: BillC Jan 30 2021, 05:36 PM
Very cool!
I'd love to have a frame bench some day.
Posted by: Cairo94507 Jan 30 2021, 05:36 PM
A-mazing!
Posted by: 930cabman Jan 30 2021, 05:58 PM
You make it look easy, sure helps if you have done it before and have the equipment and the guts
I almost forgot, the time. All of this takes plenty of time, but it can be satisfying.
Posted by: Luke M Jan 31 2021, 07:26 PM
It's hard work for sure. If you have the proper tools and a attack plan it's kinda easy.
I have a list of things to get done but little by little knocking them out.
Got the outer right suspension mount prepped and ready to install.
That alone took a few hours to get ready for install.
Attached image(s)
Posted by: horizontally-opposed Jan 31 2021, 07:31 PM
Incredible work, and wonderful photos. Thank you for sharing these!
The cleverness of the 914 unibody never ceases to amaze me in pics like these. It may not have been perfect, or able to fend off the tin worm, but its design was certainly quite advanced for its time.
Posted by: Luke M Feb 6 2021, 10:05 AM
Not much progress but did cut away some rusted out sections which will need to be replaced. Got the spot welding tongs in but looks like I still need another set to install the fenders.
Attached image(s)
Posted by: 14carrot Feb 6 2021, 08:12 PM
Wow, Luke. Simply amazing. I knew you had mad skills but am utterly blown away by your level of commitment in putting together all the right tools for the job. Just outstanding. Like everyone here, I can't wait to see the finished result!!! This car is going to be killer!
I take it you are simply mothballing the original engine for posterity? Simply great that you're taking so much care to make that chassis better than new and then also have the guts to do the reversible performance upgrades to make the car your own.
Kudos!
PS - how did your brother's car turn out? Is it detailed somewhere here? You went in deep on that one, but this is entirely beyond next level.
R E S P E C T !!!!
Someday I'll get your old six done and we'll have a reunion. Still trying to gather parts.
-John
Posted by: 930cabman Feb 7 2021, 08:23 AM
Not much progress but did cut away some rusted out sections which will need to be replaced. Got the spot welding tongs in but looks like I still need another set to install the fenders.
Cutting out the old rusty stuff is often more difficult than putting new stuff in, at least much more messy. Spot welding tongs, are they simply 1/2 or 5/8" copper rods with tips? can you fabricate new tongs to fit a specific task?
Posted by: Luke M Feb 7 2021, 10:21 AM
Wow, Luke. Simply amazing. I knew you had mad skills but am utterly blown away by your level of commitment in putting together all the right tools for the job. Just outstanding. Like everyone here, I can't wait to see the finished result!!! This car is going to be killer!
I take it you are simply mothballing the original engine for posterity? Simply great that you're taking so much care to make that chassis better than new and then also have the guts to do the reversible performance upgrades to make the car your own.
Kudos!
PS - how did your brother's car turn out? Is it detailed somewhere here? You went in deep on that one, but this is entirely beyond next level.
R E S P E C T !!!!
Someday I'll get your old six done and we'll have a reunion. Still trying to gather parts.
-John
Hi John,
Lots of work being done on both cars. My brothers 914 is about 90% done with the welding. Then it would need to go out for body and paint work. He has most if not all of the parts to get it back together.
Link to his : http://www.914world.com/bbs2/index.php?showtopic=212849&hl=
I'd love to finish my 6 this year and get some seat time in. See how things go here. I keep finding rust issues that need to be addressed so that slows me down. Tracking down good sheet metal to use and get in takes time.
The spot welding togs are solid 5/8'' copper rods with replaceable tips. I need some close quarter togs to install the front fender and a few other small sections. I figured the one set I purchased was gonna work but it won't. I did get two 5/8 '' straight rods in case I had to make some specific tongs. I'll have to see what if anything I can do with them. Maybe use them as an extension to clear longer runs?
Posted by: Luke M Feb 9 2021, 05:26 PM
Removed the right front fender. Time to get the spot weld cutter out to finish it up.
The door post is also coming off.
Anyone with a NOS R/F fender stashed away that they want to part with?
May take a very nice used one as well.
Attached image(s)
Posted by: Luke M Feb 10 2021, 05:08 PM
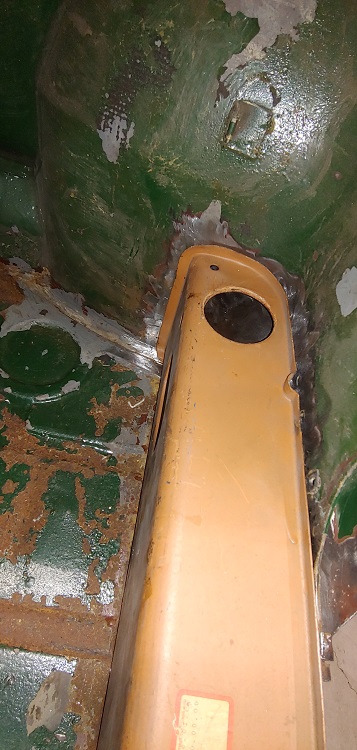
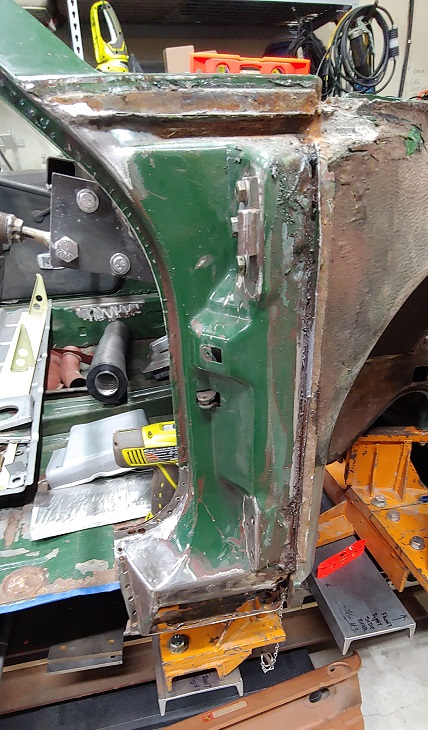
Got the door post off. Started cleaning up the mounting areas for the door post and fender. Also a quick test fit of the NOS right door post. Still got to figure out a patch panel for the lower section of the inner wheel housing/lower door post.
Attached image(s)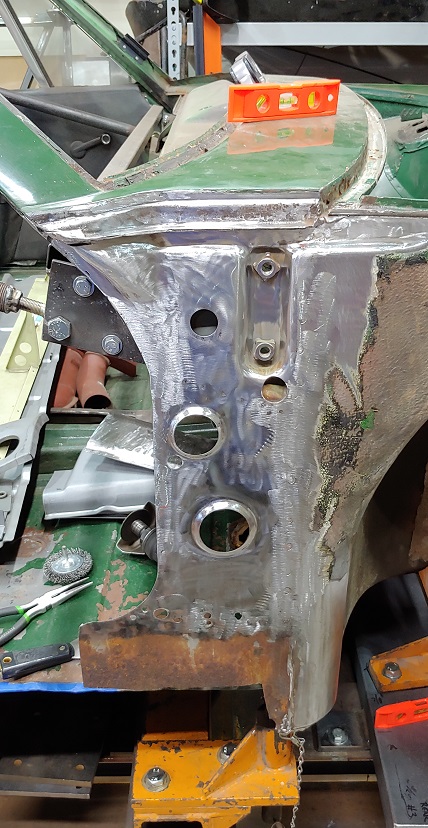

Posted by: Cairo94507 Feb 10 2021, 05:11 PM
I have never seen that NOS panel installed before.
Posted by: 930cabman Feb 10 2021, 05:15 PM
Luke must have a line on these NOS parts, and a good line at that
btw, looks great Luke
Posted by: rgalla9146 Feb 11 2021, 06:57 AM
I have never seen that NOS panel installed before.
I've never seen that joint so exposed......where the fender, the door post, the cowl and the windshield frame all come together.
I always wondered how the fender might be attached in that 5"-6" vertical
seam below the black plastic 'push-in' filler piece.
Luke, was the fender welded below the black filler ?
Man you get 1st prize in the DIY category.
WOW ! great work.
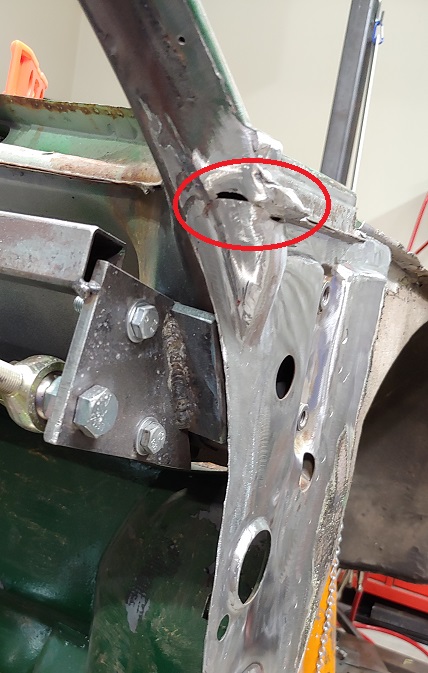
Posted by: Luke M Feb 11 2021, 11:00 AM
I have never seen that NOS panel installed before.
I've never seen that joint so exposed......where the fender, the door post, the cowl and the windshield frame all come together.
I always wondered how the fender might be attached in that 5"-6" vertical
seam below the black plastic 'push-in' filler piece.
Luke, was the fender welded below the black filler ?
Man you get 1st prize in the DIY category.
WOW ! great work.
Hi Rory,
Thanks for the kind words. A work in progress it is. Little by little I'm chipping away at the list of things to do.
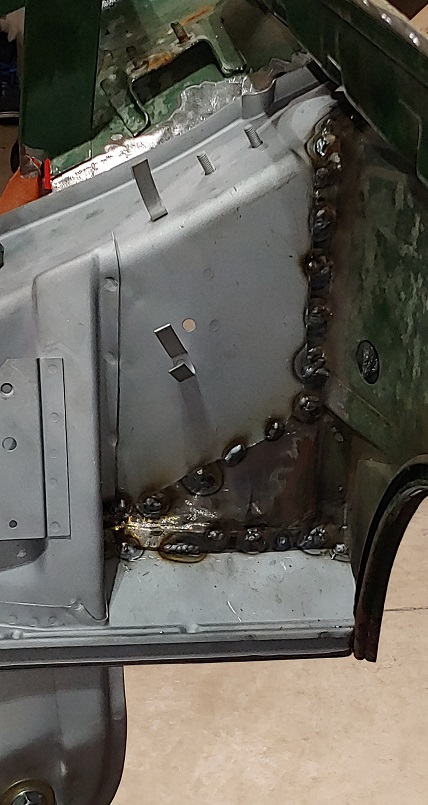
The fender to cowl was welded in the area I have circled in the pic. Looks to be lead welded/filled to me. It's way too soft to be anything else. Then there was a few spot welds that attach the fender to the door post at the very top and along down the door post.
Attached image(s)
Posted by: horizontally-opposed Feb 11 2021, 01:10 PM
Hi Rory,
Thanks for the kind words. A work in progress it is. Little by little I'm chipping away at the list of things to do.
The fender to cowl was welded in the area I have circled in the pic. Looks to be lead welded/filled to me. It's way too soft to be anything else. Then there was a few spot welds that attach the fender to the door post at the very top and along down the door post.
The Bermuda Triangle of the 914
I've got an(other…) appointment with the one on the passenger side of my 914.
Posted by: rgalla9146 Feb 11 2021, 02:15 PM
Luke in my reply I said vertical when I should have said horizontal.
I'm curious about the area to the right of your circle.
It does not appear to have been welded or ground clean.
Is the fender attached along there ? or 'sealed' (in that special Karmann way) ?
How would they have welded it ?
Posted by: Root_Werks Feb 11 2021, 02:18 PM
That jig, let alone the metal work, is straight up amazing! Thanks for sharing such a cool thread with all the pictures.
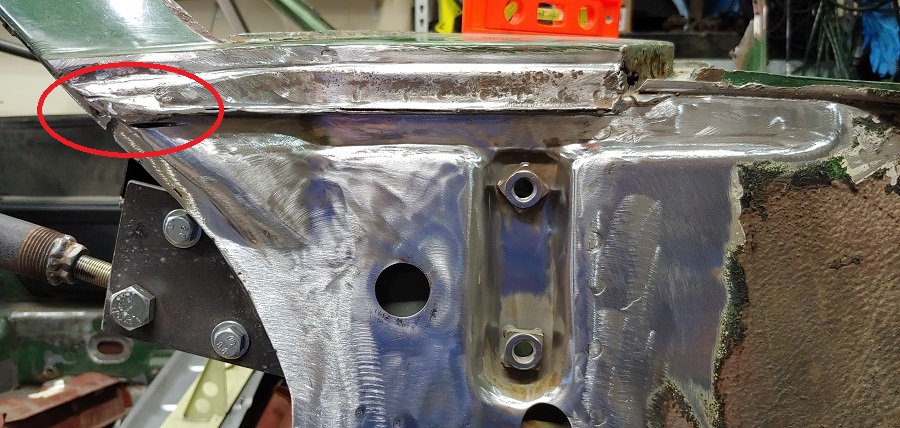
Posted by: Luke M Feb 11 2021, 02:25 PM
Luke in my reply I said vertical when I should have said horizontal.
I'm curious about the area to the right of your circle.
It does nor aoppear to have been welded or ground clean.
Is the fender attached along there ? or 'sealed' (in that special Karmann way) ?
How would they have welded it ?
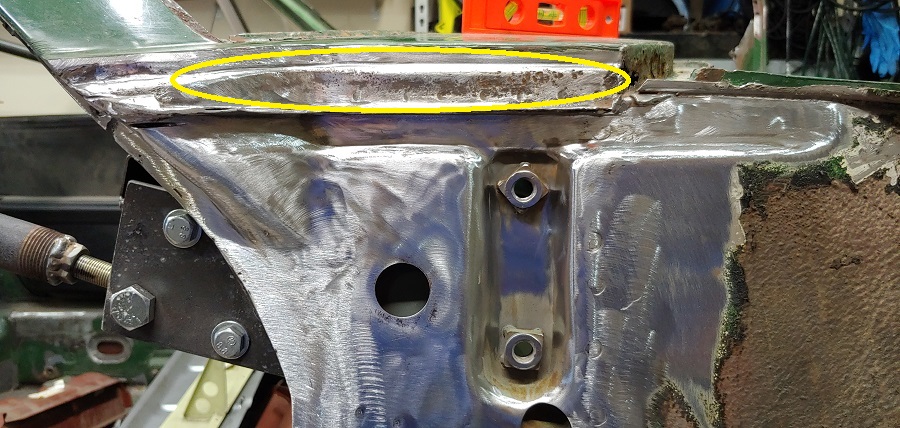
No welds at all in that area. There was just seam sealer (area in yellow) and that was it.
Attached image(s)
Posted by: Luke M Feb 15 2021, 09:06 AM
I spent a few hours on Sat. cleaning up the inner wheel housing. Got the remainder of the fender sections spot drilled and cleaned up. Now I need to fix the cowl to wheel housing area. I may need to order the cowl repair section from RD. Then I need to figure out the lower wheel housing section so I can start putting things back together.
Attached image(s)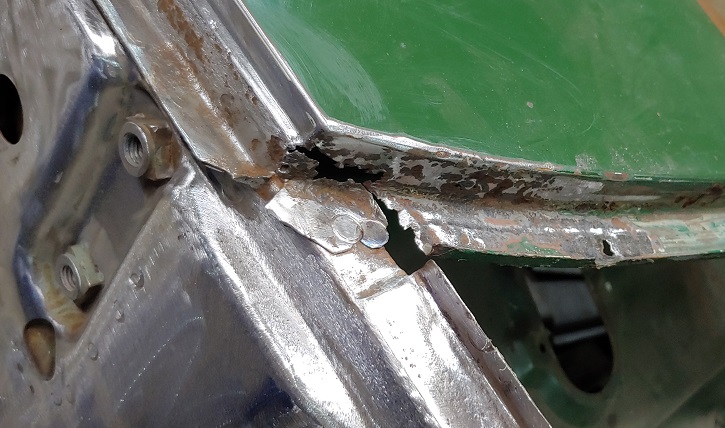
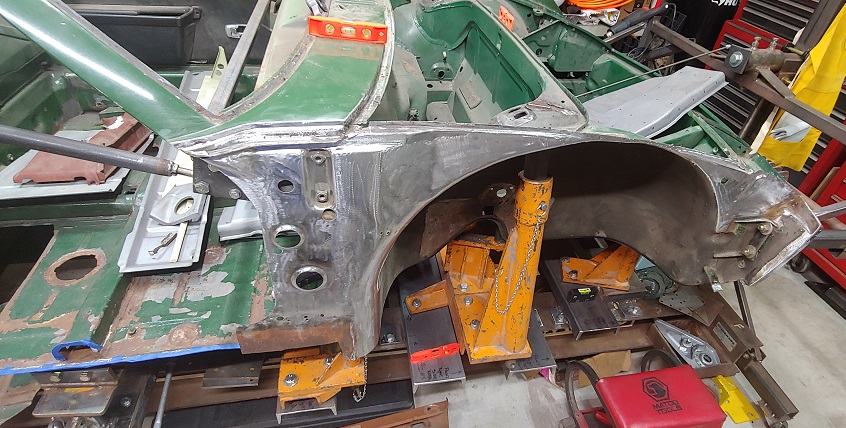
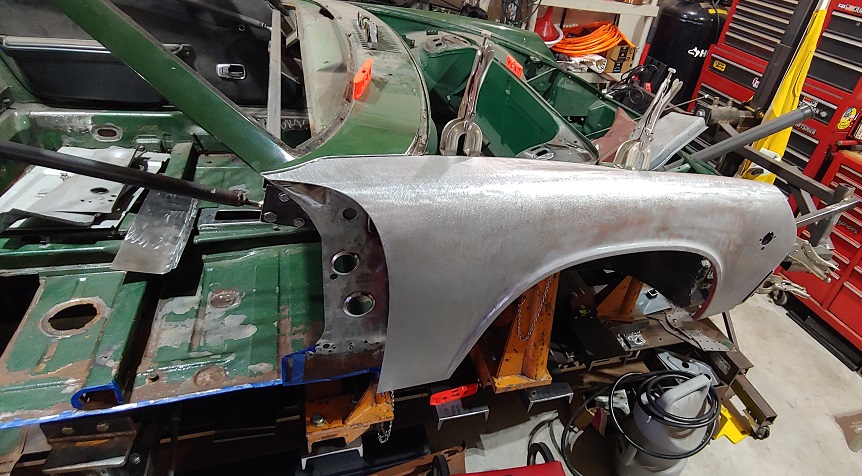
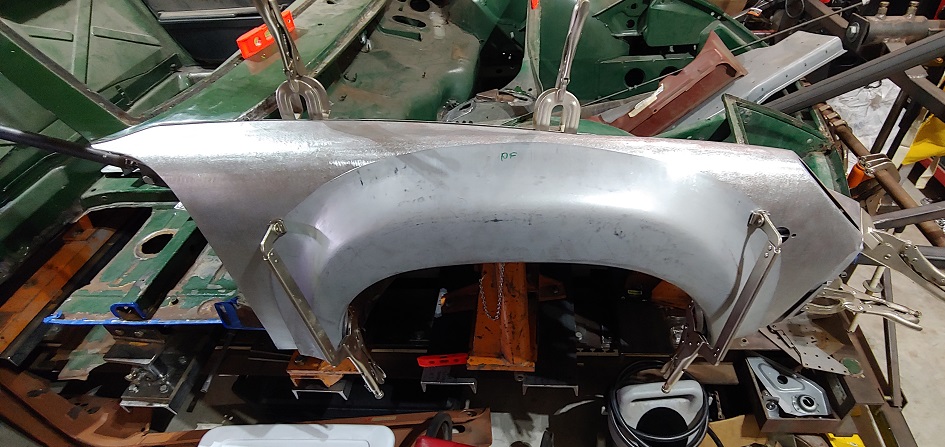
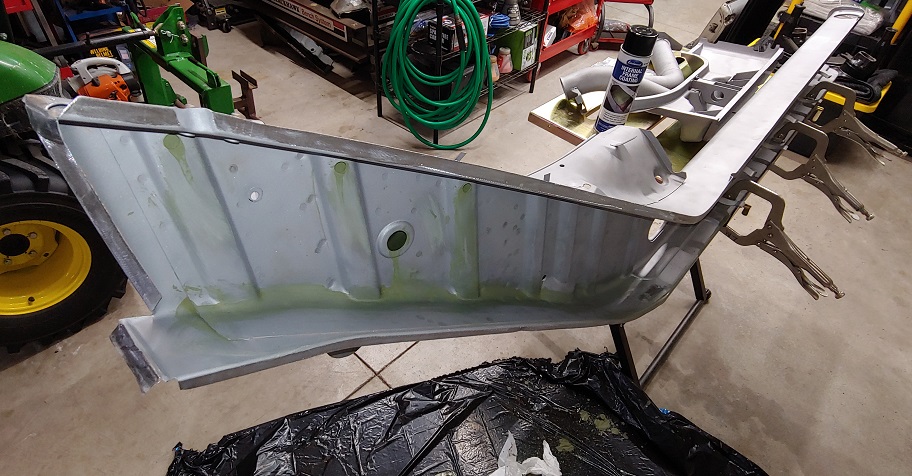
Posted by: Luke M Mar 8 2021, 02:12 PM
I received the R/F NOS fender in today ( thanks Jeff ). I got it blasted and test fitted on the chassis. Fits well and also stuck the flare on to see how she's gonna look.
Hopefully the rest of the sheet metal will arrive by Friday so I can get it welded in next week.
Attached image(s)
Posted by: Cairo94507 Mar 8 2021, 04:07 PM
Exciting to see clean metal and a flare clamped on.
Posted by: Dion Mar 8 2021, 04:13 PM
Fantastic work Luke. Love the jigs set up.
Amazing to see a NOS piece for this area.
Thanks for documenting your progress.
Attached image(s)
Posted by: sixnotfour Mar 8 2021, 07:19 PM
Oh My.. You didn't mention , GT flairs...Shouldn't those be NOS Porsche too ??? LMK
Posted by: Luke M Mar 8 2021, 08:18 PM
Oh My.. You didn't mention , GT flairs...Shouldn't those be NOS Porsche too ??? LMK
Fender has some pitting but adding flares takes care of that.
Sent you a pm about flares.
Posted by: Luke M Mar 9 2021, 05:01 PM
Blasted the right NOS long today. Prepping all the metal that's to get welded back on.
Hopefully by the end of next week the right side will be back together.
Attached image(s)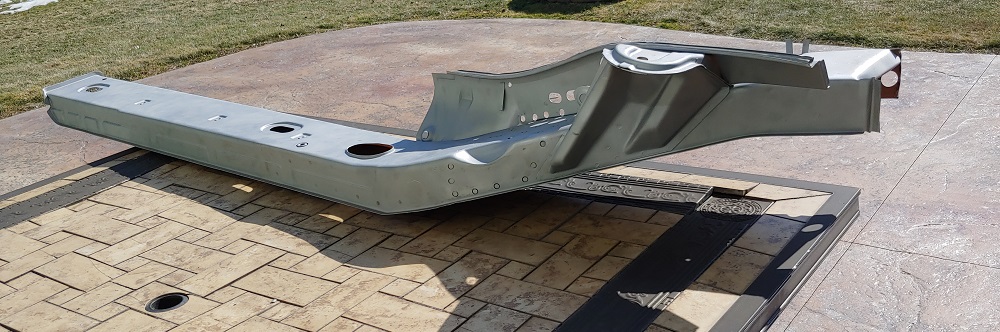
Posted by: gms Mar 10 2021, 02:01 PM
Things are looking great over there Luke
Posted by: 930cabman Mar 10 2021, 02:09 PM
Luke has a killer supply of NOS stuff
Posted by: Luke M Mar 11 2021, 07:56 AM
Things are looking great over there Luke
Thanks Glenn,
Working away here when I can. I have a few section blasted and ready for install.
I want to paint the areas where I will not be able to reach once attached to the chassis.
I have Eastwood internal frame coating cans, and also picked up a few cans of the epoxy paint too. Anyone have an idea which would be best to use? I'd like to save the internal coating cans for those areas I can't reach. Think the epoxy will be ok to help with future rust? Thinking of using the epoxy for the inside of the long and behind the door post.
Any thoughts on this?
I have the chassis scheduled to be blasted at the end of April then right into epoxy a few days later. I have a huge list of things to knock out before the blast date.
Posted by: Luke M Mar 13 2021, 06:27 AM
The sections from a Cali 914 parts car have arrived. Thanks Vince..
Started to remove any metal I do not need and prep for install.
Got the right inner wheel housing section almost done. I just need to blast it before install.
Next up is the pass foot section and under the fuel tank.
Today we will be working on my brothers 914. Spot welding the rest of the new RD rear panel in along with a new rear trunk pan.
Attached image(s)
Posted by: Luke M Mar 16 2021, 05:55 PM
Started cutting and fitting the replacement inner fender section. Also got the right long coated with Eastwood internal frame coating. Man does that stuff make a mess.
I'll see if I can get the new section of metal tacked in on Wed.
Attached image(s)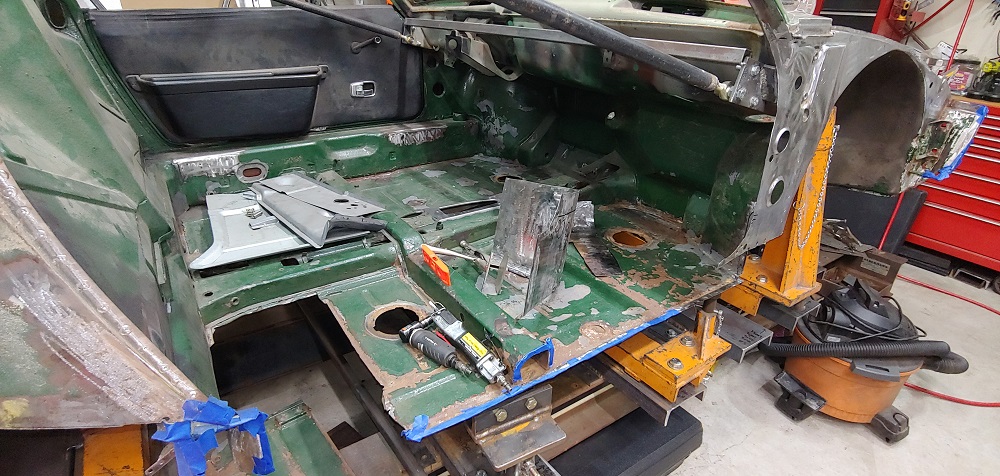

Posted by: 930cabman Mar 16 2021, 06:05 PM
Now, if we can get RD to manufacture this section, our life would become instantly easier.
Keep up the work, lookin good
btw: I have been using a Sherwin Williams industrial primer "Kem Bond" we have used it for years on steel
Posted by: rgalla9146 Mar 16 2021, 07:27 PM
Looking good Luke
'Going deep' is an understatement
Great to see your very thorough work.
Posted by: Luke M Mar 17 2021, 09:05 PM
Looking good Luke
'Going deep' is an understatement
Great to see your very thorough work.
Thanks guys.. It's time consuming getting everything to line up just right.
Putting the panels on, test fit then remove. Got the right patch panel ready but didn't have the time to weld it in. I did work on the front trunk floor damage. Pretty much done but need to confirm it's correct. Anyone got a pic of the section I have circled. Early cars if that matters?
Attached image(s)
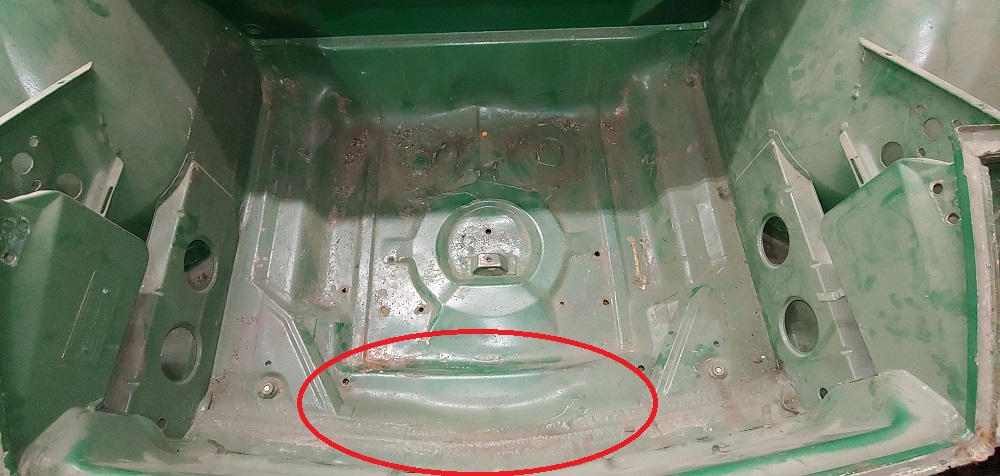
Posted by: rgalla9146 Mar 17 2021, 10:09 PM
Luke I can get pics of the trunk floor
Day or two
Posted by: pete000 Mar 17 2021, 10:45 PM
Wow, just a little metal touch up...LOL
Posted by: 914werke Mar 17 2021, 11:16 PM
DAMN!!
Posted by: Luke M Mar 18 2021, 07:41 AM
Luke I can get pics of the trunk floor
Day or two
Hi Rory, If you could also snap a few from the underside front as well.
I'd greatly appreciate it..
Thanks..
Posted by: gms Mar 18 2021, 08:36 AM
Luke,
Here are some pix of my NOS floor pan
Posted by: mate914 Mar 18 2021, 09:03 AM
I used POR 15 inside all and out side all..... it has something to do with where we live.
Posted by: Luke M Mar 18 2021, 09:04 AM
Luke,
Here are some pix of my NOS floor pan
Hi Glenn,
Thanks for posting the pics. Is the section circled flat then has a recess for the spare tire ?
I may have to fine tune the pan a little more.
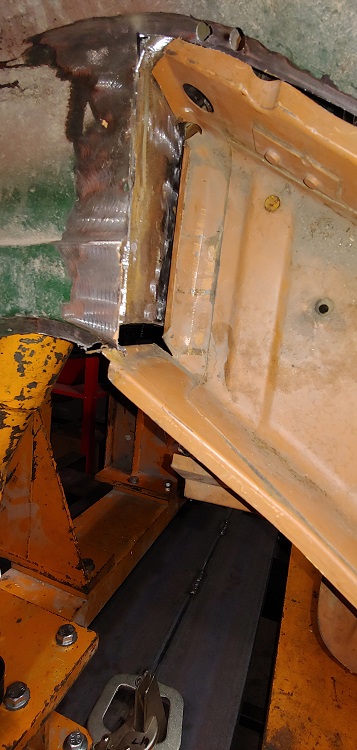
Posted by: Luke M Mar 29 2021, 08:14 PM
Got the right inner fender patch in. Installed the nos right long and test fitted the inner rocker. I need to make some final tweeks to the long prior to welding it in.
Attached image(s)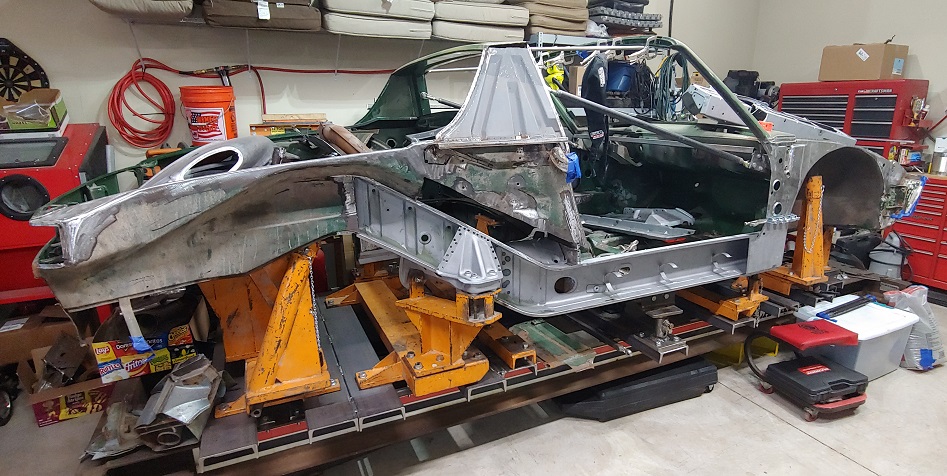
Posted by: Cairo94507 Mar 30 2021, 06:42 AM
Simply amazing work.
Posted by: 930cabman Mar 30 2021, 07:34 AM
Lookin good Luke, how is the new spot welder working?
Posted by: Luke M Mar 30 2021, 07:45 AM
Lookin good Luke, how is the new spot welder working?
Works great. I have a few plug welds to do as well. I'm gonna try and use the spot welder wherever I can to make it look factory. I got a set of 12" CLOSE QUARTER WELDING TONGS but still having a clearance issue at the front fender channels.

I may have to modify one of the welding tips.
Posted by: sixnotfour Mar 30 2021, 07:30 PM
Double carboard with filler...Fingers Crossed
Posted by: sixnotfour Mar 30 2021, 07:32 PM
Double carboard with filler...Fingers Crossed
Attached image(s)
Posted by: Luke M Mar 30 2021, 07:34 PM
Patch panel is all welded in and also started the pass side floor pan install.
Ran out of gas for my mig welder so I'll get the tank swapped out tmrw.
How I hate grinding but turned out pretty nice.
Attached image(s)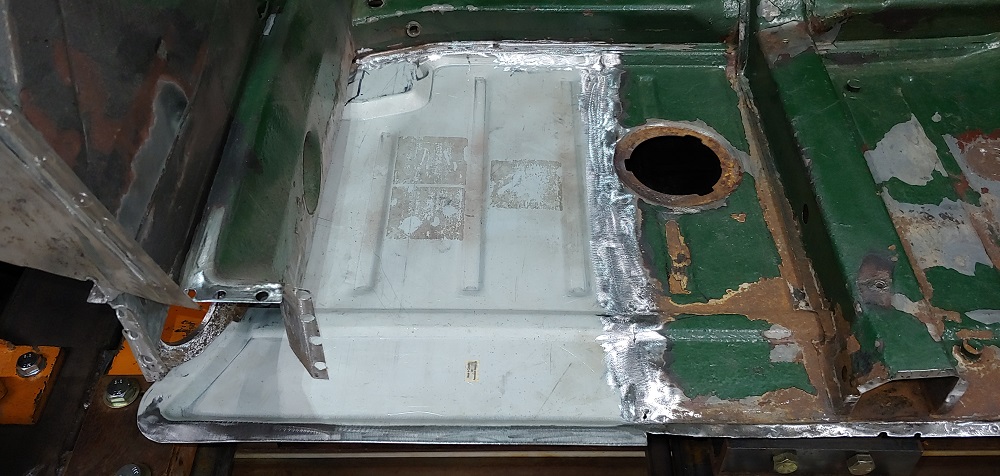
Posted by: Luke M Mar 30 2021, 07:41 PM
Double carboard with filler...Fingers Crossed
Hi Jeff,
Lets hope it gets here undamaged. Last two items didn't fair so well in shipping.
Posted by: sixnotfour Mar 30 2021, 08:24 PM
Double carboard with filler...Fingers Crossed
Hi Jeff,
Lets hope it gets here undamaged. Last two items didn't fair so well in shipping.
Posted by: sixnotfour Mar 30 2021, 08:25 PM
Double carboard with filler...Fingers Crossed
Hi Jeff,
Lets hope it gets here undamaged. Last two items didn't fair so well in shipping.
Posted by: Luke M Apr 2 2021, 06:28 PM
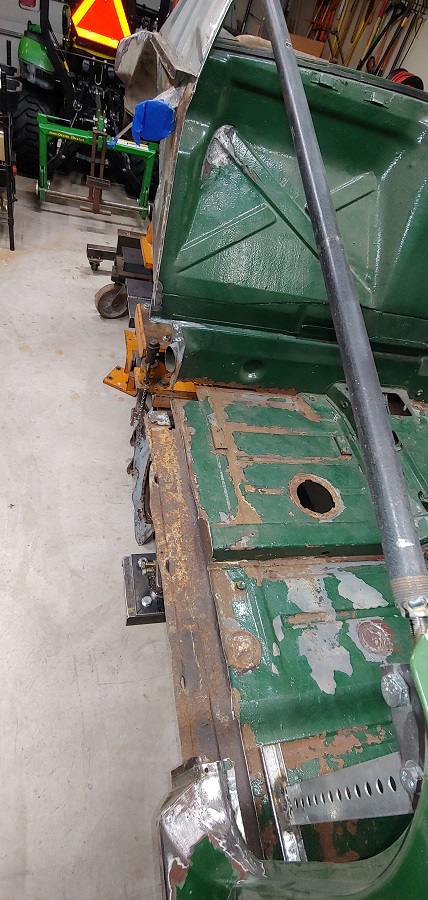
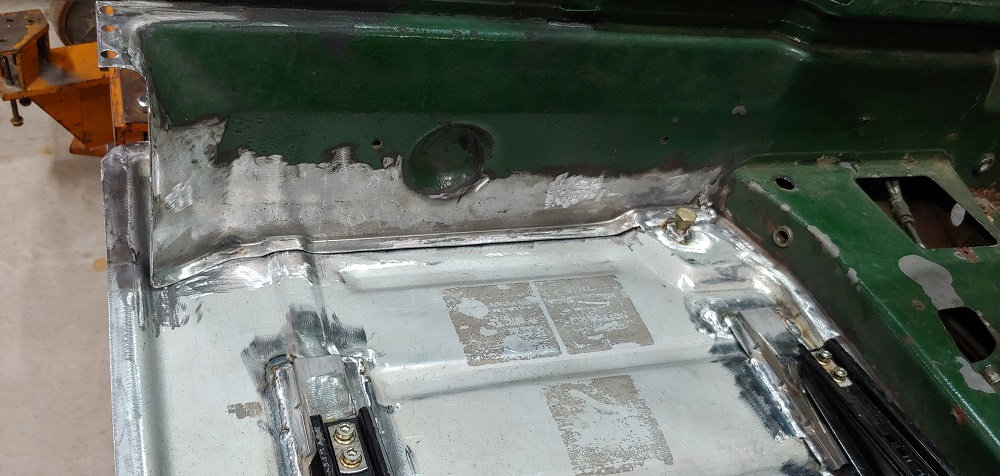
Got the pass floor pan done. Installed the adjustable seat brackets, welded in the lower inner and outer fire wall repair patches. Check that off the list.
Attached image(s)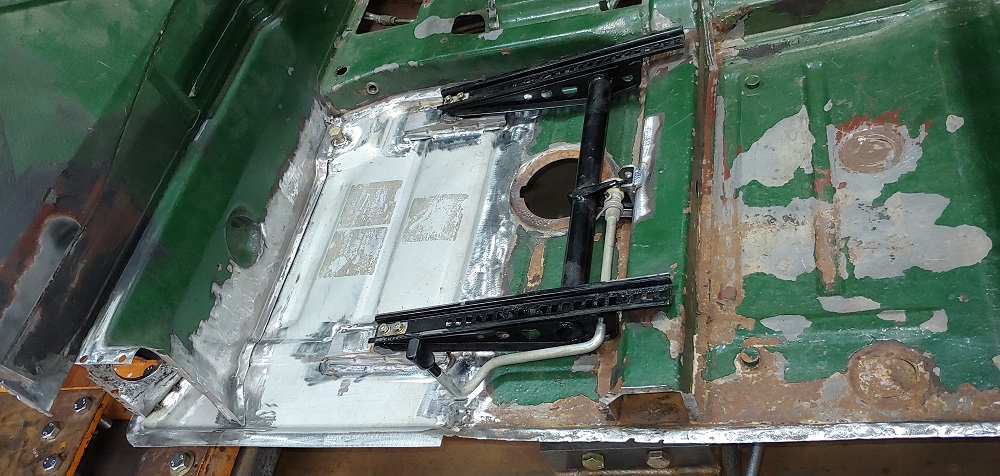
Posted by: Luke M Apr 3 2021, 09:56 PM
It's official the right long is in...
Good thing I have the bench fixtures while doing this.
The whole rear portion was off by a good 1/4'' to the outside and 1/2'' to the rear.
After about an hour of dealing with the issue the welding started.
Attached image(s)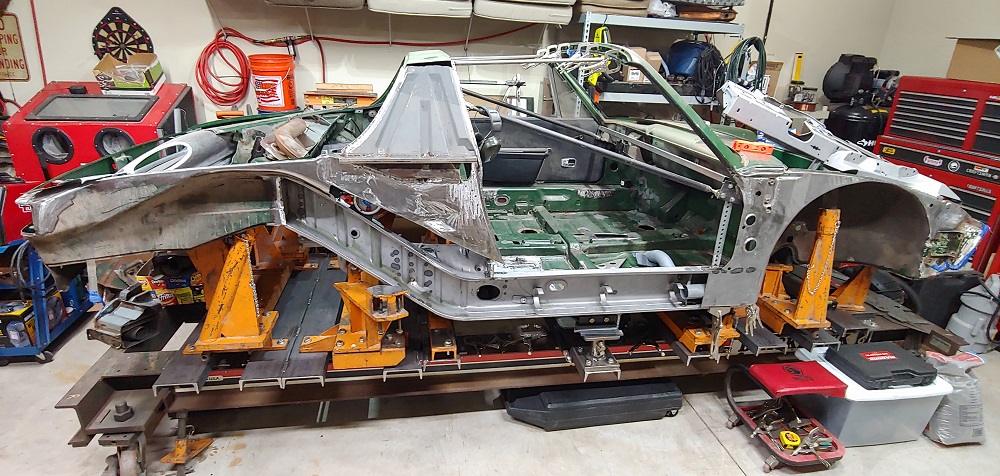
Posted by: Luke M Apr 4 2021, 08:59 AM
Tested fitted some panels this morning. Looks like everything needs to be shifted backwards 3/8'' . Starting to look like a car again.
Attached image(s)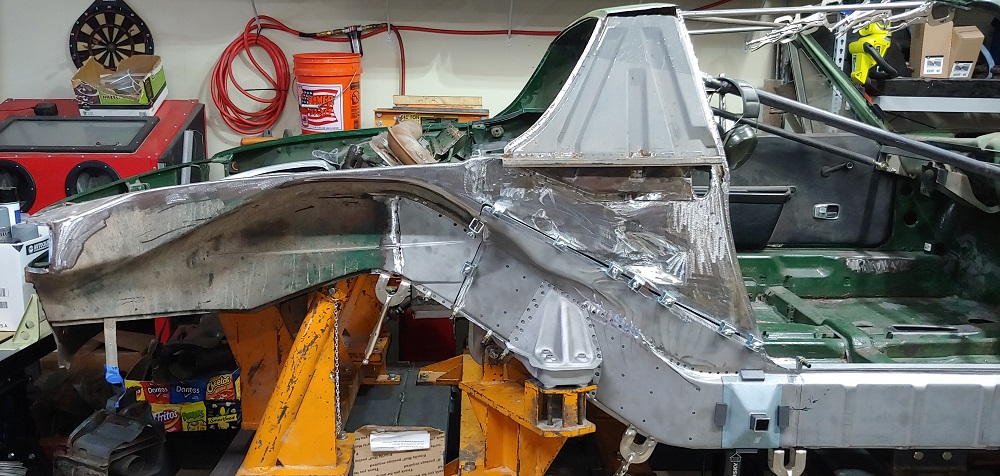
Posted by: Cairo94507 Apr 4 2021, 11:14 AM
@http://www.914world.com/bbs2/index.php?showuser=6113 M - I am now using the picture right above this is my screen saver. That is the coolest picture I have seen laying the chassis bare. Outstanding work!
Posted by: rgalla9146 Apr 4 2021, 05:51 PM
Looks beautiful Luke
Keep up the good work
Little by little
Posted by: 930cabman Apr 5 2021, 07:00 AM
Great work Luke, too bad many of us are working with backyard fixtures (at best) to get our loose 914's aligned. I suspect many of them are far from aligned to factory specs.
Posted by: Luke M Apr 5 2021, 07:42 PM
Thanks Guys. Working away here today. Started to spot weld the floor pan to long. Michael I watched your 6 being worked on by Kent. I got a lot of knowledge by watching how Kent removed the panels and fitted them. Today I spent several hours test fitting the NOS panels and adjusting the inner fender/inner rocker. First I have to seal the inside of the long then weld her up.
Attached image(s)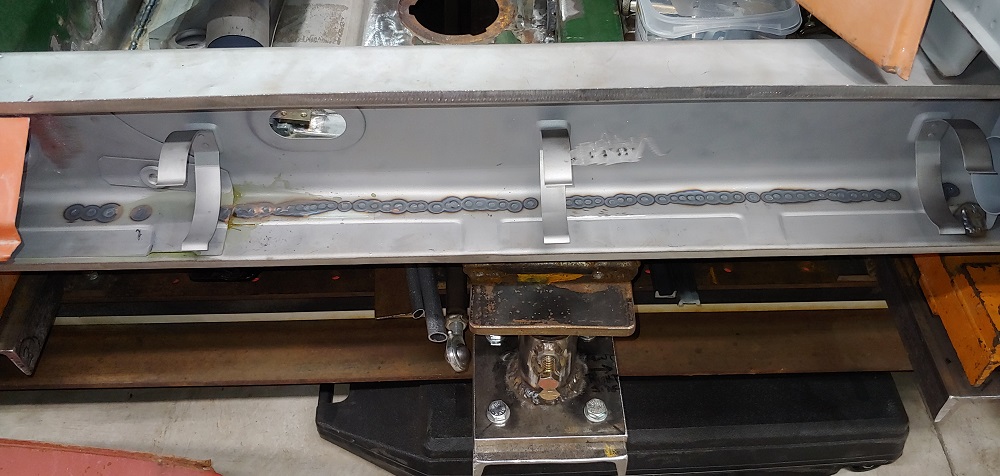
Posted by: Cairo94507 Apr 5 2021, 07:51 PM
Wow Luke, that's some gold lying on the floor. That is going to be one killer Six. I know you and Kent would be great friends if you met.
Posted by: sixnotfour Apr 5 2021, 08:34 PM
So Glad it made It.. Undamaged.. nos flairs are next ?? offers..
Posted by: Luke M Apr 6 2021, 08:30 AM
Anyone know if this 914 owner is a member here?
Attached image(s)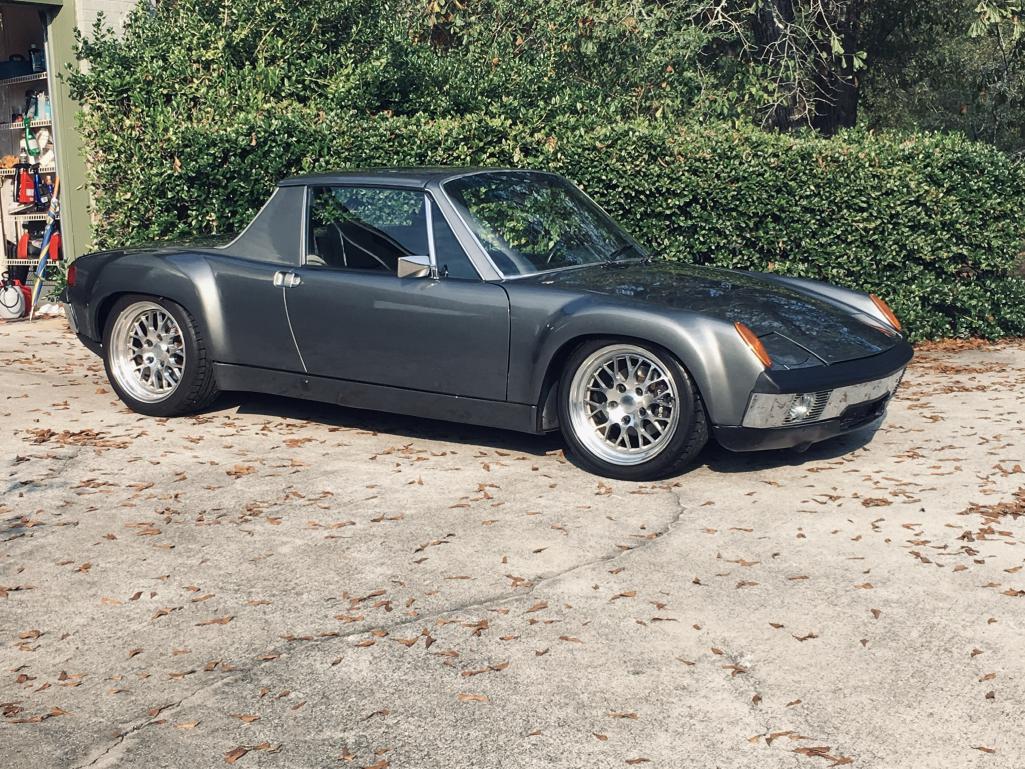
Posted by: Root_Werks Apr 6 2021, 08:48 AM
Those are some seriously rare body panels! It's starting to come together.
Posted by: Luke M Apr 6 2021, 06:49 PM
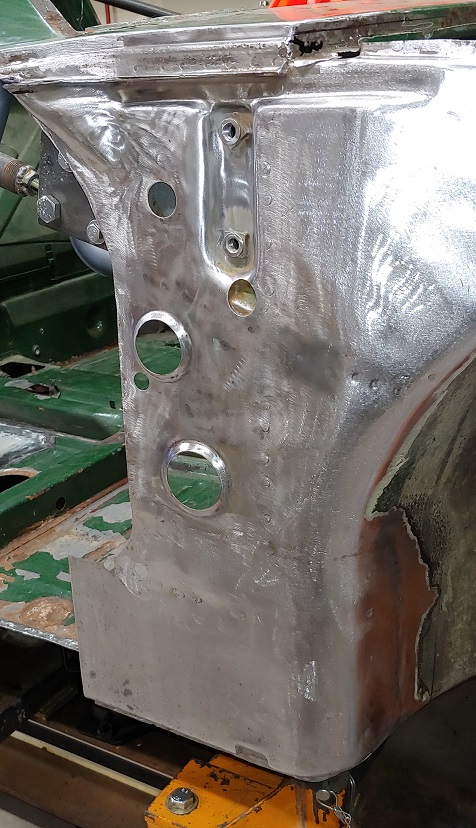
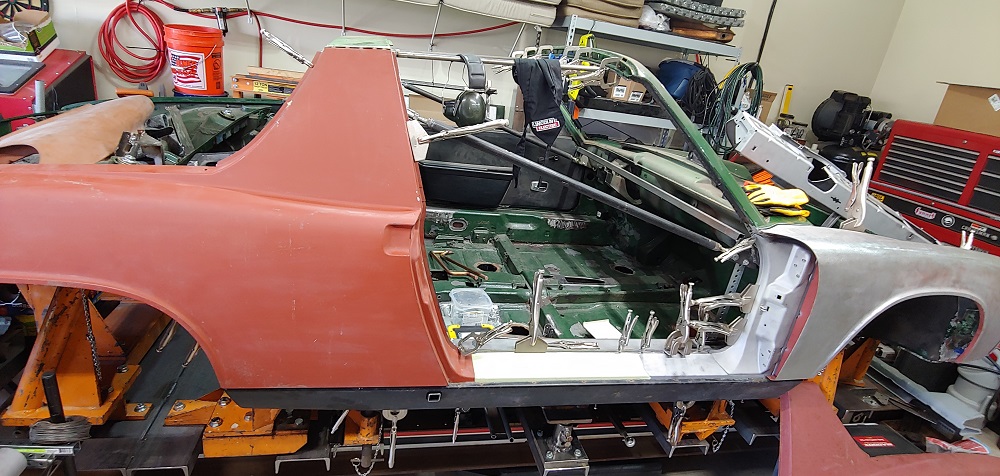
A few more things checked off the list. Installed the right rear triangle, sealed inner long, and the backsides of the sheet metal that will not see day light. If I have time tmrw morning I'll test fit some panels if not it'll have to wait until Thursday.
Attached image(s)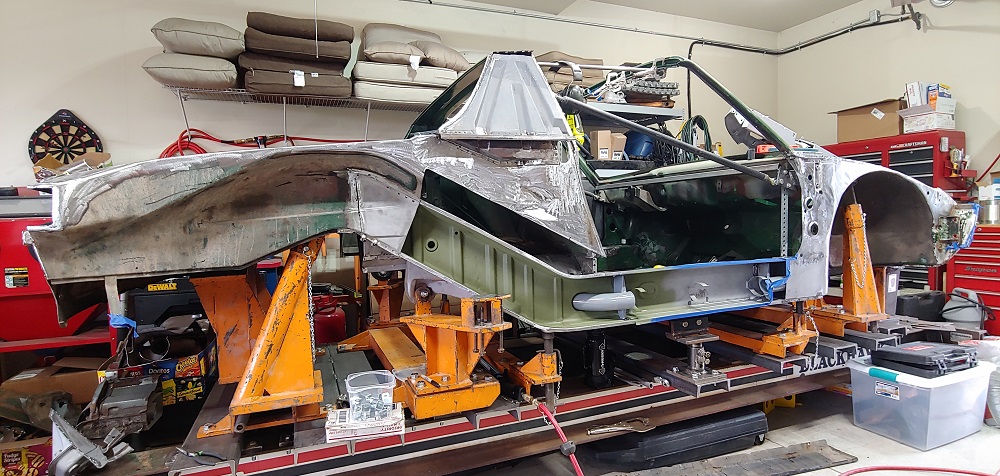
Posted by: djway Apr 7 2021, 12:56 AM
Anyone know if this 914 owner is a member here?
BIGKAT_83 I believe
Posted by: rgalla9146 Apr 7 2021, 05:48 AM
Hey Luke didn't the right long come complete with the outside suspension console ?
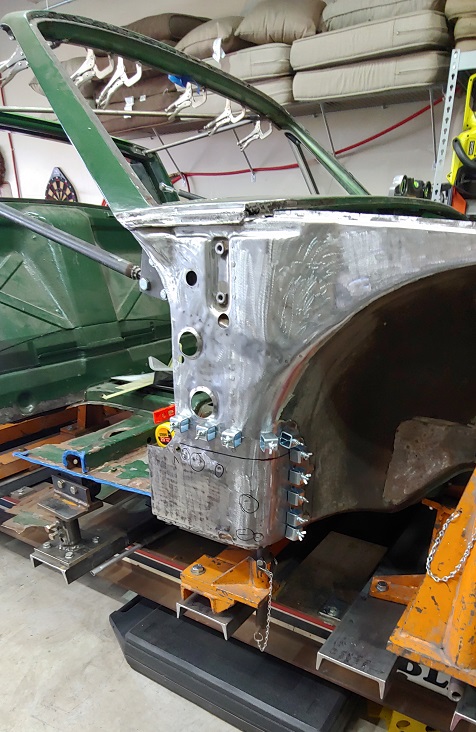
Posted by: Luke M Apr 7 2021, 07:15 AM
Hey Luke didn't the right long come complete with the outside suspension console ?
Hi Rory,
The right long came with the inner (engine side) suspension arm attached.
The outer console is attached to the inner fender portion. I have a pretty nice and rust free outer suspension console that's going back on. The org console was badly rusted out. I'm heading out in the garage soon here to test fit the panels. I want to measure everything then on Thursday I'll start welding everything up.
Posted by: 930cabman Apr 7 2021, 08:51 AM
Luke, you make this look awfully easy. Great work this baby will be honkin down the road soon!
Posted by: Luke M Apr 7 2021, 09:46 AM
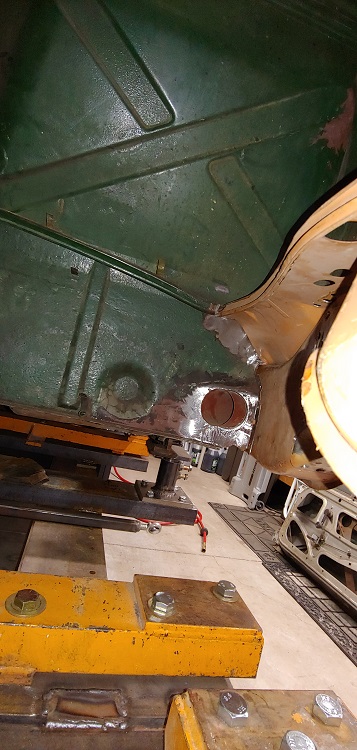
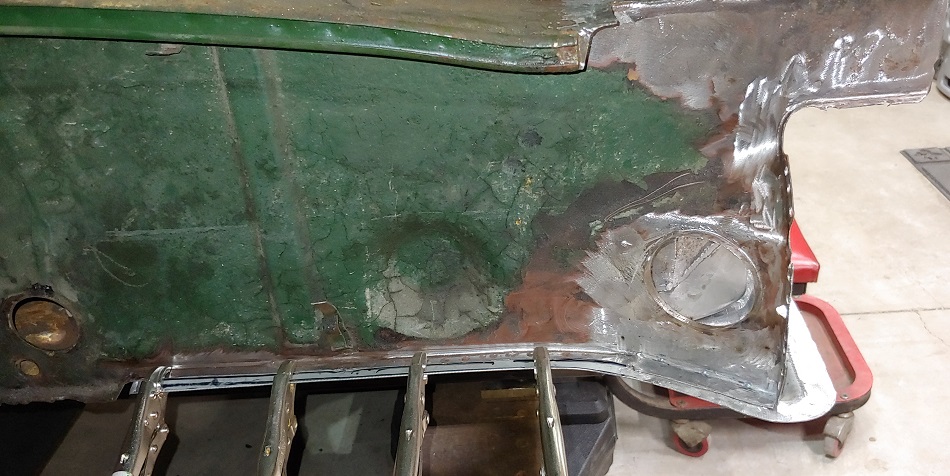
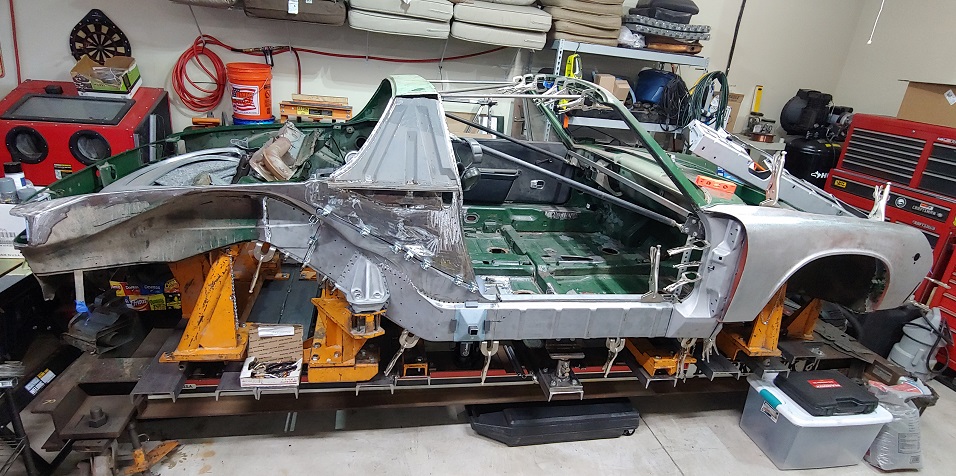
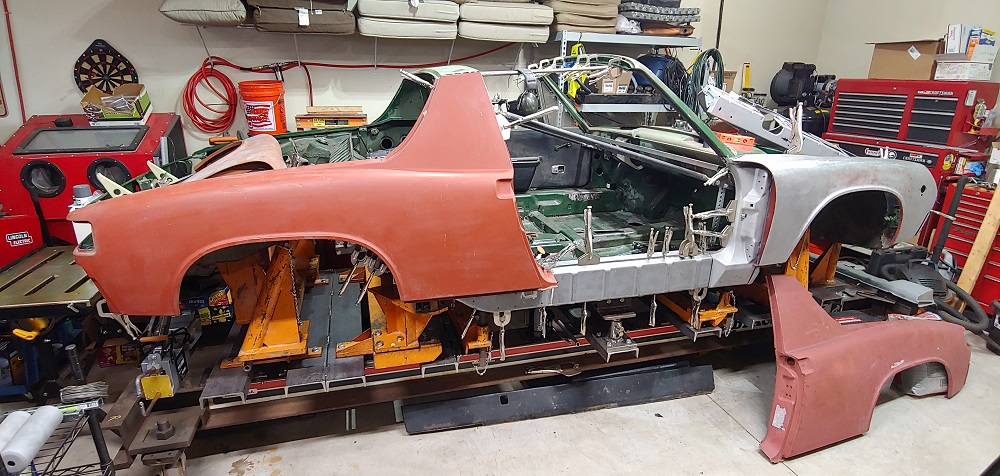
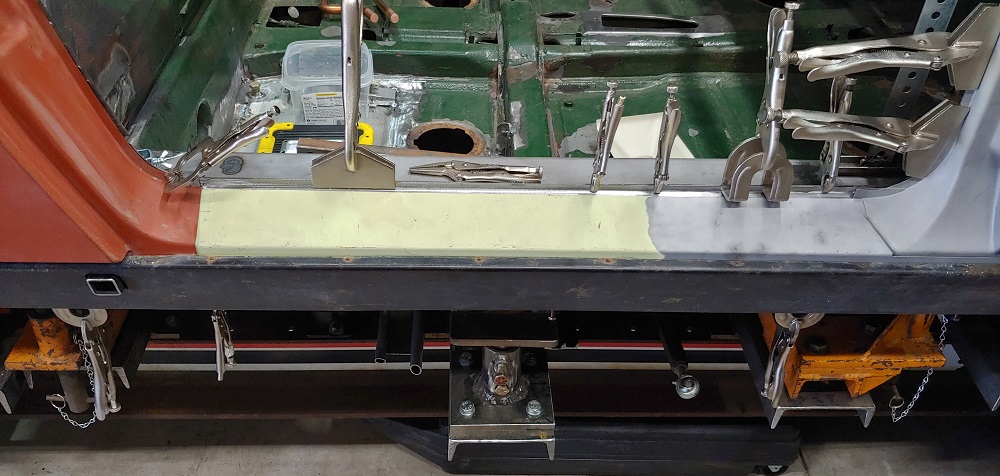
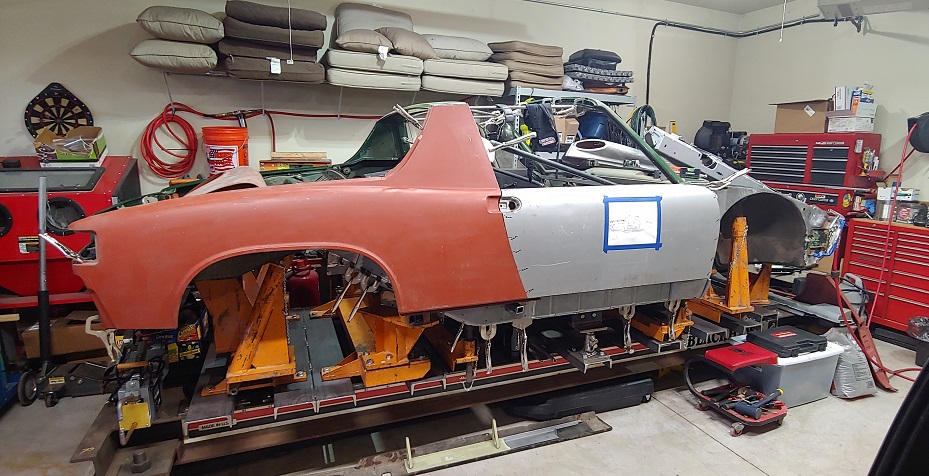
Installed the new heater tube, and tested fitted some panels. It's starting to look like a whole 914 again. That's all for today.
Attached image(s)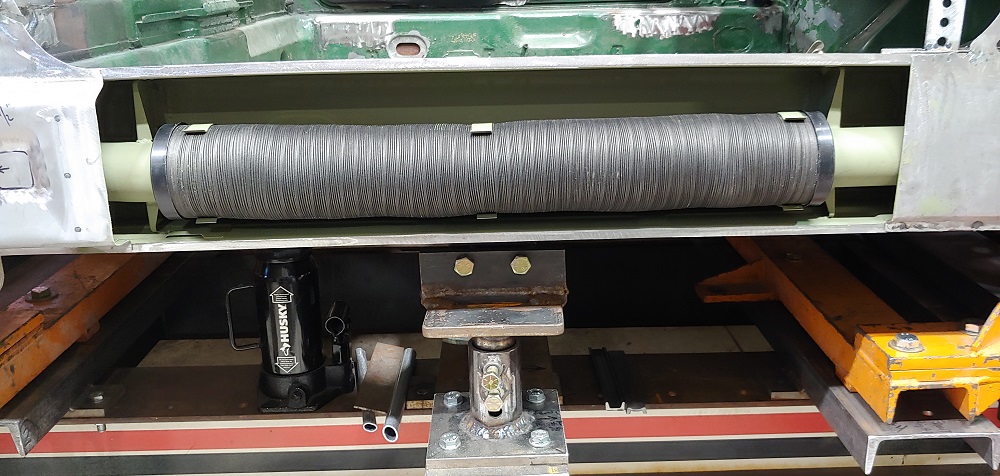
Posted by: mb911 Apr 7 2021, 11:29 AM
Wow looks great.
Posted by: 914werke Apr 7 2021, 12:09 PM
Luke curious, are you tracking your hrs on this?
Posted by: Luke M Apr 7 2021, 06:31 PM
Luke curious, are you tracking your hrs on this?
I'm not keeping track of the work hours. On the days that I work on it I spend anywhere from 4 to 6 hours. So far I have more time in locating parts then actual man hours on the car itself. If I had to guess on time spent doing the right long swap it would be in the 50 - 60 hour rage so far. Lots of time spent installing, test fitting, trimming, checking specs, prepping the new panels for install. Not to mention cutting out and grinding all the old metal sections.
Posted by: 930cabman Apr 8 2021, 04:53 AM
Don't forget all the misc. items we incur during these projects. Time = $$$$ and lots of it
BTW work looks superb
Posted by: TRS63 Apr 8 2021, 11:36 AM
Amazing project, enjoying a lot your progress as I am myself involved in such a big project (my type 14 ghia). Keep us updated, it is so great to see work well done as you are doing!
Cheers
Antoine
Posted by: ClayPerrine Apr 8 2021, 11:40 AM
Luke curious, are you tracking your hrs on this?
I'm not keeping track of the work hours. On the days that I work on it I spend anywhere from 4 to 6 hours. So far I have more time in locating parts then actual man hours on the car itself. If I had to guess on time spent doing the right long swap it would be in the 50 - 60 hour rage so far. Lots of time spent installing, test fitting, trimming, checking specs, prepping the new panels for install. Not to mention cutting out and grinding all the old metal sections.
The first rule of 914 ownership is "Don't ever total up the time you spent or the total dollar amount spent."
If you ever do, you will regret the fact that you could have had a new GT4 for less than what you already spent..... and it is still not finished.
And if your wife finds out (well... your wife, not mine), you won't have the car much longer.
Clay
Posted by: 930cabman Apr 8 2021, 12:08 PM
Amazing project, enjoying a lot your progress as I am myself involved in such a big project (my type 14 ghia). Keep us updated, it is so great to see work well done as you are doing!
Cheers
Antoine
Take your time with your Ghia, I rebuilt a 1969 convert in the mid 1980's and did not get the door gaps correct, but she held together for a long time. Best of luck Antoine
Posted by: ctc911ctc Apr 8 2021, 05:35 PM
I have that same RED level - do not trust that thing! ASK ME HOW I KNOW!
Got the door post off. Started cleaning up the mounting areas for the door post and fender. Also a quick test fit of the NOS right door post. Still got to figure out a patch panel for the lower section of the inner wheel housing/lower door post.
Posted by: Luke M Apr 8 2021, 05:55 PM
I have that same RED level - do not trust that thing! ASK ME HOW I KNOW!
Got the door post off. Started cleaning up the mounting areas for the door post and fender. Also a quick test fit of the NOS right door post. Still got to figure out a patch panel for the lower section of the inner wheel housing/lower door post.
I have a few better levels I use to make sure everything is good.
I quadruple check everything..lol
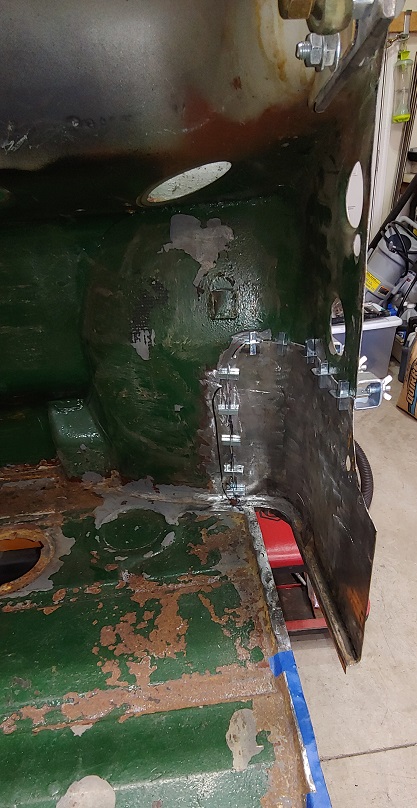
I did run into a snag today while test fitting the outer rocker and door threshold sill.
The door sill needs to be adjusted so I can move it forward 2 mm. Then all the upper rocker mount holes will line up and the sill will be in the proper location. Right now the most forward part of the sill is too far away from the door post/lower fender section.
The lower rocker to inner rocker mounting holes were slightly off so I addressed that.
Then I found the RD inner wheel housing didn't have the lower mount/hole for the outer rocker. So off that needs to come so I can drill and weld a nut inside it. Good thing I was checking everything before I started to weld everything up. I deal with that on Sat.
Attached image(s)
Posted by: Luke M Apr 15 2021, 09:09 AM
Well the last several days I've been fighting with the darn door post. The measurements went way off and couldn't figure out why. I had my son help me with installing the door and figured out the issue. The inner rocker kept dropping down under the door post which in return the door post also dropped enough to screw things all up. Now that that's figured out, I have to figure out a good way to keep everything in place so I can test all the panels prior to welding. 10 days to blasting party so I need to get it done.
Attached image(s)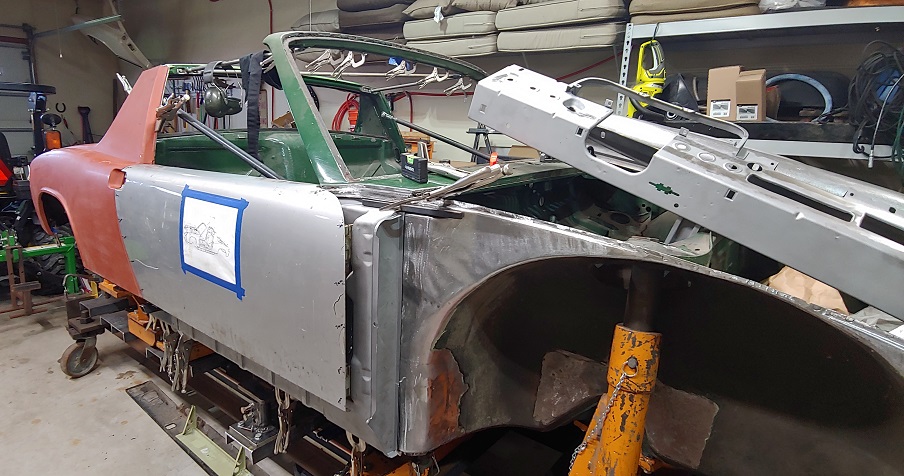
Posted by: Cairo94507 Apr 16 2021, 08:01 AM
Does anyone else see the factory red-ish primed panels and wish they could just have their whole car like that and shoot a satin clear over it?
Posted by: Luke M Apr 16 2021, 05:55 PM
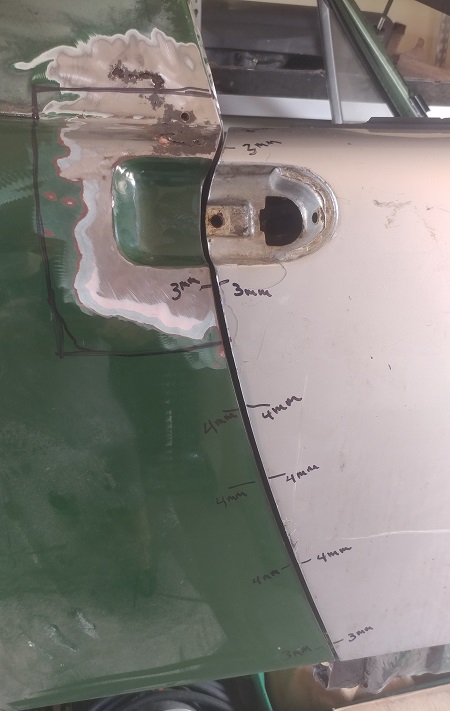
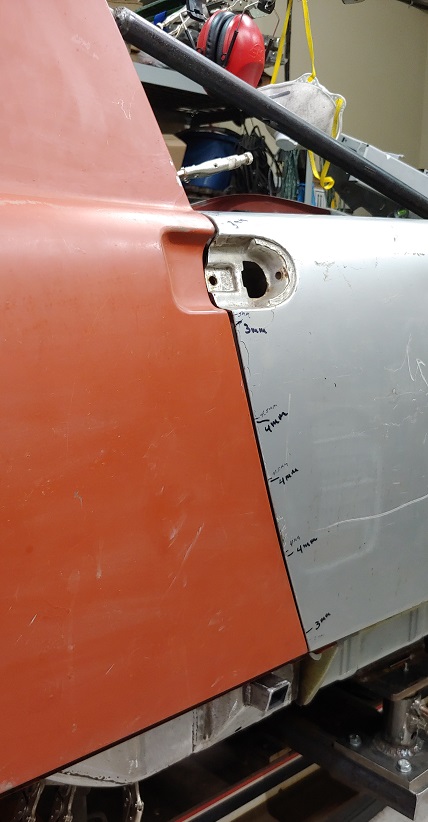
What a PIA it is to line up all the panels. I'm getting close but still off 2 mm at the bottom of the door. I'm trying to set the door to q-panel and door to front fender gaps to a max of 5 mm all around. Seams like that's gonna be harder then I think. Right now I have a 4 mm gap but opens to max of 7 mm and as tight as 3 mm. The pics posted are of the measurements prior to cutting of any sheet metal and right now. Thick sharpie is prior and fine sharpie is current measurements. I believe I can get a 5 mm gap at both of the door bottom ends. See how Sat turns out. As of right now the rear q-panel is set, outer rocker is set, jack post set, door sill is set, front fender is set, inner rocker needs a slight adjustment and the door post needs to be moved forward another 2 mm at the bottom only.
Attached image(s)
Posted by: Cairo94507 Apr 16 2021, 07:20 PM
Luke, those gaps, as they sit right now, are probably better than most 914's on the planet.
Posted by: Luke M Apr 16 2021, 08:27 PM
Luke, those gaps, as they sit right now, are probably better than most 914's on the planet.
I can see why body shops charge what they do to set the gaps.
I wonder how long it took Kent to do your car.
I'm on day three now messing with this. I'd like to set the door post tmrw and get it welded on.
Posted by: Cairo94507 Apr 17 2021, 06:43 AM
Yeah, my car was at Kent's for about 18 months. Of course he had other cars in his shop too. When people see my car they go crazy over the body, gaps and paint.
My cousin, Phil, is doing a split bumper Camaro hot rod and it is in the body shop now getting prepared to paint very soon. We took my car to the shop so the painter could see how Phil wants his car to come out. The painter looks at the car and recognizes the quality. Phil tells the painter, as they return to working on the Camaro, that is the way we are going to do my car. The painter, w/o missing a stroke of the long-board, looks at him and says, "No we are not". My cousin said he busted out laughing because he knew the painter recognized the tons of hours to get a car that straight and perfect. Phil had to call me and tell me about the compliment before they got back to the long-board work.
Posted by: Luke M Apr 21 2021, 08:36 PM
Working away here.. ready to close up the right long for good. I lost count on how many times I tested fitted all these panels. I did it for the last time this morning. Started welding things up. Got to love spot welders. I spot welded the door sill on the inner rocker prior to welding it on the right long. Sealed the internal sections with some Eastwood internal frame coating. My brother dropped his 914 off at my house for the weekend blasting party. That is if the weather co-operates.
Attached image(s)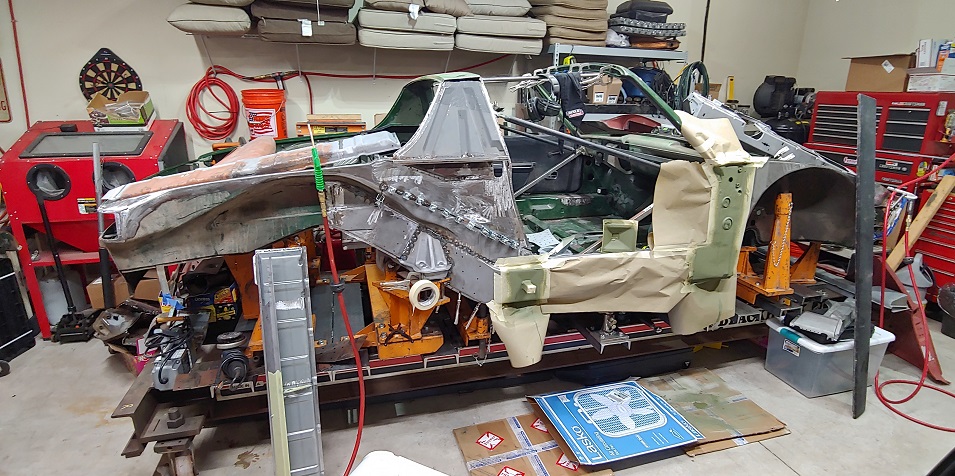
Posted by: Arno914 Apr 22 2021, 01:31 AM
Awesome work!
Speaking about gaps: You have your car on the "Celette" which is the most valuable thing to do. Is there any experience out there what might happen to the gaps when the car sits back on it´s own wheels? Is there any body sag to be expected that must be compensated beforehand?
Posted by: Luke M Apr 22 2021, 07:11 AM
Awesome work!
Speaking about gaps: You have your car on the "Celette" which is the most valuable thing to do. Is there any experience out there what might happen to the gaps when the car sits back on it´s own wheels? Is there any body sag to be expected that must be compensated beforehand?
The bench fixtures do help a lot. I had a small issue fitting the NOS right long in the chassis. Had I not had the fixtures I would've messed up the install for sure. It wasn't off by much but 13 mm here and a few more mm there gets things all screwed up. I had an issue fitting the new NOS door post too. Once I figured out the issue there the door gaps were spot on. I get a 4 to 6 mm gap now. I believe once the chassis is on the ground the gaps will show very little movement or at most 1 mm which gives me a 5 mm door gap.
I'm also installing a GT kit along with the RD long frame stiffeners. I also plan on stitch welding the seams just to strengthen the chassis.
Posted by: gms Apr 22 2021, 07:22 AM
you are moving right along, build is looking great Luke!
Posted by: Luke M Apr 22 2021, 05:53 PM
you are moving right along, build is looking great Luke!
Thanks Glenn.. Lots more to do. Looks like the blasting is being pushed back due to weather. The blasting co. owner called today to reschedule it for next week. That's fine by me as I need several more days to finish up a few things. Today I got the inner fender all welded in, and started the GT kit install. Hopefully on Friday I can have the right long sealed up.
Attached image(s)
Posted by: Cairo94507 Apr 23 2021, 06:55 AM
I just love the pictures you have posted of all the work you are doing. They really show the structure of these cars.
Posted by: Luke M Apr 23 2021, 07:00 PM
Got the GT kit welded in the right side. Did some grinding as well.. Did I mention that I hate grinding.. Anyways, welds are ground down and prepped the inner rocker to be spot welded on.
Attached image(s)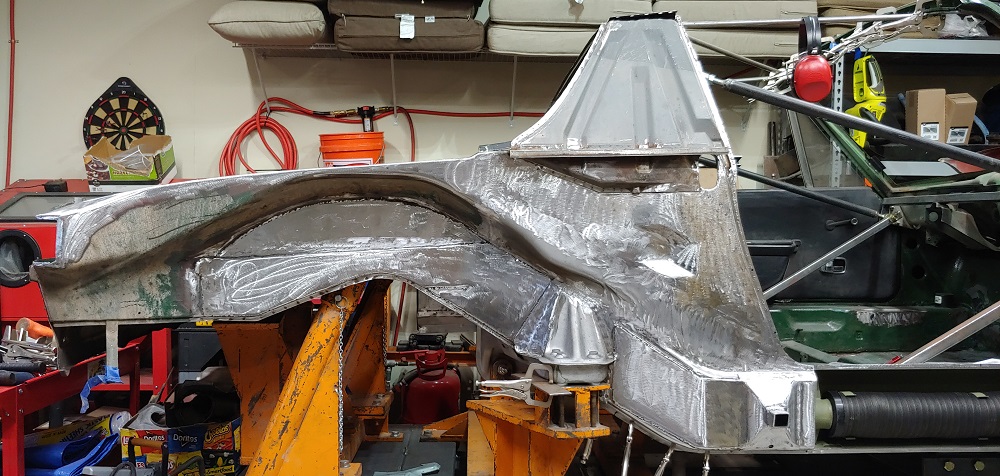
Posted by: Luke M Apr 25 2021, 07:11 AM
I got the inner rocker spot welded on Saturday. Today will be attaching the door post and checking final door gaps. Then I'll be grinding some welds.
Attached image(s)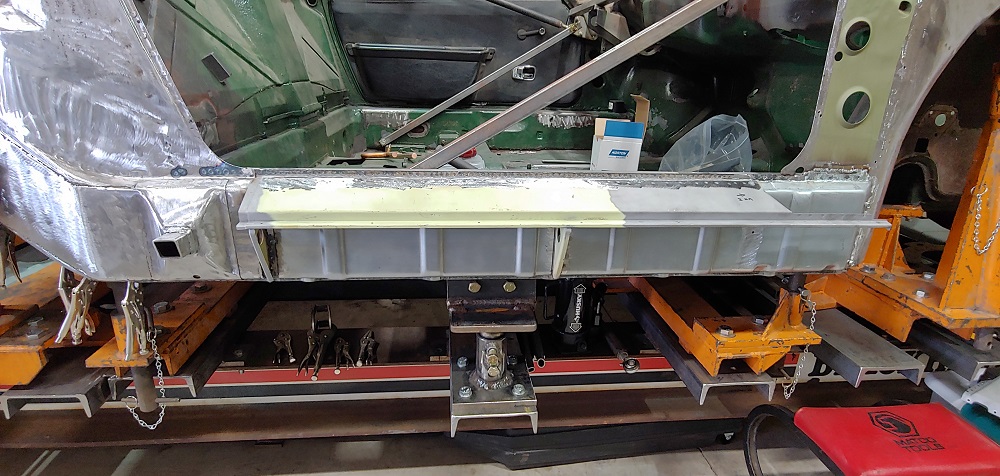
Posted by: Luke M Apr 25 2021, 06:09 PM
The door post is in and done for most part. I have to grind the welds down and clean up a few spots underneath. Test fitted the door and checked the door gaps. They came in at 4, 4.5, to 5 mm all around. I can't complain about that.
Attached image(s)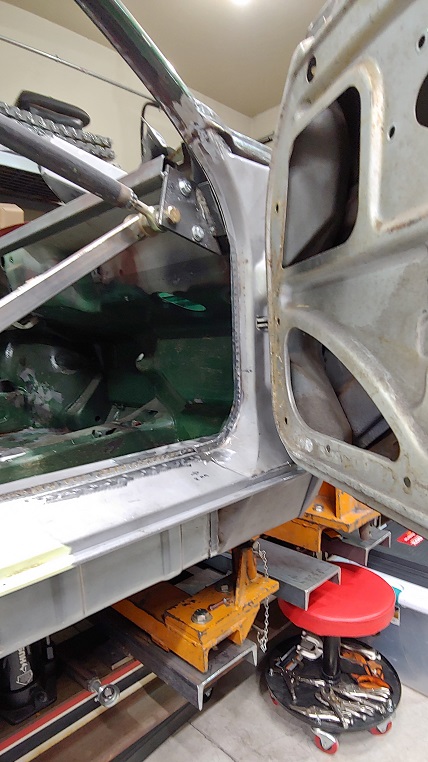
Posted by: Van914 Apr 26 2021, 06:06 AM
You must be a very patient man.
Great work!
Posted by: Luke M Apr 29 2021, 07:49 AM
You must be a very patient man.
Great work!
Yeah, you can say that..lol
It's been an 11 year project but I'm hammering away at it this year.
I want to be driving it next summer.
My brothers 914 was blasted yesterday and my 6 is up next.
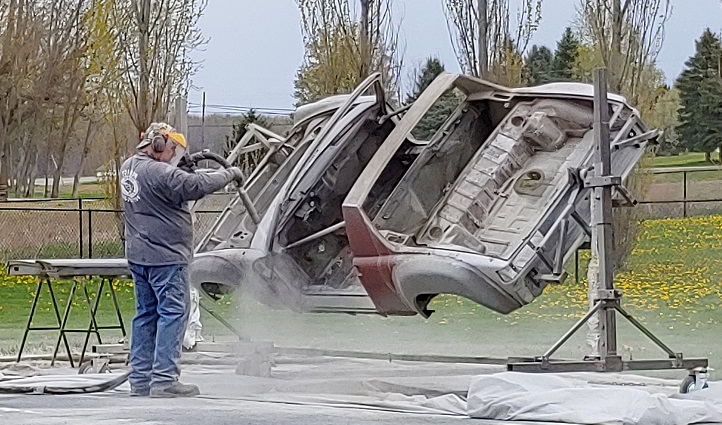
The weather is messing with the scheduling now as rain is in the forecast for the next 8 to 10 days. The blast guy said if there's a chance of rain he won't blast it. We did get about a 20 min rain fall here as they were blasting my brothers 914. It didn't flash overnight which is good. The blast guy washed the whole car down with some rust inhibiting stuff once he was done blasting.
Attached image(s)
Posted by: rgalla9146 Oct 26 2021, 10:10 AM
Anyone know if this 914 owner is a member here?
Hey Luke
I might know the new owner of the metallic grey car.
I'll confirm soon.
Rory
Posted by: Luke M Oct 26 2021, 10:45 AM
Anyone know if this 914 owner is a member here?
Hey Luke
I might know the new owner of the metallic grey car.
I'll confirm soon.
Rory
Hi Rory,
Cool and thanks...
Posted by: Root_Werks Oct 26 2021, 11:05 AM
Such an amazing build! Love seeing the inner workings of a 914 like this.
Posted by: rgalla9146 Oct 26 2021, 03:56 PM
Anyone know if this 914 owner is a member here?
Hey Luke
I might know the new owner of the metallic grey car.
I'll confirm soon.
Rory
Hi Rory,
Cool and thanks...
Nope, not the car. Right color, wrong car.
Posted by: Luke M Jan 2 2024, 09:42 AM
Happy New Year to all... 
I had a buddy of mine hit me up to see how my 6 was coming along so I figured I'd make a little update. In the fall of 2022 I had to have a surgery to fix my arm/shoulder.
Fast forward after recovery and several months of pt things seam to be coming along well. I have a followup with my surgeon here in a few days and hopefully get the ok to get back to it. So, yeah the 6 still looks like the last pic I posted. I'd have to cleanup the garage a little to get to it but I'll try my best to get working on it here soon. If anything I was glad to get my brothers 6 conv assembled enough to get it moved back to his place. It looks like I have my spring and summer booked for now.

Posted by: rick 918-S Jan 2 2024, 10:10 AM
Shoulder surgery sux! Had one done several years ago. It is still perfect now. The car looks great. Keep going. Wish I had those from strut tower fixtures. I could use a set for a week or so just to check height for my 6.
Posted by: Cairo94507 Jan 2 2024, 10:12 AM
Good luck with your doctor appointment Luke. Looking forward to seeing your progress once you get back to it.
Powered by Invision Power Board (http://www.invisionboard.com)
© Invision Power Services (http://www.invisionpower.com)