Printable Version of Topic
Click here to view this topic in its original format
914World.com _ 914World Garage _ Cell phone / Smartphone mount for Porsche 914
Posted by: johannes Oct 25 2015, 04:46 AM
http://www.914world.com/bbs2/index.php?showtopic=360712
https://www.youtube.com/watch?v=yDaeY1dAp0M
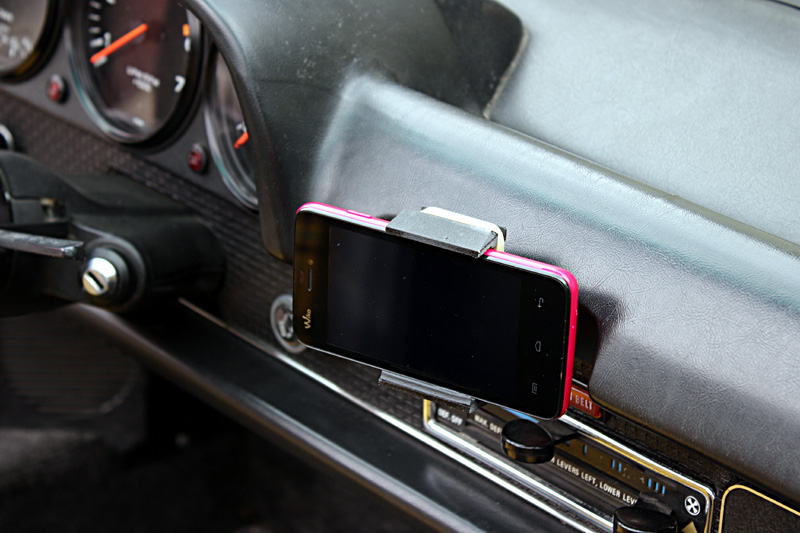
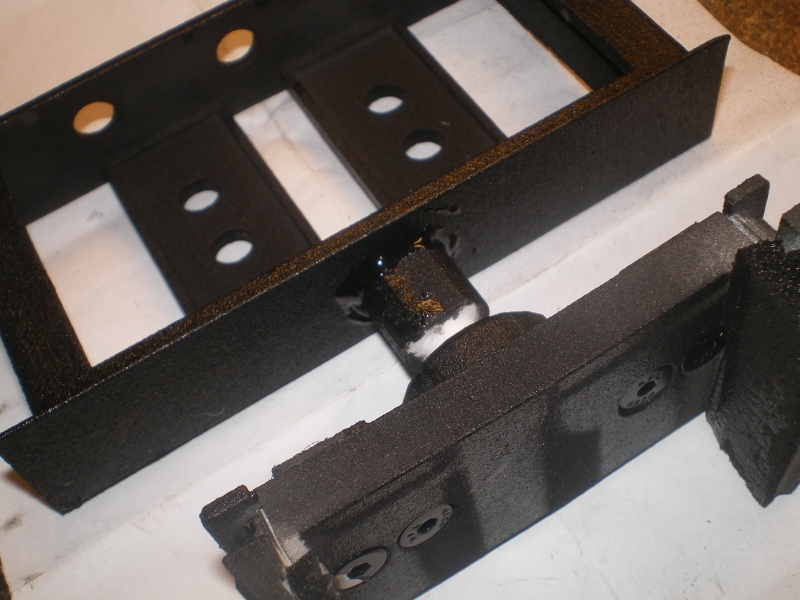
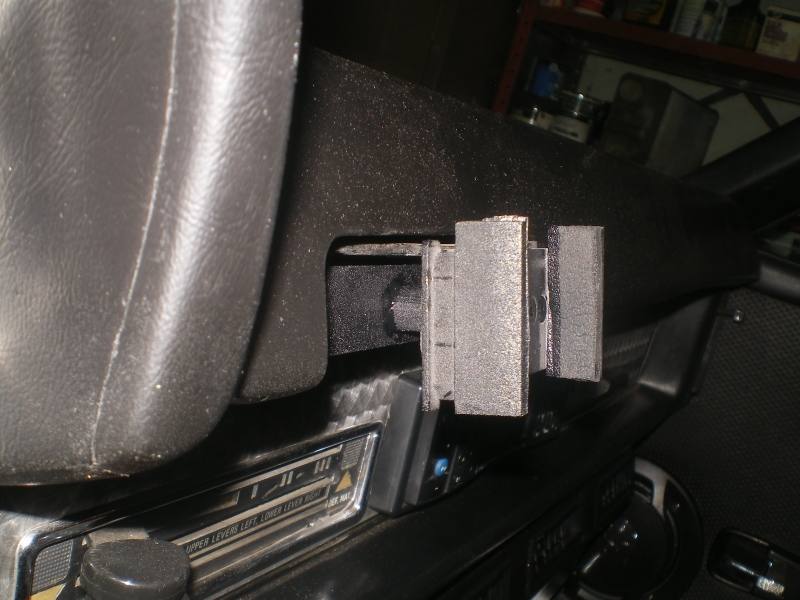
I just finished and tested the first prototype of the 3D printed cell phone / smartphone mount. The mount replaces the ashtray.
This is available as a kit. You will have to order the 3D parts directly from the printer. The 3D printing is made with Polyamide. Its a white, very fine, granular powder. The result is a strong, somewhat flexible material that can take impacts and resist pressure while being bent. The surface has a sandy, granular look, and is slightly porous. The material can be painted.
To complete the kit you will also have to source or order
4x M4x12 screws and nuts
1x M4x15 screw
2x 5x70mm rubberbands
2x small pieces of 10x3mm rubber windows seal
(see ordering post below)
- Fits most phones from the small I-Phone to the large Galaxy from 6 to 8 cm wide (2.3/8 to 3.1/4)
http://www.914world.com/bbs2/index.php?showtopic=360712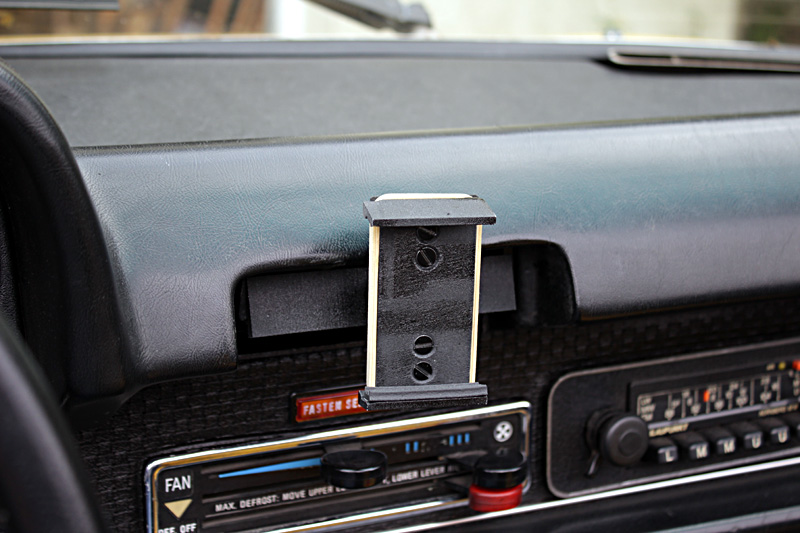
[attachmentid=524358]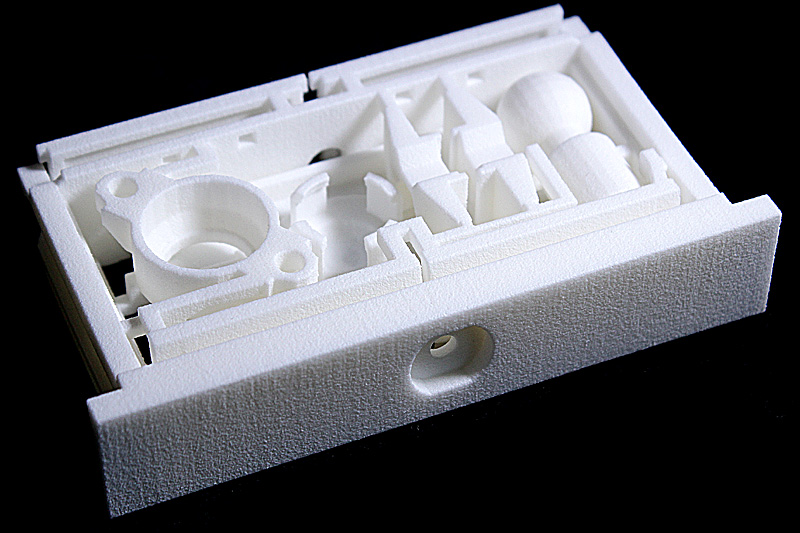
http://www.914world.com/bbs2/index.php?showtopic=360712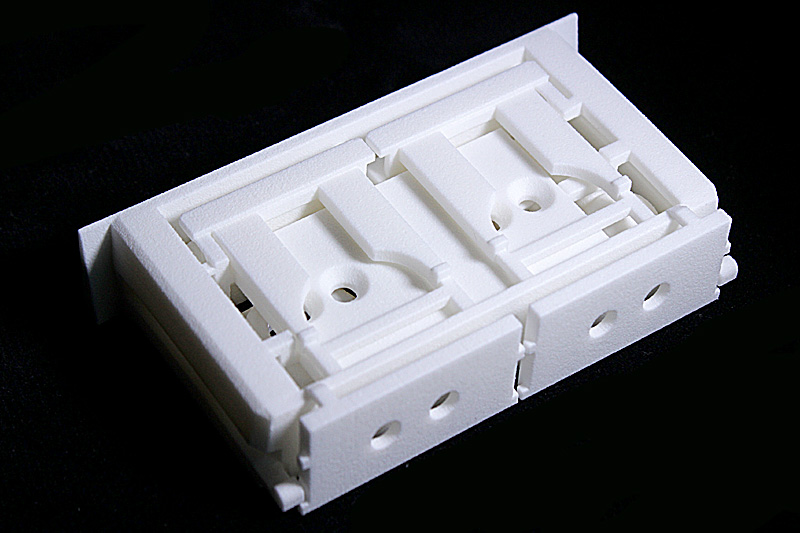

http://www.914world.com/bbs2/index.php?showtopic=360712
...
Posted by: johannes Oct 25 2015, 04:46 AM
http://www.914world.com/bbs2/index.php?showtopic=360712
1 - Ordering the 3D printed kit
You will order the 3d printed kit directely from the printer
Price is 23.32 Euros + shipping (VAT may apply when shipping in some countries)
https://i.materialise.com/shop/item/porsche-914-cell-phone-smartphone-mount 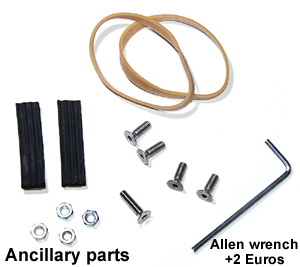
2 - Ordering the ancillary parts kit
You will order the ancillary parts from me.
You will need a 2,5mm Allen wrench to assemble the kit. If you don't own this tool I can provide it (option available below).
From 11/20/2015 screws and nuts are ony available in black
http://www.914world.com/bbs2/index.php?showtopic=360712
Posted by: johannes Oct 25 2015, 04:46 AM
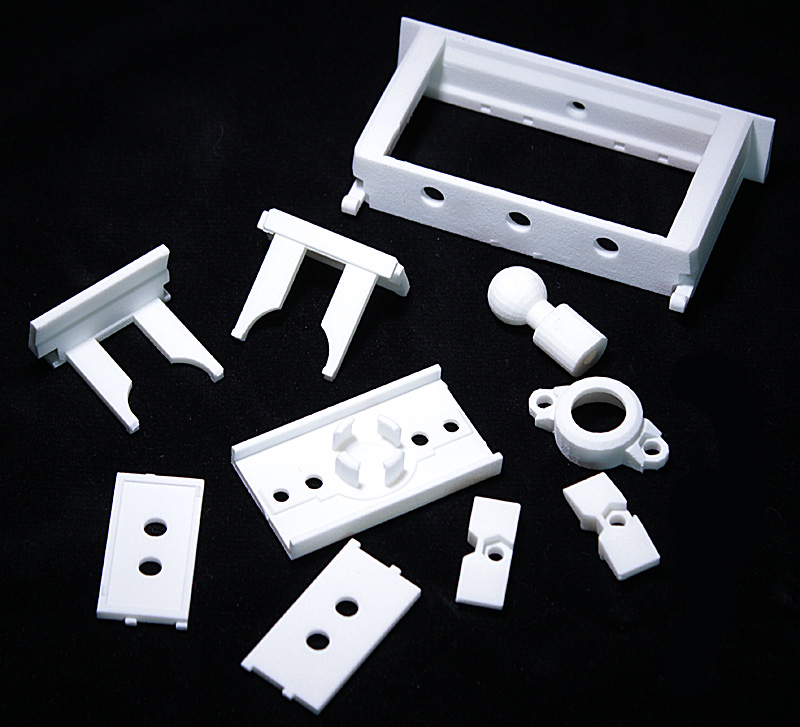
ASSEMBLY INSTRUCTIONS
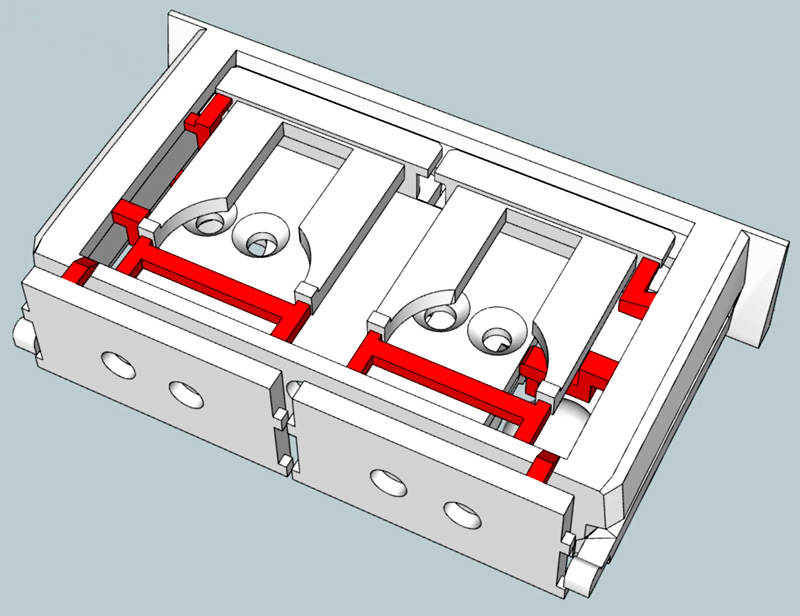
1- With a small plier, cut and remove all the parts that are shown in red.
Wear safety goggles as parts will jump all over the place.
2- Use a cutter to remove all the excess material.
3- Clean the parts as powder may stick on the surface and in the holes.
You can paint the parts but be carefull to not put too much paint on contact surface of the moving parts.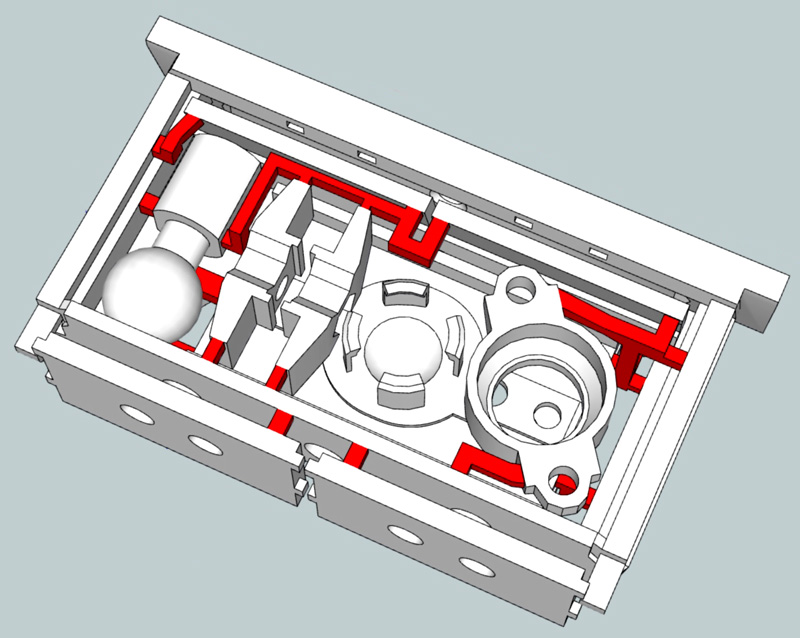
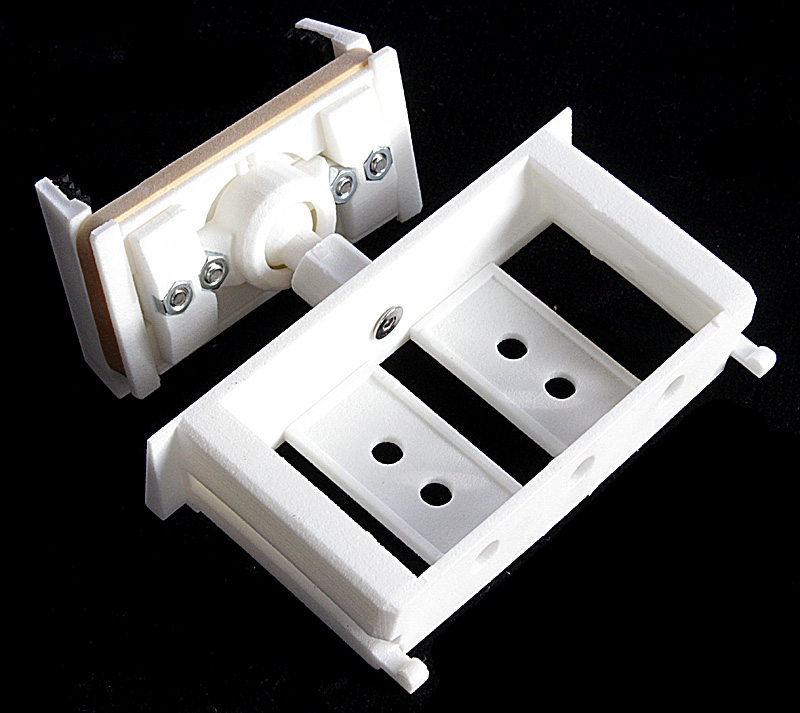
4- Assemble the parts as shown using 4x m4x12 and 1x m4x15 screws and nuts. Tight the screws gently. Overtighting will bend the parts and damage the plastic thread in the ball joint.
5- Glue the black joints
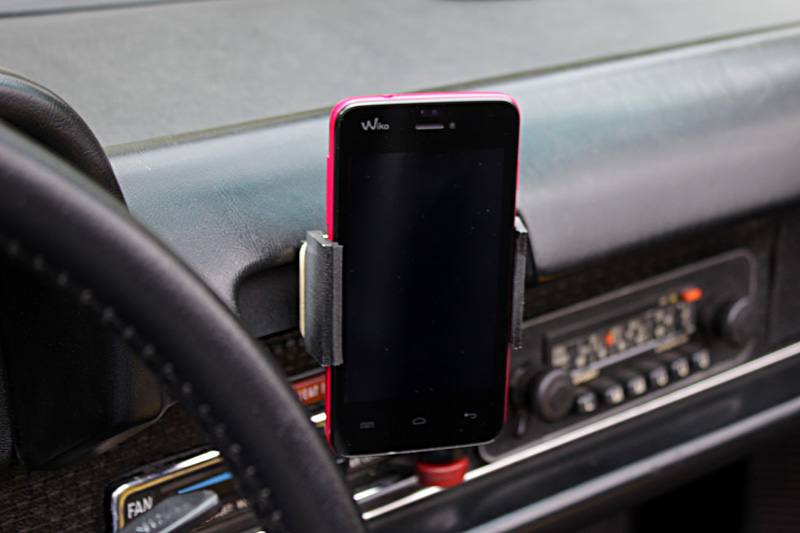
6- wrap a rubberband as shown on the pictures. A second rubberband is provided as a spare. The two rubberbands can be monted together if clamping force is not enough to maintain small phones.
IMPORTANT: One of the clamps always travels free, the other has to be set up to fit the size of the phone then tightened with the screw.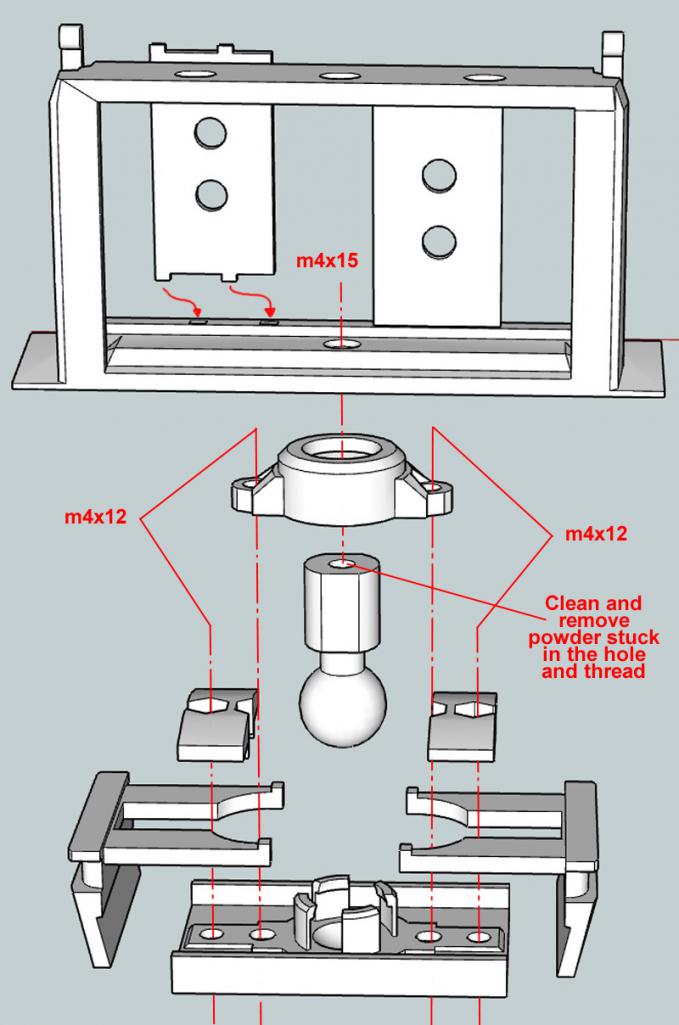
Posted by: Harpo Oct 25 2015, 05:59 AM
Very interested. Thanks for doing this
David
Posted by: cary Oct 25 2015, 06:53 AM

Very interested. Thanks for doing this
David
Ditto ...............
I'll be in for a couple.
Posted by: Steve Oct 25 2015, 08:16 AM
Interested also
Posted by: Bossman Oct 25 2015, 09:20 PM
December seems so far away!
Posted by: Steve Oct 25 2015, 10:58 PM
Just in time for Christmas!! Now everyone knows what to get me!! Lol
Posted by: johannes Oct 26 2015, 03:43 AM
December seems so far away!
I may sell a few working prototypes sooner... stay tuned ...
...
Posted by: johannes Oct 26 2015, 04:02 AM
Some more news
I made some refinements on the design and sent the file for a fourth (I hope final) prototype. I also added two small hooks that will prevent the mount of slipping out of the dashboard. That's something I experienced when testing on long trips on roads with a rough surface.
Price is around 20 Euros + shipping for the 3D printed part alone.
The kit with the ancillary parts will be around 5 Euros (worldwide shipping included).
Posted by: sb914 Oct 26 2015, 09:47 AM
I'm in for one with hardware ,thanks
Posted by: 76-914 Oct 26 2015, 09:59 AM
+1 here, as well.
Posted by: MrHyde Oct 26 2015, 10:46 AM
I'm in for one with the hardware if you can ship it to Canada.
Posted by: johannes Oct 26 2015, 10:56 AM
I'm in for one with the hardware if you can ship it to Canada.
This will be shipped worldwide. I checked prices and it seems https://i.materialise.com/ has the best price for the part.
..
Posted by: wes Oct 26 2015, 12:36 PM
I like it and want one as a kit! thanks
Posted by: zipedadoo Oct 26 2015, 01:40 PM
One for me please....
Posted by: Chris Pincetich Oct 26 2015, 08:36 PM


Posted by: db9146 Oct 26 2015, 09:14 PM
Looks good to me!!
Posted by: 914-300Hemi Oct 26 2015, 09:27 PM
Count me in for one. Looks pretty cool.
Posted by: Eric_Shea Oct 27 2015, 08:08 AM
Consider cord storage for a charger application.
If using an iPhone as a GPS device for any longer period of time, it will need to be plugged in. Having a place to stash the extra cord length from the lighter to the ash tray would be a premium. It keeps the cord from dangling around and getting in the way of the shifter etc.
Posted by: ben*james Oct 27 2015, 08:23 AM
Consider cord storage for a charger application.
If using an iPhone as a GPS device for any longer period of time, it will need to be plugged in. Having a place to stash the extra cord length from the lighter to the ash tray would be a premium. It keeps the cord from dangling around and getting in the way of the shifter etc.
+1

Posted by: PThompson509 Oct 27 2015, 09:21 AM
Also very interested!
Posted by: dflesburg Oct 27 2015, 11:41 AM
if you can do that, it shouldn't take you any time to make one into a cup holder that holds my coffee cup for Saturday am cars and coffee cruise ins....
Posted by: clapeza Oct 27 2015, 12:12 PM
Instead of having to source it out to a local third-party printing service, have you considered selling the 3D model file, and people could print their own?
There's a Kickstarter campaign going on now that the creator has made a bunch of 3D printable pieces for use in playing Dungeons & Dragons that let you print and build your own dungeons.
https://www.kickstarter.com/projects/1679800548/dragonlocktm-28mm-scale-dungeon-gaming-terrain
(No affiliation, but I am a backer!)
Just an idea.
Posted by: johannes Oct 27 2015, 03:31 PM
Consider cord storage for a charger application.
If using an iPhone as a GPS device for any longer period of time, it will need to be plugged in. Having a place to stash the extra cord length from the lighter to the ash tray would be a premium. It keeps the cord from dangling around and getting in the way of the shifter etc.
I found a way to include a cord holder in the same volume, so it won't increase price.
Here is a picture. There are holes everywere so you can tight the cord in the mount. There is space under the 914 dashboard so the cord can enter and exit the mount from below.

Posted by: johannes Oct 27 2015, 03:47 PM
Instead of having to source it out to a local third-party printing service, have you considered selling the 3D model file, and people could print their own?
I found i-materialise has by far the best price on the internet for this printing technique. It is not ABS printed (with a wire) but with laser from a powder. These are very expensive machines and this is not the kind you can have home or at your library. ABS (wire) is not precise enough for this design that has 0,2mm details.
https://www.youtube.com/watch?v=-6ItiCbYFvI
Posted by: GregAmy Oct 28 2015, 12:57 PM
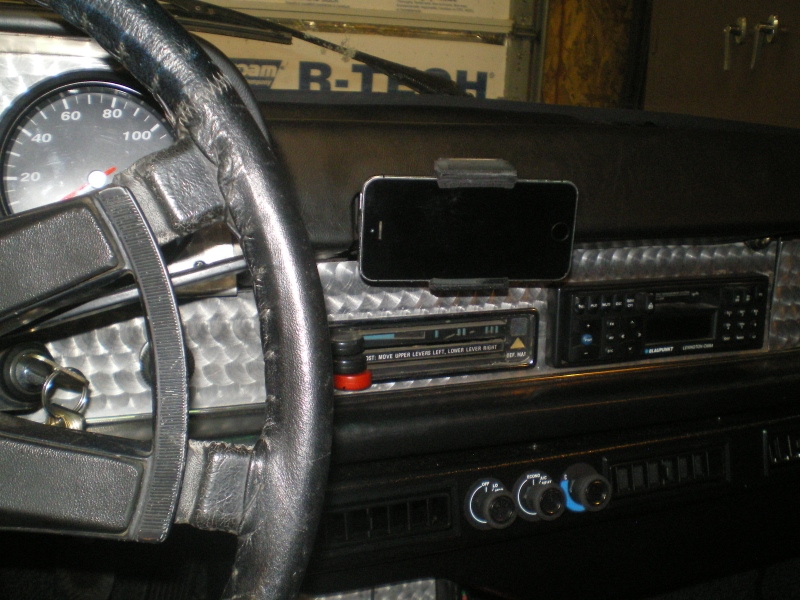
Subscribing...CLEVER! Excellent mount for the iPhone, as I use it for GPS and for accurate speedo info...tired of it falling out of the ashtray...
Posted by: 1972 914 2.0 Oct 29 2015, 07:26 PM
This is a good thing you're doing. I've just been sticking mine in the actual ashtray 
I'll be in for one or two kits.
Posted by: johannes Oct 30 2015, 03:19 AM
I just ordered the 3D print with the cord storage. I should receive it within 10 working days. There is no price increase with this feature, we are still around 20 Euros + shipping for the 3D printed kit alone.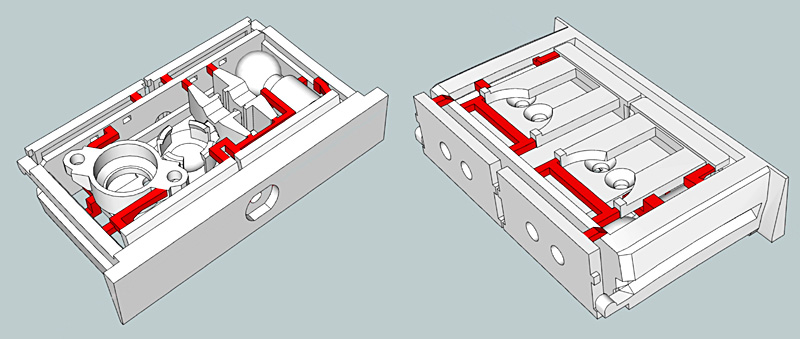
Posted by: johannes Nov 10 2015, 10:55 AM
...
The kit is now available. Read post 2 on the first page of the thread.
...
...
Posted by: Kansas 914 Nov 10 2015, 11:39 AM
Order placed!
Posted by: Steve Nov 10 2015, 04:35 PM
Order placed!! Thanks!!
Posted by: Harpo Nov 11 2015, 08:58 AM
Ordered mine. Thanks
Posted by: 76-914 Nov 11 2015, 09:32 AM
The order form would not recognize the USA phone format. I keep getting a "Phone number format not recognized"??
Posted by: johannes Nov 11 2015, 09:36 AM
The order form would not recognize the USA phone format. I keep getting a "Phone number format not recognized"??
As i-materialise is in Belgium, you may have to add 001 before your number (USA prefix)
Exemple
001 212 439 XX XX
...
Posted by: malcolm2 Nov 11 2015, 10:10 AM
very cool.
Posted by: 76-914 Nov 11 2015, 10:14 AM
Done. Thx for doing this, Johannes. Our phones have become a very large part of our lives and your product will allow us to update our 914's as well.
Posted by: rgolia Nov 11 2015, 02:48 PM
Just ordered mine....thank you much for this... 
Posted by: KELTY360 Nov 11 2015, 06:09 PM
Ordered 1 + kit with black screws. Great looking item. Thanks Johannes!
Posted by: johannes Nov 13 2015, 11:17 AM
Started to ship the ancillary parts ... Still missing the black M4 nuts that I should receive next week...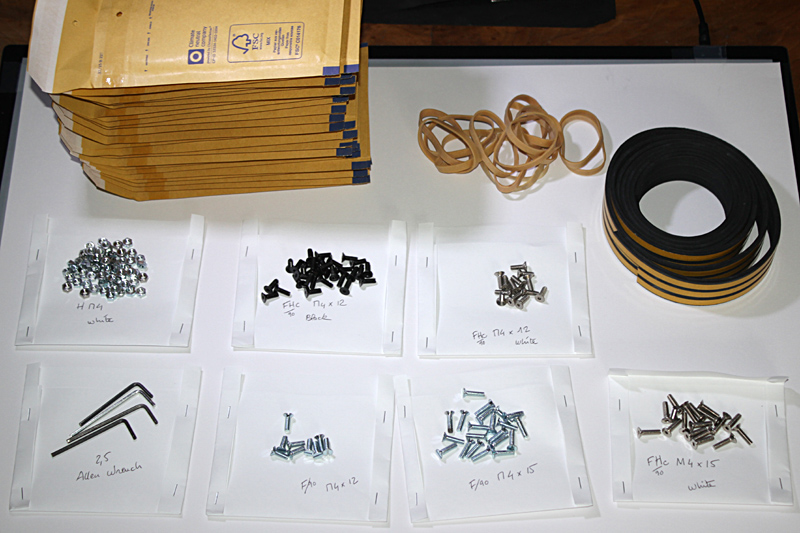
Posted by: Kansas 914 Nov 20 2015, 05:48 PM
WOW! Fast shipping to the US. I just received my ashtray mount. Now to assemble and paint.
Thanks again!
Posted by: Steve Nov 20 2015, 06:50 PM
I also got mine today. Just waiting for the screw kit to assemble it.
Posted by: 76-914 Nov 21 2015, 09:09 AM
Hah! I received the screw kit but not the holder kit. 
Posted by: JoeD Nov 21 2015, 10:22 AM
Super cool! I ordered the kit and it's supposed to be delivered UPS Monday; assuming that the hardware is on it's way, too. Now if only my car wasn't on jack stands... 
Posted by: karmann Nov 21 2015, 01:42 PM
Will these be available in black in the near future?
Posted by: johannes Nov 22 2015, 01:28 PM
Will these be available in black in the near future?
The Polyamide is white and this is the only color available. But it is paintable.
I tryed dyed polyamide, but the kit is too compact an lots of surfaces are not dyed correctely. Juctions are white anyway and need touchup. It also increases parts size and it assembles very badly.
Posted by: johannes Nov 22 2015, 01:30 PM
Information about ancillaries.
There next to no demand for white screws and my stock is out.
So I decided, white screws will not be offered as an option anymore.
...
Posted by: johannes Nov 22 2015, 03:39 PM
I also got mine today. Just waiting for the screw kit to assemble it.
All ancillaries have been shipped now. You should receive them very soon. Paint will be dry ...

Posted by: 76-914 Nov 23 2015, 10:33 PM
OK, what am I missing? The grip range is too large for my Iphone which is ~58mm. Do I need my phone in some case to fit? 2nd, it's floppy and I dont want to over tighten that little bolt. Not sure wh it has mch threads eith. Seems like the long one would be a tapered screw like a sheet rock screw.  Is it just me???????
Posted by: johannes Nov 24 2015, 03:17 AM
OK, what am I missing? The grip range is too large for my Iphone which is ~58mm. Do I need my phone in some case to fit? 2nd, it's floppy and I dont want to over tighten that little bolt. Not sure wh it has mch threads eith. Seems like the long one would be a tapered screw like a sheet rock screw.
Is it just me???????The phone support was designed for minimum 60mm so you are a bit under. One of the clamps is free and the other has to be ajusted and tightened.
You can put your phone in a case, this would be the easiest way to fix the issue.
The clamps have a rake and if your phone is very thin, you can glue a 3 to 5mm rubber or foam on the surface that will receive the back of your phone. THis will push the phone towards the clamps.
You can shorten the main part about 1mm each side with a file and gain 2mm clamp travel
If the ball join with main frame assembly is floppy you better disassemble and put some glue on the surface before re assembling. This is not intended to be disassembled in the future.
Posted by: JoeD Nov 24 2015, 07:33 AM
Johannes, I received my kit from iMaterialize yesterday and cut all the pieces out this morning to paint. This is damn ingenuous! I'm amazed at how you packaged everything together and how well it goes together. Very, very clever. Looking forward to receiving the ancillary parts... as you said, just in time for the paint to dry.
Note to others- I got a little happy trimming the excess plastic and accidentally trimmed off the two little "posts" on each end of the little cross-members that were meant to pop into the main body. Nothing a little super glue couldn't fix, but just a small watch-out for anyone else...
Again, thanks so much for doing this!
Posted by: johannes Nov 24 2015, 07:49 AM
Thank you for your message JoeD. Yes it was very challanging to have all the parts in this small volume in order to lower the price. Every decision on the support design had to be made in accordance. By the way when assembling the last prototype, I also accidentelly cut one of those small posts on the cross memeber  ...
...
As also said to 76-914, on final assembly you can glue the ball joint to the main frame to secure the screwed assembly. This reduces stress on the plastic thread that is in the ball joint and prevents from wobeling. I suggest you don"t paint the surfaces that will receive the glue.
Posted by: 76-914 Nov 24 2015, 10:56 AM
OK, what am I missing? The grip range is too large for my Iphone which is ~58mm. Do I need my phone in some case to fit? 2nd, it's floppy and I dont want to over tighten that little bolt. Not sure wh it has mch threads eith. Seems like the long one would be a tapered screw like a sheet rock screw.
Is it just me???????The phone support was designed for minimum 60mm so you are a bit under. One of the clamps is free and the other has to be ajusted and tightened.
You can put your phone in a case, this would be the easiest way to fix the issue.
The clamps have a rake and if your phone is very thin, you can glue a 3 to 5mm rubber or foam on the surface that will receive the back of your phone. THis will push the phone towards the clamps.
You can shorten the main part about 1mm each side with a file and gain 2mm clamp travel
If the ball join with main frame assembly is floppy you better disassemble and put some glue on the surface before re assembling. This is not intended to be disassembled in the future.
Pretty much what I planned on doing. I'll use a strip of foam pipe insulation to correct the dimensional problem. Then I'll replace the machine screw w/ another style and JB Weld the square post to the body. I'll post my results if I have results.
Posted by: 76-914 Nov 25 2015, 05:27 PM
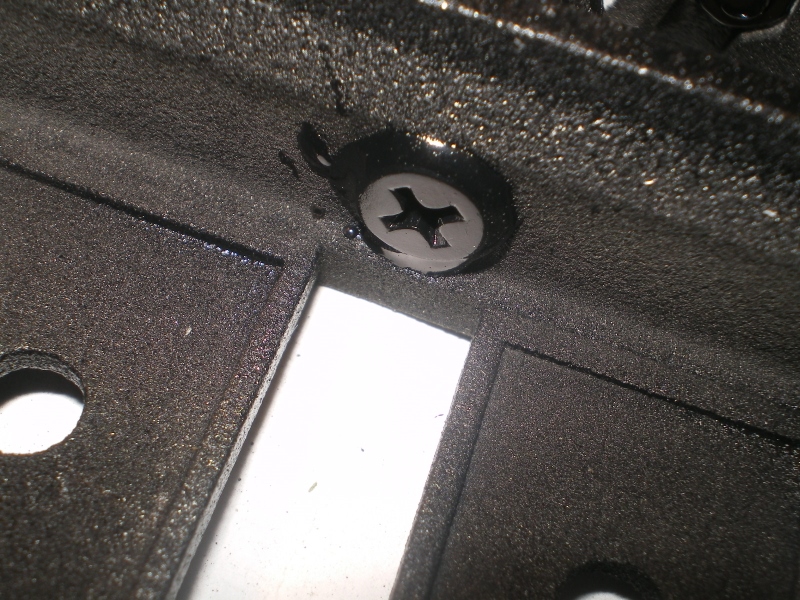
Made those two mods and luv it  Also hit it with some duplicolor vinyl spray paint.
If you look closely you can see the head 0f the #8 1" sheetrock screw and the bead of JB Weld around the stem base. Solid as a rock now. Also added a thin strip of foam on one side. The texture of the material blends well with the OEM look.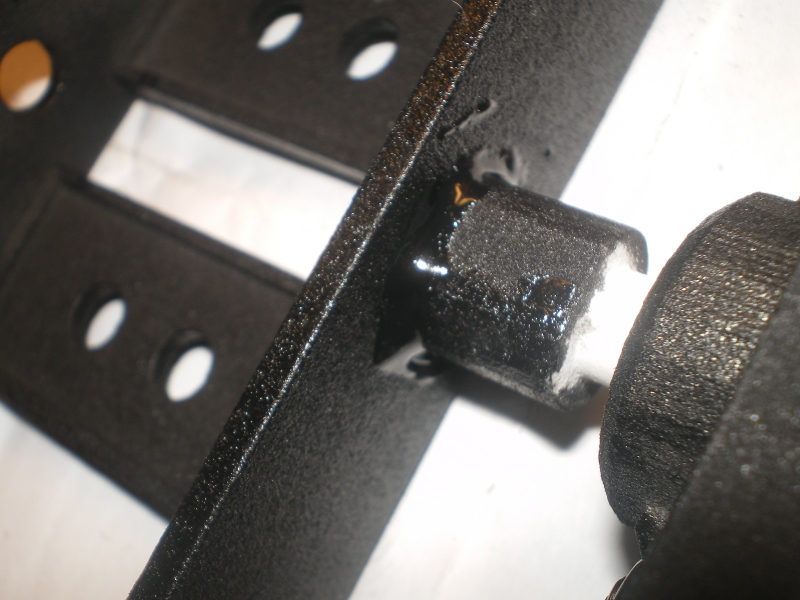
Posted by: johannes Nov 25 2015, 05:38 PM
Looking good. For small phone I suggest you put two rubber bands.
...
Posted by: cary Nov 26 2015, 10:24 AM
Screw kit arrived yesterday. Hopefully the mount will be following shortly.
What about sourcing a black o-ring for the tensioner?
Posted by: johannes Nov 26 2015, 10:37 AM
Screw kit arrived yesterday. Hopefully the mount will be following shortly.
What about sourcing a black o-ring for the tensioner?
Well , I have already bought 200 rubber bands ... with a bout 160 left over ...
...
Posted by: johannes Nov 27 2015, 02:07 AM
Just got a mail from IMaterialise the company that 3D prints the phone mount.
They decided tom make a FREE SHIPPING promotion for Black Friday.
https://i.materialise.com/shop/item/porsche-914-cell-phone-smartphone-mount
...
Posted by: Harpo Nov 27 2015, 05:59 PM
Good evening guys,
I ordered one but received three of the cell phone mounts. At first I assumed that I screwed up but after looking at the paperwork I actually received units that belong to C Kutter & D Bryson. I don't know who these members are but if they could PM me I would like to confirm the shipping addresses.
Thanks
David
Posted by: cary Nov 27 2015, 07:57 PM
Hmmm............ David, I was at work and didn't get online.
I'd say lets give it till Tuesday and see if anything shows up here.
Posted by: johannes Nov 28 2015, 09:26 AM
Good evening guys,
I ordered one but received three of the cell phone mounts. At first I assumed that I screwed up but after looking at the paperwork I actually received units that belong to G Kutter & D Bryson. I don't know who these members are but if they could PM me I would like to confirm the shipping addresses.
Thanks
David
Man ! that is bad news... MP Sent
Kutter and Bryson ordered on the same day as you. I also sent them the ancillaries.
I-materialise staff messed big time ...
Posted by: Steve Nov 28 2015, 09:35 AM
Great product. I used a dremel tool with cutoff wheel to cut out the parts and cut off the excess. Have to be extra careful, the dremel tool cuts fast, but made it quicker to get apart. I also used the same vinyl paint. My pictures look the same, so I won't post any.
No problems with assembly. Curious should we lubricate any of the moving parts? Would silicone grease damage the paint or parts?
Posted by: johannes Nov 28 2015, 09:52 AM
Great product. I used a dremel tool with cutoff wheel to cut out the parts and cut off the excess. Have to be extra careful, the dremel tool cuts fast, but made it quicker to get apart. I also used the same vinyl paint. My pictures look the same, so I won't post any.
No problems with assembly. Curious should we lubricate any of the moving parts? Would silicone grease damage the paint or parts?
I wouldn't lubricate any part.
Posted by: 76-914 Nov 28 2015, 09:53 AM
Good evening guys,
I ordered one but received three of the cell phone mounts. At first I assumed that I screwed up but after looking at the paperwork I actually received units that belong to G Kutter & D Bryson. I don't know who these members are but if they could PM me I would like to confirm the shipping addresses.
Thanks
David
Man ! that is bad news... MP Sent
Kutter and Bryson ordered on the same day as you. I also sent them the ancillaries.
I-materialise staff messed big time ...
Yeah, they have their wires crossed. I wasn't going to mention this but in light of the another SNAFU; I ordered one, received 2 and was charged for 2.
The ancillary order was fine. Ordered one received one. 
Posted by: Steve Nov 28 2015, 10:12 AM
Great product. I used a dremel tool with cutoff wheel to cut out the parts and cut off the excess. Have to be extra careful, the dremel tool cuts fast, but made it quicker to get apart. I also used the same vinyl paint. My pictures look the same, so I won't post any.
No problems with assembly. Curious should we lubricate any of the moving parts? Would silicone grease damage the paint or parts?
I wouldn't lubricate any part.
Thanks Johannes!! Amazing design. Reminds me of a plastic model car kit, but much stronger.
Posted by: Harpo Nov 30 2015, 09:46 AM
I just mailed Cary's cell phone holder. It should arrive on Thursday
Posted by: cary Jan 9 2016, 07:27 PM
Finally put mine together. The precision is amazing.
This is the first 3-D printed item that I've purchased.
Now to figure out what black paint to paint it with.
Posted by: johannes Jan 10 2016, 06:19 AM
Finally put mine together. The precision is amazing.
This is the first 3-D printed item that I've purchased.
Now to figure out what black paint to paint it with.
There are various 3D printing technologies ans some can achieve better precision than other ... but at a cost...
You can paint it with satin black from a spray can.
Posted by: cary Jan 22 2016, 10:05 PM
Cool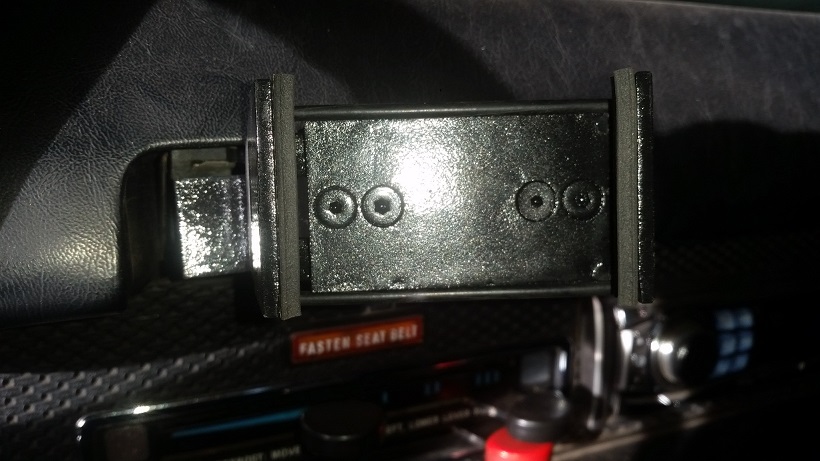
Sliding portion will need to be cut with a maroon scuffing pad. Too Tight.
Posted by: johannes Jan 23 2016, 01:46 AM
That is glossy !
Posted by: cary Jan 23 2016, 10:38 PM
Home Depot only had flat and gloss. 
Stopped at Ace Hardware for some magnets. They carry flat, satin, semi gloss and gloss.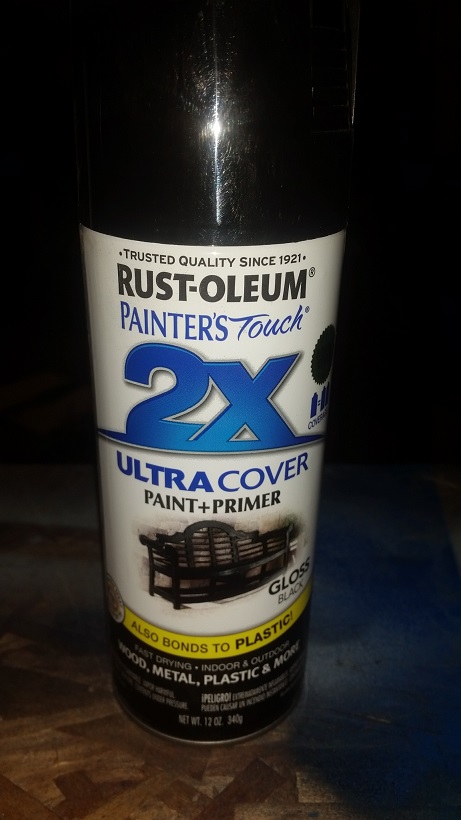
Posted by: kellygeorge Feb 18 2016, 07:07 PM
Just placed my orders for the mount and Ancillary parts kit with black screws + 2,5mm Allen wrench. Super excited! My stereo uses an iphone USB connection with a pretty slick app to control song info, maps, etc. It will be nice to have it mounted within reach.
Posted by: johannes Feb 18 2016, 07:20 PM
Just placed my orders for the mount and Ancillary parts kit with black screws + 2,5mm Allen wrench. Super excited! My stereo uses an iphone USB connection with a pretty slick app to control song info, maps, etc. It will be nice to have it mounted within reach.
Order received... Shipping is on it's way ...

Posted by: 76-914 Feb 19 2016, 09:33 AM
A pleasant addition and worth the $$.
Posted by: iwanta914-6 Feb 19 2016, 09:53 AM
This is amazing. If i had a 914 I would be buying!
Posted by: kellygeorge Feb 29 2016, 09:53 PM
Order received... Shipping is on it's way ...
Received all my parts and assembled today. It's awesome. Thank you.
To all, I recently started using https://itunes.apple.com/us/app/pioneer-arc-advanced-remote/id1020616923?mt=8 to control music while I drive. Its nice because you can swipe to the next song or tap to pause, swipe up or down for other options. Its free, and makes navigating music really easy while driving. And it frees up hands for the important stuff.
Posted by: johannes Mar 1 2016, 05:45 AM
Looks interesting. I will give it a try
Posted by: GregAmy Mar 8 2016, 03:39 PM
Finally got around to assembling mine today (we hit the 60s air temp in CT!)
Bravo! Well done.
Assembled, hit it with some flat black spray lacquer, slid right in the race car to test fit. Worked great. Now I can use my Speedometer app and not worry about the troopers (my stock speedo is off quite a bit)...
Thanks!
Posted by: johannes Mar 8 2016, 04:04 PM
Finally got around to assembling mine today (we hit the 60s air temp in CT!)
Bravo! Well done.
Assembled, hit it with some flat black spray lacquer, slid right in the race car to test fit. Worked great. Now I can use my Speedometer app and not worry about the troopers (my stock speedo is off quite a bit)...
Thanks!
You are welcome...

Posted by: cary May 23 2016, 08:38 PM
Here's a shot of my mount is use on the way to WCR. Worked marvelously.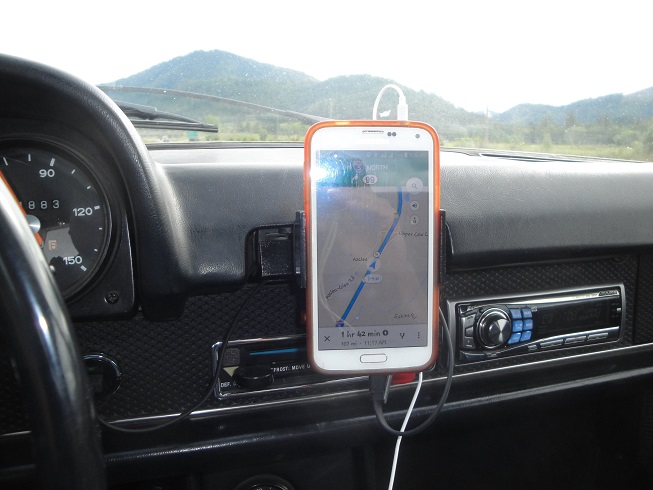
Posted by: johannes May 23 2016, 11:41 PM
Are you using Google Maps ?
Posted by: cary May 23 2016, 11:47 PM
Yep .............
Posted by: matthepcat May 24 2016, 09:24 AM
Oops. My question was asked earlier.... Free bump.
Posted by: cary Jun 24 2016, 09:27 PM
New modification ......................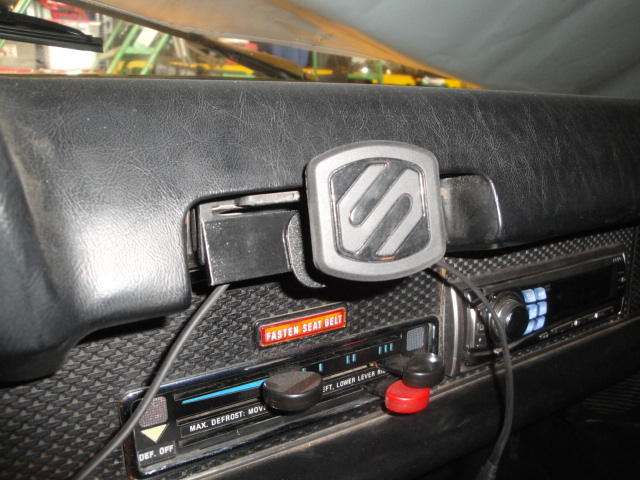
Posted by: BillC Apr 23 2017, 08:41 AM
I ordered one of these mounts last year, but never used it until the drive up to Hershey yesterday. Just wanted to mention that it worked great! Even with the phone mounted vertically between the jaws, it never slipped; and the mount held it rock steady. 
Definitely worth the money. I don't know if Johannes is still selling the "ancillaries" package anymore, but all the bits you need to assemble one of these is readily available at your local hardware store.
Posted by: johannes Apr 23 2017, 09:08 AM
I ordered one of these mounts last year, but never used it until the drive up to Hershey yesterday. Just wanted to mention that it worked great! Even with the phone mounted vertically between the jaws, it never slipped; and the mount held it rock steady.
Definitely worth the money. I don't know if Johannes is still selling the "ancillaries" package anymore, but all the bits you need to assemble one of these is readily available at your local hardware store.
I still have "ancillaries" for the mount. Order instructions in the first message.
...
Posted by: mepstein Apr 23 2017, 11:19 AM
I just purchased a kit and hardware.
Posted by: 23e Heure Jan 28 2018, 06:09 AM
Hi Johannes,
I'm putting my kit together. Question:
Instructions say "glue the black joints". I don't see any black joints in the instruction pictures.
Sorry if I'm being dim!
Thanks,
ASSEMBLY INSTRUCTIONS
1- With a small plier, cut and remove all the parts that are shown in red.
Wear safety goggles as parts will jump all over the place.
2- Use a cutter to remove all the excess material.
3- Clean the parts as powder may stick on the surface and in the holes.
You can paint the parts but be carefull to not put too much paint on contact surface of the moving parts.
4- Assemble the parts as shown using 4x m4x12 and 1x m4x15 screws and nuts. Tight the screws gently. Overtighting will bend the parts and damage the plastic thread in the ball joint.
5- Glue the black joints
6- wrap a rubberband as shown on the pictures. A second rubberband is provided as a spare. The two rubberbands can be monted together if clamping force is not enough to maintain small phones.
IMPORTANT: One of the clamps always travels free, the other has to be set up to fit the size of the phone then tightened with the screw.
Posted by: johannes Jan 29 2018, 03:58 AM
Hi Johannes,
I'm putting my kit together. Question:
Instructions say "glue the black joints". I don't see any black joints in the instruction pictures.
Sorry if I'm being dim!
Thanks,
Those are the black joints that are glued on the claws. You can see them on the pictures (they are not shown on the drawings). Sorry I am french and my english is not always understandable.
Posted by: johannes Mar 12 2018, 03:20 AM
THIS ITEM IS NO MORE AVAILABLE. NEW DESIGN COMMING
Posted by: drem914 Feb 22 2020, 04:56 PM
THIS ITEM IS NO MORE AVAILABLE. NEW DESIGN COMMING
Anything new?
Posted by: johannes Feb 23 2020, 04:51 AM
Prototype done. Works fine. Looks great.
Production is on it's way. I will post more information in a few days.
Posted by: barefoot Feb 23 2020, 08:11 AM
My I phone 6 sits nicely in the ash tray when held half open.
Bawrefoot
Posted by: drem914 Feb 23 2020, 09:33 AM
My I phone 6 sits nicely in the ash tray when held half open.
Bawrefoot
That is what I normally do but the metal is cutting/marking my screen protector. I don't have a bulky case cover.
Posted by: 76-914 Feb 23 2020, 09:52 AM
My I phone 6 sits nicely in the ash tray when held half open.
Bawrefoot
Warren, get one of these when they become available. I love mine. I too used to lay my iPhone in the ashtray but it would fall out during turns or rough roads. They're compact and will fit in your glove box when hot in use.
Posted by: GregAmy Feb 23 2020, 04:47 PM
I have one of the older design that someone can have for shipping costs. I ended up going with a windshiled suction cup mount.
First PM with mailing address...
Posted by: tyfighter123 Apr 12 2020, 09:47 PM
Any more news on these?
Posted by: 914bub Apr 12 2020, 10:42 PM
I have one of the older design that someone can have for shipping costs. I ended up going with a windshiled suction cup mount.
First PM with mailing address...
I assume it's spoken for , but PM sent.
Posted by: forrestkhaag Oct 23 2020, 03:35 PM
THIS ITEM IS NO MORE AVAILABLE.
NEW DESIGN COMMING
Maybe sell tee shirts with this moniker thereon.........
Sidebar: I have had one of these units for years and still works just fine.
Posted by: dangrouche Oct 23 2020, 07:25 PM
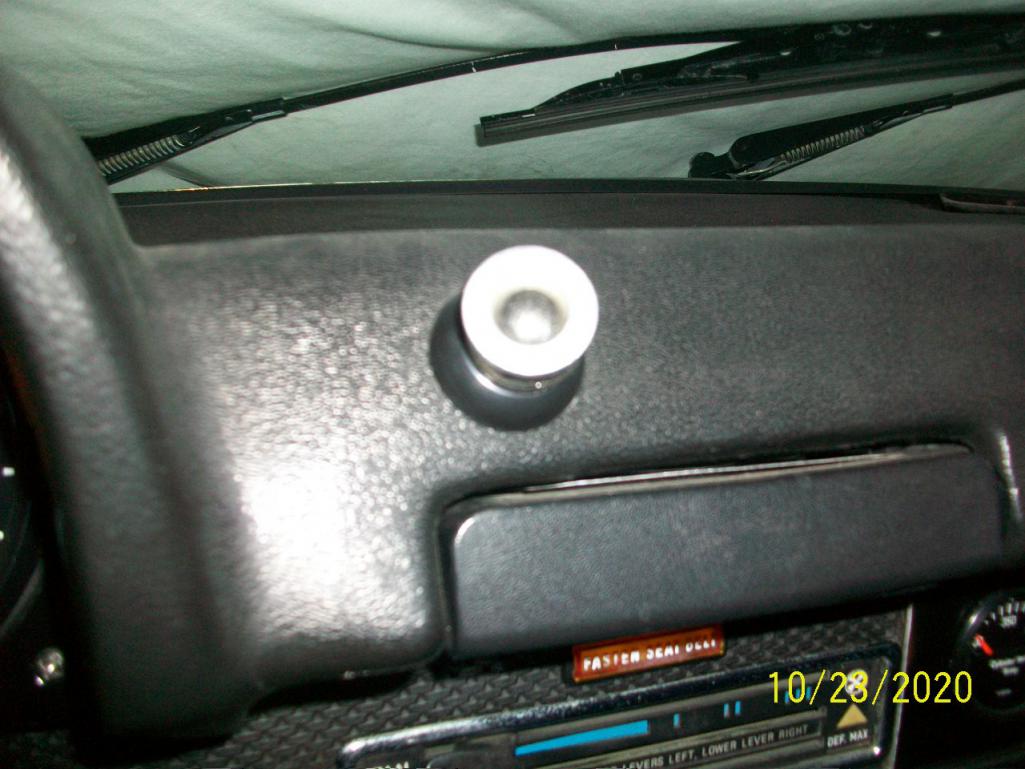
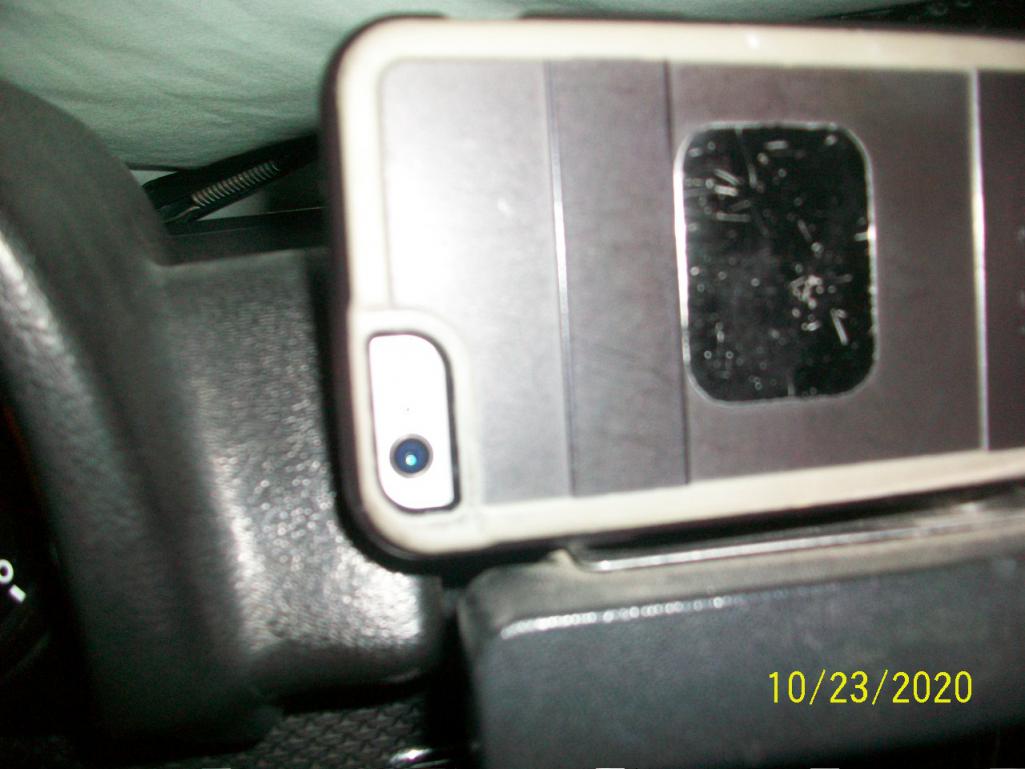
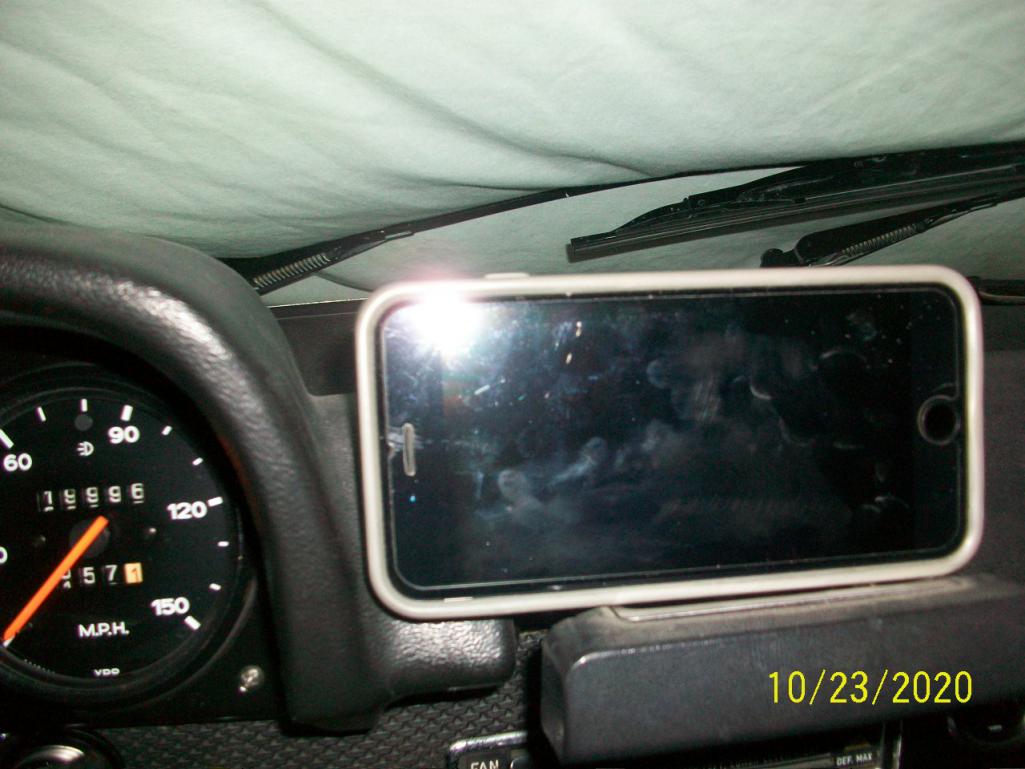
here's an alternative solution I've employed. The caveat is that the magnet is attached with double stick tape to the dash surface. In my case, I have a dash cover, so I'm not worried about ruining the face of my dash vinyl. 1. Source out a magnetic type mount that pivots. 2. Source out the steel plates that attach to the back of your phone. Both these items were sourced from eBay. The extended dash tray is the support of my phone. Here are the pics
Attached thumbnail(s)
Powered by Invision Power Board (http://www.invisionboard.com)
© Invision Power Services (http://www.invisionpower.com)