Printable Version of Topic
Click here to view this topic in its original format
914World.com _ 914World Garage _ Got some new shiney parts
Posted by: Dave-O Mar 10 2005, 06:43 PM
First semi-complete picture of my home-made drop-links. I still have to track down some jam-nuts. Can't wait to finish this sway bar project next week during my spring break.
David
Attached image(s)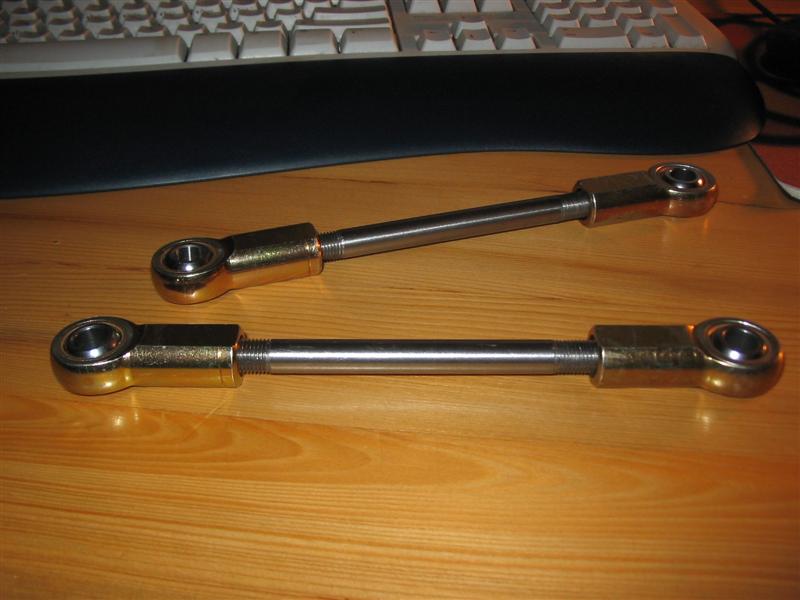
Posted by: Mueller Mar 10 2005, 06:47 PM
look nice...I bought a set similar to those from a fellow club member a few years back....when I parted out the car, those endlinks had a bunch of slop in them after only a few hundred miles...that is if those are the cheaper brass lined ends and not the better teflon/hardened steel units....
Posted by: Dave-O Mar 10 2005, 07:00 PM
| QUOTE (Mueller @ Mar 10 2005, 06:47 PM) |
| look nice...I bought a set similar to those from a fellow club member a few years back....when I parted out the car, those endlinks had a bunch of slop in them after only a few hundred miles...that is if those are the cheaper brass lined ends and not the better teflon/hardened steel units.... |
Thanks for the warning. I'll keep my eye on them. I only have about $20 invested in these things so it won't break my heart to have to "upgrade" to some higher quality rod-ends.
David
Posted by: Jeroen Mar 10 2005, 08:16 PM
you need to fab something so you can turn the rods
Posted by: Aaron Cox Mar 10 2005, 08:22 PM
| QUOTE (Jeroen @ Mar 10 2005, 07:16 PM) |
| you need to fab something so you can turn the rods |
drill a hole through them. then you can stick an allen wrench in there, and turn the rod....
Posted by: MattR Mar 10 2005, 08:26 PM
Aaron, you significantly weaken the part by drilling a hole through it. Think about the surface area you've exposed.
You can either grind two shallow notches and fab your own "drop link adjuster tool" out of a flat piece of steel shaped like an H, or you can add material and use channel locks to adjust.
Posted by: Mueller Mar 10 2005, 08:27 PM
| QUOTE (Jeroen @ Mar 10 2005, 07:16 PM) |
| you need to fab something so you can turn the rods |
I was thinking vise-grips


two opposing flats might be easier to do instead......
Posted by: Aaron Cox Mar 10 2005, 08:31 PM
btw...what size heim joints are those? 8mm?
also... were female heim joints cheaper than males? just curious
Posted by: MattR Mar 10 2005, 08:32 PM
Aaron, dont make me break out the text book. Any other engineers want to chime in here? Im not saying what the other company has isnt sufficient, Im just saying one is stronger then the other. If you have the option to do either, i'd go with the stronger one. But thats just me.
Posted by: bondo Mar 10 2005, 08:37 PM
Drill out a big nut, slide it on, and weld it in place.
Posted by: Aaron Cox Mar 10 2005, 08:38 PM
| QUOTE (bondo @ Mar 10 2005, 07:37 PM) |
| Drill out a big nut, slide it on, and weld it in place. |
best solution yet!

Posted by: Dave-O Mar 10 2005, 08:44 PM
| QUOTE (Mueller @ Mar 10 2005, 08:27 PM) | ||
I was thinking vise-grips two opposing flats might be easier to do instead...... |
ding ding...we have a winner. That was my plan. Since i will never be putting any load on them i don't think they should be too tough to turn. If it doesn't work well i cold possibly tac-weld a big nut onto it. It's all experimental right now.
| QUOTE |
| btw...what size heim joints are those? 8mm? also... were female heim joints cheaper than males? just curious |
The price was about the same, but with the rod section in the center I have much more control over length. I still have like 4 feet of rod stock that i could make any length needed.
The ends are 3/8"...just under 10mm. You can bash me all you want for using 'merican hardware but it's just easier to find around here. I can run down to the local tractor dealership and find a HUGE selection of standard hardware in various grades. Works for me...
David
Posted by: Dave-O Mar 10 2005, 08:45 PM
| QUOTE (bondo @ Mar 10 2005, 08:37 PM) |
| Drill out a big nut, slide it on, and weld it in place. |
reading my mind...didn't get it typed in time!
Posted by: TimT Mar 10 2005, 08:46 PM
Actually you should be able to adjust these just using your fingers.
when the car is on the ground and you have settled the suspension, adjust the length of ONE of the links such that there is no preload..of course it helpd to have the ride heights and corner weights dialed in before you adjust the drop link length
Posted by: Racer Chris Mar 10 2005, 09:45 PM
Does one end have a left hand thread?
Any corner balancing needs to be done before attaching one of the drop links to make sure there is no preload. Then adjust the length until the bolt slildes easily through the rod end.
I find it easier to use male ends and make the rods out of larger diameter stock, drilled and tapped. Left and right hand taps are cheap and easy. Then Aaron's idea of a hole for an allen wrench is ok because of the additional cross-section.
Posted by: rick 918-S Mar 10 2005, 11:20 PM
Those should work out nice. Keep the photos coming.
Posted by: Dave-O Mar 11 2005, 12:12 AM
| QUOTE (Racer Chris @ Mar 10 2005, 09:45 PM) |
| Does one end have a left hand thread? |
yes sir, one left and one right
| QUOTE |
| I find it easier to use male ends and make the rods out of larger diameter stock, drilled and tapped. |
good idea...might use it if i ever have to make another set
| QUOTE |
| Those should work out nice. Keep the photos coming. |
pictures will start again when i start wrenching on saturday

David
Posted by: skline Mar 11 2005, 12:33 AM
Well Dave, looking at your avatar, I can see you need this sway bar. Good luck with it.
Powered by Invision Power Board (http://www.invisionboard.com)
© Invision Power Services (http://www.invisionpower.com)