Printable Version of Topic
Click here to view this topic in its original format
914World.com _ 914World Garage _ I was given a Metal Lathe.
Posted by: Series9 Jan 2 2016, 08:13 PM
So, I was given a lathe that had electrical problems.
I sorted those problems, and I am now looking for some simple projects so I can learn the machine.
My first thought is to turn some clutch pulleys out of brass. Do you have other suggestions?
Attached thumbnail(s)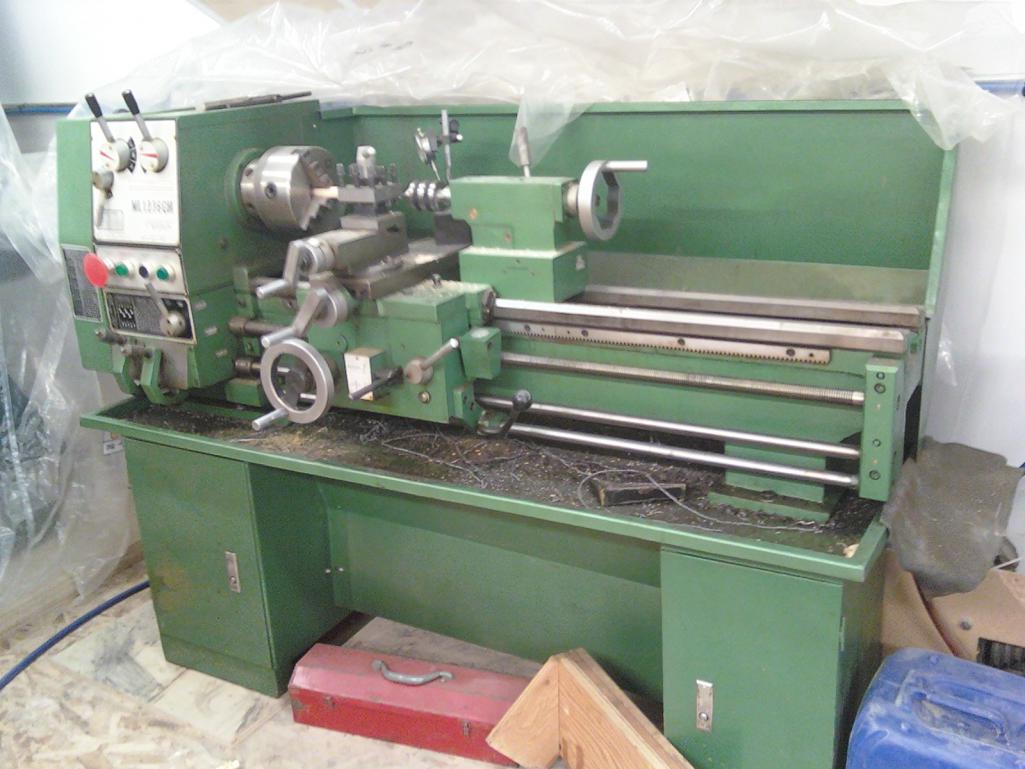
Posted by: r_towle Jan 2 2016, 08:17 PM
Bronze suspension bushings.
Make a mount for a 911 head to spin the head on the main body of the lathe and then you can resurface heads.....probably not a beginner thing to do, but if you have some junk heads it might be good to learn how to make a decent jig.
Pedal cluster bushings.
Posted by: Series9 Jan 2 2016, 08:26 PM

Bronze suspension bushings.
Make a mount for a 911 head to spin the head on the main body of the lathe and then you can resurface heads.....probably not a beginner thing to do, but if you have some junk heads it might be good to learn how to make a decent jig.
Pedal cluster bushings.
Thanks for the input.
As far as surfacing heads is concerned, that is advanced,professional-level machine work. I am going to have to get some experience first.
Suspension bushings and pedal bushings are already readily available, but would make good practice projects.
Posted by: r_towle Jan 2 2016, 08:29 PM
Practice projects to get a feel for it.
Learn how to be precise and how much you can cut.
It's easy to start with store bought bushings from the hardware store and cut them from there, for instance the side shifter rear bushing...that is store bought, then turned to fit the exact need.
It wastes less material also.
Posted by: Series9 Jan 2 2016, 08:42 PM
Practice projects to get a feel for it.
Learn how to be precise and how much you can cut.
It's easy to start with store bought bushings from the hardware store and cut them from there, for instance the side shifter rear bushing...that is store bought, then turned to fit the exact need.
It wastes less material also.
Good advice. Those plastic rear shift bushings all fit like shit. I'm definitely doing some of those in brass.
Posted by: r_towle Jan 2 2016, 08:44 PM
Look for tephlon impregnated bronze, not brass.
Grainier has them....just find one that needs material removed, not added.
Posted by: jmill Jan 2 2016, 09:00 PM
That's a pretty big lathe for making fairly small bushings. Drill bits and reamers aren't cheap either. That sucker looks like it was made to cut 3 feet of threads. Nice score.
Posted by: pete000 Jan 2 2016, 10:14 PM
Nice unit, we have the same one in our shop at work. Pretty easy to run, I use it from time to time on stuff...Enjoy !
Posted by: toolguy Jan 2 2016, 10:42 PM
Find an old retired machinist to teach you how to first-
1. grind cutter edges
2. set up a cutter in the toolpost at correct height and angles. . that's a 4 way toolpost and requires shimming cutters to correct height
3. show you the correct chuck rpm speed and correct cutter feed speed. The tendency is to turn too fast.
4. after all those, start on PVC or wood. . .
5 remember no matter how fast you think your reactions, hands and fingers are,
the chuck is always faster and a lot stronger.
It's not rocket science but it's easy to hurt yourself badly. . You might want to start
by positioning the machine and leveling the bed. Then make sure the headstock is parallel and perpendicular to the bed and center of tailstock. Determine the off center runout of the chuck. .Those Chinese chucks are usually spec'ed at .003 off center as the normal limit when new . If not set up properly, no matter what you do, your finished project will have taper and be out of square and off center.
Posted by: porschetub Jan 3 2016, 12:26 AM
Find an old retired machinist to teach you how to first-
1. grind cutter edges
2. set up a cutter in the toolpost at correct height and angles. . that's a 4 way toolpost and requires shimming cutters to correct height
3. show you the correct chuck rpm speed and correct cutter feed speed. The tendency is to turn too fast.
4. after all those, start on PVC or wood. . .
5 remember no matter how fast you think your reactions, hands and fingers are,
the chuck is always faster and a lot stronger.
It's not rocket science but it's easy to hurt yourself badly. . You might want to start
by positioning the machine and leveling the bed. Then make sure the headstock is parallel and perpendicular to the bed and center of tailstock. Determine the off center runout of the chuck. .Those Chinese chucks are usually spec'ed at .003 off center as the normal limit when new . If not set up properly, no matter what you do, your finished project will have taper and be out of square and off center.
There chucks are rubbish and they pop gears in the drive,good score for light work however,go for it.
Posted by: Montreal914 Jan 3 2016, 01:15 AM
I practice on the lathe at work and did some door stop rollers out of aluminum. Yes they are available but I figured the machine is there why not try it. Simple part.
Posted by: veekry9 Jan 3 2016, 03:41 AM
Find an old retired machinist to teach you how to first-
1. grind cutter edges
2. set up a cutter in the toolpost at correct height and angles. . that's a 4 way toolpost and requires shimming cutters to correct height
3. show you the correct chuck rpm speed and correct cutter feed speed. The tendency is to turn too fast.
4. after all those, start on PVC or wood. . .
5 remember no matter how fast you think your reactions, hands and fingers are,
the chuck is always faster and a lot stronger.
It's not rocket science but it's easy to hurt yourself badly. . You might want to start
by positioning the machine and leveling the bed. Then make sure the headstock is parallel and perpendicular to the bed and center of tailstock. Determine the off center runout of the chuck. .Those Chinese chucks are usually spec'ed at .003 off center as the normal limit when new . If not set up properly, no matter what you do, your finished project will have taper and be out of square and off center.
2nd that,safety 1st.
An intro course at a local school will get you up to speed on the operation of lathes,the inet is a fount of info.
Loss of body appendages is a distinct possibility if not properly trained.
Due diligence is the primary impetus and fear of agony the second.
It's a machine,and will not ask if you are competent,just prove if you are not,instantly.
https://www.youtube.com/watch?v=FfcukAV_Zhk
A simple op,one that requires practice to perform correctly and accurately to a honing tolerance.
The Wright brothers machined their engines on a lathe far cruder than the one you have there.
An expert tuneup of the hard parts is likely in order if the hours are beyond 20K.
https://en.wikipedia.org/wiki/Charlie_Taylor_(mechanic)
(edit)oh yeah,keep it spotless clean,do not spit in the sump.
/
Posted by: Mark Henry Jan 3 2016, 05:46 AM
I agree with all of the above, start small projects that at not important till you get the feel for it. Lots of on-line resources, it's a bigger learning curve than you think.
Don't forget the damn key in the chuck 
Posted by: thieuster Jan 3 2016, 06:31 AM
I agree with all of the above: especially those about safety. Make sure that you wear proper clothing when operating this machine. Loose clothing can be deadly (around your neck) when picked up by the machine. Same goes for long hair, a necklace etc.
A good medium to start with is Teflon/Teflon. Get yourself a few chunks of that stuff and start with that. Teflon is quite soft so it will not affect your cutters too much.
One of the first things I did on a lathe was a knob for my Triumph's gear lever. First a specimen made from teflon, the second one from a alloy billet.
Menno
Posted by: barefoot Jan 3 2016, 07:15 AM
Get some Delrin or brass and make some of the rear trunk rollers for the torsion bars.
Posted by: bulitt Jan 3 2016, 08:21 AM
And watch those carbide bits. When they shatter they are like shrapnel- Safety glasses at all times! 
Posted by: ThePaintedMan Jan 3 2016, 09:07 AM
Hey Joe! How bout a present or Christmas ornament for the new beh-beh? Congrats BTW Dad!
Posted by: cary Jan 3 2016, 11:04 AM
Nice .............. Beautiful Machine
I bought a 1930's belt driven version to check for out of round and cleaning up burrs. Not a clue on how to use it.
Posted by: timothy_nd28 Jan 3 2016, 11:55 AM
Chrome bezel gauge rings would be cool.
Posted by: Series9 Jan 3 2016, 03:09 PM
Wow!
Thanks for all the responses.
I'll try to post updates as I figure this thing out. 
Posted by: r_towle Jan 3 2016, 03:14 PM
Make something square....
Posted by: veekry9 Jan 3 2016, 04:37 PM
A test trinket,tolerances of +/-.003" ,in various alloys.
The nicest one I've seen was on the desk of the pres's office in chromolly,heatreated and ground,+/-0.0005".
Another was in hardened 52100,32 rms,CBN tooling,beautiful homogeneous finish.
Posted by: Mueller Jan 3 2016, 04:54 PM
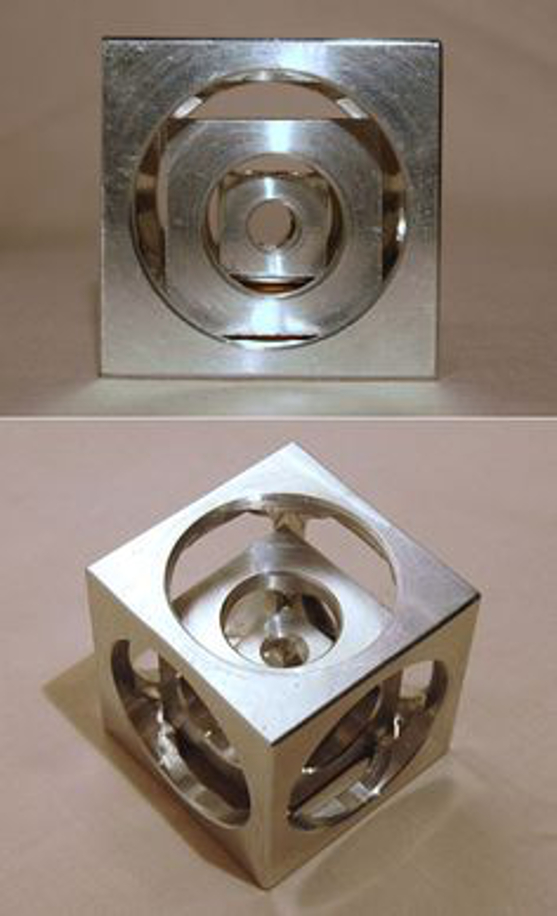
http://www.cnczone.com/forums/general-metalwork-discussion/52757-making-large-quot-turners-cubes-quot-engine.html
http://www.cnccookbook.com/CCTurnersCube.html
Posted by: Series9 Jan 3 2016, 09:09 PM
http://www.cnczone.com/forums/general-metalwork-discussion/52757-making-large-quot-turners-cubes-quot-engine.html
http://www.cnccookbook.com/CCTurnersCube.html
I read all of that. Pretty cool stuff and certainly good training.
Without the use of a mill, chucking up a square piece in a 3-jaw chuck looks like a challenge.
Posted by: Mueller Jan 4 2016, 08:23 AM
http://www.cnczone.com/forums/general-metalwork-discussion/52757-making-large-quot-turners-cubes-quot-engine.html
http://www.cnccookbook.com/CCTurnersCube.html
I read all of that. Pretty cool stuff and certainly good training.
Without the use of a mill, chucking up a square piece in a 3-jaw chuck looks like a challenge.
Invest in a 4 jaw chuck, each jaw is independent so you can dial it within .0005" if you have the tools and patience.
Posted by: Series9 Jan 4 2016, 08:36 AM
Let's start with the basics.
What's the turning speed for various metals and other media?
How do I set the correct tool height?
Posted by: mbseto Jan 4 2016, 08:46 AM
Get a copy of Machinery's Handbook. It's the standard text for speeds and feeds and looks impressive on your bookshelf. If you have a half-price bookstore nearby, they often have a copy.
Posted by: Racer Chris Jan 4 2016, 09:21 AM
Let's start with the basics.
What's the turning speed for various metals and other media?
How do I set the correct tool height?
Speed is dependent on diameter in addition to material. Surface feet per minute (at the tool) is the basis for selecting the correct rpm.
Generally, Aluminum under 1 1/2 inches can be spun at 1000 rpm or faster in most cases. Steel should be below 500 rpm for anything over 3/4 inch.
Carbide tools accept higher rpm than Cobalt steel. Cobalt tools can be run a little faster than High Speed Steel. Ie., they will operate at higher temperatures without ruining the tool.
Rule of thumb with steels, if the chips turn straw or amber color your at the max rpm. If they turn blue, slow the rpm down.
If a high speed steel tool turns color you are going too fast and ruining the cutting edge quickly.
Use a feed rate that gives a good surface appearance without taking too long to reach the other end. That will usually be around .005" per revolution, plus or minus, depending on the specific cut.
Depending on the equipment and the specific tool shape, you can run at cutting depths of .010" to .050". Deeper cuts will lose some accuracy, so best to leave a small cut for the last passes.
The crossfeed dial measures change in diameter, so turn the dial in 50 for a cutting depth of .025".
To lubricate aluminum, add 50% kerosene to your cutting oil.
You want some smoking of your cutting fluid to occur.
That usually indicates a good temperature for cutting.
The tool needs to be very close to the centerline, or just slightly above (< .060") in many cases.
Posted by: Mueller Jan 4 2016, 09:44 AM
Let's start with the basics.
What's the turning speed for various metals and other media?
How do I set the correct tool height?
http://blog.cnccookbook.com/2015/02/10/turning-lathe-feeds-speeds-g-wizard/
^I'm a fan of the GWizard above, I use it for my CNC mill once in a while.
Nothing wrong with the Machinist Handbook as well, but sometimes it is nice to just punch in numbers and get a result to start off with.
I'd learn with the standard dials, but if you really want to get jobs done quicker and with a little bit less chance of messing up I'd recommend a DRO (digital read out)
http://www.dropros.com/
and
http://www.acu-rite.com/index.html
We have been using the Acu-Rites with good results when the shops don't want the extra expensive of the normally used Magnescale DRO units.
Posted by: Series9 Jan 4 2016, 09:53 AM
Thanks, Chris and Mike.
Posted by: ConeDodger Jan 4 2016, 10:51 AM
http://www.cnczone.com/forums/general-metalwork-discussion/52757-making-large-quot-turners-cubes-quot-engine.html
http://www.cnccookbook.com/CCTurnersCube.html
I read all of that. Pretty cool stuff and certainly good training.
Without the use of a mill, chucking up a square piece in a 3-jaw chuck looks like a challenge.
Invest in a 4 jaw chuck, each jaw is independent so you can dial it within .0005" if you have the tools and patience.
Mike,
He should make 5 lug conversion hats for front rotors...

Posted by: toolguy Jan 4 2016, 11:04 AM
You can make anything you put your mind to. . .
My Chevy V8, most from scratch.
Crank took 2 weeks, cam 1 week. . both from solid round stock . the
roller rockers were the hardest because I needed 16 identical. .
Attached image(s)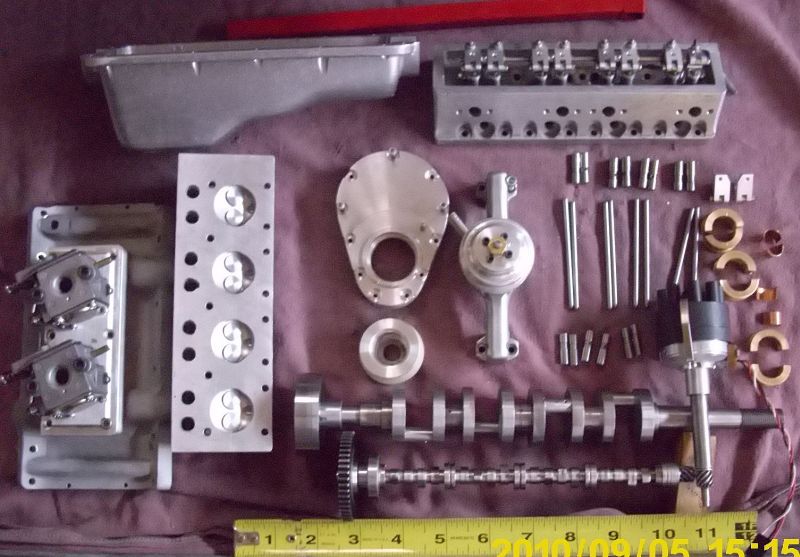
Posted by: 914bub Jan 4 2016, 11:39 AM
You can make anything you put your mind to. . .
My Chevy V8, most from scratch.
Crank took 2 weeks, cam 1 week. . both from solid round stock . the
roller rockers were the hardest because I needed 16 identical. .
That's impressive!
Posted by: NeunEinVier Jan 4 2016, 12:00 PM
A pistol silencer, so you can be James Bond?
Posted by: Kansas 914 Jan 4 2016, 12:11 PM
You can make anything you put your mind to. . .
My Chevy V8, most from scratch.
Crank took 2 weeks, cam 1 week. . both from solid round stock . the
roller rockers were the hardest because I needed 16 identical. .
That's impressive!

Just WOW!
Posted by: veekry9 Jan 4 2016, 01:19 PM

You are in the fla machine belt,supporting nasa and have experts all around you.
Take advantage and prepare yourself accordingly,this is not an overnite,instant gratification endeavor.
I have seen and heard of too many horrible industrial accidents and have become skeptical of selfproclaimed 'gurus'.
Grenade training in the military is defined by strict protocols,so too should be the instruction and manual study of your new lathe.
Bone up on the tech,it's a tool of great versatility with which you can test yourself to get good at.
Getting great at it requires decades of practice and application.
The machine you have for cheap must be supported by the acquiring of tools of telemetry,500$ basically to start.
Electric drills and saws may be your experience to date,and if so,a period of training is needed,because it's the right thing to do.
Broaching allen sockets in titanium bolts on a manual lathe,circa 1981,<10pcs.
(edit)
Come to think of it,an ad for a part time machinist of skill may be an alternative way to part cost in labor and time.
Hire a machinist to make your swingarm bearing barrel or front upright to carry a driven axle!
Posted by: Series9 Jan 4 2016, 02:10 PM
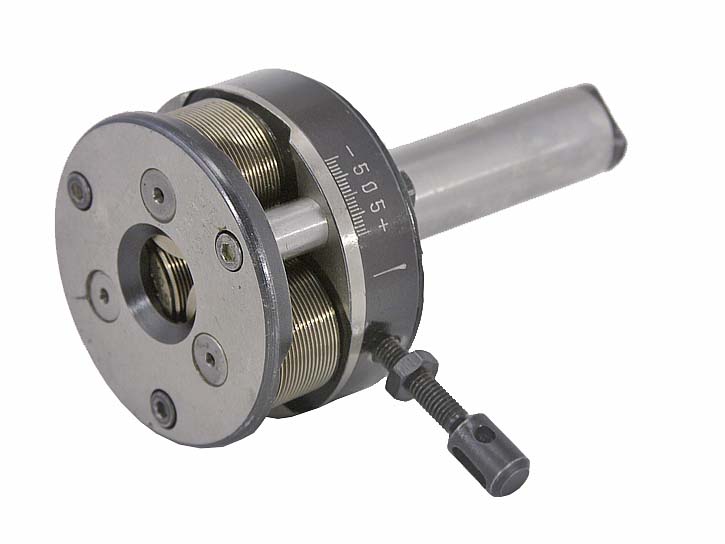
I think I'll be getting this set:
Attached image(s)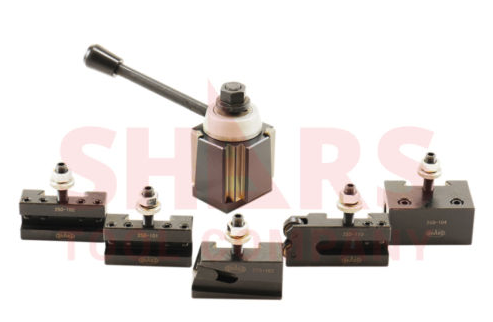
Posted by: Series9 Jan 4 2016, 02:14 PM
The machine you have for cheap must be supported by the acquiring of tools of telemetry,500$ basically to start.
Electric drills and saws may be your experience to date,and if so,a period of training is needed,because it's the right thing to do.
This is all excellent advice. Trust me, it is clear to me that this could be a very dangerous machine. It's also clear that I have almost everything to learn.
Posted by: Mueller Jan 4 2016, 02:23 PM
The machine you have for cheap must be supported by the acquiring of tools of telemetry,500$ basically to start.
Electric drills and saws may be your experience to date,and if so,a period of training is needed,because it's the right thing to do.
This is all excellent advice. Trust me, it is clear to me that this could be a very dangerous machine. It's also clear that I have almost everything to learn.
No gloves, no long hair (female grad student died this way a few years ago at one of the universities) , long sleeves also a bad idea.
Don't leave key in chuck and turn on lathe....I did this before, luckily the key went straight up in the air and not into my face...it did almost land on the hood of my car!
Don't be tempted to put a chuck into a chuck! Yes, people have done it!
Posted by: veekry9 Jan 4 2016, 03:40 PM
http://littlemachineshop.com/products/product_focus.php?Focus=Cutting%20Tools%20Lathe
http://www.yellowpages.com/orlando-fl/machine-shop-tool-supply
These are some basic tools to get started,do try to be a csob as a money pit is right in front of you.
Planning is everything,make your plan,work your plan,plan to make a profit.
A wee Scotsman told us that in '68,the instructor of the course,of WW2 machining experience.
Know what you are doing before you start making chips,or you'll make chips of gold.
Much to learn of turning,there is.

https://www.youtube.com/watch?v=Za0t2Rfjewg
I'm guessing the lathe has no toolpost holders,which is why you're looking to purchase a set.
You won't need a large capacity,3/4" will suffice.
(edit)I see in the photo up top,the post you have will do fine for your application.
The quickchange holders are for production speed and repeatability,can be useful for toolroom applications,setup speed.
btw,
If your sump smells like shit,it is because there is shit in it.
You'll want to keep it as clean as a toilet bowl,at minimum.
An extreme biohazard,keep it off your skin,eyes,mouth.
Steph and staph out of the sump.
https://en.wikipedia.org/wiki/Necrotizing_fasciitis
http://fluids.doallsawing.org/products_detail.aspx?idcategory=cutting%20fluids&idsubcategory=cleaners%20%7C%20additives&idproduct=DOALL014
http://www.zepcommercial.com/product/Heavy-Duty-Citrus-Degreaser
Posted by: iwanta914-6 Jan 4 2016, 03:58 PM
I used to operate Lathes and Mills when I was a kid. My dad owned a machine shop so I learned from one of the best machinists. Of course I chose not to follow in his footsteps and haven't operated any machines since I was 18.
My suggestion is that you take some classes at a local vo-tech just to get a better understanding of the basics, which includes all the safety lessons.
Posted by: veekry9 Jan 4 2016, 03:58 PM
https://www.google.ca/search?q=miniature+v8+engine&espv=2&biw=1280&bih=641&source=lnms&tbm=isch&sa=X&ved=0ahUKEwi81_6akZHKAhXIlx4KHUUWCqwQ_AUIBygC#imgrc=dLyA95qXWQQ22M%3A
Ya gotta appreciate the massive workload to achieve these works of machining art.
(edit:01/06/16)
http://www.craftsmanshipmuseum.com/dahlberg.htm
Mindboggling,dedication,talent,perseverance,skill...
I happen to have made a plastic model of this car along with a Stutz Bearcat in the early '60s.
Why I like it,the time and talent as applied to machine sculpture,as you would a fine Swiss watch.
https://www.youtube.com/watch?v=aoDFV_-FPrc
https://www.youtube.com/watch?v=08Rfvu7k2nI
https://www.youtube.com/watch?v=4L4Hj85Kb5o
(
You may find this illuminating.
" Here we show that a dense uniform dispersion of silicon carbide nanoparticles (14 per cent by volume) in magnesium can be
achieved through a nanoparticle self-stabilization mechanism in molten metal. An enhancement of strength, stiffness, plasticity and high-temperature stability is simultaneously achieved, delivering a higher specific yield strength and higher specific modulus than almost all structural metals."....wow!
I've worked with some amazing hitemp alloys,if they are referring to the top 3%,we have a new paradigm of power to weight across all applications.
Magnesium-SiliconCarbide Composite(MgSiC) conrods,pistons,valvegear,chassis.
Big changes coming.Wow.
http://gizmodo.com/new-magnesium-composite-has-record-breaking-strength-to-1749578336
http://www.nature.com/nature/journal/v528/n7583/full/nature16445.html
)
/
(edit:2/22/16)
Think of an engine block with cylinder bores of < 3mm wall thickness,an engine of half the weight.
Pistons weights allowing high rpm use,the temp stability to allow much higher velocities.
Who will be the first to offer a superleggara boxer engine for a ridiculously exorbitant price?
A 40 Kg advantage will eventually find it's way to a 914 engine bay.
/
Posted by: Series9 Jan 5 2016, 08:12 AM
Don't be tempted to put a chuck into a chuck! Yes, people have done it!
Dammit, it came with a small chuck and I thought that was how it was used.
I figured out how to remove the 6" chuck and it's attached by 3 cam-locks. The small chuck has a shaft with threads on the rear portion, so it appears the small one is for another type of lathe.
I have some tools. I'll take pictures and ask for more advice.
Posted by: toolguy Jan 5 2016, 01:25 PM
I think I'll be getting this set:
Look up KDK toolpost and holders. . The best and most versatile design
There are some knock off's on EBay that are just as nice.. . this is the 100 size set. . that is what you want for a 12 inch lathe
http://www.ebay.com/itm/6-PIECE-KDK-STYLE-100-QUICK-CHANGE-TOOL-POST-HOLDER-SET-3900-5425-/231314112361
Posted by: aircooledtechguy Jan 5 2016, 02:23 PM
You can make anything you put your mind to. . .
My Chevy V8, most from scratch.
Crank took 2 weeks, cam 1 week. . both from solid round stock . the
roller rockers were the hardest because I needed 16 identical. .
I marvel at guys like you with these kinds of skills. . . AMAZING!!

When it's done and running you have to post-up a video!!
Posted by: veekry9 Jan 5 2016, 02:38 PM
A pistol silencer, so you can be James Bond?
Warning!
This is not a drill!
Graphic content of industrial accident within!Gore.
An example of not following rules of MC 101.
http://www.silencertalk.com/forum/viewtopic.php?t=41444
(edit:01/12/16)
He looked as surprised as anyone could get.
I found this while searching for 'Mas' engine lathe.
(edit:05/22/16)
Photobucket has taken down the pix of the accident,
I suppose the horrible nature of accident investigation is too offensive.
Civil War pix,or plane and train crashes.
Boer War,WW1 and WW2,Korea and VietNam and so on.
Used to be,the dead were front page news,all around the world.
Surely,they were more offended than the viewers,decades or centuries later.
They were professionally taken for reference in law,an inquiry for recommendations to regulation changes.
The purpose,to avoid more accidents,like the carnage on the highways.
Teaching more people about the results of ignored rules or seatbelts might have an effect on the number of casualties.
/
Posted by: VegasRacer Jan 5 2016, 09:30 PM
My first thought is to turn some clutch pulleys out of brass.
Like this.

Attached image(s)
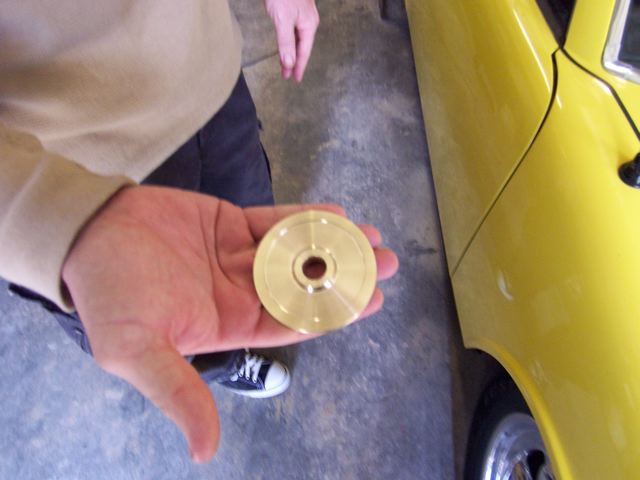
Posted by: Series9 Jan 5 2016, 09:57 PM
My first thought is to turn some clutch pulleys out of brass.
Like this.
Yes, exactly like Wills' souvenir.
Posted by: zambezi Jan 6 2016, 01:02 AM
Don't be tempted to put a chuck into a chuck! Yes, people have done it!
Dammit, it came with a small chuck and I thought that was how it was used.
I figured out how to remove the 6" chuck and it's attached by 3 cam-locks. The small chuck has a shaft with threads on the rear portion, so it appears the small one is for another type of lathe.
I have some tools. I'll take pictures and ask for more advice.
Maybe the small chuck is for the tail stock for drilling holes. That is how ours is done.
Posted by: toolguy Jan 6 2016, 10:25 AM
12X36 and 13x40 import {China or Taiwan] lathes almost always come with a 6 inch camlock chuck with a D1-4 spindle mount. . Going up to an 8 inch chuck is double the rotating weight, A 6 in chuck is around 20 pounds, 8 in is about 35+ pounds,
You lathe looks to be a 12x36 with probably a 1 1/2 motor at best. A 6 inch chuck is what it is best suited to turn.
Consider what the HP is on the motor on yours. . .and the weight of the piece you are turning when considering a larger chuck. . Wanting to hold larger objects is why the chuck jaws are reversible and have 3 steps, once you exceed the limit of the chuck you should consider a bigger lathe to match a larger chuck. . .
A drill chuck is what is used in the tailstock, just like on a drillpress but with a Morse taper mount.
Once again, just my 2 cents, but think safety here. . flying metal is hard to stop.
Posted by: Olympic 1.7 Jan 6 2016, 11:05 AM
Warning!
This is not a drill!
Graphic content of industrial accident within!Gore.
An example of not following rules of MC 101.
http://www.silencertalk.com/forum/viewtopic.php?t=41444
Veekry
Thanks for posting this.
Very graphic....
I also was given a small lathe, old Logan 10x24. and I have very little metal working experience. I have made a couple small parts and am very careful when using it.
But these pictures will be in my mind anytime I use it from now on....
Posted by: sean_v8_914 Jan 6 2016, 11:39 AM
grab a chunk of broom stick. make a contoured handle. pencil out a simple handle with some steps and dia changes. them try to make the wood look like your picture. my son just gave me a lathe. my first real project was to turn down the ID of a steering hub adapter. im having fun with it. this thread is awesome. thanks for the guidance
Posted by: veekry9 Jan 6 2016, 11:41 AM
The horror technique was used on us in our teen years and effectively shocked us into a safety mode around machine tools.
The instructor was a WW2 vet of military discipline,the values imparted by strict rules of operation.
It is true some people have no business messing with them,at all.Case in point,a new guy tried to off himself twice in a few days.
Untrained,unwary and ignorant of the first premises of self preservation,he was dismissed with a recommendation to a trade school.
A shop coat caught in the lead screw of the lathe,panicked,screamed and was saved by me when I shut the spindle off.
Next day,'forgot'to clamp the barfeeder and had the turret lathe hopping off the floor,he froze.
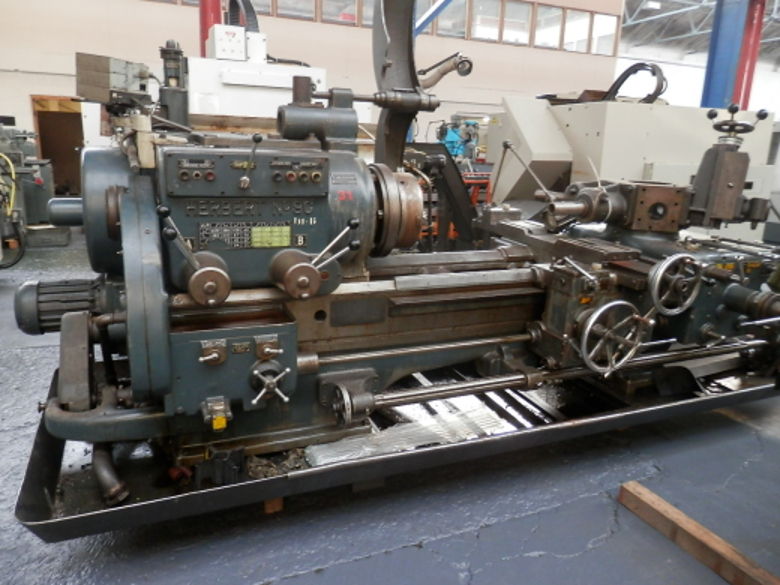
Herbert No9,made in England,30-60's.https://en.wikipedia.org/wiki/Alfred_Herbert_(company)
/
Posted by: Mueller Jan 6 2016, 12:14 PM
The horror technique was used on us in our teen years and effectively shocked us into a safety mode around machine tools.
It is true some people have no business messing with them at all.Case in point,a new guy tried to off himself twice in a few days.
Untrained,unwary and ignorant of the first premises of self preservation,he was dismissed with a recommendation to a trade school.
A shop coat caught in the lead screw of the lathe,panicked,screamed and was saved by me when I shut the spindle off.
Next day,'forgot'to clamp the barfeeder and had the turret lathe hopping off the floor,he froze.
Herbert No9,made in England,50-60's.https://en.wikipedia.org/wiki/Alfred_Herbert_(company)
We had a cast lathe chuck failure on a machine a little bit bigger than that one a few years ago, the part weighed a few hundred pounds which wasn't the problem , it was too high of an RPM for a cast chuck! Luckily no injuries. The forged steel replacement chuck cost over $15,000.
Joe,
Hurry up and make some chips, show off your work!
Posted by: 76-914 Jan 6 2016, 12:33 PM
So, I was given a lathe that had electrical problems.
I sorted those problems, and I am now looking for some simple projects so I can learn the machine.
My first thought is to turn some clutch pulleys out of brass. Do you have other suggestions?
Arrgh. I hate you. But, as with most gifts, you probably earned it so enjoy. I'm just envious as shit. Did that little red Kennedy KK19 hip box come with it? It's about the same age. Have fun with it, Joe.

Posted by: mbseto Jan 7 2016, 03:09 PM
Machine shop guys always have impressive stories. And there's 101 ways to get zinged. Was in a shop with an impressively large shaper, bed over 30ft. long. Me and a new guy were watching that head slide towards us, curling off .1 thk steel corkscrew. It hit the ground right at our feet and sounded as big as a garage door spring. He bent down to pick it up and I hip-checked him. He was affronted for a moment, but then we watched it slowly turn that same blue as a motorcycle exhaust pipe.
Posted by: Series9 Jan 7 2016, 05:11 PM
So, I had to replace the front wheel bearings on the right side of my Vanagon today.
The rotor looked pretty crappy, so I took the opportunity to put it in the lathe.
Success! It was the first time I used the power feed and it came out pretty well.
I'm going to want a nicer finish in the future, but definitely good enough for a brake rotor.
My oldest boy (14) seemed unimpressed as I was smiling with the lathe running. I told him he didn't understand the significance of what he was seeing.
Posted by: Mueller Jan 7 2016, 05:33 PM
So, I had to replace the front wheel bearings on the right side of my Vanagon today.
The rotor looked pretty crappy, so I took the opportunity to put it in the lathe.
Success! It was the first time I used the power feed and it came out pretty well.
I'm going to want a nicer finish in the future, but definitely good enough for a brake rotor.
My oldest boy (14) seemed unimpressed as I was smiling with the lathe running. I told him he didn't understand the significance of what he was seeing.
There is something therapeutic when turning the handles on a manual lathe or mill when making chips, I don't get the same satisfaction when running the CNC...
Don't laugh.....I might have some VCR tapes of Rudy Kouhoupt that cover lathe operation and tool grinding...if you still have a player and I can find them you can have them for the cost of shipping.
http://bay-com.com/Rudy_Kouhoupt.php
http://bay-com.com/cid/1-1/Machining_lathe_tool_machinists.html
Instructional DVDs to rent:
https://smartflix.com/store/author/23/Rudy-Kouhoupt
Posted by: r_towle Jan 7 2016, 09:17 PM
Btw,
I was joking about making something square.
Love this place.
Posted by: veekry9 Jan 8 2016, 01:55 AM
Now you too can make your own stroker crankshaft!

Go ahead,make your hay.
Note how spic n span his shop is.
A cap for the lathe top should have railings,to keep tee wrenches there.
Long stringy chips are bad,dangerous,and a sign of wrong.
Never mess with those chips while rotating!
Never.
Posted by: Series9 Jan 8 2016, 08:35 AM
I'll be turning that rotor again...... 
Posted by: MoveQik Jan 9 2016, 10:26 AM
My first thought is to turn some clutch pulleys out of brass. Do you have other suggestions?
Totally lame idea. It'll never work.
Posted by: MoveQik Jan 9 2016, 10:27 AM
My first thought is to turn some clutch pulleys out of brass.
Like this.
I'm sort of a pulley snob.
Posted by: 914Bryan Jan 10 2016, 07:14 PM
Lighten a flywheel
Posted by: Series9 Jan 11 2016, 07:28 PM
Lighten a flywheel
Okay, soon.
Right now I'm thinking, if I lighten a flywheel like I "lightened" that brake rotor, I might damage an engine....

Posted by: r_towle Jan 11 2016, 08:49 PM
Lol, bet it was fun though.
Posted by: toolguy Jan 12 2016, 11:07 AM
Turning a brake rotor on an engine lathe is difficult at best in keeping both sides parallel. The problem is rotors are too damn big to get your cutter to both sides without unmounting the rotor and reversing it. Holding it on a regular chuck for both sides hasn't worked for me without a lot of set-up time with a dial indicator.
Best way is to use a 'faceplate', not a chuck to start.
Bolt the rotor to the faceplate using the flat surface where the car rim mounts. that way you are turning the back of the rotor parallel to the axis the rim spins on. .
Then reverse the rotor, mount the rotor surface you just cut to the faceplate. now turn the opposite side of the rotor. .
Theoretically both sides will be parallel and consistent with the axis of the wheel.
Posted by: Buckeye914 Jan 12 2016, 03:52 PM
I kinda just skimmed through this post but with that said, I would also suggest investing in quality measurement tools. 1" micrometers and nice 6" calipers from mitituyo or starret can be had for reasonable prices. and like others have said checking the runout of the spindle and chuck assembly is important if you plan on your parts being true. A dial indicator with a magnetic mount should get you running true in no time. And as many others have said safety is most important.
Posted by: veekry9 Jan 12 2016, 08:04 PM
Several factors in the machining of shafts.
1)The spindle rotates about it's center within 0.00005"/0.00008",under load.(the bearings are good)
2)The spindle is parallel to the bed in both axis.
3)The carriage moves true to the bed.
4)The cross feed saddle is square to the spindle.
5)The clearance gibs are adjusted to minimums.
A tuned instrument is needed to make a correct shaft,adjust the machine to do so.
Speeds and feeds for horsepower are the required knowledge.
Keep a table poster above the lathe for reference,noting the cutting(sfm) (Surface Feet per Minute)speeds.
A turned part in hardened metal can be finished to fine tolerances with these versatile attachments.
http://www.micro-machine-shop.com/tool_post_grinder.htm
http://www.cnccookbook.com/CCLatheTPGrinder.htm
https://www.google.ca/#q=porsche+904+main+shaft
https://www.google.ca/search?q=spherical+turning+attachment&espv=2&biw=1280&bih=641&source=lnms&tbm=isch&sa=X&ved=0ahUKEwiOgK_A1qXKAhVG6RQKHRFdCJEQ_AUIBigB
Learn something new every day,continuous learning.
Turning costs money,never turn for free.
(edit:01/14/16)
Quote:post#9
toolguy
....If not set up properly, no matter what you do, your finished project will have taper and be out of square and off center.
Correctomundo.
Pretty basic geometry,the setting up and fettling of the machinetool defines the results possible.
Direct measurement and trial cuts are required,then your efforts will satisfy you and 'customers'.
Nowadays,the price of indexable carbide tooling makes their use standard,tungsten and cobalt hss is perfect for delrin and bronze.
The manual and drawings that came with the machine makes the repair and maintenance of it painless.
The design of the headstock bearing may allow refurbishment,grinding a tighter clearance on a spacer ring.
Make,year,model,ser# and the fx# of the manufacturer is handy.
Never do repair work on the machine while under power,lockout rules apply.
/
Posted by: Series9 Jan 12 2016, 08:21 PM
Turning a brake rotor on an engine lathe is difficult at best in keeping both sides parallel. The problem is rotors are too damn big to get your cutter to both sides without unmounting the rotor and reversing it. Holding it on a regular chuck for both sides hasn't worked for me without a lot of set-up time with a dial indicator.
Best way is to use a 'faceplate', not a chuck to start.
Bolt the rotor to the faceplate using the flat surface where the car rim mounts. that way you are turning the back of the rotor parallel to the axis the rim spins on. .
Then reverse the rotor, mount the rotor surface you just cut to the faceplate. now turn the opposite side of the rotor. .
Theoretically both sides will be parallel and consistent with the axis of the wheel.
Excellent! These are points I had already decided would be necessary to perform this operation correctly next time.
I ordered another rotor, but I intend to "fix" this one until the three faces are parallel.
I have instruments and holders on order. First, I'm going to make sure the face of the chuck turns true and then proceed from there. I had planned to take the jaws out of the chuck and hold the wheel-face of the rotor against the chuck with the tail stock and a live center.
When I get the instruments, I'll measure the magnitude of my errors and report them for your entertainment. I can tell you the Vanagon is "interesting" to drive right now.
Posted by: r_towle Jan 13 2016, 07:50 AM
You might want to consider building a jig or faceplate that has lots of threaded holes in it to accomidate all the cars you work on, then you can reuse the jig for a few years
Posted by: worn Jan 13 2016, 01:49 PM
I wouldn't worry too much - the projects have a way of finding you. One of the most useful tools in the shop. For example, I used mine to copy some of your ideas.
I have a few Popular Mechanics year book of projects dated from around 1940. I found them when my Dad passed away last year. They kind of just assume that any guy is gonna have a metal lathe. One article is how to build a complete gasoline engine from scratch - a small motor for a model something.
They also assume that you have a plentiful supply of Model Ts, from which they make an astonishing number of things.
My Dad saved his allowance and bought a Craftsman wood lathe in the 1930s. It is a good as the day it was bought. Plan on a lot of projects
Posted by: veekry9 Jan 14 2016, 08:10 AM
Useful attachment to mill splines on axleshafts.
A multipurpose mill/turn machine.
https://www.google.ca/search?q=lathe+milling+head+attachment&espv=2&biw=1280&bih=641&source=lnms&tbm=isch&sa=X&ved=0ahUKEwjbi62ru6nKAhXMSSYKHbK6DMcQ_AUIBigB#imgrc=OEAJfnkmXvAX6M%3A
Posted by: Series9 Jan 14 2016, 08:54 AM
Useful attachment to mill splines on axleshafts.
A multipurpose mill/turn machine.
https://www.google.ca/search?q=lathe+milling+head+attachment&espv=2&biw=1280&bih=641&source=lnms&tbm=isch&sa=X&ved=0ahUKEwjbi62ru6nKAhXMSSYKHbK6DMcQ_AUIBigB#imgrc=OEAJfnkmXvAX6M%3A
Neat.
Posted by: mbseto Jan 14 2016, 04:09 PM
This is NOT a beginner project and I'm not recommending to anyone, but I found it very educational in terms of what good custom lathe work looks like.
http://www.the-long-family.com/making_a_muzzle_brake.htm
Posted by: Mueller Jan 14 2016, 04:39 PM
This is NOT a beginner project and I'm not recommending to anyone, but I found it very educational in terms of what good custom lathe work looks like.
http://www.the-long-family.com/making_a_muzzle_brake.htm
Heck, that should be labeled NSFC...Not Safe For Californians , hahaha
Joe, when you get bored with it, convert it to CNC, I'm in the planning stages with my old Sebastian lathe to convert it... http://dynomotion.com/KFLOP.html
Posted by: veekry9 Jan 14 2016, 05:33 PM
https://forum.linuxcnc.org/forum/index/
Proprietary boards and motors have their place in manufacturing,and there are a number of heavy machine companies doing business.
http://www.dipaolocnc.com/
https://www.youtube.com/watch?v=9IAHUy9A4U4
Very expensive though,you would have to have the work to pay for it.
The beauty of the Emc2,now LinuxCNC is that the development costs were borne by http://www.nist.gov/
to circumvent the bottleneck of the manufacturer's constraints.
A fella in Wichita converted a heavy 1960's 20hp Cincinnati 5X Mill to do aerospace,cheaply with great success,cheeply.
Some sweat equity is also a prerequisite,the geometry of the machine defining the expenditures.Big=$.
https://www.google.ca/webhp?sourceid=chrome-instant&ion=1&espv=2&ie=UTF-8#q=machinetools+used+usa
The prices are dropping rapidly for burnt board machines.
Converting a manual machine to cnc poses additional,large hardware costs.
(edit)
https://www.youtube.com/watch?v=Nn1bJ3YAQdI
https://www.youtube.com/watch?v=mxxdq6y8z8M
https://www.youtube.com/watch?v=35tHYaDUmZQ
This is it,in action.
/
Posted by: Mueller Jan 14 2016, 05:51 PM
https://forum.linuxcnc.org/forum/index/
Proprietary boards and motors have their place in manufacturing,and there are a number of heavy machine companies doing business.
http://www.dipaolocnc.com/
https://www.youtube.com/watch?v=9IAHUy9A4U4
Very expensive though,you would have to have the work to pay for it.
The beauty of the Emc2,now LinuxCNC is that the development costs were borne by http://www.nist.gov/ to circumvent
the bottleneck of the manufacturer's constraints.
A fella in KC converted a heavy 60's Pratt+Whitney 5X Mill to do aerospace,cheaply with great success,cheeply.
Some sweat equity is also a prerequisite,the geometry of the machine defining the expenditures.Big=$.
https://www.google.ca/webhp?sourceid=chrome-instant&ion=1&espv=2&ie=UTF-8#q=machinetools+used
The prices are dropping rapidly for burnt board machines.
Converting a manual machine to cnc poses additional,large hardware costs.
I've done a few small CNC conversions from manual machines at home, I did a CNC retrofit a few years ago at work using Mach3, nobody likes it except for me and a few machinists.
No more low dollar retrofits for work, all new FANUC electronics or Delta Tau, a little more $$ but worth it in the end.
Posted by: Series9 Jan 14 2016, 05:55 PM
when you get bored with it......
No pun?
Posted by: r_towle Jan 14 2016, 07:18 PM
You should make a clock out of the rotor and hang it over the lathe......just cause
Posted by: Series9 Jan 15 2016, 08:20 AM
You should make a clock out of the rotor and hang it over the lathe......just cause
You're right. I'll do something like that.
Posted by: Series9 Jan 24 2016, 06:20 PM
I have my first revenue project.
I'll be modifying 914 axles for 944 CVs.
That should be a good one, because .001 precision isn't critical.
Updates will follow.
Posted by: r_towle Jan 24 2016, 06:21 PM
Oh no....
Posted by: veekry9 Jan 24 2016, 06:27 PM
Broaching or shaping,rolling or milling?
https://www.google.ca/search?q=spline+shaping+on+lathe&biw=960&bih=480&source=lnms&tbm=isch&sa=X&ved=0ahUKEwjequLGmY3LAhXorYMKHc27AjEQ_AUIBygC
https://www.google.ca/search?q=rope+thread+rolling+lathe&espv=2&biw=960&bih=480&source=lnms&tbm=isch&sa=X&ved=0ahUKEwiUi4z0lY3LAhWkg4MKHc-nATAQ_AUIBigB#tbm=isch&q=thread+rolling+process
https://www.google.ca/search?q=spline+milling+on+lathe&biw=960&bih=480&source=lnms&tbm=isch&sa=X&ved=0ahUKEwiHyNuCmo3LAhUjuIMKHS8QBjEQ_AUICCgC#imgrc=NZ_IjncQ_R52HM%3A
/
Posted by: mskala Jan 28 2016, 07:23 PM
Or you could trade your lathe for 250 beanie babies...
https://nh.craigslist.org/bar/5416282872.html
Posted by: Series9 Jan 28 2016, 07:53 PM
Observations from the mind of a beginner on the lathe:
Not having quick-change tools with adjustable height is complete bullshit. That will be corrected shortly.
The "simple" task of chucking a lug nut is not simple at all. It's almost impossible to get them to spin true. I have discovered this is because the bolt head and the threaded shaft are not necessarily manufactured on the same axis. This makes the "easy" task of turning a flat shoulder out of the conical seat very difficult if you want it to be perpendicular to the axis of the threading.
With the (?) tooling I found with the lathe, I can face steel at about 1mm per pass at 260 rpm. If you get greedy or impatient and go for 1.5mm per pass, you will be looking for another tool.
I ruined a parting tool, so I need more information on its correct use. Once I ruin the tip on a parting blade, how do I fix/sharpen it again? Can I?
On a positive note, I was able to put that brake rotor I ruined back on the machine. I got the wheel face turning within .001" and was then able to make the braking surfaces do the same. On my previous effort, I had managed to turn the outer face to a runout of .006" and the inner face to .01". Ouch.
Attached thumbnail(s)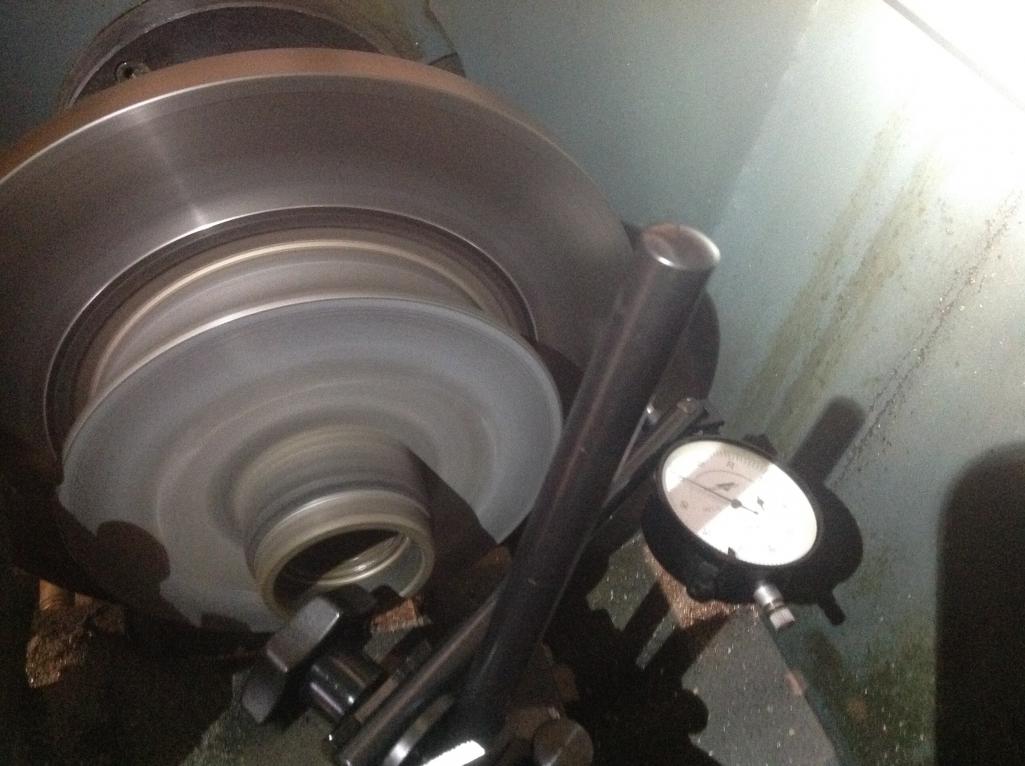
Posted by: r_towle Jan 28 2016, 08:20 PM
Nice clock
Posted by: Series9 Jan 29 2016, 08:06 AM
I don't want to pay the price, but it looks like I'll be buying an Aloris BXA tool post and holders. I found a set for around $650, but I'm still shopping for used.
Chinese sets can be had for less than half that, but I think I'll eventually replace my Chinese lathe with a good one, so I might as well start assembling good tooling.
Posted by: toolguy Jan 29 2016, 09:39 AM
Look at KDK style first. . much better and a lot easier to use. . there use to
be a seller that had Tiawan copies which are just as good. . holders are about $20 each. . It's the toolpost that is expensive. . Get the 100 size
This is an excellent deal. . full set with 8 holders $350 buy it now
http://www.ebay.com/itm/Lathe-KDK-100-Quick-Change-Tool-Post-System-PLUS-8-KDK-holders-/191755917200?hash=item2ca58b1790:g:kVUAAOSwHQ9WZ2KZ
Posted by: jd74914 Jan 29 2016, 10:03 AM
Look at KDK style first.
Those are so cool without the big bar on top to get in the way. Never seen one around here though; maybe it's a west coast thing?
Posted by: Series9 Jan 29 2016, 10:28 AM
Look at KDK style first. . much better and a lot easier to use. . there use to
be a seller that had Tiawan copies which are just as good. . holders are about $20 each. . It's the toolpost that is expensive. . Get the 100 size
This is an excellent deal. . full set with 8 holders $350 buy it now
http://www.ebay.com/itm/Lathe-KDK-100-Quick-Change-Tool-Post-System-PLUS-8-KDK-holders-/191755917200?hash=item2ca58b1790:g:kVUAAOSwHQ9WZ2KZ
Where is the height adjustment on those?
Posted by: Racer Chris Jan 29 2016, 10:53 AM
I use Aloris BX series. They have sales on a regular basis.
I use their .087 wide carbide parting tool inserts (with someone else's holder I think).
Posted by: toolguy Jan 29 2016, 11:32 AM
Where is the height adjustment on those?
There are allen set screw in the top and bottom. . these can be turned over so 2 cutters can be set up in 1 holder. .each side with different heights
Yes, these are primarily a West Coast thing. . all the areospace industries of the 90's used them. . can't understand why they never caught on in the East. .
Posted by: nathansnathan Jan 29 2016, 05:57 PM
I like to use what's called a "dial test indicator" for setting up stuff on a lathe.... different than a "dial indicator". The feeler nub has less range of motion but it springs back to position on its own.
About the issue with the lugs having multiple axis for the heads/threads, you can use a 4 jaw independent chuck, vs the universal 3 jaw. They take longer to set up but more accurate. The test indicator becomes very handy with an independent chuck.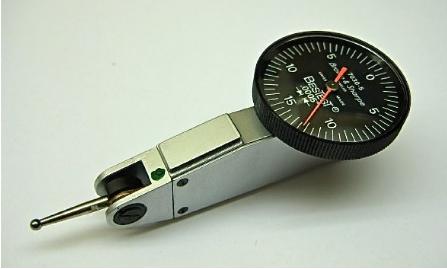
Posted by: r_towle Feb 8 2016, 05:18 PM
How can you inform your neighbors that it's noon each day, and practice on the lathe....and impress all your friends.
https://m.youtube.com/watch?v=YH4ereLJWtY
Posted by: veekry9 Feb 8 2016, 06:46 PM
https://www.google.ca/search?q=lathe+tool+height+setter&espv=2&biw=1280&bih=641&source=lnms&tbm=isch&sa=X&ved=0ahUKEwi_5sXnsunKAhWIrYMKHYCVBUsQ_AUIBigB#imgrc=bNIb7EMPqcWc9M%3A
Quick height setting.
BTW,buy a few sets of feeler gauges as shimpacks,under the tool,handy,< 20$.
(edit:2/09/16)
A boxfull of shims,cut from shipping strappings,burr-less and flat.<5$
How we set our tool IC,circa 1971,1967-VDF Boehringer.Optical Microscope.
https://www.google.ca/webhp?sourceid=chrome-instant&ion=1&espv=2&ie=UTF-8#q=VDF+Boehringer
Most of all these are all solved techniques,doing it for like,forever.
https://www.google.ca/search?q=wartime+women+machinists&espv=2&biw=1280&bih=641&source=lnms&tbm=isch&sa=X&ved=0ahUKEwiMyrXyt-nKAhWDsYMKHSkcAlgQ_AUIBigB#imgrc=JNOF9vsdonD5SM%3A
(edit:2/23/16)
https://www.google.ca/search?q=carbide+insert+ic&espv=2&biw=960&bih=480&source=lnms&tbm=isch&sa=X&ved=0ahUKEwi6_pSLm43LAhXjn4MKHQMgDzQQ_AUIBigB#imgrc=rCNqs2bbXrH_-M%3A
The nose radius of the tool in the picture is not the IC of the tool.
The nose radius is a variable to which compensation is applied on manual,nc and cnc machines,when radii or slopes are machined.
In general,a nose radius imparts it's form to shoulder intersections when using manual machines.
For a larger shoulder radii with a smaller nosed tool,'stair-step' the large rad using trigonometry calculations of gradually finer resolutions.
/
Posted by: mbseto Feb 9 2016, 10:45 AM
I ruined a parting tool, so I need more information on its correct use. Once I ruin the tip on a parting blade, how do I fix/sharpen it again? Can I?
When I had access to a shop, it seemed like a grinder was pretty much a lathe accessory. We had a stock of blanks and old cutters and the experts could grind new tools or just grind new edges onto old tools with the right relief angles just by eye. I used a template. I think guys doing high quality work were always touching up the edges. IIRC, we frequently dipped the tools in a can of water as we were grinding to keep from losing the temper on the edge.
Posted by: veekry9 Feb 9 2016, 10:38 PM
Making your own bushings is a handy skill.
Turning(cryogenically) dry-ice or nitrogen frozen rubbers and plastics calls for hss tool grinding and diamond honing.
Form tool geometry for those materials and some light metals requires high positive rake.
A carbide ball tool in a die grinder can create a groove in the top surface of the hss shank,a kind of 'moat'.
The relief flank is then ground to give a .005/.007" wide top face and positive chip rake.
With some practice and a toolmaker's microscope,a <16rms finish can be achieved.
https://www.google.ca/search?q=shadowgraph+inspection&espv=2&biw=1280&bih=641&source=lnms&tbm=isch&sa=X&ved=0ahUKEwjhupPbr-zKAhWlk4MKHRz1AvcQ_AUIBigB
http://www.graphalloy.com/html/type_317.html
/
(edit:2/23/16)
Generally,the use of old tech is cheap in terms of tooling costs,high in labour for the grinding of tungsten and cobalt HSS,or B-CARs.
The first error with either tool type will destroy the tool and or part,forcing a restart from the beginning.
A brand new indexable insert tool holder will allow some leeway for miscalculated feeds and speeds.
Know what you are doing before the tool touches the part.
https://www.google.ca/search?q=hand+grinding+hss+lathe+tools&espv=2&biw=960&bih=480&source=lnms&tbm=isch&sa=X&ved=0ahUKEwjV8ZKlrY3LAhUCmoMKHbYTBjIQ_AUIBigB#imgrc=yeBxuxkzkYIx6M%3A
/
Posted by: r_towle Feb 9 2016, 11:08 PM
Seriously
Attached image(s)
Posted by: veekry9 Feb 10 2016, 12:02 AM
Thread rolling for fun.
https://www.google.ca/search?q=thread+rolling+head&espv=2&biw=1280&bih=641&source=lnms&tbm=isch&sa=X&ved=0ahUKEwi5u8rTv-zKAhUklYMKHa-zABAQ_AUIBygC#imgrc=G4I0PmuZ6LetkM%3A
Thread turning on a lathe:
https://www.google.ca/webhp?sourceid=chrome-instant&ion=1&espv=2&ie=UTF-8#q=thread+turning+on+lathe
Pitch diameter,metric,thread series,3-wire measurements and calculation of fits.
https://www.google.ca/webhp?sourceid=chrome-instant&ion=1&espv=2&ie=UTF-8#q=buttress+thread+specification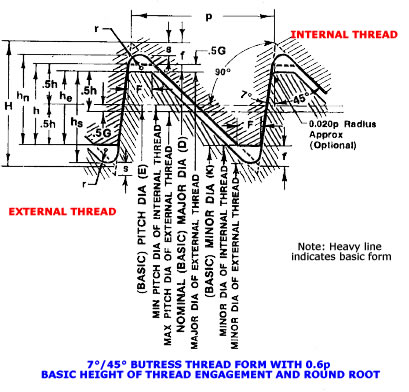
Need to know.
https://www.google.ca/webhp?sourceid=chrome-instant&ion=1&espv=2&ie=UTF-8#q=metric+thread+specification
/
Posted by: porschetub Feb 10 2016, 12:36 AM
[quote name='Mueller' post='2285347' date='Jan 5 2016, 09:23 AM']
[quote name='Series9' post='2285343' date='Jan 4 2016, 12:14 PM']
[quote name='veekry9' post='2285327' date='Jan 4 2016, 02:19 PM']
The machine you have for cheap must be supported by the acquiring of tools of telemetry,500$ basically to start.
Electric drills and saws may be your experience to date,and if so,a period of training is needed,because it's the right thing to do.
[/quote]
So funny but not ,the same thing happened in our machine shop the apprentice started the lathe with 3 jaw chuck key in and the guy next door wore it in the nose,blood everywhere...he had a few days off to recover.
Seen some nasty accidents with hot swarf (turnings) sticking to faces or people clearing swarf and receiving nasty cuts to the bone,this stuff can be very hot and super sharp.
Enjoy your lathe ,there is so much you can do with them,but safety is foremost
Posted by: veekry9 Feb 10 2016, 12:57 AM
Well,a trick to the key is:
Every time you engage the spindle,
"Say Key Please"
rhymes with "say cheese please".
Getting a chuck key in the eye is a harsh first lesson.
Danger will robinson,Danger.
Posted by: Series9 Feb 10 2016, 07:48 AM
Well,a trick to the key is:
Every time you engage the spindle,
"Say Key Please"
rhymes with "say cheese please".
Getting a chuck key in the eye is a harsh first lesson.
Danger will robinson,Danger.
There's something I can use. I don't respond to 90% of your posts because most are so far beyond my current skill level that I just say

I have walked up to the lathe and witnessed the key in the chuck and then thought about the consequences.

Posted by: veekry9 Feb 10 2016, 08:13 AM

Try this,turn your crossfeed handle into the tailstock or chuck(off).
Be certain neither of those immovable objects move.
Use medium pressure.
With a felt pen ,mark the dial at 0.
Gently,turn out until you get movement indicated.
Read off the difference,that is your backlash clearance on the crossfeed acme screw.
0.005" is like new,0.030" is buggered,the crossfeed saddle must be linear in movement to .0005".
Don't worry,it,the aluminum-bronze threaded crossfeed nut may be replaced or repaired.
https://en.wikipedia.org/wiki/Trapezoidal_thread_forms
Fun isn't it?
Posted by: jd74914 Feb 10 2016, 08:18 AM
They actually make self-ejecting keys; the machine shops at school have them to keep kids from throwing keys. They are the most frustrating things in the world when you're trying to delicately clamp something though.
http://www.ebay.com/itm/like/181249515436?ul_noapp=true&chn=ps&lpid=82
Posted by: veekry9 Feb 10 2016, 08:35 AM
See?
Someone is always coming up with a better mousetrap.
Not once did the idea come to mind,because we always remove it before turning.
An idiot proof chuck key would be a hot seller.
Kudos.
Posted by: nathansnathan Feb 10 2016, 08:47 AM
When I first got my South Bend, it was a whole new experience for me as I'd only used production lathes with carbide insert quick change tooling and cnc controls - it's very different with a home lathe using hss bits that can be sharpened. I often use the 4 way switching tool holder seen below. Sometimes the old school tool holders can be more versatile, but I can only use 1/4" bits that way, where the 4 way can handle 3/8" bits.
The most important aspect to forming bits is the end clearance angle. If there is not enough, the tool will ride on the part, bit gets hot and dulls quick. Too much angle and you also have a bit that will dull prematurely.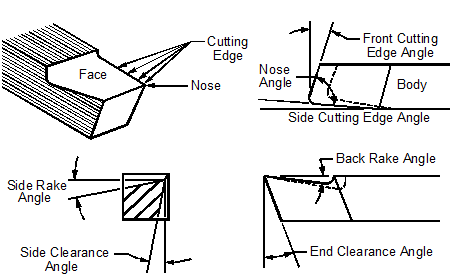
It's helpful to get preformed bits if you're just starting out. It gives you something to go by, just grind the same shape further down the bit.
http://www.mcmaster.com/#lathe-bits/=112bdwg
Parting is the hardest operation. The trick is flood coolant.
My 1931 south bend.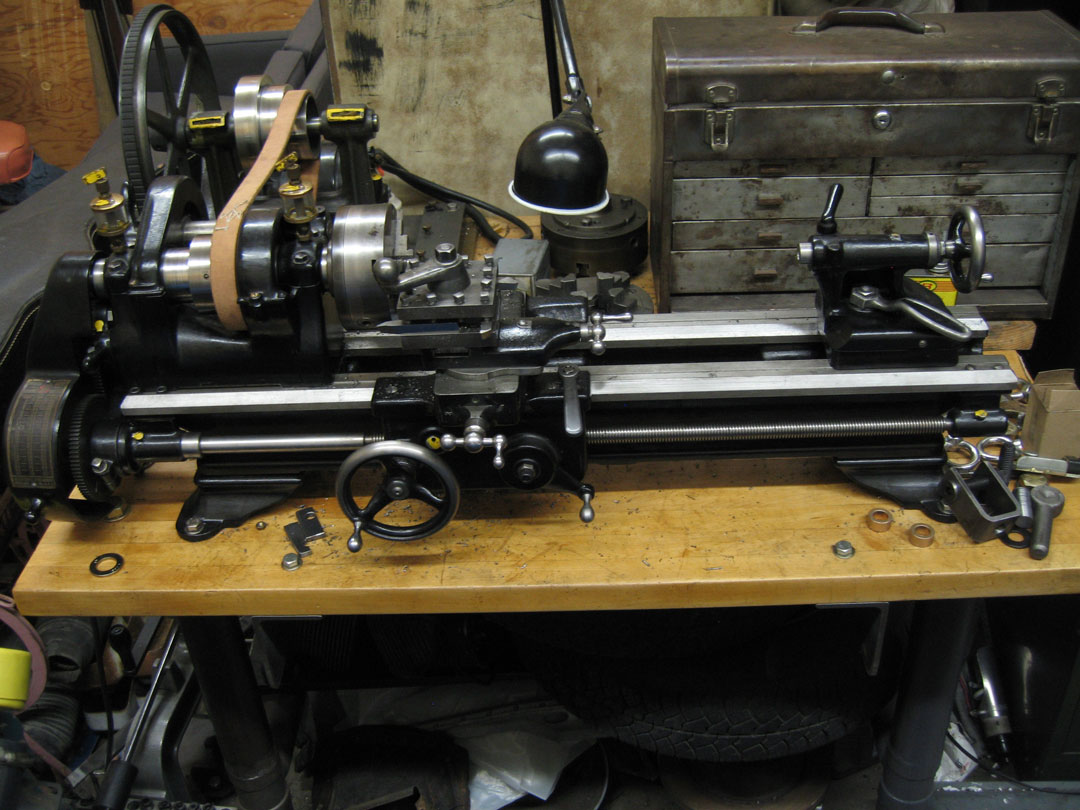
Posted by: veekry9 Feb 10 2016, 09:12 AM
Nice condition.
Posted by: Series9 Feb 11 2016, 09:00 AM
Try this,turn your crossfeed handle into the tailstock or chuck(off).
Be certain neither of those immovable objects move.
Use medium pressure.
With a felt pen ,mark the dial at 0.
Gently,turn out until you get movement indicated.
Read off the difference,that is your backlash clearance on the crossfeed acme screw.
0.005" is like new,0.030" is buggered,the crossfeed saddle must be linear in movement to .0005".
Don't worry,it,the aluminum-bronze threaded crossfeed nut may be replaced or repaired.
https://en.wikipedia.org/wiki/Trapezoidal_thread_forms
Fun isn't it?
I tried this a few times. I would say mine has about .010" or so.
Posted by: mbseto Feb 11 2016, 09:29 AM
They actually make self-ejecting keys; the machine shops at school have them to keep kids from throwing keys. They are the most frustrating things in the world when you're trying to delicately clamp something though.
My drill press came with one of these. It made my brain itch. After much thought I took it apart and removed the spring for this reason: I don't ever want to be in someone else's shop without a strongly ingrained habit of removing the chuck key.
Posted by: Series9 Feb 17 2016, 03:52 PM
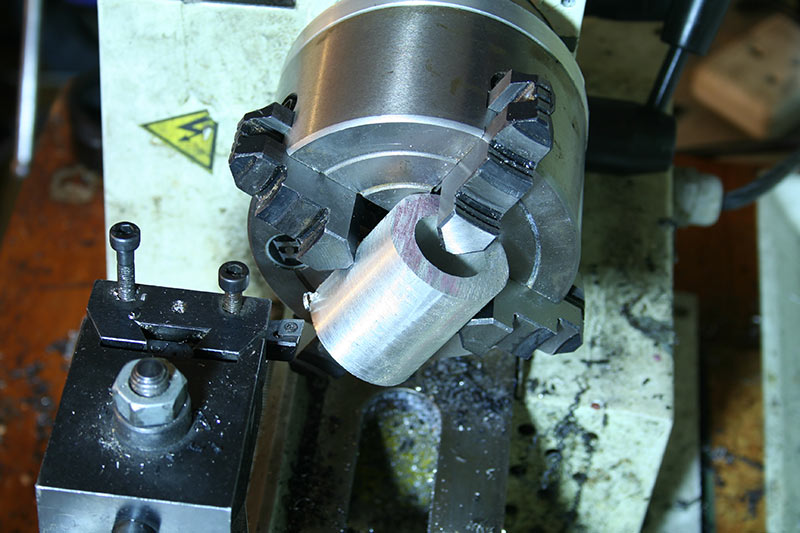
Here it is! My first part to go into service. It's a custom hub spacer for a T34 swing-axle car that has T1 rear brakes.
Yes, it took me 4.5 hours to make.
What did I learn?
Start with a piece of metal that's as close to the finished size as possible.
The 1.75" OD on this started as a "free" 3" solid piece of round stock.
Attached thumbnail(s)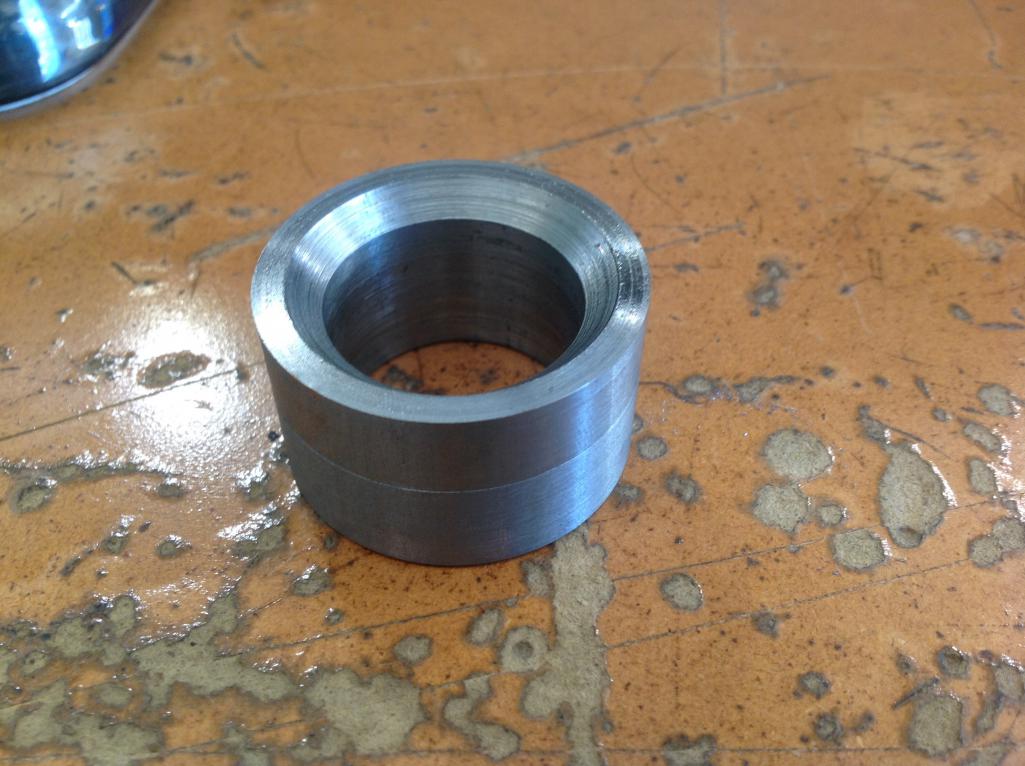
Posted by: Series9 Feb 17 2016, 03:53 PM
Installed:
Attached thumbnail(s)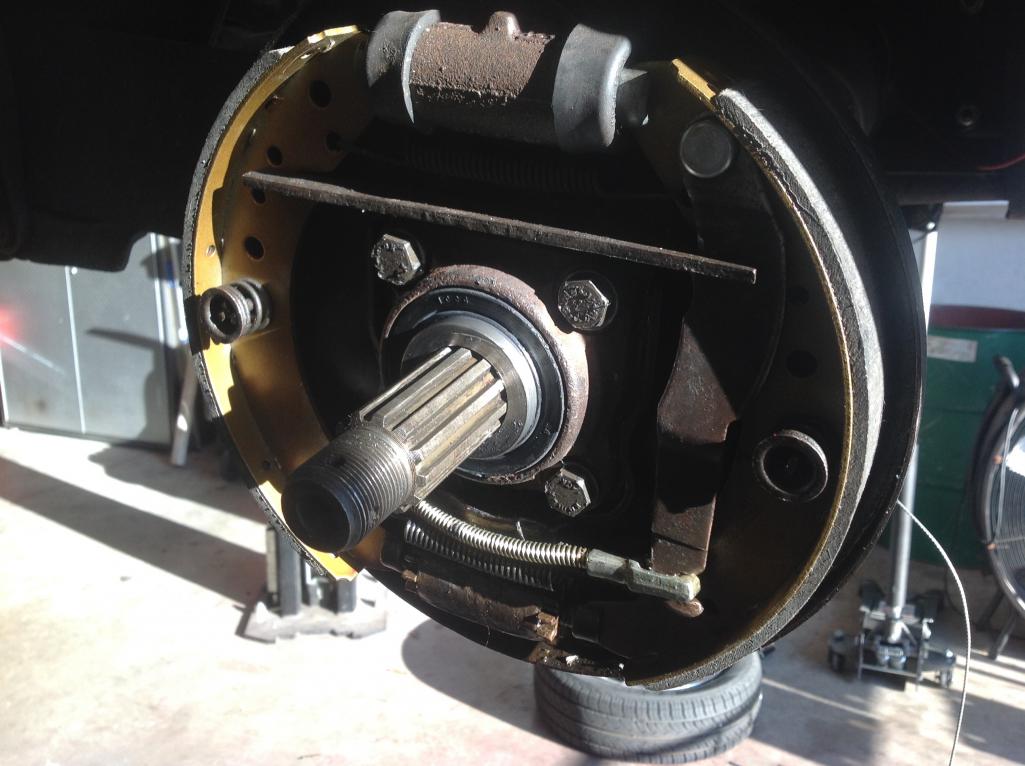
Posted by: Darren C Feb 17 2016, 04:04 PM
Not bad attempt there Joe,
Watch the outside diameter.
Original bushes are precision ground to a fine micron finish where the lip seal runs.
A turned finish using a HSS tool with coolant will not be good enough.
It'll wear the lip seal within a few miles and your brake hub will be full of oil.
Posted by: Series9 Feb 17 2016, 04:43 PM
Not bad attempt there Joe,
Watch the outside diameter.
Original bushes are precision ground to a fine micron finish where the lip seal runs.
A turned finish using a HSS tool with coolant will not be good enough.
It'll wear the lip seal within a few miles and your brake hub will be full of oil.
After that amount of time at the lathe, we are not calling this an "attempt".
I polished it before installation. We'll see how it goes.
At least the brakes work correctly and the axles turn smoothly.
I'm looking into carbide and ceramic bits. I would definitely like to turn something that comes out like it was polished in the lathe.
I did discover that turning slowly works better for larger bites during the rough process, and spinning the piece quickly for a light pass produces a nicer finish.
Posted by: r_towle Feb 17 2016, 05:10 PM
I think the clock is really the first production piece
Posted by: Series9 Feb 17 2016, 08:16 PM
I think the clock is really the first production piece
It's not yet a clock and it doesn't contribute to the operation of anything. It is simply a reminder to me that the lathe is much more complicated than it appears.
Posted by: r_towle Feb 17 2016, 09:27 PM
Well, keeping time is important.
I think it's pretty cool you made a custom part for a client, well done go have a beer
Posted by: Series9 Feb 18 2016, 09:15 AM
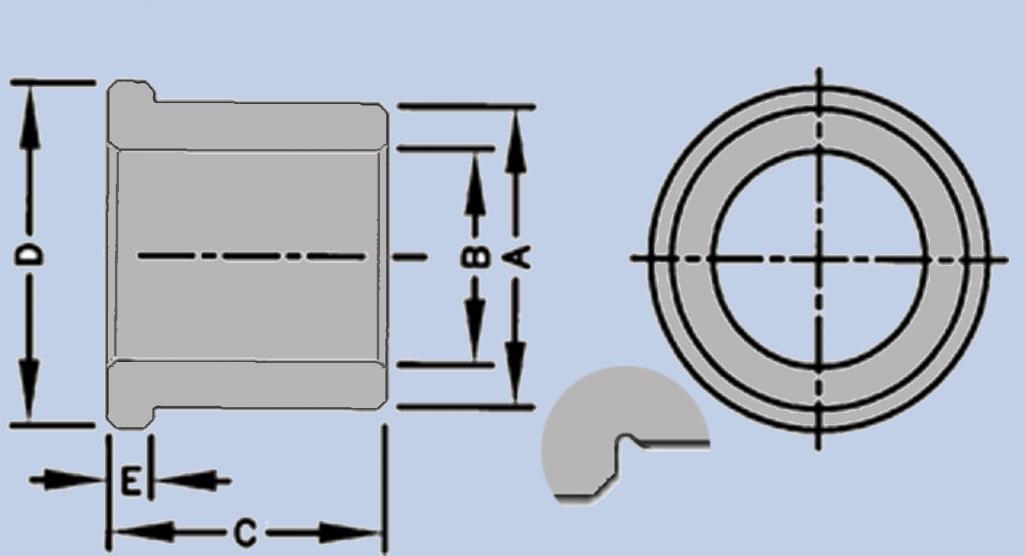
Here are my tail stock parts.
I don't see a way to mount the drill chuck. Is this called a Morse Taper?
What size is it? I need to find the piece to mount the chuck in the tail stock.
Attached thumbnail(s)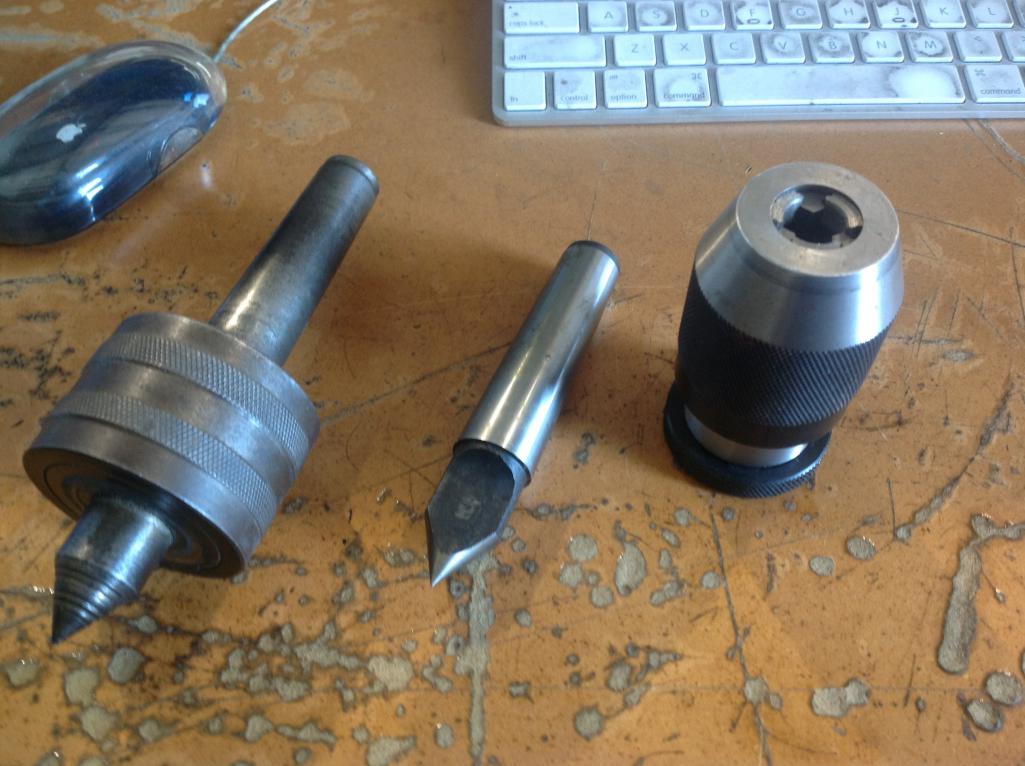
Posted by: nathansnathan Feb 18 2016, 10:15 AM
You need an arbor that goes from morse taper to jacobs taper probably. Looks like morse taper 3 from here. Here's a link to some dimensions you can check to be sure
http://littlemachineshop.com/reference/tapers.php
Some chucks are threaded, too, though.
here's the page at mcmaster-carr
http://www.mcmaster.com/#drill-chuck-arbors/=116h0wj
Posted by: r_towle Feb 18 2016, 10:48 AM
threaded chuck?
Rich
Posted by: Series9 Feb 18 2016, 02:29 PM
threaded chuck?
Rich
Negative.
Attached thumbnail(s)

Posted by: Series9 Feb 18 2016, 02:56 PM
It looks like the tail stock is an MT3. The numbers don't match the chart exactly, but pretty close.
The drill chuck, however, doesn't really match any of it. It does appear to have a taper that's about 1" long and about .670" at the big end.
Posted by: Darren C Feb 18 2016, 03:07 PM
From the pictures it looks like you need a Morse to Jacobs taper spindle as Nathan also thought.
My advice is swap the chuck for one that takes a Jacobs key. The self locking chuck like you have are great in a hand drill, not so good in a lathe. You cant tighten them up very well and then they can "work-lock" and then you cant get the darn things undone.
Posted by: nathansnathan Feb 18 2016, 03:14 PM
Sounds to me like mt3 to jt6, which is "2811A37" part number at mcmaster. 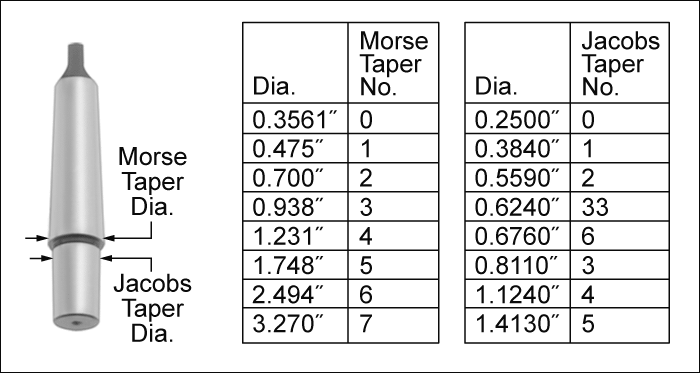
Posted by: Series9 Feb 18 2016, 04:42 PM
From the pictures it looks like you need a Morse to Jacobs taper spindle as Nathan also thought.
My advice is swap the chuck for one that takes a Jacobs key. The self locking chuck like you have are great in a hand drill, not so good in a lathe. You cant tighten them up very well and then they can "work-lock" and then you cant get the darn things undone.
I think I agree with that. This chuck looks and feels really nice, but there are no numbers on it (I mean no identifying marks of any sort) and it might be good for light duty work, but I can see how it could get stuck.
Shopping for MT3 keyed tail chuck....
Posted by: Mueller Feb 18 2016, 04:44 PM
Nice, making chips and a part for a project car even better!
Posted by: Porsche930dude Feb 18 2016, 09:15 PM
my brother just got a little 6" atlas . its smaller than he wanted but it was cheap. he rebuilt it and is starting to make stuff now. he's been watching utube videos for years so he knows alot. weve been melting aluminum down and making soup can ingots to turn down into stuff. he already made a 4 slot pulley that the lathe was missing now he is going to attempt to make some gears that its missing. He hasnt tried turning steel yet I think hes a little afraid
Posted by: Darren C Feb 19 2016, 02:01 AM
my brother just got a little 6" atlas . its smaller than he wanted but it was cheap. he rebuilt it and is starting to make stuff now. he's been watching utube videos for years so he knows alot. weve been melting aluminum down and making soup can ingots to turn down into stuff. he already made a 4 slot pulley that the lathe was missing now he is going to attempt to make some gears that its missing. He hasnt tried turning steel yet I think hes a little afraid
40 years ago when I was at school my metalshop teacher (who inspired me to go into engineering) said to the class...
"The lathe is the only machine created by the hand of man that can reproduce itself"
I went on to build my own lathe between age 14 & 16 as my project for my "o level in mechanical engineering workshop theory & practice" I made the headstock, tailstock and carriage in wood, cast it in aluminium using sand boxes and then used the school lathe as a mill. I turned everything, I made the chuck, lead screw, saddles, tool holders...absolutely everything.
It was about a 3ft long when finished and powered by clamping in a hand drill into the basic gear box that I'd made.
Very crude looking back; but hey I was only a kid making his first lathe.
Posted by: Series9 Feb 19 2016, 07:53 AM
Will someone explain the different uses for these different angles?
Attached image(s)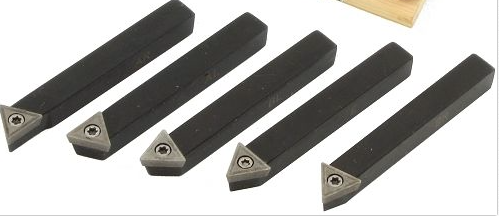
Posted by: Darren C Feb 19 2016, 08:32 AM
It’s all to do with available clearance between what your turning and the position of components of the lathe.
Most standard tip tools are design to sit in one position (90 degrees to the lathe centre) in this normal position the angle of the tip is optimised to turn down or face off.
If you have a rotating tool post you can fit several tools and spin it in 90 degree increments to change between say a parting off tool and a facing off tool. The clamp mechanism allows a small say 10 degree misalignment from North, East, South, West positions where you can clamp it correctly. However if you try and set it a 45 degrees (NE) for example, the clamp device doesn’t lock correctly and the tool will be off Height.
It’s always good practice with a tip tool (particularly with radius end tools) to change the angle slightly between jobs so that it’s not cutting on the same point all the time.
Different finishes can be achieved with different tool angles. (These are angles in the horizontal plane and can be described as angle of attack)
Different angles in the vertical plane (called “Rake”) come into play with HSS tools especially with differing materials. On a soft material such as aluminium you need a larger rake angle than for steel.
Large radius ended tools of HSS are commonly used for a fine smooth shiny finish
Tipped ceramic tools tend to be pre manufactured by material type where best speed and material are specified.
This begins to get complicated when you adjust the tool slide to produce tapers or to reach around the job to gain access to turn awkward shapes, turn with the lathe spinning in reverse or Left hand turn. That’s why you can buy tools with various position tips in the holder. It’s to optimise the angle of attack that the tip of the tool makes contact with the job under various positions and types of RH or LH turning where the tool post angle is not at 90 degrees to lathe centre.
That said some angles of attack vary dependent on the material they are designed for in addition to having differing rakes.
All of this means nothing if you don’t have the correct speed and feed for the material.
Looking at the photo from left to right; the 6 tools run RH, LH, LH, Universal, RH
Hope this is of help.
Posted by: Series9 Feb 20 2016, 04:43 PM
Good information. Thank you.
I think I understand angle of attack, but I need more on rake. While I understand the rake plane, what is an example of zero rake vs high rake?
Does the tool always intersect the piece at the 270 degree point in the rotation? (270 being the point that represents west if you look at the chuck end-on).
Also, when you say Right-hand and Left-hand, is that a reference to the direction the tool is moving against the piece or the direction the piece is spinning in the lathe?
I'm under the assumption that almost everything is turned in a CCW direction at the chuck.
Posted by: veekry9 Feb 20 2016, 08:14 PM
https://www.youtube.com/watch?v=vAo0xmDQ-kI
https://www.google.ca/#q=turning++4130+shaft
https://www.google.ca/search?q=turning+4340+shaft&espv=2&biw=1097&bih=549&source=lnms&tbm=isch&sa=X&ved=0ahUKEwiVwLrjzonLAhXE6x4KHbEaDPIQ_AUIBigB
http://www.weldingtipsandtricks.com/welding-4130.html
Machining Fundamentals
https://www.google.ca/search?q=Machining+Fundamentals&biw=1097&bih=549&espv=2&source=lnms&tbm=isch&sa=X&ved=0ahUKEwjzkdS4vYnLAhVM2R4KHZDzBXwQ_AUIBygC&dpr=1.75#imgrc=PSEM_xr18tvY8M%3A
The design of the lathe makes the CCW rotation load the the toolpost and carriage in compression.(pushing down)
For similar CW loads a secondary toolpost can be installed on the other side of the CL.
As an example,during the '70s while using VDF engine lathes,a shaft similar to the one in the ytub above was ruf turned in conventional
ccw rotation using all 6 corners of the indexing toolpost,heavy production turning.
http://www.carboloy.com/company.html
Subsequently,the final finishing passes were turned with a cw rot and the hydraulic tracing attachment installation,whereby the carriage radius was servo controlled.
A 1:1 scale template was held in sync with the actual shaft and guided the rear crosslide with several paths to the correct dimensions.
The point of all this is that every year since,there has been progress in materials and methods and a steep learning curve is needed to 'bone up'.
Basic,elementary concepts are easily available freely,worthwhile study for the proper use of the machinery.
A horror story:
In 1979 a recently purchased cnc mill was programmed to zig instead of zag by an error of polarity,negative,not positive.
The 7/8" drill in the spindle,about a foot long,snapped off at the shank and struck the operator,the shop owner,between the eyes at the bridge of his nose.
He fell to one knee,hand over his face then staggered to his feet,a golf ball sized lump swelling on his face.
I got him an emergency ice pack from the freezer,and he left for a few days off.
What I mean is,is that even expert machinists make mistakes,had the broken drill penetrated his eye,it would have been fatal.
The energy needed to break the drill and travel the 20-30 feet after striking him,was from the rapid travel rate of the mill and the M42 steel strength of the drill.
Prepare yourself for the proper use of machine tools,period.
Exercise caution and due diligence and read the manuals,warnings and safety notices.
Never run the machine without safety glasses or masks.
Never.
/
ref.
http://www.ebay.com/itm/20-x-157-VDF-S500-ENGINE-LATHE-W-TRACER-ATTACHMENT-27503-/371318352994?hash=item56744c6c62:g:~wAAAOSwstxVQ8sM 20__x_157__VDF__S500__Engine_Lathe_w_Tracer_Attachment_27503___eBay.html ( 248.74k )
Number of downloads: 375
20__x_157__VDF__S500__Engine_Lathe_w_Tracer_Attachment_27503___eBay.html ( 248.74k )
Number of downloads: 375

https://www.google.ca/webhp?sourceid=chrome-instant&ion=1&espv=2&ie=UTF-8#q=dana+summit+bandit+II+cnc+mill
https://www.google.ca/search?q=lathe+tool+geometry&espv=2&biw=1097&bih=549&source=lnms&tbm=isch&sa=X&ved=0ahUKEwjqn4qUgIjLAhWFWh4KHc3HAskQ_AUIBigB#imgrc=gb-lXnx3BrxfKM%3A
http://www.metalsdepot.com/catalog_cart_view.php?msg=
http://www.ingersoll-imc.com/en/index.htm
https://www.google.ca/search?q=carbide+insert+tooling&biw=1097&bih=549&espv=2&source=lnms&tbm=isch&sa=X&ved=0ahUKEwiOqt6ruonLAhVBFh4KHdPPBKAQ_AUIBigB&dpr=1.75
/
The industry is so vast that learning the right question is in order.
The grinding of HSS and brazed carbide tools is a whole subject in itself,safety paramount.
Learning to sharpen drill bits to a tested standard is a part of a machine trade training course.
Turning a simple shaft to +/-0.0003 was demonstrated,the experience evident.
Simple errors would get it wrong and useless,making scrap for double or triple loss.
Safety errors cost more than money. 
/
https://www.youtube.com/watch?v=otifkak5RMA
/
Good stories of success by innovation and effort.
Just when you think you learned something new,something new must be learned.
The RH,LH refers to the offset of the tool's shank,ie:a left moving tool has a RH offset shank.
http://www.cmsna.com/blog/2013/01/history-of-cnc-machining-how-the-cnc-concept-was-born/
http://www.practicalmachinist.com/vb/cnc-machining/nc-punch-code-paper-tape-174794/
https://www.cncci.com/resources/tips.htm
http://www.fadalvmcparts.com/history.html
http://www.haascnc.com/home.asp#gsc.tab=0
http://www.heidenhain.com/en_US/products-and-applications/cnc-controls/
http://www.fanucamerica.com/
http://w3.siemens.com/mcms/mc-systems/en/automation-systems/cnc-sinumerik/sinumerik-controls/pages/sinumerik-controls.aspx
http://www.toshiba-machine.com/departmentlanding.aspx?dept=2
http://www.fidia.it/en/prodotti_en.htm
http://www.selca.it/index.php?id=selca
http://www.gruppoparpas.com/products.aspx
http://www.fptindustrie.com/en/products/boring_machines/3/
https://cache.industry.siemens.com/dl/files/554/74475554/att_56792/v1/PGsl_0313_en_en-US.pdf
https://cache.industry.siemens.com/dl/files/795/21904795/att_62564/v1/229_800_WS800A_Cycle_Language_CL800_Plannig_Guide.pdf
Information Overload.
There is so much data to absorb,a small step approach can be effective.Training is crucial,if only for the safety lessons.
Buy a programmable calculator to do the formulas for feeds/speeds/hp/ruf-rms/,just to be in the ballpark,on the same page.
https://www.google.ca/search?q=programmable+calculator&espv=2&biw=960&bih=480&site=webhp&tbm=isch&imgil=6ASUw0c1UIRqdM%253A%253BuY7w0wSpcS092M%253Bhttp%25253A%25252F%25252Fwww.vrcworks.net%25252Fblog%25252Fhow-to-identify-calculator-is-programmable-or-non-programmable-calculator%25252F&source=iu&pf=m&fir=6ASUw0c1UIRqdM%253A%252CuY7w0wSpcS092M%252C_&usg=__mxgLgHYx1JHgyjlCEt36eqW_2hM%3D&ved=0ahUKEwiTvLGZoo3LAhVnuYMKHeqPCTMQyjcIMA&ei=Y_3LVtP-MefyjgTqn6aYAw#imgrc=6ASUw0c1UIRqdM%3A
An actual 'real' tool grinder is needed to prepare hss or brazed carbide tools for turning,with the correct abrasive wheels.
Learning of the proper terminology and functions of the lathe controls and components is step #1.
Cutting rates are the next subject,tool geometry the next after that and so on.
/
http://www.cnccookbook.com/MTCNCDictDeflecttoFollow.htm
A good single source of info,handy helpful references for machining.
/
Posted by: Darren C Feb 21 2016, 02:34 AM
Good information. Thank you.
I think I understand angle of attack, but I need more on rake. While I understand the rake plane, what is an example of zero rake vs high rake?
Does the tool always intersect the piece at the 270 degree point in the rotation? (270 being the point that represents west if you look at the chuck end-on).
Also, when you say Right-hand and Left-hand, is that a reference to the direction the tool is moving against the piece or the direction the piece is spinning in the lathe?
I'm under the assumption that almost everything is turned in a CCW direction at the chuck.
Rake angle is adjustable dependent on the metal, most metal can be cut like wood does with a plane. The shavings curl off the wood if a sharp plane is used in long continuous shaving pieces to leave a smooth finish. With a soft metal a larger rake angle tool tends to do the same. Harder metals can be too hard to cut with "shavings" without immense speeds and pressure, so the rake angle is less and they cut with "small chips" not shavings...This is the best way I can think to explain it to you at the moment.
RH & LH is the direction the tool takes not the rotation of the lathe. Normal turning is RH where the tool travels towards the chuck. LH is where the tool starts near the chuck and moves away from it.
99% of stuff is turned with the CCW direction, but for access reasons or some awkward shape piece there is the ability to reverse the rotation. This is also very common when thread turning.
I'm still concerned for you....
Operating a lathe is a little like flying an airplane.....you can ask 1000's of questions, watch multiple films and read 1000's of books.....but when you start you really need someone by your side to stop you making dangerous mistakes, watching over your shoulder to guide you and prevent things going wrong before they do.
Why don't you contact your local school or college and see if you can enroll in some basic class for turning...you seem like a switched on guy and I think a few hours with a tutor would be great for you.
Posted by: Series9 Feb 21 2016, 09:50 AM
RH & LH is the direction the tool takes not the rotation of the lathe. Normal turning is RH where the tool travels towards the chuck. LH is where the tool starts near the chuck and moves away from it.
That is backwards to me. If the tool is traveling toward the chuck, it's moving to the left. Why would that be RH?
I'm happy that came up, because the directions you put on the tool picture I posted seemed backwards.
And again, please give me a simple explanation of "high rake". I assume zero rake would be directly perpendicular to the piece. Is high rake tip up?
I would love to go take a class, but I've spent hours trying to find one in Central FL and have come up empty. All the tech schools have shifted to IT and no longer offer machine classes of any sort.
As for the flying comment, I'm an 8000-hour jet captain and firmly believe flying a 172 only on book knowledge would be easier and safer than trying to learn this lathe without previous experience.
.....but I will.
Posted by: Darren C Feb 21 2016, 01:09 PM
LH & RH tools and examples of where they are used.
http://s265.photobucket.com/user/DarrenLCollins/media/3-5_zpstjrvdild.jpg.html
Rake angles (side and back rake)
http://s265.photobucket.com/user/DarrenLCollins/media/GrindingLathe07_zpsdhqhhm2e.gif.html
Posted by: Series9 Feb 21 2016, 05:02 PM
LH & RH tools and examples of where they are used.
http://s265.photobucket.com/user/DarrenLCollins/media/3-5_zpstjrvdild.jpg.html
That is the single, most useful piece of information I have been given.
From basic observation, I still think LH and RH are reversed, but if that's how it is, then that's how it's is.
LH tools move right and RH tools move left. Okay.
The rake angle diagram, however, actually made things worse.
Simply show me an example of a high rake tool and a zero rake tool, please.
I appreciate the contributions to this thread very much, but you guys are seriously mixing PhD-level lathe processes with middle-school, with high-school, with 2nd grade....
Right now, I'm in lathe Kindergarten. Let's keep it on that level for the moment. I've always been a quick study, but I didn't start my flying career by sitting down in a jet.
Posted by: Series9 Feb 21 2016, 05:38 PM
More questions:
How do you run a finishing pass with this tool if you need to complete the pass at a 90* angle on the right side of the pass?
A good example of the need to do this would exist on crankshaft main journals.
Attached image(s)
Posted by: Series9 Feb 21 2016, 05:47 PM
The direction of travel on this makes no sense to me.
Do you have to set it up so the cutting surface is precisely parallel to the intended finish?
How do you begin the cut? Do you move the tool in to full depth and then move it to the face to start cutting? That scenario would require a lot of tool surface cutting all at once.
It seems like you would move the tool from the outside toward the center.
Attached image(s)
Posted by: veekry9 Feb 21 2016, 07:30 PM
Scope,
the overall scope of the task at hand is knowing the the machine will hurt you if not operated correctly,as I've pointed out.
Evidently,a new career in shafting is not in the plan,but obviously if the standards of reference are unknown to you,the links have all the info available.
And yes,everyone who has taken the curriculum has asked the why of the LH/RH question,it's good that you asked.
I believe it came about a few hundred years ago at the very beginning of the 'industrial revolution',while turning bronze cannons,by hand.
The tools were used in a way similar to wood spindle makers,the tool levered to the right hand to turn left,the iron tool shank offset right.
The right hand thread derived it's name from the same roots,the lathe CCW rotating.
Take note that some of the drawings,from 1914 as above,are greatly exaggerated for visual clarity.
The difference between the lh and rh is annoted,for those falling off the turnip wagon.
(A stunt was to draw a face on the back of his head,stumping some beginners!)
http://www.nist.gov/
http://www.nspe.org/
http://www.astm.org/
http://www.sae.org/
https://www.ansi.org/
https://en.wikipedia.org/wiki/BSI_Group
http://www.iso.org/iso/home.html
https://en.wikipedia.org/wiki/Metric_(mathematics)
https://www.google.ca/webhp?sourceid=chrome-instant&ion=1&espv=2&ie=UTF-8#q=metallurgy
https://www.google.ca/search?q=involute+splines&biw=1097&bih=549&source=lnms&tbm=isch&sa=X&ved=0ahUKEwimvJmKiIrLAhWBVh4KHfuID7UQ_AUIBigB
https://www.google.ca/search?q=involute+splines&biw=1097&bih=549&source=lnms&tbm=isch&sa=X&ved=0ahUKEwimvJmKiIrLAhWBVh4KHfuID7UQ_AUIBigB#tbm=isch&q=splines
http://bbs.homeshopmachinist.net/threads/60789-Pin-measurements-for-involute-splines
https://www.google.ca/search?q=thread+turning+on+lathe&espv=2&biw=1097&bih=549&source=lnms&tbm=isch&sa=X&ved=0ahUKEwjVrL-1jorLAhWHJx4KHYbcAeQQ_AUIBigB#imgrc=uC1URScmeD2ycM%3A
https://www.google.ca/search?q=lathe+tool+rake&espv=2&biw=1097&bih=549&source=lnms&tbm=isch&sa=X&ved=0ahUKEwil64XhgIrLAhXC0h4KHRHrC5cQ_AUIBigB#imgrc=cqzPDxLma0rFDM%3A
http://www.amazon.com/Eshbachs-Handbook-Engineering-Fundamentals-Myer/dp/0470085789
http://www.sandvik.coromant.com/en-gb/pages/default.aspx
Here is a demo of the spline or involute gear forms possible on your lathe.
And how he did it,a most useful idea,though an additional heavy disc brake would ensure the stability of the chuck.
https://www.youtube.com/watch?v=lqreWsmXG4k
https://www.youtube.com/watch?v=BgGXQUeYNKw
Yes,I used this technique recently a few years ago on a heavy 12' X 8' 20T platen.Broaching or shaping by cnc,a keyway or spline into a stationary bore.
I also like the RC heavy equipment he built.
https://www.youtube.com/watch?v=rt8VfgfWa54
The answers to the most basic questions are on page 2 of the manual. 
https://www.youtube.com/watch?v=Hjsfs49SRbc
/
Posted by: veekry9 Feb 21 2016, 09:44 PM
Dedicated tooling and machinery,expressly for the manufacture of crankshafts.
A manual lathe can be used,however,it is a long laborious and expensive process of many steps.
The tools are designed for their single purpose,hence the designation of their names.
The toolpost on the lathe must be indicated to index true,the tooltip must be at the vertical centerline of the shaft.
While threading shafts,the compound slide must be set at the correct angle and zeroed.
The stops must be set to avoid crashes,the speeds and feeds calculated beforehand.
The correct operation of the lathe's feedscrew and halfnut phase dial must be known.
The use of the headstock gearbox also must be understood.
Boring tubes and holes is a primary task,broaching or scraping rifling grooves another.
Drilling deep holes,undercutting and relieving bores is more.
Heavy grooving tools are the methods traditionally used to ruf out crank billet bars.
Offset and steadyrest turning and grinding of cranks is a whole science and skillset by itself.
A 4340 forged 16' X 5' stroke marine crank was done a decade ago in the shop,from scratch to ground finish.
Many tons of chips made,without error,a thing of beauty,by one guy,who had survived a bad accident in '04.
https://www.google.ca/webhp?sourceid=chrome-instant&ion=1&espv=2&ie=UTF-8#q=machining+merlin+crankshafts&tbm=vid
https://www.google.ca/webhp?sourceid=chrome-instant&ion=1&espv=2&ie=UTF-8#tbm=vid&q=machining+large+crankshafts
Some useful drops of info,the iso tooling from Walter is just what you might need.
Other vendors sell competing tools too,so buy the lowest price possible.
As mentioned earlier,the hss and brazed carbide tooling is cheap,but requires expert grinding to achieve good results.
These tools,with the quickchange holders,will have you up and running in a jiffy,painlessly.
Jurassic,some retro tools for the small hobbyist user,making the choice easy.
https://www.google.ca/webhp?sourceid=chrome-instant&ion=1&espv=2&ie=UTF-8#q=turning%20feeds%20and%20speeds
http://www.walter-tools.com/en-us/tools/standard_products/turning/overview/iso_turning/pages/default.aspx
http://www.jurassictools.com/store/tools-engineering-etc
/
Walter:external::screw type:
http://waltertools.blaetterkatalog.de/gc2012/en/#page_A80
/
https://www.youtube.com/watch?v=7cXBXewS4IM
/
Posted by: veekry9 Feb 22 2016, 12:11 AM
A trip to the wreckers,an old rusty crank brought to new life by dirty '30s tech.
A little pickle to remove the rust,then a shoestring polish.
All of this came from before,the T Fords and babbit bearings.
This low level flying,or retrotech can be applied to your VW crank if you are looking to stroke for a larger displacement.
A few passes of weld,turning and grinding,and presto,a piece of work.For the all hands on deck type of machiner.
https://www.youtube.com/watch?v=j7DZxqPUQto
http://175.103.60.140/globalindo/carbon-steel-s45cst60aisi-1045/
An entire industry was built out of this,this enterprising approach to the make it better cheaper and faster equation.
http://www.hotvws.com/catalogs-2013/2/
/
https://www.youtube.com/watch?v=6lfpip4u-pA
/
Posted by: Darren C Feb 22 2016, 02:20 AM
I appreciate the contributions to this thread very much, but you guys are seriously mixing PhD-level lathe processes with middle-school, with high-school, with 2nd grade....
Right now, I'm in lathe Kindergarten. Let's keep it on that level for the moment. I've always been a quick study, but I didn't start my flying career by sitting down in a jet.
You're most welcome,
When I get home from Work this evening I'll take some pictures of some of my lathe tools to explain "rake angle" and post them.
In the meantime, my worry is that a loaded gun left in Kindergarten is just as likely to harm as one left in high school in naive or untrained hands.
Posted by: veekry9 Feb 22 2016, 04:49 AM
http://www.914world.com/bbs2/index.php?showtopic=273101&st=52
The details of the'Hopping Herbert'is entertaining to some degree.
Must have been late'70s,an aquaintance of the shop owner,looking for work,I suppose the music biz not panning out.
A simple collet chuck turret lathe series of operations.
https://en.wikipedia.org/wiki/Oxygen-free_copper
Copper alloy bar 1-1/2"dia X 20'length.
Well,neglecting to clamp the barfeeder clamps,the bar,unencumbered,began flapping around the back end of the heavy lathe.
From the other side of the shop,I saw the heavy'wire'create a giant spiral whipping about at high rpm.
Crossing the plane of the whirling,hopping mass,I stopped the spindle,again.
The unbalance of the unique creation had been lifting the Herbert almost a foot,noisily.
When I released the collet,the Danish bun looking thing came out without breaking,the plasticity of the material saving us.
Had it broken,the spinning wheel would have raced around the shop wreaking havoc at 1200 rpm.
Needless to say,that ginger was frozen in fear,the ashen pale look on his face said incomprehension.
A common household 12ga wire might show the same results if spun up in a hand drill.
/
Safety:
Brings to mind the'starting plane',that,which is directly in line with the chuck and work.
Always stand clear of the projectile plane,when starting the spindle,ensure no tools can fall off into the spinning chuck or work.
A place for tools is in safe areas only,secured.
Make a box for them as required.
/
Posted by: Darren C Feb 22 2016, 02:37 PM
Ok……home from work now.....
Lets get down to basics….
There are 6 important angles to understand on a simple HSS lathe tool. The best illustration I can find is this.
http://s265.photobucket.com/user/DarrenLCollins/media/Toolbit_zpsuhdhtvtm.gif.html
Looking down on the tool you have front and side cutting angle. This relates to cutting in line with the lathe or across it (turning down or facing off).
These angles can be set or fixed by grinding the tool or by clamping the tool post at differing angles.
Back rake and side rake are in the horizontal plane and I think were the ones perplexing you? These refer to the top surface of the tool. It can angle downwards to left or right (side rake) in LH or RH tools and angle back towards the lathe operator (hence back rake angle)
Side relief and front relief are in the vertical plane, and hopefully self explanatory in the picture above.
I have been making lathe tools for over 40 years and I’m a qualified toolmaker for my sins, yet I'm still learning stuff. Here’s a few home made basic samples in “proper” High Speed Tool Steel.
http://s265.photobucket.com/user/DarrenLCollins/media/lathe%20tools1_zpsqekddo0f.jpg.html
This is what good old fashioned HSS lathe tools should be like.
http://s265.photobucket.com/user/DarrenLCollins/media/lathe%20tools%20002_zpskocn10p6.jpg.html
The tool steel is purchased as a bar (far right in photo) and you precision grind it by hand, sometimes to within + or – 1 thousandth of an inch where the rake angles are hand ground to minutes of degrees.
Today however these skills are lost and most lathe users are NOT tool makers, just tool sharpeners and the majority are blissfully unaware of what a true tool maker can do. Most HSS lathe tools today are like this….
http://s265.photobucket.com/user/DarrenLCollins/media/lathe%20tools%20003_zpsyd5zccqo.jpg.html
Only a small amount of quality HSS is brazed or welded into a poor quality steel holder. The tip is only HSS. These come in all shapes and sizes. But fundamentally they’re pre made so you don’t need to grind any angles or profiles, just dress them on a stone to keep them sharp.
I’m not sure what you have with your lathe, but this is just a real basic guide/help for you to understand simple tool shape. The possibilities of shape and angles are limitless. Understanding what the correct angle on all 6 planes takes years to master and is variable on material, speed and feed.
Hopefully that’s helpful to you for now.
Ceramic or tipped tools are another thing altogether with usually zero apparent back and side rake. Here’s one I set in my lathe tonight to show zero rake.
http://s265.photobucket.com/user/DarrenLCollins/media/lathe%20tools%20004_zpskgsrmwlj.jpg.html
My advice is start with some basic HSS tools, learn and understand how they work before going on to tipped tools. Plus get yourself on a basic lathe class!
Posted by: Series9 Feb 22 2016, 03:33 PM
That is incredibly helpful.
The amount of time you spent on that for me is greatly appreciated.
Thank you.
Posted by: Series9 Feb 22 2016, 03:34 PM
I purchased this today.
Attached image(s)
Posted by: Series9 Feb 22 2016, 04:42 PM
This is the tooling that came with the lathe.
I've been operating on the assumption that you "get what you pay for" with this stuff.
I have successfully turned some pieces and I've also destroyed some tools.
I'm not afraid to spend some money on high quality bits. I'm looking at carbide and ceramic.
Attached thumbnail(s)
Posted by: Darren C Feb 23 2016, 04:20 AM
Ok, you got a fair mix there..
http://s265.photobucket.com/user/DarrenLCollins/media/Numbered%20tools_zpsjdoveqgc.jpg.html
Some are no good, others need work and just a few are useful to you as a beginner. I’ve numbered them so you know which tool I’m referring to.
1. Parting tool HSS and Holder. (very good, keeper. Get it sharp, grind the correct front relief, very tiny side relief and no side rake. A medium back rake will see you through most materials) A very good basic and useful parting tool. As it wears you re-grind and move the HSS steel forwards. ALWAYS set the tip contact with the job at dead centre height or ever so slightly low. NEVER go above centre height.
2. Plain Parting HSS (looks to be too wide for holder 1, you may need another holder for this)
3. Resolution on photo poor, but looks like a badly ground/messed up HSS parting. Cut off re-grind and start again with a suitable holder. (may fit same holder as 2)
4. Including 9, 16 & 30. HSS tool holders for smaller maybe what looks like ¼ or 3/8 HSS. You buy the HSS as in my first photo of the early rake descriptions and grind whatever tool you need. Very good old tool holders worth their weight in gold but too advanced for you for learning without good HSS ground tools to fit them. (keepers. Put them in your tool drawer for the future and get a new locking screw for 30 it looks a little chewed up)
5. Including 6 are RH knife tools profile for bevel turning steel Side & Front cutting angle too steep for straight turning and facing off steel, but ok with brass & aluminium.
7.Including 24 & 20 LH knife tool uses as for 5 & 6 above.
8. Including 10, 14, 22 & 23 Ream tools. I doubt you’ll ever need these.
11. Including 17 from the poor resolution photo look like unground tool steel. (put them in a draw for the future)
12. Including 18, 25 & 26 RH Knife tools. These have better side and front cutting angles for steel but they look well used and poorly re-ground. This is the sort of shape tool you need as a beginner but unfortunately these four look in a poor condition and need grinding work to restore them.
13. Including 27 are LH knife tools but old 13 looks useable as 27 needs a re-grind like your RH knifes.
15. Knurl tool. Good basic tool. Check the wheel spindle pins aren’t worn and the wheels are firm and don’t wobble or side in the shaft as any movement will make for a "double" inprint knurl. Plus also check the knurl profile is sharp. They do get worn down over the years and then they’ll be no good.
19. RH facing tool, looks badly ground on top surface back and side rake. Profile looks ok for facing off, but rakes need re-grind.
21. Including 28 & 29 are HSS thread cutting tools. Again these are not for you at this learning stage, stick them in the drawer for the future.
Overall you have a reasonable selection of tools but none are really up to scratch for using successfully.
Try and find a good machine shop or college nearby, take them in and get someone who knows what they’re doing to re-grind them for you. This shouldn’t cost too much money (may be just a crate of beer) and will be far cheaper than buying carbide/ceramic tipped tools and holders that you’re not ready for just yet.
You only need 1, 18 & 19 to learn with at an early stage.
Good choice on new tool post, very handy for setting tool height easy without shims under tools.
Posted by: Series9 Feb 23 2016, 08:12 AM
Fantastic information. Some of the tools have a wax-like protective coating on the tips. That's probably what you're seeing as "poor resolution".
Posted by: mbseto Feb 23 2016, 08:18 AM
This is turning into a pretty cool thread!
(see what I did there?)
Posted by: nathansnathan Feb 23 2016, 08:26 AM
I haven't tried using carbide on my lathe so take it for what it's worth, but there are a number of disadvantages to carbide.
I'm not sure how fast your machine will turn or if it's got the horsepower to sustain recommended feed rates at higher speeds, but I can say that mine doesn't come even close.
Carbide doesn't like sudden changes in temperature, which means running full coolant is preferable. If you stall out your spindle which carbide, you are going chip your tool. In my experience running production lathes with indexable carbide tooling, it's just a different word as far as rigidity. HSS is going to be much more forgiving of chatter, any flexation. Also the nature of using turn screws to manually feed vs even a jog wheel much less cnc control makes hss seem more at home on a toolroom style manual lathe.
HSS can be sharpened easily in whatever grinder, carbide is going to be more difficult to sharpen. At lower spindle speeds of a manual lathe, you're going to chip and dull carbide bits a lot more than if you could go 3x faster, which is where carbide shines. There may be a sweet spot for heavy cutting if you are turning large material (high surface feet per minute) where a carbide insert tool would be handy, but it will probably come down to if your lathe has the heft to maintain that. Like I said, stall the spindle and you'd be flipping the insert.
We never ground carbide when I did production. With indexable turret style tooling, you flip the insert when it gets dull. Each insert has like 2 -4 sides, and they are expensive, like $20 for each insert - and you don't buy just 1.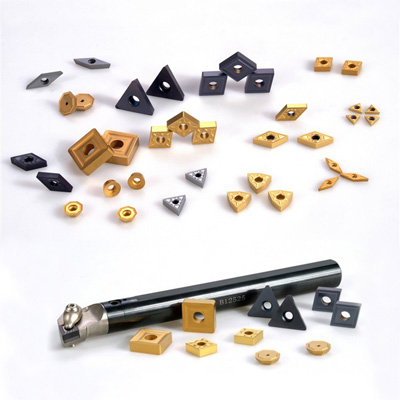
So problems with carbide are need to run flood coolant ideally, not enough spindle speed, not enough spindle power at higher sfm, difficult/not possible to sharpen depending on what style you get, and more expensive.
Like I said, I don't have any carbide tooling for my little lathe. Based on my reading/research, it wouldn't be worth it.
Posted by: Series9 Feb 23 2016, 08:26 AM
This is turning into a pretty cool thread!
(see what I did there?)

Posted by: Mueller Feb 23 2016, 08:53 AM
http://blog.cnccookbook.com/2016/02/17/peck-parting-lathes/
More info on parting.
Yes the story is mainly for CNC, but still some good reading. Also check out the comments as there is some good information there as well.
Posted by: Darren C Feb 23 2016, 08:55 AM
Fantastic information. Some of the tools have a wax-like protective coating on the tips. That's probably what you're seeing as "poor resolution".
Again you’re most welcome!
The wax on the tool ends comes on new HSS tools to protect them in transit and storage, so hopefully if the cutting edge is intact, they should be good to go.
As Nathan says Carbide, Ceramic tool tips come in box sets 6, 10 12 etc and at $20 a tip it’s a big initial expense. You also need the correct tool holder that can be anything from $50 to $200 to fit them in.
Yes you flip them once the edge is chipped so you get 2 or 3 cutting sides per tip but you CANNOT sharpen them, just throw them in the trash can. Speed, feed, material, angle and depth of cut need to be right for these type of tools (as Nathan has said) they chip and break real easy.
Generally used for high spindle speed turning 1000rpm upwards by operators with a good knowledge.
This is why I’m steering you away from this type of tool as a beginner. Besides you can do pretty much everything you need at home with HSS tools for less cost and lower lathe speeds.
Posted by: Series9 Feb 23 2016, 09:25 AM
Here's a close up of some of the tools that were unclear in the larger picture:
Attached thumbnail(s)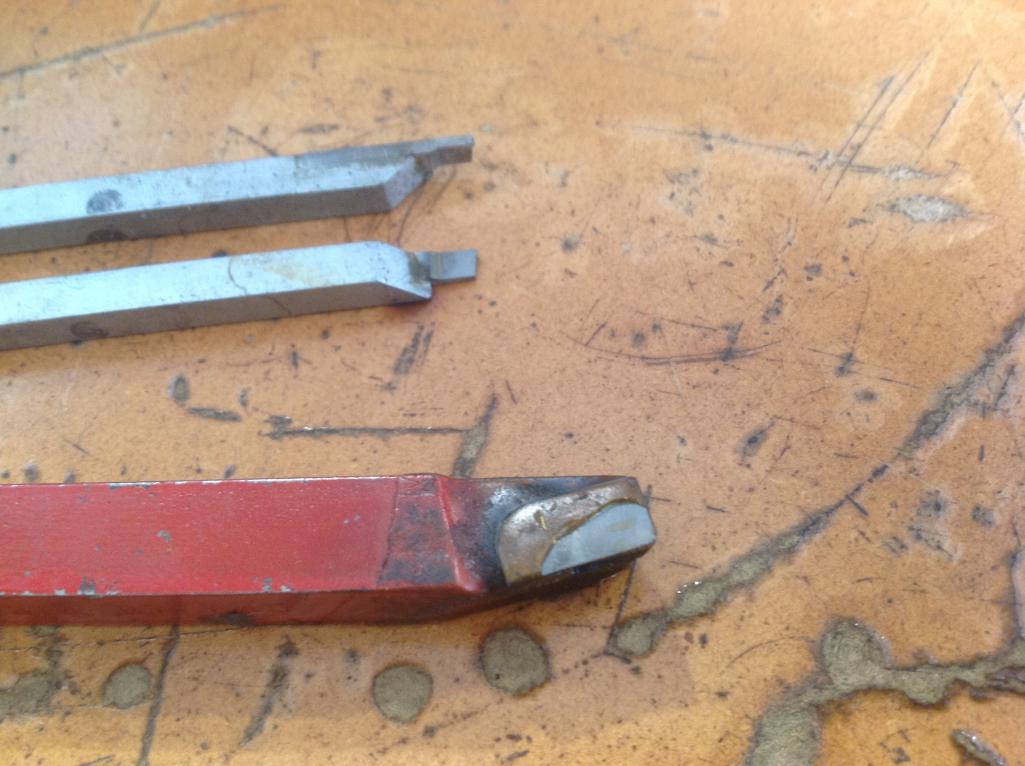
Posted by: Darren C Feb 23 2016, 10:02 AM
The top two have most probably been ground for detail undercutting or for cutting a square thread. I’m drawn more to under cutting due to the side clearance. Both are RH tools which cut using topslide (in and out at 90 degrees to lathe only) An example of undercutting would be where you make a machine thread or basic bolt and a small area under the bolt head is undercut to the thread core diameter for the thread tool to exit into at the end of a cutting stroke. Or basically the area at the end of any machine cut thread (particularly against an obstruction like a bolt head or shoulder) that has no thread.
Basic Bolt threads that are rolled not machine cut, don’t have an undercut.
DONT be tempted to try and part off using these tools, they're not going to be strong enough or have the correct clearance angles and relief.
The bottom larger tool is a LH knife. Looks a nice tool, good for turning steel (has a good side and front angle for steel) ideal for turning and facing off in a LH situation.
Posted by: Series9 Feb 23 2016, 10:16 AM
CAUTION: THE FOLLOWING CONTENT MAY HAVE ENTERTAINMENT VALUE.
So.....my titanium wedding ring has always had annoying sharp edges at the top.
I know you told me to not put the small chuck in the large chuck, but it helped me solve my problem.
My ring is much better now. Chamfered on both edges, nice and smooth.
Attached thumbnail(s)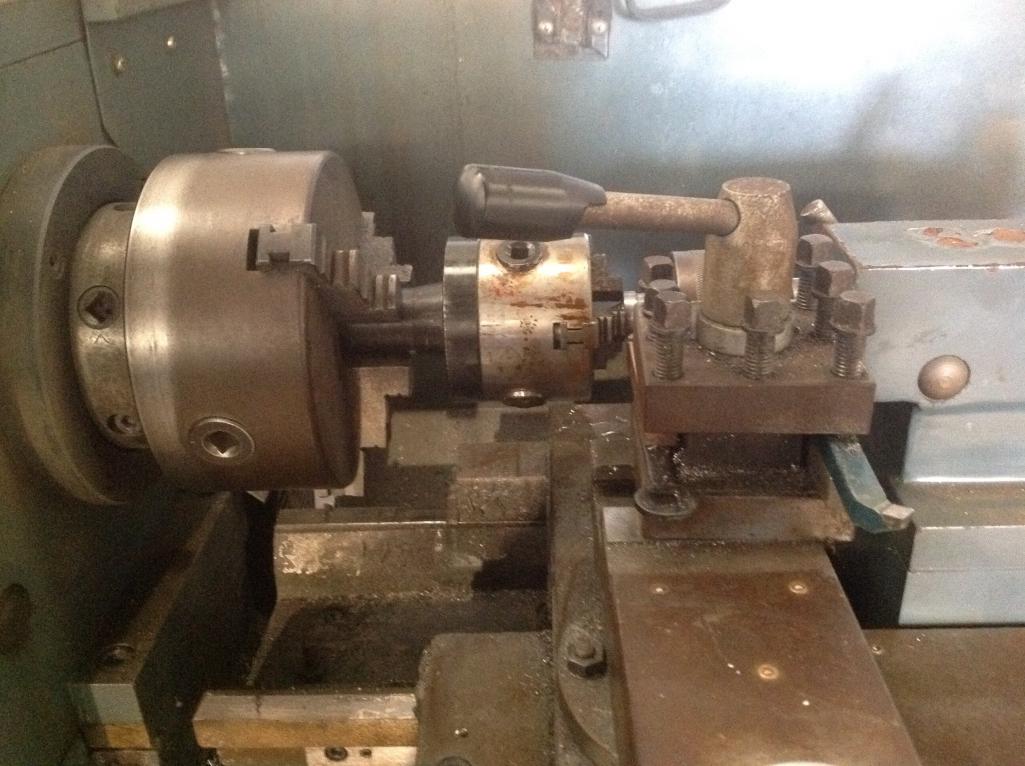
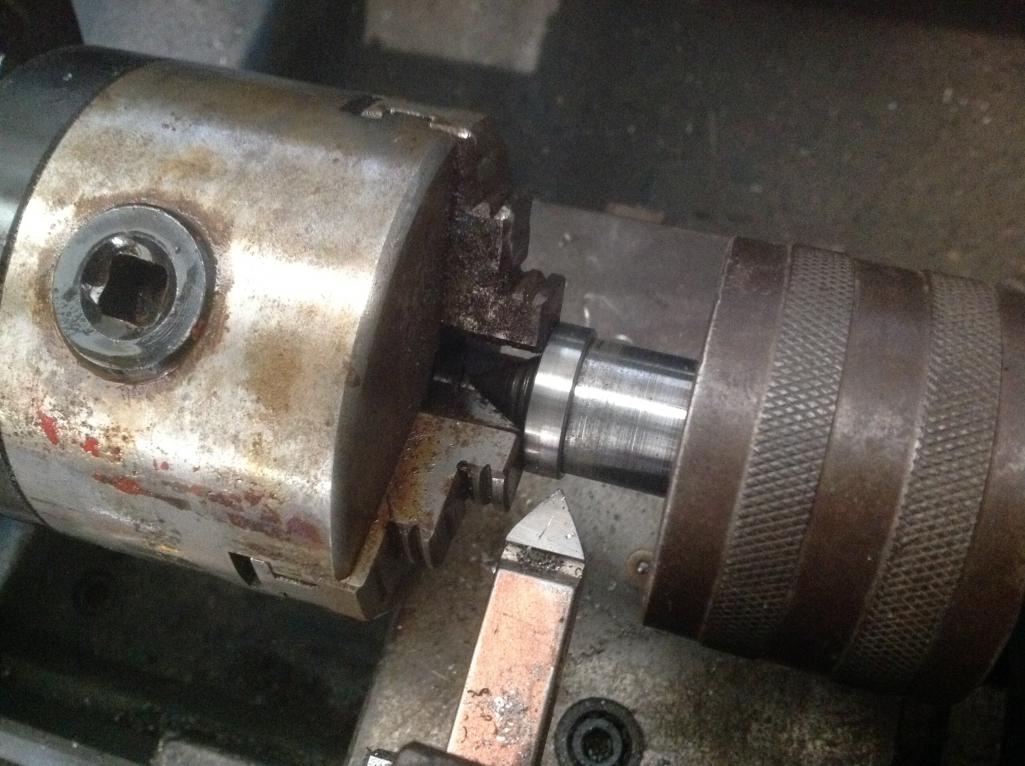
Posted by: r_towle Feb 23 2016, 10:20 AM
Divorce coming soon?
Posted by: Series9 Feb 23 2016, 10:23 AM
Divorce coming soon?
Nope. I'm going to do the same to hers when she picks up the baby.
Posted by: Darren C Feb 23 2016, 10:28 AM
I'd have kept the sharp edges....
In the same way as those dog collars that gives the dog a small electric shock so it knows when its done wrong.... :-)
Posted by: Series9 Feb 23 2016, 10:39 AM
I'd have kept the sharp edges....
In the same way as those dog collars that gives the dog a small electric shock so it knows when its done wrong.... :-)
What? That's it?
You're not going to chastise me for major lathe safety violations?
You know: "kindergarten with a loaded gun"...
Posted by: Darren C Feb 23 2016, 10:48 AM
You just know I wouldn't be able to resist a photo like that... ;-)
Wrong on so many levels....
Posted by: Series9 Feb 23 2016, 10:55 AM
You just know I wouldn't be able to resist a photo like that... ;-)
Wrong on so many levels....
There you go. Now I feel better.....oh, that's probably because I fixed my ring....
Posted by: Darren C Feb 23 2016, 12:36 PM
"Turning" to the dark side you are… (see what I did there) ;-)
Travelling through a hypermill lathe ain't like dusting crops, boy! Without precise calculations we could fly right through a starter tool set or bounce too close to the chuck, and that'd end your trip real quick, wouldn't it?
Much to learn you still have…my old padawan. … This is just the beginning!
Use the Course…............A lathe course.
Posted by: Series9 Feb 23 2016, 01:54 PM
Use the Course…............A lathe course.
There is no course. The closest one I can find is in Houston (Dagobah System), and that's like you flying to Berlin to go to class.
I'm desperately needed elsewhere, so I have to do it on my own, just like Luke.
Who says the British don't have a sense of humor?
Well...me, mostly.
Posted by: Series9 Feb 23 2016, 02:01 PM
"Darkside Turning" is now the name of S9's machine shop department.
Who wants a T-shirt?
Posted by: nathansnathan Feb 23 2016, 02:08 PM
I remember this time they had me turning these pistons - J&E pistons is right accross te street from HUntington Beach Machining where I worked. The boss man set up the 1st one as we were using the toolroom lathe for whatever reason, had a 3 jaw universal chuck instead of a collet setup. He does the math, and I'm like, "are you sure?" People like to run aluminum really fast and take these big cuts... apparently these were some special alloy. First one I try to run, BAM! tear a jaw right off the chuck, the piston blank hitting the guard, the lathe jumped off the ground. You learn certain things with an experience like that - keep your hand on the emergency shut off, don't mess around with how you chuck stuff up. Chucking the taper of another chuck is retarded 
Posted by: Darren C Feb 23 2016, 02:19 PM
“Darkside Turning” good name!
I’ll have the first T shirt ;-)
Will it have your face on it, like when Vader takes his helmet off to show your lathe scars?
As for British “sense of humor”, I think you’ll find its spelt “Humour”, we invented the language..
That's what you call….”The Empire (British Empire) Strikes Back” :-) :-) :-)
Posted by: Series9 Feb 23 2016, 02:22 PM
“Darkside Turning” good name!
I’ll have the first T shirt ;-)
Will it have your face on it, like when Vader takes his helmet off to show your lathe scars?
As for British “sense of humor”, I think you’ll find its spelt “Humour”, we invented the language..
That's what you call….”The Empire (British Empire) Strikes Back” :-) :-) :-)

Darren, you and I are now officially friends.
Posted by: Series9 Feb 23 2016, 02:23 PM
Chucking the taper of another chuck is retarded
But I needed a small chuck and there's no other way to mount it. And, it's only retarded to you because you have followed the instruction of an old machinist from when you were trained.
I don't have anyone to tell me no, so I have to use my own logic and common sense. Placing that small chuck in the lathe makes perfect sense to me. How is it different than chucking any other piece of metal?
If there's a defense, the small chuck's shaft is not tapered.
Only the end close to the chuck had a taper. I was able to set it up so it rotated with a .002" runout.It might be a silly thing to do, but give me a real reason it's dangerous.
"Because I said so" and "Because it isn't done that way" are not acceptable answers.
Posted by: Darren C Feb 23 2016, 02:35 PM
Darren, you and I are now officially friends.
Ditto !
Posted by: nathansnathan Feb 23 2016, 02:40 PM
Somehow it looked like the 1st chuck was clamping on a taper and you were using a live center in the tailstock to hold it concentric. -I see now that's not the case. If it was, well yeah that would be really unsafe.
3 and 4 jaw chucks aren't nearly as secure as a true collet system, 3 jaw especially - and to run 2 doubles the risk. I've pulled some plastic parts right out of a 3 jaw, like deforming the part. No gaurds on these old school lathes, one becomes wary. You need to develop a healthy respect for the lathe whatever size. Here's the Bridgeport EZ path I crashed. It was never the same after that. I can say, "picture it leaping off the ground" but there's no substitute for actually crashing a lathe to instill the fear that is required to run one with the proper mindset.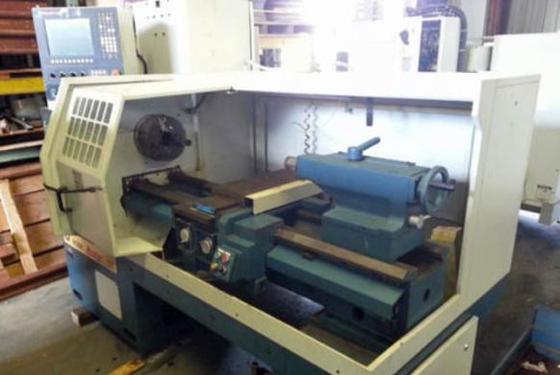
Posted by: Series9 Feb 23 2016, 02:43 PM
keep your hand on the emergency shut off,
I never keep my hand on that switch. To do so would mean that my head is in line with the chuck.
Yeah, I'm not doing that. If something flings off, it might make a hole in the wall, but my head will not be a target.
They should put the switch at the tailstock end...
Posted by: Series9 Feb 23 2016, 02:46 PM
Somehow it looked like the 1st chuck was clamping on a taper and you were using a live center in the tailstock to hold it concentric. -I see now that's not the case. If it was, well yeah that would be really unsafe.
3 and 4 jaw chucks aren't nearly as secure as a true collet system, 3 jaw especially - and to run 2 doubles the risk. I've pulled some plastic parts right out of a 3 jaw, like deforming the part. No gaurds on these old school lathes, one becomes wary. You need to develop a healthy respect for the lathe whatever size. Here's the Bridgeport EZ path I crashed. It was never the same after that. I can say, "picture it leaping off the ground" but there's no substitute for actually crashing a lathe to instill the fear that is required to run one with the proper mindset.
It's a wedding ring. I was using the live center to push it up against the (assumed) square jaws of the small chuck in order to create enough friction for the ring to continue spinning when I started cutting.
And, WOW, you saw that lathe hop around?!!
I hope to never see that.
Posted by: nathansnathan Feb 23 2016, 03:11 PM
It's a wedding ring. I was using the live center to push it up against the (assumed) square jaws of the small chuck in order to create enough friction for the ring to continue spinning when I started cutting.
And, WOW, you saw that lathe hop around?!!
I hope to never see that.
Boss man used to say, "Things go south real quick". Words to live by as a machinist. I wouldn't chuck anything like that ever again.
You're lucky it didn't get mangled, seriously. It's kind of hard to turn something like that without a collet system, but i'd chuck it in the lathe and use a stop to make it sit flat against the chuck. A dial test indicator, like I said before, is handy to check that it's actually running true. 3 jaw is finicky though, too much feed, you mangle the part. I haven't turned much Titanium, seems tough.Lathe hopped once. It hadn't hit the ground before I hit the cutoff switch - I guess that's another better thing about a cnc lathe, when you do the hard cuts nothing else to do but cover the switch.
I remember turning some sensors from big ass stainless hex stock. Was running like 5 lathes, but when this one got to that operation, I'd cover the cutoff through the whole operation - ridiculous cost when things do go south, taking out inserts, tool holders, chuck jaws, stuff gives you nightmares. In production, you watch your offsets, if they start moving, can be a false edge, things can go wrong real quick, check your tool for burn. With 1 time setups, every cut is one to be wary of.
Posted by: Series9 Feb 23 2016, 03:25 PM
I wouldn't chuck anything like that ever again.
I wish I could tell you that will never happen again.
And, the ring wasn't chucked. It was "friction confined" (my new proprietary term).
Posted by: Series9 Feb 23 2016, 03:36 PM
Darkside Turning's first T-shirts will be called the 10-finger edition. I will put an impression of my hands on each sleeve.
Don't be left holding the bag when the 9-finger edition comes out. Get yours now.
If you pre-order your 9-finger shirt, I guarantee the first three will be stained with my actual blood. I'm sure they will sell well in the UK.
Posted by: Series9 Feb 23 2016, 04:56 PM
“Darkside Turning” good name!
I’ll have the first T shirt ;-)
Will it have your face on it, like when Vader takes his helmet off to show your lathe scars?
As for British “sense of humor”, I think you’ll find its spelt “Humour”, we invented the language..
That's what you call….”The Empire (British Empire) Strikes Back” :-) :-) :-)
Darren, you and I are now officially friends.
Here you go:
Attached image(s)

Posted by: veekry9 Feb 23 2016, 08:00 PM

Posted by: veekry9 Feb 23 2016, 08:01 PM

You're a ginger too!
What a fluke,no relation to Sith,I'm guessing.
Looks like that fla sun is a little harsh on that northern complexion.
That was too easy,a kind of rip,lacking originality.
How bout Serious9 Turning,a subsidiary of Series9.
That way serious people will flock to your door rather than to the flimflam flybynight con artist shop,down the street.
Find an old retired machinist to teach you how to first-
1. grind cutter edges
2. set up a cutter in the toolpost at correct height and angles. . that's a 4 way toolpost and requires shimming cutters to correct height
3. show you the correct chuck rpm speed and correct cutter feed speed. The tendency is to turn too fast.
4. after all those, start on PVC or wood. . .
5 remember no matter how fast you think your reactions, hands and fingers are,
the chuck is always faster and a lot stronger.
It's not rocket science but it's easy to hurt yourself badly. . You might want to start
by positioning the machine and leveling the bed. Then make sure the headstock is parallel and perpendicular to the bed and center of tailstock. Determine the off center runout of the chuck. .Those Chinese chucks are usually spec'ed at .003 off center as the normal limit when new . If not set up properly, no matter what you do, your finished project will have taper and be out of square and off center.
Some good experienced advice,then,'secure' the machine to the floor.
An unbalanced load may tip the machine over.
A mod we did with the Hardinge toolroom turret lathes was 'pan' them.
A sheetmetal steel pan braked and welded watertight,large enough for the machine's footprint,3-4" dp.
The pan should not intrude into the operators footspace,the pan's floor sloped to the back,the rear of the pan's lip sloped.
A giant pool of swarf and sour coolant on the floor is thus avoided.
When he says level and square,he means dead level perfect,not merely carpenter.
Sit it down on 3 points,2 at the headstock end,to minimize twist.
Shim to interference all around for good stability and drill for anchors into the concrete.
You'll need an accurate level in your toolbox eventually,for serious work.
http://www.penntoolco.com/mitutoyo-digital-protractor-level-pro-360-pro-3600/
950-318 Mitutoyo Pro 3600 Digital Protractor Level $385.00
A laser level can get it close,a laser transit will do better.
http://www.exactmachineservice.com/cnc-laser-alignment/
They may know someone in fla.
/
Posted by: Series9 Feb 23 2016, 09:00 PM
The moment you learn to speak English/American/Canadian, I would love to hear what you have to say.
Posted by: r_towle Feb 23 2016, 10:03 PM
Shirts should say "turning stuff into shit"
Or "turning shit into stuff"
Posted by: veekry9 Feb 24 2016, 06:54 AM
From the Latin.
Plagiarism:plagiarism is the "wrongful appropriation" and "stealing and publication" of another author's "language, thoughts,ideas,
or expressions" and the representation of them as one's own original work.https://en.wikipedia.org/wiki/Plagiarism
'It isn't brass you ass',an observation by journeymen of apprentice's errors.
Not knowing the difference is a signal of ignorance and or negligence,a result of lack of knowledge.
Attempting to machine and sell an aircraft part without the oversight and endorsement of an Engineer is a felony,punishable by life imprisonment.
The material selection of vital automotive components likewise,requires an engineer's approval,as a failure of control parts causing harm,may be grounds for prosecution.
Discovering a trig error in a preliminary ruf op,it was determined that the entire 900kg lot of S5000 was scrapped.
The machinist responsible was questioned,he attempted to cover his ass,not wishing to be held accountable,he was.
I learned a few years later from a disgruntled journeyman,a former employee,that they had replaced the material with 4340,the availability of that specified,untimely.
The switch was discovered by the client,a suit was brought,the vendor forced into surrender and loss.Military helicopter flight control components.
http://asm.matweb.com/search/SpecificMaterial.asp?bassnum=M434AE
https://en.wikipedia.org/wiki/Mass_spectrometry
http://www.dtic.mil/dtic/tr/fulltext/u2/a231588.pdf
http://standards.sae.org/amss5000/
Caveat emptor.
http://www.goltens.com/in-situ-machining/fast-rebabbitting-response-keeps-drydocking-on-schedule
https://en.wikipedia.org/wiki/Babbitt_(alloy)
To something like this,actually,exactly like this,steel mill shears to heavy crushers and their power transmission gears,shafts and boxes.
Hydrostatic conversions are economical life extenders,for heavily loaded shafts,on legacy large capital equipment.
Several decades later,I recall,a 44"ID bearing was repaired in record time,prompting the prez to remark to the gm,"Now he's a machinist!".
He made it worth my while,we continued until he retired the chair and passed away shortly afterwards,a decent selfmade man,100M+.
Having had the privilege of working with these men over the course of four decades and more,a common attribute is a low tolerance for bs.
Clearly,some of the 'advice'extended here by charlatans and neophytes is of that nature.
/
Posted by: Mueller Feb 24 2016, 08:51 AM
Fantastic information. Some of the tools have a wax-like protective coating on the tips. That's probably what you're seeing as "poor resolution".
Again you’re most welcome!
The wax on the tool ends comes on new HSS tools to protect them in transit and storage, so hopefully if the cutting edge is intact, they should be good to go.
As Nathan says Carbide, Ceramic tool tips come in box sets 6, 10 12 etc and at $20 a tip it’s a big initial expense. You also need the correct tool holder that can be anything from $50 to $200 to fit them in.
Yes you flip them once the edge is chipped so you get 2 or 3 cutting sides per tip but you CANNOT sharpen them, just throw them in the trash can. Speed, feed, material, angle and depth of cut need to be right for these type of tools (as Nathan has said) they chip and break real easy.
Generally used for high spindle speed turning 1000rpm upwards by operators with a good knowledge.
This is why I’m steering you away from this type of tool as a beginner. Besides you can do pretty much everything you need at home with HSS tools for less cost and lower lathe speeds.
If you ever see a pot of this stuff don't be tempted to stick your finger into it like one could do with a melting candle!
Much, much hotter and it doesn't come off as easily...and no, I didn't do it. Some other knuckle head did it a few years ago in our tool cutter and grinder shop.
Posted by: Series9 Feb 24 2016, 05:45 PM
Fantastic information. Some of the tools have a wax-like protective coating on the tips. That's probably what you're seeing as "poor resolution".
If you ever see a pot of this stuff don't be tempted to stick your finger into it like one could do with a melting candle!
Much, much hotter and it doesn't come off as easily...and no, I didn't do it. Some other knuckle head did it a few years ago in our tool cutter and grinder shop.
Is he on the "9 Finger Edition" of his T-shirts?
You guys are warning and warning me about how dangerous machine shops can be, but they appear to be filled, at least partially (
) with idiots.
Posted by: Series9 Feb 27 2016, 10:18 AM
Got the new tool post.
Now I have to take the base to a machine shop with a mill to cut the base of the T nut.
Dammit.
Attached thumbnail(s)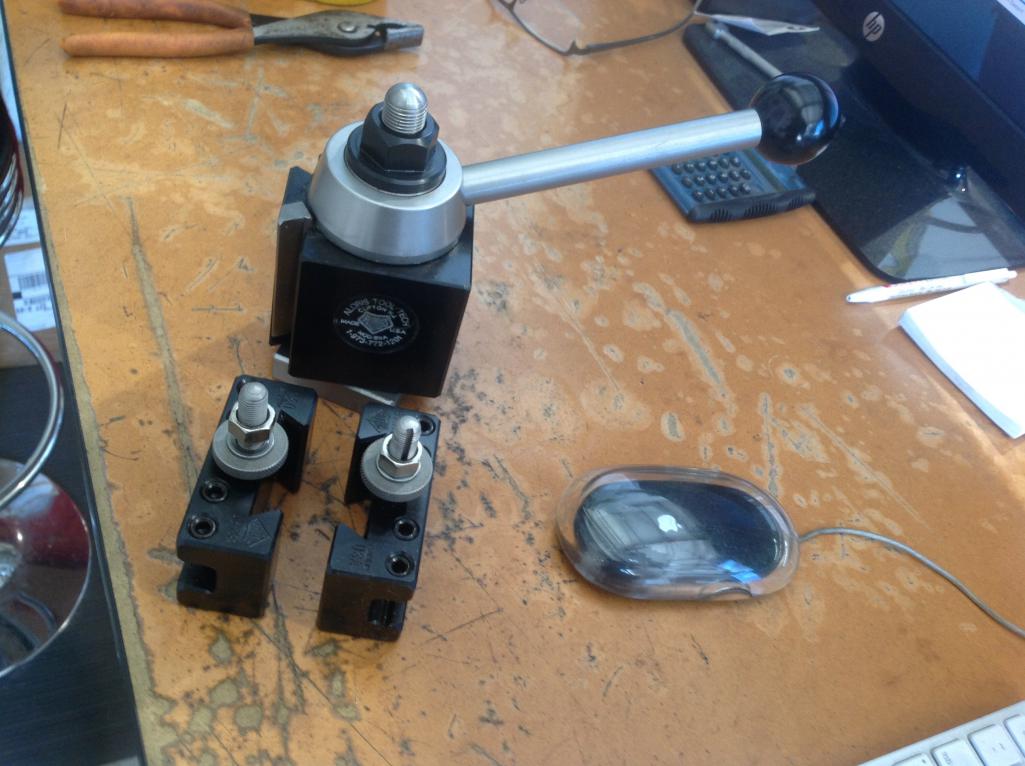
Posted by: Series9 Mar 5 2016, 04:41 PM
Two questions:
Given a narrow bushing, like a clutch pulley on a 914:
How do you accurately chuck something so thin?
How do you chuck this in a way that you can machine the outer diameter?
I have a feeling that the answer is to make a tool to insert in the chuck and then mount the bushing with a bolt.
Attached image(s)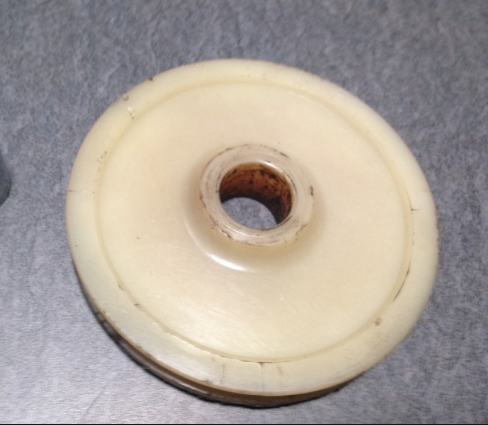
Posted by: Series9 Mar 5 2016, 04:59 PM
Perhaps a better route to this question:
If I were going to make this bushing from brass, I think the steps would be:
1. Chuck up some solid brass stock.
2. Face the end.
3. Bore the inner diameter.
4. Turn the outer diameter.
5. Create the contour on the face (although it's not necessary to the finished piece).
6. Groove the OD for the cable.
7. Part the pulley from the parent stock, leaving a small amount to turn the other face.
8. Then what? How do I put it back in the lathe in a way that I can turn a parallel face on the parted side?
Posted by: toolguy Mar 5 2016, 05:50 PM
How to hold something on the inside with a small diameter
Use expanding arbor collets, just another in the line of the many tools you'll need. .
How to hold thin wall tube. . . 6 jaw chuck is best, make percision inside bushing so you don't distort the tube.
Posted by: 914forme Mar 5 2016, 07:01 PM
Got the new tool post.
Now I have to take the base to a machine shop with a mill to cut the base of the T nut.
Dammit.
Wow that is an old school Apple Mouse
Posted by: Mikey914 Mar 6 2016, 02:47 AM
You have the right idea, we did leave off the grove detail on the delrin ones as it's not necessary, and would require a second operation to add to the back side. We finish off the back side on the part off.
Attached image(s)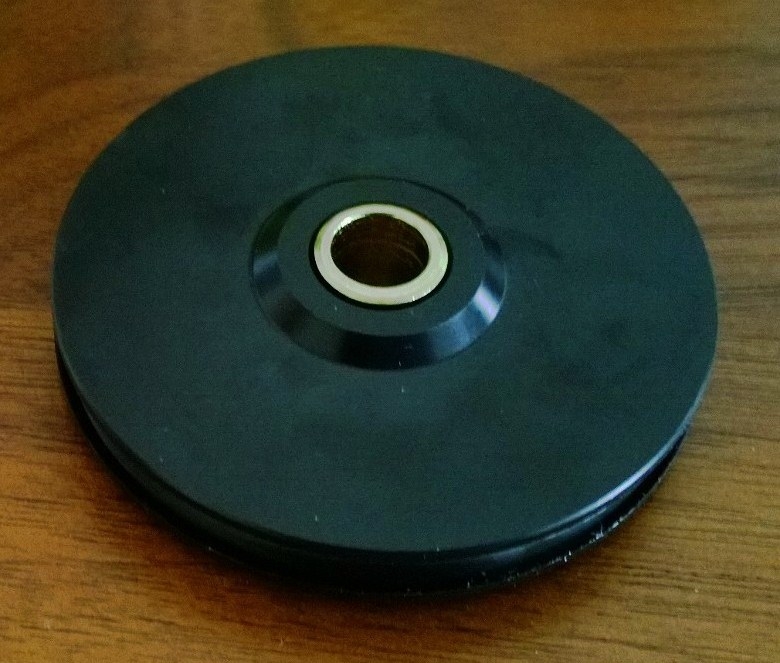
Posted by: Series9 Mar 6 2016, 08:21 AM
You have the right idea, we did leave off the grove detail on the delrin ones as it's not necessary, and would require a second operation to add to the back side. We finish off the back side on the part off.
So, is that a parting tool that contains the profile?
Posted by: Darren C Mar 6 2016, 03:01 PM
Joe,
You have 2 options here.
Face off the bar stock.
Machine the "hub" profile on front face.
Machine large diameter and cut cable groove.
Here's where you choose option 1 or 2
Option 1
Using parting tool cut reverse of pulley down the the Largest diameter of hub profile.
Second run with parting tool closer to the chuck (and to the overall width of the pulley at the hub and to the smaller size of pulley hub bevel NOT hole size)
Grind a thin tool for hub bevel, fit down double width parting slot and cut Hub profile on reverse of pulley nearest chuck.
Now drill hole through centre (left until near the end to retain strength).
Finally part off to over all width.
Option 2
Buy some reverse jaws for your chuck
http://s265.photobucket.com/user/DarrenLCollins/media/30292_3_jawchuck_6_zpsgbehdii5.jpg.html
Part pulley off fully extra wide, flip and cut hub profile in reverse jaw chuck.
Hope that makes sense?
Posted by: Mikey914 Mar 6 2016, 04:58 PM
You have the right idea, we did leave off the grove detail on the delrin ones as it's not necessary, and would require a second operation to add to the back side. We finish off the back side on the part off.
So, is that a parting tool that contains the profile?
Yes, and it's possible to and the detail on the bacside, but you waste more material handling have more machine time per unit.
Posted by: Series9 Mar 6 2016, 08:02 PM
You have the right idea, we did leave off the grove detail on the delrin ones as it's not necessary, and would require a second operation to add to the back side. We finish off the back side on the part off.
So, is that a parting tool that contains the profile?
Yes, and it's possible to and the detail on the bacside, but you waste more material handling have more machine time per unit.
I have no intention to compete on this part, so for my education as a machinist, may I see a picture of the parting tool that you use to accomplish that in one pass?
Please.
Posted by: Series9 Mar 6 2016, 08:21 PM
Option 2
Buy some reverse jaws for your chuck
I infer from this that the lands on the jaws on the chuck should be perfectly perpendicular to the X axis (or turning axis).
I assumed this at first, but have found this assumption to not be true (no pun intended). That assumption ruined that brake rotor I first turned last month.
I actually faced the outside of the jaws on my chuck in an attempt to be able to simply chuck a piece up square with the jaws. I haven't had any real success in that respect.
Posted by: mbseto Mar 6 2016, 09:10 PM
Hey if you're still looking for projects to make, I have a 4" telescope objective lens with a fine thread. Need to thread a tube for it, or at least a short section I can weld on to the end of a tube. If you're game for something like that, I'll come up with exact measurements.
Posted by: Darren C Mar 7 2016, 02:12 AM
I actually faced the outside of the jaws on my chuck in an attempt to be able to simply chuck a piece up square with the jaws. I haven't had any real success in that respect.
Jeeez Joe...That's a bit harsh!!!
Standard orientation chuck jaws can clamp around the metal bar in the most conventional way; but also open outwards to clamp inside large tube. (subject to it being a short length of tube or supported in a lathe steady. or have a rotating centre at the other end)
With a reverse jaw set you can clamp around the outside of larger diameters (that conventional jaws wont open up far enough to hold) or where the metal doesn't need to pass through the eye of the chuck. The beauty of the reverse jaws is that you use the shoulder "step or land" of the jaw to push up against and get the "job" flush and square. (Ideal with your pulley example where its too thin once parted off to clamp and get it running true without great effort to machine the reverse side)
I'm not sure what condition your chuck is in but you should NEVER need to turn down chuck jaws! Besides, good quality jaws are hardened steel and at best you'll ruin your lathe tool.
What you need is a good 4 jaw chuck with conventional jaws and a good 3 jaw with conventional and reverse jaw set and you should be able to turn most things.
Anything big, you need a bigger lathe and faceplates which is completely different territory that you aren't ready for just yet and to be fair I doubt you'll ever need in a garage.
Posted by: Series9 Mar 7 2016, 08:05 AM
Hey if you're still looking for projects to make, I have a 4" telescope objective lens with a fine thread. Need to thread a tube for it, or at least a short section I can weld on to the end of a tube. If you're game for something like that, I'll come up with exact measurements.
I am not up to threading yet.
Posted by: Series9 Dec 29 2016, 02:26 PM
Lathe update: I still have ten fingers!
I'm still not up to threading, but I do get much more reliable results these days.
Here's a little thing I did today that saved me at least five days of waiting. I'm working on making a fuel injector kit for Vanagons where I'm going to use EV6 injectors and CB fuel rails. Well, good fittings to go in the rails are hard to find here, so I went to Lowe's and got four crappy barb fittings and then "fixed them".
Attached thumbnail(s)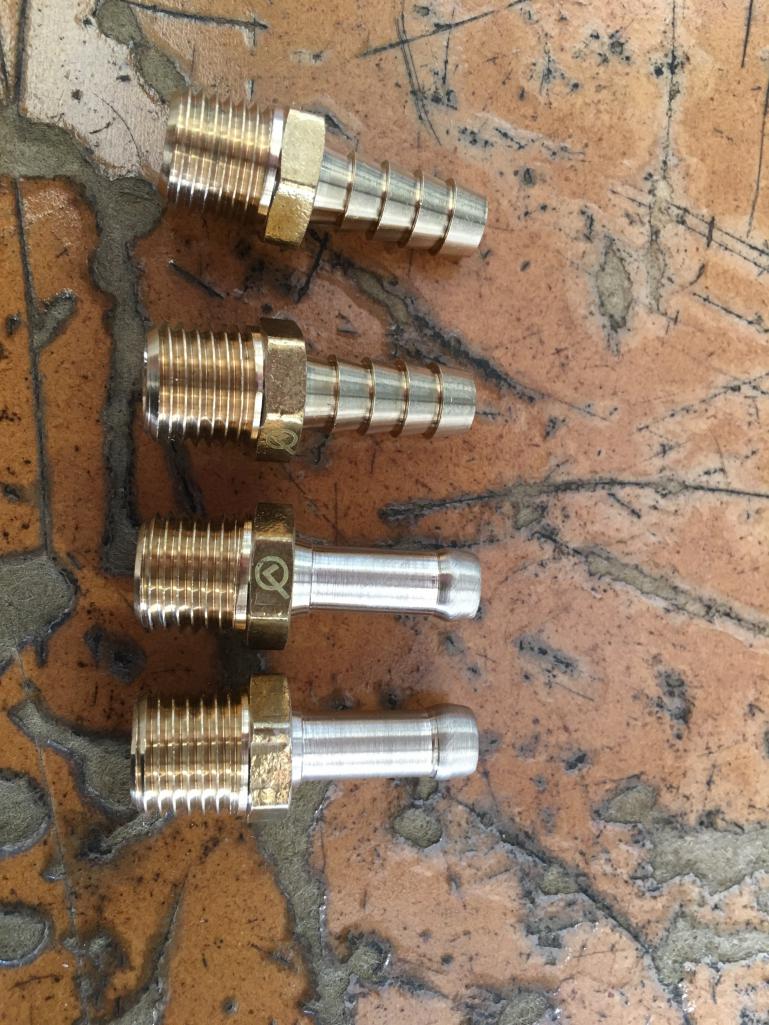
Posted by: Darren C Dec 30 2016, 06:44 AM
Nice work Joe.
Glad to hear you still have 10 fingers!
Posted by: 914forme Dec 30 2016, 08:44 AM
Very nice, love it when people come up with a good solution to their problems.
"What you need is a good 4 jaw chuck with conventional jaws and a good 3 jaw with conventional and reverse jaw set and you should be able to turn most things."
I have purchased three of them, as the previous owner of my lathe broke the jaw teeth over tightening them I presume. I would add to the list a 4 jaw self-centered for precision boring, and a 4 jaw independent for off center boring and turning operations.
Posted by: Mueller Dec 30 2016, 09:40 AM
Very nice, love it when people come up with a good solution to their problems.
"What you need is a good 4 jaw chuck with conventional jaws and a good 3 jaw with conventional and reverse jaw set and you should be able to turn most things."
I have purchased three of them, as the previous owner of my lathe broke the jaw teeth over tightening them I presume. I would add to the list a 4 jaw self-centered for precision boring, and a 4 jaw independent for off center boring and turning operations.6 jaw are nice if you do any tubing, invest in some soft jaws that you can machine/modify.
Not sure if i mentioned it, but never be tempted to mount a chuck into another chuck!
Posted by: Series9 Dec 31 2016, 08:54 AM
The Aloris tool post has made a big difference in the quality of stuff I'm able to pull off. It's so much more rigid that it's making me look better than I am.
Posted by: Mueller Jan 14 2017, 12:36 AM
I missed having a lathe and don't have the space for a new one, so I comprimised and got this, still need to buy a servo motor and drive for it. It mounts on the table of my CNC mill.
It will go up to 3000rpm, will do indexing (bolt pattern or flats for a hex or timing marks in a flywheel with assistance of a disc brake that is built in) , it will also allow me to machine items like small model camshafts and crankshafts. 
Powered by Invision Power Board (http://www.invisionboard.com)
© Invision Power Services (http://www.invisionpower.com)