Printable Version of Topic
Click here to view this topic in its original format
914World.com _ 914World Garage _ Ignition System: Cranking very well but won't start 75 1.8FI
Posted by: ndfrigi Feb 17 2016, 04:08 PM
Need help diagnose from members!
Well, last saturday Feb. 13 I joined fellow members at the Aliso Viejo Cars and Coffee which is about 30 miles one way. After the event, drove home and for less than 2.5 miles away from home at a traffic light, my tachometer is bouncing between 2.5k to 3k rpm (sorry not 3.5k to 4k rpm on what I have said on the other thread). But the actual is pretty much on normal idle of less than 1k rpm. When about to go on green light, engine died. Tried to start the engine but it is just cranking (cranking very well), but the engine won't engage.
Some good members here already mentioned about ignition circuit. Well today, I was able to checked and opened the rotor cap, and I found out that I have/had Pertronix Electronic Ignitor which I already forgot since the last time I opened it last 2011 (Since the engine is running very well after I was able to make it run after fixing it from the time I bought. I haven't open it since then. I even bought lately a spare of contact points and condenser to replace it soon).
So a friend of mine was here this morning and asked him to start the engine and try touching at the base cover of my front mounted fuel pump and I don't feel any vibration. So we tried to unplug fuel hose from the SS engine tunnel lines which is a direct supply line from fuel pump to engine bay before the fuel injector line. We did crank the engine but no fuel is spitting out from the line.
So is it fuel pump issue I have?
In addition, a member also mentioned about the fuel pump relay from the relay board. But after opening my relay board cover. I noticed there is some wiring that was changed/modified. No round relay for the fuel pump terminal. 
Thanks again for your help!
Posted by: Series9 Feb 17 2016, 05:14 PM
The wiring bypass on the relay board is for the starter. That suggests the relay board already has high-resistence issues (like many of them).
Unplug the fuel pump and put 12V on it manually. See if the car will start.
Report your findings.
Posted by: ndfrigi Feb 17 2016, 05:15 PM

The wiring bypass on the relay board is for the starter. That suggests the relay board already has high-resistence issues (like many of them).
Unplug the fuel pump and put 12V on it manually. See if the car will start.
Report your findings.
Thanks Series9!
Posted by: timothy_nd28 Feb 17 2016, 05:16 PM
Start at the relay board, remove the 14 pin and 12 pin connectors. Next, use a multimeter that is set to read resistance and put one meter lead on pin one of the 14 pin connector. Put the second meter lead on pin 6 of the 12 pin connector. You should read 0 ohms.
Posted by: ndfrigi Feb 17 2016, 05:23 PM
Start at the relay board, remove the 14 pin and 12 pin connectors. Next, use a multimeter that is set to read resistance and put one meter lead on pin one of the 14 pin connector. Put the second meter lead on pin 6 of the 12 pin connector. You should read 0 ohms.
thanks also Timothy! any picture of the board that indicates those pin numbers? but I try Series9 suggestion first since it is more easier for
me than with those pins on the board.
Posted by: ndfrigi Feb 17 2016, 05:28 PM
Like what other member said from my initial thread responsed, they said my issue is ignition circuit (like contact point) and since i have pertronix ignitor, thus it mean not on the distributor area?
Posted by: Series9 Feb 17 2016, 05:29 PM
One of the problems with continuity readings is that they are performed by a meter putting milli-amps across the circuit.
The circuit can pass the "milli-amp test" but show high resistance under load.
I'm just saying, take a positive continuity test with a grain of salt.
Posted by: Series9 Feb 17 2016, 05:32 PM
And before you go too far:
Check your fuses. If they are okay, check for 12V on the positive side of the coil with the key in the "run" position.
Posted by: ndfrigi Feb 17 2016, 05:35 PM
And before you go too far:
Check your fuses. If they are okay, check for 12V on the positive side of the coil with the key in the "run" position.
Thanks again Joe!
Posted by: timothy_nd28 Feb 17 2016, 06:11 PM
I don't think one needs to worry about a phantom resistance when the circuit is under load, but there is another way of testing this circuit for resistance while under load. Leave the 14 and 12 pin connector connected to the relay board. Slip off the back plastic clam shells of the 14 and 12 pin connector, exposing the wires. Set the multimeter to DC, put a meter lead on pin 1 of the 14 pin connector (should be a big yellow wire) and the other meter lead on pin 6 of the 12 pin connector (should be a smaller yellow wire). Have someone start the car as you are watching the multimeter, you should observe 0 volts, anything higher than 0.1 indicates you have resistance in the circuit.
The Ljet will have no fuses for the fuel pump. One of those many red wires at the positive battery post lead feeds directly to the dual relay which then feeds the fuel pump.
I'm somewhat confused with what is going on at the relay board. I don't think that the start circuit is what is being bypassed. The start circuit is a solid yellow wire that is on pin one of the 14 pin connector. The wire in the picture being spiced is a yellow/red wire. It might make more sense of what is going on if you peel back the electrical tape of the other end of the spice in the 12 pin harness to reveal the color.
Isolating the problem by applying power to the fuel pump is a great way of diagnosing your issue. If that does work, you may want to try leaving the ignition switch to "on" and deflecting the airflow meter flap inside the airflow meter. This should also turn on the fuel pump.
Since you will be doing troubleshooting with the key on, you may want to consider unplugging the red wire on the ignition coil that leads to your petronix module. These modules will smoke if you leave the ignition switch on with the engine not running.
Posted by: ndfrigi Feb 17 2016, 06:23 PM
I don't think one needs to worry about a phantom resistance when the circuit is under load, but there is another way of testing this circuit for resistance while under load. Leave the 14 and 12 pin connector connected to the relay board. Slip off the back plastic clam shells of the 14 and 12 pin connector, exposing the wires. Set the multimeter to DC, put a meter lead on pin 1 of the 14 pin connector (should be a big yellow wire) and the other meter lead on pin 6 of the 12 pin connector (should be a smaller yellow wire). Have someone start the car as you are watching the multimeter, you should observe 0 volts, anything higher than 0.1 indicates you have resistance in the circuit.
The Ljet will have no fuses for the fuel pump. One of those many red wires at the positive battery post lead feeds directly to the dual relay which then feeds the fuel pump.
I'm somewhat confused with what is going on at the relay board. I don't think that the start circuit is what is being bypassed. The start circuit is a solid yellow wire that is on pin one of the 14 pin connector. The wire in the picture being spiced is a yellow/red wire. It might make more sense of what is going on if you peel back the electrical tape of the other end of the spice in the 12 pin harness to reveal the color.
Isolating the problem by applying power to the fuel pump is a great way of diagnosing your issue. If that does work, you may want to try leaving the ignition switch to "on" and deflecting the airflow meter flap inside the airflow meter. This should also turn on the fuel pump.
Since you will be doing troubleshooting with the key on, you may want to consider unplugging the red wire on the ignition coil that leads to your petronix module. These modules will smoke if you leave the ignition switch on with the engine not running.
Wow a lot of information and i'm learning more! thanks again Timothy and Joe for your helped! I will try doing some of those suggestions tomorrow!
God bless!
Posted by: Geezer914 Feb 17 2016, 06:23 PM
Check the dual relay near the battery.
Posted by: ndfrigi Feb 17 2016, 06:27 PM
Check the dual relay near the battery.
Since you and Timothy mentioned about the dual relay underneath the battery tray, is this trigger the fuel pump to engage? And yes my dual
relay in there is in bad shape but it was working well for the last 5 years unless it broke now! thank you too Geezer914!
Posted by: Dave_Darling Feb 17 2016, 10:35 PM
The dual relay powers the FI, and powers the fuel pump.
Don't leave your key on without the engine running for too long, or you'll fry the Pertronix.
--DD
Posted by: ndfrigi Feb 17 2016, 11:08 PM
The dual relay powers the FI, and powers the fuel pump.
Don't leave your key on without the engine running for too long, or you'll fry the Pertronix.
--DD
Thank you too Dave! You are 1 of those guys here that normally or always to support fellow members in sharing your expertised with this car.
Maybe that is one of those I will check tomorrow!
Posted by: ndfrigi Feb 19 2016, 06:08 PM
Update:
Joe (Series9)
1. Unplug the fuel pump and put 12V on it manually. See if the car will start.
Report your findings.
My Reply: Instead of putting a 12v to the fuel pump, what I did is to turn the key to run position and immediately went to air intake sensor (with square plastic cover) and swing the arm and i feel the fuel is running along the fuel hoses. Meaning fuel pump is okay. Or should I still place a direct 12 volt to the fuel pump and try to start the engine again?
2. And before you go too far:
Check your fuses. If they are okay, check for 12V on the positive side of the coil with the key in the "run" position.
My Reply: All fuses under dash (only the fuse panel showing outside and didn't check anything at the rear of that fuse panel.) All fuses are okay and has resistance on both sides of the fuses.
Coil positive side has 12 volts power
Timothy_nd28
1. Start at the relay board, remove the 14 pin and 12 pin connectors. Next, use a multimeter that is set to read resistance and put one meter lead on pin one of the 14 pin connector. Put the second meter lead on pin 6 of the 12 pin connector. You should read 0 ohms.
My Reply: Unplugged the 14 pin and 12 pin connectors. #1 pin from 14 pin board with #6 pin from 12 pin board has a full resistance using multimeter. So meaning this is bad?
2. Leave the 14 and 12 pin connector connected to the relay board. Slip off the back plastic clam shells of the 14 and 12 pin connector, exposing the wires. Set the multimeter to DC, put a meter lead on pin 1 of the 14 pin connector (should be a big yellow wire) and the other meter lead on pin 6 of the 12 pin connector (should be a smaller yellow wire). Have someone start the car as you are watching the multimeter, you should observe 0 volts, anything higher than 0.1 indicates you have resistance in the circuit.
My Reply: Sorry was not able to do this since I don't have anyone can help me start the car.
Geezer914
1. Check the dual relay near the battery.
My Reply: I was able to replaced it with a used dual relay from my friends running 1.8 engine. Still engine didn't engage/run.
In addition: I also used another blue coil from the 71 car and still didn't help.
Any next step I should check?
Thank you again fellow teeners!
Posted by: timothy_nd28 Feb 19 2016, 06:51 PM
Full of resistance? What did the meter say exactly?
We need to rectify the issue with the relay board, but it can be done at a later time. The fact that the airflow meter does engage the fuel pump is a good sign. The next step is to see if the fuel delivery is the problem with the no start condition. Either jump the fuel pump with 12vdc or at the dual relay find pin 88d and jump that terminal to the positive battery post. The wire on pin 88d should be a big black wire with red stripe.
It doesn't matter which method you choose to turn on the fuel pump. Once the fuel pump is whirling away, go ahead and start the car. Report back with the results.
Remember to reattach the pertronix module when attempting to start the car if you happened to remove it earlier like I recommended.
Posted by: timothy_nd28 Feb 19 2016, 07:29 PM
Update:
My Reply: I was able to replaced it with a used dual relay from my friends running 1.8 engine. Still engine didn't engage/run.
In addition: I also used another blue coil from the 71 car and still didn't help.
Any next step I should check?
Don't be a part changer, it only adds extra variables. This is a pretty simple system to troubleshoot, it makes it much harder to diagnose if you randomly change parts.
Posted by: ndfrigi Feb 19 2016, 07:35 PM
Update:
My Reply: I was able to replaced it with a used dual relay from my friends running 1.8 engine. Still engine didn't engage/run.
In addition: I also used another blue coil from the 71 car and still didn't help.
Any next step I should check?
Don't be a part changer, it only adds extra variables. This is a pretty simple system to troubleshoot, it makes it much harder to diagnose if you randomly change parts.
yes sir i'm like that! i will try a part one at a time and also return my original part if the replacement does not help. thanks!
Posted by: timothy_nd28 Feb 19 2016, 07:37 PM
It's a blind and expensive way to go about solving a problem.
Posted by: ndfrigi Feb 19 2016, 07:39 PM
It's a blind and expensive way to go about solving a problem.
My 73 has the same ignitor, should i use that to test it?
Posted by: Series9 Feb 20 2016, 12:26 PM
Do you have a timing light?
Hook it up and see if it blinks during cranking.
Posted by: Series9 Feb 20 2016, 12:39 PM
Actually, here's the easiest way to diagnose a non-running condition as either fuel or spark:
Get some starting fluid and shoot it in the intake.
Does the car sputter when cranked?
Yes: Fuel problem
No: Ignition problem
Posted by: ssuperflyoldguy Feb 20 2016, 02:28 PM
Has maybe been covered before but for working on automotive electrical - I'm a HUGE fan of the PowerProbe. Quick & easy once you're comfortable with using it, wish I had one since day one as I've always done my own work. And does odd voltages from 0 - 48v DC. Still need a digital multimeter however
Posted by: The Cabinetmaker Feb 20 2016, 04:54 PM
I've seen an sbc literally blow out a head gasket and bend push rods from starting fluid. At the very least, it will wash the oil from the cylinders and score cylinder walls. Use gas, not starting fluid.
Posted by: thelogo Feb 21 2016, 12:44 AM
[quote name='The Cabinetmaker' date='Feb 20 2016, 02:54 PM' post='2305605']
I've seen an sbc literally blow out a head gasket and bend push rods from starting fluid. At the very least, it will wash the oil from the cylinders and score cylinder walls. Use gas, not starting
Dont throw parts just install yourself a new engine 

![popcorn[1].gif](style_emoticons/default/popcorn[1].gif)
Posted by: The Cabinetmaker Feb 21 2016, 07:30 AM
Dont throw parts just install yourself a new engine


Posted by: ndfrigi Feb 22 2016, 06:19 PM
Joe (Series9):
Do you have a timing light?
Hook it up and see if it blinks during cranking.
my reply: Sorry Joe I don't have timing light.
Timothy_nd28
The next step is to see if the fuel delivery is the problem with the no start condition. Either jump the fuel pump with 12vdc or at the dual relay find pin 88d and jump that terminal to the positive battery post. The wire on pin 88d should be a big black wire with red stripe.
my reply: I was able to hook 88d from dual relay to battery and I immediately heard the fuel is flowing. But same thing it is just cranking when I tried to start it.
Posted by: Jeffs9146 Feb 22 2016, 07:01 PM
Vacuum Leaks.
Posted by: timothy_nd28 Feb 22 2016, 08:00 PM
Now that fuel delivery is proven to turn on, turn your attention to the ignition side. With your multimeter, set it for DC volts. Probe the + side of the ignition coil with one meter lead and probe the negative battery post with the other meter lead. Turn the ignition switch to on, and observe what the meter is saying.
Posted by: ndfrigi Feb 22 2016, 09:15 PM
Now that fuel delivery is proven to turn on, turn your attention to the ignition side. With your multimeter, set it for DC volts. Probe the + side of the ignition coil with one meter lead and probe the negative battery post with the other meter lead. Turn the ignition switch to on, and observe what the meter is saying.
Yes sir I did that and there is 12 v supply.
Posted by: Rotary'14 Feb 22 2016, 09:28 PM
Hey Noel,,,
you can check for spark by doing what this guy shows,,, but you need an assistant to crank the engine while you observe.
https://www.youtube.com/watch?v=ZceAZgZBn9E
if you do have a nice strong spark,, you will still eventually need to buy a timing light to fine tune your timing. but I doubt your timing would've moved on it's own,,, so I would rule out the ignition at this point and look at other things that might prevent your car from running.
Come to think of it,,, I think autozone lends out tools timing lights and compression testers are something you might be able to borrow.
take care
-Robert
Posted by: timothy_nd28 Feb 22 2016, 09:38 PM
I agree, I was going to suggest this as the next step. You can test spark by following the steps in the video, but like Joe stated earlier, it's far easier with a timing light. This is a tool you should have anyways with a old car.
Clip the timing light to any sparkplug wire, as you crank the engine, observe for any flashes the timing light emits. Also, obtain a fuel pressure gauge (another tool you should have), and connect it to the fuel rail. Even though the fuel pump is running, it would be nice to know what the pressure is
Posted by: ndfrigi Feb 22 2016, 10:21 PM
Hi Robert! Thanks for the suggestion too!
Timothy_nd28 thanks again!
Maybe I should buy timing light now since I will be installing the djet of the 73 1.7 i recently bought.
Posted by: ndfrigi Feb 22 2016, 11:27 PM
Vacuum Leaks.
Hi Jeff, thanks for your suggestion. Although the car is running well that day and I had replaced all vacuums lines less than a 1,000 miles it was driven. But well, no harm in checking them and maybe it has a leak(s) already after the lines was replaced last 2011.
Posted by: ndfrigi Feb 23 2016, 12:02 AM
I agree, I was going to suggest this as the next step. You can test spark by following the steps in the video, but like Joe stated earlier, it's far easier with a timing light. This is a tool you should have anyways with a old car.
Clip the timing light to any sparkplug wire, as you crank the engine, observe for any flashes the timing light emits. Also, obtain a fuel pressure gauge (another tool you should have), and connect it to the fuel rail. Even though the fuel pump is running, it would be nice to know what the pressure is
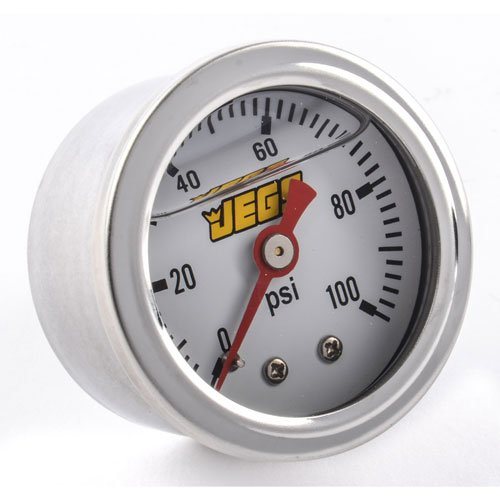
Thinking of buying a fuel pressure gauge that I will add on my fuel rail.
Is this a good type/model?
http://www.amazon.com/gp/product/B007VRAH62/ref=ox_sc_mini_detail?ie=UTF8&psc=1&smid=
Posted by: r_towle Feb 23 2016, 12:08 AM
Pull a plug.
Place plug back into the spark plug wire.
Using a leather glove, hold plug against a good ground to touch the body of the plug to the ground, yet leave the plug visible to let you see the spark event.
Have someone turn over the car in neutral while you watch for a spark....it will only take a couple of seconds to creat a spark.
Sounds like a wiring problem if it did work, you worked on the car, and now it does not work.
Is the wire to the distributor still plugged in? The white trigger wire? I think it's white...
Posted by: ndfrigi Feb 23 2016, 12:16 AM
Pull a plug.
Place plug back into the spark plug wire.
Using a leather glove, hold plug against a good ground to touch the body of the plug to the ground, yet leave the plug visible to let you see the spark event.
Have someone turn over the car in neutral while you watch for a spark....it will only take a couple of seconds to creat a spark.
Sounds like a wiring problem if it did work, you worked on the car, and now it does not work.
Is the wire to the distributor still plugged in? The white trigger wire? I think it's white...
No white but there is a light gray I think but connected to the negative side of the coil.
thanks also for sharing your knowledge!
Posted by: ndfrigi Mar 14 2016, 09:24 PM
well after few weeks of not really taking care of my 75. Now I'm back after finishing (almost done) the 71 1.7 Megasquirt rear ear suspension replacement and last week we were able to install the engine back. Now the 71 is running after I bought it last 2014.
Well, this afternoon, I tried doing some checking and did a few trial starting the car and still won't start. What I noticed, the ignition key seems having some problem, it requires me to turn the key a few tries before the engine crank or starter turns until it was totally not cranking anymore. So i assume it was the ignition switch need replacement. I took the ignition switch from a roller car and after trying to start it again, same issue does not crank.
Is there something I should check why it is not cranking anymore even after replacing the ignition switch? Battery has around 12.8 volts (meaning battery is not drain), checked the ground cable of tranny with under rear trunk, checked wires connected to the starter.
Any other things should I check to make it crank again and to be able to go back on my original problem?
Posted by: ndfrigi Apr 14 2016, 06:00 PM
Hi again fellow members:
Update: Still same issue.
After finishing the 71 1.7 megasquirt that Bro. Bob bought from me which is now running and he is enjoying driving with it while fixing some details with the car.
I was able to do several testing, swapping parts on my 75 1.8 FI.
1. Ignition switch was new after it failed during several testing.
2. Swap following parts:
* ECU (no known condition but borrowed it from Abe that came from his 75 1.8 Ljet which is now using carb).
* Thermo time switch
* Resistor pack (2 used spare)
* ignitor to standard points with condenser and to new ignitor. Several swapping was made.....
* dual relay (2 used spare)
* cold start valve
3. Blue coil to another blue coil and with new flame thrower coil
4.Did several wiring continuity with ECU, dual relay, resistor pack, fuel injector plug... and it looks all okay
5. Fuel pressure checked with 35-36 psi
6. Good spark on the other end of the plug wire (end wire from coil to center of distributor cap).
MY CONCERN NOW IS: NO FUEL SPRAY on both 3 and 4 injectors. (didn't check number 1 and 2 since there is no much room because of the air filter and I assumed it will be the same with number 3 and 4). I Removed number 3 and number 4 fuel injector from intake and insert them both to a bottle.
Any other direct items should I check now?
Or anyone from Orange county could help me that I can pay like $100 just to help me share his knowledge with FI at my place and I will do the labor work.
thank you!
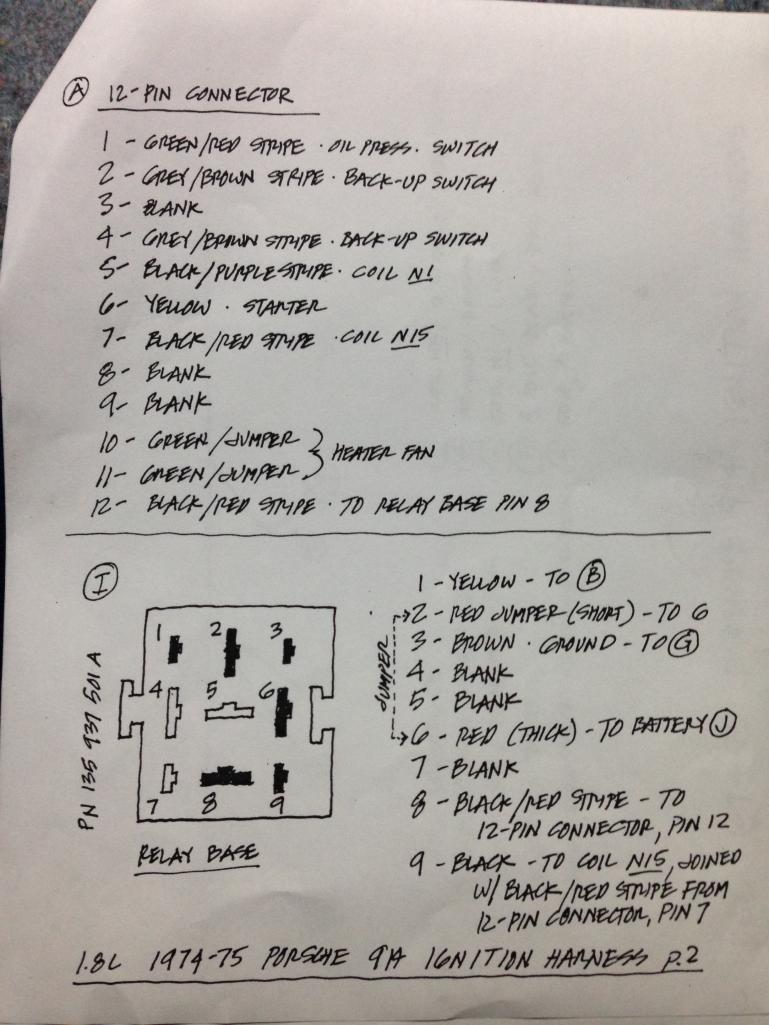
followed this diagram from bowlsby to check continuity and other related parts.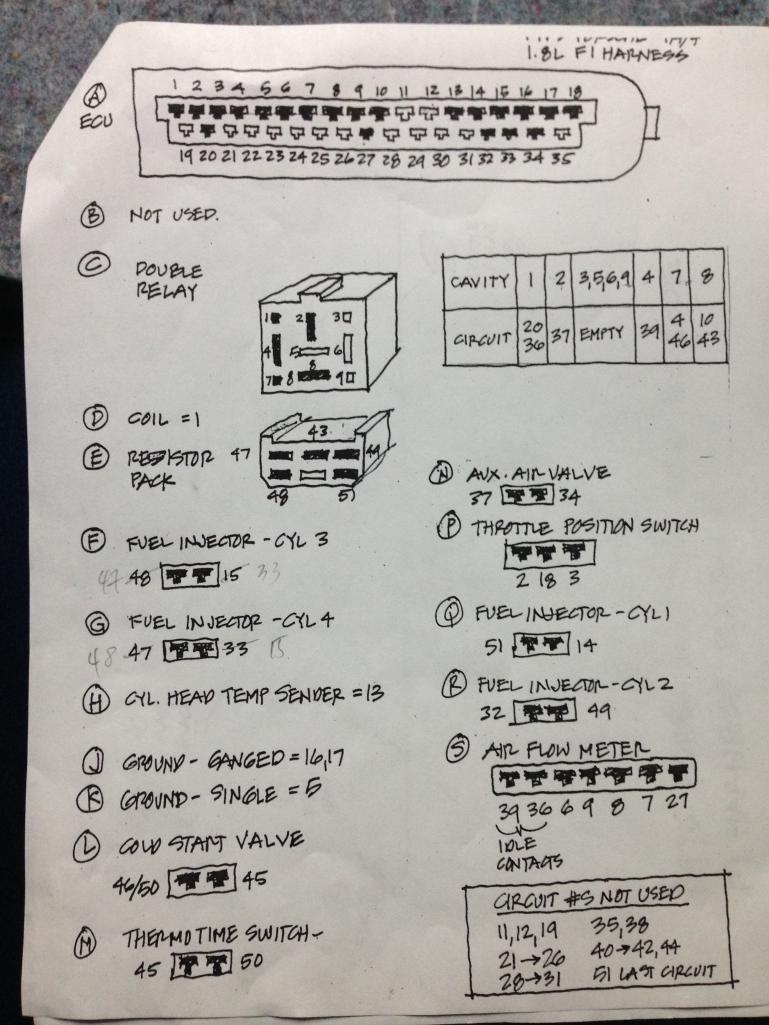
Posted by: ndfrigi Apr 14 2016, 06:06 PM
Posted by: timothy_nd28 Apr 14 2016, 07:44 PM
You seem to be all over the map with this one. What we know so far is that the fuel pump does turn on when you jump pin 88d on the dual relay to the positive battery post. So far this is good, but what was the pressure on the fuel rail? The next step is to verify that you have spark. I'm not sure if this was done or not?
Answer these questions before we continue with any further steps. Also, don't sell yourself short, I have faith in you that we can solve this issue. As you now know, changing parts at random will usually not solve anything but cause additional problems. Many people make a false assumption that the replacement part they have in hand is actually good. If you just change parts with a replacement part with no rhyme or reason, and the replacement part you have which you assume is good but is actually faulty, you just added a whole new variable to the equation with the system. It's always better to diagnose down to component level.
Posted by: ndfrigi Apr 15 2016, 12:57 AM
You seem to be all over the map with this one. What we know so far is that the fuel pump does turn on when you jump pin 88d on the dual relay to the positive battery post. So far this is good, but what was the pressure on the fuel rail? The next step is to verify that you have spark. I'm not sure if this was done or not?
Answer these questions before we continue with any further steps. Also, don't sell yourself short, I have faith in you that we can solve this issue. As you now know, changing parts at random will usually not solve anything but cause additional problems. Many people make a false assumption that the replacement part they have in hand is actually good. If you just change parts with a replacement part with no rhyme or reason, and the replacement part you have which you assume is good but is actually faulty, you just added a whole new variable to the equation with the system. It's always better to diagnose down to component level.
Thanks Timothy_nd28!
1. I did check the fuel pressure as mentioned on my Post #40. I'm getting 35-36 psi.
2. Spark: I checked the spark using an extra wire plug to the Negative side of the coil and with Negative of the battery while the wire plug from center of distributor cap was close to the fan shroud. And I do get a good spark coming from the coil. I forgot to mentioned, I don't get a spark from any of the spark plug wire on all cylinders. Or maybe the way I do is not right. I did try what you have suggested on one of your reply here and even using a timing light.
All original parts before my car broke down was installed back except I have to replaced spark plug wires because of some corrosion on it. The reason I did try swapping several parts one at a time is to check if my parts has some issue and base on the bowlsby tech details on what parts affects the ignition system.

http://bowlsby.net/914/Classic/TechNotebook.htm
thanks again!
Posted by: porschetub Apr 15 2016, 02:54 AM
Dont throw parts just install yourself a new engine
 or
or  not sure
Posted by: JOEPROPER Apr 15 2016, 06:14 AM
Check for consistent spark on all 4 wires AT the spark plugs. If you don't have that, then suspect secondary ignition problem. If you do have that, go to the injectors and check for b+ and - AT each fuel injector. If you have that, verify fuel pressure and volume is present at injectors. If you have that, verify fuel injector pulse (switching on and off) b+ wire. Go from there. Start with these basics before you get to technical. Hope this helps.
Posted by: The Cabinetmaker Apr 15 2016, 06:52 AM
Dont throw parts just install yourself a new engine
or not sure I was neither smoking or drinking. I was quoting "the logo". I did not write that. Get your facts straight. Maybe your the one smoking crack?
Posted by: ClayPerrine Apr 15 2016, 06:55 AM
I forgot to mentioned, I don't get a spark from any of the spark plug wire on all cylinders. Or maybe the way I do is not right. I did try what you have suggested on one of your reply here and even using a timing light.
Go to FLAPS and get a spark tester. It will clip on the engine and you can hook a plug wire to it. Use it to check for spark on each cylinder when the engine is cranking. Also hook it to the coil wire and check there.
If you have no spark at all, check to see if you have 12v at the coil positive wire. Then check the points to make sure they are opening.
If you have spark at the coil wire but not at the plug wires, replace the distributor cap and rotor.
Posted by: malcolm2 Apr 15 2016, 07:18 AM
I forgot to mentioned, I don't get a spark from any of the spark plug wire on all cylinders. Or maybe the way I do is not right. I did try what you have suggested on one of your reply here and even using a timing light.
Go to FLAPS and get a spark tester. It will clip on the engine and you can hook a plug wire to it. Use it to check for spark on each cylinder when the engine is cranking. Also hook it to the coil wire and check there.
If you have no spark at all, check to see if you have 12v at the coil positive wire. Then check the points to make sure they are opening.
If you have spark at the coil wire but not at the plug wires, replace the distributor cap and rotor.
I feel like the inductive timing lite is so much easier. And it is multi-functional... you can also check your timing...

Rotor and Cap... I was thinking that too. He said he had Coil spark (center of disty) but no Spark at any spark plug.
I have an 85 water cooled VW. It died one day. It is just a fun car, so I did not work on it for months.... I was so pissed after a few weeks of checking stuff, when I took the rotor cap off and the button was in 2 pieces. It is never the simple stuff with me, so I did not check that....

Posted by: timothy_nd28 Apr 15 2016, 07:44 AM
 with all above, especially with what Clark suggested. Time to break down and buy a timing light. It's a very useful tool to have in your garage. Fuel delivery has already been proven. The next step is verify that you have good spark on each cylinder. A timing light will aid you with this test.
Posted by: ndfrigi Apr 15 2016, 12:54 PM
Thanks for your inputs Joeproper, Clayperrine and Malcolm2!
* Distributor cap and rotor was swap with a new one but like what i mentioned, I installed back original parts just to make sure I'm not adding new problem.
* Positive side of Coil has 12 volts.
* Installed back the original ignitor after swapping with new ignitor and even with points/condenser.
Timothy_nd28:
I bought timing light after you have suggested it the last time I updated this thread.
Well, got a few time this morning and checked again if there is spark on the spark plug wires, NO spark using the timing light while cranking the engine and even used a manual starter switch so I can be at the rear and check if Number one spark plug wire with spark plug will have a spark against the fan shroud. Well No sparks.
Getting frustrated and almost giving up and thinking of removing all the FI parts and just install the 44 empi hpmx that I have. But offcourse FI is still the best.
Posted by: timothy_nd28 Apr 15 2016, 01:10 PM
Good, so you narrowed it down to no spark. Even if you did yank the FI stuff and installed carbs, the car will still not start.
Now we can narrow down to what's going on here. Let's retest that you are getting voltage to the ignition coil. Put a meter lead on the + side of the ignition coil and put the other meter lead to the negative battery post. Set your meter to DC volts, turn the ignition key to on, and observe that you are indeed reading 12 volts.
If you have 12vdc for that test, try this: Set your meter to ohms (resistance) and put one meter lead on the negative battery post. Remove and temporarily tape off the wire on the positive lug of the ignition coil. Take your other meter lead and connect it to the negative side of the ignition coil. Try starting the car, you should see the meter go from 0 ohms to infinite ohms. These readings should alternate rather fast, and your meter may not be able to keep up. If this is the case, you could swap out your digital multimeter with a old school analog meter. The analog meter will show the sweeps from infinity to 0 ohms. Or, you can simply put the car in 5th gear and slightly push the car while observing the meter. If you push the car slow enough, you will see the meter alternating from 0 to infinity ohms.
Posted by: timothy_nd28 Apr 15 2016, 01:26 PM
I'm sorry, the above test procedure will not work if you have a pointless electronic module installed
Posted by: JOEPROPER Apr 15 2016, 01:38 PM
What should work is an old fashion test light. KOEO b+ to pos side of coil. crank engine with test light touching neg side of coil. Light should flash. If all this pans out and still no spark from COIL, then replace the coil. If you have spark from coil into cap then suspect defective cap, rotor, wire set etc... cracked cap can cause crossfire, rotors could have carbon track to ground in distributor, coil wire coild be bad... You're almost home. I think... Hope this helps.
Posted by: ndfrigi Apr 15 2016, 01:50 PM
Good, so you narrowed it down to no spark. Even if you did yank the FI stuff and installed carbs, the car will still not start.
Now we can narrow down to what's going on here. Let's retest that you are getting voltage to the ignition coil. Put a meter lead on the + side of the ignition coil and put the other meter lead to the negative battery post. Set your meter to DC volts, turn the ignition key to on, and observe that you are indeed reading 12 volts.
[/b] YES checked again now and it has 12 volts.
If you have 12vdc for that test, try this: Set your meter to ohms (resistance) and put one meter lead on the negative battery post. Remove and temporarily tape off the wire on the positive lug of the ignition coil. Take your other meter lead and connect it to the negative side of the ignition coil. Try starting the car, you should see the meter go from 0 ohms to infinite ohms. These readings should alternate rather fast, and your meter may not be able to keep up. If this is the case, you could swap out your digital multimeter with a old school analog meter. The analog meter will show the sweeps from infinity to 0 ohms. Or, you can simply put the car in 5th gear and slightly push the car while observing the meter. If you push the car slow enough, you will see the meter alternating from 0 to infinity ohms.
[/b]Removed wires from positive coil side and taped those wires. Ignition was still on OFF position but Negative side of battery with Negative side of Coil has a Continuity already and same thing when ignition ON it also has continuity with some needle movement towards higher continuity while cranking.
Posted by: timothy_nd28 Apr 15 2016, 01:51 PM
, a ton easier. Find a 12volt light bulb and attach with jumper wires to the ignition coil + and - terminals.
Posted by: ndfrigi Apr 15 2016, 01:53 PM
What should work is an old fashion test light. KOEO b+ to pos side of coil. crank engine with test light touching neg side of coil. Light should flash. If all this pans out and still no spark from COIL, then replace the coil. If you have spark from coil into cap then suspect defective cap, rotor, wire set etc... cracked cap can cause crossfire, rotors could have carbon track to ground in distributor, coil wire coild be bad... You're almost home. I think... Hope this helps.
Thanks again Joeproper!
Posted by: ndfrigi Apr 15 2016, 01:55 PM
, a ton easier. Find a 12volt light bulb and attach with jumper wires to the ignition coil + and - terminals.Okay I will try this since I just bought test light meter. Thanks Joeproper and Timothy_nd28!
Posted by: ndfrigi Apr 15 2016, 02:09 PM
, a ton easier. Find a 12volt light bulb and attach with jumper wires to the ignition coil + and - terminals.Okay I will try this since I just bought test light meter. Thanks Joeproper and Timothy_nd28!
Update: Used test light and attached one wire clip from test light to Positive of coil and touching Negative side of coil from other wire of test light, Not lighting while cranking. It lights when I touched fan shroud even not cranking the engine (to make sure test light is ok).
Posted by: ClayPerrine Apr 15 2016, 02:54 PM
If the light doesn't flash when jumping the positive side of the coil to the negative side, then take the ignitor out of the distributor and put in a set of points and a condenser. Then see if you have spark.
Posted by: ndfrigi Apr 15 2016, 03:11 PM
If the light doesn't flash when jumping the positive side of the coil to the negative side, then take the ignitor out of the distributor and put in a set of points and a condenser. Then see if you have spark.
hi again Clay,
i did swapping of new points/condenser and even with new ignitor but no spark also.
Installed back the original ignitor. questions: on a 1.8 ljet, to install back to original points. do i just replace ignitor with the points and condenser and green wire goes to negative side of coil? unlike ignitor has two wires 1 for positive and 1 negative of coil. I also noticed some distributor has this 2 prong plug on the side of the distributor. Is that only for djet and not for ljet?
Posted by: JOEPROPER Apr 15 2016, 04:17 PM
, a ton easier. Find a 12volt light bulb and attach with jumper wires to the ignition coil + and - terminals.Okay I will try this since I just bought test light meter. Thanks Joeproper and Timothy_nd28!
Update: Used test light and attached one wire clip from test light to Positive of coil and touching Negative side of coil from other wire of test light, Not lighting while cranking. It lights when I touched fan shroud even not cranking the engine (to make sure test light is ok).
test light alligator clip to neg battery terminal. Key on. Pos side of coil should make test light light. Crank engine, alligator clip still on neg battery terminal pointy end to neg coil. flash or no flash?
Posted by: ndfrigi Apr 15 2016, 04:27 PM
, a ton easier. Find a 12volt light bulb and attach with jumper wires to the ignition coil + and - terminals.Okay I will try this since I just bought test light meter. Thanks Joeproper and Timothy_nd28!
Update: Used test light and attached one wire clip from test light to Positive of coil and touching Negative side of coil from other wire of test light, Not lighting while cranking. It lights when I touched fan shroud even not cranking the engine (to make sure test light is ok).
test light alligator clip to neg battery terminal. Key on. Pos side of coil should make test light light.[/b] Light ON
Crank engine, alligator clip still on neg battery terminal pointy end to neg coil. flash or no flash? Light ON even without cranking the engine.
Posted by: JOEPROPER Apr 15 2016, 04:47 PM
, a ton easier. Find a 12volt light bulb and attach with jumper wires to the ignition coil + and - terminals.Okay I will try this since I just bought test light meter. Thanks Joeproper and Timothy_nd28!
Update: Used test light and attached one wire clip from test light to Positive of coil and touching Negative side of coil from other wire of test light, Not lighting while cranking. It lights when I touched fan shroud even not cranking the engine (to make sure test light is ok).
test light alligator clip to neg battery terminal. Key on. Pos side of coil should make test light light.[/b] Light ON
Crank engine, alligator clip still on neg battery terminal pointy end to neg coil. flash or no flash? Light ON even without cranking the engine.
When testing b- side of coil you need to crank the engine. Light should flash... If it doesn't, then you have a trigger problem ie points, module. If it flashes and no spark. replace the coil.
Posted by: JOEPROPER Apr 15 2016, 04:49 PM
You should probably always have an extra coil and extra set of points and condenser if you're going to own and drive an old car.
Posted by: ndfrigi Apr 15 2016, 05:05 PM
You should probably always have an extra coil and extra set of points and condenser if you're going to own and drive an old car.
I do have new points and condenser in hand and even a new Flame thrower 3 ohms coil (actually from my 73 project car).
When testing b- side of coil you need to crank the engine. Light should flash... If it doesn't, then you have a trigger problem ie points, module. If it flashes and no spark. replace the coil.
I tested it again by cranking the engine. The test light is already Lighted even without cranking it and when I did crank the engine, the test Light is ON all the time but it just dimmed a little bit. Did try also push the car forward and back on a gear to see if make the test slower. Should the test light turns ON even not cranking it yet just with ignition On?
Posted by: timothy_nd28 Apr 15 2016, 06:49 PM
I mentioned for a test procedure to remove the positive wires on the ignition coil and tape them off, but then decided to abort that test procedure. Did you put the wires back on the positive terminal on the ignition coil?
Also, some inconsistent results you are posting. You said in one post that the test light never lit, unless you touched one end of the test light to the engine shroud. In another post, you say that the light stays on continuously, but dims as you crank.
Time to redo the test one more time. All wires need to be on the ignition coil. The test light should have two wires. Connect one wire to the ignition coils positive terminal. Connect the other wire to the ignition coils negative terminal. Turn the ignition switch to on, put the car in 5th gear, and push the car slowly. You should see flashing with the light, if things are working correctly.
I think it's also time for a picture. Remove the distributor cap and rotor, take a pic and post it on here.
Posted by: ndfrigi Apr 15 2016, 07:54 PM
I mentioned for a test procedure to remove the positive wires on the ignition coil and tape them off, but then decided to abort that test procedure. Did you put the wires back on the positive terminal on the ignition coil?
Also, some inconsistent results you are posting. You said in one post that the test light never lit, unless you touched one end of the test light to the engine shroud. In another post, you say that the light stays on continuously, but dims as you crank.
Time to redo the test one more time. All wires need to be on the ignition coil. The test light should have two wires. Connect one wire to the ignition coils positive terminal. Connect the other wire to the ignition coils negative terminal. Turn the ignition switch to on, put the car in 5th gear, and push the car slowly. You should see flashing with the light, if things are working correctly.
I think it's also time for a picture. Remove the distributor cap and rotor, take a pic and post it on here.
Looks like the ignitor is damaged maybe it is the main issue at first or maybe it broke during my several test when I turn on the ignition.
Well, Test light is not flashing when trying moved the car on 5th gear while test light is attached to positive and the other to negative side of coil. If i touched the fan shroud again instead of the negative of coil, the test light flashed.
Posted by: timothy_nd28 Apr 15 2016, 07:58 PM
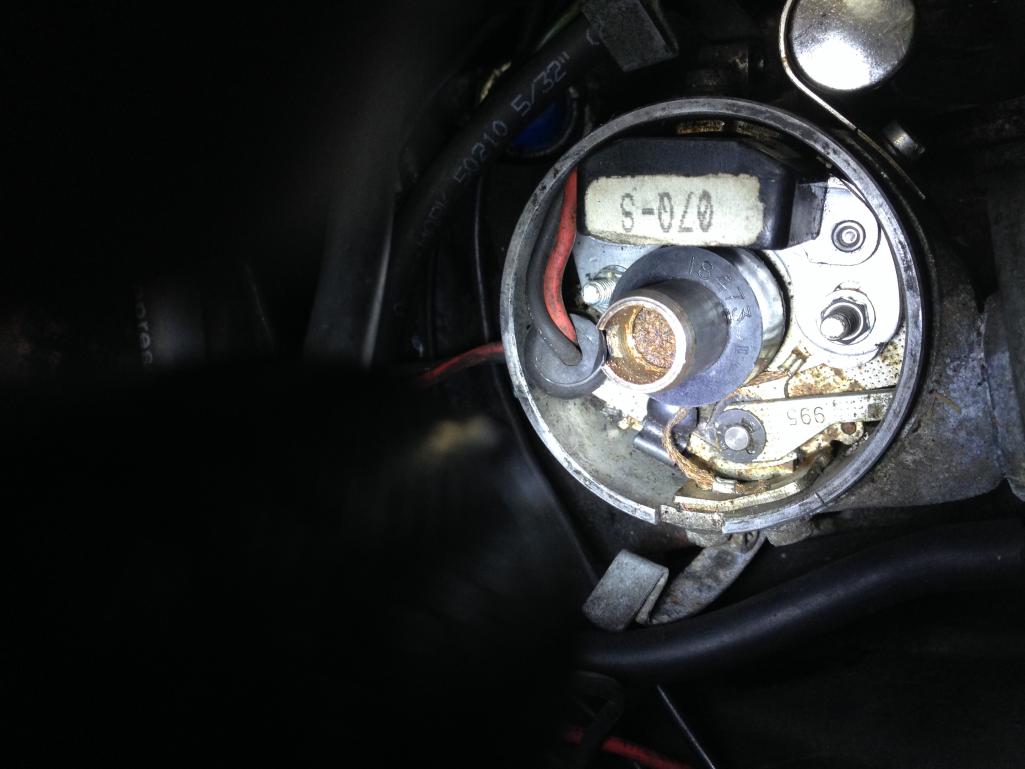
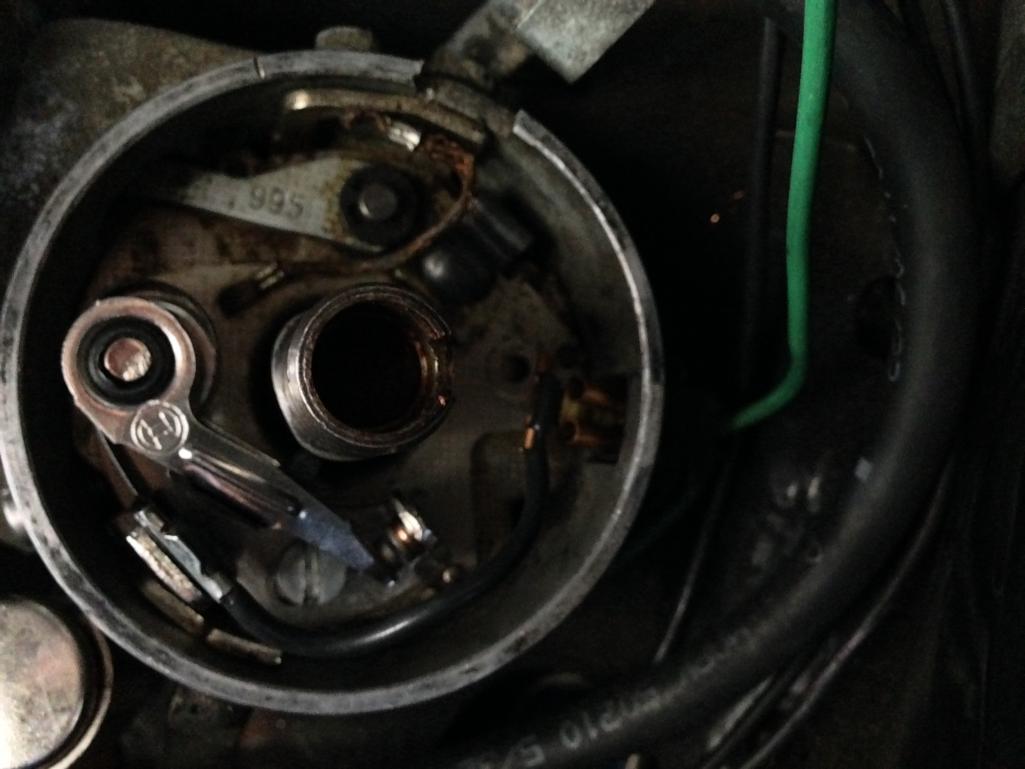
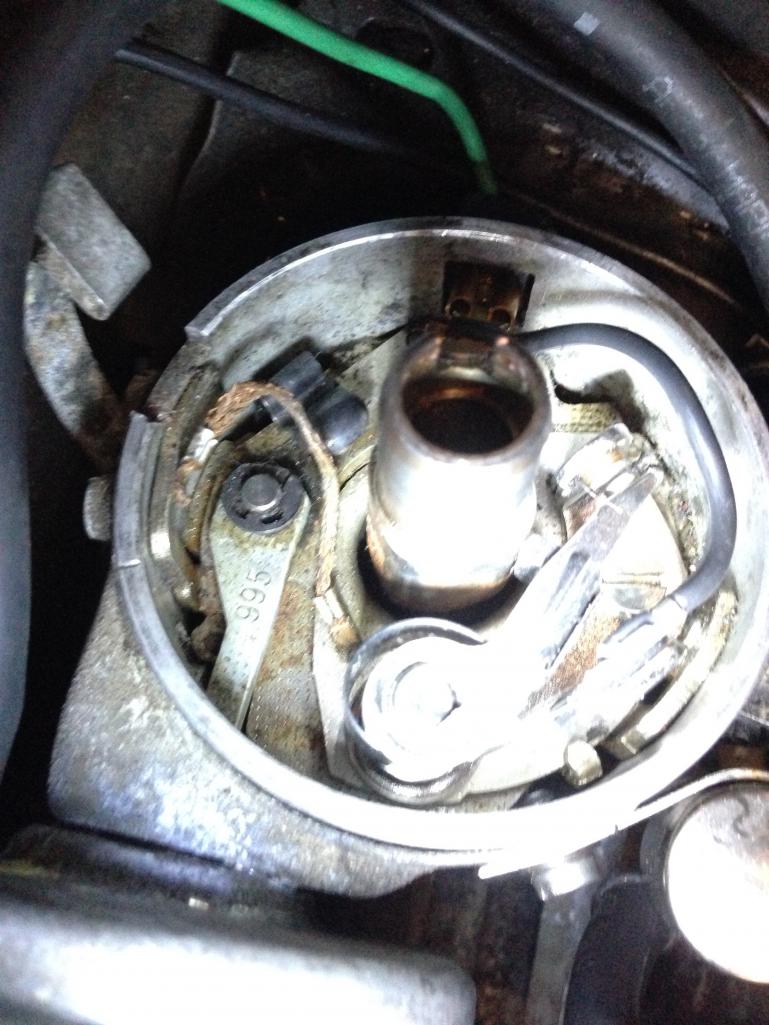
Does the vacuum advance lever, the part that's labeled 995, move freely?
Time to yank out the electronic module. Do you have a new set of mechanical points?
Posted by: ndfrigi Apr 15 2016, 08:41 PM
Posted by: ndfrigi Apr 15 2016, 08:43 PM
Does the vacuum advance lever, the part that's labeled 995, move freely?
Time to yank out the electronic module. Do you have a new set of mechanical points?
Yes Tim it moves freely and that wire is ok and has continuity from the distributor body and to the lower part that moves for the vacuum.
Posted by: ClayPerrine Apr 16 2016, 06:59 AM
Take the cap off and crank the car to see if the distributor actually spins.
If the drive is missing in the case half, it won't spin.
Posted by: ndfrigi Apr 16 2016, 09:11 AM
Take the cap off and crank the car to see if the distributor actually spins.
If the drive is missing in the case half, it won't spin.
Yes Clay, when I installed a new points last week to adjust the gap, I was able to make the rotor turns by cranking and by moving the car shifted on a gear. Since Tim suggested to install a points for the next step being suggested, i will be able to check that again anytime today. Just wondering, since i didn't get the test light flash yesterday when ignition ON and used the test light on the positive and negative of coil, do you think something wrong with those wires attached on negative of coil? because if i touched the fan shroud from the test light, i get some grounds and make the test light flash.
Posted by: ndfrigi Apr 16 2016, 11:57 AM
Take the cap off and crank the car to see if the distributor actually spins.
If the drive is missing in the case half, it won't spin.
Yes Clay, when I installed a new points last week to adjust the gap, I was able to make the rotor turns by cranking and by moving the car shifted on a gear. Since Tim suggested to install a points for the next step being suggested, i will be able to check that again anytime today. Just wondering, since i didn't get the test light flash yesterday when ignition ON and used the test light on the positive and negative of coil, do you think something wrong with those wires attached on negative of coil? because if i touched the fan shroud from the test light, i get some grounds and make the test light flash.
Hi Clay and Tim
I was able to install new points and condenser. Same result. Ignition ON, test light clip wire side attached to the positive of coil and the other test light wire to the negative of coil. Test light was ON all the time when cranking or on 5th gear pushing the car. Rotor rotates when pushing the car also on 5th gear.
Posted by: JOEPROPER Apr 16 2016, 12:47 PM
Take the cap off and crank the car to see if the distributor actually spins.
If the drive is missing in the case half, it won't spin.
Yes Clay, when I installed a new points last week to adjust the gap, I was able to make the rotor turns by cranking and by moving the car shifted on a gear. Since Tim suggested to install a points for the next step being suggested, i will be able to check that again anytime today. Just wondering, since i didn't get the test light flash yesterday when ignition ON and used the test light on the positive and negative of coil, do you think something wrong with those wires attached on negative of coil? because if i touched the fan shroud from the test light, i get some grounds and make the test light flash.
Hi Clay and Tim
I was able to install new points and condenser. Same result. Ignition ON, test light clip wire side attached to the positive of coil and the other test light wire to the negative of coil. Test light was ON all the time when cranking or on 5th gear pushing the car. Rotor rotates when pushing the car also on 5th gear.
Points open and close properly? Connection at points to neg coil is good? Engine is grounded properly? Condenser is grounded? You're missing a switching ground at the neg side of the coil. Double check all connections mentioned. Double check points gap.
Posted by: ndfrigi Apr 16 2016, 02:27 PM
Take the cap off and crank the car to see if the distributor actually spins.
If the drive is missing in the case half, it won't spin.
Yes Clay, when I installed a new points last week to adjust the gap, I was able to make the rotor turns by cranking and by moving the car shifted on a gear. Since Tim suggested to install a points for the next step being suggested, i will be able to check that again anytime today. Just wondering, since i didn't get the test light flash yesterday when ignition ON and used the test light on the positive and negative of coil, do you think something wrong with those wires attached on negative of coil? because if i touched the fan shroud from the test light, i get some grounds and make the test light flash.
Hi Clay and Tim
I was able to install new points and condenser. Same result. Ignition ON, test light clip wire side attached to the positive of coil and the other test light wire to the negative of coil. Test light was ON all the time when cranking or on 5th gear pushing the car. Rotor rotates when pushing the car also on 5th gear.
Points open and close properly? Connection at points to neg coil is good? Engine is grounded properly? Condenser is grounded? You're missing a switching ground at the neg side of the coil. Double check all connections mentioned. Double check points gap.
1. Points open on all four corner of the rotor mount with .4 gap
2. Points connection to negative of coil - good continuity
3. Engine shroud, tins and distributor body has good continuity with body grounds
4. point body to condenser to negetive coil- good continuity
5. what is that missing switching ground?
I just noticed, is there suppose to be a continuity from the negative of coil or body of points against the middle (where rotor plug) that rotates even the points is open? and even the two contacts of the points has continuity even it is wide open?
Posted by: ndfrigi Apr 16 2016, 02:30 PM
Posted by: marksteinhilber Apr 16 2016, 02:50 PM
So you might have a bad ground inside the distributor, that braided wire
Posted by: marksteinhilber Apr 16 2016, 03:01 PM
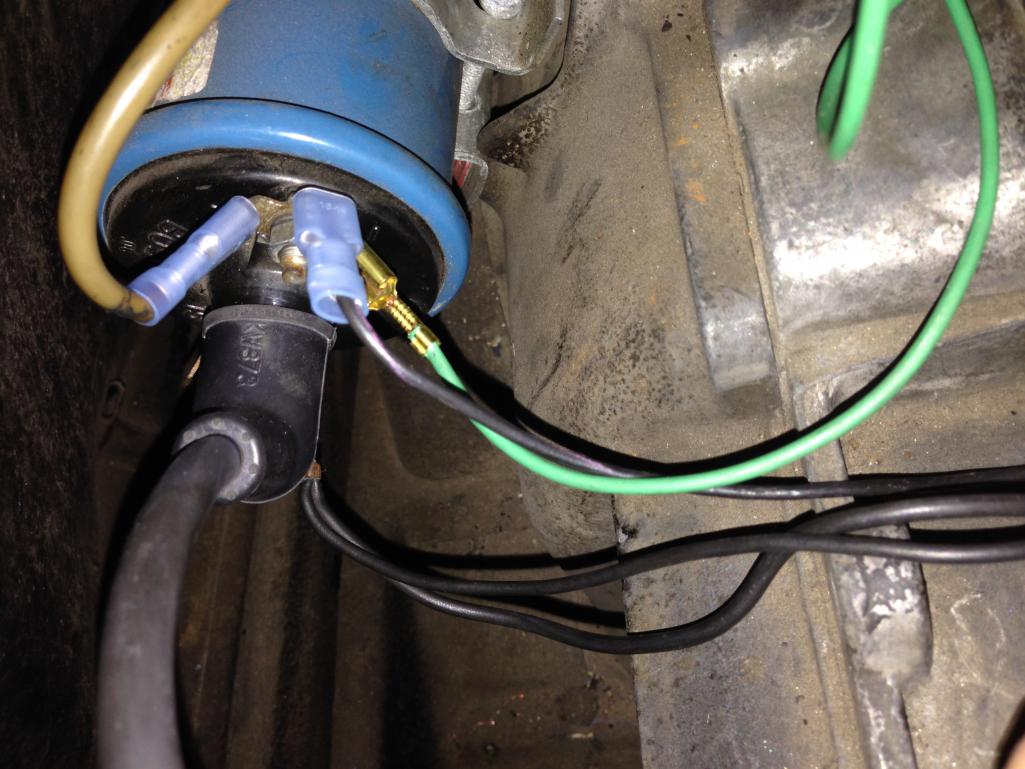
[attachmentid=550921]
Earlier I thought you said you had spark from the coil wire which would indicate the points were working properly. From there, a good rotor and cap would get spark to each plug wire. An inductive timing light put on each plug wire would confirm spark going to each plug wire. Various tests with plug testors, or plugs removed would allow you check for spark. If these aren't the problem, then you are back looking for spray from the injectors. the coil signal also needs to get to the ECU for the injectors to fire.
An inductive timing light and a dwell meter or multimeter with capability and the instructions on how to check dwell for a 4 cylinder really make it easier to troubleshoot lack of spark.
Posted by: ClayPerrine Apr 16 2016, 03:23 PM
Where does the big yellow wire on the negative side of the coil go? It shouldn't be there.
Posted by: ndfrigi Apr 16 2016, 03:27 PM
Where does the big yellow wire on the negative side of the coil go? It shouldn't be there.
It is more on a light brown and goes to the wiring harness along with the wires for ecu, dual relay.

Posted by: timothy_nd28 Apr 16 2016, 03:50 PM
Remove all wires on the negative terminal of the ignition coil except that green wire. Try the test again
Posted by: ndfrigi Apr 16 2016, 05:01 PM
Remove all wires on the negative terminal of the ignition coil except that green wire. Try the test again
Green wire only from points/condenser connected to the Negative of coil. test same result.
Just to clarrify, is the test light flash means, total ON and OFF? When engine cranking, test light is ON at all times with just a little dimming (i assumed it dims a little bit just because the battery is not charging). And on 5th gear and pushing the car, the light is full ON not even dimming.
Posted by: timothy_nd28 Apr 16 2016, 05:26 PM
With the voltmeter, attach one meter lead to the circled area in the picture. Take the other meter lead and connect it to the positive battery post. Set the meter for DC, and make sure the points are open, like you have it in the picture. You should have 0 volts DC, 
Posted by: ndfrigi Apr 16 2016, 05:34 PM
With the voltmeter, attach one meter lead to the circled area in the picture. Take the other meter lead and connect it to the positive battery post. Set the meter for DC, and make sure the points are open, like you have it in the picture. You should have 0 volts DC,
it has around 12 volts both Open and close at the contact point and that is ignition OFF. I did checked that circled you showed and with battery post has a continuity also.
Posted by: timothy_nd28 Apr 16 2016, 05:39 PM
K, unplug the green wire at the negative terminal on ignition coil. Redo the test with the wire off.
Posted by: ndfrigi Apr 16 2016, 05:43 PM
K, unplug the green wire at the negative terminal on ignition coil. Redo the test with the wire off.
same Tim with 12 volts
Posted by: Rand Apr 16 2016, 07:25 PM
An aside...
I get all the comments about using a timing light to check for spark, but it's so simple to test spark without any special tools. Just pull a plug wire, stick a spare plug into it, ground the threads to the engine, and watch the spark color on the plug while cranking. (If you don't have a buddy to help, pick up a remote momentary switch - super cheap at HF or parts house - a push button with leads and alligator clips.)
Sometimes there's more than just knowing IF there is spark... You need to look at the characteristics of the spark (color). It should be a nice blueish white arc that makes you want to flinch as it snaps, vs a weak yellow color. (Which is what you get if that braided ground strap between the dizzy plates isn't doing it's job right, or if there's another weakness in the ignition.)
Posted by: timothy_nd28 Apr 16 2016, 09:55 PM
Just to make sure, you have a meter lead on the positive battery post, and you have the other meter lead in the red circle of that picture, and you are measuring 12vdc (with the points open)?
You then re performed the test with the green wire pulled off the negative terminal of the ignition coil, and you still read 12volts?
Try this, same test, but remove the condenser coil, make sure it doesn't touch anything and measure again as described.
Something is shorted out, it should be a open circuit. We just need to narrow it down (almost there) 
Posted by: Rand Apr 17 2016, 12:08 AM
Just to make sure, you have a meter lead on the positive battery post, and you have the other meter lead in the red circle of that picture, and you are measuring 12vdc (with the points open)?
You then re performed the test with the green wire pulled off the negative terminal of the ignition coil, and you still read 12volts?
Try this, same test, but remove the condenser coil, make sure it doesn't touch anything and measure again as described.
Something is shorted out, it should be a open circuit. We just need to narrow it down (almost there)
Or you can check spark? Not eveyone gets meter post 12v lobes, red circles....
Just please check your spark so simply as I suggested? This is not rocket science. But it is upon you to report back on results. Please do.
Posted by: ndfrigi Apr 17 2016, 12:16 AM
Just to make sure, you have a meter lead on the positive battery post, and you have the other meter lead in the red circle of that picture, and you are measuring 12vdc (with the points open)?
You then re performed the test with the green wire pulled off the negative terminal of the ignition coil, and you still read 12volts?
Try this, same test, but remove the condenser coil, make sure it doesn't touch anything and measure again as described.
Something is shorted out, it should be a open circuit. We just need to narrow it down (almost there)
Or you can check spark? Not eveyone gets meter post 12v lobes, red circles....
Just please check your spark so simply as I suggested? This is not rocket science. But it is upon you to report back on results. Please do.
Hi Rand, thanks also for your help! I do used manual starter switch while doing various testing. We did several testing already to get spark. Only the spark I can get is from the center coil plug wire but not from the spark plug wires.
Posted by: ndfrigi Apr 17 2016, 12:23 AM
Just to make sure, you have a meter lead on the positive battery post, and you have the other meter lead in the red circle of that picture, and you are measuring 12vdc (with the points open)? Reply: Yes Tim
You then re performed the test with the green wire pulled off the negative terminal of the ignition coil, and you still read 12volts? Reply: Yes here too
Try this, same test, but remove the condenser coil, make sure it doesn't touch anything and measure again as described. Reply: I will check on this tomorrow afternoon (sunday). And to confirm, i will unplug the condenser from the contact point then re-test again by attaching the meter lead to the contact point wire and the other meter wire to the + battery post.
Something is shorted out, it should be a open circuit. We just need to narrow it down (almost there)
Reply: Yes Tim it looks something is shorted (I believed it is just one wire is the culprit. Hope we can trace that.Please check all replies above in BOLD letters.
To refreshed what had happened when the car died. Heading home from Cars and Coffee last February and less than 3 miles to home. At stop light, the rpm was bouncing between 2,500 and 3,000 but the actual idle is normal (not really revving around 2,500 rpm). And on green light, just about to move, the engine died. And since then, I can only get the engine crank but does not make it run even up to this point after several test and swapping parts.
Posted by: Rand Apr 17 2016, 01:36 AM
Surely this is useful to the other experts. Don't you think this narrows the whole complicated thread down to a simple thing? Dizzy to plugs is not hard to follow. Somebody swap a dizzy for our friend and nip this. It's not rocket science.
Posted by: ClayPerrine Apr 17 2016, 02:51 PM
If you are getting spark at the coil wire but not at the plugs, either the button in the middle of the distributor is broken off, or the rotor has burned through and is grounding to the distributor shaft.
Put a cap and rotor on it and try it again.
Posted by: timothy_nd28 Apr 17 2016, 08:15 PM
There is a 3rd option not listed. He mentioned in post 43 that he was only getting spark if he manually grounded the negative terminal of the ignition coil and only getting spark from the the HT lead off the ignition coil.
I was trying to chase down a problem with why the points are continuously in a grounded state, which will not allow the ignition coil to fire.
Posted by: ndfrigi Apr 17 2016, 09:18 PM
Update:
Last night, Tim gave me his phone number and we started exchanging text messages to make the process more faster.
Well, after several test and different approached. This afternoon, Tim and I able to figure out that the New Contact Point is defective. This contact point has a resistance on both points even it is wide open. Wow this new defective points had given us especially Tim a headache why the Meter test we are doing does not make sense.
So, we decided to call it a day until I able to buy another new contact points. While preparing to remove all the tools and close the garage, I realized if the 1.7 core engine I have in my backyard has a contact point just to make comparison with it. Well the contact points from the core engine looks okay and no resistance on the points when it is open. I told Tim that i will install the used point and test the spark plug wire for a spark using timing light. When doing the first spark plug test on spark, I was at the side of the car while using the manual starter, the engine almost about to rev/run but the battery need to be charge. So after few minutes of charging the battery, I tried starting the engine, The RESULT: engine did run but wants to have a high rpm to have a good running engine and if I remove my foot on the accelerator, the engine will have a very rough idle and then dies. The used contact point seems cannot make the gap to exactly .4. the filler gauge does rub too much in between points. Tomorrow I will buy another contact point and update you guys tomorrow if the engine will do improve the idle and if I should need to adjust the timing now that I am using points instead of ignitor that I have before.
Thanks again to Tim, Clay, Joeproper, Mark and to all the other members who did share their knowledge and patience following this thread. I forgot to mentioned, thanks also to Abe and Bob who lend me their Ljet parts for me to use during the diagnosing which part has to be replaced. If not with those parts, maybe I have bought so much used Ljet parts like resister, dual relay, ECU, thermo time switch and cold start valve. That is what a 914world member is! Supportive and helpfull in many way!
God Bless!
Posted by: ndfrigi Apr 20 2016, 02:47 AM
Update Sept. 19, 2016
Installed new points but idle still rough on low rpm. I was thinking maybe the condenser went bad when I was using a new points that is defective. Since I was not able to buy new condenser along with the points (Autozone does not have available condenser when I got the points), I installed a used ignitor (not the original ignitor when the car died), still same rough idle. Tim and I had a several text messages for guiding me on a step by step in checking different items.
Well, after several test run and wire test. We noticed that when we removed the fuel injector plug wires, One at a time, #1, #2 and #4 will make the idle lower and engine will die but when we removed #3 injector wire plug, there is no change in idle. So, I did replace #3 fuel injector from my borrowed FI parts (Thanks Abe and Bob for your FI parts you lend me for my swap testing of parts), and my idle is back to normal.
Moral lesson with my experienced on this Ignition issue:
1. Make sure to double check the part(s) you are using is working when replacing specific part. The new points I was using since the beginning of this thread was defective. Doing several test when in fact the initial parts replaced was not working.
2. New Timing Light: well after several test using this timing light since it was suggested that I should have one to make the test easier. Well sad, the new timing light is also defective. Good Pepboys replaced it yesterday and when I used the new timing light, I was able to verify the sparks from all spark plug wires and it makes the job easier.
Thank you again to all who shared their ideas and knowledge, especially to Tim who really spent a lot of time here and ended up using our phone to make the communication easier and faster. Sending pictures and video to Tim makes the job easier too!
Posted by: malcolm2 Apr 20 2016, 06:44 AM

Tim is not one to give up. I think he worked with me 'til 2am one time. Keep up the good work Tim. On to the next one. 
Posted by: timothy_nd28 Apr 26 2016, 11:57 AM
Another LJet up and running, back on the street where it belongs 
Even new replacement parts can't be trusted which is why due diligence is needed when troubleshooting any system. Of course none of this is "rocket science" just replacing parts because it makes you feel better is like a Virologist predicting the correct seasonal flu vaccine.
I'm glad that I kept you from replacing the whole distributor merely because your new mechanical ignition points where shorted (which was a freak of nature all in itself). The shame in all of this is that we had to take our conversation off line because it seemed to be annoying to some.
There seems to be a lack of troubleshooting procedures for the Ljet systems on this forum. Every successful diagnosis is valuable for future peeps searching and trying to find how to fix their own car vs hiring their local mechanic.
I have received many personal PM's from members thanking me for fixing their Ljet 914s, even though I have never spoken with any of them. They say it was all thanks to the old threads they had found through the search feature.
I would never berate other rocket scientist from chiming in with their insight when collectively trying to solve a problem, I would only expect the same courtesy in return.
Carry on with the plan of the day
Posted by: ThePaintedMan Apr 26 2016, 12:33 PM
Haven't really check in here, but the result is the same as it usually is: TIM IS A GREAT GUY! And smart as hell to boot.
Glad the OP got the issue resolved. Congrats!
Powered by Invision Power Board (http://www.invisionboard.com)
© Invision Power Services (http://www.invisionpower.com)