Printable Version of Topic
Click here to view this topic in its original format
914World.com _ 914World Garage _ Tail to Side Shift Conversion Rookie
Posted by: Jameel Mar 12 2016, 08:25 AM
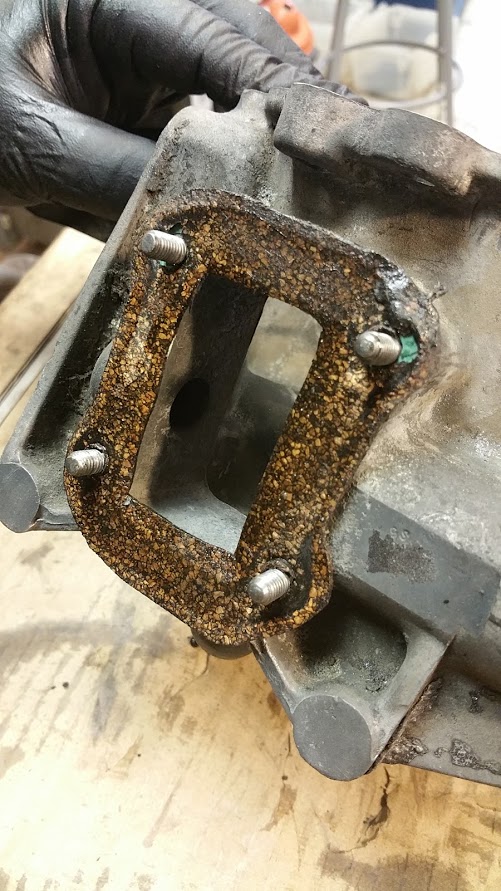
A few days ago I decided to take a closer look at my shift linkage, since my car has some serious issues. Took that rear cover off and found this: https://youtu.be/gtFysPUBIO0
I'm no engineer, but that looks nasty to me. I decided to fix it right.
So yesterday I made a trip to 914 Limited and was treated quite well by Brad and Mike. Brad and I had exchanged a couple emails and calls and since I'm less than 3 hours from Peoria, I decided to kill two birds and simply drive in. Brad was kind enough to let me drive his daily 914 to see what a side shifter felt like. Took me about 1/3 mile to decide I would do the conversion. Brad and Mike walked me through a few of the finer points of the process, but this being my first time opening up a transaxle, I figured I'd try and document as much as possible.
I've done a bunch of searches here (and at Pelican) but have not found much in terms of step-by-step. Brad's instructions were provided, and he invited me to call anytime for support, but I'll be taking pics anyway, so figured I'd start a thread.
Can anyone point me to a thread where someone has documented the process? The best I've found so far is mikedsilva's, http://www.914world.com/bbs2/index.php?showtopic=261596&hl=side+shift+conversion I could not find others.
Sort of off topic too, but is there any way to get rid of the huge smileys window when composing a post? My composition pane is just tiny, like 1/4 the size of the smileys pane.
Posted by: Spoke Mar 12 2016, 09:12 AM
Dr Evil here has a DVD on how to rebuild the 901 transmission. Send him a PM here or on Facebook.
https://www.facebook.com/EvilwerksLLC
Posted by: The Cabinetmaker Mar 12 2016, 12:42 PM
As for the smilie thing, just use the fast reply button at the bottom.
Posted by: 396 Mar 12 2016, 12:44 PM

A few days ago I decided to take a closer look at my shift linkage, since my car has some serious issues. Took that rear cover off and found this: https://youtu.be/gtFysPUBIO0
I'm no engineer, but that looks nasty to me. I decided to fix it right.
So yesterday I made a trip to 914 Limited and was treated quite well by Brad and Mike. Brad and I had exchanged a couple emails and calls and since I'm less than 3 hours from Peoria, I decided to kill two birds and simply drive in. Brad was kind enough to let me drive his daily 914 to see what a side shifter felt like. Took me about 1/3 mile to decide I would do the conversion. Brad and Mike walked me through a few of the finer points of the process, but this being my first time opening up a transaxle, I figured I'd try and document as much as possible.
I've done a bunch of searches here (and at Pelican) but have not found much in terms of step-by-step. Brad's instructions were provided, and he invited me to call anytime for support, but I'll be taking pics anyway, so figured I'd start a thread.
Can anyone point me to a thread where someone has documented the process? The best I've found so far is mikedsilva's, http://www.914world.com/bbs2/index.php?showtopic=261596&hl=side+shift+conversion I could not find others.
Sort of off topic too, but is there any way to get rid of the huge smileys window when composing a post? My composition pane is just tiny, like 1/4 the size of the smileys pane.
You have all the information on mikedsilva"s tread. It's not rocket science.....you can do it.
Posted by: jcd914 Mar 12 2016, 06:10 PM
Sort of off topic too, but is there any way to get rid of the huge smileys window when composing a post? My composition pane is just tiny, like 1/4 the size of the smileys pane.
Use you mouse to grab the bottom right corner of the of the composition pane and drag down and out to make the pane larger.
The is also a "+" and a "-" button at the bottom left corner of the composition pane that will lengthen or shorten the pane.
Jim
Posted by: stugray Mar 12 2016, 07:06 PM
One trick:
You have to remove the engine bar to put the SS rod in the center tunnel.
So if the engine is out, put that rod in before you put the engine back in.
If the engine is in, you have to jack up the engine and remove the bar.
And if the car was originally a TS and you are converting to a SS you either need to buy the special bushing from PP, or tangerine racing has a firewall bushing that will work instead (and is better).
Posted by: Jameel Mar 12 2016, 08:16 PM
Thanks everybody. I don't have any doubts that I'll be able to figure it out. Just hoping to flatten the learning curve a little. Stu, I'm fairly certain Brad included everything I need to do the conversion. I'll keep your sequence in mind. I'm not planning on dropping the engine to do the conversion. I'll eventually drop the engine I suppose, but for now I just want to get the car shifting sweeter so I can drive around this summer and enjoy it while I learn the ropes.
Posted by: Jameel Mar 17 2016, 07:56 PM
Took the day off to work on this. I spent the last couple days looking for step photos of this process, but came up empty, so I've decided to make my own step photos with explanations for complete neophytes (me of course) Keep in mind this is my first time doing this, or working on a 914 at all for that matter. Feel free to laugh, ridicule, whatever. I'm ready.
First task, remove the muffler. I need a new bracket, obviously...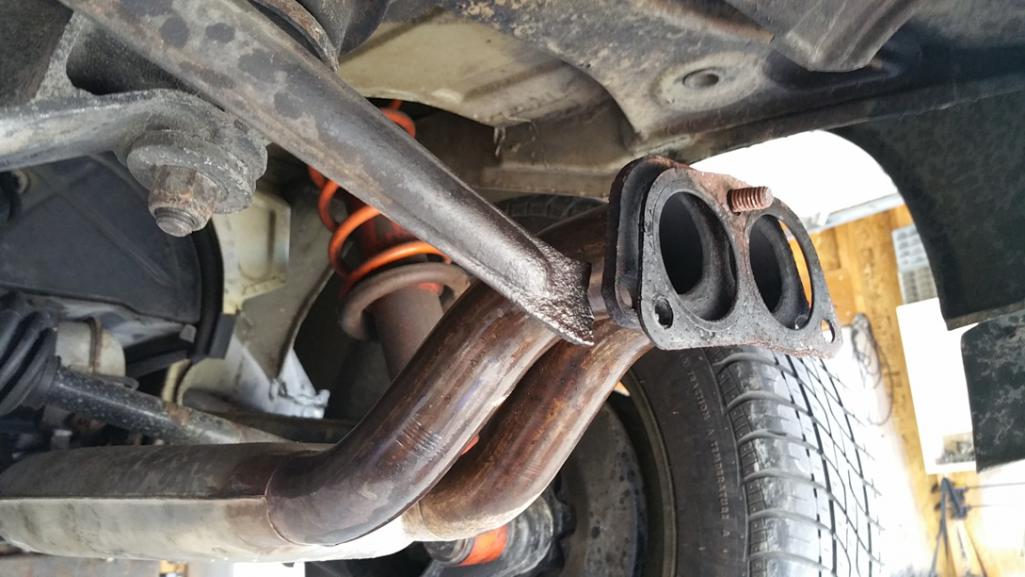
Next up, remove the tail shifter components from the back of the tranny all the way up to the shifter. Removing these two bolts is about all that can be done before venturing into the tunnel up front. 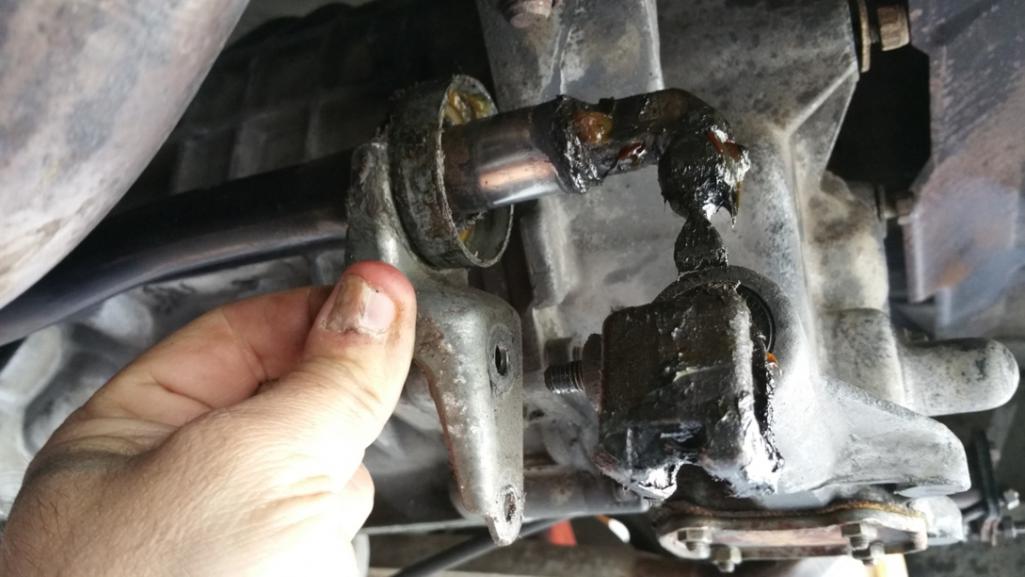
After pulling the center seat out (it just lifts up) I unscrewed the plastic tray underneath to reveal tunnel. I peeled back the vinyl to get at the little access door by the firewall. 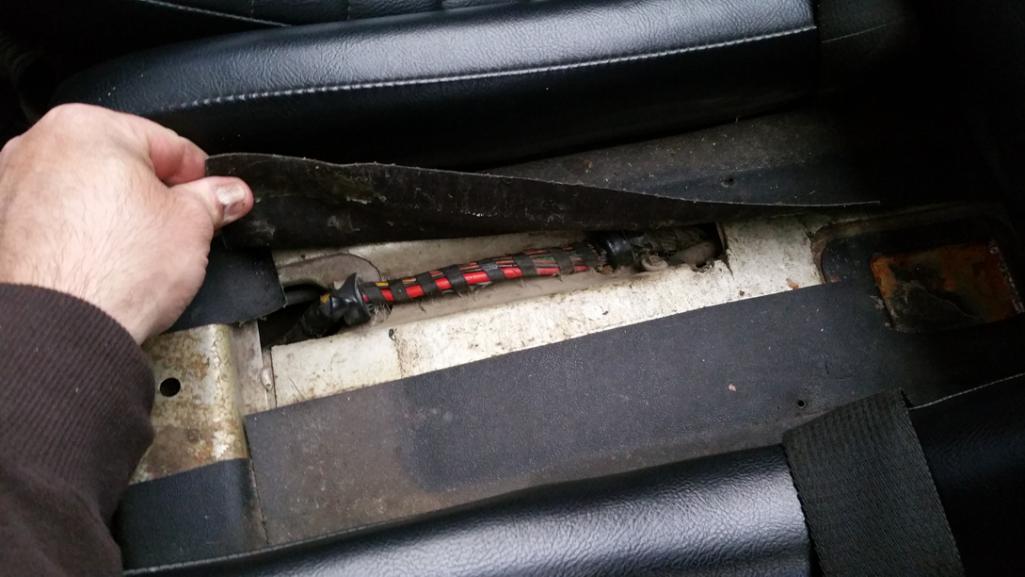
I quickly realized I would need tor remove all the seats to access the tunnel properly. Driver's seat comes out easy enough (it has that little tab to press down on the driver's side--like my 69 bug, only on the proper side!) Passenger fixed seat came out with a few nuts and screws under the bottom seat cushion and at the bottom of the back, then I slide it down and forward to remove. I unscrewed the engine lid release knob too before pulling the seat out. 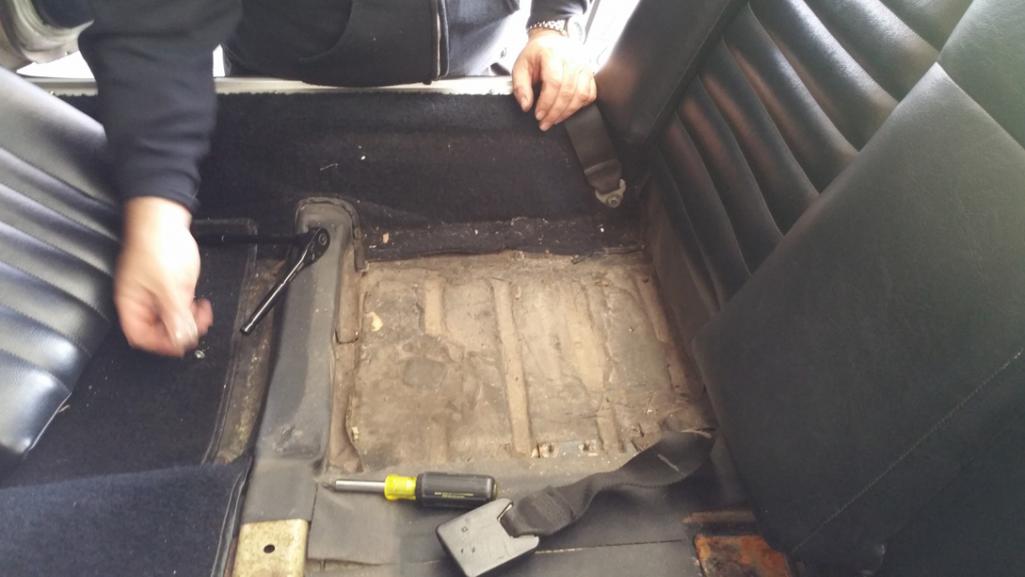
I also removed the light, and disconnected the wires before pulling the seat. 
With the seat out I realized I'll need to redo the rear window rubber before I put it back. 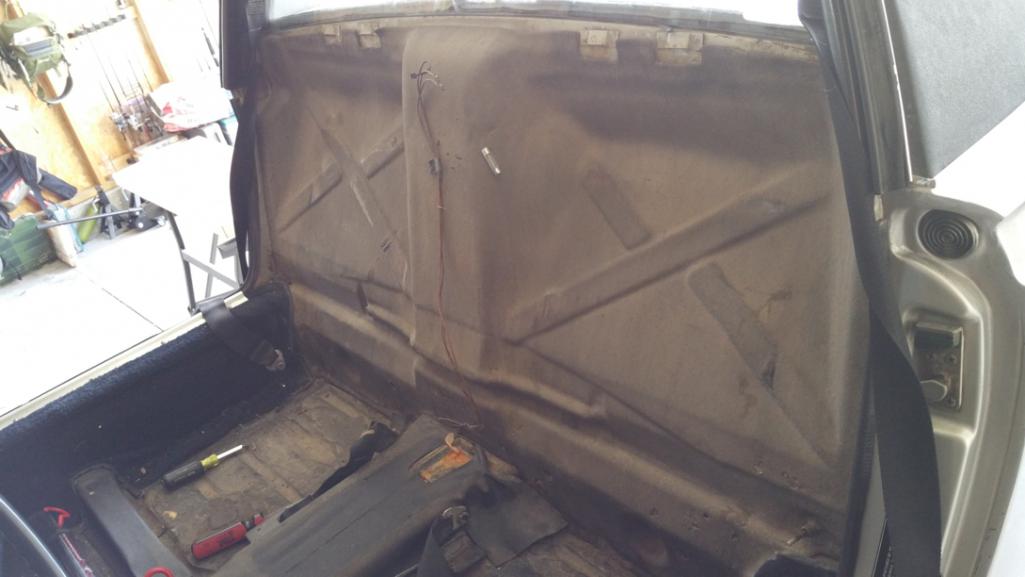
I peeled back the vinyl to expose the tunnel access panel.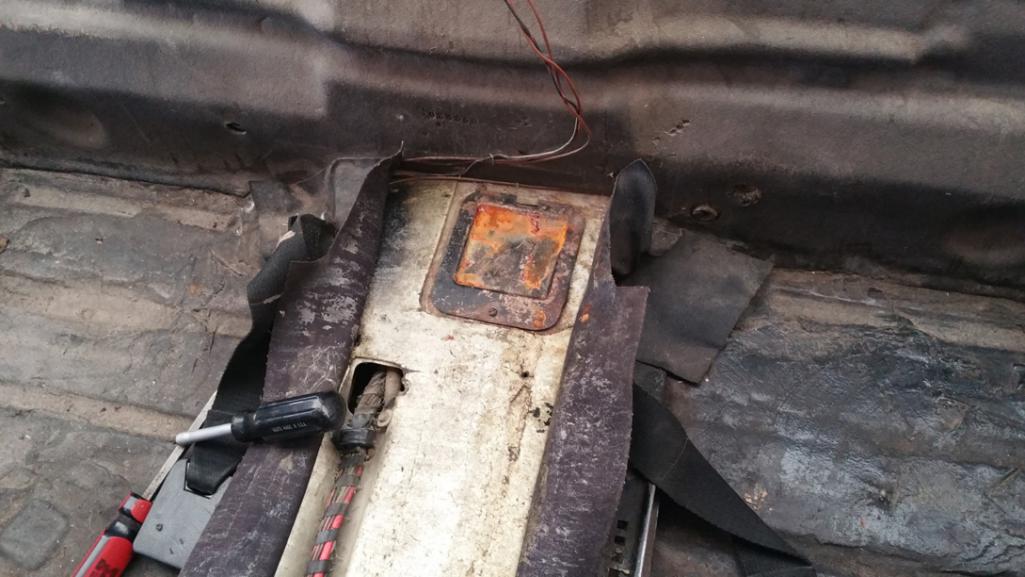
Removed the little screw to remove the panel.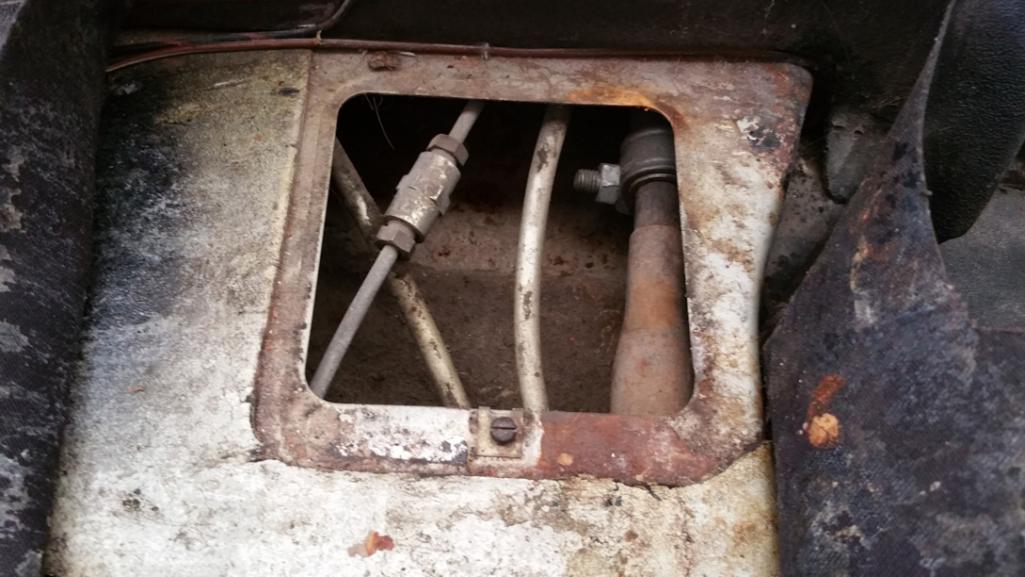
Pulled the shift knob off (it had a tiny set screw holding it on) removed the carpet, then unbolted the shifter from the tunnel.
Posted by: Jameel Mar 17 2016, 08:08 PM
Next I loosened the connection between the two shift rods in the access panel. 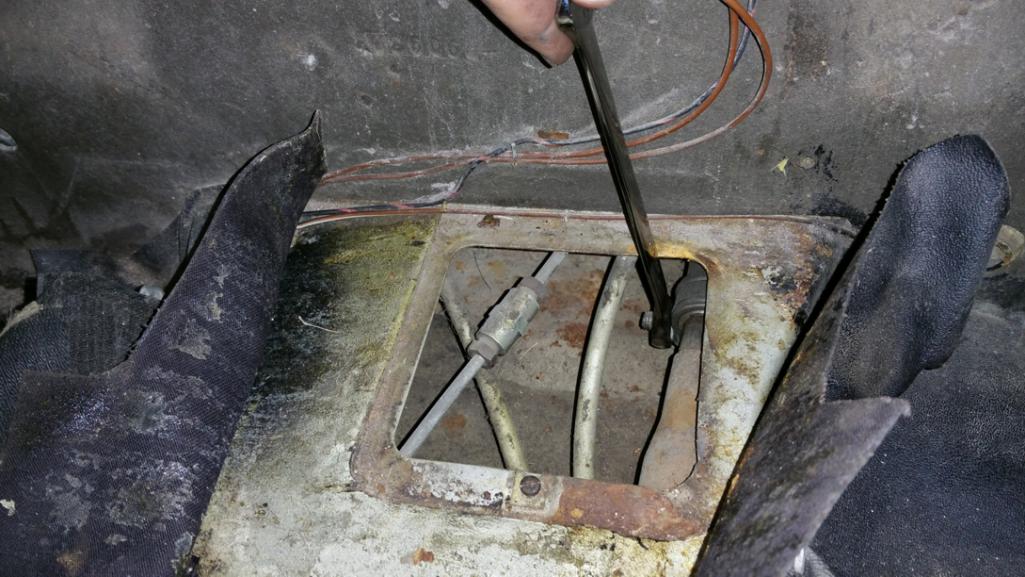
Then the shift connector rod pulled out pretty easily from behind the firewall, along with the rear shift rod.
Next I dismantled the front shift rod from the shift rod head. It's a single allen head set screw with a cone shaped shaft. 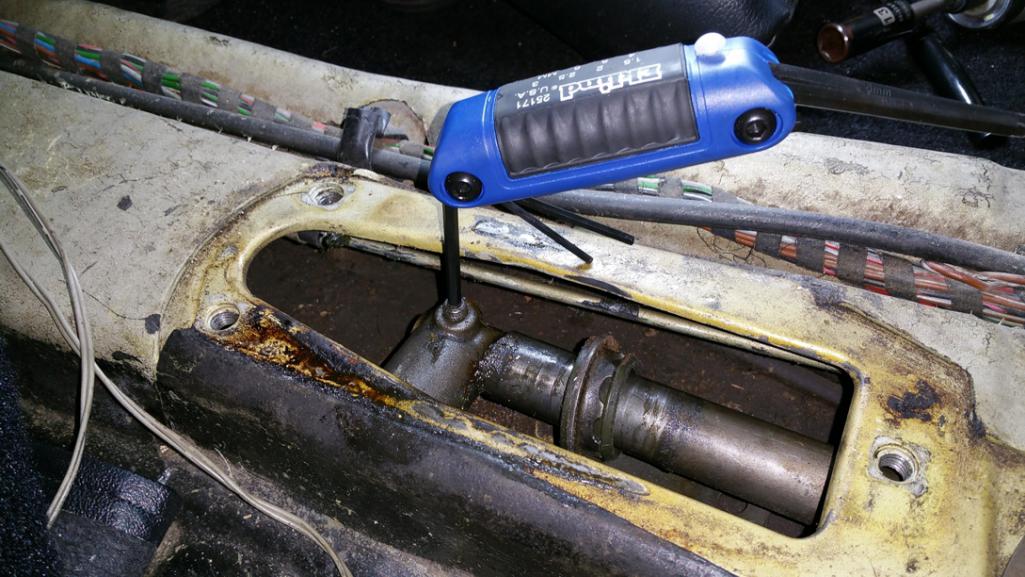
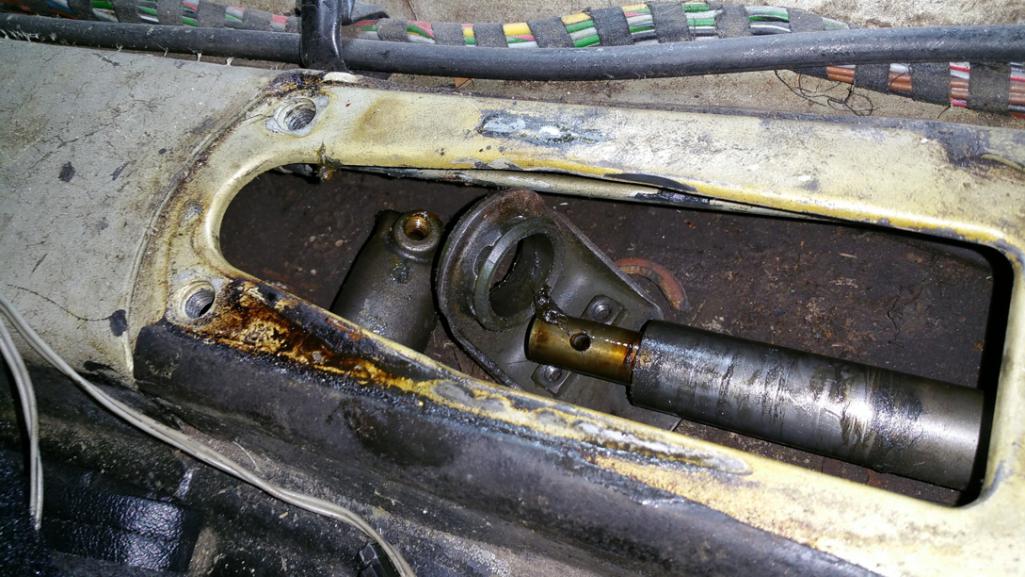
Next I removed the old bushing from the firewall by prying it out with a screwdriver. It came out fairly easily. 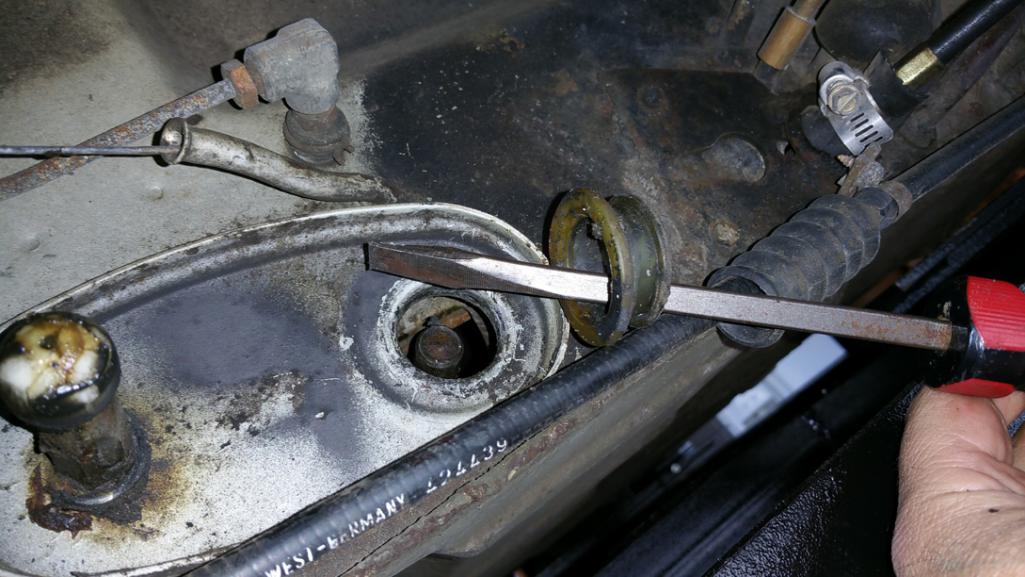
With the bushing out I could feed the front shift rod out the firewall.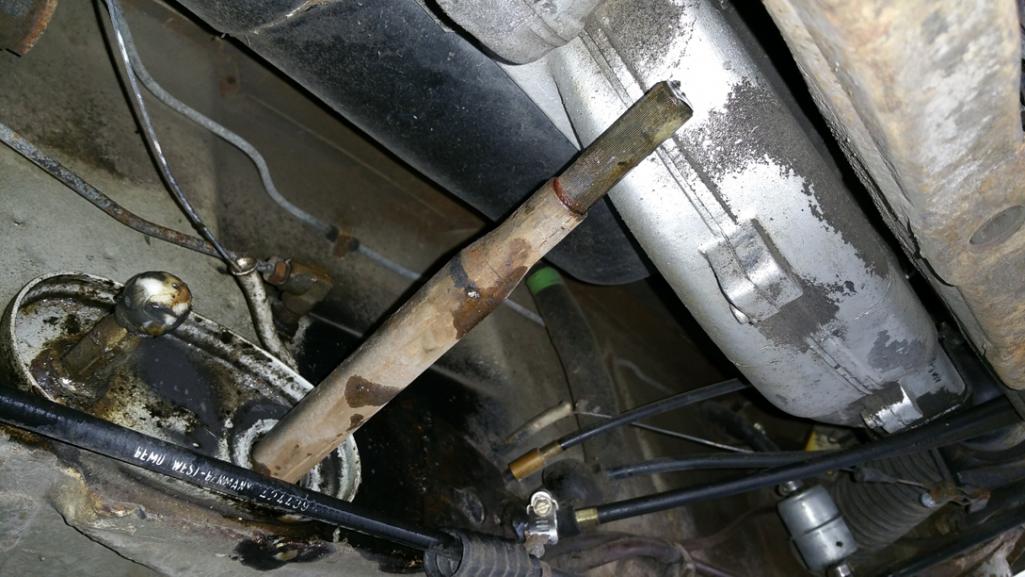
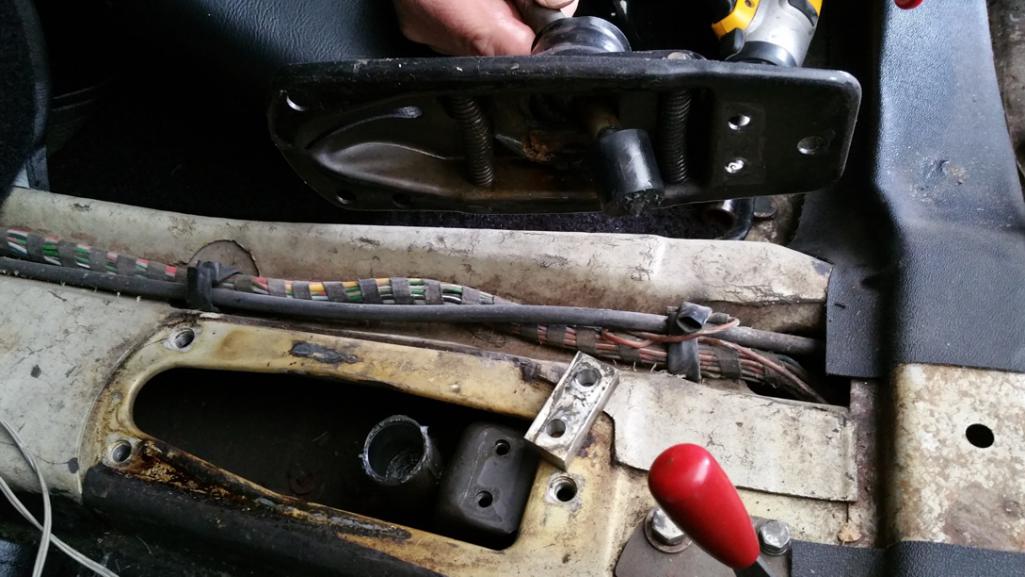
Posted by: Jameel Mar 17 2016, 08:26 PM
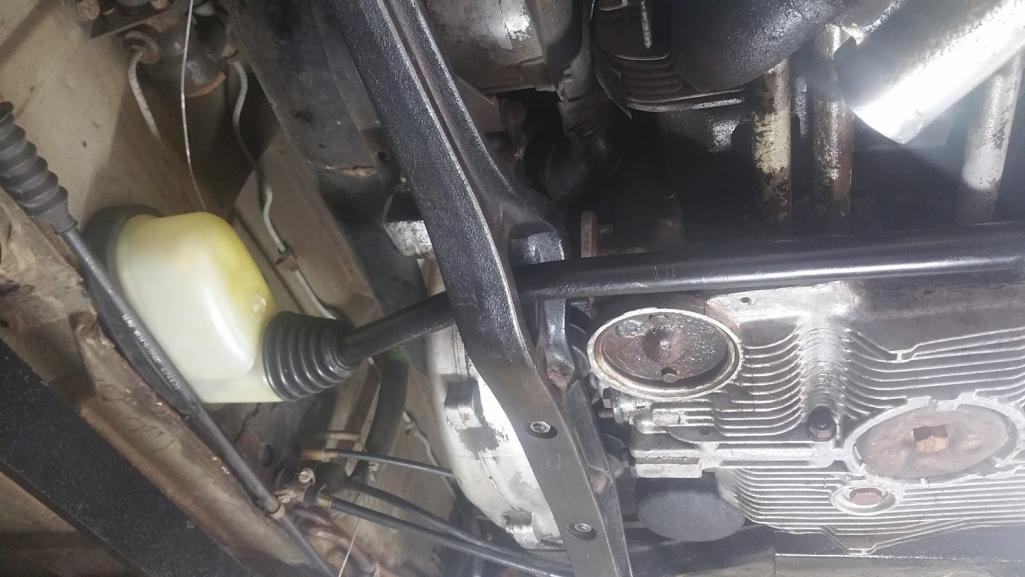
Next I began removing the engine support bar to replace it with the one that came with my side shift conversion kit. 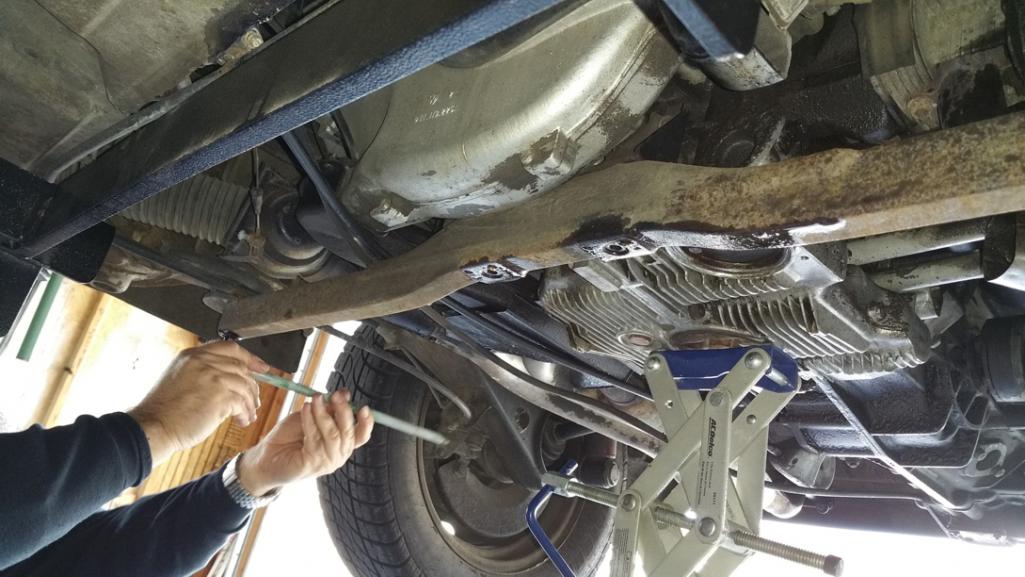
I was told to support the engine while swapping this out, so I slid my workmate underneath and used some blocking and a scissor jack to support the engine.
Posted by: SKL1 Mar 17 2016, 09:46 PM
May I recommend while you're going to that trouble, put in a Rennshift at the same time!
Posted by: Jameel Mar 17 2016, 10:01 PM
May I recommend while you're going to that trouble, put in a Rennshift at the same time!
I thought Brad's side shift felt pretty great compared to my nearly unshiftable tail shift. What does the Rennshift provide above a nice side shift?
Posted by: ndfrigi Mar 17 2016, 10:05 PM
You might want to just get a set of side shift parts and transmission and i think you should fix the clutch tube since it has that clamp already for temporary holding the clutch tube.
ooops sorry your title already said you are converting it to side shift.
Posted by: rhodyguy Mar 18 2016, 08:38 AM
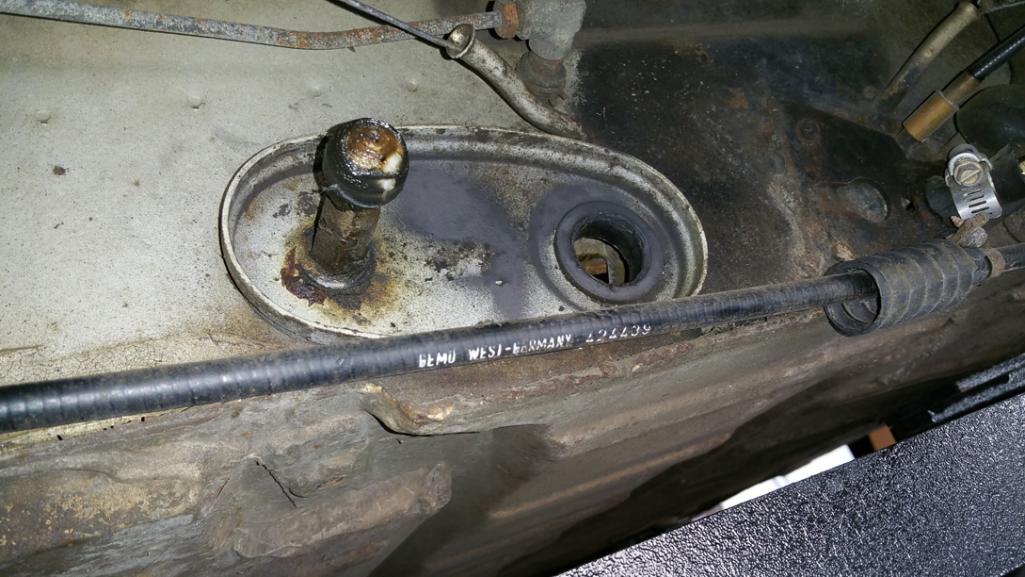
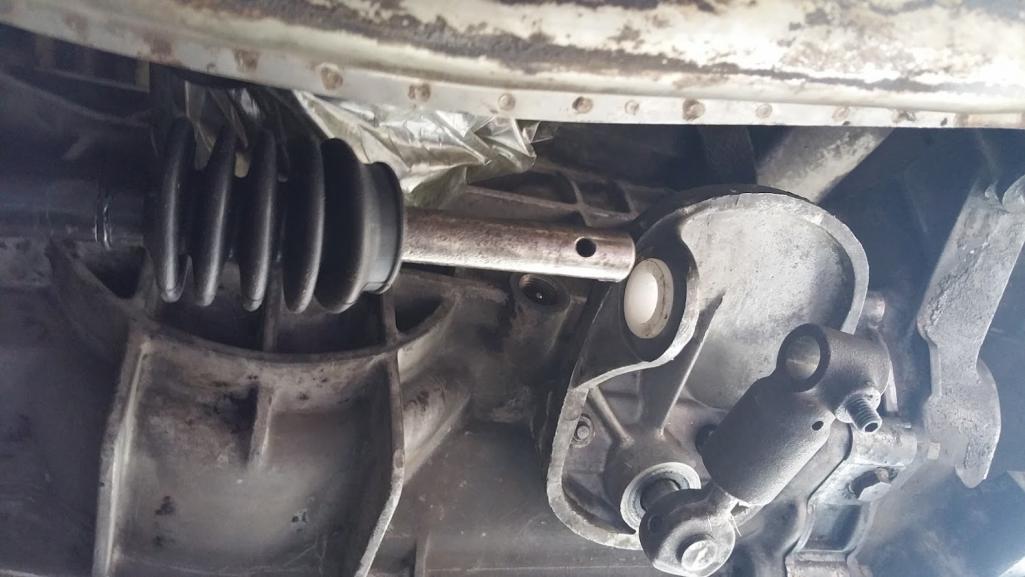
The fact that most if not all of the bushings are spent lead to your shifting issues. Note the pivot ball on the post on the firewall.
Posted by: Jameel Mar 18 2016, 07:53 PM
You might want to just get a set of side shift parts and transmission and i think you should fix the clutch tube since it has that clamp already for temporary holding the clutch tube.
ooops sorry your title already said you are converting it to side shift.
I will eventually deal with the clutch cable (among other things). One step at a time...
Posted by: Jameel Mar 18 2016, 08:19 PM
Managed to sneak in a couple hours on the 914 after work today. I took off the old engine support mounts from the chassis. I thought I'd have to replace these since the rubber was cracked, but it turns out the new bar just bolts right to the chassis, no rubber involved. 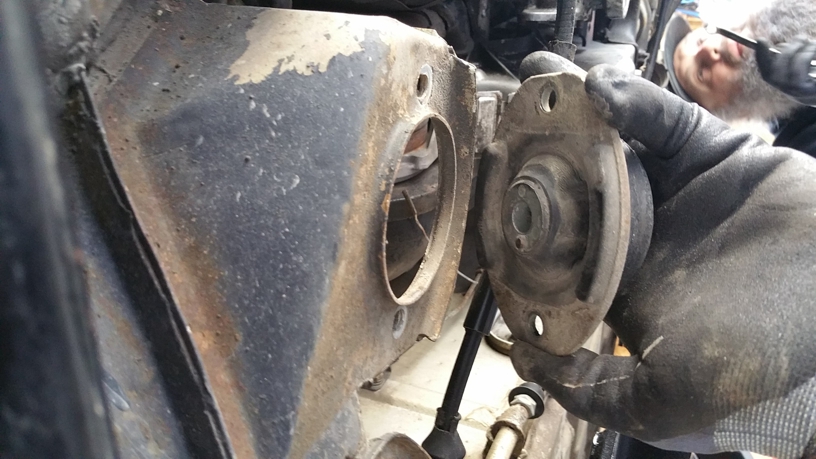
After removing the bracket that holds the engine support to the engine I bolted up the new bracket. It's a little tight access to the upper bolts, but its doable.
Can't figure out why these pics are posting rotated...
Next up the U brackets into the chassis points. These replace the rubber mounts. 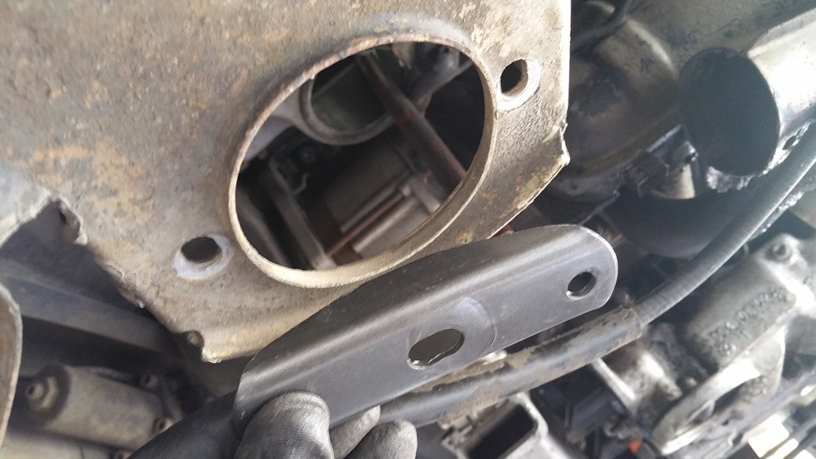
The engine bar bolts right to these U brackets. At least that what I was told, and what the parts explosion shows.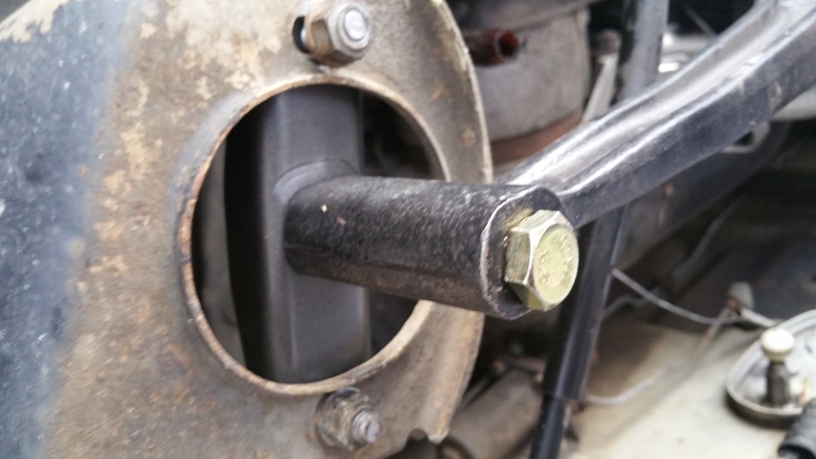
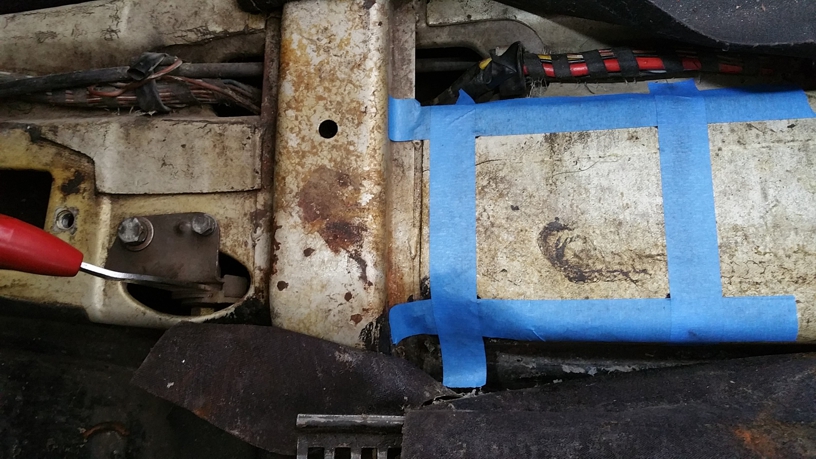
I'm doing things sort of out of order. I can't fully bolt up the engine support yet, because I don't have the firewall bushing in, which means I can't also insert the front shift rod. Which means (still with me?) I need to venture inside and start cutting holes. Here's the template for the access hole for cutting away part of the hole in the bulkhead--clearance for the new shift rod. I punched the corners using Brad's template, then taped off the outline with the ubiquitous blue masking tape. 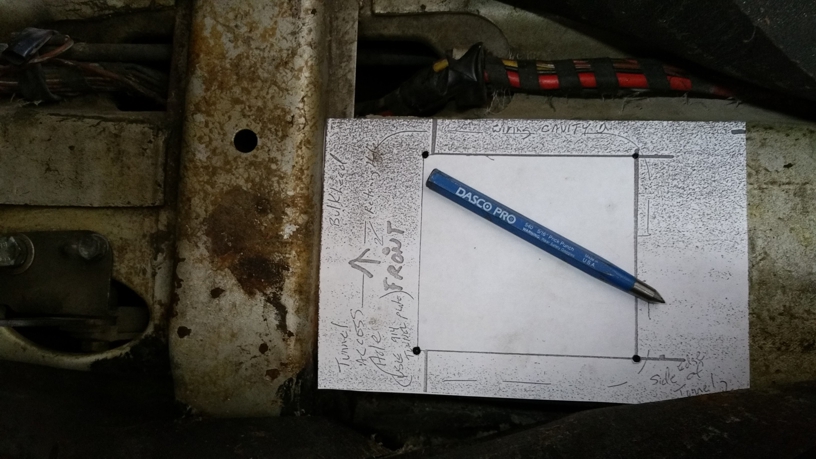
I'm making sparks inside my car. There are tools everywhere. I feel like a total hack, yet I'm loving every minute of it. This car will shift like a champ, I can feel it. 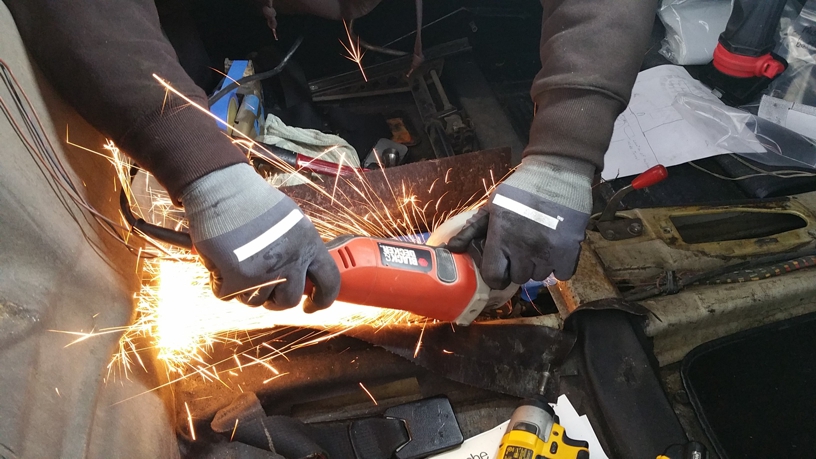
I get the hole cut without ruining anything inside. Yes! This is ripping good fun. 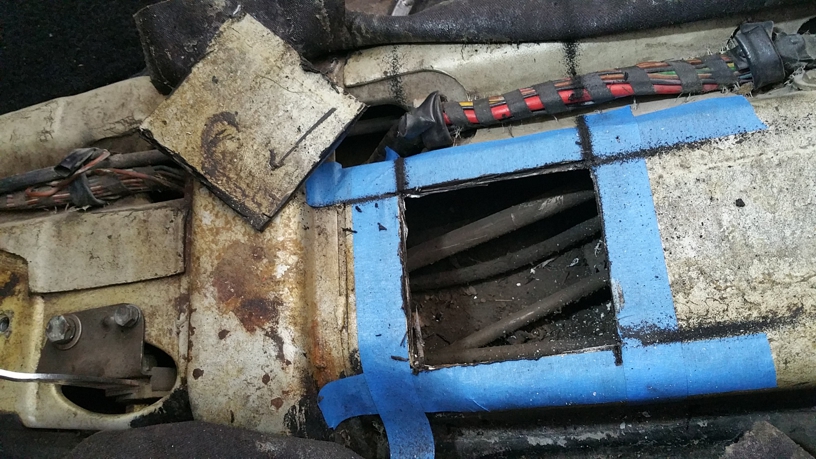
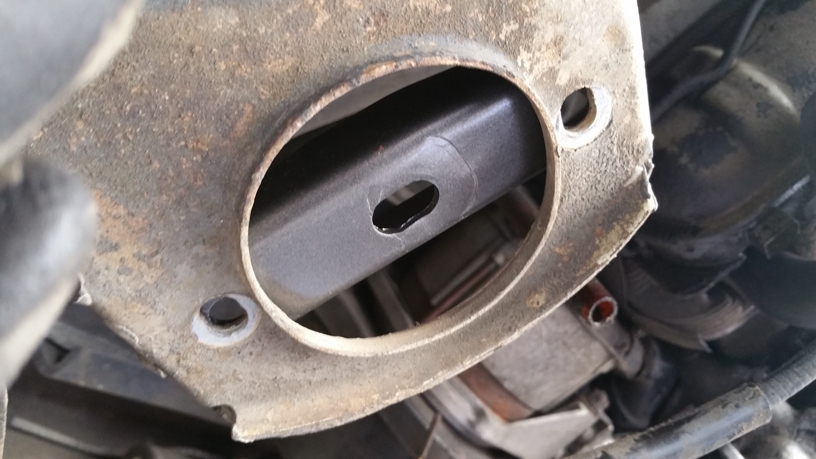
Look at that bulkhead, will you? This tail shift rod has been trying to escape for years I tell you! I guess I don't need to file any clearance for the new rod. I bet the right side of that puppy comes out with a couple twists. Clutch cable is unscathed, as far as I can tell.
Tomorrow I get to boil my bushing. Always wanted to say that.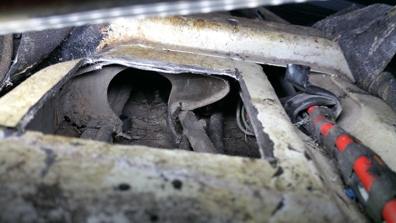
Attached image(s)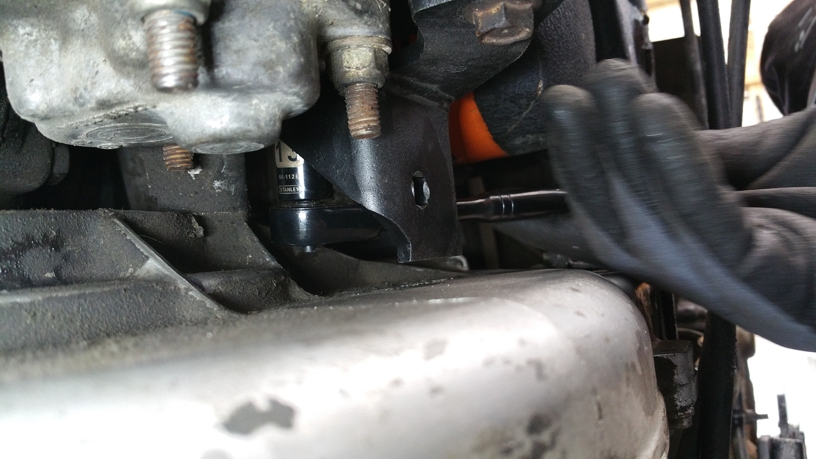
Posted by: eyesright Mar 19 2016, 04:41 AM
Good work and nice write up. We are waiting with...er...bait breath... for the next step...at least in part because you may be starting with a well worn shifter but very nice everything else. This will shift like a dream.
Posted by: Jameel Mar 19 2016, 07:06 PM
Good work and nice write up. We are waiting with...er...bait breath... for the next step...at least in part because you may be starting with a well worn shifter but very nice everything else. This will shift like a dream.
Thanks! I certainly hope it shifts like a dream.
Posted by: Jameel Mar 19 2016, 08:58 PM
So this is the first entire day I've been able to work on the 914. Got a bunch done. First up, getting rid of the gnarly part of that bulkhead with a die grinder. I didn't manage to hit any fuel lines. Bonus!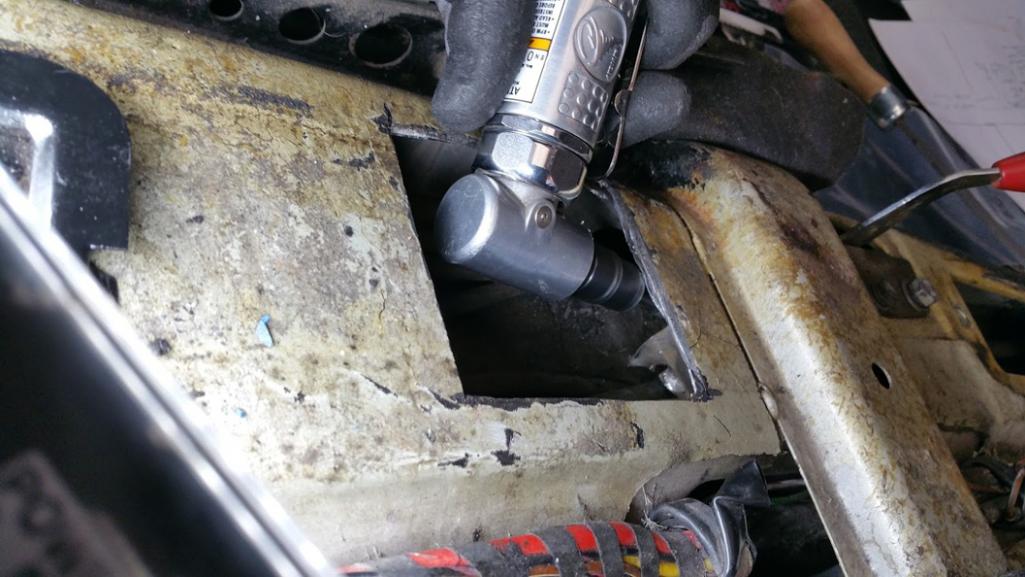
With the tunnel ready to accept the front shift rod, I boiled me some bushing and popped it in. Easy. What is everyone doing for a boot here? The raised metal flange is for tail shift setup, so I can't use a side shift boot here. 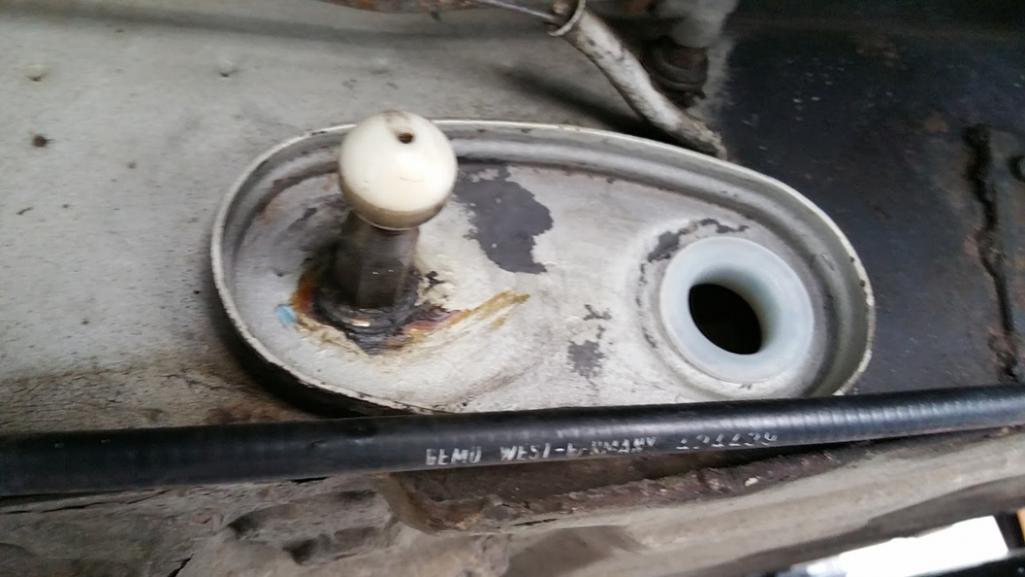
When I went to finally mount the engine support bar on I realized it was pretty much impossible to bolt the rubber dampers to the engine case (the brackets were already on the case) with the bar in place. So I ended up taking the dampers off the bar and bolting them to the brackets individually. It was still a pain to do this since access to the front of the case is so restricted. The left one went on pretty easy, but the right one was a pain. I had to loosen the upper bolt from the bracket and pivot it to get the damper mounted. Then I pivoted the bracket/damper back up and was just barely able to fit a small socket in there. The oil filter is in the way. Taking it out would make this a much easier task. But I don't have a tool for taking the filter off yet. I finally got them and the bar mounted after an hour of damned tedious work. Glad I'm done with that.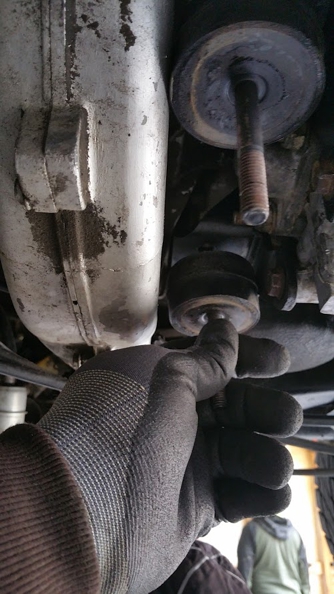
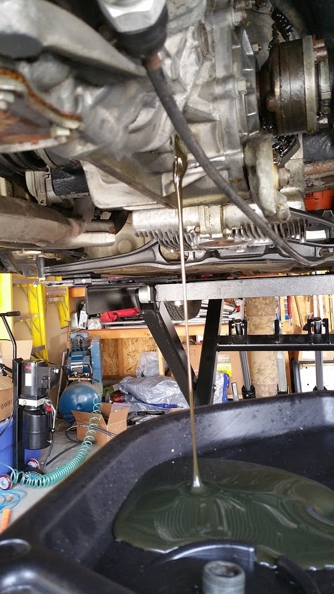
With the bar mounted I went ahead and fed the front shift rod into the tunnel through the new bushing. No pic of this. I'll take one next time. Next step is to remove the transaxle. Before I got too deep into that I decided to drain the gear oil. The first minute was dark brown and opaque. Looked pretty nasty to me, but I really have no idea what I'm talking about, so it could be okay...who knows? 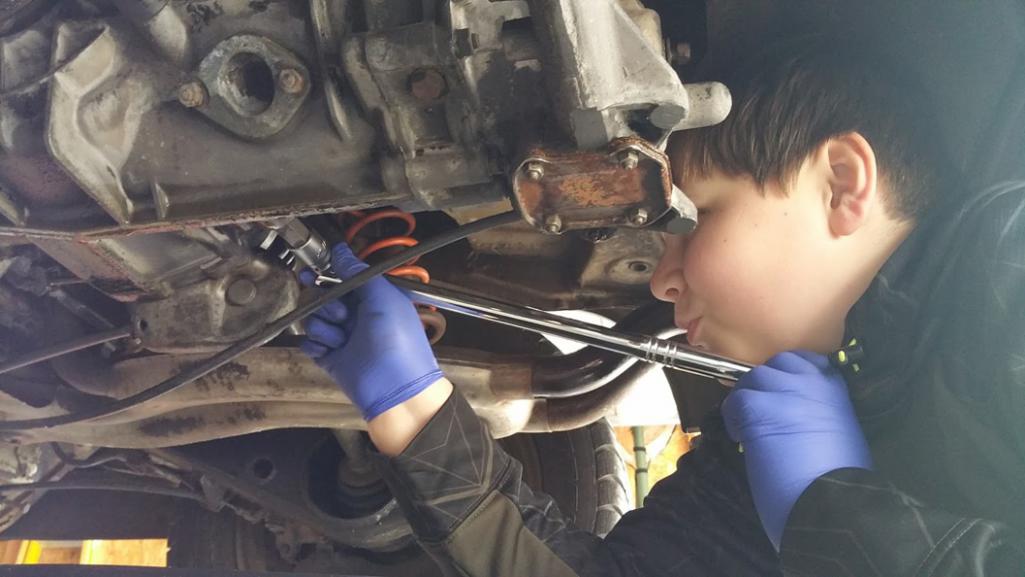
The magnet had some filings on it. But nothing big (what's big anyway?)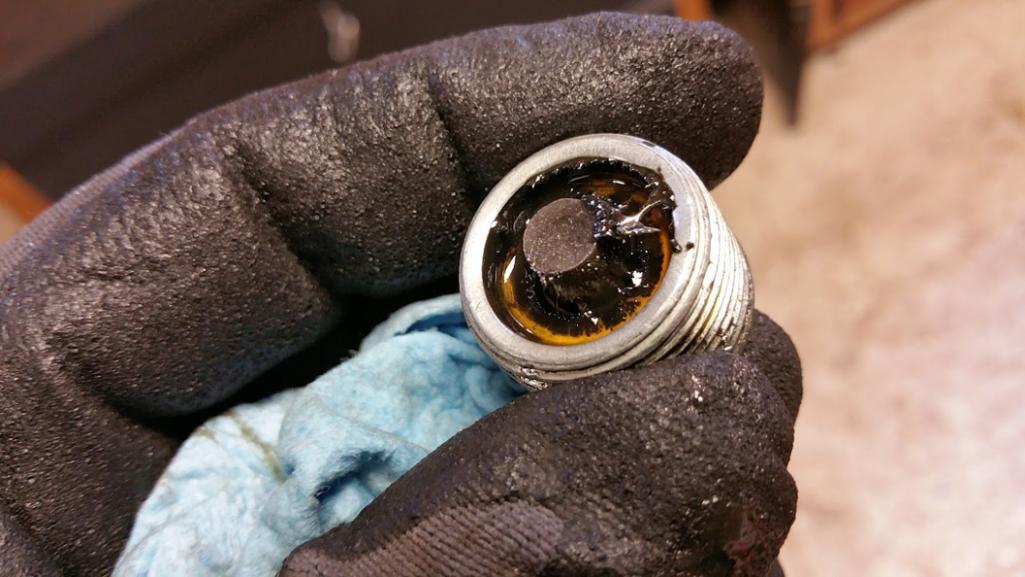
While the tranny drained I started disconnecting stuff. First the speedometer cable. I loosened the light colored nut here. Discovered it was a left hand thread before I destroyed it thankfully.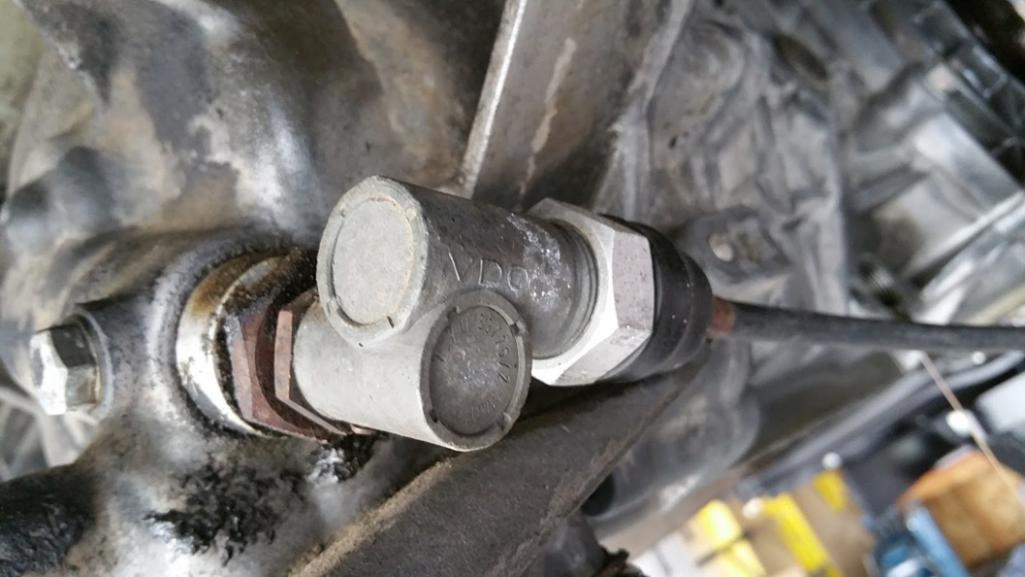
Then I unbolted the CV joints.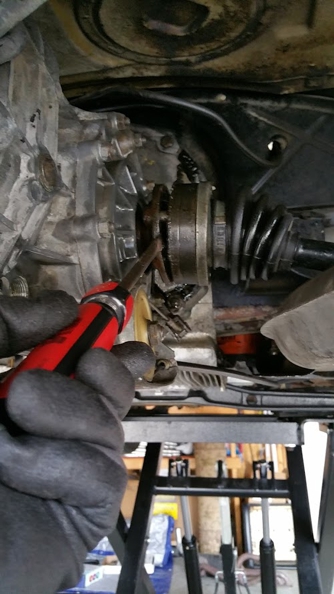
Removing the reverse light switch. Add this to the shopping list. This looks like its been at the bottom of the ocean for a century. Weird, since the boot is in great shape.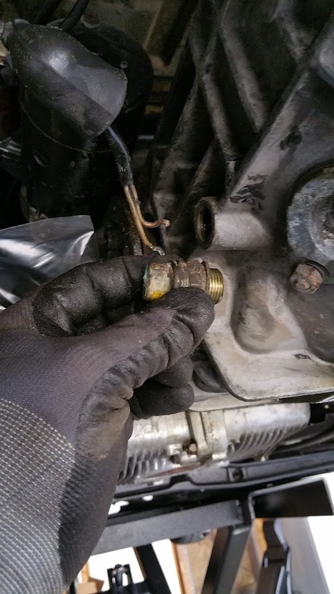
Then I disconnected the three wires going into the starter motor solenoid (I think that's right, right?)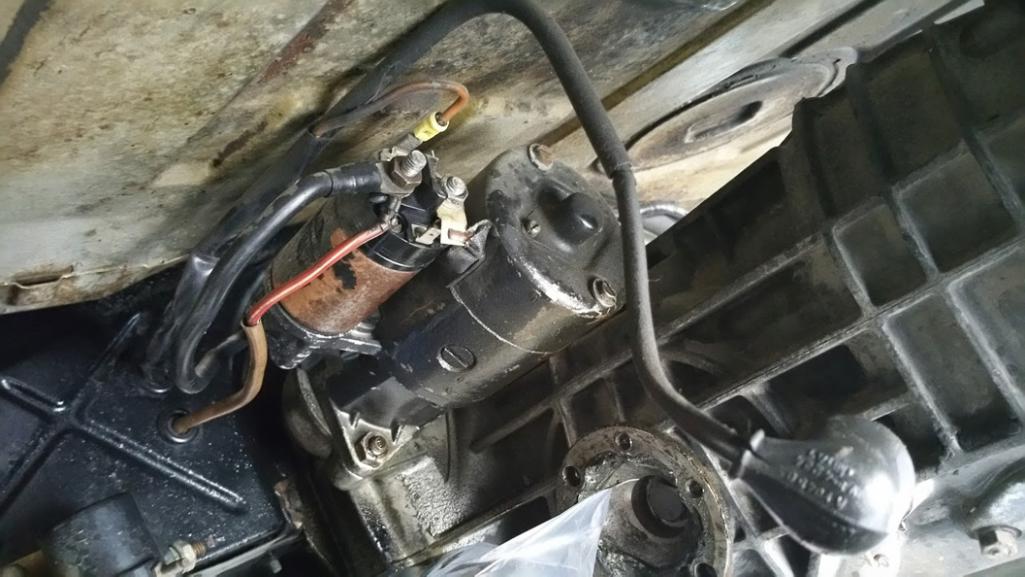
Two nuts and a washer came off the end of the clutch cable, which allowed me to pull the cable from the lever. 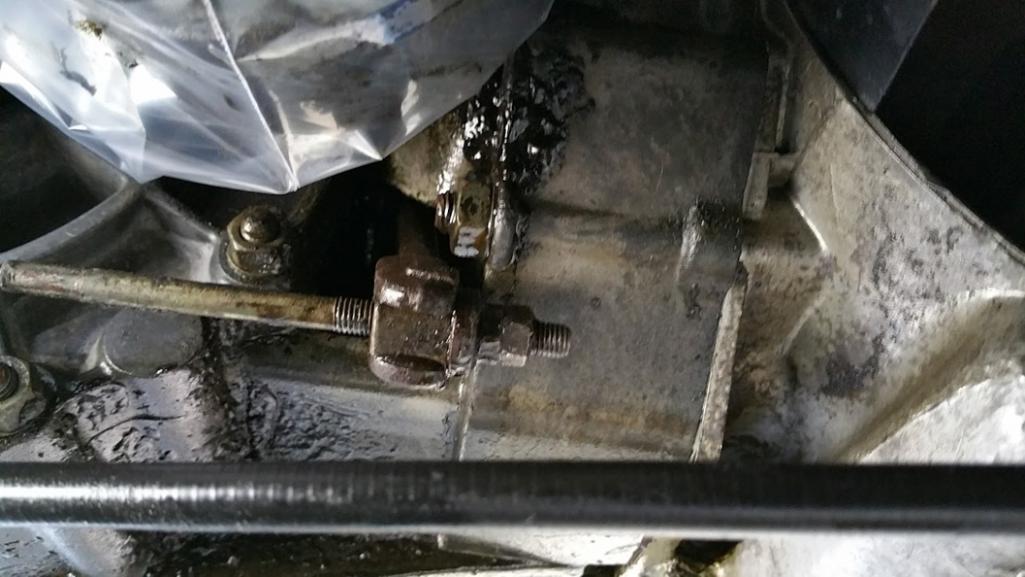
The center nut in the middle of the clutch pulley allows the pulley to come off and the cable to detach from the transaxle.
Tomorrow I hope to get the tranny removed completely. Then the real fun begins.
Get the popcorn, because this greenhorn is about to crack open his first transmission. 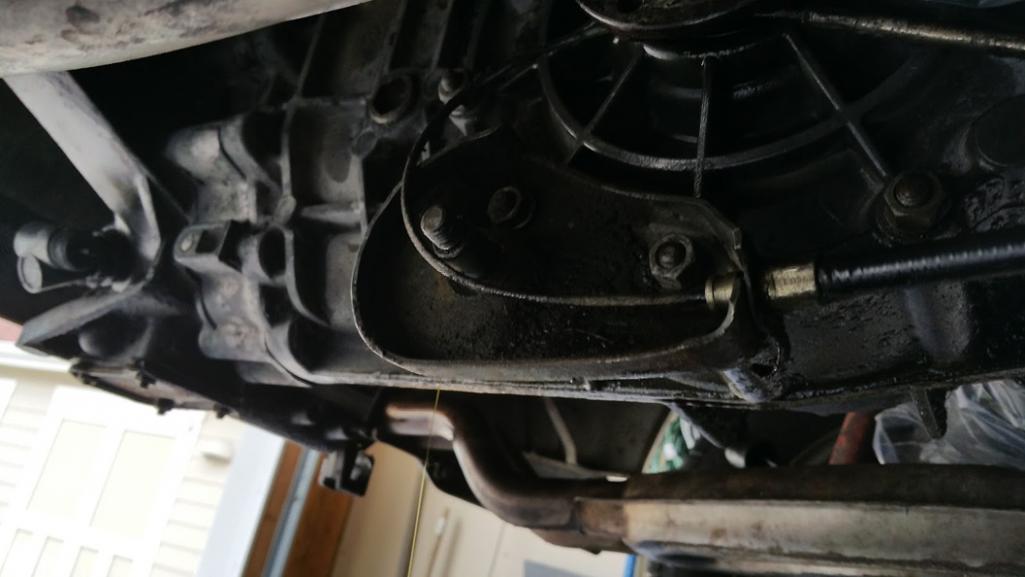
Posted by: SKL1 Mar 19 2016, 10:16 PM
Wonder why you had to cut out that access hole in the tunnel? When I converted my '71 to a side shifter MANY years ago I didn't have to do that.
When adjusting the shift rod, if you experience difficulties, Tangerine makes a slick part that allows easier adjustment- check Tangerine Racing website...
Posted by: zambezi Mar 19 2016, 10:18 PM
watch out on the reverse light switch. There should be a small rod in the hole that pushes into the switch to activate the switch. Look in the hole in the trans to see if it is still there. If it is it may fall out and you won't notice it.
Posted by: Dr Evil Mar 20 2016, 10:55 AM
Looking good!
Brad is a great guy and will always takes good care of people. I messaged you back about the DVD. Ill help however I can. 
Posted by: Jameel Mar 20 2016, 11:38 AM
watch out on the reverse light switch. There should be a small rod in the hole that pushes into the switch to activate the switch. Look in the hole in the trans to see if it is still there. If it is it may fall out and you won't notice it.
Great info! I read about that in the Haynes manual, but sort of spaced it out. Going to fetch it now.
Thanks Dr. Evil. DVD ordered, $ sent.
Posted by: Jameel Mar 21 2016, 09:36 PM
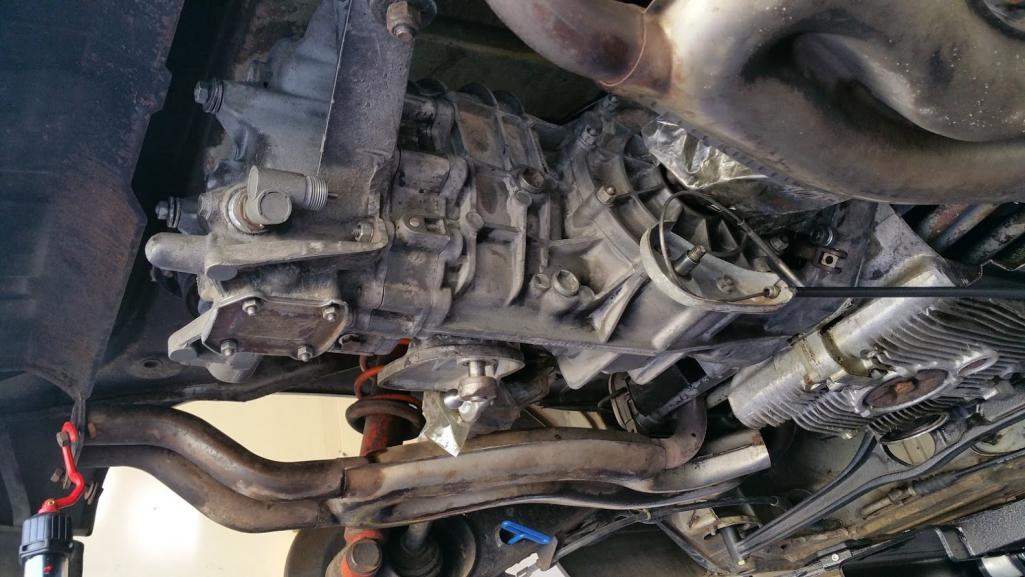
Had an hour today to fiddle with this. First up, I loosened the four bolts holding the front end of the trans to the engine. 
Then supported the trans and engine. I later swapped the jack and block of wood so the jack was under the engine. Gave me more adjustability.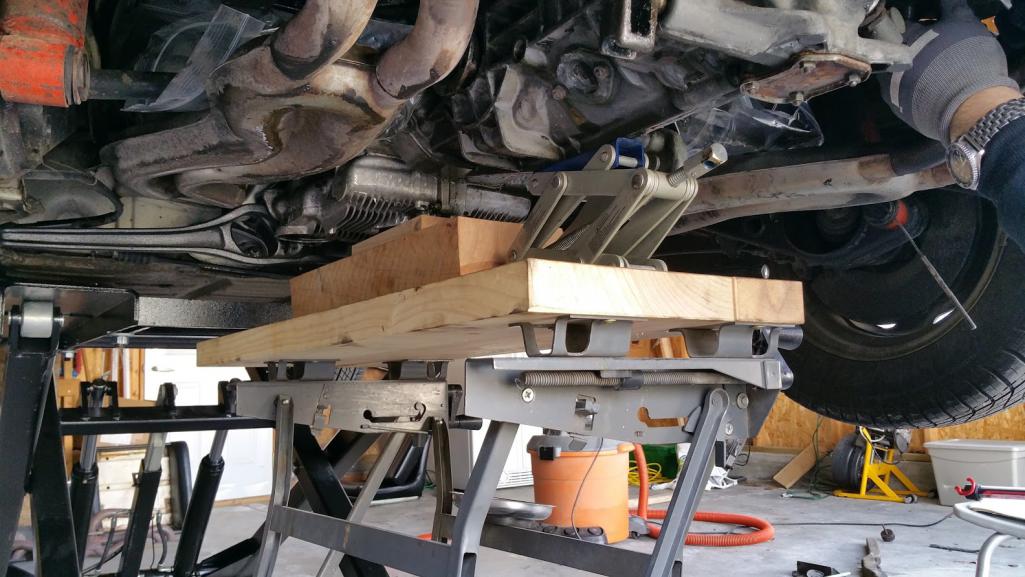
Then I unbolted the rear trans mounts.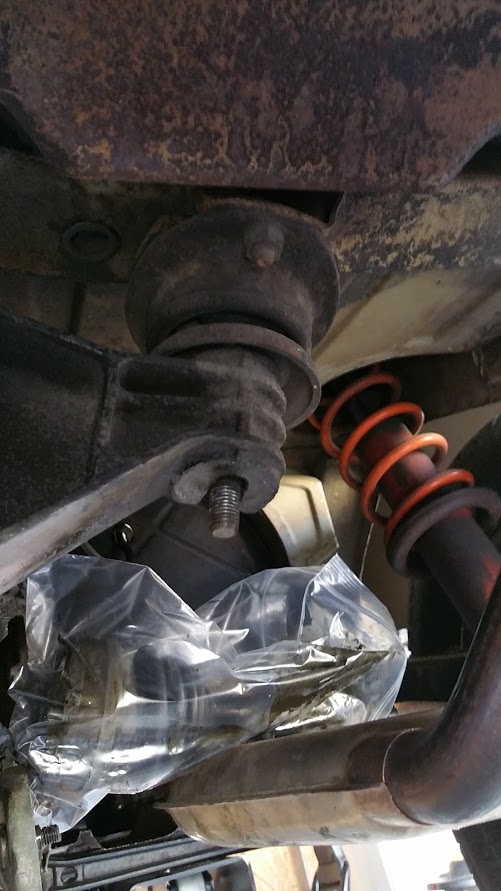
Then with some help from my brother and a few rearward tugs, the trans was out.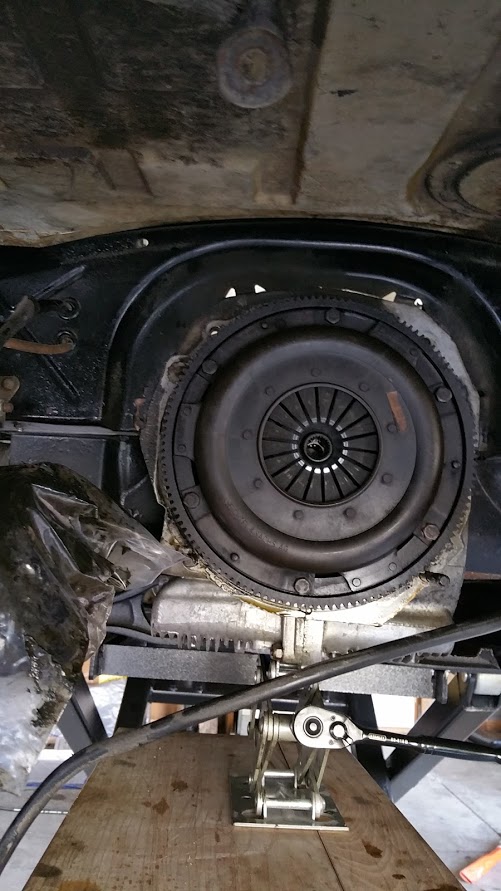
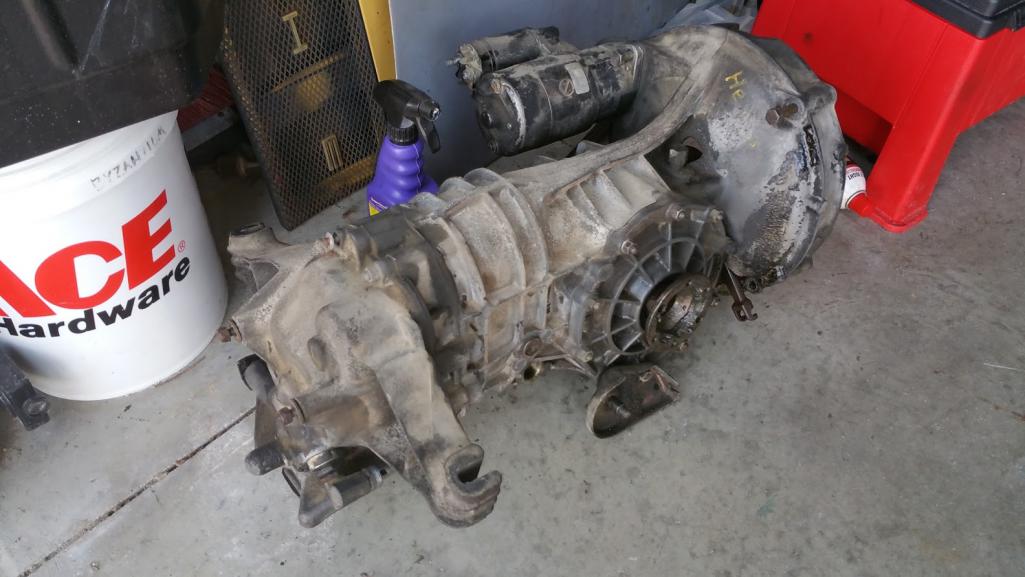
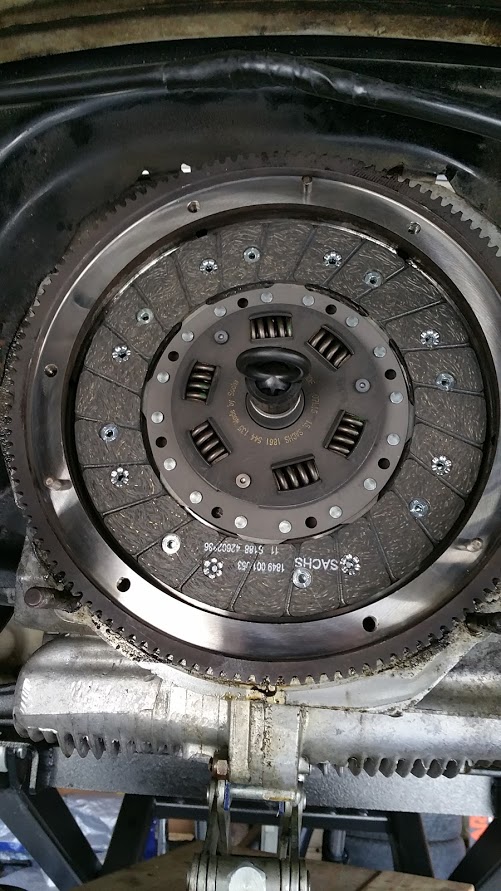
Next up, evaluating the condition of my pressure plate, friction disc and flywheel. Something tells me they need a little attention....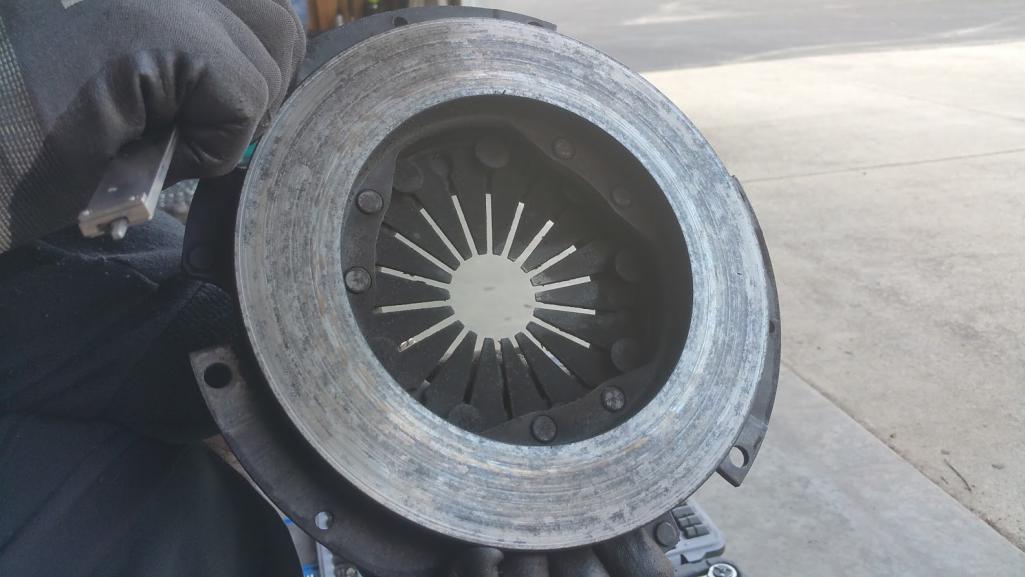

Posted by: Jameel Mar 26 2016, 08:44 AM
Moving along....I removed the side cover plate which is attached to the fork piece.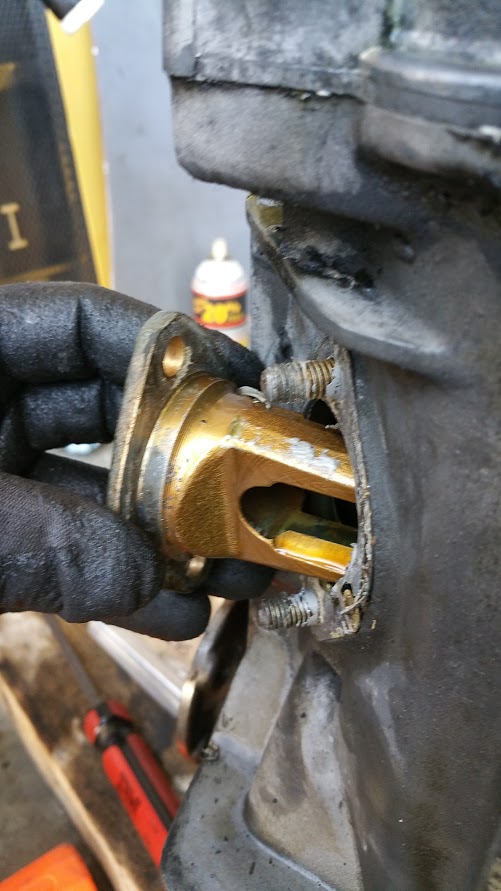
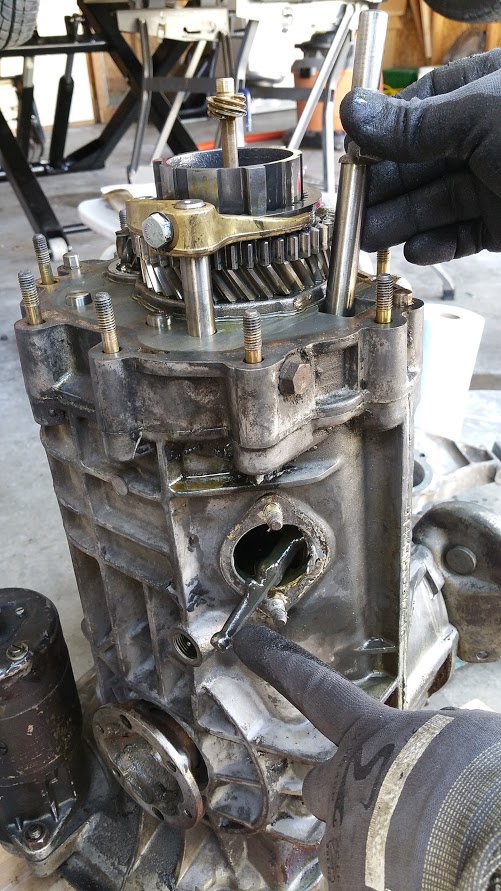
I tried lifting the intermediate plate out of the case, but it would lift up maybe 2 inches before encountering resistance. I called Brad Mayeur and he said to press the end of the shift rod for 2nd/3rd gear a little bit (the lower one that just protrudes out the int. plate, just above the rod for 1st/rev). I did that and the whole plate and guts lifted right out. Awesome!
With the gears out, I could disassemble the internal shift rod by removing the cotter pin and driving out the pin. This was a little tricky. Thankfully I had a helper to hold the rod steady while I drove it out with a punch and hammer. 
With the intermediate plate out I carefully measured the two gaskets from a section of the casting that fell between the bearing surfaces to get a good measurement from gasket that had not been compressed. It was still a bit tricky. One round of measuring showed one shim at .005 and one at .004. Another round of measuring showed .004 and .003. So I'm not sure what I've got here. I'll try again. Not sure what the tolerances here are, as the Haynes manual doesn't mention this. I'll do a little searching.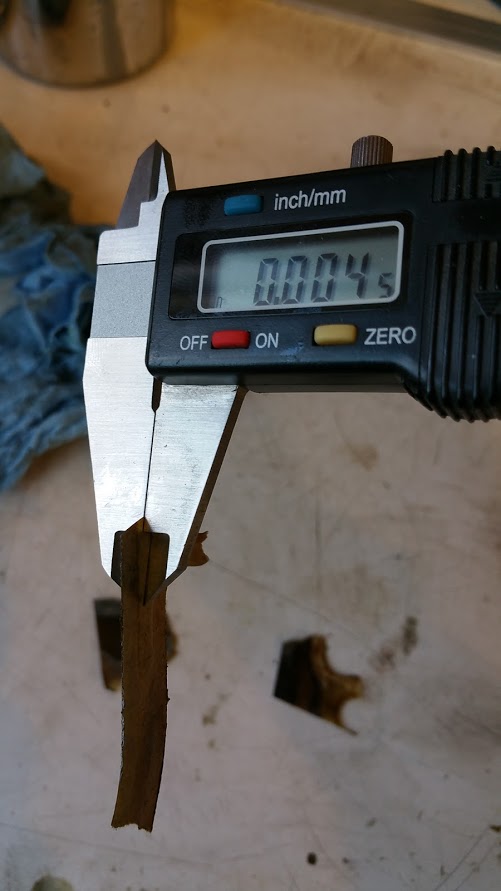
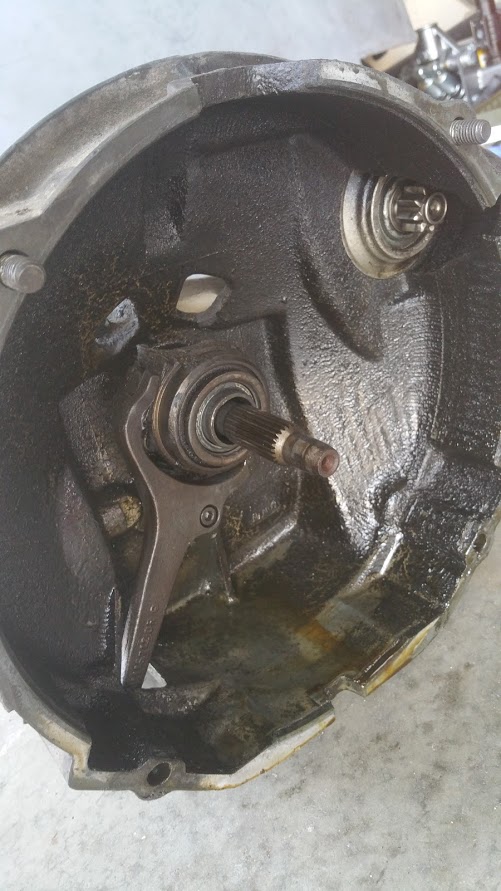
Here's my pinion gear. Looks really nice to me. But that's probably just wishful thinking. I'm heading out to the garage now to take my flywheel off.
https://www.youtube.com/watch?v=RYFn5VvpZ4U
Posted by: Dr Evil Mar 26 2016, 09:31 AM
Hard to tell in the video, there looks to be some material missing on the teeth face. Normal wear. You will have a hard time finding a perfect R/P that is 40yrs used. If you are not blasting lots of power through it then it is fine. Gasket tolerance is +/-0.03mm. Consider that is with new bearings in perfect shape. Used bearings are going to have some serious play so close enough is good for the gaskets. Consider that the kits only come with 0.24-25mm gaskets, you get as close as you can with that and roll with it. Sounds crazy, I know. Next question would be, "What if you change to new, tight bearings?" Well, there are other size gaskets that you can order. Also, there are shims under the pinion that you adjust. Now, you can rebuild the box using the standard kit with the 0.25 gaskets, get close enough, and things are all good. How? My only educated guess is that the R/P are worn and the tolerance on them is much looser than new which allows for there to be wider tolerance range. What happens if you are not spot on? Noise. What happens in an old transmission usually? Noise. So, you can be pretty bold in assembly if you just get real close. Thats kind of a gist of the stuff mentioned in the DVD.
Posted by: Jameel Mar 26 2016, 03:03 PM
Thanks for the info. As for recognizing noise, I have very little experience with the 901 tranny (I've driven three 914's, and a 71' 911S) and my own car has dual 40IDF Webers and a loud exhaust. I guess I could try coasting downhill in gear off the throttle to hear the possibly noise. I can see myself making improvements to this car little by little, and now that I've removed the transaxle once, I'm not afraid to do it again. I'm going to have the tranny looked at by the gents down at Stalltek next week, get some experienced eyes on this thing. Can't wait to get the DVD and learn more. 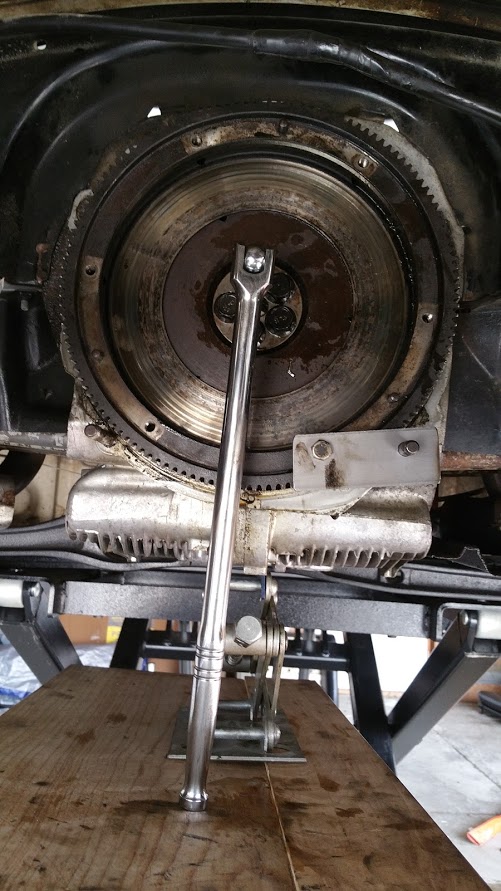
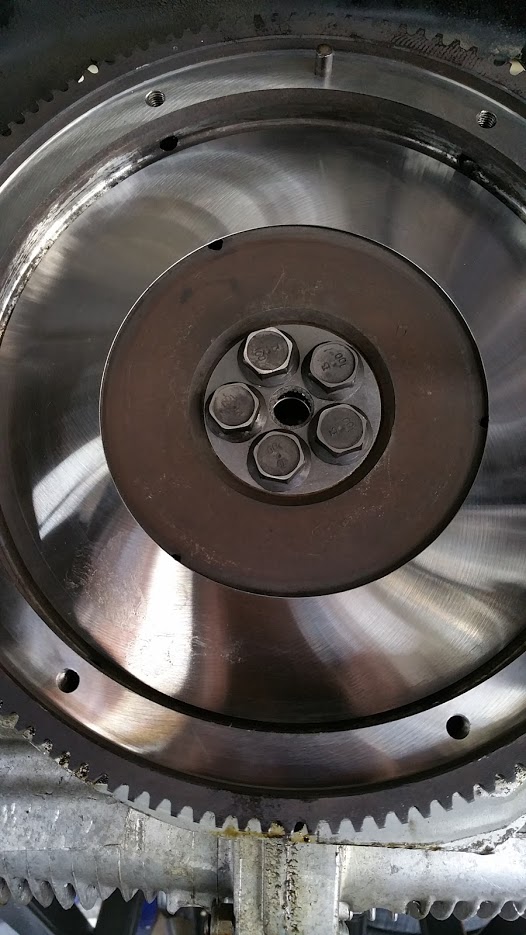
I did get the flywheel off this morning after making a quick and dirty locking plate. I like not having to deal with a 300lb. torqued gland nut! The five bolts came off relatively easily with my breaker bar.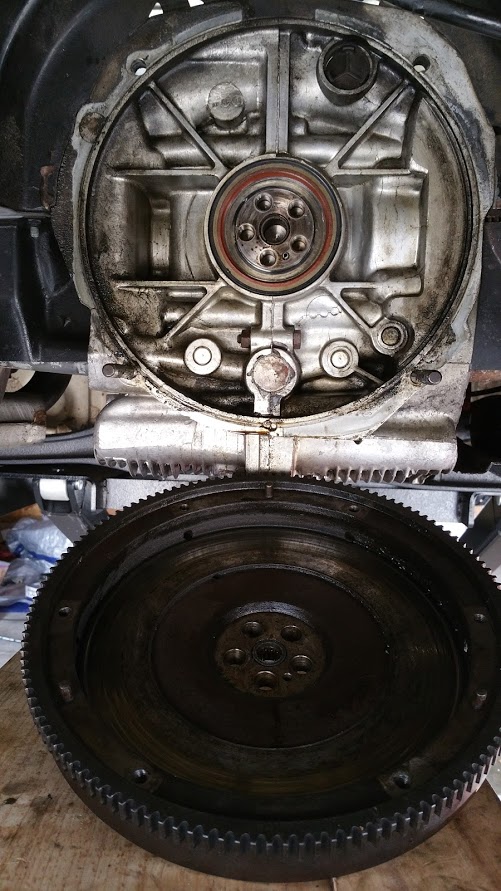
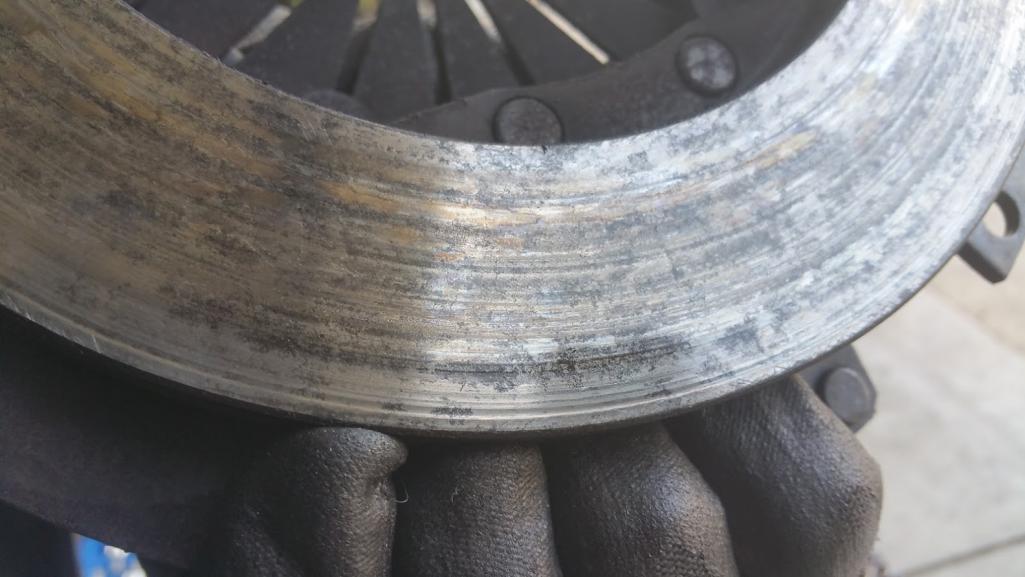
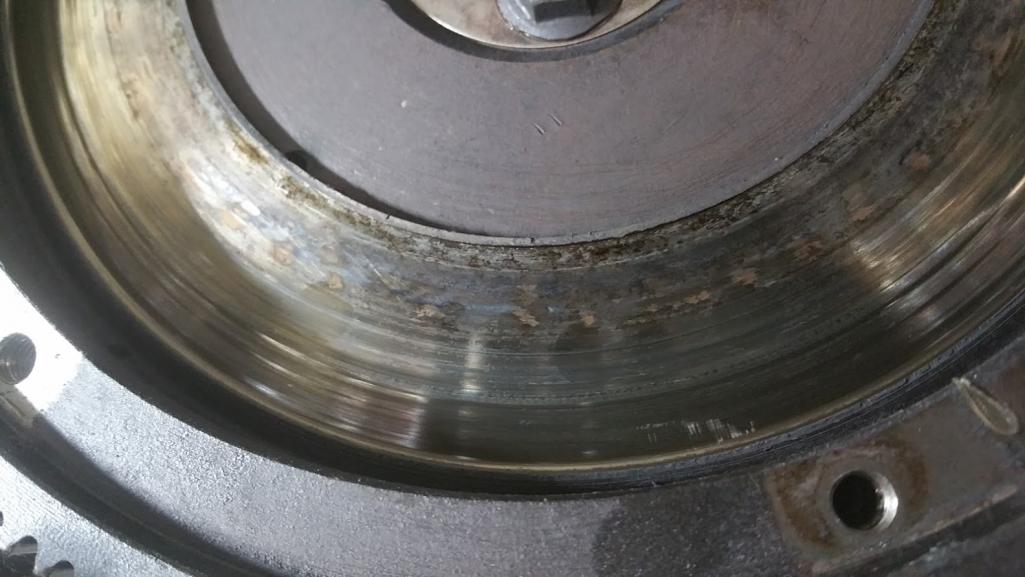
Cleaned up the flywheel and put a straight edge across the face. Wow. No wonder my clutch didn't feel very grippy. I hope I've got enough trough at the perimeter for a resurface. I was hoping to not have to buy a new flywheel. 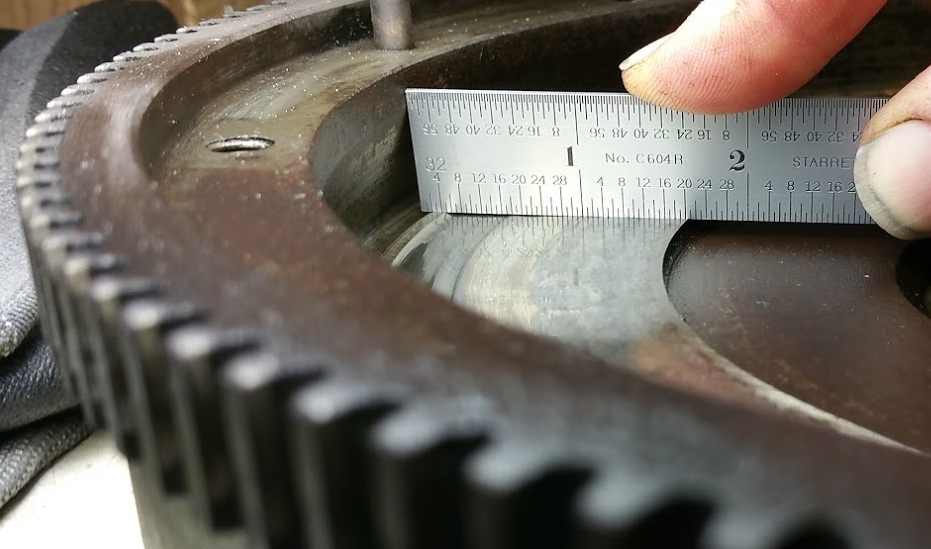
Posted by: Jameel Mar 29 2016, 09:46 PM
Dropped my flywheel off this morning, got it back the same day! 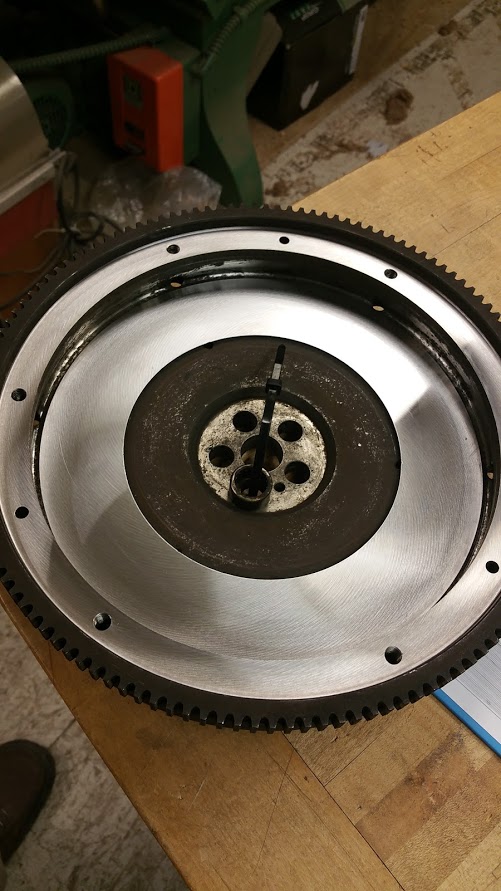
Posted by: mepstein Mar 29 2016, 09:57 PM
I just resurfaced mine for my six conversion. For $40 bucks there's no reason not to. Also replaced the bearing. It's just a couple dollars.
Posted by: Dr Evil Mar 29 2016, 10:41 PM
Things to consider:
1) Was the flywheel finished to within spec?
2) You may need to grind down, ever so specifically, the tops of the new flywheel bolts as the clutch disk will sit closer to the crank and will often hit the bolt heads after an aggressive resurface such as what looks like you needed.
3) You will need to put another washer under the pivot ball. Use teflon tape as the threads with two washers will seep oil pretty easily.
Posted by: Dr Evil Mar 29 2016, 10:44 PM
Specs
Attached image(s)
Posted by: Dave_Darling Mar 30 2016, 04:23 PM
One thing I spotted early on--one of the wires going to the interior light is always "hot". So either disconnect the battery or tape up the black wire so it doesn't short to ground.
--DD
Posted by: Jameel Mar 30 2016, 07:24 PM
I just resurfaced mine for my six conversion. For $40 bucks there's no reason not to. Also replaced the bearing. It's just a couple dollars.
I didn't get off quite so cheap. Mine was $73. But I ain't complaining!
Things to consider:
1) Was the flywheel finished to within spec?
***Yes. I got the print from one of your old threads. And confirmed with Brad M. before heading to the shop.
2) You may need to grind down, ever so specifically, the tops of the new flywheel bolts as the clutch disk will sit closer to the crank and will often hit the bolt heads after an aggressive resurface such as what looks like you needed.
***They took off 0.023". And I still got groove. I was planning on grinding off .023"
3) You will need to put another washer under the pivot ball. Use teflon tape as the threads with two washers will seep oil pretty easily.
***Ok, will do.
One thing I spotted early on--one of the wires going to the interior light is always "hot". So either disconnect the battery or tape up the black wire so it doesn't short to ground.
--DD
I disconnected the batt. But I'll remember that!
Posted by: 76-914 Mar 31 2016, 08:09 AM
![]()
Posted by: Jameel Mar 31 2016, 06:22 PM
While studying the good Dr.'s DVD I've been trying to examine my trans without taking it completely apart. I'm just not ready for that yet. So here's some things I've observed so far.
First gear dog teeth look to be nice and pointed. 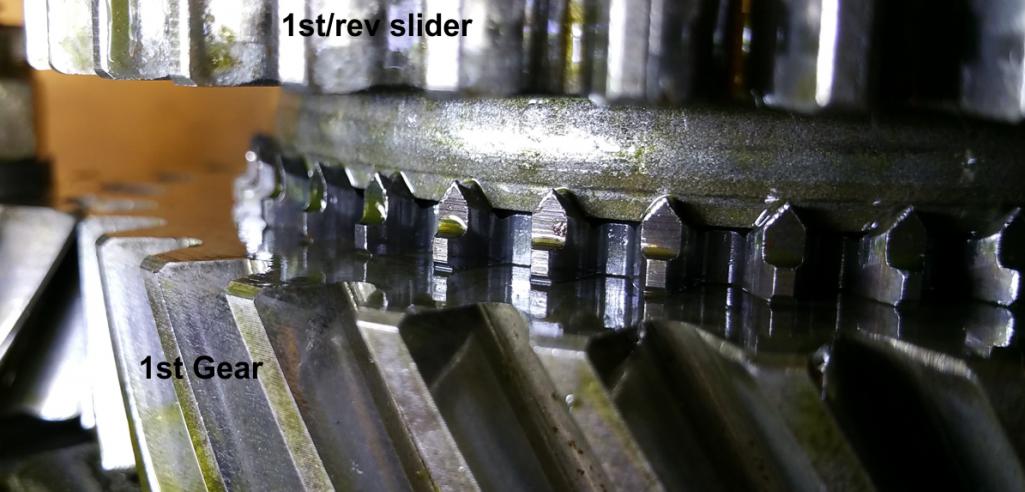
Here's another grouping of teeth. The synchro ring is worn.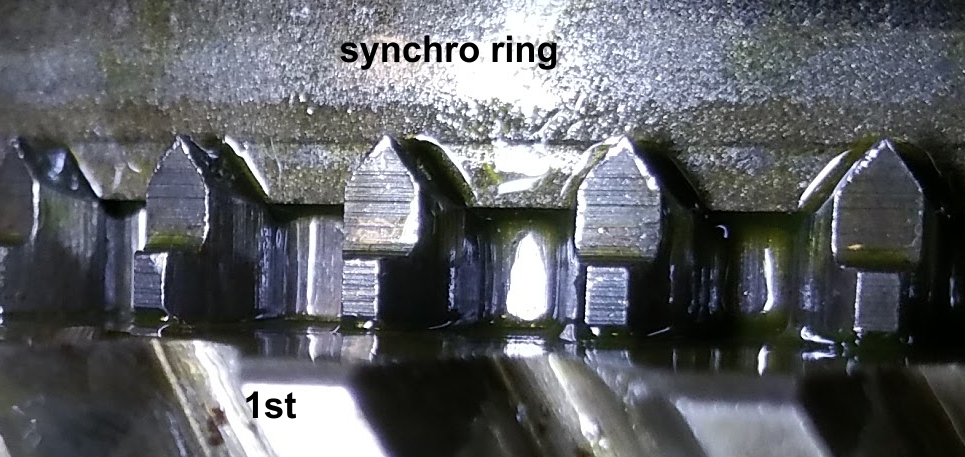
The 1st/rev slider teeth are definitely worn in comparison. 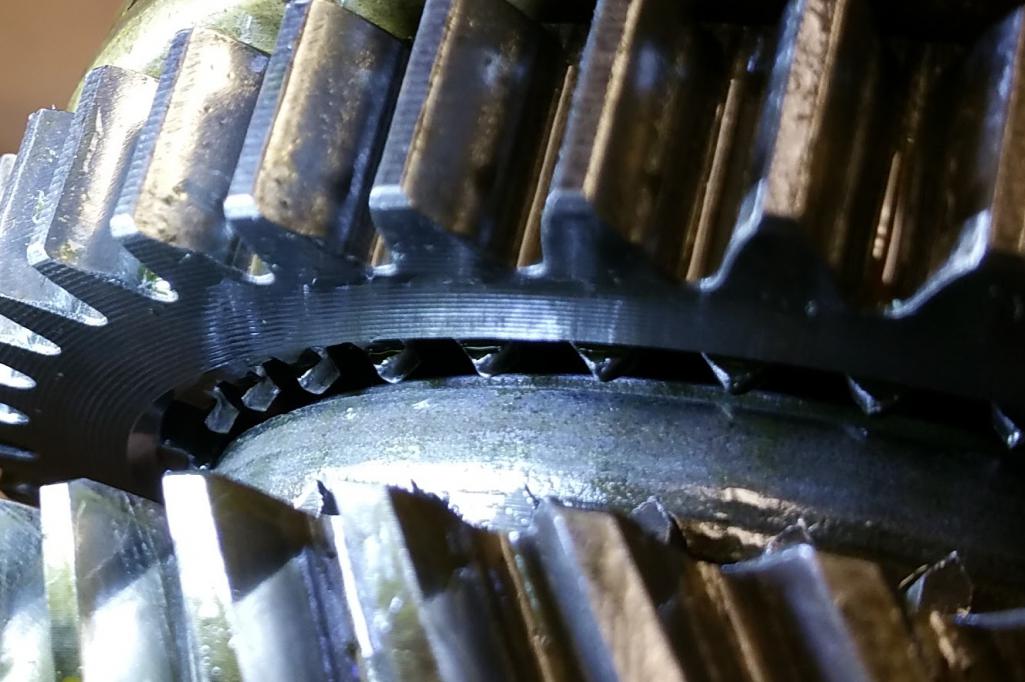
And here are the 3rd gear teeth.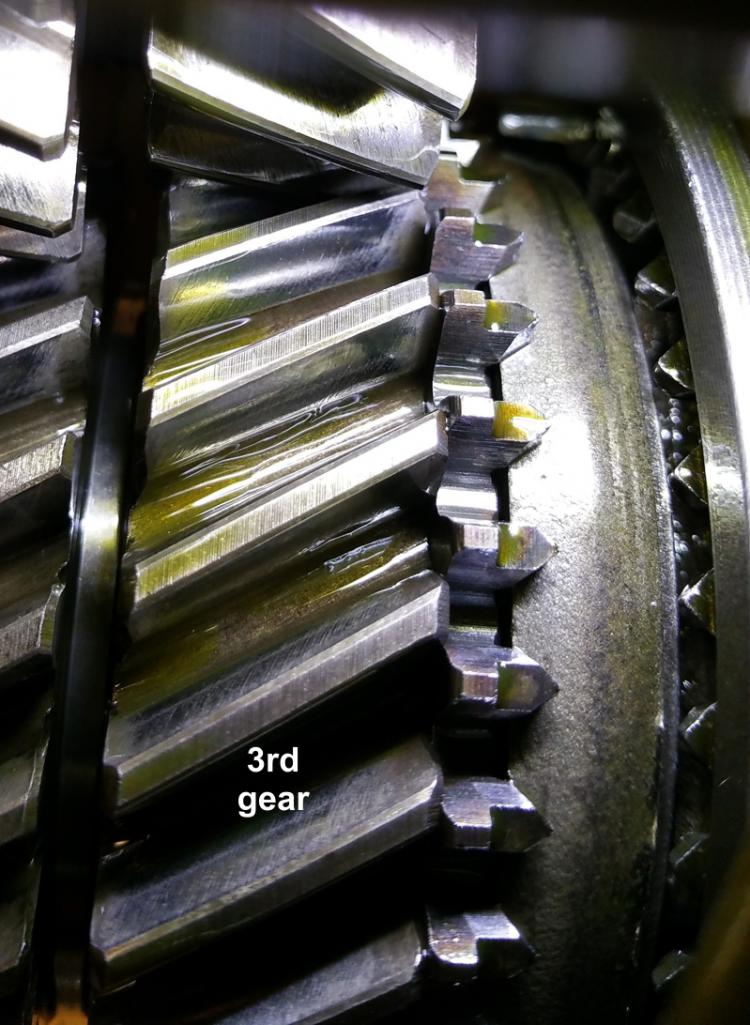
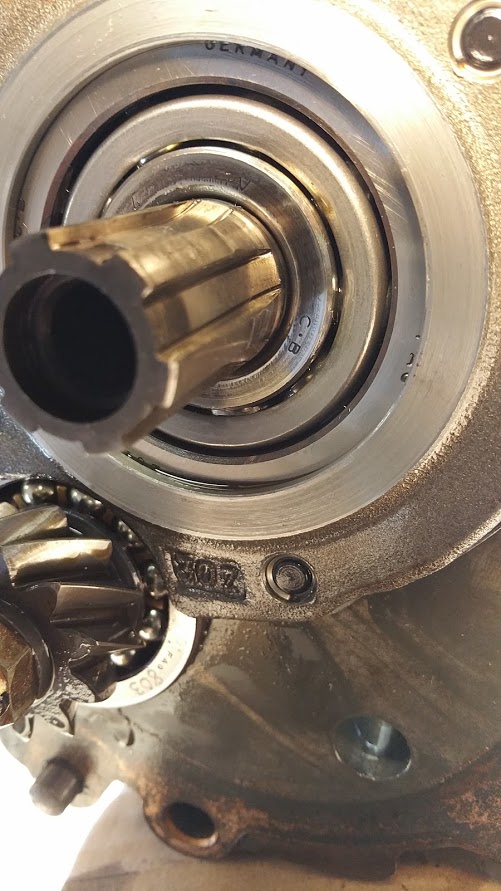
And here's a video of my pinion shaft. What do you think of the play there?
https://www.youtube.com/watch?v=E_7_PfFhaYI
Posted by: forrestkhaag Mar 31 2016, 06:30 PM
Amen on Tangerine's products RE: side shift conversions
And Dr. Evil's work is unparalleled in the rebuild of the 901 area. You can pluck the gear stack and he will tune that up to spec and with a little educated effort, you can reassemble your gearbox after enduring his video set as a baseline edu.........
Who is the gal in Dr. Evil's Hollywood production?...
Posted by: stugray Mar 31 2016, 07:17 PM
The dog teeth in those pics look pretty good.
One more thing to consider checking:
When I installed the side shift in a tail shift car, I also installed a rennshifter.
When the shifter was in the extreme 4th/5th plane, the bottom of the lever on the rennshifter was dragging on the clutch cable tube.
I ground the side of the rennshifter a little and moved the shifter up 1/4" with an aluminum plate.
I was reminded of this when I was in my tunnel checking for a clearance issue where you cut into the tunnel above.
There WAS an interference at that point you identified, so I enlarged that hole a little towards the driver's side.
I used a 3" hole saw instead of your angle grinder above and had enough room to fit a 90deg porting tool in there.
Thanks for showing that or I wouldnt have known to check it.
I always could hear something rubbing beside the seat when I shifted it without the engine drowning out the sound
Posted by: Jameel Apr 6 2016, 08:30 AM
The dog teeth in those pics look pretty good.
One more thing to consider checking:
When I installed the side shift in a tail shift car, I also installed a rennshifter.
When the shifter was in the extreme 4th/5th plane, the bottom of the lever on the rennshifter was dragging on the clutch cable tube.
I ground the side of the rennshifter a little and moved the shifter up 1/4" with an aluminum plate.
I was reminded of this when I was in my tunnel checking for a clearance issue where you cut into the tunnel above.
There WAS an interference at that point you identified, so I enlarged that hole a little towards the driver's side.
I used a 3" hole saw instead of your angle grinder above and had enough room to fit a 90deg porting tool in there.
Thanks for showing that or I wouldnt have known to check it.
I always could hear something rubbing beside the seat when I shifted it without the engine drowning out the sound
Wow! I helped somebody. Cool. I guess they are right, although slow and dangerous behind the wheel, senior citizens can still serve a purpose.
So what are we doing with a firewall boot for side shift conversions since neither style work with a conversion? I hunted around for a pic, but didn't find one.

Posted by: Phoenix-MN Apr 6 2016, 09:02 AM
The dog teeth in those pics look pretty good.
One more thing to consider checking:
When I installed the side shift in a tail shift car, I also installed a rennshifter.
When the shifter was in the extreme 4th/5th plane, the bottom of the lever on the rennshifter was dragging on the clutch cable tube.
I ground the side of the rennshifter a little and moved the shifter up 1/4" with an aluminum plate.
I was reminded of this when I was in my tunnel checking for a clearance issue where you cut into the tunnel above.
There WAS an interference at that point you identified, so I enlarged that hole a little towards the driver's side.
I used a 3" hole saw instead of your angle grinder above and had enough room to fit a 90deg porting tool in there.
Thanks for showing that or I wouldnt have known to check it.
I always could hear something rubbing beside the seat when I shifted it without the engine drowning out the sound
Wow! I helped somebody. Cool. I guess they are right, although slow and dangerous behind the wheel, senior citizens can still serve a purpose.
So what are we doing with a firewall boot for side shift conversions since neither style work with a conversion? I hunted around for a pic, but didn't find one.
There was an article in Panorama many years ago on making an adapter plate to use the late style boot, I'll see if I can find it.
Found it
http://www.914world.com/bbs2/index.php?showtopic=88401
Posted by: Jameel Apr 6 2016, 01:31 PM
My Panoramas only go back to '92. Any chance you've got a scan?
Posted by: db9146 Apr 6 2016, 09:04 PM
My Panoramas only go back to '92. Any chance you've got a scan?
See my post below for the much higher resolution scan of the August 1990 Pano article that includes an adapter diagram that enables the use of the sideshifter boot at the firewall.
Posted by: Dr Evil Apr 6 2016, 09:29 PM
Yer teeth are worn. Like saggy roofs. Look to the inner aspect, not the profile.
Posted by: oldie914 Apr 7 2016, 01:52 AM
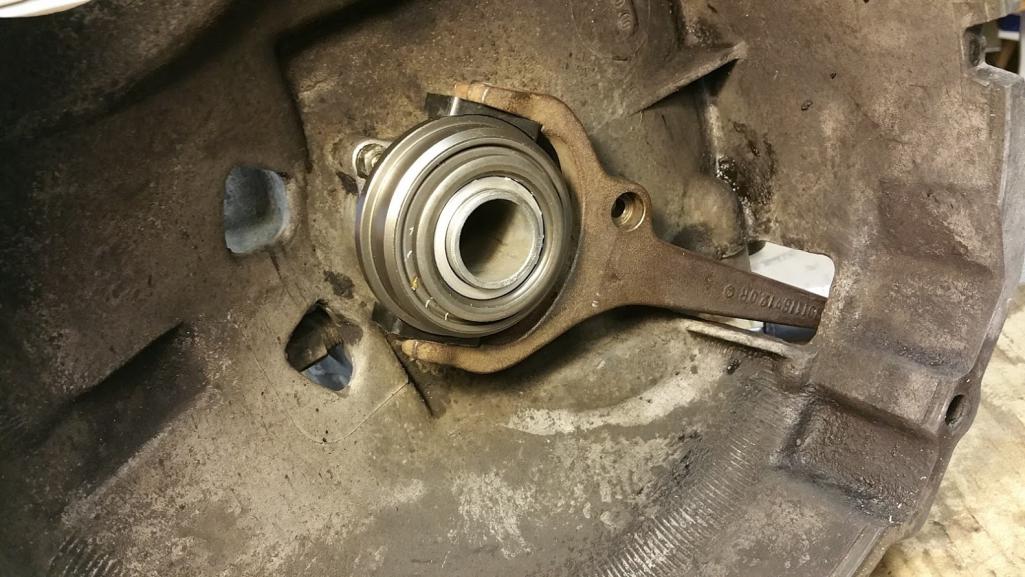
Your March 31st video shows visible end play on your pinion shaft. If you can feel end play, it is too much; if you can see the play, it is way too much.
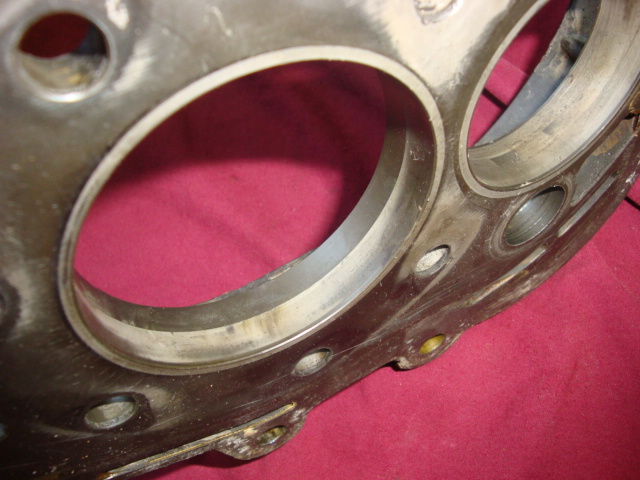
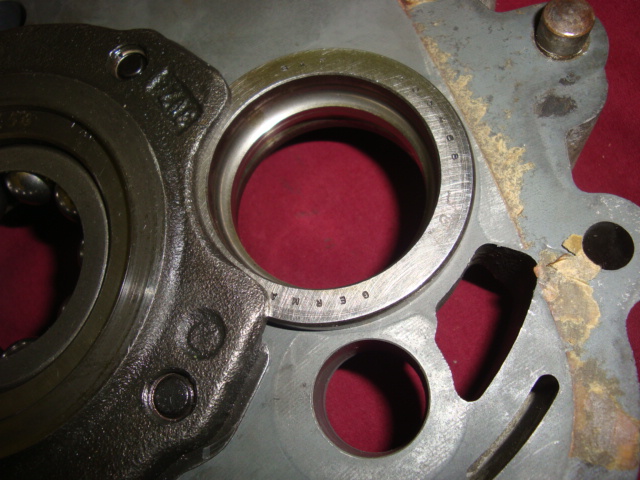
The pinion bearing is probably turning in the intermediate plate and has worn into the retaining plate. The plate should clamp the bearing with about 0.08mm preload. The attached picture shows a clamping plate with wear on the mainshaft bearing retaining area. The mainshaft bearing turns first because it is not clamped well; the pinion shaft bearing follows. You need to replace the retaining plate and will probably the intermediate plate as well. 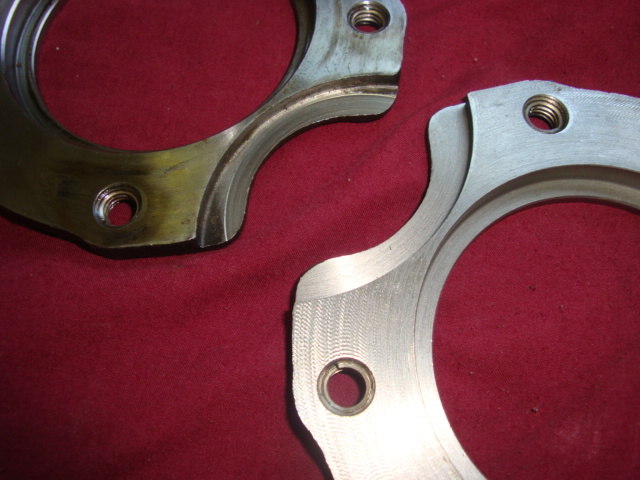
Posted by: oldie914 Apr 7 2016, 03:27 AM
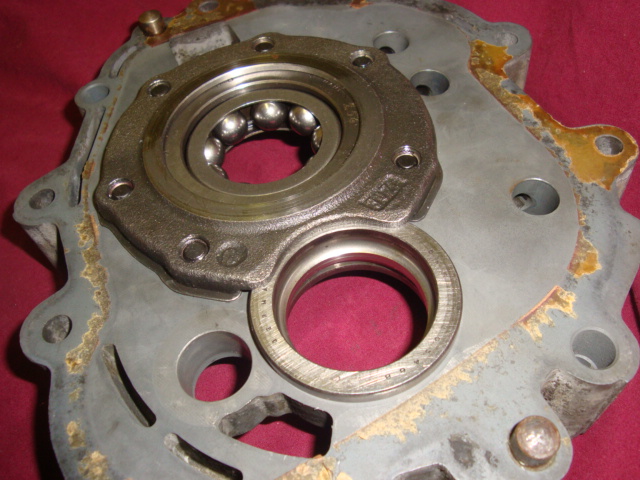
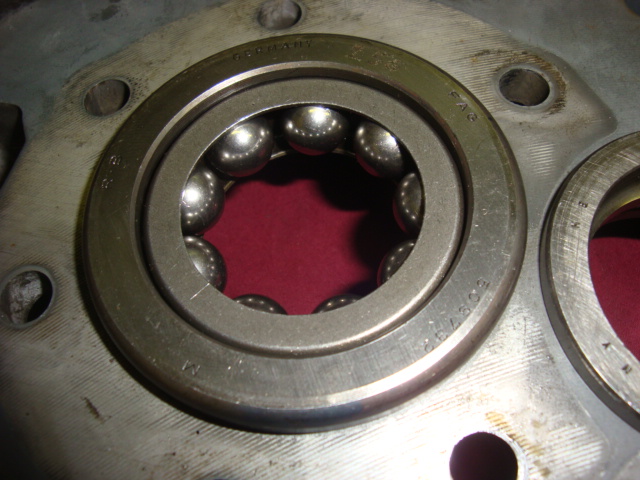
Here are some more pictures showing indicators of loose intermediate plate bearings. You can see the wear signs on the bearing even though it is hardened steel. When the bearings start to turn, they only get worse.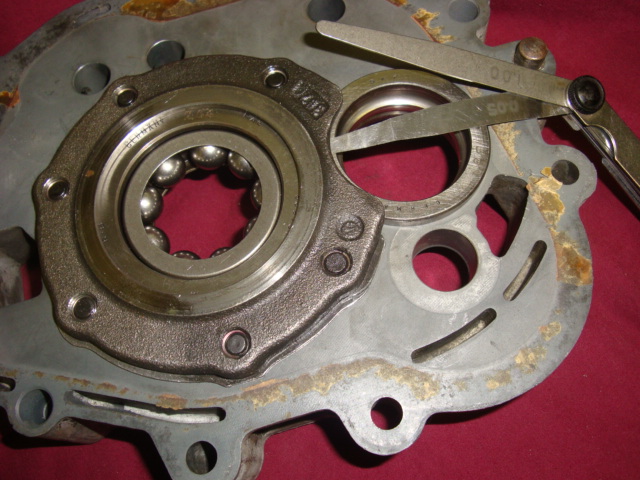
Posted by: Jameel Apr 7 2016, 06:19 AM
Yer teeth are worn. Like saggy roofs. Look to the inner aspect, not the profile.
Aha, I get it. So not the shape of the gable end of the roof, but the condition of the ridge and the "roof surface".
I just got a new 1st gear syncro and slider set from Brad, so I'll be swapping them out.
Posted by: Jameel Apr 7 2016, 06:42 AM
Thanks for the tips oldie914. I'll look closer when I have everything apart.
Posted by: Jameel Apr 8 2016, 02:02 PM
My Panoramas only go back to '92. Any chance you've got a scan?
I've got Panos way back but the scan tonight is lacking.
 Aug._1990_Panorama_914_TS_to_SS_Conversion_Article.pdf ( 363.34k )
Number of downloads: 134
Aug._1990_Panorama_914_TS_to_SS_Conversion_Article.pdf ( 363.34k )
Number of downloads: 134Its not as clear as I'd like for it to be but you can get an idea of the oval plate and washers for the adapter for the SS cover.
I'll try again with the better scanner at the office, including a close up of the adapter plate and washer dimensions.
Thanks for posting that. I'll have to hunt around for a boot now.
Posted by: Jameel Apr 8 2016, 08:28 PM
Got some deliveries past couple days. I have everything I need, except for the boot/cover at the firewall. If you've got an extra of either style, I'd be interested.
I grabbed my old clutch and hacksawed the rivets out, then had a friend weld up a drive shaft tool ala Dr. Evil. I see a welder in my future...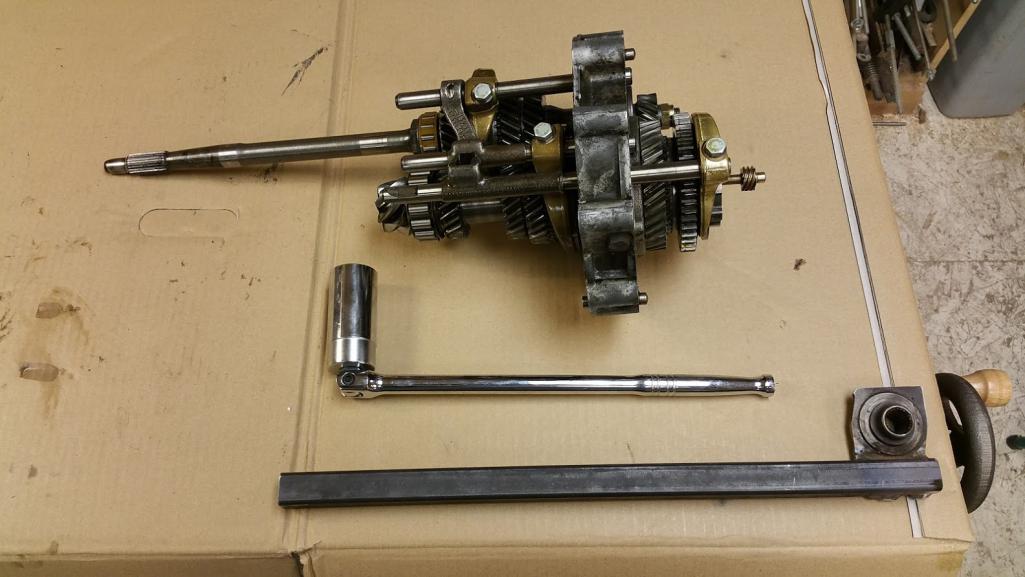
I've decided to replace 1st gear, 1st /rev slider and syncro band with a good used one from Brad Mayeur. So first step is to get the shift forks and rods off, along with the detent assembly. If you're a rank beginner like me, and you're reading this sometime in the future, just do yourself a favor and buy Dr. Evil's DVD. I won't be covering the assembly of the side shift rods and forks here because he obviously covers it better than I ever could. Plus, it's already a pain to try and shoot cell phone pics with gear oil all over my hands. 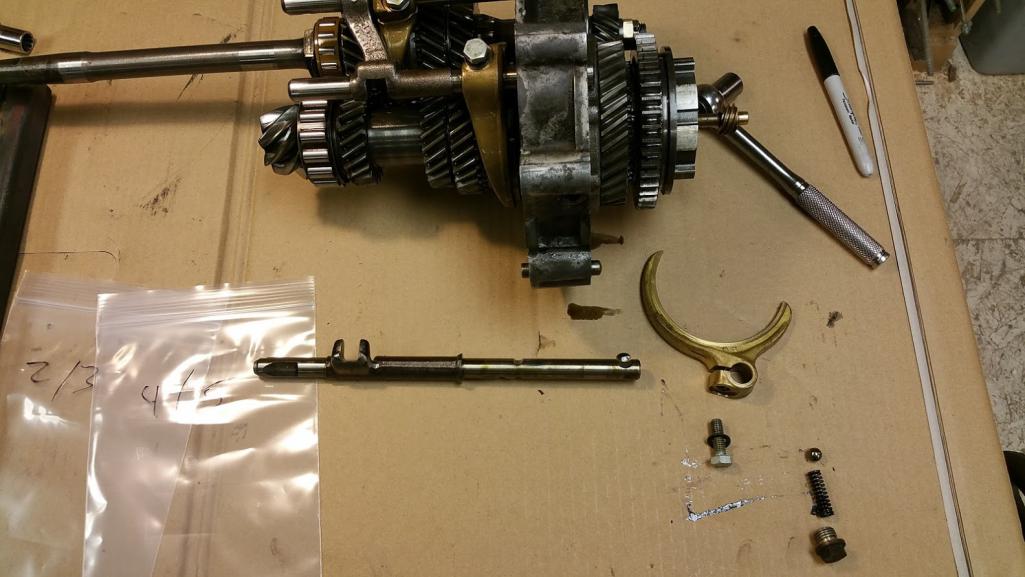
Someone has cracked this tranny open before I think. They scratched the numbers of the gears into the bronze shift forks. Thanks for that, whoever you are!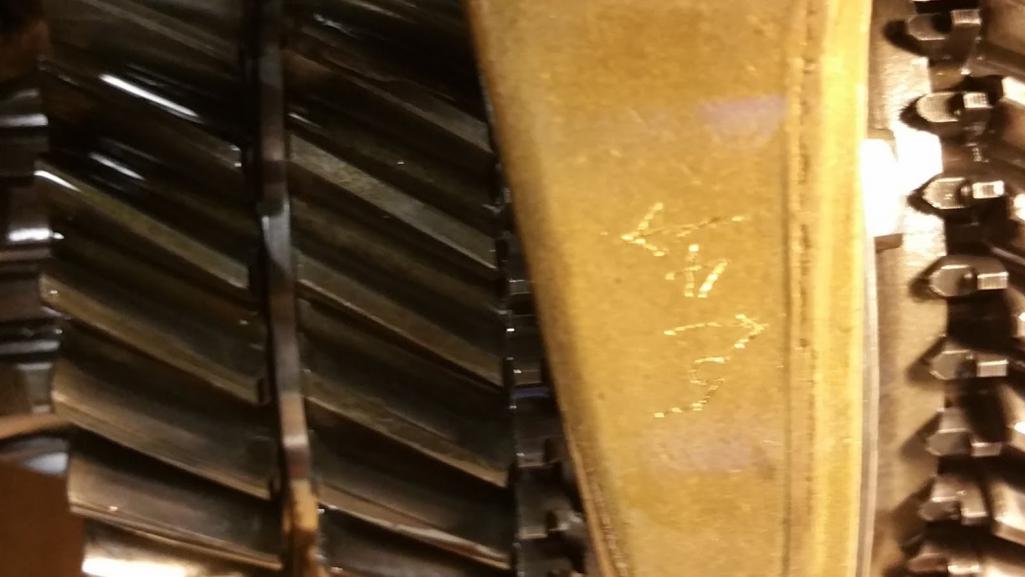
I was also surprised to see a Volkswagen symbol cast into the shift forks. Is this normal? I thought the 901 transmission was a Porsche product, same as the early 911's. 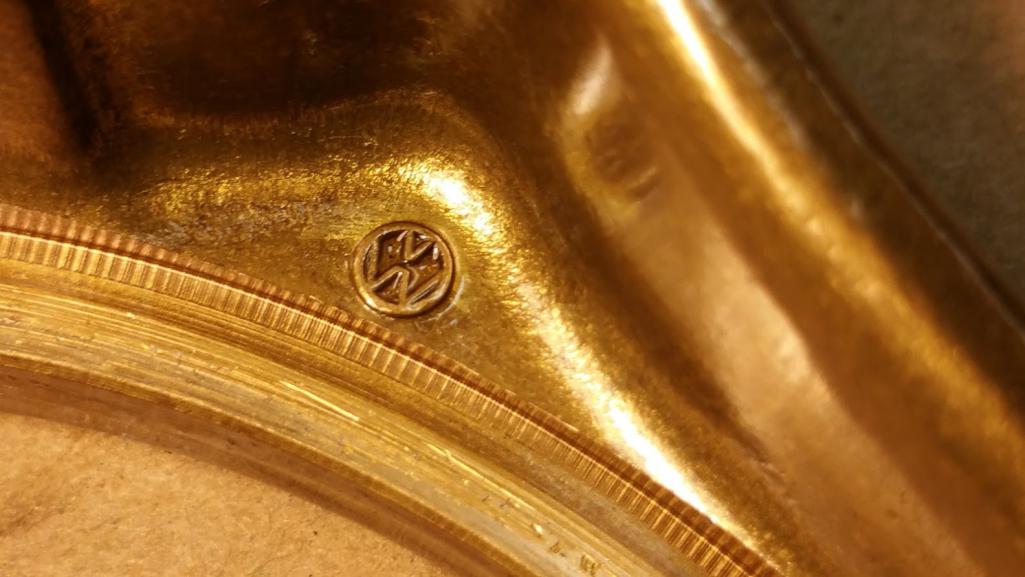
Started getting tired, so I pulled off the tranny and did a little grunt work. Since my flywheel got .023" removed to resurface, I ground at least .023" off the raised rim of the flywheel bolt heads so they don't interfere with the clutch.
Tomorrow, if I everything goes well, I may get this thing put back together!
Posted by: Jameel Apr 9 2016, 05:58 PM
Lots to report today. Here's my setup for taking off the pinion shaft nut. I found that it was better to turn so the pinion shaft was turning "into" the drive shaft. This helped prevent the two shafts from spreading. Of course the jig (Brad Mayeur kindly lent me one of his) helps this too.
Here's my first gear. The dog teeth definitely look worse with the gear out of the stack.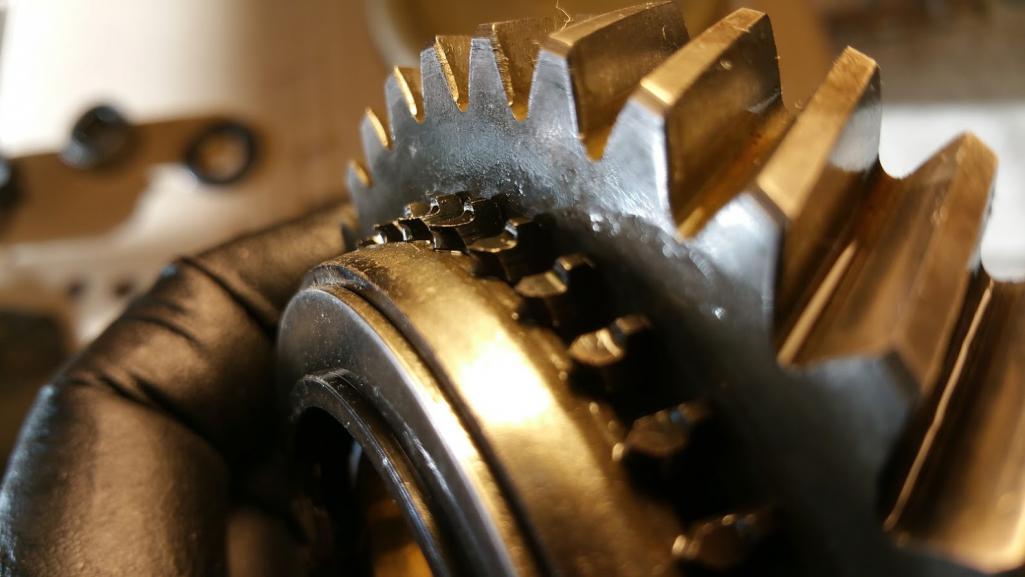
The new used gear and syncro from Brad.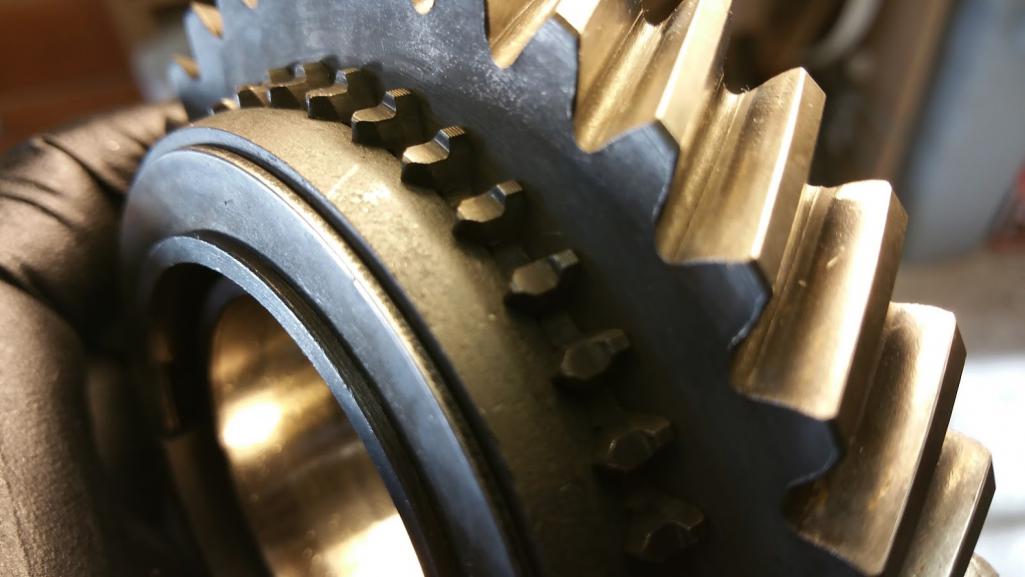
After replacing the gears I replaced the tail shift rods with the side shift rods. This was a tad finicky, but I actually enjoyed it. I spent a good 45 minutes getting everything lined up as perfectly as I could. I want this to shift sweetly. I followed Dr. Evil's steps from the DVD.
https://www.youtube.com/watch?v=Dj35Zq-tt98
The inner surface of the intermediate plate was kind of messy. Looks like someone had put some RTV in there at some point. It was really on the surface or the gaskets, just thin remnants mostly in the voids of the casting. I picked it all out with tweezers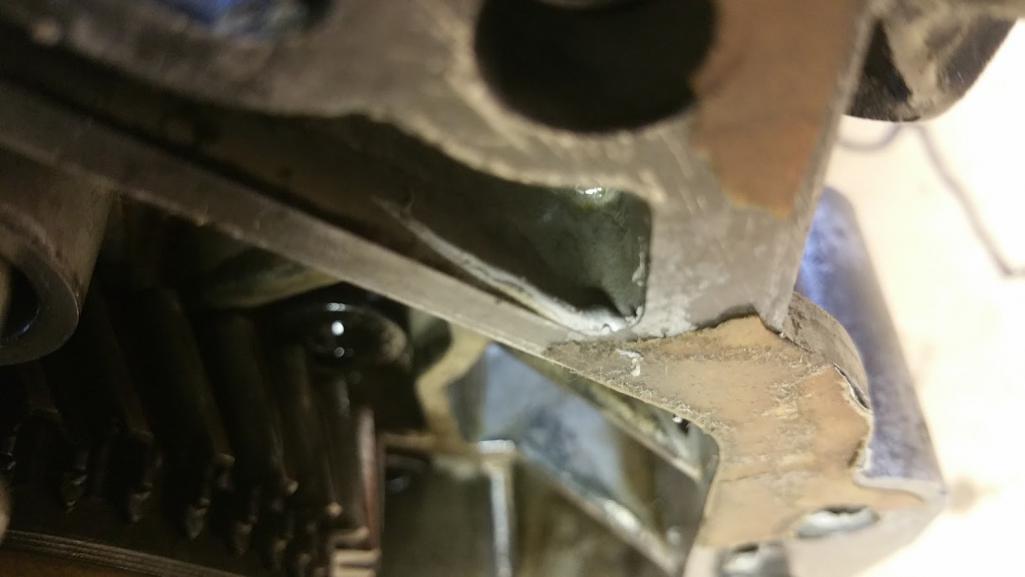

To prep the case for cleaning I removed the starter motor. The side with the long through bolt had a thin washer under it, but no washer on the stud side. I couldn't find this washer in my Hayne's manual. Any clues here?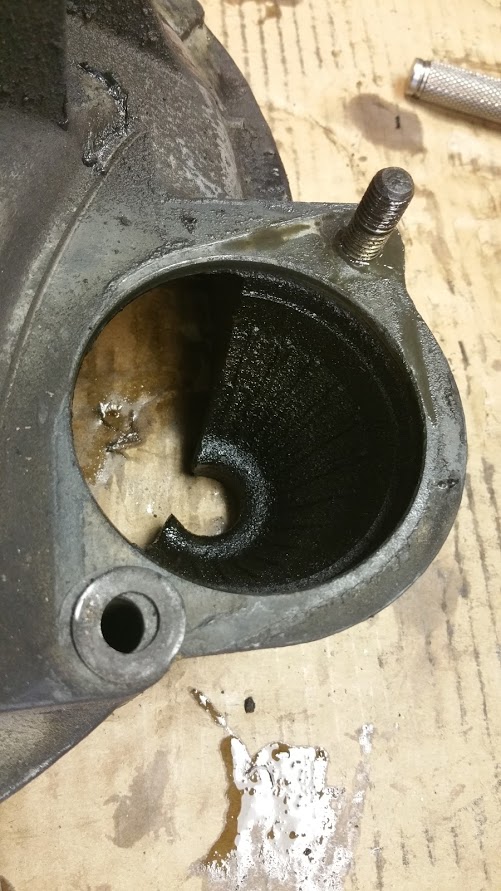
It felt good to do something brainless for a change. Tomorrow I may have this back together.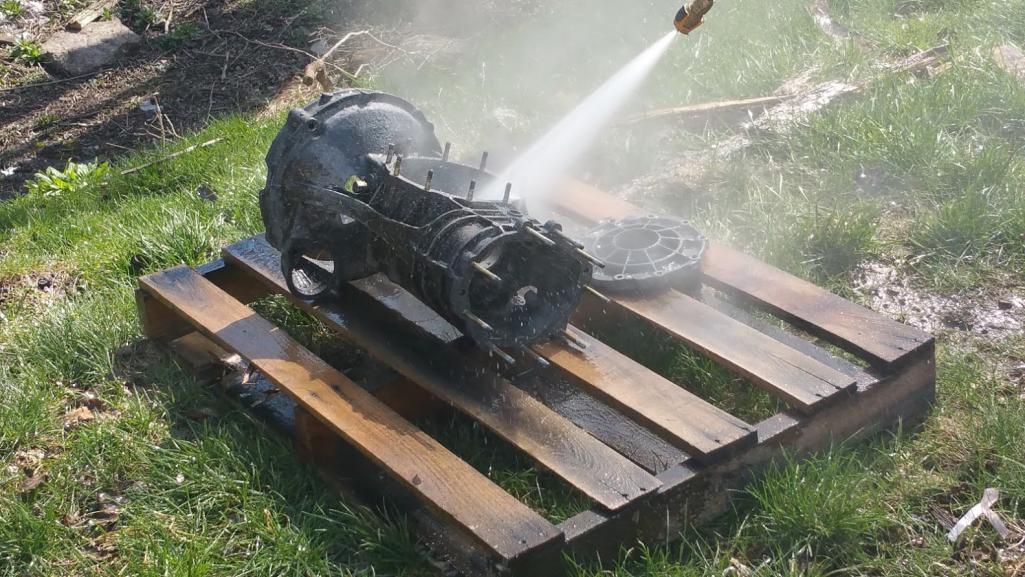
Posted by: Jameel Apr 9 2016, 09:01 PM
Well, I guess I screwed up. Sort of half assed cleaned my case today by scrubbing off the thick sludge with mineral spirits and a brush, then sprayed that off with just water. I guess I missed that from Dr. Evils notes when I read them earlier this week. So now I guess I need to clean it all the way so the paint will stick. Cripes. What an idiotic mistake.
Posted by: Jameel Apr 12 2016, 08:07 PM
Putting my case back together I had to reuse the bottom rectangular plate from the tail cone of my tail shifter. The thing was a little beat up. Like someone had backed into a curb or something. The back edge was folder over a little, and the plate was far from flat on the gasket side. There were raised areas around each hole, like the plate got pulled away from the case.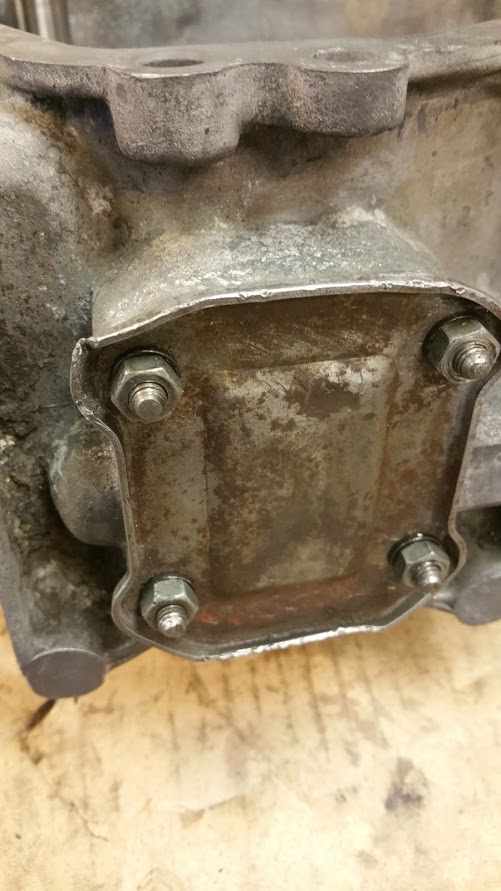
Looks like someone tried to fix this with a cork gasket and a paper one together. My gasket set only came with one gasket, and it wasn't nearly thick enough to span the 1/16" gaps between studs on this plate.
So I went to the anvil and carefully peened around each hole from the outside of the plate with a 1/4 punch to flatten it. It worked really well. It still wasn't perfectly flat though. So I hit the inside face on my belt sander and then it flattened up real quick. Hopefully this will be leak proof.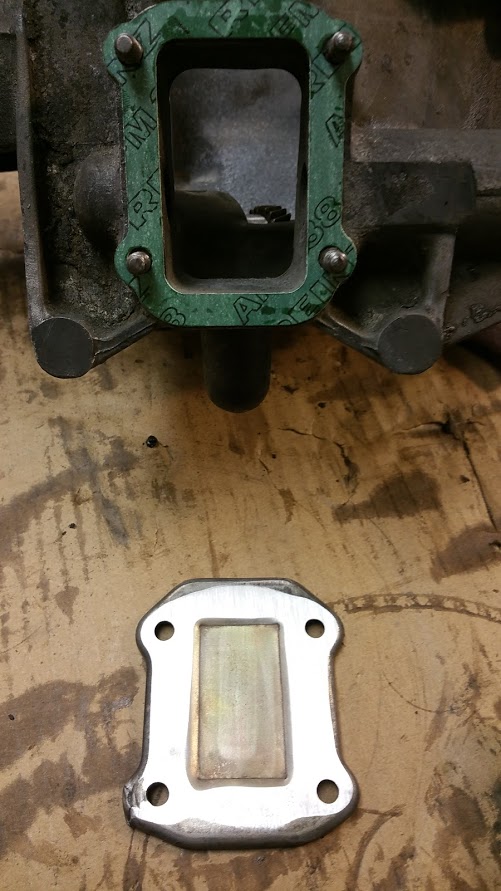
Also used Dr. Evil's method to get the cup out of the clutch throwout arm. PTFE S'mores anyone?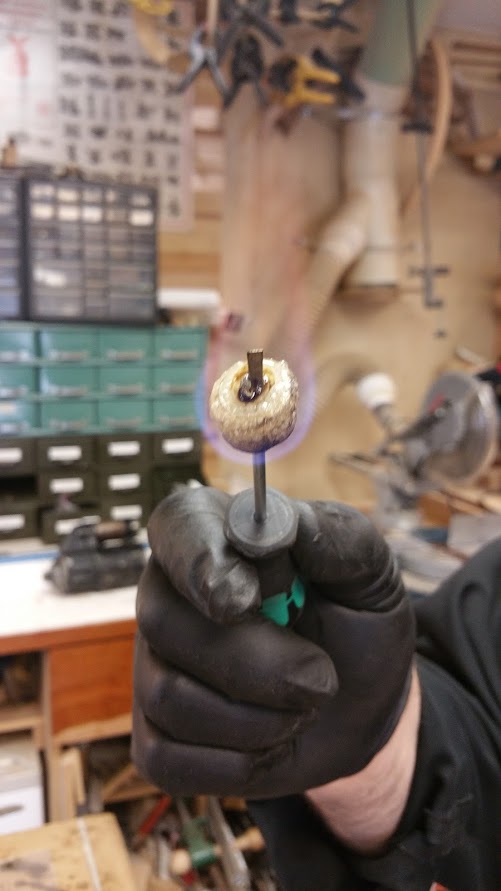
The last step was to install the new side shift console (I polished up the ball arm) and try and select the gears. I was able to select all gears pretty easily. They all clicked in real positively. I didn't feel any interference between the comb and the selector arms, so I must have got my spacing correct. This was so satisfying. I can't wait to shift this in the car!!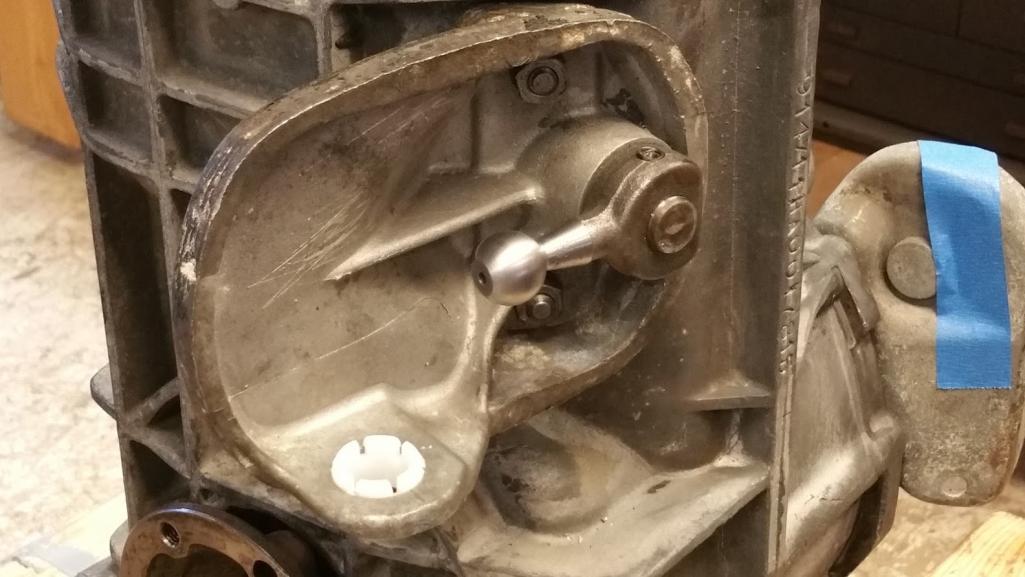
Posted by: db9146 Apr 15 2016, 11:33 AM
Here is the much better scan of the Pano article from my collection - 26 years old! Good grief I've got a lot of stuff in the basement.
This includes an idea on how to make an adapter so that the sideshifter boot at the back of the firewall can be incorporated. Hope this helps. I'm going to be doing this conversion myself.
914_Tail_Shift_to_Side_Shift_Conversion___Pano_Aug._1990.pdf ( 1.57mb )
Number of downloads: 247
Posted by: Dr Evil Apr 18 2016, 08:22 PM
Great job on this! Looking like you got it all good. Its going to shift well and you will be happy for many miles
Posted by: Jameel Apr 19 2016, 07:45 AM
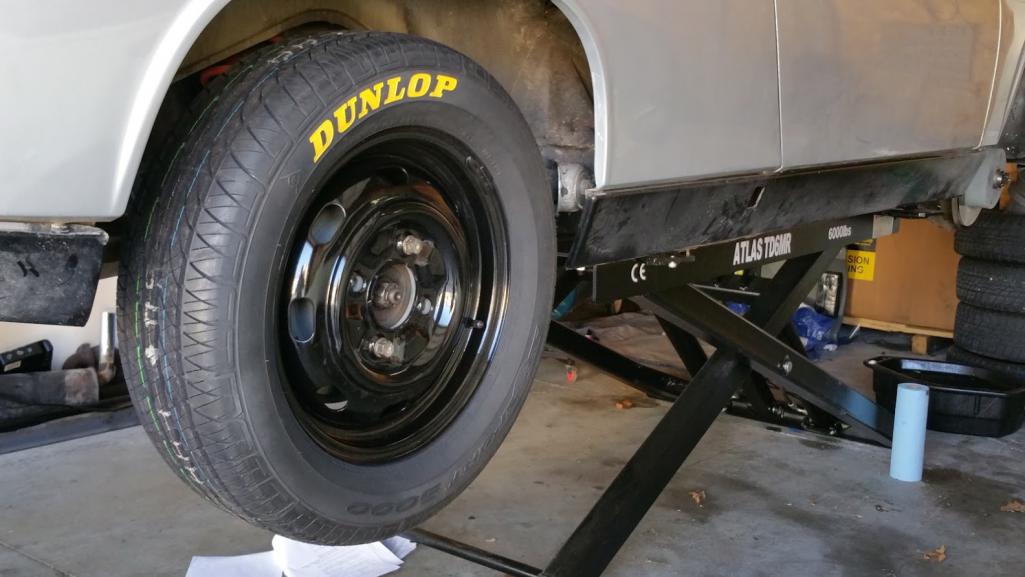
Thank you Sir! I'm just waiting on some new trans mounts to arrive before I can plug it back in. Getting new tires today too. Dunlop SP Sport 5000. Mine dated out (14 years.)
Posted by: Jameel May 8 2016, 07:36 AM
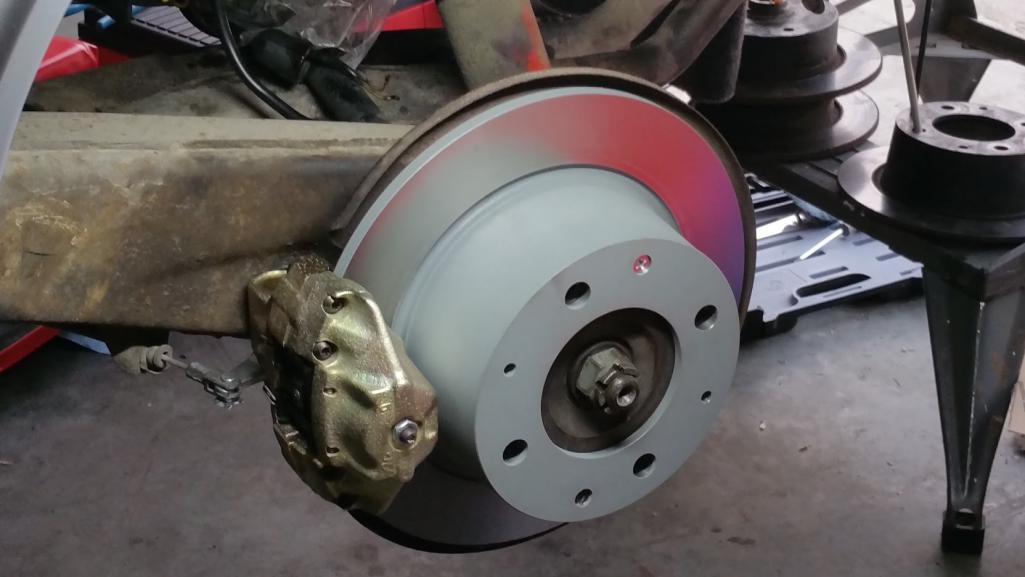
So I'm still waiting on a couple rubber boots to arrive to get this put back together. I did get the transmission reinstalled, and along with it a new clutch and pressure plate. The flywheel had enough meat left to do a resurface. I took 0.023" off, which I also ground from crown of the flywheel bolt heads. I also added a 0.023" washer under the pivot ball. So it should all work sweetly (crossing fingers.) I resealed the trans with all new seals. So while fiddling around with my brakes, I thought I'd mic my discs. Way past the wear limit. So not much choice, I ordered a set of discs and rebuild calipers from PMB. Didn't expect this bill, but all new brakes (and lines) will be really nice for staying alive. I also got my wheels painted up in the meantime and new tires mounted. These are Dunlop SP Sport 5000 195/65s. I'm having a little fun with this one, so I took an oil paint marker to paint the raised letters. If all goes well in the next week, I'll have this car back on the road lickety split.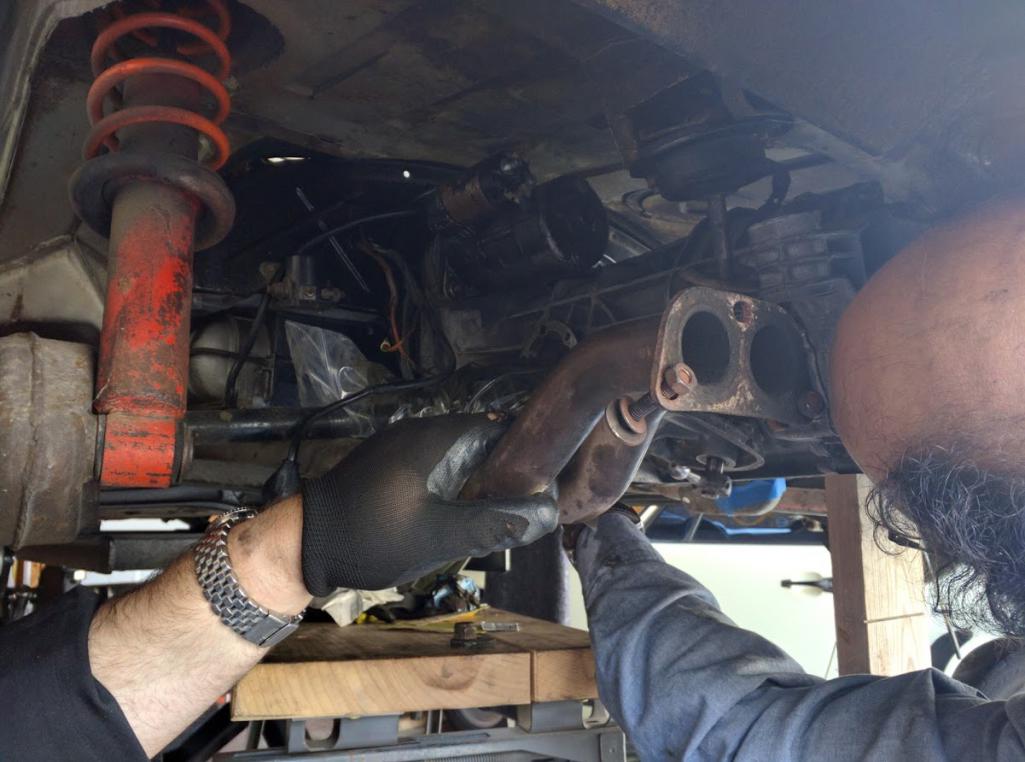
Posted by: Jameel May 14 2016, 08:07 AM
Made some good progress this week. Got the shifter rods installed.
Greased the front shift rod where it passes through the firewall. I ended up pulling the shift rod into the tunnel to get a little grease in the bushing itself. 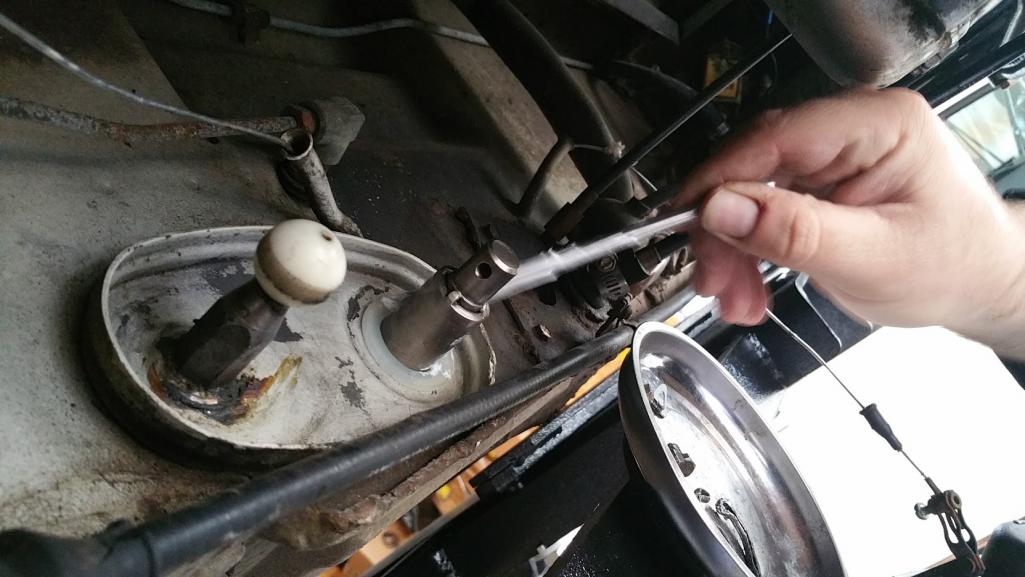
The rear side shift rod has a football-shaped flange on the front end (right behind joint) I learned that this was to clip the side shift boot onto. But since I'm doing the conversion I needed to cut off the flange (sorry, no pics) so the front end of the shift rod would fit into the tail shift plastic firewall housing. Once the flange gets cut off, the rubber bellows (http://shop.914rubber.com/Early-tail-shift-bellows-91442429700-70-72-91442429700.htm?categoryId=-1) got installed from the back end of the rod.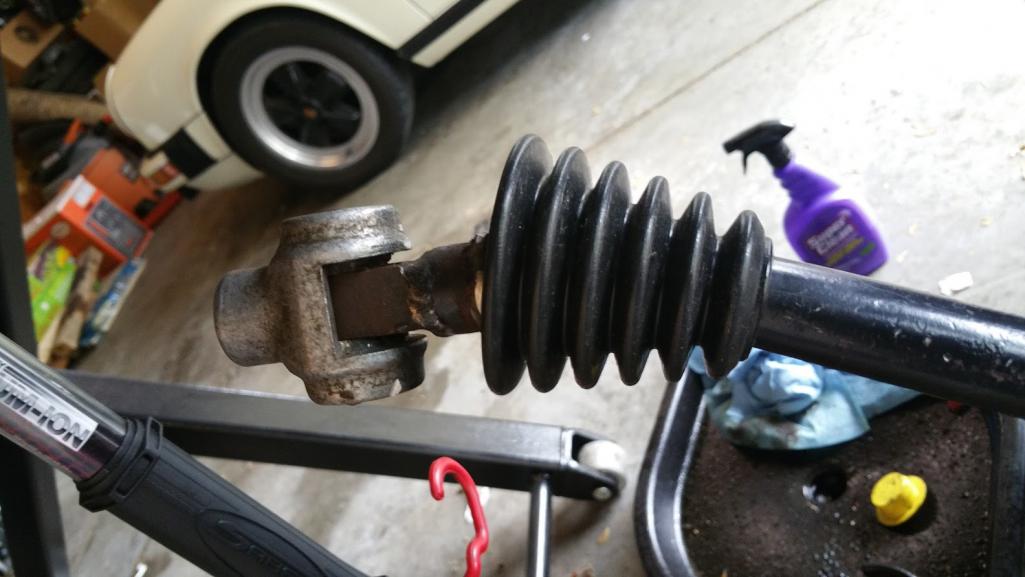
And then I put the boot on that clips to the side shift module cover.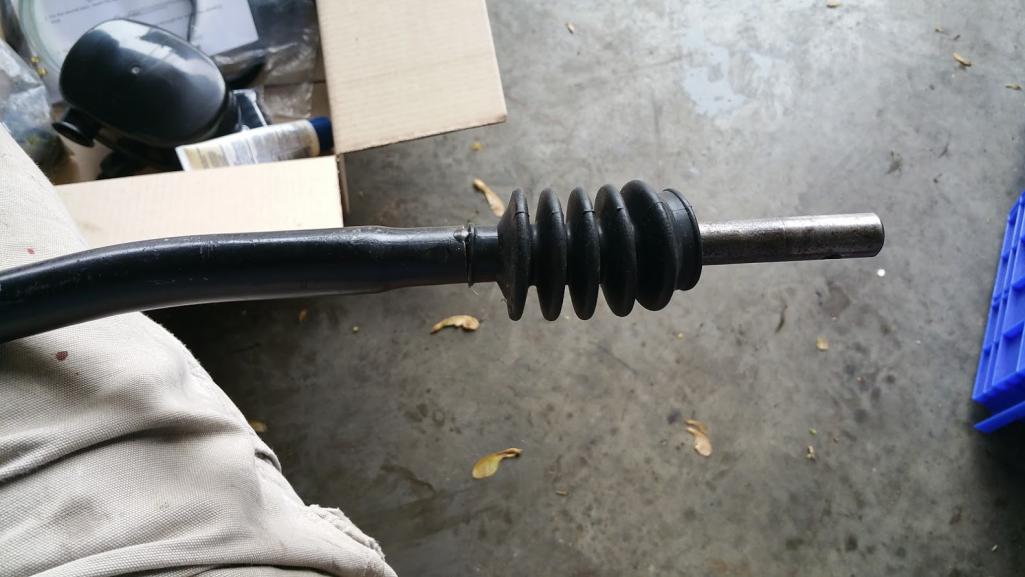
I installed the tail shift firewall housing by pulling the rubber band toward the back of the car (while on the housing), working the housing over the steel lip on the firewall, then working the rubber band over the lip. This was a little tedious. It helped to put a small screwdriver under the band to stretch it and get it started over the lip. Then I pushed it on by working my way around the lip.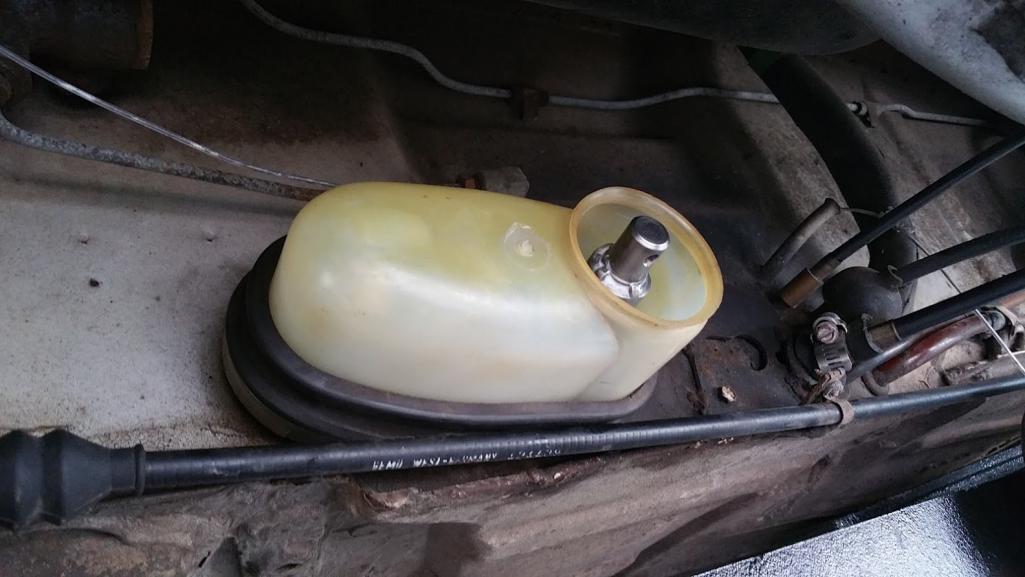
Then I greased the shifter ball at the back.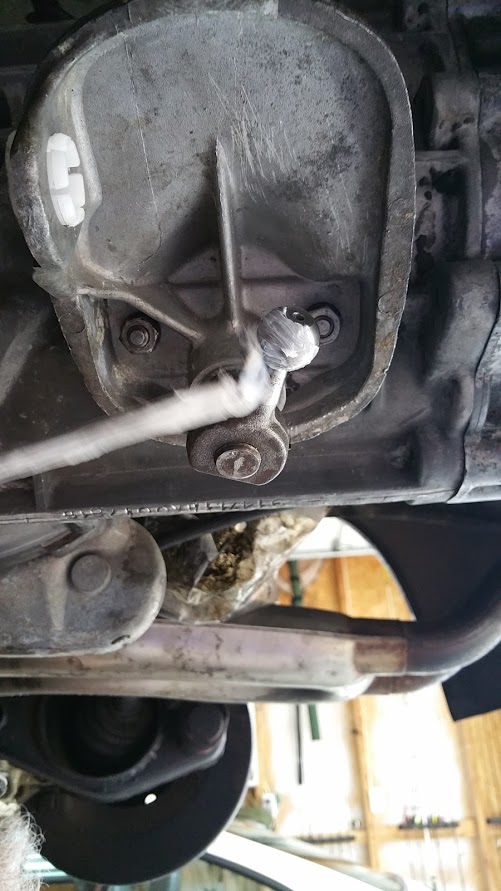
And tapped on the bushing (which I also put a little grease into)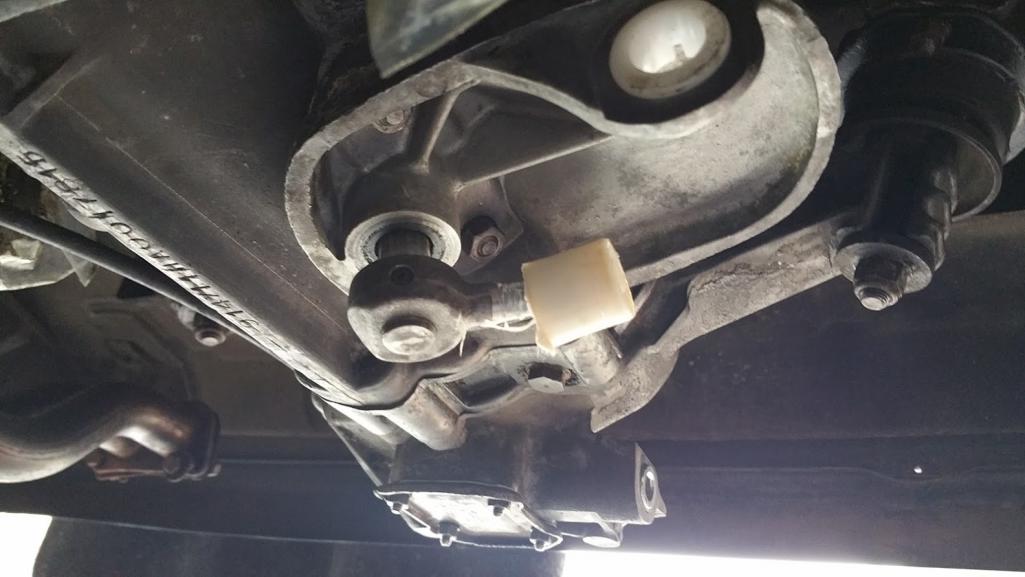
And then pressed on the coupler until it clicked over the bushing.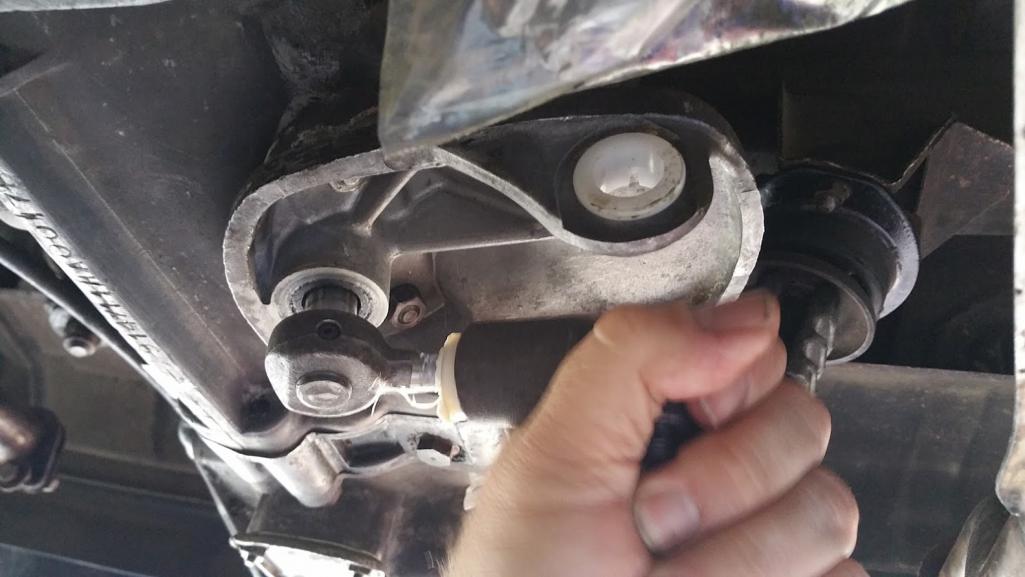
I fed the shift rod through the engine bar from the back and let it ride under the chassis a little until the rear end cleared the side shift module.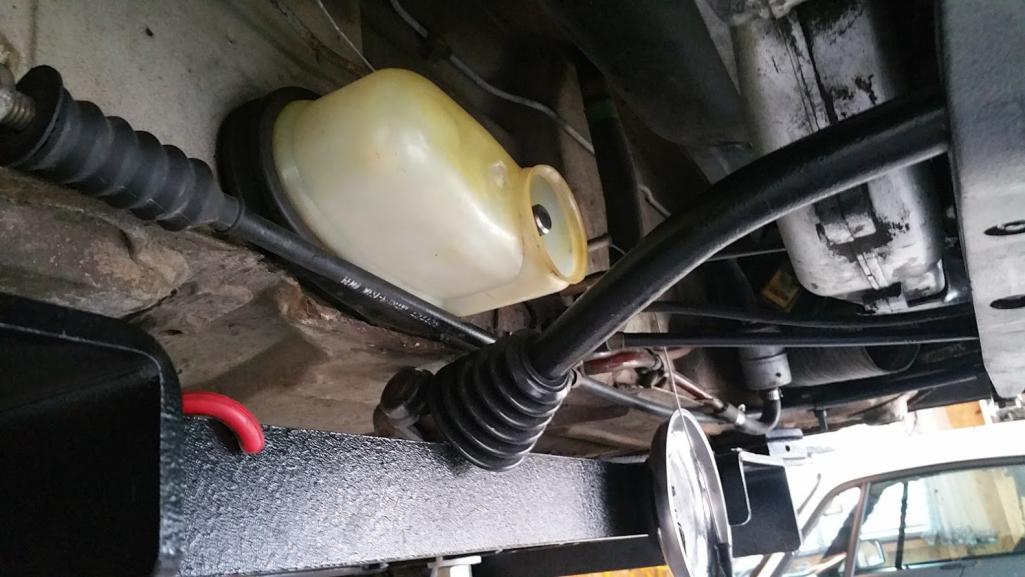
Then I installed the plastic cover
Then I fed the shift rod through the cover and bushing into the module
I found it needs to go past the coupler to clear things up front
With a good amount of fiddling, I eventually got the shift rods lined up. I did need to remove the cone screws so I could get the holes lined up just right. This wasn't difficult, just tedious.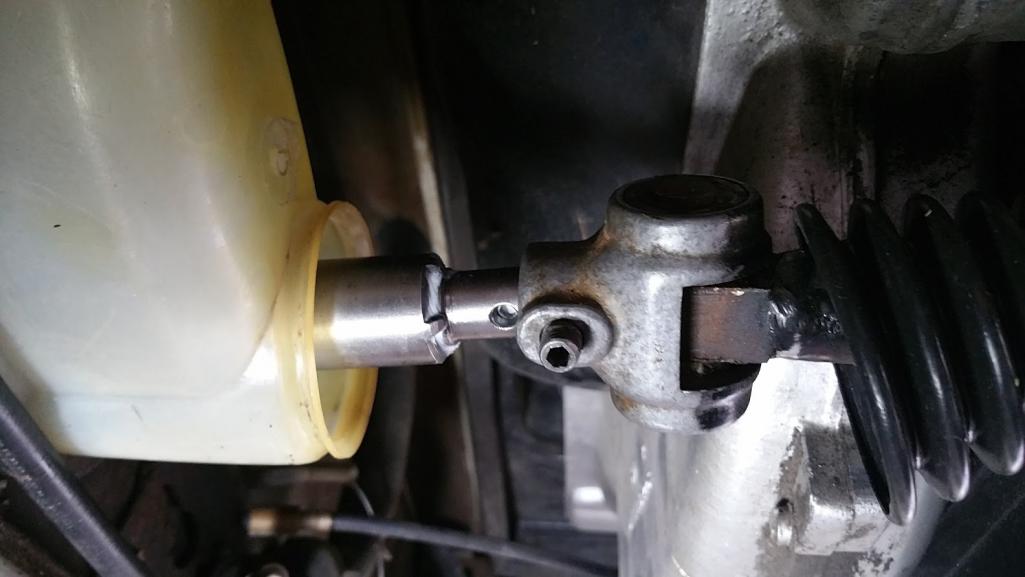
With the holes lined up at the front coupler I installed the cone screw, then did the same thing at the back end and installed the second cone screw. I had to shift the trans into a different gear to get the coupler to line up with the shift rod. 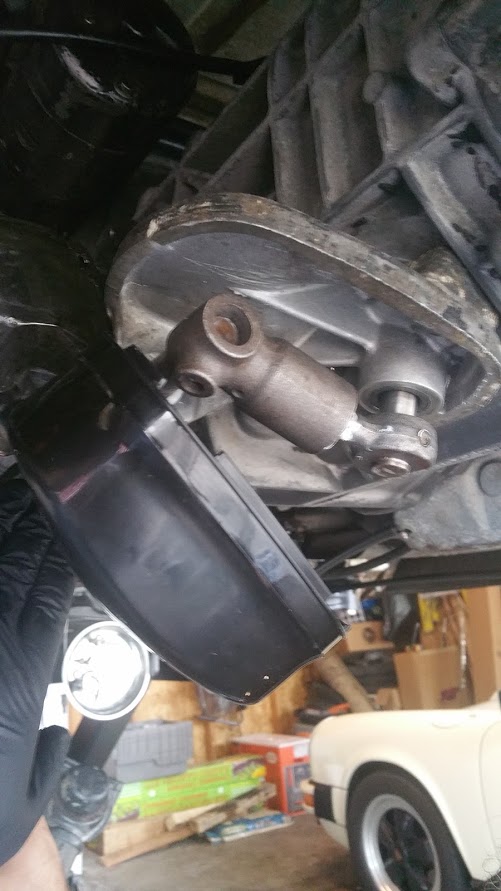
With the rods all attached, I stretched the bellows over the covers. I still need to attach the strap to the rear cover to hold it in place. I think I'm going to use some wire to hold the bellows on, unless someone here has a better idea. My car didn't come with anything here, so suggestions welcome. 
Posted by: Jameel May 15 2016, 08:40 PM
Today I finished up the side shift conversion!! I got all the covers completely attached as follows: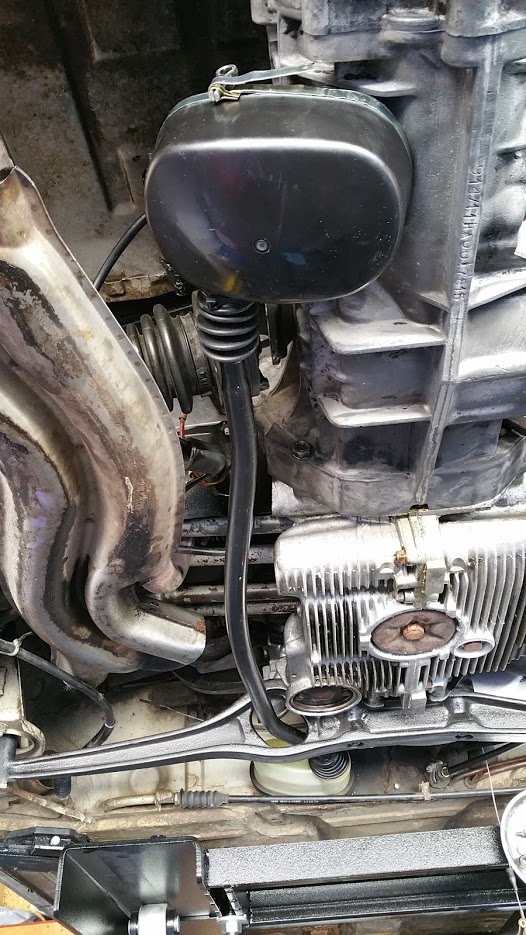
The bellows at the side shifter module cover got secured with a zip tie. I figured it'd hold up as long as the bellows, so I wasn't too concerned about not using a metal strap. 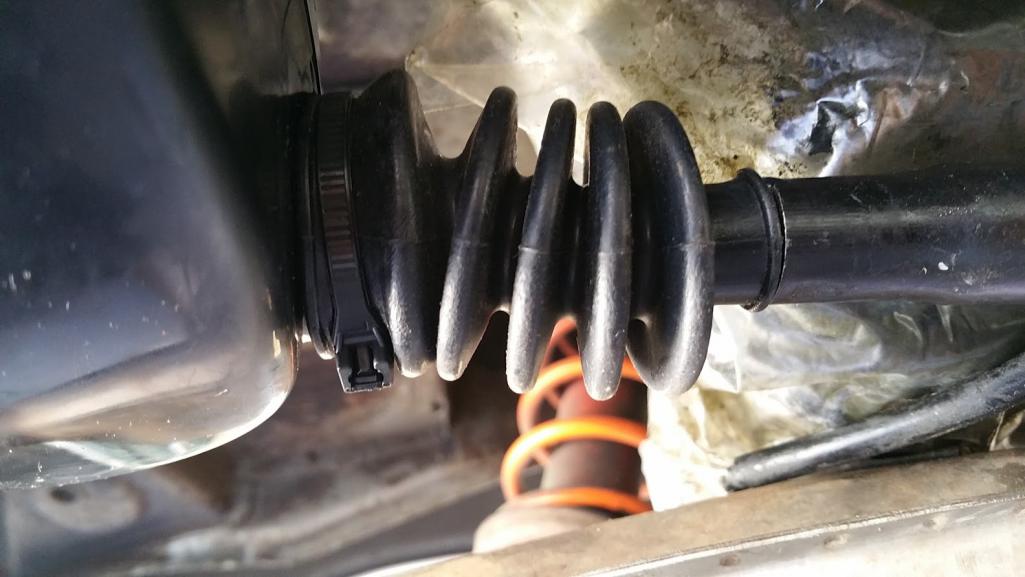
The bellows at the firewall cover posed some problems. There really isn't much of a lip on either the bellows, or the cover. I tried to wrap a wire around the groove in the cover, but I didn't have much luck. It turns out that the first pleat in the bellows fit rather nicely just inside the hole in the cover. It felt quite secure. So I simply tucked one pleat inside and called it good. We'll see how this holds up I guess. 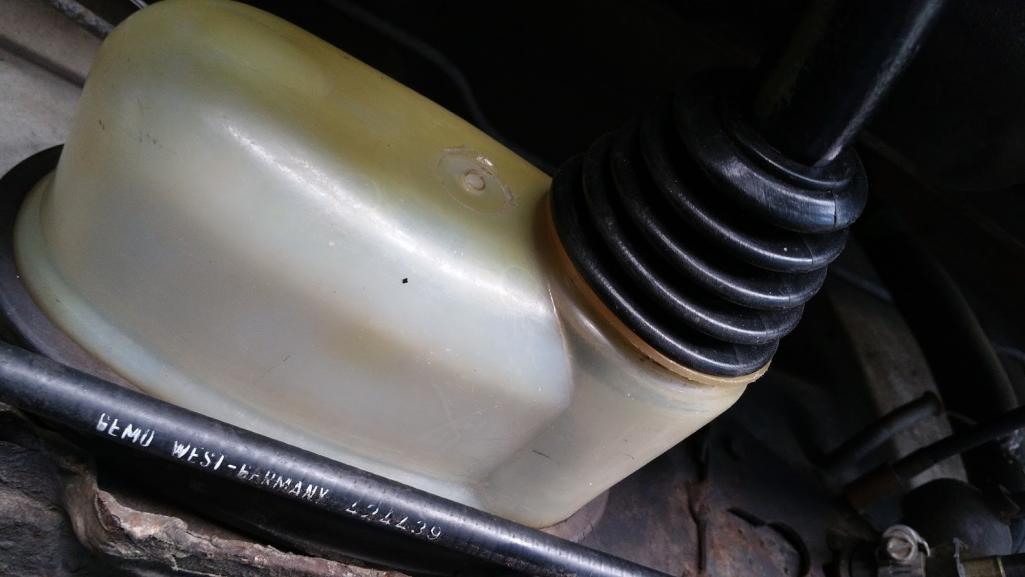
The metal strap that came with the side shift cover from 914 rubber was a little tricky to install. The instructions were a little vague for this first timer. I had to do it twice to get it right, but once I figured it out I was able to cinch it down tight and it stayed put. 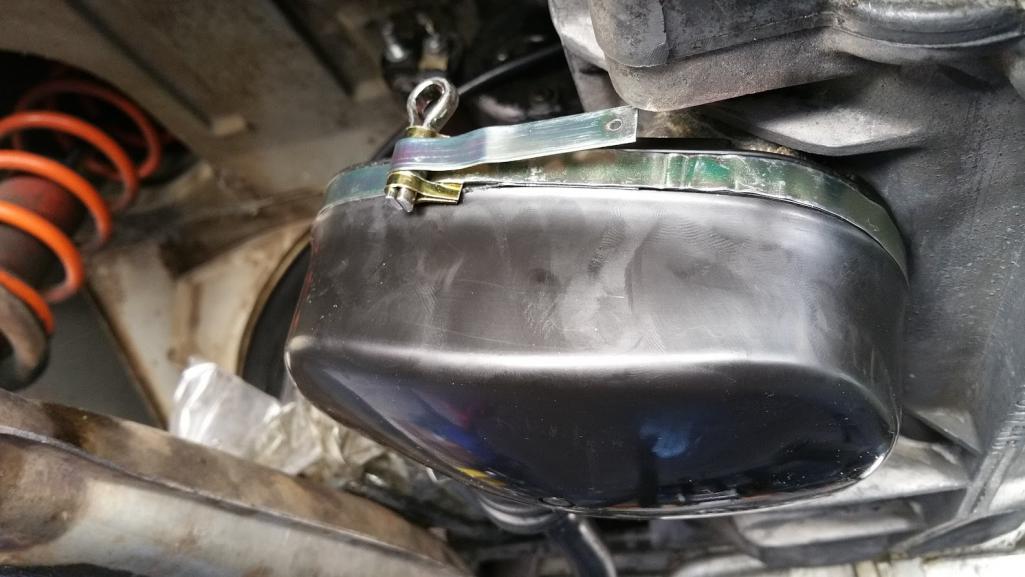
The terminals that connect with the back up switch were totally corroded in my old switch, so I had to wire some new ones on. I had a hard time finding any that would fit the round holes. And at this point I've gotten a little impatient, so I dug around in my electrical supplies and found these. They were too small, but I found they had a split in the side. So I took a little pick and a thin blade and worked the metal apart to make it a little large. They fit in the switch nicely with a good amount of bite. Seems like they will hold just fine. 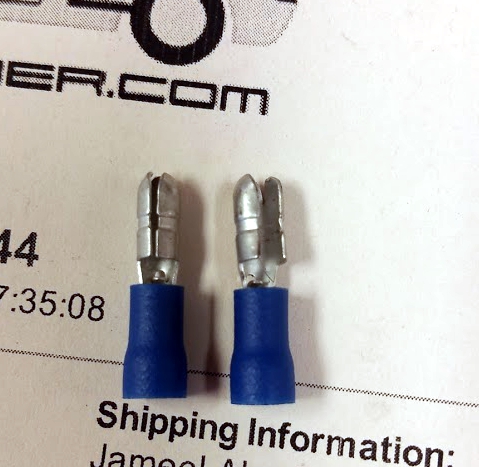
I also reattached my wiring to the started motor and installed a new reverse light switch into the tranny. I followed Dr. Evils dirt simple method of shifting the transmission into 2nd, then pushing the shift lever forward into second as I slipped the coupler over the front end of the front shift rod, while holding the lever tight to the spring plate (left) and cinching down the pinch bolt. It feels good as is, but I'll need to drive the car to make the final determination. All I'm waiting on now is a rear brake caliper to show up, then reinstall the muffler and I can fire her up!
Posted by: gereed75 May 16 2016, 04:30 AM
Really nice write up. Thanks
Posted by: Jameel May 17 2016, 07:49 AM
Hopefully someone in my shoes someday will find it useful. I'm hoping to bleed my brakes after work today, fire her up and take her out for a test drive!
Posted by: Porsche930dude May 20 2016, 09:39 PM
I just picked up a junk yard side shift trans today and am looking forward to the conversion. I did not get the new style rubber mounts with the cross bar. do you think it would be possible to retain the old rubber outer mounts and solid mount the center like the old bar?
Posted by: Cuda911 May 20 2016, 11:54 PM
Excellent work, Jameel, and excellent write-up. Thanks!
Posted by: brant May 21 2016, 12:11 AM
Wonder why you had to cut out that access hole in the tunnel? When I converted my '71 to a side shifter MANY years ago I didn't have to do that.
When adjusting the shift rod, if you experience difficulties, Tangerine makes a slick part that allows easier adjustment- check Tangerine Racing website...
Agreed.
No cutting necessary
Posted by: Jameel May 21 2016, 05:47 AM
Thanks! Great news! Two nights ago I got everything buttoned up, fired her up, pressed the clutch pedal in, put her in reverse, then with great apprehension I slowly let the clutch out. The car backed out of the garage! Then I put her in first and drove over to the school parking lot across the street from my house and checked everything out. It works! It seems I even got lucky and nailed the shift coupler adjustment up front first time out. It goes into every gear without issue and feels great. I have not taken her out for a serious drive though, just a spin around the parking lot. Needless to say, an ENORMOUS improvement over my worn and sloppy tail shift. Once I get a few other things sorted on this car (oh, forgot to mention our first test drive with maybe 10% brakes was interesting) it's going to be pretty sweet. I'm just waiting on a new master cylinder to finish the brake system. I bled them three separate times, two-man method, and still have pretty much zero pedal. Must be the seals in my master.
Posted by: Jameel May 21 2016, 05:58 AM
I just picked up a junk yard side shift trans today and am looking forward to the conversion. I did not get the new style rubber mounts with the cross bar. do you think it would be possible to retain the old rubber outer mounts and solid mount the center like the old bar?
Hard to say. There might be a way to do that. I think the front end of the engine case might have some bits that interfere if you delete the rubber mounts. Might be a way to shim it out with rigid spacers so you can use the early rubber mounts at the ends. I'm a rank beginner here, so these are really green opinions.
Posted by: Dave_Darling May 21 2016, 11:18 AM
I just picked up a junk yard side shift trans today and am looking forward to the conversion. I did not get the new style rubber mounts with the cross bar. do you think it would be possible to retain the old rubber outer mounts and solid mount the center like the old bar?
Nope. The shift rod will foul on the hole in the motor mount bar. You need the late style mounts.
--DD
Posted by: stugray May 21 2016, 11:43 AM
Wonder why you had to cut out that access hole in the tunnel? When I converted my '71 to a side shifter MANY years ago I didn't have to do that.
When adjusting the shift rod, if you experience difficulties, Tangerine makes a slick part that allows easier adjustment- check Tangerine Racing website...
Agreed.
No cutting necessary
Actually when I saw this, I looked into my center tunnel with a borescope (my car is a tail-shift to Side-shift conversion as well).
There WAS interference between the shifter and the clutch cable tube AND the shift rod was rubbing on the hole in the tunnel like shown in the pics.
I have a rennshifter so I dont know if that contributes.
I used a hole saw to make a hole in the center tunnel and reached in with a die grinder and enlarged that hole.
You could actually hear the rod rubbing on the center tunnel opening before as you shifted. Now I cant hear anything rubbing.
Posted by: Jameel Jun 5 2016, 09:37 PM
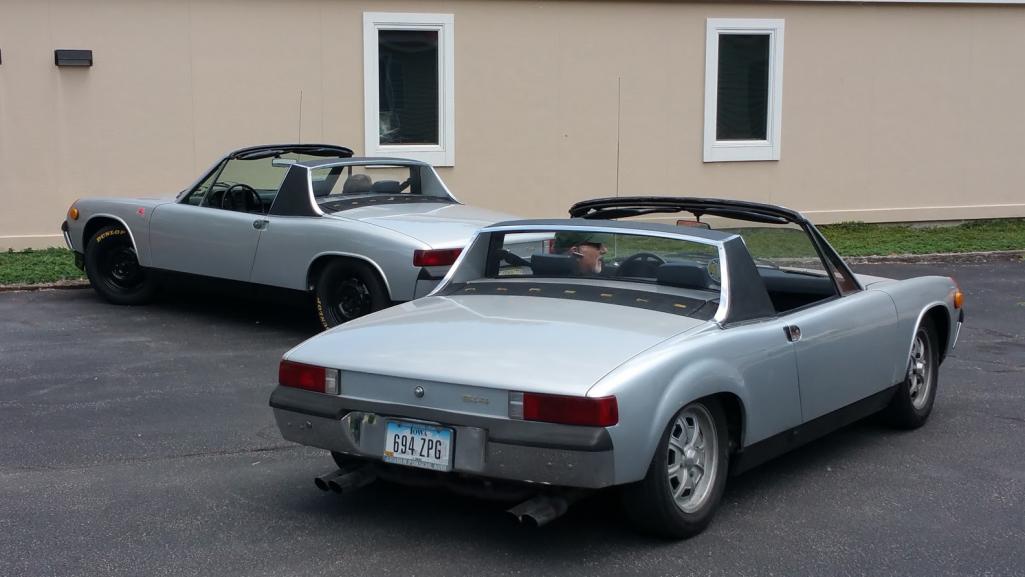
Just a quick follow up. I got my brakes bled properly after installing a new master cylinder. Now I can lock up my wheels. A GREAT feeling, which made a proper shakedown drive possible. After a few days my shifter started acting up. I couldn't get into 2nd or 3rd, it went right into 4th from 1st. With the knowledge from rebuilding everything I knew to look at the cone screws to see if one had come loose. Sure enough the one way at the back was loose and the rear shift rod was rotating in the coupler at the side shift module. I reinstalled it with some blue loctite (and did the same to the front one for good measure) and all is well. It still shifts great. I've been tearing around town in this little go kart for the past week and loving every minute of it. Here's a couple pics of the car, along with a friend's 1971 914. He's the original owner. He's my dad's age, and used to take me for rides in this car when I was a kid. Great memories. Thanks again to everyone who helped me out here, especially Dr. Evil and his invaluable video. 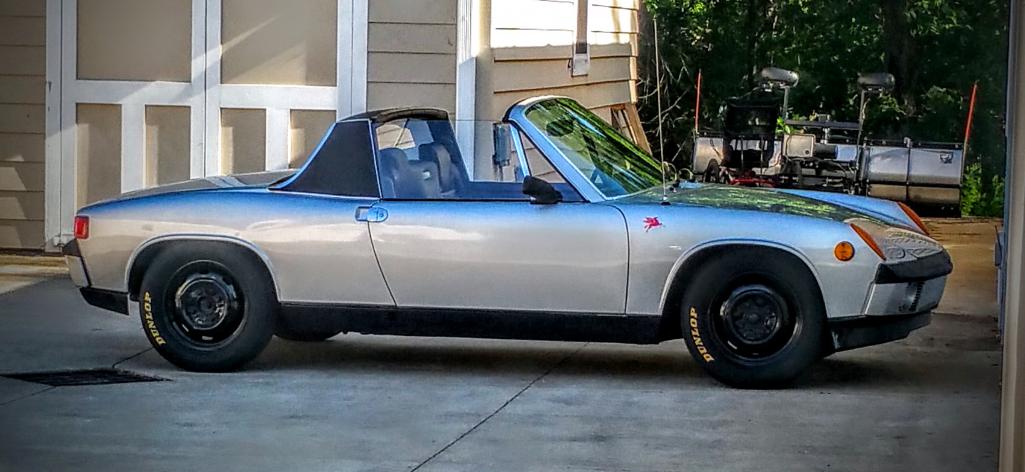
Posted by: gereed75 Jun 6 2016, 06:26 AM
Nice work and really nice looking car(s). Feels great to be able to rat around and shift with some confidence!! Really increases enjoyment of driving the car! Thanks for the great write up.
Posted by: mbseto Jun 6 2016, 07:59 AM
I've been tearing around town in this little go kart for the past week and loving every minute of it.
All is right in the world.
I like the steelies. No-nonsense.
Posted by: Porsche930dude Jun 9 2016, 09:05 PM
I just picked up a junk yard side shift trans today and am looking forward to the conversion. I did not get the new style rubber mounts with the cross bar. do you think it would be possible to retain the old rubber outer mounts and solid mount the center like the old bar?
Nope. The shift rod will foul on the hole in the motor mount bar. You need the late style mounts.
--DD
Iv completed the conversion and I was able to use the old outboard rubber mounts and old engine mount with the new bar. I had to drill out the center bar holes slightly bigger to fit the old bolts. also cut off the nubs on the ends of the bars that stick up so they are the same height as the old bar. The biggest problem was the old engine mount holes are about 1/2" narrower than the ones in the new bar. So I sliced out a nut on one side and bent out the gusset to weld in a new nut to slightly widen out the holes.
For the shift lincage my old u joint was shota nd part of the bar that came through the firewall was all bent up. so i welded in a new pipe section the same diameter as the old bar. Actually a bit bigger so it sits tighter in the bushing. and i welded in a u joint from a car steering shaft with the splines so its removable on one end. And I even used the old tailshift firewall boot just turned around. It fit over the new u joint since i positioned it as close as i could to the firewall. Hope that all makes sense
 The conversion seems to work good. i wasnt able to drive it at the moment because i have one wooden wheel
Powered by Invision Power Board (http://www.invisionboard.com)
© Invision Power Services (http://www.invisionpower.com)