Printable Version of Topic
Click here to view this topic in its original format
914World.com _ 914World Garage _ Go Big or Go Home: Clay's 914-6
Posted by: ClayPerrine Mar 17 2016, 08:54 PM
It begins:
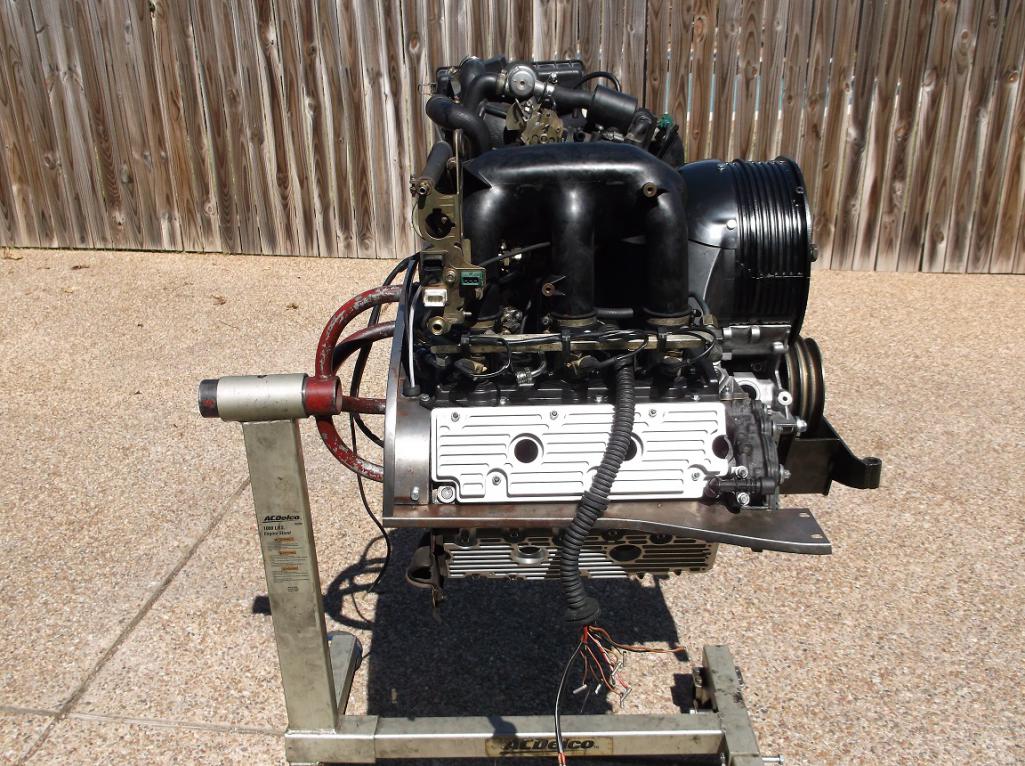
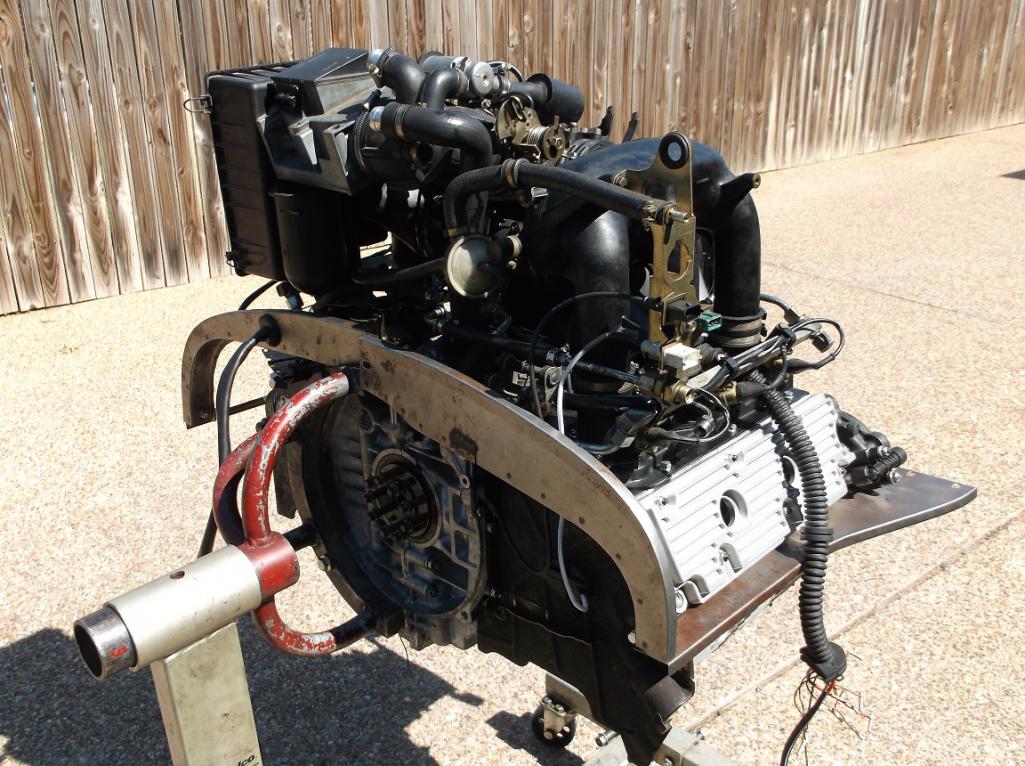
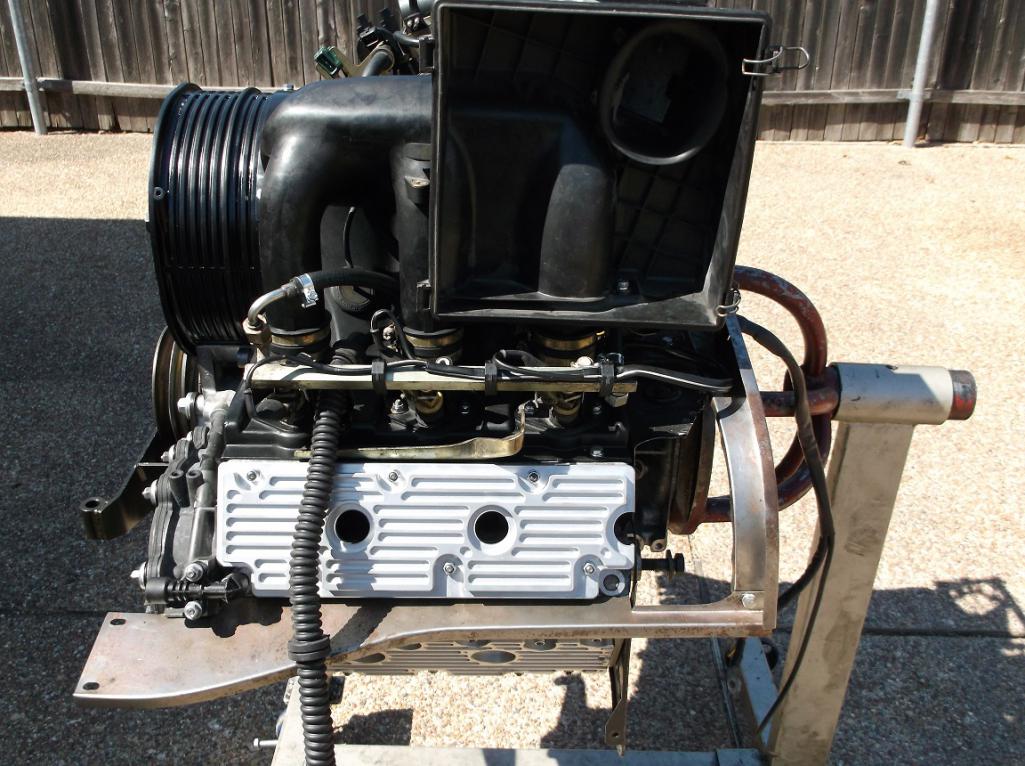
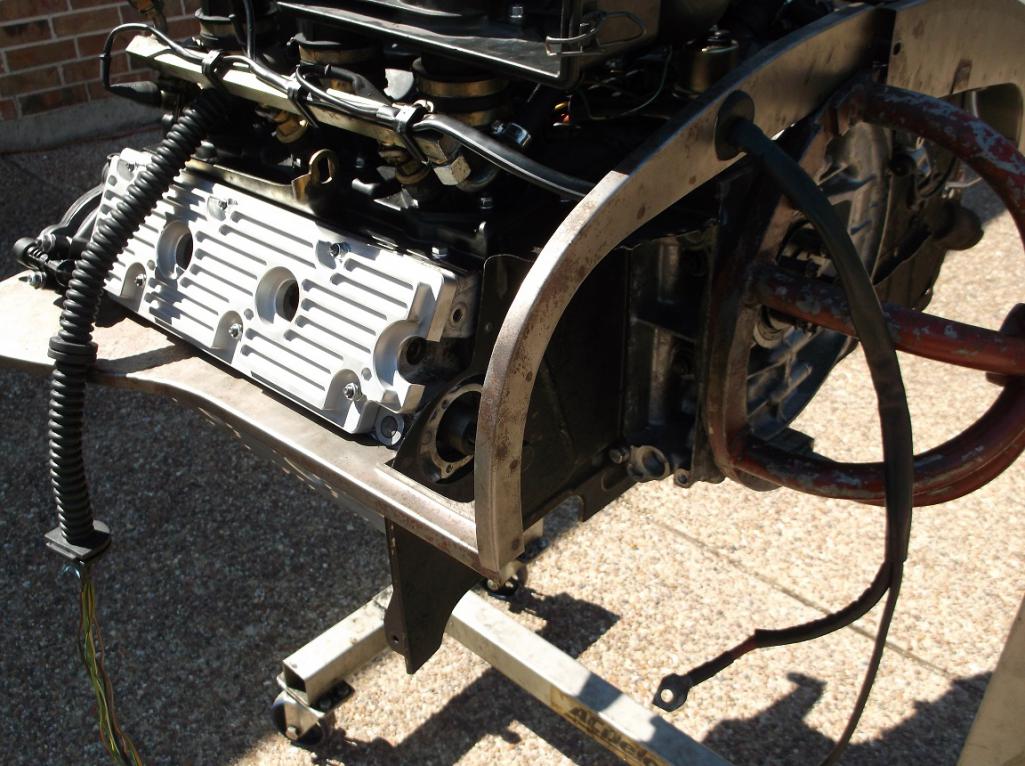
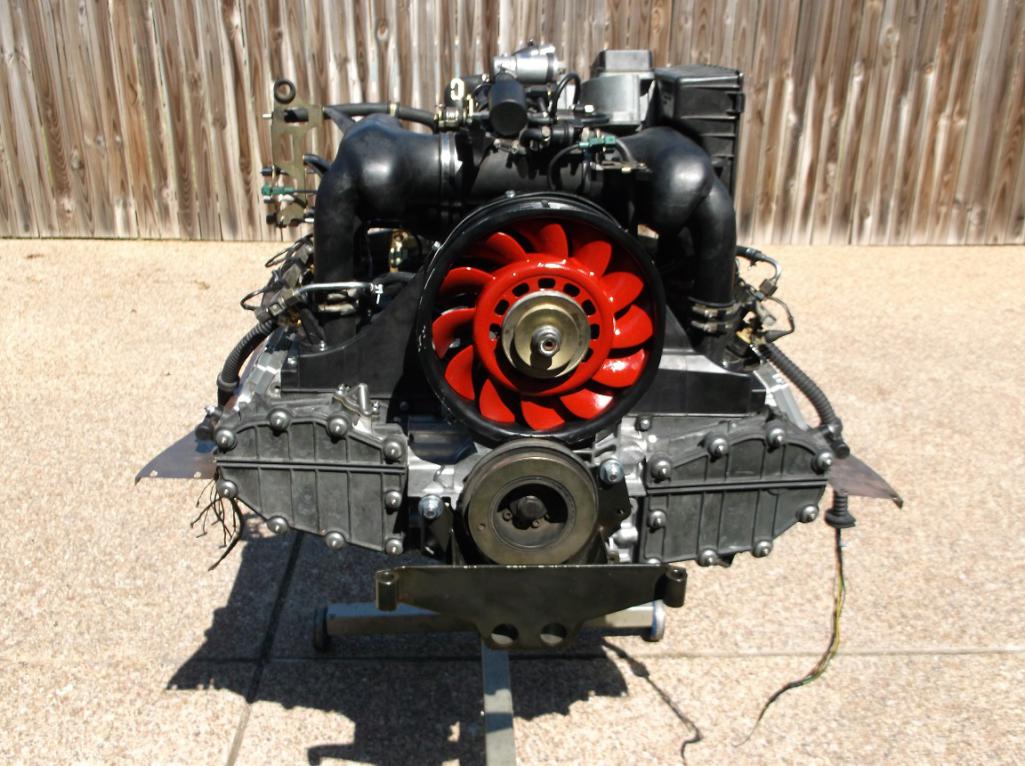
Just arrived from Hawaii...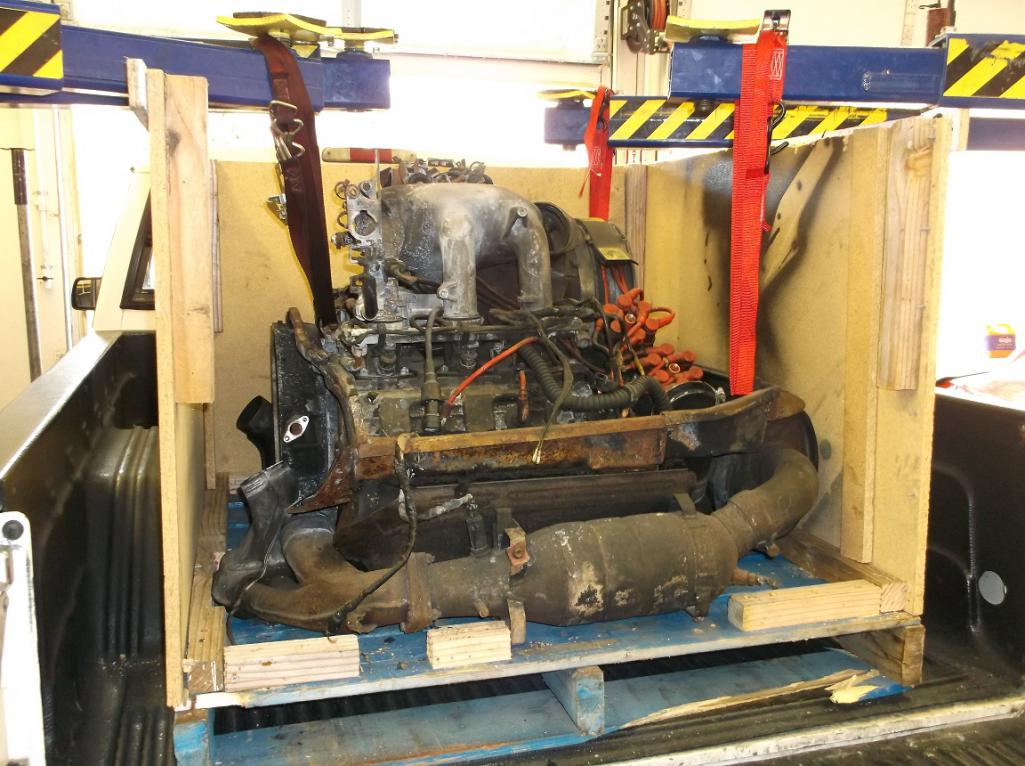
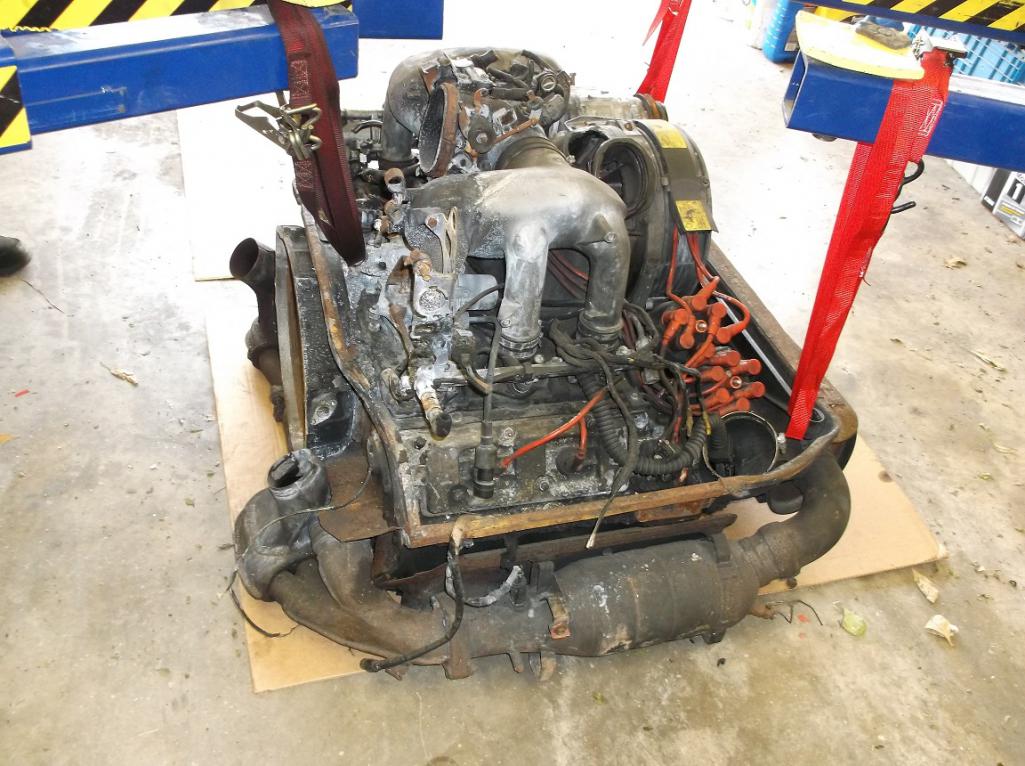
3.6L 964 motor. Destined to become a 4.0L with 993 RS cams. I am keeping the FI so it is a bit more drivable than the MFI motor I have now.
I actually started this years ago. I bought a 3.6, but it turned out to be unusable. But I had already bought the LN engineering pistons, cylinders, rods and stud kit to make it a 4.0. So now I get to use all that stuff!.
Posted by: whitetwinturbo Mar 17 2016, 10:00 PM
![popcorn[1].gif](style_emoticons/default/popcorn[1].gif)
Posted by: Andyrew Mar 17 2016, 10:11 PM
Build off challenge?
That being said Im looking forward to this engine build 
Posted by: RobW Mar 17 2016, 11:10 PM
4.0 Porsche motor in a 914...... 
Posted by: 396 Mar 18 2016, 04:13 AM
Yes,4.0
Posted by: 914forme Mar 18 2016, 05:06 AM
Posted by: stevegm Mar 18 2016, 07:26 AM
Interesting engine build. Are you planning to do the 2017 Build-Off Challenge?
Posted by: theleschyouknow Mar 18 2016, 11:13 AM

sweet glad you found one!
let me know if you ever need a hand I'm not much of a wrench but I can follow directions

cjl
Posted by: Mueller Mar 18 2016, 11:22 AM
Dang...that will be a fun motor!
I figured only pineapples got exported from HI
Posted by: Mark Henry Mar 18 2016, 11:24 AM

Posted by: porschetub Mar 18 2016, 11:38 AM

It begins:
Just arrived from Hawaii...
3.6L 964 motor. Destined to become a 4.0L with 993 RS cams. I am keeping the FI so it is a bit more drivable than the MFI motor I have now.
I actually started this years ago. I bought a 3.6, but it turned out to be unusable. But I had already bought the LN engineering pistons, cylinders, rods and stud kit to make it a 4.0. So now I get to use all that stuff!.
Great find,had the original car suffered from an interior or engine fire?.
What plans do you have for a gearbox,stock or 915 ?,cheers.
Posted by: ClayPerrine Mar 18 2016, 01:15 PM
Great find,had the original car suffered from an interior or engine fire?.
What plans do you have for a gearbox,stock or 915 ?,cheers.
The original car suffered an engine fire due to a front end crash.
I plan on using a Boxster 6 speed for a transmission.
Posted by: naro914 Mar 18 2016, 02:49 PM
I plan on using a Boxster 6 speed for a transmission.
How??
Posted by: 396 Mar 18 2016, 02:57 PM
If you're going to install factory 993RS cams. .you better buy now às I believe there's only one more in stock at the factory.
Posted by: ClayPerrine Mar 18 2016, 09:15 PM
I plan on using a Boxster 6 speed for a transmission.
How??
Bubble gum and bailing wire.
Seriously, I have been researching this for a while now. I will document it here for everyone to see.
If you're going to install factory 993RS cams. .you better buy now às I believe there's only one more in stock at the factory.
I am not using "Real" 993RS cams. I want to leave them for someone who really needs them for a 993RS. I will be getting aftermarket cams with the same grind.
Posted by: ClayPerrine Mar 18 2016, 09:17 PM
Interesting engine build. Are you planning to do the 2017 Build-Off Challenge?
There is an official contest? I thought it was just for motivation and sharing with the board.
Posted by: ClayPerrine Mar 18 2016, 09:27 PM
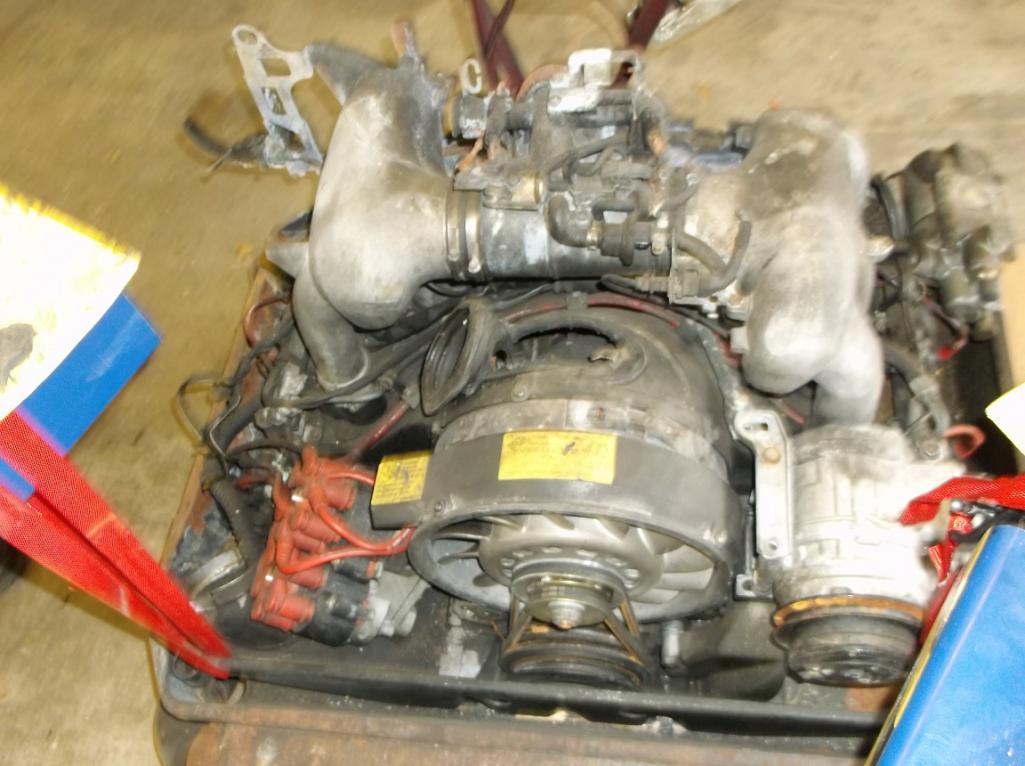
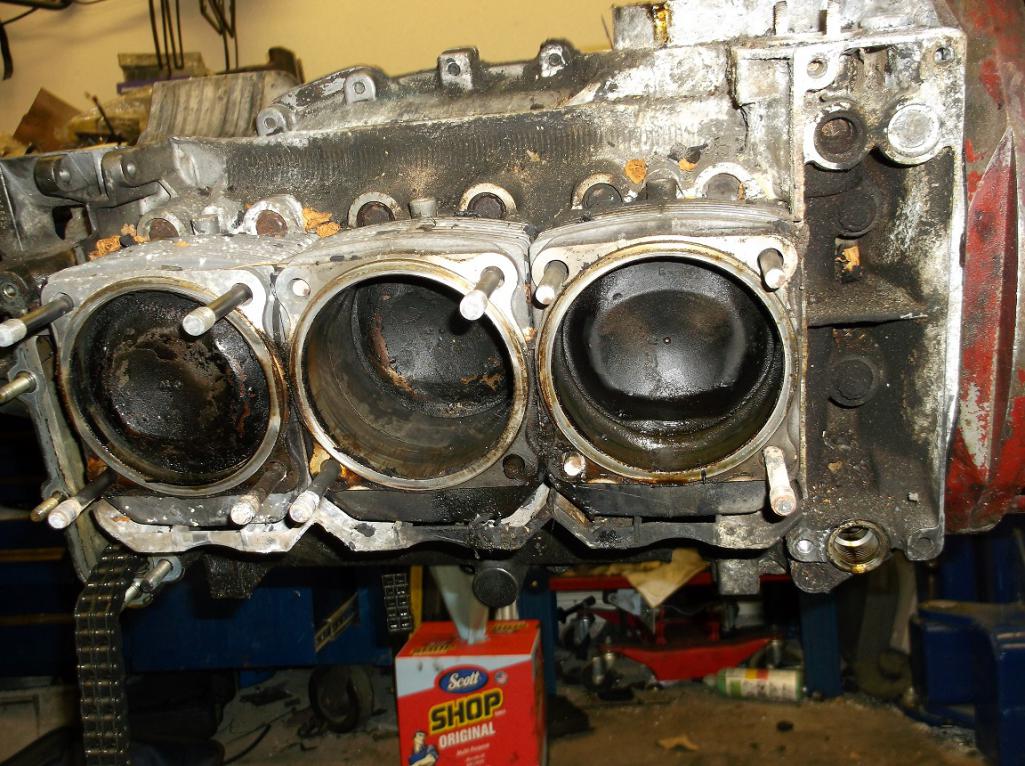
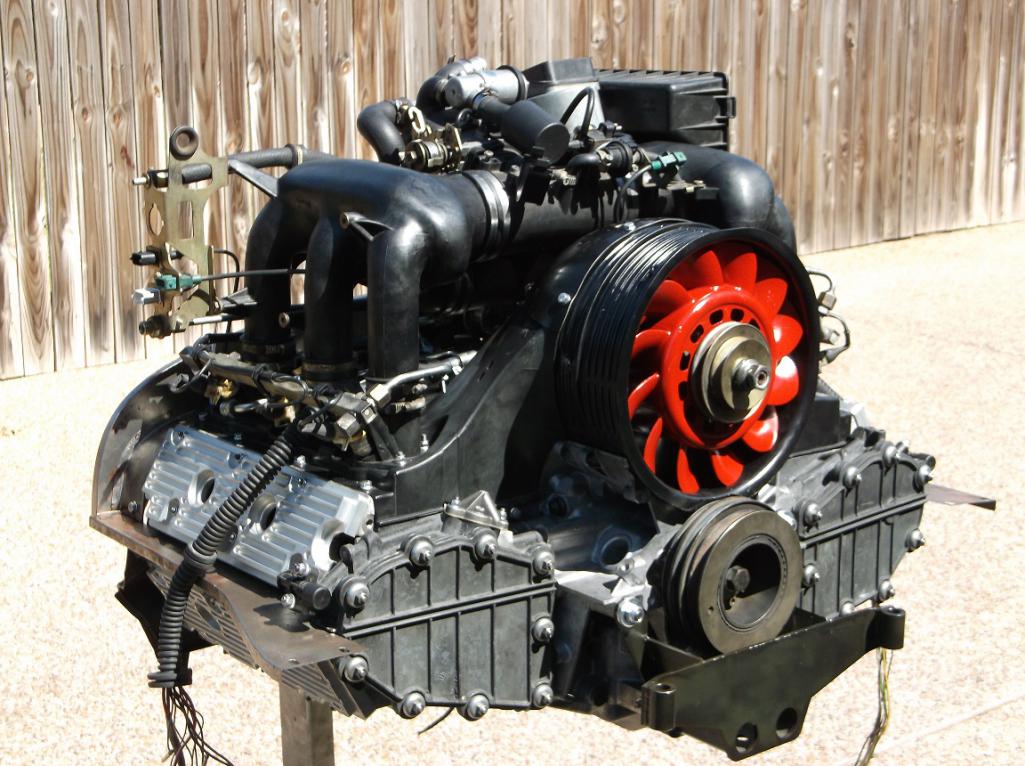
A little gratuitous engine porn: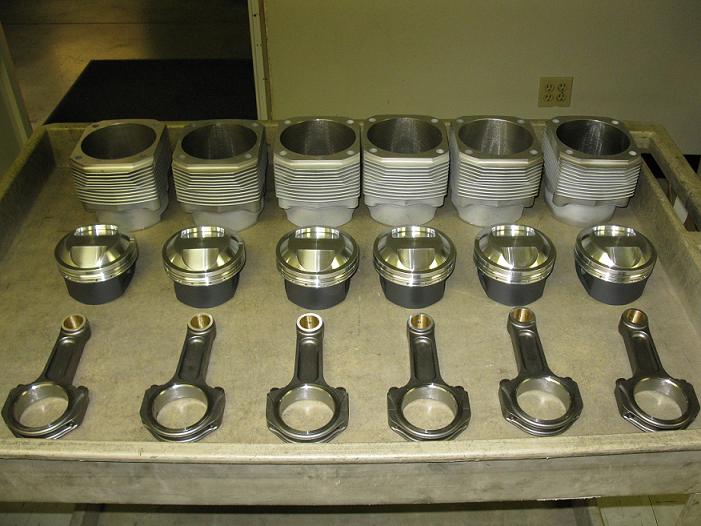
I started this project years ago, and it got sidetracked by life (layoff from my job) and a bad crankshaft.
http://www.914world.com/bbs2/index.php?showtopic=91027&hl=
I am glad it is finally going again.
Posted by: Mueller Mar 18 2016, 11:09 PM
I plan on using a Boxster 6 speed for a transmission.
How??
Bubble gum and bailing wire.
Seriously, I have been researching this for a while now. I will document it here for everyone to see.
I'm not giving up on my quest for using a Boxster transmission yet , hopefully you'll figure it out before I get back to mine so it'll be easier for me
Posted by: ClayPerrine Mar 19 2016, 06:48 AM
Interesting engine build. Are you planning to do the 2017 Build-Off Challenge?
There is an official contest? I thought it was just for motivation and sharing with the board.
I just read the thread. I don't qualify. I am only doing a drivetrain replacement.
Posted by: kid914 Mar 19 2016, 08:23 AM
4.0 ? 
I thought of doing this awhile back.


Posted by: tomrev Mar 19 2016, 08:45 AM
A little gratuitous engine porn:
I started this project years ago, and it got sidetracked by life (layoff from my job) and a bad crankshaft.
http://www.914world.com/bbs2/index.php?showtopic=91027&hl=
I am glad it is finally going again.
Wow! Porn is apt here; I'd want that pile on the dinner table, so I could look at it while I eat!
Posted by: PanelBilly Mar 19 2016, 10:30 AM
Details, I want all the details of what you've figured out. I've heard about these 4 liter monsters and I want to see just what it would take to make one work in a teener.
I'm thinking about a creamsickle six-pack project
Posted by: whitetwinturbo Mar 19 2016, 08:23 PM
........all in for the 4.0 version 
Posted by: Rob-O Mar 19 2016, 09:49 PM
Looks fantastic, can't wait to see this come to fruition.
Posted by: r_towle Mar 19 2016, 10:59 PM
Great project, good luck this time around.
Posted by: thelogo Mar 20 2016, 12:03 AM
4.0 in 914
You must have alot
Of
Driveing skill to pull that off
---------'''''---------
An screw the boxter six speed and
How to install ,
You went all out on the engine so
Give me the
Porsche 7 speed stick shift 

Posted by: ClayPerrine Mar 20 2016, 06:42 AM
An screw the boxter six speed and
How to install ,
You went all out on the engine so
Give me the
Porsche 7 speed stick shift
Boxster 6 speeds are really, really cheap because Boxster motors keep blowing up.
I can't even find a 7 speed for sale. And I don't know if it can be run as mid engine.
Posted by: JmuRiz Mar 20 2016, 08:17 AM
Why would you want the 7-speed?
It's only there for mpg, they put a 6-speed in the 'drivers car' 911R, if that tells you something...
Boxster box may be fun, if you can get it to fit. Cable shifter would feel nice too.
Posted by: Catorse Mar 20 2016, 09:49 AM
Clay what kind of power can you get out of a built 4.0?
Posted by: mepstein Mar 20 2016, 10:18 AM
Clay what kind of power can you get out of a built 4.0?
325-350?
Posted by: naro914 Mar 20 2016, 10:23 AM
I plan on using a Boxster 6 speed for a transmission.
How??
Bubble gum and bailing wire.
Seriously, I have been researching this for a while now. I will document it here for everyone to see.
Please do!! I would be seriously interested in having you do one for me if you can figure out how to do this...the idea of a cable shift 6 speed in Papa Smurf has always intrigued me...
Posted by: Catorse Mar 20 2016, 11:58 AM
Clay what kind of power can you get out of a built 4.0?
325-350?
That's pretty good....
Posted by: mepstein Mar 20 2016, 12:22 PM
Clay what kind of power can you get out of a built 4.0?
325-350?
That's pretty good....
I'm just guessing. No real idea.
Posted by: ClayPerrine Mar 20 2016, 06:34 PM
Clay what kind of power can you get out of a built 4.0?
325-350?
That's pretty good....
I'm just guessing. No real idea.
A stock 964 motor with a free flow exhaust and a chip can make 300HP. I ma hoping for 325, but I have no idea what it will be. Other than more than I have now.
Posted by: ClayPerrine Mar 20 2016, 06:40 PM
The weekend progress: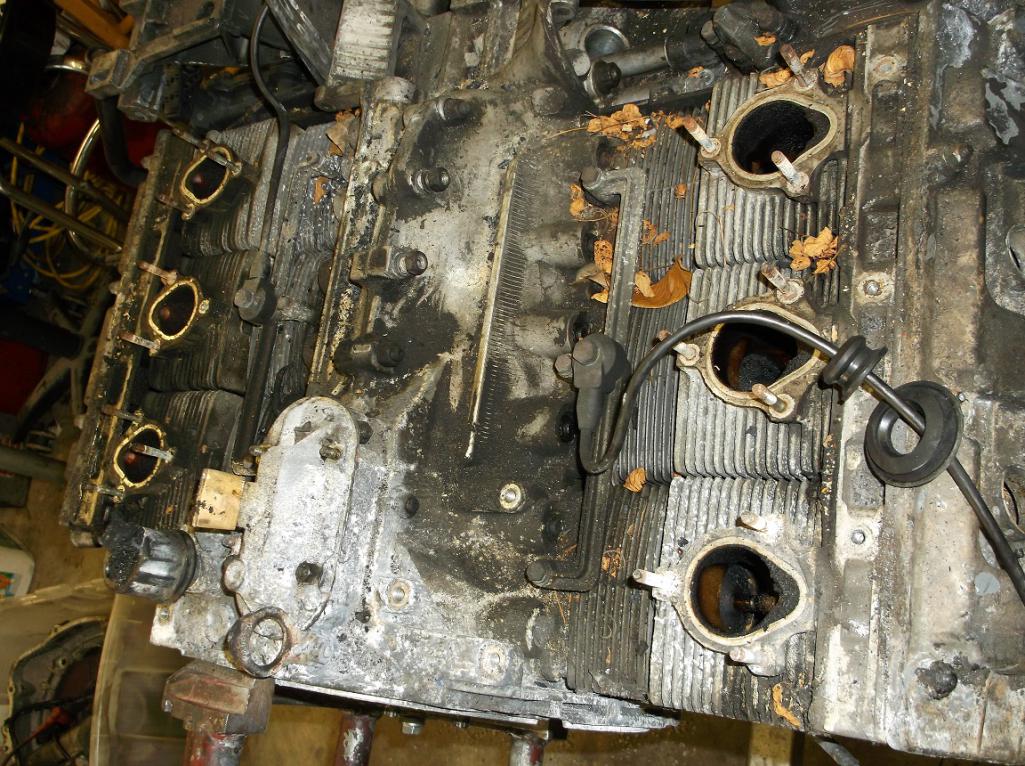
Posted by: billh1963 Mar 20 2016, 06:42 PM
The weekend progress:
Ugly on the outside but beautiful inside!
Posted by: ClayPerrine Mar 20 2016, 06:49 PM
The weekend progress:
Ugly on the outside but beautiful inside!
It was a tiptronic car. The owner drove it gently and did regular oil changes. So it makes for a great core motor.
Anyone need some stock 964 pistons, cylinders and rods? I have them cheap...
Posted by: mepstein Mar 20 2016, 07:03 PM
The weekend progress:
Ugly on the outside but beautiful inside!
It was a tiptronic car. The owner drove it gently and did regular oil changes. So it makes for a great core motor.
Anyone need some stock 964 pistons, cylinders and rods? I have them cheap...
Maybe. Do you also have another case?
Posted by: ClayPerrine Mar 20 2016, 07:17 PM
The weekend progress:
Ugly on the outside but beautiful inside!
It was a tiptronic car. The owner drove it gently and did regular oil changes. So it makes for a great core motor.
Anyone need some stock 964 pistons, cylinders and rods? I have them cheap...
Maybe. Do you also have another case?
Nope. That's why I bought this one.....
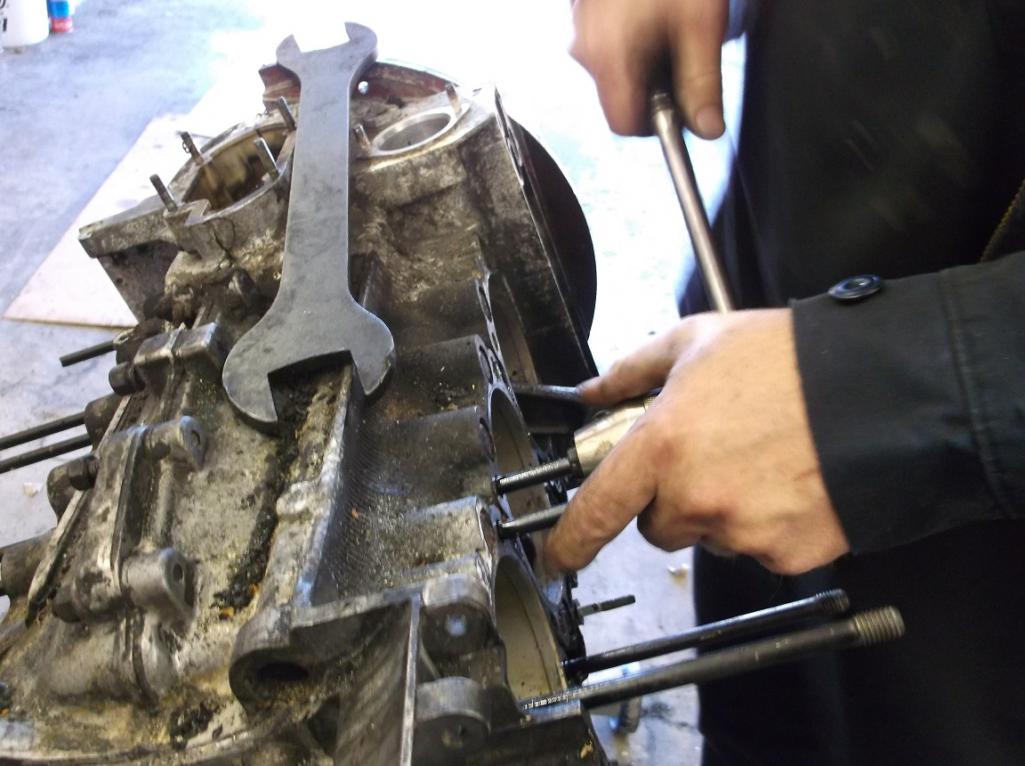
Posted by: ClayPerrine Mar 24 2016, 01:57 PM
Update.. no pictures.
Cases are stripped, including the studs. As soon as I can find time they and the heads are off to the machine shop.
I put all the case studs in my eastwood bolt tumbler. Pulled one out for a sample after and hour. It looks good. Tonight I am going to let them run some more, and pull them tomorrow.
Then I go through the parts boxes, and get all the nuts, bolts and washers and put them in the tumbler.
I also have to get the cam carriers and assorted external engine parts off to Zims to be cleaned.
Posted by: Rob-O Mar 24 2016, 02:52 PM
Looks like the tear down is coming along quick. How many head studs snapped? Looks like at least three on one side...
Posted by: 396 Mar 25 2016, 08:18 PM
Clay what kind of power can you get out of a built 4.0?
325-350?
Mark, after reading your post of 325 -350 hp.
I have a few questions. Being that your exposed to some high end builds. How did you arrive at these numbers? Has the shop built such an animal? If so, what were the injection and exhaust option.
If I recall, a stock 964 3.6 from the factory USA is only rated at something like 270hp.
Asking because I'm inquisitive.
Thanks
Posted by: SirAndy Mar 25 2016, 08:26 PM
I have a few questions. Being that your exposed to some high end builds. How did you arrive at these numbers? Has the shop built such an animal? If so, what were the injection and exhaust option.
If I recall, a stock 964 3.6 from the factory USA is only rated at something like 270hp.
Asking because I'm inquisitive.
My 3.6L is just over 300HP without any modifications to the internals.

Posted by: Mueller Mar 25 2016, 08:27 PM
Clay what kind of power can you get out of a built 4.0?
325-350?
Mark, after reading your post of 325 -350 hp.
I have a few questions. Being that your exposed to some high end builds. How did you arrive at these numbers? Has the shop built such an animal? If so, what were the injection and exhaust option.
If I recall, a stock 964 3.6 from the factory USA is only rated at something like 270hp.
Asking because I'm inquisitive.
Thanks
Reading all the articles about the Singer 911, I seem to remember those number being mentioned quite a bit.
Posted by: mepstein Mar 25 2016, 09:03 PM
Clay what kind of power can you get out of a built 4.0?
325-350?
Mark, after reading your post of 325 -350 hp.
I have a few questions. Being that your exposed to some high end builds. How did you arrive at these numbers? Has the shop built such an animal? If so, what were the injection and exhaust option.
If I recall, a stock 964 3.6 from the factory USA is only rated at something like 270hp.
Asking because I'm inquisitive.
Thanks
Im no expert but when you:
Tune the exhaust
Raise the compression
Hot cams
Ditch the cat
Tune the chip
Bigger p&c
325-350 should be a very realistic number.
Posted by: 396 Mar 25 2016, 09:33 PM
Clay what kind of power can you get out of a built 4.0?
325-350?
Mark, after reading your post of 325 -350 hp.
I have a few questions. Being that your exposed to some high end builds. How did you arrive at these numbers? Has the shop built such an animal? If so, what were the injection and exhaust option.
If I recall, a stock 964 3.6 from the factory USA is only rated at something like 270hp.
Asking because I'm inquisitive.
Thanks
Im no expert but when you:
Tune the exhaust
Raise the compression
Hot cams
Ditch the cat
Tune the chip
Bigger p&c
325-350 should be a very realistic number.
All, I agree with the above examples of what is needed to achieve those numbers. If I recall, the original poster left some of those critical notes his 4.0 build.
Thanks again for your response.
Enjoy your weekend
Posted by: ClayPerrine Mar 27 2016, 06:46 AM
Im no expert but when you:
Tune the exhaust
Raise the compression
Hot cams
Ditch the cat
Tune the chip
Bigger p&c
325-350 should be a very realistic number.
Tune the exhaust - Check... I already have the headers .
Hot Cams - not too hot, just the equivalent to factory RS cams.
Ditch the cat - no place to put one on a 914
Tune the chip - already planned....
Bigger p&c - that's covered...
And for future mods I am looking at a hotwire mass airflow sensor conversion.
And for really, really stupid horsepower in a 914, I could spend the 9 grand to put this on:
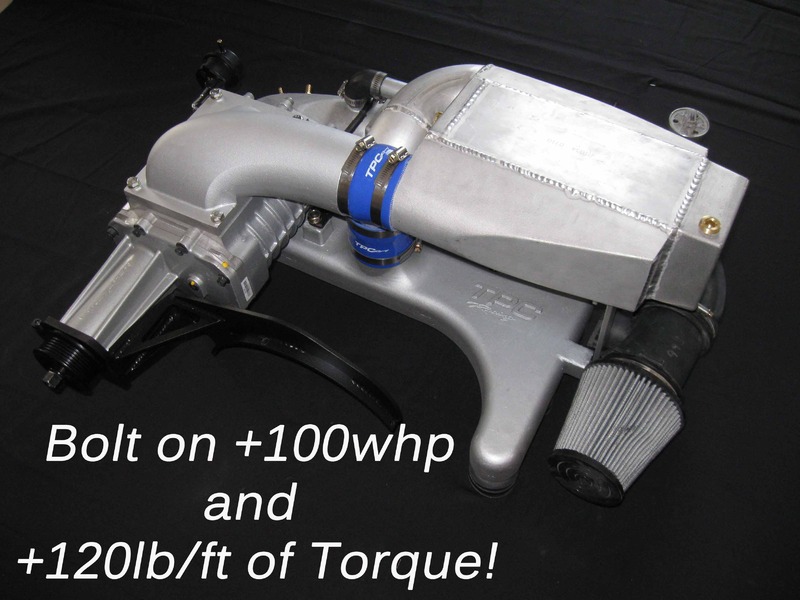
Adds 100 HP
Not going to happen during this build. I am already getting ambitious enough with what I am doing.
But maybe someday.....

Posted by: mepstein Mar 27 2016, 07:05 AM
Im no expert but when you:
Tune the exhaust
Raise the compression
Hot cams
Ditch the cat
Tune the chip
Bigger p&c
325-350 should be a very realistic number.
Tune the exhaust - Check... I already have the headers .
Hot Cams - not too hot, just the equivalent to factory RS cams.
Ditch the cat - no place to put one on a 914
Tune the chip - already planned....
Bigger p&c - that's covered...
And for future mods I am looking at a hotwire mass airflow sensor conversion.
And for really, really stupid horsepower in a 914, I could spend the 9 grand to put this on:
Adds 100 HP
Not going to happen during this build. I am already getting ambitious enough with what I am doing.
But maybe someday.....
Fun but I can't imagine it would be easy to tune. At least not at home.
Posted by: Rob-O Mar 27 2016, 07:51 AM
I got a peek at the rods and pistons yesterday. Pictures don't do them justice. It's a shame they're going to be inside the engine where you can't see them.
Assuming that the supercharger adds 100 to the already hoped for 300-325, I'm foretelling the project after that. Bigger flares and wider rubber!
Posted by: ClayPerrine Mar 30 2016, 04:33 PM
Heads, case halfs and one cylinder went to the machine shop today.
About a month before they finish..... 
Posted by: 396 Mar 30 2016, 05:45 PM
Congrats with your progress. Quick question, since you're doing this big build, have you ever thought of using a 993RS intake and or a Rothsports RS intake? If you've come across one, I'm interested.
Thanks
Posted by: ClayPerrine Mar 30 2016, 06:30 PM
Congrats with your progress. Quick question, since you're doing this big build, have you ever thought of using a 993RS intake and or a Rothsports RS intake? If you've come across one, I'm interested.
Thanks
I am going to use the 964 plastic intake. I am trying to keep the physical stuff on the engine easy.
Posted by: 76-914 Mar 31 2016, 08:13 AM
![]()
Posted by: ClayPerrine Jun 3 2016, 06:21 PM
Update:
Went to the machine shop today. They still have to bore the cases for the cylinders. It is on the schedule for Wednesday. Then I can come pick up them up and start assembly.
In the interim, I have been in parts acquisition mode. Here are some of the items: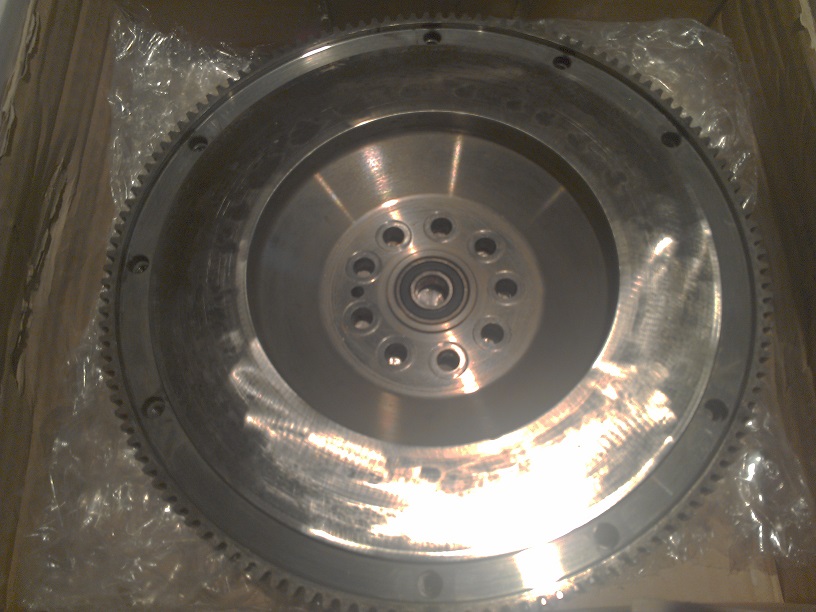
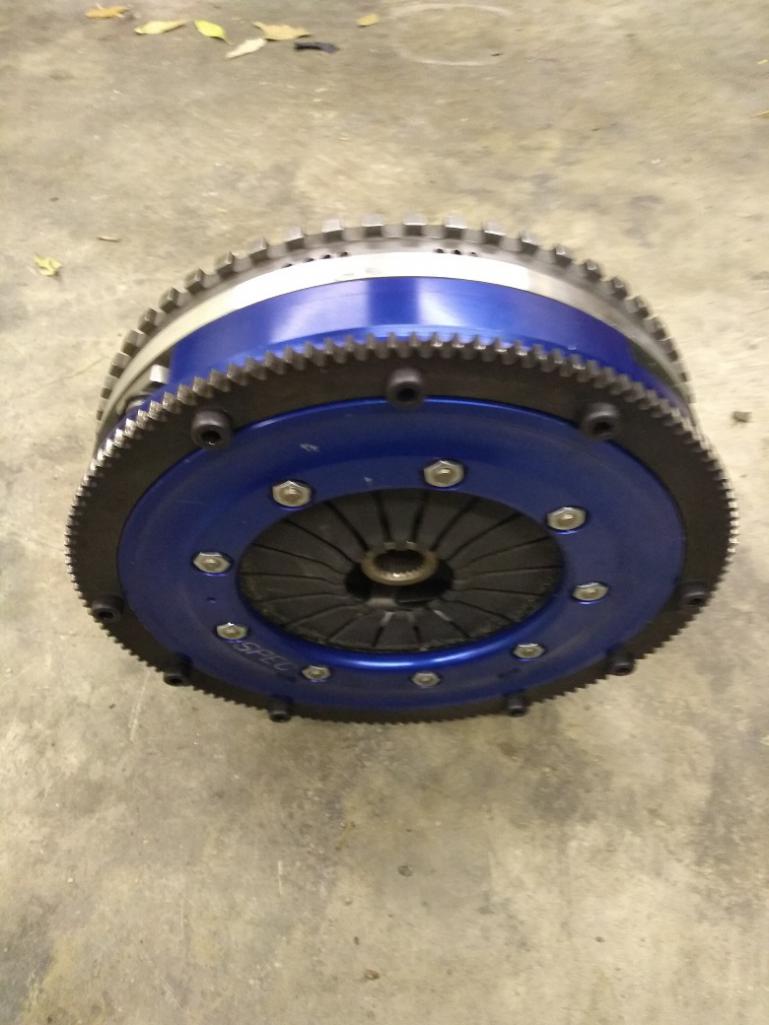
Used single mass flywheel and ring gear. 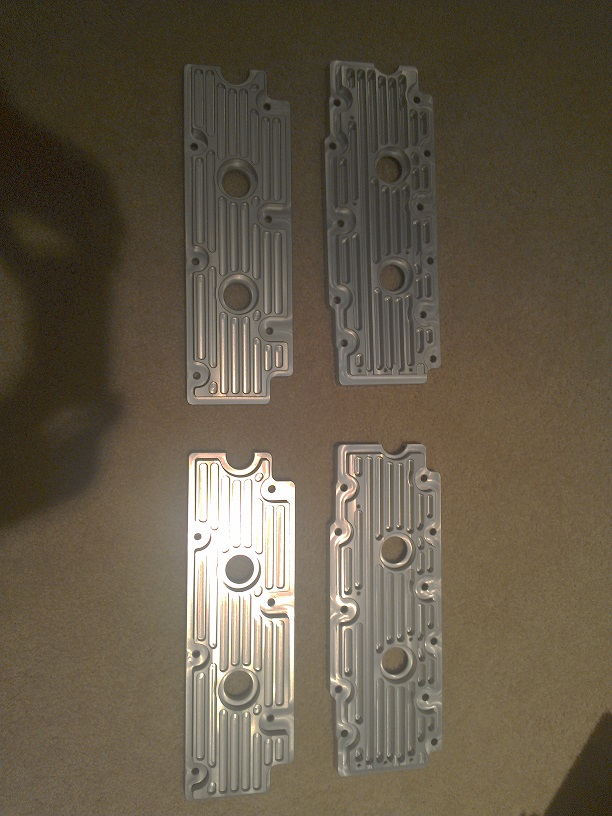
Billet 964 valve covers. They are about 25% of the cost of factory new valve covers, and they are supposed to seal better. 
Block off for the top of the fan shroud.
Based on recommendations from the cam grinder, I decided to use a 993SS cam grind. I sent them off to have them reground, and I got a quote for a new chip for the ECU. The cam and chip updates change the estimated HP to 375. I also have the G86-21 Boxster 6-speed on the way.

Posted by: ClayPerrine Jul 2 2016, 01:08 PM
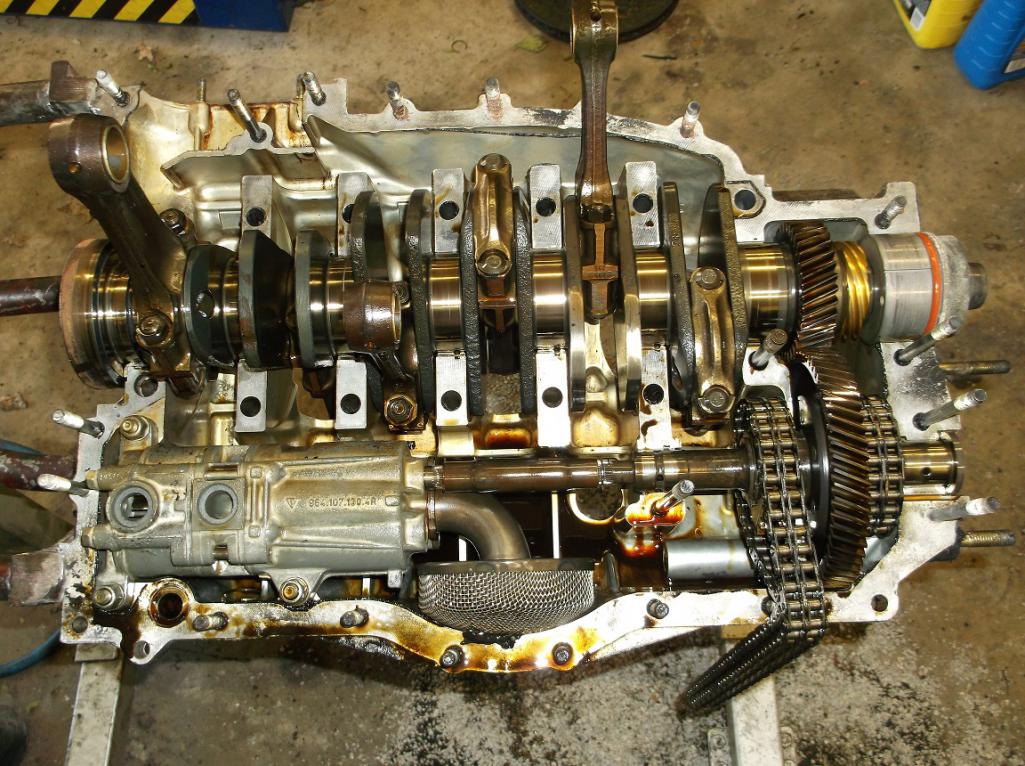
I got the engine cases back, and started assembling the engine this morning.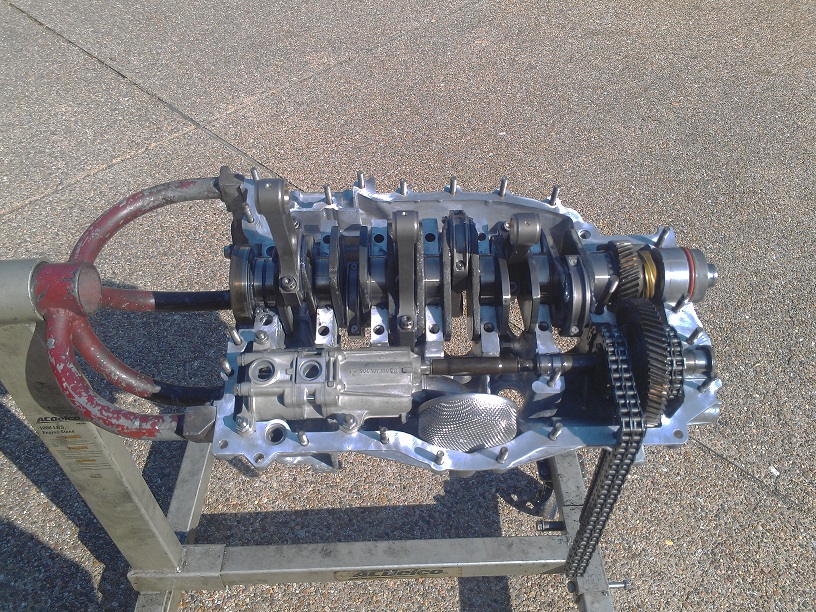
I was putting the case halves together, and I got bit hard by the engine case.  To the tune of 7 stitches to the end of the finger I drive with...
  Yes, that finger. I kept making jokes with the doctor and the nurse about " this is not an editorial comment, I am just getting the other fingers out of the way"
This sucks. I am finally able to make progress on my engine and now I have to stop.  My cams should be done on Tuesday, and I was hoping to have the engine assembled and ready for the cams when they arrive.
Maybe I will get out there tomorrow and keep going.
Posted by: Mueller Jul 2 2016, 01:14 PM
Nice motor there....
and OUCH, small world, I too cut myself yesterday splitting the case on my 1.8 /4 I don't think the factory believes in de-burring anything!
No stitches for me, still hurts and it could have worse for sure!
Posted by: Rob-O Jul 2 2016, 01:25 PM
Sorry to hear about the finger. But the assembly so far looks great.
Posted by: theleschyouknow Jul 2 2016, 01:33 PM
looking good clay!
sorry bout your finger
cjl
Posted by: veekry9 Jul 2 2016, 03:46 PM

Seven stitches. 
As a reminder to timesert the studs on a set of cases that will squirm around with the added power.
The cost is so small and adds so much clamping force.
Use the new ceramic filled epoxy,ensure there are no risers on the mating surfaces.
Do check the mating case faces for flatness on a granite block or cmm,trial assemble and check the mains for straightness and sizing.
The lay-shaft's mid bearing journal looks ok,so,I assume the inserts too are in spec.
The pump has no plugs in the exposed ports,so I would inspect the pump for debris as a precaution.A single grain of sand.
These parts you have gathered have all the right stuff,and the idea of force feeding more air into them is thrilling.
Big Six gun,most suitable for the desert highway.
/
Posted by: ClayPerrine Jul 2 2016, 04:09 PM
Seven stitches.
As a reminder to timesert the studs on a set of cases that will squirm around with the added power.
The cost is so small and adds so much clamping force.
Use the new ceramic filled epoxy,ensure there are no risers on the mating surfaces.
Do check the mating case faces for flatness on a granite block or cmm,trial assemble and check the mains for straightness and sizing.
The lay-shaft's mid bearing journal looks ok,so,I assume the inserts too are in spec.
The pump has no plugs in the exposed ports,so I would inspect the pump for debris as a precaution.A single grain of sand.
These parts you have gathered have all the right stuff,and the idea of force feeding more air into them is thrilling.
Big Six gun,most suitable for the desert highway.
/
Timecerts were done at the machine shop
Case was fully checked when bored for the new jugs.
Lay shaft was fine. New inserts.
Brand new oil pump.
Thanks everyone for the sympathy on the stitches. As Betty says "It's not a good job until you bleed on it and cuss at it." Well, this is definitely a good job. I was inventing new cuss words when I cut my finger.
And typing is a bitch when you touch type and one finger is inoperative. I actually have to think about where the keys are located.
Posted by: veekry9 Jul 3 2016, 04:25 PM
I have a similar scar,same finger,missed the tendons.
A F-18 radome chassis,billet,5x-cnc,'80s,razorsharp.
I was so pissed I had sliced myself so badly.
Just one of those shop accidents that should have been avoided.
Reminded me to wear the proper safety protection,diligently.

One thing to consider is the amount of twist imparted to the cylinder studs when torquing.
'Clocking'the studs to maintain an untwisted condition at final stretch.
/
Posted by: ClayPerrine Oct 1 2016, 12:02 PM
I have not updated this thread in a while.
But here is the progress...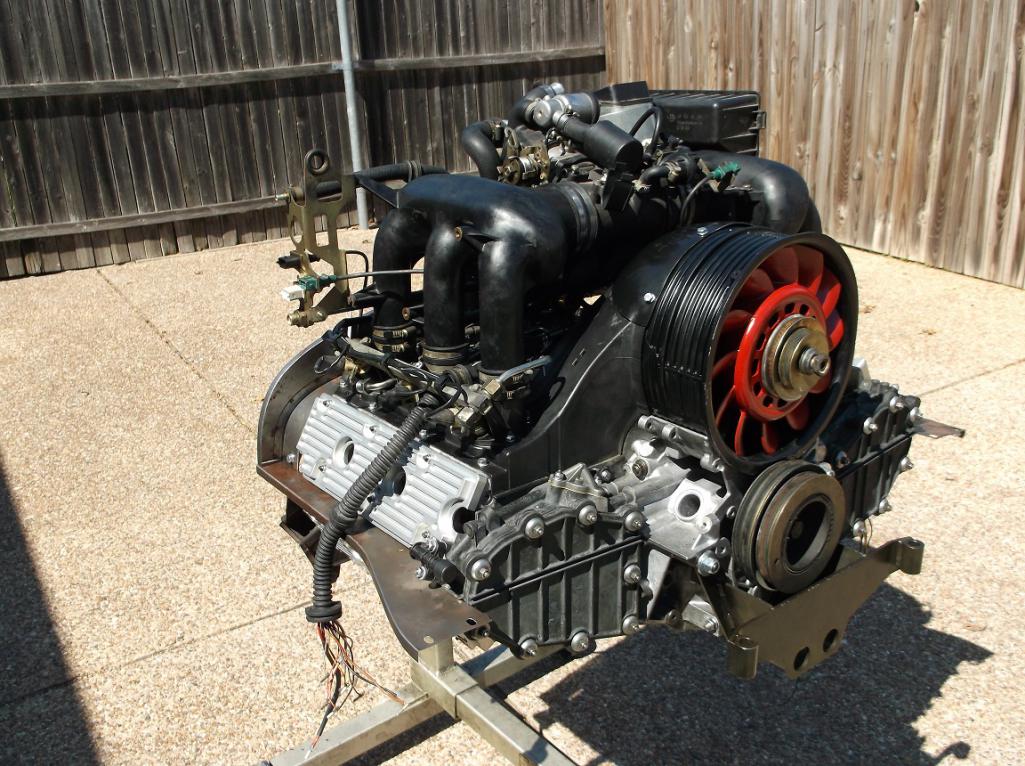
Betty was trying to convince me to paint the valve covers red. I like them in the natural aluminum.
Should I start a poll paint/no paint?
Posted by: raynekat Oct 1 2016, 12:30 PM
Big no on the red paint. Keep it as much factory looking as possible. Very nice.
Posted by: 914forme Oct 1 2016, 12:30 PM
Clear them
Paint or Powdercoat the engine tin, unless you want them to return to their natural state.
Posted by: mepstein Oct 1 2016, 12:37 PM
Big no on the red paint. Keep it as much factory looking as possible. Very nice.
 all the fancy stuff just gets swallowed up in a 914 engine bay anyway.
Posted by: ClayPerrine Oct 1 2016, 12:48 PM
Clear them
Paint or Powdercoat the engine tin, unless you want them to return to their natural state.
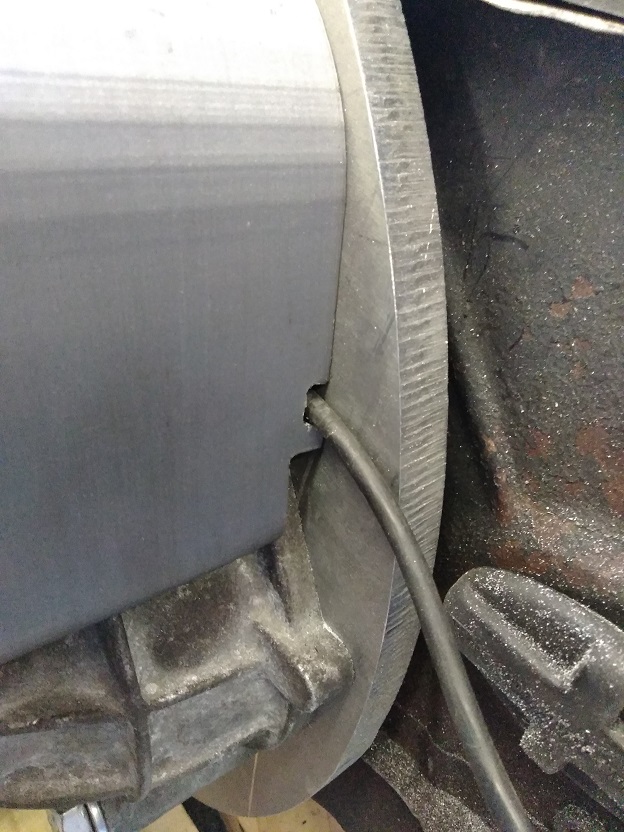
The engine tin is still a work in progress. I have to mod the 914-6 tin to fit the 964 motor. You can see the left rear setup I did.
Once I am ready to complete it, it will be bead blasted then powdercoated along with the rest of the tin.
I have to mod the power steering belt housing before I can make the tin for the right rear.
I have to add the holes for the lower spark plug wires in the side tins, and I still have to figure out how to send air to the heat exchangers. It will probably involve holes in the side tin for air feeds from the fan.
Posted by: Rob-O Oct 1 2016, 01:03 PM
Awesome.
Posted by: bandjoey Oct 1 2016, 01:14 PM
You don't need that finger with that Big motor. Zowie
Posted by: whitetwinturbo Oct 3 2016, 08:42 PM
................size matters
Posted by: rgalla9146 Oct 3 2016, 09:29 PM
Is the end of the cam visible in front of the oil cooler ?
Shouldn't there be a cap there ?
Posted by: Perry Kiehl Clone Oct 3 2016, 09:49 PM
Paint the valve covers black and sand off the ribs. It's your car though, do whatever gives you a thrill.
Posted by: ClayPerrine Oct 5 2016, 11:55 AM
Is the end of the cam visible in front of the oil cooler ?
Shouldn't there be a cap there ?
964/993 motors don't have engine mounted oil coolers
The motor originally had a power steering pump drive there. I intend to fabricate an AC compressor mount for the same location.
Posted by: ClayPerrine Oct 5 2016, 01:04 PM
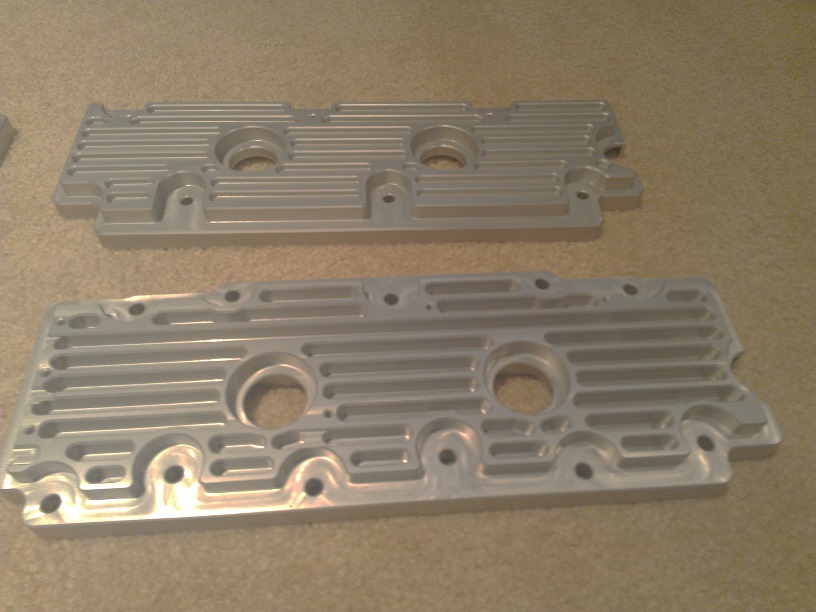
Paint the valve covers black and sand off the ribs. It's your car though, do whatever gives you a thrill.
They are not cast valve covers. They are billet aluminum, and the ribs are machined into them.
Posted by: ClayPerrine Oct 7 2016, 07:25 PM
New picts of progress
Clewett 964 Serpentine belt kit
Rebuilt distributor installed.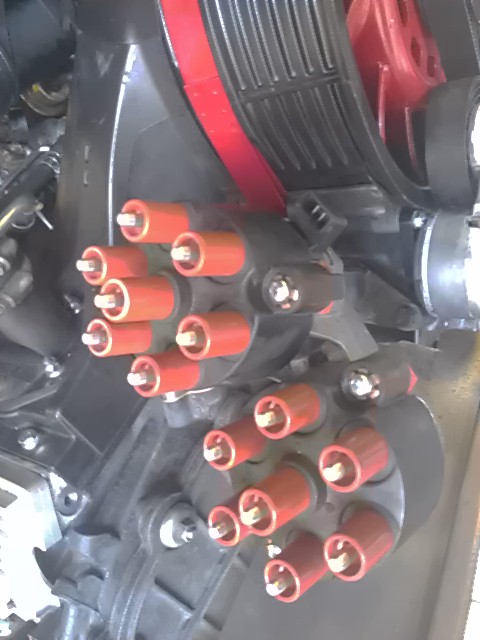
Custom Throttle linkage.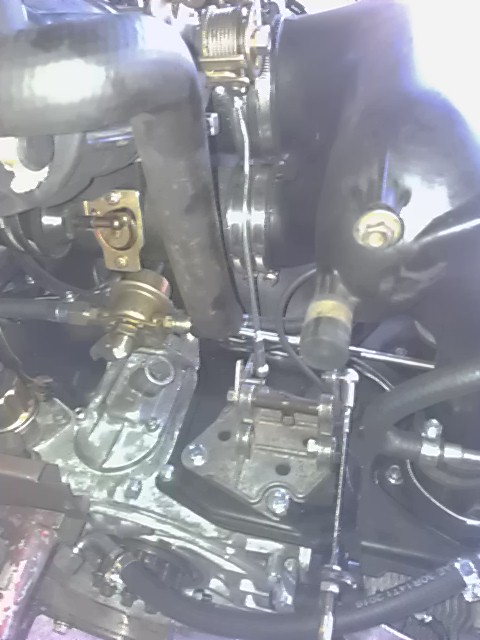
The throttle linkage uses a stock 914-6 cable and a bell crank assembly from a 964 Turbo. Custom uplink to the throttle body. Hooked it to the cable in the car to test the geometry and the pedal pressure.
Betty accused me of making vroom vroom noises.
Posted by: Rob-O Oct 7 2016, 07:46 PM
I believe Betty. I know I'd be making vroom vroom noises too.
Love that Clewett setup. Should make changing the belt a lot easier. I don't remember, did you already have a cut out in the firewall to facilitate belt changes?
Posted by: ClayPerrine Oct 7 2016, 09:07 PM
I believe Betty. I know I'd be making vroom vroom noises too.
Love that Clewett setup. Should make changing the belt a lot easier. I don't remember, did you already have a cut out in the firewall to facilitate belt changes?
Nope.. I don't believe in cutting holes in something called a "Firewall".
I had a serpentine belt setup on my old engine, until the AC compressor mount cracked the chain housing. They make changing the belt much easier.
Posted by: Cracker Oct 8 2016, 06:03 AM
Get that thing on the road Clay...even better, to a track! Way to stay after it - make all the vroom, vroom sounds you want, ya earned it!
PS: That thing looks heavy...better put some big springs in the rear. 
Tony
Posted by: ClayPerrine Oct 9 2016, 06:51 AM
I am at work this morning, so I don't have pictures to post.
Took the front 914-6 engine tin and the 911 engine tin and cut them up to make one set that fits the front of the motor. I figured out that I can use the 911 fan and blower stuff to push air into my heat exchangers. Flipped the engine upside down, and temporarily installed the headers. I am going to get some poster board to cutup to make heater box templates. I am going to make the bottom of them bolt on so I can open them up to inspect the internal tubes.
Pictures soon...
Posted by: Dave_Darling Oct 9 2016, 01:51 PM
Good ideas! Sounds like this is going to be awesome and terrifying.
I'm sure Betty can handle it. (And never, EVER, let me drive it! But you already knew that.)
--DD
Posted by: Ferg Oct 9 2016, 02:00 PM
Do I spy a Pulsar?
Posted by: Mark Henry Oct 9 2016, 02:20 PM
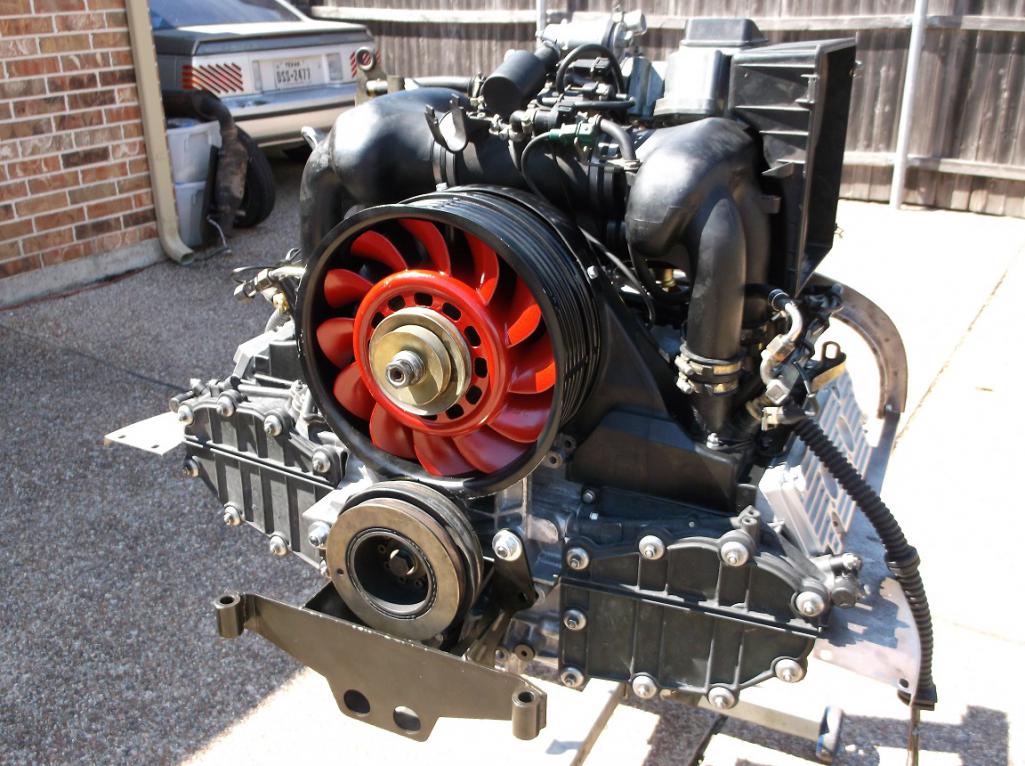
Is the end of the cam visible in front of the oil cooler ?
Shouldn't there be a cap there ?
964/993 motors don't have engine mounted oil coolers
The motor originally had a power steering pump drive there. I intend to fabricate an AC compressor mount for the same location.
On my engine I'm using 993 cams, I cut that drive off to use a stock cooler. I also modified the cam nose to accept regular 911 cam sprockets. Had to weld them up and grind in a woodruff key slot.
No more funky 993 sprockets that take $1+k worth of tools to do the cam timing.
Posted by: ClayPerrine Oct 9 2016, 07:35 PM
Good ideas! Sounds like this is going to be awesome and terrifying.
I'm sure Betty can handle it. (And never, EVER, let me drive it! But you already knew that.)
--DD
If you are EVER near my car, I am going to carry a big piece of cardboard to hold up to keep you from even LOOKING at it.
Posted by: ClayPerrine Oct 9 2016, 07:49 PM
Do I spy a Pulsar?
Yep... Good Eye. It is an 87. I bought it from the original owner for $700.00 when his pregnant wife let the timing belt go too long. It was 4 years old at the time. It ate all 16 valves and guides. I put another $700.00 into it in machine work. It ran well over 200K after that. Then the engine blew the head gasket. The motor was the 1.6L DOHC, and parts were no longer available, because it was only made for one year.
So I got creative. Now it has an JDM SR20DET from a 1991 Pulsar GTiR .
The Pulsar GTiRis the Nissan answer to the Subaru WRX, and was never sold in the US. It came with a 2.0L turbo 4 that develops over 240HP driving all 4 wheels.
In my Pulsar, which is much lighter than the GTiR, it uses a Setra SER limited slip 5 speed to drive the front wheels only. It will smoke the front tires in first and second. It is a real sleeper. Looks dead stock from the outside.
The paint is faded and dead, then brakes are WAY too small for the motor, and the AC compressor has a blown seal.
It is the alternate driver if we lose the truck or Betty's 914.
I know... it is a sickness. But I really don't want a cure.

BTW.. it is for sale if you know anyone who wants it.
Posted by: Ferg Oct 10 2016, 02:02 PM
Here was mine, found 2 years ago. Same deal low miles 74k, but after a bit the trans popped out of 5th. Sold it to the mechanic for what I paid.
Attached image(s)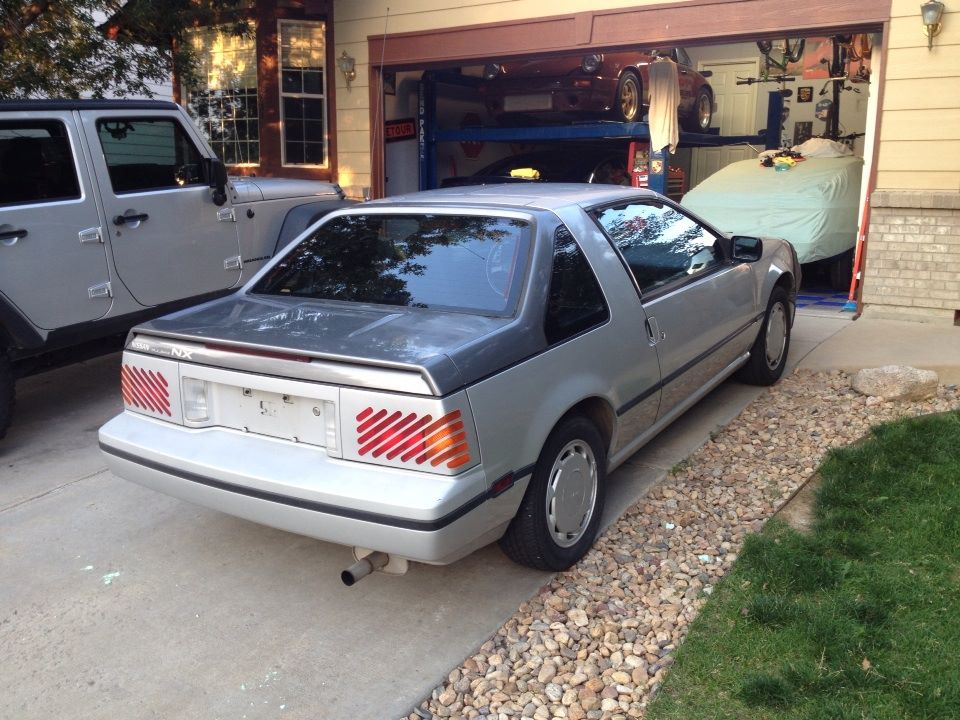
Posted by: Dave_Darling Oct 10 2016, 04:53 PM
If you are EVER near my car, I am going to carry a big piece of cardboard to hold up to keep you from even LOOKING at it.
Are you sure you can hold the cardboard up high enough to keep me from looking?
(I swear, sometimes it really is too easy!!)
The Pulsar sounds cool! SR20DET seems to be a fabulous motor.
What happened to the BMW?
--DD
Posted by: Cracker Oct 10 2016, 05:13 PM
--DD

Posted by: rhodyguy Oct 10 2016, 06:49 PM
Those GTiRs are pretty cool. The AWD version must be a hoot to drive. Not all that much money if you can live with the RHD. Poor man's EVO. The 914 of modernish nissans.
Posted by: ClayPerrine Oct 10 2016, 07:23 PM
Are you sure you can hold the cardboard up high enough to keep me from looking?
(I swear, sometimes it really is too easy!!)
The Pulsar sounds cool! SR20DET seems to be a fabulous motor.
What happened to the BMW?
--DD
I don't have to hold it up high. I will just knock you down to my height.
The BMW is in the garage. One day I have to finish the the head gasket replacement on it.
After I finish my 914.
Posted by: ClayPerrine Oct 15 2016, 05:48 PM
Today was "Arts and Crafts" day....
I made this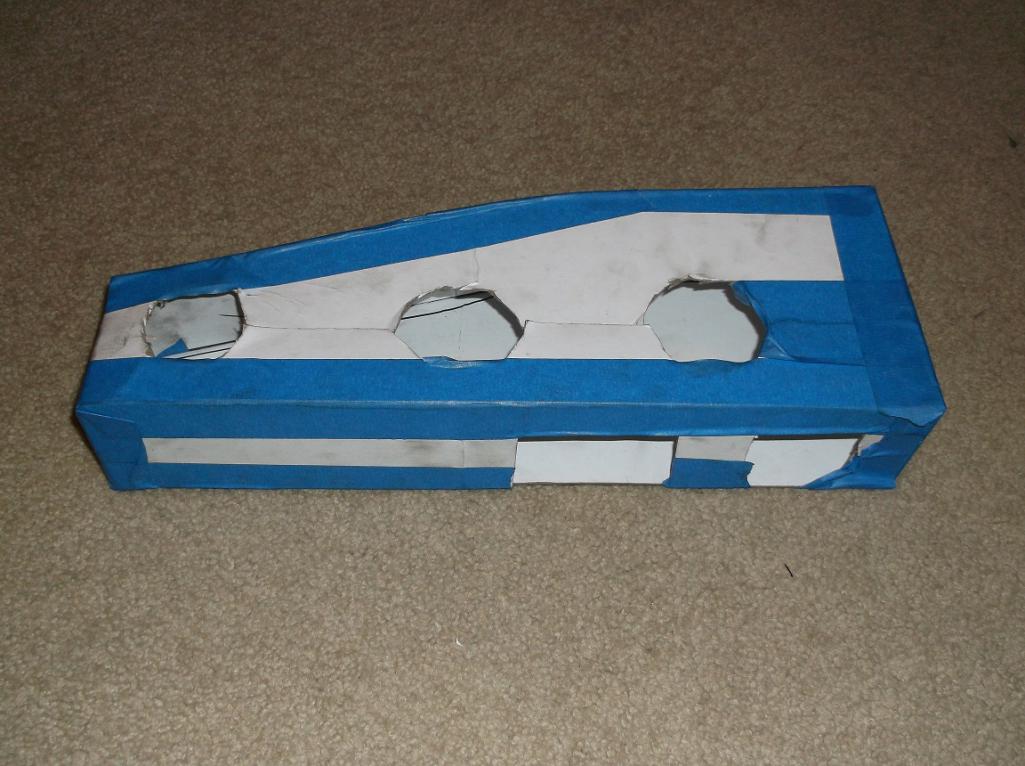
This is a rough template made from posterboard to make left heater boxe for my headers. I will be taking this apart to determine the best way to bend the stainless sheet. The right will be slightly different due to the differences in the headers side to side.
The openings for the exhaust tubes will be drilled with 1 34 inch hole saw. The slots in the side will be drilled with the same hole saw, but elongated to let the exhaust pipe out.
The small end will have a 2 1/4 inch tube attached to it to mount the heater box. The big end of the tapered side will have a 2 /14 inch tube with a 90 dfegree bend attached to it to feed air into the end of the heater box. The tube will run parallel to the tapered side, and will come as far forward as the front of the heater box. I will use hoses to attach to the blower feed in the front engine tin. The factory 964 blower tubing will be used on top of the motor to provide air.
Fabricating the heating stuff is slow going. Lots of false steps in the process. It will work out in the long run though.
Posted by: ClayPerrine Oct 16 2016, 06:21 PM
Did some work on the left heater box.
Transferring the template.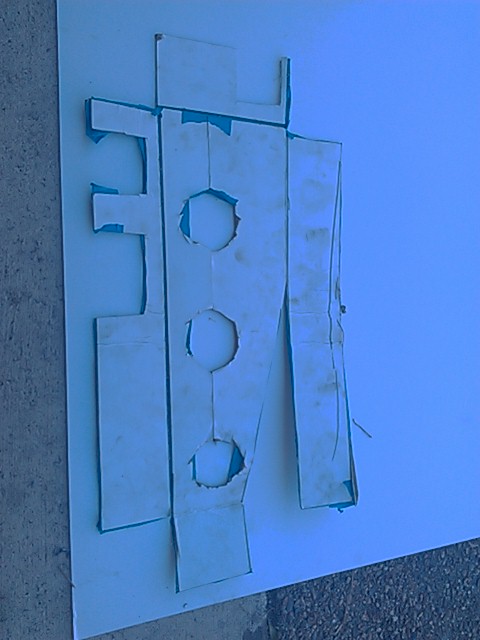
Layout work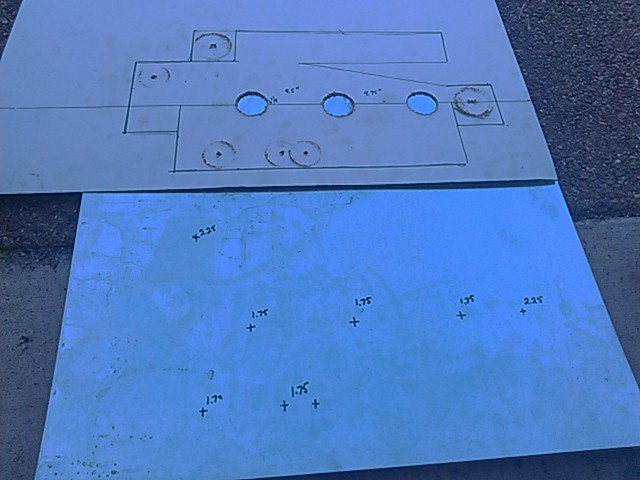
completed template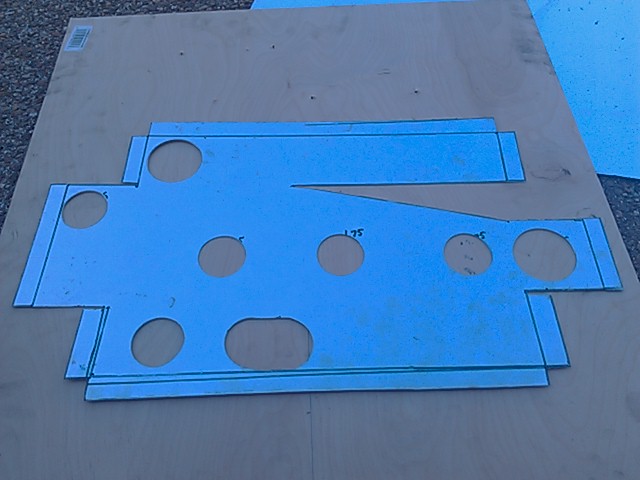
And the heater box test fit on the header.
This is the prototype, and will be scrapped, for two reasons.
1. I made all the holes too small and they had to be opened up with a grinder. They look terrible
2. I was told this was stainless, but it turns out it is just galvanized steel.
I will build another one out of the galvanized, taking what I learned on this one and refine the design. Then I will make one out of stainless.
Posted by: ClayPerrine Sep 5 2017, 06:39 PM
Well... this hasn't been updated for a while. If you are wondering where I have been, lots of extra time at work and 3 different minor surgeries, a case of pink eye, and lately prepping Betty's car for the trip to Okteenerfest have been taking my time.
But here's my latest update.
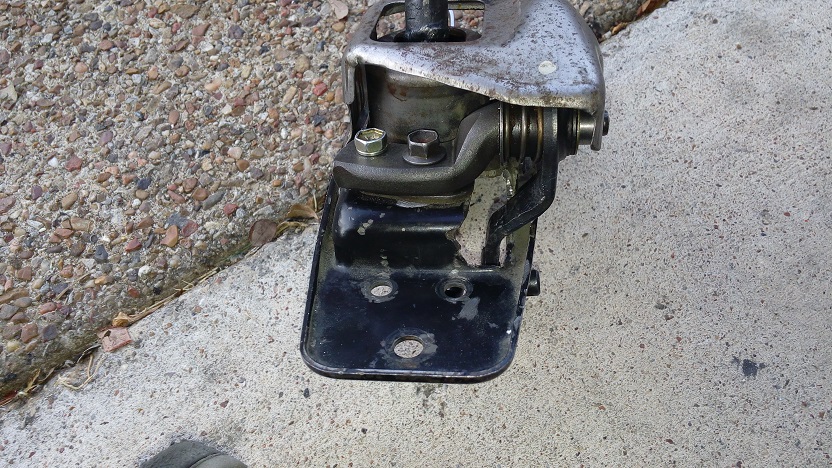
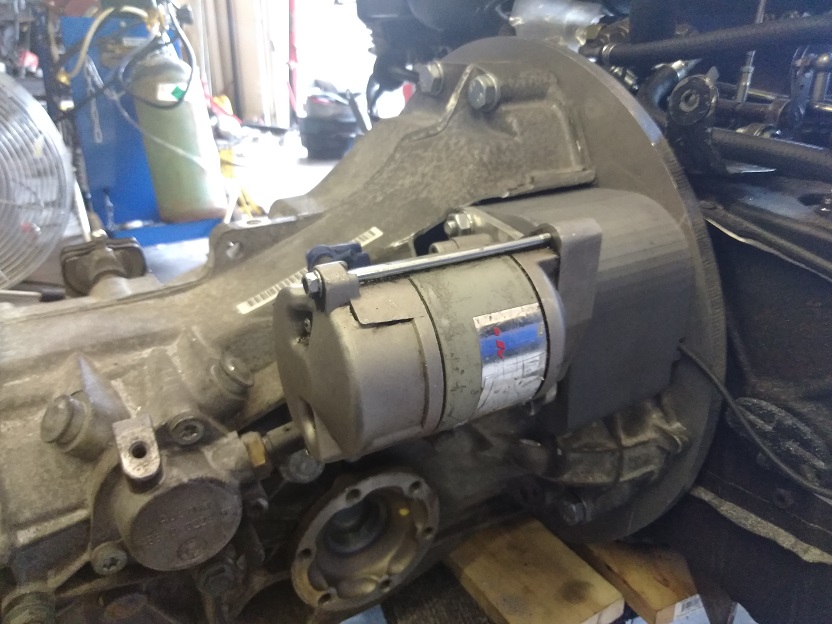
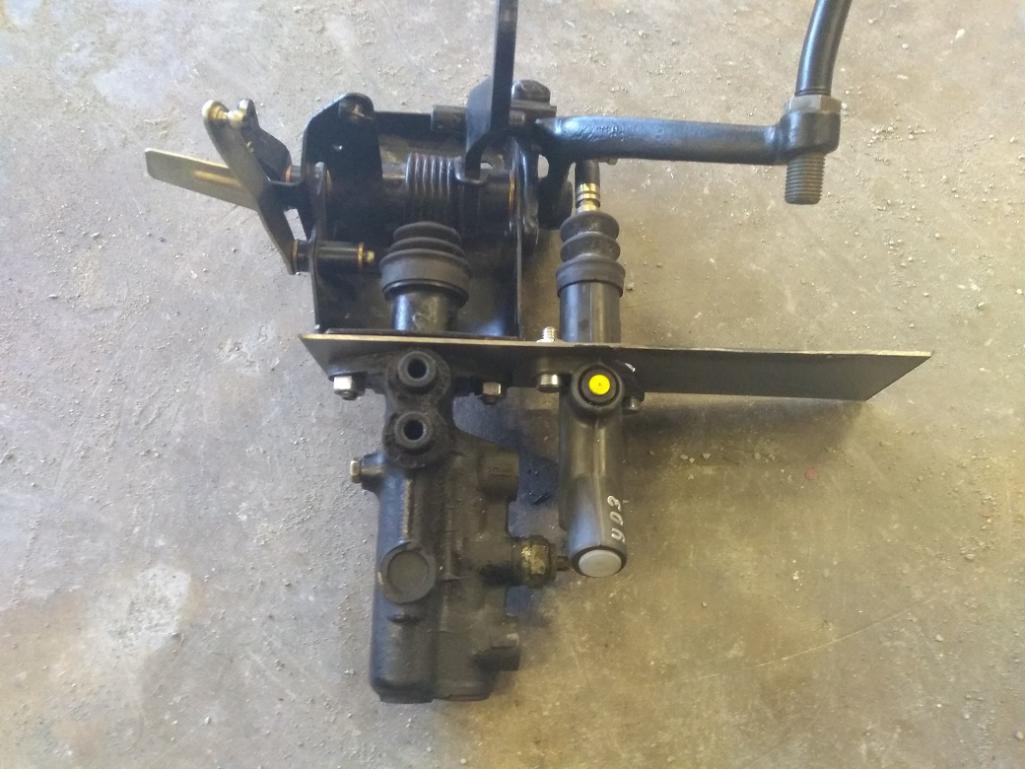
Boxster Transmission adapter is coming along. Here are pictures of the 3-D printed parts.
This is the first pass at the relief for the DME sensor.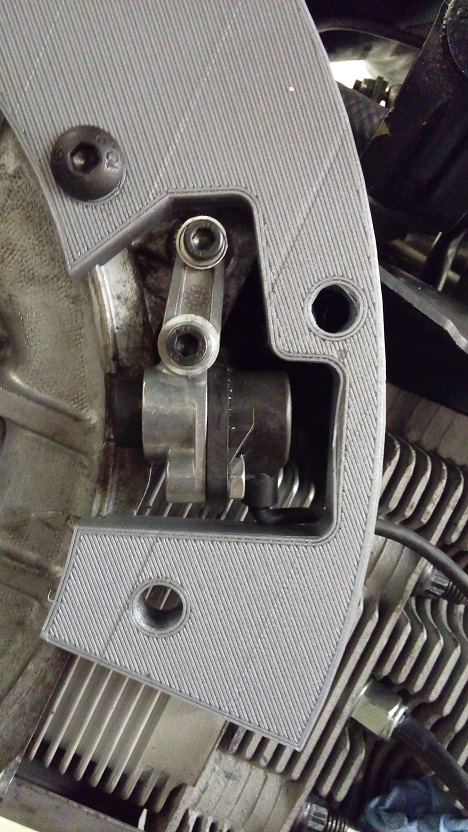
It's too tight in some places, and too much taken away in others.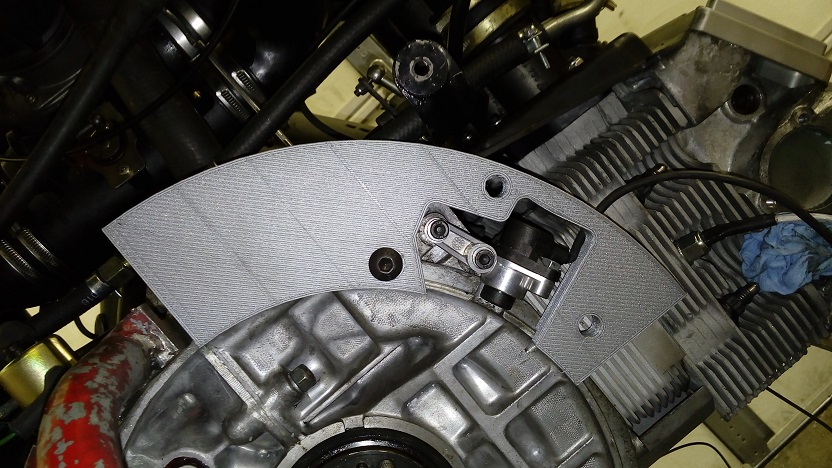
Adjustments to take to the place doing the printing.
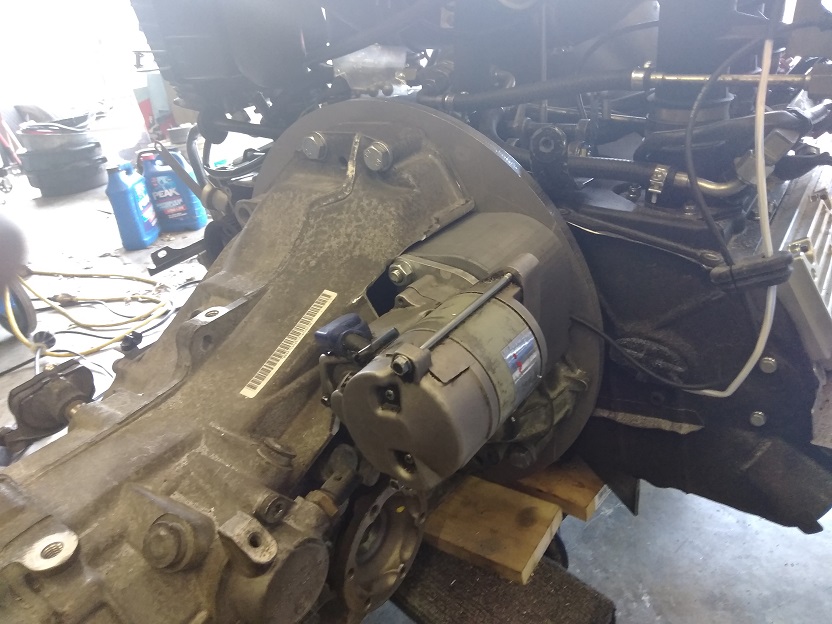
Here is the whole thing mounted to the transmission.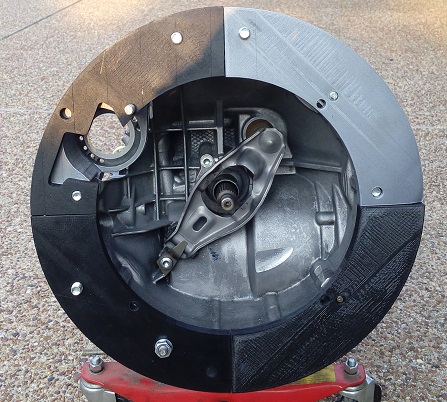
The starter adapter. Transmission has not been relieved completely for the starter.
I am using the gear drive 914 starter, and mounting the ring gear on the front of the pressure plate. A standard starter won't clear the backup light switch on the transmission.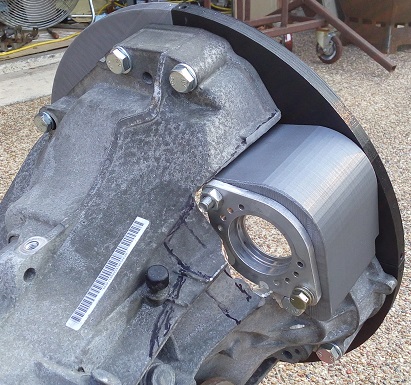
Inside looking at the starter mount.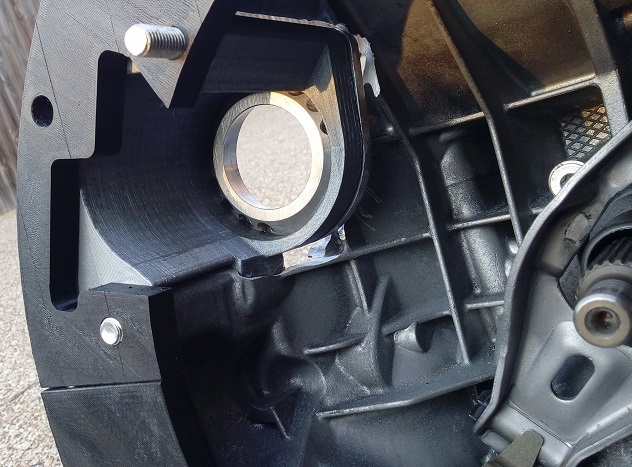
I don't have a picture of the whole thing mounted to the engine. I have to take it off the stand to do that.
I will be bringing the pieces to Okteenerfest so you can see it in person.
Also, here is the cable shifter.
Built from a Toyota Celica shifter (I don't remember who, but someone on here used one and I just borrowed the idea).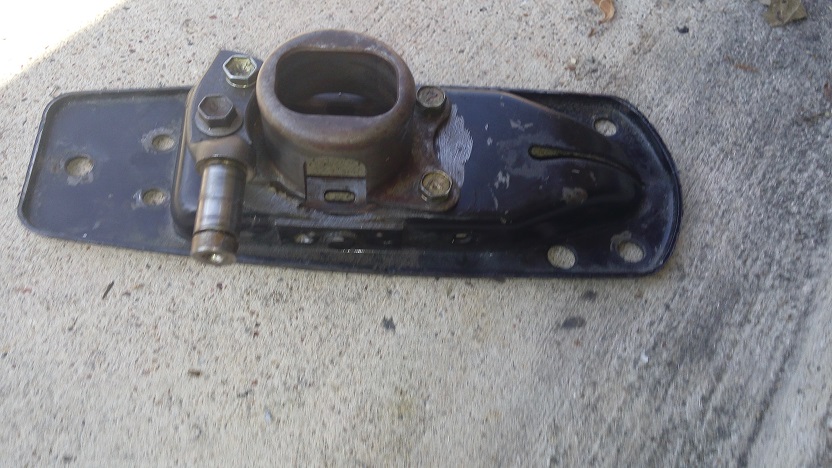
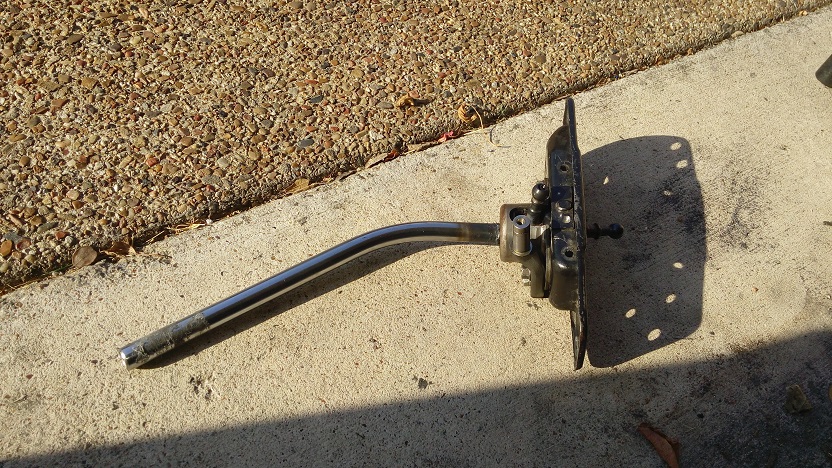
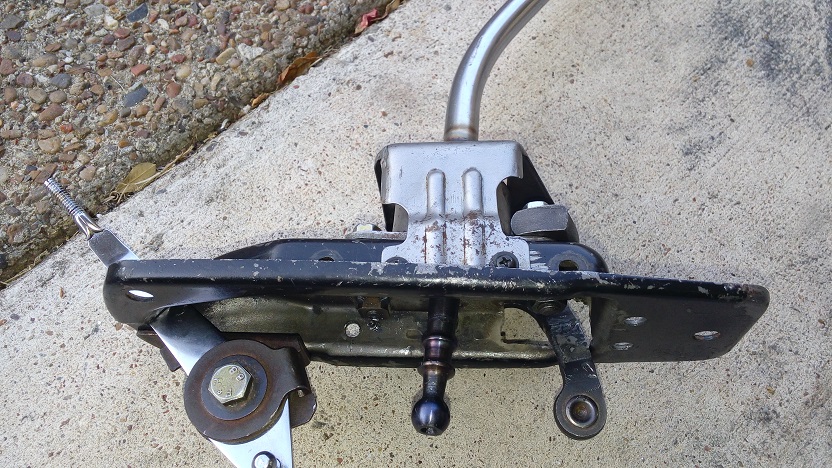

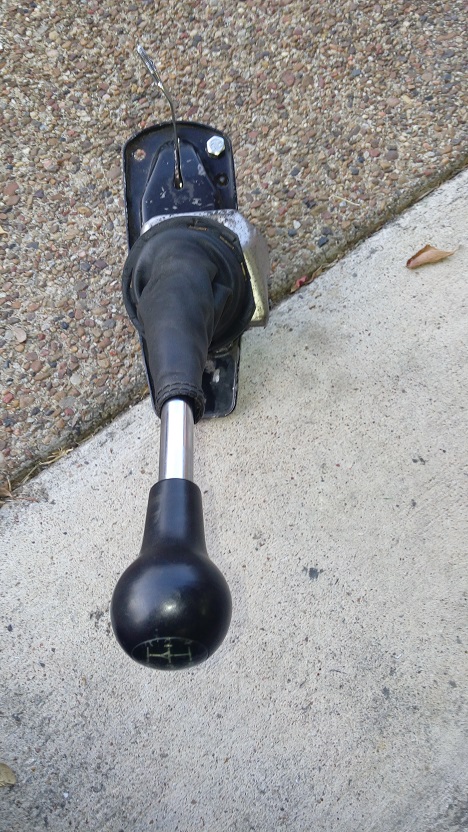
I wanted to keep the hand throttle, and not go cutting up the floorboard. I also wanted it to appear somewhat stock, so I welded on a 901 shift arm to the top of the Celica shifter. I used a tail shifter base, and fitted the Celica shift box to the top. I cut a slot for the arm, and after a little rebending of the left-right shift arm, it all fits in the car without cutting anything.
I still have to make the mount for the cables.
I am bring it to Okteenerfest too if anyone wants to see it.
As for the adapter.. I am willing to have multiple sets made if anyone wants to go to a boxster 6 speed in their car. But it would have to be a group buy. And I have not made the mounts to hook the transmission to the 914 chassis at the rear.
Stay tuned folks... Things are now back to moving along nicely.
Attached image(s)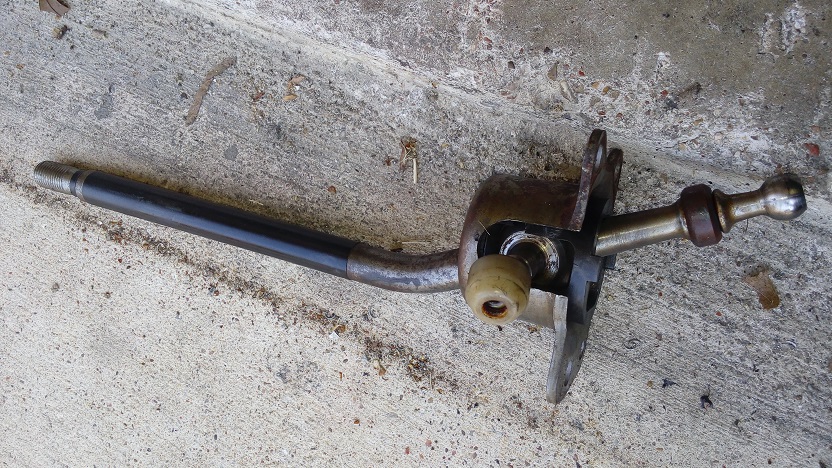
Posted by: Rob-O Sep 5 2017, 08:48 PM
Impressive work, Clay. I can't wait to see this thing in person.
Since this was all transmission related, are we to assume that the motor is complete?
Posted by: jesse7flying Sep 6 2017, 03:15 PM
I always marvel at the inventiveness of the folks on the forum and you're no exception Clay. Nice work!
Posted by: Maltese Falcon Sep 8 2017, 03:37 PM
Clear them
Paint or Powdercoat the engine tin, unless you want them to return to their natural state.
The engine tin is still a work in progress. I have to mod the 914-6 tin to fit the 964 motor. You can see the left rear setup I did.
Once I am ready to complete it, it will be bead blasted then powdercoated along with the rest of the tin.
I have to mod the power steering belt housing before I can make the tin for the right rear.
I have to add the holes for the lower spark plug wires in the side tins, and I still have to figure out how to send air to the heat exchangers. It will probably involve holes in the side tin for air feeds from the fan.
Clay , Betty...never got on the topic of your build while we briefly met at Rennsport5 , but you are building something epic here. If you are a fan of brass grommets in your seats; Singer might be jonesing your 914 at the next Rennsport !
Marty
Posted by: ClayPerrine Sep 8 2017, 09:24 PM
Clear them
Paint or Powdercoat the engine tin, unless you want them to return to their natural state.
The engine tin is still a work in progress. I have to mod the 914-6 tin to fit the 964 motor. You can see the left rear setup I did.
Once I am ready to complete it, it will be bead blasted then powdercoated along with the rest of the tin.
I have to mod the power steering belt housing before I can make the tin for the right rear.
I have to add the holes for the lower spark plug wires in the side tins, and I still have to figure out how to send air to the heat exchangers. It will probably involve holes in the side tin for air feeds from the fan.
Clay , Betty...never got on the topic of your build while we briefly met at Rennsport5 , but you are building something epic here. If you are a fan of brass grommets in your seats; Singer might be jonesing your 914 at the next Rennsport !
Marty
Marty,
I gotta build something that can keep up with your car.

Singer who?
Clay
Posted by: burton73 Sep 8 2017, 09:35 PM
Hi Clay,
Why did you not just use a Boxster shifter and cables for this car? I had some words with Renegade on cable shifter for my V8 to 930 trans and he was going on the reasons to get a Boxster trans and using the factory shifter and cables. He said lots of trans around for $2500. And if it went out they where cheep and there where lots of them. Cable shift Co. has there own set up for $700.
I sold my Boxster shifter for $50. So they are not that much and cables are going the right way.
Bob B
Posted by: ClayPerrine Sep 8 2017, 09:43 PM
Hi Clay,
Why did you not just use a Boxster shifter and cables for this car? I had some words with Renegade on cable shifter for my V8 to 930 trans and he was going on the reasons to get a Boxster trans and using the factory shifter and cables. He said lots of trans around for $2500. And if it went out they where cheep and there where lots of them. Cable shift Co. has there own set up for $700.
I sold my Boxster shifter for $50. So they are not that much and cables are going the right way.
Bob B
I have a boxster shifter.
Three reasons:
1. I wanted a stock appearing shifter.
2. I wanted to keep the hand throttle.
3. I have to remove the cable mount on top of the trans to clear the starter. So I decided to remove the lever for the side to side select and run the cable sideways across the top of the trans. That means the lever in the shifter has to be on the other side to get everything to work correctly.
Hard to visualize, I know. But I have not made the cable mount for the trans yet.
The boxster shifter is a big clunky box sitting on top of the tunnel. I hate the look. It doesn't match the period feel of the car.
Posted by: partsguy22 Mar 27 2018, 09:07 AM
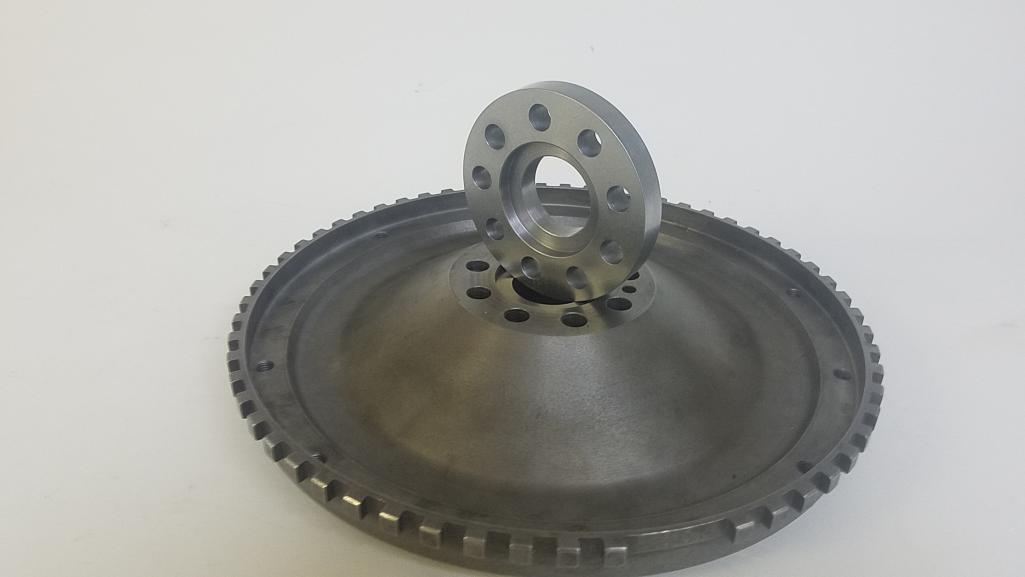
I am enabling Clays bad ideas in the form of making his parts for this bad idea
One hardened 4140 964 flywheel spacer ready
Attached thumbnail(s)
Posted by: mb911 Mar 27 2018, 03:54 PM
Did this trans ever get completed. I would love a 6 speed for my -6
Posted by: Luke M Mar 27 2018, 05:16 PM
... Great now I need one of these too.. hurry up Clay give it a test.
Posted by: ClayPerrine Mar 27 2018, 07:04 PM
I am enabling Clays bad ideas in the form of making his parts for this bad idea
One hardened 4140 964 flywheel spacer ready
Aaron,
Now that you posted on 914world, you need to own a 914!
Why didn't you call and let me know it was ready?
Posted by: ClayPerrine Mar 27 2018, 07:05 PM
... Great now I need one of these too.. hurry up Clay give it a test.Still have to make the pilot bearing spacer.
Once I get that, I can put together the clutch and then make the starter adapter.
Are you going to put a boxster trans in your 914????
Posted by: ConeDodger Mar 27 2018, 08:43 PM
sweet glad you found one!
let me know if you ever need a hand I'm not much of a wrench but I can follow directions
cjl
Great! Someone who can follow directions! Ok, so stand by the door and watch for the guy that owns this motor! We’ve got to get installed quick!

Posted by: whitetwinturbo Mar 30 2018, 10:30 AM

Posted by: Luke M Mar 30 2018, 04:02 PM
... Great now I need one of these too.. hurry up Clay give it a test.Still have to make the pilot bearing spacer.
Once I get that, I can put together the clutch and then make the starter adapter.
Are you going to put a boxster trans in your 914????
Yes, I would like to stuff a Boxster trans in the next 914 that I build. Maybe my brothers car once his 901 goes south. Any plans to mass produce or forward things to have someone else make a kit for you ?
Posted by: ClayPerrine Mar 30 2018, 09:01 PM
... Great now I need one of these too.. hurry up Clay give it a test.Still have to make the pilot bearing spacer.
Once I get that, I can put together the clutch and then make the starter adapter.
Are you going to put a boxster trans in your 914????
Yes, I would like to stuff a Boxster trans in the next 914 that I build. Maybe my brothers car once his 901 goes south. Any plans to mass produce or forward things to have someone else make a kit for you ?
This is the kit development. Slow, but moving in the right direction.
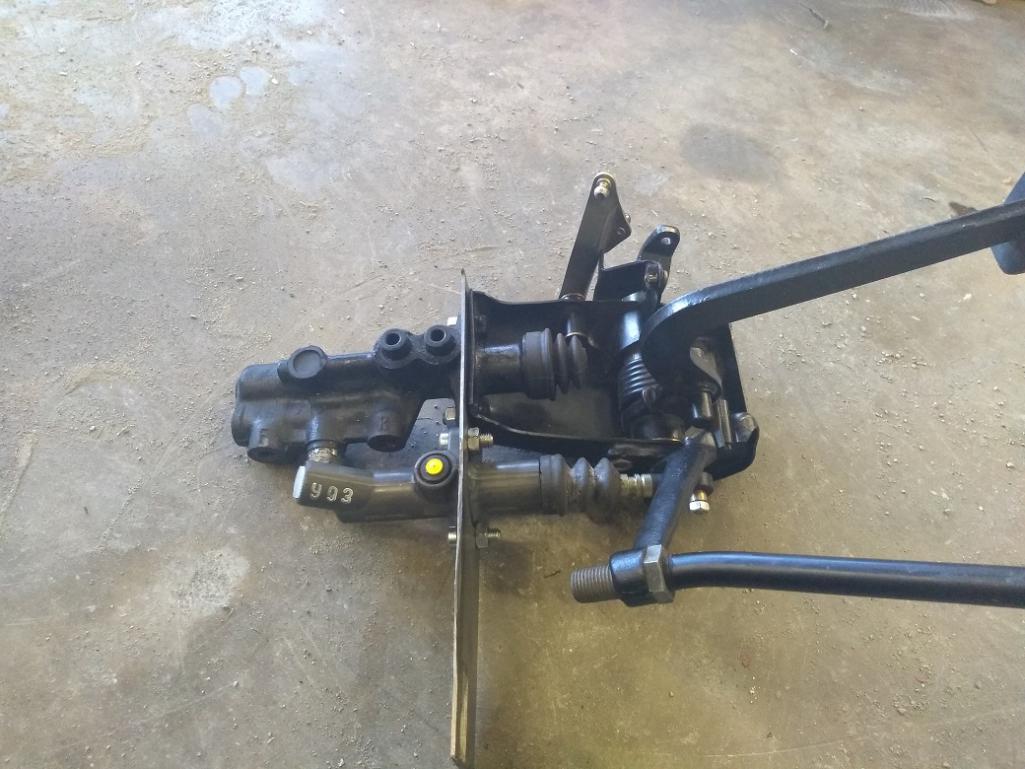
Posted by: ClayPerrine Jun 6 2018, 12:40 PM
I am spending the day in the garage test fitting clutch parts.
Here are some pictures for you.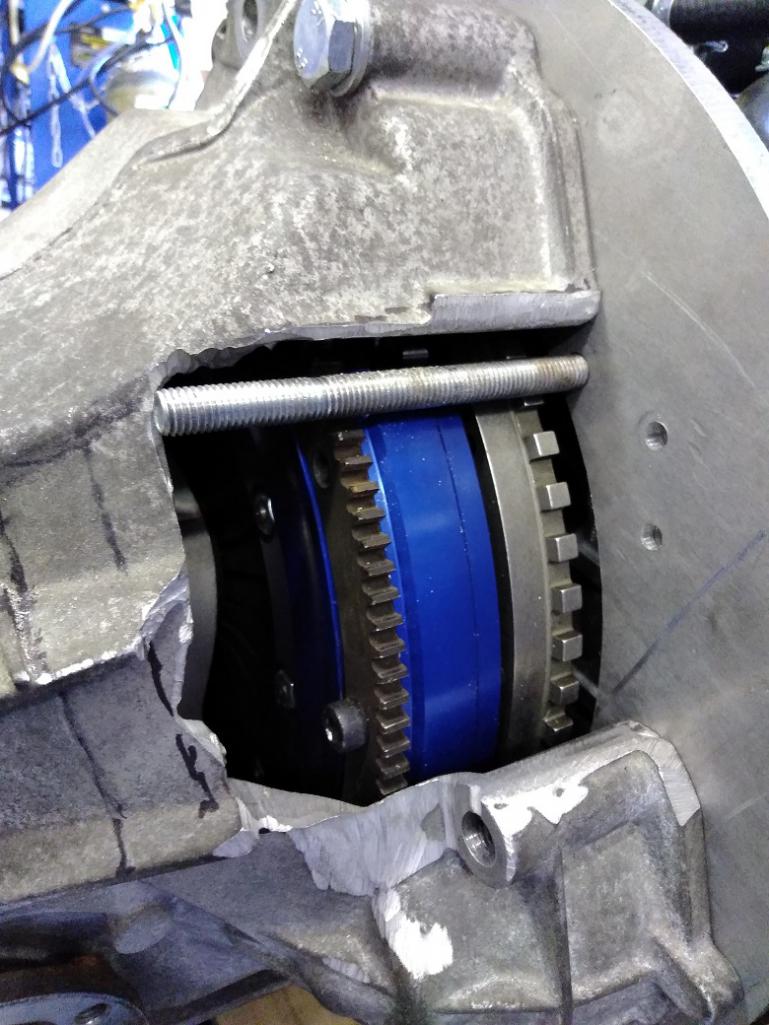
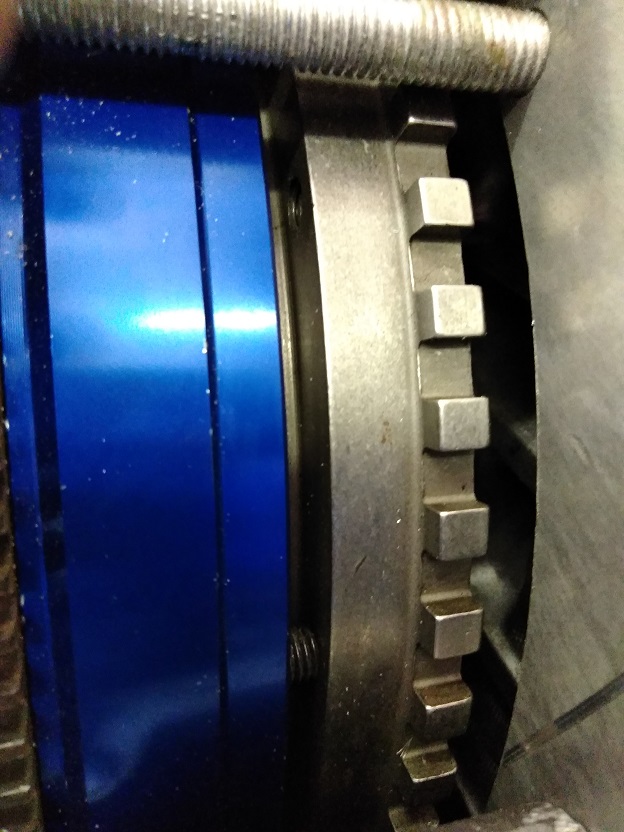

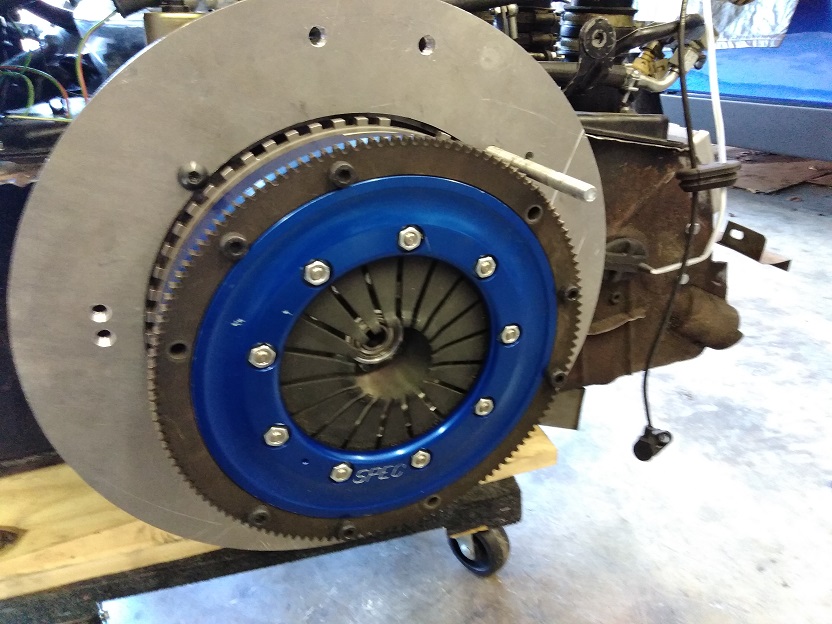
There is no clutch disk in it, and we still have to make an adapter to center the pressure plate on the flywheel. That's why there is a gap between the pressure plate and the flywheel.
But it is coming along nicely!!
Posted by: ClayPerrine Jun 6 2018, 03:51 PM
More pictures.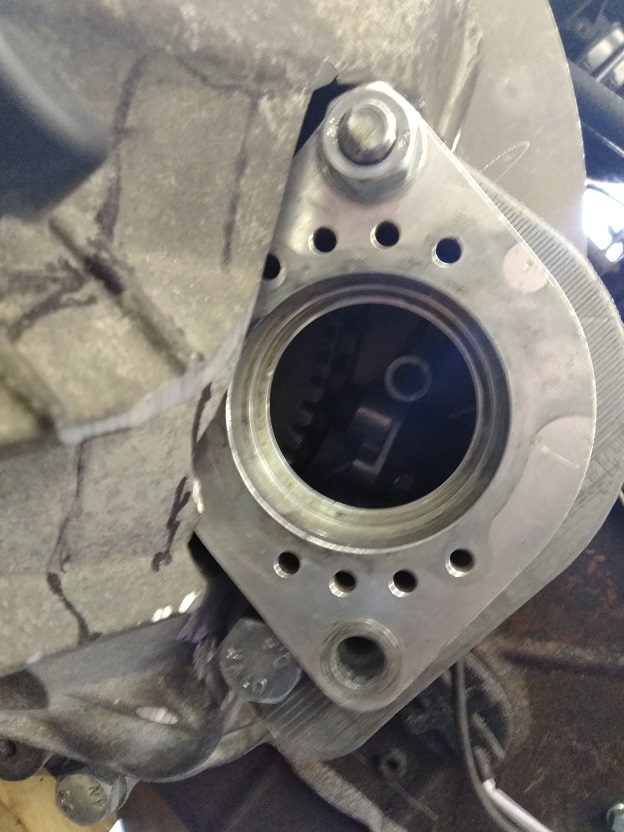
First picture looks through the starter hole at the DME sensor. If the sensor fails, just pull the starter and the adapter block.
Last picture shows starter fitted. Once I fitted the starter, I realized that the starter adapter was setup before I realized I had to move the flywheel back 13mm. So now I have to make the starter block 13mm longer to move the starter rearward.
Tomorrow I will be making starter adapter plates from 6061-T6 aluminum. I have to make 11 to be the correct distance.
Stay tuned for further updates.
Posted by: aharder Jun 6 2018, 04:36 PM
Nice work !!
Posted by: Steve Jun 6 2018, 04:52 PM

Posted by: 76-914 Jun 6 2018, 05:03 PM
Nice work Clay. I was going to give you "the business" about taking so long but I know things take 10x longer when you also play the role of fabricator/engineer. Should be a beast.
Posted by: ClayPerrine Jun 7 2018, 08:04 PM
An update from today.
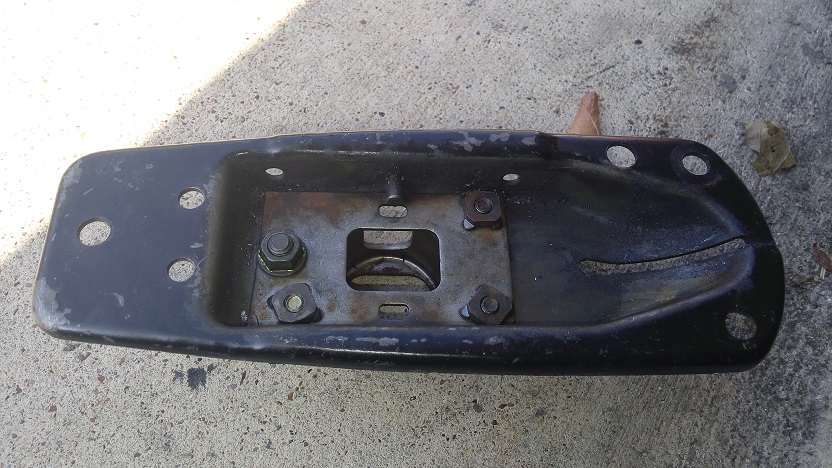
Found I had an issue with the starter. Seems the bolt pattern for the starter overlaps the bolt that holds the starter adapter to the trans/motor. So something had to give. I have to use a gear drive starter, so I just made a new mounting plate for the starter with the hole in the correct location for the trans/motor bolt already there.
Took me all day to figure that one out. But in the end I spun the engine with the starter, so now I can confirm the starter will work.
Next up.. continue turning plate aluminum into multiple starter spacers with a drill press and a hole saw.
Posted by: ClayPerrine Jan 18 2019, 07:11 AM
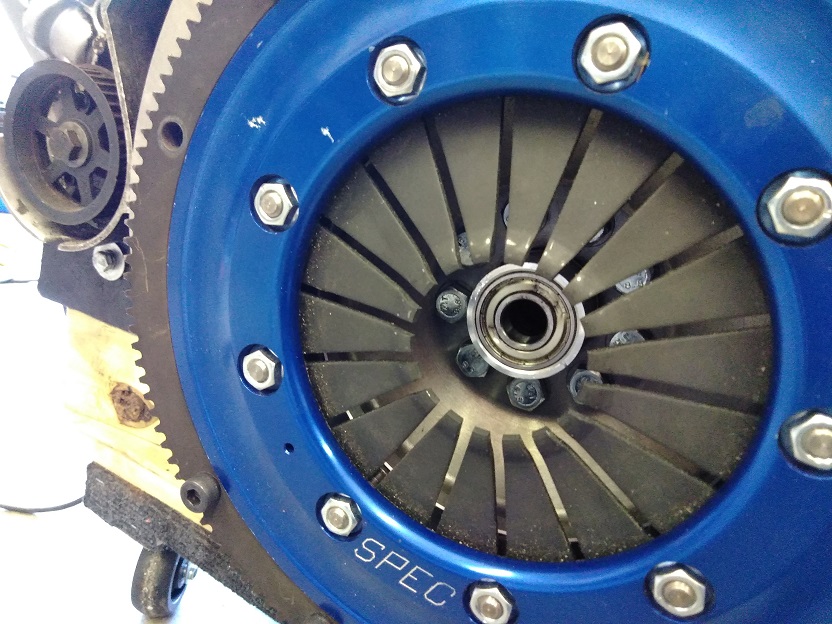
I got the pressure plate spacer prototype back from the machinist yesterday. I assembled the whole clutch and put it in the press to verify functionality. I have about 2mm gap between the pressure plate and the clutch disk when it is compressed, and it locks tight when the pressure plate is not compressed.
Some pictures of the clutch assembly for you.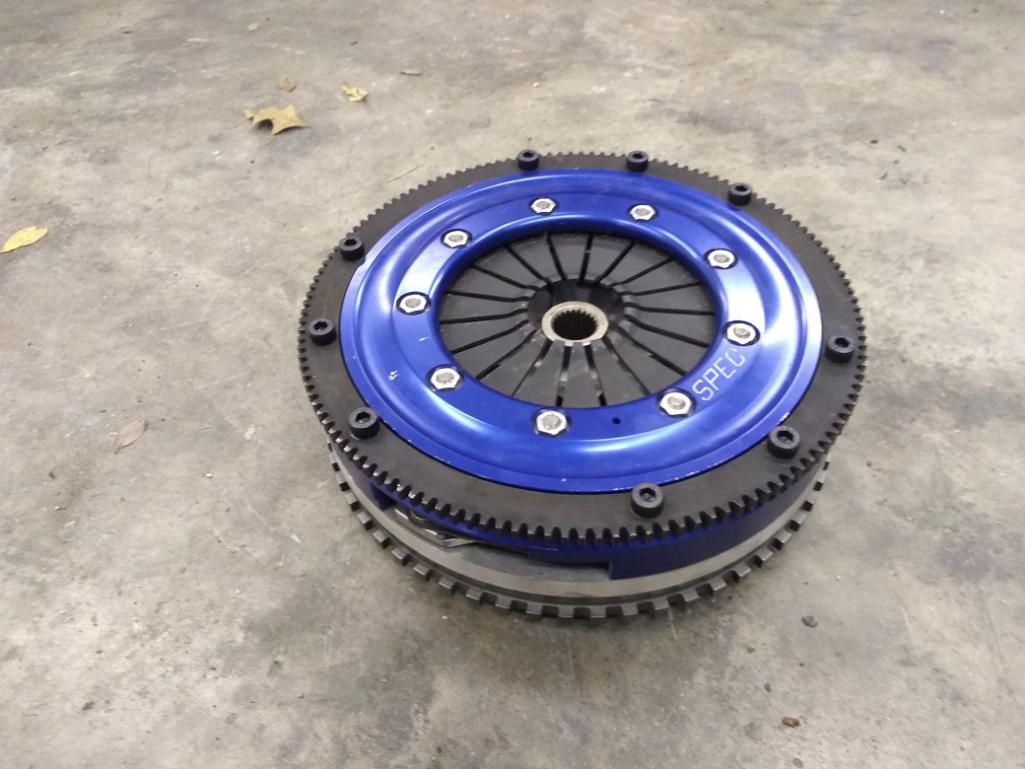


Tonight after work I am going to get it fitted to the motor, and hook up the transmission. Then I get to figure out the size of the spacer for the throwout arm, and the starter block thickness.
Development of stuff like this always takes lots of time.
I am moving forward, slowly, but forward progress is being made.
Posted by: rick 918-S Jan 19 2019, 08:34 PM


Posted by: bandjoey Jan 19 2019, 09:08 PM
So it's gonna look like this
Attached image(s)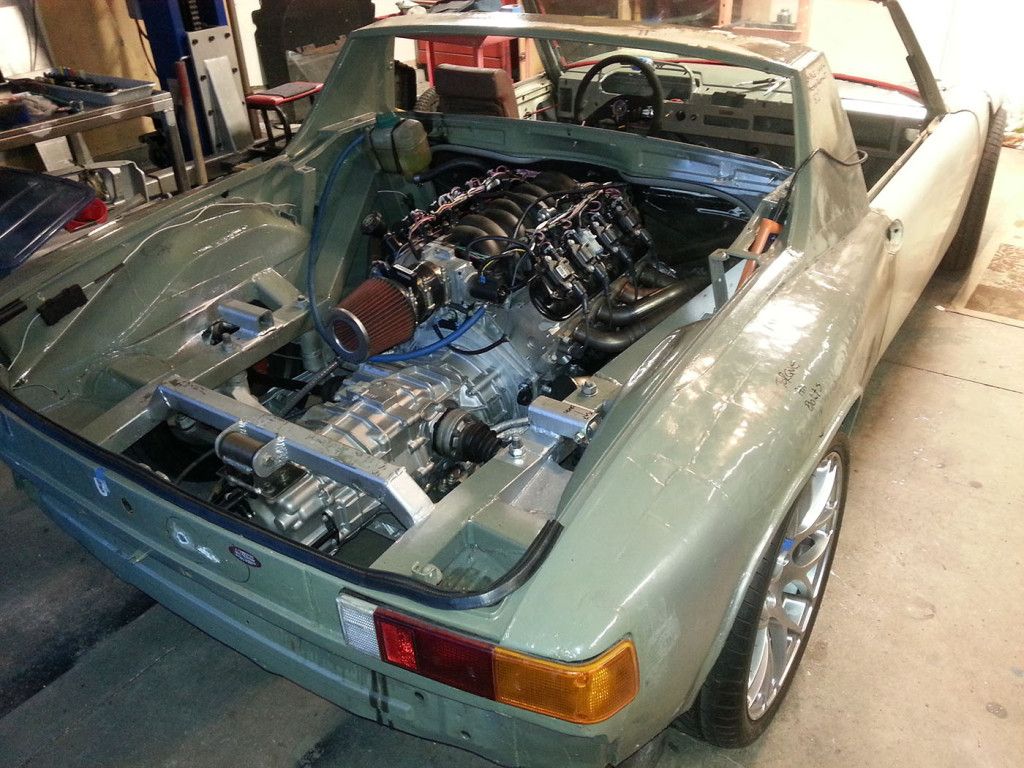
Posted by: Larmo63 Jan 19 2019, 09:11 PM
I am spending the day in the garage test fitting clutch parts.
Here are some pictures for you.
There is no clutch disk in it, and we still have to make an adapter to center the pressure plate on the flywheel. That's why there is a gap between the pressure plate and the flywheel.
But it is coming along nicely!!
All of that fits in a 914 Porsche?
Dang.
Posted by: mepstein Jan 19 2019, 09:39 PM
A fully dressed four engine & trans weighs 350lbs.
The 964 engine weighs ~525 fully dressed and the boxter trans weighs ~150 with starter.
So +325lbs, +/- for the conversion.
*all weights are approximate.
Posted by: Rob-O Jan 19 2019, 11:41 PM
So it's gonna look like this
Except with a Porsche 6 cylinder, without 300 pounds of steel square tubing and without the Frankenstein rear fenders.
But other than that, EXACTLY like this car...
Posted by: ClayPerrine Jan 20 2019, 01:58 PM
A fully dressed four engine & trans weighs 350lbs.
The 964 engine weighs ~525 fully dressed and the boxter trans weighs ~150 with starter.
So +325lbs, +/- for the conversion.
*all weights are approximate.
But...
HP output of a 914/4 is approximately 100 to 130 depending on build.
HP output of the 4.0 engine I have is approximately 425 to 430.
So, I am giving up 325 lbs for 300 HP... sounds like a good trade to me!
Posted by: mepstein Jan 20 2019, 02:13 PM
A fully dressed four engine & trans weighs 350lbs.
The 964 engine weighs ~525 fully dressed and the boxter trans weighs ~150 with starter.
So +325lbs, +/- for the conversion.
*all weights are approximate.
But...
HP output of a 914/4 is approximately 100 to 130 depending on build.
HP output of the 4.0 engine I have is approximately 425 to 430.
So, I am giving up 325 lbs for 300 HP... sounds like a good trade to me!
I love the HP jump. I've driven small block chevy conversions and didn't like them so I'm always concerned about extra weight. Granted, our cars put the weight in the right place and proper suspension setup can make a huge difference. Your car should be an E ticket ride for sure.
Posted by: ClayPerrine Jan 20 2019, 03:11 PM
Yesterday I got the clutch hooked up and the transmission installed. I made a temporary spacer for the clutch arm pivot to move the throw-out bearing closer to the pressure plate.
I tested the clutch with a grease gun hooked to the slave cylinder. The clutch works fine. I also mounted the starter to get the spacing between it and the ring gear correct.
I had to add a brace to keep the starter from shifting, as I don't have the starter adapter made yet. But the starter engages fine and the engine cranks. 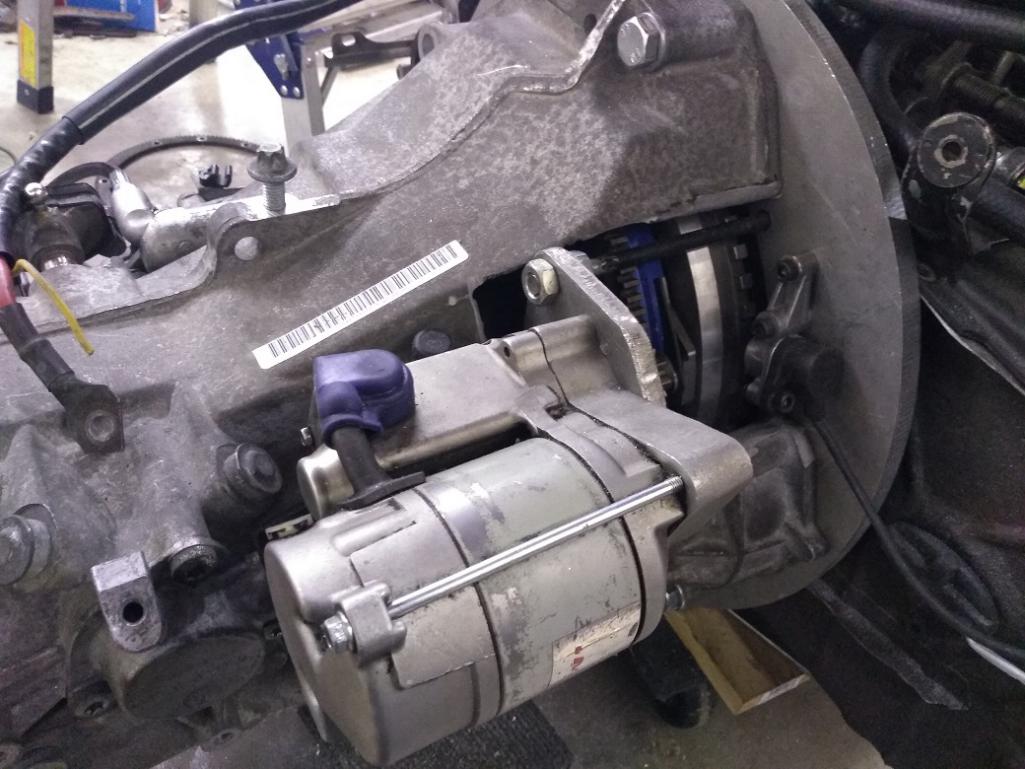
I have to get different bolts for the pressure plate, as the heads of the current ones keep hitting the inside of the bell housing. I also have to pick up the replacement backup light switch from an early Boxster.
The later Cayman switch is too long and interferes with the battery cable lead to the starter.
Going to see my machinist this week to get the spacer for the clutch arm and the starter block made.
This has to be the slowest part of the development.
But I am making progress..
Posted by: wvspin2 Apr 6 2019, 12:03 PM
 This is going to be the coolest ride on the planet. Above all keeping it Porsche is very special. Some have tried to persuade me to go to the dark side, renegade my 914, this thread keeps me honest. The challenges you have faced putting this terrific ride together are monumental. You have tremendous skill and patience. Your truly inspirational.
Posted by: ClayPerrine Apr 20 2019, 08:52 PM
Today I got to work on my 4.0 conversion. The Cayman transmission has a hydraulic clutch, so I needed to make a way to hook it to the existing clutch pedal.
I fabricated a metal plate to hook to the pedal box, and stick out to the side to mount the clutch master. Simple plate with holes. I had already pulled the pedal box and brake master out of the chassis, so I bolted them together with the plate, and bolted the clutch master to the plate.
I marked where the clutch master would meet the clutch pedal. Then I disassembled the pedals, pulling the clutch pedal and arm. I won't need the spring with the hydraulic master, so it wont be reinstalled.
I drilled into the arm, and put a 6mm pin with a threaded end into it. That has a brass bushing that is 6mm on the inside, and 8mm on the outside so it fits in the factory end of the 964 clutch master cylinder.
Here are some picts of the assembled pedal box with the 964 clutch master.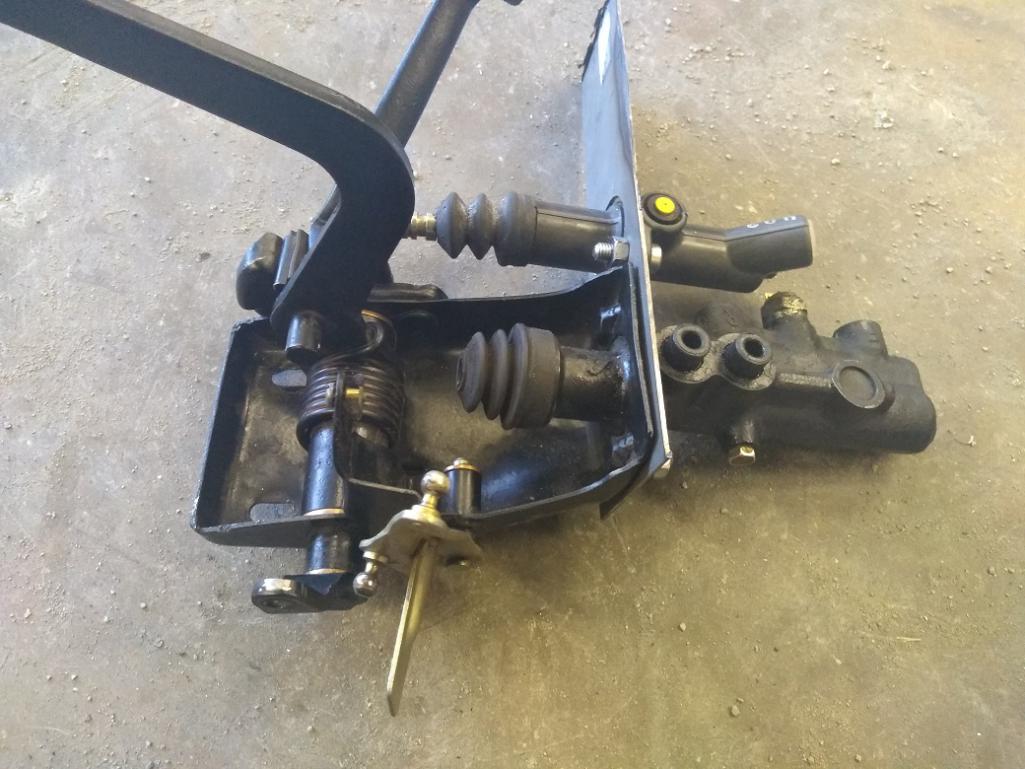
The plate I made is just a template to determine spacing between the brake and clutch masters. I had not trimmed it down when those pictures were taken.
This is the area on the chassis I have to modify. The plate is hanging off the stud on the left. It was trimmed to the correct length, and tapered to fit the clutch master cylinder location. I put a bare pedal box in the chassis so I could use it for the studs.
The black lines show where it needs modified. I have figured out that I need to cut the right vertical line, and the bottom line, then pull it out so that it is flat. I can then add metal on the side and the bottom to fill in the open holes.
Because of the neighborhood, my garage curfew is 9:00 PM. So I had to stop for the night.
More to come tomorrow (Unless we go to visit my MIL).
Posted by: Rob-O Apr 21 2019, 06:34 AM
Cool!
I have two questions. The position where it’s connected, will it allow full stroke of the clutch master cylinder? Also, since the clutch master rod is below the clutch pedal arm, does this setup allow for the clutch pedal arm it’s full swing arc without hitting the clutch master rod? As much thought as you’ve put into this build I’d bet you’ve accounted for all this. Hard to tell from the pictures, but the horizontal portion of the clutch pedal arm looks really close to the clutch master rod.
Posted by: ClayPerrine Apr 21 2019, 07:50 AM
Cool!
I have two questions. The position where it’s connected, will it allow full stroke of the clutch master cylinder? Also, since the clutch master rod is below the clutch pedal arm, does this setup allow for the clutch pedal arm it’s full swing arc without hitting the clutch master rod? As much thought as you’ve put into this build I’d bet you’ve accounted for all this. Hard to tell from the pictures, but the horizontal portion of the clutch pedal arm looks really close to the clutch master rod.
The clutch pedal is against the top stop when the clutch master is fully extended. When the pedal is down, the clutch master reaches full stroke. There is a recess in the floor for the end of the clutch pedal that also acts as a stop. I won't know if that works correctly until I get it on the car. But I am fairly sure it will. The pedal doesn't reach the bottom of the recess on either of the other two 914s when the clutch is adjusted correctly.
I am willing to bet most of you never realized that recess was there. It's built into the left mount for the crossmember.
Posted by: 76-914 Apr 21 2019, 08:18 AM
What gauge metal is that plate? Looks thin? You running AN-3 down the old clutch tube like the rest of us?
Posted by: ClayPerrine Apr 21 2019, 08:54 AM
What gauge metal is that plate? Looks thin? You running AN-3 down the old clutch tube like the rest of us?
The plate was made as a template to use to determine the location for the clutch master cylinder, not to take the whole load. I may weld it on as a doubler once I get the whole moved out. I have some metal from a parted out 914 to use for the extensions.
The metal the plate was made from is the same thickness as the pedal box. It flexes because it doesn't have any reinforcement bends in it.
The line from the clutch master to the engine compartment will be run next to the brake line down the tunnel. I probably won't use the clutch tube for anything.
Posted by: whitetwinturbo May 24 2019, 06:39 PM
..........way interesting
Posted by: 76-914 May 24 2019, 06:50 PM
What gauge metal is that plate? Looks thin? You running AN-3 down the old clutch tube like the rest of us?
The plate was made as a template to use to determine the location for the clutch master cylinder, not to take the whole load. I may weld it on as a doubler once I get the whole moved out. I have some metal from a parted out 914 to use for the extensions.
The metal the plate was made from is the same thickness as the pedal box. It flexes because it doesn't have any reinforcement bends in it.
The line from the clutch master to the engine compartment will be run next to the brake line down the tunnel. I probably won't use the clutch tube for anything.
It's your build but you might want to rethink that. Using the old clutch cable tube as a conduit will make it simple to R&R the AN-3 hose should the need arise; keep any unforeseen leaks out of the tunnel>cabin>carpet; prevent peaks & valleys that occur with non supported hose.
Posted by: ClayPerrine May 24 2019, 08:33 PM
What gauge metal is that plate? Looks thin? You running AN-3 down the old clutch tube like the rest of us?
The plate was made as a template to use to determine the location for the clutch master cylinder, not to take the whole load. I may weld it on as a doubler once I get the whole moved out. I have some metal from a parted out 914 to use for the extensions.
The metal the plate was made from is the same thickness as the pedal box. It flexes because it doesn't have any reinforcement bends in it.
The line from the clutch master to the engine compartment will be run next to the brake line down the tunnel. I probably won't use the clutch tube for anything.
It's your build but you might want to rethink that. Using the old clutch cable tube as a conduit will make it simple to R&R the AN-3 hose should the need arise; keep any unforeseen leaks out of the tunnel>cabin>carpet; prevent peaks & valleys that occur with non supported hose.
It is not AN3. It is bubble flared steel tubing, just like the brake line. I just bought all the tubing and I will be installing it this weekend.
Posted by: ClayPerrine Jun 8 2019, 06:20 PM
Found an article on Pelican showing how to "back date" a 964 motor with an engine mounted oil cooler.
http://forums.pelicanparts.com/porsche-911-technical-forum/563879-retrofit-911-oil-cooler-964-engine-here-s-how.html
So today I pulled the camshaft off the Left side of the 4.0. Going to have the power steering pump drive machined off of it so I can transfer the factory 914-6 engine mounted oil cooler from the 2.4. It will make hooking up the oil lines and mounting the rear engine tin much easier.
I also got the master cylinder installed and the steel lines hooked up. Next I have to do the clutch master cylinder plumbing. No pictures, but I promise some tomorrow.
Posted by: porschetub Jun 8 2019, 07:26 PM
That will be a fast car when finished,do the Audi transmissions all suffer from starter location issues also or is it just the boxster trans ?.
What have you planned for extra oil cooling after the 964 cooler mod ?.
Thinking that Pelican custom made cooler duct is rather large ? hope there is no loss of cooling to each cylinder,however the fan design for is much improved on the 993 engine so maybe not matter ?.
Great build keep it up .
Posted by: ClayPerrine Jun 9 2019, 05:32 AM
That will be a fast car when finished,do the Audi transmissions all suffer from starter location issues also or is it just the boxster trans ?.
What have you planned for extra oil cooling after the 964 cooler mod ?.
Thinking that Pelican custom made cooler duct is rather large ? hope there is no loss of cooling to each cylinder,however the fan design for is much improved on the 993 engine so maybe not matter ?.
Great build keep it up
.The Porsche Boxster/Cayman transmissions are the same as the Audi transmissions, so they will have the same starter issues.
I am also adding 2 factory 964 oil coolers on either side of the transmission to make sure it stays cool. The engine mounted oil cooler is more about hooking up the oil lines.The extra cooling is a bonus. I plan on cutting the cooler feeds off a 911 shourd and using them on the 964 shroud. I think it will be simpler that way.
Today I get to pull the cooler off the 2.4L so I have have it cleaned before installation. I am also going to finish up extending the DME harness so it fits the chassis right.
Posted by: porschetub Jun 9 2019, 10:29 PM
That will be a fast car when finished,do the Audi transmissions all suffer from starter location issues also or is it just the boxster trans ?.
What have you planned for extra oil cooling after the 964 cooler mod ?.
Thinking that Pelican custom made cooler duct is rather large ? hope there is no loss of cooling to each cylinder,however the fan design for is much improved on the 993 engine so maybe not matter ?.
Great build keep it up
.The Porsche Boxster/Cayman transmissions are the same as the Audi transmissions, so they will have the same starter issues.
I am also adding 2 factory 964 oil coolers on either side of the transmission to make sure it stays cool. The engine mounted oil cooler is more about hooking up the oil lines.The extra cooling is a bonus. I plan on cutting the cooler feeds off a 911 and using them on the 964 shroud. I think it will be simpler that way.
Today I get to pull the cooler off the 2.4L so I have have it cleaned before installation. I am also going to finish up extending the DME harness so it fits the chassis right.
Thanks for the reply great build,good call on the cooler they tend to get rather dirty inside ,IMO more than most think,blew a cooler sold to me by the PO ,the replacement one was filthy even after I soaked it ,ultrasonic cleaning really finished the cleaning process.
The cooler ducting what ever you choose will be dependant on the shape of the 993 shroud to how it fits,may need work ?,I seem to remember the latter ones have more area around where the cooler mounts.
Go well
Posted by: ClayPerrine Jun 16 2019, 08:33 PM
I made a lot of progress this weekend, so I wanted to share some photos.
DME wiring in Engine compartment (Sorry it's blurry)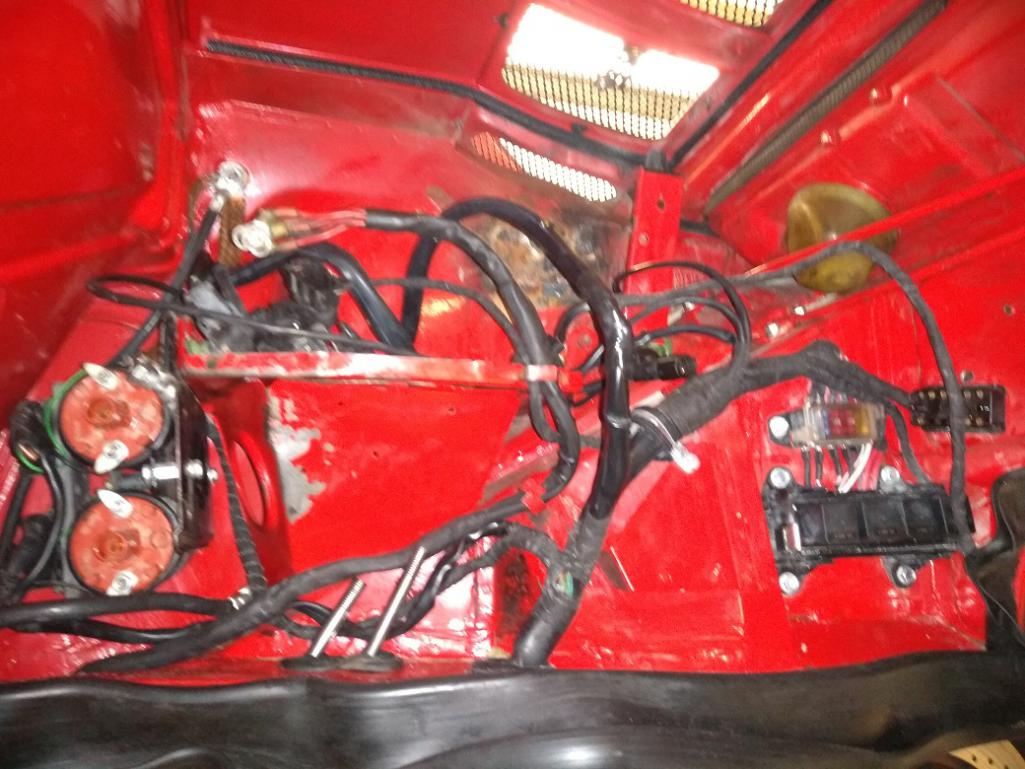
Mount for Coils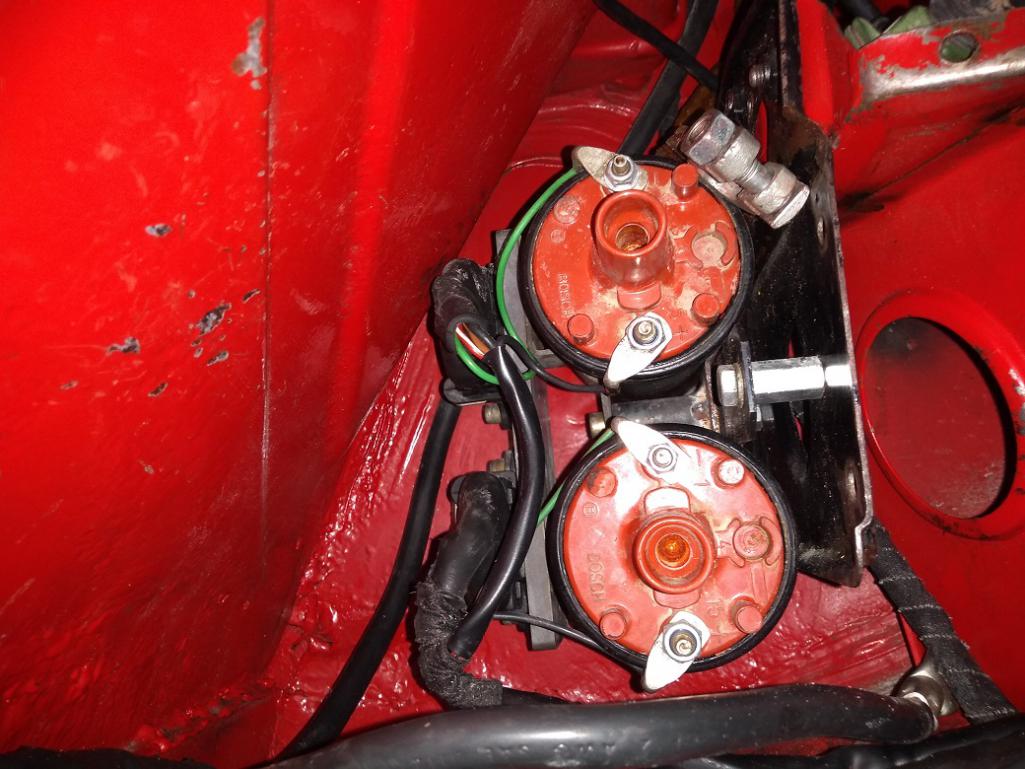
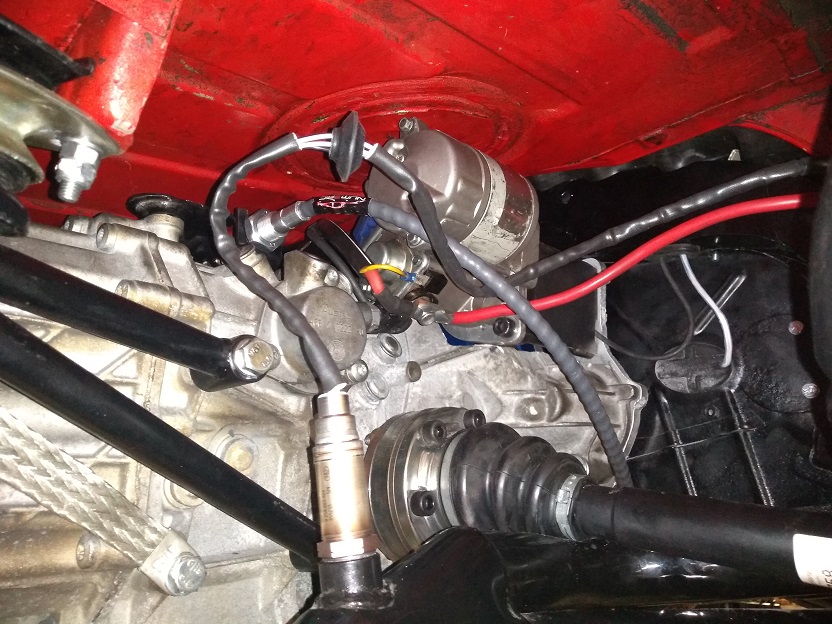
DME fuse box and relays. I got rid of the problematic DME relay for 3 solid state relays. The wire over the last relay is the connection for the HEGO sensor.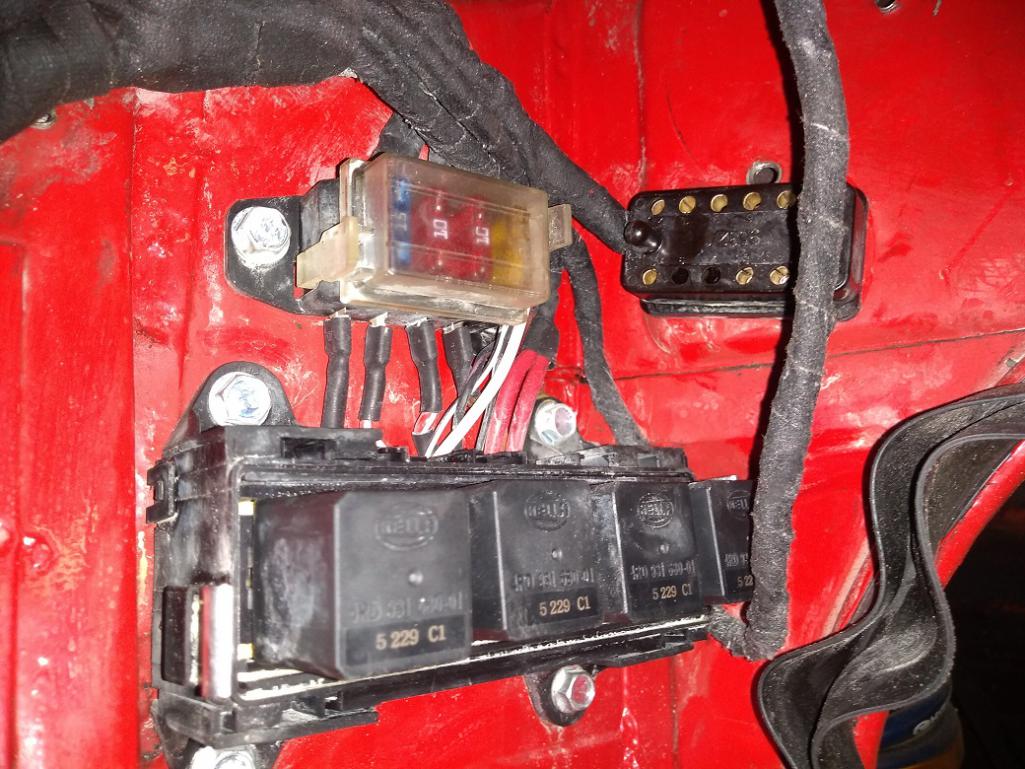
I have never had a proper oil line hook on my conversion. So I bought one from Restoration design and installed it.
Steel starter mount. We found it much easier, cheaper, and lighter to make this than mill out a honking big expensive block of aluminum.
After the first one was built, I added it to the motor. Once it was properly aligned (see the empty hole above the adapter) I found out it was too short and the gear on the bendix was engaged all the time. So I extended it with some steel tubes from the local Ace hardware.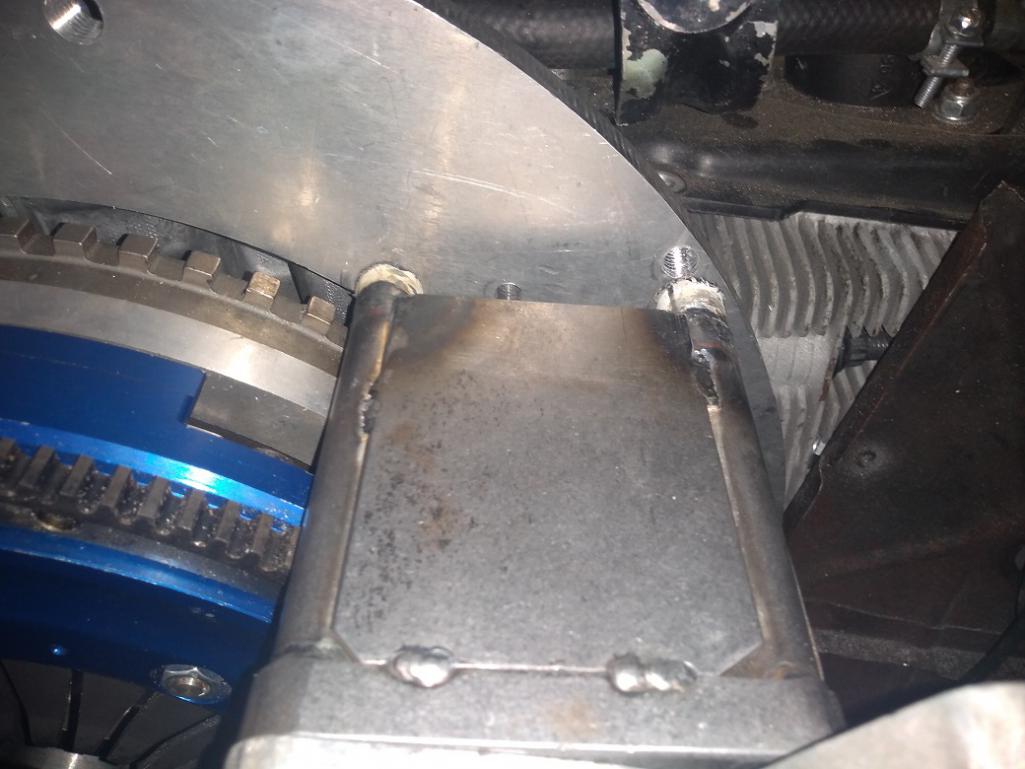
View down the starter hole showing the DME sensor. To replace the DME sensor, just remove the starter mount. 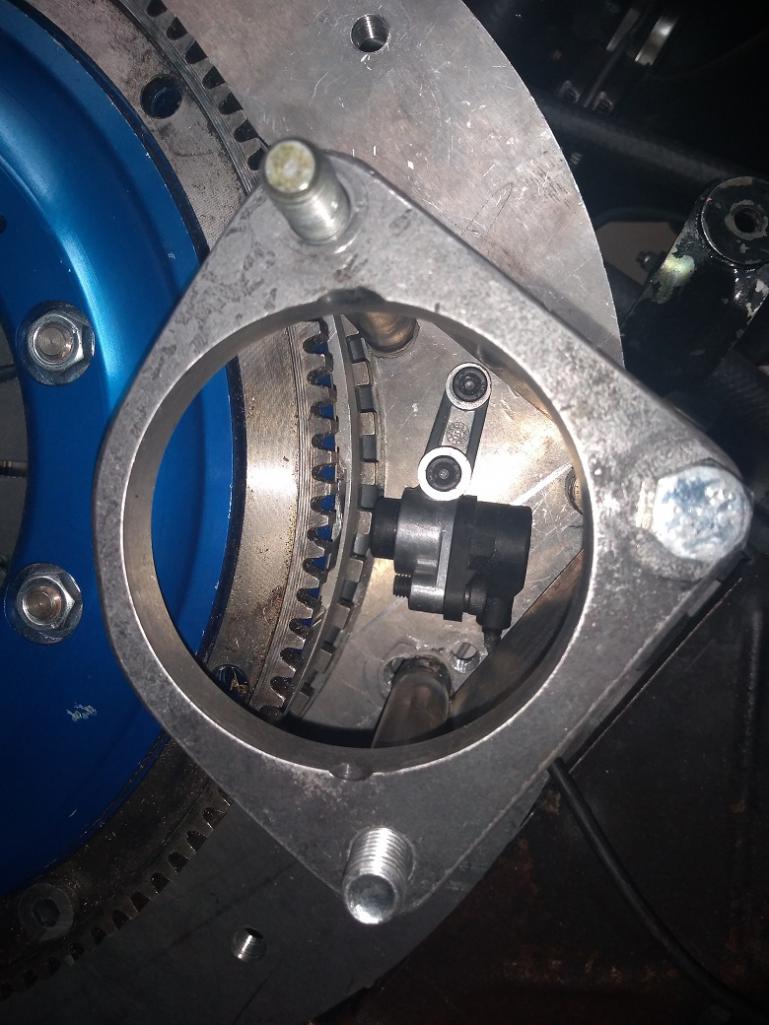
More updates on the oil cooler backdate and the clutch hydraulics to follow.
Posted by: ClayPerrine Jun 29 2019, 05:03 PM
Well.... 
Got the cleaned 914-6 oil cooler back. Tried to install it.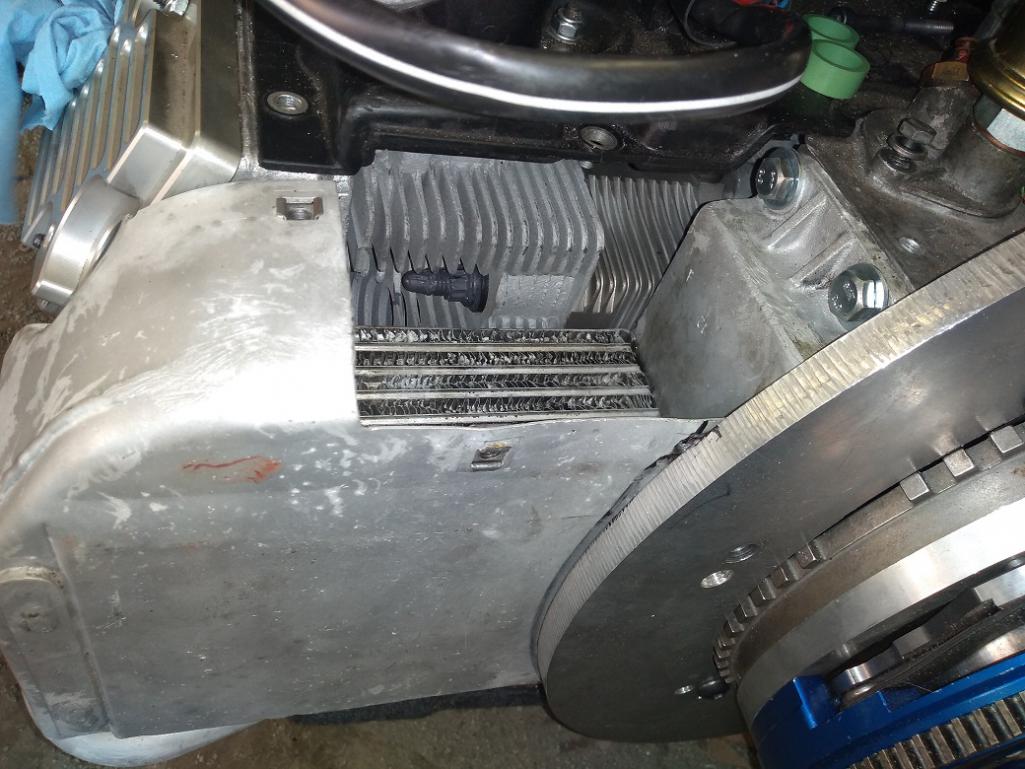

The oil cooler sticks out from the back of the case about 1/2 inch. That means the adapter plate hits it. I already pulled the cam, had the power steering pump drive removed, put a plug in the back of the cam carrier, and put it all back together, including timing the cams. And I had the adapter fitting made to hook the threaded fitting in the engine case to the bottom of the 914-6 oil cooler.
Modifying a factory -6 oil cooler is out of the question. So I have a 964/993 oil line adapter for early cars coming from Pelican, and an oil cooler conversion fitting coming from Clewett. I am going to combine the two to make an adapter for the oil line.
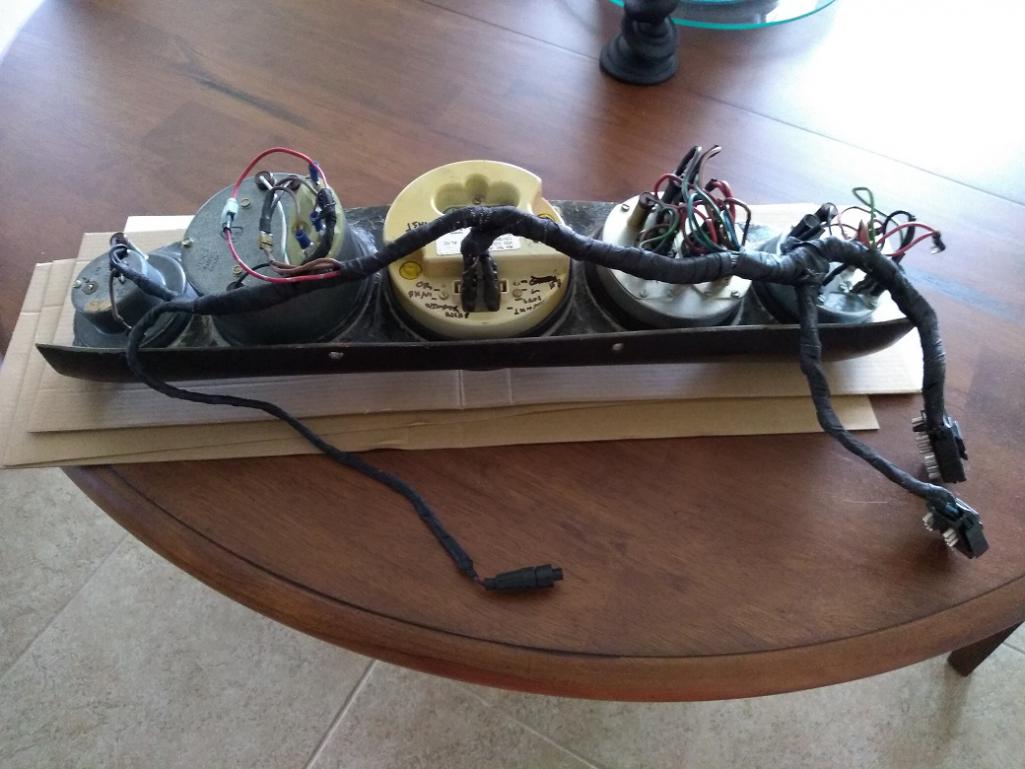
Next up is to install the instrument cluster, run the wiring for the fuel pump and the diagnostic connector, pull the tank so I can change the fuel pump, and mount the ECU and altitude sensor. The ECU is going on the passenger side foot well wall and I was paranoid about drilling holes into the tank when I put in the ECU.
Instrument cluster pictures.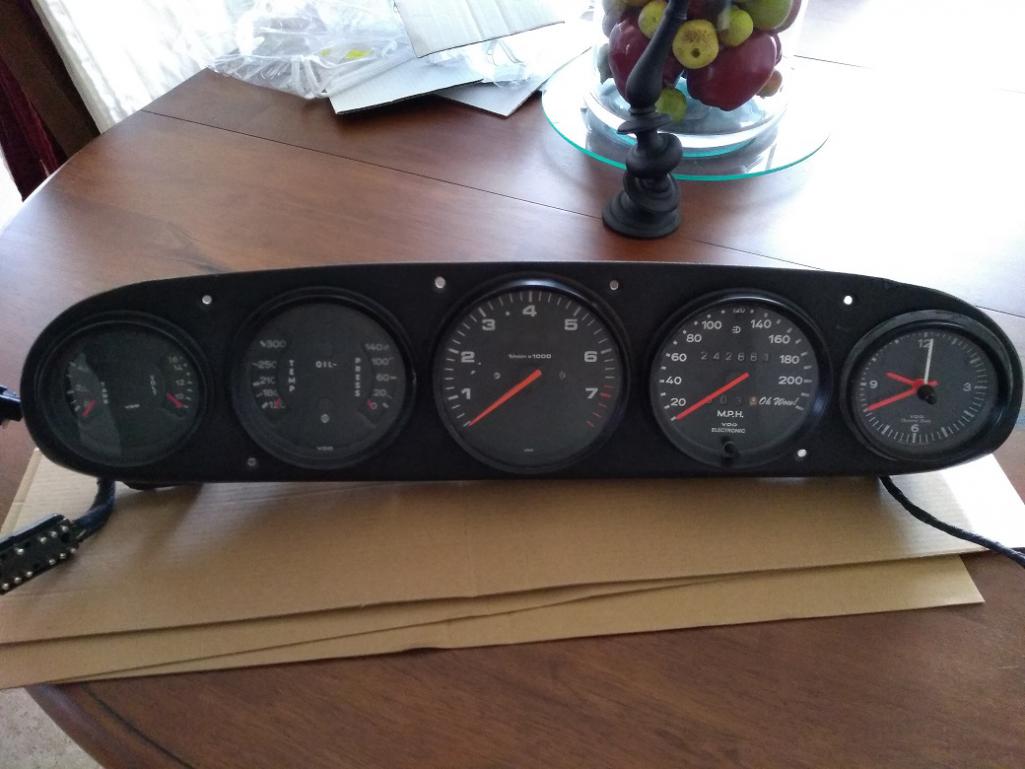
Made the first prototype of the oil cooler block off for the engine, and I need to cut out the sheet metal to make the second version. That one I am going to get TIG welded so it looks nice. (I never learned to make pretty welds).
Purchased a second 964 oil cooler, and a MAF replacement from a 964 RS. The cooler is here. The MAF and the oil line parts are on the way.
Gotta make time to put a clutch in Betty's car too.
Posted by: ClayPerrine Aug 4 2019, 09:35 PM
Today was to put the engine and trans combo into the car. All the engine tin is done, the transmission mount is done, wiring is done, plugs and wires are in the car.
We are ready to put it in the car.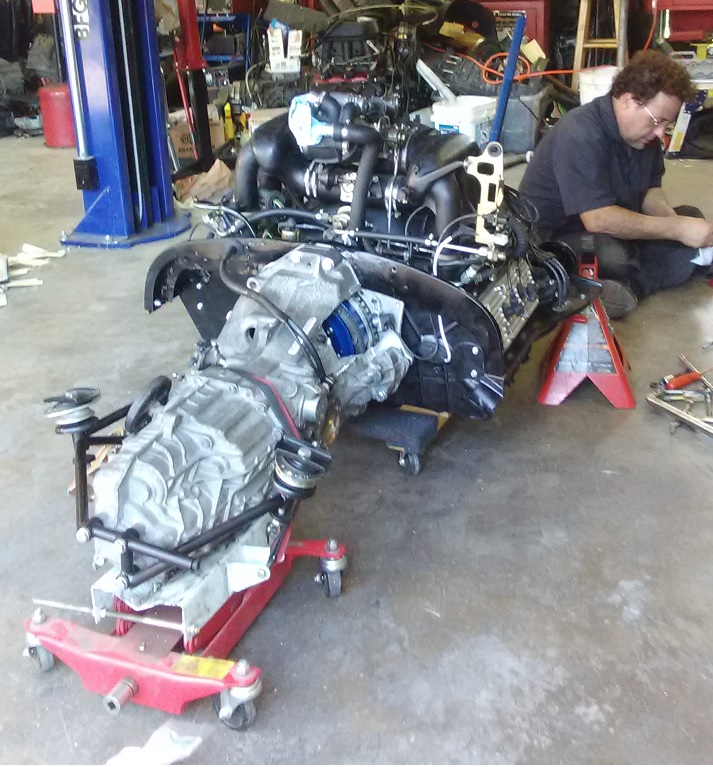
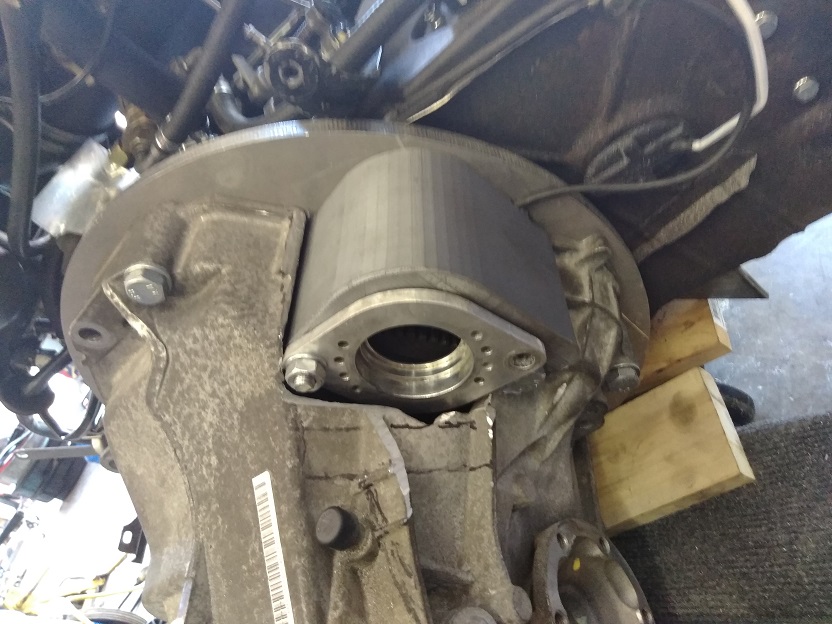
I get the front engine mount hooked up (with lots of profanities) and I run into this: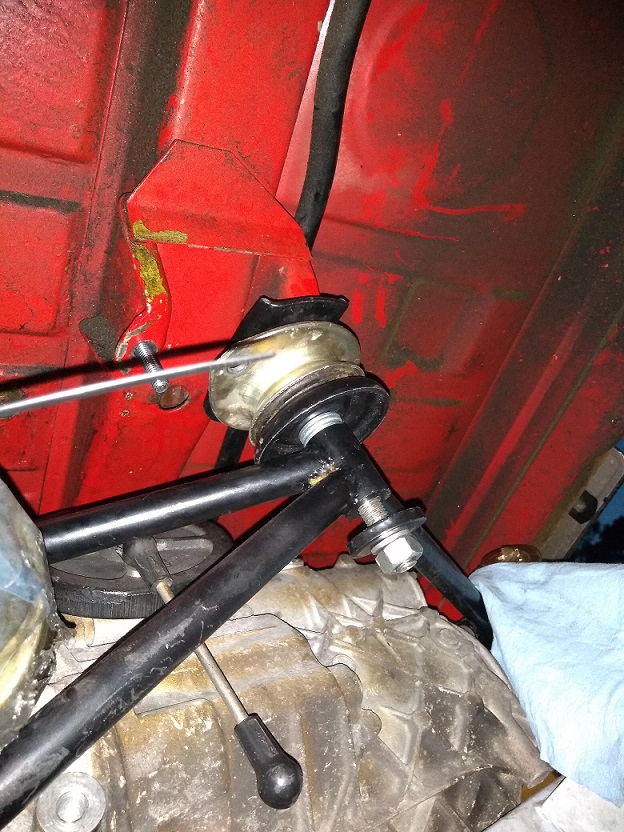
So I start second guessing the trans mount. But it was built off a jig that fits a 901 trans. So it's not wrong.
I do some more looking. Seems the new motor mount for the 3.6 based engine is longer.
I did a quick measurement against the one on the 2.4, and it is shorter, about the same amount as my transmission mounts are off.
So I called Rich Johnson. He made the mount. The reason it's longer is to clear the stock pulleys on the 3.6. Mine has a Clewett serpentine belt setup. I don't need the extra space for the pulleys. So I am going to rework the mount to be the same length as the one on the 2.4.
There are days when I wonder why I started this project.
Posted by: dr914@autoatlanta.com Aug 5 2019, 08:28 AM
that sure is a lot of work Clay! We put a 964 in a 914 a couple of years ago, what an effort! https://www.youtube.com/watch?v=mjp1hi28rug
Posted by: 76-914 Aug 5 2019, 08:41 AM
There are days when I wonder why I started this project.
Uhh, because you don't want to waste your life watching TV and would rather do something constructive with your finite time on Earth?

Posted by: Cairo94507 Aug 5 2019, 09:13 AM
Amen brother.
Posted by: Betty Aug 5 2019, 08:11 PM
There are days when I wonder why I started this project.
Uhh, because you don't want to waste your life watching TV and would rather do something constructive with your finite time on Earth?
More like he wanted to spend ungodly amounts of money.
(my 914 is still without a paint job) Or... he wanted time alone in the garage but had the misfortune to pick a project that required assistance - so he ended up stuck in the garage with his wife this past weekend putting the transmission and motor together, taking it apart, putting it together, taking it apart - 6 times total! I remember the number because I kept saying "once for each cylinder"!
Or... he started his car 'hobby/career' (waaaaay back as a teenager) as a drag racer (still has the NHRA license) and just... can't ... seem... to ... overcome his irrational desire for stoopid, crazy horsepower (I refer to it as a handicap, but hey, I can still beat him on an autocross course).

Posted by: ClayPerrine Aug 5 2019, 08:13 PM
There are days when I wonder why I started this project.
Uhh, because you don't want to waste your life watching TV and would rather do something constructive with your finite time on Earth?
More like he wanted to spend ungodly amounts of money.
(my 914 is still without a paint job) Or... he wanted time alone in the garage but had the misfortune to pick a project that required assistance - so he ended up stuck in the garage with his wife this past weekend putting the transmission and motor together, taking it apart, putting it together, taking it apart - 6 times total! I remember the number because I kept saying "once for each cylinder"!
Or... he started his car 'hobby/career' (waaaaay back as a teenager) as a drag racer (still has the NHRA license) and just... can't ... seem... to ... overcome his irrational desire for stoopid, crazy horsepower (I refer to it as a handicap, but hey, I can still beat him on an autocross course).
This is what happens when you post on 914 World after a few beers.
Posted by: rick 918-S Aug 5 2019, 08:17 PM
Don't tell us what happened after a few more 
Posted by: ClayPerrine Aug 5 2019, 08:25 PM
Don't tell us what happened after a few more
She fell asleep muttering something about "Please don't take it apart and put it back together one time for each spark plug."
(It's a twin plug engine)
Posted by: 76-914 Aug 6 2019, 11:00 AM
Don't tell us what happened after a few more
She fell asleep muttering something about "Please don't take it apart and put it back together one time for each spark plug."
(It's a twin plug engine)
Your a very fortunate man to have a girl that will roll up her sleeves and lend a hand.
Posted by: Dave_Darling Aug 6 2019, 03:34 PM
The above shows so very many reasons why we love Betty! (And tolerate Clay!  )
)
--DD
Posted by: wvspin2 Aug 6 2019, 06:49 PM
My wife loves to say, I could have worse habits than my project car.  Support is great :
Posted by: ClayPerrine Aug 6 2019, 08:55 PM
My wife loves to say, I could have worse habits than my project car.
Support is great :Betty always says "It's a hobby that keeps you off the streets. Literally off the streets."
Posted by: wvspin2 Aug 6 2019, 10:54 PM

Posted by: Mark Henry Aug 7 2019, 04:26 AM
My wife loves to say, I could have worse habits than my project car.
Support is great :Betty always says "It's a hobby that keeps you off the streets. Literally off the streets."
Cheaper than a crack habit and you have more than bad teeth to show for it.

Even if it is still on jackstands.
Posted by: whitetwinturbo Aug 7 2019, 08:53 PM
Car girls are an asset
Posted by: Rob-O Aug 7 2019, 10:46 PM
My wife loves to say, I could have worse habits than my project car.
Support is great :Betty always says "It's a hobby that keeps you off the streets. Literally off the streets."
That right there is funny!!
Posted by: ClayPerrine Aug 8 2019, 08:25 PM
I have to use this quote!
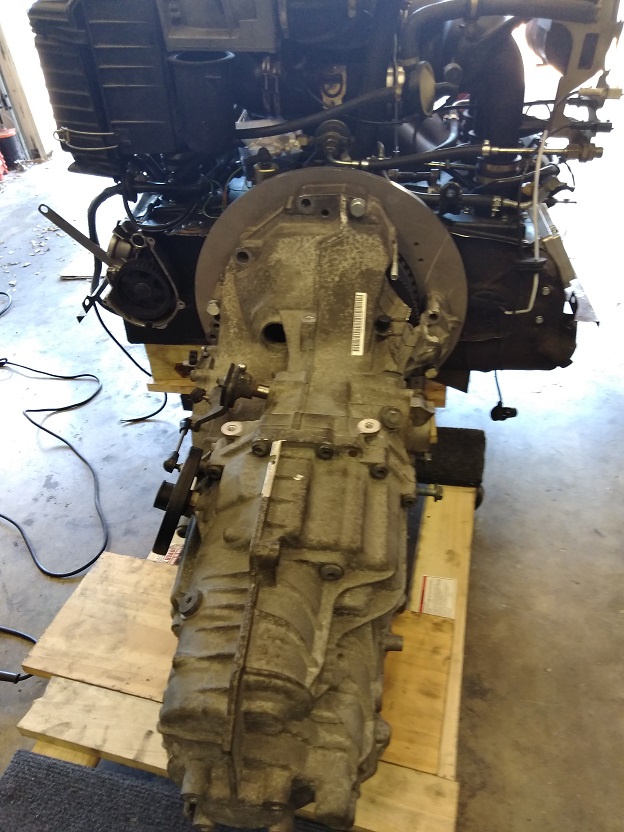
Got the engine and trans into the chassis tonight! 
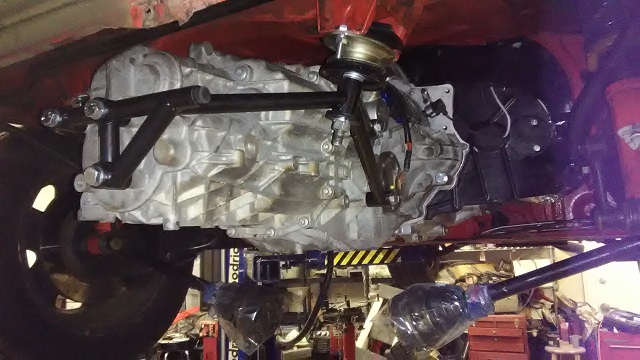
Now to get everything hooked up and get it FIRED UP!
Posted by: 76-914 Aug 8 2019, 08:30 PM
Where is the cut n patch you that needed to do to the cradle so the tranny lines up?
Posted by: ClayPerrine Aug 8 2019, 08:52 PM
Where is the cut n patch you that needed to do to the cradle so the tranny lines up?
Aaron (the machinist) took the front mount apart and removed 1.25 inches from the U shaped plate between the engine and the arm for the mounts. That moved the engine forward enough so the trans mounts fit. It probably could have used another quarter inch removed.
Posted by: ClayPerrine Aug 8 2019, 08:53 PM
Car girls are an asset
She is definitely a great ToolWench!
Posted by: Krieger Aug 8 2019, 11:42 PM
Nice work Clay!
Posted by: ClayPerrine Aug 9 2019, 05:59 AM
Cheaper than a crack habit and you have more than bad teeth to show for it.
Even if it is still on jackstands.
Cheaper? Maybe not. But a lot more physically healthy. I don't know about mental health.

Posted by: Mblizzard Aug 9 2019, 10:10 AM
Cant wait to see this beast!
Posted by: Jamie Aug 9 2019, 11:33 AM
I have to use this quote!
Got the engine and trans into the chassis tonight!
Now to get everything hooked up and get it FIRED UP!
It actually fits, what a relief that must be!
Posted by: ClayPerrine Aug 11 2019, 06:52 PM
Got the engine compartment completed today, with the exception of the oil tank vent lines. I also need the restrictor they put in the 3.2 engine oil lines to keep it from dying when the oil cap is removed to check the oil.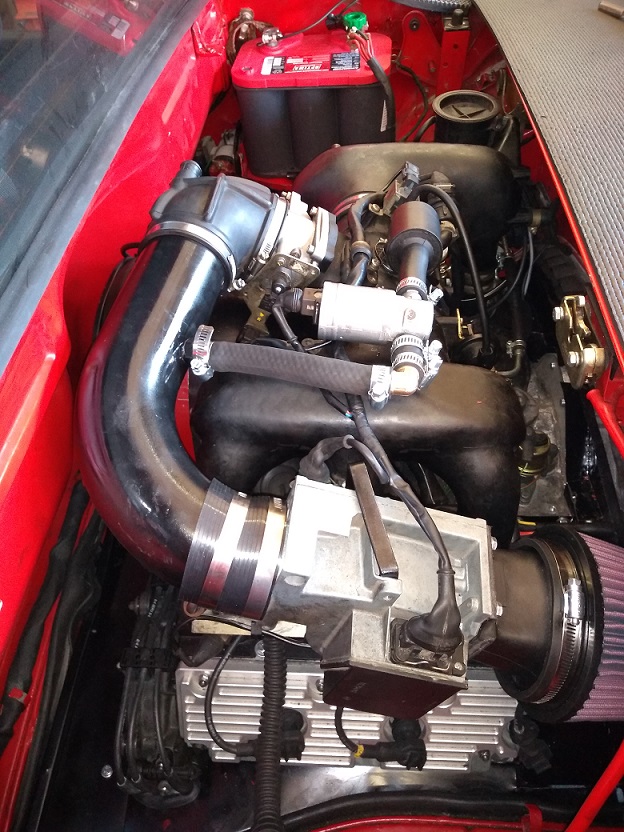
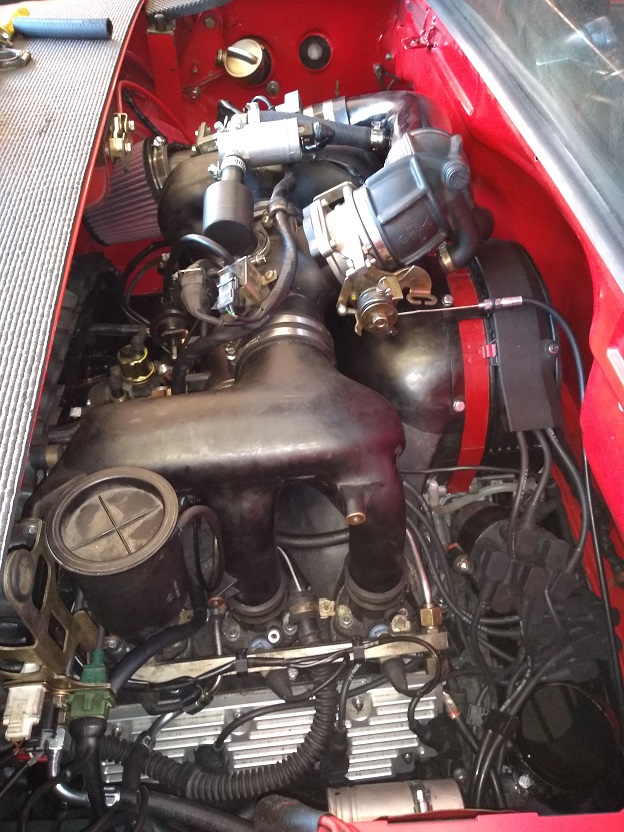
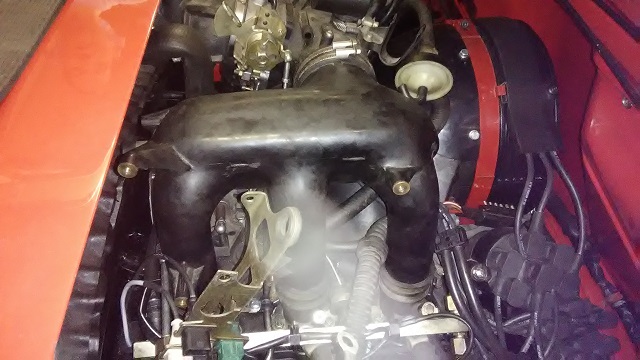
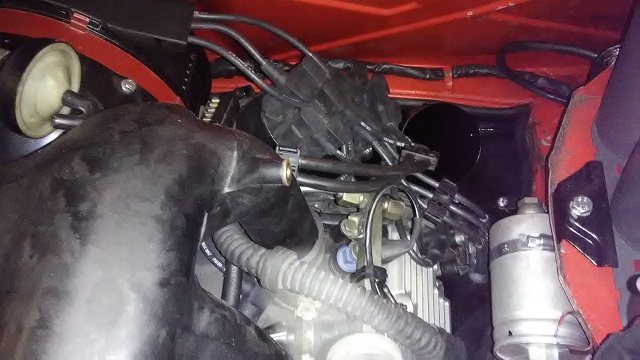
With the throttle body in the original location, The air intake elbow hit the back wall of the engine compartment. So I flipped it around. I had to fabricate mounts for the air flow meter, and I had to redo the throttle linkage. I don't like the bend in the cable, but the throttle works smoothly without binding. The K&N air filter is just stuck over the air horn cut out of the factory air box. It works, but I will be doing a little rework after Okteenerfest. I still don't like K&N filters, but it is better than nothing.
And yes, the engine lid fits and closes with nothing hitting it. It is close at the elbow on top, but it just barely clears. There is a lot of stuff on the right side of the engine bay. But everything fits, so I am happy.
Next up. Drive axles and exhaust.
Posted by: mb911 Aug 12 2019, 08:06 AM
I always thought it would be great to fab an airfilter box that would take a paper element in the passenger fender well . it would require cutting a hole under the battery tray area. Just a thought.
Posted by: ClayPerrine Aug 12 2019, 02:12 PM
I always thought it would be great to fab an airfilter box that would take a paper element in the passenger fender well . it would require cutting a hole under the battery tray area. Just a thought.
With all the stuff on the right side (battery, coils, fuses and relays for the DME, fuel filter, fuel return line, and connectors for the sensors) there really isn't room to run it to the wall there.
I need a close up picture of all the crap on that side......
Posted by: Superhawk996 Aug 12 2019, 04:15 PM
With the throttle body in the original location, The air intake elbow hit the back wall of the engine compartment. So I flipped it around. I had to fabricate mounts for the air flow meter, and I had to redo the throttle linkage. I don't like the bend in the cable, but the throttle works smoothly without binding. The K&N air filter is just stuck over the air horn cut out of the factory air box. It works, but I will be doing a little rework after Okteenerfest. I still don't like K&N filters, but it is better than nothing.
And yes, the engine lid fits and closes with nothing hitting it. It is close at the elbow on top, but it just barely clears. There is a lot of stuff on the right side of the engine bay. But everything fits, so I am happy.
Next up. Drive axles and exhaust.
Man, that's a tight fit. You're up to the modern day standard of leaving no space unclaimed !!!
Great Fab work! Love the thread.
Posted by: ClayPerrine Aug 12 2019, 05:22 PM
After flipping the throttle body around to the front of the engine, I realized I could have left the rear trunk torsion bars in.
Maybe I will put them back in.... later.
Posted by: horizontally-opposed Aug 12 2019, 05:45 PM
Really cool to see this coming together....
Posted by: Superhawk996 Aug 12 2019, 06:10 PM
After flipping the throttle body around to the front of the engine, I realized I could have left the rear trunk torsion bars in.
Maybe I will put them back in.... later.
One of the few fans of the torsion bars here.
Posted by: ClayPerrine Aug 13 2019, 07:48 PM
No pictures tonight... but I got the new Steve Wong chip installed in the ECU, ordered the shift cables and the axles.
Speaking of axles, Turns out the 5 speed uses 100mm CV joints. The 6 speed uses 108mm CV joints. Plus the 914 length is just a bit too long. I need 930 axles.
Oil tank vent hoses and the restrictor (to keep it from dying when I try to check the oil)will be here tomorrow. The shift cables will be here tomorrow night around 8pm.
Current checklist:
1: Install oil vent hoses
2. Install axles.
3. Install exhaust and fabricate exhaust hanger for supertrapp mufflers.
4. Install shift cables and and shifter. Requires fabricating cable mount brackets.
5. Install oil coolers.
6. Run oil lines.
7. Install starter mount and starter.
8. Install clutch slave line, and bleed clutch and brakes.
9. Pressure test fuel system.
I may have missed something, but I think that's all that is left to do.
Then I get to try to start it up.
Posted by: ClayPerrine Aug 20 2019, 09:52 PM
Just some update pictures:
Shift cables are mounted to the trans. Waiting for a fitting for the shifter end.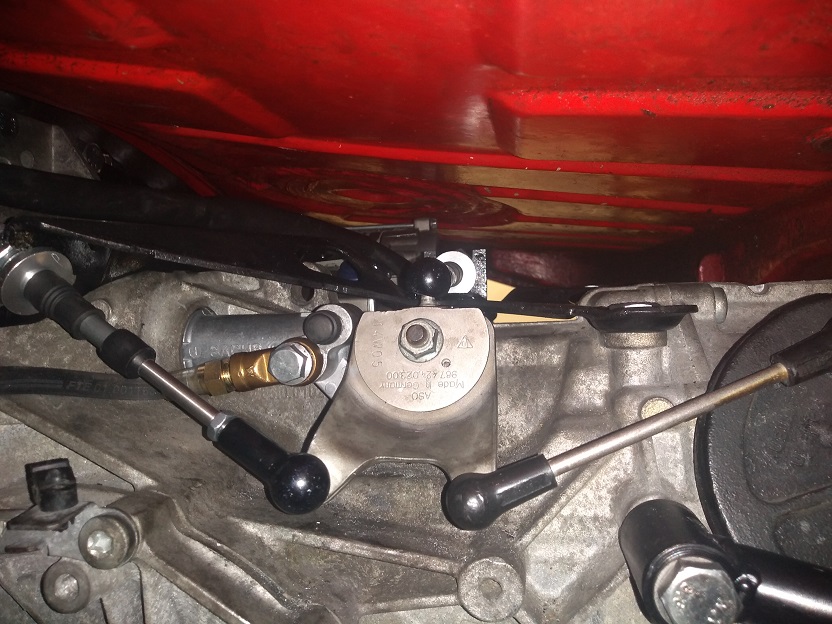
You can see them running into the shift rod and speedo cable holes.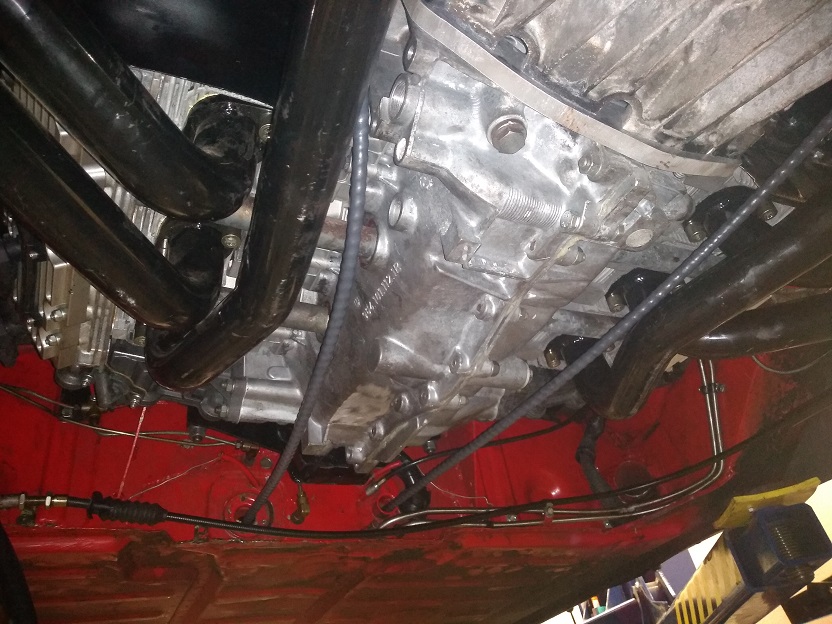
I have to tie them down to keep them away from the headers once I get the shifter hooked up.
The oil lines from the tank to the motor should be finished later this week.
Clay
Posted by: Mblizzard Aug 21 2019, 06:58 AM
No pictures tonight... but I got the new Steve Wong chip installed in the ECU, ordered the shift cables and the axles.
Speaking of axles, Turns out the 5 speed uses 100mm CV joints. The 6 speed uses 108mm CV joints. Plus the 914 length is just a bit too long. I need 930 axles.
Oil tank vent hoses and the restrictor (to keep it from dying when I try to check the oil)will be here tomorrow. The shift cables will be here tomorrow night around 8pm.
Current checklist:
1: Install oil vent hoses
2. Install axles.
3. Install exhaust and fabricate exhaust hanger for supertrapp mufflers.
4. Install shift cables and and shifter. Requires fabricating cable mount brackets.
5. Install oil coolers.
6. Run oil lines.
7. Install starter mount and starter.
8. Install clutch slave line, and bleed clutch and brakes.
9. Pressure test fuel system.
I may have missed something, but I think that's all that is left to do.
Then I get to try to start it up.
way to go! You are so far ahead of me!
Posted by: ClayPerrine Aug 21 2019, 12:12 PM
[way to go! You are so far ahead of me!
I still have to build oil cooler mounts and plumb the system. Also have to make an exhaust that will fit.
Cutting it close. I need to drive it some before we leave, just to get the inspection done. I have to do that before I can register it.
Posted by: ClayPerrine Aug 24 2019, 08:02 PM
Today in the land of big sixes, I got the shifter installed and hooked up. As soon as I started testing it, the half-assed weld I did to hook the 914 shifter arm to the Celica shifter assembly broke. So I had to take it back out, and disassemble the shifter to re-weld the arm on it.
It is back in, and I verified that I can get all 6 gears, and reverse. So that task is done. Tomorrow we will be bleeding brakes and clutch, and I will be fixing the exhaust. Oil system is waiting on a fitting to hook the tank suction line to the engine.
I have to get up in the attic tomorrow morning and look for a clutch stop for the pedal board. I have to have one so I don't damage the clutch master cylinder from over travel.
Picture of the starter side of the transmission. Need to add a few zip ties to keep everything in place. Betty bought me red zip ties, so I am using them! Gotta love a wife who loves 914s. 
Here's a shot of the interior, all cleaned up. Just waiting on the floorboard to get a clutch stop.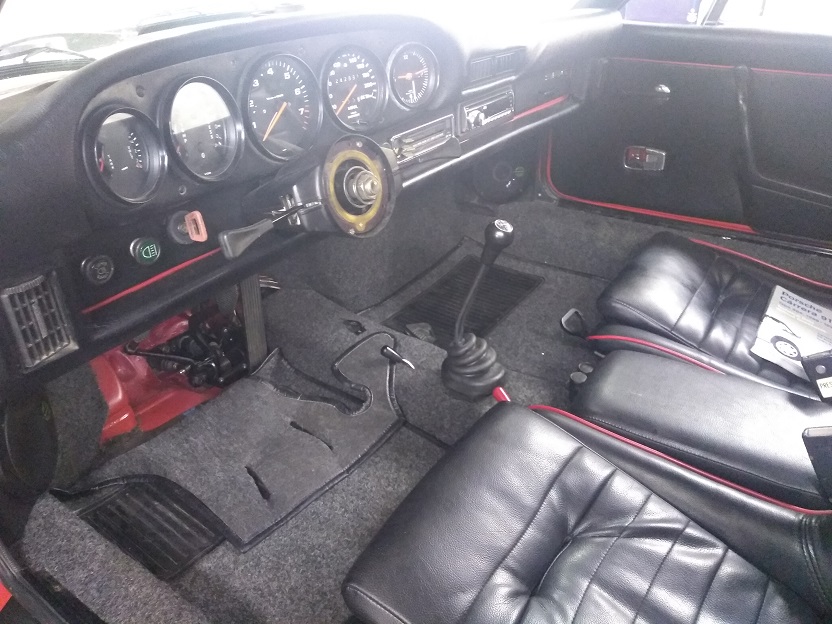
And this showed up on the back decklid after we got the motor installed. I moved it to the dash.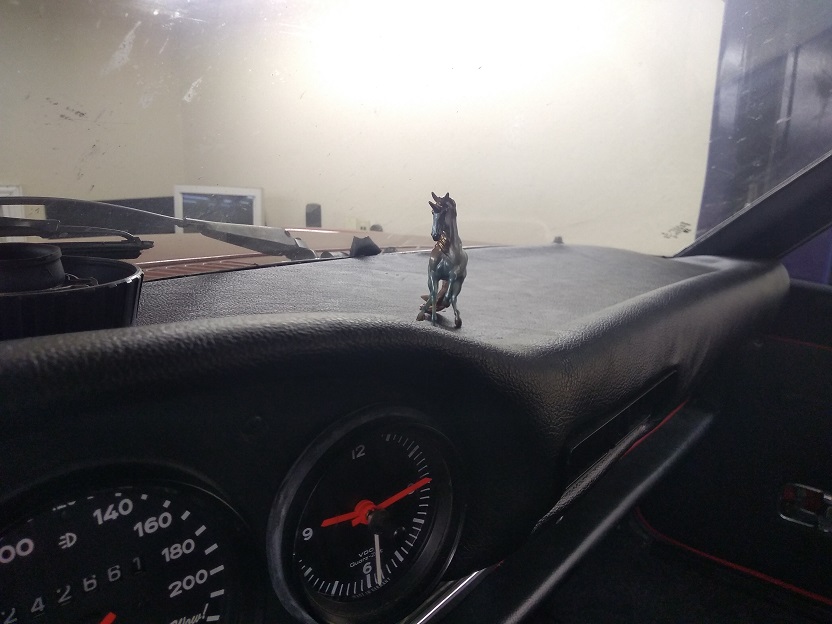
If you are curious why, just look at Betty's signature.
Posted by: Rob-O Aug 24 2019, 08:54 PM
Oh, look! It’s the Ferrari uni-horse!
Posted by: worn Aug 24 2019, 09:31 PM
Oh, look! It’s the Ferrari uni-horse!
Man, that is one cool build. There is so much to like, even though you have spent so much time getting motor and tranny into place, the interior is going to get a lot of praise. Still, the drive train really captures the imagination. Wow! I hope to see the car one day.
Posted by: ClayPerrine Aug 25 2019, 07:28 PM
Nightly update. I don't have a clutch stop, and the left floorboard is not installed. So I think I turned the cup in the clutch master cylinder. It will build some pressure, but won't disengage the clutch. Tried to bleed the brakes and they are moving fluid, but won't make the pedal come up. I replaced the 23mm master cylinder with a 19mm. I don't think it is big enough for Boxster calipers.
I think some of Mike's luck rubbed off on me.
Gonna look up the master cylinder I had online.
Anyone have a clutch pedal stop they can send me asap???
Posted by: 914forme Aug 25 2019, 08:01 PM
I should PM me your address
Posted by: Mblizzard Aug 26 2019, 06:50 AM
Nightly update. I don't have a clutch stop, and the left floorboard is not installed. So I think I turned the cup in the clutch master cylinder. It will build some pressure, but won't disengage the clutch.
Tried to bleed the brakes and they are moving fluid, but won't make the pedal come up. I replaced the 23mm master cylinder with a 19mm. I don't think it is big enough for Boxster calipers. I think some of Mike's luck rubbed off on me.
Gonna look up the master cylinder I had online.
Anyone have a clutch pedal stop they can send me asap???
Ugh that not good!
Posted by: SirAndy Aug 26 2019, 01:22 PM
19mm works just fine with Boxster calipers ...
Posted by: bandjoey Aug 26 2019, 11:39 PM
Not go big. GO MASSIVE! Wow that's a build.
Posted by: ClayPerrine Aug 29 2019, 08:45 PM
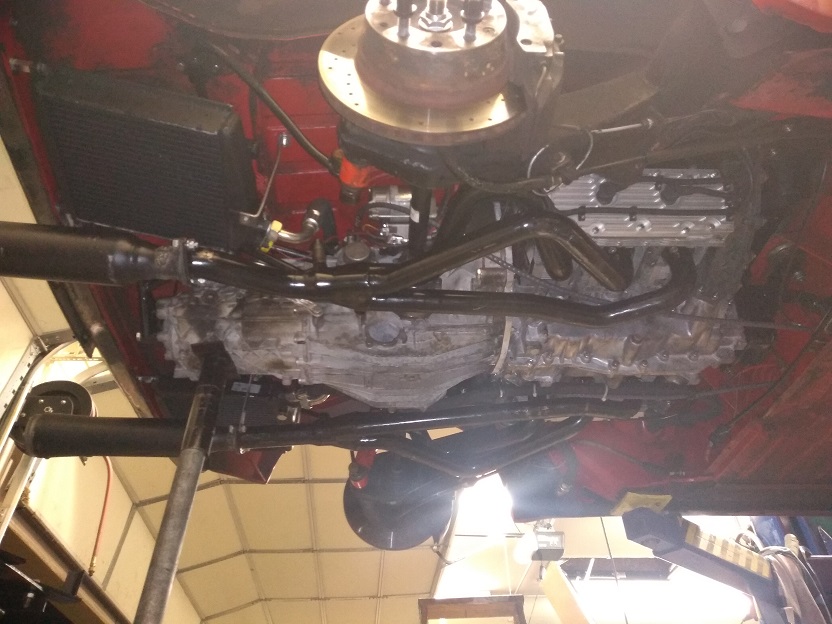
Only missing one oil line, from the engine to the right cooler. I have it, but we made it a little too long. So I have to take it and get the fitting crimped back on.
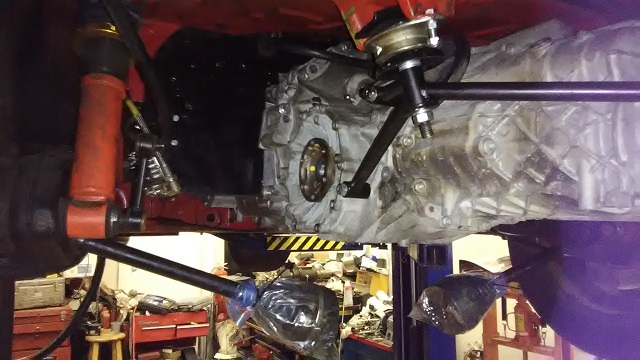
I actually took this picture after sitting on the garage floor, looking up at the engine and trans, and thinking "I can't believe we actually did this!" 
Posted by: horizontally-opposed Aug 29 2019, 08:48 PM
Only missing one oil line, from the engine to the right cooler. I have it, but we made it a little too long. So I have to take it and get the fitting crimped back on.
I actually took this picture after sitting on the garage floor, looking up at the engine and trans, and thinking "I can't believe we actually did this!"
Digging the twin-cooler setup...and can't wait to hear how this thing drives. Biggest six I've tried was a 3.8, and it was a beast.
Posted by: ClayPerrine Aug 29 2019, 08:54 PM
Only missing one oil line, from the engine to the right cooler. I have it, but we made it a little too long. So I have to take it and get the fitting crimped back on.
I actually took this picture after sitting on the garage floor, looking up at the engine and trans, and thinking "I can't believe we actually did this!"
Digging the twin-cooler setup...and can't wait to hear how this thing drives. Biggest six I've tried was a 3.8, and it was a beast.
The twin cooler setup was to make sure it runs cool. A friend as a stock 993 engine in his 914-6, and he is OK temp wise on the street, but at a DE he can't complete the session without overheating. He only has one cooler on the car, in the back like I have. The coolers I have are factory 964/993 coolers. Porsche put one on a 964, but it is up front in the cool air flow. Hopefully doubling the size will allow it to run cool even under extended load.
Posted by: wvspin2 Aug 29 2019, 10:42 PM
Wow great engineering it looks like its always belonged in there. Can't wait to see this perform.
Posted by: ClayPerrine Aug 30 2019, 06:51 AM
I actually took this picture after sitting on the garage floor, looking up at the engine and trans, and thinking "I can't believe we actually did this!"
This morning I looked at the picture, and thought "What the F**K have I done?"
Posted by: ClayPerrine Aug 31 2019, 06:44 AM
Update: Last night I completed the oil system. The one remaining line was installed, and the system filled. 13 quarts in the tank and sump. Then I spun it over until I had oil pressure. Found I had switched the wires between the oil light sender and the oil pressure gauge. Swapped them and now I can see that I get above 30 psi when cranking.
Working on the brake and clutch systems today. Then the tank goes back in and I start it up!!!
Posted by: Rob-O Aug 31 2019, 07:16 AM
How exciting! So close!
Posted by: jdamiano Aug 31 2019, 07:51 AM
I’m looking forward to Octeenerfest for several reasons, seeing this being one of them. Clay might be able to charge for rides. This one looks like an E ticket for sure!
Posted by: ClayPerrine Aug 31 2019, 09:23 PM
Today was not a good day in the land of Big Sixes.....
Tried to start the motor. No bueno. DME is getting power, check engine light is working, but no ignition, no injector pulse, no fuel pump... nothing.
Check the power to all the sensors and solenoids. There is power to the injector plugs, the coils and the igniters.
Online it says to check the crank sensor. Not the problem. Checks out like the guys on the Rennlist 964 forum say it should. 5.5 volts AC at the DME plug. Spec is between 3v and 6v.
Check the hall effect sensor in the distributor. It is a 3 wire hall sensor, and the shield wire is also the ground wire. And there is no connection between the Hall sensor plug and pin 30 on the DME plug. So no signal.
Tomorrow morning I am going to put a temp wire between the DME and the hall sensor to connect the grounds back up. Maybe that will fix it.
Gotta get it running. I don't want to disappoint anyone.
Posted by: ClayPerrine Sep 1 2019, 08:55 PM
So today's update...
Found out the DME is bad. Put the stock chip back in it for troubleshooting. Now the check engine light doesn't read codes. Online says the DME is bad if it does that. Trying to locate another one.
Pushed another liter of fluid through the brakes. Still no pedal. More details in my other thread.
Changed the clutch master cylinder. Ran out of day before I got it bled.
And my truck is trying to eat a left front wheel bearing.... so I have to do that tomorrow morning before anything else.
Posted by: rick 918-S Sep 2 2019, 05:29 AM
Have a cup of coffee and relax for an hour. Fresh mind and you will get it sorted. Make a list and work thru it.
Posted by: burton73 Sep 2 2019, 11:29 AM
Have a cup of coffee and relax for an hour. Fresh mind and you will get it sorted. Make a list and work thru it.

And do not forget to breath.
Bob B
Posted by: ClayPerrine Sep 2 2019, 11:30 AM
Fixed the truck wheel bearing. Got the brakes fixed on Igor. Got a replacement DME. So after I finish eating, I am back in the garage to see if it will run!!
Clay
Posted by: Rusty Sep 2 2019, 06:21 PM
Fixed the truck wheel bearing. Got the brakes fixed on Igor. Got a replacement DME. So after I finish eating, I am back in the garage to see if it will run!!
Clay

Posted by: ClayPerrine Sep 2 2019, 06:42 PM
Keep waiting.
I was trying to fix the issue with the clutch hydraulics. I didn't try to start it. No point if the clutch won't disengage, and to work on the clutch, I have to work around the headers. I don't want them hot when I try that.
Posted by: 76-914 Sep 3 2019, 08:39 AM
Posted by: ClayPerrine Sep 4 2019, 08:39 PM
Update: Sorry, no pictures. Too busy fixing shit.
Got really frustrated with the car.
Seems I had a mismatch between the clutch master and clutch slave. The master was too small to move the slave enough to disengage the clutch. Ordered the proper one from Summit. Hopefully here in the next day or so.
Worked on the DME issues tonight. Found I HATE Porsche for superseding the crank sensor with the one from the 993. It has a different plug, and I wired the plug up a year ago when I got to installing it on the engine. Well, I swapped the shield and signal wires, so the DME was not seeing the signal from the cranks sensor. Fixed that, and the fuel pump started to work when cranking. Fixed a minor fuel leak, and started testing ignition and injector pulse. I have ignition on one coil only. Swapped stuff around to verify the issue, and its not the wiring, it is the ignitor. Hopefully I can get one tomorrow.
Still no pulse at the injectors. Checked them and I have 12V to one side of all of them, and I have continuity back to the DME unit. I had to stop for the night
So the injector issue is next on the DME hit parade.
I am still pushing to make Okteenerfest!
Posted by: Mblizzard Sep 4 2019, 09:11 PM
I feel your pain! Wishing you all the best. But the reality in doing what we love is that there are an incomprehensible number of variables in the effort success. You have to chase each one down and that consumes a lot of time. Keep going! Just in case I ordered a case of 914 bourbon to drown our sorrows.
Posted by: Rob-O Sep 4 2019, 09:33 PM
The experience you’re getting though is priceless.
Posted by: Rusty Sep 5 2019, 05:01 AM
Hang in there buddy!
Posted by: 914dave Sep 5 2019, 05:28 AM
Nothing like a deadline to motivate you. Looking forward to seeing the car.
Posted by: ClayPerrine Sep 5 2019, 09:16 AM
I feel your pain! Wishing you all the best. But the reality in doing what we love is that there are an incomprehensible number of variables in the effort success. You have to chase each one down and that consumes a lot of time. Keep going! Just in case I ordered a case of 914 bourbon to drown our sorrows.
Not a big fan of bourbon, but I have some Whipped cream Vodka and orange soda. (yea, I know.. girly drink.. I like it so screw you!)
I can also bring the band-aids and we can compare our respective injuries.
Clay
Posted by: ClayPerrine Sep 6 2019, 06:12 AM
Last night I got the replacement ignitor installed. Now it fires both coils. Spent time tracking down an issue with the fuel pump. Seems the check valve in the outlet was improperly installed. I uninstalled it. Its supposed to maintain fuel pressure to make the engine start quicker. I can live without it. That brought me to a leak in a hose between the pressure line and the fuel filter. Got that fixed. Changed the DME unit. Seems the injector drivers were bad on the one I was using.
It fired up and died. Twice.
The clutch master is supposed to arrive today, so tonight I will be installing it and fixing the clutch. Tomorrow I will be getting the issue with the engine dying fixed. I think I know the problem.
If all goes well, I will be getting the car inspected Saturday.
Posted by: poorsche914 Sep 6 2019, 06:14 AM
Posted by: Rob-O Sep 6 2019, 06:57 AM
Great to hear!!
Posted by: Cairo94507 Sep 6 2019, 06:57 AM
Wow! That is exciting. Congratulations on working all of the bugs out. Please post a video of it running so those of us living vicariously will be able to enjoy it too.
Posted by: Krieger Sep 6 2019, 08:18 AM
HOORAY! Way to push through!
Posted by: 76-914 Sep 6 2019, 08:41 AM
Stay with it. RE: conversions; I'm convinced that attitude plays a larger role in completions than experience.
Posted by: ClayPerrine Sep 7 2019, 08:44 AM
Turn on your sound!!!!
Posted by: jdamiano Sep 7 2019, 08:46 AM
Awesome!!!
Posted by: Coondog Sep 7 2019, 08:47 AM
Congrats, sounds awesome.
Posted by: Rob-O Sep 7 2019, 08:52 AM
I just decided I’m never getting in that thing. Yes, it sounds scary.
Posted by: Mueller Sep 7 2019, 08:57 AM
Congrats, huge achievement with that transmission!
Sounds great.
Posted by: ClayPerrine Sep 7 2019, 08:57 AM
I just decided I’m never getting in that thing. Yes, it sounds scary.
Chicken
You are no fun!
And yea, it makes NICE grumbly noises!
Posted by: Rob-O Sep 7 2019, 09:05 AM
Absolutely chicken! Anybody who heard that video is thinking the same thing as me!
Okay I’ll get in it, but only if we stay under 45mph. Which I’m guessing will occur with the slightest blip of the throttle.
Posted by: Mblizzard Sep 7 2019, 09:14 AM
AWESOME. way to go. Do mine next?
Posted by: wvspin2 Sep 7 2019, 09:21 AM
Major achievement, its an awesome build. Gotta love that sound. 
Posted by: 914four Sep 7 2019, 10:15 AM
Turn on your sound!!!!
Congratulations!!!
The troubleshooting and quick fixes were quite impressive. Can't wait to see this thing run at Okteenerfest!

Posted by: Rusty Sep 7 2019, 11:34 AM
Congrats, brother. I knew you had it in you... even if you drink girly drinks.
j/k.... good job. Proud of ya. 
Posted by: Literati914 Sep 7 2019, 11:39 AM
Yea Clay that is sooo awesome! Congrats!
Posted by: SirAndy Sep 7 2019, 01:19 PM
Am i the only one who kept replaying the Frankenstein clip like 10 times before watching the car clip?

Posted by: Rob-O Sep 7 2019, 01:38 PM
Am i the only one who kept replaying the Frankenstein clip like 10 times before watching the car clip?
I did it the other way around. I listened to the Young Frankenstein clip once and the engine clip about ten times.
Young Frankenstein was a great movie, though. True Mel B Classic.
Posted by: ClayPerrine Sep 7 2019, 05:19 PM
Updated the emblem on the back.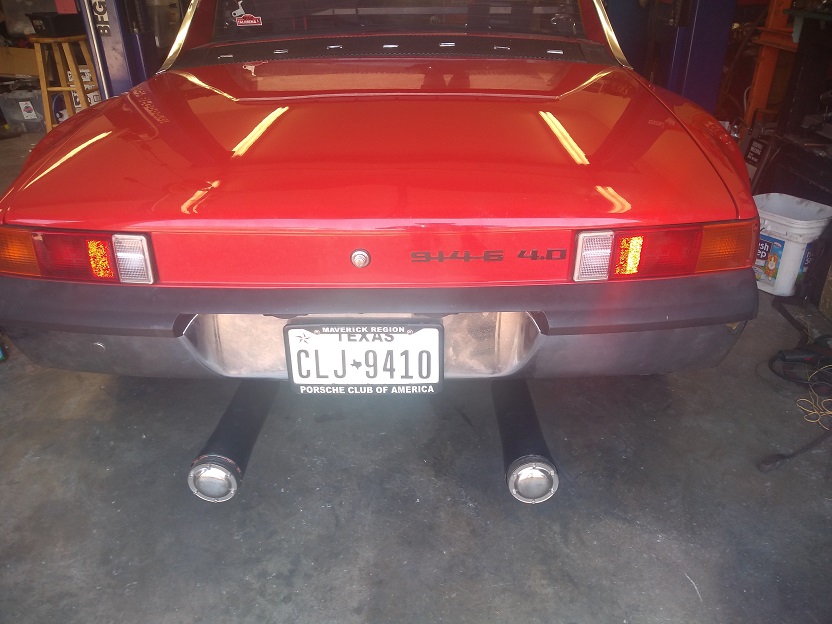
Thanks to Mike Mueller for the 4.0 emblem. It completes it for me.
As of about an hour ago, Igor has been run through the Texas Vehicle Safety Inspection process and passed. He now has 5.5 miles on the trip odometer.
I have an oil leak and a check engine light to resolve. But even if they don't get resolved, he will be on the trailer headed out on Wednesday morning.
More pictures and videos to follow when I get them off Betty's phone.
Posted by: worn Sep 7 2019, 06:16 PM
Am i the only one who kept replaying the Frankenstein clip like 10 times before watching the car clip?
No. I have spent my life in bio sciences, and i can tell you first hand that Young Frankenstein tells the story with accuracy and courage. Many times have i heard the “it’s alive chant” Also, i use it in lectures to professional students from a range of disciplines. With that mouthful, congratulations on the start up. Hold onto your hat for teener fest.
Posted by: ClayPerrine Sep 8 2019, 07:43 AM
Betty got me a shirt....
Posted by: jesse7flying Sep 8 2019, 10:09 AM
Congrats Clay! That's some serious determination, inventiveness and dedication on display. Love the shirt too!
Jesse
Posted by: wvspin2 Sep 10 2019, 02:21 PM
Absolutely 
Posted by: Garland Sep 10 2019, 02:49 PM
Sound real goooood!
Posted by: Cairo94507 Sep 10 2019, 03:12 PM
Sounds very good.
Posted by: ClayPerrine Sep 19 2019, 12:10 PM
Okteenerfest was a blast on the drives. Seems like I could run out of first gear before I could blink. The car ran great for the whole thing.
The bad news is I lost all the gears in the trans. The shifter moves the shaft on the transmission, but nothing is happening inside. I got a whole box full of neutrals.
So tomorrow I fly to Charlotte, and Sat morning I get driven over to Boone, NC to pick up the tow vehicle. It got a 4k transmission replacement. Then I go back to Charlotte to pick up the trailer, then drive home. Long 2 days of driving.
Next weekend I will be looking into the trans failure. I am fairly sure it is the shift mechanism rather than the syncros or gears.
Posted by: Jamie Sep 19 2019, 01:10 PM
Igor certainly sounded scary big when you fired it up a Okteenerfest!
Posted by: Rob-O Sep 19 2019, 05:21 PM
Fingers crossed that it’s a relatively simple repair.
Posted by: worn Sep 19 2019, 05:39 PM
Fingers crossed that it’s a relatively simple repair.
Good luck
Posted by: sixnotfour Sep 19 2019, 05:50 PM
Igor certainly sounded scary big when you fired it up a Okteenerfest!
supertrapps , ruin sound...need dif muffler IMHO..
Posted by: partsguy22 Sep 19 2019, 09:01 PM
Okteenerfest was a blast on the drives. Seems like I could run out of first gear before I could blink. The car ran great for the whole thing.
The bad news is I lost all the gears in the trans. The shifter moves the shaft on the transmission, but nothing is happening inside. I got a whole box full of neutrals.
So tomorrow I fly to Charlotte, and Sat morning I get driven over to Boone, NC to pick up the tow vehicle. It got a 4k transmission replacement. Then I go back to Charlotte to pick up the trailer, then drive home. Long 2 days of driving.
Next weekend I will be looking into the trans failure. I am fairly sure it is the shift mechanism rather than the syncros or gears.
What were you doing when you broke it ?
Posted by: ClayPerrine Sep 20 2019, 06:19 AM
Okteenerfest was a blast on the drives. Seems like I could run out of first gear before I could blink. The car ran great for the whole thing.
The bad news is I lost all the gears in the trans. The shifter moves the shaft on the transmission, but nothing is happening inside. I got a whole box full of neutrals.
So tomorrow I fly to Charlotte, and Sat morning I get driven over to Boone, NC to pick up the tow vehicle. It got a 4k transmission replacement. Then I go back to Charlotte to pick up the trailer, then drive home. Long 2 days of driving.
Next weekend I will be looking into the trans failure. I am fairly sure it is the shift mechanism rather than the syncros or gears.
What were you doing when you broke it ?
Shifting from third to fourth on an entrance ramp. I wasn't even accelerating hard.
I think it's in the shift mechanism inside the trans, but I won't know until I open it up.
Posted by: partsguy22 Sep 20 2019, 10:05 AM
Shifting from third to fourth on an entrance ramp. I wasn't even accelerating hard.
I think it's in the shift mechanism inside the trans, but I won't know until I open it up.
when shifted can you still feel the shift gates or does the shifter move in any direction at anytime ?
Posted by: ClayPerrine Sep 20 2019, 10:15 AM
Shifting from third to fourth on an entrance ramp. I wasn't even accelerating hard.
I think it's in the shift mechanism inside the trans, but I won't know until I open it up.
when shifted can you still feel the shift gates or does the shifter move in any direction at anytime ?
The input shaft on the trans moves with the cables, but it feels like nothing is hooked to it internally.
Posted by: Betty Sep 20 2019, 06:09 PM
Igor certainly sounded scary big when you fired it up a Okteenerfest!
supertrapps , ruin sound...need dif muffler IMHO..
I agree completely - but it was Super Traps or the car didn't go on the trip. There were a lot of, I'll say... 'expedient liberties' taken to get the car to Okteenerfest. A genuine exhaust system is in the future game plan.
Posted by: wvspin2 Sep 20 2019, 06:18 PM
Was the clutch working when it failed or were you matching revs to gears Did that make sense
Posted by: Betty Sep 20 2019, 06:39 PM
Was the clutch working when it failed or were you matching revs to gears
Did that make sense They were separate events from my understanding. Clutch failed, he was going to make the trip back home driving without a clutch (matching revs), then the transmission failed at a later point.
Clay's on the plane right now to Charlotte NC, maybe he'll clarify if he checks World later...
Posted by: scottthephotog Sep 20 2019, 09:02 PM
That sounds right. He was driving without a clutch for the first couple of hours of the return trip.
Was the clutch working when it failed or were you matching revs to gears
Did that make sense They were separate events from my understanding. Clutch failed, he was going to make the trip back home driving without a clutch (matching revs), then the transmission failed at a later point.
Clay's on the plane right now to Charlotte NC, maybe he'll clarify if he checks World later...
Posted by: ClayPerrine Sep 22 2019, 08:38 PM
I am home from picking up the SUV. I did a 2 day banzi run from Denver, NC to Hurst, TX. Left Saturday noon. Got home Sunday 1:30. Long drive, no problems.
I will continue to update this as I fix the issues, both major and minor, with my car.
Stay tuned....
Posted by: ClayPerrine Sep 27 2019, 06:31 AM
So last night I got out and pulled the pedal box out of my car to see what happened to the clutch.
Sheared a roll pin. But the attachment point for the clutch master cylinder rod was fatigued and would have broken anyway.
So I am reworking the pedal box to fix both these issues. I almost have it, but I need a few more hours to get it right. I will post pictures when I get it done.
As for the trans, it was suggested that the nut holding the cable connections onto the shift rod possibly backed off. That would cause the move but no gears. I checked the nut. It is tight. So Saturday I am going to pull the trans mount and remove the back of the transmission so I can see what happened.
Hopefully nothing major... fingers crossed......
Clay
Posted by: ClayPerrine Sep 28 2019, 12:03 PM
I fixed the pedals... 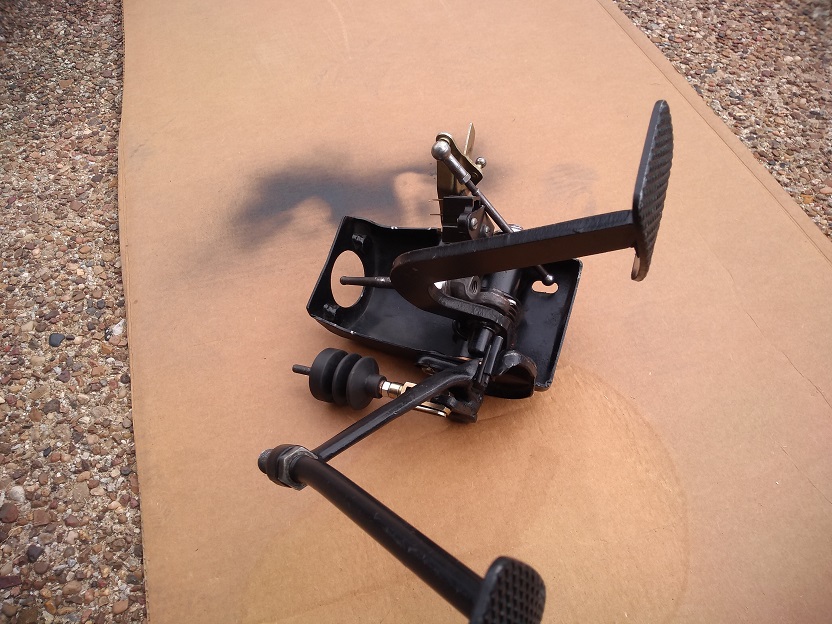

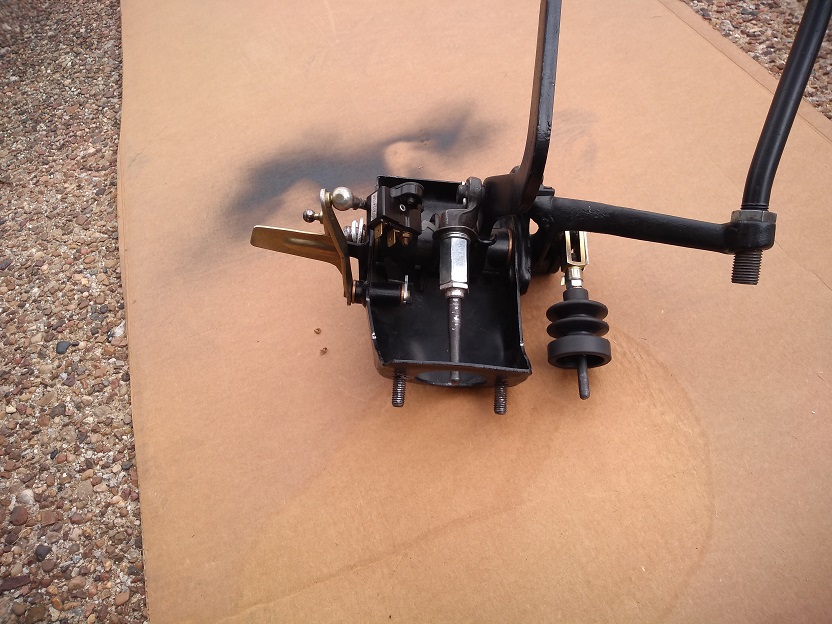
I turned around the shaft, straightened up the arm, and shortened it so it wouldn't hit the pedal arm. New pin made from solid steel, not a spiral pin. Heated both ends with the torch and flattened them so it won't come out.
The right end had the tube in the pedal base shortened and the bushing reinstalled. Then I put a washer and cotter key in to make sure it doesn't come out.
Now to see what's wrong in the transmission...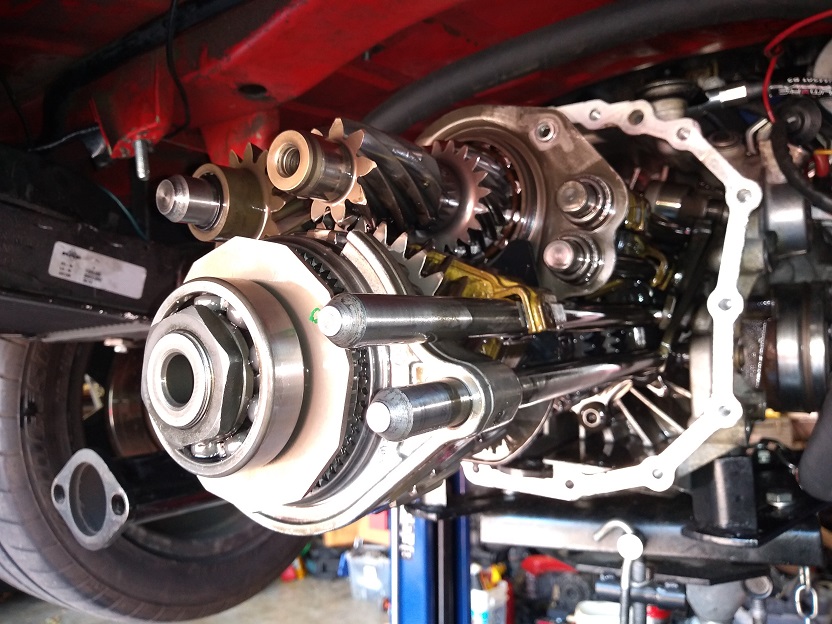
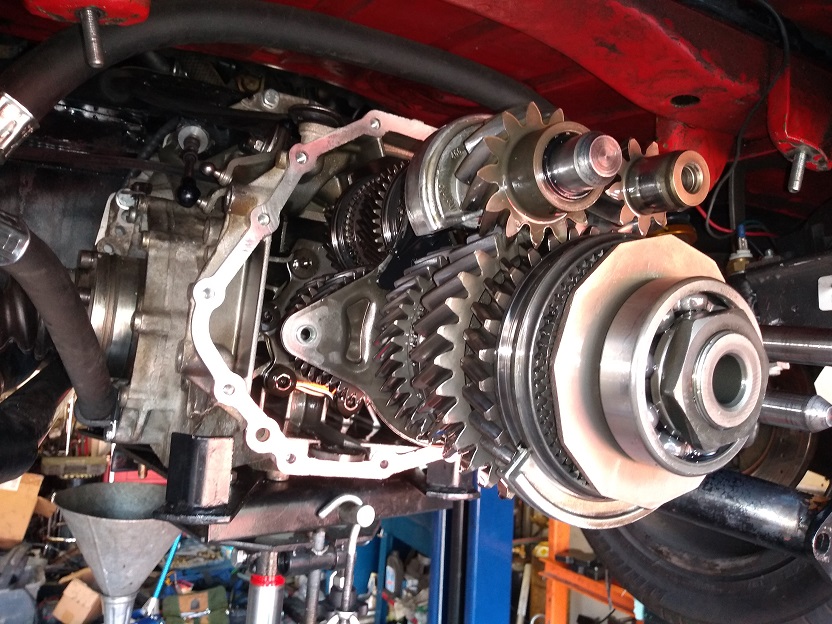
Opened it up and found nothing wrong. With the cables disconnected, it shifts fine through all the gears.
Hooked up the cables and shifted it to first at the trans. The shifter was in first. Pulled the shifter to second, and the trans won't engage second gear. At the trans, I am able to put it into second. So now I think there is a problem with the shfiter.
I am going to put the trans back together after lunch and pull the shifter to see what is wrong.
But at least I know what it looks like inside now.
Posted by: Rob-O Sep 28 2019, 12:54 PM
But at least I know what it looks like inside now.
Yeah, clean! Glad to hear it’s in the shifter and not the box.
Posted by: ClayPerrine Sep 28 2019, 04:56 PM
So I found the problem.....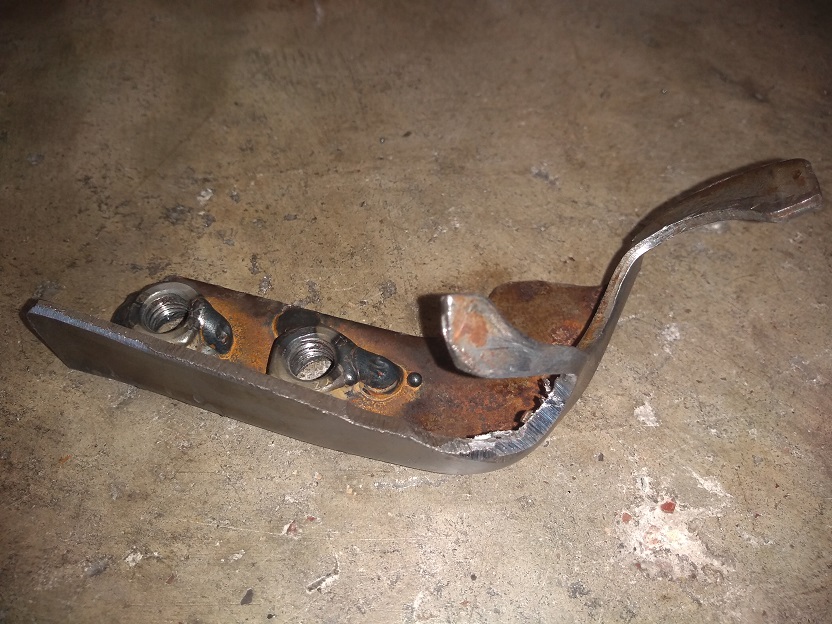
This is the bracket that is supposed to hold the shift cable in the tunnel. It was made from part of the Toyota shifter, and I kinda under-engineered it for my use.
So tomorrow I make a new cable mount.
Posted by: Rob-O Sep 28 2019, 07:22 PM
I’m not sure exactly what that looked like when it was tabbed up. But it looks pretty beat up now.
I’m sure it’s a bit frustrating. But if you think about it, if this is your only issue after this build I’d say this is minor.
Posted by: ClayPerrine Sep 28 2019, 07:44 PM
I’m not sure exactly what that looked like when it was tabbed up. But it looks pretty beat up now.
I’m sure it’s a bit frustrating. But if you think about it, if this is your only issue after this build I’d say this is minor.
The bent parts were a flat ring with a notch cut in it. The new one is going to me made a LOT stouter to accommodate my "aggressive" shifting style.
And that is not the only issue. I have a leaking timing box cover. I suspect it is warped. The timing boxes and covers are magnesium, and are really prone to warping and leaking. I am going to try to tighten it up.
Posted by: wvspin2 Sep 28 2019, 08:10 PM
First of all, I am glad you had a safe trip to pick up your suv .
Secondly, you really dodged a bullet  finding a pin in the peddle box and adapter in the tunnel box. You certainly deserved a good break after all you went through coming home from NC. I was so glad you had all the joy of making the drive at Okteenerfest with your 4.0 mod machine. It's a wonderful machine. Looks like you'll have it back running soon.
Posted by: ClayPerrine Sep 28 2019, 08:16 PM
Looks like you'll have it back running soon.
Tomorrow...... It will be running tomorrow.
Posted by: JFJ914 Sep 29 2019, 10:03 AM
And that is not the only issue. I have a leaking timing box cover. I suspect it is warped. The timing boxes and covers are magnesium, and are really prone to warping and leaking. I am going to try to tighten it up.
Ah, yes all 964's leak there. Mine did
Posted by: ClayPerrine Sep 29 2019, 06:14 PM
So I got the cable mount for the shifter fixed. Got everything buttoned up and tried to back out of the garage. The clutch works great, but I got the shifter mis-adjusted.
I also don't have an oil pressure idiot light. I can see oil pressure on the gauge, but no light.
Oh well... As Scarlet O'Hara said "I'll think about that tomorrow. After all, tomorrow is another day."
Posted by: Dr Evil Oct 2 2019, 10:18 AM
I fixed the pedals...
I turned around the shaft, straightened up the arm, and shortened it so it wouldn't hit the pedal arm. New pin made from solid steel, not a spiral pin. Heated both ends with the torch and flattened them so it won't come out.
The right end had the tube in the pedal base shortened and the bushing reinstalled. Then I put a washer and cotter key in to make sure it doesn't come out.
Now to see what's wrong in the transmission...
Opened it up and found nothing wrong. With the cables disconnected, it shifts fine through all the gears.
Hooked up the cables and shifted it to first at the trans. The shifter was in first. Pulled the shifter to second, and the trans won't engage second gear. At the trans, I am able to put it into second. So now I think there is a problem with the shfiter.
I am going to put the trans back together after lunch and pull the shifter to see what is wrong.
But at least I know what it looks like inside now.
Those picks make me feel funny in a good way
Posted by: ClayPerrine Oct 2 2019, 07:14 PM
So this evening I fixed the oil light. Broken wire in the 14 pin plug to the relay board.
Fixed the shifter, and still didn't have reverse. Got online and searched the 987 forums on Pelican and Rennlist. Found lots of posts about no reverse gear that said to adjust the shift linkage. Considering that I am not running a Cayman shifter, I wasn't able to use the procedures they outlined. But I was able to disconnect the cable at the transmission, then put it in reverse by moving the input shaft. I know it was working because the backup lights came on. I adjusted the cable on the transmission end so it would hook up correctly.
TA-DA!!! Now I have reverse. I start the car up, and back it out of the garage. I put it in first and start to pull away down the driveway, and it dies.
I don't hear the fuel pump running. The cheap aftermarket replacement 964 pump died. I have power and ground to it. I tried tapping it with a hammer. Nothing.
What the H3LL do I have to do to catch a break???? The tank is completely full of premium unleaded. So now I have to drain the tank to replace the cheap pump with a real Bosch pump that I should have bought in the first place.
Off to email Aaron@allzim.com to order a 964 factory pump.
Posted by: ClayPerrine Oct 2 2019, 07:15 PM
Those picks make me feel funny in a good way
So... are you going to start rebuilding Cayman transmissions now???
Posted by: Jamie Oct 2 2019, 08:21 PM
So this evening I fixed the oil light. Broken wire in the 14 pin plug to the relay board.
Fixed the shifter, and still didn't have reverse.
Got online and searched the 987 forums on Pelican and Rennlist. Found lots of posts about no reverse gear that said to adjust the shift linkage. Considering that I am not running a Cayman shifter, I wasn't able to use the procedures they outlined. But I was able to disconnect the cable at the transmission, then put it in reverse by moving the input shaft. I know it was working because the backup lights came on. I adjusted the cable on the transmission end so it would hook up correctly. TA-DA!!! Now I have reverse. I start the car up, and back it out of the garage. I put it in first and start to pull away down the driveway, and it dies.
I don't hear the fuel pump running. The cheap aftermarket replacement 964 pump died. I have power and ground to it. I tried tapping it with a hammer. Nothing.
What the H3LL do I have to do to catch a break???? The tank is completely full of premium unleaded. So now I have to drain the tank to replace the cheap pump with a real Bosch pump that I should have bought in the first place.
Off to email Aaron@allzim.com to order a 964 factory pump.
Why don't you just put a clamp on the fuel line out of the tank, saves a lot of fuel draining except for the rest of the fuel system?

Posted by: ClayPerrine Oct 3 2019, 05:56 AM
So this evening I fixed the oil light. Broken wire in the 14 pin plug to the relay board.
Fixed the shifter, and still didn't have reverse.
Got online and searched the 987 forums on Pelican and Rennlist. Found lots of posts about no reverse gear that said to adjust the shift linkage. Considering that I am not running a Cayman shifter, I wasn't able to use the procedures they outlined. But I was able to disconnect the cable at the transmission, then put it in reverse by moving the input shaft. I know it was working because the backup lights came on. I adjusted the cable on the transmission end so it would hook up correctly. TA-DA!!! Now I have reverse. I start the car up, and back it out of the garage. I put it in first and start to pull away down the driveway, and it dies.
I don't hear the fuel pump running. The cheap aftermarket replacement 964 pump died. I have power and ground to it. I tried tapping it with a hammer. Nothing.
What the H3LL do I have to do to catch a break???? The tank is completely full of premium unleaded. So now I have to drain the tank to replace the cheap pump with a real Bosch pump that I should have bought in the first place.
Off to email Aaron@allzim.com to order a 964 factory pump.
Why don't you just put a clamp on the fuel line out of the tank, saves a lot of fuel draining except for the rest of the fuel system?
The fuel pump is under the tank. I have to take the tank out of the chassis to replace the pump. Gasoline weighs 6lbs /gallon, so that is almost 100LBS to pull out of that hole.
Posted by: 914forme Oct 3 2019, 02:10 PM
And that is why I got a 75-76 cover to build a pump mount in the earlier chassis. You can also mount it to the steering rack, and just have to pull a dust shield. Done it both ways. I hate having to pull a tank to get to a fuel pump.
Cut a hole in the floor of an Astro Van once so I did not have to drop the tank for a third time. Crappy GM design
Posted by: ClayPerrine Oct 3 2019, 02:21 PM
And that is why I got a 75-76 cover to build a pump mount in the earlier chassis. You can also mount it to the steering rack, and just have to pull a dust shield. Done it both ways. I hate having to pull a tank to get to a fuel pump.Cut a hole in the floor of an Astro Van once so I did not have to drop the tank for a third time. Crappy GM design
I have a 75 fuel pump mount cover in my parts stash. It's missing the actual mount. I used it for the 964 fuel filter in the engine compartment.
Posted by: ClayPerrine Oct 10 2019, 10:07 AM
Today I drove it to work. I lost the gauges when I hit a bump coming into the airport. Drove the last 1/2 mile in with all the gauges pegged at the bottom.
Lunch will be spent troubleshooting the gauge power issue. I suspect a blown fuse.
Posted by: db9146 Oct 10 2019, 10:19 AM

Posted by: 76-914 Oct 10 2019, 11:37 AM
Your presently in the "debug" chapter of this conversion which only has 2 emotions. or Either way, enjoy the Hell out of it.
Posted by: ClayPerrine Oct 10 2019, 09:04 PM
Fixed the fuse at lunch. Gauges are working again. I have a broken instrument light wire in the speedo. It is broken right at the socket, so I need to scavenge one off a junk harness and splice it in.
The biggest problem is it has a huge tip-in problem. When warm, it will die trying to accelerate from a stop. It even happens with the car idling at 1500 rpm. I now know that the used throttle switches have an intermittent open in the common wire. That will cause it. Hopefully I get the new throttle switch assembly tomorrow. I want to take it to the AX on Sunday.
I also let Aaron@allzim.com (on here as partsguy22) drive it. He is the machinist on this project, and he has a lot of time invested in it. He is a Miata guy, and had never driven a 914. This was a hell of an introduction to them. He says "It needs bigger brakes, and more tire on the back".
After moving the throttle switch wires, I got to drive it home with no check engine light. It drives really nice... pulls smooth and drops to idle with no hunting or surging.
I like DME!
Posted by: partsguy22 Oct 10 2019, 09:31 PM
I've driven cars with similar power to weight ratios but Igor is a different kind of fast... it makes heaps of torque down low...really low like 1500rpm and power builds from there to redline which arrives way faster than you think it will
It makes the 245 width tires seem inadequate as do the 4 piston boxster brakes ...as it sits this car is like a clown with a switch blade , amazingly entertaining but will kill you without a second thought.
Eta: this car really is absolutely amazing and I think it will only get better as development continues
Posted by: Rob-O Oct 10 2019, 11:27 PM
Eta: this car really is absolutely amazing and I think it will only get better as development continues
EXactly why I’m not riding in this thing. With my luck I’d get the switch blade...
Posted by: rick 918-S Oct 11 2019, 03:38 AM
Down to one tire manufacturer producing 255/50/16's
May have to run race rubber to get tires next time.
Posted by: ClayPerrine Oct 11 2019, 08:44 AM
Down to one tire manufacturer producing 255/50/16's
My have to run race rubber to get tires next time.
Rick,
That's what you are running for rear tires? I may have to look into them. I assume they fit under the factory GT flares?
I wonder how hard it would be to fit 911 PCCB brakes????
Edit: Nevermind... PCCBs are prone to cracking rotors and really expensive to replace. Maybe Cayenne calipers and rotors???
Posted by: mepstein Oct 11 2019, 09:02 AM
Does Rick’ alien have glass flares. I seem to remember it that way. If so, I feel they fit a slightly wider tire than steel.
Posted by: ClayPerrine Oct 11 2019, 10:29 AM
...as it sits this car is like a clown with a switch blade , amazingly entertaining but will kill you without a second thought.
I don't know if I should be offended or flattered.

Posted by: partsguy22 Oct 11 2019, 12:26 PM
...as it sits this car is like a clown with a switch blade , amazingly entertaining but will kill you without a second thought.
I don't know if I should be offended or flattered.
That's not a bad thing , I just meant its all fun and games until it tries to kill you.
Currently its just an extremely fine line between fun and certain agonizing death.
Posted by: ClayPerrine Oct 12 2019, 07:16 AM
I went by to pick up a new throttle switch assembly, and Aaron told me it was either "a clown with a switchblade" or "a stripper named Tiffany".
I told Betty about it and she came up with a "a stripper named PorSHA. She is a lot of fun, until she isn't."
Posted by: Maltese Falcon Oct 12 2019, 12:13 PM
Down to one tire manufacturer producing 255/50/16's
My have to run race rubber to get tires next time.
Rick,
That's what you are running for rear tires? I may have to look into them. I assume they fit under the factory GT flares?
I wonder how hard it would be to fit 911 PCCB brakes????
Edit: Nevermind... PCCBs are prone to cracking rotors and really expensive to replace. Maybe Cayenne calipers and rotors???
Clay..don't know if you have checked this Co. out www.vehiclecraft.com
I almost used their bolt-in Big Brake kit...however went with StopTech . Although StopTechs still required a bit of customizing of their adapters blocks; I am now equipped with larger calipers/ rotors than those of the Vehiclecraft Brembo selections. Posted by: Rob-O Oct 12 2019, 12:14 PM
A clown stripper named PorSHA who carries a switch blade...***shiver***
Posted by: whitetwinturbo Oct 23 2019, 10:19 AM
...........love this sled 
Posted by: Alapone Oct 23 2019, 11:11 AM
...........love this sled
can we get some more pics ?????? sounds incredible
Posted by: ClayPerrine Oct 24 2019, 02:03 PM
Ok.. I am being stupid here... someone PLEASE volunteer to stop me!
I found this online:
http://vonnen.com/technology/#1
Basically, it is a hybrid conversion for all 911s from 65 up to current. It replaces the flywheel and starter with a motor, generator, and a small battery pack. It adds 150Hp and a 60% increase in torque.
Putting this into my 4.0L car would be beyond insane... it is downright stupid...
And I can't afford the 75K price tag, plus they have to install it.
So why do I grin every time I think about it???
Posted by: 914forme Oct 24 2019, 02:10 PM
100% stupid for the price, but it would be heck of a lot more fun.
Posted by: ClayPerrine Oct 24 2019, 02:18 PM
100% stupid for the price, but it would be heck of a lot more fun.That would put 575HP in a FREAKING 914 CHASSIS! It would go from a clown with a switchblade to a chimp with an AK-47!
Combine it with the supercharger, and it gets into serious supercar HP.
Wait.. you are supposed to be TALKING ME OUT OF THIS!!!
Posted by: Rob-O Oct 24 2019, 02:41 PM
I’m officially calling first dibs on Elwood...
Posted by: mepstein Oct 24 2019, 02:53 PM
It would make it miserable to drive on any road but a straight line.
Posted by: ClayPerrine Oct 24 2019, 03:48 PM
I’m officially calling first dibs on Elwood...
You can't. The DAPO made it a condition of the sale that he has right of first refusal if we ever sell it.
Posted by: 914forme Oct 24 2019, 08:11 PM
100% stupid for the price, but it would be heck of a lot more fun.That would put 575HP in a FREAKING 914 CHASSIS! It would go from a clown with a switchblade to a chimp with an AK-47!
Combine it with the supercharger, and it gets into serious supercar HP.
Wait.. you are supposed to be TALKING ME OUT OF THIS!!!
I'm not your person to talk you out of more power. Everything needs More Power. I have never meet a car that could not use more power. After all I am getting an X5M and all ready on Dinan site looking to get more power.
Defiantly the wrong guy to talk you out out of more power.
Posted by: Rob-O Oct 24 2019, 11:43 PM
I’m officially calling first dibs on Elwood...
You can't. The DAPO made it a condition of the sale that he has right of first refusal if we ever sell it.
Dammit Rusty!
Posted by: ClayPerrine Oct 25 2019, 07:08 AM
I’m officially calling first dibs on Elwood...
You can't. The DAPO made it a condition of the sale that he has right of first refusal if we ever sell it.
Dammit Rusty!
And Betty would own Elwood if anything happens to me. Remember community property?
Posted by: Rob-O Oct 25 2019, 07:11 AM
I’m officially calling first dibs on Elwood...
You can't. The DAPO made it a condition of the sale that he has right of first refusal if we ever sell it.
Dammit Rusty!
And Betty would own Elwood if anything happens to me. Remember community property?
In the highly unlikely event that Betty would want to sell a 914 I was hoping to be first in line...after Rusty.
Posted by: petza914 Oct 25 2019, 08:02 AM
Down to one tire manufacturer producing 255/50/16's
My have to run race rubber to get tires next time.
Rick,
That's what you are running for rear tires? I may have to look into them. I assume they fit under the factory GT flares?
I wonder how hard it would be to fit 911 PCCB brakes????
Edit: Nevermind... PCCBs are prone to cracking rotors and really expensive to replace. Maybe Cayenne calipers and rotors???
Clay, I can't believe I missed the debut of this beast at Okteenerfest this year - the first year in the past few I couldn't make it due to kid sports conflicts - bummed.
Sounds like the car is amazing with plenty of bliss moments mixed in with the troubleshooting issues - you know how it goes.
Anyway, I pulled the complete braking system from my widebody Cayenne Turbo S when I replaced it with a 958 PCCB setup. If you're looking for OEM Porsche brakes, these are some of the largest you can find - front rotors are 380x38mm. Everything is cleaned and boxed up - 4 rotors, 4 calipers, 4 lines, sets of pads, etc. Pulled them with 35,000 miles on them. Details and photos are in my ad here - https://rennlist.com/forums/market/1122935
Let me know if you're interested and super job on the car !
Posted by: ClayPerrine Apr 13 2020, 07:13 AM
While we have this downtime, I am finally getting something done on my car. The oil system is pulled apart to add a thermostat, but I am stuck because I am waiting on, of all things, a drill bit. I need a 20.5mm bit to fix some fittings with messed up threads. Yes, I realize that is a 13/16 bit, but everything is closed on Easter Sunday.
So yesterday I started to tear into another issue. My LED front lights act weird. If you turn on the turn signal or flashers, the white LEDs flash. If you turn on the park lights, the yellow LEDs come on. If you turn on the park lights when the white LEDs are flashing, the yellow lights come on, and the white lights stop working. Considering how custom my wiring harness is, I figured it was something in the wiring causing it.
I tore the knee pad off, dropped the fuse box, pulled the gauge cluster, and pulled both the light switch and the hazard switch out so I could get to the wires.
No matter what I did, I could not find a reason for the problem. I finally broke down and pulled the LED board out of the right signal pod. I made a test rig to hook it to an old Radio Shack 110V AC to 12V DC converter.
I get the exact same results when on the test rig. White lights on, hook Yellow lights to the 12v power and the white lights go out. Remove the power to the Yellow lights, and the white lights come back on. But there is a delay before the white lights come back on, about 2 to 3 seconds, kinda like a capacitor charging.
The other thing I noticed is the jumper pads on the back of the board. There are three pads, labeled "US", "Euro" and "Blanking".
Mine has the "Blanking" one soldered.
I looked at Betty's 914, and the Six, both of which have the same LED boards. Bot of those have the jumper on "US" because they are US spec lights. Mine are Euro spec lenses, so I would assume they need to be on the "Euro" setting.
Can anyone with Euro Spokeworks LED boards check and see if the pad should be on "Euro"?
Thanks!
Posted by: 76-914 Apr 13 2020, 08:54 AM
Clay, just PM Jerry. He will get back with you quickly. Great over the phone customer service. He will walk you through any difficulties you might encounter.
Posted by: petza914 Apr 13 2020, 09:23 AM
While we have this downtime, I am finally getting something done on my car. The oil system is pulled apart to add a thermostat, but I am stuck because I am waiting on, of all things, a drill bit. I need a 20.5mm bit to fix some fittings with messed up threads. Yes, I realize that is a 13/16 bit, but everything is closed on Easter Sunday.
So yesterday I started to tear into another issue. My LED front lights act weird. If you turn on the turn signal or flashers, the white LEDs flash. If you turn on the park lights, the yellow LEDs come on. If you turn on the park lights when the white LEDs are flashing, the yellow lights come on, and the white lights stop working. Considering how custom my wiring harness is, I figured it was something in the wiring causing it.
I tore the knee pad off, dropped the fuse box, pulled the gauge cluster, and pulled both the light switch and the hazard switch out so I could get to the wires.
No matter what I did, I could not find a reason for the problem. I finally broke down and pulled the LED board out of the right signal pod. I made a test rig to hook it to an old Radio Shack 110V AC to 12V DC converter.
I get the exact same results when on the test rig. White lights on, hook Yellow lights to the 12v power and the white lights go out. Remove the power to the Yellow lights, and the white lights come back on. But there is a delay before the white lights come back on, about 2 to 3 seconds, kinda like a capacitor charging.
The other thing I noticed is the jumper pads on the back of the board. There are three pads, labeled "US", "Euro" and "Blanking".
Mine has the "Blanking" one soldered.
I looked at Betty's 914, and the Six, both of which have the same LED boards. Bot of those have the jumper on "US" because they are US spec lights. Mine are Euro spec lenses, so I would assume they need to be on the "Euro" setting.
Can anyone with Euro Spokeworks LED boards check and see if the pad should be on "Euro"?
Thanks!
The flashing colors in your initial description sound weird that your white lights are flashing with your turn signals and the yellow lights working as the parking lights.
Mine are the opposite.
But in your second description, with the white lights turning off when the yellow lights are activated, that I believe is how they're supposed to be working. You'll notice in modern cars that have white DRLs in the front that when the turn signal is activated the white DRL light on that side turns off to not obscure the visibility of the flasher blinking. Since the yellow light you're connecting is the turn signal, it cuts off the white part of the light while it's activated and then returns power to the white part of the light when the turn signal is deactivated. I think it's cool that these LEDs have that updated and more modern functionality and yours work just like mine do. I never noticed the pairs of jumpers at the bottom to know if the functionality can be changed if desired by resoldering the board.
See my post in the spokeworks led thread here - http://www.914world.com/bbs2/index.php?showtopic=248192&st=161
Posted by: ClayPerrine Apr 13 2020, 12:12 PM
The flashing colors in your initial description sound weird that your white lights are flashing with your turn signals and the yellow lights working as the parking lights.
Mine are the opposite.
But in your second description, with the white lights turning off when the yellow lights are activated, that I believe is how they're supposed to be working. You'll notice in modern cars that have white DRLs in the front that when the turn signal is activated the white DRL light on that side turns off to not obscure the visibility of the flasher blinking. Since the yellow light you're connecting is the turn signal, it cuts off the white part of the light while it's activated and then returns power to the white part of the light when the turn signal is deactivated. I think it's cool that these LEDs have that updated and more modern functionality and yours work just like mine do. I never noticed the pairs of jumpers at the bottom to know if the functionality can be changed if desired by resoldering the board.
See my post in the spokeworks led thread here - http://www.914world.com/bbs2/index.php?showtopic=248192&st=161
On a Euro 914, the amber lights are the park lights, and the white lights are the front turn signals. The factory euro turn signal buckets I have (they are boxed and being sent to Spoke today) have split wiring for the lights. The small white section of the light at the bottom is wired as the turn signal, and the larger, amber upper section is wired to be the park light. Other than the ground wire, they are completely separate. I verified the wiring is correct, I matched the numbers on the connectors to the correct circuits.
I am wondering if the jumper on the board needs to be on the "Euro" tab to get it to work like a factory original light setup.
Posted by: Cairo94507 Oct 24 2020, 07:25 AM
Man, I just re-read this thread and Clay your car and skills are just amazing.
Posted by: horizontally-opposed Oct 24 2020, 07:34 AM
It would make it miserable to drive on any road but a straight line.
What Clay really needs is the GT3R Hybrid front-axle powertrain.
Flywheel will make the car a one-seater (or, at least…deeply uncomfortable for a passenger), but he'll be able to put the power down.
What could possibly go wrong?
Posted by: ClayPerrine Oct 24 2020, 03:05 PM
It would make it miserable to drive on any road but a straight line.
What Clay really needs is the GT3R Hybrid front-axle powertrain.
Flywheel will make the car a one-seater (or, at least…deeply uncomfortable for a passenger), but he'll be able to put the power down.
What could possibly go wrong?
Geeze... quit putting
I would love to have a Vonnen Hybrid conversion done, but it not do it yourself, and it is VERY expensive. http://vonnen.com/
Out of curiosity I called them a while back. It is 70K installed. He was very interested, and he read this thread about my build. He said I wouldn't need the starter, their motor/generator will provide that function.
Posted by: ClayPerrine Oct 24 2020, 03:06 PM
Man, I just re-read this thread and Clay your car and skills are just amazing.
If y'all would quit holding the West coast event way in the north, I might consider attending and bringing my car.
Posted by: horizontally-opposed Oct 24 2020, 03:12 PM
Geeze... quit putting
I would love to have a Vonnen Hybrid conversion done, but it not do it yourself, and it is VERY expensive. http://vonnen.com/
Out of curiosity I called them a while back. It is 70K installed. He was very interested, and he read this thread about my build. He said I wouldn't need the starter, their motor/generator will provide that function.
The good news is you save on the starter. The bad news is you don't get AWD…and put even more weight towards the back of the car.
Man, I just re-read this thread and Clay your car and skills are just amazing.
+1
If y'all would quit holding the West coast event way in the north, I might consider attending and bringing my car.
Looks like 20 hours from Hurst to LA, or 25 hours from Hurst to Petaluma. Most who know Petaluma will put you miles (and possibly hours) ahead on traffic and quality of the roads. The people are okay, too. Honest!
(If still in doubt, I submit Tygaboy.)
And, as for the roads: Add some days before or after the trip to head north—and to add a set of memories to your 4.0 you'll simply never forget.
Posted by: ClayPerrine Nov 7 2020, 05:15 PM
Today I got out and fixed the broken shifter.
I had continuous issues with the frankenstein shifter I built. Then I melted a shift cable on the header. So another $500.00 set of cables, and a new shifter setup.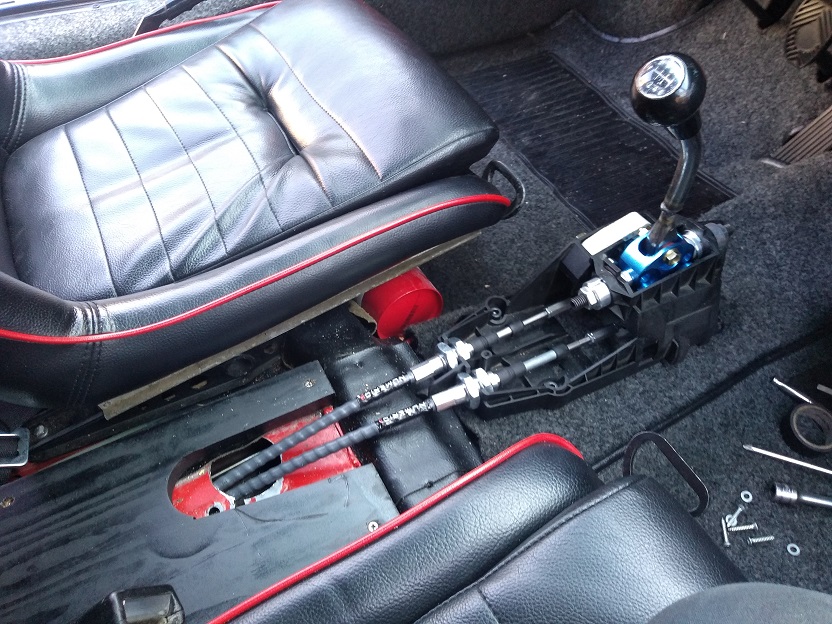
It is a Boxster shifter installed on an aluminum adapter plate.
It has a short shifter kit with a 914 shift rod welded onto it. Still nice and tight shifting. Going to take some time getting used to it.
Now I can't put in the deposit box because of the cable run. So I made up a wooden spacer with a notch to clear the cables. I fixed the hinge and got everything installed.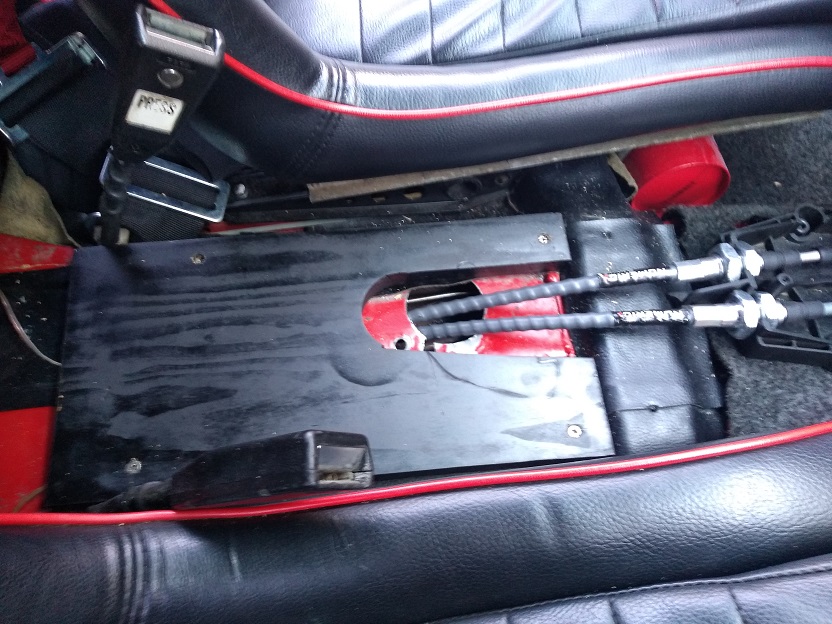
Next I will be building a console to go around the shifter. Going to add 12V plugs and a USB charging port for my phone. And a cup holder in front of the shifter.
Tomorrow we go to the AX at lone star park, so Betty and I cleaned up the car. I also put the rear valence on. It looks much better with the valence.
Posted by: ClayPerrine Nov 11 2020, 08:07 PM
Got my speedo back from Zim's today. They fixed the odometer. I put it back in, and attempted to fix the volt meter. Now when I turn on the key, the gauge fuse blows.
Oh well. got to pull it back apart and try again.
I also got new oil line bridge pieces for the cam oil feeds. The right hand one developed a bad leak, and there is an updated one used on the 993 that is supposed to fix that issue.
Tomorrow I tackle the oil leak.
Posted by: ClayPerrine Feb 23 2021, 07:16 AM
Yesterday I sent of a 911 Carrera tach to North Hollywood Speedometer to get the upshift light converted to be a check engine light for the DME. Right now I have an annoying red light in the dash. But I need that space for the AC compressor switch.
I also spent some time reworking the oil lines. I have popped multiple oil coolers on the right when the weather was cold. So I wanted to add a thermostat. Doing that requires a complete re-plumbing of the oil cooler system. I got the partially assembled lines from Zims, and started trying to fit them.
In the process, I found this:
Seems the crossover hose is crimping when I tighten it up, causing a restriction. That would account for the right hand oil cooler doing it's best imitation of a child's balloon. I am going to replace that line with the green striped stuff seen the pictures. That green striped hose is really stiff and doesn't kink.
Here are some more shots of the oil system being laid out.
I had a 911 oil line that goes under the transmission bell housing shortened, and put a 90 on the end of it to go up to the thermostat. It also has the line back to the tank from the thermostat.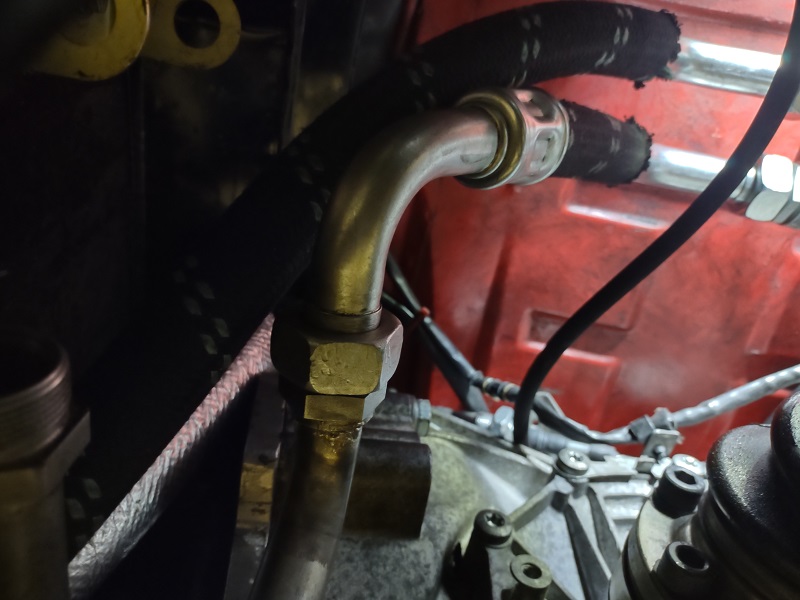
Shot of the thermostat and left cooler. I need two 90 degree fittings to make this connection. Yes, I know the thermostat is hanging out in space. I am going to get the lines fitted, then put int he mount for the thermostat.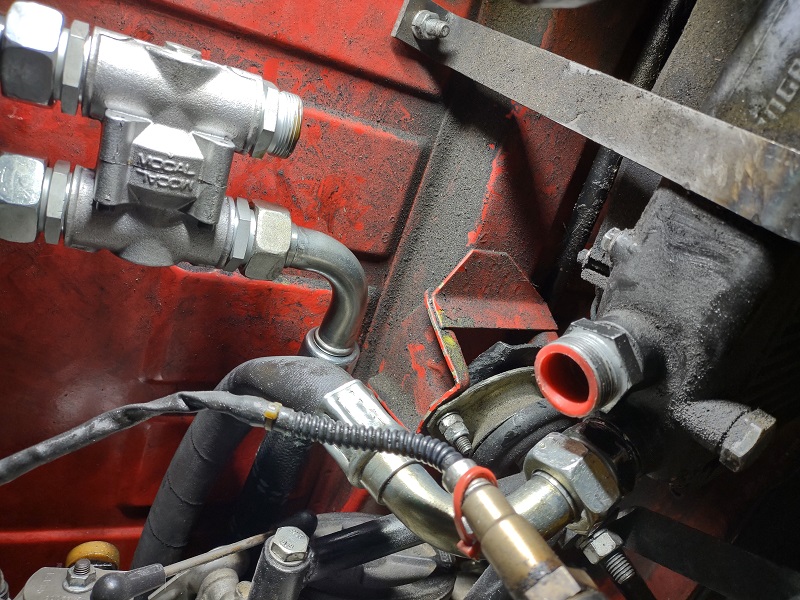
Another angle of the lines coming up to the thermostat.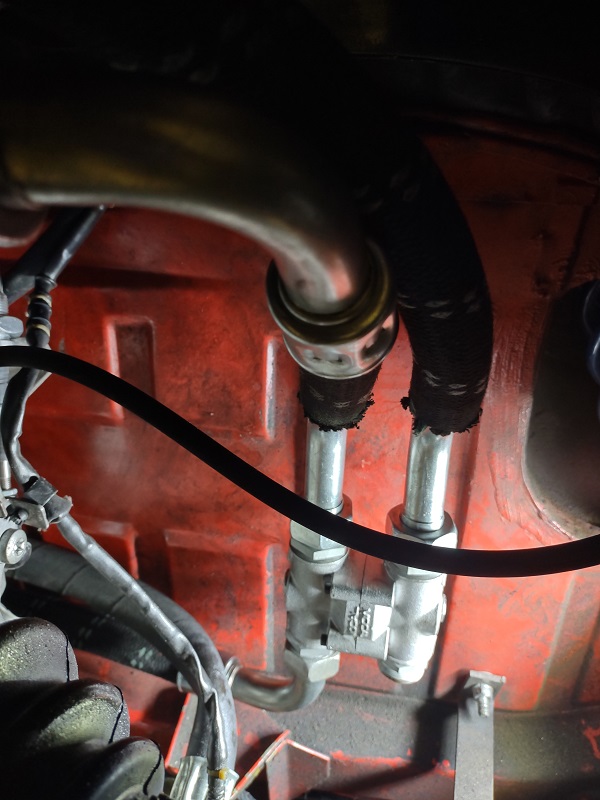
I sent off an email to Aaron@Zims.com ( @http://www.914world.com/bbs2/index.php?showuser=21587 ). He has to order more of the 90 degree fittings.
Maybe I will make the AX on Sunday, but I doubt it at this point.
Clay
Posted by: ClayPerrine Mar 24 2021, 11:39 AM
The oil cooler plumbing is done. And I found the flat spot I had when trying to accelerate. I replaced the barn door air flow meter, and it went away.
Posted by: ClayPerrine Mar 24 2021, 12:13 PM
On to the "AC Evaporator Build"
I wanted AC in my car, but I didn't want an underdash unit. Larry Hubby's AC build inspired me to copy his evaporator, but with some changes specific to my car.
You can see Larry's AC build here - http://www.914world.com/bbs2/index.php?showtopic=316728&st=0&p=2530141&
So first, I ordered the evaporator and the fans like Larry used.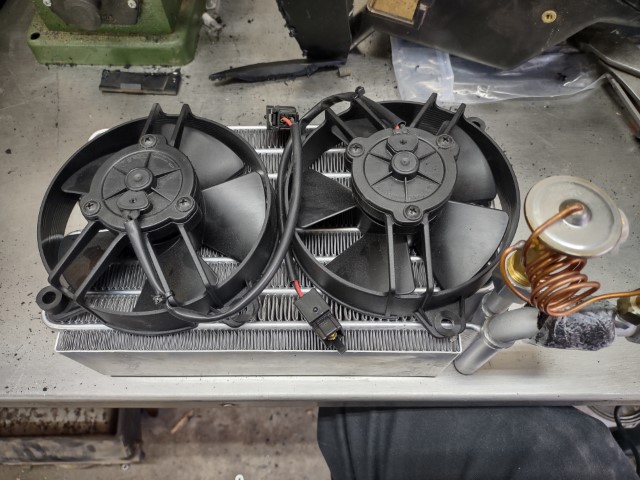
Then I started on the "shorty" air box to fit the cowl. I cut down the factory air box and carefully removed the rain shield inside of it.
In the third picture, I show where the rain shield was cut loose. 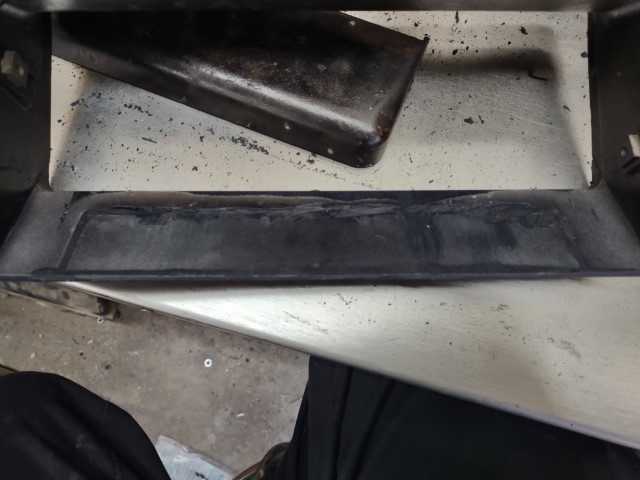
One of the things I noticed when I was reading Larry's thread, his opening for the outside air door was really small. So I removed the oval intake from the factory fresh air blower, and attached it to a sheet of ABS. Then I created a door and an actuator rod. 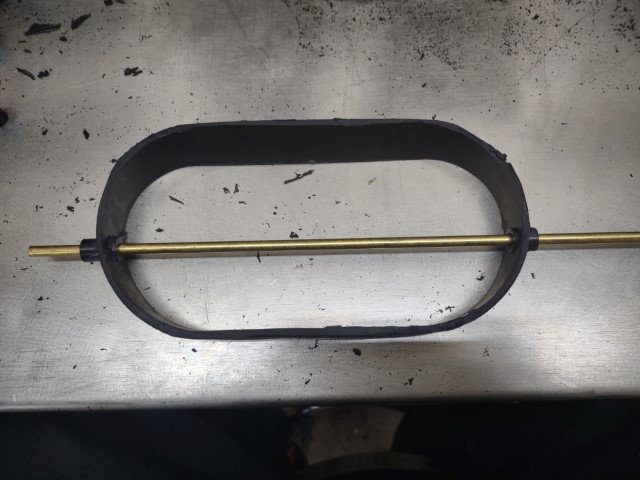
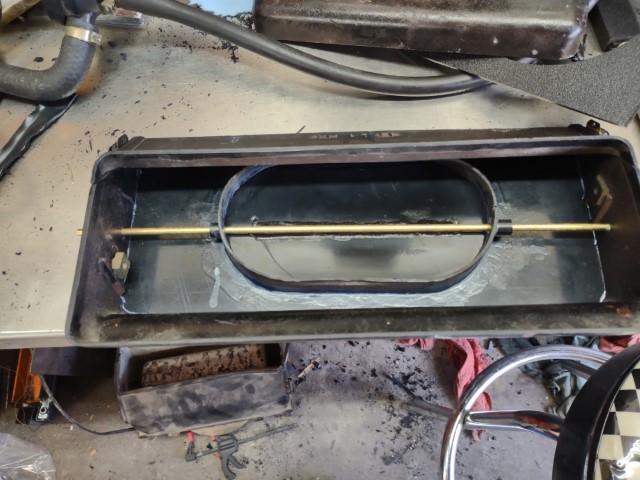
I left the rain shield off for now. I will reattach it later. That way I can see how much the door opens when it is moved.
By now I ran out of super glue, so I had to order more. Yes, it is assembled with super glue. My father designed AC units for VW for years, and they used super glue extensively. The whole Vanagon AC unit was assembled with it. I got the glue and the accelerator spray. Just put the glue on one part, and spray the other. 5 seconds after contact, it is bonded.
Next, I start making the bottom box to house the evaporator.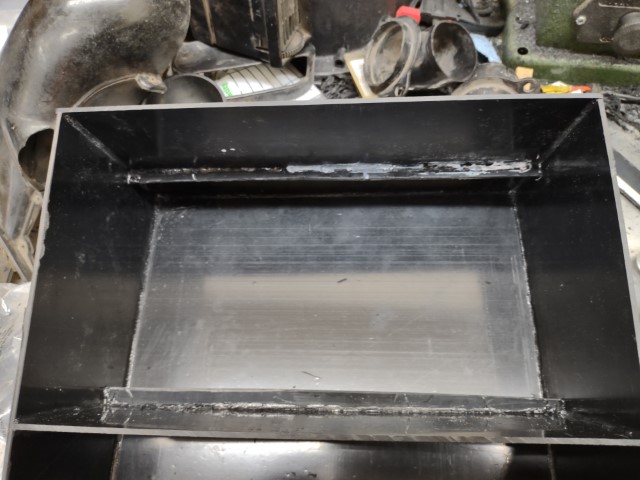
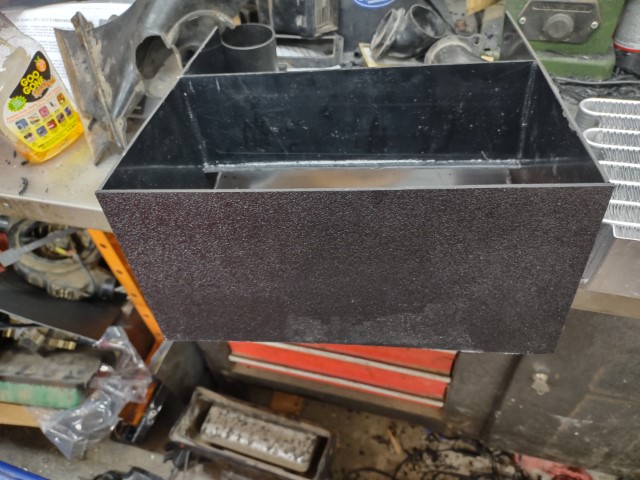
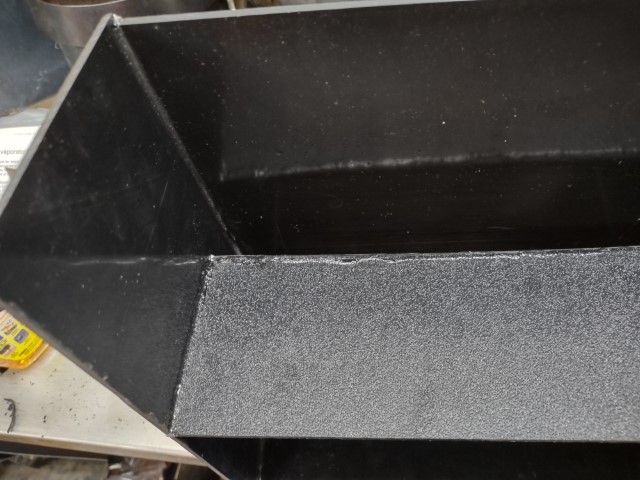
The box has a sloping floor that will carry condensation to the drains at the front (that I have not installed yet).
I also put in a couple of pieces of ABS to act as a shelf to hold the evaporator up off the bottom.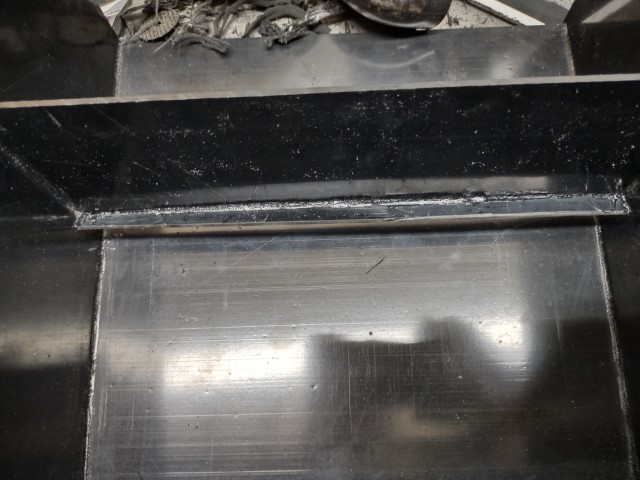
I test fit the evaporator core, and everything looked good.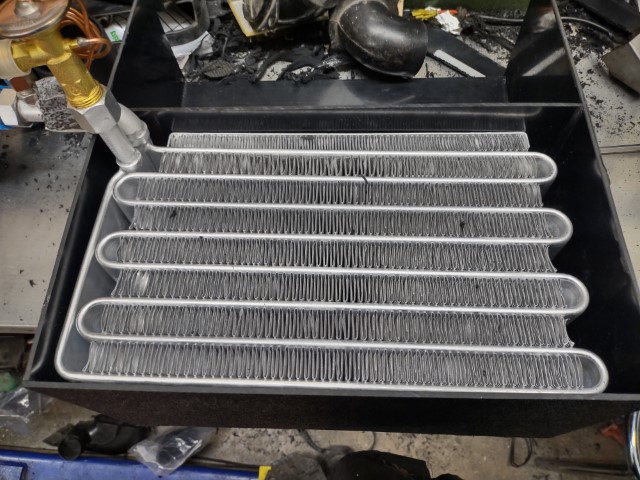
Next I created a ABS plate to hold the fans. I used a dremel with a circle cutter to make the holes for the fans. I had to slightly enlarge the holes to get the fans to clip in. I notched the corner to clear the evaporator lines. It sits right on the core, so I didn't have to glue anything.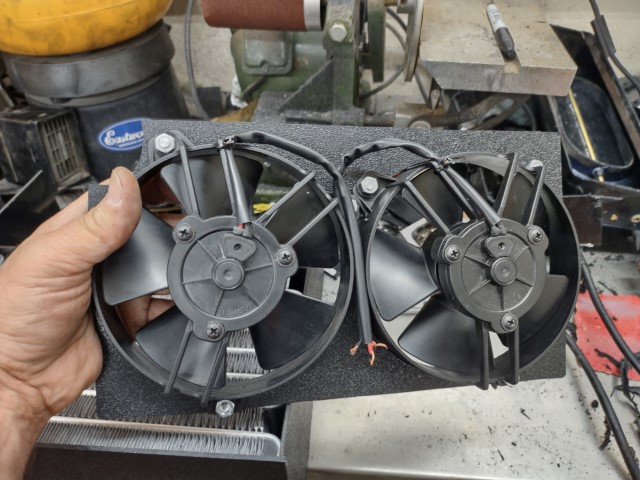
After that, I created the air distributor that goes on the back of the unit. I am going to route AC to the defroster ducts to push dry air over the windshield to defog it. I am going to feed the two outside vents in the dash, and to a 911 center vent in my Geddy design dash. So I setup the air distributor to be able to switch between the defroster vents and the center vent. The elbows at the back feed the defrost ducts, and the big outlet in the middle feeds the dash vent.
This is a picture of the door on the inside of the box.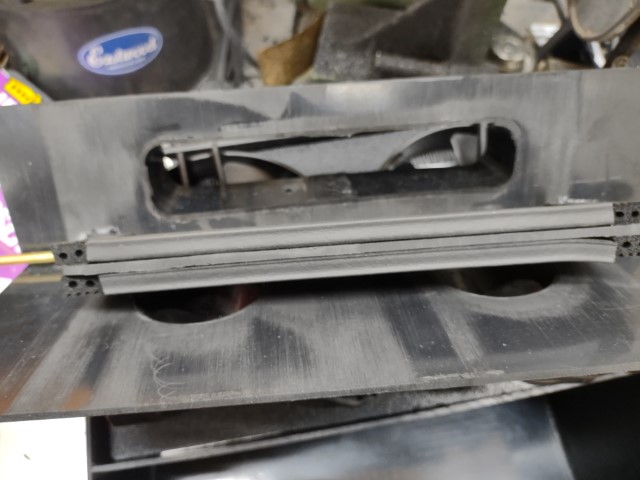
I hooked up the fans to 12v, and checked the airflow. It moves a lot of air through the evaporator core!
I still need to add the fittings to hook up the vents in the end of the dash. There are no doors for them. They already have doors in the vents.
I started creating the connection between the shorty air box and the top of the evaporator core. 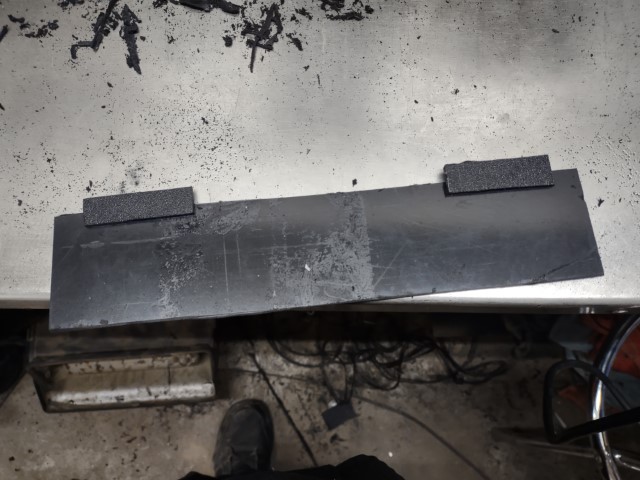
The tabs on this are to align it with the bottom box. I may need to add some small screws to hold the box together when it is in the car. But I will only put them on the side where they are not visible.
Here is the top box installed on the bottom evaporator box. 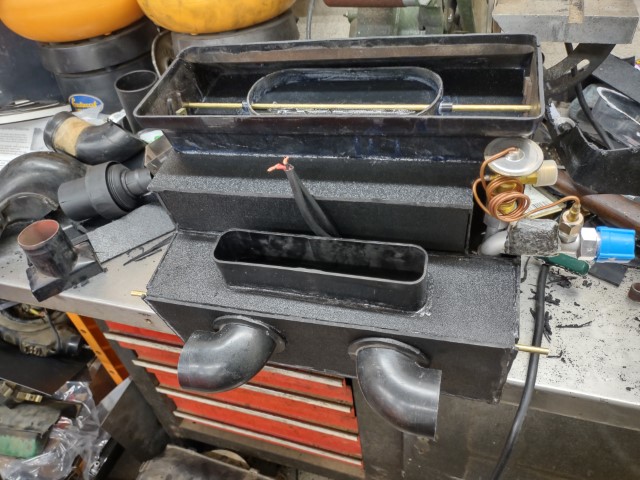
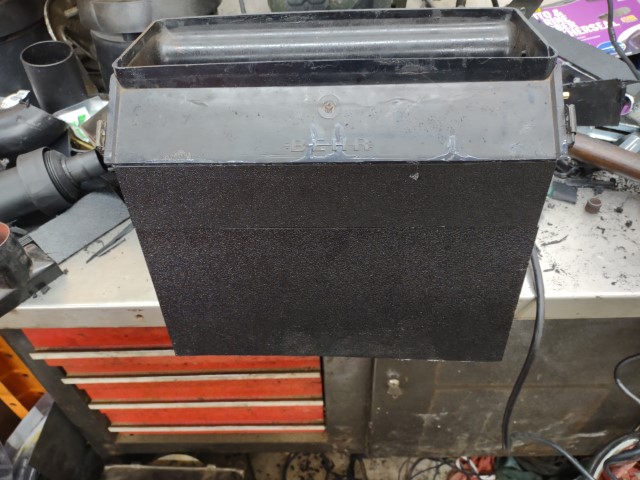
I again ran out of super glue. Gotta go to Ace hardware and get some more.
Next steps are to put in the fittings for the side vents, and the fittings for the recirculation connections. I am going to connect the intake to the inboard connections on the factory air control boxes on either side. I will wire them open to the foot well so they always pull inside air. Closing the flap in the top of the evaporator will force all the air to come from inside.
I set it next to the factory fresh air box. They are only a few millimeters in height difference. I need to pull the gas tank to check the fit in the dash.
More updates to come as I add more to it.
Clay
Posted by: Root_Werks Mar 24 2021, 12:35 PM
Some seriously mad fab skills, love it!
Posted by: Shivers Mar 24 2021, 02:05 PM
When we first met Clay, I wanted your Cousin. Now I want your car. I must be getting old. Wow man, what an incredible journey. I was away from the site for a while so I had to catch up. It must really be something behind the wheel. Be safe
Posted by: ClayPerrine Mar 24 2021, 02:09 PM
When we first met Clay, I wanted your Cousin. Now I want your car. I must be getting old. Wow man, what an incredible journey. I was away from the site for a while so I had to catch up. It must really be something behind the wheel. Be safe
My cousin? What are you talking about??????
Clay
Posted by: Shivers Mar 24 2021, 02:24 PM
PM sent
Posted by: ClayPerrine Mar 26 2021, 08:03 AM
Last night I went back to work on the AC evaporator.
And the door for the defrost/face vents came loose from the rod.... inside the box I already glued closed. So I ended up cutting the box open at the seams to fix the door.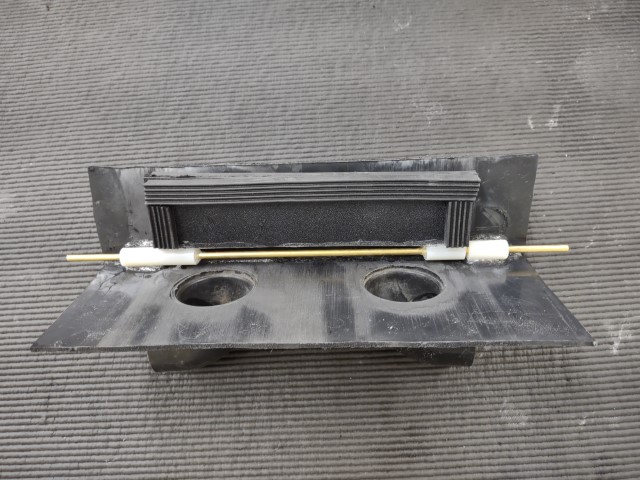
Safety note kids.. when cutting plastic that was bonded with super glue, wear a mask and goggles. When the cured glue gets hot, it gives off toxic fumes that will make your lungs hurt and your eyes water. I use an N95 mask and a set of safety goggles. And I keep a fan running to push the fumes away.
Got the door fixed, and set it aside to let the glue dry. I will be adding epoxy to re-enforce the pivots inside to insure the door does not come off again.
I also added the connections for the recirculation air. 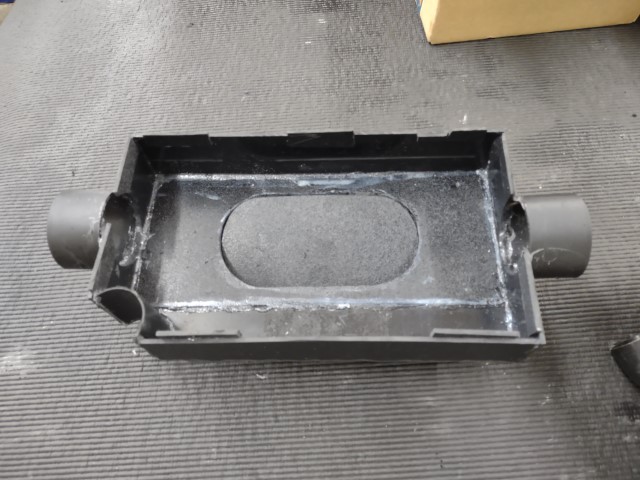
Probably not going to be able to update this for a few days.
Gonna be a busy weekend... we are helping to pull a 914 out of storage that has been there for many years. The new owner can tell that story. He needs to start his own thread.
Posted by: ClayPerrine Apr 4 2022, 06:16 PM
I have not updated this in a long time. Worked stopped on the ac setup due to family issues. Now I am going to drop the motor, and fix the leaking cam box. And I just got an epic case of Dirk Wright's disease. While I am in there, I am going to install this: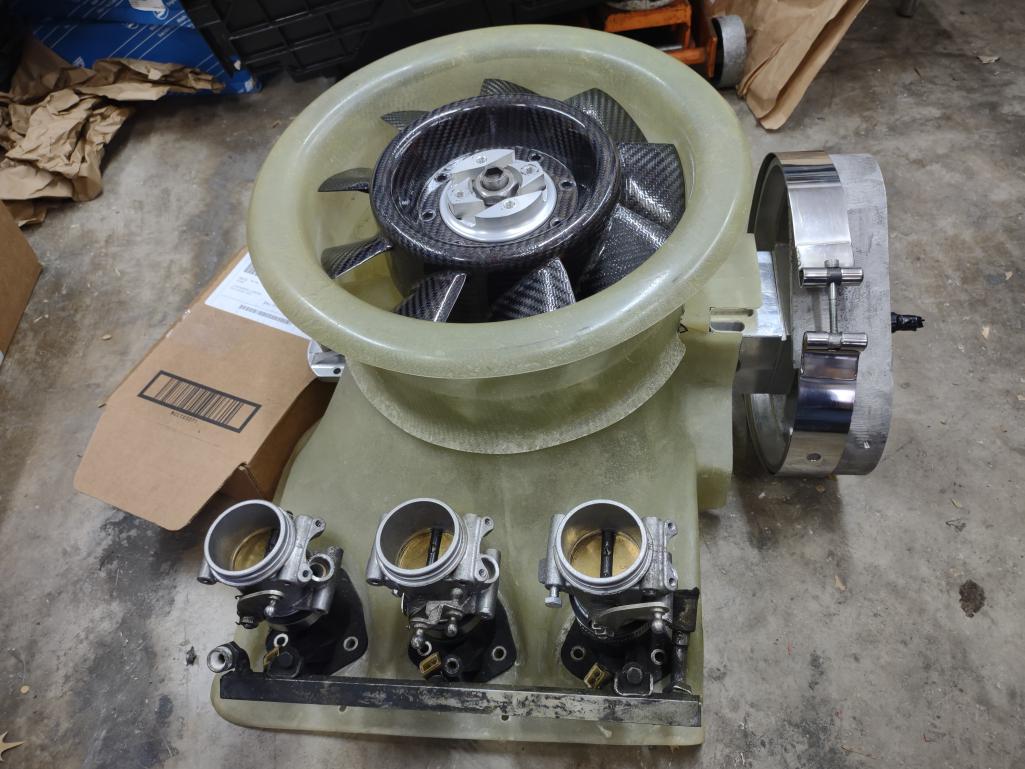
It is going to be FUN!
It will be after the Hill Country tour, and when Betty's 914 finally comes back from the body shop, it moves to the front of line.
Posted by: Van B Apr 4 2022, 06:34 PM
Duuuude…. That’s REAL NICE!
Posted by: Shivers Apr 4 2022, 06:49 PM
So cool
Posted by: mepstein Apr 4 2022, 07:14 PM
Now you need a clear engine lid.
Posted by: ClayPerrine Apr 4 2022, 07:28 PM
Now you need a clear engine lid.
I already have a GT lid on it.
Clay
Posted by: Literati914 Apr 4 2022, 08:03 PM
![yellowsleep[1].gif](style_emoticons/default/yellowsleep[1].gif)
J/k 
.
Posted by: wonkipop Apr 4 2022, 08:33 PM
I have not updated this in a long time. Worked stopped on the ac setup due to family issues. Now I am going to drop the motor, and fix the leaking cam box. And I just got an epic case of Dirk Wright's disease. While I am in there, I am going to install this:
It is going to be FUN!
It will be after the Hill Country tour, and when Betty's 914 finally comes back from the body shop, it moves to the front of line.
I'm counting 6, its missing 2?

Posted by: ClayPerrine Apr 5 2022, 02:38 AM
I have not updated this in a long time. Worked stopped on the ac setup due to family issues. Now I am going to drop the motor, and fix the leaking cam box. And I just got an epic case of Dirk Wright's disease. While I am in there, I am going to install this:
It is going to be FUN!
It will be after the Hill Country tour, and when Betty's 914 finally comes back from the body shop, it moves to the front of line.
I'm counting 6, its missing 2?
Nope, only six cylinders. That is a replica of a Porsche 935 fan. It is going on top of the 4.0L air cooled six. The throttle bodies are from a BMW K1300GS motorcycle. I have another set for the other side. I have to make plates to tie the throttle bodies together and provide a mount for the throttle linkage crossbar.
Stay tuned... more to come.
Clay
Posted by: mb911 Apr 5 2022, 05:14 AM
Wow super cool
Posted by: wonkipop Apr 5 2022, 05:46 AM
I have not updated this in a long time. Worked stopped on the ac setup due to family issues. Now I am going to drop the motor, and fix the leaking cam box. And I just got an epic case of Dirk Wright's disease. While I am in there, I am going to install this:
It is going to be FUN!
It will be after the Hill Country tour, and when Betty's 914 finally comes back from the body shop, it moves to the front of line.
I'm counting 6, its missing 2?
Nope, only six cylinders. That is a replica of a Porsche 935 fan. It is going on top of the 4.0L air cooled six. The throttle bodies are from a BMW K1300GS motorcycle. I have another set for the other side. I have to make plates to tie the throttle bodies together and provide a mount for the throttle linkage crossbar.
Stay tuned... more to come.
Clay
i hope this is not going to distract you from the mini monster phoenix red 74 that has to be reborn.
interesting about the throttle bodies.
the only time i have stood next to a 935 was when it was getting warmed up in a pit garage at phillip island. sounded like an angry motorbike. nice.
Posted by: ClayPerrine Apr 5 2022, 10:38 AM
i hope this is not going to distract you from the mini monster phoenix red 74 that has to be reborn.
Nope. Her 914 comes first. It always has, and always will. You know the old adage "Happy Wife, Happy Life!" When your wife loves 914s as much or more than you do, you put her car first.

I are a smart feller........
(Don't say it...)
Posted by: Maltese Falcon Apr 5 2022, 05:34 PM
That big-block 4.0, itb's , 6 speed and now the cherry ON top; Flat Fan !¡!
Most incredible mix of components for your street beast 
Posted by: racerbvd Apr 5 2022, 06:21 PM
Impressive.
Posted by: Bullethead Apr 5 2022, 09:31 PM
Great hoogly-moogly. Subscribed.
Posted by: eric9144 Apr 6 2022, 10:19 AM
All I can say it woooooooooow! Can't wait to see that in place!
Posted by: ClayPerrine Apr 6 2022, 10:35 AM
I am considering painting the fan shroud red to match the car?
Should I?
Clay
Posted by: DRPHIL914 Apr 6 2022, 11:01 AM
I am considering painting the fan shroud red to match the car?
Should I?
Clay
Posted by: TRS63 Apr 6 2022, 11:07 AM
I would just let the shroud like that..looking amazing
Antoine
Posted by: ClayPerrine Apr 6 2022, 11:11 AM
Adding poll for painting the fan shroud.
Posted by: Cairo94507 Apr 6 2022, 11:26 AM
Beautiful shroud; please do not paint it Clay.
Posted by: Chris914n6 Apr 6 2022, 11:32 AM
I'm split.
Paint the bottom half
Posted by: Steve Apr 6 2022, 11:52 AM
I voted to paint it, but the way it is also looks cool. What did the factory do? I would lean that way.
Posted by: Maltese Falcon Apr 6 2022, 06:38 PM
I'm sure that the (clear look) F'glass used here is comparable to the RSR type shrouds of the '70s RSR's. The fan appears to be c/f, or c/f "Look">> should be left as is.
Red is more of the IMSA 962 days (also cool), and a match for your car...but there's no going back to clear once applied...as the red will tint the clear f'glass.
If you're feelin' it; perhaps red shroud/ clear diffuser section and leave the c/f as is ¿¿

Posted by: Bullethead Apr 6 2022, 07:20 PM
I would just let the shroud like that..looking amazing
Antoine
Everything about this build is amazing. Raw was how the factory made them, with heat and time it'll develop that honey color you won't see if it's painted.
Posted by: Maltese Falcon Apr 6 2022, 07:51 PM
This Factory type 935/78 fan system was salvaged out of an IMSA March 83G w/962 engine. It was already red, and I just refreshed it with a new coat of red. The fan is natural (color) f/glass.
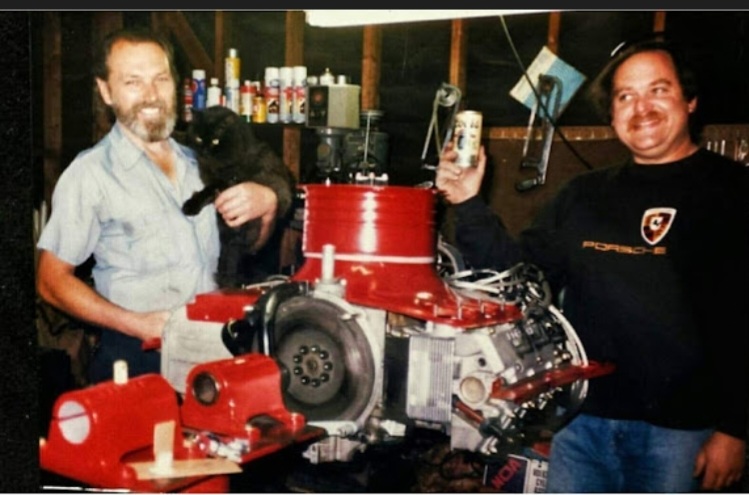
Posted by: bkrantz Apr 6 2022, 07:59 PM
IMO, the bare fiberglass is a vintage 60s-70s look. Paint, especially body color, is more modern. What vibe are you after?
Posted by: AZBanks Apr 6 2022, 08:45 PM
Red tinted clear coat??
Posted by: ClayPerrine Apr 13 2022, 12:02 PM
IMO, the bare fiberglass is a vintage 60s-70s look. Paint, especially body color, is more modern. What vibe are you after?
The fan is not fiberglass, it is carbon fiber (and it looks amazing!) So I don't really have an opinion on the subject of modern or vintage. My car is a hodgpoge of stuff I just wanted to do to it.
So far, the poll shows leaving it natural color is winning. Unless someone stuffs the ballot box, I will probably just leave it the color it is.
Clay
Posted by: Van B Apr 13 2022, 12:18 PM
Do what you want man! It's your hard earned money and your hobby!
That said, I have some thoughts about when paint is appropriate that might be worth sharing.
Basically, I think paint is best used to a.) provide a uniform finish, b.) coverup undesirable aspects i.e. quality or aesthetic defects, or c.) accent certain attributes.
with regard to your fan housing, if it were mine, I would either want to leave it natural or I would want to paint the lip of the housing to show off the "intake" aspect of it's function. But if that wasn't possible to do without affecting the remainder of the quality laid finish, then I would want to leave it all natural.
The good news is, you could experiment with some vinyl wrap to see how it could look before you actually commit to a decision.
Posted by: ClayPerrine Jun 26 2022, 07:19 PM
I have been working on our BMW, but I did make progress on the custom ITB setup for my flat fan.
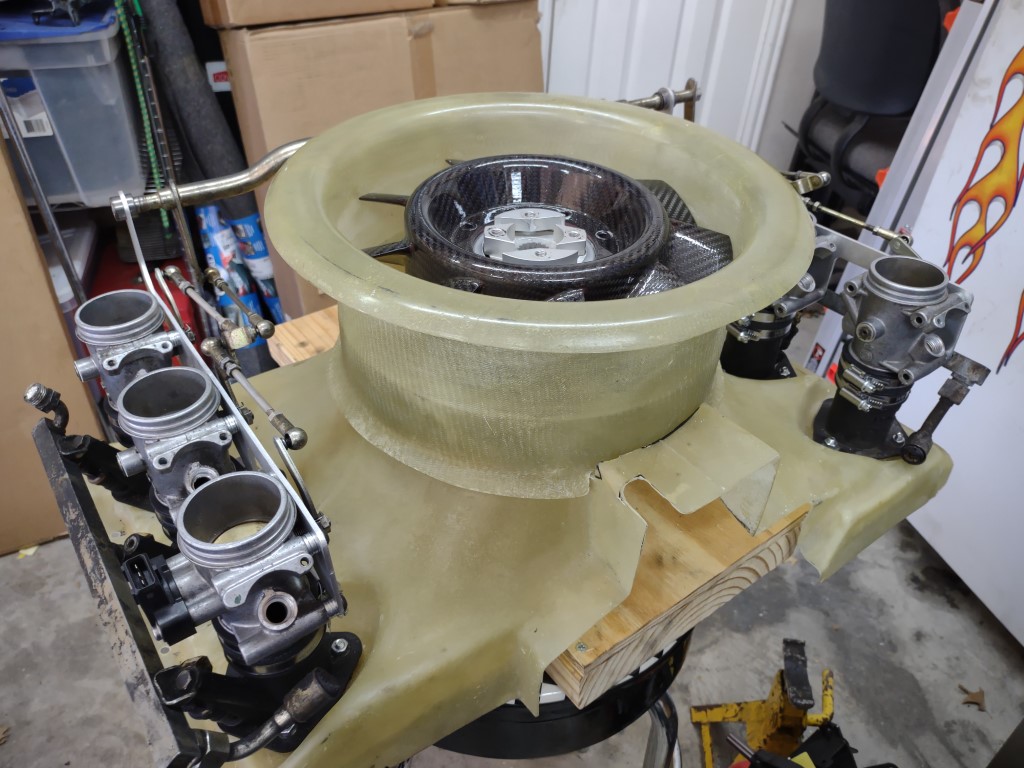
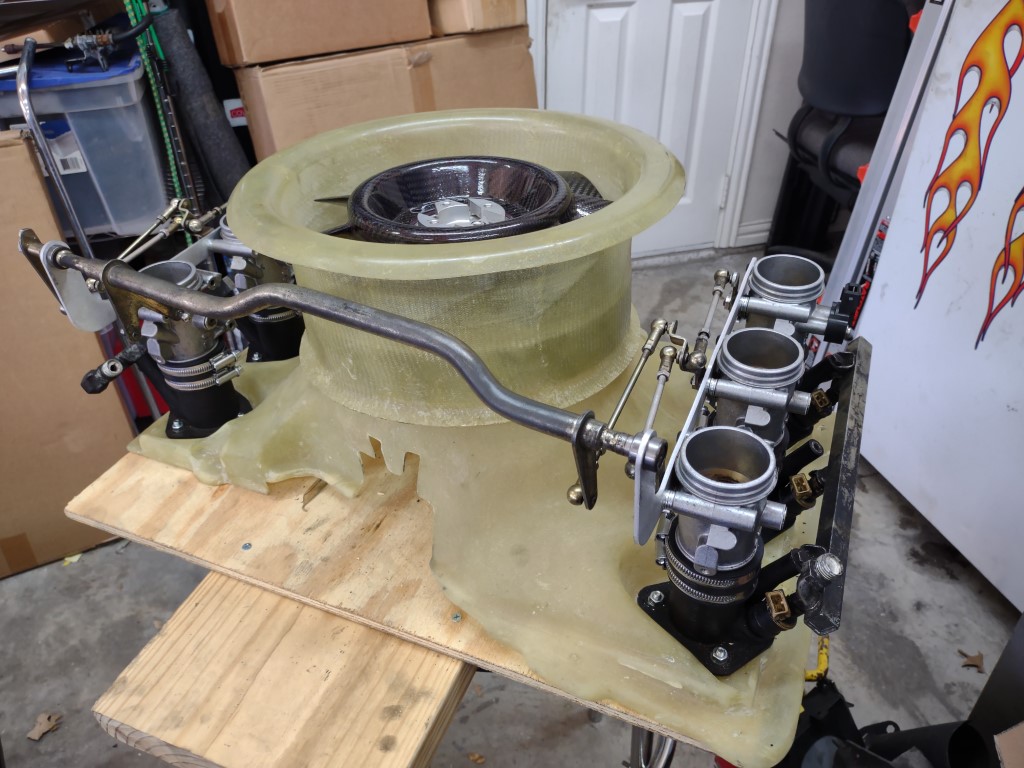
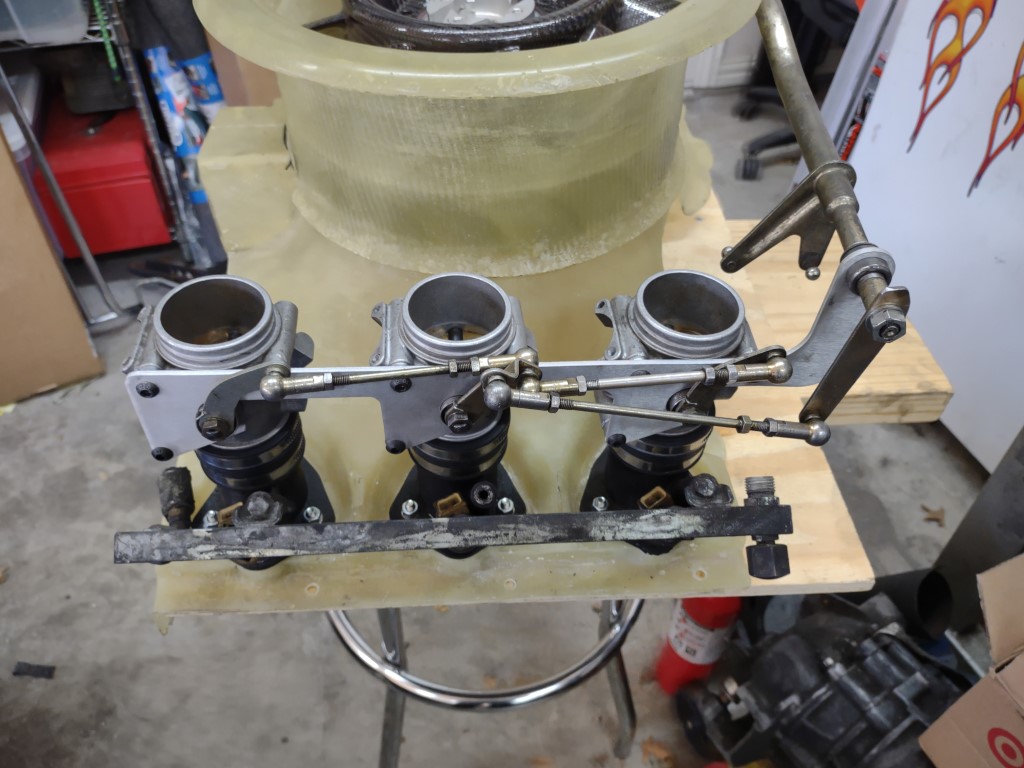
The throttle bodies are from a BMW R1300GS Motorcycle. They started out looking like this: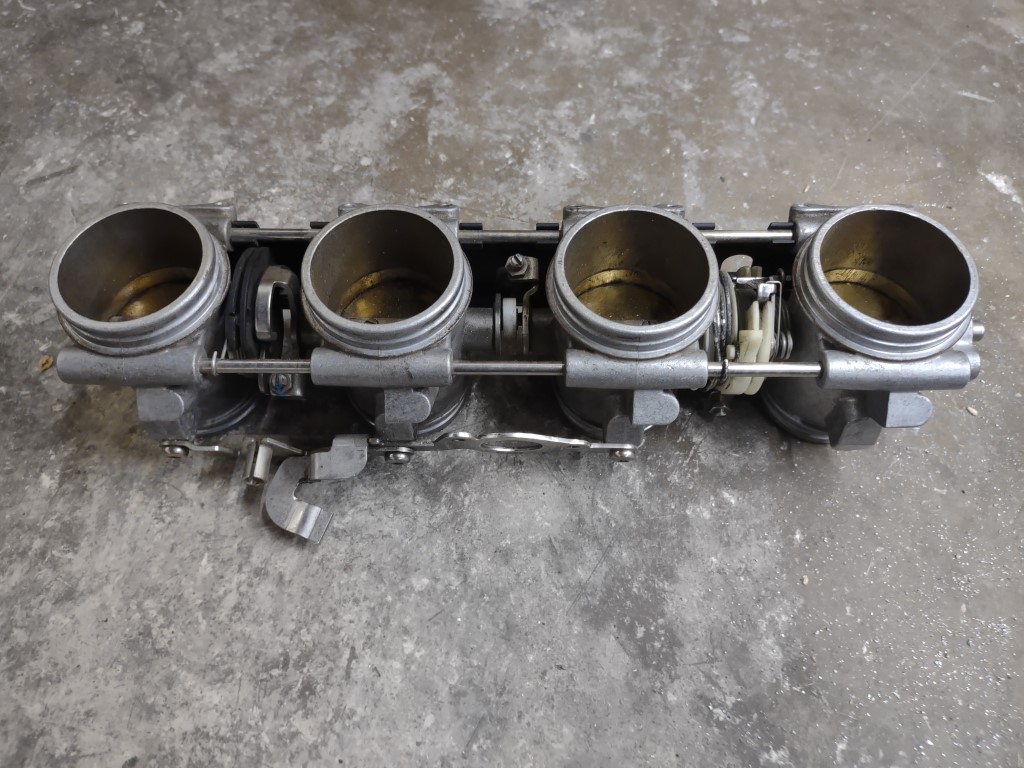
I cut them apart and replaced the throttle shafts with a set from a totally corroded MFI throttle body setup. I had to enlarge the shaft slot for the butterflies, but the holes in the throttle plates, and the shaft were the same size. The injector port on the throttle bodies has been tapped to provide a vacuum port. I will be using the original 964 injector mounts and fuel system.
I designed the mounting plates with Fusion 360 and had Send Cut Send make them. The second set is what you currently see. It was a learning curve, but worth it.
Unlike the MFI setup, the crossbar is at the back of the engine. I will be making a cable mount that will attach to the inside of the throttle body, and hook to the original MFI crossbar. I have to make new linkage rods to connect the crossbar to the center throttle bodies, and then measure the original six to get the proper location for the bracket.
Slow Progress.. but there is some. It won't be done in time for Red Rocks. This is a over the winter project.
Clay
Posted by: sixnotfour Jun 26 2022, 09:29 PM
a shade darker,
Attached image(s)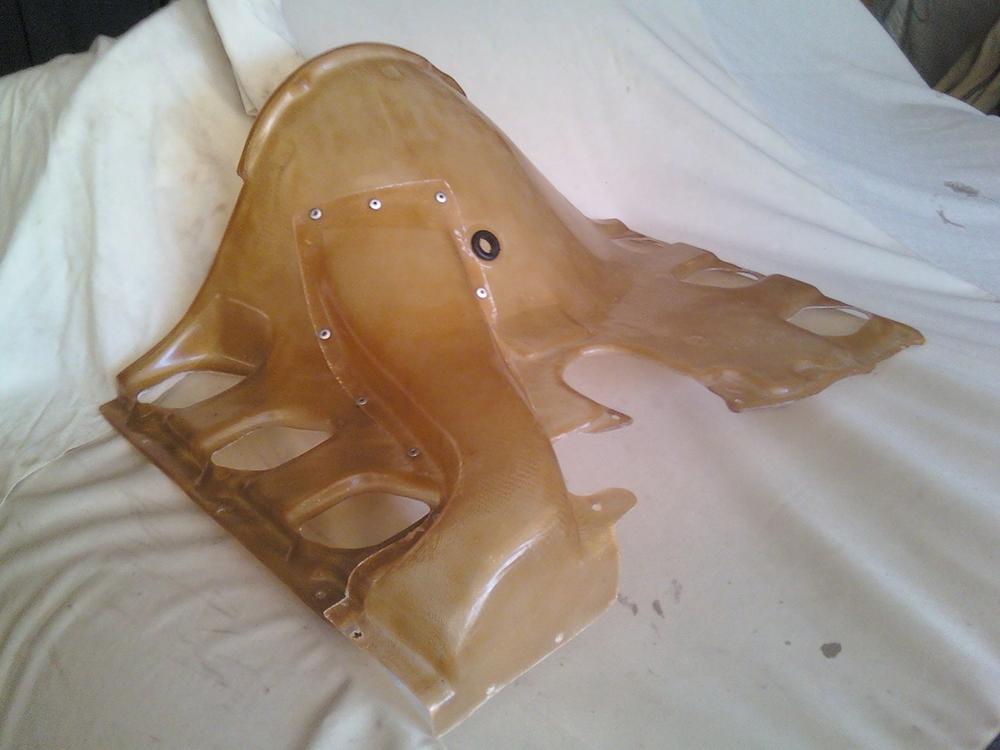
Posted by: tygaboy Jun 27 2022, 08:46 AM
Clay - I'd leave it as is, at least for now. You can always paint it later. If you're unsure, take more time until you know.
Also, depending on the resin system used, that fiberglass may darken up, as in @http://www.914world.com/bbs2/index.php?showuser=2744 's pic.
I recently purchased an air dam for my E9. It arrived in raw finish and "color-wise" looked just like your shroud. It's been sitting in the garage for a few months and it's darkened up quite a bit.
Personally? I love the raw finish. But as has been said ad-nauseum about decisions like this: It's your car, do what makes you happy.
Whatever you decide, that's an epically bad-ass set up!
Posted by: ClayPerrine Jun 27 2022, 09:03 AM
Clay - I'd leave it as is, at least for now. You can always paint it later. If you're unsure, take more time until you know.
Also, depending on the resin system used, that fiberglass may darken up, as in @http://www.914world.com/bbs2/index.php?showuser=2744 's pic.
I recently purchased an air dam for my E9. It arrived in raw finish and "color-wise" looked just like your shroud. It's been sitting in the garage for a few months and it's darkened up quite a bit.
Personally? I love the raw finish. But as has been said ad-nauseum about decisions like this: It's your car, do what makes you happy.
Whatever you decide, that's an epically bad-ass set up!
I talked to the body shop owner we use on Saturday and asked him about it. He says to just clear coat it to prevent grease impregnation. So that's what I am going to do with it.
Clay
Posted by: Justinp71 Jun 27 2022, 09:10 AM
I think Red engine covers look sexy!
Posted by: Mark Henry Jun 27 2022, 01:06 PM
Man... that thing is going to suck!
I've thought about placing a few LED lights inside a raw shroud.
Posted by: Shivers Jun 28 2022, 11:06 AM
This is going to look so cool
Posted by: ClayPerrine Jun 28 2022, 11:11 AM
This is going to look so cool
I am going to add air filters with plexiglass tops so you can see the velocity stacks on top of the throttle bodies.
Posted by: Shivers Jun 28 2022, 01:23 PM
Posted by: ClayPerrine Feb 20 2023, 07:14 PM
Updating this thread...
I fixed the oil leak, and this evening it was 80 degrees F here in Texas, so I moved the engine and trans outside and cleaned them.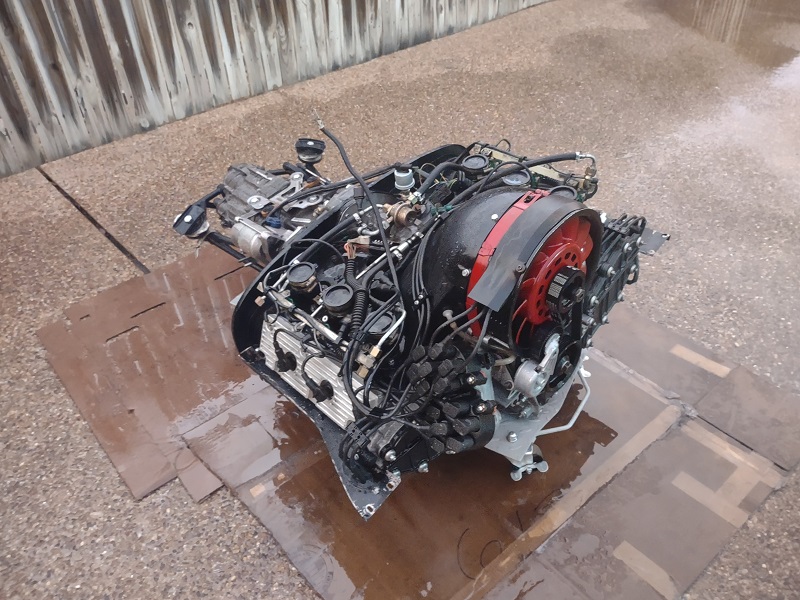
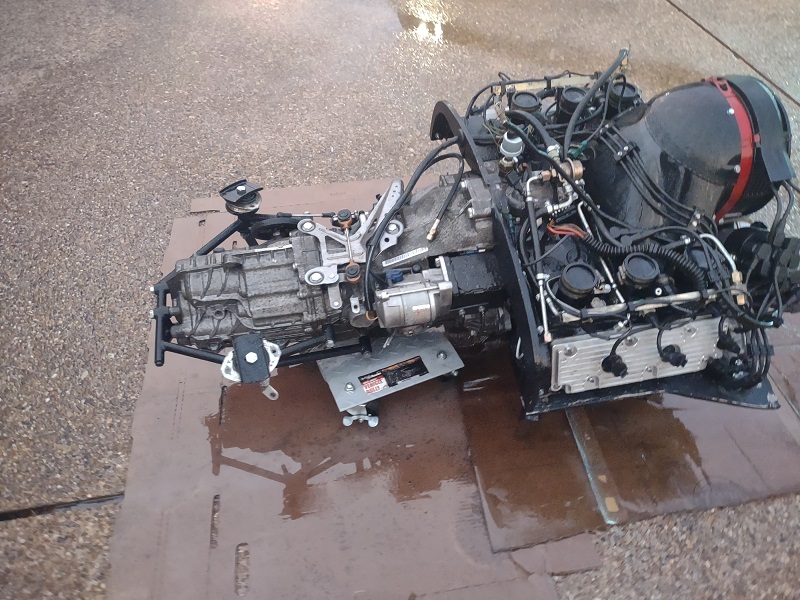
Had to get all the oil and muck off the engine before putting it back in the car.
By 7pm, it was getting dark so I put it back in the garage.
Just another evening for a 914 owner......
Posted by: Puebloswatcop Feb 20 2023, 07:19 PM
Very nice Clay. And you're right the temp here in east Texas was perfect for Porsche work....
Posted by: Maltese Falcon Feb 20 2023, 09:44 PM
Clay, in my experience driving with the flat fan; try to avoid dirt roads.The downdraft from the fan really moves dirt debris under the qtr panels...then gets picked up once again as the dust cloud gets sucked back into the fan 
Dust gets into the serpentine belt, pulleys and the belt actually started slipping and squealing.
Couple hours cleaning up in there !
It's going to be epic eye + ear candy
Marty
Posted by: rick 918-S Feb 20 2023, 11:33 PM
That thing is going to be dead sexy with the downdraft shroud and those throttle bodies. 
Posted by: CCE Feb 21 2023, 01:50 AM
Posted by: ClayPerrine Feb 21 2023, 06:27 AM
I have about 2 weeks to put the motor back in the car for the Texas Hill Country Rally in March. After that, it will be coming back out to do the flat fan.
I wanted the oil leak fixed before the tour.
Posted by: mepstein Feb 21 2023, 06:52 AM
We just built a custom 3560 engine for a customer who does that rally every year.
Attached image(s)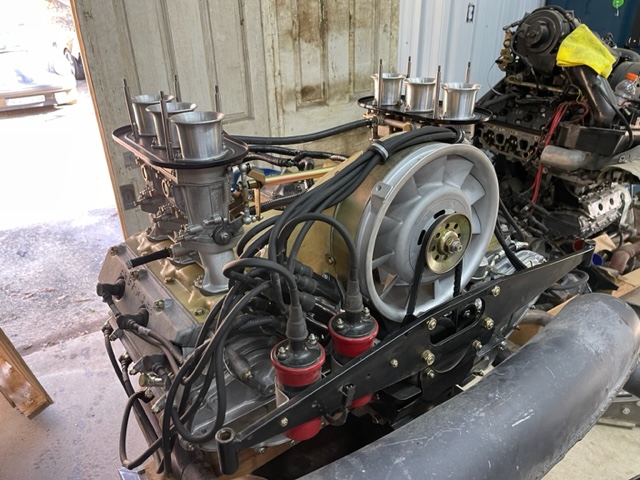
Posted by: Chris914n6 Feb 21 2023, 12:36 PM
You should weigh it while it's out. Inquiring minds are curious...
Posted by: ClayPerrine Feb 21 2023, 12:53 PM
We just built a custom 3560 engine for a customer who does that rally every year.
If I see it in a car, I will let him know that I know you.
Or maybe I shouldn't??
Posted by: ClayPerrine Feb 21 2023, 12:54 PM
You should weigh it while it's out. Inquiring minds are curious...
The only thing I have to weight it with would be a glass bathroom scale, so that's not going to happen. Sorry.
Posted by: rick 918-S Feb 21 2023, 08:20 PM
Voted! Clear Coat it! It looks so vintage. Reminds of those stolen engines Pelican help find.
Posted by: worn Feb 21 2023, 10:26 PM
Updating this thread...
I fixed the oil leak, and this evening it was 80 degrees F here in Texas, so I moved the engine and trans outside and cleaned them.
Had to get all the oil and muck off the engine before putting it back in the car.
By 7pm, it was getting dark so I put it back in the garage.
Just another evening for a 914 owner......
I refuse to be…jealous…I think…maybe…oh what the hell. I am. Nice power plant.
Posted by: Maltese Falcon Feb 22 2023, 01:03 AM
For all that dig the clear...this one on Monte Shelton's RSR in the Riverside Raceway period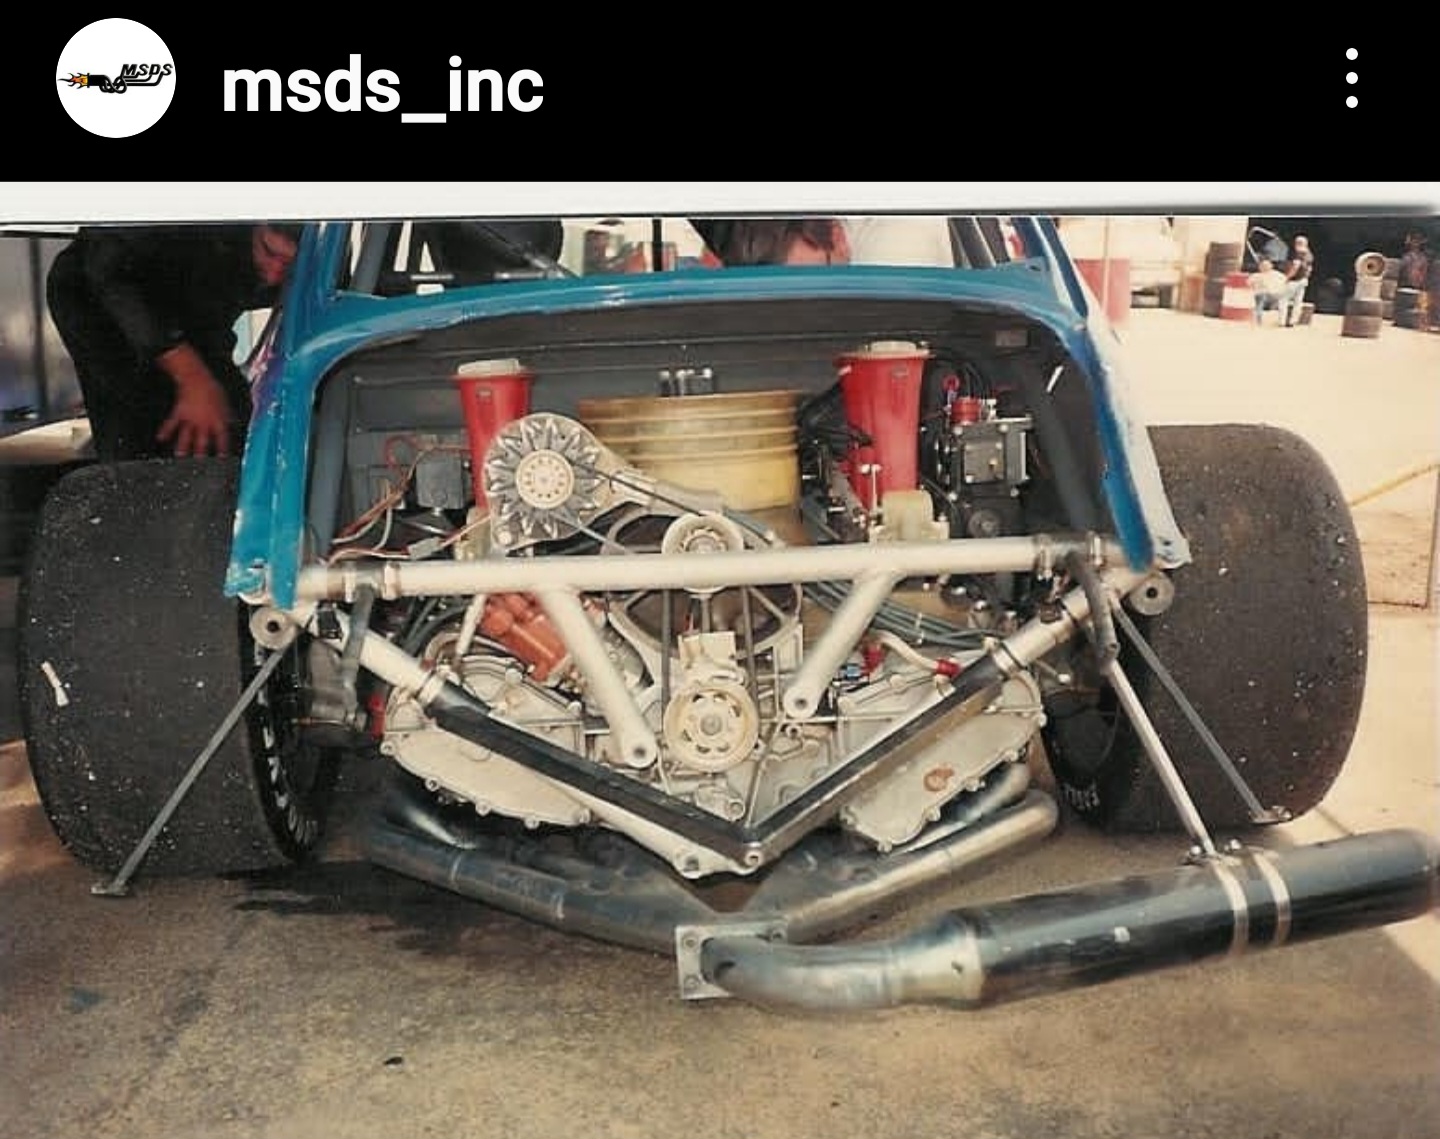
Posted by: ClayPerrine Feb 22 2023, 06:43 AM
Last night I got new 911 sport mounts installed on the chassis, and got the engine in position to reinstall it. It should be back in the car over the next few days.
Hopefully back up and running this weekend!
Posted by: ClayPerrine Mar 27 2023, 06:55 AM
So there was an issue with the motor, and I didn't take the car to the Hill Country Rally.
So I pulled the motor back out to start the Flat Fan/ITB/MS3Pro install. I didn't take pictures of the boring tear down stuff, but the motor is now down to a long block.
Here is the first thing done...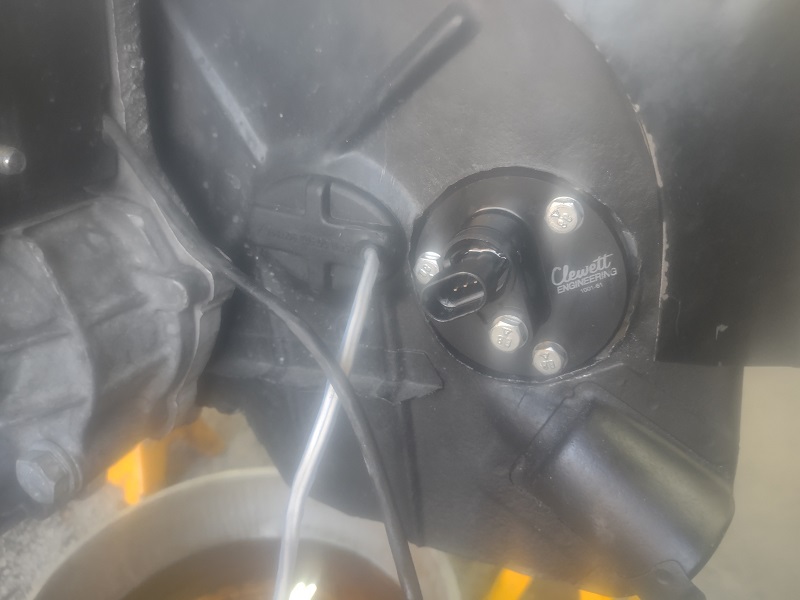
It needs a cam sensor to replace the one in the now deleted distributor.
Posted by: ClayPerrine Apr 1 2023, 05:53 PM
Today we got the big six down to the car wash sans motor, and cleaned out all the crud that accumulated from the oil coming out of the warped cam box.
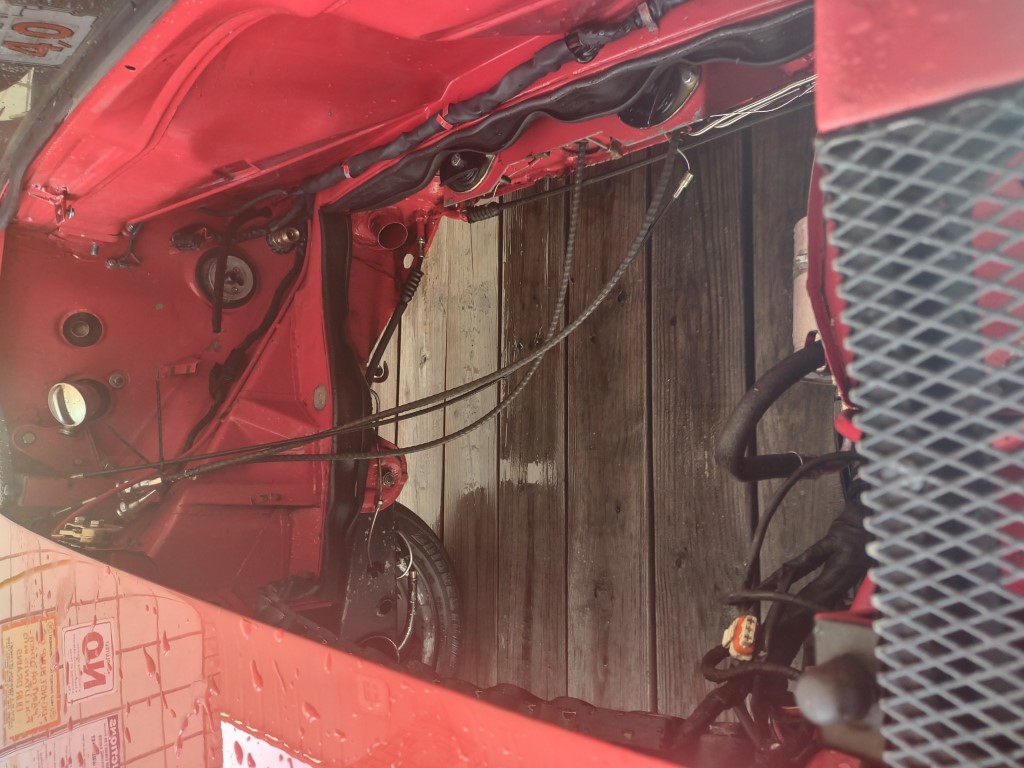
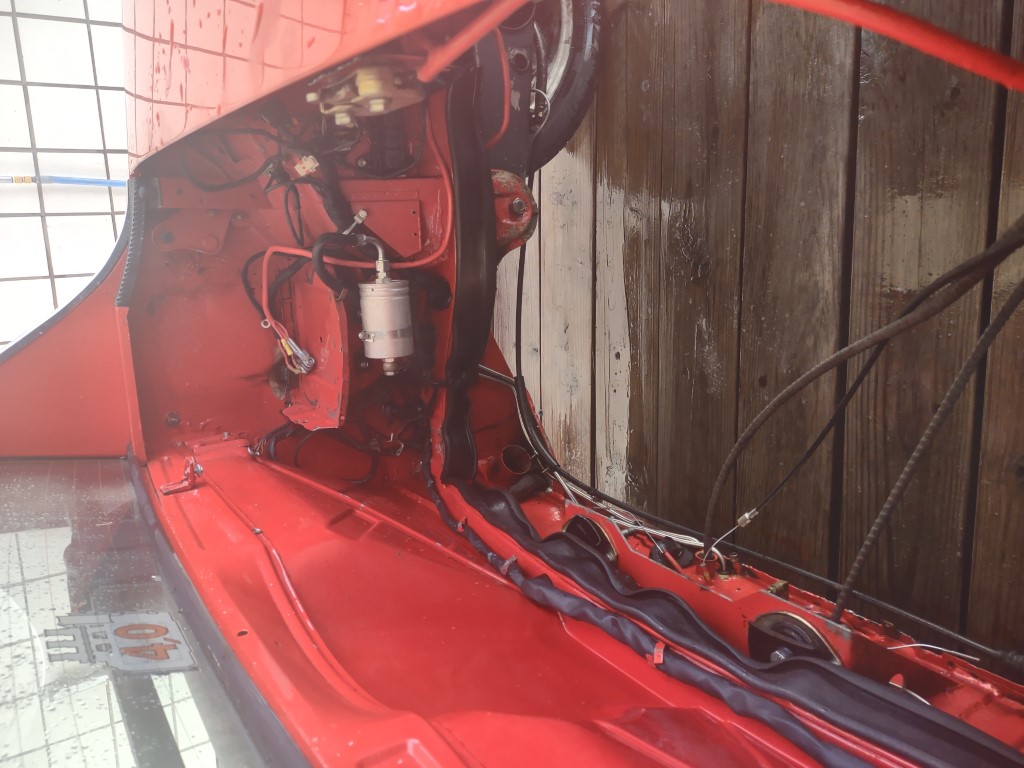
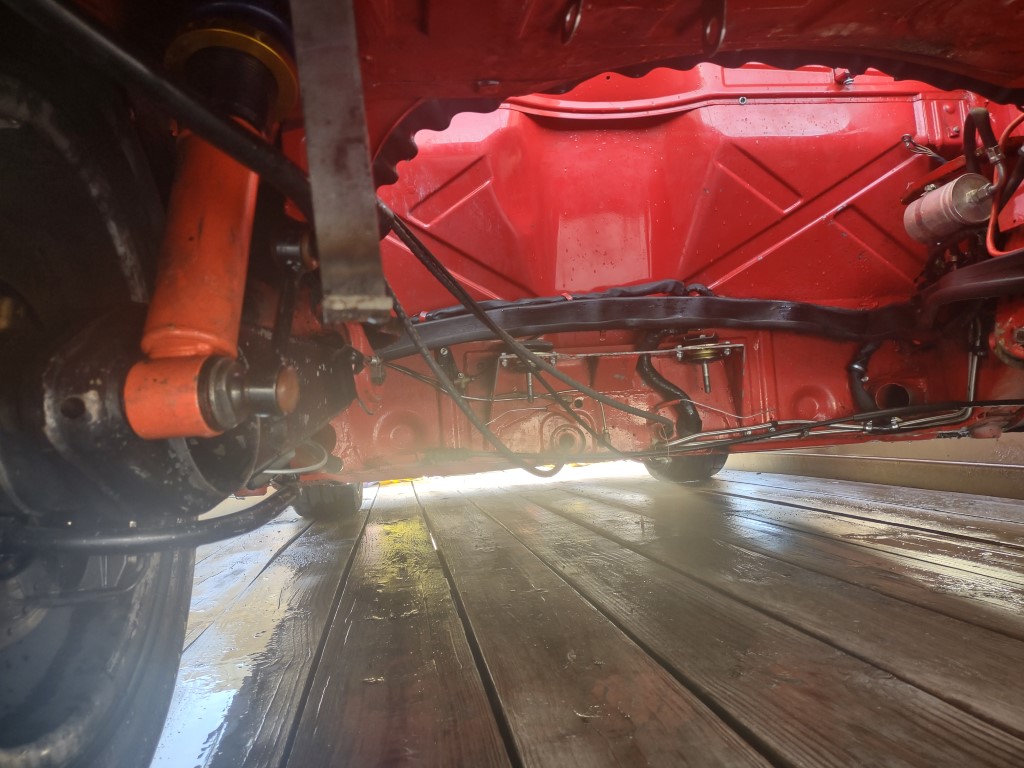
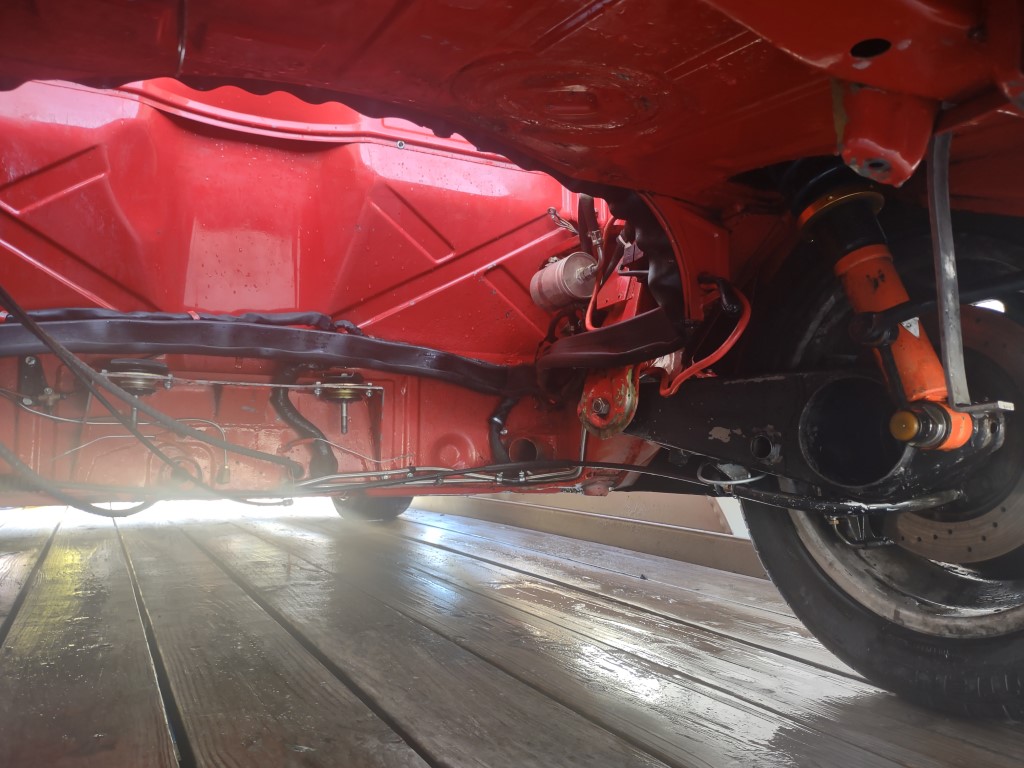
I swear that washing a car is just transferring the dirt off the car and on to the person washing the car. 
Posted by: Maltese Falcon Apr 1 2023, 08:54 PM
Looks like new Clay
Posted by: Literati914 Apr 2 2023, 01:08 PM
.
Posted by: ClayPerrine Apr 2 2023, 03:26 PM
Today's progress...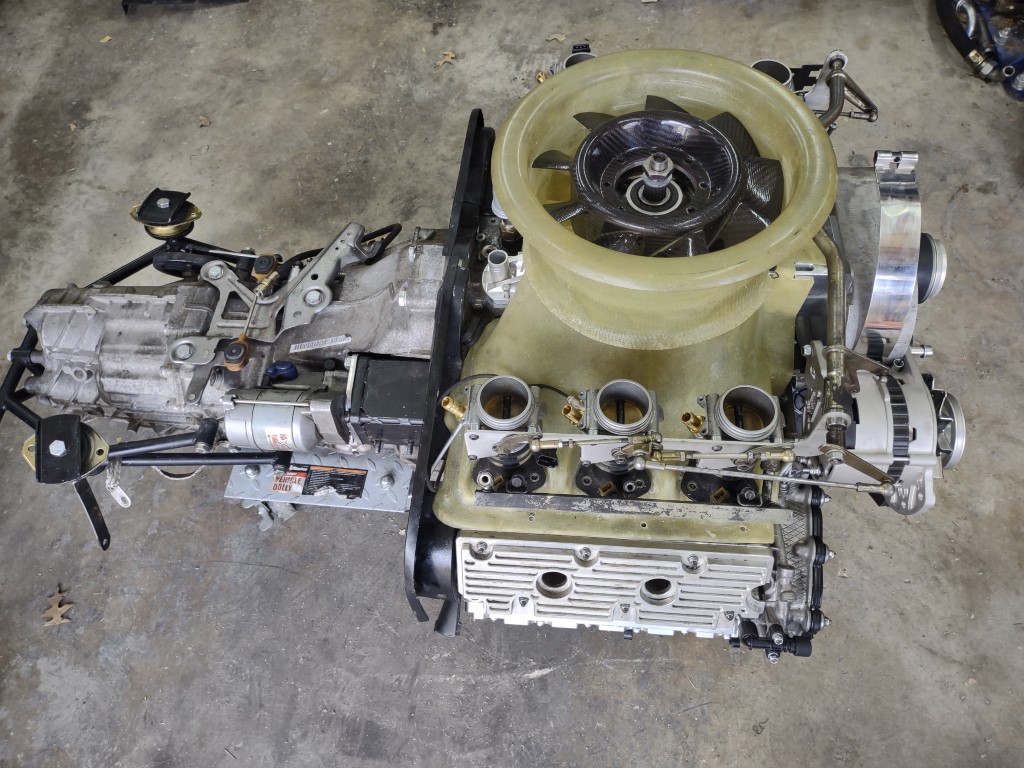
There is a big hole behind the original fan location. So I am going to have to make a block off plate for it.
After the picture, I made the holes in the shroud for the wiring for the two knock sensors. They are the same size as the holes in the original 964 fan shroud, so I can use the original grommet setup.
Posted by: wonkipop Apr 2 2023, 03:55 PM
do you have to do firewall mods for the alternator position?
engine looks horn. you almost want a circular hole cut in the engine lid to cop an eyeful of that fan like the old 917s.
Posted by: mepstein Apr 2 2023, 04:42 PM
do you have to do firewall mods for the alternator position?
engine looks horn. you almost want a circular hole cut in the engine lid to cop an eyeful of that fan like the old 917s.
I had a Paxton supercharger for my 3.2 but gave it up when I realized it would hit the 914 firewall.
Attached image(s)
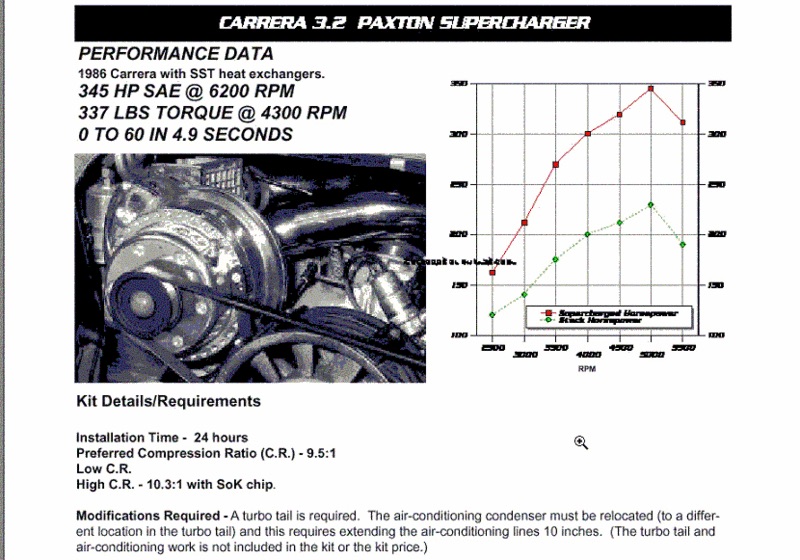
Posted by: technicalninja Apr 2 2023, 06:20 PM
Just read through whole thread 
You have a Unicorn Wife!
The comment "Literally off the road" rolled me out of my chair laughing...
Way cool car!
Where's the compressor going?
I was SO happy when you chose to NOT drive it off the PS drive sprocket. That spot is a BITCH to get to on a 964. It would be easier in a 914 but still damn tight.
That MS3 pro has the ability to drive a PWM compressor!
I'm going to have to get one for my 75 for that reason alone.
Are you going to have enough room for a top mount condenser?
The current fan mounted directly underneath the spot appears to be of adequate size.
Might not even need a shroud...
I've had excellent results using this line of condenser. They have multiple sizes available.
https://www.oldairproducts.com/product/condenser-superkool-14-x-24-x-1-overall-11-1424
All the little holes give you unlimited mounting options and the mounting hardware has proven nicely adaptable. They come with little stainless "straps" that can be bent so the mounting is both rigid but has enough flex to allow for expansion across the core.
These folks are my "go-to" for hose and fittings.
https://coldhose.com/?gclid=EAIaIQobChMI_eLhtLWM_gIVfvLjBx0Q9wr1EAAYASAAEgIZIvD_BwE
The only type I use now is what they call "reduced barrier"
It's smaller and more flexible than standard barrier hose and only slightly more expensive.
I have a Mastercool hydraulic hose crimper that will be available to you if you don't have one. SO MUCH easier than manual crimpers...
https://www.mastercool.com/product/71500/
Looking forward to meeting both you and you wife soon.
Rick
Posted by: worn Apr 2 2023, 09:12 PM
Today's progress...
There is a big hole behind the original fan location. So I am going to have to make a block off plate for it.
After the picture, I made the holes in the shroud for the wiring for the two knock sensors. They are the same size as the holes in the original 964 fan shroud, so I can use the original grommet setup.
Wow. And a clean car too! Yep. Envy.
Posted by: ClayPerrine Apr 3 2023, 05:53 AM
do you have to do firewall mods for the alternator position?
engine looks horn. you almost want a circular hole cut in the engine lid to cop an eyeful of that fan like the old 917s.
I am using coil on plug, so there is no distributor. The alternator will be placed lower, down where the distributor is located, to clear the firewall.
I have a GT engine lid, so the fan will be visible through it. My only worry is getting something sucked into the fan while running it when working on it.
Posted by: ClayPerrine Apr 3 2023, 06:07 AM
Just read through whole thread
You have a Unicorn Wife!
The comment "Literally off the road" rolled me out of my chair laughing...
Way cool car!
Where's the compressor going?
I was SO happy when you chose to NOT drive it off the PS drive sprocket. That spot is a BITCH to get to on a 964. It would be easier in a 914 but still damn tight.
That MS3 pro has the ability to drive a PWM compressor!
I'm going to have to get one for my 75 for that reason alone.
Are you going to have enough room for a top mount condenser?
The current fan mounted directly underneath the spot appears to be of adequate size.
Might not even need a shroud...
I've had excellent results using this line of condenser. They have multiple sizes available.
https://www.oldairproducts.com/product/condenser-superkool-14-x-24-x-1-overall-11-1424
All the little holes give you unlimited mounting options and the mounting hardware has proven nicely adaptable. They come with little stainless "straps" that can be bent so the mounting is both rigid but has enough flex to allow for expansion across the core.
These folks are my "go-to" for hose and fittings.
https://coldhose.com/?gclid=EAIaIQobChMI_eLhtLWM_gIVfvLjBx0Q9wr1EAAYASAAEgIZIvD_BwE
The only type I use now is what they call "reduced barrier"
It's smaller and more flexible than standard barrier hose and only slightly more expensive.
I have a Mastercool hydraulic hose crimper that will be available to you if you don't have one. SO MUCH easier than manual crimpers...
https://www.mastercool.com/product/71500/
Looking forward to meeting both you and you wife soon.
Rick
Rick,
The compressor is going in the front trunk. It is an electric compressor, so all the plumbing will be contained up front. I am going with a 250 amp alternator to make sure I have enough juice to run it. A big battery cable will run to the compressor controller, and it will be tied into the ECU to insure the engine idles up under the additional alternator load.
I have a parallel flow condenser for the front trunk, and I am thinking of adding a smaller one on the outlet side to provide some initial temperature drop of the refrigerant. I know the location is not ideal, but my engine compartment is really crowded. If my math is correct, the ratio of condenser to evaporator should be correct. And I am going to put a really big fan (or multiple fans) on the condenser, and make sure there is a low pressure area behind the condenser outlet.
And I have something for you...
Posted by: ClayPerrine Apr 3 2023, 06:11 AM
Wow. And a clean car too! Yep. Envy.
It still needs LOTS of additional cleaning before I put the motor back in. I am also going to pull the trailing arms and fix the park brake setup. The park brake was installed a long time ago, and at the time I didn't realize I needed a stop block for the shoes. So I am pulling the trailing arms and fixing that too. I also have a potential new way of actuating the park brake, so I will be documenting that too.
Posted by: technicalninja Apr 3 2023, 09:19 AM
Ohh, happy day!
You have the unicorn part I need!
Ratio of condenser to evaporator is engineering gobbly-gook as far ss I'm concerned.
There appears to be zero downside to having too much condenser...
It just makes everything work easier-better.
Your suggestion of "just running two condensers" was a slap in the face for me.
I thought "Duh, you moron, so easy and someone else had to tell me something I already knew."
Dual, in series, condensers KICK ASS!
Above the engine, with the airflow that the engine fan requires, is an excellent idea IMO.
You have a billy bad-assed fan in the correct location as it sits...
Too bad you're not going to have AC stuff back there. It would vastly simplify everything to keep it all up front and not clutter up the masterpiece you're installing so I understand "why".
I'm VERY interested in the ac system you have designed. If you can do it with a standard charging system (250 amps 12V is still "standard" in my book) and not require a 600-volt battery make it all the easier. Your alternator will require it's own cooling system I believe.
I've always thought running a Prius AC system (with the big battery and all) would be a good option for a "pro-mod" car. The late model Cadillac Escalade Hybrid uses one of those, completely divorced from the engine, mounted on the right fenderwell.
It takes longer to cool the big beast down but those will kick 35 degrees out of the vents and a normal one is lucky to hit 42. The one that I have messed with was black and it was a 100+ degree day. Worked far better than I expected.
Shoot me a link/info on your electronic compressor.
"Enquiring minds want to know!"
Most electronic compressors REQUIRE special di-electric oil and Toyota suggests replacement of everything the refrigerant touches for an oil contamination issue.
The whole enchilada, 6k plus...
One last thought- a finned discharge line with proper airflow can add additional cooling as can a secondary cooler (modern 1234 systems have this).
Now, I'm even more interested in meeting you.
Thanks
Rick
Posted by: hencar Nov 14 2023, 06:26 PM
Great work Clay. Thanks for sharing.
Henry
Posted by: mepstein Nov 14 2023, 07:02 PM
Today's progress...
There is a big hole behind the original fan location. So I am going to have to make a block off plate for it.
After the picture, I made the holes in the shroud for the wiring for the two knock sensors. They are the same size as the holes in the original 964 fan shroud, so I can use the original grommet setup.
Does the alternator clear the firewall?
Posted by: rick 918-S Nov 14 2023, 07:58 PM
Love that fan shroud
Posted by: Spoke Nov 14 2023, 10:19 PM
While we have this downtime, I am finally getting something done on my car. The oil system is pulled apart to add a thermostat, but I am stuck because I am waiting on, of all things, a drill bit. I need a 20.5mm bit to fix some fittings with messed up threads. Yes, I realize that is a 13/16 bit, but everything is closed on Easter Sunday.
So yesterday I started to tear into another issue. My LED front lights act weird. If you turn on the turn signal or flashers, the white LEDs flash. If you turn on the park lights, the yellow LEDs come on. If you turn on the park lights when the white LEDs are flashing, the yellow lights come on, and the white lights stop working. Considering how custom my wiring harness is, I figured it was something in the wiring causing it.
I tore the knee pad off, dropped the fuse box, pulled the gauge cluster, and pulled both the light switch and the hazard switch out so I could get to the wires.
No matter what I did, I could not find a reason for the problem. I finally broke down and pulled the LED board out of the right signal pod. I made a test rig to hook it to an old Radio Shack 110V AC to 12V DC converter.
I get the exact same results when on the test rig. White lights on, hook Yellow lights to the 12v power and the white lights go out. Remove the power to the Yellow lights, and the white lights come back on. But there is a delay before the white lights come back on, about 2 to 3 seconds, kinda like a capacitor charging.
The other thing I noticed is the jumper pads on the back of the board. There are three pads, labeled "US", "Euro" and "Blanking".
Mine has the "Blanking" one soldered.
I looked at Betty's 914, and the Six, both of which have the same LED boards. Bot of those have the jumper on "US" because they are US spec lights. Mine are Euro spec lenses, so I would assume they need to be on the "Euro" setting.
Can anyone with Euro Spokeworks LED boards check and see if the pad should be on "Euro"?
Thanks!
@http://www.914world.com/bbs2/index.php?showuser=1143
I like to stay on top of things and make sure all my LEDs work for folks. So this one is only 3 years old...
I'm hoping it's all worked out for you.
For your front turnsignals, I was offering 'Euro' which would act like the original Euro lights where the white lights stayed on with turnsignals. The 'Blanking' you have was an upgrade like modern cars where the white running lights turn off with turnsignals on that side for better contrast.
I don't do the 'Euro' front turnsignals any longer. All boards have white LEDs blank out with turnsignals.
Posted by: Spoke Nov 14 2023, 10:26 PM
@http://www.914world.com/bbs2/index.php?showuser=1143
@http://www.914world.com/bbs2/index.php?showuser=10825
Would this flat alternator belt work on a 911? I have the high output alternator with standard V-belt and was wondering if the flat belt with tensioner would be better.
Attached image(s)
Posted by: ClayPerrine Nov 15 2023, 06:23 AM
@http://www.914world.com/bbs2/index.php?showuser=1143
@http://www.914world.com/bbs2/index.php?showuser=10825
Would this flat alternator belt work on a 911? I have the high output alternator with standard V-belt and was wondering if the flat belt with tensioner would be better.
Jerry,
Yes, the serpentine belt conversion will work with the high output alternator. Clewett engineering even makes an underdrive belt kit to increase the fan/alternator speed.
Here's the link to their page: https://www.clewett.com/index.php?main_page=index&cPath=60
Clewett's kits were designed for the 911, and the tensioner had to be slightly modified for use with a 914. I know there was a recent thread on it, but I don't have it handy. The tensioner attaches to the 911 motor mount on a part that is not present in the 914 motor mount. Clewett redesigned the tensioner, and I have not seen the new design, so that may not be true any more.
I hope that helps.
Posted by: ClayPerrine Nov 15 2023, 06:24 AM
While we have this downtime, I am finally getting something done on my car. The oil system is pulled apart to add a thermostat, but I am stuck because I am waiting on, of all things, a drill bit. I need a 20.5mm bit to fix some fittings with messed up threads. Yes, I realize that is a 13/16 bit, but everything is closed on Easter Sunday.
So yesterday I started to tear into another issue. My LED front lights act weird. If you turn on the turn signal or flashers, the white LEDs flash. If you turn on the park lights, the yellow LEDs come on. If you turn on the park lights when the white LEDs are flashing, the yellow lights come on, and the white lights stop working. Considering how custom my wiring harness is, I figured it was something in the wiring causing it.
I tore the knee pad off, dropped the fuse box, pulled the gauge cluster, and pulled both the light switch and the hazard switch out so I could get to the wires.
No matter what I did, I could not find a reason for the problem. I finally broke down and pulled the LED board out of the right signal pod. I made a test rig to hook it to an old Radio Shack 110V AC to 12V DC converter.
I get the exact same results when on the test rig. White lights on, hook Yellow lights to the 12v power and the white lights go out. Remove the power to the Yellow lights, and the white lights come back on. But there is a delay before the white lights come back on, about 2 to 3 seconds, kinda like a capacitor charging.
The other thing I noticed is the jumper pads on the back of the board. There are three pads, labeled "US", "Euro" and "Blanking".
Mine has the "Blanking" one soldered.
I looked at Betty's 914, and the Six, both of which have the same LED boards. Bot of those have the jumper on "US" because they are US spec lights. Mine are Euro spec lenses, so I would assume they need to be on the "Euro" setting.
Can anyone with Euro Spokeworks LED boards check and see if the pad should be on "Euro"?
Thanks!
@http://www.914world.com/bbs2/index.php?showuser=1143
I like to stay on top of things and make sure all my LEDs work for folks. So this one is only 3 years old...
I'm hoping it's all worked out for you.
For your front turnsignals, I was offering 'Euro' which would act like the original Euro lights where the white lights stayed on with turnsignals. The 'Blanking' you have was an upgrade like modern cars where the white running lights turn off with turnsignals on that side for better contrast.
I don't do the 'Euro' front turnsignals any longer. All boards have white LEDs blank out with turnsignals.
Yes, it did. I had the boards wired backwards, with the yellow lights on as the running lights and the white lights as the turn signals. Once I switched them, they worked fine.
Thanks for checking up on me.
Clay
Posted by: Maltese Falcon Nov 15 2023, 06:36 AM
do you have to do firewall mods for the alternator position?
engine looks horn. you almost want a circular hole cut in the engine lid to cop an eyeful of that fan like the old 917s.
I am using coil on plug, so there is no distributor. The alternator will be placed lower, down where the distributor is located, to clear the firewall.
I have a GT engine lid, so the fan will be visible through it. My only worry is getting something sucked into the fan while running it when working on it.
Clay; you should be good to go with the gt engine lid keeping 99% of debris from sucking into the fan while under way. Working in the engine bay while it's running; don't wear loose fitting long sleeve shirt, keep anyone with long hair away from looking over the fan, and no loose shop rags left near the fan. Dirt and gravel roads tend to throw debris up from below and suck back into the fan downdraft. When parked (not running) you might want to make a simple plexi disc to cover the top of fan housing...I've seen several displayed on 917's at Rennsport 7.
Posted by: Maltese Falcon Nov 15 2023, 08:10 AM
Clay, we might have spoke about this; but make sure that this alum breather tube is tightly in place.
On the factory flat fan units these have been known to work loose (pressed fit) and you risk major oil loss during competition ! I've run a thick bead of JB weld around the base of the alum tube for extra safety & keep on my check list.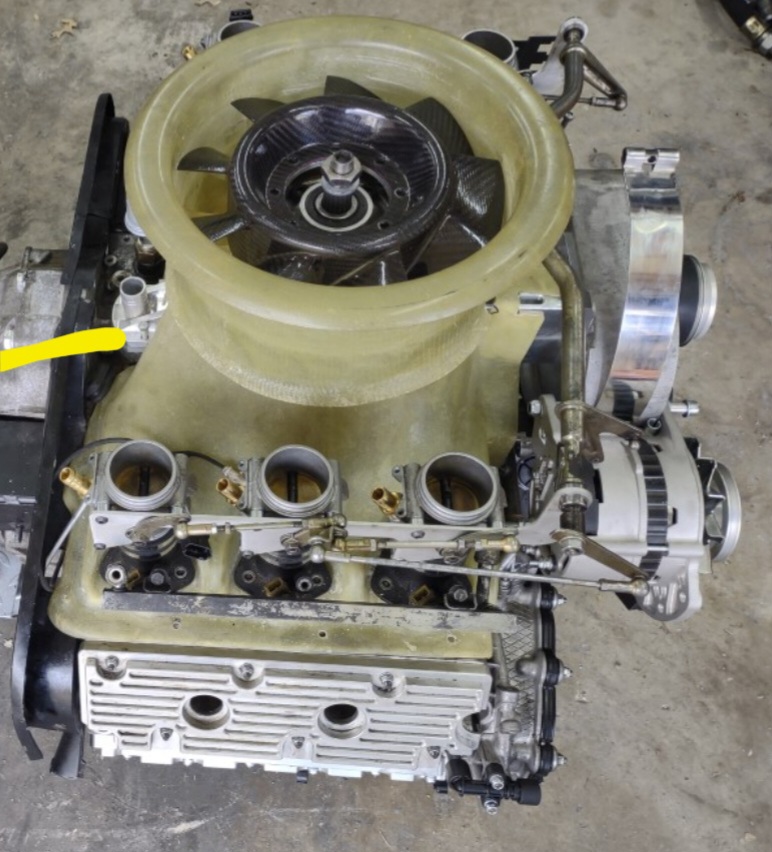
Posted by: Spoke Nov 15 2023, 08:57 PM
@http://www.914world.com/bbs2/index.php?showuser=1143
@http://www.914world.com/bbs2/index.php?showuser=10825
Would this flat alternator belt work on a 911? I have the high output alternator with standard V-belt and was wondering if the flat belt with tensioner would be better.
Jerry,
Yes, the serpentine belt conversion will work with the high output alternator. Clewett engineering even makes an underdrive belt kit to increase the fan/alternator speed.
Here's the link to their page: https://www.clewett.com/index.php?main_page=index&cPath=60
Clewett's kits were designed for the 911, and the tensioner had to be slightly modified for use with a 914. I know there was a recent thread on it, but I don't have it handy. The tensioner attaches to the 911 motor mount on a part that is not present in the 914 motor mount. Clewett redesigned the tensioner, and I have not seen the new design, so that may not be true any more.
I hope that helps.
@http://www.914world.com/bbs2/index.php?showuser=1143
Thanks Clay. I reached out to Clewett to see which kit would work with my '86 930 turbo. I don't like the tensioned V-belt with the high output alternator. Plus the high output alternator has to spin at a higher minimum speed than the OEM alternator else it won't generate enough voltage to keep the system voltage above 13V.
Posted by: ClayPerrine Nov 16 2023, 06:41 AM
@http://www.914world.com/bbs2/index.php?showuser=1143
@http://www.914world.com/bbs2/index.php?showuser=10825
Would this flat alternator belt work on a 911? I have the high output alternator with standard V-belt and was wondering if the flat belt with tensioner would be better.
Jerry,
Yes, the serpentine belt conversion will work with the high output alternator. Clewett engineering even makes an underdrive belt kit to increase the fan/alternator speed.
Here's the link to their page: https://www.clewett.com/index.php?main_page=index&cPath=60
Clewett's kits were designed for the 911, and the tensioner had to be slightly modified for use with a 914. I know there was a recent thread on it, but I don't have it handy. The tensioner attaches to the 911 motor mount on a part that is not present in the 914 motor mount. Clewett redesigned the tensioner, and I have not seen the new design, so that may not be true any more.
I hope that helps.
@http://www.914world.com/bbs2/index.php?showuser=1143
Thanks Clay. I reached out to Clewett to see which kit would work with my '86 930 turbo. I don't like the tensioned V-belt with the high output alternator. Plus the high output alternator has to spin at a higher minimum speed than the OEM alternator else it won't generate enough voltage to keep the system voltage above 13V.
@http://www.914world.com/bbs2/index.php?showuser=3031 I thought this was for a 914-6 conversion. If it is on a 930, then it should work great. If you need extra speed, get the underdrive kit. I would always suggest it here in Texas for the additional cooling, but it also helps increase the low speed charging.
Posted by: ClayPerrine Mar 11 2024, 06:21 PM
So I am finally getting back to working on the new EFI system for my 914-6 conversion.
I am finishing up the new relay box for the MS3Pro.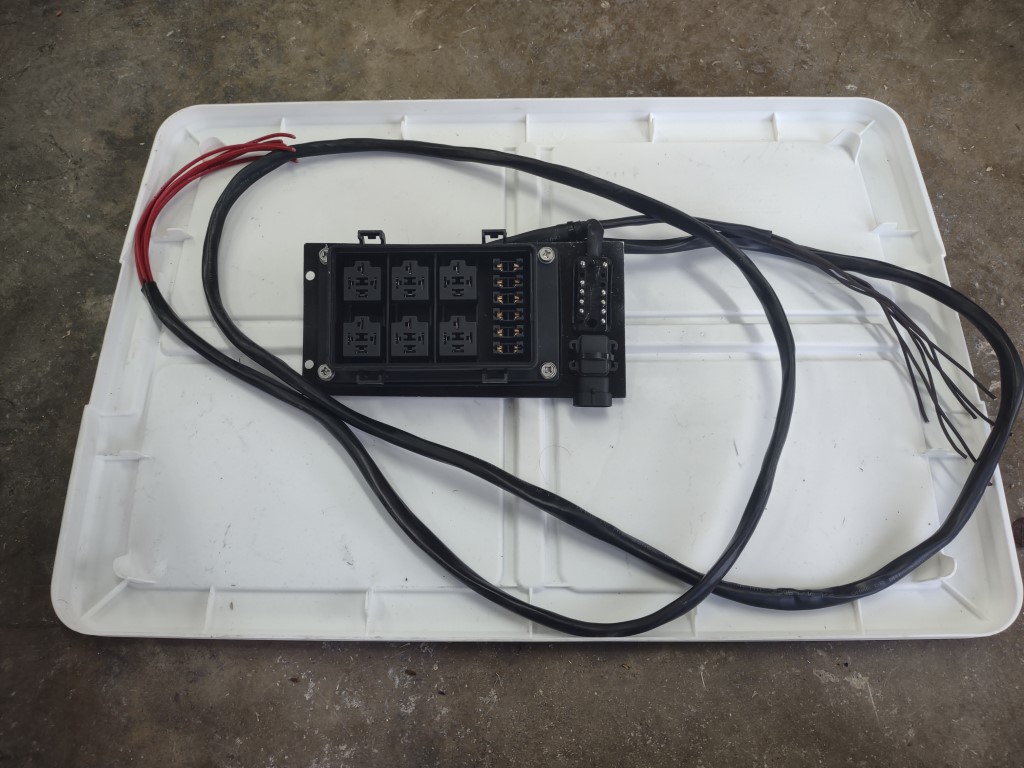
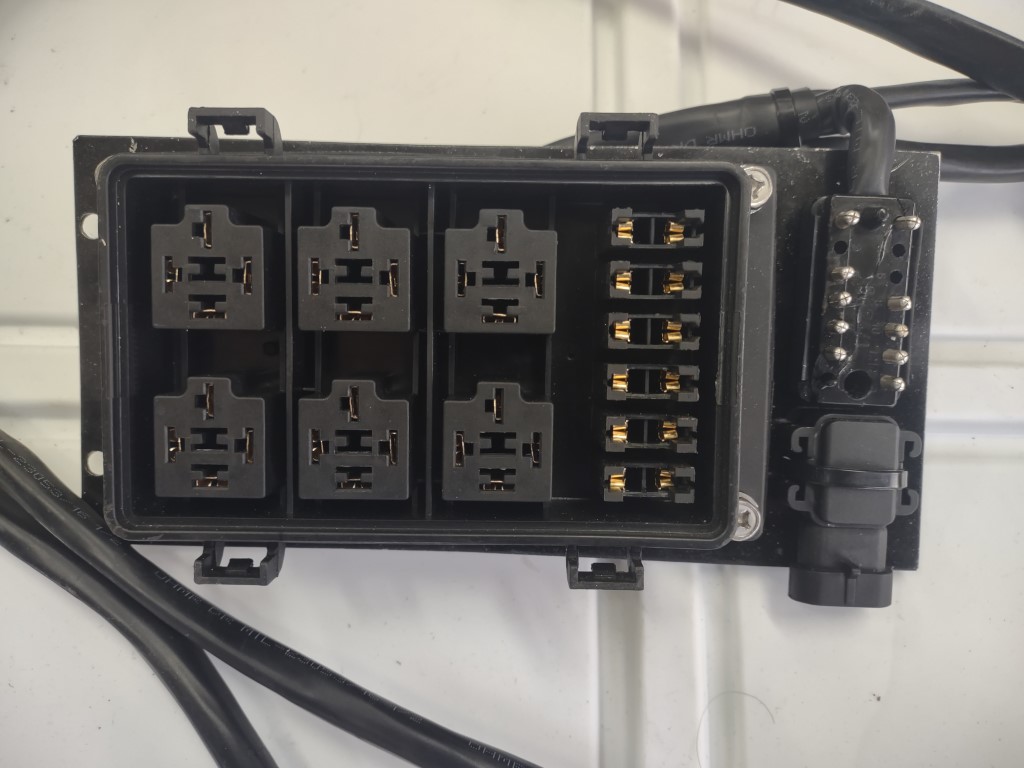
This goes in the same location as the factory relay board. It has fuses and 6 relays for the EFI, the baro sensor, and a 14 pin connector to hook it to the rest of the harness.
I stopped because I have to go get loop connectors for the ground leads and for the power connections. I also need to get a new 14 pin connector. That one is broken and glued back together.
Posted by: mate914 Mar 11 2024, 06:54 PM
Clay,
Engine looks so 917teenish.
I think your engine is F*&KI$$ awesome!
Matt 
Posted by: mepstein Mar 11 2024, 07:04 PM
Still wondering if the alternator bumps against the firewall.
Posted by: ClayPerrine Mar 12 2024, 06:25 AM
Still wondering if the alternator bumps against the firewall.
So am I. My plan is to use a modern GM 300 amp Hairpin style computer controller alternator and put it low on the right where the distributor was, but I am not sure if it will clear the firewall or not.
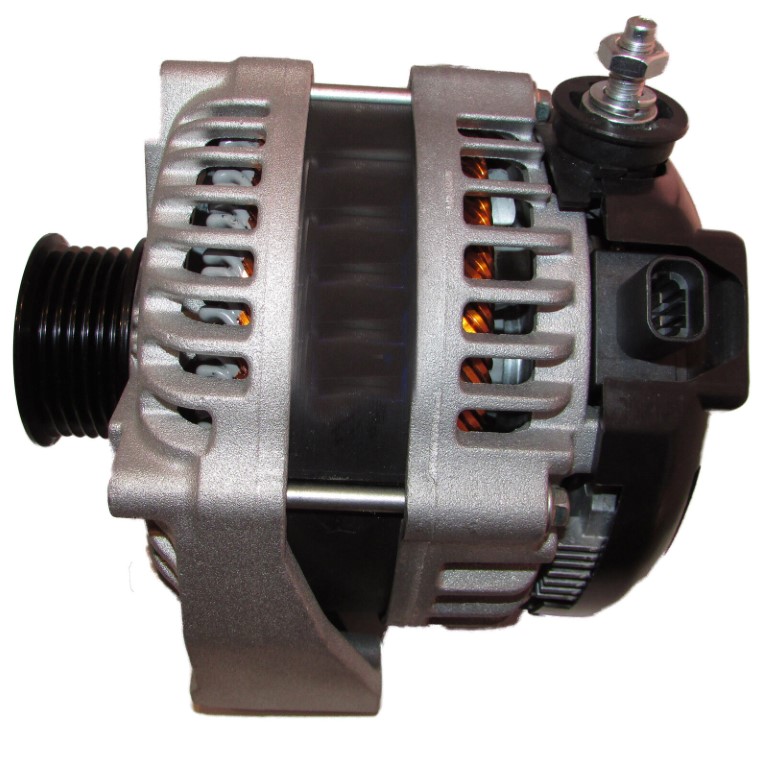
I am going to run it from the same serpentine belt as the fan, so if the belt breaks, I get a generator light that tells me before the engine overheats.
The alternator will be controlled by the MS3Pro ECU to only put out the amperage needed. But I have to have the amperage to run the Electric AC compressor, so I have to go with something stout.
Posted by: mepstein Mar 12 2024, 08:28 AM
I had bought a supercharger that went into the same space as your alternator but there was no way to fit it in the 914. There is a bump out for the fan but then the metal moves back to the engine.
Posted by: ClayPerrine Mar 12 2024, 09:10 AM
I had bought a supercharger that went into the same space as your alternator but there was no way to fit it in the 914. There is a bump out for the fan but then the metal moves back to the engine.
I hope you are wrong, but if not, then I will add a dimple for the alternator pulley.
Posted by: Shivers Mar 12 2024, 10:40 AM
This is Steve McQueen cool, Clay
Powered by Invision Power Board (http://www.invisionboard.com)
© Invision Power Services (http://www.invisionpower.com)