Printable Version of Topic
Click here to view this topic in its original format
914World.com _ 914World Garage _ Clutch Tube Repair
Posted by: ThinAir914 Mar 30 2005, 10:22 PM
This is the center tunnel from the donor car, turned upside down.
Attached thumbnail(s)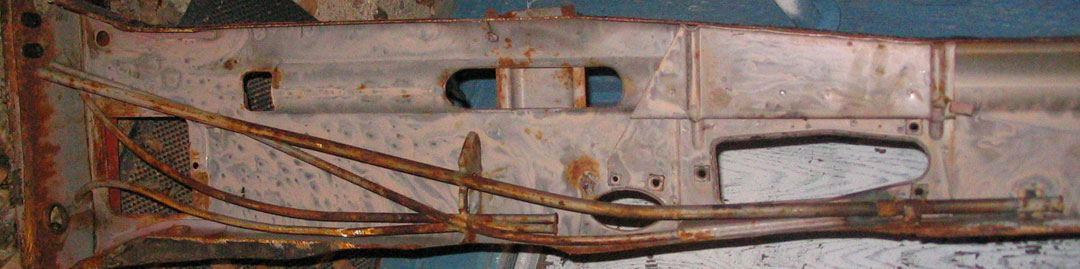
Posted by: ThinAir914 Mar 30 2005, 10:24 PM
This is what the center weld point looks like. The bracket shown is from the early tunnel. The later tunnels have a more oval hole in the bracket. Our bracket had the whole right side gone.
Attached image(s)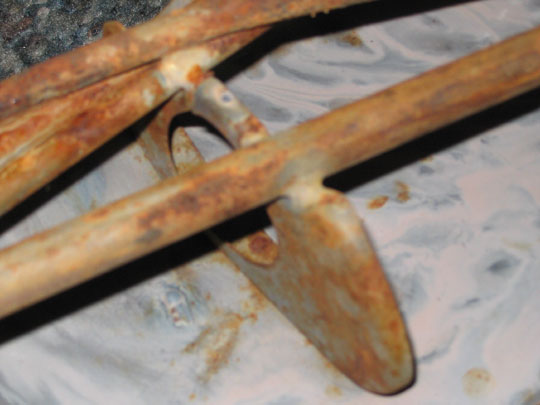
Posted by: ThinAir914 Mar 30 2005, 10:25 PM
This is the firewall from the donor to show what it's supposed to look like.
Attached image(s)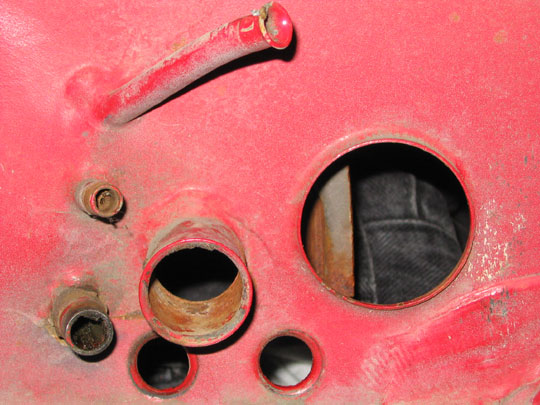
Posted by: ThinAir914 Mar 30 2005, 10:28 PM
This is what our firewall looked like. We were surprised to find out that all the metal was still there. We just had to bend it back into shape from the inside of the tunnel. Our original plan was to replace a piece of the firewall from the donor along with using the the tube from the donor as well. It turned out to be easier to put the original tube back into the tunnel and fix the firewall.
Attached image(s)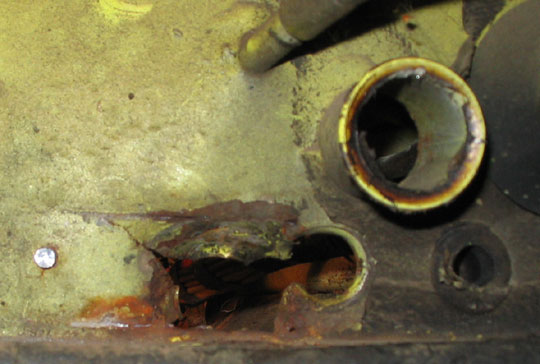
Posted by: ThinAir914 Mar 30 2005, 10:30 PM
The front end of our clutch tube.
Attached image(s)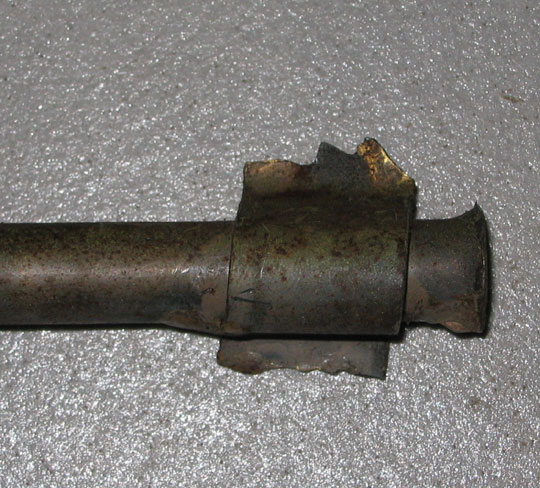
Posted by: ThinAir914 Mar 30 2005, 10:30 PM
The front tube bracket reinforced.
Attached image(s)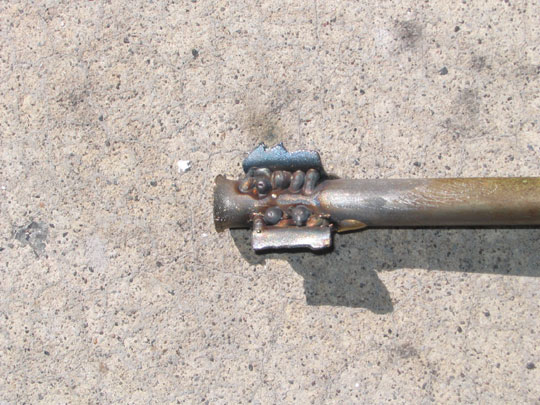
Posted by: ThinAir914 Mar 30 2005, 10:31 PM
Front tube bracket #2. The brazing that you see came back to haunt us later.
Attached image(s)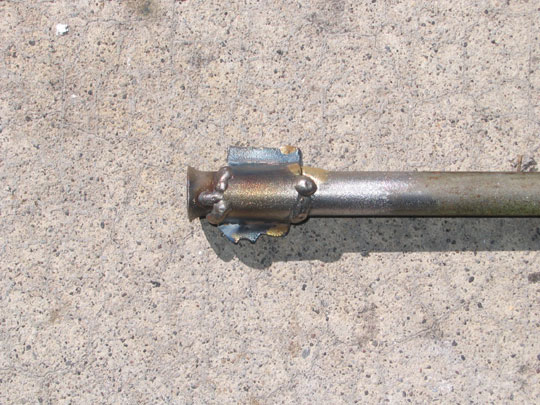
Posted by: ThinAir914 Mar 30 2005, 10:32 PM
This is the flap we cut in the front of the tunnel. Tape shows the measurement from the shifter hole
Attached image(s)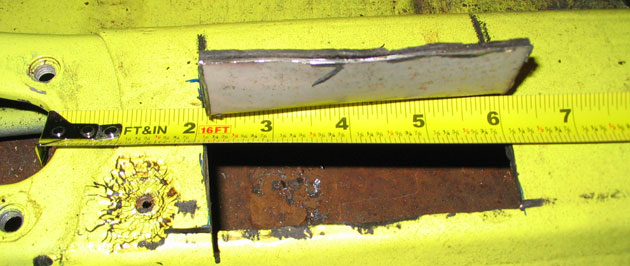
Posted by: ThinAir914 Mar 30 2005, 10:33 PM
This is the rear flap, measured from the cross brace.
Attached image(s)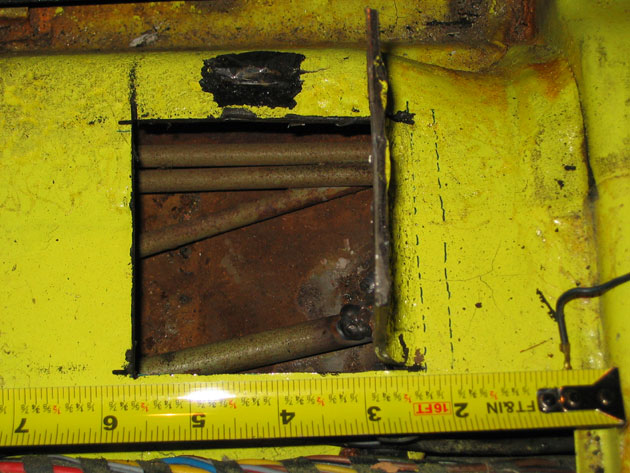
Posted by: ThinAir914 Mar 30 2005, 10:35 PM
The front bracket as originally repaired. We just welded the bracket where it had originally broken.
Attached image(s)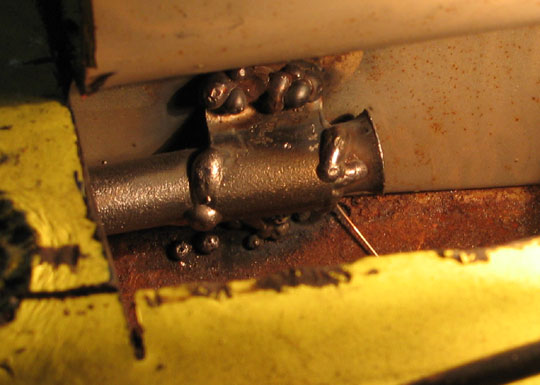
Posted by: ThinAir914 Mar 30 2005, 10:36 PM
We cut a piece from the donor's old tunnel to make a "bracket" for the center weld point. It was easier to weld it to the floor of the tunnel than to try to rebuild the factory bracket.
Attached image(s)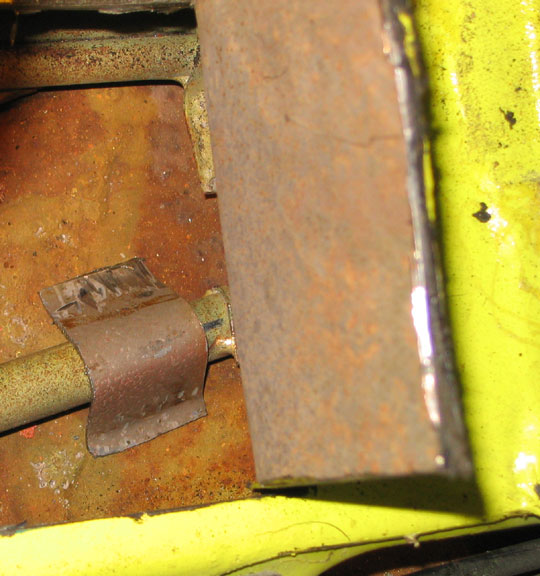
Posted by: ThinAir914 Mar 30 2005, 10:37 PM
The center weld after it was finished. You can see how little of the original bracket was left.
Attached image(s)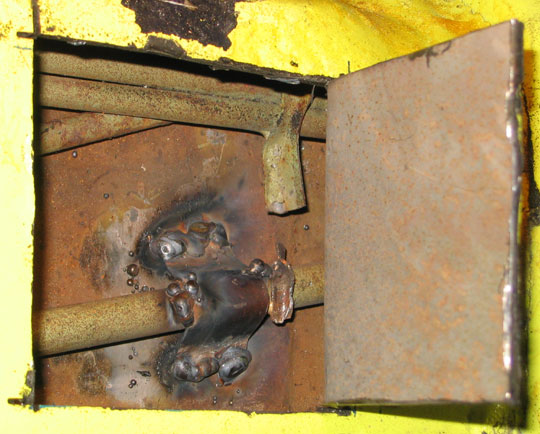
Posted by: ThinAir914 Mar 30 2005, 10:39 PM
The firewall was repaired by bending the metal back into as flat a shape as we could get, then using an appropriate washer that was cut into a "D" to fit and welding it in place.
Attached image(s)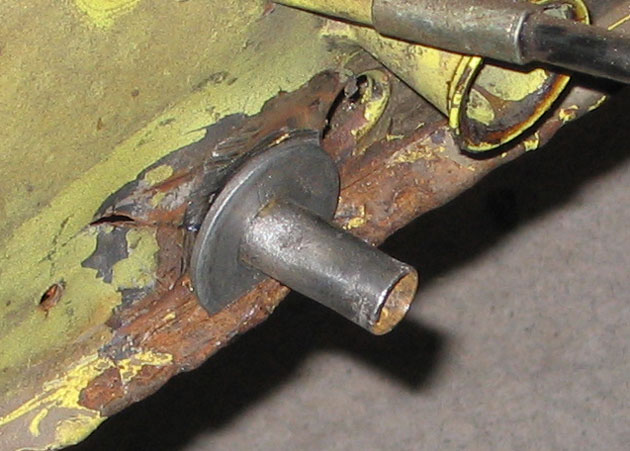
Posted by: ThinAir914 Mar 30 2005, 10:40 PM
The finished firewall welding.
Attached image(s)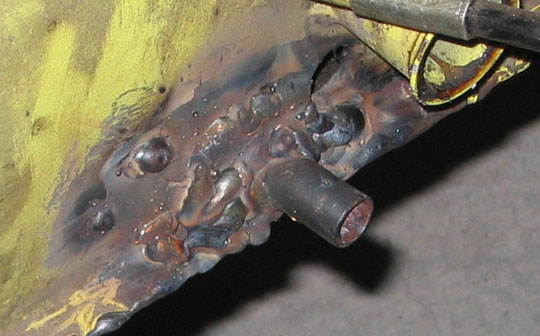
Posted by: ThinAir914 Mar 30 2005, 10:41 PM
Mike was not happy with the way the welding came out. I'm sure it will hold just fine. It looks better after I worked on it with the grinder. It's hard to reach a lot of places in that space. Once it is painted it will look just fine by me.
Attached image(s)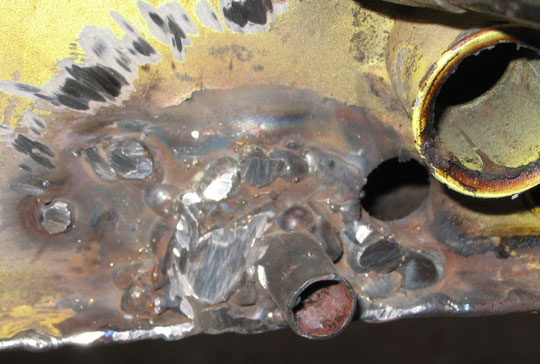
Posted by: ThinAir914 Mar 30 2005, 10:45 PM
The engine end of our tube was bent and out of round. Mike pounded a spike into it to fix these problems, but the force ended up breaking the middle weld where the bracket attached to the tube and the front weld where the bracket attached to the wall. The pre-existing brazing on the front seemed to be the problem.
The middle was just rewelded. The front was fixed using a trick that Brad Roberts posted. Mike drilled holes through the wall and the bracket, then welded through the holes. This worked quite well. For those who only have a broken front bracket, this might be the only thing you need to do instead of cutting the flaps for access to the inside of the tunnel.
http://www.914world.com/bbs2/index.php?act=ST&f=5&t=20684&hl=
Attached image(s)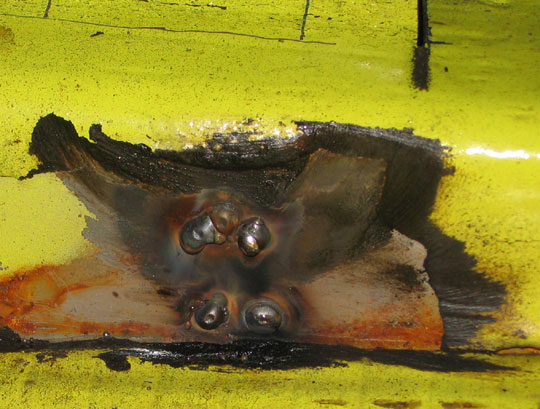
Posted by: ThinAir914 Mar 30 2005, 10:46 PM
My welder at work. I can't say thanks enough for Mike taking a weekend to come up from Phoenix with his welder to do this job. Thanks Mike! 
Attached image(s)
Posted by: ThinAir914 Mar 30 2005, 10:48 PM
It was only 44F and the wind was blowing when we did this job. Fortunately I had the pieces of a recently removed fiberglass tub/shower to use as wind breaks.
Attached image(s)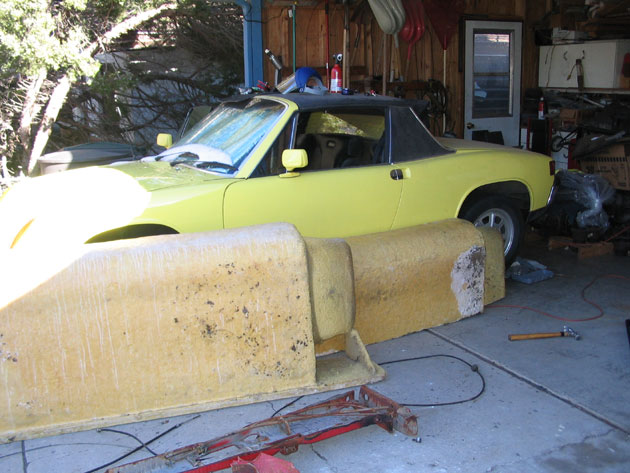
Posted by: ThinAir914 Mar 30 2005, 10:50 PM
As clutch cable tube repair jobs go, I would guess that this is about as involved as they can be since the tube had broken free in all three places. The hole in the fire wall was large enough that I was actually able to pull the tube out through the firewall.
Hopefully this will help others who face this common repair job.
Posted by: mattillac Mar 31 2005, 12:34 AM
nice work!
Posted by: Jeff Bowlsby Mar 31 2005, 01:02 AM
Thanks Ernie...nice job. Kinda makes you wish the center tunnel had a bolt on cover eh?

Posted by: Mike9142.0 Mar 31 2005, 11:10 PM
The picks make my welds look good 
That center bracket would not have broken loose if I had cleaned the tube better.
But  on it did not help.
I need to spend some more time  and the welds will look beter.
Posted by: SirAndy Oct 7 2005, 11:19 AM
i'll move this to the classic threads section! 
one thing, i *really* hope you sprayed out the inside of that tunnel with *plenty* of metal ready.
all that surface rust will come back to haunt you otherwise ...
 Andy
Andy
Posted by: olav Oct 7 2005, 12:14 PM
| QUOTE (SirAndy @ Oct 7 2005, 09:19 AM) |
| i'll move this to the classic threads section! one thing, i *really* hope you sprayed out the inside of that tunnel with *plenty* of metal ready. all that surface rust will come back to haunt you otherwise ... Andy |
Where do you get Metal Ready and POR-15?
Just a regular paint store?
Posted by: SirAndy Oct 7 2005, 12:22 PM
| QUOTE (olav @ Oct 7 2005, 11:14 AM) |
| Where do you get Metal Ready and POR-15? |
http://www.por15.com/
 Andy
Andy
Posted by: McMark Oct 7 2005, 12:43 PM
Nice Job!
As you noticed, you have to be careful with welding on the tube to avoid plugging the center. Also, as you noticed, the factory brazed every joint of that install to avoid damaging the tube which can make it impossible to weld.
It's a PITA of a job, looks like yours will be fine for another 30 years. 
Posted by: jonwatts Oct 7 2005, 12:59 PM
I like that washer on the rear firewall. I might do that (and anything else I can think of) as a preventative measure.
Posted by: Spoke Oct 7 2005, 12:59 PM
| QUOTE (McMark @ Oct 7 2005, 10:43 AM) |
| Nice Job! be careful with welding on the tube to avoid plugging the center |
I have to weld my tube also. What do you mean by "plugging the center"?
Spoke
Posted by: jonwatts Oct 7 2005, 01:20 PM
I think he means don't burn through and block the clutch cable with slag, mig wire, etc.
Posted by: Brad Roberts Oct 7 2005, 03:22 PM
Correct Jon. I slide a number 2 Phillips into the tube when welding on it. It is VERY difficult to weld to a screwdriver.
B
Posted by: McMark Oct 7 2005, 03:43 PM
Welding can something like what is pictured below. The weld on the inside of the circle can either keep the cable from going through at all, or can chaff the wire enough to shorten its life-span. Gotta be careful. Brads idea is a good one.
Attached image(s)
Posted by: bondo Oct 7 2005, 04:13 PM
| QUOTE (McMark @ Oct 7 2005, 02:43 PM) |
| Welding can something like what is pictured below. The weld on the inside of the circle can either keep the cable from going through at all, or can chaff the wire enough to shorten its life-span. Gotta be careful. Brads idea is a good one. |
Better would be a piece of copper tubing smeared with mig dip. It'd be flexible enough that you could feed it down the whole length of the clutch tube and it would protect it everywhere you might be making repairs. On my V8 car I'm going to do this and I'll be welding the tube in place every few inches. It won't be going anywhere!
Posted by: ThinAir914 Oct 8 2005, 11:23 AM
| QUOTE (SirAndy @ Oct 7 2005, 10:19 AM) |
| i *really* hope you sprayed out the inside of that tunnel with *plenty* of metal ready. all that surface rust will come back to haunt you otherwise ... |
Thanks Andy! I was hoping this would be helpful to folks.
I did not treat the surface rust. It's not that the surface rust isn't a concern, but I'd never heard of Metal Ready so I didn't know there was anything I could do about it. I see that it is listed as a prep treatment for POR-15 so I probably would not have thought about using it by itself. I've often thought that the center tunnel could be a rust problem waiting to happen because it is so tight that you can't get into it to do anything. Will spraying it with Metal Ready really help if you don't follow up with POR-15?
Posted by: bd1308 Oct 8 2005, 11:33 AM
i guess
metal ready converts rust into a paintable surface and is supposed to, in therory, prevent more rust from forming......
b
Posted by: SirAndy Oct 8 2005, 11:38 AM
| QUOTE (ThinAir914 @ Oct 8 2005, 10:23 AM) |
| Will spraying it with Metal Ready really help if you don't follow up with POR-15? |
absolutely!
metal ready is what does all the work, POR-15 is primarily a moisture barrier and heavy duty protective coat ...
you can most certainly use metal ready all by itself and it will permanently get rid of your surface rust and create a protective coat of sorts ...
Andy
Posted by: Gint Oct 12 2005, 07:56 PM
| QUOTE (SirAndy @ Oct 8 2005, 11:38 AM) | ||
absolutely! metal ready is what does all the work, POR-15 is primarily a moisture barrier and heavy duty protective coat ... you can most certainly use metal ready all by itself and it will permanently get rid of your surface rust and create a protective coat of sorts ... Andy |
Moving this to the Classics section.
I have to add though...
I hate to break this to you, but Metal Ready by itself will only prevent rust for a short time or under a finite set of circumstances (whatever they are, I certainly don't know exactly).
I can tell you without a doubt, that exposed to enough moisture, Metal Ready will allow rust to form on bare steel. When I hauled my tub to NorCal, I had coated it beforehand with *many* coats of Metal Ready. The rain washed it off, and surface rust started to form.
Posted by: SirAndy Oct 15 2005, 01:22 PM
| QUOTE (Gint @ Oct 12 2005, 06:56 PM) |
| The rain washed it off, and surface rust started to form. |
hmmm, interesting ...
i had used metal ready on some surface rust in my rear trunk and later had water standing in it for quite a while (2 weeks +) with NO sign of rust whatsoever ...
 Andy
Andy
Posted by: malcolm2 Mar 13 2023, 01:41 PM
Sorry.... old post, but a good one. Wanted to add that I am a fan of the POR-15 products.
I used what used to be called Metal Ready from them, then sometimes, if the application warrants it, I use the Eastwood internal frame coating.... That stuff will NEVER come off. I even got some on a window and a razor would not get it off. It comes with a long spray hose that would be perfect for this application.
https://www.eastwood.com/eastwood-internal-frame-coating-14oz-aerosol.html
Powered by Invision Power Board (http://www.invisionboard.com)
© Invision Power Services (http://www.invisionpower.com)