Printable Version of Topic
Click here to view this topic in its original format
914World.com _ 914World Garage _ Finally - GT project
Posted by: Mitox Jun 26 2016, 08:10 PM
Finally starting my 914-6 GT project after waiting a couple decades. The infection hit me after driving a 911 my employer owned, so I found a '69 912 that I drive for five years until I sold it. Since then, I have been waiting to build a 914-6 GT. John Forbes helped find the starting point for me in October 2015: a white '76 with flares.
Attached image(s)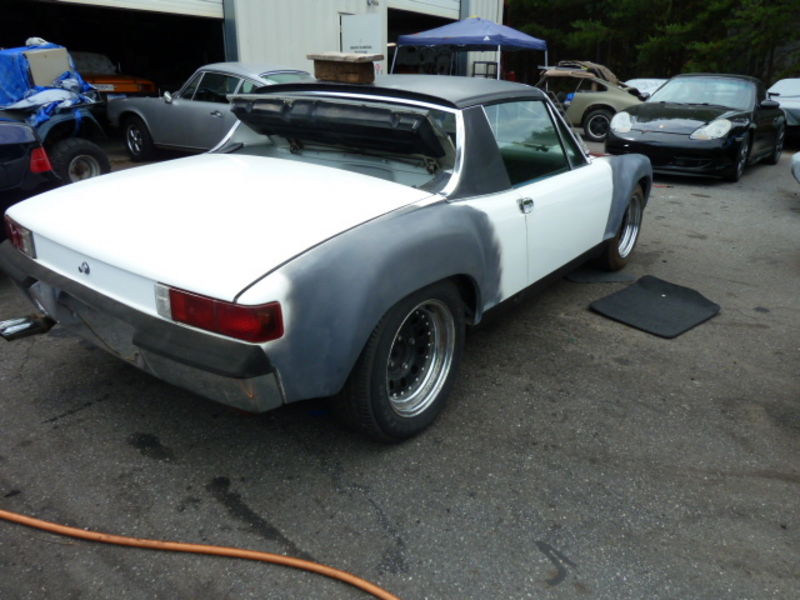
Posted by: G e o r g e Jun 26 2016, 08:13 PM

looks like a nice starting point
Posted by: Mitox Jun 26 2016, 08:20 PM
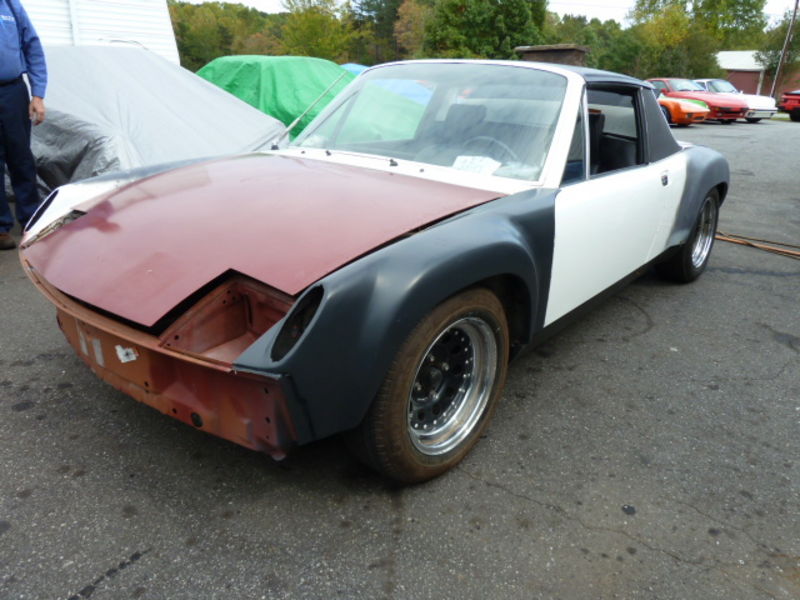
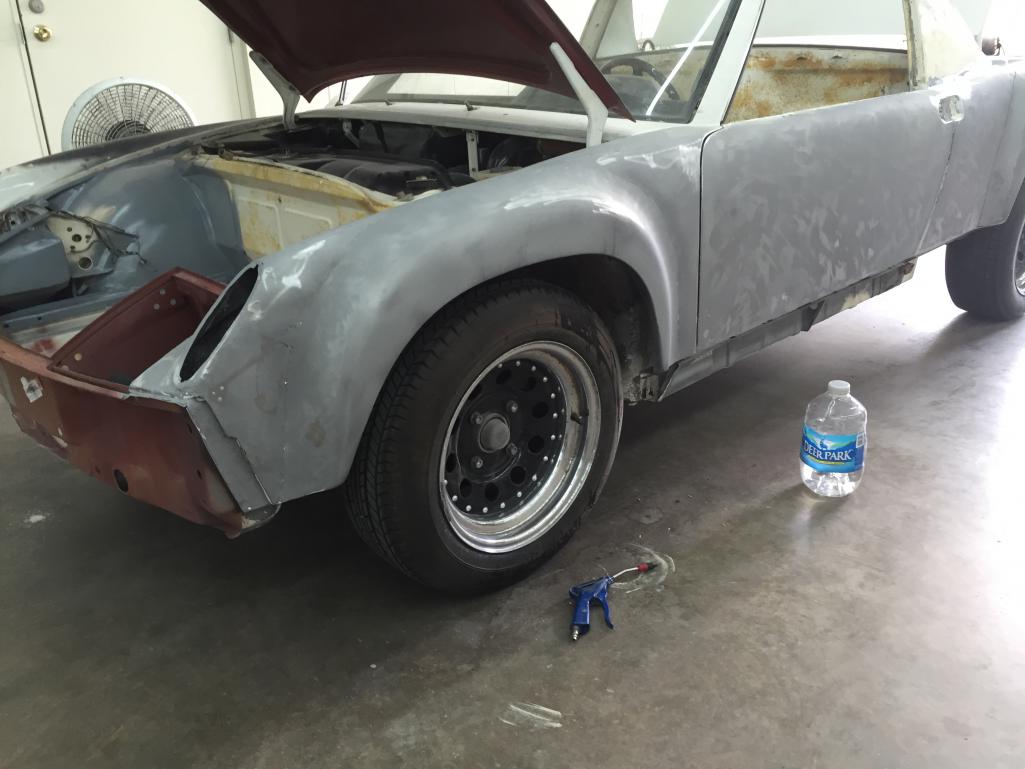
So, after many months, work finally begins in the GT. Heinz Peters is helping out with the body work and prep for paint. Found that the flares were lapped and welded, so the work begins there cutting and butt welding. One side was stripped to reveal the two fenders; only found a couple small spots of rust at the jack point.
Attached thumbnail(s)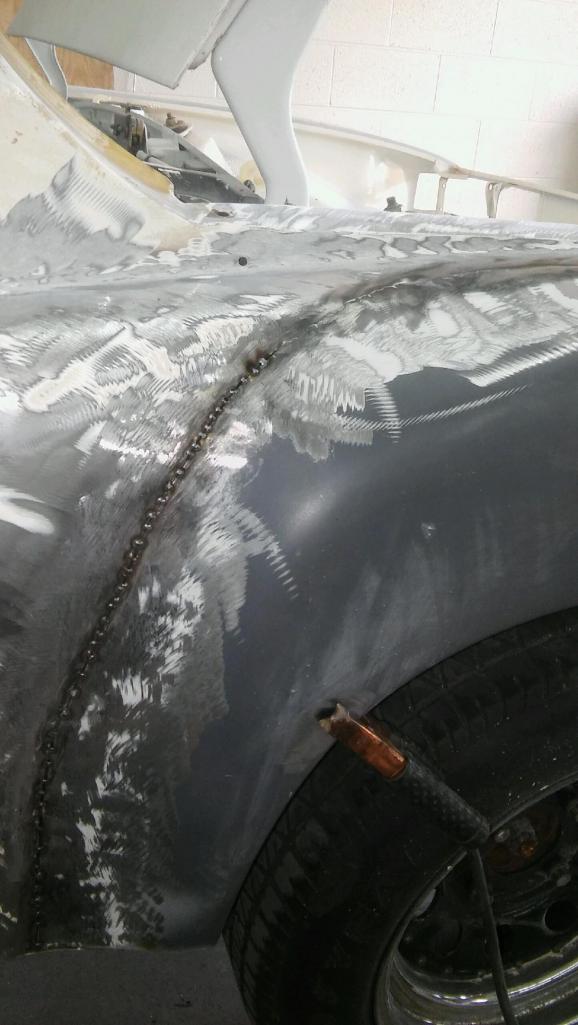
Posted by: Mitox Jun 26 2016, 08:23 PM
Hopefully this is all of the rust there is- one can hope. Next week I'll be removing the dash, and starting to strip the flloor, so more to come.
Attached thumbnail(s)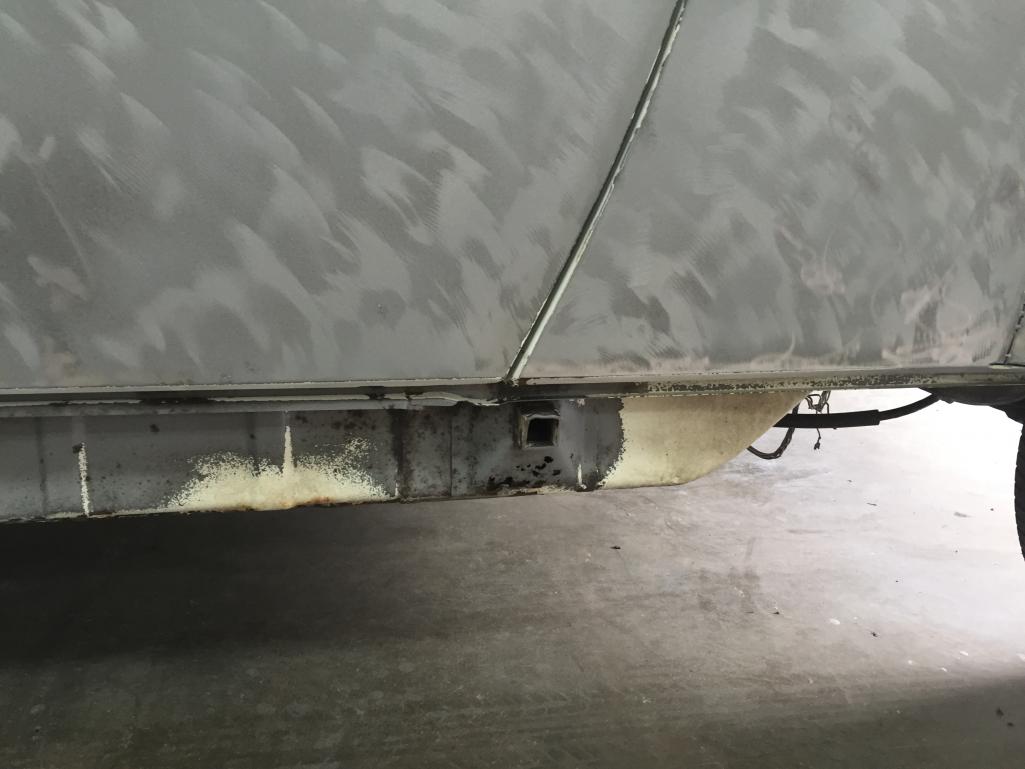
Posted by: JRust Jun 26 2016, 08:46 PM
Welcome & looks like your starting it right! What are you doing drivetrain wise
Posted by: Mitox Jun 26 2016, 08:54 PM

Welcome & looks like your starting it right! What are you doing drivetrain wise
I found a 3.2 out of a wrecked '88 to slip in there.
Posted by: Cairo94507 Jun 27 2016, 06:19 AM
Excellent. This should be nice build thread. Nice looking car to being with. The fact that you are correcting the flare installation speaks to the level of detail you are willing to go through to make the car right. 
Posted by: Mitox Jun 28 2016, 09:26 PM
One fender is nearly complete. Still need to fill in a few pin holes in the seam, and needs a little shaping.
Attached thumbnail(s)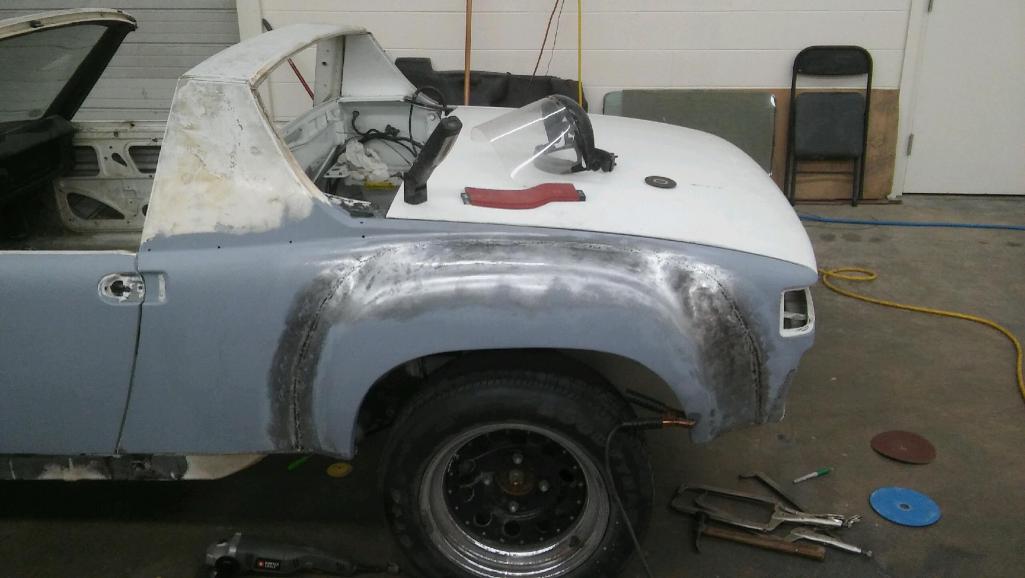
Posted by: Mitox Jun 30 2016, 11:16 AM
Heinz is starting to block the curves today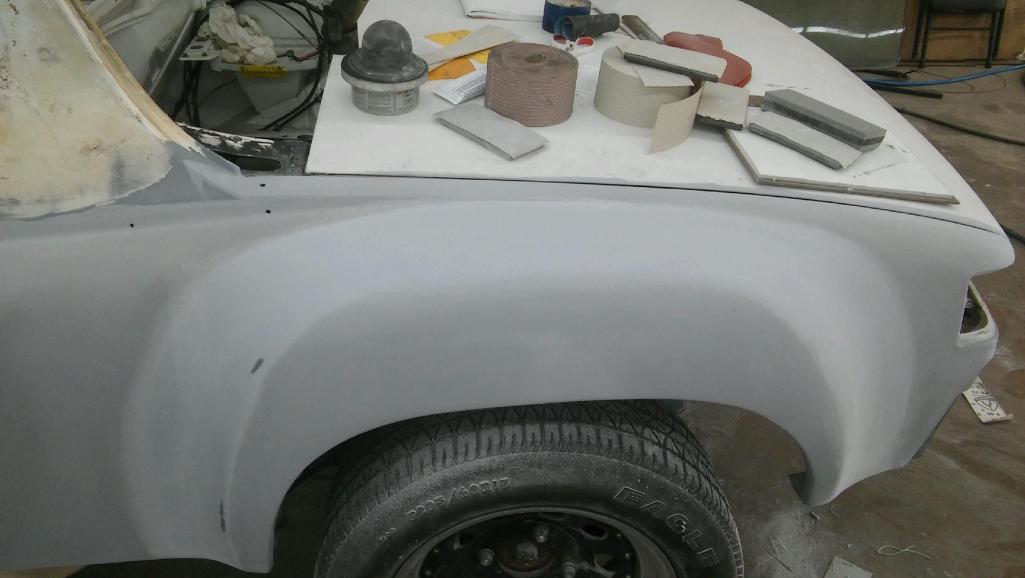
Posted by: Mitox Jul 1 2016, 06:40 PM
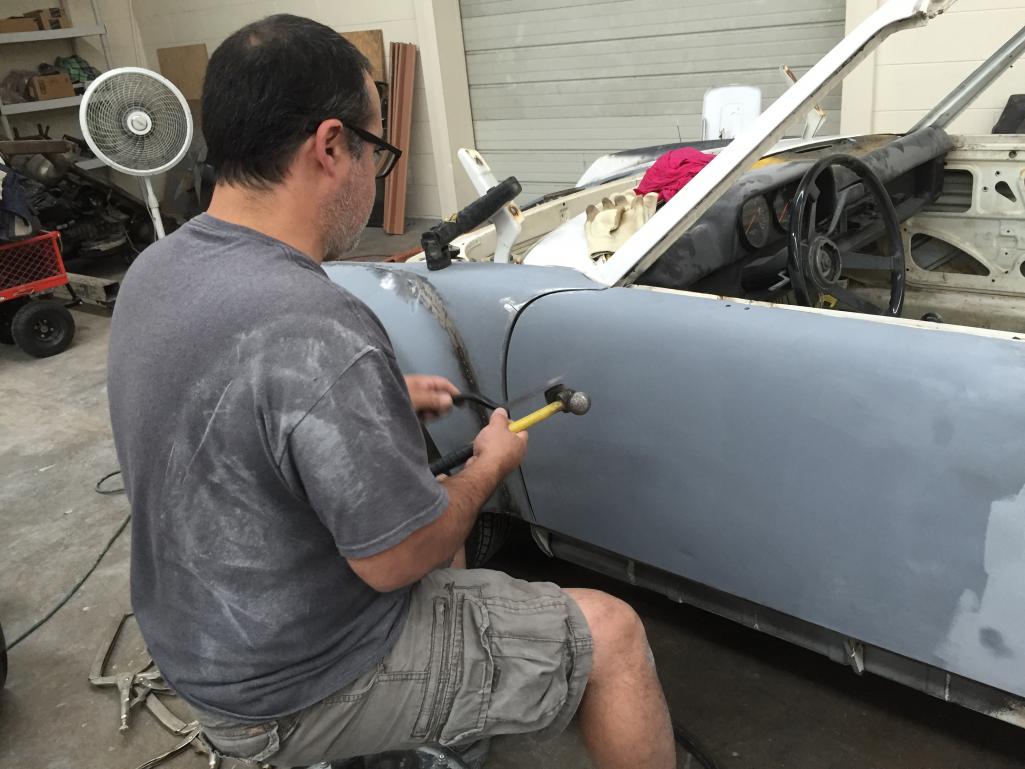
Disassembly continued today; removed the windshield, tank, some of the ventilation system and more trim work. While I did the easy work, Heinz started working the front flare correcting the weld and shaping the fender better.
Attached thumbnail(s)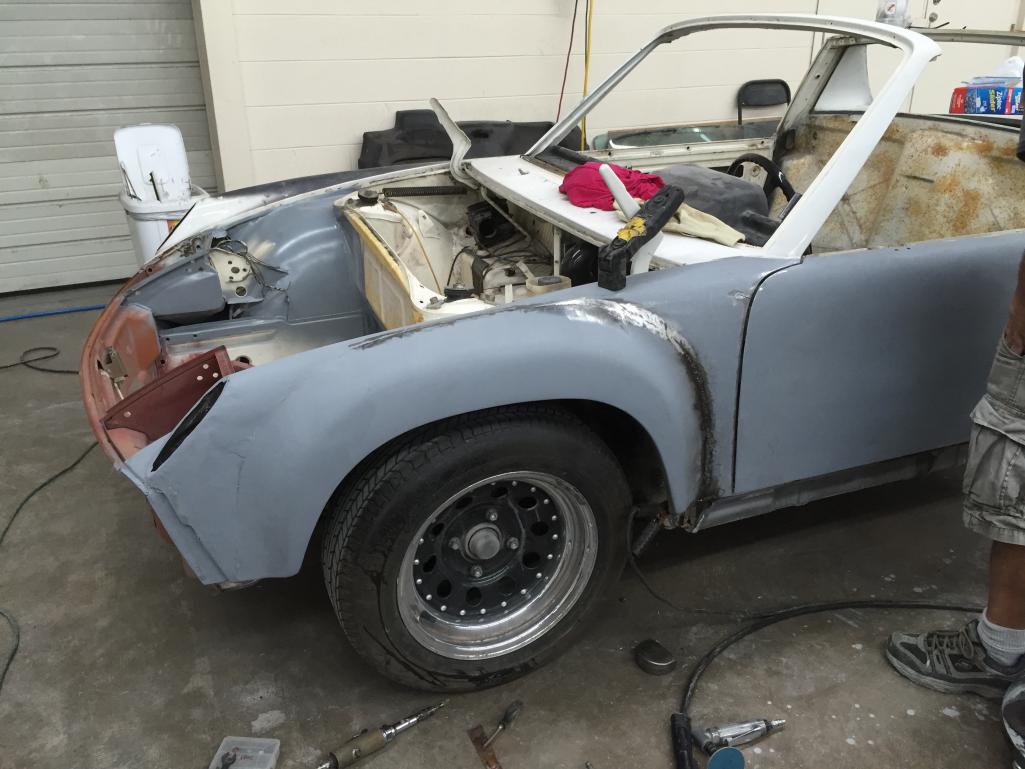
Posted by: Mueller Jul 1 2016, 06:46 PM
Awesome...action shot!
Posted by: Cairo94507 Jul 1 2016, 09:02 PM
Man, the front of that driver's side front fender looks a little rough. I know he hasn't started on that yet. Nice progress.
Posted by: Mitox Jul 1 2016, 09:52 PM
Man, the front of that driver's side front fender looks a little rough. I know he hasn't started on that yet. Nice progress.
Yeah, that is the one area found so far that looks like it was hit at some time in the past. Thinking about cutting it out and grafting in a section from a donor; may be easier than fixing all of the wrinkles.
Posted by: Mitox Jul 5 2016, 09:15 AM
I'm hoping to get some wisdom from those in the know. I am debating my options for the front suspension. Should I just change the struts to early 911 parts, or should I change everything out to SC or Carrera parts?
Any and all thoughts are welcome. Thanks
This post was moved to another thread.
Posted by: Mitox Jul 24 2016, 07:27 PM
Third fender is now complete. I'm not sure where these flares came from, but they needed a tremendous amount of reshaping.
Attached thumbnail(s)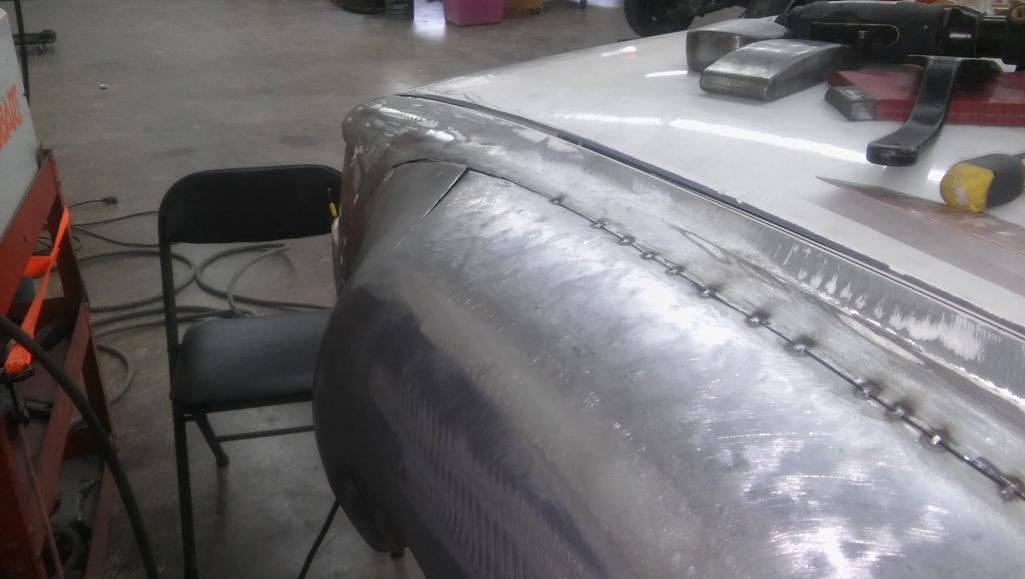
Posted by: Mitox Aug 29 2016, 07:23 PM
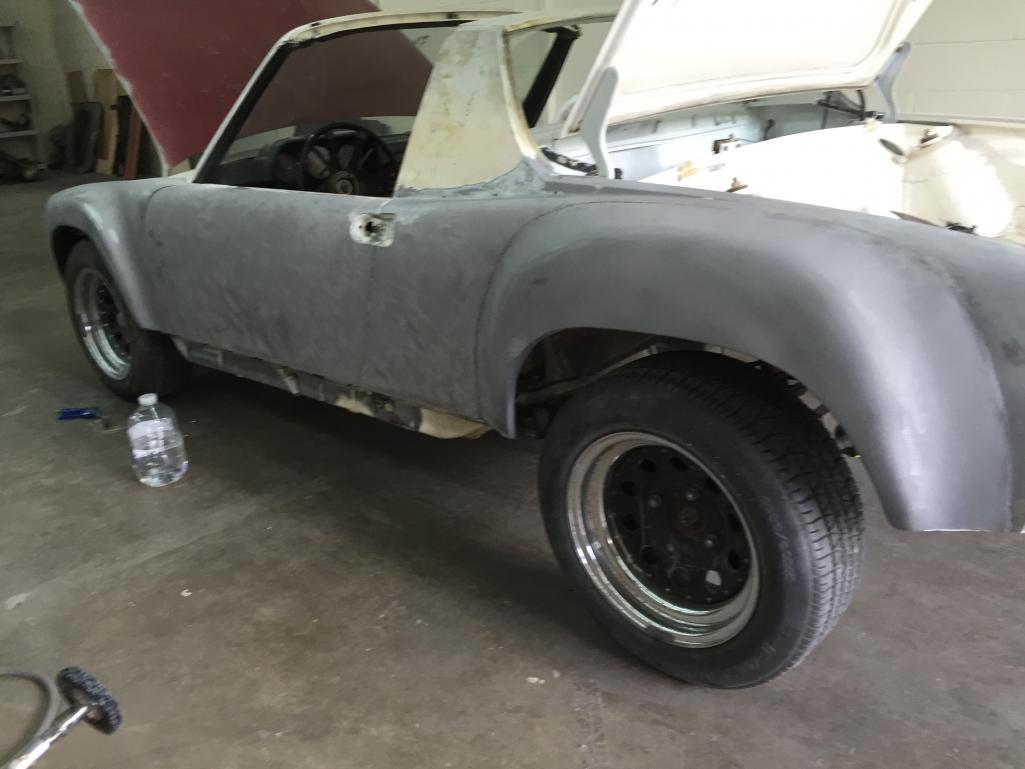
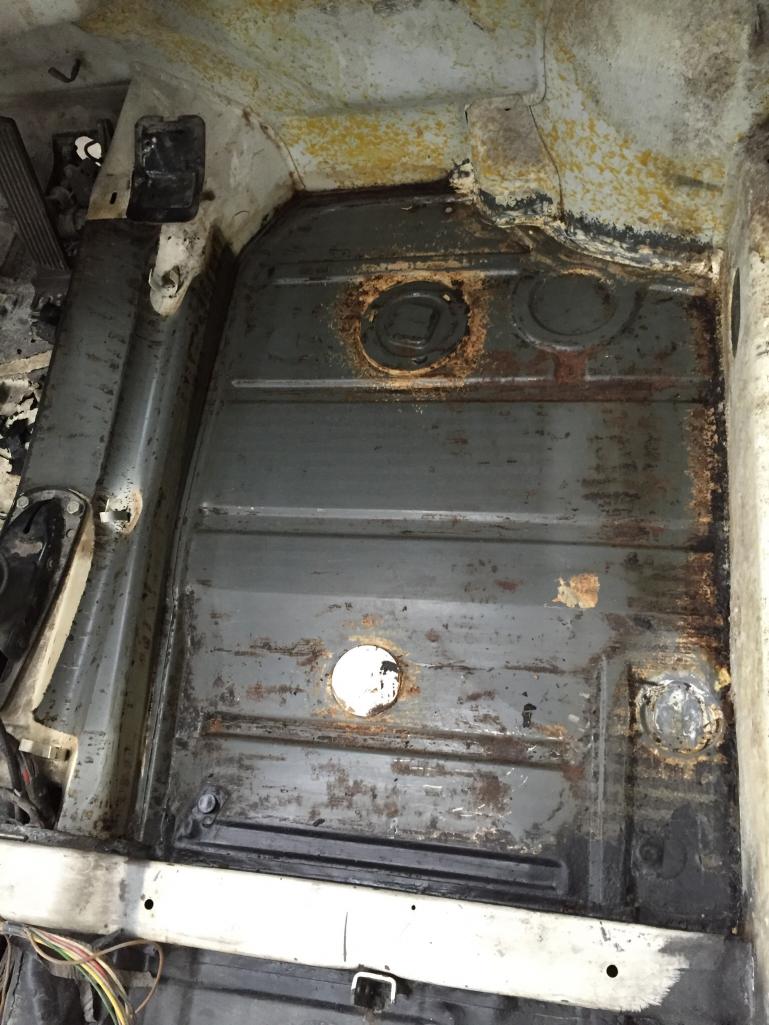
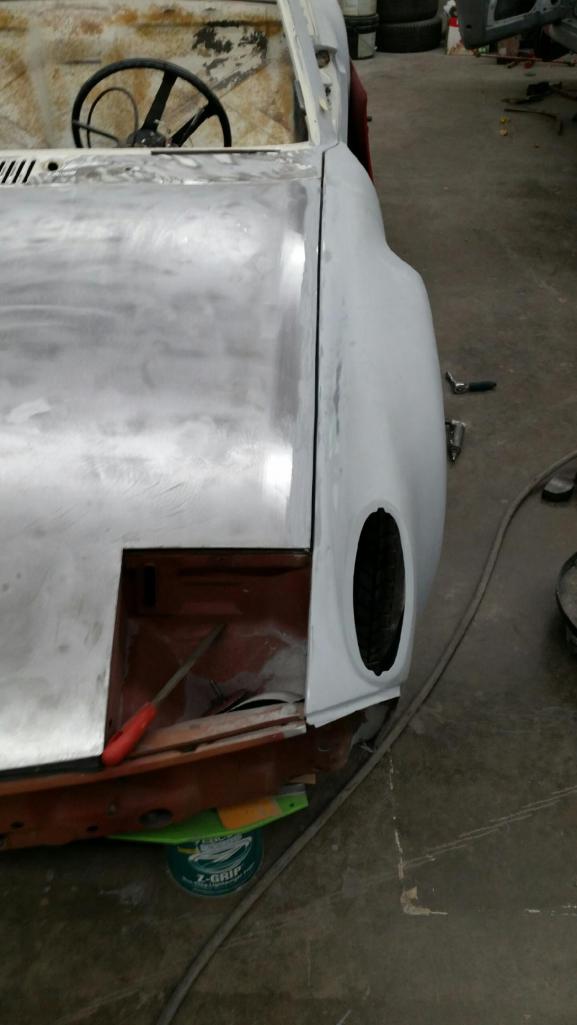
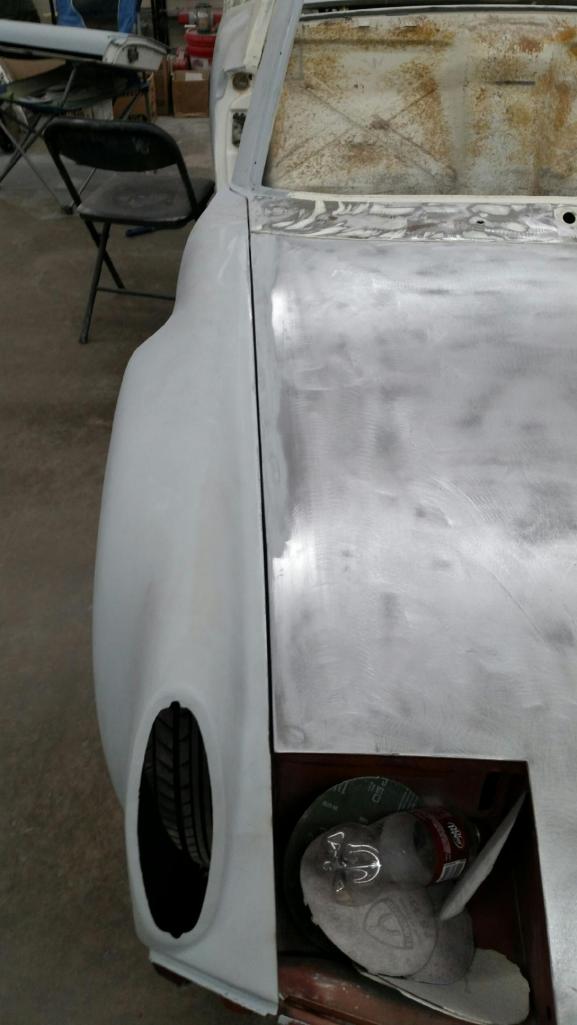
Time for an update. All four corners are complete, but the drivers side signal lite area needed to be replace (the original has been crushed sometime in the past). I stripped the floors inside - they're near perfect with no rust issues, so I'm happy with the progress there. Heinz has improved the front hood gaps significantly; can't wait to see it in person this weekend, but I have some pics to get me excited.
Attached thumbnail(s)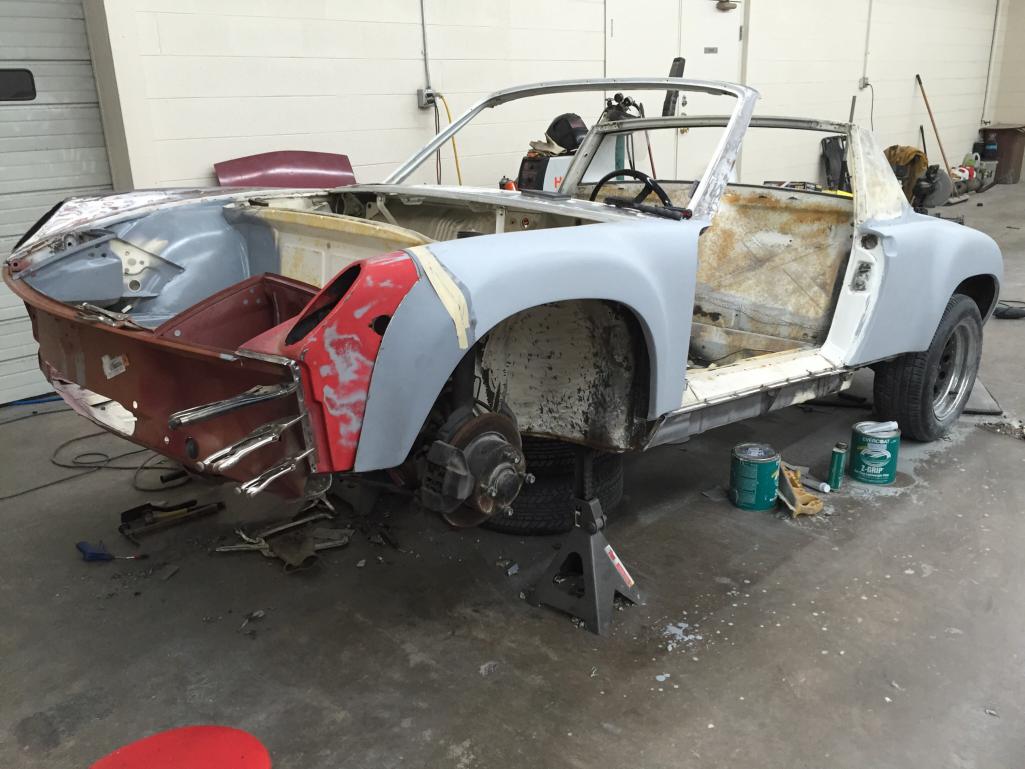
Posted by: Cairo94507 Aug 29 2016, 07:49 PM
That looks beautiful. Your man definitely knows what he is doing. The gap between the hood and fenders looks outstanding.
Posted by: Mitox Aug 29 2016, 08:09 PM
That looks beautiful. Your man definitely knows what he is doing. The gap between the hood and fenders looks outstanding.
I'm very happy with Heinz' work; when it is painted and looking beautiful he will deserve the credit.
Posted by: RobW Aug 29 2016, 09:57 PM
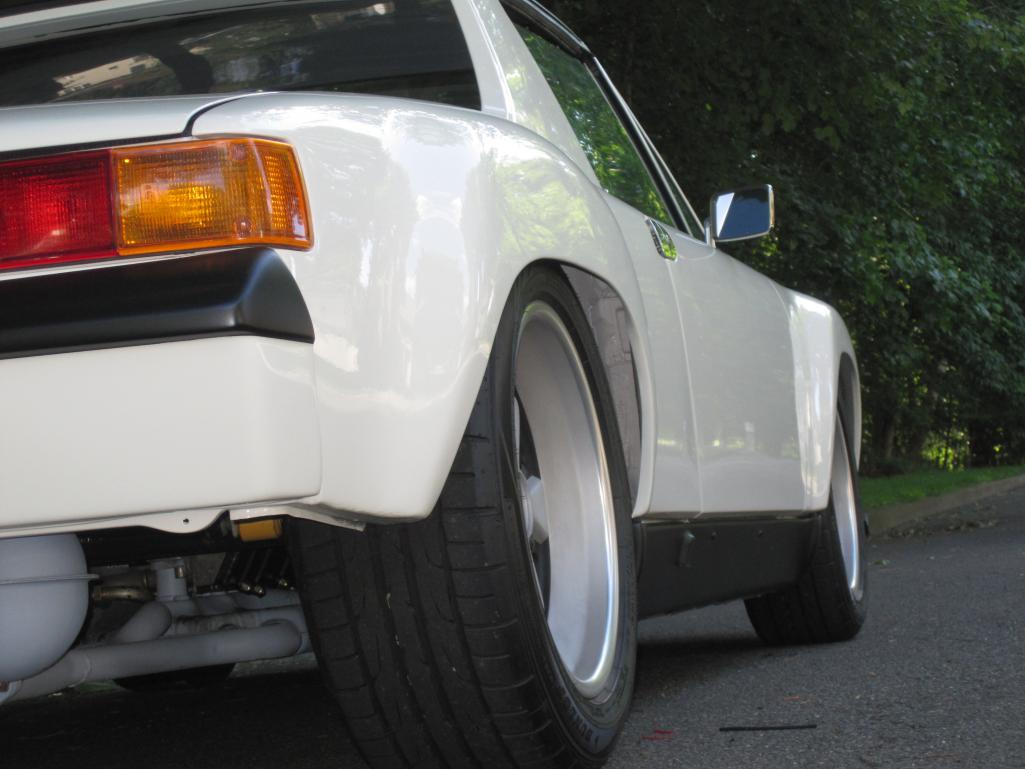
I dig those flares! Keeping it white?
Posted by: Mitox Aug 30 2016, 05:48 AM
I dig those flares! Keeping it white?
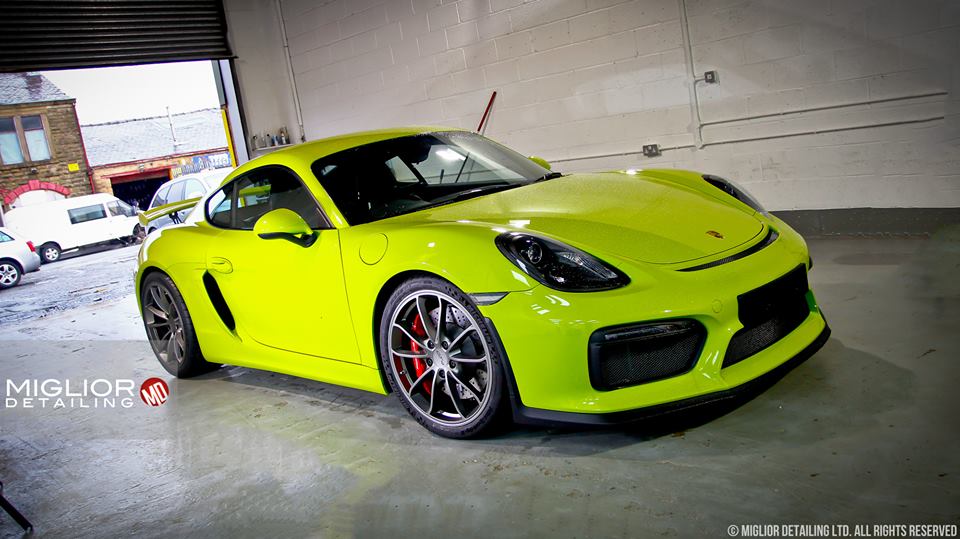
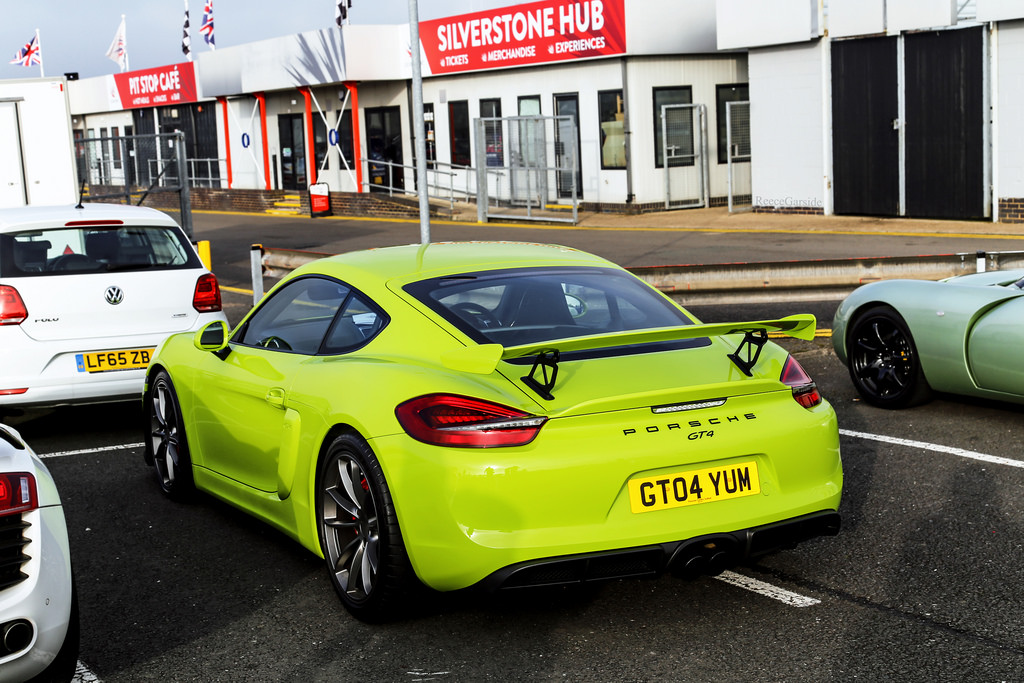
Well, I'm having some trouble deciding on color. I want to keep the original color, but white is boring to me. I may go with green; if I do it will be the 2008 Green, or Viper green.
Posted by: falcor75 Aug 30 2016, 07:18 AM
Put the SC struts in the front. The lower balljoint mount on the early 911's was upgraded to the later version in 1973? (just learned this myself as I need to change my struts)
Posted by: Mitox Aug 30 2016, 07:26 AM
Put the SC struts in the front. The lower balljoint mount on the early 911's was upgraded to the later version in 1973? (just learned this myself as I need to change my struts)
Thanks for the heads up; currently the plan is to swap in a full SC front suspension.
Posted by: Mitox Sep 13 2016, 07:50 AM

The 914 is beginning to look like a GT now. White epoxy was applied last evening. It is looking fine, and is getting a lot closer to going to a paint shop for the green.
Attached thumbnail(s)
Posted by: Mitox Feb 1 2017, 06:59 PM
I have a question for those much more knowledgeable than I.
While stripping the bottom of the 914, I noticed the lip around the inside of the GT flares. They are about 5/8" wide; this looks too wide.
Does anyone know the correct width?
I'm thinking about 3/8" would look OK.
Posted by: jmitro Feb 1 2017, 07:30 PM
I don't know the "correct" width, but I rolled mine in with a hammer. Smoother and about 1/4-1/2" more tire clearance
Posted by: Mitox Feb 1 2017, 07:36 PM
I don't know the "correct" width, but I rolled mine in with a hammer. Smoother and about 1/4-1/2" more tire clearance
I think the rolled look may be better even if I trim it shorter. The lip in currently angled into the wheel opening rather than away from it as it would be if rolled.
Posted by: rgalla9146 Feb 1 2017, 07:38 PM
I have a question for those much more knowledgeable than I.
While stripping the bottom of the 914, I noticed the lip around the inside of the GT flares. They are about 5/8" wide; this looks too wide.
Does anyone know the correct width?
I'm thinking about 3/8" would look OK.
Yes, they are wide and irregular.
I'm going to use a stock lip as a reference.
It will take time and patience.
Your car is white and you are going to paint it green.
My steel flare GT project started life Palma green and I want to go white !!!
You're doing a beautiful job.
Posted by: Mitox Feb 1 2017, 10:52 PM
I have a question for those much more knowledgeable than I.
While stripping the bottom of the 914, I noticed the lip around the inside of the GT flares. They are about 5/8" wide; this looks too wide.
Does anyone know the correct width?
I'm thinking about 3/8" would look OK.
Yes, they are wide and irregular.
I'm going to use a stock lip as a reference.
It will take time and patience.
Your car is white and you are going to paint it green.
My steel flare GT project started life Palma green and I want to go white !!!
You're doing a beautiful job.
I still think about staying white. Guess I'll make the final decision a day before it gets painted.
As for the fender lips, I'll find an older Porsche somewhere and measure it.
Posted by: forrestkhaag Feb 1 2017, 11:53 PM
My lovely wife is an x-NYWS stockbroker,m&a manager for a fortune 5 firm / and today sees the uptick in a 914 conversion project if properly undertaken. go. Now is the time.
I have converted 3.2 K 914 in AZ into a 60-+ asset in CA and not for sale.. It is a thing to do now.. but not for the faint of heart...

Posted by: krazykonrad Feb 2 2017, 10:12 AM
I still think about staying white. Guess I'll make the final decision a day before it gets painted.
[/quote]
Signal orange is the awesome-est! 
My $0.02
Posted by: Mitox Feb 2 2017, 11:06 AM
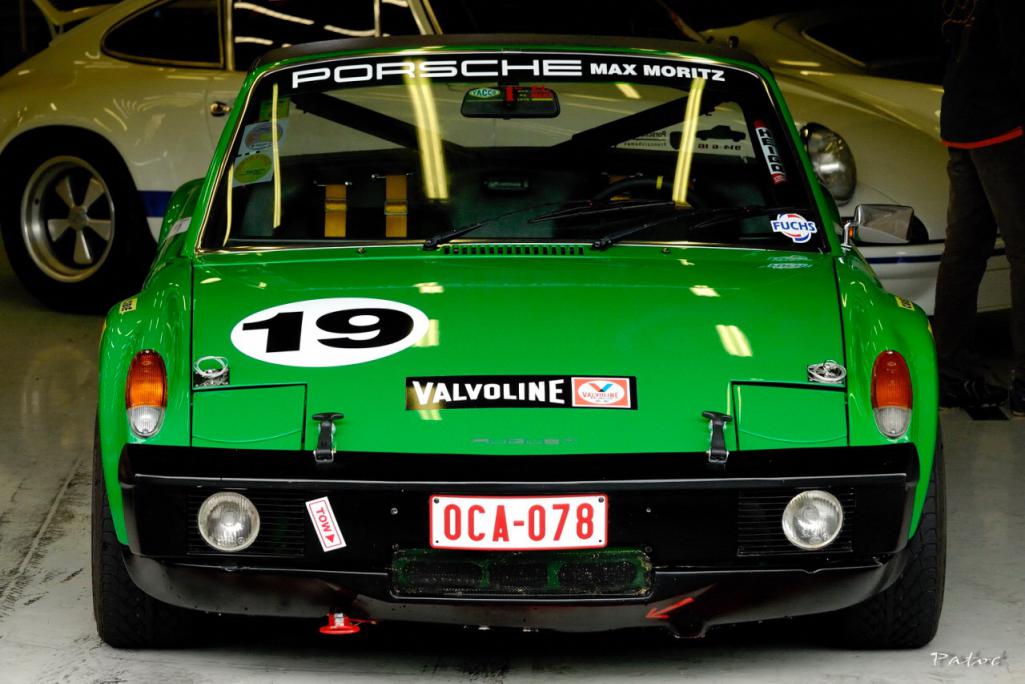
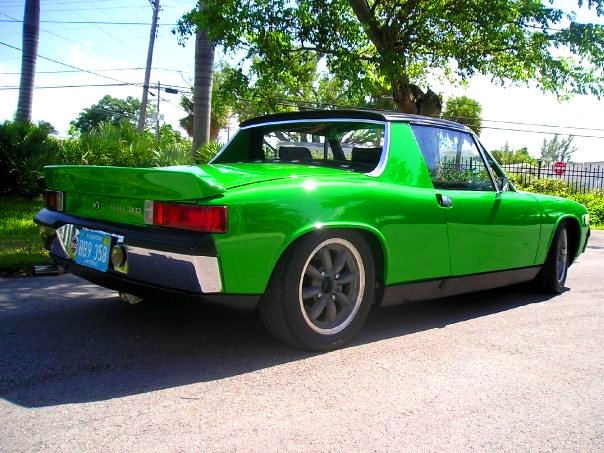
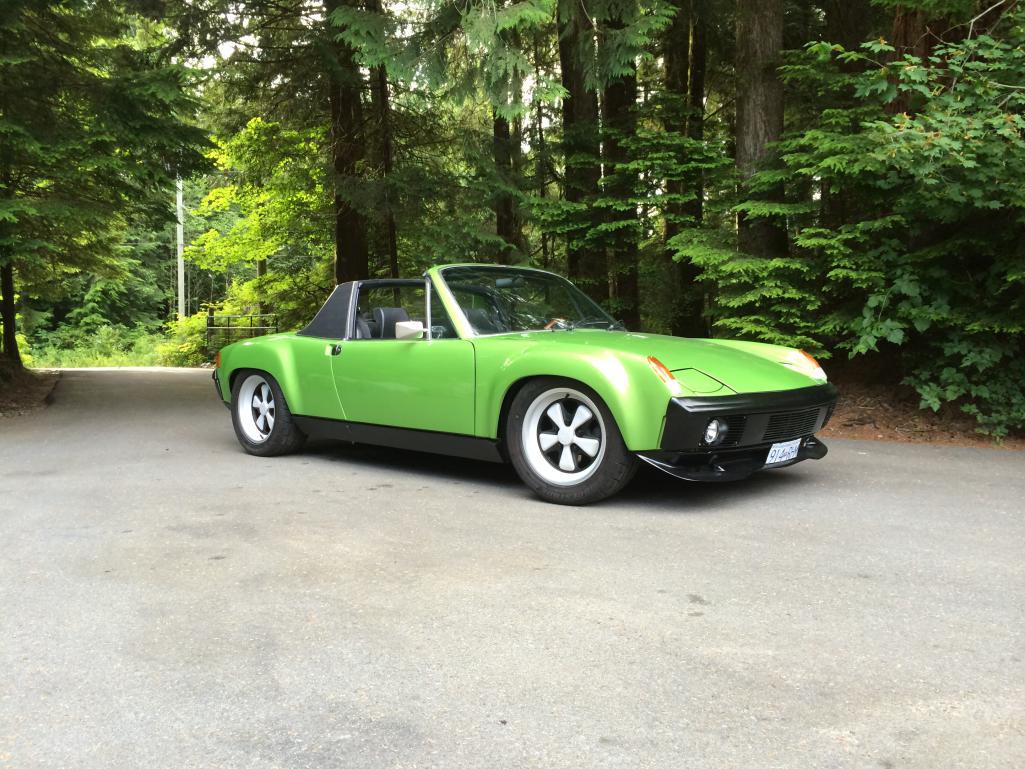
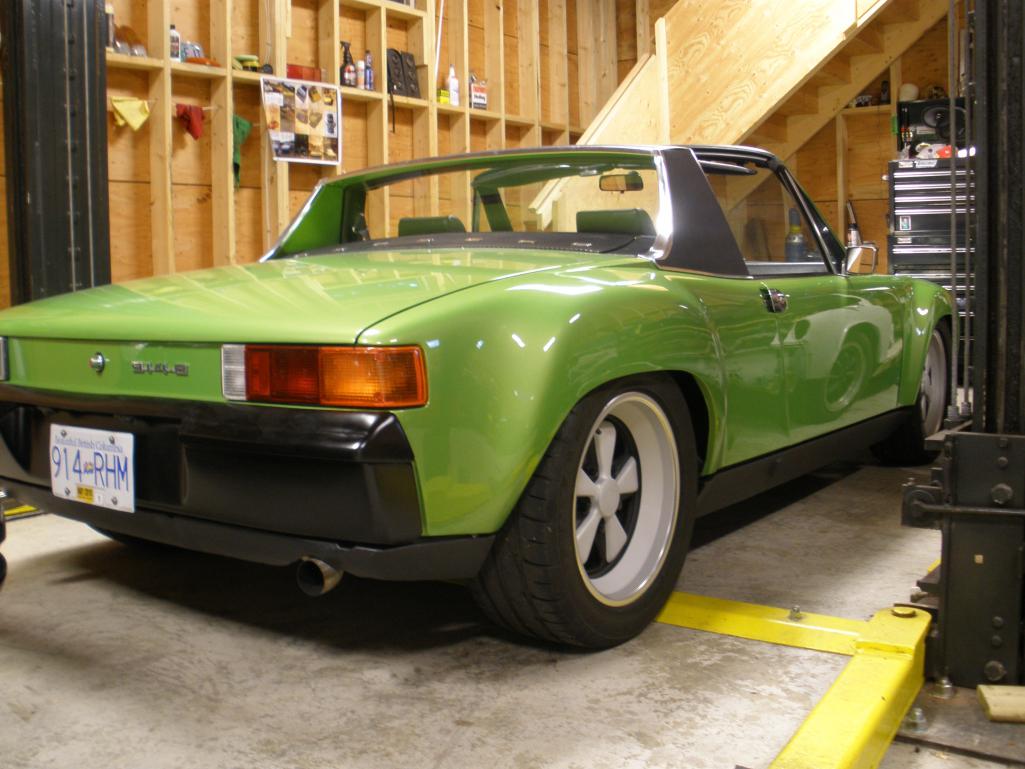
Pretty sure I'm going green. Wish I knew exactly what color these two cars are.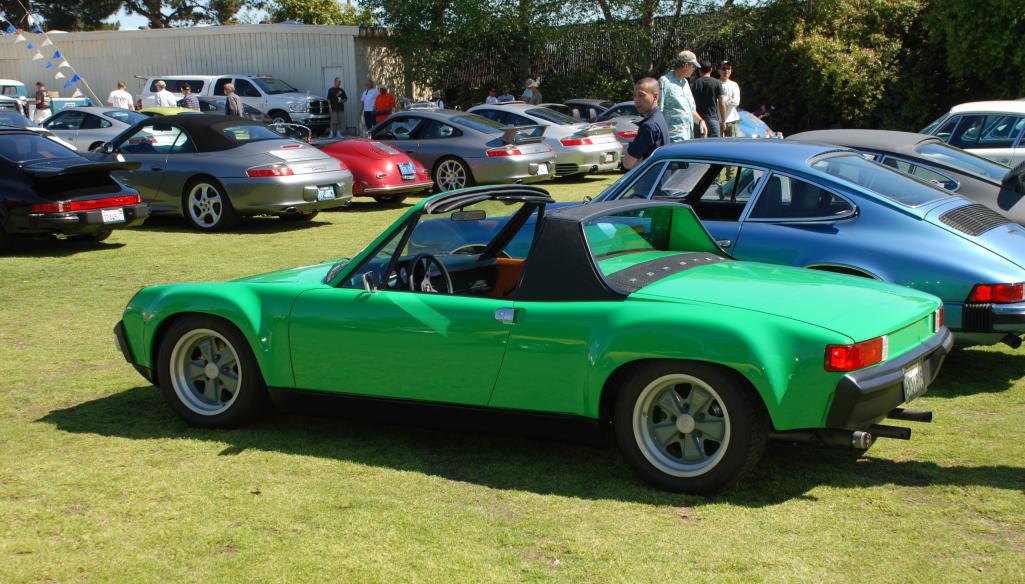
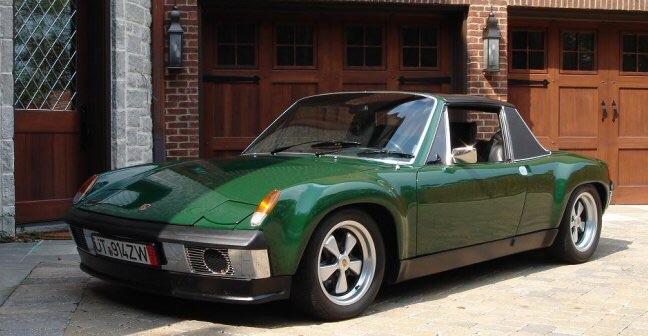
Posted by: jmill Feb 2 2017, 12:53 PM
You've got emerald, viper, Conda and Zambezi green.
Posted by: Chris H. Feb 2 2017, 03:50 PM
Those appear to be Conda Green. L2626 is the code I think.
Posted by: raynekat Feb 2 2017, 04:53 PM
Bottom one looks like viper green.
Posted by: jmill Feb 2 2017, 05:19 PM
Some pics.
Attached thumbnail(s)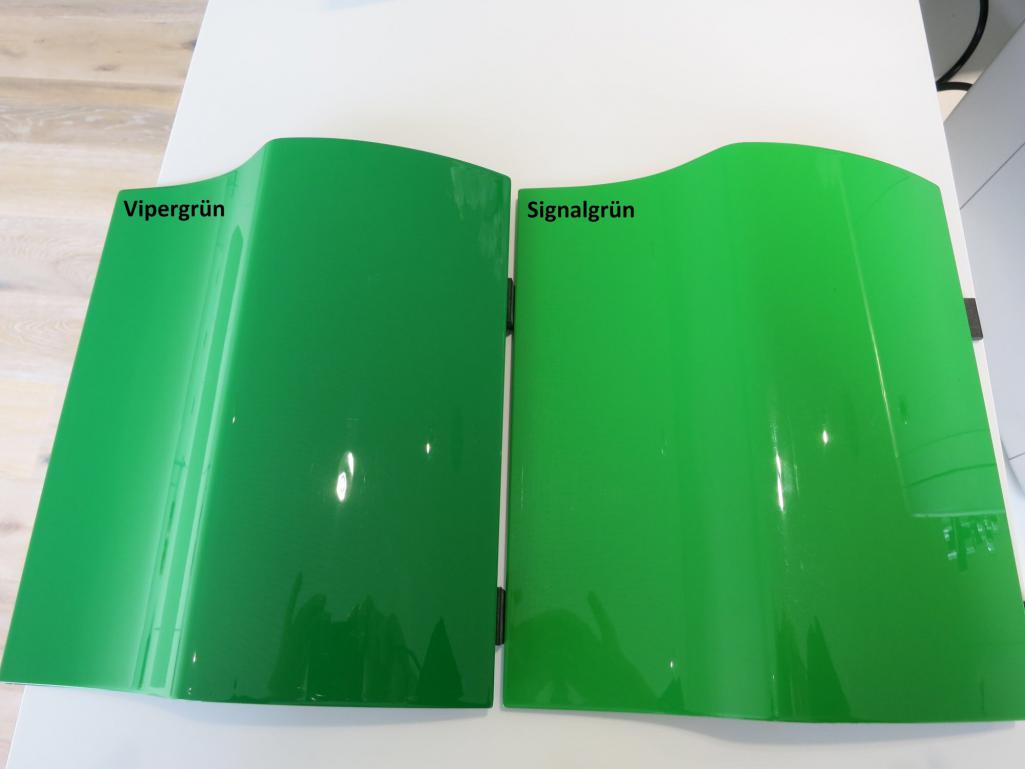
Attached image(s)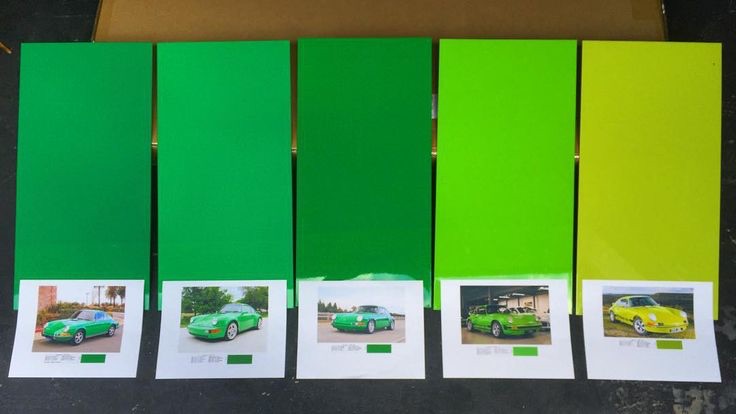
Posted by: Larmo63 Feb 2 2017, 11:16 PM
Viper Green is siiiiiiiiiick.
The #19 car color wins.
Posted by: ConeDodger Feb 2 2017, 11:44 PM
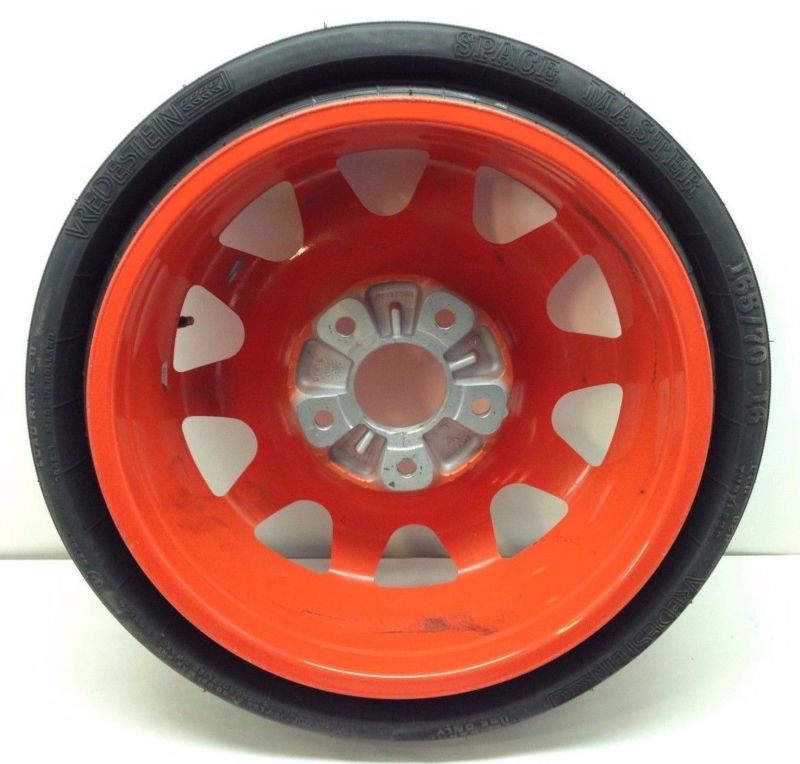
The replica flares have more "flange" than the original factory GT flares. McMark clearances mine a bit to fit the rear tires. In the front, it's not a problem. I'll edit in a picture from my project thread in a minute or two...
Ok, here are before and after pictures of my rear flares. Before would tear up sidewalls. After? Just right!
Attached image(s)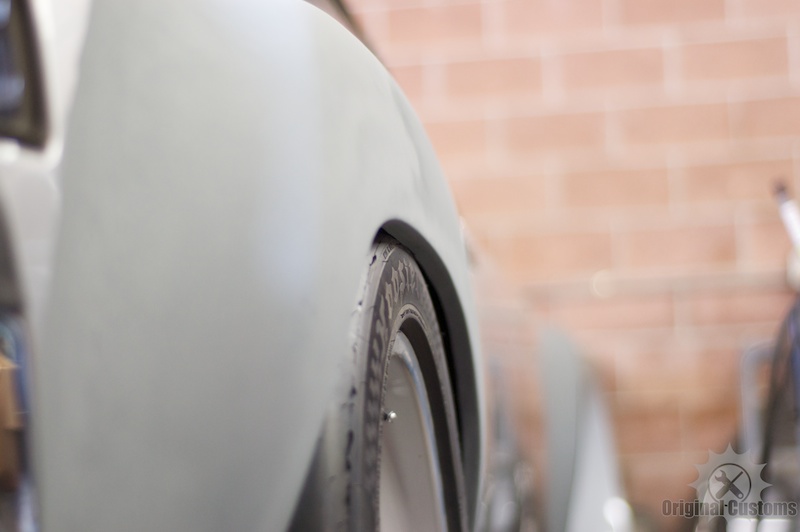
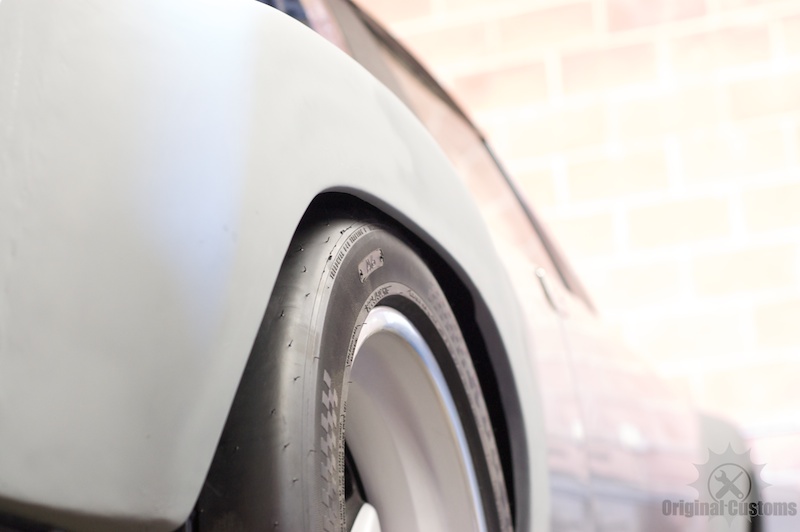
Posted by: Mitox Feb 3 2017, 06:24 AM
The replica flares have more "flange" than the original factory GT flares. McMark clearances mine a bit to fit the rear tires. In the front, it's not a problem. I'll edit in a picture from my project thread in a minute or two...
Ok, here are before and after pictures of my rear flares. Before would tear up sidewalls. After? Just right!
Thanks, your "before" pic is exactly what my flares look like. At the top, yours now look like roughly 1/4" or maybe slightly more, so that works.
I'm thinking I should trim the lip to about 3/8", and roll the top of the arch up.
Posted by: Mitox Feb 3 2017, 11:16 AM
Some pics.
John,
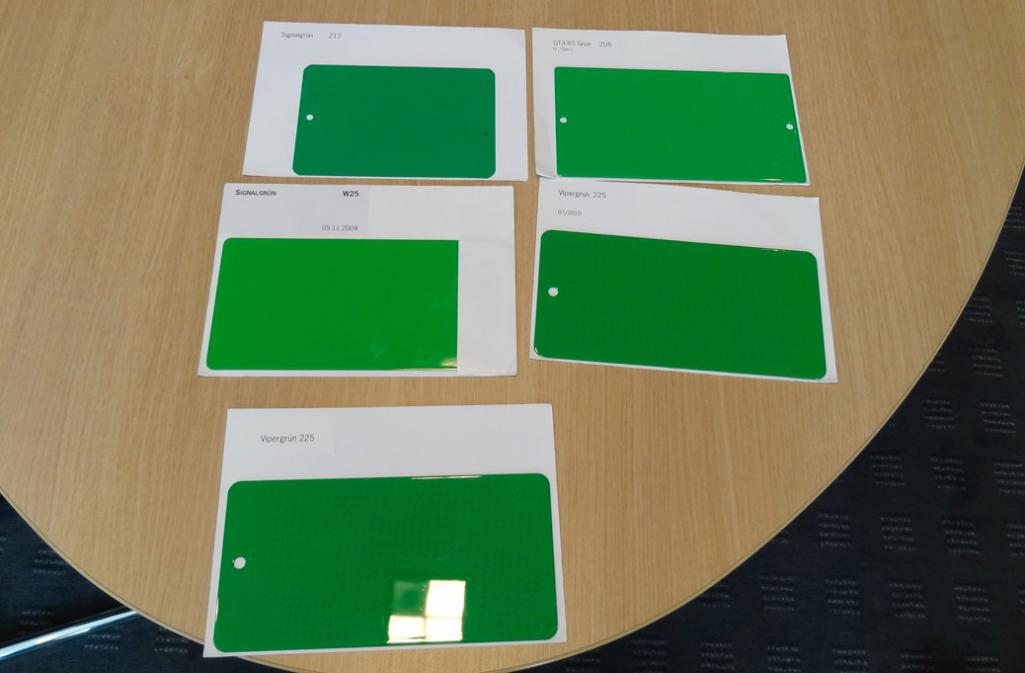
The last pic on your post is great, but I can't make out the paint names on the paper labels. Do you have a better copy?
Posted by: jmill Feb 3 2017, 11:41 AM
Not really. I found it on Rennlist. Here's one that includes a description. I also included another pic with 2 colors side by side.
Looking at photos of Conda, Signal, Viper, Green, and Zambezi it's difficult to tell them apart unless they are side by side.
Attached thumbnail(s)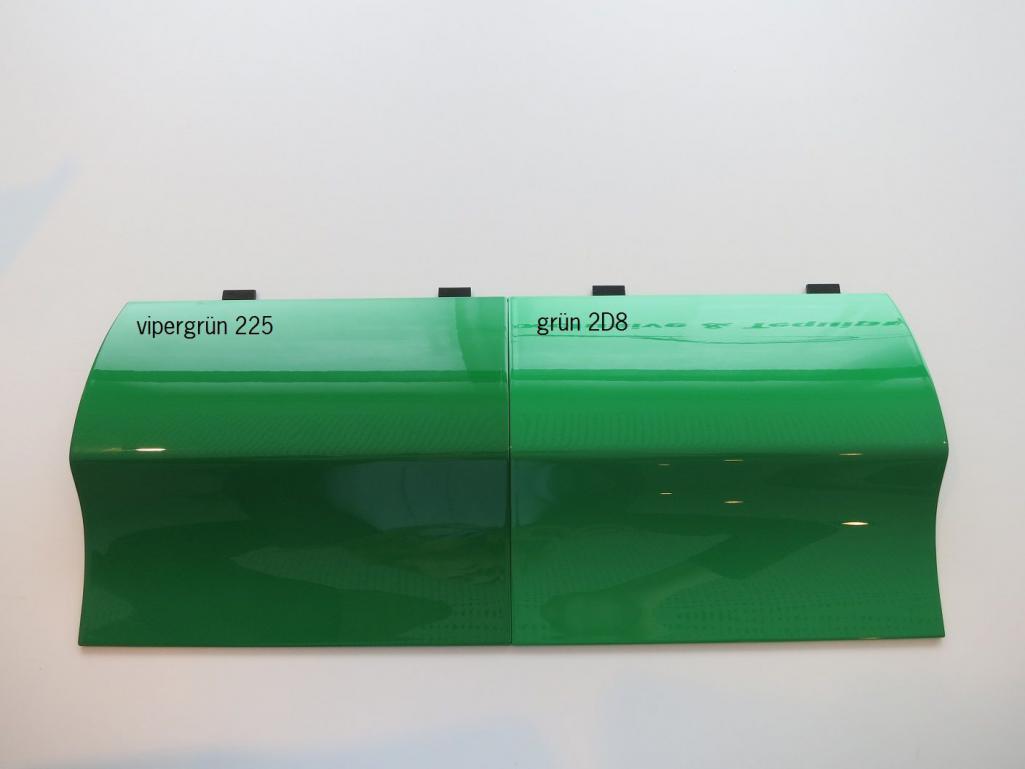
Attached image(s)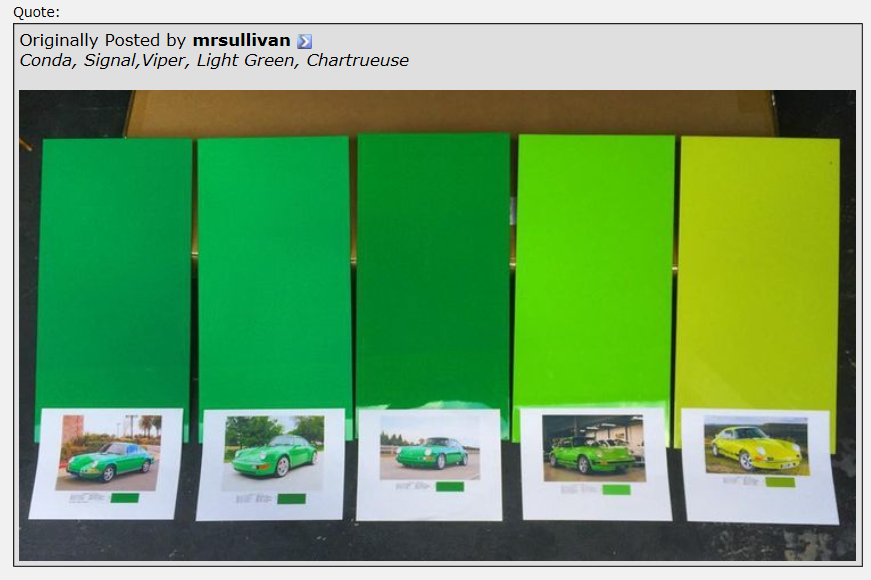
Posted by: Mitox Feb 3 2017, 01:04 PM
Not really. I found it on Rennlist. Here's one that includes a description. I also included another pic with 2 colors side by side.
Looking at photos of Conda, Signal, Viper, Green, and Zambezi it's difficult to tell them apart unless they are side by side.
Thanks,
I'm going to order a few custom mix spray cans so I can compare colors first hand. I think it's going to be either viper green, conda, or 2D8 Green from the 2007 GT3 RS.
Posted by: jmill Feb 3 2017, 02:54 PM
My favorite one.
Attached thumbnail(s)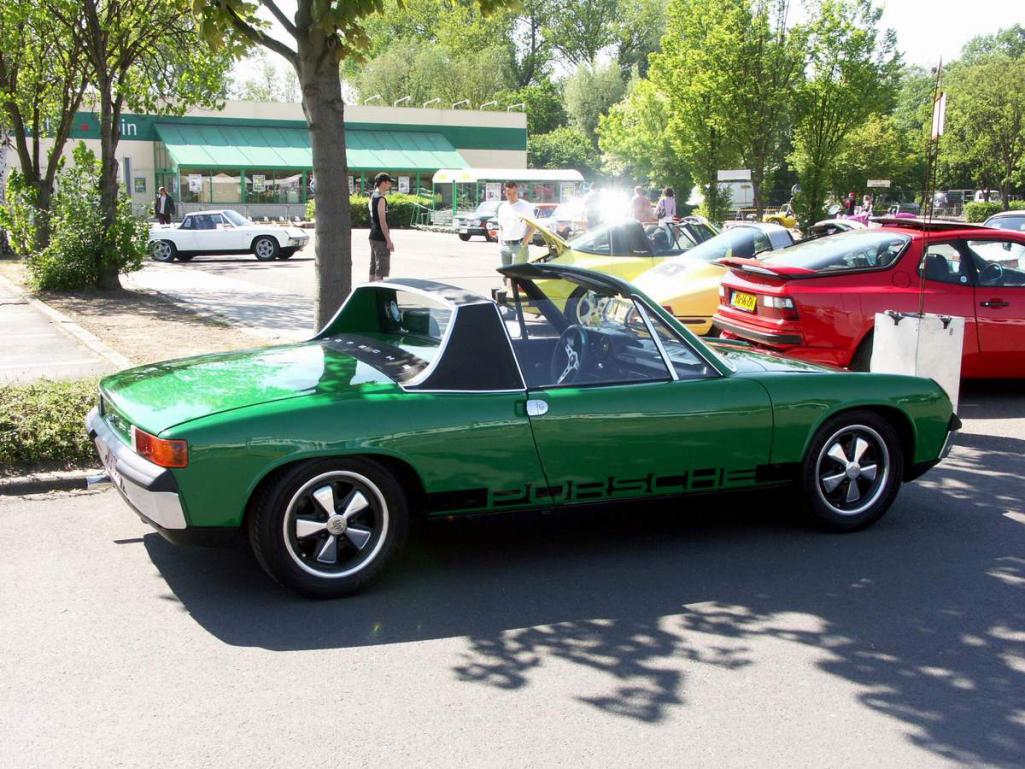
Posted by: Mitox Feb 3 2017, 03:40 PM
My favorite one.
I can see why! Very nice!
Posted by: Cal Feb 4 2017, 03:05 PM
Have you considered Irish Green?
Attached image(s)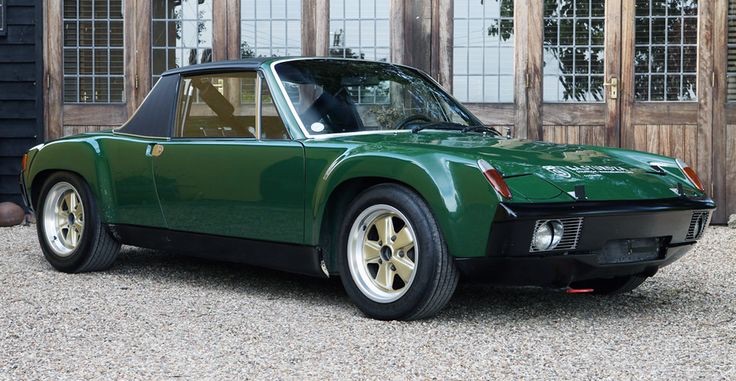
Posted by: Mitox Feb 4 2017, 06:51 PM
Have you considered Irish Green?
I like the Irish green; I've lusted for the second car you posted. However, I have the need for a bright color. 2D8 from the 2007 GT3 RS is growing on me.
Posted by: jmill Feb 5 2017, 11:17 AM
Here's a comparison between green (on the car) and signal green (sample). Too close to call IMHO.
Attached thumbnail(s)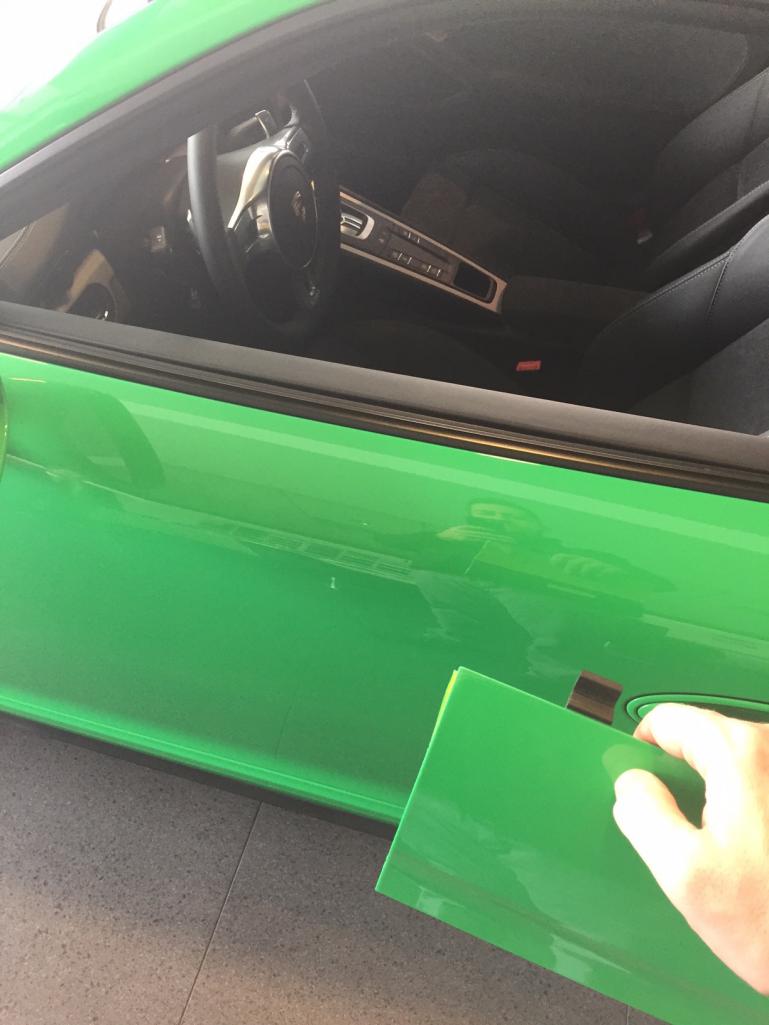
Attached image(s)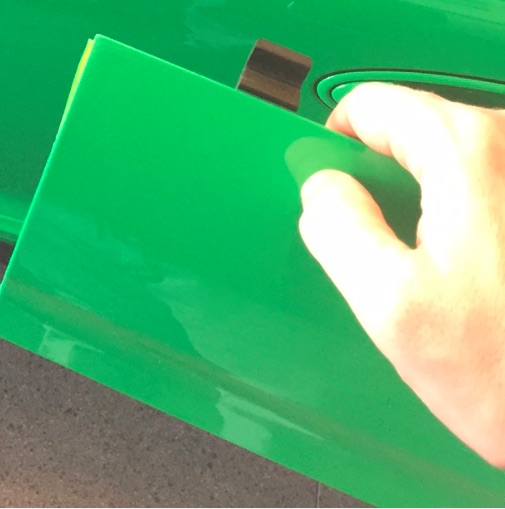
Posted by: Mitox Feb 5 2017, 12:29 PM
Here's a comparison between green (on the car) and signal green (sample). Too close to call IMHO.
Hmmm; looks like I need to get a spray can of signal green also. The two you show look very close. If anything, the signal seems to have a little more yellow in it.
Posted by: mepstein Feb 5 2017, 12:49 PM
It also depends what primer goes under the paint and even what brand of paint.
Posted by: Mitox Feb 11 2017, 12:50 PM
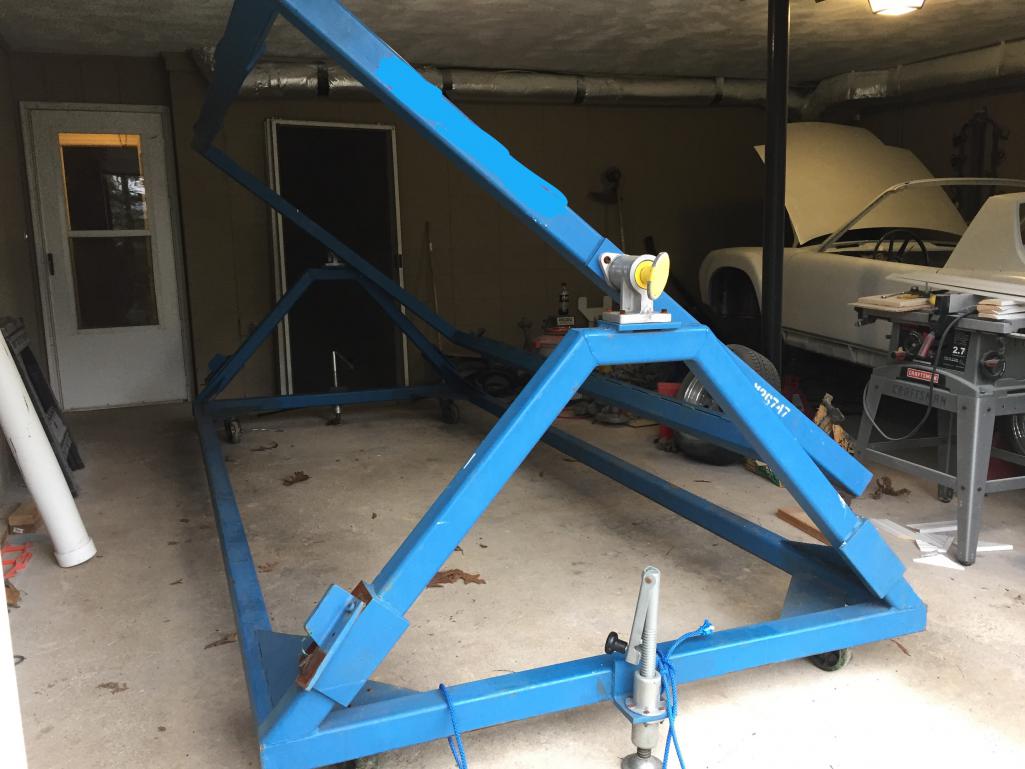
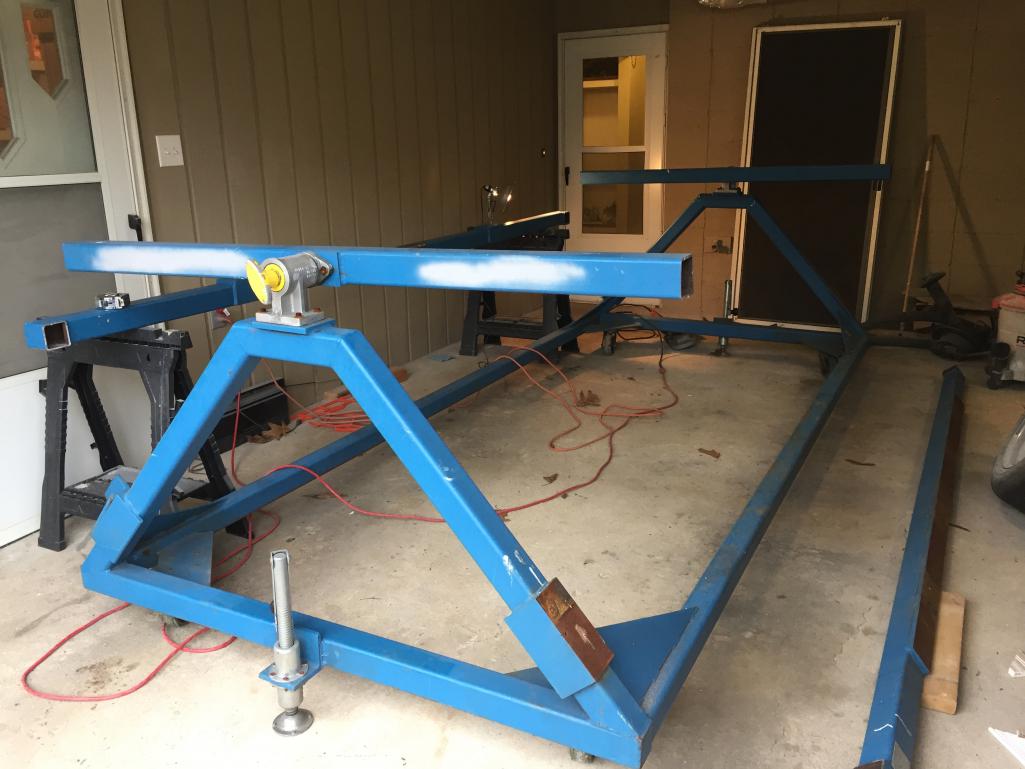
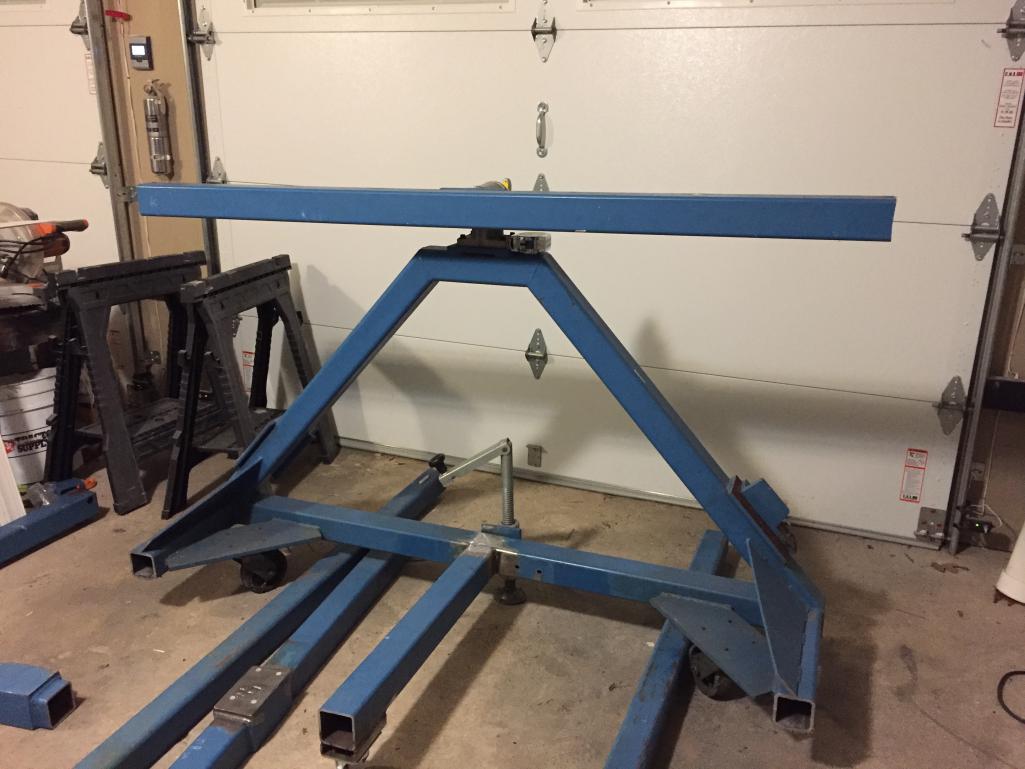
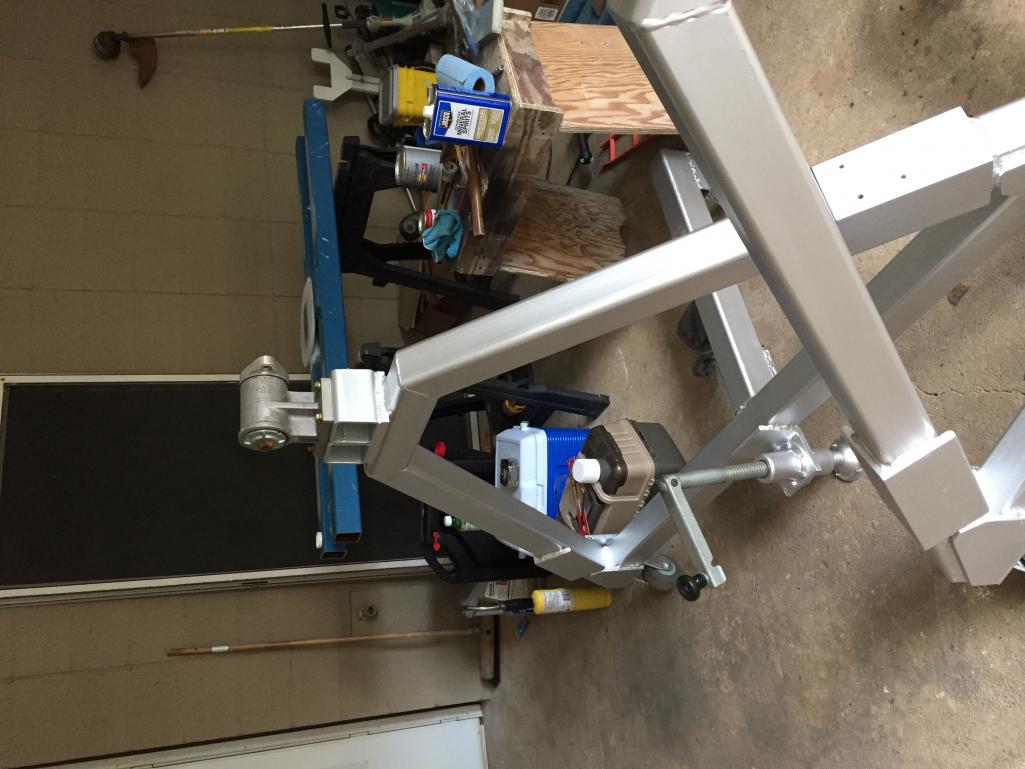
Time to build the rotisserie. I have a great starting point; it's a rotisserie built to assist with assembling aircraft landing gear doors - big aircraft.
So far I have cut the sides off of the rotating section. I plan to cut the sides off of the bottom also, and add a third leg and wheel to each end. Off to find a couple casters, and start welding. 
Posted by: horizontally-opposed Feb 11 2017, 02:32 PM
Irish is tough to argue with, but if you're after more color—and maybe something different than the Viper/Kelly/Signal (all of which look great) but still "period"—you might want to look into Gelb Grun or even Acid Green.
Gelb Grün on a GT3 RS:
http://rennlist.com/forums/vehicle-marketplace/947065-2016-porsche-gt3-rs-paint-to-sample-gelbgrun-cxx-options.html
http://rennlist.com/forums/991-gt3-gt3rs-and-911r/936564-gelbgrun-gt3-rs-delivered-4.html
Acid Green on a GT4 and 918
https://www.autoevolution.com/news/acid-green-porsche-cayman-gt4-gets-full-detailing-the-images-are-amazing-photo-gallery-103429.html#agal_6
https://hiveminer.com/Tags/acid,porsche
And, finally, good old Birch Green (I think...):
http://www.stanceworks.com/2014/04/admiring-an-icon-the-1974-porsche-3-0-rs/
Attached thumbnail(s)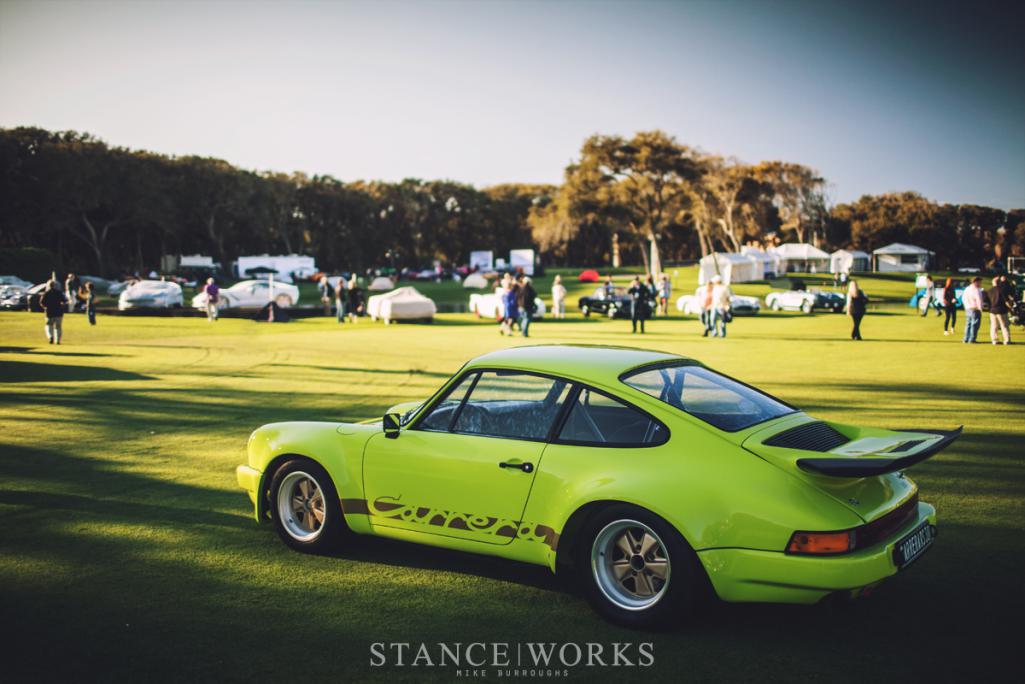
Attached image(s)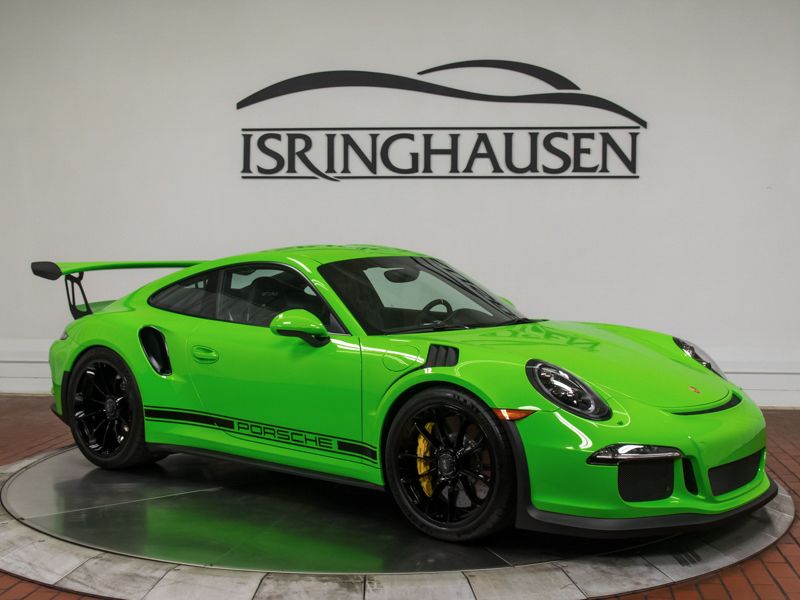
Posted by: southernmost914 Feb 11 2017, 04:09 PM
Signal
Posted by: Mitox Mar 2 2017, 08:54 PM
So, I've made some progress on the rotisserie. I've added a third leg and caster on each end, and removed the steel connecting the ends to each other. During March I need to make the mounting sections to connect to the 914 bumper locations, and get the car on the rotisserie.
I'd like to have the car as balanced as possible. Does anyone know the center of gravity vertically at the bumper mount locations?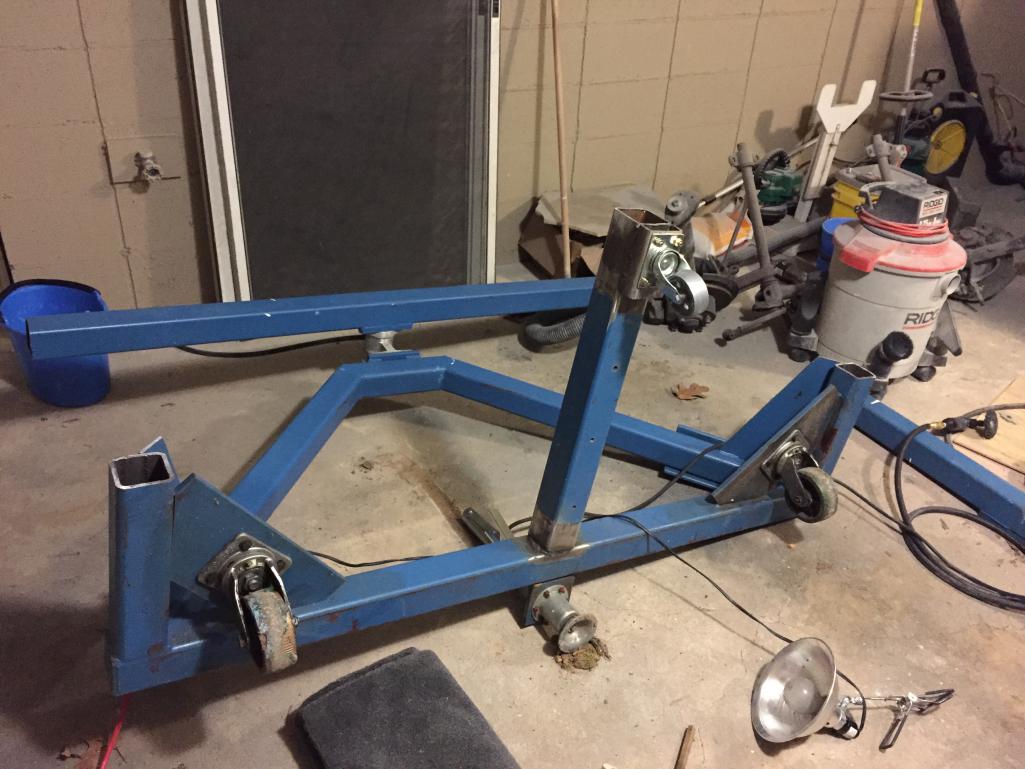
Posted by: speed metal army Mar 2 2017, 11:00 PM
L98B is nice 
That's a burly roto! NIce stuff.
Posted by: Mitox Mar 3 2017, 11:10 AM
L98B is nice
That's a burly roto! NIce stuff.
Love the Lime Green. Love the wheels also; I plan to have mine done the same way.
Posted by: Mitox Apr 16 2017, 05:32 PM
I've made some progress in the rotisserie. I expect to have it complete this week; I just need to add the mounting points to the arms and finish the paint.
The next project on the list is to cut the front oil cooler outlet hole once I decide which methods of venting to use. I like the PMS kit, but I don't think the outlet vent has enough open area. I also like some of the project pics I have seen that have the outlets in the wheels wells.
After the venting holes are complete, I'll put the car on the rotisserie and start stripping the bottom. I'm thinking of using the Upol Raptor on the bottom.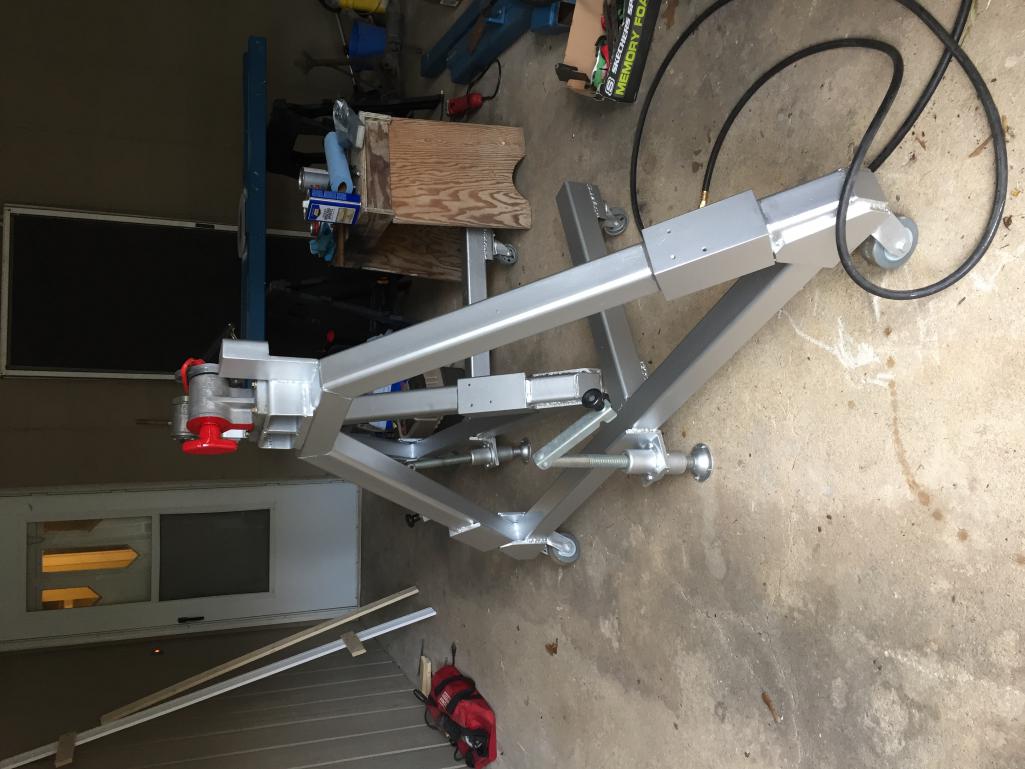
Posted by: ConeDodger Apr 16 2017, 07:13 PM
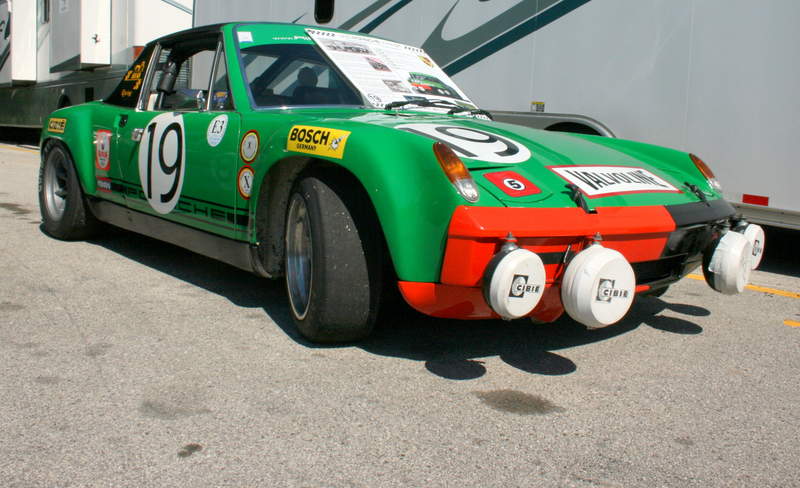
The Moritz race car is Conda Green. I've seen a Conda Green car in person and that color is soooo fantastic! 
Posted by: t collins Apr 16 2017, 07:38 PM
Keep up the good work neighbor 
Posted by: wndsrfr Apr 16 2017, 07:43 PM
Here's Lime Green on Kermeee.....
Posted by: Cracker Apr 17 2017, 05:50 AM
Nice job on the rotisserie...I would be interested in "renting" it in the future if that is an possibility. My friend sold the car to Forbes (so he could in turn provide it to you). I believe we spoke awhile back as you were "determining a course" for this car - looks like it is gaining momentum. Good job!
Tony
Posted by: Mitox Apr 17 2017, 09:05 PM
Signal
OK, I admit it. I keep coming back to lust over the paint on your car.
Posted by: Mitox Apr 17 2017, 09:09 PM
Nice job on the rotisserie...I would be interested in "renting" it in the future if that is an possibility. My friend sold the car to Forbes (so he could in turn provide it to you). I believe we spoke awhile back as you were "determining a course" for this car - looks like it is gaining momentum. Good job!
Tony
Yes, thanks for spending some time with me going over the project. Now I can see the path to paint, so I hope I can move quickly.
Posted by: Mitox May 11 2017, 06:32 PM
Just gathered a few pieces over the past several weeks, and traveled to Hershey for the swap meet. I was somewhat disappointed with Hershey; seeing the cars was great, but the swap meet didn't match the hype. Maybe I expected too much. Anyway, the day after the meet, I purchased a Carrera front suspension in North Carolina.
The other parts collected include the center of the firewall, which I will use to make a cover for an access hole. I'm also awaiting shipment of a hook and grommet from one of the recent group buys.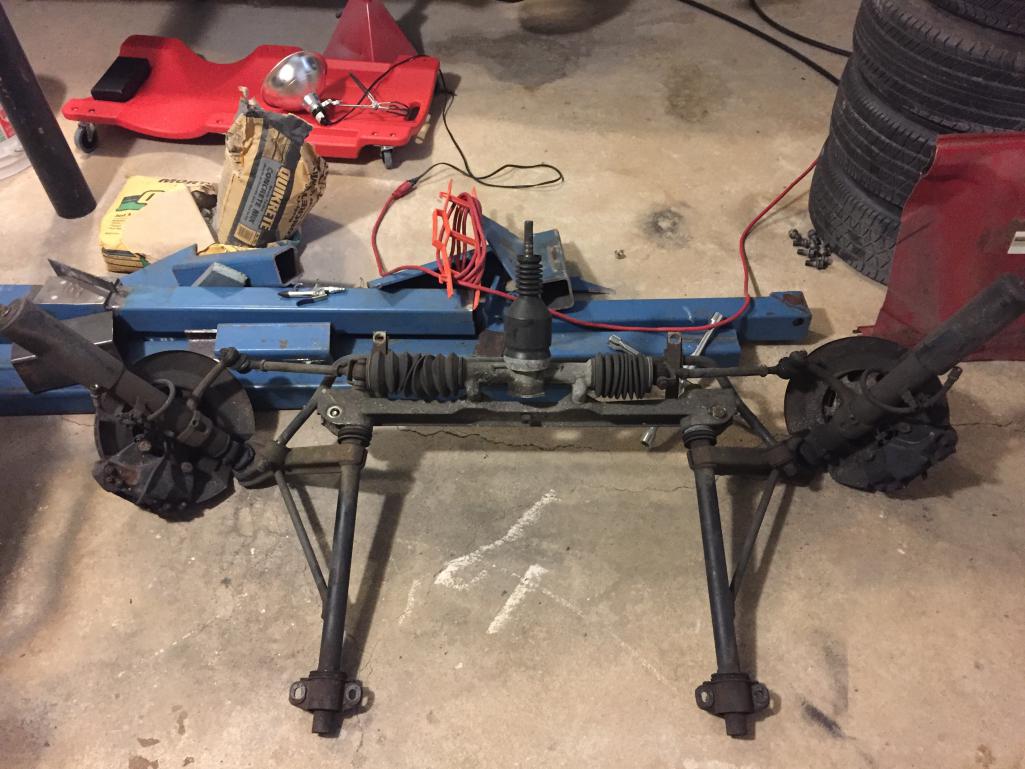
Posted by: Cracker May 11 2017, 07:37 PM
Looking good...make big piles of parts!
T
Posted by: Mitox May 13 2017, 07:29 PM
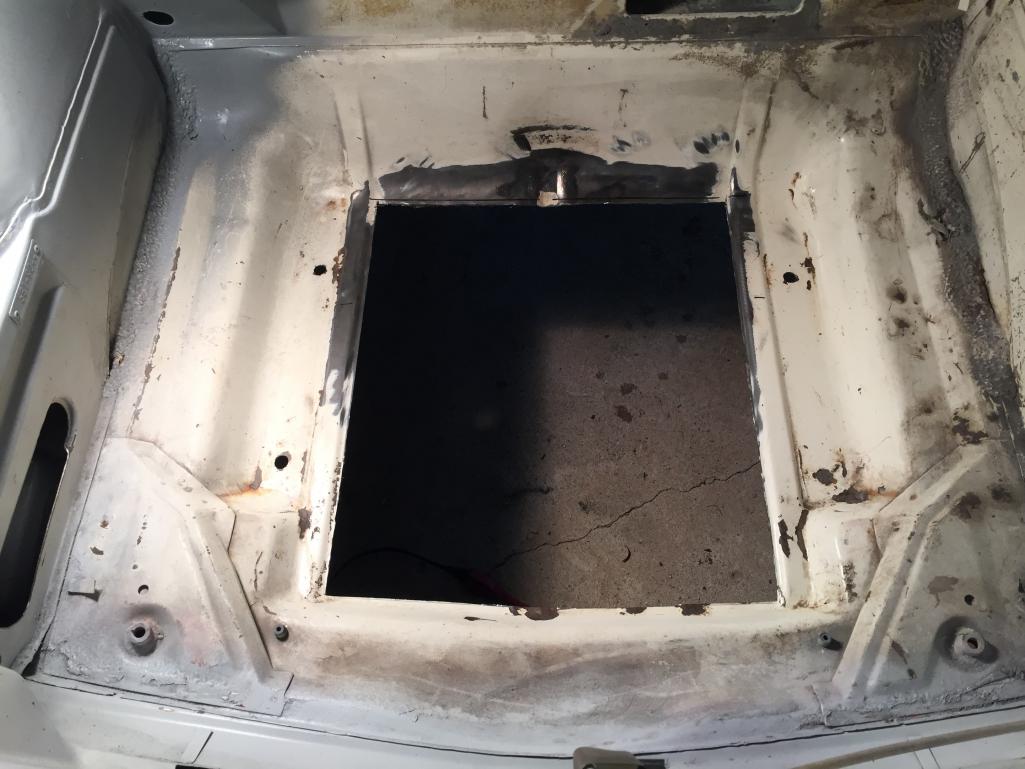
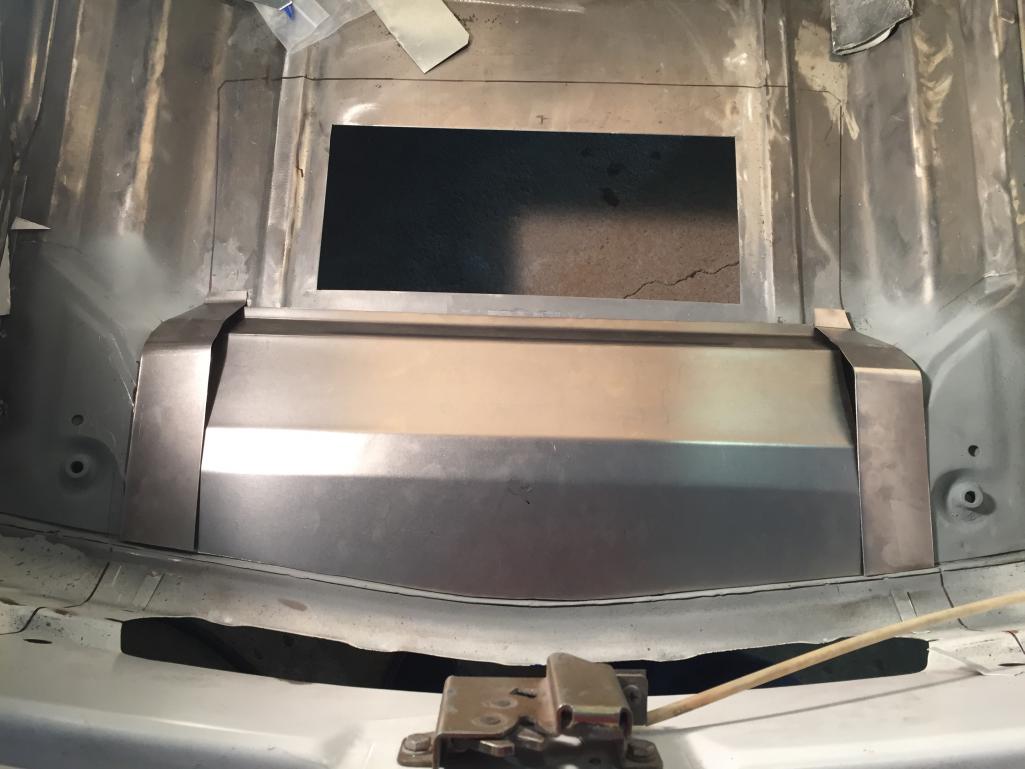
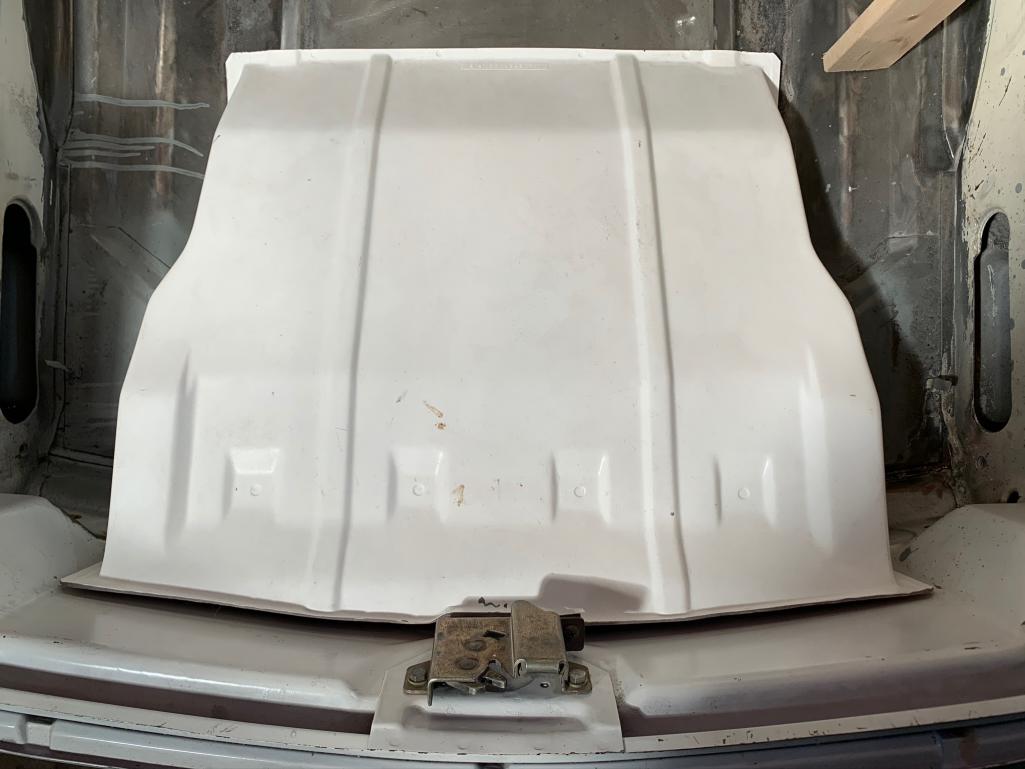
Worked on the metamorphosing 914 most of the day today. Removing the rear suspension was easier than expected; three bolts and three nuts per side. I also removed the hood and rear trunk lid, so now to get it in the air for attaching it to the rotisserie.
I've decided to add an access panel on the firewall. The cover will be made from a section I purchased from 914 Ecology a few days ago. I've completed the rough trim on the cover; real happy with how it turned out.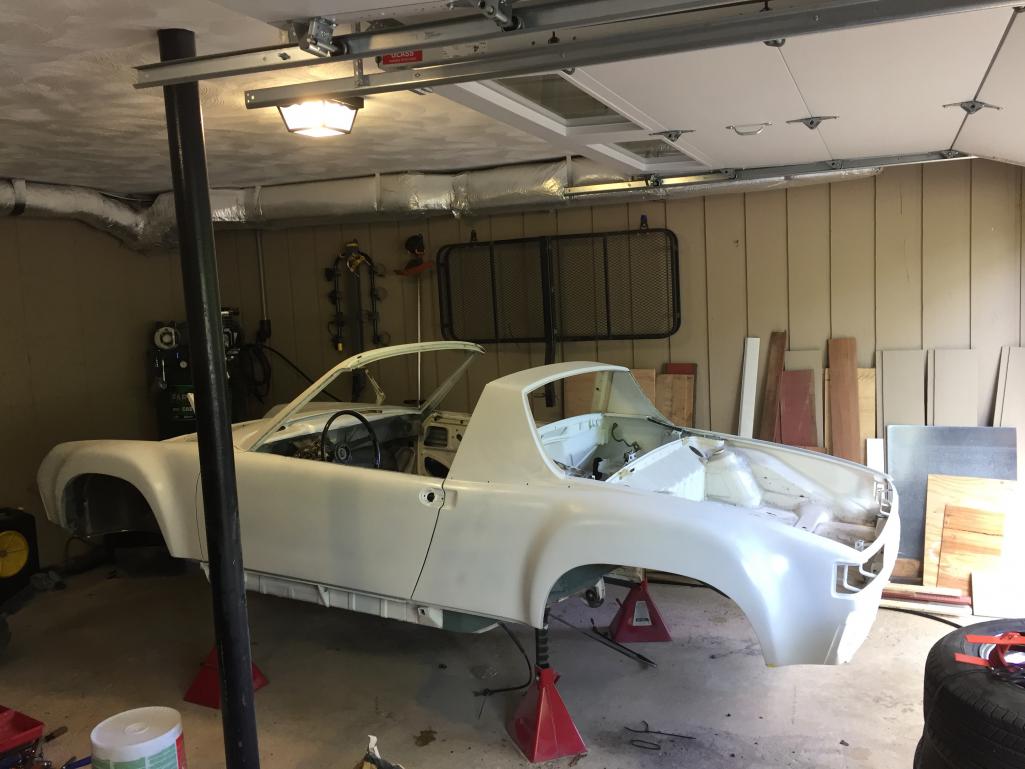
Posted by: Mitox May 13 2017, 07:36 PM
Can't decide whether or not to remove all of the old seem sealer in the trunk. I looks terrible, but its original. It may be interesting to keep the 41 year old fingerprint also.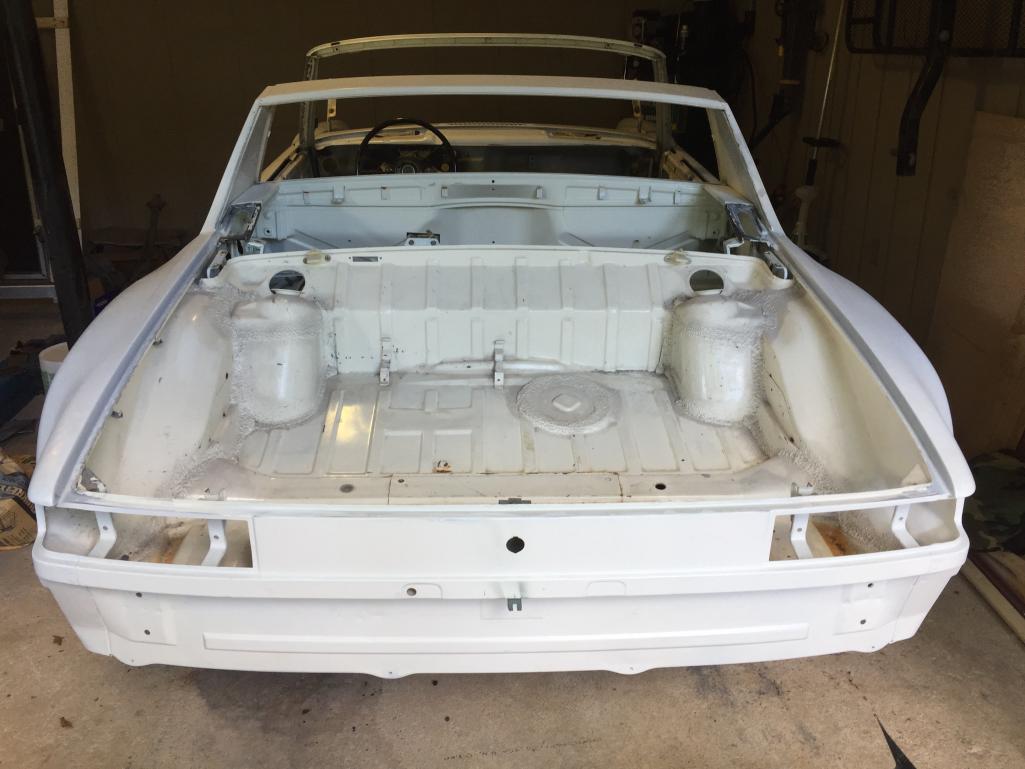
Posted by: raynekat May 13 2017, 07:43 PM
That just the way the factory did the seam sealer back in the day. I wouldn't touch it if it's good shape. It will grow on you I think. When I re-seam seal parts of my car, I'll try to replicate this unique factory application.
Oh...and the car looks great. Have a wonderful time with the re-do.
Posted by: Mitox Jul 21 2017, 07:57 PM
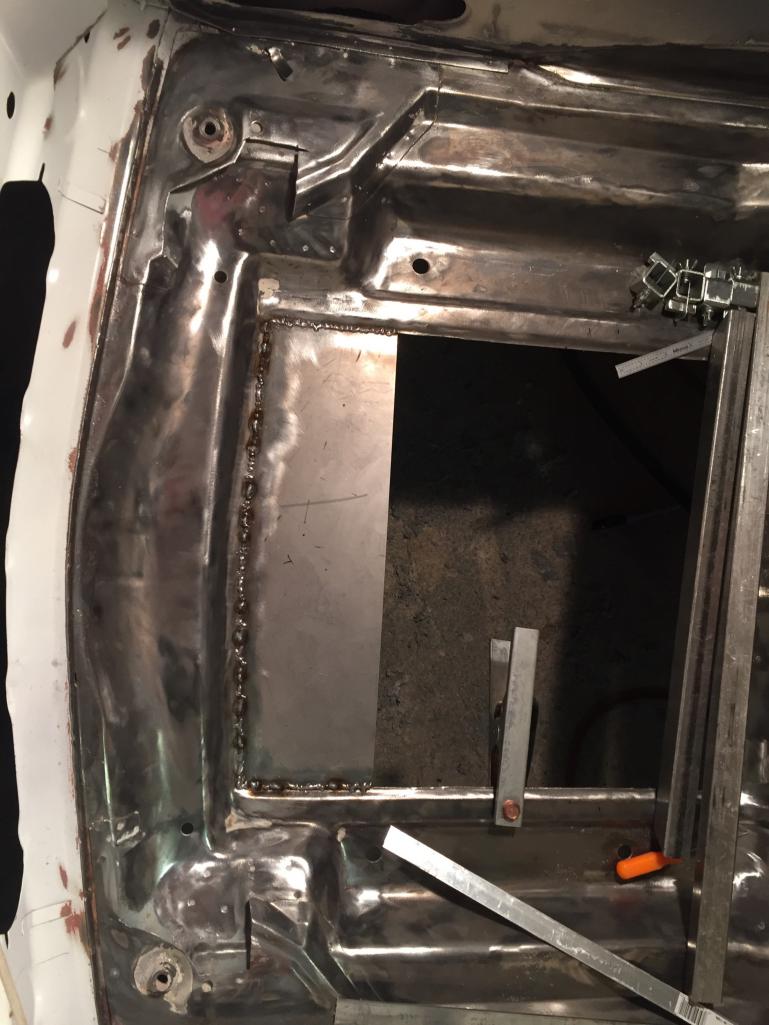
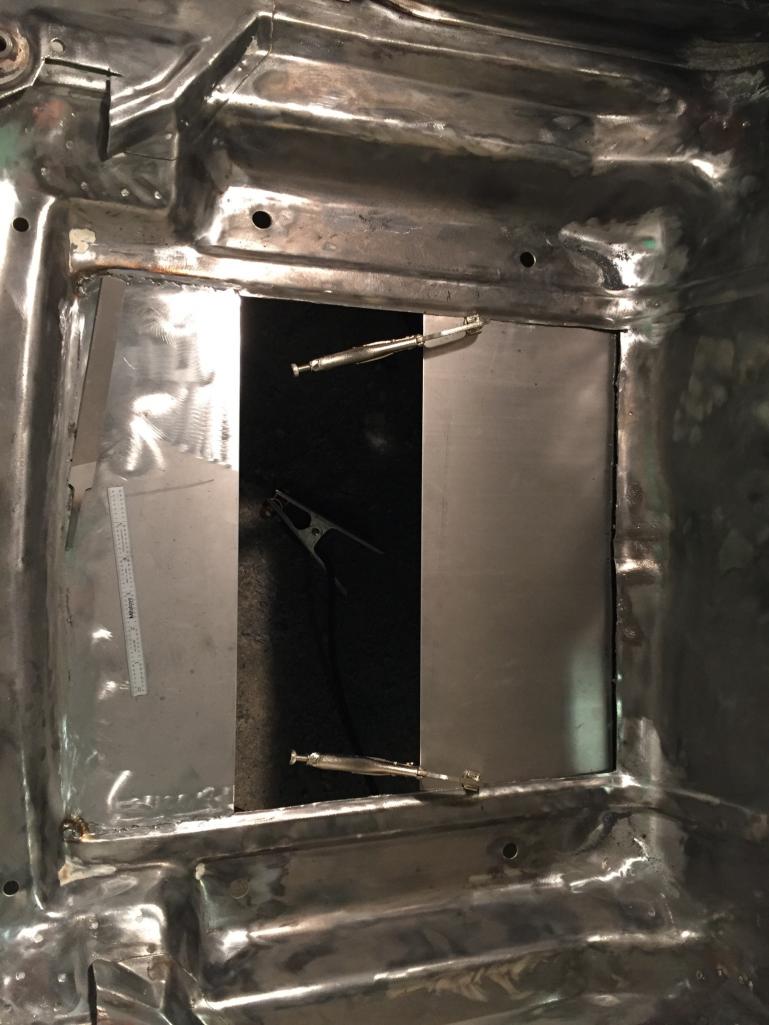
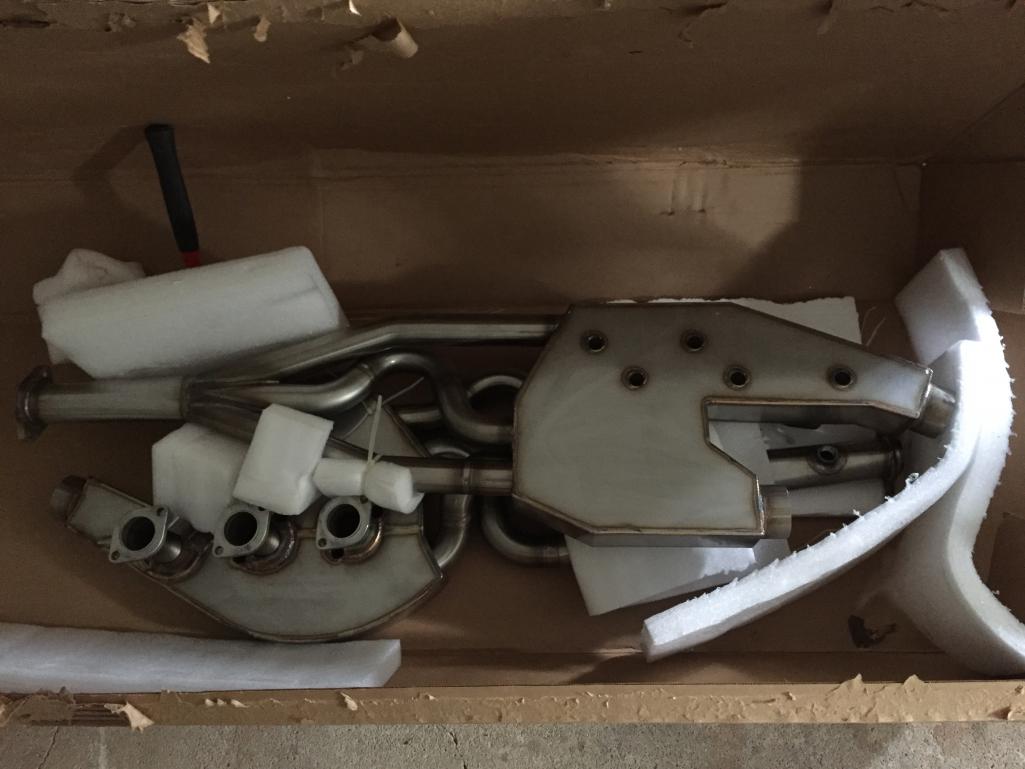
I've finally been able to work on the GT again recently. I purchase an oil cooler from PMS and the shroud from QRS before starting the work to be sure I cut and weld in the correct locations. Here are a few pics of the progress.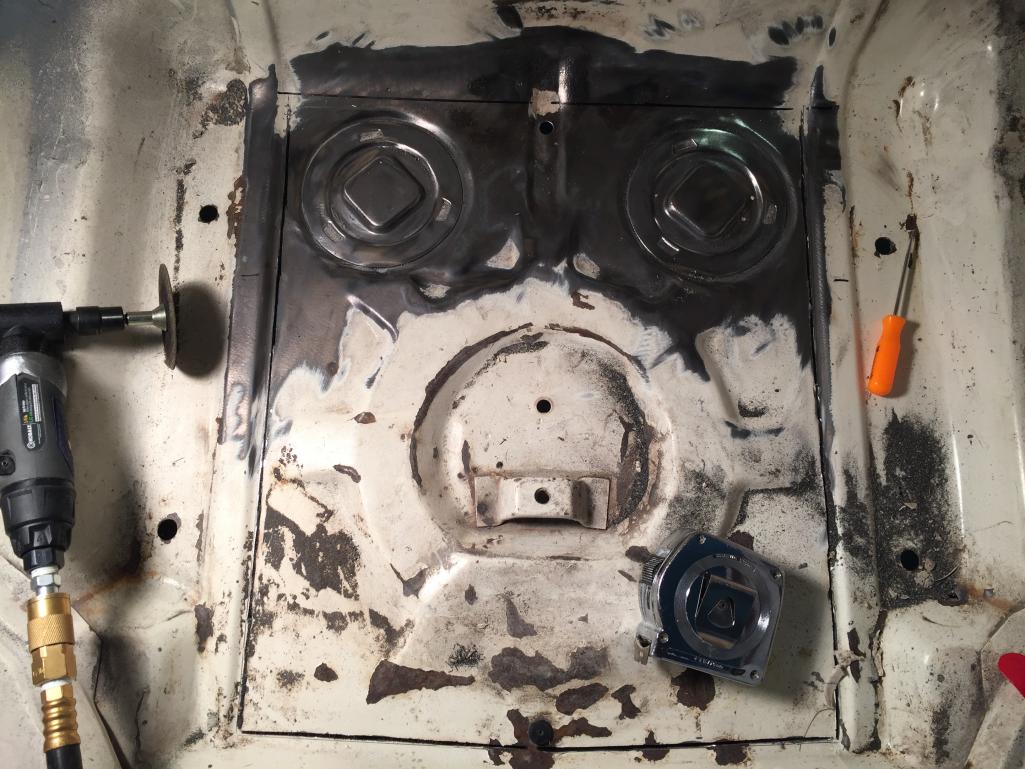
Posted by: Mitox Jul 21 2017, 08:01 PM
More pics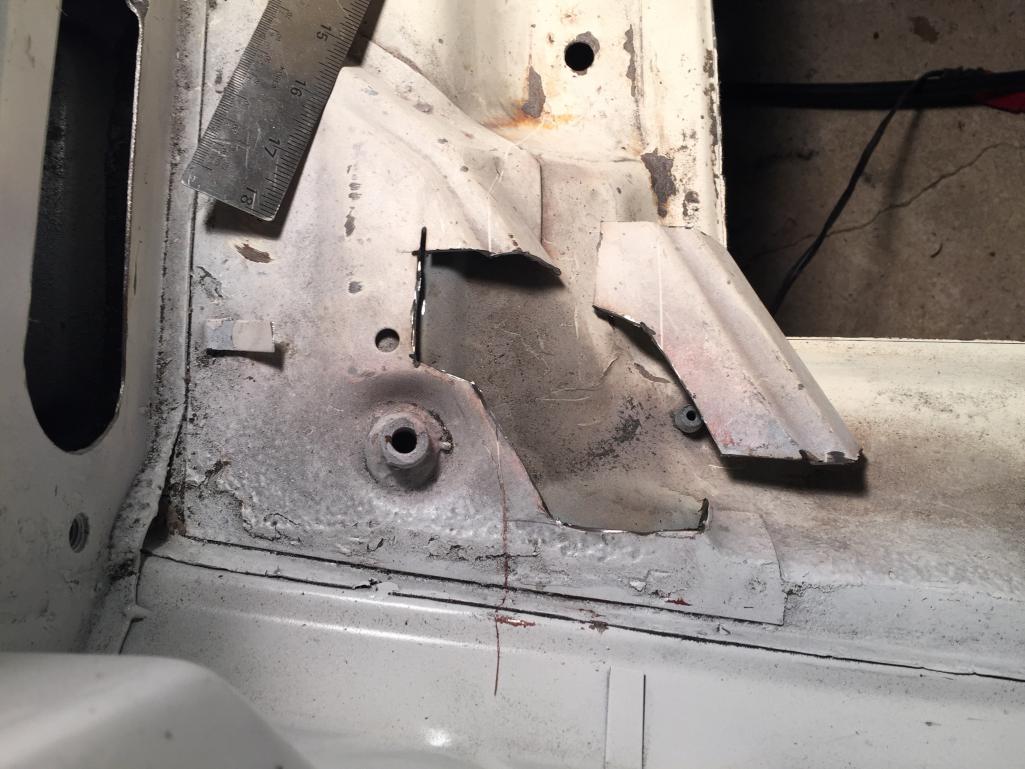

Posted by: Mitox Jul 21 2017, 08:03 PM
More pics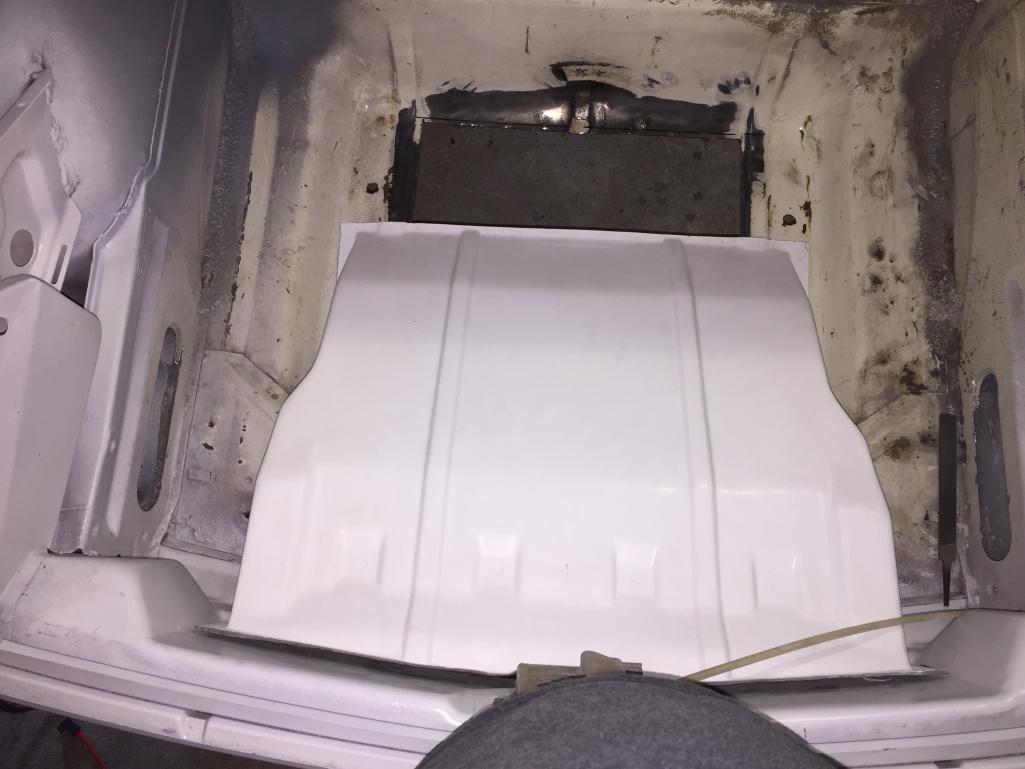

Posted by: Mitox Jul 21 2017, 08:14 PM
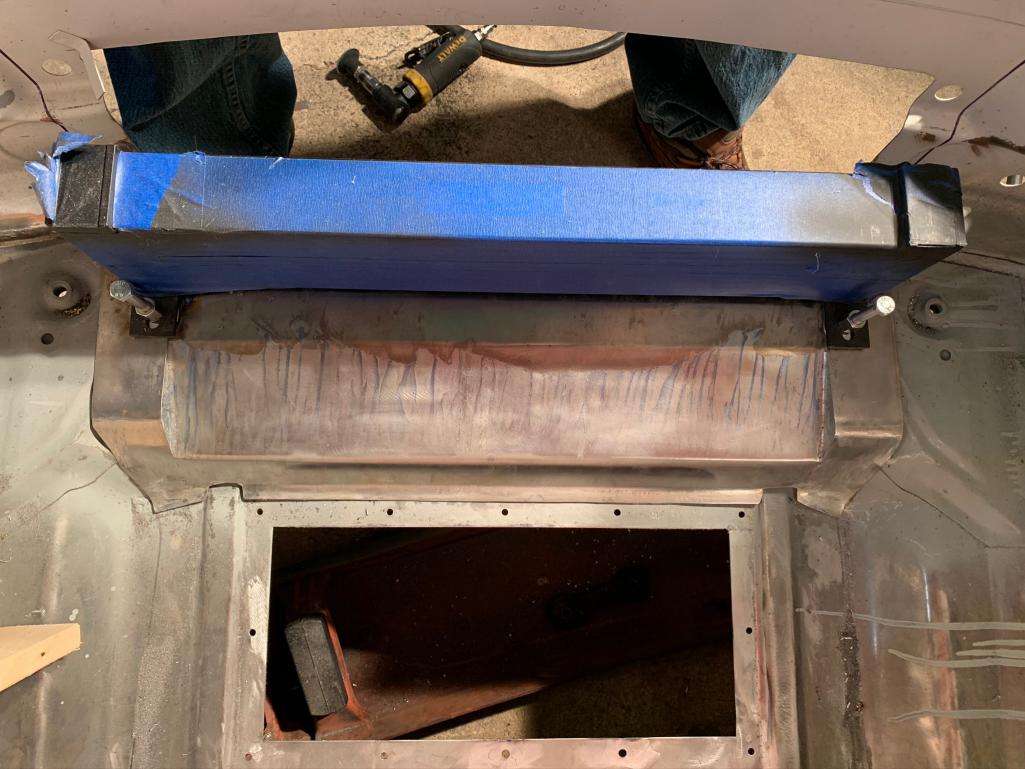
Saturday's project is to finish fitting the braces shown in the pic below, and weld them in. I really liked what Armando did to his car as shown in his "Last New 914-6 GT Project" thread, so I'm using his ideas.
I'll also weld in sheet metal for the floor defining the outlet vent for the cooler.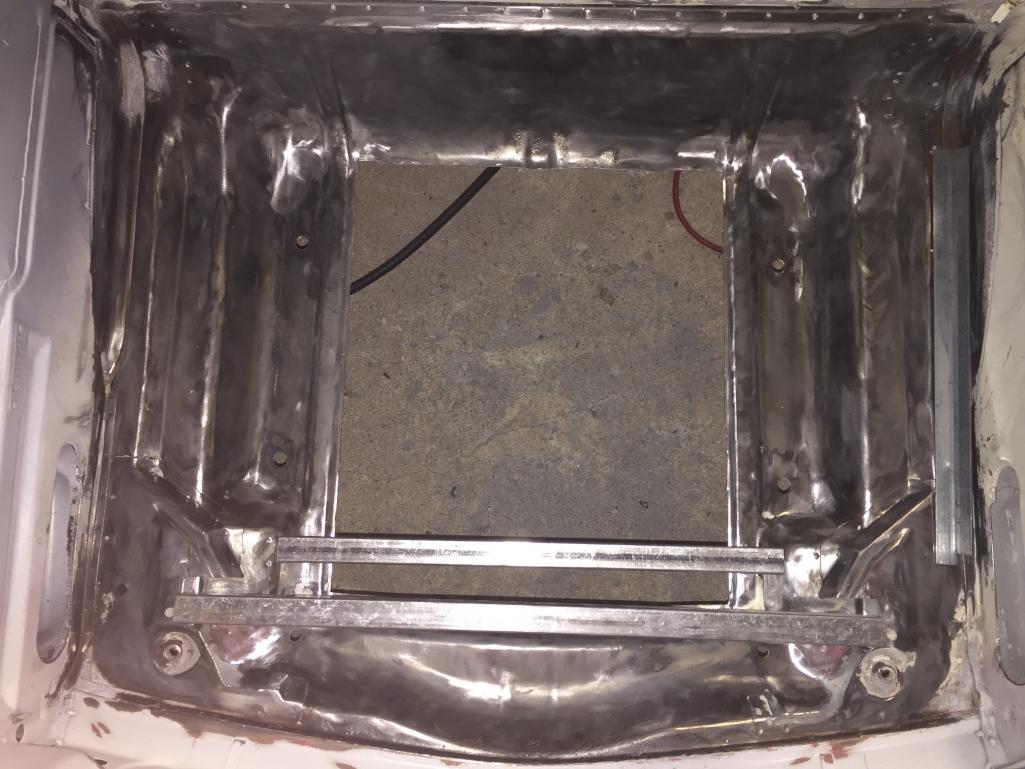
Posted by: Larmo63 Jul 21 2017, 09:16 PM
I'm doing all of these installs, actually I'm a bit ahead of you and done with them. I know what it takes to do this...
What you're doing looks great!!!!
Posted by: defianty Jul 22 2017, 07:57 AM
Good work, I was going to make my front trunk floor cut a different size to that but after seeing yours I think that's the way to go. Thanks.
Posted by: Mitox Jul 22 2017, 09:09 AM
Good work, I was going to make my front trunk floor cut a different size to that but after seeing yours I think that's the way to go. Thanks.
If I had access to a bead roller, the replacement sheet metal would have a wide channel bead in the middle to tie into small section remaining on the car.
Posted by: Mitox Jul 22 2017, 09:18 AM
I have a question for those more wise than I - everyone.
When I removed the floor section, the tow hook went with it. I think if I replace it closer to the front of the car it will be blocked by the front valance under the bumper, and the valance would be destroyed if I ever used the tow hook. What do you think?
An alternative would be to leave the tow hook off, and use bolt on hooks that mount to the front suspension mounts. Do these tow hooks work well? Tarett has one that looks good.
Any input is appreciated. Thanks
Posted by: Mitox Jul 22 2017, 09:21 AM
I'm doing all of these installs, actually I'm a bit ahead of you and done with them. I know what it takes to do this...
What you're doing looks great!!!!
It's my first time doing anything like this, so I'm moving incredibly slow. Do you have any pics of yours?
Posted by: SirAndy Jul 22 2017, 11:01 AM
I'm a bit late to the party but for a period correct GT replica, Conda Green (26G) is the only green way to go.

The Max&Moritz GTs were Conda Green and there is at least one car we know of (not a GT) that was delivered in Conda Green from the factory using the correct 26G paint tag instead of a 98 (Custom Color) tag. Even though Conda Green was never an official 914 color.

Posted by: Larmo63 Jul 22 2017, 12:46 PM

Posted by: mepstein Jul 22 2017, 02:03 PM
Welcome & looks like your starting it right! What are you doing drivetrain wise
I found a 3.2 out of a wrecked '88 to slip in there.
Are you using the 915 trans
Posted by: Mitox Jul 22 2017, 05:00 PM
Welcome & looks like your starting it right! What are you doing drivetrain wise
I found a 3.2 out of a wrecked '88 to slip in there.
Are you using the 915 trans
I want to use a 915, but I'll likely start out using the 901 and change it out later after it detonates.
Posted by: Mitox Jul 22 2017, 05:27 PM
I'm a bit late to the party but for a period correct GT replica, Conda Green (26G) is the only green way to go.
The Max&Moritz GTs were Conda Green and there is at least one car we know of (not a GT) that was delivered in Conda Green from the factory using the correct 26G paint tag instead of a 98 (Custom Color) tag. Even though Conda Green was never an official 914 color.
Conda is in the running still. I purchased a few custom mix spray bombs, so I can paint samples for comparison. I have three colors to try: conda green, viper green, and 2D8 green from 2007.
Posted by: Mitox Jul 22 2017, 05:29 PM
Very nice; and its green which makes it even better
Posted by: Mitox Aug 6 2017, 09:03 PM
I completed the front trunk floor welding last weekend and did some touch-up and grinding to smooth it out over the next few days. Still need to smooth the corners; waiting on Amazon to deliver a smaller roloc set.
I also filled in the four small holes in the floor. Why are they there anyway?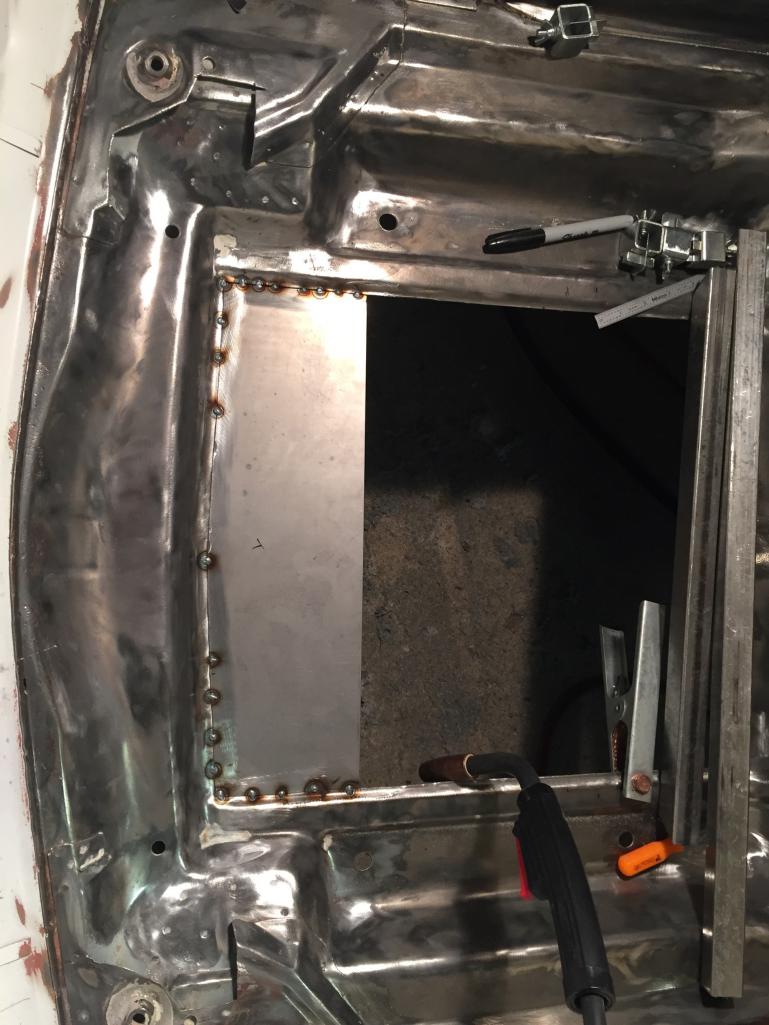
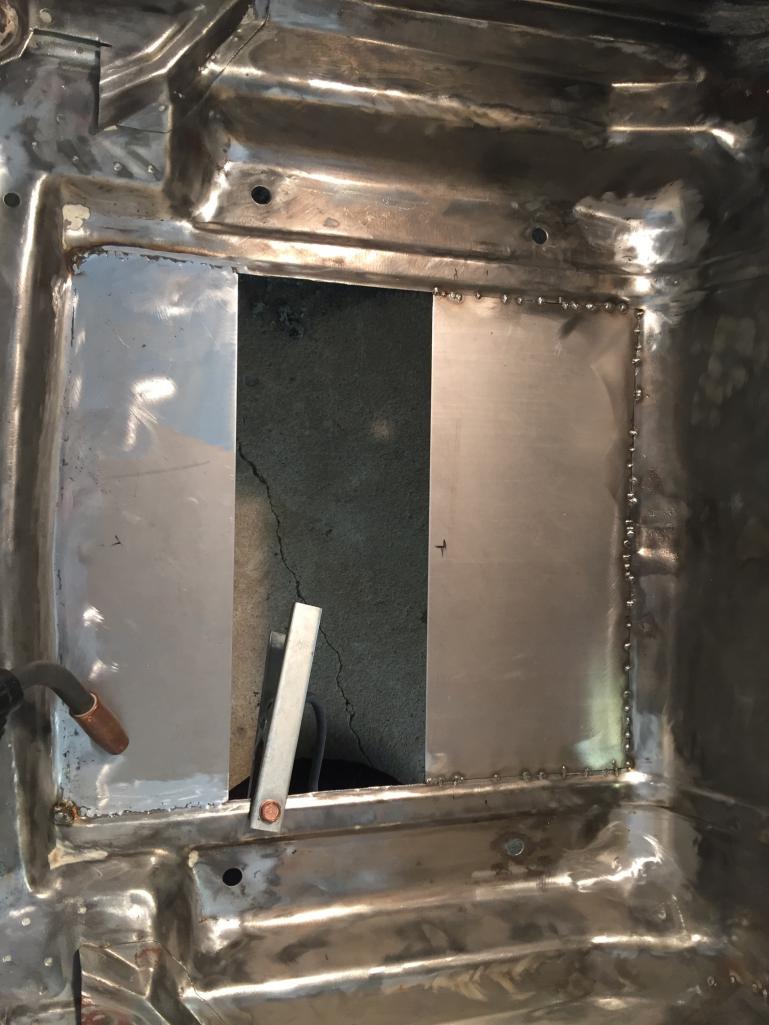
Posted by: Mitox Aug 6 2017, 09:09 PM
Here the almost finished shot. Needs minor smoothing. Not too bad I guess for the first time welding sheet metal.
The spare tire I purchased should arrive Tuesday, so need to figure out how to mount it vertically in the trunk wall this week.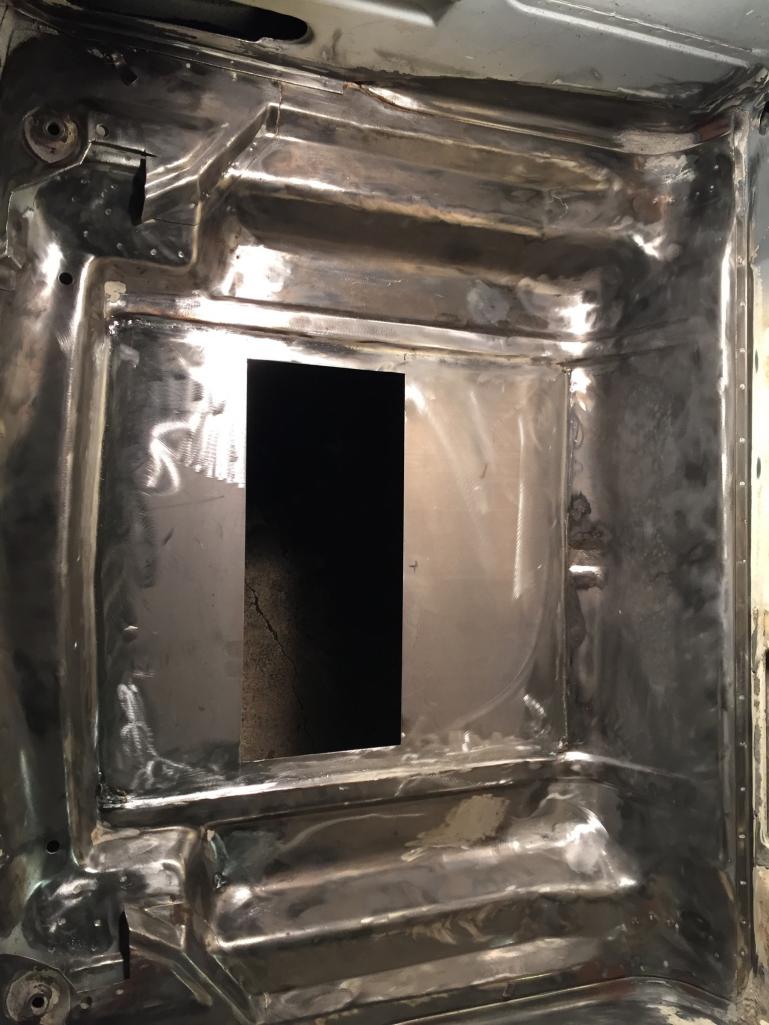
Posted by: Mitox Aug 20 2017, 06:35 PM
I've been contemplating how to mount the spare tire for a while. I finally settled on a plan and completed the tire mount this weekend. I welded up the bracket shown below, and added a couple studs to the car to attach it to. Should work OK.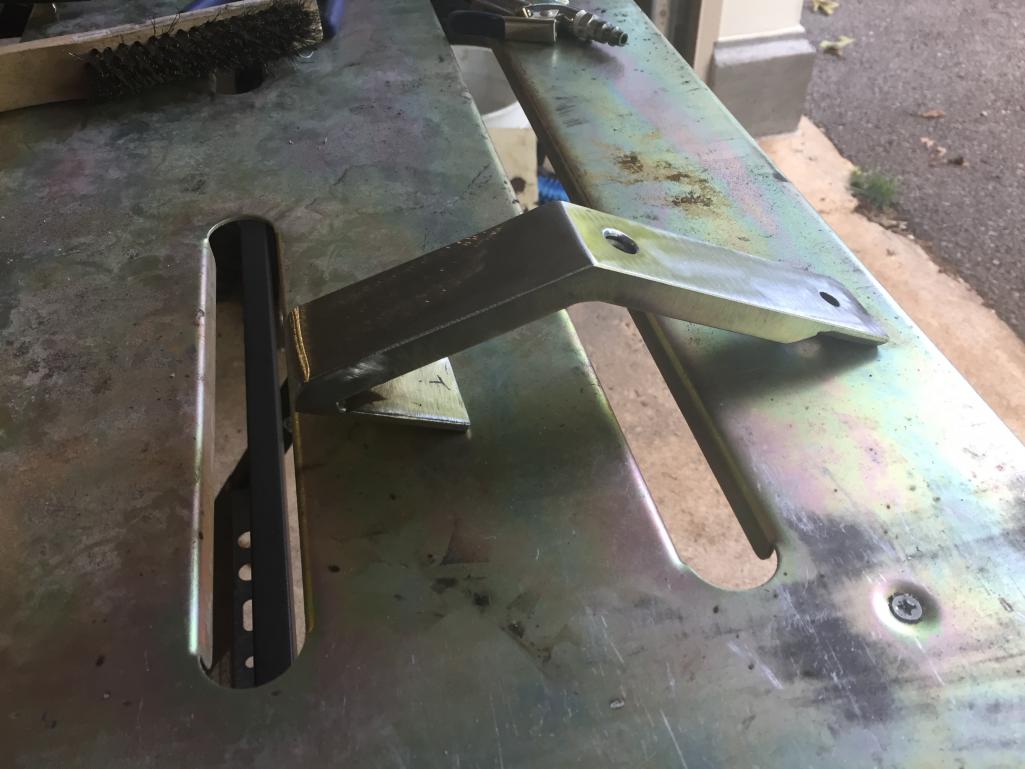
Posted by: Mitox Aug 20 2017, 06:36 PM
Posted by: Spoke Aug 20 2017, 06:46 PM
There's always Ravenna green as well.
Attached thumbnail(s)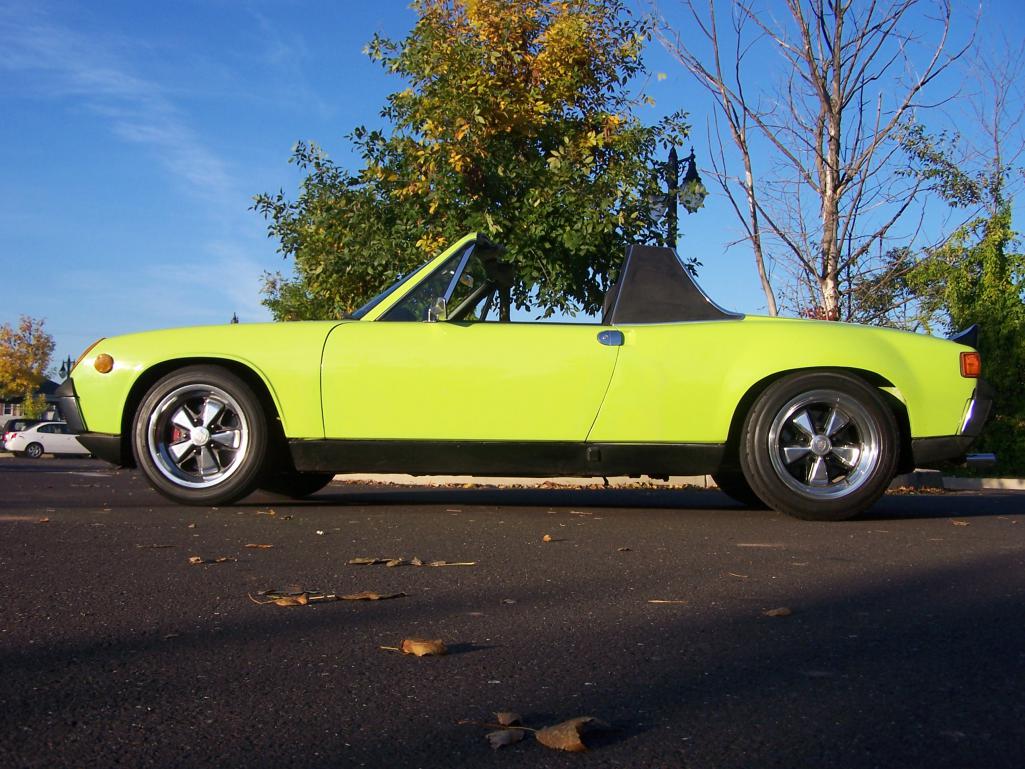
Posted by: Spoke Aug 20 2017, 08:30 PM
BTW, great build. Good luck. Looking forward to seeing it completed.
Posted by: Mitox Aug 20 2017, 08:38 PM
BTW, great build. Good luck. Looking forward to seeing it completed.
Thanks,
hope to get it up on the rotisserie next month to strip the bottom
Posted by: Mitox Aug 27 2017, 07:13 PM
Didn't get to work on the project much this weekend. It's probably good though, because my welding was rather poor. It took a while, but I welded in the reinforcements today. I'll prime the area and weld the sections that I cut out earlier in the coming few days. 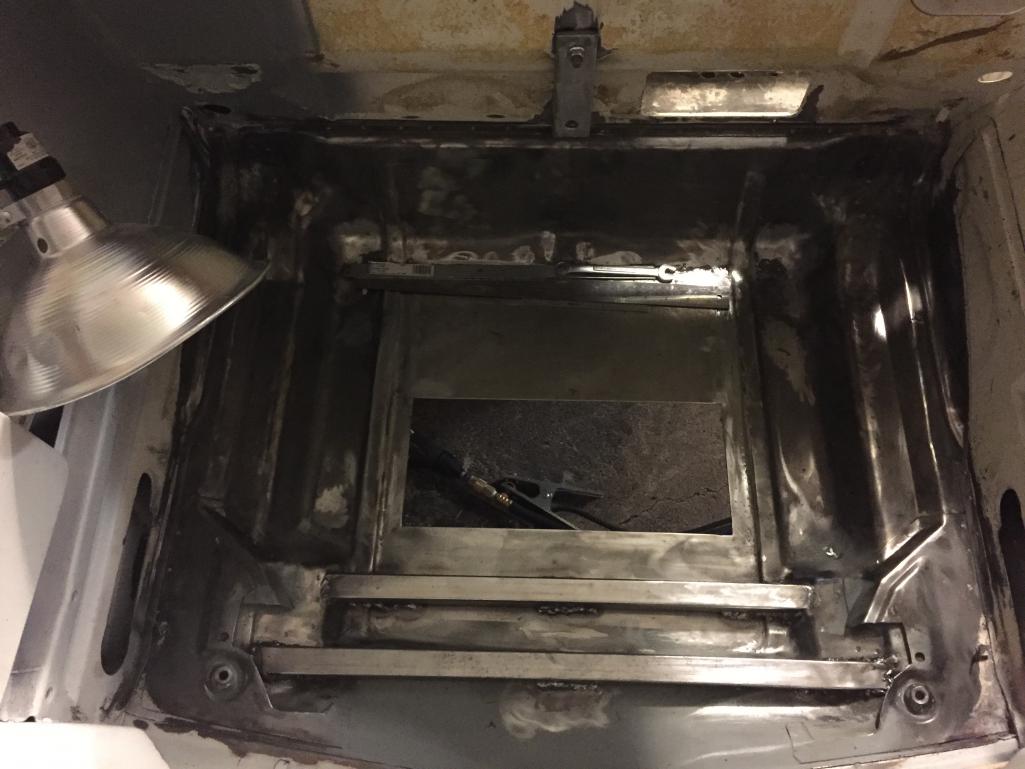
Posted by: Mitox Sep 3 2017, 07:07 PM
I've completed the reinforcements and welded the cut outs back; here's a few pics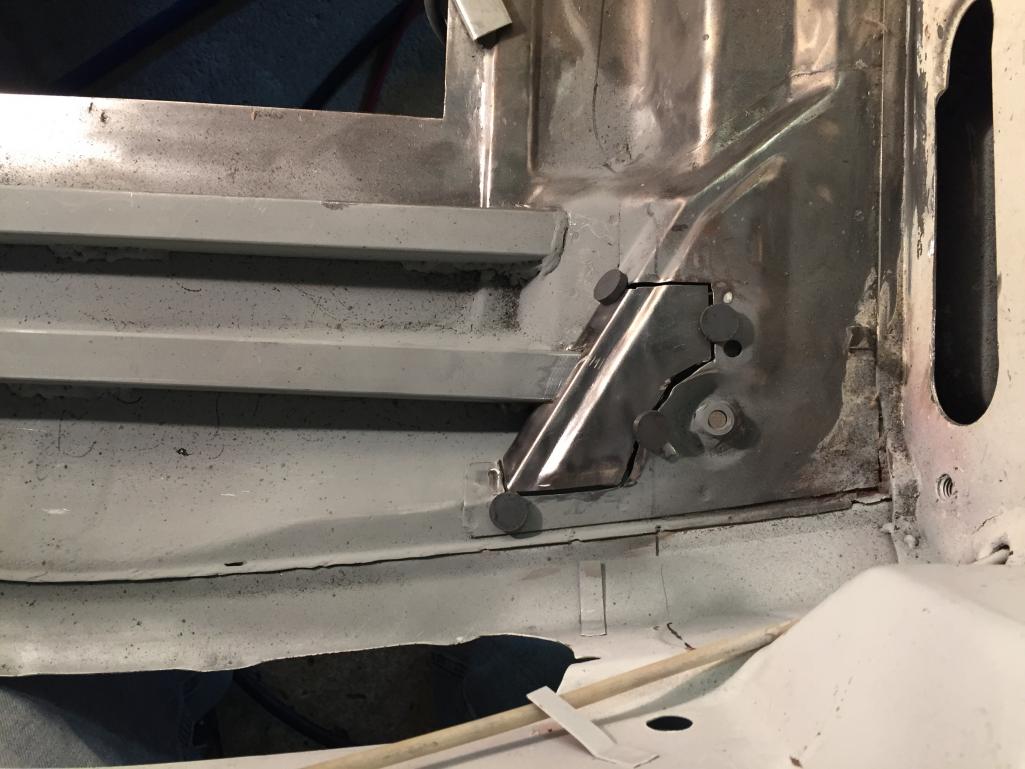
Posted by: Mitox Sep 3 2017, 07:10 PM
Completed this section of the project, so tomorrow I'll start fitting the oil cooler shroud, and figuring out a way to mount the oil cooler.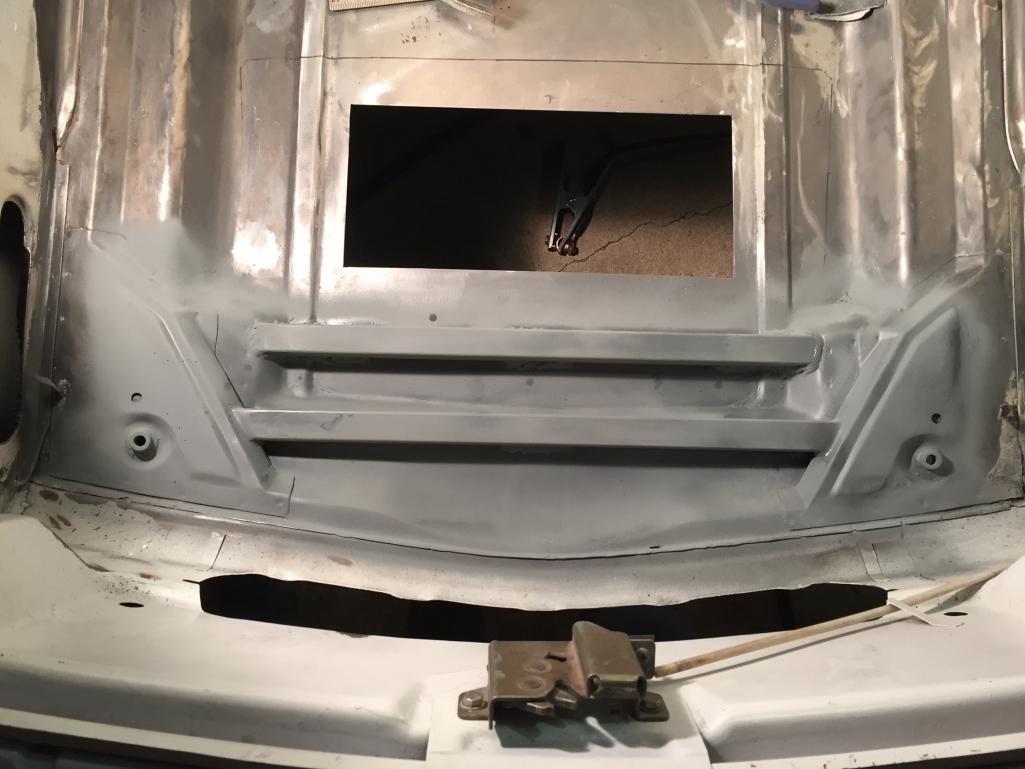
Posted by: totle Sep 4 2017, 07:38 AM
Great work. In the same process with my conversion.
Did similar in the front for the oil cooler ducting.
Posted by: Mitox Sep 4 2017, 09:00 AM
Cleaniing the garage this morning, and need to make space. I'm thinking about trashing the old four lug wheels. I have all four.
Anyone need them? I'm in SW Virginia in Marion.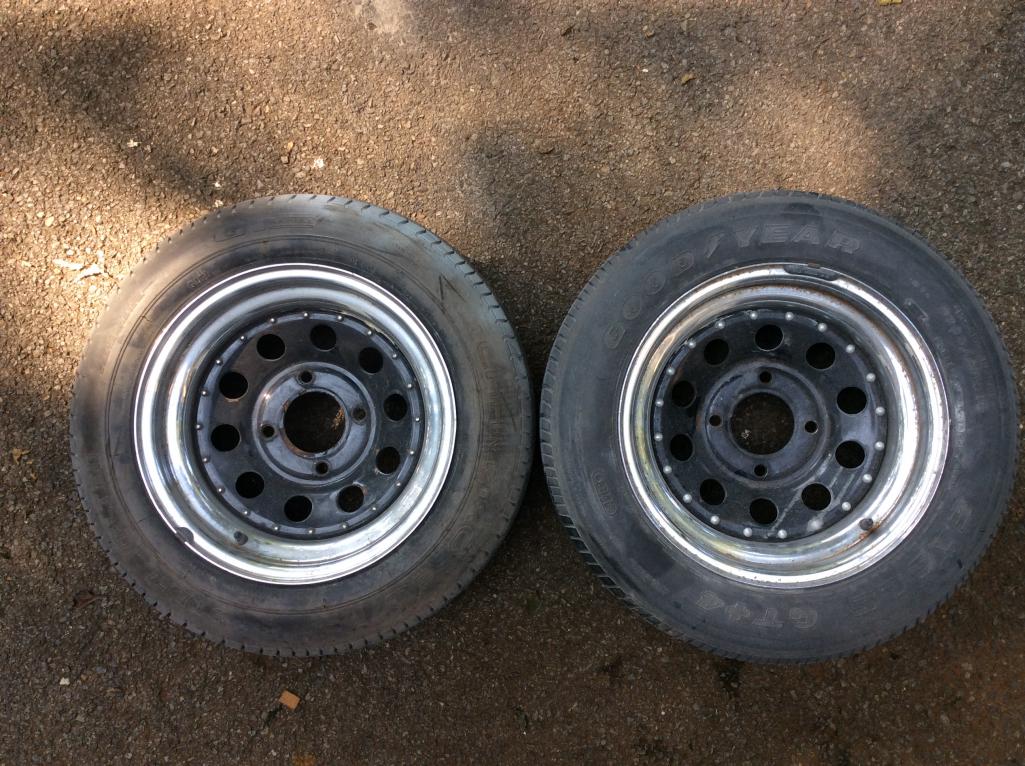
Posted by: Mitox Sep 8 2017, 08:55 PM
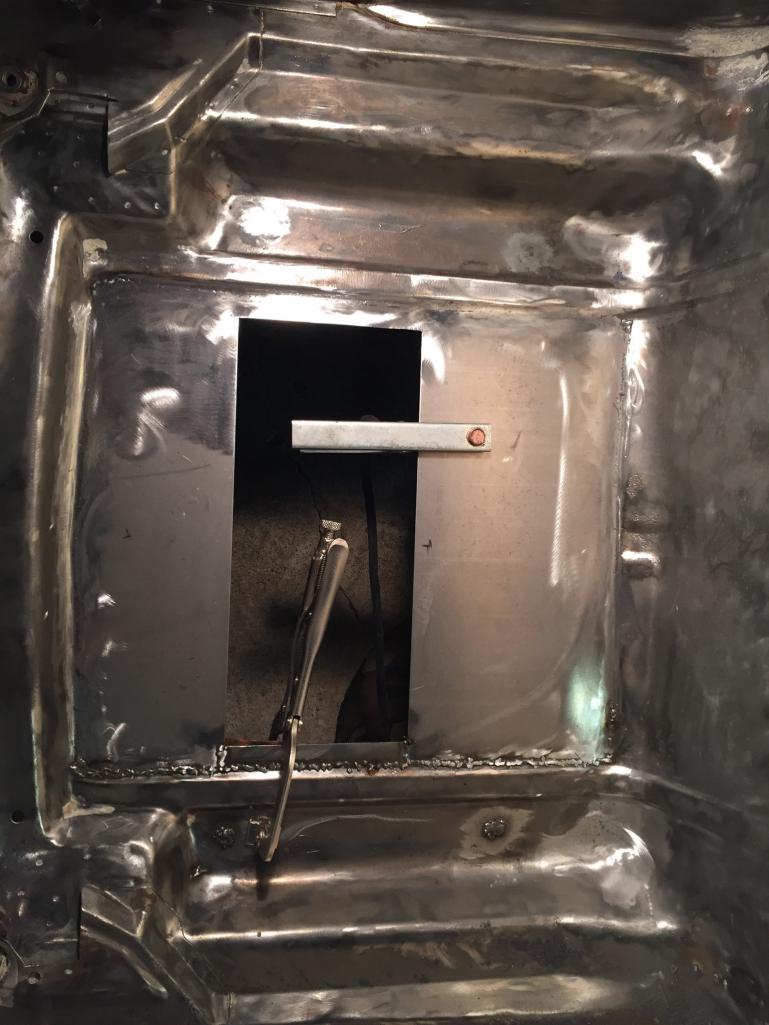
Getting close to finishing the oil cooler mod. Made a template this evening, so tomorrow it turns into steel with a few minor changes.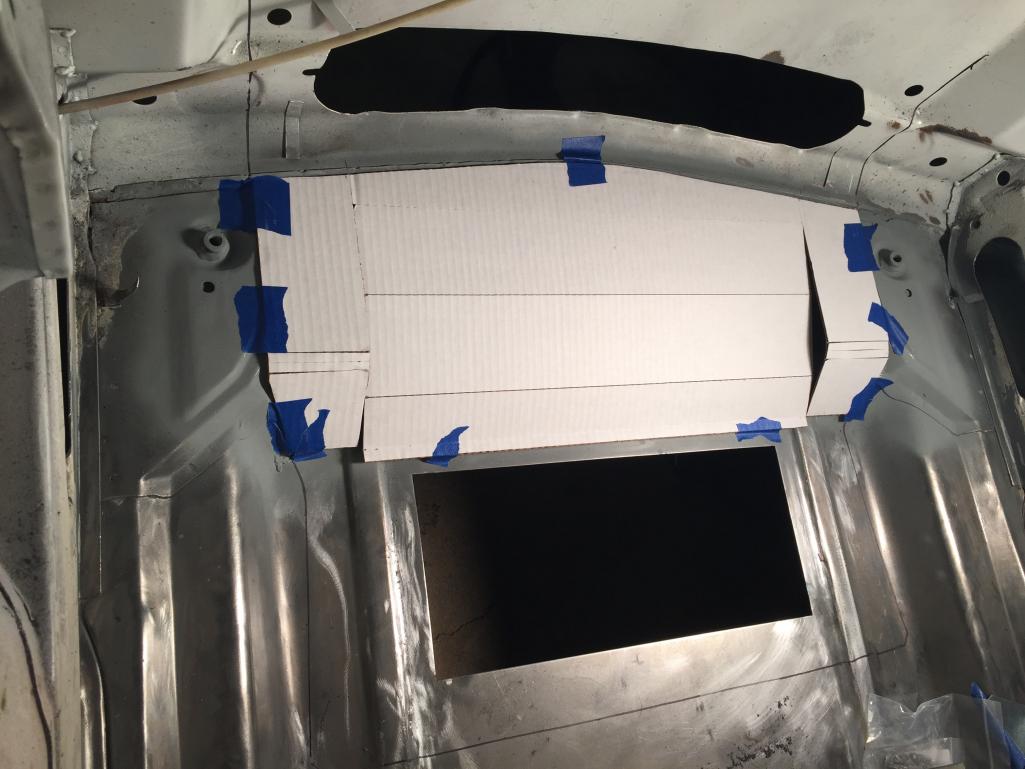
Posted by: Mitox Sep 20 2017, 09:06 PM
The bottom section of the oil cooler shroud is nearly complete now; it just needs minor touch ups for fit. I'll be working on the oil cooler mount next, or maybe I'll load the car onto the rotisserie and get the bottom stripped and coated before it gets cold.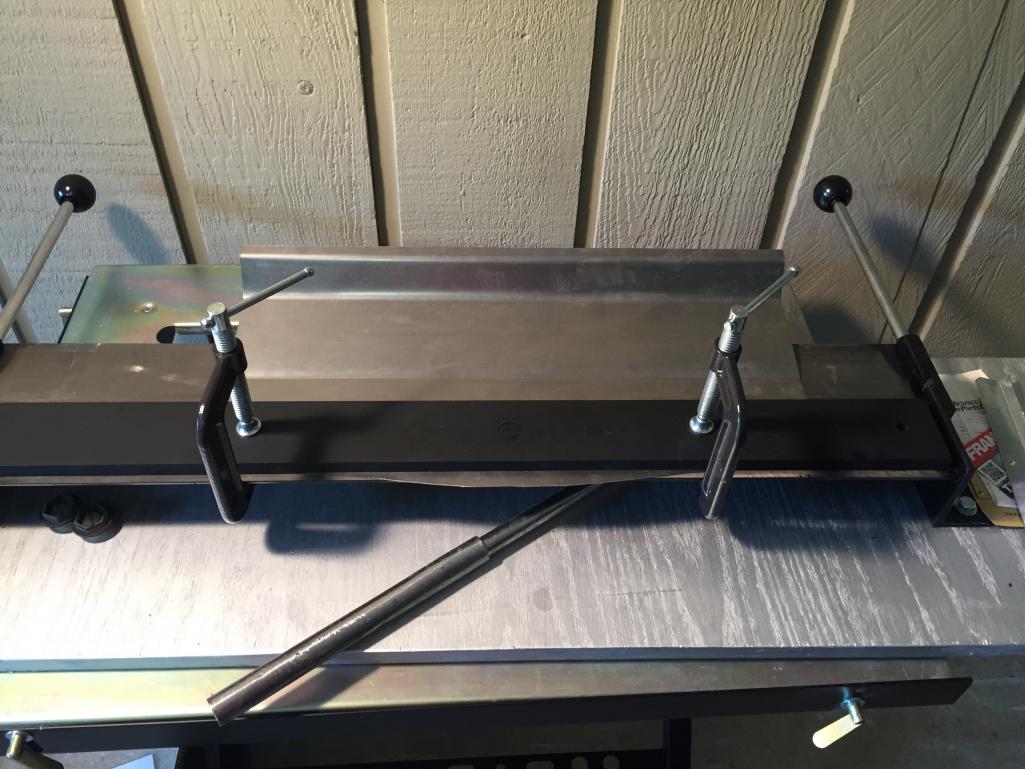
Posted by: Mitox Sep 20 2017, 09:09 PM
Few more pics 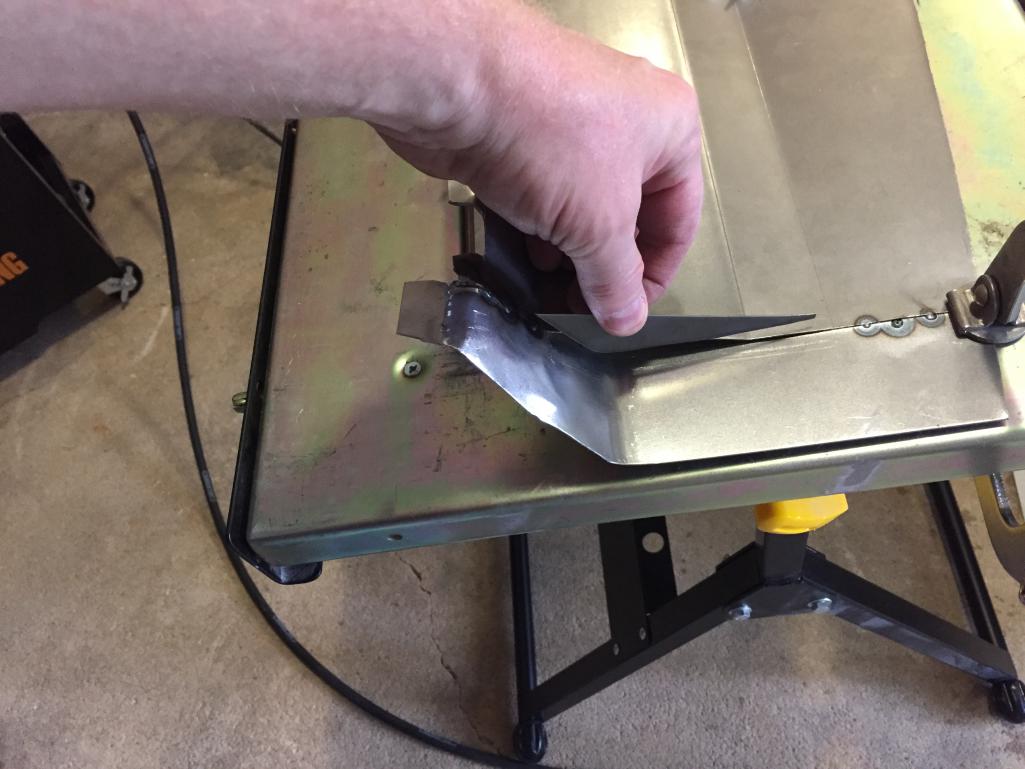

Posted by: Mitox Sep 20 2017, 09:11 PM
Finished pic (almost)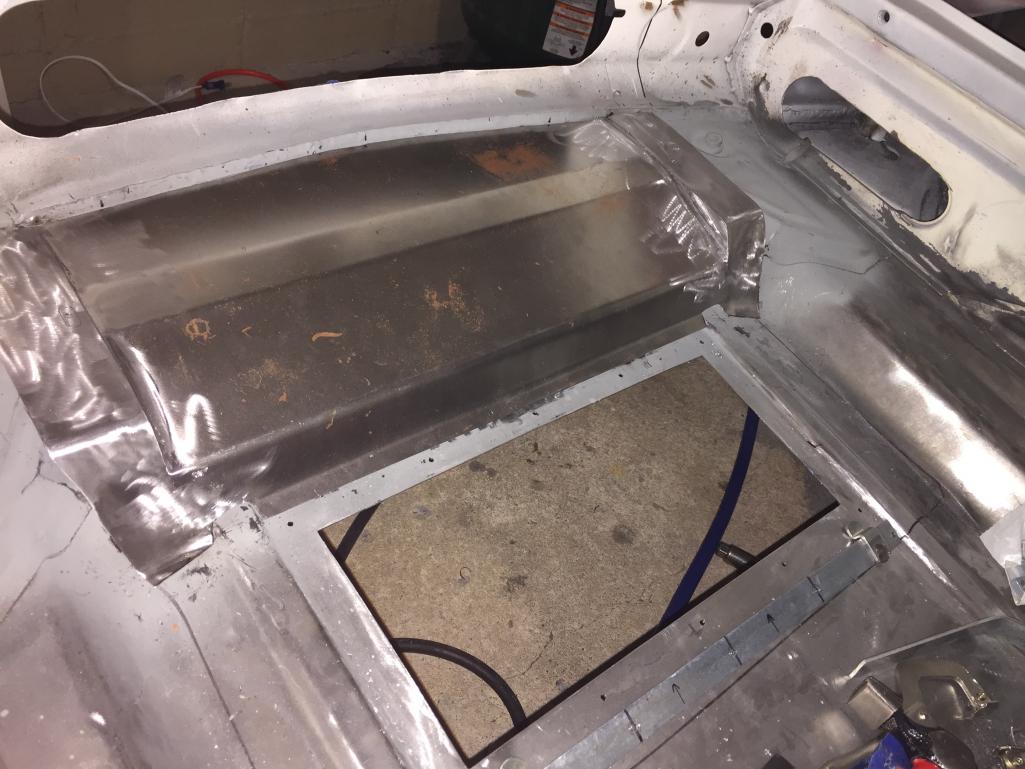
Posted by: Mitox Sep 25 2017, 03:49 PM
WOW!! These pipes are beautiful.
I first noticed the welding quality; Ben is truly a master. 
Posted by: mb911 Sep 25 2017, 04:49 PM
Lots of practice
Posted by: jd74914 Sep 25 2017, 06:32 PM
Your spare tire mount is awesome! Totally stealing that idea!
Posted by: Mitox Sep 25 2017, 08:38 PM
Your spare tire mount is awesome! Totally stealing that idea!
Feel free. I mounted it with two weld on studs, but had considered welding the whole bracket in place.
Posted by: Dion Sep 25 2017, 09:09 PM
Michael that car is coming along nicely. I Do like that spare wheel mount as well.
Cool touch out of necessity I see.
Posted by: Larmo63 Sep 25 2017, 09:30 PM
Please make me one of those spare tire mounts.....Please?
Posted by: Mitox Sep 27 2017, 08:01 AM
Please make me one of those spare tire mounts.....Please?
I wouldn't mind doing it, though I certainly couldn't commit to it. It's easy to make as you can see, but I would change it a bit if done again.
Posted by: Mitox Oct 7 2017, 11:31 AM
This coming week should be a great week for progress. Four months ago, John Forbes and I scheduled this week to reassemble my 3.2 at Black Forest Racing, and get it running again.

Posted by: Mitox Oct 11 2017, 06:12 PM
The 3.2 is fully disassembled and mostly clean now. A little more cleaning to do more n the morning, then reassembly begins.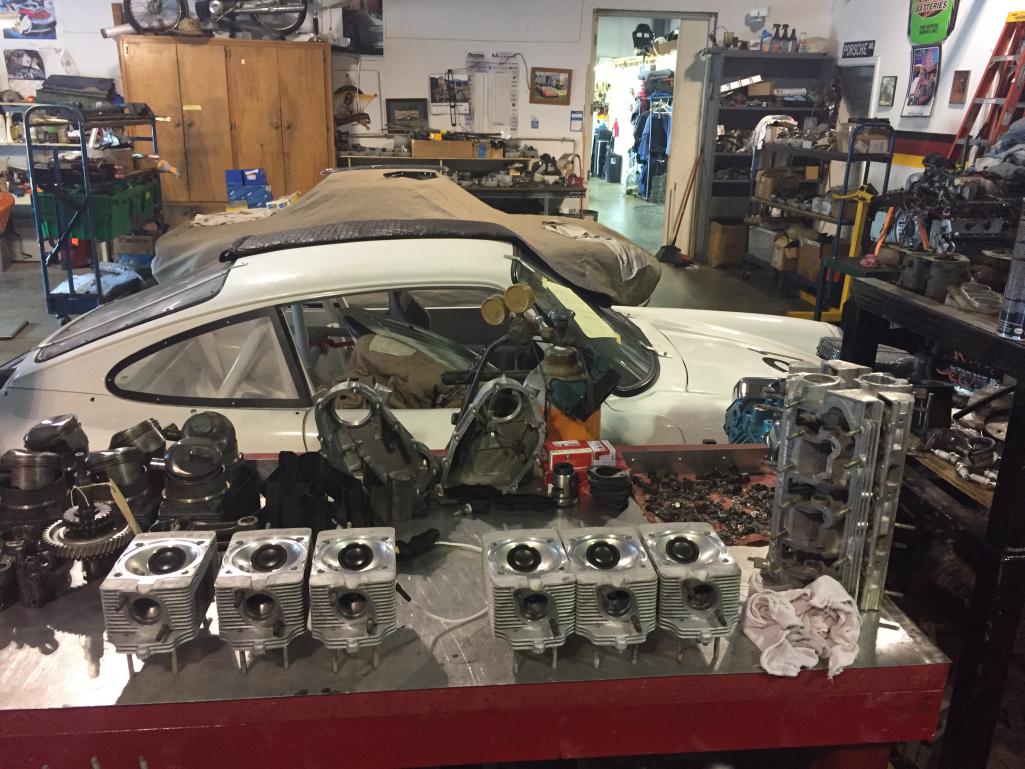
Posted by: Mitox Oct 11 2017, 06:14 PM

Posted by: porschetub Oct 12 2017, 12:10 AM
Your spare tire mount is awesome! Totally stealing that idea!
Feel free. I mounted it with two weld on studs, but had considered welding the whole bracket in place.
Would really like to mount my alloy spare the same way but the regulation police here wouldn't like it,it is there to provide crash protection also,if you are running a front cooler what do you do,no real choice ,nicely done.
Posted by: Mitox Oct 12 2017, 06:17 PM
Your spare tire mount is awesome! Totally stealing that idea!
Feel free. I mounted it with two weld on studs, but had considered welding the whole bracket in place.
Would really like to mount my alloy spare the same way but the regulation police here wouldn't like it,it is there to provide crash protection also,if you are running a front cooler what do you do,no real choice ,nicely done.
 ...the regulation police...
I fear we are headed the same direction. For some reason people want government to control every aspect of life.
Posted by: porschetub Oct 12 2017, 07:58 PM
Your spare tire mount is awesome! Totally stealing that idea!
Feel free. I mounted it with two weld on studs, but had considered welding the whole bracket in place.
Would really like to mount my alloy spare the same way but the regulation police here wouldn't like it,it is there to provide crash protection also,if you are running a front cooler what do you do,no real choice ,nicely done.
...the regulation police...I fear we are headed the same direction. For some reason people want government to control every aspect of life.
That's what we have here,I need separate compliance for my brakes,wheels and engine change,they will find something else to clip the ticket on,real car guys have suffered here due to the ricer drivers and their total disregard for sensible modifications.....sad really,Australia is worse than my country.
Posted by: gereed75 Oct 13 2017, 05:49 AM
Tub, here I thought you guys were all just un-restrained hooligans gooning it up!
And MIT, I am sure you saw the white cat on BAT that got so much attention and brought nice bucks! Love Light Ivory, something about the simplicity of white black and chrome accentuates the simplicity of these cars in my eyes.
Posted by: Mitox Nov 4 2017, 09:47 PM
A good Saturday morning. The rear rotisserie mounts are welded up, and attached. Sunday afternoon the car should be turning over.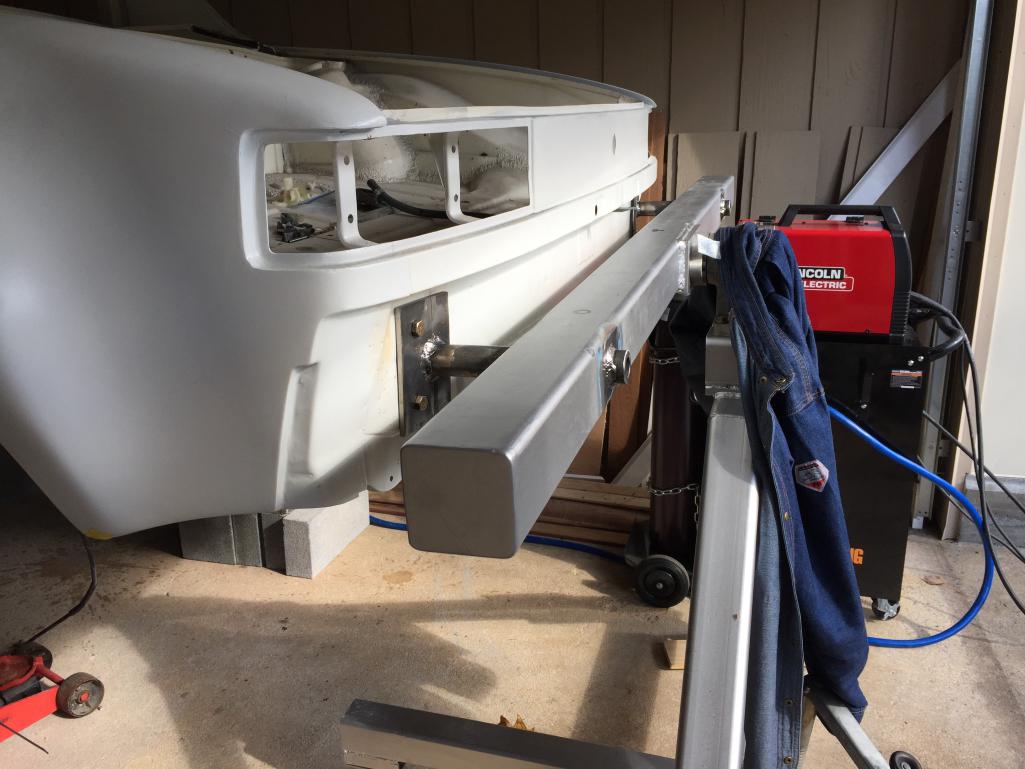
Posted by: infraredcalvin Nov 4 2017, 11:13 PM
Careful, the stripped shell is top heavy when mounted on bumper mounts. I like how you passed the supports through the main bar, and cleaned up the ends by capping them.

Posted by: mepstein Nov 5 2017, 07:38 AM
Your spare tire mount is awesome! Totally stealing that idea!
Feel free. I mounted it with two weld on studs, but had considered welding the whole bracket in place.
Would really like to mount my alloy spare the same way but the regulation police here wouldn't like it,it is there to provide crash protection also,if you are running a front cooler what do you do,no real choice ,nicely done.
...the regulation police...I fear we are headed the same direction. For some reason people want government to control every aspect of life.
In PA, we are lucky. There's no inspection on antique vehicles. One time registration and carry insurance. That's it.
Posted by: Mitox Nov 5 2017, 05:40 PM
Completed the rotisserie today, and mounted the 914. For now, I'm going to let it float over the supports I used for a few days - just in case my amateur welds have an issue.
Bottom strip to begin soon.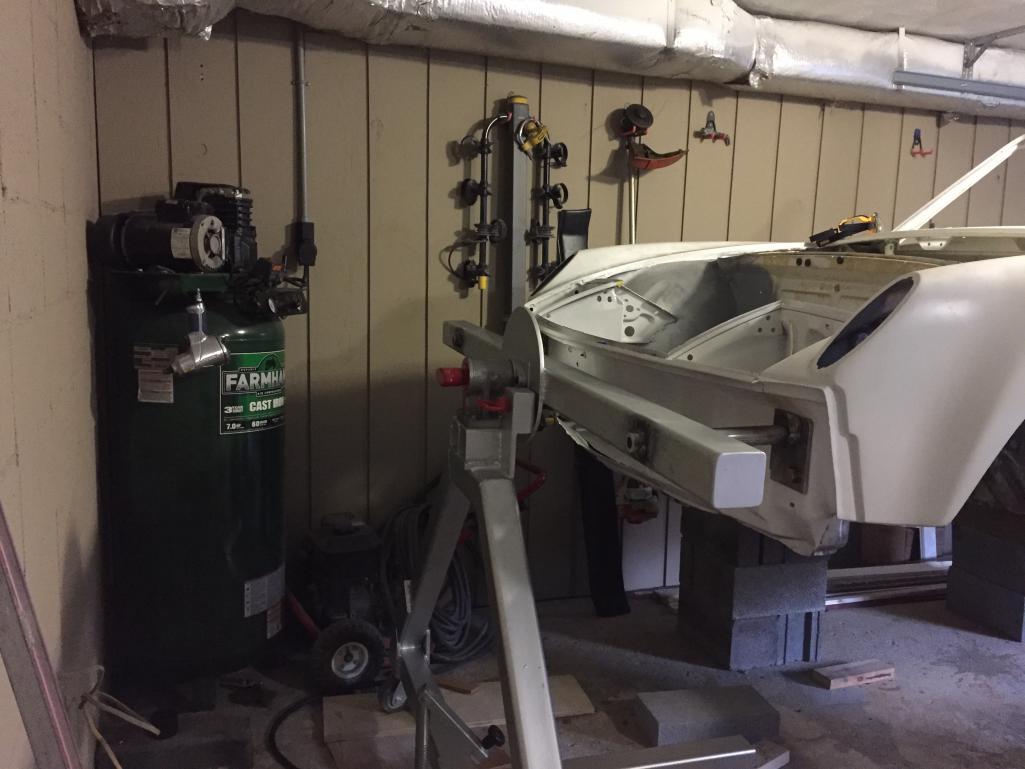
Posted by: Mitox Nov 25 2017, 04:03 PM
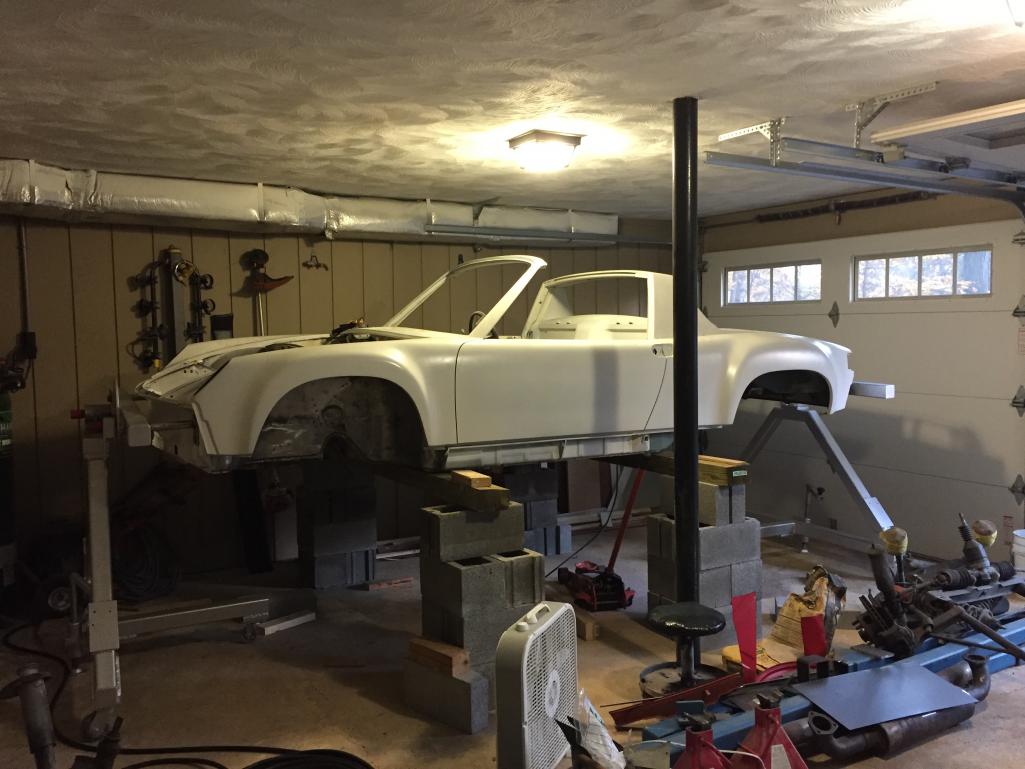
Turned the car on the rotisserie for the first time today. Works perfectly! One hand turning, and seems to be balanced well. Now to blast the bottom, and remove all of the old seem sealer.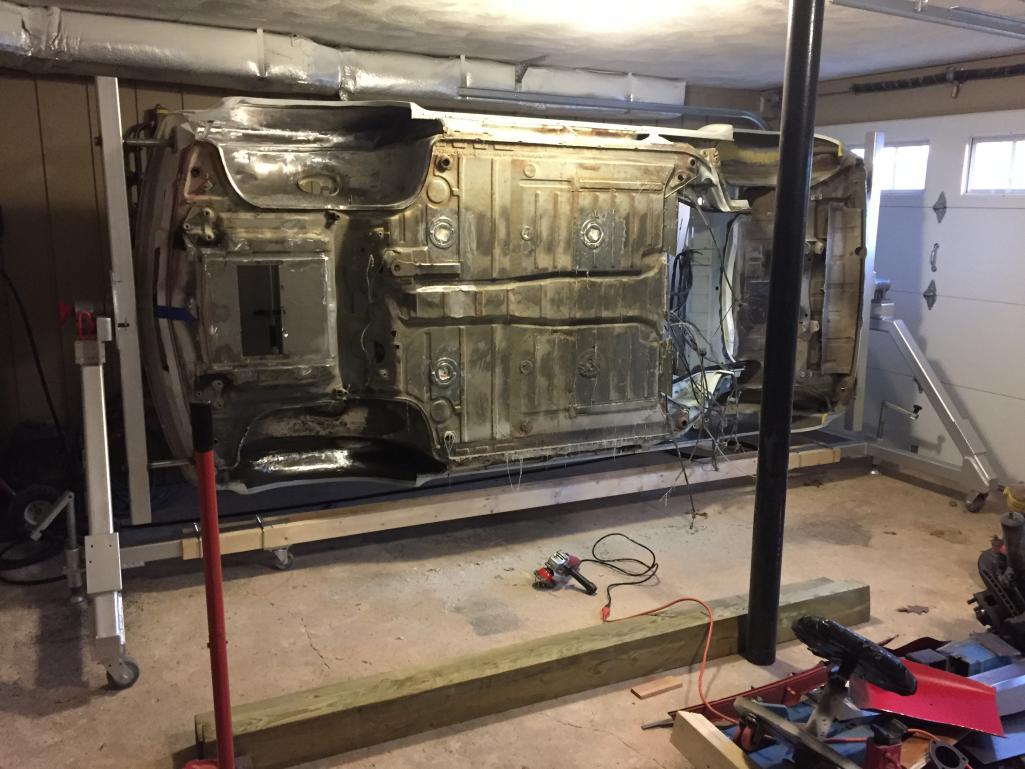
Posted by: Mitox Feb 24 2018, 09:15 PM
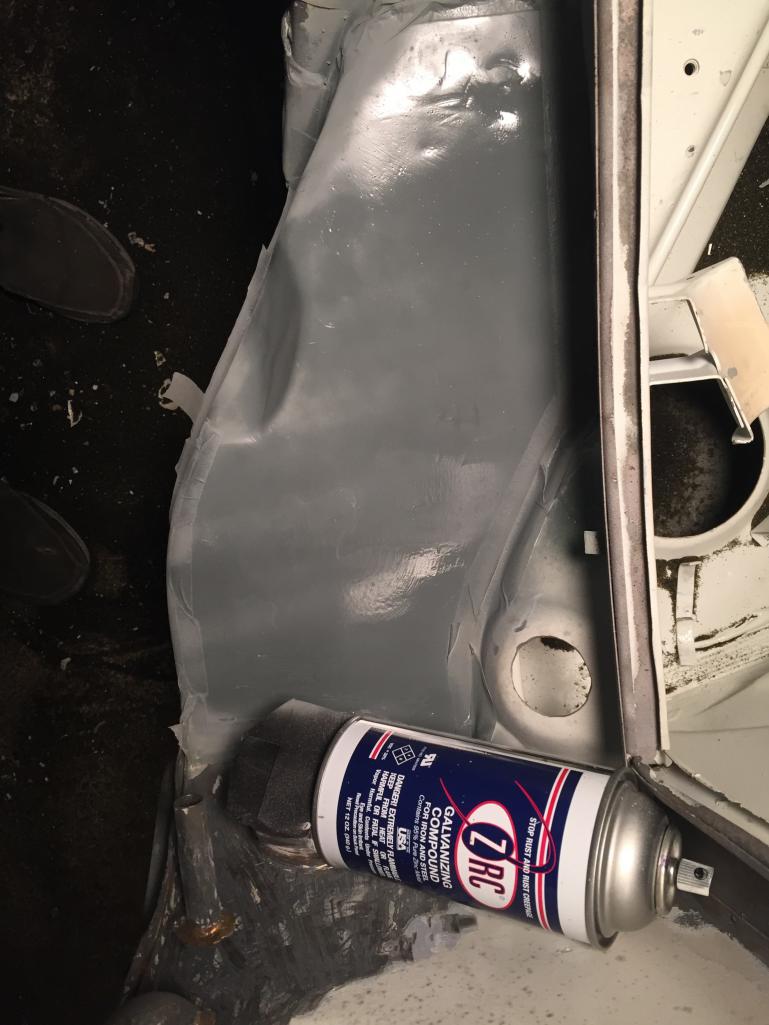
Stripping the bottom and removing all of the seam sealer; a few more evenings and it's done. I'm also removing the 4 banger motor mounts, and am thinking about welding another reinforcement plate over the area. 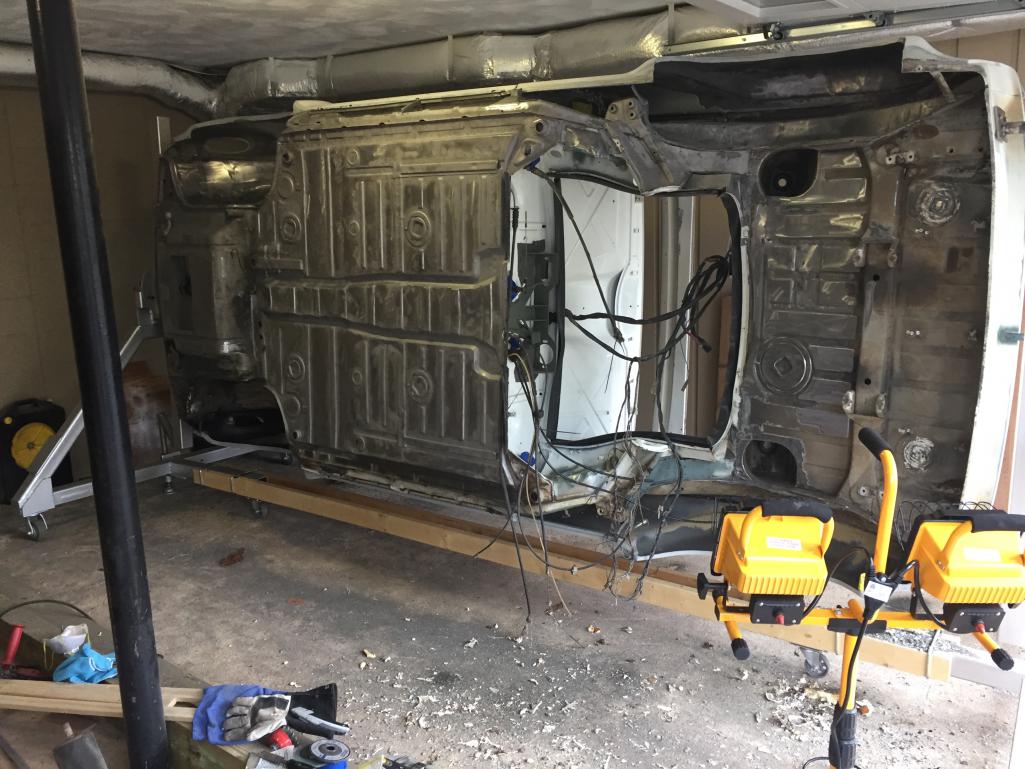
Posted by: Mitox Mar 10 2018, 08:55 PM
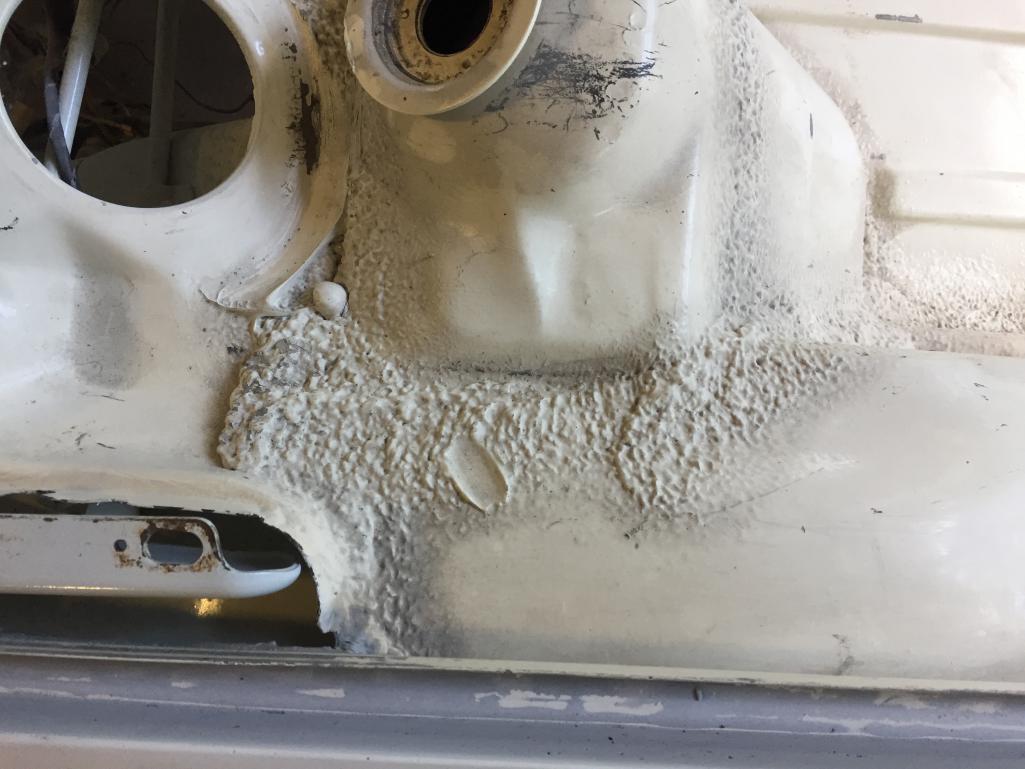
I must be developing OCD. While stripping the bottom, I kept thinking of the potential rust hiding under the seat reinforcements and jack pads. Finally, I placed an order for replacement parts, and then cut the old parts off the car today.
Rust can't hide any longer. No holes, but heavy surface rust.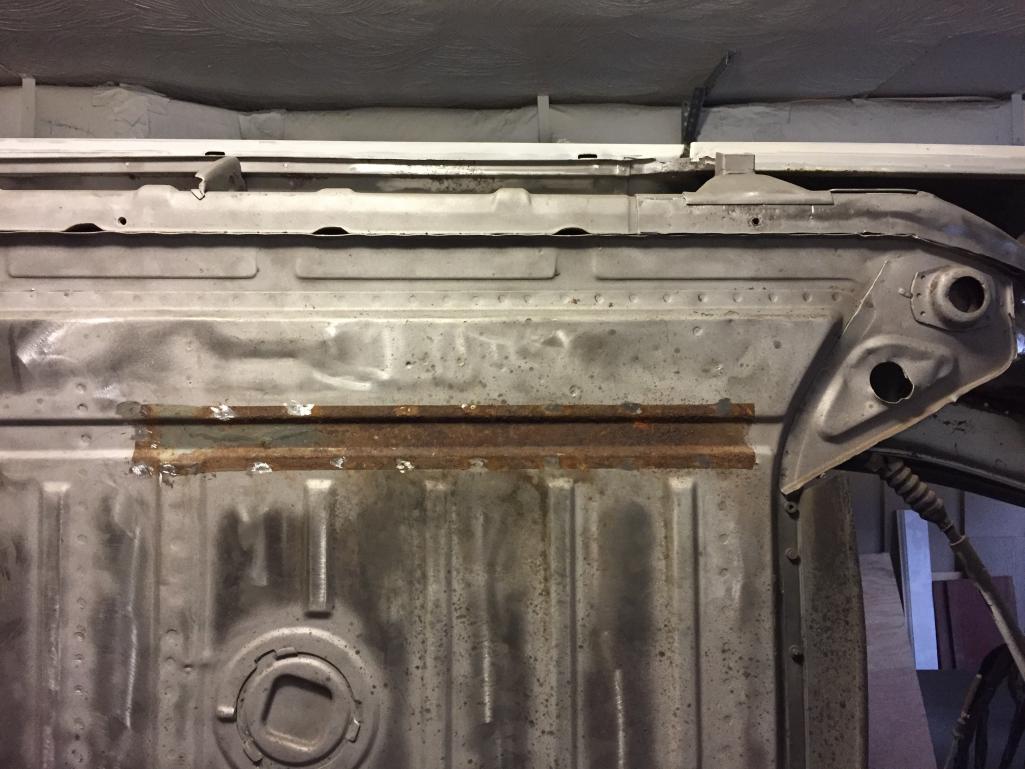
Posted by: Mitox Mar 10 2018, 08:56 PM
Posted by: pete000 Mar 10 2018, 10:25 PM
Looking great
Posted by: Cairo94507 Mar 11 2018, 06:30 AM
In for a penny, in for a pound.
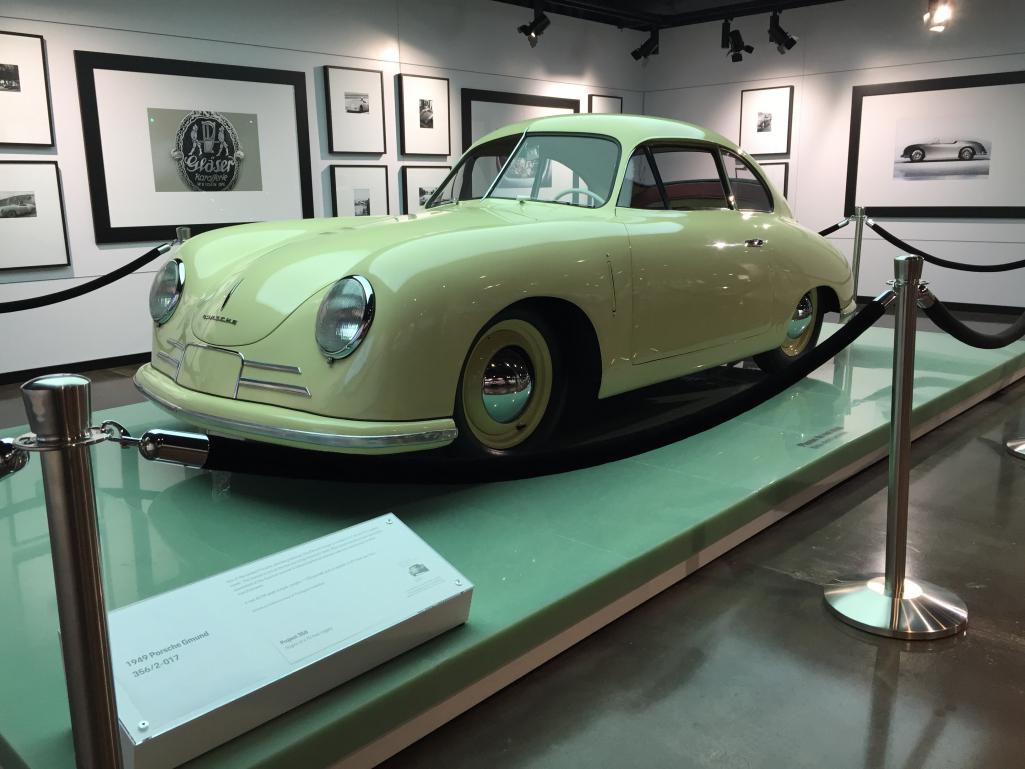
Posted by: Mitox Mar 18 2018, 08:07 AM
I didn't make any progress on the GT this week due to work travel, but I did get to spend an afternoon at the Porsche headquarters in Atlanta. Here's a few pic from the museum. Next time I'll plan ahead, so I can take a few laps on the track.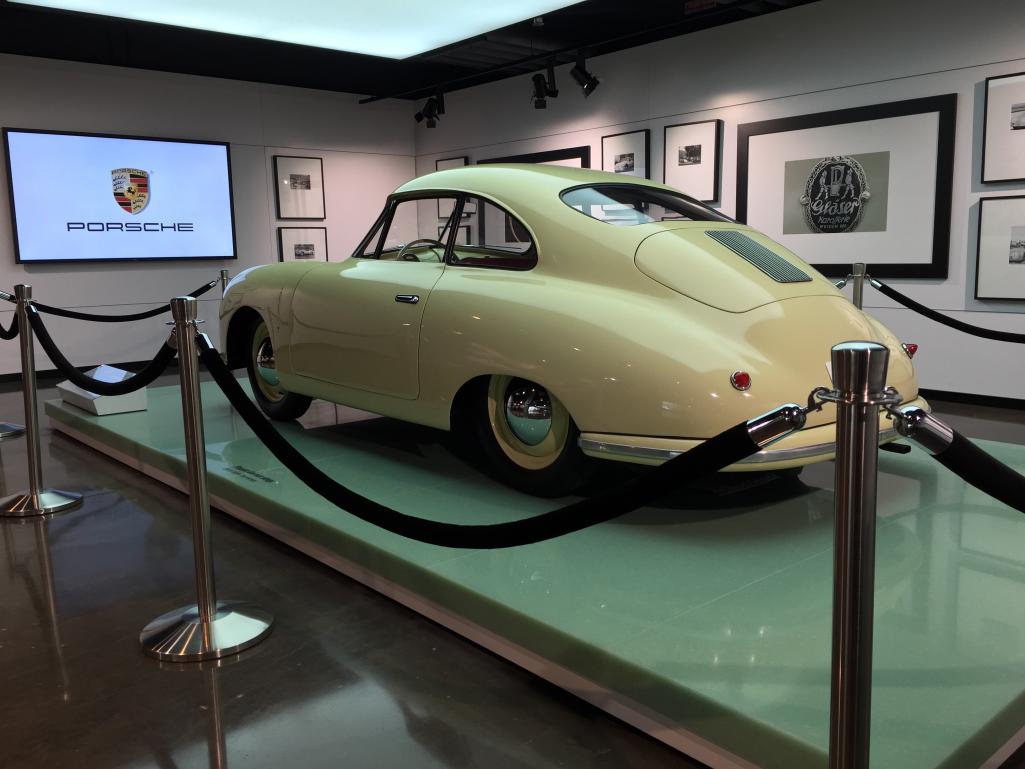
Posted by: Mitox Mar 18 2018, 08:08 AM
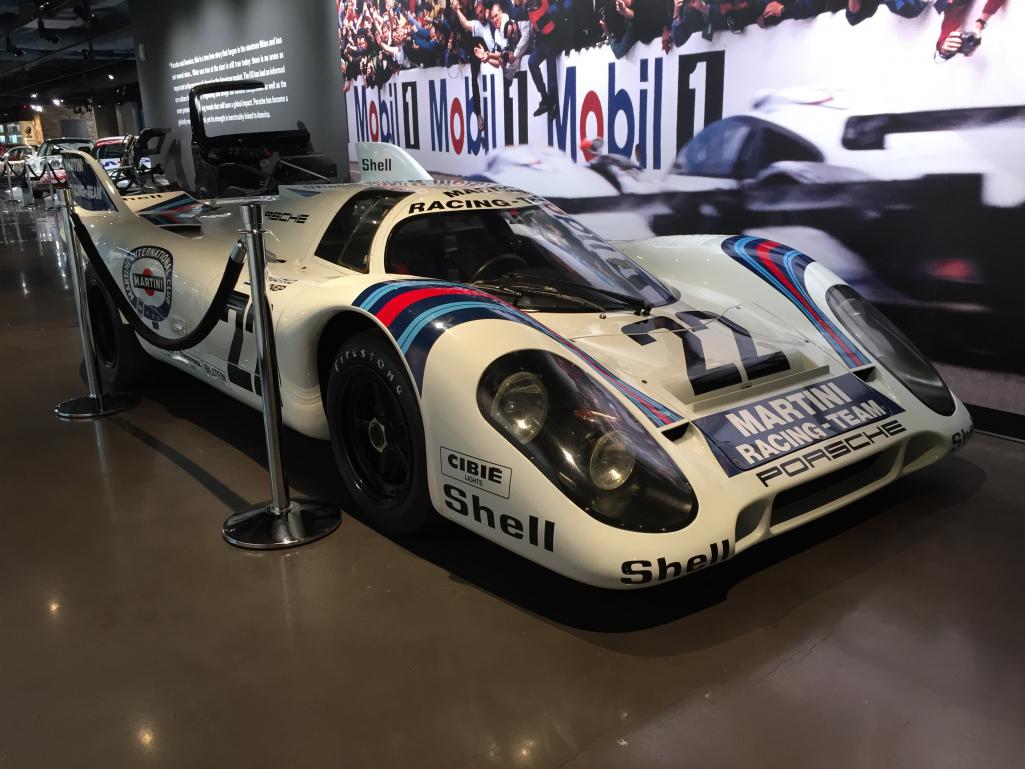
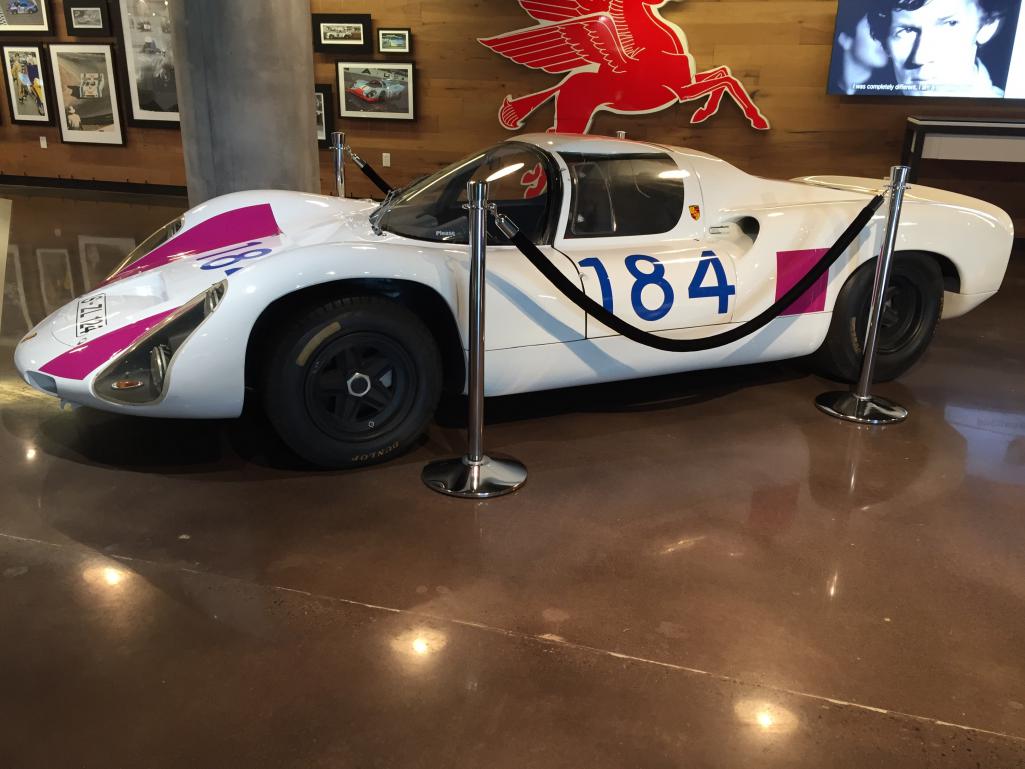
Posted by: Mitox Mar 18 2018, 08:09 AM

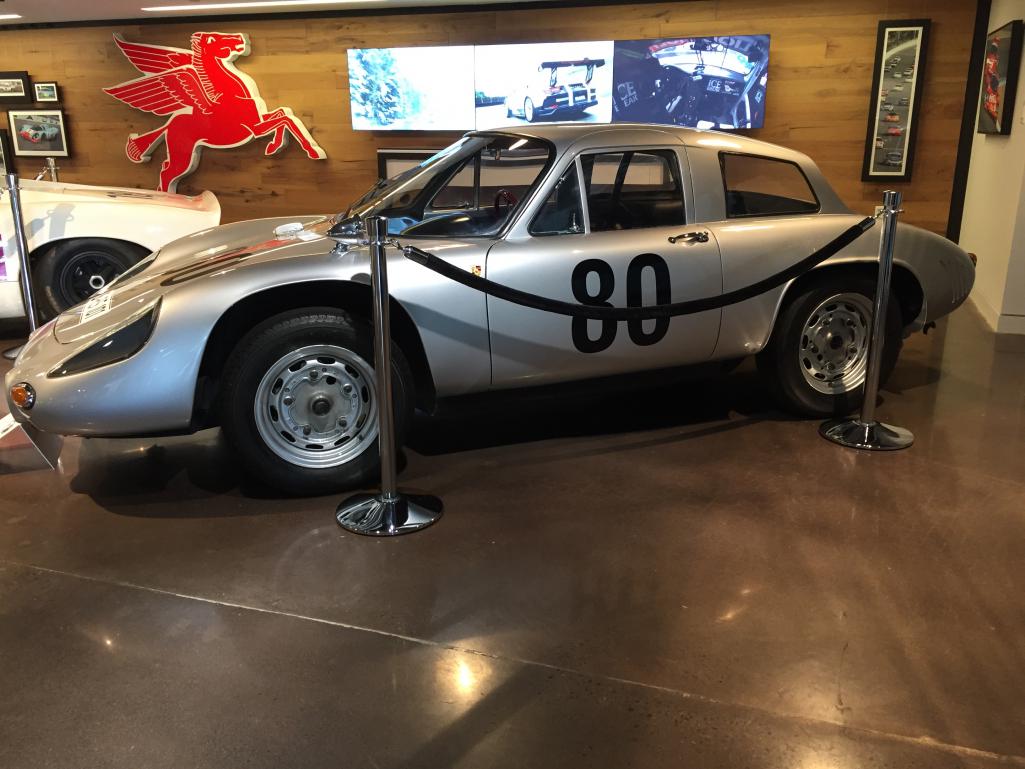
Posted by: Mitox Mar 18 2018, 08:11 AM

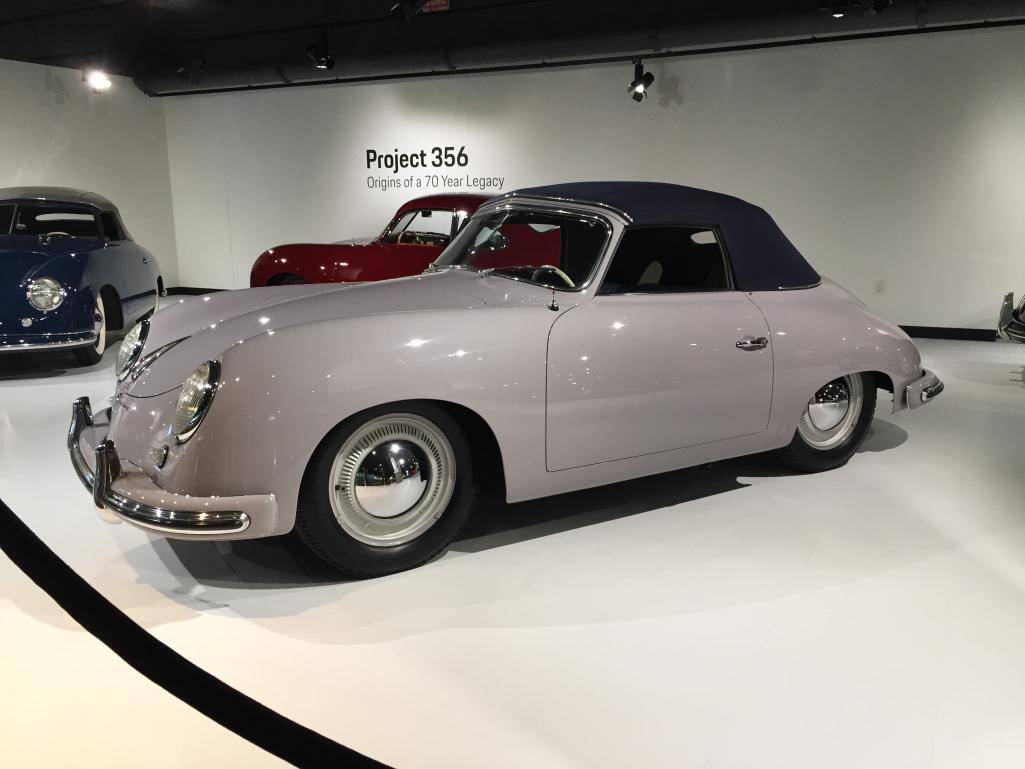
Posted by: Mitox Mar 18 2018, 08:11 AM
Posted by: Mitox Jul 5 2018, 09:10 PM
It’s been a few months, and most progress isn’t very noticeable. After many hours of heating-scraping-heating-scraping, all of the seam sealer is gone.
Now I get to work on the fun stuff; welding pieces back on. The front jack points and seat/ floor reinforcements were replaced a couple days ago, and I just removed the pedal support bracket. This bracket seems to double as a water scoop, directing water into the hole under the pedals; great design to ensure the area rusts adequately. Maybe I should weld this hole closed instead of relying on the seem sealer method.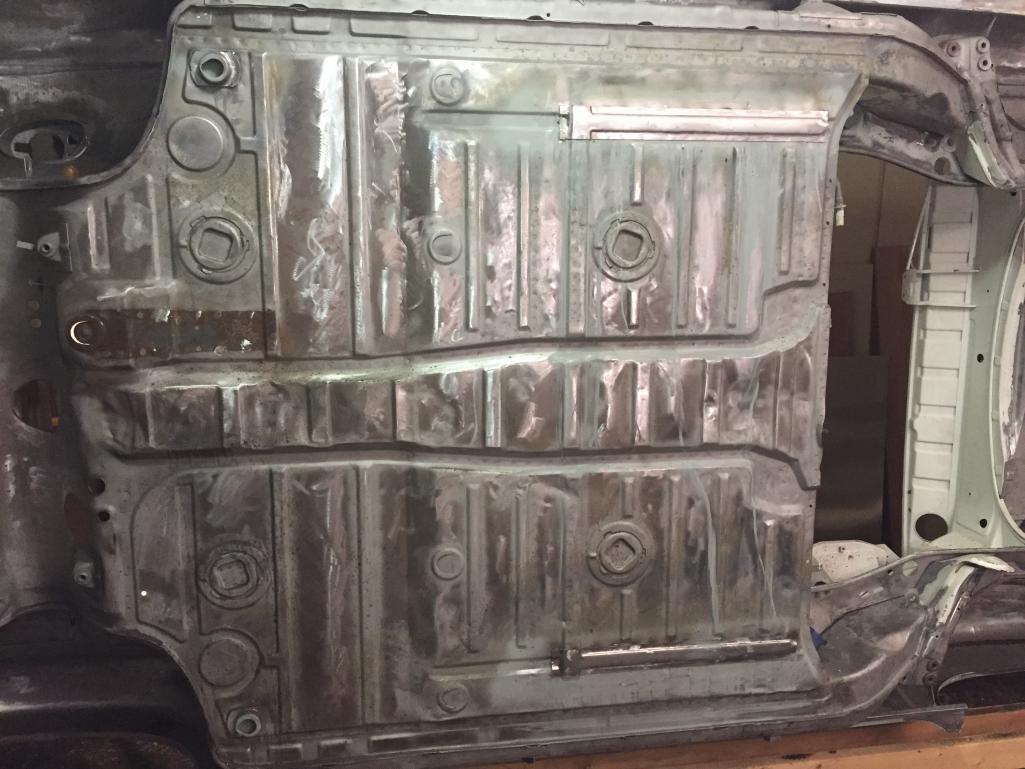
Posted by: Mitox Jul 5 2018, 09:11 PM
Rust under pedal cluster to clean out. No rust through though.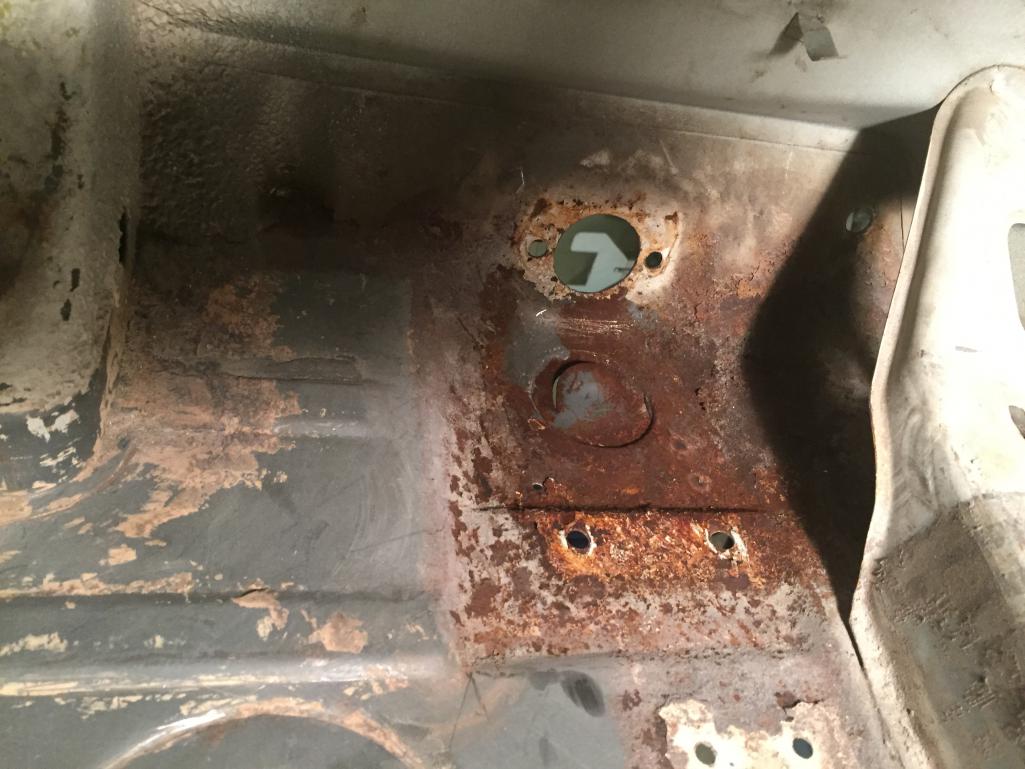
Posted by: bbrock Jul 5 2018, 09:22 PM
That pedal reinforcement is certainly a curious design and I wrestled with what to do about it too. Another issue is that water from wet feet is sure to accumulate around the pedal cluster and migrate through that drain slot or bolt holes into the reinforcement piece. I think the piece is engineered to let that water drain out but it sure is a dumb design. In the end, I just sprayed the inside area with 2 coats of 2K epoxy and put it back together, figuring I'll be dead by the time it becomes a problem again.
Posted by: Mitox Jul 9 2018, 09:14 PM
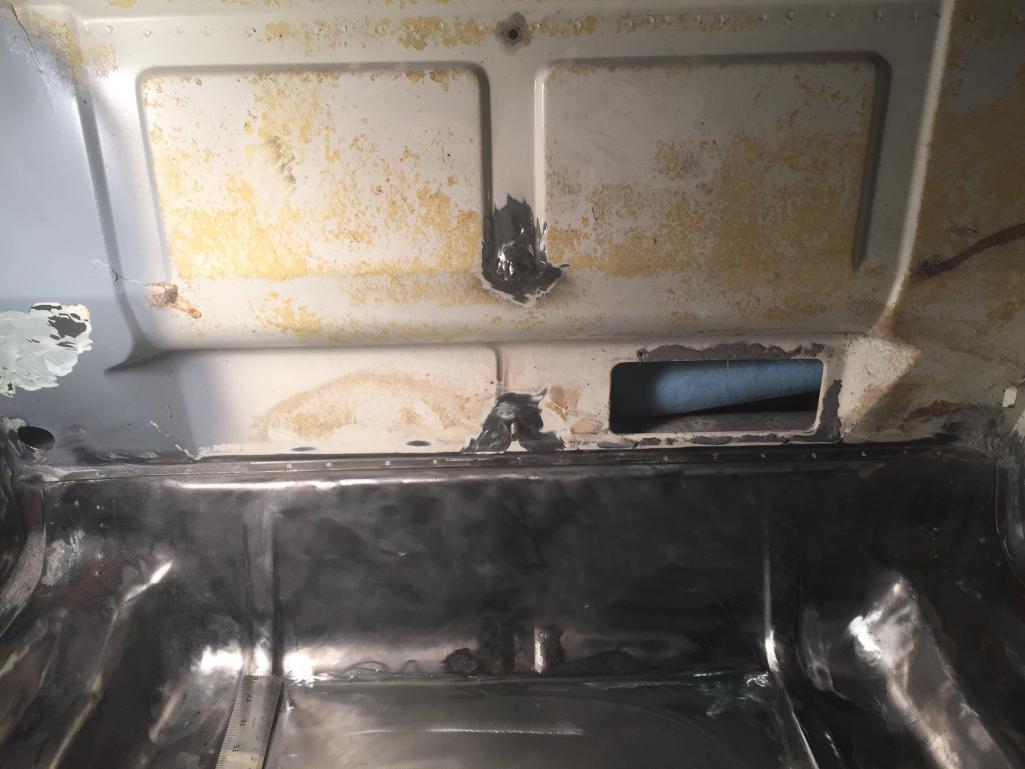
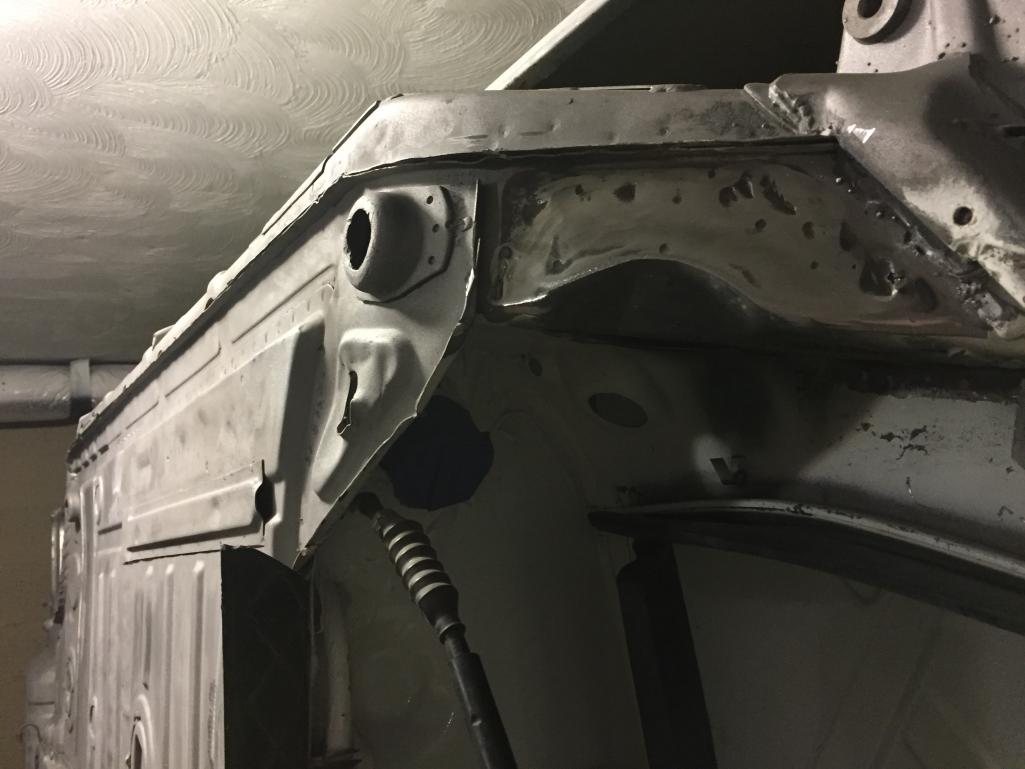
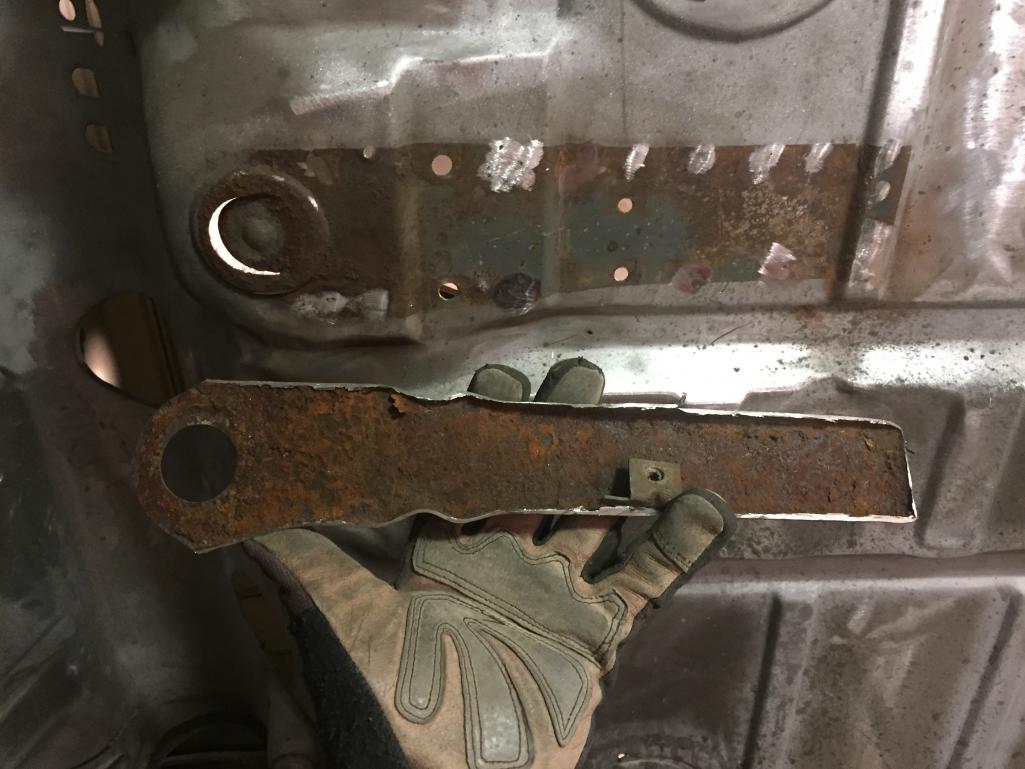
Just a question this time. Can someone tell me what this bracket with stud is for? It is on the drivers side front corner, and there isn’t a matching part on the other corner.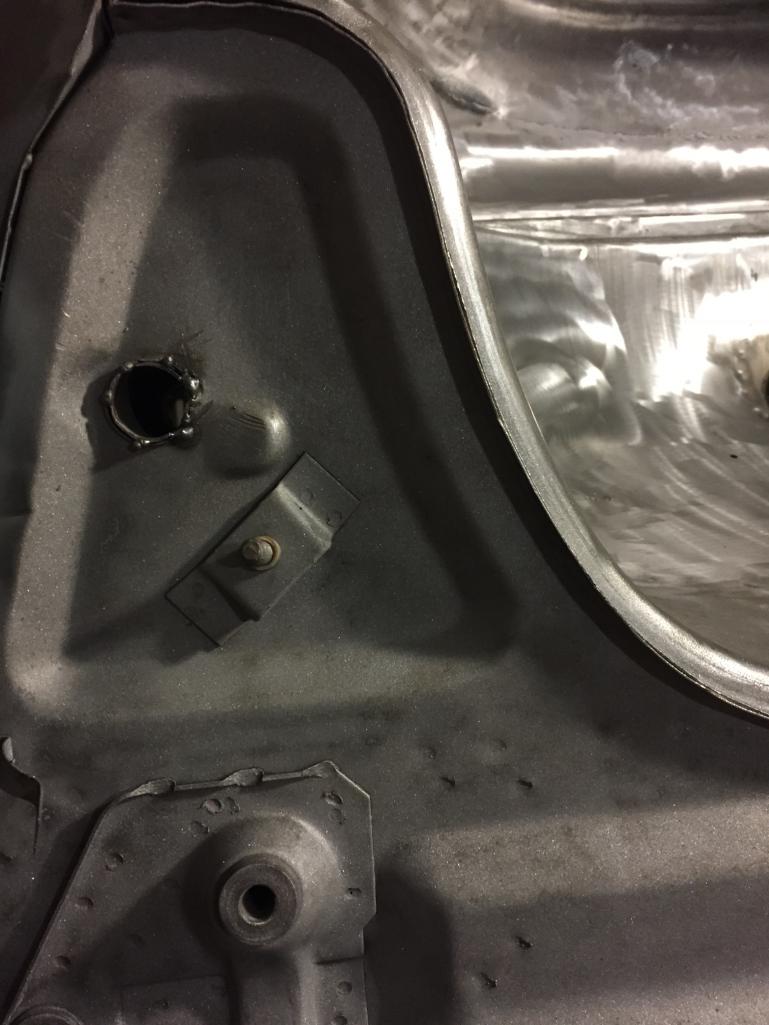
Posted by: Mitox Jul 10 2018, 09:45 PM
My list of items to complete before paint had another one added today. I knew I needed to fix an ugly repair on the firewall, but learned from looking through other posts here that the real problem is the clutch tube.
Found a few threads detailing the repair, so that’s next. 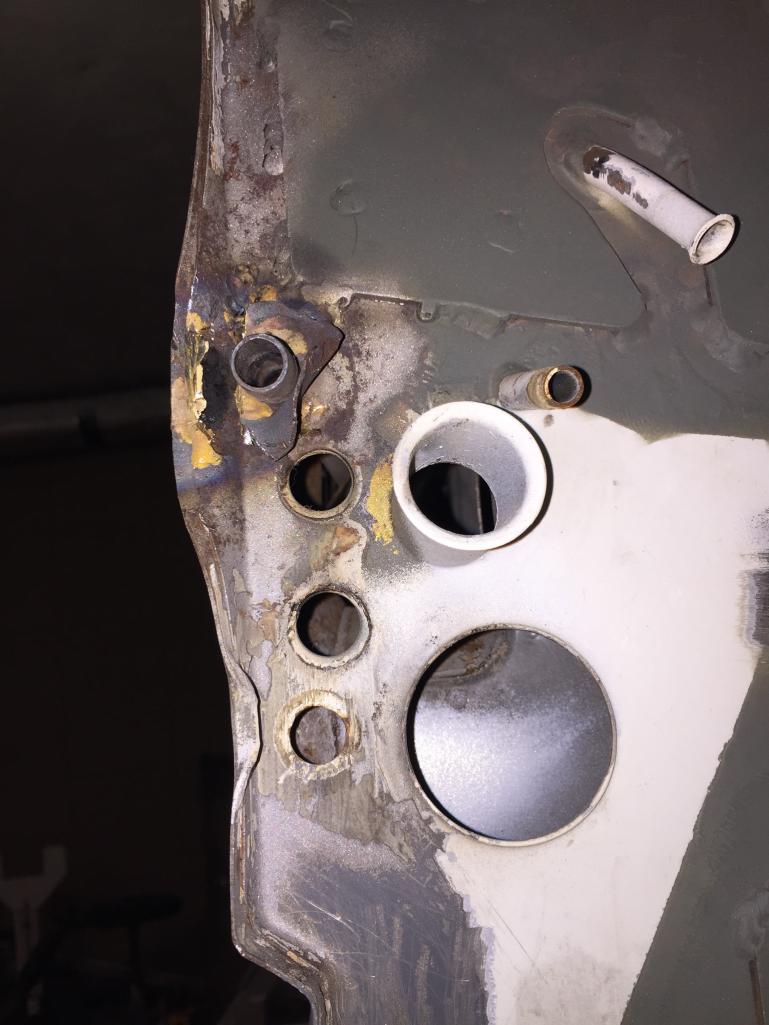
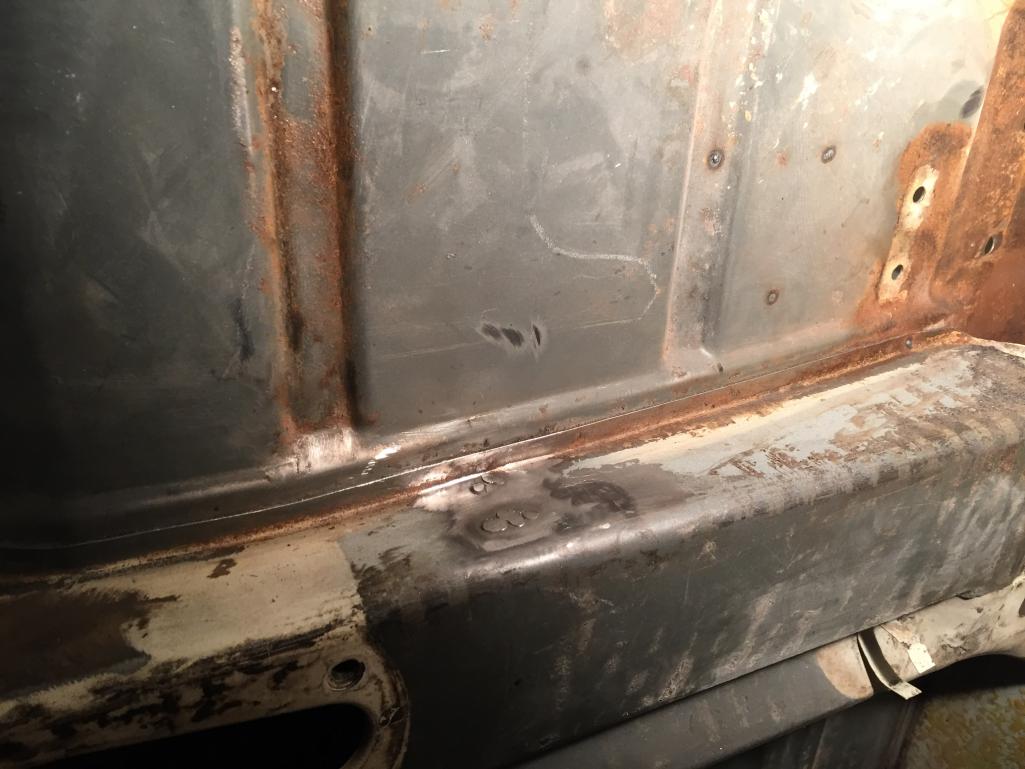
Posted by: Mitox Jul 12 2018, 08:29 PM
Yeah, this is a problem ... what to do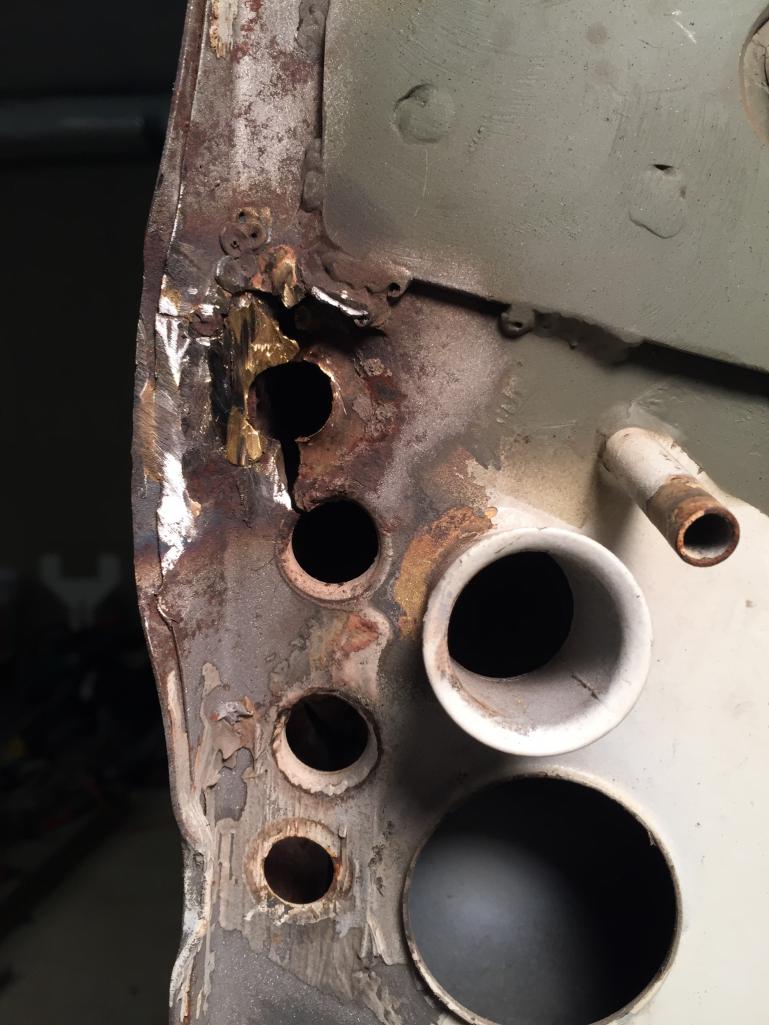
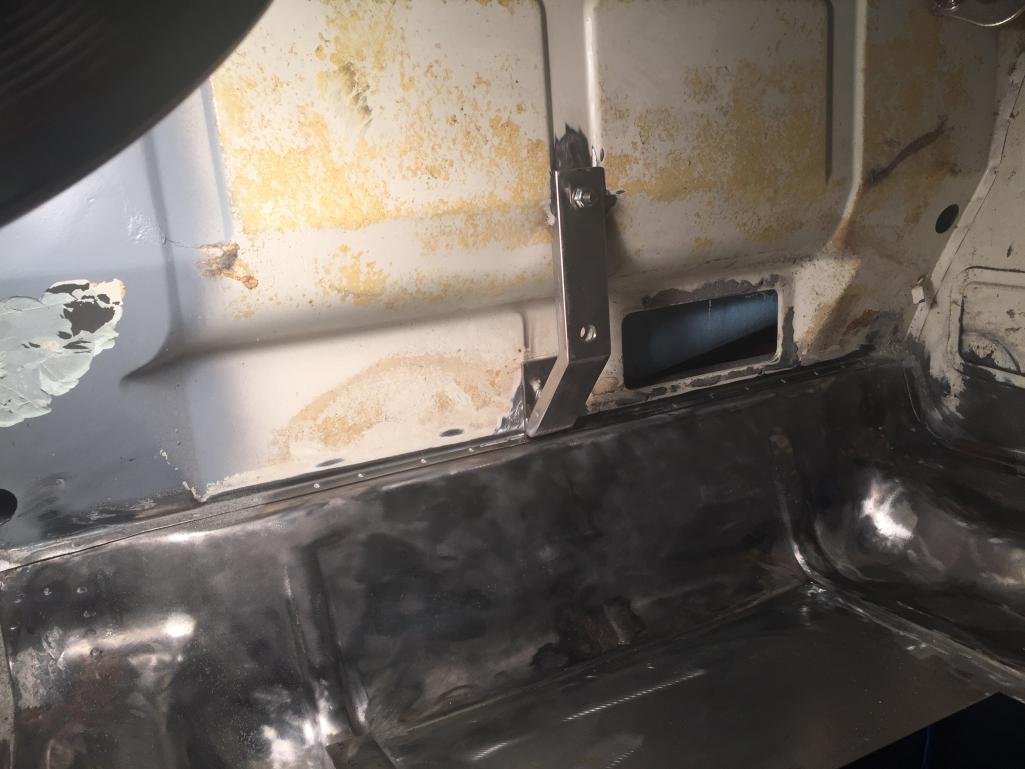
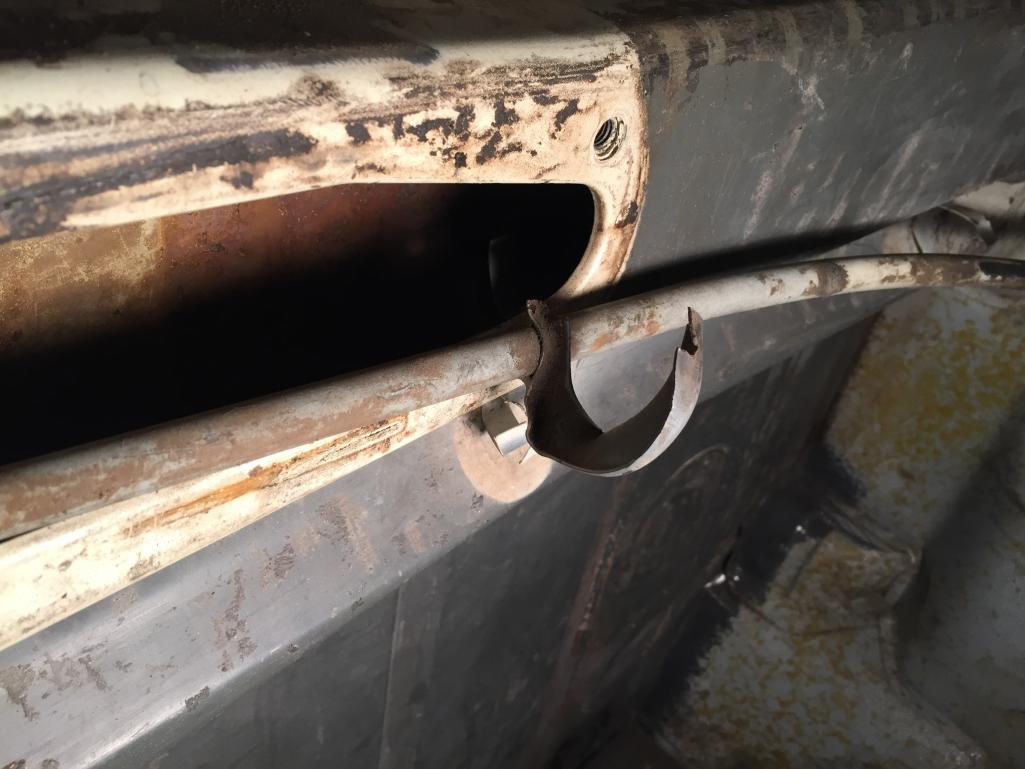
Posted by: sixnotfour Jul 12 2018, 08:31 PM
horn mount 75-76
Posted by: Mitox Jul 12 2018, 09:48 PM
horn mount 75-76
OK, thanks. Guess I’ll keep it there.
Posted by: Mitox Jul 14 2018, 06:53 PM
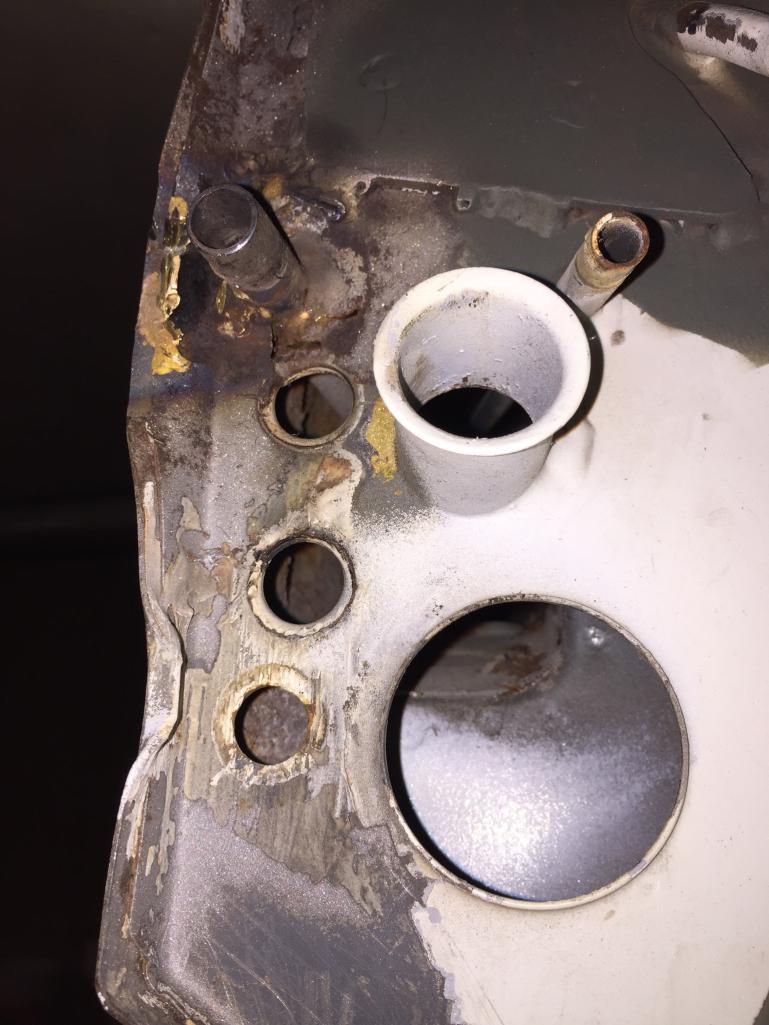
A little progress today. Fixed the crack/break on the firewall where the clutch tube exits. 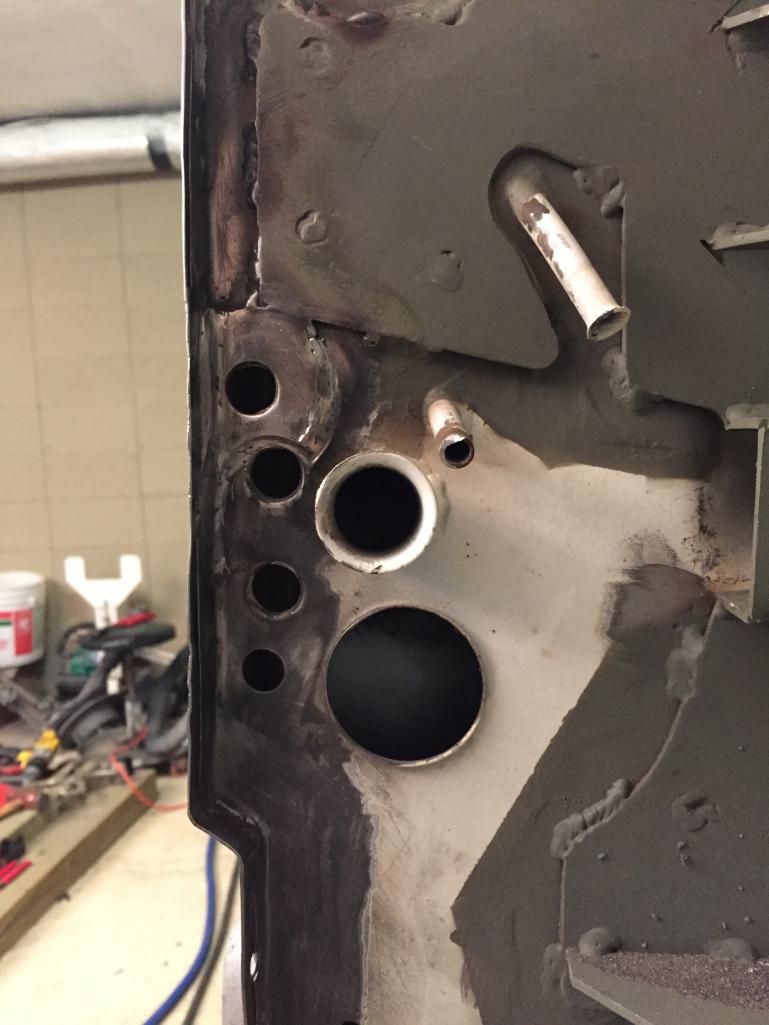
Posted by: Mitox Jul 14 2018, 06:59 PM
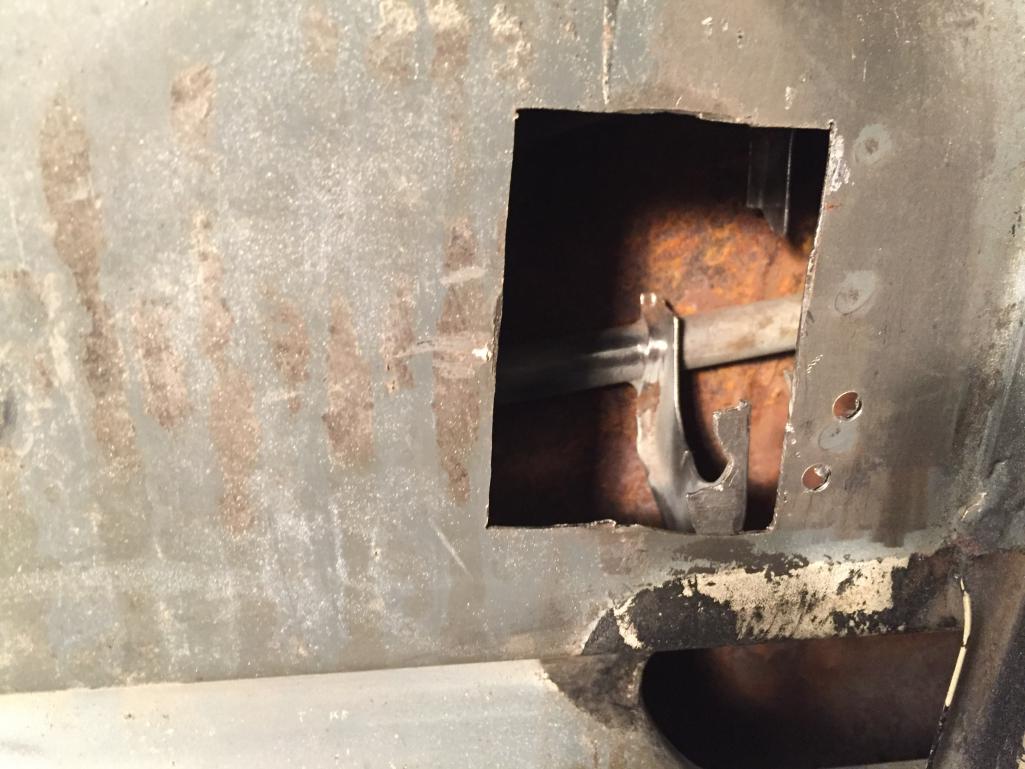
Now to fix the tube that is completely loose. From the other posts on this subject, I have an idea how to fix the front clamp. However, there is some sort of bracket at the middle of the tube. It looks like it may be broken, but I can’t see how or if it should be attached anywhere in the tunnel.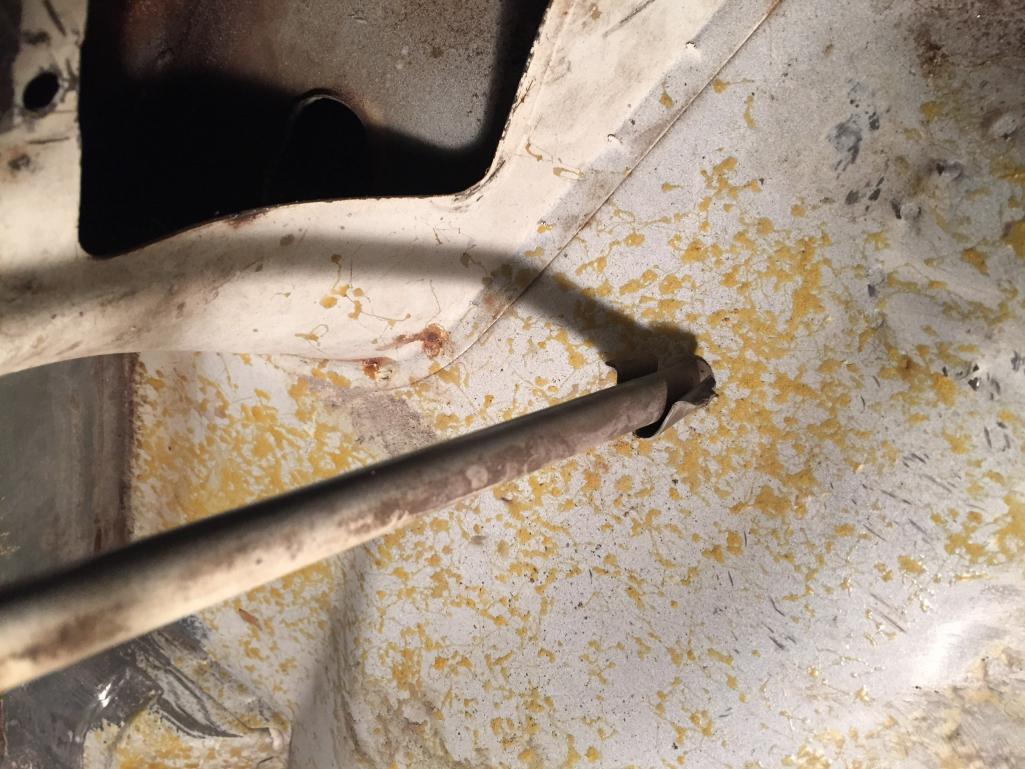
Posted by: Mitox Jul 14 2018, 07:36 PM
I found a pic of the inside of the 914 tunnel. Looks like I have a broken bracket: not sure I’ll secure the tube there.
Posted by: rgalla9146 Jul 15 2018, 06:20 PM
With a 3" holesaw open a hole on the top of the tunnel for adequate access.
Weld the plug back in when the repair is complete
Posted by: Mitox Jul 16 2018, 02:27 PM
With a 3" holesaw open a hole on the top of the tunnel for adequate access.
Weld the plug back in when the repair is complete
I think your suggestion is likely the best path forward. There's no other way to get inside the tunnel very well. Thanks
Posted by: Mitox Jul 25 2018, 09:13 PM
Clutch tube repaired - hopefully forever. Made a new front bracket,and had to cut a hole to access the middle bracket to weld it back together.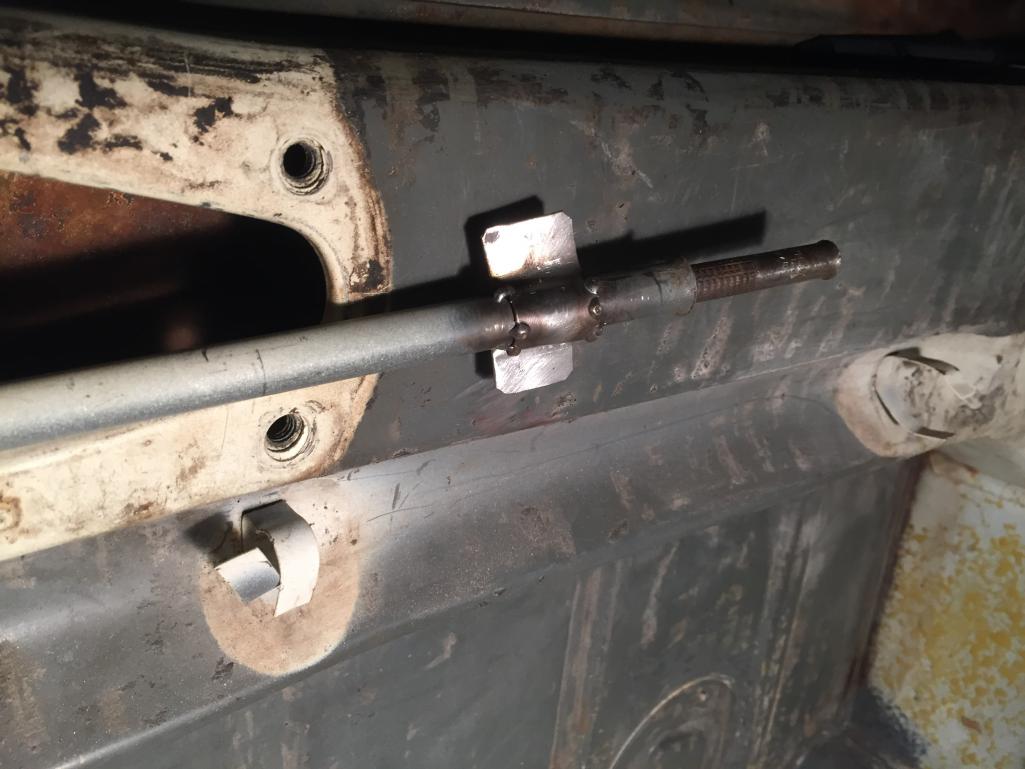

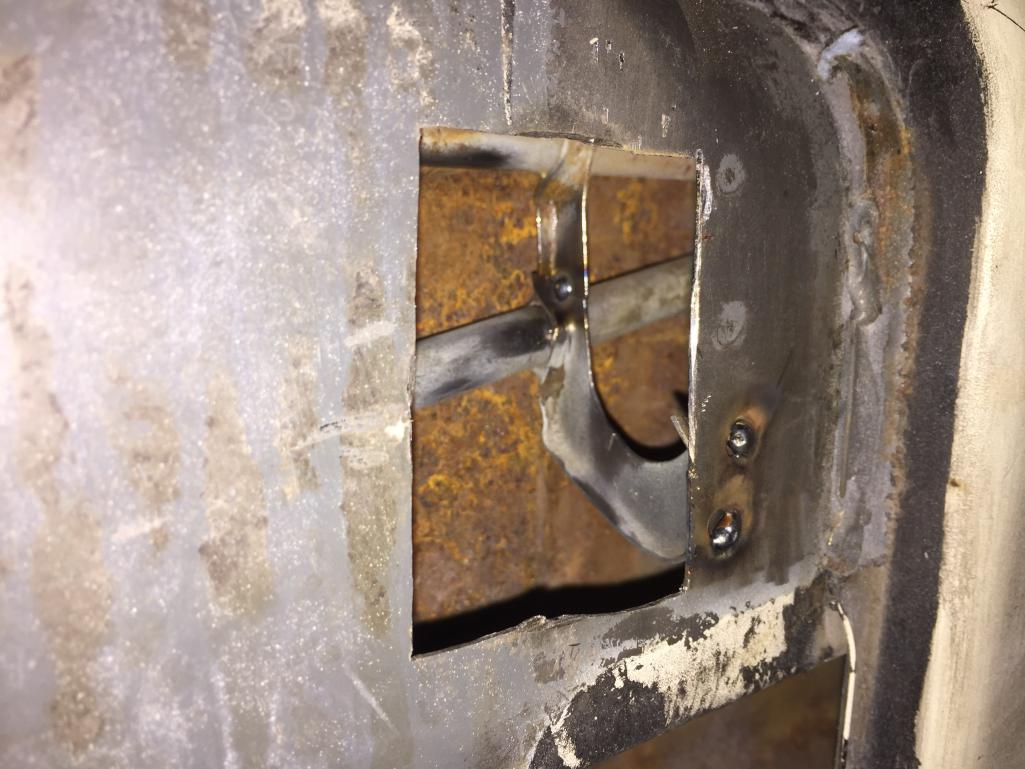
Posted by: Mitox Jul 25 2018, 09:17 PM
Had a little difficulty locating the front bracket tight to the wall, so finally decided to pull it into place with a screw so I could weld the first hole. 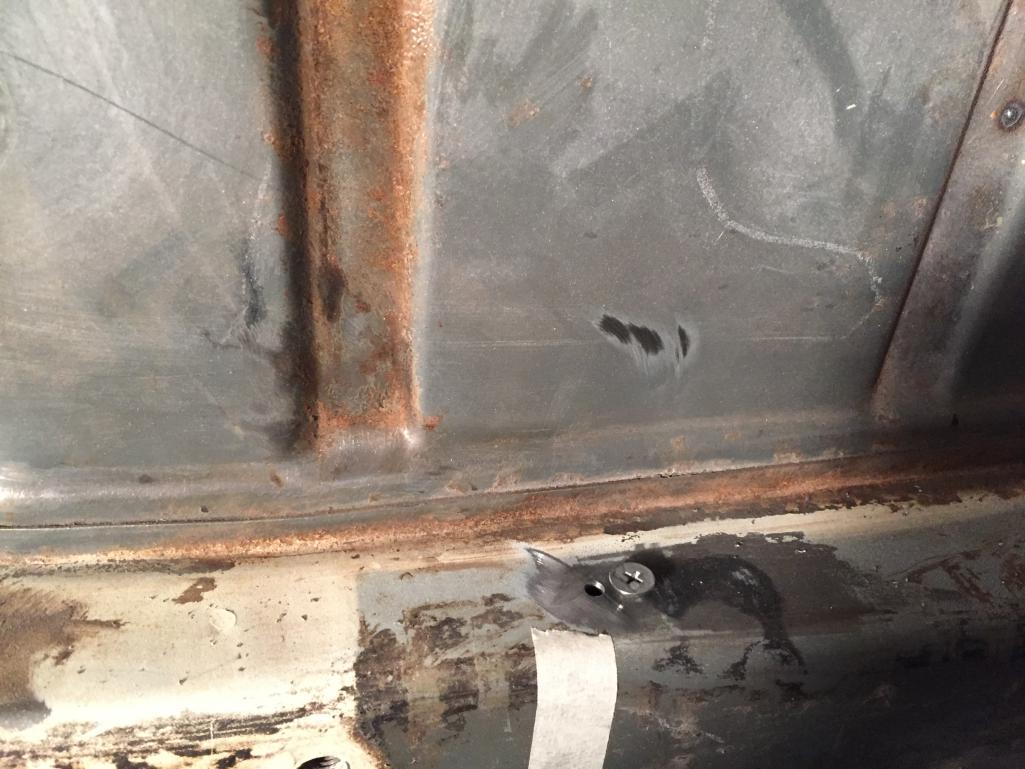
Posted by: Mitox Jul 25 2018, 09:19 PM
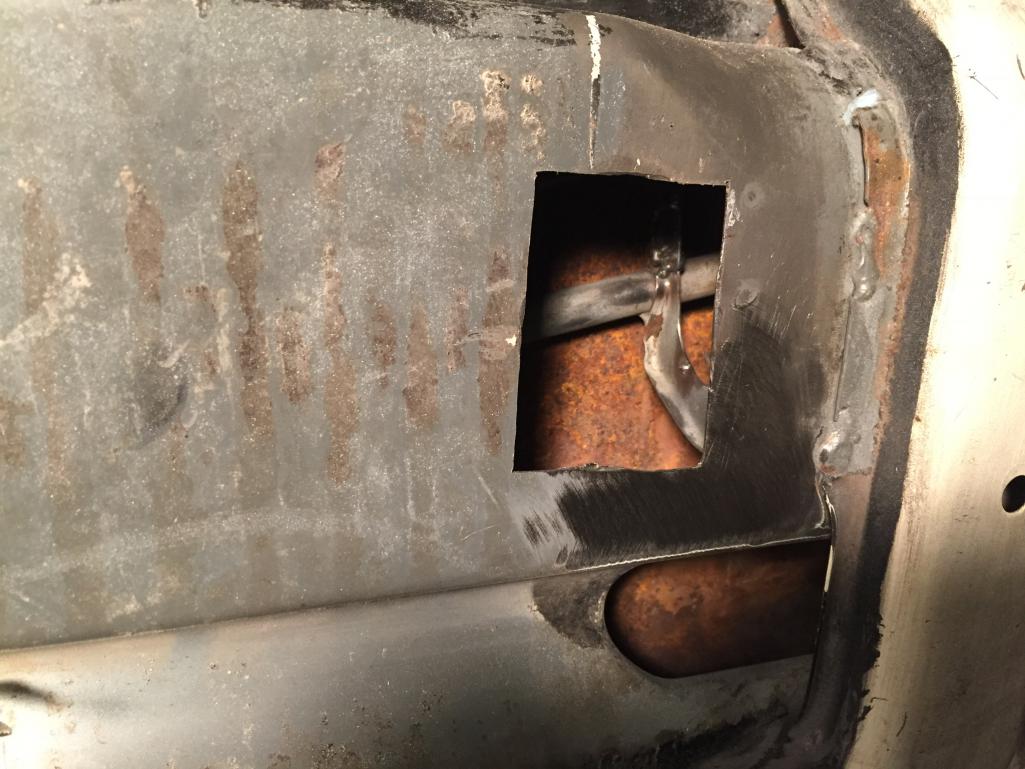
Here’s the repair at the firewall.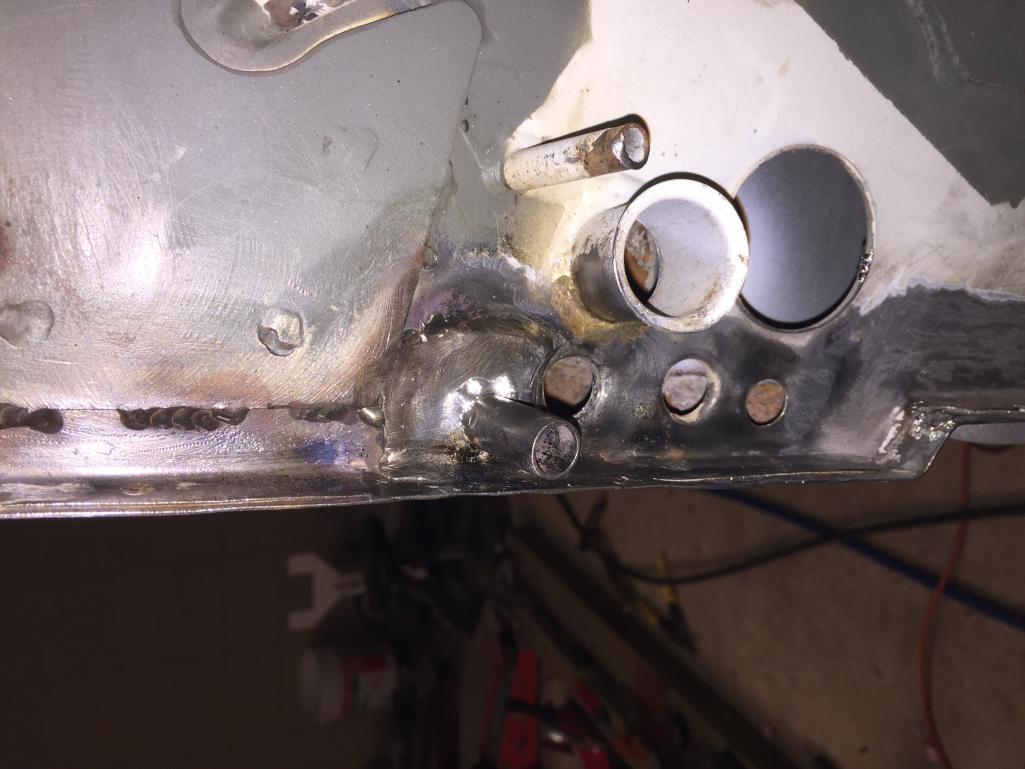
Posted by: mepstein Jul 26 2018, 06:06 AM
looking good.
Posted by: Mitox Jul 27 2018, 09:28 PM
Decided to change up today and work on removing the adhesive from the interior. Sanding and scraping doesn’t work well, so I tried adhesive remover. Well, it removed the adhesive...and the paint, and remaining seam sealer.
I think I’ll do the rest of the inside with this stuff.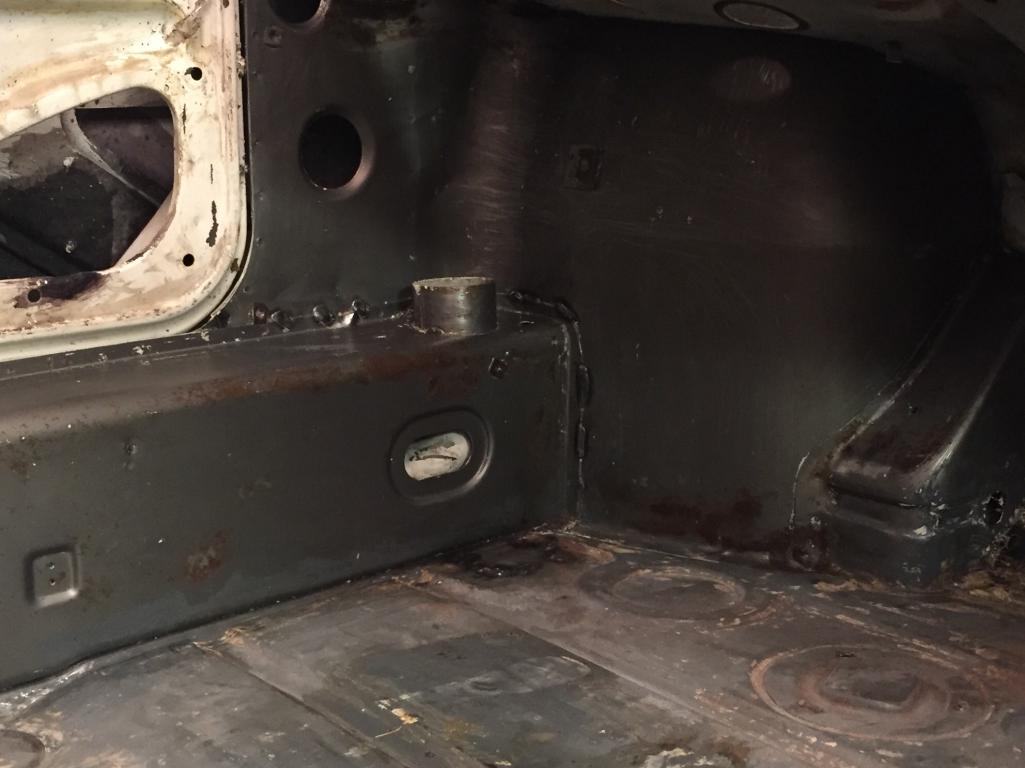
Posted by: bbrock Jul 27 2018, 11:20 PM
Decided to change up today and work on removing the adhesive from the interior. Sanding and scraping doesn’t work well, so I tried adhesive remover. Well, it removed the adhesive...and the paint, and remaining seam sealer.
I think I’ll do the rest of the inside with this stuff.
Great tip!!! Can you share the specific product you are using?
Posted by: Mitox Jul 28 2018, 06:41 AM
Yep, here it is. I purchased it about six years ago to remove carpet glue from concrete. Glad it works well on the 914 also.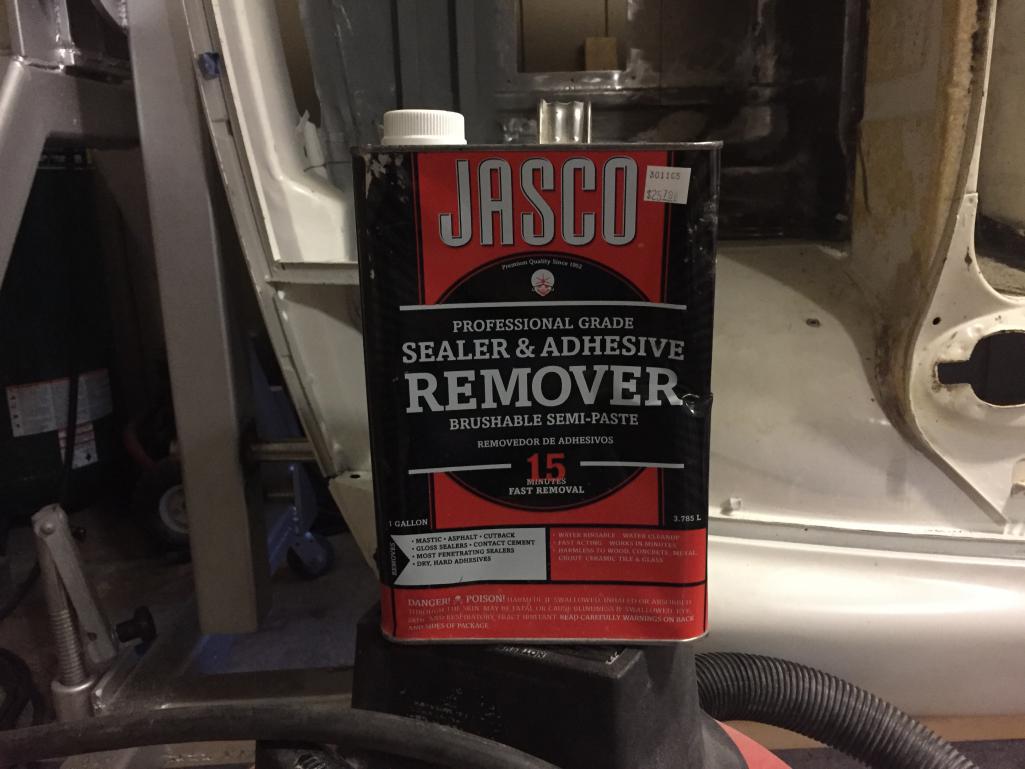
Posted by: mepstein Jul 28 2018, 07:20 AM
Yep, here it is. I purchased it about six years ago to remove carpet glue from concrete. Glad it works well on the 914 also.
I use their paint remover. Good stuff.
Posted by: Mitox Sep 23 2018, 08:36 PM
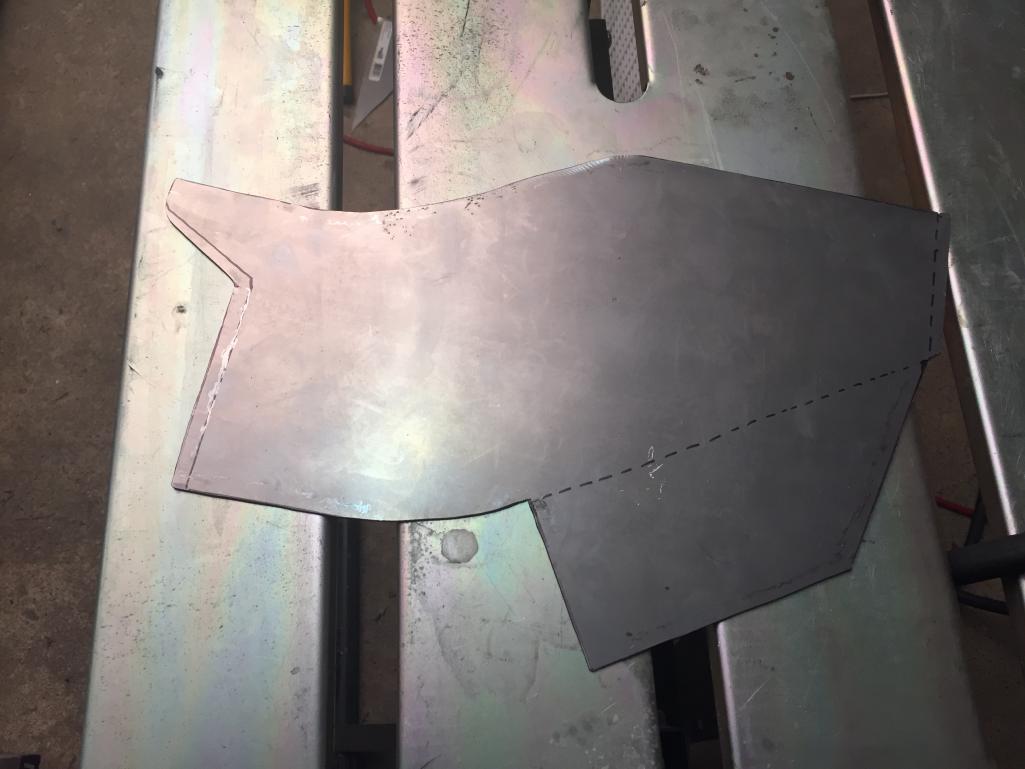
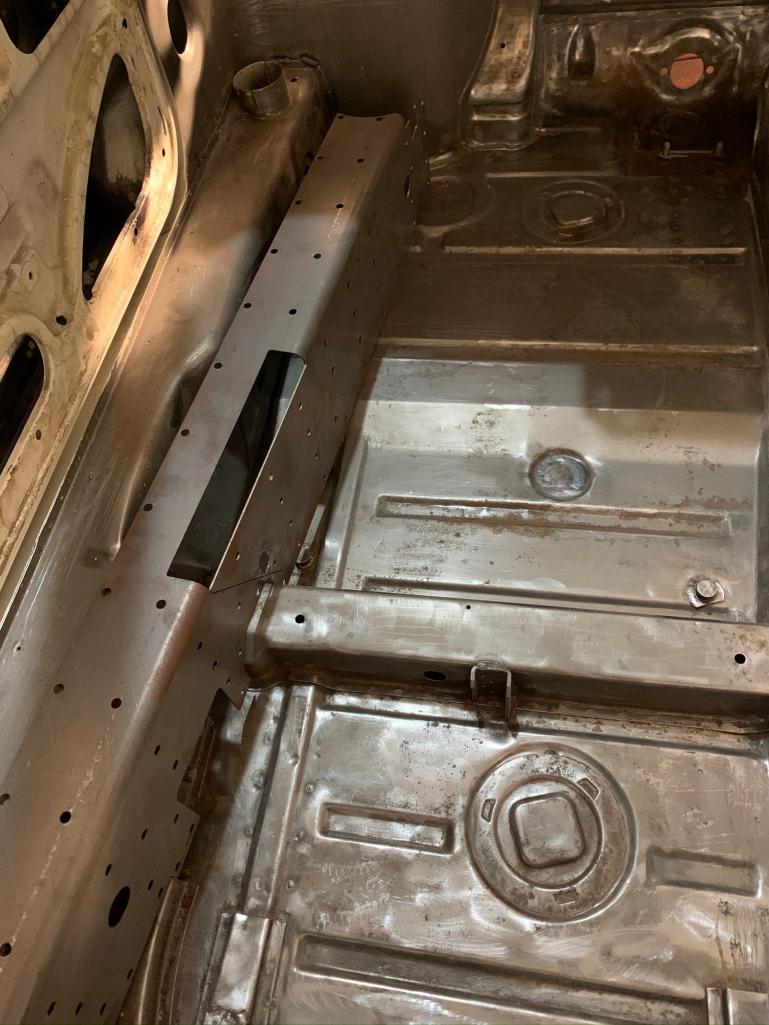
Catching up on posting my progress. I’ve welded in the GT chassis kit, and made additional panels to go over the area where I removed the 4 jug engine mounts. Also had to replace the brake line mount due to the added panel, and welded on new rear jack plates after cleaning out the rust.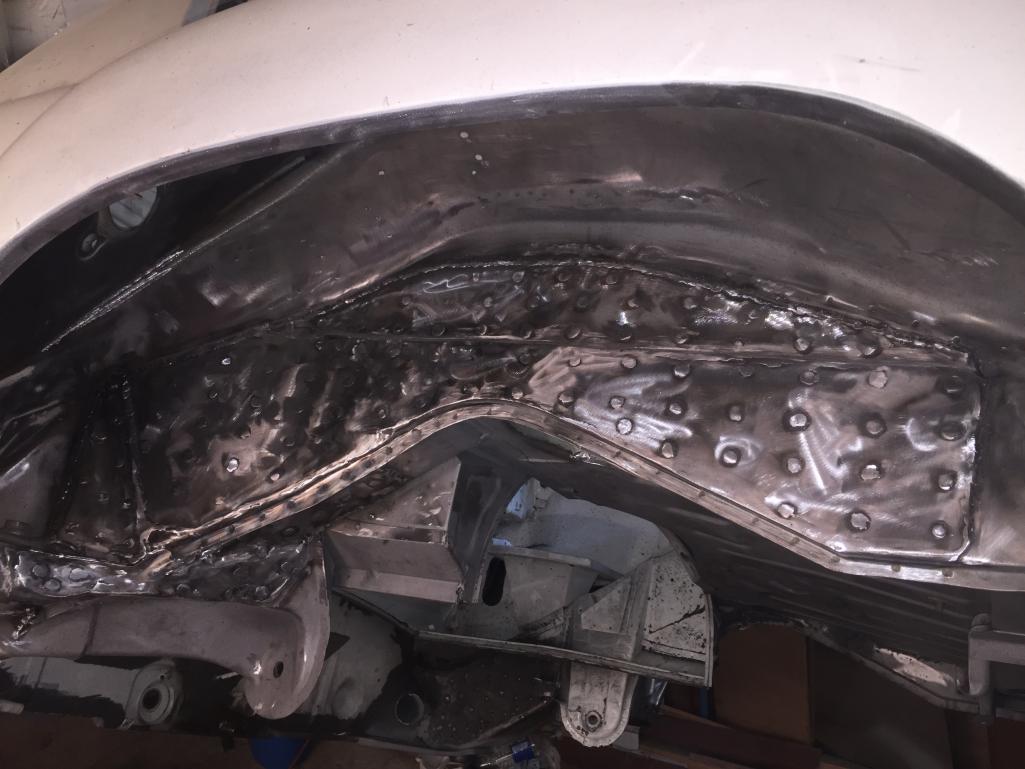
Posted by: Mitox Sep 23 2018, 08:38 PM
Pics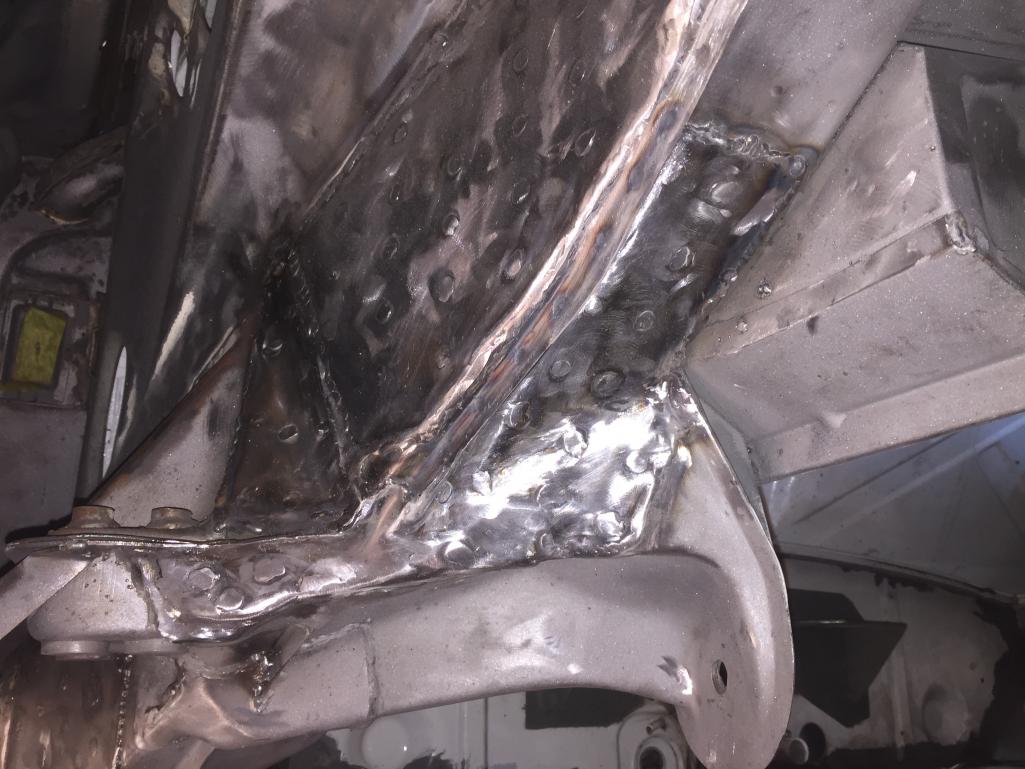
Posted by: Mitox Sep 23 2018, 08:40 PM
Mo pics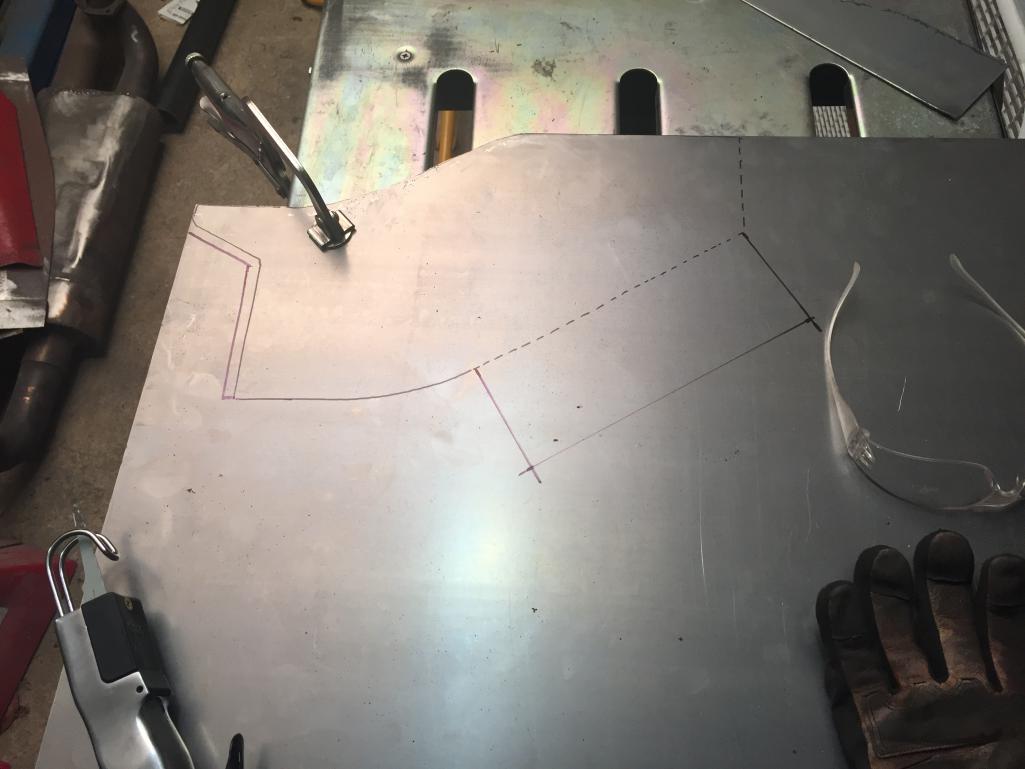
Posted by: Mitox Sep 23 2018, 08:43 PM
And more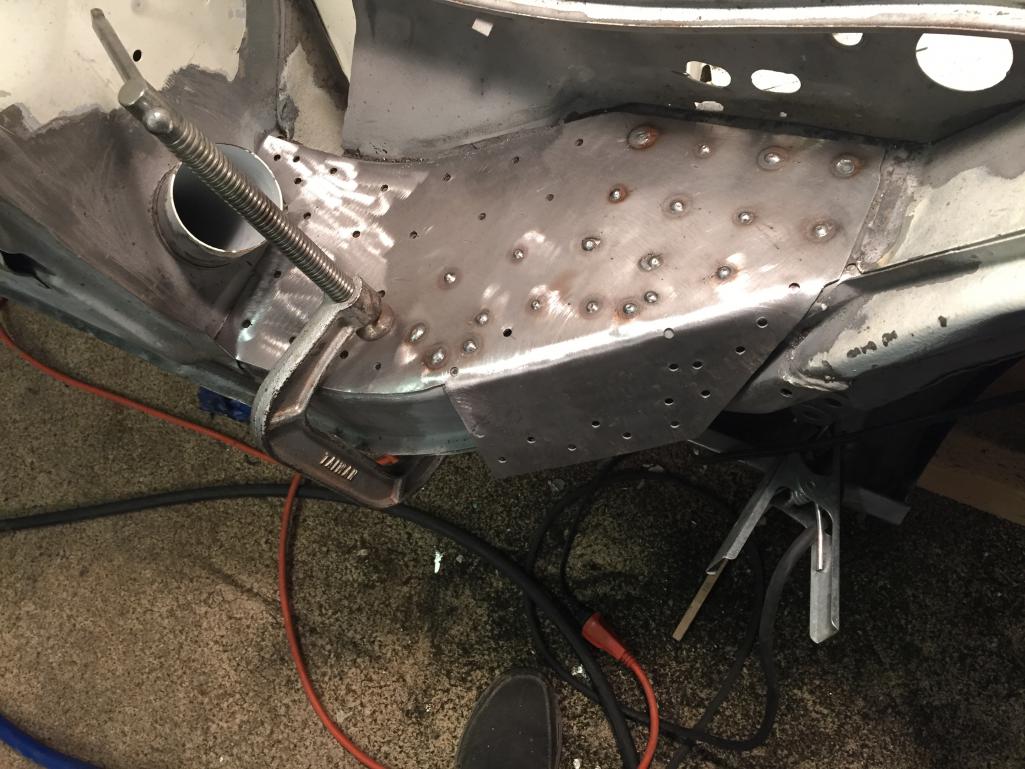
Posted by: Mitox Sep 23 2018, 08:46 PM
One side done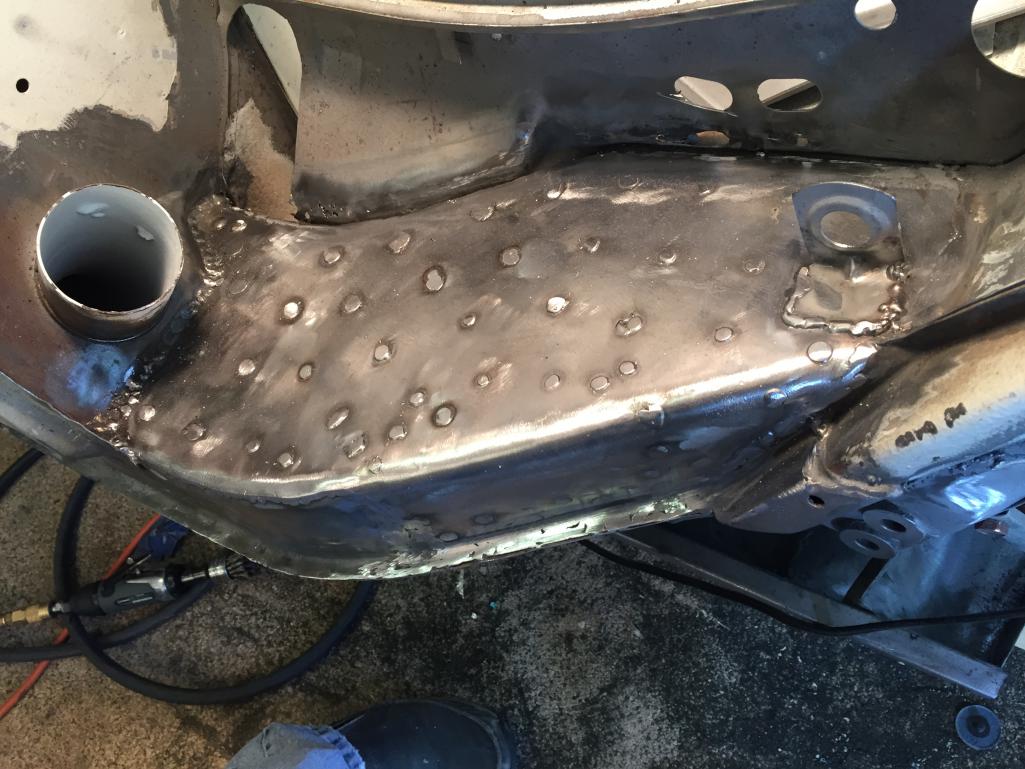
Posted by: Mitox Sep 23 2018, 08:50 PM
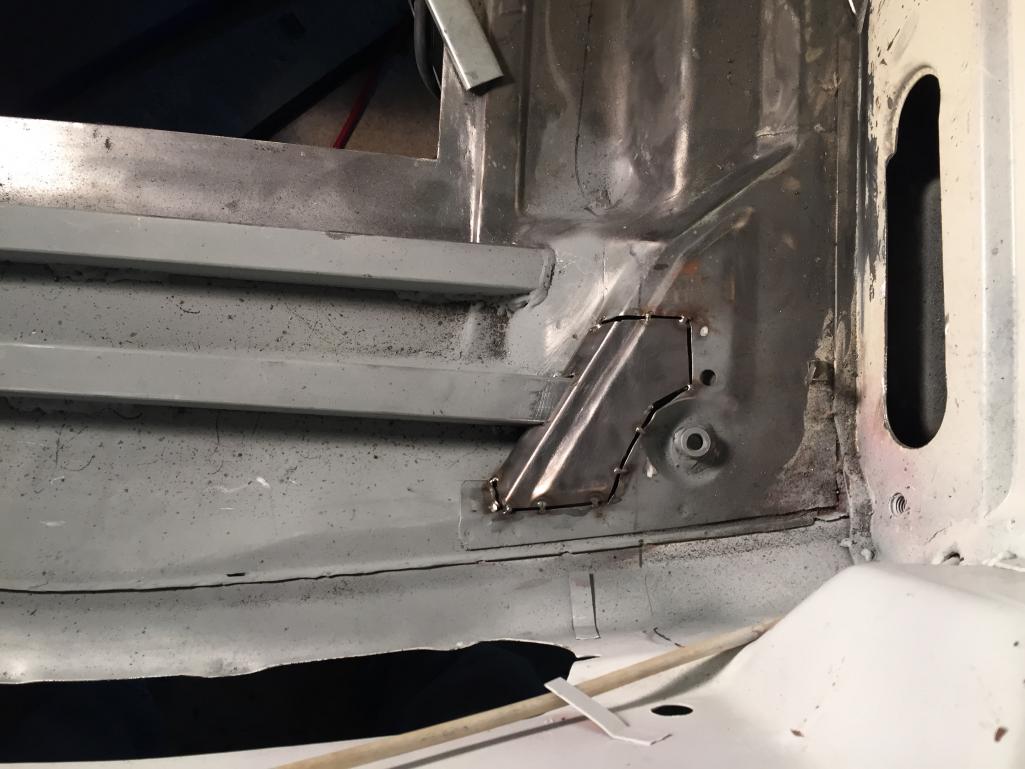
I think the second side looks better. This one shows the zinc I put between everything I’m welding onto the car.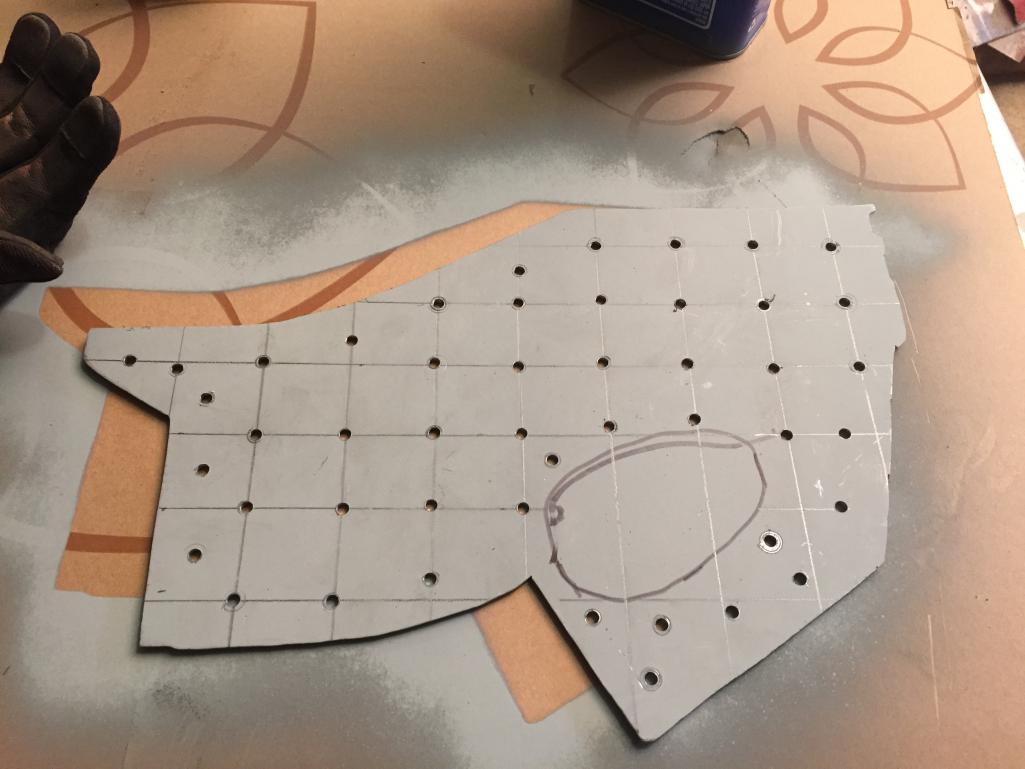
Posted by: Mitox Sep 23 2018, 08:55 PM
Second side finished.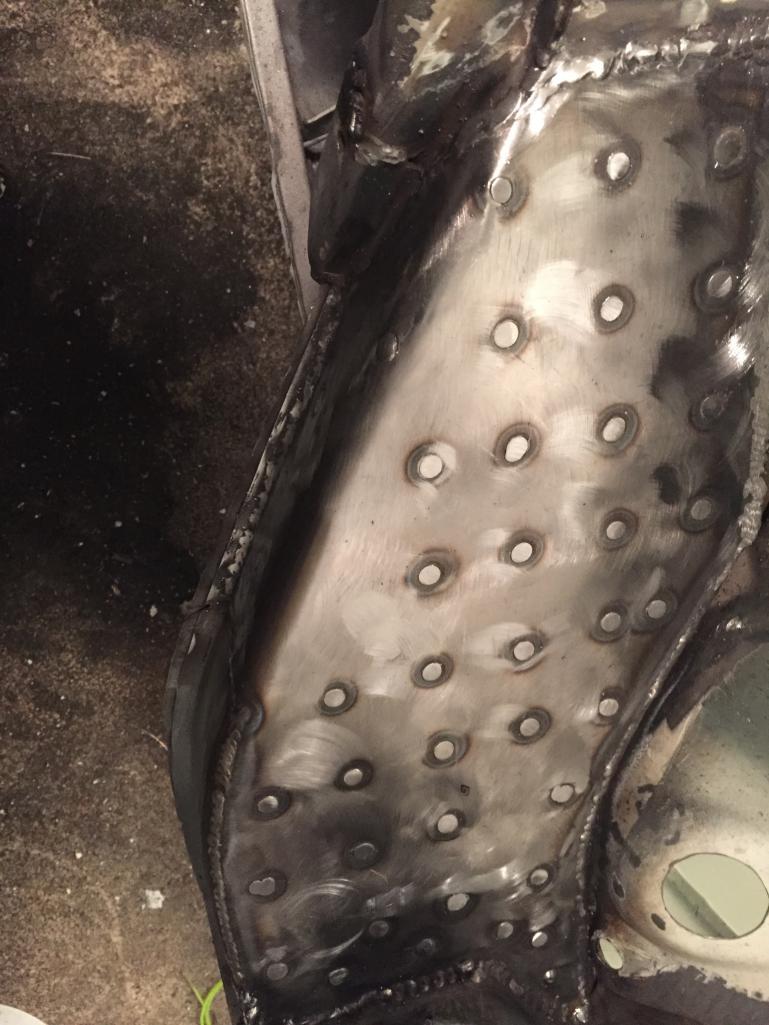
Posted by: Mitox Sep 23 2018, 09:01 PM
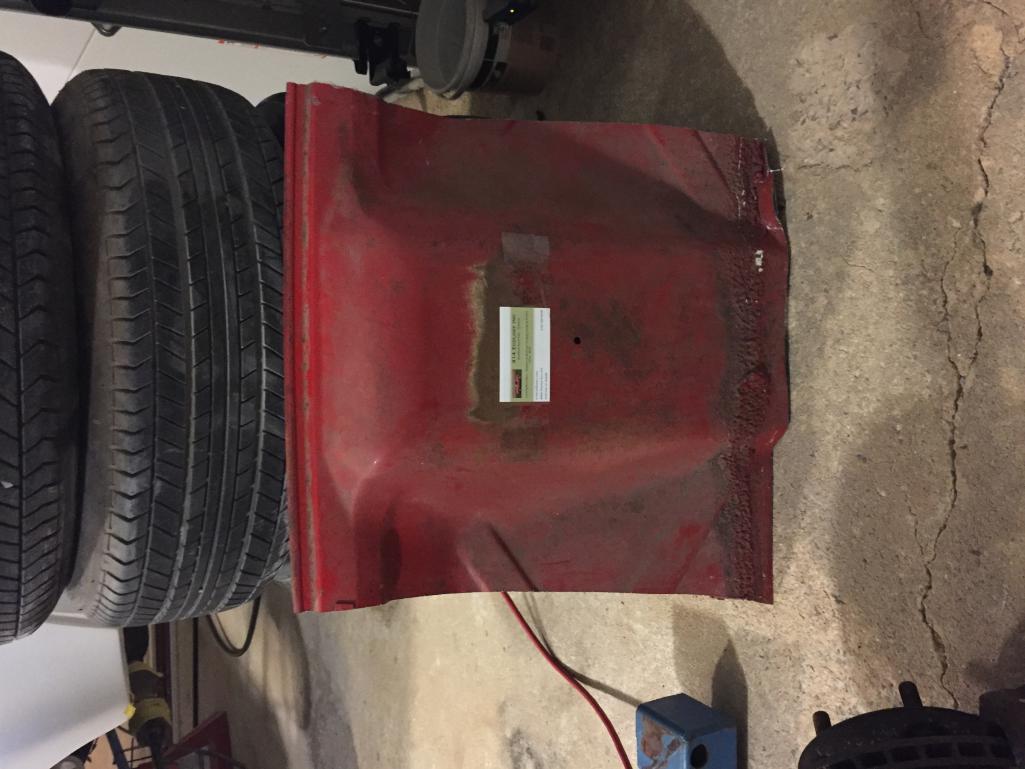
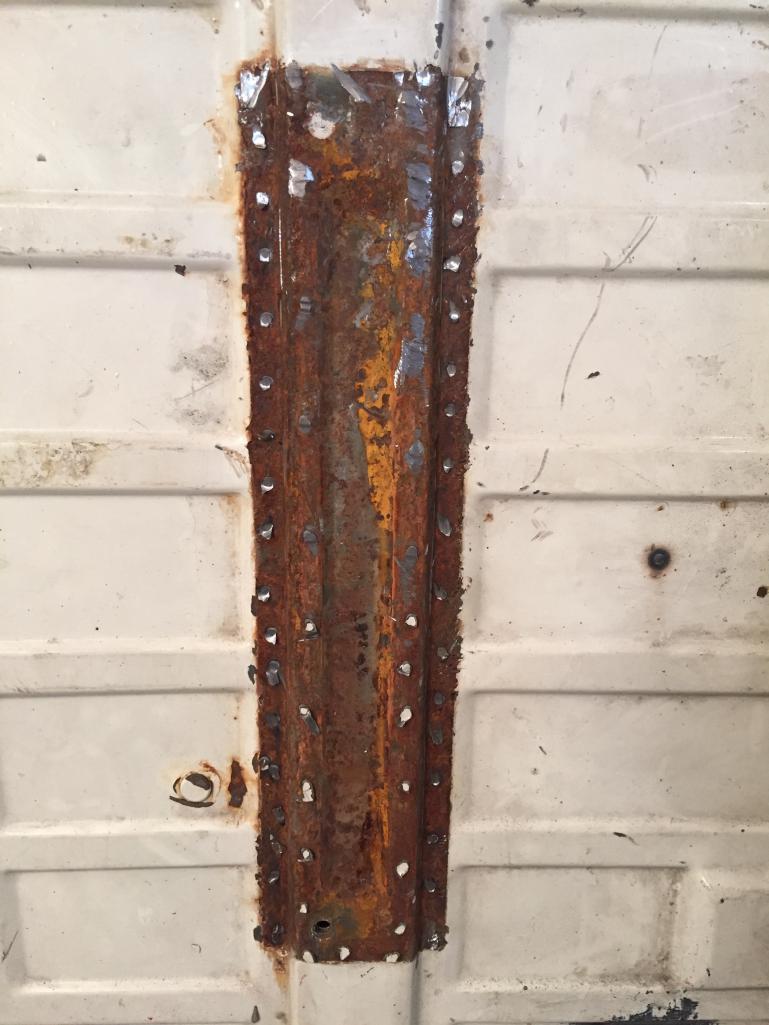
And the rust paranoia continues. Here is the plate in the rear trunk before and after removal. I have a replacement from RD that needs to go on after cleaning the rust off.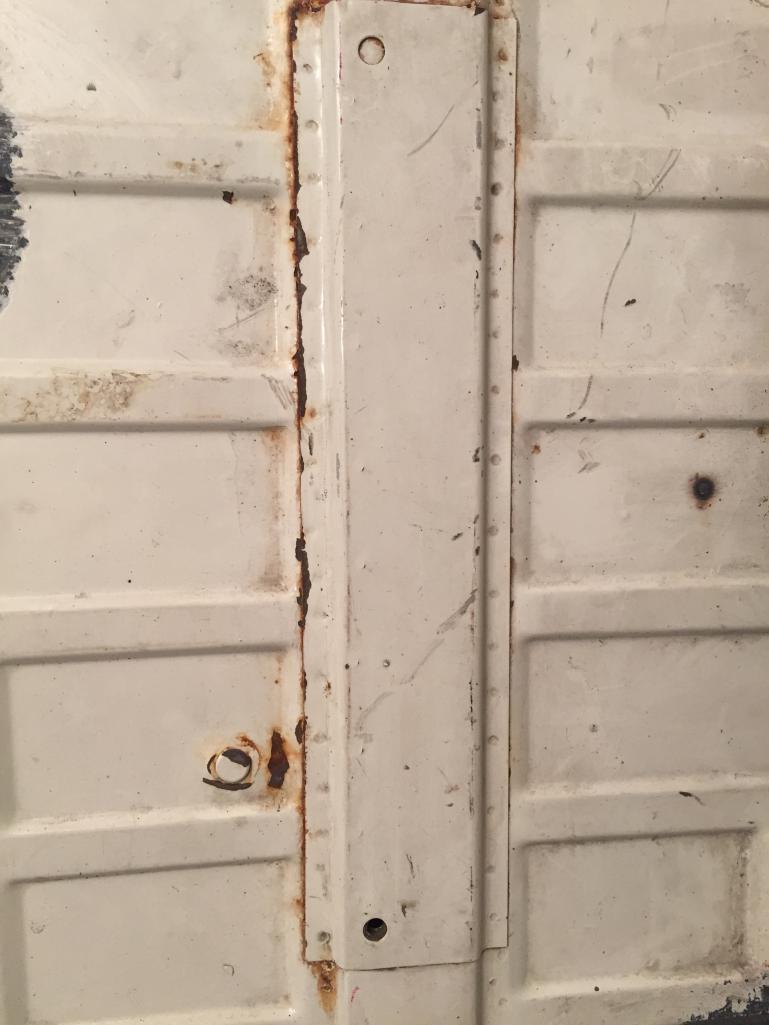
Posted by: Lucky9146 Sep 24 2018, 07:54 AM
Catching up on posting my progress. I’ve welded in the GT chassis kit, and made additional panels to go over the area where I removed the 4 jug engine mounts. Also had to replace the brake line mount due to the added panel, and welded on new rear jack plates after cleaning out the rust.
Cool shot! Nice work!!
I was fortunate in that my car came with this work completed so I will tuck this shot away in my files. Love it.

Posted by: bbrock Sep 24 2018, 08:30 AM
And the rust paranoia continues. Here is the plate in the rear trunk before and after removal. I have a replacement from RD that needs to go on after cleaning the rust off.
Ugh! That's about the only piece of metal I didn't replace on my resto. Now I'm going to have nightmares
 Hoping I can get enough rust converter and internal frame coating to seep into there to kill the rust.
Beautiful work on the car. Love watching the progress

Posted by: Cairo94507 Sep 24 2018, 08:33 AM
Yeah, the rust worm never sleeps.
Posted by: TravisNeff Sep 24 2018, 09:30 AM
Thanks for sharing the detail pics of the reinforcements. I was starting to make the same yesterday, and it is great to see another perspective.
Posted by: mb911 Sep 24 2018, 01:31 PM
Looks great.. The rust worm is interesting to say the least. I plan to spray. Corrosion x in all the cavitys as that will creep into every potential spot on the car..
Its an avaition protectant.
Posted by: Mitox Sep 24 2018, 06:48 PM
Looks great.. The rust worm is interesting to say the least. I plan to spray. Corrosion x in all the cavitys as that will creep into every potential spot on the car..
Its an avaition protectant.
I haven’t heard of Corrosion X; I’ll need to look into that. Thanks
Posted by: Mitox Sep 26 2018, 11:31 AM
It’s engine week!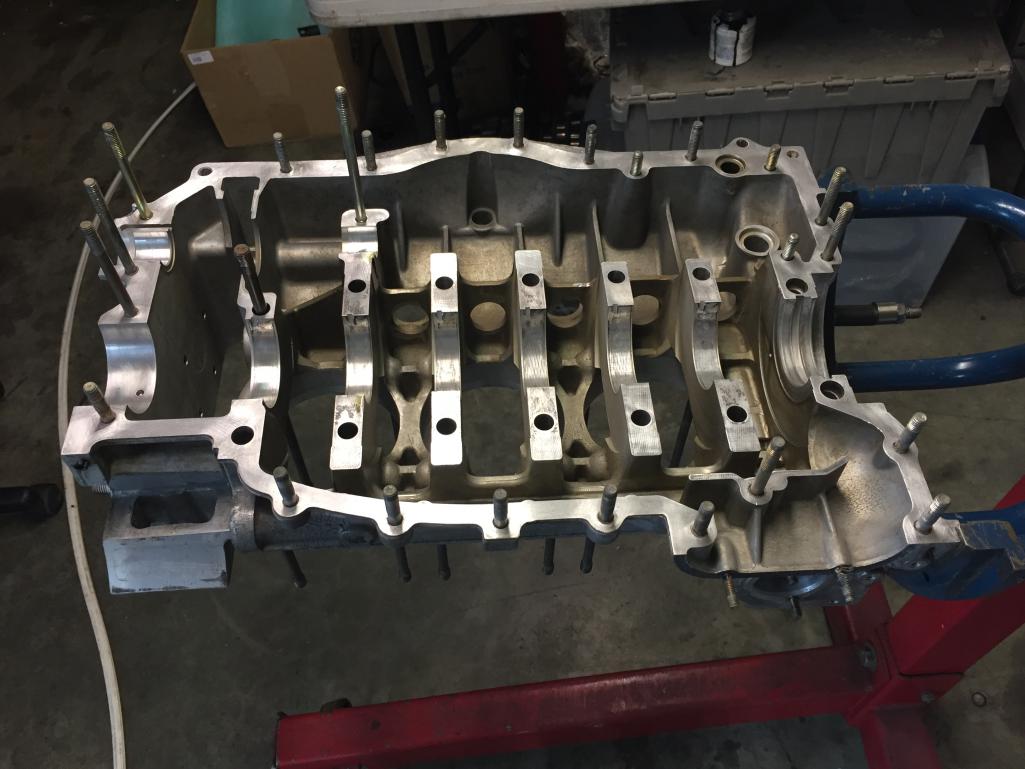
Posted by: Mitox Sep 26 2018, 01:08 PM
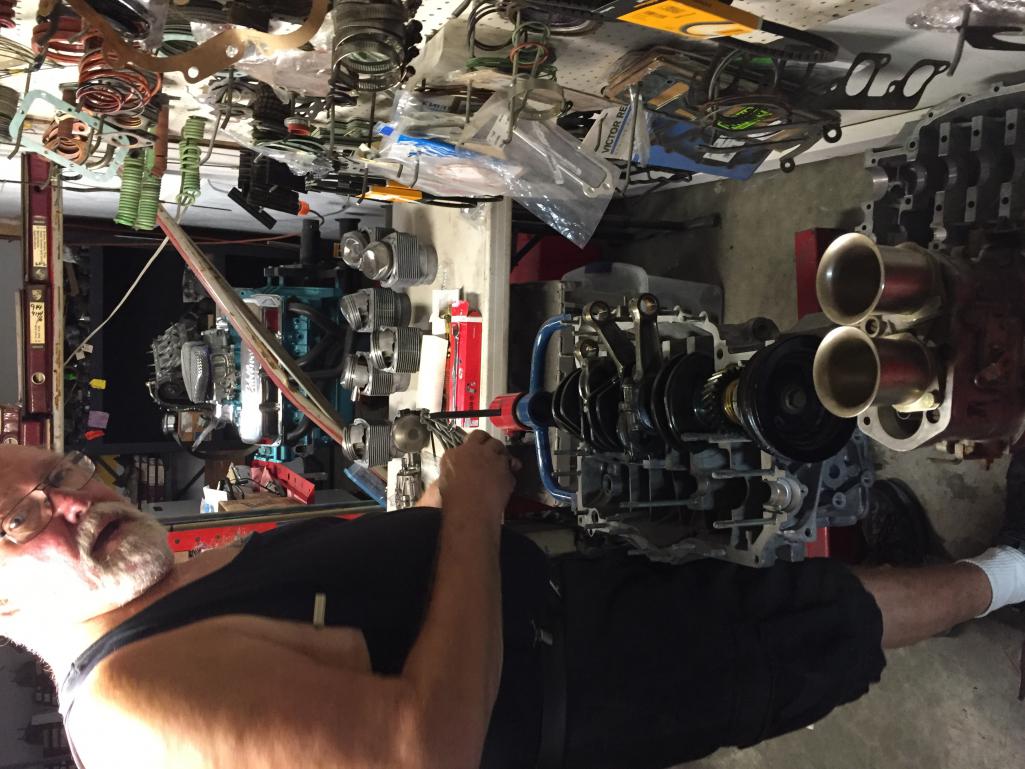
Posted by: Mitox Sep 26 2018, 03:33 PM
Progress
Posted by: Cairo94507 Sep 26 2018, 03:47 PM
Cool.
Posted by: Mitox Sep 26 2018, 06:28 PM
John at work: a little more progress. The plan is to have it running this week.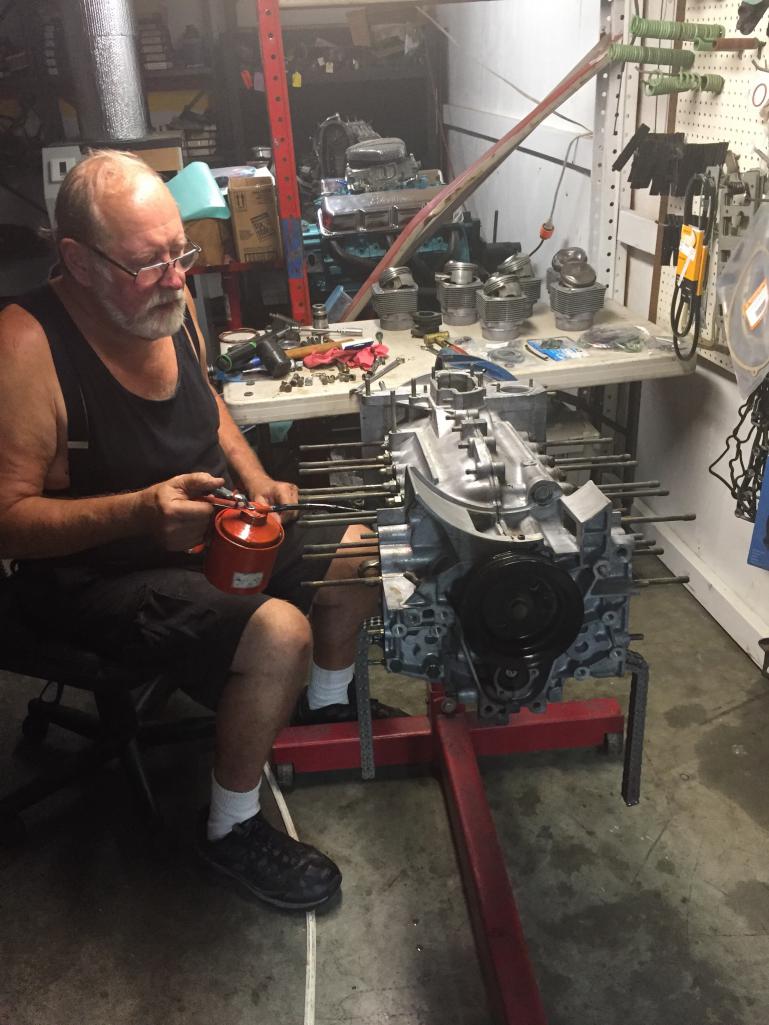
Posted by: mepstein Sep 26 2018, 06:34 PM
John’s a great guy. Loved talking to him at okteenerfest last year.
Posted by: Mitox Sep 26 2018, 06:46 PM
John’s a great guy. Loved talking to him at okteenerfest last year.
Agreed, I’ve enjoyed working with John. And, while hanging around the shop he lets we help work on my engine and ask a thousand questions.
Posted by: 2mAn Sep 26 2018, 06:53 PM
Its threads like this that make me love 914 owners and 914 world...
Cant wait to see this thing completed! Excellent work!!
Posted by: Dion Sep 26 2018, 08:32 PM
John at work: a little more progress. The plan is to have it running this week.
That’s exciting news!
The chassis reinforcements look awesome.
Posted by: Mitox Sep 27 2018, 05:42 PM
Little further along today, but still waiting on the cams and springs to arrive.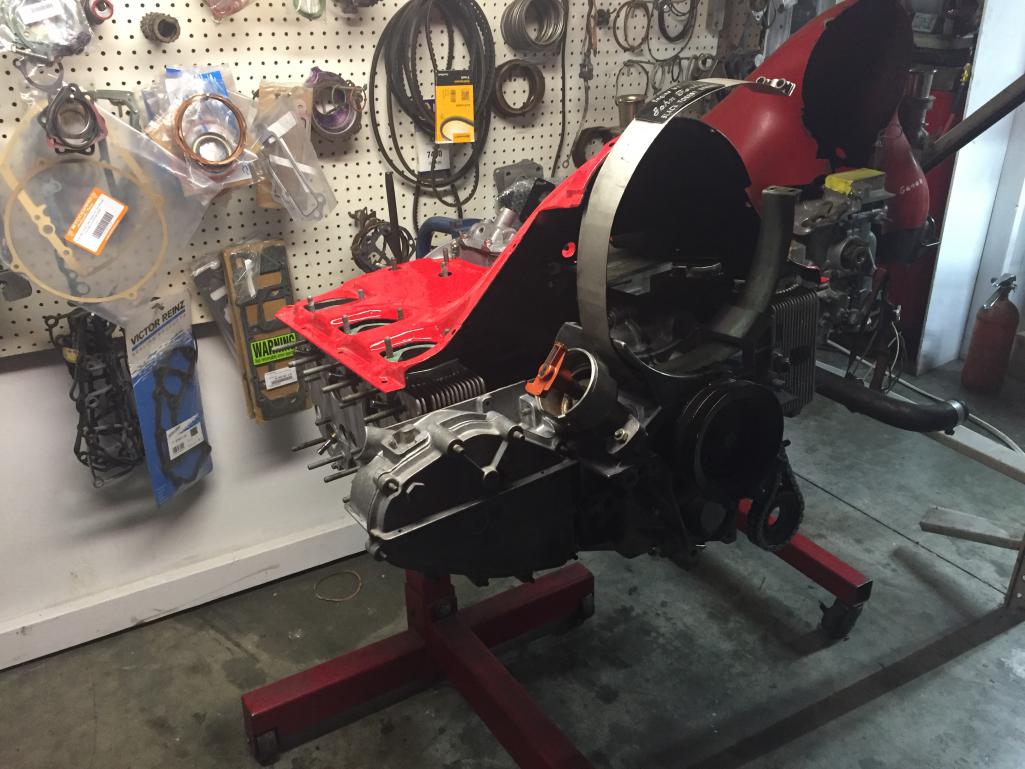
Posted by: Mitox Sep 28 2018, 08:16 PM
Nearly complete!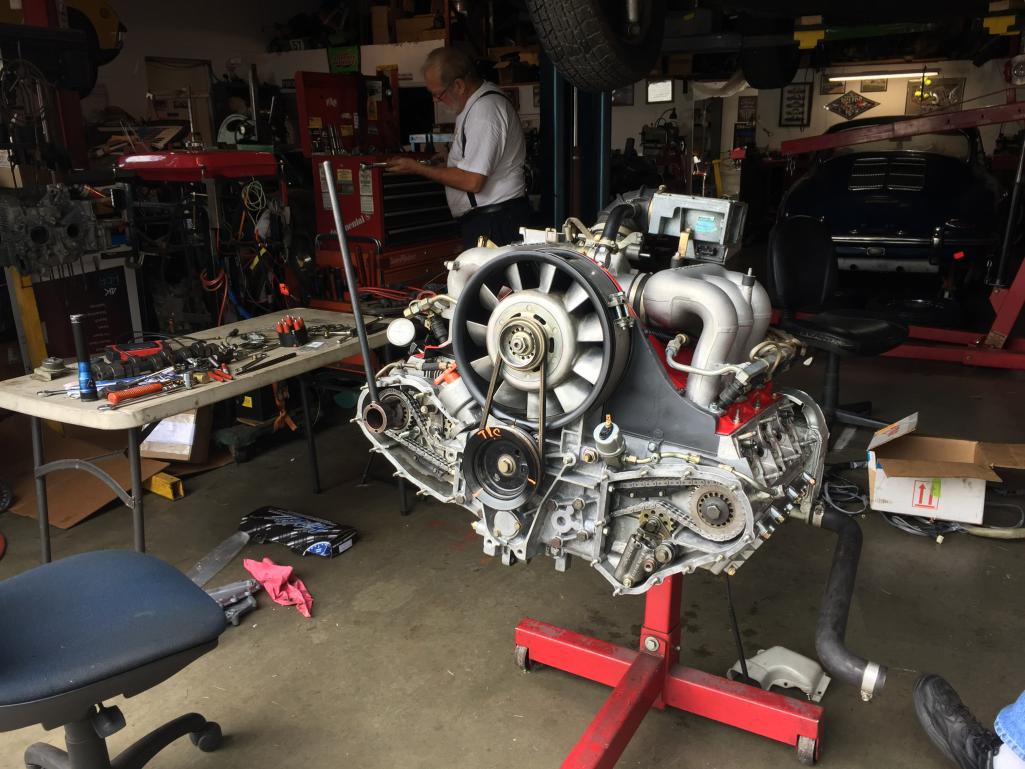
Posted by: Mitox Nov 1 2018, 08:33 PM
More cool stuff came in the mail today; I can’t wait to start reassembly!
Luckily my wife doesn’t even comment when packages arrive at the house now - she knows it’s more 914 stuff.
Posted by: Mitox Oct 21 2019, 10:05 PM
I need help; my wife says this often, but this time I agree.
I’ve found five painters for my GT. Three retired before “getting to it”, one just didn’t get to it, and the fifth I fear is about to retire. The fifth painter I found is very highly qualified, and would do a great job, but after 16 months of waiting my turn and hearing his retirement plans, I think my turn will never arrive.
Does anyone have recommendations? I live in southwest Virginia and am willing to travel within reason.
- What I’m looking for:
- Highly skilled in body/paint
- high attention to detail
- someone that can replace seam sealer: the car is fully stripped on the bottom, and all seam sealer was removed everywhere inside and out. Car is fully disassembled- just a shell on a rotisserie.
- someone that can verify the chassis is straight/square, and tweak if required
- someone trustworthy
Any recommendations? Please!
Posted by: stevesc_us Oct 21 2019, 11:42 PM
Sorry can’t help with a recommendation for a shop near you, but getting back to your decision on what color green to choose, have you considered Willow Green? It’s a super rare 914-6 color. George at AA has one in this color and it’s a stunning car with freaky low miles.
Here’s a pic of another 6 at Luft 6 that was painted this color. 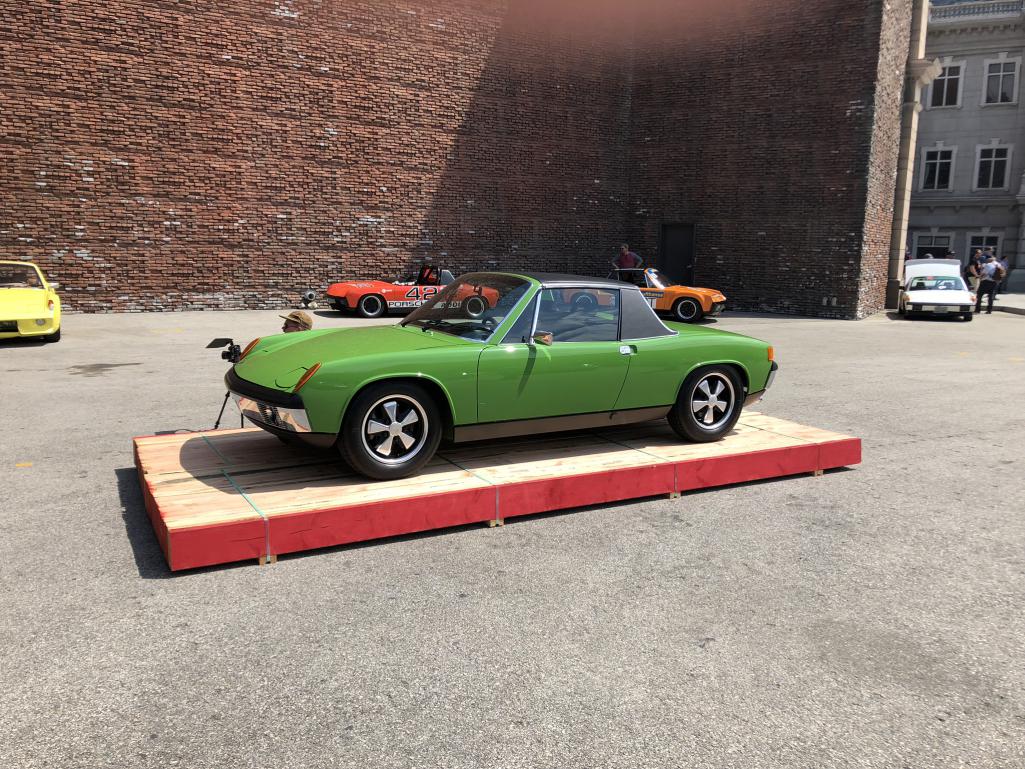
Posted by: stevesc_us Oct 21 2019, 11:46 PM
Then again, I always loved my 914-6 that was Metallic Green! God how I still miss that car!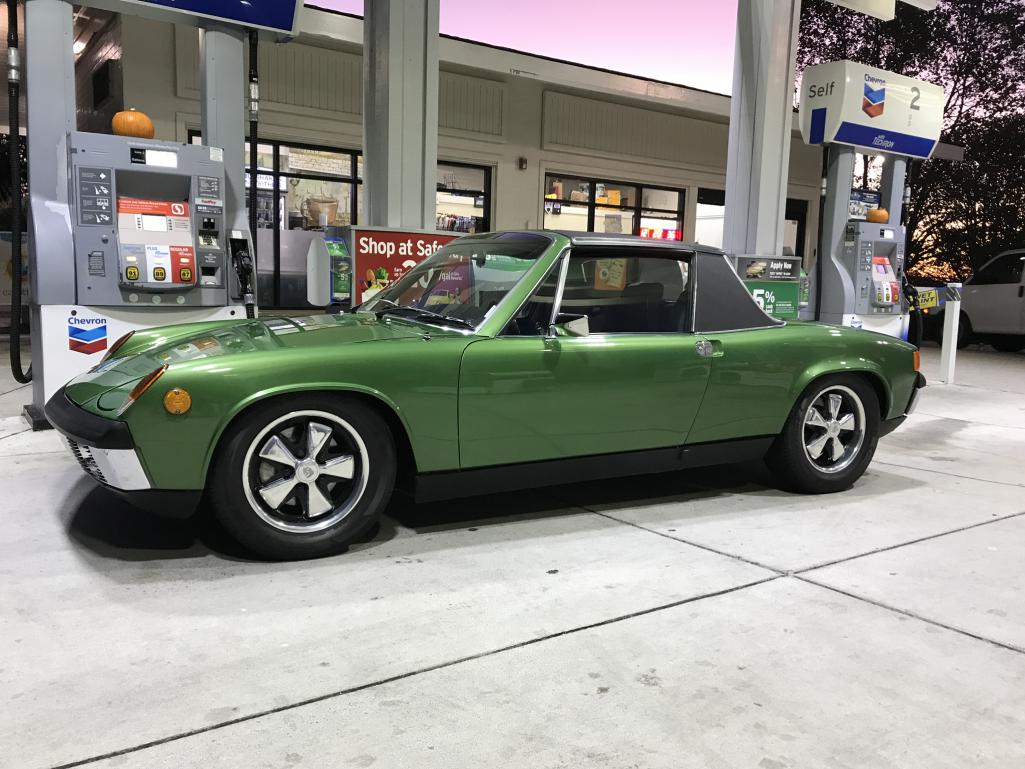
Posted by: rgalla9146 Oct 22 2019, 06:55 AM
[quote name='Mitox' date='Sep 23 2018, 11:01 PM' post='2651575']
And the rust paranoia continues. Here is the plate in the rear trunk before and after removal. I have a replacement from RD that needs to go on after cleaning the rust off.
May I humbly suggest a different take on a GT trunk reinforcement ?
Your work is beautiful.......and thorough !
Attached thumbnail(s)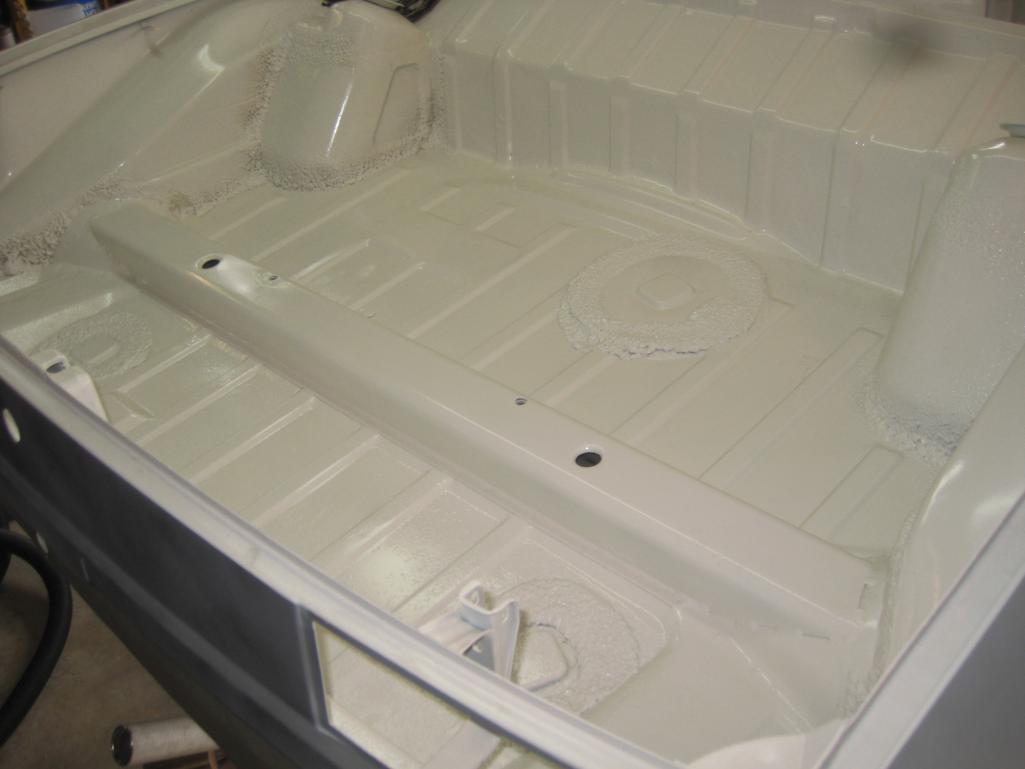
Attached image(s)
Posted by: Mitox Oct 22 2019, 05:37 PM
[quote name='rgalla9146' date='Oct 22 2019, 08:55 AM' post='2756358']
[quote name='Mitox' date='Sep 23 2018, 11:01 PM' post='2651575']
And the rust paranoia continues. Here is the plate in the rear trunk before and after removal. I have a replacement from RD that needs to go on after cleaning the rust off.
May I humbly suggest a different take on a GT trunk reinforcement ?
Your work is beautiful.......and thorough !
[/quote]
Your take looks good; I like the clean look. It’s likely stiffer also
Posted by: Mitox Oct 22 2019, 05:39 PM
Then again, I always loved my 914-6 that was Metallic Green! God how I still miss that car!
I do like green. The metallic viper green was one of the options I considered, and your car looks great.
Posted by: Krieger Oct 22 2019, 06:02 PM
Why don't you put a borescope in there and take a look first?
Posted by: Mitox Oct 22 2019, 06:27 PM
Why don't you put a borescope in there and take a look first?
Guess I’m lost. Why? In where?
Posted by: Mitox Oct 22 2019, 06:35 PM
Why don't you put a borescope in there and take a look first?
Guess I’m lost. Why? In where?
Oh, you’re referring to the hole on the structural section? Sorry for the slow brain cells. My mind is focused on paint - going nuts trying to find someone to put a finish on my car
Posted by: Mitox Nov 25 2019, 11:07 PM
Well, haven’t received any suggestions on painters, but I found two close by.
The first is excellent, though like previous finds, he sold his shop and is ready to retire. Currently he wants the project, but I will need to wait another 10 months for him to start.
The second posted pics of a 914 GT job he was working on 914world Facebook. The pics look good, but I haven’t had a chance to visit his shop yet.
If anyone knows of a good painter, please let me know. I’m willing to bring the car to most areas of Virginia, NC, SC, TN, or WV. Maybe further.
I’d love to paint it myself, but the job and life doesn’t allow.
Posted by: rgalla9146 Nov 26 2019, 06:55 AM
I dig those flares! Keeping it white?
Well, I'm having some trouble deciding on color. I want to keep the original color, but white is boring to me. I may go with green; if I do it will be the 2008 Green, or Viper green.
Looks fantastic ! Great work.
White is an outstanding color! ... not boring at all.
Most factory racers were white.
Avoid the difficult task of changing your color code tag.
If I may....
Attached thumbnail(s)
Posted by: Mitox Nov 26 2019, 10:12 PM
I dig those flares! Keeping it white?
Well, I'm having some trouble deciding on color. I want to keep the original color, but white is boring to me. I may go with green; if I do it will be the 2008 Green, or Viper green.
Looks fantastic ! Great work.
White is an outstanding color! ... not boring at all.
Most factory racers were white.
Avoid the difficult task of changing your color code tag.
If I may....
I must admit your car in white looks fantastic. I like the white bumpers also.
Is it ivory white, or another code?
Posted by: rgalla9146 Nov 27 2019, 07:08 AM
I dig those flares! Keeping it white?
Well, I'm having some trouble deciding on color. I want to keep the original color, but white is boring to me. I may go with green; if I do it will be the 2008 Green, or Viper green.
Looks fantastic ! Great work.
White is an outstanding color! ... not boring at all.
Most factory racers were white.
Avoid the difficult task of changing your color code tag.
If I may....
I must admit your car in white looks fantastic. I like the white bumpers also.
Is it ivory white, or another code?
Light Ivory L80 E The body color bumpers ? I wanted it to look like a '70-'71
no option stripper. No vinyl either.
Thank you
Don't worry, your car will look fantastic no matter what color.
Posted by: Mitox Feb 17 2020, 10:49 PM
So, it heads off to another paint shop this coming weekend (someone that promises not to retire before completing the paint), so I’m reinstalling the suspension so I can roll it onto a trailer.
One problem and question for the many more knowledgeable than I: I can’t get the top of the strut up to the mount. I’m sure there’s something simple, but I don’t know what to do. I’ve stretched the strut out, and used a jack to push the assembly up, but can’t it it all the way up.
Any thoughts?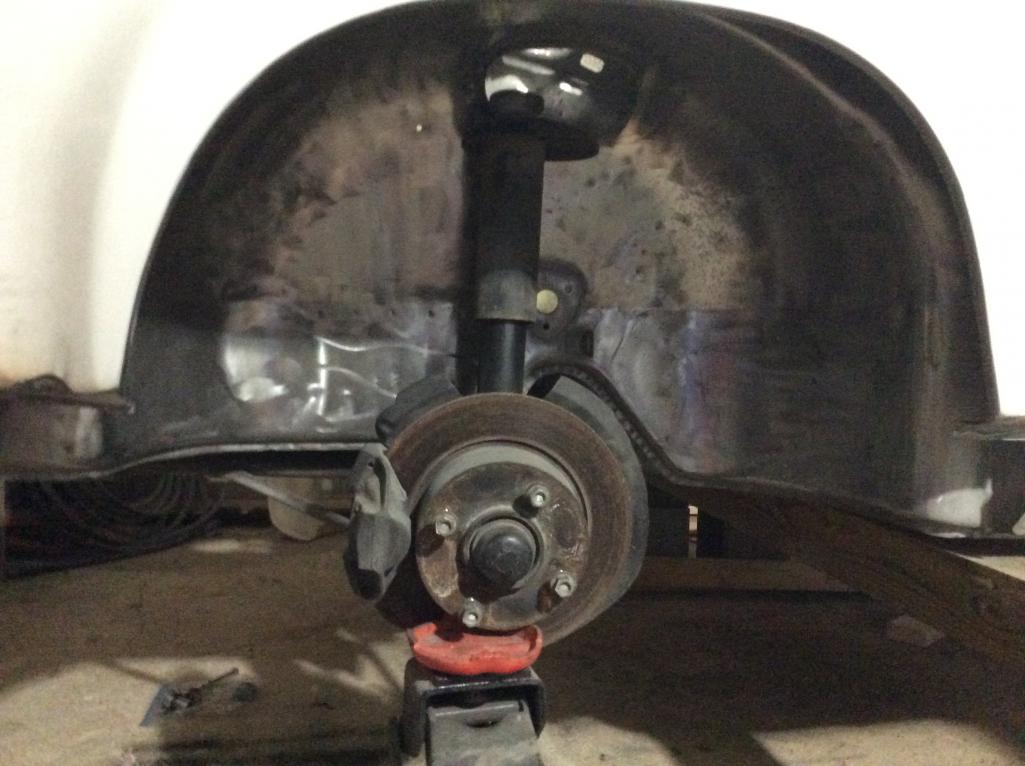
Posted by: mepstein Feb 18 2020, 06:15 AM
A jack usually does it for me but one time I had to extend the shaft of the strut insert, hold it with a vise grip (piece of rubber sheet to protect the shaft) and then jack it up so the could put the nut on it. Some inserts are threaded in the shaft so you can use a long bolt to pull them up.
Posted by: rgalla9146 Feb 18 2020, 07:34 AM
I agree with Mark.
For now leave the dust cover off so that you can keep the shaft exposed and extended.
Worst case remove the 'dog bone' adjuster at the rear of the torsion bar
so that the lower control arm can be raised at the ball joint.
If the shaft is threaded internally at the top thread a long bolt into it and pull it up with a vise grip.
Posted by: Luke M Feb 18 2020, 07:37 AM
Take off the t-bar cap and lift the strut into place. Sometimes the shocks are stiff to pull out but should go. It maybe just binding on the t-bars which is not allowing you to go up as far as you need.
Posted by: Mitox Feb 18 2020, 12:10 PM
Thanks for the input; I’ll try each suggestion this evening. It came off, so it’s gotta go back somehow.
Posted by: Mitox Feb 18 2020, 09:06 PM
Evidently, a blood sacrifice is required. I tried everything until my hand slipped leaving blood on the brake shield. After wrapping my hand up, I tried again - it moved very easily into place. Maybe the strut was just stuck...
Posted by: Mitox Feb 21 2020, 07:51 AM
I’m trying to be sure I have addressed everything prior to paint, and can’t stop thinking about more reinforcements. MadDog has inner longs panels that look like a good idea. Is this overkill, or beneficial?
My car is a very rust free car, but this could help reduce flex I think.
Posted by: peteyd Feb 21 2020, 12:58 PM
I’m trying to be sure I have addressed everything prior to paint, and can’t stop thinking about more reinforcements. MadDog has inner longs panels that look like a good idea. Is this overkill, or beneficial?
My car is a very rust free car, but this could help reduce flex I think.
If your car is rust free I wouldn't do that mod. There is a chance you could put too much heat into the chassis while welding which will twist the chassis. Then you will be regretting it big time.
Pete
Posted by: Mitox Feb 21 2020, 10:18 PM
I’m trying to be sure I have addressed everything prior to paint, and can’t stop thinking about more reinforcements. MadDog has inner longs panels that look like a good idea. Is this overkill, or beneficial?
My car is a very rust free car, but this could help reduce flex I think.
If your car is rust free I wouldn't do that mod. There is a chance you could put too much heat into the chassis while welding which will twist the chassis. Then you will be regretting it big time.
Pete
Hmm, good point. I hadn’t considered that.
Thanks for the input.
Posted by: Mitox Feb 21 2020, 10:30 PM
I’m trying to be sure I have addressed everything prior to paint, and can’t stop thinking about more reinforcements. MadDog has inner longs panels that look like a good idea. Is this overkill, or beneficial?
My car is a very rust free car, but this could help reduce flex I think.
If your car is rust free I wouldn't do that mod. There is a chance you could put too much heat into the chassis while welding which will twist the chassis. Then you will be regretting it big time.
Pete
Hmm, good point. I hadn’t considered that.
Thanks for the input.
Posted by: 914forme Feb 24 2020, 09:40 AM
If you brace properly and Take your time, you are going to be good.
But I would set the chassis down on the middle section. Let the weight of the two ends unsupported and mount the doors and get you bracing set with proper gaps, add tap at each gap measurement, and write down your beginning measurement, and continue on from there. If you take your time, very little chance you will fleet the chassis.
Lots of them have been installed proper bracing of the opening is key.
I did my first set with a porta-power running from targa bar to footwells. Jacked it open to what I wanted and started welding. Just took my time, gaps never changed.
I coated both sides with weld through primer heavy zinc stuff, then took a drill bit made the tip flat, and cleaned each plug weld hole out. Then welded each one out becasreful not to put to much heat into the chassis.
I have seen your work, you got this.
Posted by: Mitox Feb 24 2020, 10:59 PM
If you brace properly and Take your time, you are going to be good.
But I would set the chassis down on the middle section. Let the weight of the two ends unsupported and mount the doors and get you bracing set with proper gaps, add tap at each gap measurement, and write down your beginning measurement, and continue on from there. If you take your time, very little chance you will fleet the chassis.
Lots of them have been installed proper bracing of the opening is key.
I did my first set with a porta-power running from targa bar to footwells. Jacked it open to what I wanted and started welding. Just took my time, gaps never changed.
I coated both sides with weld through primer heavy zinc stuff, then took a drill bit made the tip flat, and cleaned each plug weld hole out. Then welded each one out becasreful not to put to much heat into the chassis.
I have seen your work, you got this.
Thanks for the suggestions; seems like a good method to move forward with the reinforcement panels. I’m going to bring to car to a frame guy to check and straighten as needed prior to adding the panels. I know it needs tweaking; a PO covered some damage rather well.
I’m also thinking about adding the front panels Mad Dog has. I already have the original sway bar plates, but this would reinforce an area damaged in the previously hidden wreck area.
Posted by: Mitox Mar 2 2020, 07:17 PM
My painter has been delayed a couple weeks - good thing since I have more to do.
Just finished the oil cooler base, mount, and front cut out. Later I’ll make a bracket to hold the cooler more firmly.
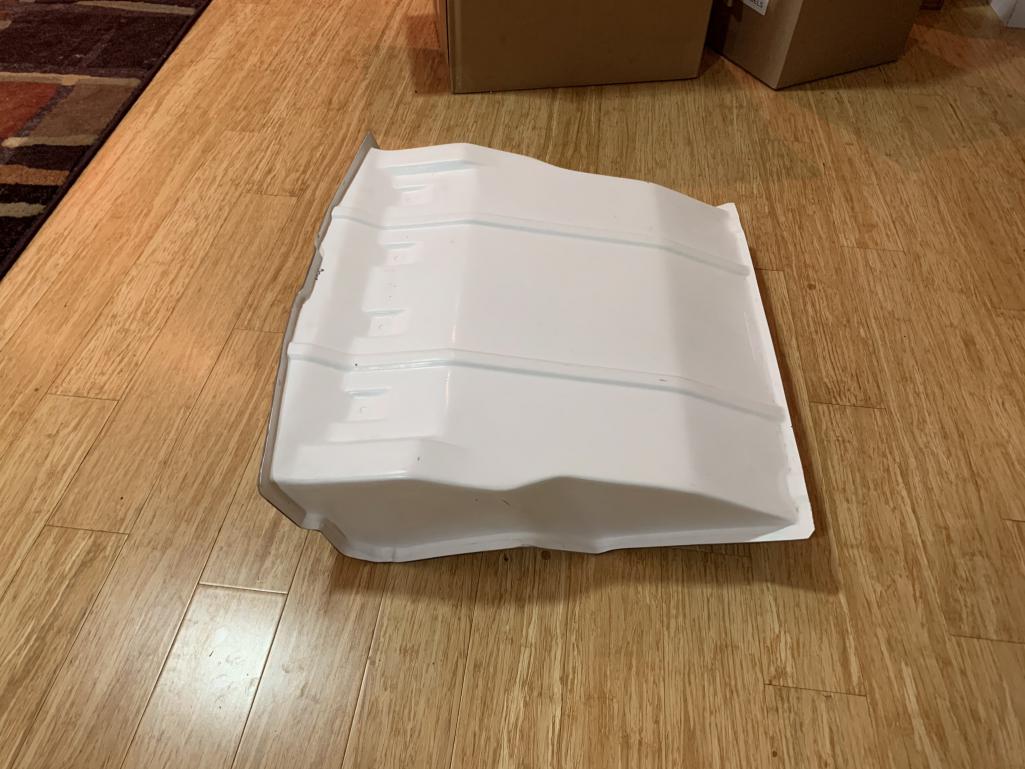
I’m still not happy with the fiberglass shroud; it has huge gaps where it should fit to the car. Maybe I’ll make one, or have a moment of weakness and buy one from Mittelmotor.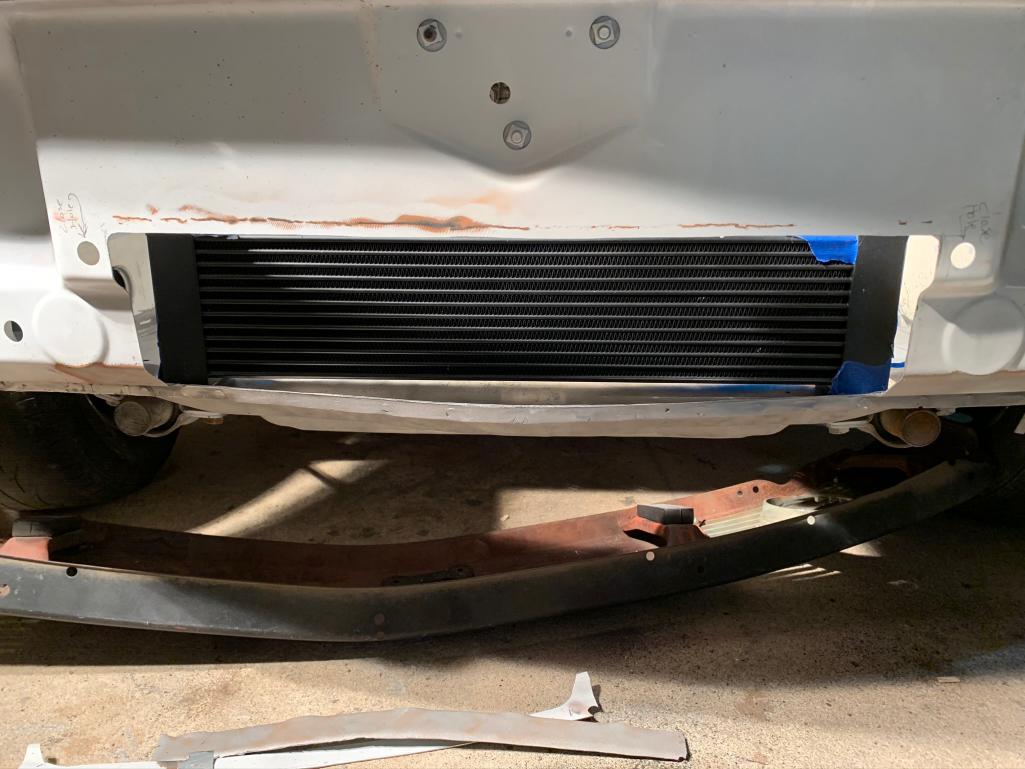
Posted by: mepstein Mar 2 2020, 07:26 PM
My painter has been delayed a couple weeks - good thing since I have more to do.
Just finished the oil cooler base, mount, and front cut out. Later I’ll make a bracket to hold the cooler more firmly.
I’m still not happy with the fiberglass shroud; it has huge gaps where it should fit to the car. Maybe I’ll make one, or have a moment of weakness and buy one from Mittelmotor.
I don’t care for the glass ones either. I’m hoping to have Ben build me one in aluminum. May he can make more than one. It won’t be cheap but it won’t be Mittlemotor pricing. @http://www.914world.com/bbs2/index.php?showuser=9892 .
Posted by: Mitox Mar 2 2020, 07:35 PM
My painter has been delayed a couple weeks - good thing since I have more to do.
Just finished the oil cooler base, mount, and front cut out. Later I’ll make a bracket to hold the cooler more firmly.
I’m still not happy with the fiberglass shroud; it has huge gaps where it should fit to the car. Maybe I’ll make one, or have a moment of weakness and buy one from Mittelmotor.
I don’t care for the glass ones either. I’m hoping to have Ben build me one in aluminum. May he can make more than one. It won’t be cheap but it won’t be Mittlemotor pricing. @http://www.914world.com/bbs2/index.php?showuser=9892 .
Ben’s work is excellent; I’ve sent him a lot of money so far. If he does make a shroud, he’ll likely get some more of it.
Posted by: Mitox Mar 2 2020, 07:40 PM
And parts from Mad Dog arrived today. I decided to go ahead with the longitudinal reinforcement, but I’ll wait until the frame guy checks the chassis.
These parts are well made also
Posted by: Mitox Mar 11 2020, 08:16 AM
The night before going off to paint.
[attachmentid=73401
Attached thumbnail(s)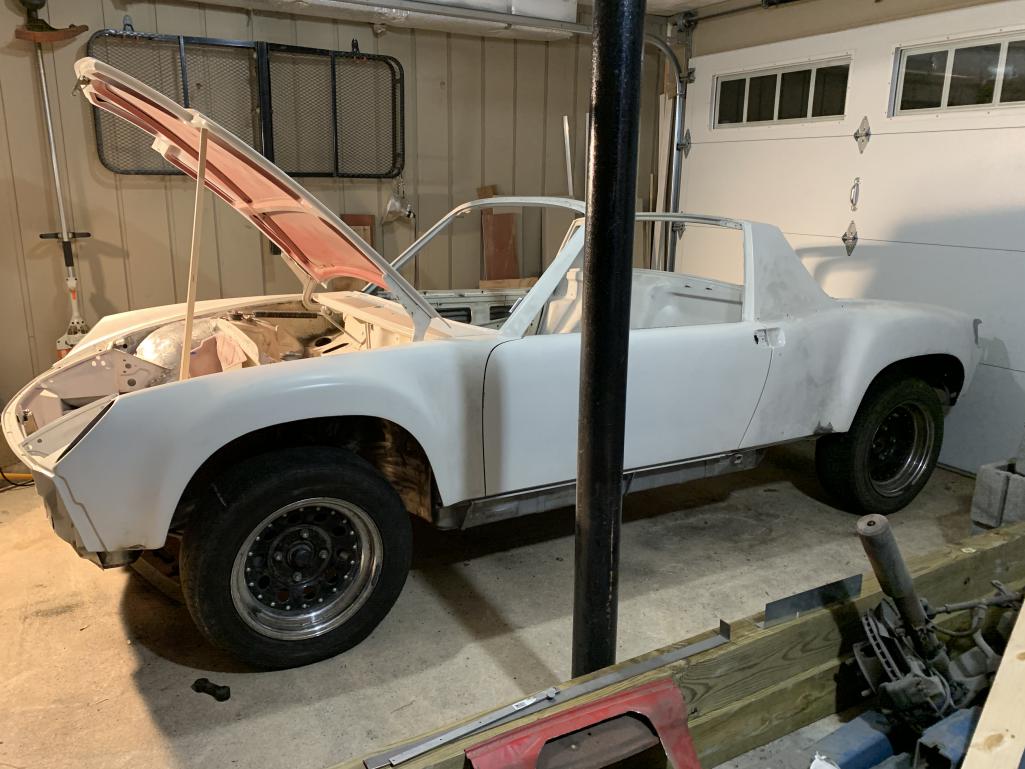
Posted by: Mitox Mar 11 2020, 09:38 PM
And it’s on the way to the painter. Now I’ll have a chance to get the 911 suspension and trailing arms ready.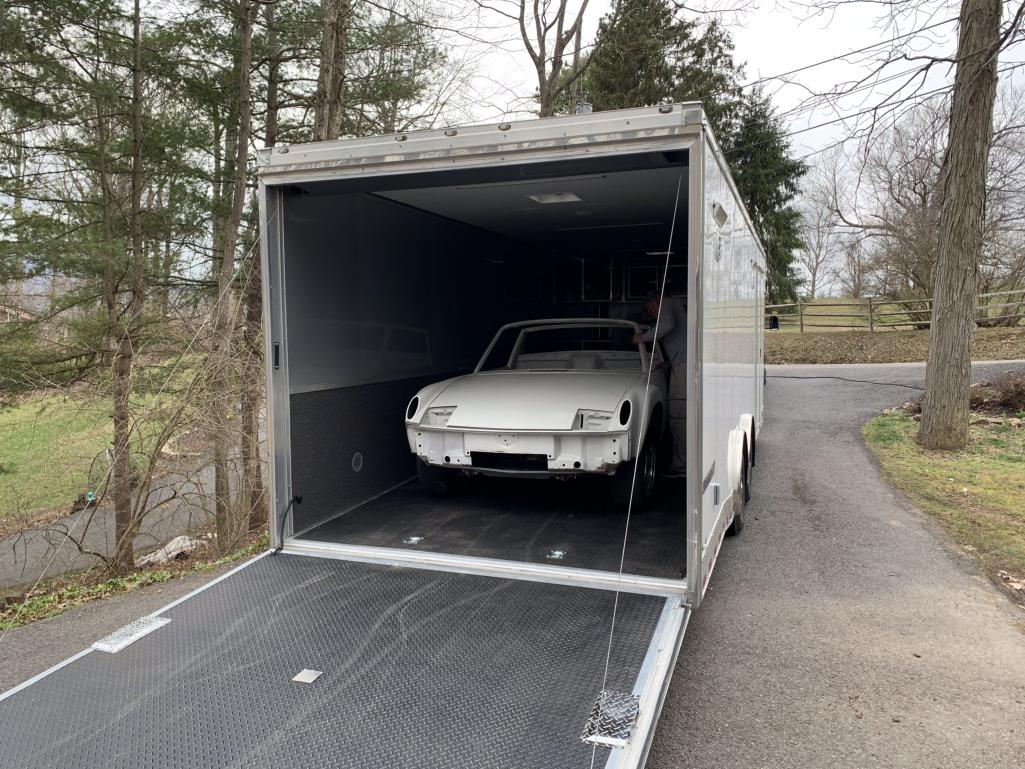
Posted by: Root_Werks Mar 12 2020, 04:19 PM
The inner Long kit makes a big difference. Project looks great!
Posted by: Mitox Mar 12 2020, 06:10 PM
The inner Long kit makes a big difference. Project looks great!
Thanks, can't wait to get it back to start reassembly.
Posted by: Mitox Mar 13 2020, 09:22 PM
My moment of weakness slipped in this evening. The 914 is in body work, and I "need" the oil cooler duct. Well, you can save a few hundred buying direct from Mittelmotor, but the shipment takes a couple months.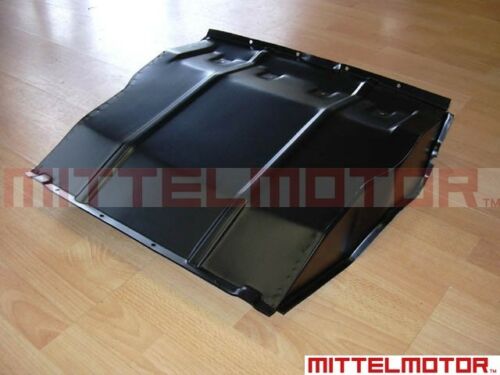
Posted by: Mitox Mar 13 2020, 09:54 PM
Guess I’ll sell this fiberglass duct as soon as I find a box for it. I was disappointed with the fit, but it would be fine if a a seal is added, or with a little additional material on the leading edge.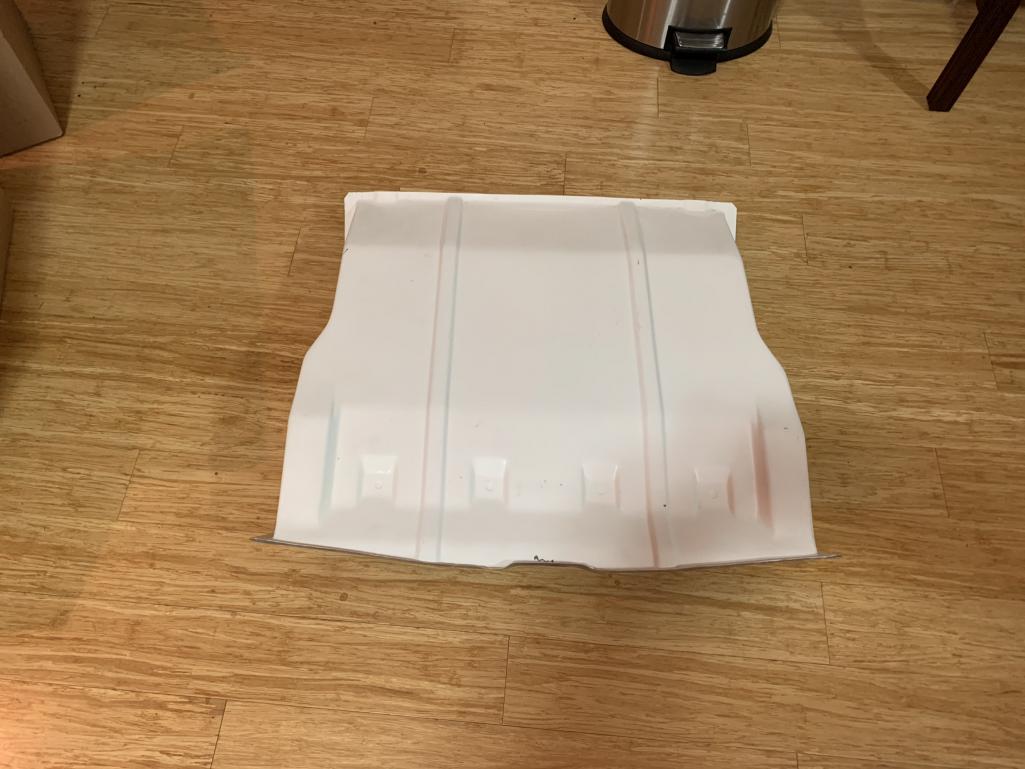
Posted by: Mitox Mar 24 2020, 11:55 AM
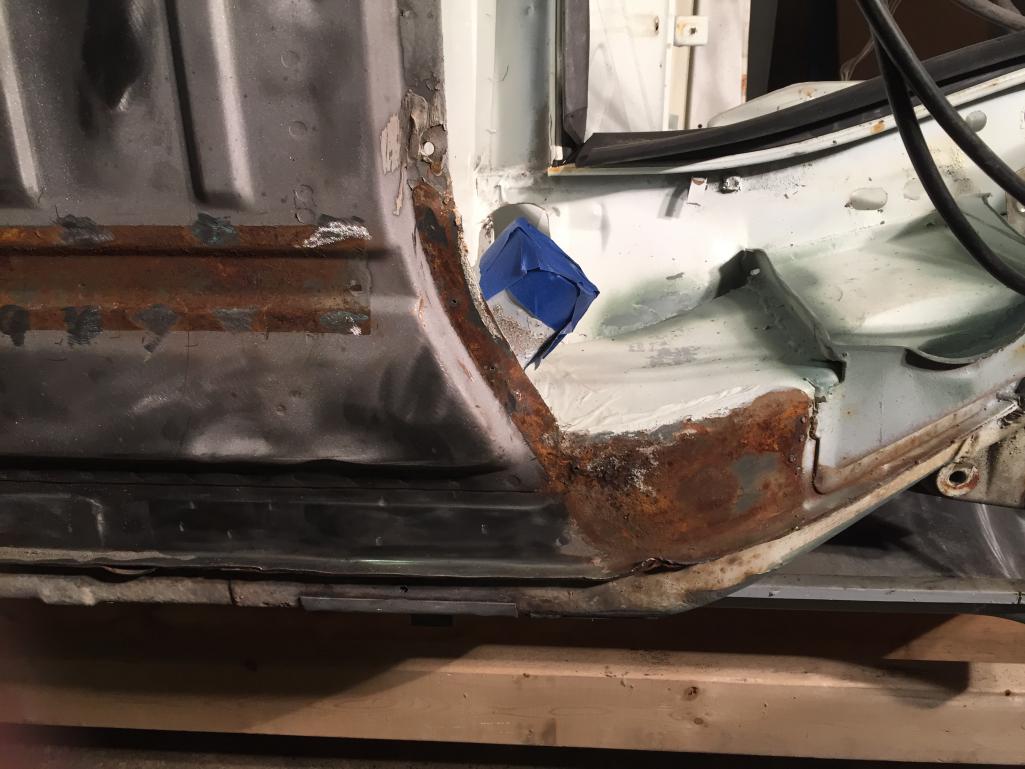
I’m wanted to have my chassis checked prior to bodywork and paint due to the PO hiding damage on the car, but I wasn’t expecting the answer I got back.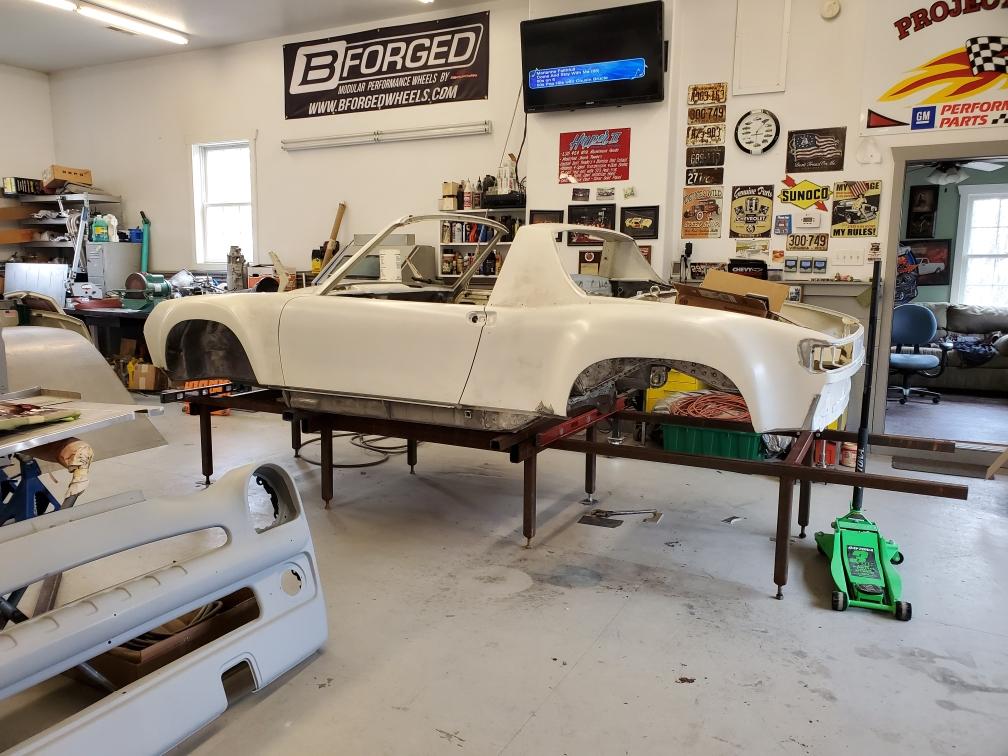
He’s telling me that he may be able to straighten the chassis after removing the passenger fender and front panel that was replaced by PO, but that he highly recommends removing and replacing the inner fender, fender, and front panel along with a little more surrounding metal.
This sucks!!- guess I need to find a good passenger side front section.
Posted by: mepstein Mar 24 2020, 12:17 PM
So once you have some time to figure out what you need, give me a call. I have a parts car that should have the needed metal. Some parts on it are pretty rusty but some appear to be good. No charge if you come up and take what you need. Mark
Posted by: Mitox Mar 24 2020, 12:52 PM
So once you have some time to figure out what you need, give me a call. I have a parts car that should have the needed metal. Some parts on it are pretty rusty but some appear to be good. No charge if you come up and take what you need. Mark
Thanks Mark, I really appreciate it. I’m going to go over the issue this weekend to see how to move forward.
Posted by: jaredmcginness Mar 24 2020, 01:05 PM
This project is seriously so cool! So much inspiration. Maybe the next time around.
Posted by: Cairo94507 Mar 24 2020, 02:11 PM
@Mitix - I feel your pain, having been there myself. Stay positive and think how nice it will be when it is done correctly and straight.
Posted by: TravisNeff Mar 24 2020, 03:07 PM
aye aye aye! That has got to sting getting that news.
Posted by: Mitox Mar 24 2020, 07:48 PM
This project is seriously so cool! So much inspiration. Maybe the next time around.
Thanks; we’ll figure it out - while I silently curse someone
Posted by: Mitox Mar 24 2020, 07:51 PM
@Mitix - I feel your pain, having been there myself. Stay positive and think how nice it will be when it is done correctly and straight.
Yeah, I’ve read your thread. You’ve had some seriously “enjoyable” experiences yourself. Even so, I still want to get it fixed so I can stare at it knowing it’s right.
Posted by: Mitox Mar 24 2020, 08:58 PM
My BDay & Christmas present to myself arrived yesterday. It took a little more than one week to ship from Mittelmotor in Germany, go through customs and arrive at my house - good job UPS. My wife is in shock though.
Looks great: it’s made well and powder coated nicely.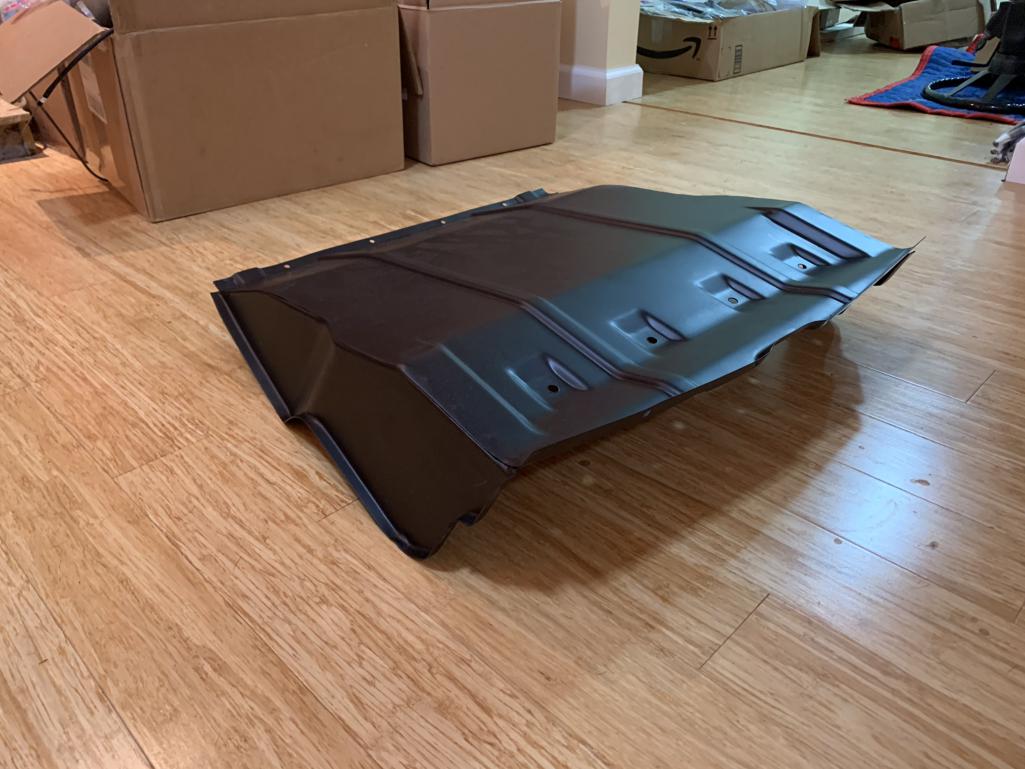
Posted by: rgalla9146 Mar 25 2020, 08:03 AM
My BDay & Christmas present to myself arrived yesterday. It took a little more than one week to ship from Mittelmotor in Germany, go through customs and arrive at my house - good job UPS. My wife is in shock though.
Looks great: it’s made well and powder coated nicely.
Wow. That requires committment.
Posted by: Biggles Mar 25 2020, 09:38 AM
Wish I had known. I've got one from mittlemotor I never fitted ! Anybody needs a proper metal one let me know. I'll post in classifieds too.
My moment of weakness slipped in this evening. The 914 is in body work, and I "need" the oil cooler duct. Well, you can save a few hundred buying direct from Mittelmotor, but the shipment takes a couple months.
Posted by: Mitox Mar 25 2020, 09:58 AM
Wish I had known. I've got one from mittlemotor I never fitted ! Anybody needs a proper metal one let me know. I'll post in classifieds too.
My moment of weakness slipped in this evening. The 914 is in body work, and I "need" the oil cooler duct. Well, you can save a few hundred buying direct from Mittelmotor, but the shipment takes a couple months.
I wish I had remembered. You let me know a year ago, but I didn’t remember. Sorry about that.
Edit: My memory Off again - found it was it was two years ago
Posted by: Mitox Mar 30 2020, 09:11 PM
I’m wanted to have my chassis checked prior to bodywork and paint due to the PO hiding damage on the car, but I wasn’t expecting the answer I got back.
He’s telling me that he may be able to straighten the chassis after removing the passenger fender and front panel that was replaced by PO, but that he highly recommends removing and replacing the inner fender, fender, and front panel along with a little more surrounding metal.
This sucks!!- guess I need to find a good passenger side front section.
Talked with the guy that will straighten the car out, and it looks like I need to find a good passenger inner fender and front panel at a minimum. The hard part is getting these parts separated from everything else attached; it maybe best to find a wrecked or parts car that has a good front end.
With the virus issue it will be difficult to travel, so if anyone knows of or has parts in Virginia, please let me know.
Posted by: Mitox May 30 2020, 03:26 PM
The body is now in the shop where it will be straitened out and painted. It’s enough to drive me mad, but eventually it will be back on the road.
Anyway, while the body is gone, I’ve begun working on the suspension. While making space in the garage, I decided to disassemble the old front suspension to make it easier to move and sell.
The torsion rods are surprisingly clean. Does anyone know if these are original or aftermarkets?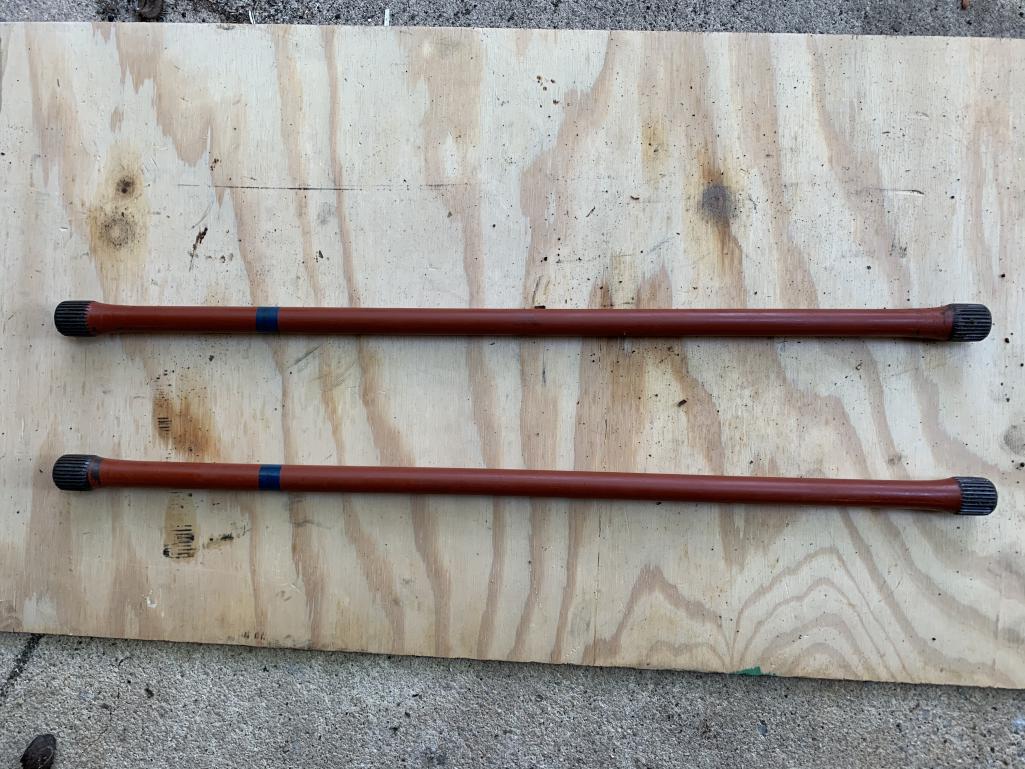
Posted by: Matty900 May 30 2020, 03:50 PM
Just dropped my GT tribute off at the body shop for paint yesterday too. You are making great progress. Once the car comes back all pretty it's great motivation to keep going. Start getting the things ready that will be going back in first and building up a parts pile of restored parts your going to have a lot of fun soon
Posted by: mepstein May 30 2020, 04:48 PM
The body is now in the shop where it will be straitened out and painted. It’s enough to drive me mad, but eventually it will be back on the road.
Anyway, while the body is gone, I’ve begun working on the suspension. While making space in the garage, I decided to disassemble the old front suspension to make it easier to move and sell.
The torsion rods are surprisingly clean. Does anyone know if these are original or aftermarkets?
measure them and see what marks are on the end.
Posted by: Mitox May 30 2020, 09:02 PM
The cross section seems to be 18mm. One end of each is as shown in the photo below, and the other end has either R or L . Wonder why the side is identified unless the metal grain is specific to the side in some way.
[attachmentid=746512]
Posted by: mepstein May 30 2020, 09:14 PM
I'm no expert but they look stock to me. The markings face out and the rods should be put back on the same side as they came out. From what I understand, they are side specific once used so they mark them so when they are removed, they get put back in the correct side.
Posted by: Mitox May 30 2020, 09:20 PM
I'm no expert but they look stock to me. The markings face out and the rods should be put back on the same side as they came out. From what I understand, they are side specific once used so they mark them so when they are removed, they get put back in the correct side.
Yeah, I think they are stock. One marking kinda looks like a VW mark, but don’t know.
As for L/R, your statement “side specific once used” makes a lot of sense.
Posted by: raynekat May 30 2020, 09:23 PM
The torsion bars are not side specific before they are used.
Only after they have been used are they side specific....they get used to twisting a certain direction.
If you twist them the opposite direction, they can break.
They are label L and R from the factory (and aftermarket for that matter) to keep it simple in knowing which bar came from which side of the car.
And thus which side to return each bar to.
You could just as easily without problems put a new L bar in the right side and visa versa with the R bar.
The problem is that someone down the line may not remember (or know) that the sides have been switched and then you potentially have problems with the bars breaking if they are put in the opposite side of the car.
Clear as mud I'm sure..... 
Posted by: Mitox May 30 2020, 09:49 PM
The torsion bars are not side specific before they are used.
Only after they have been used are they side specific....they get used to twisting a certain direction.
If you twist them the opposite direction, they can break.
They are label L and R from the factory (and aftermarket for that matter) to keep it simple in knowing which bar came from which side of the car.
And thus which side to return each bar to.
You could just as easily without problems put a new L bar in the right side and visa versa with the R bar.
The problem is that someone down the line may not remember (or know) that the sides have been switched and then you potentially have problems with the bars breaking if they are put in the opposite side of the car.
Clear as mud I'm sure.....
Thanks, it does make sense once I exercised the second brain cell. It was hard to get that one going though. Reversing the twist on a bar that has been moving one direction for some time would likely induce stress fractures. The factory was smart to label them.
Posted by: Mitox Jul 15 2020, 08:57 PM
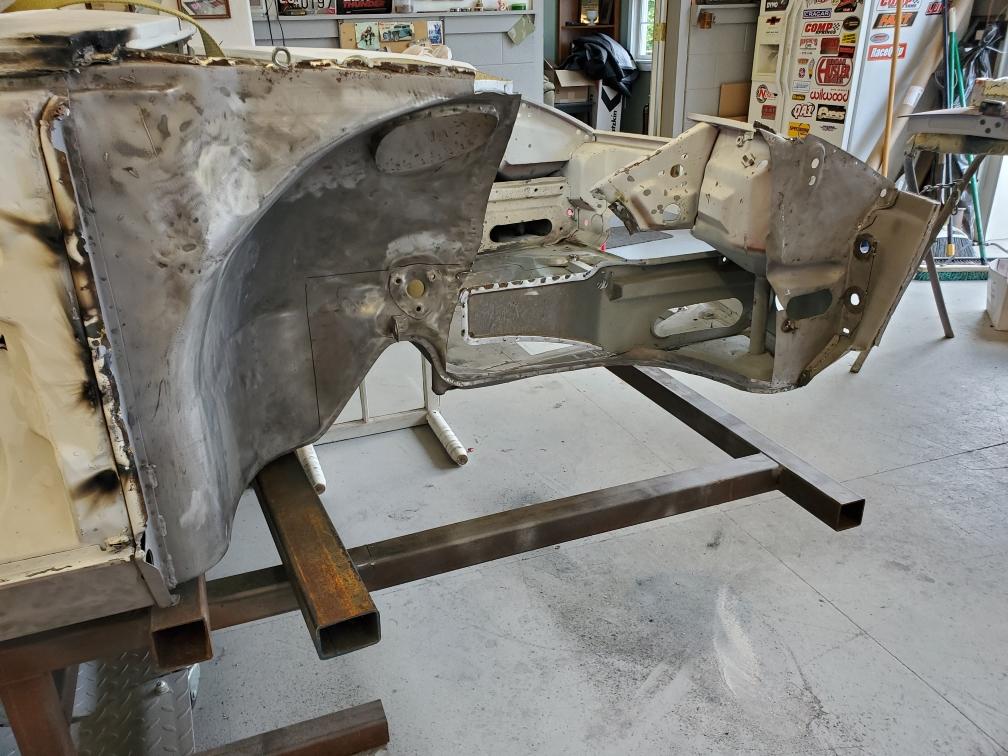
Moving forward now. The hidden damage on the front drivers side is being cut out and replaced. A PO evidently smashed the passenger front side, removed some of the smashed pieces, “straightened” the inner wheel well, then replaced the fender and front panel afterward. All wrinkles were conveniently hidden with filler.
Well, to fix it, we are reversing the process and will replace the inner wheel well also. All will be perfect when completed.
Some in process pics below; just started removing the inner.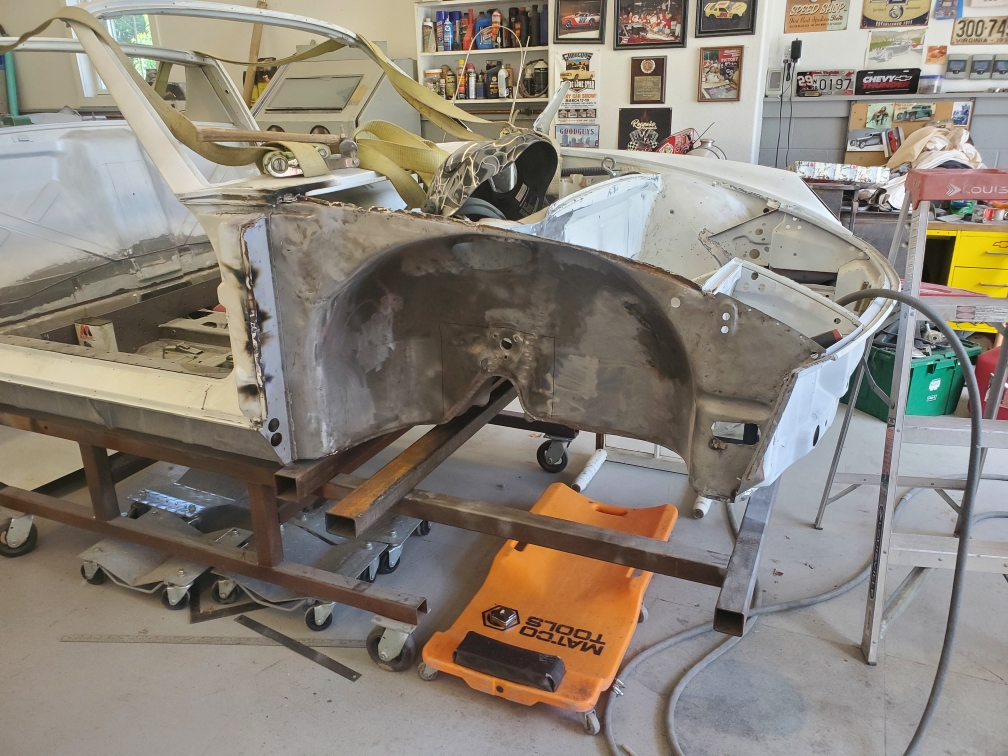
Posted by: gms Jul 18 2020, 03:02 PM
Make sure the stamped VIN in the inner wheel house is not removed
Posted by: Mitox Jul 19 2020, 07:51 PM
Make sure the stamped VIN in the inner wheel house is not removed
Thanks for the reminder. It will be retained, but I had let it slip from the plans. Getting too excited about progress I guess.
Posted by: Mitox Jul 19 2020, 09:24 PM
While the body is being reworked and painted, my primary task is to get the suspension ready to bolt back on. I’ve started on the trailing arms.
Welded on the reinforcement and prepped it to accept the 911 E-brake system. I think I want to keep the shield, but I’ll need to move one mount that interferes with the E-brakes and will need to modify the shield for the relocated mount.
I’ve ordered the E-brake cable kit from Chris Foley last month, so waiting on that to see how everything fits up.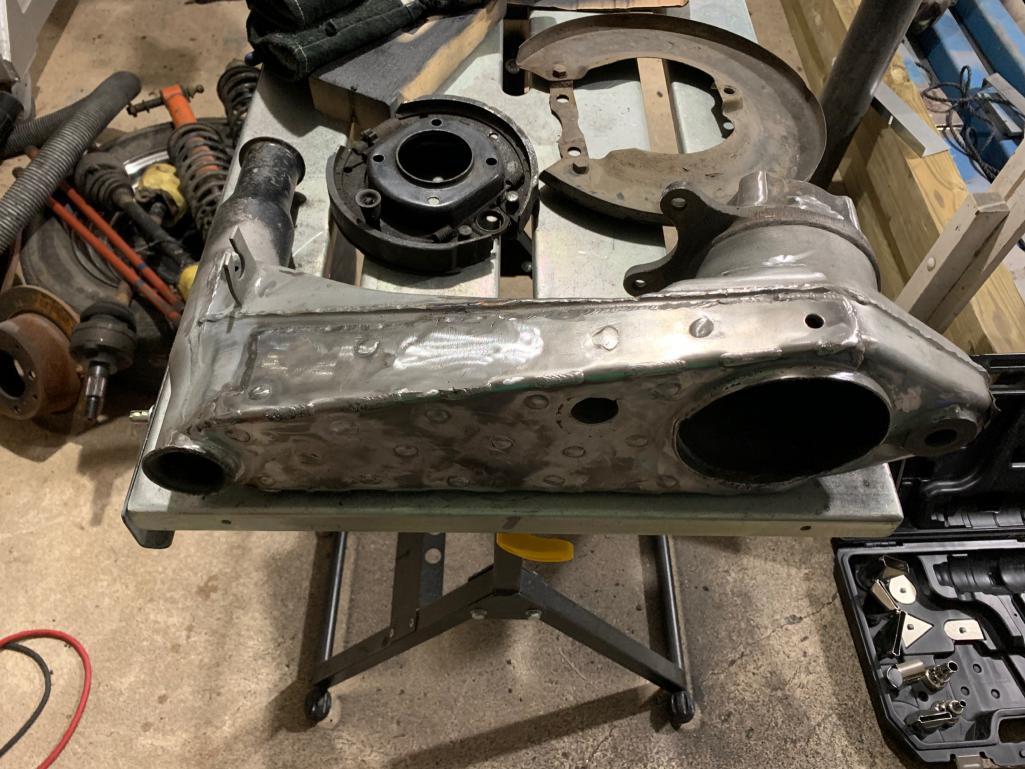

Posted by: Mitox Oct 17 2020, 07:03 PM
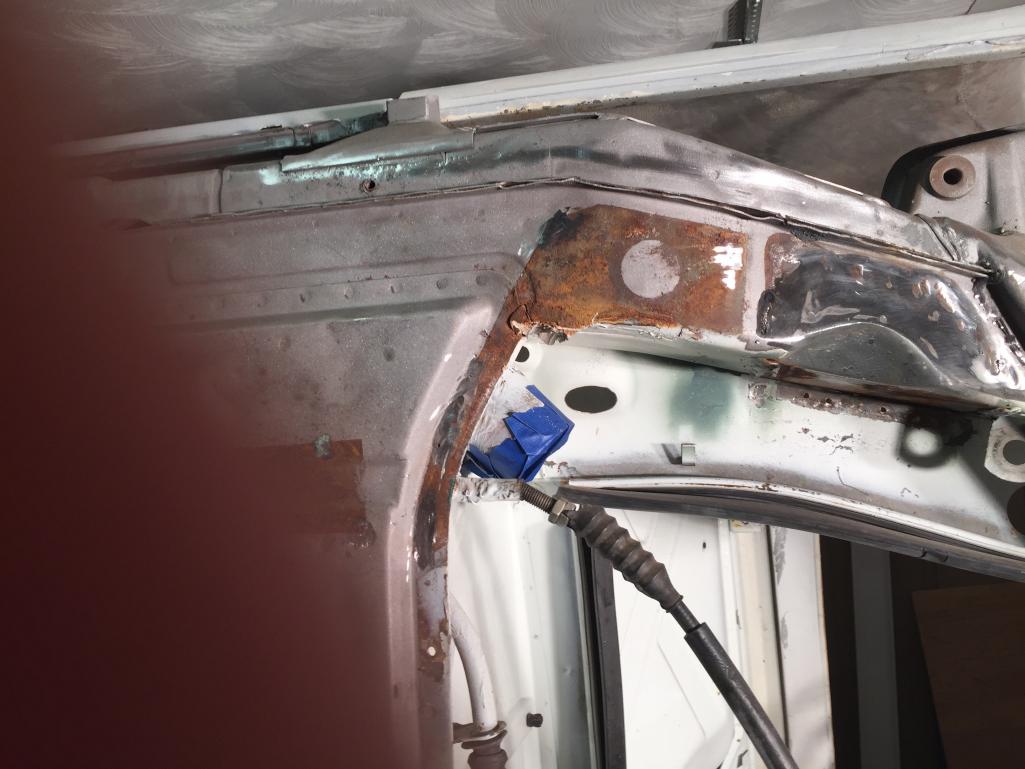
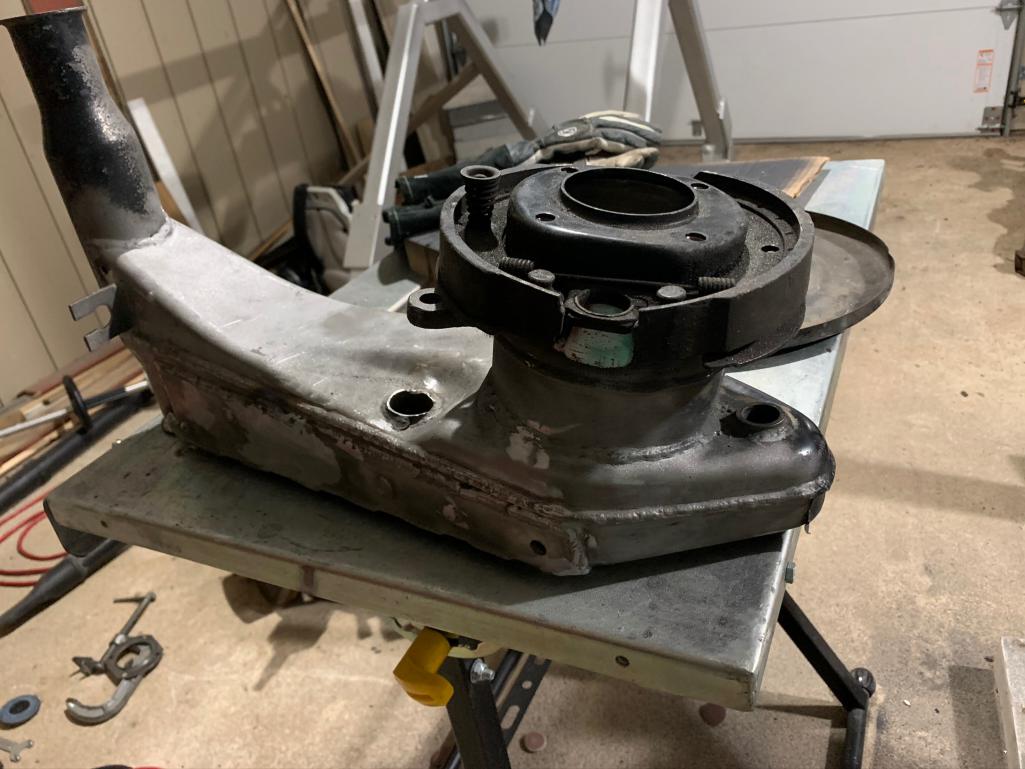
And a few months later - the inner fender is fully removed. There’s a little surface rust in the bottom of enclosed areas, but but nothing worrisome.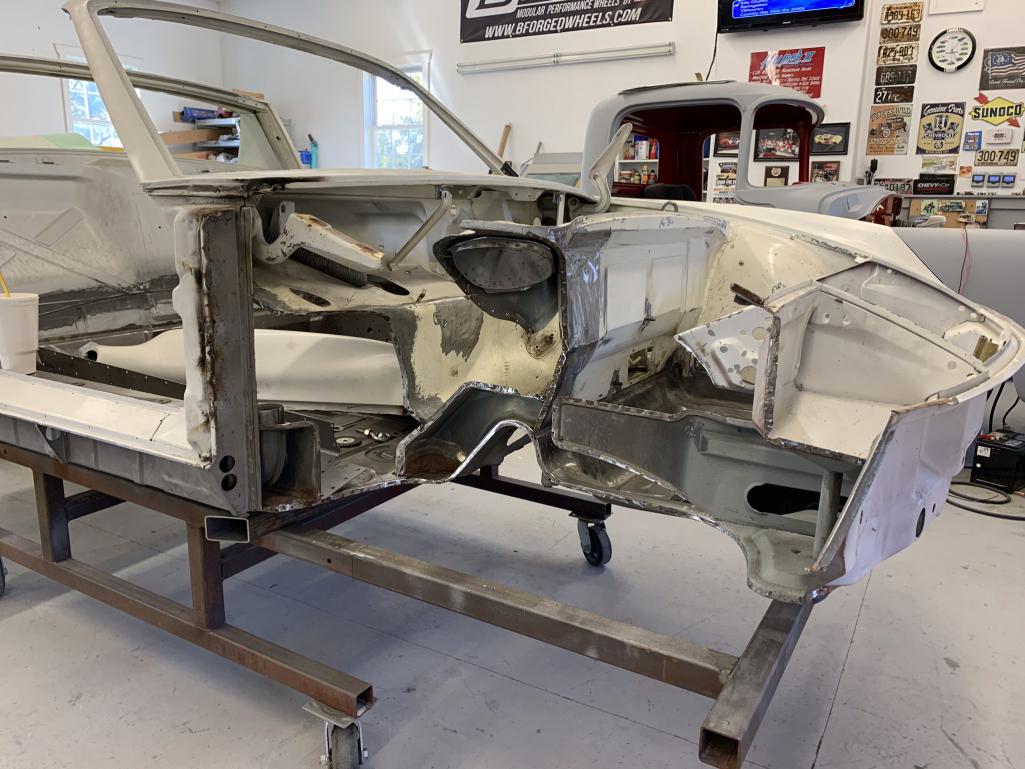
Posted by: Mitox Oct 17 2020, 07:09 PM
Meanwhile, back in the garage ...
I’ve gathered the remaining parts needed to complete the trailing arms (except for new rubber bushings). Trial fit is in work to ensure everything works before final welds and paint. The high tech wooden bearing is helping out nicely.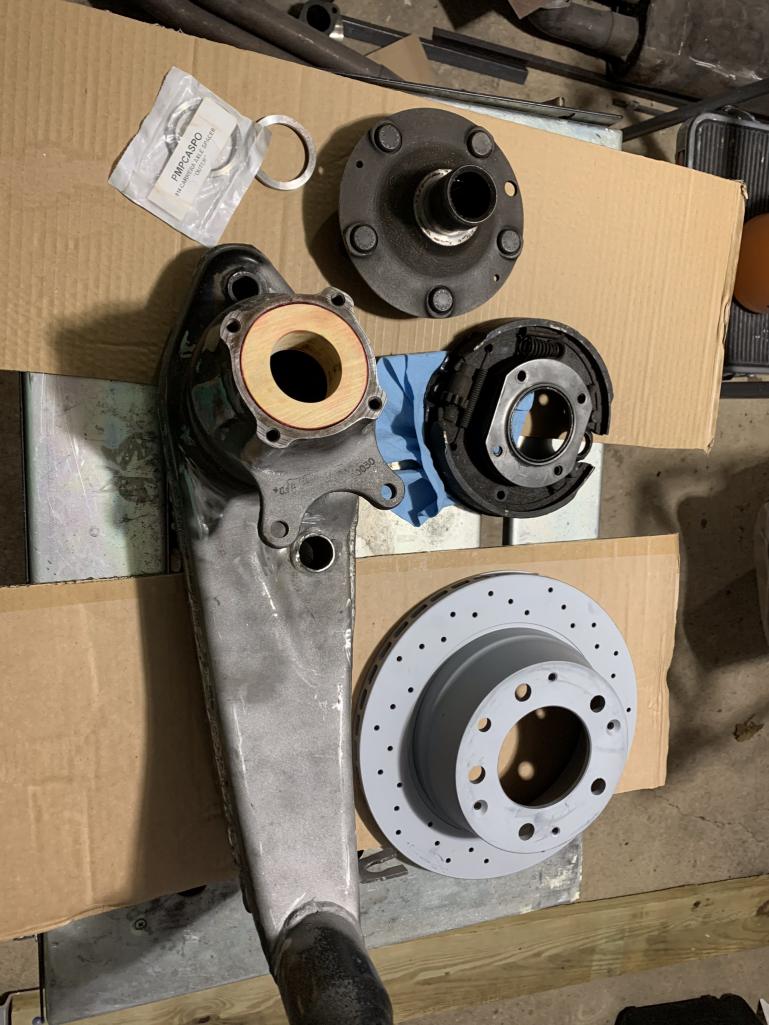
Posted by: Mitox Mar 4 2021, 09:21 PM
While I'm impatiently waiting on the front fender reconstruction and paint, I've been researching the many options and opinions on suspension setup.
My plan (subject to change) is to use:
- the original 19mm torsion bars in the donor '84 911 front end
- Koni 914 strut inserts KON-8641-1077 (I think they fit the 911 strut)
- Koni 914 rear shocks and spring set up from Ground Control
- no rear sway bar
- All new rubber bushings - most likely Elephant's
Remaining issues:
- What spring rate to use on the rear - 140?
- what front sway bar to use and what diameter - 21mm?
I'd appreciate any input to help finish the plan and purchase list.
Does this make sense?? What suggestion would you have for changes or for the spring rate and front sway bars??
Driving style will be "wannabe" racer, but actually mountain curves as fast as I can without wrecking or hurting my back on bumps.
-
Posted by: CptTripps Mar 5 2021, 12:18 PM
I've no advise to offer on the last questions, but just wanted to comment that this is a damn nice build. Well done, sir.
Posted by: mepstein Mar 5 2021, 12:44 PM
A 21mm front sway bar is a BIG bar on a 914 and will increase the stiff feel of the 911 torsion bars that are for a 2700 lb 911. I'm not saying it's wrong and I certainly don't have the education in suspension like smarter people here but... It's going to be pretty stiff on the road.
Posted by: Retroracer Mar 5 2021, 01:06 PM
You'll probably get too many answers with too many variables to your question, but I'll chime in, just to add to the melange:
So FWIW, my set up - on a GT /6 clone with mostly fiberglass everything, but roll cage & much stiffening welded in - is as follows:
- stock /4 torsion bars front, Sachs inserts in 911 struts
- stock /4 springs rear, Bilsteins height adjustable
- Weltmeister 21mm front sway bar, H&H adjustable arms
- no rear sway bar
- Falken street tires on 7Jx15 F, 8Jx15 R
I was concerned with Marks point about the front sway bar being too much, but the softest setting on the H&H arms (which are longer than the stock ones) works well for spirited canyon driving, and was not hideous on a recent track day either. CA freeway driving is pretty comfortable (with ear protectors in...!).
My car is pretty lightweight so the stock springs cope OK; if I was auto crossing then I'd think about stiffer springs and more expensive shocks, as well as dialing up the front sway bar. Also, $$ investment on the sticky tires du jour.
Again, FWIW,
- Tony
Posted by: Mitox Mar 5 2021, 07:35 PM
I've no advise to offer on the last questions, but just wanted to comment that this is a damn nice build. Well done, sir.
Thanks - hopefully, the reassembly begins soon.
Posted by: Mitox Mar 5 2021, 10:32 PM
A 21mm front sway bar is a BIG bar on a 914 and will increase the stiff feel of the 911 torsion bars that are for a 2700 lb 911. I'm not saying it's wrong and I certainly don't have the education in suspension like smarter people here but... It's going to be pretty stiff on the road.
After reading more - I think I agree 21mm may be too large. It looks like Tarett has a 19.3mm sway bar, and maybe I could go with the original sway bar but I don't know what size that is.
Posted by: Mitox Mar 5 2021, 10:42 PM
While I'm impatiently waiting on the front fender reconstruction and paint, I've been researching the many options and opinions on suspension setup.
My plan (subject to change) is to use:
- the original 19mm torsion bars in the donor '84 911 front end
- Koni 914 strut inserts KON-8641-1077 (I think they fit the 911 strut)
- Koni 914 rear shocks and spring set up from Ground Control
- no rear sway bar
- All new rubber bushings - most likely Elephant's
Remaining issues:
- What spring rate to use on the rear - 140?
- what front sway bar to use and what diameter - 21mm?
I'd appreciate any input to help finish the plan and purchase list.
Does this make sense?? What suggestion would you have for changes or for the spring rate and front sway bars??
Driving style will be "wannabe" racer, but actually mountain curves as fast as I can without wrecking or hurting my back on bumps.
Modifications to my thoughts/plans:
- It seems that I should start with a smaller front sway bar: the smallest I can find is 19.3mm from Tarett, or I could use an original but I don't know how large it is.
- As for the spring rate: 100# - 140# seems like a start. The 3.2 is adding weight to the rear.
- The 911 front suspension I'm using has the 19mm torsion bars; I could keep the control arms from the 914 suspension and use 17mm units, but the next option step up is still 19mm.
Posted by: Mitox Apr 30 2021, 09:19 PM
Another example of Ben’s artwork to add to my collection arrived a few days ago.
Can’t wait to listen to it.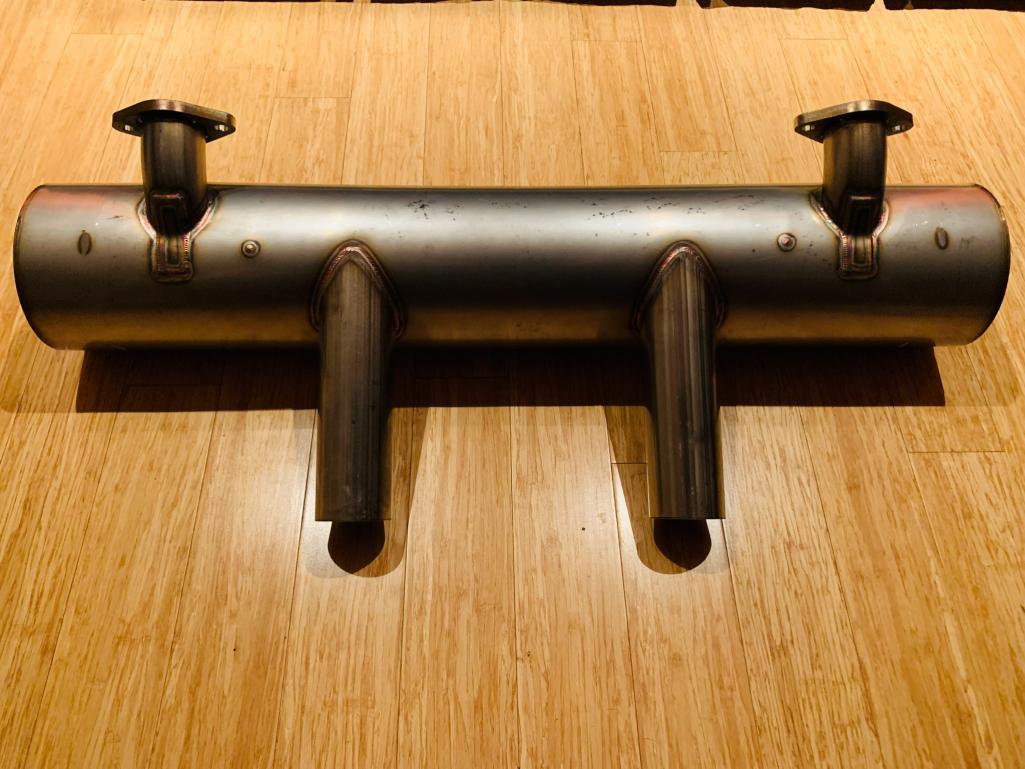
Posted by: Mitox Apr 30 2021, 09:23 PM
Also had an exciting morning. I drove to Winston Salem to pick up a load of parts I had cad plated. Beautiful gold piece-parts!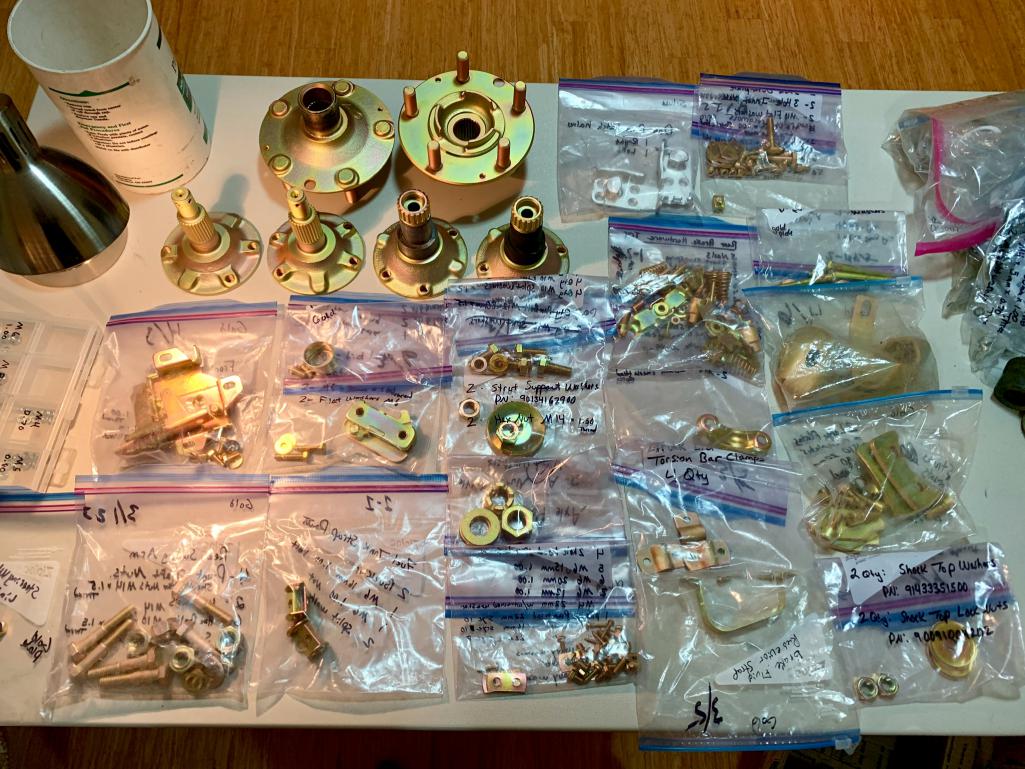
Posted by: dlee6204 May 1 2021, 06:23 AM
Also had an exciting morning. I drove to Winston Salem to pick up a load of parts I had cad plated. Beautiful gold piece-parts!
Looks good! Who in Winston did you use for plating?
Posted by: Mitox May 1 2021, 06:41 AM
Frank at Stratford Metal Finishing took car of me. He rebagged everything, and didn’t lose anything.
Posted by: Mitox Mar 4 2022, 11:26 PM
It’s been a while, but getting back into the project. My car’s bodywork and paint is supposedly going to move along with some speed now that others ahead of me are nearly all complete. This truck is the only thing in my way.
I know, it’s not a 914, but it’s cool -
You can see a bit of my 914 on the right side of the pic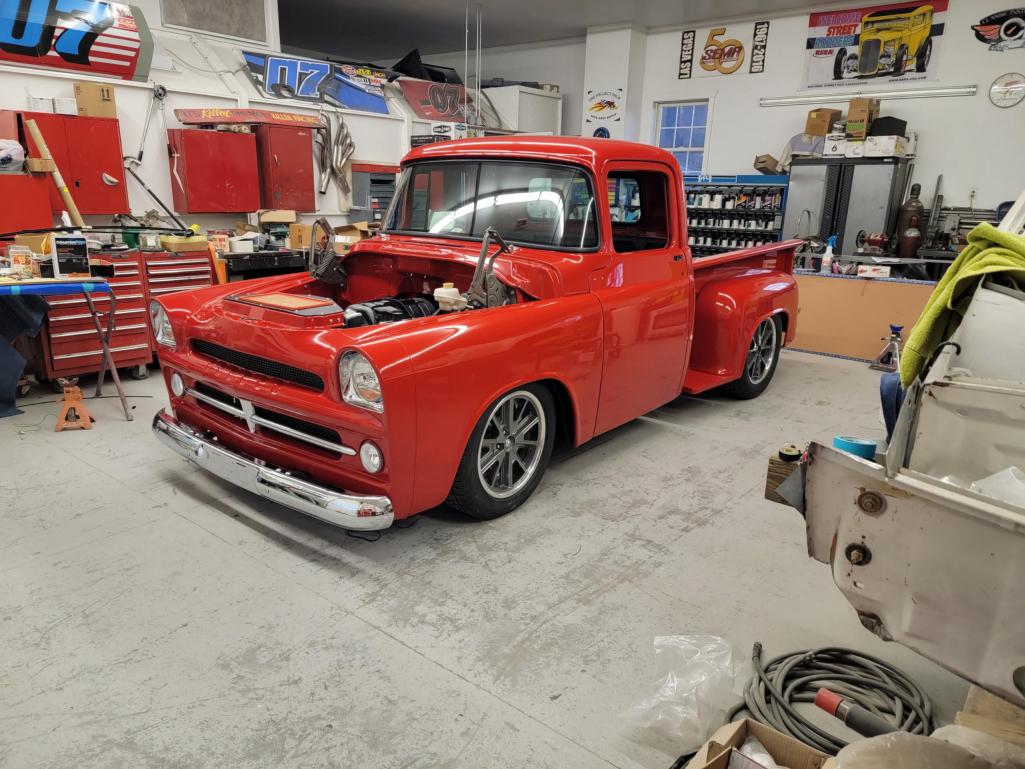
Posted by: Mitox Mar 4 2022, 11:35 PM
I’ve started stripping done the Carrera front end I bought, and am considering sending a few parts out.
I have Boge struts, and I’m thinking about sending them to Elephant to have the spindles raised 19mm (the max they can raise them).
Still can’t decide between Bilstein and Koni inserts.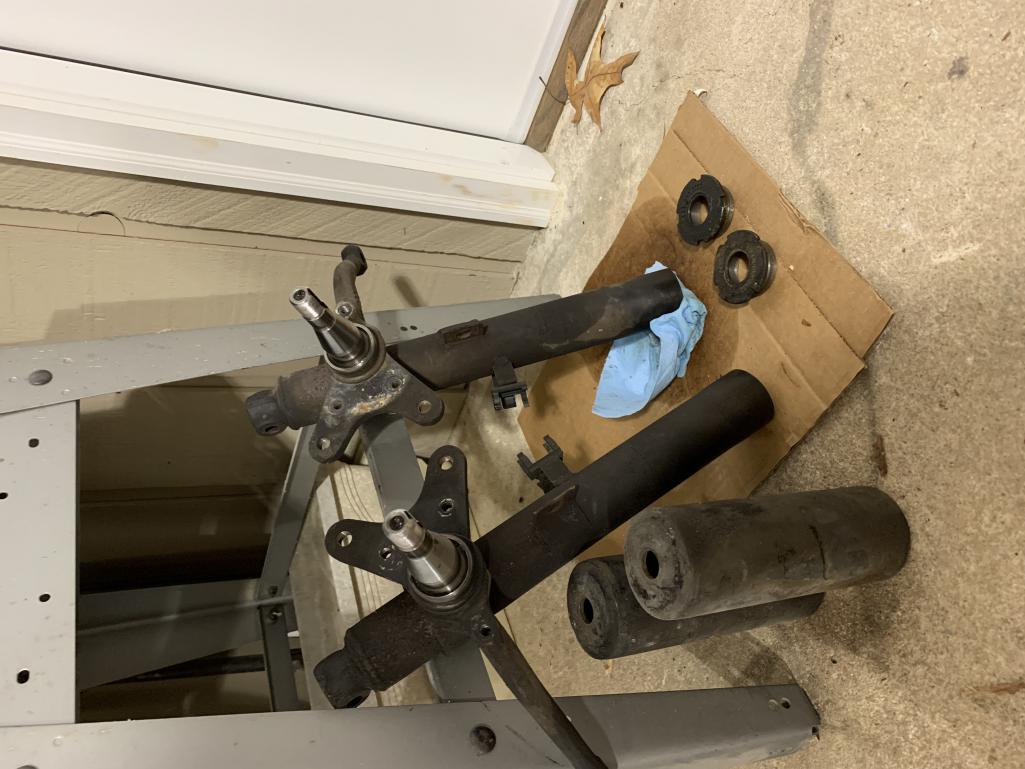
Posted by: Mitox Mar 4 2022, 11:40 PM
When I finally got the ball joints out, I found some damage on the drivers side control arm. It looks like the end has been shoved back a little off centering the ball joint location and ovaling the whole. Seems odd, no damage noticeable any where else.
Posted by: mepstein Mar 5 2022, 08:16 AM
Also had an exciting morning. I drove to Winston Salem to pick up a load of parts I had cad plated. Beautiful gold piece-parts!
It’s always fun to get back jewelry for your car.
Posted by: brant Mar 5 2022, 08:44 AM
While I'm impatiently waiting on the front fender reconstruction and paint, I've been researching the many options and opinions on suspension setup.
My plan (subject to change) is to use:
- the original 19mm torsion bars in the donor '84 911 front end
- Koni 914 strut inserts KON-8641-1077 (I think they fit the 911 strut)
- Koni 914 rear shocks and spring set up from Ground Control
- no rear sway bar
- All new rubber bushings - most likely Elephant's
Remaining issues:
- What spring rate to use on the rear - 140?
- what front sway bar to use and what diameter - 21mm?
I'd appreciate any input to help finish the plan and purchase list.
Does this make sense?? What suggestion would you have for changes or for the spring rate and front sway bars??
Driving style will be "wannabe" racer, but actually mountain curves as fast as I can without wrecking or hurting my back on bumps.
-
I like big sway bars
They don’t make for a harsh ride on the highway
Yet give you a higher spring rate in the corners
My non flared street car runs a 21mm with 7 inch wheels
My non flared race car runs a 27mm. Also on 7 inch rims
The more wheel and track you have, the more leverage is impacting your spring rates So you need larger springs to maintain the effective rate
Posted by: Mitox Mar 5 2022, 10:04 AM
While I'm impatiently waiting on the front fender reconstruction and paint, I've been researching the many options and opinions on suspension setup.
My plan (subject to change) is to use:
- the original 19mm torsion bars in the donor '84 911 front end
- Koni 914 strut inserts KON-8641-1077 (I think they fit the 911 strut)
- Koni 914 rear shocks and spring set up from Ground Control
- no rear sway bar
- All new rubber bushings - most likely Elephant's
Remaining issues:
- What spring rate to use on the rear - 140?
- what front sway bar to use and what diameter - 21mm?
I'd appreciate any input to help finish the plan and purchase list.
Does this make sense?? What suggestion would you have for changes or for the spring rate and front sway bars??
Driving style will be "wannabe" racer, but actually mountain curves as fast as I can without wrecking or hurting my back on bumps.
-
I like big sway bars
They don’t make for a harsh ride on the highway
Yet give you a higher spring rate in the corners
My non flared street car runs a 21mm with 7 inch wheels
My non flared race car runs a 27mm. Also on 7 inch rims
The more wheel and track you have, the more leverage is impacting your spring rates So you need larger springs to maintain the effective rate
Thanks for the input. I have flared fenders and will have 7” wheels on the front and 8” in the back. When you reference spring rates, are you addressing both the torsion bars and rear springs?
Posted by: brant Mar 5 2022, 11:29 AM
As the more flare and wider your wheels. The leverage on the spreadsheet ng increases
Meaning a wide track car will need heavier spring rates as the extra leverage will reduce the effective spring rate
So you can bump your spring rates
Or gain a portion of that back with bigger sea bars
Posted by: Mitox Apr 1 2022, 04:59 PM
Cleaning up the garage this evening to see what I can get rid of. I have these Boge inserts from my struts; they came from an ‘84 that was wrecked a few weeks before I bought the front end.
Do they go in the scrap pile, or are they usable by someone - anyone?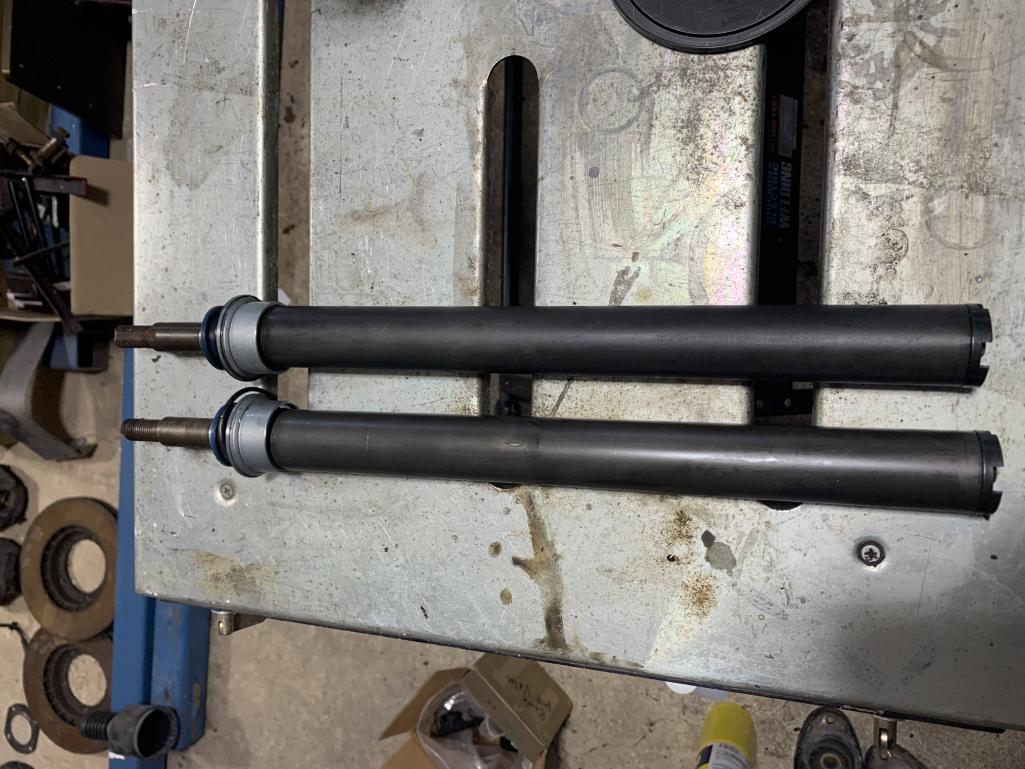
Posted by: Mitox Apr 8 2022, 06:39 PM
Transmission plans:
Step 1: half way cleaned, but there’s a crusty grease/oil still there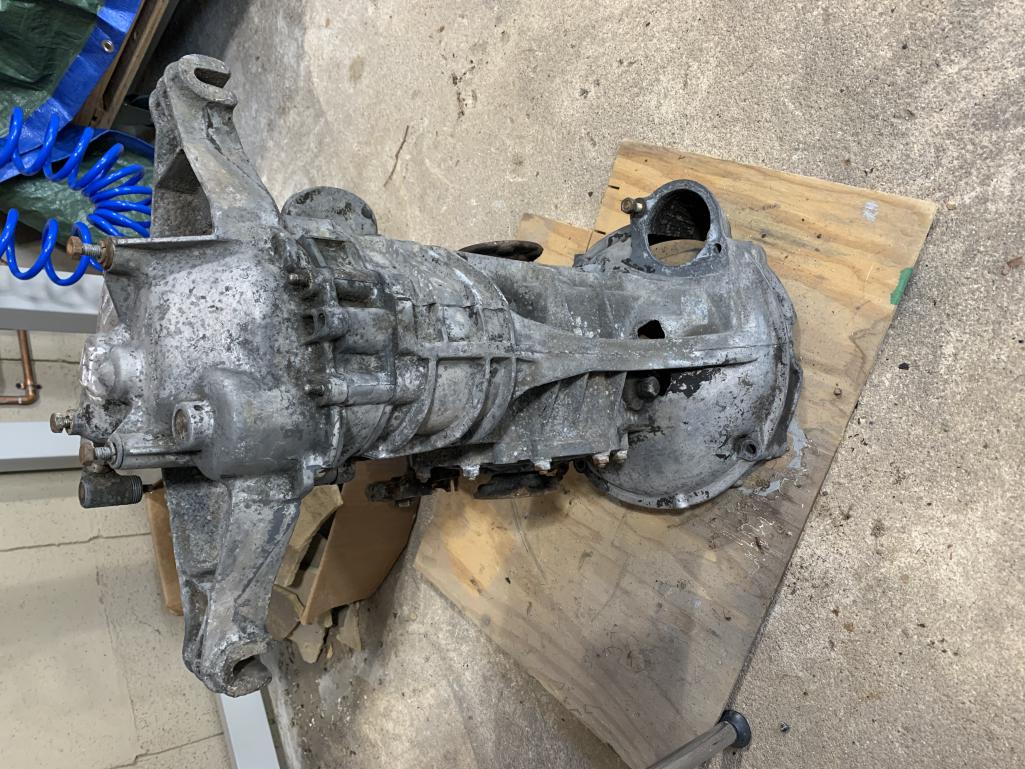
Posted by: Mitox Apr 8 2022, 06:52 PM
Transmission plans:
Step 2: Tear down - my first time ever. Good thing Dr. Evil knows how it all goes back together.
Before I bring it to Evilwerks the case needs a serious cleaning; not sure of the best method for that yet. Then, after it’s clean, it gets a coating of cerakote; thinking about Satin Nickel C-124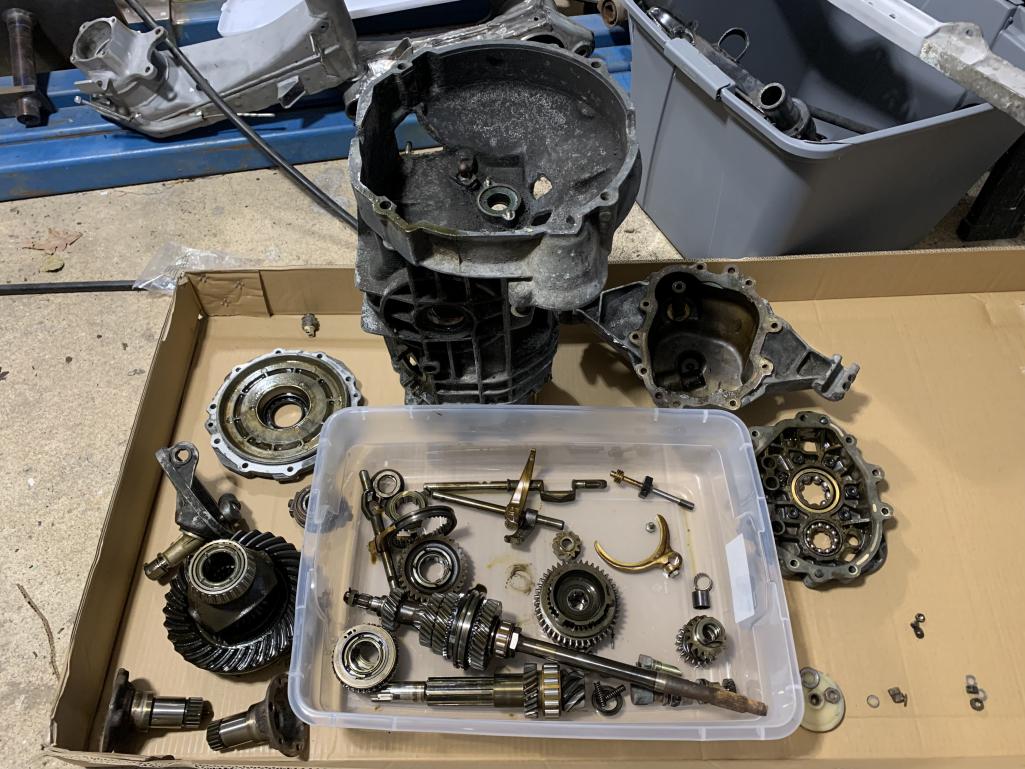
Posted by: Mitox Apr 18 2022, 12:35 PM
It’s beautiful; just received my pedal cluster after a full rebuild by Bruce.
Awesome work!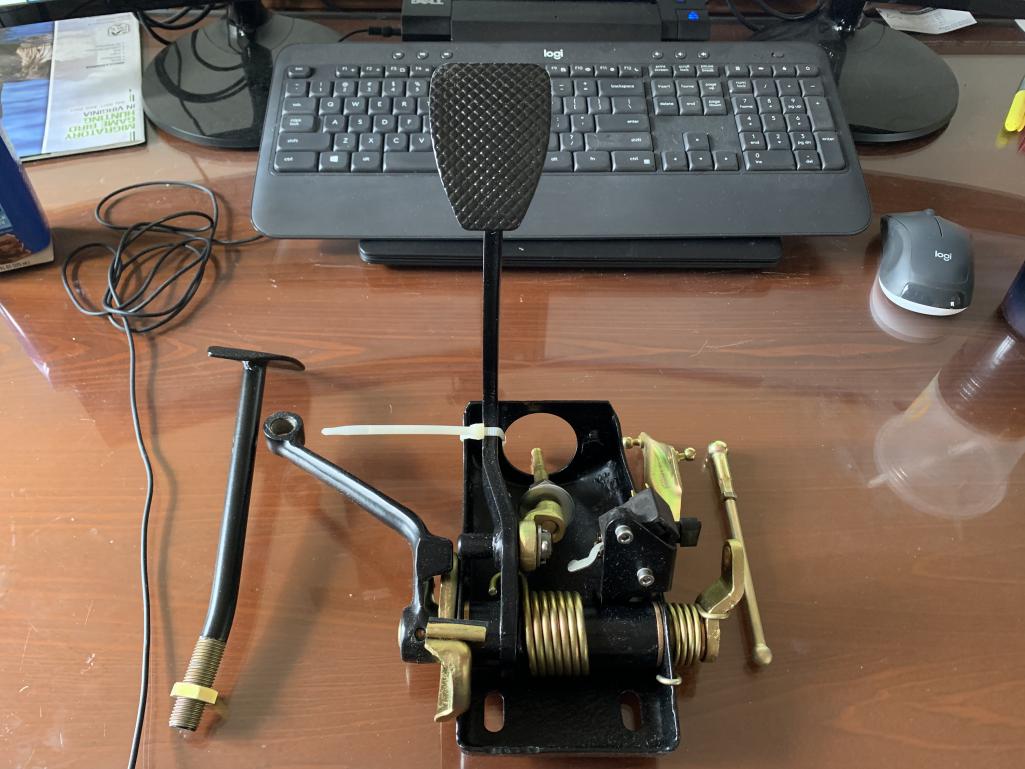
Posted by: Mitox Apr 25 2022, 07:36 AM
Used the weekend to clean the transmission case more. Here’s a couple pics after two cleanings, each one soaking in oven cleaner overnight
Still need to remove the crusty oxidation - looks like blasting may be the way to go.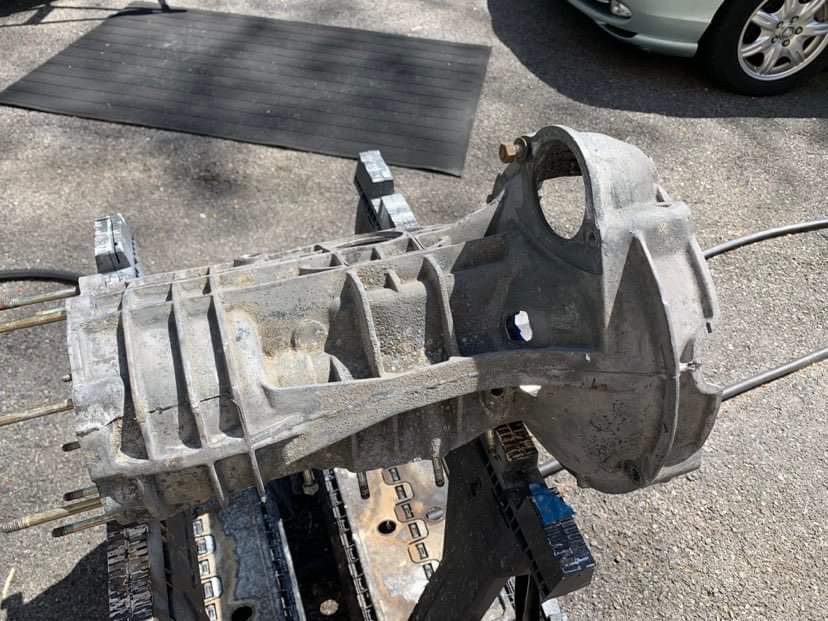
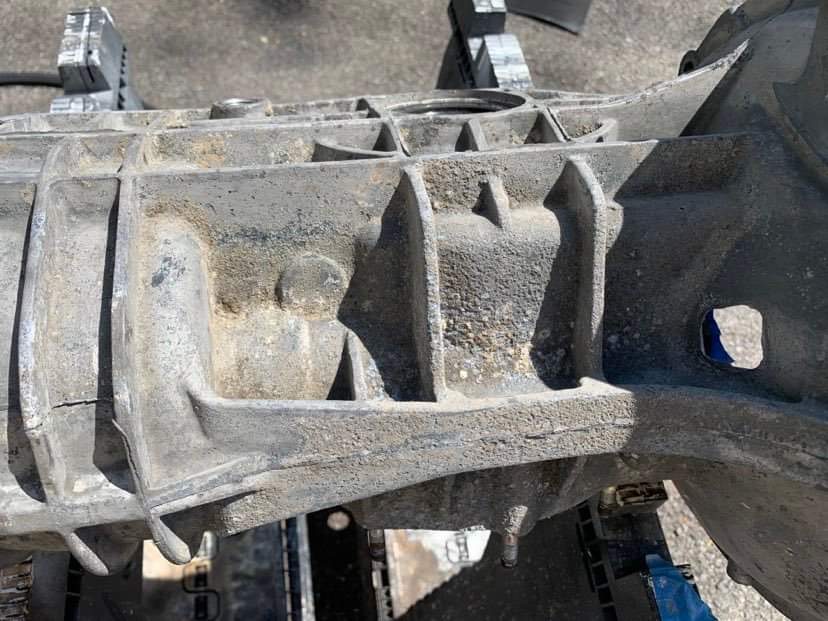
Posted by: Cairo94507 Apr 25 2022, 08:37 AM
I have seen I think it is called Vapor Hone blasting, (if memory serves) and it leaves the case like the day it was made. No damage to anything and beautiful results.
Posted by: Mitox Apr 25 2022, 09:09 AM
I have seen I think it is called Vapor Hone blasting, (if memory serves) and it leaves the case like the day it was made. No damage to anything and beautiful results.
I tried glass beads on a small area yesterday; it cleaned up well, but leaves the pits from the corrosion. I’d like to find someone to vaporblast it, but so far the closest place I can find is 5 hours away. There are a few disadvantages to living in the SW Virginia mountains - but not many.
Posted by: mepstein Apr 25 2022, 11:06 AM
I've vapor blasted a lot of parts. I usually glass bead blast to clean it and then vapor blast to get the smooth finish. Most mag parts on the east coast will be pitted and there's really nothing to do about it. A thick powder coat or epoxy will smooth it over some. Vapor blasting produces a finish similar to shot peening or tumbling and does help bare metal stay cleaner than bead blasting alone.
We should have a vapor blast machine soon for our new parts business. "The Nine Store"
Posted by: Mitox Apr 25 2022, 11:24 AM
I've vapor blasted a lot of parts. I usually glass bead blast to clean it and then vapor blast to get the smooth finish. Most mag parts on the east coast will be pitted and there's really nothing to do about it. A thick powder coat or epoxy will smooth it over some. Vapor blasting produces a finish similar to shot peening or tumbling and does help bare metal stay cleaner than bead blasting alone.
We should have a vapor blast machine soon for our new parts business. "The Nine Store"
I definitely like the idea of the shot peening finish. I think it would “smooth” some of the rough edges on the pitted areas. I’ve ordered some Cerakote to make it look nice, and it calls for a 100 grit surface to ensure adhesion - unfortunately I may need to stick with dry blasting.
Posted by: Mitox Apr 27 2022, 03:08 PM
914Rubber delivery today - rebuilt and Cerakoted steering rack
Looks great, but due to the grease I’ll keep it in the bag until the car is ready.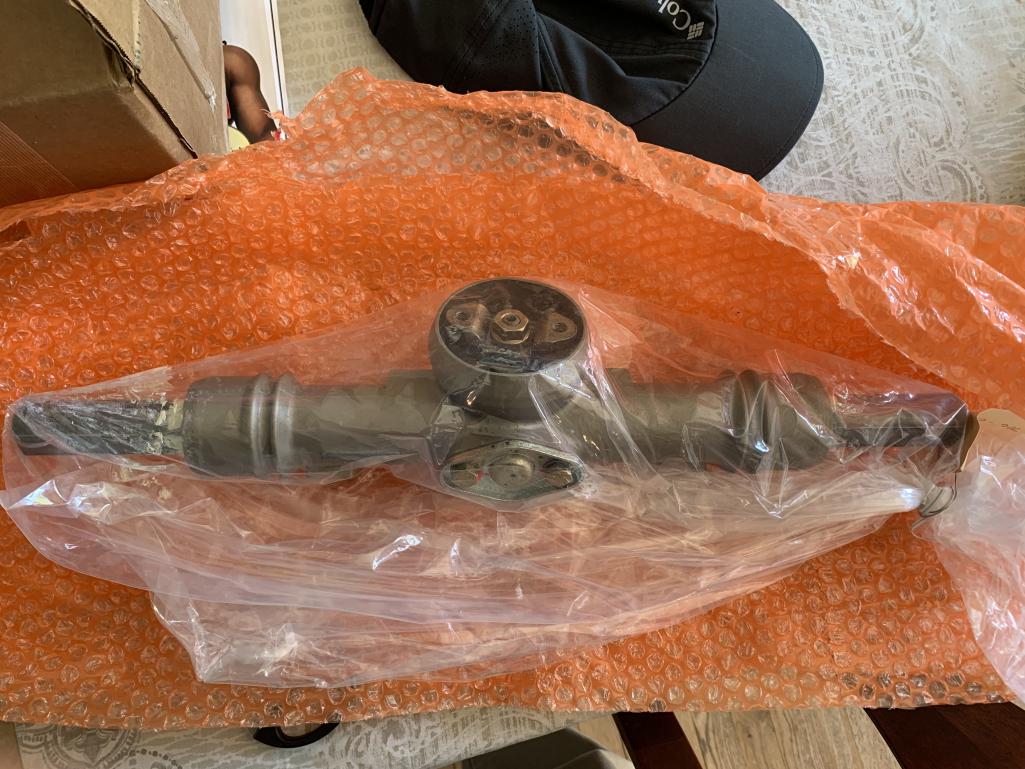
Posted by: Mitox Jun 15 2022, 11:06 AM
FedEx delivered my modified struts today. Elephant raised the spindles and added all the bits.
If I could only get my car back….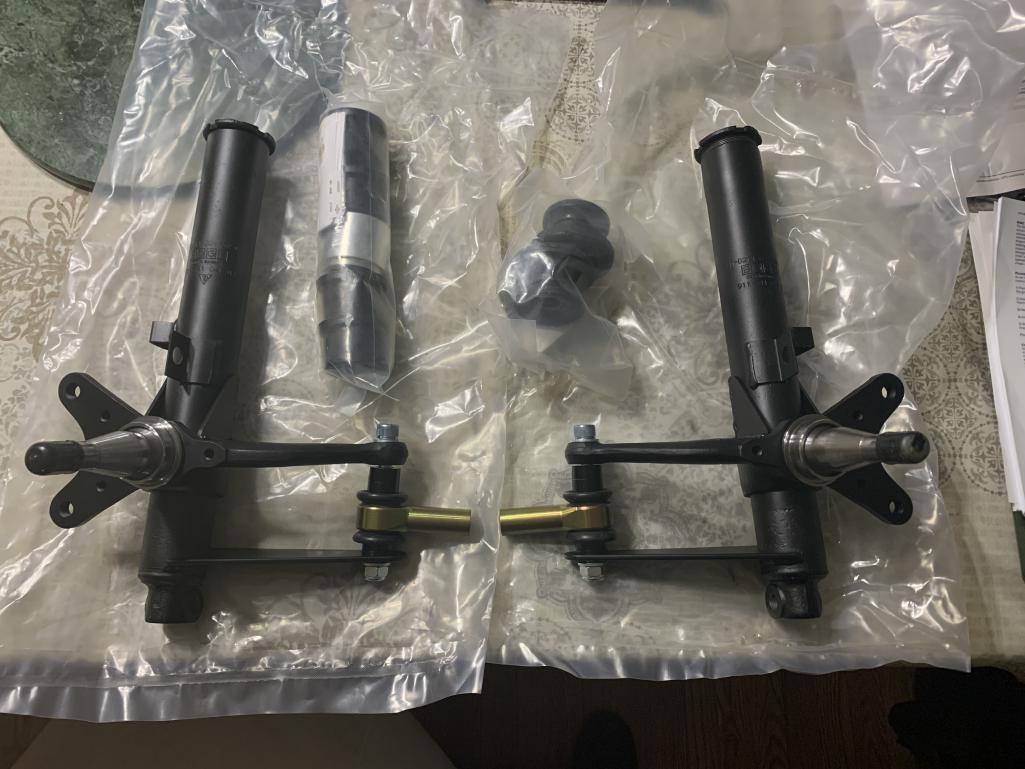
Posted by: Mitox Jan 2 2023, 08:51 PM
Another six months and my 914 is on the top of the list at the shop working the body. We’ve nearly completed fixing previous poor workmanship and the hidden damage in the front. The passenger side inner fender is replaced, and the body is getting a full strip. During the process I’m adding some reinforcements purchased from Maddogs.
Hmmm - now I need to finalize my color choice! 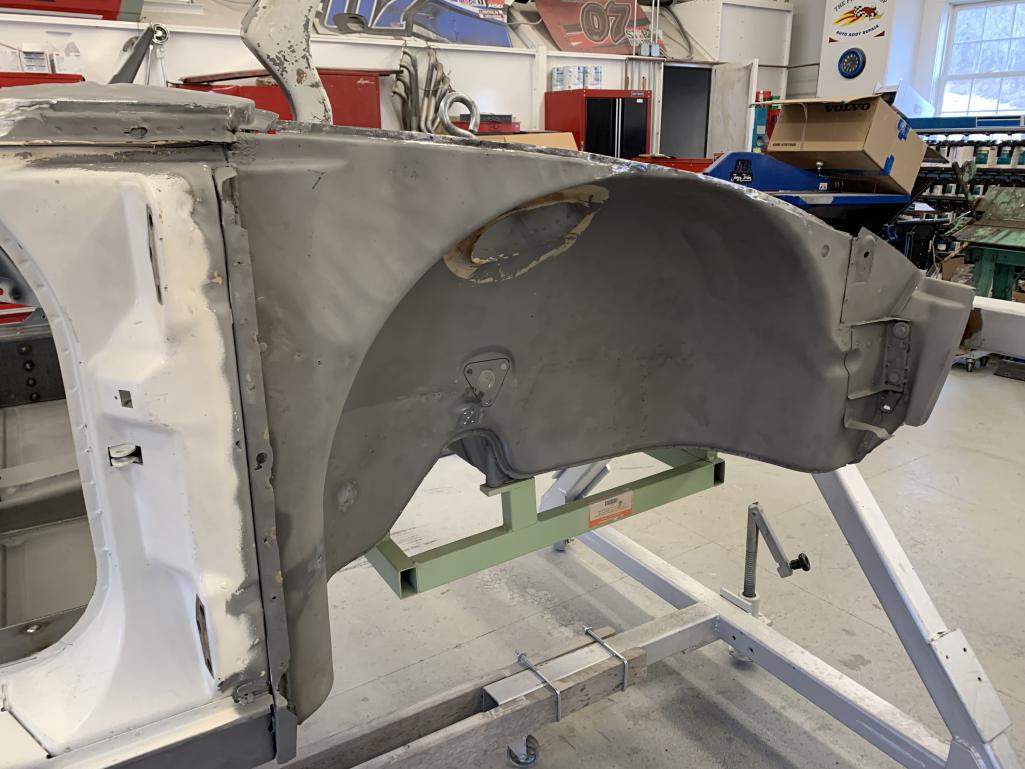
Posted by: Mitox Jan 2 2023, 08:53 PM
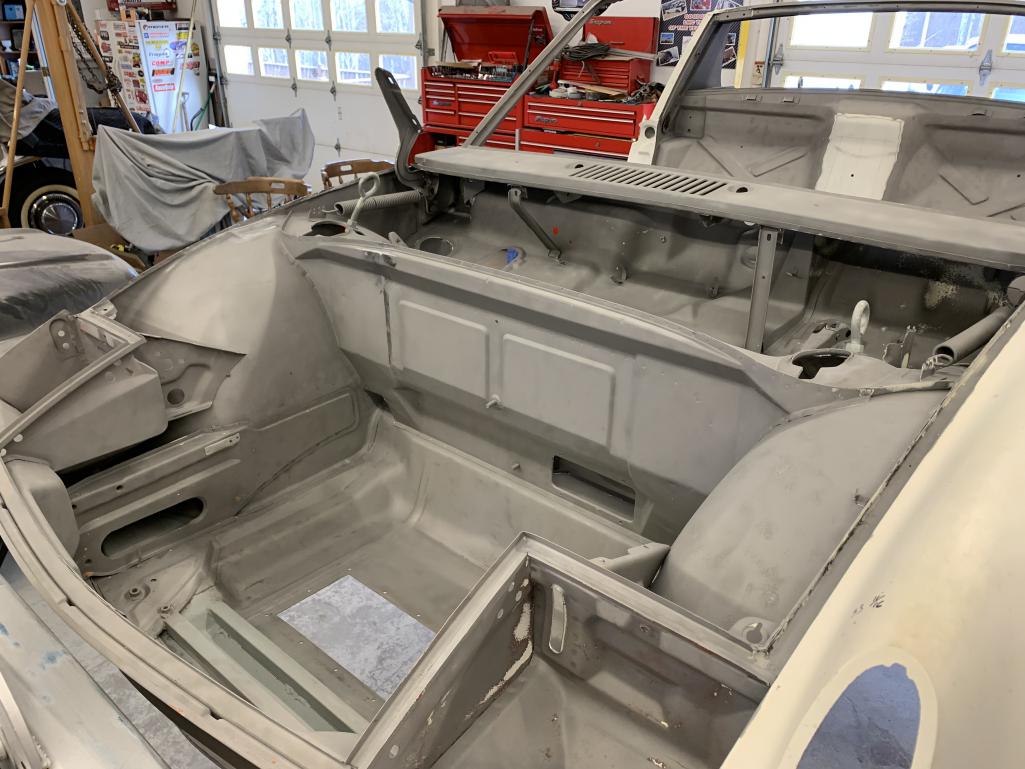
Posted by: Mitox Jan 2 2023, 08:54 PM
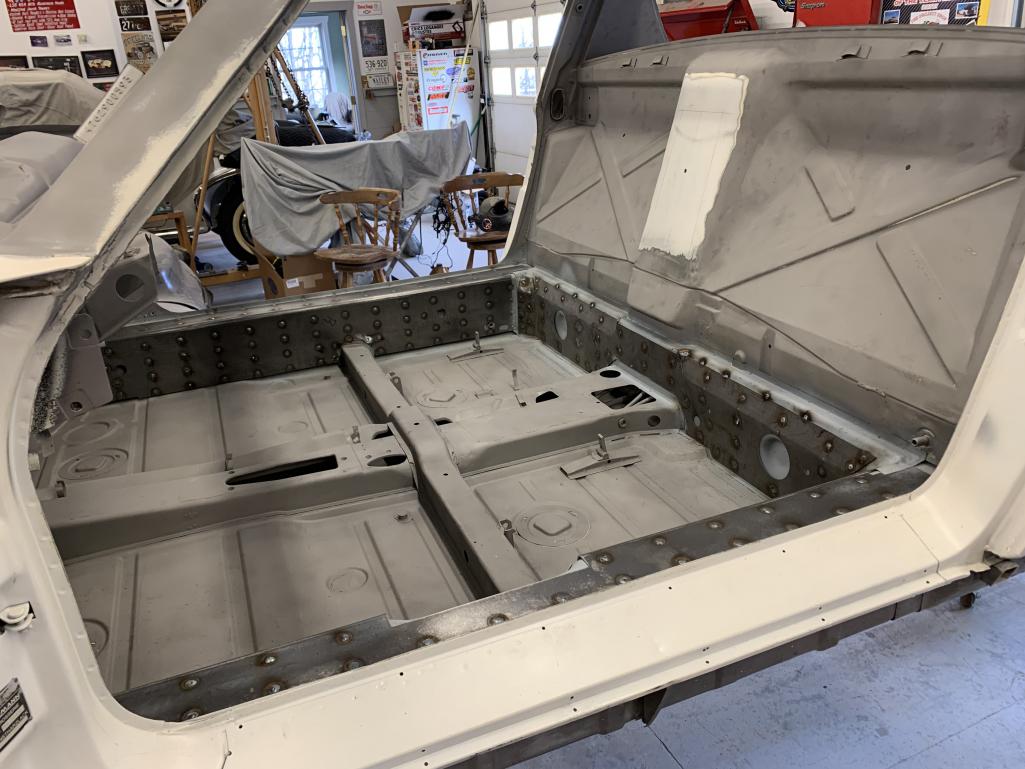
Posted by: Mitox Jan 2 2023, 08:55 PM
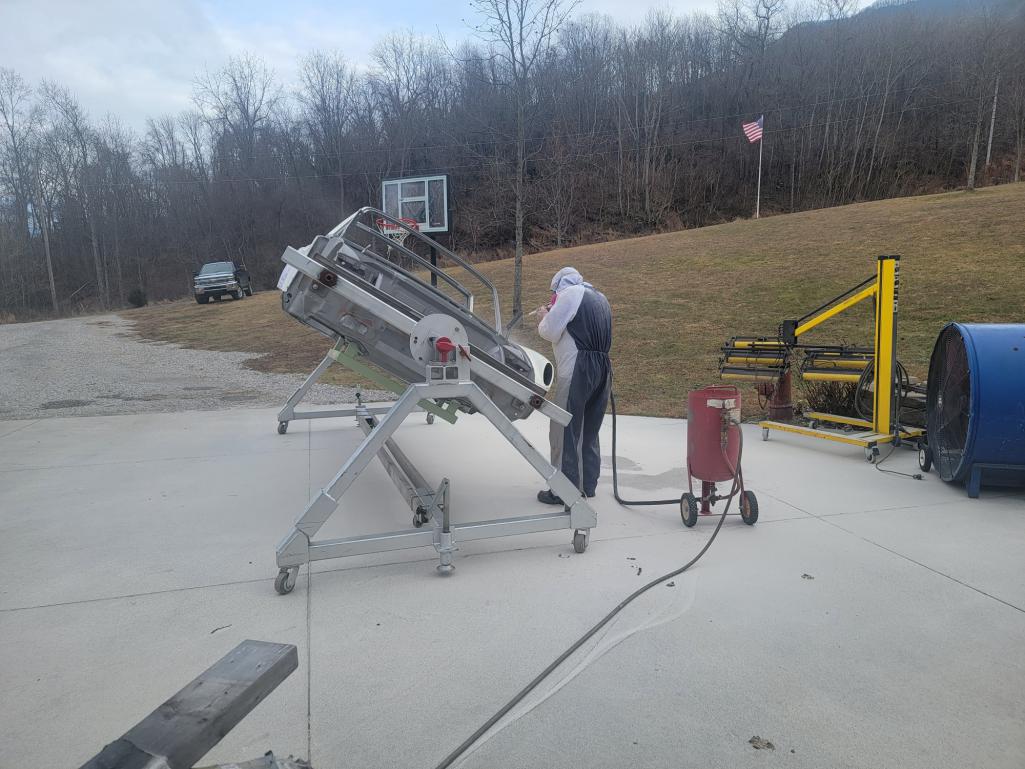
Posted by: Mitox Jan 2 2023, 09:06 PM
Here are my current four color choices - subject to change at any moment. I think I need more 914s so I can have more than one color.
Ravenna Green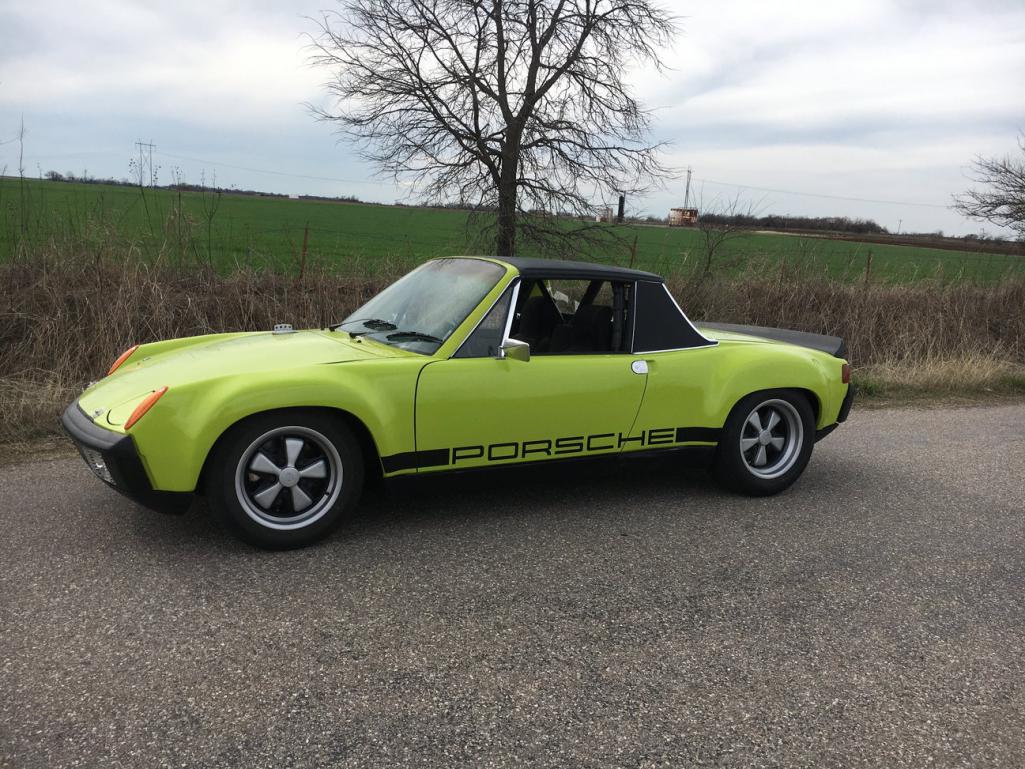
Gran Prix White and black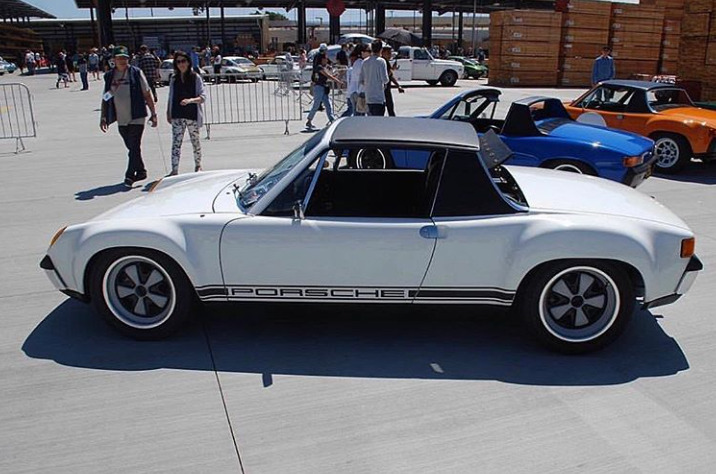
White with a vivid green
Graphite Blue with graphics (probably in bright blue)
Posted by: Mitox Jun 29 2023, 04:15 PM
Progress at last. E coated and urethane seam sealer. 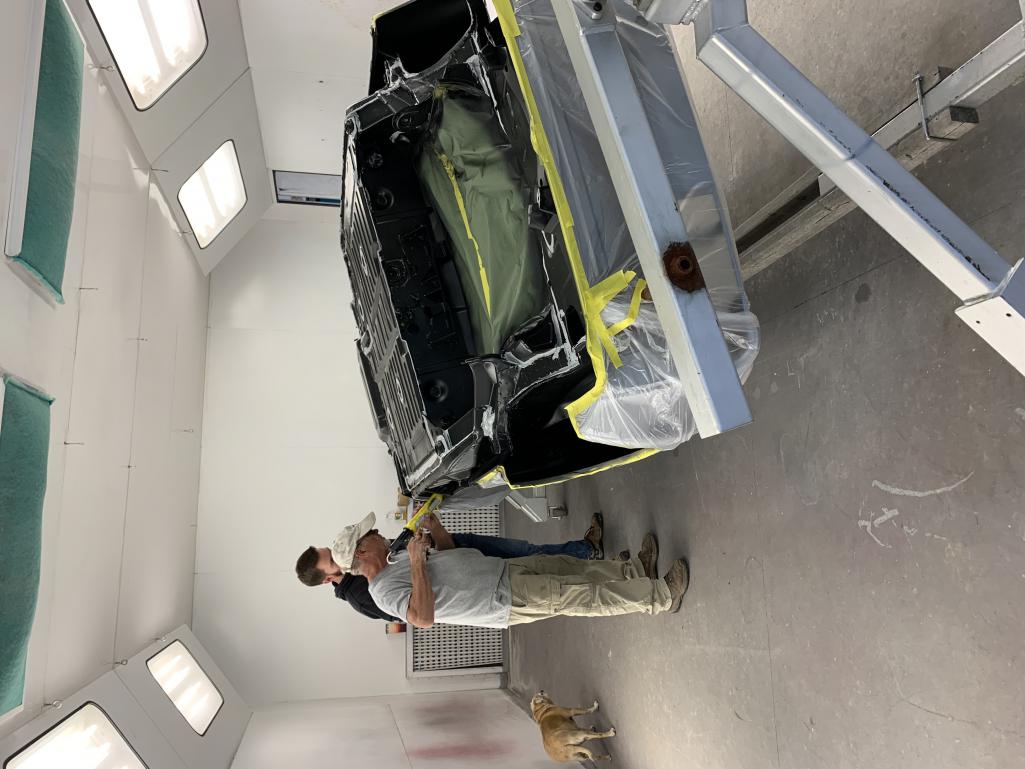
Posted by: Mitox Jun 29 2023, 04:25 PM
Seam sealer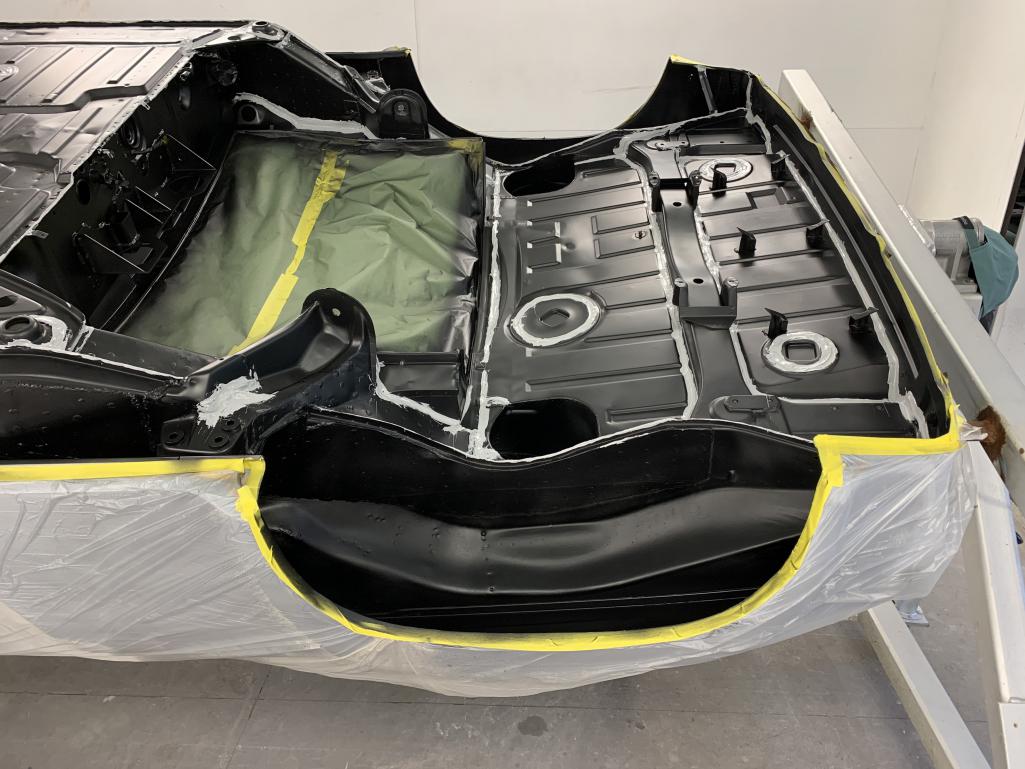
Posted by: Mitox Jun 29 2023, 04:29 PM
And - bottom coated with Raptor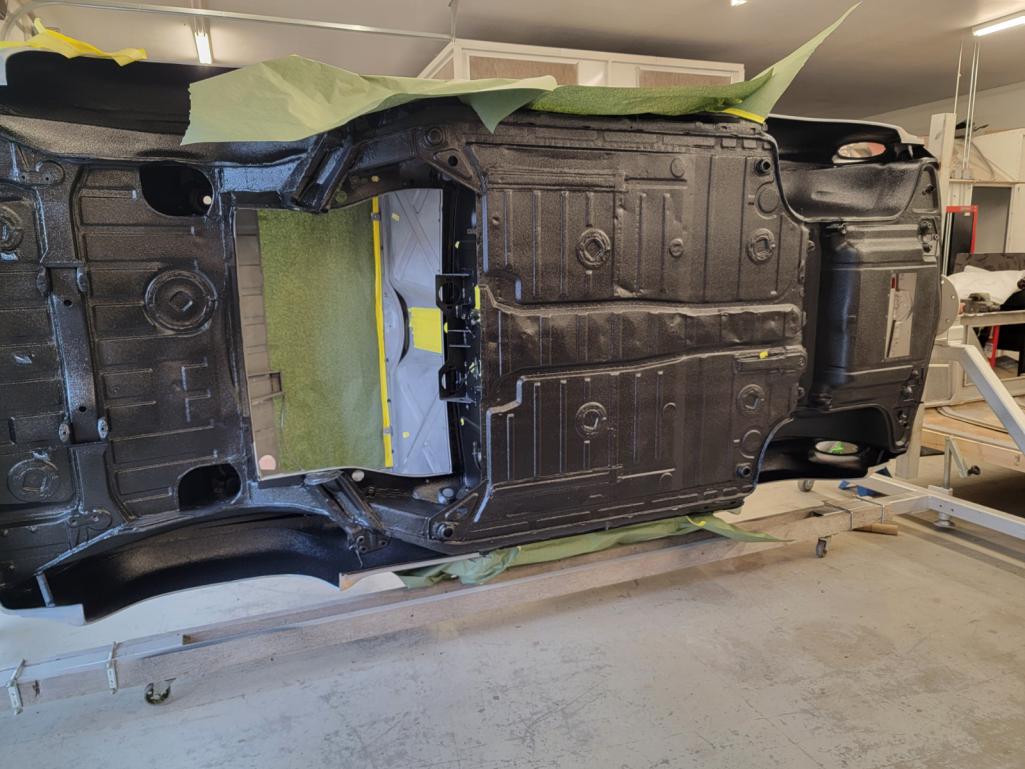
Posted by: Mitox Jun 29 2023, 05:01 PM
Adding a couple pics of the fender bodywork.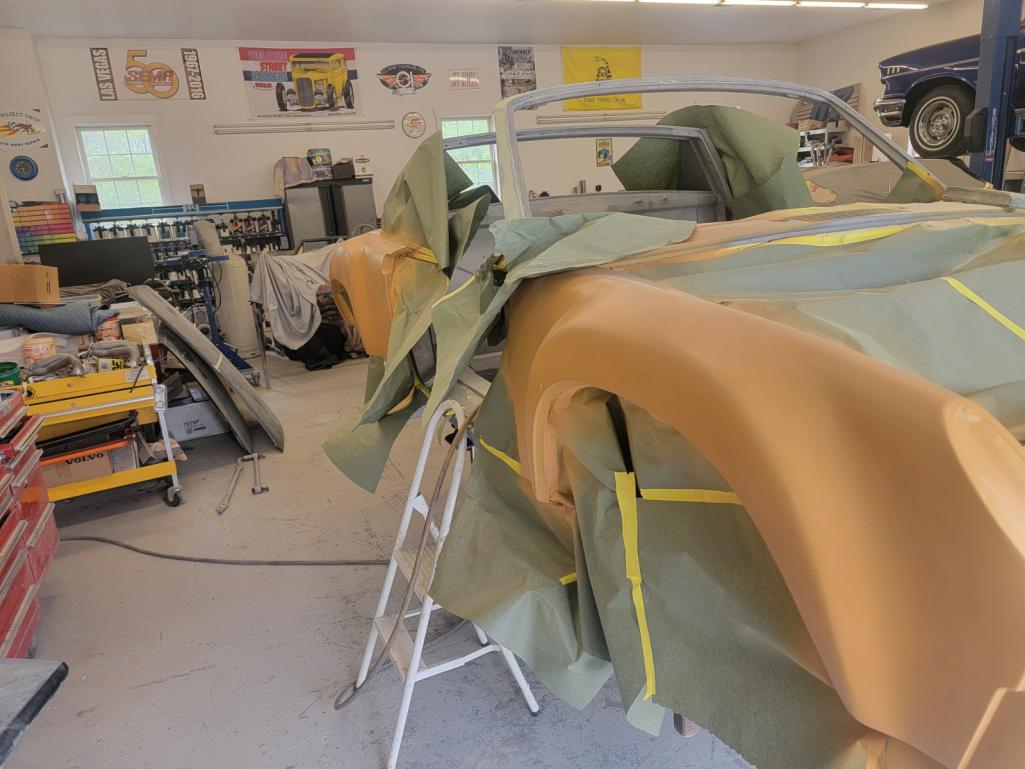
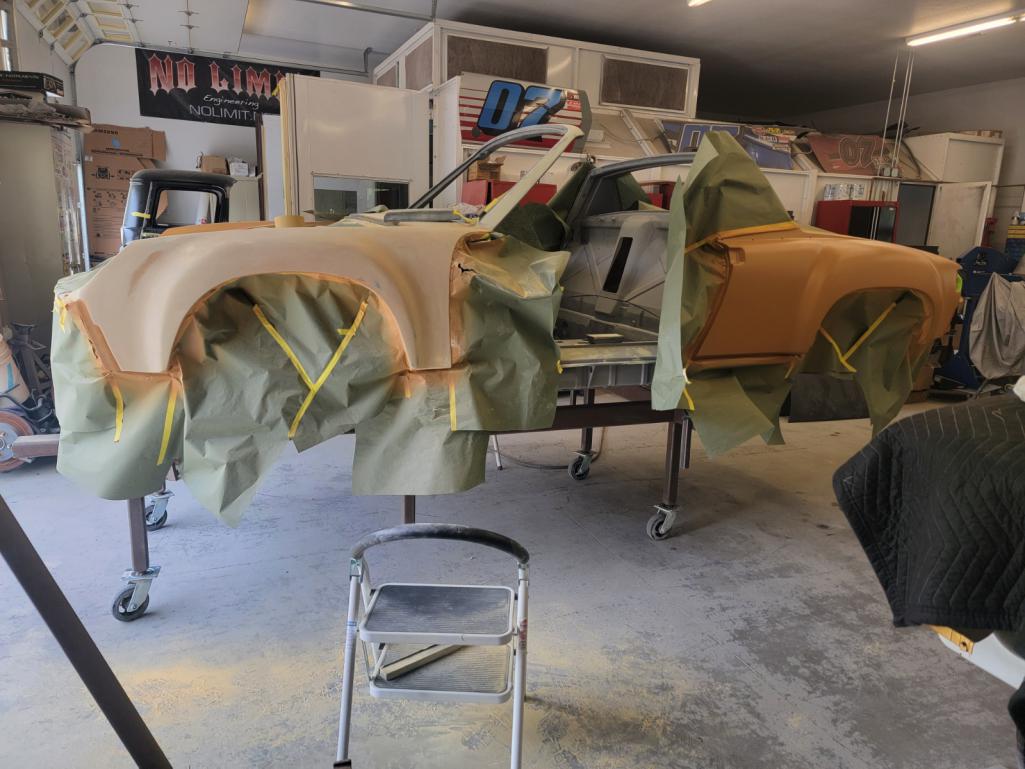
Posted by: tygaboy Jun 29 2023, 05:17 PM
Getting there... and looking REALLY good! Hang in there. It'll be SOOOOO worth it when you're driving it. 
Posted by: flyer86d Jun 29 2023, 05:26 PM
Wow just Wow! It looks like a new car!
Charlie
Posted by: Justinp71 Jun 29 2023, 05:53 PM
Here are some paint inspirations-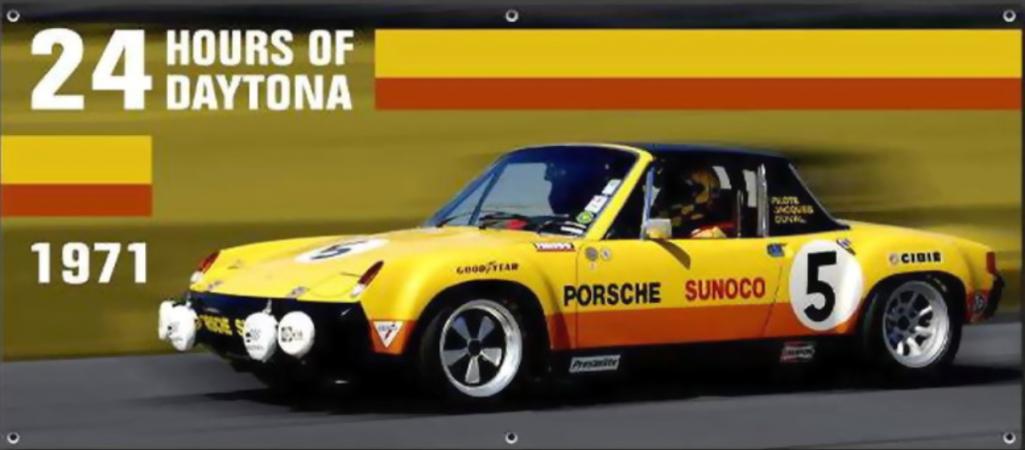
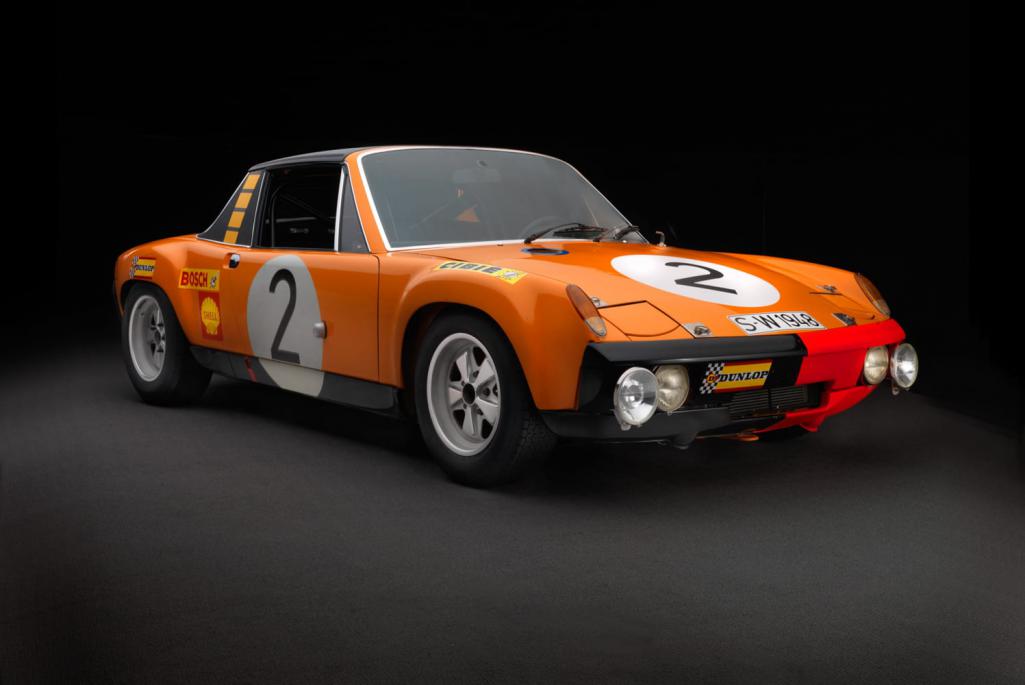
Posted by: Mitox Jun 29 2023, 08:15 PM
Latest pic. Primed the interior and started the seam sealing. On the inside I’m using the urethane and then trying to duplicate the factory style sealer on top. This will be done in the front and rear trunk also.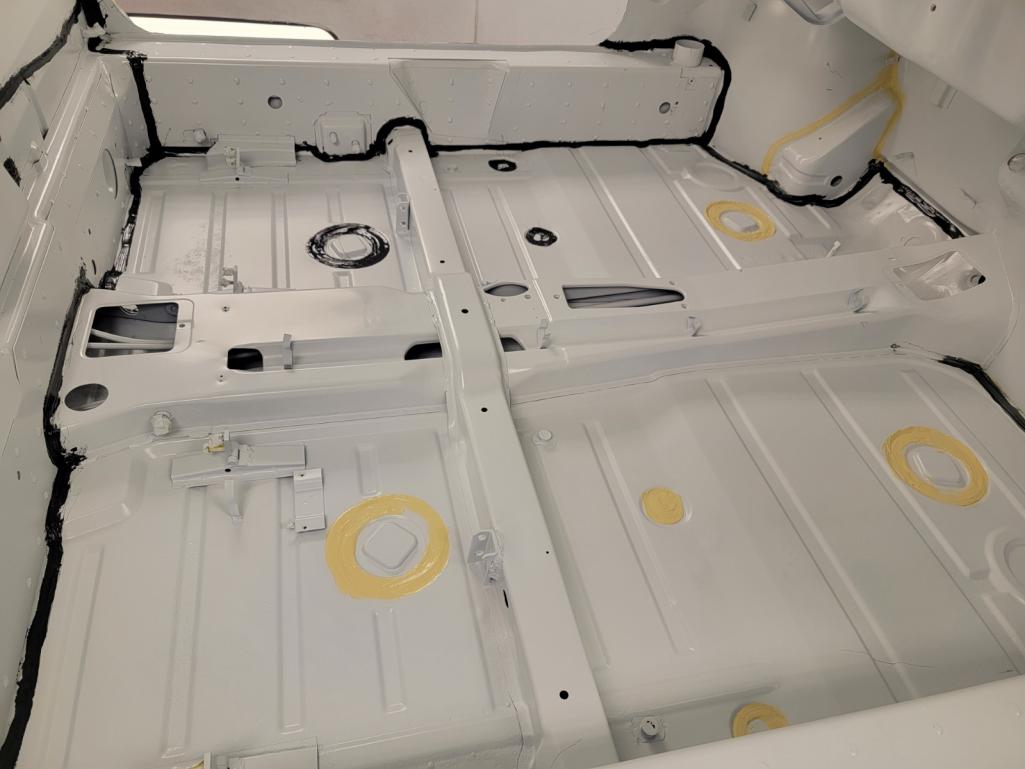
Posted by: Mitox Jun 29 2023, 08:30 PM
Just noticed I forgot to add a few pics of the body work. So, it’s out of order, but I wanted to be sure they are here.
The fenders were stripped again due to poor work at a previous shop. Also decided to add a thin layer of glass applied over the weld line to ensure the line doesn’t transfer through the finish paint.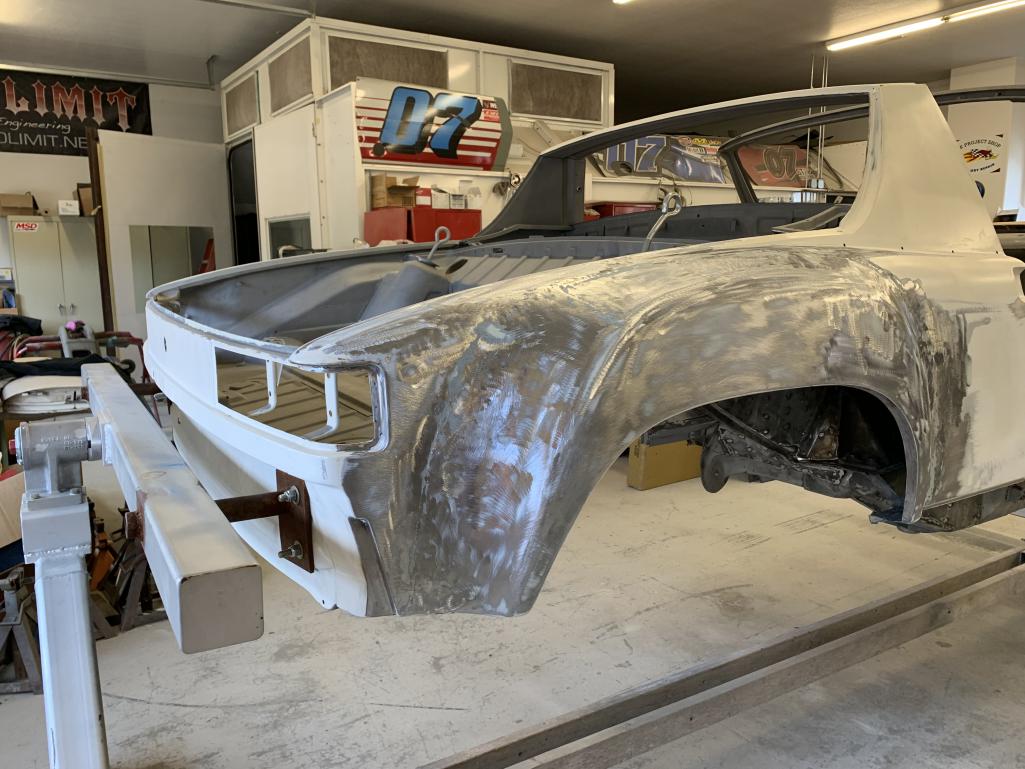
Posted by: Mitox Jun 29 2023, 08:32 PM
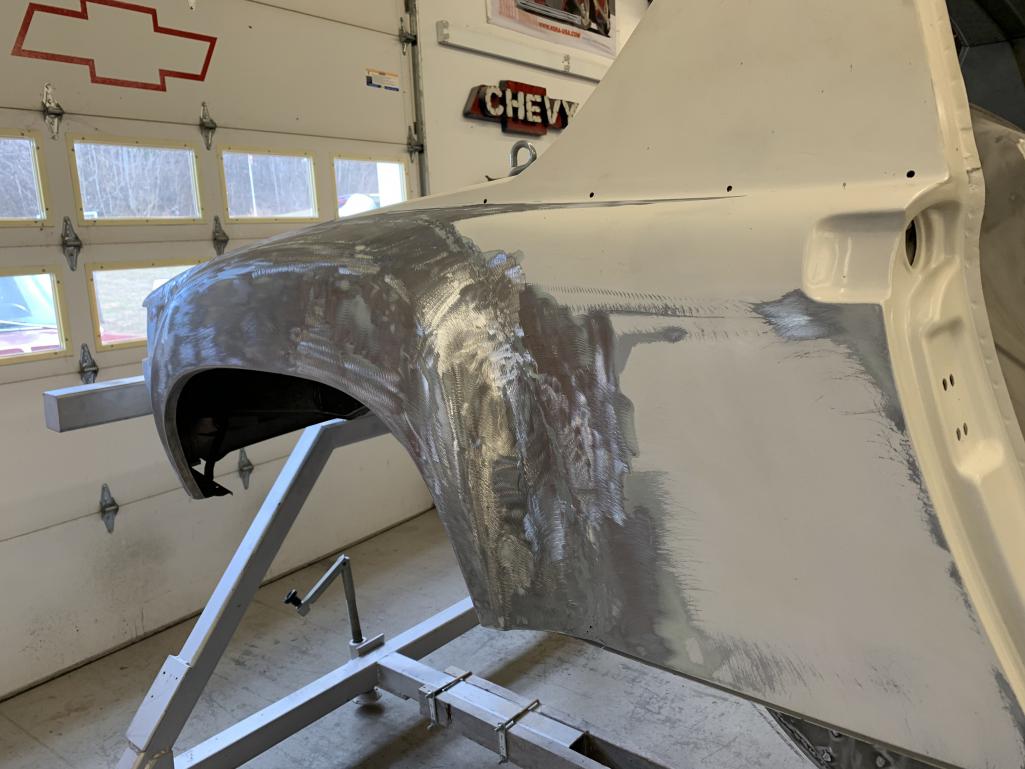
Posted by: Nate W Jun 29 2023, 08:33 PM
Love that Graphite blue paint scheme, your car looks great
Posted by: DRPHIL914 Jun 30 2023, 09:25 AM
And - bottom coated with Raptor
@http://www.914world.com/bbs2/index.php?showuser=19302
what did you use to apply the Raptor to the outer floor pan?
Phil
Posted by: Mitox Jul 13 2023, 09:03 PM
And - bottom coated with Raptor
@http://www.914world.com/bbs2/index.php?showuser=19302
what did you use to apply the Raptor to the outer floor pan?
Phil
Late answer, sorry, just saw the question. I believe he used the simple sprayer typically used with the Bed liner kits.
Posted by: Mitox Jul 13 2023, 09:08 PM
More seam sealer pics. The inside and the trunks have been primed, and we are finishing the seam sealer. Using urethane sealer first with a brush finish, then following up with sprayed sealer in an attempt to match the original look.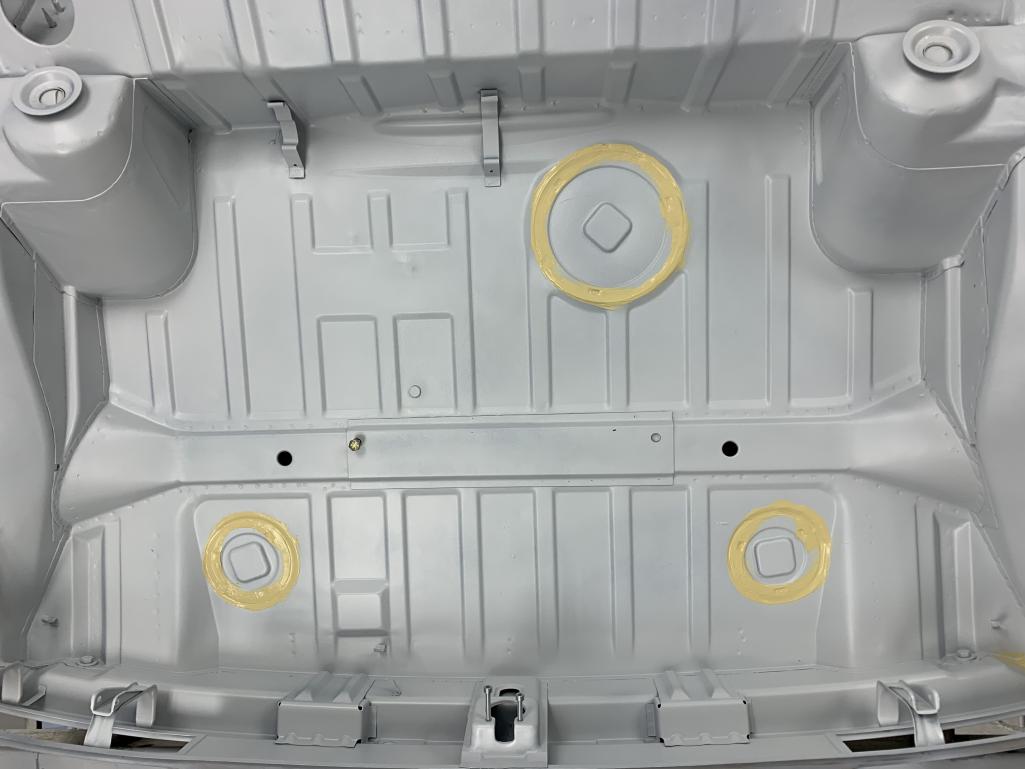
Posted by: Mitox Jul 13 2023, 09:09 PM
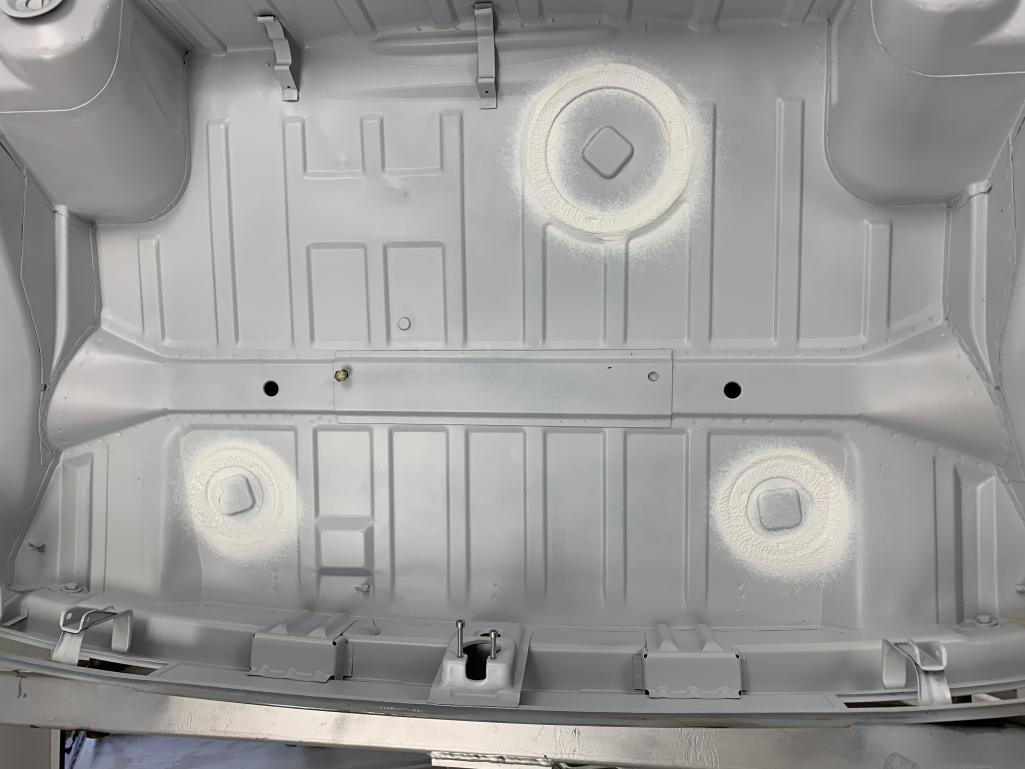
Posted by: Mitox Jul 13 2023, 09:11 PM
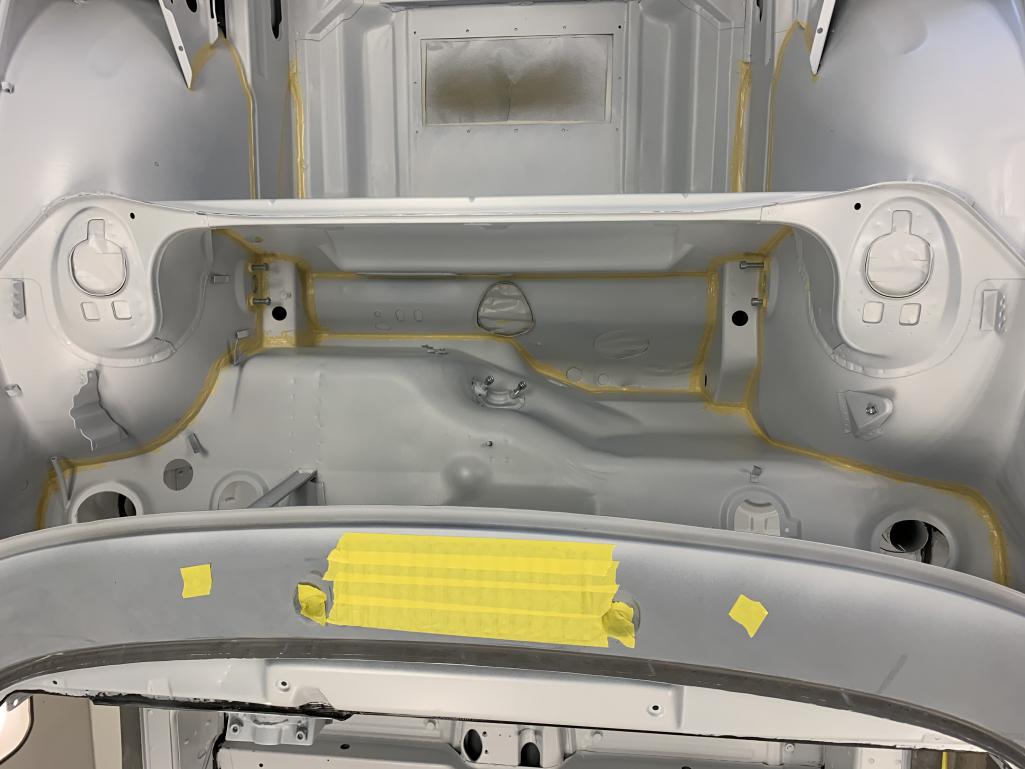
Posted by: Mitox Jul 13 2023, 09:11 PM
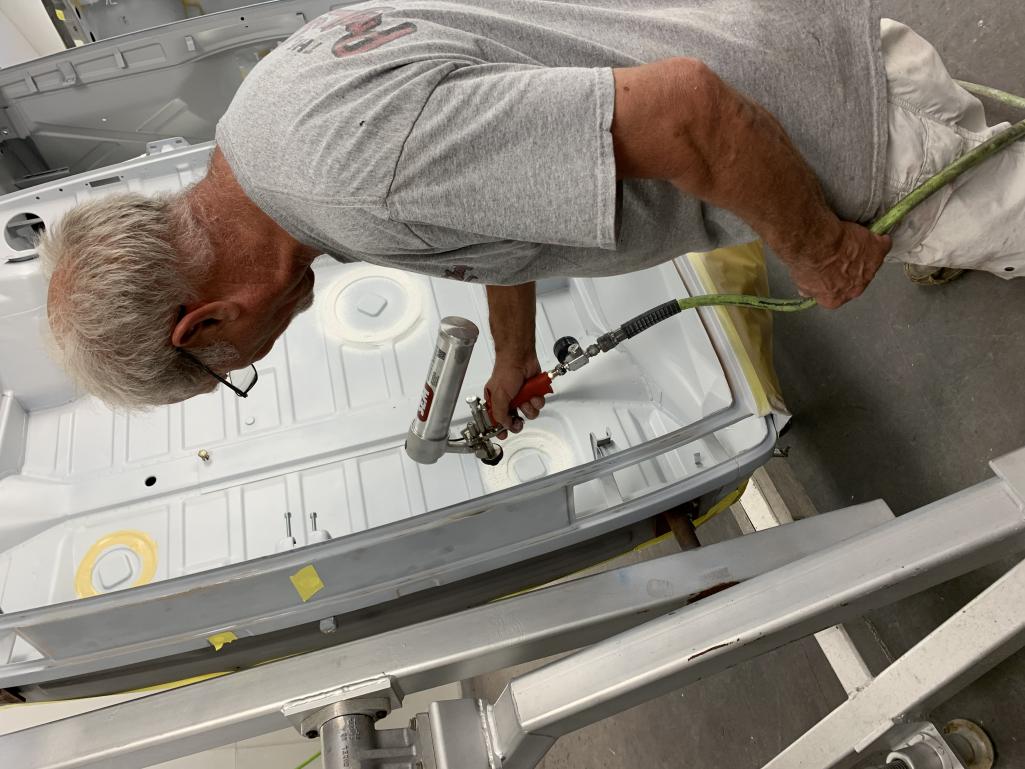
Posted by: Mitox Jul 13 2023, 09:40 PM
I have a question for anyone that can help. There is a seem on the back side of the sail panels where a small permanently mounted section of the engine cover is. Does it have sealer at the locations shown in this pick? (Not my car, but it shows the area well)
It’s been a few years since I stripped everything, so I can’t recall. 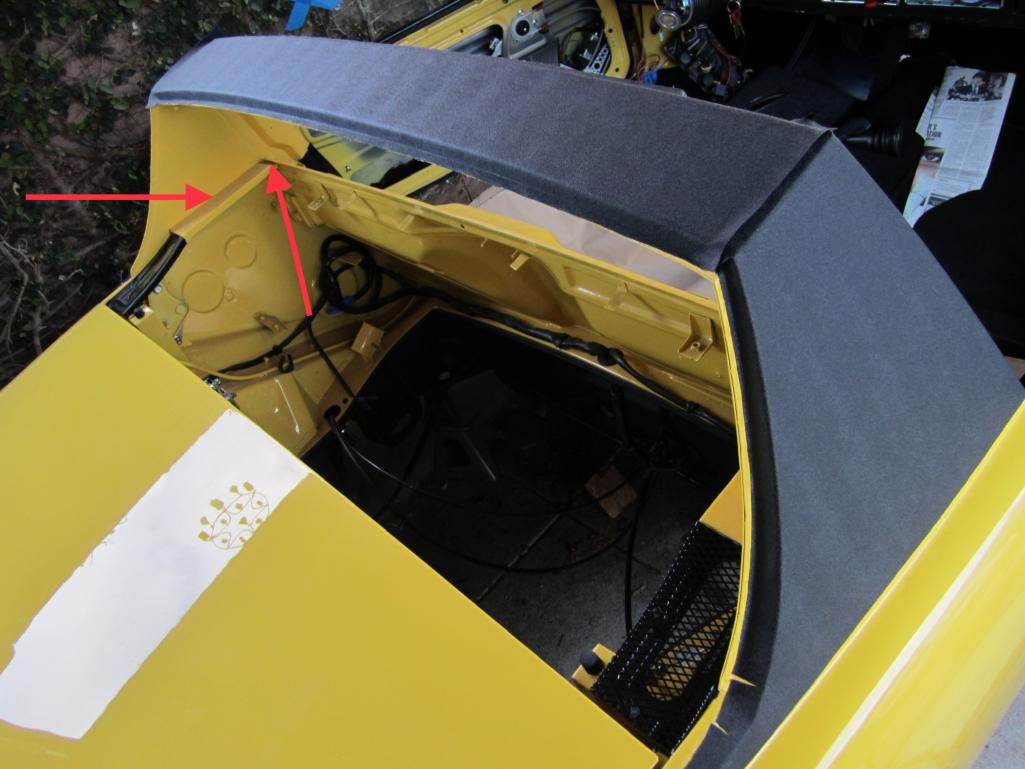
Posted by: rgalla9146 Jul 14 2023, 05:12 AM
No sealer in the long seam from the factory.
The area close to the glass is space for the rubber seal
Both are difficult to 'flood' with paint.
I've never seen rust jump out of that area in spite of how vulnerable it looks.
Posted by: Mitox Jul 14 2023, 01:22 PM
No sealer in the long seam from the factory.
The area close to the glass is space for the rubber seal
Both are difficult to 'flood' with paint.
I've never seen rust jump out of that area in spite of how vulnerable it looks.
Thanks for the info. My vague memory is the same for the seam n the side , however I think I remember digging out seam sealer from the section just under the window. I’ve also looked through the part diagrams and can’t find a seal that would be in this location.
Does anyone have a rubber seal in the section under the window?
Posted by: mate914 Jul 14 2023, 06:12 PM
what are the brackets on the left and right of the trunk lock?
Matt
Posted by: rgalla9146 Jul 14 2023, 07:18 PM
what are the brackets on the left and right of the trunk lock?
Matt
standard on '75-'76 chassis
probably better to remove on a GT replica
Posted by: Mitox Jul 15 2023, 10:55 AM
what are the brackets on the left and right of the trunk lock?
Matt
I think they are just stiffeners for the rear panel -
Posted by: sixnotfour Jul 15 2023, 04:48 PM
Just go with the last "GT"
Posted by: Mitox Jul 21 2023, 07:40 PM
It actually has some paint on it!
Pics are rotated 90 degrees for some reason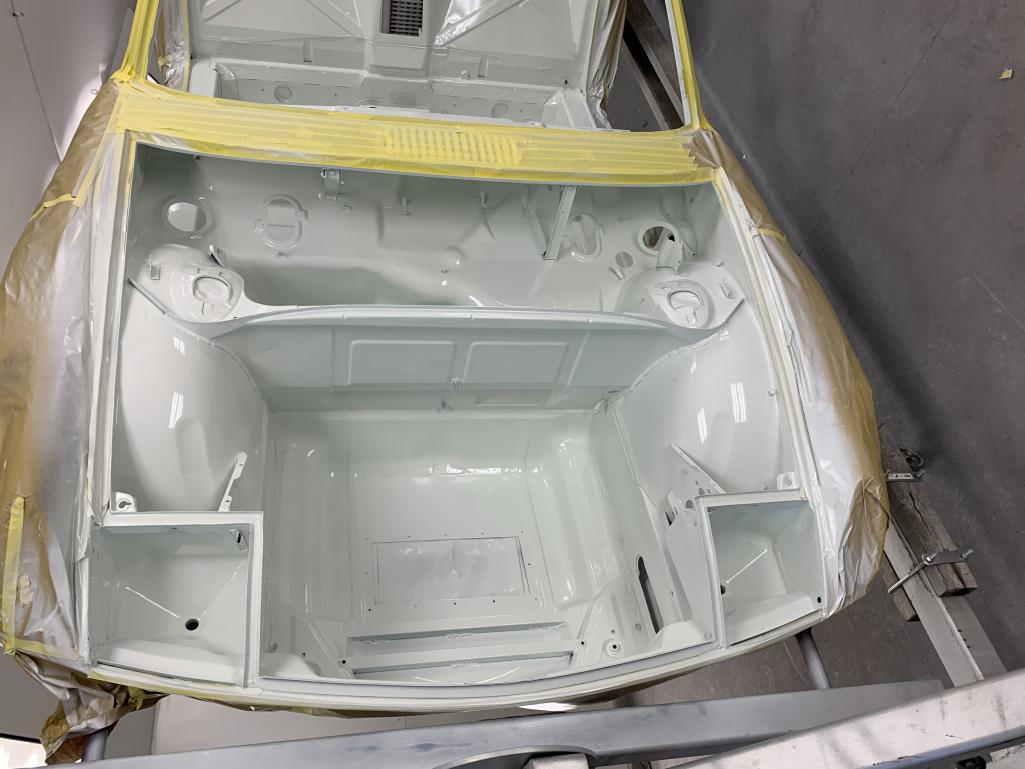
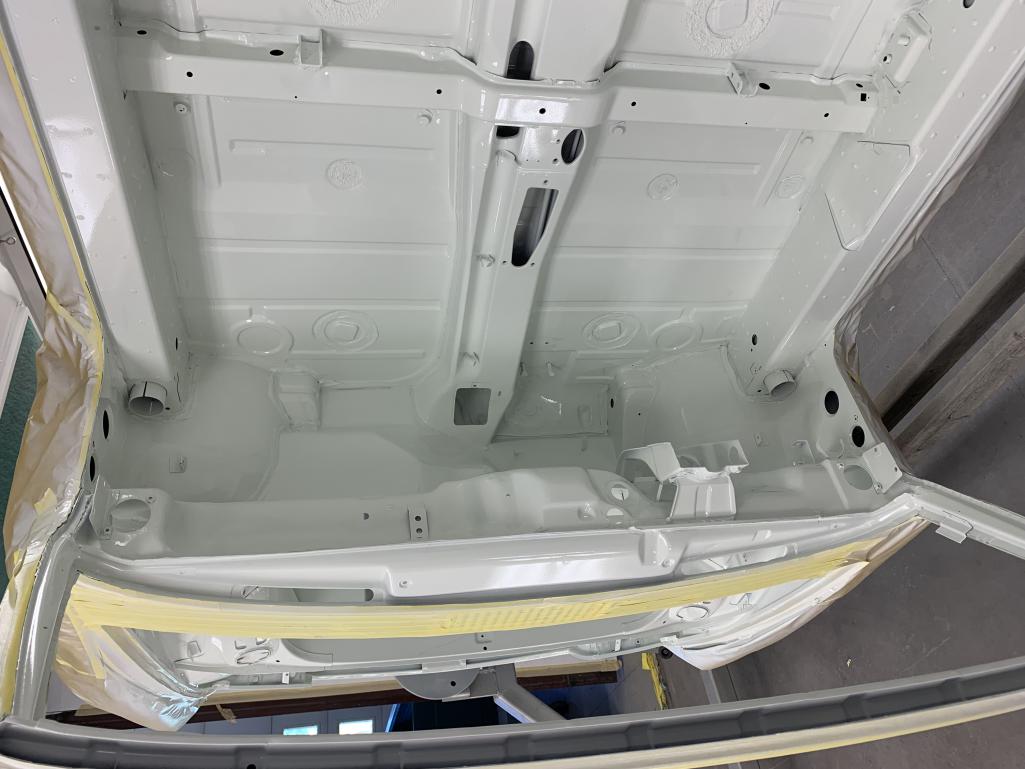
Posted by: Mitox Jul 21 2023, 07:41 PM
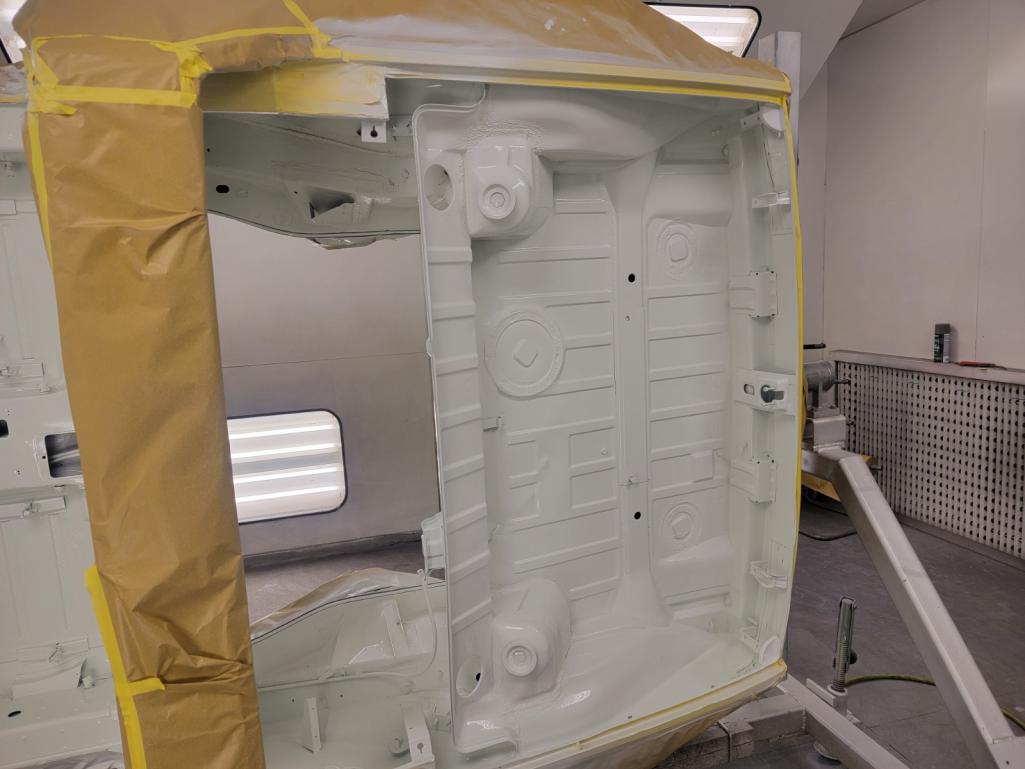
Posted by: East coaster Jul 21 2023, 08:47 PM
Nice! Gratifying to see some color on it, isn’t it….
Posted by: Mitox Dec 25 2023, 09:47 AM
A few months later and it’s starting to look like a 914 again.
We’re working on the metal flared rockers, the front bumper cut-out, and the front valance: pics to come.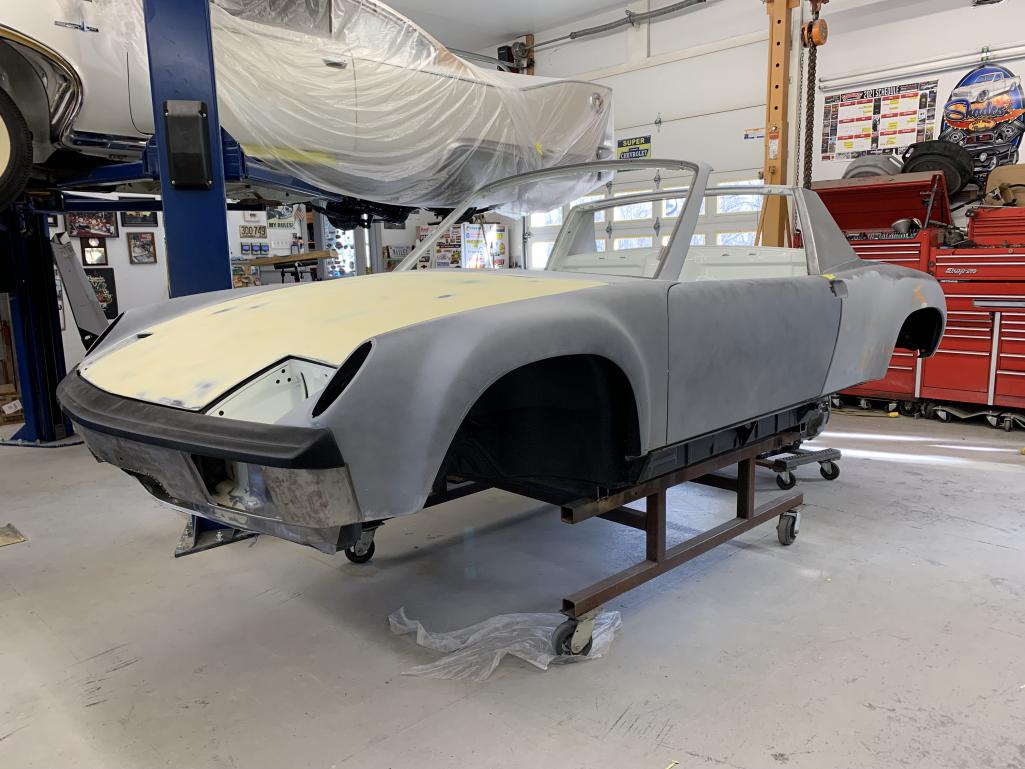
Posted by: Mitox Dec 25 2023, 09:49 AM
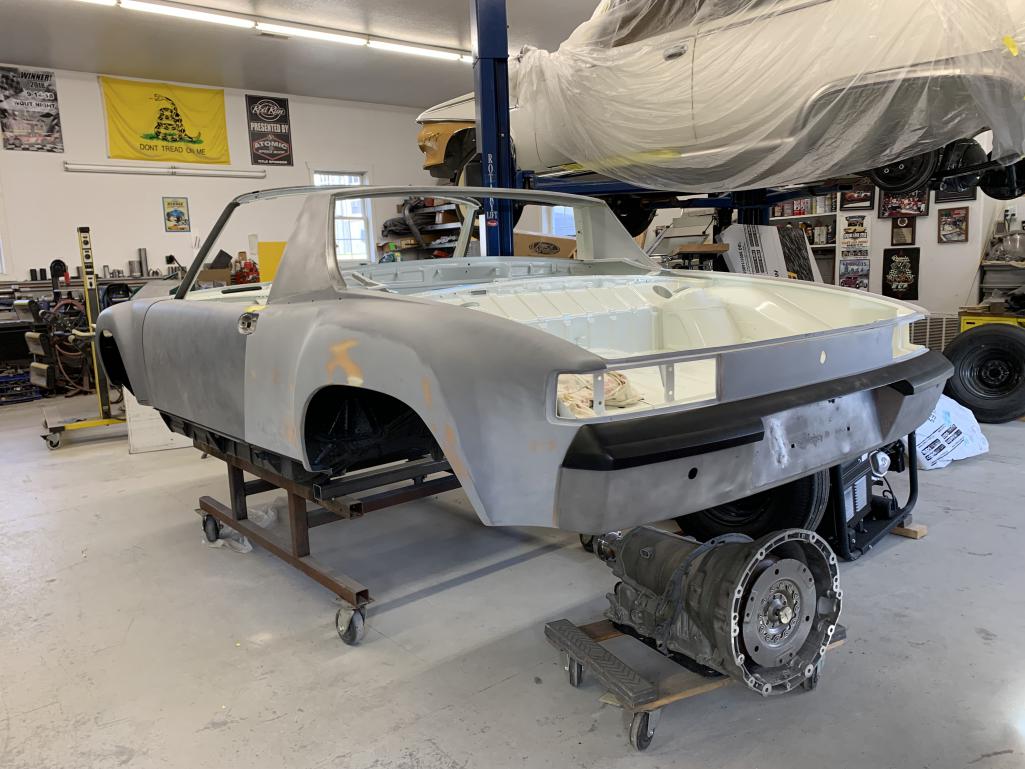
Posted by: Cairo94507 Dec 25 2023, 09:59 AM
Really coming along nicely.
Posted by: Shivers Dec 25 2023, 11:59 AM
I have a question for anyone that can help. There is a seem on the back side of the sail panels where a small permanently mounted section of the engine cover is. Does it have sealer at the locations shown in this pick? (Not my car, but it shows the area well)
It’s been a few years since I stripped everything, so I can’t recall.
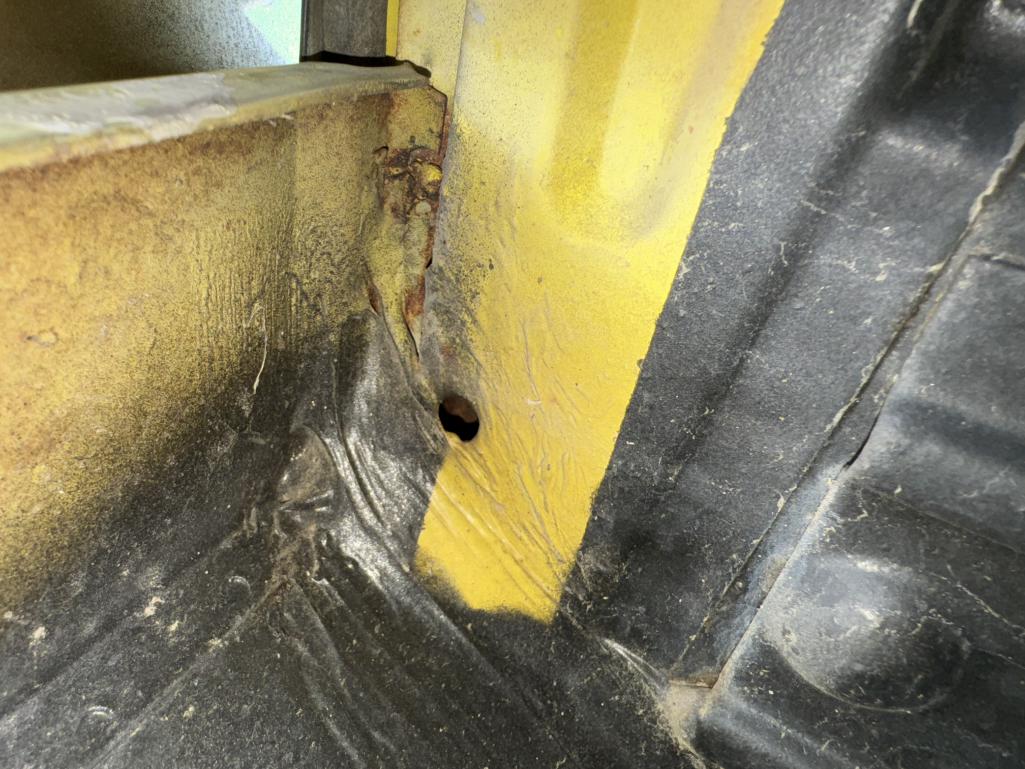
Posted by: Mitox Jan 25 2024, 06:39 PM
I might actually get my 914 back soon!! - but then I’ll need to remember how to put it back together.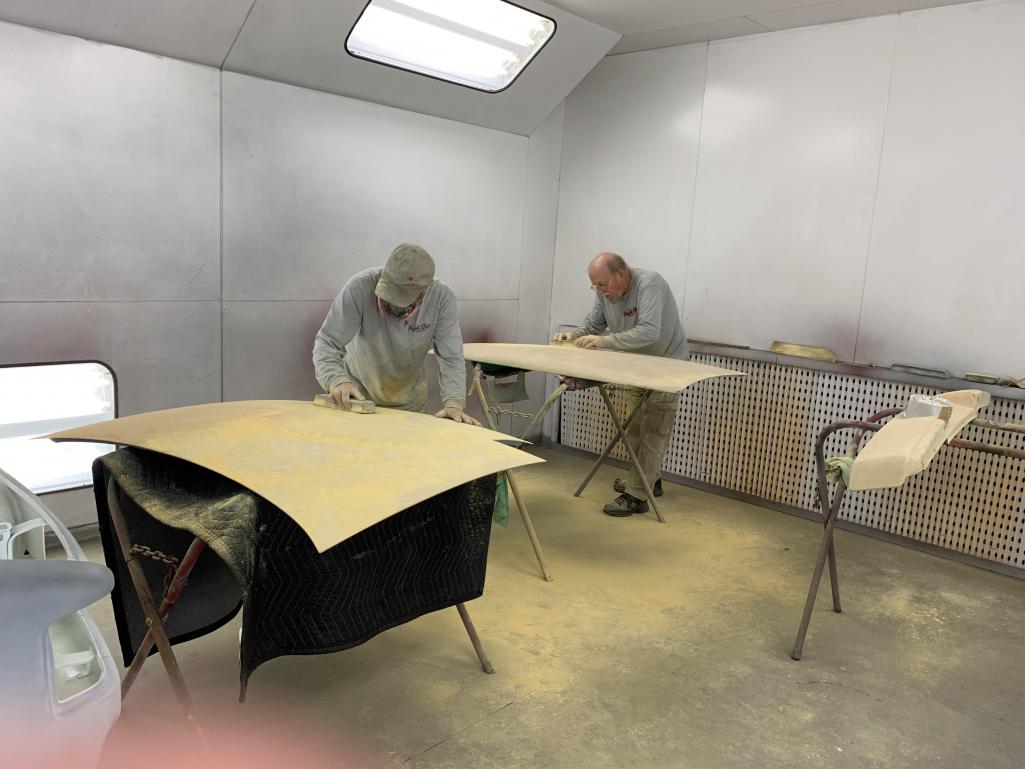
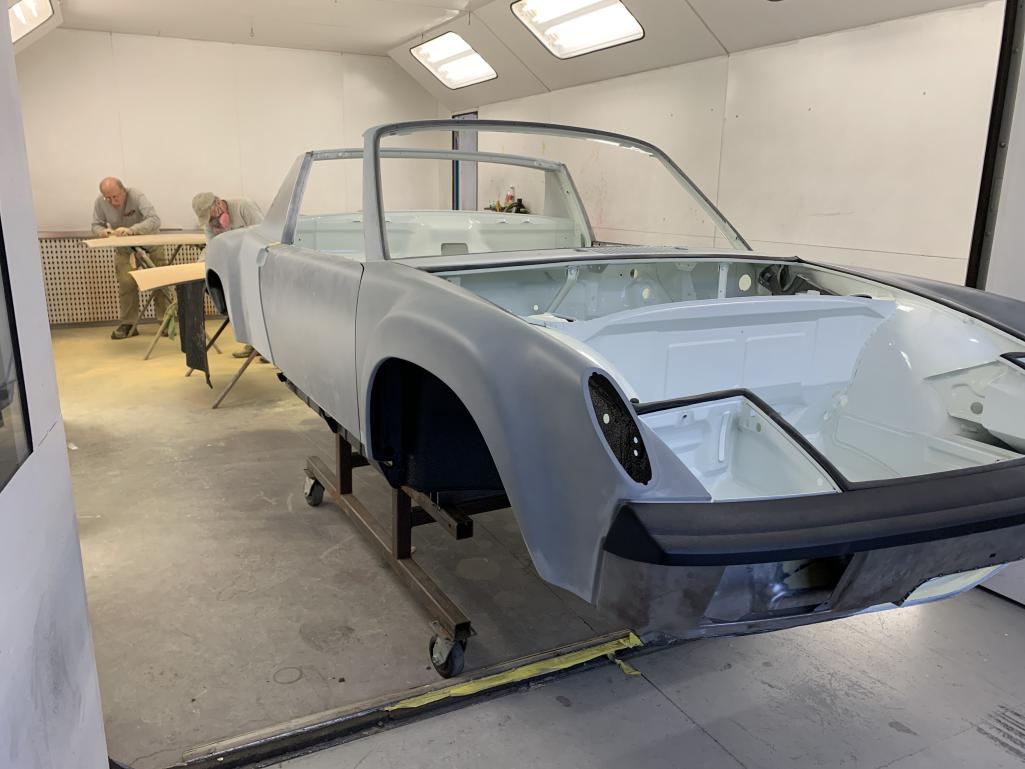
Posted by: Mitox Jan 25 2024, 06:43 PM
Here’s a pic of the front bumper in-work. The lower valence will be flared and have the lower section of the oil cooler opening.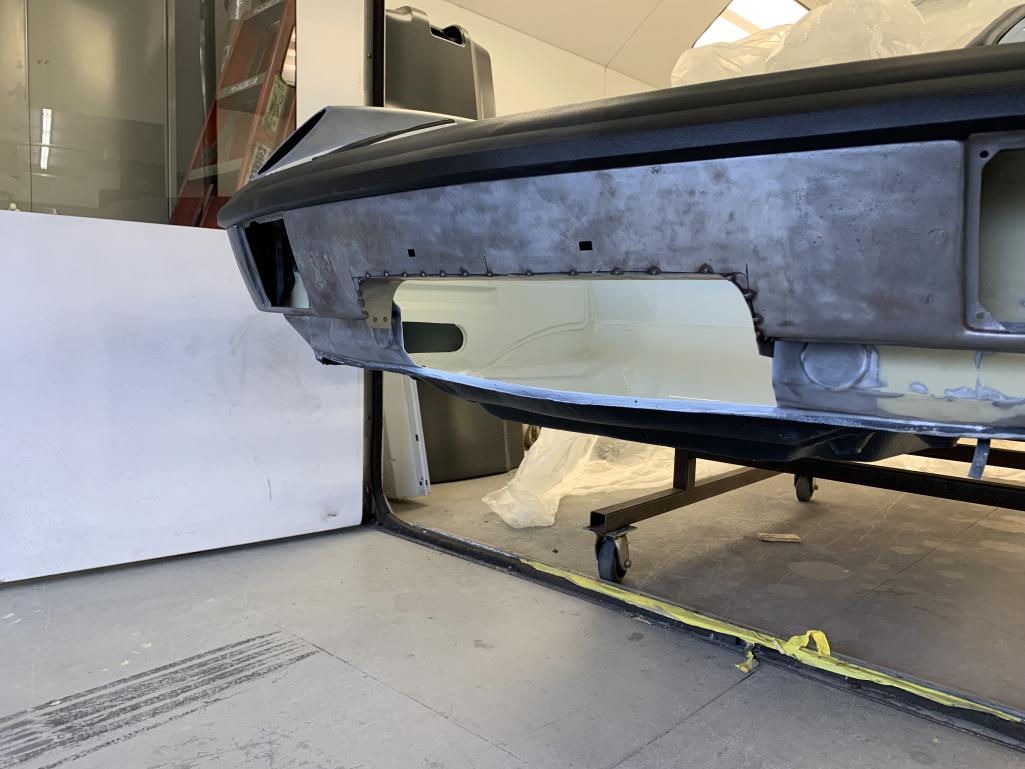
Posted by: Cairo94507 Jan 25 2024, 06:44 PM
That is really looking nice.
Posted by: Mitox Jan 30 2024, 06:29 PM
Another primer coat closer to final paint.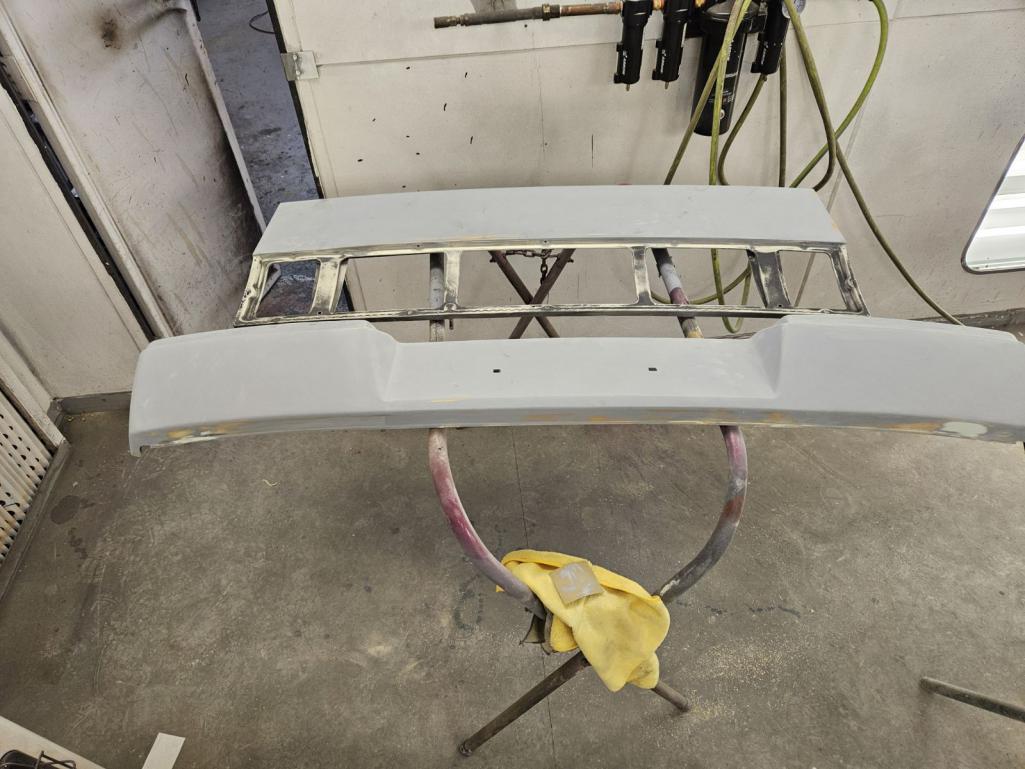

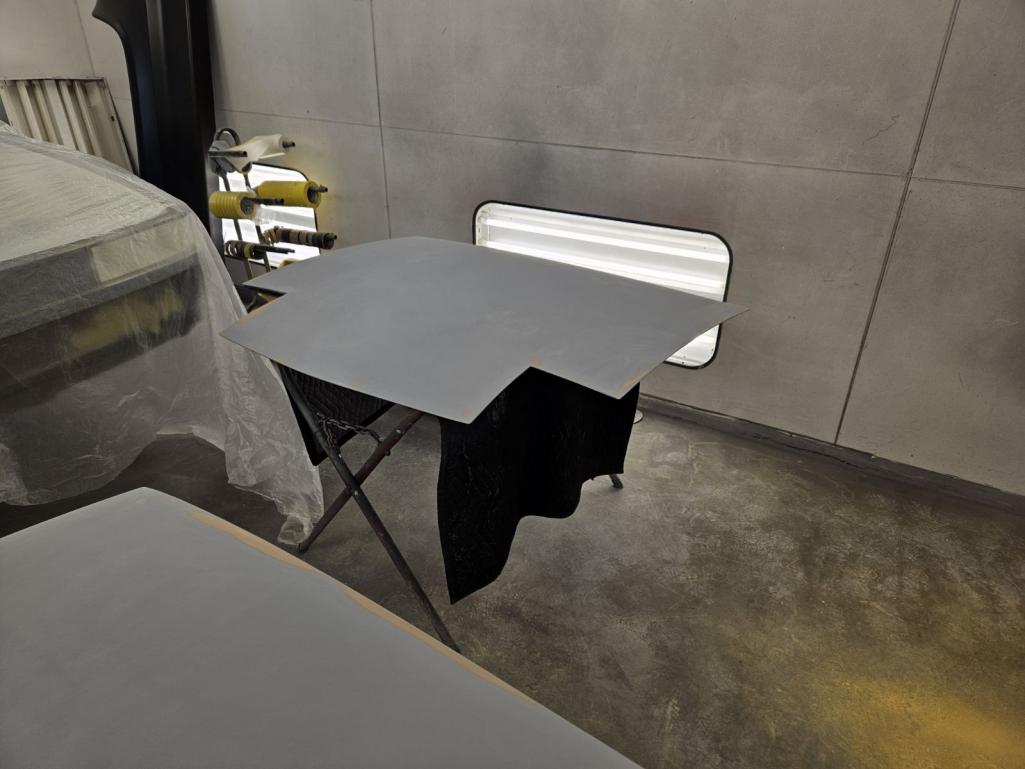
Posted by: Mitox Jan 30 2024, 06:38 PM
So, I’m having a rough time deciding on the bumper color.
Body color, black, or green to match the green “Porsche” graphic going on the side (front valence and rockers will be black). I like all options.
Here are a few sample pics I’ve found.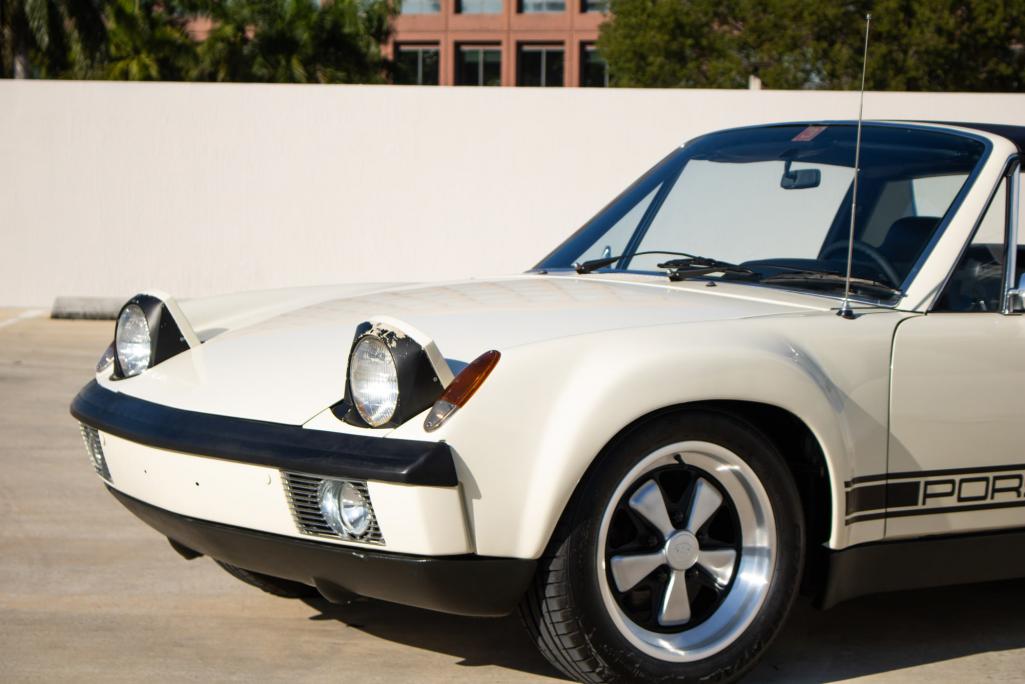
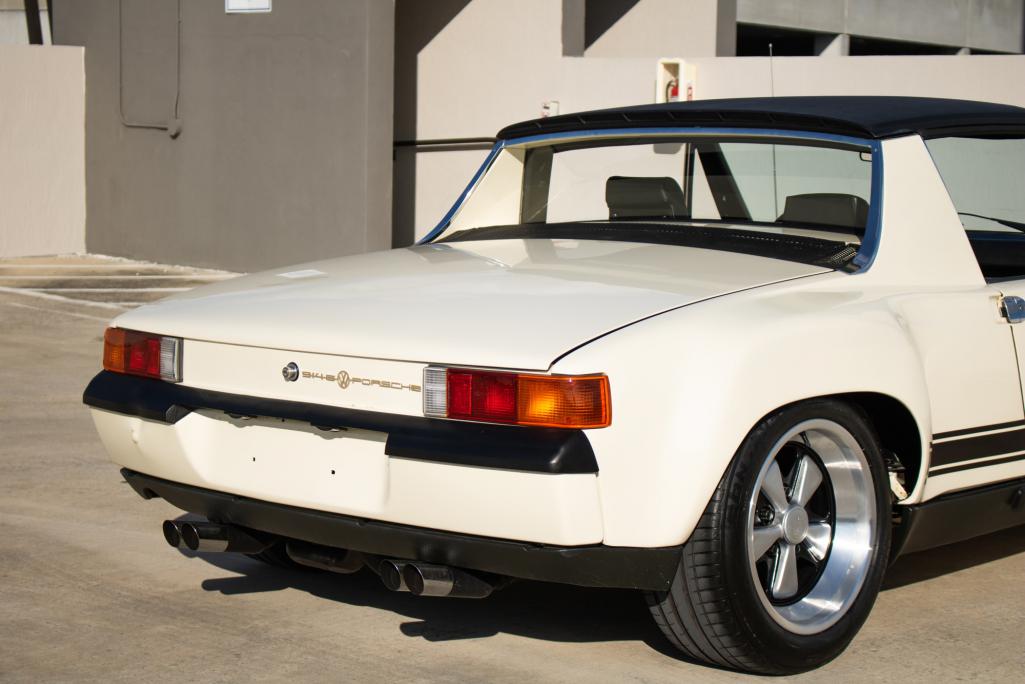
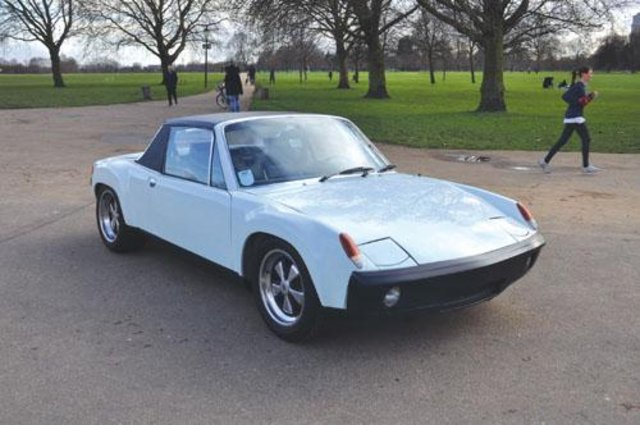
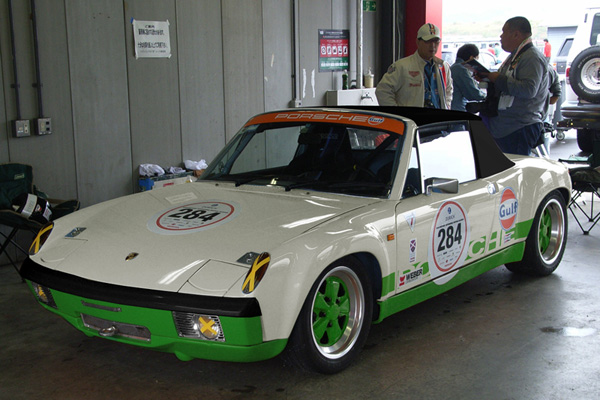
Posted by: Mitox Jan 30 2024, 09:34 PM
I think I’m liking this direction: green graphics and bumpers. Maybe paint the horn grills green also. 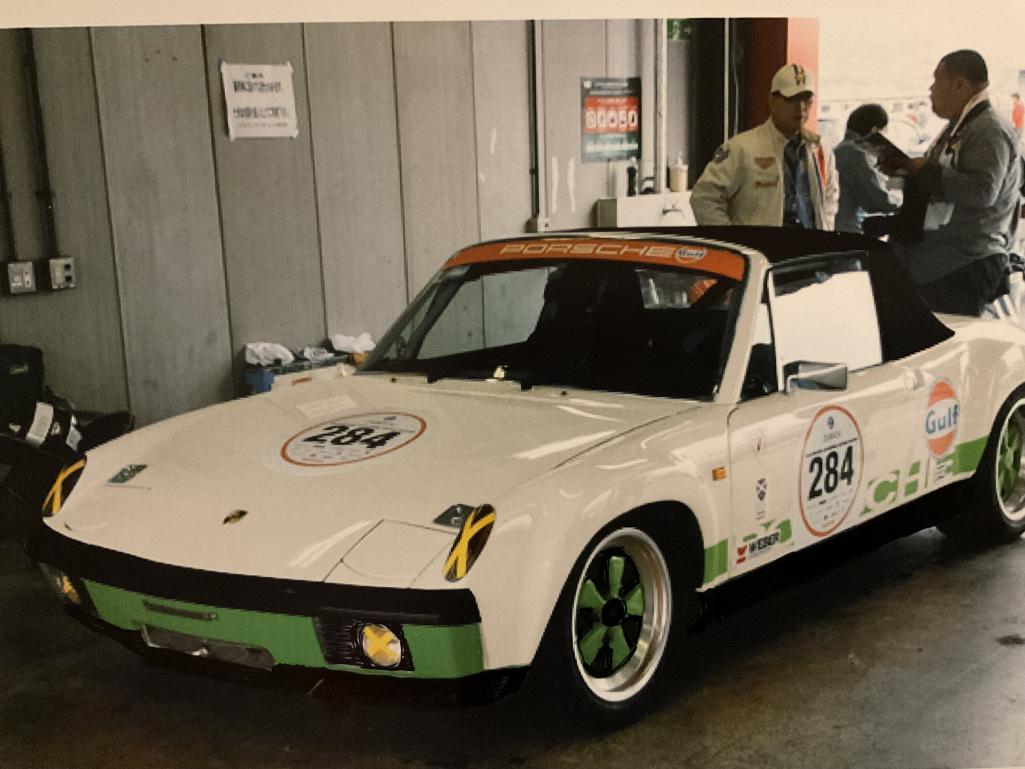
Posted by: infraredcalvin Jan 30 2024, 10:30 PM
I like your green bumper black valence and rockers.. looks slick, but i dont like the green pedals and black background and polished barrels on the wheels. Wheels look best in orig pic, green pedals and background, polished or anodized barrels.
Other option is to paint the bumper black or body color and wrap with green, gives you an option to go back to in the future…
Posted by: gereed75 Jan 30 2024, 11:29 PM
Really liking the green treatment in post 305. Not so much 311. You asked
Really like 306. Best painted bumper scheme I’ve seen. Only one I like actually. Maybe better than chrome.
Posted by: Mitox Jan 31 2024, 08:29 AM
I like your green bumper black valence and rockers.. looks slick, but i dont like the green pedals and black background and polished barrels on the wheels. Wheels look best in orig pic, green pedals and background, polished or anodized barrels.
Other option is to paint the bumper black or body color and wrap with green, gives you an option to go back to in the future…
Thanks for the input. I don’t like the wheels either, but wanted to see what it looked like.
Posted by: Mitox Jan 31 2024, 08:33 AM
Really liking the green treatment in post 305. Not so much 311. You asked
Really like 306. Best painted bumper scheme I’ve seen. Only one I like actually. Maybe better than chrome.
Yep, I asked - thanks for the input.
Considering the RSR finish on the wheels also.
Posted by: mepstein Jan 31 2024, 08:40 AM
I like the green on everything but the wheels. But wheels are wheels, easy to have more than one set for changing moods and uses.
Posted by: Mitox Feb 2 2024, 12:45 PM
More in-work pics: front valence flares and inlet mods.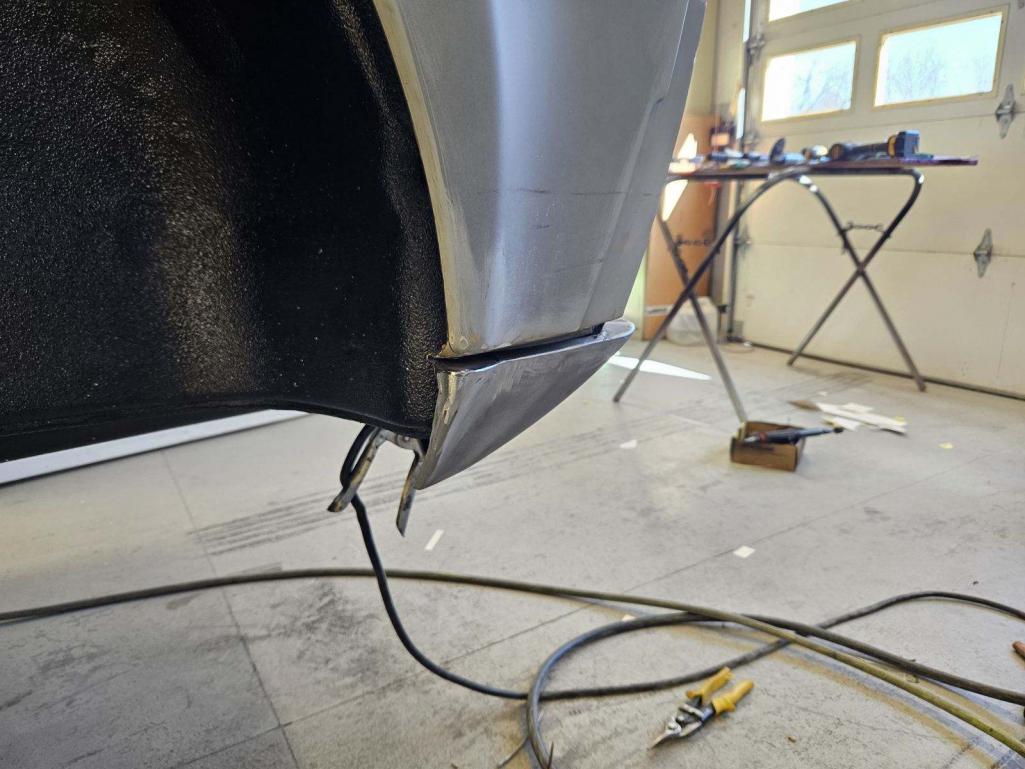
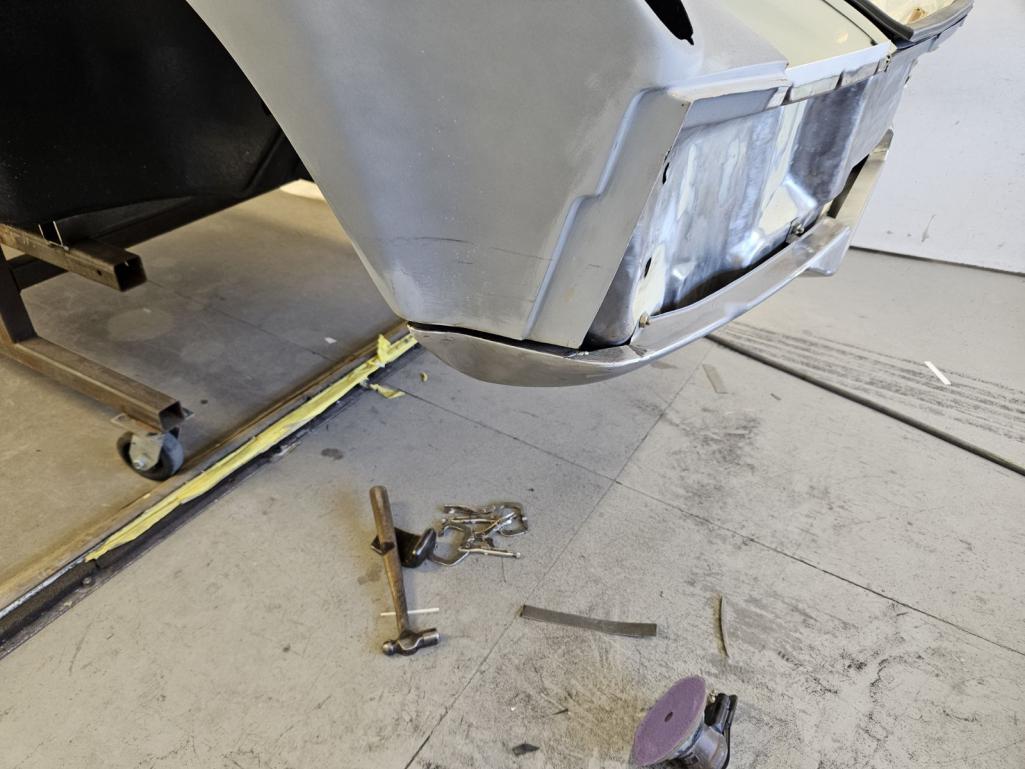
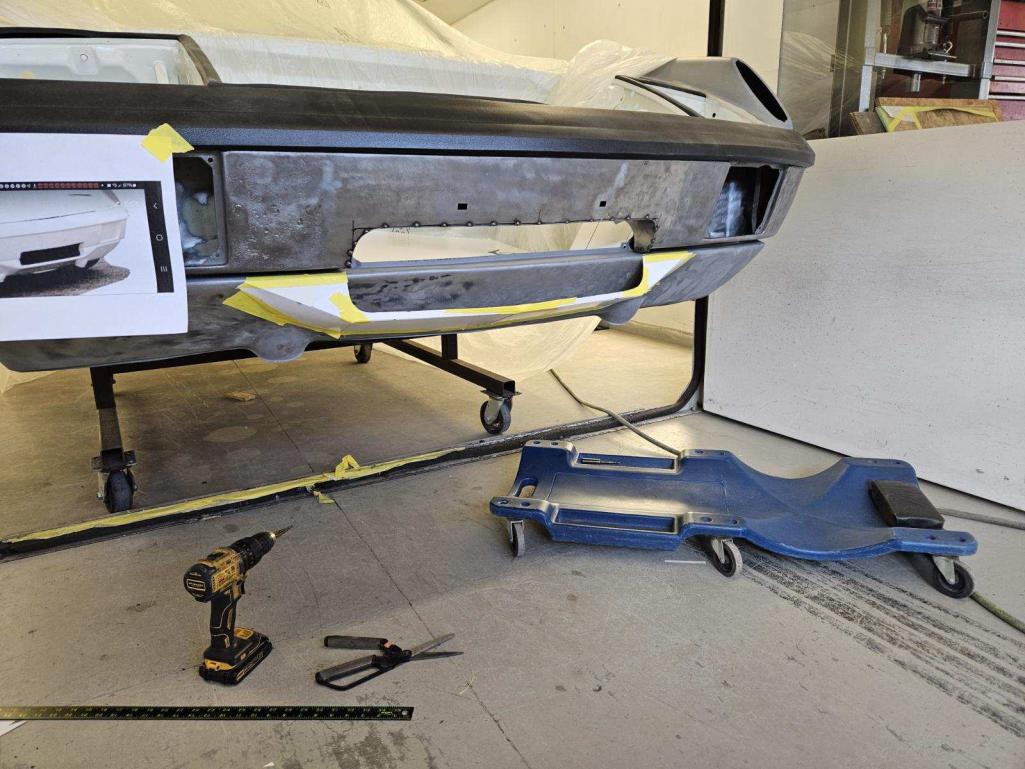
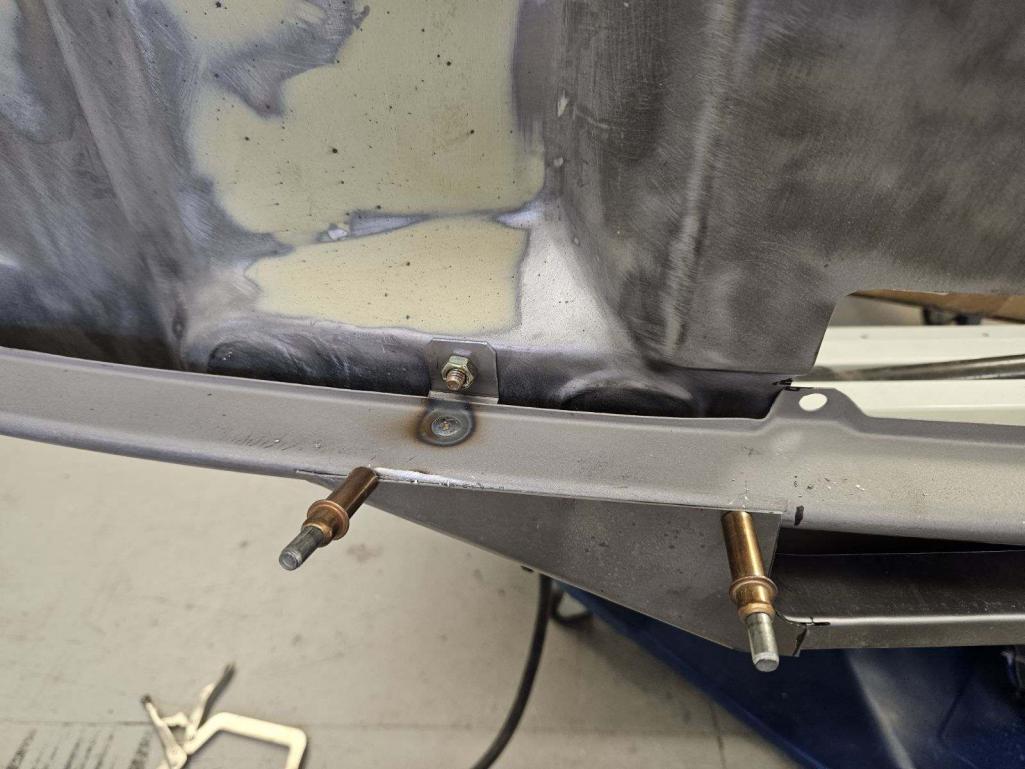
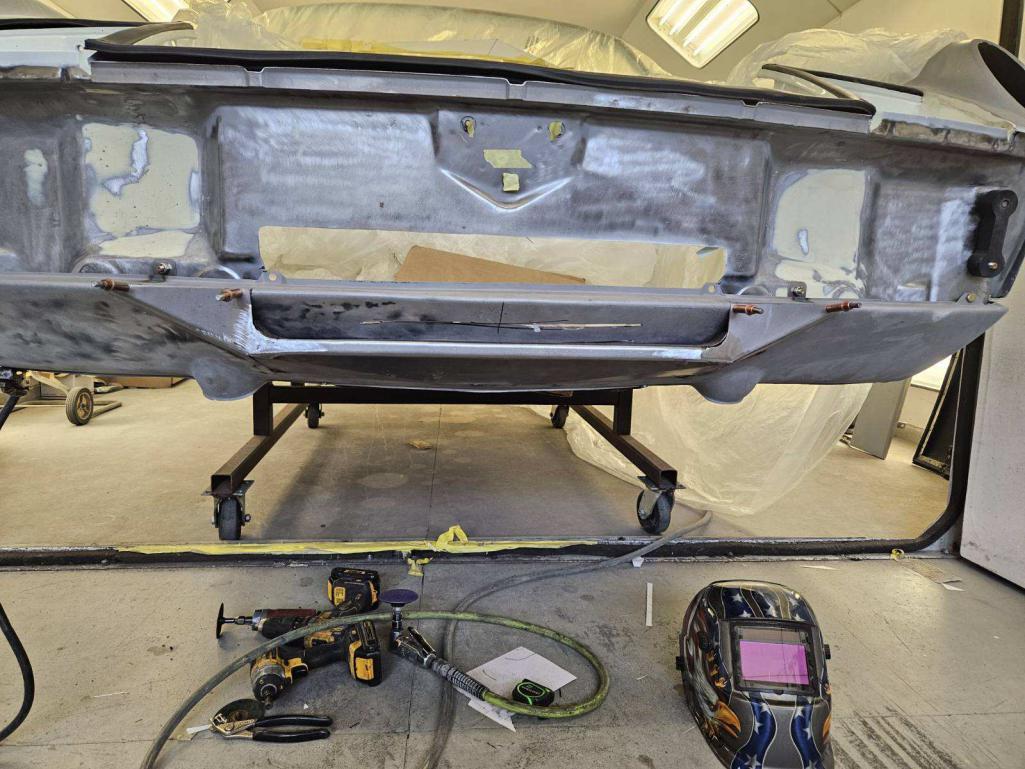
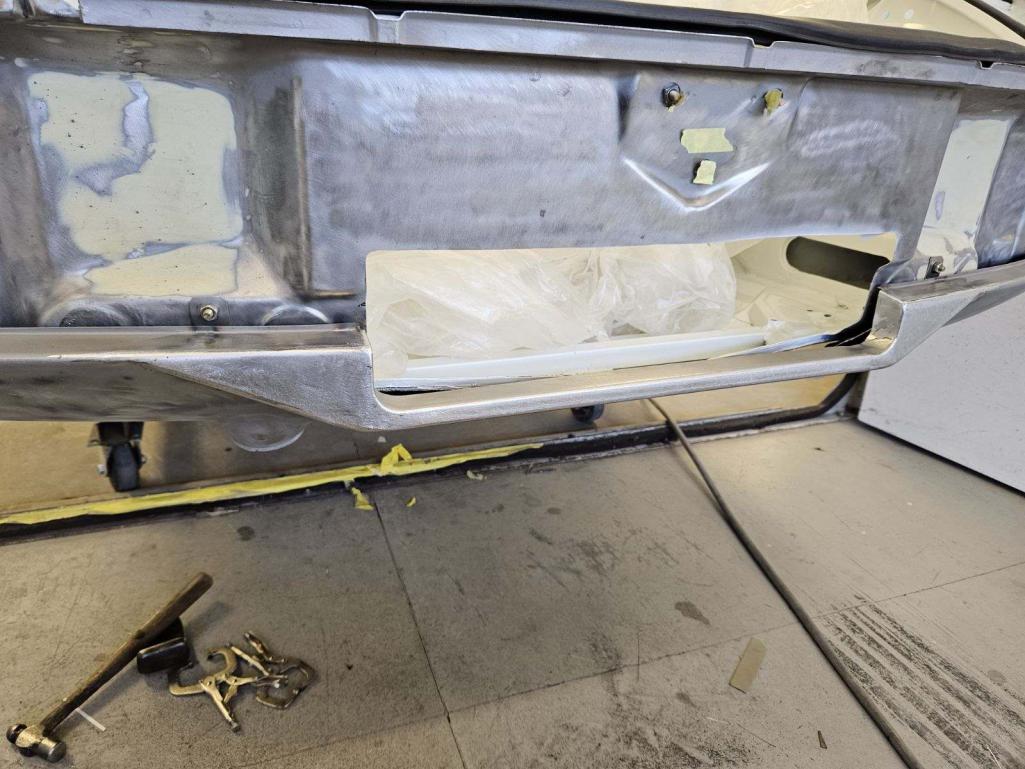
Attached thumbnail(s)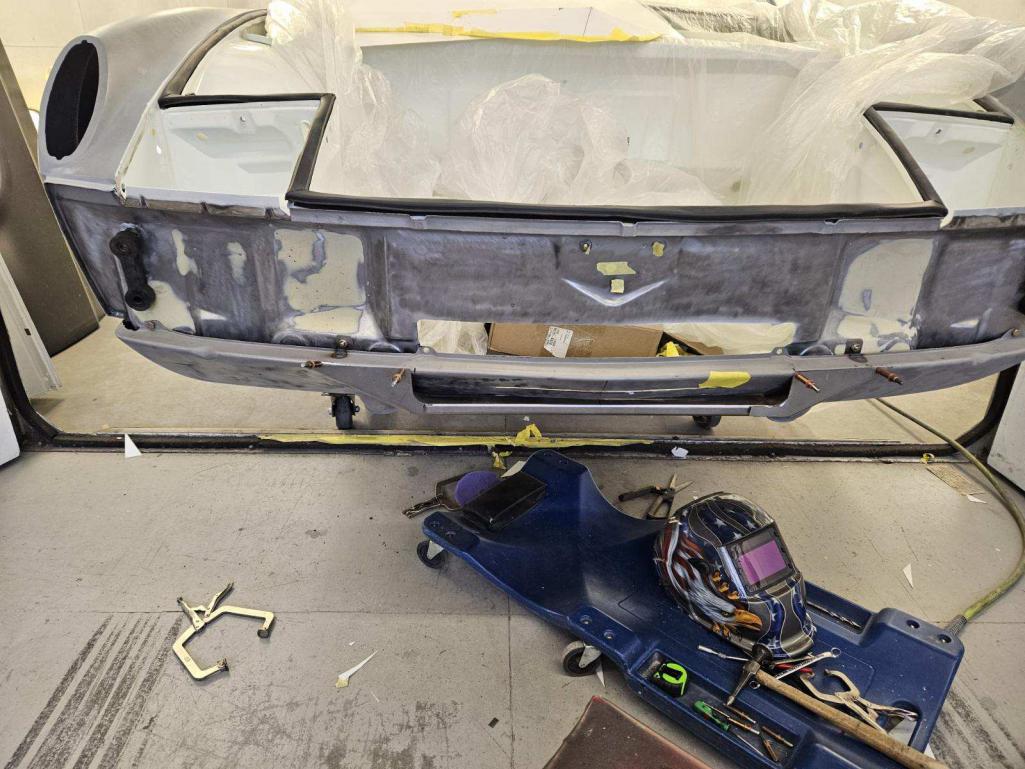
Posted by: East coaster Feb 2 2024, 05:51 PM
Nice fab work on the inlet. I keep feeling I should’ve done that on mine, I guess time will tell.
Posted by: mb911 Feb 2 2024, 06:36 PM
That bumper opening looks very 914-8 like. Having done a few hundred now I see the difference
Posted by: Cairo94507 Feb 2 2024, 06:49 PM
Very nice metal work on the valance and bumper.
Posted by: Mitox Feb 2 2024, 08:37 PM
Thanks. I must give credit where it is due, Greg, the guy working the body back to perfection is doing an excellent job. He’s built many great cars, but this is his first Porsche.
After the body and paint are done, I get to start working on it again - can’t wait
Posted by: Mitox Feb 2 2024, 08:40 PM
That bumper opening looks very 914-8 like. Having done a few hundred now I see the difference
We decided to make the opening radius a little smaller to match what has been done on the valence. - it looked a little too large.
Posted by: Mitox Feb 12 2024, 12:54 PM
More paint pics - seal coat going on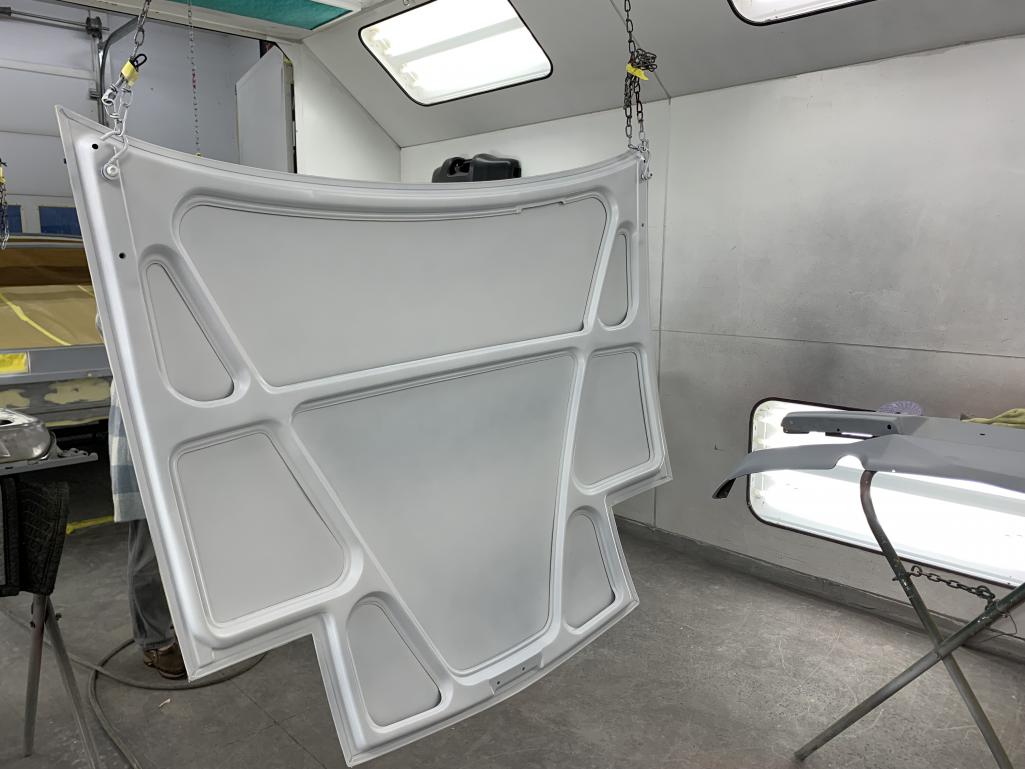
And one more touch up needed on the trunk lid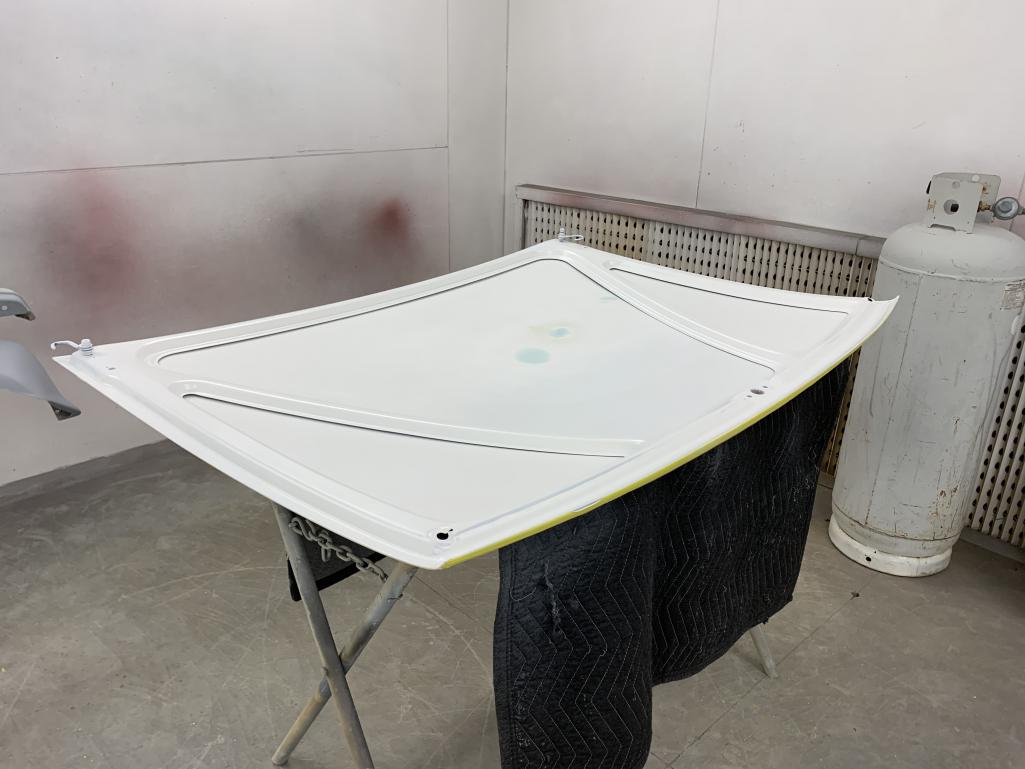
Posted by: Mitox Feb 12 2024, 12:56 PM
The body is next for final prime and seal coat
Posted by: Mitox Feb 12 2024, 01:01 PM
Just mixed the the green this morning. This is for the bumpers and side graphics; the color in the pic is a little off - should be Viper Green M6C.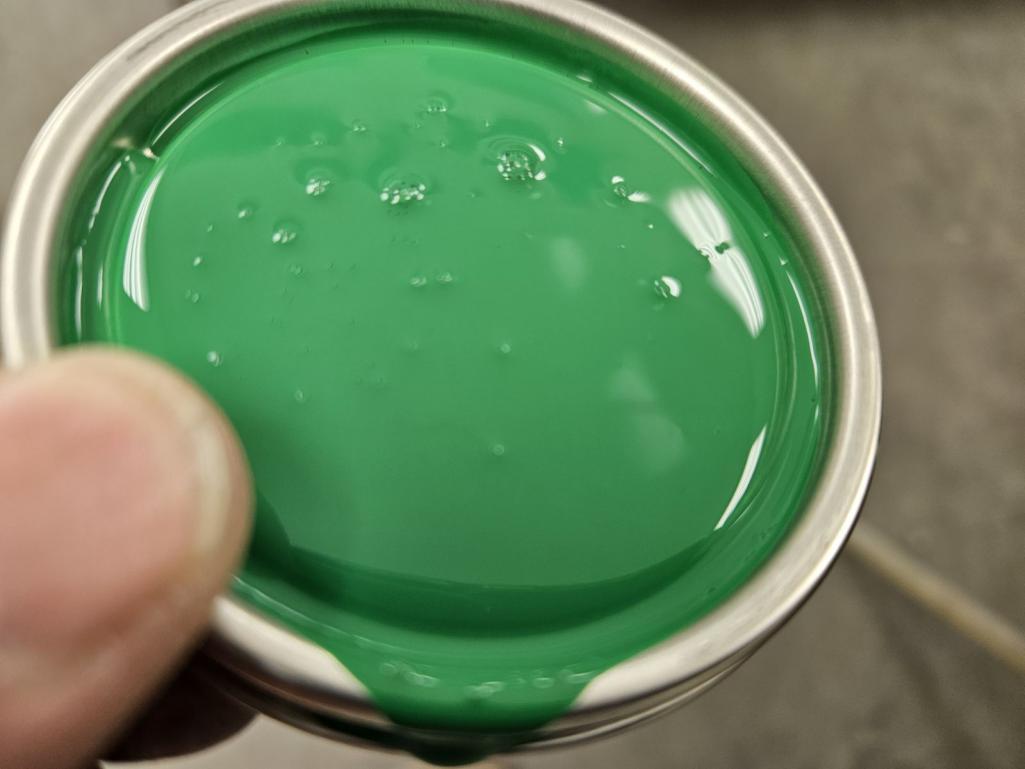
Posted by: Mitox Feb 15 2024, 06:01 PM
The body is now in sealer - looks like pearl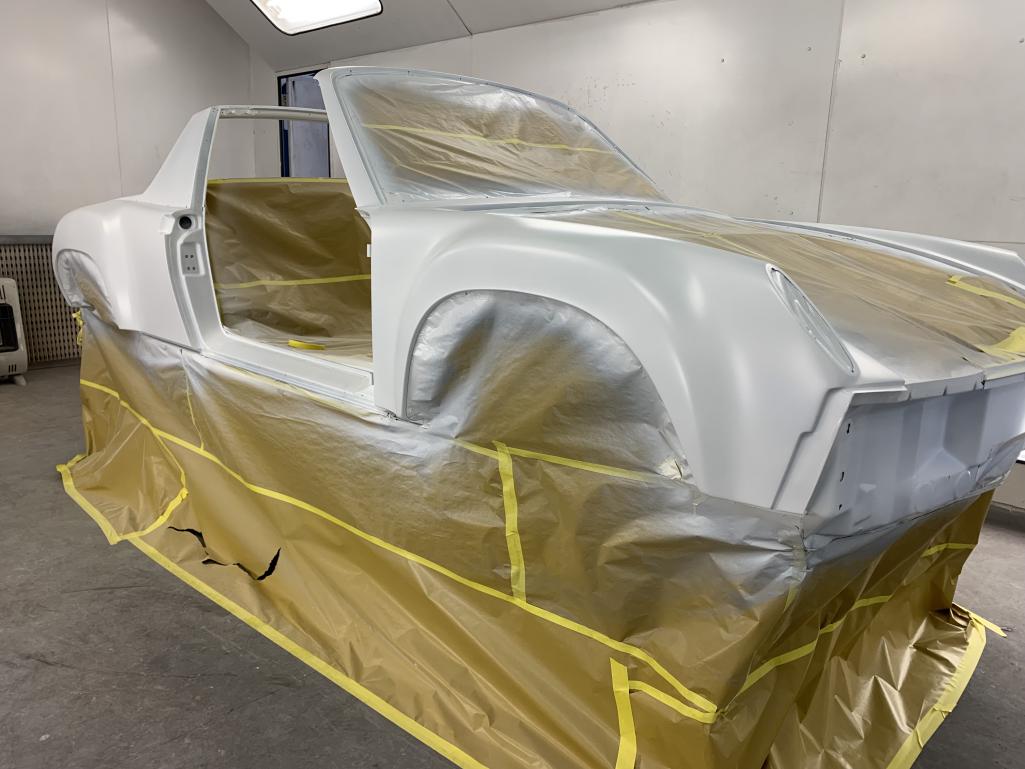
Posted by: Mitox Feb 15 2024, 06:13 PM
I wanted to do one more thing before paint goes on. The gap/joint at the fender-cowl is getting a liquid epoxy sealer that runs into the joint. Probably unnecessary, but it makes me feel good.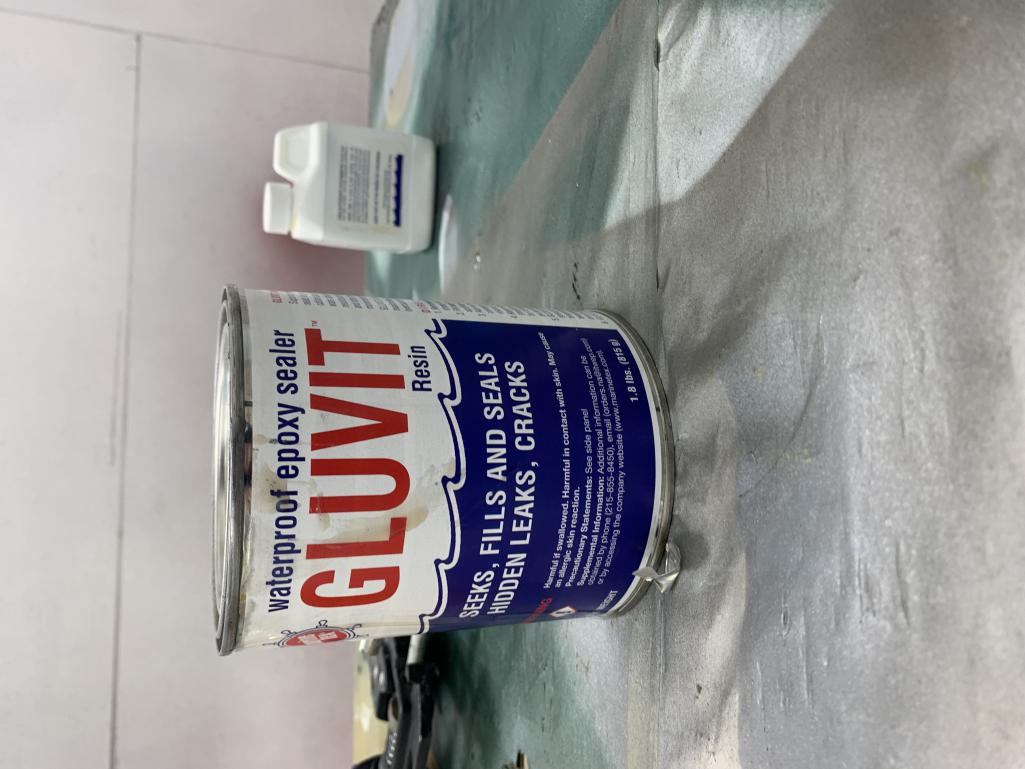
Posted by: Mitox Feb 15 2024, 06:14 PM
Used a syringe to get it into the bottom of the joint.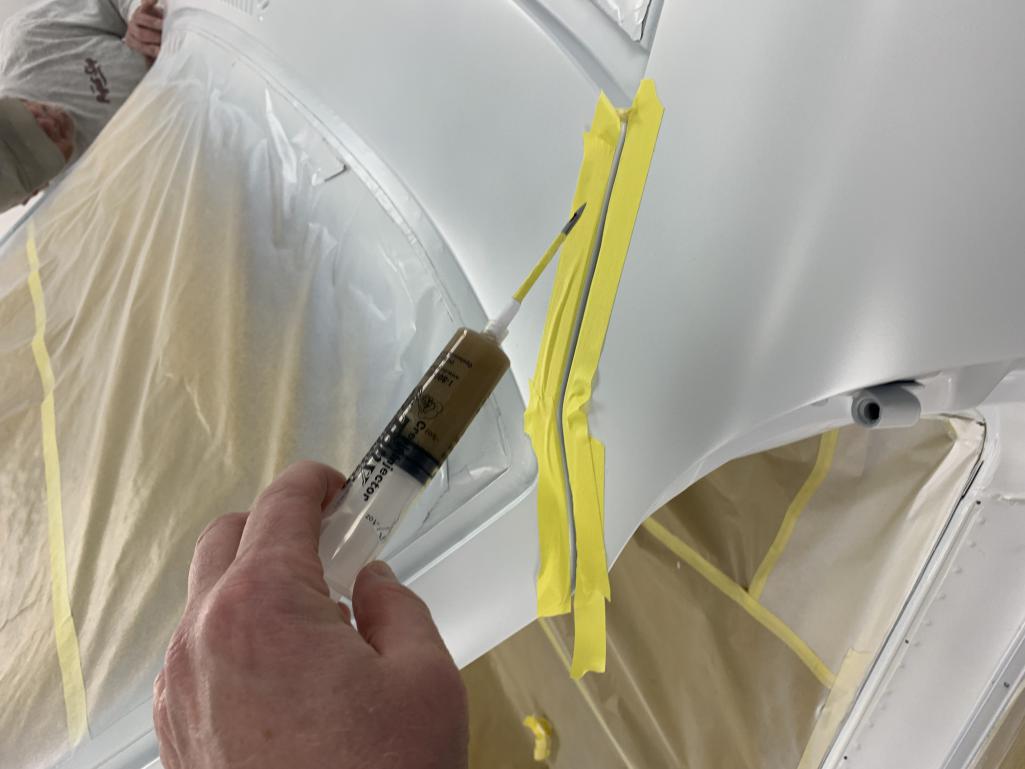
Posted by: Mitox Feb 16 2024, 10:58 AM
Base coat going on. Can’t wait to get it back in my garage!
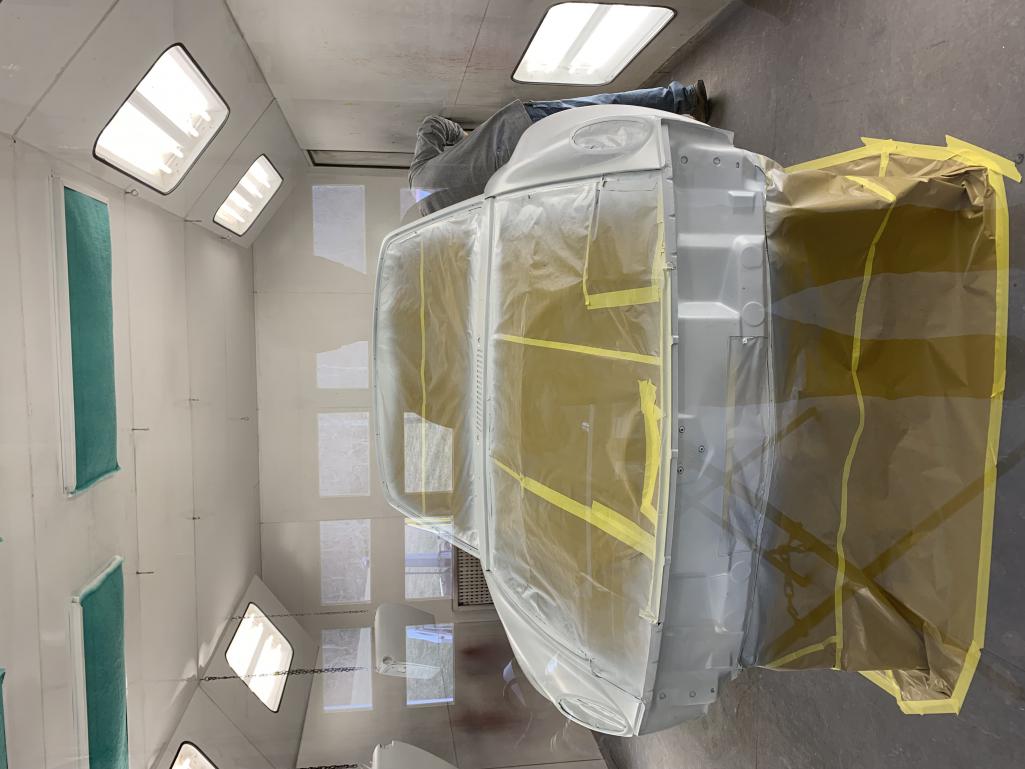
Posted by: TRS63 Feb 18 2024, 01:22 PM
Already looking fantastic
Antoine
Posted by: Mitox Feb 21 2024, 01:33 PM
Final paint and clear coat! Still need to get a stencil for the green side graphic.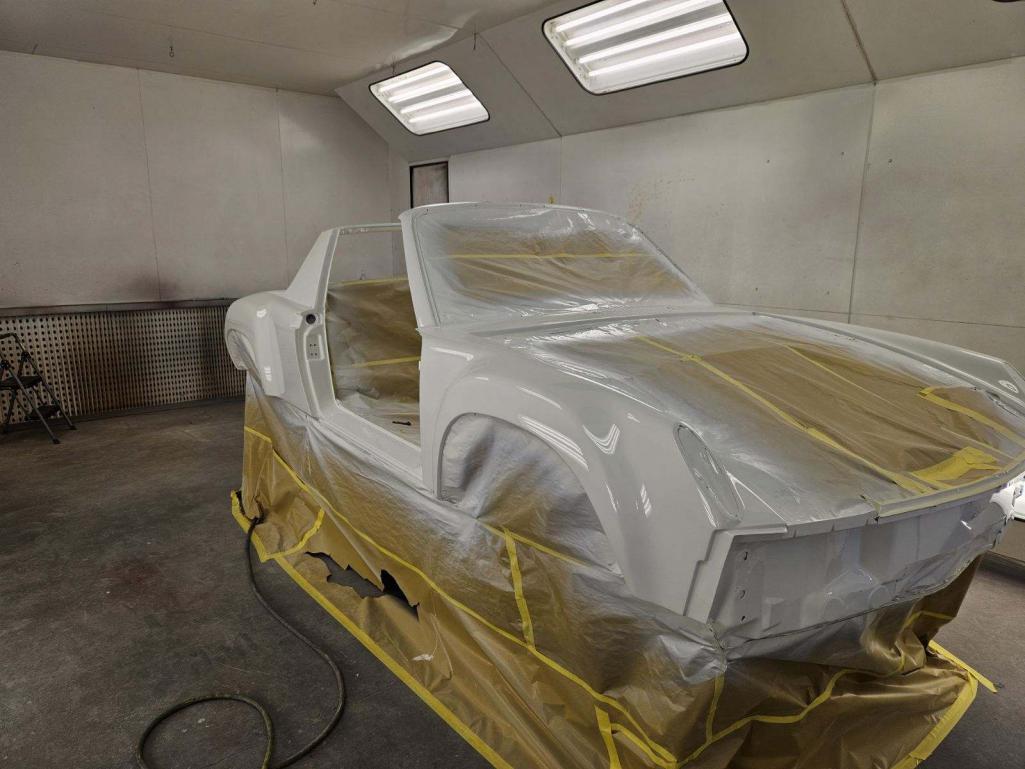
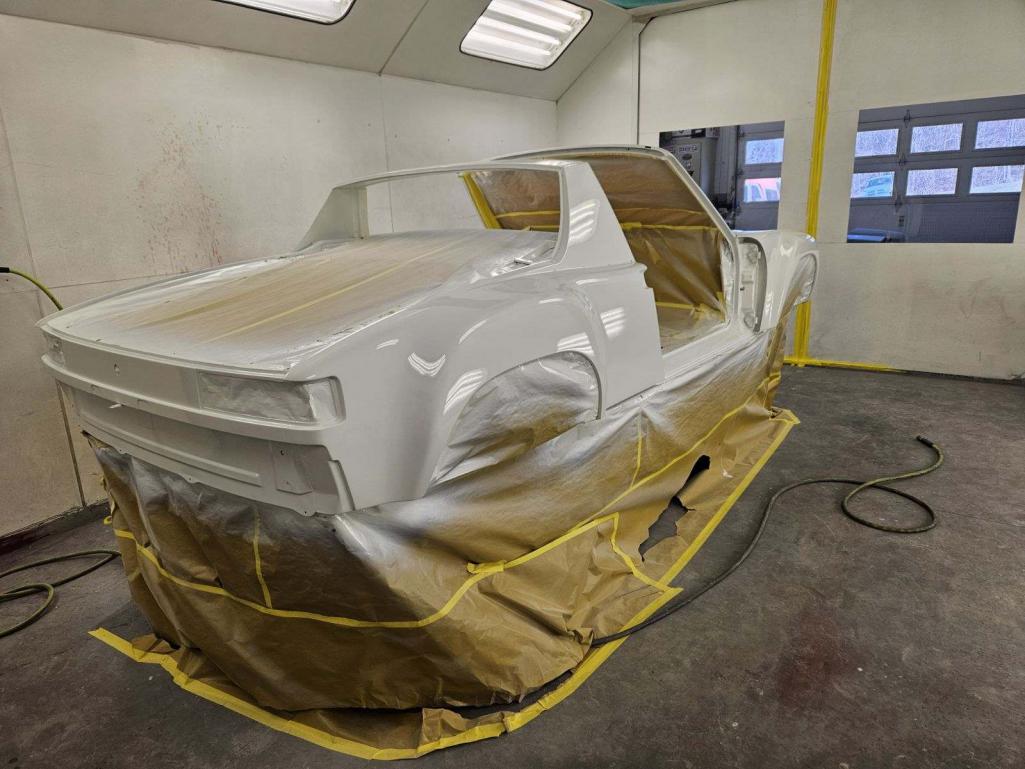
Posted by: TRS63 Feb 24 2024, 01:01 AM
Looking forward to the reassembly pictures!
Bests
Antoine
Posted by: rgalla9146 Feb 24 2024, 07:25 AM
Fantasstic color choice !!
Attached thumbnail(s)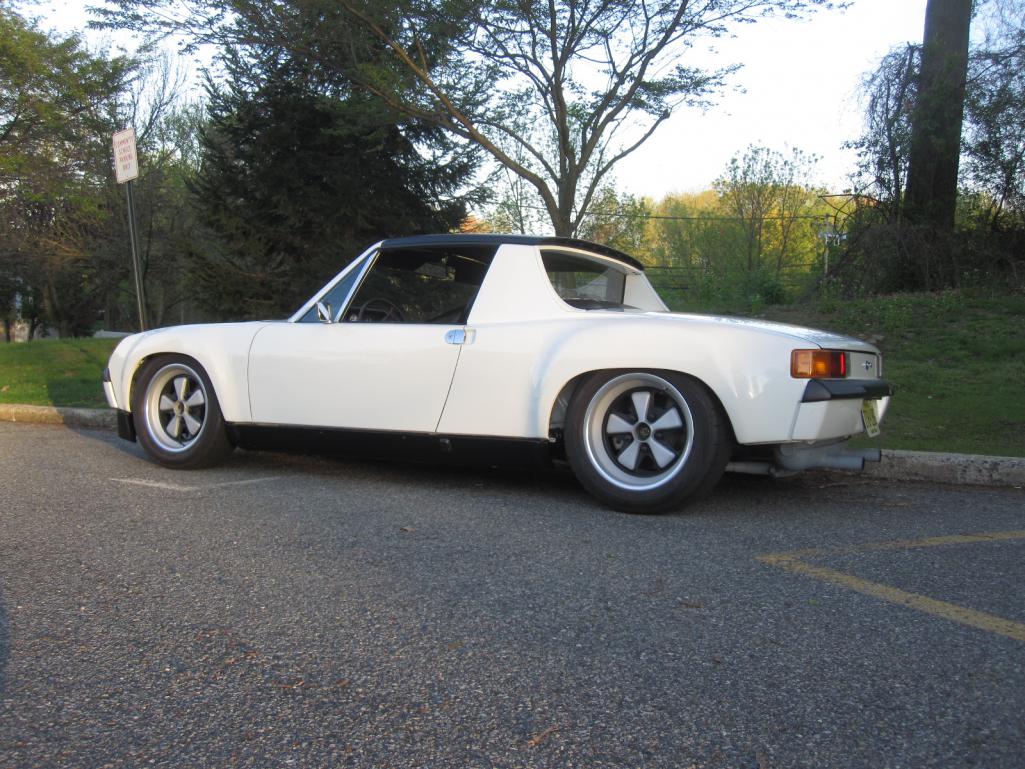
Posted by: Mitox Feb 28 2024, 08:06 AM
More color!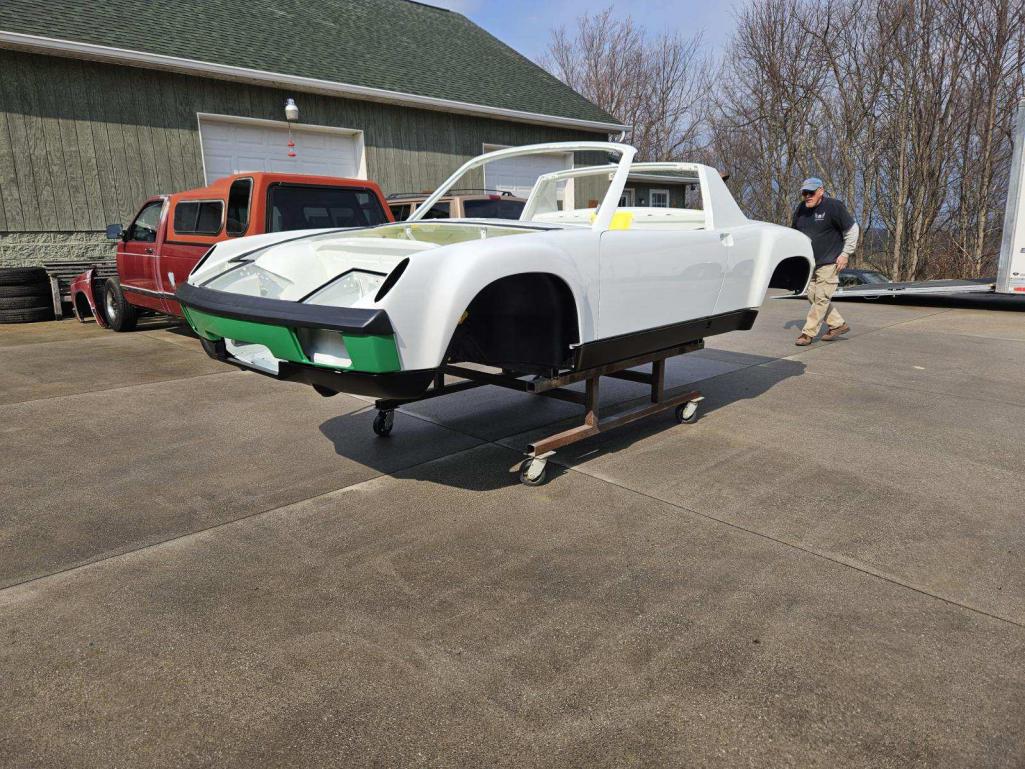
Posted by: Cairo94507 Feb 28 2024, 08:12 AM
A freshly painted shell is a thing of pure beauty.
Posted by: ValcoOscar Feb 28 2024, 08:54 AM
Great job, great color
Here's mine
I congratulate you!!!!

O
Posted by: Dion Feb 28 2024, 06:05 PM
More color!
Looking fantastic. That’s a good feeling, seeing it like that.
Posted by: Mitox Feb 28 2024, 06:24 PM
Great job, great color
Here's mine
I congratulate you!!!!
O
Very nice; I like your black trim - thinking of doing that myself.
Posted by: Mitox Feb 29 2024, 03:56 PM
! I’m loving it! We couldn’t get a template made, so ended up using a mile of tape. But, it worked really well. It will get cleared tomorrow.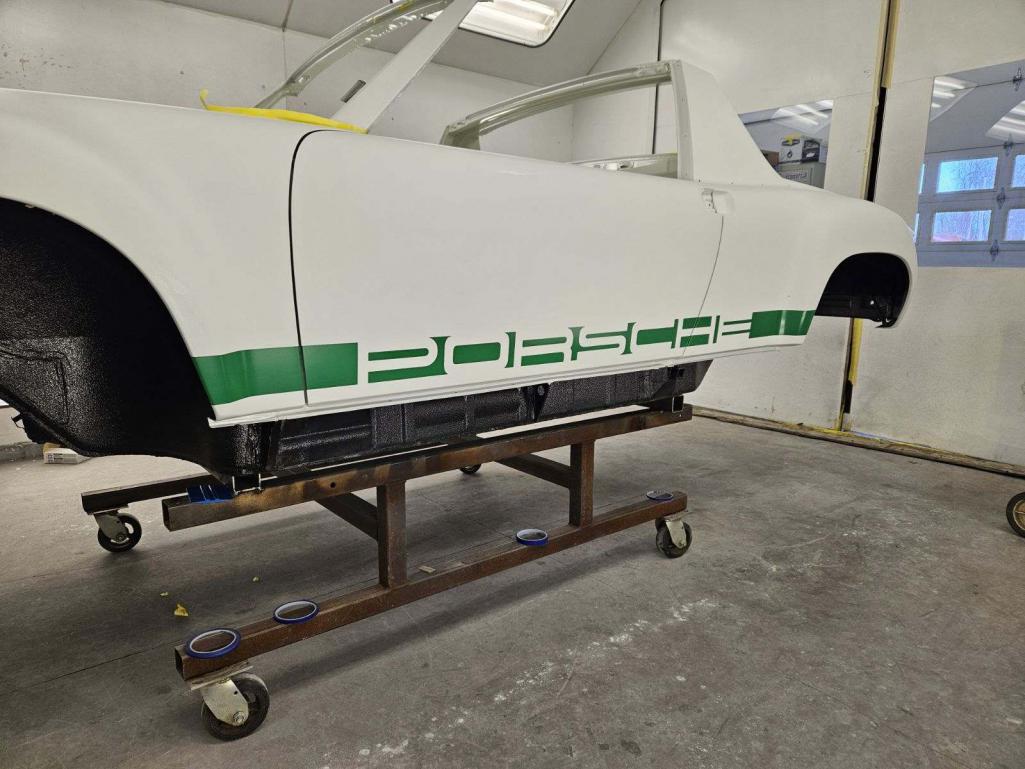
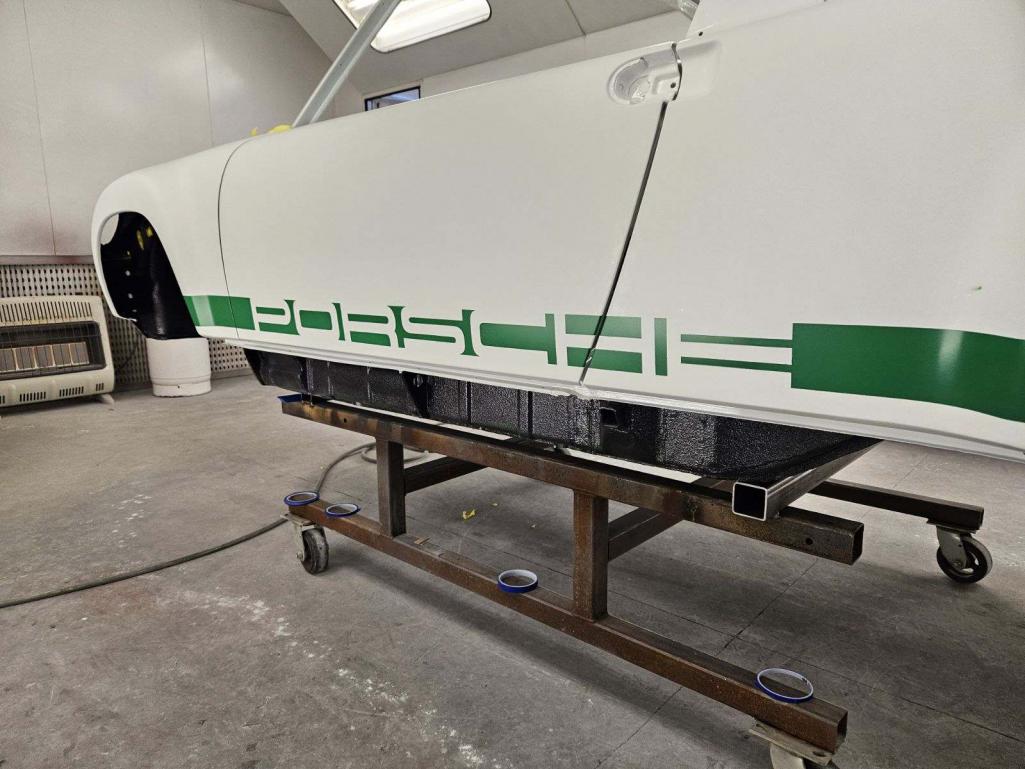
Posted by: East coaster Feb 29 2024, 07:53 PM
They came out great! That must’ve been tedious but it looks perfect.
Posted by: Mitox Mar 21 2024, 04:49 PM
Four years later the 914 is back in my garage. Time for reassembly - and buying more stuff. I’ll need to make decisions on the suspension: front sway bar, torsion bars, rear springs, and shocks. I’ve already decided to use Elephant Racing rubber on the control arms and trailing arms. 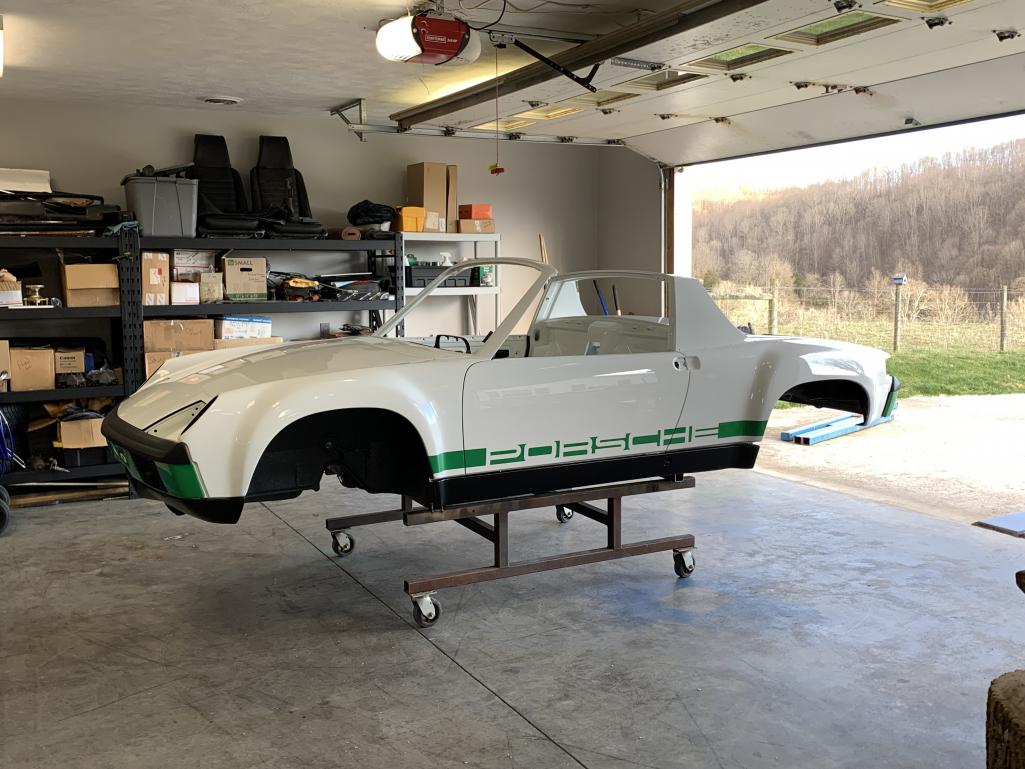
Posted by: 930cabman Mar 21 2024, 05:31 PM
There is one thing of beauty.
Posted by: East coaster Mar 21 2024, 05:48 PM
Looks great, loving the grasshopper look!
Powered by Invision Power Board (http://www.invisionboard.com)
© Invision Power Services (http://www.invisionpower.com)