Printable Version of Topic
Click here to view this topic in its original format
914World.com _ 914World Garage _ Type IV rebuild / refresh thread. Nothing ground breaking.
Posted by: Mueller Jun 29 2016, 02:47 PM
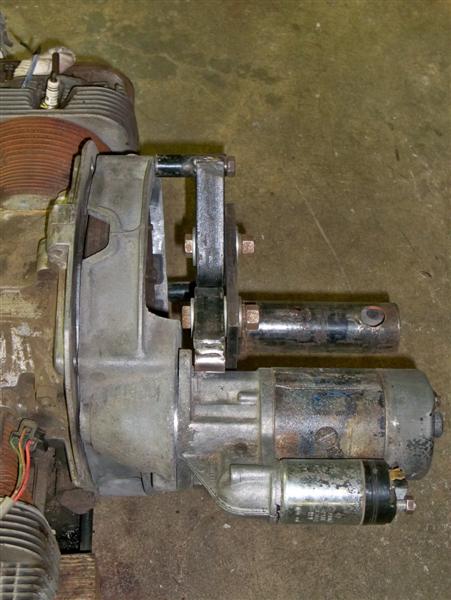
I popped the heads off in order to remove the broken exhaust studs (one per cylinder)
(I wrote broken head studs....I meant exhaust studs)
Stock camshaft has some strange wear patterns on it which might be part of the previous owner problems with the motor.
Cam will be a 9600 grind from Rabys old store
Intake planned is stock L-Jet, however I can be swayed to install Megasquirt (plenum or ITB) since I already have the Megasquirt.
Exhaust is older European Racing Header.
Posted by: stugray Jun 29 2016, 02:58 PM
you can measure the valve travel without even taking the rockers off.
To actually get at the cam to change it, you have to split the case, now the "what should I replace?" comes down to 1 - your budget & 2 - what you find.
In either order.
You can inspect & measure all the 'pertinents' and decide if anything is worn.
Posted by: OU812 Jun 29 2016, 02:59 PM
Did you try the search function ?
You will find mucho Grande info on this subject there.
Posted by: Mueller Jun 29 2016, 03:06 PM

you can measure the valve travel without even taking the rockers off.
The actually get at the cam to change it, you have to split the case, now the "what should I replace?" comes down to 1 - your budget & 2 - what you find.
In either order.
You can inspect & measure all the 'pertinents' and decide if anything is worn.
Not really looking into splitting case, for some odd reason I was thinking cam came out without do that, been too long.
Oh well, I'll still measure it yet chances are it's going to stay unless that camshaft mentioned earlier would really offer some improvements.
Posted by: John Jentz Jun 29 2016, 03:11 PM
Jake doesn't sell parts anymore, only turnkey engines. The Type IV store is now owned by LN Engineering.
Posted by: OU812 Jun 29 2016, 03:16 PM
I think Jake uses the search function .
Be like Jake.......
Posted by: rhodyguy Jun 29 2016, 03:21 PM
Saw that one coming 1/2 hour ago. Funny. No quotes required.
Mike, have you tried contacting LN/type4 store directly with the cam #s you have? Does the site list a phone #? Edit: I checked. you should call type4 support
Posted by: Mueller Jun 29 2016, 03:48 PM
Jake doesn't sell parts anymore, only turnkey engines. The Type IV store is now owned by LN Engineering.
I'd think he'd still have the specs to the older stuff he sold.
Cam is not listed on Store website. I could call them tomorrow, might be something not usually offered.
Posted by: Mueller Jun 29 2016, 03:49 PM
Did you try the search function ?
You will find mucho Grande info on this subject there.
Yes, yes I did...feel free to search 9600 for the specs. I asked after I couldn't find the specs!
Posted by: rhodyguy Jun 29 2016, 04:20 PM
Unless somebody had their NEW cam read, those details are probably proprietary knowledge.
Posted by: OU812 Jun 29 2016, 05:49 PM
Did you try the search function ?
You will find mucho Grande info on this subject there.
Yes, yes I did...feel free to search 9600 for the specs. I asked after I couldn't find the specs!
Just messin with ya
Posted by: Chris H. Jun 29 2016, 06:05 PM
If Jake doesn't see this just call Charles at LN Engineering. He owns the Type 4 Store now. phone: 815-472-2939. Super nice guy.
Posted by: r_towle Jun 29 2016, 06:47 PM
Mike,
Go to Elgin camshafts and look at what he sells.
Lift ramp is most of what you can change .
He has one that will work.
Split the case, it will make drilling out the head studs easier to jig up.
Plus, you cannot replace the camshaft without doing that .
Posted by: Valy Jun 29 2016, 08:44 PM
How long did the motor run with broken head studs?
I would suspect the cylinders are out of round.
Posted by: Mueller Jun 29 2016, 10:01 PM
Exhaust studs broken, not head studs.....
Posted by: r_towle Jun 29 2016, 10:13 PM
Exhaust studs broken, not head studs.....
You are a nice guy to make sure we don't think we are nuts...
Posted by: stugray Jun 29 2016, 10:58 PM
Exhaust studs broken, not head studs.....
maybe contact saigon71 and see this thread:
http://www.914world.com/bbs2/index.php?showtopic=248544
Posted by: Mueller Jun 30 2016, 10:57 AM
I called LN Engineering, they found the specs for the cam I have sitting around...
Lift:
I .335
E .400
Duration:
290 I/E
Duration @ .050:
I 252
E 254
108 Lobe center.
Posted by: stugray Jun 30 2016, 11:23 AM
I called LN Engineering, they found the specs for the cam I have sitting around...
Lift:
I .335
E .400
Duration:
290 I/E
Duration @ .050:
I 252
E 254
108 Lobe center.
That is the lift at the cam.
edit - not even sure of that. The #s look wrong. Is that at the cam or at the valves?
While you have his attention, could you please ask what lift he expects with that cam at the valves?
Posted by: Mark Henry Jun 30 2016, 01:22 PM
I called LN Engineering, they found the specs for the cam I have sitting around...
Lift:
I .335
E .400
Duration:
290 I/E
Duration @ .050:
I 252
E 254
108 Lobe center.
The 290 duration number is odd.
Look at the WEB 73 numbers in the link below:
http://vwparts.aircooled.net/Web-Cam-Type-4-Camshaft-73-Grind-00-472-p/00-472.htm
WEB 73 is a FI grind but IIRC it has bit more lift. If you want L-Jet you need an stock based FI grind like the 73.
Posted by: stugray Jun 30 2016, 01:53 PM
I called LN Engineering, they found the specs for the cam I have sitting around...
Lift:
I .335
E .400
Duration:
290 I/E
Duration @ .050:
I 252
E 254
108 Lobe center.
So those numbers seem a little odd.
If that is lobe lift at the cam you will have approx.
Ivalve = .460, Evalve = .520 at the valves
Just as a datapoint, there are no webcams that are off much at all between Intake & exhaust advertised lift (although there is some).
The 86b I run has advertise lift of .500/.500 at the valves with a similar duration as yours.
The measured on mine for the 86b was I valve .475 Evalve .504
SO your cam is even a little more 'aggressive' than an 86b as far as intake/exhaust flow ratio is.
Maybe that cam was destined for a big valve setup?
Posted by: G e o r g e Jun 30 2016, 04:50 PM
a http://www.thesamba.com/vw/forum/viewtopic.php?t=637703&start=0 over on the samba Jake references a http://www.webcamshafts.com/pages/automobile/porsche/install_data/tc_001691_001094.html as the equal to the 9600.
looks like the 290 duration fit into their readings the + 2 1/2 must account for the intake and exhaust changes
Posted by: Mueller Jun 30 2016, 06:38 PM
a http://www.thesamba.com/vw/forum/viewtopic.php?t=637703&start=0 over on the samba Jake references a http://www.webcamshafts.com/pages/automobile/porsche/install_data/tc_001691_001094.html as the equal to the 9600.
looks like the 290 duration fit into their readings the + 2 1/2 must account for the intake and exhaust changes
Thanks, of course I am drawing a blank what "2 1/2" means.
Advanced?
Posted by: maf914 Jul 1 2016, 07:11 AM
It looks like the cam specs are for a split duration cam, with the lift and duration for the exhaust valve increased to overcome the more restrictive exhaust port flow (relative to the better flowing intake port). At least that is what I recall from earlier tech threads from 914 World and ShopTalkForums.
Posted by: Jake Raby Jul 1 2016, 07:50 AM
The 9600 is a straight pattern version of the 9610, which is the more modern offering. I stopped using the 9600 in 2007.
Still a great cam. Just build it!
Posted by: Mueller Jul 1 2016, 07:51 AM
The 9600 is a straight pattern version of the 9610, which is the more modern offering. I stopped using the 9600 in 2007.
Still a great cam. Just build it!
Thanks,
Will do!
Posted by: Mark Henry Jul 1 2016, 07:53 AM
Jake is it an FI cam?
Mike said he was thinking L-jet.
Posted by: stugray Jul 1 2016, 08:22 AM
The 9600 is a straight pattern version of the 9610, which is the more modern offering. I stopped using the 9600 in 2007.
Still a great cam. Just build it!
Jake, based on the numbers above for the cam, can you give the expected values for the lift at the valves?
Posted by: Mueller Jul 1 2016, 10:11 AM
Jake is it an FI cam?
Mike said he was thinking L-jet.
If worth it, I'll swap to Megasquit with a bigger TB or even ITBs
I've already bought 911 swivel adjusters (new, factory items)
Next will be the lifters and pushrods from LN....is the DVD for building Type IVs available anymore?
Posted by: Mark Henry Jul 1 2016, 11:45 AM
....is the DVD for building Type IVs available anymore?
Just post your progress, you'll get lots of help.

Posted by: r_towle Jul 1 2016, 01:08 PM
Yup, just build it.
Take your time, learn about how to do the valve geometry and you will enjoy the process.
Rich
Posted by: Mueller Jul 1 2016, 06:18 PM
Curious if I should be looking for a cheap single or dual carb setup for the break-in since with a new cam and lifters it'll be like starting a newly rebuilt engine.
Posted by: Mueller Jul 1 2016, 10:08 PM
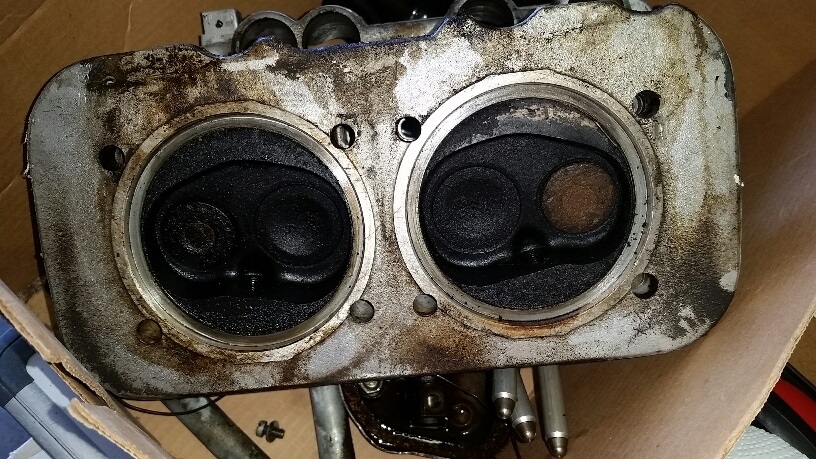
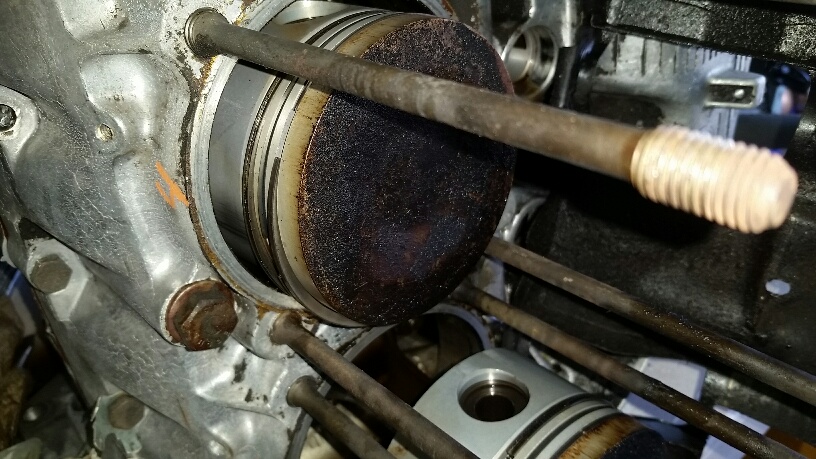
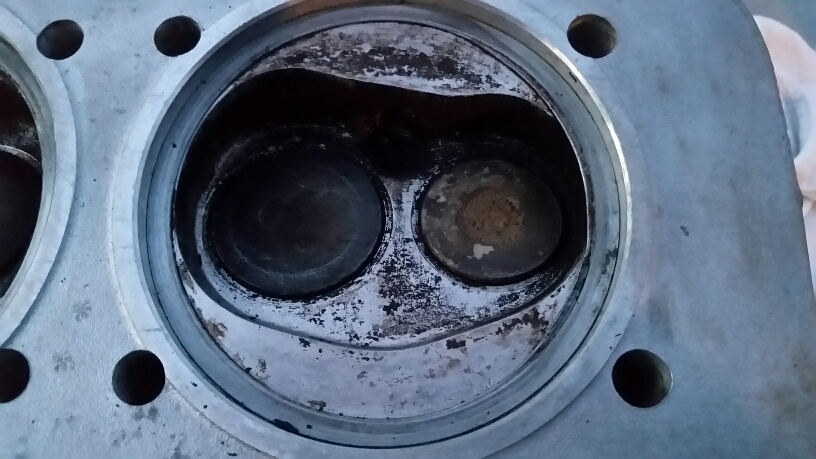
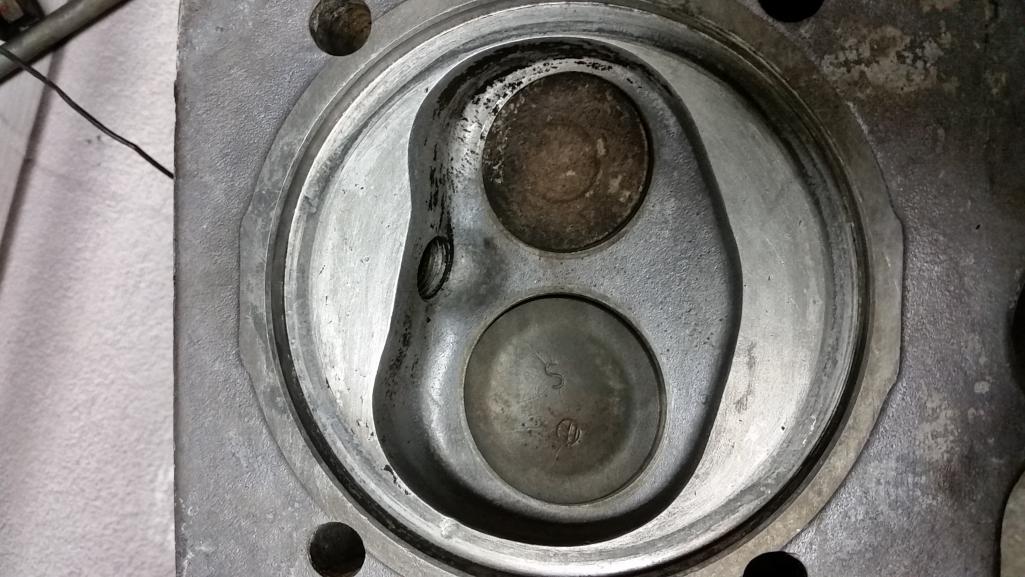
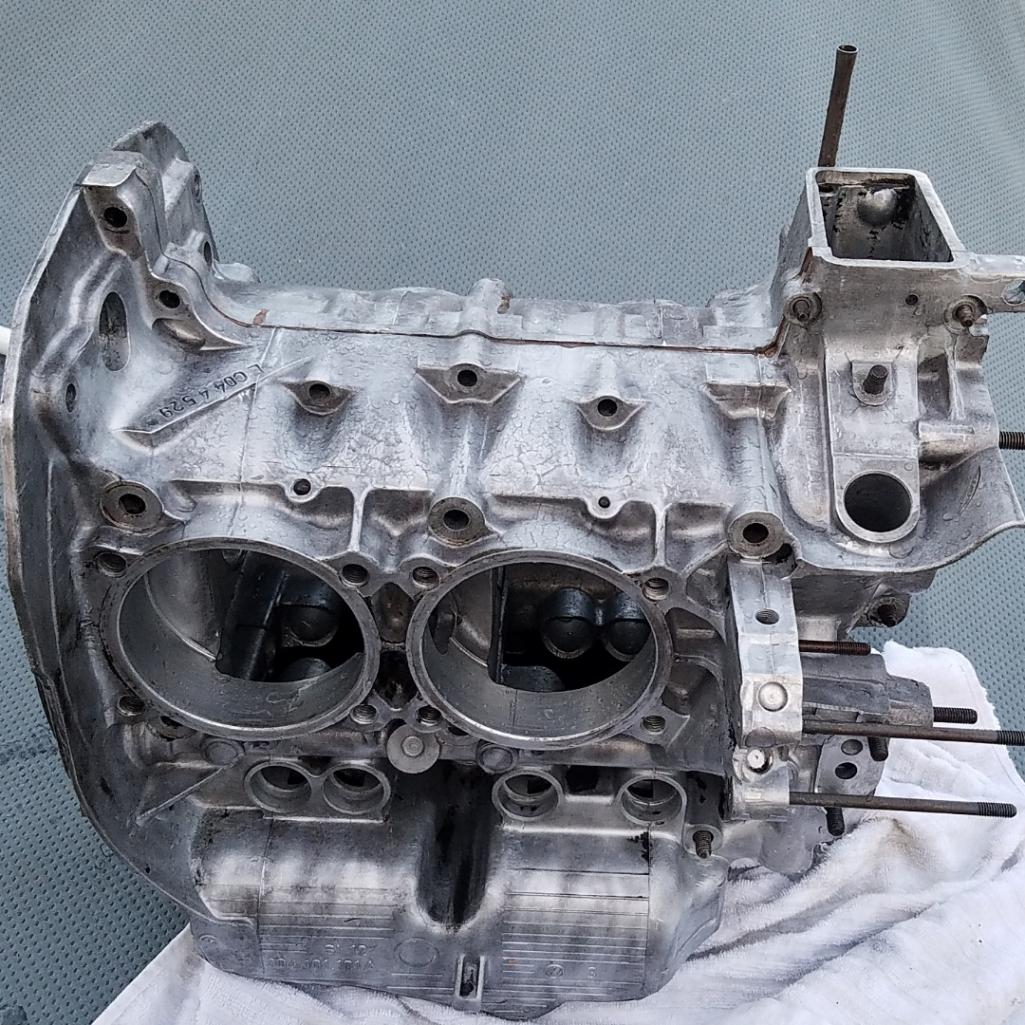
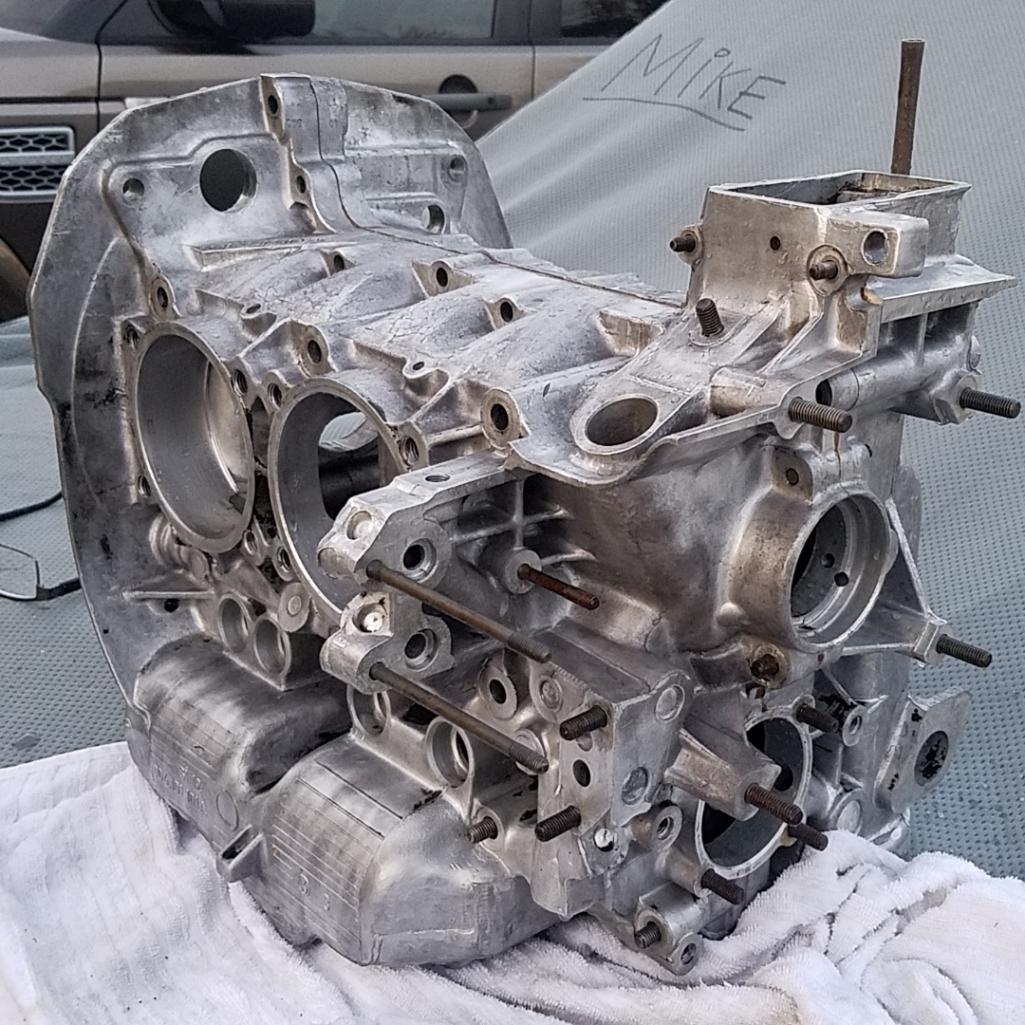
I ran the part numbers on the head and the cylinders, 1.8 parts.
Cylinders are in great shape, no pitting just some discoloration.
Stock camshaft looks odd, or at least to me.
The heads show no signs of cracks, I didn't have to do much to clean the springs and seat area, just wiped off the old oil and sprayed with hot water.
Pistons are in good shape, the one pictured has signs of something falling in there or is that detonation?
Combustion chamber has a few little divots just like the piston, very minor.
I think piston #4 had the most buildup on the top.
I still have a bunch more cleaning to do to the heads and case. 

Posted by: Valy Jul 1 2016, 11:49 PM
That cam is a paperweight.
Posted by: Mueller Jul 5 2016, 11:11 AM
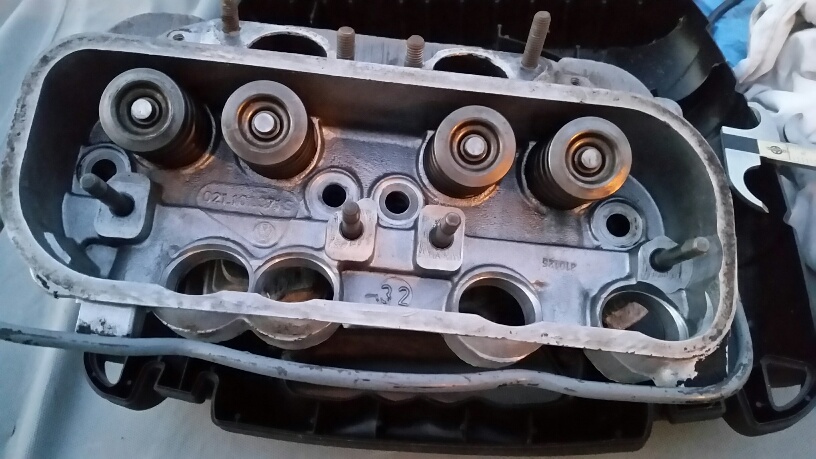
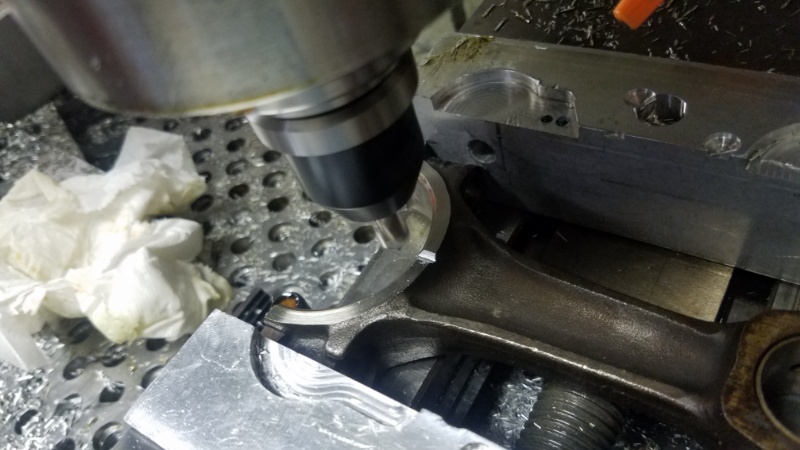
Both heads will need a little machine work to clean up the head to cylinder mating surface, I removed the head gaskets the previous engine builder used. I will not be using gaskets here again.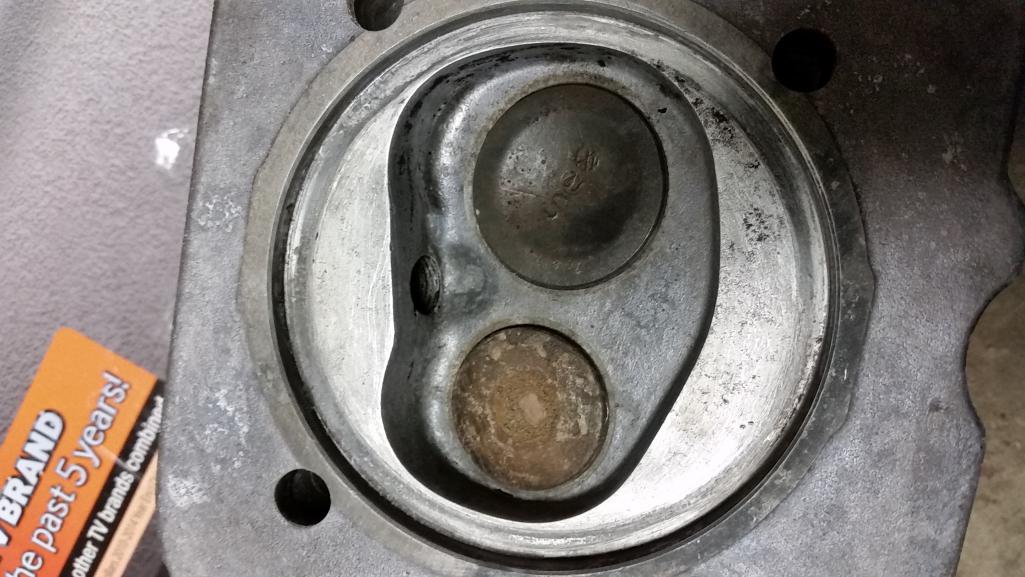
Posted by: r_towle Jul 5 2016, 11:47 AM
That cam is a paperweight.
With the gear they make neat lamps....
Posted by: JOEPROPER Jul 5 2016, 12:48 PM
No head gaskets? Is that right? I didn't know that was an option... 
Posted by: Mueller Jul 9 2016, 07:10 PM
Do I have to buy a new gear for the cam or can I remove the rivets on the original cam and the use bolts?
I saw a straight cut gear in the classifieds....too loud?
What about cutting a groove in it?
And if I do use my original cam gear worth making it adjustable able?
Posted by: Valy Jul 9 2016, 09:19 PM
Reuse.
Posted by: jcd914 Jul 9 2016, 11:34 PM
Do I have to buy a new gear for the cam or can I remove the rivets on the original cam and the use bolts?
I saw a straight cut gear in the classifieds....too loud?
What about cutting a groove in it?
And if I do use my original cam gear worth making it adjustable able?
Send the cam over to Elgins and get it reground.
Posted by: Mark Henry Jul 9 2016, 11:54 PM
Don't used straight cut gears, my great big engine in the bug still uses a stock gear.
You can reuse the gear but you have to face the holes and sink them a bit to clear the pump, but really a new gear is only something like $30.
Use the extra thrust bearing on the cam. BTW type 1 and 4 use the same thrust bearing.
Posted by: DavidSweden Jul 10 2016, 10:29 AM
Use the extra thrust bearing on the cam. BTW type 1 and 4 use the same thrust bearing.
Extra thrust bearing? Please explain
Posted by: Mueller Jul 10 2016, 10:41 AM
Don't used straight cut gears, my great big engine in the bug still uses a stock gear.
You can reuse the gear but you have to face the holes and sink them a bit to clear the pump, but really a new gear is only something like $30.
Use the extra thrust bearing on the cam. BTW type 1 and 4 use the same thrust bearing.
Thanks, I'll do more shopping around.
^ditto on "extra bearing"

thanks
Posted by: Tbrown4x4 Jul 10 2016, 11:12 AM
Only 1 half of a cam bearing has a thrust surface. You buy two cam bearing kits and use two thrust bearings to increase thrust surface area.
Posted by: Mark Henry Jul 10 2016, 11:26 AM
On the double thrust cam bearing couple ways to go about it:
1/Buy a 2nd set of T4 bearing use the DT and toss the rest.
2/Same thing with T1, same bearing as T4, but you can get a DT set that has two DT and save the 2nd DT bearing for later.
3/ buy a set of porsche /6 intermediate shaft DT bearings, they are the same but the oil hole is in the wrong place. So make sure you use one T4 with the correct hole and the other half can be the /6 DT. You could drill the /6 bearing and use both, but I've never done that
Sometimes you have to mod the bearing by filing off the lock tang, the lock tang isn't needed, I've never seen a spun cam bearing.
Posted by: Mueller Jul 10 2016, 11:32 AM
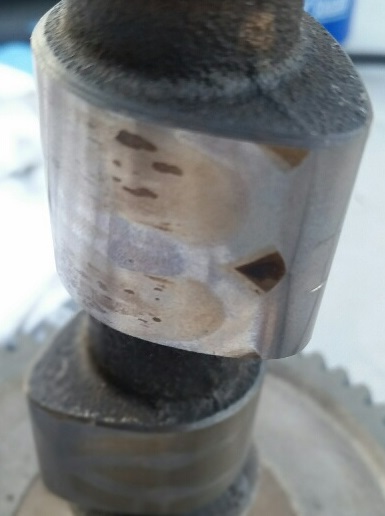
Looked at the bearings I took out of the motor, makes sense now.
Only one shell has the thrust surfaces, middle bottom shell.
Bearings not shown in assembly order, the pair that has one thrust bearing surface is the 1st bearing in the motor. The middle is a tad narrower than the rear bearing. 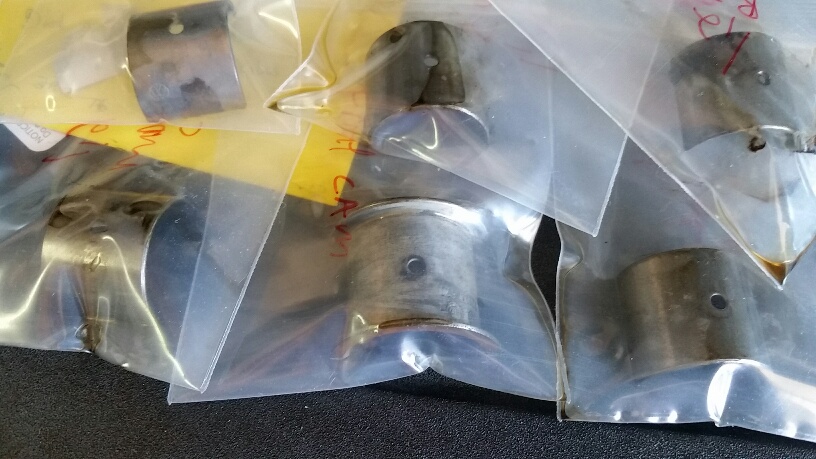
Posted by: Mark Henry Jul 10 2016, 12:04 PM
If that used DT bearing has a copper face and is in spec you can reuse it for your 2nd DT half.
Posted by: Mueller Jul 10 2016, 12:22 PM
If that used DT bearing has a copper face and is in spec you can reuse it for your 2nd DT half.
Yes on the copper face and all the bearings and surfaces look perfect, but I'll still measure here and there.
Posted by: rdauenhauer Jul 10 2016, 09:57 PM
Do I have to buy a new gear for the cam or can I remove the rivets on the original cam and the use bolts?
I saw a straight cut gear in the classifieds....too loud?
What about cutting a groove in it?
And if I do use my original cam gear worth making it adjustable able?
I also was curious about a straight cut cam gear. I happen to have one

Whats the advantage, if any?
Also as Mike queried anyone made an adjustable gear to index the cam in the eng?
Posted by: McMark Jul 11 2016, 07:19 AM
Do I have to buy a new gear for the cam or can I remove the rivets on the original cam and the use bolts?
I saw a straight cut gear in the classifieds....too loud?
What about cutting a groove in it?
And if I do use my original cam gear worth making it adjustable able?
I also was curious about a straight cut cam gear. I happen to have one
Whats the advantage, if any?
Also as Mike queried anyone made an adjustable gear to index the cam in the eng?
Straight cut cam gears are much louder, but take less HP to turn. The helical gears on a stock cam gear keep some tension on the system (hence the thrust bearing) as well as ease the contact between teeth by gradually bringin them together.
There are adjustable gears available as well. But from what I've heard they can lose adjustment or go loose. If I wanted an 'adjustable' cam gear, I would buy one of the cheap ones, find the timing I wanted, and then index a regular cam gear to that new location.
Posted by: colingreene Jul 11 2016, 09:39 AM
I have a straight cut cam gear, its not honestly all that loud.
Posted by: Mueller Jul 11 2016, 10:01 AM
I have a straight cut cam gear, its not honestly all that loud.
thanks, I've watched a few youtube videos and with rest of the Type IV engine sound (mechanical, intake and exhaust) the cam gear doesn't seem that bad.
Makes it sound a little more /6 engine'ish

Posted by: Mueller Jul 11 2016, 09:22 PM
Still trying to find some input on whether or not the stock L-Jet will work with this 9600 RAT camshaft?
Dual Webers are calling my name, trying to avoid spending the $$$ and joining the darkside.
Posted by: McMark Jul 11 2016, 09:28 PM
Induction is easy to change. Run the L-Jet and see what happens. 
Posted by: Mike Bellis Jul 11 2016, 09:32 PM
Run the L Jet and put a piggy back system or full ECU swap on it.
Posted by: colingreene Jul 11 2016, 09:42 PM
the right and best way to do modern ish fuel injection on the cheap would probably be Megasquirt.
Posted by: Mueller Jul 11 2016, 10:26 PM
the right and best way to do modern ish fuel injection on the cheap would probably be Megasquirt.
Just nervous with a fresh rebuild, what if it doesn't start right away or stalls too often?
Will I screw up my new cam if it takes too long to get it running longer than 20 minutes or so?
Posted by: colingreene Jul 11 2016, 11:12 PM
You might want to talk to Mark on here about it, or read through some of the builds using it.
Worst case start it and run it on a carb to break the cam in.
Posted by: McMark Jul 12 2016, 06:14 AM
The cam assembly lube sticks around for awhile. And if you run closed loop and autotune you can get it to rev to 2000-3000 pretty easily and be sure you're not flooding the motor.
With no load on the engine, your mixture and timing isn't nearly as critical. So you run the engine, rev it up, keep an eye on the mixture, but keep it running/rev'd until the cam break in is over. Then move your attention to tuning.
Also, this is the part where I praise the gospel of dyno tuning. Pay the money. Get it done first, not last. It's worth every penny.
Posted by: jim_hoyland Aug 11 2016, 12:22 PM
Any updates Mike ? I am looking at upgrading my L-Jet as well. Currently, it has the 94mm pistors and 2L crank shaft. I have a set of stock heads that are resurfaced and and new valves added- no mods though.
My local indy is going to replace the heads and suggested adding 96mm pistons. Since you drove my car at the WCR 2015 at San Simeon, I thought you might have some useful suggestions. And. it hasn't pinged again...
Gonna stay L-Jet
Attached thumbnail(s)
Posted by: Mueller Oct 18 2016, 09:08 AM
Finally getting back to my engine.
I picked up new lifters and uncut chromoly push rods from The Type IV Store,
I'm thinking I should go with better than stock valve springs for my 9600 RAT camshaft?
Posted by: Mueller Oct 26 2016, 11:08 AM
Bump for spring recommendations!
Also, any work I can do myself on the combustion chambers like adding a radius to the edge from the flat to the combustion pocket?
Posted by: Mueller Mar 7 2017, 01:55 PM
Let's see if this one gets ignored as well 
Can the stock Type IV oil pump deal with a remote cooler all the way up front behind the bumper if i wanted to go with a GT type setup?
Posted by: Mark Henry Mar 7 2017, 01:56 PM
Let's see if this one gets ignored as well
Can the stock Type IV oil pump deal with a remote cooler all the way up front behind the bumper if i wanted to go with a GT type setup?
no
Posted by: Mueller Jun 7 2017, 07:03 PM
Time to start working on the engine again.....
Dual or single valve springs? (Raby 9600 cam)
Posted by: Vacca Rabite Jun 8 2017, 07:06 AM
Time to start working on the engine again.....
Dual or single valve springs? (Raby 9600 cam)
I think that HD springs were used on most the Raby cams with a more aggressive ramp.
The springs that came with mine were single coil, HD springs.
Be 100% positive that you use the right lifters for your new cam. Ceramic lifters are best, or the correct Raby / LE lifters for that cam. Otherwise you can flat spot the cam in no time flat. Learned that the hard way. :-(
Zach
Posted by: McMark Jun 8 2017, 07:23 AM
I think that cam would prefer to have dual or HD springs. But if you email the Type4Store they should be able to tell you what's recommended.
Posted by: Mueller Jun 9 2017, 12:43 PM
I think that cam would prefer to have dual or HD springs. But if you email the Type4Store they should be able to tell you what's recommended.
Called and got someone that had the cam card!
Recommended dual (with a little hesitation which makes me nervous?)
Specs:
.335 IN
.400 EX
Duration 290°
@ .050" 252° IN
@ .050" 254° EX
Looking at the Web Cam catalog, it looks similar to the 86a (below) except for intake lift, I hope it was a misprint or I didn't hear her correctly. Web Cam doesn't show any cams with that small of an intake lift!
00-232
Strong mid and upper end performance for high performance street engines. WEB CAM mechanical lifters required. Requires
Performance Valve Spring Kit, and New Lifters Part #00-265.
I think I will measure the lift just to make sure.
Posted by: Mueller Jun 9 2017, 12:45 PM
Time to start working on the engine again.....
Dual or single valve springs? (Raby 9600 cam)
I think that HD springs were used on most the Raby cams with a more aggressive ramp.
The springs that came with mine were single coil, HD springs.
Be 100% positive that you use the right lifters for your new cam. Ceramic lifters are best, or the correct Raby / LE lifters for that cam. Otherwise you can flat spot the cam in no time flat. Learned that the hard way. :-(
Zach
I have the parkerized lifters from the Type IV store.
Posted by: Mueller Aug 11 2017, 12:02 AM
I just did a quick measurement using my HF digital calipers.
Lift for stock cam:
I = .277 , E = .255 so the intake lift is .022 greater than exhaust.
9600 cam:
I = .310 , E = .384 so the exhaust is almost .070" greater than the intake? Turbo cam or okay for N/A?
Posted by: McMark Aug 11 2017, 08:41 AM
More exhaust flow to compensate for the type 4s poor exhaust flow characteristics. Common idea with a variety of implementations.
Posted by: Mueller Aug 11 2017, 11:29 AM
More exhaust flow to compensate for the type 4s poor exhaust flow characteristics. Common idea with a variety of implementations.
Thanks, that is what I was thinking, will run it.
Posted by: Keith914 Aug 11 2017, 11:59 AM
Back to your original question, I suggest you evaluate upgrading your oil pump (higher flow) in tandem with Tangerine's oil pressure relief valve upgrade.
Posted by: Mueller Aug 15 2017, 12:43 AM
Back to your original question, I suggest you evaluate upgrading your oil pump (higher flow) in tandem with Tangerine's oil pressure relief valve upgrade.
Thanks, ordered the Tangerine Racing oil pressure relief spring upgrade.
Only oil pumps i could find are the 30mm units:
https://type4store.com/products/oiling-system-accessories/30mm-oil-pump-modified-for-type-4-vehicles-486.html
I also found an article for using the stock oil pump and making it better than as delivered:
http://www.shoptalkforums.com/viewtopic.php?f=1&t=127097
Posted by: McMark Aug 15 2017, 07:04 AM
Did you want a 26mm pump? I can send one your way.
Posted by: Mueller Oct 14 2017, 08:20 PM
Started to clean the engine again to get it ready to put back together.
I Bought a media blaster kit to hook up to my pressure washer....
I am using baking soda for the media.... 1st test and it works pretty darn good, just messy (more so the water spraying back at me ) I'll have to fix that!
There was a lot more build up between the webs before I gave it a blast. Just plain water out of the gun didn't do squat.
Posted by: Mueller Nov 7 2017, 12:15 PM
Megasquirt question...really EDIS related. Older MS2 V3.57
I screwed up and bought the wrong EDIS setup, I bought the -8 version instead of the -4 version.
I still think I can get it to work correctly as long as I mount the sensor 50° as per EDIS-8 requirements.
The stock V8 firing order is 1-3-7-2-6-5-4-8 (wasted spark pairs are 1-6, 3-5, 7-4 and 2-8)
As long as I connect to the correct coil I see no reason it wouldn't work.
Any possible damage if I didn't hook up the other 4 spark plug wires?
Will I damage a coil if it is only firing on one side and not as a pair?
Good time to convert the heads to dual plug? 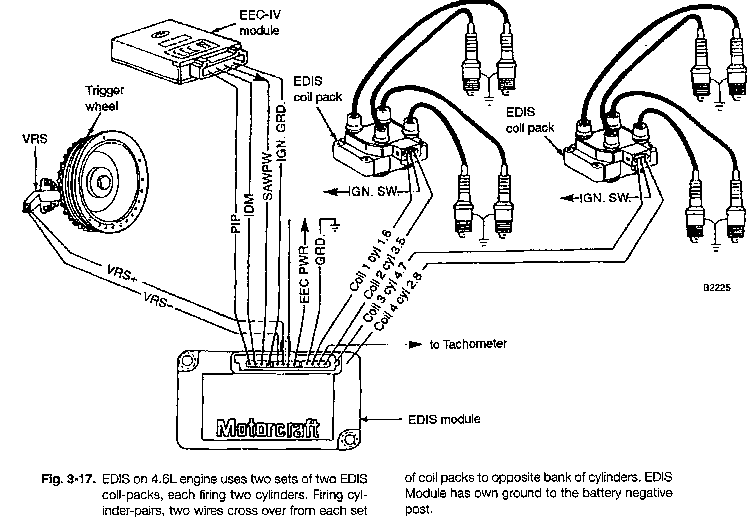
Posted by: 76-914 Nov 7 2017, 05:59 PM
That's definitely above my pay grade.
Posted by: McMark Nov 7 2017, 10:24 PM
I'm pretty sure you can just set up your MegaSquirt board with a second ignition driver and then dispense with the EDIS altogether. Less components to break/die. Simpler wiring. Simplicity. 
Posted by: Mueller Nov 7 2017, 11:58 PM
I'm pretty sure you can just set up your MegaSquirt board with a second ignition driver and then dispense with the EDIS altogether. Less components to break/die. Simpler wiring. Simplicity.
Thanks I'll look unto that. Didn't really want to go with COPs.
Posted by: JamesM Nov 8 2017, 12:54 AM
I'm pretty sure you can just set up your MegaSquirt board with a second ignition driver and then dispense with the EDIS altogether. Less components to break/die. Simpler wiring. Simplicity.
Thanks I'll look unto that. Didn't really want to go with COPs.
If you want the "easy button" for spark output look at VAG Part #032905106B wasted spark coil off late 90s/early 2000s VWs. Aftermarket/generic can be had for less than 20 bucks. Its logic level so no high current ignition drivers are needed, the wiring of it is crazy simple. Only thing you need to know is to swap the 3 and 4 plug wires from how they are labeled on the coil to account for the Type 4 firing order.
Posted by: McMark Nov 8 2017, 10:49 AM
I'm pretty sure you can just set up your MegaSquirt board with a second ignition driver and then dispense with the EDIS altogether. Less components to break/die. Simpler wiring. Simplicity.
Thanks I'll look unto that. Didn't really want to go with COPs.
You've already put more work into EDIS than it would take to add a second driver -- and there's more work to make the EDIS function. Follow James recommended coil and you'll be done with ignition. With what's available now, I don't see why anyone should ever use EDIS.
Posted by: Mueller Nov 8 2017, 11:49 AM
Thanks Mark and James.
So i do not need to upgrade to the BIP737 ignition drivers with that VW modual?
Posted by: Dr Evil Nov 9 2017, 12:27 PM
I may have an EDIS4 if you want it.
Posted by: Mueller Nov 9 2017, 12:58 PM
I may have an EDIS4 if you want it.
Thanks, I ended up buying the VW unit above. $20 shipped brand new on Amazon, that route seems to be better method now.
Posted by: Mueller Nov 15 2017, 01:28 PM
Silly question, I need to buy or make an engine stand yoke/holder for my Type IV, if I make one does it matter which half of the case I mount to the engine stand to start the assembly?
Posted by: 914werke Nov 15 2017, 07:18 PM
Perhaps these might help?
Attached image(s)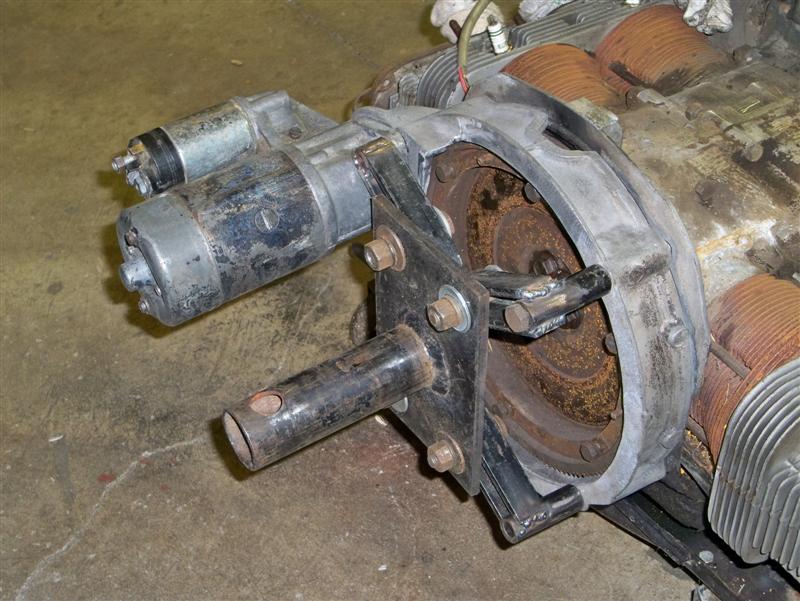
Posted by: McMark Nov 16 2017, 08:01 AM
I haven't worked with a MegaSquirt unit yet, so I haven't done a bunch of research on the nuance of adding ignition drivers. But with that coil you're only using a few milliamps to fire the coil, so you don't need beefy drivers. Essentially, any driver will work fine becuase the draw will be far below the safe rating. The BIP737 is something like 11A max. So that VW coil will be about 1% of that.
I always install the stand/yoke on the 3-4 (passenger) side of the engine case.
Posted by: Mikedrevguy Nov 16 2017, 08:29 AM
Look forward to seeing this all come together. Good read. Thanks.
Posted by: Mueller Dec 25 2017, 02:14 PM
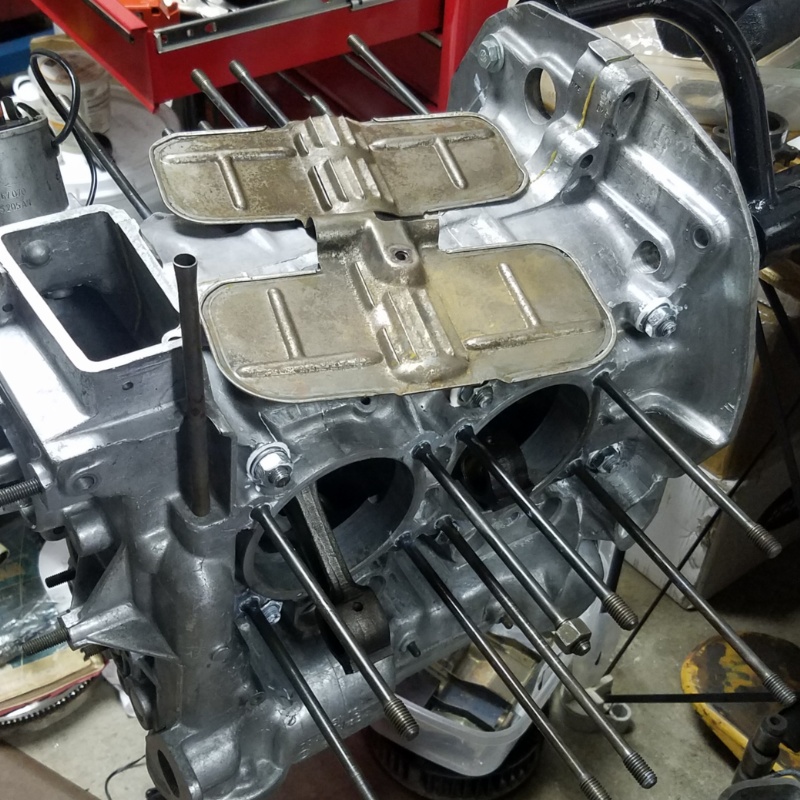
Finally, some work related to my 914...
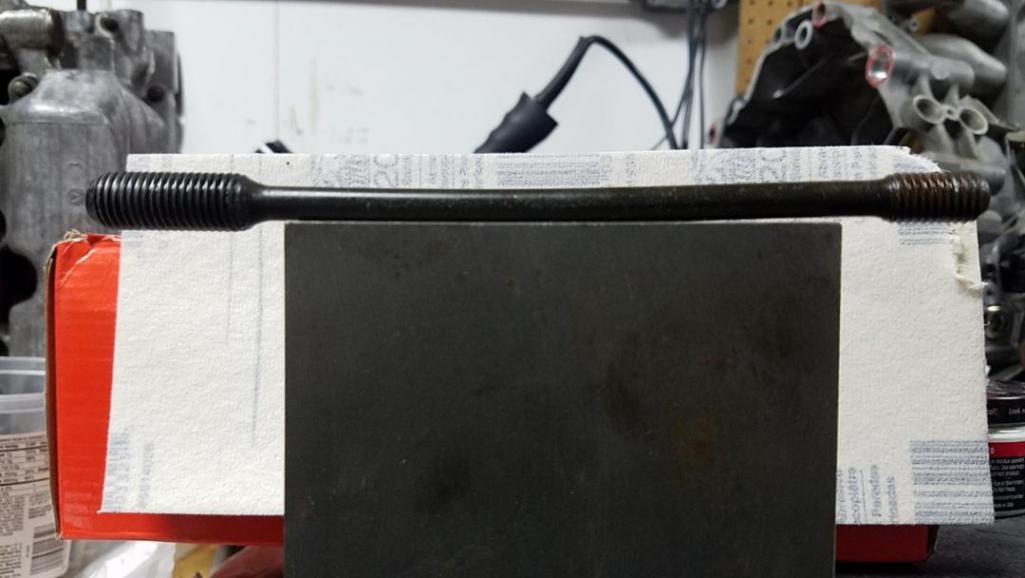
Removed the main cylinder studs this morning.
Noticed one of the smaller studs is bent pretty good. Will have to source another one.
I plan to clean the engine case one more time, might be a little easier with the studs removed. The other side has a lot more oil caked onto it for some reason.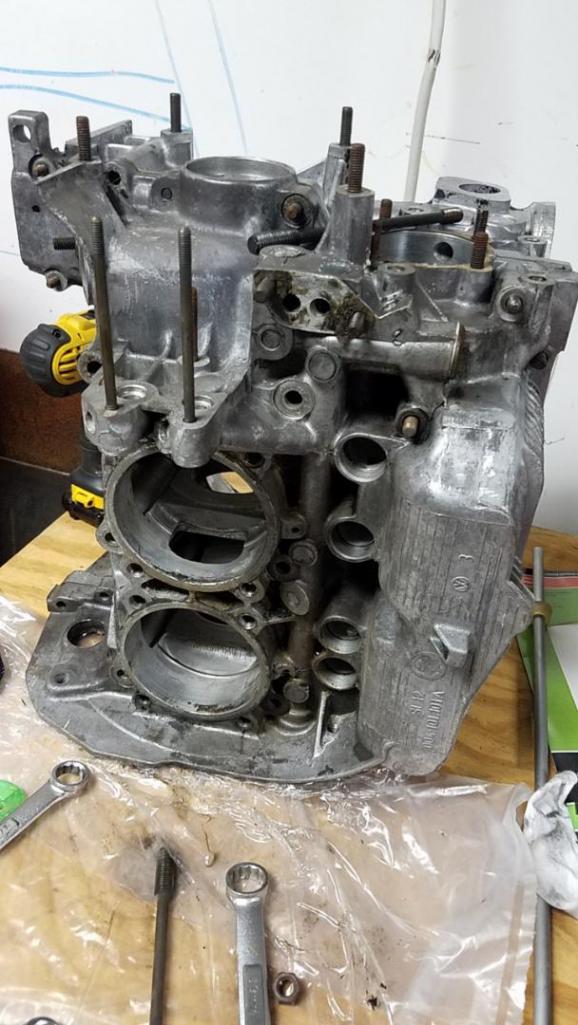
Posted by: Mueller Dec 28 2017, 07:54 PM
Cleaned my engine, also deburred it a little bit also by cleaning up the extra aluminum from the casting process. Not as sharp now.
Cleaned it using my pressure washer with media blaster attachment with baking soda.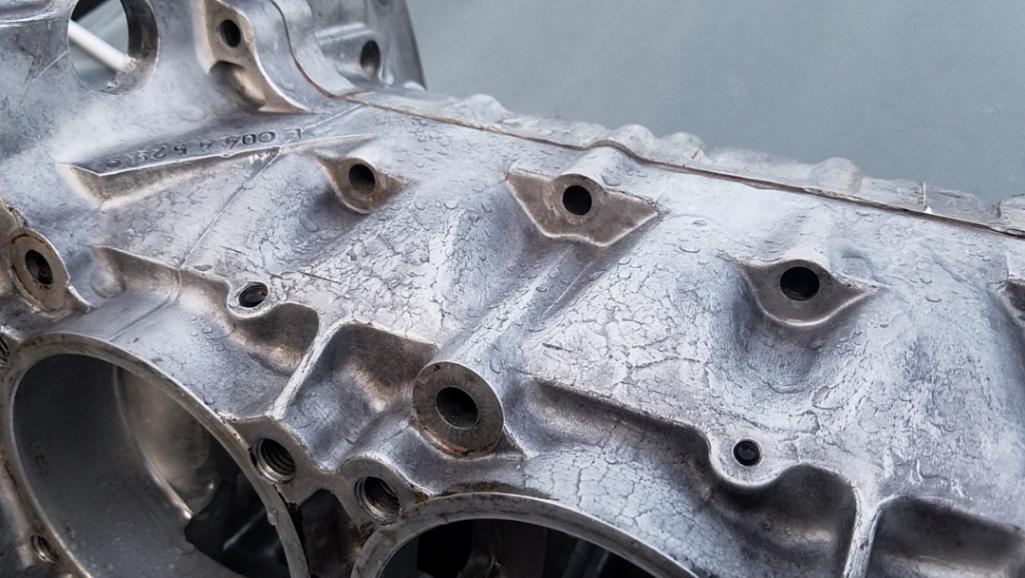
Posted by: Mueller Jan 11 2018, 09:51 AM
In case it is not in Raby's Type IV assembly DVD I have not fully watched,
What do people use and recommend for installing the head/cylinder studs?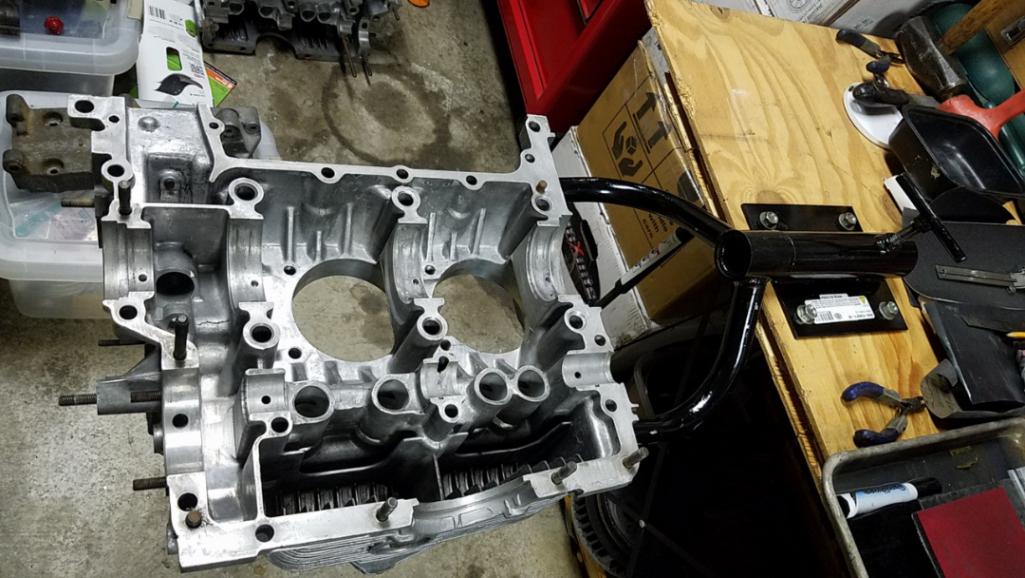
Posted by: Mueller Jan 12 2018, 02:47 PM
Bump for:
What sealant do people use and recommend for installing the head/cylinder studs?
Posted by: 76-914 Jan 12 2018, 03:57 PM
Mike, it's in there somewhere but IIRC it was Loctite PST 565 thread sealant. 
Posted by: Mueller Jan 12 2018, 04:21 PM
Mike, it's in there somewhere but IIRC it was Loctite PST 565 thread sealant.
Thanks, I'll have to finish watching it this weekend.
Posted by: holtby914 Jan 12 2018, 06:31 PM
Did you order the DVD recently? I'd love to get a copy.
Posted by: Mueller Jan 13 2018, 11:39 AM
Did you order the DVD recently? I'd love to get a copy.
Actually I asked about it and a few weeks later someone sent me their old one anonymously.
I'd put a WTB in the classifieds.
https://vwparts.aircooled.net/Bug-Me-Video-DVD-Jake-Raby-Type-4-Engine-Rebuild-p/bmv-rebuild-vol-8.htm
Posted by: Mueller Jan 21 2018, 02:32 PM
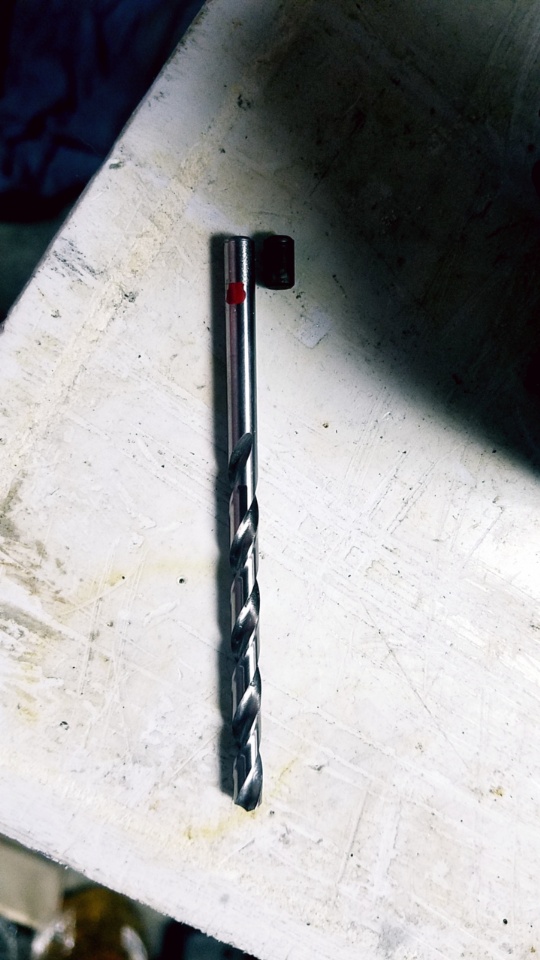
Not sure if this qualifies for being cheap or resourceful. Lost a dowel pin and had a perfect sized HSS drill that I figured could be used. Drill still usable so no big deal.
Anyone using special engine break-in oil?
https://type4store.com/products/sealants/joe-gibbs-break-in-15w50-oil-12-quarts.html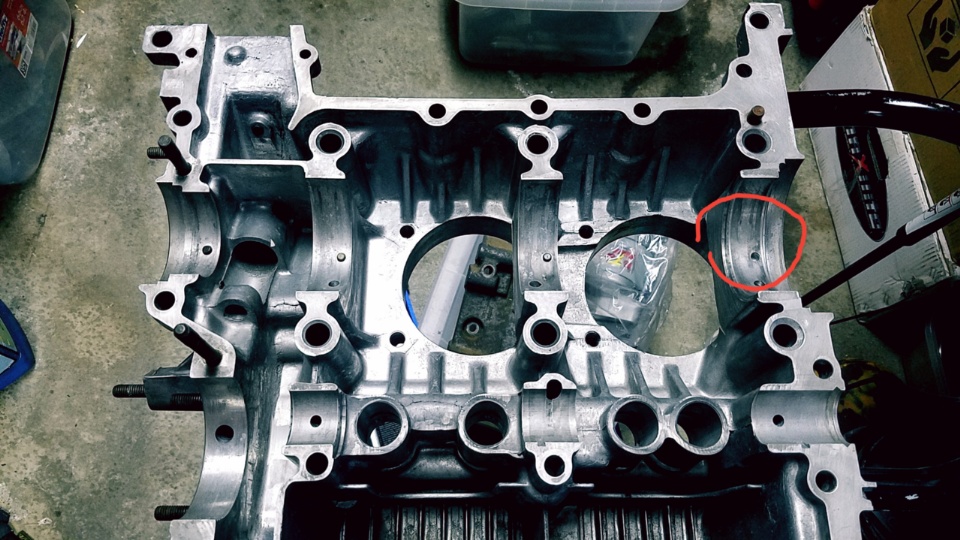
Posted by: McMark Jan 22 2018, 07:57 AM
 Lookin' good!
Posted by: Mueller Jan 27 2018, 11:03 PM
Dominic was nice enough to send me a straight engine stud and I got my 1.7 rockers with 911 adjusters. 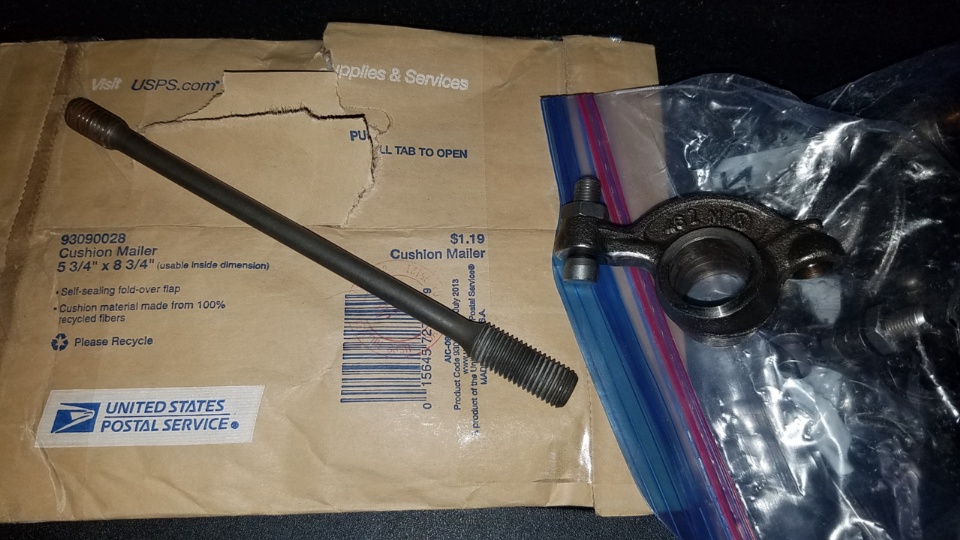
Posted by: Mueller Mar 14 2018, 04:36 PM
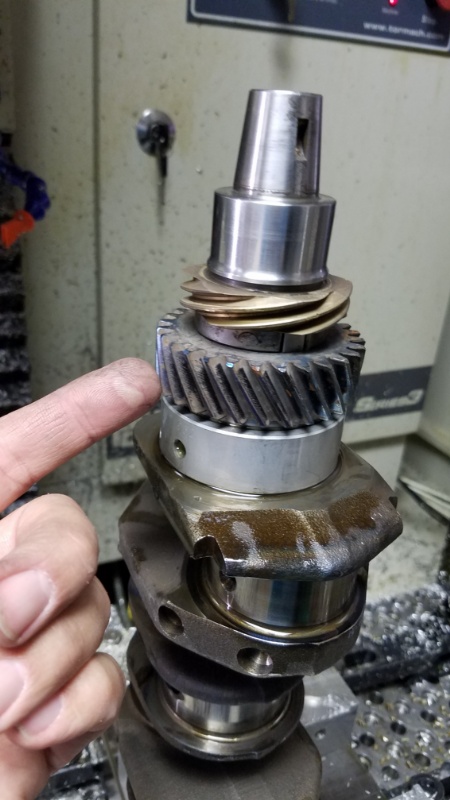
When I took this motor apart I removed the crankshaft with rods, bearings and front fan hub still attached.
Being that the cam bearings look good and it only had a flat cam, I'm thinking not to disassemble the crank setup any further?
Good idea or bad idea?
Posted by: The Cabinetmaker Mar 14 2018, 05:10 PM
Personally, I'd want to at least check the rod bearings, and you will have to remove the fan hub and gear to replace the crank bearing. And why not balance the rotating assembly? Do it right, Mike. You'll love setting valve train geometry. Fun stuff
Posted by: Mueller Mar 20 2018, 07:47 PM
Wanted to thank McMark for the brand new bolts for the cam gear, Dominic for the straight stud, and cabinetmaker for thw plastic stud locaters used in the engine.
Posted by: Mueller Apr 9 2018, 11:27 PM
1 step forward, 2 steps back.
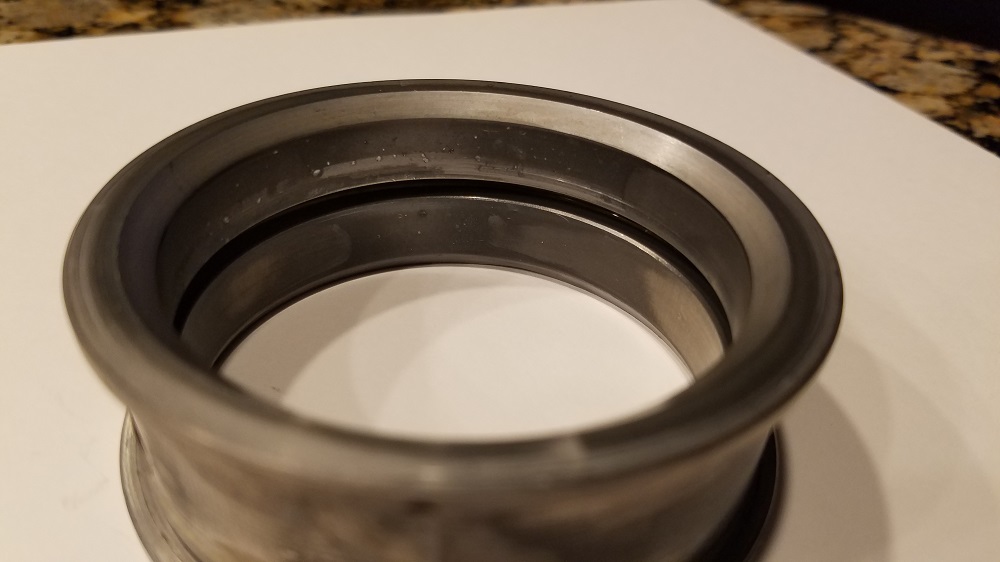
I decided to look at the rod and crank bearings on the low mileage rebuilt motor..glad I did.
Gears still need to be pulled to look at the captured bearing, but since it is a set that bearing will be replaced. The crank looks good so far which is nice. 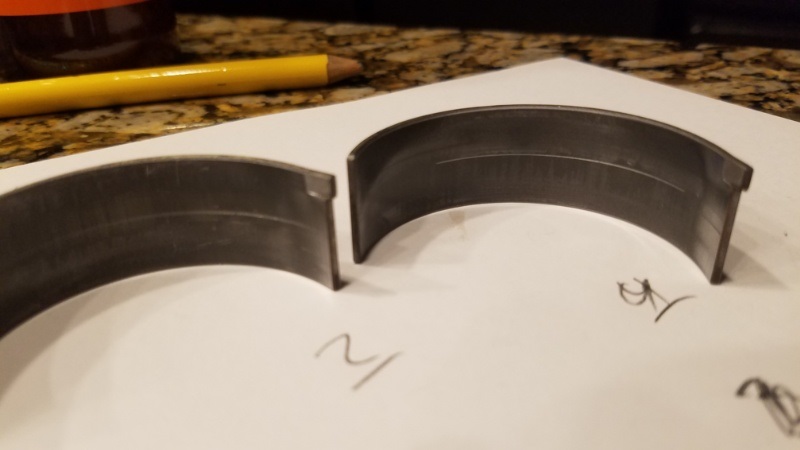
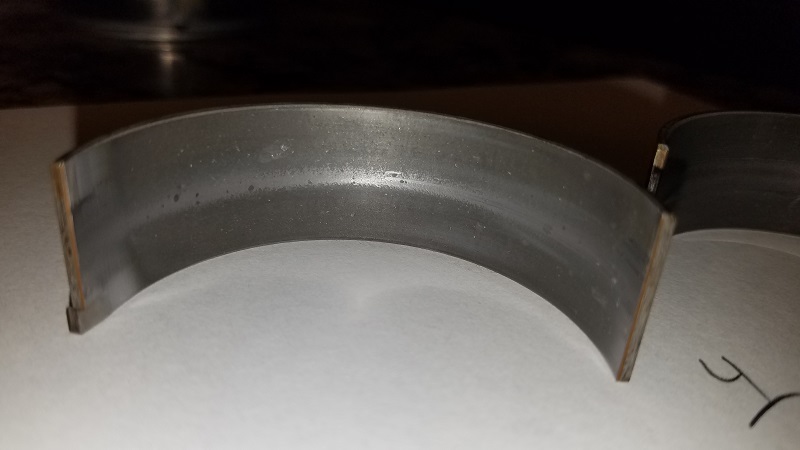
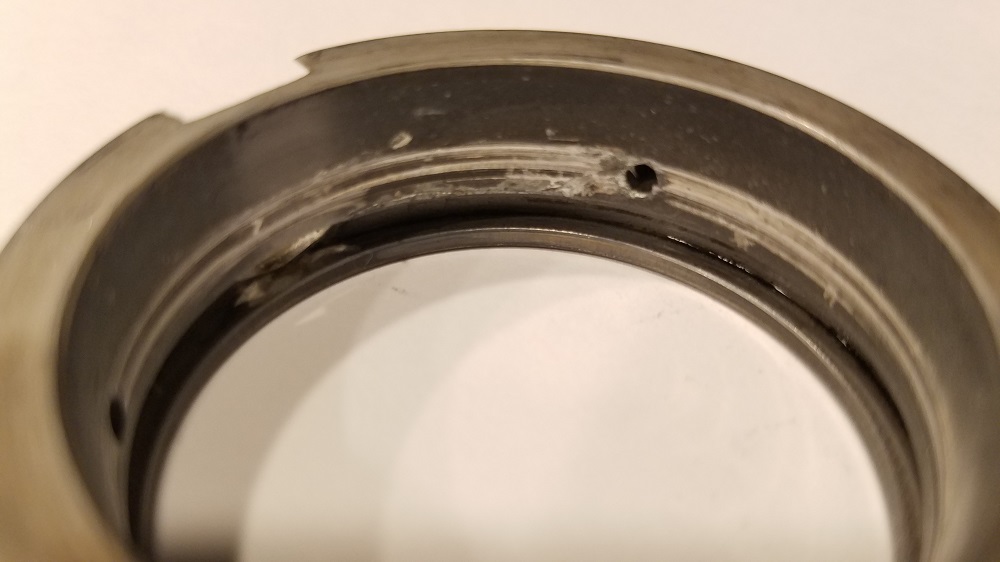
Posted by: 76-914 Apr 10 2018, 08:19 AM
Whoa! That engine must have been thrown together quickly. Good thing that you checked it Mike.
Posted by: McMark Apr 10 2018, 10:29 AM
Are those bearings STD? It's marked/stamped on the outside of the bearings. I'll get new ones ordered and shipped to you as soon as you let me know.
Posted by: Mueller Apr 10 2018, 02:57 PM
Part number for rods: 021 105 701A (standard?)
Cannot find a single number on the crank bearings. Are the numbers in the PET?
Posted by: Chris914n6 Apr 10 2018, 03:15 PM
After that, I'd measure the crank too
Posted by: Mueller Apr 13 2018, 10:50 AM
Mark,
Crank has stock factory journal size diameters.
You mentioned you had another oil pump I think at one time? Let me know how much $ and I'll send you some funds.
Posted by: Mueller Apr 23 2018, 12:07 AM
Motor going together slowly. Yes, that is a blister from installing the gear on the crank, I guess my leather gloves not insulated enough.
I added the notches in the rods for some extra oil slinging as well as per this:
http://www.ratwell.com/mirror/www.dolphinsci.com/techbull.html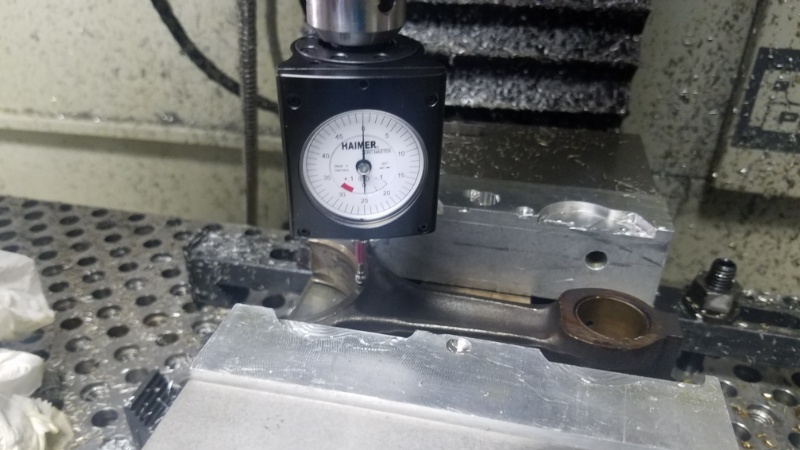
Posted by: Mueller Apr 25 2018, 03:50 PM
More goodies arrived today.... new cam bearings and a new flywheel. Hope to make some good progress on the build in the next few days.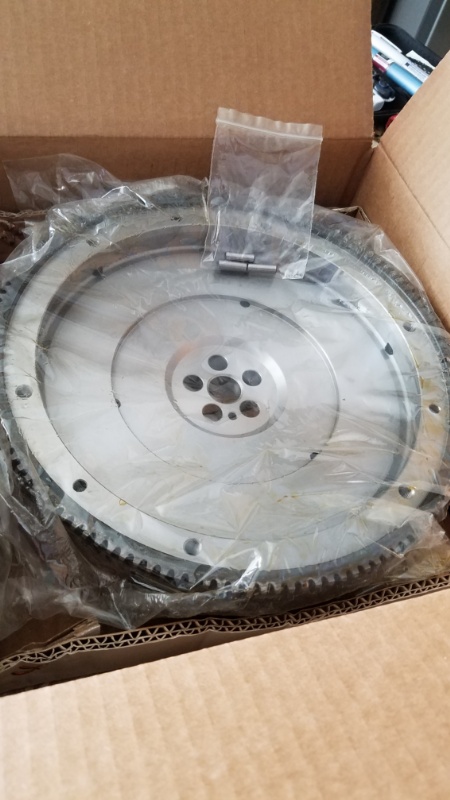
Posted by: porsche913b_sp Apr 25 2018, 04:22 PM
I'm pretty sure you can just set up your MegaSquirt board with a second ignition driver and then dispense with the EDIS altogether. Less components to break/die. Simpler wiring. Simplicity.
Thanks I'll look unto that. Didn't really want to go with COPs.
If you want the "easy button" for spark output look at VAG Part #032905106B wasted spark coil off late 90s/early 2000s VWs. Aftermarket/generic can be had for less than 20 bucks. Its logic level so no high current ignition drivers are needed, the wiring of it is crazy simple. Only thing you need to know is to swap the 3 and 4 plug wires from how they are labeled on the coil to account for the Type 4 firing order.
This one ?
https://www.amazon.com/Ignition-Coil-Pack-Volkswagen-032905106E/dp/B06WRS3KJY/ref=sr_1_2?ie=UTF8&qid=1524694581&sr=8-2&keywords=coil+032905106B
Any place to get the correct connector for it ?


Posted by: McMark Apr 26 2018, 07:07 AM
I'm ordering this one. I think it's right.
https://www.amazon.com/gp/product/B071F5CPPT/ref=ox_sc_mini_detail?ie=UTF8&psc=1&smid=A2XTE5UFIF2OCI
Posted by: Mueller May 14 2018, 12:47 PM
Well I thought I had a complete short block put together and then I see the windage try laying on the bench 

Posted by: 76-914 May 14 2018, 01:35 PM
Well I thought I had a complete short block put together and then I see the windage try laying on the bench
 Hey Mike, you can avoid those type mistake if take your lap top and Raby video with you into the garage.
Posted by: Mueller May 14 2018, 01:59 PM
Well I thought I had a complete short block put together and then I see the windage try laying on the bench
Hey Mike, you can avoid those type mistake if take your lap top and Raby video with you into the garage. I was watching it! I put it on pause to answer the phone and somehow skipped him installing that part. I did install the oil pickup and then next thing I know I am installing nuts and tightening bolts!
Oh well...
Posted by: tygaboy May 14 2018, 02:10 PM
Mike - Are you trying to catch up to me on "most re-dos"?
Joking aside, I HATE it when that happens...
See you June 2?
Chris
Posted by: 76-914 May 14 2018, 05:56 PM
Shit, I put an engine back together once before I realized I left a knife on top of the cam. I was 16 and haven't gotten any smarter since. 
Powered by Invision Power Board (http://www.invisionboard.com)
© Invision Power Services (http://www.invisionpower.com)