Printable Version of Topic
Click here to view this topic in its original format
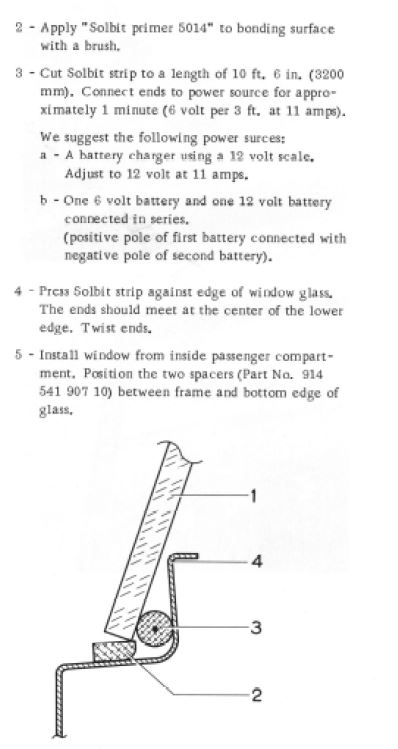
914World.com _ 914World Garage _ Installing Back Window
Posted by: pneuhyde Oct 7 2016, 11:51 AM
I hope to install my back window this weekend and am looking for any tips.
I have Mikey's Butyl cord package and the 2 rubber spacer blocks that I believe get placed on the lower sill? area for the window to rest on.
And, I read something somewhere about hooking up 2 batteries in parallel to run current thru the Butyl cord to warm it up? Is that a preferred method?
Your help is appreciated,
Steve
Posted by: Kansas 914 Oct 7 2016, 11:57 AM

I hope to install my back window this weekend and am looking for any tips.
I have Mikey's Butyl cord package and the 2 rubber spacer blocks that I believe get placed on the lower sill? area for the window to rest on.
And, I read something somewhere about hooking up 2 batteries in parallel to run current thru the Butyl cord to warm it up? Is that a preferred method?
Your help is appreciated,
Steve
The battery method was only to be used with the proper butyl - 914Rubber butyl is not that type.
It really isn't necessary.
Here is a good write up: http://www.914world.com/bbs2/index.php?showtopic=15821
Posted by: BeatNavy Oct 7 2016, 12:00 PM
the 2 rubber spacer blocks that I believe get placed on the lower sill? area for the window to rest on.
Correct. I've not heard about the battery trick, but that's interesting.
Other thoughts:
Very thoroughly clean the surfaces, both the metal and the glass surfaces. It is good to have a second pair of hands to help. Take a couple of rolled up towels and wedge them between the seat headrest and the window to put pressure on the window and seal, say, overnight. Did you get a new rear window seal? Now's a good time to replace that.
I didn't think this was that hard. Just take your time.
Posted by: blackmoon Oct 7 2016, 12:20 PM
be careful when removing the glass, it can be a little awkward and removing the old hardened sealant is a pain.
Posted by: pneuhyde Oct 8 2016, 08:52 AM
I hope to install my back window this weekend and am looking for any tips.
I have Mikey's Butyl cord package and the 2 rubber spacer blocks that I believe get placed on the lower sill? area for the window to rest on.
And, I read something somewhere about hooking up 2 batteries in parallel to run current thru the Butyl cord to warm it up? Is that a preferred method?
Your help is appreciated,
Steve
The battery method was only to be used with the proper butyl - 914Rubber butyl is not that type.
It really isn't necessary.
Thank you, that's a relief.
Here is a good write up: http://www.914world.com/bbs2/index.php?showtopic=15821
Good info
Posted by: pneuhyde Oct 8 2016, 08:53 AM
the 2 rubber spacer blocks that I believe get placed on the lower sill? area for the window to rest on.
Correct. I've not heard about the battery trick, but that's interesting.
Other thoughts:
Very thoroughly clean the surfaces, both the metal and the glass surfaces. It is good to have a second pair of hands to help. Take a couple of rolled up towels and wedge them between the seat headrest and the window to put pressure on the window and seal, say, overnight. Did you get a new rear window seal? Now's a good time to replace that.
I didn't think this was that hard. Just take your time.
Thanks,
Posted by: pneuhyde Oct 8 2016, 08:54 AM
be careful when removing the glass, it can be a little awkward and removing the old hardened sealant is a pain.
Already done, by p.o.
Posted by: Kansas 914 Oct 8 2016, 09:03 AM
I've not heard about the battery trick, but that's interesting.
The factory butyl had a wire in it. It was Solbit 8mm and made by Bostik - not sure if it is available anywhere anymore.
This is from the Workshop Manual:
Posted by: PanelBilly Oct 8 2016, 09:28 AM
Barbour freight has glass suction cups that you can use to hold the windsheild
Posted by: mlindner Oct 8 2016, 09:33 AM
I did mine a week ago, very easy.....that said, the butyle is really sticky...soo, do a dry fit with spacers in place, place glass bottom on spacers and rock back to fit. Then do the same move with butyl in place. Have fun. Best, Mark
Posted by: Cairo94507 Oct 8 2016, 09:58 AM
I did this on my last Six. Definitely do the "dry run" first to make sure you have the whole "rock the window in place" down. Make sure everything is super clean with no dust left on anything. Plenty of light and room to work. The towels behind the headrest is a good tip too. Good luck.
Posted by: 87m491 Oct 8 2016, 12:24 PM
Just did this last week. I found that factory drawing to be off a bit. I used 3/8s (9.5mm) from NAPA and wished I used the 5/16s (8mm) my factory blocks were still in place and with the 3/8s butyl, I could barely get my glass to sit over/on them as the butyl was so thick. I'd guess at ambient of 90 or so there is more give. It was 70 maybe, and even with a heat gun to warm the glass and butyl the glass sat further out than I was happy with.
The original tape I removed was compressed to between 2 and 3mm. No way for me to get that thin with 3/8s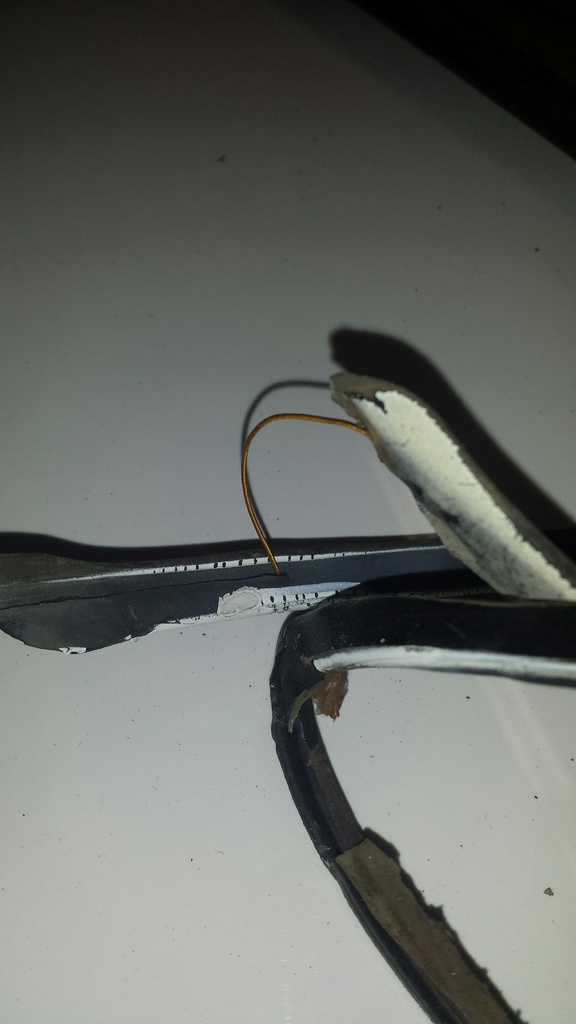
I've not heard about the battery trick, but that's interesting.
The factory butyl had a wire in it. It was Solbit 8mm and made by Bostik - not sure if it is available anywhere anymore.
This is from the Workshop Manual:
Posted by: RobW Oct 8 2016, 12:42 PM
i did one with a weld in roll bar. Once it's in, it's in. Get it right the first time. Oh, and have fun!
Powered by Invision Power Board (http://www.invisionboard.com)
© Invision Power Services (http://www.invisionpower.com)