Printable Version of Topic
Click here to view this topic in its original format
914World.com _ 914World Garage _ Quickie 2.0 Rebuild
Posted by: McMark Oct 17 2016, 05:21 PM
One of my winter tasks is to build a stock 2.0 with my MicroSquirt fuel injection that I can install in my car and get it dyno tuned. That's been the missing piece of my MicroSquirt setup for the last few years.
Since there isn't much demand for a stock 2.0, I just plan on doing the minimum to build a solid motor. I plan on having the valves reground, cylinder surfaces machined and reringing the pistons. Regrinding the cam and rebuilding the rods and all new bearings as well. This should give me a motor that will last through the testing, and be worth something when I'm done to pass on to a new owner at a nice price.
This thread does not represent my standard procedures for rebuilding engines. This is a special case and special circumstances.
For those of you on a budget, but looking to refresh their motor should appreciate this writeup.
Starting off with a core engine. The previous owner mentioned this engine had a 'knock', so I'll be on the lookout for what might have caused that. This is a 'GC' code engine with air injection ports in the heads.
Attached image(s)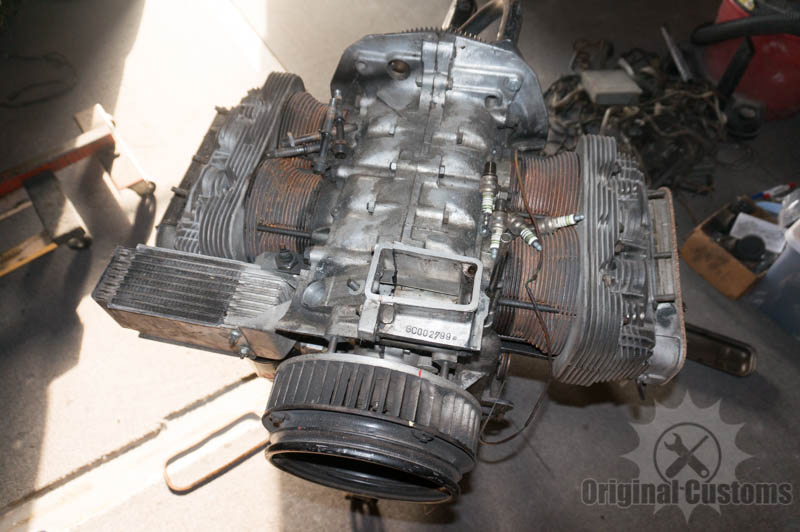
Posted by: McMark Oct 17 2016, 05:28 PM
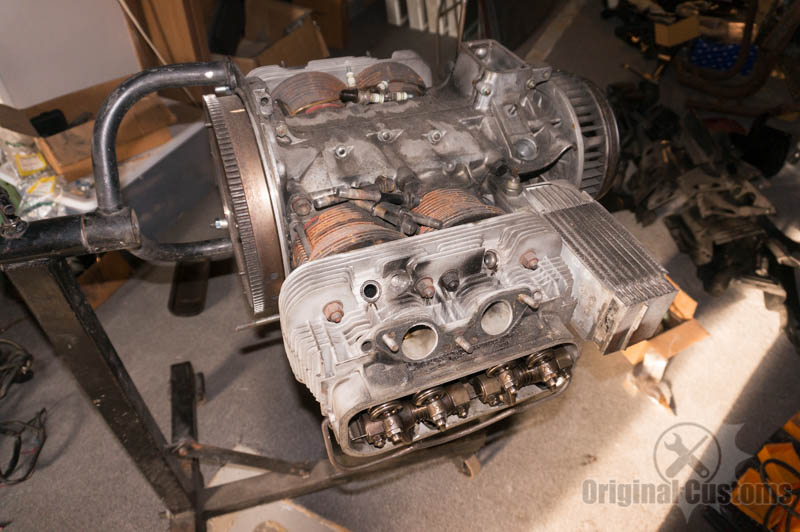
Pulled the heads and found the first issue. I think the previous owner knew about this. Might have mentioned a screw down the intake? It's all a bit fuzzy.
The damage to the face of the head and the piston crown isn't much of an issue. These could be smoothed out and run.
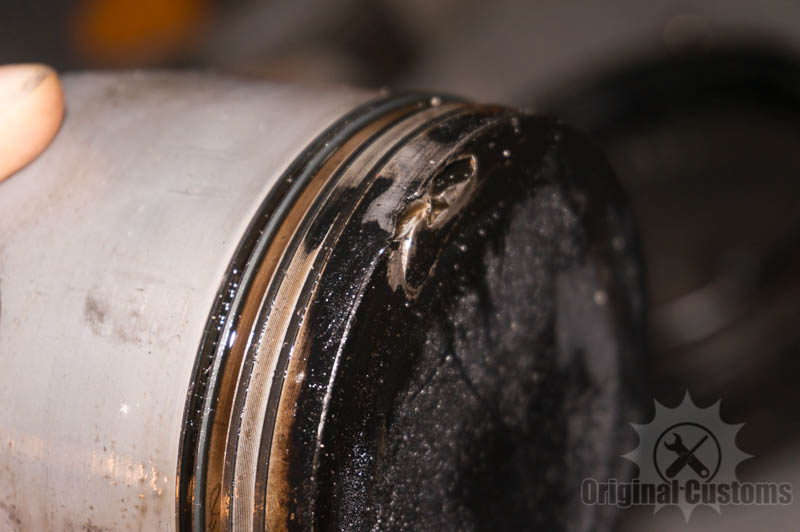
But there is a bigger issue. Because the piston impact is so close to the edge is deformed the first and second ring grooves. Notice the light spot on the side of the piston. So those rings weren't floating loose like they should be. The rings normally help center the piston in the bore, so this would leave the piston slightly loose and could have been the 'knock' the PO mentioned. Big piston slap.
Attached image(s)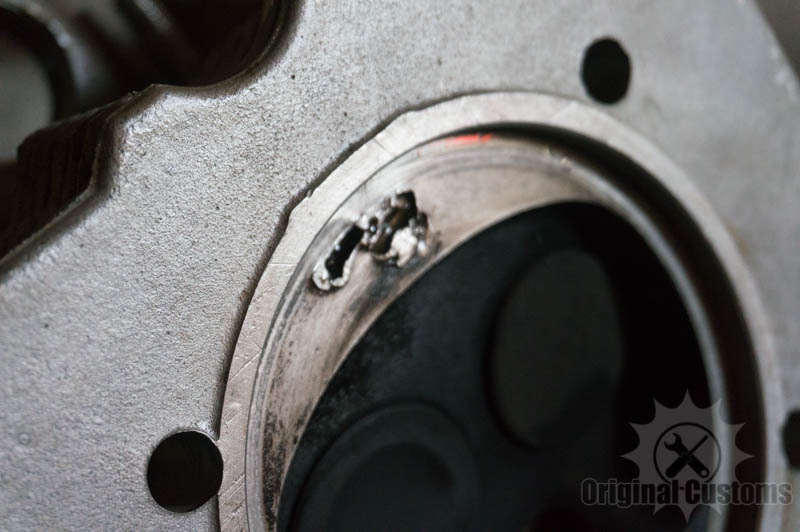
Posted by: Bartlett 914 Oct 17 2016, 05:29 PM
![popcorn[1].gif](style_emoticons/default/popcorn[1].gif)
Posted by: McMark Oct 17 2016, 05:33 PM
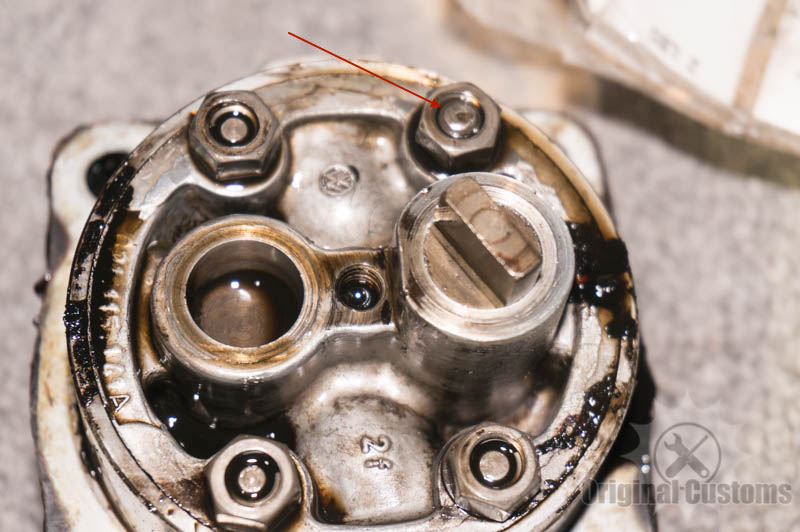
Another issue that I found was that the cam install was pretty much wrong every way possible. The grinding on the bolts is atrocious, but I can ignore the lack of concern for aesthetics. One of the bolts holding the cam gear on was left a little too long and was contacting the oil pump. This could have been another source of noise. The cam has slight movement front to back, so so it can make noise under some conditions and not others.
Attached image(s)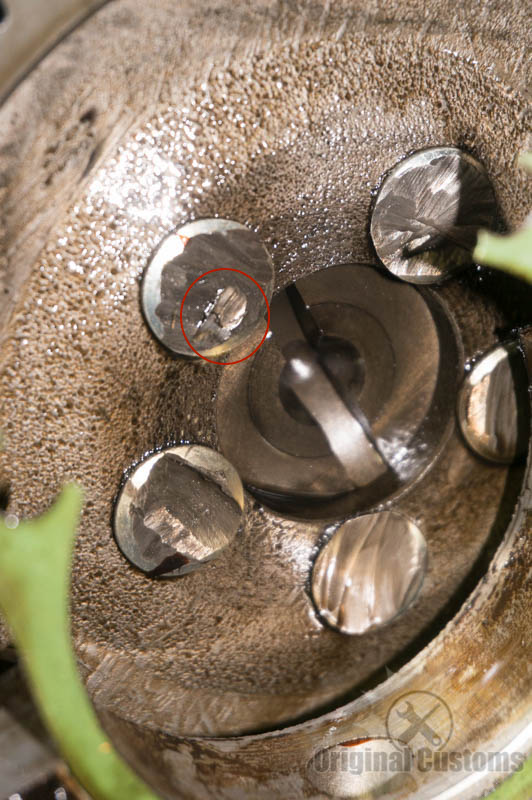
Posted by: McMark Oct 17 2016, 05:35 PM
Still on the cam, the end plug was installed backwards. Which cause the cam to rub on the plug. This wasn't allowing the cam to float fore-aft like it should. This would cause premature wear of the bearings and could eventually wear through the plug leaking massive amounts of oil.
Attached image(s)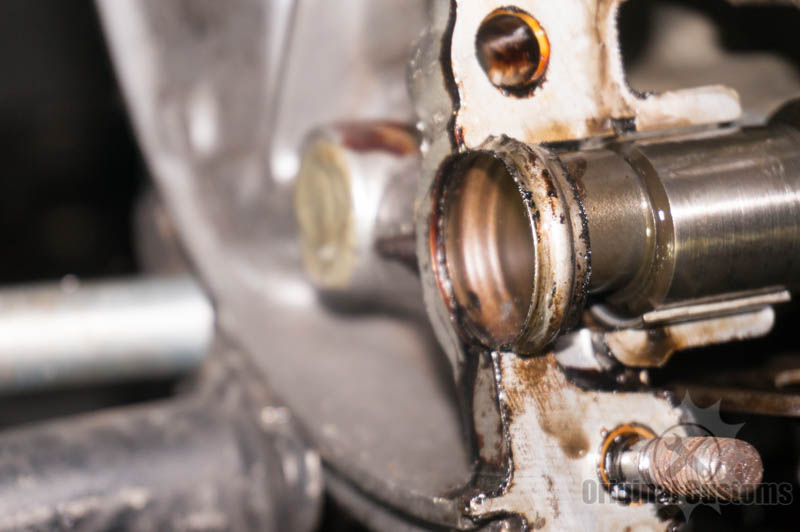
Posted by: McMark Oct 17 2016, 05:37 PM
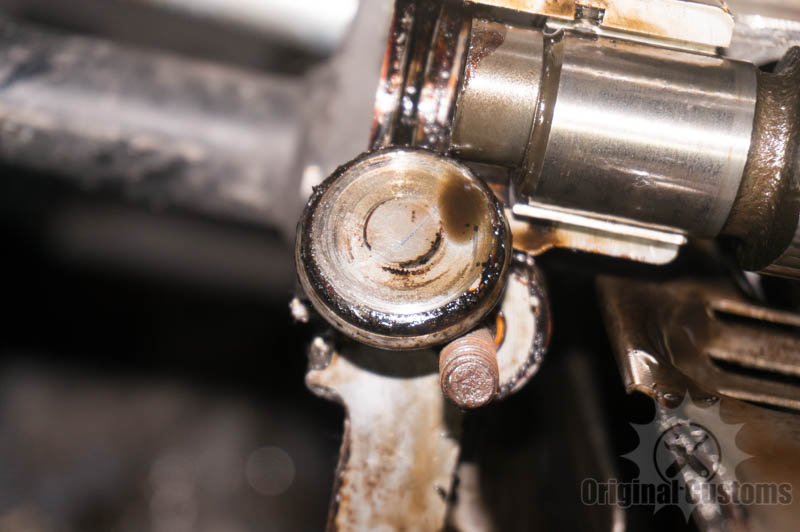
And finally, it appears the cam was beginning to go flat. It was a reground stock cam (as far as I can tell), but this lobe has a very rough wear pattern on the nose and the associated lifters were looking pretty rough.
Attached image(s)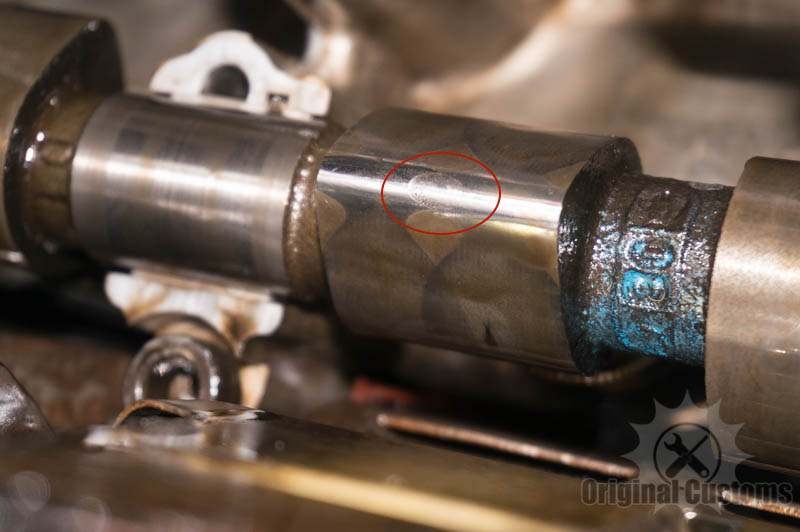
Posted by: McMark Oct 17 2016, 05:42 PM
So now that my quickie 2.0 rebuild is torn down, I'm left wondering how to proceed. This is not a bad core motor, because usually I toss the pistons/cylinders and cam/lifters. And the PO provided a set of good heads along with these. But the plan I laid out in the first post can't really work now. I need to think a bit about if I should seek out a set of decent used 2.0 pistons. If I should buy new ones. Or maybe bump it to 2056.
The whole point was to not really spend any money on this build because it's only purpose was supposed to allow me to tune a 100% stock engine on MicroSquirt. If I start changing things (cam grind/piston size) I can't really do that anymore.
If anyone wants to commit to buying this engine after I'm done with it we can talk about making a deal. Just keep in mind I'm looking to build a stock 2.0 with no upgrades.
Posted by: napasteve Oct 17 2016, 07:26 PM
As Chance the gardener said "I like to watch".
Posted by: 76-914 Oct 17 2016, 08:15 PM
I'm sure this isn't the first time you've opened up someone else's "can of worms". Just curious Mark; what are the most common mistakes made by rookies that you've witnessed?
Posted by: Vacca Rabite Oct 19 2016, 11:50 AM
I would not worry about the cam bolt to oil pump contact. It was a self-machining problem. It clearanced itself!
(come tune my engine) ;-)
Posted by: Mueller Oct 19 2016, 11:54 AM
thanks for the thread Mark, always nice to learn from someones mistakes (not yours, the previous motor owner! )
bummer you have to spend a little more time and money on it!
Posted by: ottox914 Oct 19 2016, 01:09 PM
I have a set of 2.0 flat top pistons and cyls that are in great shape if you need/want them. I think you were going to give me a ring tonight about some other things? We could talk p/c's then too. They would need rings, but any reasonable re-build, "quickie" or not, should probably have those anyway.
Posted by: JOEPROPER Oct 19 2016, 02:43 PM
This looks to be the makings of a great thread. I'm sure many will be watching. 
Posted by: Kansas 914 Oct 20 2016, 08:12 AM
 This looks to be the makings of a great thread. I'm sure many will be watching.
 Subscribed!
Posted by: McMark Oct 20 2016, 08:55 AM
Got a PM from a member who has stock 2.0 pistons to send me and wants to make this their engine when I'm done. So we're gonna proceed! 
Just gotta finish cleaning the parts and start shipping stuff out that needs it. I found a lightly used Webcam stock grind camshaft in my pile. I'll send that back to Webcam for inspection, resurfacing and I'll get new lifters from them as well.
Posted by: blackmoon Oct 20 2016, 09:20 AM
 I appreciated the build with the explanations and review of the parts
Posted by: McMark Aug 20 2017, 01:49 PM
FINALLY got caught up enough to jump back into this a bit. 
This is an alternate set of pistons I mentioned. Better shape, but still a few warts. These make a pretty good example of typical used pistons. I first hit these with my portable soda-blaster from Harbor Freight. Soda is soft enough to not damage the surface of the aluminum. No other media should be used on pistons. The soda was extremely effective at cleaning out the collected deposits in the ring grooves.
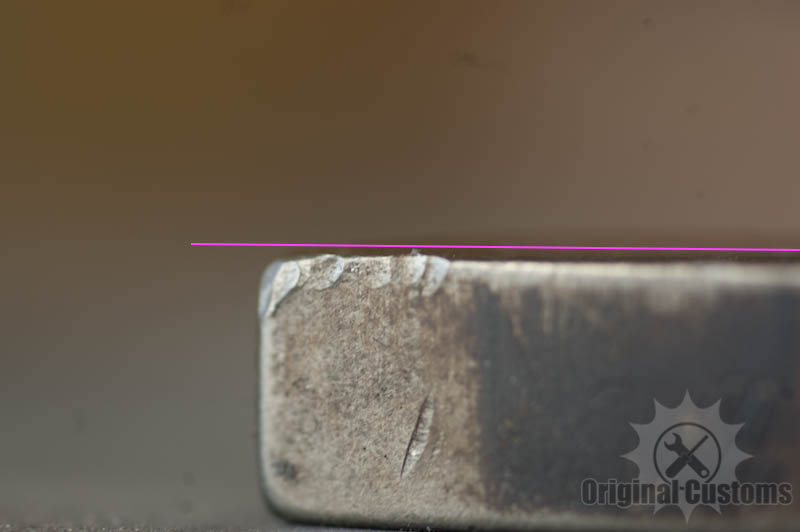
The small divots and the valve impact crescent aren't really a big deal for a budget build engine. The two big factors to watch out for when evaluating these pistons was making sure any divots near the edge of the piston weren't deforming outward and pressing against the cylinder wall. Small imperfections can be carefully and lightly filed and sanded smooth. The rings are what rides against the cylinder walls, so filing/sanding a tiny area is okay. It's also important to make sure there are no 'peaks' from the damage. Peaks sit higher than the piston and collect more heat. These hot-peaks can, in some cases, cause detonation/pinging by igniting the air/fuel mixture before the intended time. Knock down any peaks with sandpaper, small file, or a razor blade. No need to get it perfectly flat, and nothing pictured here is peaky.
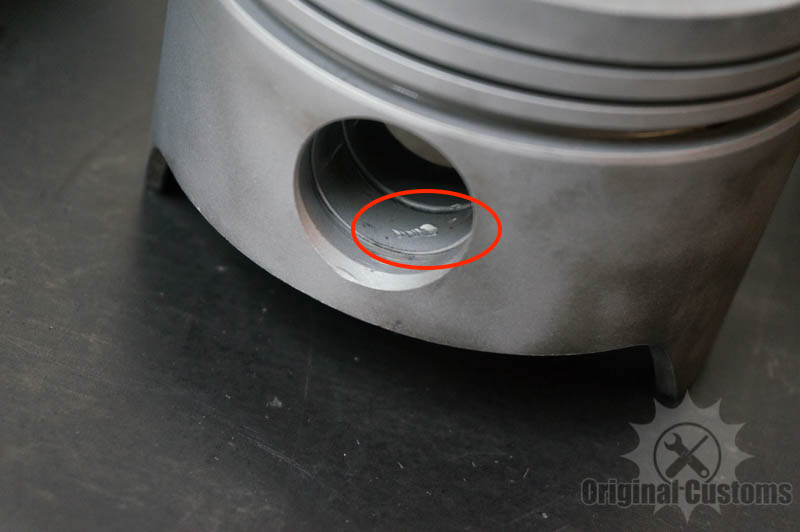
Also, these pistons illustate why you ALWAYS knock wrist pins out with a brass drift. I had to carefully file and sand all four wrist pin bores. This takes a light touch and some skill to know when to stop filing. The idea is to remove only the high spots, and bring the wrist pin bore back to it's original size.
So here's the wrap up the piston evaluation: Remember the scope of this build is targeted at the home builder just looking to breathe a little life back into a tired motor. These pistons took a fair amount of labor to get right, but you save a few hundred dollars. These will work well for this engine, regardless of their imperfections.
Attached image(s)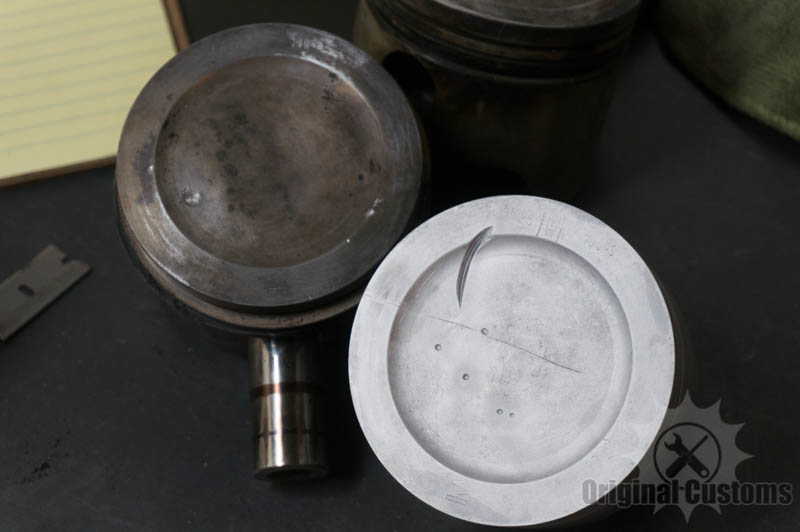
Posted by: pichu Aug 21 2017, 10:34 PM
Nice thread and idea! Not all of us are rich and I want to take out and 'refresh' my engine for education (and winter fun) 
Posted by: Mblizzard Aug 22 2017, 06:55 AM
Got a PM from a member who has stock 2.0 pistons to send me and wants to make this their engine when I'm done. So we're gonna proceed!
Just gotta finish cleaning the parts and start shipping stuff out that needs it. I found a lightly used Webcam stock grind camshaft in my pile. I'll send that back to Webcam for inspection, resurfacing and I'll get new lifters from them as well.
Can't go wrong there. I know from experience! I even did the same drop the screw in but with less dramatic results.
i think going to the 96 mm pistons is a must and if the budget allows big valves. It will never make a huge difference but the changes are notable in normal driving and a bit of hard driving.
Posted by: cary Aug 22 2017, 06:59 AM
subscribed
Posted by: 76-914 Aug 22 2017, 09:23 PM
Tambien.
Posted by: Phoenix914 Aug 23 2017, 05:10 AM
FINALLY got caught up enough to jump back into this a bit.
This is an alternate set of pistons I mentioned. Better shape, but still a few warts. These make a pretty good example of typical used pistons. I first hit these with my portable soda-blaster from Harbor Freight. Soda is soft enough to not damage the surface of the aluminum. No other media should be used on pistons. The soda was extremely effective at cleaning out the collected deposits in the ring grooves.
The small divots and the valve impact crescent aren't really a big deal for a budget build engine. The two big factors to watch out for when evaluating these pistons was making sure any divots near the edge of the piston weren't deforming outward and pressing against the cylinder wall. Small imperfections can be carefully and lightly filed and sanded smooth. The rings are what rides against the cylinder walls, so filing/sanding a tiny area is okay. It's also important to make sure there are no 'peaks' from the damage. Peaks sit higher than the piston and collect more heat. These hot-peaks can, in some cases, cause detonation/pinging by igniting the air/fuel mixture before the intended time. Knock down any peaks with sandpaper, small file, or a razor blade. No need to get it perfectly flat, and nothing pictured here is peaky.
Also, these pistons illustate why you ALWAYS knock wrist pins out with a brass drift. I had to carefully file and sand all four wrist pin bores. This takes a light touch and some skill to know when to stop filing. The idea is to remove only the high spots, and bring the wrist pin bore back to it's original size.
So here's the wrap up the piston evaluation: Remember the scope of this build is targeted at the home builder just looking to breathe a little life back into a tired motor. These pistons took a fair amount of labor to get right, but you save a few hundred dollars. These will work well for this engine, regardless of their imperfections.
Without giving away any proprietary secrets, could you give an example of tools and procedures you would use to correct damage from driving out wrist pins the wrong way? I may have, ahem, seen a piston with some dings like this before.
Posted by: Toast Aug 23 2017, 07:19 AM
Mark,
I know it's not your norm but I'm very interested in having my 2.0 redone. It's getting pretty tired. Sits was refreshing my other motor.... 
I'll be watching for when you have finished this one. 

Posted by: moorepower Aug 23 2017, 09:14 AM
FINALLY got caught up enough to jump back into this a bit.
This is an alternate set of pistons I mentioned. Better shape, but still a few warts. These make a pretty good example of typical used pistons. I first hit these with my portable soda-blaster from Harbor Freight. Soda is soft enough to not damage the surface of the aluminum. No other media should be used on pistons. The soda was extremely effective at cleaning out the collected deposits in the ring grooves.
The small divots and the valve impact crescent aren't really a big deal for a budget build engine. The two big factors to watch out for when evaluating these pistons was making sure any divots near the edge of the piston weren't deforming outward and pressing against the cylinder wall. Small imperfections can be carefully and lightly filed and sanded smooth. The rings are what rides against the cylinder walls, so filing/sanding a tiny area is okay. It's also important to make sure there are no 'peaks' from the damage. Peaks sit higher than the piston and collect more heat. These hot-peaks can, in some cases, cause detonation/pinging by igniting the air/fuel mixture before the intended time. Knock down any peaks with sandpaper, small file, or a razor blade. No need to get it perfectly flat, and nothing pictured here is peaky.
Also, these pistons illustate why you ALWAYS knock wrist pins out with a brass drift. I had to carefully file and sand all four wrist pin bores. This takes a light touch and some skill to know when to stop filing. The idea is to remove only the high spots, and bring the wrist pin bore back to it's original size.
So here's the wrap up the piston evaluation: Remember the scope of this build is targeted at the home builder just looking to breathe a little life back into a tired motor. These pistons took a fair amount of labor to get right, but you save a few hundred dollars. These will work well for this engine, regardless of their imperfections.
Many people don't understand that glass beads shatter and embed in the piston, and then come out in the oil. Have you ever tried plastic media?
Posted by: McMark Aug 23 2017, 09:53 AM
Yeah, glass bead and other media doesn't belong anywhere near engine parts. Soda is great because it dissolves and is comparatively soft. Not many other medias do that. I haven't used plastic media before. When I first got a blasting cabinet I used 'normal' sand like most people. I've also tried garnet, and of course glass bead. But the one that I settled on for my main blasting cabinet is a fine steel grit. Basically looks like sand, but it's steel so it doesn't really break down and it doesn't create dust. But again, it's not for engine parts. The portable soda blaster is nice cause I can just head out to the lawn next to my shop and blast my parts. It rains pretty frequently in MI, so it just washes away.

Posted by: McMark Aug 23 2017, 09:56 AM
There's no real secrets in engine building, IMHO. It's all been done before. I don't feel people hire me to build engines because I 'know the secrets', but rather because I have the experience, muscle memory, and know what parts feel like when they're right. It's not the knowledge, it's the skill to feel when something isn't quite right and that's something you can't type out or take a picture of. So feel free to ask for the 'secrets'.

I used a small 'half-round' file to bring down most of the raised material. Working slowly with light pressure. With each stroke, I'm paying attention to the angle of the file to make sure it's parallel to the bore-wall. I'm also paying attention to the feeling/feedback from the file, noticing how it feels when I first start and paying attention to how that 'chattery' feeling goes away as the protrusions get smaller and smaller. Once I feel I've taken a good 75-85% of the bumps out, I stop and clean the bore and test fit the wrist pin. The first time it never goes in, but I don't want it to. Processes like this should be approached by inching towards perfect, not by trying to hit the target in one shot. Imagine you're running towards the edge of the Grand Canyon, do you want to run flat out and then stop at the last second? Or slowly approach the edge? The former may be impressive when done right, but I'm not here to impress anyone. I'm here to do it right, and a slow methodical approach accomplishes that safely and repeatably. Go too far in filing a wrist pin bore and you're weakening it. Anyway, after a few iterations the pin will slide in, but not smoothly. Pull it back out and look for shiny spots that indicate where the pin and bore are contacting firmly. Focus on those areas, and then switch to some fine sandpaper. I was using old, already worn down 400grit. I would probably grab 800-1200grit if I was using fresh sandpaper.
And speaking of weakening. This technique is not 'correct'. If these were rare pistons that I had no choice but to reuse, and they had this damage I would be outsourcing this to someone who had the correct honing tools to refresh the bore. But this build is about making do with what you've got in front of you. It's about building a engine that's just a little tighter than it was before. If you're looking for ultimate longevity, build a new motor.

So with that in mind (again) I don't think this process is really reducing the strength if done right. If the red circle is the original bore and the blue section is what's left after I file everything down you can see the pin still has original contact and support over a large segment. And by approaching it slowly, that blue line is a HUGE exaggeration of what I did. My final wrist pin bores probably still have WELL above 95% of their original contact area. Probably above 98%.
Attached thumbnail(s)
Attached image(s)

Posted by: Phoenix914 Aug 23 2017, 02:00 PM
Thanks for taking the time to respond with such a well-thought post. Your procedure is rational and intuitive, but when written down it also makes sense! You're my hero of the day. 
Posted by: rgalla9146 Aug 23 2017, 02:07 PM
And finally, it appears the cam was beginning to go flat. It was a reground stock cam (as far as I can tell), but this lobe has a very rough wear pattern on the nose and the associated lifters were looking pretty rough.
can you believe this ?.....VERY heavy wear.
Attached image(s)

Posted by: McMark Aug 23 2017, 03:35 PM
Now THAT'S how you flatten a cam! Nice work!

Posted by: Dave_Darling Aug 23 2017, 11:01 PM
can you believe this ?.....VERY heavy wear.
That is strange; it looks like part of the typical wear? I'm more used to seeing double-arch patterns with a flat-bottomed notch in the nose of the cam. That one looks like a single-arch pattern and the notch has an angled bottom.
Am I remembering wrong, or is this odd wear?
--DD
Posted by: rgalla9146 Aug 24 2017, 08:16 AM
can you believe this ?.....VERY heavy wear.
That is strange; it looks like part of the typical wear? I'm more used to seeing double-arch patterns with a flat-bottomed notch in the nose of the cam. That one looks like a single-arch pattern and the notch has an angled bottom.
Am I remembering wrong, or is this odd wear?
--DD
Guys I wish I could offer more info on how this got so bad. I can't
Dave I can't explain the pattern either. Valves adjuster to near coil bind ? .... no oil pump drive ?
The cam came to me in a box of parts along with a car... long ago.
Posted by: worn Aug 24 2017, 06:51 PM
can you believe this ?.....VERY heavy wear.
That is strange; it looks like part of the typical wear? I'm more used to seeing double-arch patterns with a flat-bottomed notch in the nose of the cam. That one looks like a single-arch pattern and the notch has an angled bottom.
Am I remembering wrong, or is this odd wear?
--DD
Guys I wish I could offer more info on how this got so bad. I can't
Dave I can't explain the pattern either. Valves adjuster to near coil bind ? .... no oil pump drive ?
The cam came to me in a box of parts along with a car... long ago.
The tap pet has worn hollow so that a ball would stand in it end on. The dished tap pet is wearing evenly across its width, scooping away at the edges at the lobe. I am guessing that the tap pet was still rotating in its bore, which was probably pretty durn worn.
Worn.
Posted by: worn Aug 24 2017, 06:54 PM
Darn spell check. Not talking about pet animals. Besides, this is Mark's thread.
Posted by: 914_teener Aug 24 2017, 07:22 PM

Let's assume that when a cam looks like this it should not be reused
Posted by: McMark Oct 2 2017, 06:11 AM
Working on assembling the crank finally. This isn't going to be a step by step build thread. Mostly just pointing out the thing that I look for that aren't listed in most other build threads. This is the nitpicky stuff.
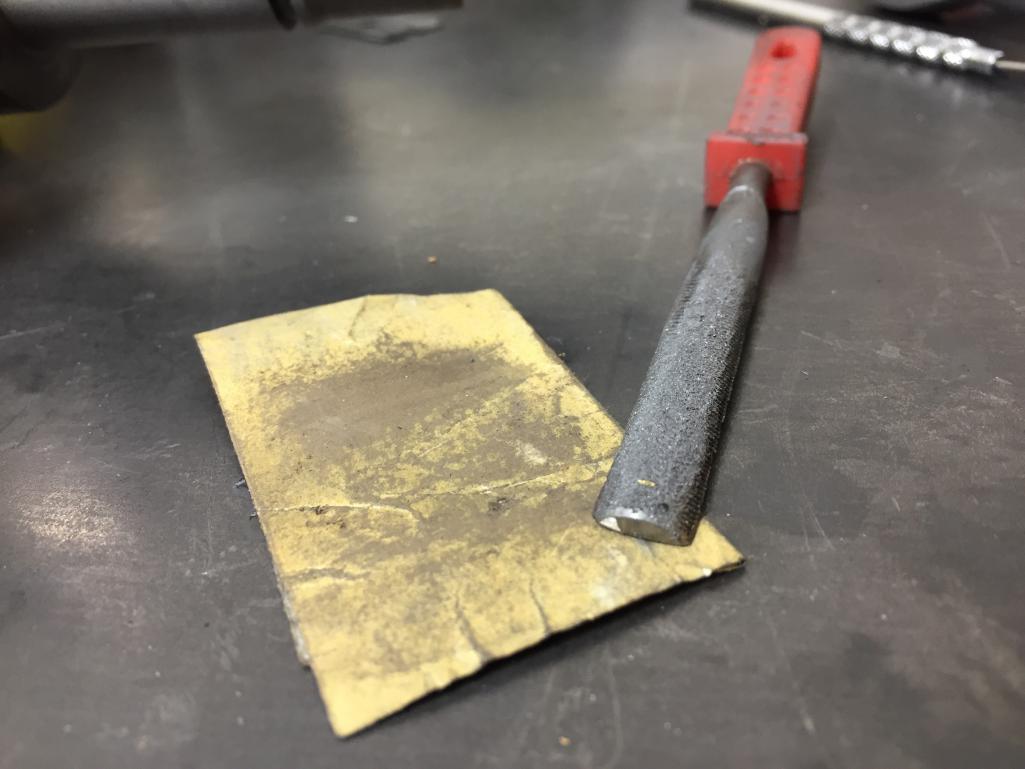
I installed the rods on the crank, and everything went fine with that. But before I heat and install the gears onto the crank I like to make sure and set myself up for success. The keys that locate the gears are often nicked, dented or deformed. I find it very worthwhile to remove the keys from the crank and test fit them in their respective slots. Any keys that have deformations get smoothed on all sides with some fine, adhesive-backed sandpaper (designed for body shops, but works great for many things). As with most things I've talked about in this thread so far, this is a nuanced operation. You're trying to removed to protruding material without affecting the original size of the key. You should also be checking the key in the keyway as you go. Once the key slides smoothly through the keyway, you're done.
This is super helpful when you're trying to quickly slide a HOT crank gear into place and this makes sure it doesn't get stuck. I still keep a brass drift and hammer at the ready when I'm installing gears, but I haven't ever needed them once I started test fitting and cleaning these parts. Now that I started doing this, the gears just slide easily into place.
These are the parts that go on the crank.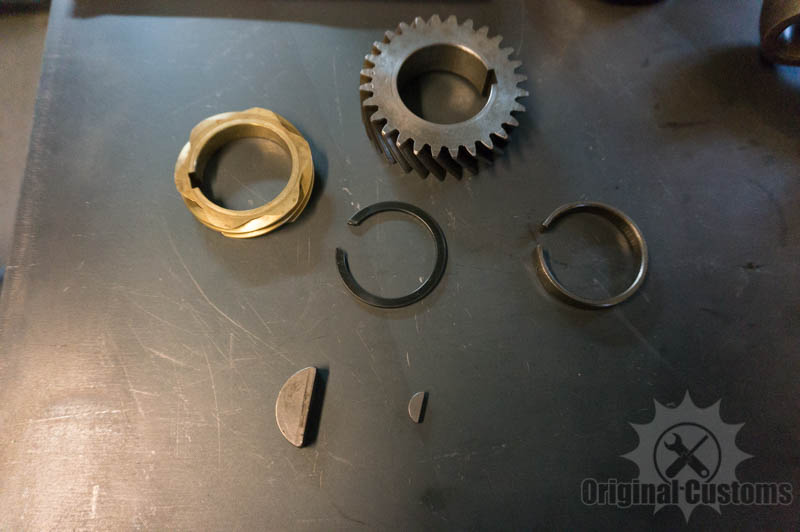
The big key needs to slide through this slot easily.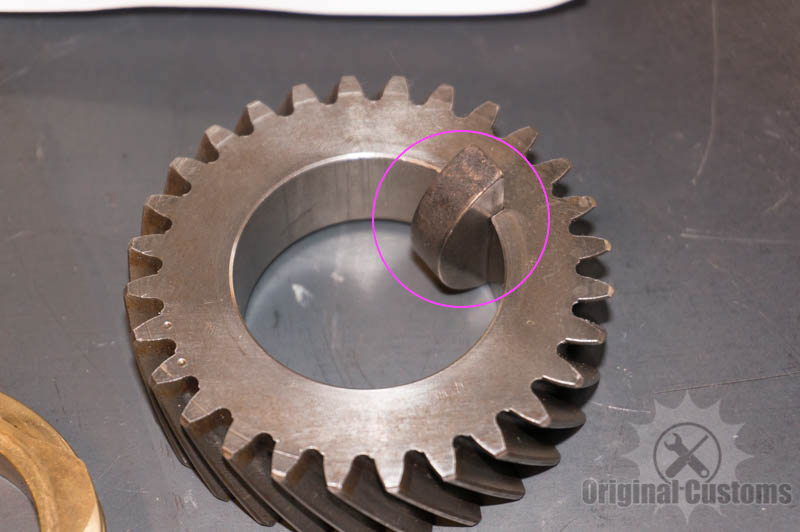
The small key needs to slide in the fan hub slot.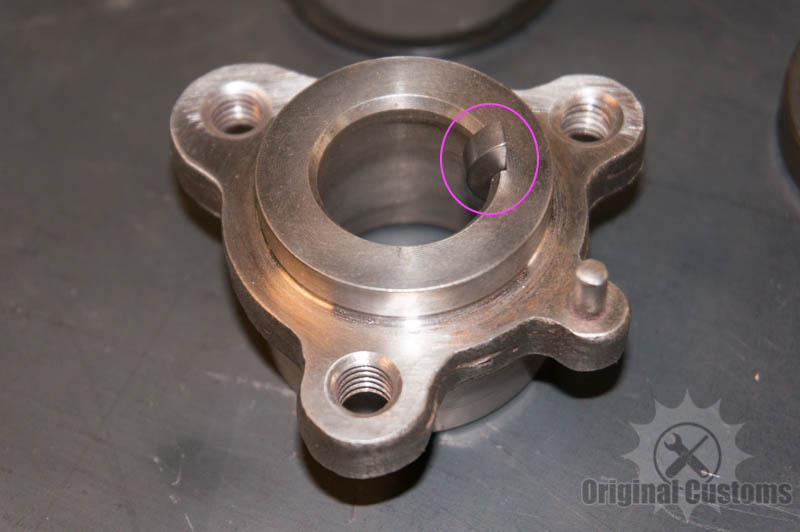
Some examples of damage.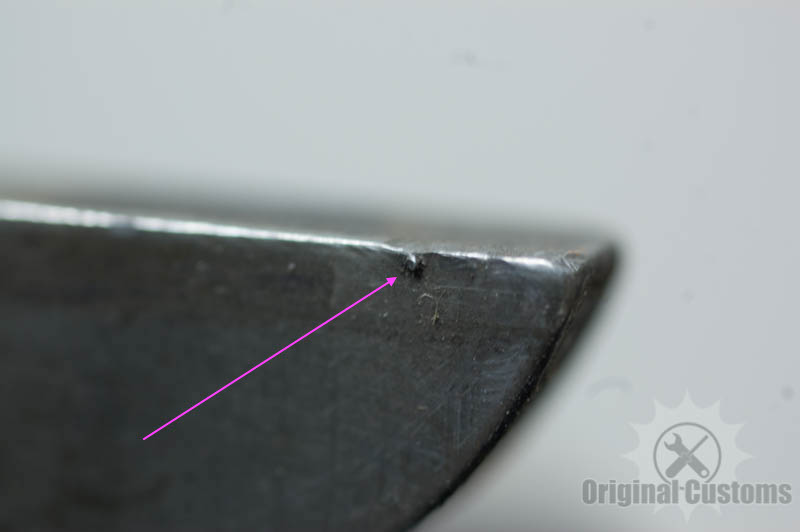
Smoothing keys with adhesive backed sandpaper on a smooth surface. Not trying to remove any more material than just enough for things to slide.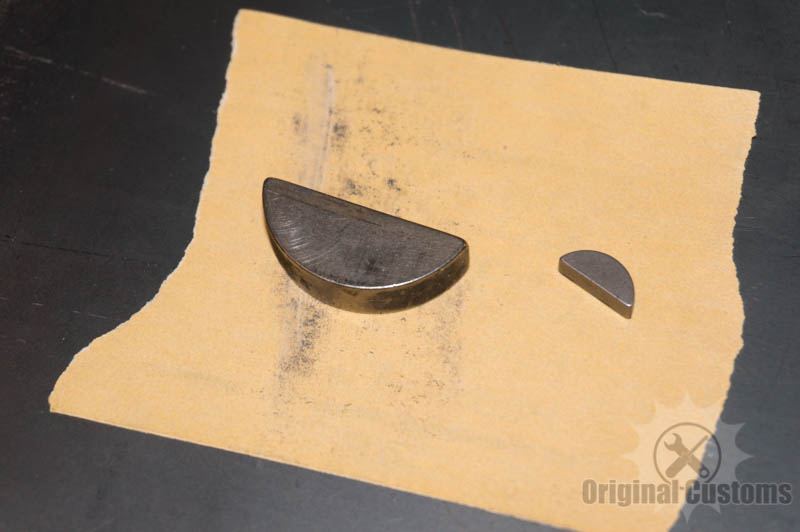
Using a small file with edge serrations to clean and smooth the corners of the keyway. Not all files have the edge teeth/serrations. Again, not trying to remove any more material than just enough for things to slide.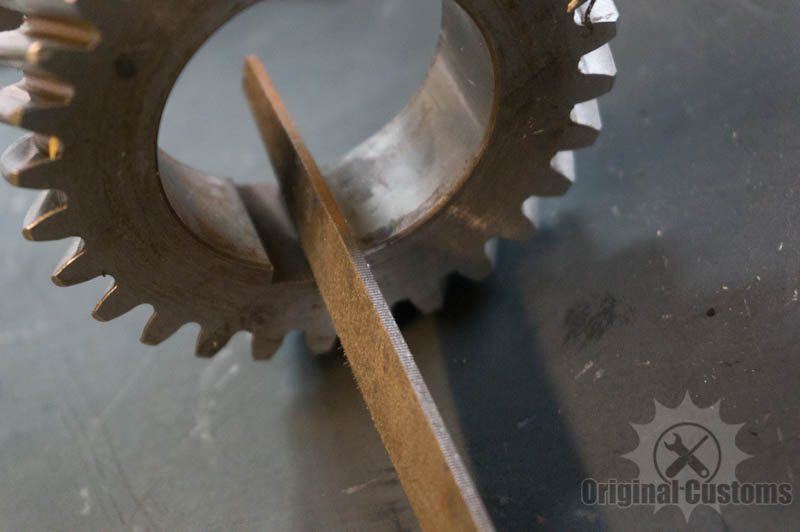
Posted by: 76-914 Oct 2 2017, 09:22 AM
Good info 
Posted by: 90quattrocoupe Oct 2 2017, 01:20 PM
It is the little things that are important in a rebuild.
Greg W.
Posted by: Mblizzard Oct 2 2017, 03:09 PM
I have done a number of complete rebuilds in my day. But unless you do it often you over look these types of details and something as simple as a damaged keyway can cause untold frustration on assembly.
Posted by: DM_2000 Oct 2 2017, 05:34 PM
A few things on this thread. I've repaired / put together countless engines across many brands and have seen lots of damage tried various repairs to see what would happen when an opportunity presents it's self.
Building a "junkyard" motor is a good way to build a decent used engine that is sometimes difficult to find. ( Not all parts are to OE spec, some stuff is worn, attention is paid to crankshaft journals and bearings as these are a typical failure point. )
Piston rings are not used to center or support pistons in their bores. Pistons ( Aluminum ) expand a greater rate than iron bores so if rings supported pistons, they would either be too lose when cold or seize when hot. Piston skirts accomplish holding the pistons square to the bore, over a surprisingly small area due to skirts having an oval diameter and barrel shape lengthwise.
For removing piston pins, a 3/8" socket extension dropped through the pin and a 2nd one clipped on works wonders as a drift. This way the "drift" does not walk on the end of the pin risking surface damage. Think valve guide driver / bushing driver.
For dents in metal, I hammer them flat then scrape level to the surface. This way a minimal amount of material is removed. It is critical to remove any metal that is flaking off.
I'd rather have a somewhat tight fit for keys than loose. Tightish keys help reduce fretting when a part is installed on a shaft. Crankshaft rotation on a 4 cylinder engine is far from smooth, some of this is each cylinder firing and the rest of it is camshaft. The fewer lobes on a cam the rougher the rotation is. Turn the cam and it will be difficult as a lifter rides up a lobe then it will snap as the lobe rides down the other side of the lobe.
Posted by: McMark Oct 2 2017, 08:19 PM
Everyone's got their ways, that's part of what makes this all interesting.
I will address the 'loose' key. I'm talking about a key that slides smoothly through the keyway. Not loose. Not dropping out on it's own. Just smooth even tension. The goal is just slightly less tension than tap-it-with-a-hammer tight. Fine sandpaper and slow methodical process with frequent checks are they way. Like taking 5m to true up one key.
Posted by: McMark Feb 1 2018, 11:16 AM
Getting ready to finally finish this project.
Attached thumbnail(s)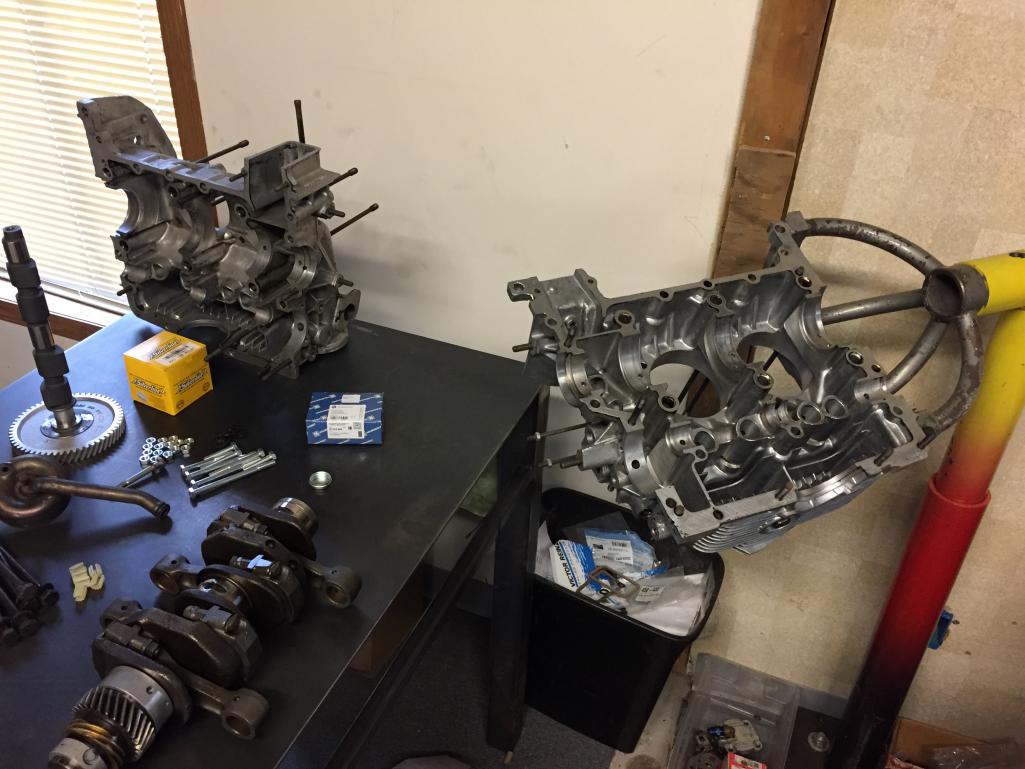
Posted by: JOEPROPER Feb 1 2018, 11:48 AM
Looks like you're ready to go! I'll be interested to see the cam bearing installation on this build.
Posted by: gothspeed Feb 1 2018, 03:08 PM
Looks good so far, can't wait until the microsquirt part
Powered by Invision Power Board (http://www.invisionboard.com)
© Invision Power Services (http://www.invisionpower.com)