Printable Version of Topic
Click here to view this topic in its original format
914World.com _ 914World Garage _ Powdercoating is awesome... even WITHOUT an oven!
Posted by: Lawrence914-6 Jun 24 2003, 11:22 AM
I'm about 3 hours into my first powdercoating adventure. Man, this stuff rocks. Again, Ginter is right. If you have a garage, and don't have your own setup - you might want to rethink that.
My setup from Columbia Coating, including about 8 pounds of various metallics/clears was about 200 bucks. Pam picked up some extra natural corks (because she saw it on American Chopper). They seem to work as well as the synthetic/plastic corks for plugging bolt holes.
I will post pictures later... gotta get back out and monitor temps.
-Rusty 
Posted by: John Jentz Jun 24 2003, 03:42 PM
I thought you were doing this in a parking lot????????????????????
Posted by: elmonte Jun 24 2003, 03:53 PM
What are you using for heat? THE SUN!!
Posted by: Lawrence914-6 Jun 24 2003, 04:53 PM
I removed the entire front suspension, and took it to Pam's garage, where we're doing the powdercoating.
For heat, we're using a 28,000 BTU propane heater. It's not ideal, but it's a solution if you don't have 220 power in your garage.
Pictures soon.
-Rusty
P.S. You joke about the sun, but that's actually been done. Ask Ginter for the details - I don't remember enough of the story to tell it correctly.
Posted by: Gint Jun 24 2003, 04:56 PM
Yup. A guy sent me pics of an old Weber BBQ grill with sides he built and painted it all black. Powdered his parts and placed them in the grill in the sun for the afternoon. He said it had been years since he coated them and they were still mint.
Posted by: elmonte Jun 24 2003, 04:59 PM
What temp do you need to get to and how long do need to
hold it there?
Posted by: Gint Jun 24 2003, 05:10 PM
Finer details really depend on the powder used (spec sheet will tell you). But generally speaking 400F +/- for 20 minutes after flow out. Flowout is when the powder liquefies and turns to a glossy finish (that's how you tell it has occurred). Flow out usually takes around 5 minutes, but that is dependent on the size (mass) of the part.
Posted by: elmonte Jun 24 2003, 05:18 PM
Gint
thanks for the info
Rusty- Curious to see your setup. For some reason my wife
says NO!!! to any powdercoat in her oven..
THANKS
Posted by: mr914 Jun 24 2003, 05:25 PM
Please, tell me more 
I have access to two desicant ovens at work.
Nothing like a goverment job after hours 
No wonder a guy about 20 miles away only wants 30 bucks to do a couple of parts.
Posted by: Gint Jun 24 2003, 05:37 PM
It's not hard or technically challenging. It can be tedious though. Trying not to knock your part or blow or knock the powder off the part while getting it in the oven, stuff like that. It's almost not worth your labor as compared to having it done professionally. Unless you're really cheap. On the other hand, it's nice to do it yourself. And handy to be able to blast and powder coat anything you want even at a moments notice.
Pull a rusty metal part off the car during routine maintenance? No problem! Bead blast, powder and bake!
Posted by: mr914 Jun 24 2003, 06:17 PM
It does help if you have the resources to do it yourself......
Besides, I'd love to know how to do it myself.
It's like brewing your own beer, the first few batches are fun, then it turns into a pain in the ass....
Posted by: jonwatts Jun 24 2003, 11:23 PM
Did someone call my name?

Good going, LB. I've thought of trying the gas heater idea also. It would be pretty easy to make a reflective hood to help heat the parts uniformly and not have to rotate them as much.
Can anyone report on how well it works on aluminum?
Posted by: Mike T Jun 24 2003, 11:48 PM
To do this in an oven, it needs to be electric? Gas won't work?
Mike (no 220v in garage) T
Posted by: GWN7 Jun 25 2003, 12:47 AM
I saw some pics on a site that showed them cureing with a round propane heater on the top of a 20lbs tank. They were using a piece of plywood as a reflector. Think I bookmarked it, but I'm at work now. Will look tomorrow.
Posted by: 914Timo Jun 25 2003, 02:10 AM
Heh.... We have 220V everywhere and I have even 360V in garage, but I dont know where I could buy the powder

Different continentals, different problems....
Posted by: maf914 Jun 25 2003, 06:47 AM
Plywood as a reflector for a propane heater? Sounds a little iffy to me.
Mike
Posted by: Lawrence914-6 Jun 25 2003, 07:09 AM
My source for powdercoating is:
http://www.columbiacoatings.com/
Their website needs some professional help, but the product is good. If you check the Online Store for the Chicago Electric powder kit, it's the best deal. $135.00.
It comes with powder, PC masking tape (the good green stuff), plugs of various sizes and hooks.
Attached image(s)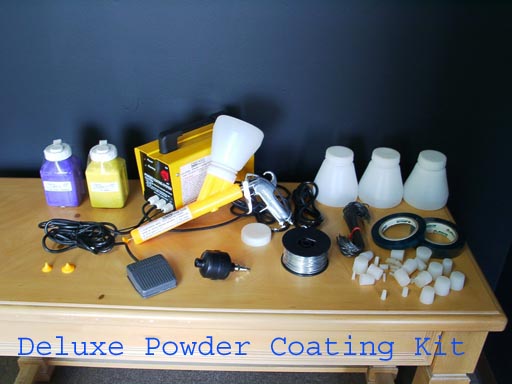
Posted by: campbellcj Jun 25 2003, 12:22 PM
I wonder if a gas grille could be used? You could potentially put some sheet metal, slab of slate/rock/brick or whatever over the grille area to even out the heat. Or just get it super hot and then turn off the burners. My grille has ceramic tiles that absorb and radiate quite a bit of heat after the flame is off.
Posted by: Lawrence914-6 Jun 25 2003, 01:36 PM
A gas grille would be good, if you could find an old one.
The key is keeping a steady temp. I'm checking that thermometer every 2-3 minutes (Walmart, about 2 bucks.)
Sorry no pics yet. I forgot my camera-to-computer cable.
Plywood as a heat reflector sounds like a recipie for fire. I'm using heavy grade sheet steel.
Posted by: Jeff Bonanno Jun 25 2003, 10:10 PM
Rusty,
wha's the electro-gizmo thingy for in that setup? what is the procedure (readers' digest style)?
jbb
Posted by: Lawrence914-6 Jun 25 2003, 10:47 PM
The yellow box in the picture? It controls current to the gun and the ground.
How it works is like this:
1. The item to be coated is hooked up to a negative cable (with an alligator clip) and it's charged negatively.
2. Gun sprays out the powder. On the way out the tip of the gun, the particles are given a positive charge.
3. Particles stick to part. They stick pretty damned well, too. I was able to move parts around easily without knocking powder off.
4. Part is then baked, and the paint cooks into the lovely stuff we all like - a cured powder coating!
Simple enough?
-Rusty
Posted by: Jeff Bonanno Jun 25 2003, 10:52 PM
Rusty,
got it! thanks - have been wondering about that process. wonder how long before kellzey gets one...
Jeff
Posted by: 914Timo Jun 26 2003, 12:26 AM
Thanks Rusty about the explanation. That was something complitely new to me. 
Posted by: seanery Jun 26 2003, 07:23 AM
I think Rusty is just making all of this up!
I don't he's doing any powdercoating!!
I don't even think there is such a thing as powdercoating!!!
I think he even made up the word!!!!
NOW, prove me wrong and show us some damn pictures!!!!!
Posted by: Lawrence914-6 Jun 26 2003, 03:48 PM
To review.. this is the before picture.
Attached image(s)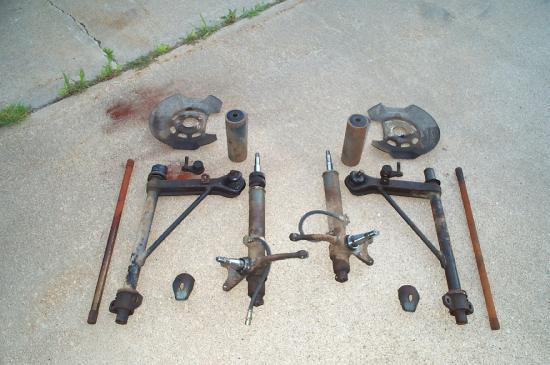
Posted by: Lawrence914-6 Jun 26 2003, 03:49 PM
Here's the basic setup. I was going to buy sheet metal as a heat shield/reflector, but Pam suggested using some old shelving sections. Very good call on her part.
The heater (a Mr Heater two element model) was 28000 BTU. I did the entire front suspension on less than one bottle of propane.
Attached image(s)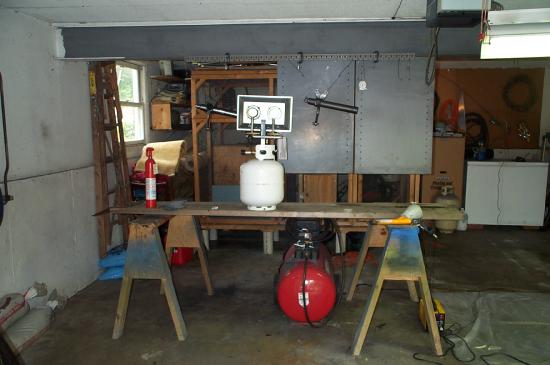
Posted by: Lawrence914-6 Jun 26 2003, 03:50 PM
The heater really wasn't this far away.. but it's just a good pic of the setup.
Attached image(s)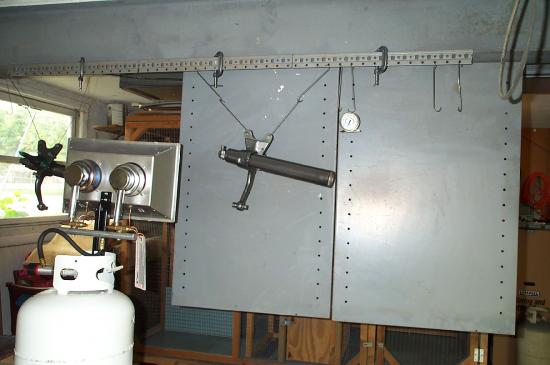
Posted by: Lawrence914-6 Jun 26 2003, 03:51 PM
Taped and plugged and coated in "smoke chrome".
Attached image(s)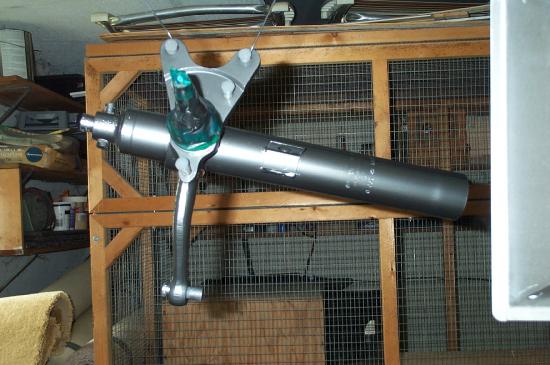
Posted by: Lawrence914-6 Jun 26 2003, 03:52 PM
Close up of the gun itself. It's made of sturdy plastic. It slipped out of my gloved hand once, and didn't chip or crack.
Attached image(s)
Posted by: echocanyons Jun 26 2003, 03:54 PM
Lookin Good Lawrence!
What temp do the pros cook them too?
Posted by: Lawrence914-6 Jun 26 2003, 03:54 PM
The foot pedal is to activate the negative charge (on the item). It was just as easy to hold the small pedal switch in my hand when working on smaller parts.
The drop cloth is to catch overspray. Overspray wasn't bad at all on the metallic smoke chrome. The clearcoat powder was like spraying powdered sugar. I think part of the struggle was the high humidity.
Good thing: catch your old powder, and you can reuse it if it's not full of dirt (hence the dropsheet). Just keep it separate from the new powder.
Attached image(s)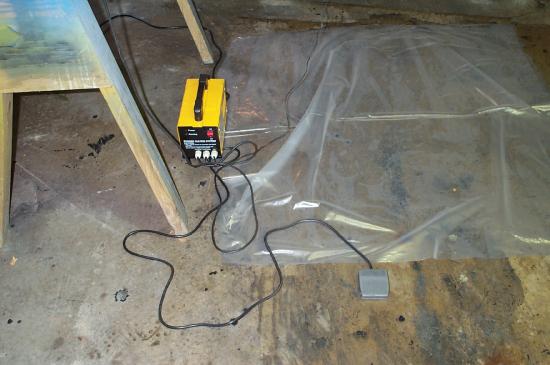
Posted by: Lawrence914-6 Jun 26 2003, 03:55 PM
Some items before the clearcoat.
Attached image(s)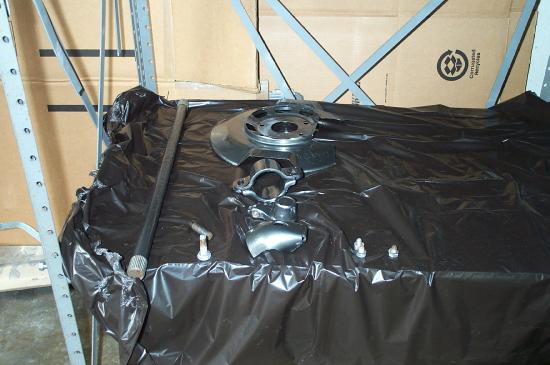
Posted by: Lawrence914-6 Jun 26 2003, 03:57 PM
Cleaning up some spots before I use Opsho/Rust Mort/Rust Free/your favorite phosporus based rust treatment.
Yeah, the wire wheel bit my knee. 
Attached image(s)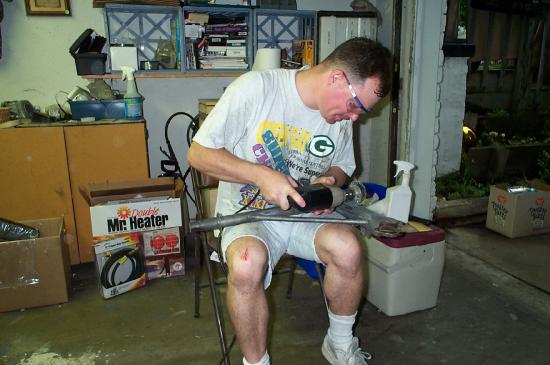
Posted by: Lawrence914-6 Jun 26 2003, 04:01 PM
Recoating the brake shields after scuffing them with 220. This was an adventure, and I learned several things.
1. The thicker powdercoating gets, the harder it is to apply the next layer (of clear or whatever). The electrical charge (negative at the part) is weaker, and attracts less positively charged powder.
2. Very thin metal parts cure MUCH faster than smaller ones. You can over-cook quickly if you're not careful. Watch how the powder flows, rather than the exact temp.
3. I can't imagine ever using an oven. That must be so much harder, because of knocking the powder off, etc. In my setup, I hung them exactly as they'd be heated, powdered them, and transfered them (on the hooks) to the heating area.
Attached image(s)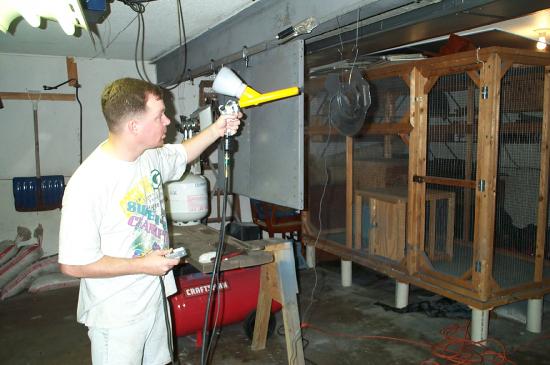
Posted by: AZ914 Jun 26 2003, 04:04 PM
The Packers...? :finger2:
BTW.. the parts look good....!
Posted by: Dave Cawdrey Jun 26 2003, 04:04 PM
What goes in that cage?? 
Posted by: Lawrence914-6 Jun 26 2003, 04:04 PM
Spraying an A-Arm.
Please note the "ground strap" hooked to the end.
1. Grounding points don't work well through masking tape.
2. If your hanging hook contacts the metal part directly, you can ground on the hook. That's often much easier.
3. You need to be creative with your hanging methods. I plugged the ends of the A-Arm and then jammed the hooks into the plugs.
4. Wherever you hang an item will leave a small dimple during the curing process, obviously.
Attached image(s)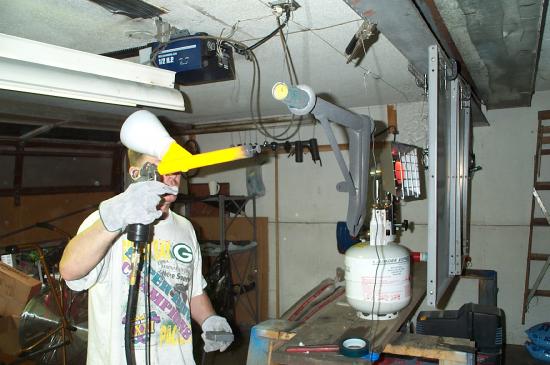
Posted by: Lawrence914-6 Jun 26 2003, 04:06 PM
More spraying, same part. The powder is charged, so most of it will go to the part like a magnet.
Attached image(s)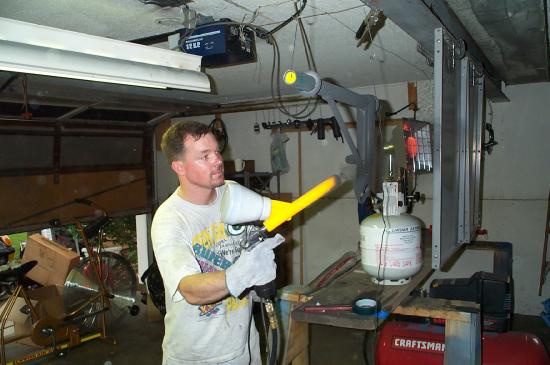
Posted by: Lawrence914-6 Jun 26 2003, 04:07 PM
Cooking clear onto a strut.
Clear requires some practice. The finer the powders, the more difficult it seems to be to spray.
Attached image(s)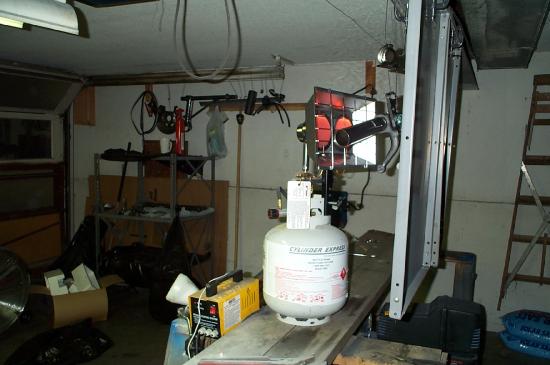
Posted by: Lawrence914-6 Jun 26 2003, 04:12 PM
Next part in line to have clear cooked on it.
The entire process can be set up to be an assembly line. Some tips:
1. Generally, only metallics require a clear coat.
2. Spray all your base parts. Have a place set up to hang them to cool. DON'T TOUCH them with your bare hands or anything else! Just leave it be.
3. Then, you can cover them directly with clearcoat.
yeah, yeah.. you touched it after the basecoat didn't you, cause it looked all purty?
4. Put some vinyl gloves on. You need to rewash with water soluble degreaser, and then flush with water. Get ALL the water off you can with clean lint-free towels. If you leave ANY water on it at all, the clear will water-spot. Best to pre-heat to 150 or so, as well, then spray clear.
Attached image(s)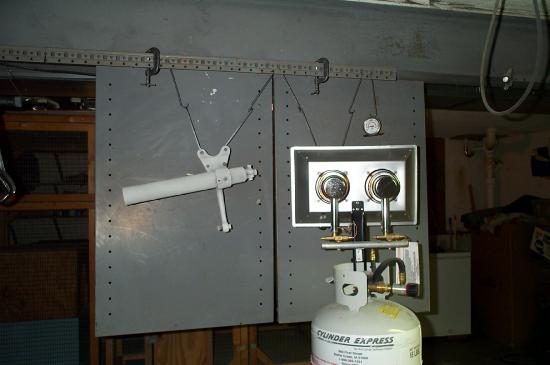
Posted by: Lawrence914-6 Jun 26 2003, 04:14 PM
Here's the finished product, all spread out on the floor. The picture doesn't do it justice. Also added to the picture is the crossmember and the master cylinder that I'm rebuilding.
-Rusty
P.S. After several attempts at the brake shields, I ended up doing them with satin black powder. Even then, they didn't turn out exactly the way I wanted. Someday, I'll take the time to redo them.
Attached image(s)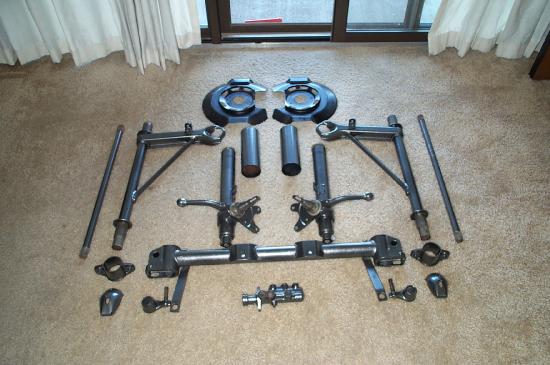
Posted by: Lawrence914-6 Jun 26 2003, 04:16 PM
Hi Kelly!
My target temp was usually 375, for 15 minutes on the basecoat, and 20-25 minutes on the clear.
-Rusty
Posted by: Lawrence914-6 Jun 26 2003, 04:19 PM
Pam's dog. It's not particularly user-friendly to strangers, so she has the kennel built in the garage.
Posted by: L8Apex Jun 26 2003, 05:06 PM
Funny how everyone only cares about what's off topic. Green Bay Packers and the cage. hehehe
Nice, reminds me of Gunnarracing.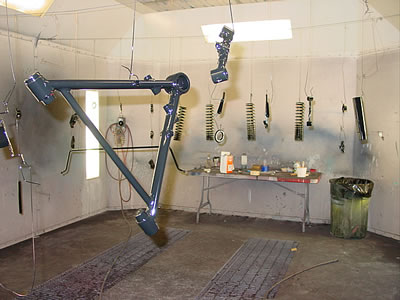
Posted by: Lawrence914-6 Jun 26 2003, 05:15 PM
yeah, I know what you mean. 
A booth would be great. I wonder if a typical paint booth could get to that temp?
When I was at a local coating place, they had large ovens that had a moving chain that moved parts through a timed cycle. Some of these ovens were 12-15 feet long, 6 feet high and 2-3 feet deep.
Posted by: ChrisReale Jun 26 2003, 05:16 PM
Way to go Rusty. Thta is one hellofa job.
Posted by: Curvie Roadlover Jun 26 2003, 05:43 PM
very nice!!! 

Posted by: seanery Jun 26 2003, 05:45 PM
This is a hoax! Just like the man on the moon! 
Rusty, they look nice...good job...do mine for me?
Posted by: Lawrence914-6 Jun 26 2003, 06:07 PM
Thanks, everyone, for the compliments.
If you were closer.. sure, Sean.
It's not difficult, but does have a brief learning curve. The Heater was a b-day present (early) from Pam.
Total cost: tools, powder, prep chemicals: about 300.00, with LOTS of powder left over. I used about a pound of smoke chome, and less than a pound of clear.
The cost doesn't include stripping/media blasting the parts.
Posted by: Pam Jun 26 2003, 07:00 PM
Since Lawrence has weighed in on the powdercoating experience - let me add my two cents worth....(this may be of interest to those of you who think 'gee - I wish I had someone to help me in the garage'). Remember - we are there to help but we also remember those moments you wish we wouldn't.
Some of you may know from previous posts that I'm always concerned about a fire. Sure...we survived the 2 gallons of gas on the garage floor from a huge fuel leak on the Bee and we've survived the learning curve on carbs ("whoa...that really flamed up, didn't it")...but I figure its only a matter of time before I have to pull the pin on the fire extinguisher. Propane....flame just six inches from the tank.....seemed like a little browse through the instructions would be in order before firing it up so I suggested to Lawrence that he read the instructions before lighting the heater. I was informed "I know every damn thing I need to know about this and I don't need no f'n instructions".
So...I stand patiently by with the fire extinguisher in my hand as he puts the match directly into the hole the propane is coming out of. The force of the gas coming out of the tank blows out the first match..and the second....and the third....so, he does what any reasonable person would do....puts two matches together and holds them directly in the stream of the propane. Still...the force blows the matches out. Does he go for the instructions? Of course not...he informs me he needs 'stronger matches'.
As I stood and watched him hold two matches with the vise grips...I reluctantly put down my fire extinguisher and go find the instructions. Certainly 'stronger matches' weren't the way they designed this thing. I look at the picture. I look at where he's lighting the heater. What's wrong with this picture??? Oh....apparently stronger matches aren't necessary if you don't put the matches directly in the stream of propane. I mention in a supportive and helpful tone that he might want to move the match to the front of the heater...but by that time he's found another hole he can stick a match in (with, of course, the same result...that flame just won't catch) and he tells me he 'knows what he's doing'. Okay..no more supportive tone - I toss the instructions at him and tell him he'd have more success if he lit the heater...........somewhere around the front where it says 'Light Here'.
Along the same lines - I think you've seen the picture where he has the wire wheel scrape on his knee. Anyone care to guess who in the garage said 'you shouldn't do that while you are sitting in case the wheel jumps and you hit your skin??' (in fairness - I learned that the hard way - when we re-did the Bee I was forever catching the wire wheel on my shoe strings and had scrapes on my ankles almost every day...the guys at work were really beginning to think 'car repair' was my term for something much more interesting)
On final thought...it was hot and it was two really long days but Lawrence did a great job and he should be proud of how good the pieces look.
-Pam
Posted by: Qarl Jun 26 2003, 07:22 PM
Nice job Lawrence!
Can you come over and do mine?
Regards,
Karl
Posted by: campbellcj Jun 26 2003, 07:29 PM
Pam's dog. It's not particularly user-friendly to strangers, so she has the kennel built in the garage.
Hey, that's a good idea. My psycho dog goes into the garage when visitors come over...but then if -they- go into the garage...

Posted by: Lawrence914-6 Jun 26 2003, 07:33 PM
In all fairness, and I wish I had a close-up picture of the propane heater... it LOOKED like the logical place to start the unit.
Unfortunately, it wasn't. But lighting the heater directly in the propane stream coming from the tank made a really cool noise.
Posted by: Lawrence914-6 Jun 26 2003, 07:35 PM
You have exactly the right idea.
Jasmine, Pam's basenji, likes to eat stuff. Lots of stuff. Well, pretty much anything if she's in an aggravated mood.
Since the garage has shovels, rakes and implements of destrucion (bonus points if you know where that came from), not to mention boxes of shoes, chemicals, etc... it's best that she's contained in the garage to keep her safe.
Posted by: GWN7 Jun 26 2003, 07:49 PM
Nice job on the parts. All I can say about the tank lighting is boom. Don't try and vacume rocks out of your gas tank either.
Posted by: jonwatts Jun 26 2003, 10:41 PM
Alice's Restaurant
(and I knew that way before I lived in the vicinity of it)
Posted by: jonwatts Jun 26 2003, 10:42 PM
I'll have to try that one on Monique.
Geoff
Geoff, I'm sure you could figure out some way to get the powder to stick to her but I'm not sure she'd survive the curing process.
Posted by: jonwatts Jun 26 2003, 10:48 PM
LB, is it more difficult to see the clear flow out since it's, well, clear?
I BBQ with coals instead of gas, and I forget how much does a bottle of propane go for. Does $50 for a bottle and $25 for a refill sound about right?
Posted by: Bleyseng Jun 26 2003, 11:18 PM
Jon, the curing process would be one of those HOT Surinamese dishes she can make. They get your body temp up to atleast 350 degrees.
Geoff
Posted by: Lawrence914-6 Jun 27 2003, 06:20 AM
Nope. Actually, it's easier to see. It sprays on opaque white. Then as it flows out, it becomes clear.
Posted by: Gint Jun 27 2003, 07:59 AM
I've been out a few days and ignoring you guys.
Looks great Rusty. Nice job.
Thanks for the story Pam. I got a good chuckle out of that.
Posted by: Lawrence914-6 Jun 27 2003, 08:21 AM
Thanks, Mike. You were the one that inspired me to do this. All the work you did on the brown car was beautiful.
Hi Jon,
Actually, that sounds very high. I was at Menards on Monday night, and saw propane bottles (with current non-tip safety valve) for less than 30 dollars. Exchange (refills) at the local foreign-operated convienence store was 16 dollars. I think 16 bucks is high, but it's just up the street.
-Rusty
Posted by: maf914 Jun 27 2003, 11:51 AM
Here in the Southeast a propane bottle exchange goes for about $16. Just a year ago it was $13, but one day all of the vendors got together and said "screw you, we're charging $16"!
Mike
Powered by Invision Power Board (http://www.invisionboard.com)
© Invision Power Services (http://www.invisionpower.com)