Printable Version of Topic
Click here to view this topic in its original format
914World.com _ 914World Garage _ Center tunnel
Posted by: iansale Jun 25 2003, 08:04 PM
Has anyone seen a diagram as to what the center tunnel is supposed to look like? The clutch tube is pulled through the firewall and laying loose in the tunnel and I'm trying to figure out what to do. I have no clue what it is supposed to look like, so am having a little trouble developing a strategy.
Posted by: drew365 Jun 25 2003, 09:49 PM
You will need to strip your carpet off the center tunnel, you might as well take the seats out to give yourself room to work. There is an access panel at the rear of the top of the tunnel that will let you get at the clutch tube where it connects to the firewall. It will need to be welded back in place. The front weld is probably broken also. You'll need to cut an access door just in front of the shifter to weld that back in place. Here is a pic of the access hole I cut with a Dremel on three sides, folded it up and then screwed it back in place when I was done.
Attached image(s)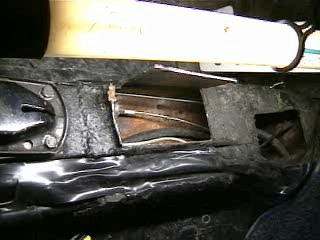
Posted by: drew365 Jun 25 2003, 09:50 PM
A close up
Posted by: drew365 Jun 25 2003, 09:52 PM
Sorry,
Attached image(s)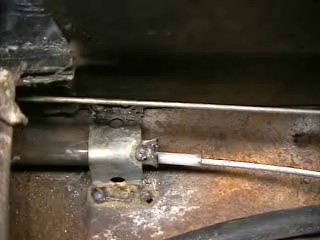
Posted by: iansale Jun 26 2003, 04:51 AM
Thanks, Drew! I don't suppose you have a picture of what the engine-side of the firewall looks like after the weld job, do you?
Posted by: drew365 Jun 26 2003, 08:28 AM
Mine wasn't broken at the firewall so I don't have any pics of that area. I tried a search here using clutch tube but didn't get much. I think if you try a search on Pelican you'll get a few threads that will help. Or maybe some of our senior citizens here will help a newbie out.
Posted by: SirAndy Jun 26 2003, 11:37 AM
the weld is right here ...
Attached image(s)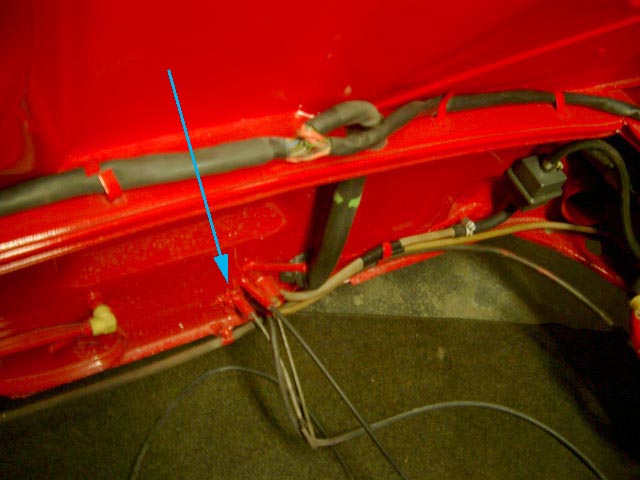
Posted by: iansale Jun 26 2003, 07:54 PM
Thanks, guys. I might finally have an excuse to buy that welder I've had my eye on in the Grainger catalog!
Posted by: Racer Chris Jun 26 2003, 08:07 PM
The factory brazed the tube to the firewall, and to the tab inside the tunnel. Less chance of a weld booger inside the tube from overpenetration that way.
If you try to weld where there is any residual braze the weld will be no good.
Posted by: crash914 Jun 27 2003, 05:17 AM
If I remember correctly, braze is stronger than a mig weld........You can get a cheep bottle set of O2 and map gas from home depot.........about $60.00...This is what I am planning to do.. at least until I can sneek in a $400.00 mig welder by the wife...... 

Posted by: James Adams Jun 27 2003, 07:15 AM
Brazing is not stronger that mig. Brazing is more like soldering - the joint is made of weaker brass and the bond is not very strong either.
Mig is steel all the way through - if done correctly the joint is just as strong as the base metal.
The risk of penetration and screwing up the tube is a real concern for an amateur welder, though. Brazing (and ending up with a mechanically strong joint) is not exactly easy, though, either.
Posted by: Racer Chris Jun 27 2003, 08:01 AM
Brazing, if done correctly, can easily be stronger when tubing or sheet metal are involved. The main reason is surface area. A small weld with heat stresses at the edges can crack or tear if bending or flexing occur, whereas a brazed joint spreads filler around a relatively large area, minimizing stresses. I would suggest practicing with test samples before tackling the real thing if you don't have much experience brazing. for the bracket in the tunnel it might be worth brazing the bracket to the tube, then mig welding the bracket to the chassis.
One potential downside to using an open flame is the proximity of fuel lines. This should be done while the fuel lines are removed.
:kaboom: 
Posted by: James Adams Jun 27 2003, 08:44 AM
Good point Chris. I almost said something about how a mig weld usually fails in the area surrounding the weld if there is any flex in the joint.
Powered by Invision Power Board (http://www.invisionboard.com)
© Invision Power Services (http://www.invisionpower.com)