Printable Version of Topic
Click here to view this topic in its original format
914World.com _ 914World Garage _ L-jet AFM replaced
Posted by: malcolm2 Dec 25 2016, 01:13 PM
Update on my post about the BENT AFM. FYI prior to the bending, the car was running great as my daily driver.
I now have a 75 7-pin AFM found on San Diego Craigslist and shipped to TN. I have verified all the proper ohm readings on the connector, fuel pump contacts especially. The flap has full range of motion and the PCB track looks similar to the AFM I removed.
The replacement unit is installed as received and the car will only run (and poorly I may add) if I mash the accel pedal to get about 3000 rpms.
I had planned to go thru the Itinerant ( http://www.itinerant-air-cooled.com/viewtopic.php?t=7761)process today, but I can't get it to idle. I only got as far as setting the MIXTURE screw to the 4-1/2 turn spot.
I do have the new intake elbow on and have tight vacuum line fittings. No vacuum lines appear to be a problem. Triple checking now.
Just tinkering around, I opened the idle screw on the TB, but that did not help.
What do you think? What is next?
Clark
Posted by: jim_hoyland Dec 25 2016, 04:16 PM
Open the relay board and look at the 4 spade connector in the lower left corner. Ground the spade in the upper left corner. It's designated III in the diagram.
When you key the ignition, the fuel pump will run without having to rely on the dual relay.
If the engine runs then you have a connection issue at the dual relay
Attached thumbnail(s)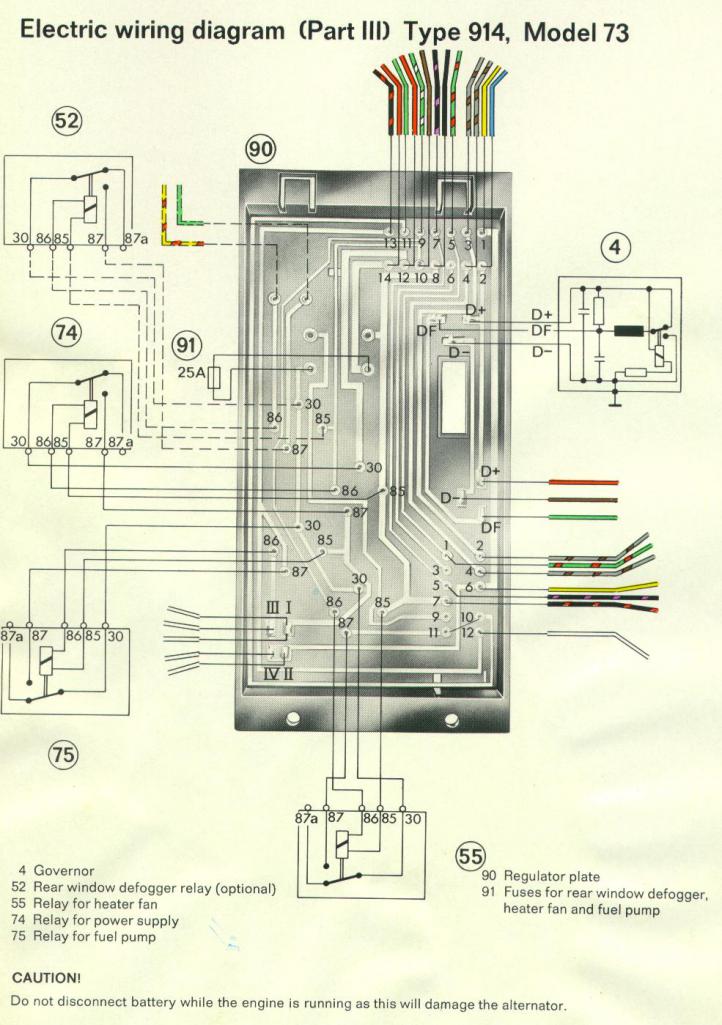
Posted by: malcolm2 Dec 25 2016, 04:36 PM
No change at all. It will fire up quickly, But takes some accel pedal pumping to get the revs up, then is controlled with the pedal at 2000- 3000.
Remove my foot and drops to a sputter and I turn the key off.
Posted by: jim_hoyland Dec 25 2016, 05:04 PM
Disconnect the fuel line and check for flow - carefully....A permanent fuel pressure gauge mounted in line is a great diagnostic tool.
Posted by: malcolm2 Dec 25 2016, 06:50 PM
I have an in-line fuel press guage. Plenty of pressure.
Here is a shot of the residual pressure after my current shut down. small, fuzzy photo, but it is @ 35 psi.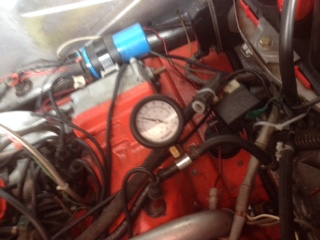
Not knowing anything about this afm, could the spring tension be tight? The seller said it came out of a 75 914. It seems to have a delayed reaction to the pedal.
I gotta get a helper to crank while i watch.
Posted by: timothy_nd28 Dec 26 2016, 01:00 PM
Before adjusting the air flow meter, you should double check the basics. Start with making sure that your valve lash is perfect and not too tight, especially the intake valves. This could of been the reason to why the car backfired.
Next, do a compression test on each cylinder. Then post some pictures of the spark plugs. After that, get the car started, manipulate the throttle linkage so that the car stays running. Then remove one fuel injector connector and make sure you hear the engine stumble. Do this for each injector.
It would be nice to verify timing, but this may be hard to do if your car doesn't want to run anything less than 3k rpm.
Next, I would assume your car is inside a warm garage? If so, remove the hoses leading to the aux air valve, temporarily cap at the rubber S boot and cap at the plenum. Do the same for the decel valve. These two items are not critical for the engine to run and would be two less variables to worry about.
Then, read that manual about adjusting the AFM. You really need to borrow your friends air/fuel ratio gauge meter thing to adjust it correctly.
Posted by: jim_hoyland Dec 26 2016, 01:55 PM

And : Be sure the resistor pack does not have a broken wire; and check the harness ground is attached tot he spade on the motor
Posted by: malcolm2 Dec 26 2016, 02:43 PM
Thanks gentlemen. Gives me plenty of things to check. Man do i hate checking the valves.  I'll add the results as I get them.
I am curious about the PCB differences. They don't look different but the have different part #s on them. The current one has 7805 then 1 288 310 021.
The former one has 9006 then 1 288 310 021. I wondered if they could send different signals. 
Posted by: ClayPerrine Dec 26 2016, 09:41 PM
To quote my father "What was the last thing you F_cked with!"
The description of your problem reeks of false air (air that does not go through the air flow meter on the way into the engine).
Check all the hosts, especially the ones from the AFM to the throttle body. You probably knocked off a line somewhere. No L-Jet car ever built will run with an open hole downstream of the air flow meter. It leans out sooo far that there is just not enough fuel to run.
I would bet on the hose to the aux air regulator or the decel valve.
Posted by: malcolm2 Dec 27 2016, 08:26 AM

To quote my father "What was the last thing you F_cked with!"
The description of your problem reeks of false air (air that does not go through the air flow meter on the way into the engine).
Check all the hoses, especially the ones from the AFM to the throttle body. You probably knocked off a line somewhere. No L-Jet car ever built will run with an open hole downstream of the air flow meter. It leans out sooo far that there is just not enough fuel to run.
I would bet on the hose to the aux air regulator or the decel valve.
I will go thru all the vac hoses once again this evening. (procrastinate before I get to Tim's list)

In post 5 above I added a photo of my fuel press gauge. You can see the DECEL vac line folded, plugged and wire tied. I have not had a DECEL valve in operation in 3 years... since the beginning.

I hope you are correct about a vac leak, Tim has been saying the same thing. If there is one, it is not very obvious. I guess I should just remove everything and re-seat the hoses.
A few months back, I seem to remember accidently not replacing the DECEL hose from the air distributor for some reason.... and the car did act very similar to the way it is acting now.
Thanks to all for your input.
Posted by: ClayPerrine Dec 27 2016, 05:51 PM
To quote my father "What was the last thing you F_cked with!"
The description of your problem reeks of false air (air that does not go through the air flow meter on the way into the engine).
Check all the hoses, especially the ones from the AFM to the throttle body. You probably knocked off a line somewhere. No L-Jet car ever built will run with an open hole downstream of the air flow meter. It leans out sooo far that there is just not enough fuel to run.
I would bet on the hose to the aux air regulator or the decel valve.
I will go thru all the vac hoses once again this evening. (procrastinate before I get to Tim's list)
In post 5 above I added a photo of my fuel press gauge. You can see the DECEL vac line folded, plugged and wire tied. I have not had a DECEL valve in operation in 3 years... since the beginning.
I hope you are correct about a vac leak, Tim has been saying the same thing. If there is one, it is not very obvious. I guess I should just remove everything and re-seat the hoses.
A few months back, I seem to remember accidently not replacing the DECEL hose from the air distributor for some reason.... and the car did act very similar to the way it is acting now.
Thanks to all for your input.
Check to make sure the hose from the AFM to the throttle body is still connected on the throttle body end. If it gets disconnected accidentally, it usually opens up a gap on the bottom where you can't see it.
I paid for a factory L-Jet class about 28 years ago. That is probably the most useful factory training I ever got.
Posted by: Mark Henry Dec 28 2016, 06:48 AM
I have an in-line fuel press guage. Plenty of pressure.
Here is a shot of the residual pressure after my current shut down. small, fuzzy photo, but it is @ 35 psi.
Not knowing anything about this afm, could the spring tension be tight? The seller said it came out of a 75 914. It seems to have a delayed reaction to the pedal.
I gotta get a helper to crank while i watch.
Unless you can see that gauge when sitting in the drivers seat it isn't worth a pinch of dog poo.
Did you have the tank out, a pinched/kinked line at the tank will drive you bat shit.
Posted by: malcolm2 Dec 28 2016, 08:44 AM
I have an in-line fuel press guage. Plenty of pressure.
Here is a shot of the residual pressure after my current shut down. small, fuzzy photo, but it is @ 35 psi.
Not knowing anything about this afm, could the spring tension be tight? The seller said it came out of a 75 914. It seems to have a delayed reaction to the pedal.
I gotta get a helper to crank while i watch.
Unless you can see that gauge when sitting in the drivers seat it isn't worth a pinch of dog poo.
Did you have the tank out, a pinched/kinked line at the tank will drive you bat shit.
Oh I disagree on the gauge.... Anytime I have issues, someone always asks about the fuel pressure. And it would take time to install one, every time someone asks, or I want to know. Really it is for troubleshooting.
The tank has not been out since 2012. But being a 75 the pump is in the front and a couple months ago I pulled the pump and the filter out from under the tank to verify operation and kink-less hoses. For now it is just lying in the trunk, lazy-ness on my part. So I believe the hoses are still not kinked.
BTW: I had to work on the Volvo last night and tonight I am going to the Ryman to see Robert Earl Keen
So the 914 has taken a back seat 'til Thurs or Fri. More to come soon tho. Not switching to carbs just yet.
Posted by: McMark Dec 28 2016, 08:47 AM
The AFM could be bad or maladjusted as well. Fuel Injection Corp rebuilds them. I've used a bunch of them. It's great peace-of-mind to know it's fresh and calibrated correctly.
Posted by: malcolm2 Dec 28 2016, 08:55 AM
The AFM could be bad or maladjusted as well. Fuel Injection Corp rebuilds them. I've used a bunch of them. It's great peace-of-mind to know it's fresh and calibrated correctly.
So when you install them.... the car starts right up?
I wondered about the condition of this one, being used and previously rebuilt by out-of-business PYTHON.
Is there any way to further test the operation? Physically the flap opens smoothly, the track has marks, but is not worn thru, neither was my BENT one. I have done the ohms tests on all the connections, verified and cleaned up the FP contacts and the swivel contact on top of the swiper, what else is there to verify?
I would think I would get varying readings as the arm moves (flap opens), right. I have not done that yet, but don't know the spec per degree of motion.
I saw a test on the samba about a 60 gram weight on the flapper, have not read completely thru that yet. At this point, I am praying for a vacuum leak.

I hate it when my paying job gets in the way of fixing this car!!!
Posted by: jim_hoyland Dec 28 2016, 09:23 AM
Perhaps you could borrow a known "good" AFM and swap it in- that will tell you more?
Posted by: McMark Dec 28 2016, 09:26 AM
Yup, plugged in and fired up.
I don't know of any reliable tests, but I take a much more quantitative approach then most. If I were setting up to test an AFM, I would want to graph airflow vs. signal output across a range. Then compare to a known good baseline. But in shop time that's $1,000,000.  So just replacing it with a rebuilt and calibrated unit, to me, is a 'shortcut'.
You may have a vacuum leak, and the AFM may be fine - So I'm not suggesting a new AFM will cure your issue. But just sharing my perspective that I hate dealing with unknowns and I find it worthwhile to simply pay a little extra and at least know what I'm starting with.
Posted by: malcolm2 Dec 28 2016, 09:50 AM
Perhaps you could borrow a known "good" AFM and swap it in- that will tell you more?
I have been offered one to test.... I hate the thought of BENDING someone else's $300 part.
I will go thru all the suggestions here by the weekend, I hope. They should remove all other doubt. Then check and see if the offer to loan is still good. And then I may have to breakout the checkbook on a freshly re-built, known good one.
Thanks again.
Posted by: ClayPerrine Dec 28 2016, 10:27 PM
I have a factory calibration tool for the AFM in my toolbox.
It is not easy to use, and it requires patience. But it can be done.
I also have about 30 old AFMs. Some are bent, some are completely scrap and some work. The factory L-jet tester I have only partially works because it got immersed in water at some time in the past.
Simpler to use a volt meter.
Posted by: malcolm2 Jan 3 2017, 07:38 AM
BACK TO 914 TROUBLESHOOTING: I finally carved out some time to dig into this problem. Before I got to Tim's list of goodies, I decided to dive into vacuum leak detection.
I felt like my hoses and intake boot were tight. Everything was new. I checked a few other hoses.
DECEL: As stated earlier, the decel has been removed. I capped and folded the large hose securely. However, it easily slipped off of the connector on the Air Distribution box.
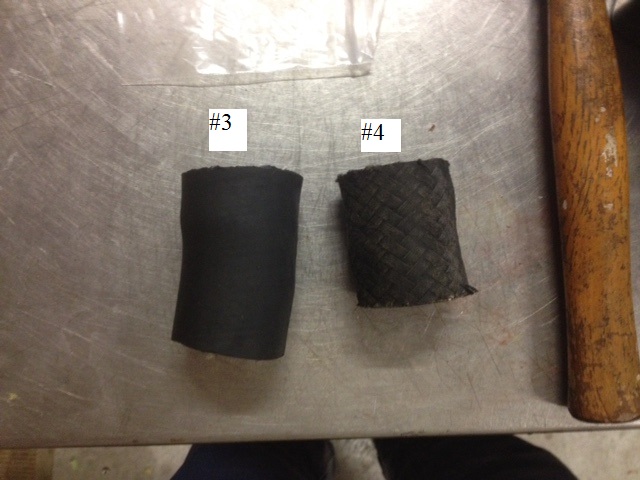
I have never been positive that #3 intake was perfect. The pipes just don't line up. #3 is on the left below. They are also too far apart to use the pretty cloth hose. I bought a radiator hose and cut it. Might have still been too short. Notice the curve. When mounted one edge was lifted up. 
3/4 side INTAKE: Again as I removed these hoses, they slide off fairly easily. During this tedious removal, I noticed that the phenolic block was cracked in between the ports. Another find.... The nuts holding the intake to the head required very little effort to break the torque. Not loose but just better than "hand tight". The paper on the phenolic was brittle, cracked and delaminating from the block.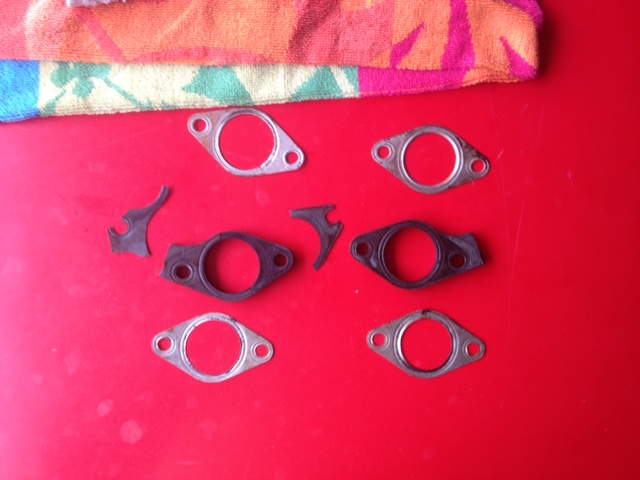
During removal, I realized that maybe I did some OVER INSTALLING of the seal kit. Probably a bad time to ask, but does anyone use the metal seals with the phenolic block on FI installs? 
About 30,000 miles on all this. I plan on purchasing new hoses and intake seals today. I also plan on NOT using metal seals under and over the phenolic block.
Please chime in, could the cracked block and easily removable (not snug) hoses be the trouble?
Posted by: falcor75 Jan 3 2017, 08:04 AM
I have never seen those metal gaskets used before?
Posted by: malcolm2 Jan 3 2017, 11:36 AM
I have never seen those metal gaskets used before?
Could they be for Carb intakes?
Posted by: jtprettyman Jan 3 2017, 12:50 PM
Perhaps you could borrow a known "good" AFM and swap it in- that will tell you more?
I have been offered one to test.... I hate the thought of BENDING someone else's $300 part.
I will go thru all the suggestions here by the weekend, I hope. They should remove all other doubt. Then check and see if the offer to loan is still good. And then I may have to breakout the checkbook on a freshly re-built, known good one.
Thanks again.
Clark -
Offer is still good to borrow mine, just keep in mind it is in the same uh, "patina'd" condition as my throttle body. Just let me know.
Posted by: McMark Jan 3 2017, 04:11 PM
Just the phenolic block. The metal seals are indeed for carb motors (busses).
Posted by: malcolm2 Jan 18 2017, 07:30 PM
HEY HEY, I am back. Spent the last 2 weeks working on a VOLVO. Damn I hate that car.
Ok, I have gone thru my books... Haynes, Climer and Tom Wilson looking for intake runner torque settings.
Haynes said "4.35 lb f ft" on page 39. what the hell is that? My wrench is not gonna read that low if it is FT-LB.
Tom Wilson said 14 ft-lb on page 154 but that was in a table for type 1-3. just under that table are the torque settings for the type 4, but there is no mention of the intake manifold in the Tiv table.
Tom (page 153) also says "Use new gaskets on both sides, then lay the spacers on their studs. Using gasket sealer doesn't hurt, but isn't mandatory."
Is the gasket and the spacer the same? Climer has a nice exploded view drawing. #2 is the spacer, but there are no gaskets included. would both sides mean "of the engine" or both sides "of the spacer"?
Anyone use gasket sealer here? and where? on the head, on the top of the spacer, or both sides of the spacer?
What torque setting for #4?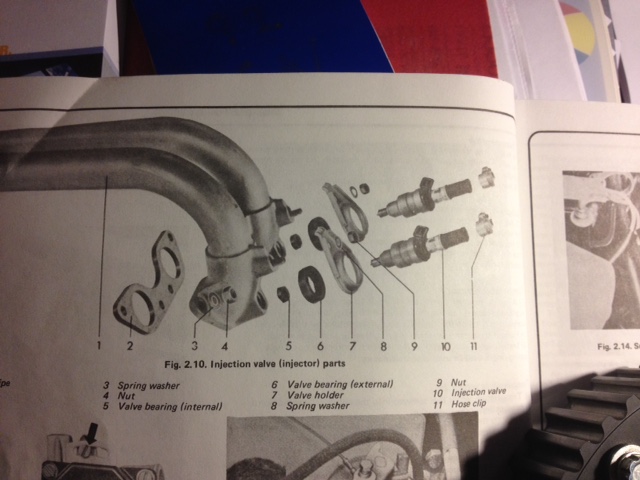
Posted by: Dave_Darling Jan 18 2017, 09:14 PM
The spacer should have paper on both sides of it. I remember the part coming with those already glued to it.
Torque for an M6 bolt into aluminum is on the order of 10 lb-ft. Use anything between 5 and 10, or just get it "a bit tight."
--DD
Posted by: malcolm2 Jan 18 2017, 09:29 PM
These are Victor-Rienz. Looks like paper on each side. Tuff to tell. The edges are shiny and i see what looks like glue on the edge. the mating surfaces are not shiny, probably paper.
On the torque, i figured i'd compare intake to exhaust, which would be a bolt. The intake is a nut on a stud. Seems to me that setup might handle more since the stud is not being torqued.
May be opposite tho.
Posted by: malcolm2 Jan 19 2017, 06:21 AM
Morning ![]()
Posted by: Rob-O Jan 19 2017, 09:52 AM
So I've been fighting with a very similar problem with my L-Jet. For months....
However, I had just installed my L-Jet after removing the single carb setup. Almost everything was checked before being installed on the car (more on that later) or new (i.e. vacuum hoses, dual relay, TB rebuilt, etc.). I timed the car (multiple times) and installed a Pertronix.
I checked and rechecked everything, including the CHT. The resistance readings on the CHT were very close to expect4ed values published on the 'net (I checked it installed on the car, so it was difficult to get the readings at the exact temperatures that are called out for the CHT).
My symptoms were similar to yours, although not exactly the same. My car idled poorly and ran poorly. In checking the CHT, if I unplugged it from the harness while the car was running, the engine died. It started right up again when I plugged the CHT back in. I thought vacuum leak as well so put clamps around any of the new hoses that weren't on their respective parts as tight as I thought they should be. This included anything downstream of the AFM. As in, the hookup of the AAV to the plenum and the line that runs from the large rubber elbow to the oil fill housing. The small metal sleeve on the rubber elbow between the AFM and TB was pulled out and I could never get it back in. But even when I pulled the hose off the elbow and plugged the hole I still had poor running/driving. Last week I even purchased a new elbow from 914Rubber (it is awesome, BTW). Installing it didn't help. I also had purchased a new CHT from 914Rubber. I tried to pull the old CHT out of the head and had trouble doing that. It unscrewed about a turn and a half and then stops. But then I got the bright idea that the CHT is using the head as a ground and that if I grounded the new CHT and hooked it up to the FI harness, it should be getting the same reading as if it was hooked up to the engine when the engine is cold. I did that little experiment. Car started right up and idea was rock steady at 1000 rpm. I adjusted down to 850 or so. Took it for a very short drive and the car runs 90% better. Didn't want to go too far with the CHT just sitting in the engine bay getting erroneous temperature readings and using those readings to richen or lean out the mixture.
I had opened my AFM cap as well and marked the position of the spring. I adjusted it tighter and looser and neither had an effect. Probably shouldn't have opened the cap to begin with.
So, I know that's a long story, but my point is, after you get your vacuum leak project completed, check your CHT. As cheap as they are at 914Rubber you might want to pick one up anyways. Just to have one on hand. You could always do what I did, just ground it securely to something in the engine bay and plug it into the harness. You should also check to see that your current one is plugged in securely. If it isn't, that would cause a whole host of problems similar to what you're experiencing. Ask Clay, he had this issue awhile back where it took him a week or so to realize that the CHT was making a poor connection and causing poor running. If I remember correctly, it turned out that the CHT, while plugged into the small plastic sleeve, wasn't actually plugged into the male spade inside the sleeve.
According to the Anders site on D-Jet, the CHT plays a huge role in the fuel enrichment circuit. I assume that the CHT plays a similarly large role in the L-Jet system.
Sorry for the long rambling post!!!!!
Posted by: Rob-O Jan 19 2017, 09:59 AM
These are Victor-Rienz. Looks like paper on each side. Tuff to tell. The edges are shiny and i see what looks like glue on the edge. the mating surfaces are not shiny, probably paper.
On the torque, i figured i'd compare intake to exhaust, which would be a bolt. The intake is a nut on a stud. Seems to me that setup might handle more since the stud is not being torqued.
May be opposite tho.
I don't remember what I torqued mine to. Actually I don't think I torqued them. I just got them tight. But in reading some posts on the subject, it was mentioned (RTowle?) that he used a small amount of orange high-temp sealant on each side of the phenolic spacer/gasket. I did the same and I don't think there are any leaks there.
Posted by: malcolm2 Jan 19 2017, 12:46 PM
Sometime in the last few months, I installed the 914rubber TS2. Prior to that I ran the "INSTALLED" green line unit.... for about 3 years. The other line on this graph is from Ratwell's website as a comparison.
So the unit that made the RED line is currently in the car. I have not checked it since my AFM warped. My problem with the green line unit, was start-up idle or cold idle. The car needed my foot to stay idling at 950-ish until I got to 300*F CHT. Looking at the graph, it seems that the 914rubber unit would help. But I really did not see a difference.
BTW Thanks for the info about your test. And I also have a new 914 rubber 1975 version of the elbow with 2 large accessory outlets.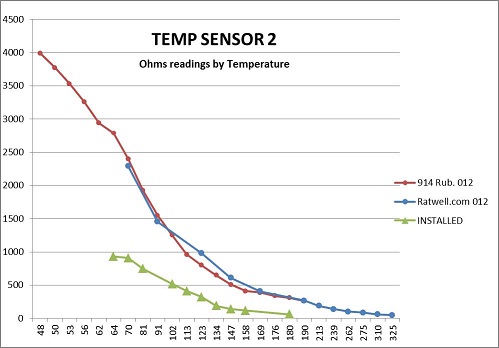
Soak your stuck sensor overnite in PB Blaster, or Sili-Kroil or WD-40 to break it loose.
I am glad to hear someone else has tried the gasket sealer, I have some and will give it a shot. I found a few more sites with FT-LB recommendations... crazy tho, some say 4 ft-lbs some say 18 ft-lbs. I think I will go with 10.
THEGOLDENBUG.COM
Torque Wrench settings
Injector/Manifold bolts to cylinder head
Lb Ft 4
Nm 5.4
mkg 0.6
TORKSPEC.COM
Intake Manifold To Cylinder Head Multi Port Fuel Injection
18 Ft-Lbs
216 In-Lbs
24.4 N-m
Intake Manifold To Cylinder Head Single Point Injection
7 Ft-Lbs
84 In-Lbs
9.49 N-m
Posted by: timothy_nd28 Jan 19 2017, 12:57 PM
You forgot to add the units to your graph 
Posted by: Rob-O Jan 19 2017, 01:25 PM
You forgot to add the units to your graph
He did, but the title of the graph should help out there...
Only one axis can be temperature and the other axis resistance.
Posted by: malcolm2 Jan 19 2017, 01:38 PM
You forgot to add the units to your graph
I figured the title would do. I never really planned on showing anyone and I know what the units are.

Posted by: malcolm2 Jan 19 2017, 01:51 PM
And now back to the subject....
This is the 1/2 side. Bottom of the intake runners. so the black stuff would be under the pipes close to the head.
Would this be considered a leak?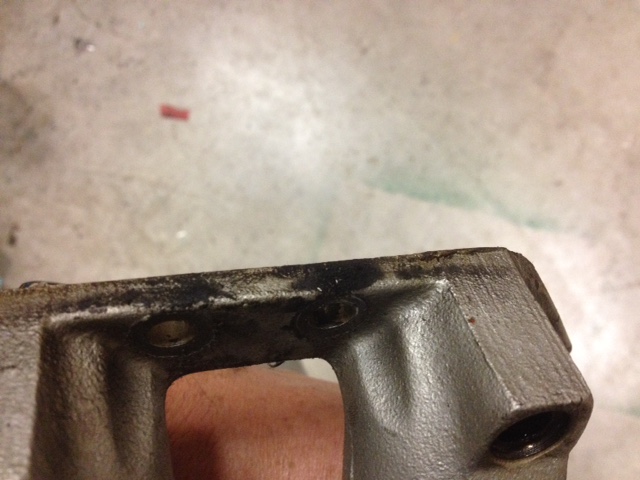
Posted by: Rob-O Jan 19 2017, 02:53 PM
I would think so. Looks sooty to me but I'm not sure I would believe that much soot would be coming out of the intake area...even with the backfiring you had going on.
Posted by: timothy_nd28 Jan 19 2017, 04:30 PM
I think Clark did something sneaky by quickly adding that subtitle, I never saw that before 
The great Captain Krusty may roll in his grave as I get ready to say this, go ahead and RTV the shit out of that gasket. Your previous threads asked the community why certain cylinders were running hotter than others. A vacuum leak will cause this, and as you have learned, a vacuum leak will also cause our Ljet's to backfire and kill the airflow meter.
I don't think you need a torque wrench for the 4 nuts on the intake manifold, just use your best judgement. Keep in mind that the steel studs are screwed into aluminum, which will strip.
Posted by: malcolm2 Jan 19 2017, 04:53 PM
Gracias Timothy,
Adding that graph was not easy, 1st I had to boil water, make a rig to hang the TS2 in the water ( need to use cooking oil next time), get a thermometer, take the measurements and make the graph. 
then figure out how to save it as JPG. then make it small enough for this forum. I wish we could just copy and paste into this forum and the screen shot would be there.....and be the right size, facebook figured it out, why can't we?
anyway, I was heading in your direction Tim, but I will at least check the torque once I get a warm and fuzzy with my tightening.
I thought I had the right gasket maker, but I don't have any that will handle over 300. So I am off to the store.
I have been looking at lots of pix of vw engines online. It seems that lots of them use hose clamps on the little intake hoses. I got new ones, but I am gonna clamp them too.
During disassembly, I found lots of oily-gassy, wet spots around and under areas where stuff connects. kinda like the sooty picture above. Damn I have vacuum leaks.
Clark
Posted by: malcolm2 Jan 21 2017, 04:05 PM
As luck would have it, I got everything back together and the fuel pump is not starting up. I have 0 psi on my engine bay fuel gauge shown in previous posts.
UPDATE. bent my AFM. Got a used 7 pin one that matches, Car would start but would not idle or even run well. Air leaks seemed to be the problem.
I removed the intake tubes on both sides and found a broken spacer/seal. To remove the tubes, most of the FI stuff needed to be unplugged on the passenger side.... ECU, DUal relay, the resistor pack, the coil. And of course the FI and fuel lines were moved.
Right side needed the airbox and intake elbow removed. along with the Injectors.
OK, i got new intake spacers added 600*F RTV to both sides, new FI seals, new air distributor hoses and added hose clamps to those little hoses. Already had a new intake elbow.
Put it all back together and the starter fires, but no fuel pressure. With the key on I can open the AFM and move it and I hear what I assume is the dual relay clicking, but no fuel pump.
Posted by: malcolm2 Jan 21 2017, 05:32 PM
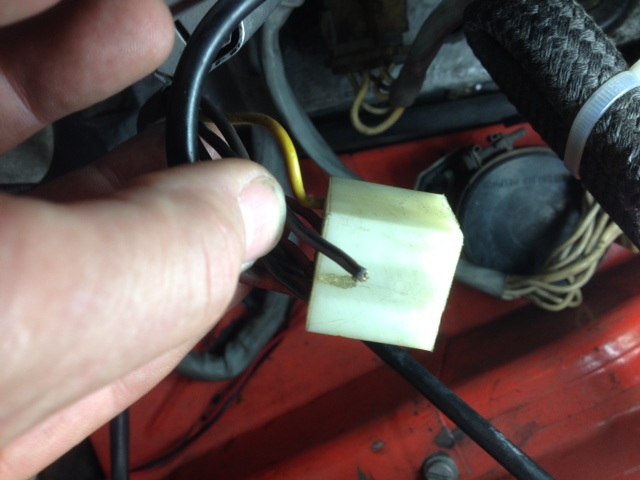
BROKEN WIRE.... I decided to retrace my steps and found this wire on the ignition side of the dual relay had broken. Luckily I did have some of that type of connectors with the tab to insert into the block.
once fuel pressure built up the car started..... problem is still there. Ruff starting and even ruff running. I can hold the pedal at about 2500 rpm for 4 seconds, then the car starts to die on it's own.
I think I am back to the culprit being the USED and unknown condition AFM I bought for $150, I think it was. Well at least that is what some of the core charges were on freshly rebuilt ones.
Back to the drawing board.
Posted by: malcolm2 Jan 22 2017, 01:17 PM
I am searching for a 7 pin AFM. I saw on a post that Fuel Injection Corp sells them. Their website says they have zero in stock. I will call them tomorrow.
I also see that AA has them $300 includes $100 core charge.
Anyone have another vendor they have used? Or a 75 7-pin that they will loan me for troubleshooting? I have one lead here in town, but I am not yet sure that it is 7-pin.
Anyone know what the difference in part #'s might be?
is a 7-pin the same? I see that lots of VWs had L-jet with a 7-pin AFM.
Posted by: malcolm2 Jan 26 2017, 06:16 PM
I am moving slowly on this problem.
I never heard from anyone that had a 7-pin known good AFM. So I purchased what I thought was a rebuilt one from EUROCARS9101. They had one they called REMAN! with a warranty etc....
It will be here Friday. I got tired of waiting and I have the BENT AFM that ran in my car for 25K miles and the OLD tired one that I bought from San Diego that could be bad cause my car won't run with it installed. 
I took out the guts of the bent one, everything but the big gear and the spring. Cleaned things up and installed them in the San Diego unit that is not bent.
I was able to move the PCB about 1mm so the sweep arm is hitting a fresh track.....
I am now on my way to install it. 
Those that pray, please say one for me.... Back in about 20.
Posted by: malcolm2 Jan 26 2017, 06:35 PM
God could not help either. Pretty much the same problem. It struggles to start unless I use the gas pedal, then it will not idle.
If I get the revs to 2000 with the pedal, it will stay there, but it is stumbling slightly. Let off the pedal and it dies.
SO now with the guts of an AFM that I know were good, I basically get the same result.
The only thing I did not transfer was the gear and the spring. Could the spring be too tight not allowing the flap to move enough at idle?
I will have a 3rd unit to try tomorrow, so maybe the pray-ers should give me one more days worth. 
Posted by: Root_Werks Jan 27 2017, 02:19 PM
A vacuum tester is an excellent way to ensure there are no leaks in any components. Can’t count how many times I heard of someone chasing a K-Jet or L-Jet running problem only to find out the can on the dual vac dist. Leaked or something similar. It still sounds like a vac leak to me or something in the valve train system. Have you done a leak down? A burned intake valve might now show telling results on a compression test, but often show on a leakdown.
Keep at it, you'll get it figured out.
Posted by: malcolm2 Jan 27 2017, 05:28 PM
a vacuum tester sounds AWESOME. How does it work, can you buy one, or do I make one?
I got my nice clean REMAN! eurocars9101 ebay AFM today. Installed it.... and you guessed it: very little change.
It started a little quicker and ran a bit smoother (forced by the acell pedal). But it started and was slower to die. Gave me enough time to jump out of the seat and reach in for the throttle body and control the engine.
Again, it ran very ruff, even at 2500 to 3000 RPM, and will not idle, but is slower to die.
I'll get a video in the morning.
My plan is to go thru all the Trouble Shooting tips here once again. I will crawl under and do the HATED valve check. Probably will do the compression test 1st.
I pulled the resistor pack and checked the condition of the wires. everything looked good. It seems that the 4 tubes are connected at the bottom and wired to the 5th tab. I checked continuity from the 5th tab to each remaining tab. Is there a bench test for that thing?
I am going to be back at it in the AM, chime in with anything that we have missed so far. Disty vacuum can is a new one, so I will be on that for sure!
Posted by: zach914v8 Jan 27 2017, 05:37 PM
a vacuum tester sounds AWESOME. How does it work, can you buy one, or do I make one?
I got my nice clean REMAN! eurocars9101 ebay AFM today. Installed it.... and you guessed it: very little change.
It started a little quicker and ran a bit smoother (forced by the acell pedal). But is started and was slower to die. Gave me enough time to jump out of the seat and reach in for the throttle body and control the engine.
Again, it ran very ruff, even at 2500 to 3000 RPM, and will not idle, but is slower to die.
I'll get a video in the morning.
My plan is to go thru all the Trouble Shooting tips here once again. I will crawl under and do the HATED valve check. Probably will do the compression test 1st.
I pulled the resistor pack and checked the condition of the wires. everything looked good. It seems that the 4 tubes are connected at the bottom and wired to the 5th tab. I checked continuity from the 5th tab to each remaining tab. Is there a bench test for that thing?
I am going to be back at it in the AM, chime in with anything that we have missed so far. Disty vacuum can is a new one, so I will be on that for sure!
http://www.harborfreight.com/mityvac-vacuum-pump-39522.html
No tool box is complete without one.
Posted by: malcolm2 Jan 27 2017, 07:35 PM
http://www.harborfreight.com/mityvac-vacuum-pump-39522.html
No tool box is complete without one.
I hope it comes with some instructions.... I have quite a few Harbor Freight tools. I can't believe I never ran into this one while shopping.
I will make a point to get one.
Posted by: malcolm2 Jan 28 2017, 06:09 PM
I started the car this morning, messed with the disty and the button. checked the Ohms on the coil. Bypassed the TS2 and saw no improvement.
And now I remember why I hate dealing with the valves.... I need to back-date my exhaust. Valves and ALT work require the exhaust to be removed on a 75.
I did compression tests today and checked the valves on one side before it became MILLER TIME.
I am concerned about the compression I thought it should be more like #4:
#1 95
#2 100
#3 75
#4 110
I wish I had done a comp test right after the cam break in, then I would have a base-line, oh well. What do you guys think?
1/2 valves checked out. I have chromoly pushrods and 911 swivel feet, so I just check the swivel foot for spin. All 4 on the drivers side would spin and the rockers only clicked just a bit, so I have 0 lash.
3/4 exhaust comes off tomorrow.
Posted by: BillC Jan 28 2017, 07:05 PM
If your valves check out, you may want to look into borrowing a smoke tester machine.
They work sorta like a vacuum tester, but in reverse. You hook the machine up to your throttle body or to a port on the intake manifold, and then it pumps smoke into your intake. If there's a leak, you'll see a stream of smoke from the leak. They work well and can save a lot of time looking for a vacuum leak. The big drawback is they are quite pricey -- I did a quick look on Amazon, and the decent-looking machines start at ~$800 and go up (that's why I suggested trying to borrow one).
Posted by: malcolm2 Jan 31 2017, 01:54 PM
BACK TO BUSINESS..... I have finally checked, adjusted and re-checked my valves. Each cyl at TDC, I set the corresponding valves to zero lash. My chromoly push-rods were spinning, my swivel feet were spinning, wiggle the rocker and I got no clicking.
I re-checked compression, hoping to see a GRAND improvement.... I did not. All cylinders were within 5 psi of the pre-valve adjustment check. Except #3. It has now risen to 95.
#1 95
#2 100
#3 95
#4 110
I plan on putting the car back together this evening and returning to FI troubleshooting and air leak hunting.
any other suggestions?
Posted by: zach914v8 Jan 31 2017, 06:04 PM
BACK TO BUSINESS..... I have finally checked, adjusted and re-checked my valves. Each cyl at TDC, I set the corresponding valves to zero lash. My chromoly push-rods were spinning, my swivel feet were spinning, wiggle the rocker and I got no clicking.
I re-checked compression, hoping to see a GRAND improvement.... I did not. All cylinders were within 5 psi of the pre-valve adjustment check. Except #3. It has now risen to 95.
#1 95
#2 100
#3 95
#4 110
I plan on putting the car back together this evening and returning to FI troubleshooting and air leak hunting.
any other suggestions?
Clark I know you have been having issues here. Make no mistake I have zero L-jet, D-jet or any other Bosch injection knowledge. Its not what I do. But the guy that owns the shop I manage is a Bosch fuel injection whisperer. He was a Porsche and Audi factory trained technician in the 70's and 80's. He is a very cranky old coot and hates to be bothered with much of anything.
That being said I brought up you issues with him. Of course he told me that vacuum leaks are huge on these cars. I discussed with him what you have done so far. He asked me if you popped the top on the AFM and manually played with the flap with the engine running? So have you? Also he mentioned that there are small adjustments that can be made to make up for a worn engine by popping a cap on the AFM and adjusting it?
But most of all he said it sounds like to him that you just have a bad AFM. I hope something here can help you if not maybe PM me and see if I can talk him into taking a phone call from you.
Posted by: jim_hoyland Jan 31 2017, 06:24 PM
Have you checked the continuity of all the wires going to the brain ? Reason I bring it up is I was cleaning a space FI harness and noticed some worn wires
Posted by: malcolm2 Jan 31 2017, 09:00 PM
He asked me if you popped the top on the AFM and manually played with the flap with the engine running? So have you?
Also he mentioned that there are small adjustments that can be made to make up for a worn engine by popping a cap on the AFM and adjusting it?
But most of all he said it sounds like to him that you just have a bad AFM. I hope something here can help you if not maybe PM me and see if I can talk him into taking a phone call from you.
Have not opened this, newest AFM. I know about the "playing with" deal and hope to get to that point. I am going to have to find a way to hold the idle. It won't idle long enough for me to even get out of the car and grab the TB cable. broom stick time i guess.

3 years ago, I did "adjust" the spring on original AFM when i made the engine a 1911.
I thought my 2nd AFM might have been bad. It was old, previously rebuilt, guts were kinda rusty looking, but then I put the guts of my bent one into it. The car acted the same with AFM #3 (guts from #1) as it does with #2 and now #4. I think "bad AFM" may now be ruled out or at least put on the back burner.
a bad ECU has been discussed, Not sure if there is a test for that. I think I could ring out the wires easily enough tho.
Posted by: timothy_nd28 Jan 31 2017, 09:02 PM
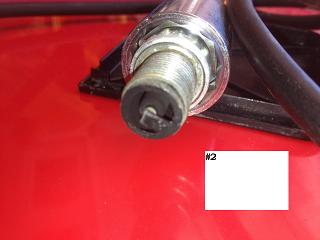
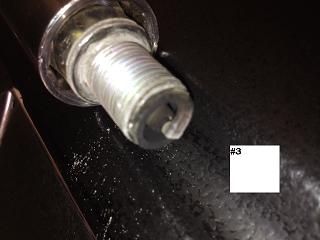
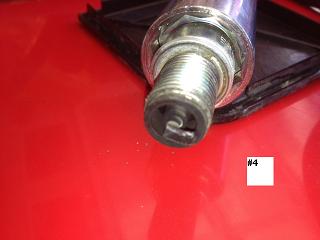
I was on the phone with him, turns out that his plugs are fouled (except number 3 cyl, possibly from his intake leak). Clark, you should post the picture of your plugs on here for others to see.
I think he's running rich. I tasked him to attach a air/fuel gauge analyzer tomorrow and document the readings at different RPMs.
Posted by: zach914v8 Jan 31 2017, 09:04 PM
He asked me if you popped the top on the AFM and manually played with the flap with the engine running? So have you?
Also he mentioned that there are small adjustments that can be made to make up for a worn engine by popping a cap on the AFM and adjusting it?
But most of all he said it sounds like to him that you just have a bad AFM. I hope something here can help you if not maybe PM me and see if I can talk him into taking a phone call from you.
Have not opened this, newest AFM. I know about the "playing with" deal and hope to get to that point. I am going to have to find a way to hold the idle. It won't idle long enough for me to even get out of the car and grab the TB cable. broom stick time i guess.
3 years ago, I did "adjust" the spring on original AFM when i made the engine a 1911.
I thought my 2nd AFM might have been bad. It was old, previously rebuilt, guts were kinda rusty looking, but then I put the guts of my bent one into it. The car acted the same with AFM #3 (guts from #1) as it does with #2 and now #4. I think "bad AFM" may now be ruled out or at least put on the back burner.
a bad ECU has been discussed, Not sure if there is a test for that. I think I could ring out the wires easily enough tho.
I will ask him tomorrow if he knows a way to test an ecm... but I imagine he will probably mention a break out box or something of that nature.... but then again maybe not.
Posted by: zach914v8 Jan 31 2017, 09:06 PM
I was on the phone with him, turns out that his plugs are fouled (except number 3 cyl, possibly from his intake leak). Clark, you should post the picture of your plugs on here for others to see.
I think he's running rich. I tasked him to attach a air/fuel gauge analyzer tomorrow and document the readings at different RPMs.
Ok, thats good stuff.
Posted by: JB620 Jan 31 2017, 09:19 PM
So take this for what it's worth, which is not much, but have you checked the two seals on the oil filler cap for your vacuum leak? Seems too simple, I know. I'm no mechanic but I have read a number of threads where this is an often overlooked place. Just spit-ballin' here... carry on.
Posted by: malcolm2 Jan 31 2017, 09:19 PM
Here are the plugs. I think they have about 20K miles on them. I replaced with new tonight. truthfully #3 is not that much different. You can see just a bit of white ceramic, but not much.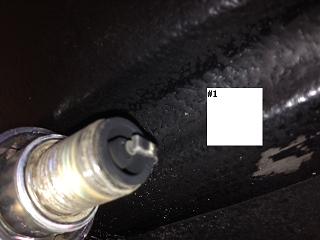 [
[
Posted by: zach914v8 Jan 31 2017, 09:26 PM
They look a bit rich, but I not seeing anything here that stop the car from running. I have pulled much worse from late model cars that were running fine.
Posted by: malcolm2 Jan 31 2017, 09:27 PM
So take this for what it's worth, which is not much, but have you checked the two seals on the oil filler cap for your vacuum leak? Seems too simple, I know. I'm no mechanic but I have read a number of threads where this is an often overlooked place. Just spit-ballin' here... carry on.
I have heard that too. Back when the car would run.... I actually pulled the filler cap off once.... the car died.
The seals are there, they are flexible. Not really sure how to test them. This might be a good place for that $800 smoke machine.
Maybe I can find some other way to cap the oil filler off to test it? I'll look at them a little closer. I have replaced the cork seal there tho.
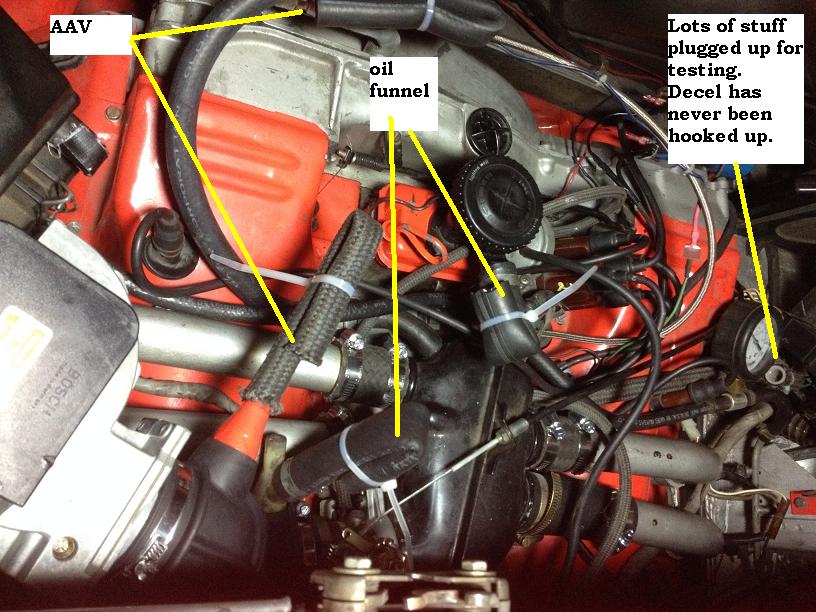
Lots of stuff plugged up for testing.
Posted by: jim_hoyland Jan 31 2017, 09:35 PM
Is the oil filler gasket is good shape ?
Posted by: zach914v8 Jan 31 2017, 09:37 PM
So take this for what it's worth, which is not much, but have you checked the two seals on the oil filler cap for your vacuum leak? Seems too simple, I know. I'm no mechanic but I have read a number of threads where this is an often overlooked place. Just spit-ballin' here... carry on.
I have heard that too. Back when the car would run.... I actually pulled the filler cap off once.... the car died.
The seals are there, they are flexible. Not really sure how to test them. This might be a good place for that $800 smoke machine.
Maybe I can find some other way to cap the oil filler off to test it? I'll look at them a little closer. I have replaced the cork seal there tho.
thanks
Clark any decent shop has a smoke machine for evap testing. I'll bet if you asked a shop to smoke test it while you look for leaks you'd probably find alot shops would charge you nothing.
Plus you got that yelp review on that volvo shop. Tell them you'll delete your post if they smoke your car... just an idea.
Posted by: malcolm2 Jan 31 2017, 09:49 PM
Clark any decent shop has a smoke machine for evap testing. I'll bet if you asked a shop to smoke test it while you look for leaks you'd probably find alot shops would charge you nothing.
Plus you got that yelp review on that volvo shop. Tell them you'll delete your post if they smoke your car... just an idea.
I have been thinking about asking William Greer if he has one. Have not seen him since Okteenerfest. But he has helped me several times. He and his brother are big 914 guys within yellin' distance from here.
I think borrowing the tool is the only way. I really don't want to haul it anywhere, until I totally give up.
How bout you call Snyder and ask him to come see me.
 maybe he can plug the leaky volvo while he is here.
Posted by: zach914v8 Jan 31 2017, 09:57 PM
Clark any decent shop has a smoke machine for evap testing. I'll bet if you asked a shop to smoke test it while you look for leaks you'd probably find alot shops would charge you nothing.
Plus you got that yelp review on that volvo shop. Tell them you'll delete your post if they smoke your car... just an idea.
I have been thinking about asking William Greer if he has one. Have not seen him since Okteenerfest. But he has helped me several times. He and his brother are big 914 guys within yellin' distance from here.
I think borrowing the tool is the only way. I really don't want to haul it anywhere, until I totally give up.
How bout you call Snyder and ask him to come see me.
maybe he can plug the leaky volvo while he is here. As a shop manager, I can tell you for a fact you have leverage here. Bad yelp reviews are a dead blow to an auto repair business. If you 1 stared my shop and asked to use a smoke machine at your house to delete your post, I would be there with a smile on.
Posted by: Rob-O Jan 31 2017, 11:15 PM
Check to ensure that the plugs are on the injectors...and the correct injectors. If after changing the gasket you mixed them up on that side it will run. But poorly and very similar to what you describe.
Posted by: timothy_nd28 Feb 1 2017, 12:09 AM
Clark, I'm all for temporary isolating auxiliary peripherals when making a diagnosis, but you may have taken it too far. The aux air valve and decel valve can definitely be temporarily removed without any ill effect to how our engine runs. However, I believe the pipe you labeled as "oil funnel" in your picture does serve a purpose and needs to be connected.
The Ljet's airflow meters flap is quite reactive to air buffeting. Ever watch how much this little AFM's arm dances back and forth at idle? This oil funnel pipe helps equalize the turbulent pressures between the plenum and crankcase. I believe the airflow meter will behave differently with this "oil funnel pipe" bypassed, therefore it should really be connected.
Also, after seeing what has been bypassed in the picture, I noticed (I added a red arrow) that the plastic stacked T is not capped?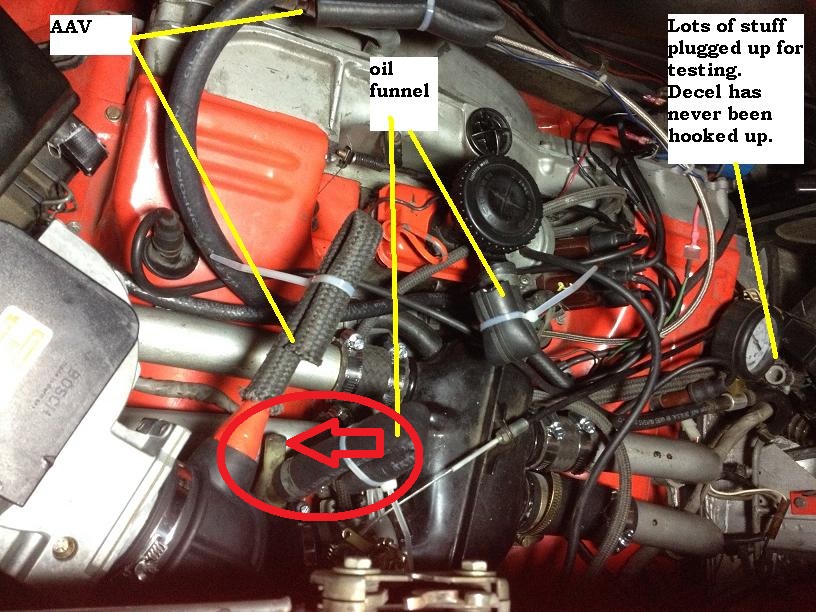
As I have already mentioned to you that I'm not a fan of bending over hoses and zip tying them. They sell a grab bag of various caps and plugs in different sizes, this would be far better than what you have pictured.
Posted by: malcolm2 Feb 1 2017, 09:08 AM
Tim, you are good.... I wondered if you would notice the UNPLUGGED "Y".
Both of the connectors on the intake elbow are "home-made". Garold got me a couple Y's and I modified them. On the top one, with orange paint on it, has been cut to make a single out of a double. I used fiberglass to seal up the hole.
The bottom one remained in the "Y" shape but I filled the un-used portion with fiber glass resin.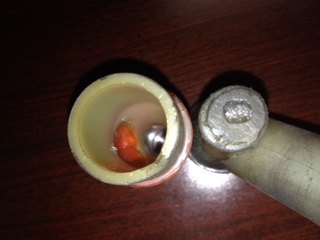
I will head to Ace Hardware and AutoZone and look for "Tim Approved" plugs and caps... 
I had a thought.... would there be a way to get "smoke" of some sort into the vacuum tester Zach linked to? anyone ever done that?
Posted by: zach914v8 Feb 1 2017, 09:29 AM
I have never seen any one rig a smoke tester out of a vac tester. One thing I have seen people do is Jerry rig a party fog maching as a smoke tester. I don't know if I would recommed that route, but its been done.
Posted by: malcolm2 Feb 1 2017, 09:43 AM
Might try the VAPE shop.... wouldn't that be similar smoke? Doesn't the smoke still act as the AIR and need to be mixed with fuel and burnt?
The smoke machine and vacuum tester are used with the car running or not running?
Posted by: zach914v8 Feb 1 2017, 09:59 AM
Might try the VAPE shop.... wouldn't that be similar smoke? Doesn't the smoke still act as the AIR and need to be mixed with fuel and burnt?
The smoke machine and vacuum tester are used with the car running or not running?
Vac tester has a ton of uses, depending what you are using it for the engine could be on or off.
The smoke tester is used with the car off, and is hooked up to air pressure from an air compressor usually regulated down to somewhere around 1psi. You T into a vac line ant turn it on. It blows a constant flow of 1psi smoke and you watch where the 1psi smoke is coming out of the engine. Naturally smoke will come out of the throttle body, so I usually tape it up.
I would watch a youtube video so you can see how it works.
Posted by: malcolm2 Feb 2 2017, 09:17 AM
WOW, what did we do before YouTube. I did a Smoke Detector search and BAM. videos galore. Most are DIY making a smoke detector. Some are elaborate, some are not. I am gonna use some of the best features of several of these guys.
Charcoal and card board, or incense. a mini compressor a paint can, some RTV.... I am kinda fired up now..... I bet a nickel I don't find anything.... I am just pessimistic tho. I will put my work on YouTube too! Then we can have a 914 gettin' smoked for the world to see.
https://youtu.be/FFlyAqiYMro
Nothing positive to report from last night. Got the exhaust back on. put some "Tim-approved" plugs in the correct places..... re-attached the oil funnel, removed the AAR, DECEL and plugged them up tight.
Started the car, I even let it warm up, got the CHT to 250-ish. Car still won't idle and runs kinda ruff at 2000.
Even my borrowed A/F meter did not work correctly. Gotta figure that out too.
Posted by: malcolm2 Feb 3 2017, 04:41 PM
https://www.youtube.com/watch?v=rBT1FP131Kw
As I mentioned, I now have made a crude smoke tester. WHile I may not have found it all, I have at least found something to fix.
So the question is, while I wait on my $20 TB seal, has anyone ever RTV'd that connection, even for a short term fix?
BTW, the cover shot of this vid is my car they day I bought it in 2011! Does not look much different on the outside.
Posted by: zach914v8 Feb 3 2017, 04:51 PM
https://www.youtube.com/watch?v=rBT1FP131Kw
As I mentioned, I now have made a crude smoke tester. WHile I may not have found it all, I have at least found something to fix.
So the question is, while I wait on my $20 TB seal, has anyone ever RTV'd that connection, even for a short term fix?
BTW, the cover shot of this vid is my car they day I bought it in 2011! Does not look much different on the outside.
Way to go Clark! That is a really cool smoke tester. You have inspired me to build one as well.
Posted by: malcolm2 Feb 3 2017, 04:57 PM
I think you were 1st to mention the smoke idea, so I give you all the credit.
I went with an outlet hose large enough to replace the DECEL hose. I think I will redo that and use a smaller hose and fitting. I believe the pressure will go up and the volume of smoke will go up too.
Gotta find a place to attach it, then buy that size. It worked so far, So I am gonna start plugging vac. leaks.
Posted by: zach914v8 Feb 3 2017, 04:57 PM
https://www.youtube.com/watch?v=rBT1FP131Kw
As I mentioned, I now have made a crude smoke tester. WHile I may not have found it all, I have at least found something to fix.
So the question is, while I wait on my $20 TB seal, has anyone ever RTV'd that connection, even for a short term fix?
BTW, the cover shot of this vid is my car they day I bought it in 2011! Does not look much different on the outside.
Way to go Clark! That is a really cool smoke tester. You have inspired me to build one as well.
One thing I wanted to ask is how much pressure are you forcing into there? you really don't need much, too much pressure and your going to create leaks. I think adding a pressure gauge on the paint can would help. I would never run more then 5psi. You never really have a reason to run more than about 2 psi.
Posted by: malcolm2 Feb 3 2017, 05:00 PM
I should have pulled the hose and showed the flow. But I set my compressor low enough to just barely blow...then I turned down the HF ball valve to almost closed. on the shot of the valve, you can see where I used a sharpie and marked the CLOSED position. I don't think it is much more than 3 or 4 psi.
Posted by: jim_hoyland Feb 3 2017, 06:06 PM
Do you have a good gasket between the throttle body and the plenum ?
Posted by: malcolm2 Feb 4 2017, 11:59 AM
Jim, yes there is a seal. It was new in 2013. I borrowed a TB while mine was being re-worked back in November, did not change the seal then. Got my TB back and did not change the seal.... I guess I should have.
I used some sealer on both sides of the TB seal as a temporary stop. Bought a new one, probably won't see it til later next week.
So tell me about the dip stick.
I now see a bit of smoke coming out of the top of the stick tube with the stick inserted. Is there a seal for that? I picked a bunch of fiber looking stuff out of the little "hat" at the top of the stick.
I bet I can make one with an o-ring or cork. But my question is how do I get the dip stick to measure properly after I add a ho-make seal?
Probably talking about a few mm one way or the other. Does it really matter that much?
Posted by: Dave_Darling Feb 4 2017, 01:45 PM
Take out the dipstick and look at the distance between the "full" and "add a quart" marks. Decide if a couple of mm will make any real difference to you. If so, re-mark the stick. A file should do for that.
--DD
Posted by: malcolm2 Feb 4 2017, 05:04 PM
I think we can OFFICIALLY close this posting. What a great day. The Throttle Body leak was the only big one. With the temp. RTV on it, the car now starts and idles !!!
LORD L-Jet (Timothy_ND28) has walked me thru many tests and AFM adjustments using a suspect A/F meter today. and we got to here.....
https://www.youtube.com/watch?v=BMspGlzl6Lo
I am so thankful to everyone that had direction for me. In the end it turned out to be ONE HELL OF A VACUUM LEAK. I now see why people give up and put on carbs. I say DON'T DO IT.
Then the need to tune the 1.8 AFM to the 1911cc engine. I ended up adjusting the AFM gear about 20 teeth. That is nerve racking! Now Tim thinks I should put the OTHER spare AFM on and adjust it.....Great to have a spare, right?
Car is running great, idling great. THANKS TO ALL.
Posted by: zach914v8 Feb 4 2017, 05:59 PM
Clark brother, I am seriously glad you got this thing going. Good work man.
Posted by: jim_hoyland Feb 4 2017, 06:03 PM
Great news ! What does the 20 tooth AFM adjustment do ? And what are you looking at to judge its right ?
Posted by: malcolm2 Feb 4 2017, 06:57 PM
Great news ! What does the 20 tooth AFM adjustment do ? And what are you looking at to judge its right ?
My engine has been converted to a 1911 cc from the 1756 cc (1.8). The original AFM was setup for the 1756 so to get the 1911 to run properly it has to be re-adjusted by changing the spring tension. The spring is wound up inside a big toothed wheel. So you move teeth to adjust.
Since my backfire bent my AFM i had to get a new one. So the AFM was not my problem, but i could not adjust it til i got the car to run.
I used an Air/Fuel gauge to measure the changes and fine tuned the amount of fuel the AFM tells the fuel injection sys to give the engine.
Posted by: jim_hoyland Feb 4 2017, 07:01 PM
Interesting; after upgrading recently to 2L and installing the Vanagon TB, I had wondered whether any correction is needed. It runs good and AFRs were within range
Posted by: timothy_nd28 Feb 4 2017, 07:07 PM
Adjusting the airflow meter is something that I would not recommend as they are calibrated from the factory. In most all cases, you can simply plug and play a new AFM straight out of the box with no issues. However, not so much in Clark's situation.
Clark had a air/fuel gauge (an awesome tool) which painted a picture on how the engine was doing.
At the beginning, his engine was running 18.0:1 air to fuel mixture, which is very lean. His meter seems to be pegged at 18.0:1 throughout the entire RPM range.
Feeling confident that he rectified all vacuum leaks by use of his ingenious vacuum leak detector, I felt we could proceed with making adjustments.
We also needed to make sure something screwy wasn't going on with his ECU, so I had him plug his spare cylinder head temperature sensor into a glass of ice while the body of the sensor was jumper-ed to the negative battery post. After rerunning the test, the air/fuel meter changed slightly from super lean, to not so much lean. This was encouraging and proved that the ECU does work and altered the air to fuel mixture in regards to temperature.
At this point, we made baby step adjustments to the AFM. The big clock spring controls the tension to the AFM's flap. Relieving spring tension will make the car run richer. Fine tuning is still needed because the air/fuel meter seems to be fidgety and doesn't seem to have the resolution for a finer tuning. 20 teeth seems like a bunch, but I have a feeling with a new gauge, the final answer may be closer to around 14-16 gear teeth (CCW from the original position).
Posted by: jim_hoyland Feb 4 2017, 07:13 PM
Thanks for the explanation-
Posted by: KELTY360 Feb 4 2017, 07:17 PM

A tribute to persistence and ingenuity. Congratulations!
Posted by: Rob-O Feb 4 2017, 09:04 PM
Wow, very nice! Glad you found that leak.
Where did you get the A/F kit? How much?
Posted by: malcolm2 Feb 5 2017, 07:37 AM
Wow, very nice! Glad you found that leak.
Where did you get the A/F kit? How much?
I borrowed it from a friend. It has a pipe that goes in the exhaust with the sensor on it and a cig lighter plug for power. I am not 100% confident in it. I plan on looking for one to buy. Might even install it in an extra spot on the dash.
Posted by: Porschef Feb 5 2017, 07:41 AM
Throttle body gasket was one of my leaks. Glad you found it! 
Posted by: malcolm2 Feb 5 2017, 07:50 AM
The leak was so bad that the car would not run. Making it difficult to use the starting fluid method. That ho-made smoker was perfect. After i fixed the TB leak i saw some tiny streams in a few places.
So i have a few more leaks to get. But I am gonna drive today. She has been on jack stands since before Christmas waiting on me to get to her.
Posted by: Rob-O Feb 5 2017, 07:58 AM
Well, I hope that's the last of the major troubles for awhile. Between the 914 and the Volvo, you've had your hands full!
Posted by: ndfrigi Feb 5 2017, 09:30 AM
wow big thanks again for various members here especially "the Ljet man" Tim who is always there to help us. He did helped me before and he really did help me go through various steps to fix my electrical issue on my 75 1.8 Ljet. I may be asking his help soon on my minor backfire if this can damage my AFM flaps.
Good to hear your car is running now!
Posted by: malcolm2 Feb 5 2017, 06:29 PM
wow big thanks again for various members here especially "the Ljet man" Tim who is always there to help us. He did helped me before and he really did help me go through various steps to fix my electrical issue on my 75 1.8 Ljet. I may be asking his help soon on my minor backfire if this can damage my AFM flaps.
Good to hear your car is running now!
Yep, i now believe the backfire will do damage. It was a low, different sounding backfire. They call it an internal backfire.
So, i suggest you buy a spare afm and tune it in. And you make a smoke machine and use it a couple times a year or when ever you change any induction part.
Posted by: ndfrigi Feb 5 2017, 07:49 PM
wow big thanks again for various members here especially "the Ljet man" Tim who is always there to help us. He did helped me before and he really did help me go through various steps to fix my electrical issue on my 75 1.8 Ljet. I may be asking his help soon on my minor backfire if this can damage my AFM flaps.
Good to hear your car is running now!
Yep, i now believe the backfire will do damage. It was a low, different sounding backfire. They call it an internal backfire.
So, i suggest you buy a spare afm and tune it in. And you make a smoke machine and use it a couple times a year or when ever you change any induction part.
currently, my car runs well on all gears and 800 to 900 rpm on idle when it is in normal running temp. No hesitation when I accelerate. I get the small backfire when I slow down only. Usually just before I downshift.
Posted by: pete000 Feb 5 2017, 11:29 PM
I have been playing with a AFM on my L-Jet and am a bit skeptical of the 02 sensors at the tail pipe. I think the readings can very there. I am planning welding in a bung and getting the 02 sensor further inside the exhaust.
My car seems lean at idle. There are a few videos on youtube showing the procedure of the two ways to change the mixture on the flapper box.
Keep posting your results.
Powered by Invision Power Board (http://www.invisionboard.com)
© Invision Power Services (http://www.invisionpower.com)