Printable Version of Topic
Click here to view this topic in its original format
914World.com _ 914World Garage _ How to inspect the underside and longs without a lift
Posted by: seanpaulmc Dec 25 2016, 04:26 PM
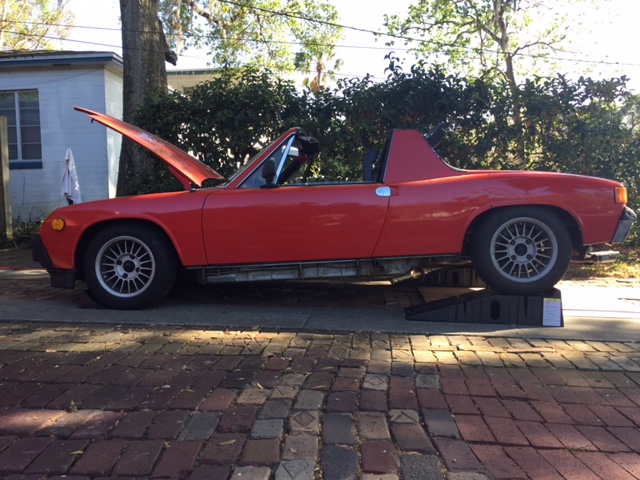
I've just purchased a '73 914 and owned it long enough to ship it to Orlando and take it to go get titled. With only having it for this short period my list of concerns is growing. I have no intentions of driving the car around until I can assess how rusty it is. I appreciate the support and responses to the questions about transportation and engine identification. This is a superb community.
What advice do you have for lifting the car to inspect underneath and such without having access to a lift? I have read some of the build threads on here and you guys have some amazing shops and do incredible work! ...one day. But, at this point I don't have that.
For now I'd like to lift the car, take the wheels off, and take the longitudinal covers off to get a good look at the structural areas of the car. However, I have concerns because this is a snowbelt car and I've read the stories about putting a floor jack through a rusted out car. Where should I lift with the floor jack (trust the jacking points?, other areas) and where should I put the jack stands so that I can poke around some and get pictures?
Merry Christmas!!!
Posted by: Rand Dec 25 2016, 04:34 PM
Don't worry about lifts and jacks yet. Just start sharing lots of pics here to get some meaningful help. Start with engine compartment, battery tray and below. Share what's easy to share. Then pull the rocker covers off and examine the jack points or anything that looks questionable. Bring the pics, get the feedback.
Posted by: mepstein Dec 25 2016, 04:59 PM
Start cleaning the trunks and interior of your car. Take out the upholstery and the carpet. As you go through the car you will be getting it cleaner and assessing the condition. Good luck.
Posted by: branston Dec 25 2016, 10:01 PM
I don't jack my '74 under the body, I tend to use the engine cross member close to the outer mounting bolts or under the bolt itself, and use the front suspension to lift the front. My own car is a mid west car and in remarkably good shape for a car from this area.
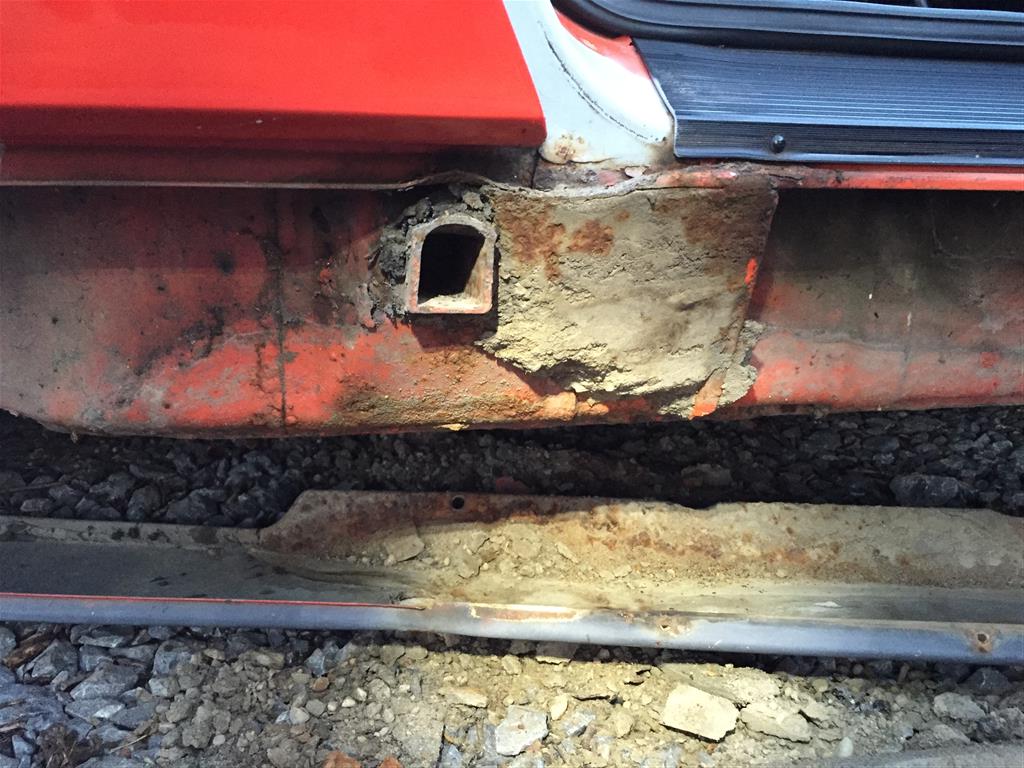
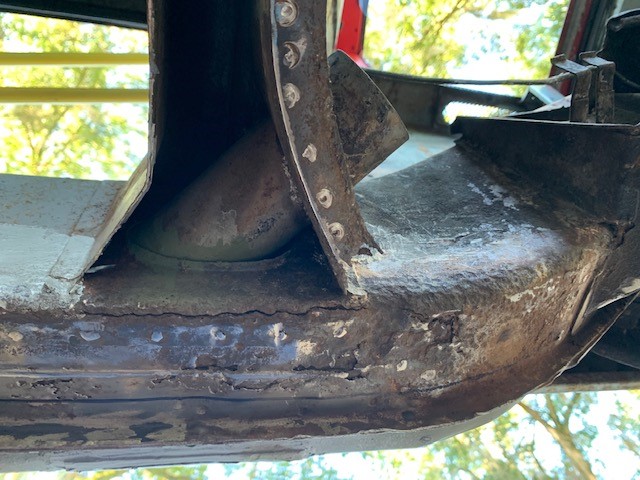
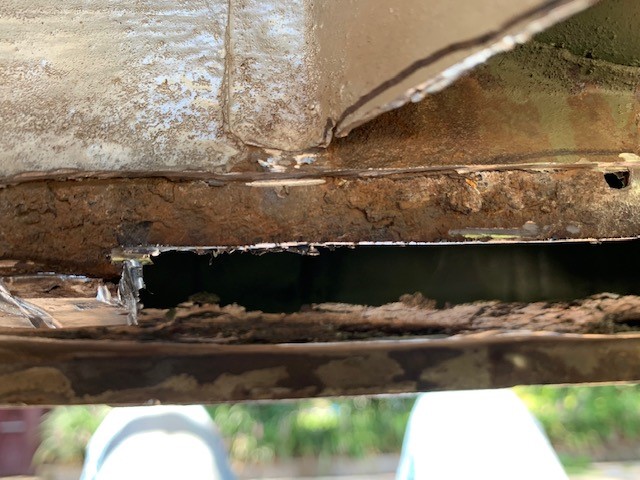
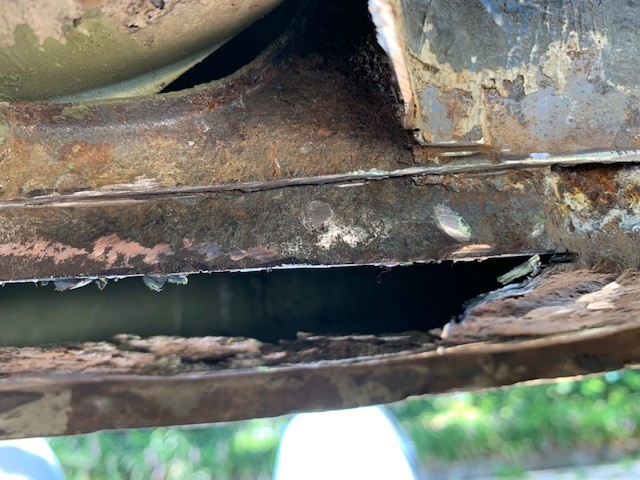
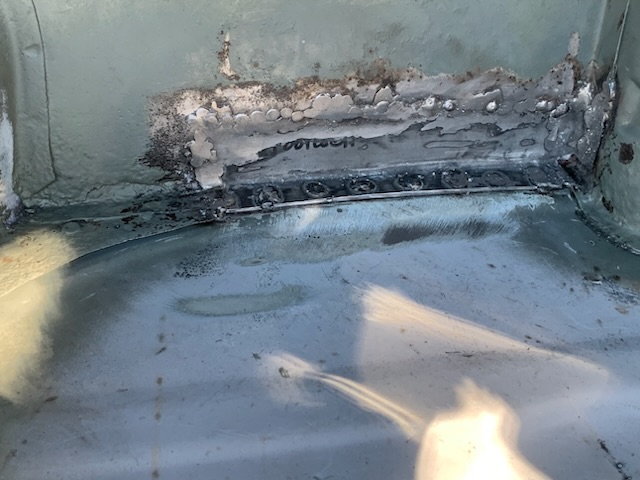
However removal of the outer rockers revealed rust close to the jack points affecting the longs. this my first 914 and have learned much, a quick check if to insert a jack into the jack point and see how much it moves when you try to lift it, don't lift it just try to see how much it moves. To my horror the jack point moved freely by hand!
Go ahead and remove the outer rockers, removing mine which on the surface showed little signs of rust revealed dirt trap Porsche designed, mud and moisture accumulate in this area and the rot starts, once inside it rots the underside of the longs.
I've attached photos of what was hiding behind the outer rocker on my car you can see the mud accumulated between the jack point and the reinforcing gusset.
Attached image(s)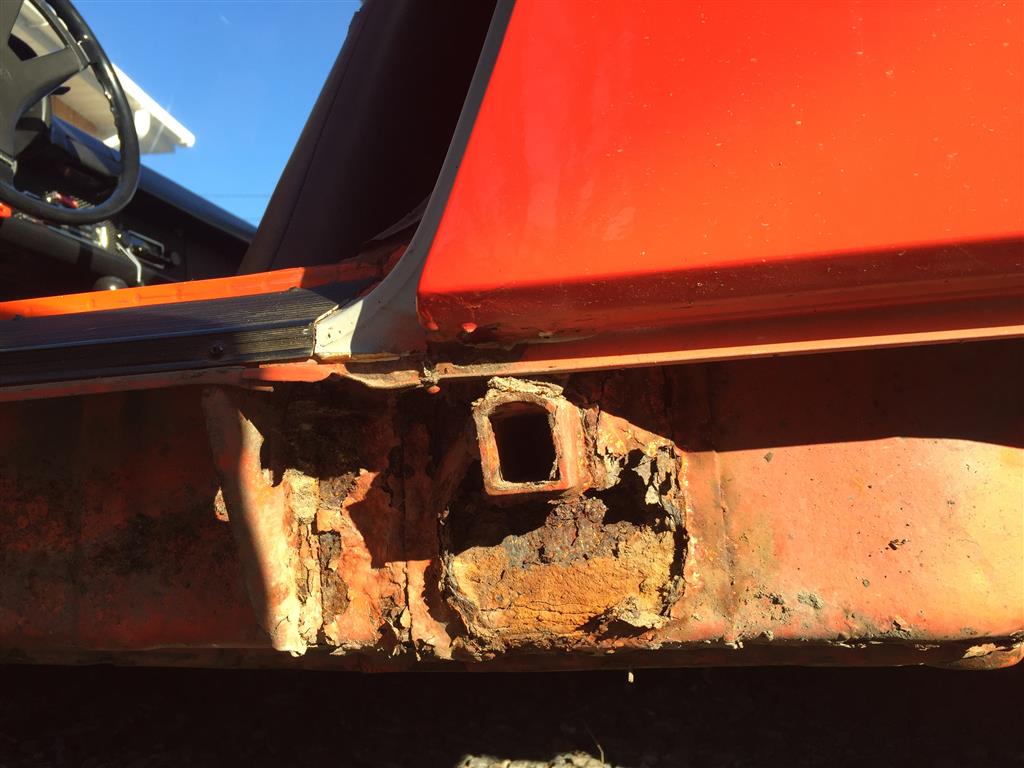
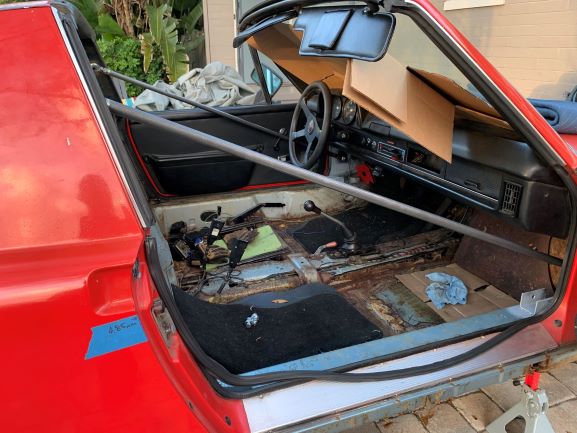
Posted by: seanpaulmc Jan 31 2017, 05:01 PM
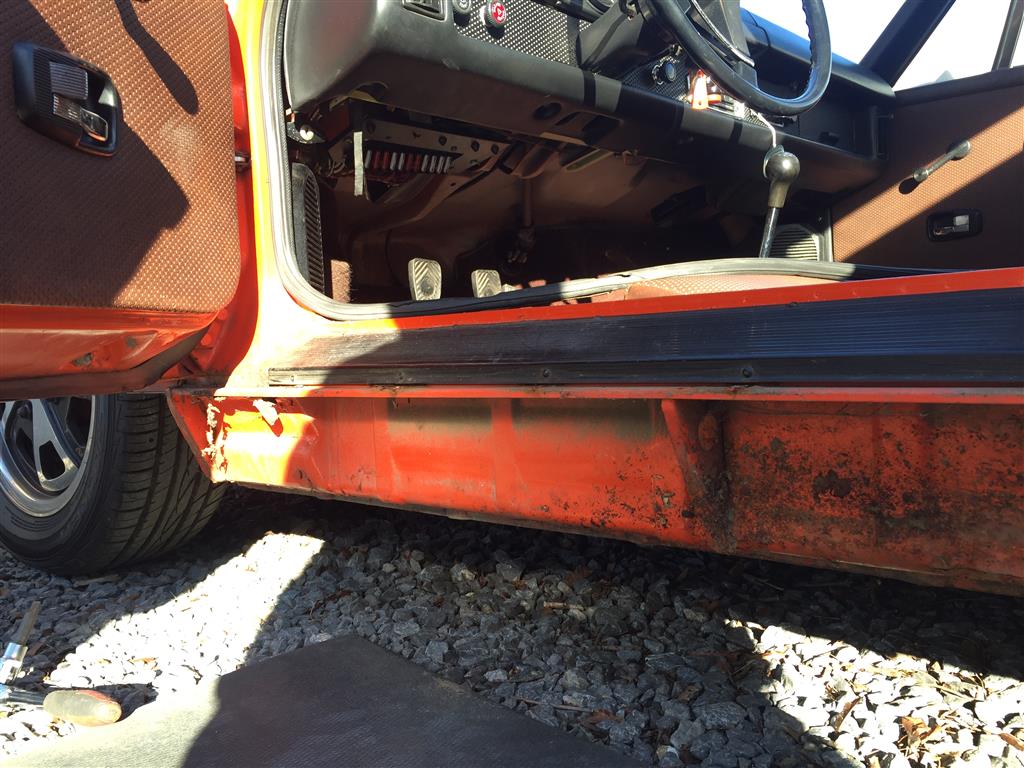
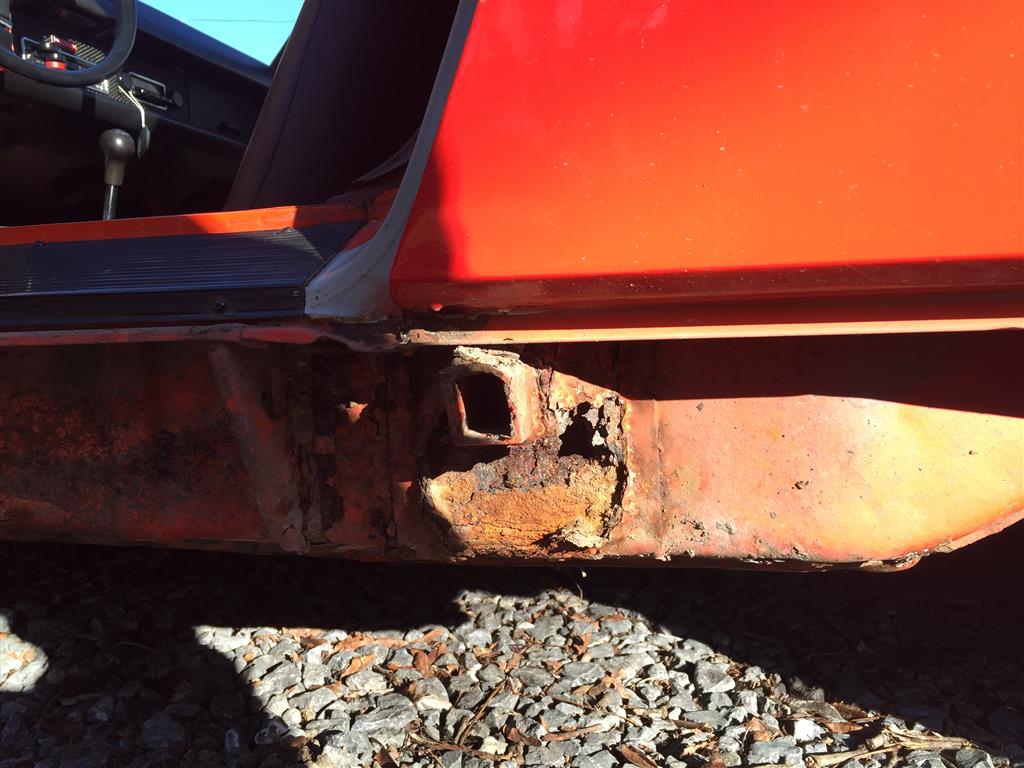
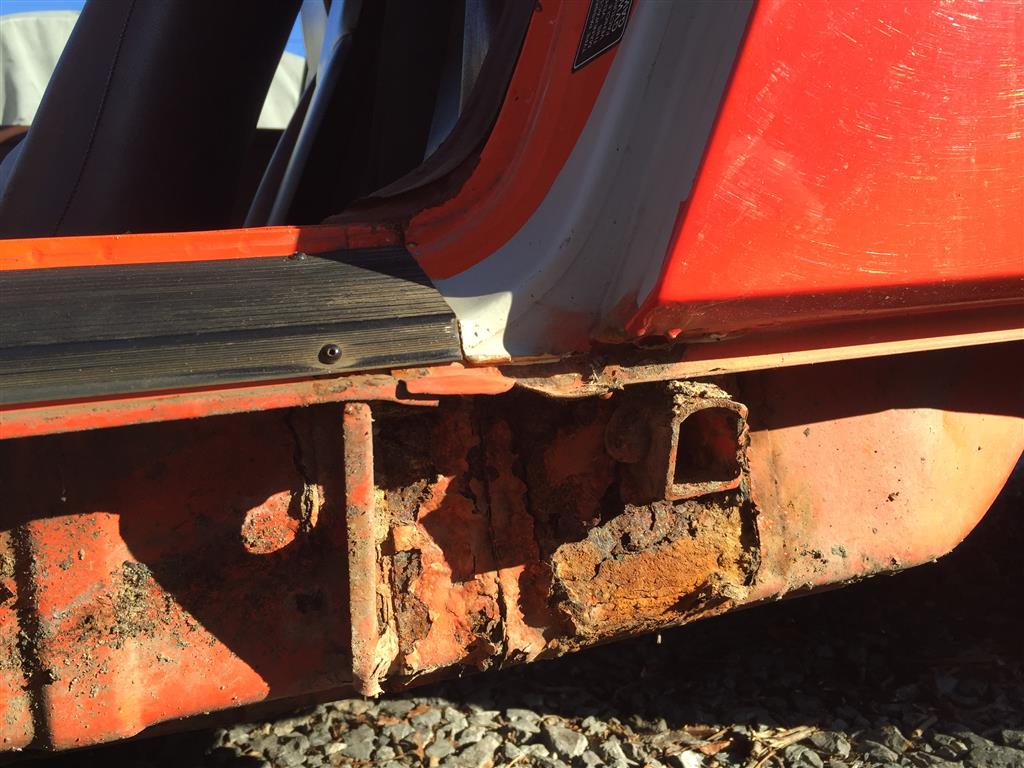
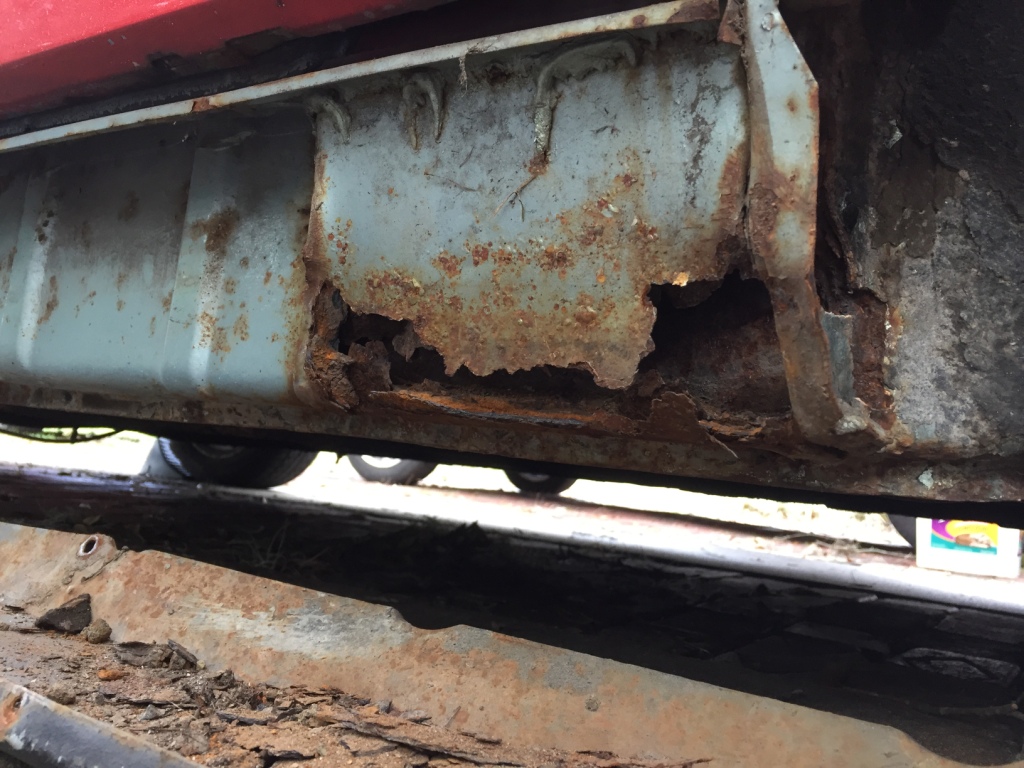
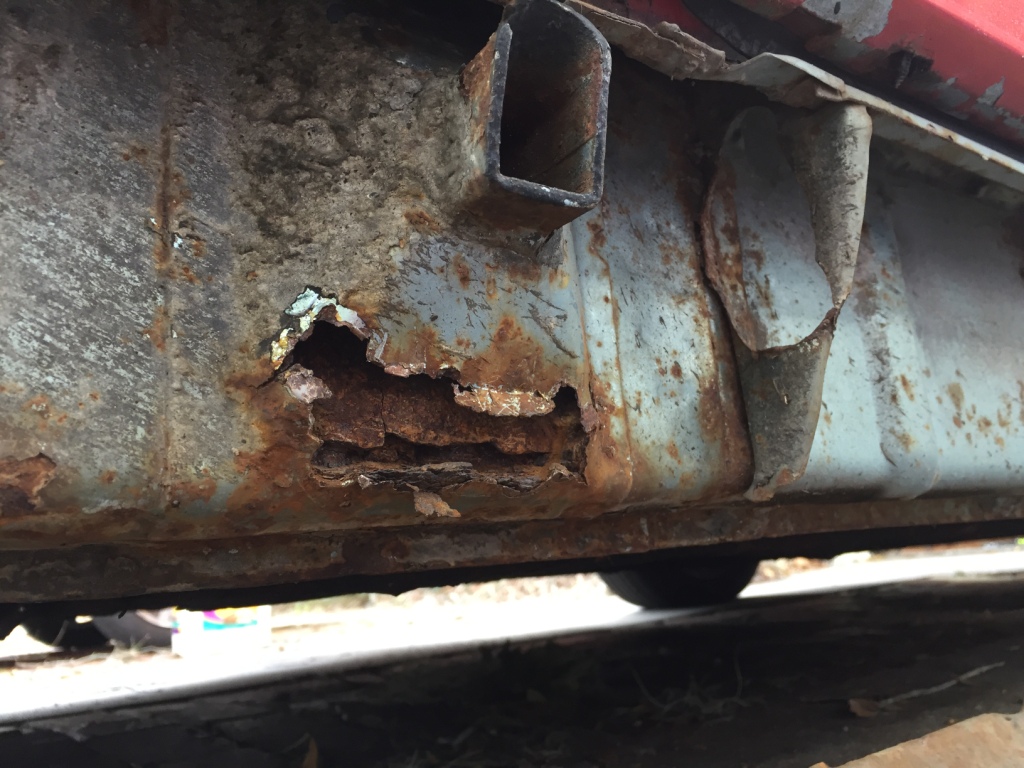
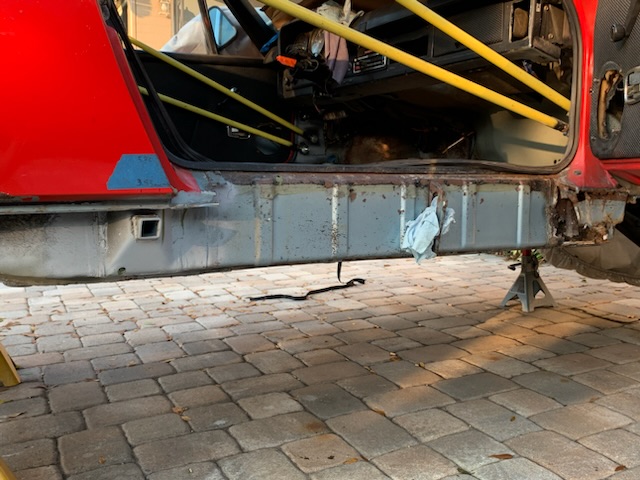
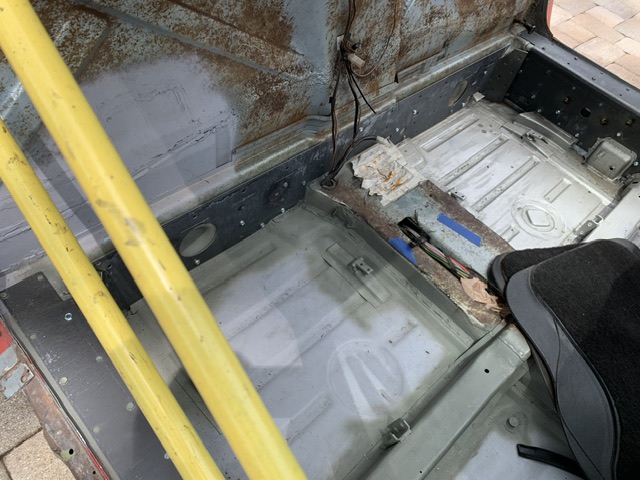
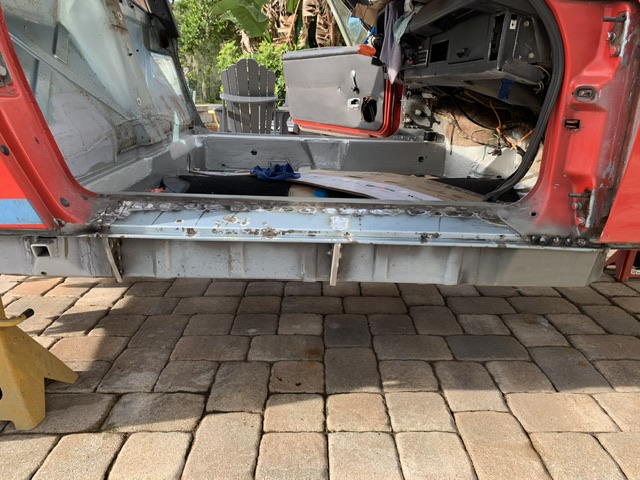
I finally got some time and pulled the covers off the longs, and Branston, thanks for your pictures because it looks a lot like what I found. The pass side had been off before because of the hardware used to reattach it but the driver's had not. I drilled out the rivets and broke all the undercarriage bolts when taking off the driver's side cover.
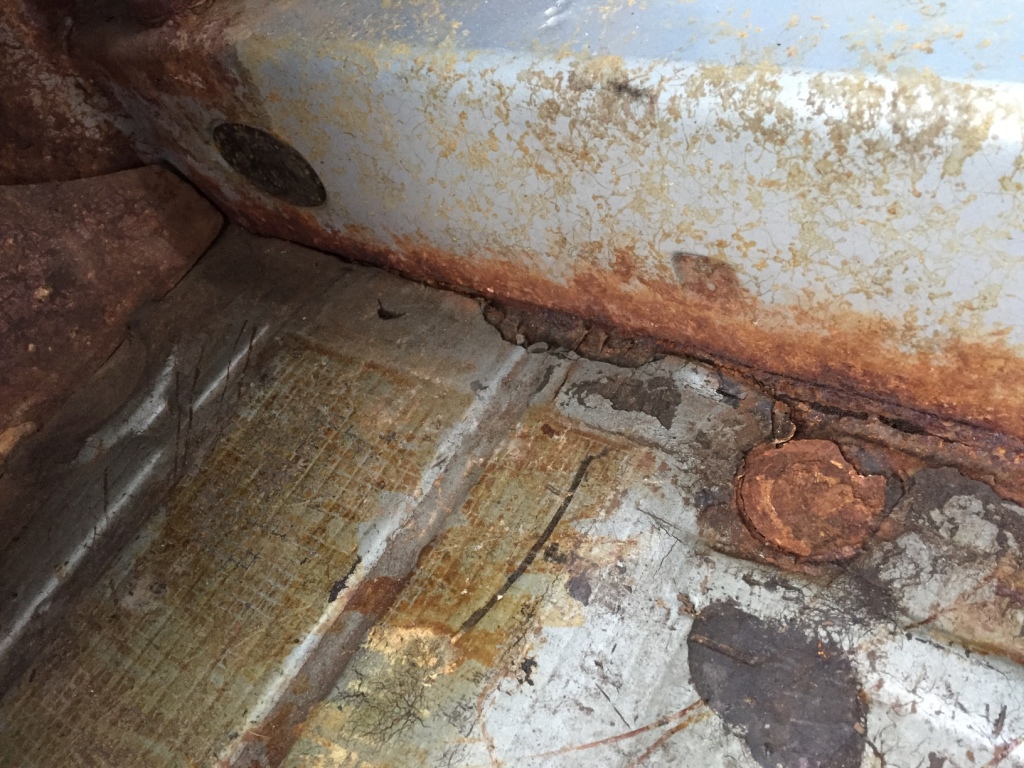
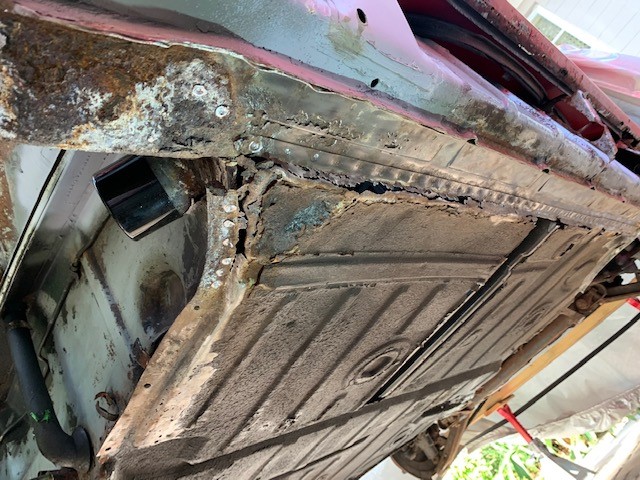
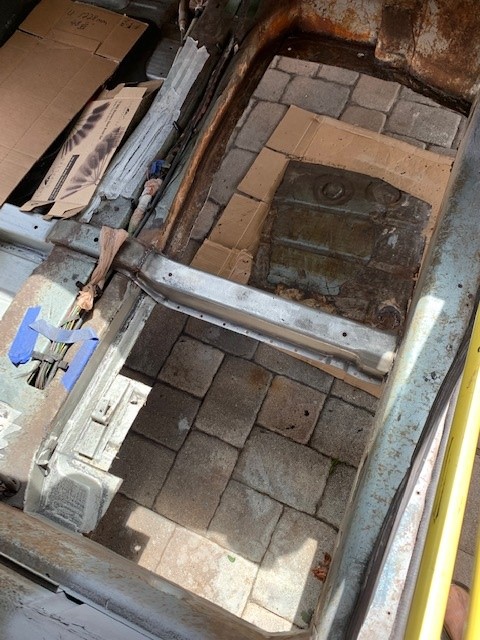
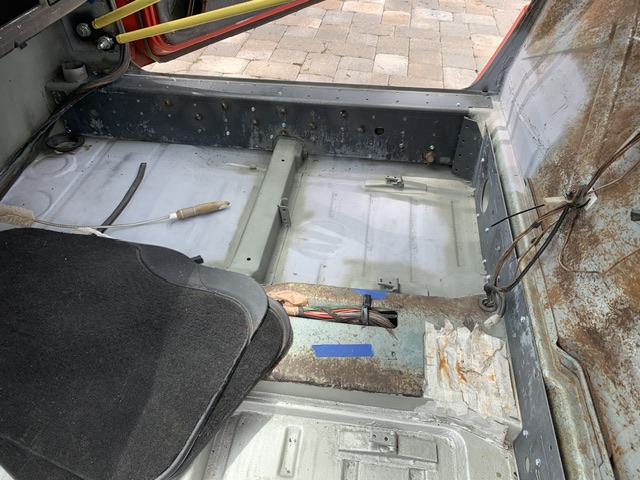
I also started pulling out the carpet, interior, and began chipping away at the floor pan on the passenger side. Not liking what I'm finding. When I get back to it I'll pull the plugs from the insides of the longitudinal but for now here are some pictures of what I'm finding.
So, what does the group think thus far?
Passenger side: 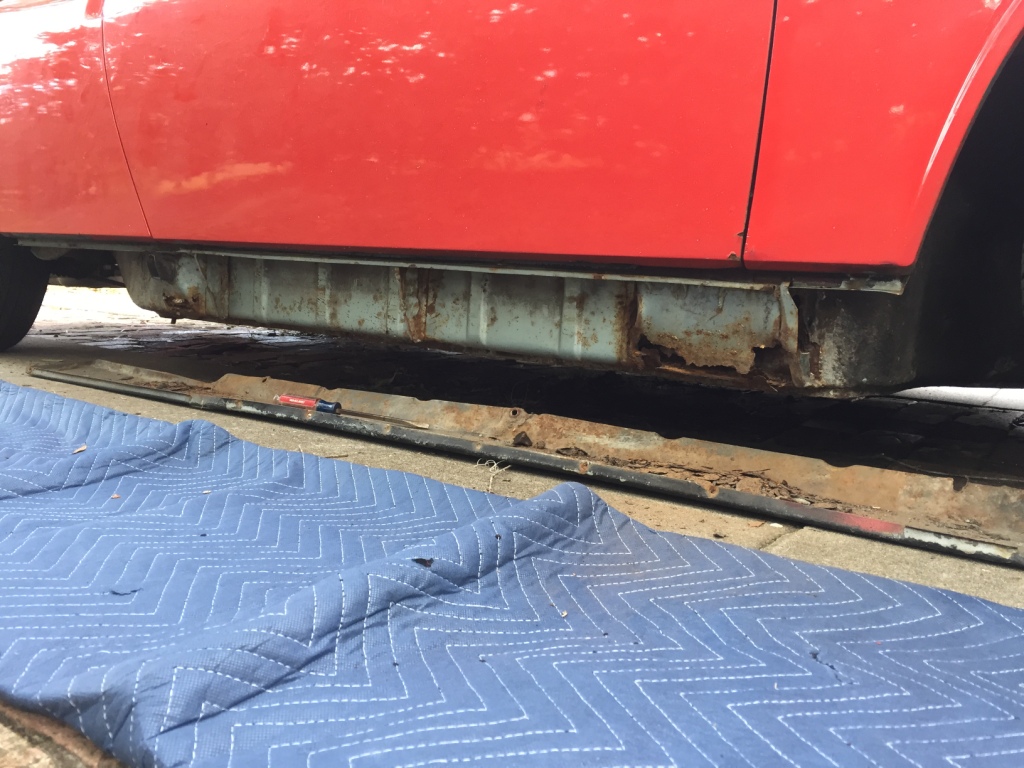
Driver side: 

Inside: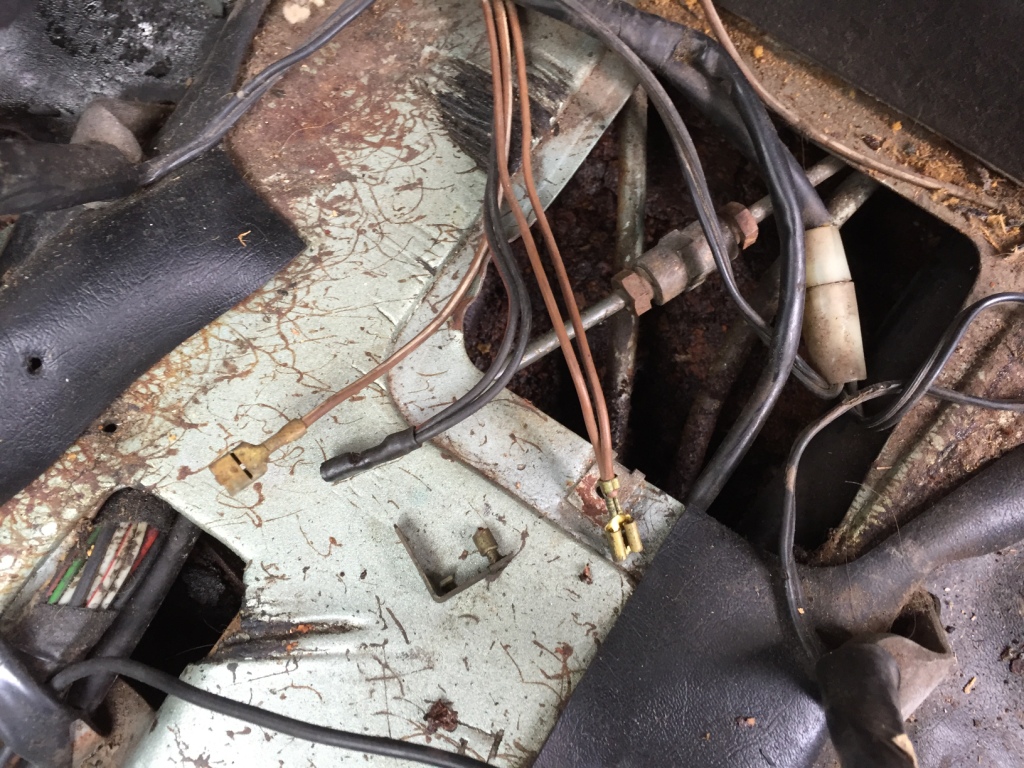

A few questions/observations:
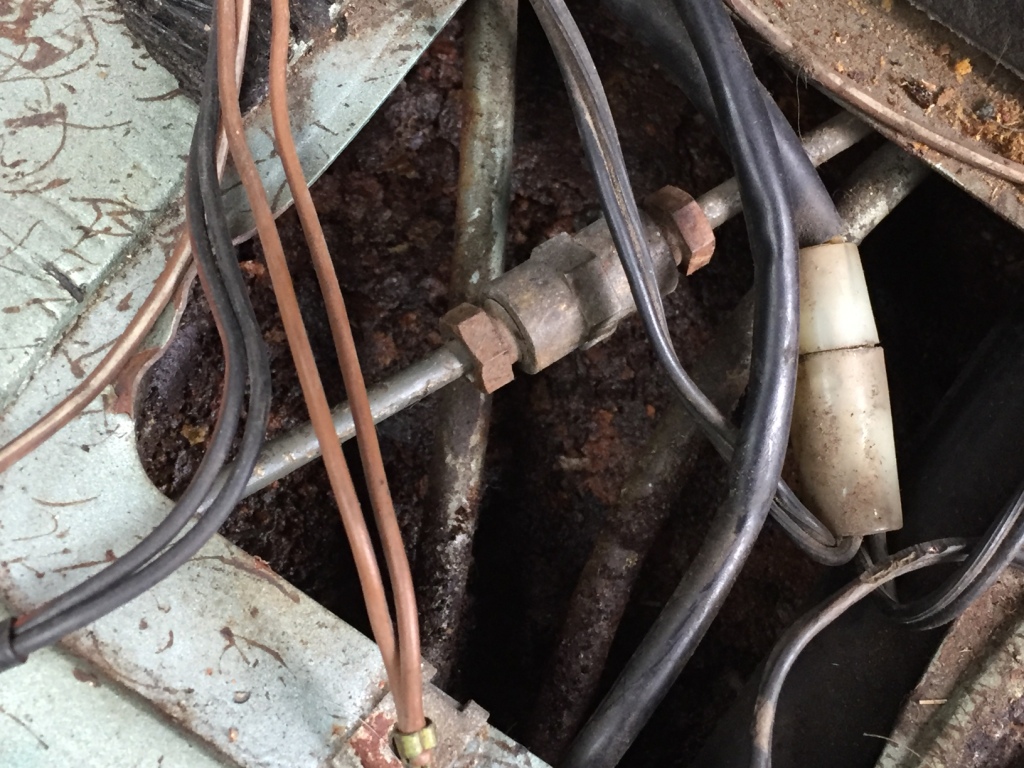
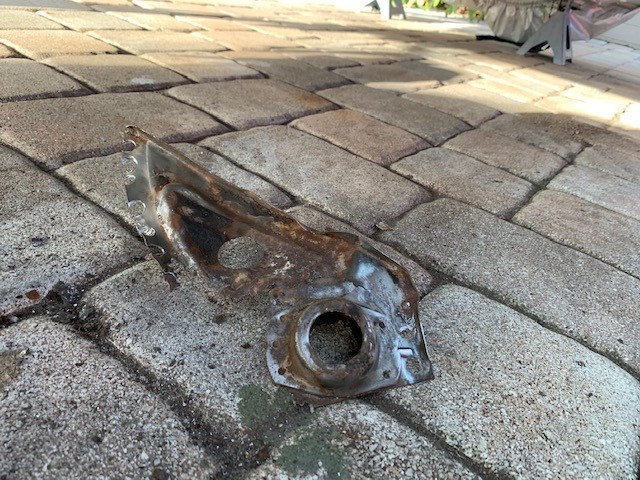
1. Are those unconnected wires laying at the back of the tunnel (brown and black) for the light that is supposed to be in the backpad? (Missing)
2. Any idea what the little brass metal piece laying next to the wires is for? It doesn't seem to be for the light.
3. Looks moist and nasty inside that tunnel.
4. How is the pad affixed to the firewall? How is it removed? Should it be retained and reused?
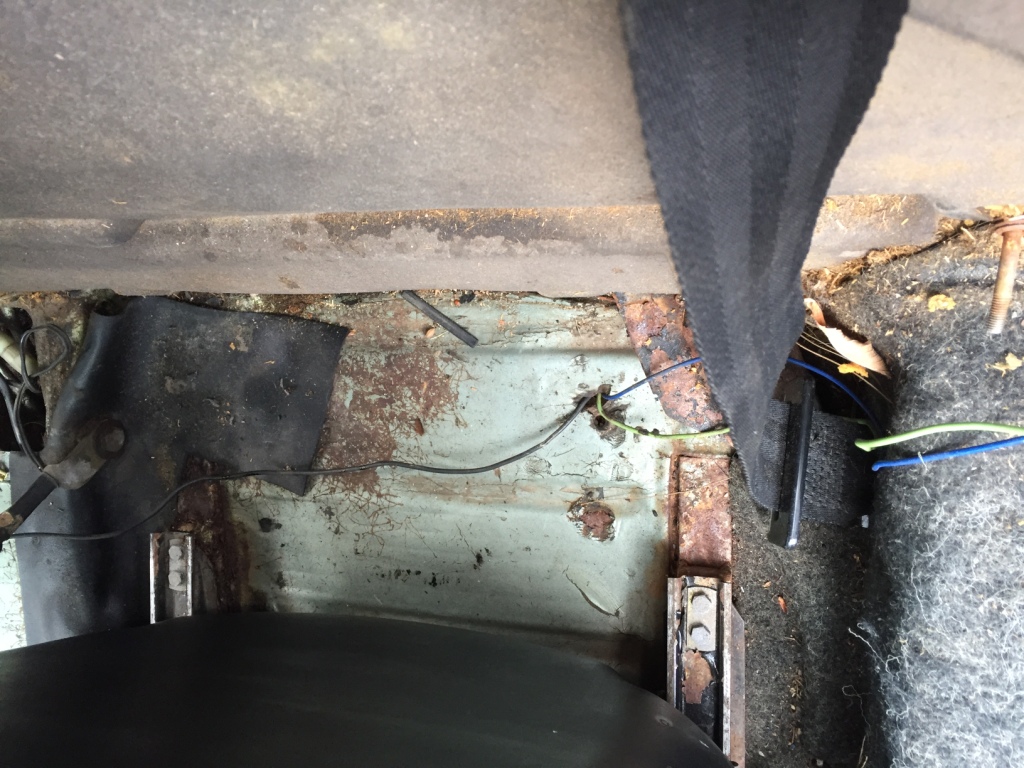
5. Behind the driver's seat you can see three new wires (black, green, and blue) going through the floor to routed to the engine bypassing whatever original equipment isn't working.
6. After chipping away at the loose material on the floor daylight is observed along the passenger long.
7. Retaining bolt for the passenger seatbelt at the floor was a total PITA to get out.
8. How does the wooded piece on the passenger footwell come out? Seems brittle.
Thanks in advance!
Attached image(s)
Posted by: JoeDees Jan 31 2017, 05:11 PM
You're gonna need to buy a welder.
Posted by: mepstein Jan 31 2017, 05:16 PM
You need long and floor pan repair. Once you scrape off the tar, the floor will look worse. You really need to check out the hell hole and the rear passenger suspension console. Those are the two areas most affected by battery acid and water and the rear long also reaches into that area. There's a good chance it's going to be a mess and make these pictures look tame.
Posted by: Dave_Darling Jan 31 2017, 05:39 PM
A 2x4 can distribute the load from the jack across a larger area of the floor pan. You can try that if you want to lift the car.

A few questions/observations:
1. Are those unconnected wires laying at the back of the tunnel (brown and black) for the light that is supposed to be in the backpad? (Missing)
Yes, that's what they're for. Tape up the black wire to keep it from shorting to ground; it should be "live" all the time.
It isn't for the light. Not sure what it might be for, possibly something inside the turn signal switch mechanism? There is an angled brass piece in there that loves to go AWOL when the steering column is taken apart.
Kinda typical. Worse than most I've seen here in CA, but we are a bit less rust-prone than many other areas.
Which pad? There are three that I can think of.
1- The "back pad" that is the upholstered part that sits on the firewall. The interior light snaps into this part. It is held on by a pair of clips and four screws. The screws are about 6" up from the floor, I think, two in each seat well. Remove those screws, remove the engine-lid pull knob and the "escutcheon" around the knob, slide the bottom of the back pad forward and push the top of the pad down. It should come away from the firewall. (The seats need to be out, obviously.)
2- The tar insulation on the interior of the firewall, that is uncovered when the back pad is removed. This must be scraped off, like the other insulation.
3- The heavy rubber-covered mat on the engine side of the firewall. This is held in with a combination of glue and screws with very large plastic washers, and metal tabs on the edges. The actual function of this pad is to trap water against the firewall, leading to rust perforations. Ditch it.
Learn the acronym DAPO. (The PO stands for "previous owner". I'll let you guess the rest.) You may wind up using it a lot.
Never a good thing. I see door braces and welding in your future...
Penetrating oil, like PB Blaster or Aero Kroyl, can help a lot. WD-40 is a lousy penetrating oil, BTW.
Wooded? Do you mean the styrofoam plug in the front of the passenger footwell? I think that may be glued in--I haven't messed with it myself, but have seen several out of the car.
The wood floorboard on the driver's side is held in with two or three bolts (likely Allen-head) and has to be turned to a fairly specific angle in order to maneuver it off of the pedals.
--DD
Posted by: seanpaulmc Feb 1 2017, 04:49 PM
Thanks for the feedback, All.
About that welder, is there advice for a recommended welder for a novice on here? Likewise, on what to stay away from?
DD - thanks for breaking down the Q&A like that. Really easy to follow. I'll have to learn how to do that.
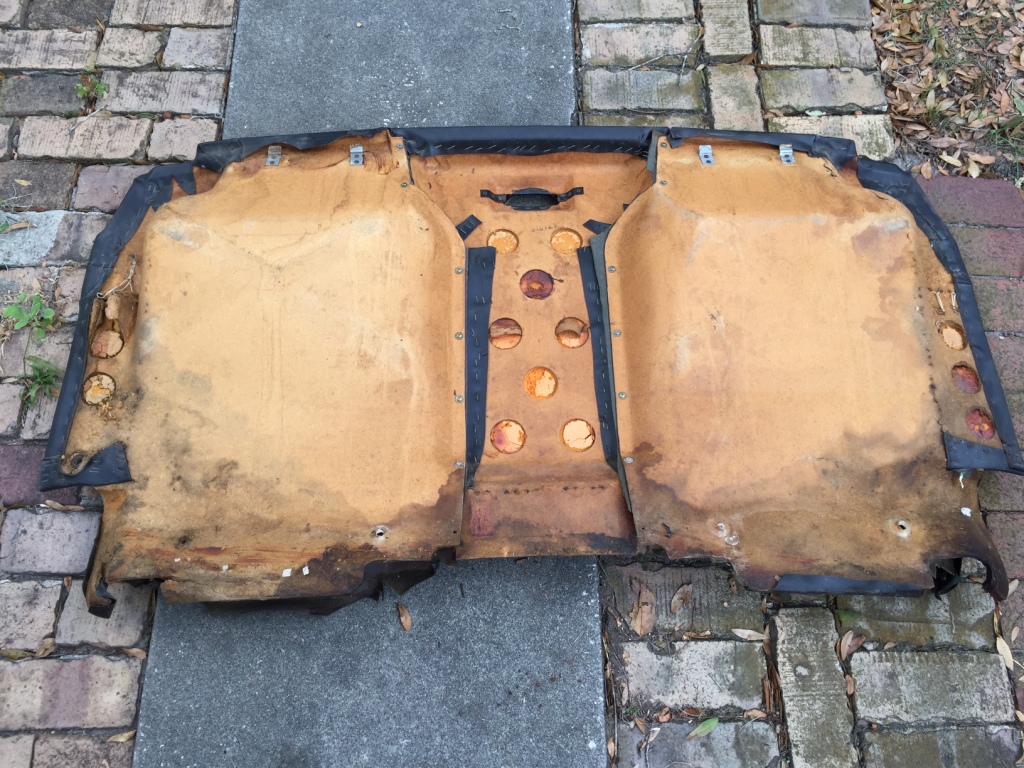
The actual pad I meant in my question was the pad affixed to the firewall behind the seat backpad. I was able to get the upholstered seat backpad out of car without removing the seats. What was left is stuck to the firewall but I'm not sure how. Seems like a kind of fiberboard. Should this be kept and retained for future use or removed no matter the cost and discarded?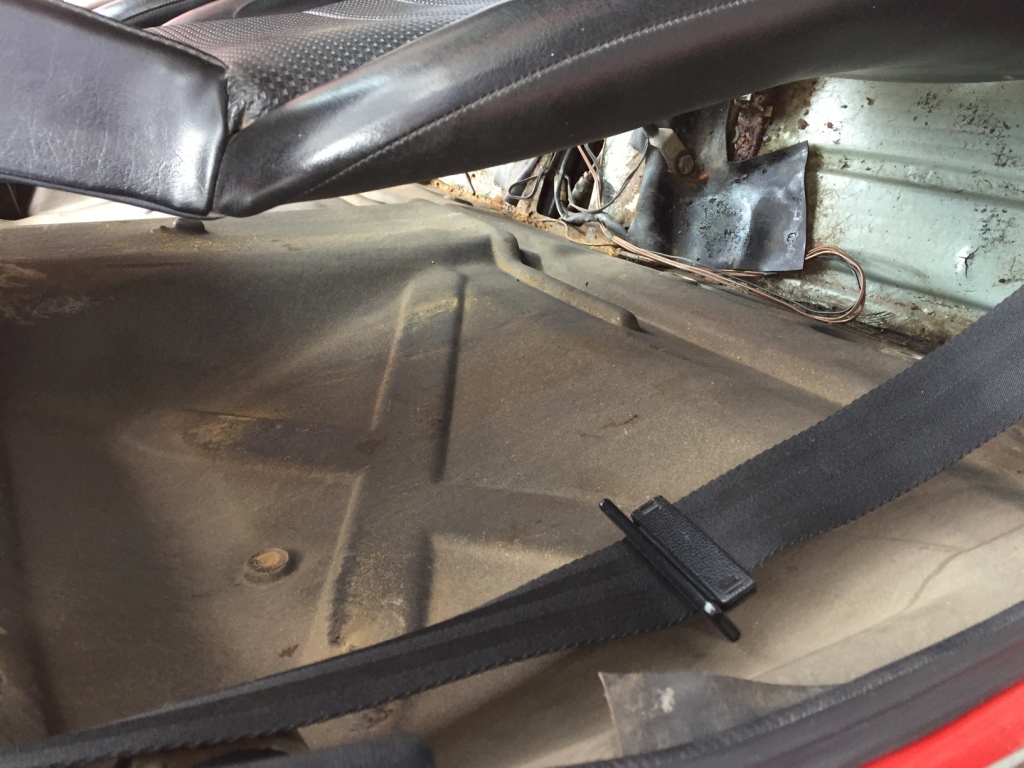
Here's the condition of the seat backpad which looks salvageable. It clearly shows water damage at the bottom.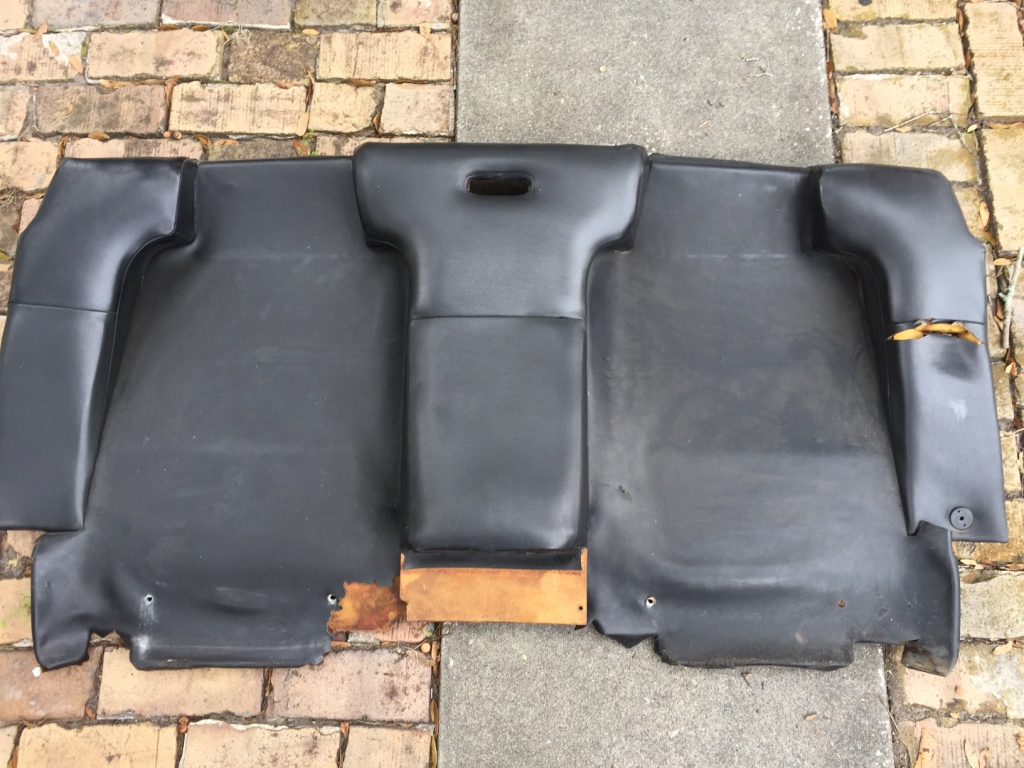
Thank you!
Posted by: Ferg Feb 1 2017, 04:57 PM
Whats the code for the original color on this car? My monitor makes it look like a light green metallic aka special order...
Posted by: seanpaulmc Feb 1 2017, 05:35 PM
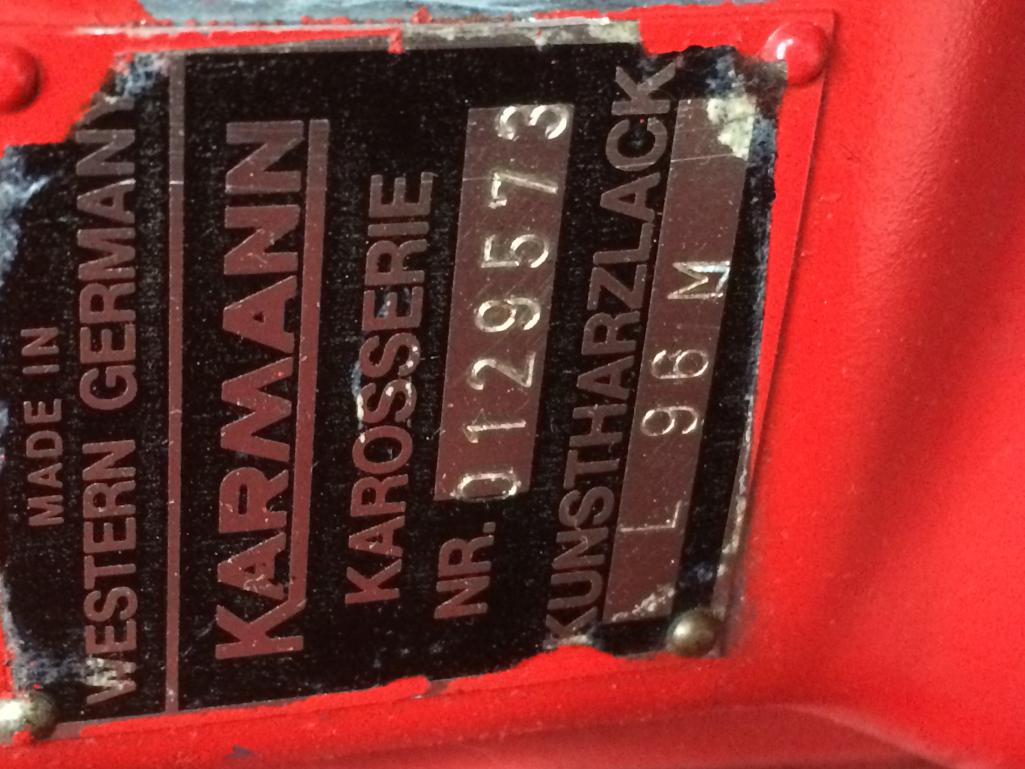
L96M
Original is a light blue metallic. Currently painted a reddish orange.
Posted by: Ferg Feb 1 2017, 05:47 PM
L96M
Original is a light blue metallic. Currently painted a reddish orange.
Marathon Blue, I need to adjust my monitor

Posted by: amfab Feb 1 2017, 05:52 PM
Your longs and pans look like they have similar issues to mine.
Its a lot of work.
Im about 6 weeks ahead of you. Check my thread in my signature.
There is so much help here.
I would be freaking out if it weren't for all the people here who have been here before who are willing to help.
At least you only have rust to deal with and not others who have worked on the car before and made it worse.
Posted by: JoeDees Feb 1 2017, 06:06 PM
There will be a lot of opinions on the welder (and there are many, many threads), but if you're just a hobbyist planning to weld little more than this car and only have 110 wiring in your garage and what not, I think your best deal is the Eastwood MIG 135. Don't weld flux, get the gas, practice and learn the right heat and wire speeds. Stay away from the Harbor Freight, if you're needing cheap but good enough, this Eastwood will do the job.
Posted by: PanelBilly Feb 1 2017, 07:29 PM
There's some smart people with the skills to help not all that far from you. Start making friends and bribe them with food and beer to come over and ponder how to attack the project. With any luck, you'll get a hand and the car will be driveable in no time.
Posted by: mepstein Feb 1 2017, 08:03 PM
How about the hell hole?
You can see the suspension console without a lift. You just need a flashlight.
Posted by: Larmo63 Feb 1 2017, 08:10 PM
You should assess everything under the tar padding on the floor before you go any further in buying a welder. It looks like rain water has infected the lower part of this car's interior by the looks of the backpad.
Make sure you have a chassis that is worth the effort and cash outlay. It will take a lot of work and patience to fix these issues.
I wish you the very best, but this is going to be a project. and,

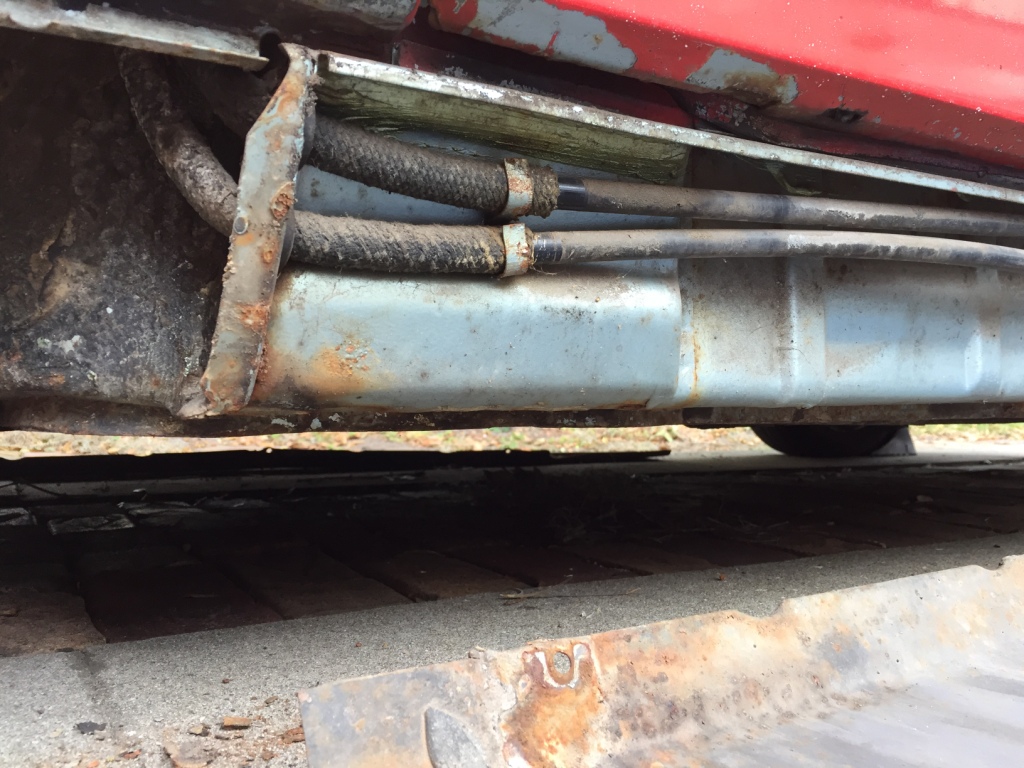
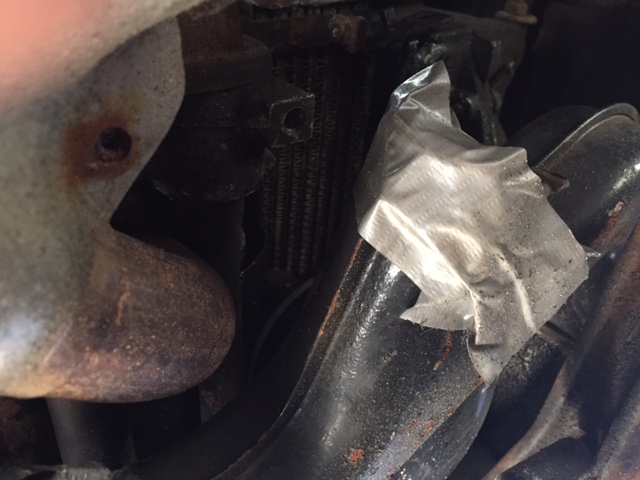
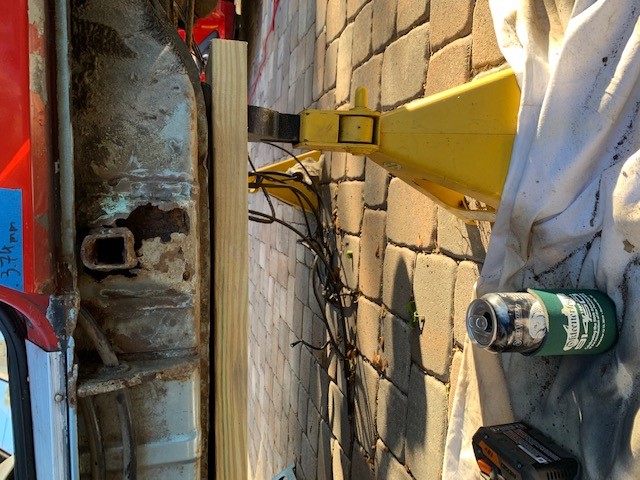
Posted by: seanpaulmc Apr 1 2017, 06:52 PM
Here's the initial look underneath. I'm pretty sure the duct tape shouldn't be there. 
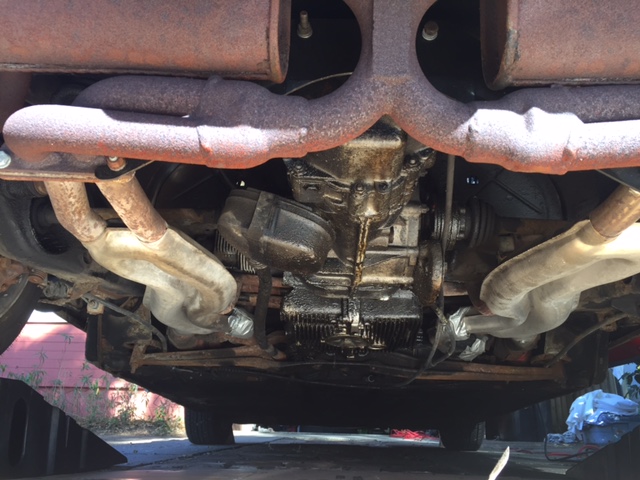
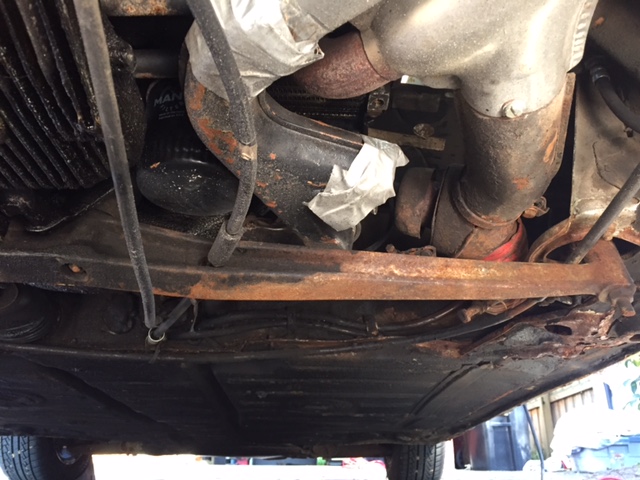
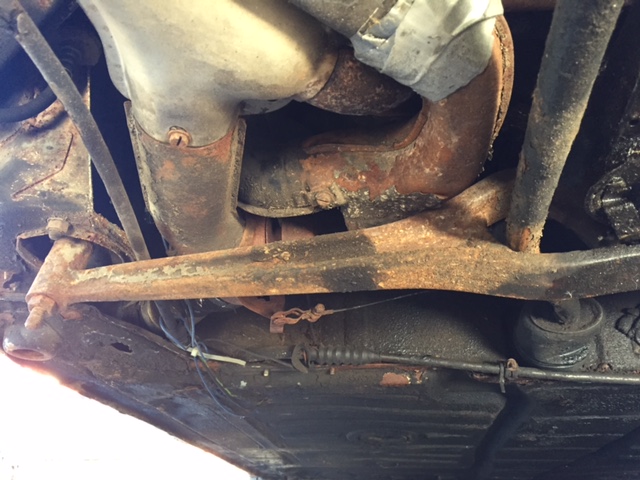
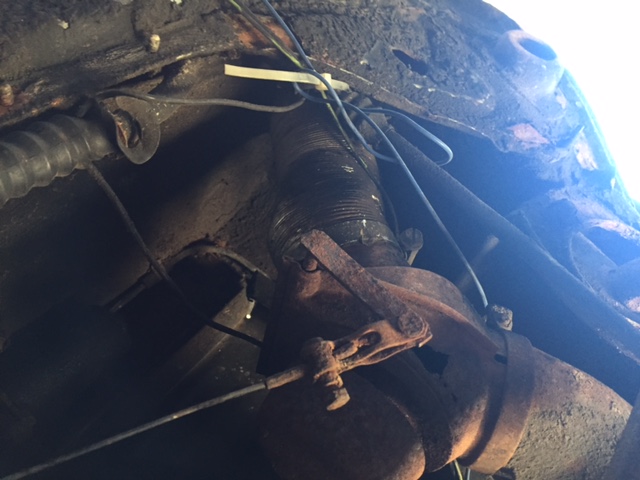
The engine cradle is cockeyed (i.e. not vertical), should it be?
Also, I started in on the removing the tar from the floor pans. The oscillating multi-tool with scraper blade works great. Didn't get very far since I started late in the day. Spent three hours doing yard work first. Will show the floor carnage after a little more progress tomorrow.
Findings to date:
Seat belts do not work well at all. Replace or refurbish?
Has original fuel lines. I bought a fire extinguisher just in case.
Rust in the longs and floor pans.
Windshield washer switch arm broken.
Horn moved to a button on the dash (push button).
Ignition moved to a button on the dash (push button).
Low beam headlights don't work but Highs do. I did put in LED bulbs if that means anything.
Speedometer does not work; it is hooked up at both ends.
Broken engine lid bracket (LS).
No rear trunk springs (broom handle).
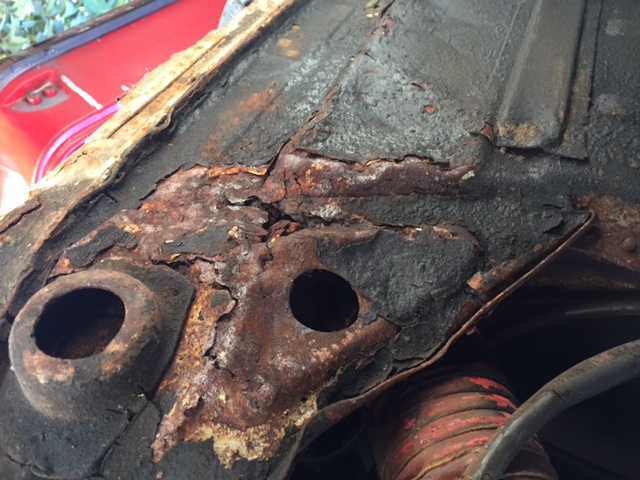
Lots of rust in the rear jack points.
The hunt goes on. Thoughts?
Posted by: branston Apr 1 2017, 07:32 PM
There will be a lot of opinions on the welder (and there are many, many threads), but if you're just a hobbyist planning to weld little more than this car and only have 110 wiring in your garage and what not, I think your best deal is the Eastwood MIG 135. Don't weld flux, get the gas, practice and learn the right heat and wire speeds. Stay away from the Harbor Freight, if you're needing cheap but good enough, this Eastwood will do the job.
I Agree the Eastwood MIG 135 is an awesome little welder, I have doen all my bodywork on my other cars with it. yes get the gas for sure don't waste your time with flux wire. Good advise from JoeDees
Posted by: Dave_Darling Apr 2 2017, 01:16 PM
The engine cradle is cockeyed (i.e. not vertical), should it be?
If you mean that the bottom of the bar leans back toward the rear of the car, this is fairly common. Someone ran over something, and the mounting bolts for the bar or the outer plates that those bolts go through are bent.
Replace them.
Cleaning the webbing can do wonders! Be very very very very careful if you remove the side covers from the retractors, the spring inside has sharp edges and is under a lot of tension. At least the scars fade over the course of a decade or two.

There is a high/low relay on top of the fuse panel. It chooses where the headlight current goes, to the high beam circuit or the low beam one. Note that each headlight filament has its own fuse, so there are four: high beam left, high beam right, low beam left, low beam right. Double-check the fuses, but with both low beams out it is more likely to be the relay or something between the fuse and the relay.
Though it could be the filaments. Worth checking that you have voltage at the low beam pin of the headlight connector.
Does the dashboard end of the cable spin when the car is in gear and moving?
Everything is fixable. Lots of work to do on this one. Depending on where you are and how available 914s are there, it might be $$ ahead to part this and buy a different one. But $$ is not always the only determinant...
--DD
Posted by: branston Apr 2 2017, 01:42 PM
If your webbing doesn't clean up or the retractor sticks - I just mailed seat belts from my 912e to Safety Retore in MA, $75 to replace webbing. Claim to use OEM webbing will report back!
Posted by: boxsterfan Apr 2 2017, 02:26 PM
You are definitely going to need to order from these guys to replace longs.
http://www.restoration-design.com/store/category/914
They make a lot of the pieces you will need, but from the looks of it, not all of the pieces. There's going to be some custom fabricating or you will need some areas cut off of a parts car.
When I do my car, I will be going without the jack points. I don't use them and I don't want to put back in a mud collector.
Posted by: seanpaulmc Mar 3 2021, 07:11 PM
You are definitely going to need to order from these guys to replace longs.
http://www.restoration-design.com/store/category/914
They make a lot of the pieces you will need, but from the looks of it, not all of the pieces. There's going to be some custom fabricating or you will need some areas cut off of a parts car.
When I do my car, I will be going without the jack points. I don't use them and I don't want to put back in a mud collector.
Funny that this was the last post on this thread...and that my first order from RD arrived yesterday (3/2/2021).
Reviving this old thread since so much good advice was offered when I just got the car. Well, still got the car and am getting back to working on it - I hope more regularly.
Posted by: 930cabman Mar 3 2021, 07:24 PM
Time, patience, basic skills, repeat, repeat and don't forget $$$. Anything can be fixed, I have been at our project since late 11/20 and just about done with the structural metal work, still have floors, engine, transmission, brakes, suspension, ................
Persevere, you can/will win
Posted by: seanpaulmc Mar 3 2021, 07:30 PM
Hard to believe this tread was stared four years ago. A lot has happened but little with the car. However, recent progress has me hopeful and wanting to share as well as seek advice.
Purchased a welder.
Eastwood Mig135. 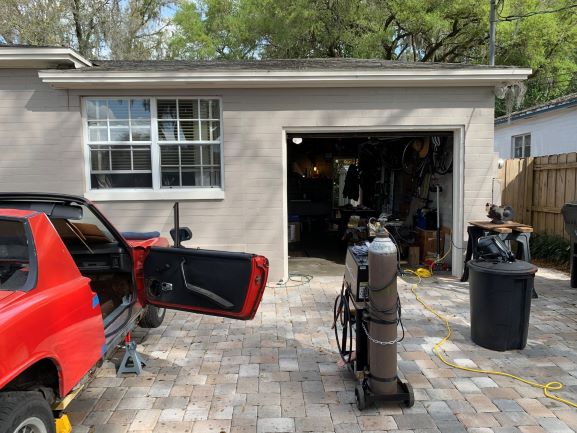
...as well as a driveway should the keen observer look back at the older pictures. Same house. One day hopefully I'll get a two-car garage and get to work inside. It rained hard early today.
Repaired an engine deck lid bracket.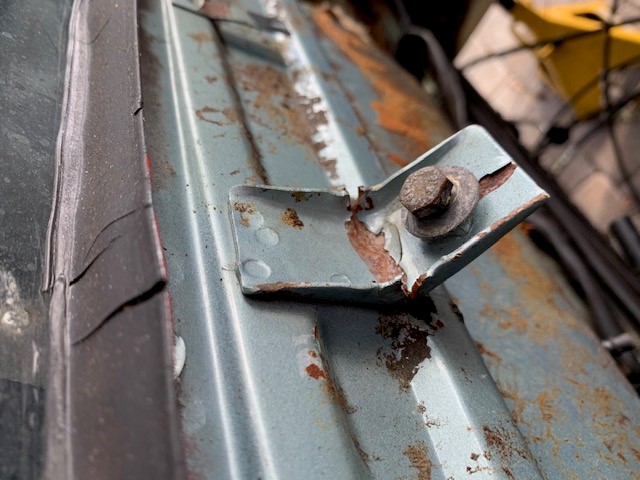
Started working on my engine tin repairs. 
Made some door braces in anticipation of what's to come. 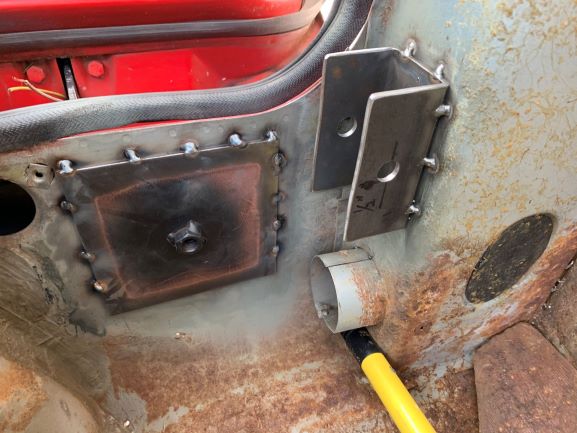
Posted by: seanpaulmc Mar 3 2021, 07:55 PM
Let's see what we're working with. Or, without in this case.
How may holes did you count? 
What about the battery tray area? 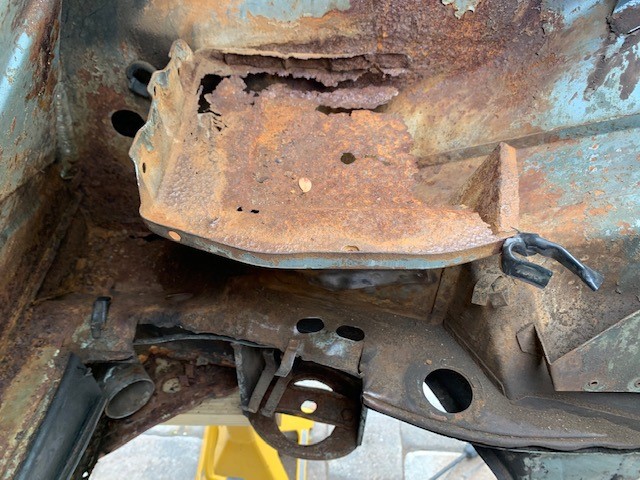
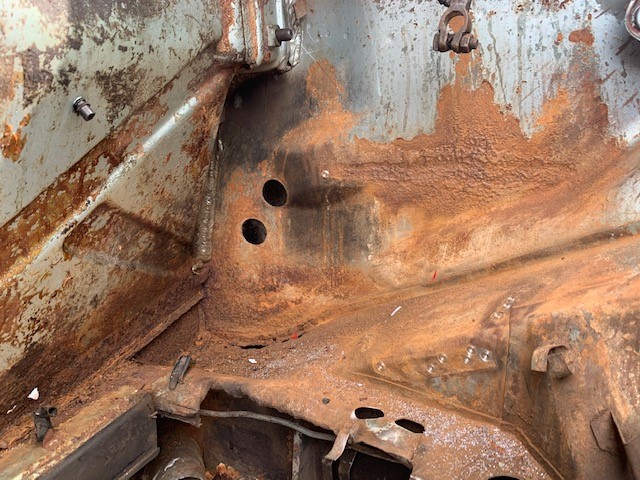
The tray itself was gone but the support was in rather good condition.
However, it had to come out to do what is needed to do. 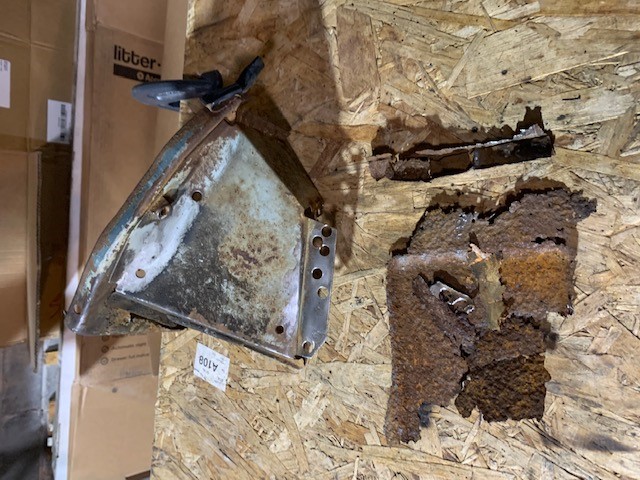
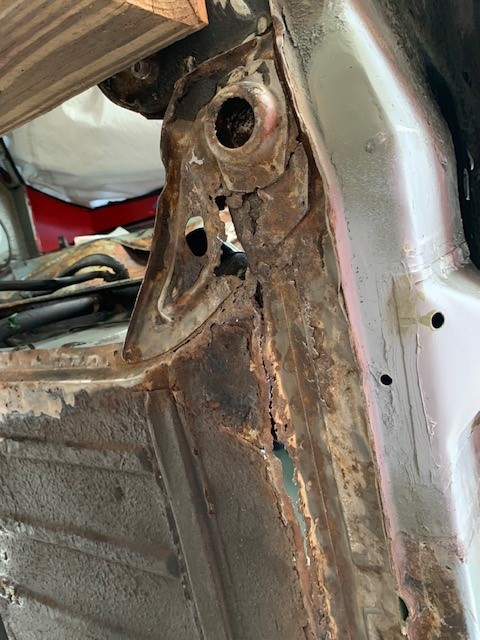
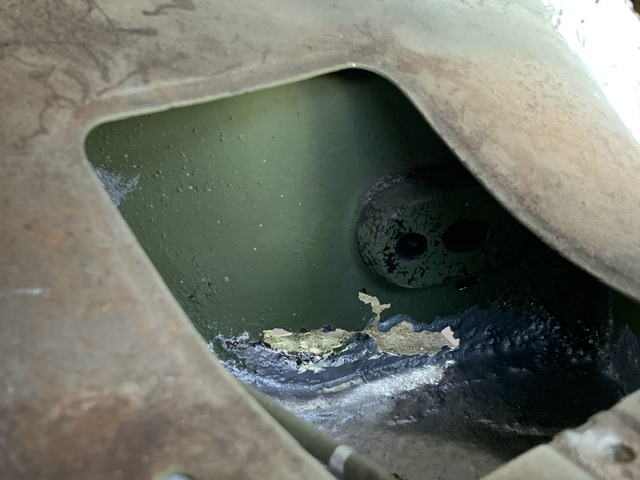
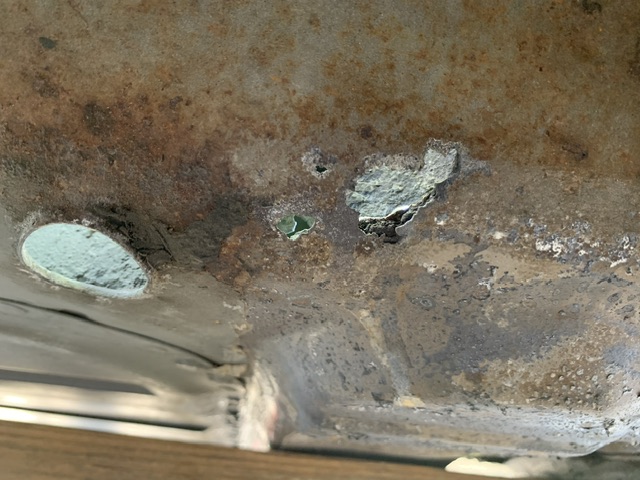
Let's look at that hell hole area.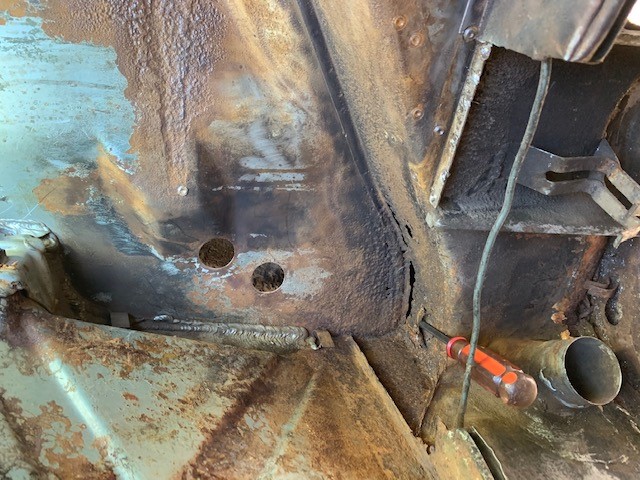
That's the paper thin top layer just eaten away. It took me a while before I realized what I was looking at. 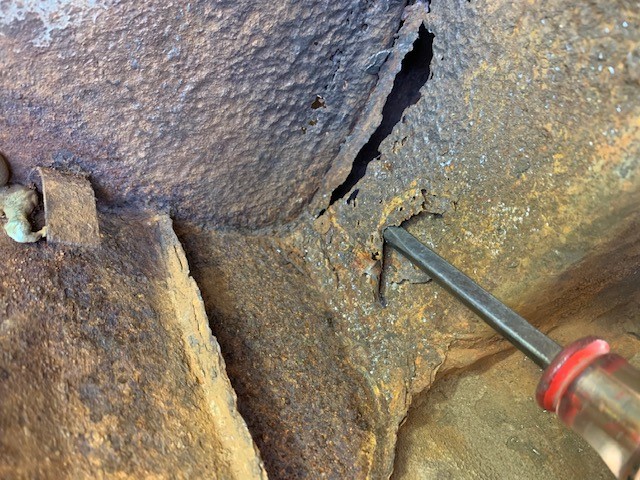
As thin as it was it still took me a while to peel back. Quite surprised to see the inner layer (top of the long I suppose) in quite good shape. However, I know the bottom of the long is not in good shape and will need work (think door braces). Still a nice surprise nevertheless. 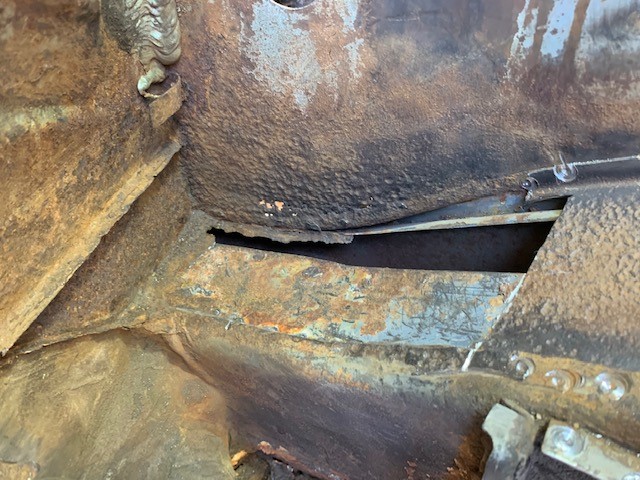
And if you look at the firewall in these pictures, it's pretty thin and rusted away at the bottom. Almost as if it was soaked in a wet sponge for years. 
Here's to getting good use of that new welder. 
Thanks for the inspiration everyone.
Cheers.
Posted by: Robarabian Mar 3 2021, 10:33 PM
Duplicate post. Sorry.
Here's the initial look underneath. I'm pretty sure the duct tape shouldn't be there.
The engine cradle is cockeyed (i.e. not vertical), should it be?
Also, I started in on the removing the tar from the floor pans. The oscillating multi-tool with scraper blade works great. Didn't get very far since I started late in the day. Spent three hours doing yard work first. Will show the floor carnage after a little more progress tomorrow.
Findings to date:
Seat belts do not work well at all. Replace or refurbish?
Has original fuel lines. I bought a fire extinguisher just in case.
Rust in the longs and floor pans.
Windshield washer switch arm broken.
Horn moved to a button on the dash (push button).
Ignition moved to a button on the dash (push button).
Low beam headlights don't work but Highs do. I did put in LED bulbs if that means anything.
Speedometer does not work; it is hooked up at both ends.
Broken engine lid bracket (LS).
No rear trunk springs (broom handle).
Lots of rust in the rear jack points.
The hunt goes on. Thoughts?
Posted by: seanpaulmc May 8 2022, 05:30 PM
5/8/22 - might as well make it a project thread.
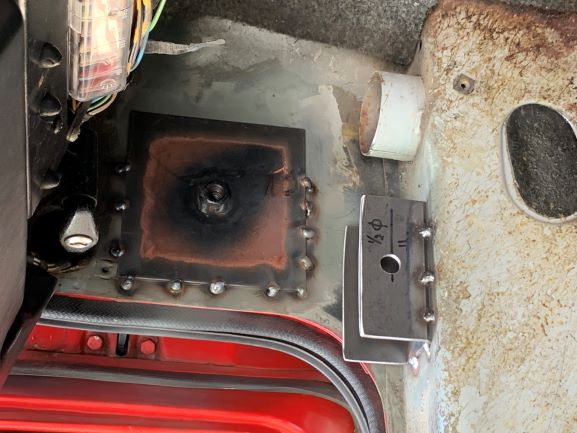
Catching up with the hell hole repair...
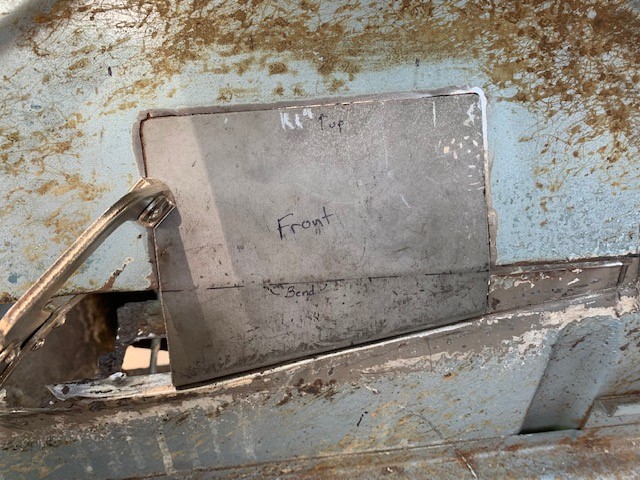
Got good advice to use copper backers when working on my engine tin repairs. Worked very well here to hold the patch panel in place and reinforce the really thin material at the bottom.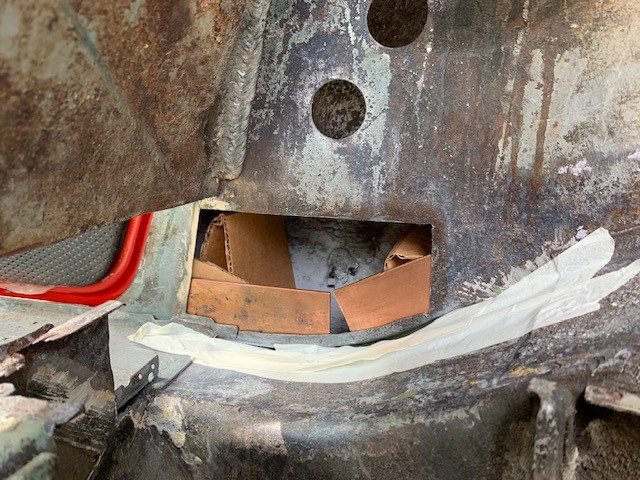
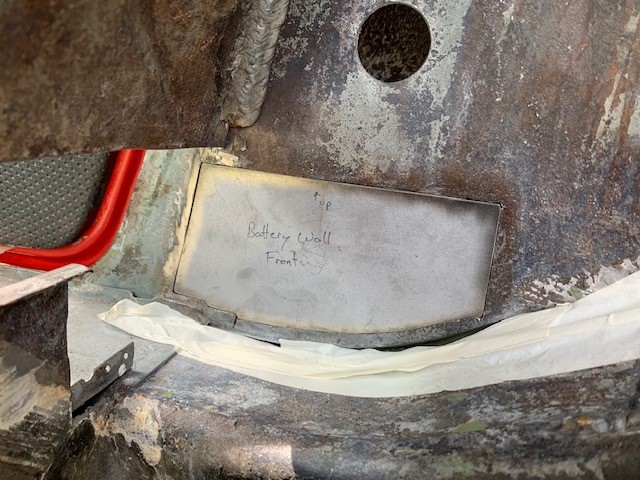
And looking from inside the fender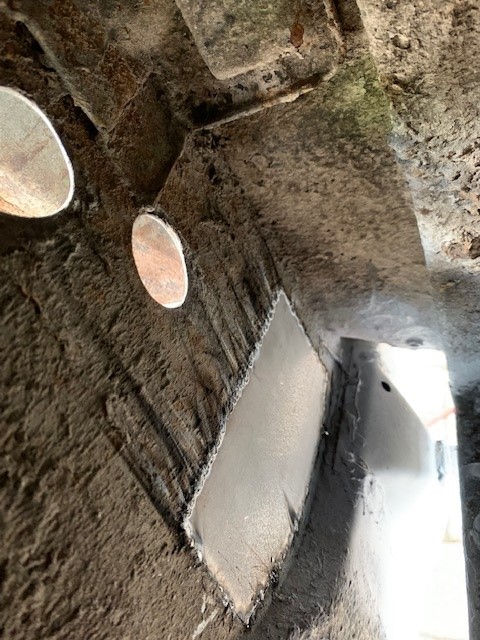
More to come.
Posted by: seanpaulmc May 8 2022, 05:41 PM
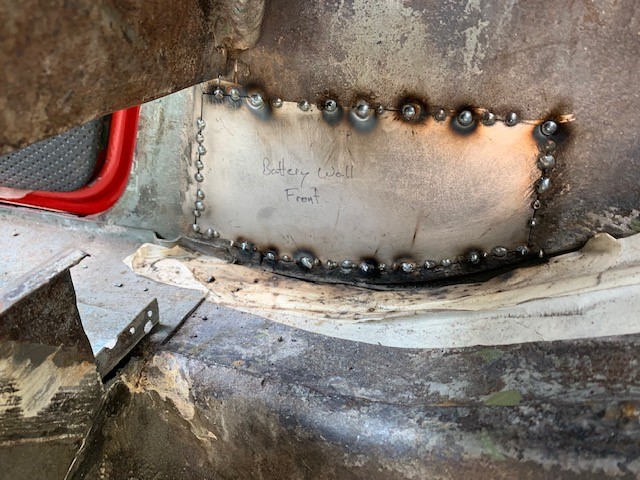
I'm using 18 gage gavaneal and a lot of self taping screws.
You can also see the patch panel in the inner fender wall where the battery acid ate away a good chuck. 
I may go back and grind more to pretty it up some but for now I'm just trying to get the patches in with solid weld connections. There is a lot of work still to do in this corner so I have ample opportunity to come back and dress those welds. 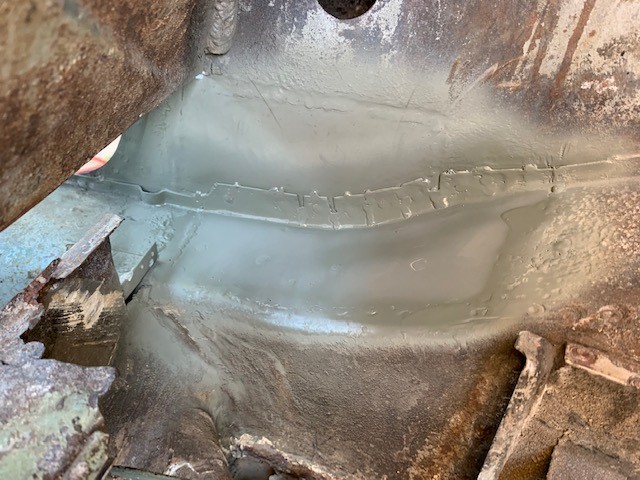
All better now.
Question: Is this it? Or, does anyone do anything further like add a second layer on top of this?
Posted by: seanpaulmc May 8 2022, 05:50 PM
Links to threads on some of the other repairs: 
Engine Tin -
http://www.914world.com/bbs2/index.php?showtopic=351801&st=40&gopid=3000501&#entry3000501
Front Sway Bar -
http://www.914world.com/bbs2/index.php?showtopic=312210&st=20
Trunk Hinge Pivots -
http://914world.com/bbs2/index.php?showtopic=312209
This is so I can find them in the future. 
Posted by: seanpaulmc May 8 2022, 06:06 PM
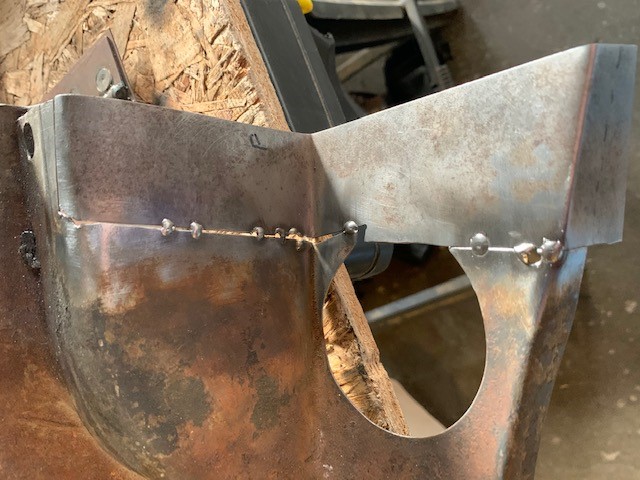
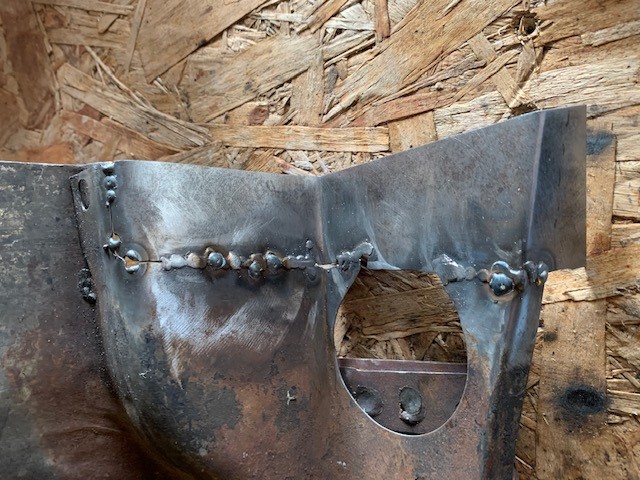
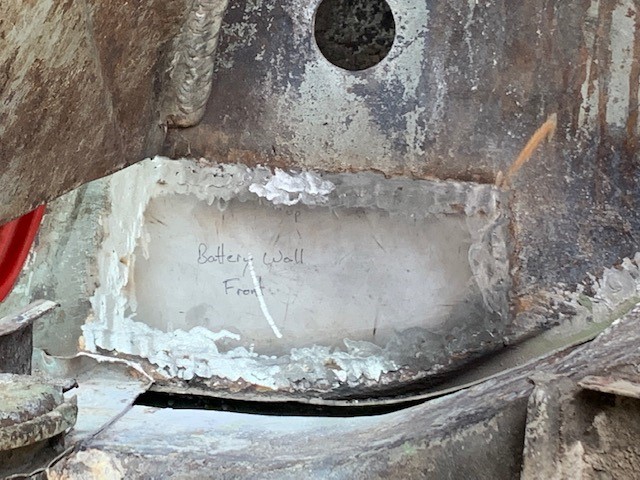
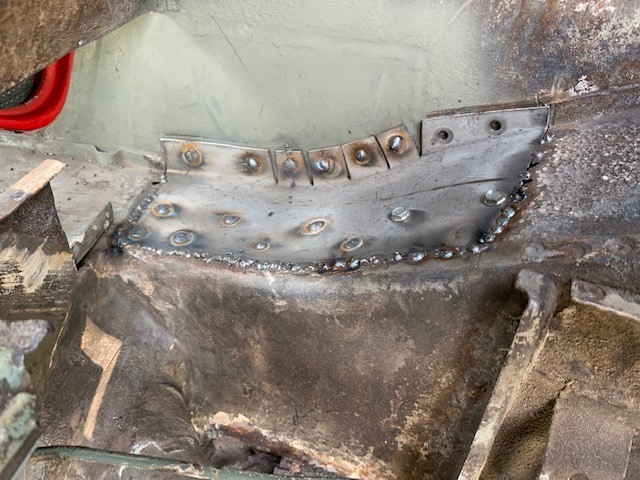
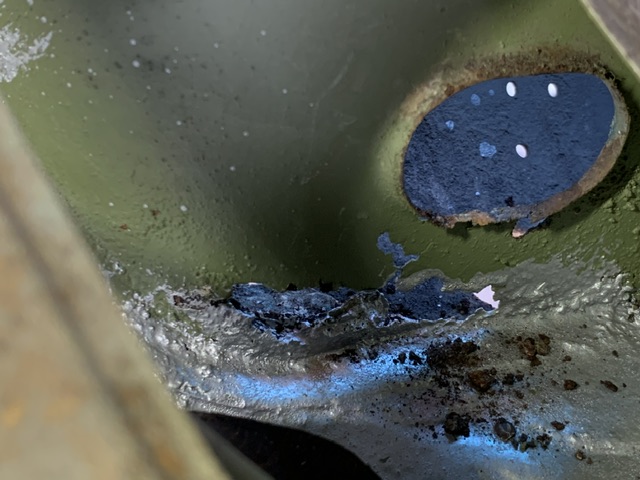
Starting to patch the firewall.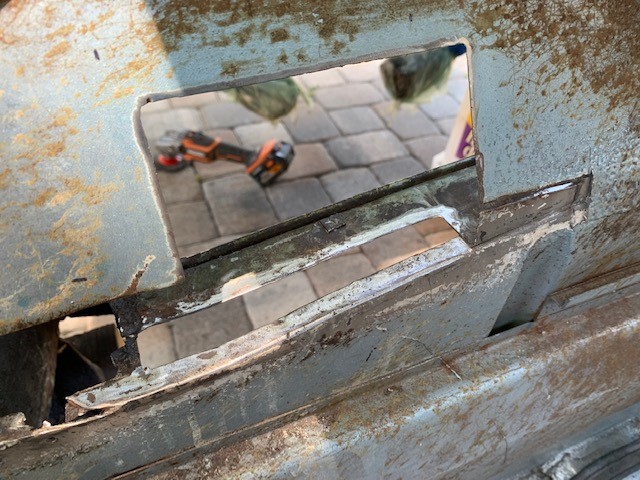
Using those copper backing plates where possible.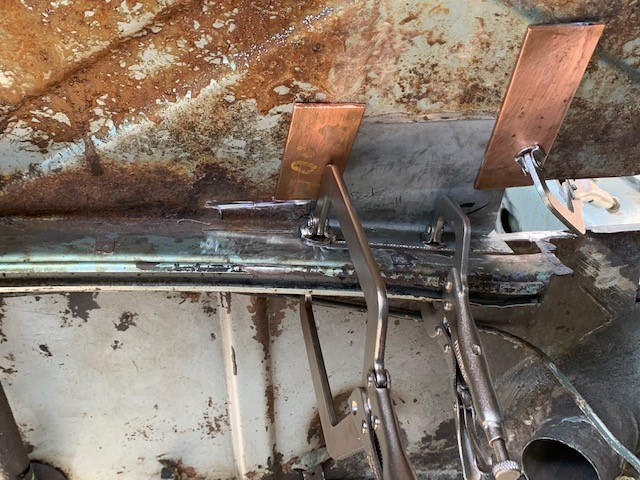
Looking pretty good. Small gaps. Good alignment.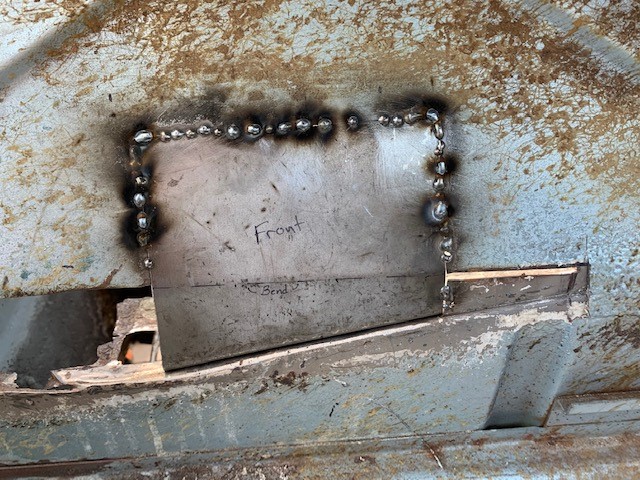
Looks good, that is, until you see the back. Notice the lack of weld penetration in the top panel. I'll have to go over the whole firewall section again to fix it but I'll do it from the engine side before grinding anything.
So I turned up the machine when I realized this and have excellent weld penetration into the section of engine shelf. 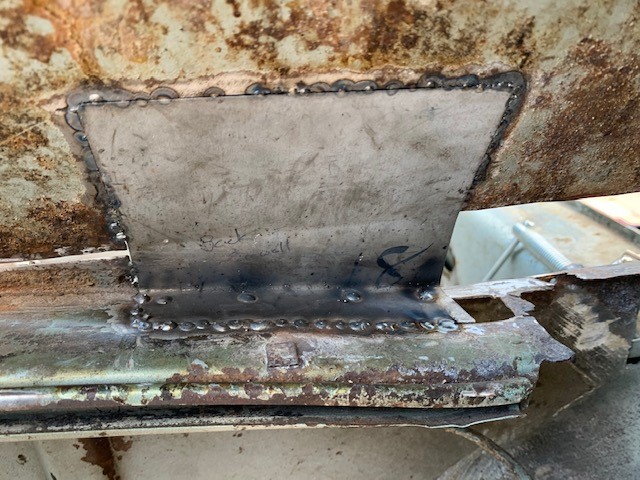
End of progress for the weekend.
Time to take Mom out for Mother's Day.
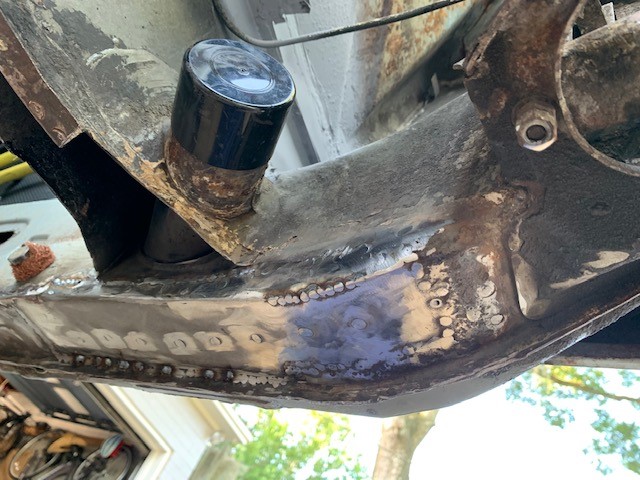
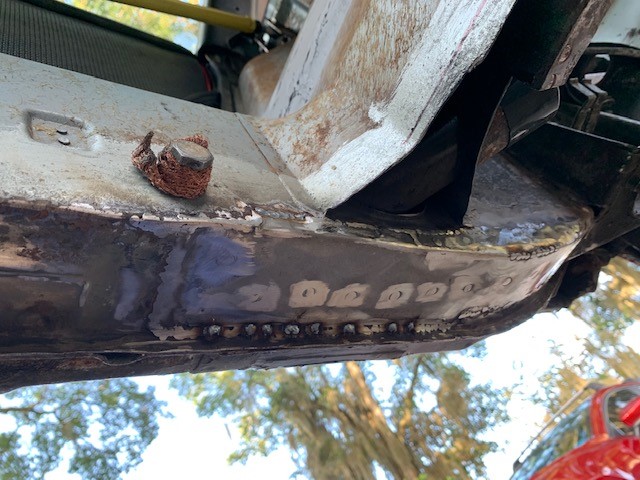
Posted by: seanpaulmc May 8 2022, 06:33 PM
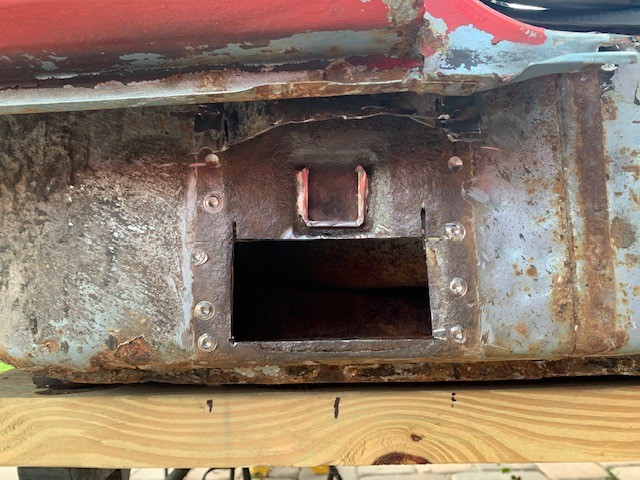
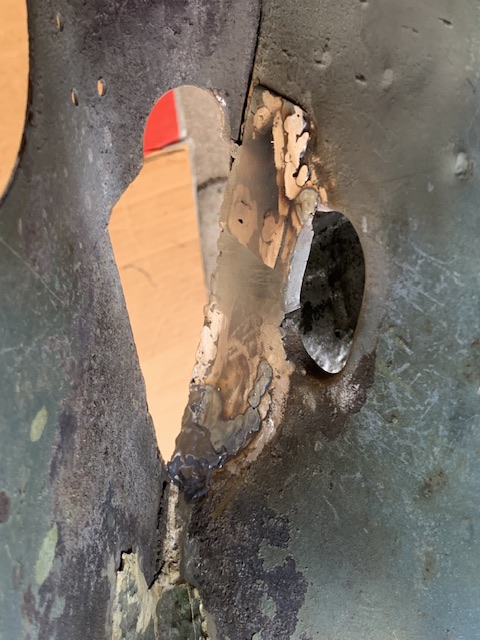
Passenger Jack Point repair: 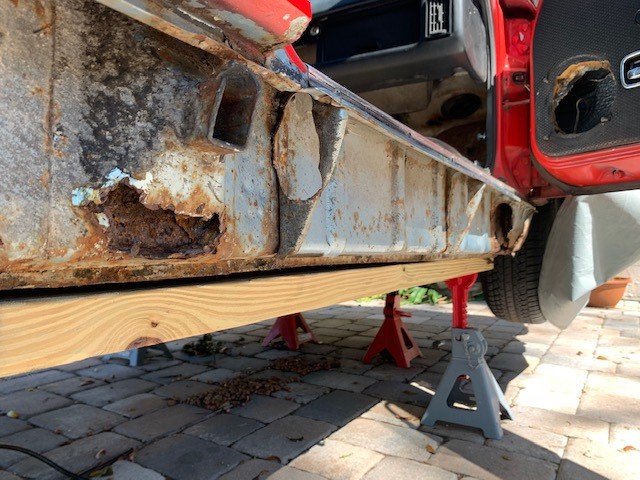
Peeing back the onion.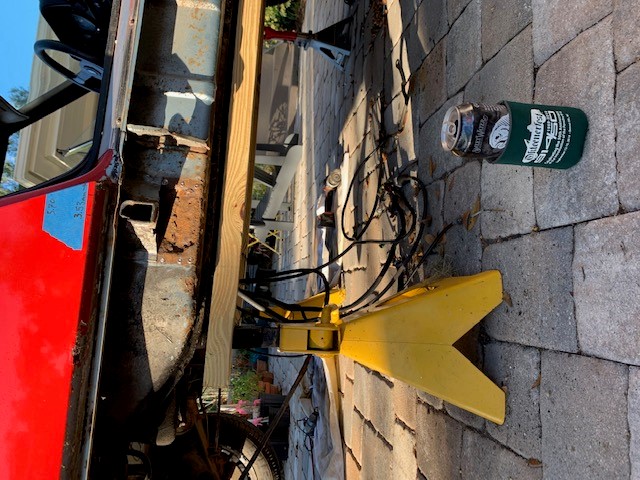
The jack tube, from the factory, is only welded on each side. No welds top or bottom of the tube.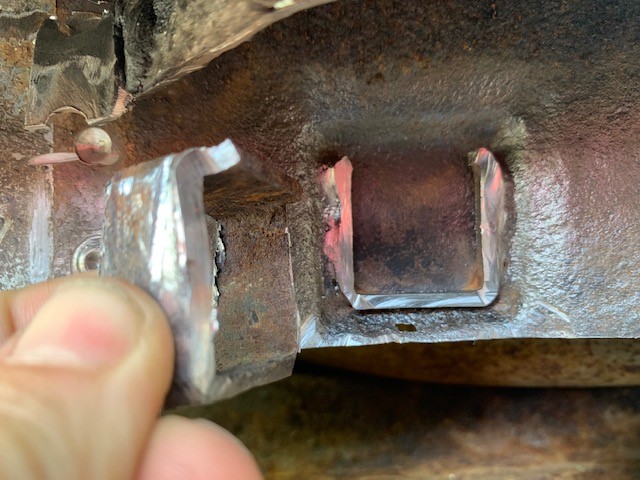
TAMO. (Then a Miracle Occurs)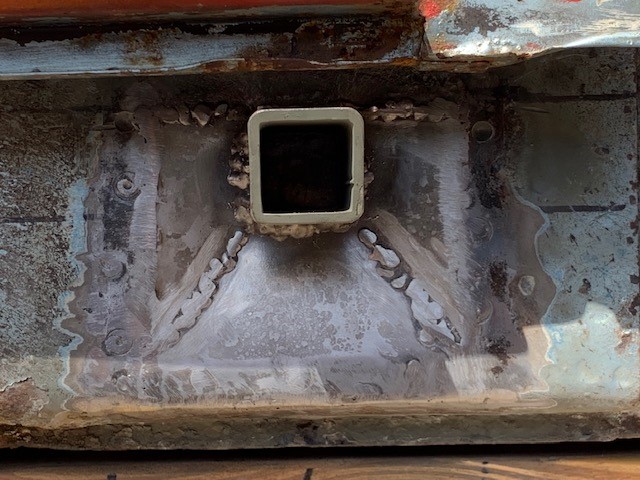
Should have taken more pictures.
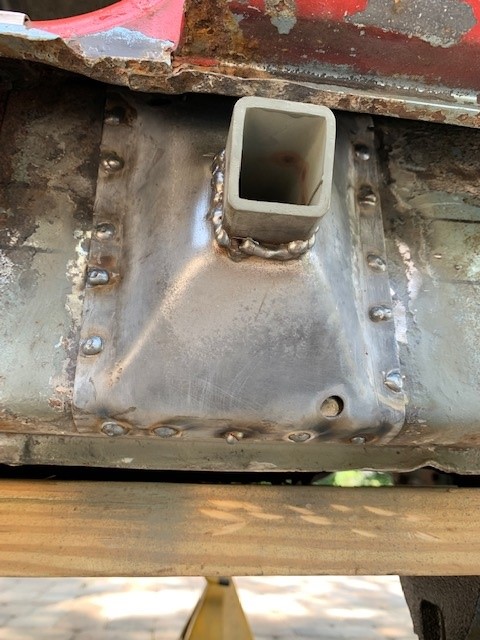
I replaced both inner and outer layers with hand formed 16 ga.
Trying to avoid cutting the fender away I chose to cut out to the top of the jack tube because the metal above was solid and could be welded to with the new. To make it recess for the jack tube, the panel needed relief cuts that got weld once installed.
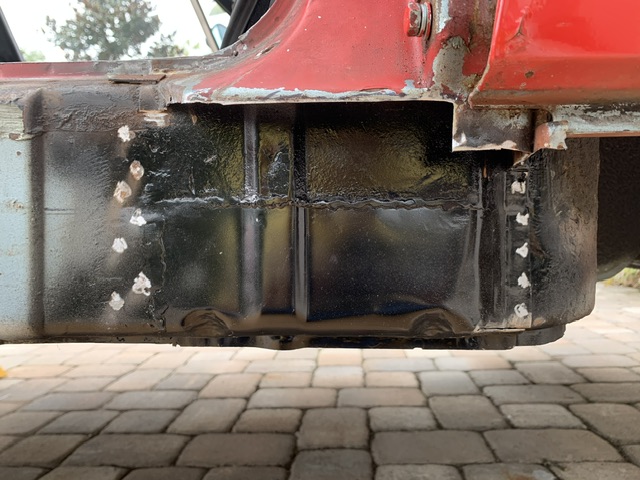
View from fender.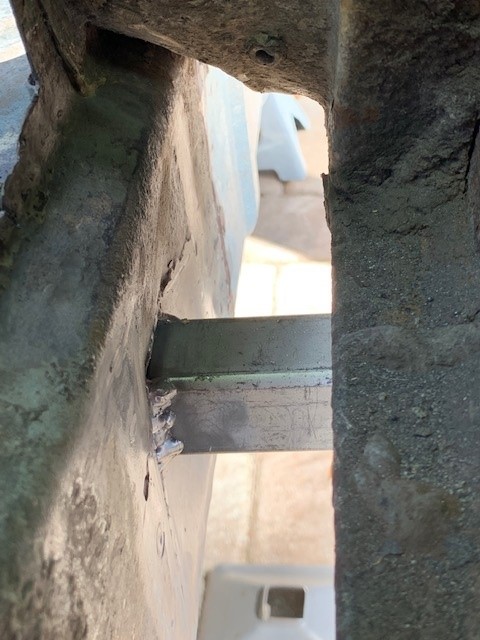
With the RD pyramid cover installed. 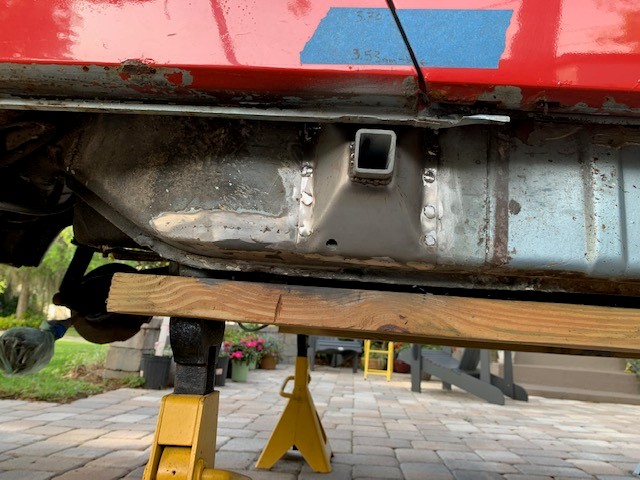
It will be so much fun to do the other side now.
Posted by: r_towle May 8 2022, 07:06 PM
You're gonna need to buy a welder.
Yup
Posted by: 930cabman May 9 2022, 07:06 AM
Great looking work, keep your focus and she will be rolling down the road once again.

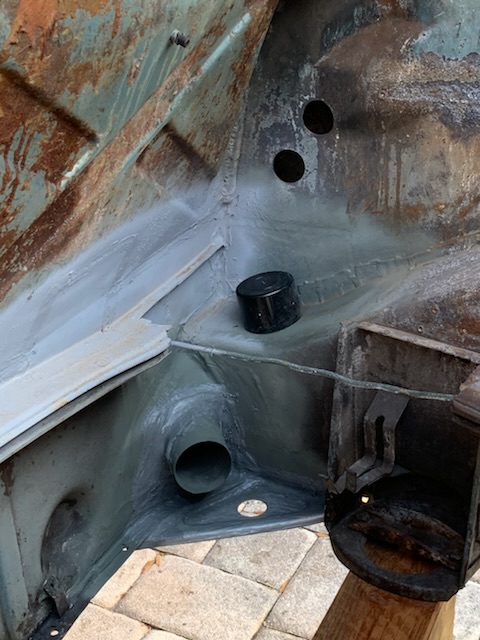
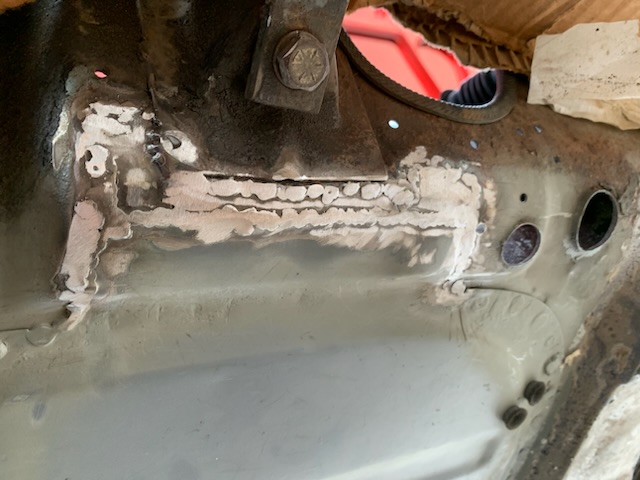
Posted by: seanpaulmc Aug 14 2022, 02:43 PM
Been a while for an update. With it raining like it does here in the summer not much I can do outside anymore today so time for that update.
Driver side jack point as-found.
Getting down into it.
Entire outside layer of the long which is inside the pyramid is in poor shape. However, the inner layer of the long here is in good shape on this side
Time to clear out this rental. Previous tenant left a ton of $h1t.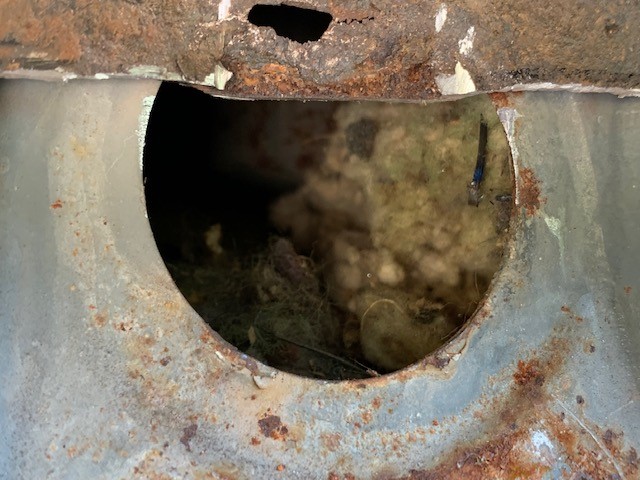
I'm amazed at how much nesting material got pulled out of here. There's a wall somewhere missing its insulation. Wonder if it's in my house? 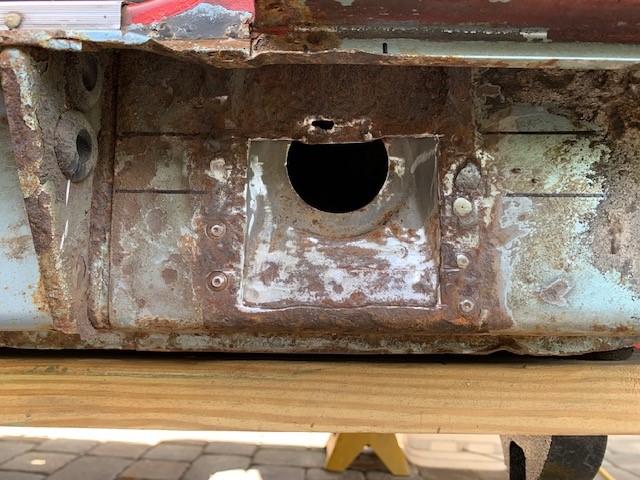
I had to put in an order to Eastwood for another can of the internal frame coating. Once the nest was removed I treated the whole long and the cavity in the firewall again. Used up the can in the center tunnel.
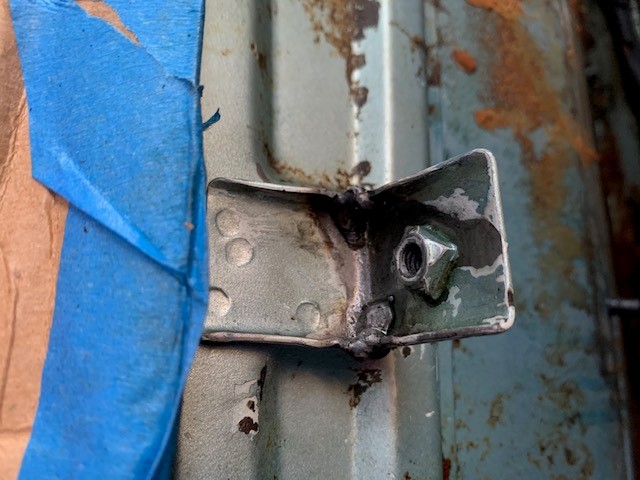
Rebuilding the outer layer with 16 gage. 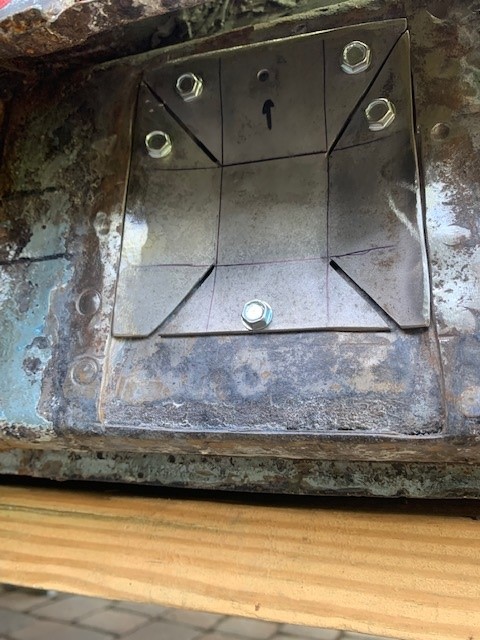
Got rolling and missed taking phots of the intermediate steps but much a repeat of the passenger side. Jack tube and pyramid in place. Not cutting to the fenders on either side to do this but does take a lot of time and I've left the suspension in place while doing all this. My wife says I always do things the hard way and I'm starting to believe her. 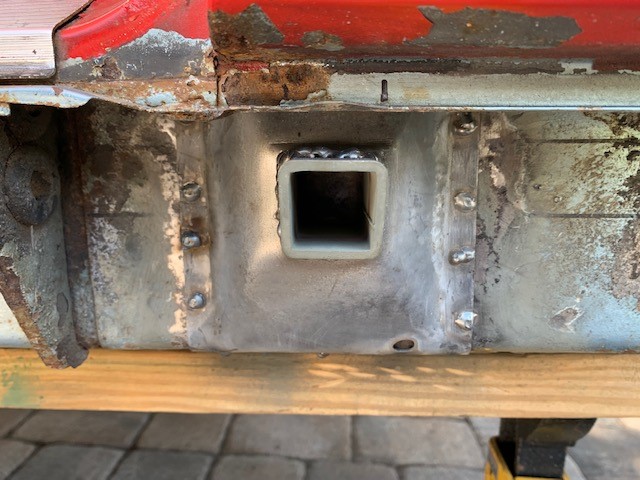
This is my first time doing anything like this and I'm pleased with the results on both sides. I've checked the alignment with the rocker covers on both sides and everything lines up nicely. Ugly welds did get dressed but again didn't take pictures.
Posted by: seanpaulmc Aug 14 2022, 03:01 PM
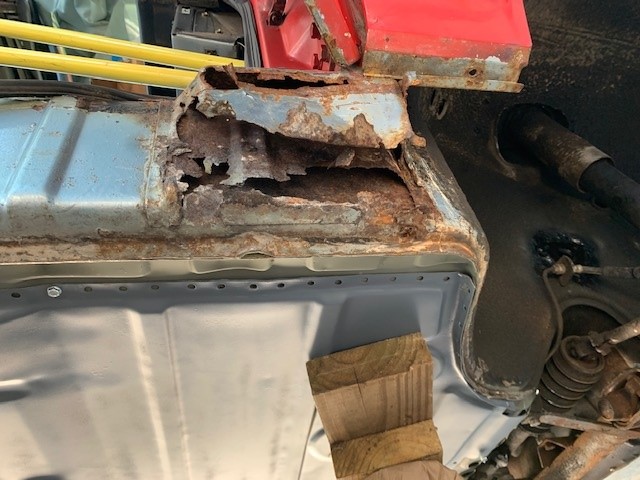
Now that I've cut my teeth on the Hell hole repair, firewall patch, and both jack points it was time to move onto the passenger floor. Here's what I'm working with...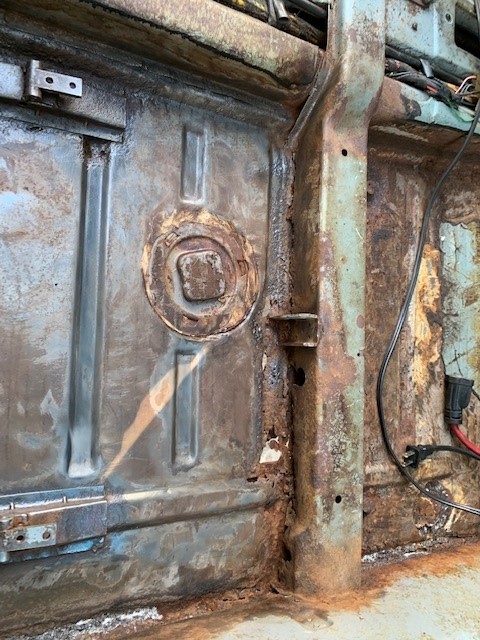
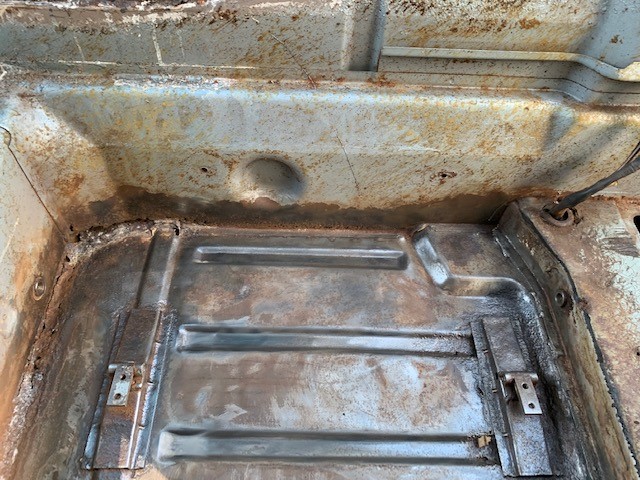
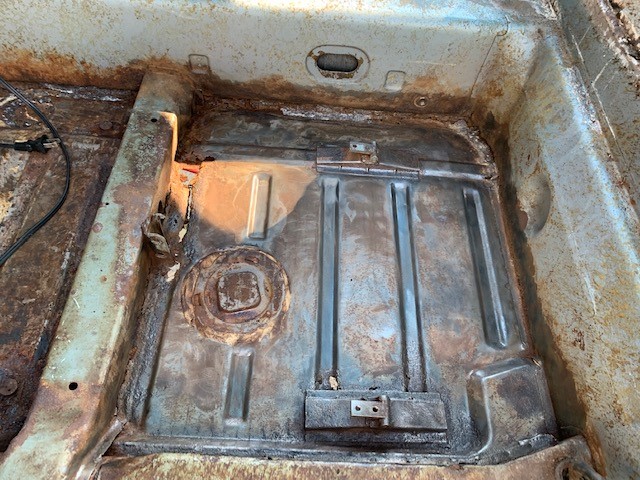
Passenger side floor cross brace has been replaced with keeping most of the old floor in place in order to get set right. Worked out well. 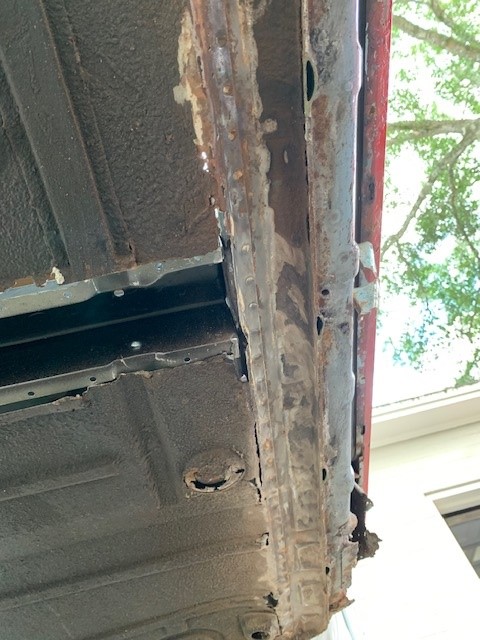
Ah nuts! They were very dirty tenants. 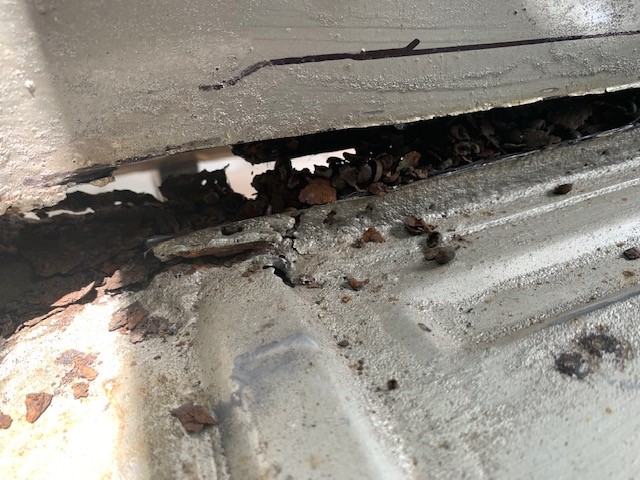
The floor was solid on the tunnel side but no so much on the side of the long. It all had to go.
Posted by: seanpaulmc Aug 14 2022, 03:21 PM
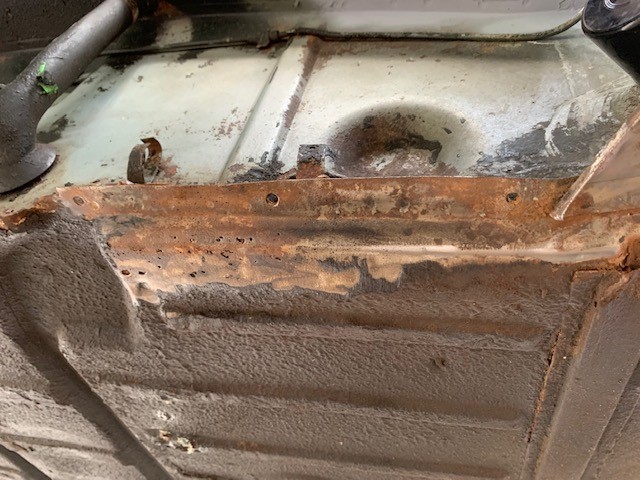
Clearly the plan was to work on getting the new floor installed. But that was not to be. 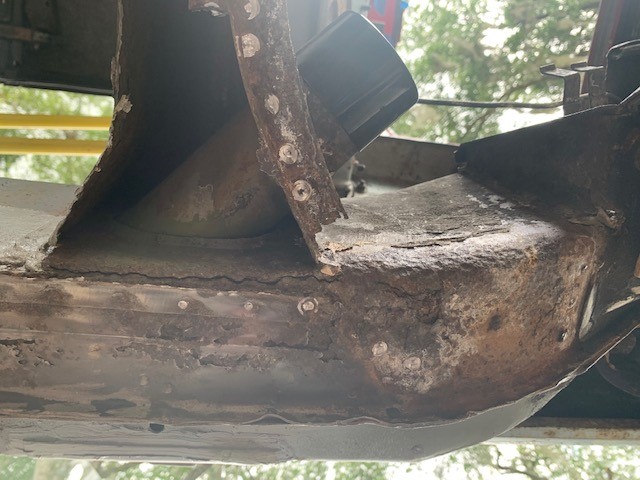
You know what they say, 'crack kills', so this needs to be fixed up before getting to that floor install.
Peeling back the onion...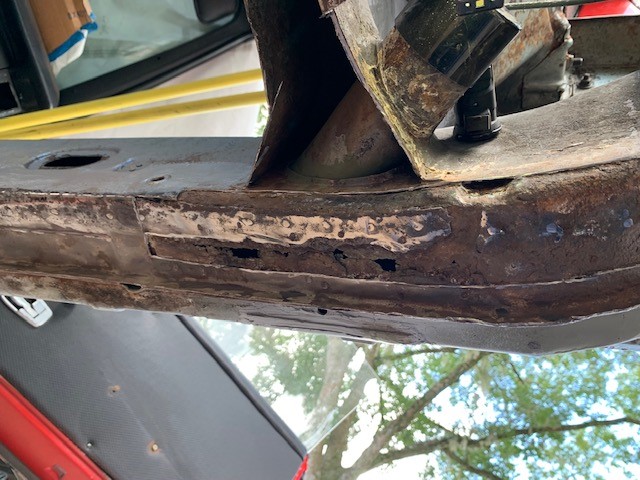
Here again I didn't do a good job of taking photos of the repair along the way. Kinda pissed I'm not gonna get that floor in over my long weekend. It needs to get fixed, I get it. There are several layers here. It took me quite a while. That Hell hole really lived up to the hype on this car. It just keeps on giving.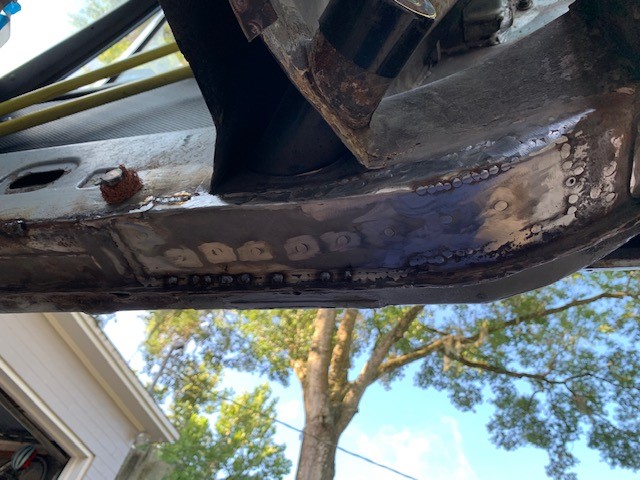
Rock solid now and ready for the floor panel.
Posted by: seanpaulmc Aug 14 2022, 03:27 PM
And, for a change of pace worked on something else.
I finally got the pedal assembly disassembled using a valuable tip for another member who got it from Bruce Stone. It worked. Disassembled! 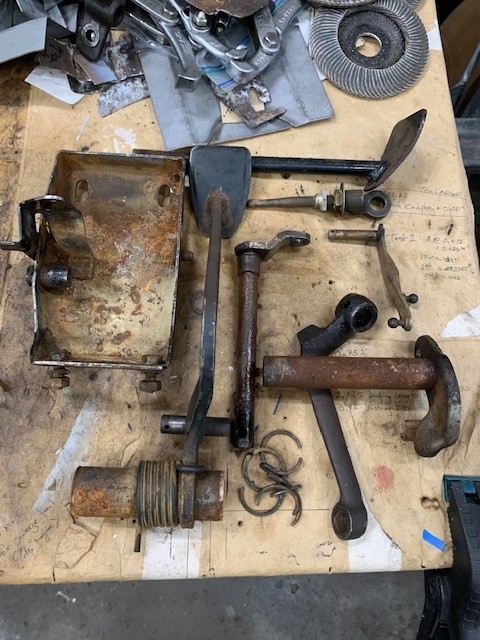
And, for the rebuild...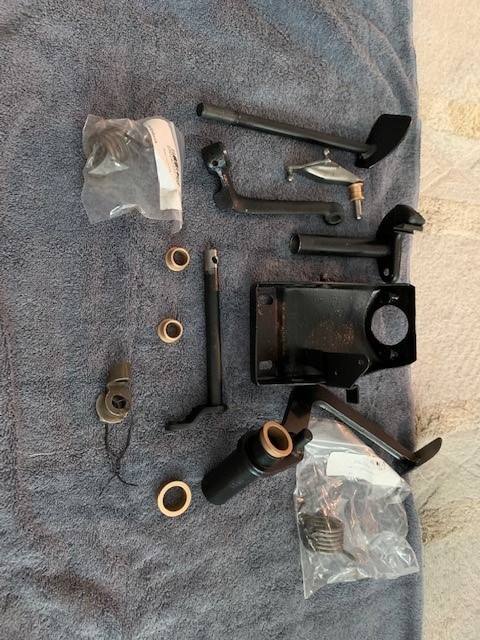
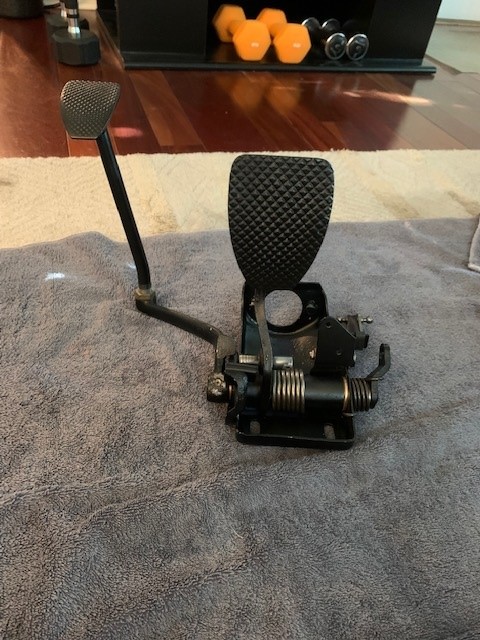
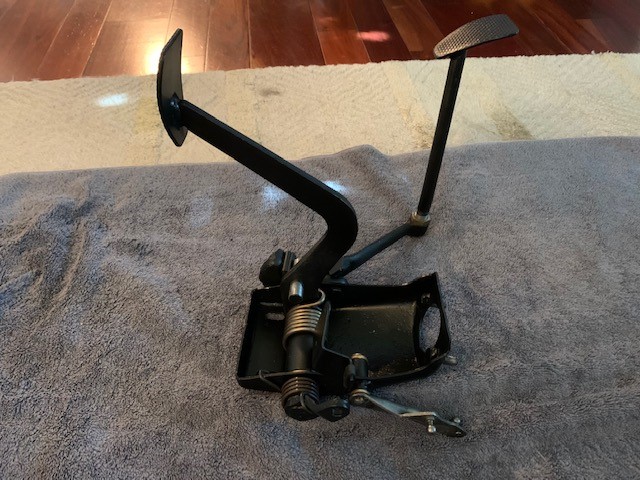
Just need to go get some cotter pins to finish it off.
Posted by: Puebloswatcop Aug 14 2022, 05:33 PM
Hey, things are looking good so far. as for the change of pace thing, I know the feeling...I go from a month of body work, to small projects, just to give myself a break, but keep my project moving. All I can say is have fun, and don't get frustrated, one day it will all come together..... 
Posted by: seanpaulmc Aug 22 2022, 03:33 PM
Working on the passenger side floor fit up. 

See the next 'opportunity'? 
Posted by: DRPHIL914 Aug 22 2022, 04:28 PM
good work! keep on trucking! great you are saving it!
Phil
Posted by: Dave_Darling Aug 22 2022, 05:22 PM
Double-check the roll pin on your pedal cluster that holds the clutch pedal onto the cross-shaft. Earlier versions of the bronze bushing kit used a standard roll pin that is not up to the job in the longer term. The original pin is a spiral pin that has a lot more meat and is tougher. I think I have heard that newer bronze bushing kits also come with spiral pins, but I'm not sure--and it's worth taking a minute to check.
--DD
Posted by: seanpaulmc Aug 22 2022, 05:26 PM
Double-check the roll pin on your pedal cluster that holds the clutch pedal onto the cross-shaft. Earlier versions of the bronze bushing kit used a standard roll pin that is not up to the job in the longer term. The original pin is a spiral pin that has a lot more meat and is tougher. I think I have heard that newer bronze bushing kits also come with spiral pins, but I'm not sure--and it's worth taking a minute to check.
--DD
Thanks for the advice, Dave.
The bronze bushing kit did come with a roll pin similar to the original. It was not just a solid pin. I, however, re-used the original roll pin based on that very advice I'd seen throughout some pedal rebuilds.
Thanks!
Posted by: 930cabman Aug 23 2022, 08:37 AM
Great progress and all this while working on your back, outdoors 
Thanks for the updates and keep your momentum moving forward
Posted by: seanpaulmc Aug 26 2022, 08:09 AM
For a Safe, Quick, and simple way to remove the spring and retaining pin from the seat frame rails see thread here...
http://www.914world.com/bbs2/index.php?showtopic=361282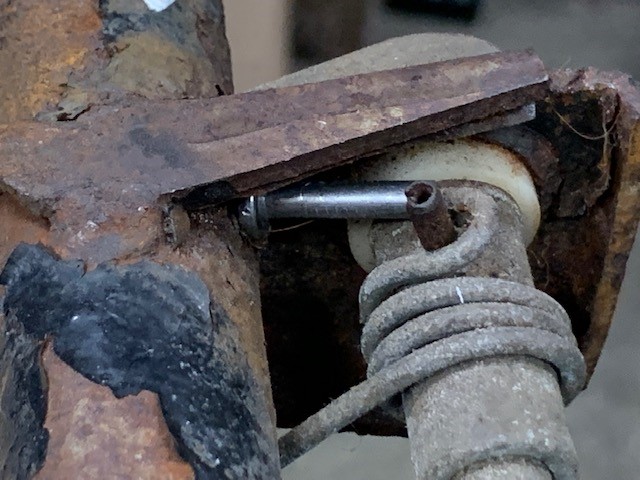
Be safe.
Posted by: seanpaulmc Aug 26 2022, 08:24 AM
Working towards installation of the passenger side floor.
Do these interior holes on the bracket get welded? 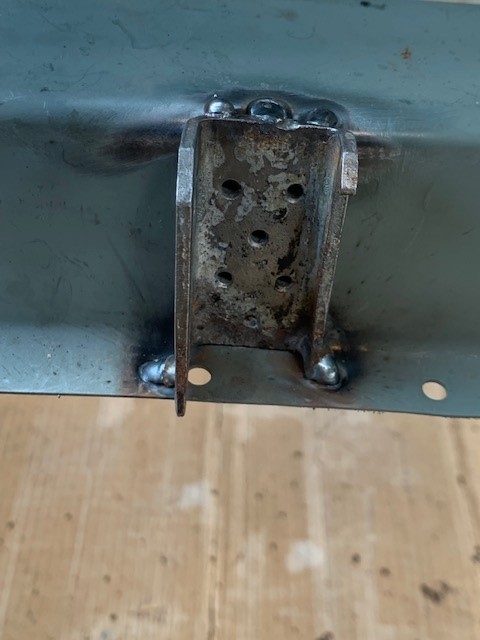
Fit up of seat hinges.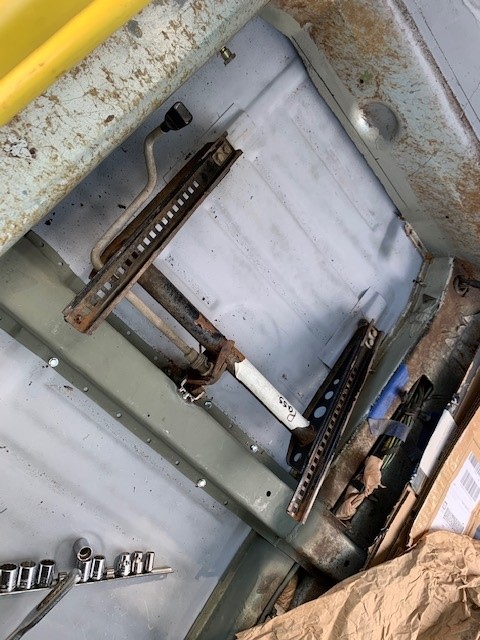
Floor pan taken back off to get access to fully weld seat hinges. 
Floor pan is now ready for the rain this weekend.
If the rain shuts me down on the floor install, then I have transaxle to get cleaned for transportation.
Anyone have recommendations on what to use to clean the off the transaxle? TIA!
-Sean
Posted by: 930cabman Aug 26 2022, 04:51 PM
From what I know it was coated with cosmoline when new for protection. If I recall correctly Bbrock's build covered this topic
Posted by: seanpaulmc Feb 21 2023, 06:57 PM
Well it’s been a while.
Where was I?
Right, a life on jack stands…
The passenger floor - front to back - is in with a new cross brace.
This photo is from before the welding.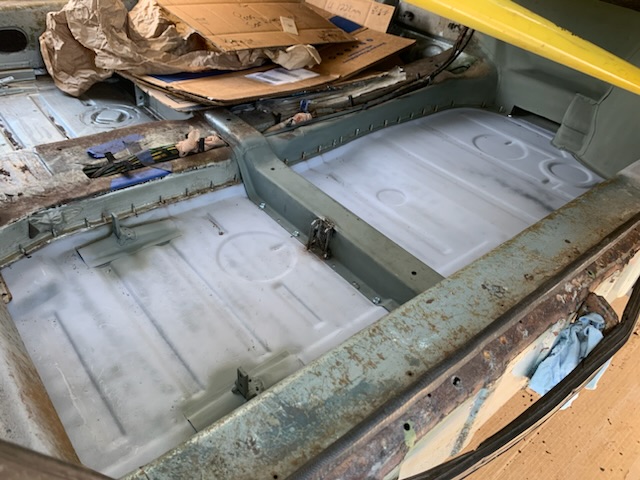
Inner firewall patched (hellhole).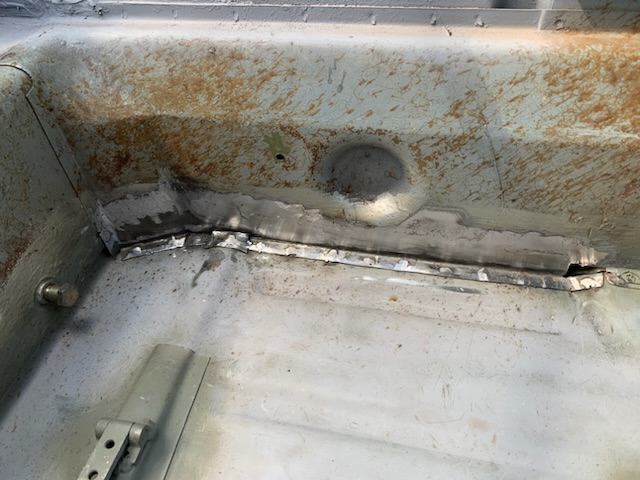
Outer firewall patched (hellhole).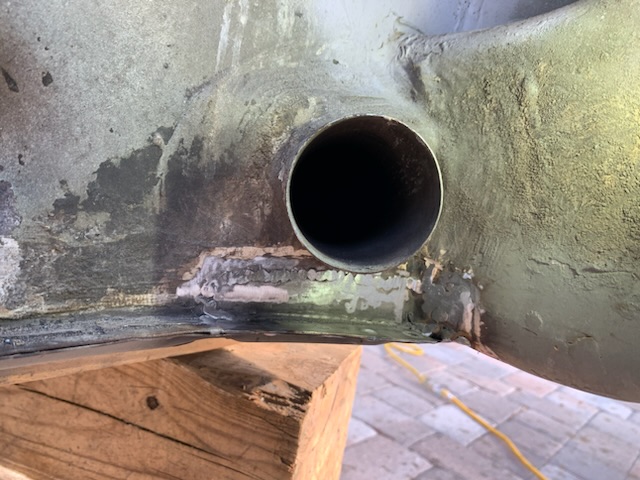
Corner triangle replaced (hellhole).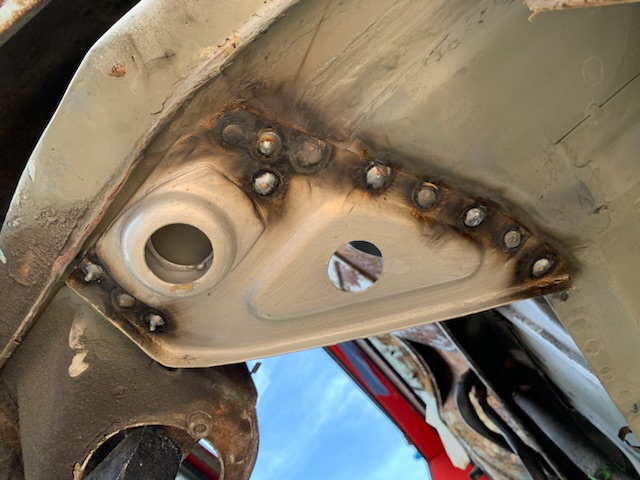
Looks a little better now than when I got it. And, surely a lot stronger. 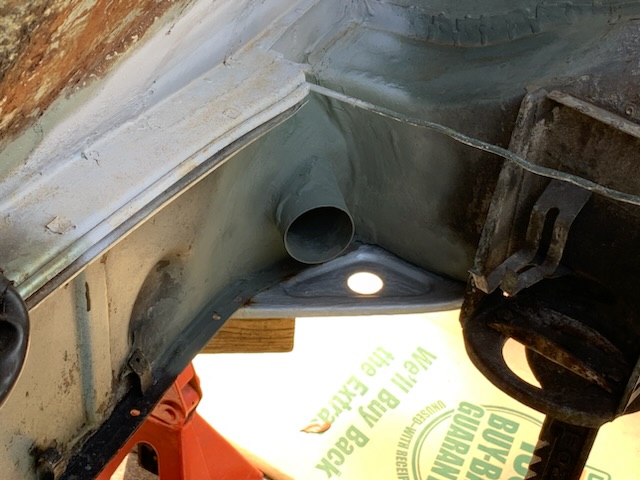
Now it needs a new engine shelf and some decisions need to be made about where to relocate the battery. I’m fairly certain I won’t put it back in the original location with this now being a Florida. But there’s more to do before I get to that - front of the floor board at the bulkhead, replacement of the door sill, and all the layers to the A-pillar support.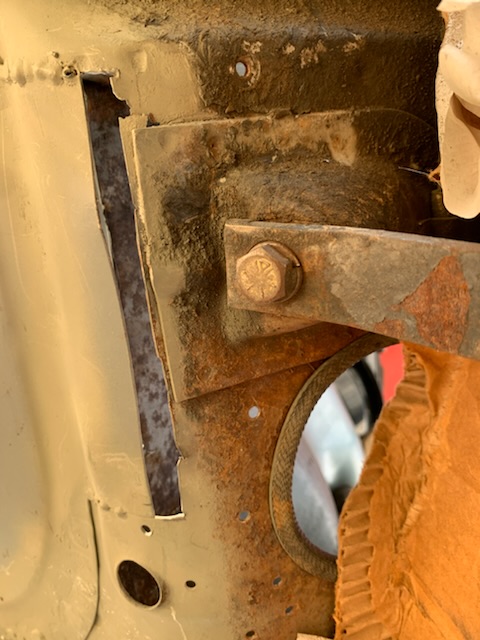
Hope you all enjoy the progress report.
Thanks for looking!
Attached image(s)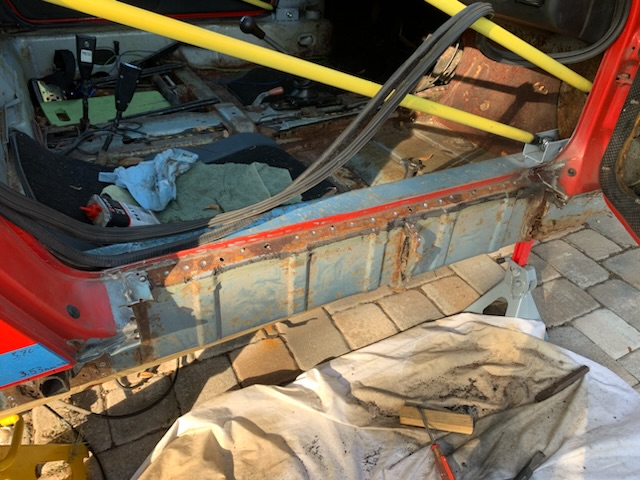
Posted by: Cairo94507 Feb 22 2023, 08:25 AM
Great work and progress.
Posted by: seanpaulmc Feb 23 2023, 09:15 AM
Looking for some pictures of how this section at the passenger A-pillar support is supposed to come together before I tear into it. I understand there are three layers, but obviously not on my car. 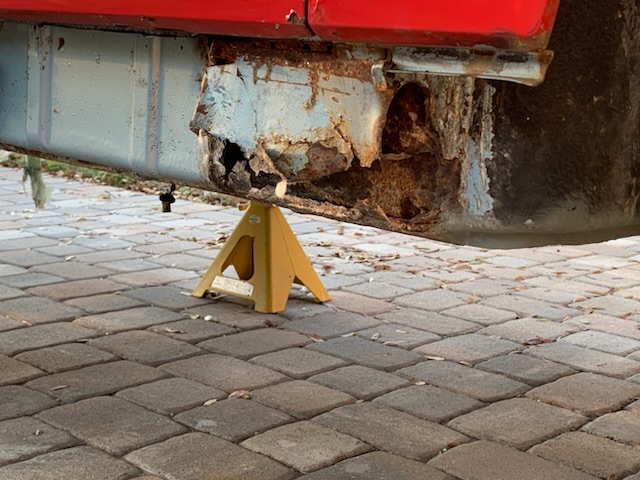
Thank you.
Posted by: 930cabman Feb 23 2023, 10:13 AM
Quality of workmanship looks great, keep it going
is this an original Marathon Blue car?
Posted by: Cairo94507 Feb 23 2023, 10:18 AM
Here is the best shot I have of my car when we were getting it ready for paint. I looked through all of my pictures and can't find one that is a better shot of that area: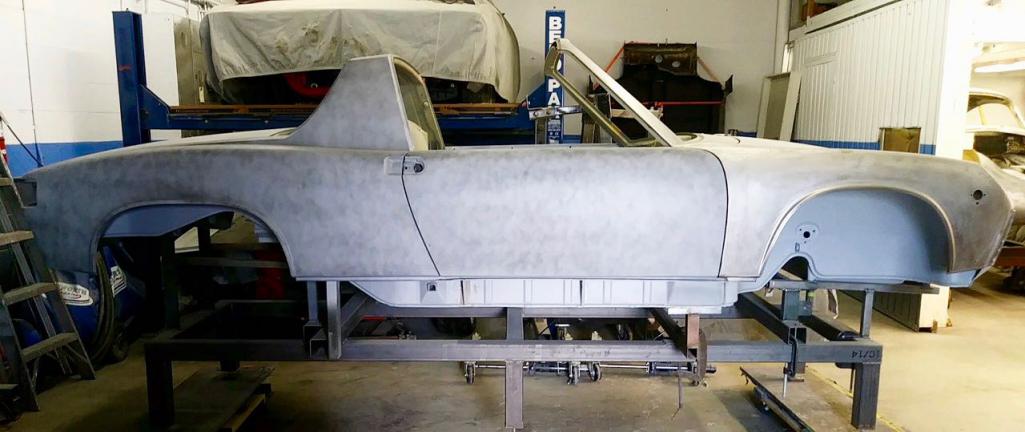
Posted by: Root_Werks Feb 23 2023, 10:36 AM
Marc and I used a Borescope camera to inspect inside the Longs before he bought his LE. There is a "vent" hole in the engine bay you have to reach back and up to get to. Easy to snake the camera through the hole and down a few feet to the "hell hole" area. Gives you a very clear picture what condition the Longs are in.
Posted by: seanpaulmc Feb 23 2023, 10:40 AM
Quality of workmanship looks great, keep it going
is this an original Marathon Blue car?
Yes, Marathon Blue Metallic. Which is really a nice color.
Paint now is in really poor condition. It’ll definitely get painted in the future. Since it is a mix of parts and nothing special, other than being mine, future color palette is wide open.
Posted by: 930cabman Feb 23 2023, 11:26 AM
Quality of workmanship looks great, keep it going
is this an original Marathon Blue car?
Yes, Marathon Blue Metallic. Which is really a nice color.
Paint now is in really poor condition. It’ll definitely get painted in the future. Since it is a mix of parts and nothing special, other than being mine, future color palette is wide open.
Cast my vote for Marathon Blue

Posted by: seanpaulmc Feb 25 2023, 06:54 PM
Today…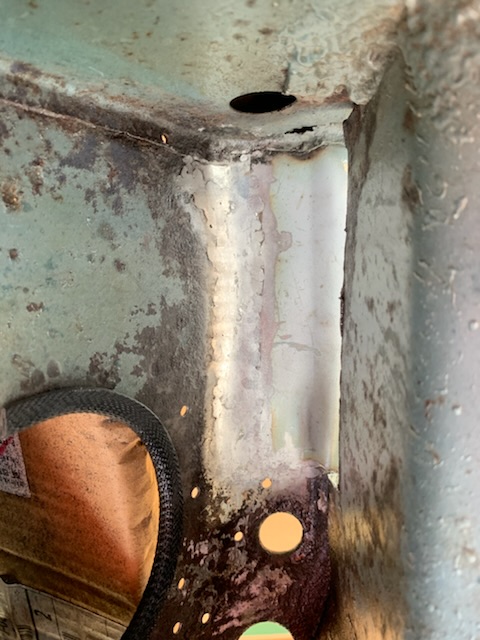
…all day. 
Remarkably time consuming. Or, I’m just remarkably slow.
I may dress the outside some more but leaving that for another time to decide. Need to put it aside for now.
Was thinking I might need to add extra strength in this area before getting the welding done so I made this backing plate. Now that the patch is in I’m not sure it’s warranted. What do you all think - yes, no with the reinforcement?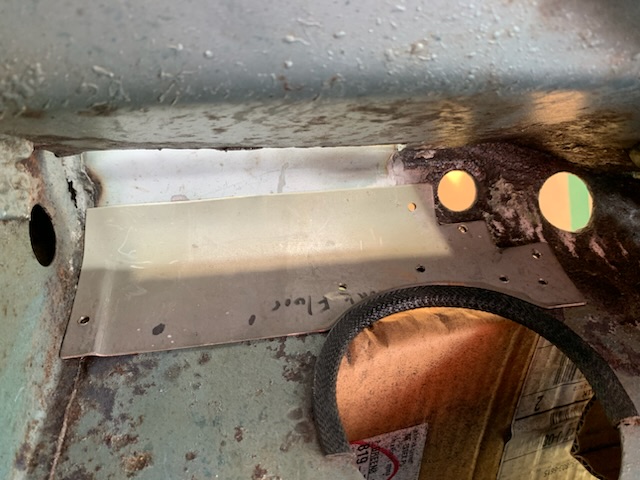
Anyone ever see a need to reinforce this area?
Posted by: seanpaulmc Mar 11 2023, 07:43 PM
Another patch panel.
Passenger footwell - floorpan to bulkhead. 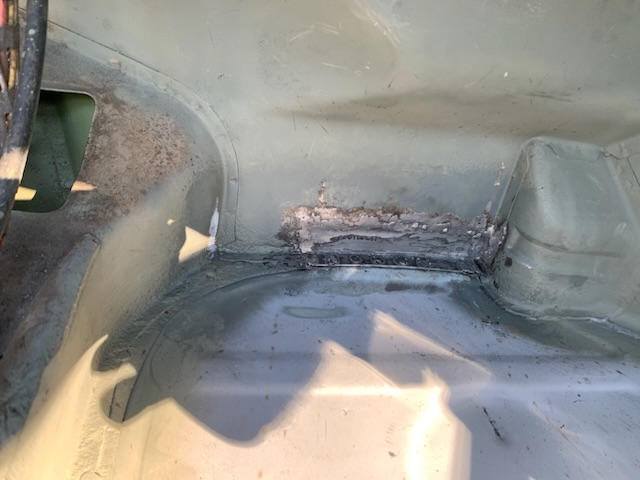
Some cleanup to do and some primer still.
Posted by: seanpaulmc Mar 11 2023, 07:53 PM
Moved on to peeling back the rusty onion of the A-pillar corner. 
Still looking for good photos of how this should go back together. Please post them if you’ve got’em.
Thanks
Posted by: seanpaulmc Apr 20 2023, 12:32 PM
Really for the first time I feel like I am making an improvement rather than replacing or repairing…
Off the jack stands for the first time in ??? With her shoes back on, I started on the inner stiffening kit. Just getting started on it but you’ve all seen this before.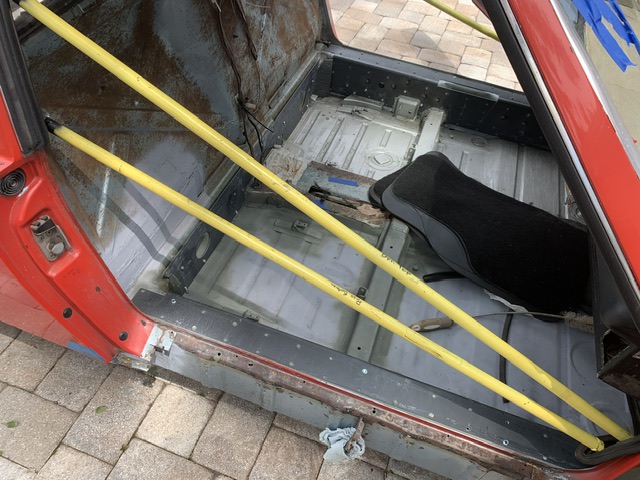
The top is on and I have it braced so I hope the gaps won’t shift too much. They’re already uneven from side to side from when I got the car and the obvious accident damage but they’re workable. I’m going at it slowly with aim to finish this weekend.
The whole piece has been osphoe’d, cleaned, and then hit with self etching primer on the inside before being installed. I didn’t remove any paint from the longs prior. I wanted to leave as much coverage as possible. So, before welding I have a tiny wire brush from my dremel in my cordless drill to clean the metal before starting a weld. It has worked well.
Once this is done, I look forward to finally having a solid chassis to work with. There is still a lot of other metal work to do but once it’s solid I can work towards a rolling restoration.
Thanks for watching!
Posted by: 930cabman Apr 20 2023, 01:25 PM
Lookin good, keep on truckin and you will be motoring before you know
Posted by: seanpaulmc Apr 26 2023, 04:14 PM
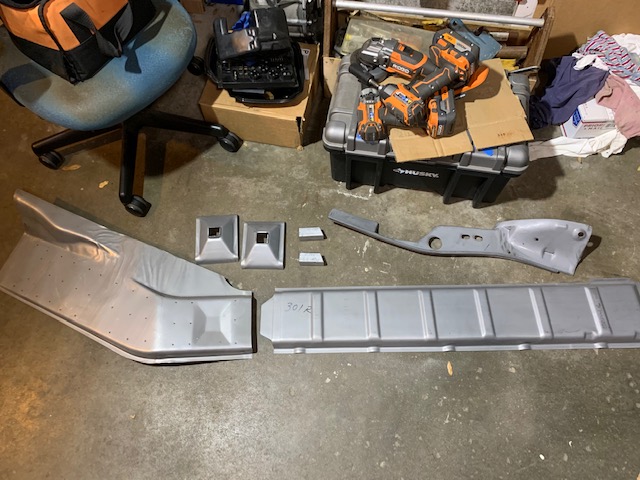
Mmmmmm parts! 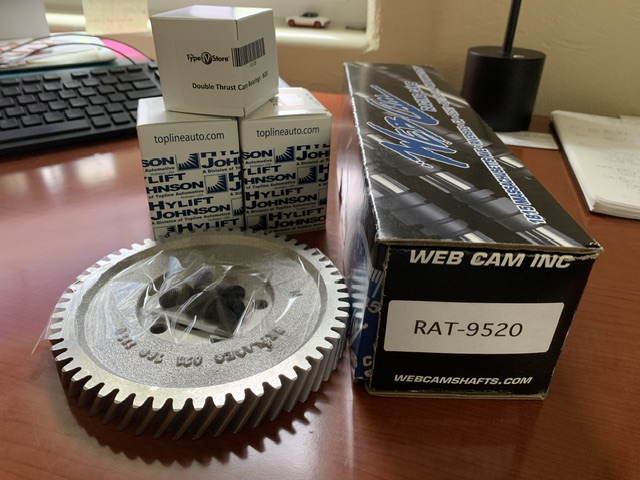
Had to share my excitement.
Posted by: East coaster Apr 26 2023, 08:01 PM
Good metal work. I just did some of those same spots myself, not much fun but it’s nice to see the car become solid again.
Posted by: seanpaulmc May 27 2023, 05:20 PM
Been a while for an update… floors are done. At least the inside of the floors. Brushed on three layers of rust bullet. Two coats then seam sealed and then the final third coat. I’m impressed with its durability. 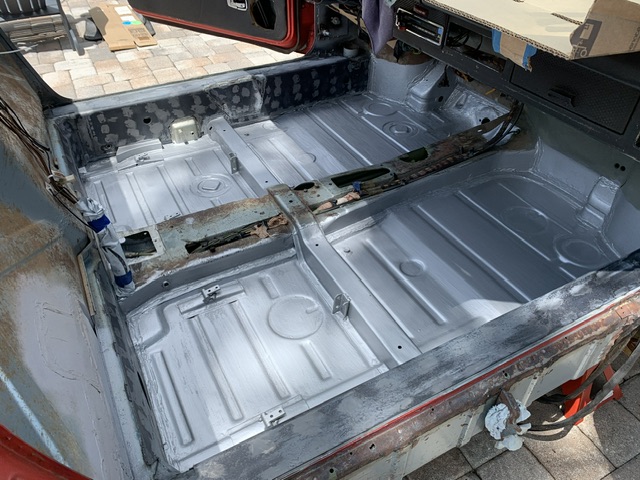
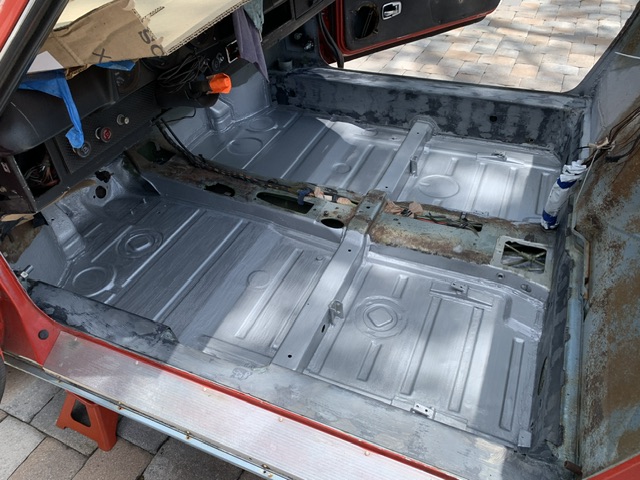
Had to treat the longs with ospho for some surface rust that developed during the very rainy week we had here. Will get them cleaned off and coat with rust bullet to finish off the longs and interior floors.
Then I will need to clean and treat the underneath outside of the floors. Followed by Raptor? Herculiner? Anyone want to share their experiences with either?
Thanks for looking.
Posted by: Dave_Darling May 27 2023, 05:41 PM
Herculiner? Make sure you don't get it on your hootus.
(Dammit, the Exploder Forum won't let you see that thread any more without logging in.)
--DD
Posted by: mgarrison May 27 2023, 07:20 PM
Been a while for an update… floors are done. At least the inside of the floors. Brushed on three layers of rust bullet. Two coats then seam sealed and then the final third coat. I’m impressed with its durability.
Had to treat the longs with ospho for some surface rust that developed during the very rainy week we had here. Will get them cleaned off and coat with rust bullet to finish off the longs and interior floors.
Then I will need to clean and treat the underneath outside of the floors. Followed by Raptor? Herculiner? Anyone want to share their experiences with either?
Thanks for looking.
Here's my Raptor liner experience/results for reference:
http://www.914world.com/bbs2/index.php?s=&showtopic=343765&view=findpost&p=2923677
Posted by: East coaster May 28 2023, 05:18 AM
Just sprayed my tub with Custom Coat bedliner (from TCP Global). I did black on the underside of the car and tinted (to match my exterior paint color) in the trunks, engine compartment, and interior. I used Raptor on my last project and this was the same to work with and results seem the same. Just another option……I got mine from Amazon.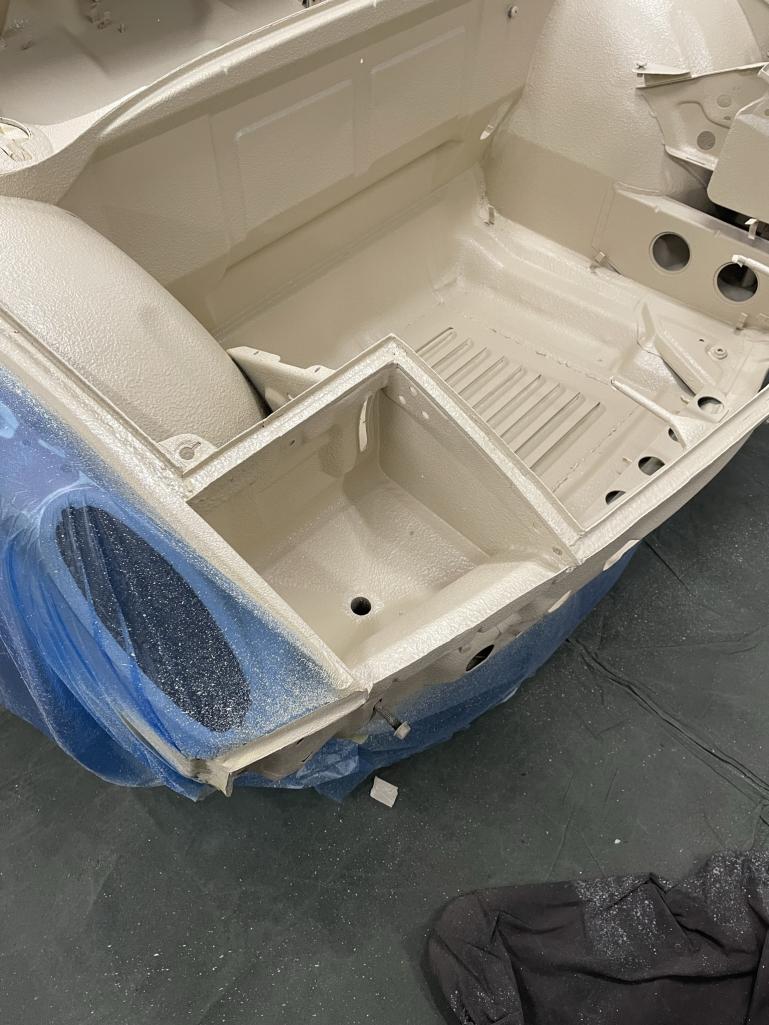


Posted by: seanpaulmc May 28 2023, 09:12 AM
Thanks for the references on the bed / raptor liner. Results on both your cars looks amazing. Nice work, Gents!
Posted by: bajafreaks May 29 2023, 08:06 AM
Well it’s been a while.
Where was I?
Right, a life on jack stands…
The passenger floor - front to back - is in with a new cross brace.
This photo is from before the welding.
Inner firewall patched (hellhole).
Outer firewall patched (hellhole).
Corner triangle replaced (hellhole).
Looks a little better now than when I got it. And, surely a lot stronger.
Now it needs a new engine shelf and some decisions need to be made about where to relocate the battery. I’m fairly certain I won’t put it back in the original location with this now being a Florida. But there’s more to do before I get to that - front of the floor board at the bulkhead, replacement of the door sill, and all the layers to the A-pillar support.
Hope you all enjoy the progress report.
Thanks for looking!
Did the replacement passenger floor pan come with the seat rails and brackets already attached/welded in place? If so where did you get the pan? I need to do the same repair including the center support cross brace. Thanks
Posted by: seanpaulmc May 29 2023, 01:45 PM
@http://www.914world.com/bbs2/index.php?showuser=16969
The passenger floor pan I bought from the classifieds here on World from another member. With shipping it still cost me the price as a new one but I got to help another member out with the purchase.
The pan was likely originally from Stoddard since it was the full passenger side. Yes, this pan came with the seat rail underside reinforcement and the seat hinge brackets/risers installed. I only had to weld on the hinges themselves which I was able to salvage from the old floor.
Depending on what you need various configurations of floor replacement pans can be obtained from Restoration Design, AA, Stoddard and maybe others. These same vendors will also have the cross brace.
You could start with a WTB ad to see what others might have to offer up before going straight to retail.
Good luck!
Posted by: bajafreaks May 29 2023, 06:09 PM
[quote name='seanpaulmc' date='May 29 2023, 12:45 PM' post='3080330']
@http://www.914world.com/bbs2/index.php?showuser=16969
The passenger floor pan I bought from the classifieds here on World from another member. With shipping it still cost me the price as a new one but I got to help another member out with the purchase.
The pan was likely originally from Stoddard since it was the full passenger side. Yes, this pan came with the seat rail underside reinforcement and the seat hinge brackets/risers installed. I only had to weld on the hinges themselves which I was able to salvage from the old floor.
Depending on what you need various configurations of floor replacement pans can be obtained from Restoration Design, AA, Stoddard and maybe others. These same vendors will also have the cross brace.
You could start with a WTB ad to see what others might have to offer up before going straight to retail.
Good luck!
[/quote
Thanks for getting back to me. Res. Design and Stoddard look to have the best sheet metal. Working on cars for 40+years Ive been able to do just about anything mechanically including body work and paint, but welding has never been my thing, oh well time to dive in...
Posted by: seanpaulmc Jul 6 2023, 01:27 PM
For review, we last left off with completion of the inner stiffening kit installation and a liberal coating of Rust Bullet. 3 coats brushed on.
With the holiday weekend and cool, dry weather (upper 90s and feels like in the 100s) time to get back to the floor weld repairs. So, I opened up the shop for the weekend. 
Of course it’s bigger on the inside.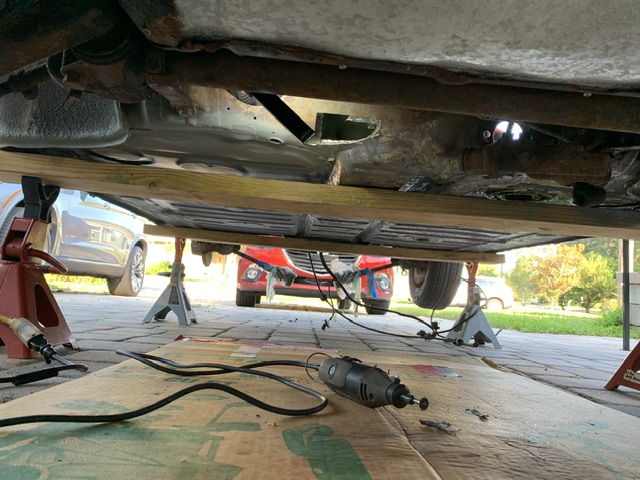
Remaining areas needing repair before I can move on to applying an underside protective coating of the floorpan are the A-pillar door support and this little spot at the bulkhead in the forward section of the tunnel underneath the fuel tank. 
I posted separately about removal of the bulkhead fuel line grommet. Light heat and liberal amounts of soapy water and we can see what we’re working with behind there. Thanks for the removal tips, Zach.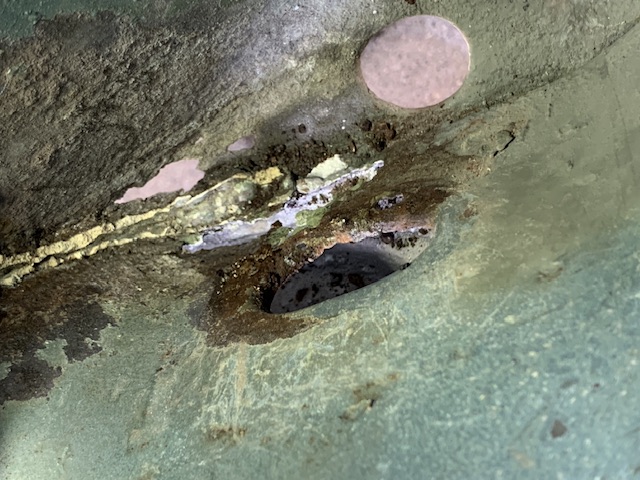
After 3 days of acrobatics, hot yoga, and inventing new swear words my attempt at making an acceptable weld repair yielded what I am calling a passable repair. Much better than the as found rotten metal but I had to acquiesce and use a small lap panel because one edge kept blowing through. I also had to use a little epoxy at edges as well since I could not get the mig nozzle positioned correctly.
This patch piece has quite the geometry. 


I’ll fiddle with it some more before I’m done with it of course. I need to confirm the shape of the hole and flange lip. Then add some seam sealer and a good coat of rust bullet and reinstall the fuel line grommet.
I miss our shade tree.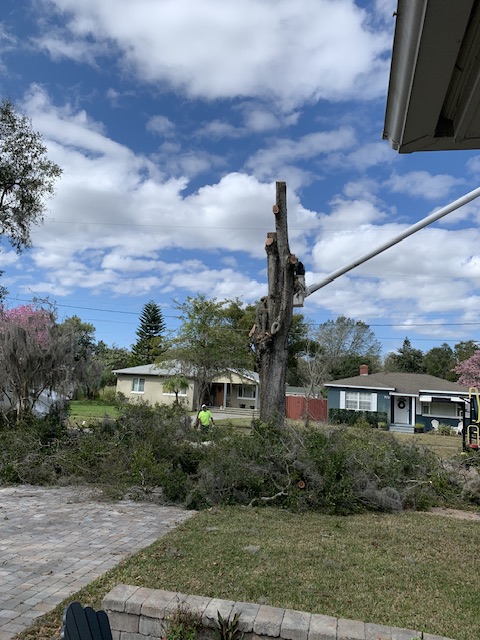
I really could have used an extra set of hands and of course there’s always that neighbor looking over your shoulder never offering to help.
No further mention of the A-pillar support repair should speak for itself.
That repair will have to wait for the next heat wave.
Posted by: 930cabman Jul 6 2023, 02:23 PM
Great progress, currently I am repairing some minor rusting issues, completing a good prep job with the entire area and coating with oil based brush on paint from my local True Value hardware store. I can't really see all the hype with such high performance coatings when our cars have made it 1/2 century with minimal protection from the factory and in many cases very little maintenance. In 50 years I will be 120 years of age
Getting most of the rust out is key
Posted by: seanpaulmc Aug 27 2023, 03:29 PM
Back at it.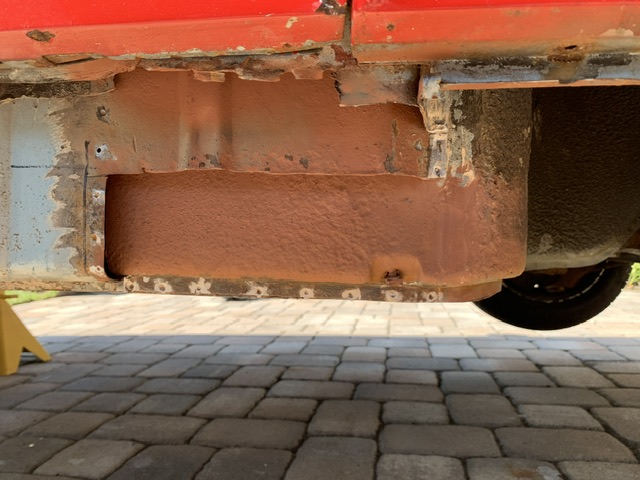
I made up my own replacement corner out of some other cut offs rather than cutting out a tiny section from a brand new RD piece which seemed wasteful to me. Used the RD piece as a template.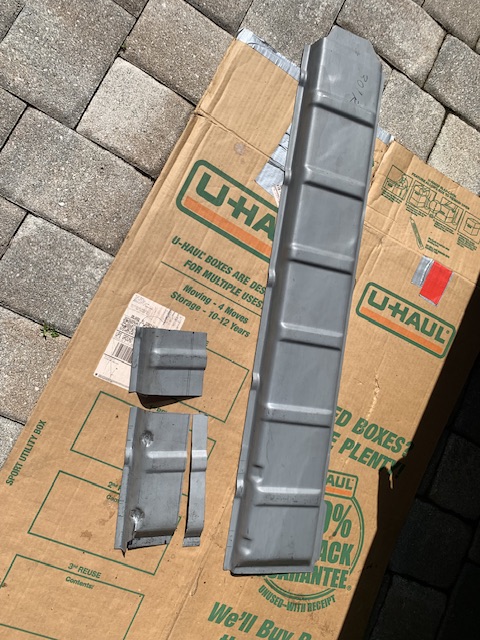
Turned out rather nice.
But it is just going to get covered up by the outer reinforcement piece that goes here.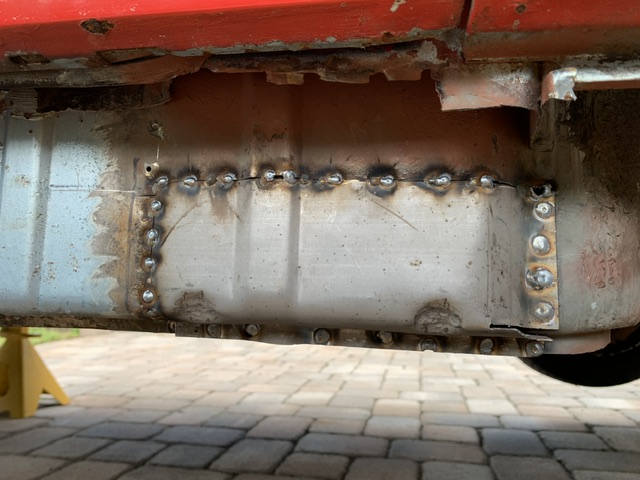
Question for you experts. Any tips for getting the door on and off alone?
To install the outer reinforcement piece I have to get the door out of the way. It’ll probably take a couple on and offs I’m sure so looking for some practiced advise.
Thanks for looking.
Posted by: DennisV Aug 27 2023, 04:15 PM
About that welder, is there advice for a recommended welder for a novice on here? Likewise, on what to stay away from?
I started down the path of welding just over a year ago. If you plan to do any body panels, you may benefit from learning TIG. Plenty of people are successful with MIG, but I think you'll find it offers less control and introduces more heat distortion on body panels.
I ended up buying the https://www.lincolnelectric.com/en/Products/k4499-1. I’ve been very happy with it so far. You can do TIG, MIG, or stick. Runs off 110 which is convenient. It is pretty compact. I put it on a cheap Harbor Freight cart and it has been fine. I have only used it for TIG of 18-20 gauge sheet metal so far. There are two key drawbacks, but neither would stop me from buying this one again:
1. Volt / Amp control doesn’t allow you to select a value. It’s a letter system that take a little trial and error. But once you know, you know. You will spend at least another $500 to get a Lincoln model that offers precise readout.
2. It is lift start. You get used to it. High Frequency start would be ideal. Again more $$$.
I did online classes first. Tom Perazzo who is pretty well known for his Garage Time YouTube channel has a https://ahhgaragetime.thinkific.com/collections. Also, master metal shaper https://covell.biz/dvds/welding-dvds/. Beyond being good teachers, they are swell people. And don't rule out YouTube. https://www.youtube.com/playlist?list=PLycH4h-dMkRDOkz6PU_sFdqDryGhn6Q8Y has a wealth of knowledge he shares for free from ProShaper.
Then took three hands on classes. Starting with a MIG class at my local maker space. You may also be able to find classes at a junior college too.
Ultimately, practice, practices, practice.
Posted by: seanpaulmc Sep 2 2023, 07:29 PM
With a little help from you guys I was able to figure out how this piece should look and fit on the bottom. 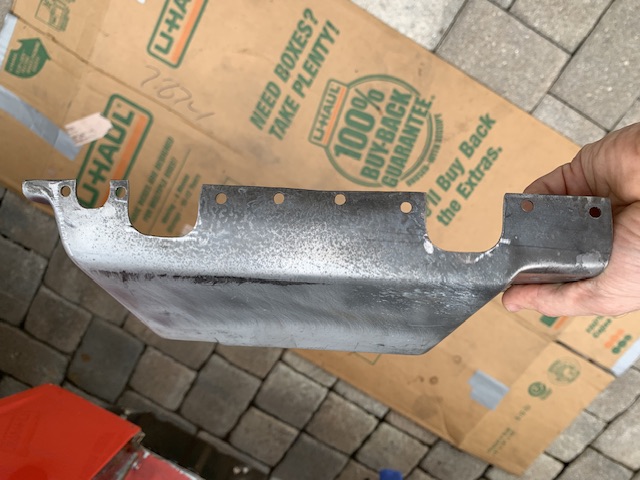
Some 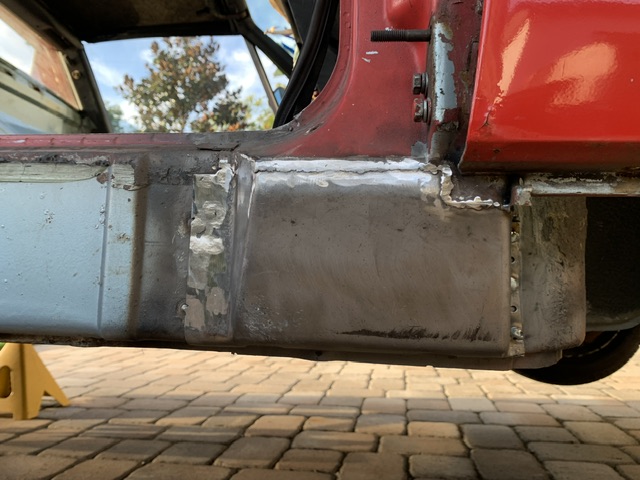
Mostly done.
Posted by: 930cabman Sep 3 2023, 05:51 AM
+1 with your progress, all the while working outdoors in the hurricane season. 
Keep up your efforts and soon you will be cruising
Posted by: seanpaulmc Sep 9 2023, 06:14 PM
Put back the old door sill.
Mostly. Almost done but still some finishing to do.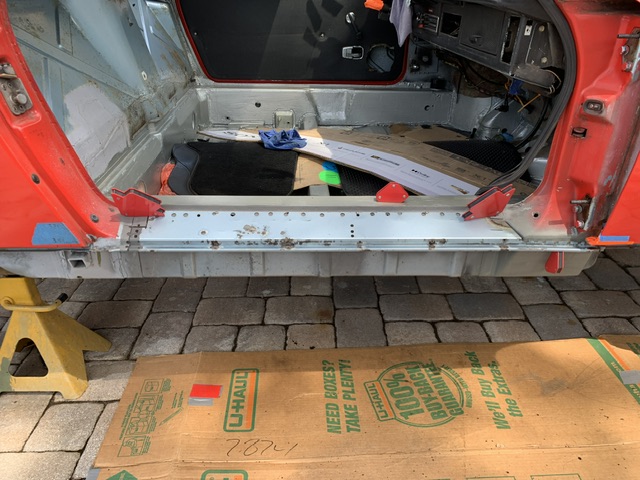
Advice on painting anyone?
At my rate of metal repair it will be a while before this chassis gets repainted. Till then I’ll need to keep the rust off the new and repaired metal. What should I be doing? Advice?
Thanks
Powered by Invision Power Board (http://www.invisionboard.com)
© Invision Power Services (http://www.invisionpower.com)