Printable Version of Topic
Click here to view this topic in its original format
914World.com _ 914World Garage _ Exhaust ports and sealing....
Posted by: falcor75 Feb 23 2017, 12:50 PM
How do you know you get a good seal at the exhaust port?
The only way to really know is to take down the heaterbox and look for soot on the copper gaskets. But by then you will need to anneal the gasket again and hope that you get a good seal the next time you mount the heater box too....
Tips and tricks are most welcome....
Posted by: Marty Yeoman Feb 23 2017, 01:14 PM
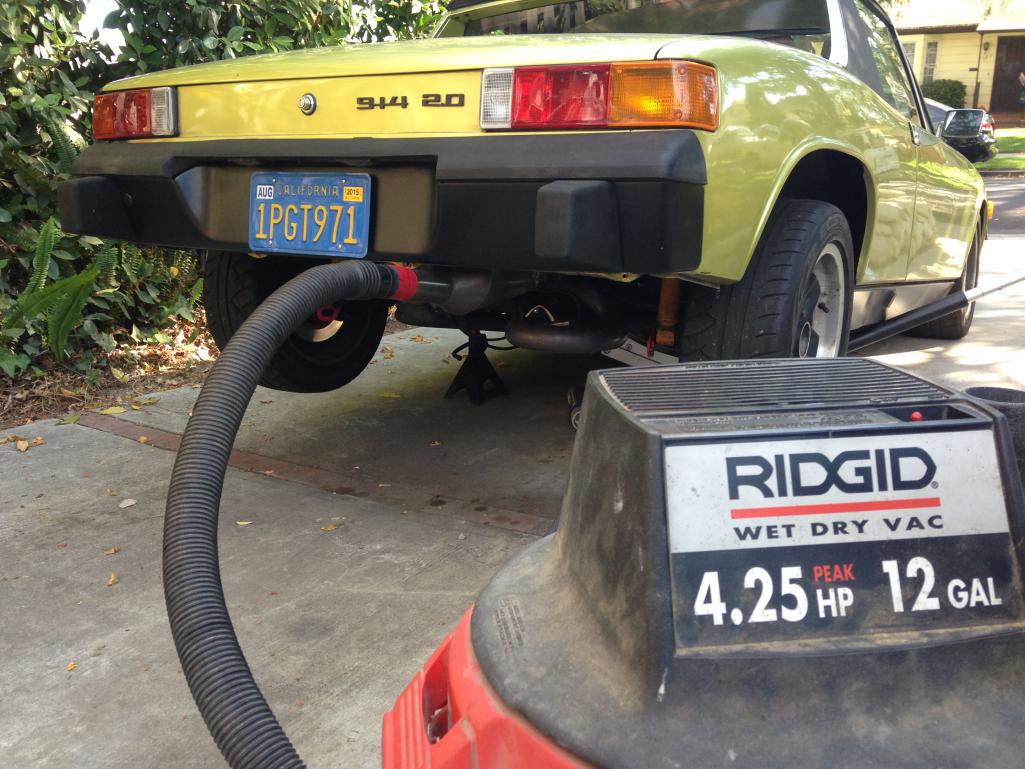
I've taken to using McMark's feather technique. Pressurize your exhaust system using the output from a shop vac and probe about the head ports with a feather. It's surprisingly accurate at locating even the smallest leaks. Plus there's the bonus of not working on and around hot heat exchangers. I recommend trying it.
Posted by: falcor75 Feb 23 2017, 01:35 PM
Aaah thats clever, my shopvac cant blow but I guess I can hook up the compressor to pressureize the exhaust a bit.
Posted by: Bartlett 914 Feb 23 2017, 01:40 PM
you can use a piece of hose and use it as a stethoscope. This is not perfect but I did use this the other day on a friends car and found a leak. Compare the sound difference from bank to the other. I used a 5/8: ID hose.
Posted by: bandjoey Feb 23 2017, 04:31 PM
OK this might be crazy but what about a torque wrench? I heat mine, push them in place with a small screwdriver handle, and they always stay put. quickly put on the exhaust and torque. Have installed about 4-5 x this way and (so far) no leaks. The first time i discovered some crud on the seating area. Carefully cleaned the seating surface and no problems yet.
Posted by: John Jentz Feb 23 2017, 04:47 PM

How do you know you get a good seal at the exhaust port?
The only way to really know is to take down the heaterbox and look for soot on the copper gaskets. But by then you will need to anneal the gasket again and hope that you get a good seal the next time you mount the heater box too....
Tips and tricks are most welcome....
The really loud noise goes away.
Posted by: Rand Feb 23 2017, 05:16 PM
Nothing crazy about that! The nuts should absolutely be tightened appropriately. For anyone who isn't sure what that feels like, a torque wrench is important.
The mating surfaces being clean and flat is most important. I've seen all kinds of things, from old gaskets left in, to erosion that started because of leaks at the head. Exhaust leaks at that location are a time bomb.
Sometimes the tops of the pipes need filing to make sure the surfaces are flat and smooth. (Long file strokes across both pipe ends at the same time (per side pair) to make sure they are flat with each other.) Sometimes you need to keep the rear mounts loose so you can adjust the angle as you torque at the heads to preserve the flat mating at the heads first before tightening up the rest. Depends on your exhaust system though - this is why I love stub pipes.
Posted by: N_Jay Feb 23 2017, 05:19 PM
On this topic:
Is there really any difference between the early and late sealing rings?
They have different part numbers, but I thought the exhaust ports were all the same.
If you hunt you can get rings at about $1 so why bother reusing?
Posted by: stugray Feb 23 2017, 05:29 PM
- this is why I love stub pipes.
 I put them on while the engine is still on the stand and I can flip it upside down
Posted by: rgalla9146 Feb 23 2017, 05:34 PM
If you have a leak at a port it is usually pretty obvious.
You hear a pop at idle each time that cylinder fires.
To find which cylinder it is remove one spark plug wire at a time with the engine idling.
The pop will go away when the leaking cylinder is not firing.
Posted by: Rand Feb 23 2017, 05:38 PM
If you hunt you can get rings at about $1 so why bother reusing?
I would never re-use! They CRUSH and fatigue. I would way rather use a new ring without annealing than try to re-anneal and re-use and old collapsed one as some have suggested.
And to bandjoey Bill's point, you should RE-torque after a couple heat cycles on a new install.
Posted by: yeahmag Feb 23 2017, 11:03 PM
Posted by: cuddyk Feb 24 2017, 09:15 AM
I love the idea of the shop vac...but isn't there a concern about blowing soot from the muffler into open exhaust valves? I'd imagine that reversing the flow of exhaust would dislodge all kinds of nasties. No?
Posted by: Perry Kiehl Feb 24 2017, 09:25 AM
That stuff would come out faster than a broken chop stick 
I love the idea of the shop vac...but isn't there a concern about blowing soot from the muffler into open exhaust valves? I'd imagine that reversing the flow of exhaust would dislodge all kinds of nasties. No?
Posted by: cuddyk Feb 24 2017, 09:36 AM
not sure I get the reference 
Posted by: Marty Yeoman Feb 24 2017, 09:51 AM
You wooda hadda been there.
Posted by: N_Jay Feb 24 2017, 10:00 AM
On this topic:
Is there really any difference between the early and late sealing rings?
They have different part numbers, but I thought the exhaust ports were all the same.
Anyone? . . . Anyone? . . . .
. . . . Beuler?
Posted by: Bartlett 914 Feb 24 2017, 10:05 AM
Sometimes the tops of the pipes need filing to make sure the surfaces are flat and smooth. (Long file strokes across both pipe ends at the same time (per side pair) to make sure they are flat with each other.) Sometimes you need to keep the rear mounts loose so you can adjust the angle as you torque at the heads to preserve the flat mating at the heads first before tightening up the rest. Depends on your exhaust system though - this is why I love stub pipes.
One has to be careful doing this. You really need a BIG file. A standard 12" file is too short. I have seen where this has created a problem that may not have been there before. It is very easy to get these surfaces uneven. I have a surface plate I can use. I use abrasive paper on the plate (or a really good flat surface) and sand the ends in smooth strokes. I feel going in a single direction works best. Using a permanent marker can help see the high spots. You need two sets of hands works best here or a good way to hold the paper in place while working.
Posted by: McMark Feb 24 2017, 10:07 AM
On this topic:
Is there really any difference between the early and late sealing rings?
They have different part numbers, but I thought the exhaust ports were all the same.
Anyone? . . . Anyone? . . . .
. . . . Beuler?
Yes, but it's negligible. The early ones have a slightly smaller ID. You'd be hard pressed to identify one vs the other without having them next to each other.
Posted by: 7TPorsh Feb 24 2017, 10:30 AM
Do any of you use any sealant of any kind? or is it only HEAD-COPPER-EXHAUST
Posted by: rmital Feb 24 2017, 10:36 AM
not sure I get the reference
..the chop stick story pops up every once in a while (happened about 10ish years ago)...it's from the "what not to do" techniques while working on a 914. trying to find top dead center poking a chop stick thru your spark plug hole. I cringe just thinking about it...

Posted by: Dave_Darling Feb 24 2017, 10:52 AM
Do any of you use any sealant of any kind? or is it only HEAD-COPPER-EXHAUST
I don't know of any common sealants that can stand the temperatures seen by the exhaust ports. Just head/copper/exhaust.
--DD
Posted by: falcor75 Feb 24 2017, 11:38 AM
Mounted the drivers side HE today.... The good news is that I didnt need a hose to listen for a leak.... The bad news is that I could easily feel it with my hand.... 
Posted by: yeahmag Feb 24 2017, 12:12 PM
You need to do the two tried and true methods. File the HE so they are flat and in plane with one another AND heat the copper gaskets to "just red" and let air cool. This is assuming there isn't damage somewhere in the system (head or HE).
Posted by: falcor75 Feb 24 2017, 12:48 PM
You need to do the two tried and true methods. File the HE so they are flat and in plane with one another AND heat the copper gaskets to "just red" and let air cool. This is assuming there isn't damage somewhere in the system (head or HE).
Both of those are done already. I think the pipe catches on the head at the outside bolts and doesnt meet the copper seal properly....
Posted by: 914_teener Feb 24 2017, 01:02 PM
Permatex makes a copper high temperature sealant that I have used sucessfully. You can Google it.
I still file the HE's and then put a bead of the stuff after the gaskets go in.
Fit the HE in and torque carefully.
Posted by: yeahmag Feb 24 2017, 01:05 PM
I have cursed many a back yard mechanic that did that... Spend the extra time to get it to seal up without bandaids.
Posted by: 914_teener Feb 24 2017, 01:37 PM
I have cursed many a back yard mechanic that did that... Spend the extra time to get it to seal up without bandaids.
I don't claim to be anything other than that!
Posted by: McMark Feb 24 2017, 04:13 PM
It's common for them To catch on the edge. You can use a pry tool to push th offending pipe into place.
Posted by: N_Jay Feb 24 2017, 04:18 PM
Do any of you use any sealant of any kind? or is it only HEAD-COPPER-EXHAUST
Metal to metal
Posted by: N_Jay Feb 24 2017, 05:21 PM
On this topic:
Is there really any difference between the early and late sealing rings?
They have different part numbers, but I thought the exhaust ports were all the same.
Yes, but it's negligible. The early ones have a slightly smaller ID. You'd be hard pressed to identify one vs the other without having them next to each other.
Any issue using the older ones?
I have found them a bit less expensive.
Posted by: Amphicar770 Feb 24 2017, 07:06 PM
If you can get hold of an evap smoke machine, they are awesome for finding all sorts of leaks from exhaust to AC. I picked up a nearly new OTC one on evilbay cheap.
I did not use sealant but you do want to apply liberal quantity of anti-sieze to the exhaust studs as breaking of those will lead to all sorts of heartache.
Posted by: rgalla9146 Feb 24 2017, 07:12 PM
It's common for them To catch on the edge. You can use a pry tool to push th offending pipe into place.
Once you've determined which cylinder is leaking loosen the nuts slightlythen use a screwdriver or the similar to push the tube to the proper position and
tighten.
Also... use a straightedge to determine if there is an issue at the sealing edges of the
header tubes
Posted by: cwpeden Feb 24 2017, 08:20 PM
I've always used a straight edge too.
However, the center distance on my SS exchangers is not the same as the heads.
So when I put the pipes up to the head they need to be pushed together about a 1/4 inch.
The next time I took the exchangers off it was obvious that it made a difference.
I made them flat to within .0015 on the bench using glass, bearing blue and feeler gages and there was maybe 90% sealing on the copper.
After squeezing the pipes to the right location they were around .010 inches out of plane.
My situation may be unique but there was no way I was going try and bend the SS exchanger!
Posted by: falcor75 Feb 25 2017, 01:00 AM
I flattened the stub pipes last summer using a piece of thick milled flat piece of steel and 1200 grit sandpaper. With one stub completely flat against the steel piece the other had a max deviation of 0,1 mm so they should be ok. My sealing issues seem to be from the the fact that the centre of the stubs are too closer together.
Will have to see what I can figure out to fix it today.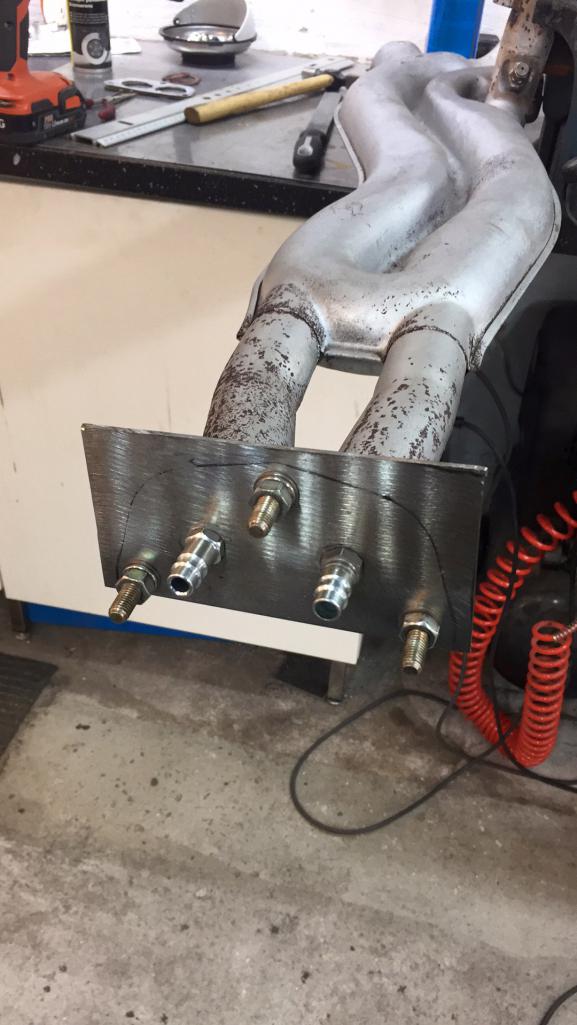
This is how I solved the leakfinding. Made up a 3 mm plate and brazed two male compressor fittings to it. Set the pressure to 0,5-1 bar and just connect the hose to the cylinder I want to test....
Posted by: falcor75 Feb 25 2017, 03:20 AM
Torquing the nuts to 18 Nm (14 ftlbs) i have very small leak on cyl 2 and big one at cyl 1. Air pressure set to as low as possible. The fit around cyl 1 seems better than cyl two but it still leaks at cyl one. Yaay for fiddly exhausts.
Posted by: falcor75 Feb 26 2017, 02:52 AM
A few hours of adjustment later and I have a very tiny leak on both cyl 1 and 2 with the heaterbox pressurized to 0.5 bar (around 7-8 psi) Would this be acceptable?
I dont think the exhaust backpressure will ever get that high....
Posted by: Perry Kiehl Feb 26 2017, 07:12 AM
Exhaust pressures will be way more than .5 bar, think mild explosion.
It should seal completely. More leveling with the big file. I don't think you cut enough material with 1200 grit sand paper.
I've never heated the copper sealing rings, ever. I'm not going to say it doesn't help, I've just never had to do it.
You can use a little grease to stick the copper ring in it's place, and I always use anti seize on the exhaust studs.
Posted by: bdstone914 Feb 26 2017, 07:22 AM
On this topic:
Is there really any difference between the early and late sealing rings?
They have different part numbers, but I thought the exhaust ports were all the same.
Anyone? . . . Anyone? . . . .
. . . . Beuler?
Yes, but it's negligible. The early ones have a slightly smaller ID. You'd be hard pressed to identify one vs the other without having them next to each other.
I thought the difference was size of the hole and the 2.0L used the larger hole.
Posted by: falcor75 Feb 27 2017, 01:38 PM
Got brand new seals in the mail today. I annealed them and mounted them with new copper nuts. #1 cylinder still has a leak thats not hearable except if I use a hose to listen right at the port. #2 is leak free.
Will do the other side tomorrow, need some more copper nuts lock nuts.
Powered by Invision Power Board (http://www.invisionboard.com)
© Invision Power Services (http://www.invisionpower.com)