Printable Version of Topic
Click here to view this topic in its original format
914World.com _ 914World Garage _ GT project
Posted by: rgalla9146 May 15 2017, 03:23 PM
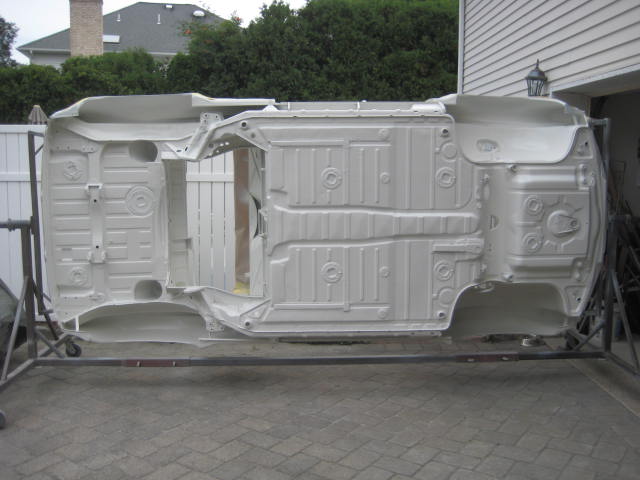
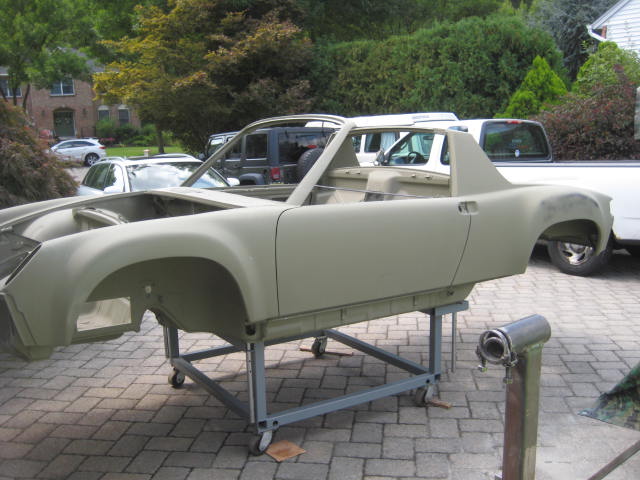
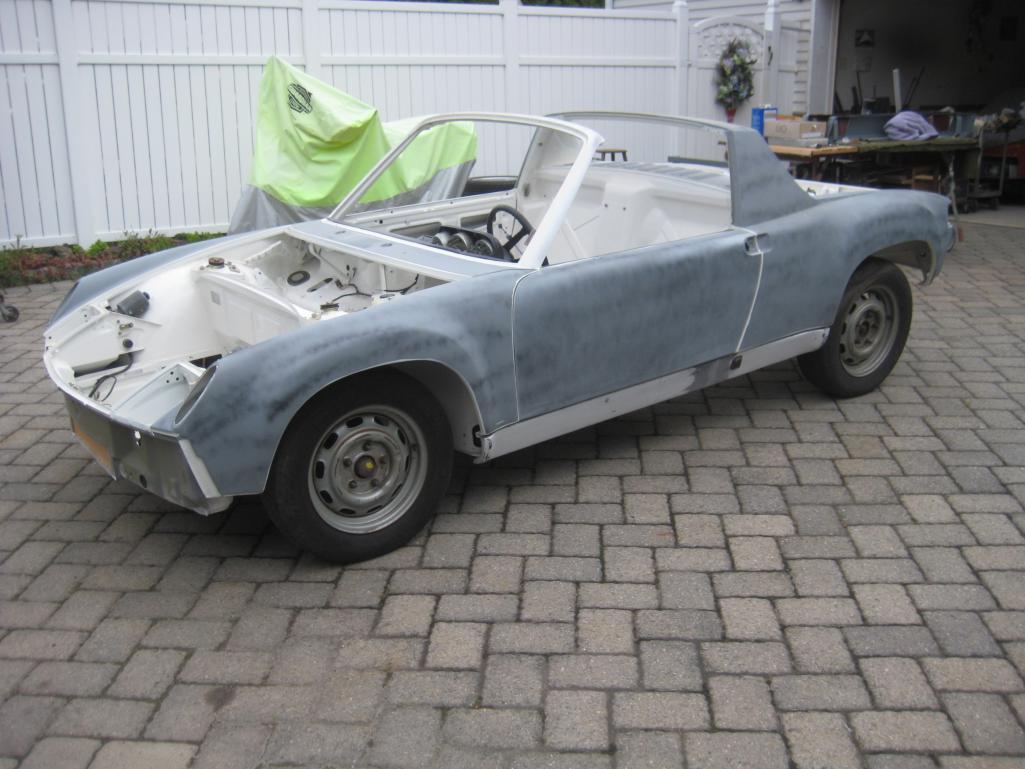
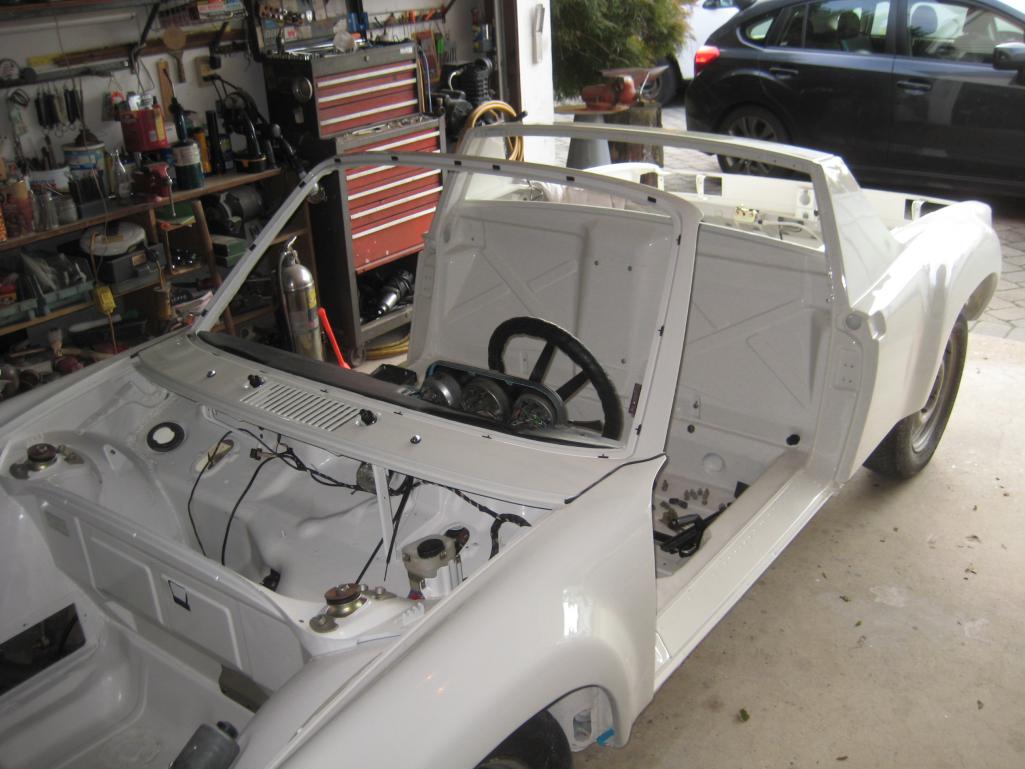
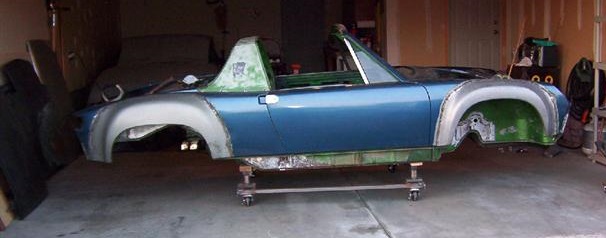
Big day for my GT project.
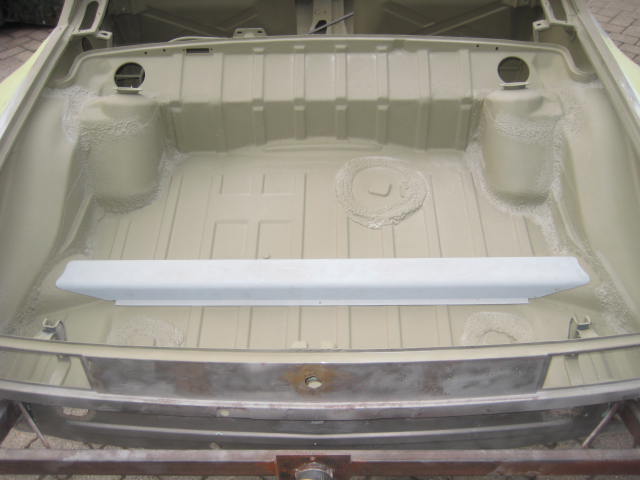
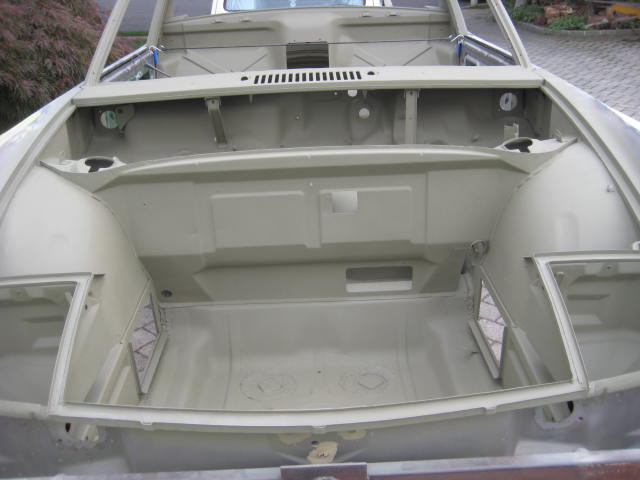
Getting a combination soda blast and garnet blast on my bare chassis and all the
removable panels.
The baking soda is used to remove paint and is suitable for the body panels.
The garnet is much more course and removes surface rust on the undersides.
I hope I did enough to keep it out of the longs and all the other cavities.
Fingers crossed.
Attached image(s)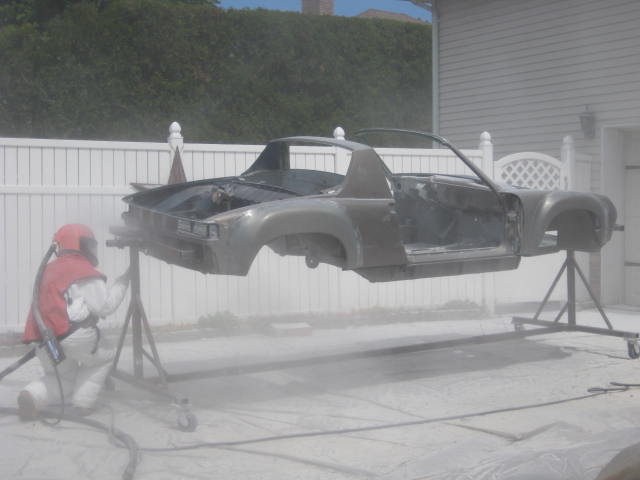
Posted by: mb911 May 15 2017, 03:44 PM

Big day for my GT project.
Getting a combination soda blast and garnet blast on my bare chassis and all the
removable panels.
The baking soda is used to remove paint and is suitable for the body panels.
The garnet is much more course and removes surface rust on the undersides.
I hope I did enough to keep it out of the longs and all the other cavities.
Fingers crossed.
Awesome .. I want to do that in just spots on my car once the welding is all done.
Posted by: PanelBilly May 15 2017, 03:59 PM
Is that you doing the blasting? You might not be able to keep out every bit of dust, but with a bit of effort you can get most of it. The sound of the engine will drown out anything that is rattling around in the longs anyways
Posted by: mepstein May 15 2017, 04:07 PM
Your neighbors are going to love you.
Posted by: gms May 15 2017, 05:59 PM
congratulations she is looking good!
Posted by: porbmw May 15 2017, 07:03 PM
Looks sweet!
Congrats!
Am jealous, in a good way 
Posted by: Krieger May 15 2017, 08:10 PM
Very cool! Do the best you can to blow and vacuum it out. Then move on.
Posted by: Garland May 15 2017, 10:05 PM
Great job, one step at a time.
Posted by: rgalla9146 May 16 2017, 05:20 AM
Is that you doing the blasting? You might not be able to keep out every bit of dust, but with a bit of effort you can get most of it. The sound of the engine will drown out anything that is rattling around in the longs anyways
Not me, I took the pic.
Two guys doing one hour stints each. All day.
Soda on the outside bodywork and garnet on the bottom.
The noise was friggin' LOUD
I specified a weekday so most of my neighbors were out.
I would have dipped and E coated but the longs were already reinforced.
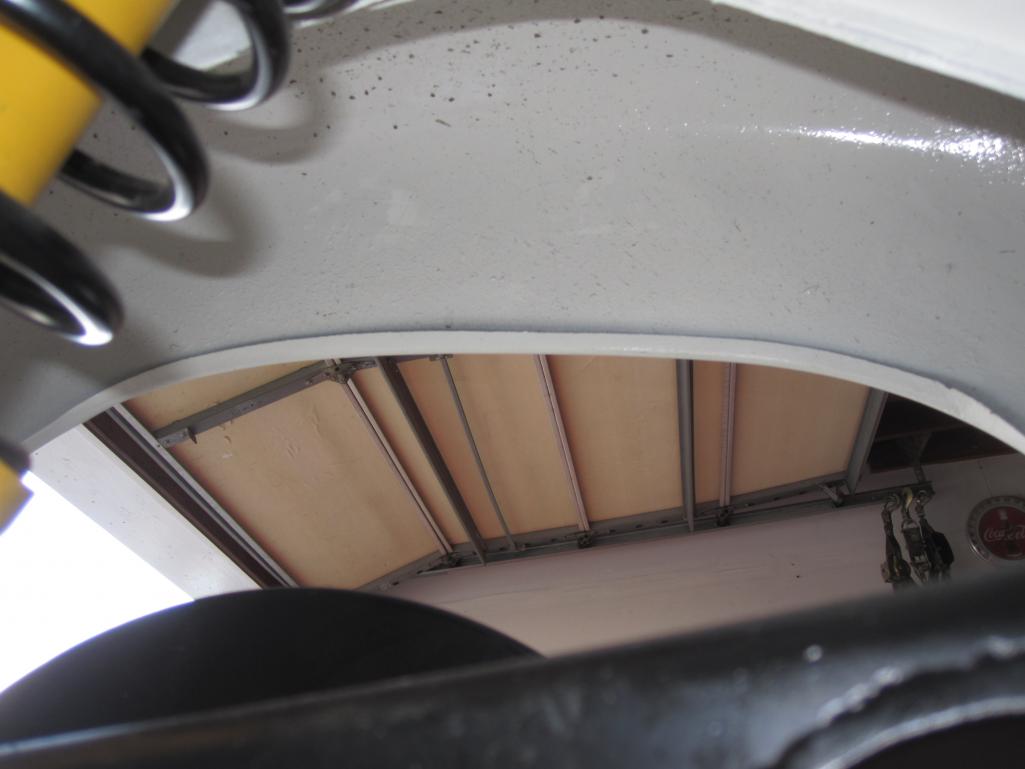
I used duct tape, dum dum, butyl and hardware to fill every hole along the longs
the rollbar, the windshield frame and all crossmembers.
I'v only done preliminary blow and vacuum cleaning so far.
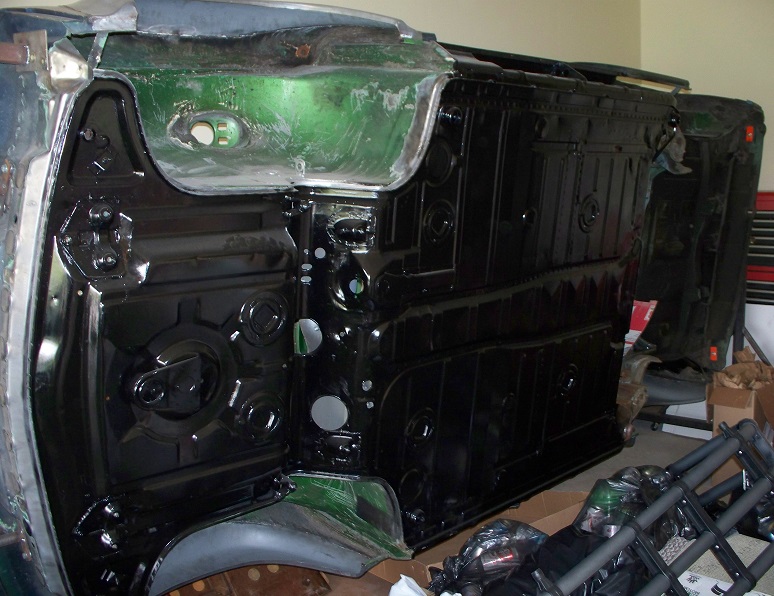
The ability to roll the car over easily is key to removal of contamination.
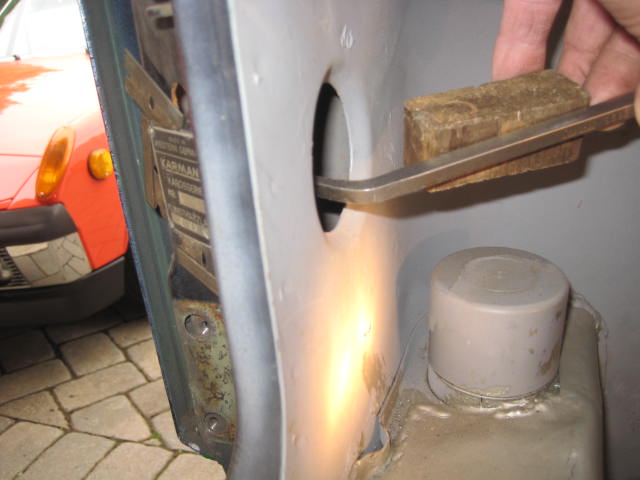
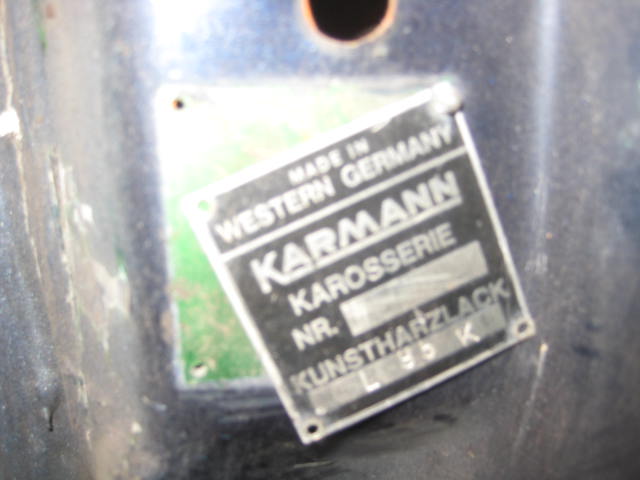
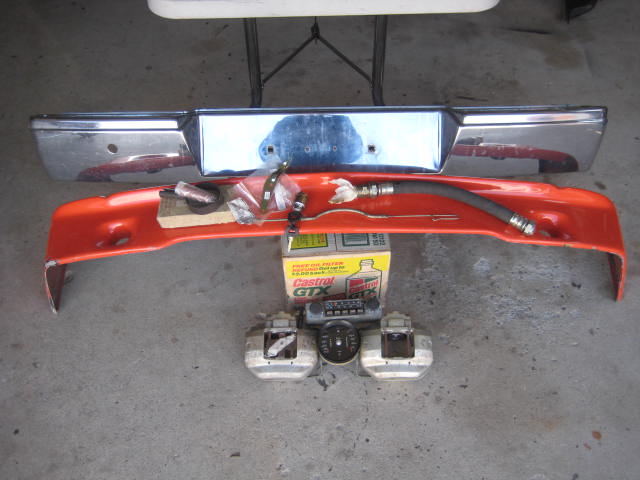
I added a picture of removal of the Karmann tag.
I levered the rivets out from behind.
Attached image(s)
Posted by: Luke M May 16 2017, 06:16 AM
Looking good there Rory.
How did the chassis look after the blasting ?
I know there wasn't too much rust when I had it.
Posted by: Cairo94507 May 16 2017, 07:25 AM
That is definitely the way to begin one of these builds. I love the removal of the Karman tag too. Now we need to see how it came out after blasting please.
Posted by: rgalla9146 May 16 2017, 07:40 AM
Looking good there Rory.
How did the chassis look after the blasting ?
I know there wasn't too much rust when I had it.
Hey Luke
No big surprises.
I had to replace the drivers door.... it was already painted and buttered up twice.
I decided not to replace the rear of the floor. The issues it had were
cosmetic.....dents and some welding.
I put the jack receivers back on and replaced the pass. rear ear. along with some additional reinforcements on the both rear ears.
The chassis is solid.
Next it goes to get primed and initial body work.
Posted by: cary May 16 2017, 07:56 AM
Only way to go ...............
That way you know what you have from the get go.
Posted by: ValcoOscar May 16 2017, 08:03 AM
Great job....nice that you are taking proper safety precautions with that hood. Looks like an Apollo 600 set up.
I am lucky enough to have a sandblast room here at work. I can help any SoCal MEMBERS with blast projects, if anyone is interested. I will donate room and media....operator labor is minimal.
Keep up the good work an keep us posted on progress. 
Posted by: Eric_Shea May 16 2017, 08:55 AM
Go Rory Go!
Posted by: rgalla9146 Jul 28 2017, 07:59 PM
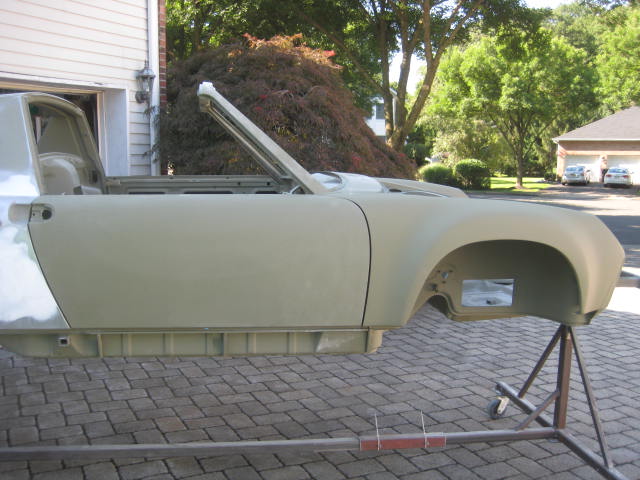
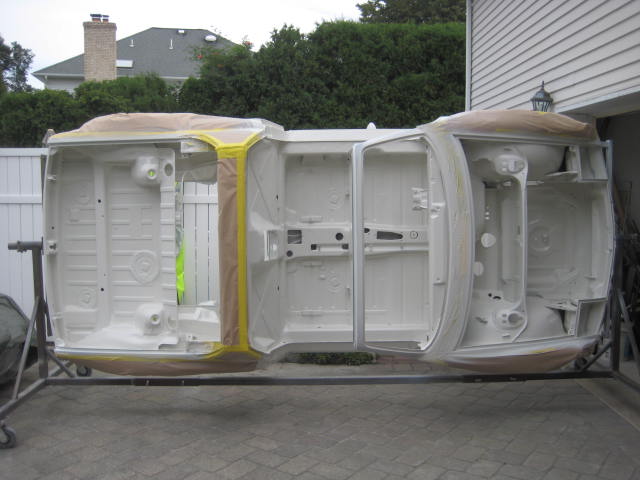
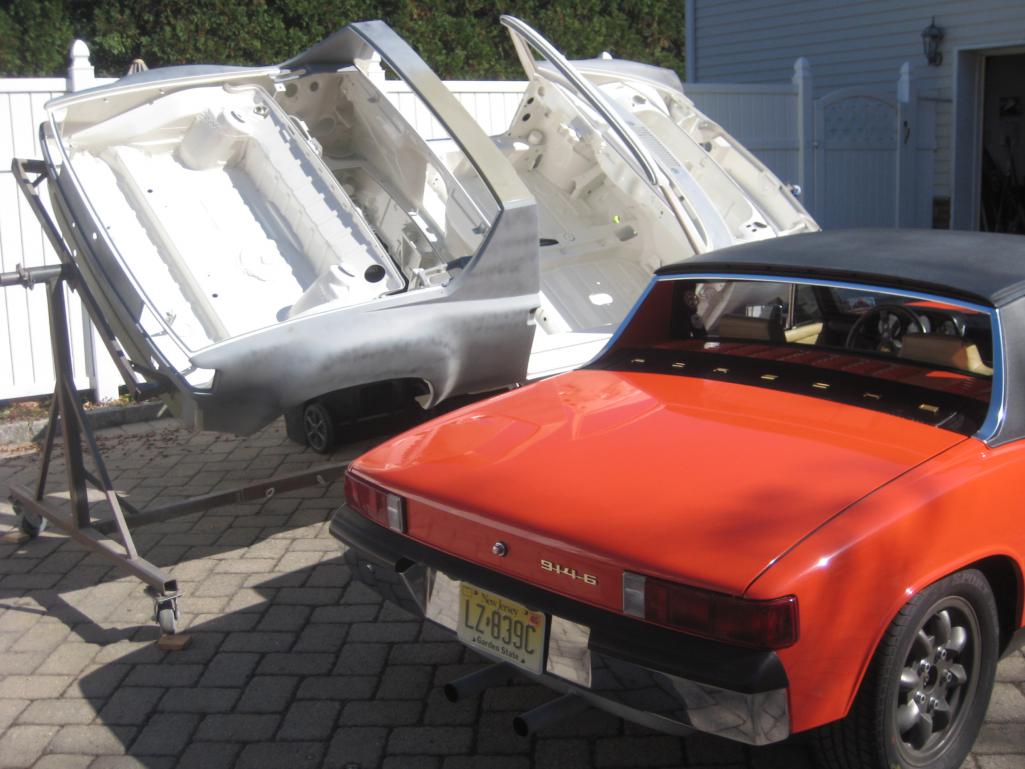
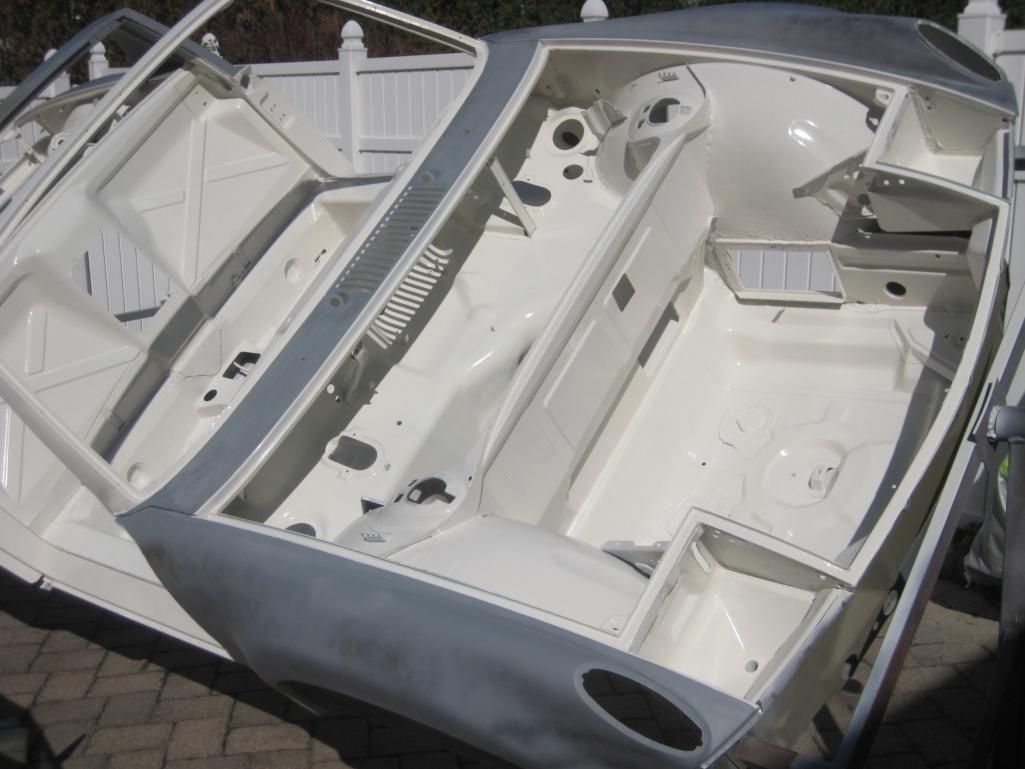
My chassis was blasted about a month ago.
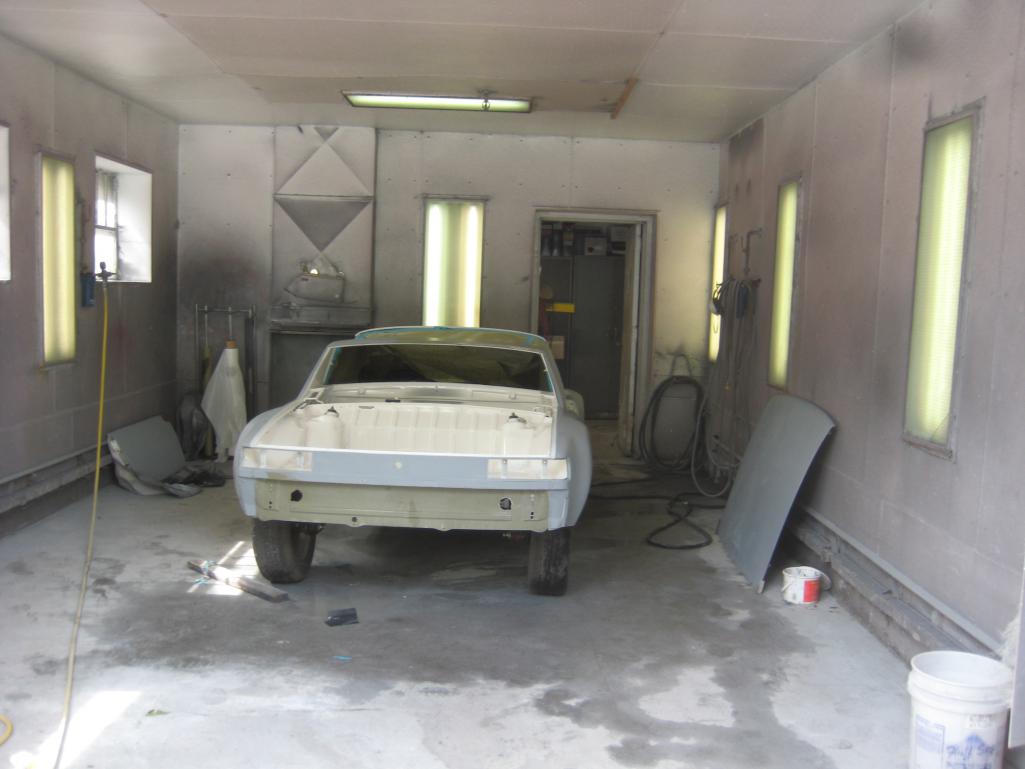
I finally got a long time friend to come to do the prep/prime and
hammer/dolly work.
I'm hoping to get to a paint booth in a month.
Attached image(s)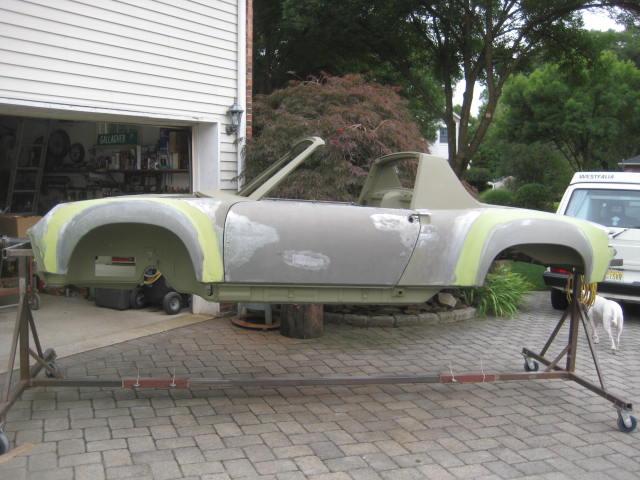
Posted by: tygaboy Jul 28 2017, 10:50 PM
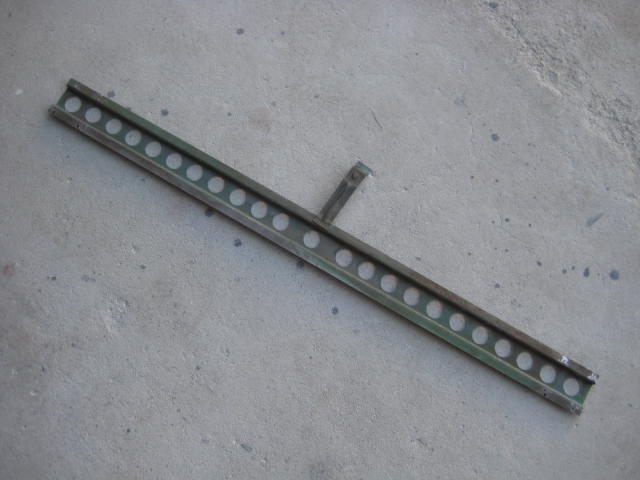
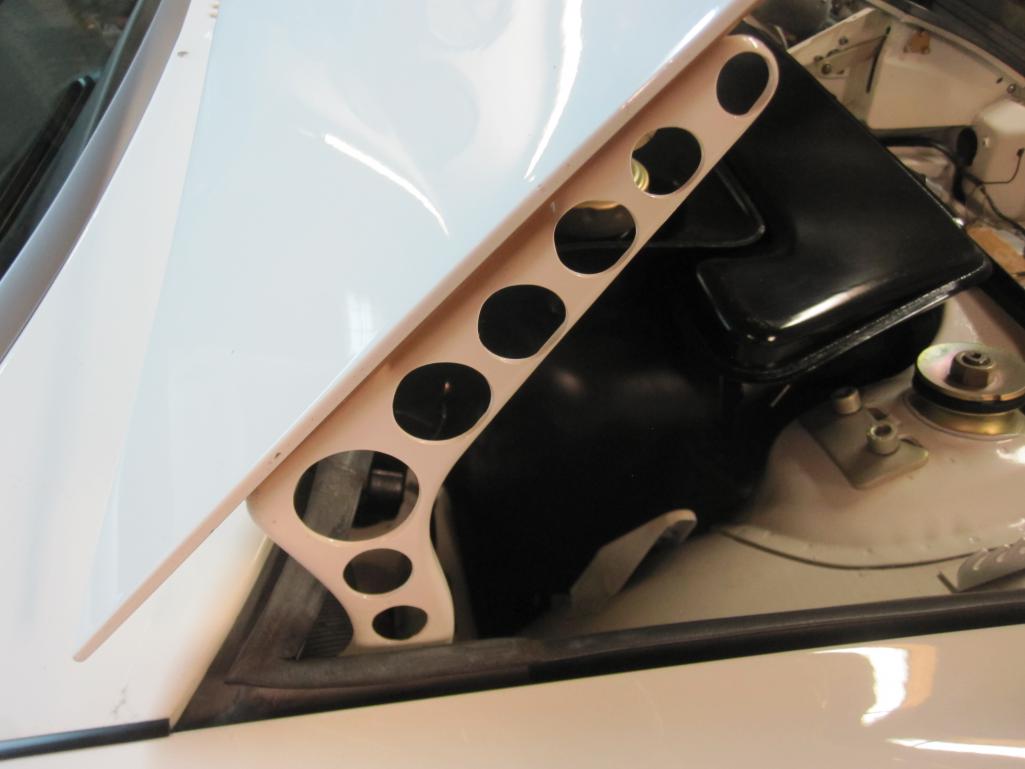
Looks great! Do tell about that trans support "cover". I've been working up a design for stiffening mine and yours caught my eye.
Details man, I want some details!
Posted by: Krieger Jul 28 2017, 11:12 PM
That is going to look great! What color are you going to paint it?
Posted by: rgalla9146 Jul 29 2017, 05:37 AM
Looks great! Do tell about that trans support "cover". I've been working up a design for stiffening mine and yours caught my eye.
Details man, I want some details!
It's 18 ga. fabed at a local metal shop .
48" wide then whittled down to contact the outside ends of the original
crossmember. 2 1/8" deep x 3 1/8" wide.
I'll include the nut to secure the spare tire and a couple pads for the tire to rest on
as well.
I not a fan of the tubular diagonal supports.
Posted by: rgalla9146 Jul 29 2017, 05:44 AM
That is going to look great! What color are you going to paint it?
White......not sure of the name...Grand Prix ?
what color white was is a 906 ?
Posted by: okieflyr Jul 29 2017, 11:23 AM
Did you get it blasted locally?
Posted by: Tom_T Jul 29 2017, 11:38 AM
My chassis was blasted about a month ago.
I finally got a long time friend to come to do the prep/prime and
hammer/dolly work.
I'm hoping to get to a paint booth in a month.
Looks like a nice FG bumper `88-92 Westy in the background too!

Tom
///////
Posted by: rgalla9146 Jul 29 2017, 06:09 PM
My chassis was blasted about a month ago.
I finally got a long time friend to come to do the prep/prime and
hammer/dolly work.
I'm hoping to get to a paint booth in a month.
Looks like a nice FG bumper `88-92 Westy in the background too!
Tom
///////
'
'nice FG bumper ' ?
yes, '89 Westy, full camper
OH ! I get it , the fiberglass bumper identifies the year of the Vanagon....Duh !
Posted by: Cairo94507 Jul 29 2017, 08:25 PM
Wow, that is looking great. Going to love seeing it in color.
Posted by: rgalla9146 Jul 29 2017, 09:07 PM
Did you get it blasted locally?
Yes, A guy from Haskell NJ came to my driveway and did it in two visits.
He also did four removable panels away from here.
The bottom was done with garnet ,the outside with soda.
Soda is much kinder to the surface and avoids distortion that occurs with heavy abrasive.
Scott Morley morleysodablasting@hotmail.com
Posted by: Montreal914 Jul 29 2017, 11:09 PM
Looking good,
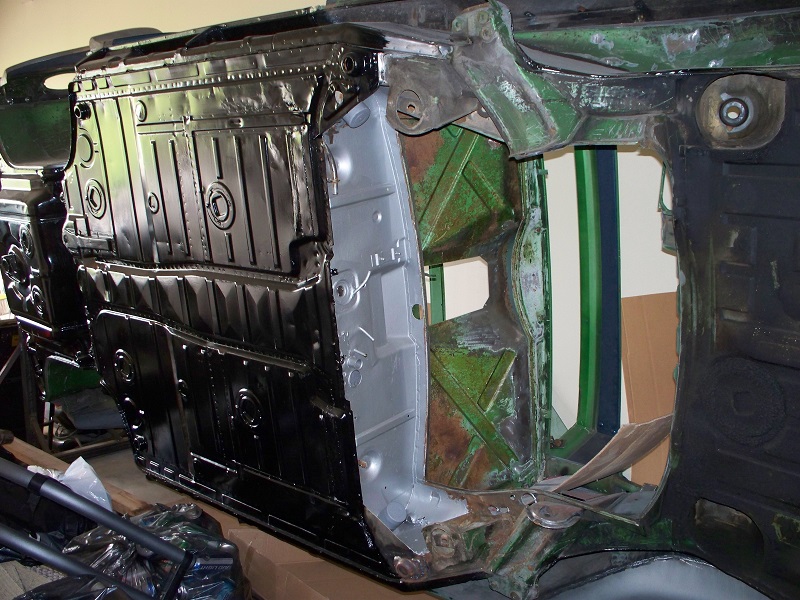
Side vents in the front inner wheel well  front oil cooler or H2O conversion?
Posted by: rgalla9146 Jul 30 2017, 06:17 AM
Looking good,
Side vents in the front inner wheel well
front oil cooler or H2O conversion?Oil cooler for a 3.0 SC engine w/carbs
Attached thumbnail(s)

Posted by: Front yard mechanic Jul 30 2017, 06:43 AM
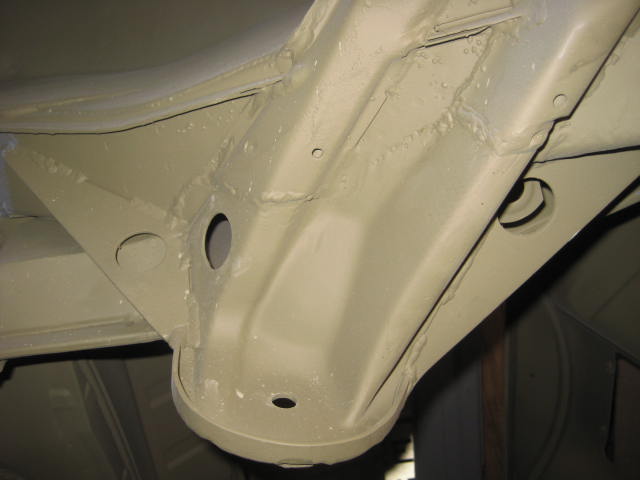
Nice looking car! Why do the jack supports look differant?
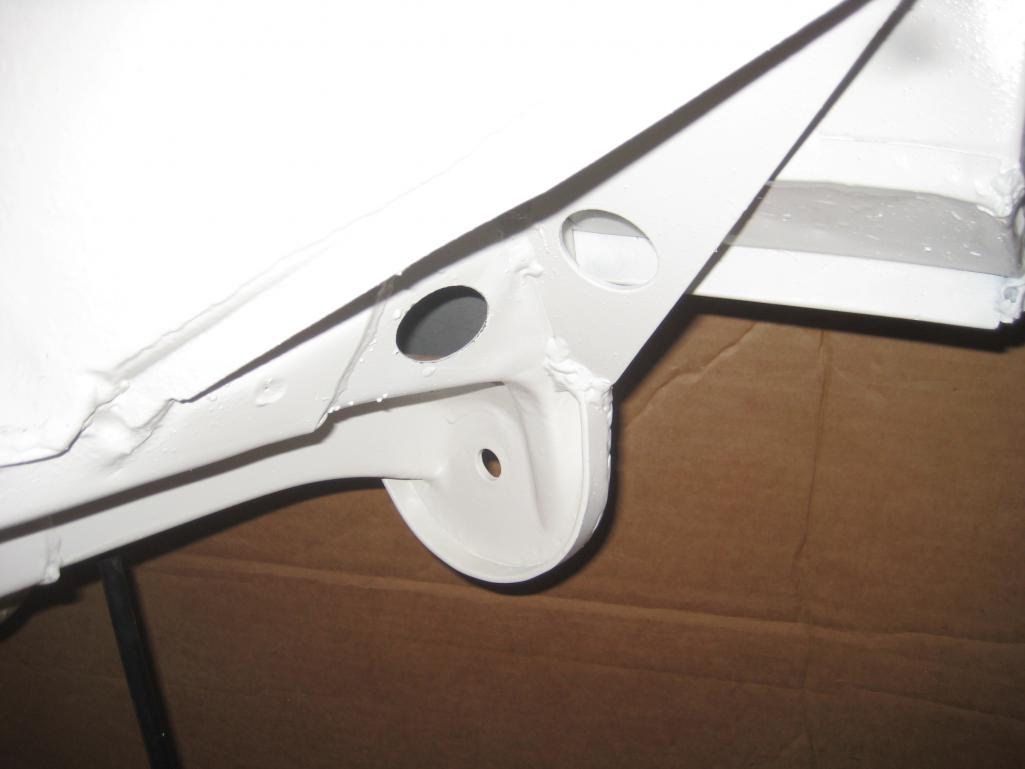
Posted by: rgalla9146 Jul 30 2017, 07:16 AM
Nice looking car! Why do the jack supports look differant?
Drivers side only,
Clearance for oil cooler plumbing
Posted by: Luke M Jul 30 2017, 07:46 AM
Looks good Rory...
Posted by: whitetwinturbo Aug 8 2017, 11:59 PM

![popcorn[1].gif](style_emoticons/default/popcorn[1].gif)
Posted by: Big Len Aug 9 2017, 06:28 AM

Posted by: rgalla9146 Aug 9 2017, 08:31 AM
Some update pics and a question.
The white color offered in 1970 for a 914 was L80E, (or 11 for a 914 6 )
On our site color chart the name is Elfinbein. Is that right ?
As I recall the early cars are a real white but Elfinbein is a very light ivory color.
I'm looking for info from original early white color cars.
Any help is appreciated.
PS my doors are not fully adjusted yet.
Attached image(s)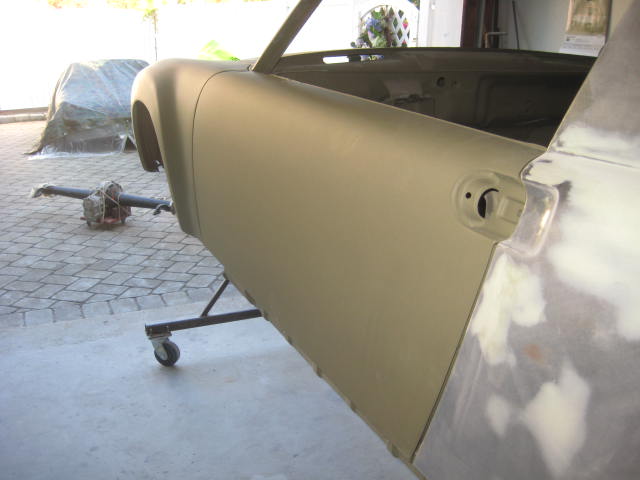
Posted by: rgalla9146 Aug 26 2017, 01:53 PM
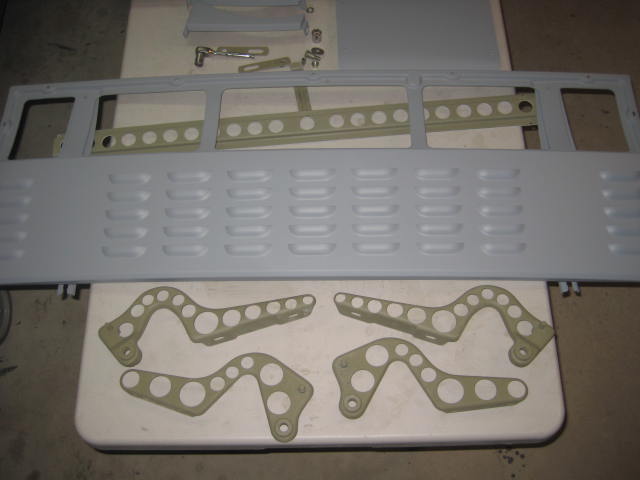
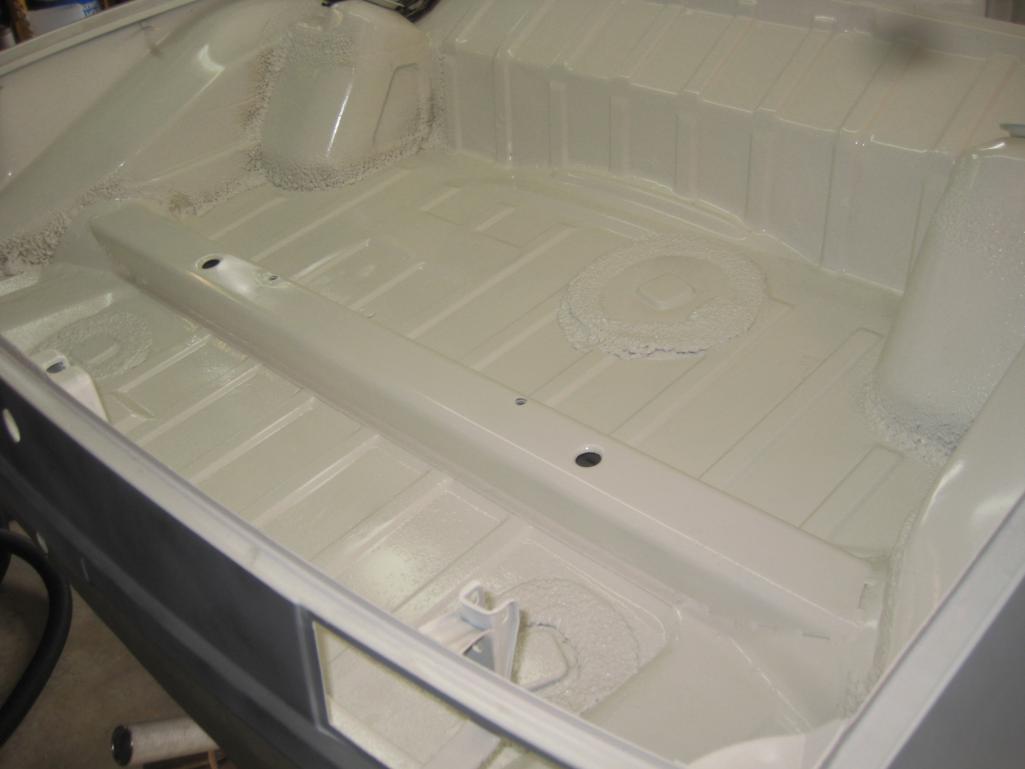
Ray visited yesterday and told me to post some pictures.
All bottom paint including pan, wheelhouses, five compartments front to rear, insides of doors and lids and all jambs will be painted this week...fingers crossed.
Picture shows front and rear lid hinges after visit to drill press.
Also louvered engine lid after visit to NY hot rod shop. Louvers Unlimited
Attached image(s)
Posted by: injunmort Aug 26 2017, 02:46 PM
looking good rory
Posted by: rgalla9146 Sep 3 2017, 10:11 AM
looking good rory
Thanks Mort....
and some more.
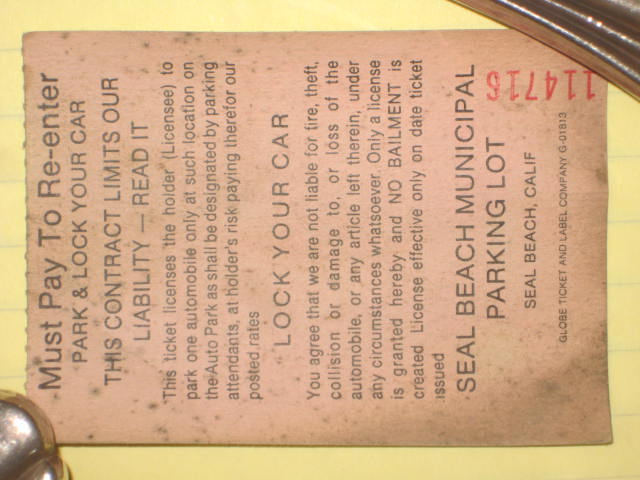
After so much cleaning, welding, blasting and painting I removed the caps from the heater tubes and look what fell out !
Seems the car lived in or at least visited California.
At this point everything is painted except the outside skin.
Should I complete the painting and then assemble ...or assemble now and paint the outside later ?
I wish I had unlimited time and every part ready to be attached.
I'll have to wait at least for a couple weeks before beginning.
Can't wait !
Attached image(s)
Posted by: Lucky9146 Sep 3 2017, 11:31 AM
Some update pics and a question.
The white color offered in 1970 for a 914 was L80E, (or 11 for a 914 6 )
On our site color chart the name is Elfinbein. Is that right ?
As I recall the early cars are a real white but Elfinbein is a very light ivory color.
I'm looking for info from original early white color cars.
Any help is appreciated.
PS my doors are not fully adjusted yet.
Great work so far, very impressive. If you want to see what your car would look like in light Ivory check out the 916-6 GT conversion currently on Bring A trailer. It will provide inspiration.
Keep it up!
Posted by: rgalla9146 Sep 3 2017, 11:54 AM
Some update pics and a question.
The white color offered in 1970 for a 914 was L80E, (or 11 for a 914 6 )
On our site color chart the name is Elfinbein. Is that right ?
As I recall the early cars are a real white but Elfinbein is a very light ivory color.
I'm looking for info from original early white color cars.
Any help is appreciated.
PS my doors are not fully adjusted yet.
Great work so far, very impressive. If you want to see what your car would look like in light Ivory check out the 916-6 GT conversion currently on Bring A trailer. It will provide inspiration.
Keep it up!
I know ! The day the paint was done that car showed up ! they're both '75s too.
It made me feel very good about my choice of color .
I hope to have results almost as good.
Posted by: gcrotvik Sep 3 2017, 12:00 PM
Some update pics and a question.
The white color offered in 1970 for a 914 was L80E, (or 11 for a 914 6 )
On our site color chart the name is Elfinbein. Is that right ?
As I recall the early cars are a real white but Elfinbein is a very light ivory color.
I'm looking for info from original early white color cars.
Any help is appreciated.
PS my doors are not fully adjusted yet.
Yes, Elfinbein is the German name for light ivory. I have a 74 L80E car and my painter did his research to get the correct color.
Greg
Posted by: Luke M Sep 19 2017, 08:24 AM
How's it going Rory ?


Posted by: mb911 Sep 19 2017, 10:05 AM
I know I plan to paint the underside then assembly so I can make mine a roller. Being that I have chosen black it will be a multi year project for body work.
Posted by: Luke M Jan 11 2018, 01:54 PM
![]()
How's it coming along there Rory?
Any updates ?
Posted by: rgalla9146 Jan 11 2018, 04:29 PM
How's it coming along there Rory?
Any updates ?
Hey Luke
Happy New Year !
Plenty of progress through the fall months.
Etching primer, metal massage / body work , fitting doors and lids, body schutz, pebble coat, etc.etc. Not my work, I paid an old friend.
By the way two sets of front and rear lids and front and rear bumpers.
Four in fiberglass and four in metal.
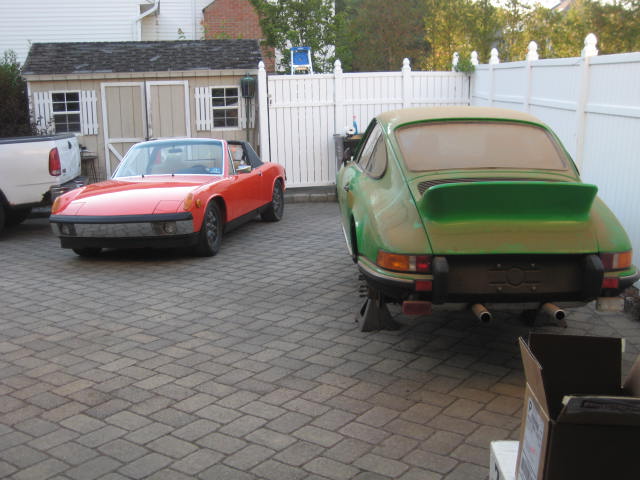
In a lull now, doing projects on friends cars. Revived a 73 911 after a 21 year snooze and also revived a '70 914 6 that is 13 VINs from mine. The engines are consecutive numbers ! Fresh engine never started after being rebuilt in 1991 ! by a well known guy I worked for ....way back. Purrs like a kitten.
Attached are some random pics.
Stay in touch
Attached thumbnail(s)
Attached image(s)

Posted by: Perry Kiehl Jan 11 2018, 07:28 PM
Was it originally metallic green? Love that color. Cool stuff!!!
Posted by: rgalla9146 Jan 11 2018, 08:46 PM
Was it originally metallic green? Love that color. Cool stuff!!!
Yes, Palma green.
Posted by: Lucky9146 Feb 21 2018, 11:00 AM

Posted by: rgalla9146 May 7 2018, 07:17 PM
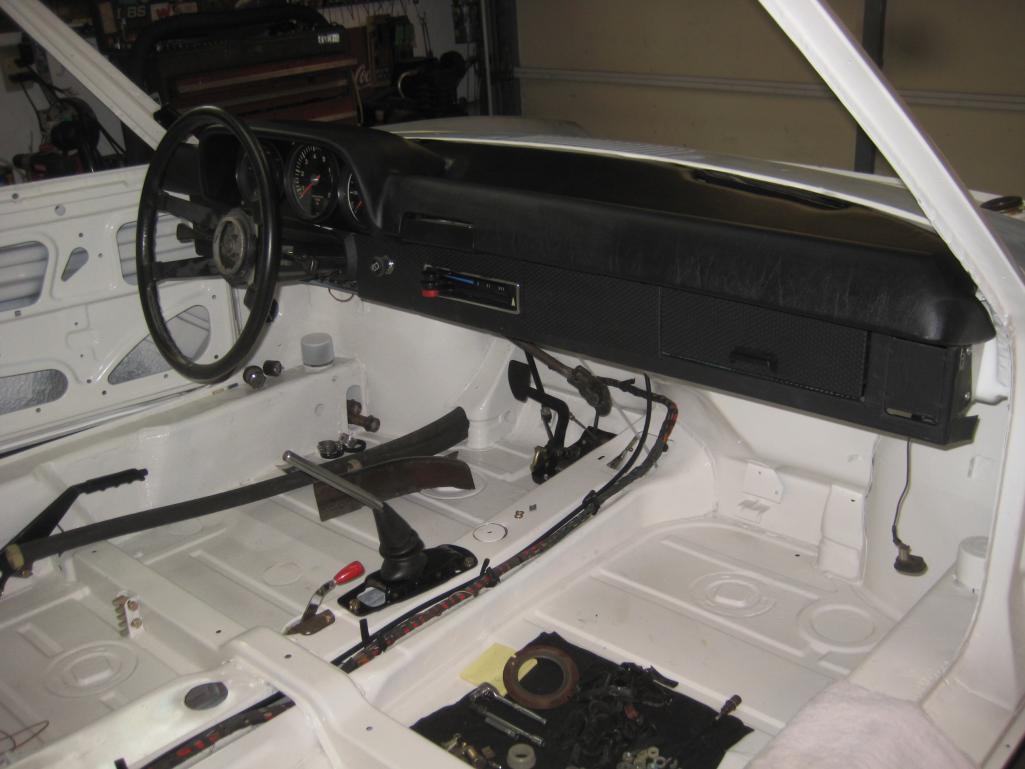
Some new pics since last report eight (!) months ago.
'6' harness in, dash and instruments in and wired, 6 column in, brakes all plumbed,
fuel lines in tunnel, speedo drive in tunnel, pedal cluster rebuilt and in, shifter freshened,modified and in, all suspension rebuilt and waiting ( install before or
after paint ?) thermostat and front cooler plumbed , etc.etc.etc.
I'm going to go with a '68 2.0 alum. engine for starters. It's been rebuilt and never started so this is a way to establish soundness for eventual sale.
Attached thumbnail(s)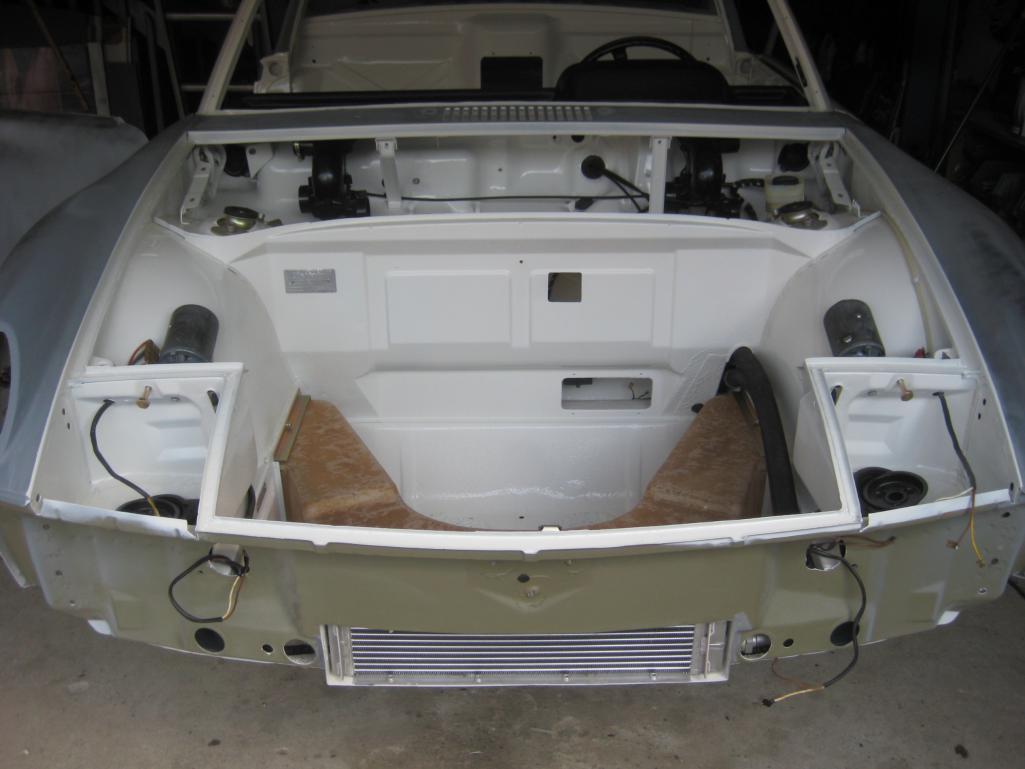
Posted by: effutuo101 May 7 2018, 11:24 PM
Wow! Nice!
Posted by: Lucky9146 May 7 2018, 11:44 PM
Looking really good. Hope to see more updates!
Posted by: AndyB May 8 2018, 05:25 AM
Wow Rory, that car is looking great.
Andy
Posted by: jkb944t May 8 2018, 05:56 AM
Great progress!!! It is a great feeling to start to see the light at the end of the tunnel! Keep up the great work!
Jeff B
Posted by: Big Len May 8 2018, 06:41 AM
Looks fantastic.
Posted by: gms May 9 2018, 12:40 PM
Looks great Rory!
Posted by: Dion May 9 2018, 01:56 PM
Very nice Rory. Looking good.
Posted by: rgalla9146 Jul 17 2018, 06:48 PM
Off the chassis cart today !!
Since the bottom was painted.....
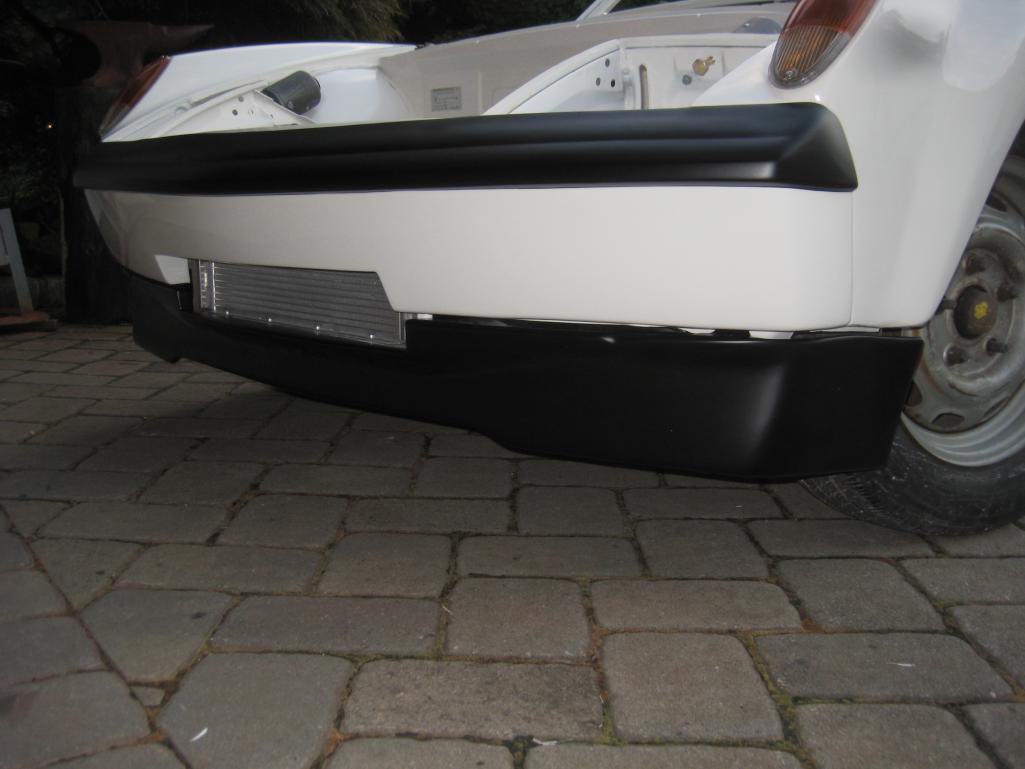
Fabricated mounts for fiberglass bumpers which needed much massage to look and fit acceptably. Modified the front for the oil cooler inlet.
Fabed mounts for glass rockers so no rivets will be used along the door sill.
Rivets or screws along that edge don't get along very well with fiberglass. Or the door seal.
Modified a very deep aftermarket front spoiler to mimic a LE unit, had to extend
each side for GT fenders and made an inlet for GT oil cooler. I hope it looks good,
It's about 1" deeper than a stock LE
Today it sits on temporary suspension and wheels waiting to go for paint.
All the refinished suspension, engine (an alum 2.0 6 for now) and trans are
ready to go.
Used the lift (with my brothers '57 Speedster on it ! ) to lower the rear and a
motorcycle jack at the front.
Attached thumbnail(s)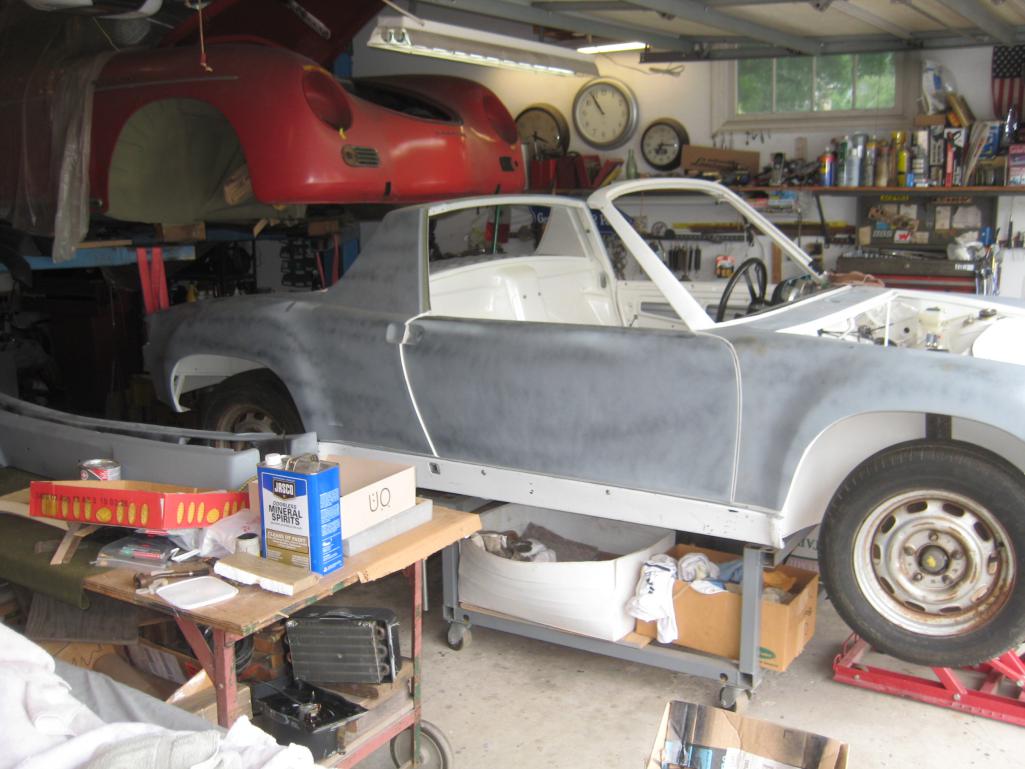

Posted by: mepstein Jul 17 2018, 07:04 PM
Rory - looking good.
Posted by: Maltese Falcon Jul 17 2018, 07:27 PM
Built  not Bought...looking real good !
Posted by: Retroracer Jul 17 2018, 07:53 PM
Funny, I was at almost the same stage exactly 3 years ago! Getting the paint done is a huge milestone - well done and keep going Rory.
Pic of the freshly painted rolling shell:
Attached thumbnail(s)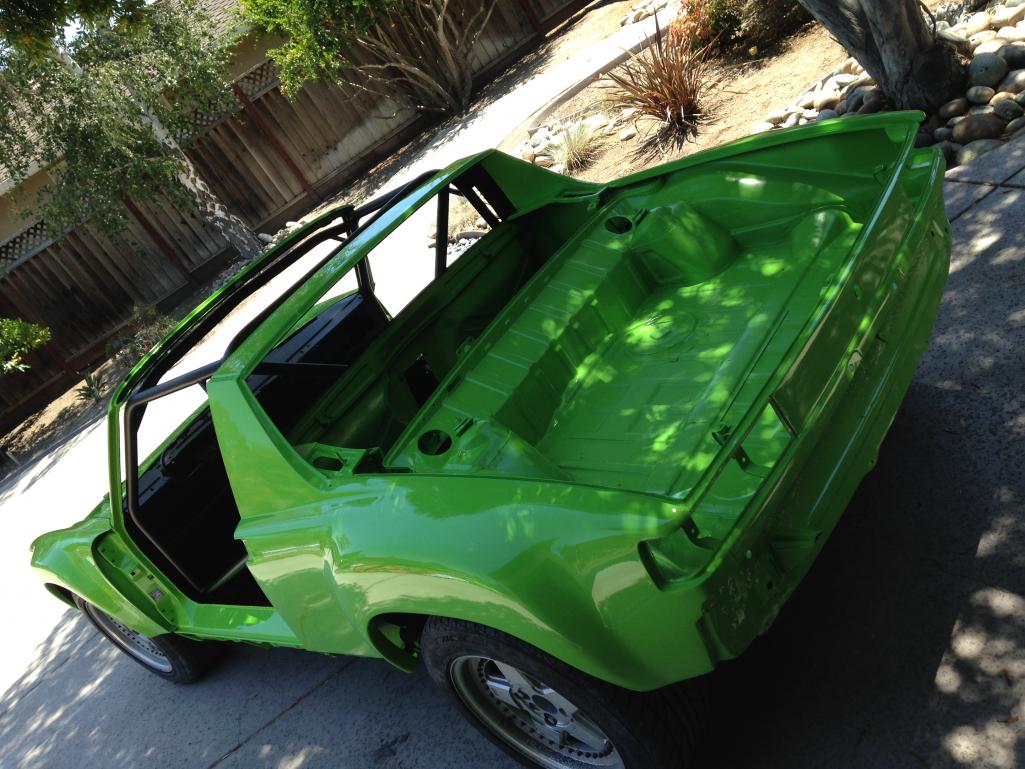
Posted by: Mitox Jul 17 2018, 08:52 PM
Looks great...looking forward to seeing your progress.
Posted by: Cairo94507 Jul 17 2018, 09:18 PM
Congratulations on that milestone.
Posted by: Larmo63 Jul 17 2018, 09:26 PM
We're here cheering you on!!!!!

Posted by: Krieger Jul 17 2018, 10:57 PM
Gorgeous! More pictures!
Posted by: Luke M Jul 18 2018, 02:00 PM
Go Rory go.... I need to take a trip to NJ to see it in person.
Posted by: 914dave Jul 18 2018, 02:11 PM
Way to go!!! Looking good
Posted by: maf914 Jul 19 2018, 07:16 AM
Great work!
Where did that flared GT front spoiler/valance come from? Is it a custom piece made from a modified front spoiler?
Attached image(s)
Posted by: gms Jul 19 2018, 02:37 PM
you are getting closer!
Posted by: rgalla9146 Jul 19 2018, 06:34 PM
Great work!
Where did that flared GT front spoiler/valance come from? Is it a custom piece made from a modified front spoiler?
Home modified aftermarket piece.
Bought it at Hershey and hacked it to pieces.
Cut it to suit the front cooler.
Took one inch from the the height.
Removed the brake cooler openings.
Cut each end vertically in three one inch pieces to create the flares.
My objective was to have a slightly deeper LE copy that suits a front cooler and GT flares.
Did it over the last two weeks.
Still itchy.
Attached thumbnail(s)
Attached image(s)
Posted by: maf914 Jul 20 2018, 06:48 AM
Home modified aftermarket piece.
Bought it at Hershey and hacked it to pieces.
Cut it to suit the front cooler.
Took one inch from the the height.
Removed the brake cooler openings.
Cut each end vertically in three one inch pieces to create the flares.
My objective was to have a slightly deeper LE copy that suits a front cooler and GT flares.
Did it over the last two weeks.
Still itchy.
Thanks for your description and photos. I should have read you earlier post #21 more closely. I have what I think is the same spoiler/air dam you started with in my attic. I picked it up years ago and always thought it was a little too deep or tall for a street 914. I also thought about cutting the height and filling the brake openings, but that's as far as that went.

Again, good work and best of luck.
Posted by: rgalla9146 Jul 21 2018, 08:06 AM
Off to paint booth !
Whooo whooooo !!!!!
Attached thumbnail(s)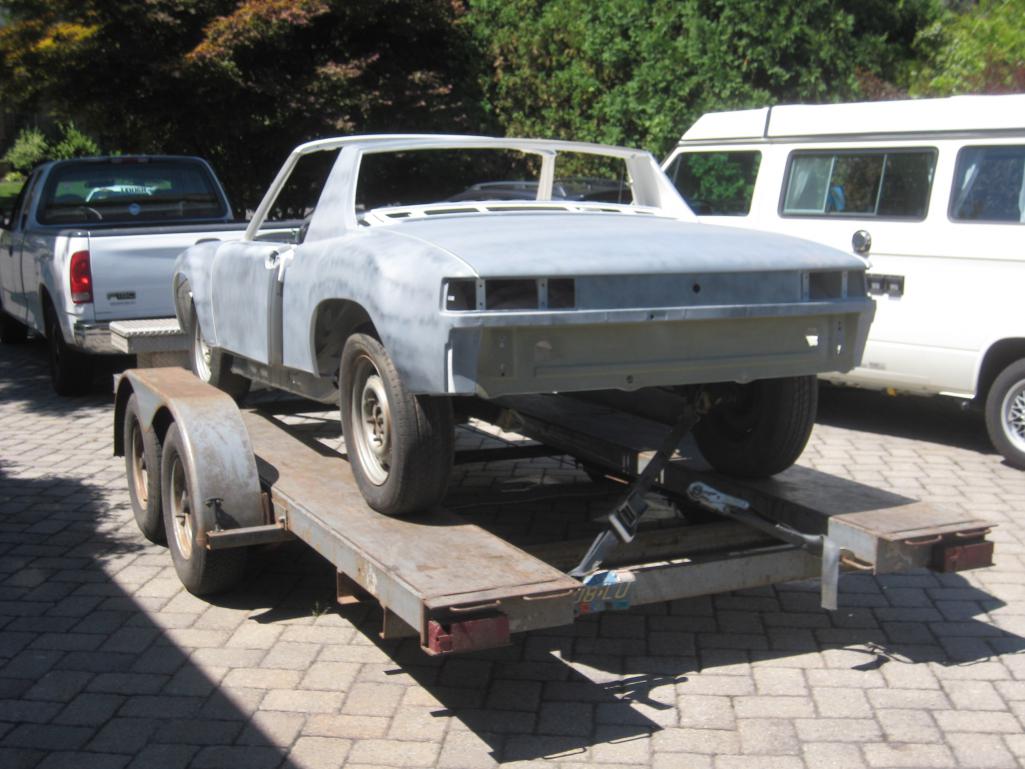
Posted by: 914dave Jul 21 2018, 03:55 PM
Well done! Big day!
Posted by: rgalla9146 Jul 25 2018, 09:08 AM
Well done! Big day!
Thanks Dave
Can't wait till they're parked side by side.
Attached thumbnail(s)
Posted by: rgalla9146 Aug 1 2018, 06:12 PM
Picked up the chassis and doors yesterday.
I'm very happy with the paint texture and color.
Today I installed the wiper assembly and wired and tested it.
Also installed windshield trim clips and various rubber plugs and other bits.
Need to find some parts in storage or order them to continue with windshield
and rear glass install.
Think I can make it to Ockteenerfest ?
Attached thumbnail(s)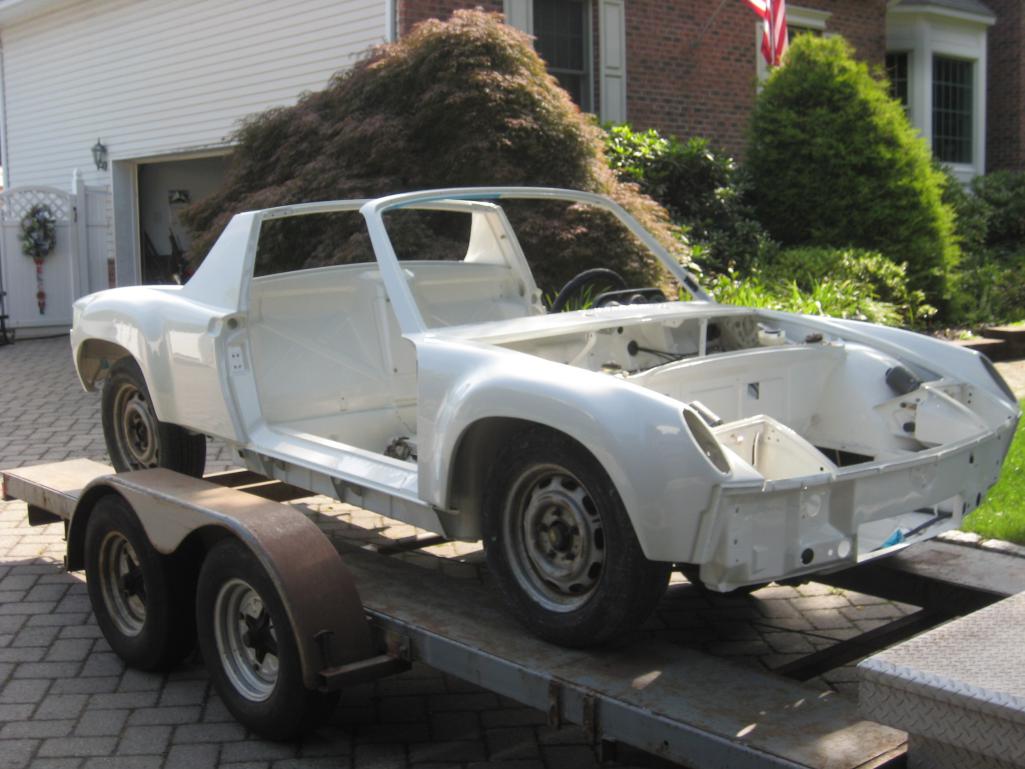
Posted by: Cairo94507 Aug 1 2018, 06:24 PM
Looking good.
Posted by: Socalandy Aug 1 2018, 09:35 PM
Great build and dig that color 
Posted by: Porschef Aug 2 2018, 04:19 AM
Think I can make it to Ockteenerfest ?
 Maybe, but you can definitely make it up to Mort's place when roadworthy so we can all drool...
Beautiful. Obviously, you've been busy
Posted by: jfort Aug 2 2018, 08:43 AM
enjoying watching this and marveling at the skill and work. thanks for posting
Posted by: Luke M Aug 2 2018, 03:02 PM
Looking good Rory... keep up the work and post the progress pics.
Posted by: carr914 Aug 2 2018, 07:40 PM
keep it up Rory !
Posted by: rgalla9146 Aug 10 2018, 07:20 PM
Thank you all for such nice compliments and encouragement.
A few more pics.
My plan is to install as many interior and compartment parts as possible
before installing any lids or the doors.
Well....I couldn't help myself.
I needed to see some exterior results.
Feels good.
Attached thumbnail(s)
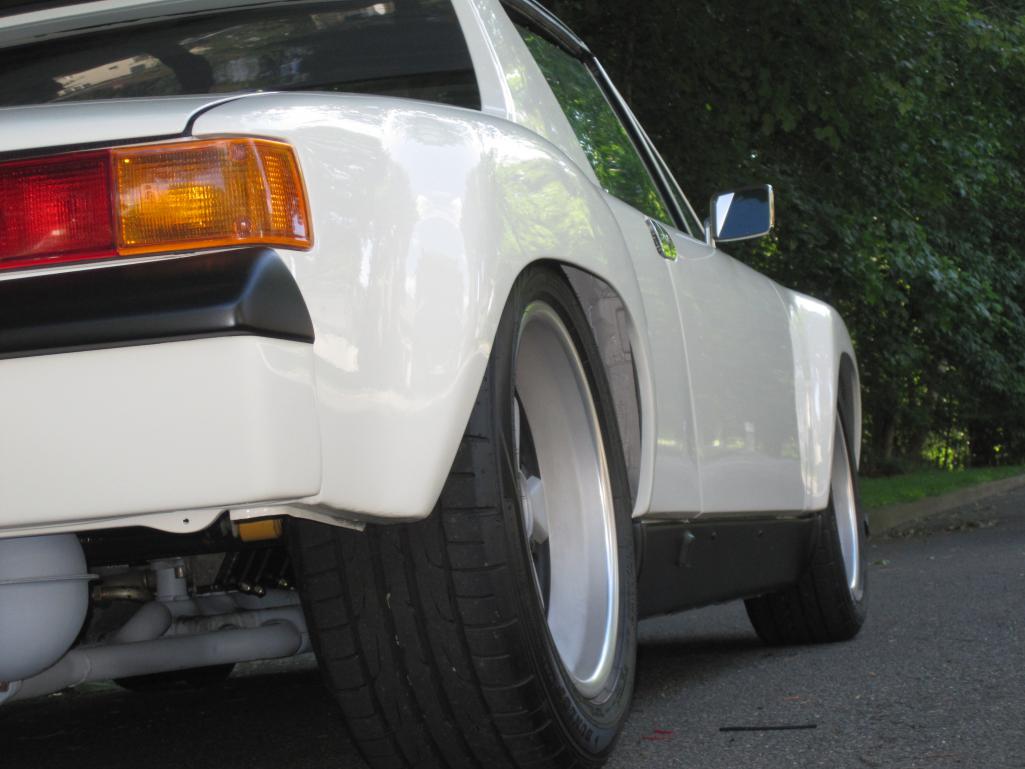
Posted by: Luke M Aug 18 2018, 08:00 AM
Looks good Rory..
Here's a few pics of Rory's GT when I had it.
I have a few more pics on my other computer and will send them to you Rory.
It's come a long way and keep posting the progress pics.
Attached image(s)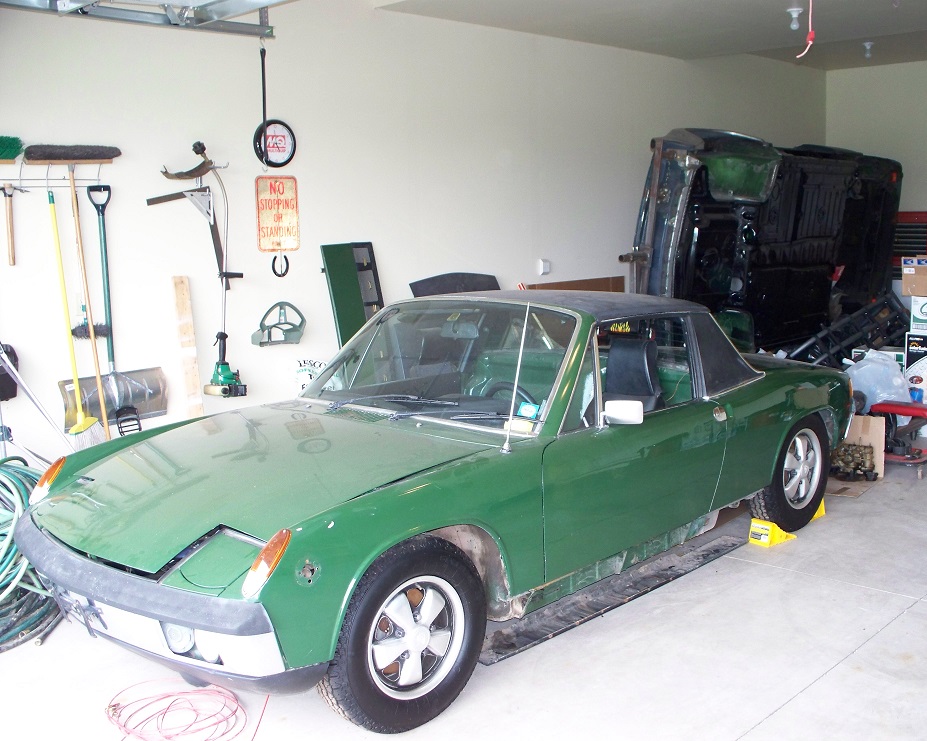
Posted by: rgalla9146 Aug 18 2018, 09:22 AM
Hey Luke
When did I get it from you ?
It's been a while.
Although there was detail work and some progress over the longer period
the most has been done in the last year.
Even with so many things done and so many parts ready everything that
gets attached needs to be found, fitted, washed, painted, plated, rebuilt, tested, adjusted, correct fasteners located, etc.etc.
The recent weather has made it brutal to work on many days.
I push forward.
Installed front and rear glass this week.
Working on windshield rear seal and door glass seals now.
Attached thumbnail(s)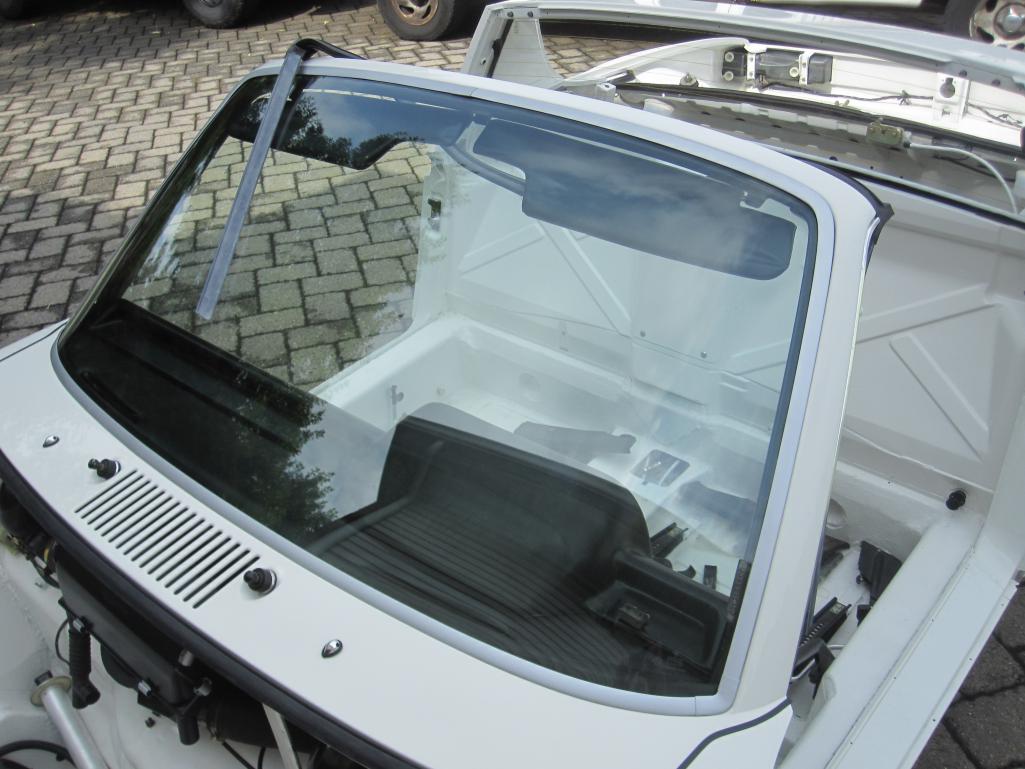
Posted by: Dion Aug 18 2018, 09:43 AM
I love the treatment you gave the front end.
Beautiful lines. 
That airdam shows the time you spent massaging it to form.
Can’t wait to see in person Rory. Keep posting!
Attached thumbnail(s)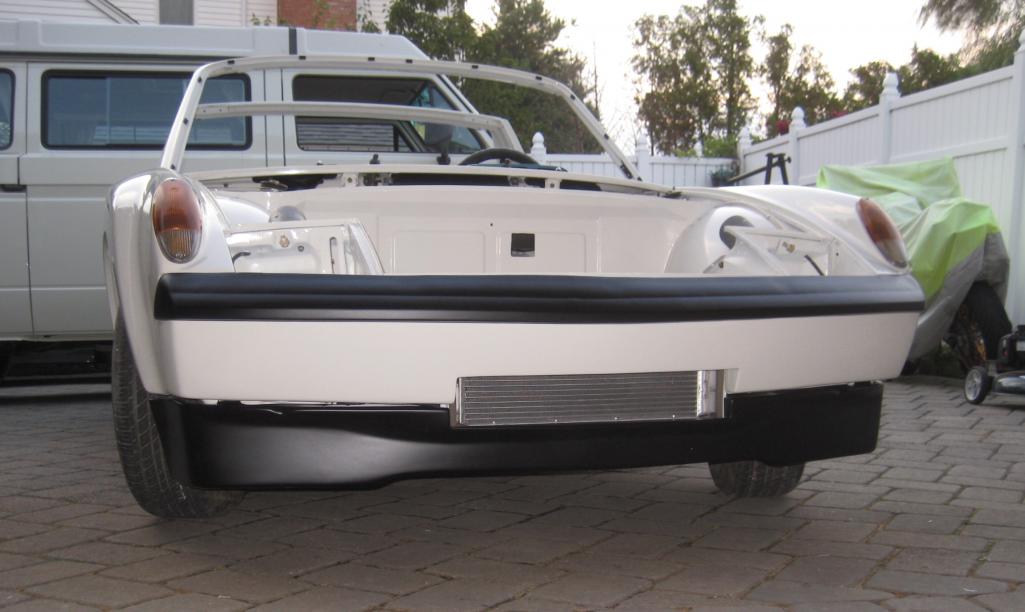
Posted by: injunmort Aug 18 2018, 09:48 AM
gorgeous work rory, I cant wait to see it.
Posted by: Luke M Aug 18 2018, 12:44 PM
Hey Luke
When did I get it from you ?
It's been a while.
Although there was detail work and some progress over the longer period
the most has been done in the last year.
Even with so many things done and so many parts ready everything that
gets attached needs to be found, fitted, washed, painted, plated, rebuilt, tested, adjusted, correct fasteners located, etc.etc.
The recent weather has made it brutal to work on many days.
I push forward.
Installed front and rear glass this week.
Working on windshield rear seal and door glass seals now.
April 2011 is when you got the 914.
I can see most if not all the work you put into it.
Keep plugging along and you'll be on the road soon enough.
Posted by: rgalla9146 Aug 20 2018, 07:05 PM
Couple more pictures.
Installed the wheels to check if I'd need longer studs and spacers.
The ancient tires (P7s !) will be replaced and the wheels will be done.
Finally fitted the oil cooler plumbing.
Attached thumbnail(s)
Posted by: rgalla9146 Aug 20 2018, 07:07 PM
another
Attached thumbnail(s)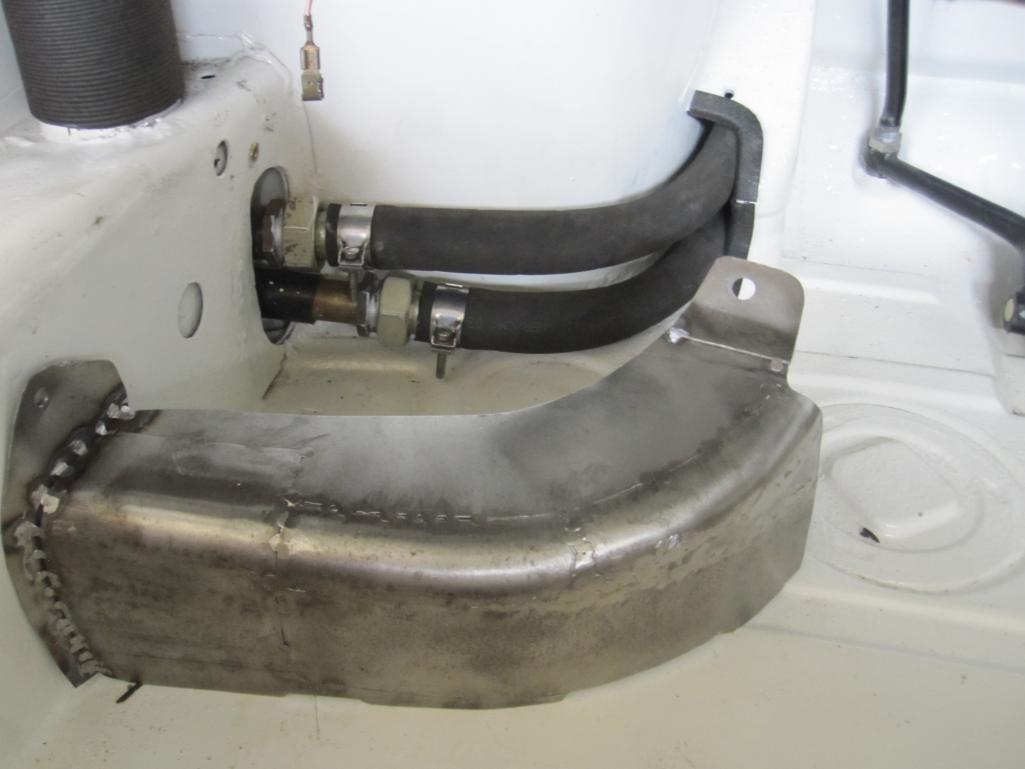
Posted by: rgalla9146 Aug 20 2018, 07:27 PM
another
Attached thumbnail(s)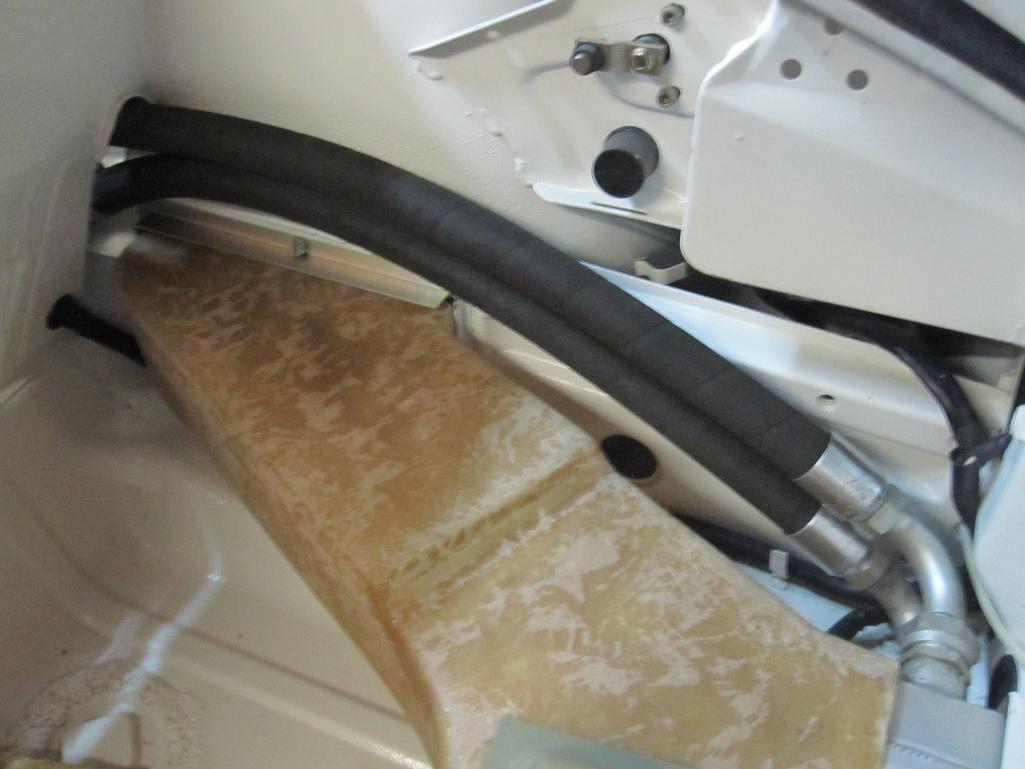
Posted by: rgalla9146 Aug 21 2018, 06:32 PM
Installed the restored rear suspension today.
Tomorrow the front gets the same attention.
Attached thumbnail(s)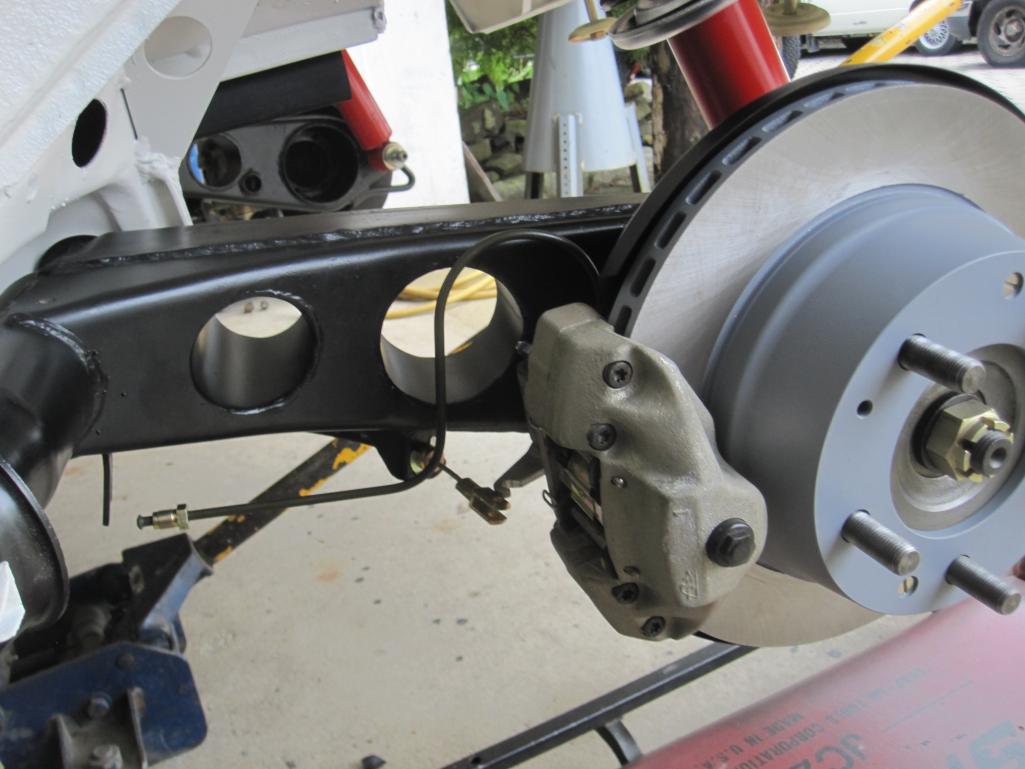
Posted by: rgalla9146 Sep 17 2018, 07:48 AM
This is different.
My project car has a complete 914 6 wiring harness, steering column and switches.
Plug and play right ?
I hooked up the battery yesterday to check the newly installed headlamp motors and lights.
All is fine.
Here's the mystery.
Ignition on.... indicators and parking lamps work as they should.
Ignition off....parking lamps off.
Move lever to left .....right marker lamps go on.
Move lever to right....left marker lamps go on.
Opposite world ?
I don't know what changed but the last time the battery was connected they were
normal.
What the.....
Posted by: johnhora Sep 17 2018, 11:07 AM
The Grounds...
Posted by: pete000 Sep 17 2018, 02:54 PM
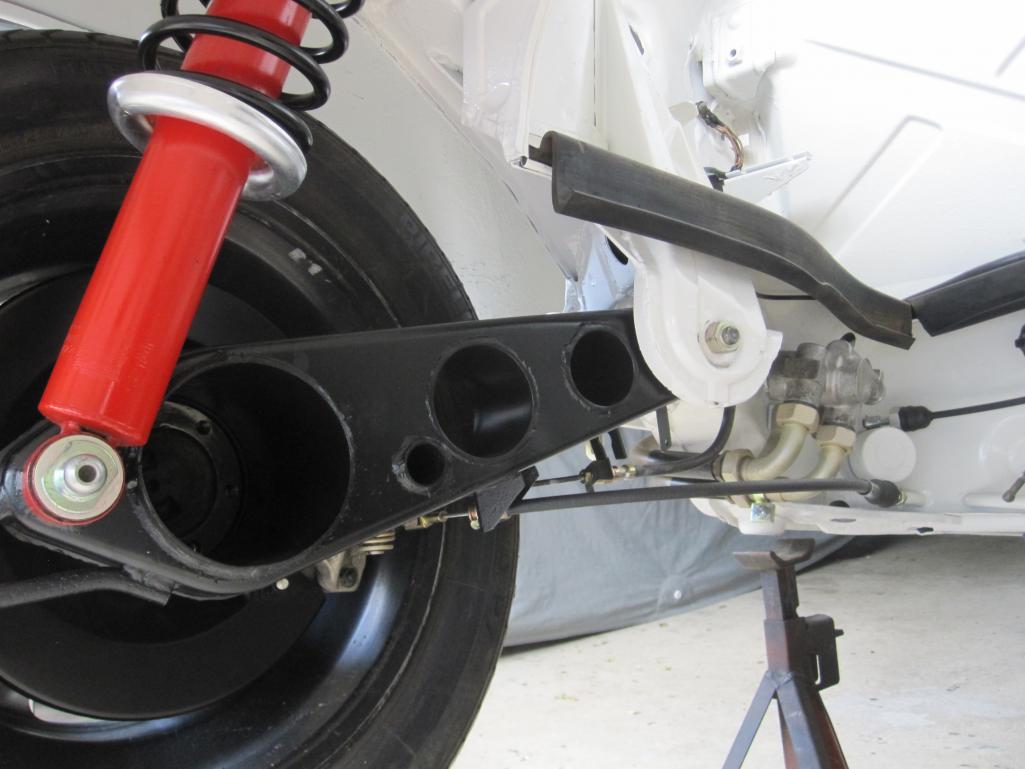
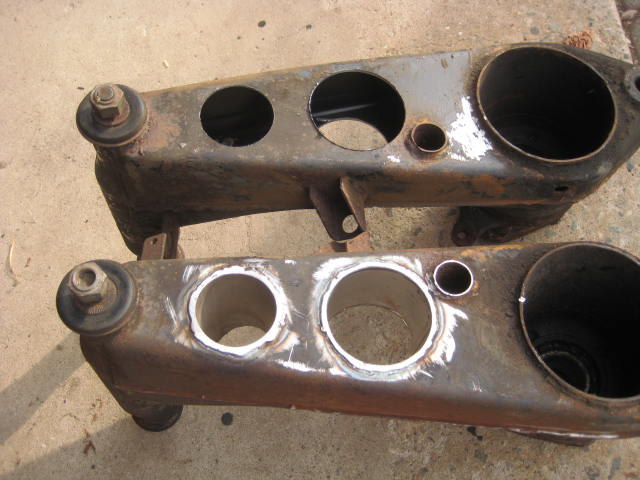
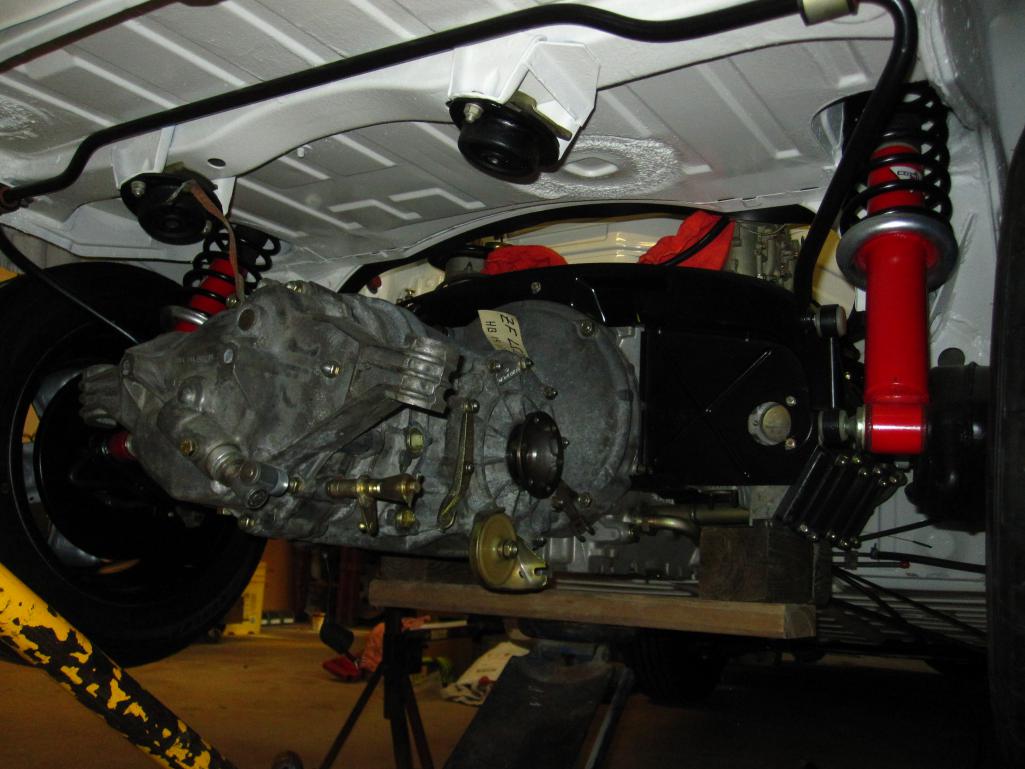
Wow ! those are the wildest trailing arms I have ever seen. Tell us more about them. Are they lighter? I assume they are stiffer. NICE !
Posted by: rgalla9146 Sep 17 2018, 04:05 PM
Wow ! those are the wildest trailing arms I have ever seen. Tell us more about them. Are they lighter? I assume they are stiffer. NICE !
They're a little heavier then stock but not as heavy as the GT reinforcement
kits make them.
Just an idea I had , I'm not an engineer.
I think they should be stiffer than stock but without as much additional
weight.
Attached image(s)
Posted by: jmitro Sep 17 2018, 07:38 PM
agree, those look fantastic. it would be really interesting to compare those arms to stock (or even GT) in terms of weight and resistance to deformation in bending and twisting loads
Posted by: 914dave Sep 17 2018, 08:05 PM
Everything looks great Rory. Trailing arms are cool.
Posted by: Lucky9146 Sep 17 2018, 08:14 PM
Wow ! those are the wildest trailing arms I have ever seen. Tell us more about them. Are they lighter? I assume they are stiffer. NICE !
They're a little heavier then stock but not as heavy as the GT reinfircement
kits make them.
Just an idea I had , I'm not an engineer.
I think they should be stiffer than stock but without as much additional
weight.
Those trailing arms look trick! Nice work, keep it up!

Posted by: rgalla9146 Sep 20 2018, 04:24 PM
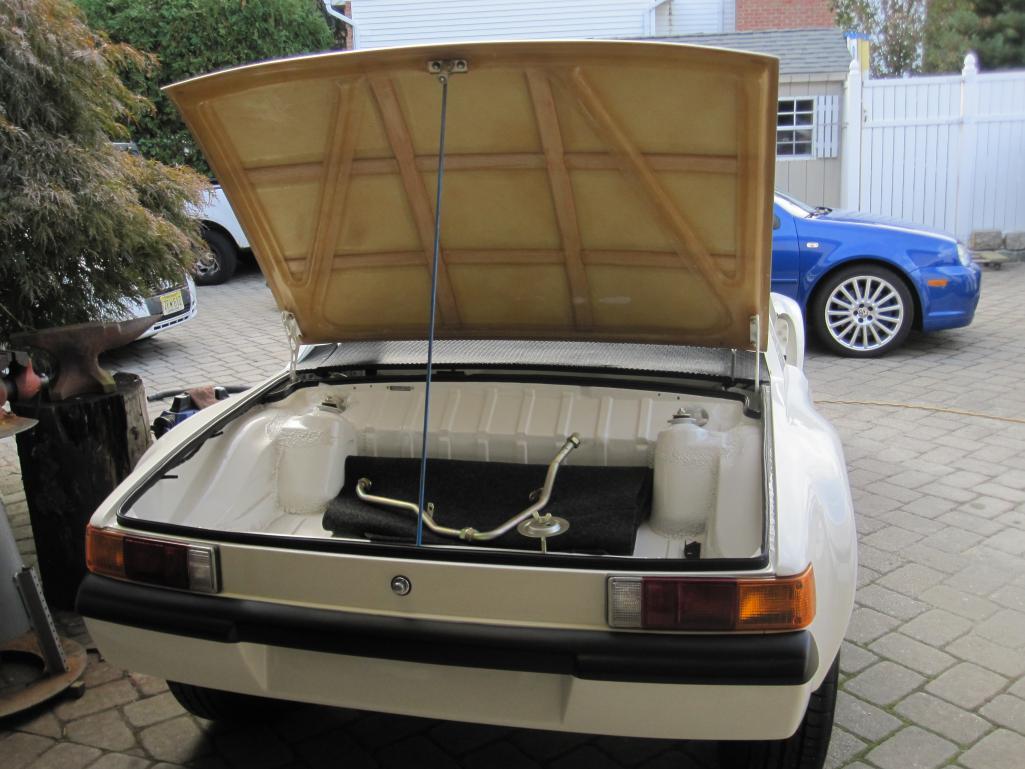
Installed the gas tank and most of the front trunk equipment.
Also got the headlights installed and roughly adjusted.
With those tasks done it was time to add the hood.
Every day there's more to do.
The refinished wheels are still almost two months away.
Attached thumbnail(s)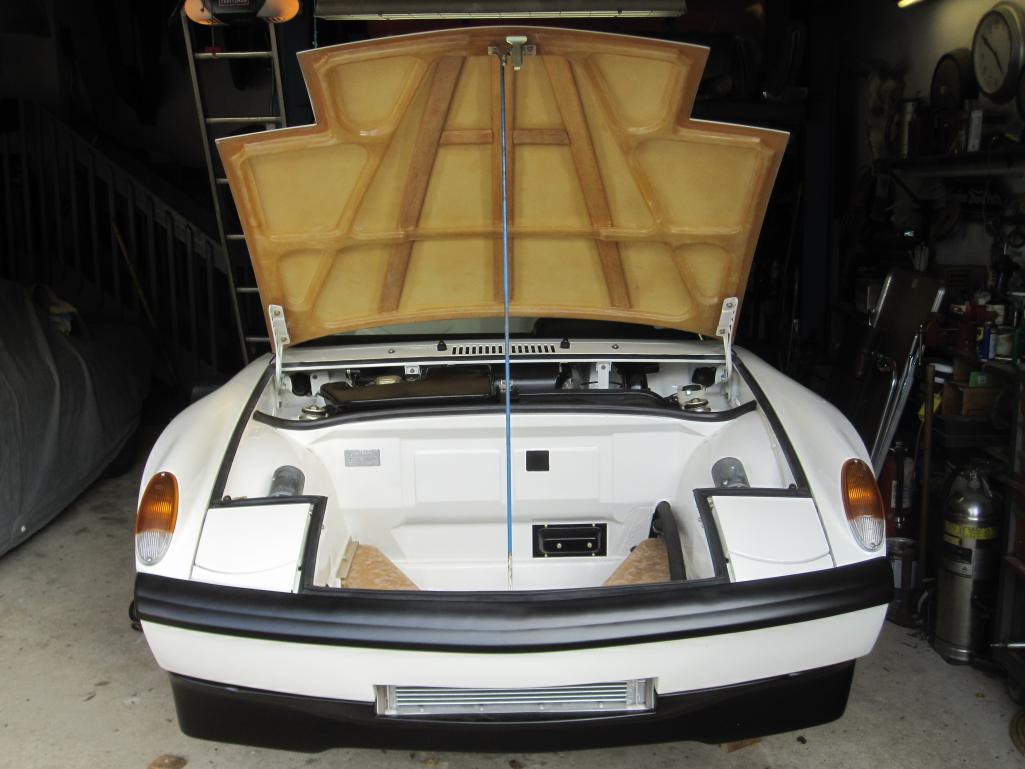
Posted by: rgalla9146 Sep 20 2018, 04:26 PM
2nd photo
Attached thumbnail(s)
Posted by: Lucky9146 Sep 20 2018, 04:34 PM
Installed the gas tank and most of the front trunk equipment.
Also got the headlights installed and roughly adjusted.
With those tasks done it was time to add the hood.
Every day there's more to do.
The refinished wheels are still almost two months away.
Cool hood!

Who did you get it from? What is the weight savings? Sorry if you have already posted this info.
Also, your FG hood closed looks better than my steel one
What's up with that? Now I'm really jealous.
Posted by: wes Sep 20 2018, 07:24 PM
Installed the gas tank and most of the front trunk equipment.
Also got the headlights installed and roughly adjusted.
With those tasks done it was time to add the hood.
Every day there's more to do.
The refinished wheels are still almost two months away.
Cool hood!
Who did you get it from? What is the weight savings? Sorry if you have already posted this info.
Also, your FG hood closed looks better than my steel one
What's up with that? Now I'm really jealous. Just what I was thinking and are you using one for the rear?
Posted by: rgalla9146 Sep 20 2018, 08:02 PM
Installed the gas tank and most of the front trunk equipment.
Also got the headlights installed and roughly adjusted.
With those tasks done it was time to add the hood.
Every day there's more to do.
The refinished wheels are still almost two months away.
Cool hood!
Who did you get it from? What is the weight savings? Sorry if you have already posted this info.
Also, your FG hood closed looks better than my steel one
What's up with that? Now I'm really jealous. I bought front and rear replica GT hoods at Hershey probably ten years ago.
I think they belonged to Gary Wigglesworth.
I don't know the manufacturer.....maybe someone here does ?
The lids are weightless.
The fit of the hood /lights/ eyelids is a very flattering picture.
I got everything pretty good....then I installed the hood gasket and started over.
Many hours.
Posted by: rgalla9146 Sep 20 2018, 08:11 PM
Installed the gas tank and most of the front trunk equipment.
Also got the headlights installed and roughly adjusted.
With those tasks done it was time to add the hood.
Every day there's more to do.
The refinished wheels are still almost two months away.
Cool hood!
Who did you get it from? What is the weight savings? Sorry if you have already posted this info.
Also, your FG hood closed looks better than my steel one
What's up with that? Now I'm really jealous. Just what I was thinking and are you using one for the rear?Yes, rear hood too.
Attached another pic....... my pics can go only one at a time.
Front hood hinge detail
Attached thumbnail(s)
Posted by: Lucky9146 Sep 20 2018, 10:02 PM
Installed the gas tank and most of the front trunk equipment.
Also got the headlights installed and roughly adjusted.
With those tasks done it was time to add the hood.
Every day there's more to do.
The refinished wheels are still almost two months away.
Cool hood!
Who did you get it from? What is the weight savings? Sorry if you have already posted this info.
Also, your FG hood closed looks better than my steel one
What's up with that? Now I'm really jealous. I bought front and rear replica GT hoods at Hershey probably ten years ago.
I think they belonged to Gary Wigglesworth.
I don't know the manufacturer.....maybe someone here does ?
The lids are weightless.
The fit of the hood /lights/ eyelids is a very flattering picture.
I got everything pretty good....then I installed the hood gasket and started over.
Many hours.
You lucky duck to have gotten them at a swap 10 years ago. Aase Sales has the pair for $3895.00 and they look exactly like yours.
Posted by: eric9144 Sep 20 2018, 10:47 PM
Installed the gas tank and most of the front trunk equipment.
Also got the headlights installed and roughly adjusted.
With those tasks done it was time to add the hood.
Every day there's more to do.
The refinished wheels are still almost two months away.
Cool hood!
Who did you get it from? What is the weight savings? Sorry if you have already posted this info.
Also, your FG hood closed looks better than my steel one
What's up with that? Now I'm really jealous. I bought front and rear replica GT hoods at Hershey probably ten years ago.
I think they belonged to Gary Wigglesworth.
I don't know the manufacturer.....maybe someone here does ?
The lids are weightless.
The fit of the hood /lights/ eyelids is a very flattering picture.
I got everything pretty good....then I installed the hood gasket and started over.
Many hours.
You lucky duck to have gotten them at a swap 10 years ago. Aase Sales has the pair for $3895.00 and they look exactly like yours.
@http://www.914world.com/bbs2/index.php?showuser=17942 Getty design sells them $899 ea front and rear in white gelcoat with the balsa enforcement
http://www.gettydesign.com/914tailbases/914coachwork/
Posted by: raynekat Sep 20 2018, 11:31 PM
That front hood looks more like the Getty one than the Aase one.
Getty is about half the price of Aase.
Posted by: mepstein Sep 21 2018, 10:29 AM
Installed the gas tank and most of the front trunk equipment.
Also got the headlights installed and roughly adjusted.
With those tasks done it was time to add the hood.
Every day there's more to do.
The refinished wheels are still almost two months away.
Cool hood!
Who did you get it from? What is the weight savings? Sorry if you have already posted this info.
Also, your FG hood closed looks better than my steel one
What's up with that? Now I'm really jealous. Just what I was thinking and are you using one for the rear?Yes, rear hood too.
Attached another pic....... my pics can go only one at a time.
Front hood hinge detail
I love the details like this, especially when they look so uniform and precise.
Posted by: mepstein Sep 21 2018, 10:35 AM
That front hood looks more like the Getty one than the Aase one.
Getty is about half the price of Aase.
Fiberglass never fits like the oem steel no matter who it's from. We have good luck with the new aluminum 911 long hoods because they hold their shape better when closed. The glass ones are always too springy to lay right. There's not one piece of fiberglass made - at any price- that will fit right out of the box.
Posted by: sixnotfour Sep 21 2018, 10:42 AM
Gary made them himself...
Posted by: rgalla9146 Sep 21 2018, 03:29 PM
Gary made them himself...
Do you mean Gary Wigglesworth (RIP) ?
His business is still operating.
Someone there would probably know.
Posted by: seanery Sep 21 2018, 04:33 PM
Gary made them himself...
Wow!! If they look 1/2 as good in person as they do in the pics!!!
Posted by: sixnotfour Sep 21 2018, 05:28 PM
Gary made them himself...
Wow!! If they look 1/2 as good in person as they do in the pics!!!
Yes they would know
Posted by: rgalla9146 Sep 23 2018, 04:43 PM
.......July 2012
Attached thumbnail(s)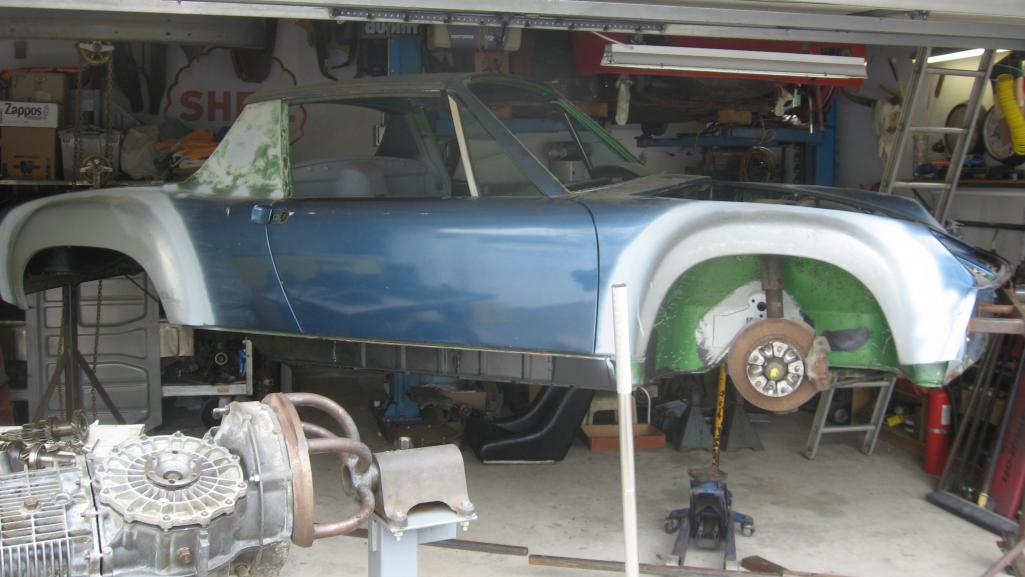
Posted by: Luke M Sep 25 2018, 05:23 PM
Hi Rory,
The 914 is looking good. Keep up the great work and post the progress pics.
Here's a few pics of your 914 from 2006.
It defiantly has come along nicely.
Attached thumbnail(s)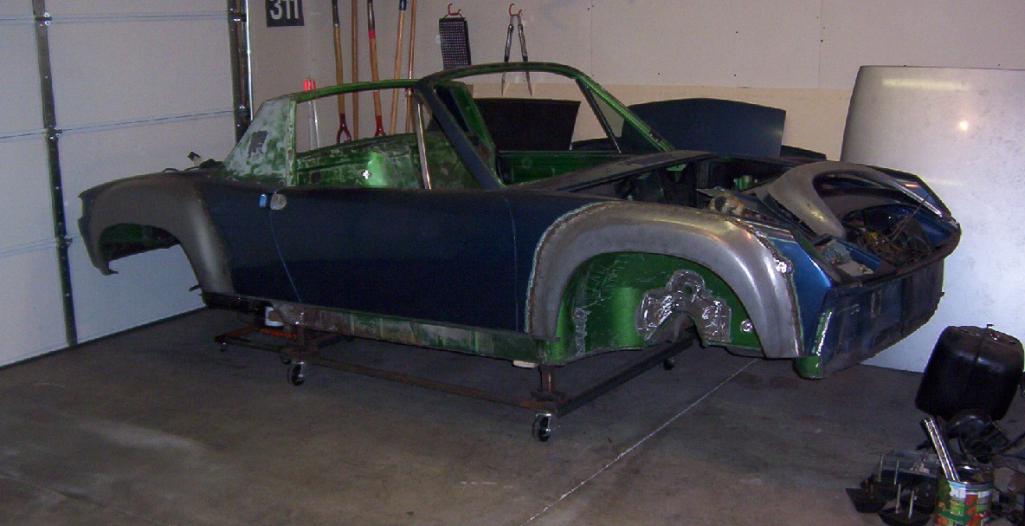
Attached image(s)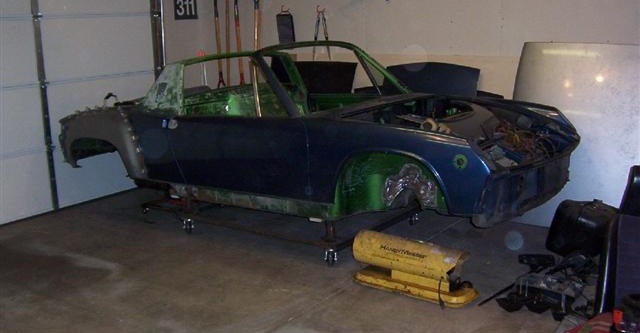
Posted by: rgalla9146 Oct 17 2018, 09:23 PM
It's now on the ground with the refinished wheels and new tires.
Beautiful job on the wheels by Rick at Fuchs Restoration Service.
Done on time ...no delay...no BS
Project still going strong but way too slow.
Bled the brakes today too.
Engine install in the near future but chunks of time are out of my control this time of the year between family and weather.
Attached thumbnail(s)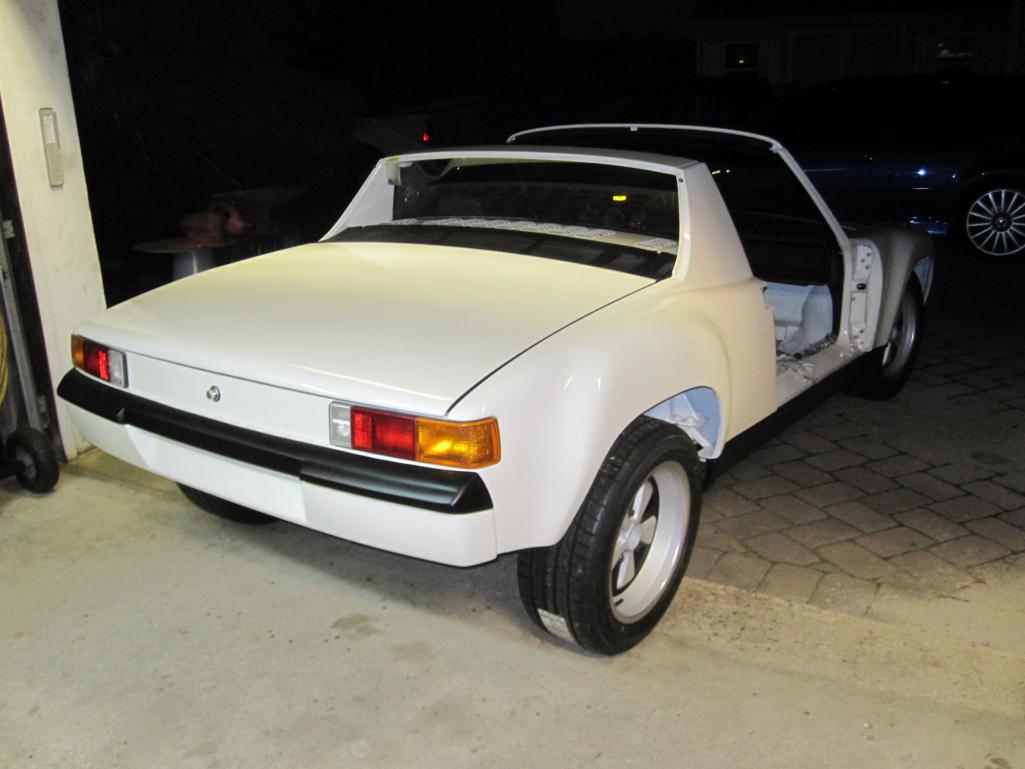
Posted by: rgalla9146 Oct 17 2018, 09:26 PM
more
Attached thumbnail(s)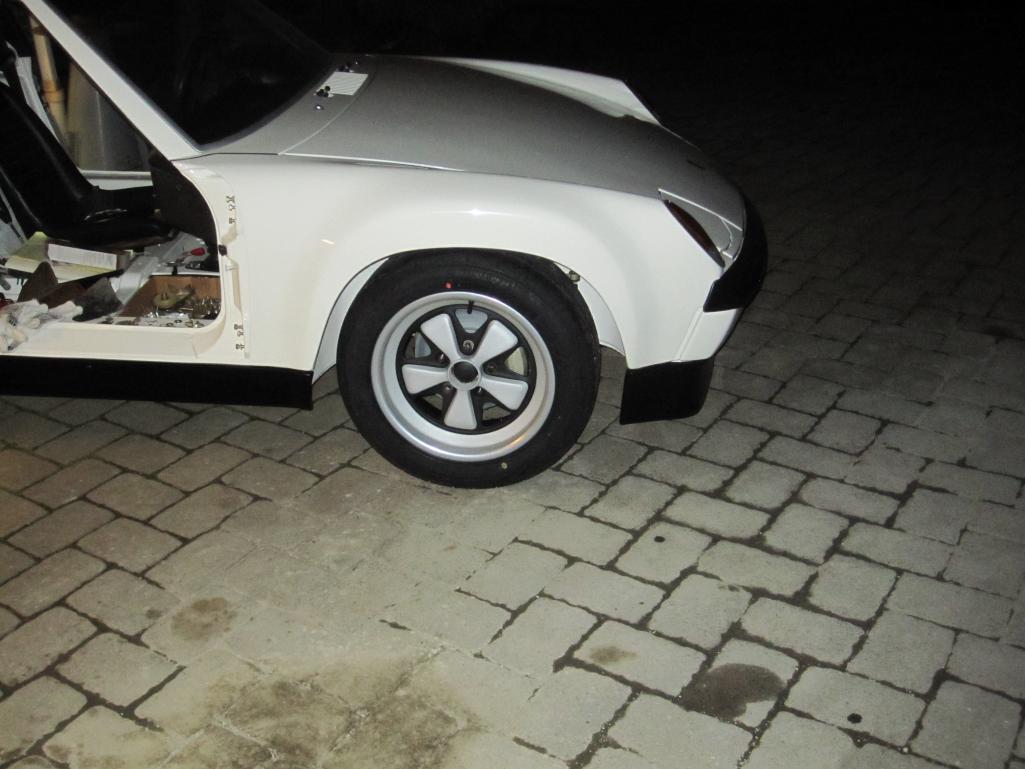
Posted by: TravisNeff Oct 17 2018, 10:51 PM
Wow, that looks fantastic. I sure do like the GT's in white.
Posted by: raynekat Oct 17 2018, 11:47 PM
Any issues when you bled the brakes?
I'm ready to start doing that on my project as well....
Your car looks great.
Mine is kind of a narrow body version of this.
Posted by: rgalla9146 Oct 18 2018, 05:55 AM
Any issues when you bled the brakes?
I'm ready to start doing that on my project as well....
Your car looks great.
Mine is kind of a narrow body version of this.
No problem with the bleeding.
Three laps around the car starting with the right rear.
Rear clearance is adjusted.
The pedal is still a bit soft but everything is new and driving will make the usual
improvement. I'll certainly bleed it again.
I need a source for the clear overflow tubing at the brake reservoir.
The tubing I've found is too fat to fit into the clips on the rim.
Posted by: jkb944t Oct 18 2018, 06:05 AM
Any issues when you bled the brakes?
I'm ready to start doing that on my project as well....
Your car looks great.
Mine is kind of a narrow body version of this.
No problem with the bleeding.
Three laps around the car starting with the right rear.
Rear clearance is adjusted.
The pedal is still a bit soft but everything is new and driving will make the usual
improvement. I'll certainly bleed it again.
I need a source for the clear overflow tubing at the brake reservoir.
The tubing I've found is too fat to fit into the clips on the rim.
Generally they will firm up some after the pads are bed into the rotors.
Your car is looking really awesome. I certainly can appreciate all the time and work you are going through to finish this project. It is a real commitment but very satisfying once you get it done.
Jeff B
Posted by: burton73 Oct 18 2018, 09:02 AM
Nice and clean!!
Bob B
Posted by: mepstein Oct 18 2018, 09:15 AM
Rory, you are making me like white. Looking great. What size tires?
Posted by: rgalla9146 Oct 18 2018, 11:17 AM
Rory, you are making me like white. Looking great. What size tires?
Hey Mark
The wheels are 16" x 7" and 8" Fuchs
The tires are 205/55 front and 225/50 rears Dunlop Direzza DZ102
The white ?
I didn't want the color to 'shout'
Posted by: mepstein Oct 18 2018, 11:27 AM
Rory, you are making me like white. Looking great. What size tires?
Hey Mark
The wheels are 16" x 7" and 8" Fuchs
The tires are 205/55 front and 225/50 rears Dunlop Direzza DZ102
The white ?
I didn't want the color to 'shout'
Still can get noticed.
Attached image(s)
Posted by: rgalla9146 Oct 19 2018, 03:57 PM
Rory, you are making me like white. Looking great. What size tires?
Hey Mark
The wheels are 16" x 7" and 8" Fuchs
The tires are 205/55 front and 225/50 rears Dunlop Direzza DZ102
The white ?
I didn't want the color to 'shout'
Still can get noticed.
Thank you Mark
Another reason for the choice is that from about the 906 on, factory
race and GT cars were most often delivered in white....not to say this is a race car by any means. I just like the look.
Attached thumbnail(s)
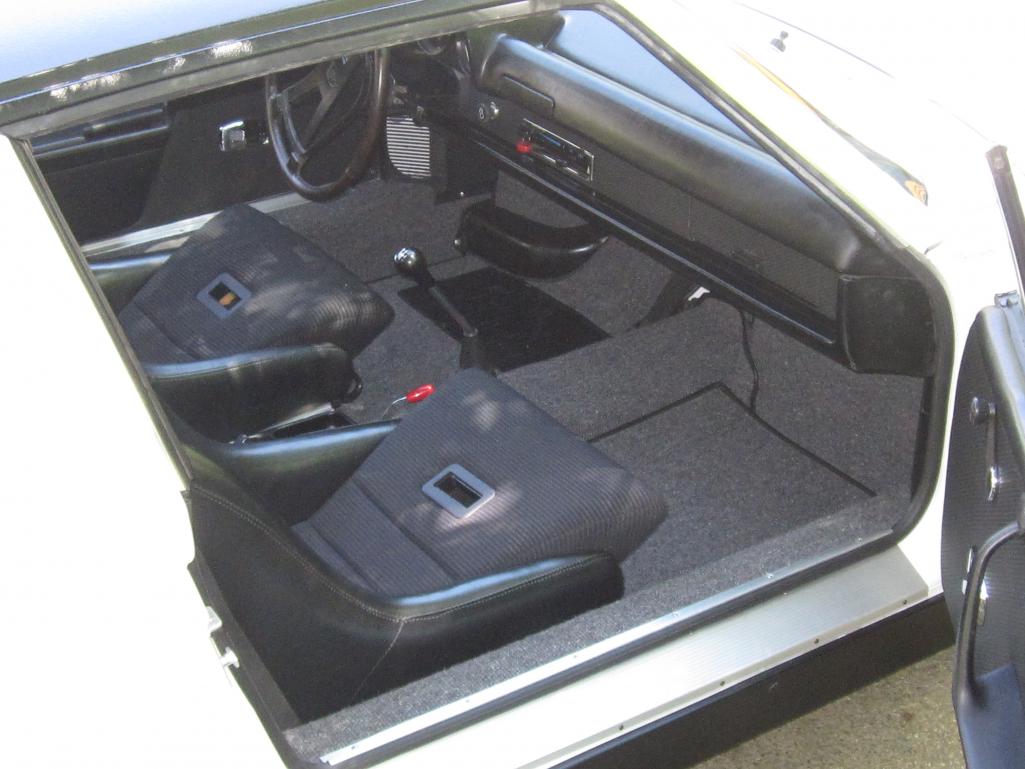
Posted by: rgalla9146 Oct 19 2018, 03:59 PM
another.
Vintage Scheel /Mann sport seats
Attached thumbnail(s)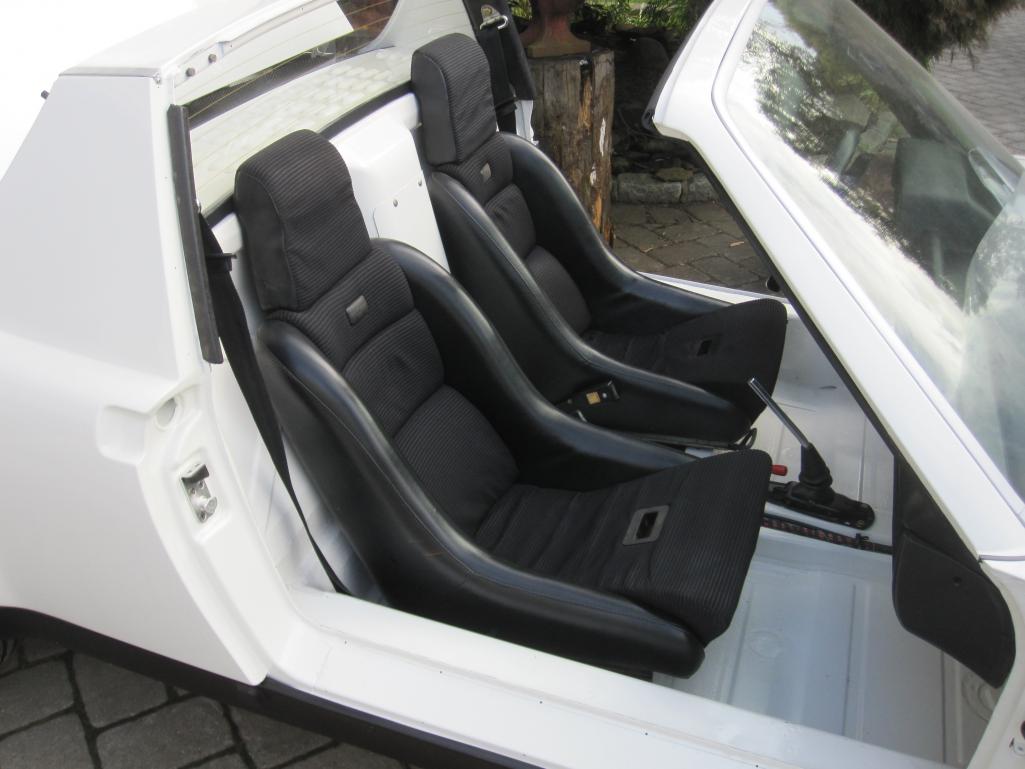
Posted by: Maltese Falcon Oct 20 2018, 05:05 PM
another.
Vintage Scheel /Mann sport seats
Lots of win in these pics...I also dig the white ! Going to take baby steps when putting the livery (wrap) over our GP white car, as I need to see more white than logo
Posted by: rgalla9146 Oct 21 2018, 05:50 AM
another.
Vintage Scheel /Mann sport seats
Lots of win in these pics...I also dig the white ! Going to take baby steps when putting the livery (wrap) over our GP white car, as I need to see more white than logo
That's a new expression to me "Lots of win".....pretty cool.
Since you mention it I've been thinking of accent possibilities .
Maybe black doors with a big gold star on them, red and blue light bar with a
siren on the roof ? Canyon Patrol Police ? Naaah.
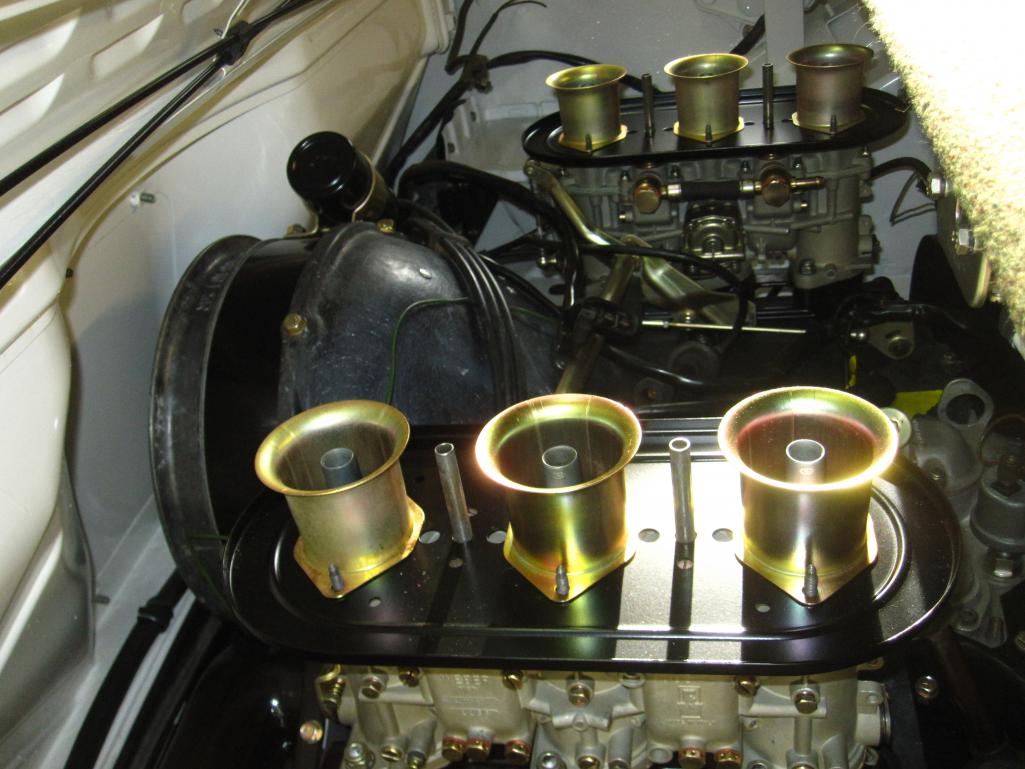
Posted by: rgalla9146 Jan 11 2019, 05:15 PM
Finished the carbs this AM and dropped them on the manifolds.
Will install and start pretty soon.
Attached thumbnail(s)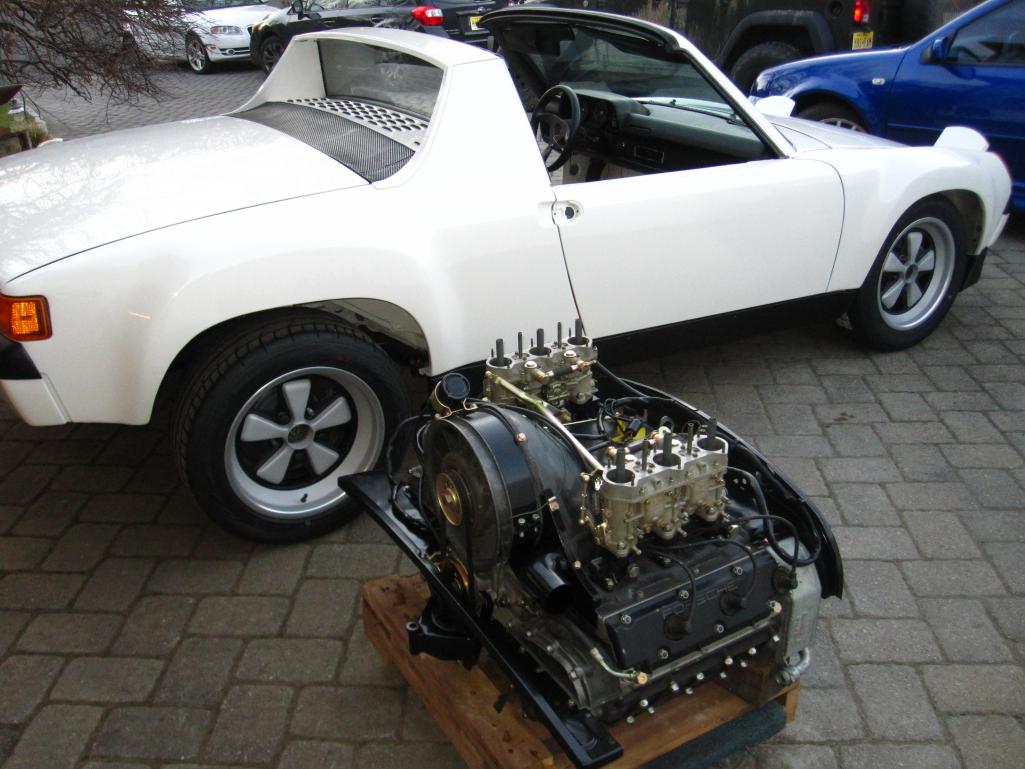
Posted by: Tdskip Jan 11 2019, 06:28 PM
Exciting!
Posted by: mepstein Jan 11 2019, 06:32 PM
Car looks even better in person.
Posted by: flyer86d Jan 11 2019, 07:06 PM
Sooooo, what motor is that?
Charlie
Ps, car looks great!
Posted by: rgalla9146 Jan 11 2019, 09:07 PM
Sooooo, what motor is that?
Charlie
Ps, car looks great!
It's an alum. '68 2 liter rebuilt years ago in California and never started.
Need to evaluate it and possibly sell it.
Next comes a carbed 3.0 and a Bott conversion 916 trans.
Attached thumbnail(s)
Posted by: rgalla9146 Jan 15 2019, 07:05 PM
Say Ahhh !
In she goes.
Attached thumbnail(s)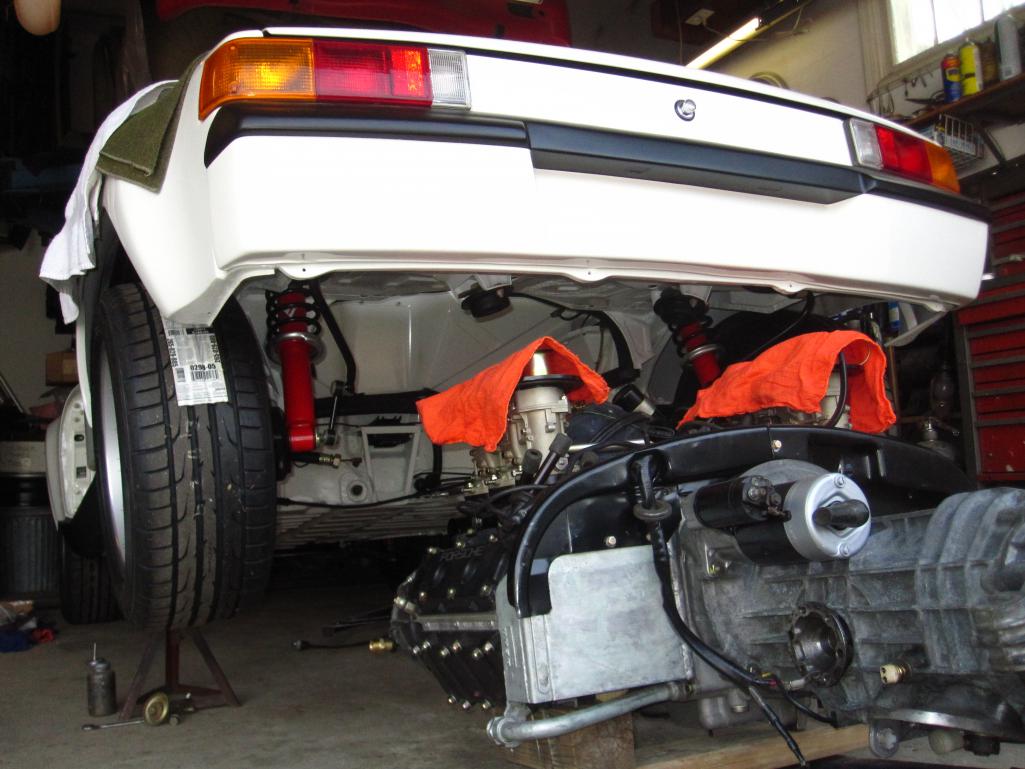
Posted by: sixnotfour Jan 15 2019, 07:13 PM
2 liter can of wasps,,,.I have one ...fun...lazy drivers have long stroke motors....depends on you..how you want row the boat..that being said ...I love 2.4s
Posted by: Biggles Jan 16 2019, 09:36 AM
Installed the gas tank and most of the front trunk equipment.
Also got the headlights installed and roughly adjusted.
With those tasks done it was time to add the hood.
Every day there's more to do.
The refinished wheels are still almost two months away.
How are you planning to secure the trunk lids or are you just relying on the latch (which I think will not be enough). I’ve got GRP lids and haven’t fitted yet as I don’t like the look of the racing metal split pin tie downs.
Posted by: DRPHIL914 Jan 16 2019, 10:33 AM
just noticed that you got your car back from pain last summer about the same time I did but you had way more work to do to get it on the road and running, good to see it might finally have power!! we started re-assembly about the same time. I hope you are able to bring that to Okteenerfest this year!, I have heard rumors that it will be up closer to you guys from the north this time around. Anyway beautiful car!
Phil
Posted by: rgalla9146 Jan 16 2019, 12:41 PM
Installed the gas tank and most of the front trunk equipment.
Also got the headlights installed and roughly adjusted.
With those tasks done it was time to add the hood.
Every day there's more to do.
The refinished wheels are still almost two months away.
How are you planning to secure the trunk lids or are you just relying on the latch (which I think will not be enough). I’ve got GRP lids and haven’t fitted yet as I don’t like the look of the racing metal split pin tie downs.
The rear lid is no problem.
Both lids work very well with the stock latches. I'm not running the torsion bars in the rear or the coils up front. The gaps are pretty good.
In the front it is important to have a working safety latch and to have the leading edge of the lid even with or slightly below the trailing edge of the bumper top.
I'm not too concerned. I have heard of an incident on a Signal orange car.
I'm not thrilled with drilling holes in the lids for pins. At one point I was going with
hood pins and an outside filler cap but for now both are off the table.
Attached thumbnail(s)
Posted by: rgalla9146 Jan 16 2019, 12:48 PM
just noticed that you got your car back from pain last summer about the same time I did but you had way more work to do to get it on the road and running, good to see it might finally have power!! we started re-assembly about the same time. I hope you are able to bring that to Okteenerfest this year!, I have heard rumors that it will be up closer to you guys from the north this time around. Anyway beautiful car!
Phil
Octoberfest is on the radar.
Closer is better.
Thank you for the compliment, I try to do something every day.
Attached thumbnail(s)
Posted by: Biggles Jan 16 2019, 01:11 PM
How are you planning to secure the trunk lids or are you just relying on the latch (which I think will not be enough). I’ve got GRP lids and haven’t fitted yet as I don’t like the look of the racing metal split pin tie downs.
The rear lid is no problem.
Both lids work very well with the stock latches. I'm not running the torsion bars in the rear or the coils up front. The gaps are pretty good.
In the front it is important to have a working safety latch and to have the leading edge of the lid even with or slightly below the trailing edge of the bumper top.
I'm not too concerned. I have heard of an incident on a Signal orange car.
I'm not thrilled with drilling holes in the lids for pins. At one point I was going with
hood pins and an outside filler cap but for now both are off the table.
Agreed at the rear, interesting point about the front. I guess the air pressure will always force it down, and provided the air doesn't get under it, should be ok. Would be interested to see how you get along with yours.
Posted by: mepstein Jan 16 2019, 01:24 PM
The weight of the decal will surely keep the hood down.
Posted by: rgalla9146 Jan 16 2019, 01:51 PM
The weight of the decal will surely keep the hood down.
Yes, according to my calculations you are correct.
Posted by: 914dave Jan 17 2019, 07:59 AM
Looking awesome Rory. Will you have it at Hershey?
Posted by: rgalla9146 Jan 17 2019, 10:15 AM
Looking awesome Rory. Will you have it at Hershey?
I'll be there Dave.
Progress is pretty good but still plenty to do.
Posted by: bbrock Jan 17 2019, 10:22 AM
I'm really enjoying watching the progress. That engine is just beautiful. There is something about the look of a carbureted flat six. Just wonderful.
Posted by: Luke M Jan 17 2019, 12:49 PM
Looking good there Rory... Looks like I'll have to take a trip this summer and come see it in person.
Posted by: rgalla9146 Feb 2 2019, 04:38 PM
Looking good there Rory... Looks like I'll have to take a trip this summer and come see it in person.
Thanks Luke
IT's ALIVE !!!!!
I STARTED THE ENGINE TODAY !
The engine has been in for a while but finally today all the elements
come together and I turned the key.
I had lubed the cylinders and cranked it by hand without plugs (the rebuilt
engine has been stored for ten plus years) I then cranked it by starter
until it had oil pressure. Installed the plugs.
Because there were leaks at the carbs I un-plugged the fuel pump and cranked it.
Like it had been running forever it just started and idled !!!
I shut it off. It runs so quiet !
A great milestone. I'm happy.
Now to solve this leak issue.
Posted by: 76-914 Feb 3 2019, 10:05 AM
Congrats Now grab a cold one and reflect.
Posted by: altitude411 Feb 3 2019, 10:08 AM
Thanks Luke
IT's ALIVE !!!!!
I STARTED THE ENGINE TODAY !

Posted by: 914dave Feb 3 2019, 11:14 AM
Congrats Pal!!! 
Posted by: preach Feb 3 2019, 11:18 AM
Posted by: rgalla9146 Feb 4 2019, 08:49 AM
Thank you all.
When I first ran the fuel pump there was a small leak under the tank.
Turned out to be a leaking NOS fuel filter ! that's a new one to me. Easy fix.
Next, big leaks at the carb inlet banjos and float valve caps.
Again, NOS, OEM parts leaking. After many attempts to make them swell with Marvel
Mystery Oil , gasoline, and patience .....still leaking. WTF ?
OK, select other seals from the Weber box and.....still leaking...but slowing down too.
And finally stopped.
Now it was possible to run it on more than the the contents of the float bowls.
It's so quiet ! stock muffler for now.
Fumigated the whole neighborhood just in time for the worthless football game.
Adjusted the timing, a few laps around the carbs with the syncro meter and
Voila ! Easiest start up in memory.
I then drove it around the street and backed into the driveway just as the loose
shift adjustment said 'enough'
What a great day !!!!!
Attached thumbnail(s)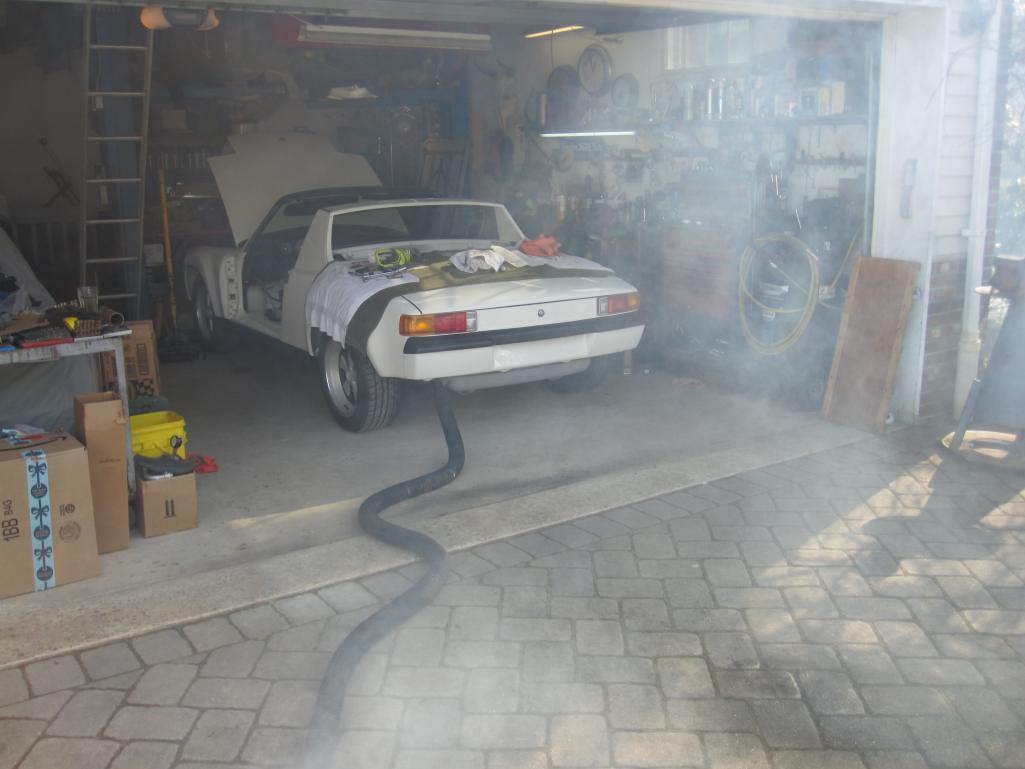

Posted by: rgalla9146 Feb 4 2019, 08:51 AM
more
Attached thumbnail(s)
Posted by: rgalla9146 Feb 4 2019, 08:58 AM
more. This shot's for Martin Baker
Attached thumbnail(s)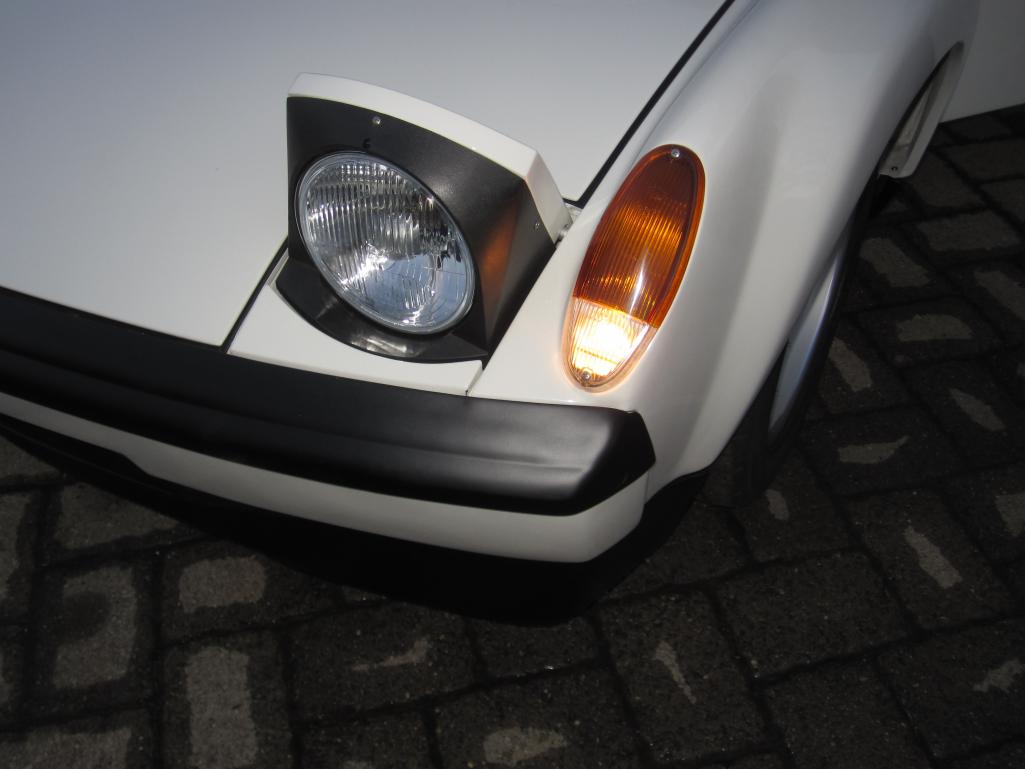
Posted by: Martin Baker Feb 4 2019, 09:04 AM
AWESOME! Looks great! Your work is first class, as is the car!
Thanks for your recent help with my oil system. Hope to meet you and shake your hand someday.
MB
Posted by: Tdskip Feb 4 2019, 09:26 AM
Careful about not have loose items and small children pulled back into the engine compartment when the cover isn't on.
Nice work!
Posted by: bbrock Feb 4 2019, 09:29 AM
So cool!
Posted by: Ferg Feb 4 2019, 09:32 AM
Congrats!
Posted by: campbellcj Feb 4 2019, 12:04 PM
Congrats! That's a great looking car and clearly a ton of TLC entailed.
I wonder if your fuel pressure may be too high, contributing to leaks? I went to the PMO solid rails long ago cuz the stock banjos did not enthuse me...but they look very non-stock and add $$.
Posted by: 914werke Feb 4 2019, 12:46 PM
Posted by: rick 918-S Feb 4 2019, 01:00 PM
Just about time!
Posted by: Dion Feb 4 2019, 02:06 PM
Fantastic Rory! Will it be ready to roll into Hershey? Look forward.
Posted by: jfort Feb 4 2019, 02:18 PM
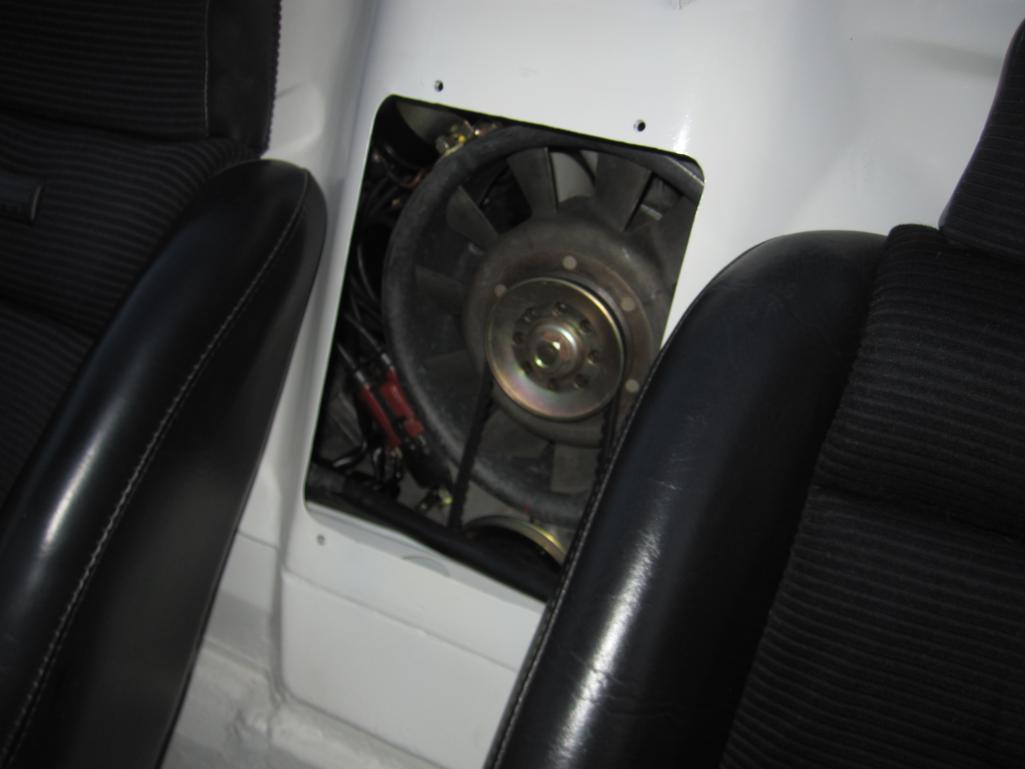
looks great! I, too, did the firewall hatch. my wheels and tires:
front wheels 7x16,
74mm studs 21mm 944 spacer
rear wheels 8x16,
tires: TOYO Proxes R888 225/45ZR16 front, 245/45ZR16 rear
Posted by: rgalla9146 Feb 6 2019, 06:57 PM
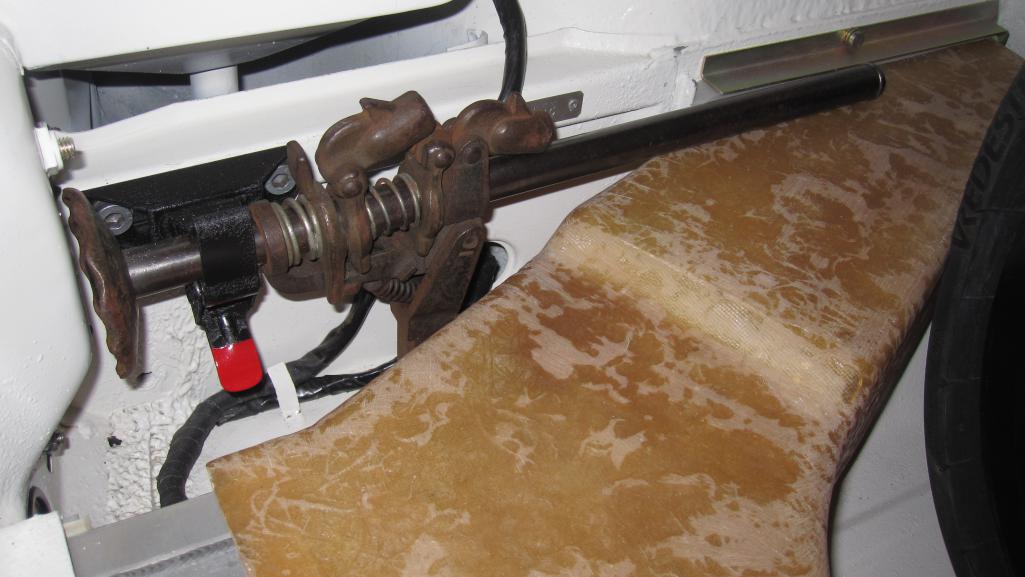
Two more pics, drove it a little more today.
Found the source of a tight spot in the steering.
After near complete disassembly of the front end and thorough process of
elimination it turned out to be a problem with the bearing in the front end of the steering column.
Bearing on order. Two steps forward....
Attached thumbnail(s)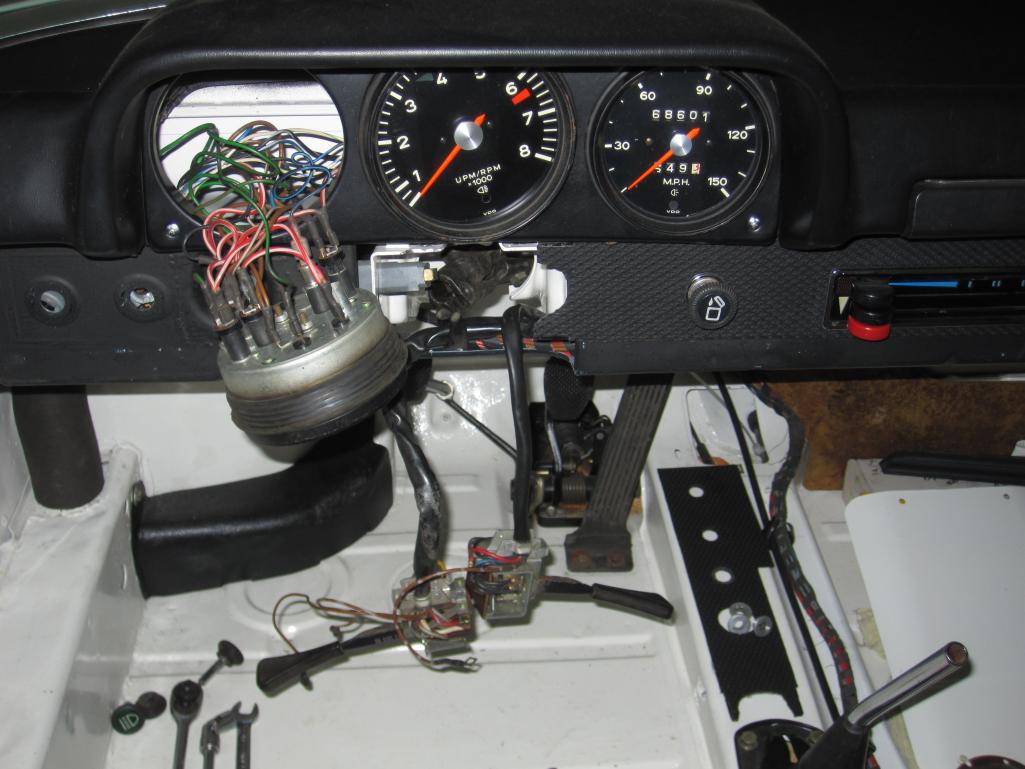
Posted by: rgalla9146 Feb 6 2019, 07:01 PM
...and the second.
Needs to lose some altitude
Attached thumbnail(s)
Posted by: Maltese Falcon Feb 6 2019, 09:14 PM
Two more pics, drove it a little more today.
Found the source of a tight spot in the steering.
After near complete disassembly of the front end and thorough process of
elimination it turned out to be a problem with the bearing in the front end of the steering column.
Bearing on order. Two steps forward....
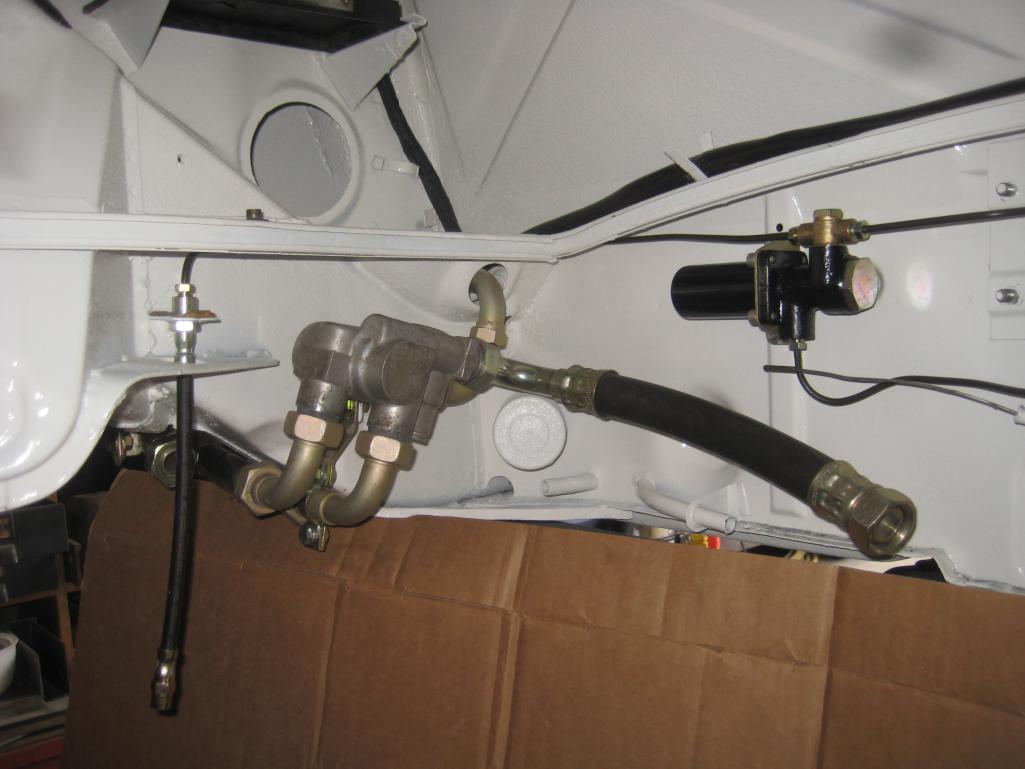
Looks like your running the front oil cooler lines down along the left floor into the mouse hole ¿¿
Posted by: rgalla9146 Feb 7 2019, 06:10 AM
Two more pics, drove it a little more today.
Found the source of a tight spot in the steering.
After near complete disassembly of the front end and thorough process of
elimination it turned out to be a problem with the bearing in the front end of the steering column.
Bearing on order. Two steps forward....
Looks like your running the front oil cooler lines down along the left floor into the mouse hole ¿¿
Yes Martin
Essentially copied the original GT layout.
I'm running repro brass long pieces.
I fabricated parts to position a 911 thermostat under the drivers side engine
shelf.
I also modified the front latch panel to mount a repro 906 front cooler with
my own version of fiberglass duct work.
There are pics further back in the thread.
Please review. You'd like it.
Posted by: jkb944t Feb 7 2019, 07:01 AM
Congrats!
It is such an amazing feeling to finally get them running! I'll bet you are wishing for some good weather to come quickly so you can really enjoy it!
Jeff B
Posted by: Cairo94507 Feb 7 2019, 07:04 AM
Very exciting. Congratulations.
Posted by: mepstein Feb 7 2019, 07:10 AM
I've seen the car in person. Looks better than the pics - and they look good. Against the right background, this car will pop. There's lots of small details that work really well.
Posted by: NS914 Feb 7 2019, 07:38 AM
Hey Rory, Congratulations from Nova Scotia....amazing....those trailing arms.....I have not seen that before re cuts out....so cool and some weight....I am assuming you will not lose any strength as a result....again, wonderful work....dont know how I missed this. Grant
Posted by: defianty Feb 7 2019, 08:57 AM
Somehow missed this thread for a while. Car is looking fantastic.
Posted by: injunmort Feb 7 2019, 09:01 AM
awesome rory, looking forward to seeing it in the flesh
Posted by: Martin Baker Feb 15 2019, 12:14 PM
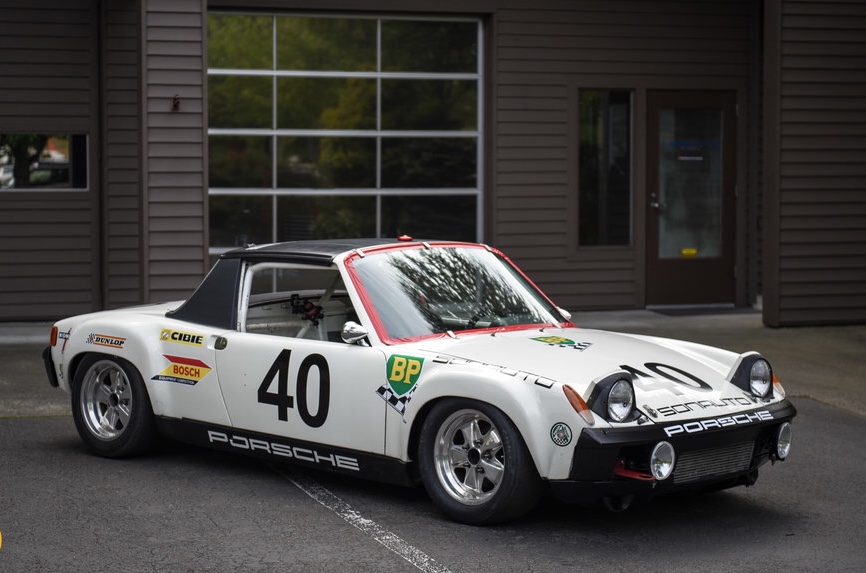
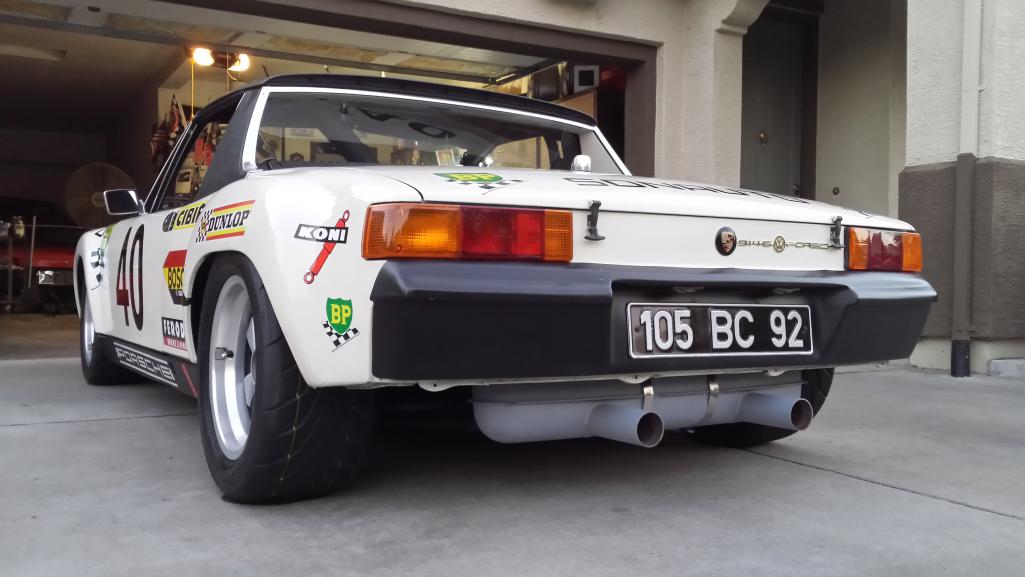
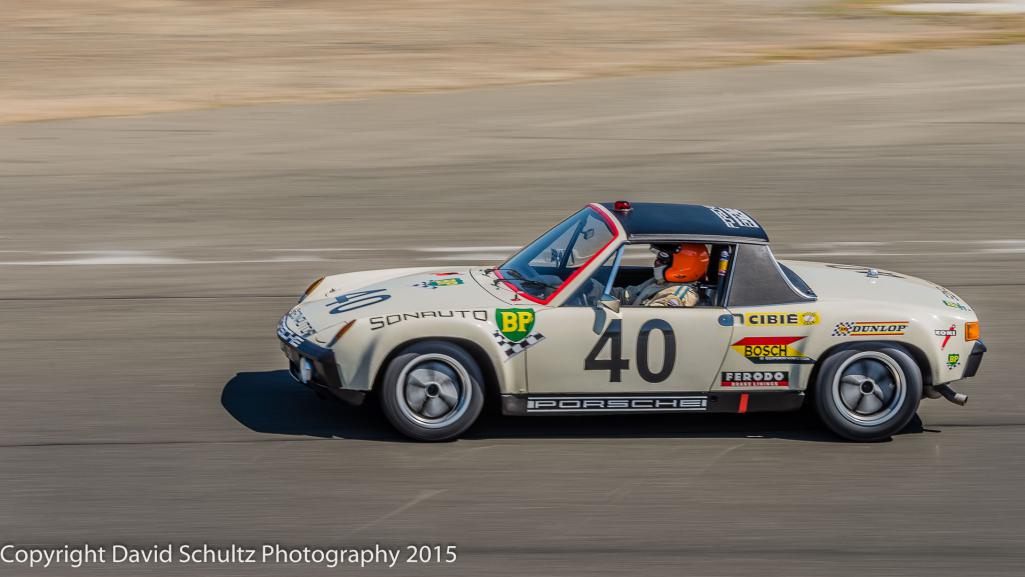
Rory asked me to put a shot of my L80E (The Light Ivory Crew) car here, which I would never try to invade another persons build thread, but we texted about it, so only as how cool a Light Ivory car can look, here is my turd, formerly a 1975 1.8 car, now a lowly SONAUTO replica, which I Vintage Race now and again...and only because I was told the "Cool Guys" have the Light Ivory cars! Personally I like Signal Orange, but Light Ivory all the way BABY!!!
MB
Attached thumbnail(s)
Posted by: porschetub Feb 15 2019, 01:20 PM
Thank you all.
When I first ran the fuel pump there was a small leak under the tank.
Turned out to be a leaking NOS fuel filter ! that's a new one to me. Easy fix.
Next, big leaks at the carb inlet banjos and float valve caps.
Again, NOS, OEM parts leaking. After many attempts to make them swell with Marvel
Mystery Oil , gasoline, and patience .....still leaking. WTF ?
OK, select other seals from the Weber box and.....still leaking...but slowing down too.
And finally stopped.
Now it was possible to run it on more than the the contents of the float bowls.
It's so quiet ! stock muffler for now.
Fumigated the whole neighborhood just in time for the worthless football game.
Adjusted the timing, a few laps around the carbs with the syncro meter and
Voila ! Easiest start up in memory.
I then drove it around the street and backed into the driveway just as the loose
shift adjustment said 'enough'
What a great day !!!!!
Fantastic looking car,well done,great feeling on the first engine start,still remember when I did mine,good to hear your sorted your fuel leaks sorted I had the same issue but found the banjo bolts tightened up a little more with the carbs mounted on the engine.
Yep those Martin Baker euro conversions are great,I just have to get off my ass and wire them correctly.
Keep up the good work
.Posted by: sixnotfour Feb 15 2019, 02:56 PM
Posted by: rgalla9146 Feb 18 2019, 08:57 PM
Two more pics, drove it a little more today.
Found the source of a tight spot in the steering.
After near complete disassembly of the front end and thorough process of
elimination it turned out to be a problem with the bearing in the front end of the steering column.
Bearing on order. Two steps forward....
Well as it turnd out the very worn bearing was not the only issue.
After installing the bearing ( FAG 6003 10 x 17 x 35) I still had vey tight
parts in rotating the steering wheel.
I had already determined the rack was good, the three shafts were all staight
and the universals were not loose or too tight.
Could a universal be bent ? they certainly looked fine.
Using a simple method I determined the joints were not faulty.
What next ?
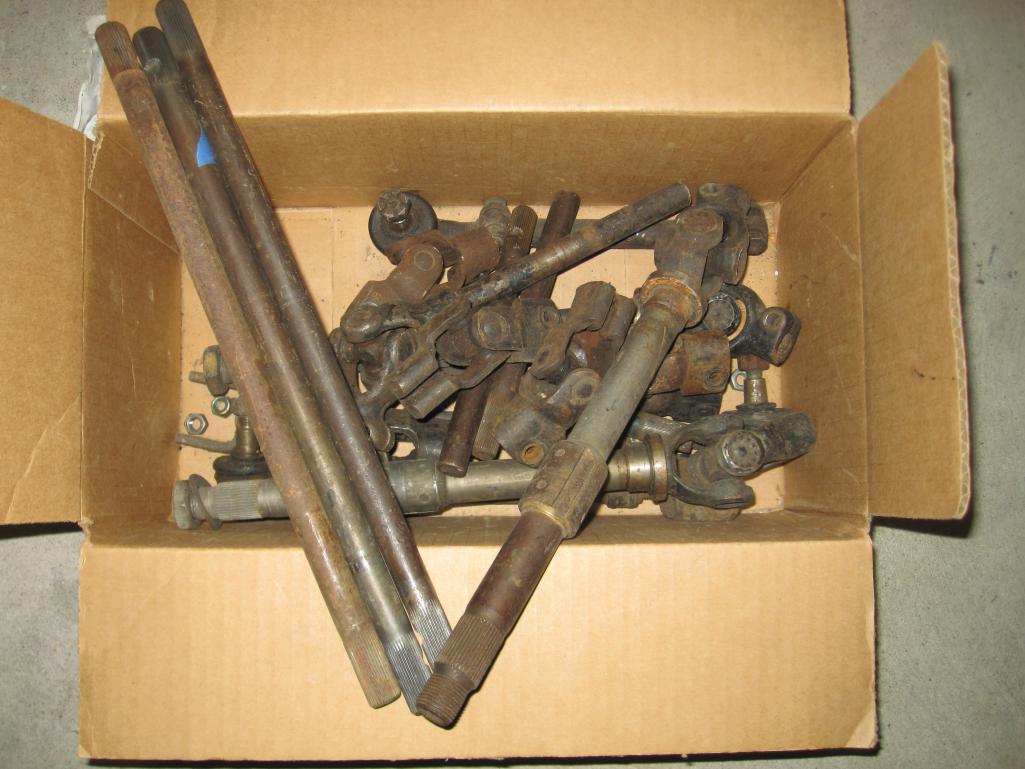
I gathered all the steering shafts and joints I had and looked them over
carefully,
I noticed that three of the center shafts I had were one length and a fourth one
was about 8mm longer. Hmmm. Also the machined recess for the binding bolt
on the three shorter were positioned uniformly....on the fourth shaft (the longer one) the two recesses were in a different arraingement to each other.
So .... out comes one like the three shorter and in goes the single longer one.
Voila !
According to the parts manual early 4 cyl. cars and 914 6 models had the same
center shaft. The longer one. With the different bolt recess positions.
Both the length and the position of the universals relative to one another
was causing the binding
Live and learn.
I haven't done a search on this subject (!) is it a known thing ?
Attached thumbnail(s)
Posted by: sixnotfour Feb 18 2019, 09:32 PM
70-71 4 ...72 up 6 and 4
Attached image(s)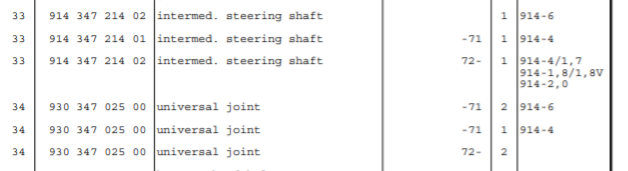
Posted by: mepstein Feb 18 2019, 09:35 PM
Rory - It sounds like you were first using the later 914-4 shaft instead of the shaft that comes with the 911/914-6 column - is that correct?
@http://www.914world.com/bbs2/index.php?showuser=5176
Posted by: rgalla9146 Feb 18 2019, 09:59 PM
Rory - It sounds like you were first using the later 914-4 shaft instead of the shaft that comes with the 911/914-6 column - is that correct?
@http://www.914world.com/bbs2/index.php?showuser=5176
Mark I assume that is the case.
I cannot posiively determine which shaft is which.
I can't access and measure intact cars.
My project car has a 914 6 steering column installed as accurately as I could make it
and it did not work with the shorter shaft.
It now works with the longer shaft.
Posted by: mepstein Feb 18 2019, 10:04 PM
Rory - It sounds like you were first using the later 914-4 shaft instead of the shaft that comes with the 911/914-6 column - is that correct?
@http://www.914world.com/bbs2/index.php?showuser=5176
Mark I assume that is the case.
I cannot posiively determine which shaft is which.
I can't access and measure intact cars.
My project car has a 914 6 steering column installed as accurately as I could make it
and it did not work with the shorter shaft.
It now works with the longer shaft.
Glad you figured it out.
You would want the early shaft anyway to match up with an early wheel. The chamfer is different on the later shaft. It has a rounded shoulder for the later wheel to rest on. The early wheel and the early shaft have a square cut shoulder. The splines are the same so everyone assumes the wheels are interchangeable but they really aren't if you want proper fit.
Posted by: rgalla9146 Feb 18 2019, 10:07 PM
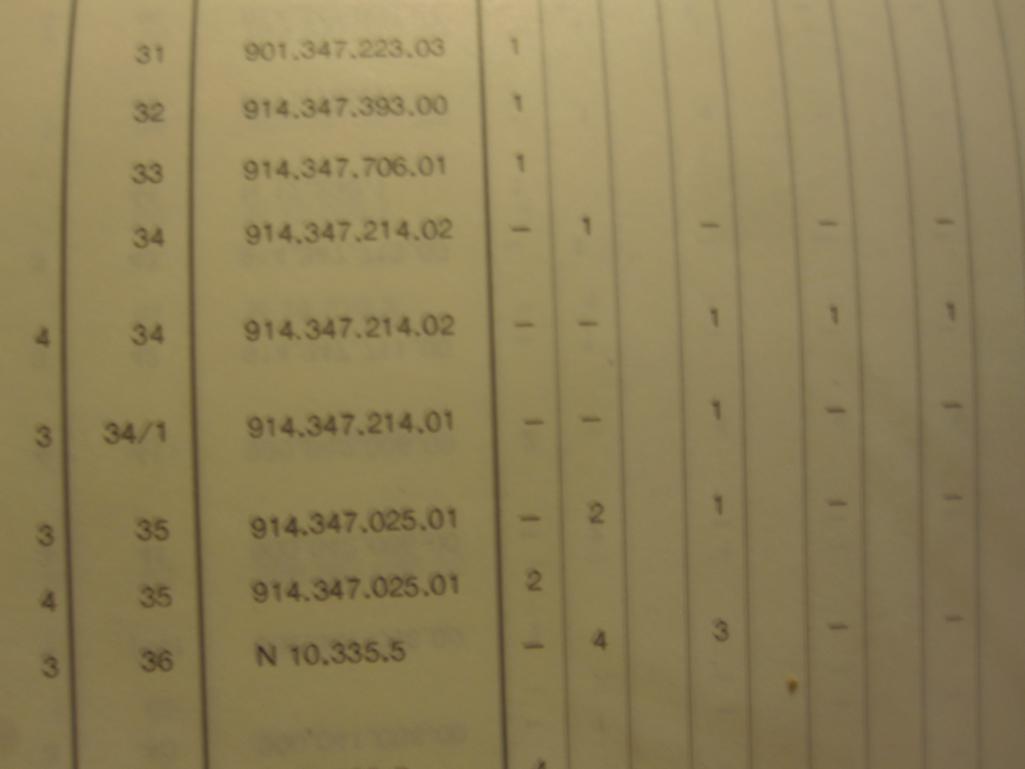
Mark I now see the parts list posted by sixnotfour and it shows that the six
shares the middle shaft with later four cyl. cars, not early ones.
I'll review my parts book listing.
Posted by: rgalla9146 Feb 18 2019, 11:02 PM
Mark I now see the parts list posted by sixnotfour and it shows that the six
shares the middle shaft with later four cyl. cars, not early ones.
I'll review my parts book listing.
Clearly shared part with later 4cyl. cars ....but without part numbers attached to a part
and being unable to measure a installed part I cannot be certain which is which.
Attached thumbnail(s)
Posted by: rgalla9146 Apr 16 2019, 07:10 PM
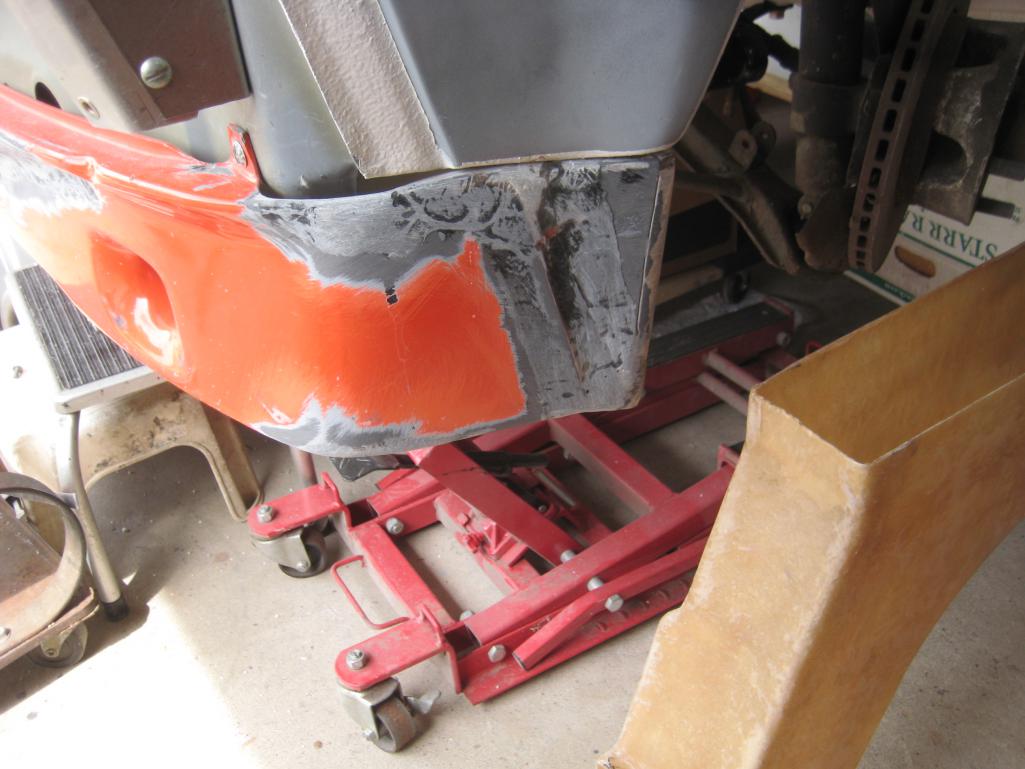
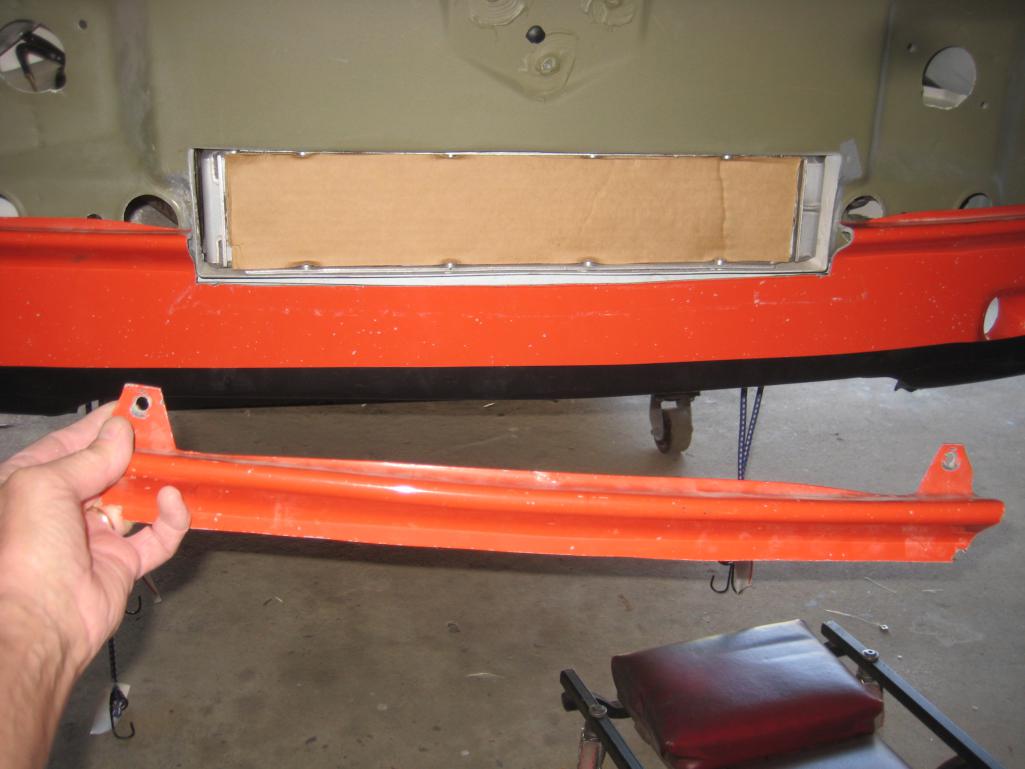
Preparing for Hershey.
Had to remove front bumper and spoiler to complete some details.
A couple pics.
Looks like I'll be refinishing my jack soon.
Attached thumbnail(s)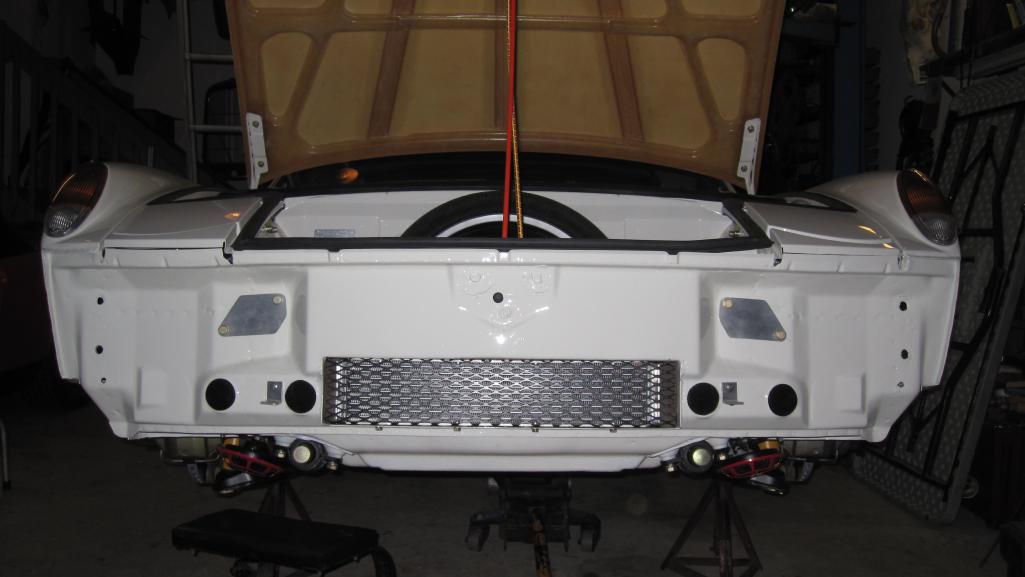
Posted by: rgalla9146 Apr 16 2019, 07:12 PM
another
Attached thumbnail(s)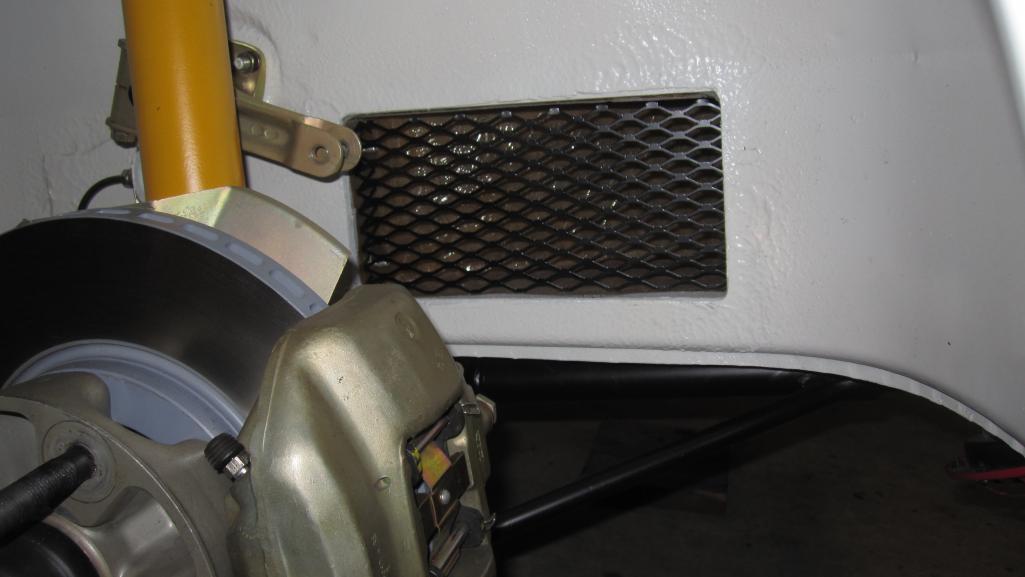
Posted by: infraredcalvin Apr 16 2019, 07:37 PM
Grillwork looks great! Clean install in and out! This is great inspiration!
Posted by: Biggles Apr 17 2019, 09:48 AM
Re earlier discussions, interested to see how your trunk lids behave without the pins !
Posted by: rgalla9146 May 2 2019, 07:30 AM
Interior and carpet details.
My new carpets had no formed recess for the hand brake.
My seats ?....same issue.
I did not want to make cuts and just hope for a clean result.
Here's what I came up with.
Attached thumbnail(s)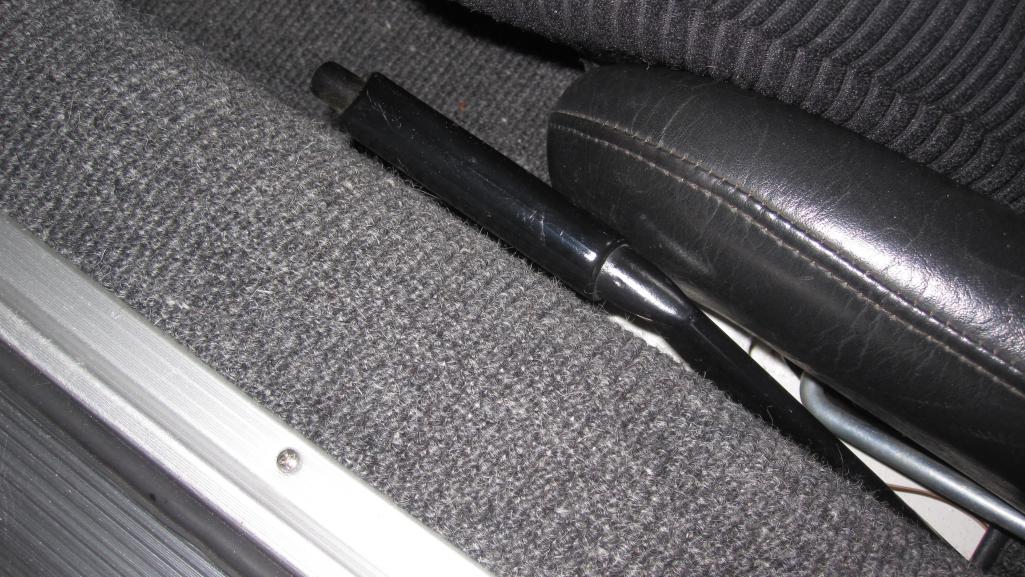
Posted by: rgalla9146 May 2 2019, 07:33 AM
fiberglass
Attached thumbnail(s)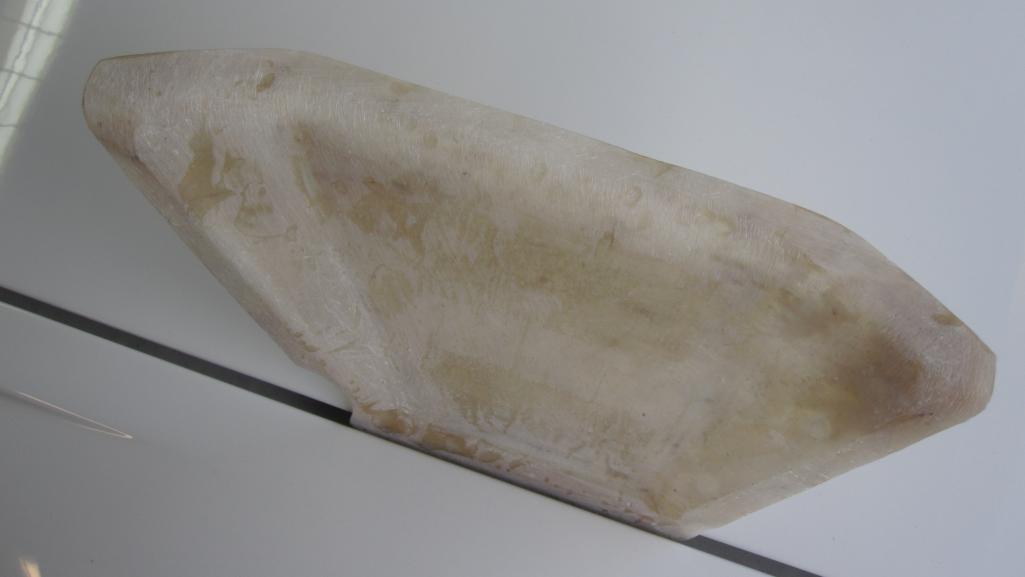
Posted by: rgalla9146 May 2 2019, 07:40 AM
And the result.
A little more work and some paint....Voila !
And find some truss head screws too.
Attached thumbnail(s)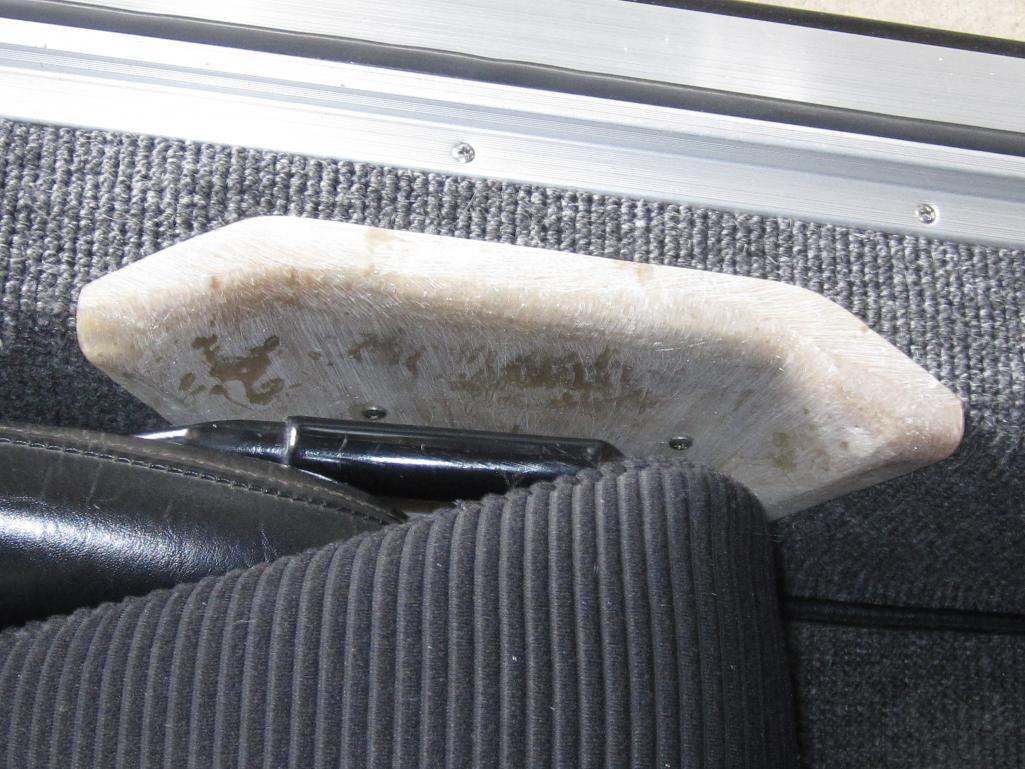
Posted by: rgalla9146 May 2 2019, 07:42 AM
better pic
Attached thumbnail(s)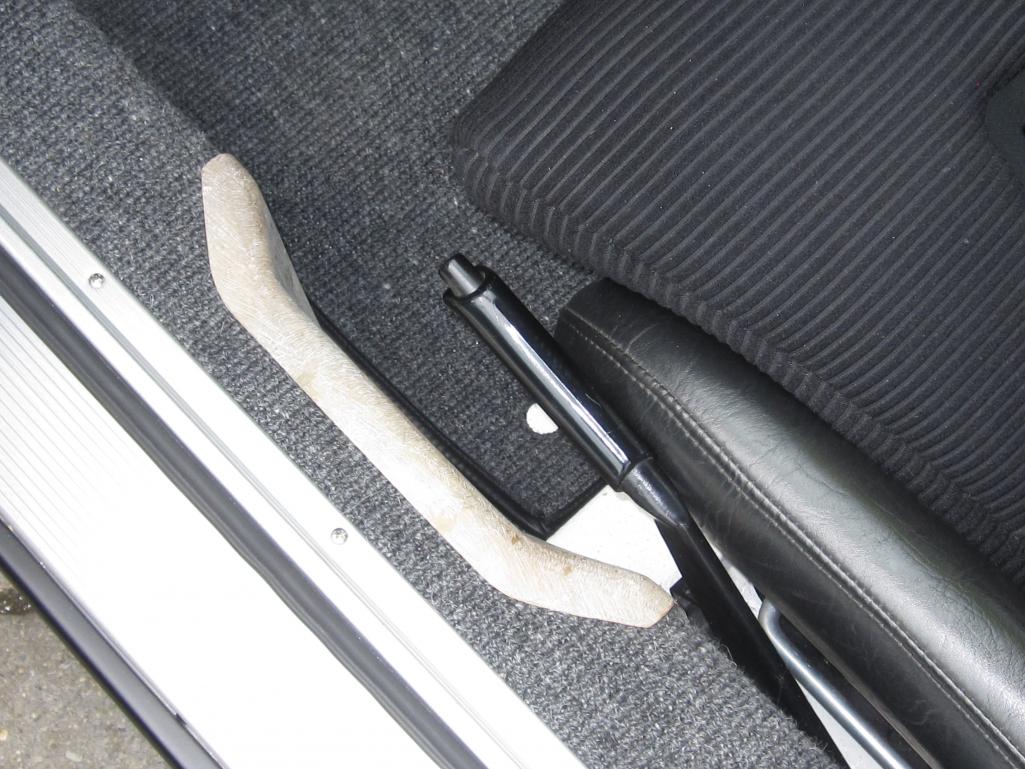
Posted by: mepstein May 2 2019, 07:44 AM
I thought the carpet was recessed with heat, rubber mallet, contact cement.
Posted by: bdstone914 May 2 2019, 07:52 AM
I thought the carpet was recessed with heat, rubber mallet, contact cement.

I was researching this yesterday. Looks like some are able to glue the carpet in shape. A lot depends on the stiffness of the material.
Found some cases wher carpets were formed with wet carpet was formed with a heat gun and pressure.
@http://www.914world.com/bbs2/index.php?showuser=5176
Posted by: rgalla9146 May 2 2019, 08:08 AM
I thought the carpet was recessed with heat, rubber mallet, contact cement.
I was researching this yesterday. Looks like some are able to glue the carpet in shape. A lot depends on the stiffness of the material.
Found some cases wher carpets were formed with wet carpet was formed with a heat gun and pressure.
@http://www.914world.com/bbs2/index.php?showuser=5176
Mark and Bruce
The carpet does have a 'plastic' backing and the supplier said to heat and hammer it into shape.
I didn't like the idea of gluing the material only to have wrinkles and be
unable to fix it. The square weave carpet was big consideration.
Also the car has a longitudinal kit that made the recess very irregular.
Posted by: Larmo63 May 2 2019, 08:23 AM
I really like the fiberglass piece you made.
Way to think outside the box!
Posted by: mepstein May 2 2019, 08:26 AM
I thought the carpet was recessed with heat, rubber mallet, contact cement.
I was researching this yesterday. Looks like some are able to glue the carpet in shape. A lot depends on the stiffness of the material.
Found some cases wher carpets were formed with wet carpet was formed with a heat gun and pressure.
@http://www.914world.com/bbs2/index.php?showuser=5176
Mark and Bruce
The carpet does have a 'plastic' backing and the supplier said to heat and hammer into it into shape.
I didn't like the idea of gluing the material only to have wrinkles and be
unable to fix it. The square weave carpet was big consideration.
Also the car has a longitudinal kit that made the recess very irregular.
Makes sense and it’s your car so....
Amazing build.
Posted by: rgalla9146 May 2 2019, 10:43 AM
some interior pics
Attached thumbnail(s)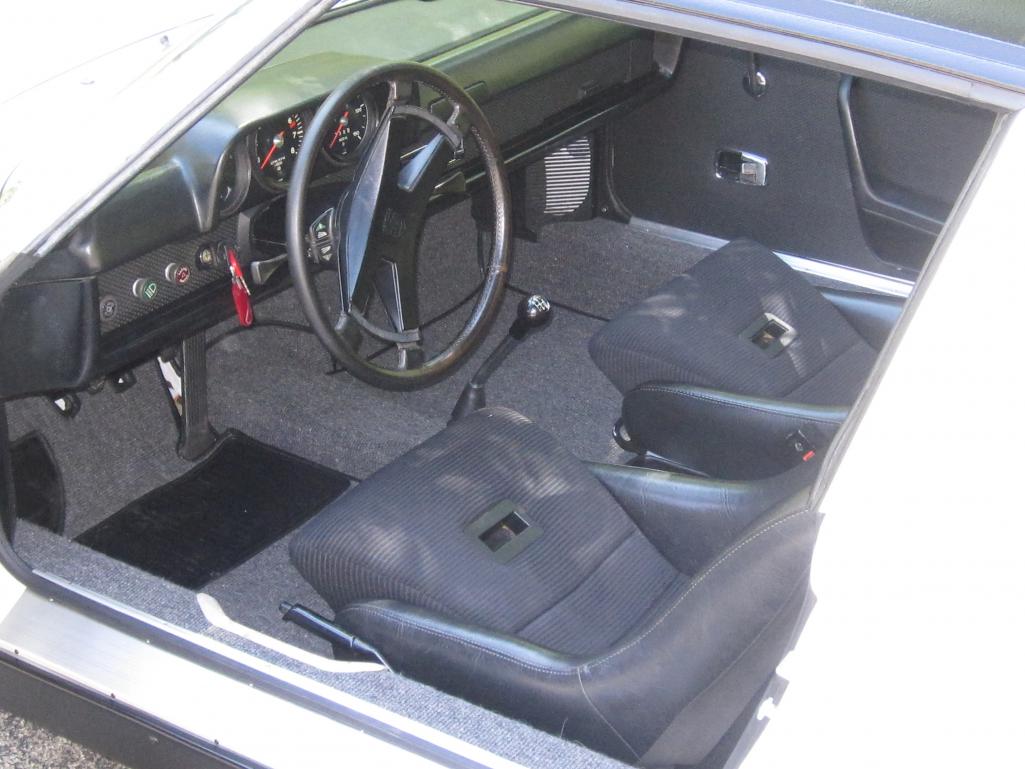
Posted by: Luke M May 2 2019, 11:39 AM
Almost done ...
Posted by: mepstein May 2 2019, 11:40 AM
Do you notice the oil line cover when you are driving
Posted by: rgalla9146 May 2 2019, 02:32 PM
Do you notice the oil line cover when you are driving
Maybe I'll notice it on a long trip.
I've only been on the highway for fifteen minutes or so a couple times.
Doesn't seem intrusive.
I might use it as a base for a dead pedal.
Posted by: rgalla9146 May 2 2019, 02:36 PM
Almost done ...
Hey Luke.....you'd think so right ?
The list is still long
At least I can drive it now between work sessions.
Posted by: rgalla9146 May 2 2019, 03:57 PM
a small picture review
February to May[attachmentid=695942]
Attached thumbnail(s)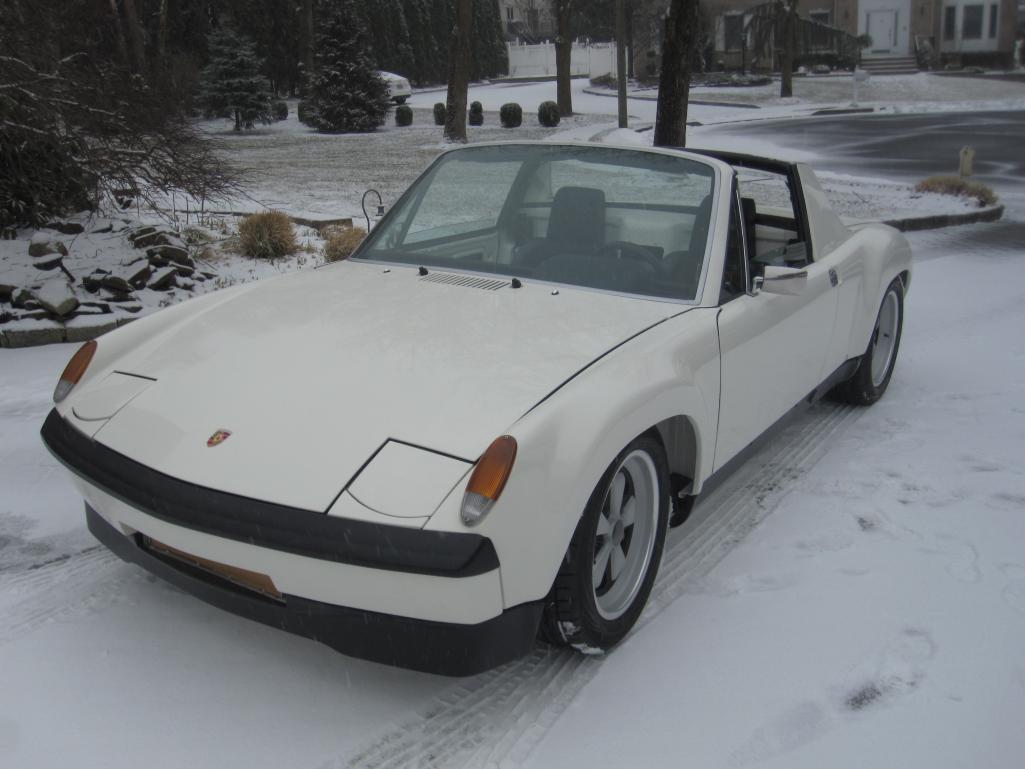
Posted by: rgalla9146 May 2 2019, 03:58 PM
DBL
Posted by: rgalla9146 May 2 2019, 04:02 PM
Today At Van Saun County Park
Paramus NJ
Attached thumbnail(s)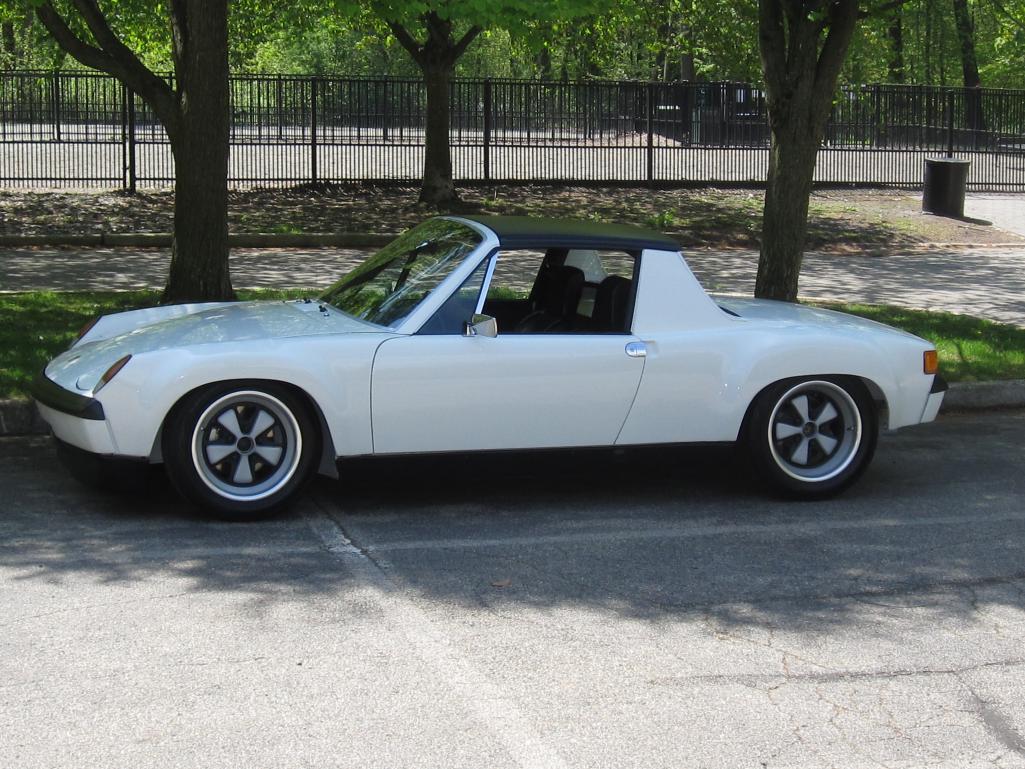
Posted by: Dion May 2 2019, 04:23 PM
Today At Van Saun County Park
Paramus NJ
Wow,
that is pretty!
Posted by: flyer86d May 2 2019, 04:25 PM
Very very nice!
Charlie
Posted by: rgalla9146 May 2 2019, 04:49 PM
Today At Van Saun County Park
Paramus NJ
Wow,
that is pretty! Thank you Dion
Sorry I missed you at Hershey.....I hope to meet sooner than next year.
Weather has really messed me up this spring.....and other issues later
this Spring/Summer
Posted by: rgalla9146 May 2 2019, 05:20 PM
Very very nice!
Charlie
Thank you, Charlie
As you may know my intro to 914 sixes was with Fred.
His Irish green car with the hand made flares was the coolest thing I'd ever seen.
I went along with him and Holly to a few races in those days.
I still have the orange six I managed to buy about five years later.
I remember seeing your name all over Porschforus for years.
Saw Fred at Hershey....No Peter AFAIK
I talk to Jim Foster and Doug every so often.
I can't wait to get a rowdy engine in the white car.
Posted by: rgalla9146 Jun 12 2019, 08:43 PM
Had a great outing tonight to Bear Mountain NY
It started with a lively four car sprint to our destination on beautiful wooded winding
roads....the line up ?
A modified lightened 280 Z, a 2008 Lotus Exige S, a genuine 951 Rothmans
cup car and me in my conversion 6 GT project car.
My car currently has a stock '68 911 2.0 six. Smallest engine and lightest car.
Mine is no match for the other three but great fun and my longest outing
with the newly finished car. I put on about one hundred miles.
The next treat was seeing Ian (cuddyk) fresh back from the West Coast Ramble.
It was great to hear about his trip and meeting many of the west coast
contingent.
My car performed flawlessly and was great fun to push pretty hard for the first time.
The weather was perfect too. I'll remember this one for a long time.
Posted by: Biggles Jun 13 2019, 01:46 AM
How’s the front trunk lid behaving without the pins? Much lift at speed?
Posted by: rgalla9146 Jun 13 2019, 04:44 AM
How’s the front trunk lid behaving without the pins? Much lift at speed?
Nothing to report.
Drove it over 90 mph and came home intact.
I did have some thoughts along the way about the very light glass bumpers
attached with bonded aluminum brackets.....and rocker panels attached with only four
screws.
Posted by: daytona Jun 13 2019, 06:54 PM
Had a great outing tonight to Bear Mountain NY
It started with a lively four car sprint to our destination on beautiful wooded winding
roads....the line up ?
A modified lightened 280 Z, a 2008 Lotus Exige S, a genuine 951 Rothmans
cup car and me in my conversion 6 GT project car.
My car currently has a stock '68 911 2.0 six. Smallest engine and lightest car.
Mine is no match for the other three but great fun and my longest outing
with the newly finished car. I put on about one hundred miles.
The next treat was seeing Ian (cuddyk) fresh back from the West Coast Ramble.
It was great to hear about his trip and meeting many of the west coast
contingent.
My car performed flawlessly and was great fun to push pretty hard for the first time.
The weather was perfect too. I'll remember this one for a long time.
Is that Bear Mountain as in Route 9W? up to the Bear Mountain Inn?
People still racing up and down the mountain?
My friends and I use to do that back in the mid 70s. I had a 1971 TVR 2500, and my friends were driving a Super 7, a Lotus Europa, and an Alfa GTV. Those were some fun times running up and down the mountain.
Great fun. Your car looks great by the way. Enjoy it.
Bill.
Posted by: rgalla9146 Jun 13 2019, 08:57 PM
Yes, that Bear Mountain.
My drive through the park to the Inn was the first in the company of skilled guys
in exciting cars.
A twelve mile blast.
This was the first time I really leaned on the car and the engine.
There is still some tune up work to be done.
Jets, dizzy check, first valve adjustment,oil change etc.etc.
The chassis feels great.
Posted by: gms Jun 13 2019, 11:06 PM
Beautiful!!!
Posted by: stownsen914 Jun 14 2019, 01:51 PM
I live pretty close to Bear Mountain. Pretty nice windy roads over there for some mountain driving. I hear motorcycles buzzing by on the highway near my house all day on nice weekend days, no doubt headed to Bear Mountain.
Posted by: horizontally-opposed Jun 14 2019, 02:27 PM
This is a really cool looking car…
Love the simplicity, wheel finishes, and overall vibe.
Nicely done, and great to hear the chassis is dialed. You'll get the engine dialed in, too...
Posted by: rgalla9146 Jun 14 2019, 02:29 PM
I live pretty close to Bear Mountain. Pretty nice windy roads over there for some mountain driving. I hear motorcycles buzzing by on the highway near my house all day on nice weekend days, no doubt headed to Bear Mountain.
Hey Scott
Any chance you're going to NNJR cruise night next Tues ?
No rain ? I'm there.
Posted by: rgalla9146 Jun 14 2019, 08:43 PM
This is a really cool looking car…
Love the simplicity, wheel finishes, and overall vibe.
Nicely done, and great to hear the chassis is dialed. You'll get the engine dialed in, too...
Thanks Pete
The idea is a no option early car with performance
enhancements.
Except for the wheels everything is period correct.
I like to make things look 'factory' no frills. No flourish.
Rory
Attached thumbnail(s)
Posted by: Luke M Jun 15 2019, 01:10 PM
Hi Rory,
The GT is looking great..
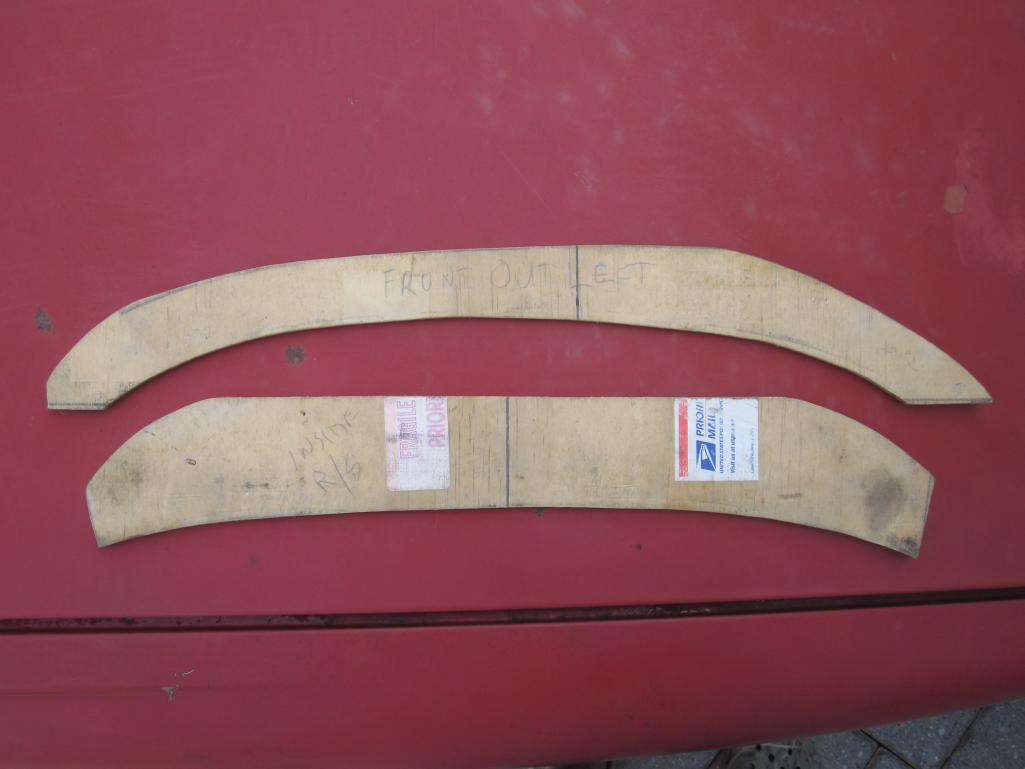
Did you roll the flare lip at all ends or trim it like the later cars?
Is 225 the largest tire you think will fit under the flares or do you have them spaced out?
Posted by: Maltese Falcon Jun 15 2019, 02:12 PM
Rory she is looking WOW with that body in white !!
Posted by: rgalla9146 Jun 15 2019, 04:17 PM
Hi Rory,
The GT is looking great..
Did you roll the flare lip at all ends or trim it like the later cars?
Is 225 the largest tire you think will fit under the flares or do you have them spaced out?
Hi Luke
The flange is turned up, not trimmed.
I traced the curve of the wheel opening and cut a piece of 1/4" plywood to conform to that shape. We then clamped it to the inside of the fender and shaped it (body hammer) as you might find on a standard fender. This adds strength and doesn't take away too much tire clearance.
As for the wheel/tires in the rear .... no spacers. I have about 3/4" space on the outside on either side. Add 21mm spacers ? at that point it would be TIGHT.
On the inside each has about 1/2" clearance. I don't think 9" wheels will fit. Can I size up from a 225 to a ? 235 , 245 ? on my 8" sixteens ? don't know.
Something I might explore when there is more power.
Posted by: rgalla9146 Jun 15 2019, 07:28 PM
Rory she is looking WOW with that body in white !!
Hi Marty
The Light Ivory thing is big and getting bigger.
One day we'll meet. Your project is inspired.
I have a mimeograph pamphlet from 1993 from your business listing 3.2 conversion parts for Vanagons, exhausts, instructions, diagrams etc.etc.
You've been at this a long time.
It's gratifying to hear that you like my car and the work I've done.
Thank you
Rory
Posted by: PanelBilly Jun 15 2019, 08:41 PM
Hi Rory,
The GT is looking great..
Did you roll the flare lip at all ends or trim it like the later cars?
Is 225 the largest tire you think will fit under the flares or do you have them spaced out?
Hi Luke
The flange is turned up, not trimmed.
I traced the curve of the wheel opening and cut a piece of 1/4" plywood to conform to that shape. We then clamped it to the inside of the fender and shaped it (body hammer) as you might find on a standard fender. This adds strength and doesn't take away too much tire clearance.
As for the wheel/tires in the rear .... no spacers. I have about 3/4" space on the outside on either side. Add 21mm spacers ? at that point it would be TIGHT.
On the inside each has about 1/2" clearance. I don't think 9" wheels will fit. Can I size up from a 225 to a ? 235 , 245 ? on my 8" sixteens ? don't know.
Something I might explore when there is more power.
The 21s will be too tight. You can check MySpace’s thread from last week and see how tight it gets. I didn’t try moving the car with them on
Posted by: rgalla9146 Jul 6 2019, 04:58 PM
repeat
Posted by: rgalla9146 Jul 6 2019, 04:58 PM
I've got about three hundred miles on my car now.
Time to get it up for an oil change and look around.
First had to deal with the CV boot flanges spewing grease everywhere.
The available boot flanges with the extra holes.....not good.
Big clean up followed by fitting 8mm ATE plastic plugs slathered with Curil T
Problem solved ? fingers crossed.
Next, evaluate approach to adjust valves.
I've done it many times in the past on the lift. It's been a while.
This time on the floor at a height that allows access to the intakes above
and the exhausts below. The bottom is tight. Check the view of the 4,5,6
exhausts. No elbow room, no hand space. 5 was OK, 6 (the worst) needed
adjustment....got it done.
Check the area of the installed thermostat plumbing. All the OE heat parts and hoses
fit as normal.
The thermo is not in use yet. When the 3.0 goes in the line from the block to the
tank will be changed out and the cooler will see oil for the first time.
Attached thumbnail(s)
Posted by: rgalla9146 Jul 6 2019, 05:00 PM
2 more
Attached thumbnail(s)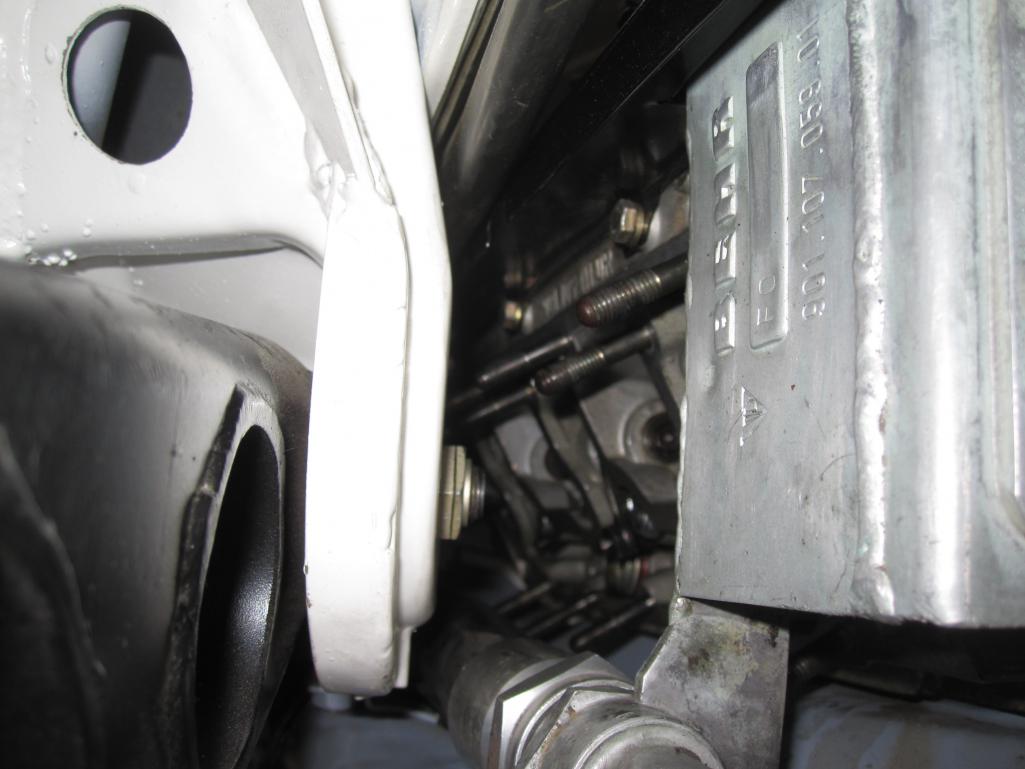

Posted by: mepstein Jul 6 2019, 05:21 PM
Hi Rory,
The GT is looking great..
Did you roll the flare lip at all ends or trim it like the later cars?
Is 225 the largest tire you think will fit under the flares or do you have them spaced out?
Hi Luke
The flange is turned up, not trimmed.
I traced the curve of the wheel opening and cut a piece of 1/4" plywood to conform to that shape. We then clamped it to the inside of the fender and shaped it (body hammer) as you might find on a standard fender. This adds strength and doesn't take away too much tire clearance.
As for the wheel/tires in the rear .... no spacers. I have about 3/4" space on the outside on either side. Add 21mm spacers ? at that point it would be TIGHT.
On the inside each has about 1/2" clearance. I don't think 9" wheels will fit. Can I size up from a 225 to a ? 235 , 245 ? on my 8" sixteens ? don't know.
Something I might explore when there is more power.
I like the plywood idea. There's a lot of extra metal on the lip of the flare so I either want to trim it or shape it like you did. I'll let my metal guy decide.
Posted by: Larmo63 Jul 6 2019, 07:10 PM
I'm weird. I never get sick of checking out a nice clean and new GT build.
Looks great Rory!!!
Posted by: burton73 Jul 9 2019, 11:46 AM
Rory,
You did a super job on your car. Clean is what I am talking about!
Beautiful car.
Bob B
Posted by: rgalla9146 Jul 10 2019, 10:30 AM
Thank you ......to my California compatriots
Bob I don't know if I've mentioned it in the past but I've known Peter Dawe for close to forty years.
He must have done your car when he lived in California and worked for Andial.
I see him at Porsche gatherings every so often. What a talented guy, he's done it all.
Thanks again
Rory
You too Larmo !
another pic
Attached thumbnail(s)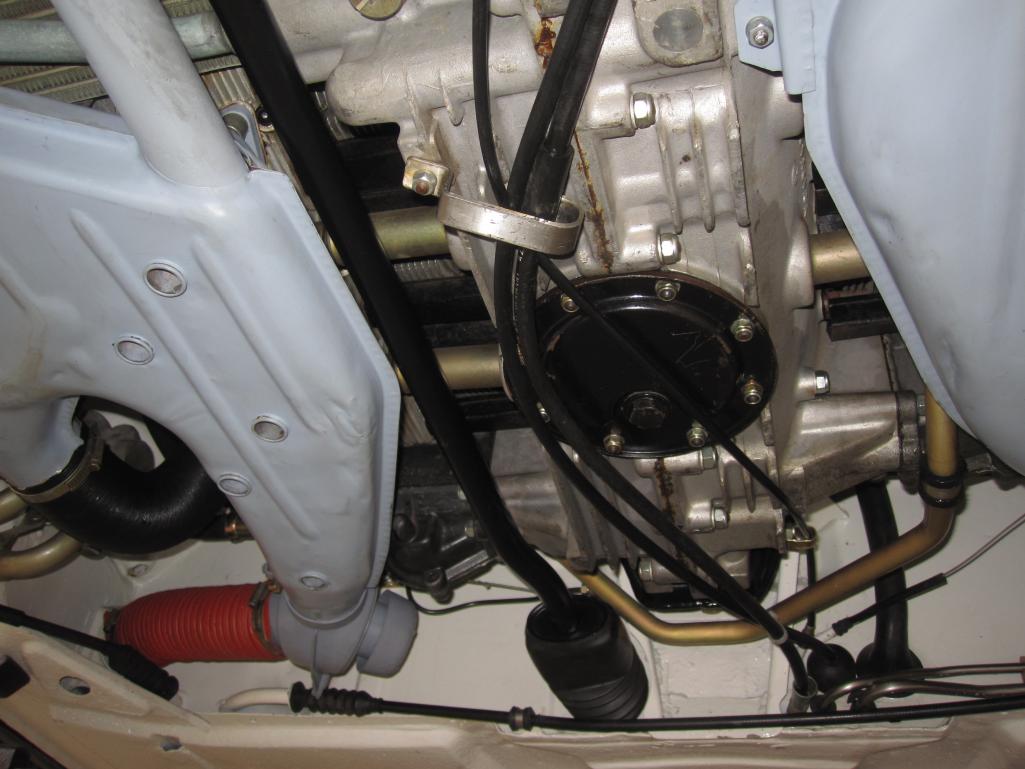
Posted by: rgalla9146 Jul 12 2019, 09:01 AM
Hi Rory,
The GT is looking great..
Did you roll the flare lip at all ends or trim it like the later cars?
Is 225 the largest tire you think will fit under the flares or do you have them spaced out?
Hi Luke
The flange is turned up, not trimmed.
I traced the curve of the wheel opening and cut a piece of 1/4" plywood to conform to that shape. We then clamped it to the inside of the fender and shaped it (body hammer) as you might find on a standard fender. This adds strength and doesn't take away too much tire clearance.
As for the wheel/tires in the rear .... no spacers. I have about 3/4" space on the outside on either side. Add 21mm spacers ? at that point it would be TIGHT.
On the inside each has about 1/2" clearance. I don't think 9" wheels will fit. Can I size up from a 225 to a ? 235 , 245 ? on my 8" sixteens ? don't know.
Something I might explore when there is more power.
I like the plywood idea. There's a lot of extra metal on the lip of the flare so I either want to trim it or shape it like you did. I'll let my metal guy decide.
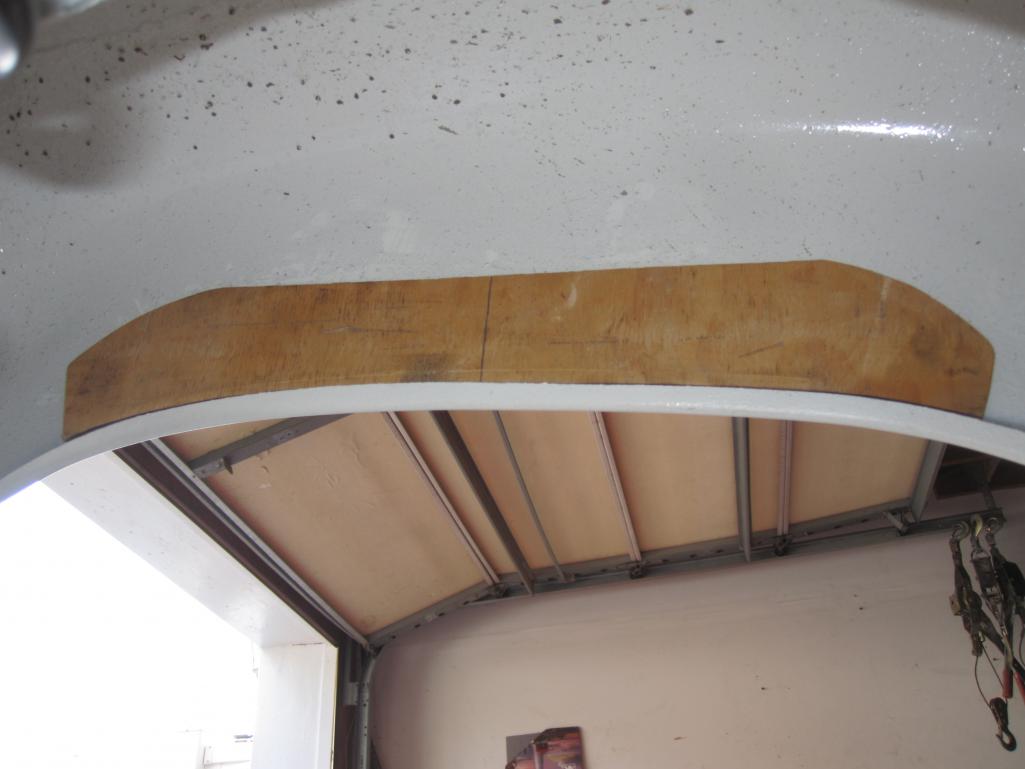
This is how it was done.
Clamped the plywood profile against the flange with five or six C clamps.
Used an additional piece of plywood on the outside to protect the flare.
Slowly hammered the flange flush against the flat of the plywood.
Used care to shape the transition from the rolled area to the untouched
flange
Attached thumbnail(s)
Posted by: rgalla9146 Jul 12 2019, 09:03 AM
Hi Rory,
The GT is looking great..
Did you roll the flare lip at all ends or trim it like the later cars?
Is 225 the largest tire you think will fit under the flares or do you have them spaced out?
Hi Luke
The flange is turned up, not trimmed.
I traced the curve of the wheel opening and cut a piece of 1/4" plywood to conform to that shape. We then clamped it to the inside of the fender and shaped it (body hammer) as you might find on a standard fender. This adds strength and doesn't take away too much tire clearance.
As for the wheel/tires in the rear .... no spacers. I have about 3/4" space on the outside on either side. Add 21mm spacers ? at that point it would be TIGHT.
On the inside each has about 1/2" clearance. I don't think 9" wheels will fit. Can I size up from a 225 to a ? 235 , 245 ? on my 8" sixteens ? don't know.
Something I might explore when there is more power.
I like the plywood idea. There's a lot of extra metal on the lip of the flare so I either want to trim it or shape it like you did. I'll let my metal guy decide.
This is how it was done.
Clamped the plywood profile against the flange with five or six C clamps.
Used an additional piece of plywood on the outside to protect the flare.
Slowly hammered the flange flush against the flat of the plywood.
Used care to shape the transition from the rolled area to the untouched
flange
one more
Attached thumbnail(s)
Posted by: rgalla9146 Jul 12 2019, 09:04 AM
Hi Rory,
The GT is looking great..
Did you roll the flare lip at all ends or trim it like the later cars?
Is 225 the largest tire you think will fit under the flares or do you have them spaced out?
Hi Luke
The flange is turned up, not trimmed.
I traced the curve of the wheel opening and cut a piece of 1/4" plywood to conform to that shape. We then clamped it to the inside of the fender and shaped it (body hammer) as you might find on a standard fender. This adds strength and doesn't take away too much tire clearance.
As for the wheel/tires in the rear .... no spacers. I have about 3/4" space on the outside on either side. Add 21mm spacers ? at that point it would be TIGHT.
On the inside each has about 1/2" clearance. I don't think 9" wheels will fit. Can I size up from a 225 to a ? 235 , 245 ? on my 8" sixteens ? don't know.
Something I might explore when there is more power.
I like the plywood idea. There's a lot of extra metal on the lip of the flare so I either want to trim it or shape it like you did. I'll let my metal guy decide.
This is how it was done.
Clamped the plywood profile against the flange with five or six C clamps.
Used an additional piece of plywood on the outside to protect the flare.
Slowly hammered the flange flush against the flat of the plywood.
Used care to shape the transition from the rolled area to the untouched
flange
one more
Attached thumbnail(s)

Posted by: maf914 Jul 12 2019, 11:41 AM
Rory,
Your car looks great! Impressive work.
Did you turn up the flange (with the plywood forms) before or after paint?
Posted by: mepstein Jul 12 2019, 01:45 PM
Rory,
Your car looks great! Impressive work.
Did you turn up the flange (with the plywood forms) before or after paint?
I’m sure he did this before paint. What a great way to shape the lip.
Posted by: rgalla9146 Sep 22 2019, 10:29 AM
Entered the PCA Zone 1 Concours
Placed 3rd in "Street Class" ...... 3 cars entered.
Could have been worse.
If Len had entered I'd have garnered a solid 4th.
Attached thumbnail(s)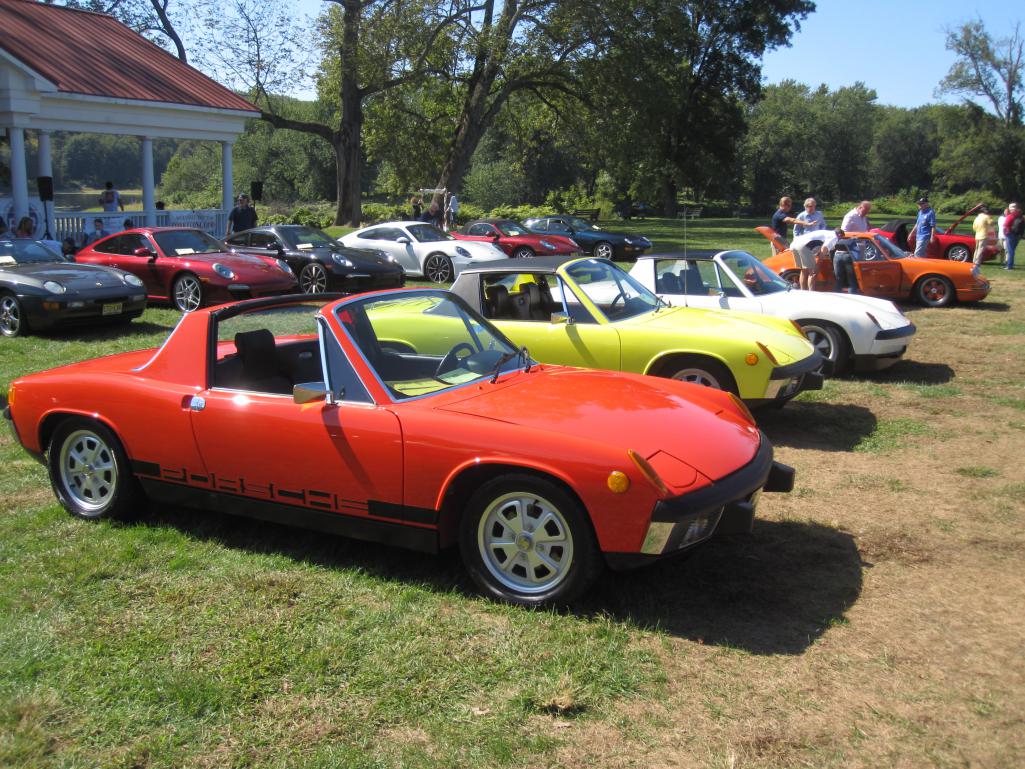
Posted by: rgalla9146 Mar 27 2020, 09:48 AM
I recently fabricated a hand throttle.
I used a heat flap handle and mechanism as the starting point and copied the rest
of an original 6 throttle mechanism.
I changed the shape of the handle by cutting it, rotating the top and making it straight.
Added a wing to the gas pedal bellcrank for rod to push against.
The rod is fabed from brake tubing.
The pictures tell the story.
I've had the NOS throttle knob for eons.
I hated taking it out of the package.
Starting a no-choke carbureted engine with the hand throttle is very easy.
Attached thumbnail(s)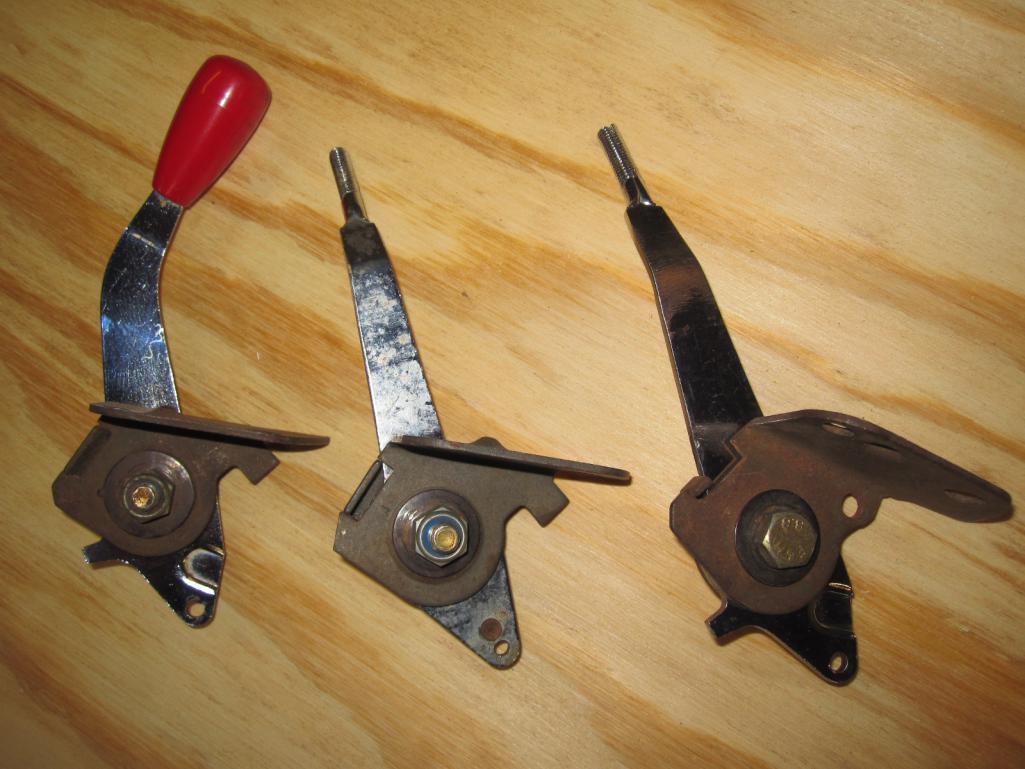
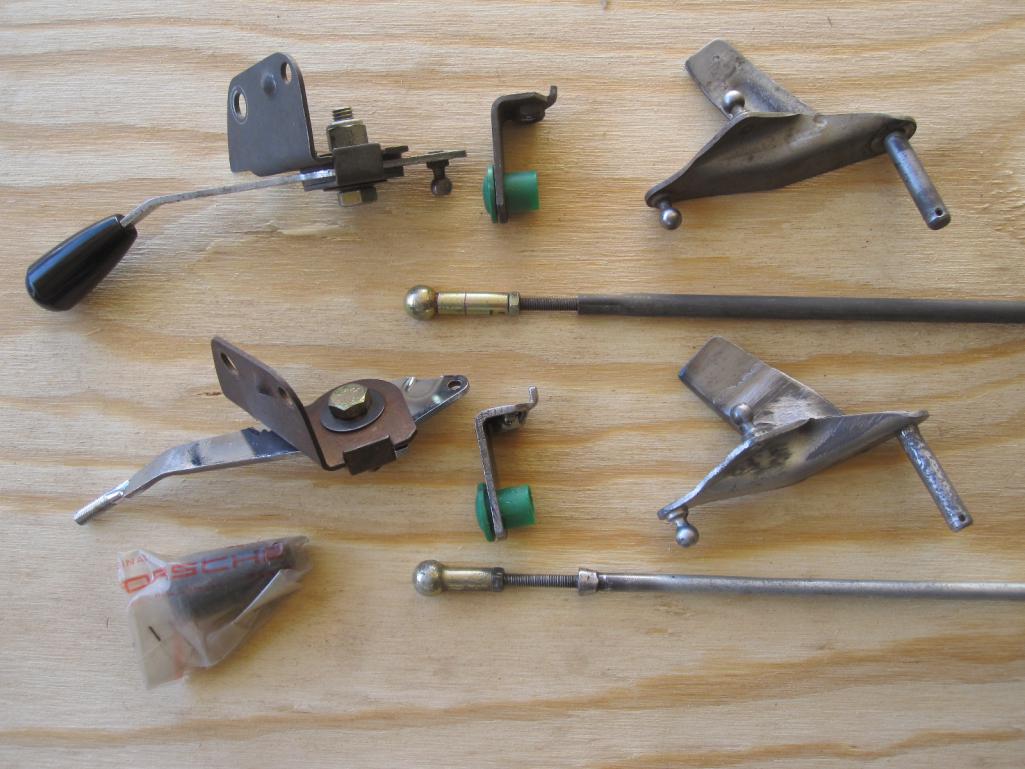
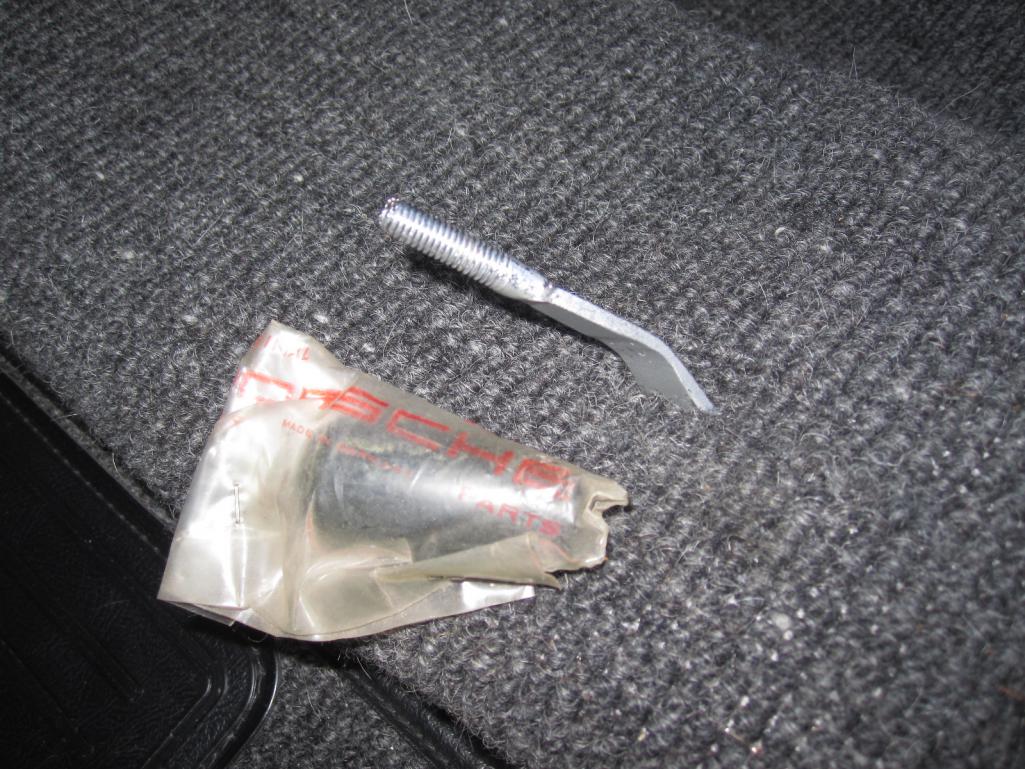
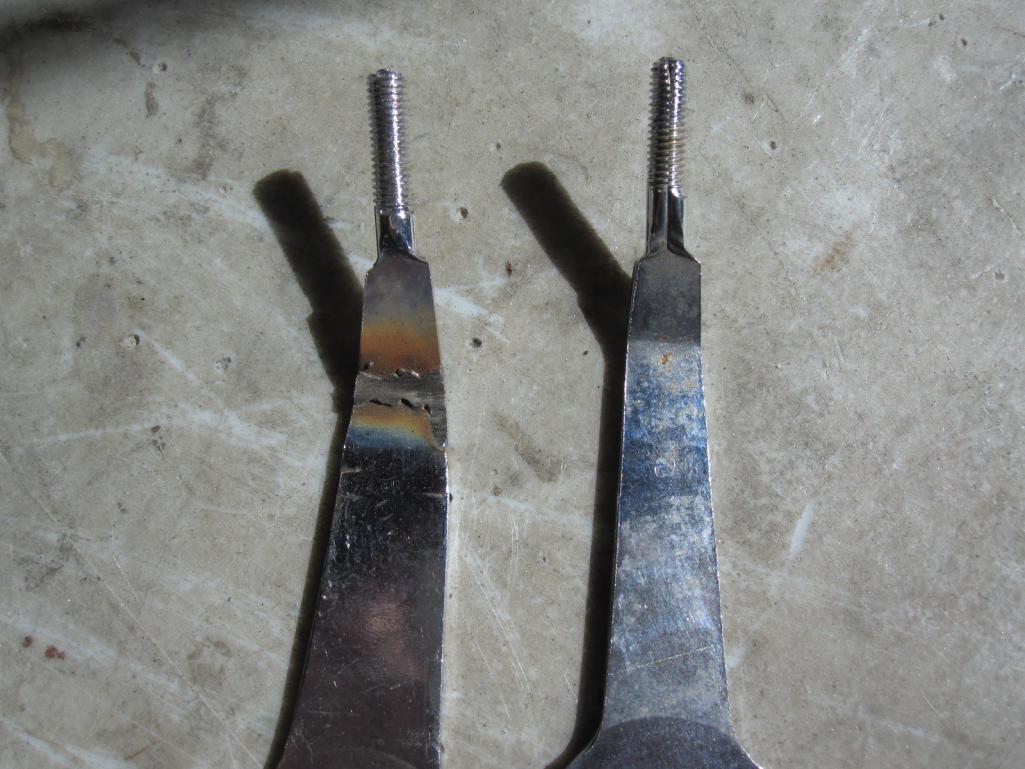
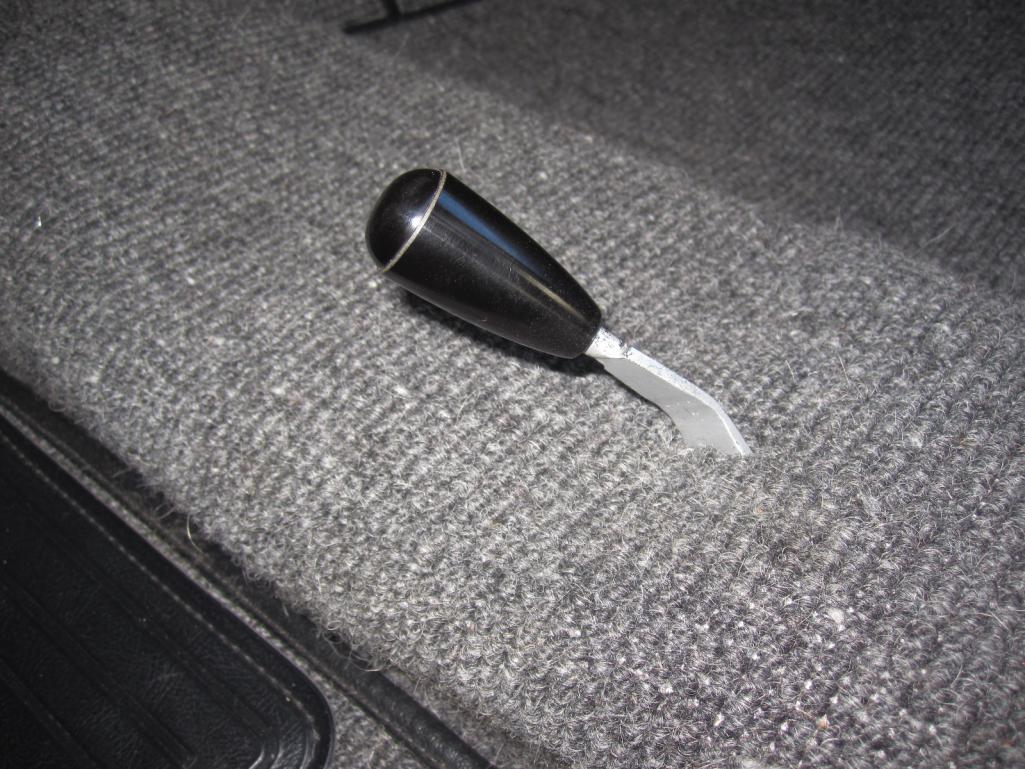
Posted by: rgalla9146 Apr 17 2020, 10:19 AM
Here's a pic of the hand brake recess part after it was finished and installed.
I'm getting to drive the car more now that the roads are free of salt
Also free of traffic due to the virus.
Attached thumbnail(s)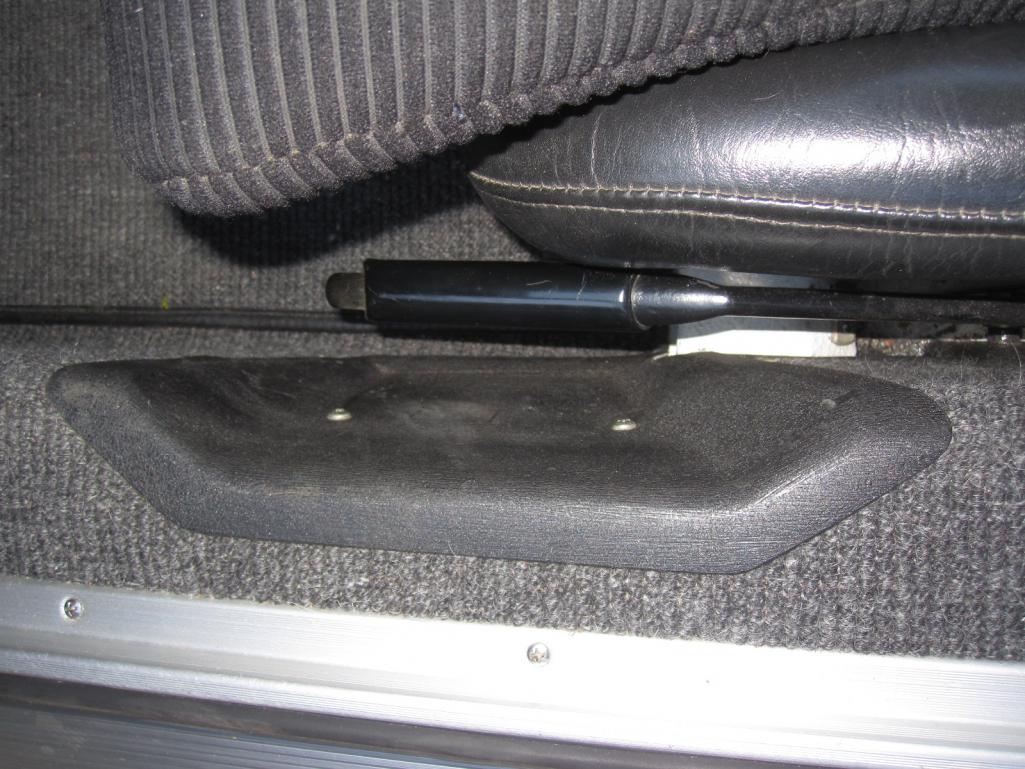
Posted by: Cairo94507 Apr 17 2020, 10:45 AM
I can't think of a better stress reliever. Enjoy the miles of smiles.
Posted by: Luke M Apr 17 2020, 04:46 PM
Posted by: Mueller Apr 17 2020, 04:54 PM
I'm weird. I never get sick of checking out a nice clean and new GT build.
Looks great Rory!!!
Not the only one..
I keep looking at how clean and perfect it is, then he adds cool touches like the hand throttle, too cool.
Great looking car and I dig the use of the plywood forms.
Posted by: Dion Apr 17 2020, 08:20 PM
Here's a pic of the hand brake recess part after it was finished and installed.
I'm getting to drive the car more now that the roads are free of salt
Also free of traffic due to the virus.
@http://www.914world.com/bbs2/index.php?showuser=5176
Ok Rory, I’ll be glad to pay you to make me one of those! That’s a very cool detail.
Enjoy the drives.
Posted by: rgalla9146 Apr 18 2020, 06:02 AM
Here's a pic of the hand brake recess part after it was finished and installed.
I'm getting to drive the car more now that the roads are free of salt
Also free of traffic due to the virus.
@http://www.914world.com/bbs2/index.php?showuser=5176
Ok Rory, I’ll be glad to pay you to make me one of those! That’s a very cool detail.
Enjoy the drives.
Hey Dion
I just found the only pics I took of the fabrication.
I made a styrofoam wedge that fit into the recess.
Then I glued it into a 90 degree corner and covered it with clear packing
tape to keep the fiberglass resin from eating the styrofoam.
Then covered the pictured piece with saturated chopped glass.
Wait a few hours......sand and shape to fit. Paint.
The texture is a lucky result.
Attached thumbnail(s)
Posted by: Dion Apr 18 2020, 09:57 AM
Thanks for sharing that technique Rory. It’s a small detail but practical. Looks factory.
Well done.
Posted by: rgalla9146 May 28 2020, 09:57 AM
I never posted pics of the complete trunks and interior of my project.
Check my $3.00 fiberglass hood props. And filthy tool kit.
I now jump in the car and drive it whenever I'm in the mood but organized events and even local C&Cs are not happening.
I hope the Northeast Gathering in Stroudsburg happens, It's a nice distance from home and some great friends and great cars will be there
Next up will be the delayed Luftgekult on November 1st. Can't wait.
Attached thumbnail(s)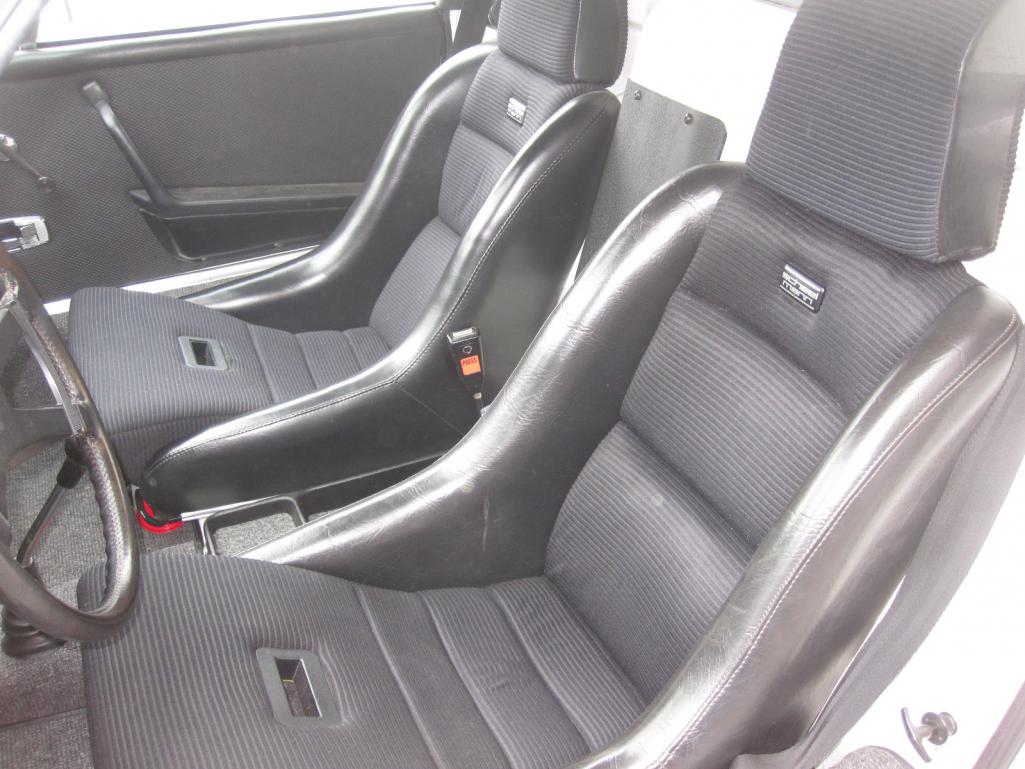
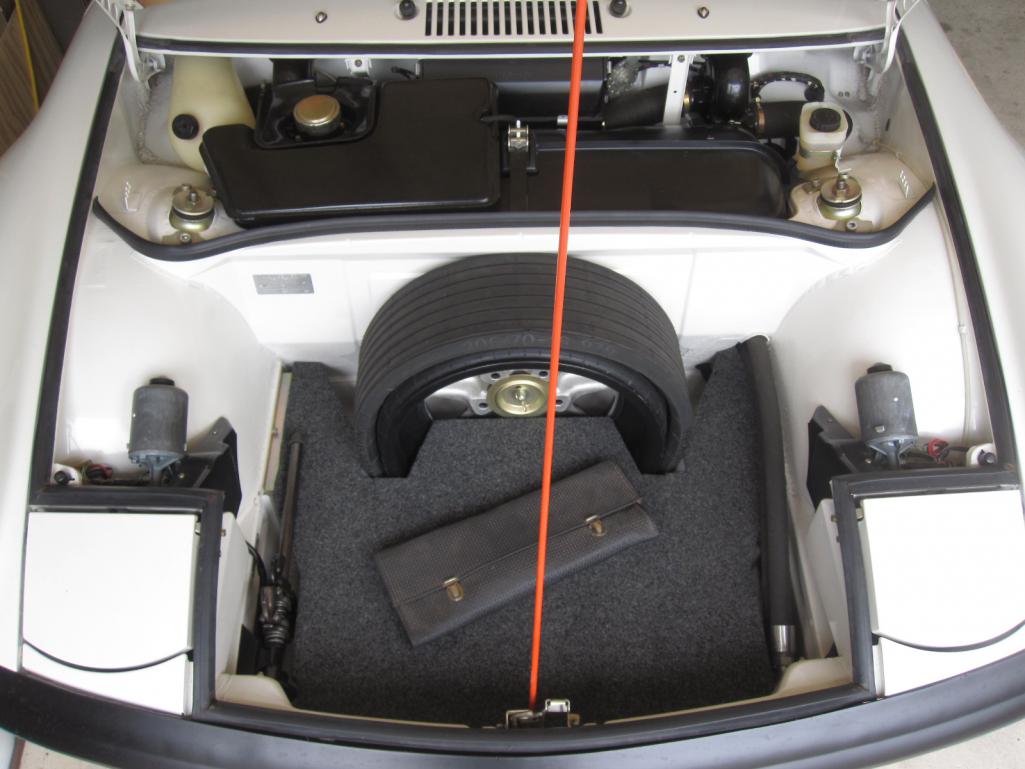
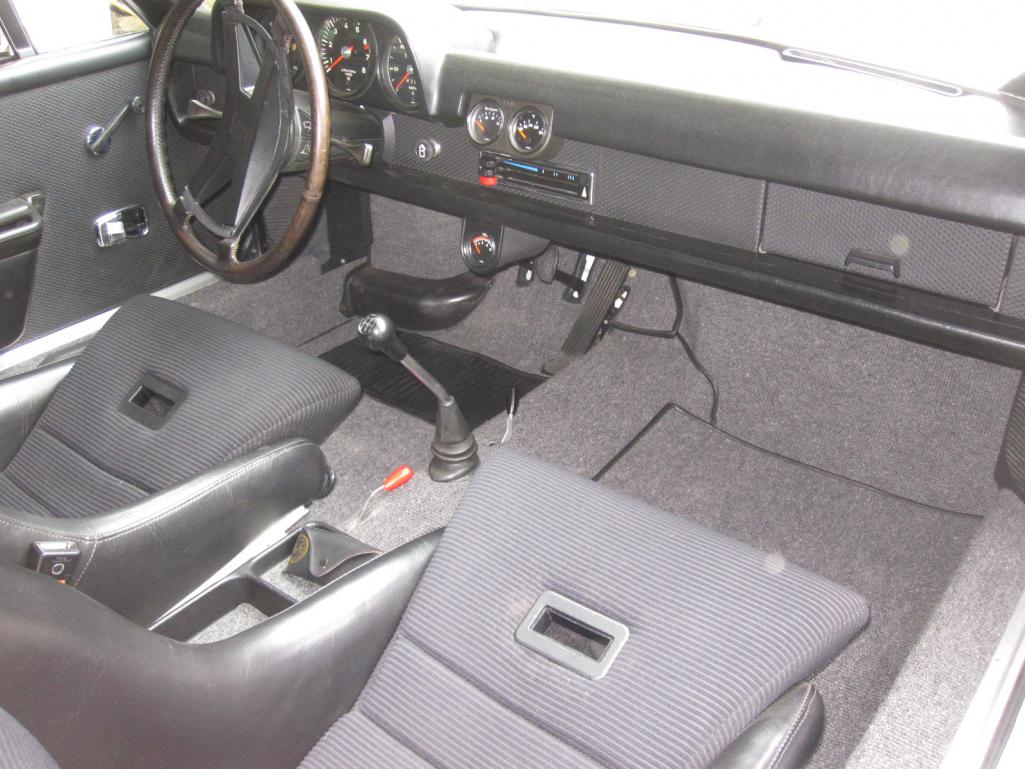
Posted by: rgalla9146 May 28 2020, 10:00 AM
more
Attached thumbnail(s)
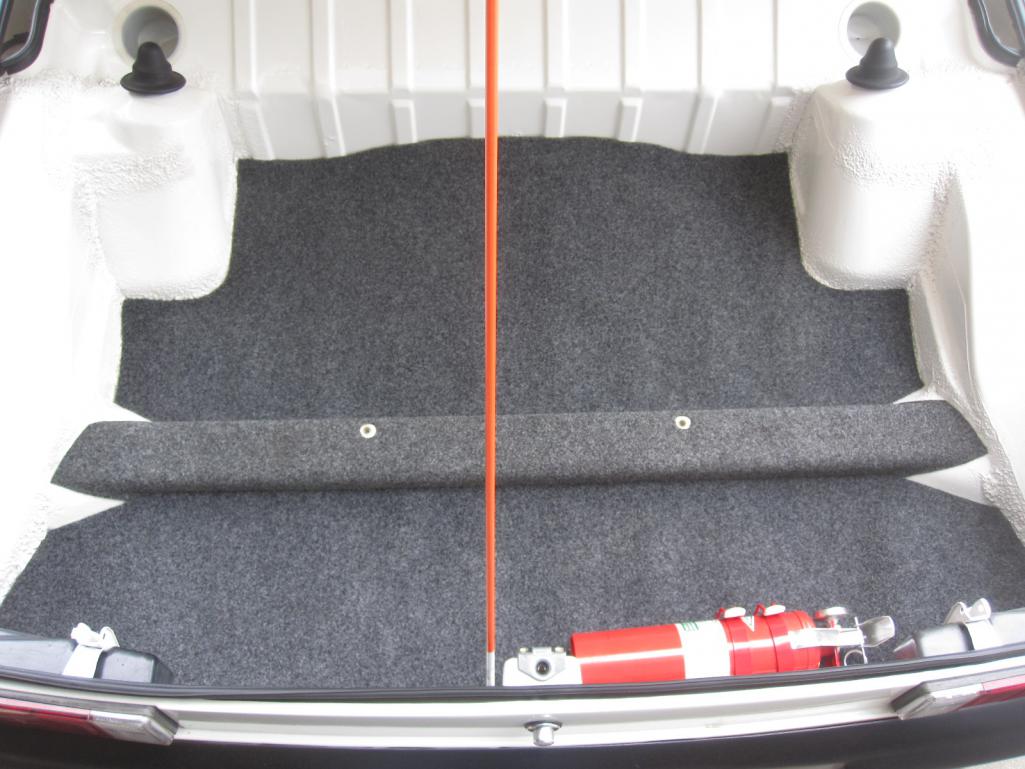
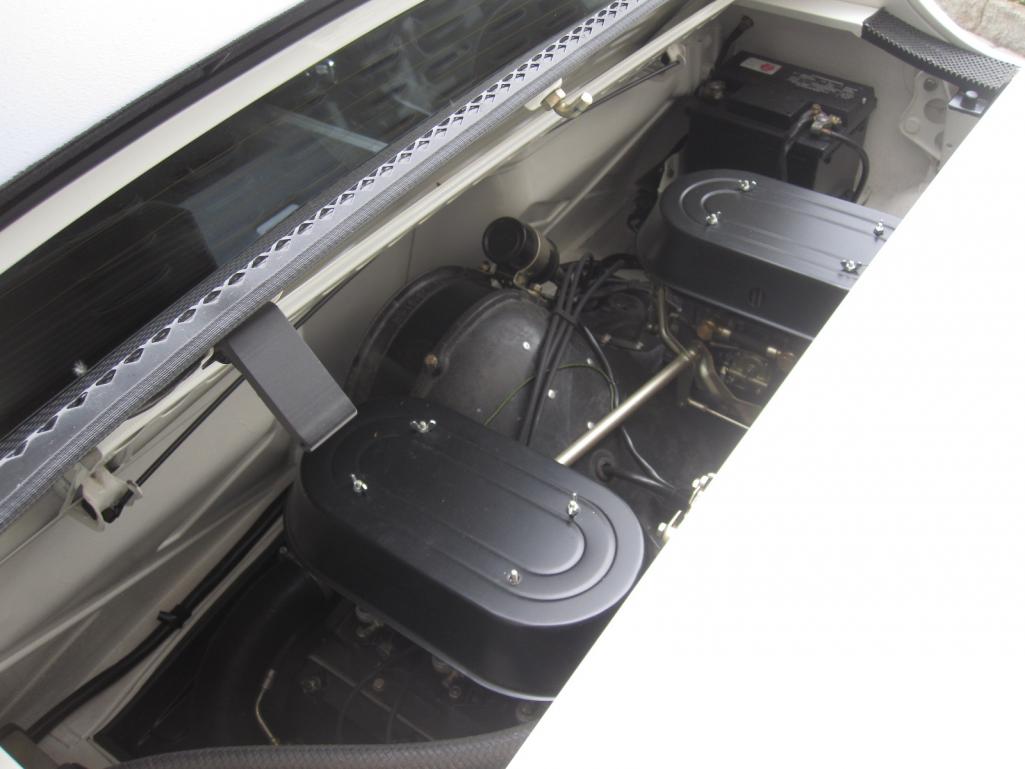
Posted by: Mueller May 28 2020, 10:54 AM
Interior and trunks look great.
Posted by: gms May 28 2020, 11:09 AM
That looks great Rory...well done!
Posted by: rmital May 28 2020, 11:11 AM
looks even better in person....social distancing in person of course.
Posted by: Root_Werks May 28 2020, 11:48 AM
Attention to detail it outstanding! Looks good!
Posted by: bbrock May 28 2020, 11:57 AM
Wow! Well done. Details do matter and this shows it.
Posted by: rgalla9146 May 28 2020, 01:34 PM
Everything done so far was on the rotisserie or on a chassis cart.
I finally can use the lift (long stored car out for a while) to do some needed tasks and take some bottom pics.
Soon to follow.
Posted by: Maltese Falcon May 28 2020, 04:10 PM
Your six should def add some 914 spice to the Lüft show in NC this November
Posted by: Cairo94507 May 28 2020, 04:13 PM
Looks great!
Posted by: rgalla9146 May 28 2020, 04:47 PM
some more
Attached thumbnail(s)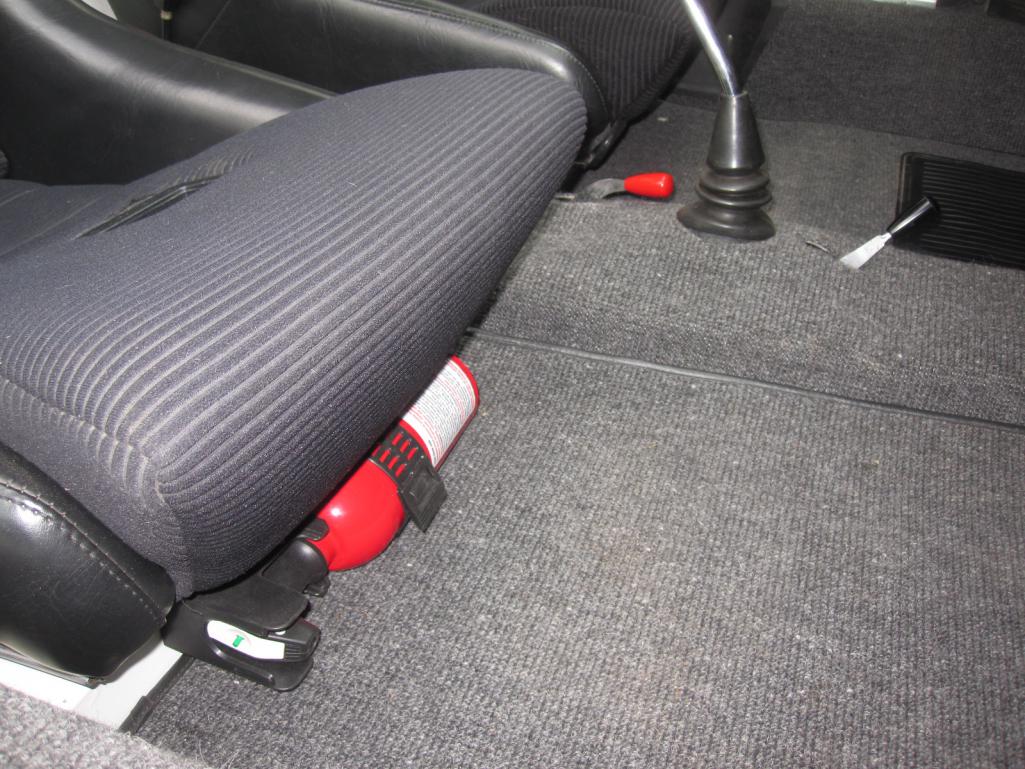
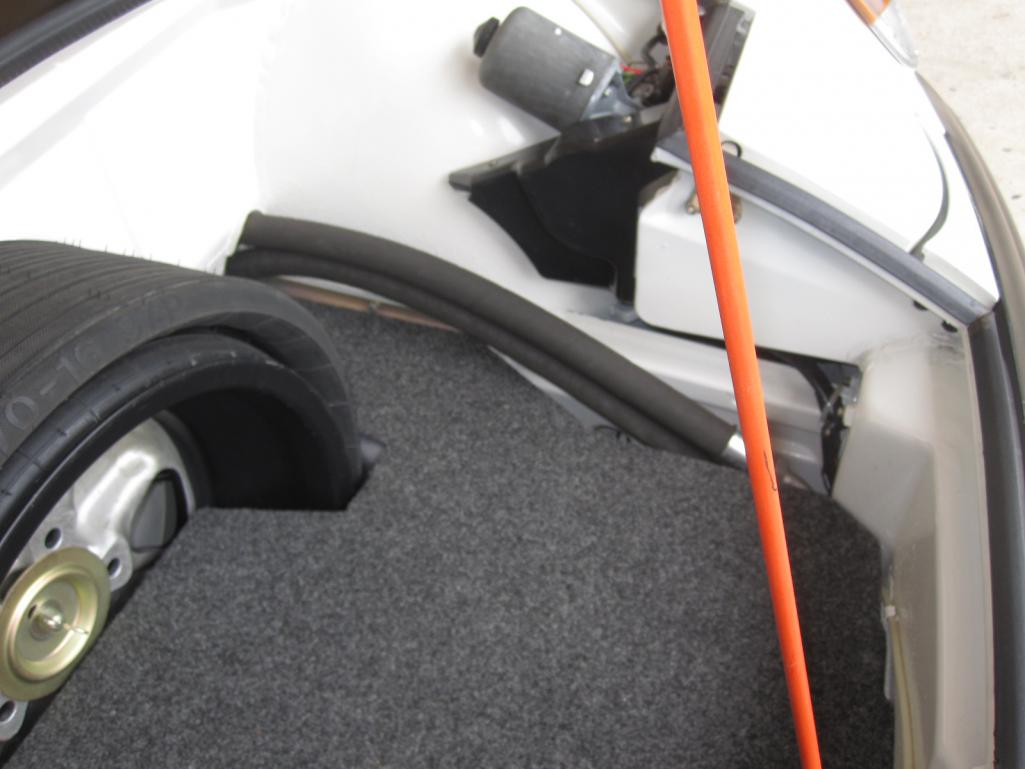
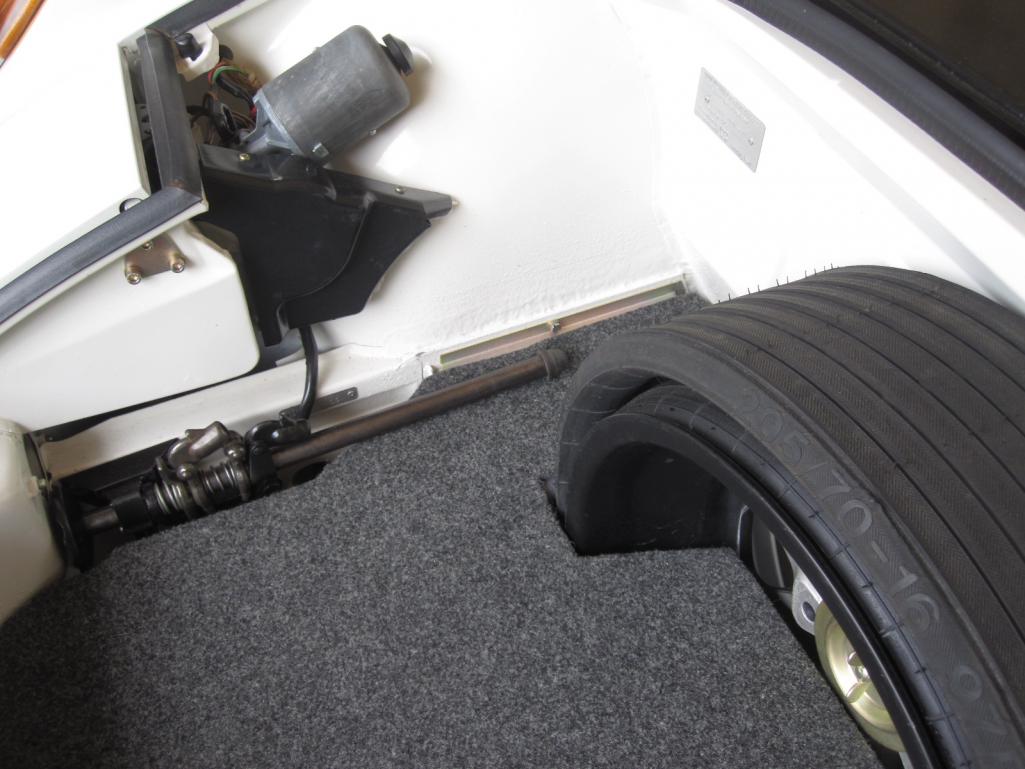
Posted by: stevesc_us May 28 2020, 05:06 PM
some more
Great build! Pardon me if you already said, but where did you score the vintage Scheel seats? Let me guess, was that from Hershey years ago as well?
Posted by: BeatNavy May 28 2020, 05:35 PM
I really hope I can see this car in person at the Stroudsburg event in July. It's beautifully done, Rory.
Posted by: mepstein May 28 2020, 05:39 PM
looks even better in person....social distancing in person of course.
I had the same comment a year ago. On the screen it’s all very nice but the car looks even better IRL. Maybe because the white body hides the curves in the pics but you see more 3D in person.
Posted by: rgalla9146 May 28 2020, 05:48 PM
some more
Great build! Pardon me if you already said, but where did you score the vintage Scheel seats? Let me guess, was that from Hershey years ago as well?
The seats ...hard to believe but they were either given to me or I paid a couple hundred
for them from a friend who owned the first hot rod 914 I worked on.
For years they were stored in my loft while I dreamed or the car to put them in.
I did have the inserts re-stretched and I made new Scheel/Mann buttons.
Posted by: Luke M May 28 2020, 06:19 PM
Glad the old girl got put back together. You did an excellent job Rory. I can't wait to see it in person some day.
Posted by: rgalla9146 May 28 2020, 07:04 PM
outside too
Attached thumbnail(s)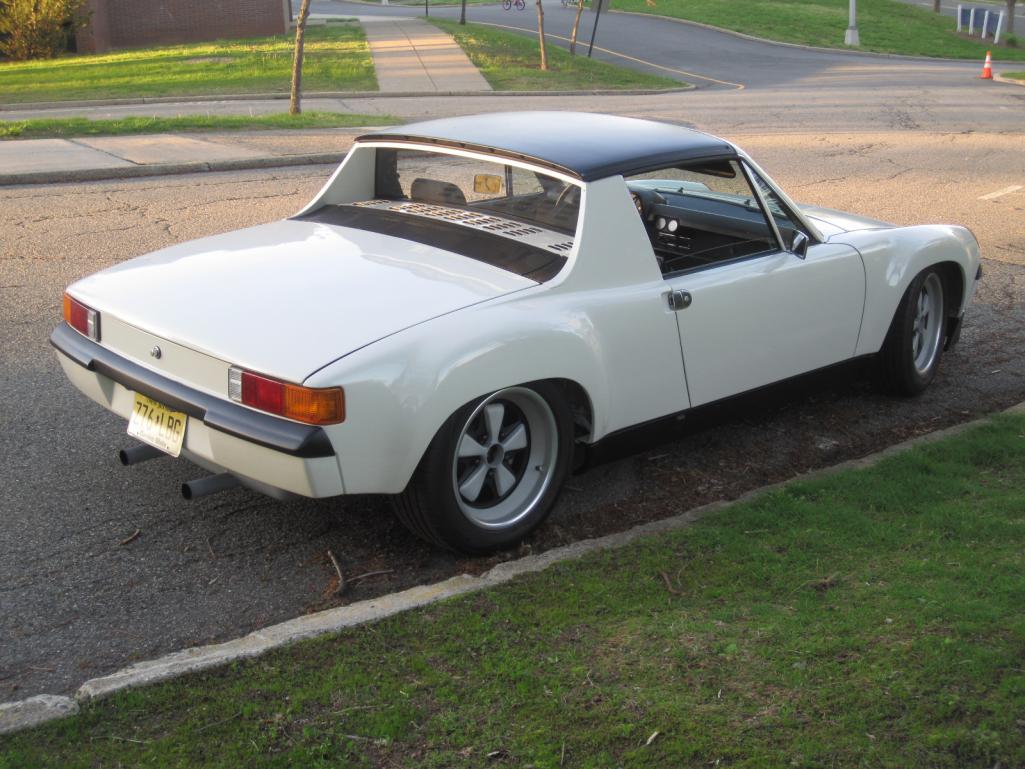
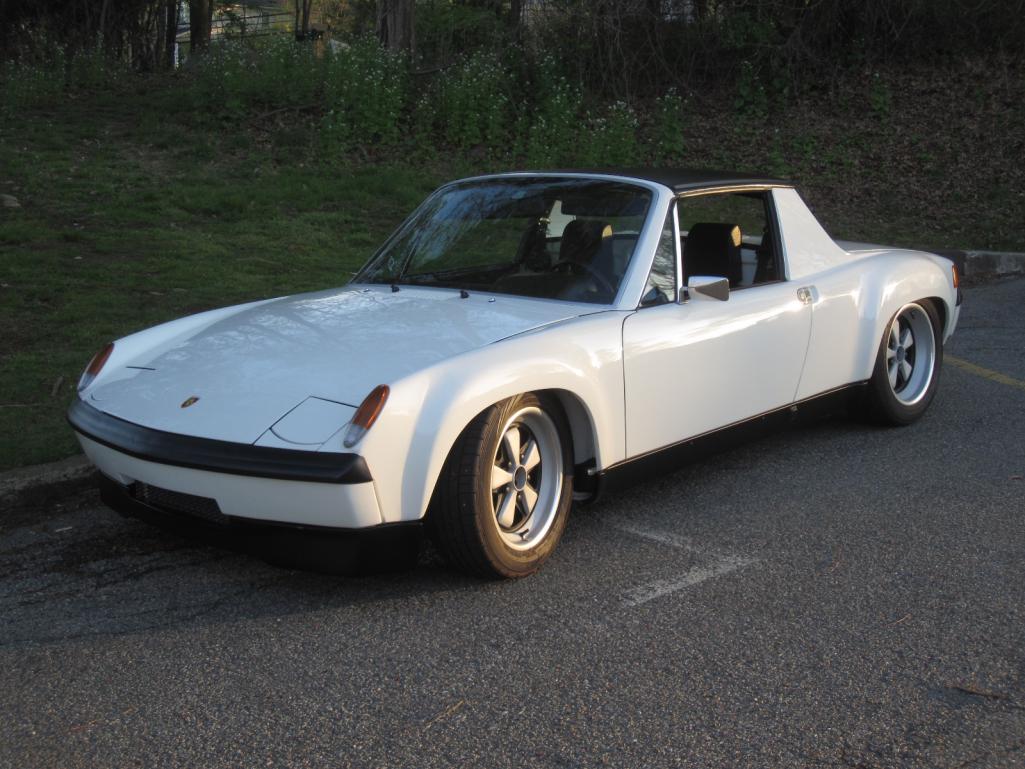
Posted by: PanelBilly May 28 2020, 07:17 PM
There’s an app called Roads where you can find local drives that are fun. I’d take the car out on some private tours and enjoy it even more. People love to see cars like yours on the open road.
Posted by: pete000 May 28 2020, 07:31 PM
Is that GP white? I like it!
Posted by: rgalla9146 May 28 2020, 07:54 PM
Is that GP white? I like it!
Actually Light Ivory L80 E
I'm pretty sure the factory race cars ironically were painted Light Ivory, not Grand Prix white.
Can someone confirm ?
Posted by: rgalla9146 Nov 15 2021, 10:24 PM
It's hard to believe but it's almost three years since I 'temporarily' installed
the 2.0 '68 911 engine in my car. I've enjoyed it and driven it extensively.
I never thought it would be years before the long planned 3.0 engine and '916'
trans would finally happen. Lets say a few target dates have come and gone.
First a pic or two of the trans.
I had to farm out the ring and pinion and back lash work to an old friend.
I did the other repairs, modifications and assembly.
This involved locating and mounting a support bracket for shift linkage inside
the trans in addition to the usual transmission freshening.
I fabricated the clutch pulley bracket and will soon whittle up an acelerator cable mount.
More to come......sooner I hope
Attached thumbnail(s)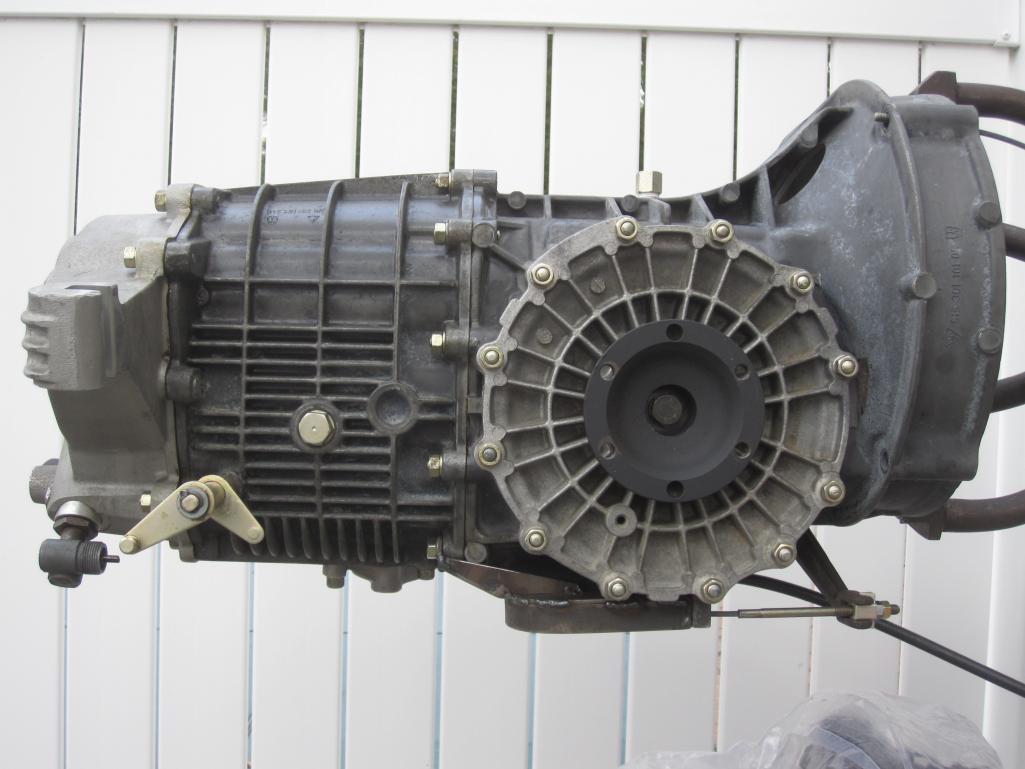
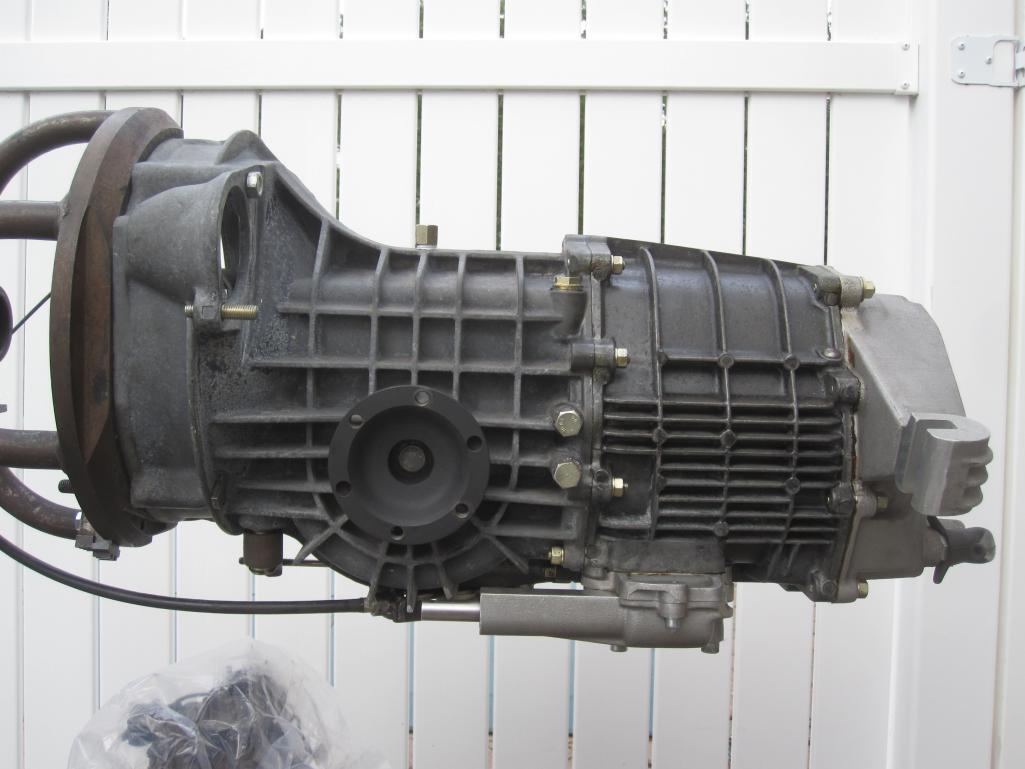
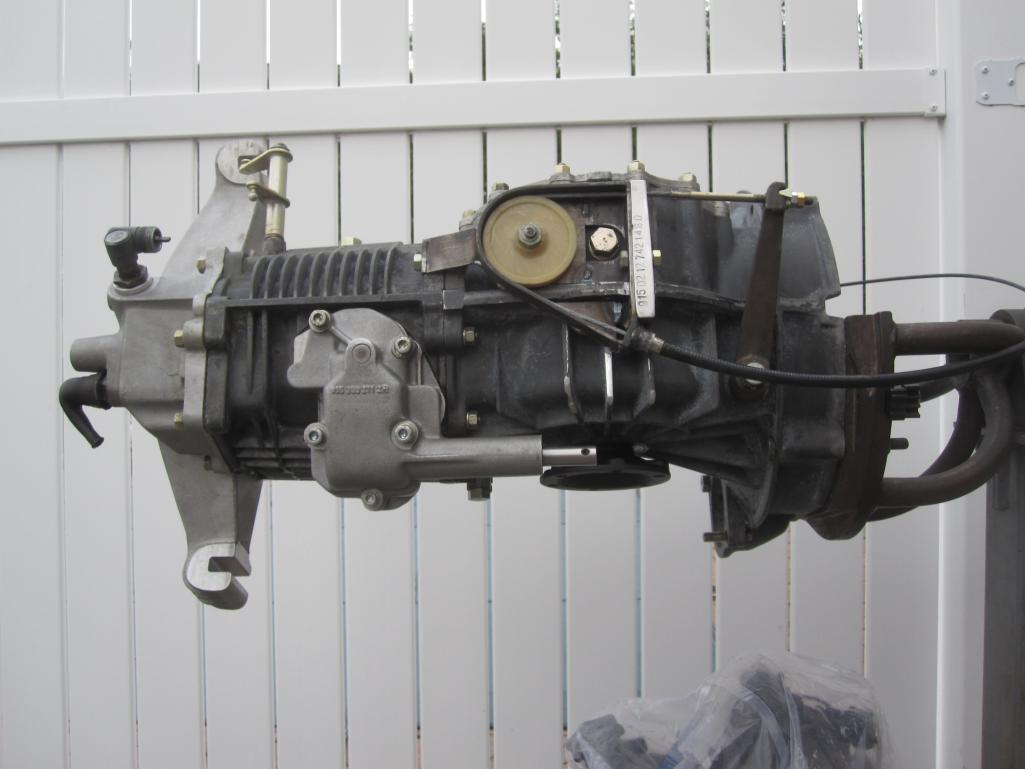
Posted by: rgalla9146 Nov 15 2021, 10:31 PM
Detail of pulley bracket
Attached thumbnail(s)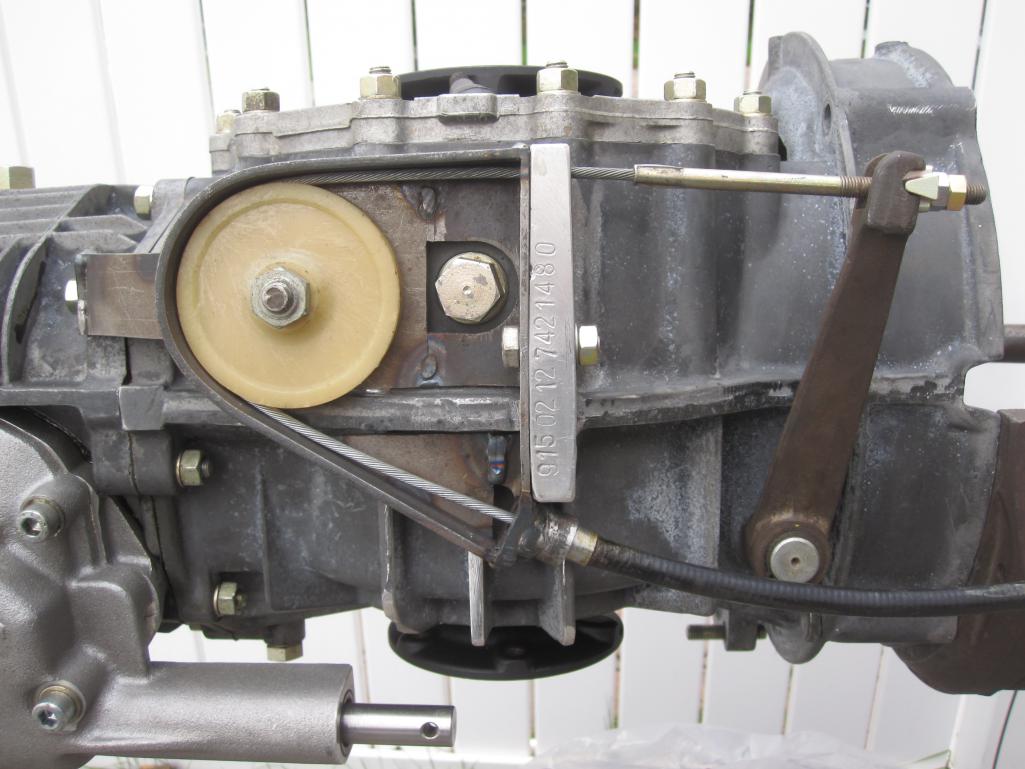
Posted by: BillJ Nov 15 2021, 10:46 PM
Thats a beauty Rory. Whats the plan for the 2.0?
Posted by: rgalla9146 Nov 15 2021, 10:54 PM
Thats a beauty Rory. Whats the plan for the 2.0?
Maybe put it in my orange car and pickle the number matching original engine.
Nothing firm yet.
Posted by: gms Nov 17 2021, 08:54 AM
very nice, I see a product in the making...The RORY-Wheel!!
Posted by: infraredcalvin Nov 17 2021, 09:01 AM
Hmmmm I have a wevo kit on my 915, not nearly as elegant as the MB kit. I wonder if that shift console alone would work with my components to clean up shifting….
Nice solution on the wheel I like how it recesses below the trans ribs instead of floating on top, great execution!
Posted by: Shivers Nov 17 2021, 10:40 AM
Wow, nice work on the clutch pulley.
Posted by: sixnotfour Nov 17 2021, 06:00 PM
Posted by: rgalla9146 Nov 17 2021, 07:41 PM
Hmmmm I have a wevo kit on my 915, not nearly as elegant as the MB kit. I wonder if that shift console alone would work with my components to clean up shifting….
Nice solution on the wheel I like how it recesses below the trans ribs instead of floating on top, great execution!
The Martin Bott kit includes three selector shafts that are modified to replicate
the real 916 items.
Included also is a bracket that must be attached to the pinion housing with three
allen bolts. The bracket supports a shaft (and does a couple other functions)
for a shift selector.
Locating, drilling and tapping the holes for this bracket is up to the buyer or
builder. Bosses for the three bolts are cast into all 915 cases,
This is a long way of saying the 916 side shifter is not a simple add-on and
certainly not easy.
Also, Martin might not be willing to sell the parts seperately.
As for shifting quality......to be determined.
Posted by: TRS63 Nov 18 2021, 06:34 AM
I can't believe I never saw this thread before! I took the time to read it all since its start and that is very inspiring!
Now to try to work even faster on mine, I miss so much driving it!
Antoine
Posted by: Shivers Nov 18 2021, 08:33 AM
Looking good,
Side vents in the front inner wheel well
front oil cooler or H2O conversion?Oil cooler for a 3.0 SC engine w/carbs
I don't covet much, but your car makes it difficult not to. So clean.
Did you make the oil cooler ducting, or was it something you adapted? Thanks
Posted by: Luke M Nov 18 2021, 10:38 AM
Hi Rory,
Get that 3.0 and 915 in that GT already.. 
Did you buy or make the short steel oil lines from the t-stat to front lines?
These in the pic.
Attached image(s)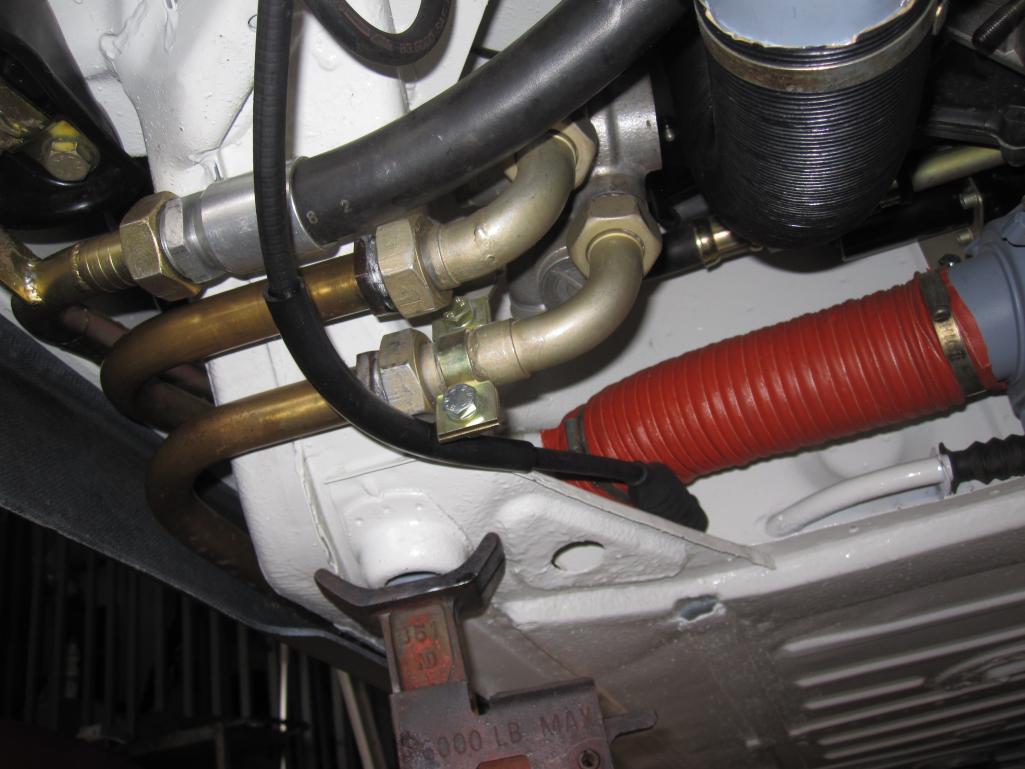
Posted by: rgalla9146 Nov 18 2021, 03:52 PM
Hi Rory,
Get that 3.0 and 915 in that GT already..
Did you buy or make the short steel oil lines from the t-stat to front lines?
These in the pic.
Made them from parts of 911 SC plumbing.
I cut sections and fit them by trial and error then tack welded them.
When it fit together in the right location I had a good TIG welder friend finish
the welding.
There are five fabricated pieces between the engine, the thermostat, the front long
tubes and the tank.
I haven't run the front cooler yet .....not needed with the 2.0 engine.
The connecting pieces will be installed to complete the front cooler circuit when the
3.0 SC engine goes in.
I'll shoot pics of the individual parts before oil goes in.
Posted by: Luke M Nov 18 2021, 06:45 PM
Hi Rory,
Get that 3.0 and 915 in that GT already..
Did you buy or make the short steel oil lines from the t-stat to front lines?
These in the pic.
Made them from parts of 911 SC plumbing.
I cut sections and fit them by trial and error then tack welded them.
When it fit together in the right location I had a good TIG welder friend finish
the welding.
There are five fabricated pieces between the engine, the thermostat, the front long
tubes and the tank.
I haven't run the front cooler yet .....not needed with the 2.0 engine.
The connecting pieces will be installed to complete the front cooler circuit when the
3.0 SC engine goes in.
I'll shoot pics of the individual parts before oil goes in.
Thanks for the info Rory...
It's for my brothers 914 with a 3.0 as well. Gonna run a PMS front oil cooler kit so need to work out the rear side of things. For now he is going to run a stock 6 setup so we can move the car about. I'll collect the parts and will get to this in the spring.
Posted by: rgalla9146 Jan 18 2022, 10:18 PM
The time is finally here to change my engine.....and transmission.
The '68 2.0 was installed three years ago.....to the day.
The SC 3.0 engine first.
I installed later 993 exhaust valve covers trimmed to provide
room to remove. These covers mount with shorter studs and have modern
perimeter seals. I hope they seal better than the 930s
I installed a later single wire alternator and fabricated an engine harness to suit
the alternator and the 6 pin CD unit for the SC distributor.
The distributor is recurved and the adv./retard pot is removed.
I installed natural fiberglass shroud pieces because I've owned them a long time.
These parts eliminate provisions for heat......as do the headers. Oh well.
I will finally install the last two front oil cooler plumbing pieces to
complete the circuit. I can't wait to hear it gurgle as the engine warms up.
On to the trans.
It is a 1972 915, the first year. A mag case.
It is built and ready to go with a Martin bott 916 conversion and ZF limited slip.
It has 110 mm flanges so suitable length half shafts from SwayAway will be
used. The one-year-only '72 shifter is on hand too....I hope it can be modified to
shift with feel and short throws.
I fabricated the shifter shaft for in the tunnel. The one under the engine will be
done when the engine and trans are in the car.
I've got a lot of cleaning to do.
Will post as I go.
Attached thumbnail(s)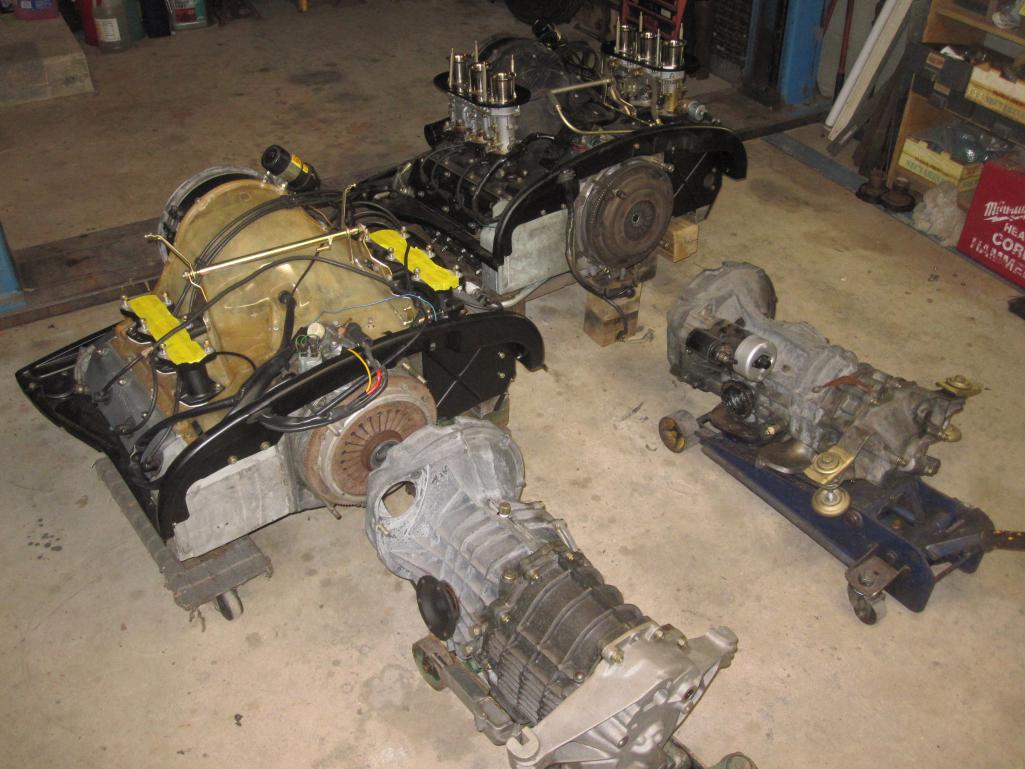
Posted by: Dion Jan 18 2022, 10:35 PM
Looking great Rory. Gonna be another fabulous build.
Posted by: Cairo94507 Jan 19 2022, 09:06 AM
Absolutely amazing work! This is an epic build.
Posted by: rgalla9146 Jan 22 2022, 08:44 PM
Luke and others asked about the installation of the 911 thermostat in my GT
project.
I hope these few pictures will help.
The plumbing pieces are made from various 911 oil system tubes that I
cut, shortened, lengthened and rearranged to support and feed the thermostat.
In total six fabricated tubes do the job. The rubber one with the elbow on one end is a
standard 911 part
The long tubes on the drivers side are brass repros, they're probably ten years old.
The thermo gets plumbed into the hard return line from the bottom of the
block to engine side of the tank.
Attached thumbnail(s)
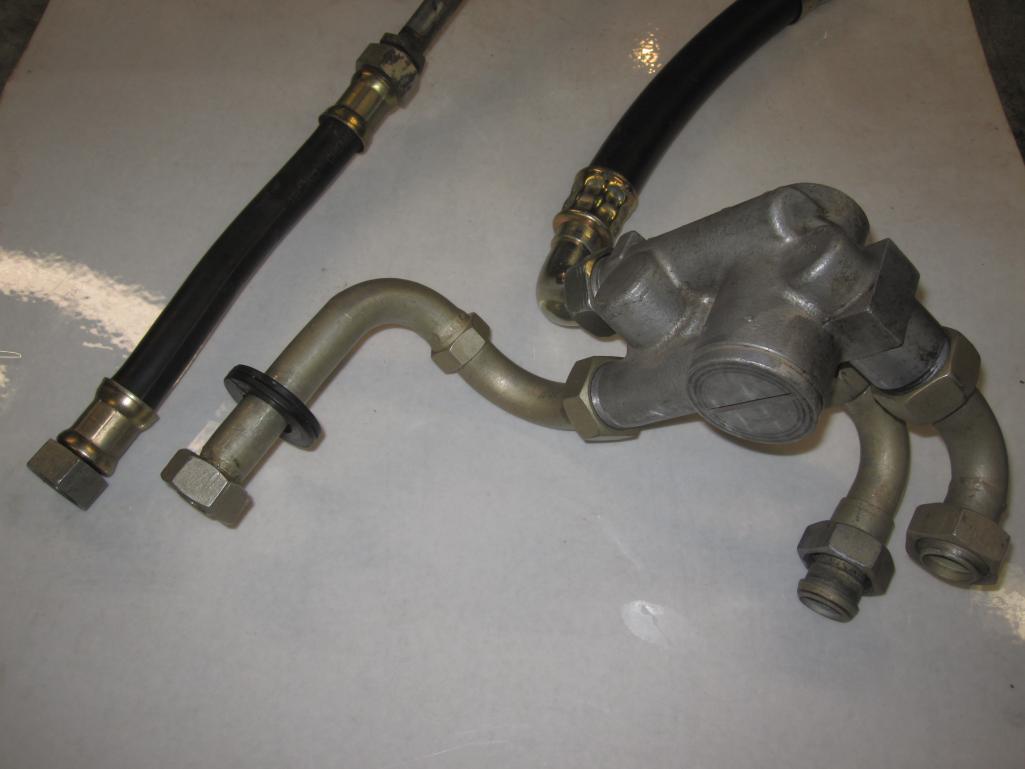
Posted by: rgalla9146 Jan 22 2022, 08:57 PM
more. I hope this helps.
Attached thumbnail(s)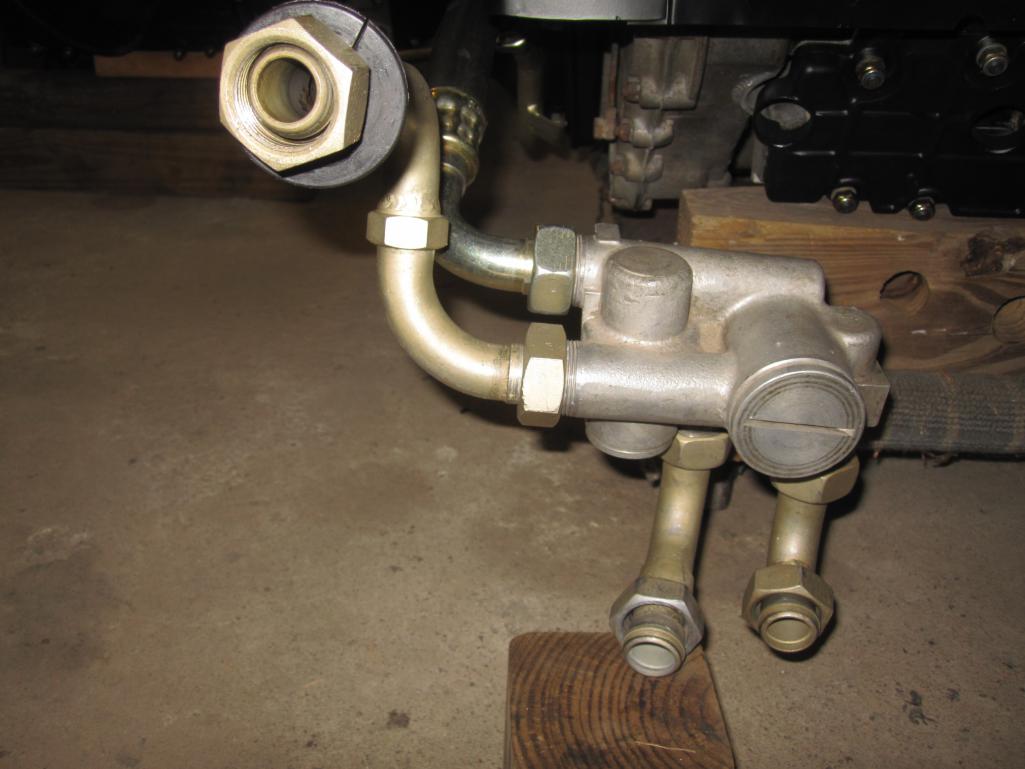
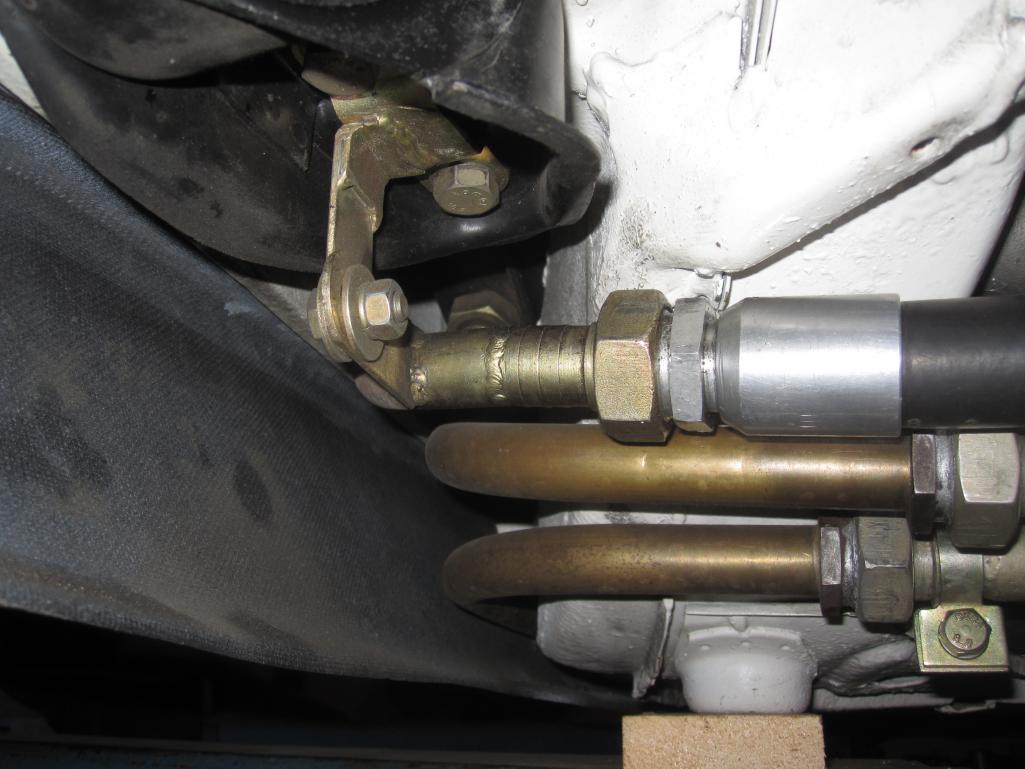
Posted by: rgalla9146 Feb 6 2022, 10:56 AM
Finally some pics of the bottom of the car with the engine and transmission installed.
I didn't disassemble or rebuild the engine so it's pretty dirty.....I do have plans.
For now I'm waiting for some exhaust parts etc. to start it.
Another few days.
Attached thumbnail(s)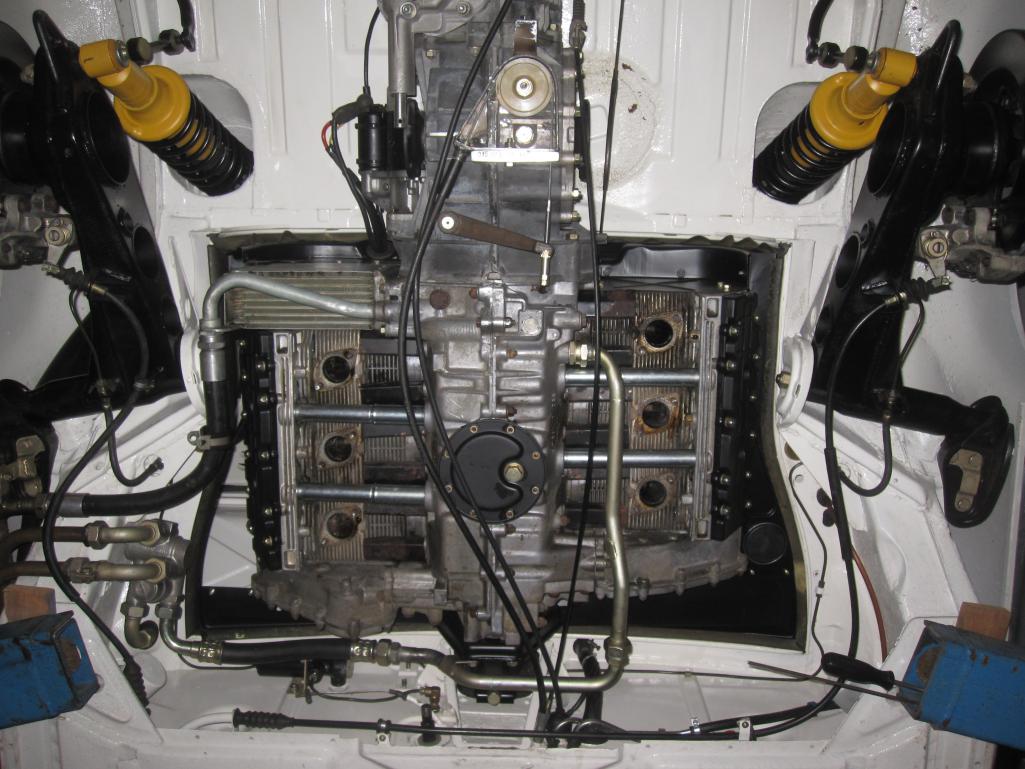
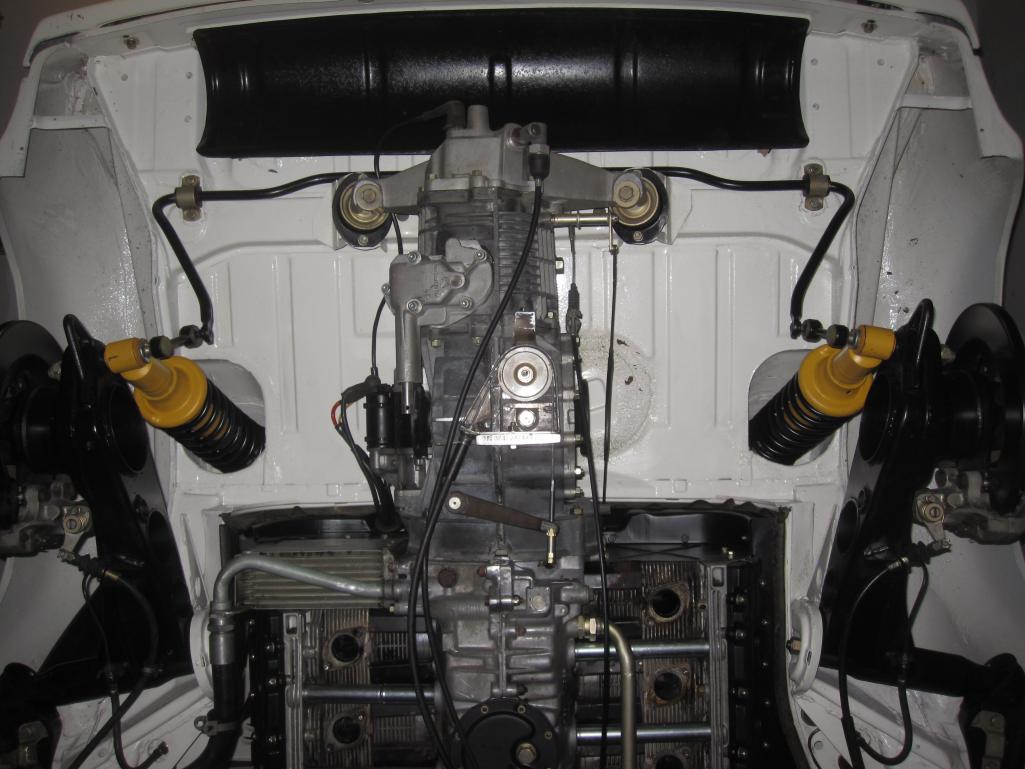
Posted by: rgalla9146 Feb 6 2022, 11:00 AM
a shot of the front
Attached thumbnail(s)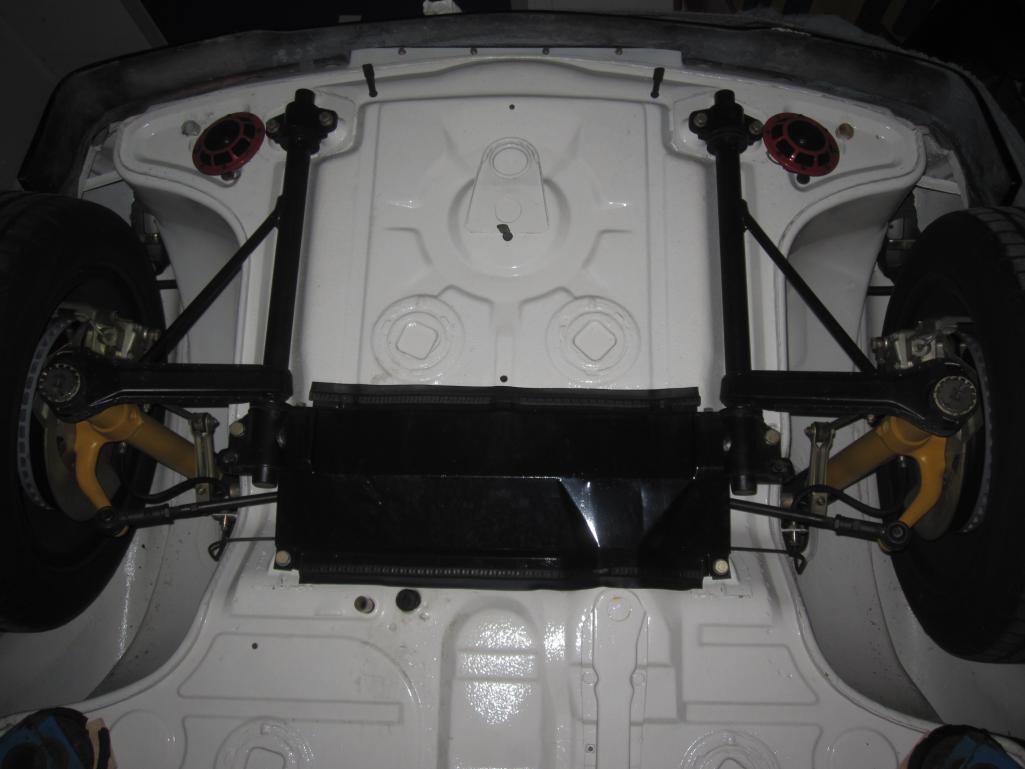
Posted by: Luke M Feb 6 2022, 01:30 PM
Looks good Rory.. Are you making your own shift rod to the Bott's kit?
Posted by: rgalla9146 Feb 6 2022, 02:15 PM
Looks good Rory.. Are you making your own shift rod to the Bott's kit?
Yes, I'm going to use two WEVO joints.
I'll use a straight piece of original 914 shift tube with ends I'm making to improve fit
into the WEVO joints.
The fit is a bit loose using the 914 shift rod ends.
Posted by: Cairo94507 Feb 7 2022, 08:38 AM
That looks very nice. I love the transaxle!
Posted by: Tom1394racing Feb 24 2022, 10:36 AM
Awesome build. Will be following in your footsteps.
Posted by: Dion Feb 25 2022, 09:12 AM
That looks fantastic Rory.
Posted by: TRS63 Feb 25 2022, 03:16 PM
Looking great
Antoine
Posted by: rgalla9146 Mar 1 2022, 08:16 PM
According to a favorite rule of thumb among car enthusiasts 'it will cost twice as much
and take twice as long' ..... that is a very optimistic prediction.
My 3.0 is finally installed and 'running' and is 'drivable'
The engine came from a running driving car that was totaled in a crash.
First surprise ? big compression leaks and oil leaks ....but it does run.
Second surprise ? very disappointing control of my 915 / 916 trans.
Soooo..... the engine will come out and be freshened up and emerge as a
short stroke 3.2
But first I'll take this 'opportuniy' chase the transmission issues.
The process began as an effort to adjust the shift linkage but soon it became
apparent that the linkage inside the trans was a problem as well.
Without going into too much detail it turns out that full days of disassembly,
adjustment, reassembly, test drive, disassembly adjustment, etc. etc. etc. have
finally paid off. Today the trans is finally working as it should.
I must say is very different to sit in a 914 and select 1st gear by pushing the lever
forward.
Now I can put the trans aside and go after the engine.
Onward
Attached thumbnail(s)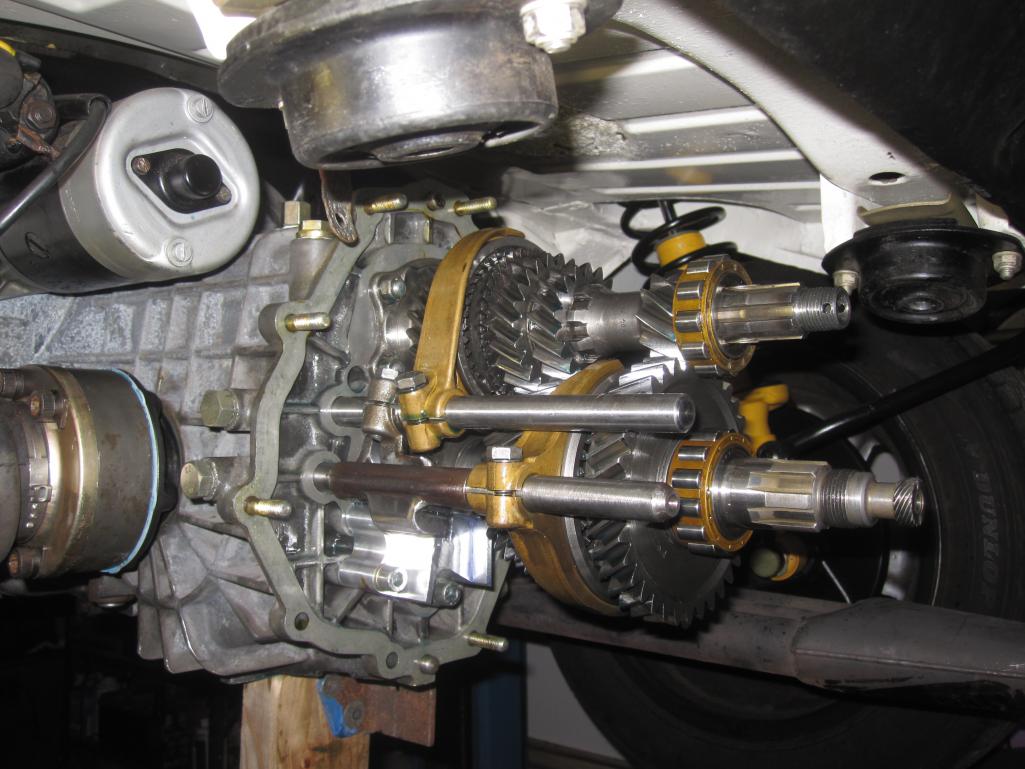
Posted by: rgalla9146 Apr 23 2022, 06:46 PM
Well my 3.2 short stroke engine project is turning into an oddyssey due to parts supply issues.
With no ARP rod bolts available I decided to go with better (Pauter)rods. Next
surprise ? No rods available.
Dual plug ignition is no picnic either. Seems everyone has their own version.
I guess I'll have mine too.
So while these things are being chased I'm working on my brothers project.
Check the pic.
1932 Ford 3 window Coupe with 283 Corvette engine.
He's owned the car since 1962 and it was his daily back then.
The body work is all done. I'm assembling the chassis and will get it running.
Can't wait to hear it run.
Attached thumbnail(s)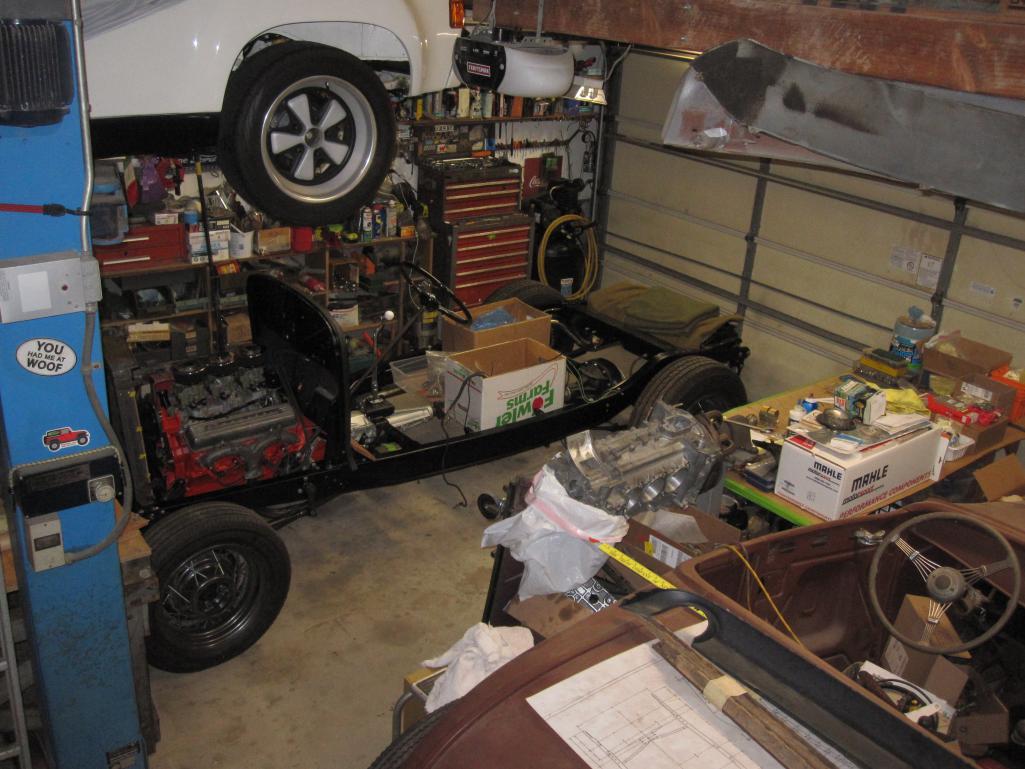
Posted by: rgalla9146 Aug 16 2022, 06:38 PM
Here goes.
Attached thumbnail(s)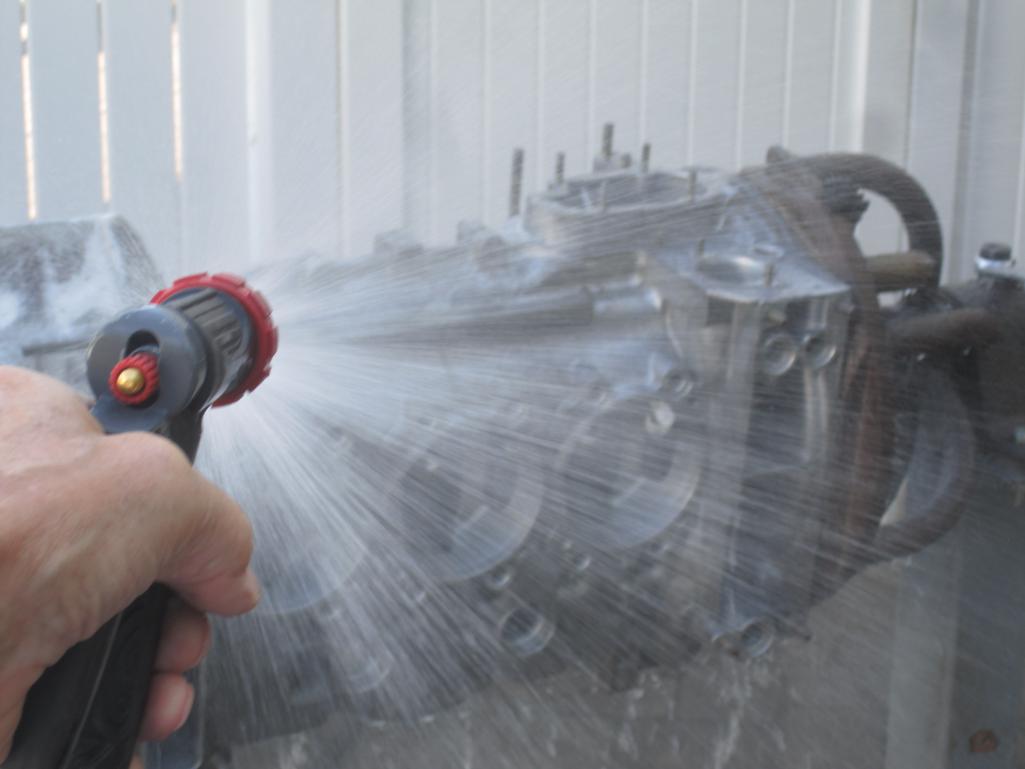
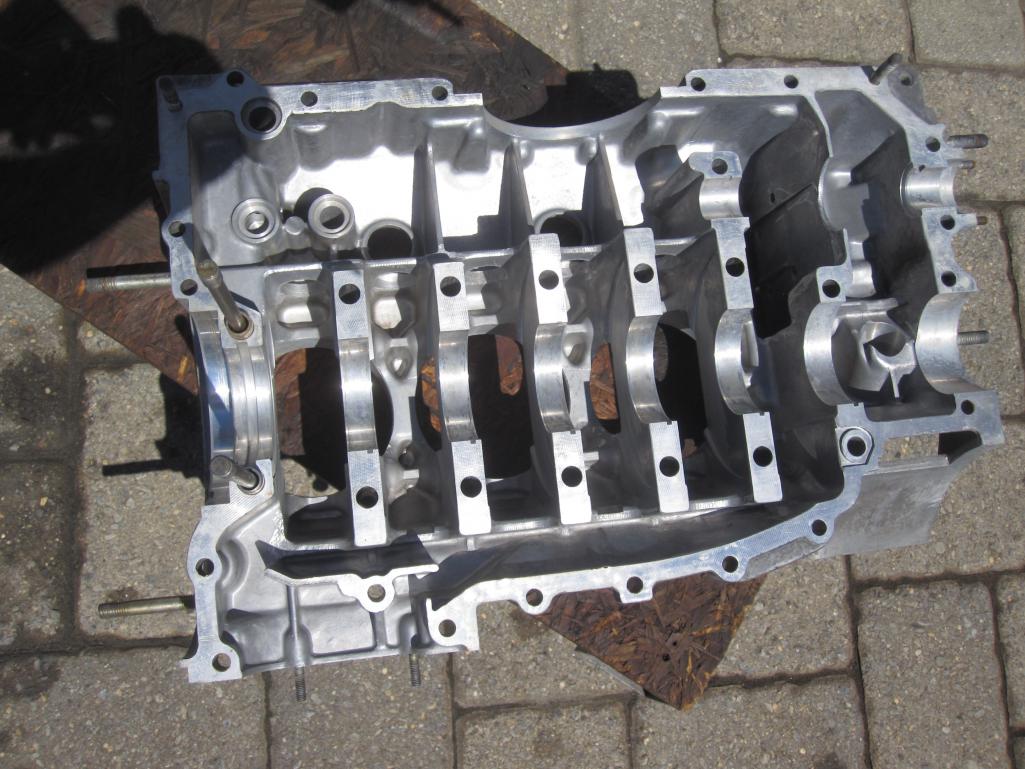
Posted by: rgalla9146 Aug 16 2022, 06:42 PM
abbreviated vesion
Attached thumbnail(s)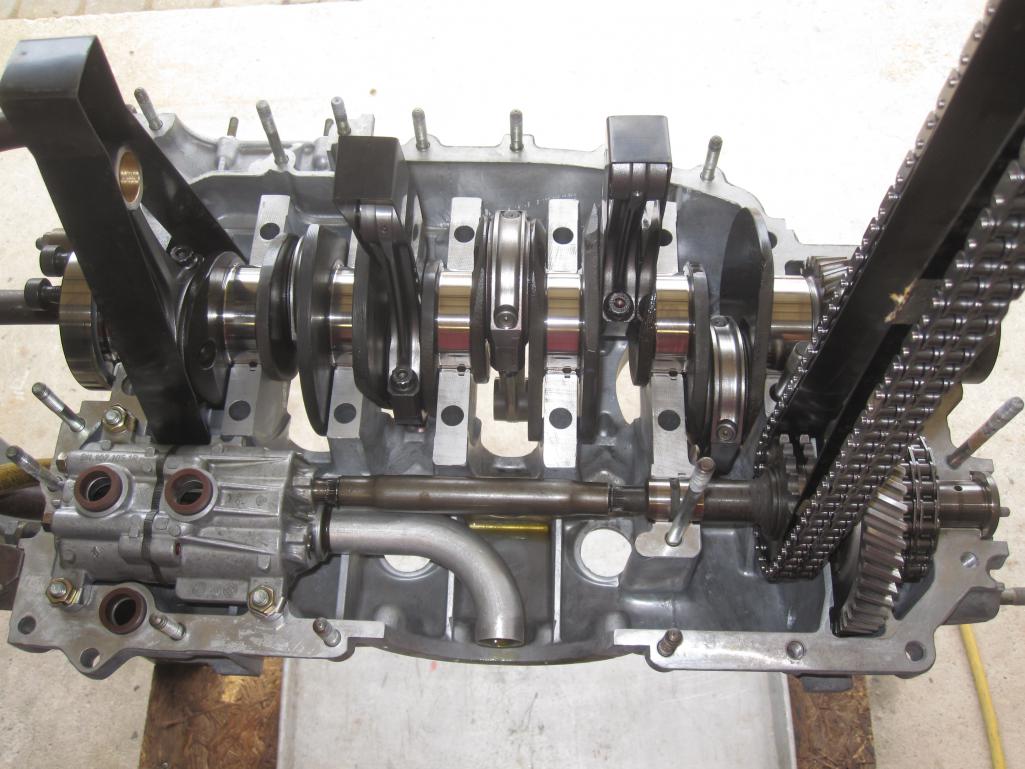
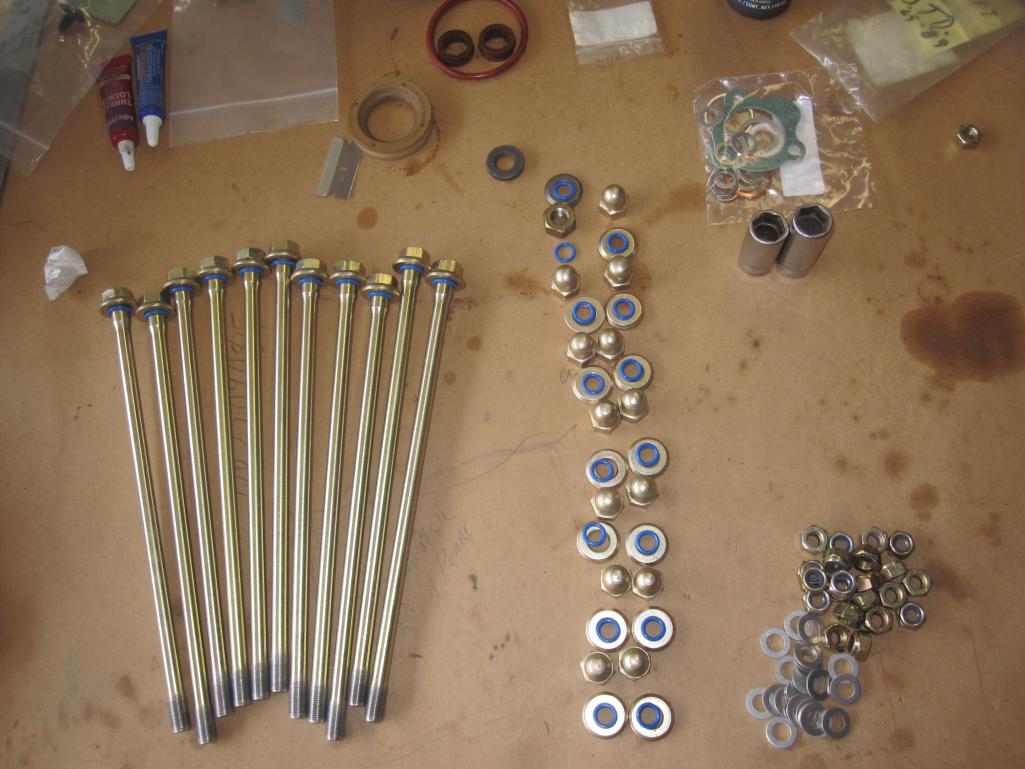
Posted by: rgalla9146 Aug 16 2022, 06:53 PM
Pauter light weight rods hanging out
twin plug heads added
Attached thumbnail(s)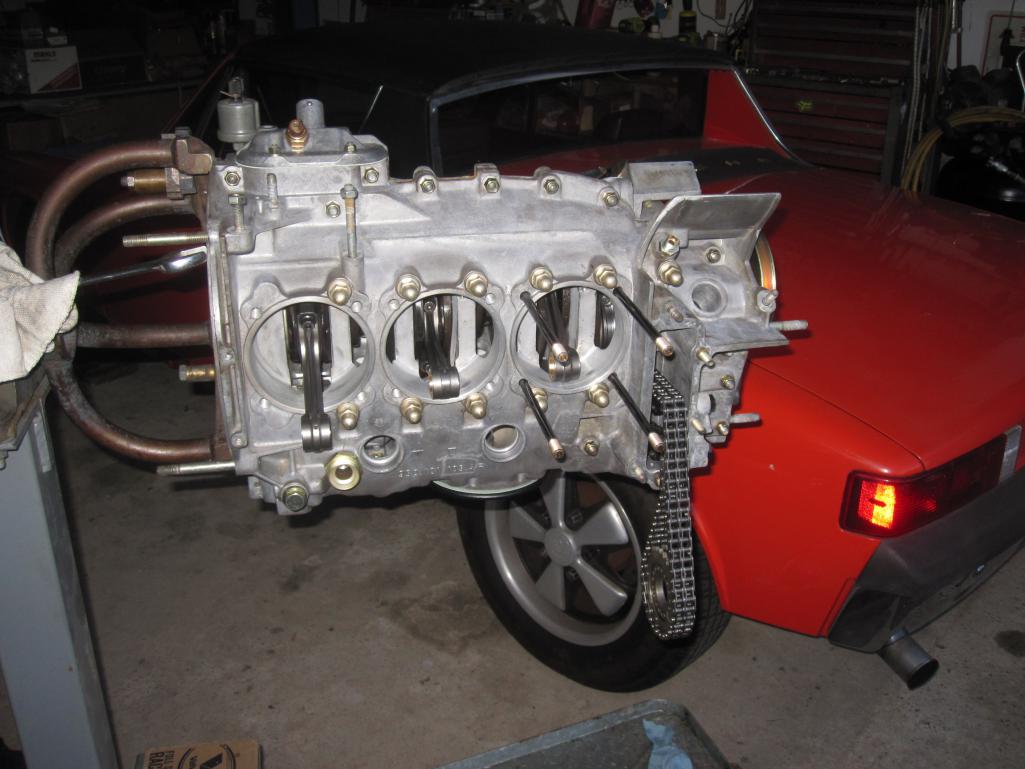
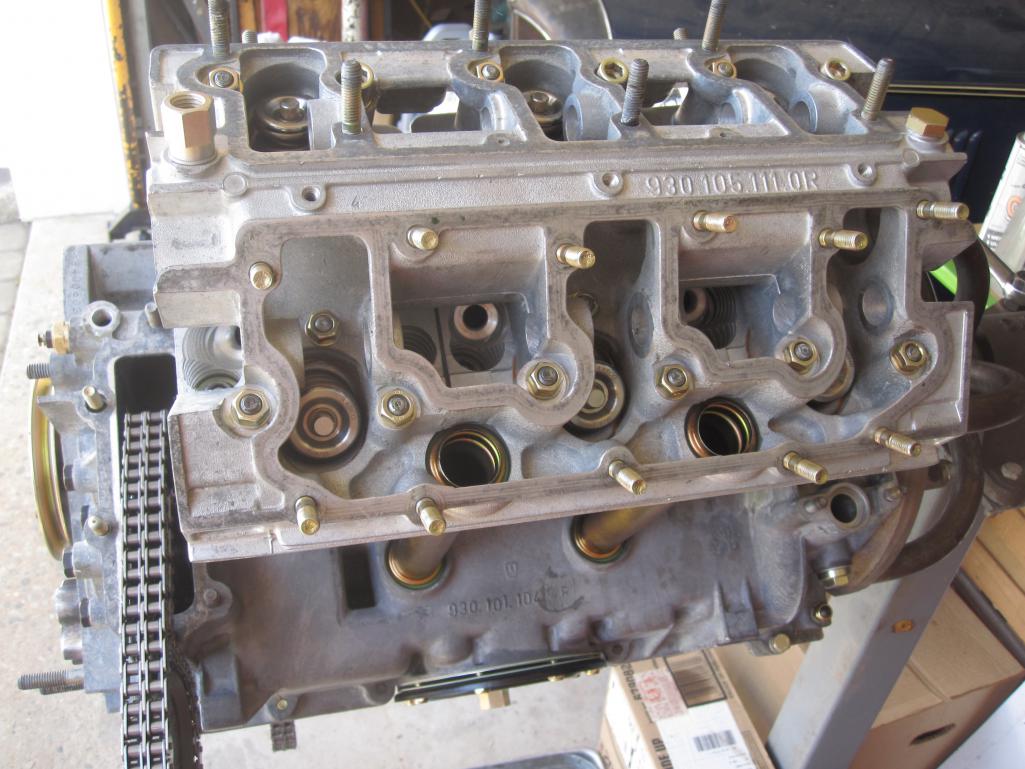
Posted by: rgalla9146 Aug 16 2022, 07:10 PM
full long block with 98mm Mahle P&Cs
compression reduced to 9.8 to 1
Twin plug distributor added for bling shot
Next up camshafts install and time, then add the rockers, adjust and button it up.
Might start it out of the car for easy access and adjustment.
I've never driven a short stroke 3.2 but understand they're quite lively and can make up to 300 hp
Progress should pick up a bit now.
Attached thumbnail(s)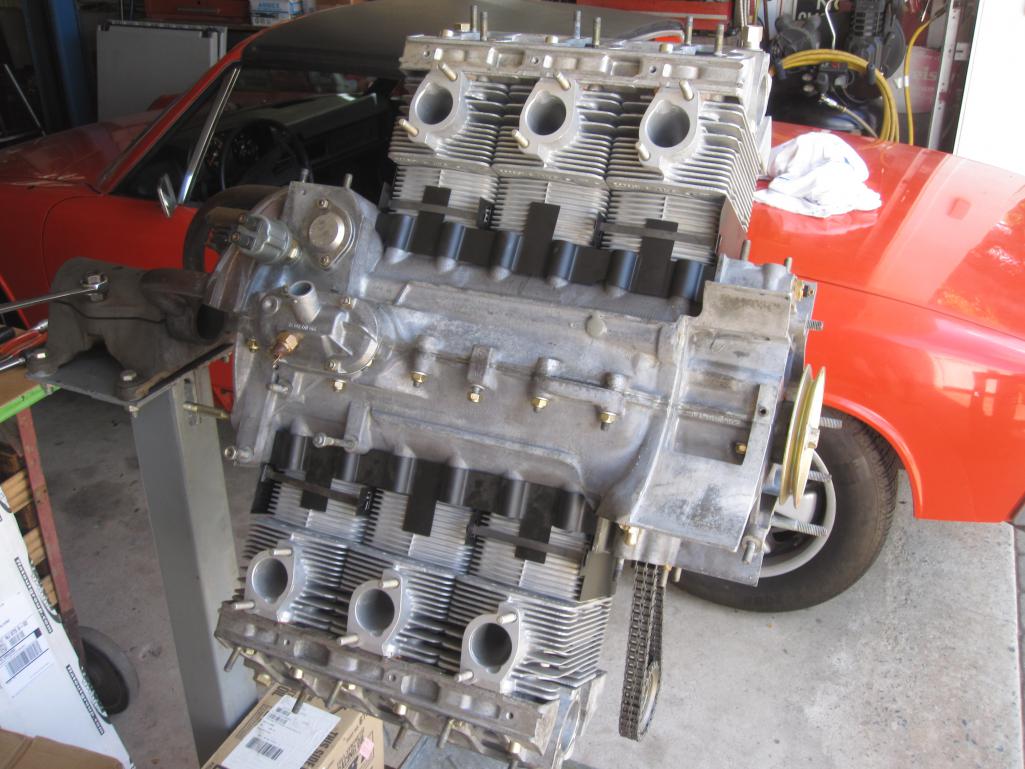
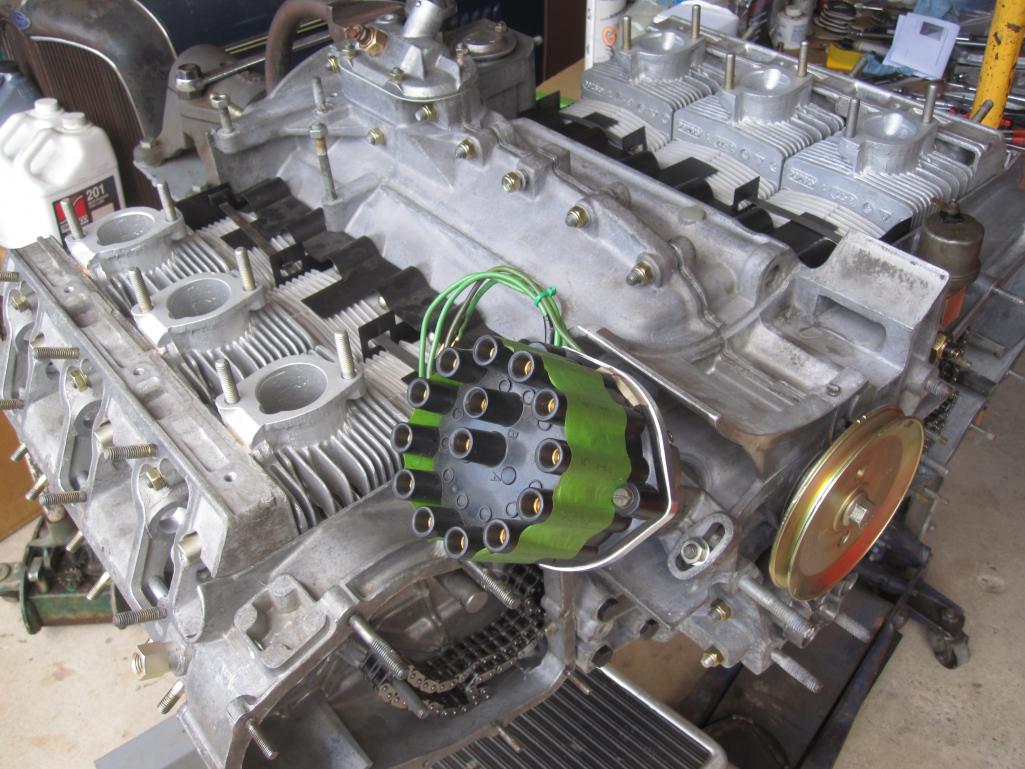
Posted by: stownsen914 Aug 17 2022, 05:56 AM
Looking good Rory!
Posted by: Cairo94507 Aug 17 2022, 06:29 AM
Posted by: DRPHIL914 Aug 17 2022, 09:15 AM
wow!! beautiful, that is quite an undertaking , what is your engine building background?
if that puts out anything over 250 hp its going to be very lively indeed!!!
Posted by: Justinp71 Aug 17 2022, 11:56 AM
Looks good! Similar to my motor. What cam/intake setup are you running? I have the DC40 cams with PMO46s, it really comes to life with high flowing exhaust. There is one on pelican dynoed at 253hp at the wheels!
Posted by: flyer86d Aug 17 2022, 01:11 PM
Rory,
My old 80 SC track car had a short stroke 3.2 built by Gene Kirschner. I bought the car from Eddie Mazur built. The engine was essentially the same as yours with Ge-80 cams and 46 Webers. 320hp @ 7500rpm. It would accelerate hard to 5000rpm and then take a deep breath and pull harder to 7500. In first gear if you fluffed it of the line and floored it, it would pull to 5000 and then light the tires off from there up. It was great fun and extremely reliable. You’ll love it in a light car.
Charlie
Posted by: ClayPerrine Aug 17 2022, 03:34 PM
This is looking great! If I may make a suggestion...
Find a good MFI system and put it on there. A 69 911 S pump and some 2.2 Mag stacks, plus rebuilt throttle bodies. You would love the throttle response and the sound will make the hair on the back of your neck stand up.
Just my $.02
Clay
Posted by: rgalla9146 Aug 17 2022, 04:02 PM
I'm running DC 60 cams, Weber 40 IDAs, (34 or 36 vents ?)AASE springs and
hardware and Pauter lightweight rods. Also big port Carrera 3.0/early SC heads.
I may be limited in ultimate performance by my carbs and exhaust. I intend to run OE
heat exchangers at least initially ......for a practical reason. Most headers I see
are very wide toward the Ebrake cables. For now I'd rather not melt beautiful cables.
Eventually I'll do a 911 Ebrake conversion and run headers.
Pictured is the dizzy I dreamt up.
It's a Bosch 911SC unit rebuilt and re-curved by J Woods
I had a machinest whittle up adapters to mount a Maserati cap and rotor.
It will work with two 6 pin Bosch CD units and two 001 Bosch coils
Attached thumbnail(s)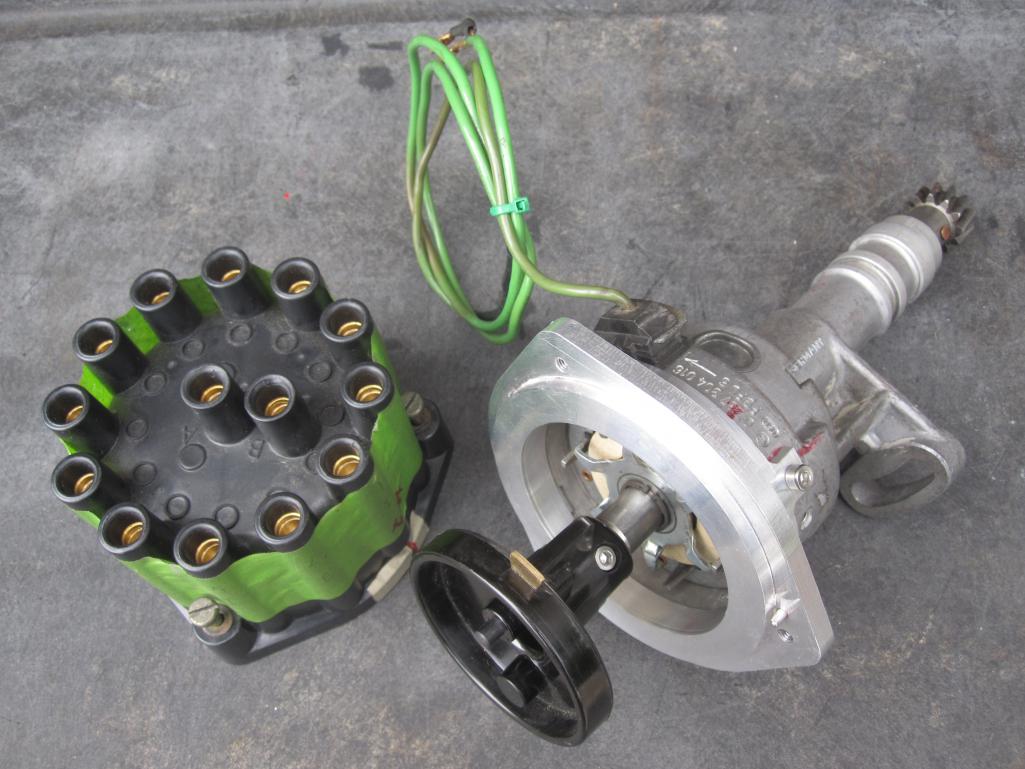
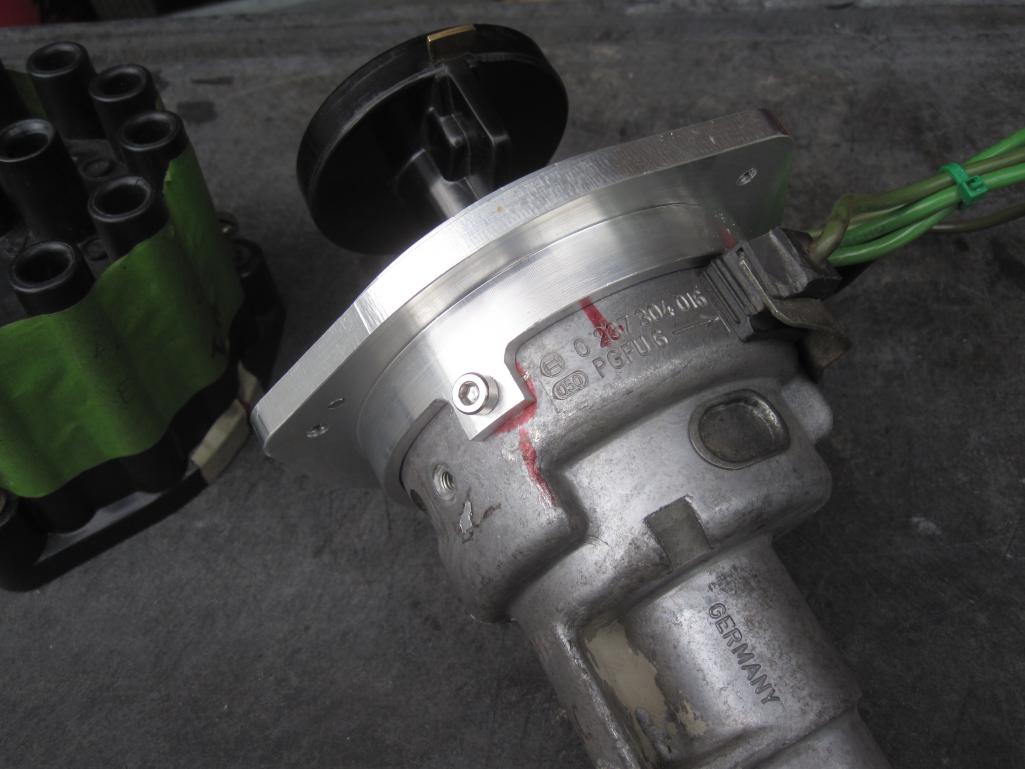
Posted by: rgalla9146 Aug 17 2022, 04:23 PM
other 12 plug parts
My experience ?
After college......BA in English
I worked for a well known north Jersey Porsche shop for maybe a year.
I then worked at an independent shop that had strong ties to Porsche/Audi North
America for eight years.
I then had a shop with my brother for twelve years.
Until now I've only done standard 911 engine repairs and rebuilds.
I have upgraded a few 930s too.
This is my first high performance 911 engine.
It is the engine I always wanted in my white GT
Attached thumbnail(s)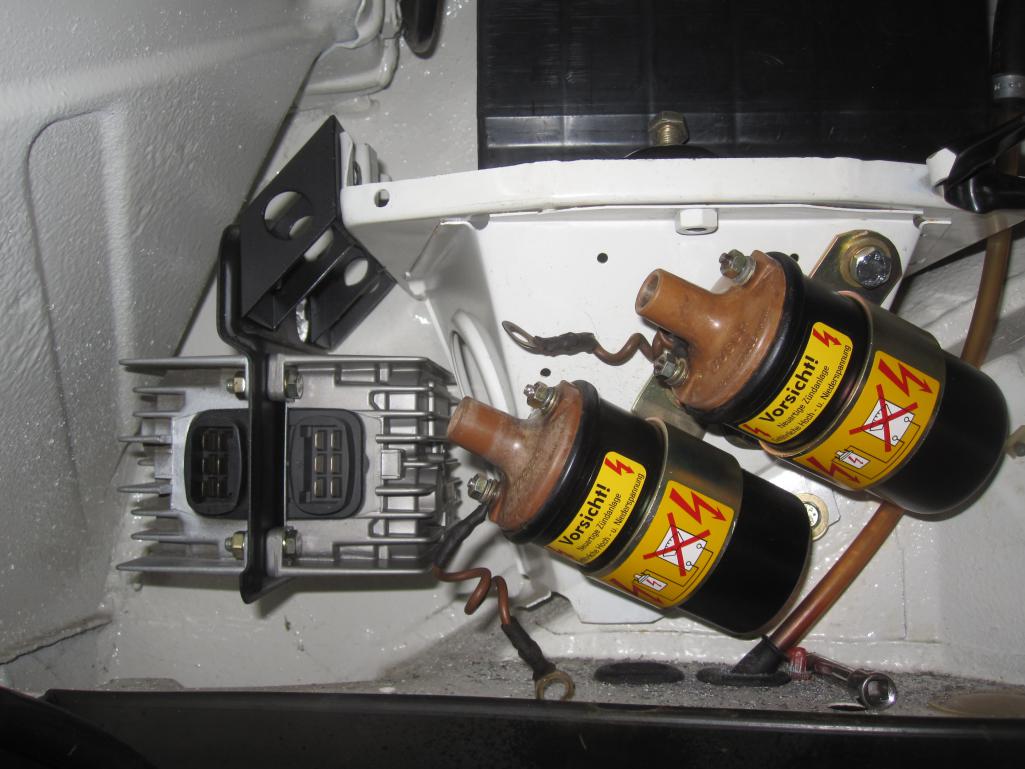
Posted by: rgalla9146 Aug 17 2022, 04:38 PM
Hey Clay.....I'm with you
I have a complete 2.2 E setup.
I cant believe I forgot a no cost addition to my cams....the machining for a MFI
pump drive.
MFI mmmmmmmm
Posted by: Justinp71 Aug 17 2022, 05:03 PM
Cool. It will scream till 5k and then have a flat power curve most likely. That is what my 3.2 did with 40s. Nice project!
Posted by: TRS63 Aug 18 2022, 04:35 AM
Beautiful engine, exactly what dreams are made of! Well done!
Antoine
Posted by: rmital Aug 27 2022, 12:38 PM
..hope Rory doesn't mind me posting this morning's fun.
but, worth the chance....what success sounds like! IMG_1568.MOV ( 3.56mb )
Number of downloads: 96
IMG_1568.MOV ( 3.56mb )
Number of downloads: 96
Posted by: flyer86d Aug 27 2022, 01:18 PM
Congratulations on getting it running on the engine stand! I had a similar 12 plug cap to SC distributor adapter the was fabricated by Rich Jascik way back when. It worked perfectly.
Charlie
Posted by: rgalla9146 Aug 27 2022, 05:37 PM
Congratulations on getting it running on the engine stand! I had a similar 12 plug cap to SC distributor adapter the was fabricated by Rich Jascik way back when. It worked perfectly.
Charlie
Hey Charlie
I actually started it on the recurved dizzy w 6 plugs only
Had issues with the adapted 12 plug dizzy yesterday so went with plan B
What a great day.
The vid is actually the second start......I had run it out of gas on the first....
DOH !!!
Rory
Posted by: ClayPerrine Aug 27 2022, 05:56 PM
Hey Clay.....I'm with you
I have a complete 2.2 E setup.
I cant believe I forgot a no cost addition to my cams....the machining for a MFI
pump drive.
MFI mmmmmmmm
I have a 69 911S pump that is for sale for the right price. It needs rebuilt, but it has all the correct part numbers for a high HP engine.
I love MFI. But living with it on a daily driver is not easy.
Clay
Posted by: rgalla9146 Aug 7 2023, 03:25 PM
I needed air filter bases for my PMO 46s. They're not the same as for Weber 40s
I just couldn't wait for the proper ones to arrive.
Attached thumbnail(s)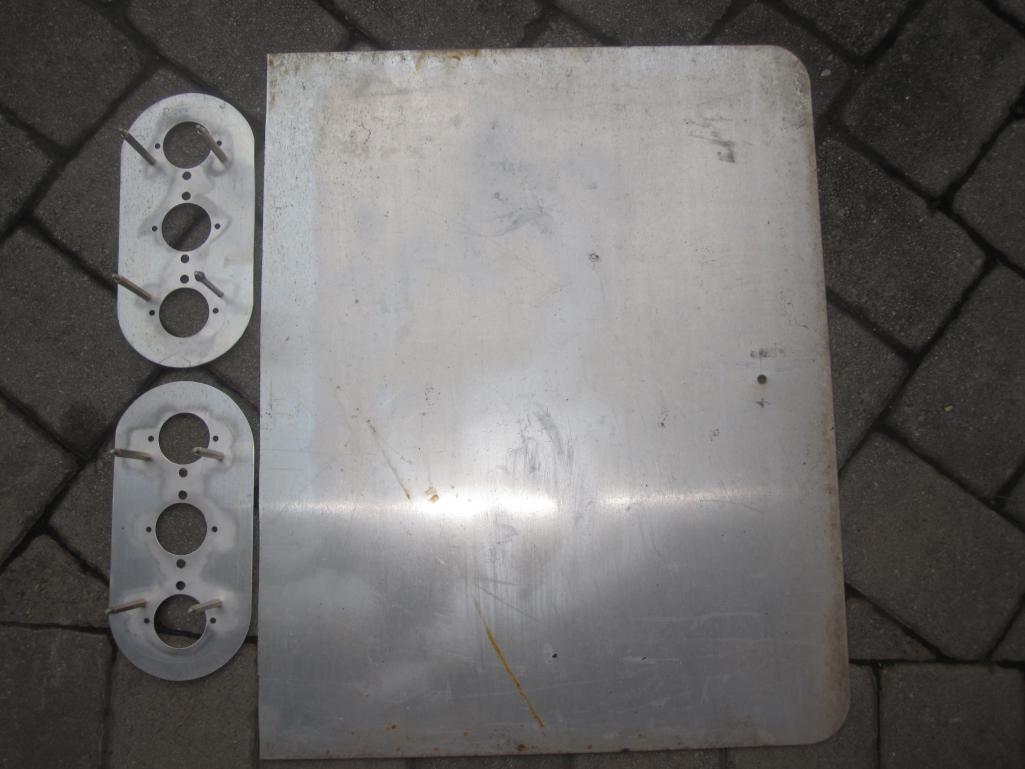

Posted by: jd74914 Aug 8 2023, 08:21 AM
Those are even better than the manufactured ones!
I love seeing street signs reused for fabrication-always a good story (unless they are riveted to the floor).
Posted by: rgalla9146 Aug 9 2023, 08:32 AM
Those are even better than the manufactured ones!
I love seeing street signs reused for fabrication-always a good story (unless they are riveted to the floor).
Caution !
My temporary parts have an important omission.
I failed to drill holes that are important vents for the idle circuit.
If you choose to make your own bases be sure to include all the holes that are seen
in the top gasket.
I made these quickly only to avoid driving my car without filters.
I now have the available bases.
Attached thumbnail(s)
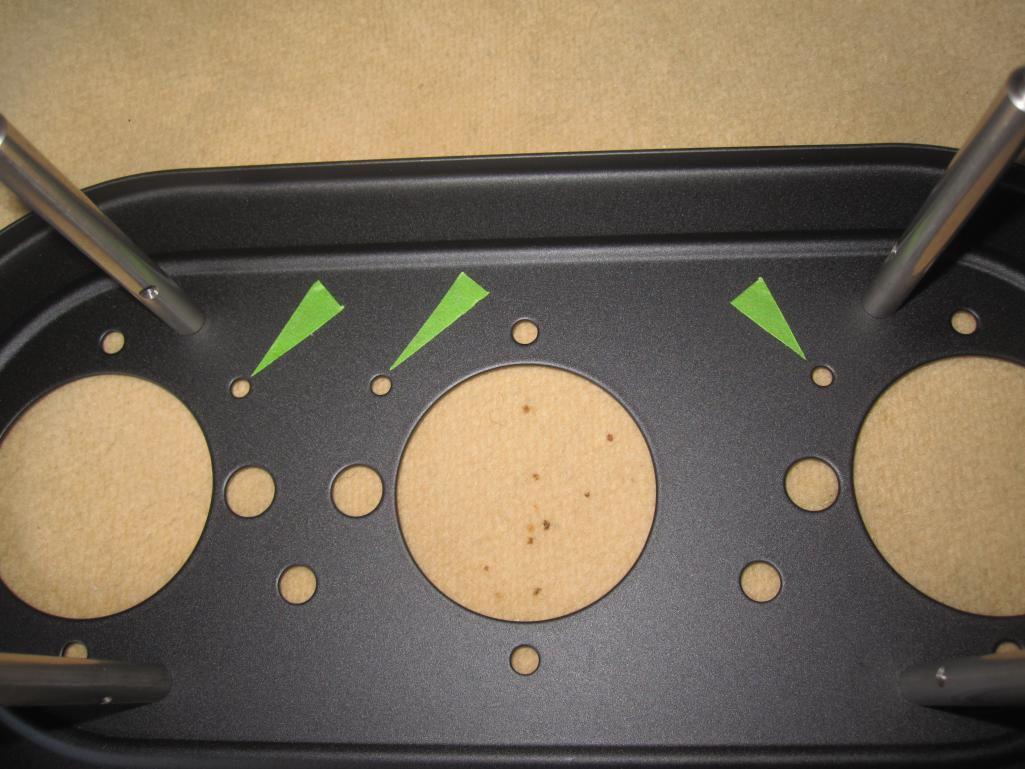
Powered by Invision Power Board (http://www.invisionboard.com)
© Invision Power Services (http://www.invisionpower.com)