Printable Version of Topic
Click here to view this topic in its original format
914World.com _ 914World Garage _ The Crest: Version 2
Posted by: tygaboy Jun 11 2017, 08:14 AM
I though you might enjoy seeing some details on this "build".
With "Crest Version 1" (my interpretation) being given away as a WCR award, I've decided to make some "improvements" to V2. This one will hang in my home office.
As you may have noticed in my LS build (with things like the engine compartment panel), I most often have to build something and experience it physically before I know what I really like. Same thing is happening here.
Comparing V1 and the pieces/cut patterns for V2, you can see I decided to add an additional layer to the main body area - I think that'll be more interesting and better balanced.
The grid in the design is 4'x4' so you can see, this uses a bit of metal! I'm thinking I may do this one in stainless, depending on cost.
And I have an idea for a wall frame that should be pretty neat. More on that as I get to it.
Attached thumbnail(s)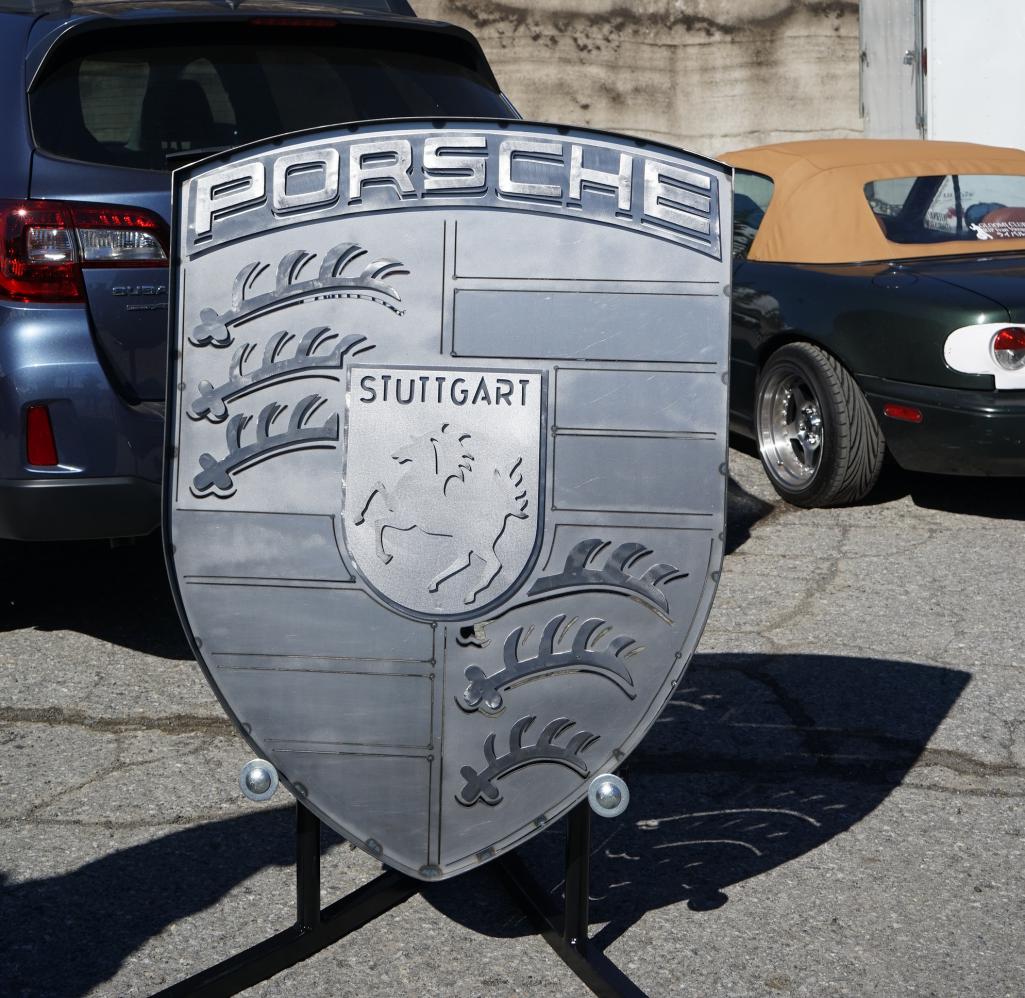
Posted by: Andyrew Jun 11 2017, 08:52 AM
![popcorn[1].gif](style_emoticons/default/popcorn[1].gif)
This should be fun!!
Posted by: ConeDodger Jun 11 2017, 09:02 AM

Posted by: mb911 Jun 11 2017, 01:49 PM
I think it looks great
Posted by: tygaboy Jun 12 2017, 09:18 AM
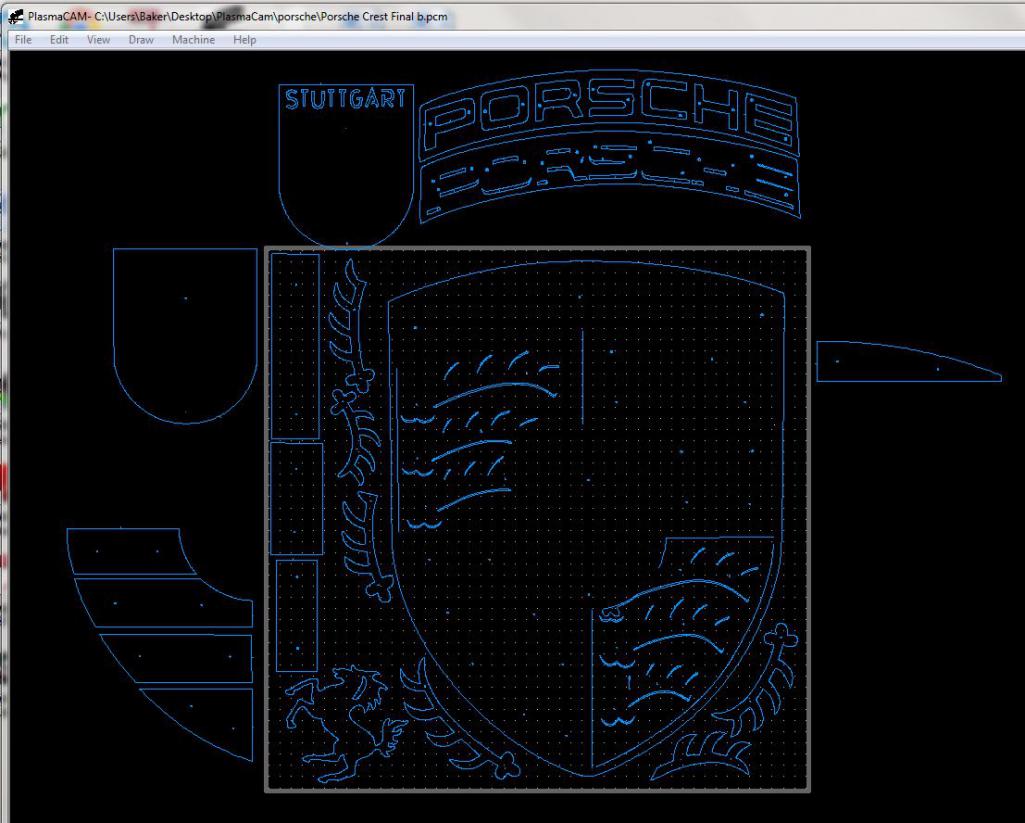
I'm still considering additional design changes so I decided to go ahead and do this version in regular vs stainless steel. I try to maximize material usage but it's a challenge with the odd, "one each" pieces I need.
In the end, there's not much left of a 4x5' sheet of steel - and there are still pieces to be cut! (Yes, this is "wrong side up".)
I'll pick up more material today or tomorrow. I'd like to get this finished in time to take it to the next R Gruppe / EASY gathering. I think those folks would enjoy seeing it.
Attached thumbnail(s)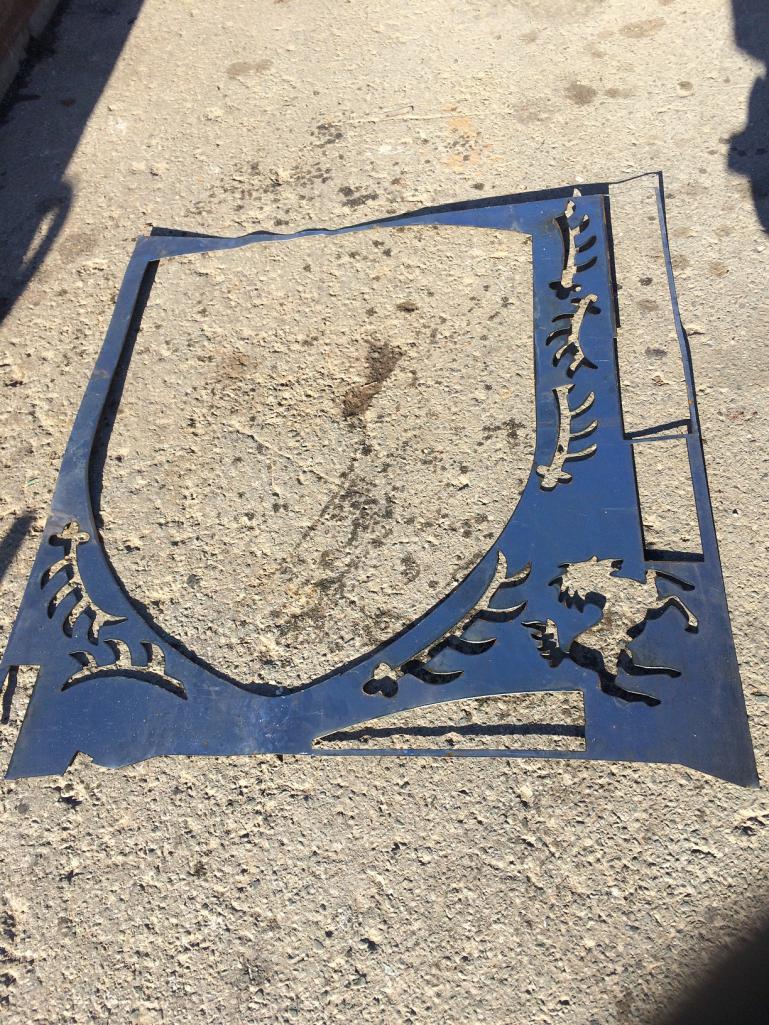
Posted by: tygaboy Jun 12 2017, 09:40 AM
The cut parts on the table. I cut those little "locating holes" on all the parts which makes it a slam dunk to get each piece just where it's supposed to be.
Again, the differences with this version are the addition of the panels (show only in the upper right area) that will add dimension where previously, I just did cut lines.
Attached thumbnail(s)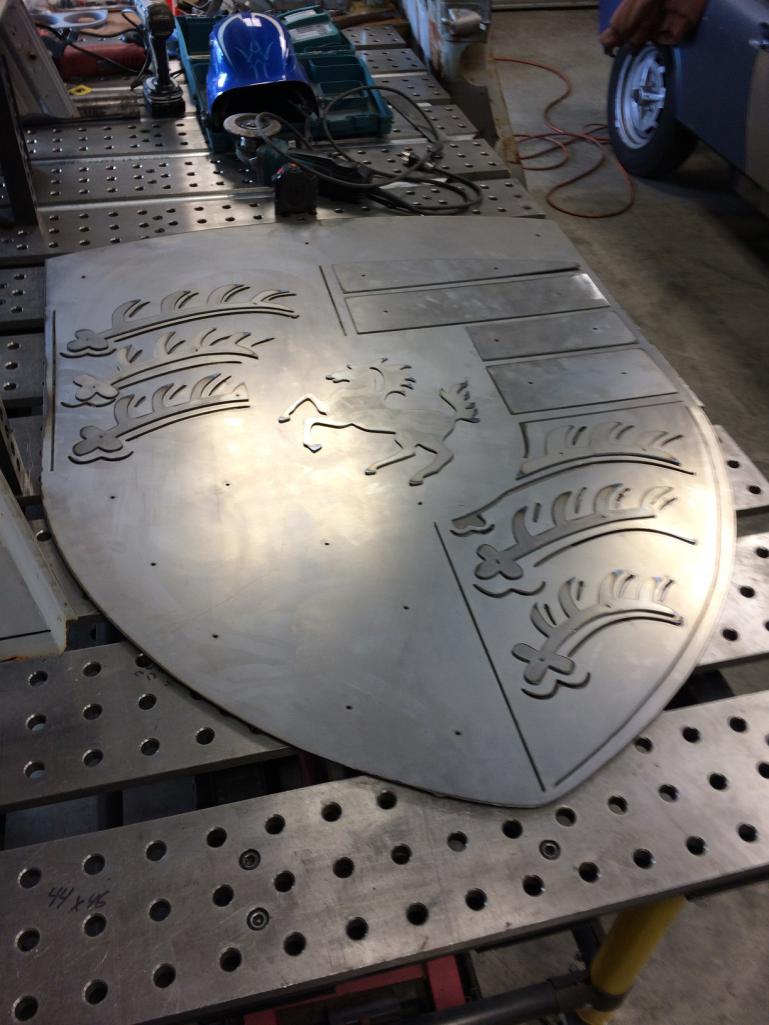
Posted by: mb911 Jun 12 2017, 09:45 AM
What are you using to cut it as in what brand plasma table?
Posted by: tygaboy Jun 12 2017, 10:11 AM

What are you using to cut it as in what brand plasma table?
I have an old (like from 1998) PlasmaCam 4'x4' table with a Miller 375 Extreme plasma cutter.
I just learned that PlasmaCam is no longer supporting this verision and spare parts are limited to what they have in stock. So I just bought all new bearings, a few spare pulley and belt sets, etc.
I have this project and two "surprise" gifts I'm doing for some special 914 folks (what, oh what might these be???
 ) and then I plan to pull it apart for a rebuild.
I've been eyeing the Archlight Dynamics 5x5 table as a replacement but so long as the good ol' PlasmaCam still works well, I figure I may as well hold off. Though I would really like the torch height control. Someday....
Posted by: Mueller Jun 12 2017, 12:15 PM
Nice work as usual, I like your welding table as well. Your shop must be huge!
Posted by: tygaboy Jun 17 2017, 03:43 PM
Finished cutting the pieces. I'm really liking how it looks with the addition of panels. It just looks more "finished" to me.
Now it's "some assembly required" time! 
Attached thumbnail(s)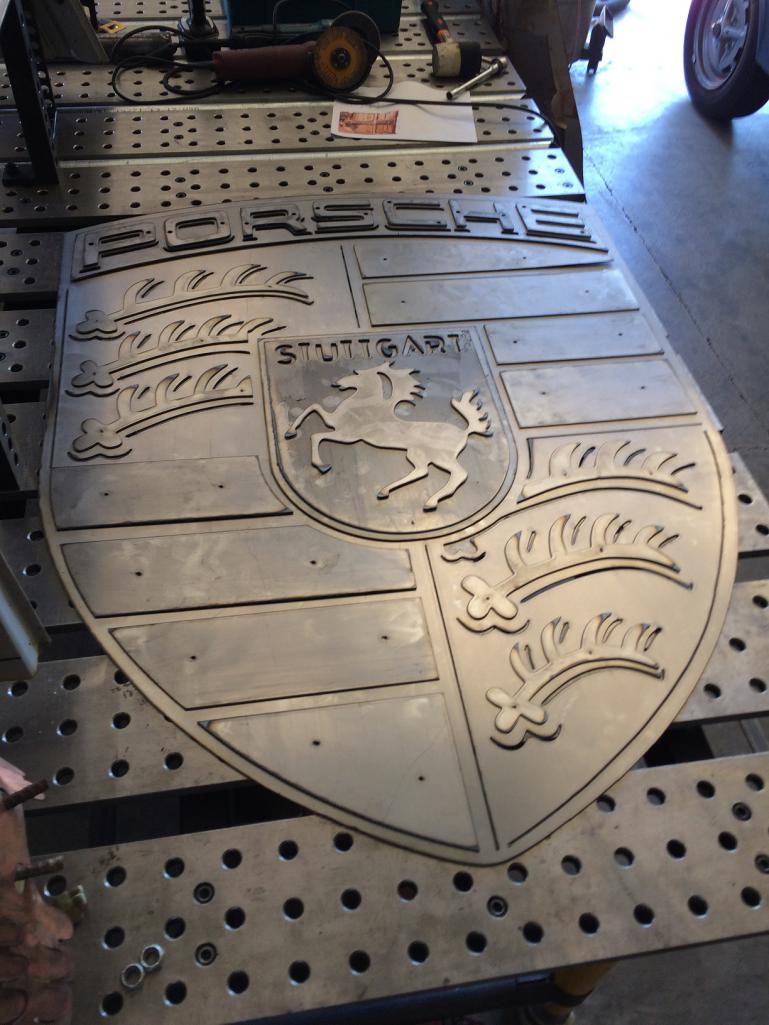
Posted by: tygaboy Jun 17 2017, 03:46 PM
My wife recently retired and she's happy to run errands for me! (Gotta love her!)
So I asked her to go pick up an order at the metal yard.
Problem was, they cut a couple pieces incorrectly and instead of 2 @ 24" x 48", I ended up with 4 @ 24" x24".
What to do...?
Scale the crest by 50% and make a 2 foot tall baby one!
I think I may paint this one...
Attached thumbnail(s)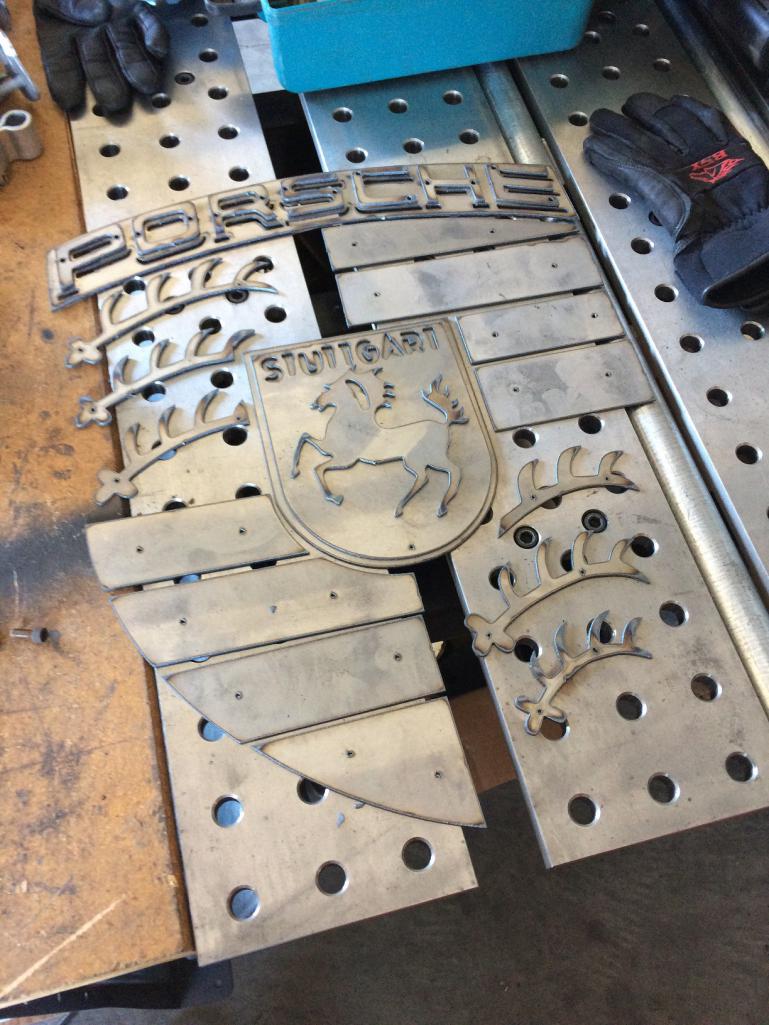
Posted by: tygaboy Jun 17 2017, 03:50 PM
And I may as well disclose how I plan to frame and light the big one.
Remember that '72 I parted out a while back? Well it struck me that the targa bar would be a cool soffit! I'll add a backing and some lighting up inside it, etc.
Should be pretty cool!
Attached thumbnail(s)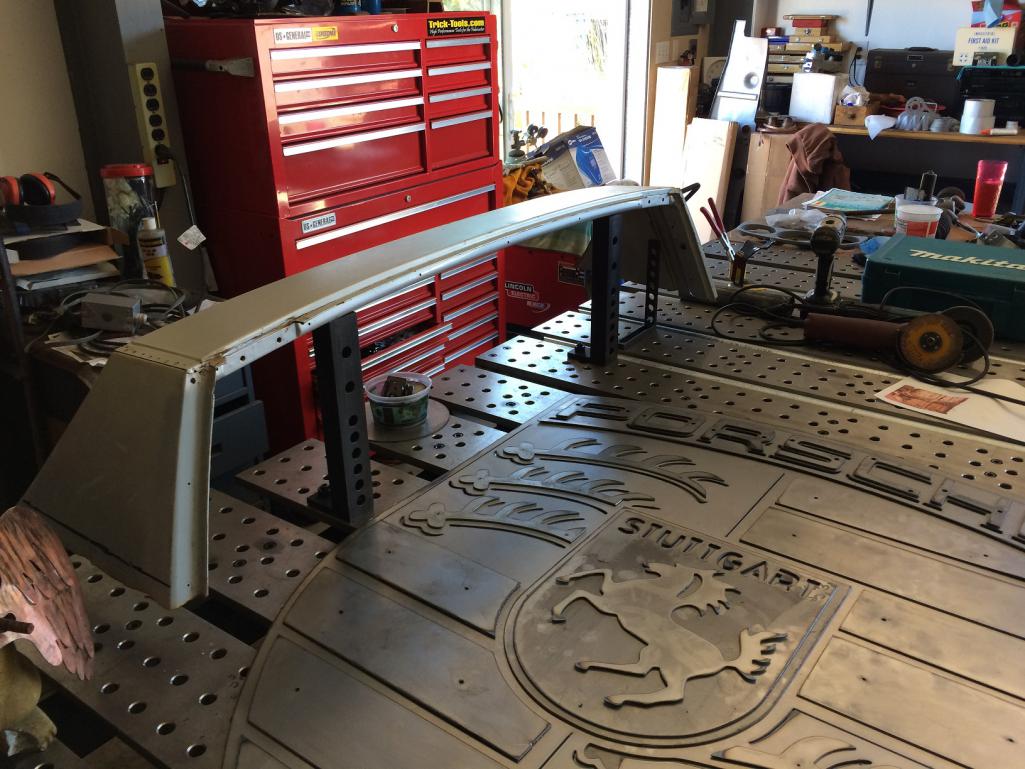
Posted by: tygaboy Jun 25 2017, 09:23 PM
I need to become proficient at TIG welding and figured the 2 foot version of the crest would be good practice. Before I knew it, I was done!
I decided not to paint it as I like the raw look. I'll hit all the stand-off panels with a flap disc to give then the same pattern, then it's clear coat everything and this little guy is ready to go. Not sure what I'll do with it. probably end up giving it away.
Now it's back to the big one!
Attached thumbnail(s)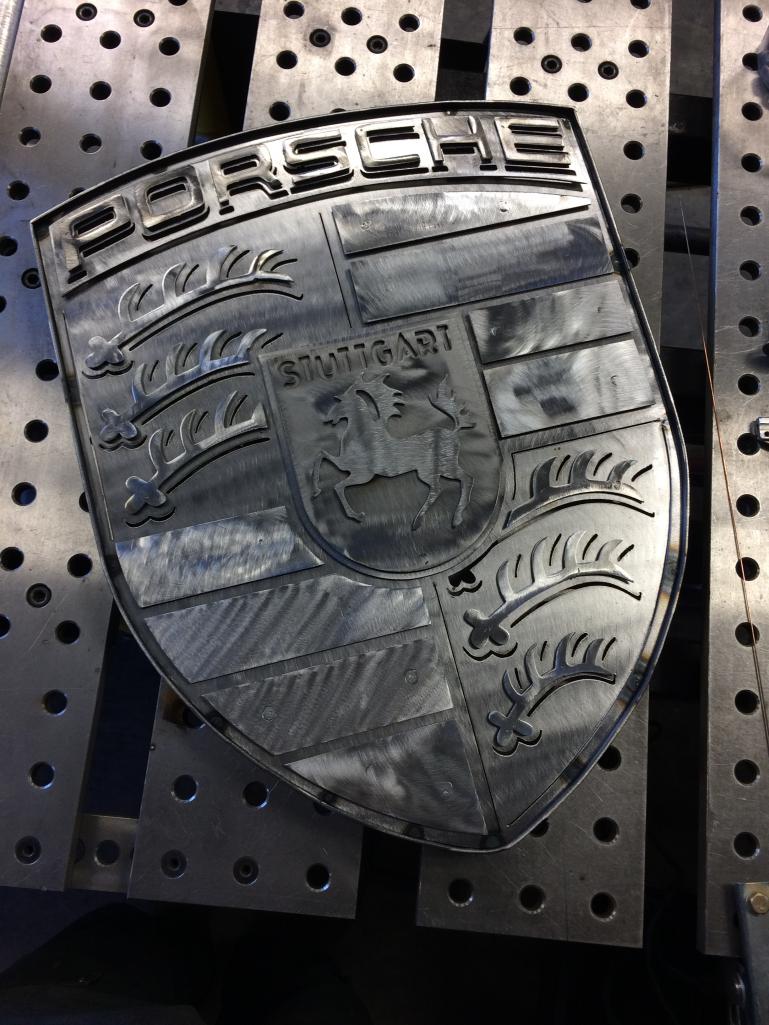
Posted by: Cracker Jun 25 2017, 11:13 PM
Looks fantastic as always Chris...I am more than thankful to own and display v1!
Tony
Posted by: Krieger Jun 25 2017, 11:37 PM
Nice work! That will look cool
Posted by: Mark Henry Jun 26 2017, 07:31 AM
Figure out a price! I bet some of the higher end Porsche guy's and shops would lap it up.
But then you might get a letter.... 
I'd also make it just a hair smaller so you can make it out of a 1/4 or 1/2 sheet.
Posted by: tygaboy Jun 26 2017, 08:22 AM
Figure out a price! I bet some of the higher end Porsche guy's and shops would lap it up.
But then you might get a letter....
I'd also make it just a hair smaller so you can make it out of a 1/4 or 1/2 sheet.
Hi Mark - Yep, doubt I'll sell them. I tend to give away most of my stuff. It keeps things fun vs. "I have to get this done by next week...", etc.
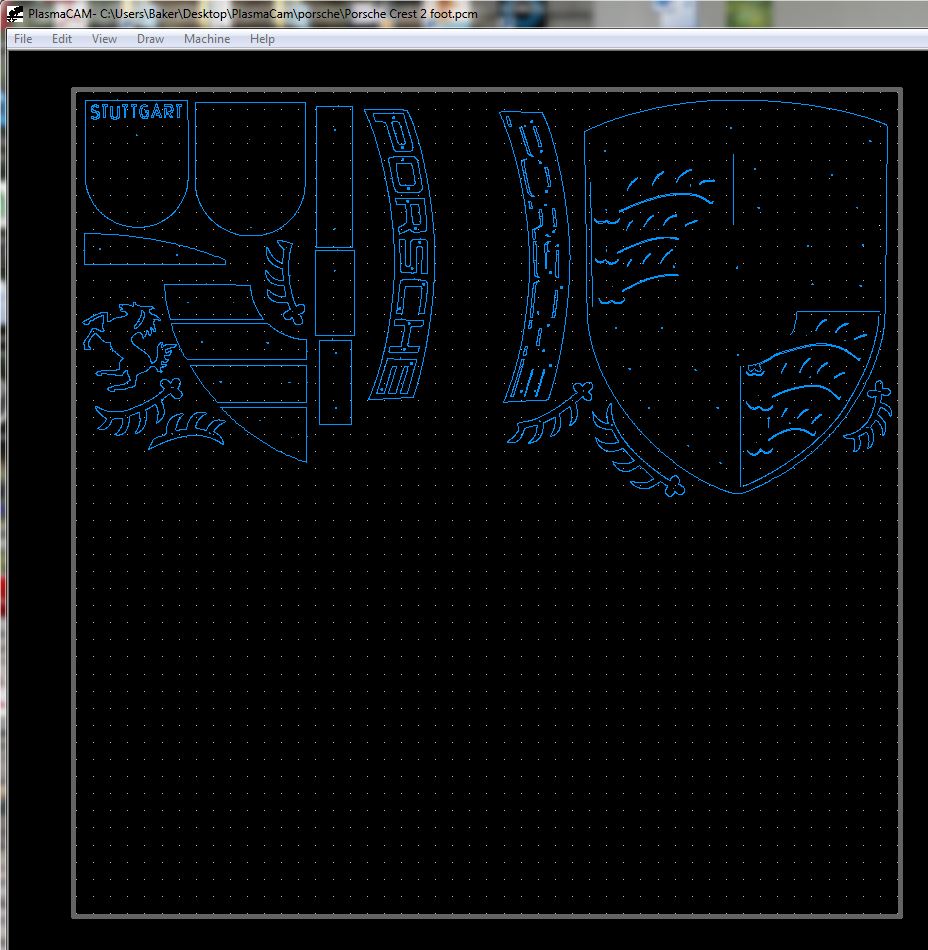
And I'm with you on material usage. Here's the cut layout for the 2 footer. I can get 2 complete sets of parts out of a 4' x4' sheet.
Attached image(s)
Posted by: tygaboy Jun 26 2017, 08:25 AM
And then this fell off the plasma table...
Another "thanks for all you do!" I decided to make for McMark! I was inspired by his t-shirt that I got at WCR. Yes, the wrench/screwdriver aren't set correctly but they will be when it's done. (Please people, give me a little credit!  )
)
It'll be about 36" wide when complete.
Say it with me: Thanks Mark! For all you do for us and our little cars! 
Attached thumbnail(s)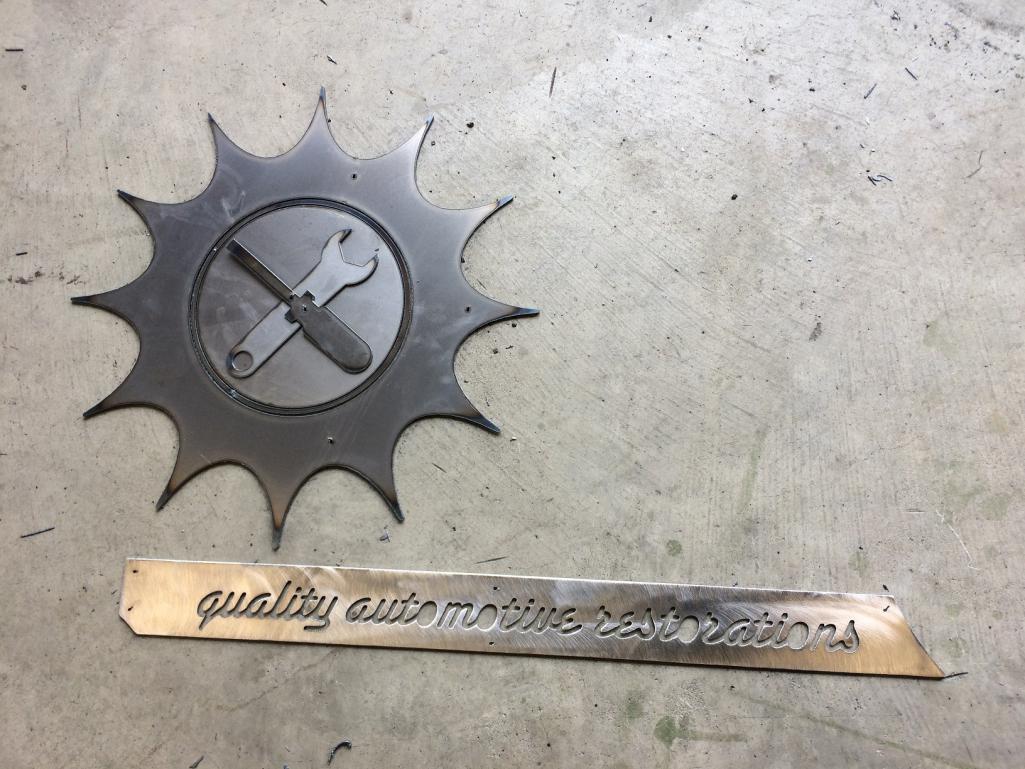
Posted by: Andyrew Jun 26 2017, 08:35 AM
That looks amazing! Are you able to just burn the metal and not just cut through? It almost looks like thats what you did.
Posted by: McMark Jun 26 2017, 10:09 AM


Posted by: jim_hoyland Jun 26 2017, 10:26 AM
Big Thanks for the 1.8 logo I won at the Raffle ! 
Just finished mounting it, really like it
Attached image(s)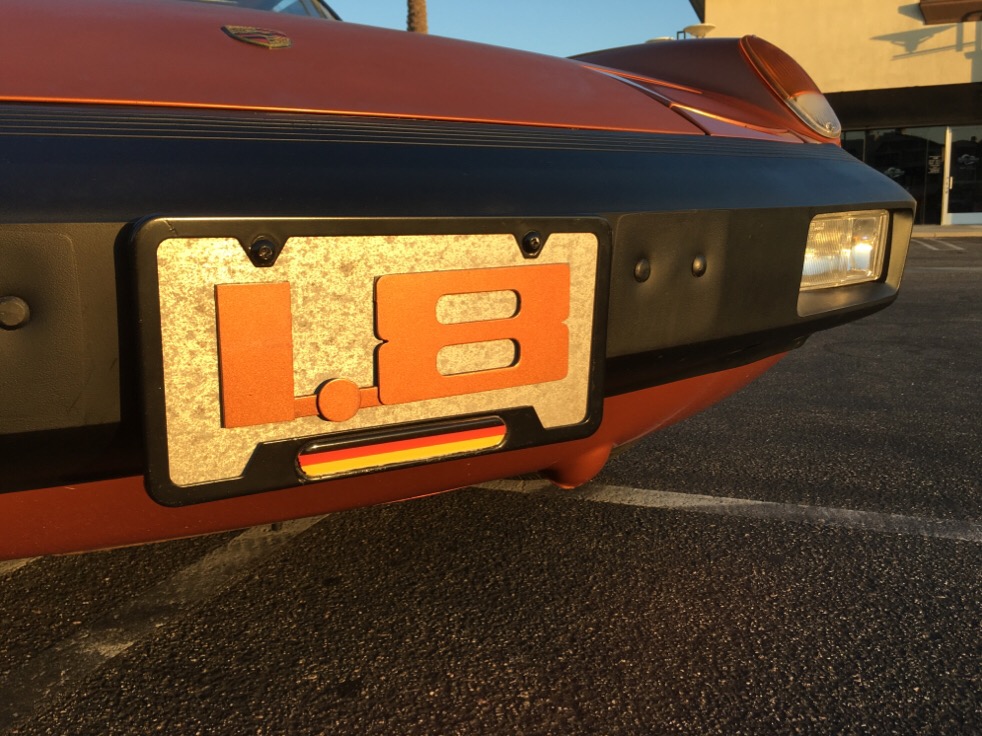
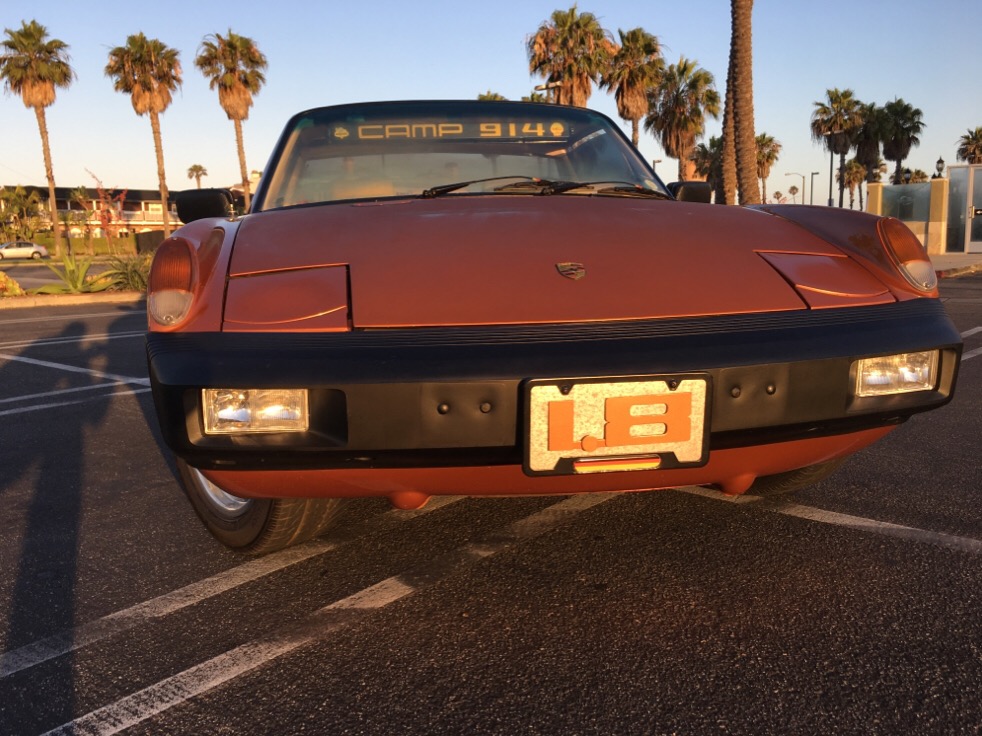
Posted by: tygaboy Jun 26 2017, 10:49 AM
Jim - I'm honored to have one of my goodies on your car!
If I'd known it was going there, I could have "copper plated" it like some of those other items...
Looks very cool! 
Posted by: boxsterfan Jun 26 2017, 02:24 PM
Group buy? I'll take one!! 
Posted by: plays with cars Jun 28 2017, 12:01 AM
Nothing wrong with V1, but I really like what you did on V2. I agree that adding the extra panels into the design makes them distinct elements that balance the stags horns.
Have you thought about doing accelerated aging on parts of the design to further highlight or enhance certain elements? Or a distressed painted look? I could see something with an aged patina really looking good.
Posted by: tygaboy Jun 28 2017, 08:11 AM
Nothing wrong with V1, but I really like what you did on V2. I agree that adding the extra panels into the design makes them distinct elements that balance the stags horns.
Have you thought about doing accelerated aging on parts of the design to further highlight or enhance certain elements? Or a distressed painted look? I could see something with an aged patina really looking good.
I've used some of these Steel F/X products (https://steelfxpatinas.com/) on some of my yard/home art pieces. It's what added the copper look to some of the WCR goodies.
As I'm getting through with the 2 footer and V2, I've been giving lots of thought to finishes. The nice thing about the Steel F/X is that if you don't like how it turns out, just hit it with a flap wheel and try again...!
I think next up, I'll try doing one in carbon fiber. Or maybe a mix of carbon fiber and aluminum. Kind of like a race version of the crest. We'll see.
Posted by: tygaboy Jun 28 2017, 03:00 PM
V2 assembled. I'm playing with different patterns on the various parts to see what I think looks good, etc. I think the lighting makes it look more extreme than it does in real life.
I definitely like it with the added panels as it really balances it out and makes it look more complete. (Tony will have to send his V1 back to the factory for an update!)
Attached thumbnail(s)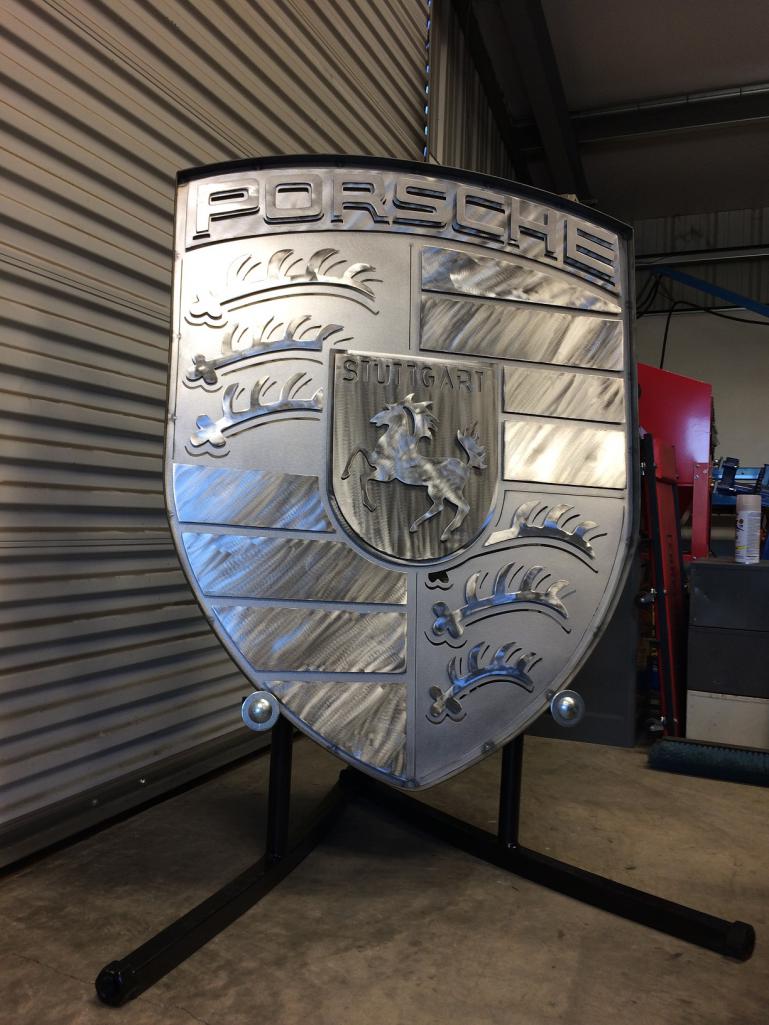
Posted by: tygaboy Jun 28 2017, 03:01 PM
The convenient part is that all the pieces unbolt so style adjustments are easy.
Here it is with the baby 2' version.
Attached thumbnail(s)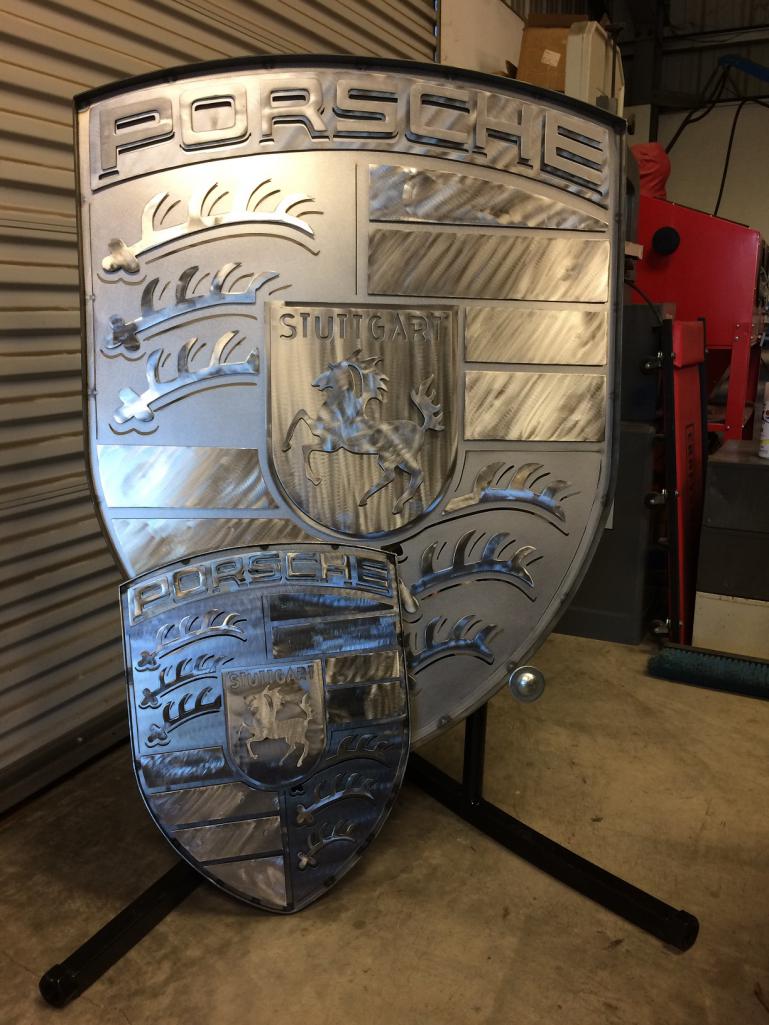
Posted by: tygaboy Jun 28 2017, 04:45 PM
Well, after looking at for a couple hours, I decided I'm going to "refinish" the panels. It looks too busy to me. I used a 40 grit flap wheel to do what's there now. Next, I'm going to try a 120 grit and a more uniform look on each panel. If I don't like that, I'll go to 80 grit on a DA. That's the finish on the main background.
Posted by: ConeDodger Jun 28 2017, 06:57 PM
Chris,
You know people are going to want one of these... 
What have you done! 
Rob
Posted by: My 914 Jun 28 2017, 07:05 PM
I think unpainted steel on steel looks great!
Posted by: tygaboy Jun 28 2017, 07:58 PM
What about a bit of both?
Attached thumbnail(s)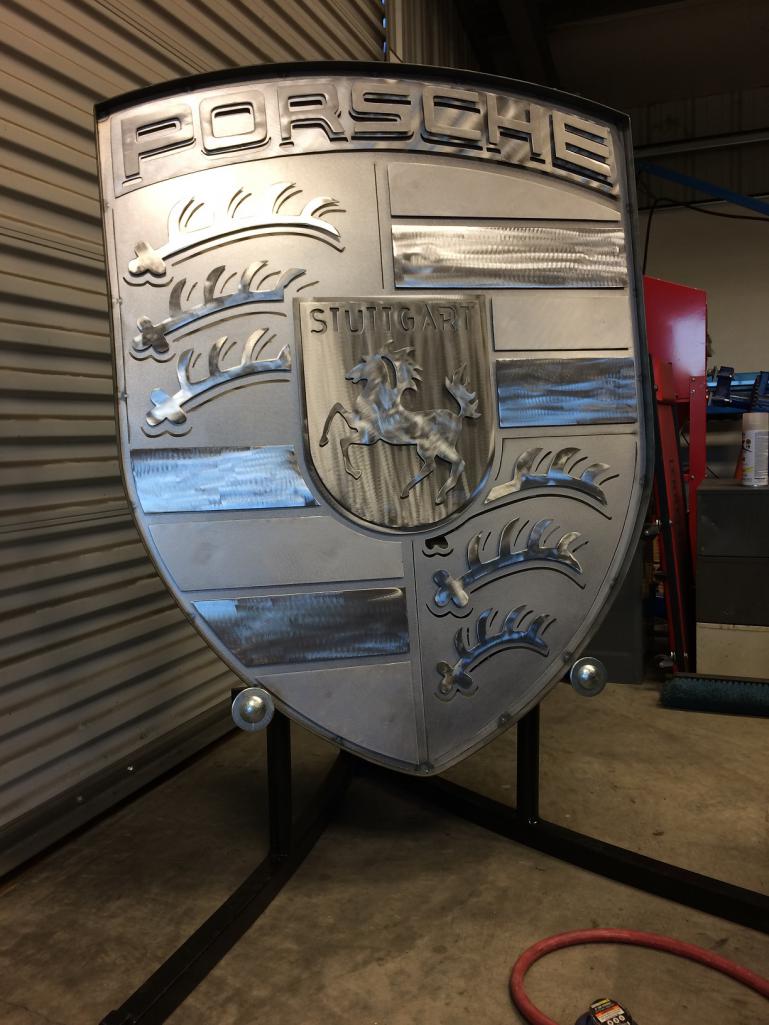
Posted by: tygaboy Jun 29 2017, 07:46 PM
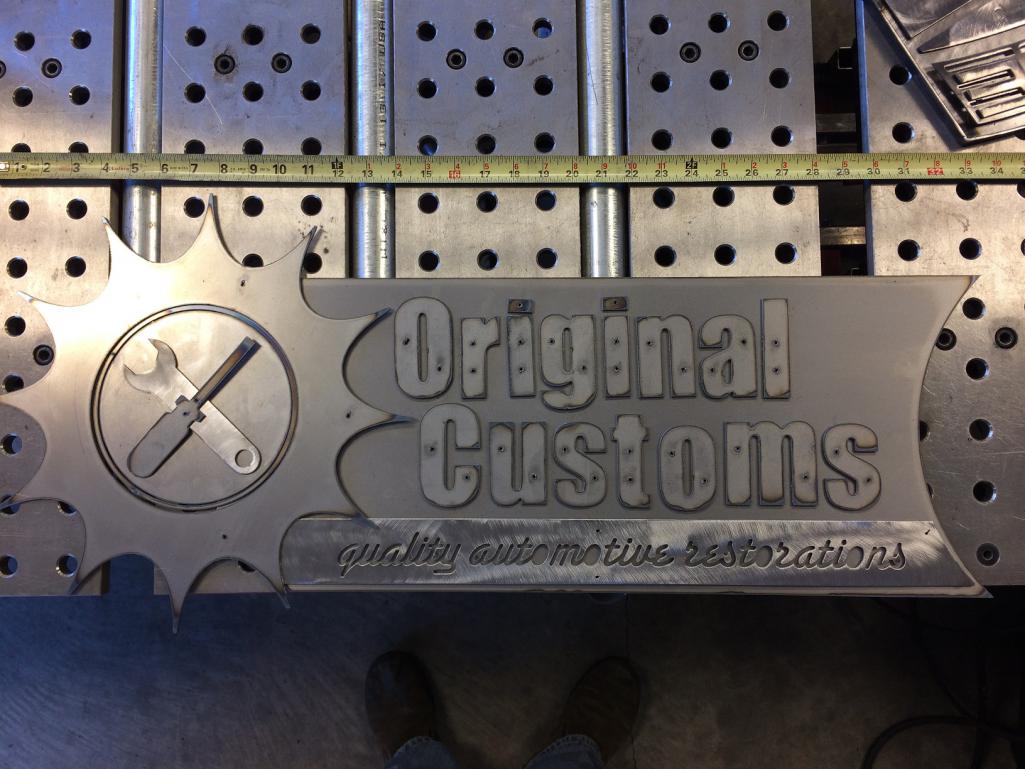
McMark's shop sign mocked up. How'd I do? 
(yes, I know things aren't lined up. Everything is just sitting there. It'll be fine, trust me...)
Attached thumbnail(s)
Posted by: Cracker Jun 29 2017, 07:54 PM
...well I doubt he will complain. 
T
Posted by: Krieger Jun 29 2017, 08:52 PM
Wow! I think he will love it!
Posted by: tygaboy Jul 1 2017, 04:16 PM
This morning, I took the crest over the the R Gruppe gathering at EASY.
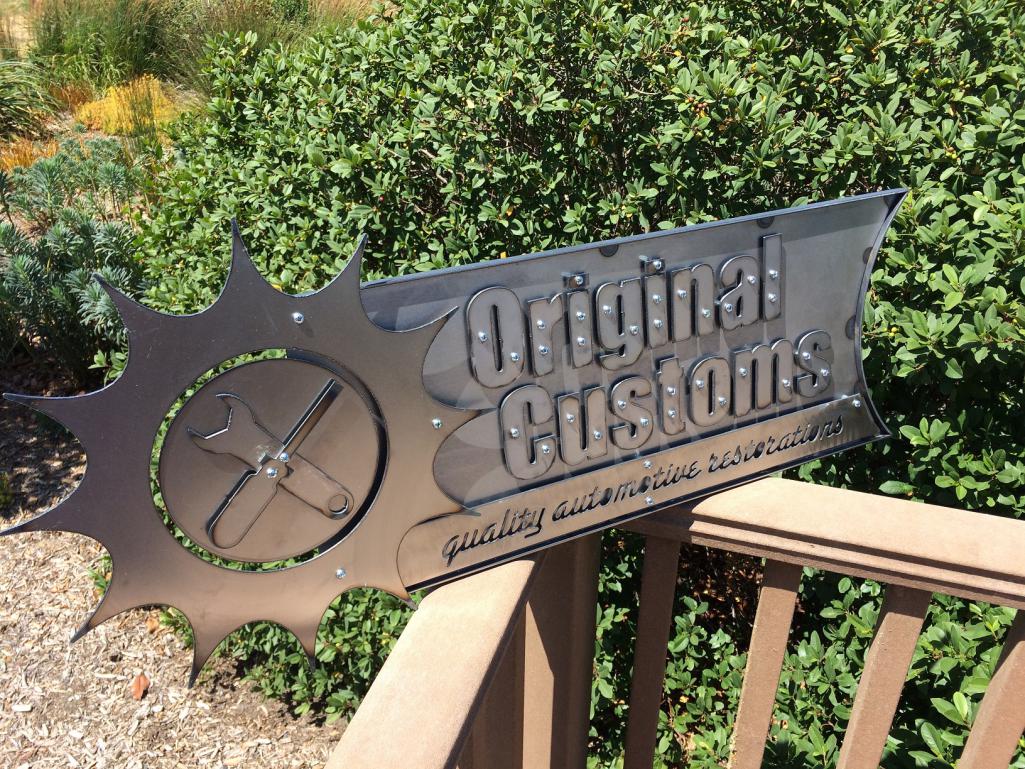
Some very cool cars... Got home and finished up McMark's sign. He wants to powder coat it so this is as far as I needed to take it. Now it's disassemble and ship time.
Attached thumbnail(s)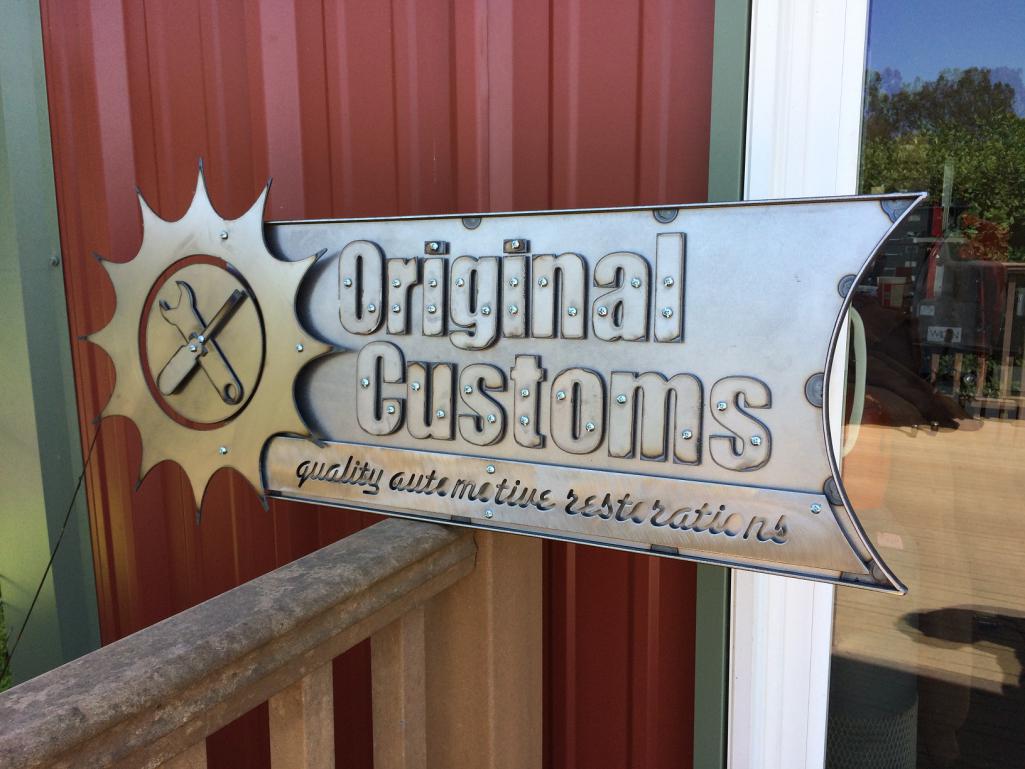
Posted by: tygaboy Jul 1 2017, 04:18 PM
Then this fell off the plasma table... What could it be? 
Attached thumbnail(s)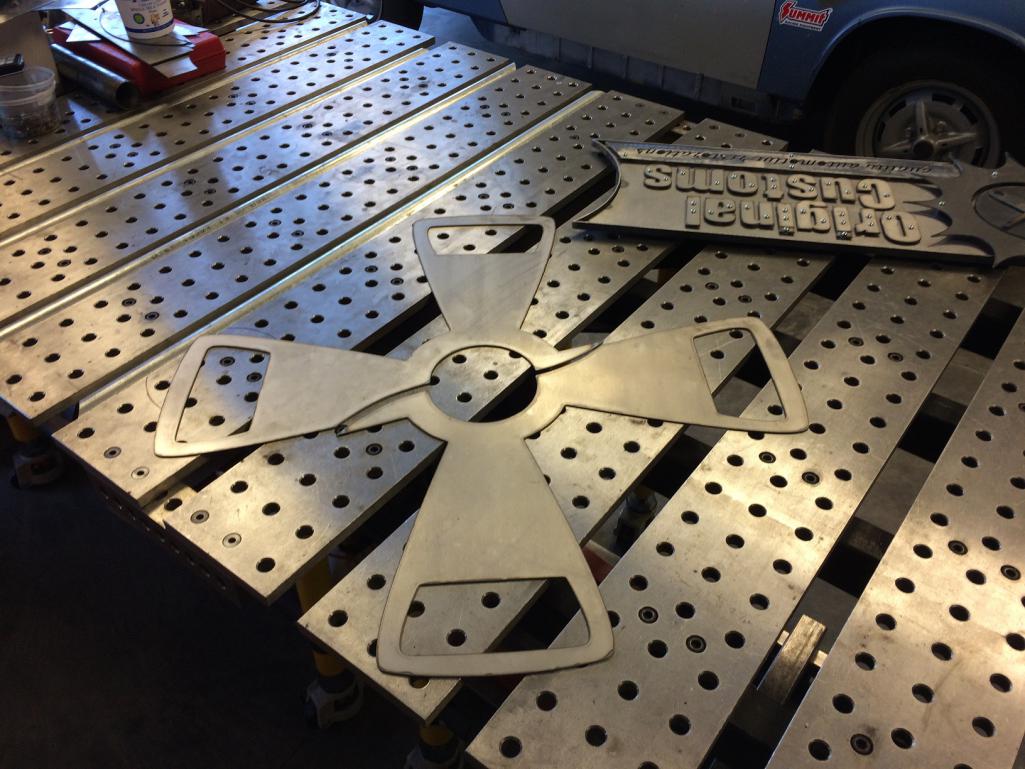
Posted by: tygaboy Jul 1 2017, 04:39 PM
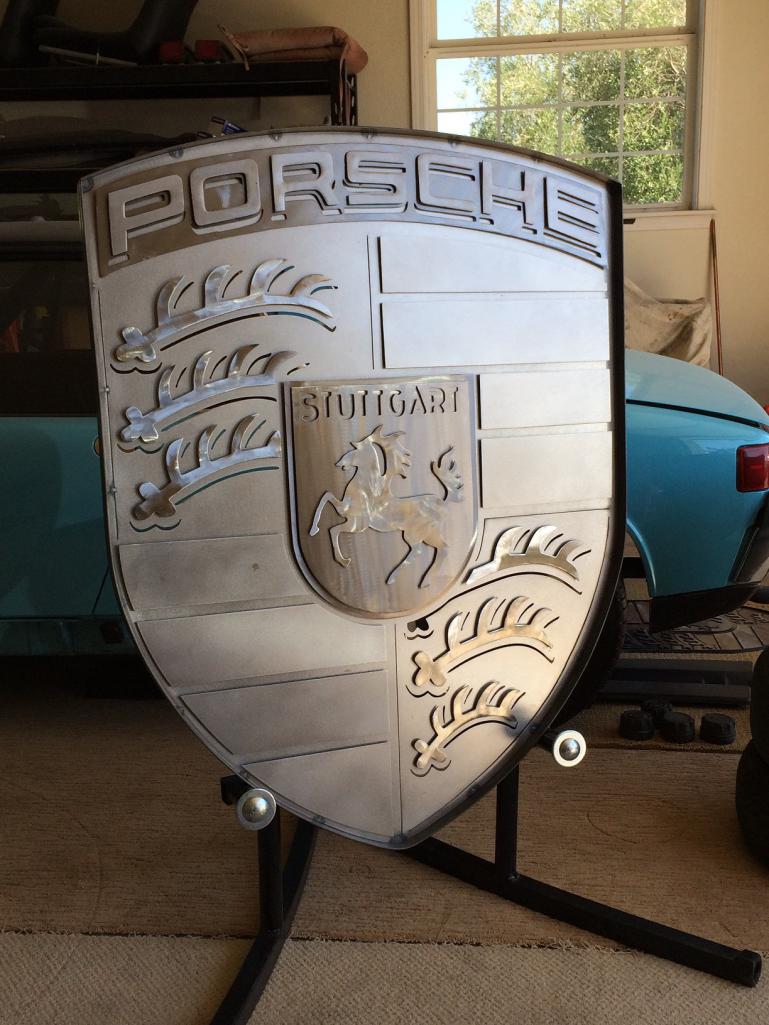
And, duh, I suppose I should include a couple pics of the finished crest! I didn't like the way the panels were looking so I cut new ones and attached the fasteners from the back, vs. plug welding through the locating holes as I did on the first set.
They turned out far nicer.
And with the raw finish, the way light reflects causes it to look a little different from every angle. I like it!
Attached thumbnail(s)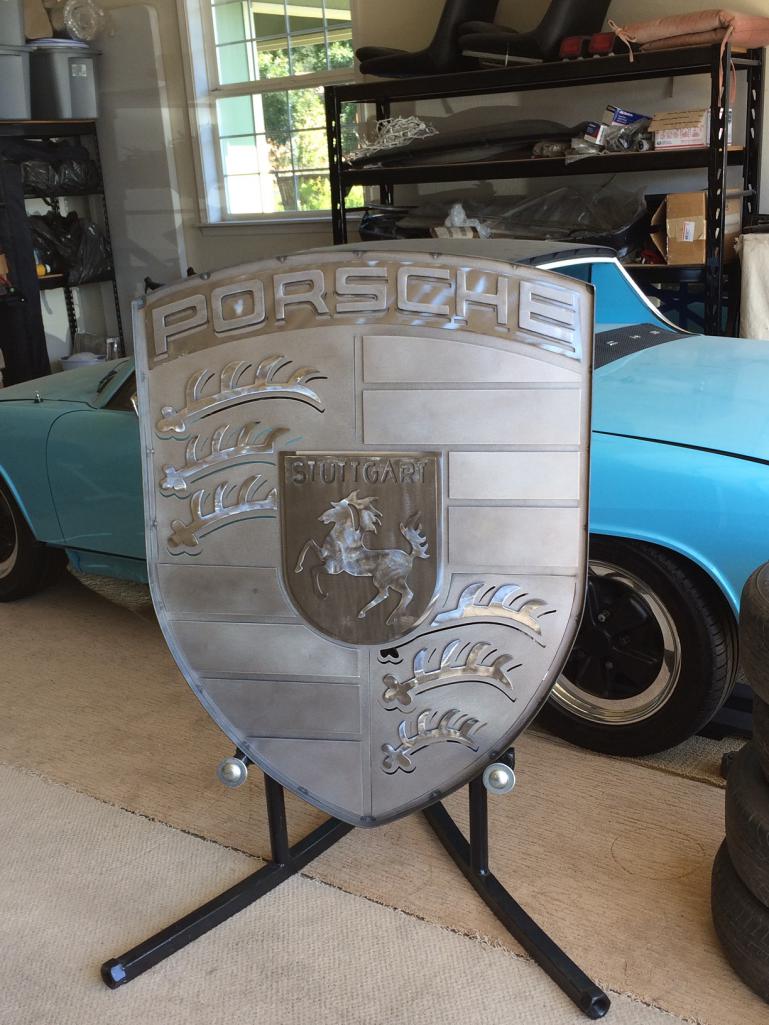
Posted by: Cracker Jul 1 2017, 05:38 PM
Bravo!
You better be careful Chris...ALLOT of things seem to "fall off your table" there in The Petaluma Metal Factory!
T
Posted by: ConeDodger Jul 1 2017, 06:04 PM
This morning, I took the crest over the the R Gruppe gathering at EASY.
Some very cool cars... Got home and finished up McMark's sign. He wants to powder coat it so this is as far as I needed to take it. Now it's disassemble and ship time.
nice job!
Posted by: McMark Jul 2 2017, 06:12 AM
That's super rad. Can't wait to see it. PM a shipping cost, or dimensions and I'll book it.
Powered by Invision Power Board (http://www.invisionboard.com)
© Invision Power Services (http://www.invisionpower.com)