Printable Version of Topic
Click here to view this topic in its original format
914World.com _ 914World Garage _ GB from 914Rubber.com A- Arm bushings CLOSING 12/23
Posted by: Mikey914 Nov 30 2017, 11:50 AM
As many of you may be aware there has been a "Cheap" option, that lets say brand "E" has done a video on notating that they are smaller than factory and change the pre-load on the arm.
Brand "U" lets call them has an install video saying that they have recreated the factory part with the same "type and amount of rubber being used"
Technically not true because as shown in the video by brand E the durometer is definitely not the same from the deflection noted.
With all the BS aside we have made a part like the factory bushing and a special tool to help install these. One of the problems with installation of this part is the end that brand E glosses over. When you get to the part where the tube holds that end from sliding down the shaft you have a "sharp edge" from the metal the rubber can catch on. If it catches you will scar the inside rubber. This will make a second attempt more difficult.
We have made the delrin "tools" to allow you to use a 1/2" stainless rod with some nuts and large washers to install. There is a taper to allow the rubber to clear the edge of the A arm without catching it.
I had Cary do up one for me and fully document this so that you will have some instruction as how to do this. We are currently compiling and putting this together now.
Attached thumbnail(s)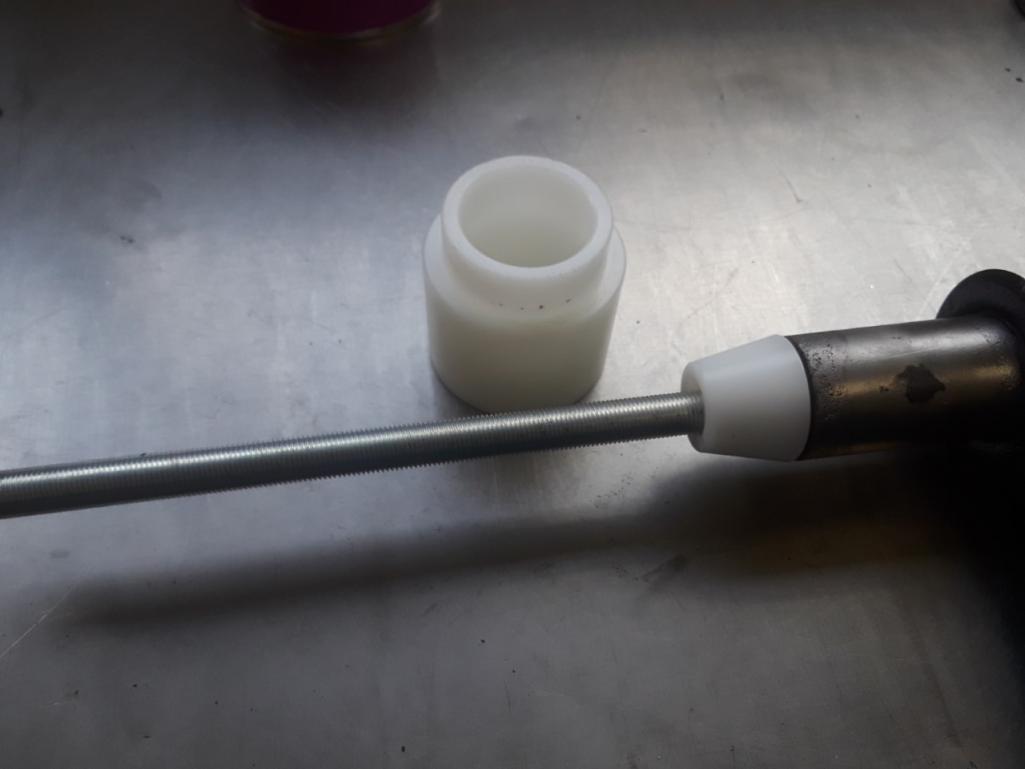

Posted by: Mikey914 Nov 30 2017, 11:54 AM
To be clear the delrin parts are the only "tools" we are providing. We figured that most of you have an Ace Hardware or Home Depot nearby and can acquire these for less than we can ship them for.
Posted by: BeatNavy Nov 30 2017, 12:00 PM
Yup, I'll need one set of these with the tool.
It would have been two but I already bought a set of "brand E" about 8 weeks ago. From the looks of it, this is a great value, and I could have saved a decent chunk of money. Oh well.
Posted by: Mikey914 Nov 30 2017, 12:04 PM

Yup, I'll need one set of these with the tool.
It would have been two but I already bought a set of "brand E" about 8 weeks ago. From the looks of it, this is a great value, and I could have saved a decent chunk of money. Oh well.
What is their return policy? I'd pay you postage

Posted by: GregAmy Nov 30 2017, 12:10 PM
Perfect timing. I'm in.
Also will go along with other winter projects, including the door/seal rebuilds kits (with all options), and how are you coming on the targa/top seals?
Posted by: BeatNavy Nov 30 2017, 12:12 PM
Yup, I'll need one set of these with the tool.
It would have been two but I already bought a set of "brand E" about 8 weeks ago. From the looks of it, this is a great value, and I could have saved a decent chunk of money. Oh well.
What is their return policy? I'd pay you postage
They probably wouldn't be thrilled that I've done a "partial install" (bushings are in the collars, but not on the arms). Otherwise I'd take you up on it
Posted by: Mikey914 Nov 30 2017, 12:16 PM
Perfect timing. I'm in.
Also will go along with other winter projects, including the door/seal rebuilds kits (with all options), and how are you coming on the targa/top seals?
we are finishing up the tools on the lathe now. Will be able to start shipping in a few days (tools)
Also doing a set of GBs aimed at suspension so we will be able to combine to the extent possible. There is one more I need to list but need to run a few errands 1st.
Posted by: MikeM Nov 30 2017, 12:16 PM
Fantastic price!!
Sadly, I also installed brand"E" last spring.
Posted by: mepstein Nov 30 2017, 12:33 PM
I’ve been waiting on these. Thank you.
Posted by: mepstein Nov 30 2017, 12:38 PM
To be clear the delrin parts are the only "tools" we are providing. We figured that most of you have an Ace Hardware or Home Depot nearby and can acquire these for less than we can ship them for.
 I just recently bought some threaded rod, nuts and washers to install some motorcycle headset cups and it was less than $10.
Posted by: mb911 Nov 30 2017, 01:16 PM
I am in but you knew that.
Posted by: bbrock Nov 30 2017, 01:19 PM
I've also been waiting, so I'm in.
Posted by: Mikey914 Nov 30 2017, 02:28 PM
We've also marked our product so you will not get imposters
Attached thumbnail(s)
Posted by: Chris914n6 Nov 30 2017, 03:06 PM
These also fit the 911 arms right?
Are rear trailing arm bushings in the works?
Posted by: CMONNETT Nov 30 2017, 03:51 PM
I'd be interested in one maybe two sets.
Thanks,
Posted by: amfab Nov 30 2017, 03:57 PM
K i'm in
Posted by: rmdinmd Nov 30 2017, 04:29 PM
in for a set. thx
Posted by: JamesM Nov 30 2017, 04:59 PM
Id love to see a video to see how much of a PITA this is, but im in, with tools. two of my cars are on 45 year old rubber and the 3rd is on $500 worth of RSR parts so this seems like its worth a shot.
Posted by: dlee6204 Nov 30 2017, 06:34 PM
I'm in
Posted by: bigkensteele Nov 30 2017, 07:59 PM
An early set of the bushings somehow landed in my mailbox, and the quality is first-rate. Compared to the poly bushings I was about to use, they are a no-brainer.
I still need to get my A-arms powder coated, but as soon as that is done, these are going on!
Posted by: Perry Kiehl Nov 30 2017, 08:12 PM
Are these available now on the 914rubber site?
Posted by: cuddyk Nov 30 2017, 09:33 PM
Id love to see a video to see how much of a PITA this is, but im in, with tools. two of my cars are on 45 year old rubber and the 3rd is on $500 worth of RSR parts so this seems like its worth a shot.
I'll be making a video of my install. Coming soon....
Posted by: Chris Scott Nov 30 2017, 09:42 PM
i would like a set with the tool please.
And what about trailing arm bushings?????
Posted by: pete000 Nov 30 2017, 10:29 PM
I am still masking payments on the brand E I installed last year!
Posted by: djway Nov 30 2017, 11:16 PM
All In 
Posted by: Mikey914 Dec 1 2017, 01:08 AM
i would like a set with the tool please.
And what about trailing arm bushings?????
Up in the other thread. Yes we can combine.
Blake is working on getting these listed up. Should be ready tomorrow.
mark
Posted by: theer Dec 1 2017, 01:45 PM
I need these and the strut-top pieces.
Posted by: Shadowfax Dec 1 2017, 02:04 PM
In for one set with tools. Thanks, Mark!
Posted by: Mike D. Dec 1 2017, 02:17 PM
I'm in for 2 sets and the tool!
(now get to work making the rears  )
)
Posted by: Mikey914 Dec 1 2017, 05:58 PM
PMs sent to all
Posted by: restore2seater Dec 2 2017, 12:32 AM
I'm in for a set.
Posted by: moorepower Dec 3 2017, 06:37 PM
I will take a set with the tool.
Posted by: ottox914 Dec 3 2017, 08:23 PM
In for a set plus tool.
Posted by: Mikey914 Dec 4 2017, 04:23 AM
Codes sent to all so far
Posted by: MasterCylinder Dec 4 2017, 09:46 PM
I would like a set with the tool.
Posted by: 914Sixer Dec 5 2017, 07:50 AM
Set with tools.
Posted by: mgphoto Dec 6 2017, 04:41 PM
I'm in for a set and the tool.
Thanks, Mike
Posted by: Camaro Mike Dec 6 2017, 08:36 PM
I'm in for a set and the tool.
Posted by: Mikey914 Dec 7 2017, 11:00 AM
PMs sent ot all
Posted by: 914Sixer Dec 7 2017, 02:13 PM
Ordered bushings and strut bearings yesterday.
Posted by: 914four Dec 9 2017, 09:30 AM
In for a set with the tools.
Kelvin
Posted by: jesse7flying Dec 9 2017, 11:14 AM
I'm in for a set with tools as well.
Jesse
Posted by: Mikey914 Dec 15 2017, 02:13 PM
Sorry guys, I messed up. We only sent out 2 pcs (should have been 4) for the bushings. We are correcting that today,
I appreciate your patience, I didn't oversee this myself, or provide Scott with the full details.
You all should have the 2nd half in a few days as I just finished packing these up.
Sorry,
and thanks again,
Mark
Posted by: Chris914n6 Dec 16 2017, 03:26 PM
Since most of us will be doing only 1 car, maybe the tools should be on a rental program?
Posted by: Mikey914 Dec 16 2017, 05:58 PM
For what it costs to ship back and forth, and keep track, thought it best to get these out there. I'm sure they could easily be loaned back and forth.
It looks like we shipped out over 20 tools.
Also theres a little tool hoe in all of us.
Mark
Posted by: JmuRiz Dec 18 2017, 07:49 PM
Sorry guys, I messed up. We only sent out 2 pcs (should have been 4) for the bushings. We are correcting that today,
I appreciate your patience, I didn't oversee this myself, or provide Scott with the full details.
You all should have the 2nd half in a few days as I just finished packing these up.
Sorry,
and thanks again,
Mark
Good to know, I only got 2 bushings...so I'll be excited to see the other pair soon-ish.
Now if only my car was ready for me to install them
BTW the parts look great packaged up (front bushings and tools, rear tubes and bushings and strut tops)...got mb911's muffler today too....hopefully this time next year I'll have a running car with all these goodies attached.
Posted by: rudedude Dec 18 2017, 08:02 PM
I know i'm a tool hoe and at least i got a full set for one of the cars.
Posted by: euro911 Dec 18 2017, 09:17 PM
I haven't seen the 911/912 question answered yet, Mr. Rubber 
Oh, I'm in, but there have been so many threads regarding this offering that my interest in obtaining said product(s) may have been overlooked, so, in essence, I didn't receive a message with the 'secret code' (yet) 
Posted by: Mikey914 Dec 19 2017, 12:22 PM
These also fit the 911 arms right?
Are rear trailing arm bushings in the works?
These do fit the 911 arms that the 914 part cross references. I believe 69-89.
The trailing arm bushings are also done and in another thread. We will be wrapping these all up this week.
Mark
Posted by: Shadowfax Dec 19 2017, 12:48 PM
Got my extra bushings yesterday. That was quick! Thanks again for the awesome parts and service, Mark. 


Posted by: mb911 Dec 19 2017, 04:54 PM
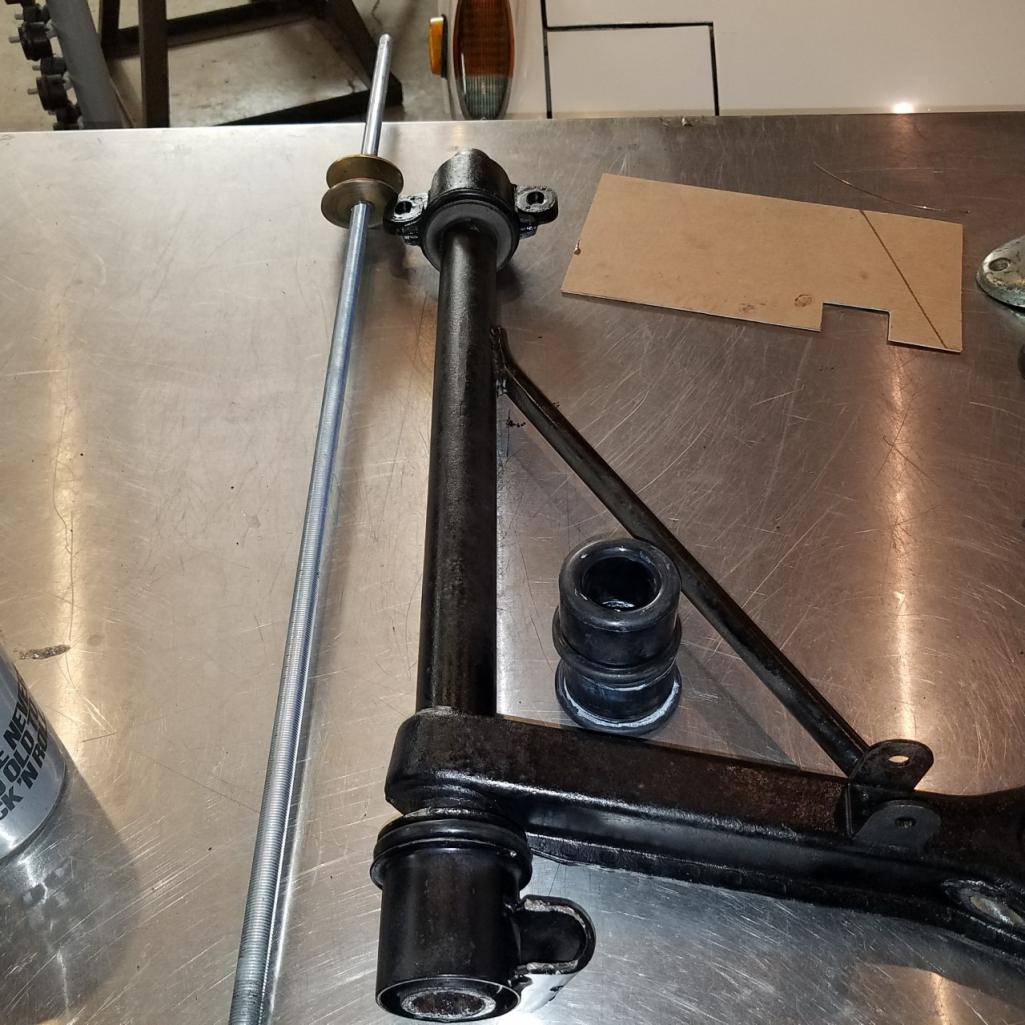
So a question and sorry if it was asked.. But the install instructions are blurry.. Do you take the cap off somehow on the end of the control arm?? I assume yes but not near the parts right now but thinking through it.
Posted by: Mikey914 Dec 19 2017, 05:44 PM
So a question and sorry if it was asked.. But the install instructions are blurry.. Do you take the cap off somehow on the end of the control arm?? I assume yes but not near the parts right now but thinking through it.
The pictures are mostly to assure you don't put it on backwards.
You will need to remove the cap if your still has one. Most seem to be missing.
Then use them to slide onto the arms. We are working on some better instructions but they will be January before we will have ready.
Mark
Posted by: Mikey914 Dec 20 2017, 09:26 PM
Closing the GB 12/23
Posted by: Mikey914 Dec 23 2017, 01:23 PM
Last call
Posted by: trojanhorsepower Dec 23 2017, 02:26 PM
Mark,
I ordered bushings from PMB, will the tool work with those?
Posted by: charlesmac Dec 23 2017, 05:58 PM
I just did make it! I'm in for two sets of bushings with the install tools. Only need one set of tools. Thanks!! and Merry Christmas!!
Oh, and I also need two sets of the rubber targa holders.
Posted by: Mikey914 Dec 23 2017, 10:50 PM
Mark,
I ordered bushings from PMB, will the tool work with those?
It should but those are URO bushings.
As long as you sign up by midnight Pacific I'll drop you the code.
MArk
Posted by: tyfighter123 Dec 24 2017, 04:07 PM
Am I to late or can I still get a set with the tool?
Tyler
Posted by: mgphoto Jan 12 2018, 07:21 PM
Do we have as link to the install procedure?
Posted by: mb911 Jan 12 2018, 08:30 PM
Just did mine today. Pretty self explanatory once you have all the parts in your hand.. Also elephant racing has a youtube video that is the same basic install.. I did have a bit of rubber get cut on the install but think it overall went well.
Posted by: bigkensteele Jan 21 2018, 02:26 PM
Just did mine today. Pretty self explanatory once you have all the parts in your hand.. Also elephant racing has a youtube video that is the same basic install.. I did have a bit of rubber get cut on the install but think it overall went well.
I tried installing mine today with using the clamp method as shown in the Elephant video. No way, now how... I think that part of the problem is that my pipe clamp is a bit small for the task, but even with a larger clamp, there is no way they would have slid right on like the video.
I just had my arms powder-coated. I am reluctant to knock the caps out of the end and risk screwing up my coating.
Looking forward to the install video. Hint. Mark.
Posted by: mb911 Jan 21 2018, 03:18 PM
Just did mine today. Pretty self explanatory once you have all the parts in your hand.. Also elephant racing has a youtube video that is the same basic install.. I did have a bit of rubber get cut on the install but think it overall went well.
I tried installing mine today with using the clamp method as shown in the Elephant video. No way, now how... I think that part of the problem is that my pipe clamp is a bit small for the task, but even with a larger clamp, there is no way they would have slid right on like the video.
I just had my arms powder-coated. I am reluctant to knock the caps out of the end and risk screwing up my coating.
Looking forward to the install video. Hint. Mark.
I ended up just using a press.. It worked well.. The issue is the bushings rock and don't go on straight until about half way on.. Thats what caused part of my failure.. They will be fine for my use.. Still mulling over the rebel racing bushings but that is at the complete other end of the spectrum and is like comparison of apples and oranges..
Posted by: Mikey914 Jan 21 2018, 04:26 PM
We recomend usina 1/2" threadded rod as ot is more self centering. It is possible to get them at an angle, but easier to see when it starts to go sideways.
Posted by: mb911 Jan 21 2018, 04:33 PM
We recomend usina 1/2" threadded rod as ot is more self centering. It is possible to get them at an angle, but easier to see when it starts to go sideways.
Yup
Posted by: bigkensteele Jan 21 2018, 05:34 PM
We recomend usina 1/2" threadded rod as ot is more self centering. It is possible to get them at an angle, but easier to see when it starts to go sideways.
After they are on, given how tight they are, is it still possible to index them using the same method as in the brand E video?
Posted by: Mikey914 Jan 21 2018, 10:31 PM
Ill have to watch the video to comment. I can tell you one on our will not slide around like the undersized U ones. Thats what we fixed with proper sizing and harder rubber. If you wat h the elephant video, you can see how tbey wpuld continually change the preload.
Posted by: bigkensteele Jan 21 2018, 10:45 PM
After looking at my newly coated A-arms, there is no way I am going to risk knocking out the caps. They are just too nice.
I already have a couple of long 3/8" threaded rod that I use to drop the motor. I think that I can make a couple of plates and try it again without going through the bar, but on either side of it. That is if I can't find a shop nearby that has a press.
Posted by: get off my lawn Jan 23 2018, 05:31 PM
How much for the all-thread and nuts?
Posted by: toolguy Jan 23 2018, 06:33 PM
Use a 4 foot 2x4 as a pry lever under the edge of a workbench to push the bushing and outer cap on. .
Posted by: Camaro Mike Jan 23 2018, 08:56 PM
I snoozed. Looks like the coupons have gone dead.
Posted by: GregAmy Feb 10 2018, 01:30 PM
Any how-to video/write-up yet? I got motivzated and pulled off a control arm this afternoon (it already has Weltmeister bushings in it) but now I'm holding a beer and starting at it on the bench. I bought the tools with the bushings, do not have a press.
For example, does the bushing go in the holfer first, or on the arm? Do I grease them? If so, both sides?
I can go buy some threaded rod - I presume it's avaialble at Lowe's - just pondering life right now.
These seem pretty tight; are they going to restrict control movement?
Also someone tapped in some zerk fittings. Should I remove those?
Posted by: GregAmy Feb 10 2018, 02:48 PM
OK, I'm totally stumped.
I went to Lowe's and bought 3' of 1/2" threaded road, washers, and nuts. Which was a great idea until I got back home and realized the end of the control arm where the torsion splines are is closed off.
How in the hell are you supposed to install these without a press?
Posted by: Mikey914 Feb 10 2018, 03:32 PM
There is a plug on it. Thats good.
We are in the process right now of working on the install video.
There are some tips and trick we want to impart to you. Im hoping to have this wrapoed up in about a week.
The main things to remember are the bushings neet to be heated in boiling water and lots of lubrication, and yes lots of lubrication. You get my drift. You need to install as hot as possible and not let the edges tear up the inside of the bushings. You will want to set them to be in a neutral position.
What is that. Where the should set when off of the car. . Take some pictures before you disassemble. This is always a good idea.
I wish i had more for you right now, but we are having a 3rd party do this up and we are in the process of working out the technical info he needs to point out. These are a more challenging install if you have not done it before.
Mark
Powered by Invision Power Board (http://www.invisionboard.com)
© Invision Power Services (http://www.invisionpower.com)