Printable Version of Topic
Click here to view this topic in its original format
914World.com _ 914World Garage _ My DIY raised spindles. How to
Posted by: jmitro Jan 6 2018, 08:33 AM
Here is my process for raising spindles on standard 914 boge strut bodies. As documented elsewhere this modification allows you to lower the car but maintain correct camber curve and suspension travel. Raising by 19 mm allows use of 15”, 16”, or 17” wheels. I have converted to 5 lug using 911 front strut bodies, so my learning curve was to first modify these 914 struts. First photo is comparison of stock unmodified left side 914 strut body versus modified right side (my first one).
Attached thumbnail(s)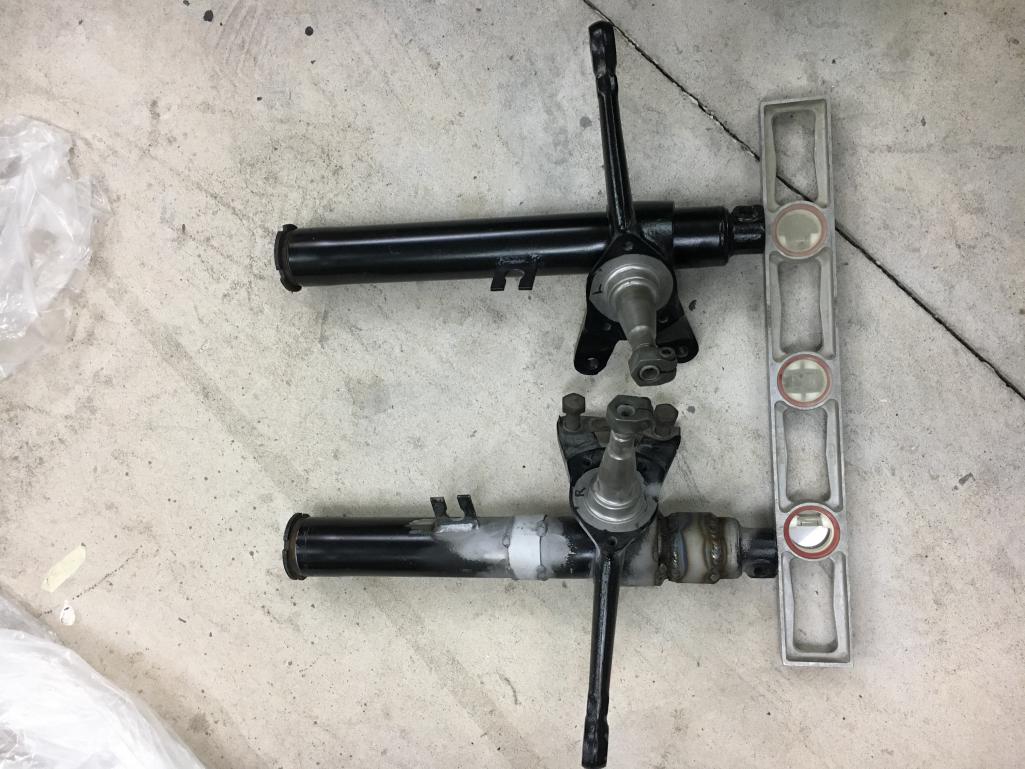
Posted by: jmitro Jan 6 2018, 08:35 AM
Next is measure the length of strut body, Mark out 19 mm to be removed above the spindle, and remove the brake line mount. I later determined it was probably not necessary to remove the brake line mount since I could remove 19mm above it and retain the proper distance from spindle to brake line
Attached thumbnail(s)
Posted by: jmitro Jan 6 2018, 08:37 AM
Next, remove 19 mm or 3/4 inch above the spindle.
The other tubes are sleeves to be explained below.
Attached thumbnail(s)
Posted by: jmitro Jan 6 2018, 08:39 AM
Next is weld the strut back together. In order to ensure precise alignment I used a EDITED 1.75" OD tube inserted the length of the body which is the exact dimension of the bilstein insert
Attached thumbnail(s)
Posted by: mepstein Jan 6 2018, 08:39 AM
Some of the guys bend the tie rod arm down.
Attached image(s)
Posted by: jmitro Jan 6 2018, 08:40 AM
Initial welding of the strut body
Attached thumbnail(s)
Posted by: jmitro Jan 6 2018, 08:41 AM
Sleeve welded on to add strength to my butt welds. It's a thin walled 2.06" ID tube.
Also, brake mount welded back in place; as above I didn't really need to remove the tab in the first place
Attached thumbnail(s)
Posted by: jmitro Jan 6 2018, 08:43 AM
In my haste to complete the project, I forgot to photograph the second half of the modification which includes cutting off the ball joint end and welding an external sleeve to return the strut to original length. This is a 2.01" ID x 2.25" OD sleeve. Again a EDIT 1.75" OD tube was inserted to ensure precise alignment, and orientation of the ball joint pin hole was maintained
Attached thumbnail(s)
Posted by: jmitro Jan 6 2018, 08:53 AM
Final completion of both strut bodies. As you can see the Bilstein insert works perfectly with no binding, and length is correct to ensure engagement of the threads.
This insert is actually for my 911 strut bodies but also fits the 914
Attached thumbnail(s)
Posted by: jmitro Jan 6 2018, 08:54 AM
Close up of external sleeve on the lower edge. Again perfectly aligned and measured to original strut length, and orientation of the ball joint pin hole is maintained
Attached thumbnail(s)
Posted by: Mark Henry Jan 6 2018, 09:05 AM
Good job 
Posted by: infraredcalvin Jan 6 2018, 11:38 AM
Nice work, I’ve been contemplating doing this as well. I have a couple of questions.
- the upper sleeve appears to be for strengthening of the welded joint while the lower is necessary to address the material lossed from cutting the strut. With the thickness of the strut tube itself, along with a good weld, do you really feel the upper sleeve is necessary?
- in your pic, the sleeves appear to be in different locations along the upper portion of the tube. I’m assuming that the lower strut in the picture is your 2nd pass, where you didn’t have to remove the brake line retainer?
Thanks for posting!
Posted by: TargaToy Jan 6 2018, 12:32 PM

- the upper sleeve appears to be for strengthening of the welded joint while the lower is necessary to address the material lossed from cutting the strut...
I think when I've seen this done before, the section of strut body removed from the upper cut is grafted back in at the lower cut. This is how the overall length is maintained. I also seem to recall another member here posted the process and did not add the external reinforcing sleeves.
Posted by: jmitro Jan 6 2018, 12:34 PM
Nice work, I’ve been contemplating doing this as well. I have a couple of questions.
- the upper sleeve appears to be for strengthening of the welded joint while the lower is necessary to address the material lossed from cutting the strut. With the thickness of the strut tube itself, along with a good weld, do you really feel the upper sleeve is necessary?
Correct; it's possible the sleeve is not necessary; however, in my case I wanted to be sure strength was maintained because, even with beveled edges, my butt welds did not penetrate the entire strut tube wall; they probably would have if I had separated the tubes a bit more.
- in your pic, the sleeves appear to be in different locations along the upper portion of the tube. I’m assuming that the lower strut in the picture is your 2nd pass, where you didn’t have to remove the brake line retainer?
Thanks for posting!
actually, that is my first attempt; the brake line mount is farther from the spindle compared to my second attempt where it is retained at the original distance. My reasoning for this was to ensure no binding or interference of the brake lines with the inside of wheel/tire
I think when I've seen this done before, the section of strut body removed from the upper cut is grafted back in at the lower cut. This is how the overall length is maintained. I also seem to recall another member here posted the process and did not add the external reinforcing sleeves.
I thought about that also, but a couple of things prevent that from being feasible:
1. the width of tube removed is too short due to the 2mm cutting wheel removing 2mm on each end of the graft so instead of a 19mm graft you end up with a 15-16mm graft
2. the strut body narrows at the spindle so the OD (outside diameter) of the upper strut section is larger (2.09") than OD of the lower section (2.00")
Posted by: maf914 Jan 8 2018, 09:43 AM
Some of the guys bend the tie rod arm down.
The tie rod arms are quite substantial. How does one bend them? Heat and hammer like a blacksmith?
The second photo is from Tangerine Racing, who offer strut shortening.
Attached image(s)


Posted by: rgalla9146 Jan 8 2018, 07:33 PM
Everything old is new again.
Hot Rodders heated and bent the steering arms on old Ford spindles.
It was necessary when they installed 'dropped' axles to lower their cars.
Best done with some sort of jig to ensure uniform shape on both struts.
Posted by: Spoke Jan 8 2018, 07:58 PM
Nice work. Especially the welding.
Posted by: Perry Kiehl Jan 9 2018, 08:38 AM
I've never tried this.
I always thought you could just grind out the welds holding the spindle assembly and slide it up.
Posted by: mepstein Jan 9 2018, 09:36 AM
I've never tried this.
I always thought you could just grind out the welds holding the spindle assembly and slide it up.
You can on at least some of them. Takes some work and at least a 20 ton press but it’s an option.
Posted by: Racer Chris Jan 9 2018, 10:16 AM
That method doesn't work on 914 Boge struts. The tube increases in diameter right above the knuckle.
Posted by: gothspeed Jan 9 2018, 11:39 AM
I've never tried this.
I always thought you could just grind out the welds holding the spindle assembly and slide it up.
Yes that works on some! I had that done on a 911 back in the day.
One thing to consider with any of these weld mods, is making sure the tubes are kept as straight as possible. Use a fixture if possible. I have seen some warped ones in the past.
Posted by: jmitro Jan 9 2018, 11:48 AM
That method doesn't work on 914 Boge struts. The tube increases in diameter right above the knuckle.
exactly; I tried grinding out the welds and using my press to force the spindle body upwards but it didn't work.
hence the reason for the 1.75" OD tube inserted the length of the strut body. I made a jig but determined it was unnecessary if I inserted this tube.
As a follow up, I completed my 911 strut bodies the same way. with my MIG welder and 0.030" wire I still could not penetrate the full thickness of the strut body on the upper welds; so I sleeved again
Posted by: 914Timo Jan 9 2018, 12:16 PM
I always thought you could just grind out the welds holding the spindle assembly and slide it up.
Works on Bilstain struts and IMHO best way to raise spindles.
Posted by: GeorgeRud Jan 9 2018, 05:14 PM
I always figured that’s the way the struts were initially fabricated. Are the welds that substantial on the Boge struts?
Posted by: gothspeed Jan 9 2018, 07:01 PM
hence the reason for the 1.75" OD tube inserted the length of the strut body. I made a jig but determined it was unnecessary if I inserted this tube.
As a follow up, I completed my 911 strut bodies the same way. with my MIG welder and 0.030" wire I still could not penetrate the full thickness of the strut body on the upper welds; so I sleeved again
I must have missed the tube insert for alignment pics ... that certainly would help keep alignment.

I prefer raising the spindle like this method or by detaching and re-welding the spindle to the tube. These two methods retain full strut travel whereas bending the steering arm only corrects for bump steer. Nice job jmitro
![popcorn[1].gif](style_emoticons/default/popcorn[1].gif)
Posted by: Racer Chris Jan 10 2018, 10:40 AM
... bending the steering arm only corrects for bump steer.
...
That's right. I only do it after raising the spindles - an equal amount to the spindle height change.
There is a minor downside to recurving the steering arm. The forging loses some strength in the heat affected zone.
I prefer to add a lower support and use a long bolt with spacers to set the tie rod height. This requires use of spherical rod ends rather than tie rod ends though.
Posted by: mepstein Jan 10 2018, 11:25 AM
... bending the steering arm only corrects for bump steer.
...
That's right. I only do it after raising the spindles - an equal amount to the spindle height change.
There is a minor downside to recurving the steering arm. The forging loses some strength in the heat affected zone.
I prefer to add a lower support and use a long bolt with spacers to set the tie rod height. This requires use of spherical rod ends rather than tie rod ends though.
And looses a bit of reach.
Powered by Invision Power Board (http://www.invisionboard.com)
© Invision Power Services (http://www.invisionpower.com)