Printable Version of Topic
Click here to view this topic in its original format
914World.com _ 914World Garage _ Making 914-6 GT Style Fuel Gauge Don't Spend Big $$$$
Posted by: 914Sixer May 2 2018, 05:10 PM
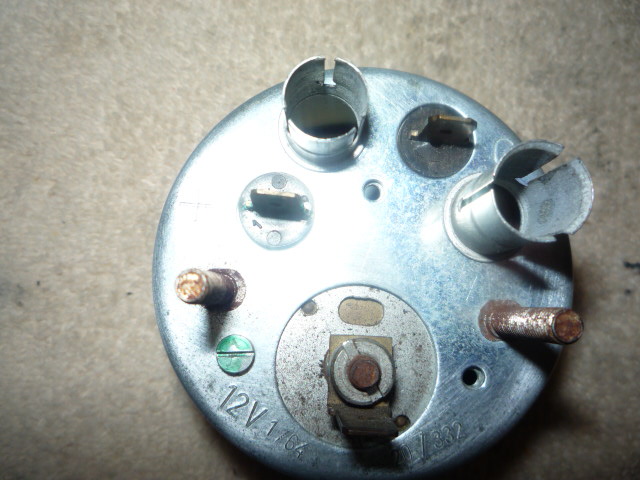
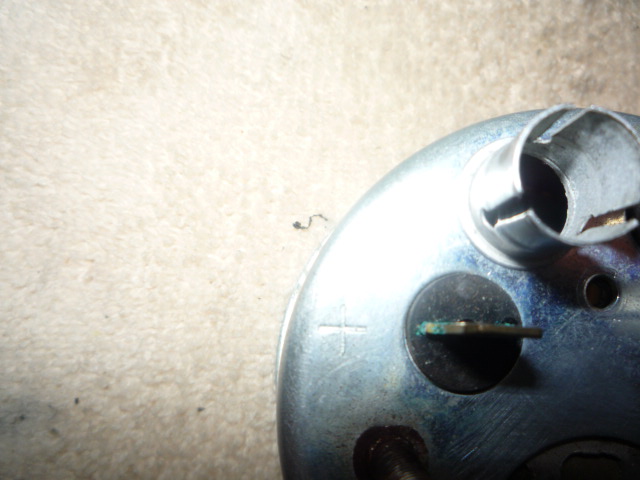
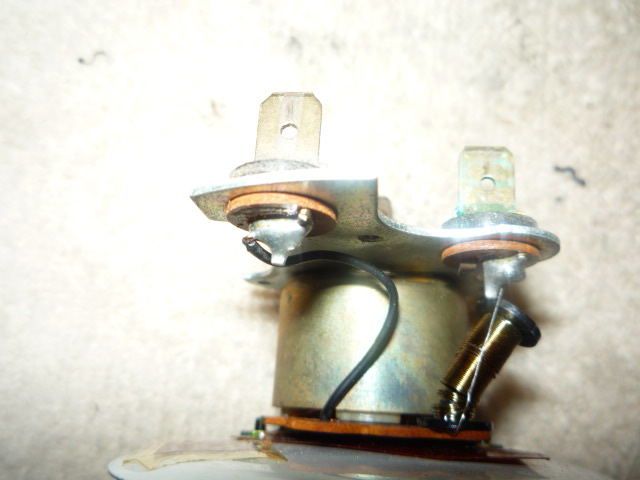
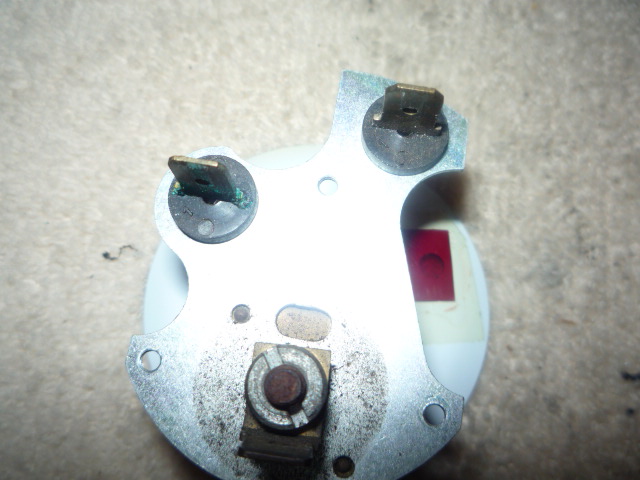
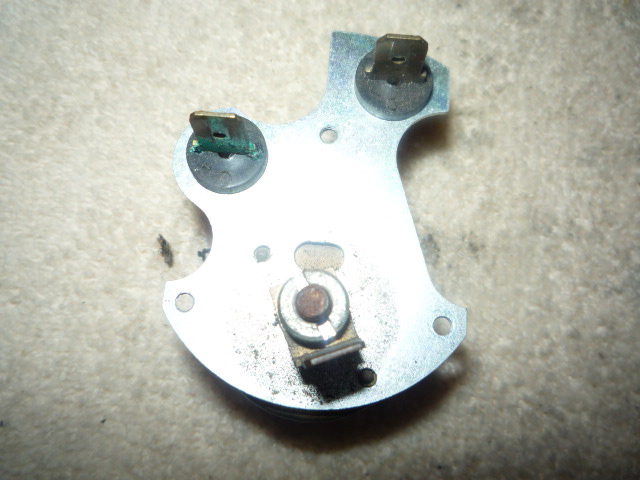
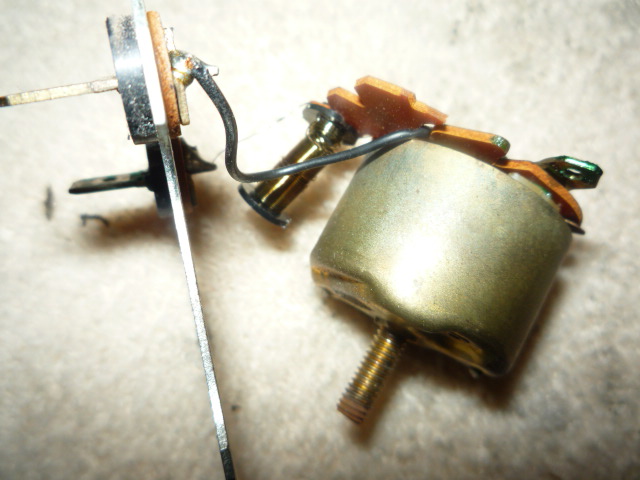
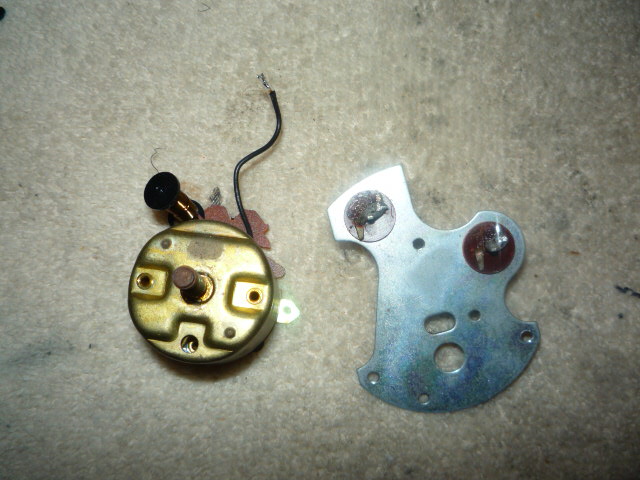
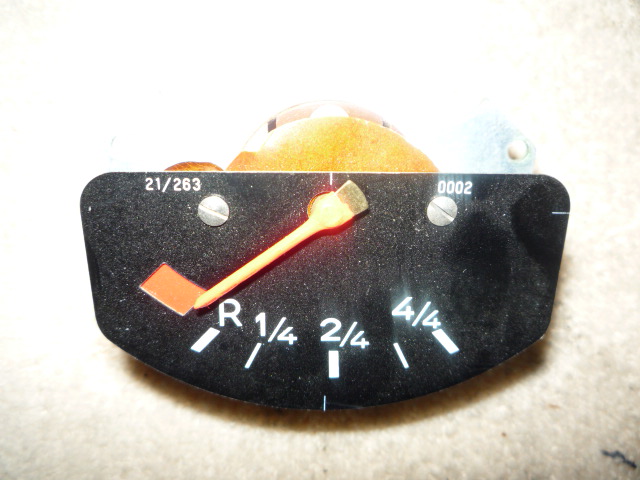
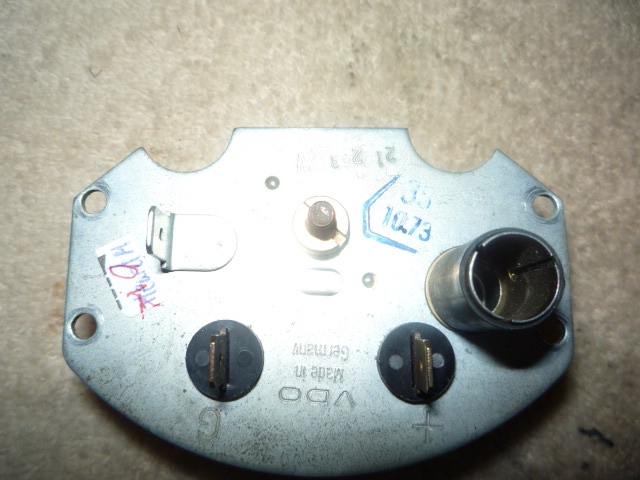
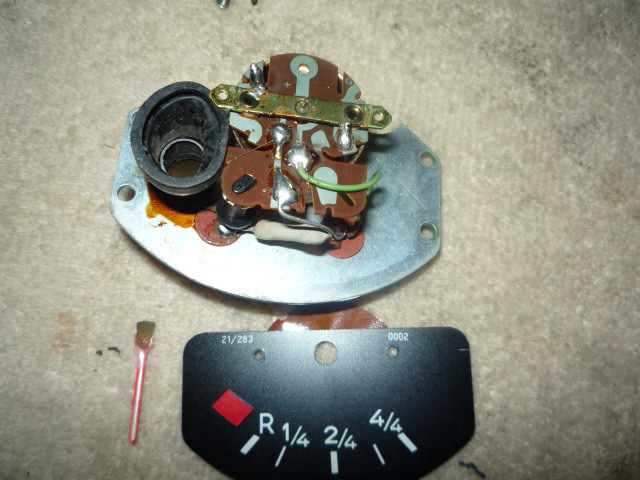
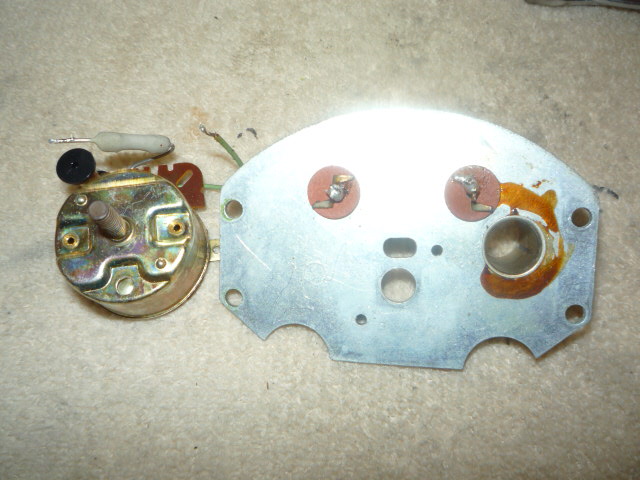
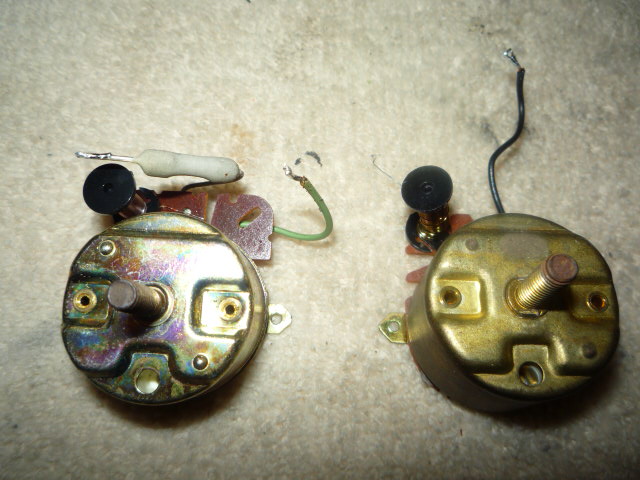
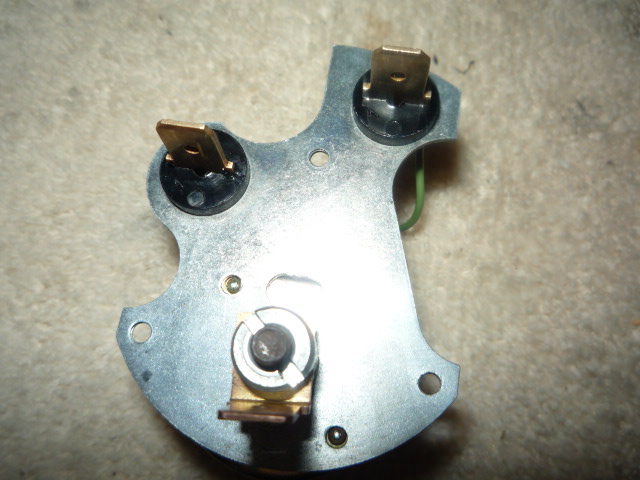
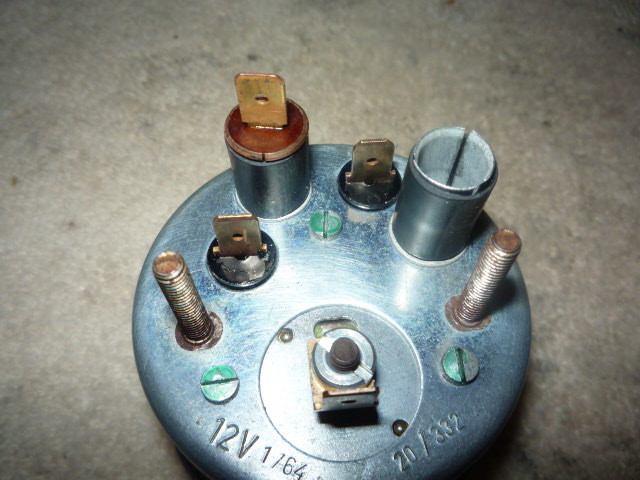
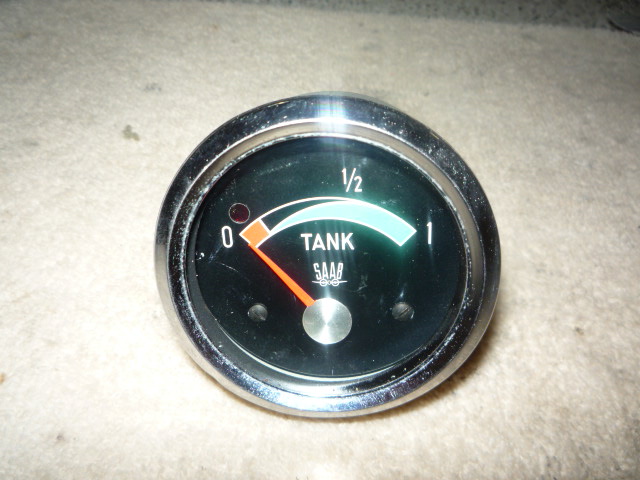
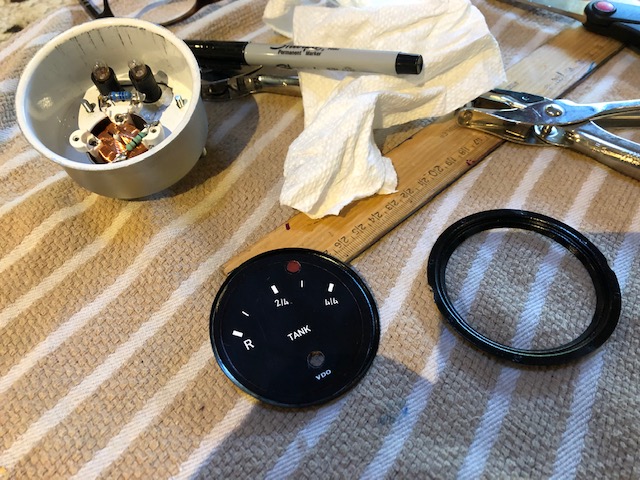
You need the Saab fuel gauge and an early 914 fuel gauge with the round black plugs on it. Take the Saab fuel gauge apart starting with the ring and face. Go around back and remove the 3 screws. Drop gauge out the front. Take a small fork and gently pull up on the needle. Take two screw off dial face. They are VERY SMALL. Turn assembly over and undo the two ground nuts and plug. Be careful pulling apart. There is two small washers on the base. Unit and mounting will come apart. NOTE THE TWO WIRE CONNECTIONS. Unsoder the wires. Now your ready to take the 914 gauge apart the same way you did the back of the Saab gauge. Remove needle and face screws. Go around the back and undo one post nut. Base will separate from the back. CHECK WIRE CONNECTIONS. Unsoder from base. Take the 914 unit over to the Saab base and match up the wire terminal. Soder in the wire and capacitor. Reassemble base with two small washers and 1st nut. Put ground spade and 2nd nut on centering the spade. Your conversion is DONE. Ready to send off for face plate silk screening. If you have some needle paint, go ahead and paint it too. (NHS charges $15 to paint needle).
If you started out with a known good gauge your costs should only be for a new black trim ring and silk screen cost. Trim rings are $45 each.
Attached image(s)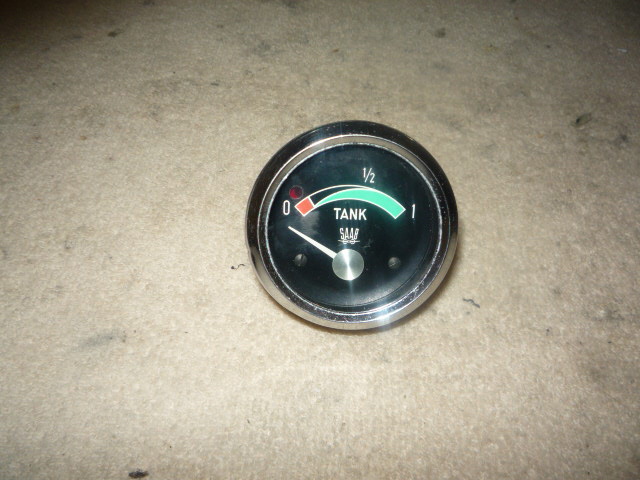


Posted by: 914Sixer May 3 2018, 02:20 PM
I thought this might be a hot ticket after finding out NHS charges $850 to redo one of these.
Posted by: pete000 May 3 2018, 04:48 PM
Who is doing the screen printing?
Posted by: 914Sixer May 3 2018, 05:36 PM
Thinking NHS. I just wanted to make sure of no outrageous cost. Keeping the whole deal simple.
Posted by: 914forme May 3 2018, 07:59 PM
Working with a company right now, on a different project. If it goes well it is an easy print on this media. And application onto the face is easy. The gauge would be no where near $850 to reproduce.
If you sourced the gauge and sent the 914 fuel gauge, easy but still have to run the numbers. But I will say most likely the final number would be devided by 8.
Posted by: Miguel K R Oct 17 2020, 03:28 AM

Working with a company right now, on a different project. If it goes well it is an easy print on this media. And application onto the face is easy. The gauge would be no where near $850 to reproduce.
If you sourced the gauge and sent the 914 fuel gauge, easy but still have to run the numbers. But I will say most likely the final number would be devided by 8.
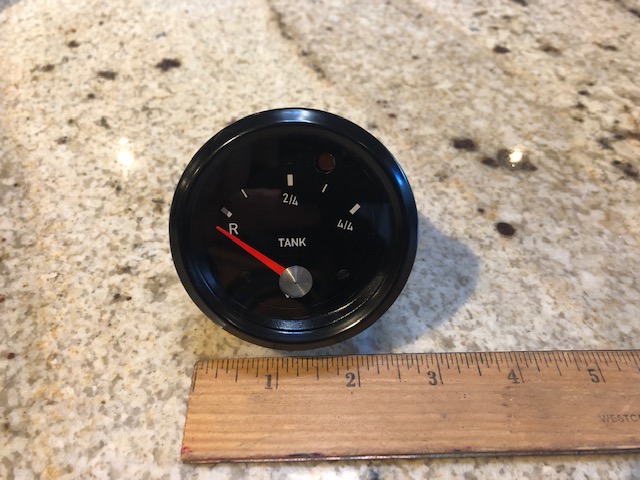
I am a bit confused because the 914 needle goes from R to 4/4 counterclockwise, while on the 914-6 GT replica gauge the needle works clockwise.
Can you please clarify this ?
I really liked your idea of silk screen printing, as until now I had only seen people printing (I guess printed on some self adhesive vinyl).
At my company I have all the equipment to silk screen print (we produce plastic buckets and returnable boxes for logistics).
Would you please be so kind to send me the file with the definition of the print ?
My email is mritto@psaplast.com
In return I am willing to silk screen a few pieces for you (it would take a few months because I am in Portugal, Europe, and to avoid hassle with Customs asking for the invoice and a proof of the payment, you would have to send the dials to my son in Philadelphia and when he comes for Christmas (or for Summer holidays) he would bring them and take them back printed, to mail to you.
Miguel
Posted by: rgalla9146 Oct 17 2020, 05:59 AM
![popcorn[1].gif](style_emoticons/default/popcorn[1].gif)
Mmmmm.
Need this. Great info.
Thank you Mark, Stephan and Miguel.
I already have some of the parts.
Carry on.
Posted by: nditiz1 Oct 17 2020, 06:54 AM
Mark told me the only piece you actually use from the 914 gauge is the resistor piece (long grayish tube)
Posted by: Retroracer Oct 17 2020, 12:46 PM
Re: fascia (and not spending big $$$): when I made mine, I tried one of these on line companies that produce vinyl stickers; you send them a graphics file via their website, and they print it and mail to to you. I chose one that had a "satin" finish option for a 2" round vinyl sticker; used PowerPoint to generate the scale markings and text, all for less than $10.
The sticker came in as slightly over 2" which worked perfectly with the fascia plate size on the 60mm gauge I modified.
It came out OK, I got the overall scaling slightly off, but good enough. FYI.
- Tony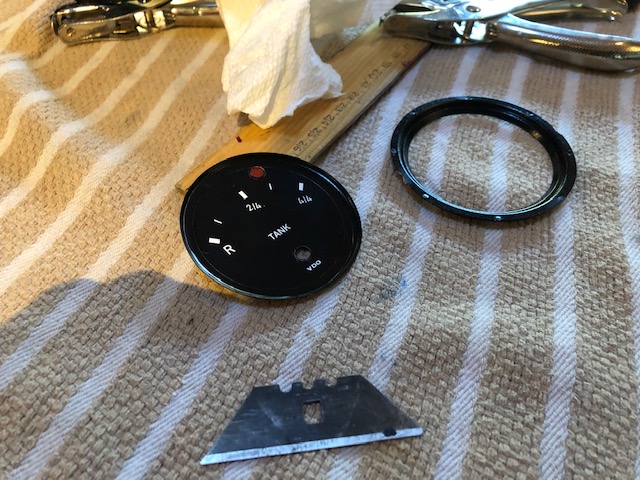
Posted by: FlacaProductions Oct 17 2020, 01:06 PM
@http://www.914world.com/bbs2/index.php?showuser=16100 - looks good - which sticker company did you use?
Posted by: Retroracer Oct 17 2020, 03:47 PM
@http://www.914world.com/bbs2/index.php?showuser=16100 - looks good - which sticker company did you use?
Think it was these guys:
https://www.makestickers.com/products/car-stickers/circle-stickers
Pretty sure it was them, but could not find the receipt. And the artwork if anyone wants to play:
 VDO_fuel_GT_v00.bmp ( 2.58mb )
Number of downloads: 136
VDO_fuel_GT_v00.bmp ( 2.58mb )
Number of downloads: 136- Tony
Posted by: FlacaProductions Oct 17 2020, 04:59 PM
Thanks - was having difficulty finding a place that would do a small order.
Posted by: 914forme Oct 17 2020, 05:52 PM
Any sign shop that does vinyl wraps should be able to do it. Just call up and ask if they can print on vinyl and cut it.
Here are some tips from using vinyl to make gauge faces.
Clean all the tick marks off the gauge face, factory ones will show through the vinyl if you do not.
Add a coat of adhesion promoter to the face to help the vinyl stick. 3M makes the good stuff.
Sharp exacto knife will help you make clean cuts.
Now for the fun part the tick marks are relative as is everything else in the gauge. These will never be precision instruments, you will go insane trying to make them precise.
As pointed out the resistance needs to be correct to make this work properly, that is where the 914 fuel gauge comes into play. Or you can measure the resistance and add a new resistor.
The 911 fuel gauge actually operates in the correct direction for this project. But the shaft size might be different than the SAAB gauge.
BTW, Mercedes also used a very similar gauge that can be found and had easier than the Saab gauges. I have about 10 of them in my shop, all oil pressure gauges, but it works the same, all pretty simple electro mechanical devices.
BTW it would be easier to use a small amber 12V LED and use some clear epoxy to set it to the back of the face. No need for light tubes etc.... This makes it a bit easier to wire up. And nobody will ever se it once it is installed.
Have Fun
Posted by: 914forme Oct 17 2020, 06:02 PM
Thanks - was having difficulty finding a place that would do a small order.
I would see what the minimum order is, my guy it is $75 for the printing and cutting. I normally run a big batch when doing projects. 2x faces for the typical 911 5 gauge set this way. Extra set for if I screw up, it does happen.
That is the clock, speedo, tach, combo gauge for oil pressure and temp, and the tank level, and fuel gauge.
And some times depending on sizes, I can get a couple more speedo or techs done.
Posted by: nditiz1 Oct 17 2020, 07:10 PM
Does anyone know where I can buy/get a longer needle? I am using a 914 volt meter can with a newer vdo gas gauge for a beetle, but the needle is too short.
Posted by: Miguel K R Dec 10 2020, 04:16 PM
I cannot imagine anyone selling a needle to suit a larger diameter gauge, but the forum member "defianty" at http://www.914world.com/bbs2/index.php?showtopic=310626&hl=needle%20%20gauge&st=40 shows the needle he made from a milk jug.
His topic presents an excelent level of workmanship, and it is curious that his needle has a "V" section. I wonder if that section was already present on the part of the milk jug that he used.
I just have one comment. Milk jugs are often blow moulded in polyethylene and this material is a pain to bond, and it also offers very poor paint adhesion.
Probably the milk jug used by "Defianty" is injection-blow-moulded in PET, and in this case the material is easy to bond and to paint (to identify these materials, PET is transparent, while polyethylene is translucent).
My favourite plastic for the needle would be ABS, and as a second choice Polystyrene. They are both easy to file or sand, and they are easy to bond and to paint. You can get profiles of these materials (Polystyrene is easier to find) at Do it yourself shops, or at model shops.
Posted by: Montreal914 Dec 10 2020, 08:53 PM
...So how exactly did the movement get reversed counter clockwise to clockwise?
I got the 911 gauge use option but an early 914 gauge was described in the OP. 
Powered by Invision Power Board (http://www.invisionboard.com)
© Invision Power Services (http://www.invisionpower.com)