Printable Version of Topic
Click here to view this topic in its original format
914World.com _ 914World Garage _ Went to change a broken clutch cable, discovered car has cancer
Posted by: davebrossi Sep 8 2018, 04:39 PM
Hi All,
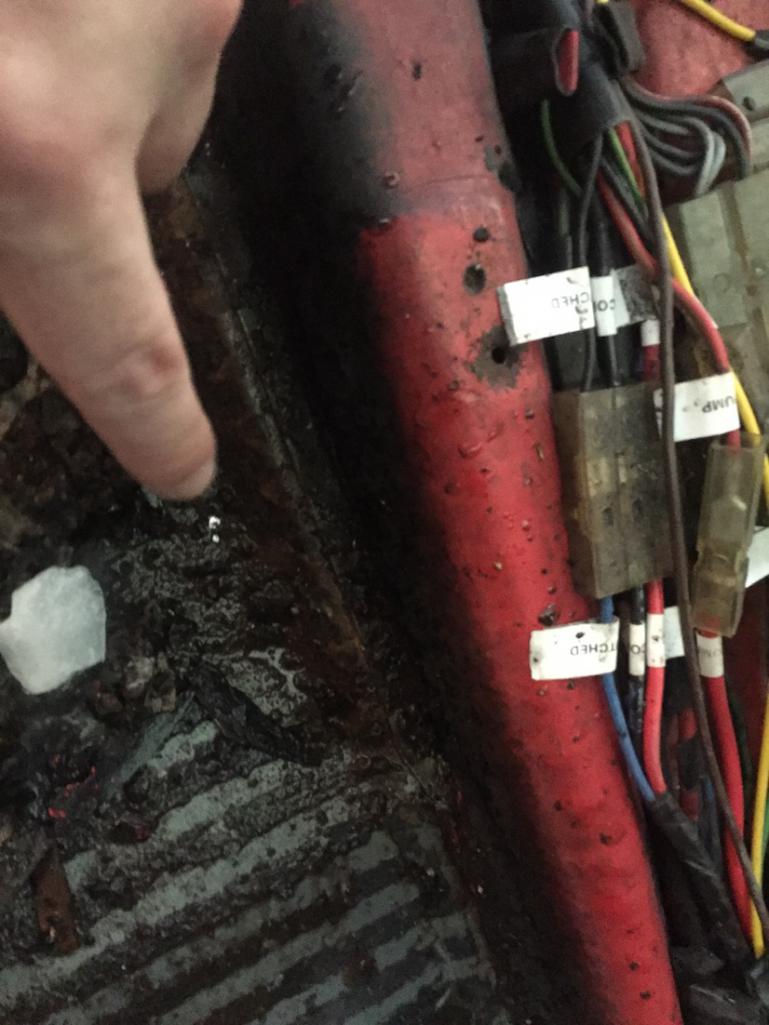
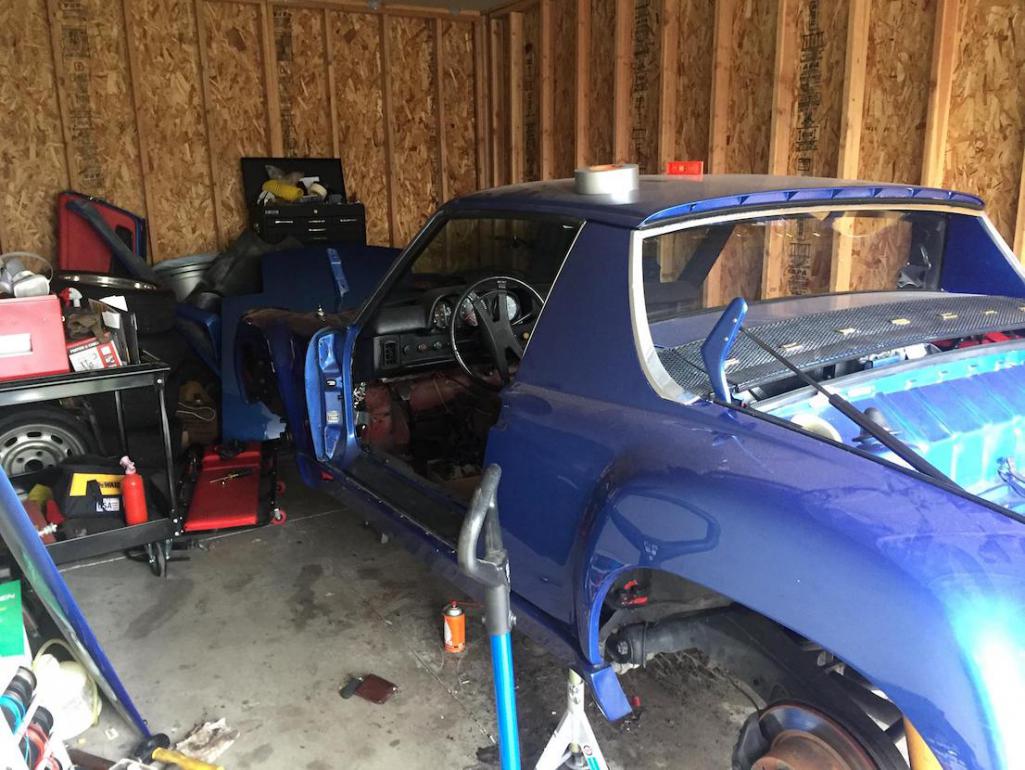
I prefer most often to lurk, but after a spin to a nearby autobody shop about filling in some rock chips on the rear fender flairs of the clown car netted me a 13,500 estimate, I've been a little on edge for rust. This morning I set out to change the clutch cable which had snapped last weekend. As I was getting myself situated I noticed some of the undercoating seemed more...flaky than usual.
I moved my finger towards it, brushed it and off it came! along with another small piece. I was now staring in disbelief at a mixture of pink body filler and carpet. OK! I told myself, this seems relatively minor, let's just clean the area, I can fix this, maybe not the best way, but I can!. That was five hours ago. As I worked I realized I needed to see where the damage was on the interior, so I removed the carpeting. Once again, I spied a familiar orange tinge... under the urethane installed at the factory. I started working with a chisel and hammer. What was a small hole was in fact a seam running along and right up to the driver's side right seat bracket. The concrete below glared at me menacingly.
The clown car (my 914-6) was the result of an venture from a forum member offering turnkey restoration of 914s. I have no interest in flaming or anything mean, so I will not say who, and that's not a challenge either, since frankly all of this was beneath urethane, and said individual cleaned, primered and properly painted surfaces all the way to the old urethane on the floor pans. but it is worth mentioning because rather than spiral down the inception styled road of 'oh god I'm doomed, DOOOOOMMMMED!' I sat back and thought about what they -had- restored and what I had to go back and work on. The interior of the door panels was rusty, I sanded, sealed with POR15, clear coat has a craze to it, but stable and looks fine. Small side sail bumps. Originally thought body filler, probably tin worm, but unlikely to fail while driving and drag me half out of the bottom of the car. Longitudinals, hell hole both extensively reviewed during restoration, both are clear. I don't see bubbles all over the car, and the 13500 was with a note saying "we don't serve yer kind round these parts try these guys since they do antiques" from a shop filled with classic american muscle cars and more of a 'get lost' message, which I understand because scope creep is real.
I want to believe this is one of those typical stories where I don't wind up with the Porsche 914 equivalent of "you have died of dysentery" on the Oregon Trail PC game, but I also have to face up to the fact that I will have to acquire new front and rear floor pans. Happily they can be ordered from Pelican without much fuss (the available weld in panels for the 914 is really REALLY a reason I love them in an odd sort of way.)
I know I have to invest in a welder as I lack the skills. I want to prepare the area as best as humanly possible because A.) I believe in being a good steward and B.) I'm afraid while I'm happy to pay for their services, I am cheap and would prefer to do the prep work myself.
Advice (maybe prayers?) is/are appreciated, but I will be searching threads and educating myself accordingly as I know I need to. in the meantime, here's some NSFW Porsche Floor pan gore;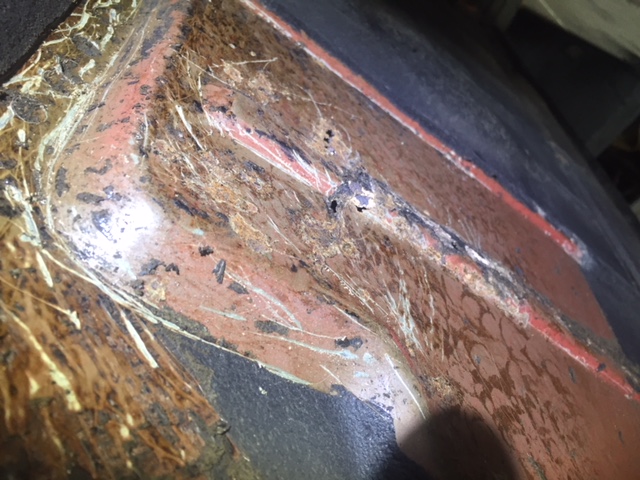
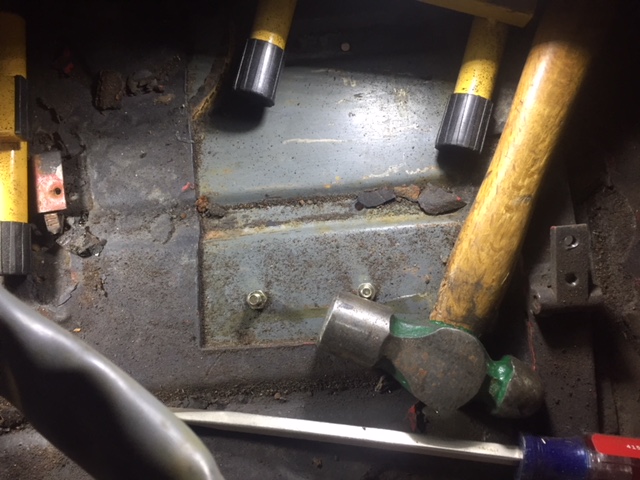
the initial discovery and early cleaning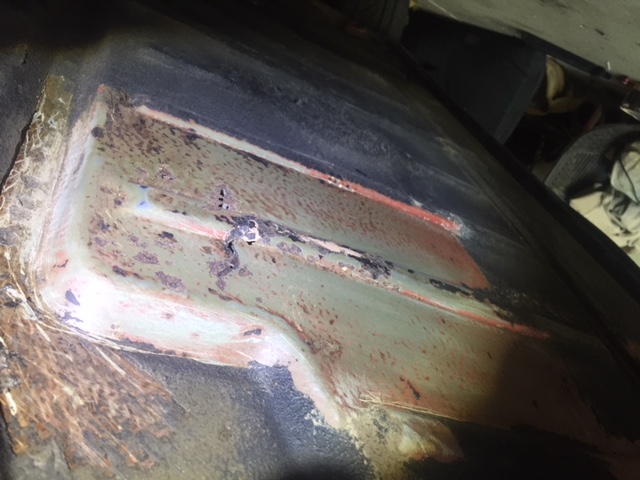
The point at which I realize I should probably look at the top end of things.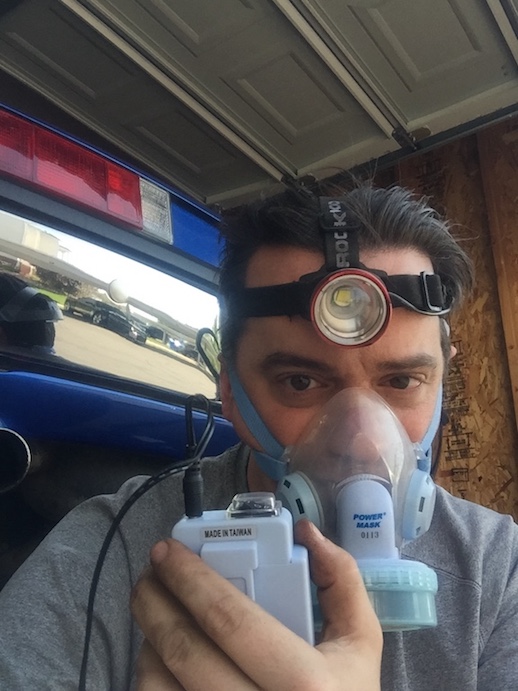
because regrettably I am a millenial, I wanted to show off my PPE for working with fiberglass and sanding. 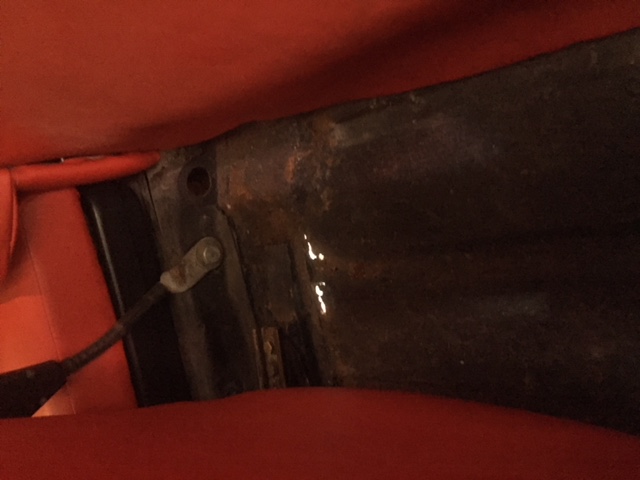
The moment my heart sank, the colour drained out of my face, and I had to go have a little sit down. 
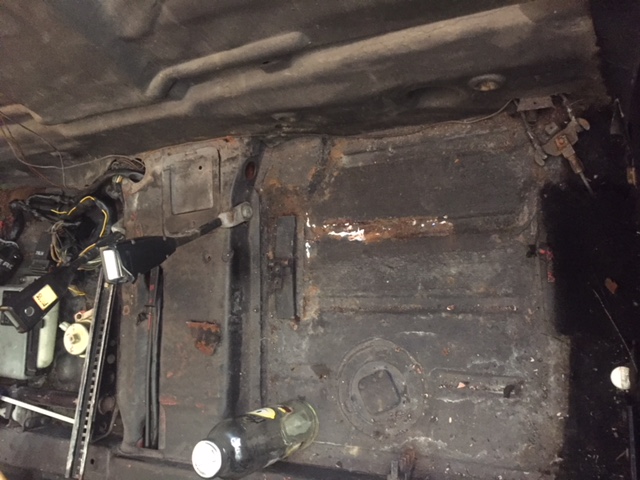
This is the extent of the rot. You can see the garage floor clearly a menacing glare fixed on it's eyeball-less face :E! I wont blame the consumption of Hubert's lemonade, wait, no, yes I'll blame it for the rust after all!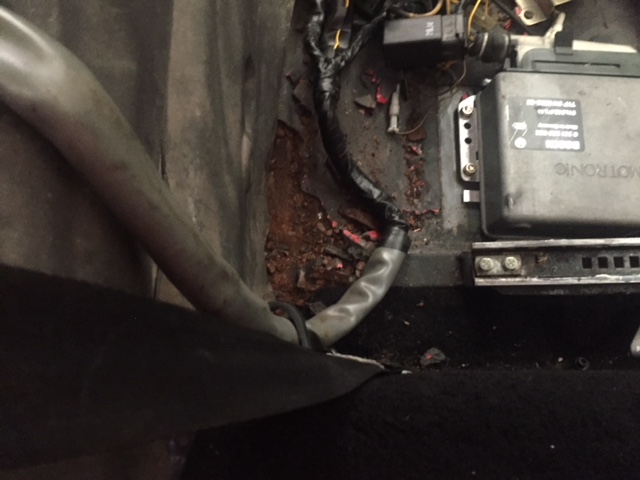
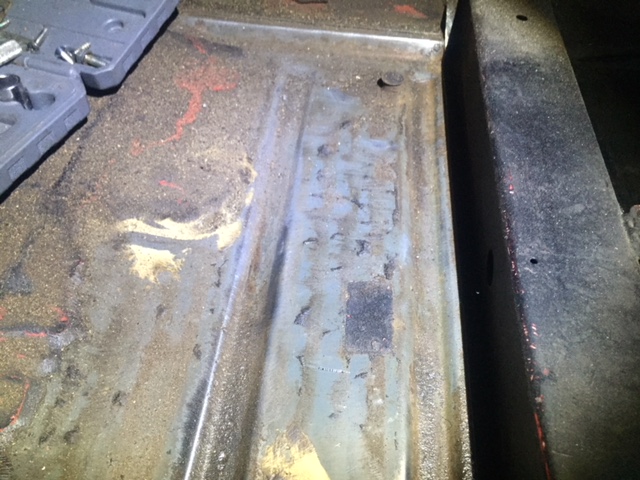
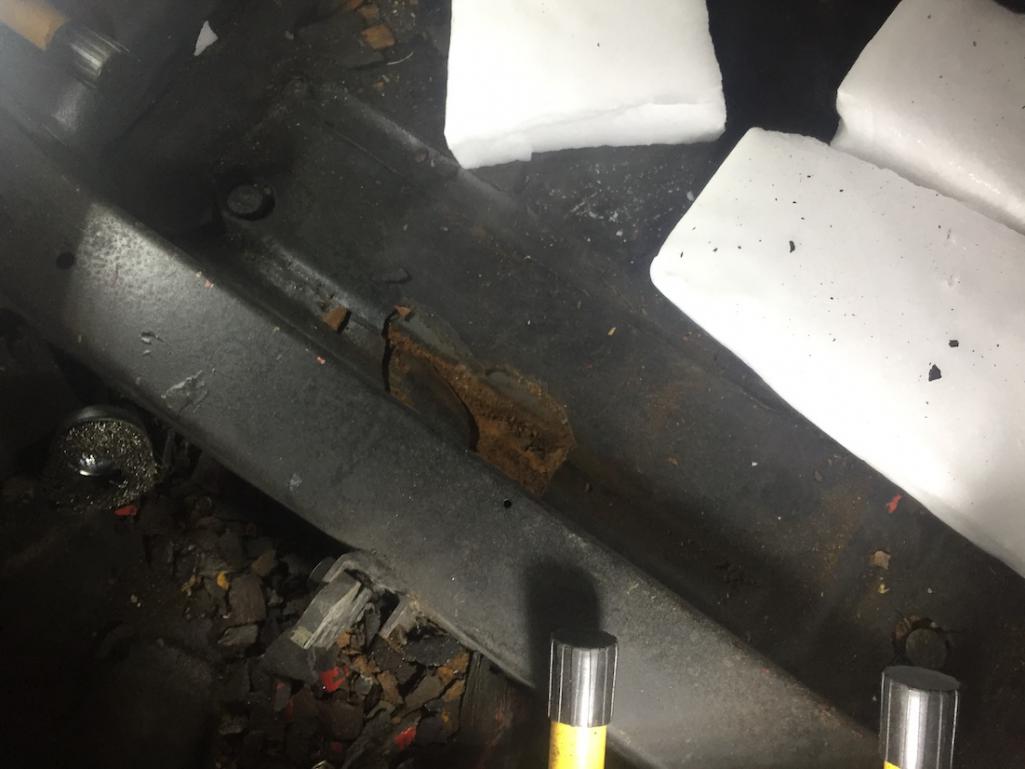
The start of (and at which point I realized that the floor pans were toast on both sides) the surface rust on the other side.
I'll admit it was heartbreaking to discover. I wanted to give up and throw it all away, sell it and be done with it. But then again, new front and rear floor panels are made for a reason, and the last undiscovered country (Star Trek) both my father and I were starting into was body work in the last couple years. I'm hoping I'm not right thinking this will require the selling of one of both a kidney and a lung, frankly I have no idea, though (in a phrase I use talking with my employers often) I look forward to the opportunities it will afford me moving forward. Bonus points here in how my dad managed to cause the usual reaction that always happened when there was a setback and he had to tell mom one last time. 
Posted by: davebrossi Sep 8 2018, 04:53 PM
Quick mention; I know the floor pan is a two piece setup. However, With said hammer and chisel I chased my way down the driver's side finding surface rust along the sides and lower portions of the metal. While I didn't check the passenger's side, I figured it was moot since the panels are upper and lower, not left and right.
Posted by: Firstcar Sep 8 2018, 04:55 PM
Condolences. Anything is fixable, just comes down to cost and motivation. If the longitudinals and suspension consoles are solid, this should not be that bad of a job. Hard to see how far the rust extends along the longs and the rear firewall from the pictures. Best find yourself a trusted club member experienced in welding repairs in your area for an in person consult before you rip everything apart. Good luck!
Posted by: EdwardBlume Sep 8 2018, 05:11 PM
Its the challenges in life that define us more than our successes. You will over come.
Restoration Designs sells the floor plans. Everyone marks them up.
Posted by: mepstein Sep 8 2018, 05:22 PM
There are a counter or different ways to buy the pans. Check with restoration design. Good luck with the project.
Posted by: billh1963 Sep 8 2018, 05:23 PM
Yes...anything can be fixed. Only costs time and money.
I'm more interested in the previous restoration work. Was rust repair mentioned in the rust repair bills?
Posted by: worn Sep 8 2018, 06:23 PM
It isn’t that bad. You can do it. Nice write up too. To me, “undiscovered country” is Hamlet, which Picard can do in his sleep.
Posted by: davebrossi Sep 8 2018, 07:14 PM

Yes...anything can be fixed. Only costs time and money.
I'm more interested in the previous restoration work. Was rust repair mentioned in the rust repair bills?
It was not. Again, I have no wish to (borrowing a millenial term here, sorry) 'throw shade' on the original work. Most of what I heard was second hand from my dad's side, but the body was originally said to be surprisingly good with only some minor rust. I was led to believe it was repaired along the way. Battery tray was either replaced or in good shape, and just above where the original urethane spray was placed in the factory, the metal is clean, primer and then just beyond that line regular paint. When I had the motor out of the car I had no sense of any rust whatsoever, which is why this was such a shock to the level that it is.
Part of it frankly is me. I know 914s are equipped with rust at the factory, but I chose to drive it in the winter, sometimes on slushy roads, and it's been in a couple storms. Salt isn't used out here so in my mind that meant I wasn't rolling the dice.
A couple years ago when I had the car in a car show I noticed the crazing in the clear coat. It took some effort to see it. I pulled the door cassettes and saw the peeling paint and mark of the beas...err the tin worm. So I sanded, sanded, sanded some more, as best I could then treated the area and any exposed skin in POR15. I reasoned I could live with (still can) crazed clear coat that you have to be right up against to see. That was where the body shop started flipping out and adding zeroes to the paint work. "See this here sir is bondo cuz it's all crazy like, so we have to start from the doors now and work our way back." I wish I was paraphrasing but the lad delivering the news was desperately trying to grow the start of a tiny pencil stache'
Time I have, and elbow grease to spare. I will sand, and do everything in my power to disassemble what I need to (johnny 5 no disassemble!) though I'm hoping this does not mean to the degree the folks on youtube with the freshly painted 914 frame on a rotisserie did (it was just the frame.)
Posted by: jdamiano Sep 8 2018, 07:31 PM
Doesn’t look too bad. Always hard to tell from pictures. What I see can be fixed. Get a grinder and wire wheel and get rid of the loose rust and coat with rust neutralizer. Just Dynamat over it. Just kidding but you could probably weld those holes up without replacing the pans.
Posted by: davebrossi Sep 8 2018, 07:45 PM
Doesn’t look too bad. Always hard to tell from pictures. What I see can be fixed. Get a grinder and wire wheel and get rid of the loose rust and coat with rust neutralizer. Just Dynamat over it. Just kidding but you could probably weld those holes up without replacing the pans.
You're absolutely right, and also correct in the fact that Dynamat will eventually cover the new pans. But as I chipped at old factory Urethane I was hoping to find a point where even mild surface rust stopped. I got to the peddle cluster and stopped. I still need to be certain the longitudinals haven't done a 180 in protest and gone the way of the floor pans (they have, I might add, been reinforced by a kit developed by the very mentionable Brad Meyer of 914 ltd fame, who despite being a sort of rock star of 914s in my eyes I lived down the street from in Peoria for four years and never knew about it until I'd moved out west.)
Also I'm happy with the restoration design pricing! I always get so excited when I mention how almost all of the 914's body and frame can be sourced and how cool that is with people shaking their heads at the man that must appear to have three heads or something. I'll admit the fact that it's because VW installed a rust upgrade that lightens the car as you race that caused the explosion in aftermarket parts, but I'm grateful at least enough people want them to justify the industry.
I actually got an offer from someone local whose family ran a welding business until the credit crunch in 2008. They worked for me briefly and we've stayed in touch on and off. They've offered to do the welding, which is a big load off my shoulders. But now it's on to the prep! the thing I was anxious to save money on by muddlin, er, carefully working my way through! hurray!
Posted by: VaccaRabite Sep 8 2018, 07:47 PM
Seriously.
This.
Is.
Nothing.
It’s not terminal. It may be a floor pan or some patching.
Fix it. Get all the damned tar off the floor of your car and really see how bad it is. But this is not terminal. This is easy to fix.
Easy peasie.
Zach
Posted by: porschetub Sep 8 2018, 10:18 PM
You will be fine ,most find out way worse,many on here that part out cars can supply cut out pieces so you can have them spliced in...unless the rest of the pans are rotted right out then its new pans,problem is these cars leak and water sits in the floor pans and they rot,no getting over that,by the way love your car really nice.
Good luck.
Posted by: Larmo63 Sep 8 2018, 10:54 PM
I'm torn here, because I want to root for you and your continued success in rust containment. On the other hand, I hope this thread lasts a while because your writing style is entertaining.
Posted by: bbrock Sep 8 2018, 11:11 PM
As someone who has one of those naked chassis hanging on a rotisserie in his garage, I'll pile on to what others have said. This ain't nothin'. Like Zach said, clean all the tar off the whole floor and then post pics of the whole thing. So far, it does look like patching in a piece from a donor car will do the trick and have you back on the road in no time. BTW, I'm just up the road in Bozeman. We're practically neighbors by our standards. 
Posted by: rjames Sep 8 2018, 11:32 PM
Cut out the pan (or the parts of it that are shot) and weld a new one in. It will take less time than it took you to write those posts. 
Posted by: davebrossi Sep 9 2018, 07:29 AM
I'm torn here, because I want to root for you and your continued success in rust containment. On the other hand, I hope this thread lasts a while because your writing style is entertaining.
When during mid sentence I realized my late father had never said to my mother just how much money was involved in the 914 I had another color draining from the face moment. The good news is (this is not some sort of humble brag) she's well taken care of in that regard, but I did everything but mouth 'oh sh*t' to the drywall in front of me covered in about a decade's worth of greasy finger prints where I'd leaned on it to get around various cars over the years.
Should also add I don't 'hate' pink or any shade thereof. While I don't wear anything pink, I'm very quickly learning to dislike it because the following was how the horrible reveal transpired; chisel and hammer, hammer, hammer, *CRACK!* up comes what looks like the rest of the urethane, but on the other side salmon pink I guess swimming up stream to spawn misery and create an unwanted new fresh air intake. On the plus side I -would- have been the guy driving along otherwise when suddenly my right side was hanging below the car and I'd have to get home and at the same time try and pretend everything was OK out of fear of being a bother or embarrassed. 'Yep, Porsche had this as a feature!'
Posted by: r_towle Sep 9 2018, 08:05 AM
No one is entitled to a rust free 914! You have to do it.
Then it’s yours, and you saved it.
Posted by: cary Sep 9 2018, 09:56 AM
Place close attention under the e-brake. Water likes to settle in there too.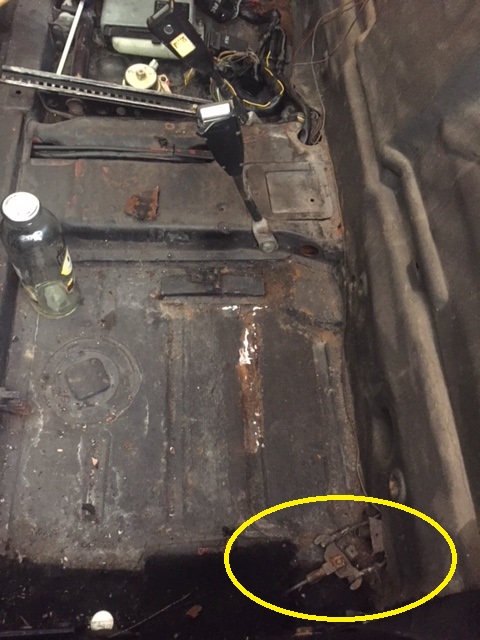
Posted by: 914Sixer Sep 9 2018, 09:58 AM
Just do it!
Posted by: burton73 Sep 9 2018, 12:39 PM
“(they have, I might add, been reinforced by a kit developed by the very mentionable Brad Meyer of 914 ltd fame,”
This worries me a little as you have some rust. This is done on cars with badly corroded longs.
If it is done and you wanted to put in new pans, it is just drilling out the welds and welding in new floors. I did this on my 6. It was a rust-free car except for a few lower areas of the floor right where yours has the rust in the pictures.
Your car is not going to melt away in 2 years. Just do not water it daily.
If you do not want to fix it up today just clean it up and fix the pans when you have time and money to do it.
I remember when my first 73 911s and I needed to put a fuel pump in it. The shop said it would be $330. That was a lot of money in 79.
Then I heard I needed to rebuild the engine because of a rod knock. $5000 for parts and machine work. This was for a $9500. Car in 79. I did all the work on engine and at 500 miles Someone stole that car and the insurance co paid me $12,500.
That car is worth$120,000 - $150,000 today.
Steel your nerves and look up people that have done this themselves and figure what you want to do.
I see your car is a 6 because of the Motoric. This should be a very desirable car. I like my cars perfect. It is a curse for me. I was in my mid 20s when I got my first P cars.
Good luck. Just BREATH.
Bob B

Posted by: davebrossi Sep 9 2018, 03:39 PM
“(they have, I might add, been reinforced by a kit developed by the very mentionable Brad Meyer of 914 ltd fame,”
This worries me a little as you have some rust. This is done on cars with badly corroded longs.
If it is done and you wanted to put in new pans, it is just drilling out the welds and welding in new floors. I did this on my 6. It was a rust-free car except for a few lower areas of the floor right where yours has the rust in the pictures.
Your car is not going to melt away in 2 years. Just do not water it daily.
If you do not want to fix it up today just clean it up and fix the pans when you have time and money to do it.
I remember when my first 73 911s and I needed to put a fuel pump in it. The shop said it would be $330. That was a lot of money in 79.
Then I heard I needed to rebuild the engine because of a rod knock. $5000 for parts and machine work. This was for a $9500. Car in 79. I did all the work on engine and at 500 miles Someone stole that car and the insurance co paid me $12,500.
That car is worth$120,000 - $150,000 today.
Steel your nerves and look up people that have done this themselves and figure what you want to do.
I see your car is a 6 because of the Motoric. This should be a very desirable car. I like my cars perfect. It is a curse for me. I was in my mid 20s when I got my first P cars.
Good luck. Just BREATH.
Bob B
Hi Bob!
So the reason behind the reinforcement kit was due to the installation of a 3.2 911 motor out of a wrecked 88 Cab. Along with a steel reinforcement plate for the 904 transmission and a strict "no dumping the clutch unless you really want to literally dump pieces of the clutch behind you on the road" policy it was to help with any issues caused by increased HP/Torque. I'll need to check upon removal of the side covers how the reinforcement was installed, I suspect weld. I -can- say with some certainty when Brad did his reinforcement there was no conversation about rust, or the discovery of any unforeseen issues, just a video from Dad showing off how nicely the car idled in -5F weather.
You're right on desirability as well, there are three parts to my ownership; enjoying my dream car rather earlier in life than I expected, being a good steward to the legacy of the build, and also to make certain as a tangible asset if the time comes to part with the car I do not have to worry about answering the questions regarding rust.
I should also add MB911's custom exhaust system made it possible to actually -enjoy- driving the car in -5F as inside it was nice and warm. I probably sound like a bit of a shill now name dropping, but it helps to know what one is working with.
Other note; When I dropped the motor to mend a pesky oil leak (which unfortunately I did not mend, banjo fitting to oil pressure sender to chain tensioner housing curse you thirty cent washer!,) I looked over the engine bad including the area around the battery tray, the back of the firewall, etc. While this was a couple years ago, no signs of corrosion. all the metal was clean and painted. Where I nicked the paint I went back with POR15 (I don't recall corrosion, but what's that reality TV show's saying about Safety Third?) and then applied touch-up paint.
....Come to think of it I got my first P Car in my mid 20s, but while you had a 911S, I had a 931 which wasn't running/never ran (eight years ago I did not have the level of confidence to tear the entire car apart so I never fixed it correctly) and then a 986S but though "No, what I'd rather have is something rusty!" though truth be told short of adding heated seats I like the 914 experience -much- more albeit somewhere down the road I know with the advancements made in A/C Compressor technology I fancy the idea of adding that to complete what I'd consider the modernity package I started with heating. Maybe by then I'll have properly replaced all the rubber too (still after a main targa seal, Dad and I buggered the install of the repro he found years ago) and wont have to explain why I have mud all over me when I stop to refill on a rainy day.
Posted by: davebrossi Sep 10 2018, 08:25 PM
Hi All, I'm back! 
I can't promise super frequent updates as life gets in the way, but while I'm ablaze with indignation that the rust fairy has been overly generous in their gifts, I will follow up as I dig into what's wrong, where, and how much will need replaced. Without further delay, cue scaring the neighbors PPE Inspection selfie!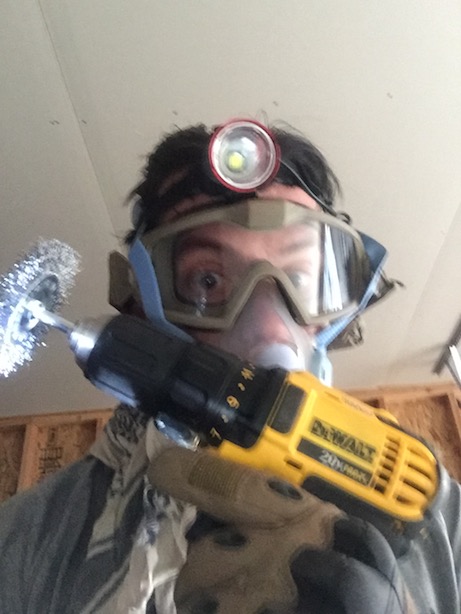
To address the question, no, I never served, but I have halted downward motion on a cactus bramble or three during ten years of airsoft, so good PPE is always essential, especially since I have the rare and mysterious ability to prove Murphy's chief axiom when it comes to bodily harm. With drill and new soon to be destroyed wire brush set I set off first to take a look at the upper floor pan, driver's side which was the cause of concern initially. 
The white areas/pinkish areas are body filler. My initial suspicion of just one seam of total rot was optimistic at best. 
This is the same low point from a side perspective. Lower in the picture you can see the previously discovered patch of sunshine and rainbows I originally discovered..oh dear, I'm seeing a pattern here. 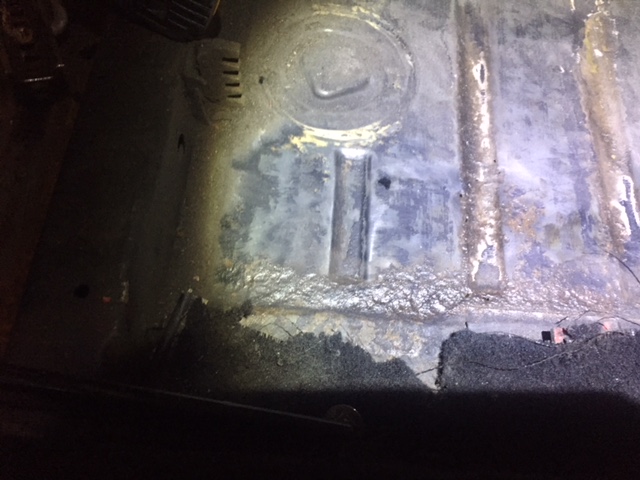
I wander a bit too easily so I pulled back the carpeting and ran the drill along the side of the pan/up against the longitudinal for a little while. The areas that look like sludge or as I prefer to see them, miniature representations of the elephant foot in Chernobyl's reactor number 4, are rust, pure and simple. Going to see lots of it, hurray!
....I feel it warranted to mention at this point that A.) I had my tetanus booster last year and B.) shortly after this picture I nicked my hand with the brush. Thanks gloves! Saved me a lot of awkward questions tomorrow! :-D:-D:-D
Holey floor pans, batman! .. there.. see..um... see what I did there with the... THERE ARE MANY HOLES IN THE FLOOR PAN THERE! Again, this is the second low point, at which point I reasoned, yes, the upper floor pan on the driver's side is cannot be salvaged. Savaged maybe, but not mended. 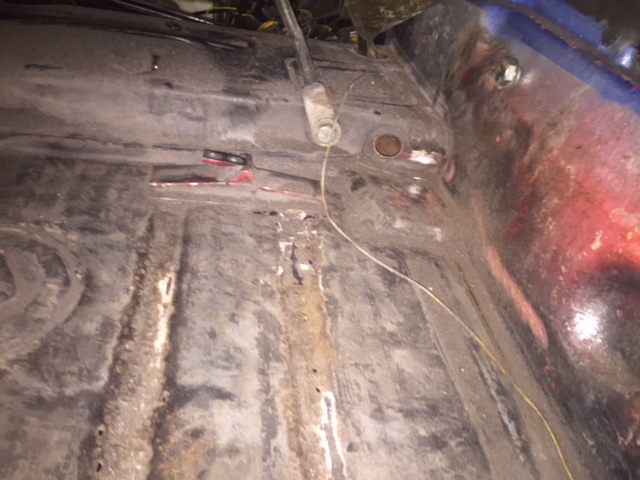
I widened not just my camera angle here, but valid questions were raised about the condition of the firewall metal. The initial good news is that while I had some rust staining, and the glue holding the urethane cover gave me a a small scare, the floor pan seems to be the worst of it. The metal on the firewall -appears- (too soon to check, I burned through three 20V batteries in an hour and a half) solid. 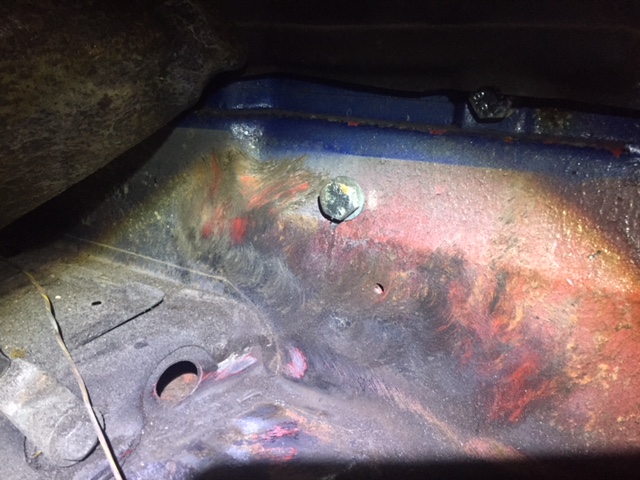
Focusing on the firewall again. Hopefully by now we all know the car was originally red, even before the rust! 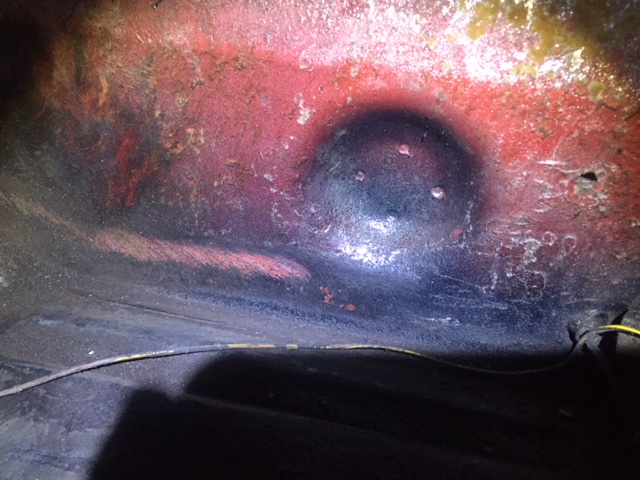
a close up just to the right of the bolts holding the engine mount partially in place, there is glue residue in the top right hand part of the frame, I promise having gotten my hand stuck to it rust hasn't become an effective adhesive that I know of. 
Where the firewall mates up with the center cross piece, I used some of the last of the precious electricity to run the brush here to bare metal. The pan? Stuffed crust, rust flavor. The firewall/Center channel; I'm cautiously optimistic. 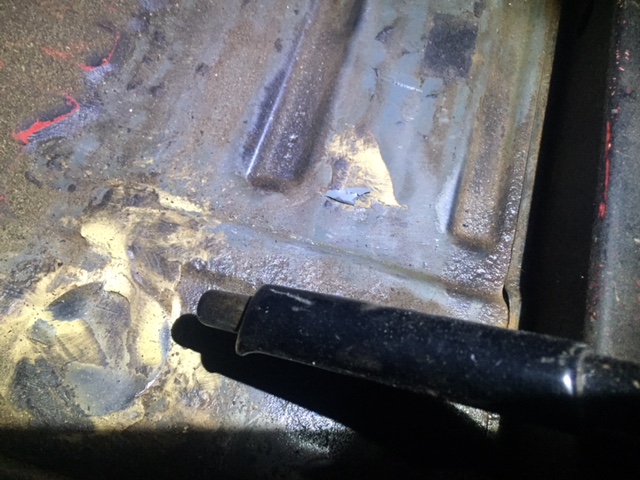
I did run the brush for a short time in front of the cross member there, the initial section I'd uncovered here, sure enough, Tin lizzy, come to say... something... I mean more rust. 
Last of the series, again, what I'm seeing is rust forming in the depressions in the pan, not to the level of severity I -thought- I'd creepily depicted in the upper pan area (i.e., that I didn't fall out the bottom of the car is a testament to the endurance of bondo under load by a man-wot-loves-cheesecake)
At this point with no batteries left it was game over, man, game over! I did get back inside before dark because they mostly come out at night...mostly. Unfortunately the brush and drill couldn't overcome the factory urethane closer to the peddle cluster, so that's another night for chip and hope. I'm also fighting two screws torqued a bit too over zealously into the side skirting. Inspecting the bare metal around the heat tube I saw no cause for alarm, but then I saw no cause for alarm driving the car about until the clutch cable retired itself.
I'm trying to maintain a light hearted attitude, yes, my nature is normally very cynical and caustic, so I fear a lot of bad attempts at humor shall follow. I figure I can either leave it buried for years, or get things as clean as possible so when the time comes the person who will be welding for me (not a forum member, but someone with 30 years experience welding stepped forward to do the job when I'm ready. That said, I am obligated to help said individual source parts for a 69 Chevelle in repayment. )
Now, a question! solid linkage for the transmission runs through that central 'tube' (I'm using the term loosely because I suffer from nominal aphasia and know someone will correct me) along with wiring from the engine. Before I go into 'scrap the hell out of the metal' mode on the passenger's side I'd like to pause and carefully disconnect what I need to. I assume that center tube remains when the pans are removed, along with the longitudinals. Other than under the car I can't really get a brush to it, any recommendations for Rust inspection?
Attached image(s)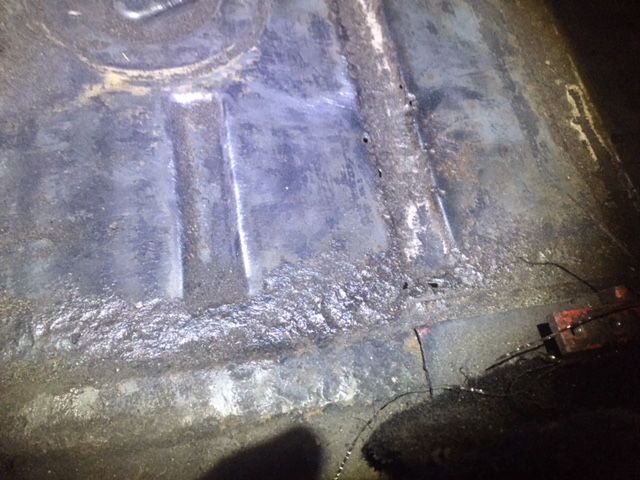
Posted by: Chip Sep 10 2018, 08:30 PM
Seriously.
This.
Is.
Nothing.
It’s not terminal. It may be a floor pan or some patching.
Fix it. Get all the damned tar off the floor of your car and really see how bad it is. But this is not terminal. This is easy to fix.
Easy peasie.
Zach
Yes and hurrah for PMA!!
Your dialogues are inspiring to anyone with two hands and a welder and a sober mind. I can do it. My '73 is typical. Sat for over 30 yrs. Hell hole is typical, but it can and will be done. Fuel tank and lines solid with the finest black, hard tar you have ever seen. But they are replaced. Hurrah! Nothing succeeds like success. Stick to the work until it sticks to you, and all that happy hs. Don't dessert us newbies. Posted by: davebrossi Sep 10 2018, 09:30 PM
Seriously.
This.
Is.
Nothing.
It’s not terminal. It may be a floor pan or some patching.
Fix it. Get all the damned tar off the floor of your car and really see how bad it is. But this is not terminal. This is easy to fix.
Easy peasie.
Zach
Yes and hurrah for PMA!!
Your dialogues are inspiring to anyone with two hands and a welder and a sober mind. I can do it. My '73 is typical. Sat for over 30 yrs. Hell hole is typical, but it can and will be done. Fuel tank and lines solid with the finest black, hard tar you have ever seen. But they are replaced. Hurrah! Nothing succeeds like success. Stick to the work until it sticks to you, and all that happy hs. Don't dessert us newbies.Wasn't pretending about the dream car part, no, I'd sell my daily driver or at least cut it up (a mazda CX5 doesn't have much in common with the 914, but it has -some- steel in it as far as I can tell beneath the plastic) before I bugger off. What I need is a corded drill, a decent A/C Inverter, and the Optima red top from the car. Maybe I'd get more than an hour's work done...probably electrocute myself too.
Posted by: bbrock Sep 10 2018, 10:33 PM
Doesn't look bad at all. I'd stab at the worst spots with a screw driver to see if they are still solid. If so, I don't think you are at any risk of going Fred Flintstone anytime soon so can take your time on the floor repair.
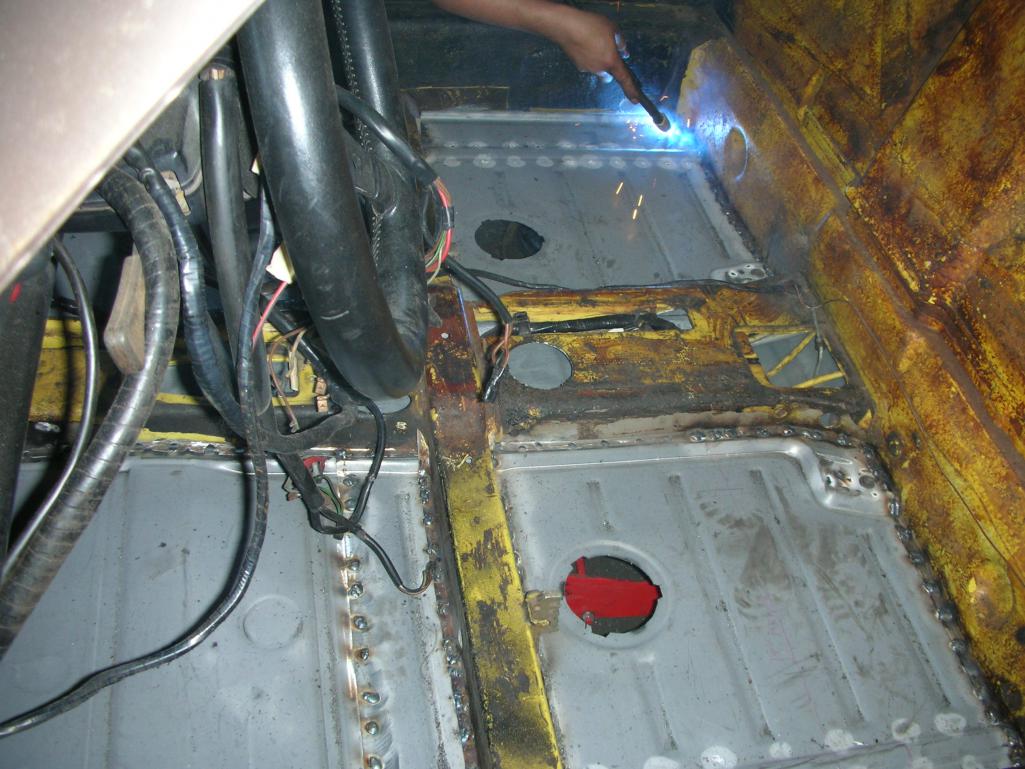
You're right that the central 'tube' (tunnel) stays in place. You can get a cheap boroscope to hook to a computer or phone to inspect, but if you wind up deciding to replace the floor, it won't really matter. Here's a pic of what you'll be looking at if the whole floor comes off.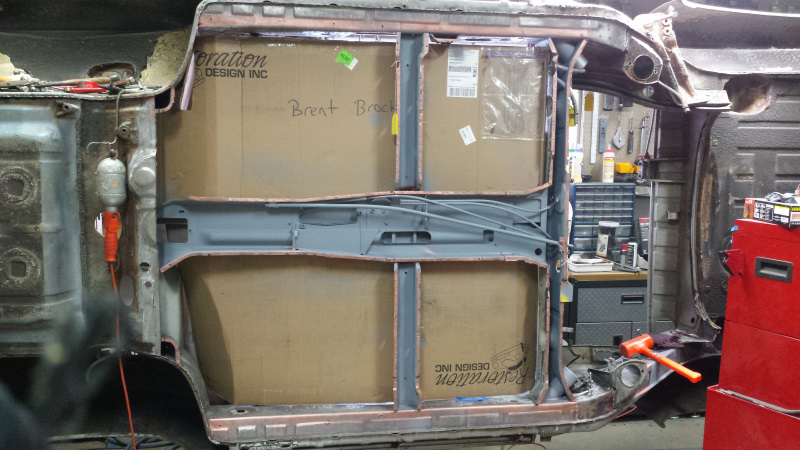
My car was completely stripped, but I don't see why you couldn't do it with the shift linkage, cables, and wire harness in place. I'd pull the shift linkage though just to get it out of the way so you can treat and paint the tunnel while it is open, but I would mess with the wire harness.
Since this all started with a busted clutch cable, I would check the metal tube that runs inside the central tunnel (the big one in that pic) that the cable runs through and make sure it is still attached to the tunnel at one end and firewall at the other. They have a nasty habit of breaking loose and causing the cable to bind and fail. There are ways to repair without yanking the floor or tunnel, but if you wind up deciding to replace the floor, dealing with the clutch tube will be easy while you are there.
Good luck!
Posted by: davebrossi Sep 15 2018, 12:07 PM
Another weekend, and another discovery but first, some context as to what I went about doing today. owing to the discovery I made regarding rust's preference to be lazy and go for the lowest points in the pans, and the fact that I burn through three cordless drill batteries in under two hours, I have to be picky about where I chase bare steel. So I started by going down the upper and lower pan on the driver's side from under the car, checking the depressed areas. Sadly there is no SSRI to provide them with a shinier rust free outlook, but no additional pinprick sized holes reared their ugly heads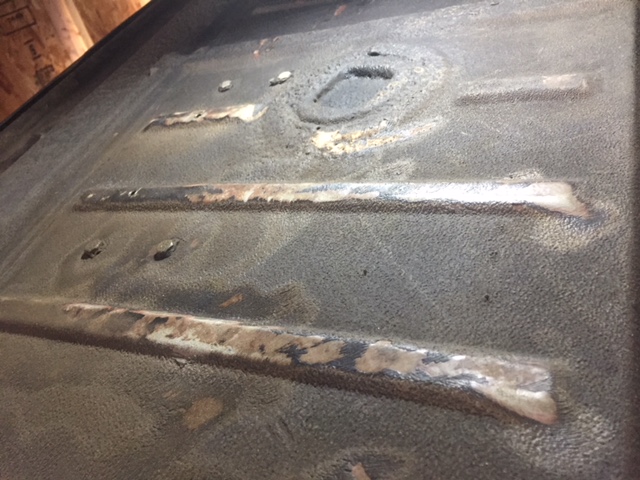
I turned my attention briefly to the Passenger's side where the Motronic brain of my 3.2 was.. so very sophisticatedly mounted to the chassis. No, really, The bolts have in-tact sealant around them, though the hole in the middle defeats the purpose :-)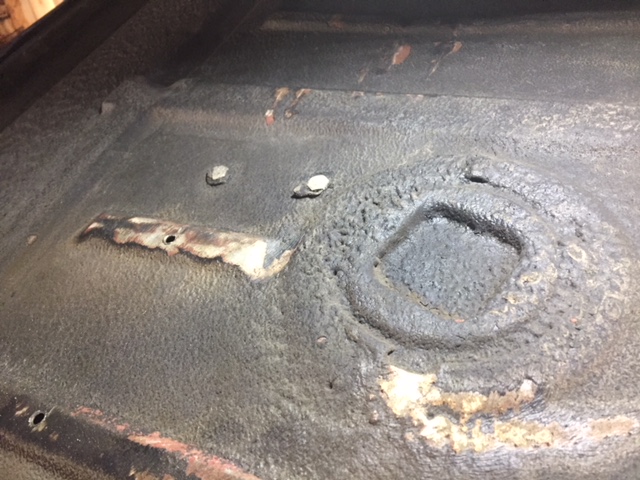
There has been -genuine- concern about the state of the longitudinals on the car, and I know there was also concern when I mentioned a body strengthening kit had been added. A cursory look at the longitudinals showed black tar, save what looked like what -might- be slight bit of rust down by the front driver's side jack point. It was then I noticed 'well, um.. that metal that makes up the back side of the front trunk looks the wrong colour.  I don't have a picture of the trunk metal, but it is -surface- rust so I know with some effort and no welding, I'll be OK. The usual 'boy it's a good thing you brought it to us, because this, this, and this was also wrong, but we done gone fixed it fer ye!' situation
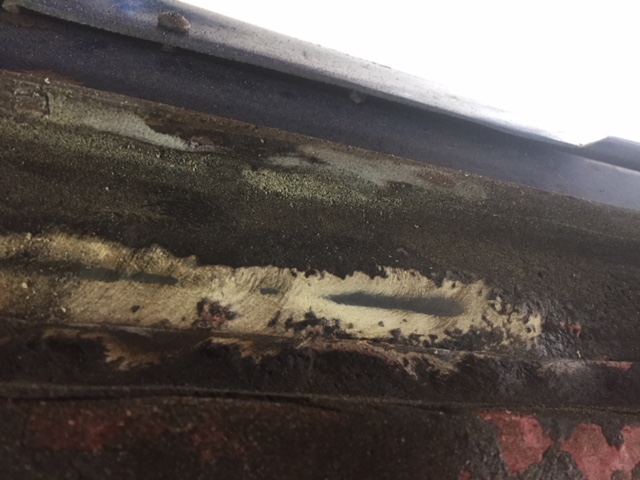
This is the best I could provide of a longitudinal au-natural, I was quickly running out of voltage, but along the driver's side, nothing making me wish I went into coin collecting instead
This warrants further exploring during the process, but I fear both creeper and myself are too fat to get that far forward for me to attack with my spinning harbor freight wheel of death.
at this point, not seeing anything on the passenger's side yet under the car to cause concern, I remembered 'wait, you had what resembled Nietzsche's void on the passenger's side just behind the ECU. So I decided It was time to try and explore the Event Horizo....er, I mean passenger's upper floor pan. 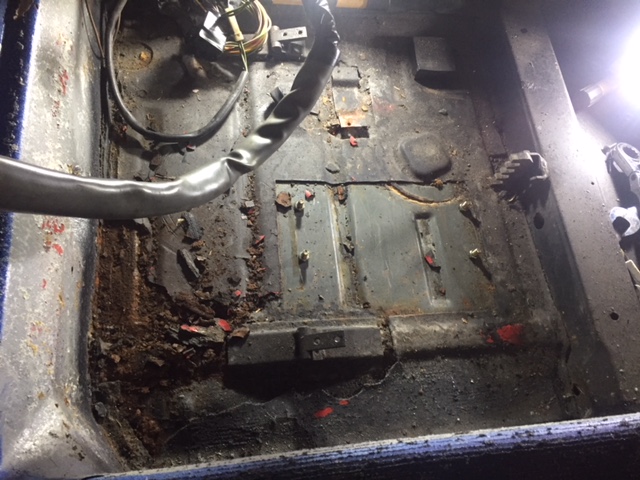
CAN YOU SEEEEEEEEEE!!??? (last of the Event Horizon jokes..I think?)
I carefully unbolted the ECU and wiring, moved it out of the way, removed the seat belt bolt and carpeting. Then it was time to get to work. I think it worth pointing out that under the ECU the Floor pan was perfect, like depressingly exactly what a healthy piece of metal should look like. For the most part I'm seeing mild surface rust, but rust none the less that gets exceedingly worse looking until the firewall....And that's when I saw -it-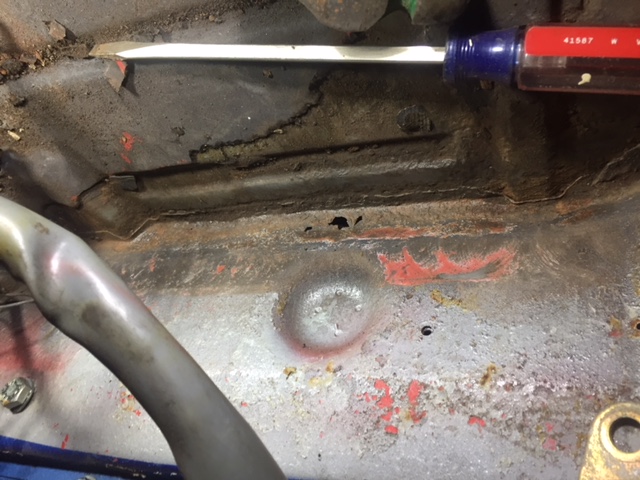
I know everything can be patched, but my hope (stupid as it is) -had- been to get the car prepped, temporarily get a seat in the driver's side and drive it to a place with a lift to help the welder out. What I see here instead is the lower firewall on the passenger's side has not fared well at all. One could surmise that if time is the fire in which we burn, this wall has fared about as well as Pink's in the Seminal "the Wall' Album (At least I've been comfortably numb about all this today! yay Pink Floyd!)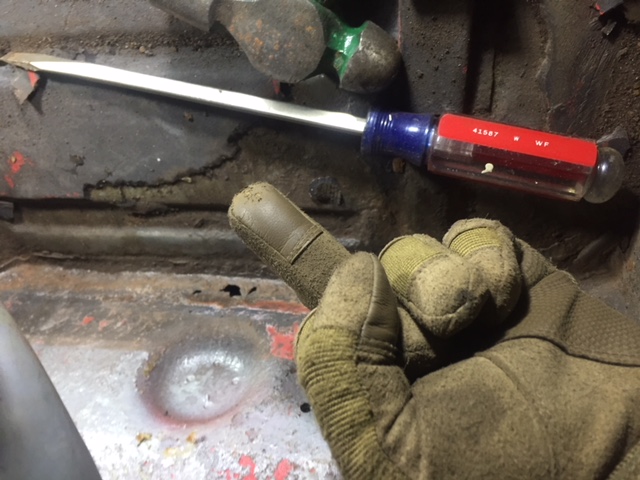
They say cars can sometimes talk to you. I was talking back in this one...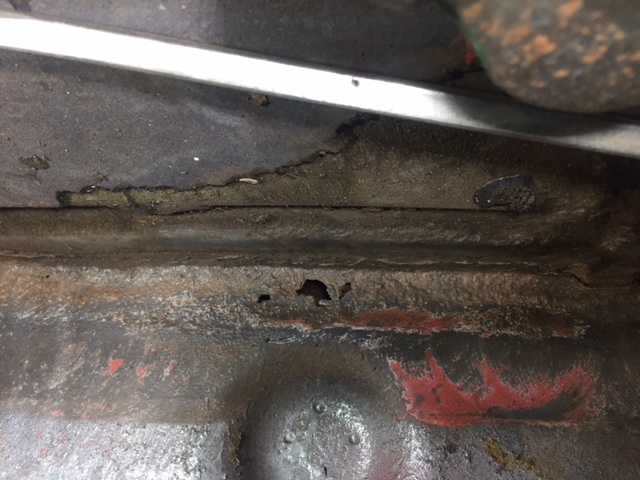
Here is the sign of the beast close up. I'm new to the concept of 'welding in chunks' so I'm hoping someone might chime in with "Dave you don't have to drop the motor and transaxle, but you'll have to be very careful to weld in a new panel." but what I'm expecting is 'nope, lolz, better get some more of those wood shims to prop the floor jacks on so the motor can clear the car!'....I know it's 'easy' to drop the motor, but, again, scope creep.
I switched tactics at this point and went back to 'chisel and beat the ever loving shit out of the urethane until it flies up at me' tactic to clear up more of the metal. Below is the length of the floor pan as it joins up to the center support post. Note the 'gentle singularity' in the right hand side of the photo 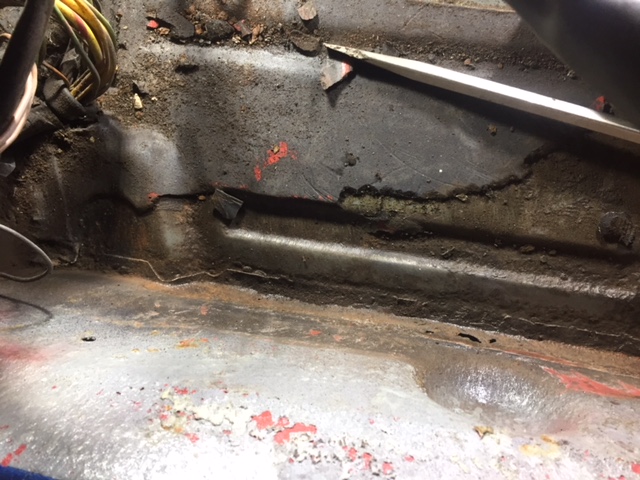
Sadly there's no time dilation effect or red shift, just the red mist descending... see what I did there... slowly? 
I wanted again to contrast where the ECU was mounted and what I am led to believe a healthy floorpan looks like.
Switching back and forth on the type of wire brush I was using I wanted to now dig into the area around the chassis/frame and where it meets up with the floor pan. At the very edge you can see distortion that I'm going to classify as rust meaning the tip of the pan at least is in a bad way. That said, the area around the seat mounts doesn't show any signs of concrete garage floor and the slip'n'slide adventure I would have encountered one day (probably in a tight turn at speed, let's be honest) but I'm not quite feeling 'nope, we'll be good' just yet. I noticed some creases in the urethane coating just forward of the cross sectional bar. I didn't get a chance to crack into. 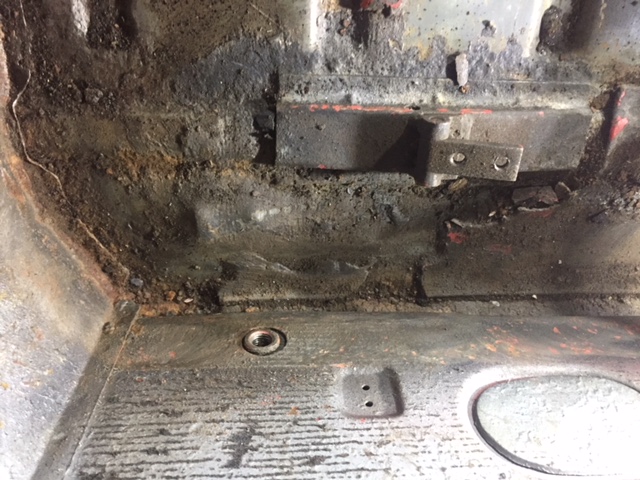
Foregoing another heady picture of Gargantua there in the firewall, here's what the back corner of the passenger's side looks. The optimistic part of me goes "yessss, it's time for pizza....It also then notes that again the damage appears localized to the upper floor pan.
By this point I was about at the end of my third battery pack and so I had to... -pack- it in. One final shot of the corner before I go though;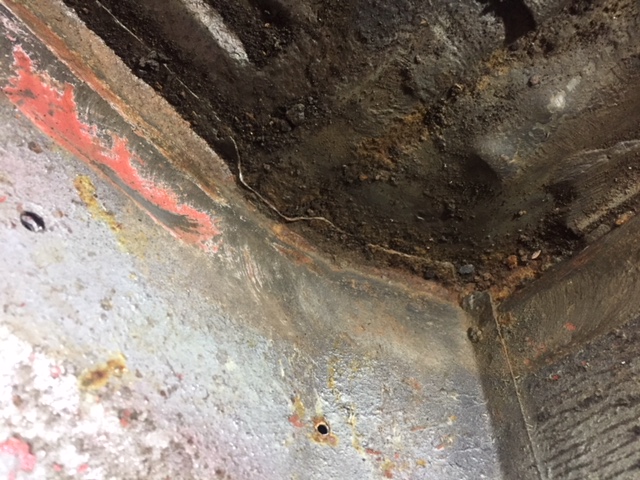
My neighbors did cheerily wave before leaving apparently having come to see me dressing up as a space man as normal for a weekend. So there is that.
Attached image(s)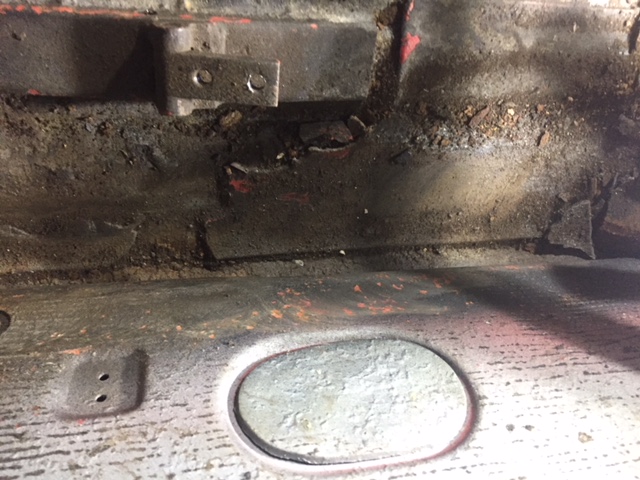
Posted by: burton73 Sep 15 2018, 02:24 PM
Dave,
I love your writing style. You are a funny guy.
Really do not get freaked out. Your car is really not that bad. It is not going to fall apart but as Brent has pointed out getting a good look at the clutch tube in the center of the car will tell you if you should go in and fix what was a very weak point for our cars. Lots of guys have had to fix this area and you can read up on that.
My 6 needed work there so the replacement of pans was the answer as I got a clear shot at all of its parts. I Fixed up the clutch tube in what I hope will be the last time in its life. Heavier clutches put more stress on this area as well.
You can just buy a cheap electric drill motor if you want to go to town removing to coatings.
Battery drills use too much battery if trying to clean a lot of surface. I used lots of different tools attached to my air compressor but I have a very big compressor.
Brent’s car had so much rust that I told him he should try to find a better body for it but he has fixed it up to a very high standard right at his home. I have been more than impressed with his work.
Be very careful with spinning wire brushes.
Best Bob B
Posted by: VaccaRabite Sep 15 2018, 04:30 PM
For the rest of the tar - dry ice.
Get some dry ice. Place the bag of dry ice on the tar and let it sit for a few minutes. Move the bag of ice and hit the tar with a hammer. It will come of in big chunks, really easy. Not much grinding needed.
Your pin holes are just that, pin holes. You will be able to weld them shut without issue.
Zach
Posted by: bbrock Sep 15 2018, 04:57 PM
Thanks for the compliments Bob. It wasn't THAT rusty though. Just a couple small pieces.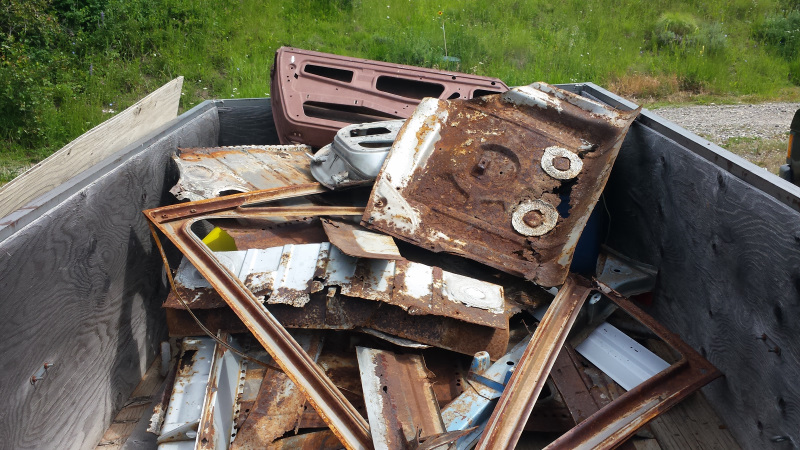
And FWIW, my wife still thinks I should get a better body. 
So Dave, you don't have to drop the motor and transaxle. Like Zach said, most of these are pinholes that can be zapped shut. That lower part of the firewall where the tinworms bit yours is double walled so even if you cut that out to patch, you still won't be inside your engine compartment. I see nothing here that would keep me from putting a seat in and driving the car. You were smart and caught this early before it became a big problem. Nicely done!
Posted by: davesprinkle Sep 16 2018, 10:29 AM
Dave, your writing is hilarious. Love your style.
Posted by: davebrossi Sep 18 2018, 09:39 PM
Dave,
I love your writing style. You are a funny guy.
Really do not get freaked out. Your car is really not that bad. It is not going to fall apart but as Brent has pointed out getting a good look at the clutch tube in the center of the car will tell you if you should go in and fix what was a very weak point for our cars. Lots of guys have had to fix this area and you can read up on that.
My 6 needed work there so the replacement of pans was the answer as I got a clear shot at all of its parts. I Fixed up the clutch tube in what I hope will be the last time in its life. Heavier clutches put more stress on this area as well.
You can just buy a cheap electric drill motor if you want to go to town removing to coatings.
Battery drills use too much battery if trying to clean a lot of surface. I used lots of different tools attached to my air compressor but I have a very big compressor.
Brent’s car had so much rust that I told him he should try to find a better body for it but he has fixed it up to a very high standard right at his home. I have been more than impressed with his work.
Be very careful with spinning wire brushes.
Best Bob B
Hi Bob! (Again!)
I have a weird situation in that I live in a -very- accepting of my crazy restoration work apartment complex that, none the less, has not gifted my tiny garage with the magic spark-wot-makes-lights-go-bing! and so everything's cordless. I actually own a small pancake compressor, and my plan for cutting the pans out was essentially (and I'll admit this is a rough early draft of the plan, the future one will probably actually work and involve sanity) carry it across the road, plug it in, pressurize it, carry it back, use an angle grinder, rinse, repeat, vaguely leave the neighbors uneasy as to what sort of relay race I'm taking part in.
I noticed the recommendation for dry ice, and, provided I can avoid the fate of the T1000 and not inadvertently shatter the remains of the pan (and my arm, without a nice and close furnace I'll never turn into mercury and reform!) I'd be willing to give it a try.
I know my progress is glacially slow right now because I'm depending on cordless, so tips are appreciated. On the plus side I own an LP-gas fired Ventless heating system (replete with onboard CO detector and a wall mounted one for good measure) so winter will not halt my endeavor.
Posted by: davebrossi Sep 18 2018, 09:41 PM
Thanks for the compliments Bob. It wasn't THAT rusty though. Just a couple small pieces.
And FWIW, my wife still thinks I should get a better body.
So Dave, you don't have to drop the motor and transaxle. Like Zach said, most of these are pinholes that can be zapped shut. That lower part of the firewall where the tinworms bit yours is double walled so even if you cut that out to patch, you still won't be inside your engine compartment. I see nothing here that would keep me from putting a seat in and driving the car. You were smart and caught this early before it became a big problem. Nicely done!
I'm going to reply with the one out of two quotes I remember from Down Periscope; "I feel like I need a tetanus shot just looking at her."
Posted by: davebrossi Sep 19 2018, 07:02 PM
For the rest of the tar - dry ice.
Get some dry ice. Place the bag of dry ice on the tar and let it sit for a few minutes. Move the bag of ice and hit the tar with a hammer. It will come of in big chunks, really easy. Not much grinding needed.
Your pin holes are just that, pin holes. You will be able to weld them shut without issue.
Zach
Hi Zach!
Just wanted to confirm before I start another thread about 'went to remove some tar, removed my hand' that the dry ice will really just make the tar more cooperative on my efforts to remove it and not cause the floor pan to make a break for freedom. I really am thick headed (need sized extra large hats and all!)

Regarding welding pin hole rust shut, I guess I need to become better oriented with my new best friend, the rust beetle, I was under the impression that when you have rust of this nature (or worse, I've seen the worse by now, sweet mother of all I've seen bad) the only option was 'cut around the portal to hell, weld in new plate, pray to the flying spaghetti monster that you've banished the rot, and move forward.' So I wont need plates, but a new weld seam will work? I appreciate all the help, I truly do, I know I've been driving people nuts talking about the process.
Posted by: Rusty Sep 19 2018, 07:33 PM
Dave,
Breathe. Relax. Listen.
You do not have serious rust issues. Left alone for years without treatment, that would change.
What you have so far is relatively minor rust in a 45 year old car that was assembled with piss-poor priming and no galvanized steel by Hans after a 2-liter lunch.
This is all fixable... and you can weld. Seriously, I'm the most untalented hack on the planet and I figured it out. So can you. And when you're done, it's the greatest feeling in the world. 
best,
Rusty
Posted by: JRust Sep 19 2018, 10:12 PM
Dang I just drove through there this past weekend Dave. My daughter is going to School in Rexburg. If I get out there before thanksgiving again. I'll shoot you a PM. Love to talk 914's so would be cool to check out your ride. Your doing great as well. For removing the tar I loved the cheap harbor freight vibrating sander with the metal tips. https://www.harborfreight.com/catalogsearch/result/index/?AttribSel=Sander+Type%3D%27All+Other+Sanding+Items%27&CatPath=All%2BProducts%252F%252F%252F%252FUserSearch%253Dsander&RequestData=CA_AttributeSelected&dir=asc&order=EAScore%2Cf%2CEAFeatured+Weight%2Cf%2CSale+Rank%2Cf&q=sander
Worked awesome on mine years ago
Posted by: VaccaRabite Sep 20 2018, 07:56 AM
There are three ways to remove tar.
1) mechanical removal. Wire wheel. This was SUCKS! The wheel clogs, the tar melts and gets thrown everywhere and ends up smearing more then being removed.
2) torch and scraper. Heat the tar with a MAP torch and scrape up the goo with a stout scraper. It works, but it puts out smoke that you don't want to be breathing, and if you don't have the full interior out of your car there is risk or burning wires or catching something on fire.
3) Dry ice and a hammer/scraper. Essentially this is the exact opposite of the torch and scraper. You are freezing the tar. No fumes, no fire risk, it comes off in big chunks, and its a cool task if the day is already hot. The downside is that you have to find dry ice. You will not hurt your floor pans doing this unless they are so far gone that the tar is all that is holding them together. In your case, this is NOT the case.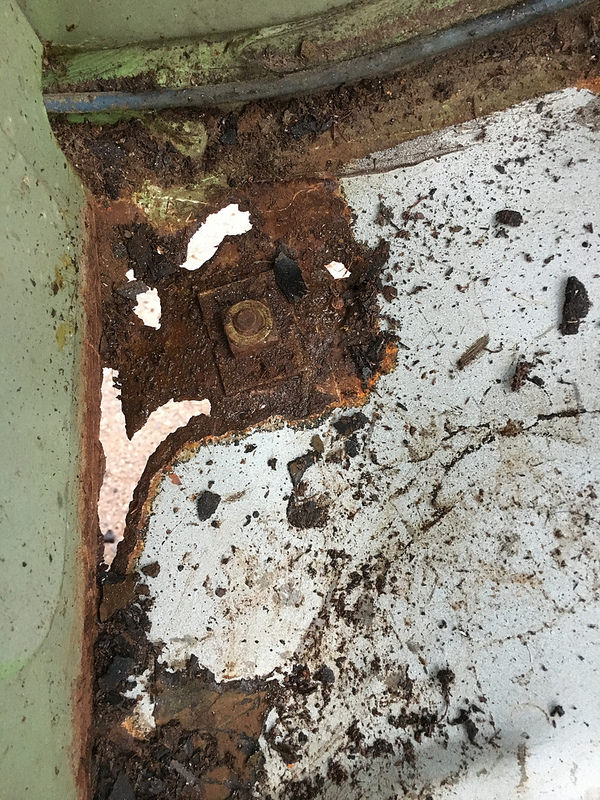
This is the rear floor pan out of my 2002. The rust is a lot worse then your 914 and the tar came up pretty easily using dry ice.
Zach
Posted by: bbrock Sep 20 2018, 04:46 PM
Regarding welding pin hole rust shut, I guess I need to become better oriented with my new best friend, the rust beetle, I was under the impression that when you have rust of this nature (or worse, I've seen the worse by now, sweet mother of all I've seen bad) the only option was 'cut around the portal to hell, weld in new plate, pray to the flying spaghetti monster that you've banished the rot, and move forward.' So I wont need plates, but a new weld seam will work? I appreciate all the help, I truly do, I know I've been driving people nuts talking about the process.
I think it's still too early to know what you'll need to do. Probably a combination of zapping pinholes, some sheet metal patches, and treating with rust converter to stop the rot before painting. Zapping a few pinholes shut takes some finesse to avoid blowing out bigger holes, but is often easier than a patch, but you reach a point where a patch is easier than than zapping a bunch of pinholes or trying to restore pitted metal that doesn't want to be restored. The beauty of the floor replacement is that all the rust comes off at once and replaced with shiny new metal in just the right shape.
Right now, just focus on getting the rest of the tar off, wire brush any rusted or pitted areas to knock the tinworm turds off so you can see how solid the metal is, and hopefully @http://www.914world.com/bbs2/index.php?showuser=129 can swing by and give some advice next time he visits his daughter. I wish I was sill working on a project that was taking me to Pocatello every now and again because I could do the same, but the money dried up on that one.
Posted by: davebrossi Sep 22 2018, 02:33 PM
So! Today was play with dry ice day! Wheeee! Finding it was actually more challenging than one might think, but I eventually bought seven pounds of the stuff, and rushed home to get started. 
Quick note on dry ice; works better if you're watering your Porsche slightly as while it's an arid pla...err.. car, in this instance water helps your success grow!
I've found since water to tar contact makes for a fast freeze and helps make the material more brittle I played a drinking game with the car. You, too, at home can play this game! You pretend to take a drink of water, then dribble it on and around the chunk of dry ice. You'll be sober the whole time, and everyone loves that! 
That said, above all else, keep your hands dry, so as a rule of thumb (unless you want to lose the tip of yours), if your hands are wet, use a stick to move the ice around. I wore gloves, so I still have my finger tips, though scraping bits of coating out did not keep the hands dry. Make sure to marinade your floor pans at least a minute or so before playing whack a mole, it seemed to work better for me. Also this served to interrupt the random teenage romance blossoming across the breezeway from the garage which I insisted on drowning out with hammering because I'm an evil shrew who hates anyone having any fun. Ever. 
So as you can see, I was correct in my suspicion that if everything seems to be going perfectly, you're not paying attention (one of Murphey's many axioms, oh how this came back to haunt me later!) and 'cracked' urethane means a 45 year old pinata filled with happy little rust candy waiting to be pummeled. 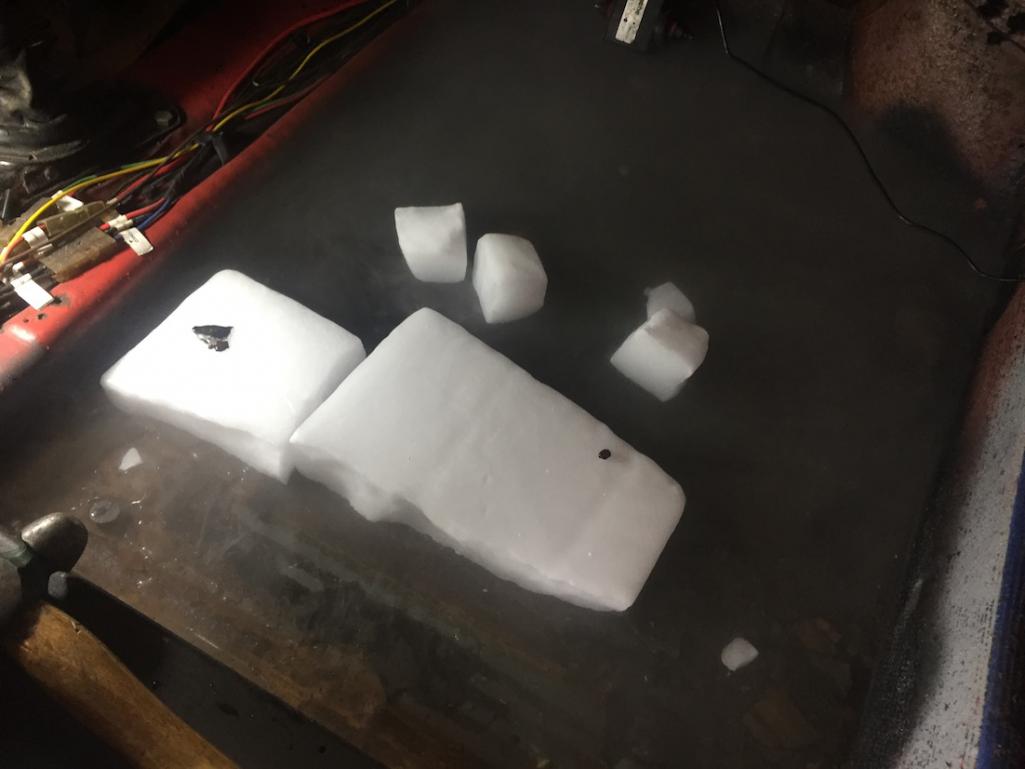
So here's where I put it all together regarding how to turn tar into tarlettes, but I spread the dry ice out to various points hoping to attack multiple areas and not at all because I accidentally swatted the block with the hammer. 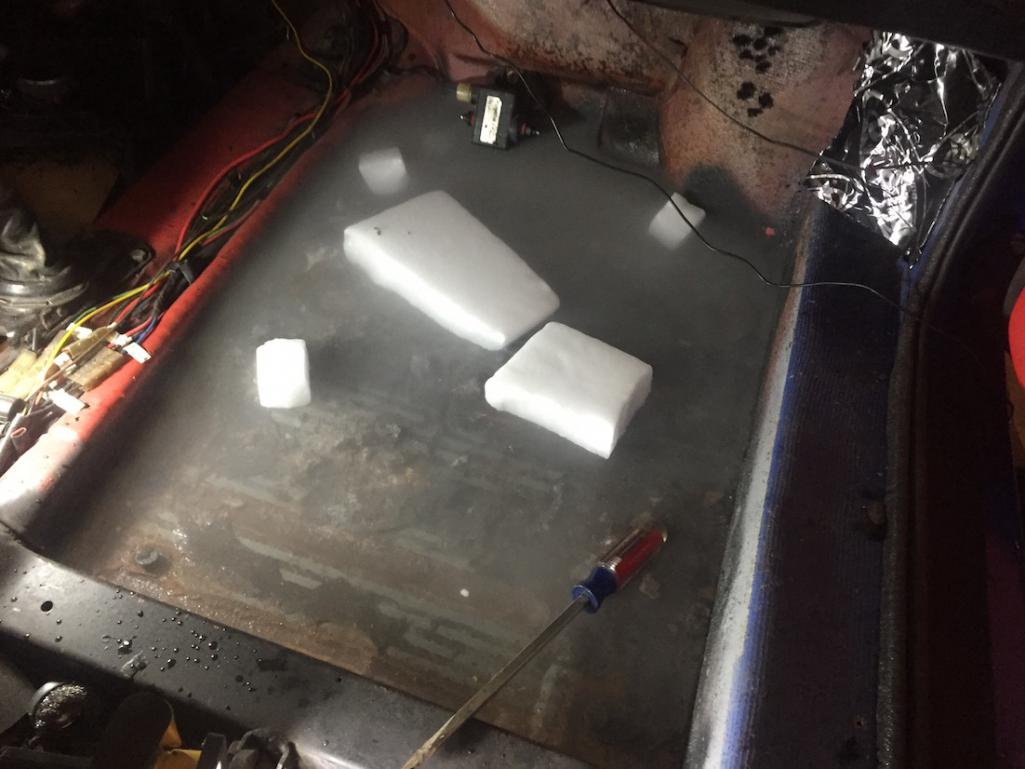
As you can see those 'little elves' Porsche talked about in their promotional videos circa the 1960s were annoyingly consistent with beads of adhesive, but also that below the paint after the first two depressions in the pan, things are looking almost 'good' (loaded term there!) I hope those elves were at least inconvenienced at times like I've been here.... 
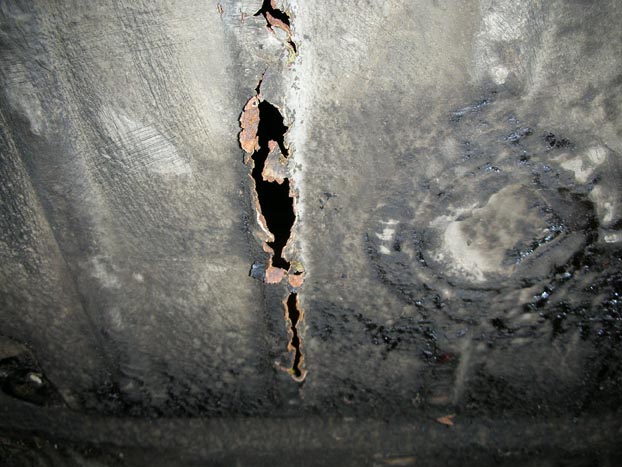
Just forward of the cross member, this was the most corrosion damage seen on the passenger's side top to bottom, with at least one pinhole in the pan where it joined with the center 'tunnel.' 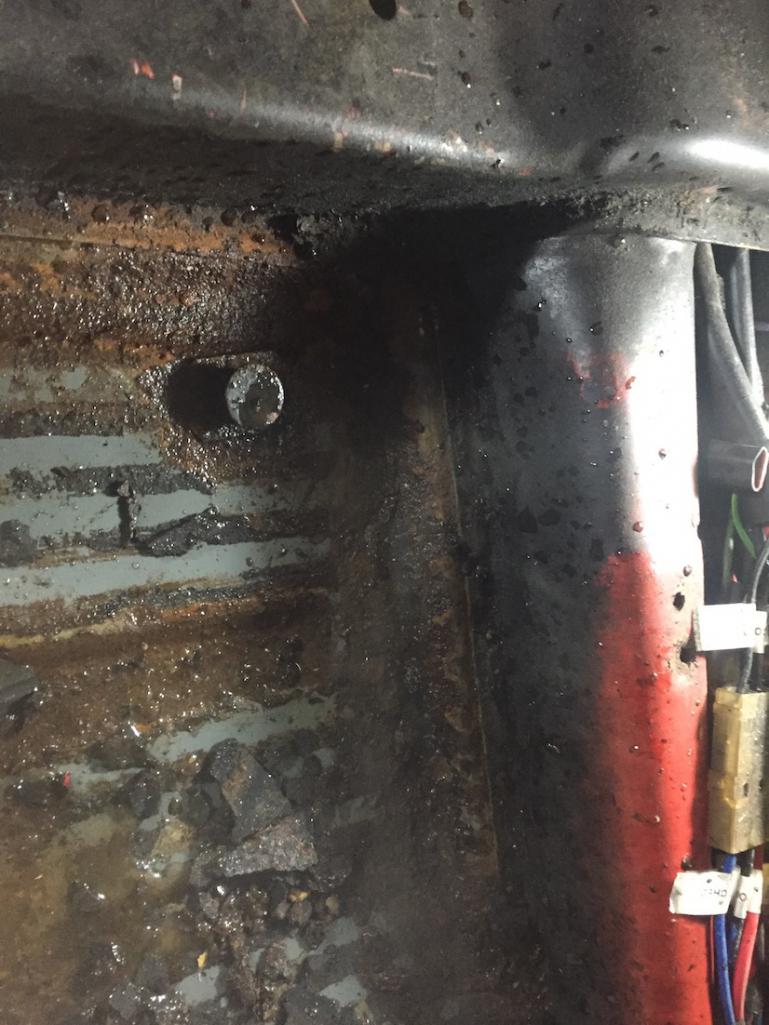
The corner where the cross member joins the 'tunnel' you can see appears to be a surface rust paradise where all the cool metal goes to... something... 
Here's the pinhole I was talking about, no deal killer, but hello concrete!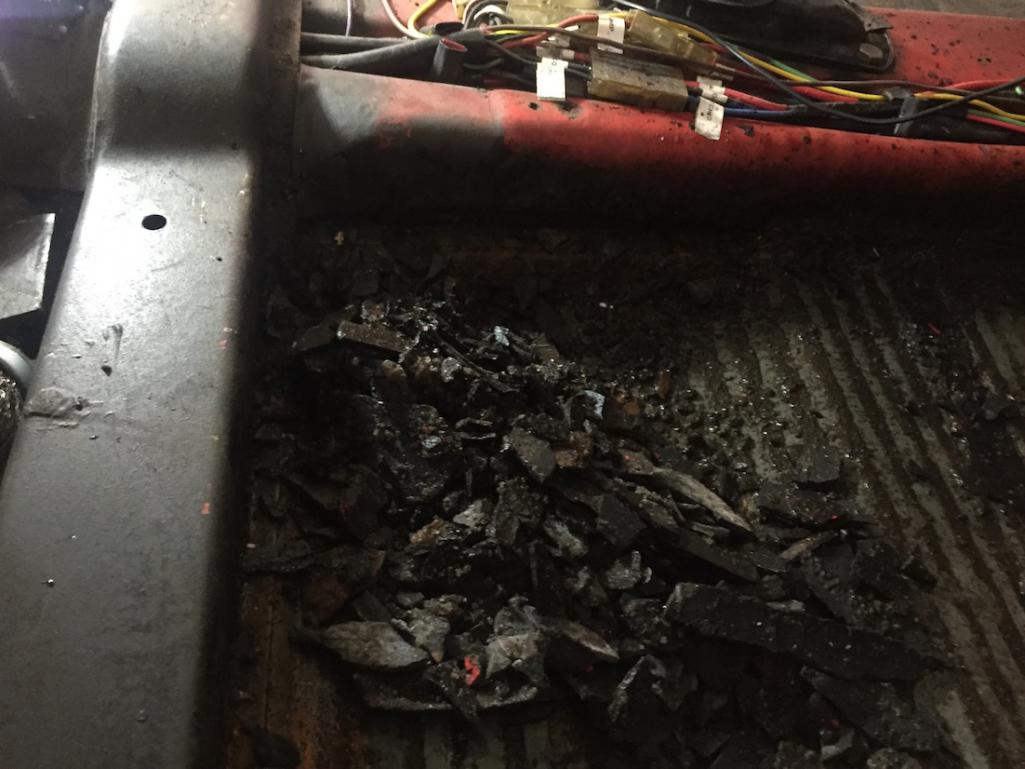
Reminds me a little of the stories of pioneers relying on buffalo chips being as a fuel source. Don't think I'll be trying that here....
YOUR WINNER! (That's a PC game Big Rigs joke) as I reached the end of the floor pan on the passenger's side relatively unscathed. 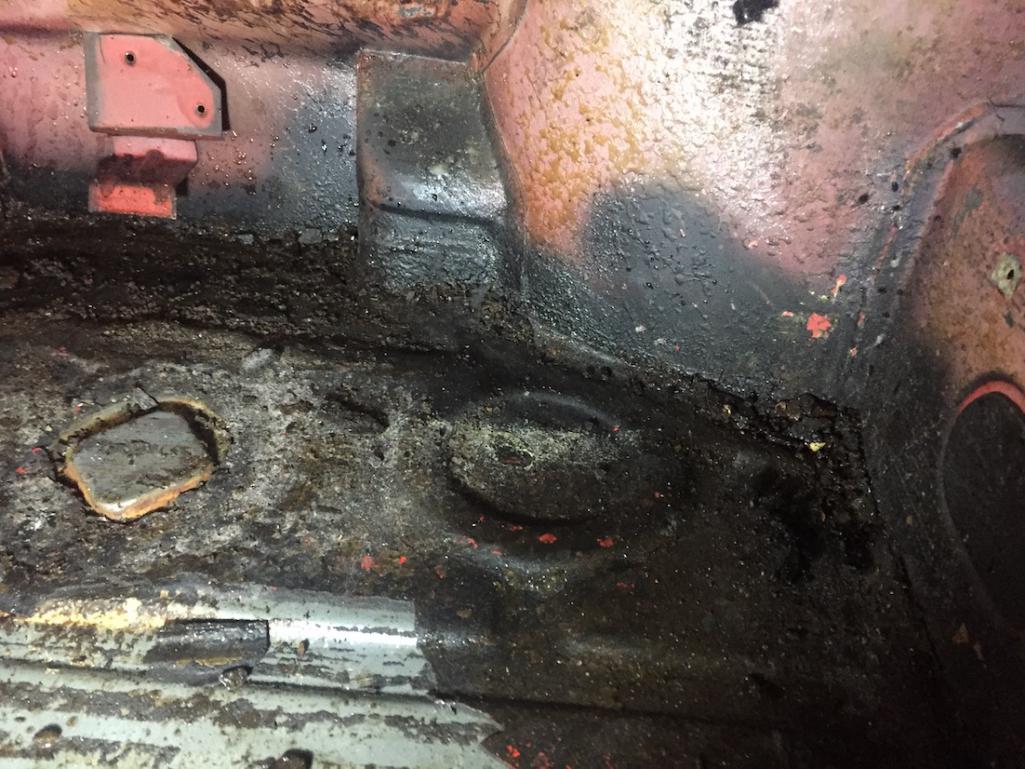
More of the area I can go back to, but I'm confident it's in good nick
By now I'd gotten almost completely to the bottom drudging up scraps of coating and beyond those first two depressions things were surprisingly healthy looking. I mean, go back with my 5000 watt A/C Inverter and deep cycle marine battery powered random orbital sander (thanks, scope creep ) and I'd be good to go. With the job done here however I knew I wanted to switch over to the driver's side. Call it a feeling?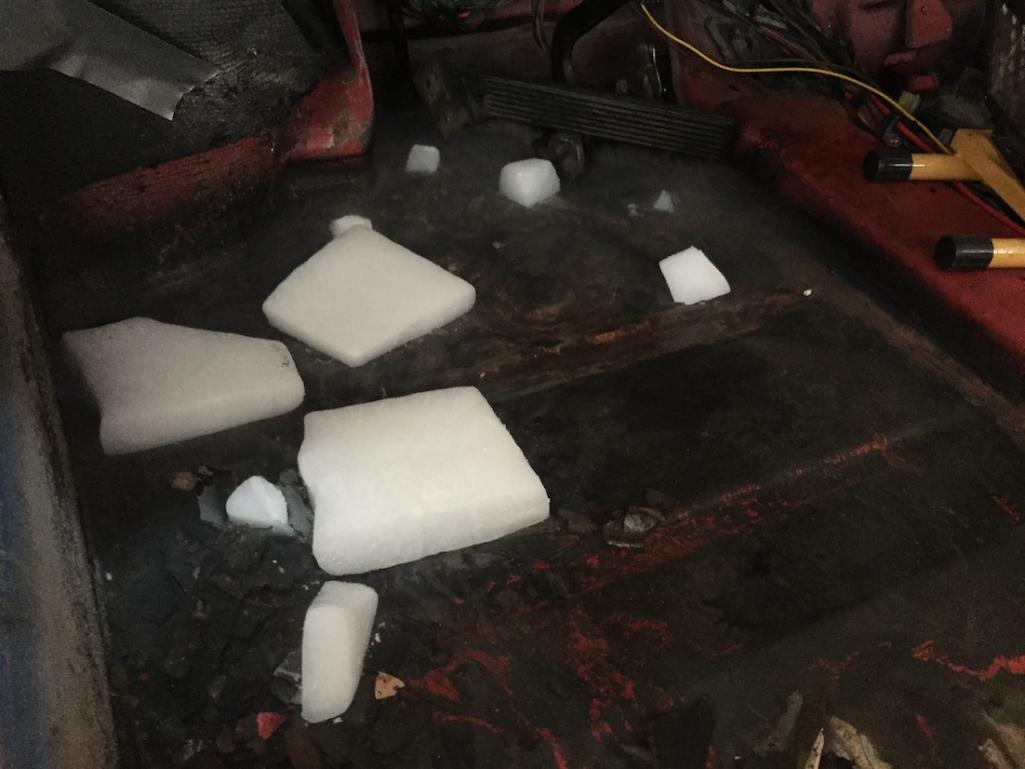
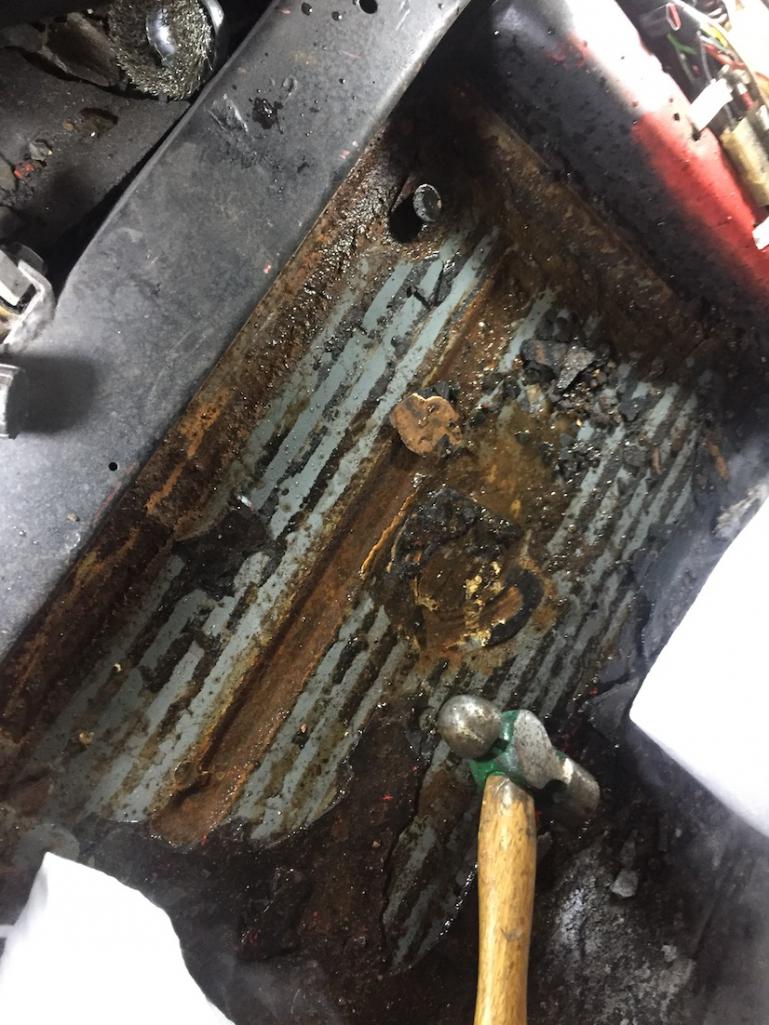
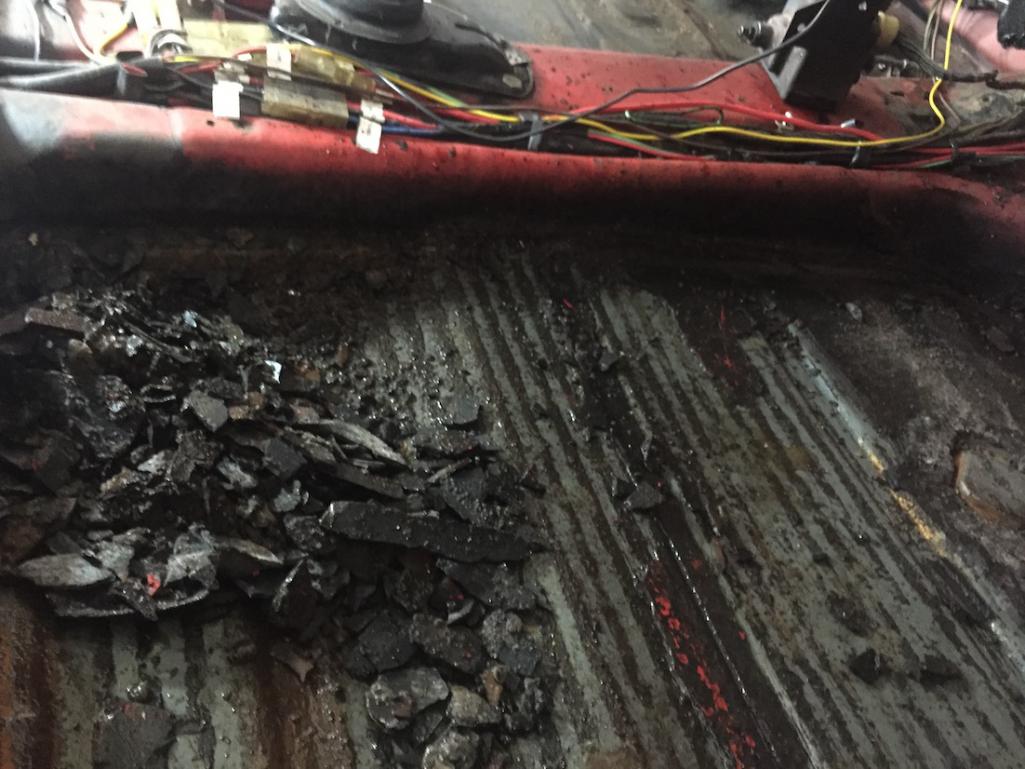
The problem here became apparent once I transplanted the ice over and got to working out emotional trauma on the coating near the driver's side footwell/ continued my evil scheme to deny young love next door  . There's a lot of rust there, like night and day difference between here and the passenger's side.
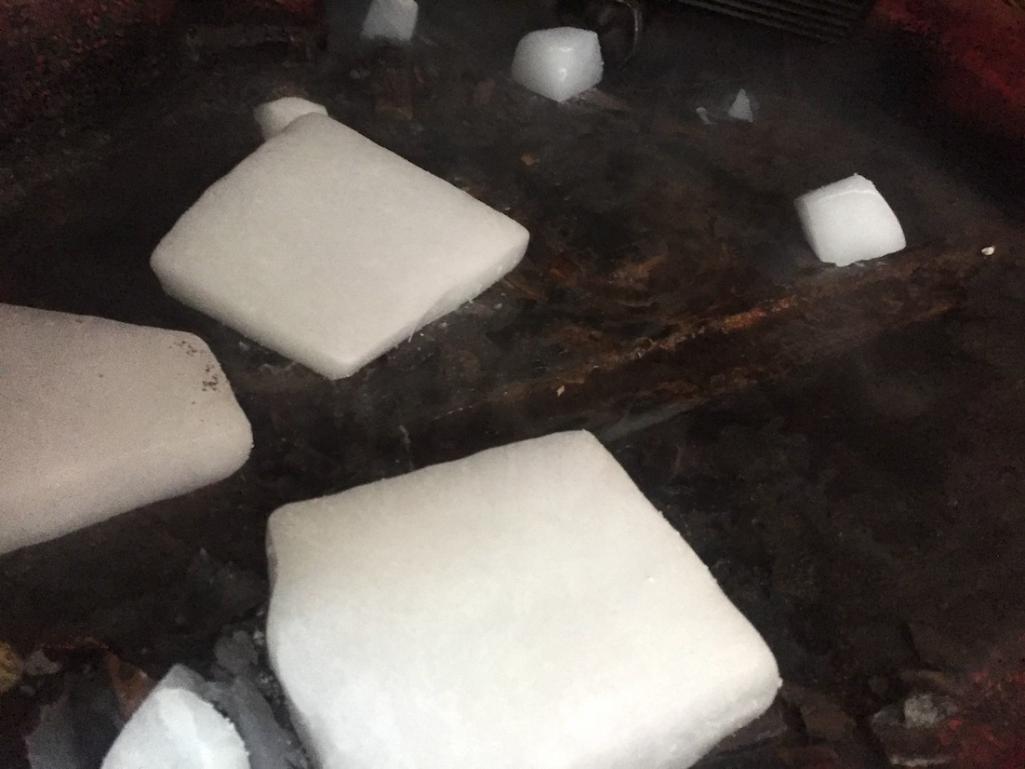
If you look closely (it's too dark to be dramatic) essentially everything the camera's imaging sensor picked up that isn't black, is deep rust. peeking below the car I noticed water dripping down now that I'd fractured the protective coating. 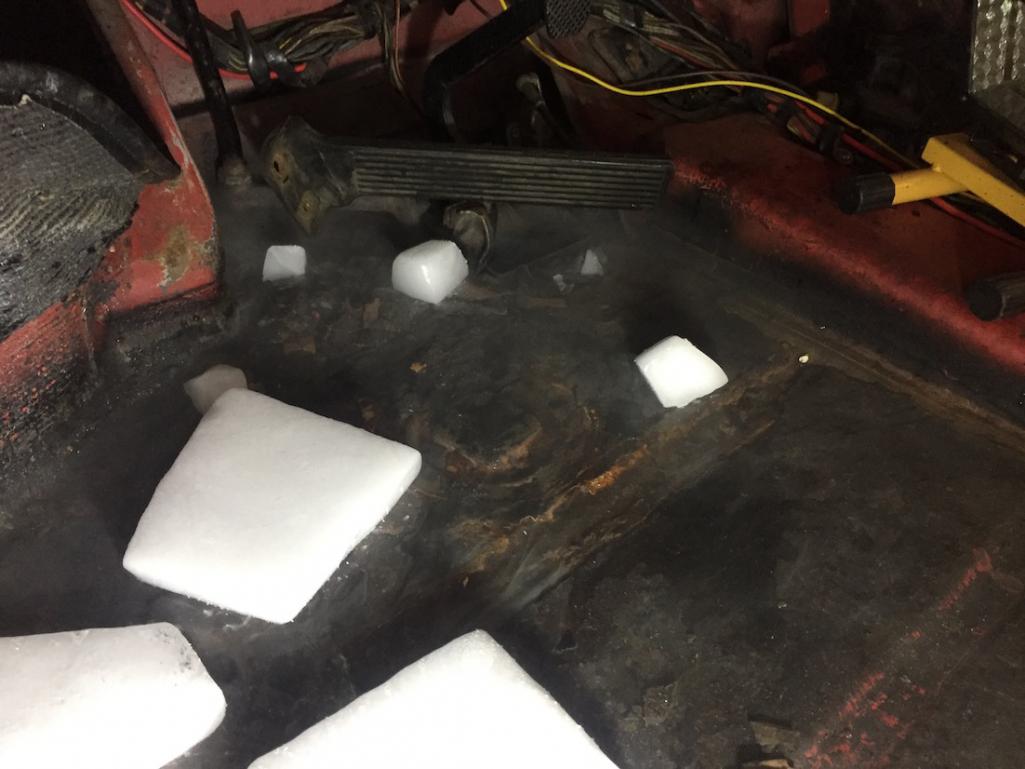
Looking at the metal here, the shallow depression portions of the pan are not completely eaten through, but a good whack with a bladed screw driver would likely go right through. Bugger...
I stopped because I had my answer more or less. So to recap;
Driver's side upper pan, on it's way to canonization as holy mother of holes. Passenger's upper pan, other than the pin hole, a bit of surface rust, but nothing scope creep sanding wont fix. Passenger's side lower pan, looks damned good, I'm pretty happy other than the first two depressed areas which need a good Prozac like sanding to lift their spirits. Driver's side lower pan; LV426 man, I say take off and nuke the whole site from orbit, it's the only way to be sure.
My concerns about pin prick rust in and around the center tunnel make me lean more towards replacement of both pans and jack points to be on the safe side, but that could be overkill. even though there is good metal on the passenger's side, it'd still a gamble, yeah?
Now for a stupid question (I always have many.) I don't suppose restoration design's metal is galvanized? I mean, part of me is hoping, but that's a whole lot of extra expense even if they've got the market cornered.
Attached thumbnail(s)
Posted by: davebrossi Sep 22 2018, 02:43 PM
https://youtu.be/TLN68M6rcrQ
Posted by: rhodyguy Sep 22 2018, 02:50 PM
Endevore to perciviere. A hot air gun and a painter's 5-in-1 tool involves a lot less smashing.
Posted by: SirAndy Sep 22 2018, 03:30 PM
You got lucky, whoever said your car was surprisingly rust free was spot on ...
Posted by: burton73 Sep 22 2018, 04:16 PM
Dude your car really is not that bad. Something you should get a look at you clutch tube inside the tunnel as that may lead you to do some pan work if the welds are broken inside of the tunnel. It can be fixed in different ways but opening up the bottom is the cleanest way to get full access It seems that most cars if driven enough over the years have this problem. A design flaw from Porsche. Not a rust problem but a stress problem on the welds holding the clutch tube in.
Looks like you are having a fun time with your 914.
Bob B
Posted by: bbrock Sep 22 2018, 10:26 PM
Now for a stupid question (I always have many.) I don't suppose restoration design's metal is galvanized? I mean, part of me is hoping, but that's a whole lot of extra expense even if they've got the market cornered.
Even better. They are galvannealed. I just posted this pic on my build thread a couple days ago. A storm front came through the day I finished blasting my car and flash rust set in to the engine compartment, but look at those RD parts. They are the ones laughing at the rust. Really good stuff.
Posted by: davebrossi Sep 22 2018, 11:06 PM
Now for a stupid question (I always have many.) I don't suppose restoration design's metal is galvanized? I mean, part of me is hoping, but that's a whole lot of extra expense even if they've got the market cornered.
Even better. They are galvannealed. I just posted this pic on my build thread a couple days ago. A storm front came through the day I finished blasting my car and flash rust set in to the engine compartment, but look at those RD parts. They are the ones laughing at the rust. Really good stuff.
Very happy to hear this! If I have to replace every panel of the car in the process so be it, I know that as value goes, there's going to be a point where the 'value' of the car tanks, but that's OK, I'd like to still be driving it when that happens
 Especially since I'm starting with the big ugly floor pans.
Posted by: davebrossi Sep 22 2018, 11:14 PM
Dude your car really is not that bad. Something you should get a look at you clutch tube inside the tunnel as that may lead you to do some pan work if the welds are broken inside of the tunnel. It can be fixed in different ways but opening up the bottom is the cleanest way to get full access It seems that most cars if driven enough over the years have this problem. A design flaw from Porsche. Not a rust problem but a stress problem on the welds holding the clutch tube in.
Looks like you are having a fun time with your 914.
Bob B
Hi Bob!
I may have gone overboard and bought a 5000 watt A/C Inverter with the intention of using my random orbital sander to get as much gunk out as possible. A dustpan and brush wouldn't hurt at this point too. Ultimately the extent of the rust on the upper and lower portions of the driver's side means I could A.) source just those two sections from a donor car, which would possibly lead to a new weld seam (which means nothing, I'm a layperson with welding, it'd just be different than the design) or B.) put in Restoration Design upper and lowers and have that small pin hole in the firewall stitched shut. Focus for me now is to try and tidy it all up. I'm leaning towards B specifically because of the concern over the weld points on the clutch cable tube, and also because I'm wanting to see what else might've gone wrong in there. The cross member between upper and lower pans and the tunnel the clutch cable and assorted items pass through are both in great shape, and I still have high hopes for the longitudinals.
I'm also hoping this 5000 watt A/C inverter with marine battery will power my compressor. It says it's rated to a 1.5. hp compressor, I've got a 2 hp. It'd mean no relay race to power an angle grinder. Lord knows I could've bought the two new pans for the price I paid for the inverter
Posted by: bbrock Sep 23 2018, 03:26 PM
Dude your car really is not that bad. Something you should get a look at you clutch tube inside the tunnel as that may lead you to do some pan work if the welds are broken inside of the tunnel. It can be fixed in different ways but opening up the bottom is the cleanest way to get full access It seems that most cars if driven enough over the years have this problem. A design flaw from Porsche. Not a rust problem but a stress problem on the welds holding the clutch tube in.
Looks like you are having a fun time with your 914.
Bob B
Hi Bob!
I may have gone overboard and bought a 5000 watt A/C Inverter with the intention of using my random orbital sander to get as much gunk out as possible. A dustpan and brush wouldn't hurt at this point too. Ultimately the extent of the rust on the upper and lower portions of the driver's side means I could A.) source just those two sections from a donor car, which would possibly lead to a new weld seam (which means nothing, I'm a layperson with welding, it'd just be different than the design) or B.) put in Restoration Design upper and lowers and have that small pin hole in the firewall stitched shut. Focus for me now is to try and tidy it all up. I'm leaning towards B specifically because of the concern over the weld points on the clutch cable tube, and also because I'm wanting to see what else might've gone wrong in there. The cross member between upper and lower pans and the tunnel the clutch cable and assorted items pass through are both in great shape, and I still have high hopes for the longitudinals.
I'm also hoping this 5000 watt A/C inverter with marine battery will power my compressor. It says it's rated to a 1.5. hp compressor, I've got a 2 hp. It'd mean no relay race to power an angle grinder. Lord knows I could've bought the two new pans for the price I paid for the inverter
One deciding factor for me would be if my replacement patches needed to include areas around the edges that attach to the bottoms of the longs or under the rear firewall. If not, then the welding could be done from inside the car. If they do, then you will need to get the car up high enough to work from underneath, or best, get it on a rotisserie so you can turn it on its side. At that point, I think it would be easier to install an RD floor. Here's a great video installing one to give you an idea of what is involved. Notice that you still end up with two butt weld seams.
https://www.youtube.com/watch?v=3kMOMNhxg-A
Posted by: davebrossi Sep 23 2018, 03:44 PM
Dude your car really is not that bad. Something you should get a look at you clutch tube inside the tunnel as that may lead you to do some pan work if the welds are broken inside of the tunnel. It can be fixed in different ways but opening up the bottom is the cleanest way to get full access It seems that most cars if driven enough over the years have this problem. A design flaw from Porsche. Not a rust problem but a stress problem on the welds holding the clutch tube in.
Looks like you are having a fun time with your 914.
Bob B
Hi Bob!
I may have gone overboard and bought a 5000 watt A/C Inverter with the intention of using my random orbital sander to get as much gunk out as possible. A dustpan and brush wouldn't hurt at this point too. Ultimately the extent of the rust on the upper and lower portions of the driver's side means I could A.) source just those two sections from a donor car, which would possibly lead to a new weld seam (which means nothing, I'm a layperson with welding, it'd just be different than the design) or B.) put in Restoration Design upper and lowers and have that small pin hole in the firewall stitched shut. Focus for me now is to try and tidy it all up. I'm leaning towards B specifically because of the concern over the weld points on the clutch cable tube, and also because I'm wanting to see what else might've gone wrong in there. The cross member between upper and lower pans and the tunnel the clutch cable and assorted items pass through are both in great shape, and I still have high hopes for the longitudinals.
I'm also hoping this 5000 watt A/C inverter with marine battery will power my compressor. It says it's rated to a 1.5. hp compressor, I've got a 2 hp. It'd mean no relay race to power an angle grinder. Lord knows I could've bought the two new pans for the price I paid for the inverter
One deciding factor for me would be if my replacement patches needed to include areas around the edges that attach to the bottoms of the longs or under the rear firewall. If not, then the welding could be done from inside the car. If they do, then you will need to get the car up high enough to work from underneath, or best, get it on a rotisserie so you can turn it on its side. At that point, I think it would be easier to install an RD floor. Here's a great video installing one to give you an idea of what is involved. Notice that you still end up with two butt weld seams.
https://www.youtube.com/watch?v=3kMOMNhxg-A
I've found pin hole damage around the points that the attach to the longitudinals and the central tunnel making me think combined with the level of rust in the drivers pan my best bet is upper and lower replacement. My hope is to buy space on a lift for a couple afternoons. The difficulty in all of this is timing. I'd have to cut the old pans out, prep the seam area as much as I can, then place the pans and at least secure them initially in place.
Now here's where the problems start; first off, I think the lift I'd be using would rely on wheels being present (jackstands at the worst of it?) so a typical ramp styled lift, can the pan be anchored from below still or are we talking 'basically impossible'?
Second, the reinforcement in the upper frame shown on the video, how is that attached? Essentially I need to remove the old pans, make certain I've added that temporary reinforcement, and make it so the welder comes in, does the job, then gets to leave. I can't weld, but I'm excited to learn about all the other bits involved.
Why not just add pieces? Well, again, the level of damage to the driver's side, would adding half a pan impair structural integrity at all? I watched that video originally to get a feel for installation, while I don't think I can do a rotisserie, I'm trying to work out how to do it without one. Maybe I'm just desperate to not have to do this again? :-) I'm learning about all of this, much to learn still! :-D
Posted by: davebrossi Sep 23 2018, 06:32 PM
Update update update half update? 
Using my power of electricity and an orbital sander I was able to grind the large majority of the remaining tar from the driver's side floor pan. I'll let the eye(s) of Sauron do the talking here;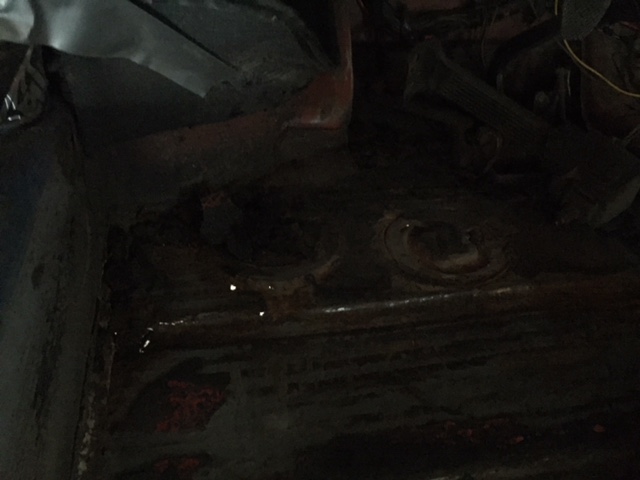
And the illuminated image for reference;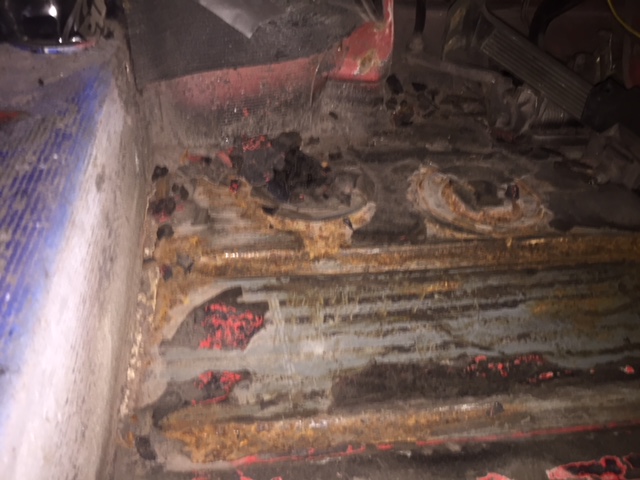
As Vonnegut would say, so it goes....
Posted by: burton73 Sep 24 2018, 02:52 PM
Dave,
Take your time with this. It takes a lot of time to drill out all the welds that hold a new pan in. You cannot be rushed on doing it or all kinds of problems can happen. The welding needs to be slow as well so things do not warp.
There are a number of ways to do this but you do need to do it slow. Very slow. My younger self would not have taken this job as a weekend job. Anything can screw up and if you are at a friend’s lift they may need you off. I think one weekend to drill all those wells out and then all the clean-up and prep. I had the body shop next door do my pan and do not remember just how much it cost in hours.
Do you have a daily driver? I remember when my daily driver was my 914 2.0 back in 79 when I was in my 20s. It made me sick worrying if my car would be running or not. I am saying really sick.
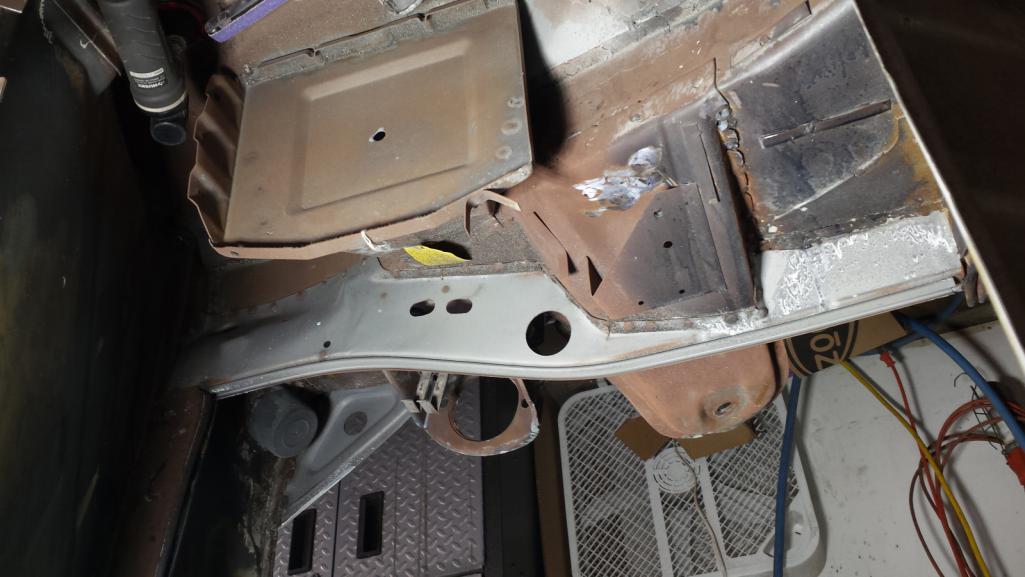
Pictures of my new pan getting welded in. The picture of old pan when I bought my car. Picture of pan after we cleaned all the tar out and I went to town with a screwdriver showing me just what was not solid.
In picture of old pan look carefully in the center section where more PO used a u clamp to hold down the clutch tube. There was a U Clamp on the side of the center channel also holding in the tube up front next to the driver’s seat.
I hope this helps you and does not send you down a very dark path of getting in too deep on your car without help.
Bob B
Posted by: davebrossi Sep 24 2018, 05:57 PM
Dave,
Take your time with this. It takes a lot of time to drill out all the welds that hold a new pan in. You cannot be rushed on doing it or all kinds of problems can happen. The welding needs to be slow as well so things do not warp.
There are a number of ways to do this but you do need to do it slow. Very slow. My younger self would not have taken this job as a weekend job. Anything can screw up and if you are at a friend’s lift they may need you off. I think one weekend to drill all those wells out and then all the clean-up and prep. I had the body shop next door do my pan and do not remember just how much it cost in hours.
Do you have a daily driver? I remember when my daily driver was my 914 2.0 back in 79 when I was in my 20s. It made me sick worrying if my car would be running or not. I am saying really sick.
Pictures of my new pan getting welded in. The picture of old pan when I bought my car. Picture of pan after we cleaned all the tar out and I went to town with a screwdriver showing me just what was not solid.
In picture of old pan look carefully in the center section where more PO used a u clamp to hold down the clutch tube. There was a U Clamp on the side of the center channel also holding in the tube up front next to the driver’s seat.
I hope this helps you and does not send you down a very dark path of getting in too deep on your car without help.
Bob B
Hi Again Bob!
Honestly nothing will happen fast as much as I want it to. I'm not even going to contact the welder until I'm comfortable I've done what I consider appropriate prep. This includes checking the longitudinals (haven't yet) and whatever else anyone chimes in to inspect. I am learning, but one thing I am always in need of being reminded to, is slow it down a notch (That's how I got to do the IMS Bearing replacement not once but twice on my 986, huzzah!)
Having seen the Restoration Design prep videos, things like seat hinges, the jack points, and other panels associated will likely be replaced if I can swing it as I'd like this to be the only time I mess with the floor pans for as long as possible, and I have seen how involved that is. Having zero welding ability makes it impossible for me alone, but in steps, hopefully I can work towards getting there.
I have a heated garage, I've got what I think will be the right tools to work through prep, and as long as wiser minds continue to remind me, I am not rushing into anything.
Not that I want to, but to confirm my initial assumption, for the sake of the welder's safety this car really does need to be on a lift, yes? Local body shops wont touch the car, but going on my own, whatever 'solution' I work out safety's number one here, proper prep second.
My daily driver's a 2014 Mazda CX5. It's boring, but one thing it is also is reliable.
Posted by: davebrossi Sep 30 2018, 01:56 PM
Back again with a 'mini' update since there's nothing that's really 'changed' save my own level of paranoia
I've inspected the two Suspension consoles in the back, the passenger's side looks OK, but I spotted this on the driver's side which may or may not be a cause for concern (yes, at this point I'm in full OCD mode, clinically diagnosed, should not at this point come as any surprise to anyone else based on previous entries of this ongoing saga)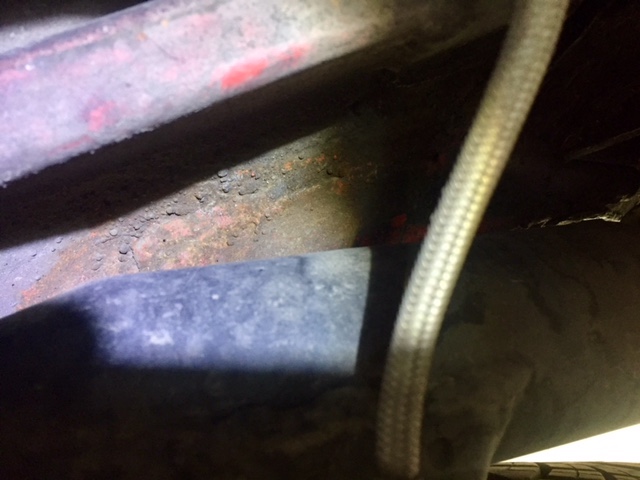
I mean the wrong color of suspension console, but not quite the "bwahahah, I am here to make you cry!" color
I'm not at the 'attack warning red duck and cover!' phase here, but I do think I need to find a way to wire brush the hell out of and Por-15 the area.
As I've started stripping undercoating off the area directly around the upper and lower pans in prep for drilling out the spot welds, on the passenger's side I've noticed the following oxidation that appears to be on the outer longitudinals between the floor pans and the reinforcement panels welded in by 914 Ltd (I'll be calling Brad to confirm the panels as best I can so I can tell what is a strengthening panel welded in because of the increased HP/Torque in the 3.2 motor and what is original longitudinal material)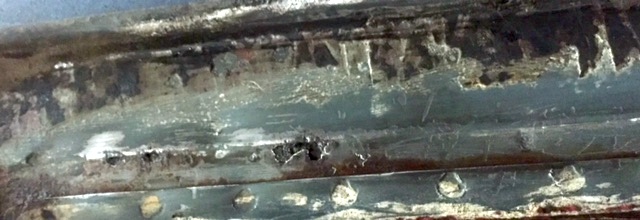
Near the back of the passenger's upper floor pan just past the pan material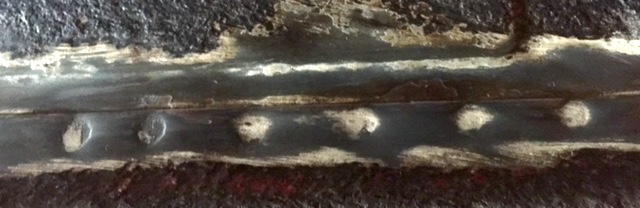
Near the lower floor pan, passenger's side
I'm a bit more concerned about these than I am the suspension console, wondering if I need to order outer rockers. I've not gotten to the driver's side yet because like an idiot, I wasted most of the marine battery power on the tar removal, and used the majority of the battery/cordless drill juice prepping the passenger's side. hence mini update status
As to interior 'tar' removal, if you have power in your garage, the heat gun is the way to go! In my case the 5000 watt A/C Inverter and battery combo meant I could once and for all remove the urethane coating from the lower floor pans area with ease. If you do not have the magic juice, dry ice works I suppose.
Posted by: davebrossi Oct 6 2018, 07:05 PM
Back again with brief update as I slog along to what will be the next 'cool' bit (which is going to be when I'm at the point that the car is on its side safely and all the nasty rust is being removed/thunderbolts and lightning, very, very, frightening, etc) today however is where I show off that I have limited space in addition to no reliable power, and have also begun the disassembly.
I'll be dropping the motor/transaxle next, then removing the stupidly full fuel tank (I expect some may leak  ) and the first of several miracles will have to happen at some point here in the next few weeks (the conjuring of a rotisserie.) I have a ventless heating system, so there will be no stopping for the winter.
yes I know about now the 'git gud n00b!' refrain of 'learn to weld!' is on reader's lips, I'd like to, but given I sell the gold standard in course materials for it and have a bird's eye view of the curriculum towards professional welderdom, I won't get there in a weekend, weak sauce, I know..So it's back to what I -can- do which is dismantle things, I'm plenty good at that!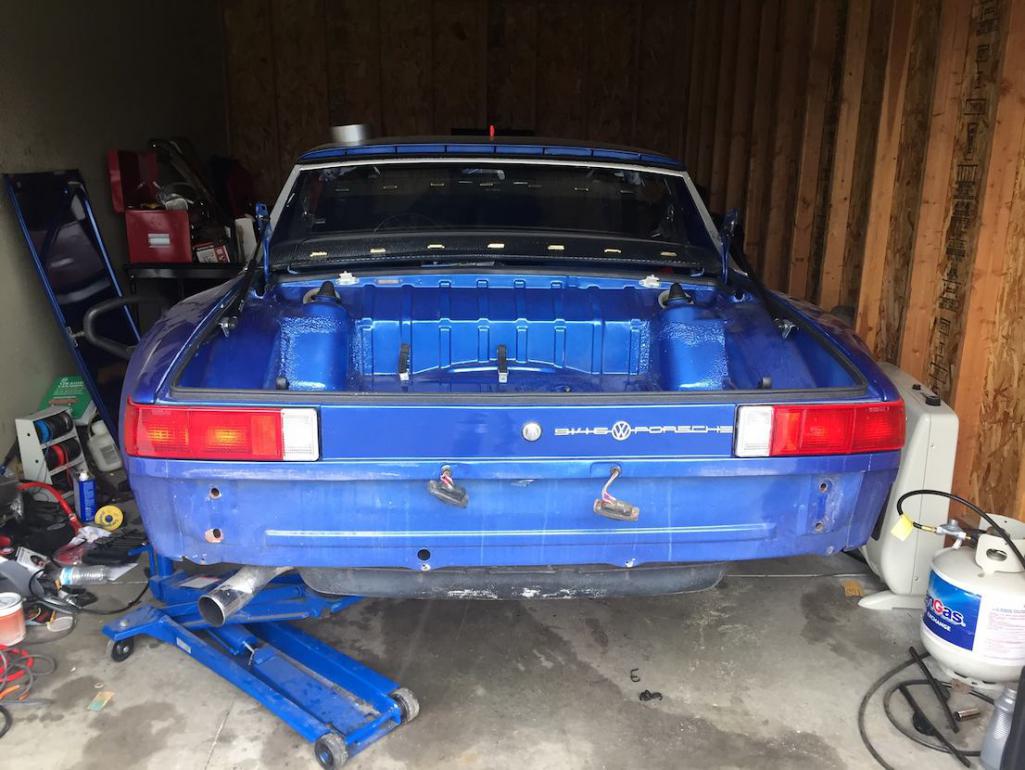
So in pulling the retrofitted pre-74 bumpers, I noticed surface rust both in the bolt channels and minor surface oxidation in the rear trunk pan. I'm not seeing 'paying owner of Restoration Design's child's university tuition' money tied up there yet, I think a nice wire brush and rust etching primer with paint cleanup should suffice. 
Yes, I did finally pull the tires, top gear top tip is, of course, to do so when they're still on the ground, but who ever said I went about things the easy way? One can also see there's a great deal of space now taken up by the doors...good god they are not light! 
Why, yes, that is a canister of kroil. And no, the fiberglass side skirting there isn't being held on at this point by one stubborn screw at all, nope, not at all. 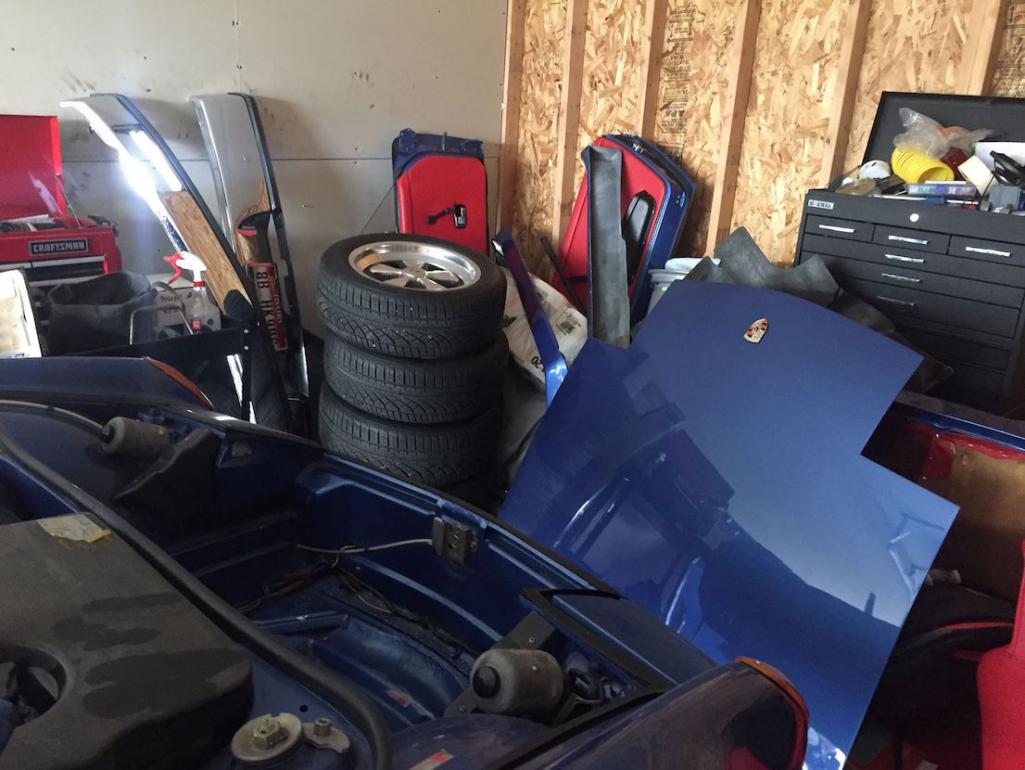
Nothing to see here, just half the car as gently placed down as I can manage it. I give myself half a day before I scratch the ever loving crap out of any of the painted surfaces. 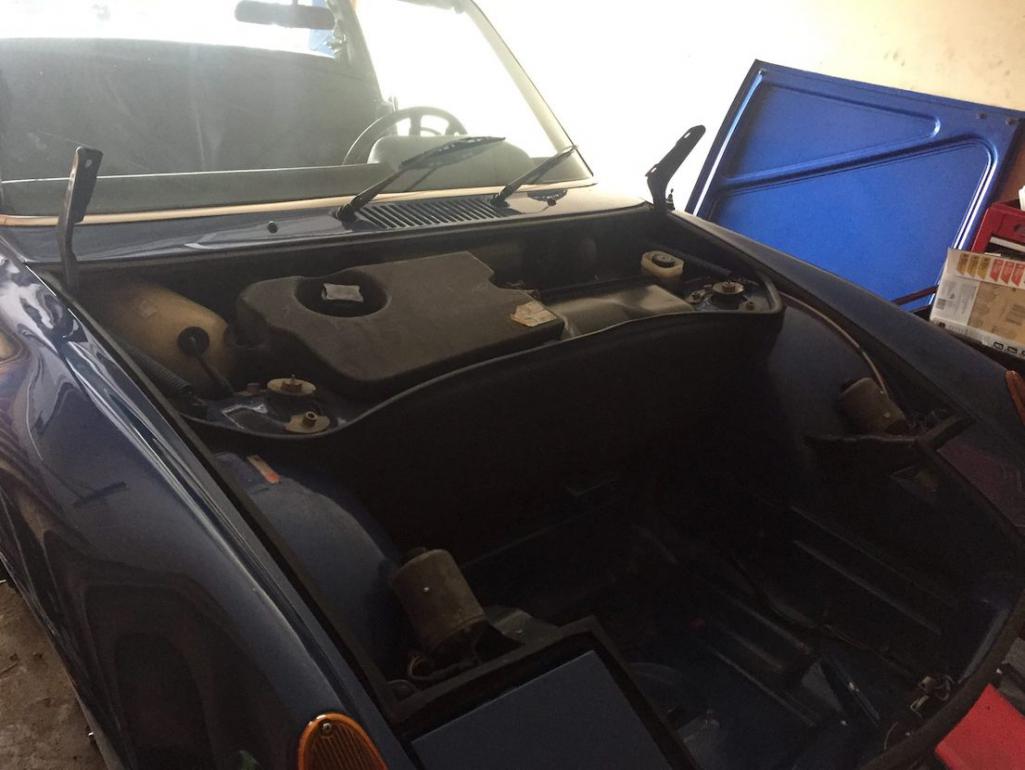
I did locate some surface oxidation in the front trunk as well. Again, no need to cut and conjure new metal into place, but this is a case where I'll use the phrase 'it's a good thing you brought her in when you did, otherwise'... in a non-ironic sort of 'here's where your wallet bleeds at the mechanic' moment. The full fuel tank however, that will be....'fun'.... 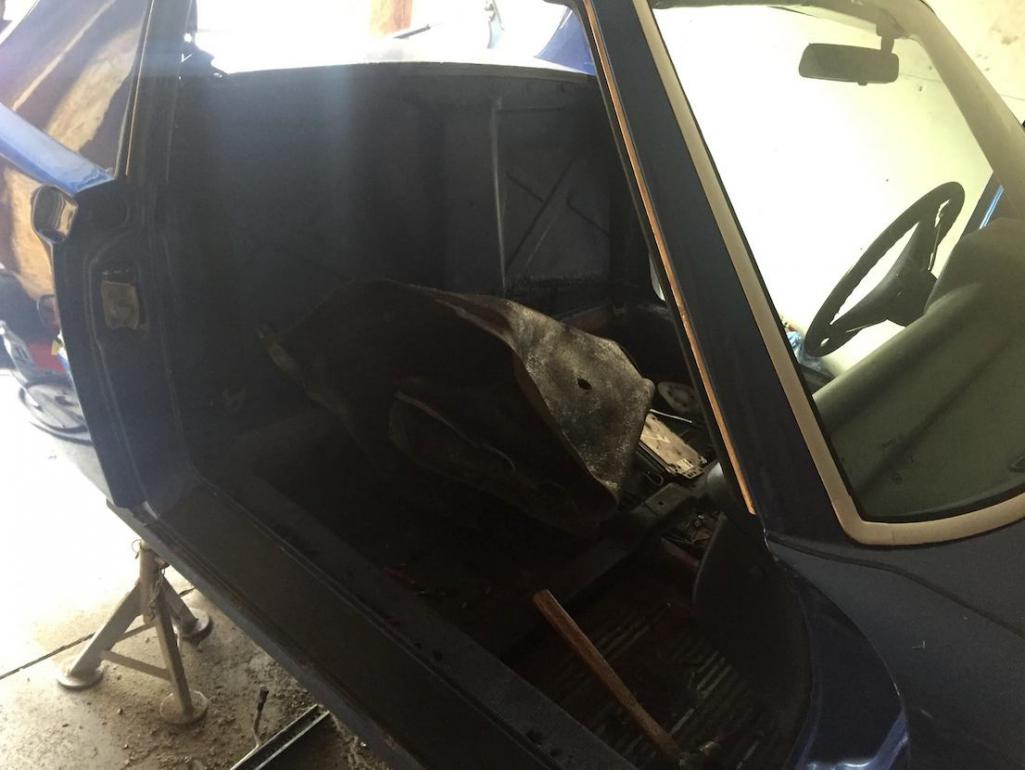
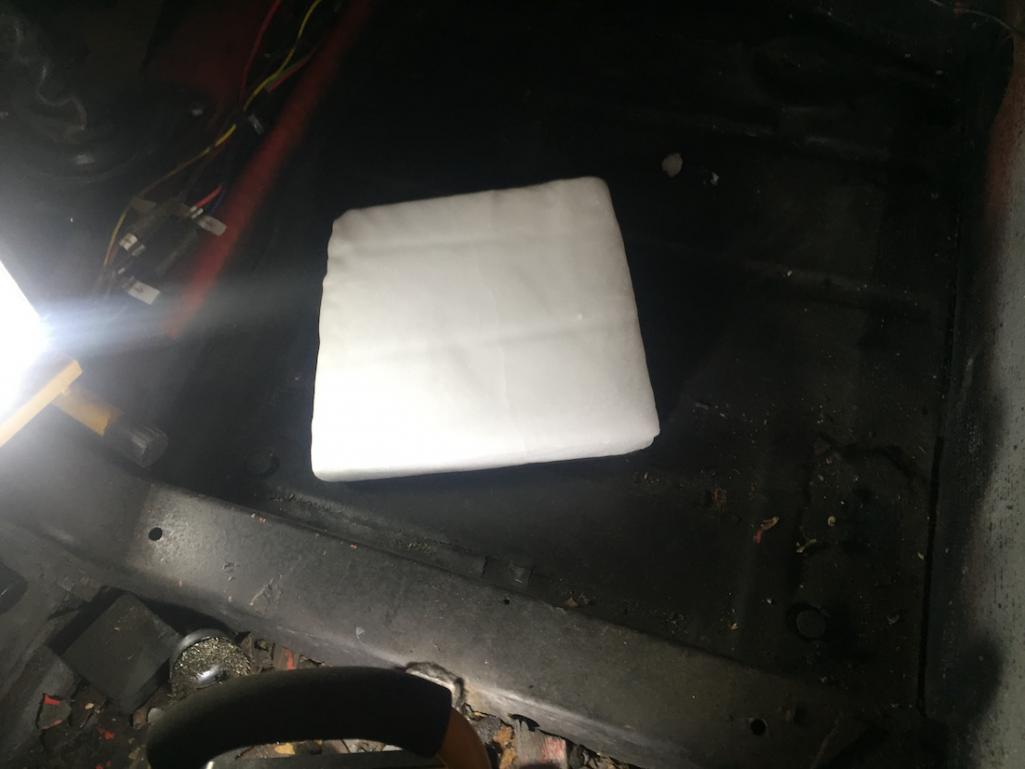
I haven't decided how I'm going to get the foam upper inner firewall cover out yet, but it's about the only semblance of interior left short of the dash and all its glory. I'll also need to pull the ECU and relays associated meaning at last I have to break out the ziplock bags and sharpie so I can pretend to appear competent in labeling everything carefully for when I get the car put back together which of course is going to happen.
As an aside, Dad's 3rd 911, a 73 Targa in Lapis blue apparently lived mostly in coffee cans for at least a year. He used to regale me with how he carried the engine block down to the basement on his back. I'm not saying he didn't do it as I can lift a VW type 4 long block no problem, but I was really hoping to avoid the whole coffee can thing. lets just hope the car's the only thing in my life oxidizing away. Smiles!
Posted by: davebrossi Oct 6 2018, 07:08 PM
I should also add I was rather annoyed to discover the original specialist who backdated the bumpers seems to have forgotten to install one of those very necessary carriage bolts on the passenger's side. I guess the thought was 3 out of 4, who was ever going to notice?
Posted by: KELTY360 Oct 6 2018, 09:02 PM
You're a brave man attacking this job in that space. My only advice would be...spend a little time putting up some shelves! No way can you store all that stuff on the ground. The only way to add square footage is to go up.
Good luck.
Posted by: davebrossi Oct 7 2018, 11:42 AM
You're a brave man attacking this job in that space. My only advice would be...spend a little time putting up some shelves! No way can you store all that stuff on the ground. The only way to add square footage is to go up.
Good luck.
Hi Mark!
I'd love to have shelving and lighting hung from the ceiling, but I suffer from 'Millenialitis' which means I spend too much on Starbucks and therefore rent my apartment/garage (joke on the Starbucks, not on the rental part.) Life would be a lot easier if I could install an exhaust system for something like a small Honda whisper quiet gas generator, but we work with what we have.
...On the plus side I may decide at some point just to store a lot of the heavier stuff in my apartment. My neighbors are no stranger to me carrying full interior sets up three flights of stairs and working on them in my common room area. Nothing quite like posting hot pics of refinishing the driver's seat out of an Alfa Romeo 164 to make friends think you've lost it
What's really going to be fun is when I have to position the rotisserie which is likely to involve backing the frame and rotisserie out into busy complex traffic. 'oh no, just a hobby, go back to your collecting a scary number of fire arms Mr. Neighbor!'
Posted by: bbrock Oct 7 2018, 12:23 PM
You're a brave man attacking this job in that space. My only advice would be...spend a little time putting up some shelves! No way can you store all that stuff on the ground. The only way to add square footage is to go up.
Good luck.
Okay, I'm going to stop whining about my cramped shop space. You win!

Shelves don't have to be permanent. For a couple hundred bucks, you could pick up a lot of heavy duty shelves at the HD that screw into the studs and easily removed when your project is done. You could sell them on Craigslist and recoup some coffee money

Also, I don't think we know if you need any longitudinal repairs, but keep in mind that's better done with the car level and supported by the suspension mount points BEFORE it goes on the rotisserie. For mine, I built a simple square tube roller frame that bolted to the suspension points and then when I was finished with the long repairs, cut it up and repurposed the metal for the rotisserie.
Now for the welding. Actually, I think you CAN learn the skills you need in a weekend. Will you be a great welder after a weekend? Of course not. But all you need to master are plug welds and butt welds. Plenty of Youtube videos, build threads here on the World, and experience from the brain trust to guide you along. If I could do it, you can too!

Not sure how you will pull this off without electricity. Good luck!
![popcorn[1].gif](style_emoticons/default/popcorn[1].gif)
Posted by: davebrossi Oct 7 2018, 06:16 PM
You're a brave man attacking this job in that space. My only advice would be...spend a little time putting up some shelves! No way can you store all that stuff on the ground. The only way to add square footage is to go up.
Good luck.
Okay, I'm going to stop whining about my cramped shop space. You win!
Shelves don't have to be permanent. For a couple hundred bucks, you could pick up a lot of heavy duty shelves at the HD that screw into the studs and easily removed when your project is done. You could sell them on Craigslist and recoup some coffee money
Also, I don't think we know if you need any longitudinal repairs, but keep in mind that's better done with the car level and supported by the suspension mount points BEFORE it goes on the rotisserie. For mine, I built a simple square tube roller frame that bolted to the suspension points and then when I was finished with the long repairs, cut it up and repurposed the metal for the rotisserie.
Now for the welding. Actually, I think you CAN learn the skills you need in a weekend. Will you be a great welder after a weekend? Of course not. But all you need to master are plug welds and butt welds. Plenty of Youtube videos, build threads here on the World, and experience from the brain trust to guide you along. If I could do it, you can too!
Not sure how you will pull this off without electricity. Good luck!
So far it only looks like the inner rockers are rotting as the metal surrounding the pans is oxidized in some locations. It Given all the metal on the inner rocker areas visible inside the cabin appear perfect I'm guessing this is the kind of area where one can 'clean things up' a little? Otherwise I guess I'll be drilling out the pans sooner than I anticipated? Again, nothing tonight, there's plenty of time for me.
As for electricity, it may end up being the relay race with my 5000 watt A/C inverter and marine battery setup that I bought them to avoid with my compressor?
Posted by: davebrossi Feb 4 2019, 10:00 AM
Update from beyond the snowwwwww. Money does tend to slow down projects despite the best intentions, but so, too, does a basic lack of skill sets, in this case, welding. Here's where the project stands;
-Sheet metal is in storage having been obtained from Restoration Design. Upper and lower floor pans, new jack points, rear trunk, the extra gubbins required on the interior (seat mounts) and both sides of the inner firewall. This last was a case of 'if I ever have to explain the repairs, people are likely to be happier that I didn't just stitch anything.) I also ordered the sails since the base of both have spots bubbling up.
-I still don't have a rotisserie though if anyone cached the roadglue build, I'd be externally grateful as I'd like to go that route for the sake of cost.
-I've been taking night classes in MIG welding. calling it a 'Class' really is a stretch as it's three hours a night of zero instruction and zero oversight, but I know how to not blow myself up, and have learned to work well with thin carbon steel on upwards. From lap welds to plug welds, I do use as much of the time as I can.
Technical hurdles I still have to get over before I'm 'ready.'
1.) Build rotisserie, then more worryingly, get car to height where I can mount it to said unit. I have a small garage, there will be re-arranging, but harbor freight engine stands and stock steel is my 'scheme' for awesome.
2.) Obtain MIG welding unit I can power off my inverter. I know there are specialized off road kits that run directly off a battery, but also small hobbyist units that run off 110 volts. I'll be pursuing the latter as a cost savings measure.
I'm not giving up, and I'm not leaving the car in pieces. I still have to drop the motor and gas tank, too, but that's mechanical work, something I'm not afraid/inexperienced in. As the first anniversary of my father's passing comes up, I'm reminded why I got into this mess in the first place, and I'm looking forward to when the two major hurdles are crossed and I'm staring at a prepped surface. Who knows, I may even lay a bead in the shape of a smiley face (I can do this!)
Posted by: GeorgeRud Feb 5 2019, 04:48 PM
Hang in there and take your time to do it right. I’m sure a lot of folks will be willing to help give advice.
Posted by: bbrock Feb 5 2019, 05:13 PM
Thanks for the update. I was just wondering about your progress today. Probably a good call on buying the sail panels. If they are bubbling at the base, there's a good chance they are much worse on the inside.
I'm no pro with welding, but I think a 110 volt welding unit is a great way to go. That's what I have and it is just the ticket for this sort of welding.
To raise my car up to the rotisserie, I bought a bunch of cinder blocks to make platforms to raise jack stands as I went while clenching my butt real tight. I can't say that I recommend it, but it worked and was cheap.
Glad to hear you are still on course. I look forward to the progress reports.
Powered by Invision Power Board (http://www.invisionboard.com)
© Invision Power Services (http://www.invisionpower.com)