Printable Version of Topic
Click here to view this topic in its original format
914World.com _ 914World Garage _ 10Krpm / 6-cyl chrome dot tach build
Posted by: Retroracer Nov 17 2018, 07:29 PM
So this post builds on, and references Tim’s (timothy_nd28) awesome post here:
http://www.914world.com/bbs2/index.php?showtopic=216719&hl=tach
…which details the steps necessary to improve the original VDO tach performance and provide better transient and damping response, coupled with a more universal input. If you’re not familiar with this DIY tach upgrade, best read that first.
Given the flexibility and performance upgrade of retrofitting the SunPro/Bosch innards into the VDO casing, I took on the challenge of seeing if a 10K racing tach could be constructed around an early 914-4 tach housing – with a target cost of $100. Read on if this piques your interest; move on if you don’t think this sort of thing is necessary or sensible.
A 10K tachometer was an essential part of the GT cars (and other Porsche race cars too), which typically had no redline area indicated under the glass, such that the actual redline could be indicated with a marker or tape, to suit the particular engine build being run for that event. Original 10K VDO units appear for sale occasionally, but the prices are usually prohibitive. 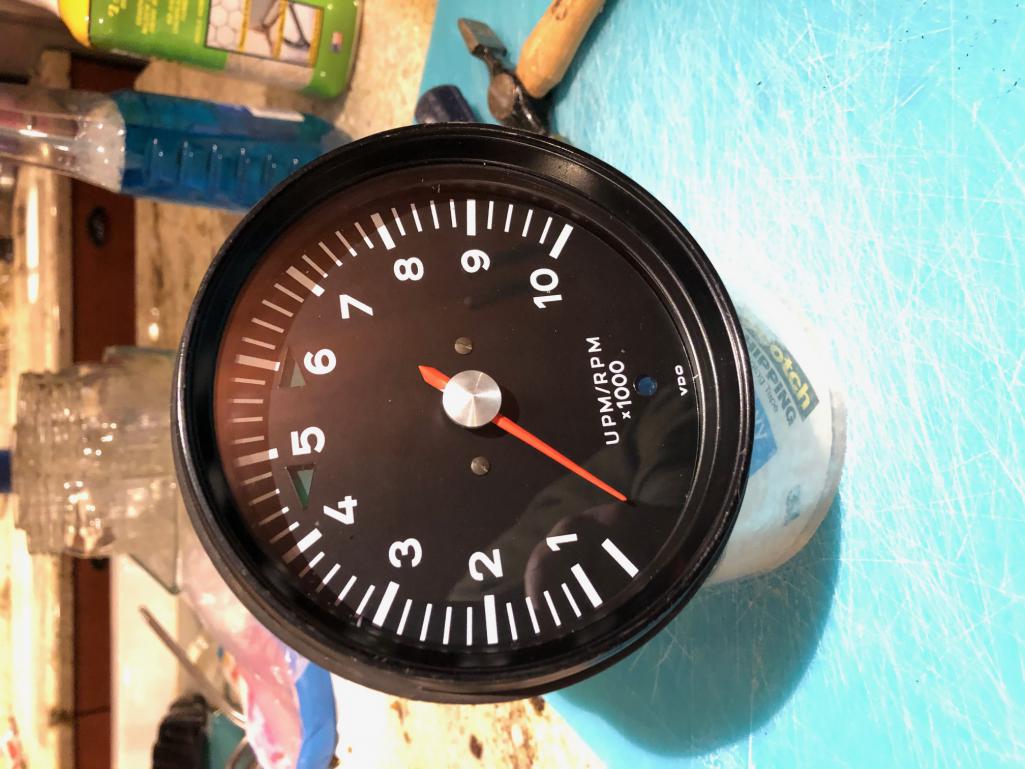
I ordered the Bosch version of the SunPro via Amazon, and disassembled it using Tim's post as suggested: 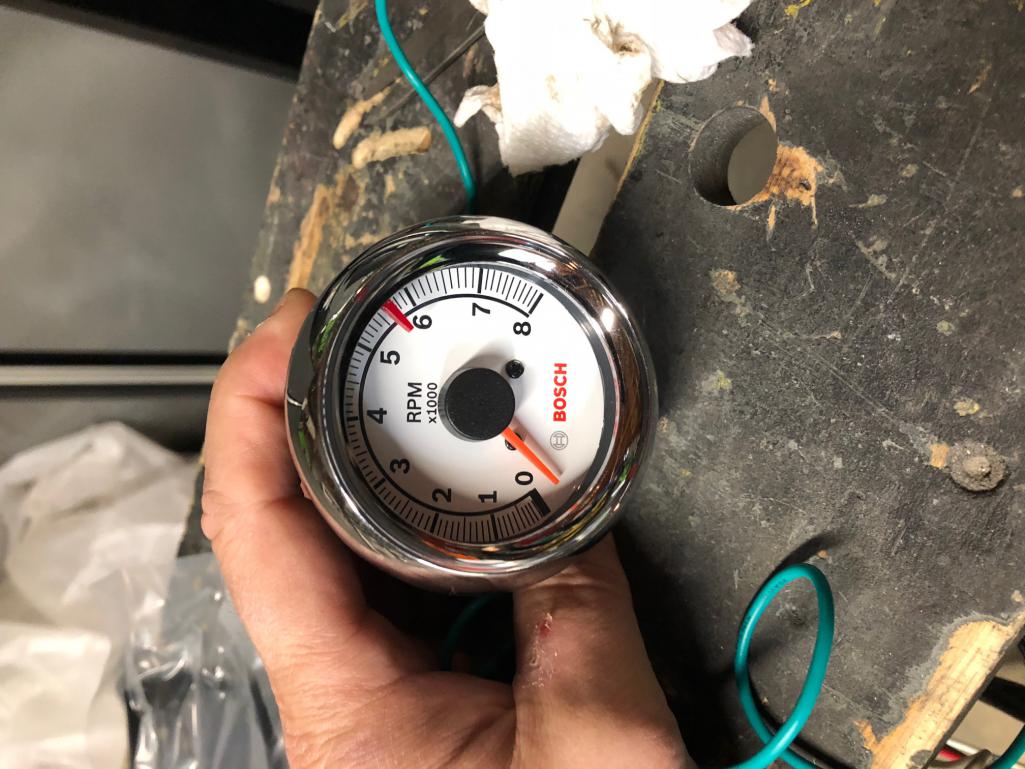
There is some metal fabrication necessary to get the donor VDO fascia to mate up to the new core. This is not difficult, the only thing you may not have around is the M2 tap.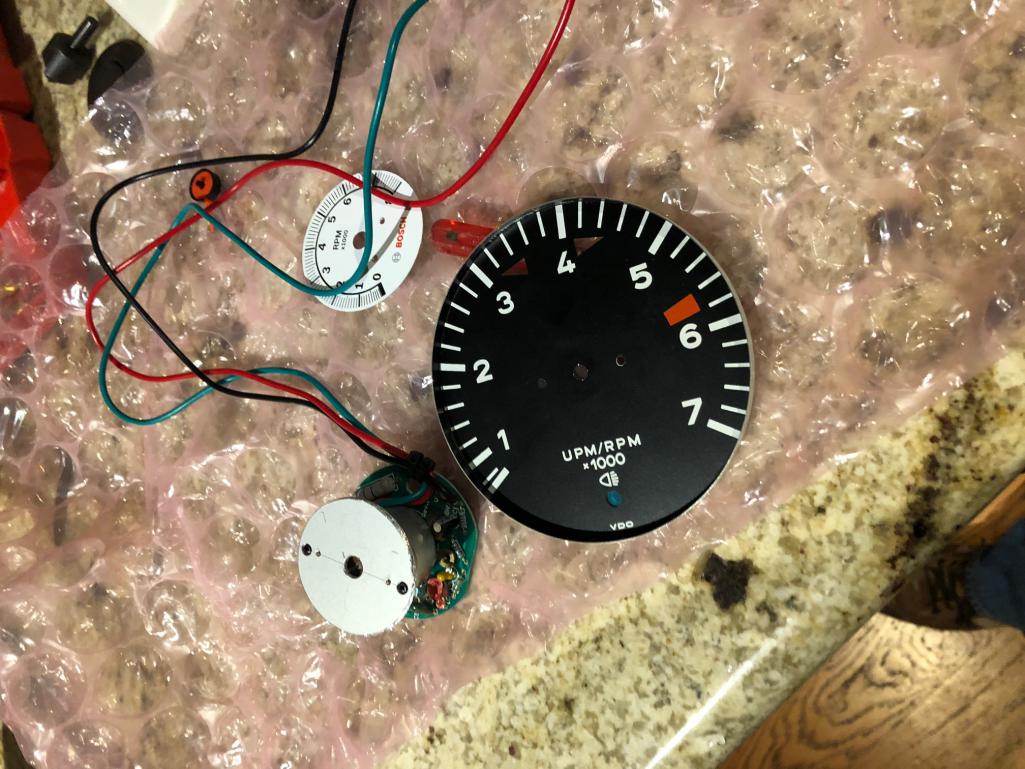
Getting the right fascia: So I toyed with idea of using a drawing or graphics package to replicate the 10K tach face, then somehow print a design on to vinyl, trim it, then glue that over the existing -4 face. Then I realized that I was never going to get round to doing that, so looked at other options.
I ended up buying a printed and finished insert fascia from these guys:
https://www.heiler-tachodesign.de/Tachometer-wheel-Porsche-911-10000-UMD-without-red-Area
Not a cheap way to get a result, but they a) offer multiple choices to match various Porsche VDO tachs and other gauges, b) the quality of the fit, paint and graphics are exemplary and c) without the talent and tools for “rolling your own”, there are very few other options. They also allow you to pick custom colors and lettering if you so desire. It took about 2 weeks to arrive, I also ordered a 914-6 style temp gauge replacement at the same time, total cost for both gauge faces including shipping was about $93.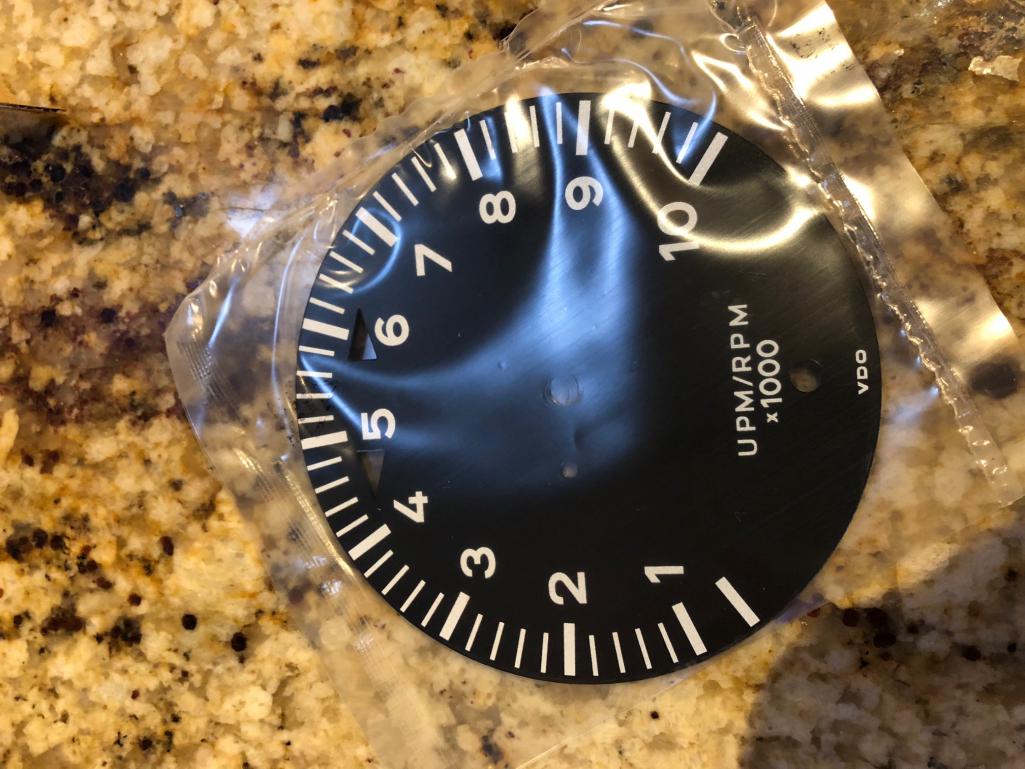
So, $100 target blown already - the tach core is around $35 - but still in the ball park.
Posted by: Retroracer Nov 17 2018, 07:43 PM
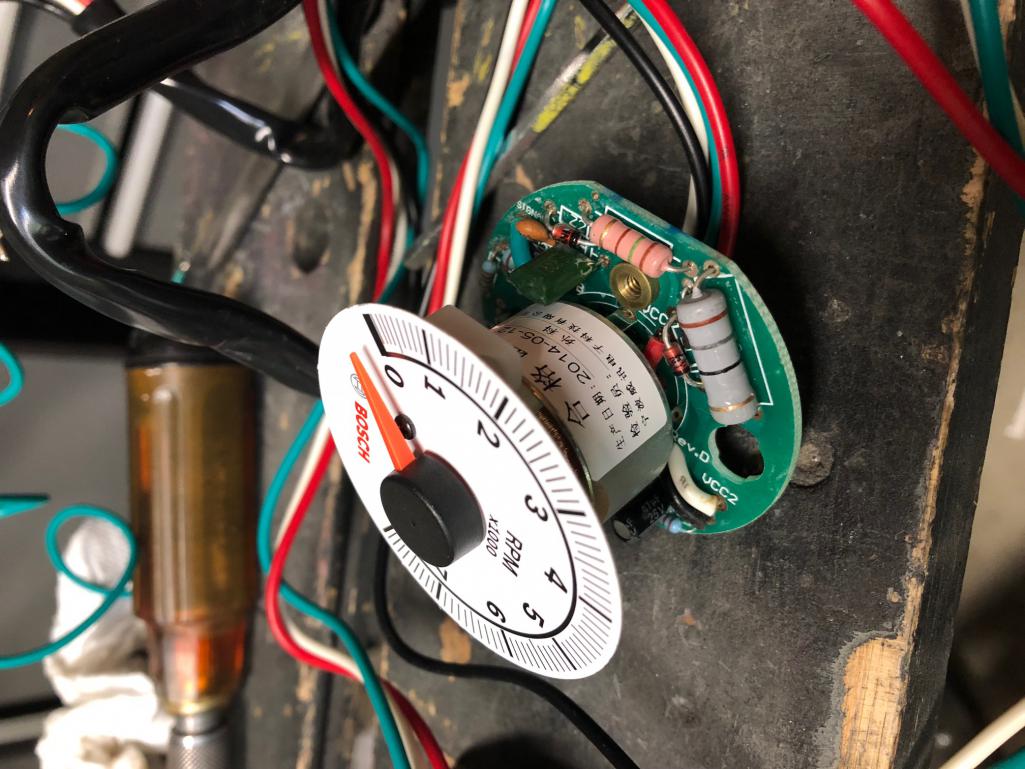
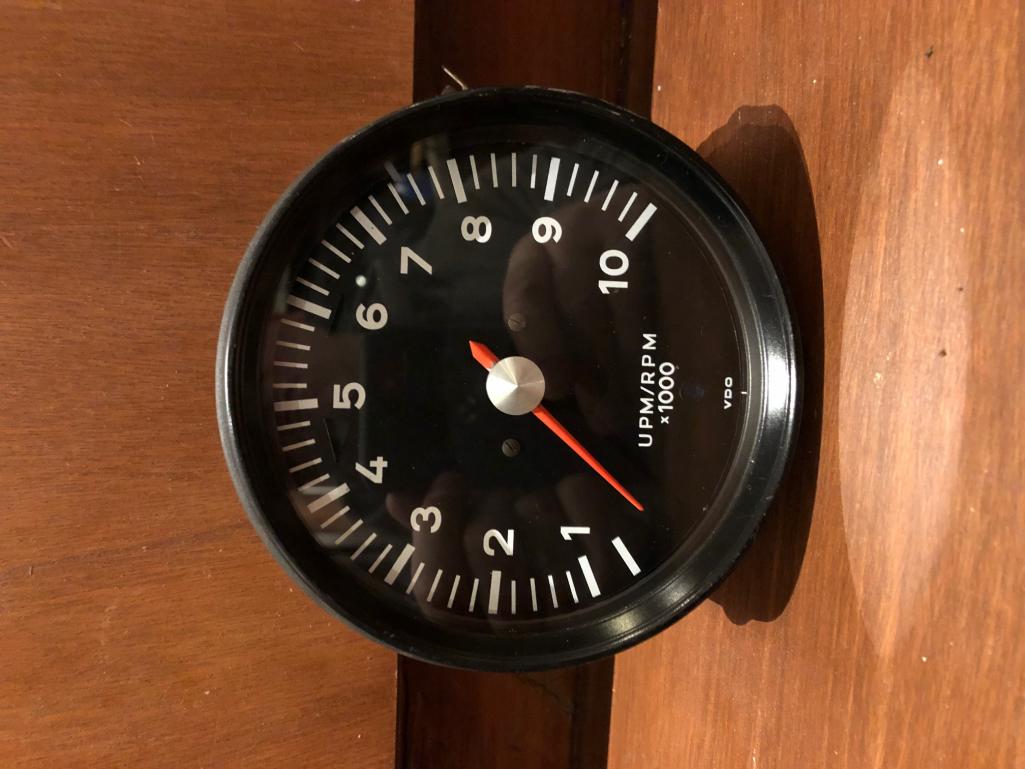
One of the key steps for the new tach to operate correctly is to make sure the response to the incoming tach pulses matches the markings on the new face: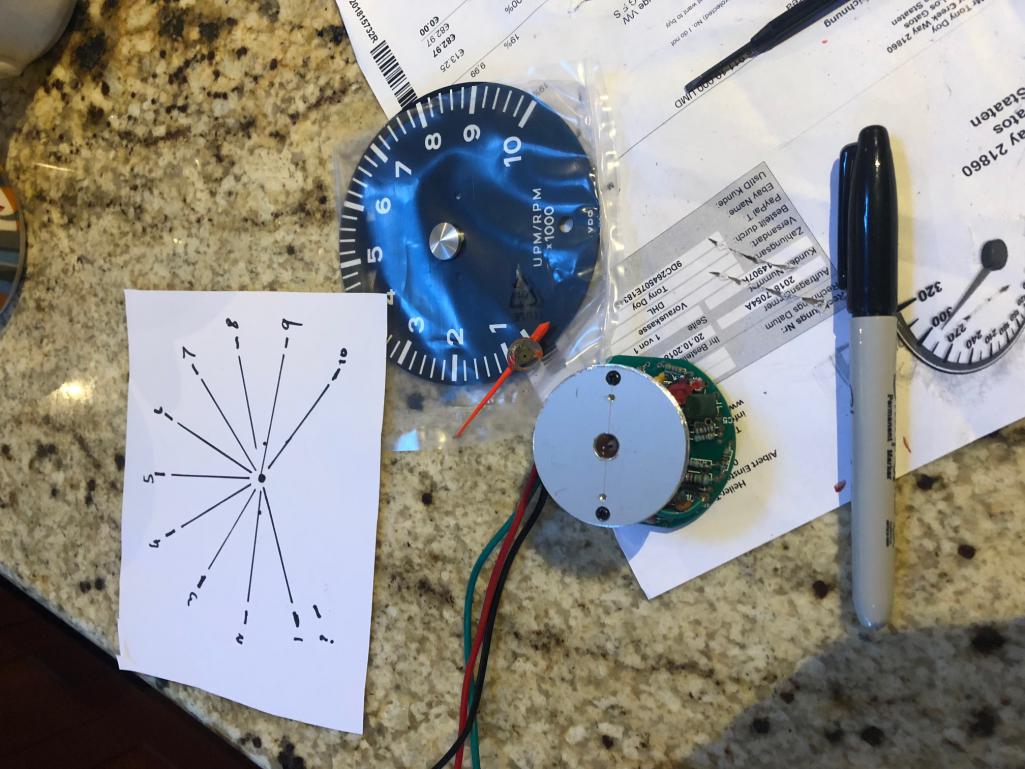
This is accomplished by the combination of adjusting the absolute position of the needle on the core shaft, and adjusting the value of resistor R9 on the PCB. I had the use of a signal generator and PCB rework facilities, so could optimize the R9 value on the bench, which is way easier than tweaking it when it’s in the car. With the fascia I chose, and using a 6-cylinder input, the value that worked for me was 220K. I adjusted the unit based on 1000rpm and 6000rpm settings to optimize, but verified operation up to 10000rpm. Viewing accuracy at 10K with R9=220K was -2% on axis.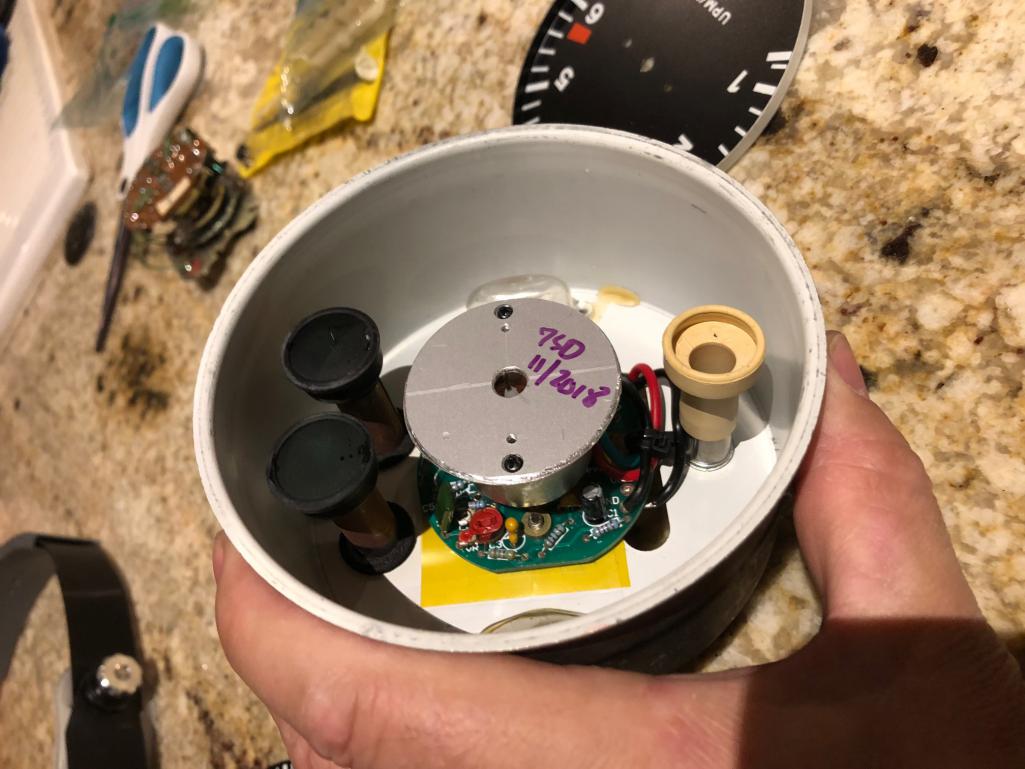
Then it was simply a case of working out the wiring terminations, a quick check on the car itself before sealing up the VDO trim ring (thoroughly cleaning the glass first), to make sure the new tach accepts the MSD Strassefeuer inputs correctly. Then it's basically finished: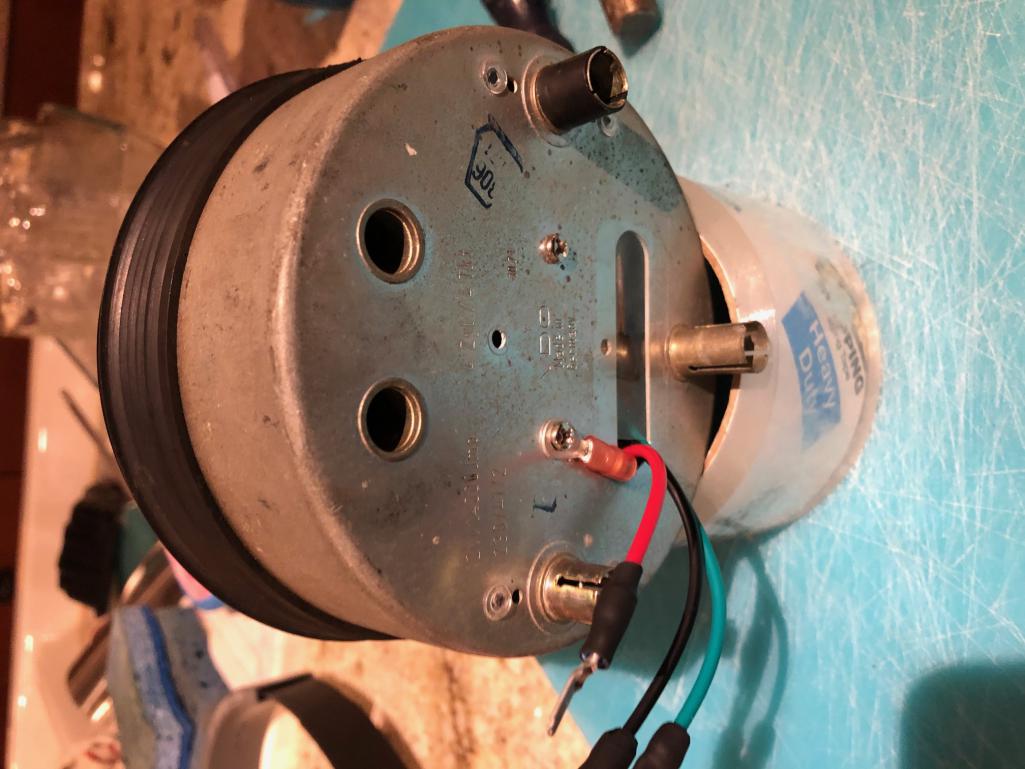
I also replaced the blue material for the high beam bulb - this had gotten opaque over the years. The L/R indicators were fine so I left those. If anyone can suggest an optimum method of removing the trim ring, that would help a lot - small screwdrivers and a lot of patience still did not prevent the occasional slip (and scratch!) when I tried it.
I installed it in the car earlier today - I'll post pictures at some future point. Things I noted that add to, or were different to Tim’s instructions:
1) The aluminum adapter plate as spec’ed by Tim, worked perfectly; dimensions are nuts on (thanks Tim!)
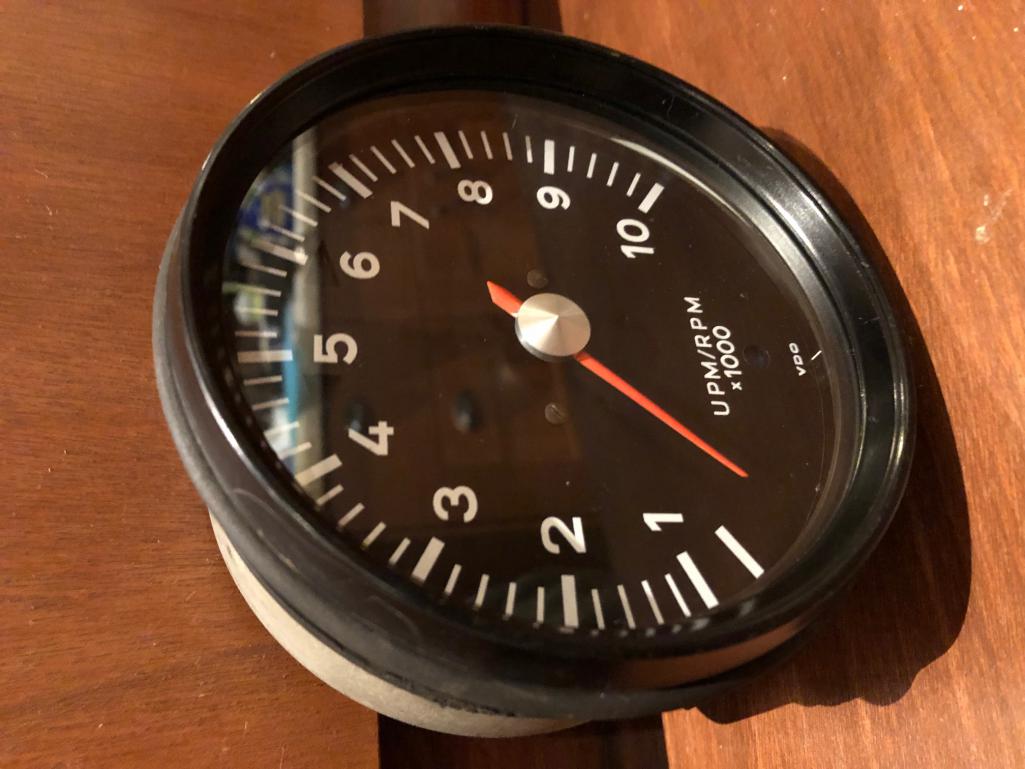
2) In my case, I had to add extra washers between the back of the core unit and the casing to get the fascia to sit correctly depth-wise. The Heiler fascia is 2mm or so thick
3) I chose to use a VDO needle from an ’71 914 speedo (chrome dot) and found that it was a loose fit on the Bosch tach spindle. It certainly did not require drilling out. To hold it in place before final assembly I put a sliver of aluminum foil inside to ensure a snug fit
4) I soldered a wire on to the GND node of the PCB (where the black wire is attached) and took that out to an external lug to ensure the case shares the same GND as the tach core. This also gives the two illumination bulbs a GND path too
So all in all, am very pleased with it. It looks the part and it is functional, has a well damped response and measures accurately. It did cost more than $100, but only just and MUCH less than an original, or a Palo Alto / Hollywood Speedometer custom order. Very happy with the result!
Posted by: Retroracer Nov 17 2018, 07:44 PM
BTW - if someone can please tell me how to rotate the pics in the thread? The orientation is annoying me....
- Tony
Posted by: 914forme Nov 17 2018, 08:06 PM
Excellent job, and yes you did it all the right way, including using the generator to set it up on the bench before dropping it in the car.
Posted by: porschetub Nov 17 2018, 08:42 PM

BTW - if someone can please tell me how to rotate the pics in the thread? The orientation is annoying me....
- Tony
Excellent skills I have done a lot of gauges for my conversion (and others),have restored a metric speedo,fixed up old rough gauges bought on ebay and fitted led light strips in them,compares little to what you have done
 .
.Posted by: campbellcj Nov 18 2018, 09:16 AM
Really cool, thanks for the write-up!
Posted by: TravisNeff Nov 18 2018, 09:28 AM
Great job Tony! I appreciate the how to. Now to understand what this generator thingy is and what does it do.
Posted by: Retroracer Nov 18 2018, 10:07 AM
Now to understand what this generator thingy is and what does it do.
Travis - good point, I didn't make this clear: so part of the reason for writing this up is that if anyone wants to build a 10k tach, they now don't need to worry about the signal generator stuff; if you use the same Heiler fascia and change the R9 resistor (per Tim's original thread) on the core to 220K, you just need to worry about getting the needle absolute position correct - which is easier.
- Tony
Posted by: Retroracer Nov 18 2018, 03:21 PM
And installed: 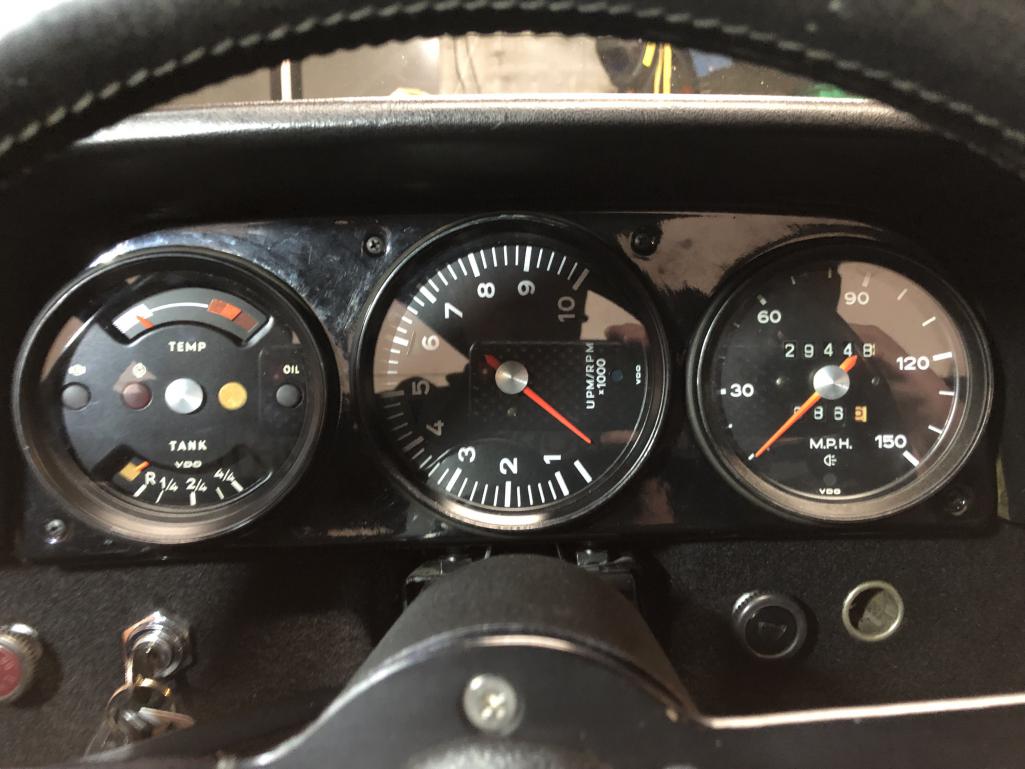
Not the best picture, lots of reflections - but you get the idea. Will play around with orientation a bit; the momo wheel I have fitted occludes some (well, a lot!) of the gauge viewable area with my current driving position. Am looking to have a vertebrae removed to compensate.
- Tony
Posted by: larryM Nov 18 2018, 09:29 PM
of course - this assumes a need for a 10K tach
- which presumes one has a $40K engine built to do that
never-the-less an interesting project
Posted by: mepstein Nov 19 2018, 06:35 AM
And installed:
Not the best picture, lots of reflections - but you get the idea. Will play around with orientation a bit; the momo wheel I have fitted occludes some (well, a lot!) of the gauge viewable area with my current driving position. Am looking to have a vertebrae removed to compensate.
- Tony
Looks great except the orientation. That would drive me crazy.
Posted by: timothy_nd28 Nov 19 2018, 12:26 PM
I like it, great job! I'm not sure if my original post talks about the SunPro's trim pot or not? The boards trim pot is cheap and junky, you can replace it with a 12 turn 500 ohm potentiometer which helps with finer calibration. 99% of the time though it's not needed. Thanks for figuring out R9's resistance for this project!
Posted by: bahnzai Dec 27 2018, 09:00 AM
Tony,
What would it take to reset the Zero & 6K positions like this (with Zero at 6 O'clock position)?
Thanks,
Danny
@http://www.914world.com/bbs2/index.php?showuser=16100 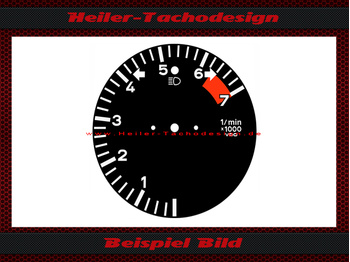
Posted by: 914forme Dec 27 2018, 09:43 AM
 You really want to know how easy it is
You rotate the needle on the shaft to the proper new location. VDO tach have stops "rests" the Sunpro / Bosch do not, they will travel 360 degrees.
More detailed version, many sets of step by steps have been written.
Okay here it goes do not get to  knowing how it is done.
1. Remove bezel - write-ups can be found on how to do this.
2. Remove needle - well documented
3. Remove face - 2 screws removes the face
If changing the guts to a "Modren"  tach then follow the write-ups
3a remove guts
3b install new guts - This thread, but Timothy did an excellent writeup on this process.
4. Install your new artwork with numbers in proper orientation
5. Install needles
6. Calibrate tach using a single generator, or tach tester, you can also connect the wires and fire up the car and gently put the needle on it where you digital tach says it goes. Analog tach are just a reference, something that sweeps to make people go wow I can rev and engine. VDO should not be used as a scientific instrument,
7. Clean up and install glass and trim
8. Crimp trim to lock it onto the gauge.
Done....
Install in the dash hook up the wires correctly and you're off and running again.
Where this gets harder, but not impossible. If you are adding an extra gauge ala 930 style unit. Moving warning lights around, building a custom gauge like a triple, or a quad to the right of the tach. clocking the gauges or painting them, making custom colors and getting all the markings right. Installing a rebuilt speedo - the old mechanical ones can get tricky to setup right. No gauge work is beyond the scope of a reasonably skilled DIYer. Maybe I am not reasonably skilled 
Custom artwork has all ways been the hardest part of gauge work for me. Old days we had to do it via a silk screen, then we got Alps printers, made life a bit better. Now I am working on two methods that show promise for getting these done, and making them easier to customize for various configurations.
Posted by: Retroracer Dec 27 2018, 10:53 AM
Tony,
What would it take to reset the Zero & 6K positions like this (with Zero at 6 O'clock position)?
Thanks,
Danny
@http://www.914world.com/bbs2/index.php?showuser=16100
Danny - couple of key things to consider here, and a couple of clarifications needed:
1) what model VDO tach will you be modifying? e.g. 914-4, 911, etc
2) what engine are you running? six, four, flat eight....!?
The first point affects the position of the warning light guides on the metal casing. I chose the Heiler fascia to match exactly the positions of the "<", ">" and "full beam" light guides in the early -4 casing I was using. I wanted these to match up, as moving the guides around seemed like an extra level of modification hell that I wanted to avoid! Heiler seem to have a bunch of choices to suit various donor casings, which helps. Note also that in my stack up, I dropped the Heiler fascia on top of the VDO original to maintain the outer lighting "lip" which allows the back light bulbs to illuminate the gauge face without having obvious gaps (when viewed from the front). Even more important for the cut outs to match precisely.
So that was an underlying assumption for my thread that was not explicitly stated. The fascia you show in the post (for instance) will not match the light guides in a -4 casing - so you're in unknown (light guide modification) territory if that's your plan...!
The second point is related to the component mods needed on the Bosch tach core. Its relatively easy to set any zero position - just a case of placing the needle on the shaft at the correct angle. The resistor change sets the correct translation from the number of ignition pulses coming in, to the correct RPM being displayed.
Perhaps a numerical analysis helps the concept: at 3000 RPM, the crank will be rotating at 50 revolutions per second - or 50Hz. Each cylinder fires once every 2 revolutions (4 stroke engine!) - so in a 4 cylinder car the tach pulses will be at 100Hz (i.e. 4 x 25Hz); for a 6 cylinder the input to the tach will be 150Hz (6 x 25Hz). The Bosch core essentially converts this input frequency to a defined swept angle; and tweaking the R9 value therefore matches the input pulse frequency (which is dependent on how many cylinders you have) to the swept angle to match the markings of the fascia you choose.
Hopefully that all makes sense... feel free to PM me if you have specific questions
- Tony
Posted by: bahnzai Dec 27 2018, 03:56 PM
Guys,
Thank you both for the responses.
Stephen, I am glad to hear it is as simple placing the needle. I have not had one apart yet.
Tony, am running a six cylinder and currently using an old 911 tach with a fair bit of bounce.
I was planning to use a 914-4 tach as the core for this project, so your point on position of the existing lights is well taken relative to the tach face chosen.
Thanks again for the great details of this thread (as well as Timothy’s original). Should be a fun learning experience.
Danny
Posted by: djway Dec 27 2018, 09:12 PM
You really want to know how easy it is You rotate the needle on the shaft to the proper new location. VDO tach have stops "rests" the Sunpro / Bosch do not, they will travel 360 degrees.
More detailed version, many sets of step by steps have been written.
Okay here it goes do not get to
knowing how it is done.1. Remove bezel - write-ups can be found on how to do this.
2. Remove needle - well documented
3. Remove face - 2 screws removes the face
If changing the guts to a "Modren"
tach then follow the write-ups 3a remove guts
3b install new guts - This thread, but Timothy did an excellent writeup on this process.
4. Install your new artwork with numbers in proper orientation
5. Install needles
6. Calibrate tach using a single generator, or tach tester, you can also connect the wires and fire up the car and gently put the needle on it where you digital tach says it goes. Analog tach are just a reference, something that sweeps to make people go wow I can rev and engine. VDO should not be used as a scientific instrument,
7. Clean up and install glass and trim
8. Crimp trim to lock it onto the gauge.
Done....
Install in the dash hook up the wires correctly and you're off and running again.
Where this gets harder, but not impossible. If you are adding an extra gauge ala 930 style unit. Moving warning lights around, building a custom gauge like a triple, or a quad to the right of the tach. clocking the gauges or painting them, making custom colors and getting all the markings right. Installing a rebuilt speedo - the old mechanical ones can get tricky to setup right. No gauge work is beyond the scope of a reasonably skilled DIYer. Maybe I am not reasonably skilled
Custom artwork has all ways been the hardest part of gauge work for me. Old days we had to do it via a silk screen, then we got Alps printers, made life a bit better. Now I am working on two methods that show promise for getting these done, and making them easier to customize for various configurations.
I miss my Alps
Powered by Invision Power Board (http://www.invisionboard.com)
© Invision Power Services (http://www.invisionpower.com)