Printable Version of Topic
Click here to view this topic in its original format
914World.com _ 914World Garage _ Delving into Powder Coating
Posted by: ValcoOscar Dec 12 2018, 03:30 PM
Well, after getting quotes on powder coating three sets of rims and misc suspension components I've decided to do my own powder coating. I've seen lots of YouTube videos but wanted some feedback from someone already doing this. Please share any tips.
My oven is 20 W x 24 D x 30 H so I'm thinking going with dual voltage Eastwood gun set up.
If I get decent at this, perhaps we can have a SoCal powder coating tech day in the near future. Any interest? 
Oscar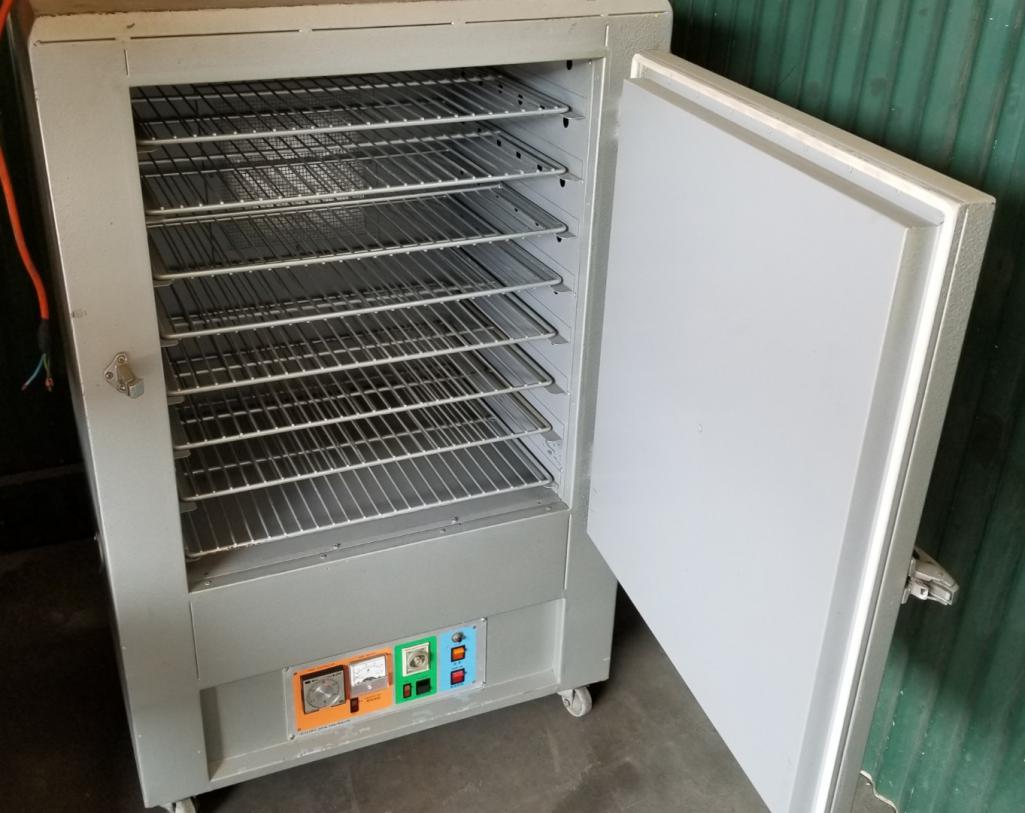
Posted by: ndfrigi Dec 12 2018, 03:43 PM
Nice sir Oscar!
Posted by: mepstein Dec 12 2018, 04:07 PM
We do a lot at our shop. It's very easy to make things look nice. Get a bunch of the proper plugs and tape so you can keep the powder off the things you don't want coated. parts also have to be pretty clean before you coat them.
Our oven is about 5x5x5 and has a rolling rack to hold the parts that hang from a wire.
Posted by: StratPlayer Dec 12 2018, 04:08 PM
Get your powder from https://www.columbiacoatings.com you can buy small amounts from them.
Posted by: mepstein Dec 12 2018, 04:12 PM

We do a lot at our shop. It's very easy to make things look nice. Get a bunch of the proper plugs and tape so you can keep the powder off the things you don't want coated. parts also have to be pretty clean before you coat them. It also helps to pre heat the larger parts.
Our oven is about 5x5x5 and has a rolling rack to hold the parts that hang from a wire.
I would build a large oven from plywood and sheetmetal and use an element from a craigslist oven at the bottom and then a metal hanging rack that rolls over the hot element.When the parts have cooked at 400 for 20 minutes, you just roll the rack out of the oven and let cool for a couple minutes.
Posted by: ValcoOscar Dec 12 2018, 04:15 PM
Get your powder from https://www.columbiacoatings.com you can buy small amounts from them.
Cool...I like color choices, easy to navigate on this site.
Thanks,
Oscar
Posted by: ValcoOscar Dec 12 2018, 04:23 PM
We do a lot at our shop. It's very easy to make things look nice. Get a bunch of the proper plugs and tape so you can keep the powder off the things you don't want coated. parts also have to be pretty clean before you coat them. It also helps to pre heat the larger parts.
Our oven is about 5x5x5 and has a rolling rack to hold the parts that hang from a wire.
I would build a large oven from plywood and sheetmetal and use an element from a craigslist oven at the bottom and then a metal hanging rack that rolls over the hot element.When the parts have cooked at 400 for 20 minutes, you just roll the rack out of the oven and let cool for a couple minutes.
Thanks Mark, I better take baby steps for now but this may be in my future.

Oscar
Posted by: 76-914 Dec 12 2018, 04:23 PM
I haven't taken mine out of the package yet. I need to get an old oven so I can coat a few pieces. LMK. how it goes for you Oscar. 
Posted by: mepstein Dec 12 2018, 04:50 PM
We do a lot at our shop. It's very easy to make things look nice. Get a bunch of the proper plugs and tape so you can keep the powder off the things you don't want coated. parts also have to be pretty clean before you coat them. It also helps to pre heat the larger parts.
Our oven is about 5x5x5 and has a rolling rack to hold the parts that hang from a wire.
I would build a large oven from plywood and sheetmetal and use an element from a craigslist oven at the bottom and then a metal hanging rack that rolls over the hot element.When the parts have cooked at 400 for 20 minutes, you just roll the rack out of the oven and let cool for a couple minutes.
Thanks Mark, I better take baby steps for now but this may be in my future.
Oscar
The only problem with a large oven is the space it takes but being able to do a rack full of suspension parts or a bunch of engine tin is really nice. At first our local commercial place was fast and cheap but over time, they got expensive and slow. Once you get your setup, the powder is cheap. a jar lasts a long time. you might spend 10-25 cents per part.
Posted by: burton73 Dec 12 2018, 04:53 PM
Oscar,
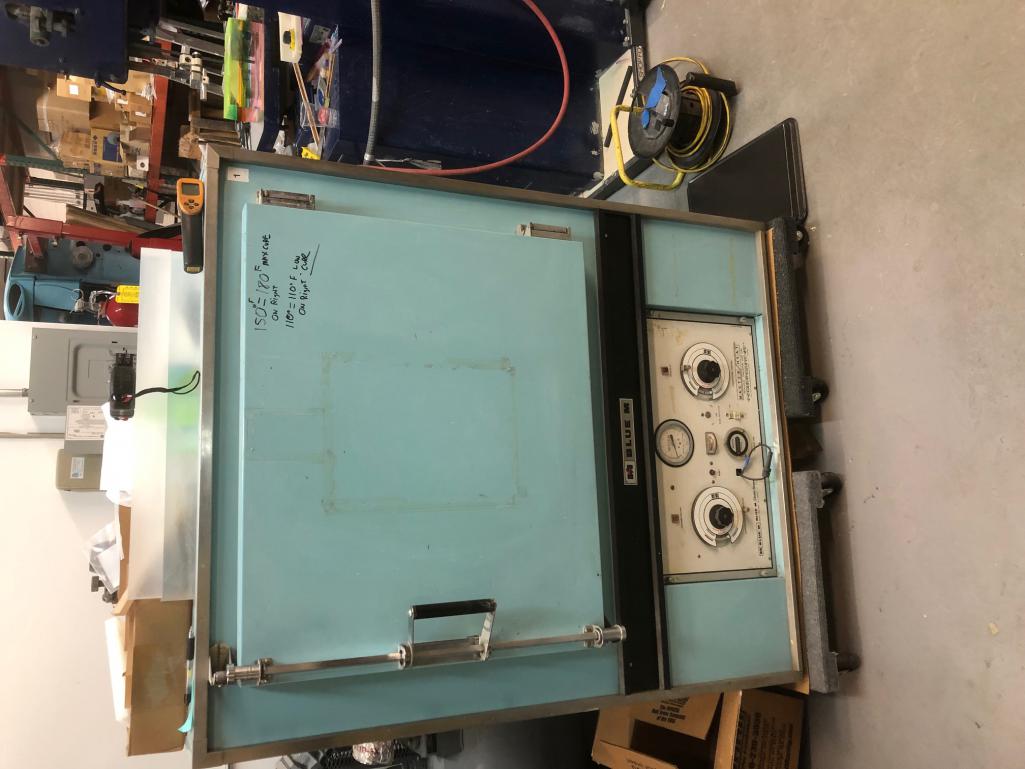
I have used Blue M Ovens at my plastic factories for 35 years. I used an old Pizza oven from the out of business Brown Derby restaurant for a while.
Temperature control is very important. The base of the Blue M is a huge coil making the heat and a ½ HP motor blowing the air over the coil. Temperature control turning the heat on and off.
Do not forget the paint in the conversion is giving off flammable Vapors. The last Blue M
I bought on EBay was cheap but I had to go through it as it did not work right.
My current oven set up is inside 26” x 21” x 21” and the outside is 40” x 29” x 49”
220 volts. More than happy to go over what I know of industrial ovens. There is a learning curve on all things. Always happy to help if I can
Best regards,
Bob B 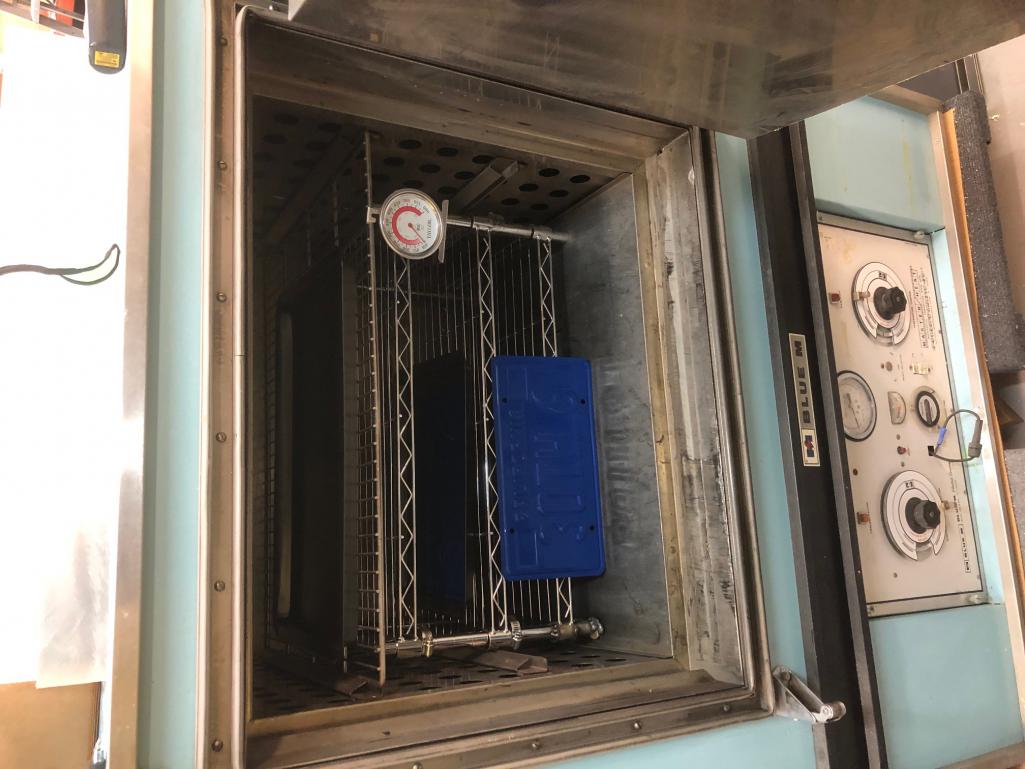
Posted by: StratPlayer Dec 12 2018, 05:00 PM
Here are a few things that I've coated, using a home stove with oven.
http://www.914world.com/bbs2/index.php?showtopic=46185&hl=
Posted by: cuddy_k Dec 12 2018, 05:03 PM
We do a lot at our shop. It's very easy to make things look nice. Get a bunch of the proper plugs and tape so you can keep the powder off the things you don't want coated. parts also have to be pretty clean before you coat them.
Our oven is about 5x5x5 and has a rolling rack to hold the parts that hang from a wire.

They sell assorted plug kits. Also a good idea to get a spool of wire to make your own hangers. I have the Eastwood dual voltage setup and also their oven...which is like a large countertop type. If you've got clean metal it's pretty easy to get nice results. make sure you have a dessicant or some inline dryer for the air source. Also there's something called the faraday cage effect which can interfere with coverage. Lots about that on the google.
Bottom line...it's fun and works well. Enjoy...and hope to see ya soon!
Posted by: ValcoOscar Dec 12 2018, 05:06 PM
Oscar,
I have used Blue M Ovens at my plastic factories for 35 years. I used an old Pizza oven from the out of business Brown Derby restaurant for a while.
Temperature control is very important. The base of the Blue M is a huge coil making the heat and a ½ HP motor blowing the air over the coil. Temperature control turning the heat on and off.
Do not forget the paint in the conversion is giving off flammable Vapors. The last Blue M
I bought on EBay was cheap but I had to go through it as it did not work right.
My current oven set up is inside 26” x 21” x 21” and the outside is 40” x 29” x 49”
220 volts. More than happy to go over what I know of industrial ovens. There is a learning curve on all things. Always happy to help if I can
Best regards,
Bob B
Got it Bob-
I used Blue M ovens in the past also when working with microelectronics. Stout industrial ovens.
My current oven has temperature control +/- 2 deg (doubt it) up to 425F with filtered air inlet and recirculating fan. Largest items I may tackle are rims and trailing arms, all else pretty small. Thanks
Posted by: infraredcalvin Dec 12 2018, 05:20 PM
Until you want to throw a sway bar or valence in there. I started with a toaster oven, now have a used kitchen oven that’ll fit a arms. As others have said, cleaning and prep are the key, otherwise it’s easy to get nice finishes, you’ll start make excuses to pc more things....
Posted by: 914forme Dec 13 2018, 08:29 AM
I still have my toaster. Always look at the idea of building a bigger unit. Rack wheels in, and hangs the parts.
If your using a blast cabinet, make sure it is clean, the cheap units are coated in something, that when it gets into the doors of your metal, it will come back out in your coat. I know people say clean clean clean, and that is true true true. But heavy cast parts will hide some indignities that you might not even find after several wipe downs.
For that reason, any part that I really care about the final appearance I will pre heat and out gas. Sometimes I will go for a really long time on the out gassing process. Pull clean, and redo.
Nice setup you will enjoy it. Then you will want a larger unit for the odd ball items like a sway bar. Valance, rockers, etc......
Posted by: Dr Evil Dec 13 2018, 08:44 AM
I want to do this so bad. Now I dont have a barn, so, been on the back burner. May need to rent shop space again as I need a blaster, too.
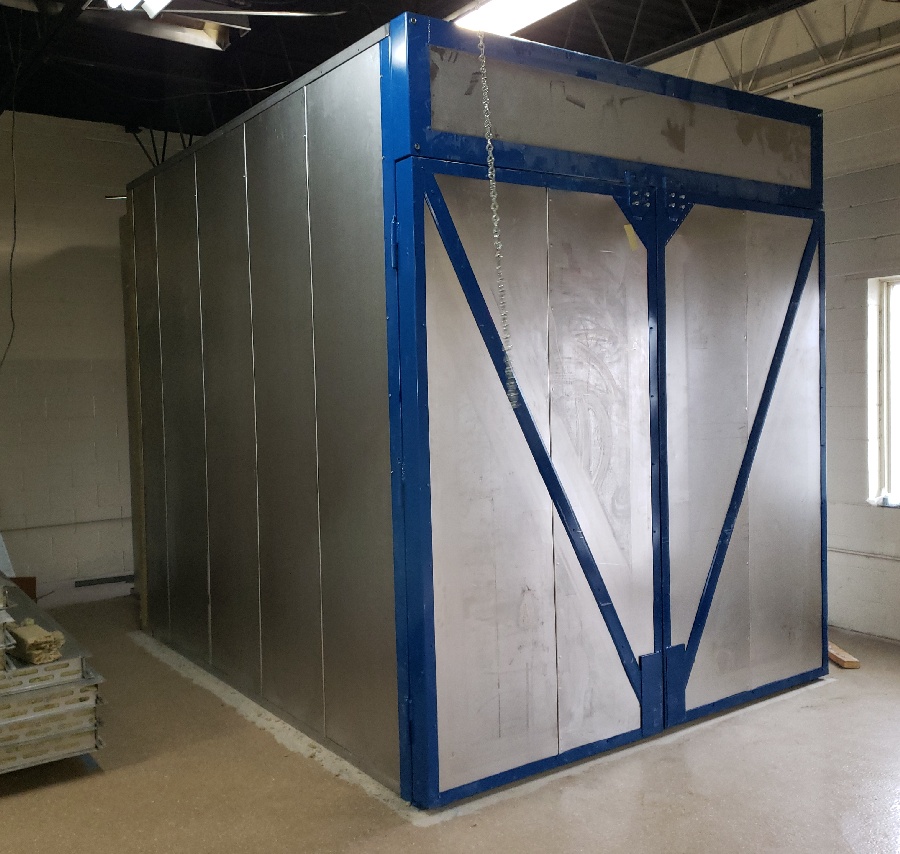
This looked like a decent option to make my own. I need one big enough for motorcycle frames. At $250/frame and several project bikes, and no limit on need over my lifetime, seems a no brainer.
http://www.homediystuff.com/building-a-diy-oven-from-filing-cabinet/
Posted by: IronHillRestorations Dec 13 2018, 08:59 AM
I have the Eastwood Hot Coat kit that I got almost 20 years ago, and it works pretty well, but I haven't powder coated things in a while.
I don't remember what temperature I landed on, but the temp recommended with the kit was hotter than need be.
Sometimes the most difficult part is getting the "powdered" piece from the spray rack to the oven. If you brush off any powder, it'll leave a bare spot.
I use small gas welding rod to make hangers
Posted by: mepstein Dec 13 2018, 08:59 AM
I want to do this so bad. Now I dont have a barn, so, been on the back burner. May need to rent shop space again as I need a blaster, too.
This looked like a decent option to make my own. I need one big enough for motorcycle frames. At $250/frame and several project bikes, and no limit on need over my lifetime, seems a no brainer.
http://www.homediystuff.com/building-a-diy-oven-from-filing-cabinet/
Mike - Another option to look at is air dry Cerikote. very hard finish, no oven or special equipment. Just a spray gun and compressor. The paint is expensive but a little goes a long way. It doesn't have much thickness so tolerances for threads and press fit is much easier. Ben uses it for his 911 fan and shroud repair and it looks great. It shows more detail so that is a plus on some parts but won't hide corrosion like powder coat.
Posted by: Dr Evil Dec 13 2018, 09:14 AM
I want to do this so bad. Now I dont have a barn, so, been on the back burner. May need to rent shop space again as I need a blaster, too.
This looked like a decent option to make my own. I need one big enough for motorcycle frames. At $250/frame and several project bikes, and no limit on need over my lifetime, seems a no brainer.
http://www.homediystuff.com/building-a-diy-oven-from-filing-cabinet/
Mike - Another option to look at is air dry Cerikote. very hard finish, no oven or special equipment. Just a spray gun and compressor. The paint is expensive but a little goes a long way. It doesn't have much thickness so tolerances for threads and press fit is much easier. Ben uses it for his 911 fan and shroud repair and it looks great. It shows more detail so that is a plus on some parts but won't hide corrosion like powder coat.
I hadnt considered doing cerikote myself, but am familiar with it. Yes, pricey. Interesting idea. Thanks.
Posted by: bbrock Dec 13 2018, 03:21 PM
http://www.homediystuff.com/building-a-diy-oven-from-filing-cabinet/
Why did you have to post this? The day before this thread started, I was shopping for toaster ovens and powder coating guns. Now you post this cool file cabinet thing? That's how it escalates!

Posted by: doug_b_928 Dec 13 2018, 03:29 PM
Brent, that’s what you get for sending me the link to that DIY video on plating 
Posted by: bbrock Dec 13 2018, 03:31 PM
Brent, that’s what you get for sending me the link to that DIY video on plating

Posted by: 914forme Dec 13 2018, 06:41 PM
I want to do this so bad.
http://www.homediystuff.com/building-a-diy-oven-from-filing-cabinet/
That is a great idea for a largish powder coat cabinet.
Posted by: gms Dec 29 2018, 11:43 PM
You should get a proper sized oven like mine 
Posted by: sixnotfour Dec 29 2018, 11:53 PM
nice TT needs some PC for his -6
Posted by: gms Dec 30 2018, 09:30 AM
nice TT needs some PC for his -6
I will let TT know, I will be up and going in about a month
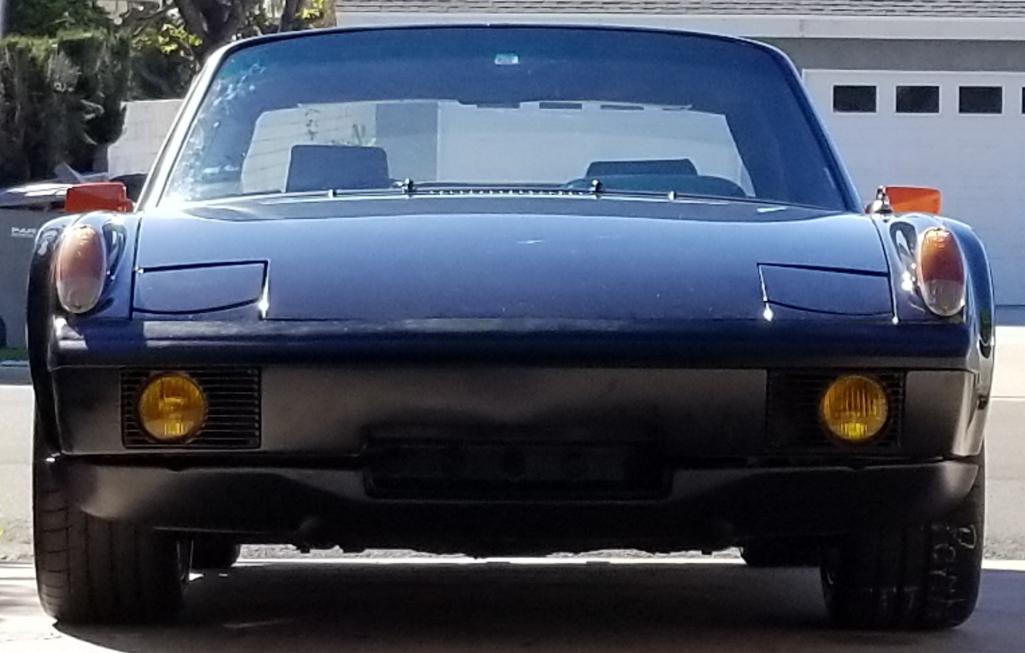
Posted by: ValcoOscar Jan 17 2019, 01:38 PM
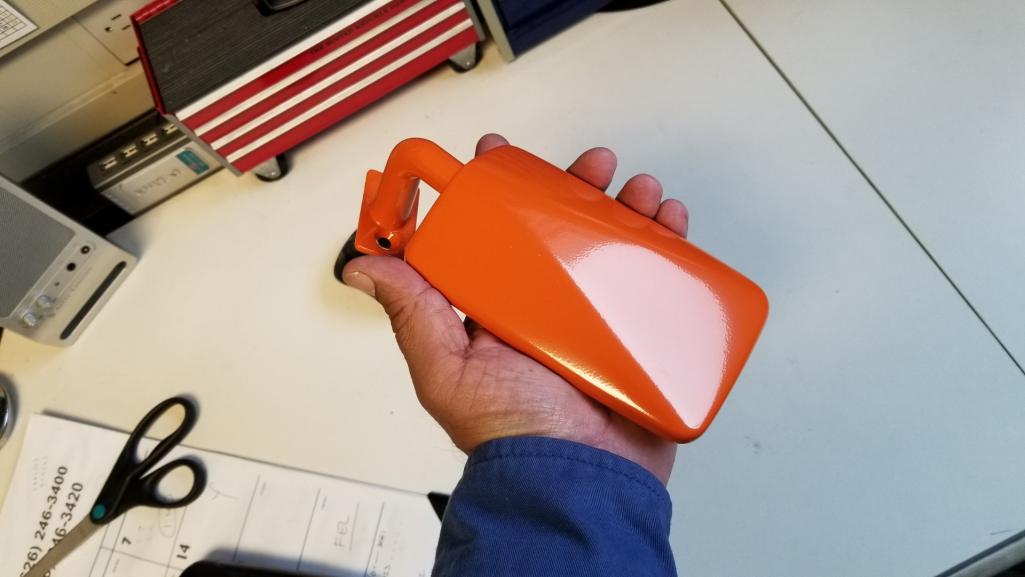
Well...here's some pictures of my first attempt. Now I have to mount my tires back. SIGNAL ORANGE. I should have cleared them. A little orange peel but okay for me.
Used: Red Line EZ50 Gun, Lab Metal (nick filler), 2010 Signal Orange powder.
Cured @ 380 deg (Part Temp) for 15 min.
A bit messy...next time I'm wearing ear plugs.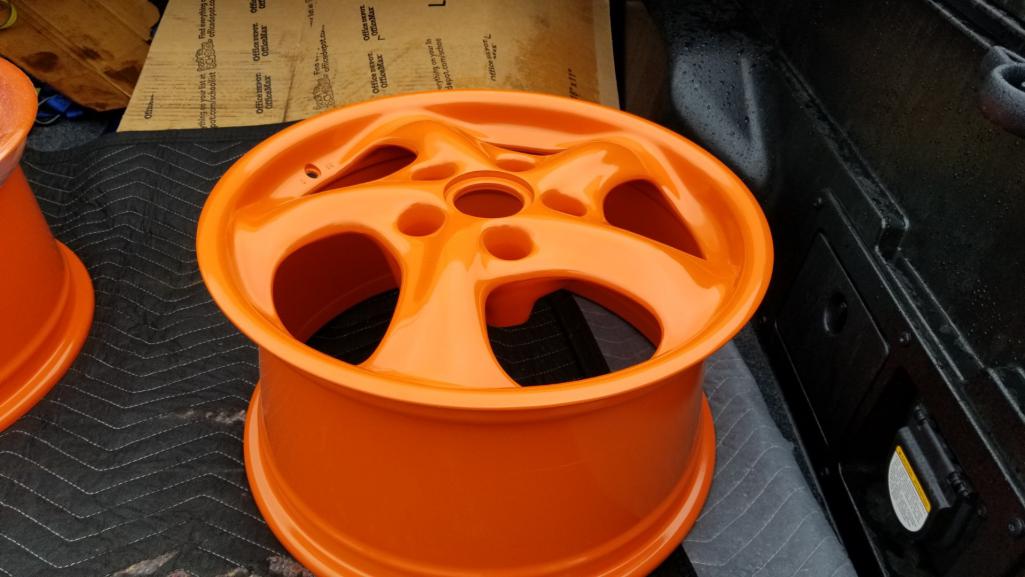
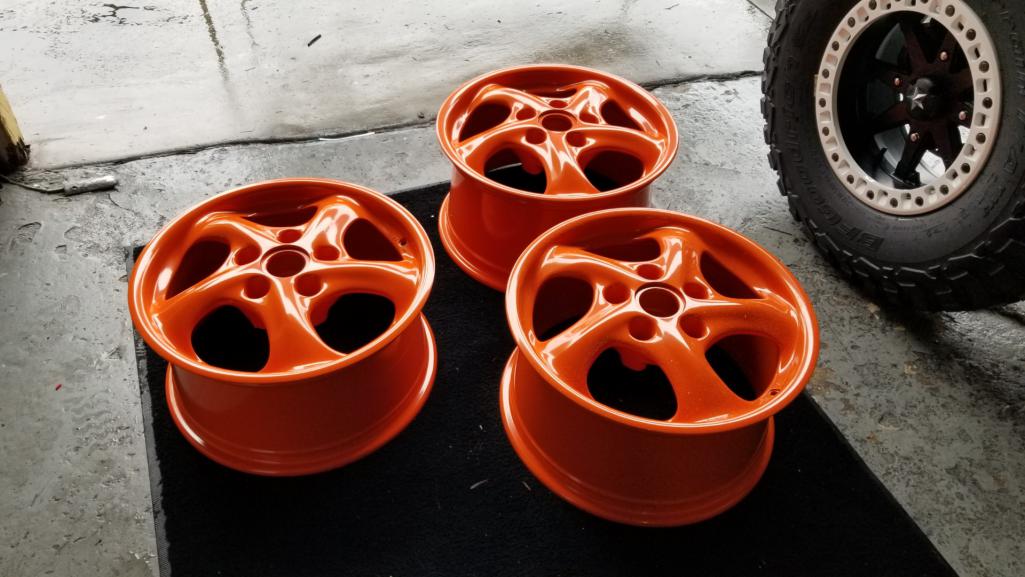

Posted by: ValcoOscar Jan 17 2019, 01:55 PM
Going for this color scheme...for now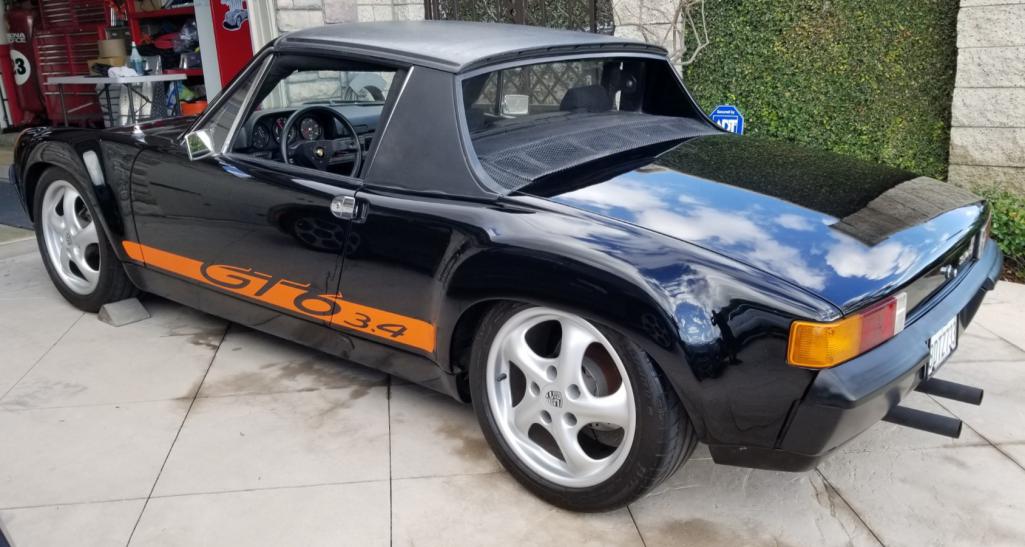
Posted by: sb914 Jan 17 2019, 03:13 PM
They look like candy! I like. 
Posted by: 7TPorsh Jan 17 2019, 03:20 PM
Would love to do a set of wheels or two in that Gold anodized look if that's possible with powder.
Posted by: 7TPorsh Jan 17 2019, 03:23 PM
Like this: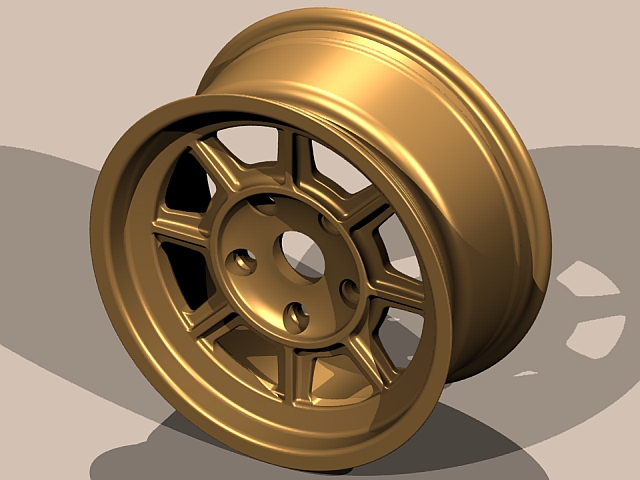
Posted by: infraredcalvin Jan 17 2019, 11:44 PM
Oscar, some of that orange peel may be from too low of heat and not long enough cure time.
IIRC you have a higher heat until the powder flows, then down a bit for 20 min or so, bigger items may take longer....
As for the gold wheels, I’ve been contemplating doing that with a set of cookie cutters... love that look...
Posted by: mepstein Jan 18 2019, 07:23 AM
We usually pre heat the larger items.
Posted by: Larmo63 Jan 18 2019, 08:36 PM
Dang, Oscar, you're in business now.
I'm impressed!!!
Posted by: ValcoOscar Jan 18 2019, 09:04 PM
Dang, Oscar, you're in business now.
I'm impressed!!!
NO business....just something I wanted to try. So far I have $850 into my set up and was quoted $450 to powdercoat my stuff so maybe not too smart...
Oscar
Posted by: mepstein Jan 18 2019, 09:27 PM
It pays off over time. It’s very convenient to be able to coat a couple pieces as you need them and install the same day vs sending them out.
Posted by: daytona Jan 19 2019, 07:06 AM
Amortize. The more you use it the cheaper it gets.
I have to say it, the DYS attitude of the people in this forum is inspiring. From fabrication, to powder coating and cad plating, I am impressed.
I am in the processes of restoring an E-Type and will have a fair amount of coating and plating to get done. Threads like this one makes me want to do it my self. At least try anyway.
Great work people.
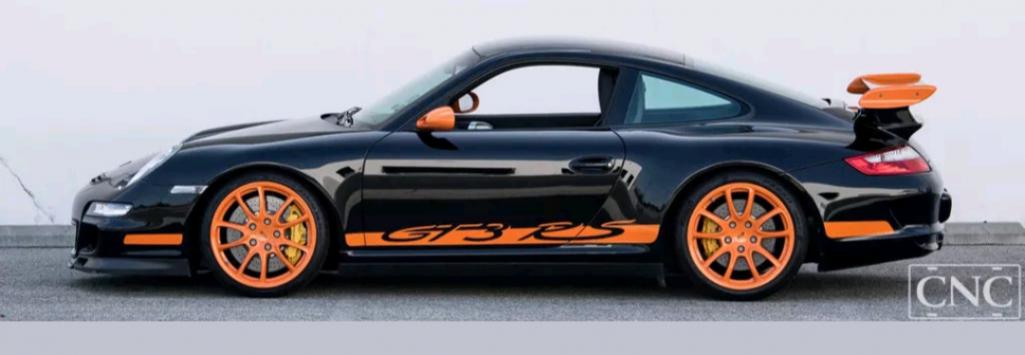
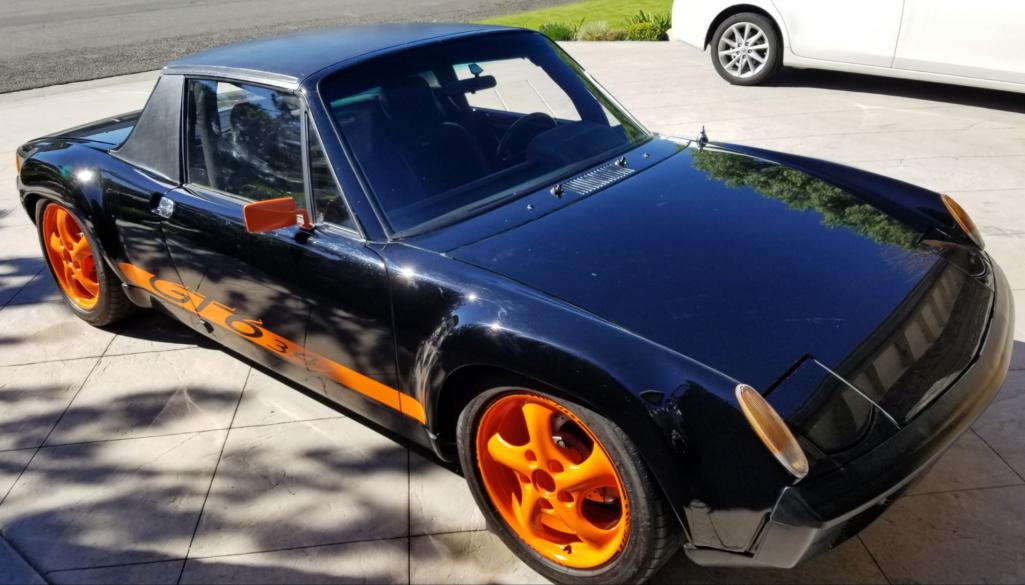
Posted by: ValcoOscar Jan 19 2019, 03:18 PM
Yes...ready for Halloween 
 [attachmentid=682
822]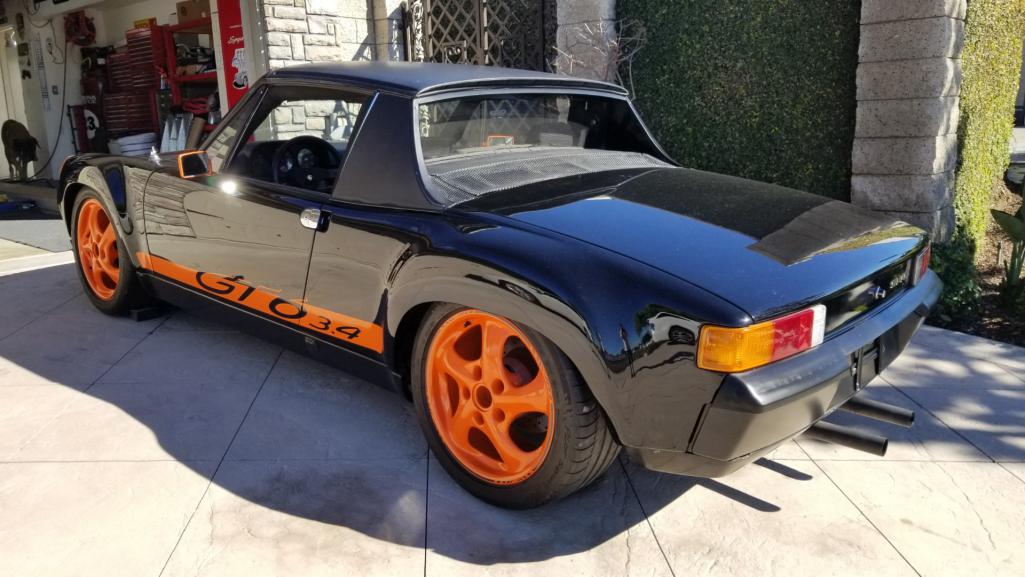
Posted by: Steve Jan 19 2019, 05:19 PM
That is way cool!! Nice way to break up the black!!
Posted by: mepstein Jan 19 2019, 05:31 PM
I like it.
Posted by: olsib914 Jan 19 2019, 06:37 PM
NICE looks great,Oscar
Posted by: Larmo63 Jan 19 2019, 06:56 PM
Wow, that really wakes up those wheels. That looks really good.
![shocked[1].gif](style_emoticons/default/shocked[1].gif)
Posted by: Lucky9146 Jan 21 2019, 02:27 AM
Cool look Oscar, Nice work! Is there anything you can't do? Front bumper looks great too!


Posted by: Andyrew Jan 21 2019, 03:03 PM
Yes...ready for Halloween
[attachmentid=682822]

KILLER!!!
Absolutely love the color scheme!! Great job on the PC as well!
Posted by: preach Jan 21 2019, 03:14 PM
Very nice.
Powered by Invision Power Board (http://www.invisionboard.com)
© Invision Power Services (http://www.invisionpower.com)