Printable Version of Topic
Click here to view this topic in its original format
914World.com _ 914World Garage _ LED Foglight Project
Posted by: Spoke Apr 13 2019, 08:45 AM
The design of an early foglight LED board has begun. mepstein sent me a couple of foglight fixtures to use to design the board. 2 main issues are fitment and heat dissipation. If things work out ok the design should be able to be re-laid out for the later square foglight.
The board will have 8 Cree XP-G3 high power surface mount LEDs with 350ma current each. These will burn about 1W of power with a total power dissipation expected to be less than 10W. Hopefully these will be almost as bright as a headlight.
Each LED will have its own focusing lens. The lenses are Carclo 10192 elliptical 20mm lenses. The light pattern for the 10192 lens is shown below.
This is the spectral dispersion for the lens.
Posted by: Spoke Apr 13 2019, 08:51 AM
The LEDs will be connected in series and driven by a Linear Technologies LT3755 switching converter. It will be the same circuit as applied to the Porsche 356 running lights previously designed.
That running light had 19 LEDs running 275ma each. This one burned about 16W total. The switching converter was placed on a separate PCB as a large heatsink was mounted behind the LEDs.
The 914 foglight fixture is much smaller so only 8 LEDs will be mounted with the switching converter mounted on the backside of a single PCB.
Attached thumbnail(s)

Posted by: Spoke Apr 13 2019, 08:58 AM
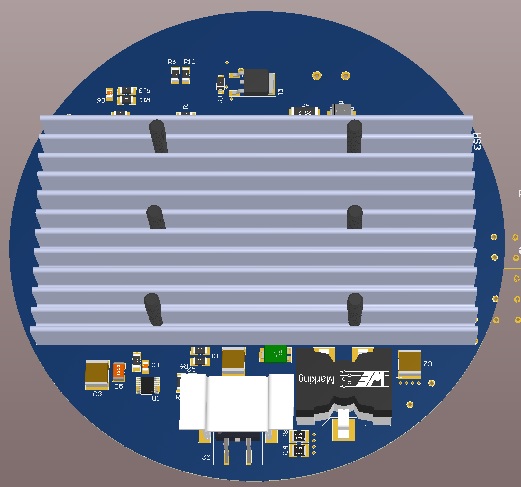
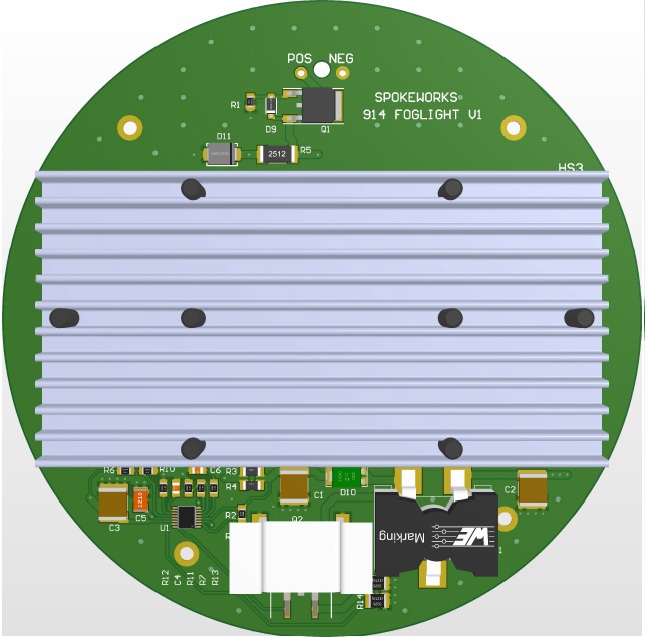
This is what the board looks like right now. It may likely change as the layout proceeds. The heatsink is 2 x 4 inches and will back the LEDs. The rest of the space will be used on the back will be used by the switching converter.
The switching converter could be mounted on the front side but I'm not sure if it would look ok since you'd be able to see the hardware. It would make the assembly much easier to have everything on one side.
Attached image(s)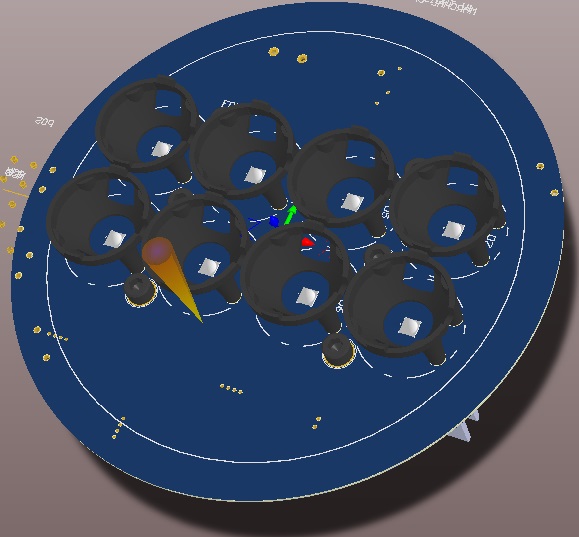
Posted by: mepstein Apr 13 2019, 12:16 PM
I don't understand any of this but it sure looks great. Can't wait to go full LED. Maybe the hood lights next?
I think the Cibie's are used on many other marque's.
Attached thumbnail(s)
Posted by: StratPlayer Apr 13 2019, 01:34 PM
Will you be making these for the rectangle style fog lights?
Posted by: Luke M Apr 13 2019, 02:11 PM
I'd be in for an early set once you get them done and tested.
Posted by: Spoke Apr 14 2019, 05:57 AM

Will you be making these for the rectangle style fog lights?
Once the round board is proved out, yes I plan to migrate to the rectangle style. Also want to do a rectangle style for the 911.
Attached thumbnail(s)
Posted by: 914-300Hemi Apr 14 2019, 06:05 AM
Looks great Spoke.
Posted by: Spoke Apr 14 2019, 06:09 AM
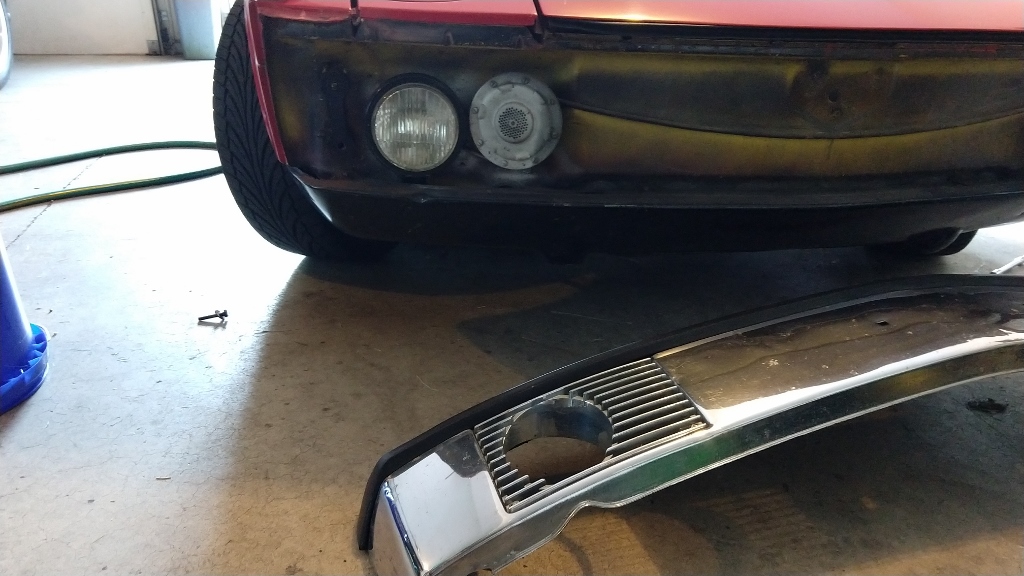
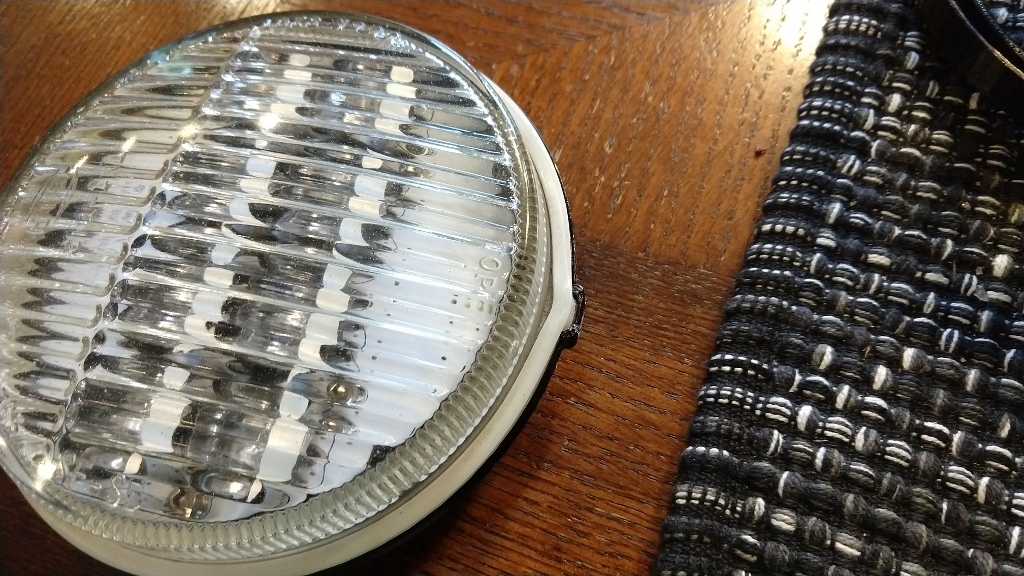
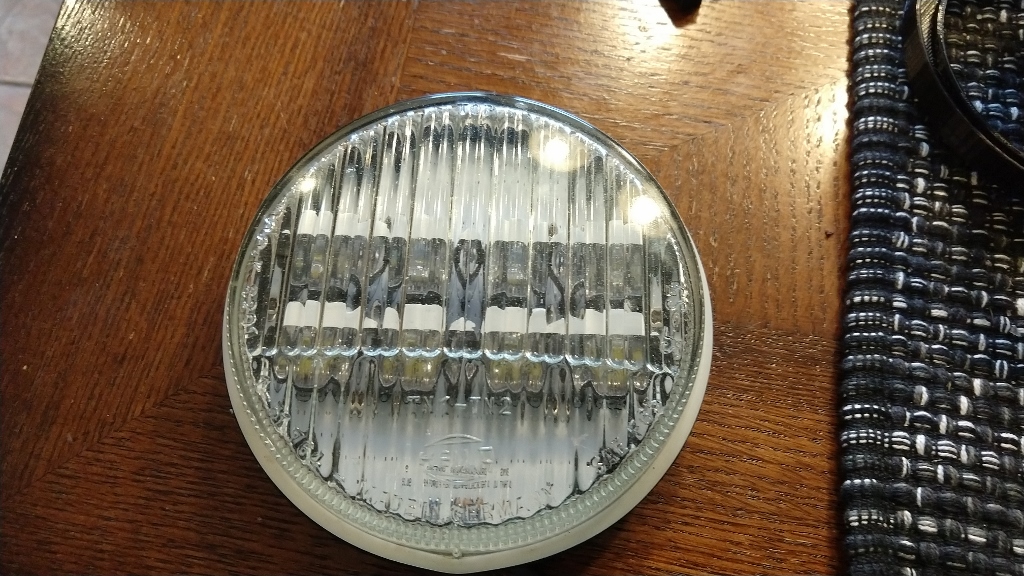
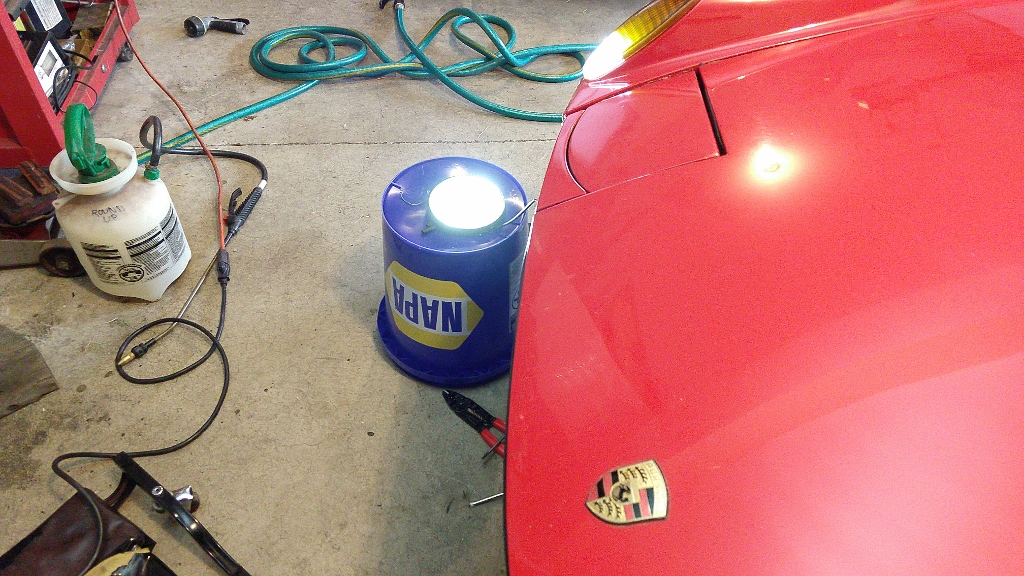
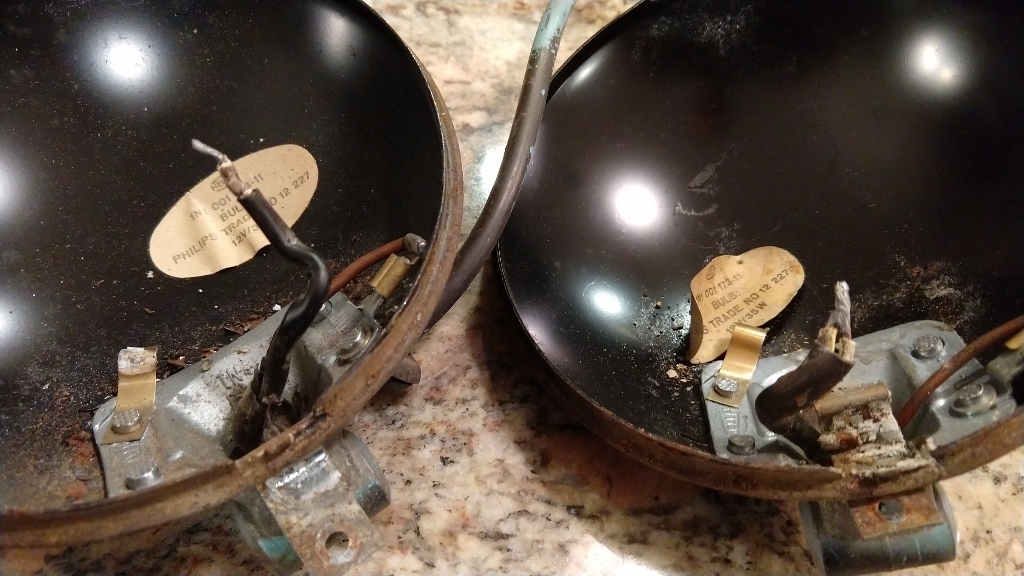
This is the fixture I'll use to size the board. The reflector and original bulb socket will not be used.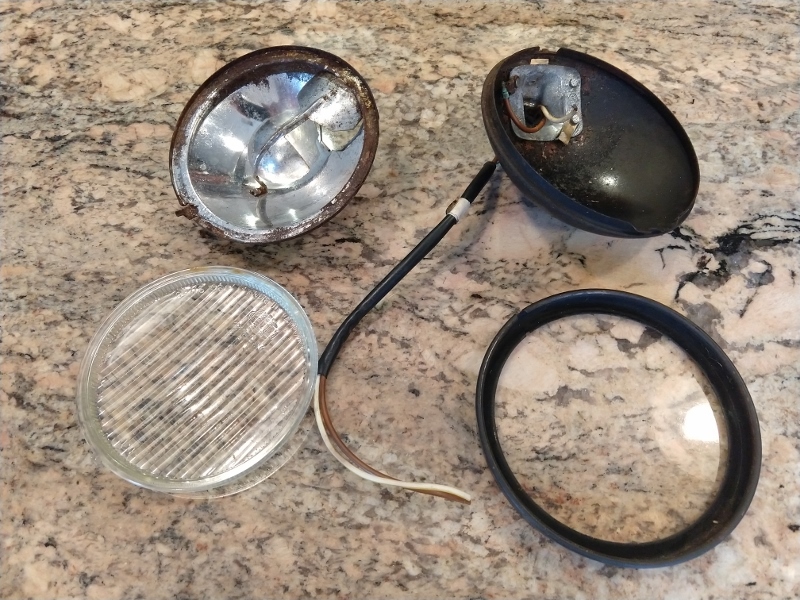
The wires from the original bulb are quite limited. The ground is a spade and the 12V is simply screwed onto the bulb socket. At least on my '71 these wires are quite short. It might be worthwhile to provide an entire pigtail for the LED board instead of trying to connect to the existing wires.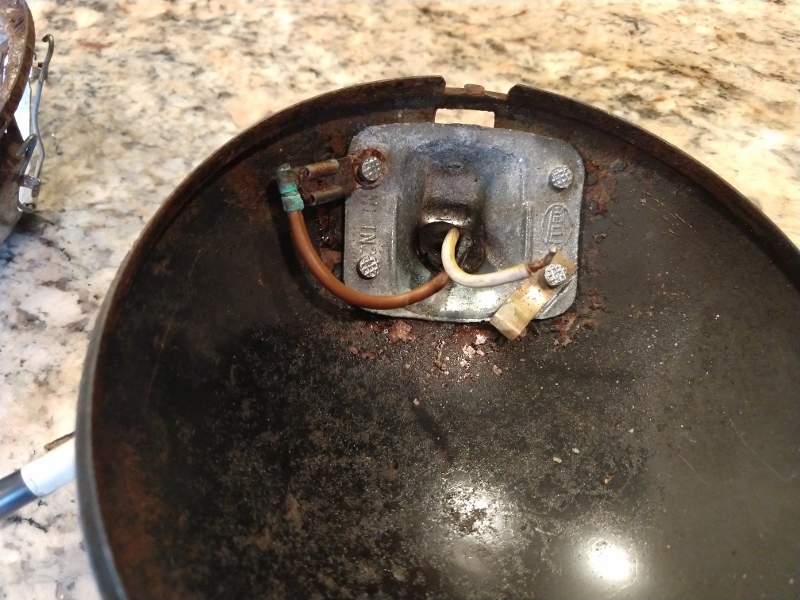
Posted by: Spoke Apr 14 2019, 06:15 AM
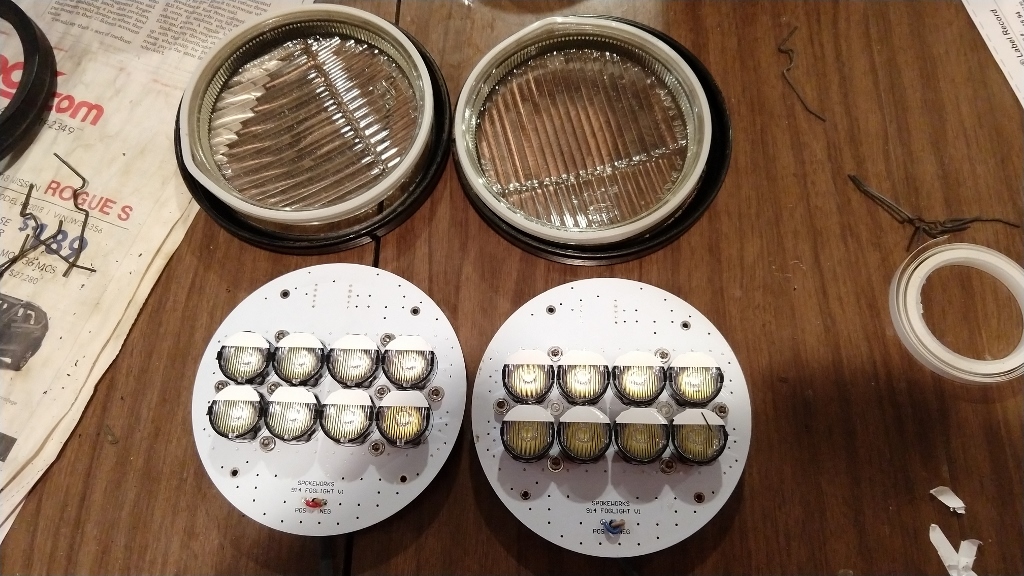
I printed the PCB front and bottom sides since I can't print both at the same time.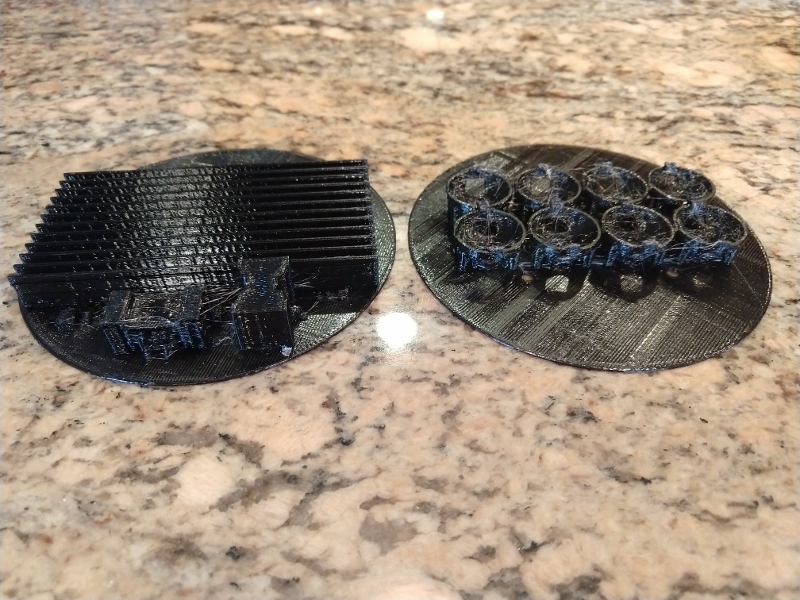
Here's the fitment of the PCB to the lens. This would be the clearance to the LED lenses. The depth of the lens leaves about 150mil gap between the PCB and the glass ledge. The PCB has to sit squarely on the ledge.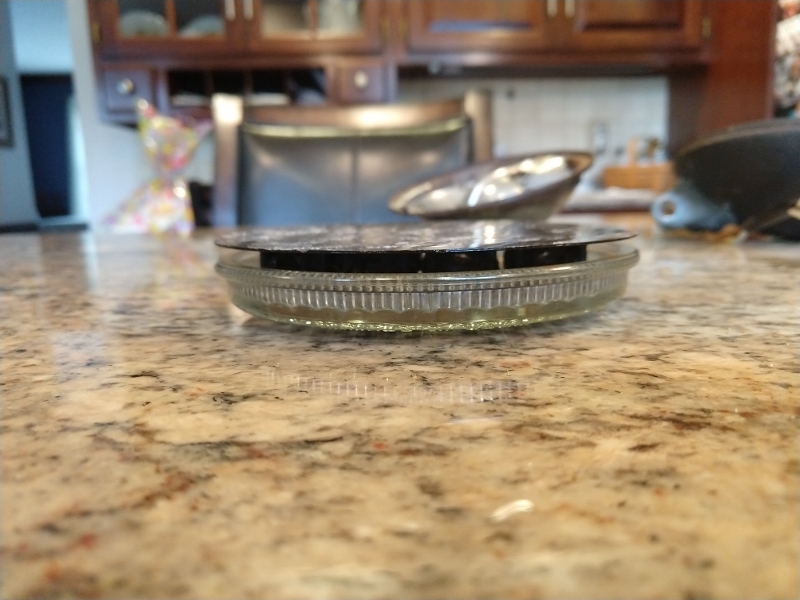
This spacer ring was printed to sit between the glass and the PCB to be able to mount the PCB.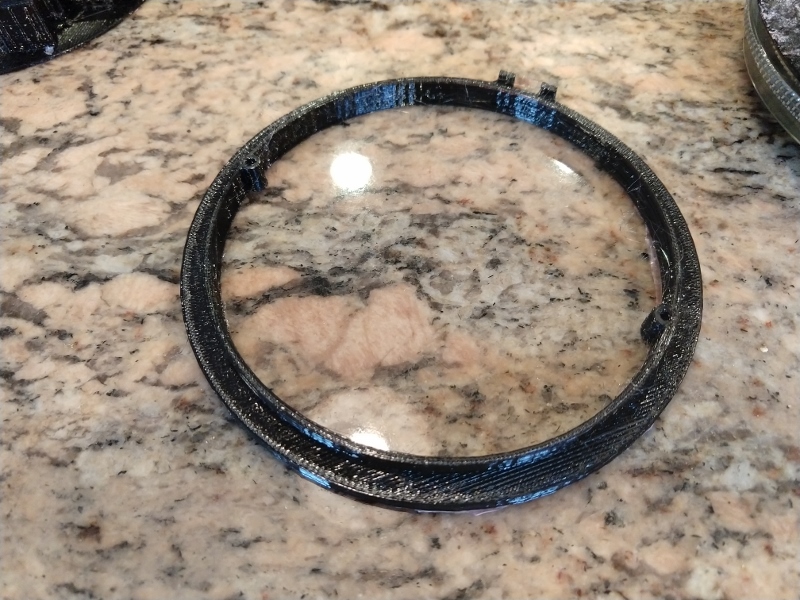
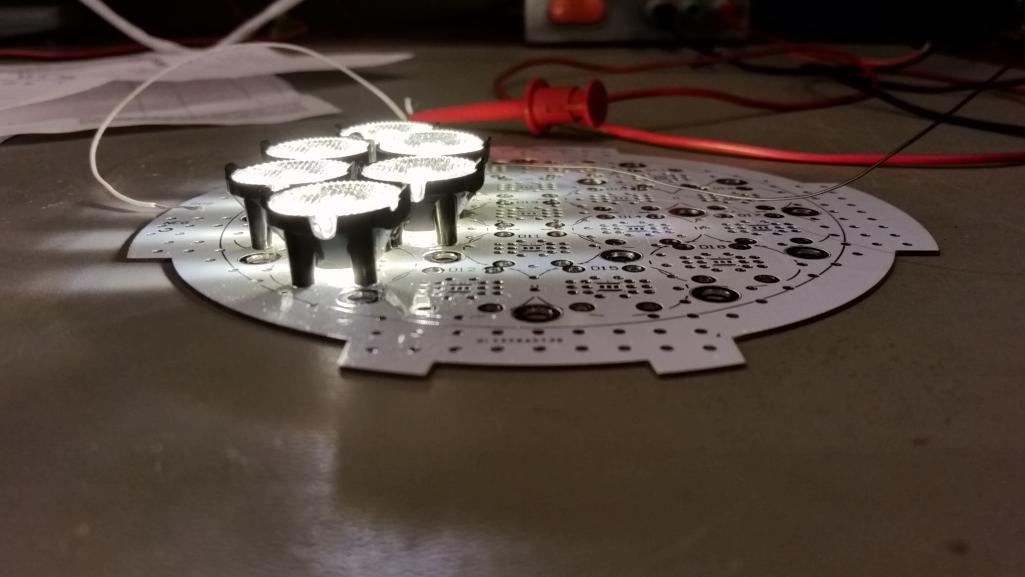
Posted by: Spoke Apr 14 2019, 06:21 AM
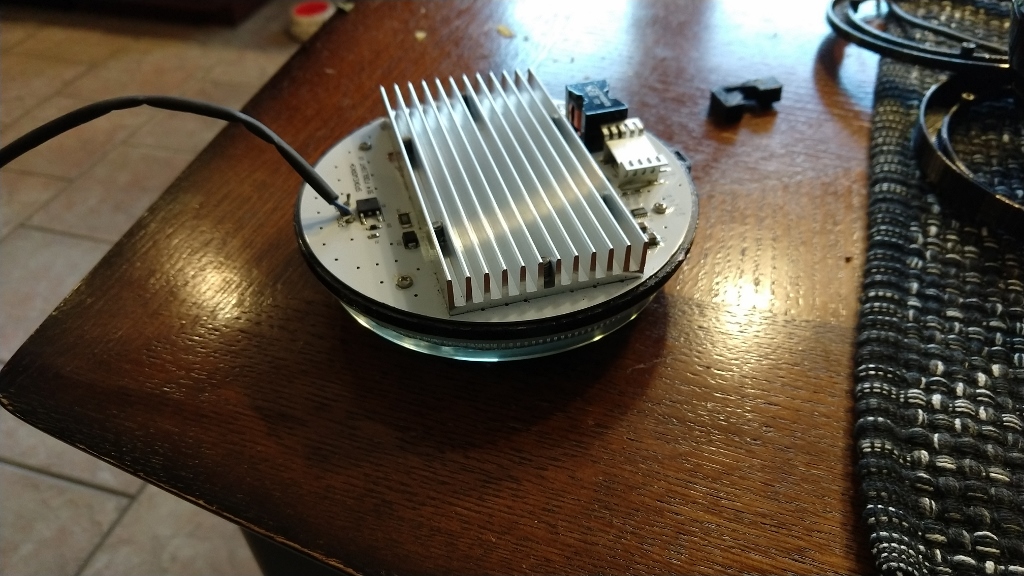
With the spacer attached, now the PCB can sit squarely on the glass. 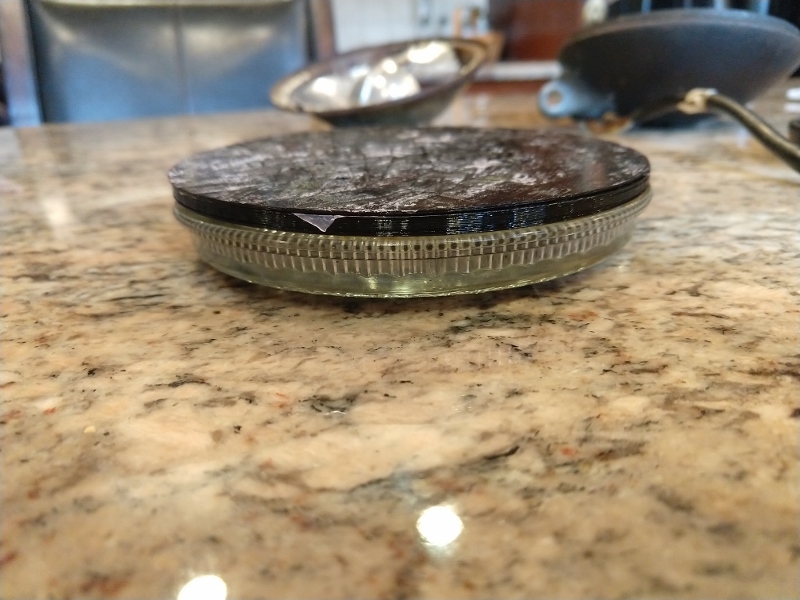
Because the spacer and PCB thickness, the original clips which hold the original reflector are too short to hold the PCB in place. The top clip is a new one made from spring wire. It will be able to hold the spacer and PCB in place. This will put the PCB on the trim ring and will make it easy to install the entire assembly.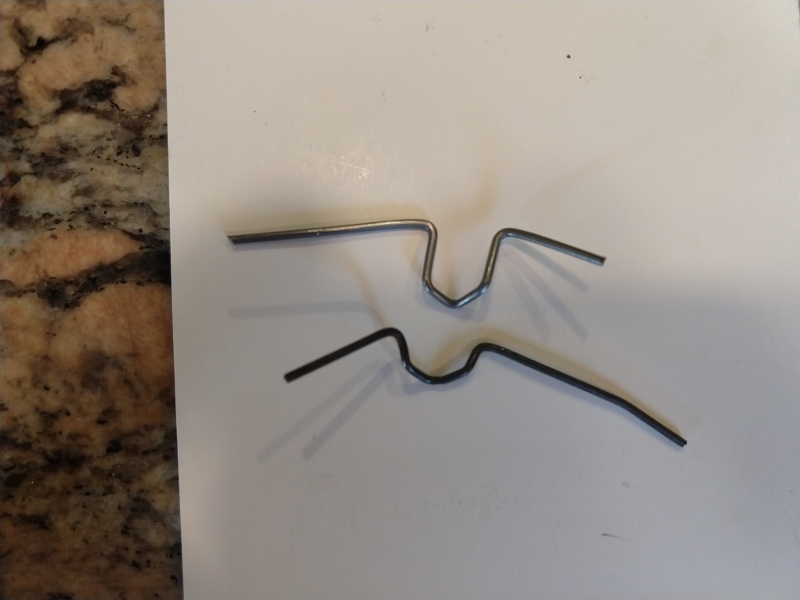
Posted by: Tbrown4x4 Apr 14 2019, 07:09 AM
I'm totally supporting this. I drive at night 90% of the time, and my fog light reflectors are shot. I got a quote to re-silver at almost $100 each side. A quality LED conversion would give me my fog lights back.
Posted by: mb911 Apr 14 2019, 09:27 AM
Really excited for this although currently I only have 1 for light some day I will buy another and do this conversion..
Posted by: mepstein Apr 14 2019, 10:33 AM
Really excited for this although currently I only have 1 for light some day I will buy another and do this conversion..
Ben- I sent Spoke 3. I have some more somewhere in a box but who knows where I put them. I want to give Spoke a nice set for his car (not the rusty set I sent him) but you are welcome to the odd one.
I think these will be amazing when finished.
Posted by: mepstein Apr 14 2019, 10:45 AM
I'm totally supporting this. I drive at night 90% of the time, and my fog light reflectors are shot. I got a quote to re-silver at almost $100 each side. A quality LED conversion would give me my fog lights back.
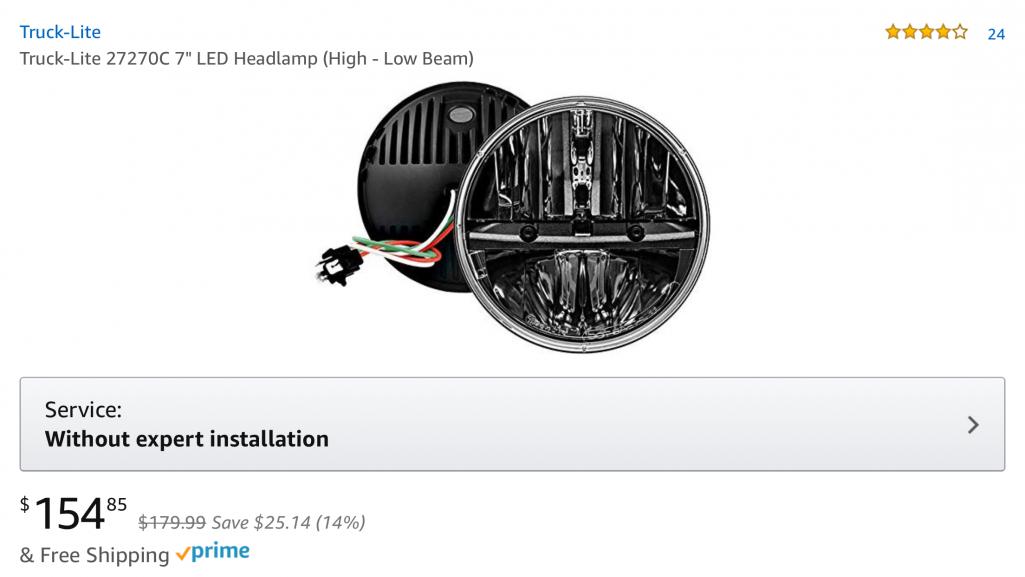
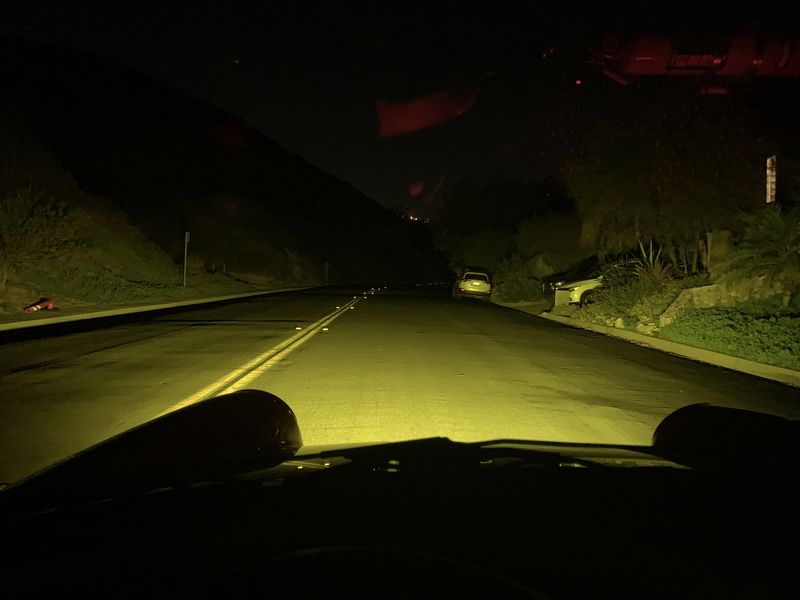
If you want the best led headlights out there - in my opinion- its these trucklight 7” headlights. Very popular with the Jeep guys as well as motorcycle riders. There are cheaper options but a lot of times you get what you pay for. They take 10 minutes to install with no mods and are a total game changer. They make driving at night so much easier. They look a little odd but during the day the lights are down anyway. Even though they are very bright, I never get flashed because they have a very good cut off. The high beam is insane. They use less voltage than ordinary lights so are a little easier on our cars older wires and less battery drain.
Attached thumbnail(s)
Posted by: Tbrown4x4 Apr 15 2019, 05:02 AM
Good to know! I think I have these on an Amazon wish list already. I just haven't pulled the trigger yet.
Posted by: orthobiz Apr 15 2019, 03:31 PM
This is great, thanks. I posted some lens pictures at:
http://www.914world.com/bbs2/index.php?showtopic=233202&hl=
The early and late lenses have different heights, is that what you meant when you said "early?" More importantly, will this affect the LED project??
I LOVE visibility and have ALL of your stuff!!
Paul
Posted by: Mike Bellis Apr 15 2019, 07:22 PM
Why not mount the power supply remote in an IP65/67 enclosure mounted behind the 914 grille? It would free up some space and maybe reduce temps inside the light assembly.
Posted by: Spoke Apr 15 2019, 07:49 PM
This is great, thanks. I posted some lens pictures at:
http://www.914world.com/bbs2/index.php?showtopic=233202&hl=
The early and late lenses have different heights, is that what you meant when you said "early?" More importantly, will this affect the LED project??
I LOVE visibility and have ALL of your stuff!!
Paul
Thanks for the info. My '71 has the early lens which looks to be a bit deeper. After doing some initial measurements on my early lens, I didn't think I'd need a spacer as needed with the later lens. Either way shouldn't be an issue.
Posted by: Spoke Apr 15 2019, 07:53 PM
Why not mount the power supply remote in an IP65/67 enclosure mounted behind the 914 grille? It would free up some space and maybe reduce temps inside the light assembly.
This is what I did for the 356 running lights although the boost converter PCB was mounted inside the housing. I proposed a separate box to put the converter in but the owner didn't want an external box so I mounted on the back of the heatsink.
I'd like to keep it to one PCB for simplicity although a separate module may be needed depending on temperature rise.
Posted by: Spoke Apr 16 2019, 09:12 PM
OK, the PCBs have been sent to the fab house. Should have bare PCBs in about a week. Only ordered 5 of them since there will be a lot of learning going on with the first units. The PCB solder mask will be white like the other running light for the 356.
The XP-G3 LEDs in white come in different temperatures. I can get 3000K, 4000K, 5000K, 5700K, and 6500K. I know I don't want 3000K as that is basically warm white. I used those on the 356 lights and they were too yellow. I'm leaning toward 5000K right now. Anyone with knowledge of LED color temperatures have a suggestion?
Attached image(s)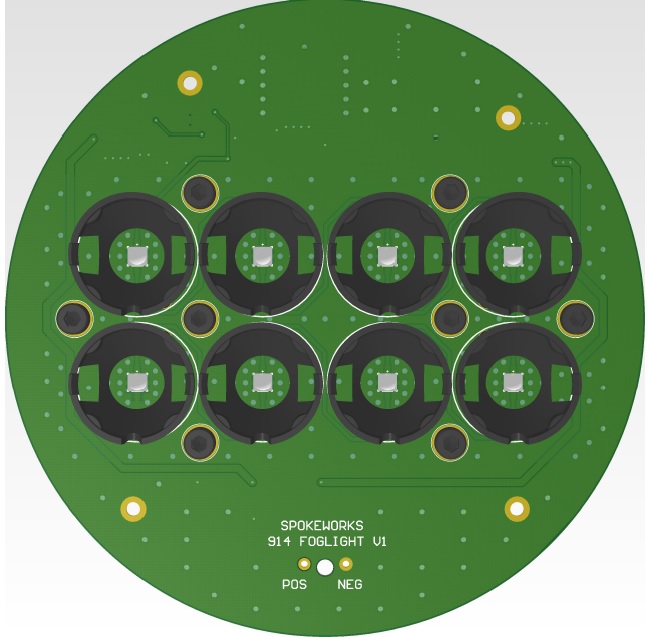
Posted by: FlacaProductions Apr 16 2019, 11:08 PM
I deal with color temp every day. 3200 is tungsten and 5600 is daylight - generally speaking. 4300 splits the difference with 3200 looking a little warm and 5600 looking a bit blue by comparison. I was thinking that 4000 or 5000 might be nice. 6500 would be really blue.
Posted by: orthobiz Apr 17 2019, 12:26 PM
Why do these need a converter when your other taillight/sidemarker lights don't?
Paul
Posted by: Spoke Apr 17 2019, 06:44 PM
Why do these need a converter when your other taillight/sidemarker lights don't?
Paul
There's a couple of reasons for using a converter on these lights. First the current is a lot higher for each LED. 350ma per LED for this foglight vs 20ma per LED for brake/turnsignals. Thus the current limiting resistor for brakes doesn't burn that much power. Total power burned by all the current limiting resistors on the brakes is less than 1W and it is evenly distributed across the board.
The brakes/turnsignals have 56 LEDs configured as 16 strings of 4 LEDs in series. 4 red or amber LEDs only need about 2V each or 8V total to turn on. In the foglight there are 8 LEDs total in one series string. White LEDs need about 3+ volts to turn on. Thus the total voltage of the string is over 24V and the need for a dc-dc converter.
With resistors providing current limit on the brakes/turnsignals, there is some brightness difference between battery voltages of 12V to 14V although it is not so noticeable.
For the foglights the light output must be constant for all operating voltages. This converter will turn on when the applied voltage is about 9V and the LED current will remain constant over the entire battery voltage range. This way there will be no flickering or dimming if the battery voltage is high or low.
In the 356 front light there were 19 LEDs in series and the voltage needed to drive that stack was over 50V.
Posted by: Morrie Apr 17 2019, 07:58 PM
Ideally you would have a converter with no resistors running in constant current mode rather than constant voltage. Or at least that’s how the growers are doing it.
Why do these need a converter when your other taillight/sidemarker lights don't?
Paul
There's a couple of reasons for using a converter on these lights. First the current is a lot higher for each LED. 350ma per LED for this foglight vs 20ma per LED for brake/turnsignals. Thus the current limiting resistor for brakes doesn't burn that much power. Total power burned by all the current limiting resistors on the brakes is less than 1W and it is evenly distributed across the board.
The brakes/turnsignals have 56 LEDs configured as 16 strings of 4 LEDs in series. 4 red or amber LEDs only need about 2V each or 8V total to turn on. In the foglight there are 8 LEDs total in one series string. White LEDs need about 3+ volts to turn on. Thus the total voltage of the string is over 24V and the need for a dc-dc converter.
With resistors providing current limit on the brakes/turnsignals, there is some brightness difference between battery voltages of 12V to 14V although it is not so noticeable.
For the foglights the light output must be constant for all operating voltages. This converter will turn on when the applied voltage is about 9V and the LED current will remain constant over the entire battery voltage range. This way there will be no flickering or dimming if the battery voltage is high or low.
In the 356 front light there were 19 LEDs in series and the voltage needed to drive that stack was over 50V.
Posted by: orthobiz Apr 17 2019, 08:06 PM
[quote name='Spoke' date='Apr 17 2019, 08:44 PM' post='2706296']
[quote name='orthobiz' post='2706213' date='Apr 17 2019, 02:26 PM']
Why do these need a converter when your other taillight/sidemarker lights don't?
Paul
[/quote]
There's a couple of reasons for using a converter on these lights........
Thanks!
Paul
Posted by: 914forme Apr 17 2019, 08:22 PM
PDBs going to be green or black in the final version?
Posted by: Mblizzard Apr 18 2019, 12:18 PM
I will be in for a set of squares. Last lights on my care that are not LED!
Posted by: eric9144 Apr 18 2019, 01:57 PM
This is pretty awesome and totally something I'm in to buy... I had actually found LED bulbs to replace the stock fog's and well...the light is scattered and kind of looks like crap overall so if you want them for real visibility they're worthless... Keep up the good work Spoke!! 
Posted by: Spoke Apr 18 2019, 08:02 PM
PDBs going to be green or black in the final version?
The first boards will be white. I used white for the 356 lights. Here's the first 356 PCB I did as I was mounting the LEDs. These are a PITA since they are surface mount. I would tin the pads then while holding the LED with tweezers, heat the the pad with air and when the solder liquified I'd drop the LED in and wait until the solder re-liquefied then remove the heat. I would do 3 LEDs at a time then test them to make sure they were soldered correctly.
For these boards I'll use solder paste and an infrared reflow oven to put the LEDs down. Then the board will be flipped and the converter components will be mounted using solder paste and hot air.
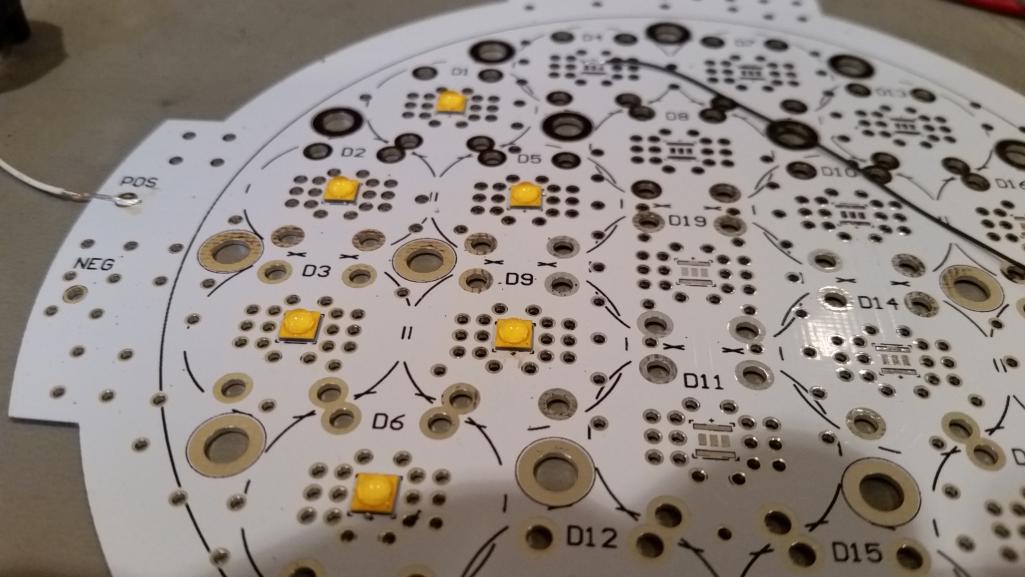
These are the Carclo 10192 elliptical lenses; one for each LED.
Posted by: 76-914 Apr 19 2019, 07:16 AM
![popcorn[1].gif](style_emoticons/default/popcorn[1].gif)
Posted by: ValcoOscar Apr 19 2019, 07:33 AM
Same here...
I see several sets of SPOKE LED Fog Lights on my cars in the near future.
Oscar
Posted by: DRPHIL914 Apr 19 2019, 07:38 AM
thanks for taking this on! I asked about this a year ago when I backdated my bumpers and sourced a nice set of OEM NOS early round fogs. I had put the H1 LED bulbs in my late square fogs and they worked fine but this is a much better way to go. I don't want to clog this documentation thread with requests so I will be looking forward to a new thread for purchase of these once you are ready !
I agree about the comments on color, you don't want to go too blue so probably staying closer to the 4000-5000k max would be best - why not a "spectrum" not just one but rather 2or 3 different ones all on the same board , how would that work?
Phil
Posted by: Spoke Apr 19 2019, 02:34 PM
Ideally you would have a converter with no resistors running in constant current mode rather than constant voltage. Or at least that’s how the growers are doing it.

This is a boost converter running constant current of 350ma. There are a couple of control loops. One for the FET/Inductor current, one for the LED current and a 3rd constant voltage output in case of open LEDs to protect the components from over voltage.
Posted by: Spoke Apr 19 2019, 02:39 PM
I agree about the comments on color, you don't want to go too blue so probably staying closer to the 4000-5000k max would be best - why not a "spectrum" not just one but rather 2or 3 different ones all on the same board , how would that work?
Phil
Not sure what a light would look like with mixed temperature LEDs.
I just ordered 5000K LEDs enough to do 4 boards. We'll see what they look like when put together. Also ordered the heatsinks and all other components. Digikey was out of the Carclo 10192 lenses so I'll order them through Arrow.
Posted by: ClayPerrine Apr 19 2019, 02:40 PM
PDBs going to be green or black in the final version?
The first boards will be white. I used white for the 356 lights. Here's the first 356 PCB I did as I was mounting the LEDs. These are a PITA since they are surface mount. I would tin the pads then while holding the LED with tweezers, heat the the pad with air and when the solder liquified I'd drop the LED in and wait until the solder re-liquefied then remove the heat. I would do 3 LEDs at a time then test them to make sure they were soldered correctly.
For these boards I'll use solder paste and an infrared reflow oven to put the LEDs down. Then the board will be flipped and the converter components will be mounted using solder paste and hot air.
These are the Carclo 10192 elliptical lenses; one for each LED.
I used to do component level repair on computer motherboards. We would desolder the offending surface mount chip, tin the contacts on the replacement chip, and use a drop of super glue to hold it in place. After that, less than a minute in the hot air machine and it would be soldered.
That was 26 years ago. Maybe technology on how to install surface mount chips has changed.
Posted by: Spoke Apr 22 2019, 06:59 PM
To reduce component and assembly cost, I'm looking for modules to do the 12V-to-constant-current conversion. I found this one from LEDsupply up in Vermont. It looks like it has all the features (12V input) and 350mA output. The package is only 0.83x0.83x0.43 inch. The one downside is the maximum operating temperature is 85C. It might be high enough temperature. Won't know until I build up a board.
PCBs are out of the fab and in shipping. Also ordered all other components. Should be able to do some assembly next week or the week after.
Attached image(s)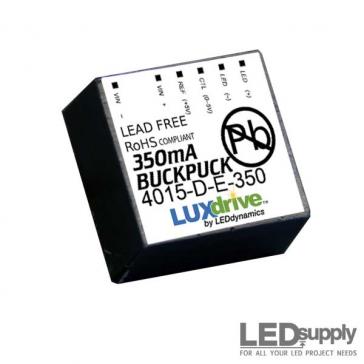
Posted by: Al Meredith Apr 23 2019, 03:39 PM
would it make sense to have two levels, one for running / daytime and one for night time use. the heat for daytime running would be decreased . AL
Posted by: windforfun Apr 23 2019, 04:02 PM
I deal with color temp every day. 3200 is tungsten and 5600 is daylight - generally speaking. 4300 splits the difference with 3200 looking a little warm and 5600 looking a bit blue by comparison. I was thinking that 4000 or 5000 might be nice. 6500 would be really blue.
This is known as Plank's Law or Wien's Displacement Law. FYI. I guess you can tell that I'm partially retired now.
Posted by: Spoke Apr 24 2019, 06:50 AM
would it make sense to have two levels, one for running / daytime and one for night time use. the heat for daytime running would be decreased . AL
It is possible to do that. Also most LED drivers have an input to dim or decrease the current. By putting a negative temperature coefficient resistor on the input, the current can be decreased by an increase in temperature.
Posted by: Chi-town Apr 24 2019, 09:25 AM
Just a thought but if you're using a LED chip with an optic and then putting behind a standard thick fluted lens the output is going to be severely reduced. I would guess roughly 30%.
Have you put the standard lens on top of your prototype to see what happens?
Posted by: Spoke Apr 24 2019, 11:11 AM
Just a thought but if you're using a LED chip with an optic and then putting behind a standard thick fluted lens the output is going to be severely reduced. I would guess roughly 30%.
Have you put the standard lens on top of your prototype to see what happens?
Not sure how the glass lens will attenuate the light from the LEDs. Once I get the first PCBs populated I'll be able to do some testing on it. The vertical diffusers of the glass lens will tend to broaden the width of the beam. The LED lenses also broaden the beam so maybe I'll have to use more of a spot type of LED lens instead of the 10192 lens and let the glass do the horizontal spreading.
Posted by: Spoke Apr 26 2019, 08:01 AM
Have the PCBs in hand. Will assemble the first boards on Monday.
Attached thumbnail(s)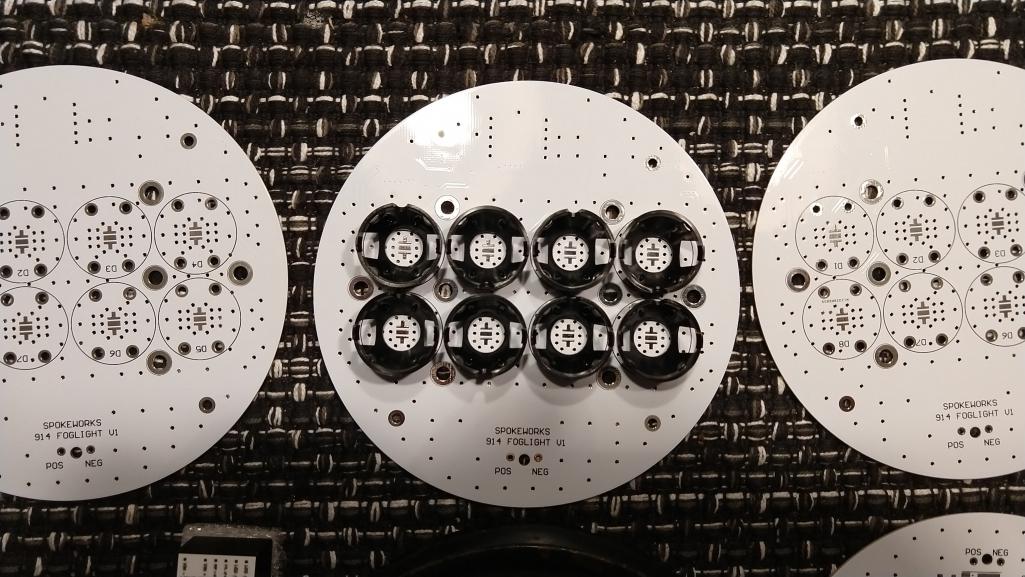
Posted by: Spoke Apr 26 2019, 08:03 AM
Here's the PCB under the glass. It will be interesting to see how the fluted glass will diffuse the beams. The LED lens already provides some lateral diffusion.
The Boostpucks by LEDynamics also arrived. I'll probably power the first prototype with these as it will shorten the time to first light-up.
Attached thumbnail(s)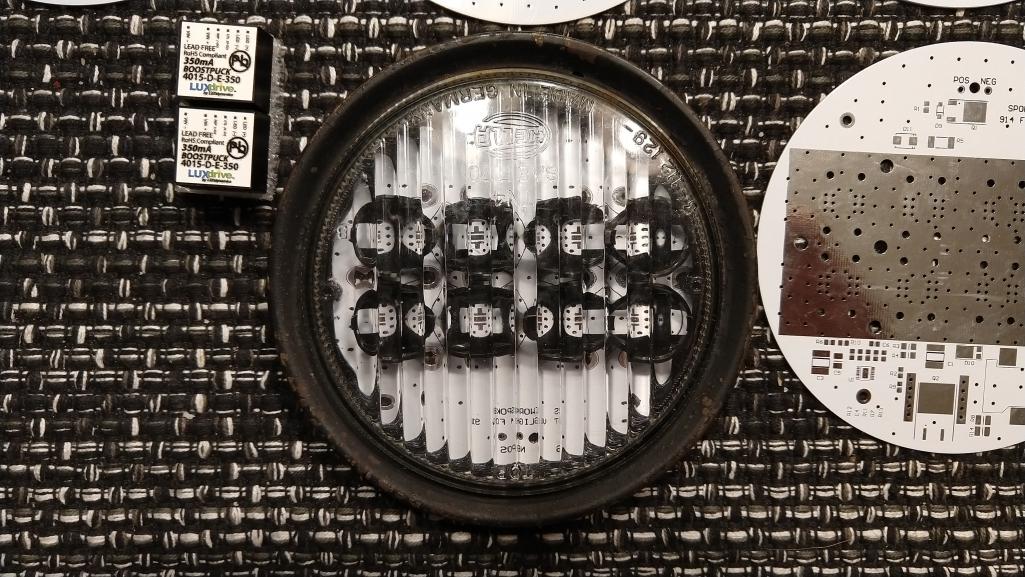
Posted by: DRPHIL914 Apr 26 2019, 08:06 AM
Looking good! Cant wait to see them in action!
Posted by: Spoke Apr 29 2019, 01:55 PM
Things like this happen when you set the temperature profile wrong on the infrared oven.
@http://www.914world.com/bbs2/index.php?showuser=10825 I have your foglight board. Not sure why it doesn't light up but I'm working on that.
Attached thumbnail(s)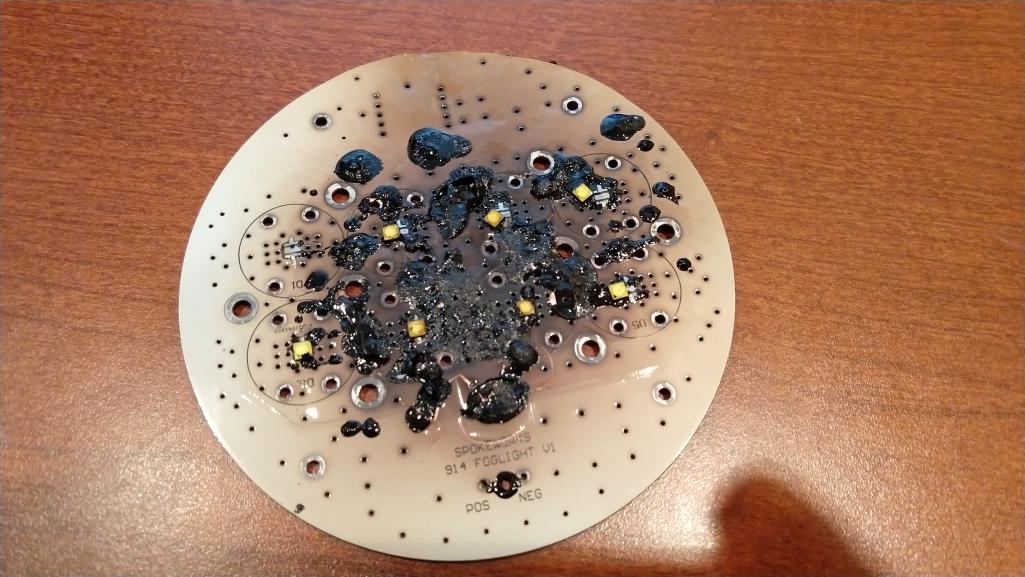
Posted by: mepstein Apr 29 2019, 02:14 PM
Things like this happen when you set the temperature profile wrong on the infrared oven.
@http://www.914world.com/bbs2/index.php?showuser=10825 I have your foglight board. Not sure why it doesn't light up but I'm working on that.
That looks more like when I try to do electrical work.
Posted by: Spoke Apr 29 2019, 03:06 PM
With the correct settings, the oven worked fine.
BTW Mark, this one is mine.
Attached thumbnail(s)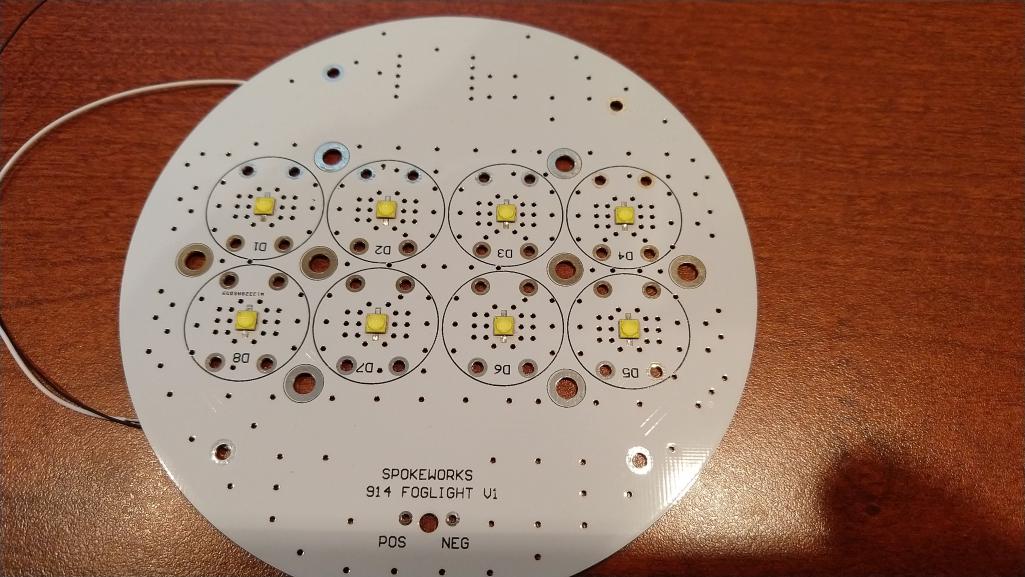
Posted by: Spoke Apr 29 2019, 03:10 PM
All lit up with LED lenses. Won't be able to compare light output until night. Also want to compare with original bulbs.
Attached thumbnail(s)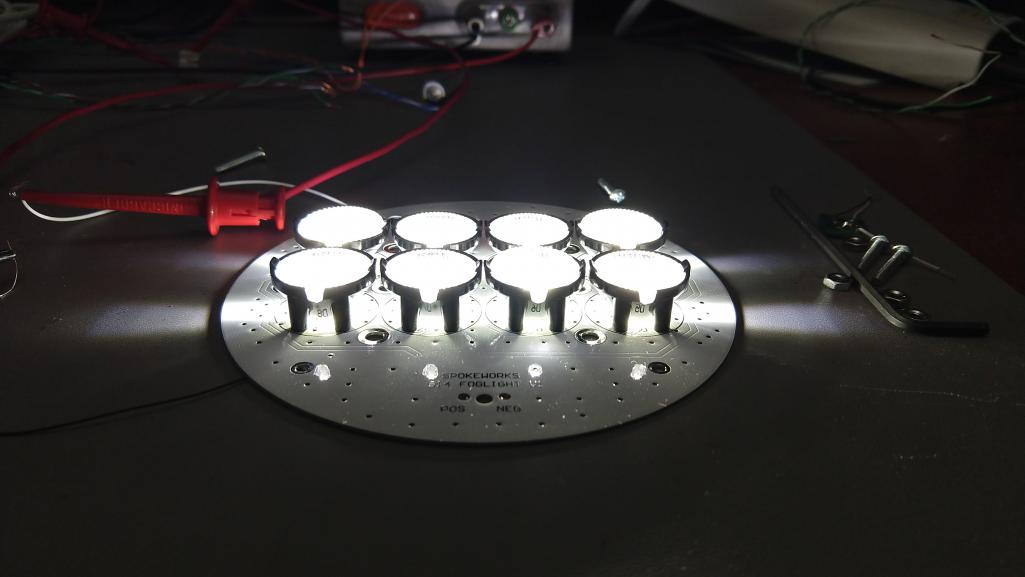
Posted by: Spoke Apr 29 2019, 03:13 PM
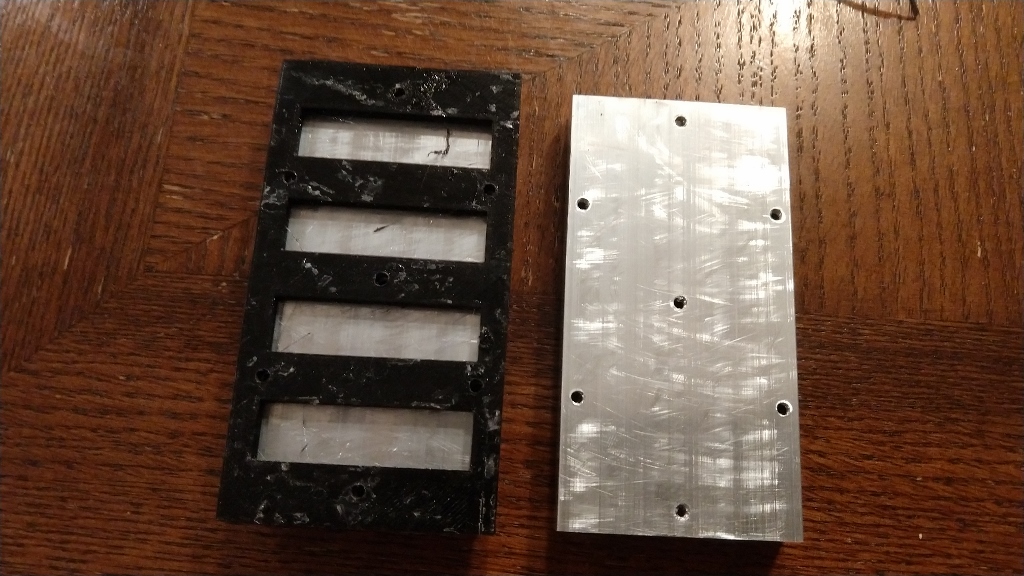
Printed a jig to drill the heat sink for tapping. Will be using 6-32 x 3/8 stainless cap screws.
Attached thumbnail(s)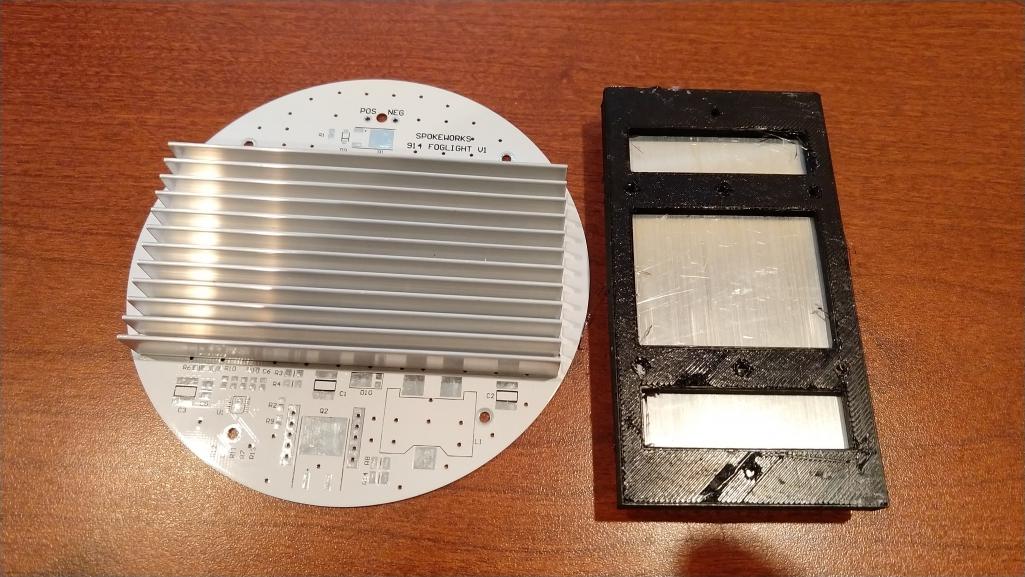
Posted by: Spoke Apr 29 2019, 03:43 PM
Here's the light pattern with 0.5A per LED [attachmentid=695594]on the ceiling w/o the glass lens. Basically what the manufacturer said it would be.
Attached thumbnail(s)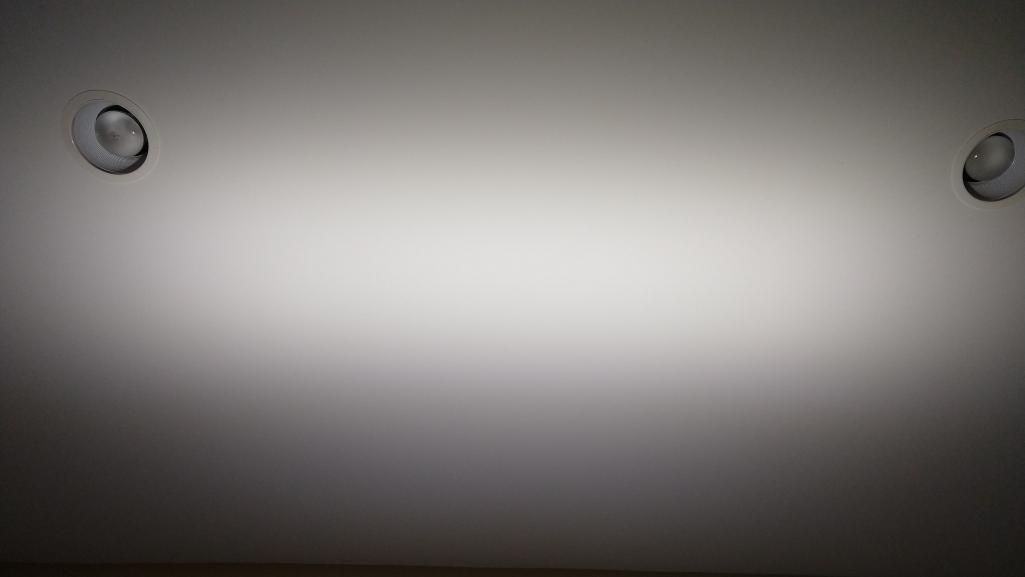
Posted by: Spoke Apr 29 2019, 03:46 PM
The glass lens fits nicely with the printed spacer. I believe the earlier lenses have a deeper cavity.
Attached thumbnail(s)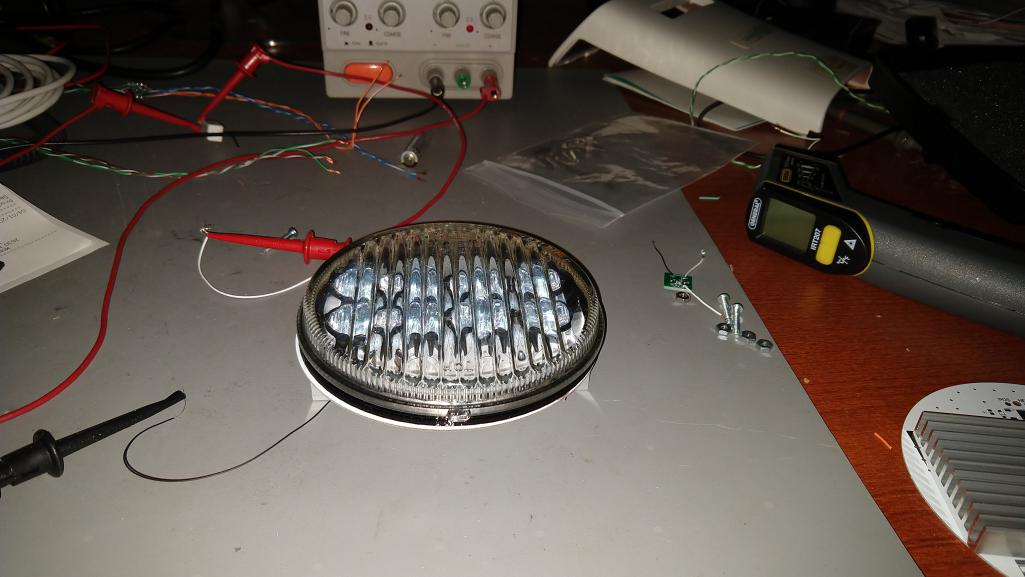
Posted by: Spoke Apr 29 2019, 03:48 PM
Here's the light pattern with 0.5A with the glass lens. The effect of the glass diffusers can be seen.
As Chi-town mentioned, there will be some loss of light because of the glass diffuser. It seems to be about 15%.
With 0.5A at 1 meter, I measure:
10000 Lux w/o glass
8500 Lux w/glass
At 0.35A at 1 meter:
6000 Lux w/o glass
4500 Lux w/glass
Attached thumbnail(s)
Posted by: Spoke Apr 29 2019, 04:49 PM
Redesigned the spacer rings so the boards can screw into them. This is how they will be assembled.
Attached thumbnail(s)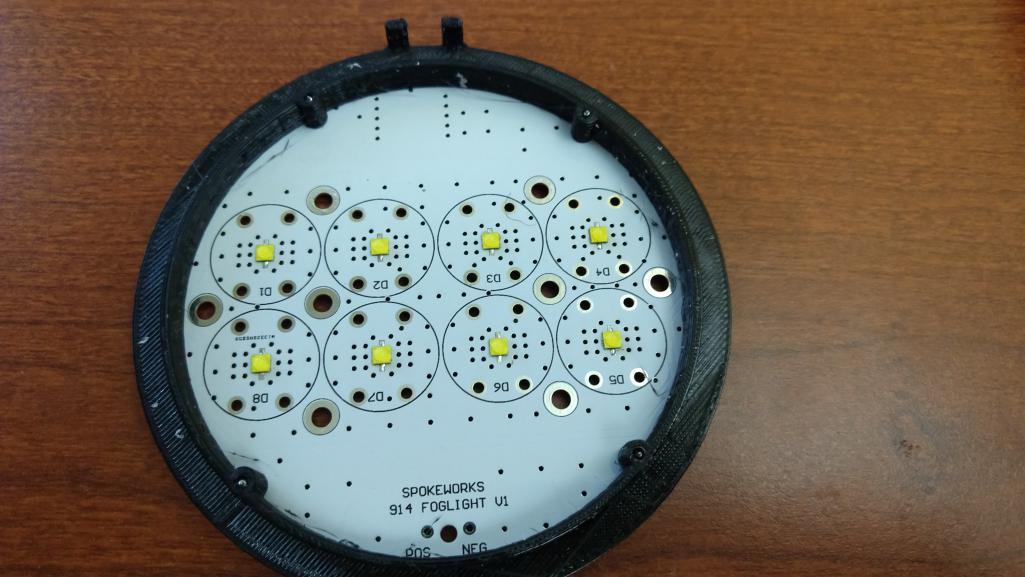
Posted by: Spoke Apr 29 2019, 04:51 PM
These are the wrong screws. These are #4 x 5/16 whereas the correct screws are #2 x 1/4. They'll do for now.
Attached thumbnail(s)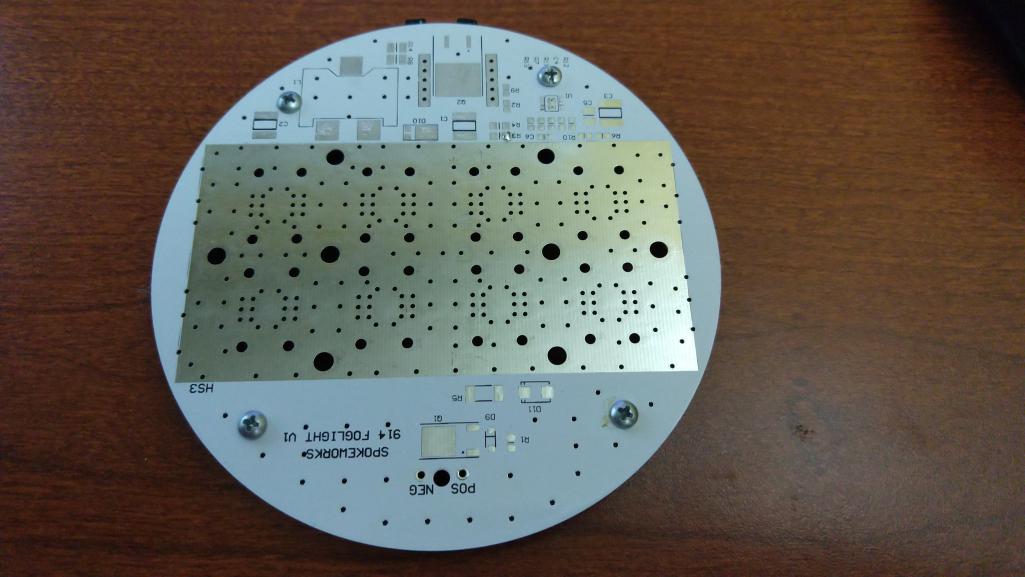
Posted by: Spoke Apr 30 2019, 04:10 AM
The first fully built up PCB. Somehow I managed to not order the correct caps for input and output filtering so had to use smaller lower voltage caps. Original caps should be 100V whereas these are 50V.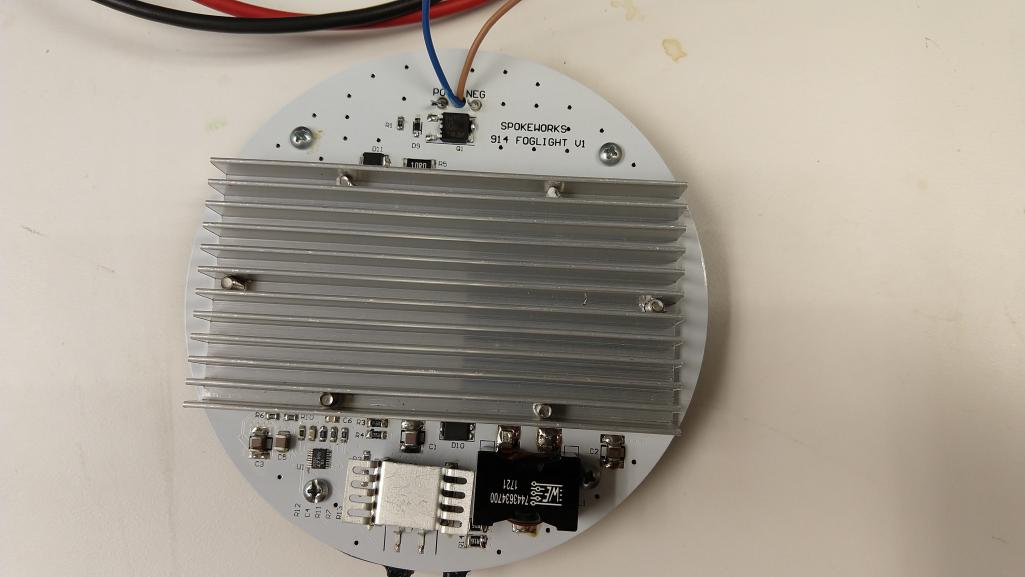
Posted by: Spoke Apr 30 2019, 04:15 AM
Started doing some burn in on the first unit. Will run this for a couple of days to make sure it works. The LEDs are running 0.5A and the total unit power dissipation is just under 14W or just about 1A at 14V input.
Comparing the light output with the headlights on my '14 328, these are less than 1/2 as bright. The headlights on the 328 measured 19000Lux at 1 meter whereas this unit measured 8700Lux with the glass lens.
From early measurements, it looks like there's about a 40C rise in temperatures over ambient. That's about what I expect. It will be interesting to get this in an enclosure and see what happens.
Attached thumbnail(s)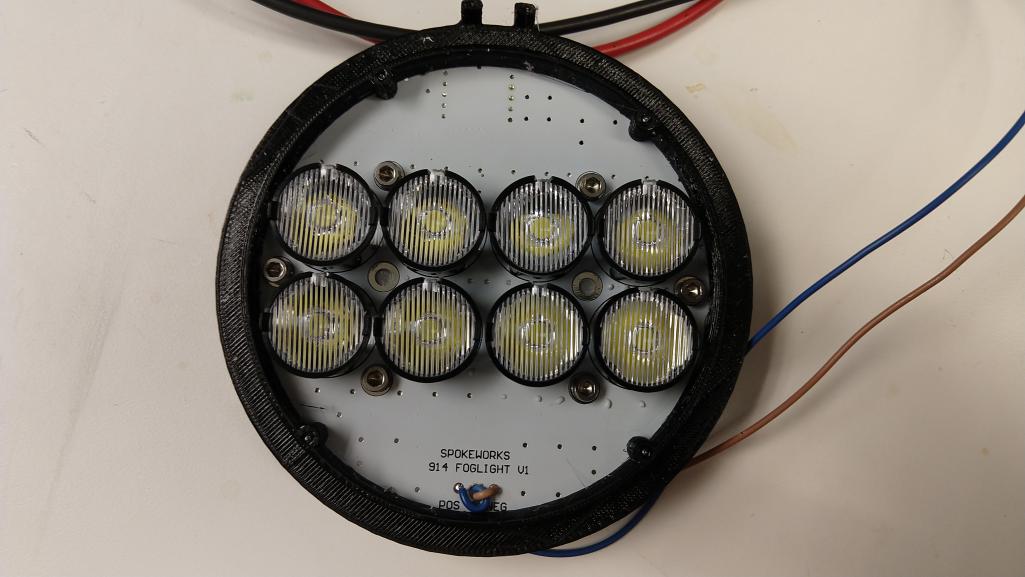
Posted by: DRPHIL914 Apr 30 2019, 05:54 AM
Looks great!!! Cant wait to get a set!!
That a lot of R&D time invested in these, but looks like it will be worth it
Posted by: jkb944t Apr 30 2019, 06:15 AM
Started doing some burn in on the first unit. Will run this for a couple of days to make sure it works. The LEDs are running 0.5A and the total unit power dissipation is just under 14W or just about 1A at 14V input.
Comparing the light output with the headlights on my '14 328, these are less than 1/2 as bright. The headlights on the 328 measured 19000Lux at 1 meter whereas this unit measured 8700Lux with the glass lens.
From early measurements, it looks like there's about a 40C rise in temperatures over ambient. That's about what I expect. It will be interesting to get this in an enclosure and see what happens.
This is so cool, I am really enjoying seeing your progress on this project!
Jeff B
Posted by: Spoke May 3 2019, 07:59 PM
Burned in the prototype for about 20 hours this week. It still works so that's a good start. With little airflow, the PCB temperature was about 50C above ambient. It will be interesting to see what the temperature rise is when operated in the case.
Put the LEDs in the case. To center the glass lens and LED board, some clips were printed to hold the board while the clips are installed.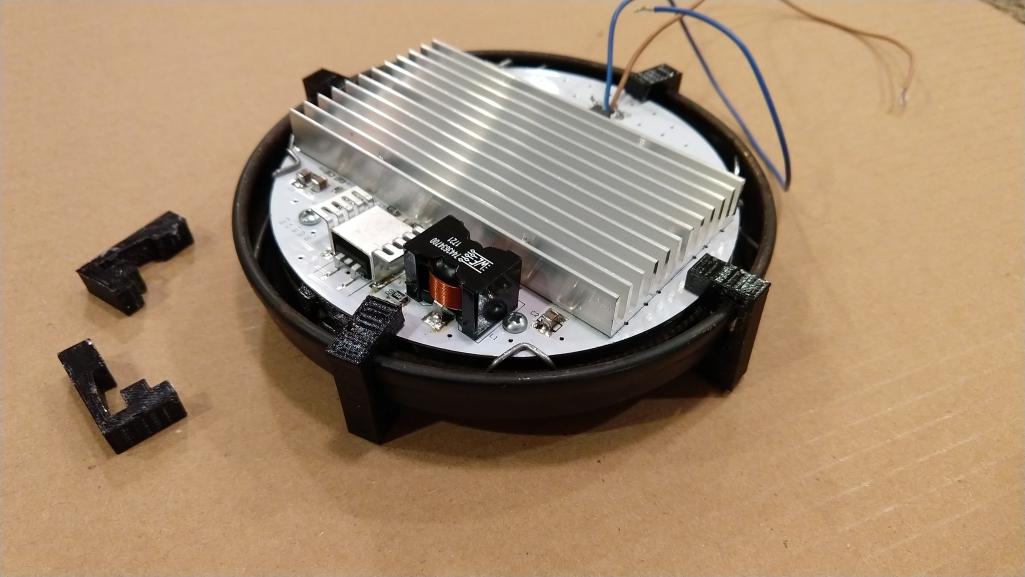
Posted by: Spoke May 3 2019, 08:01 PM
The metal clips will need to be made for each unit. The original only had 2 clips and I'm using 4 clips for the PCB plus the clips are deeper than the originals.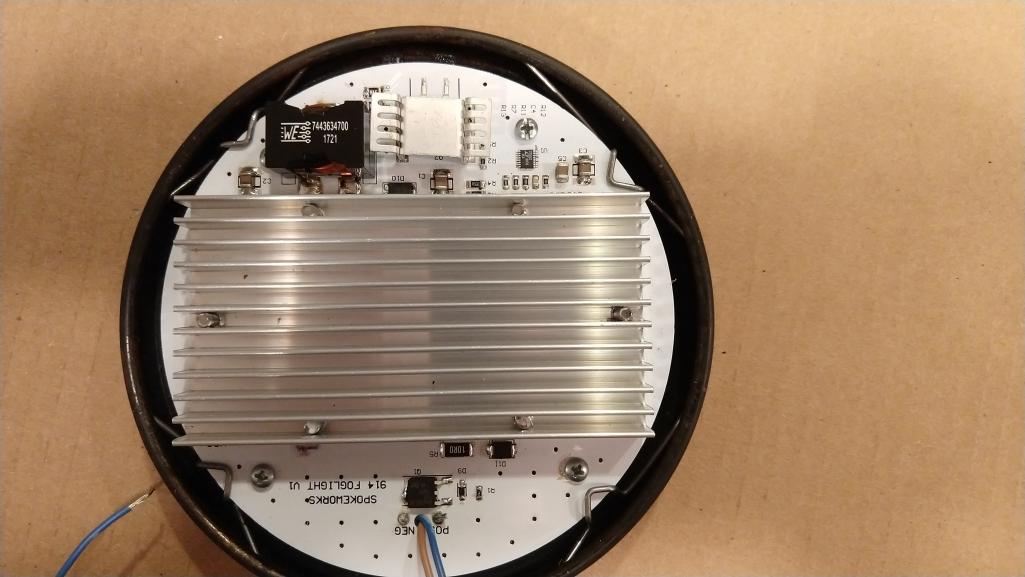
Posted by: Spoke May 3 2019, 08:04 PM
The PCB fits nicely in the case. Will run this for a while to make sure the temperature rise is ok.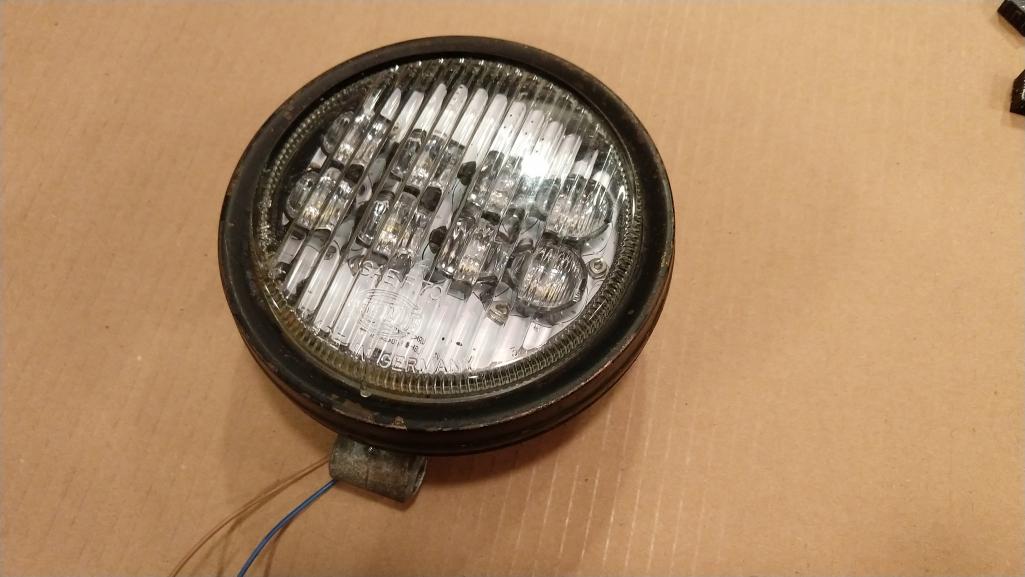
Posted by: Spoke May 3 2019, 08:07 PM
Not sure how to connect up to the existing wires yet. The ground spade and wire in the fixture were not in good shape with a fair amount of oxidation. 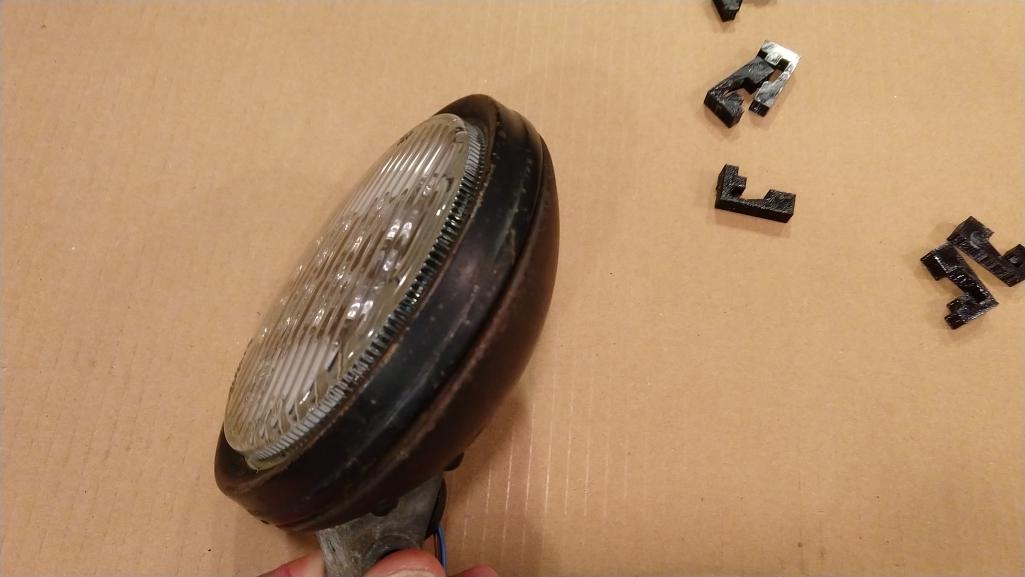
Posted by: ClayPerrine May 3 2019, 08:50 PM

Posted by: Chi-town May 3 2019, 09:58 PM
Can you take a pic of the light output on a wall from about 8' away?
Posted by: Spoke May 4 2019, 05:42 AM
This is the light pattern projected on the ceiling about 7 feet away.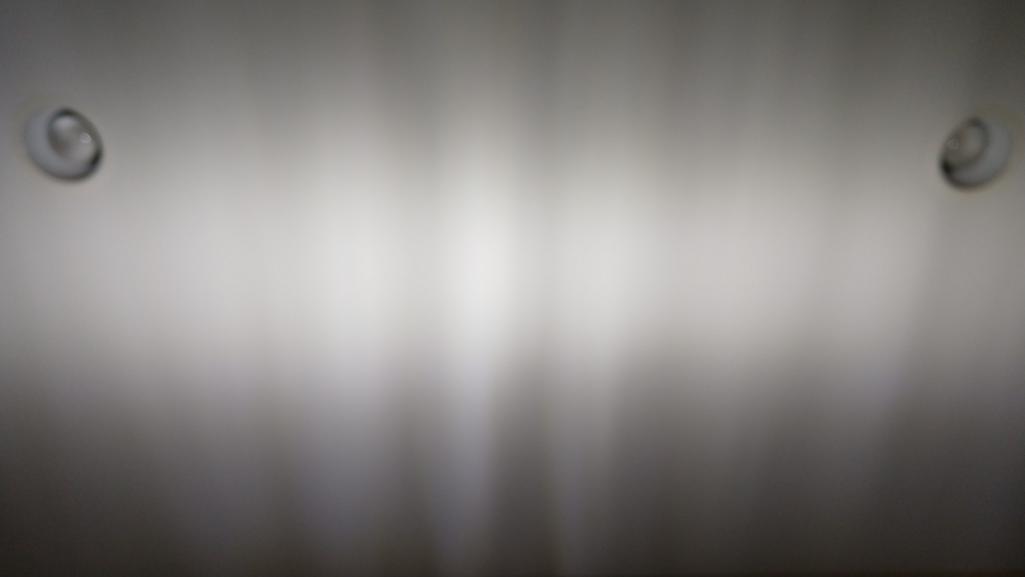
Posted by: Spoke May 5 2019, 02:13 PM
Got the prototype lit up in the foglight enclosure. Been running this at 12V @ 1A for about 2 hours. The internal temps seem to be ok at about 65C. This means a temperature rise of about 45C. So in 50C weather, the internal temps should be below 100C.
Later tonight or tomorrow I hope to compare the light output with the fogs on my '71.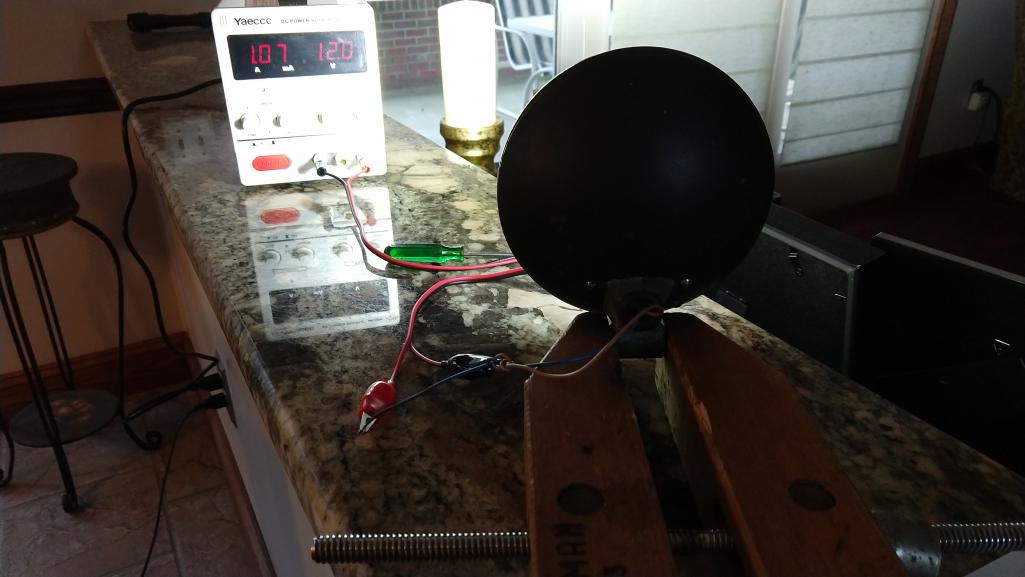
Posted by: Spoke May 6 2019, 09:52 PM
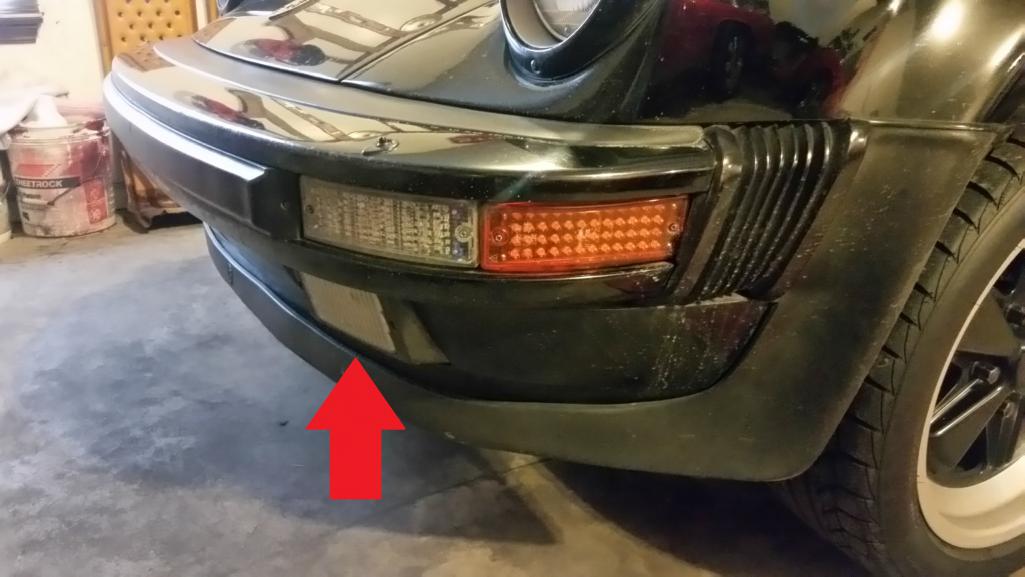
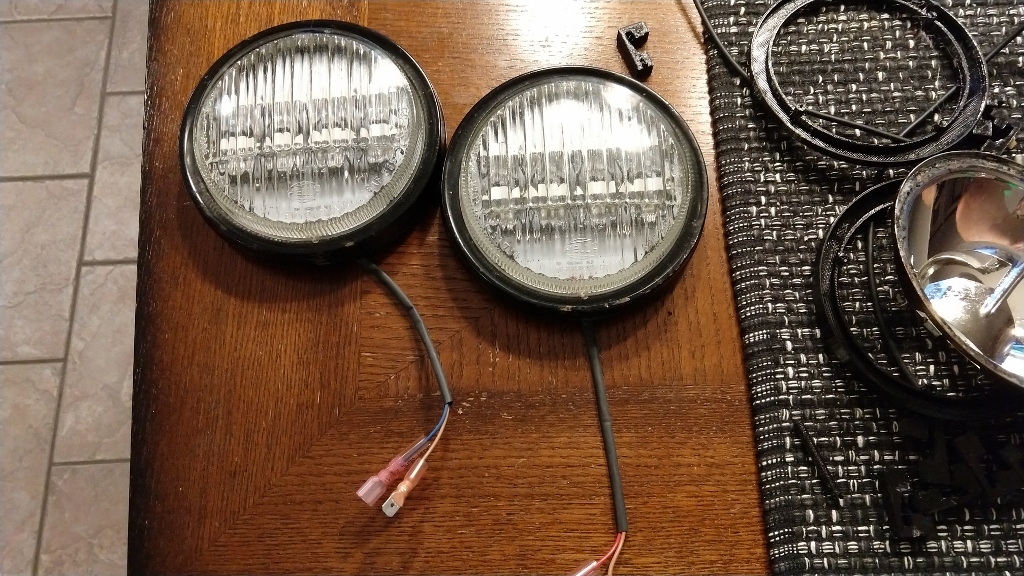
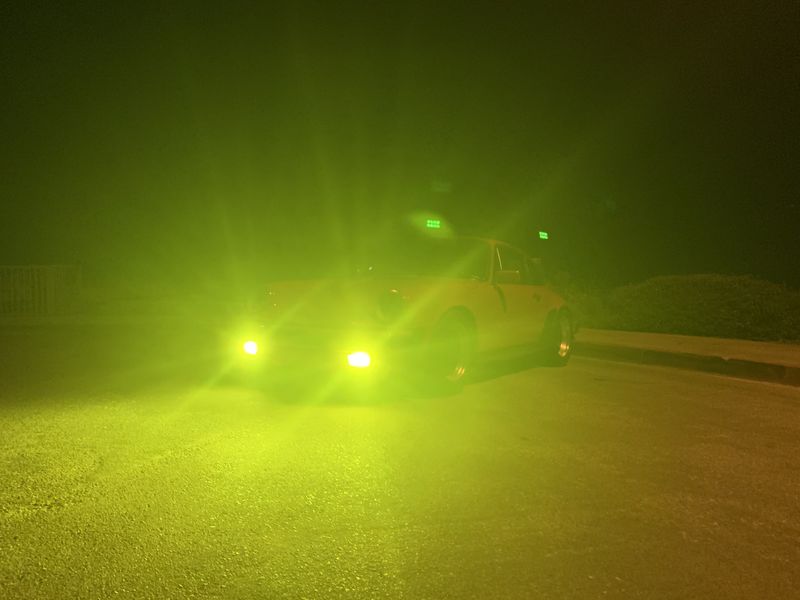
Compared the output of the LED foglight to the foglights on my '71. Here's the standard foglights on the car. The light has a nice cutoff top and bottom giving just a narrow light band.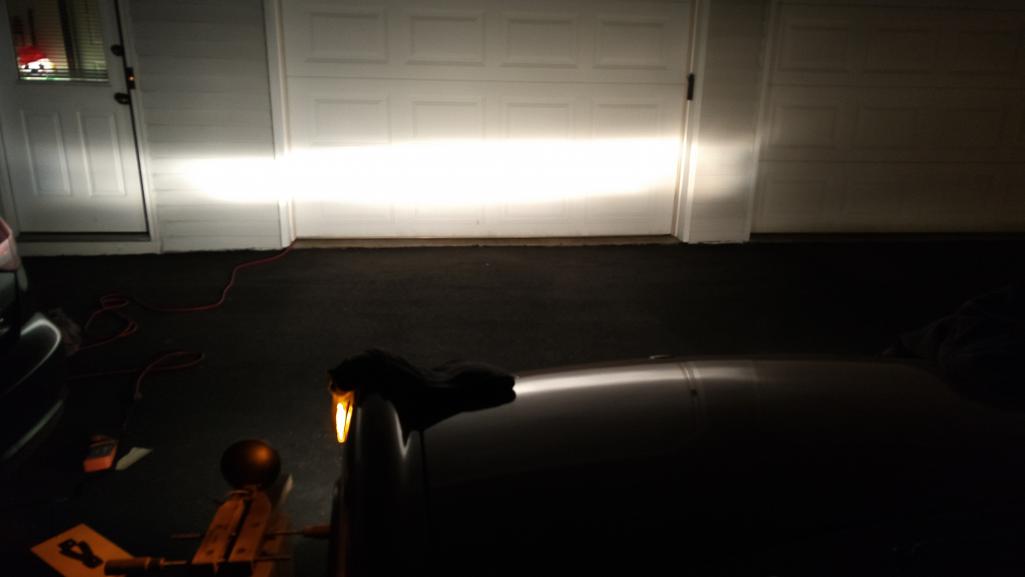
Posted by: Spoke May 6 2019, 09:57 PM
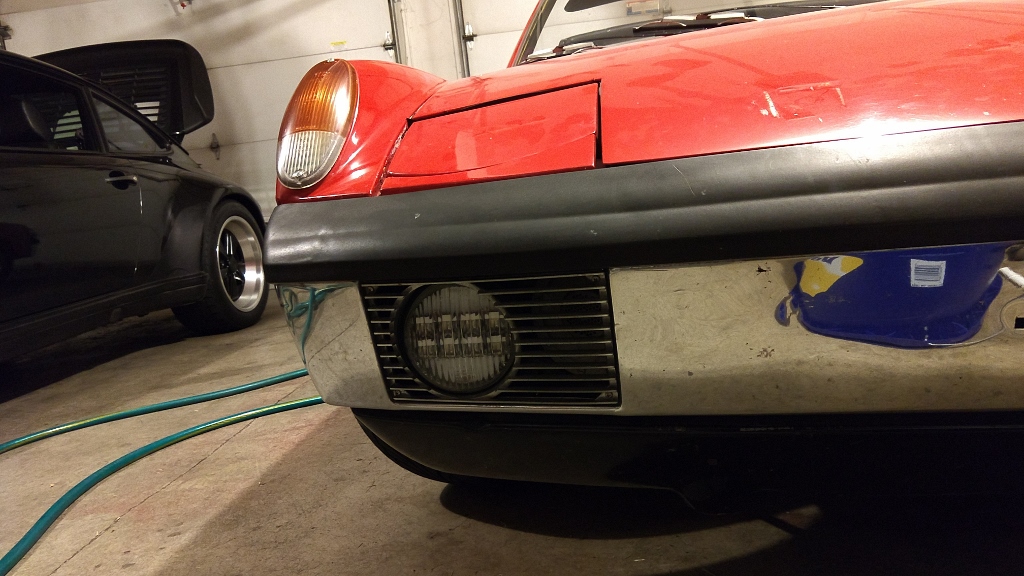
The driver side foglight is covered up and the LED foglight is lit up right next to the car. The LED does not have a sharp cutoff and the additional intensity of the LED washes out the tight cutoff of the passenger side foglight.
At 1 meter, here are the measurements of the lamps:
914 Foglight: 1800 Lux
LED Foglight: 5500 Lux
The LED foglight is 3x brighter than the standard foglight on my '71 although the upper cutoff is not as sharp with the LED as the standard foglight. The LED may need to be adjusted a bit lower to not be too bright to oncoming drivers.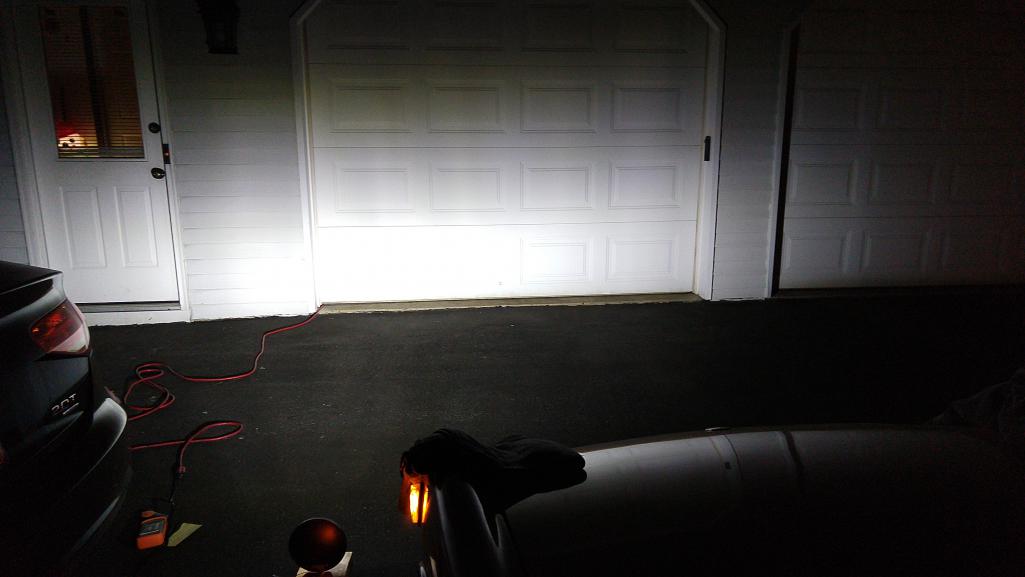
Posted by: Chi-town May 6 2019, 10:48 PM
That upper washout will be blinding to oncoming traffic 
Posted by: Luke M May 7 2019, 07:43 AM
Would the fog light lens make a difference ?
I do not know so I figured I throw it out there.
Your 71 should have the early TN1-TN2 lens.
The LED fog lens is a later TN4.
Posted by: Spoke May 7 2019, 05:21 PM
Would the fog light lens make a difference ?
I do not know so I figured I throw it out there.
Your 71 should have the early TN1-TN2 lens.
The LED fog lens is a later TN4.
Yes the '71 has the early lens and the LEDs have the later lens. The lens has got to have an effect on the light pattern. The TN4 with the LEDs actually makes brighter vertical bars. It would be best to have no lensing with the LEDs but the goal is to retro-fit these LEDs in existing fixtures.
I need to put the LEDs in an early TN1/2 lens. Anyone have a TN1/2 fixture they would like to volunteer for a while? Where's @http://www.914world.com/bbs2/index.php?showuser=10825 ?
Posted by: mepstein May 7 2019, 05:28 PM
Would the fog light lens make a difference ?
I do not know so I figured I throw it out there.
Your 71 should have the early TN1-TN2 lens.
The LED fog lens is a later TN4.
Yes the '71 has the early lens and the LEDs have the later lens. The lens has got to have an effect on the light pattern. The TN4 with the LEDs actually makes brighter vertical bars. It would be best to have no lensing with the LEDs but the goal is to retro-fit these LEDs in existing fixtures.
I need to put the LEDs in an early TN1/2 lens. Anyone have a TN1/2 fixture they would like to volunteer for a while? Where's @http://www.914world.com/bbs2/index.php?showuser=10825 ?
I can send you one tomorrow.
@http://www.914world.com/bbs2/index.php?showuser=3031
Posted by: Spoke May 7 2019, 05:35 PM
Would the fog light lens make a difference ?
I do not know so I figured I throw it out there.
Your 71 should have the early TN1-TN2 lens.
The LED fog lens is a later TN4.
Yes the '71 has the early lens and the LEDs have the later lens. The lens has got to have an effect on the light pattern. The TN4 with the LEDs actually makes brighter vertical bars. It would be best to have no lensing with the LEDs but the goal is to retro-fit these LEDs in existing fixtures.
I need to put the LEDs in an early TN1/2 lens. Anyone have a TN1/2 fixture they would like to volunteer for a while? Where's @http://www.914world.com/bbs2/index.php?showuser=10825 ?
I can send you one tomorrow.
@http://www.914world.com/bbs2/index.php?showuser=3031
Thanks. You mentioned you had a nicer foglight fixture you wanted to use on your car. Are you sending that set too? I want to get the boards built up for your car and I might as well have the fixtures so I can install the boards on the lenses.
@http://www.914world.com/bbs2/index.php?showuser=10825
Posted by: mepstein May 7 2019, 06:01 PM
Would the fog light lens make a difference ?
I do not know so I figured I throw it out there.
Your 71 should have the early TN1-TN2 lens.
The LED fog lens is a later TN4.
Yes the '71 has the early lens and the LEDs have the later lens. The lens has got to have an effect on the light pattern. The TN4 with the LEDs actually makes brighter vertical bars. It would be best to have no lensing with the LEDs but the goal is to retro-fit these LEDs in existing fixtures.
I need to put the LEDs in an early TN1/2 lens. Anyone have a TN1/2 fixture they would like to volunteer for a while? Where's @http://www.914world.com/bbs2/index.php?showuser=10825 ?
I can send you one tomorrow.
@http://www.914world.com/bbs2/index.php?showuser=3031
Thanks. You mentioned you had a nicer foglight fixture you wanted to use on your car. Are you sending that set too? I want to get the boards built up for your car and I might as well have the fixtures so I can install the boards on the lenses.
@http://www.914world.com/bbs2/index.php?showuser=10825
I have two early sets I can send you. One question, to remove from the car, where are the wires connected.
Posted by: Spoke May 7 2019, 06:21 PM
I have two early sets I can send you. One question, to remove from the car, where are the wires connected.
That's a good question. I don't know how the foglight ties in with the wire loom. That's still something I need to work out. The wires on my '71 foglights are very short at the fixture. Not sure if there's more slack inside the trunk.
It would seem that the 914 wire harness would include the wires right to the foglight as part of the harness.
Posted by: mepstein May 7 2019, 06:45 PM
I have two early sets I can send you. One question, to remove from the car, where are the wires connected.
That's a good question. I don't know how the foglight ties in with the wire loom. That's still something I need to work out. The wires on my '71 foglights are very short at the fixture. Not sure if there's more slack inside the trunk.
It would seem that the 914 wire harness would include the wires right to the foglight as part of the harness.
So should I cut wires and plan on adding connectors or can I remove wires at the housing. I’ll do whatever you think best.
Posted by: JeffBowlsby May 7 2019, 06:55 PM
Open the housing and disconnect the wires! No cutting allowed!
Posted by: worn May 7 2019, 07:54 PM
Open the housing and disconnect the wires! No cutting allowed!
Certainly cut no wires. Looks like a plus for us all. Now, since I have a pair of old Bosch rectangular fog lights mounted on my TR6, should I order LEDs for a Porsche or a Triumph?
Posted by: Spoke May 8 2019, 08:02 PM
Open the housing and disconnect the wires! No cutting allowed!
Agreed. My LED boards are designed to be plug'n'play without cutting the vehicle wiring using the existing bulb plug to power the LEDs. An exception to that are the Triumph Spitfire and TR6 where the bulb sockets are so unreliable that LED boards connect directly to the wire loom bypassing the bulb socket.
For the 914 foglight, there's not much play in the wiring at the foglight fixture. I didn't think there was a connector for the the fogs inside the trunk. One issue is the condition of the ground spade connector. The one foglight fixture from Mark the ground spade was rusted onto the lug on the fixture. For the foglight the original bulb socket will not be used as the reflector and bulb socket are not used with the LEDs.
I'll make it work with the existing wires.
Attached thumbnail(s)
Posted by: Spoke May 9 2019, 07:12 PM
I'm working on a 911 variant of the foglight like the 914 that I'm doing now. The 911 will use an LEDdynamics 4015 constant-current 350ma module. For the 911, I can't put any circuitry behind the PCB like the early 914 foglights.
Posted by: mepstein May 9 2019, 07:23 PM
Early ones are on their way. They are in much better shape than the first set. CA car vs PA car. They came apart easily. Except the one little grub screw that evaporated into thin air.
Jerry - Thanks for doing this.
Posted by: Spoke May 9 2019, 07:24 PM
Will you be making these for the rectangle style fog lights?
If you can forward a single square fixture, I'll design a board for it.
@http://www.914world.com/bbs2/index.php?showuser=27
If you don't have an extra fixture, maybe @http://www.914world.com/bbs2/index.php?showuser=10825 has an extra square foglight fixture.
Posted by: mepstein May 9 2019, 07:37 PM
Will you be making these for the rectangle style fog lights?
If you can forward a single square fixture, I'll design a board for it.
@http://www.914world.com/bbs2/index.php?showuser=27
If you don't have an extra fixture, maybe @http://www.914world.com/bbs2/index.php?showuser=10825 has an extra square foglight fixture.
No, I had a set from a ‘75 parts car and couldn’t give them away so eventually threw them away. Ask chi-town. He’s backdating a later car. Might have fogs.
I still think there is potential in the hood lights. They are on many marques and rally cars.
Posted by: Chi-town May 9 2019, 08:48 PM
Sorry no fogs on my 75'
Posted by: DRPHIL914 May 10 2019, 08:13 AM
Will you be making these for the rectangle style fog lights?
If you can forward a single square fixture, I'll design a board for it.
@http://www.914world.com/bbs2/index.php?showuser=27
If you don't have an extra fixture, maybe @http://www.914world.com/bbs2/index.php?showuser=10825 has an extra square foglight fixture.
I have a rectangular fixture that is missing the glass lens I can send you .
PM me with an address and I can sent it out tomorrow- i backdated my bumpers so I will be getting the early round LED that you are working on now, but my 75 wiring harness has the female connector for a spade from the light for + , the ground was supplied not by wire but thru the light body which grounded to the frame thru the mounting to bumper and bumper to car chassis .
Anyway let me know if you want this light to use for your mock up
Phil
Posted by: Chi-town May 10 2019, 08:32 AM
Are you going to try different optics or main lenses to see if you can get the pattern back under control? If not these things will be dangerous to other drivers on the road.
Posted by: mepstein May 10 2019, 08:42 AM
Are you going to try different optics or main lenses to see if you can get the pattern back under control? If not these things will be dangerous to other drivers on the road.
Do regular fogs have a cutoff?
I know if I left the fogs lit on my Durango, cars flashed me.
Posted by: Luke M May 10 2019, 10:31 AM
Are you going to try different optics or main lenses to see if you can get the pattern back under control? If not these things will be dangerous to other drivers on the road.
Do regular fogs have a cutoff?
I know if I left the fogs lit on my Durango, cars flashed me.
The way most newer cars are wired from the factory you can't turn on the fog lights w/o having the headlights on. Once the headlights are on the fog lights will turn on but once you turn on the high beams the fog lights turn off. After the high beams are turned off and back to low beam the fogs turn back on. You can wire the fog lights so they can turn on w/o the headlights on. I plan on doing just that on my 6. I may even use my fog lights as daytime driving lights along with my euro led front turn signal lights.
http://www.914world.com/bbs2/index.php?showtopic=330111
Once the fog lights/headlights are adjusted there shouldn't be a problem with blinding oncoming traffic. Yes, you will get the people that still flash their lights at you if they think it's too bright. There's not much you can do about that. I drive a pickup truck as my dd and even with the headlights on low I get the oncoming traffic flashing their lights at me. My dd has factory headlights on it but it's the height of the vehicle that puts the headlights right inline of sight. The height causes it to seam brighter then what they are. Then you get the newer vehicles with their led/high res lights that seam way too bright as well. All are within DOT standards but still other drivers may feel they are too bright and flash. I get this a lot when I drive my truck. I even showed an elderly gentleman that complained that my high beams where on in a parking lot. When I showed him it was on low beam vs high beam he apologized and went on his way. Like stated once adjusted properly there shouldn't be an issue.
Posted by: Chi-town May 10 2019, 12:09 PM
There's a big difference between an old 35 watt halogen bulb behind secondary reflector and multiple LED output straight out the lens.
If you look at the output shot he posted the light is everywhere there's not even a focused beam to aim.
LEDs are meant to be in a projector housing with a defined cutoff to be legal and safe for oncoming traffic.
I spent a year dealing with LED lights and SAE/DOT regulations and there are some pretty specific limitations to keep you from blinding others.
With out improved optics and light control these are just a bad idea
Posted by: Spoke May 10 2019, 02:54 PM
Are you going to try different optics or main lenses to see if you can get the pattern back under control? If not these things will be dangerous to other drivers on the road.
I think I'll be able to cut down on the upper washout by applying a shade over the top of each LED lens. Will be doing some experimentation to see what is the best shading to achieve a sharper upper cut off.
Posted by: Spoke Jun 1 2019, 06:52 AM
Put the board into one of the fixtures provided by @http://www.914world.com/bbs2/index.php?showuser=10825 . The LED lenses and holders fit under the early glass without any spacers as with the later glass. So the original clips can be used.
Mark, I'm planning to paint the fixtures since these will be ready to be installed when I return them.
Attached thumbnail(s)
Posted by: Spoke Jun 1 2019, 06:53 AM
The early lenses are at least 5mm deeper than the later lenses.
Attached thumbnail(s)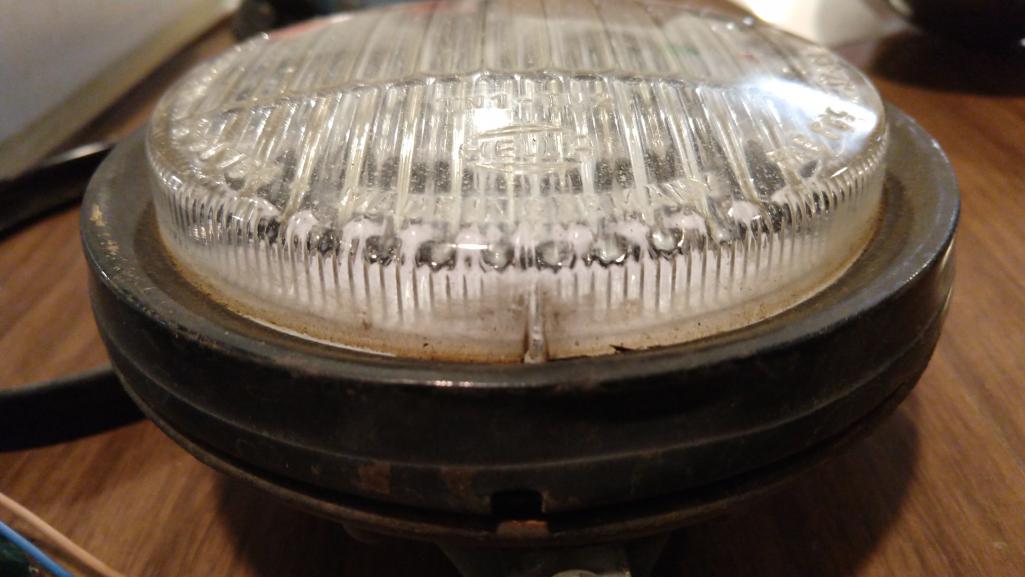
Posted by: mepstein Jun 1 2019, 07:02 AM
Put the board into one of the fixtures provided by @http://www.914world.com/bbs2/index.php?showuser=10825 . The LED lenses and holders fit under the early glass without any spacers as with the later glass. So the original clips can be used.
Mark, I'm planning to paint the fixtures since these will be ready to be installed when I return them.
Posted by: Spoke Jun 1 2019, 07:04 AM
Does anyone make the rubber gasket that goes around the lens? Or is this part of the lens? @http://www.914world.com/bbs2/index.php?showuser=3348
Attached thumbnail(s)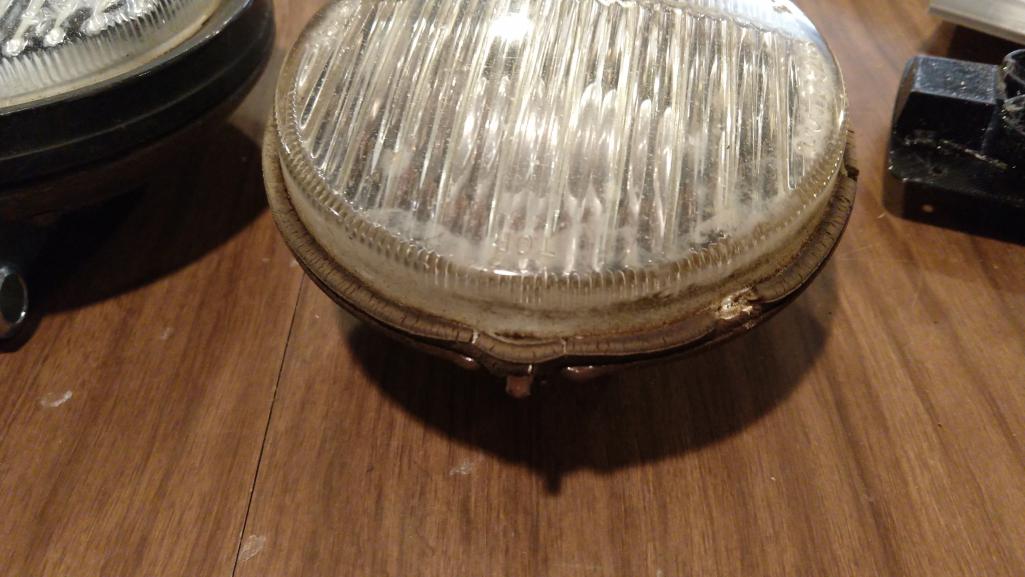
Posted by: Chi-town Jun 1 2019, 08:13 AM
914 Rubber makes them
Posted by: Spoke Jun 1 2019, 09:13 AM
914 Rubber makes them
Thanks. I ordered 2 sets. Didn't find them at first. They were on the gasket page and not on the lens page.
Posted by: Mikey914 Jun 1 2019, 09:54 PM
Ill make sure they get cross listed. We also ma in e protective lens covers and the spring clips that hold these into the outer rings.
Posted by: Spoke Jun 11 2019, 07:44 PM
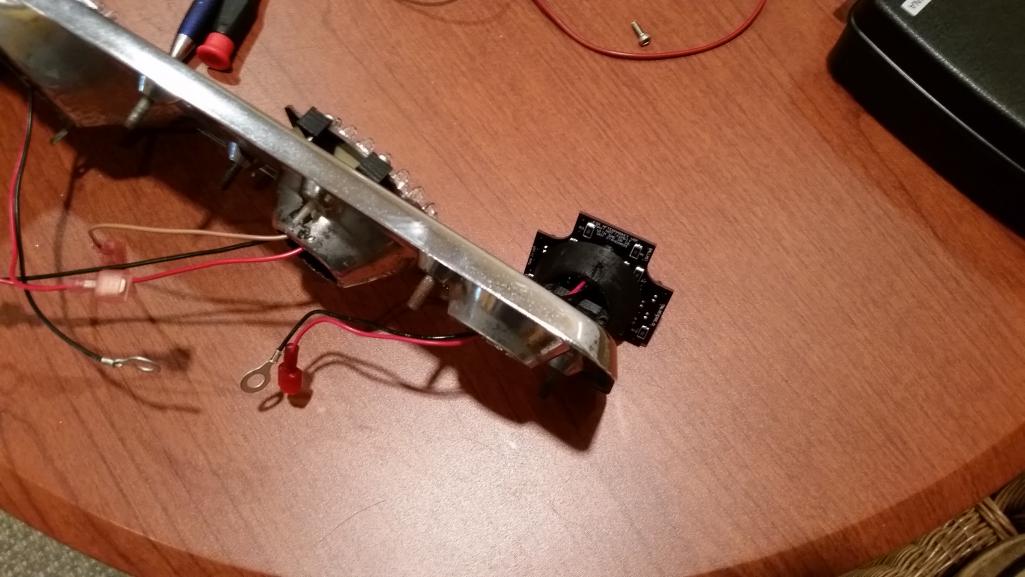
Finally got the 2nd 914 foglight assembled. This discrete converter kicks ass but is a pain in the ass to assemble.
The board on the left is a 911 foglight. I'm hoping to get those installed on my 930 this weekend. The 911 foglight uses a boost module and is much easier to assemble. The only difference at this point is the module is 350ma whereas the discrete converter is 500ma. I'm hoping the 911 foglight will still be significantly brighter than the OEM bulb even with the lower 350ma current.
If the 911 foglight is bright enough, I may go with the module for the 914 foglights. I have 4 of these first 914 boards that I will build up. I'll put a pair on my 914 and give the other pair to mepstein.
Attached thumbnail(s)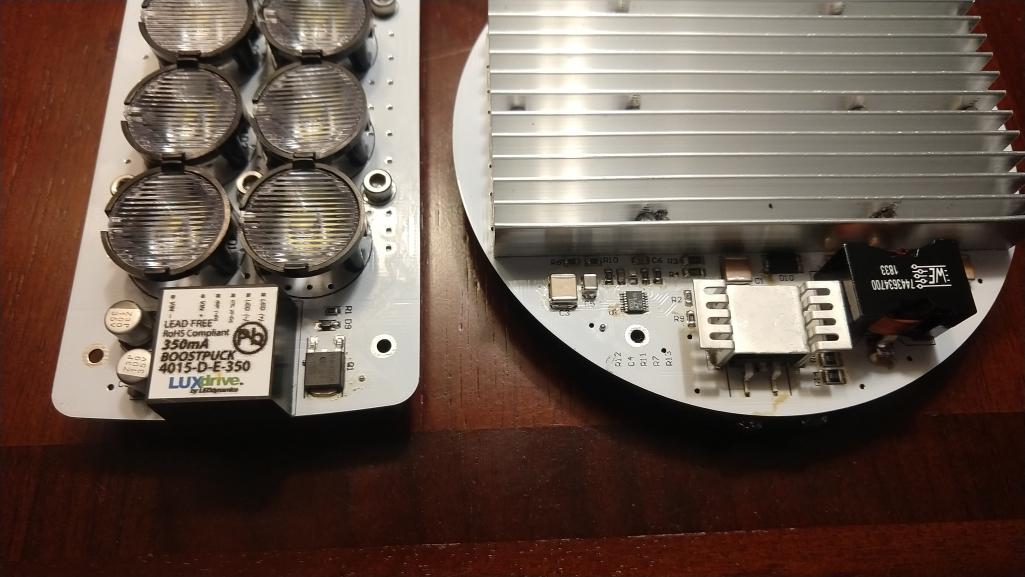
Posted by: Spoke Jun 11 2019, 07:47 PM
Here's the 911 foglight fitted in the lens. The fit is perfect and plastic spacers keep the board in place. Since the reflector is part of the fixture, there can be no components on the backside of the board like the 914 foglight.
Attached thumbnail(s)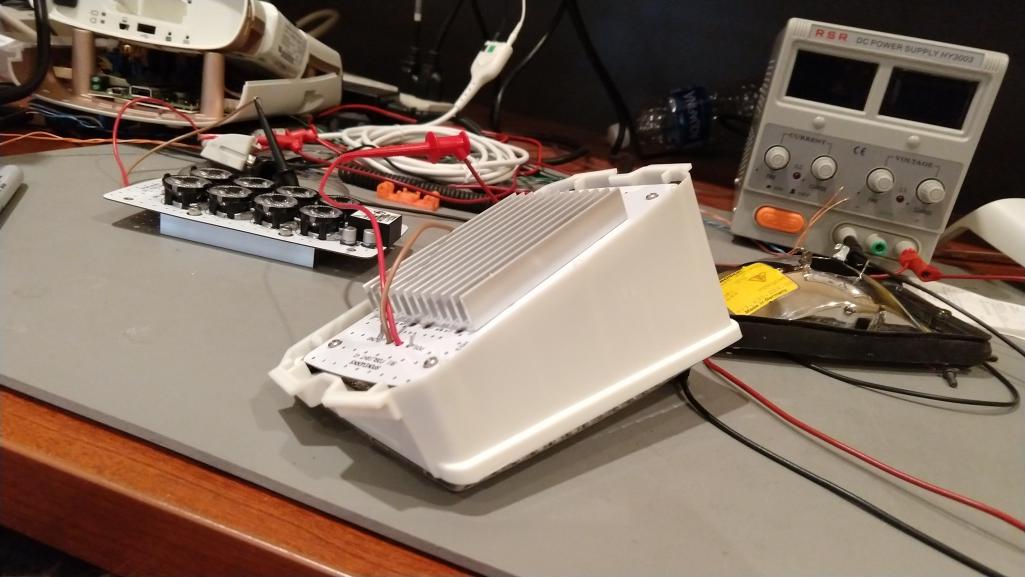
Posted by: Spoke Jun 11 2019, 07:51 PM
Here's the 911 board with the reflector installed. The fit is very good and should be an easy update for anyone. One annoyance with the converter module is it has no undervoltage lockout. It starts turning on at about 3-4V and can run very hot at this voltage.
The 911 foglight burns about 9W.
Attached thumbnail(s)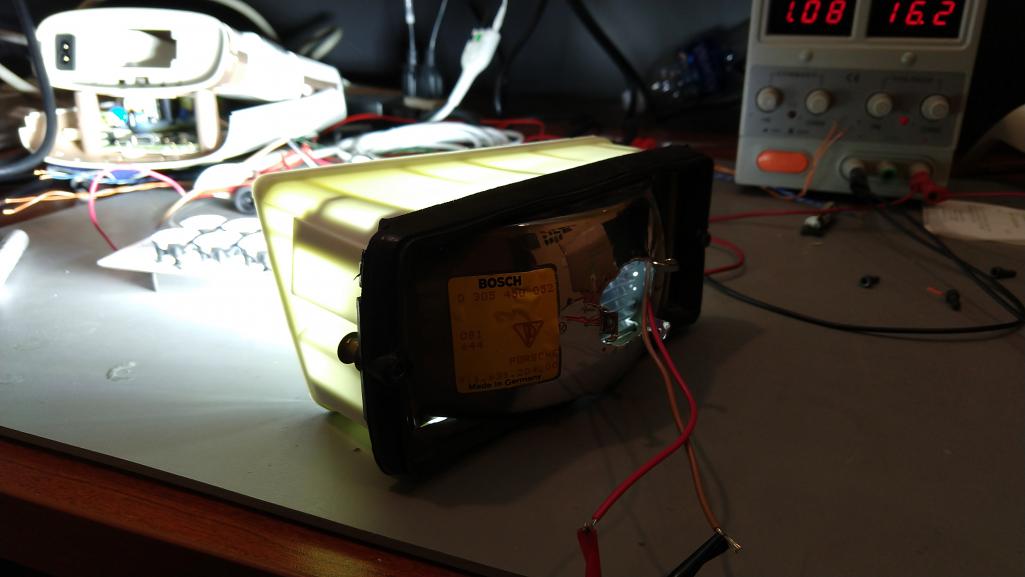
Posted by: DRPHIL914 Jul 16 2019, 07:49 AM
Finally got the 2nd 914 foglight assembled. This discrete converter kicks ass but is a pain in the ass to assemble.
The board on the left is a 911 foglight. I'm hoping to get those installed on my 930 this weekend. The 911 foglight uses a boost module and is much easier to assemble. The only difference at this point is the module is 350ma whereas the discrete converter is 500ma. I'm hoping the 911 foglight will still be significantly brighter than the OEM bulb even with the lower 350ma current.
If the 911 foglight is bright enough, I may go with the module for the 914 foglights. I have 4 of these first 914 boards that I will build up. I'll put a pair on my 914 and give the other pair to mepstein.
any updates on the beta testing of these? hoping to get a set when you are ready to do so.
@http://www.914world.com/bbs2/index.php?showuser=3031 @http://www.914world.com/bbs2/index.php?showuser=10825
Dr. Phil
Posted by: Spoke Jul 17 2019, 06:20 AM
Finally got the 2nd 914 foglight assembled. This discrete converter kicks ass but is a pain in the ass to assemble.
The board on the left is a 911 foglight. I'm hoping to get those installed on my 930 this weekend. The 911 foglight uses a boost module and is much easier to assemble. The only difference at this point is the module is 350ma whereas the discrete converter is 500ma. I'm hoping the 911 foglight will still be significantly brighter than the OEM bulb even with the lower 350ma current.
If the 911 foglight is bright enough, I may go with the module for the 914 foglights. I have 4 of these first 914 boards that I will build up. I'll put a pair on my 914 and give the other pair to mepstein.
any updates on the beta testing of these? hoping to get a set when you are ready to do so.
@http://www.914world.com/bbs2/index.php?showuser=3031 @http://www.914world.com/bbs2/index.php?showuser=10825
Dr. Phil
I did get a 2nd set of fogs assembled for mepstein but haven't refurbished his or my foglight cases. Don't want to put the foglights in beat up cases. It will be a few weeks before I get our foglights ready to test out.
I'm further ahead with the 911 foglights as they use a dc-dc converter module with very few discrete components and are very easy to assemble. Any further 914 fogs will use this module.
Here's a link at Pelican:
http://forums.pelicanparts.com/porsche-911-technical-forum/854989-led-brake-lights-44.html#post10523070
This is the 2nd set of 911 fogs built and sent to a 911 guy for him to install and evaluate.

Posted by: DRPHIL914 Jul 17 2019, 06:28 AM
Finally got the 2nd 914 foglight assembled. This discrete converter kicks ass but is a pain in the ass to assemble.
The board on the left is a 911 foglight. I'm hoping to get those installed on my 930 this weekend. The 911 foglight uses a boost module and is much easier to assemble. The only difference at this point is the module is 350ma whereas the discrete converter is 500ma. I'm hoping the 911 foglight will still be significantly brighter than the OEM bulb even with the lower 350ma current.
If the 911 foglight is bright enough, I may go with the module for the 914 foglights. I have 4 of these first 914 boards that I will build up. I'll put a pair on my 914 and give the other pair to mepstein.
any updates on the beta testing of these? hoping to get a set when you are ready to do so.
@http://www.914world.com/bbs2/index.php?showuser=3031 @http://www.914world.com/bbs2/index.php?showuser=10825
Dr. Phil
I did get a 2nd set of fogs assembled for mepstein but haven't refurbished his or my foglight cases. Don't want to put the foglights in beat up cases. It will be a few weeks before I get our foglights ready to test out.
I'm further ahead with the 911 foglights as they use a dc-dc converter module with very few discrete components and are very easy to assemble. Any further 914 fogs will use this module.
Here's a link at Pelican:
http://forums.pelicanparts.com/porsche-911-technical-forum/854989-led-brake-lights-44.html#post10523070
This is the 2nd set of 911 fogs built and sent to a 911 guy for him to install and evaluate.
thanks for the update . If I had known your issues were mainly dealing with
the condition of the fog lights I could have sent you mine, they are mint condition no rust or corrosion. in fact if you make that next set with this 911converter you are now planning on using I will pull these off the car and send them to you if you want to put them in and do some testing or have me test them. I have some other running lights I can put in or just go with out them for a while , I rarely drive the car in this 100 degree heat. I would like to have it complete before Okteenerfest though.
either way let me know.
Phil
Posted by: mepstein Jul 17 2019, 06:53 AM
Jerry, I wish I sent you better condition fogs. I just know it was taking me so long to send anything that I wanted you to have something to work with. I found the nicer sets when I stopped looking for them. I can refurbish the housings at work, powdercoat, ect so don't feel like you have to do more work on these. I promise not to post pictures until they look pretty. 
Posted by: ConeDodger Jul 17 2019, 12:34 PM
I’d love to do these but my fogs are actually aftermarket. Pilots I think...
Attached image(s)
Posted by: ConeDodger Jul 17 2019, 12:43 PM
@http://www.914world.com/bbs2/index.php?showuser=3031 any chance of doing amber?
Posted by: Spoke Jul 18 2019, 10:51 AM
@http://www.914world.com/bbs2/index.php?showuser=3031 any chance of doing amber?
Interesting thought. I'm not sure amber would work with the board designed for white LEDs. The reason is the voltage drop of the amber LED is 2V and the voltage drop of the white is 3V.
With 8 LEDs in series, the amber LEDs would drop 16V whereas the white will drop 24V. The issue is the boost converter I've targeted requires at least 3V difference between input (up to 14V) and output (16V for 8 amber; 24V for 8 white).
If 2 more amber LEDs were added, then the voltage drop would be 20V and compatible with the converter. I could either make a separate 10-LED board for ambers or make one board which would accept 8 or 10 LEDs.
Posted by: Spoke Jul 29 2019, 08:54 PM
Finally got around to installing the LED foglights on my 914. The following posts detail the installation of these LEDs into an early 914 foglight.
The later foglight lenses have less room inside the lens and require a thick spacer (3-5mm) so the LEDs fit under the glass lens. On the early foglights, this spacing isn't an issue.
Start by removing the bumper. 2 bolts on each side. I loosened the bolts all round then removed them on one side and rested the bumper on a bucket while the bolts were removed on the other side.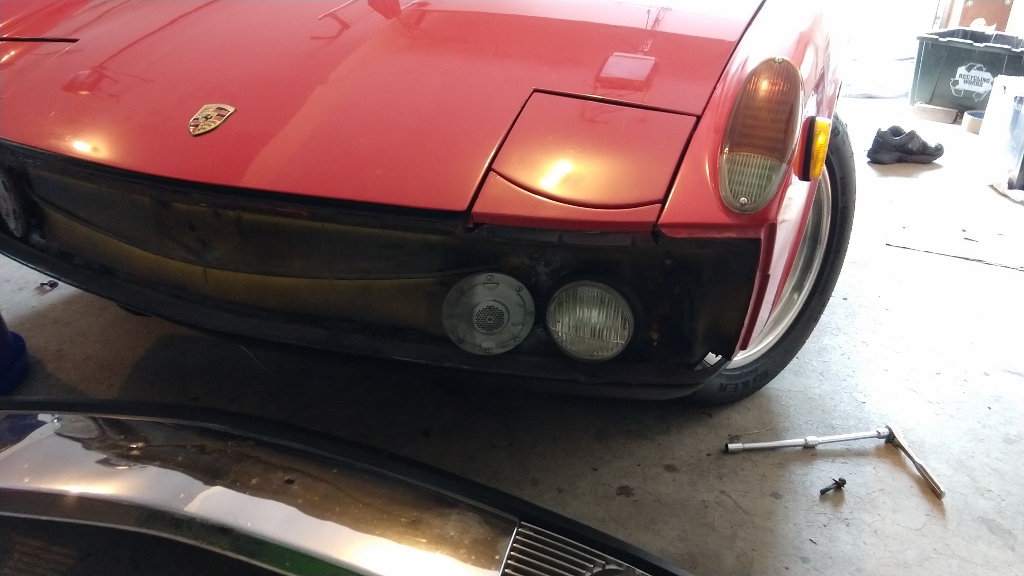
Open up the foglight fixture by removing the small screw on the bottom of the fixture which holds the bezel in place.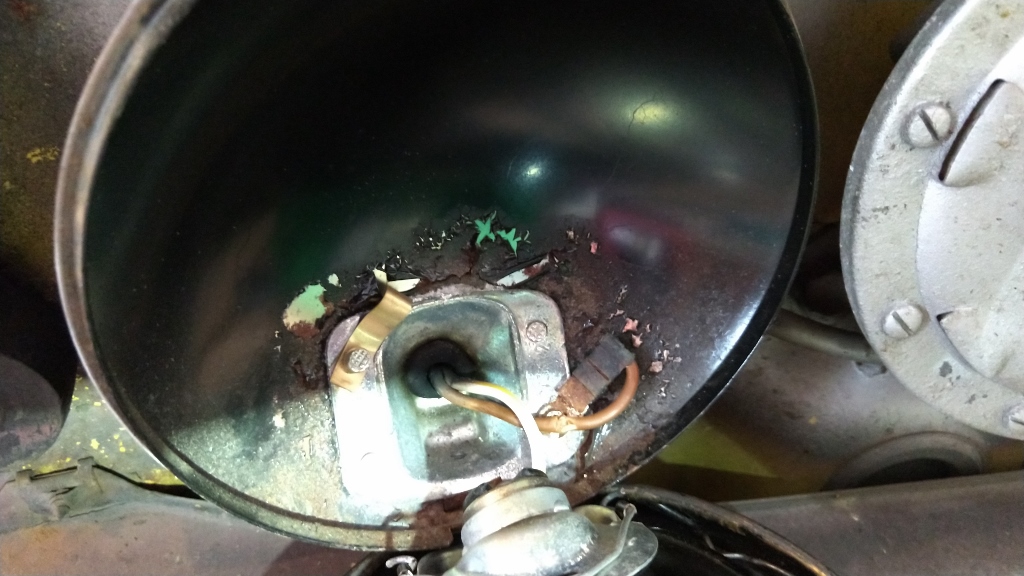
Disconnect the bulb holder from the bezel/lens/reflector assembly. Take the assembly to the workbench. Do both sides.
On the car, the bulb holder is removed from the 12V wire by loosening the flat-head screw holding the 12V wire to the bulb fixture. The bulb and its holder will not be used.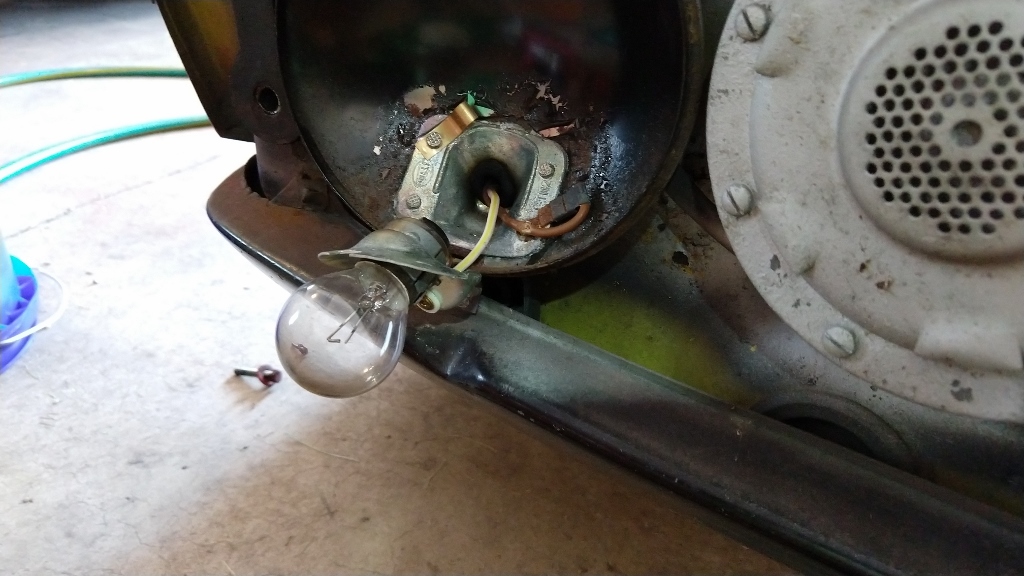
Posted by: Spoke Jul 29 2019, 09:12 PM
The bezel/lens/reflector assembly is separated by removing the 4 metal clips behind the bezel. Always wear eye protection when removing/replacing these clips because they have a tendency to fly across the room.
Also remove/replace in a smallish, clean or clutter-free room. Reason for this is when these clips fly, they can go all over the place and are hard to find. Chances are at least one of these spring clips will fly during removal/replacement.
Remove the clips with a flathead screwdriver depressing the longer of the 2 arms of the clip. Notice that the clips are different on the left assembly than the right assembly. Take a picture of the assembly before removing the clips so the orientation of the clips is remembered.
Once disassembled, clean the glass lens and refurbish the bezel as you desire. I only washed the bezels on my car. Replace the rubber gasket around the lens with a new one. These are available at 914rubber. Notice the tape on the top part of the LED lenses. This is to attempt to cut off the light bleed upward. It does cut off some light on the upper side but isn't 100%.
This is the spacer ring to align the LED board to the glass bezel. It will be attached to the board when the board is assembled.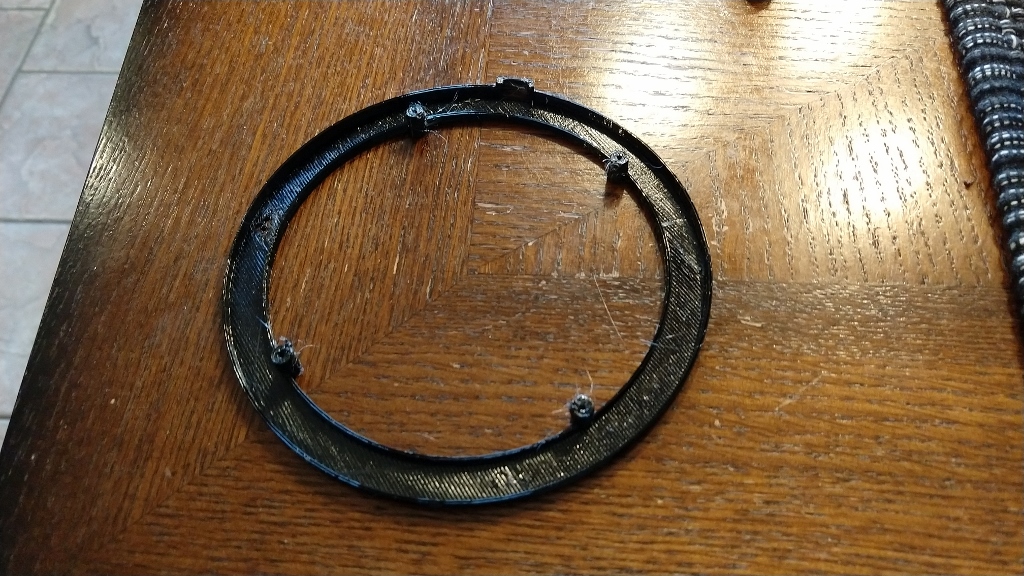
Posted by: Spoke Jul 29 2019, 09:17 PM
Here's the board with the alignment ring attached.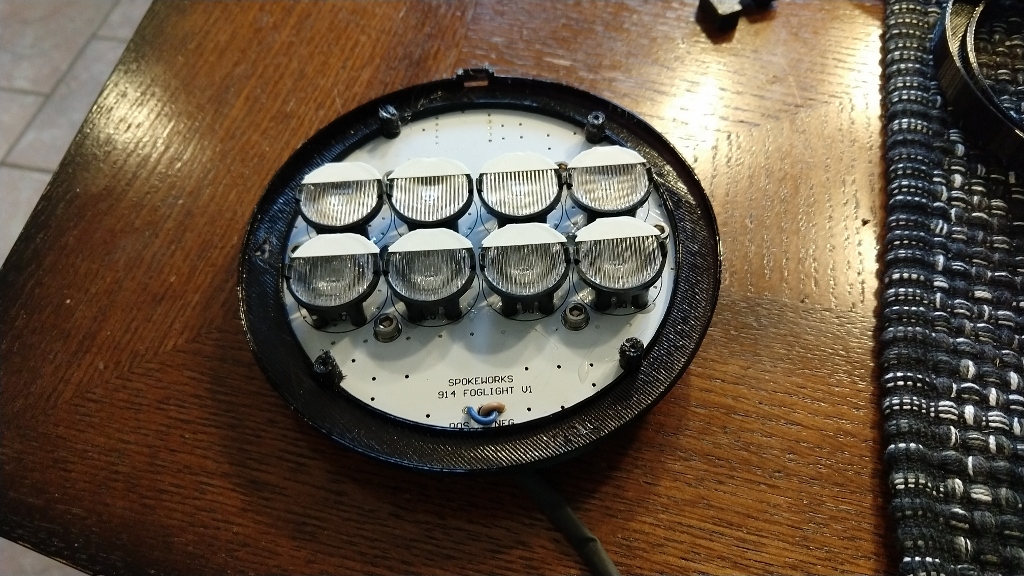
When mating the LED board with the lens, make sure the gasket remains in place. 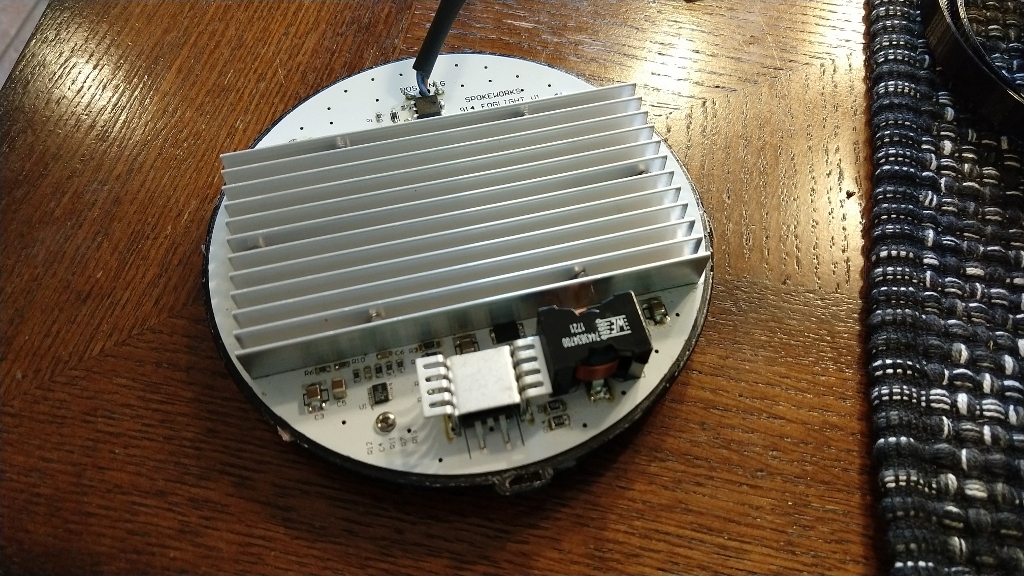
Posted by: Spoke Jul 29 2019, 09:22 PM
Here is the board mated to the lens. The alignment tab tat the top of the lens fits into the alignment gap at the top of the board alignment ring.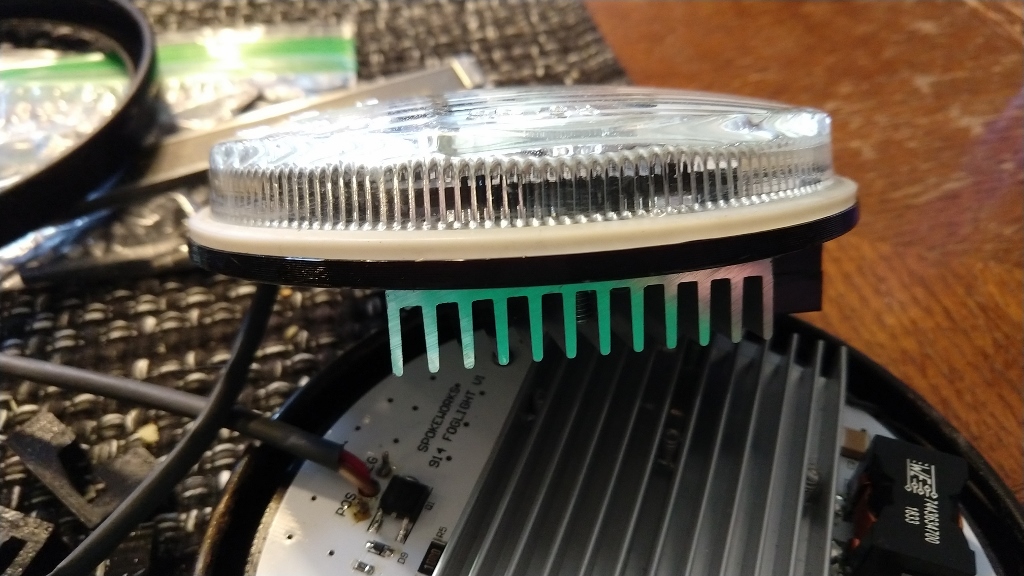
Posted by: Spoke Jul 29 2019, 09:28 PM
Now comes the tricky part: getting the spring clips back on to hold the bezel/lens/board assembly together. The lens is self-aligned with the bezel via a ridge on the outside bottom of the lens. There is a recess in the bezel where this ridge will fit.
To assist this step, 4 special clips are provided to hold the board in place. These clip right on and hold the board in place so the spring clips can be installed.
Reinstall the spring clips, one on each side of the heat sink. An installation tool will be provide to help install the spring clips. Again use eye protection and do the work in a smallish, clutter-free room in case one of the clips takes off.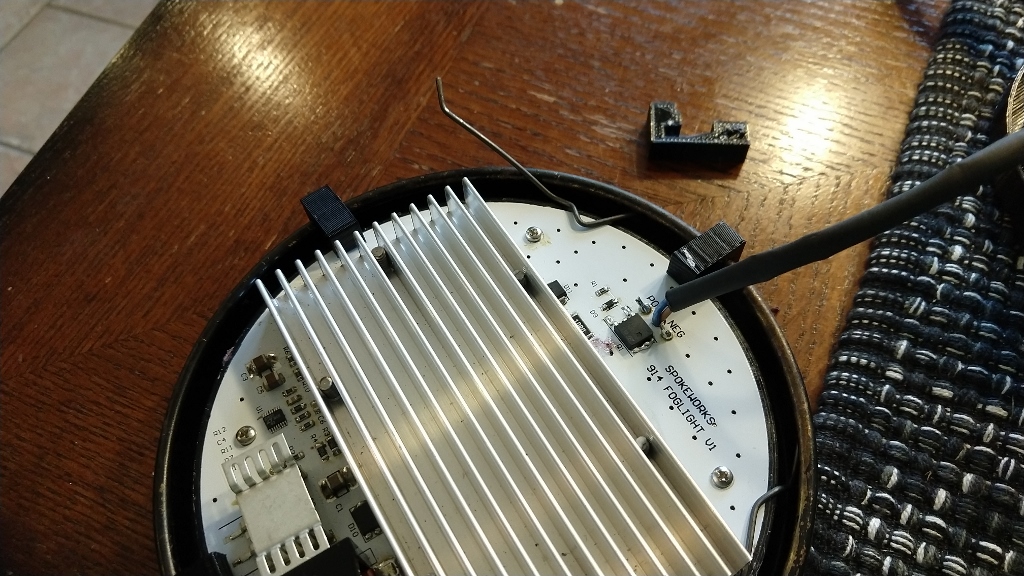
Posted by: Spoke Jul 29 2019, 09:32 PM
Reinstall the spring clips to both lights and we're almost ready for installation. Need to add quick connect spades to the 12V wires and clean the ground spade.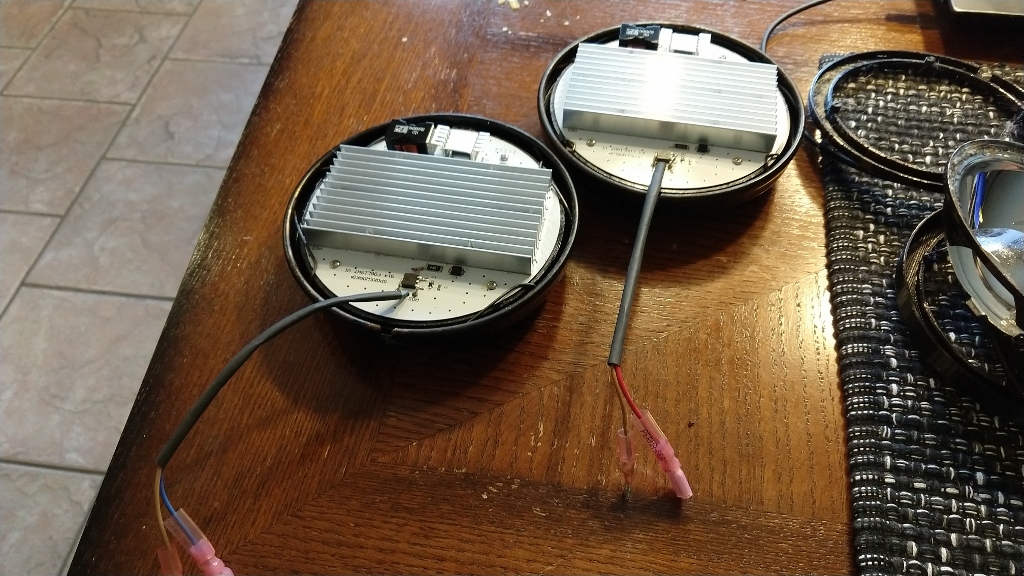
Posted by: Spoke Jul 29 2019, 09:40 PM
The driver side 12V wire is kind of a pain since it is 2 wires soldered together with some shrink wrap on it. The 2 wires were also flattened by the attachment of the wires to the bulb holder. I had to use a spade made for 10-12 gauge wire. 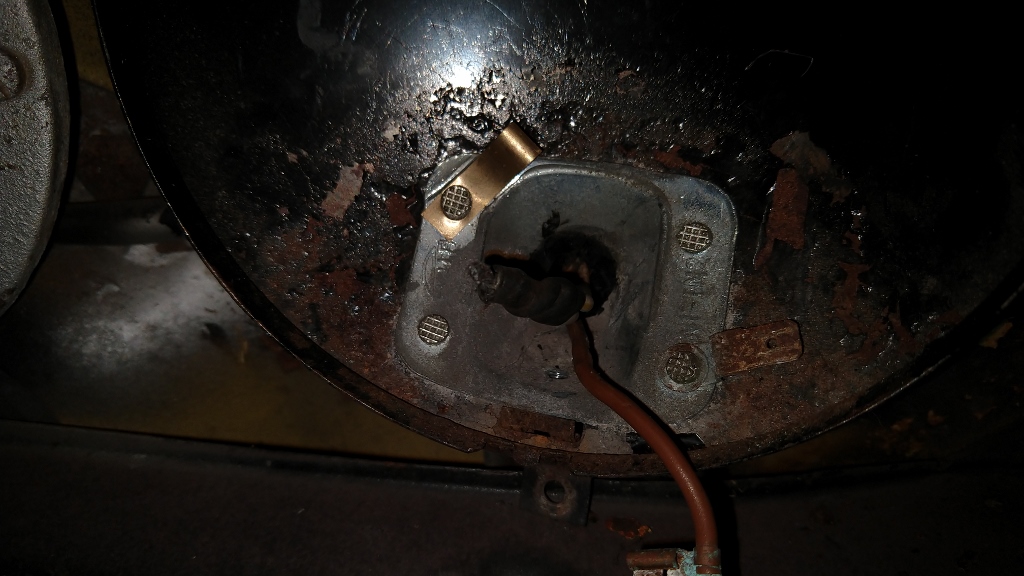
This spade isn't optimal as it should be shielded but it was all my FLAPS had in the 10-12 gauge range. The ground spade needs to be removed from the fixture and cleaned.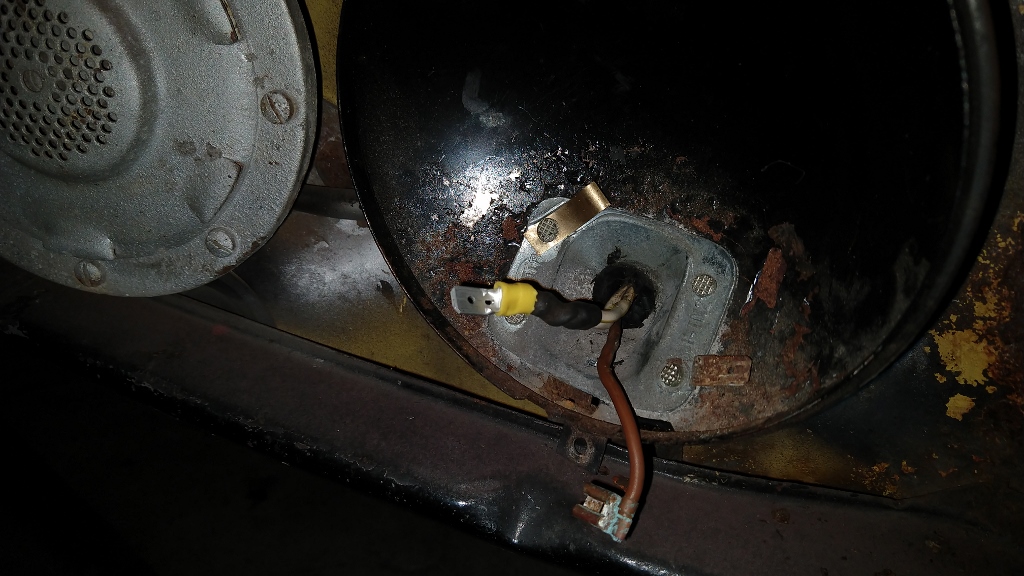
The passenger side was easier since it had only one wire with soldered end. I was able to use a shielded male spade on this one. The spades will be included with the LED boards for easy installation.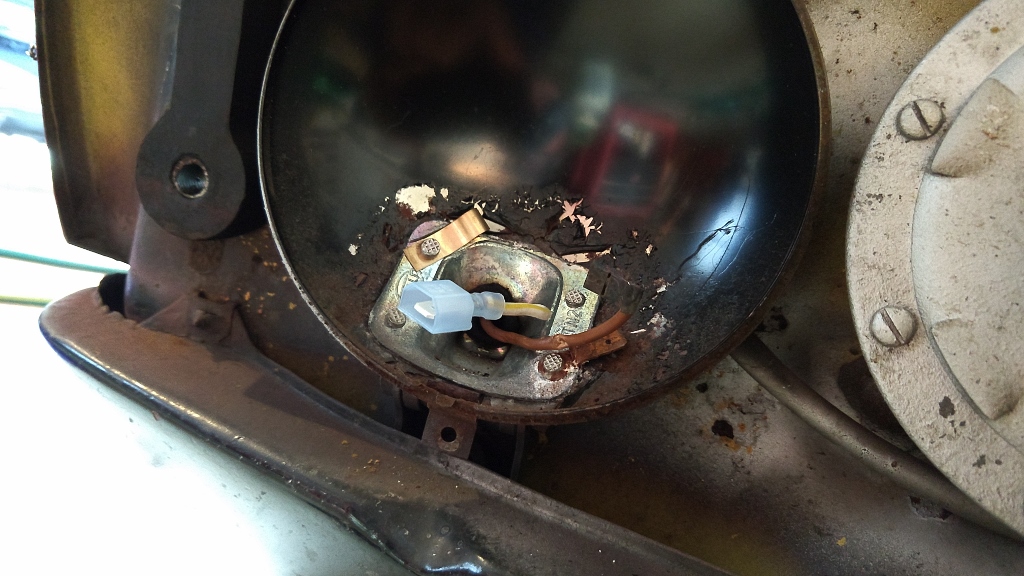
Posted by: Spoke Jul 29 2019, 09:45 PM
Time to connect the LEDs and test them. The board is set on a bucket or other item so wires can be attached without stressing any connections. Do not let the board hang by its wires. Also avoid touching any of the electronics on the board.
Before making the connect to the ground spade, a short section of heat shrink tubing is added to insulate the ground spade. Once the ground connection is made, slide the tubing into place and heat it.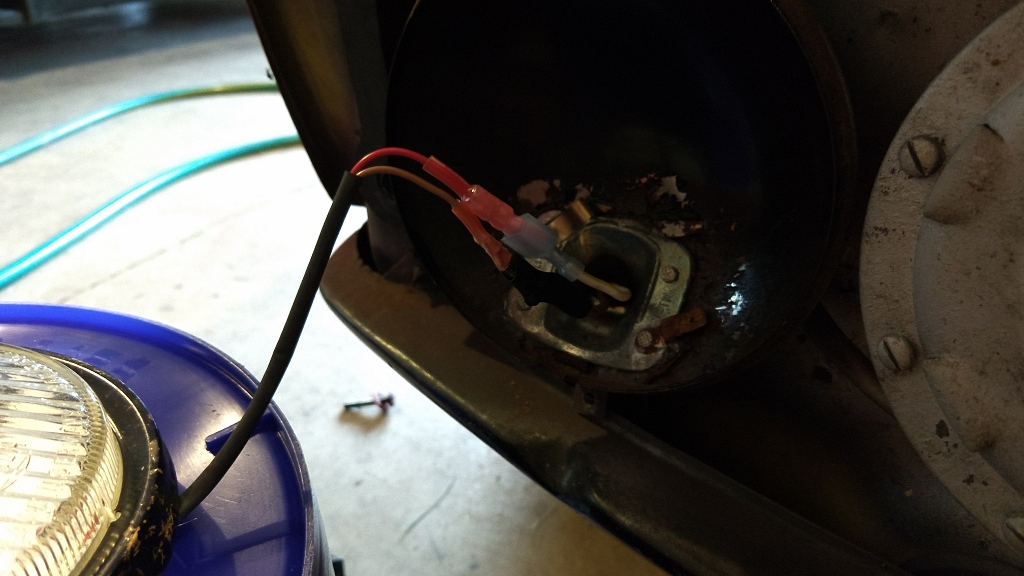
Test the board before continuing. If any connections are not made, now is the time to adjust things.
Posted by: Spoke Jul 29 2019, 09:48 PM
Install the bezel assembly making sure the wires are all inside the unit. Make sure the bezel is on straight. Replace the locking clip on the bottom and replace the small screw to hold the locking clip in place. Test the light again.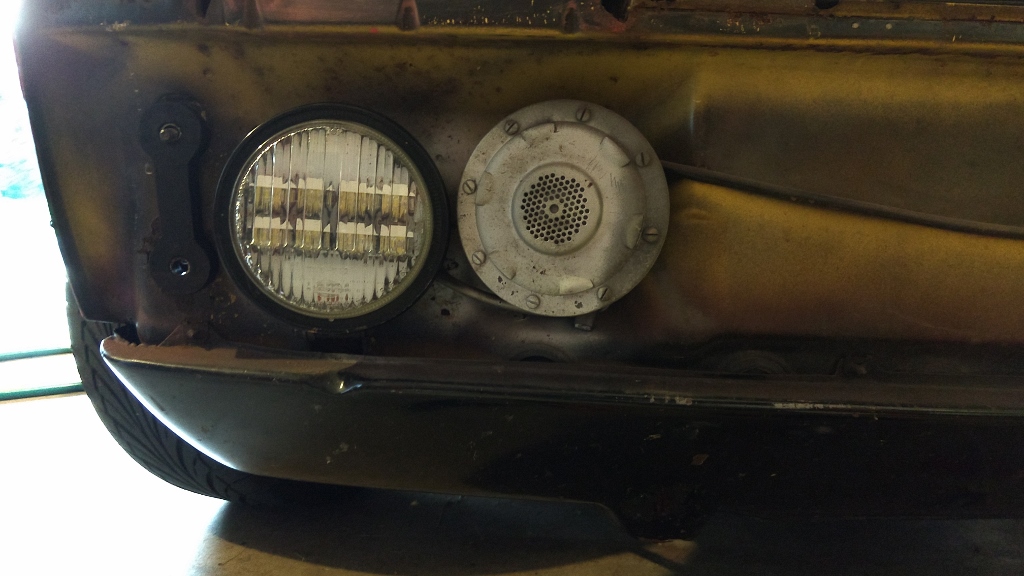
Posted by: Spoke Jul 29 2019, 09:53 PM
Repeat the installation on the other side. Support the assembly, slide the heat shrink on the ground wire, attach wires and heat the ground tubing. Test the light.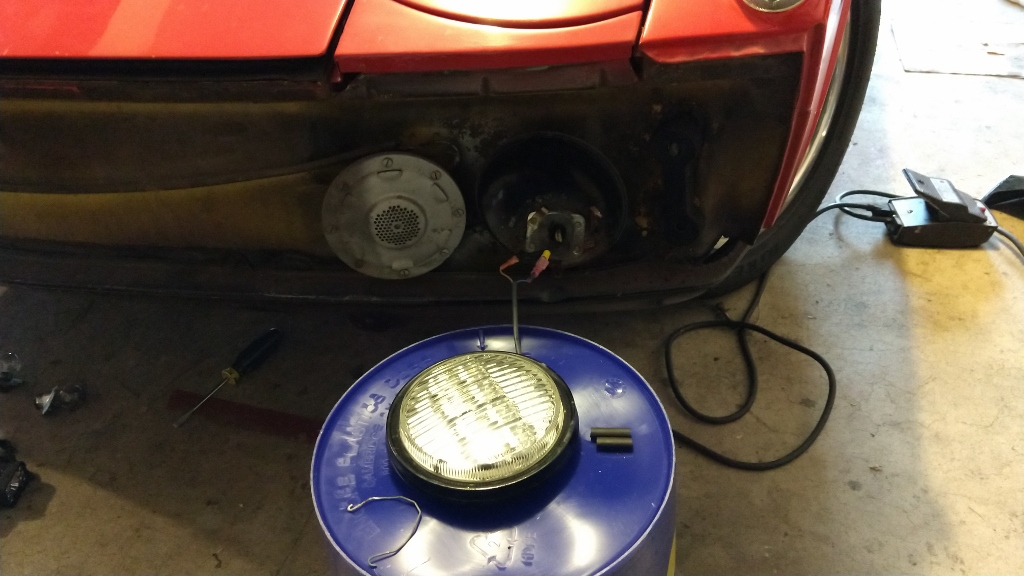
The wire should tuck nicely inside the fixture. Make sure the wire stays inside the fixture during installation.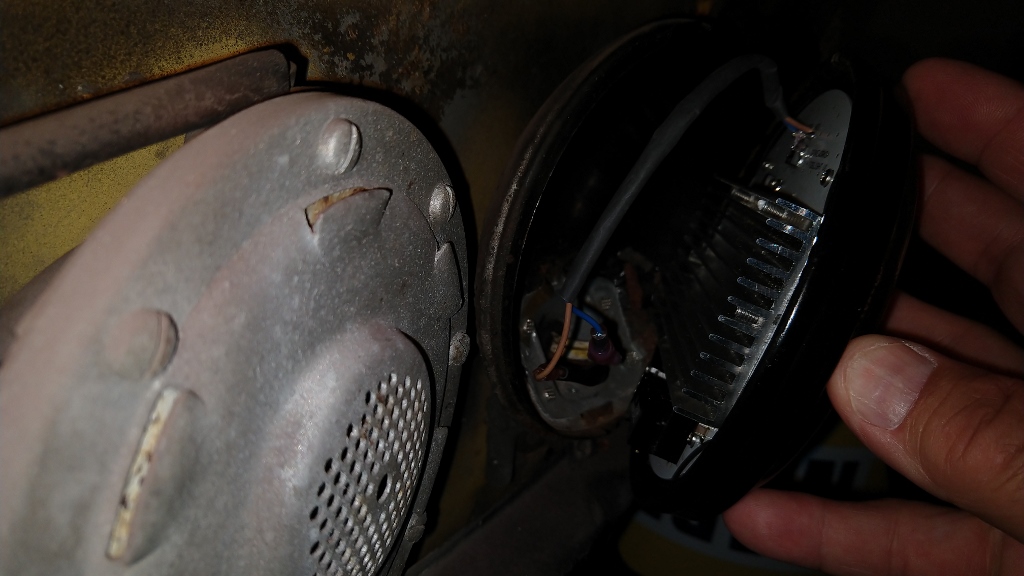
Install the bezel making sure the bezel assembly is straight. Screw in the locking clip and retest.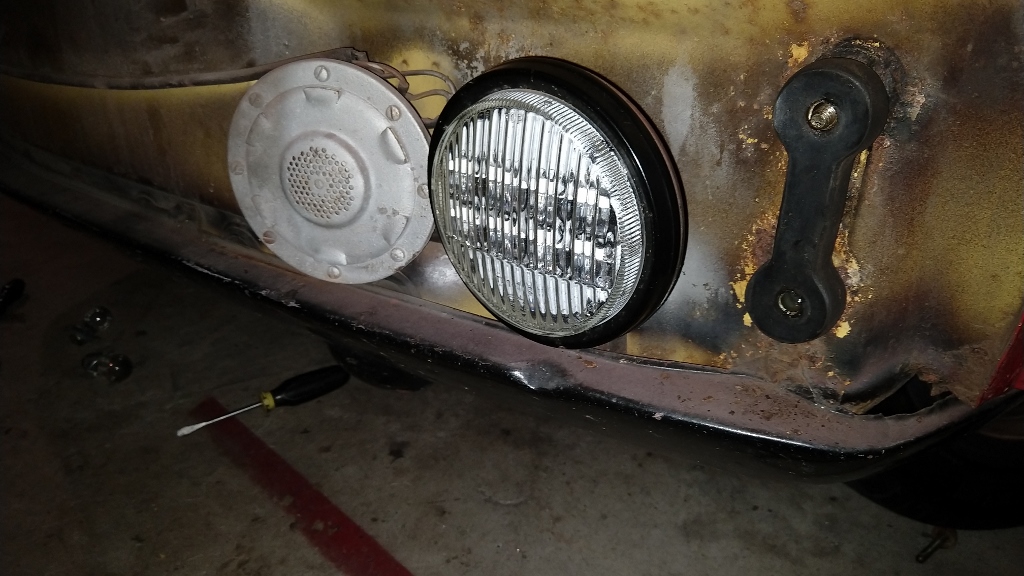
Posted by: Spoke Jul 29 2019, 09:54 PM
Replace the bumper and the installation is finished.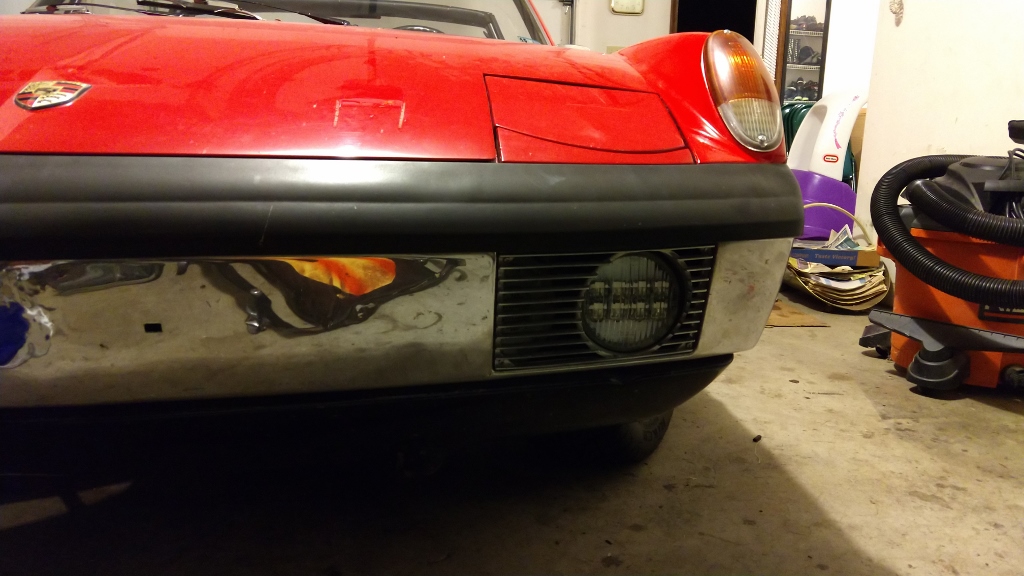
Posted by: advman89 Jul 30 2019, 11:37 AM
...and after all that.....964 Fog Lamps. You can't do anything but stock bulbs in them.
Posted by: Spoke Aug 10 2019, 08:48 AM
I'm getting ready to order some boards with updated dc/dc converter modules and was wondering if I should get the boards in white or black. One guy trying out my 911 fog lights thought they would look better with a black board.
Anyone have a preference?
Attached image(s)
Posted by: Spoke Aug 10 2019, 08:52 AM
Here's a crude attempt to photoshop a black PCB on the driver side.
Attached image(s)
Posted by: orthobiz Aug 10 2019, 09:05 AM
Great work, great thread.
Did I miss an updated picture of the light pattern with the final taping?
Paul
Posted by: Spoke Aug 10 2019, 09:33 AM
This set is for @http://www.914world.com/bbs2/index.php?showuser=10825 . This set and mine will be the only ones with the discrete dc/dc converter running 500ma. All further foglights will use a dc/dc converter module running about 425ma.
Mark, do you want me to paint one of the bezel rings or are you going to send another set already painted/powder coated? I'll only need the bezel ring as the back side of the enclosure is not necessary to install the led boards.
Attached thumbnail(s)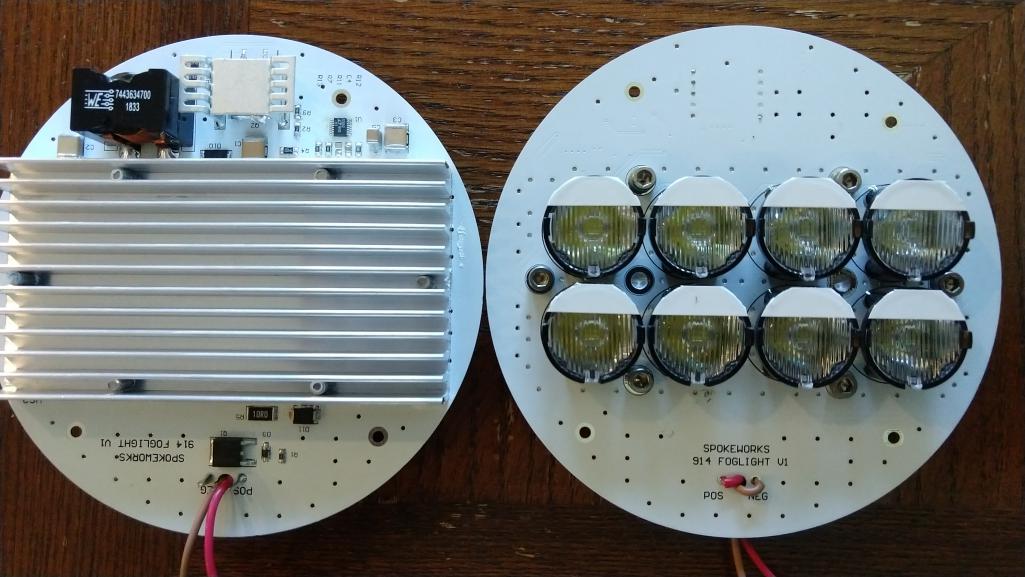
Posted by: Spoke Aug 10 2019, 09:35 AM
Great work, great thread.
Did I miss an updated picture of the light pattern with the final taping?
Paul
I haven't done a before and after with the tape. The tape does help with the upper light but does not completely cut it off. With such a small lens close to the LED it's hard to completely cut off the top of the light pattern. I'll get a before/after with Mark's set of lights.
Posted by: Spoke Sep 23 2019, 05:13 PM
I did a lot of experimenting with the light pattern from the LEDs and the results were less than I hoped. Actually none worked. Trying to shade the LEDs from the upward light output only managed to reduce the LED output.
I have a set of LED fogs on my 914 and my 911. They are 2x brighter than the standard bulbs and 1/3 the power. They don't seem to blind anyone as they're not that bright.
At this point I think I'd like to get a few of these in some other cars to get some other opinions. What I'd like to do is sell up to 5 sets at a reduced price ($100/pair). The regular price will be $165/pair.
I've only worked out the clips and fixturing for early fogs so only looking for those with early fogs. The boards will be black.
Let me know if you're interested. I've started building the boards and will have them finished in a couple of weeks. I'm hoping to get @http://www.914world.com/bbs2/index.php?showuser=10825 s fogs to him next week.
Attached thumbnail(s)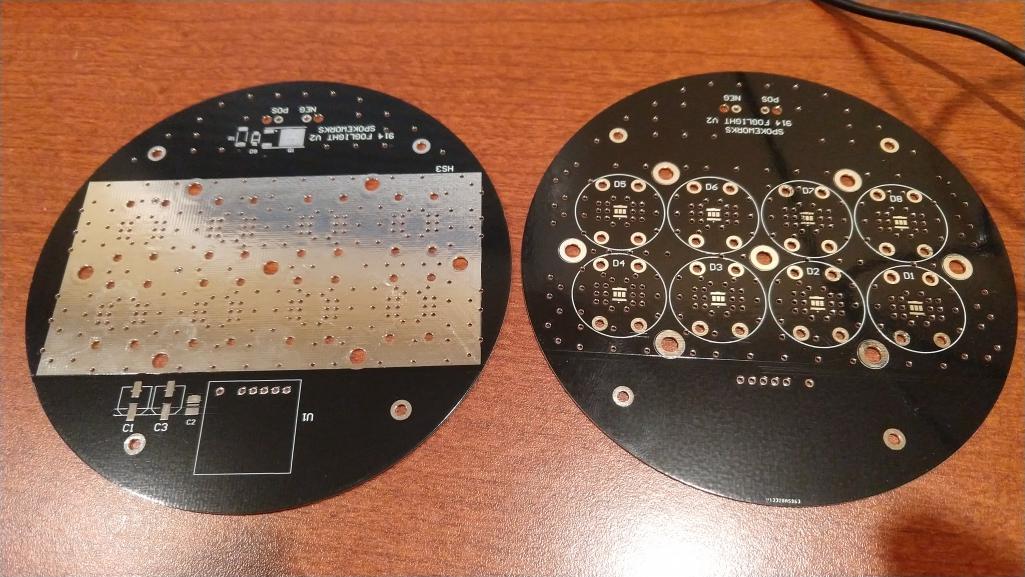
Posted by: mepstein Sep 23 2019, 05:24 PM
Very cool stuff. Driving my rural roads during dear season, the more light the better.
Posted by: Jamie Sep 23 2019, 05:36 PM
I'm totally supporting this. I drive at night 90% of the time, and my fog light reflectors are shot. I got a quote to re-silver at almost $100 each side. A quality LED conversion would give me my fog lights back.
If you want the best led headlights out there - in my opinion- its these trucklight 7” headlights. Very popular with the Jeep guys as well as motorcycle riders. There are cheaper options but a lot of times you get what you pay for. They take 10 minutes to install with no mods and are a total game changer. They make driving at night so much easier. They look a little odd but during the day the lights are down anyway. Even though they are very bright, I never get flashed because they have a very good cut off. The high beam is insane. They use less voltage than ordinary lights so are a little easier on our cars older wires and less battery drain.
At Okteenerfest we had a demo from a tech from VintagecarLED.com install a set of their headlights in the stock 7"housing. It was a slick switch, with less amp draw than my H4's installed years ago. I installed them 2 days ago and they light up the night with a well controlled beam set HI and LO. The model number is VC3500Standard and we were offered a 15% discount total $160.65 for attendees, and I believe the regular price is $179. I watched a YouTube test of 12 different brands of LED headlights, and this was the winner for me.

Posted by: FlacaProductions Sep 23 2019, 09:05 PM
I'm not in the market for these right now but I love this stuff and the work behind it. My $.02 - on this car shown, white boards. The lights just sort of disappear that way.
That said, I have black bumpers and black grills so if I would get them I'd probably go black boards......
Posted by: drem914 Oct 27 2019, 11:54 AM
Any progress on a rectangular version for 75-76 and 911s?
Posted by: Spoke Nov 7 2019, 10:37 PM
Any progress on a rectangular version for 75-76 and 911s?
Do you know if the 75-76 version fixtures open up? I had a 911 version where the glass lens was bonded to the metal reflector. I couldn't get them apart and had to give up.
Posted by: Spoke Nov 7 2019, 10:57 PM
Printed a spacer for the later foglights and they fit nicely using the original clips.
Have all the components soldered on the first of 3 black board sets. I'm offering the first 3 sets for $100/pair but no takers yet. Normal price will be $165/pair. There's lots of expensive components on these boards.
There are 5 911 owners with the 911 version of these foglights now. Once I get past this initial startup, I plan to make these generally available.
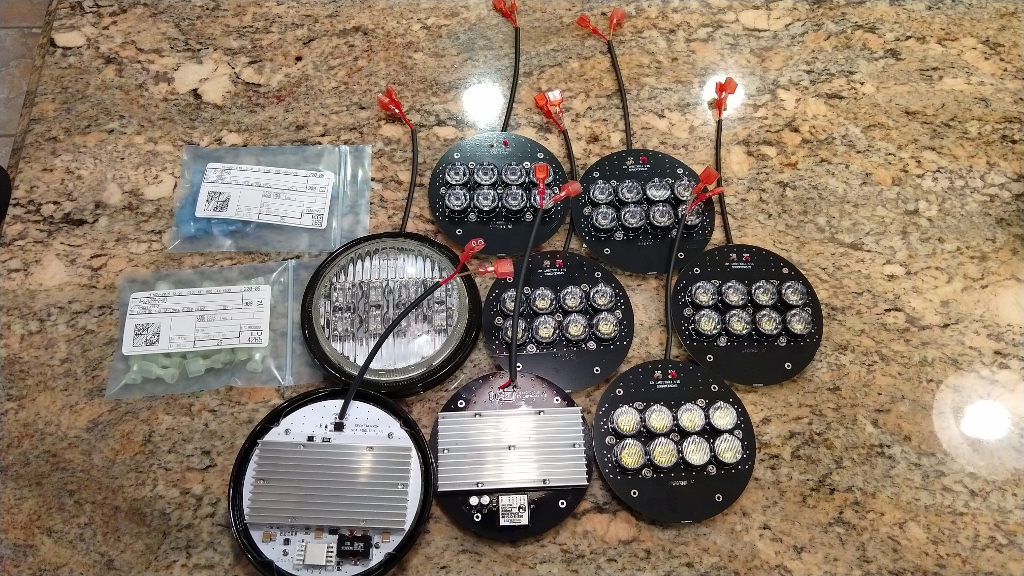
This set has been cleaned. Now will glue on the LED lens holders and screw on the heatsinks.
Printed a jig for drilling the holes for the heatsinks. This set is done and ready for assembly.
Attached image(s)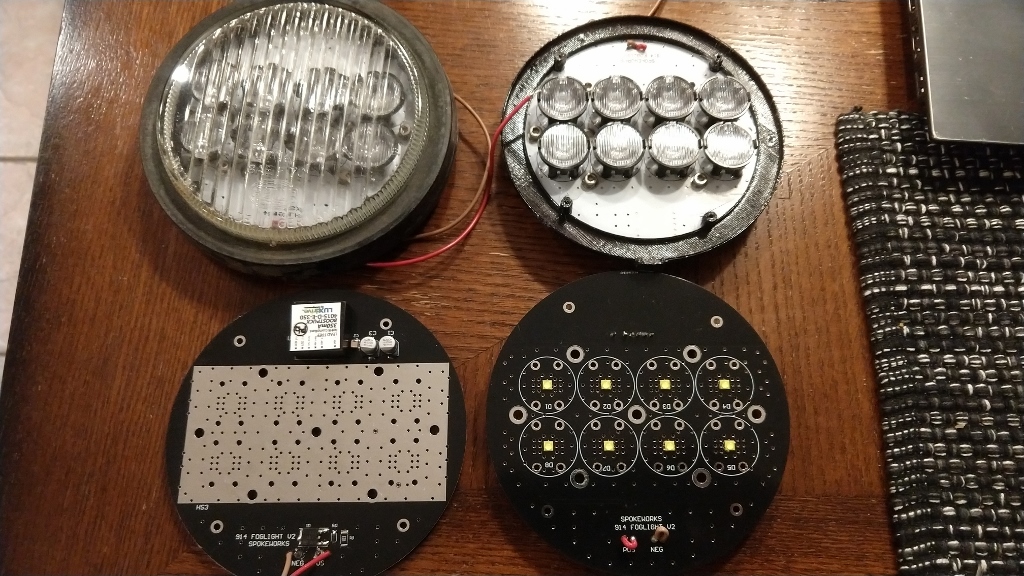
Posted by: drem914 Nov 8 2019, 12:23 AM
Any progress on a rectangular version for 75-76 and 911s?
Do you know if the 75-76 version fixtures open up? I had a 911 version where the glass lens was bonded to the metal reflector. I couldn't get them apart and had to give up.
According to the maint. manual they do not, like the 911 version. I will have to look for a replacement LED bulb to the 35w bulb to be replaced in the lens housing. Any recommendations?
Posted by: bahnzai Nov 8 2019, 07:45 AM
Hi Jerry, @http://www.914world.com/bbs2/index.php?showuser=3031
I will try a set...I have all your other LED offerings and love them 
I will PM you for the details
Thanks!
Danny
Posted by: DRPHIL914 Nov 8 2019, 07:56 AM
Hey I missed your posting back in sept. About having components for the round fog lights, I have been waiting for this since the beginning so if you still have available one of those first sets at $100 I will PayPal you now!
Phil
@http://www.914world.com/bbs2/index.php?showuser=3031
Posted by: mepstein Nov 8 2019, 08:15 AM
I’ll buy one of the intro sets if still available. Thanks
Posted by: Spoke Nov 8 2019, 08:54 AM
I’ll buy one of the intro sets if still available. Thanks
@http://www.914world.com/bbs2/index.php?showuser=10825
Is this in addition to the white set? I painted the early rings and should be ready to ship all the parts back to you. The boards will be mounted in the early rings. I didn't do anything with bodies. Please PM your contact info.
Attached image(s)
Posted by: mepstein Nov 8 2019, 09:53 AM
I’ll buy one of the intro sets if still available. Thanks
@http://www.914world.com/bbs2/index.php?showuser=10825
Is this in addition to the white set? I painted the early rings and should be ready to ship all the parts back to you. The boards will be mounted in the early rings. I didn't do anything with bodies. Please PM your contact info.
Yes.
Posted by: ClayPerrine Nov 9 2019, 07:30 AM
![]()
Spokeworks brings good things to light!
Posted by: Tdskip Nov 9 2019, 08:38 AM
Very cool thread, love to see fabrication like his.
Posted by: 914-300Hemi Nov 9 2019, 09:54 AM
Spoke,
I would like to to try a set. If they are still available
Posted by: Retroracer Nov 9 2019, 12:39 PM
Why not mount the power supply remote in an IP65/67 enclosure mounted behind the 914 grille? It would free up some space and maybe reduce temps inside the light assembly.
This is what I did for the 356 running lights although the boost converter PCB was mounted inside the housing. I proposed a separate box to put the converter in but the owner didn't want an external box so I mounted on the back of the heatsink.
I'd like to keep it to one PCB for simplicity although a separate module may be needed depending on temperature rise.
Spoke - First off, well done on tackling this design! Not noticed this thread until today.
Great that you went for a "single box" solution; the fog lights are typically subject to some airflow and not near any heat sources - which is good. Kind of wondering if there's any way to extend the LED heatsinking out to the rear metal enclosure? Again, this is usually not exposed to a casual finger burn and the mount lug to chassis would be a great "thermal sink".
Obviously some serious three dimensional issues to solve there, getting the right stack up and profile to contact well to the outer shell. And the added expense over an "off the shelf" heat sink. But 10ish watts dissipated inside a small enclosure with only convection cooling to the casing might mean the electronics be running hot....?
Again, love seeing this kind of project being tackled, with modern electronics being integrated tastefully into existing components!
- Tony
Posted by: Spoke Nov 11 2019, 08:55 PM
@http://www.914world.com/bbs2/index.php?showuser=10825
@http://www.914world.com/bbs2/index.php?showuser=11106
@http://www.914world.com/bbs2/index.php?showuser=6509
Guys, I have you down for the three V2 boards I'm assembling right now. I'll get with you about payment and shipping and all. These boards are black in color.
Unfortunately, I fucked up the design of the boards by making them too small. The amazing thing is I had these V2 boards designed about 100mil larger and I out-thought myself and at the last minute made them the same size as the V1 boards.
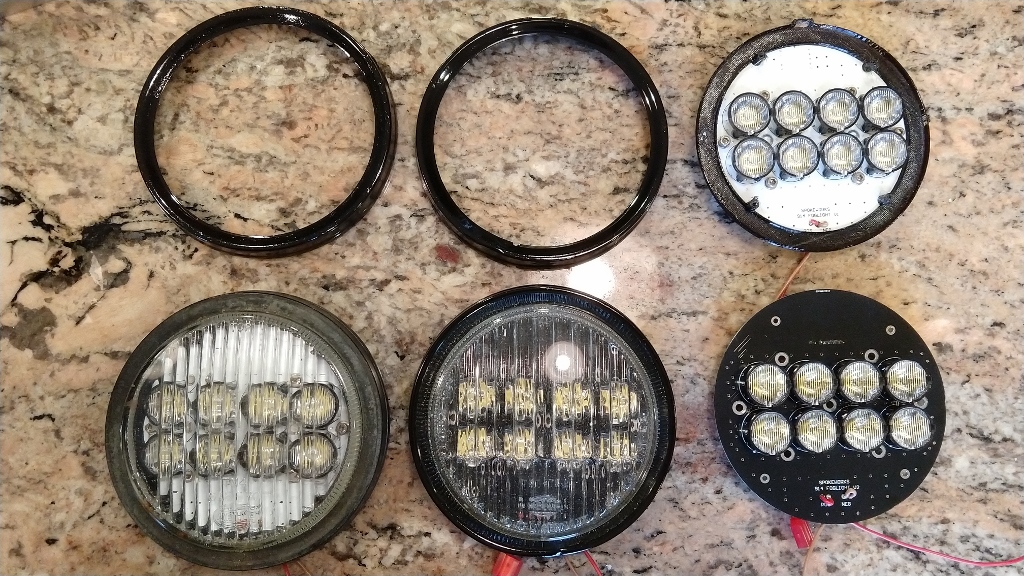
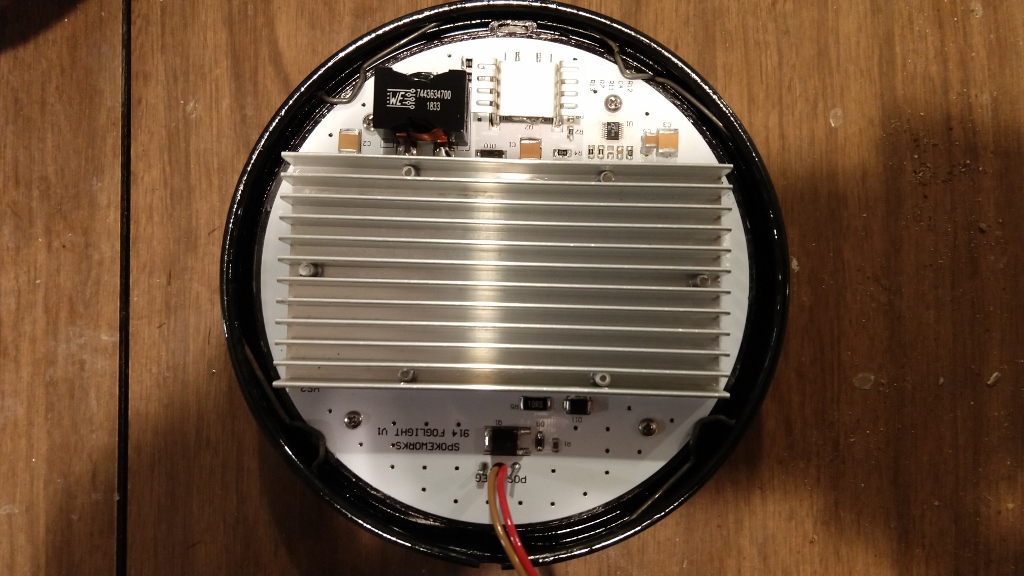
Mark and I are the only ones with the V1 boards with discrete dc-dc converter. His boards are shown below. In the first picture the black surrounding the board is the plastic part I printed to hold the board in sync with the glass lens and gasket.
The problem comes in when looking at the 2nd picture with the board mounted in the light bezel. The clips barely touch the board. This is not good or sustainable. The board needs to be about 150mil larger.
Attached image(s)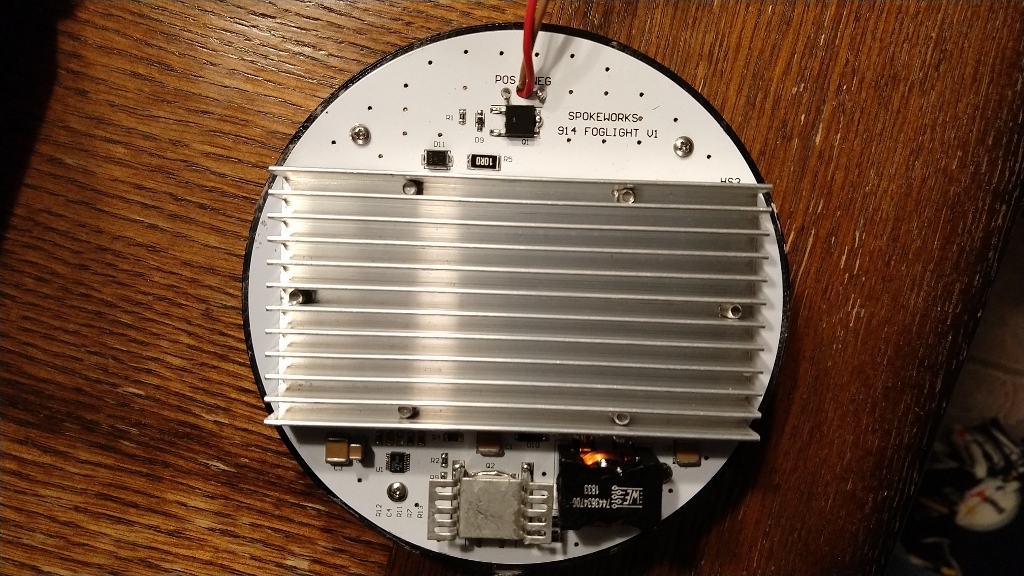
Posted by: Spoke Nov 11 2019, 09:06 PM
@http://www.914world.com/bbs2/index.php?showuser=10825
@http://www.914world.com/bbs2/index.php?showuser=11106
@http://www.914world.com/bbs2/index.php?showuser=6509
One other thing with these V2 boards, you'll have to send the glass lens and bezel to me so I can fit these boards myself. I had so much of bitch of time getting Mark's boards to fit that I cannot have you go through this. This will also help me understand how to ease the mounting of these boards in the lens/bezel.
What I will do is replace the gaskets with new 914rubber gaskets and mount the boards. It will ease your installation greatly. If you want as well I can paint (gloss black) the bezel for you if you want.
Posted by: mepstein Nov 11 2019, 09:16 PM
Jerry - Does it matter if the lights are early or late?
And I'm in no rush for the second set so if you have someone next in line, feel free to move me down the list. I'll get them but the second set will be on my shelf for a while.
Posted by: Spoke Nov 11 2019, 09:16 PM
@http://www.914world.com/bbs2/index.php?showuser=17338
I am in the process of redesigning the boards (V3) to be 150mil larger. The plan is to offer 5 members a set of foglights again for $100/set. These will be a couple of weeks out as I haven't finished the design yet. The boards will be black color.
Todd I have you down for one of the board sets. You mentioned about using the fogs for 100 mile commutes with 914rubber yellow lens. These should work well with them. Here's a 911 with my foglights with yellow lens.
Attached image(s)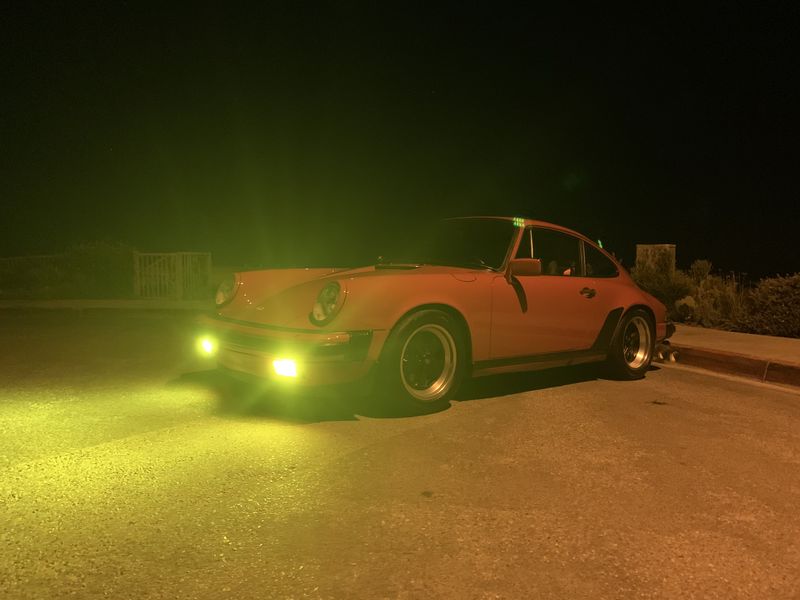
Posted by: Spoke Nov 11 2019, 09:31 PM
Jerry - Does it matter if the lights are early or late?
And I'm in no rush for the second set so if you have someone next in line, feel free to move me down the list. I'll get them but the second set will be on my shelf for a while.
Not a problem with later years. The lens is flatter than early years thus a larger spacer is needed however the later bezel is flatter thus allowing the spacer to take up space with the original clips to be used.
And no, you are getting a second set. I still haven't gotten a ride in your 914/6... Shit's piling up on your side. Karma's a bitch.
I have 3 late fogs from you although 2 of the glass lenses are pretty beat up. One is fully cracked in half. One is in good shape. If you want to send a better set, that's your decision.
Posted by: Spoke Nov 11 2019, 09:38 PM
And I'm in no rush for the second set so if you have someone next in line, feel free to move me down the list. I'll get them but the second set will be on my shelf for a while.
If you want, @http://www.914world.com/bbs2/index.php?showuser=17338 is looking for a set, I target the set to him.
Posted by: mepstein Nov 11 2019, 09:41 PM
I figured you could use those old ones for testing. I don’t need them back. I do have a better set and we’ll work out the details later. Thanks.
Posted by: Tbrown4x4 Nov 11 2019, 10:12 PM
Those look great. Should make the drive a little safer. Should I PayPal you the $ now or?
Posted by: Spoke Nov 11 2019, 10:35 PM
Those look great. Should make the drive a little safer. Should I PayPal you the $ now or?
Let me get back to you on this. I need to have the LED fogs completely assembled before asking you to send you lens/bezels to me. this will minimize the disruption in your daily commute.
Posted by: Tbrown4x4 Nov 12 2019, 07:50 AM
Sounds good!
Posted by: DRPHIL914 Nov 12 2019, 10:00 AM
@http://www.914world.com/bbs2/index.php?showuser=10825
@http://www.914world.com/bbs2/index.php?showuser=11106
@http://www.914world.com/bbs2/index.php?showuser=6509
One other thing with these V2 boards, you'll have to send the glass lens and bezel to me so I can fit these boards myself. I had so much of bitch of time getting Mark's boards to fit that I cannot have you go through this. This will also help me understand how to ease the mounting of these boards in the lens/bezel.
What I will do is replace the gaskets with new 914rubber gaskets and mount the boards. It will ease your installation greatly. If you want as well I can paint (gloss black) the bezel for you if you want.
I can pull my bumpers and fog lights this will and send you what you need, do I send you the whole fog light assembly ?
Just let me know where to send and what to send- or I can wait for the V3 set coming up, either way- also have to pay you too!!
Posted by: DRPHIL914 Nov 22 2019, 10:28 AM
@http://www.914world.com/bbs2/index.php?showuser=10825
@http://www.914world.com/bbs2/index.php?showuser=11106
@http://www.914world.com/bbs2/index.php?showuser=6509
One other thing with these V2 boards, you'll have to send the glass lens and bezel to me so I can fit these boards myself. I had so much of bitch of time getting Mark's boards to fit that I cannot have you go through this. This will also help me understand how to ease the mounting of these boards in the lens/bezel.
What I will do is replace the gaskets with new 914rubber gaskets and mount the boards. It will ease your installation greatly. If you want as well I can paint (gloss black) the bezel for you if you want.
I can pull my bumpers and fog lights this will and send you what you need, do I send you the whole fog light assembly ?
Just let me know where to send and what to send- or I can wait for the V3 set coming up, either way- also have to pay you too!!
ready when you are, just PM address etc. have a show on Dec 7 so I would like to ei have you send it to me and let me install it myself if possible.
Phil
Posted by: Spoke Nov 22 2019, 03:51 PM
@http://www.914world.com/bbs2/index.php?showuser=10825
@http://www.914world.com/bbs2/index.php?showuser=11106
@http://www.914world.com/bbs2/index.php?showuser=6509
One other thing with these V2 boards, you'll have to send the glass lens and bezel to me so I can fit these boards myself. I had so much of bitch of time getting Mark's boards to fit that I cannot have you go through this. This will also help me understand how to ease the mounting of these boards in the lens/bezel.
What I will do is replace the gaskets with new 914rubber gaskets and mount the boards. It will ease your installation greatly. If you want as well I can paint (gloss black) the bezel for you if you want.
I can pull my bumpers and fog lights this will and send you what you need, do I send you the whole fog light assembly ?
Just let me know where to send and what to send- or I can wait for the V3 set coming up, either way- also have to pay you too!!
ready when you are, just PM address etc. have a show on Dec 7 so I would like to ei have you send it to me and let me install it myself if possible.
Phil
I've been waiting on crimp connectors and shrink wrap tubing to finish off the wiring. I need to order some gaskets from 914rubber too. I'll need just the glass lens, reflector and clips from the foglights. I can either leave the bezel rings as is or paint them for you. I should be ready to go this weekend.
Posted by: DRPHIL914 Nov 24 2019, 06:54 AM
@http://www.914world.com/bbs2/index.php?showuser=10825
@http://www.914world.com/bbs2/index.php?showuser=11106
@http://www.914world.com/bbs2/index.php?showuser=6509
One other thing with these V2 boards, you'll have to send the glass lens and bezel to me so I can fit these boards myself. I had so much of bitch of time getting Mark's boards to fit that I cannot have you go through this. This will also help me understand how to ease the mounting of these boards in the lens/bezel.
What I will do is replace the gaskets with new 914rubber gaskets and mount the boards. It will ease your installation greatly. If you want as well I can paint (gloss black) the bezel for you if you want.
I can pull my bumpers and fog lights this will and send you what you need, do I send you the whole fog light assembly ?
Just let me know where to send and what to send- or I can wait for the V3 set coming up, either way- also have to pay you too!!
ready when you are, just PM address etc. have a show on Dec 7 so I would like to ei have you send it to me and let me install it myself if possible.
Phil
I've been waiting on crimp connectors and shrink wrap tubing to finish off the wiring. I need to order some gaskets from 914rubber too. I'll need just the glass lens, reflector and clips from the foglights. I can either leave the bezel rings as is or paint them for you. I should be ready to go this weekend.
Very good, I will pull those today and box them up , PM me with a shipping address and will drop them by UPS store tomorrow.
Phil
Posted by: DRPHIL914 Nov 24 2019, 07:38 PM
Jerry,
Pulled my fog light lenses and bezels . I assume you do not need my bulb socket and bulb. I have them packed and ready to go.
Thanks. Please PM me the ship to address.
@http://www.914world.com/bbs2/index.php?showuser=3031 .
Posted by: Spoke Nov 24 2019, 08:48 PM
Jerry,
Pulled my fog light lenses and bezels . I assume you do not need my bulb socket and bulb. I have them packed and ready to go.
Thanks. Please PM me the ship to address.
@http://www.914world.com/bbs2/index.php?showuser=3031 .
PM sent.
I just need the bezel, glass lens, and reflector. I don't need the bulb or socket.
I finally got all the quick disconnect spades ordered and received. The first batch of boards are now done including @http://www.914world.com/bbs2/index.php?showuser=10825 's.
Attached image(s)
Posted by: mepstein Nov 24 2019, 08:51 PM
Awesome!
Driving at night on my rural roads, there is no such thing as too much light.
Posted by: Spoke Nov 24 2019, 09:09 PM
Each kit will include 4 quick disconnect spades to be crimped onto the wire that was connected to the bulb socket. The bulb socket is held onto these wires with a small straight screw. Loosen the screw and the bulb socket comes off and leave the wires shown below.
The OEM 12V wiring goes from the cabin to the driver side foglight. Then a separate wire is soldered to the end of the cabin wire (at the driver side foglight) and runs over to the passenger side. Thus the gauge of the 2 soldered wires on the driver side is 2x that of the passenger side.
The yellow sheathed connector is for a heavy gauge wire and goes on the driver side. The blue sheathed connector is for the passenger side. 2 extra connectors will be included just in case there's an issue with the first connectors.
Attached image(s)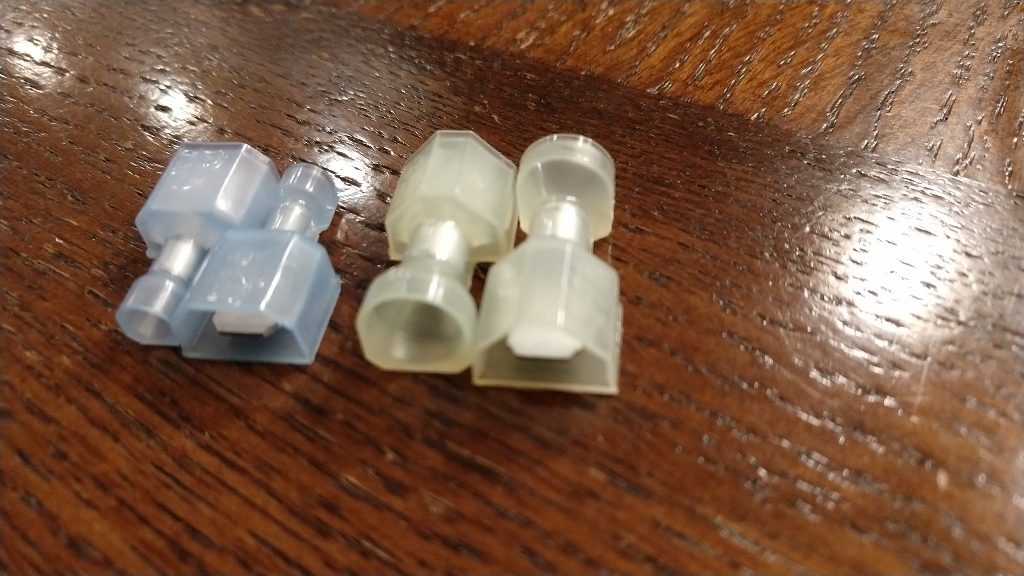
Posted by: ClayPerrine Nov 25 2019, 07:33 AM
How do I get a couple of sets??????
Posted by: DRPHIL914 Nov 25 2019, 07:50 AM
Jerry,
Pulled my fog light lenses and bezels . I assume you do not need my bulb socket and bulb. I have them packed and ready to go.
Thanks. Please PM me the ship to address.
@http://www.914world.com/bbs2/index.php?showuser=3031 .
PM sent.
I just need the bezel, glass lens, and reflector. I don't need the bulb or socket.
I finally got all the quick disconnect spades ordered and received. The first batch of boards are now done including @http://www.914world.com/bbs2/index.php?showuser=10825 's.
PM received, lights boxed and ready to ship today, will get you PP sent this afternoon.
Phil
Posted by: Spoke Nov 25 2019, 10:04 PM
How do I get a couple of sets??????
I have some V3 boards coming back from the fab house now. These boards are a bit larger (by 0.15 in) and thicker (1.2mm vs 0.8mm) than the first boards. I'll possibly make 5 sets available of the V3 boards. I should have these around Christmas time.
Stay tuned...
Posted by: ClayPerrine Nov 26 2019, 09:38 AM
How do I get a couple of sets??????
I have some V3 boards coming back from the fab house now. These boards are a bit larger (by 0.15 in) and thicker (1.2mm vs 0.8mm) than the first boards. I'll possibly make 5 sets available of the V3 boards. I should have these around Christmas time.
Stay tuned...
I have a couple of Euro front turn signal buckets to send you.
Clay
Posted by: Spoke Nov 27 2019, 07:05 PM
Received @http://www.914world.com/bbs2/index.php?showuser=11106 's fog lights today. His are a mix of early bezel with late lenses. The gasket used is much different from the 914rubber gasket and went completely around the glass and reflector.
Between the glass and reflector where the 914rubber gasket goes, someone had applied some sort of sealant. Took a razor blade, naphtha, and acetone to get the remnants off. One light had 3 clips and the other had 4 clips.
While scraping off the sealant, I scraped the plastic film off of the glass lens. I was wondering why the lenses looked hazy.
Attached image(s)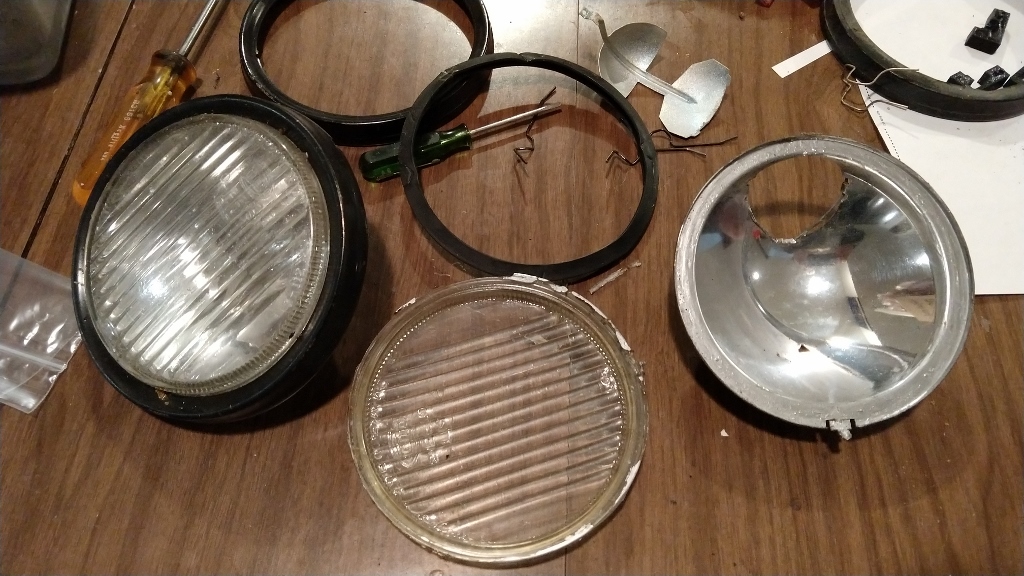
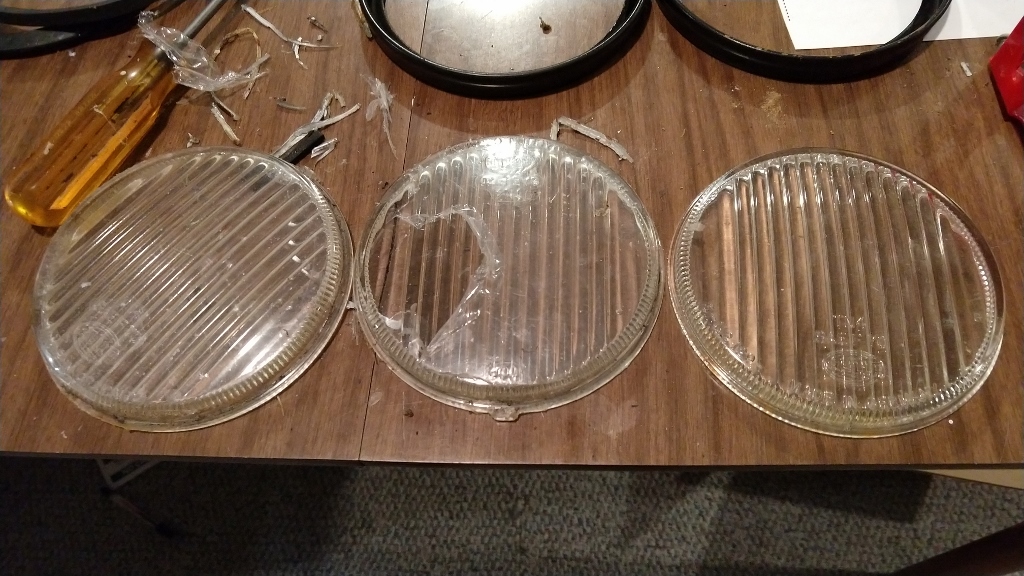
Posted by: DRPHIL914 Nov 27 2019, 07:18 PM
Received @http://www.914world.com/bbs2/index.php?showuser=11106 's fog lights today. His are a mix of early bezel with late lenses. The gasket used is much different from the 914rubber gasket and went completely around the glass and reflector.
Between the glass and reflector where the 914rubber gasket goes, someone had applied some sort of sealant. Took a razor blade, naphtha, and acetone to get the remnants off. One light had 3 clips and the other had 4 clips.
While scraping off the sealant, I scraped the plastic film off of the glass lens. I was wondering why the lenses looked hazy.
Sorry about all that extra work, I didn’t know about the sealant etc. bought them as a restored unit. I thing the film on the lenses was for protection against stone chips but probably cut down a lot on light transmission
Should be a lot brighter!!
Posted by: Spoke Nov 29 2019, 06:21 AM
Sorry about all that extra work, I didn’t know about the sealant etc. bought them as a restored unit. I thing the film on the lenses was for protection against stone chips but probably cut down a lot on light transmission
Should be a lot brighter!!
Not a problem. For fitment, it's good for me to see what condition some foglights are in. For sure the gasket between the reflector and the glass lens should be new and the type sold by 914rubber. I'm not sure what type of gasket was used on your fogs. It seemed to be made for this application but doesn't work like the original gasket.
You bezels have been painted and I should have everything in the mail by Monday.
Posted by: Spoke Nov 30 2019, 06:35 PM
The foglights for @http://www.914world.com/bbs2/index.php?showuser=11106 are ready for shipping. The fit was much better than I had expected and the install went smoothly. The bezels were wet sanded and painted and new 914rubber gaskets were installed.
The spacer/alignment piece for the later glass lens is very thick (7mm) which allows the metal clips to hold them instead of the PCBs since these V2 PCBs are about 150mil too small. The thicker spacer doesn't deform with the pressure of the metal clips like the thinner ones printed for the early (deeper) glass lenses. Perhaps I'll stick with the thicker spacers even for the early glass lenses.
Attached image(s)
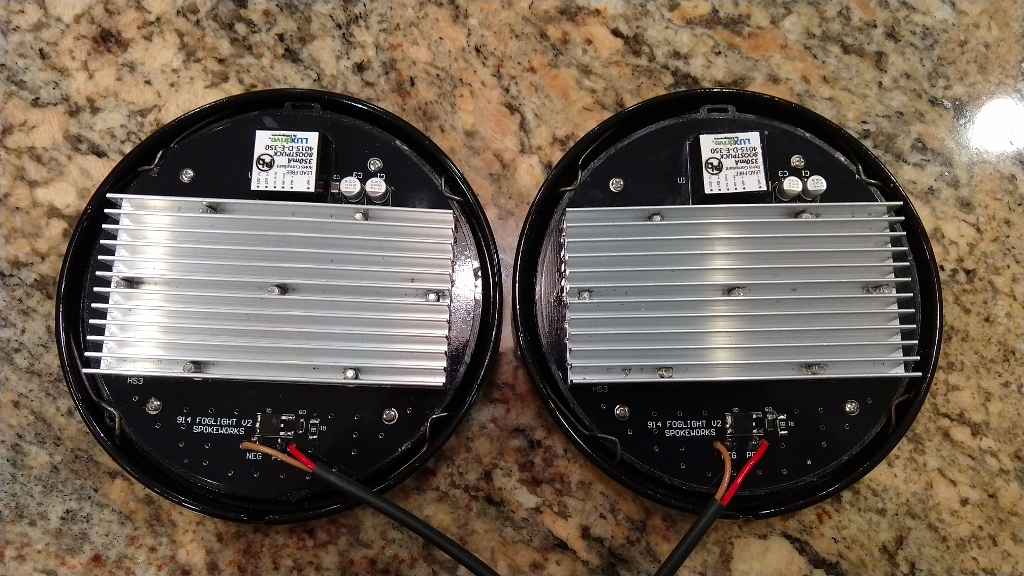
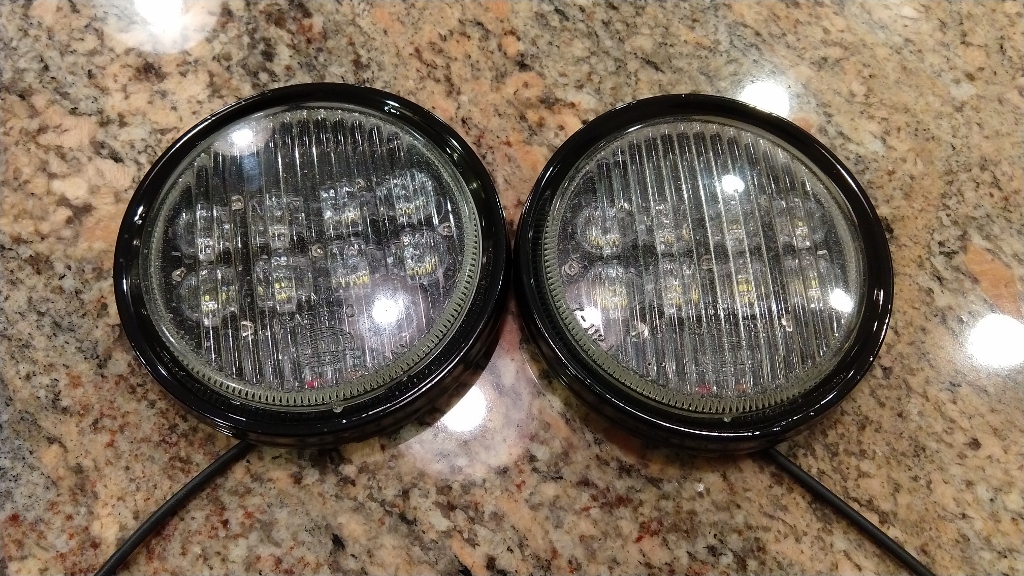
Posted by: DRPHIL914 Nov 30 2019, 07:27 PM
Wow those are spectacular!!! Really super!! Eventually I will be doing my tail lights but this was more needed, I am sure they will improve visibility immensely! And reall above and beyond touching up the bezels! Thanks so much!
Phil
@http://www.914world.com/bbs2/index.php?showuser=3031
Posted by: Spoke Dec 2 2019, 09:04 PM
I have the V3 foglight boards back from the fab house and started assembling them.
I plan to make 5 sets of these. I still want to assemble them myself so it would require folks to send me the bezel, glass, and reflector. I'm doing this so I can see for myself if these fit in the enclosure.
For pricing with these V3 boards is this:
$125/pair + $20 shipping includes:
New set of 914rubber gaskets (worth $20)I
You send the bezel, reflector, glass lens to me.
I'll paint the bezel, install the boards and return.
When I feel comfortable with the assembly in these first foglights, the foglights will be generally available for $150/pair.
Posted by: mepstein Dec 3 2019, 10:43 AM
Wow! Thank you Jerry
Attached thumbnail(s)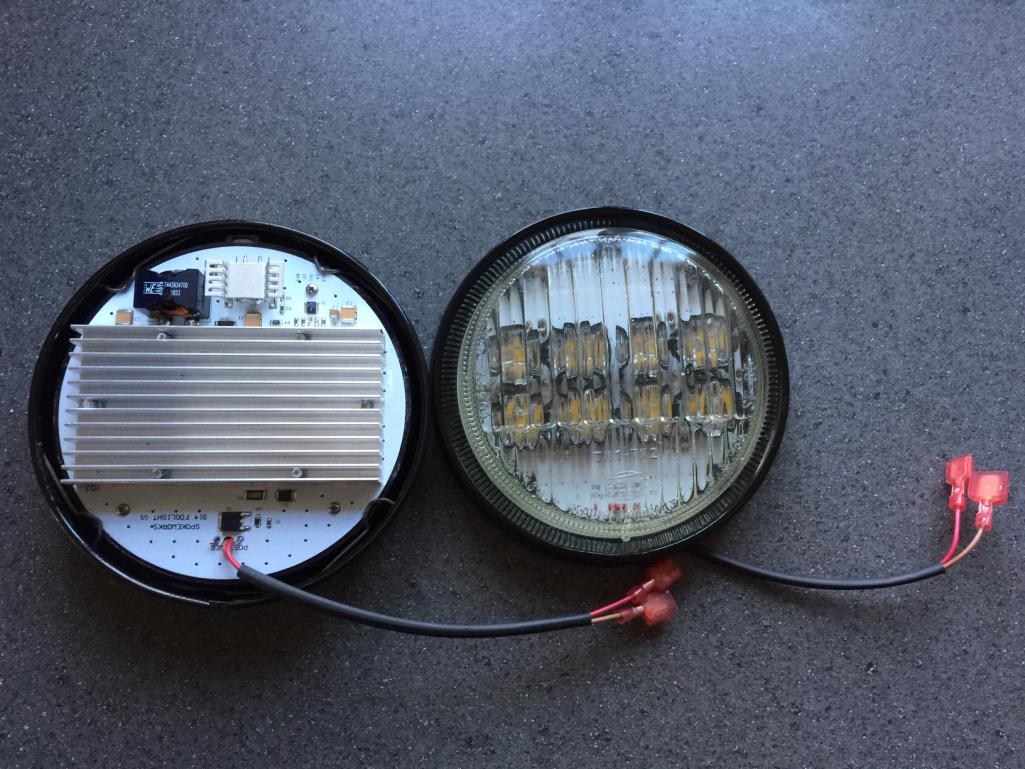
Posted by: bahnzai Dec 4 2019, 06:49 AM
Jerry,
Components are packaged and will send out today. I have the bezels, both type lenses, and the reflectors & clips. you should see them in a few days.
Thanks,
Danny
Posted by: DRPHIL914 Dec 4 2019, 09:20 PM
Package received today! I will install these tomorrow after work and take some more pictures,
Thanks again Jerry!
Attached thumbnail(s)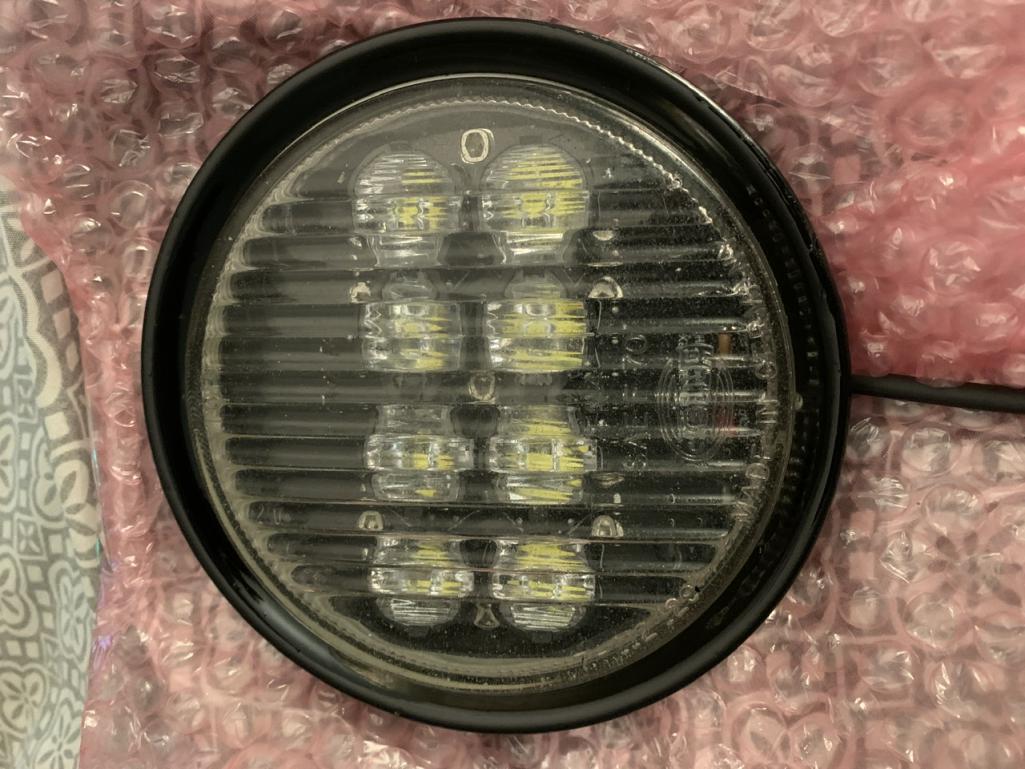
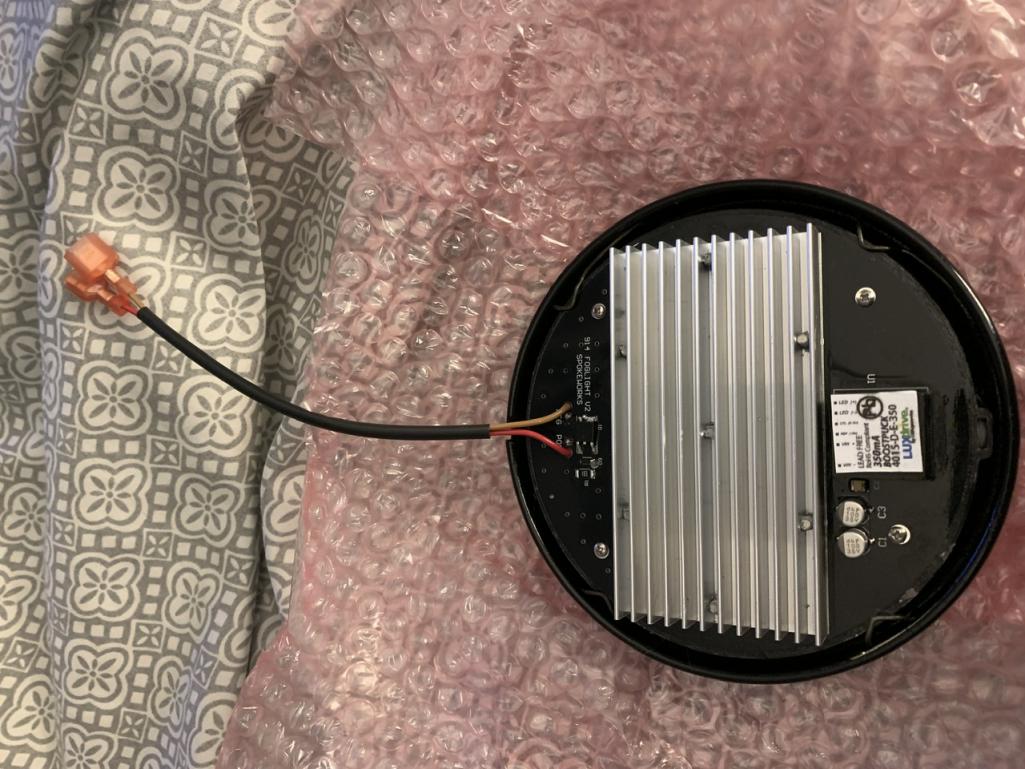
Posted by: Tbrown4x4 Dec 5 2019, 03:58 AM
Those look great! I sent mine Monday. You should get them Thursday.
I was bummed I forgot to take "before" pictures.
And Jerry, I cleaned my lenses and painted the rings. My lenses have the 914Rubber chip guards on them too.
Posted by: DRPHIL914 Dec 7 2019, 12:48 PM
This is just the fog lights ... just perfect , now I need the vintage LED headlights!!!
Attached thumbnail(s)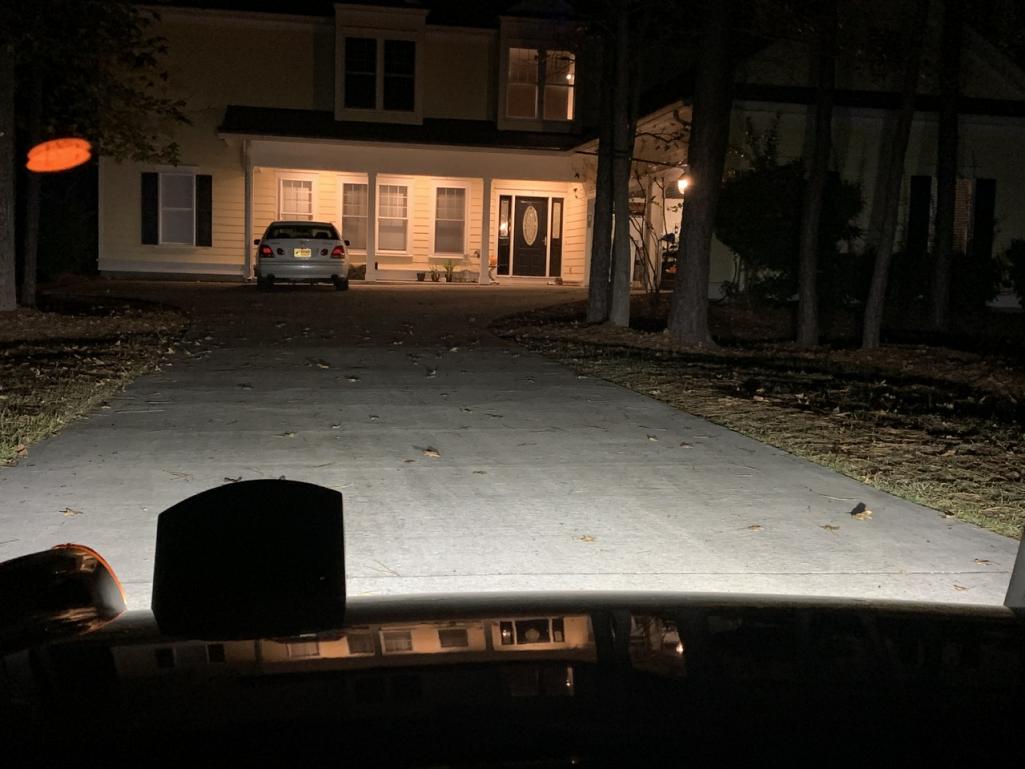
Posted by: mepstein Dec 7 2019, 02:41 PM
This is just the fog lights ... just perfect , now I need the vintage LED headlights!!!
I plan to use mine like high beams. I’ll turn them off if cars are coming at me.
Posted by: DRPHIL914 Dec 7 2019, 02:54 PM
This is just the fog lights ... just perfect , now I need the vintage LED headlights!!!
I plan to use mine like high beams. I’ll turn them off if cars are coming at me.Used them as driving lights today and I know as I came up behind several drivers moved over as they saw me coming up from behind- that has not been the case even with other fog light and headlights on before, so I think with either then GE nighthawk or Vintage LED will give better visibility for me and to be seen by other drivers.
I know you have the GE ones right? That’s my next purchase after new front strut inserts
Posted by: mepstein Dec 7 2019, 03:45 PM
This is just the fog lights ... just perfect , now I need the vintage LED headlights!!!
I plan to use mine like high beams. I’ll turn them off if cars are coming at me.Used them as driving lights today and I know as I came up behind several drivers moved over as they saw me coming up from behind- that has not been the case even with other fog light and headlights on before, so I think with either then GE nighthawk or Vintage LED will give better visibility for me and to be seen by other drivers.
I know you have the GE ones right? That’s my next purchase after new front strut inserts
Yes. They are bright and have a sharp cutoff. 5 minute install. I would buy the again. My day said they were a big improvement on his 2013 Jeep.
Posted by: mb911 Dec 7 2019, 07:40 PM
I need to get on these.. I only have 1 fog light so I need to buy another for a core..
Posted by: Spoke Dec 8 2019, 09:14 PM
I need to get on these.. I only have 1 fog light so I need to buy another for a core..
I was contacted by another member looking for a set of 914 foglights. Seems there should be a lot available but maybe not. I told him to contact @http://www.914world.com/bbs2/index.php?showuser=10825 or @http://www.914world.com/bbs2/index.php?showuser=865 . Maybe Brad @http://www.914world.com/bbs2/index.php?showuser=581 would have a set or 2.
With the LED foglights, all you need is a decent rear enclosure, glass lens and bezel. The reflector and bulb socket are not used.
Posted by: Luke M Dec 9 2019, 12:57 PM
I have the V3 foglight boards back from the fab house and started assembling them.
I plan to make 5 sets of these. I still want to assemble them myself so it would require folks to send me the bezel, glass, and reflector. I'm doing this so I can see for myself if these fit in the enclosure.
For pricing with these V3 boards is this:
$125/pair + $20 shipping includes:
New set of 914rubber gaskets (worth $20)I
You send the bezel, reflector, glass lens to me.
I'll paint the bezel, install the boards and return.
When I feel comfortable with the assembly in these first foglights, the foglights will be generally available for $150/pair.
Hi Jerry,
I want to get in on a set of these led fogs. I have a set of restored fog lights here and 2 or 3 sets that are apart. Which set is best to send you the early round or late round style fogs? Pm me if you like.
Thanks,
Posted by: Spoke Dec 9 2019, 01:05 PM
I have the V3 foglight boards back from the fab house and started assembling them.
I plan to make 5 sets of these. I still want to assemble them myself so it would require folks to send me the bezel, glass, and reflector. I'm doing this so I can see for myself if these fit in the enclosure.
For pricing with these V3 boards is this:
$125/pair + $20 shipping includes:
New set of 914rubber gaskets (worth $20)I
You send the bezel, reflector, glass lens to me.
I'll paint the bezel, install the boards and return.
When I feel comfortable with the assembly in these first foglights, the foglights will be generally available for $150/pair.
Hi Jerry,
I want to get in on a set of these led fogs. I have a set of restored fog lights here and 2 or 3 sets that are apart. Which set is best to send you the early round or late round style fogs? Pm me if you like.
Thanks,
I prefer the early fogs only because the glass lens is deeper inside. However using the best lenses you have would be best.
Posted by: Luke M Dec 12 2019, 02:20 PM
I have the V3 foglight boards back from the fab house and started assembling them.
I plan to make 5 sets of these. I still want to assemble them myself so it would require folks to send me the bezel, glass, and reflector. I'm doing this so I can see for myself if these fit in the enclosure.
For pricing with these V3 boards is this:
$125/pair + $20 shipping includes:
New set of 914rubber gaskets (worth $20)I
You send the bezel, reflector, glass lens to me.
I'll paint the bezel, install the boards and return.
When I feel comfortable with the assembly in these first foglights, the foglights will be generally available for $150/pair.
Hi Jerry,
I want to get in on a set of these led fogs. I have a set of restored fog lights here and 2 or 3 sets that are apart. Which set is best to send you the early round or late round style fogs? Pm me if you like.
Thanks,
I prefer the early fogs only because the glass lens is deeper inside. However using the best lenses you have would be best.
Jerry,
This is what I have. I have a set of new tn4 lenses, seals, and clips.
I know I have a few more someplace but can't seam to find them.
I can send a set of tn1 lenses if those are better to use.
LMK
Attached image(s)
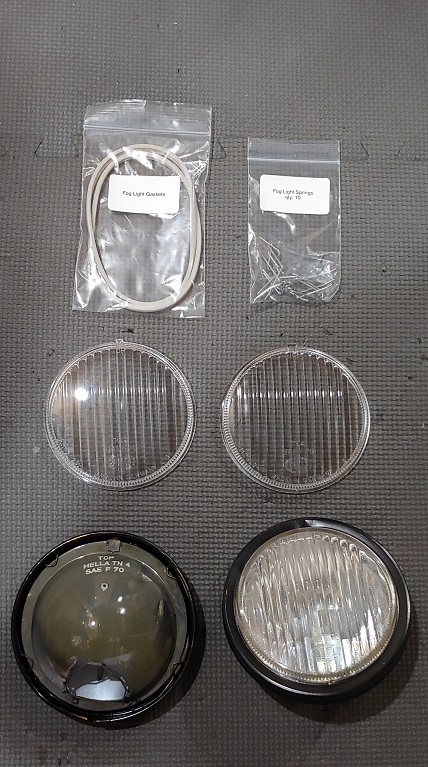
Posted by: mb911 Dec 12 2019, 02:38 PM
@http://www.914world.com/bbs2/index.php?showuser=3031 all I have is 1 good enclosure and 2 bezels.. I need to find 1 more enclosure and buy 2 new lens..
Let me know if anyone has an extra.
Posted by: bahnzai Dec 13 2019, 07:35 AM
Ben,
I think I have an extra enclosure for you. I may have an extra set of yellow lenses too. It will be Monday before I am back in where I can check.
Posted by: mb911 Dec 13 2019, 01:01 PM
Ben,
I think I have an extra enclosure for you. I may have an extra set of yellow lenses too. It will be Monday before I am back in where I can check.
@http://www.914world.com/bbs2/index.php?showuser=6509 thanks let me know..
Posted by: Spoke Dec 13 2019, 09:02 PM
Danny's @http://www.914world.com/bbs2/index.php?showuser=6509 foglights are done. Lenses are amber and in great shape with new gasket; bezels were already painted. Only took a few minutes to install. These smaller V2 boards are barely secured by the clips. The boards are screwed into the spacers so not a big deal if the clips don't touch the boards.
Attached image(s)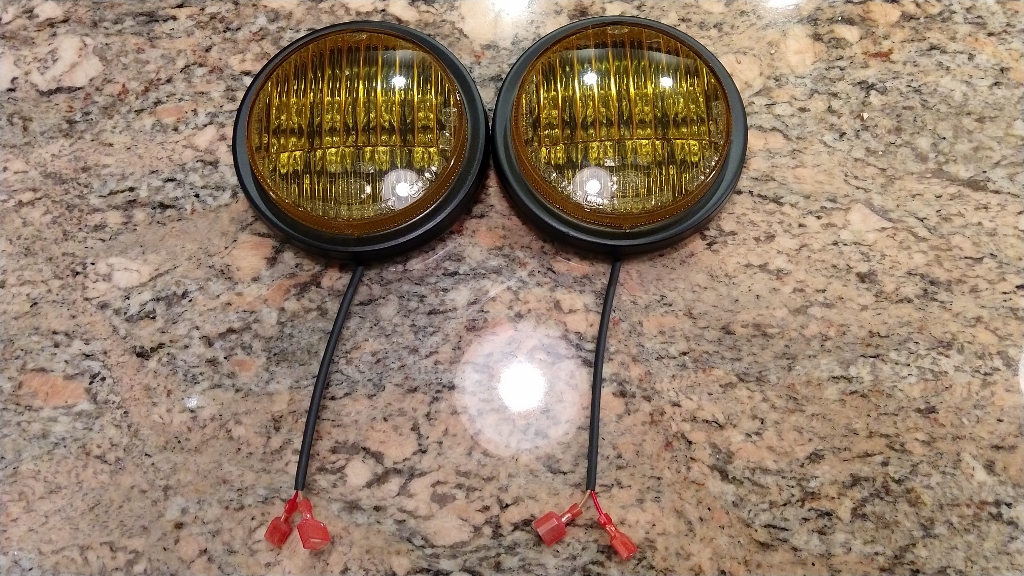
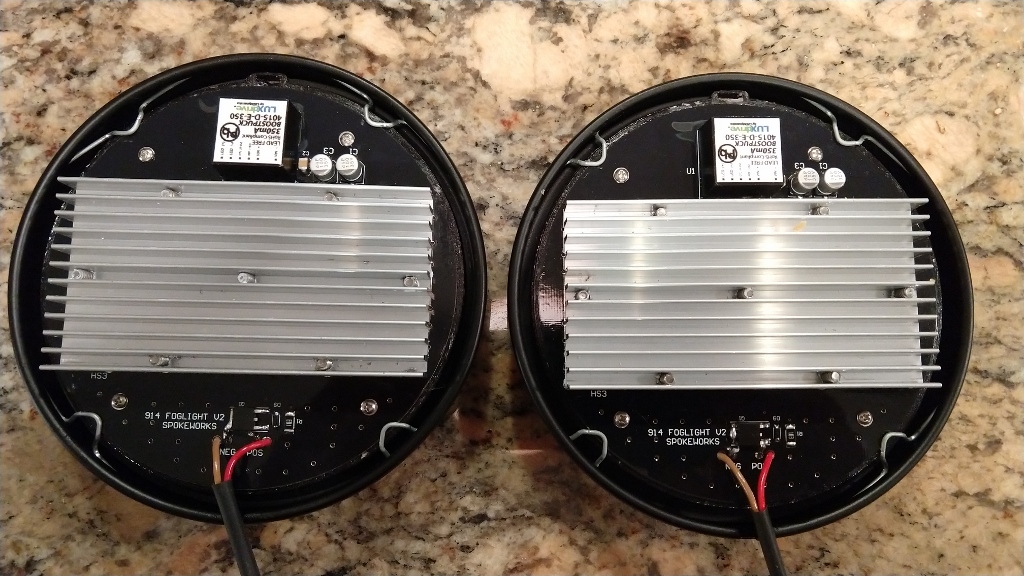
Posted by: Spoke Dec 13 2019, 09:05 PM
This is the color of the light through the amber lens. The lens is an early 914 lens.
Attached image(s)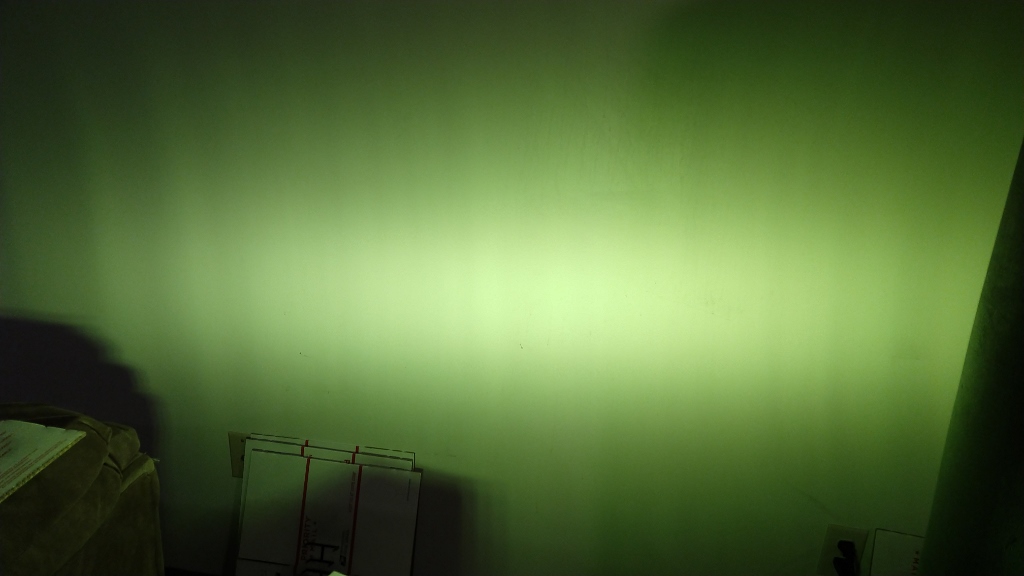
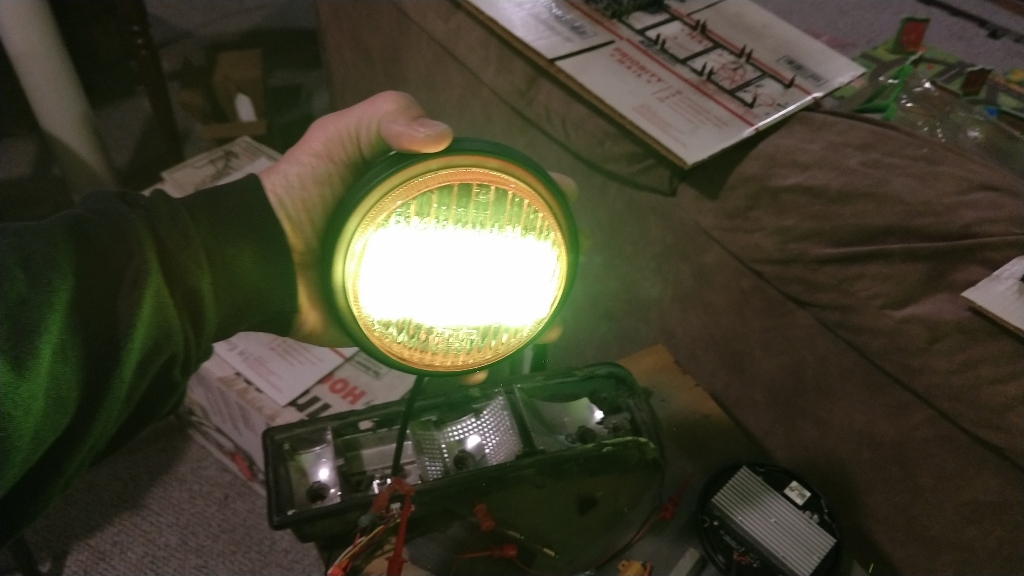
Posted by: Spoke Dec 13 2019, 09:09 PM
I burn in each set for at least 1 hour before shipping. Total current draw for both foglights is 1.2A @ 13.8V or 8.3W per foglight. They're brighter than the 35W bulbs and draw much less current.
Attached image(s)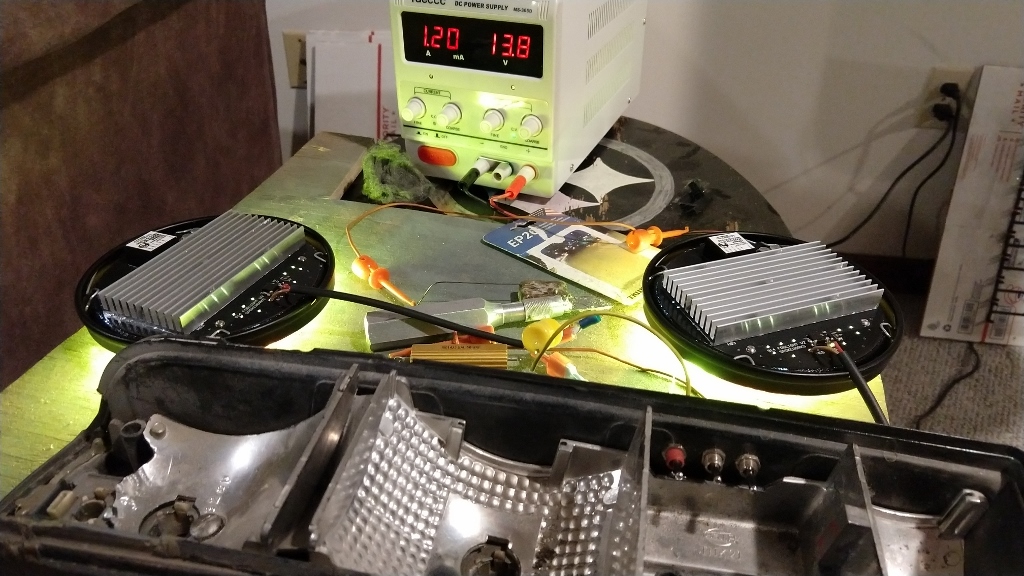
Posted by: 914forme Dec 13 2019, 09:11 PM
@http://www.914world.com/bbs2/index.php?showuser=9892 if you don't have one, I have spare pieces both early and late, just let me know. @http://www.914world.com/bbs2/index.php?showuser=3031 , get my set out this weekend.
Posted by: Spoke Dec 13 2019, 09:27 PM
Todd's @http://www.914world.com/bbs2/index.php?showuser=17338 foglights are done. The lens is early amber, the gasket is new and the bezel has been painted.
Attached image(s)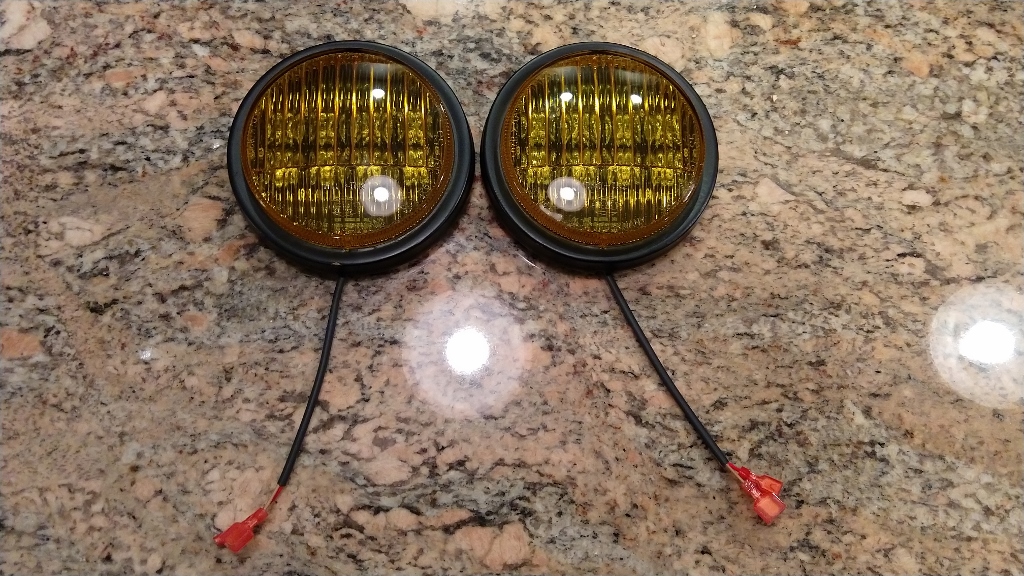
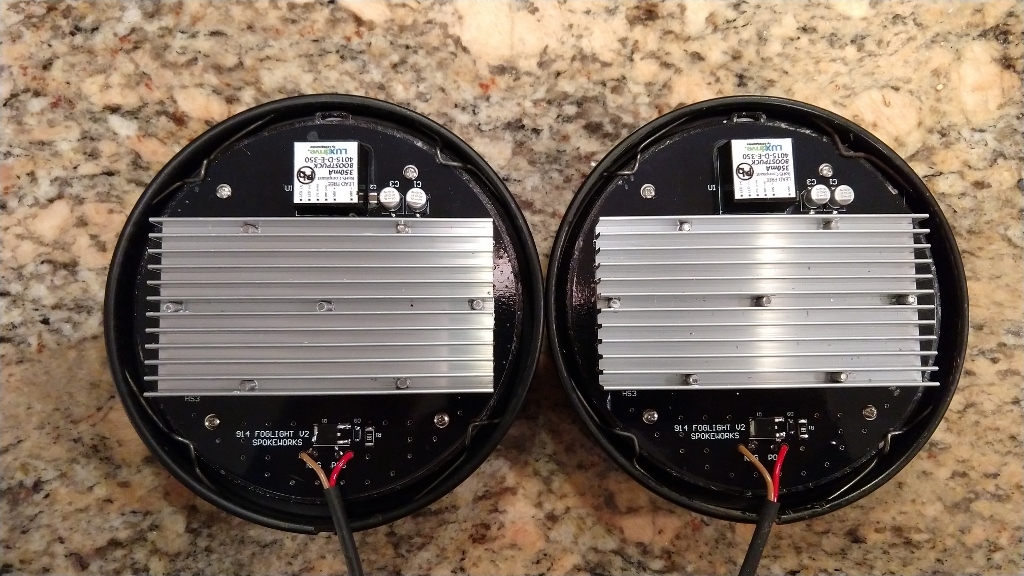
Posted by: mepstein Dec 13 2019, 09:38 PM
I like the amber lens. 
I wonder how it would look with a chrome trim ring. 
Posted by: Spoke Dec 21 2019, 08:41 AM
I'm assembling the V3 version of the foglight. These ones have all the surface mount parts on the same side as the LEDs for one-step assembly. Also the PCB is 150mil larger to match up with the spacer ring giving more PCB coverage for the spring clips.
Attached image(s)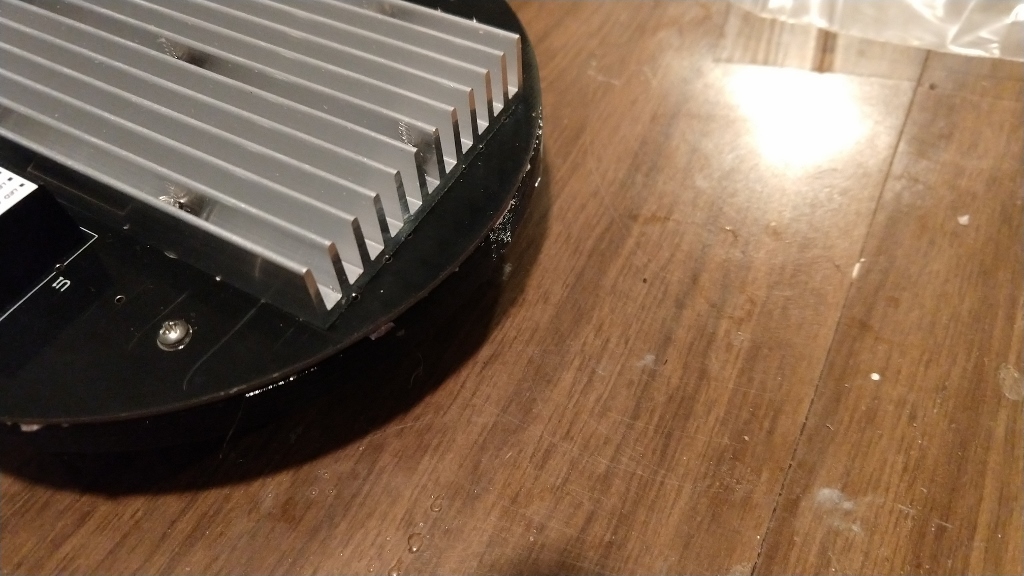
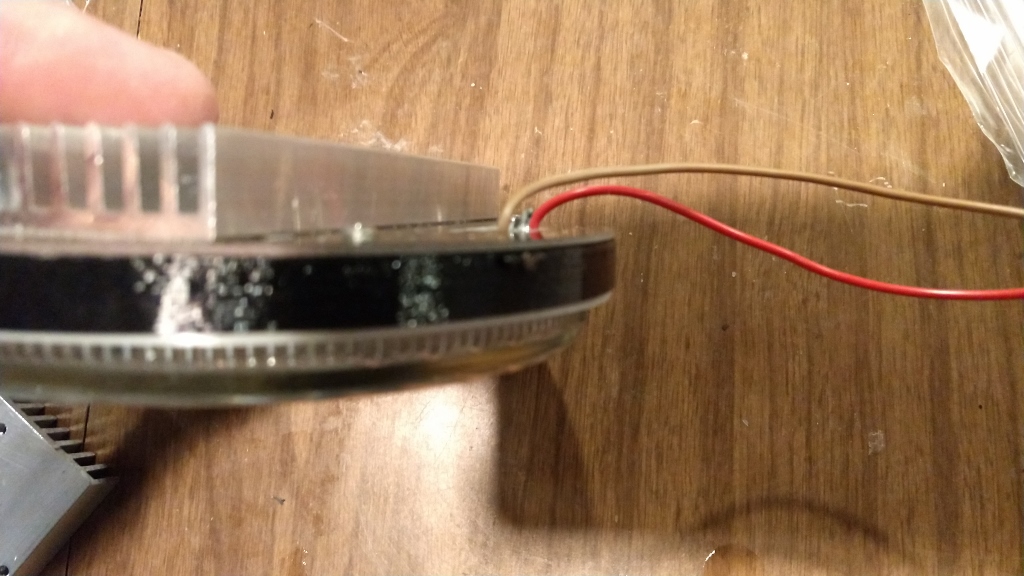
Posted by: Spoke Dec 21 2019, 08:44 AM
The V3 PCB is also a little bit thicker for more rigidity. Here's the V3 mounted in an early bezel. The spring clips do not secure the board very well.
Turns out the thickness of the spacer (needed to clear the LED lenses in the later glass lens) and the larger PCB makes it harder for the clips to secure the board.
Attached image(s)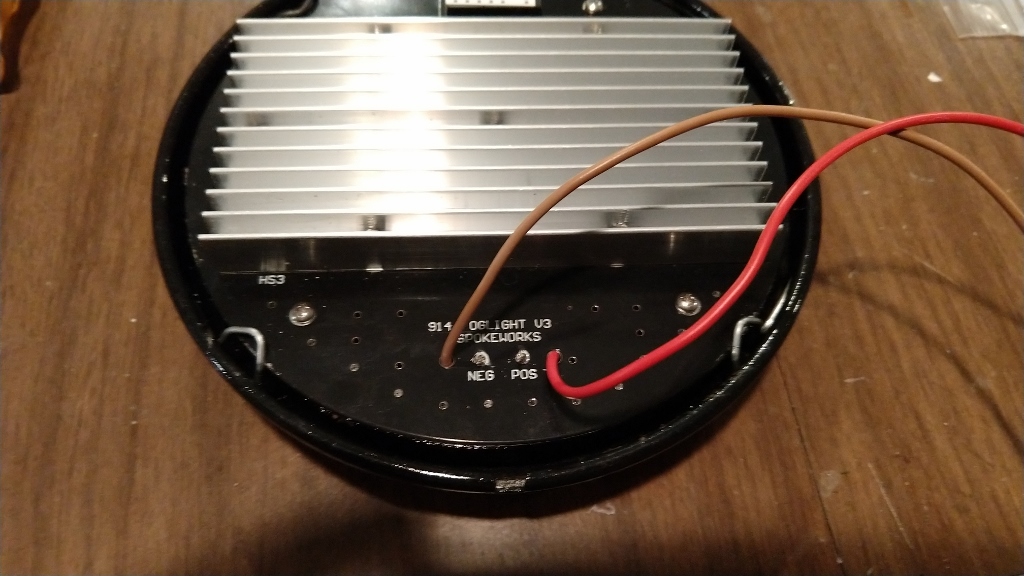
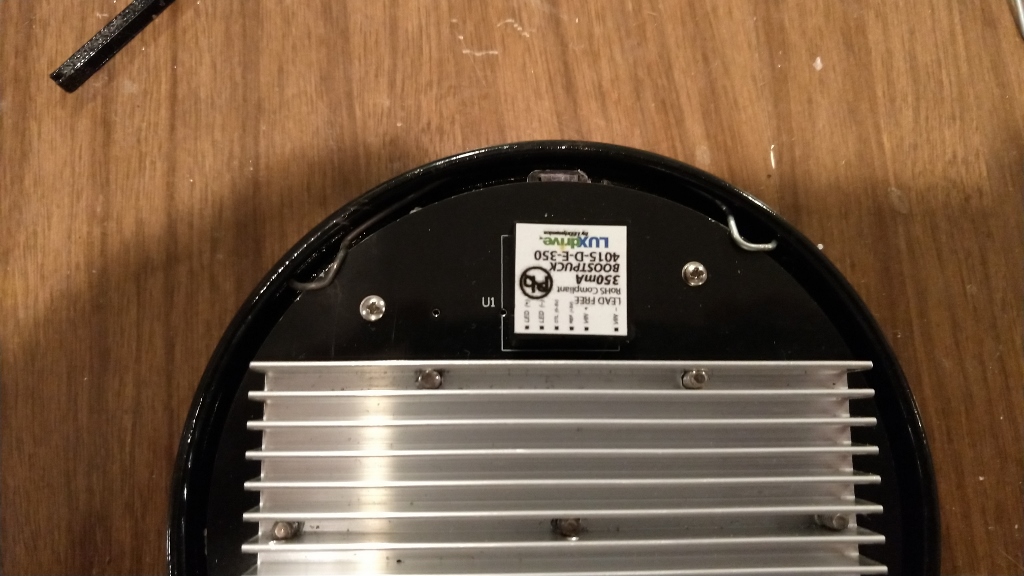
Posted by: Spoke Dec 21 2019, 08:47 AM
So making the PCB larger and thicker made it incompatible with the spring clips. Fixing one issue created another issue. So the solution is to notch out the boards where the clips go and rely on the screws to hold the board to the spacer ring.
Attached image(s)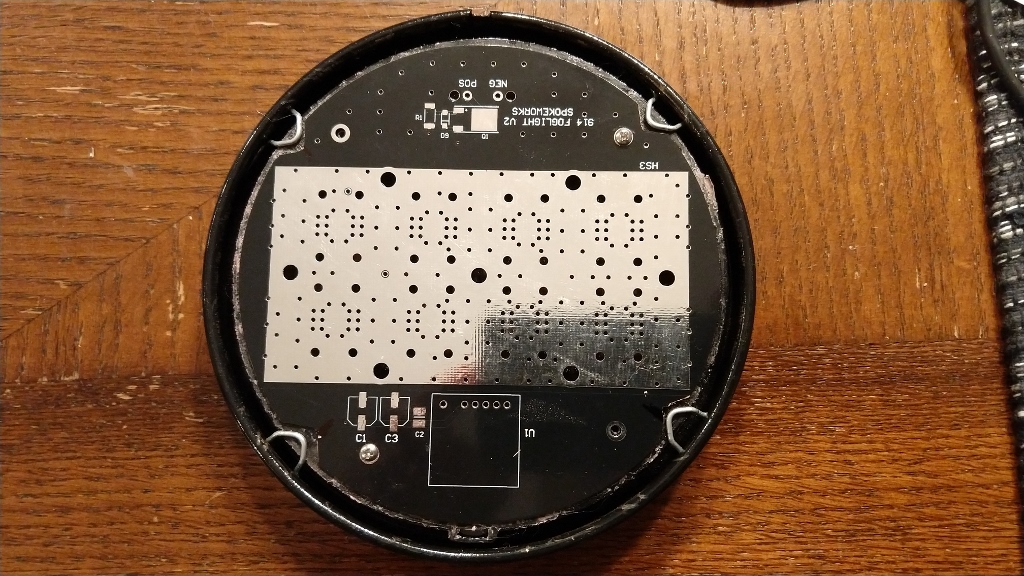
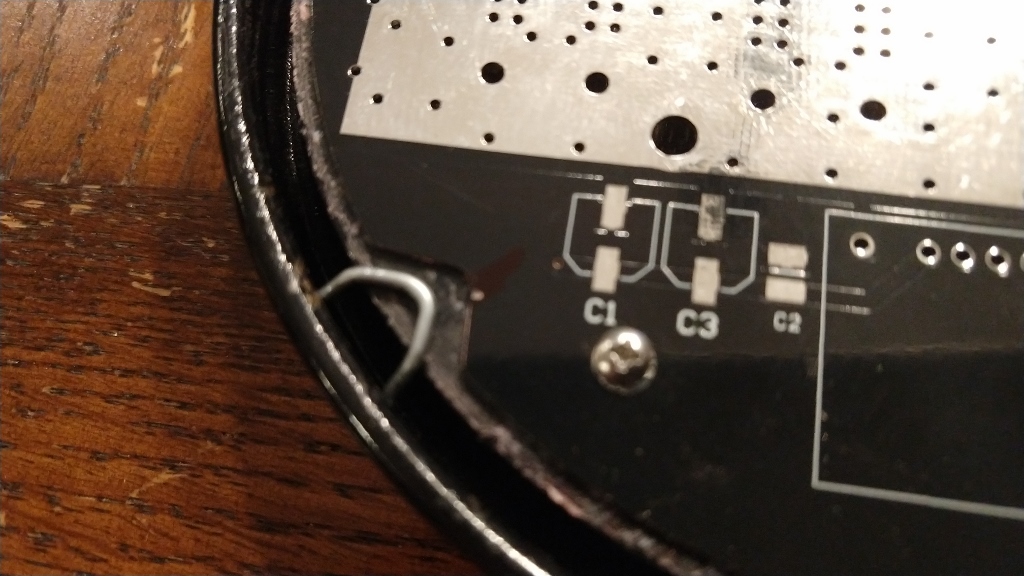
Posted by: Spoke Dec 21 2019, 08:52 AM
This is how the boards will be made with 4 notches for the 4 retainer clips. I made a jig to mark how the boards will be cut and use a Dremel tool to make the cuts. This set of foglights is for @http://www.914world.com/bbs2/index.php?showuser=6113. When I run out of the V3 boards, I think I'll reduce the new board's diameter by 150mil to the original size and add in the notches.
Attached image(s)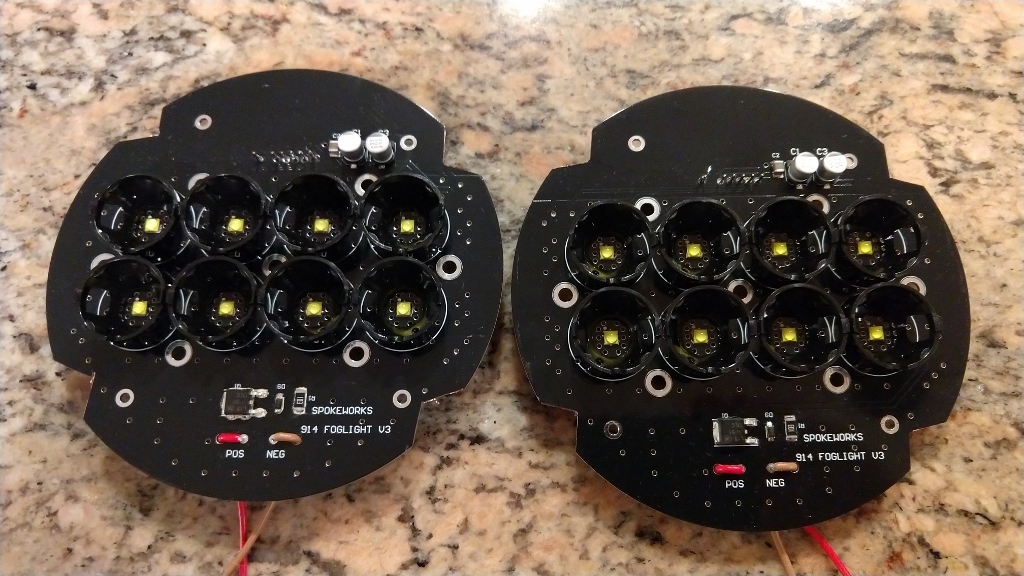
Posted by: Luke M Dec 21 2019, 10:26 AM
This is how the boards will be made with 4 notches for the 4 retainer clips. I made a jig to mark how the boards will be cut and use a Dremel tool to make the cuts. This set of foglights is for @http://www.914world.com/bbs2/index.php?showuser=6113. When I run out of the V3 boards, I think I'll reduce the new board's diameter by 150mil to the original size and add in the notches.
Hi Jerry,
I got the new early/tn1 lenses in from 914rubber. I still need to locate my other set of late/tn4 fog lights. Once I find them I'll box and ship them out to you.
 Merry Christmas
Posted by: Spoke Mar 21 2020, 10:42 AM
Just received @http://www.914world.com/bbs2/index.php?showuser=12876 's foglights to convert to LEDs. This set is the best I've ever seen. Almost no wear and the lenses are quite clean.
Attached image(s)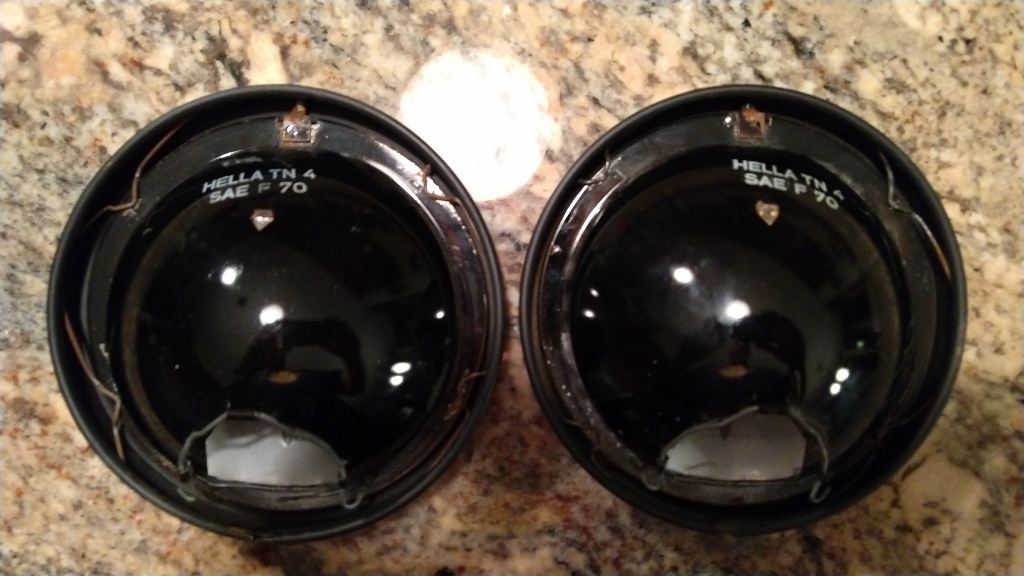
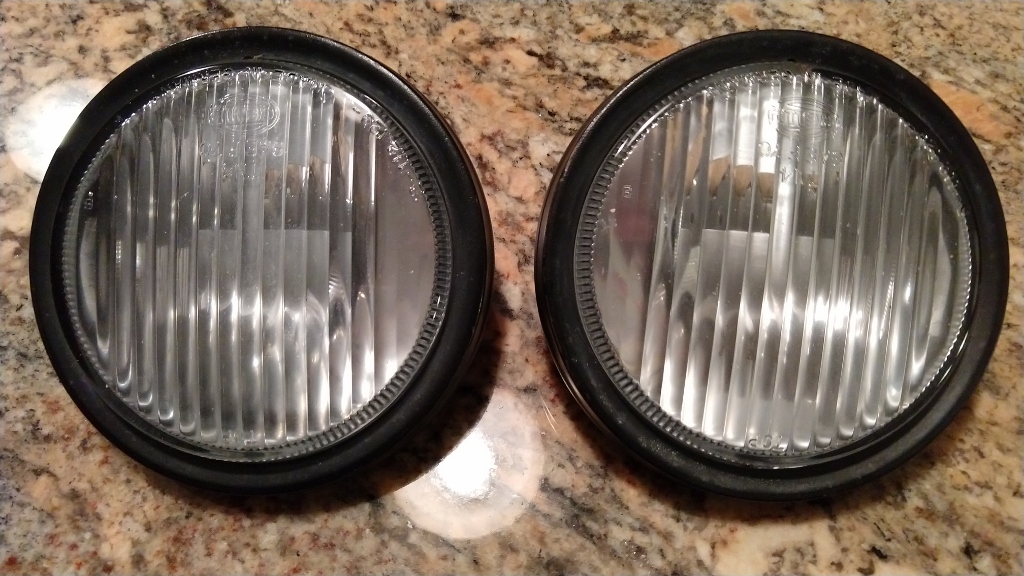
Posted by: eric9144 Mar 21 2020, 11:49 AM

Posted by: Spoke Mar 28 2020, 04:13 PM
@http://www.914world.com/bbs2/index.php?showuser=12876 's LED foglights are ready to ship. Only thing to do now is a 1+ hour of burn in just to make sure everything is good.
This was the last prototype 914 foglight I planned to make. Seems everyone was able to get them installed and they work well so I will make this available on my website.
Because of the tricky nature in getting the clips off and especially back on with the LEDs inside, I'm going to keep requiring folks to send the lens/bezel/reflector to me so I can put the LED assembly together. This way installation on the car will be much easier for the owner.
Likely I'll have 2 options: one with new 914rubber gaskets and one with user provided gaskets. The gaskets must be like new and be the type 914rubber sells. For no charge I'll paint the bezel if desired.
Attached image(s)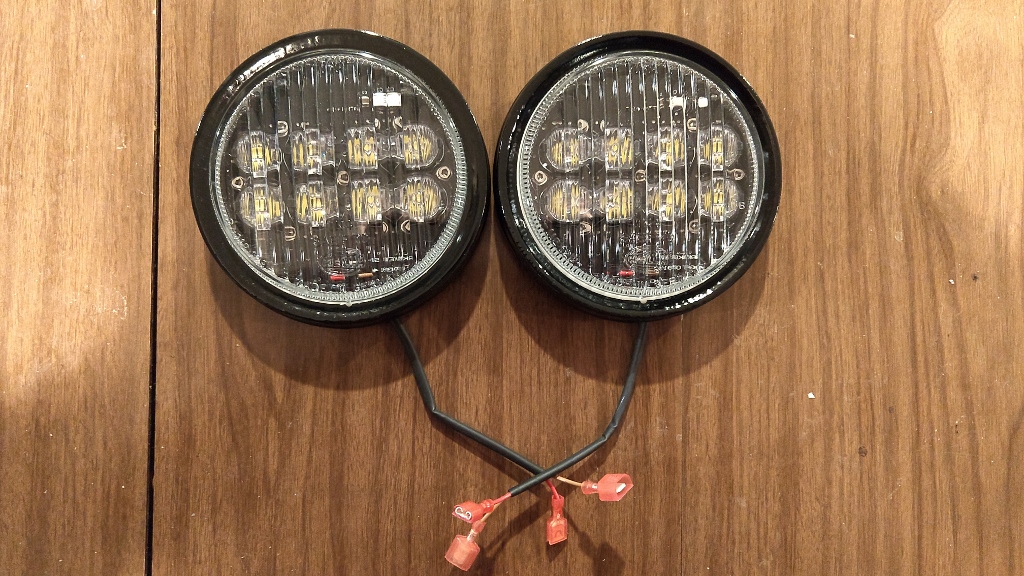
Posted by: mmichalik Mar 28 2020, 10:31 PM
I know what I will be purchasing for the '74 on Sunday!
I already have the the other lights converted to @http://www.914world.com/bbs2/index.php?showuser=3031 s LED's and they are awesome.
Will be getting a full set for the '75 as well. @http://www.914world.com/bbs2/index.php?showuser=3031 , can you convert the late model fog lights as well?
Mike
Posted by: Spoke Mar 29 2020, 08:54 AM
can you convert the late model fog lights as well?
Mike
I've not looked at the late model fog light fixture. Can the fixture be opened like the early models? Have to be able to get inside the fixture to add the circuit board.
There's one style of 911 foglight which is sealed or bonded. I tried like hell to separate the glass lens from the reflector without success. There are 2 other types of 911 foglights which can be opened and I'm able to put in LED foglights.
Posted by: eric9144 Apr 2 2020, 09:24 AM
Received my modified fogs yesterday from @http://www.914world.com/bbs2/index.php?showuser=3031 and I can't tell you guys how amazing they are in person. Installation was under 5 min per side and that's probably an exaggeration. They're nearly plug and play only requiring a spade connection be added to the naked + wire on each side (Spoke supplies the connector with them).
Pics of installation: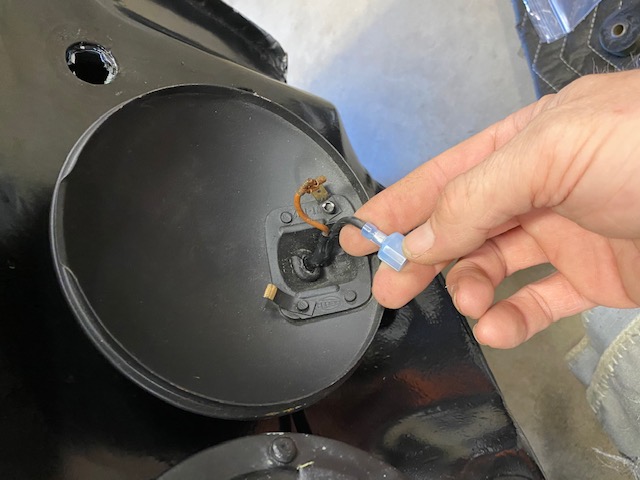
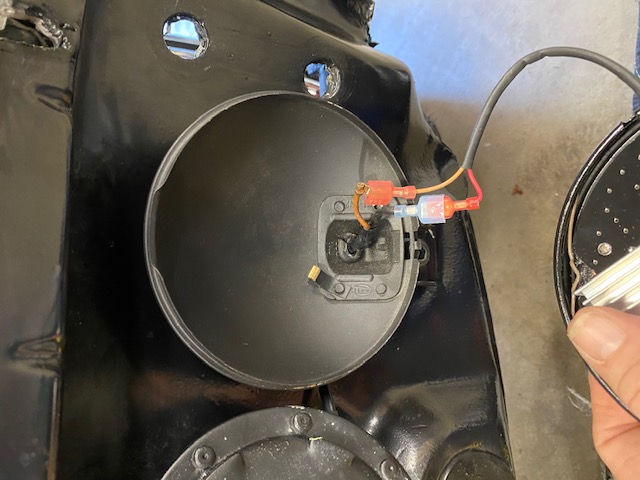
Everything swapped over to LED except the Passenger side headlight (work in progress pic) 
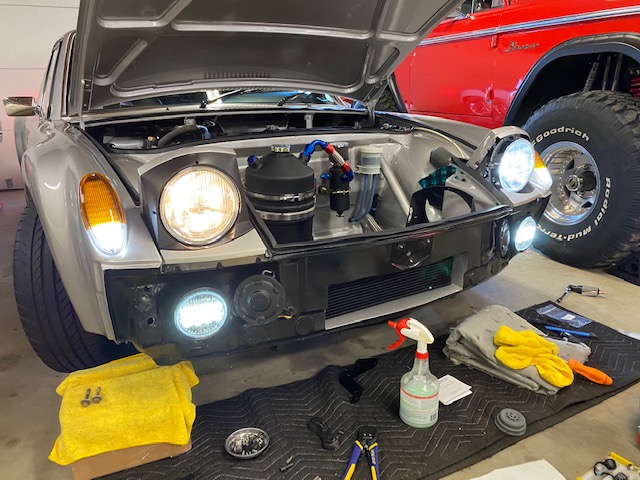
Posted by: Spoke May 6 2020, 04:13 PM
I've run into a set of 914 foglights which are different than the TN2 and TN4 fogs. These ones are H3 and use a different bulb. I couldn't get the glass lens and reflector apart so I need to bail on this conversion.
Attached image(s)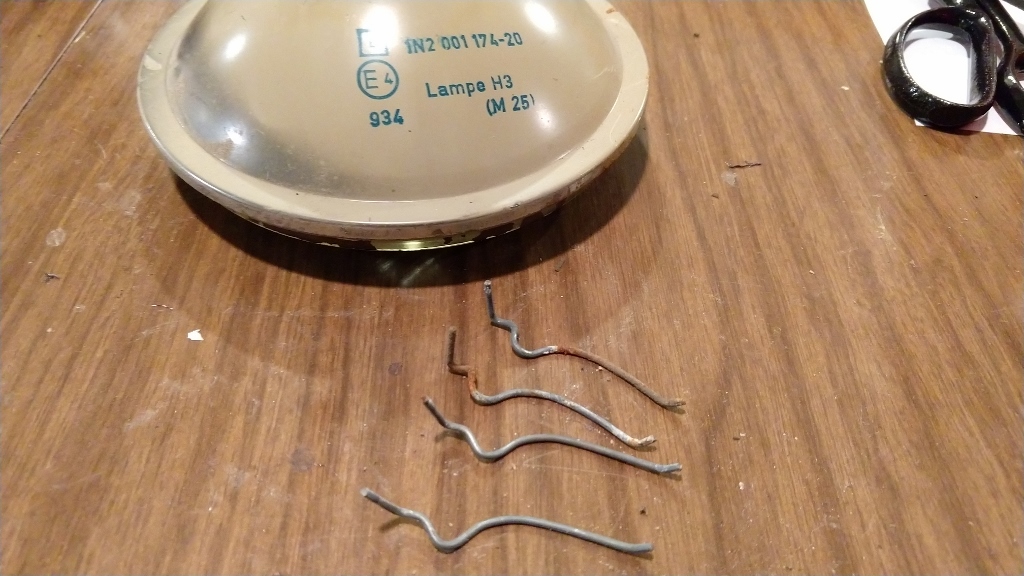
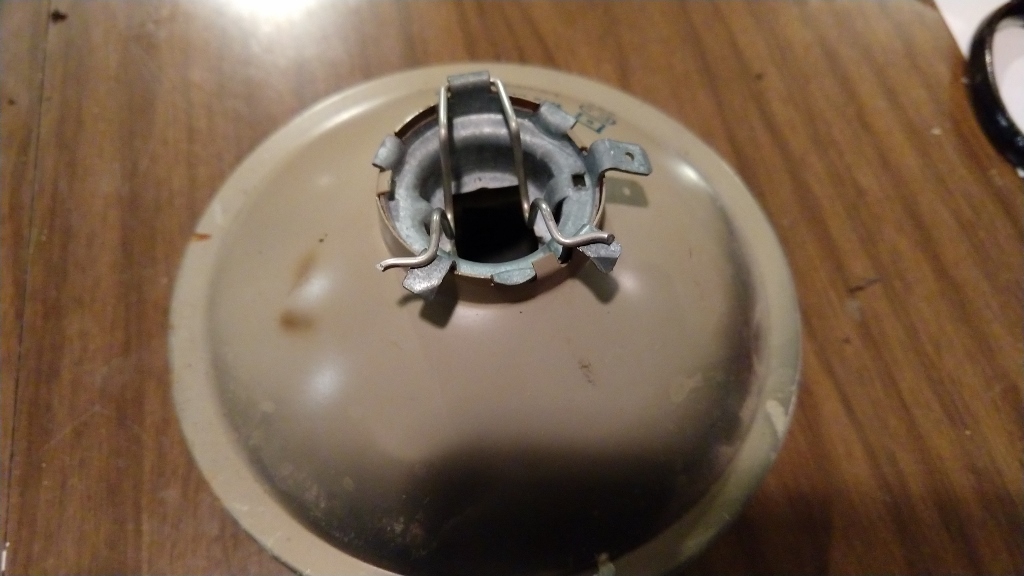
Posted by: Spoke May 6 2020, 04:15 PM
The H3 lens is much larger than the TN2/4 lenses. Thus the bezel is quite narrow as the H3 fits into the standard 914 foglight rear fixture.
Attached image(s)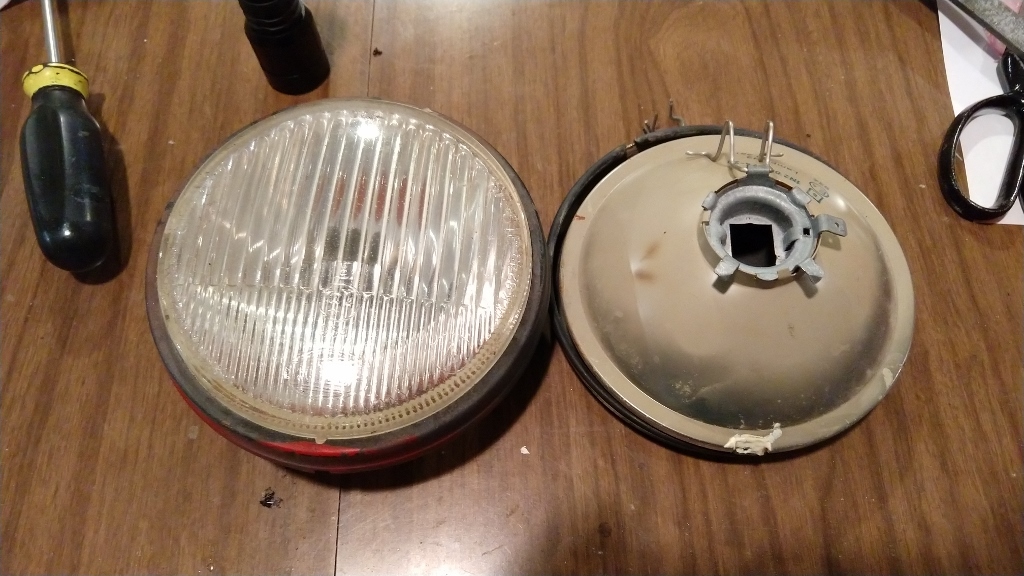
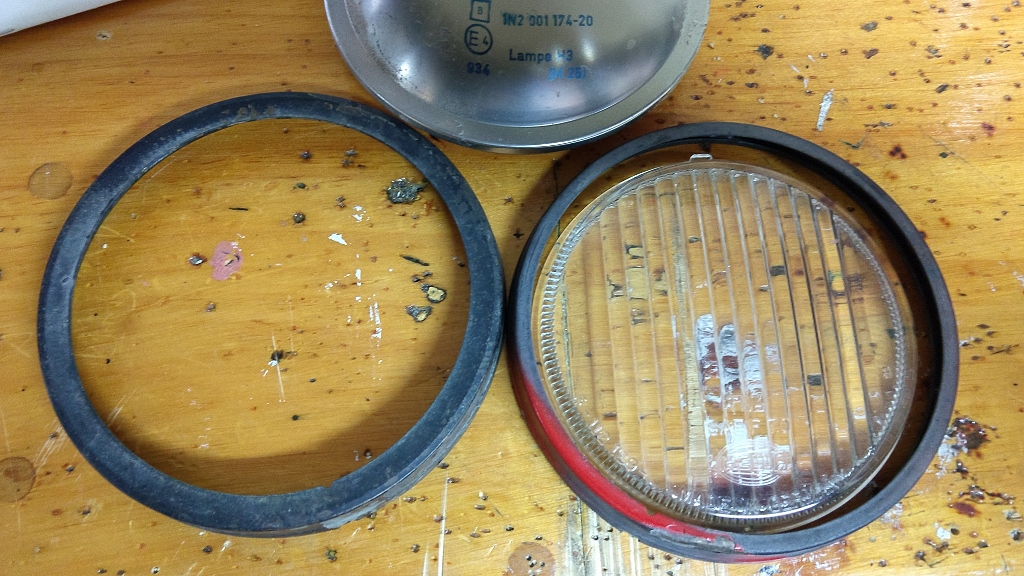
Posted by: 914forme May 6 2020, 06:24 PM
I like the H3s, would gladly send a set of TN2s or TN4s in their place.
Posted by: eric9144 May 7 2020, 03:47 PM
The H3 lens is much larger than the TN2/4 lenses. Thus the bezel is quite narrow as the H3 fits into the standard 914 foglight rear fixture.
Those are another set of the Euro drivers, they're supposed to have a different lens and were semi-sealed beam but could be separated. The housing was a little bit larger than the US fogs but they still fit the holes in the grills...
914 rubber had the correct lenses for them but I don't see them listed now. They look like this:
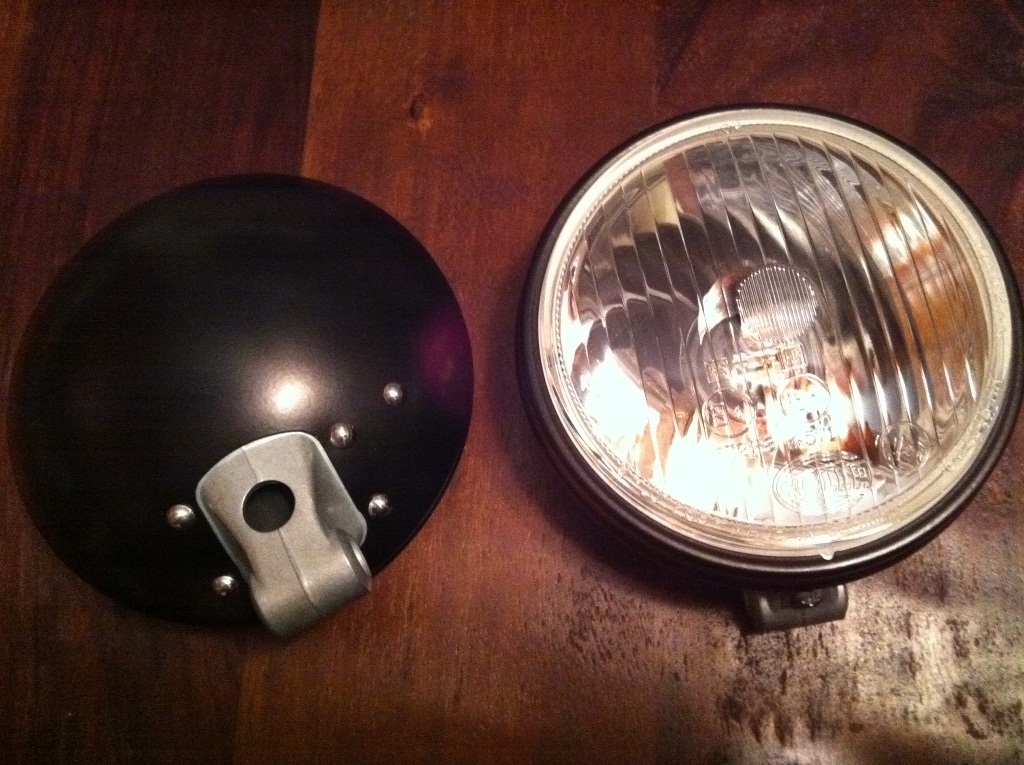
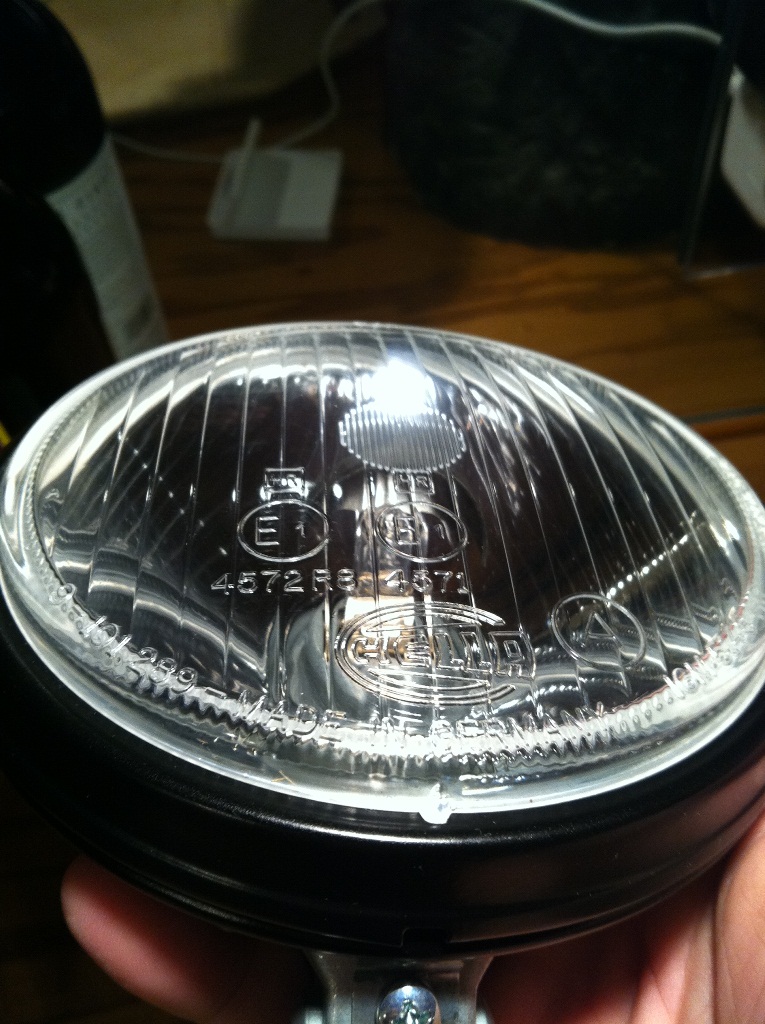
Posted by: Spoke Aug 9 2020, 05:24 PM
@Luke_M
Your foglights are done. They look really nice.
Attached image(s)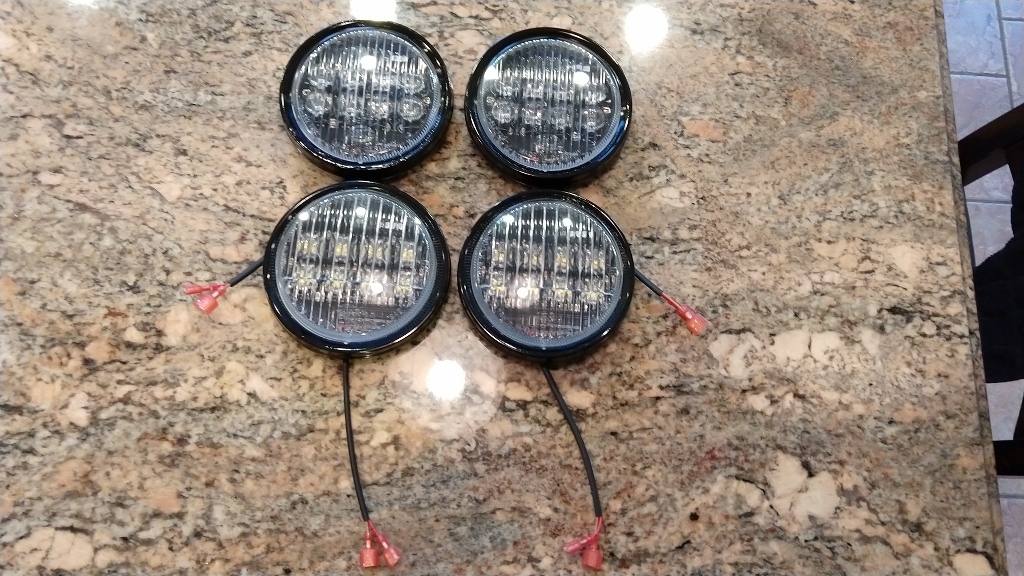
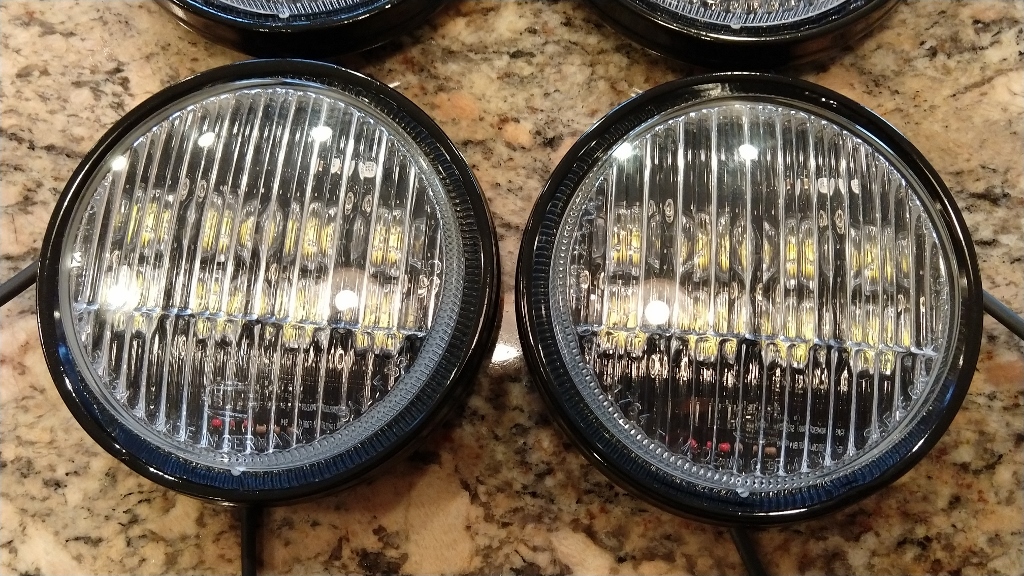
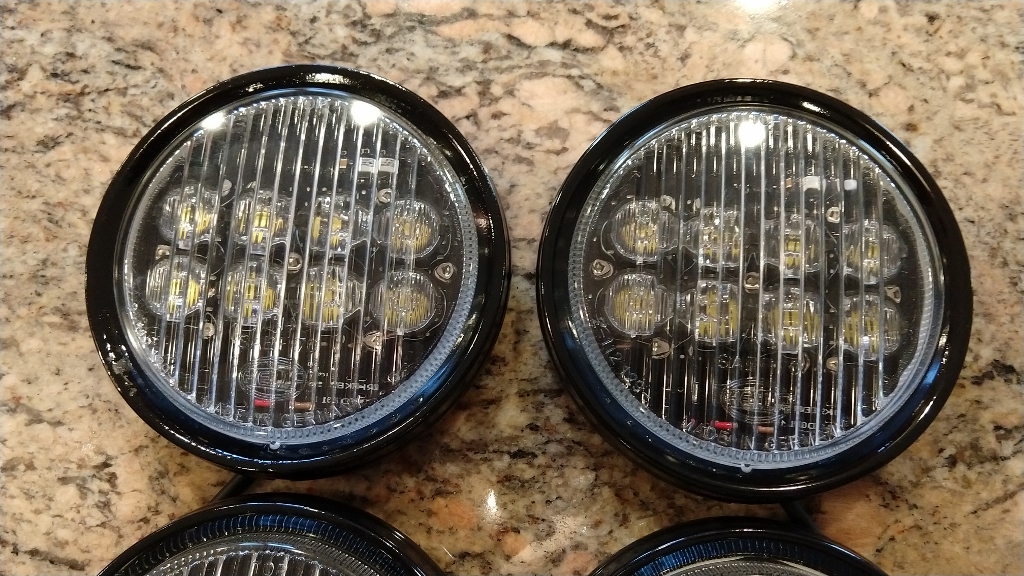
Posted by: Spoke Aug 9 2020, 05:25 PM
...more pictures...
Attached image(s)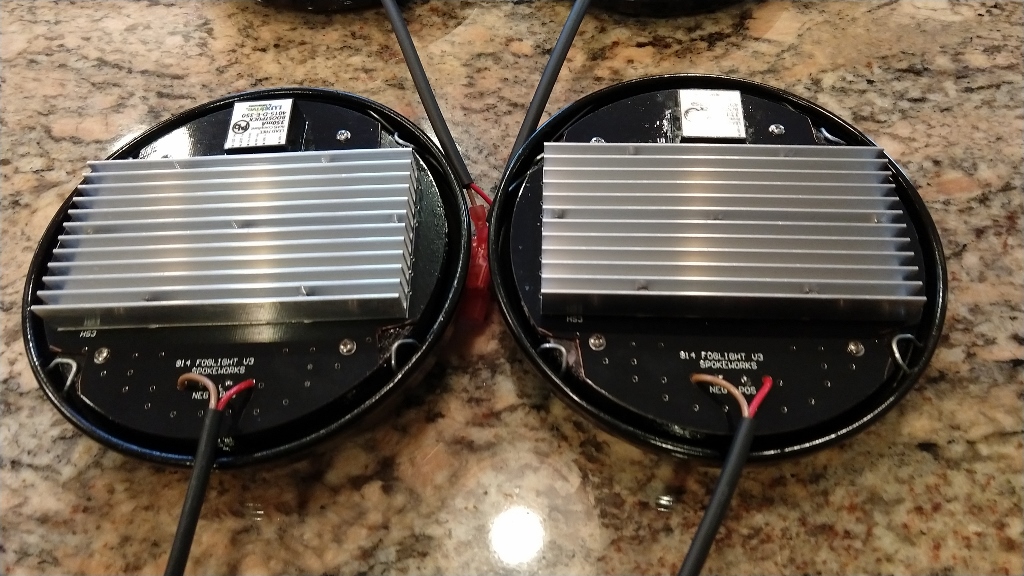
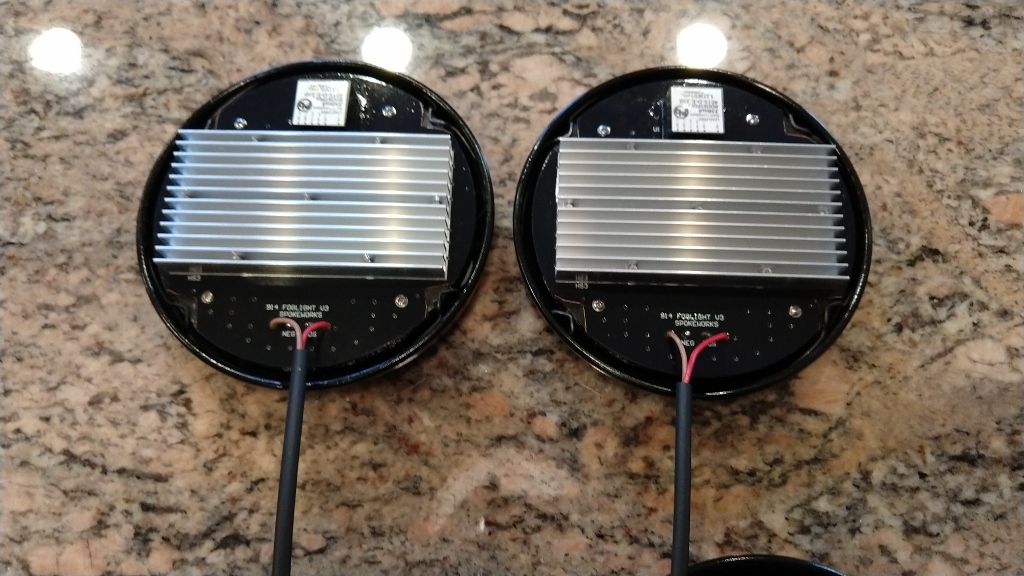
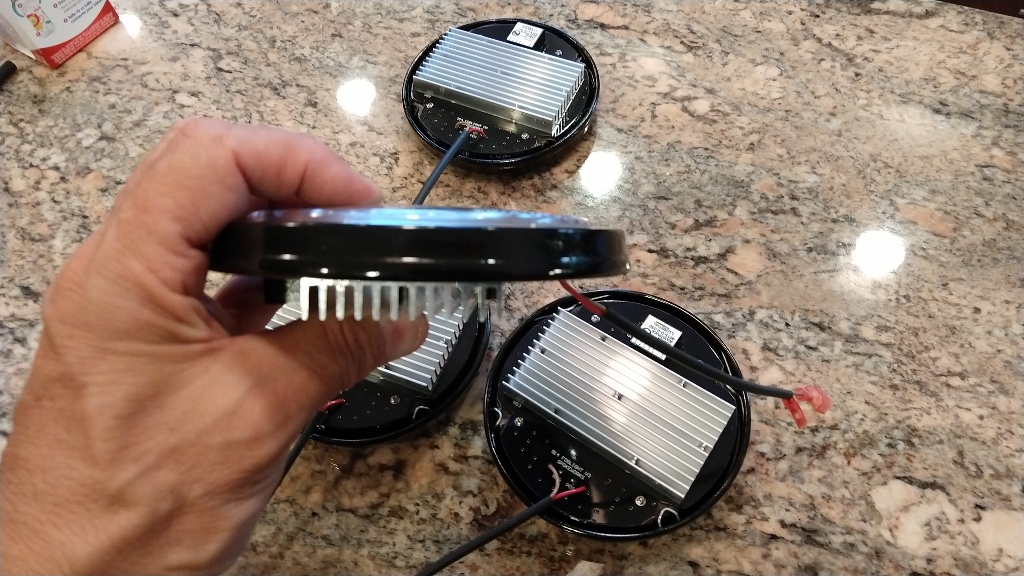
Posted by: Mikey914 Sep 4 2020, 02:10 AM
Sorry no pics but the clear is here -
https://914rubber.com/911-us-amber-fog-light-lens-1-3176
Amber here -
https://914rubber.com/911-us-amber-fog-light-lens-1-3176
Also have 2 other versions,
Just need to add the pics
Posted by: DRPHIL914 Sep 4 2020, 07:26 AM
...more pictures...
Looking great! is there the possibility of adding more LED to fill in the rest of the space rather than just 2 lines of LED?
btw, nice granite! Coral Juparana, otherwise known as "Lady's Dream" (we did a kitchen in that too),
Phil
Posted by: Spoke Sep 4 2020, 07:52 AM
...more pictures...
Looking great! is there the possibility of adding more LED to fill in the rest of the space rather than just 2 lines of LED?
btw, nice granite! Coral Juparana, otherwise known as "Lady's Dream" (we did a kitchen in that too),
Phil
I tried a design with 12 LEDs but ran out of real estate for the electrical components and the heat sink was not under the 4 extra LEDs.
Another consideration was the maximum temperature of the converter module. It is rated at 85C maximum operating temperature so there's a compromise by how many LEDs to use and how much heat will be generated.
Posted by: Spoke Sep 4 2020, 08:02 AM
I'm kicking off an updated foglight to be able to use yellow LEDs. The first set will be going to @http://www.914world.com/bbs2/index.php?showuser=643 .
Unfortunately Cree doesn't make a yellow LED in their XP-G3 series which I've been using so this design will use OSRAM's OSLON series high power LEDs.
One positive side effect of using the OSLON series LEDs over the XP-G3 is the smaller size of the OSLON LEDs. The OSLON LEDs are 2.8 x 2.8 mm whereas the XP-G3 are 3.3 x 3.3 mm. Where this plays out is in the resulting light pattern when used with Carlo's 10192 lens which both LEDs can use.
The Light dispersion for the XP-G3 through the 10192 lens is +/- 13 degrees from horizontal. The OSLON through the 10192 lens is +/- 8 degrees. The OSLON will produce less glare from the point of view of oncoming traffic.
The OSLON LEDs also come in white so I'll build a set of those in white to see how they compare to the XP-G3 fogs I've been making.
Posted by: Spoke Oct 4 2020, 07:44 PM
@http://www.914world.com/bbs2/index.php?showuser=643
Got the first boards assembled using OSRAM's OSLON Square GY (yellow) and GW (white) LEDs. These are smaller 2.7x2.7mm vs CREE's XP-G3 (3.3x3.3mm) LEDs which I have been using.
The smaller OSRAMs translates into a tighter beam being 8 degrees to 1/2 power whereas the Crees to about 13 degrees with the same lenses.
Jim,
I noticed you sent an early bezel and late bezel. The foglights are ready to go as is. If you want to match up either and send another bezel, that's your call. Also the lens gaskets look new but were cut around the alignment bump in the lens. I've replaced both gaskets with new 914rubber ones.
Here's some pictures.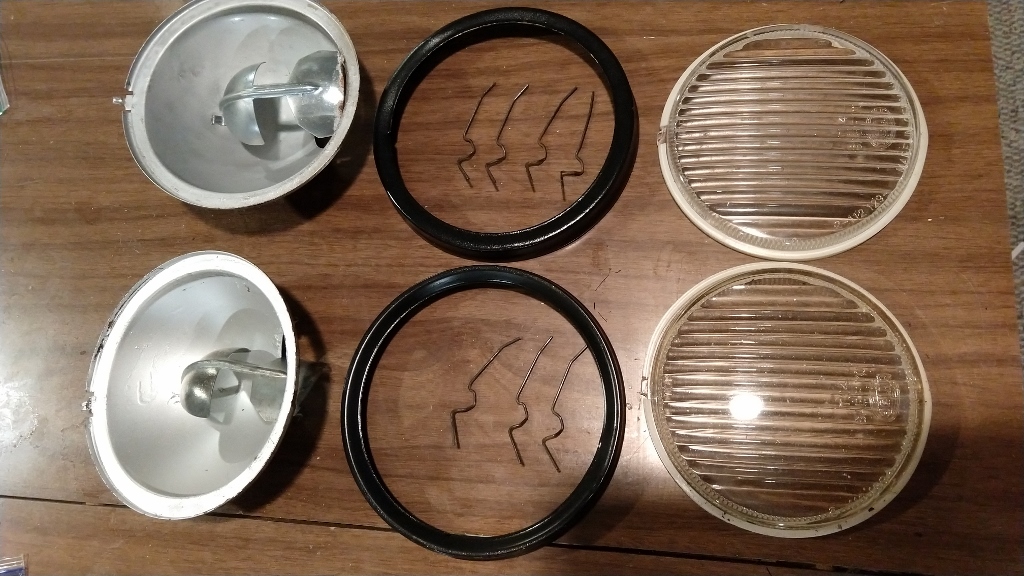
Yellow and white OSRAMs.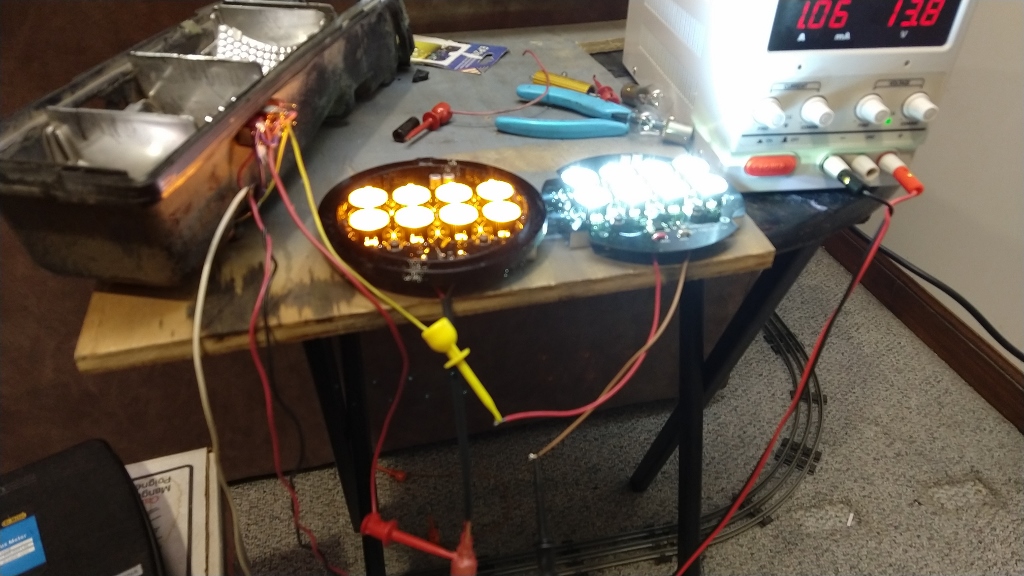
The light pattern with the OSRAMs. This is about 5 feet from the foglight. The beam is quite tight.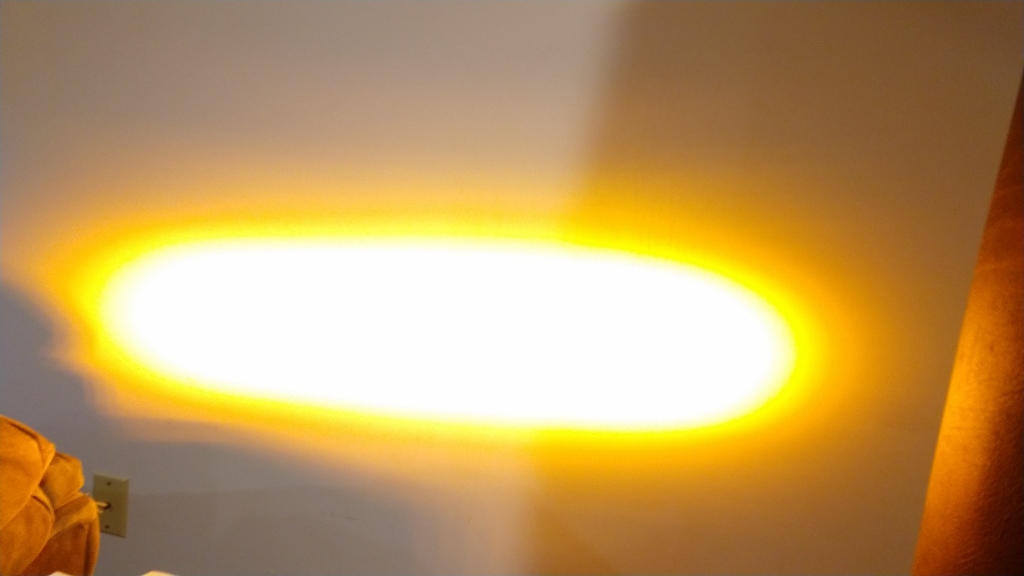
Early and late bezels.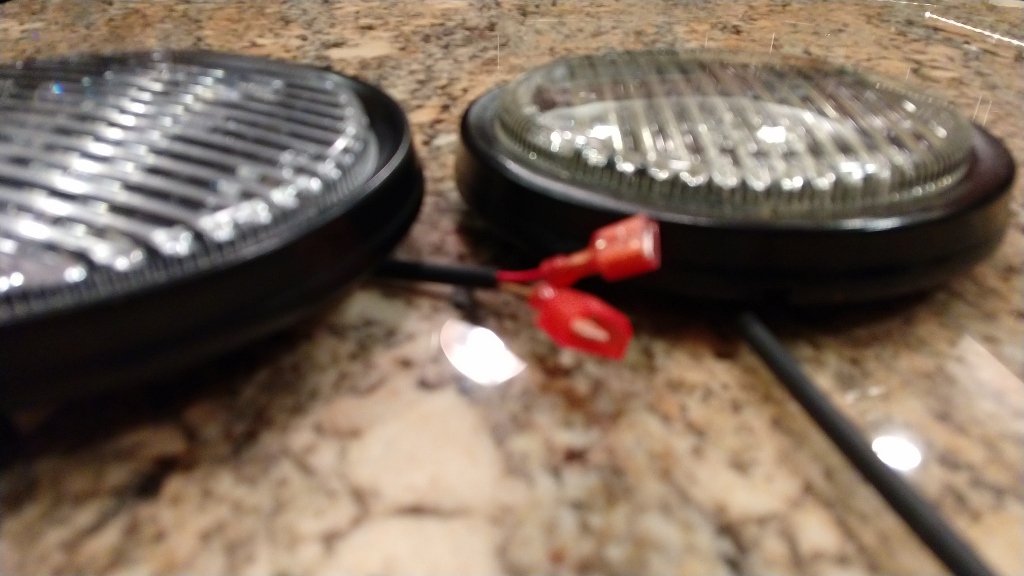
Posted by: jim_hoyland Oct 4 2020, 07:55 PM
Looks great Jerry, I can see the difference. I’m ok with the different bezels.
@http://www.914world.com/bbs2/index.php?showuser=3031
Posted by: djway Oct 4 2020, 11:52 PM
So do you use the train to deliver parts to your workstation? 
Posted by: Cairo94507 Oct 5 2020, 06:01 AM
Good eyes re the train. I really want to do LED fog lights on my car.....
Posted by: jim_hoyland Oct 21 2020, 02:51 PM
I opted to go with white LED after testing the yellow. The light was more amber than yellow. If someone is looking for Amber LEDS, a pair will be available.
I’m going to use Lanina-X yellow film over the white LEDS. My Boxster has this and it’ works good
Posted by: Al Meredith Nov 18 2020, 03:05 PM
Before retirement I was product and application specialist for the GE lamp dev. Stay with the 5K (5000 degree kelvin) LEDs . There is something call photopic vs scotopic that can be looked up but boiled down it means our eyes see better in blue at low light levels . This is the theory behind the "xenon" bluish headlights used before LEDs. These blueish headlights were first used in Scandinavian countries where it gets dark early.
Posted by: Cairo94507 Nov 18 2020, 04:17 PM
Thats great to know but if I do LED fogs I really want them to be the same color as my LED headlights. But I totally get the thought and work behind it.
Posted by: Spoke Mar 25 2021, 04:32 AM
@http://www.914world.com/bbs2/index.php?showuser=9712
Taking another look at arranging the LEDs in a round pattern. The best that can be done is 7 LEDs as shown below. I think this will work as all the LEDs are still backed on the other side of the board by the heat sink.
As long as the LEDs are backed by the heat sink the thermals should be manageable. Plus the power dissipation of the LEDs will be 7/8 of the current LED foglight as it has 8 LEDs and thermals are ok with it. The switching module is the most sensitive component with 100C maximum operating temperature. The LEDs are good to 150C.
The LEDs do not look like they would interfere with the switching module through-hole pins.
The notches in the circumference of the board are to make room for the bezel clips.
I may try to spread out the LEDs but the converter positioning may cause issues.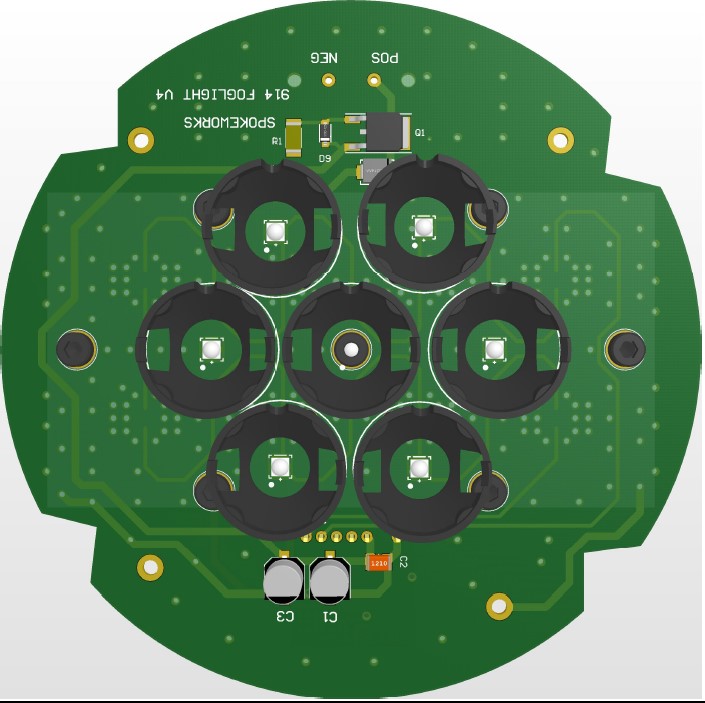
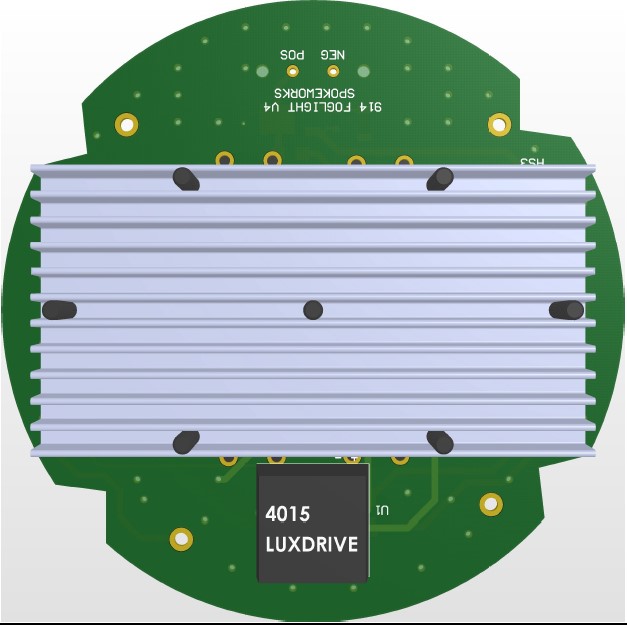
Posted by: Cairo94507 Mar 25 2021, 07:34 AM
Thanks for giving this some thought Jerry.
Posted by: Spoke Apr 23 2021, 03:53 PM
Got the first boards with LEDs in a round pattern. I spread them out as much as possible. With 7 LEDs running 350mA, each unit will burn 7.5W and should stay nice and cool.
@http://www.914world.com/bbs2/index.php?showuser=9712
Michael these are your LEDs. Please send me the bezel and glass lens from your fogs and I'll install these boards. PM sent.
Attached image(s)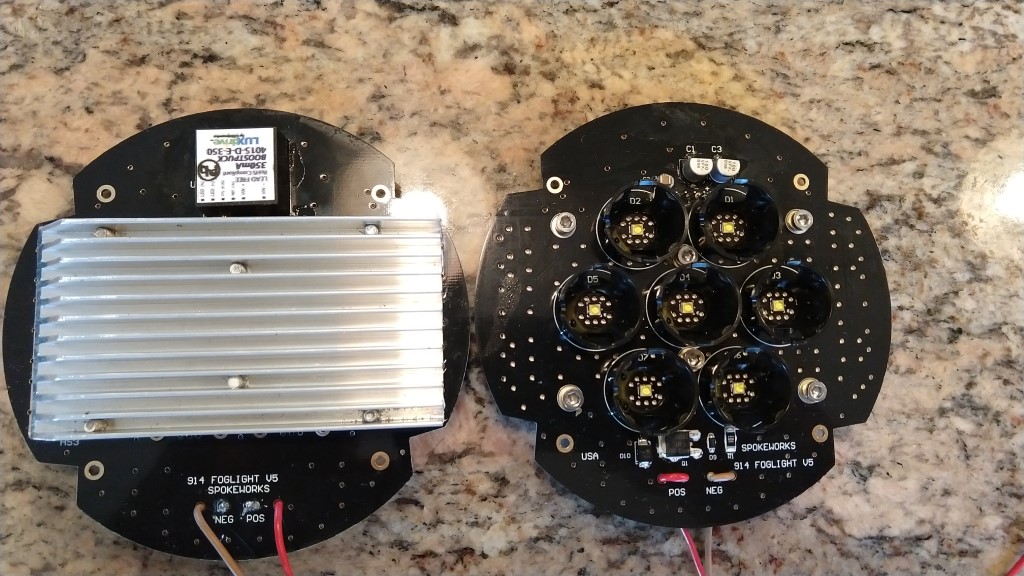

Posted by: Cairo94507 Apr 23 2021, 05:20 PM
Got the first boards with LEDs in a round pattern. I spread them out as much as possible. With 7 LEDs running 350mA, each unit will burn 7.5W and should stay nice and cool.
@http://www.914world.com/bbs2/index.php?showuser=9712
Michael these are your LEDs. Please send me the bezel and glass lens from your fogs and I'll install these boards. PM sent.
Hi Jerry,
OK. That is great. PM sent.
Posted by: Spoke May 23 2021, 09:13 AM
@http://www.914world.com/bbs2/index.php?showuser=9712
Michael, finally got your foglights assembled. Doing burn-in right now. They look really good and the round LED pattern fit the fixture nicely. The power dissipation for each foglight is 7W.
Attached thumbnail(s)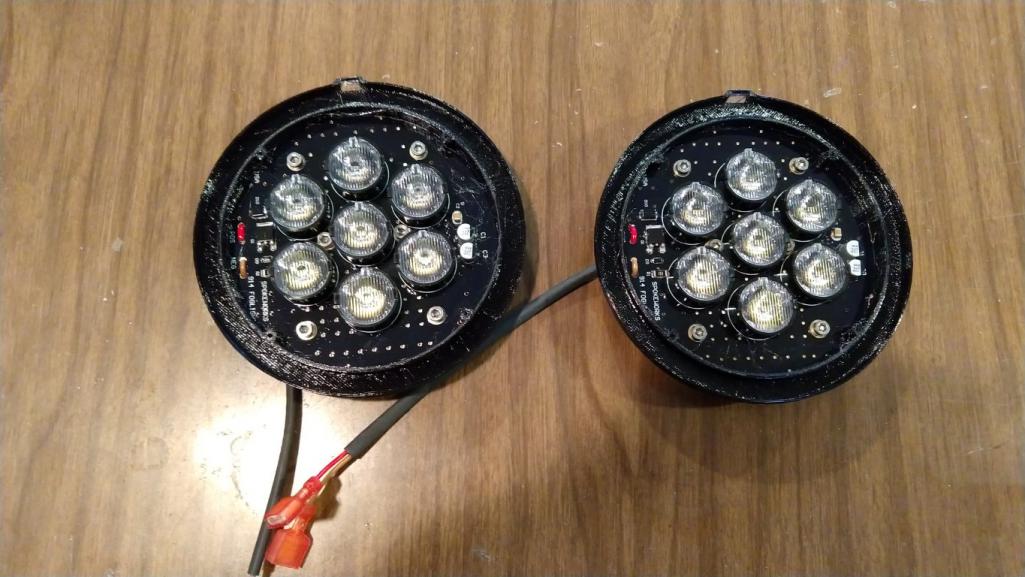
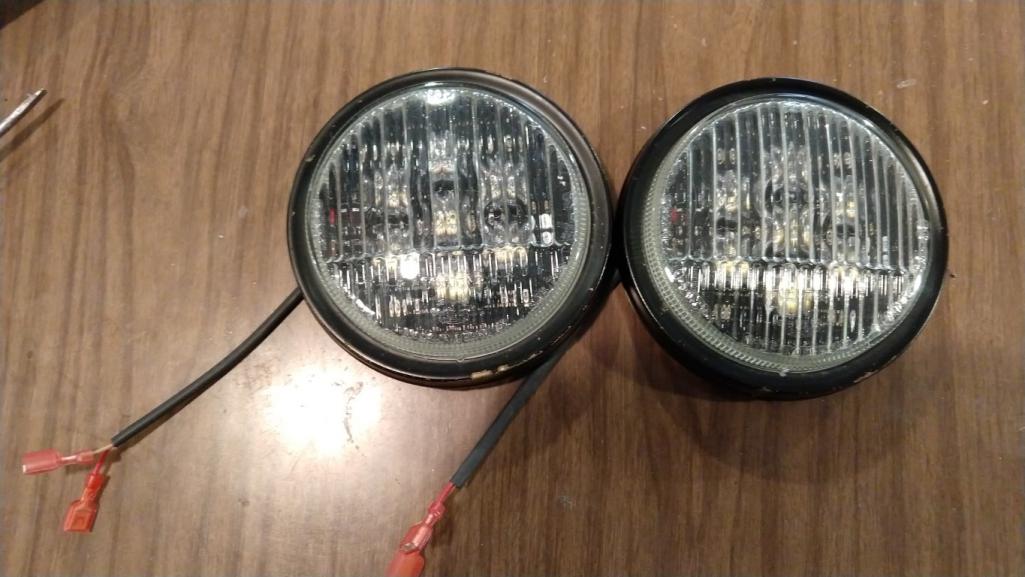

Posted by: Cairo94507 May 23 2021, 02:49 PM
Very cool Jerry. Thank you. Looking forward to getting everything buttoned up.
Powered by Invision Power Board (http://www.invisionboard.com)
© Invision Power Services (http://www.invisionpower.com)