Printable Version of Topic
Click here to view this topic in its original format
914World.com _ 914World Garage _ Something Evil Part II
Posted by: Mblizzard Apr 17 2019, 08:17 AM
Well I have been delayed with life and too many things going on. But after purchasing a lot of parts, it is time to start the process.
Up front big thanks to Charles and Nicole at the https://type4store.com/ for putting up with so many questions. Thanks to Len Hoffman for waiting on me for so long on the heads. Also to Jake Raby for his Type 4 build CD and while not giving build advice but pointing me in the right direction on a number of issues. I am afraid to look at all of the other vendor receipts as I might start to add it all up $$$$ but I will compile a list of all the vendors and add photos.
So the basics. Going for a 2.6 L FI with Microsquirt. Looking to hit 9.5:1 compression.
102 mm Nickies with Custom 102mm Dished JE Pistons for 78mm stroke and 22mm pins.
78 mm crank - New this time!
H-beam Rods 5.325 with Type 1 Rod Journals
LE-200 heads - Valve sizes: 44mm x 38mm by Manley, intake ports flow 200CFM @ .500” valve lift, and ceramic coated. 911 swivel foot valve adjusters
SPEC Clutch Kit - Stage 1 Lightened flywheel
Type 4 Store Cam Part# 9500 with Parkerized Lifters and Modified Cam Gear,
chromoly pushrods
Intake
Valve Lift: .500
Duration: 284
Duration@ .050": 250
Exhaust
Valve Lift: .500
Duration: 300
Duration@ .050": 270
Mahle bearings throughout
315cc/min Fuel Injector: Bosch 0280150945
48 mm CB Performance intakes. Dual throttle bodies with CSP linkage
Modified 30mm Oil Pump
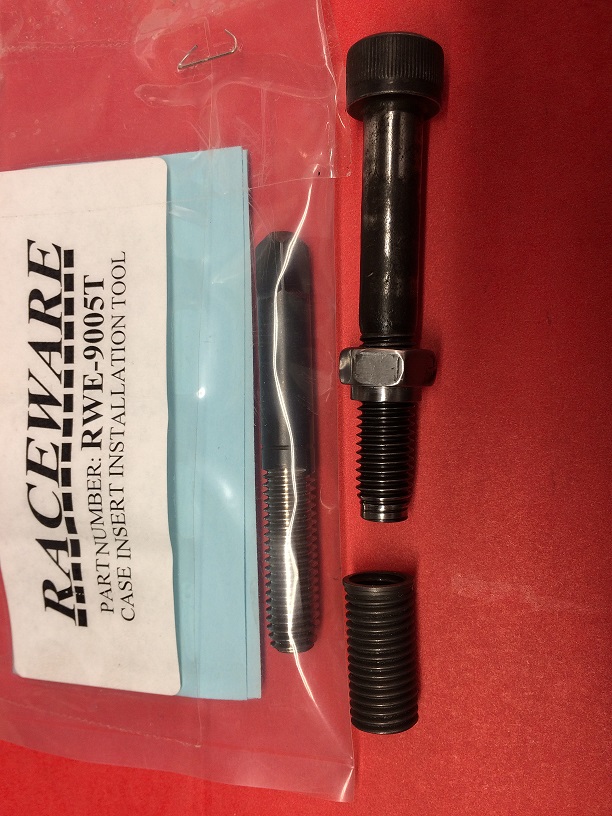
Racewear Case thru-Stud Kit and Head Stud Kit
Tangerine Racing Remote Oil Cooler Kit
Planning on Tangerine Racing 1 1/2" Street System: - High Temp coated header with EVO II Silencer
Case and all the parts are going to shop Friday for opening up to fit the 102s and balancing of all parts.
Goal is to be done by Okteenerfest!
May have potential to be evil?
Thoughts suggestions?
Posted by: thelogo Apr 17 2019, 08:27 AM
Not trying to drudge up old memories but im trying to learn from your experiences
Can you talk about what road you went this time vs your last type 4 .
You dont have to tell me your goals with these motors
I can tell its to haul ass and i appreciate you staying
Loyal to the /4 cause im sure this one cost
/6 comversion money . amd that /6 has been hard to resist
Posted by: Chi-town Apr 17 2019, 09:29 AM
You forgot what you're controlling this with, stock FI?
Posted by: Mblizzard Apr 17 2019, 09:57 AM

You forgot what you're controlling this with, stock FI?
Was not really clear but going for a 2.6 L FI with Microsquirt for fuel injection control.
Posted by: VaccaRabite Apr 17 2019, 10:10 AM
What happened with your 2056?
Zach
Posted by: Mblizzard Apr 17 2019, 10:15 AM
Not trying to drudge up old memories but im trying to learn from your experiences
Can you talk about what road you went this time vs your last type 4 .
You dont have to tell me your goals with these motors
I can tell its to haul ass and i appreciate you staying
Loyal to the /4 cause im sure this one cost
/6 comversion money . amd that /6 has been hard to resist
I am a fan of the 4. I know I have spent more money on this than a 6 conversion but the 4 is what I love.
Overall, I have always felt there was more in the 4 than most gave it credit for. The advance in technology regarding FI and engine components (Nickies and Lens heads) has made it possible to get that performance without building an engine that is a bomb waiting to explode.
I broke a 78mm crank on my last engine. It was a 2.3 with 98mm brial cylinders and Mahle pistons with a great set of big valve heads which were ported. On a very poor tune this put 115hp to the wheels. It was really fun to drive and there was still more there. I still have the components if anyone wants to go big 4 for a lower cost.
So this is just the next level. This will be my last one to build so I am going all out.
I think the last build was a great compromise between spending the 6 money and building a reasonably high HP 4. The build is what compromised the crank. Hard to survive when a bearing is installed incorrectly! Bad things happen!
So same basic road with higher quality parts and a much more matched set of components.
Posted by: Mblizzard Apr 17 2019, 10:16 AM
What happened with your 2056?
Zach
Sent to Germany!
Posted by: JOEPROPER Apr 17 2019, 10:23 AM
Not trying to drudge up old memories but im trying to learn from your experiences
Can you talk about what road you went this time vs your last type 4 .
You dont have to tell me your goals with these motors
I can tell its to haul ass and i appreciate you staying
Loyal to the /4 cause im sure this one cost
/6 comversion money . amd that /6 has been hard to resist
I am a fan of the 4. I know I have spent more money on this than a 6 conversion but the 4 is what I love.
Overall, I have always felt there was more in the 4 than most gave it credit for. The advance in technology regarding FI and engine components (Nickies and Lens heads) has made it possible to get that performance without building an engine that is a bomb waiting to explode.
I broke a 78mm crank on my last engine. It was a 2.3 with 98mm brial cylinders and Mahle pistons with a great set of big valve heads which were ported. On a very poor tune this put 115hp to the wheels. It was really fun to drive and there was still more there. I still have the components if anyone wants to go big 4 for a lower cost.
So this is just the next level. This will be my last one to build so I am going all out.
I think the last build was a great compromise between spending the 6 money and building a reasonably high HP 4. The build is what compromised the crank. Hard to survive when a bearing is installed incorrectly! Bad things happen!
So same basic road with higher quality parts and a much more matched set of components.
I can't imagine that it lasted very long... Live and learn. This next build will go better with more attention being paid. I hope. Good luck!
Posted by: Mblizzard Apr 17 2019, 10:32 AM
Not trying to drudge up old memories but im trying to learn from your experiences
Can you talk about what road you went this time vs your last type 4 .
You dont have to tell me your goals with these motors
I can tell its to haul ass and i appreciate you staying
Loyal to the /4 cause im sure this one cost
/6 comversion money . amd that /6 has been hard to resist
I am a fan of the 4. I know I have spent more money on this than a 6 conversion but the 4 is what I love.
Overall, I have always felt there was more in the 4 than most gave it credit for. The advance in technology regarding FI and engine components (Nickies and Lens heads) has made it possible to get that performance without building an engine that is a bomb waiting to explode.
I broke a 78mm crank on my last engine. It was a 2.3 with 98mm brial cylinders and Mahle pistons with a great set of big valve heads which were ported. On a very poor tune this put 115hp to the wheels. It was really fun to drive and there was still more there. I still have the components if anyone wants to go big 4 for a lower cost.
So this is just the next level. This will be my last one to build so I am going all out.
I think the last build was a great compromise between spending the 6 money and building a reasonably high HP 4. The build is what compromised the crank. Hard to survive when a bearing is installed incorrectly! Bad things happen!
So same basic road with higher quality parts and a much more matched set of components.
I can't imagine that it lasted very long... Live and learn. This next build will go better with more attention being paid. I hope. Good luck!
Not my mistake but certainly a learning experience.
Posted by: Bills914-4 Apr 17 2019, 03:49 PM
Hi Mike,
Welcome to the big motors  , Nice list of parts , do you plan on having the bearings
coated , calico coatings not to far away , I have had good success with them,
I might be wrong but with that parts list , I feel you should go 1 3/4 on the exhaust
system , let that that BIG motor breathe , I run the 1 7/8 system on my 2.8-4 ,
I'm assuming that the cam will have a reduced base circle
(rod to cam clearance with that stoke & bigger rod journal ) just a heads up ?,
Good luck & I'll be lookingforward to seeing it at Okteenerfest  , Bill D.
Posted by: mb911 Apr 17 2019, 04:46 PM
Gonna be a monster motor.. I would love to develop an exhaust for something like that.
Posted by: Mblizzard Apr 17 2019, 07:04 PM
Hi Mike,
Welcome to the big motors
, Nice list of parts , do you plan on having the bearingscoated , calico coatings not to far away , I have had good success with them,
I might be wrong but with that parts list , I feel you should go 1 3/4 on the exhaust
system , let that that BIG motor breathe , I run the 1 7/8 system on my 2.8-4 ,
I'm assuming that the cam will have a reduced base circle
(rod to cam clearance with that stoke & bigger rod journal ) just a heads up ?,
Good luck & I'll be lookingforward to seeing it at Okteenerfest
, Bill D.Yes you are correct on the exhaust. Chris Foley had already set me straight on the exhaust size. Not familiar with the coating of bearings. Tell me more.
Posted by: Mark Henry Apr 17 2019, 08:00 PM
Basically you will have the same engine I have in my '67 bug. 
102mm nickies, JE pistons with valve pockets and extra pin oiling holes., ARP case and head studs.
78mm DPR crank
CB 5.4 rods
web cam
914heads, modified by me, unshrouded 44mmX38mm SS valves, dual springs, CrMo retainers and keepers, etc...
SDS FI with 55lb Siemens injectors
46mm ITB's, modified GSXR
1-3/4" A1 header for T4 into bug conversion.
BTW I have a tangerine 914, 1-7/8" header/muffler hanging on my wall. 
You will have a hard time getting 9.5:1, big chambers, best I could do with a .040" deck was 9.2:1 CR or it maybe it was 9.3, but I couldn't get 9.5CR.
Posted by: Mblizzard Apr 18 2019, 05:59 AM
Basically you will have the same engine I have in my '67 bug.
102mm nickies, JE pistons with valve pockets and extra pin oiling holes., ARP case and head studs.
78mm DPR crank
CB 5.4 rods
web cam
914heads, modified by me, unshrouded 44mmX38mm SS valves, dual springs, CrMo retainers and keepers, etc...
SDS FI with 55lb Siemens injectors
46mm ITB's, modified GSXR
1-3/4" A1 header for T4 into bug conversion.
BTW I have a tangerine 914, 1-7/8" header/muffler hanging on my wall.
You will have a hard time getting 9.5:1, big chambers, best I could do with a .040" deck was 9.2:1 CR or it maybe it was 9.3, but I couldn't get 9.5CR.
Len is going to modify my heads to get the correct compression.
Posted by: 914dave Apr 18 2019, 06:05 AM
Mike
Are you going with the one piece crankshaft design this time around? 
Posted by: Mblizzard Apr 18 2019, 07:09 AM
Mike
Are you going with the one piece crankshaft design this time around?
The two piece arrangement did not fair very well. But the reality is that the improper installation of the bearing is what caused the crank to fail. it was apparent that the bearing was not in place and then the case was tightened down. I am sure it would not turn so they opened it up and only repositioned the bearing instead of replacing it. Small thing but after time it resulted in a broken crank.
Went with the forged crank.
Posted by: thelogo Apr 18 2019, 07:21 AM
I am sure it would not turn so they opened it up and only repositioned the bearing instead of replacing it.
Went with the forged crank.
If you dont mind me asking who is they?
Who compromised the bearing/crank/motor
Posted by: Mblizzard Apr 18 2019, 08:01 AM
I am sure it would not turn so they opened it up and only repositioned the bearing instead of replacing it.
Went with the forged crank.
If you dont mind me asking who is they?
Who compromised the bearing/crank/motor
Prefer not to post anything that I was not there to confirm. The engine had a couple of revisions so I am not going to call out anyone unless I was there to confirm.
Posted by: Mblizzard Apr 18 2019, 09:06 AM
Basically you will have the same engine I have in my '67 bug.
102mm nickies, JE pistons with valve pockets and extra pin oiling holes., ARP case and head studs.
78mm DPR crank
CB 5.4 rods
web cam
914heads, modified by me, unshrouded 44mmX38mm SS valves, dual springs, CrMo retainers and keepers, etc...
SDS FI with 55lb Siemens injectors
46mm ITB's, modified GSXR
1-3/4" A1 header for T4 into bug conversion.
BTW I have a tangerine 914, 1-7/8" header/muffler hanging on my wall.
You will have a hard time getting 9.5:1, big chambers, best I could do with a .040" deck was 9.2:1 CR or it maybe it was 9.3, but I couldn't get 9.5CR.
That has to be one bad bug!
Posted by: Bills914-4 Apr 19 2019, 05:06 PM
Hi Mike,
Welcome to the big motors
, Nice list of parts , do you plan on having the bearingscoated , calico coatings not to far away , I have had good success with them,
I might be wrong but with that parts list , I feel you should go 1 3/4 on the exhaust
system , let that that BIG motor breathe , I run the 1 7/8 system on my 2.8-4 ,
I'm assuming that the cam will have a reduced base circle
(rod to cam clearance with that stoke & bigger rod journal ) just a heads up ?,
Good luck & I'll be lookingforward to seeing it at Okteenerfest
, Bill D.Yes you are correct on the exhaust. Chris Foley had already set me straight on the exhaust size. Not familiar with the coating of bearings. Tell me more.
It's a performance coating for bearings , piston skirts, piston tops,
It might be (would be) a worthwhile investment with this motor ,
have your bearings coated , piston tops coated & skirts recoated (better quality
coating) I believe Len recommends having the heads (chambers & valves) done ,
I hope this helps Bill D.
PS who is doing your timesert install for your cylinder studs ? if your doing it ,let
me know I have some tools that I made to help install them below the surface,
bearings - CT-1
piston skirts - CT-3
piston tops - CT-2
www.calicocoatings.com/coatings/
Posted by: Mblizzard Apr 19 2019, 06:18 PM
Hi Mike,
Welcome to the big motors
, Nice list of parts , do you plan on having the bearingscoated , calico coatings not to far away , I have had good success with them,
I might be wrong but with that parts list , I feel you should go 1 3/4 on the exhaust
system , let that that BIG motor breathe , I run the 1 7/8 system on my 2.8-4 ,
I'm assuming that the cam will have a reduced base circle
(rod to cam clearance with that stoke & bigger rod journal ) just a heads up ?,
Good luck & I'll be lookingforward to seeing it at Okteenerfest
, Bill D.Yes you are correct on the exhaust. Chris Foley had already set me straight on the exhaust size. Not familiar with the coating of bearings. Tell me more.
It's a performance coating for bearings , piston skirts, piston tops,
It might be (would be) a worthwhile investment with this motor ,
have your bearings coated , piston tops coated & skirts recoated (better quality
coating) I believe Len recommends having the heads (chambers & valves) done ,
I hope this helps Bill D.
PS who is doing your timesert install for your cylinder studs ? if your doing it ,let
me know I have some tools that I made to help install them below the surface,
bearings - CT-1
piston skirts - CT-3
piston tops - CT-2
www.calicocoatings.com/coatings/
Contacted them. I like this tech?
Posted by: bahnzai Apr 20 2019, 03:30 AM
+1 on Calico Coatings! Did this on a 3.5 930 engine build.
Posted by: Mblizzard Apr 22 2019, 10:46 AM
Hi Mike,
Welcome to the big motors
, Nice list of parts , do you plan on having the bearingscoated , calico coatings not to far away , I have had good success with them,
I might be wrong but with that parts list , I feel you should go 1 3/4 on the exhaust
system , let that that BIG motor breathe , I run the 1 7/8 system on my 2.8-4 ,
I'm assuming that the cam will have a reduced base circle
(rod to cam clearance with that stoke & bigger rod journal ) just a heads up ?,
Good luck & I'll be lookingforward to seeing it at Okteenerfest
, Bill D.Yes you are correct on the exhaust. Chris Foley had already set me straight on the exhaust size. Not familiar with the coating of bearings. Tell me more.
It's a performance coating for bearings , piston skirts, piston tops,
It might be (would be) a worthwhile investment with this motor ,
have your bearings coated , piston tops coated & skirts recoated (better quality
coating) I believe Len recommends having the heads (chambers & valves) done ,
I hope this helps Bill D.
PS who is doing your timesert install for your cylinder studs ? if your doing it ,let
me know I have some tools that I made to help install them below the surface,
bearings - CT-1
piston skirts - CT-3
piston tops - CT-2
www.calicocoatings.com/coatings/
Bill Set me straight on the RaceWare head studs. I saw they cam with Timecerts but thought they were optional? Because I am sticking with relatively low compression I was going to just use the standard bolt holes.
Contacted Calico but nothing yet.
Posted by: jd74914 Apr 22 2019, 11:40 AM
Contacted Calico but nothing yet.
If you're looking for some other options...
SwainTech also is known for excellent engine coatings work. Website sucks though.
Hekimian Racing does a good amount of coatings work as I understand it. Never used them for coatings, but have used them extensively for cryoing parts (mostly bike transmission) and I would imagine they do good coatings work too. Gregg is awesome and a wealth of knowledge. Another crappy website.
Might be worth cryoing your crank and perhaps some other parts. Not too expensive and people have had good results. A while ago I read on shoptalk that Jake was cryoing parts in ~75% of his big motors.
Posted by: RFoulds Apr 22 2019, 03:10 PM
you mentioned some of your old components for sale?
whatcha got? I especially looking for heads and valves I can use.
Posted by: Mblizzard Apr 22 2019, 05:31 PM
you mentioned some of your old components for sale?
whatcha got? I especially looking for heads and valves I can use.
Got 2 big valve heads, ported, dual springs, and opened up to fit 98mm jugs. Have one good stock 2.0 and complete set of new valves.
Posted by: RFoulds Apr 23 2019, 09:00 AM
Sent you a PM
Posted by: Mblizzard Apr 29 2019, 07:35 AM
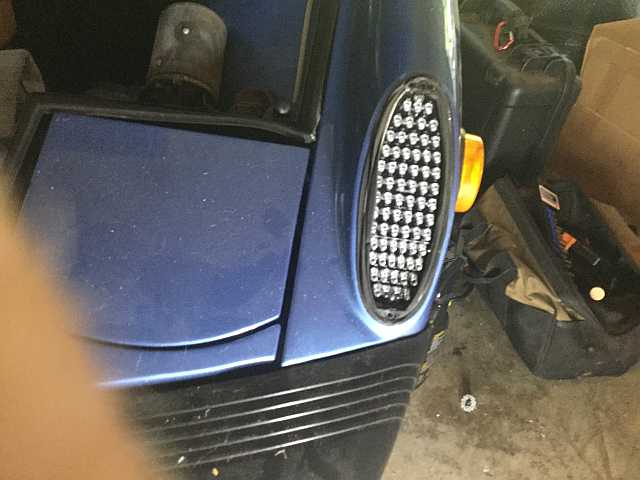
Not much progress. Still waiting on machine shop. But did get to install my https://www.spokeworksled.com/914-led-solutions LED lights. Super easy install and fit perfectly! 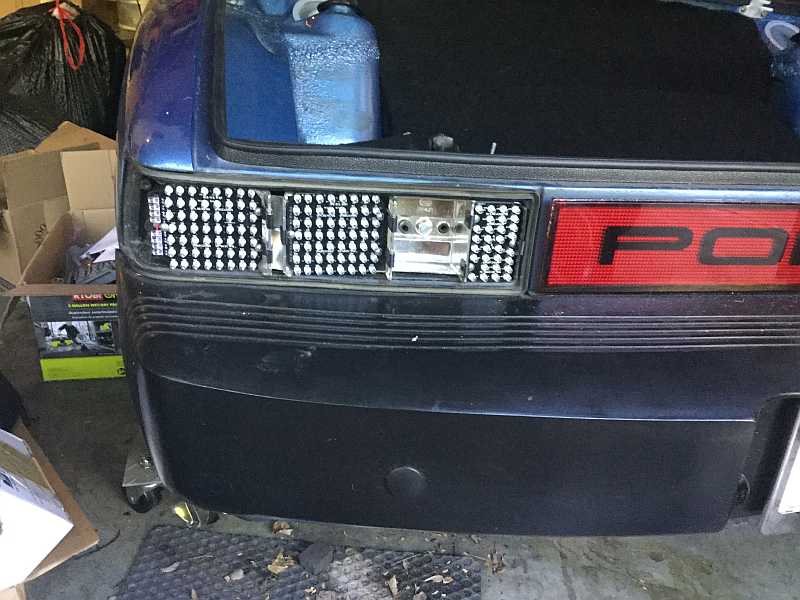

Posted by: Mblizzard Apr 30 2019, 11:47 AM
Well more good news! Shop called and they will get to my stuff next week. 
Posted by: Mblizzard May 1 2019, 07:57 AM
Bill,
On the Timesert install, I have the RaceWare install tool but I don't think it does anything for ensuring that it is flush.
Supposedly no machining is required. I have not tried to install them but it does seem like the lip on top will prevent a flush install.
What are the tools you are referring to?
Posted by: Bills914-4 May 1 2019, 08:49 AM
Bill,
On the Timesert install, I have the RaceWare install tool but I don't think it does anything for ensuring that it is flush.
Supposedly no machining is required. I have not tried to install them but it does seem like the lip on top will prevent a flush install.
What are the tools you are referring to?
It's just a 1/2 ball mill (for making recess c'bore / in slo-mo hand drill )
a bolt (matches threads on studs/ coarse end )
a nut with part of the hex turned down dia. smaller then the timesert shoulder
plus a tap for chasing thread (makes easier install )
the tool that comes with the studs & serts is for locking the serts in once you bury
them . it spreads the bottom of the serts so they don't back out . one at time you
bury it , if it's good then remove put loctite then rebury it ,then use tool that comes
with the serts , I hope this helps Bill D.
ps let me know if you decide to do yourself, I'll send you the tools
Posted by: Mblizzard May 1 2019, 09:19 AM
Bill,
On the Timesert install, I have the RaceWare install tool but I don't think it does anything for ensuring that it is flush.
Supposedly no machining is required. I have not tried to install them but it does seem like the lip on top will prevent a flush install.
What are the tools you are referring to?
It's just a 1/2 ball mill (for making recess c'bore / in slo-mo hand drill )
a bolt (matches threads on studs/ coarse end )
a nut with part of the hex turned down dia. smaller then the timesert shoulder
plus a tap for chasing thread (makes easier install )
the tool that comes with the studs & serts is for locking the serts in once you bury
them . it spreads the bottom of the serts so they don't back out . one at time you
bury it , if it's good then remove put loctite then rebury it ,then use tool that comes
with the serts , I hope this helps Bill D.
ps let me know if you decide to do yourself, I'll send you the tools
Very smart! I don't have the ball mill but is a cheap purchase. I can make up a similar bolt assuming there is nothing special about the nut on the end? But don't have the tap. Not sure what the stock bolts thread size and pattern are but can likely find or use a stock bolt from the back side to clean the threads.
Great insight! Will let you know if I cant put together or if it turns out to be more costly than I expect.
Posted by: Mblizzard May 13 2019, 08:45 AM
Well still waiting on the machine shop.
Making some progress. Got the cam gear on and prepped up my new = UK made (Jonesy) oil sump and temp sender cover. As a quick note, I was unable to get any conductivity due to the coating on the oil temp cover. Cleaned the threads of the coating and sanded a small spot on the inside of the cover near the bolt holes to be sure the sender could reach ground.
Mocked up my CFR oil coiler. Really nice stuff from Chris Foley. I was running AN 8 lines on old cooler but going to AN 10 seems like a huge increase in size. The built in thermostat in this is just amazing and Chris even provides a flap to block off air flow to the stock oi cooler location. Seems like this should help head temps as well. l 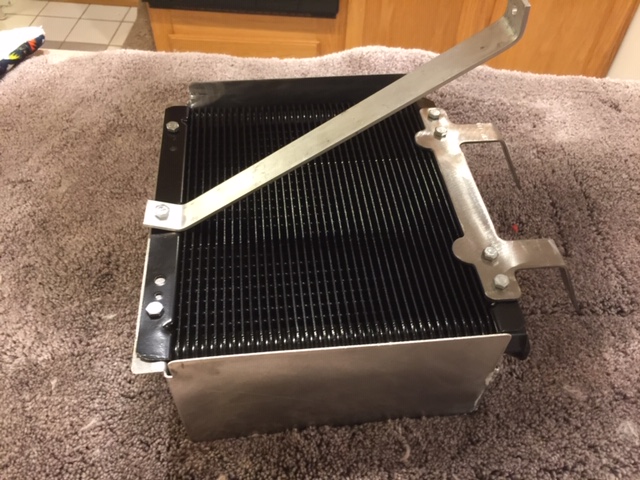

Posted by: Mblizzard May 13 2019, 12:47 PM
double
Posted by: Mblizzard Jun 20 2019, 06:57 PM
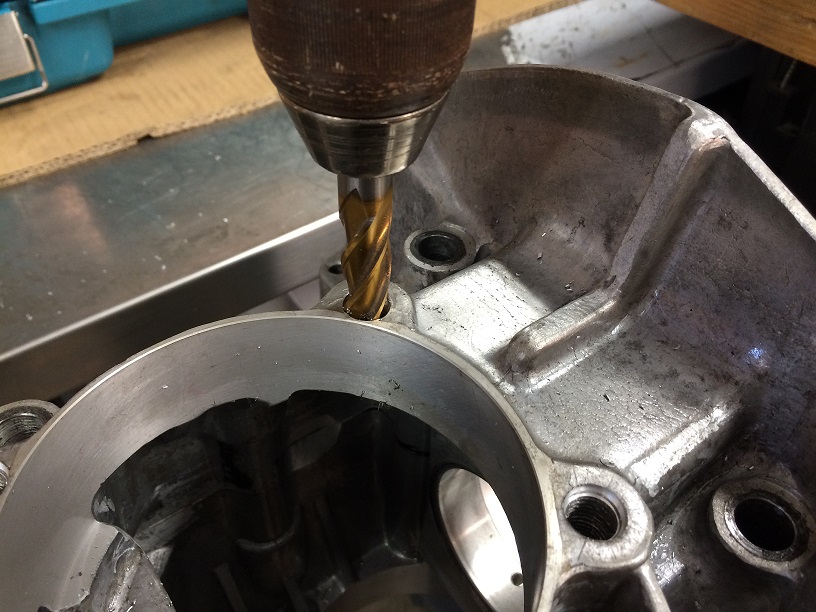
Well finally got my case back from shop. 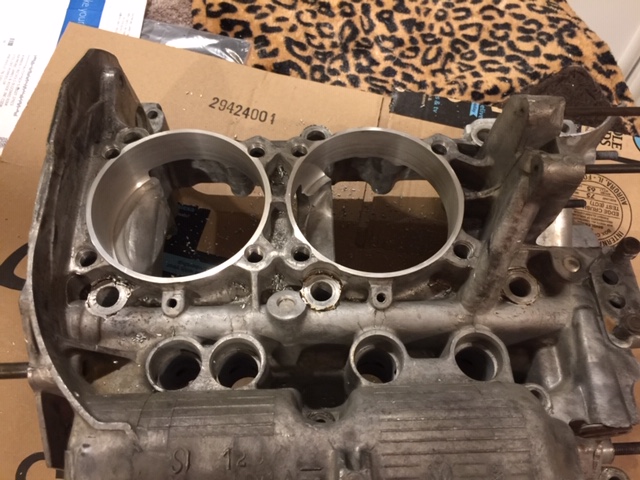
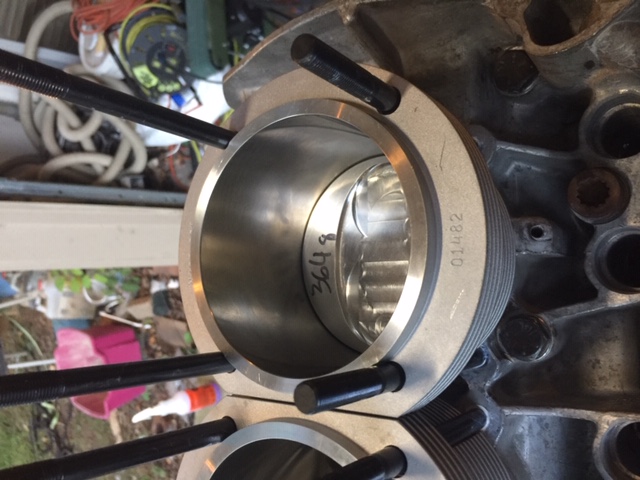
Have some substantial 102 mm holes that Nickies fit into nicely. 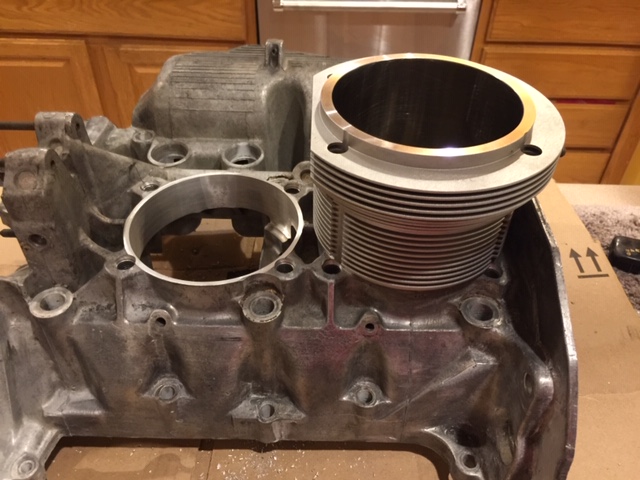
Let the build begin.
Posted by: 914werke Jun 20 2019, 08:54 PM

Posted by: DRPHIL914 Jun 21 2019, 07:46 AM
awesome! looking good,
you've go less than 3 months to get that thing back in your car and down the road!  now lets see some assembly!!
Posted by: Betty Jun 21 2019, 07:23 PM
GO MIKE, GO MIKE, GO MIKE!!! You can DO it!!! 


Posted by: Mark Henry Jun 21 2019, 07:43 PM
Well finally got my case back from shop.
Have some substantial 102 mm holes that Nickies fit into nicely.
Let the build begin.
Bigger...the 102 uses the standard 103mm cylinder size bore. I didn't see the need for timeserts/casesavers but with the ARP headstuds you would be wise to run a thread reforming tap through them.
Posted by: Mblizzard Jun 24 2019, 08:08 AM
Well finally got my case back from shop.
Have some substantial 102 mm holes that Nickies fit into nicely.
Let the build begin.
Bigger...the 102 uses the standard 103mm cylinder size bore. I didn't see the need for timeserts/casesavers but with the ARP headstuds you would be wise to run a thread reforming tap through them.
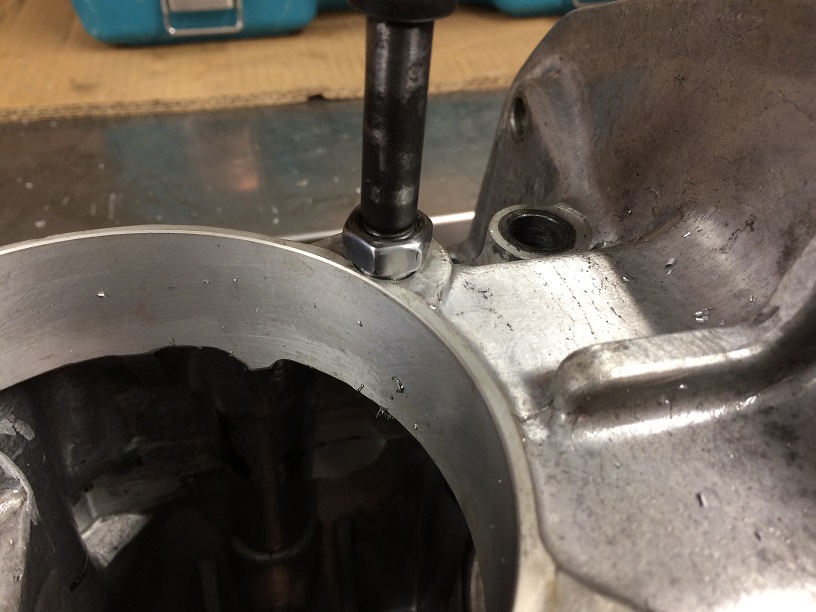
Yes I was just test fitting them. Followed Bills direction on the method for getting the Time Certs to sit flush. Apparently the ARP bolts are smaller than stock and use an insert.
Quick question. Is there a need for a gasket between the case and the cylinder and where to get them?
Len is going to cut my heads to get the correct compression ratio. Was going to check the deck height but just thought I might need a gasket.
Posted by: Mblizzard Jul 23 2019, 08:58 AM
Finally back in the country! Now for building!
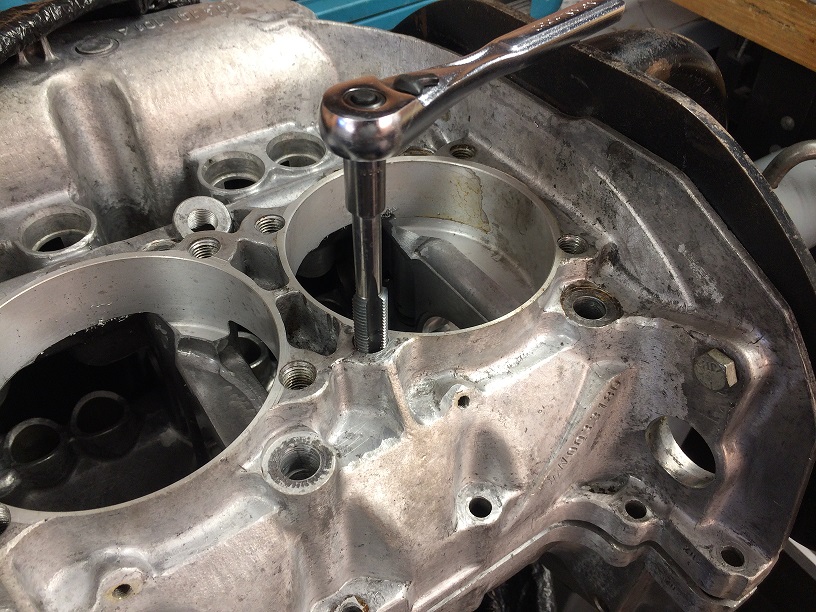
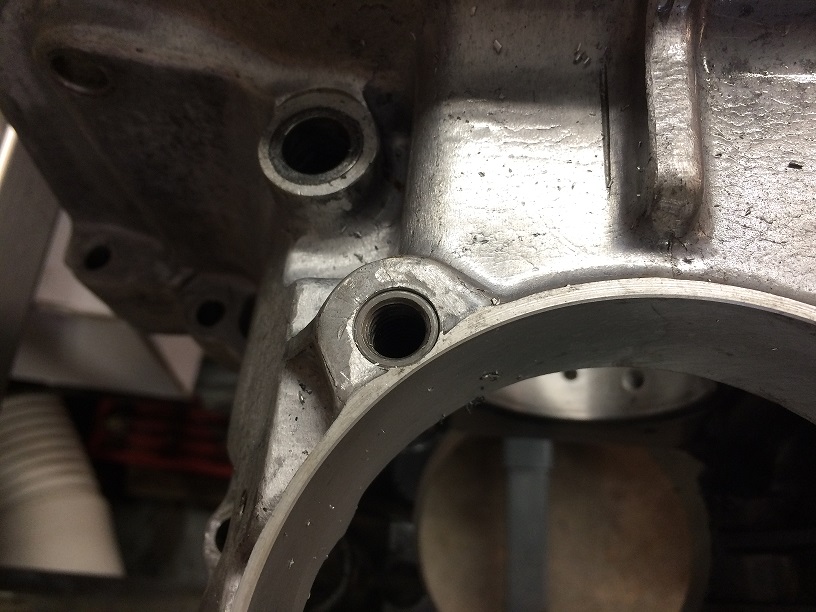
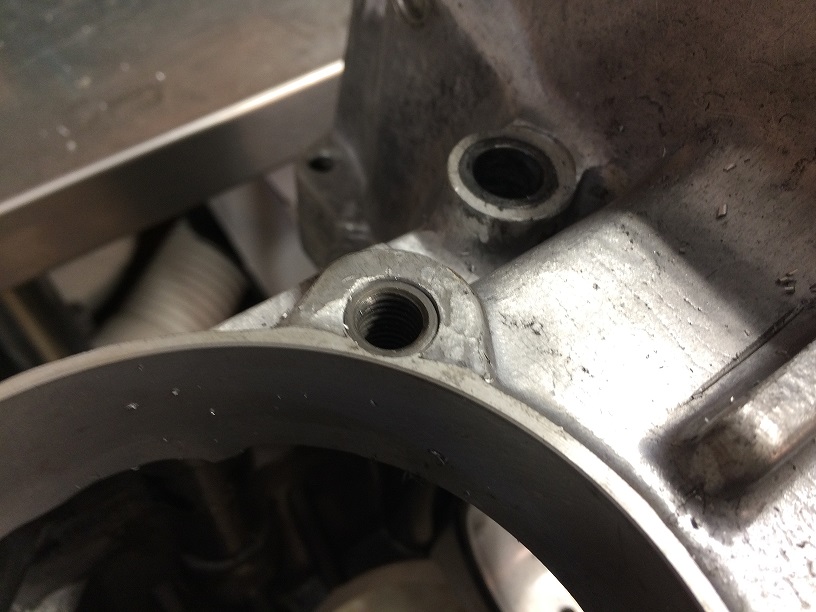
Got the case time certs installed last night. Thanks to Bill's guidance it went perfectly.
the Raceware head studs are expensive but quality for sure.
Will build the crank tonight!
Posted by: Mblizzard Jul 25 2019, 08:20 AM
Was making progress! Got the gears on the crank and was ready to add the rods.
Something did not seem right. A quick check of sizes indicated 55mm
rods = Type 1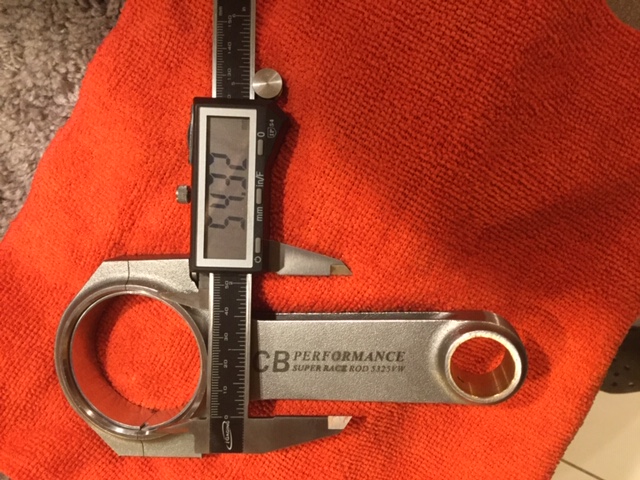
but a 50mm crank = stock 2.0L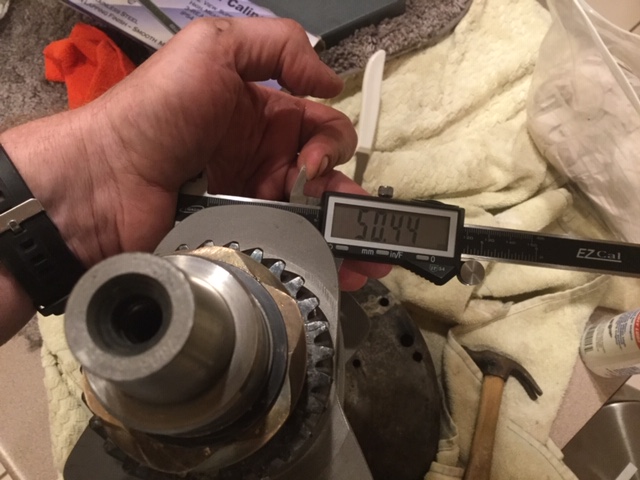
5mm is likely too much tolerance in rod bearings! 
Crank was suppose to be Type 1 journals. Have already balanced all of the components.
Hopefully can just get new rods.
Posted by: Mblizzard Aug 1 2019, 06:58 AM
Well not a lot of progress as of late. Still sorting out the rod issue but Charles at the Type 4 Store has been great in working with me on the issue!
Really have to thank Len Hoffman. He is fast tracking my heads at the ceramic coater so I can get them by Aug 9.  Cant wait to see the LE-200 heads with the coating done. Combined with the Tangerine Racing 1-3/4 headers and Evo Muffler it ought to breath well!
He is setting them up with a 1mm step so with zero deck height in the jugs I will be at 9.99:1 compression. Everyone likely says NO on the deck zero height but the pistons have valve cut outs that should allow for clearance. I will check of course!
As long as the pistons are not sticking out of the jugs I should not need any cylinder shims.
If needed, I can add as much as .5mm (0.02 in) deck height and only reduce the compression to 9.5:1.
I have ordered those shims just in case!
Posted by: Betty Aug 1 2019, 11:39 AM
Well not a lot of progress as of late. Still sorting out the rod issue but Charles at the Type 4 Store has been great in working with me on the issue!
Really have to thank Len Hoffman. He is fast tracking my heads at the ceramic coater so I can get them by Aug 9.
Cant wait to see the LE-200 heads with the coating done. Combined with the Tangerine Racing 1-3/4 headers and Evo Muffler it ought to breath well! He is setting them up with a 1mm step so with zero deck height in the jugs I will be at 9.99:1 compression. Everyone likely says NO on the deck zero height but the pistons have valve cut outs that should allow for clearance. I will check of course!
As long as the pistons are not sticking out of the jugs I should not need any cylinder shims.
If needed, I can add as much as .5mm (0.02 in) deck height and only reduce the compression to 9.5:1.
I have ordered those shims just in case!


Posted by: Mblizzard Aug 3 2019, 08:05 PM
Moving forward. Man Nickies are beautiful. 
Clark this is for you. 
Posted by: Mblizzard Aug 6 2019, 03:00 PM
Went through the mock up process all things seem to rotate and be clear. I felt I had a couple of points on the crank to case clearance that were a bit tight so I took a bit more off the case to provide clearance.
Checked deck height at 0.43 mm which with the 1 mm step the wise Len Hoffman machined into my heads will give me about a 9.5:1 compression ratio.
The heads will be here Wednesday!
Taking everything back apart for final inspection and cleaning for final assembly.
Of course I forgot that the gasket set does not come with the windage tray seal so I had to order one. I heard of people leaving them out completely any thoughts on that?
Should start final assembly this weekend!
Posted by: Betty Aug 6 2019, 08:43 PM


Posted by: ClayPerrine Aug 6 2019, 08:53 PM
Went through the mock up process all things seem to rotate and be clear. I felt I had a couple of points on the crank to case clearance that were a bit tight so I took a bit more off the case to provide clearance.
Checked deck height at 0.43 mm which with the 1 mm step the wise Len Hoffman machined into my heads will give me about a 9.5:1 compression ratio.
The heads will be here Wednesday!
Taking everything back apart for final inspection and cleaning for final assembly.
Of course I forgot that the gasket set does not come with the windage tray seal so I had to order one. I heard of people leaving them out completely any thoughts on that?
Should start final assembly this weekend!
You and I are in a competition to see who can get closest to Okteenerfest to get their car running.
Posted by: Mblizzard Aug 7 2019, 04:16 AM
Went through the mock up process all things seem to rotate and be clear. I felt I had a couple of points on the crank to case clearance that were a bit tight so I took a bit more off the case to provide clearance.
Checked deck height at 0.43 mm which with the 1 mm step the wise Len Hoffman machined into my heads will give me about a 9.5:1 compression ratio.
The heads will be here Wednesday!
Taking everything back apart for final inspection and cleaning for final assembly.
Of course I forgot that the gasket set does not come with the windage tray seal so I had to order one. I heard of people leaving them out completely any thoughts on that?
Should start final assembly this weekend!
You and I are in a competition to see who can get closest to Okteenerfest to get their car running.
What Mental stage is yours in?
Posted by: Mblizzard Aug 9 2019, 11:55 AM
Got a nice little package from Mr. Hoffman today!
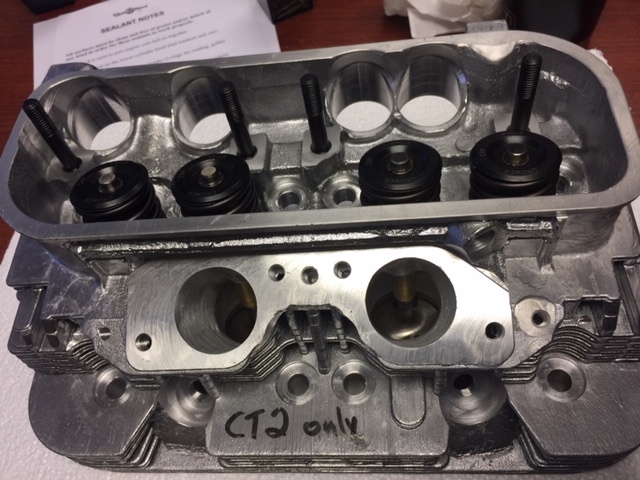
Nice LE-200 heads with ceramic!
Posted by: Mblizzard Aug 13 2019, 06:33 AM
Well as others have seen, things got ugly! 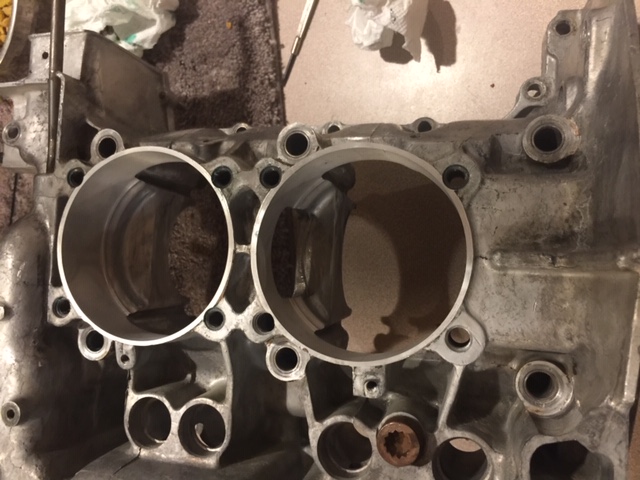
I have no idea how it happened. Bearing was fine, clearance checked out with plasti-gauge, and turned super smoothly!
With the advice from some really good people I decided to go with a new case.
It is at the shop being opened for the 102s by Friday!
But now the painful part, new Time certs, for RaceWare head bolts, new bearings main and cam, and rush charges at the shop. OUCH $$$$$$
Hope to start putting together this weekend!
Posted by: 914forme Aug 13 2019, 07:00 AM
You will always pay when you rush.
My suggestion if you re going to put this engine together in a weekend. Clean up while you are waiting.
Get everything you will need laid out on the table(s) all tools, all chemicals, parts everything. White board note pad what ever and build a check list. All tools and supplies applicators etc... must go back to the spot. Count your danm rags.
I use paint pens also to mark when bolts and studs have been torqued. Torque, mark, torque mark. Clean tools put them back on the table in the same spot. Count all my rags, sponges, qtips what the not.
You are an engine surgeon , you must be precise and know what, where and why.
Take the upcoming days to prep well, and you will be ready to get it done.
HAVE A FREAKING
CHECK
LIST AND USE IT!
Don't know how many times I have skipped a step and paid hard for it latter. The more I am rushed the worse it gets.
I built an engine once, got it fired up, and promptly left the oil fill cap off of it. That almost cost me a nice race engine. I was trying to get to an event the next day. Do not be like this bone head. Learn from my mistakes. All my car guy friends seem to have a similar story.
Posted by: Mblizzard Aug 13 2019, 07:16 AM
You will always pay when you rush.
My suggestion if you re going to put this engine together in a weekend. Clean up while you are waiting.
Get everything you will need laid out on the table(s) all tools, all chemicals, parts everything. White board note pad what ever and build a check list. All tools and supplies applicators etc... must go back to the spot. Count your danm rags.
I use paint pens also to mark when bolts and studs have been torqued. Torque, mark, torque mark. Clean tools put them back on the table in the same spot. Count all my rags, sponges, qtips what the not.
You are an engine surgeon , you must be precise and know what, where and why.
Take the upcoming days to prep well, and you will be ready to get it done.
HAVE A FREAKING
CHECK
LIST AND USE IT!
Don't know how many times I have skipped a step and paid hard for it latter. The more I am rushed the worse it gets.
I built an engine once, got it fired up, and promptly left the oil fill cap off of it. That almost cost me a nice race engine. I was trying to get to an event the next day. Do not be like this bone head. Learn from my mistakes. All my car guy friends seem to have a similar story.
So true!
But I am going back to the beginning and cleaning everything over again between now and the weekend.
On the first go I set myself small incremental goals for each night which seemed to work well. Tonight is pull rods, timing gear, and dizzy off crank.
But I think i will write it all out just to be sure!
Went back and reordered some parts that I don't like to use over like woodruff keys. I know they are fine to reuse but...
Also going to go back through and check all of my clearances and such. That would be a good list to have for stock builds.
Posted by: Mblizzard Aug 15 2019, 08:42 AM
OK so I am getting back on track.
Big shout out to Jorge at http://www.europeanmotorworks.com/vw/type-4-engine-parts.html as I am sure he put a few things down to work on my new case but he got it done in record time!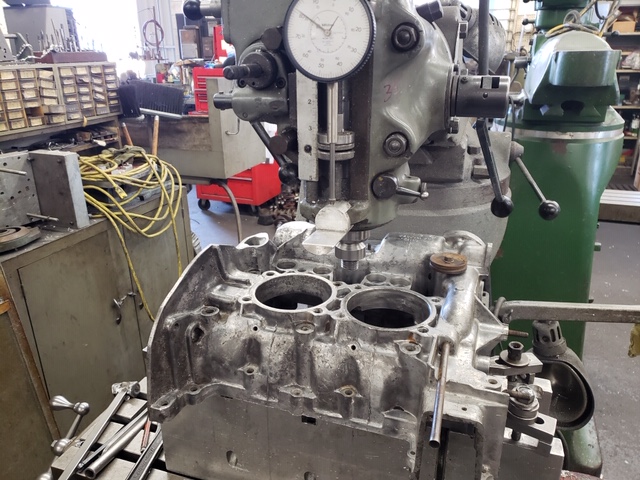
Opened for 102, line bored, and he even drilled and tapped the galley plugs.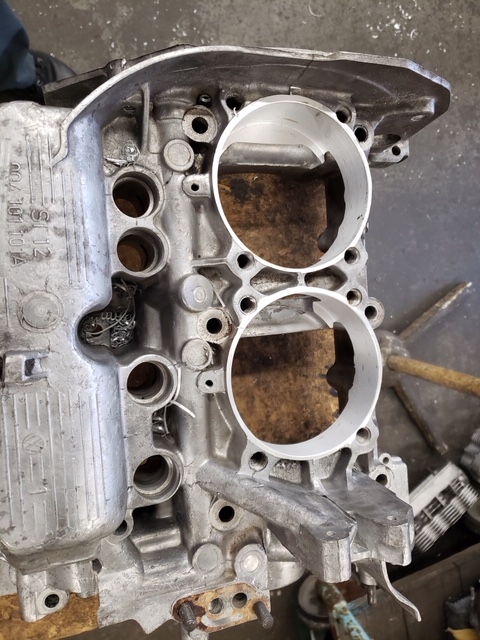
I will have to clearance a few points for the crank when it gets here but this should get me back on track. My local shop offered to pay for the whole case but because I was asking them to rush I agreed to split it with them.
OK so whats the cost of this mistake?
New case and machine work $550
New Time certs for Raceware Head bolts $70
New crank and cam bearings $200
Miscellaneous parts $50
Lost build time of over a week $???
But in the long run it will be cheap as compared to trying to implement some type of crap fix  using something like JB Weld and then losing the whole engine its very cheap.
Posted by: mepstein Aug 15 2019, 10:19 AM
One of our guys was building an engine for himself. 3.0 six. He either forgot a circle clip or didn't seat it all the way in the piston. Engine ran for 5 minutes and then let go inside. It wasn't pretty or cheap.
Posted by: malcolm2 Aug 15 2019, 10:25 AM
Moving forward. Man Nickies are beautiful.
Clark this is for you.
I am so happy you remembered (learned, or already knew from) my mistake.
Now make sure you do that on the FINAL assembly.
Posted by: Mblizzard Aug 22 2019, 06:46 AM
Well things are back to square 1 essentially Well maybe not that far back.
But new crank arrives today. Had Jorge verify the bolt fit. 
May not be real smart but I am capable of learning!
Verified clearances of the 78mm crank in new case. All good there.
Took crank timing gear and dizzy drive off old crank. Amazing how easy this is with a press!
Tonight.
Put new Raceware time serts in case.
Install head bolts
Clean case for assembly
Verify rod fitment and clearance on new crank.
Put crank timing gear and dizzy drive on new crank.
Clean all parts for assembly.
Been knocking out a few other things like adding new 914 Rubber alternator harness. Makes it look very nice! 
Got all tin cleaned and ready.
Posted by: DRPHIL914 Aug 22 2019, 07:20 AM
Mike it looks like you just may make it on time!! you are going to be chasing it down to the wire like I did last year!
Posted by: Betty Aug 22 2019, 04:01 PM
Posted by: Mblizzard Aug 24 2019, 05:15 PM
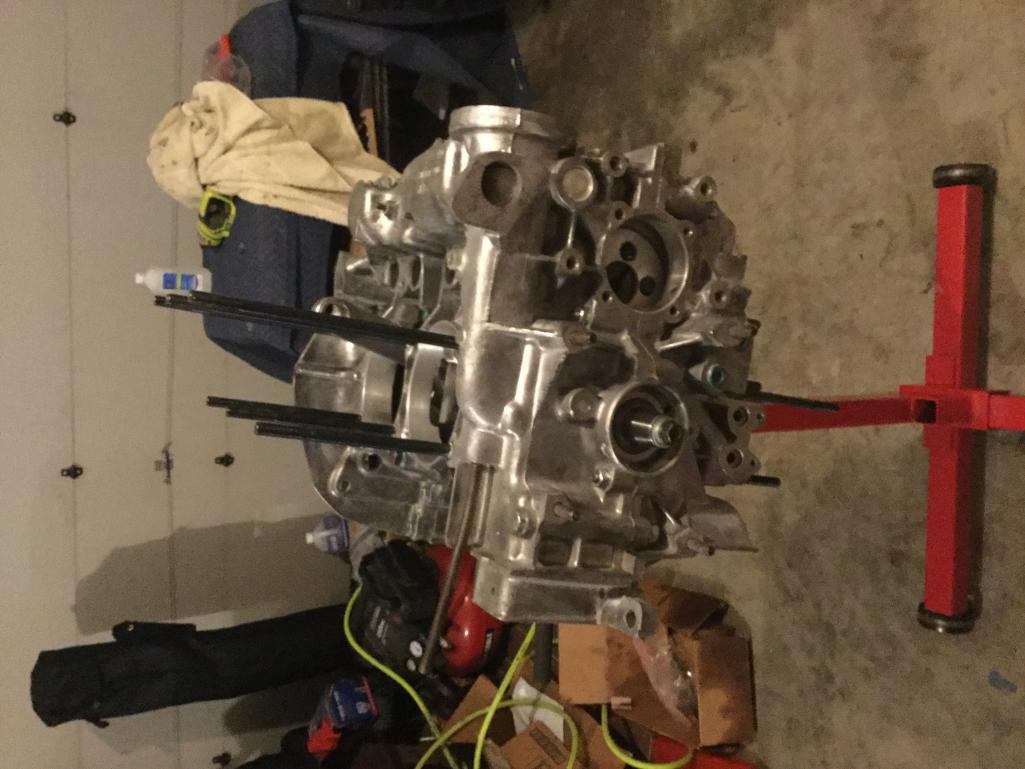
14-hours in the garage and the short block is done!
Couple of minor set backs during the build. Funny seemed to have no clearance issues on the first mock up. But in the end cam bolts were to long and had to be ground down and removing a few broken sheet metal screws sucked up some time and finding a lost rod bearing that was not anywhere in the garage but eventually found its way to my pocket sucked up more time
Tomorrow get the PCs on and start setting up the valve train. Did not get time for many photos. Man am I tired.
Posted by: ClayPerrine Aug 24 2019, 07:37 PM
14-hours in the garage and the short block is done!
Couple of minor set backs during the build. Funny seemed to have no clearance issues on the first mock up. But in the end cam bolts were to long and had to be ground down and removing a few broken sheet metal screws sucked up some time and finding a lost rod bearing that was not anywhere in the garage but eventually found its way to my pocket sucked up more time
Tomorrow get the PCs on and start setting up the valve train. Did not get time for many photos. Man am I tired.
Great to hear it is going well. I spent all day installing shift cables and the shifter.
We can park the hard luck cases next to each other at Okteenerfest.
Posted by: Mblizzard Aug 25 2019, 03:59 AM
14-hours in the garage and the short block is done!
Couple of minor set backs during the build. Funny seemed to have no clearance issues on the first mock up. But in the end cam bolts were to long and had to be ground down and removing a few broken sheet metal screws sucked up some time and finding a lost rod bearing that was not anywhere in the garage but eventually found its way to my pocket sucked up more time
Tomorrow get the PCs on and start setting up the valve train. Did not get time for many photos. Man am I tired.
Great to hear it is going well. I spent all day installing shift cables and the shifter.
We can park the hard luck cases next to each other at Okteenerfest.
Slept in this morning and didn’t get to the garage until 0600. But a really coolmsite to start from compared to yesterday.
Yep and there are going to be some stories to tell.
Not to self, don’t let Clay weld your shifter.
Posted by: Betty Aug 25 2019, 06:00 AM
Never give up, for that is just the place and time that the tide will turn.
~ Harriet Beecher Stowe
Nine -
Fourteen -
Posted by: ClayPerrine Aug 25 2019, 06:10 AM

Posted by: Mblizzard Aug 26 2019, 08:11 AM
Did a lot of rechecking on parts Sunday. Not much progress.
Had major scare. Was checking out all of the internals with a bore scope and thought the spacer ring between the timing gear and dizzy drive was cracked. pulled the case apart and found it was only a scratch. Looked much worse on the borescope. 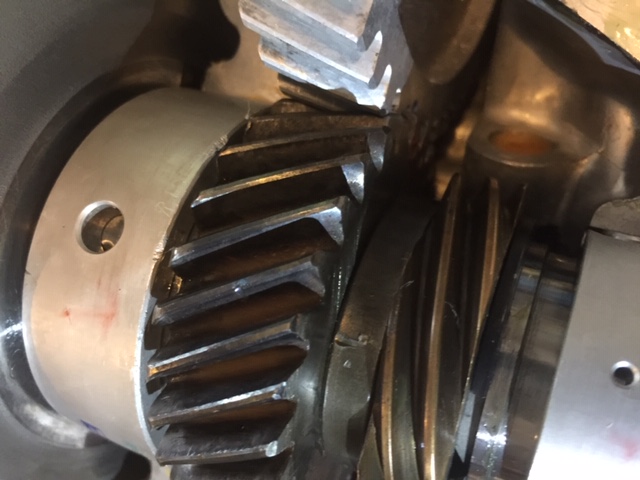
A little lost time but was very happy to put it back together!
So funny checked the gaps on a few of the rings before and they were all good. Figured I would fly through the piston part give that. But every other one required filing. Some of them essentially had no gap. Make sure you check your rings!
Tried installing one of the cursed JE Piston C-clips in piston and it shot out of the garage into the yard. Said screw that and got on line and purchased a tool!
Will install pistons without clips tonight and start valve geometry.
Posted by: maf914 Aug 26 2019, 09:31 AM
Mike, thanks for posting this build thread. This should be a great engine.
Is that a chipped gear tooth in the photo above? 
Posted by: Mblizzard Aug 26 2019, 10:09 AM
Mike, thanks for posting this build thread. This should be a great engine.
Is that a chipped gear tooth in the photo above?
Crap that might be.
Posted by: Mblizzard Aug 28 2019, 08:19 PM
Well pulled the case apart again and could not find a chipped tooth on the cam gear!
Progress is being made. These guys are my new best friends.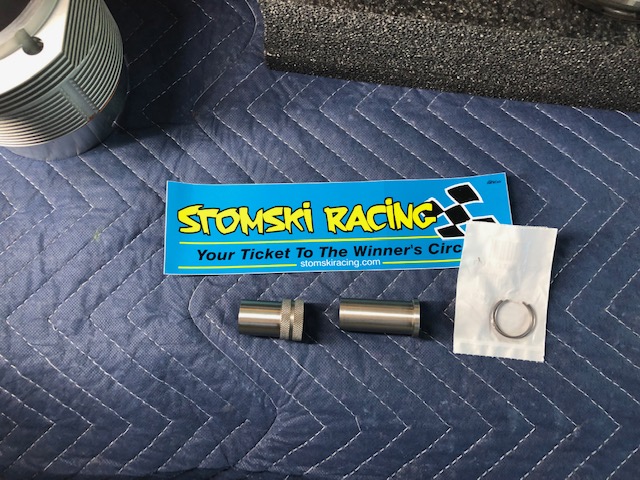
If you ever tried to put in the Circlips on pistons you know some are easy and some are impossible. JE Pistons are the worse. But this little gizmo from Stomski Racing took away all that frustration. Well worth the $90! Almost impossible to do without this tool.
While the JE circlip is a pain in the ass the ring compressor they send with a piston set is awesome. Easiest piston install ever!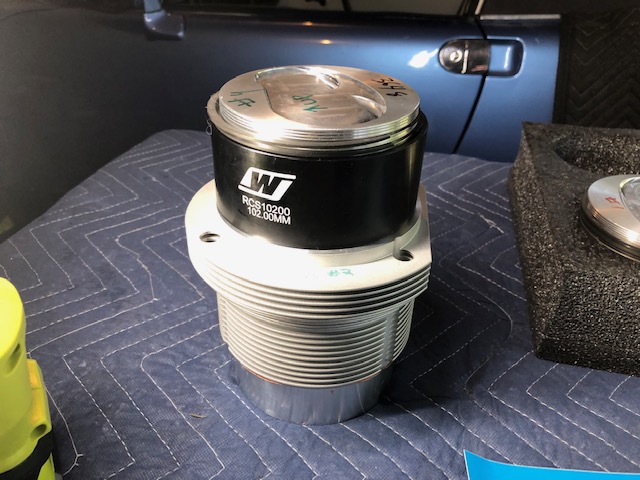
So end of the night I have almost an engine. 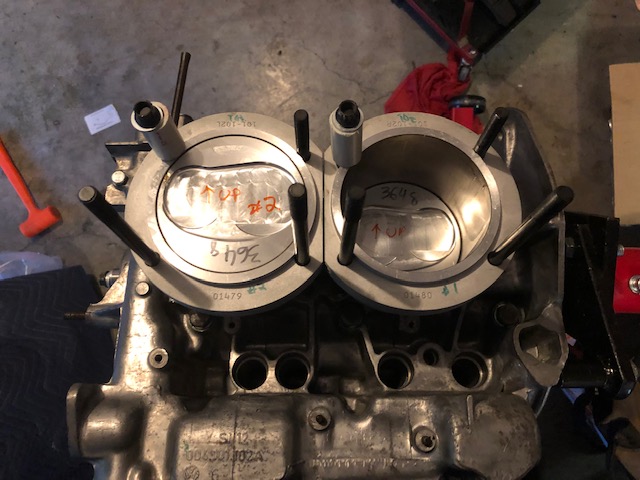
Posted by: mepstein Aug 28 2019, 08:23 PM
Stephen Stompski stops by our shop ever couple months and we have every tool he makes for 911 engines and suspensions. He's a smart guy.
Posted by: Mblizzard Aug 28 2019, 08:36 PM
Stephen Stompski stops by our shop ever couple months and we have every tool he makes for 911 engines and suspensions. He's a smart guy.
Looked through their products and all of the were so well done. Would love to meet them sometime because their stuff is worth every penny you spend.
I tried for about 4 hours to get the clips in by various methods. Buy this tool and I was done in about 1 minute per piston.
I really doubt I could have done it without this tool and not damaged some expensive pistons and Nickies cylinders.
Posted by: ChrisFoley Aug 29 2019, 05:53 AM
Mike, thanks for posting this build thread. This should be a great engine.
Is that a chipped gear tooth in the photo above?
Crap that might be.
It was a shadow from the exposed gear tooth tip of the crank gear.
paranoia.

Posted by: Mblizzard Aug 29 2019, 06:47 AM
Mike, thanks for posting this build thread. This should be a great engine.
Is that a chipped gear tooth in the photo above?
Crap that might be.
It was a shadow from the exposed gear tooth tip of the crank gear.
paranoia.
Yes but just because I am paranoid it doesn't mean someone is not out to get my engine

After the broken case issue I am a bit touchy!
But looking at it from the shadow viewpoint that makes me feel a bit less crazy because I could not find anything on the gear! I was going have to go with some engine fairy came into the garage and switched the gear. But the shadow explains it!
Posted by: maf914 Aug 29 2019, 09:35 AM
Mike,
I'm sorry my comment regarding what looked like a chipped gear tooth caused some aggravation. But, when I look at the photo in post #65 that silver colored gear looks like it has a chipped tooth. I am glad everything is okay.
Posted by: Mblizzard Aug 29 2019, 09:49 AM
Mike,
I'm sorry my comment regarding what looked like a chipped gear tooth caused some aggravation. But, when I look at the photo in post #65 that silver colored gear looks like it has a chipped tooth. I am glad everything is okay.
No worries. I was convinced it was chipped as well. But that is why we come here. Get different opinions and views. I did not see it in the photo at first. If it had been real I could have been tossing $10K of engine out the door.
So I spent about an hour splitting the case and putting it back. Cheap compared to missing something that bad.
Posted by: Mblizzard Sep 1 2019, 07:08 PM
Brutal day. Got the valve train setup. Took about 8-hours. Got decent numbers in intake 503 lift on intake and about 498 on exhaust.
I think I have more parts on the engine than off now. 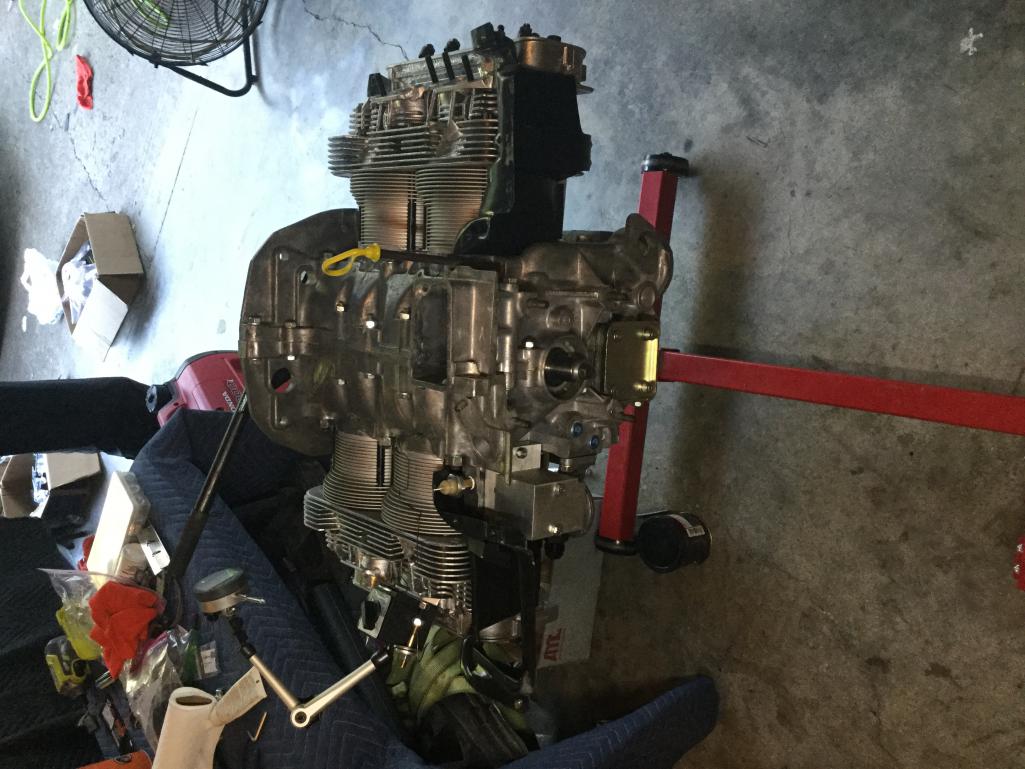
Getting there.
Posted by: Mayne Sep 1 2019, 08:50 PM
Looking great! It’ll get there and it will be an amazing motor.
Posted by: ClayPerrine Sep 1 2019, 08:59 PM
Mike,
I think you forgot to install the other two cylinders.... 

It's looking good. Keep after it.
Clay
Posted by: Mblizzard Sep 2 2019, 07:35 PM
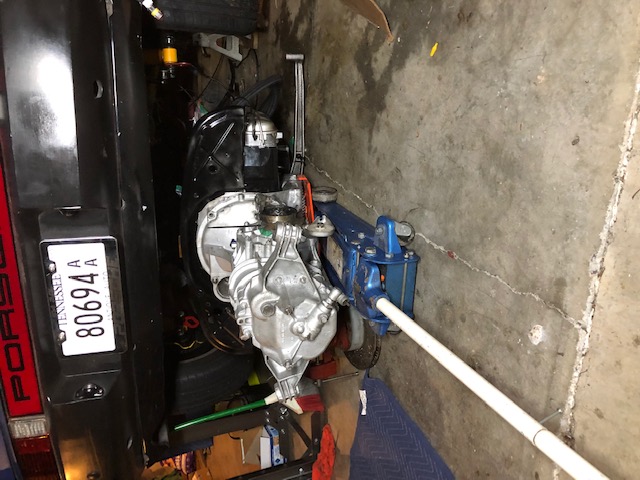
Another brutal day building but really made some progress. Have not had time to document as well as I should but got the Spec Stage 1 clutch installed.
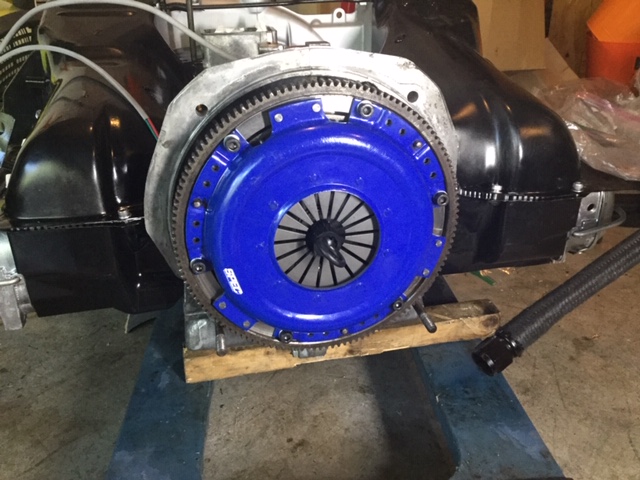
Just need to add a few more bits and then install. 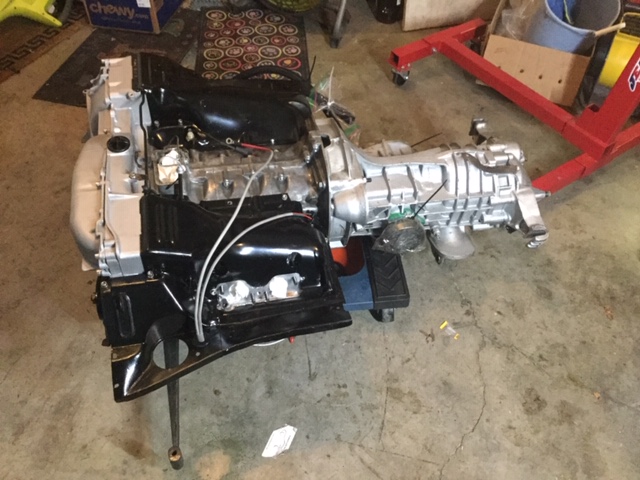
Posted by: Betty Sep 2 2019, 08:17 PM
GO MIKE!!!!!!!
Posted by: Mblizzard Sep 4 2019, 07:20 AM
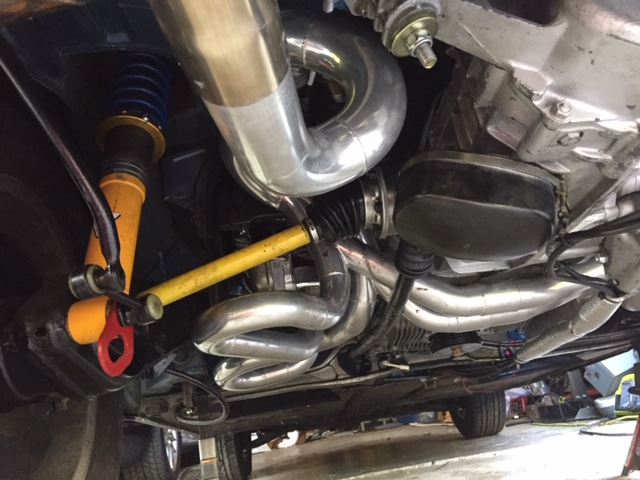
Did not have time to completely unpack and get pictures but my Tangerine Racing exhaust was delivered yesterday.
Chris makes some goo stuff!
Posted by: 914forme Sep 4 2019, 06:10 PM
 100% Chris' stuff is always Way to get after this, see you in a week now.
Posted by: Mblizzard Sep 4 2019, 08:14 PM
Did not have time to completely unpack and get pictures but my Tangerine Racing exhaust was delivered yesterday.
Chris makes some goo stuff!
A few pictures.
Exhaust porn!
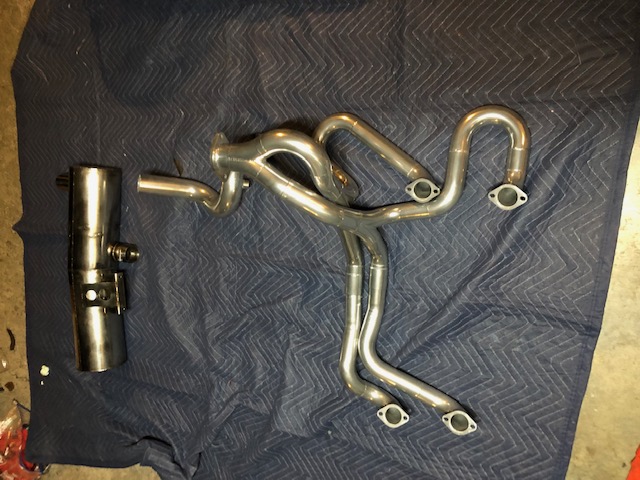
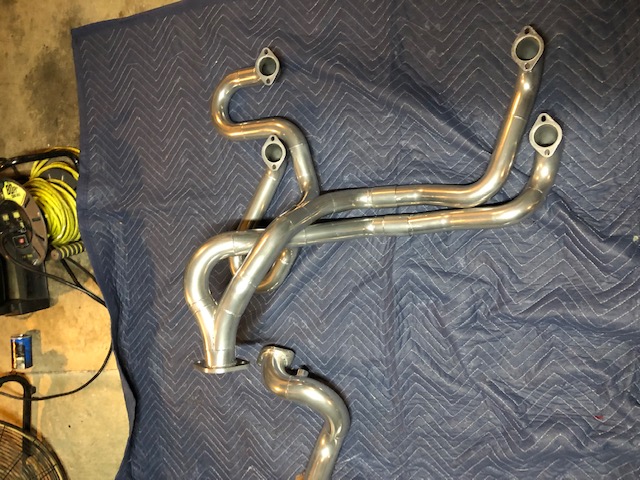
Ready to go in!
Might be time to consider revising this?
Posted by: Mblizzard Sep 6 2019, 07:13 AM

No time for pictures but it is in! Will skip out from work today and get it wired in and go for start on Sunday.
Posted by: malcolm2 Sep 6 2019, 07:16 AM
No time for pictures but it is in! Will skip out from work today and get it wired in and go for start on Sunday.
Do you have a busy Saturday planned? I hope it is not a waste of our time...

Posted by: Mblizzard Sep 6 2019, 07:26 AM
No time for pictures but it is in! Will skip out from work today and get it wired in and go for start on Sunday.
Do you have a busy Saturday planned? I hope it is not a waste of our time...
I am considering not going but my wife says I cant be a baby so I guess I am going. Got extra tickets if you are in the need of some pain!
Posted by: ClayPerrine Sep 6 2019, 07:32 AM
No time for pictures but it is in! Will skip out from work today and get it wired in and go for start on Sunday.
Copycat!!!!!
Glad its in the car again...
Posted by: malcolm2 Sep 6 2019, 07:56 AM
I am considering not going but my wife says I cant be a baby so I guess I am going. Got extra tickets if you are in the need of some pain!
Can't say I am looking forward to it myself. But I plan on numbing the pain starting at noon.
Maybe I'll have a second to swing by on our way home Sunday. Course, if you've seen 1 TIV engine you have seen them all.
Posted by: Mblizzard Sep 6 2019, 08:03 AM
I am considering not going but my wife says I cant be a baby so I guess I am going. Got extra tickets if you are in the need of some pain!
Can't say I am looking forward to it myself. But I plan on numbing the pain starting at noon.
Maybe I'll have a second to swing by on our way home Sunday. Course, if you've seen 1 TIV engine you have seen them all.
True!
Posted by: Mblizzard Sep 6 2019, 08:12 AM
No time for pictures but it is in! Will skip out from work today and get it wired in and go for start on Sunday.
Copycat!!!!!
Glad its in the car again...
Now just have to chase down all those issues like you are doing! But I am hoping that because I had a working base before they will be minimal.
Lets see essentially every part in the engine is new and nothing is stock but the case. What could go wrong?
Posted by: ClayPerrine Sep 6 2019, 09:19 AM
Posted by: ClayPerrine Sep 7 2019, 07:17 PM
Mike.. when you get a minute we would love an update on your progress.
Clay
Posted by: Mblizzard Sep 7 2019, 08:37 PM
Last push in the mornings and should try starting after lunch.
Posted by: Betty Sep 7 2019, 10:20 PM
Last push in the mornings and should try starting after lunch.

Posted by: Mblizzard Sep 8 2019, 09:14 PM
Well things took longer than they should but got everything ready to crank and build some oil pressure before trying to start. No go. Hoping it is a dead battery as the voltage dropped to 10 almost instantaneously after the starter engaged then nothing.
It has been sitting a year. New battery and try again.
Posted by: ClayPerrine Sep 9 2019, 05:40 AM
Sorry dude. BTDT.....That is a letdown after all the work. Don't let it get you down. You are sooooo close. You already have the programming done on the FI, so it should be quick.
BTW, Oreilly auto parts sells Optima batteries.
Posted by: DRPHIL914 Sep 9 2019, 07:27 AM
Well things took longer than they should but got everything ready to crank and build some oil pressure before trying to start. No go. Hoping it is a dead battery as the voltage dropped to 10 almost instantaneously after the starter engaged then nothing.
It has been sitting a year. New battery and try again.
Sometimes it’s the simple things! If you remember last year it was me trying to get all the stuff back in my car, and couldn’t get into start night before, didn’t get it figured out until the morning of day leaving for Helen, ended up being my fuel pump ground!
Good luck with new battery hoping for a successful start today!
Posted by: Betty Sep 9 2019, 04:57 PM
Posted by: porschetub Sep 10 2019, 01:45 AM
Best luck ok .
Posted by: Mblizzard Sep 10 2019, 06:14 AM
Well after all the struggle I have achieved failure!
Going through careful steps for starting cranked over until oil pressure built.
Started checking out all of the ECU functions and when sorting a lose wire something went to ground and  smoke was emitted from the ECU!
Luckily the 2 Amp fuse was still good so I at least I can use that over.
Time to call it and put it aside for a while.
Posted by: DRPHIL914 Sep 10 2019, 06:18 AM
Well after all the struggle I have achieved failure!
Going through careful steps for starting cranked over until oil pressure built.
Started checking out all of the ECU functions and when sorting a lose wire something went to ground and
smoke was emitted from the ECU!Luckily the 2 Amp fuse was still good so I at least I can use that over.
Time to call it and put it aside for a while.

What kind of ECU were you using? Is a replacement ECU easily obtained?
Posted by: Mblizzard Sep 10 2019, 06:20 AM
Well after all the struggle I have achieved failure!
Going through careful steps for starting cranked over until oil pressure built.
Started checking out all of the ECU functions and when sorting a lose wire something went to ground and
smoke was emitted from the ECU!Luckily the 2 Amp fuse was still good so I at least I can use that over.
Time to call it and put it aside for a while.
What kind of ECU were you using? Is a replacement ECU easily obtained?
Microsquirt can order today be here tomorrow most likely but still would not have time to break in the engine and sort out all of the potential bugs.
Too much money in it to not do it carefully and right.
Posted by: poorsche914 Sep 10 2019, 06:22 AM
I have a brand new Microsquirt unit in the box.
Come by and get it today.
Posted by: ClayPerrine Sep 10 2019, 07:13 AM
I have a brand new Microsquirt unit in the box.
Come by and get it today.
Do it! You have the wiring complete.
"Never Give UP, Never Surrender!" - Galaxy Quest
Posted by: VaccaRabite Sep 10 2019, 07:29 PM
Ohhhhhhhh man I have done exactly that. POP! smoke and dead Microsquirt!
The good news is that after I finished kicking myself is that there is a fuse on the board (IIRC) that can be replaced, and there is a guy in Virginia Beach that can fix it. He fixed mine.
Won't help get the car on the road this weekend, but its not the end of the world either.
Zach
Posted by: Mblizzard Sep 23 2019, 06:23 AM
Well after my last electrical failure I have been redoing all of the wiring!
Finally got to replacing the 12 pin wire harness that should have looked at least a little like this nice new one from 914 Rubber.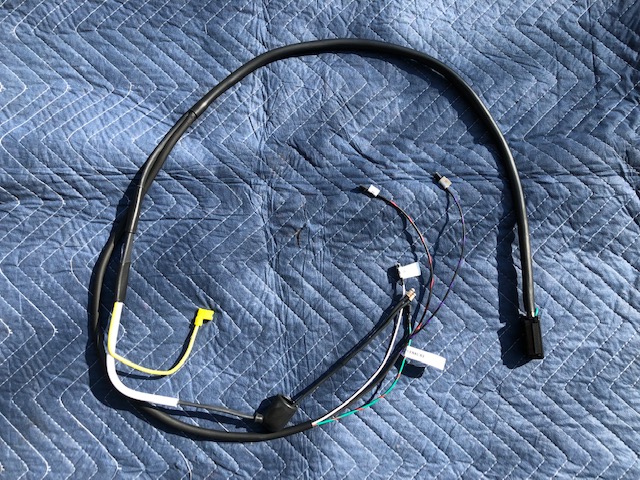
But after 44 years of time and some seriously questionable repairs it looked like this. 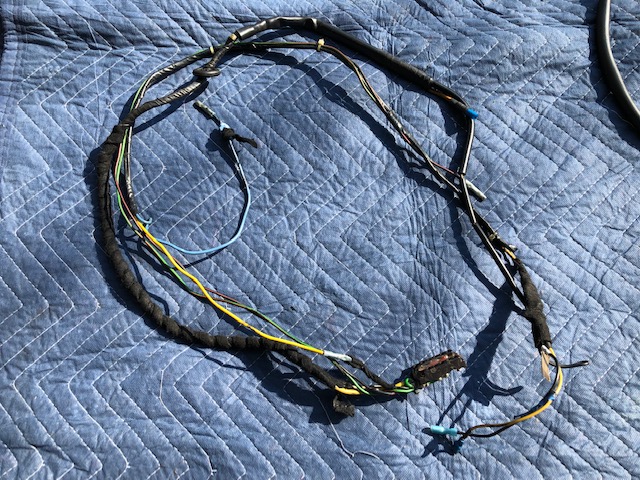
Was going to continue taking off all of the tape but when I found a wire nut and bare wires just twisted together I just had to quit!
Completely took apart Microsquirt harness and rewiring everything! Should have the wiring button up this weekend I hope.
Posted by: Betty Sep 24 2019, 05:43 PM
Posted by: Matty900 Sep 24 2019, 11:25 PM
I totally feel you pain on the wiring Mike. They are ready when they are ready, not when we are ready.
Looking forward to seeing your progress this weekend. Interested to see how much difference your tune will be on the new engine.
Posted by: 914four Nov 24 2019, 10:55 AM
Mike,
What's the latest with Part II? Any progress?
Kelvin
Posted by: AmjadY Mar 26 2020, 06:05 PM
So what happened??
Posted by: Mblizzard Mar 26 2020, 06:38 PM
Well after being sidelined by a long deployment to an undisclosed location I am getting it going. Finished all of the complete redo of the wiring and started it today! Oil leaks at the valve covers but other than than and resolving control of the cooling fan control moving forward. Pictures to follow.
Posted by: DRPHIL914 Mar 27 2020, 06:44 AM
Well after being sidelined by a long deployment to an undisclosed location I am getting it going. Finished all of the complete redo of the wiring and started it today! Oil leaks at the valve covers but other than than and resolving control of the cooling fan control moving forward. Pictures to follow.
welcome home! so that means we might see you driving again this year?(albeit in the rear view mirrior
 )
)Posted by: Root_Werks Mar 27 2020, 08:37 AM
I've been gone so long I've been missing all these great build threads. Looks like a great combo!
Posted by: ClayPerrine Mar 27 2020, 08:42 AM
I've been gone so long I've been missing all these great build threads. Looks like a great combo!
There is one nice side effect of the coronavirus... Lots of old 914World members are wandering back in here. Because of boredom or masochism or maybe something worse....
Now we just need Miles to show back up.Welcome back. We do miss you when you aren't here.
Posted by: Mblizzard Mar 27 2020, 04:25 PM
Well FUCK!
Got it started ran a few minutes. Decided to do quick oil change to get the potential debris out.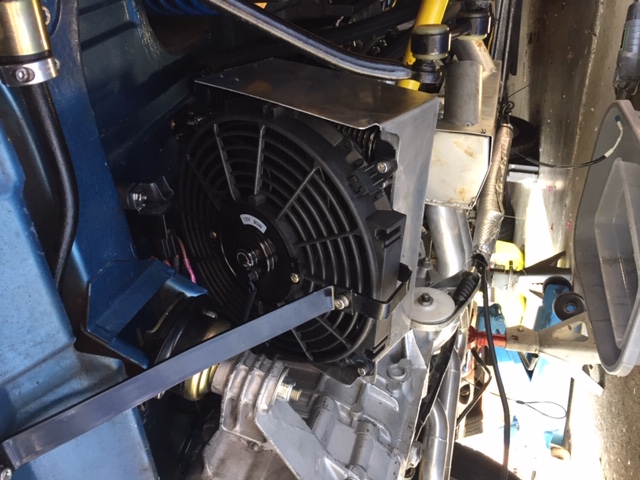
Dropped the strainer and found this! 
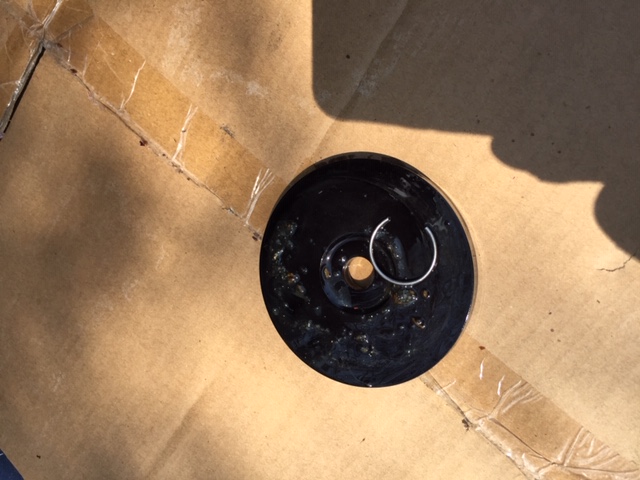
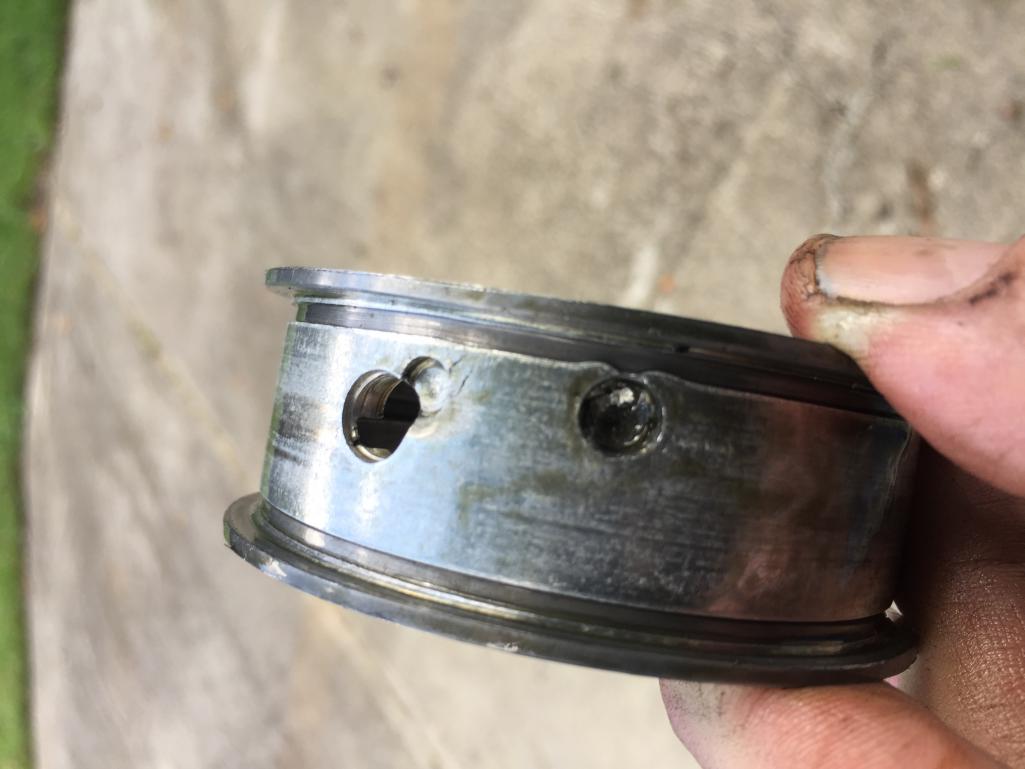
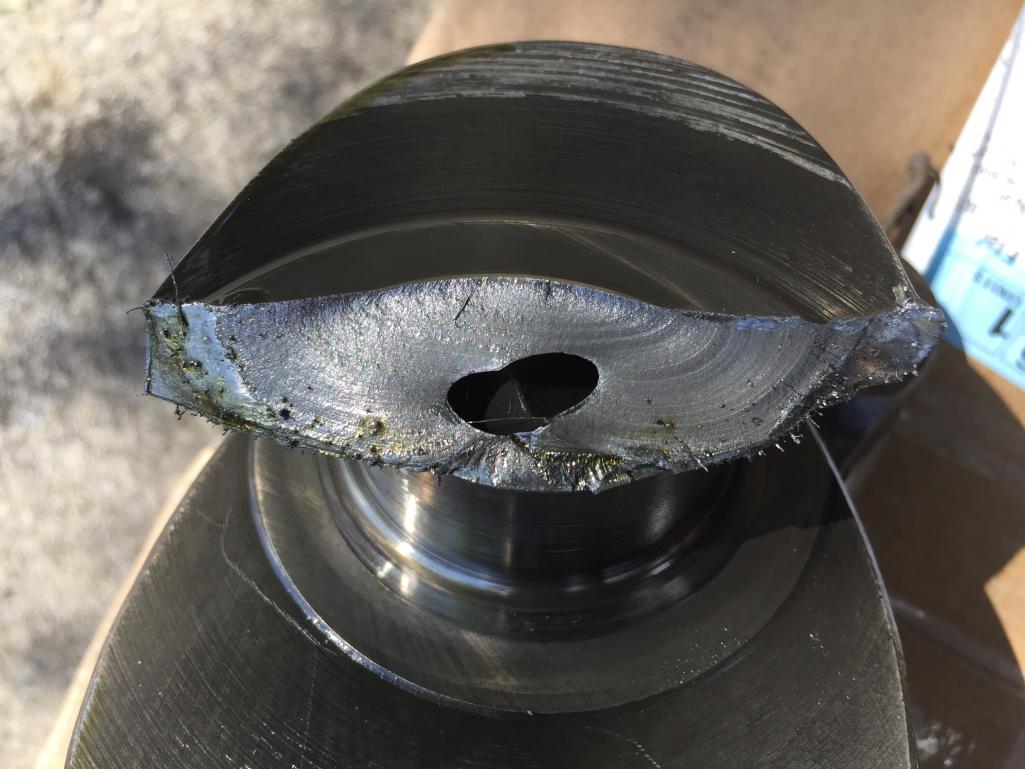
For those of you that don’t know that is a retaining ring for the wrist pin! Photo is a bit misleading as it looks like lots of metal but it is actually just bits of sealant.
Stripped everything off will drop the engine tomorrow and hope there will s no real damage.
Posted by: JOEPROPER Mar 27 2020, 07:56 PM
Ouch. That stings. ![popcorn[1].gif](style_emoticons/default/popcorn[1].gif)
Posted by: Betty Mar 27 2020, 09:08 PM
Hang in there, we're all behind you!
Posted by: 914werke Mar 28 2020, 12:12 AM
Man! That bites. What about going Teflon buttons instead?
Posted by: Mblizzard Mar 29 2020, 04:56 PM
Well I am one lucky SOB!
Looks like #1 lost the retaining clip but no damage to the cylinder. Minor scratches in cylinder but not detectable by touch. Also found #4 clip almost out.
Replacing all clips and putting back together. Take 2!
Posted by: mepstein Mar 29 2020, 06:21 PM
Posted by: Mblizzard Mar 30 2020, 10:33 AM
Well as I wait on my clips to be delivered I am getting to a few things I skipped in the rush to finish last time.
Installed the Tarrett Racing Semi-Solid trans mounts.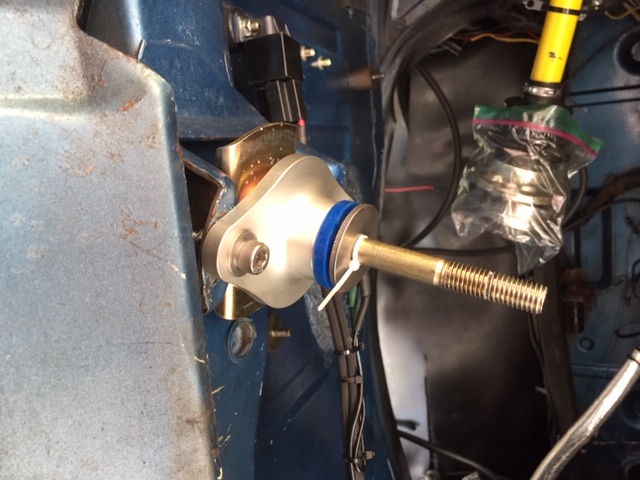
Posted by: Root_Werks Mar 31 2020, 08:45 AM
Talk about a dodged bullet!
Posted by: Mark Henry Mar 31 2020, 10:02 AM
Man! That bites. What about going Teflon buttons instead?
Won't work with JE's.
Posted by: Mblizzard Apr 2 2020, 08:43 PM
Ok so maybe I am paranoid but this seems like a lot of crank movement and there is a a distinct clunk of things moving. I couldn’t make the code work for embedding the video so the liknk is posted below.
https://youtu.be/OFYB_Z3A0NI
This is with the trans on did not notice this when I set the axial play but this just seems like a bad thing to have but I have no idea what is casing this.
Posted by: Mblizzard Apr 3 2020, 06:38 AM
Ok so maybe I am paranoid but this seems like a lot of crank movement and there is a a distinct clunk of things moving. I couldn’t make the code work for embedding the video so the liknk is posted below.
https://youtu.be/OFYB_Z3A0NI
This is with the trans on did not notice this when I set the axial play but this just seems like a bad thing to have but I have no idea what is casing this.
Well hopefully I am a moron. Thought about it and this is happening with the valve train installed on one side. So of course it would move so much as it is loading only one side and the klunk is the valve springs pushing the crank forward and back.
Posted by: mepstein Apr 3 2020, 06:53 AM
Take your time with this and it will all work out.
Posted by: Root_Werks Apr 3 2020, 08:58 AM
That seems like too much Thrust play? Is the flywheel back on?
Posted by: Mblizzard Apr 3 2020, 12:59 PM
That seems like too much Thrust play? Is the flywheel back on?
All good now! With only half the valve train in it moved a lot. Adding the both sides resulted in minimal movement.
While I did not pull the flywheel it now has what seems to be normal movement. Now just gives the expected small thunk when moving back and forth.
Posted by: Root_Werks Apr 4 2020, 09:02 AM
Whew!
Posted by: Driver174 Apr 4 2020, 11:23 AM
Does anyone have experience with this tool?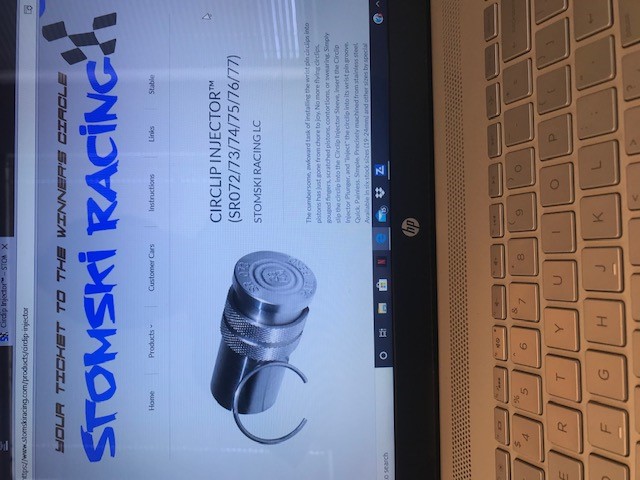
Posted by: mepstein Apr 4 2020, 11:30 AM
Does anyone have experience with this tool?
Best tool in the world and worth every penny.
Posted by: Mblizzard Apr 4 2020, 11:31 AM
Does anyone have experience with this tool?
Yep. They are worth every penny of the cost. I was struggling trying to install the clips and was getting really afraid of damaging some very costly pistons.
This solved the issue quickly. Now I obviously had some operator error on my install. Resolved by installing pistons and clips before the jugs and using a ring compressor that came apart and allowed the pistons to be installed in the jugs from the bottom.
I have the 22mm one.
Posted by: Driver174 Apr 4 2020, 01:10 PM
I will definitely order one before assembling another engine. Those JE circlips were really tuff on my thumbs, and had to have my son help as my thumbs were too sore to install all eight clips.
Posted by: Mblizzard Apr 6 2020, 07:14 PM
Taking it slow and easy as suggested. Did a final check of the intakes before moving forward and found a washer in the #1 intake. Always make a point to vacuum and inspect intakes with bore scope before adding the intakes.
Top part of engine done. 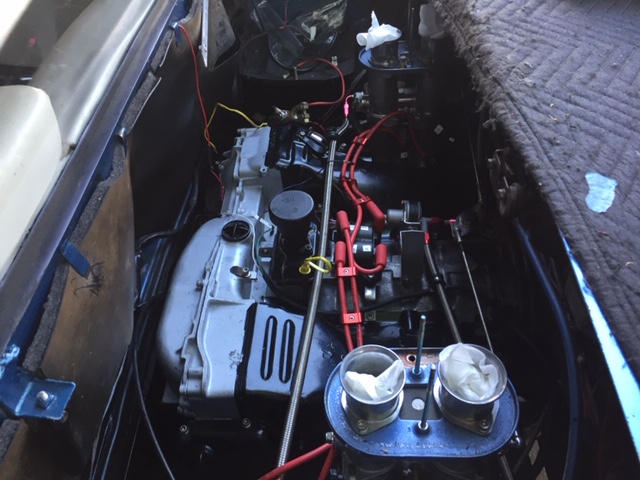
Love how the CFR exhaust looks!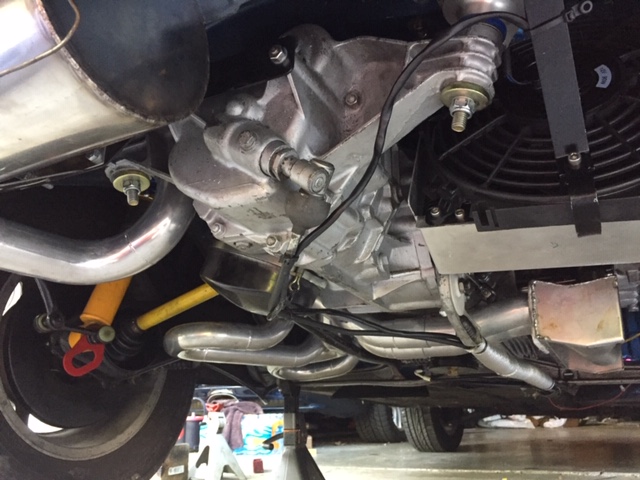
Tomorrow add the Microsquirt wiring and start!
Posted by: Mblizzard Jun 17 2020, 05:05 PM
OK so long time no post.
Tomorrow enginge comes back out! I have an oil leak that I just can't trace down. Part of it is at the rear main but it is pouring out the 3 4 side. All I can think of is that I must have a leak at the cylinder case interface.
I did get in one small drive and this thing is going to be EVIL! Not a great tune in it but hit it hard from a start and smoked wheels all through first, broke wheels lose in 2nd and continued to smoke. Let off in 3rd but still smoked the tires.
Will pull it all down and reseal the cylinders and check all galley plugs and push tube seals. Had great oil pressure so don't think it is a galley plug but I am not taking chances.
New front and rear seal, new push tube seals, and seal up everything.
Posted by: Mblizzard Oct 25 2020, 03:20 PM
Well been laying low and hiding from the pandemic but do have a bit of an update.
Went through and replaced all seals including oil pump, tubes, front rear, oil filter, and new valve covers.
Fucker still leaks! Even with a bore scope I can’t see where it is leaking from. While I had it apart I did reseal some of the head bolts which seemed to slow it down some. But it is coming from the left front side from high up (yep checked the oil pressure gauge about 6 times and resealed).
I think it has to be coming from the are where the cylinders meets the block. This case was opened up for the 102s so maybe there is a flaw.
But as it is a slow drip (doesn’t seem to increase with engine speed/oil pressure) I have been able to drive it.
HOLY CRAP IS IT STRONG! Torque like I never felt in a 914 with a 4 cylinder. Rolling in second grear and you can spin the tire with a punch of the throttle. The Tangerine Racing headers and exhaust make a truly frightening noise. Obviously not too many miles on it but thought I would drive it a bit. Will take it to the dyno soon to see where it is and then start chasing the leak again.
Posted by: ChrisFoley Oct 25 2020, 04:29 PM
The Tangerine Racing headers and exhaust make a truly frightening noise.
Correction: The headers don't make that noise, your engine does. The exhaust system just doesn't stifle the awesome sound.
RE your oil leak: Have you checked the thermostat pulley bolt?
Posted by: Mblizzard Oct 25 2020, 05:18 PM
The Tangerine Racing headers and exhaust make a truly frightening noise.
Correction: The headers don't make that noise, your engine does. The exhaust system just doesn't stifle the awesome sound.
RE your oil leak: Have you checked the thermostat pulley bolt?
Other side of engine. But I did read one of your post that suggested that so I did check anyway.
Posted by: Mblizzard Oct 25 2020, 06:37 PM
The Tangerine Racing headers and exhaust make a truly frightening noise.
Correction: The headers don't make that noise, your engine does. The exhaust system just doesn't stifle the awesome sound.
RE your oil leak: Have you checked the thermostat pulley bolt?
Oh and by the way, I have to give Chris a shout-out for his oil cooler thermostat and cooler design. While not hot these days, this is a big engine and temps never ventured above 200 F. I have fan set at 190F so may be a bit of a delay in response but I drove it hard for a while and it was rock solid on temp. Had to take a bit of timing out to get cylinder head temps in the 250F range but cooling won’t be an issue for sure.
You can do it cheaper than CFR, but it will never be as dependable and as functional. Use Your Brain and use CFR stuff. I am a first class pain in the ass when it come to letting go of my dollars, but I have never regretted a single dollar I spent with CFR. Wish I was getting a discount for promoting CFR, but the best is worth paying for.
Posted by: Betty Oct 25 2020, 07:15 PM
I have SOOOO been wondering how the engine was going. I am so happy you've been able to drive it a little bit. That kick in the back when you punch the throttle should be enough to keep you moving forward. Yeah, it sucks HARD that you're having all the problems - but once you've forced your way past them kicking and screaming..... dude..... it is SO freaking going to be worth it!
Dude... next Okteenerfest.... burnout competition between your and Clay's car in the parking lot?
Posted by: Mblizzard Oct 25 2020, 07:36 PM
I have SOOOO been wondering how the engine was going. I am so happy you've been able to drive it a little bit. That kick in the back when you punch the throttle should be enough to keep you moving forward. Yeah, it sucks HARD that you're having all the problems - but once you've forced your way past them kicking and screaming..... dude..... it is SO freaking going to be worth it!
Dude... next Okteenerfest.... burnout competition between your and Clay's car in the parking lot?
It’s on!
Posted by: ClayPerrine Oct 26 2020, 09:56 AM
I have SOOOO been wondering how the engine was going. I am so happy you've been able to drive it a little bit. That kick in the back when you punch the throttle should be enough to keep you moving forward. Yeah, it sucks HARD that you're having all the problems - but once you've forced your way past them kicking and screaming..... dude..... it is SO freaking going to be worth it!
Dude... next Okteenerfest.... burnout competition between your and Clay's car in the parking lot?
It’s on!
I think I am a bit handicapped in this competition..... you don't have 245x45/16 tires on the rear.
But then again, I have 2 more cylinders and a bunch more displacement.
We need a burnout smiley....
Posted by: Mblizzard Oct 26 2020, 11:32 AM
I have SOOOO been wondering how the engine was going. I am so happy you've been able to drive it a little bit. That kick in the back when you punch the throttle should be enough to keep you moving forward. Yeah, it sucks HARD that you're having all the problems - but once you've forced your way past them kicking and screaming..... dude..... it is SO freaking going to be worth it!
Dude... next Okteenerfest.... burnout competition between your and Clay's car in the parking lot?
It’s on!
I think I am a bit handicapped in this competition..... you don't have 245x45/16 tires on the rear.
But then again, I have 2 more cylinders and a bunch more displacement.
We need a burnout smiley....
It should be about even. But if not I have a Hollywood stunt trick we can use.
Posted by: Mblizzard Nov 13 2020, 03:12 PM
Despite oil leaks, I AM AN ENGINE BUILDING GOD!
Just look at the graph!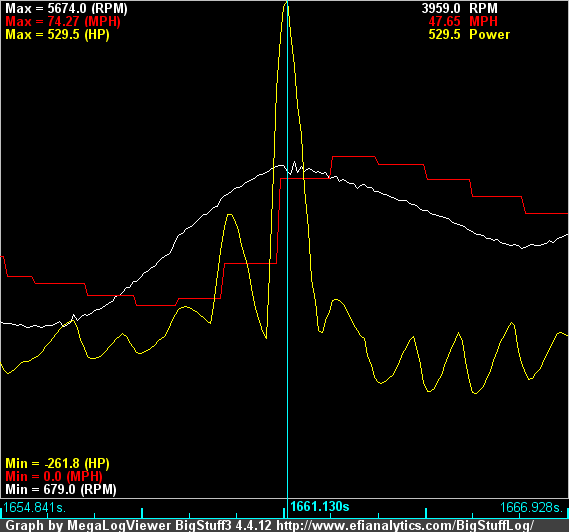
529 hp! It’s on the internet it has to be true? Right?
Well no, my tablet fell off the mount and it seems the accelerometers granted me a few extra hp.
Not sure how much I buy into the “calculated” hp, but this one seems close.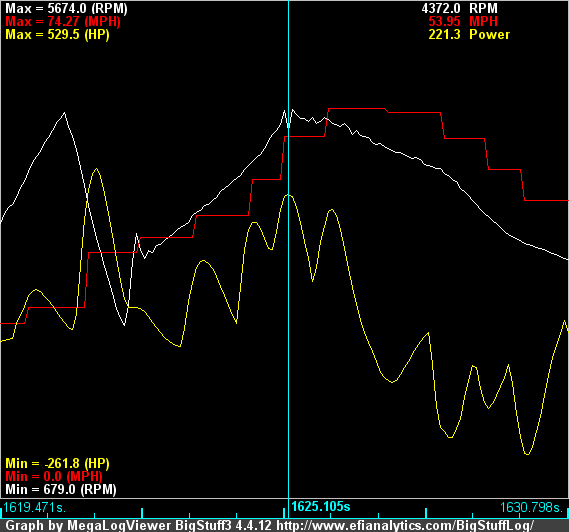
Posted by: Root_Werks Nov 13 2020, 03:25 PM
Am I reading that correct, 529hp?!?!?!?
Posted by: Mblizzard Nov 13 2020, 03:32 PM
Am I reading that correct, 529hp?!?!?!?
Yes, but it was due to the tablet falling. The program uses accelerometers and gps to estimate hp. Obviously wrong.
Posted by: ClayPerrine Nov 13 2020, 03:38 PM
DAMN!! With 529.5 HP, you had me sweating for a minute!
It was that final .5 hp that had me worried.......
Betty says that if you win our shootout I have to buy your drinks for the whole Okteenerfest weekend.
As for oil leaks, I am fighting them too. Good luck!
Clay
Powered by Invision Power Board (http://www.invisionboard.com)
© Invision Power Services (http://www.invisionpower.com)