Printable Version of Topic
Click here to view this topic in its original format
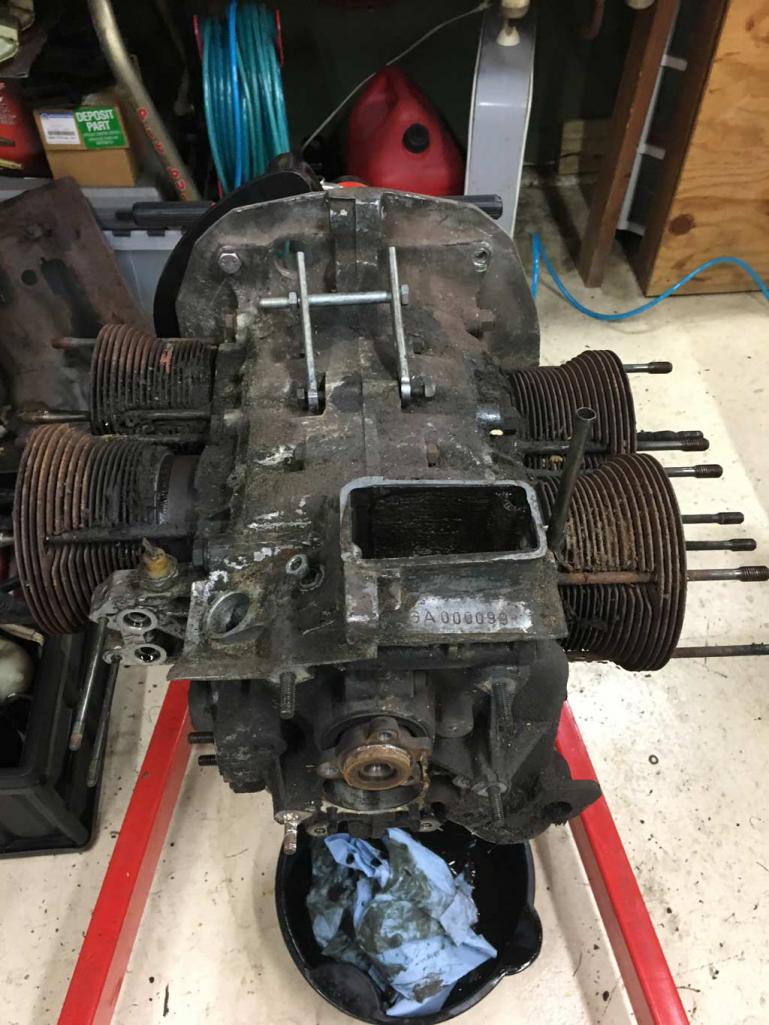
914World.com _ 914World Garage _ Engine GA000099
Posted by: Superhawk996 Jun 4 2019, 06:08 PM
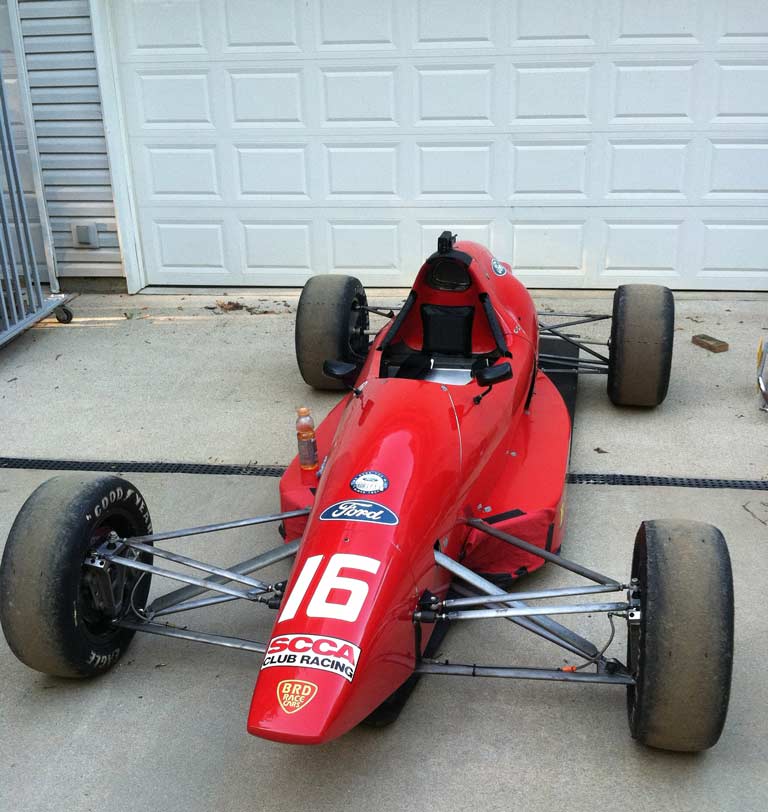
Last week I bought engine GA000099 from Freezing914 in the hopes of picking up some spare parts to support rebuild of the engine that came with my vehicle.
During the teardown of my vehicles engine, it is quickly becoming clear that the engine was abused by some DAPO. Cooling flaps and thermostat had been removed. Rust in the sump. The crank was scored and already 0.010" undersized. The oil pump was torn up. This is just the tip of the iceberg on the engine that came with my vehicle. 
14 hours of driving seems to have netted me an engine that might be worthy of a rebuild. 
This engine appears to be bone stock. D-jet mostly complete. As an added bonus I discovered upon teardown that none of the cooling tin fasteners have ever been disturbed. No screwdriver marks!
But . . . like any engine of this age and unknown origin, it absolutely needs to be gone though.
Posted by: Superhawk996 Jun 4 2019, 06:20 PM
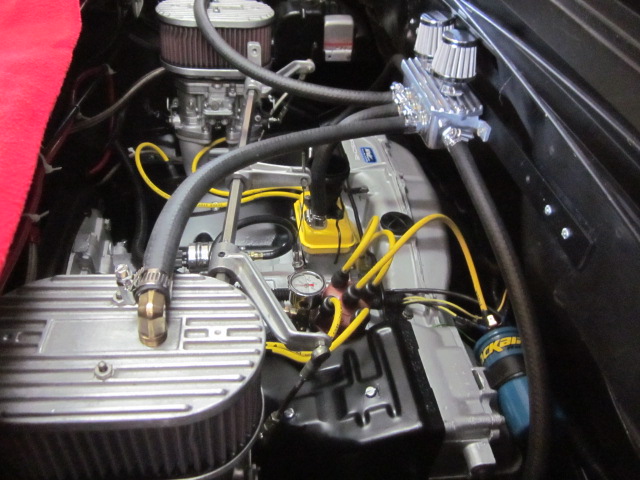
One of the nice things about this engine is that the D-jet system is pretty complete and I could take pictures of how hoses were routed before teardown.
I was anxious though to get to the good stuff. I really wanted to know what was inside. Tearing down an engine is like Christmas for me. What's in the box . . . what's in the box!
After finally getting down to the bare tin, I was a little bummed to find the passenger side tin is cracked. Not a big deal but like everything else . . . something else that needs fixin'. 
Since the cheesehead screws had never been disturbed quite a few were really rusted. Penetrating oil did the trick on most. But there is always that one. You know the one.
 The one that won't break free. Heat. Nope. Impact driver. Nope. Weld nut broke free? Nope. Finally it just pushed though the tin from hammering on it with the impact driver. Not the end of the world. Just another little hole to be welded up and re-drilled.
With that out of the way I pulled the tin. Crap. Mice have been here! 
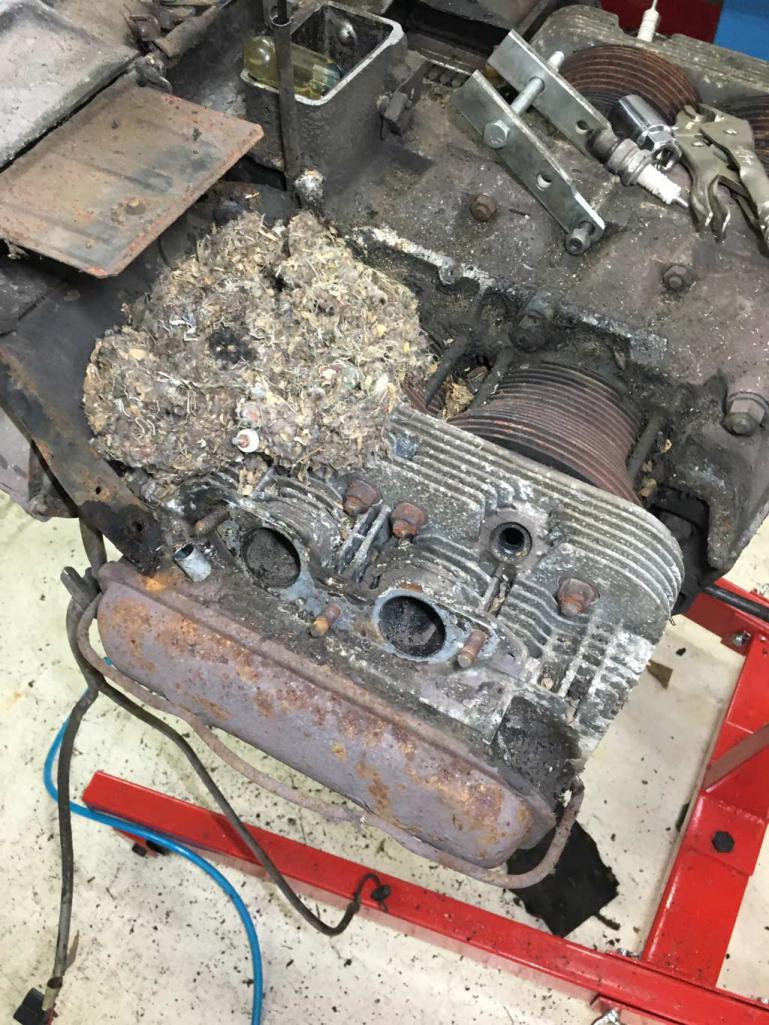
On the other side, I found all sorts of goodies. Old spark plug extension between the cylinders and basically just a bunch of blocked fins from leaves and the mouse house.
Pulled the cylinder heads which basically look pretty decent but will need to be cleaned to see if they have cracking.
And with that -- Ta da! Stock pistons. Sweet.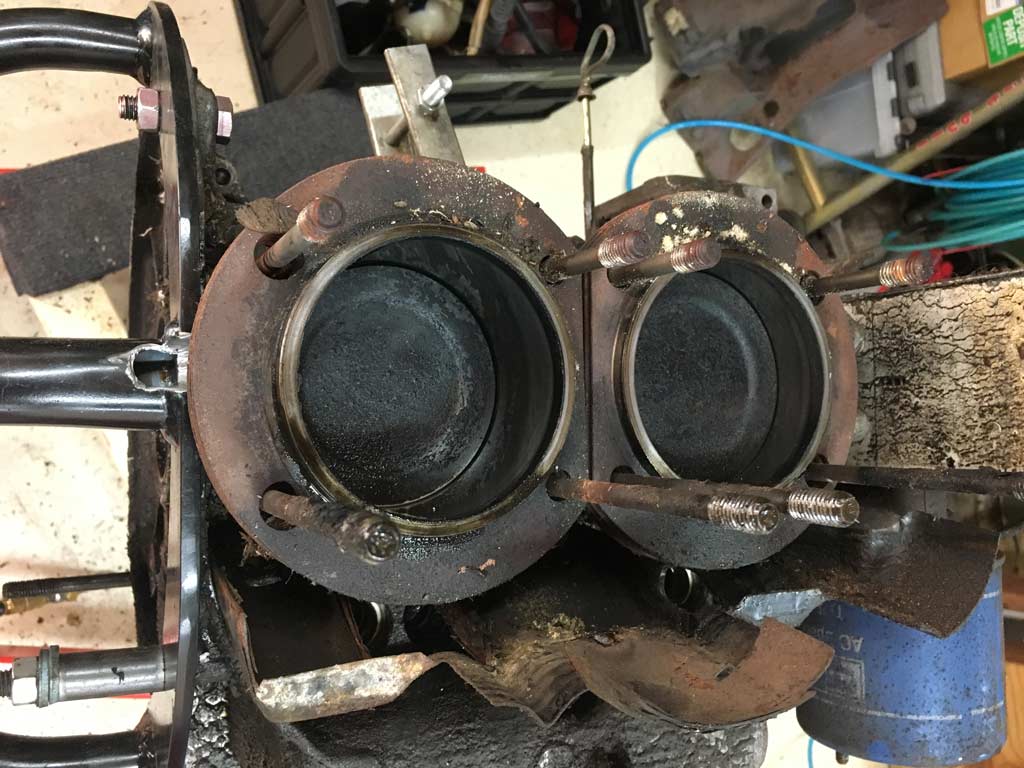
Just what I had hoped to see. Time for a drink 
Posted by: Superhawk996 Jun 4 2019, 06:27 PM
We'll have to see how this engine progresses as I start measuring parts.
The cylinders look pretty darn good. I can still see hone marks in them which I'm hoping means this is a low mileage engine.
I immediately proceeded to pull the oil pump and that looks pretty pristine inside too.
I have high hopes for this engine.
Posted by: bbrock Jun 4 2019, 06:47 PM

After finally getting down to the bare tin, I was a little bummed to find the passenger side tin is cracked. Not a big deal but like everything else . . . something else that needs fixin'.
I think I've had five of these engines now and don't think I've owned one that wasn't cracked in that area. The vibration of the coil mounted there is the issue. On my current build, I left the repair weld unground on the inside thinking it will help reinforce that area. I think they moved the coil onto the fan housing in later years but am not sure. Regardless, the mount cradle is there if you don't want a repeat, but I'll have to give you
 crap about relocating your coil on your pure stock engine.
Looking forward to watching this come together!
![popcorn[1].gif](style_emoticons/default/popcorn[1].gif)
Posted by: Superhawk996 Jun 4 2019, 06:59 PM
@http://www.914world.com/bbs2/index.php?showuser=20845
Now that I obtained this engine I will return the oil filler that you so graciously provided. I now have an unexpected donor.
With a bit of luck I'll drop off on my way to Idaho. 
I also got 4 more Green top injectors off this engine. They are coming with me. I intend to drop off in person and meet Mr. Injector himself. And . . . I'll save $15 in shipping but spend $600 in gas. 
Funny thing on the coil is this one seems to have the original (some sort of green oval Bosch label on it but very weathered). It is heavier than any coil I've ever used on my previous engine.
I previously ran my 1st 914 over 100K miles without any tin cracking issues with the coil in that very same spot.
I also think that the type of bracket is part of the issue. My previous bracket was Omega shaped. This one is different. It has a sort of snubber on the end of the bracket that contacts the tin before the rest of the foot. I think it got over torqued leading to stress cracking. I'll have to get a picture of what I mean.
Posted by: Superhawk996 Jun 4 2019, 07:03 PM
Here is one more picture of why we teardown unknown engines.
Oil cooler pretty much blocked with greasy debris. Not much air going to flow though this cooler. 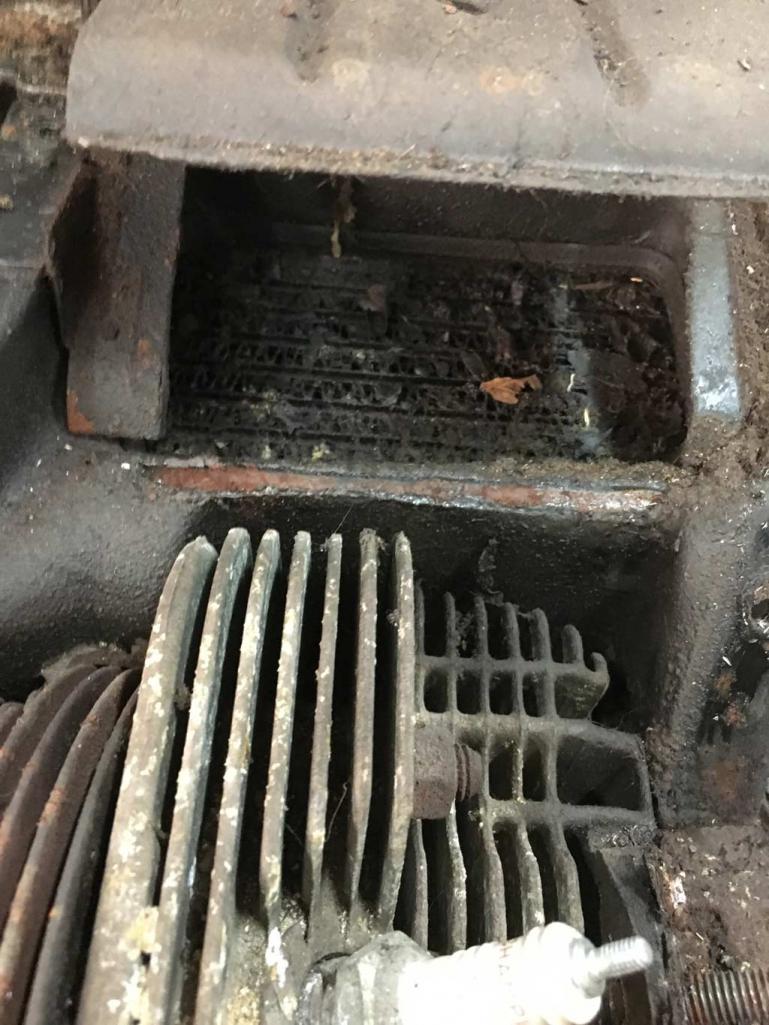
Posted by: bbrock Jun 4 2019, 08:52 PM
I also think that the type of bracket is part of the issue. My previous bracket was Omega shaped. This one is different. It has a sort of snubber on the end of the bracket that contacts the tin before the rest of the foot. I think it got over torqued leading to stress cracking. I'll have to get a picture of what I mean.
I know exactly what you mean because that how my bracket is shaped. I was looking at that the other day and thinking I'll add some rubber pads to those feet to level out the snubs, even the load out, and absorb some of the vibration.
No need to bring that breather back. I don't need it. Just get your butt out here
Posted by: barefoot Jun 5 2019, 06:15 AM
After finally getting down to the bare tin, I was a little bummed to find the passenger side tin is cracked. Not a big deal but like everything else . . . something else that needs fixin'.
I think I've had five of these engines now and don't think I've owned one that wasn't cracked in that area. The vibration of the coil mounted there is the issue. On my current build, I left the repair weld unground on the inside thinking it will help reinforce that area. I think they moved the coil onto the fan housing in later years but am not sure. Regardless, the mount cradle is there if you don't want a repeat, but I'll have to give you
crap about relocating your coil on your pure stock engine. Looking forward to watching this come together!
Yes, mount your coil here where God intended. Folks will have the correct bracket for you
Posted by: Superhawk996 Jun 9 2019, 11:36 AM
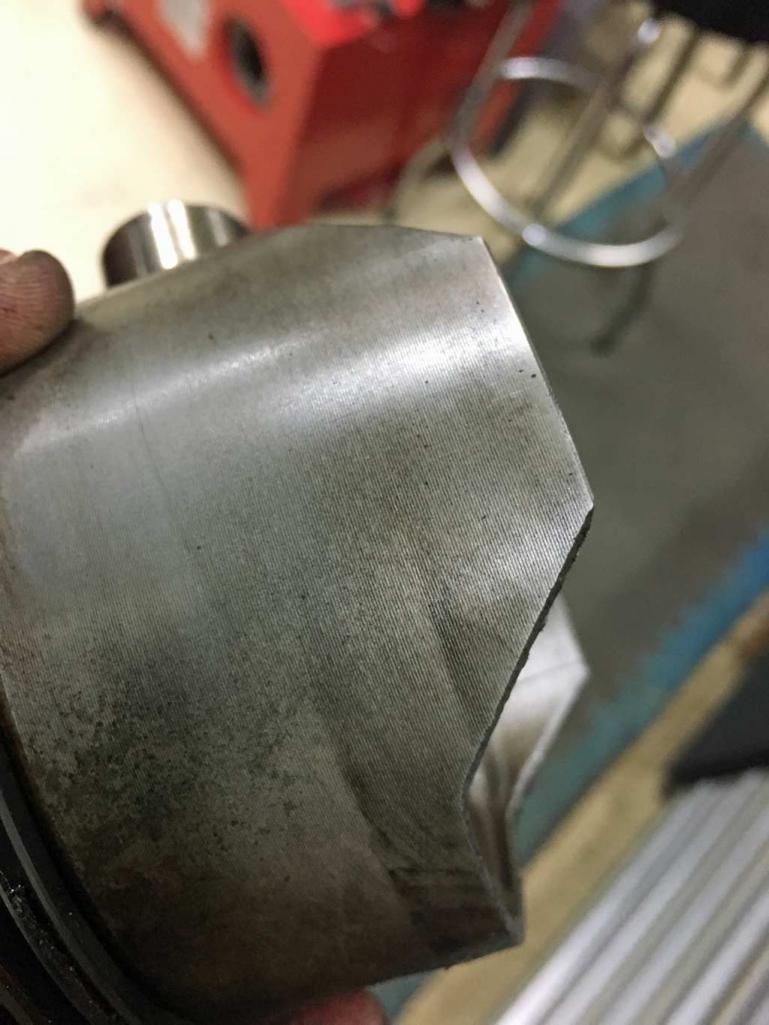
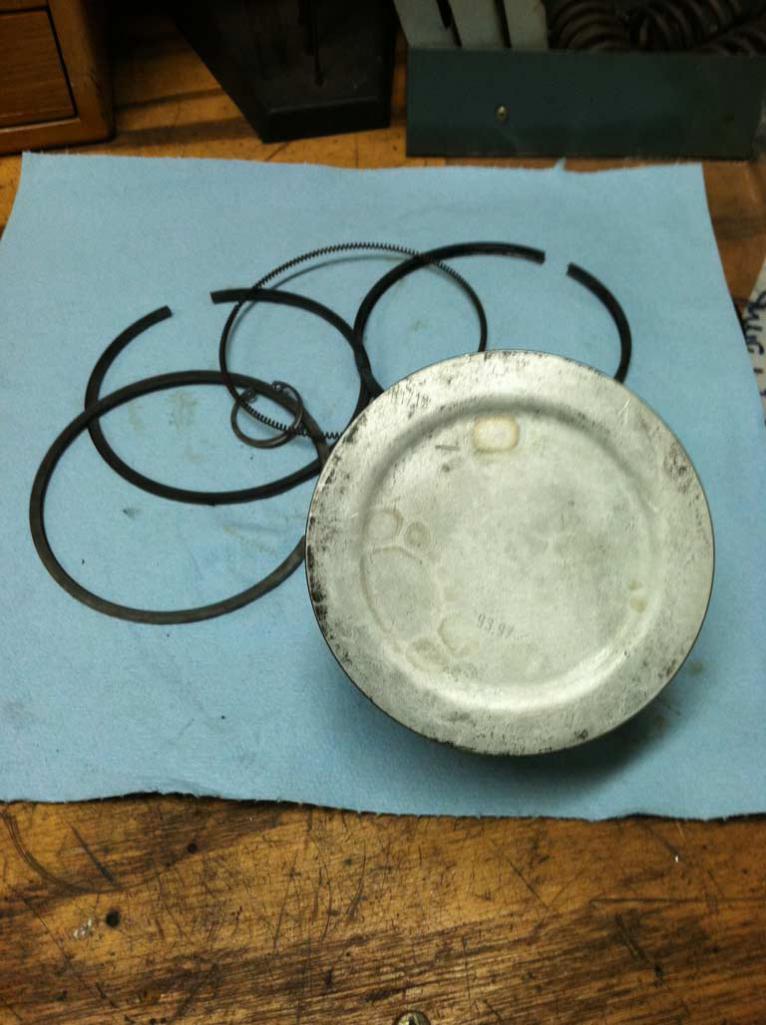
Last night I began pulling pistons and cylinders.
Looking to be a low mileage engine.
Piston skirts have virtually no wear. You can still see all the machine marks from when the pistons were originally machined.
The wrist pins are also pretty tight. Usually these slide right in and out on a well worn engine. These are a firm slip fit and take a little bit of persuasion. Not excessive but tight as if there aren't many miles on them.
Looking very likely that the pistons will only need a new set of rings. Measurement of piston ring groove clearance gaps will be the final judge.
Should have the case split later today.
Posted by: Tdskip Jun 9 2019, 08:09 PM
Thank you for documenting this.
How did you clean your oil cooler?
Posted by: Superhawk996 Jun 9 2019, 08:32 PM
Oil cooler not cleaned yet.
The problem with oil coolers is that they are pretty cheap.
On my original engine with all the rust in the sump, that cooler is garbage. No way to ensure the rust all comes out.
On this engine the sump is pretty clean. Could clean this cooler but for the time it will take to clean carefully with kerosene, I'll probably just replace it.
1). Need to clean exterior 1st. Soaking and always keeping the cooler ports facing down to help keep exterior junk from getting inside.
2). Then have to keep flushing the cooler internals until clean. In past I've used a pressure bottle of kerosene and finished with compressed air.
It is at least an hour or two of work. Coolers now seem cheaper than the labor to clean.
It'll be a tough call. I'll post pics if I do clean it.
Posted by: bbrock Jun 9 2019, 10:05 PM
It's been 30+ years but when I tore down my engine, I took the oil cooler to a radiator shop and they cleaned it in whatever tank they cleaned radiators with. I think they only charged about $5-$10 but that's 80's money.
Posted by: Superhawk996 Jul 13 2019, 06:04 PM
It has been forever since I've worked on the 914 projects.
Too many distractions. Melanoma surgeries (Wear Sunscreen, get checked!), vacation out west with a flyby to go see Bbrock's project (which is incredible), and the obligatory domestic distractions.
Today my beloved Vintage toaster took a dump. I've had this baby for over 27 years myself. I bought it for $5 at Goodwill when I was in college and too poor to afford a new toaster in my 1st apartment. I love vintage stuff because it WORKS and is easily serviced.
This is a toaster from the era before the Lawyers took over product development. This Mother get roaring hot. It has a chrome metal cover without any significant insulation.
It actually does it's job and cooks toast in about 1 minute. Imagine that. No microprocessor. No modes for cooking bagels or pastries. No heating elements that barely get warm. Just a good old toaster that actually works.
It you are dumb enough to touch it when its hot - you will get burned. If you are dumb enough to stick a knife or fork in there while it's powered up, you may get electrocuted. Just the way it should be!
Anyway it was time fix it and fend off any sly attempt by the wife to replace it with some modern piece of crap.
Just a simple repair to the cord and it was back in operation. Plus a little buffing of the chrome for good cosmetic measure. 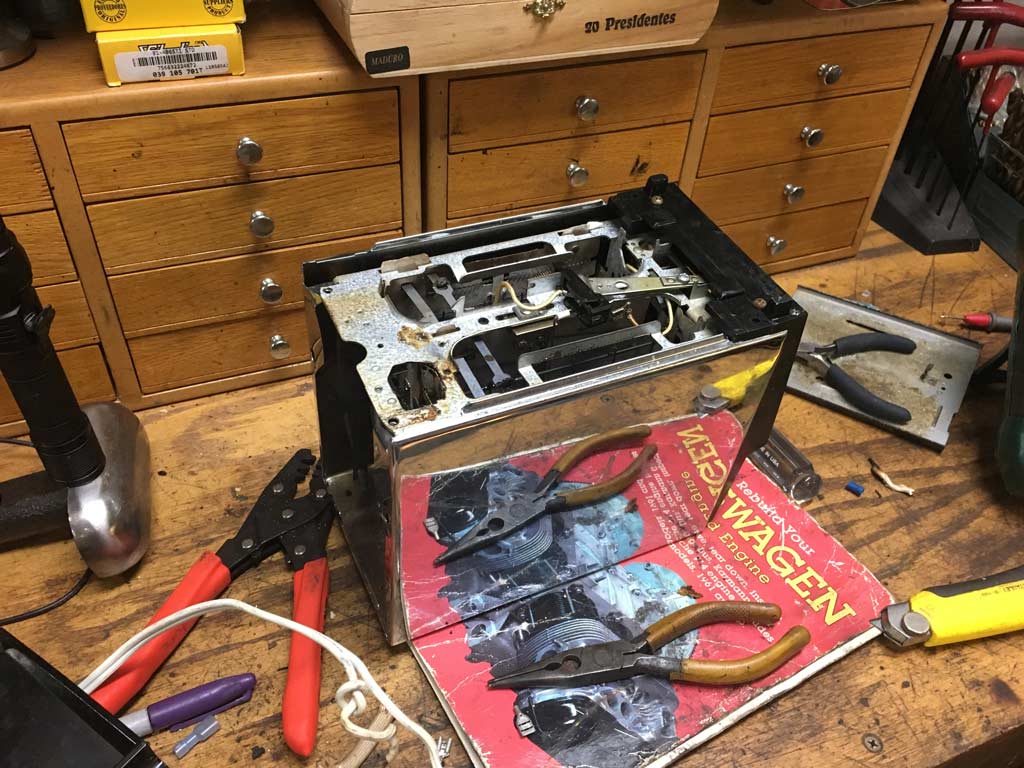
Back in it's place of honor and ready to cook! 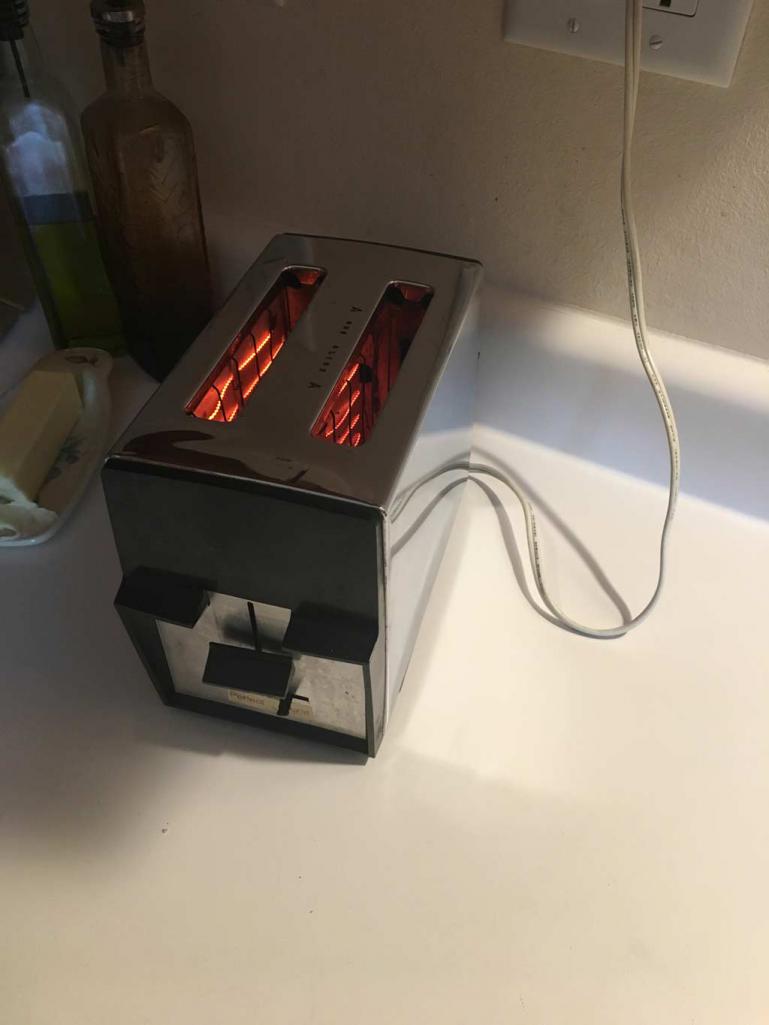
Posted by: Tdskip Jul 13 2019, 06:06 PM
“This is a toaster from the era before the Lawyers took over product development.”
Now THAT was funny.
Loved the post.
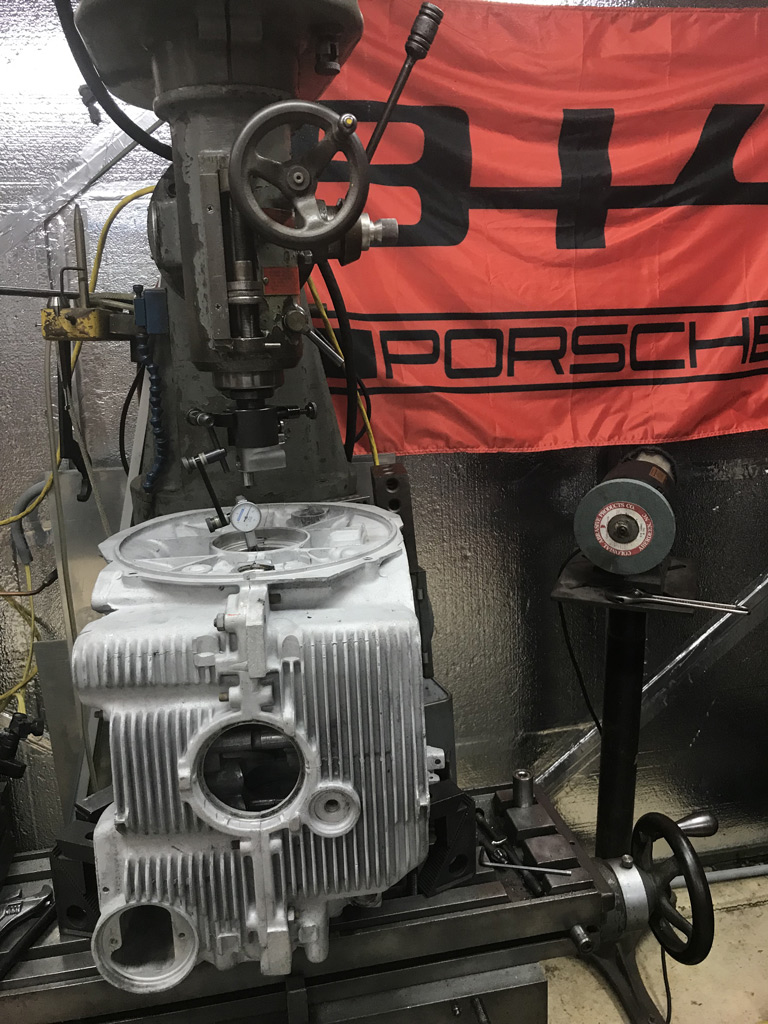
Posted by: Superhawk996 Jul 13 2019, 06:14 PM
Oh, and I did at least get the engine case for good old 099 picked up from the machine shop de-grease tank.
I am pretty disappointed. This block was literally covered in grease. It really didn't clean up like my other block which is shown in the lower left corner.
Sort of looks like some sort of corrosion. It does brush off though with a wire brush.
In addition, this 099 case seems to be crudely cast. There is a lot of surface flash and a sort of weld spatter look to it in some places.
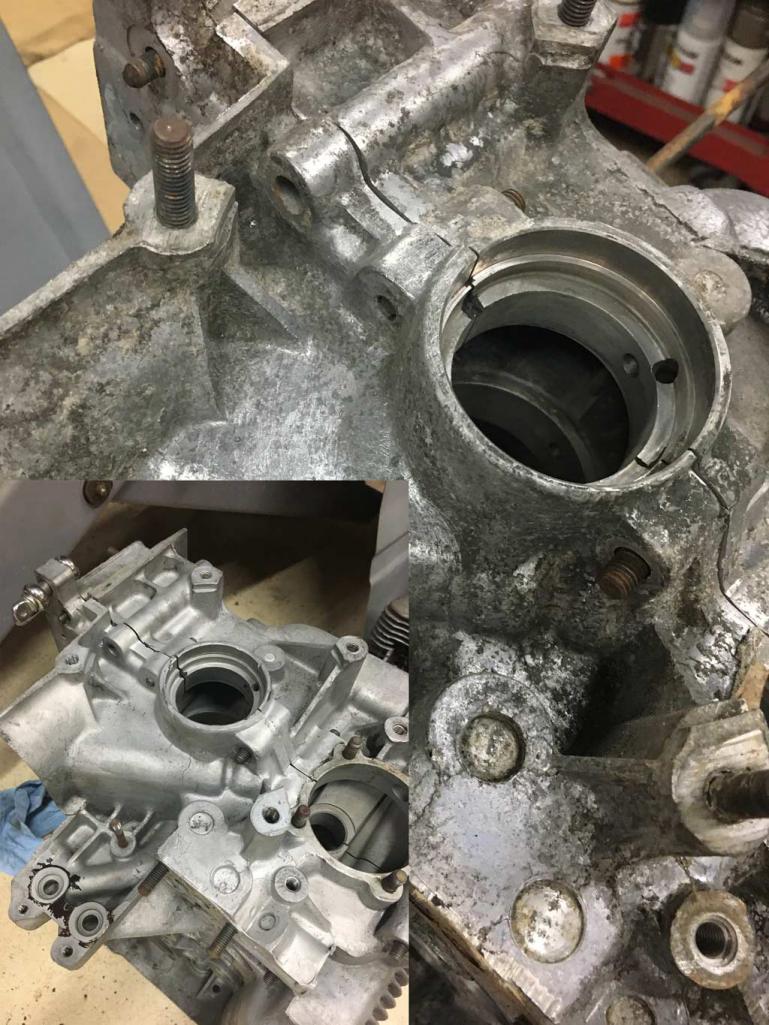
I think it will clean up OK with some bead blasting and/or walnut shell blasting. But . . . that lead to other project.
My pressure pot sandblaster was already clogged up with Horror Freight Walnut shells. In my hurry to do some work years ago on the Norton, I dumped in some HF "Fine" walnut shells. Unfortunately they were far to big (like 26 grit) to go though the nozzle properly and it just made a mess. I set it aside . . . time to pay the piper.
I spent the better part of the afternoon getting that pressure pot working again and went to HF to go buy about 100 lbs of glass bead. I'd rather use Walnut shells and still might if I can find the right grade (more like 60 grit) somewhere locally.
In the end, I will block off any oil galley ports and will ultimately pull the galley plugs so I'm not too worried about using glass bead. We'll see.
Posted by: Superhawk996 Jul 13 2019, 06:31 PM
As an added bonus, this engine came complete with FI and as it turns out the Aux Air Regulator actually works. How cool is that! 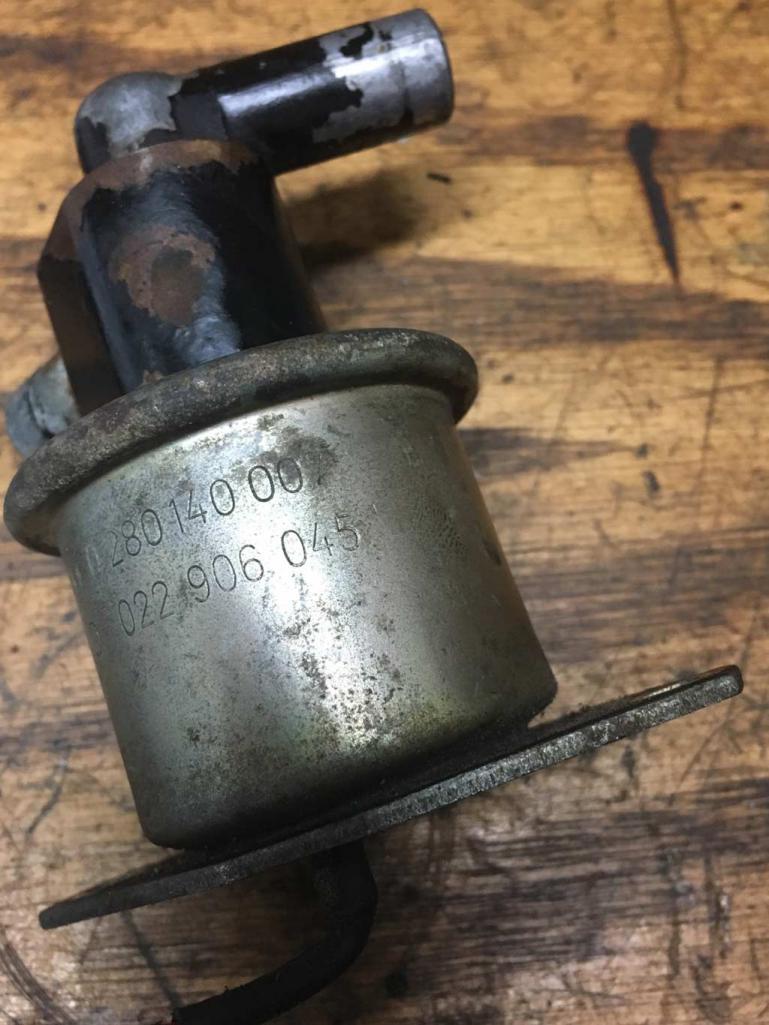
Did a light cleaning and lube with some WD-40 and it is good to go!
Likewise the injectors that came from the engine were handed off to Bill Johnson at Mr. Injector. Mr Injector is out in Hayden Lake Idaho. I lived out in that area back in the 80's.
I stopped into the shop to drop off the injectors when I was in Idaho on vacation. What a great guy. Bill has been out in Idaho since the Late 50's. We talked about how much the area has changed over the years as the population continues to grow.
Bill is the real deal - a real car guy. Not many left in this world. So thrilled to be able to do business with him face to face. He previously did another batch of injectors for me. Out of that batch of 7 unfortunately we only saved 4. The great thing about Mr. Injector is that if he can't get them working and flowing properly - No charge.
This batch was another story. All 4 were working and all 4 flow great now. 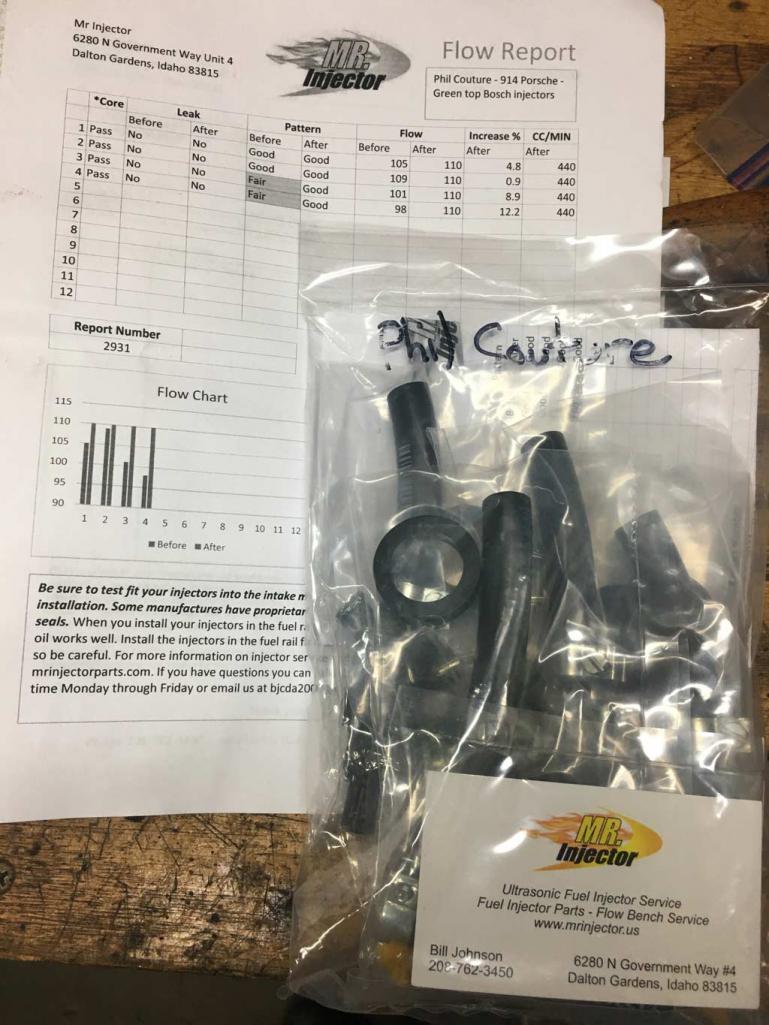
I actually have a total of 12 injectors at this point to go with 2 engines. Ultimately a set will go up on classifieds once I know I have my engines covered and running.
Posted by: Superhawk996 Jul 13 2019, 06:41 PM
And the final good news for the day is that the crank that came out of this engine is in great shape.
I had the machine shop do a cleaning and just a light polish.
Remeasured the crank to make sure they didn't take off more than .0001-.0002". No problems. I love it when that is the case.
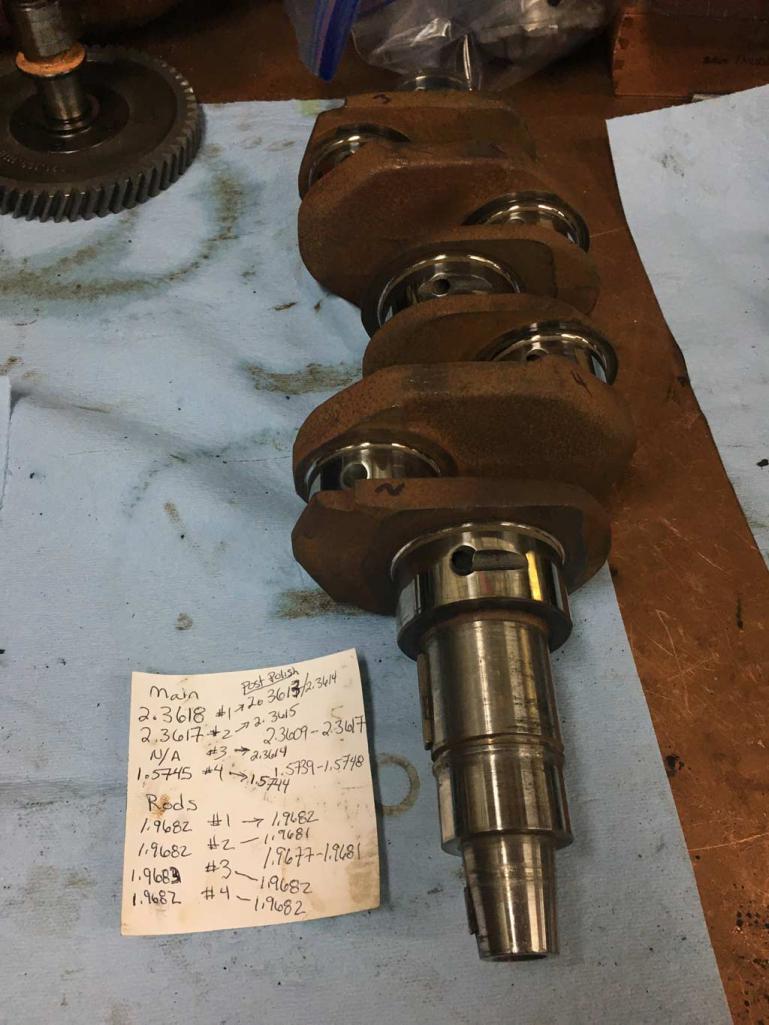
This crank still measures on the high side of specifications.
Posted by: bbrock Jul 13 2019, 07:29 PM
It has been forever since I've worked on the 914 projects.
Too many distractions. Melanoma surgeries (Wear Sunscreen, get checked!), vacation out west with a flyby to go see Bbrock's project (which is incredible), and the obligatory domestic distractions.
Today my beloved Vintage toaster took a dump. I've had this baby for over 27 years myself. I bought it for $5 at Goodwill when I was in college and too poor to afford a new toaster in my 1st apartment. I love vintage stuff because it WORKS and is easily serviced.
This is a toaster from the era before the Lawyers took over product development. This Mother get roaring hot. It has a chrome metal cover without any significant insulation.
It actually does it's job and cooks toast in about 1 minute. Imagine that. No microprocessor. No modes for cooking bagels or pastries. No heating elements that barely get warm. Just a good old toaster that actually works.
It you are dumb enough to touch it when its hot - you will get burned. If you are dumb enough to stick a knife or fork in there while it's powered up, you may get electrocuted. Just the way it should be!
Anyway it was time fix it and fend off any sly attempt by the wife to replace it with some modern piece of crap.
Just a simple repair to the cord and it was back in operation. Plus a little buffing of the chrome for good cosmetic measure.
Back in it's place of honor and ready to cook!
Smart man! When I was a poor college student, I bought an already antique toaster (older than yours) for $3 from a prof who was finishing his sabbatical and heading back to Israel. We LOVED that toaster but when it crapped out, we decided to spend a hundred dollars in 1990s money on a fancy high-brow brand toaster. We HATE that POS and even though it has been well over twenty years since our old toaster left our lives, one of us laments how much we miss it at least weekly. We saw one identical to it in a museum once and about broke down in tears. Good on you for reviving the heirloom!

Posted by: porschetub Jul 14 2019, 02:37 PM
Will be following this build as I'am currently doing a build @ the moment ,wow thought my case was dirty !!!!!,spent several hours yesterday cleaning mine,its a lot of work for me as I'am only doing a top overhaul.
Keep up the good work, .
Posted by: Superhawk996 Jul 15 2019, 07:33 PM
Not a very productive 914 weekend. In addition to my affinity for vintage toasters, I also love vintage stereo stuff and a Craigslist deal on some speakers proved to be irresistible which consumed the better part of Sunday to go pickup.
However, I did manage to get the case bead blasted to pull off the dirt and corrosion that the degrease tank didn't get. I decided to go the glass bead route and get something done rather than screw around trying to source 60 grit walnut shells.
I know you CA guys can't fully appreciate how hot and HUMID it is in the midwest. Wearing shorts and a T-shirt leads to a full on sweat if doing any sort of activity. Now imagine suiting up in long sleeves, a respirator, and then putting on a sand blasting hood that completely covers your head. I really should have worn long pants too but instead chose to wear shorts and simply take the beating of glass bead on my legs as it ricochet's off the case. Swamp ass doesn't even begin to describe it.
Sunday was mid 80's with about 80% humidity but the forecast is for even hotter and more humid this week. Had to suck it up and get this done. I have other small parts I can do inside the air conditioned garage but this had to get done outdoors.
About 50 lbs of glass bead later: 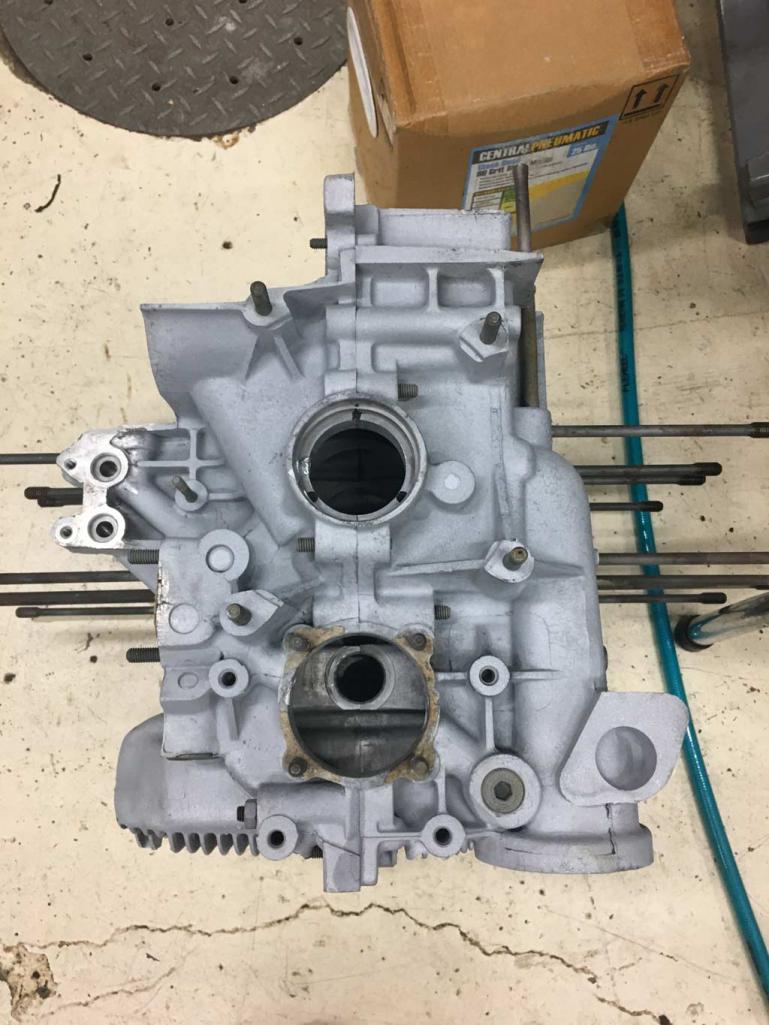
The case cleaned up pretty well. I'll likely knock off some of the bigger casting flash that is on the top side of the engine to make it easier to keep clean. Likewise, the top and bottom case surfaces will get a light coat of silver paint to help keep clean in the future. 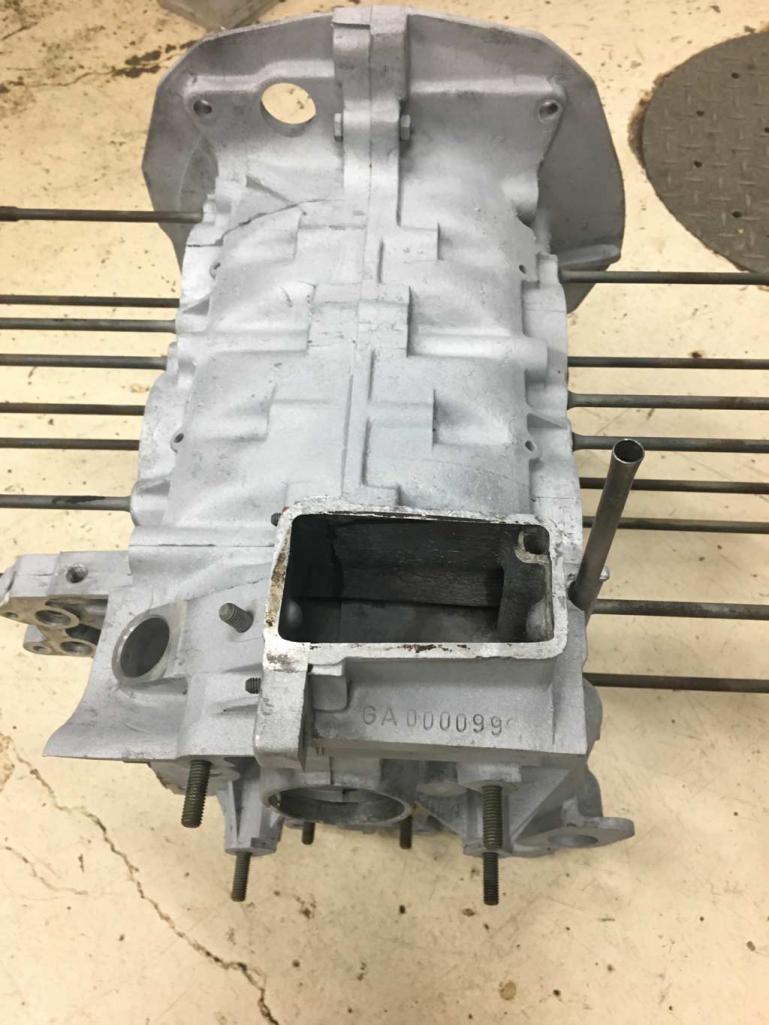
I taped off the oil galley ports with aluminum HVAC tape to minimize any bead getting in. Not a huge concern since I had planned to pull the flywheel end galley plugs anyway to ensure that I get them perfectly clean. Nothing worse than wondering what might be stacked up in the ends.
Posted by: Superhawk996 Jul 15 2019, 08:03 PM
I did notice some differences in this early 099 casting vs. the later version that came out of my car. 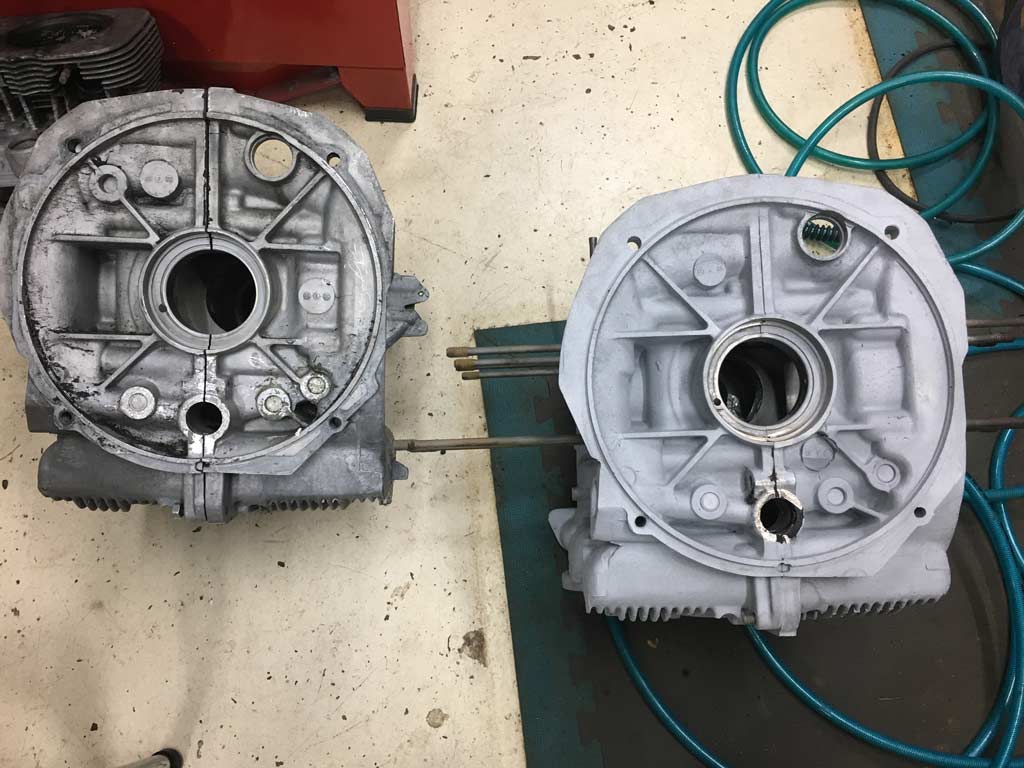
Note the differences in casting lot number/date codes
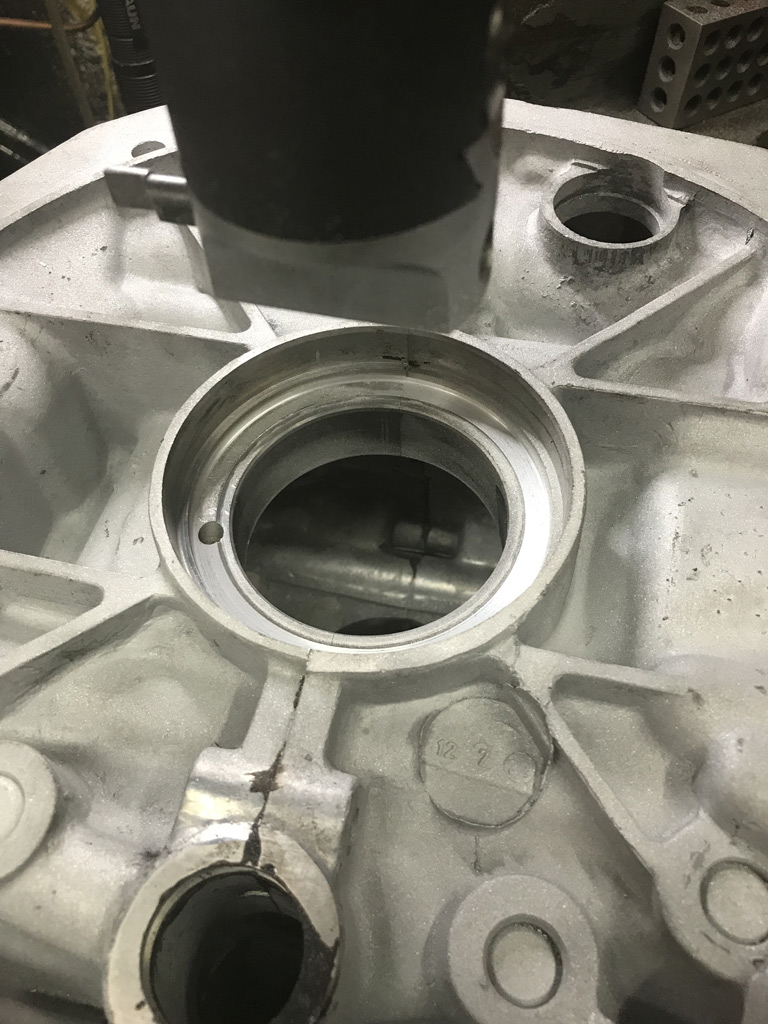
There also appears to be an error in machining the flywheel end main bearing bore.
It looks to me like whatever tool they were using to face mill the case stopped short of a 360 degree revolution.
I can't quite visualize what tooling they were using to cut this surface. The sharp edge, straight line and angular surface left aren't what I'd expect from fly cutting, or a face mill.
Curious if anyone has seen something like this before?
Posted by: Jake Raby Jul 18 2019, 10:43 PM
Early GA cases have given me lots of issues. The castings are always rough, and they measure all over the place.
Their biggest issue is sagging cylinder registers. Make sure you have the cylinders registers decked, and evened up. They are always sagging at the point where the cylinders come closest to each other.
Posted by: Superhawk996 Jul 27 2019, 03:35 AM
Early GA cases have given me lots of issues. The castings are always rough, and they measure all over the place.
Their biggest issue is sagging cylinder registers. Make sure you have the cylinders registers decked, and evened up. They are always sagging at the point where the cylinders come closest to each other.
@http://www.914world.com/bbs2/index.php?showuser=1095
Thank you for the advice and confirmation that you've seen issues on early cases too! Nice to see you posting here on 914World again!
Posted by: Superhawk996 Jul 27 2019, 03:49 AM
Time has come to tear down the heads to see if they might be good. On my original engine the heads turned out to be a disaster. I'll post more on those heads under my vehicle build thread.
On these heads I used my homemade valve spring tool. Just a few simple bits turned up on the lathe and the mill to use a C-Clamp.
The slots allow me to fish out the keepers. 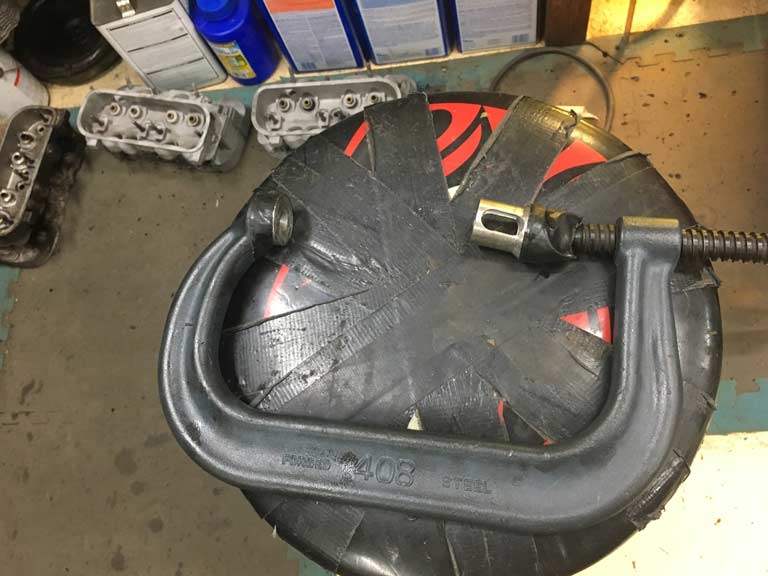
As usual, there were the typical seized exhaust studs. Ended up using one of my favorite tools to extract the studs. 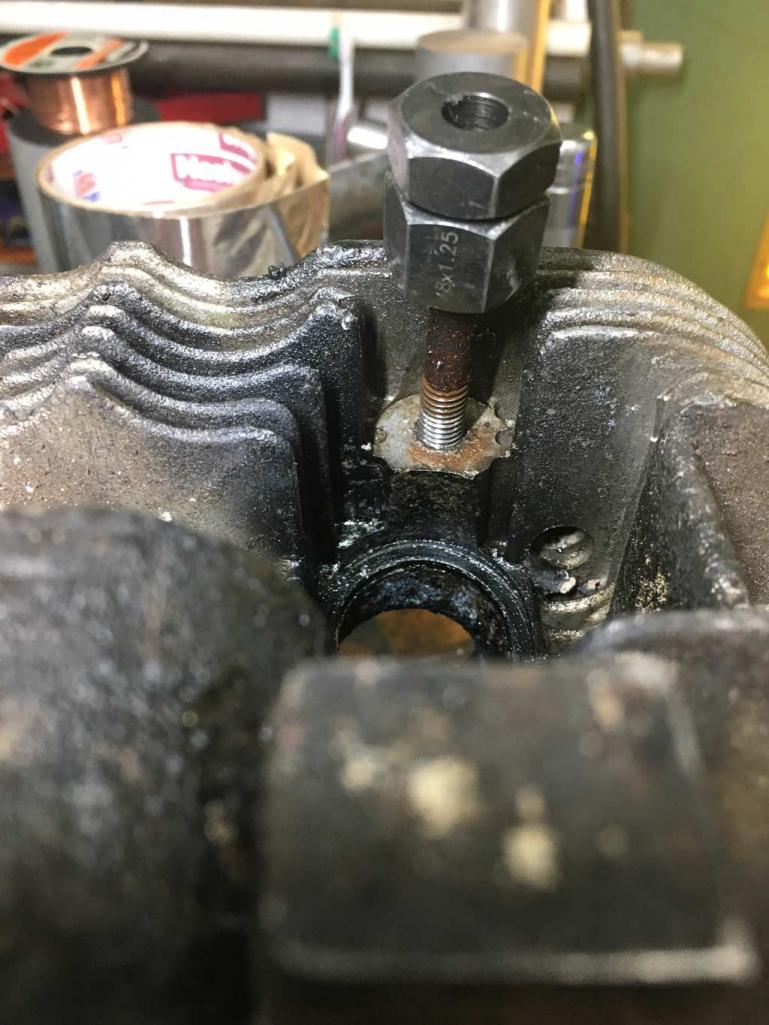
This tool plus a little heat usually works. But, of course, there is always the one stud that someone broke off leaving no threads. Tried the usual tricks. . .penetrating oils . . . heat . . . vice grips. Finally resorted to the heavy artillery & welded on a nut. 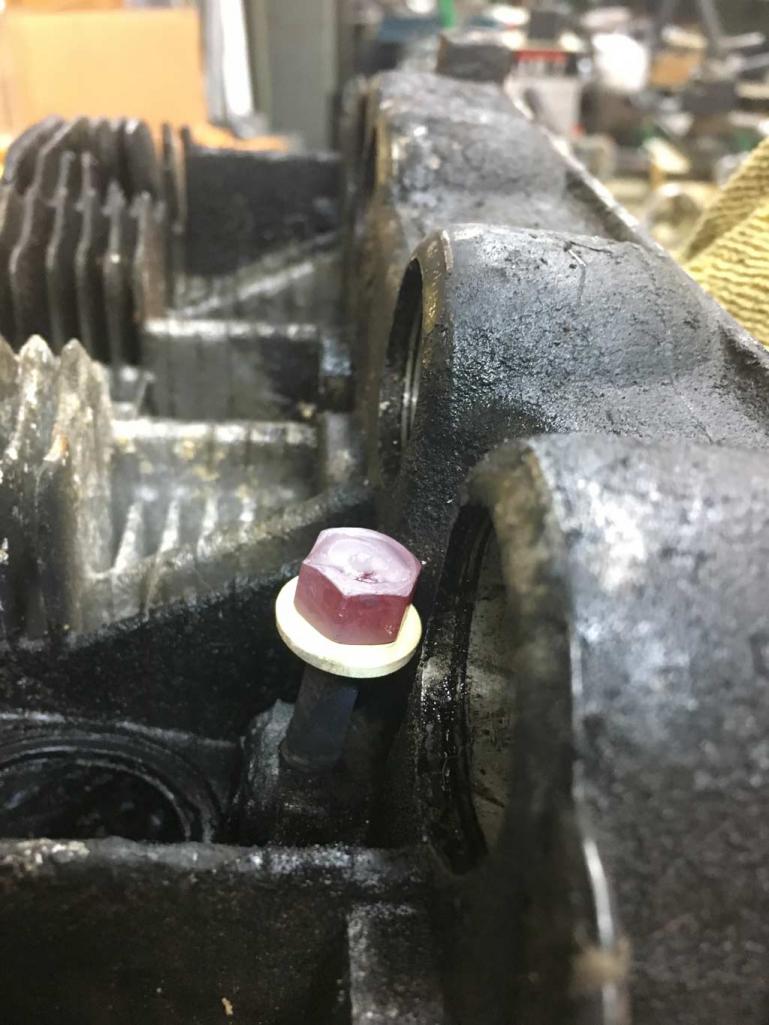
And of course the inevitable occurred. 
We temporarily interrupt this post -- Clear the children from the room. 
Guess we'll save that project for later. Need to bead blast the carbon off the combustion chambers and ports to see if there is cracking. If there isn't, then I'll deal with the broken stud by drilling it out in the mill using a left hand drill bit. If necessary it could be inserted but I prefer not to do that.
Posted by: 76-914 Jul 27 2019, 09:02 AM
I like clean. I've always said that your going to get dirty removing stuff but you don't have to get dirty putting it back. BTW, some of us CA guys grew up in the midwest and remember the humidity. My wife was astounded at how uncomfortable the cold Wx could be when humidity was part of the mix! What's your timetable for this project?
Posted by: Superhawk996 Jul 27 2019, 09:15 AM
What's your timetable for this project?
Lot's of iron's in the fire so hard to say for sure, I'd like to have at least one engine put together by September.
Right now I'm mostly burning time between Melanoma biopsy's and surgeries. Can't really get on my back and do a lot of overhead welding and grinding on the Chassis so I'm doing "easy" work.
Rods are being rebuilt as we speak by my local machine shop. Crank is in good shape. P&C's are likely reusable from what I've seen so far with just a new set of rings and a cylinder hone.
I have a set of new Chinese AAP heads being built by Len Hoffman so I know I have at least one good set of 2.0L 3 stud heads
At this point it depends on this set of heads as to whether I rebuild both this engine and my original. If I can come up with a second set of heads I'll build both. When done, one, would go up for sale to offset future purchase of a six cylinder long term project.
If these heads aren't good, the excess spares (case, crank, P&C's, etc.) will likely get sold off as parts.
Posted by: Superhawk996 Jul 27 2019, 11:10 AM
Restoration work is like a roller coaster ride.
Yesterday I was pretty mad that I couldn't get out that exhaust stud without it breaking off.
Today, I'm happier than a bird with a french fry.
Heads are in great shape. Absolutely no cracking. Not even around the spark plug which is so common its laughable.
The inset picture of the ports is typical of all cylinders.
Looks like I'm on a path to be able to resurrect two engines! 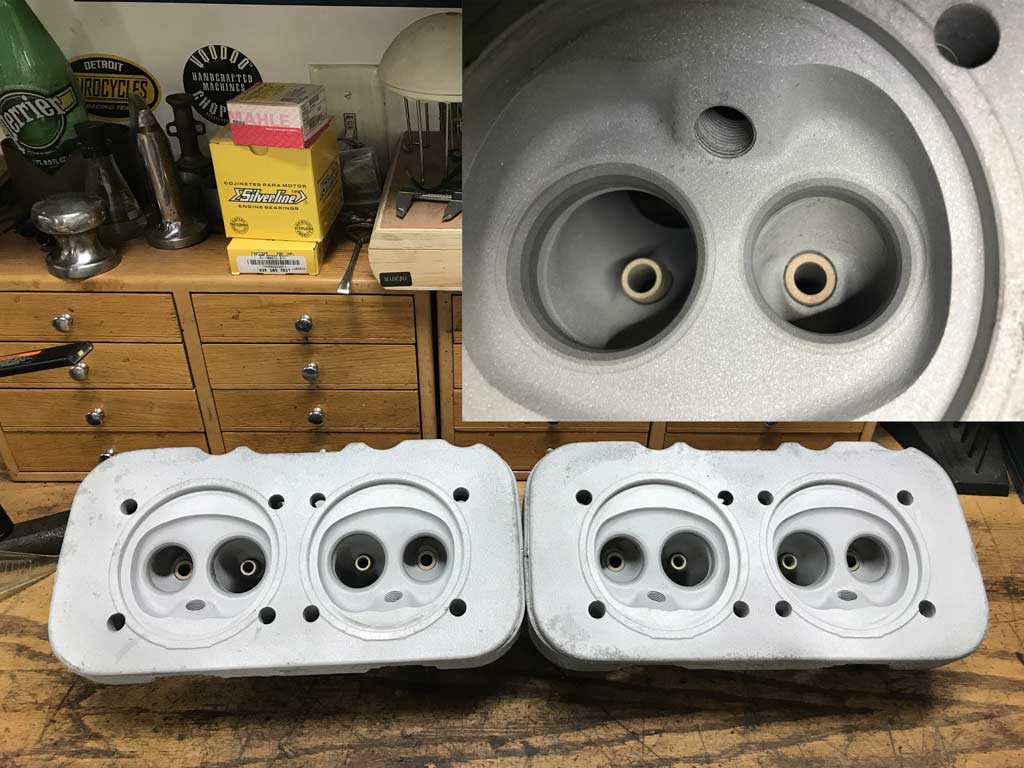
Posted by: Superhawk996 Jul 27 2019, 11:19 AM
I also have a tip for those of you with sand blasters. Not really new trick, but, I'm a slow learner.
For years I've struggled with my pressure pot. Works great for 1st 10-15 lbs of media but then starts getting clogging and intermittent media supply.
I've always worked around it by limiting the size of my batch to blast or by messing with various pressure setting above or below the sand to clear things out.
So I finally broke down and spend a grand total of about $12 to buy a mini water separator from HF. Today is humid as can be and I had absolutely no clogging.
How dumb is that? Only been fighting this nonsense for about 10 years! 
I simply put typical air coupler's on it, now it can be moved from pressure pot to bench top booth, or whatever else might need extra water filtration. You wouldn't believe how much moisture gets this far down the line even tough I have another water trap back in the garage! 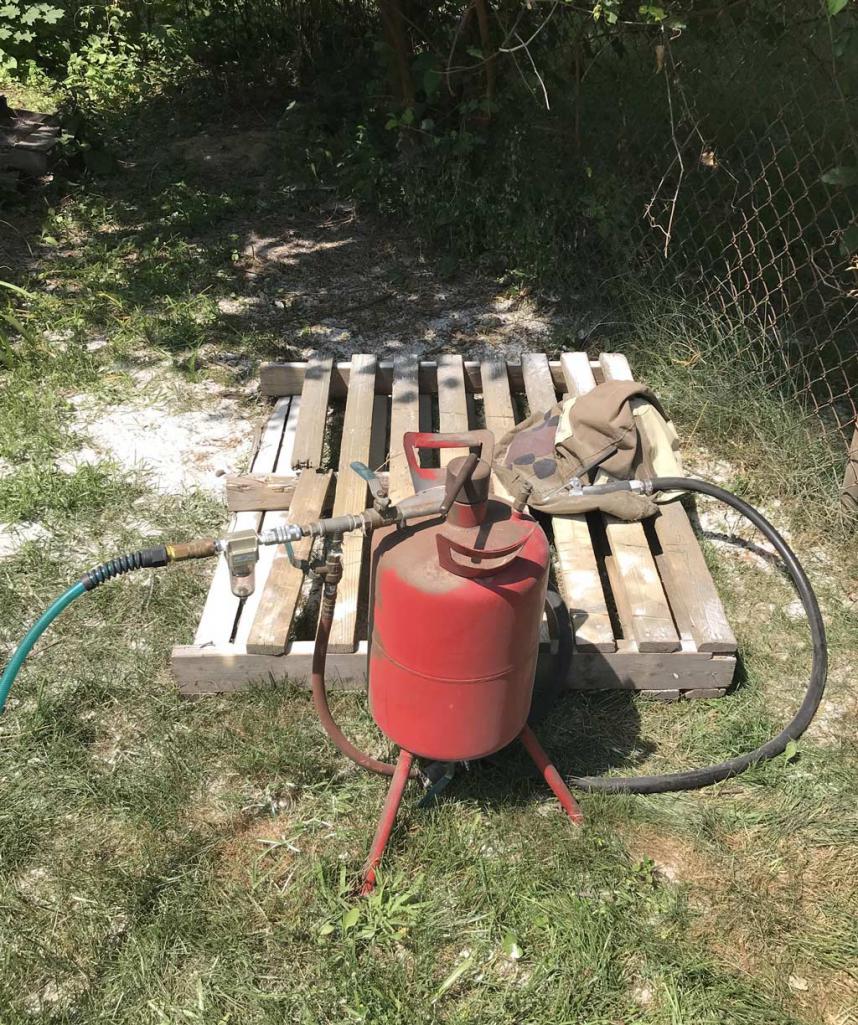
Posted by: Tdskip Jul 27 2019, 11:31 AM
You nailed it when you said all of this is a roller coaster ride.
Thanks for the updates and good tip on the water separator
Posted by: bbrock Jul 27 2019, 12:57 PM
I also have a tip for those of you with sand blasters. Not really new trick, but, I'm a slow learner.
For years I've struggled with my pressure pot. Works great for 1st 10-15 lbs of media but then starts getting clogging and intermittent media supply.
I've always worked around it by limiting the size of my batch to blast or by messing with various pressure setting above or below the sand to clear things out.
So I finally broke down and spend a grand total of about $12 to buy a mini water separator from HF. Today is humid as can be and I had absolutely no clogging.
How dumb is that? Only been fighting this nonsense for about 10 years!
I simply put typical air coupler's on it, now it can be moved from pressure pot to bench top booth, or whatever else might need extra water filtration. You wouldn't believe how much moisture gets this far down the line even tough I have another water trap back in the garage!
This will make you mad. I have a nice Sharpe water separator on my air supply that I moved when I left Kansas, plus an auto drain purge on the compressor tank that pops off a puff of air every 30 minutes to keep the water drained. The other day I realized I had been running my compressor a LOT for blasting but hadn't drained the separator for months. I opened up the petcock until it hissed. Nothing but dry air. I LOVE not having to deal with humidity anymore!
Posted by: Superhawk996 Jul 27 2019, 05:00 PM
Sure . . . rub it in. 
Someday I'll relocate to Idaho!
Posted by: Superhawk996 Jul 27 2019, 05:05 PM
OK -- so I got the head set up in the mill and was able to get the broken stud out and salvaged the existing threads.
Here is the basic setup. 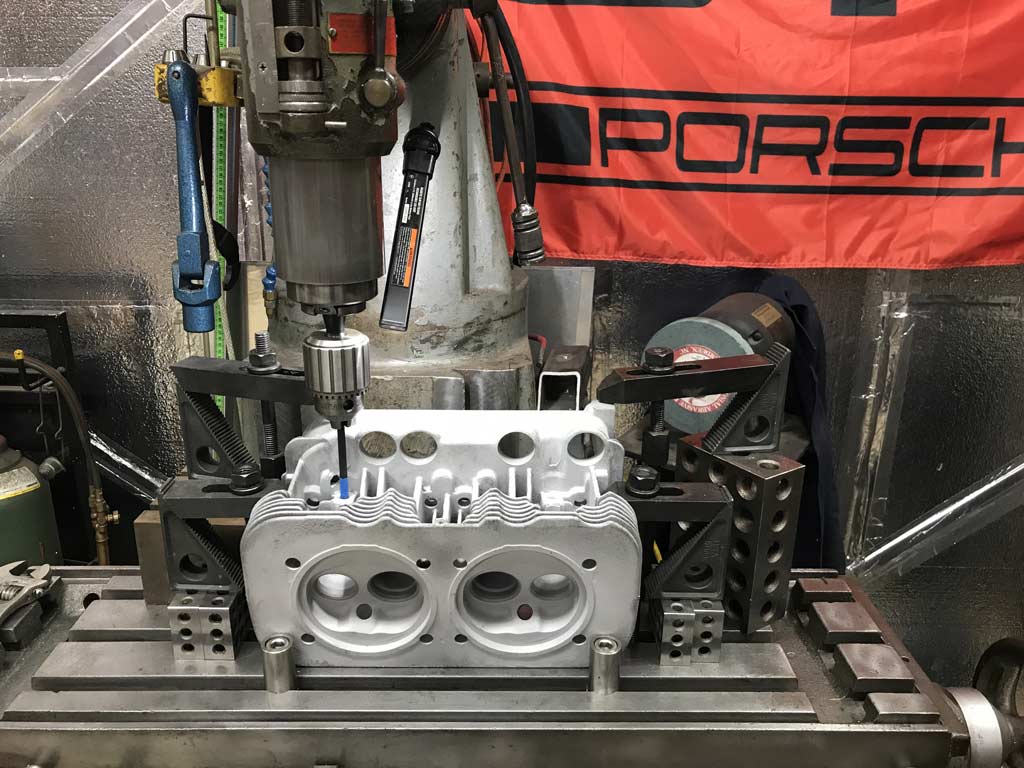
And here is the final result after a few hours of farting around. Not sure you guys want the gratuitous details on the interim steps. Will post if there is interest. 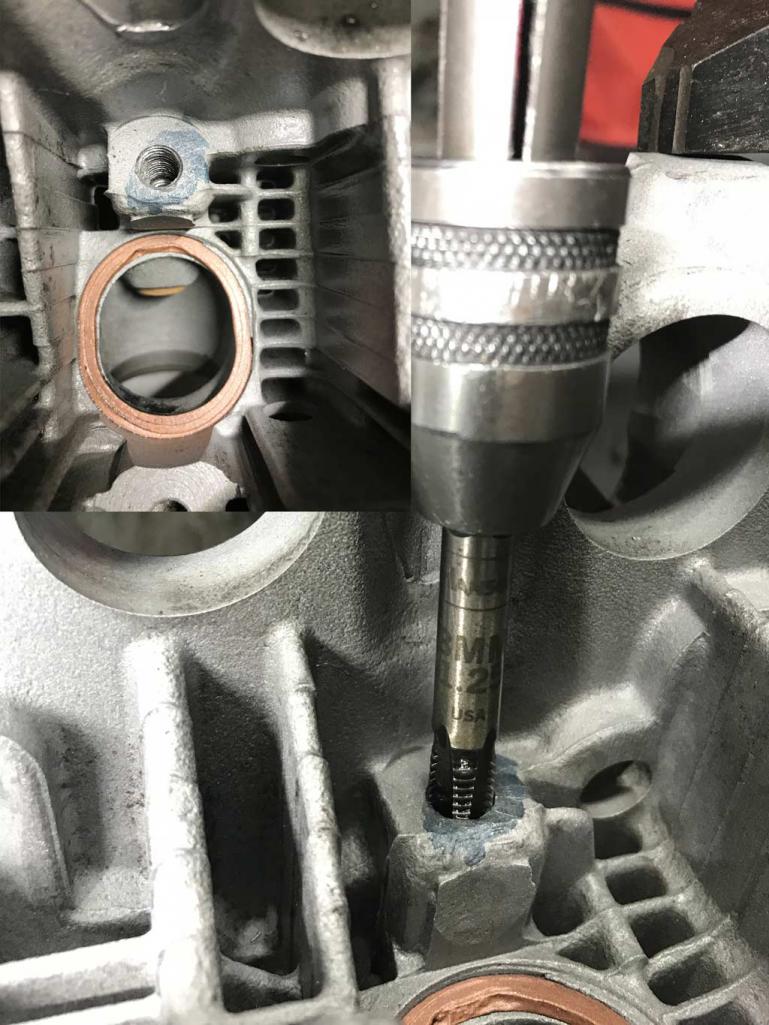
I feel better now. Two good heads - time to start sourcing new valves, springs, and valve guides. Good weekend so far!
Posted by: bbrock Jul 27 2019, 05:09 PM
OK -- so I got the head set up in the mill and was able to get the broken stud out.
Here is the basic setup.
Sure, rub it in

That really is awesome work. Those heads look beautiful.
Posted by: Superhawk996 Jul 27 2019, 05:18 PM
Now onto the last PITA on the other head. The stupid M6 cheese head screw that attaches the under cylinder tin also sheared off too. 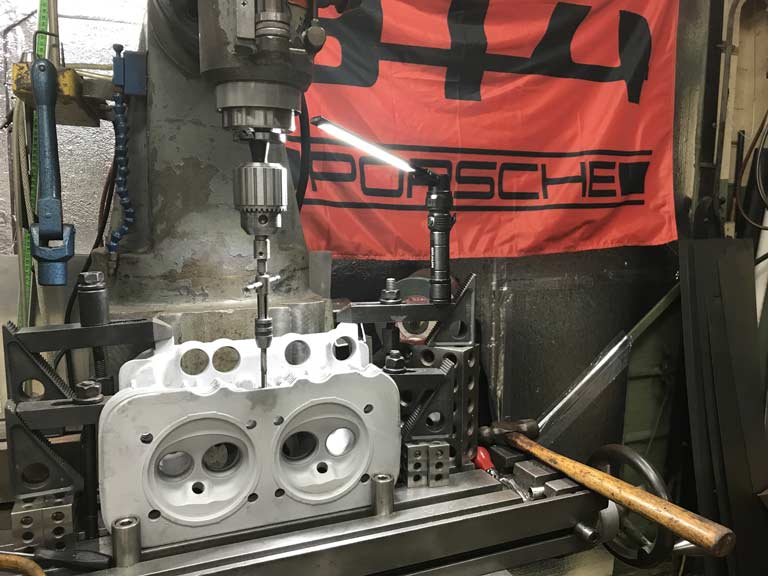
Posted by: Tdskip Jul 29 2019, 06:35 AM
Thanks for the update
Posted by: jd74914 Jul 29 2019, 06:54 AM
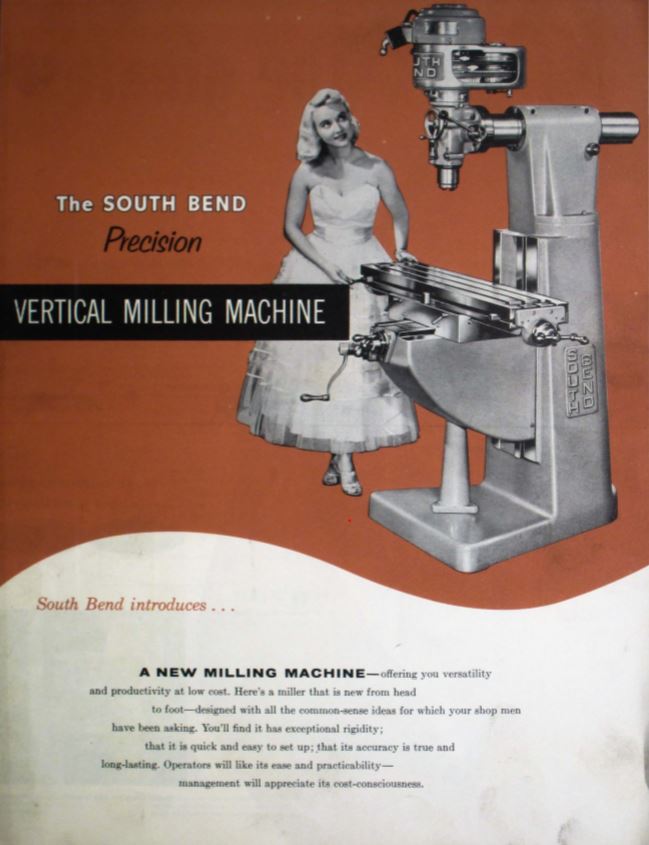
Gotta ask...what kind of knee mill is that?
Posted by: Superhawk996 Jul 29 2019, 10:15 AM
Gotta ask...what kind of knee mill is that?
@http://www.914world.com/bbs2/index.php?showuser=1659
1950's vintage American Iron - about 1600 lbs worth.
South Bend Vertical Mill. It's a bit different in that it doesn't use standard R8 collets but uses a NT30 taper but has a weird countersink in the taper for holding the taper into the spindle rather than using the threaded end like a standard NT30 or CAT40. I end up buying NT30 tooling but have to grind in the countersinks on the taper to use on this machine.
I like it because NT30 is a positive drive vs. R8's that can be prone to slipping.
Price was right ($500 delivered) back when I bought it a few decades back.
Contemplating adding a VFD so that I can get spindle speed down to 40-45 RPM. Then I can cut my own valve seats.

Posted by: jd74914 Jul 29 2019, 01:41 PM
Very cool! Strange taper for a little mill but definitely better than the stuff with B&S9. Looks like it has a ton of z-travel too for having such a compact footprint, that's awesome! Do you have an equally cool lathe to go with it?
Definitely add the VFD-I've found that just being able to fine tune speeds really increases tool life and improves surface finish. It's a really nice knob to have.
Little anecdote: One of the machinists I know is good friends with the owner of MasterCAM; he told me they were talking about advances in machining one day (from when they had both started in the early 70s) and his opinion was the most important change was the addition of continuous variable speed to all machining centers.
Posted by: nathanxnathan Jul 29 2019, 04:16 PM
Now onto the last PITA on the other head. The stupid M6 cheese head screw that attaches the under cylinder tin also sheared off too.
The screw for the under cylinder tin is actually 5mm, in case it matters
9 N 010 704 2 pan-head screw AM 5 X 10
Posted by: 76-914 Jul 29 2019, 05:03 PM
Now onto the last PITA on the other head. The stupid M6 cheese head screw that attaches the under cylinder tin also sheared off too.
The screw for the under cylinder tin is actually 5mm, in case it matters
9 N 010 704 2 pan-head screw AM 5 X 10
Yep, that's the Lone Oddball screw that usually gets misplace. BTW, you couldn't have the mill delivered for $500 today.

Posted by: Superhawk996 Jul 29 2019, 06:28 PM

Doh! 
It's definately M6x1.0 now.
I quickly grabbed a standard cheese head and gauged it in the rush to get it done. Didn't realize that it was actually M5.
We'll call it a custom upgrade.
Posted by: Superhawk996 Jul 29 2019, 06:38 PM
BTW, you couldn't have the mill delivered for $500 today.
Sure you can. All about the deal & the negotiation process. In this case it was a piece of metal working equipment that a wood working shop had had for quite a while. Due to the NT30 spindle taper most of the the Bridgeport guys weren't interested and passed it over. He was basically stuck with a 1600lb paperweight taling up space in his shop. I basically bought it for $0.31 per pound. Cheaper than hot dogs.
My buddy turned me on to it after it had been sitting unsold for a long while.
Just struck up a deal inclusive of shipping to my driveway but the owner didn't want anything to do with placing it in the garage due to "liability" he said. He literally lifted it off the trailer with a fork lift and then left it in my driveway.
It was still an awful lot of work to get that beast inside and positioned. By then my buddy regretted telling me about it in the first place. But, what are friends for.
I paid back the debt by some minor parts fab for his toy over the years.
Posted by: Superhawk996 Jul 29 2019, 06:58 PM
I started cleaning up the stock pistons from this 099 engine. Overall pistons seem to be in great shape. I need to measure them to make sure but likely will reuse them with new rings for this build.
I used the ultrasonic cleaner with some simple green but it still struggled to get some of the really tough carbon off. Wondering what cleaning solutions folks are using with better results.
Purple Power seemed to be in wide use based on quick troll of YouTube. (8/8/2019 post edit: Purple Power not recommended for Aluminum via their Website FAQ)
Could resort to carb cleaner but the smell of that stuff will permeate the garage in a hurry. Then the wife starts to complain as it makes it's way into the house.
To me, it smells like Hoppes #9 (pure heaven), but, my wife hates the smell. Women. 
Posted by: Superhawk996 Aug 4 2019, 11:15 AM
Still working on GA000099 slowly but surely.
I've been cleaning up pistons to figure out if they are worth reusing. I'd really like to reuse but the thought of building up a 2056 carburated engine has crossed my mind. I haven't ordered the cam for this engine yet so still some time to decide.
In the end, I know I want a dead stock 2.0L FI engine for my project and have purchased 94mm NOS P&C's and a NOS cam to build that. But I need to decide what case I'm using.
This is getting complicated. I've never done two engine rebuilds near simultaneously and the possibilities are limitless since I planned to sell off the spare engine later and I do have a set of Dell's sitting on standby that came off my original engine.
For now I'm going to keep forging ahead assuming I'm using GA000099 as my engine case. But that needs machine work still to come.
Cleaning pistons is a PITA. But, these seem to be low mileage, and, in good shape so I can't see tossing them. Maybe I'll offer them up on forum or Samba if I do decide to build a 2056. It is nice to get a fresh set of P&C and not have to do all this work!
Measured skirts to make sure they aren't collapsed along with the ring grooves to see how much wear there is. Short answer - virtually none. All looking good on the 1 piston (cylinder #3) I measured yesterday. I'll do a few more today but expected #3 to be the worst due to location & generally running hottest. 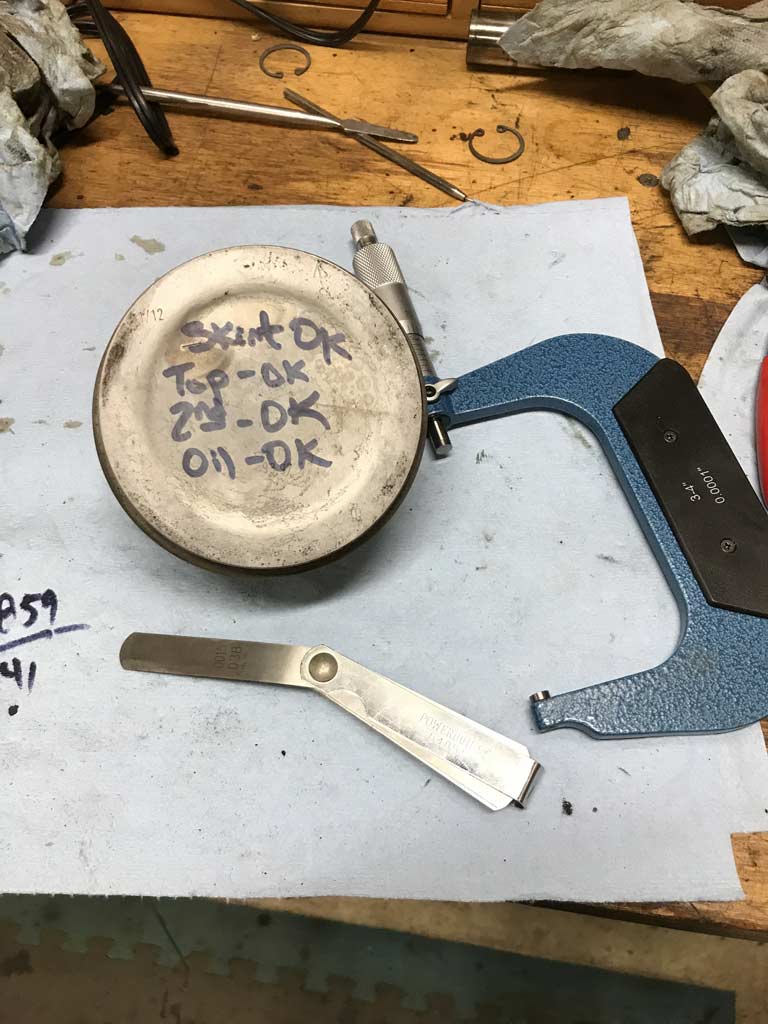
Posted by: 914_7T3 Aug 4 2019, 10:40 PM
Phil, Keep posting on your progress. Of course its complicated, but well worth it as you get closer to the end goal. Ask me how I know 
Posted by: Superhawk996 Aug 8 2019, 07:08 PM
Continuation of piston and cylinder measurement.
I've been measuring pistons and cylinders and not quite believing the results. A few days ago I was measuring cylinders and comparing between the new set of KolbenSchmidt Pistons and Cylinders (P&C's) and those from GA000099.
I measured 1st with a Mitutoyo snap gauge and my Chinese micrometer. Coming up right on the money for the cylinder. Right around 94mm with no real taper. 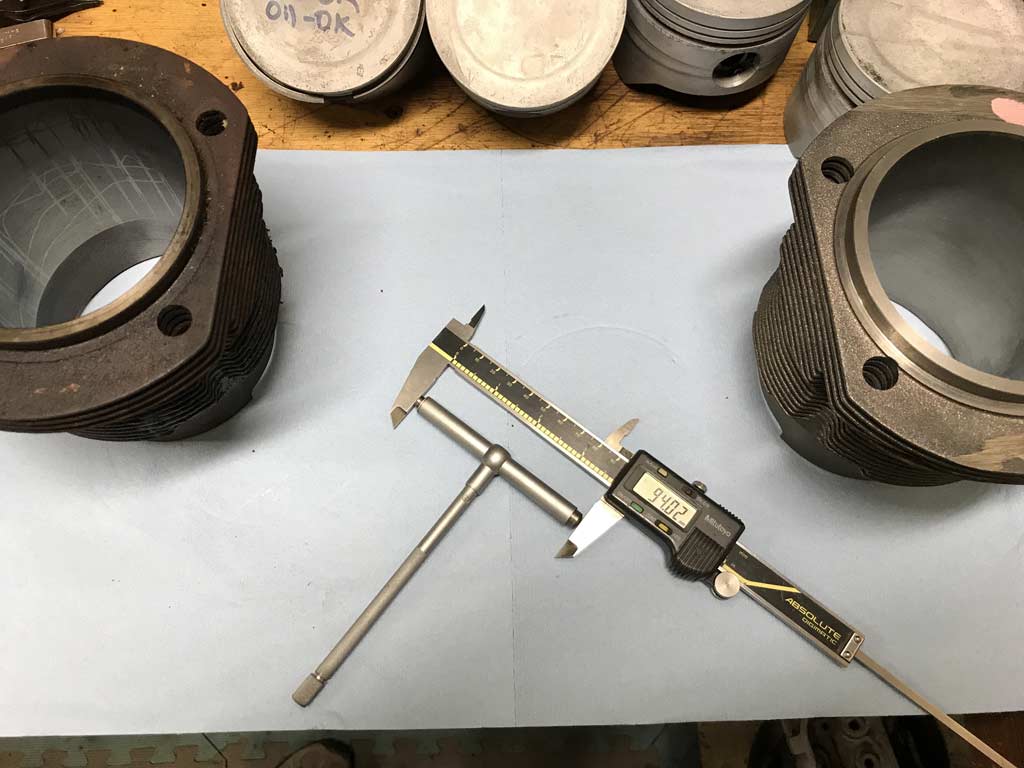
So then I did a quick check of the snap gauge with a set of Mitutoyo calipers. Same result about 94.02mm. 0.02mm = .0008" so about 0.001" over size. New cylinder size is 94mm with tolerance of 0.02mm - 0.05mm for new parts per factory manual with a upper wear limit at 0.2mm which is about .008".
Not quite believing this, I took the time to set up a bore gauge at 94mm. Sure enough, still coming in about 0.001" oversize to the 94mm gauge (sorry for swapping units back and forth). 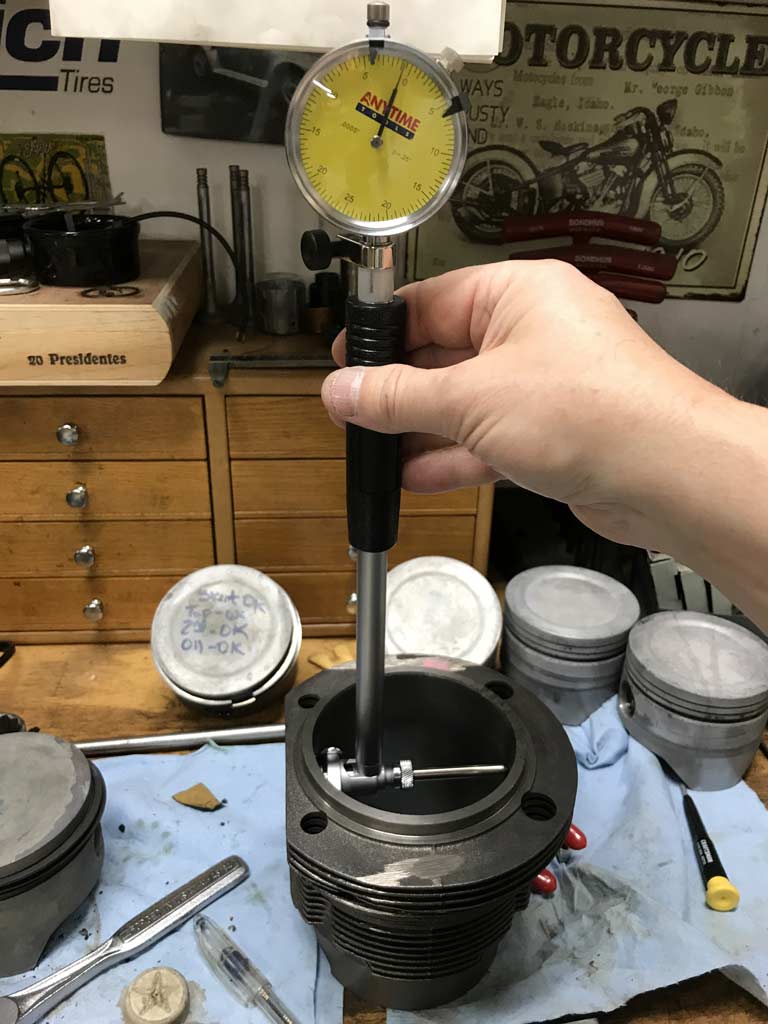
This does align pretty well to the fact that the cylinders visually look good and I can still see some of the original hone / hatch marks.
Pretty amazing that these are still in great shape and can probably be cleaned up with just a light re-hone.
Here's a quick video
https://www.youtube.com/watch?v=-ObzdlUJhhc
Posted by: Superhawk996 Aug 17 2019, 12:56 PM
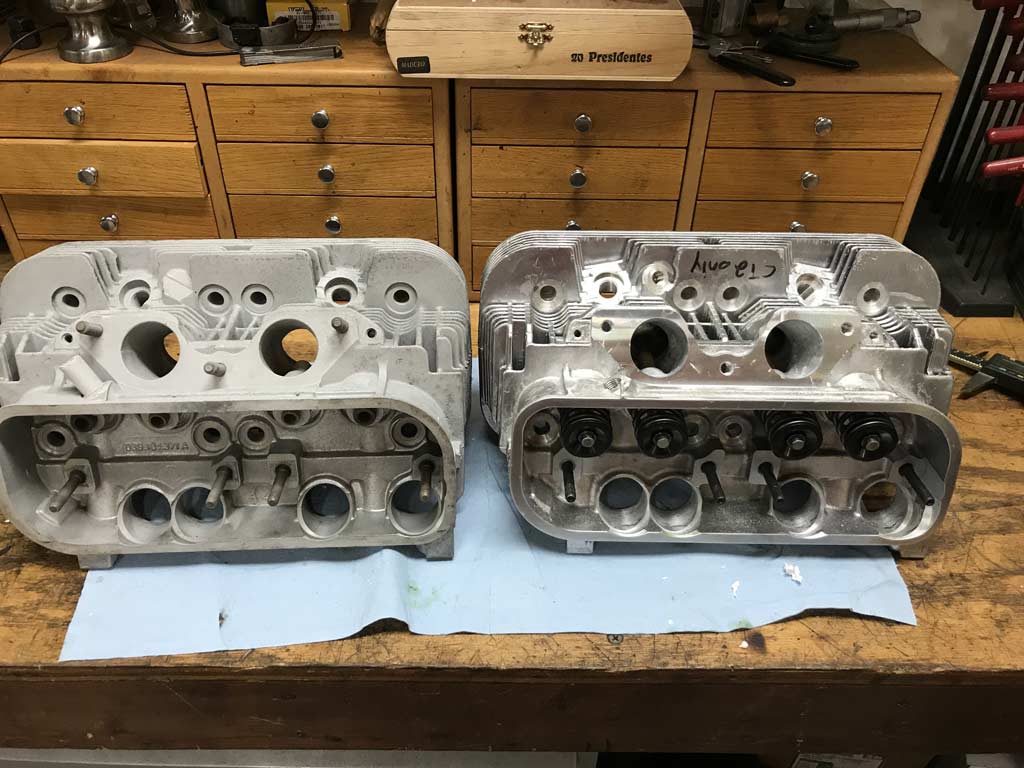
Received a new pair of HAM prepared AA Performance Chinese 2.0L 3 stud heads today.
Now, I know it's silly to judge by looks alone but I'm impressed.
Packaging was 1st rate. UPS could have dropped these from 8 foot high and they would have been fine. The white boxes contain form fitted polystyrene foam that fits the head perfectly. These boxes are what ensured the heads got to US port in 1 piece from China so it would have been hard for UPS to screw it up with HAM's double boxing and foam packing. Great work! 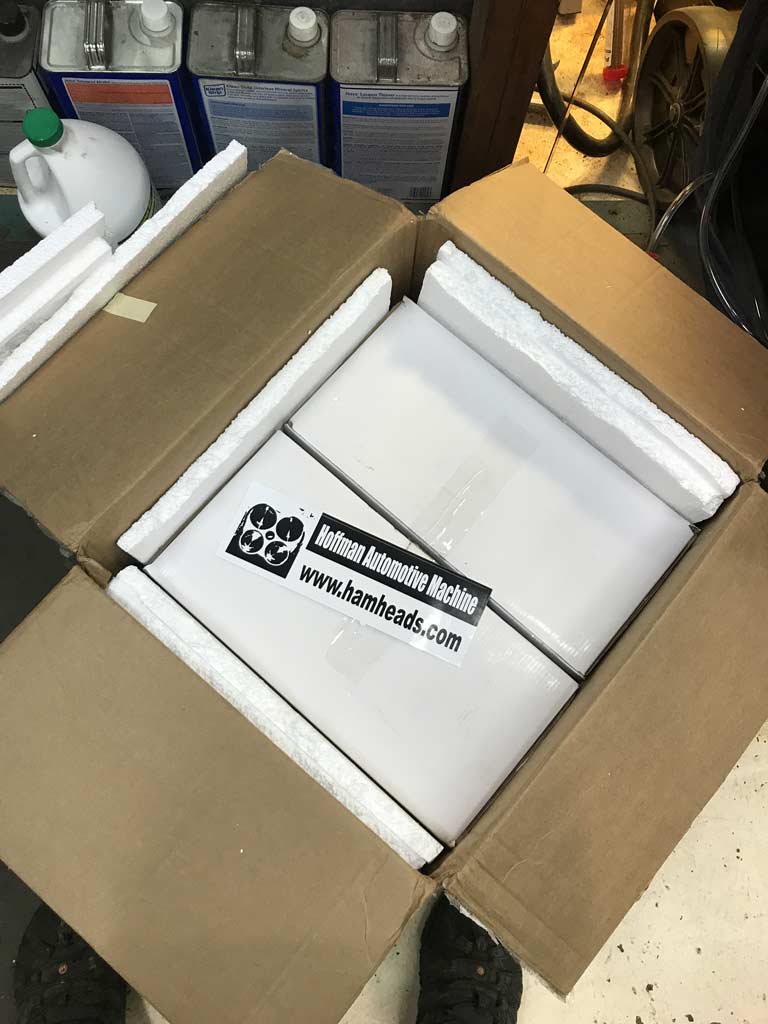
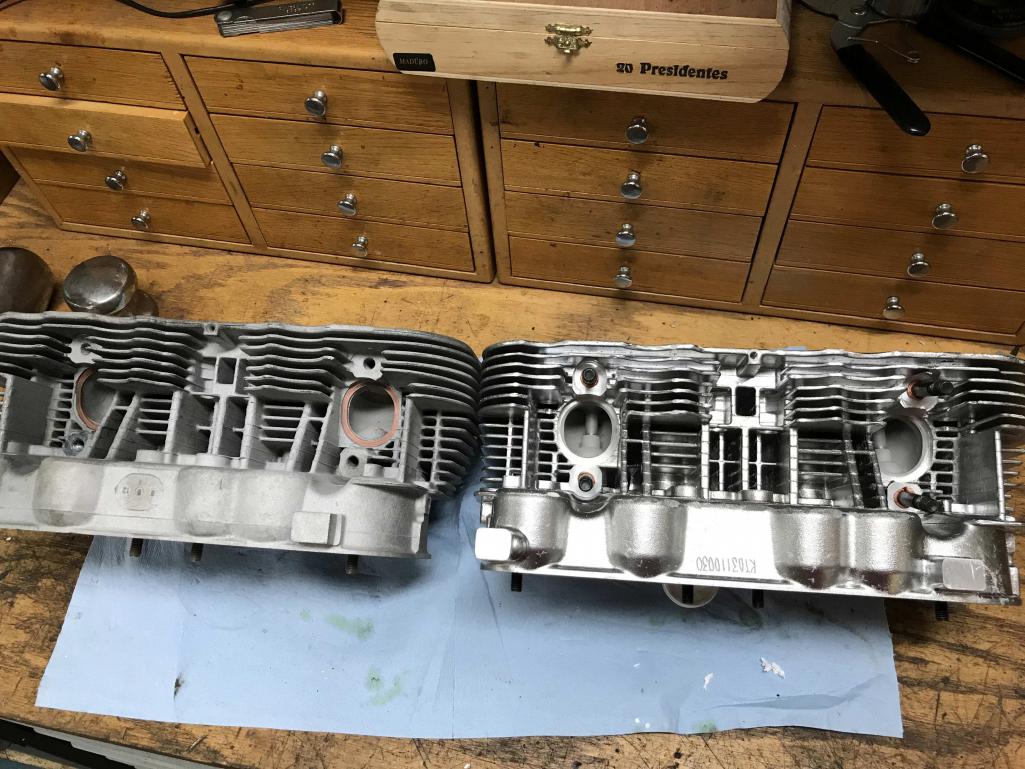
Quick side by side comparison of Chinese head (on right) vs. Porsche 2.0L Head (on left) is pretty good. As Len Hoffman describes on his website, these are basically a straight up copy of the Porsche 2.0L factory head. As he describes there is a bit more porosity and casting flash than OEM but honestly this should be expected with any Chinese knockoff.
I haven't made up my mind which engine these will go on - the engine I keep for my car or the engine I sell.
I'm honestly tempted to buy another set of these HAM heads and keep these GA00099 Porsche heads for later given how hard it seems to be getting to find real 2.0L heads that don't have cracking issues.
Here's a couple more quick views. 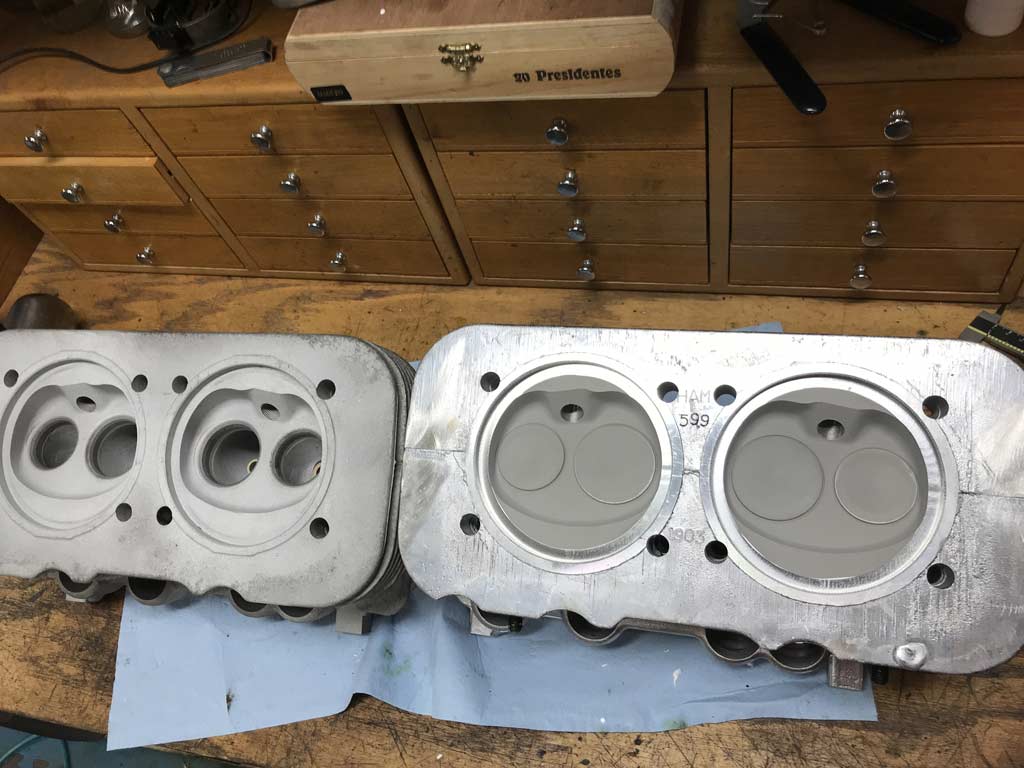
Posted by: Superhawk996 Aug 17 2019, 01:02 PM
Other than the exciting arrival of heads, my 914 work this week was pretty . . . weak.
I did drop of the engine tin for degreasing. That will go to powder coat once done.
I also dropped off GA000099 cylinders for degreasing now that I've determined that they are in great shape and reusable.
Did get a bit of disappointing news from my machine shop. Let's just say their customer record keeping is not what it should be. Apparently they can't find a source for the rod bushings and want me to order them. Not a big deal. However, they had the rods for the past 2 weeks or more. When I finally called to check on them . . . . you guessed it. . . . they lost my phone number and were waiting for me to call them.
Posted by: Superhawk996 Aug 21 2019, 06:09 PM
The stork dropped off some more parts for GA000099.
Fresh Rings and valve guides. 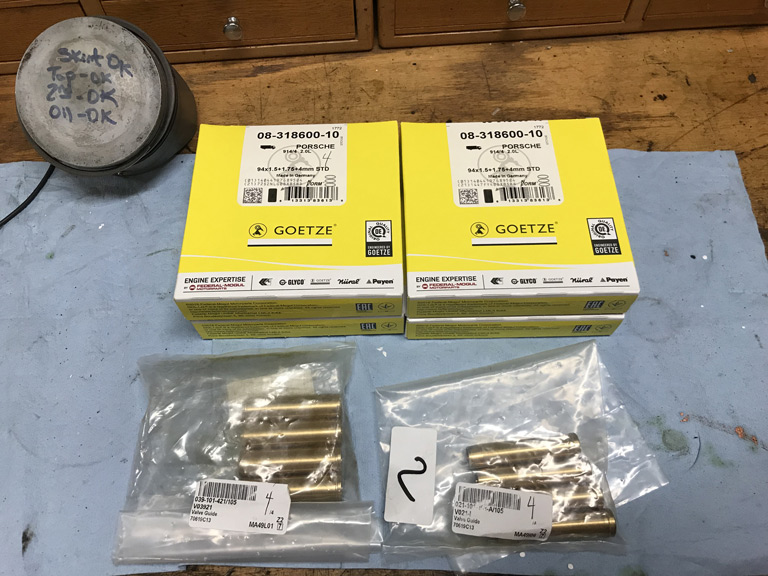
Still can't do much with a gaping hole in my shoulder. It honestly looks like something from a horror movie. Can't wait to get to the 2nd surgery on 9/17 to put a real skin layer back on it just so it looks sort of normal.
Nothing to do but to collect parts in anticipation. At least it gives me something to look forward to.
Posted by: bbrock Aug 21 2019, 07:23 PM
Can't wait to get to the 2nd surgery on 9/17 to put a real skin layer back on it just so it looks sort of normal.
I can't wait either. I want to see that pic!
Posted by: Superhawk996 Oct 9 2019, 05:30 PM
It's been a while since I've updated this thread progress has been slow.
Tin is still out for media blast and powder coat.
I did finally get the rods rebuilt. 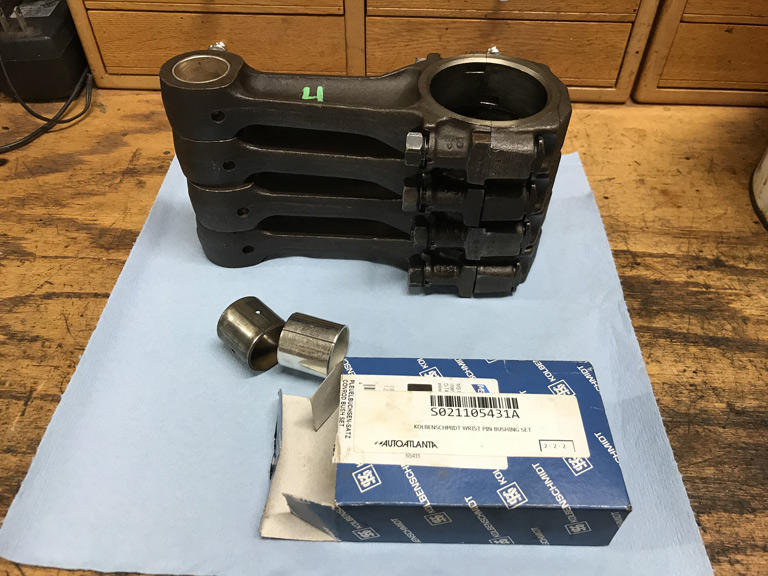
I ended up going with the KolbenSchmidt rod bushings.
Initially I purchased AAP rod bushings but my machinist had some reservations about pressing them in because they seemed a little oversize. I had some reservations about the KS bushings since they seemed to lack the "interlock" design that was on the 1st rod bushing we pressed out.
At the recommendation of my machinist, I ended up purchasing KS bushings at least for comparison purposes. As it turned out, the KS bushings were a bit nicer both in finish and in fit. The KS bushings were round where as the AAP bushings were a bit oval. Honestly, I'm not sure it would matter after pressing but my machine shop felt more comfortable with KS and that is what was used.
Subsequent to pulling the bushings out of two rod sets (GA000099 and GA004310) it was clear that 6 of the 8 rods actually had bushings that lacked the "interlock" feature (shown on left) and appeared to more closely match the KS bushings (far right). All four of the rods from GA000099 which were known to be stock, had the KS style bushings. 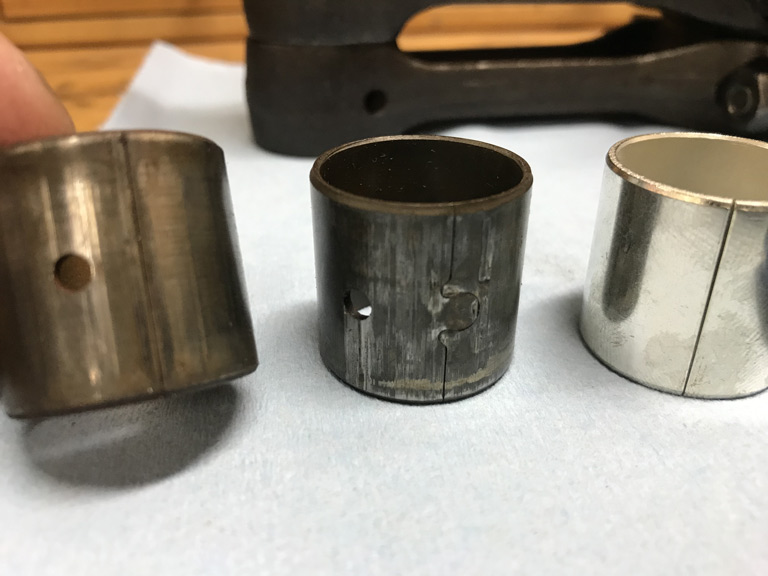
Posted by: barefoot Oct 9 2019, 06:11 PM
Received a new pair of HAM prepared AA Performance Chinese 2.0L 3 stud heads today.
Quick side by side comparison of Chinese head (on right) vs. Porsche 2.0L Head (on left) is pretty good. As Len Hoffman describes on his website, these are basically a straight up copy of the Porsche 2.0L factory head. As he describes there is a bit more porosity and casting flash than OEM but honestly this should be expected with any Chinese knockoff.
I haven't made up my mind which engine these will go on - the engine I keep for my car or the engine I sell.
I'm honestly tempted to buy another set of these HAM heads and keep these GA00099 Porsche heads for later given how hard it seems to be getting to find real 2.0L heads that don't have cracking issues.
For any heads, check for excess casting flash in the cooling fins. My 2L heads had lots of flash with age, junk had accumulated in the cooling passages limiting air flow considerably.
Here's agter drilling out:

Posted by: Superhawk996 Oct 9 2019, 06:27 PM
Have you ever noticed how one project leads to another side diversion?
As part of getting ready to rebuild GA000099, I've wanted to modify my vertical mill set up so that I can slow down the spindle to do cylinder honing and ultimately, I'd like to be able to cut my own valve seats down the road.
My current slowest spindle speed is 135 RPM and that is just too fast for cutting valve seats.
So I broke down and bought a Variable Frequency Drive (VFD) for my mill which operates on 220V 3 phase power. Previously I was using a static phase converter that creates 3 phase power from single phase 220VAC. The problem is that it only creates the 3rd phase for starting purposes.
After starting, the 3rd phase drops out and then the mill is basically running on 2 phases. This works but it also de-rates the motor. For example my mill is 1 HP. But running on 2 phases it is only 2/3 HP at best not accounting for other inefficiencies.
The VFD will get me back to rated horsepower and more importantly, it allows for variable speed control. It also has some other benefits like soft starts but those were secondary to getting the spindle slowed down.
So after some rewiring of my garage and installation of proper conduit this time around to protect my mill wiring, I have the VFD wired up and operational. Still need to build a bracket to mount it to the mill or within close reach. Doh! Another project that doesn't involve the 914!
https://www.youtube.com/watch?v=cQ9_Aofg9aA
Posted by: 76-914 Oct 11 2019, 06:56 PM
A few years back I bought the KS main bearings from AA.I paid through the nose for them but they were the "real deal", in short supply and at that time there were some trash bearings floating around. No one minds paying for the "real deal".
Posted by: Superhawk996 Oct 20 2019, 04:32 PM
There also appears to be an error in machining the flywheel end main bearing bore.
Note the step mismatch between case halves (yes, the case half ID stamps match so this wasn't 1/2 of one case and 1/2 of another).
There was also that little unmachined tab that partly obscures the main seal oil drain back hole.

I finally got around to setting this GA000099 case up on the mill to fix the mismatch in the Rear Main Seal counter bore area.
Setup and dialed in the bearing bore.
Finished product.
If anyone is interested, I can post a few more details and a short video but mostly wanted to get this fix documented.
Next up: Need to pull all the oil galley plugs in order to get full access for galley cleaning.
Posted by: Superhawk996 Oct 27 2019, 10:54 AM
GA000099 galley Plugs pulled. 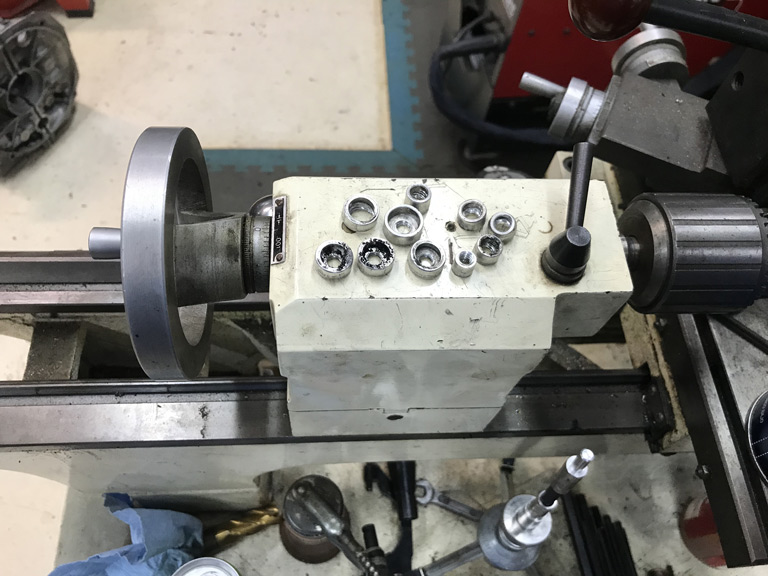
For those not convinced that galley plugs should be pulled I offer up the following pictures. First is a dark view of the sludge piled up against the end of the galley plug. 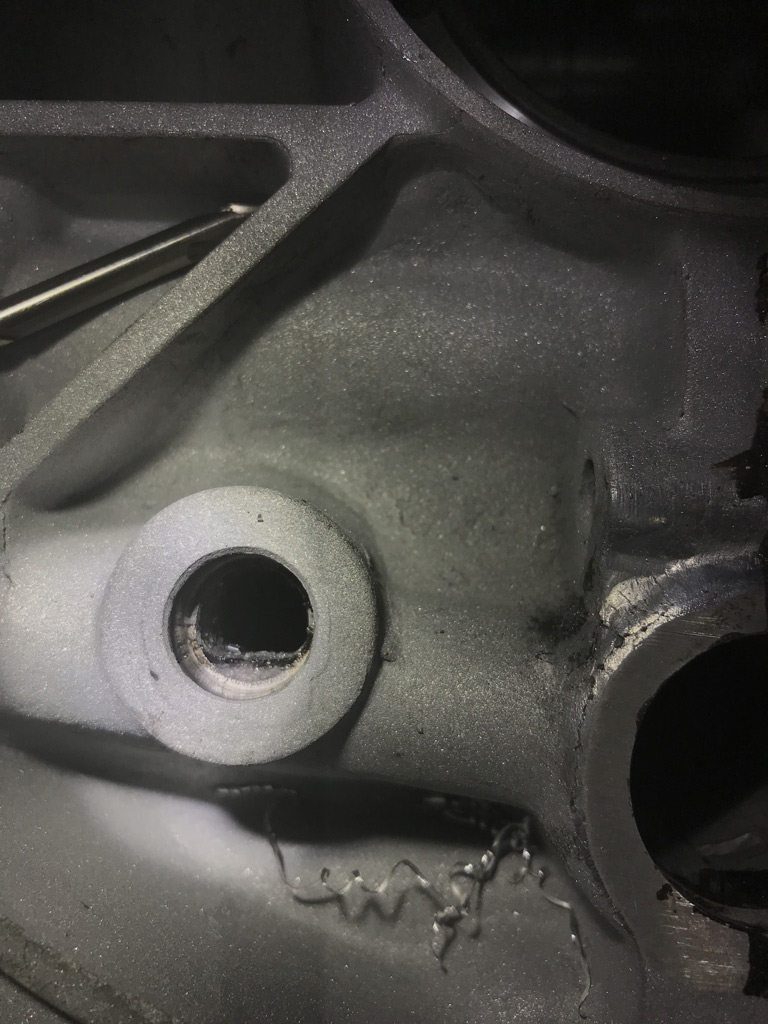
The second is the goop scooped out. 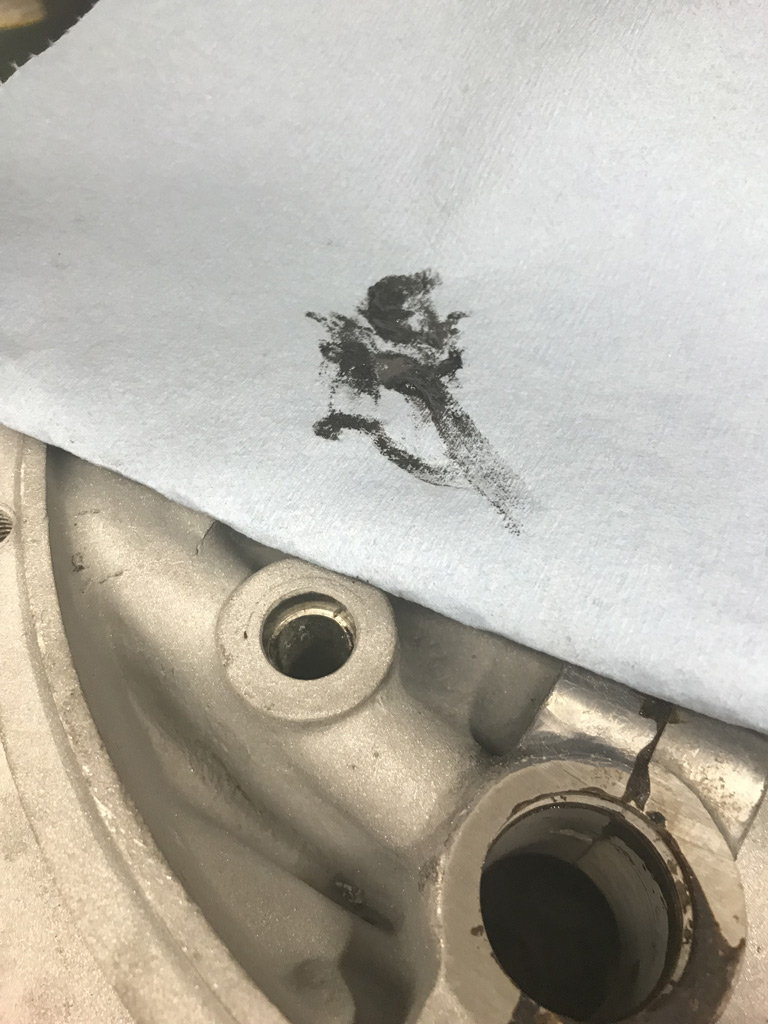
After I finish machining the case, all galleys will get a good scrubbing with a galley brush!
Posted by: Superhawk996 Oct 27 2019, 11:05 AM
Check of cylinder deck shows that we have some flatness issues that need to be corrected.
I was able to easily get a .004" feeler under my straight edge. Straight edge is .0005" out of flat as judged against my granite surface plate. 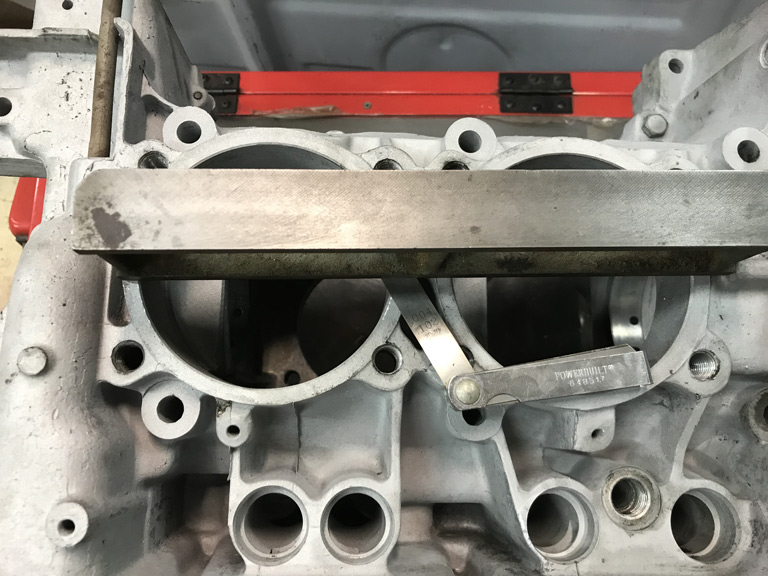
My flat edge spans both cylinder spigots which isn't the best way to judge this surface since both cylinders don't necessarily need to be on the same plane. They could be corrected later via cylinder base shims. However, in theory they should be on the same plane to minimize downstream problems later with sealing, valve geometry, and compression ratios.
I will fly cut this deck surface once I finish pulling the various studs from the case halves and get around to Tramming my mill to ensure that they are surfaced flat.
Posted by: 914werke Oct 27 2019, 12:06 PM
Nice! following..
not to  but though this would be of interest.
Attached thumbnail(s)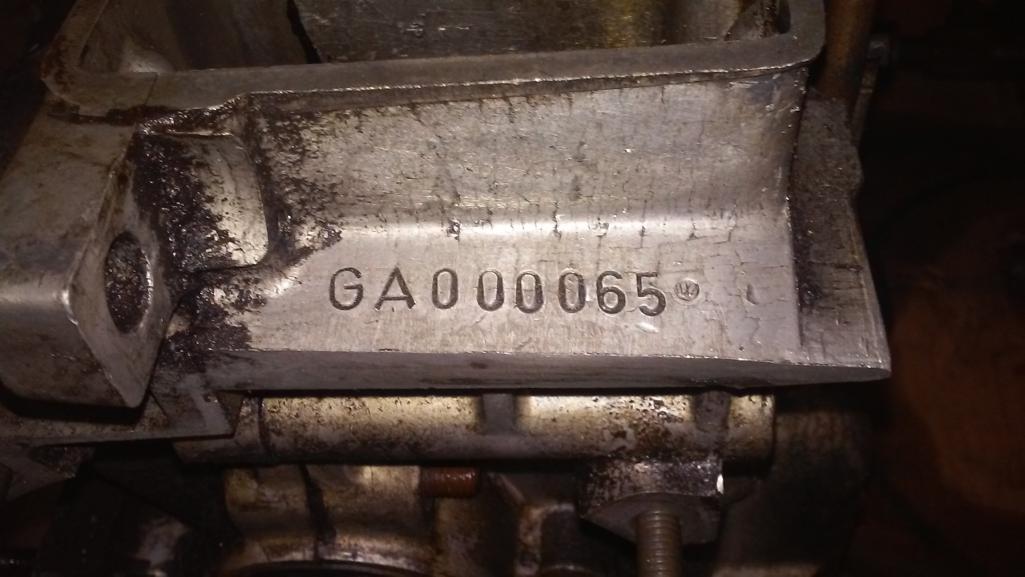
Posted by: Superhawk996 Oct 27 2019, 01:16 PM
 Right on.
Earlier in the year I had someone PM me about another low serial # GA engine. I think it was in the 40's!
11/4/2009 update: I went back though my PM's. the early case referenced was GA000004. Holy Cow!
That is cool. What is your plan for it? I recommend Get Er' running! Do you happen to have a photo of the rear main seal end? I'm curious if other early cases had the machining error that mine had.
We need to find GA000001  Come on guys who has the lowest serial # GA engine?
Posted by: Superhawk996 Oct 27 2019, 07:12 PM
So I spent some time to make sure my mill was set up perfectly. When fly cutting surfaces, if the head of the mill isn't perfectly square to the table, you will end up with an imperfect surface finish that will be prone to leaking.
For any of the guys doing machine work, I love this EDGE Technology head tram. Makes the work pretty quick and easy . . . relatively speaking vs. old school singe dial indicator. 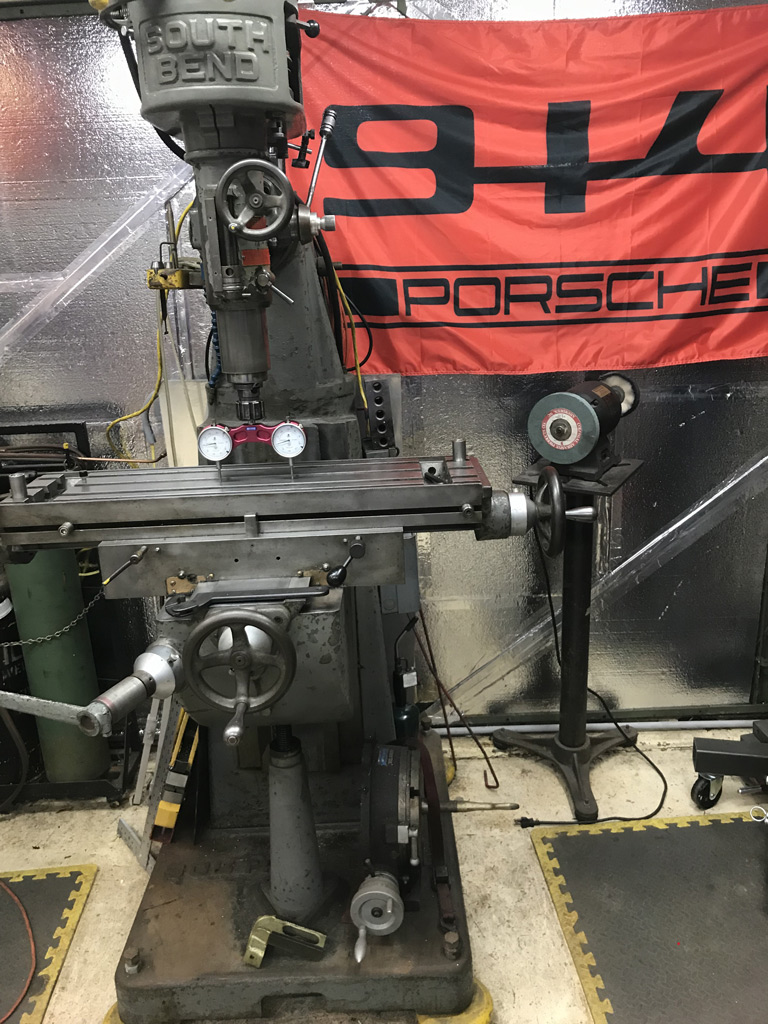
Dual dial indicators make the job so much easier.
The only problem was that I chickened out on cutting GA000099 1st. I decided that I had better make sure I liked the result before committing to cut 099.
Instead I cut GA004310 that I viewed as a little more disposable.
As it turns out, everything worked out OK.
Here is a partial cut at about 0.004". You can see the surface cleaning up but still haven't got into all the old material. 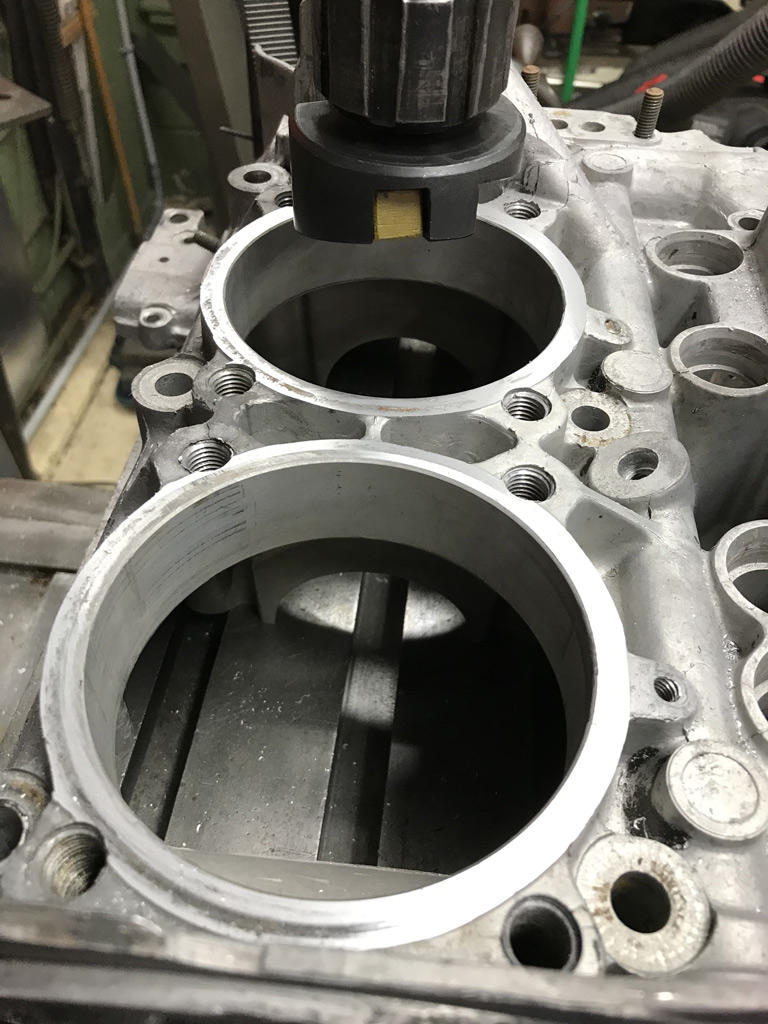
Ultimately, I had to cut a bit more than I was hoping. This case showed about the same 0.004" from flat as I showed earlier on the GA000099 case. However, it took 0.010" to clean it up fully which isn't a big deal since shims are easily available in 0.010" increments.
Here's the final clean up. 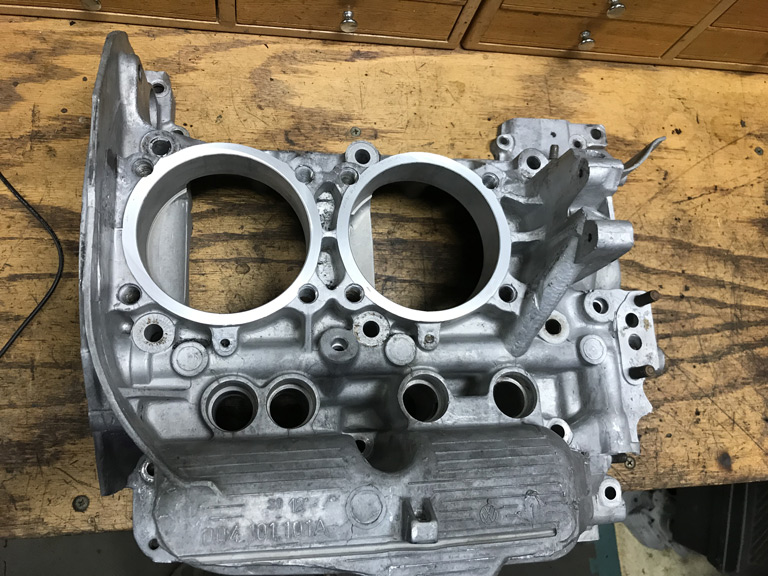
Happy with the result. Next time I'll cut GA000099!
Posted by: cassmcentee Oct 28 2019, 08:54 AM
Thank you for this thread!
I'm breaking down GA000130 and am learning from your work.
So appreciative!
Posted by: Superhawk996 Nov 2 2019, 10:30 PM
Burning the late night oil.
So many other obligations for the weekend pushed machine work on GA000099 case into the late evening as the only means to get something productive done this weekend. The past couple weekend have been occupied with getting MIL moved into an assisted care facility after a fall. Nothing broken but her days of living alone and 90 miles away are over.  Hard to see loved ones aging. Hard enough to see myself aging.
As predicted based on initial measurements it took 0.010" of clean up to get a completely clean cylinder deck surface. 0.005" pretty much cleaned things up (recall I could get a 0.004" feeler under my straight edge) so I feel comfortable about the work. The last 0.005" is pretty much just to ensure complete flatness and to easily coincide with the availability of cylinder base shims in 0.010" thickness.
Here are the final pic's of the Cylinder 1/2 side: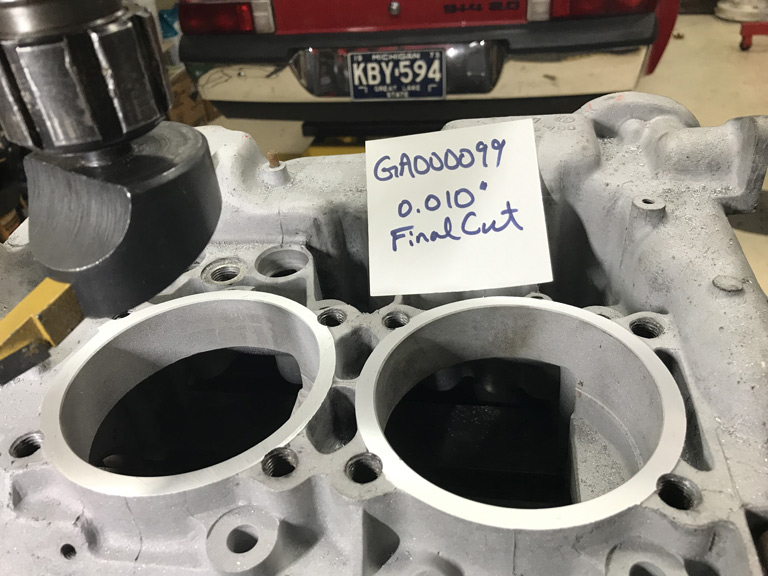
And the 3/4 cylinder side: 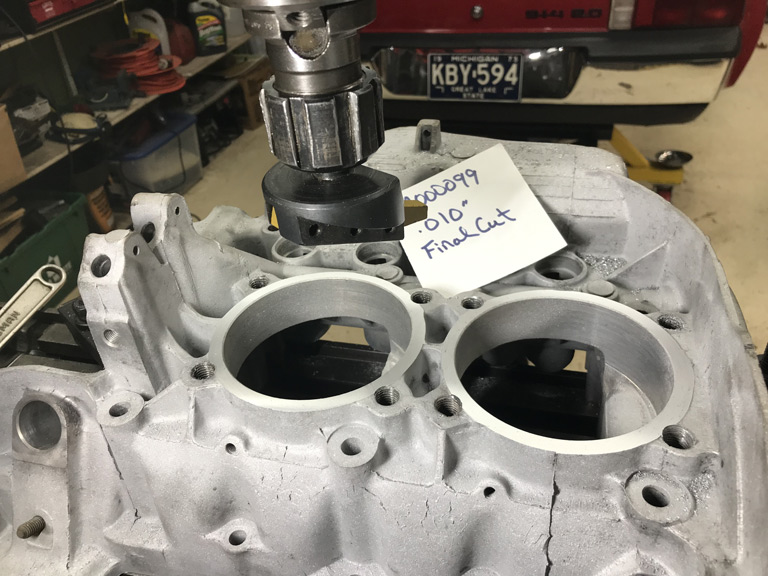
Need to follow up with my powder coat guy. Engine tin is past due It should have been complete a week or two ago. 
Also need to get my own butt in gear. I need to get the original cam out of this engine sent to Elgin for a weld and regrind back to stock. There isn't a terrible amount of wear on it but there is some on the lobes that share lifters.
Posted by: Superhawk996 Nov 4 2019, 07:03 PM
Earlier in the year I had someone PM me about another low serial # GA engine. I think it was in the 40's!
That is cool. What is your plan for it? I recommend Get Er' running! Do you happen to have a photo of the rear main seal end? I'm curious if other early cases had the machining error that mine had.
We need to find GA000001
Come on guys who has the lowest serial # GA engine?11/4/2009 update on low GA cases:
I went back though my PM's, the early case referenced was GA000004. Holy Cow! It may be for sale if someone is seriously interested in a super early 73' GA case. Not sure anyone can top that!
 If you're seriously interested I'll pass along member contact info to you via PM if you wish to locate GA000004.
 Its not for me. I'm already over committed on 3 simultaneous engine builds that are currently Work-in-Progress. I need to get back to rust repair work now that my shoulder is healed but I'm on a temporary hold for a pinched nerve and then I can get back at it.
Posted by: wndsrfr Nov 5 2019, 07:33 AM
When you get the cylinder base shims, order in twice as many as you think you need and carefully deburr them then measure...I found significant variation within one package....
Posted by: Superhawk996 Nov 5 2019, 06:46 PM
When you get the cylinder base shims, order in twice as many as you think you need and carefully deburr them then measure...I found significant variation within one package....
Thanks! I haven't gotten that far but sounds like great advice.
Posted by: Superhawk996 Nov 16 2019, 11:48 PM
Here's a continuation of the case machine work that is ongoing on this GA000099 case and GA004310. It's easier to do both cases simultaneously as batch work to minimize set up time.
There are 11 galley plugs on each case that need to be bored and tapped. Tonight I managed to get six on each knocked out on each case.
The 3/8" NPT plugs are a bear. Due to the size of the tap and especially since they are cutting a tapered bore out of stright hole, they take a lot of muscle to get them tapped to the proper depth. This job would be a whole lot easier if I had a NPT tapered reamer to clear out some of the material but I don't so it's just a good workout for the arms and shoulders.
Typical process.
Locate the center of the galley bore. 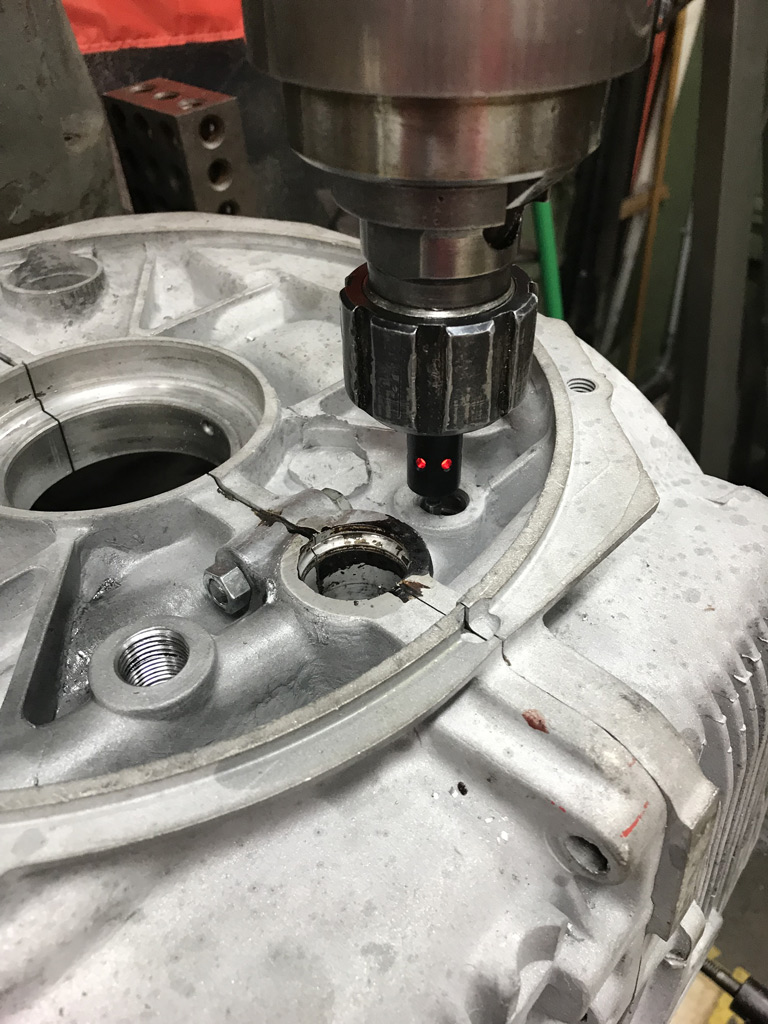
Bore the galley end to 3/8" NPT size. 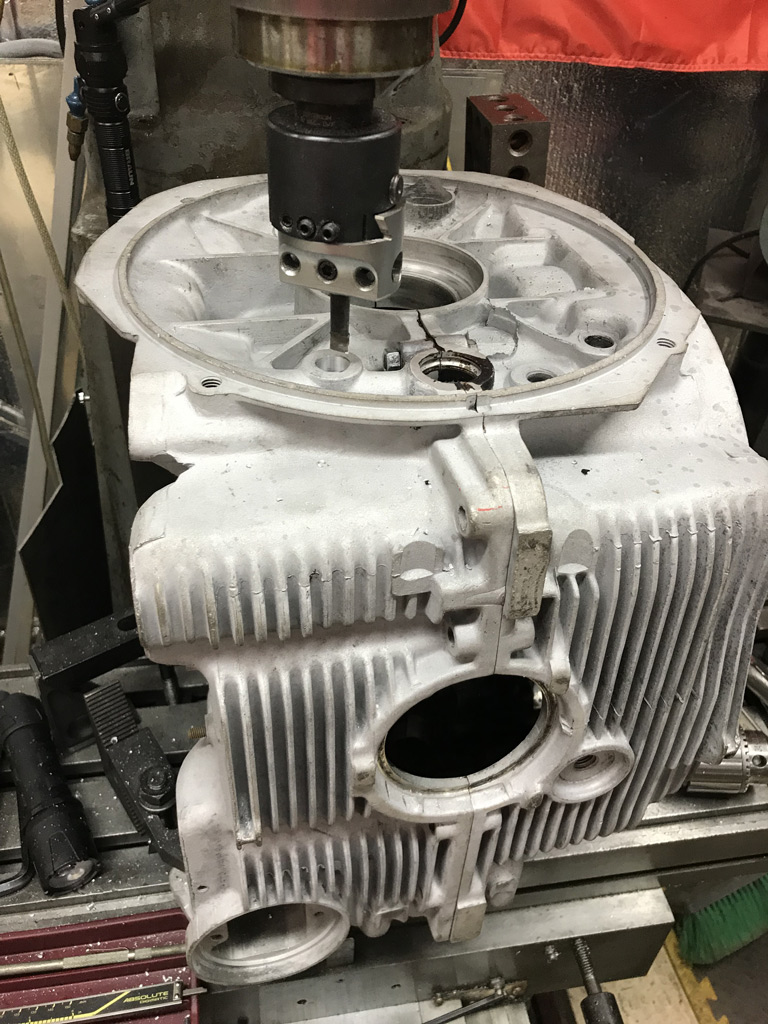
And then the worst part, tapping the hole. 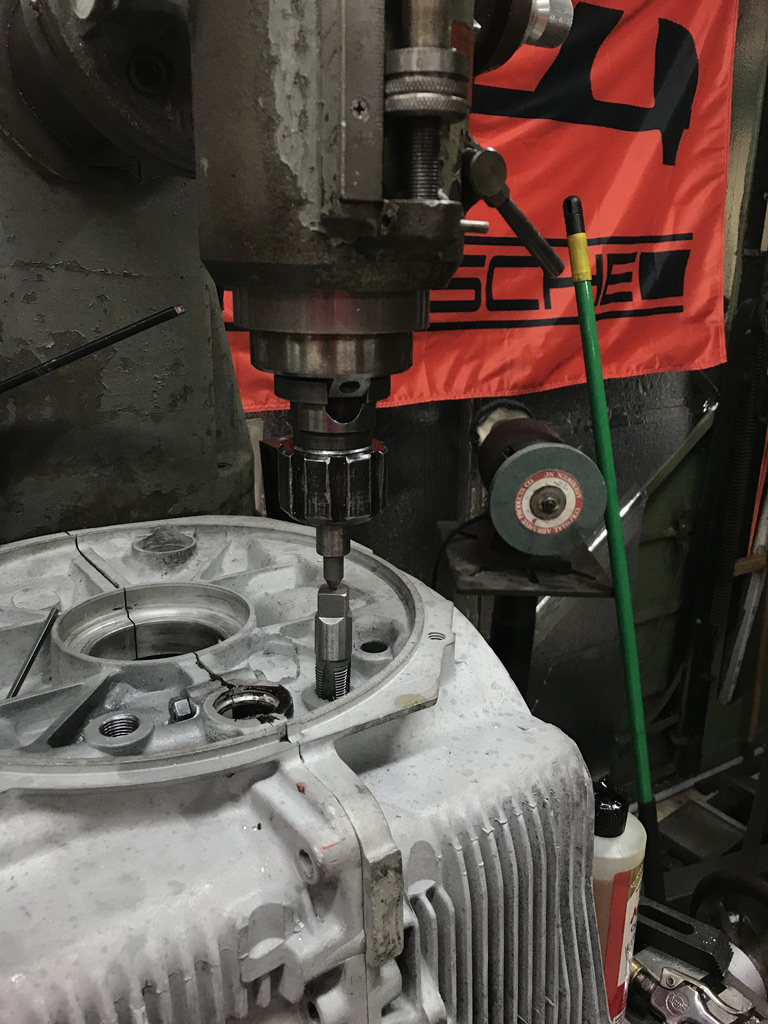
I contemplated using an impact gun to drive the tap but since the tap is tapered there is a risk of cracking the case if you try to drive too much tap too fast. Cutting the taper is a time consuming back and forth affair of advancing the tap only about 90 degrees at a time and making sure the threads and the taper is cut before advancing another 90 degrees or so.
Finished the rear galley plugs. 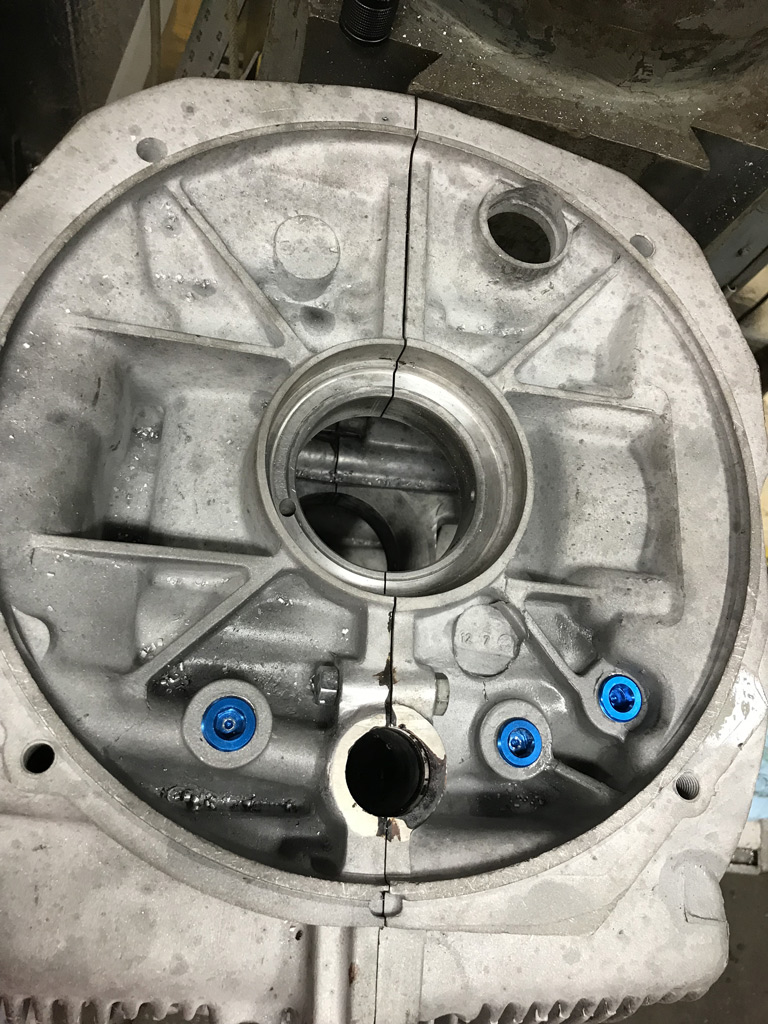
And got three of the front end plugs in place. 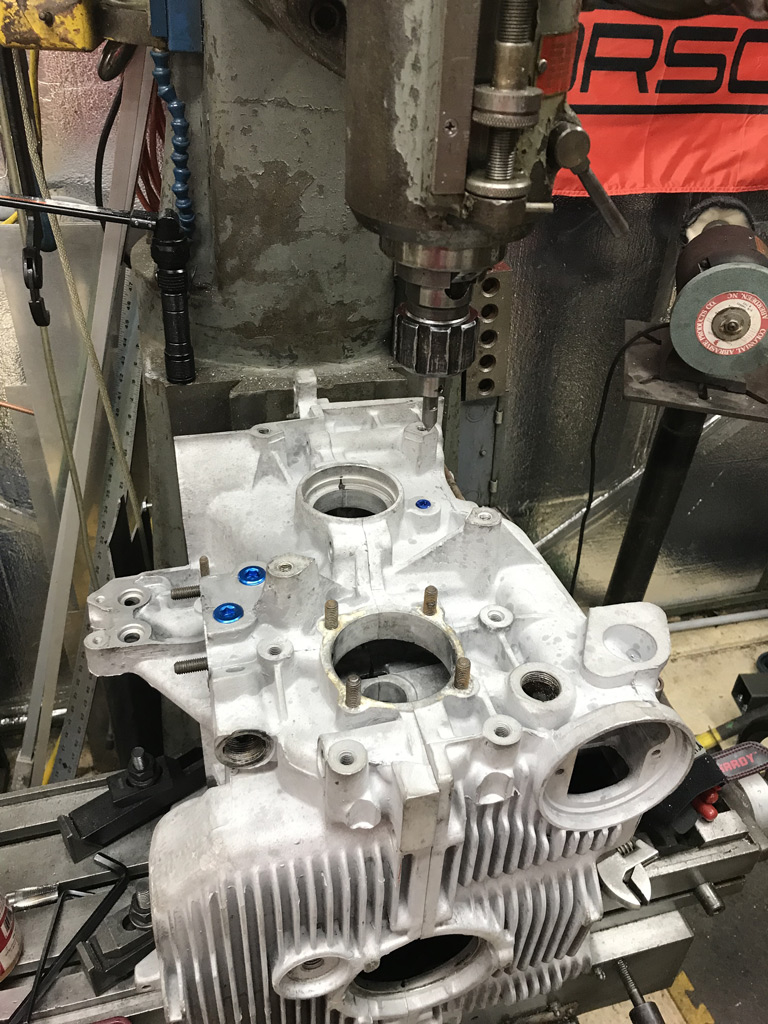
Hope to finish up the other 5 tomorrow but those will require more complicated set ups on the mill due to the galleys being at an angle.
Posted by: Superhawk996 Nov 18 2019, 07:52 PM
Work on the galley plugs continues . . . . 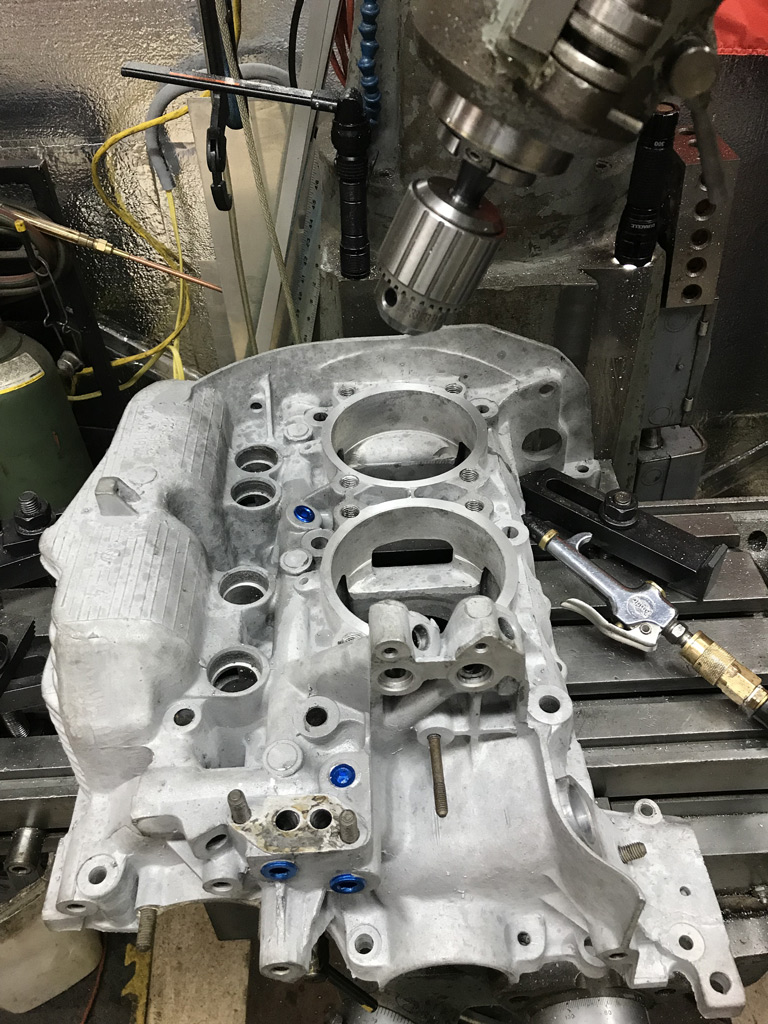
Simply takes longer when you can only drill and tap a hole or two before having to put my mill into another Yoga pose.
The compound angle on this one has me near the limits of my table travel. 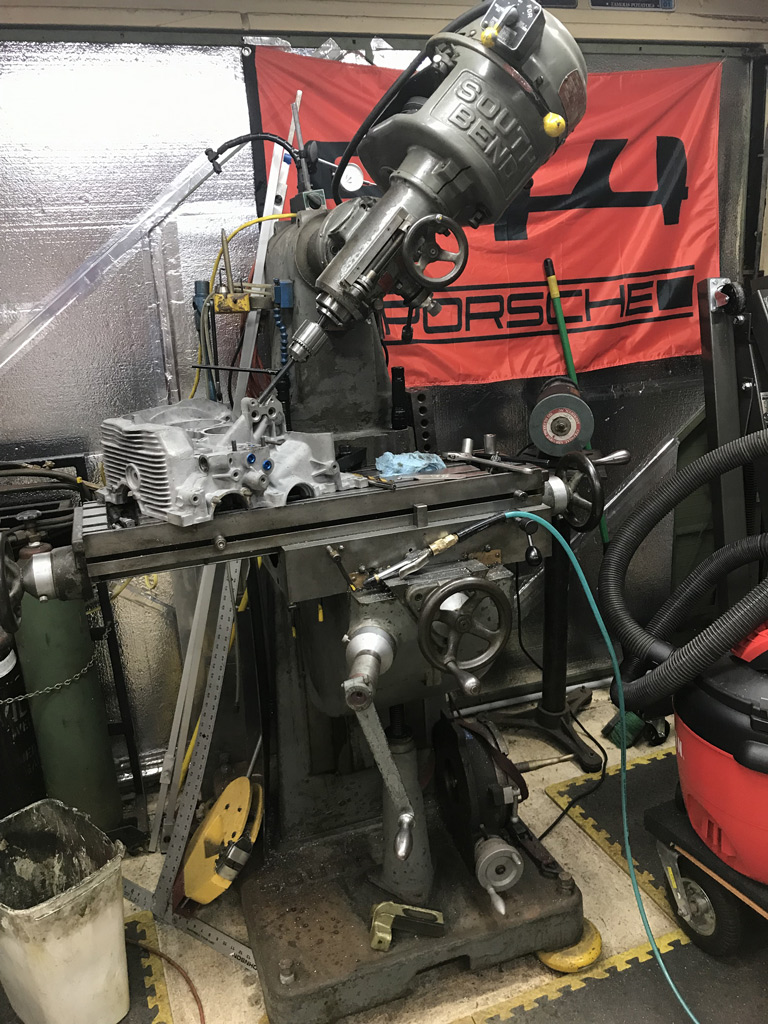
Posted by: Superhawk996 Nov 18 2019, 08:01 PM
Started stacking up some parts in anticipation of putting things back together once I finish the case work.
I found one of the stock 94mm cylinders has a bit of corrosion pitting in it that I missed upon initial inspection. I think it can be honed out, but, given that I'm falling behind on getting at least one engine built this fall, I opted to order a set of new 94mm cylinders. If I can get it honed out later on without taking off more than 25% of the wear tolerance, I'll have an "extra" set of 94mm cylinders that might go up on Samba or on classifieds if someone is in need.
The stock cam from GA000099 was sent to Elgin to see if they can regrind but I'll be surprised if they can do it given two of the lobes had wear I could feel. I ordered a new Web Stock cam, gear, and lifters just in case Elgin doesn't come thorough. 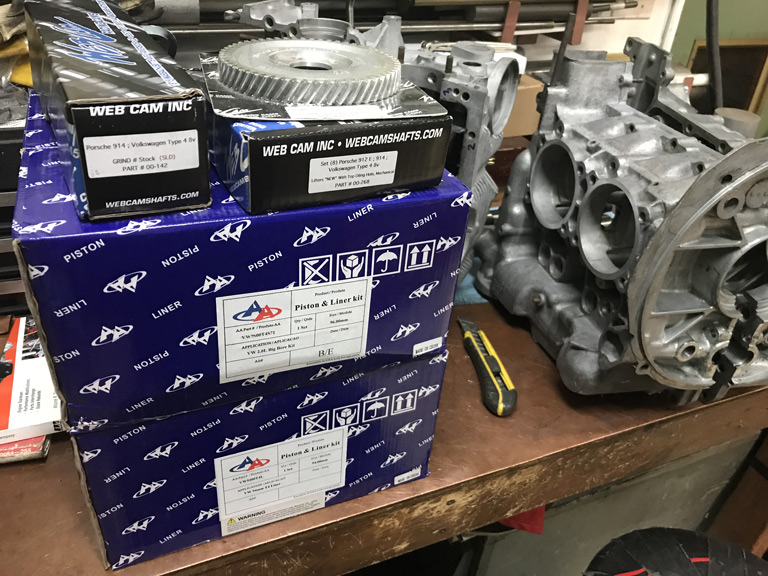
The 96mm pistons and cylinders will go to GA004310.
@http://www.914world.com/bbs2/index.php?showuser=20991
Per previous agreement with Jeffrey, the NOS 94mm KS pistons and NOS cam go on the self until someone wants to build up a bone stock 2.0 using NOS parts given that GA000099 won't be my forever engine.
Posted by: Superhawk996 Nov 18 2019, 08:11 PM
And what looks to be the best surprise I found on my doorstep this evening. 
I mistakenly ordered the 1st one in German. I cancelled the order but I never really could tell if the seller actually cancelled. If it delivered, my plan was to give it to my German neighbor as a joke. He actually seems to prefer Audi's 
I then placed the order for this one in English but it took forever to arrive and it finally arrived with some miscellaneous wife stuff!
Posted by: Superhawk996 Nov 24 2019, 09:18 AM
While I'm waiting on my garage to heat up this morning I thought I'd post the setup for the last galley plug and short video making chips.
https://www.youtube.com/watch?v=y0OtYHrOzqo
In the case of this galley hole, I couldn't go as deep as I would normally without intersecting the oil pressure relief valve bore. That meant using a drill was out since it has a tapered point that simply adds unnecessary length to the hole bore. A 7/16" center cutting end mill is the solution that allows the bore to be flat bottomed and as short as possible.
Once the bore was done I started the 1/4" NPT tap as usual but in the case of this bore, I couldn't go as deep as I would normally would. This meant that the 1/4" tap couldn't be inserted deep enough to get the plug to sit flush with the surface. 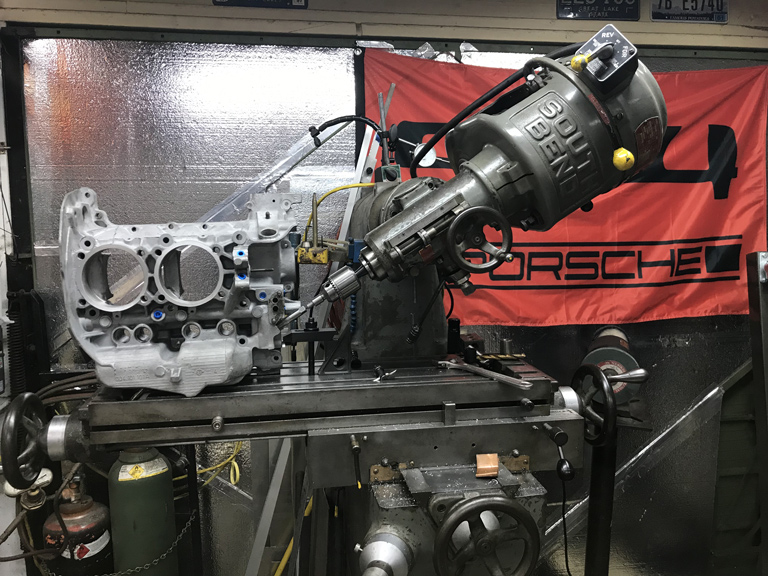
The solution to this problem is to start the tap normally, and, get as many threads cut as possible before the tap bottoms in the bore. Once those initial threads were formed, I then had to convert my tap to a bottoming tap.
If you're not familiar with the various types of taps here is a quick link:
https://www.yamawa.com/Portals/0/resource/en/tips/pdf/tips-007.pdf
Since I didn't have a 1/4" NPT bottoming tap on hand and knew that this was the last hole I was going to tap, I made one by using a cut-off wheel to take off the chamfered portion of the plug tap. 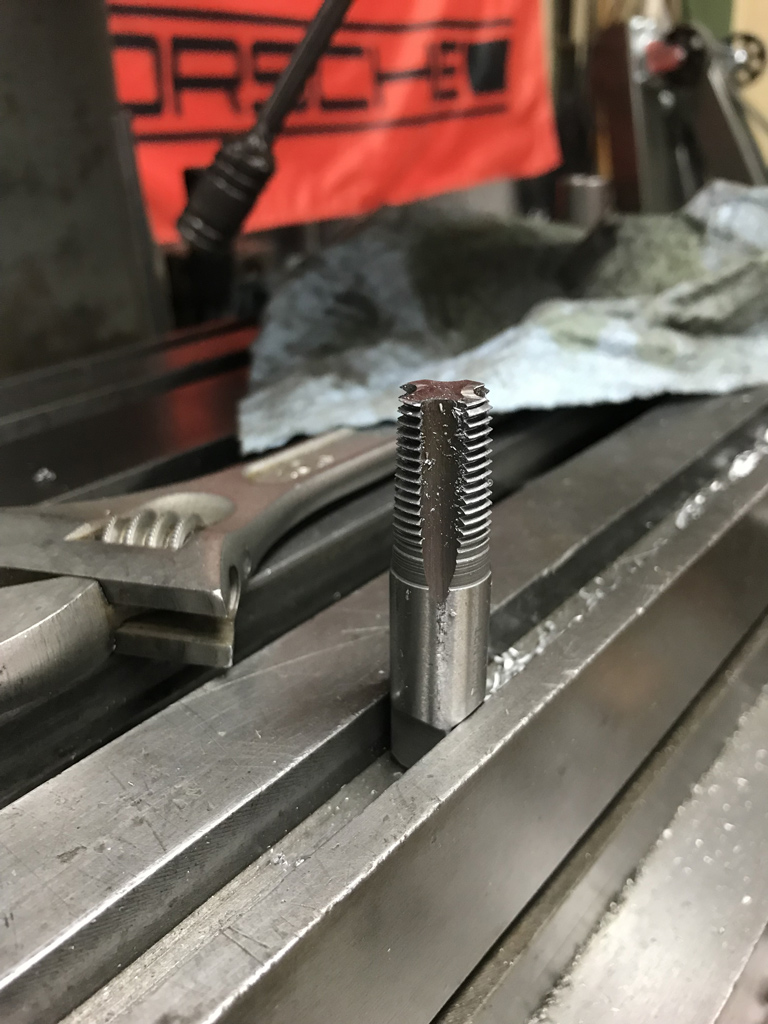
The main downside to this approach is that I will need to buy another 1/4" NPT tap to repace this one, but, it works in a pinch. The upside is that I now have a 1/4" NPT bottoming tap should I ever need one again!
Posted by: Superhawk996 Jan 14 2020, 07:21 PM
Hasn't been a lot of action on the engine front lately. I'm not sure if that is a bad thing or not since I was largely using it as filler work during the summer surgeries until I could get back to my rusted chassis which has finally happened.
Still have a few parts that were outstanding - the camshaft being one of them.
The orginal OEM cam from this engine was still in it when I did the teardown. The cam appeared to have very little wear as compared to the others I've typically seen where the lobes with shared lifters tend to wear a deep notch at the center where both the lifter lobes overlap.
Given that I wanted to put this engine back together with as many original parts as I could I sent the cam to Elgin to see if it could be reground.
I sent the cam out to Elgin for inspection back toward the end of November. I hadn't heard anything so a few days after Christmas I decided to give them a call. The phone rang, and rang, and just about as I was going to hang up. An older guy answers.
He says, were closed for the Christmas holiday period. No worries, so I say I'll call back after the New Year. He then says, "well you got me on the phone now, what can I do for you?". I ask about the cam and right off the top of his head he says it's over at the inspection area and tell's me he's already taken a look at it, it looks really good unlike most of the 914 cam's they get and/or reject for regrinding. We have a little chat about what it came out of, what I want to do with it (street use, race, etc.) and then he reconfirms that I just want a regrind to stock. "It'll be done right after we get back after the New Year when we get back to work".
Now I know Dema Elgin has got to be getting up there in years but I'm sort of suspecting I talked to the man himself. Regardless, who ever it was . . . he was incredibly nice to talk with. Stuff like that seems to be getting rare nowaday's but it is why I like dealing with Mom & Pop shops
Well, anyway here is the reground and parkerized cam. Looks good as new. 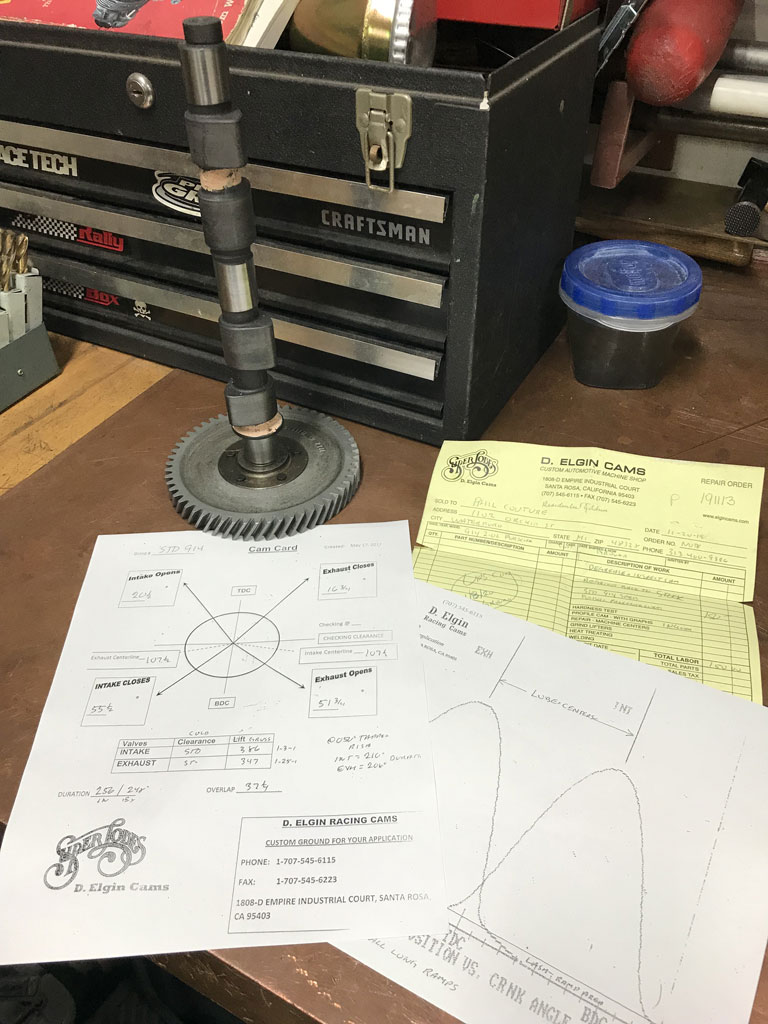
Now before ya'all start in on the routine of regrinding isn't as good, that it takes off part of the OEM case hardened surface, yadda yadda. I know all that.
The purpose of this GA000099 build is to put a low mileage low serial number engine back together using as many of the original parts as I can without compromising the overall durability of a engine for a hobby car that will lucky to accumulate 5,000 miles per year. IF I'm lucky and we don't have crazy hot, crazy humid summers, or snow in June. 
Next up . . . I need to get the heads checked for cracks with dye pentrant and then start thinking about new valve guides, springs, valves, etc.
Powered by Invision Power Board (http://www.invisionboard.com)
© Invision Power Services (http://www.invisionpower.com)