Printable Version of Topic
Click here to view this topic in its original format
914World.com _ 914World Garage _ Jack point replacement and paint matching
Posted by: Tdskip Sep 12 2019, 09:19 AM
Good morning gentlemen, hope everybody’s having a good week. Just doing some planning here on the blue 74 that is currently in storage. It’s a original Southern California car, been off the road for a very long time but is quite solid except for the passenger side Jack point as shown in the pictures below. Just doing some planning here on the blue 74 that is currently in storage. It’s a original Southern California car, been off the road for a very long time but is quite solid except for the passenger side jack point as shown in the pictures below. There was a repair made here but it’s not to proper standard and I am planning on addressing it. The door gaps are still perfect, so I don’t think the structure overall is weak, this just needs a more proper repair.
I have the donor metal from car that was written off so I think I’m “just” looking at bracing the car to protect my gaps and then getting good weld penetration to complete the repair. Yes/no/maybe?
The paint will have to be touched up of course, and while this is not a visible part of the car if I’m going through this level of effort it would be nice to have it match. It looks like it was a custom paint that I am assuming is going to require me bringing a sample to a shop and then getting as good of a match as possible? Think a good paint shop will be able to get close in match?
Thanks!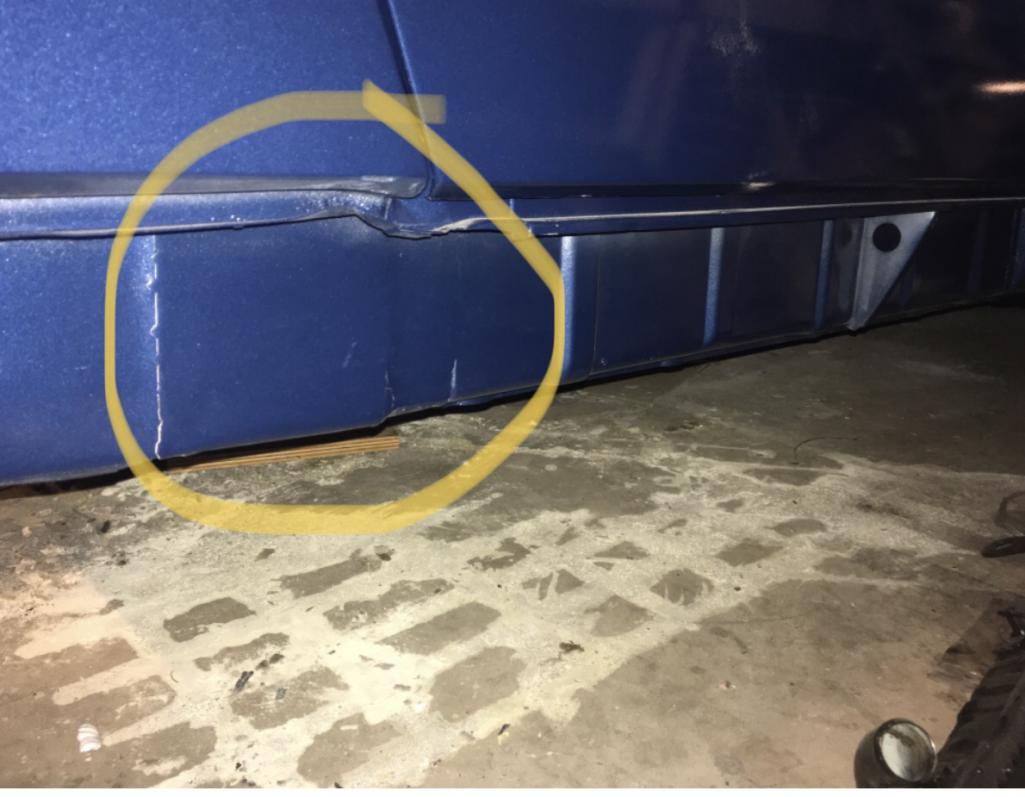
Posted by: burton73 Sep 12 2019, 01:34 PM
I think you should get Restoration Designs Jack Receiver Plate P302 $15. And Jack Receiver Tube P303 for $18. Measure it all and then weld the Tube in the right place at the right angle and then slip over the Jack Receiver Plate and weld that. Make sure that it is going to line up with your rocker panel hole.
The strength from welding the tube on 1st is increased a huge amount so you can jack the car up without the tube bending. When done you may need to grind/cut the extra length of the tube.
Get someone to help with a squirt bottle with water so you can put out any fire on the paint so it does not hurt the paint on the side of the car. Tack weld in a lot of places. I did this on my V8 car it worked great.
What you have cannot be welded inside to the inner rocker panel.
Bob B


Posted by: Tdskip Sep 12 2019, 01:37 PM
Hi Bob, hope you’re having a good day and thanks for the reply.
Let me give it all I think, I haven’t tried to go after the existing patch to see if it is stronger where it looks but I’m a bit concerned that the metal that they tacked in place there is too flimsy.
Posted by: burton73 Sep 12 2019, 01:51 PM

Hi Bob, hope you’re having a good day and thanks for the reply.
Let me give it all I think, I haven’t tried to go after the existing patch to see if it is stronger where it looks but I’m a bit concerned that the metal that they tacked in place there is too flimsy.
Well you can go in and remove the patch and dig in deeper and maybe you just need the inner right rocker panel $127. and you can overlap part of it. When you dig in who knows what you will find. I think some people have doubled up on that part for adder strength but I bought a Brad LTD rocker kit for super strength for my V8 car so it could handle the huge torque as I was going for more than 450 LB torque.
Bob B
Posted by: johnhora Sep 12 2019, 02:09 PM
Tdskip...
Why do you want to replace it
I stopped jacking up 914s and early 911s there along time ago.
Really..how many 914 and 911 have you seen the rocker buckled and bend right there.
Best to have a jack like from a 944 and jack up under a better part
of the car. Emergency thing ok I can see doing it there.
It doesn't show when the rocker panel is in place and you can glue the
plastic hole cover on the the panel.
Usually this type of repair on the right side was done because the of the
rotting out of the jack point front both the outside and especially the inside.
I've seen this quick repair done many times.
I know this sounds like a sacrilege for many but really cover it up and drive it.
If you start poking in there you will probably end up replacing the whole longitudinal.
Oh and too...you don't have any paint problems covering it... 
Just advice from an old curmudgeon doing this stuff for too damn long.
If you've got to do it...Bob has the right idea...get some new stuff from RestoDesign
Good luck on what even you decide to do....
Posted by: burton73 Sep 12 2019, 02:27 PM
Tdskip...
Why do you want to replace it
I stopped jacking up 914s and early 911s there along time ago.
Really..how many 914 and 911 have you seen the rocker buckled and bend right there.
Best to have a jack like from a 944 and jack up under a better part
of the car. Emergency thing ok I can see doing it there.
It doesn't show when the rocker panel is in place and you can glue the
plastic hole cover on the the panel.
Usually this type of repair on the right side was done because the of the
rotting out of the jack point front both the outside and especially the inside.
I've seen this quick repair done many times.
I know this sounds like a sacrilege for many but really cover it up and drive it.
If you start poking in there you will probably end up replacing the whole longitudinal.
Oh and too...you don't have any paint problems covering it...
Just advice from an old curmudgeon doing this stuff for too damn long.
If you've got to do it...Bob has the right idea...get some new stuff from RestoDesign
Good luck on what even you decide to do....
I think you are right on this. Drive this car if you can and you could do this anytime. I do like to test out a car for flex by lifting at this spot and seeing if the door gap is still right and that the door can open and close when the rear tire is off the ground.
Bob B
Posted by: dr914@autoatlanta.com Sep 12 2019, 02:36 PM
be best to replace the jack post and support with new, we have made these high quality parts for years and they are very inexpensive, you will have to dent in what you have welded in, then weld the tube to that and then install the cover over it and spot weld to the inner rocker and solid weld the tube to the cover. Line it up by installing a factory rocker panel in its proper holes
Good morning gentlemen, hope everybody’s having a good week. Just doing some planning here on the blue 74 that is currently in storage. It’s a original Southern California car, been off the road for a very long time but is quite solid except for the passenger side Jack point as shown in the pictures below. Just doing some planning here on the blue 74 that is currently in storage. It’s a original Southern California car, been off the road for a very long time but is quite solid except for the passenger side jack point as shown in the pictures below. There was a repair made here but it’s not to proper standard and I am planning on addressing it. The door gaps are still perfect, so I don’t think the structure overall is weak, this just needs a more proper repair.
I have the donor metal from car that was written off so I think I’m “just” looking at bracing the car to protect my gaps and then getting good weld penetration to complete the repair. Yes/no/maybe?
The paint will have to be touched up of course, and while this is not a visible part of the car if I’m going through this level of effort it would be nice to have it match. It looks like it was a custom paint that I am assuming is going to require me bringing a sample to a shop and then getting as good of a match as possible? Think a good paint shop will be able to get close in match?
Thanks!
Posted by: Tdskip Sep 12 2019, 02:38 PM
Thanks guys - I thought the key thing here, more than having the jacking point there to use it for jacking (which I don't do either), was to get thicker/strong metal back here?
Posted by: SirAndy Sep 12 2019, 02:59 PM
Am i the only one that immediately thinks "what's hiding under that ugly patch?" whenever i see something like that?

Posted by: preach Sep 12 2019, 03:16 PM
No. I think I'd have to take that patch off and see the underneath unless I was just getting it on the road.
Posted by: Larmo63 Sep 12 2019, 05:51 PM
I'm not sure if I've EVER used a jack point on any Porsche I've ever owned....
That said, I'd like to see what's under that plate too. I think you could do it without effing up the paint that shows.
Posted by: Superhawk996 Sep 12 2019, 06:16 PM
I'm not sure if I've EVER used a jack point on any Porsche I've ever owned....
That said, I'd like to see what's under that plate too. I think you could do it without effing up the paint that shows.
Come on, don't do that to Tdskip. We all know whats under there and it probably isn't good.
I'm pretty OCD and would have to open it up, just so I know.
But . . . . just drive it. You really don't want to know.
Posted by: Superhawk996 Sep 12 2019, 06:24 PM
. . . . you will have to dent in what you have welded in, then weld the tube to that and then install the cover over it and spot weld to the inner rocker and solid weld the tube to the cover.
I'm doing a longitudinal on my car without cutting the rear quarter. I can assure you that if you try to do this without cutting the rear quarter, getting access to weld in the top of the proper jack post support will be nearly impossible on the top side where it goes over the top of the longitudinal. At best it will be a blind operation of pulling the trigger on the MIG and hoping you're in the right area and hitting something meaningful.
Access down the side and along the bottom is not a problem. Not welding the top wouldn't be a show stopper but given I'm a little OCD it would drive me crazy knowing the top wasn't welded to anything.
If you're just trying to fill the hole in the outer rocker and have a place to plug in the jack post cover, you could cut the post tube (without denting in the current panel) and just weld on the reinforcement along the sides and accessible bottom. Stock jack would never fit in deep enough though. Maybe not an issue if you never intend to jack there. Back when I was broke - I just bought a 5 dollar scissor jack at the junk yard since my factory jack was missing. Never used the factory jack points myself either.
Maybe the Doc has more experience and can suggest a way to weld the top in vehicle but it didn't see doable to me.
Posted by: Tdskip Sep 13 2019, 11:30 AM
Hi guys - thanks for the responses.
I'm not confident that what is under that patch is awesomeness either, agree it needs to be opened up to have it be address properly.
Let me - which will be awhile - open that up and see what I've got.
Any ideas on the second part of the quesiton on paint matching? Think I'll be able to get a good match on this? I don't have the color code from the seller unfortunately.
Posted by: bbrock Sep 13 2019, 11:54 AM
No. I think I'd have to take that patch off and see the underneath unless I was just getting it on the road.
As someone guilty of putting a very similar patch on my car and decades later fixing it the right way..... oh yeah, I would open it! I found a pile of gold coins inside of mine.

Posted by: Tdskip Sep 13 2019, 05:16 PM
As someone guilty of putting a very similar patch on my car and decades later fixing it the right way..... oh yeah, I would open it! I found a pile of gold coins inside of mine.
Well then, I'll get right on it!
Posted by: bdstone914 Sep 15 2019, 02:10 PM
@http://www.914world.com/bbs2/index.php?showuser=20845 post='2746783' date='Sep 13 2019, 12:54 PM']
As someone guilty of putting a very similar patch on my car and decades later fixing it the right way..... oh yeah, I would open it! I found a pile of gold coins inside of mine.
Well then, I'll get right on it!
The jack point is a very important structural part. That is a critical flex point. Do replace it. Do not jack up the car from it.
Posted by: burton73 Sep 15 2019, 04:59 PM
Frist, I use the jack post area and a jack post lift thing inserted into the jack post if I am in my garage. From there jack stands. This is with my floor jack on flat surface. If you have a solid car this is no problem if you have a weak body on your car it will show in body flex. This is a good test on door gaps. This is the way I will lift my 6 whenever I get it back.
On the road ?
Bob B
Posted by: Tdskip Sep 16 2019, 06:30 AM
Thanks gentlemen, agree this is very important to fix properly.
Going fix this properly by getting the patch off and trimming the deliberately oversized patch I took from a donor car in there. The total gauge of the metal there is pretty thick due to the importance to the car.
I have some other cars to sort out first but this has been very helpful, thank you.
Posted by: Tdskip Aug 9 2020, 06:25 AM
Good morning, dusting this thread off as I am going to dive into this over the next week or so.
Found this picture on another thread which helps additionally focus the question.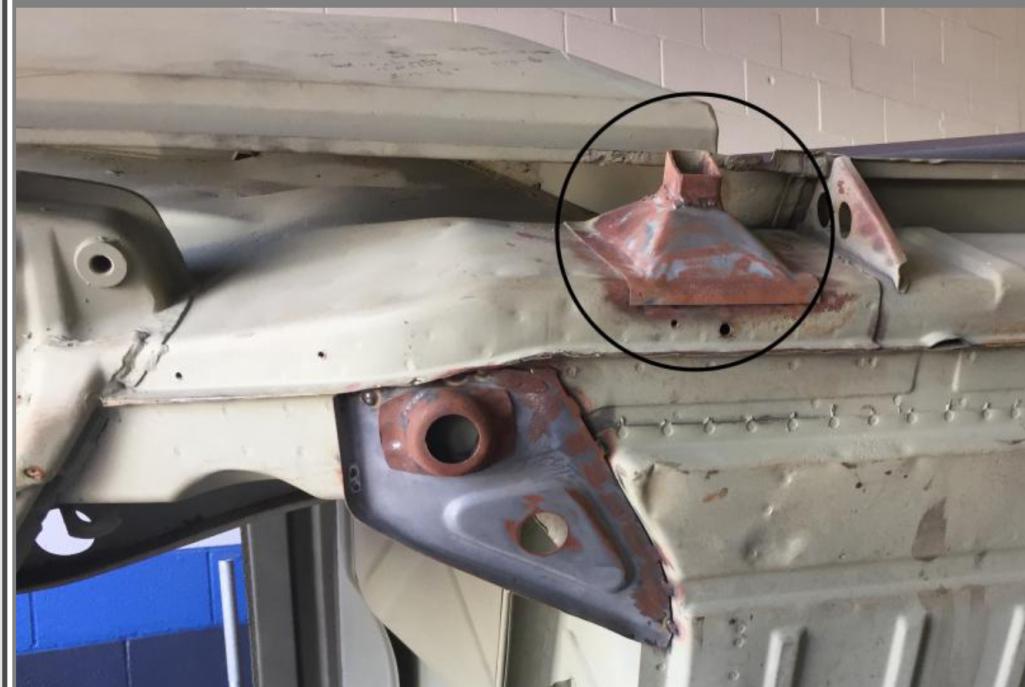
When I remove the patch that is on there now, and then deal with whatever is behind there, I will need to close it back up obviously. I was planning on using the OEM orange-ish piece since the metal should all be the same gauge and I has that little lip as a reference point.
Just to make sure I understand - @http://www.914world.com/bbs2/index.php?showuser=22428 the concern you raised is how I properly weld the top of that replacement panel to the rest of the car which I highlighted in blue below, correct?
@http://www.914world.com/bbs2/index.php?showuser=20845 - I don’t remember from your thread if you had to deal with this or not.
In under car picture shown it is clear I will have access to the bottom so I can weld in the three areas I highlighted in red on the second picture. To get to the area in blue do people remove part of the rear fender usually?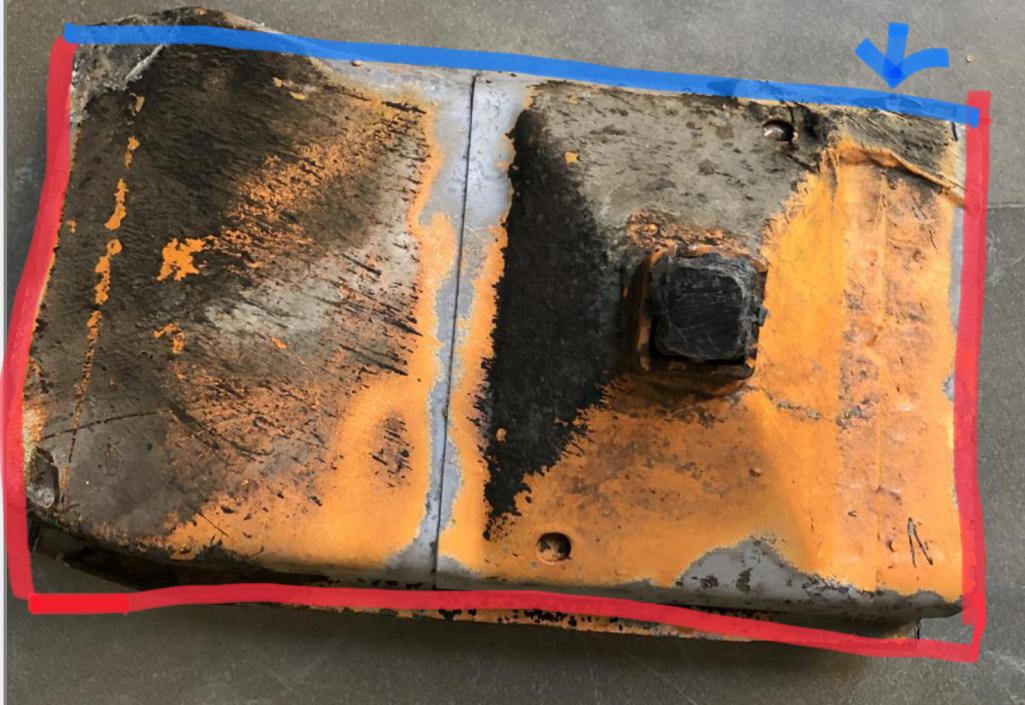
Posted by: Superhawk996 Aug 9 2020, 08:11 AM
@http://www.914world.com/bbs2/index.php?showuser=21666
How timely. We are both going to go though the same hell together. Misery loves company. 
Yesterday in an effort to get the sand out of my driver side longitudinal I cut some holes to get access to the front. Those will get repaired along with replacment of the pedal box area.
How to get to the back?
Well DAPO had some 1/2 ass jack point repair on driver side. Seemed like a good time to cut off the lame sheetmetal bottom 1/2 of the pyramid to get access to the normal rust hole that is behind one of these 1/2 ass repairs.
Sure enough. 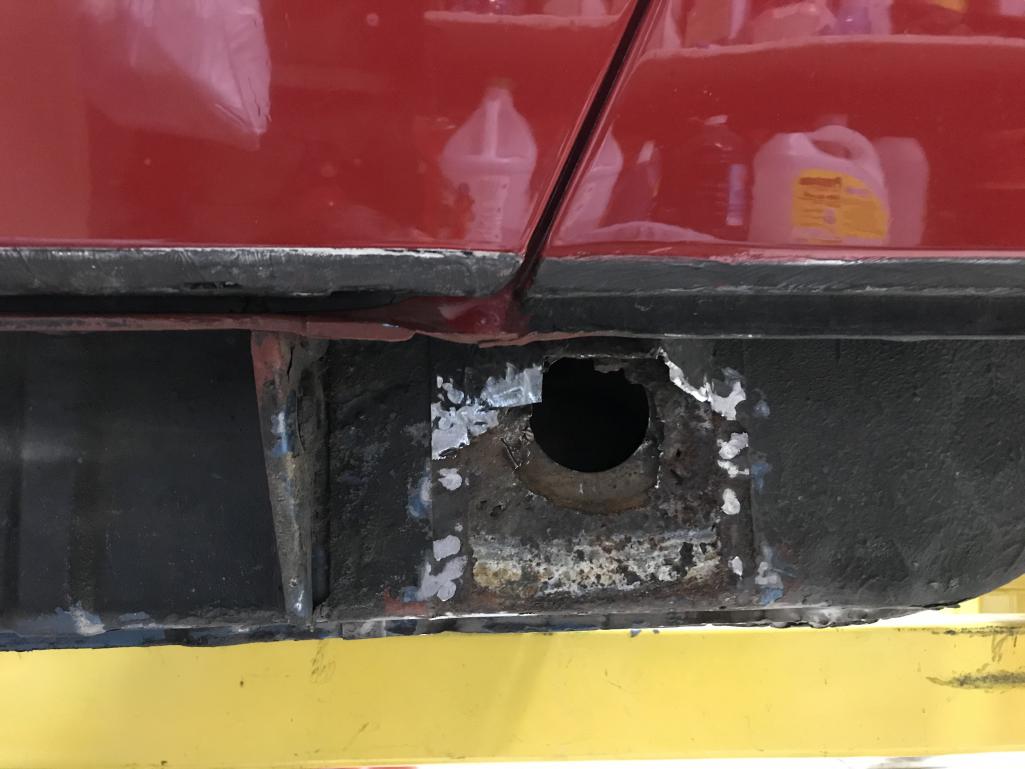
I used the shop vac, compressed air and some profanity to get the sand out.
Now I have to figure out how to repair it.
In my case the DAPO left the top 1/2 of the pyramid so there is some thought that I could just buy a proper pyramid, cut it and than do a slightly cleaner version of the DAPO repair done with thin (20 GA?) sheetmetal and lots of booger welds.
As you state, removal of fender is the usual way.
I think the Doc also mentioned that door jamb can be cut out to provide acccess to the top of the pyramid via MIG. Point & shoot with MIG would probably work but I've only got TIG and I actually need to see to weld.
In my case I can't do either because i want to preserve the paint and the fiberglass flares without creating a  load more sheetmetal work and paint work.
I'm contemplating creating a surgical flap from the wheelhouse inner that I can access the top of the pyramid from. It just rubs me the wrong way to only replace 1/2 of the pyramid but I can't exactly put my finger on why other than some generic version of "craftsmanship" and wanting to do the job right. 
In my case the wheelhouse inner will eventually get cut for /6 coversion and oil tank. Plus the bulkhead is already stripped to bare metal for sheetmetal repairs so I already am going to have to shoot some paint in the engine compartment. I'm just not sure if I actually cut the flap, will it be good enough access to allow me to TIG the top.
Still thinking about other options. 
Posted by: cary Aug 9 2020, 08:17 AM
Am i the only one that immediately thinks "what's hiding under that ugly patch?" whenever i see something like that?
Nope ............... but I didn't want to put on my "Bearer of Bad News" hat.
Posted by: Tdskip Aug 9 2020, 08:22 AM
Good morning. Looks like much the same access issue, especially with a TIG.
The MIG already lets to get some welds on to the top section without cutting anything else but.....
Please keep us posted on how this comes together for you.
Posted by: cary Aug 9 2020, 08:49 AM
Yes the Mig can go in from the fender well. But your helmet doesn't fit. 
So I have a pair of Miller, what I can scuba goggles.
I use an 18" 1/2 pneumatic belt sander to remove the four upper welds. Nose them out.
All this done without cutting the door jam or the qtr. panel.
Be very very careful up against the door jam. Could easily buzz a hole thru it on the last
spot weld.
Welding back in. I tighten up the spacing so its not so close to the door jam.
Because of the obnoxious location welds aren't ways tidy. So I tune them up with the
18" sander. Then brush on some seam sealer for good measure.
My .02c.
Posted by: Superhawk996 Aug 9 2020, 09:01 AM
Yes the Mig can go in from the fender well. But your helmet doesn't fit.
So I have a pair of Miller, what I can scuba goggles.
I use an 18" 1/2 pneumatic belt sander to remove the four upper welds. Nose them out.
All this done without cutting the door jam or the qtr. panel.
Be very very careful up against the door jam. Could easily buzz a hole thru it on the last
spot weld.
Welding back in. I tighten up the spacing so its not so close to the door jam.
Because of the obnoxious location welds aren't ways tidy. So I tune them up with the
18" sander. Then brush on some seam sealer for good measure.
My .02c.
@http://www.914world.com/bbs2/index.php?showuser=1608
Hmm. Can you post picture of said scuba goggles? I assume like old school OxyAcetylene goggles but with shade #9 lenses?
If you can get head & hand in there then maybe I can TIG in there. Hadn't thought of the goggles option.
Posted by: cary Aug 9 2020, 09:08 AM
https://store.cyberweld.com/miwe26.html
It's a long ways in there. Most work done by the braille method.
Posted by: bbrock Aug 9 2020, 09:11 AM
I did have to deal with it but I had a lot of rust and fab work to do aft of the pyramid so the rear quarters got cut on both sides. Obviously your plan of attack will be dictated by what you find inside. If the damage is localized to the pyramid area, I'd definitely follow Cary's method before cutting the quarter. That adds a lot of work best avoided if possible.
Posted by: cary Aug 9 2020, 09:15 AM
Ditto on Brent's comment.
The simple method is only used on a simple jack point only repair.
Usually caused by debri slung from the tires.
Posted by: Tdskip Aug 9 2020, 06:33 PM
Thanks for the discussion and thoughts, will start trimming and determining what is under there tomorrow. Will take pictures, likely scary.
Posted by: bkrantz Aug 9 2020, 08:19 PM
One minor suggestion: drill a second drain hole in the jack tube support. That way you can actually flush out dirt by squirting in one hole and draining from the other.
Posted by: Tdskip Aug 29 2020, 03:09 PM
Dusting this off now that I have the rear trunk k panel and front patch (were the EV cables went) done.
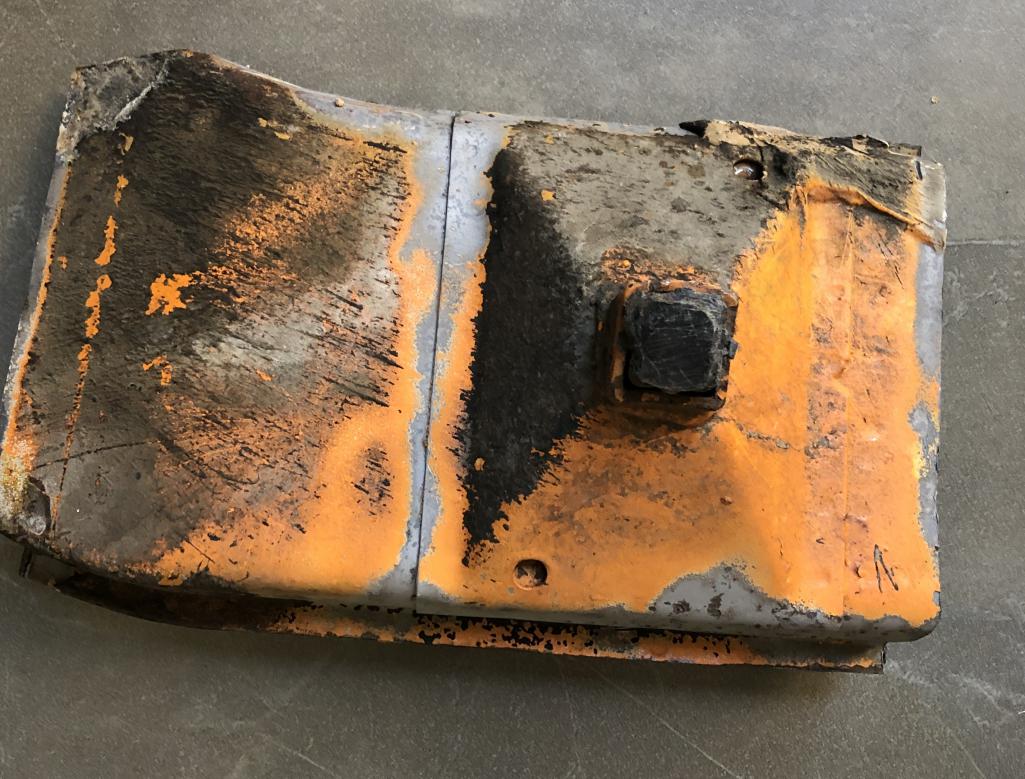
Here is the section from below;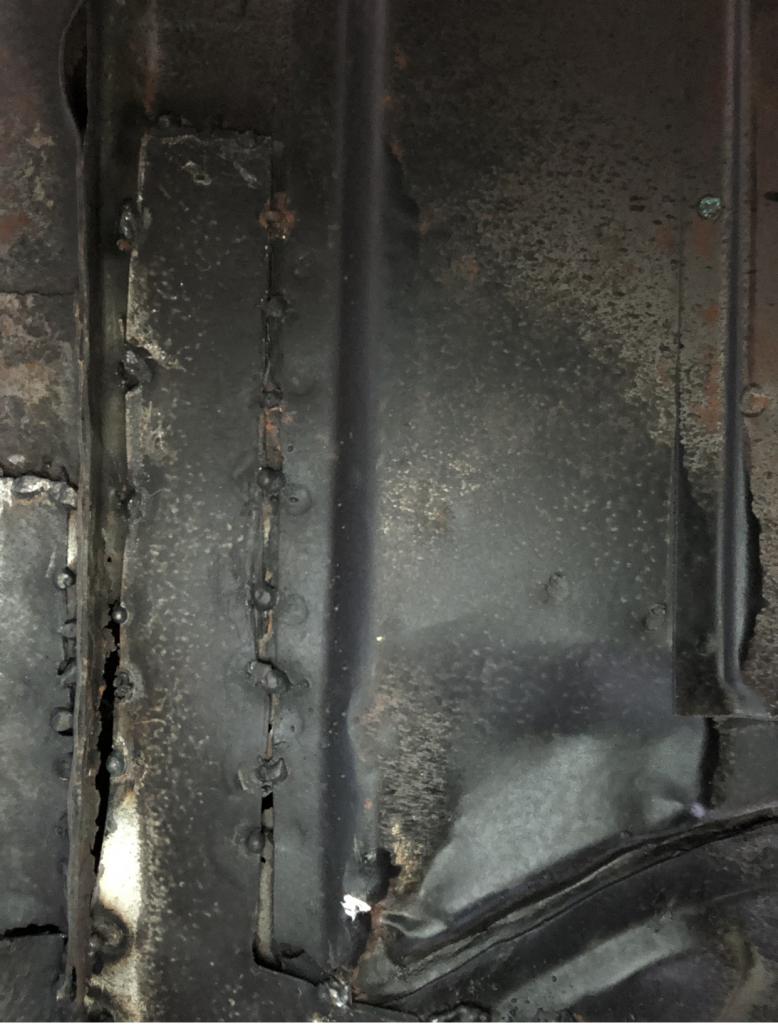
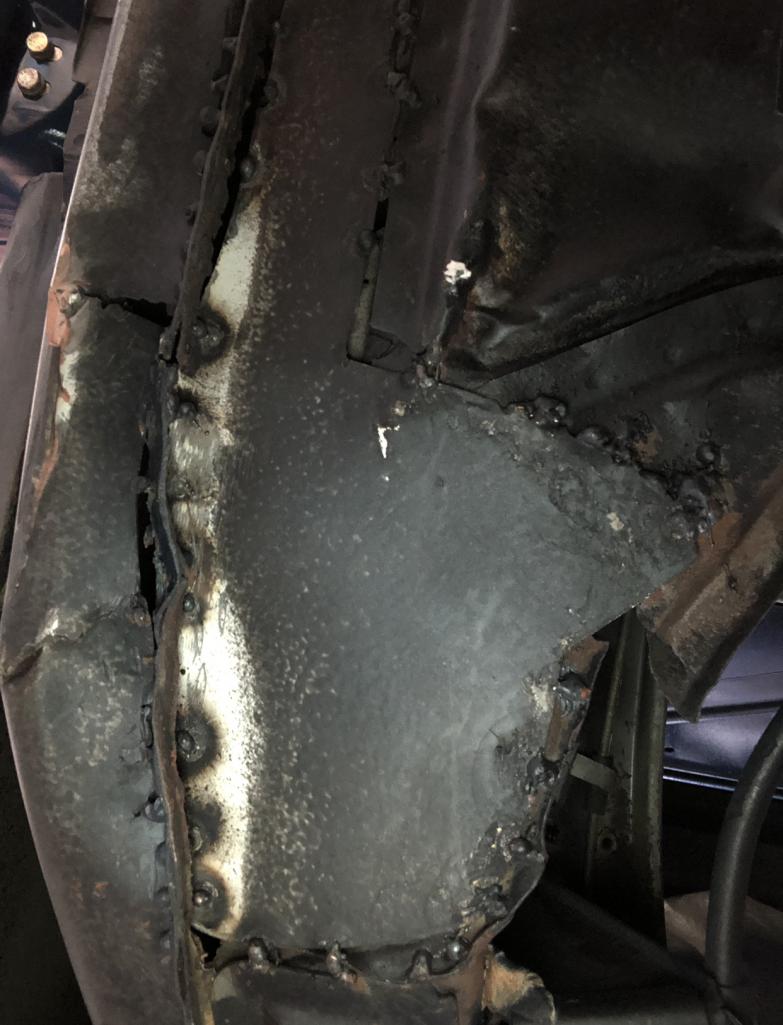
Posted by: Tdskip Aug 29 2020, 03:12 PM
Original damage the PO was trying to repair;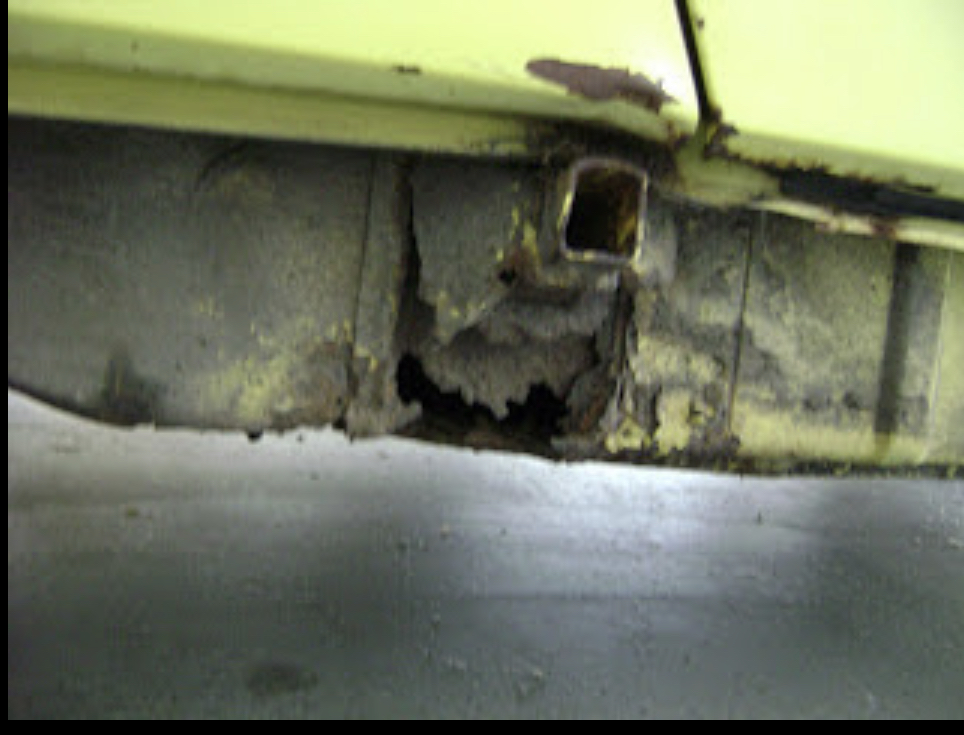
Posted by: Tdskip Aug 29 2020, 03:32 PM
Door gap is good still however;
Posted by: Lilchopshop Aug 30 2020, 11:46 AM
Good morning, dusting this thread off as I am going to dive into this over the next week or so.
Found this picture on another thread which helps additionally focus the question.
When I remove the patch that is on there now, and then deal with whatever is behind there, I will need to close it back up obviously. I was planning on using the OEM orange-ish piece since the metal should all be the same gauge and I has that little lip as a reference point.
Just to make sure I understand - @http://www.914world.com/bbs2/index.php?showuser=22428 the concern you raised is how I properly weld the top of that replacement panel to the rest of the car which I highlighted in blue below, correct?
@http://www.914world.com/bbs2/index.php?showuser=20845 - I don’t remember from your thread if you had to deal with this or not.
In under car picture shown it is clear I will have access to the bottom so I can weld in the three areas I highlighted in red on the second picture. To get to the area in blue do people remove part of the rear fender usually?
Probably not what you want to see, but this is how I recently repaired my passenger jack point. (I’m in process of doing the exact same thing on the drivers side). I knew I had hidden rust, so I wasn’t too concerned with cutting the fender so I had good access. If I was sure the jack point was the only issue, I would have figured out a way to weld the top of the replacement jack point without cutting the fender.
http://www.914world.com/bbs2/index.php?showtopic=343967&hl=Replacing+rusty+jack+points
Posted by: Tdskip Sep 1 2020, 12:24 PM
Probably not what you want to see, but this is how I recently repaired my passenger jack point. (I’m in process of doing the exact same thing on the drivers side). I knew I had hidden rust, so I wasn’t too concerned with cutting the fender so I had good access. If I was sure the jack point was the only issue, I would have figured out a way to weld the top of the replacement jack point without cutting the fender.
http://www.914world.com/bbs2/index.php?showtopic=343967&hl=Replacing+rusty+jack+points
Thanks for the post, it is what it is, appreciate the link. Hope you r week if off to a good start.
Powered by Invision Power Board (http://www.invisionboard.com)
© Invision Power Services (http://www.invisionpower.com)