Printable Version of Topic
Click here to view this topic in its original format
914World.com _ 914World Garage _ Restoration Literati914 Build
Posted by: Literati914 Oct 24 2019, 07:56 PM
I've been putting this off, but I guess I should document the restoration build for my latest 914. I finally got the car on my property and even though there no garage (YET) I can go ahead and get some things started. This will be my 3rd 914 and it'll be a bit of a second chance for this car, as it has a front end section that's been grafted on (by PO) because of a previous accident - not to mention the rusted away hell-hole and holes in the floor. The graft actually looks pretty well done and solid, and the other items will be addressed. The car came with it's original engine - a 1.7 that's freshly rebuilt with zero miles on the rebuild (uninstalled). I've also got a 2056cc 'GA' motor that'll probably end up in this car.
The car was originally L21E Tangerine and someone's gone over it with a real crappy red paint. Since my last 914(/6) was L21E Tangerine.. I'm going to paint this one something else, and will be doing all bodywork and paint myself.
This "restoration" will be considered a driver quality effort.. but I don't plan on cutting too many corners either. I plan to do a quality job but it won't be going across the block at Christies either. Lots of parts have already been sourced, but there's always more, right! Here's the BEFORE shots:
https://postimages.org/
Posted by: Literati914 Oct 24 2019, 08:04 PM
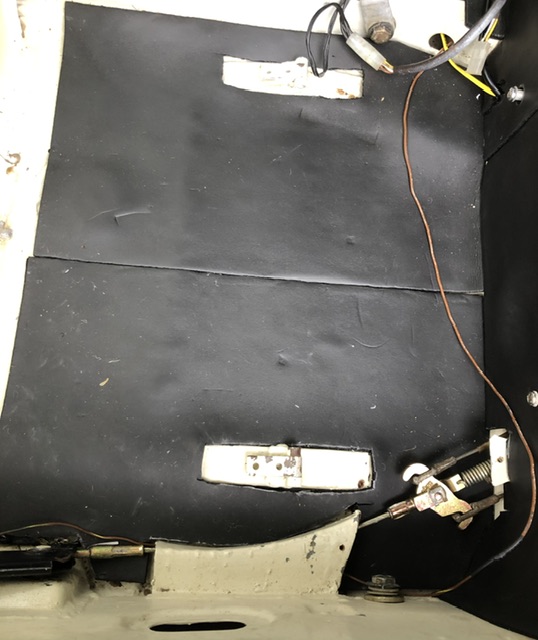
UGLY FLOORS:
https://postimg.cc/bD8br5mD
https://postimages.org/https://postimages.org/
https://postimages.org/https://postimages.org/
https://postimages.org/
https://postimages.org/
HELL HOLE:
https://postimages.org/
RUSTY FENDER TIPS:https://postimg.cc/2bvcRgV1
https://postimg.cc/CnSNy132
Posted by: PlaysWithCars Oct 25 2019, 12:21 AM
You've got your hands full with that one. Always good to see another saved though.
Posted by: Literati914 Dec 10 2019, 07:31 PM
I've not been doing much of anything to my 914 project lately, what with all the rain, weather and me doing over 200ft of cedar fencing (single handedly at that), etc. Anyway, I took some time yesterday and was able to get out there and cut away all the rusted metal from the Hell Hole. So, that's a little piece of progress I can report on  . Here's a shot of it:
https://postimages.org/
Posted by: Literati914 Dec 10 2019, 07:34 PM
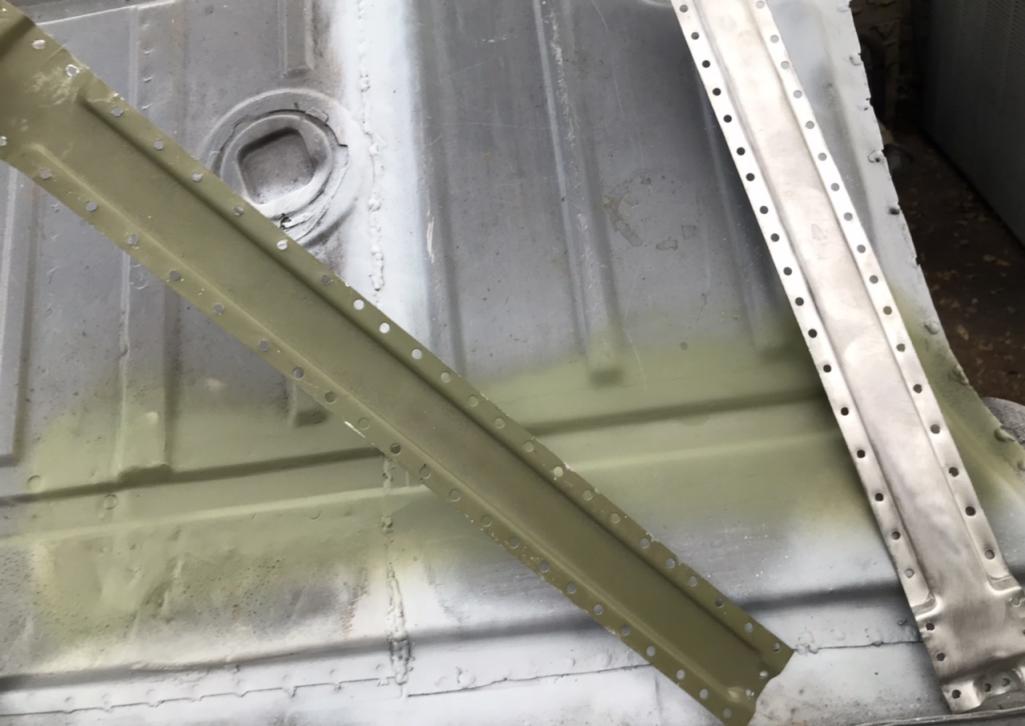
Here's my replacement metal test fit:
https://postimages.org/https://postimages.org/
Posted by: ClayPerrine Dec 11 2019, 10:14 PM
When can I come by and see it? I can bring a 914 for some motivation.....


Posted by: rjames Dec 12 2019, 11:53 AM

Here's my replacement metal test fit:
https://postimages.org/https://postimages.org/
Nice work on making/forming that patch!
Posted by: Literati914 Jan 24 2020, 11:59 PM
When can I come by and see it? I can bring a 914 for some motivation.....
Wow, would love to have you out this way.. just gotta let me get a driveway poured first, it's in the planning stage.. but it's just a big strip of mud and gravel most days. Your 914 would NOT care for it.
This 914 'build' will probably take forever with all the home improvement going on (thats what we get for buying a fixer upper
 ). Still, I'd like to have it painted before summer. Here's part of the fence I've been building, and that's been taking up my spare time:
https://postimg.cc/dhfDMrDv
Posted by: Literati914 Jan 25 2020, 12:08 AM
I was able to mess with the 914 a couple days since my last update. I've cut the rusted thru parts of the floors out:
https://postimg.cc/t71y1Jqv
I've got the panels already and picked up some Mig gas for welding, the other day.
Posted by: Literati914 Jan 25 2020, 12:15 AM
Also, I've removed all of the suspension.. for bushing, bearing, seal replacement - but also for under car clean up and painting. This car will not be on a rotisserie, I plan to wire wheel the entire underside, treat with phosphoric acid, epoxy and paint, or bed liner stuff, or both.
https://postimg.cc/nj1CWL5t
Posted by: ssuperflyoldguy Jan 25 2020, 01:10 AM
Looks like you used galvanized- bravo.
Posted by: Literati914 Jan 25 2020, 09:02 PM
I busted most of the front suspension apart today. Gotta figure out how to get those bushings off the A-arms and the joints out of them too. Couldn't budge the dang set screws in the REAR discs rotors, so I just called it a day 
https://postimg.cc/DWgrVPDm
Posted by: mepstein Jan 25 2020, 09:09 PM
Put a torch on the bushy gs until they smoke and then turn them off with a screwdriver stuck in the hole on the mounting tab.
Heat will loosen the set screw.
It’s worth it to go to your local home store and buy a map torch. Heat makes everything loosen up.
Posted by: KELTY360 Jan 25 2020, 10:20 PM
Here's my replacement metal test fit:
https://postimages.org/https://postimages.org/
Nice patch! Don't forget the drain hole.
Posted by: Literati914 Jan 25 2020, 10:41 PM
Put a torch on the bushy gs until they smoke .. go to your local home store and buy a map torch. Heat makes everything loosen up.
Will do, thanks. What about the ball joint thingy that attaches to the strut - does it take a special tool to remove?
Nice patch! Don't forget the drain hole.
Yea, planning on adding one before welding it in.
Posted by: bkrantz Jan 26 2020, 10:06 PM
Nice work. Every hour and step is progress.
Posted by: Literati914 Mar 19 2020, 08:08 PM
OK - made some small progress lately.
So the general plan is this (since I'm working on this car with NO garage). Phase 1 is as follows:
1) pull and restore all the suspension.
2) weld in new floor areas & interior firewall sections.
3) remove dash
4) prime interior
5) address the entire underside of the car, wire wheel, prime, paint, etc.
6) repair: hell hole, damage to shifter hole & clutch cable hole - in engine compartment.
7) prime engine compartment.
8) address the front trunk including to cut out area for A/C condenser.
What I've been working at lately is.. getting the area under the rear trunk scrubbed down with a nylon 'wire wheel'. I really like the nylon wheel for this because it lasts forever, stays cool, is cheap and leaves an 80 grit texture which is good for the epoxy primer that'll be coming next (I will not be taking this all the way down to bare metal - not necessary). Here's the nylon wheel: https://postimg.cc/87v3NhYp
..AND one of the major hurdles has been removing the muffler heat shield (so I could get above it for rust treatment and paint. They'll tell you it's only spot welded in, but mine also had small strips of edge welding - I'll be bolting it back in:https://postimg.cc/06BJnw8S
..Here's a shot showing under the trunk floor after nylon wheeling it. I'll be scuffing all the nooks and crannies with maroon scotch-brite pads and phosporic acid solution before epoxy primer.
BEFORE: https://postimg.cc/ZWDr7gH0
AFTER:https://postimg.cc/WhzmGTmx
Also I've gotten up inside the fenders/wheel wells and removed all of the foam that's known to eventually cause rust. Mine look pretty good at this point. The job sucks but glad I did it, and got it out of the way:
DURINGhttps://postimg.cc/k2Fx9G76
REMOVED:https://postimg.cc/D4kMHm2j
Posted by: Literati914 Jul 26 2021, 09:15 PM
I know, I'm honestly terrible with documenting my project.. in my defense I did accidently crush my old android phone, that had a ton of pictures documenting the work so far on my project#1 914. So, I'm going to try to catch uo with what little I do have. Here's a shot showing the body stripped down to bare metal, with as little filler (kitty hair in this case) as possible, before epoxy primer.
.
Attached thumbnail(s)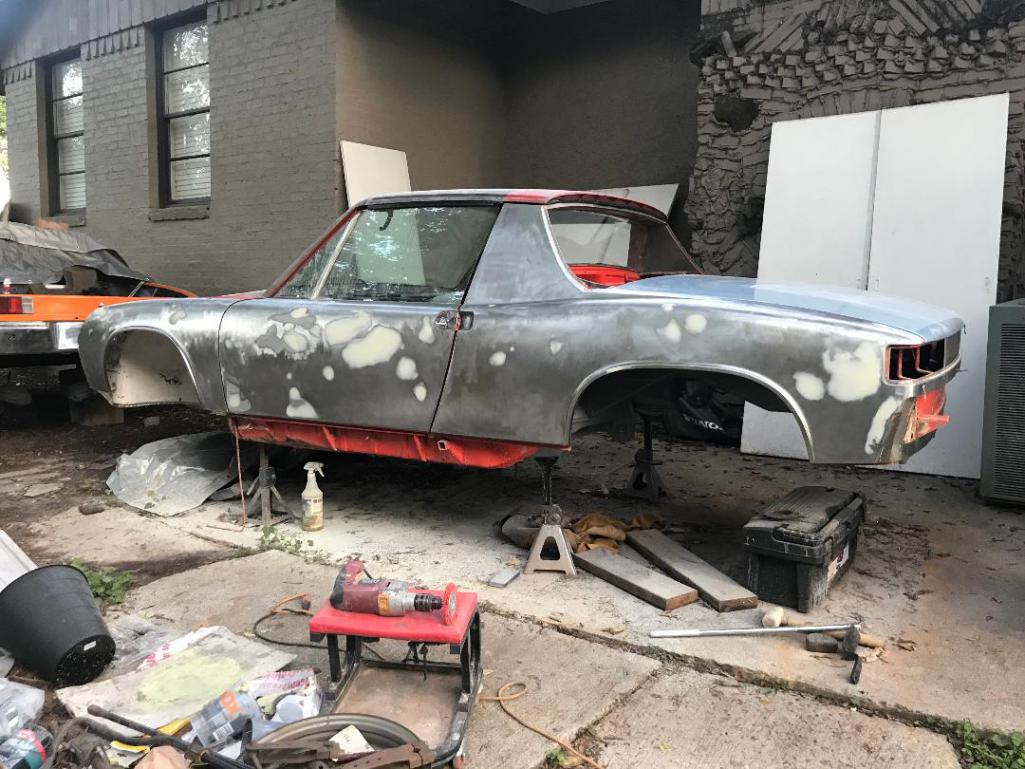
Posted by: Literati914 Jul 26 2021, 09:25 PM
We're obviously in Epoxy primer and.. Got my rotisserie built and the car mounted:
Attached thumbnail(s)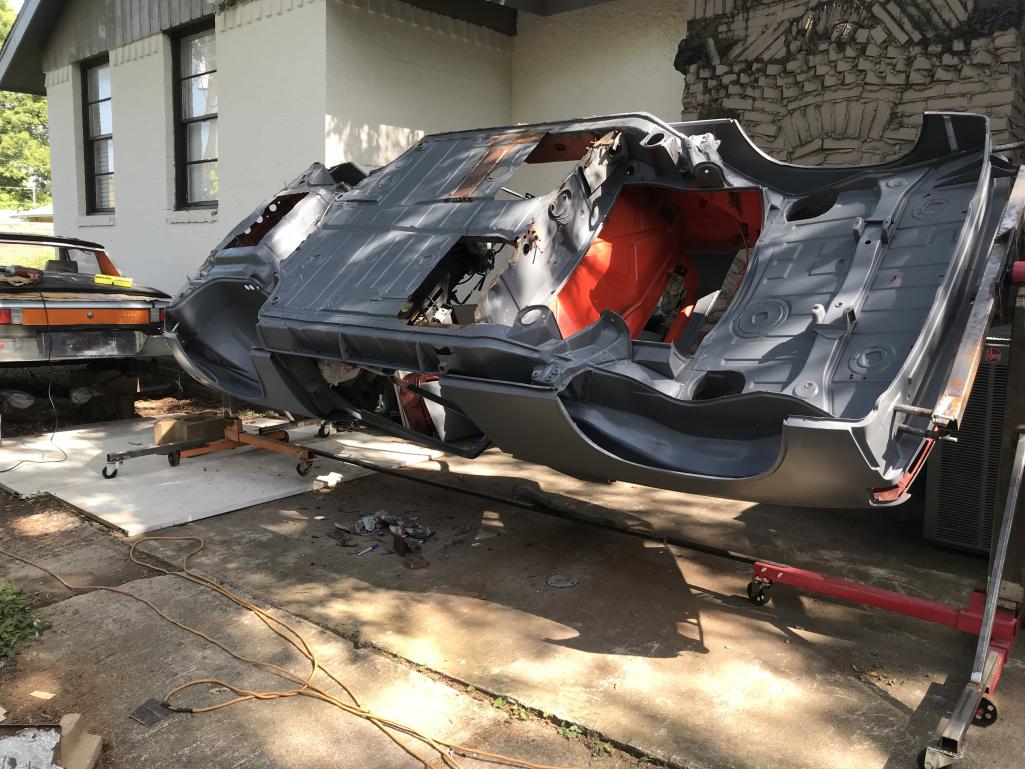
Posted by: Literati914 Jul 26 2021, 09:36 PM
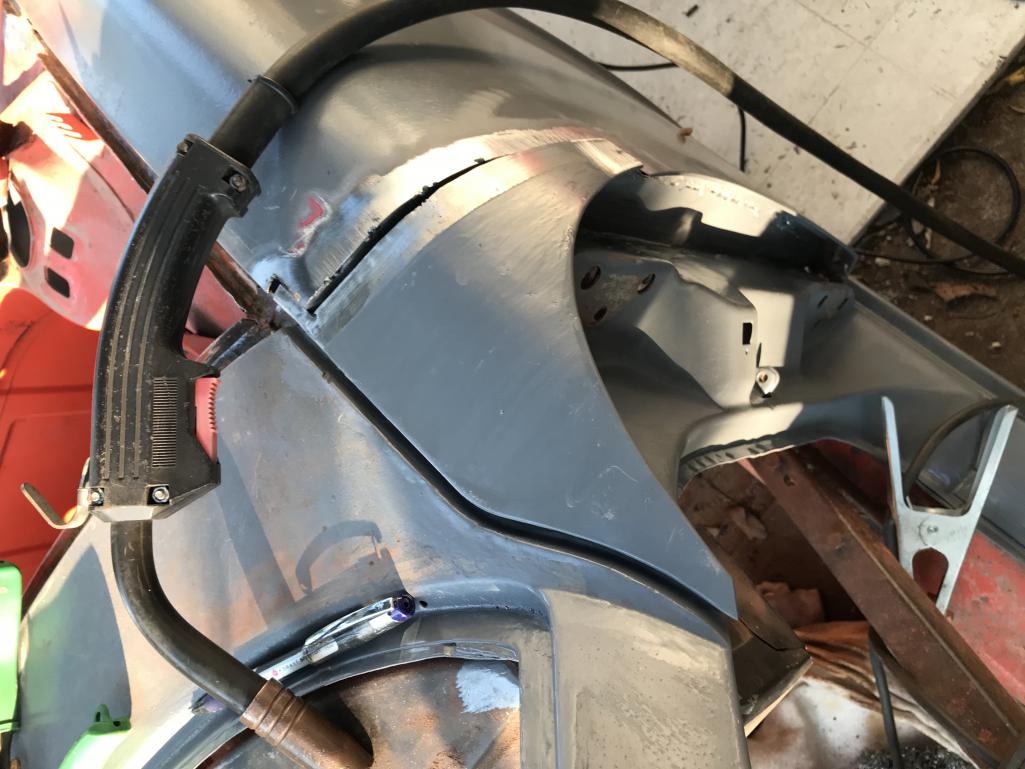
Oh yeah, before it got on the rotisserie I had to address the fender to cowling issues... both fender's "pointy tips" by the cowl, were rotting away. I cut them off and welded on replacements:
Before, during -
Attached thumbnail(s)
Posted by: Literati914 Jul 26 2021, 09:39 PM
^ frustrating, when I use the forums 'attachment' buttons for pics, they get turned in all kinds of directions - is there something I can do to fix this?
.
Posted by: mb911 Jul 27 2021, 08:40 AM
^ frustrating, when I use the forums 'attachment' buttons for pics, they get turned in all kinds of directions - is there something I can do to fix this?
.
If your using your phone before uploading just go to edit your picture on the phone and just make some silly edit and that will be all that is needed to ensure they post correctly.
Posted by: TargaToy Jul 28 2021, 12:38 PM
When in the world do you sleep? In addition to the fence (looking great!), it appears you've painted the house in the meantime too. And STILL got a bunch of stuff done on your car--OUTDOORS! Major kudos to you!
Posted by: Literati914 Jul 28 2021, 02:02 PM
Thanks, however it’s been two years that this car’s been in that spot.. so I’m seeing it as I’ve been too lazy. The lack of a garage is a big deal though as it seems as though it’s done nothing but rain around here (when it’s not 95+ degrees out)! I’m trying to do better.. thanks for the encouragement!!
Ps- I do plan on addressing the hideous chimney this fall  (I have a plan believe it or not)
Posted by: Literati914 Aug 10 2021, 09:41 PM
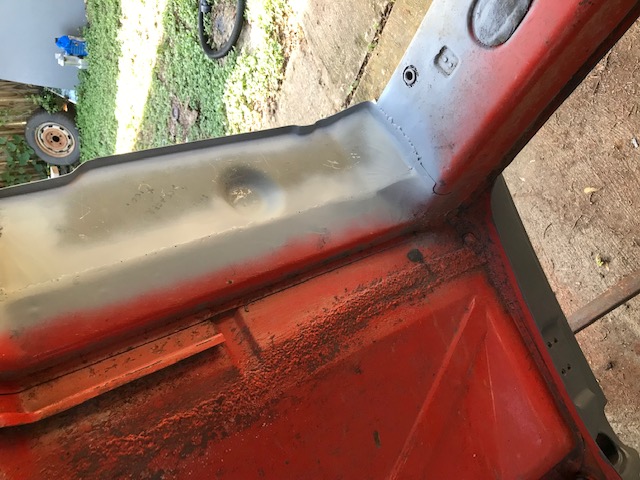
My longs are generally in good condition on this car, but there was a small amount of perforated metal (outer skin) where the two rear firewalls meet the longs on each side, so I’ve been cutting and patching:
Passenger side, before, during and after-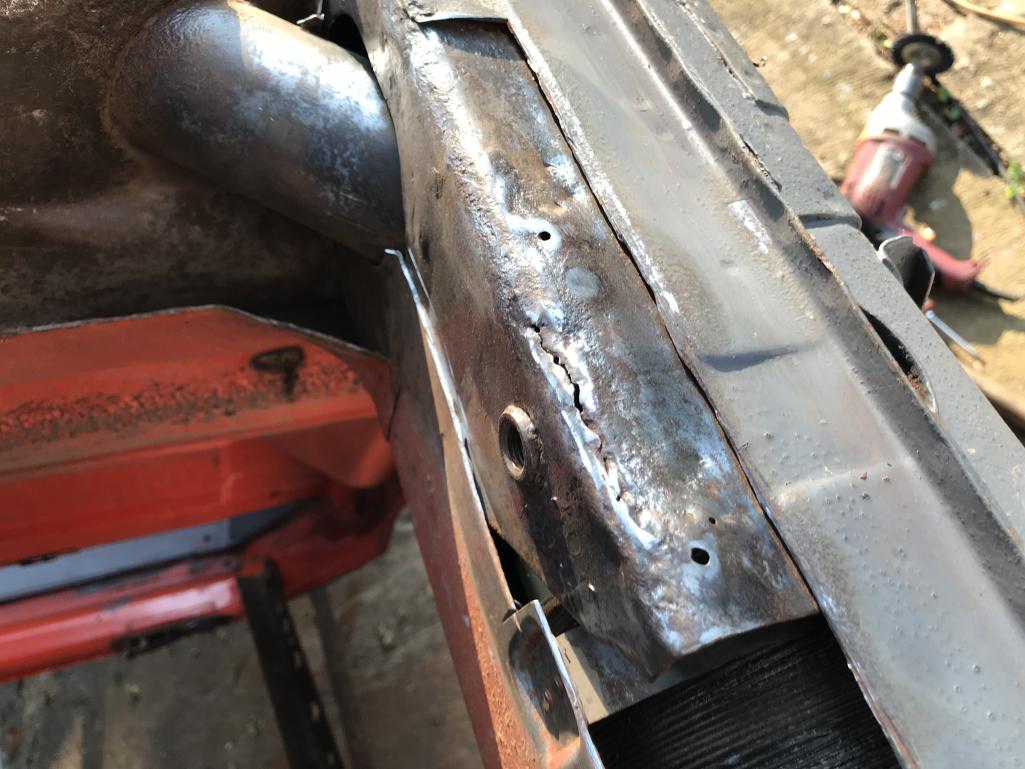
Posted by: Literati914 Aug 10 2021, 09:43 PM
Welded up holes from spot welds and the crack under the belt mount: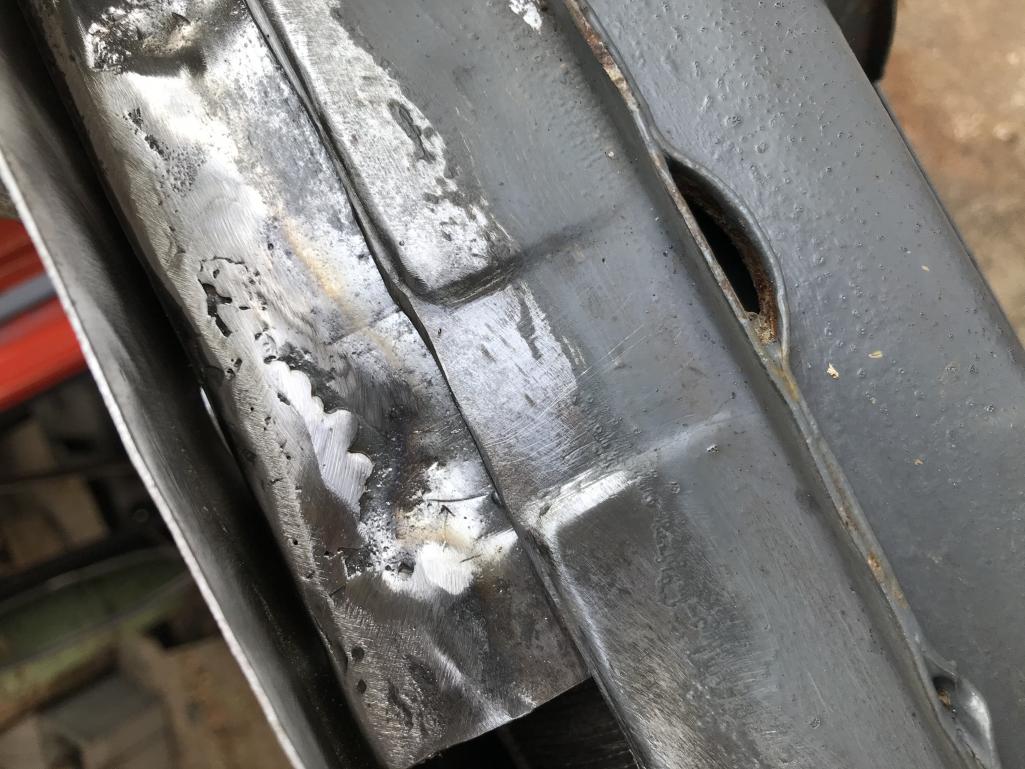
Posted by: Literati914 Aug 10 2021, 09:44 PM
..after phospho acid and primer to the inner layer: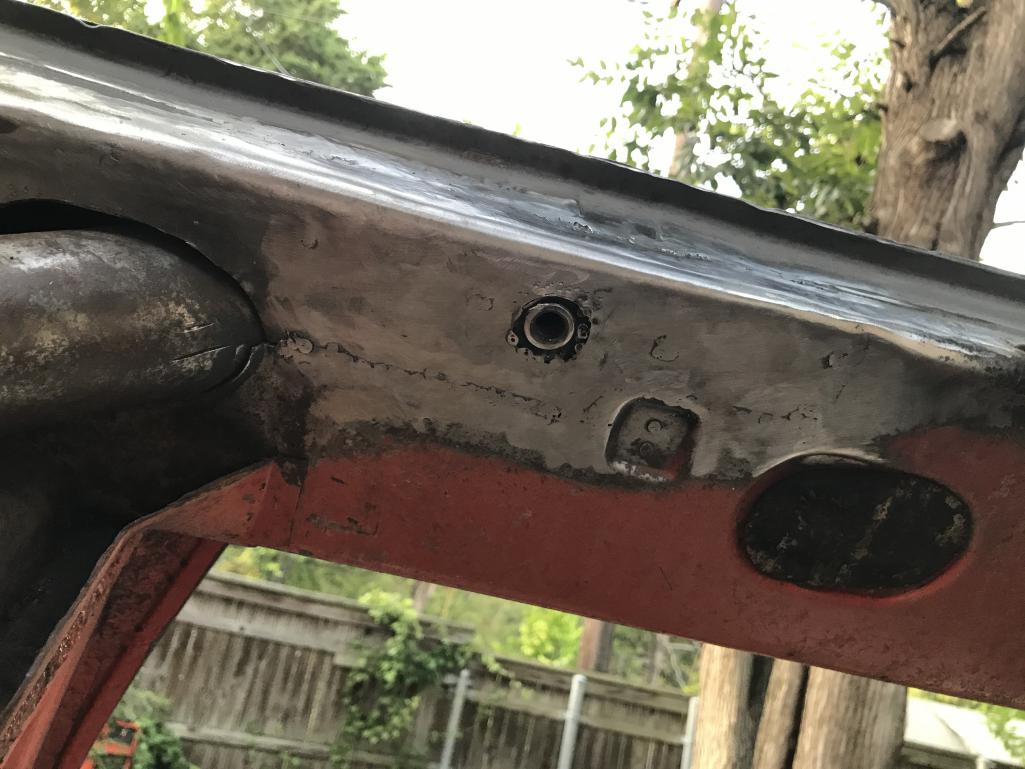
Posted by: Literati914 Aug 10 2021, 09:46 PM
Now to do the driver’s side: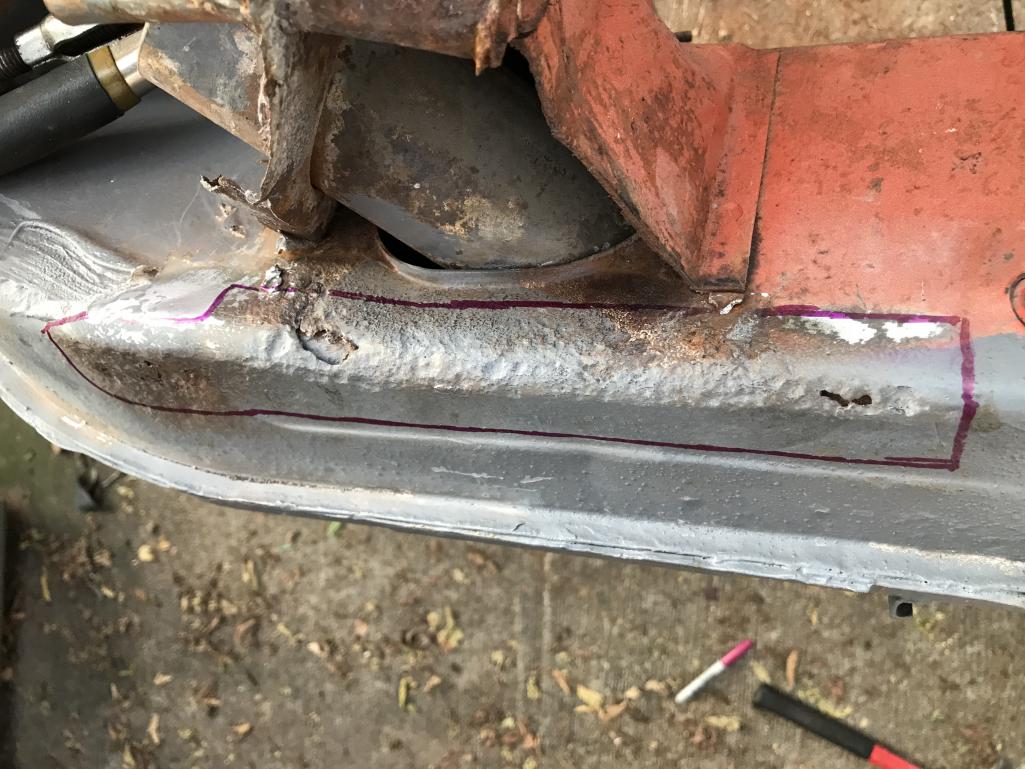
Posted by: Literati914 Aug 10 2021, 09:50 PM
..in process: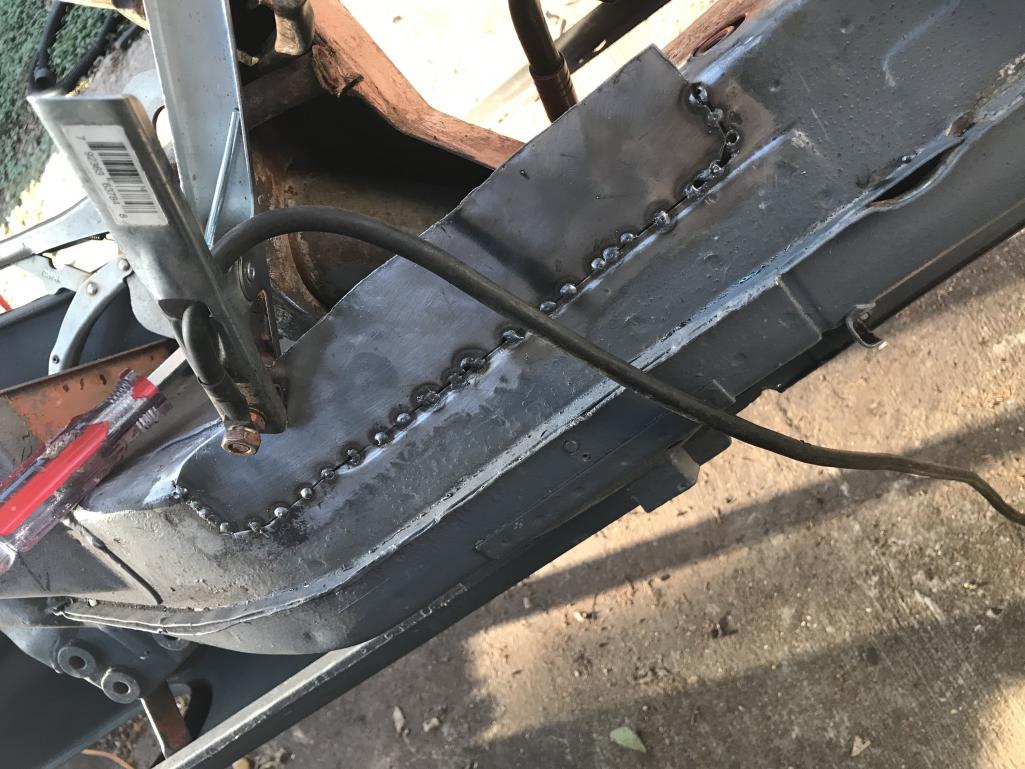
Posted by: Literati914 Aug 10 2021, 09:57 PM
I actually finished up just before dark , will post a finished shot tomorrow.
Btw, I had a practically new bottle of welding gas empty on me after sitting a couple weeks and I had to run and get a replacement. The frustrating thing is that I had the valve closed tight. Supply house wouldn’t hear it.. my gauges must be leaking they said.. I checked them when I got back and they’re not leaking. The valve knob on the empty felt particularly loose but was normal according to them.
Posted by: Literati914 Aug 11 2021, 04:00 PM
Driver’s side long repair, done: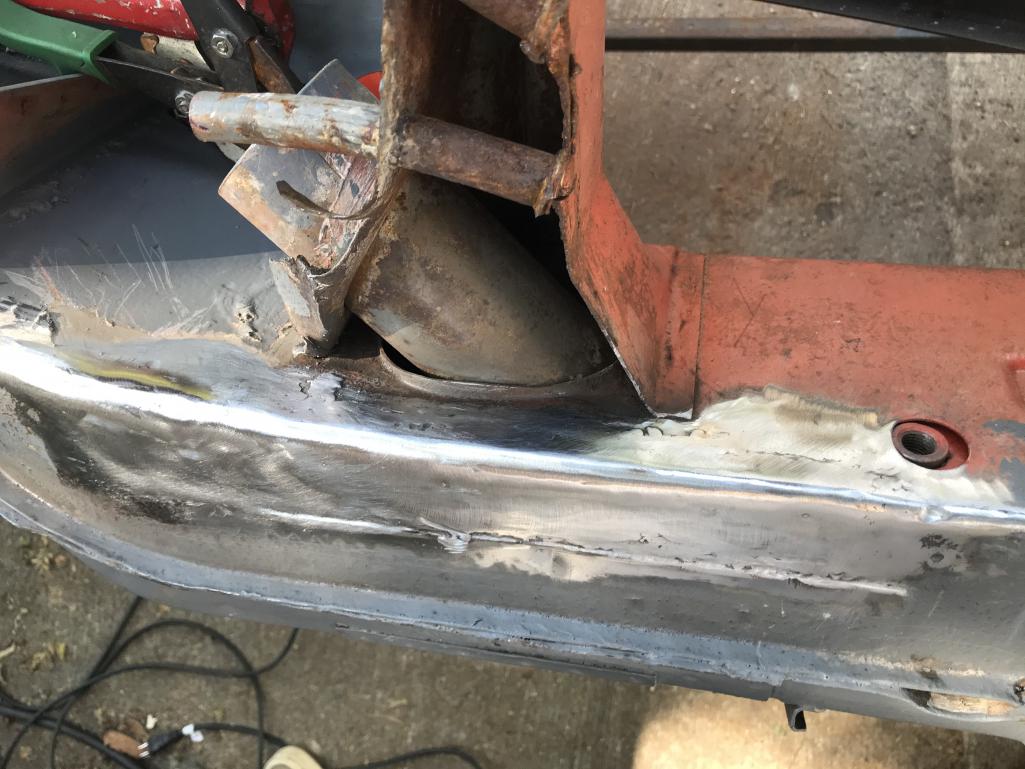
Posted by: Literati914 Aug 11 2021, 07:30 PM
.. here’s a picture showing the reason I broke down and built a rotisserie...
The first pic is what my miserable welds were looking like while trying to weld a patch to the floor while laying on my back and the car a ft or so off the ground  . Couldn’t really even manage to get anything clean enough for consistency. Had hot slag dripping on me and trying to dress the welds with a grinder between me and the car felt really dangerous.
The second pic is the very same area that I managed to clean up today and make look a little less embarrassing. So much easier with the rotisserie!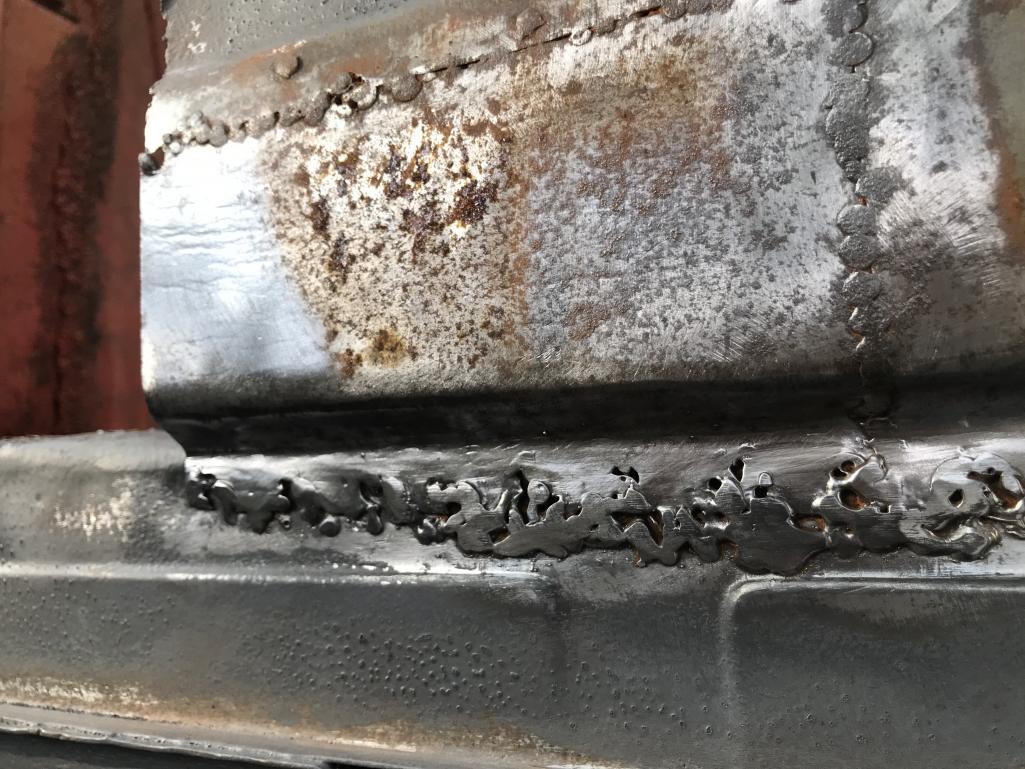
Posted by: Literati914 Aug 11 2021, 07:31 PM
AFTER clean up 
Posted by: bkrantz Aug 11 2021, 07:47 PM
I can't imagine doing the underside work I did without a rotisserie--and certain not being able to enjoy any of it. Being able to turn the car on either side or upside-down made most of the cutting, welding, and grinding fun(ish).
Posted by: Literati914 Aug 16 2021, 09:06 PM
Ok so today I removed the rear under side of the tunnel and cleaned up the lips on the tunnel where the floor will be welded to eventually, as well as cleaned up the inside of the tunnel forward - in prep for internal chassis paint there. Note, the tunnel had been left intact before I had a rotisserie and this was going to make installing the floor easier somehow  . This way is much more thorough but also helpful because my clutch tube needed securing at the firewall as well as some repairs needed to the area around the throttle cable tube (see last pics):
Here’s the a shot showing the rear floor completely removed and tunnel flanges cleaned
Posted by: Literati914 Aug 16 2021, 09:13 PM
Very Loose clutch tube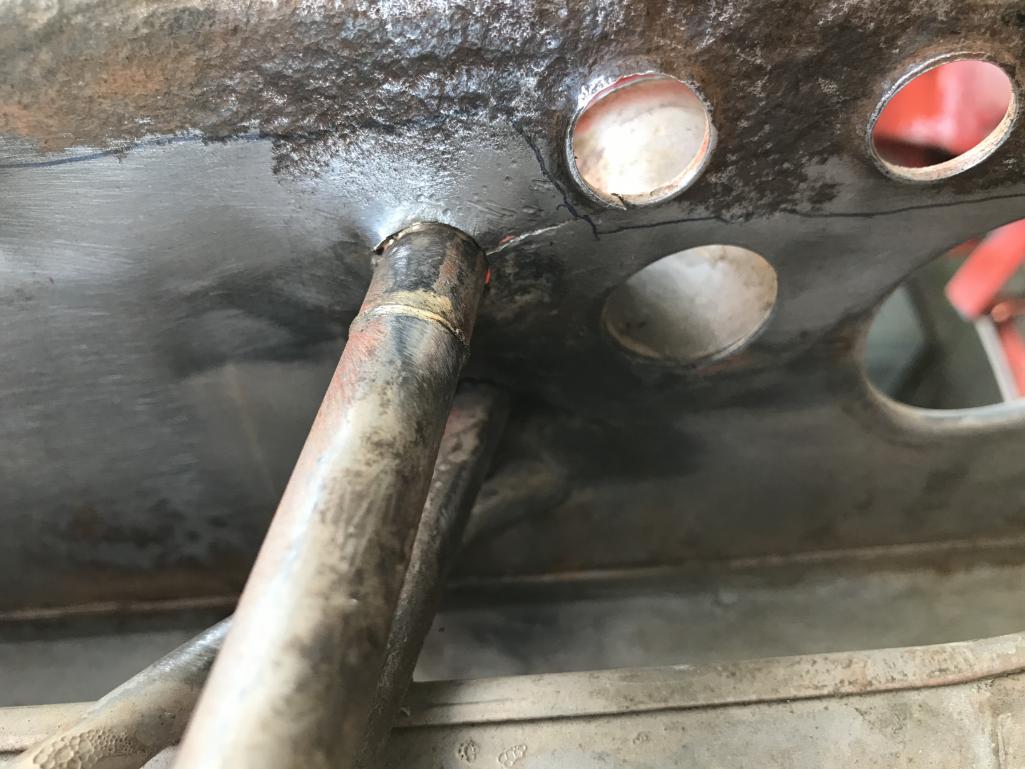
Posted by: Literati914 Aug 16 2021, 09:15 PM
..both repaired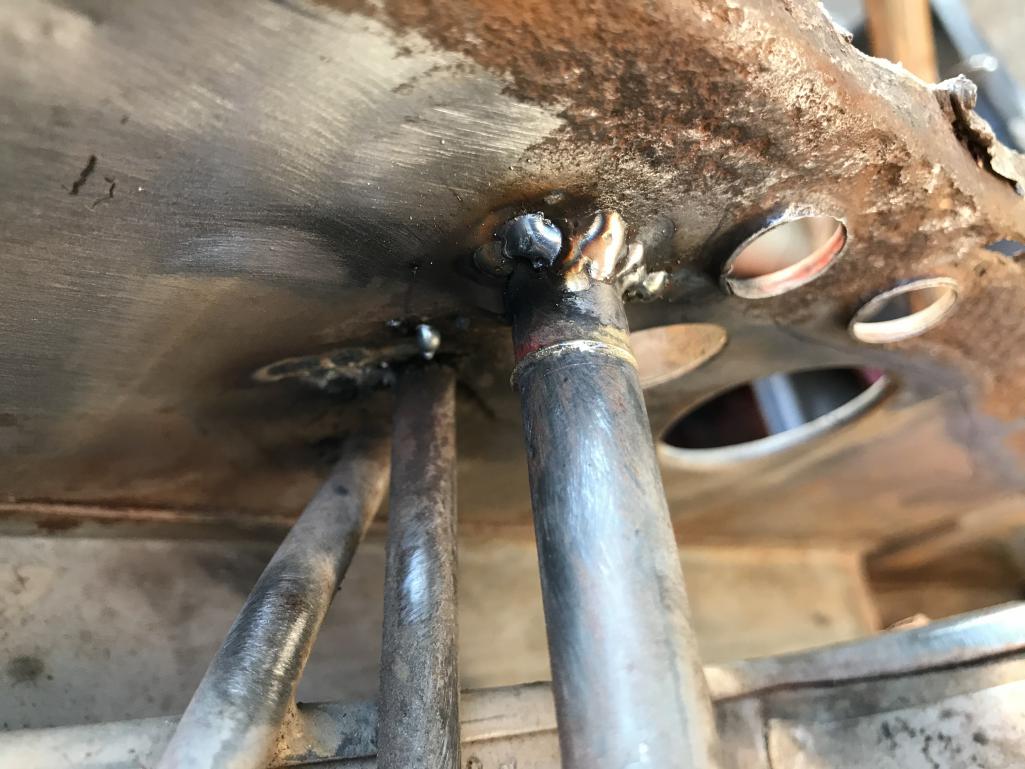
Posted by: Literati914 Aug 16 2021, 09:20 PM
Here you can see marks for the cuts I made at the bottom of the outside firewall..I will be fabricating the lower section of the firewall - buying a whole panel seemed wasteful since most of it is in good shape. Hopefully these repairs will last a long time, the car will be a driver, if not a daily driver.
Posted by: Literati914 Aug 24 2021, 07:24 PM
Here’s a before shot of the PS inner firewall panel that I bought..followed by a shot of how I cut it length wise. Only the bottom most part of my inner and outer firewalls were in need of replacing. I’m using the upper part of this panel to create the lower section of the outside firewall, pics of that to come.
https://postimg.cc/7GwSnmjV
Posted by: Literati914 Aug 24 2021, 07:27 PM
https://postimg.cc/0MnXY6Xz
Posted by: Literati914 Aug 24 2021, 07:55 PM
PS inner repair in process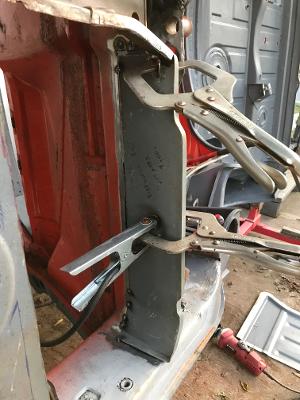
Posted by: Literati914 Aug 24 2021, 08:20 PM
^ frustrating, when I use the forums 'attachment' buttons for pics, they get turned in all kinds of directions - is there something I can do to fix this?
.
If your using your phone before uploading just go to edit your picture on the phone and just make some silly edit and that will be all that is needed to ensure they post correctly.
GAWD !! Can’t make 1 single pics post as it should… as it is on my phone. The attachment feature here kinda sucks I guess! Twists photos at its whim
 and the host I use will not make the photo any larger than a thumbnail, so my apologies for the viewing angles. Maybe it’s the apple phone as I never had this issue with my android, just sayin’.
PS inner firewall repair, completed
Posted by: Literati914 Aug 24 2021, 08:47 PM
The outside passengers firewall panel I made up from the remainder of the PS inner firewall:
Posted by: Literati914 Aug 24 2021, 08:54 PM
Posted by: Literati914 Aug 24 2021, 08:55 PM
Posted by: Literati914 Aug 24 2021, 09:03 PM
Posted by: tygaboy Aug 24 2021, 10:52 PM
Nice, nice work! 
Posted by: Literati914 Sep 12 2021, 09:09 AM
Received a couple more items from RD, time to finish the firewalls.
Attached thumbnail(s)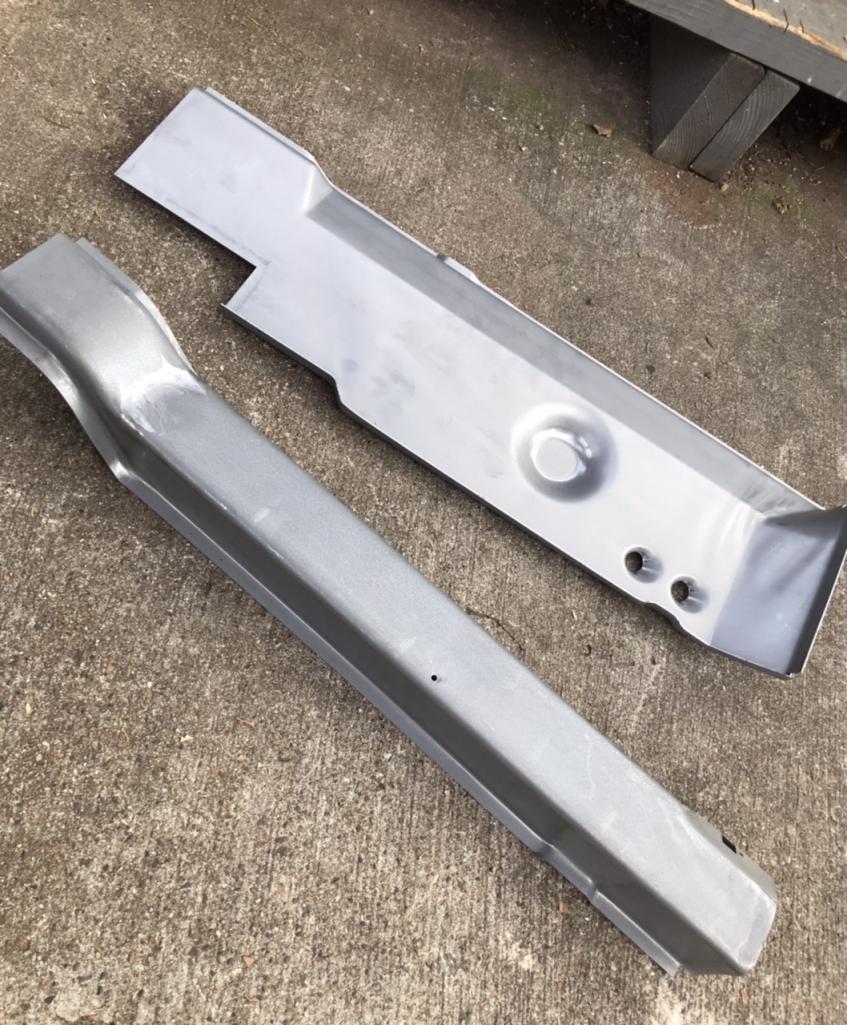
Posted by: Literati914 Sep 12 2021, 09:17 AM
So next up.. the driver’s side inner. This time I popped holes around the perimeter for spot welds, with a convenient air tool I forgot I had (harbor freight). Before proceeding I needed to separate the ebrake tube from inner and outer firewalls: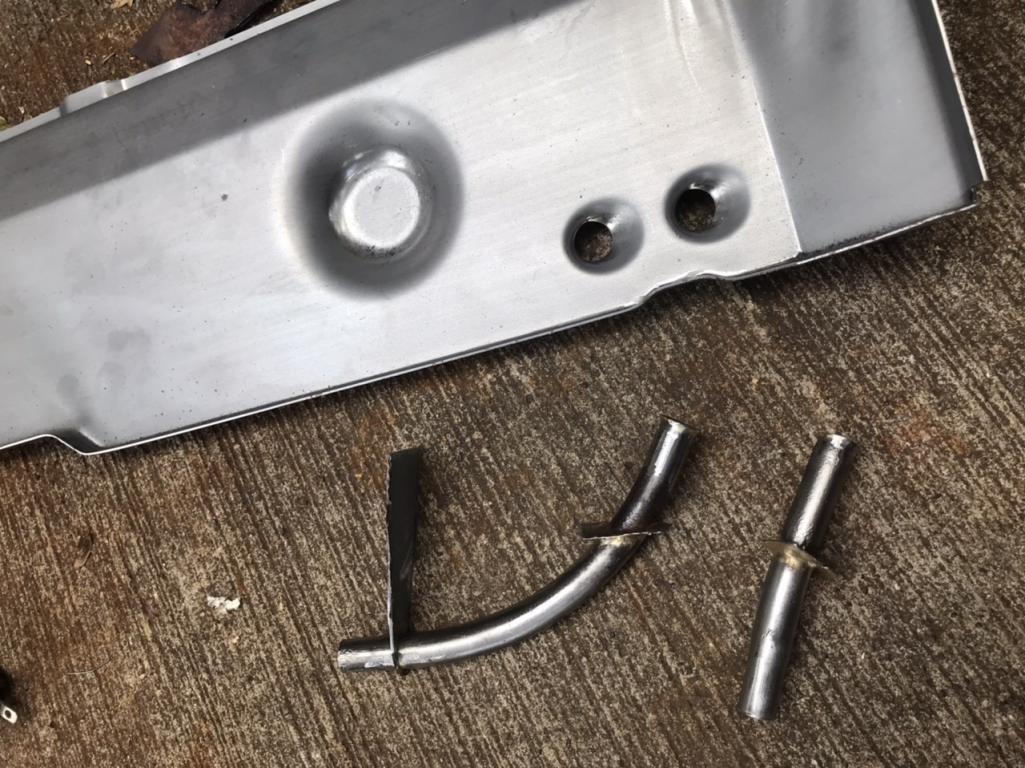
Posted by: Literati914 Sep 12 2021, 09:23 AM
Drivers side inner wall with holes ready to be welded.. this is actually and over-lay or a second skin for most of this wall as only the bottom of the original was bad. I figured why not use the entire piece, since some people buy ‘reinforcement’ panels and over lay anyway.
Attached thumbnail(s)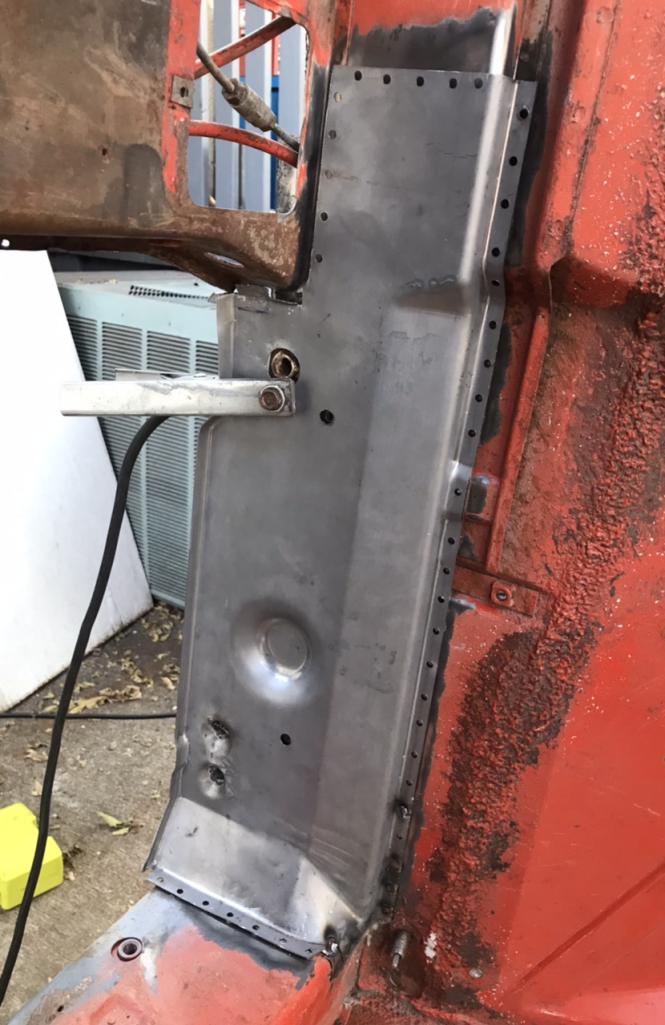
Posted by: Literati914 Sep 12 2021, 09:29 AM
The rear DS wall repair was more complicated, needed to do it in a couple of sections. Here’s the first part.
Attached thumbnail(s)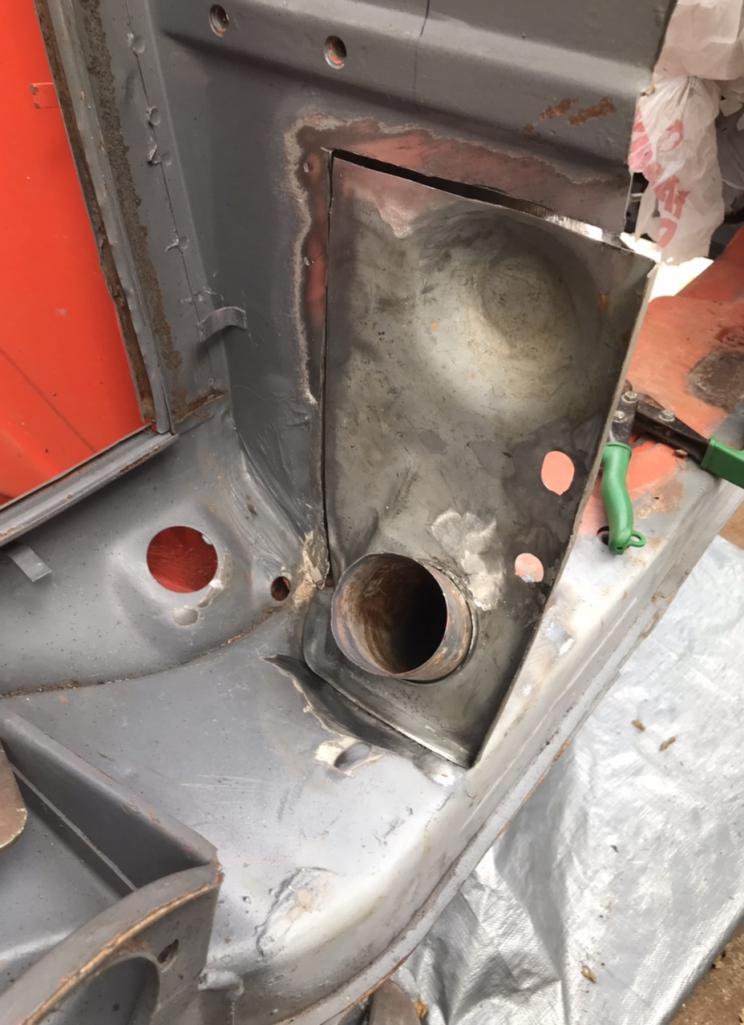
Posted by: Literati914 Sep 12 2021, 09:35 AM
Here you can see where the original ebrake tubes are reinstalled and to get this to happen I kind of had to install the front and rear firewall at the same time on the drivers side.
Attached thumbnail(s)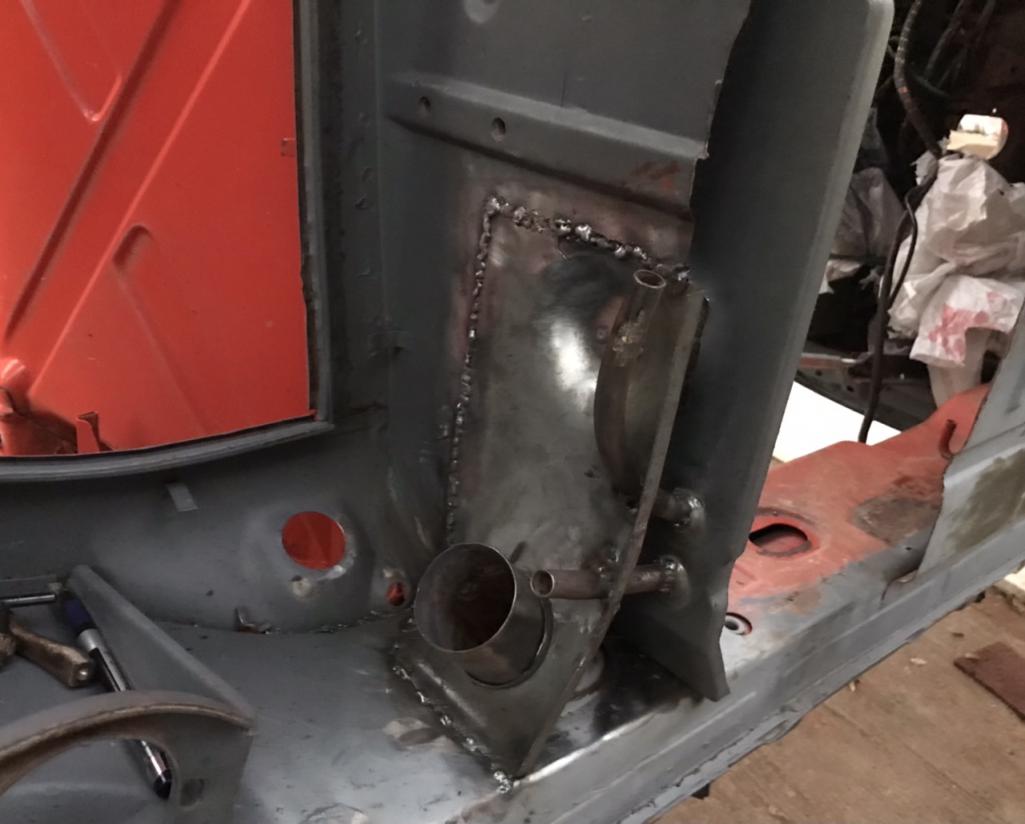
Posted by: Literati914 Sep 12 2021, 09:53 AM
…I’ll go back and dress the weld and make things look better later..
Attached thumbnail(s)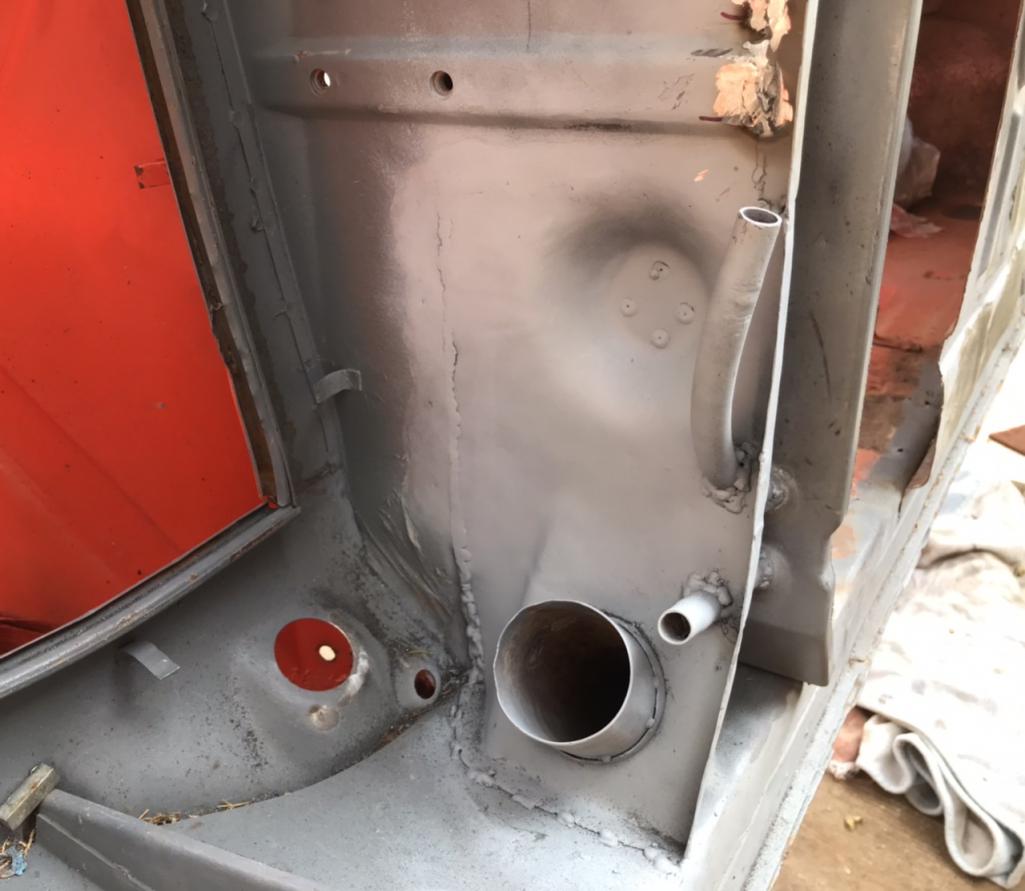
Posted by: Literati914 Sep 12 2021, 10:14 AM
Ok so I’ve realized that when I retacked the clutch tube in place, that it was not in the right place.. it’s too far inward and not sticking out into the engine compartment enough. There is a bracket midways thru the tunnel that has broken loose and I will need to repair. I can see a brass ring around the clutch tube where it should meet the firewall (see the arrow in the pic). I will repair the inner tunnel bracket later. So ive cut the FW around the clutch tube, cleaned up the tube and will be correcting the tubes placement. Glad to do this cause those welds around the tube were kinda crappy looking.
Attached thumbnail(s)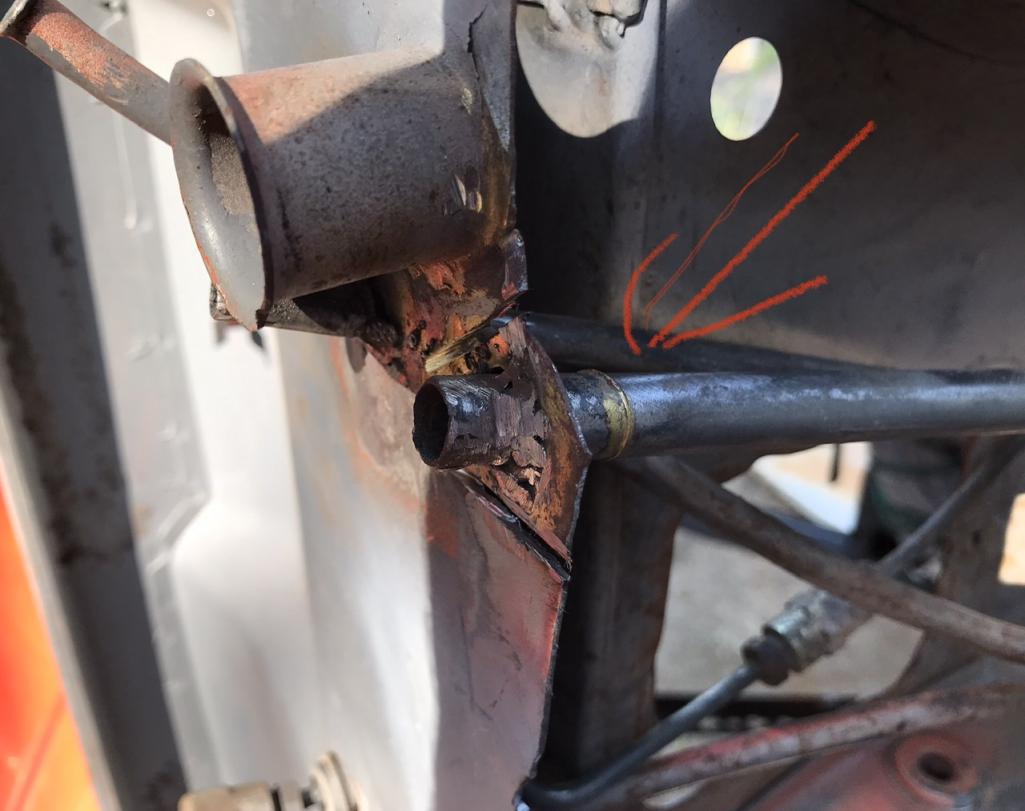
Posted by: Literati914 Sep 12 2021, 10:16 AM
…tube released
Attached thumbnail(s)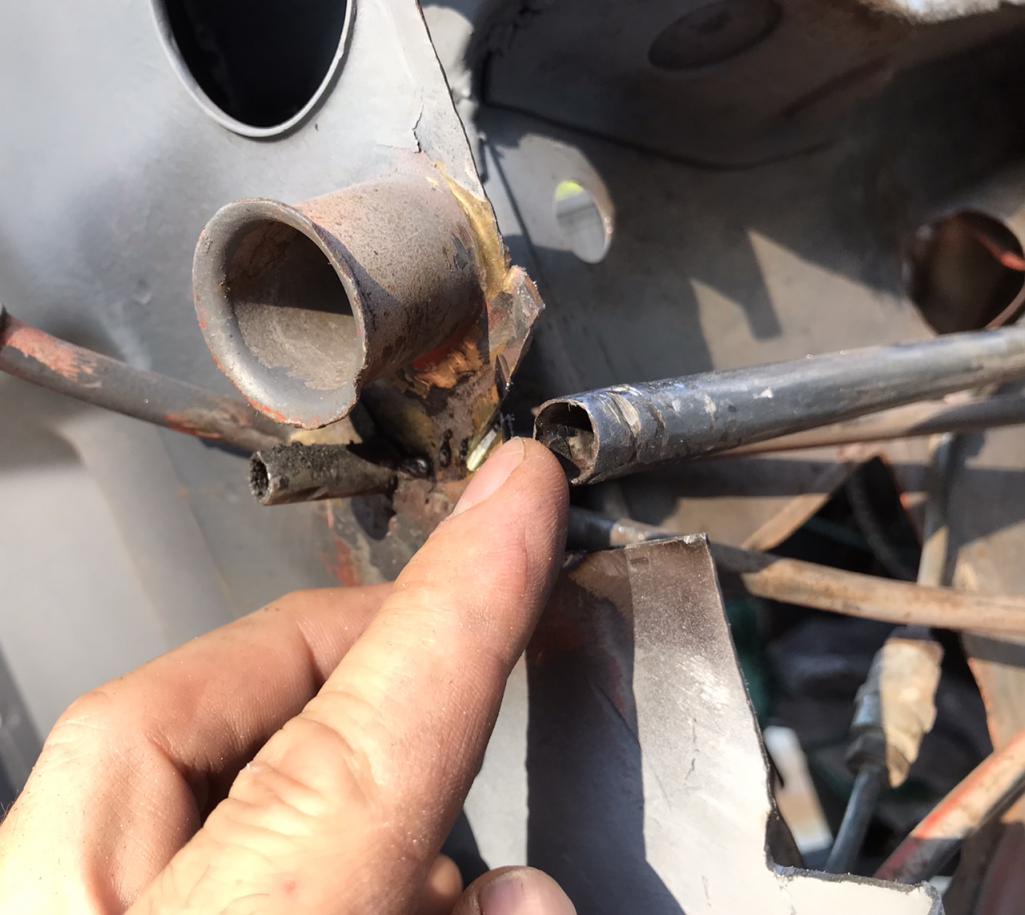
Posted by: Literati914 Sep 12 2021, 10:18 AM
.. and cleaned
Attached thumbnail(s)
Posted by: Literati914 Sep 12 2021, 10:31 AM
And a shot showing the remaining gap that needs filling on the firewall.
Attached thumbnail(s)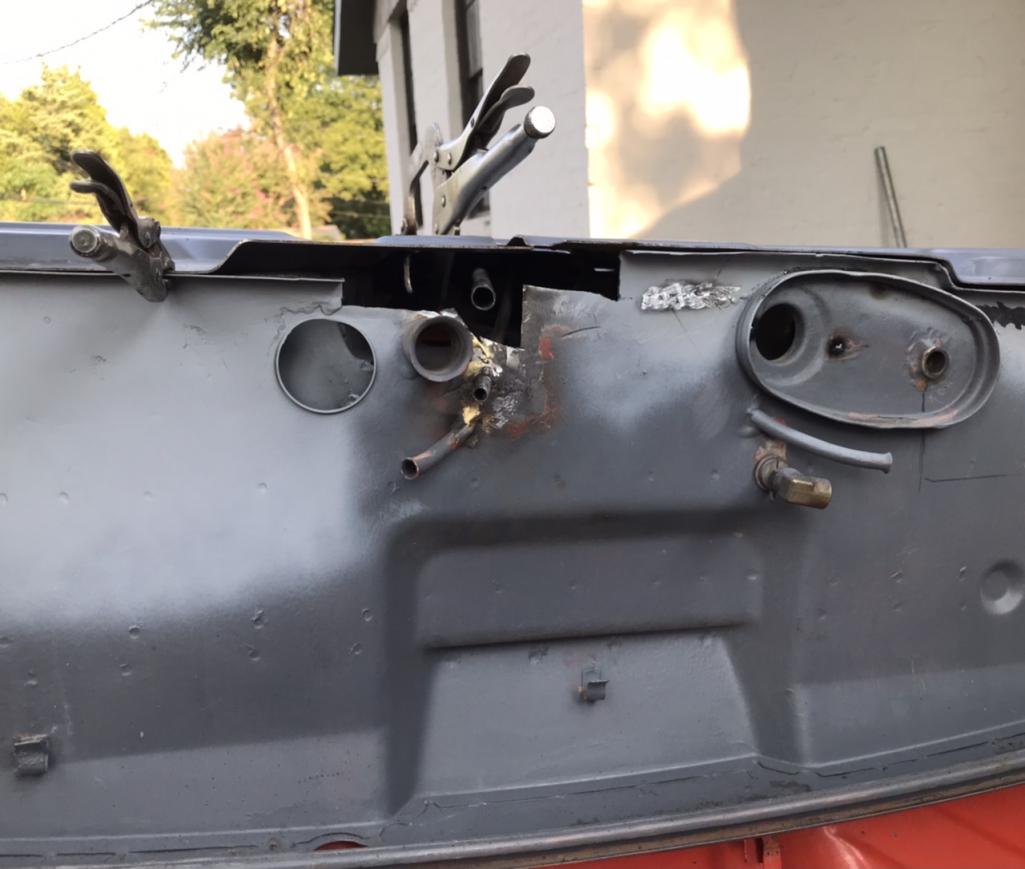
Posted by: Literati914 Sep 12 2021, 10:42 AM
Fabricated a panel and tacked it in.. in this pic the clutch tube is loose in its hole so it can be adjusted outward later.
Attached thumbnail(s)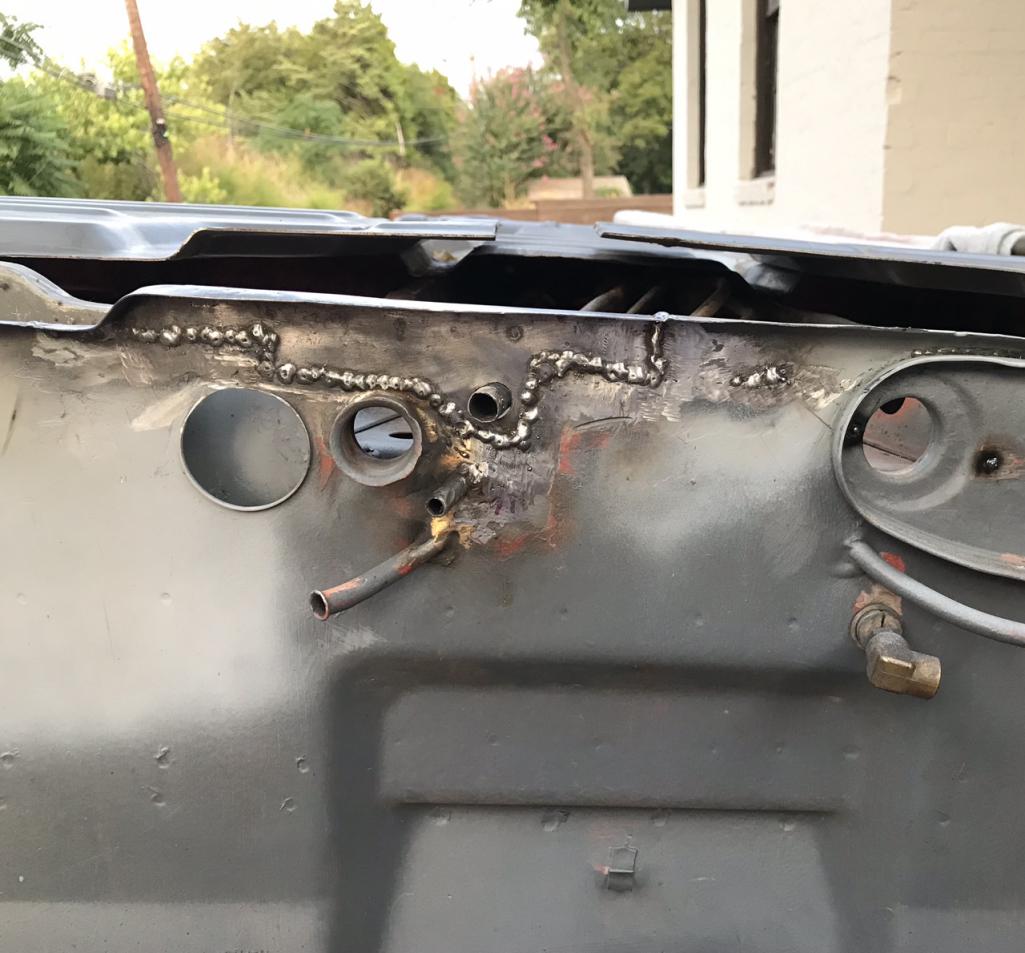
Posted by: Literati914 Sep 12 2021, 11:23 AM
Spitz called himself helping, but honestly didn’t really do much… 
Attached thumbnail(s)
Posted by: Literati914 Sep 12 2021, 06:27 PM
Welds knocked down and lightly primed
Attached thumbnail(s)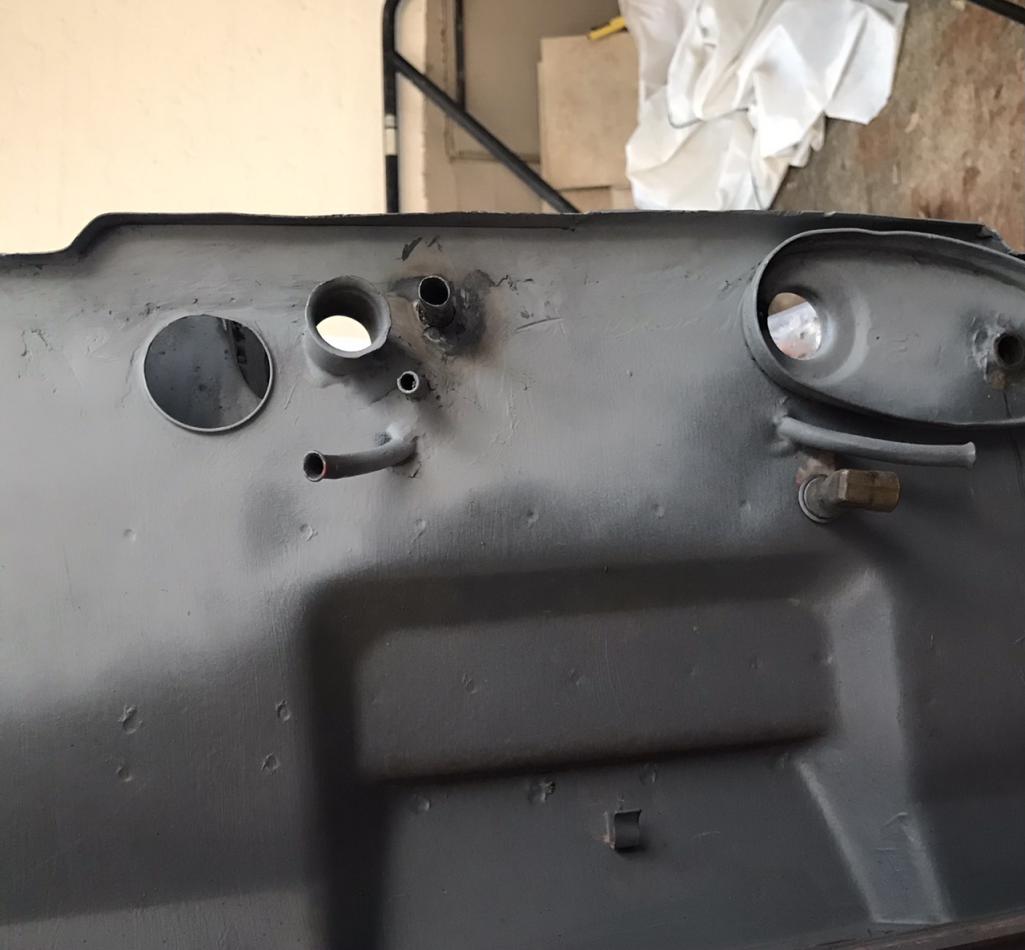
Posted by: Literati914 Sep 12 2021, 06:31 PM
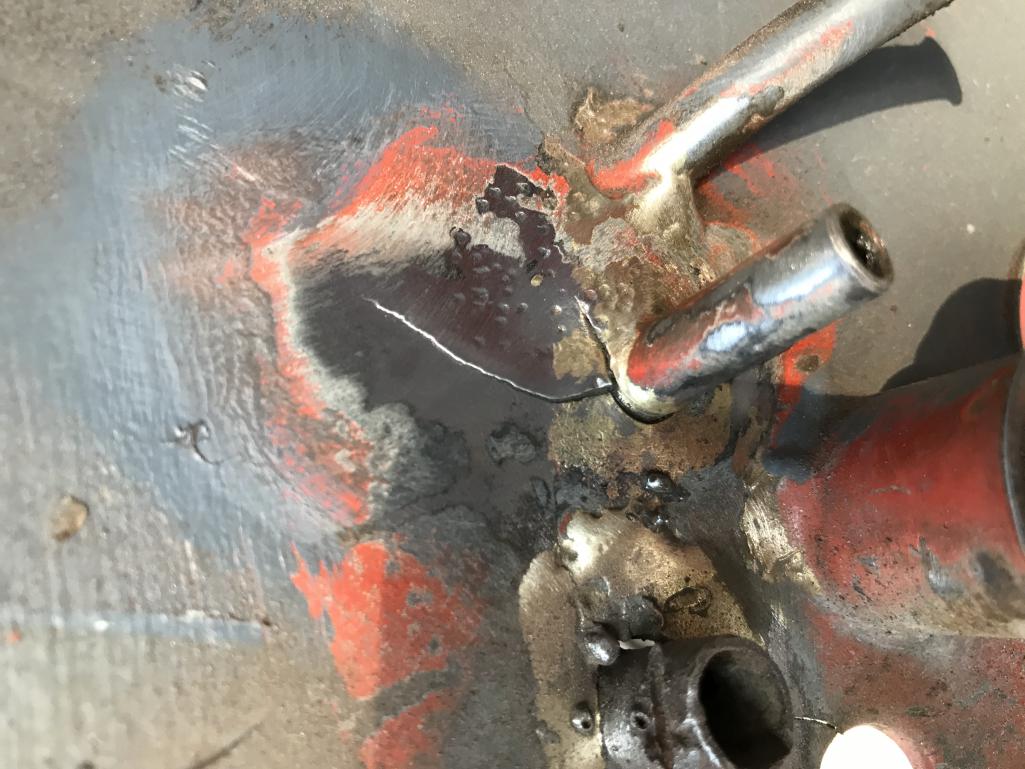
Now to tackle the loose clutch tube bracket midway down the tunnel.. in this pic a small section of the tunnel has been peeled back and my pen is pointing to where the bracket snapped, and pulled the tube towards the front of the car.[attachmentid=807527]
Posted by: Literati914 Sep 12 2021, 06:31 PM
Now to tackle the loose clutch tube bracket midway down the tunnel.. in this pic a small section of the tunnel has been peeled back and my pen is pointing to where the bracket snapped, and pulled the tube towards the front of the car.[attachmentid=807527]
Attached thumbnail(s)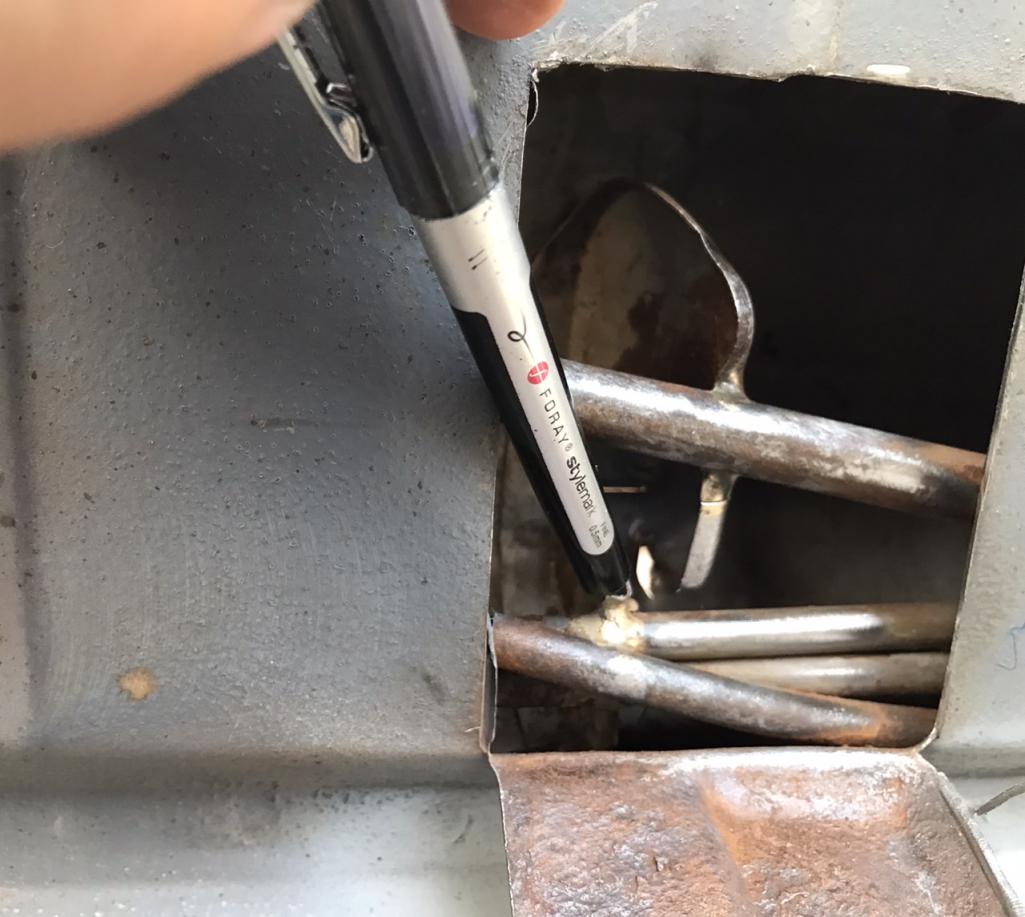
Posted by: Literati914 Sep 12 2021, 06:36 PM
Bracket realigned and rewelded… I didn’t shoot a pic but I rewelded the tube to the inside of the rear firewall, the correct length exposed now. All is VERY solid! Well, I will need to address the typical clutch tube repair at the front of the tunnel, but that’s for later..
Attached thumbnail(s)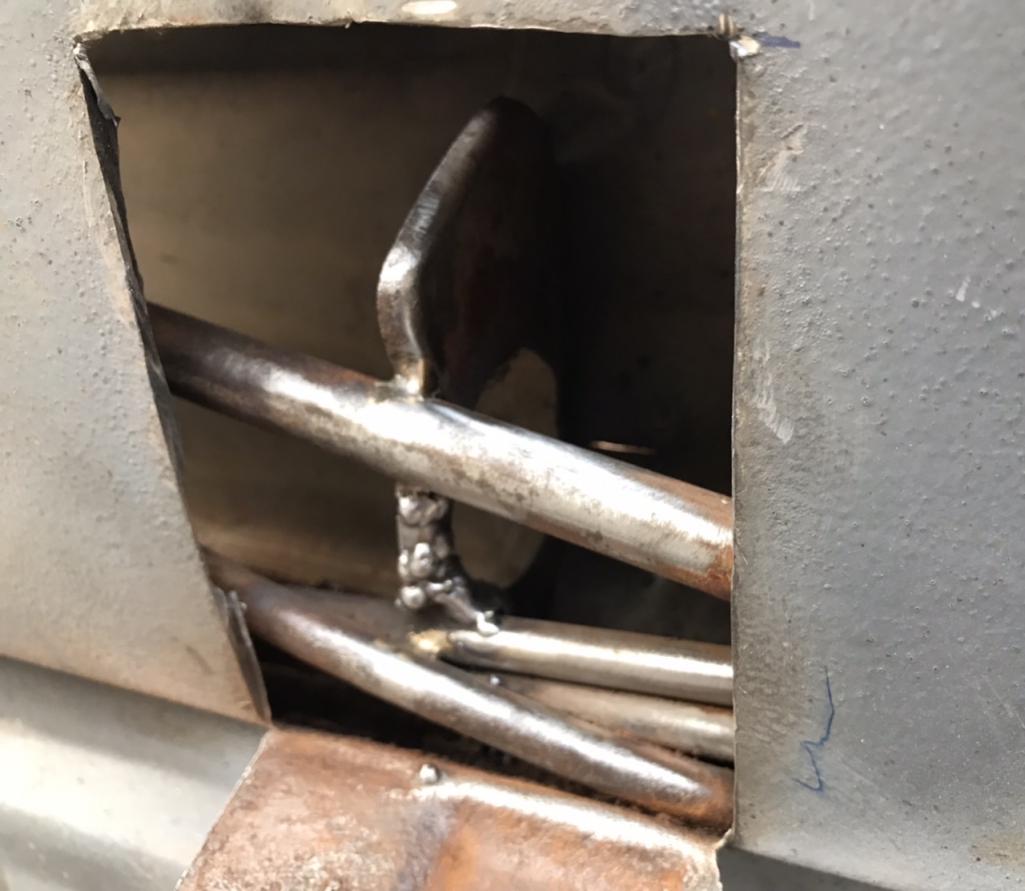
Posted by: Literati914 Sep 12 2021, 06:36 PM
Closed up, worked down and lightly primed
Attached thumbnail(s)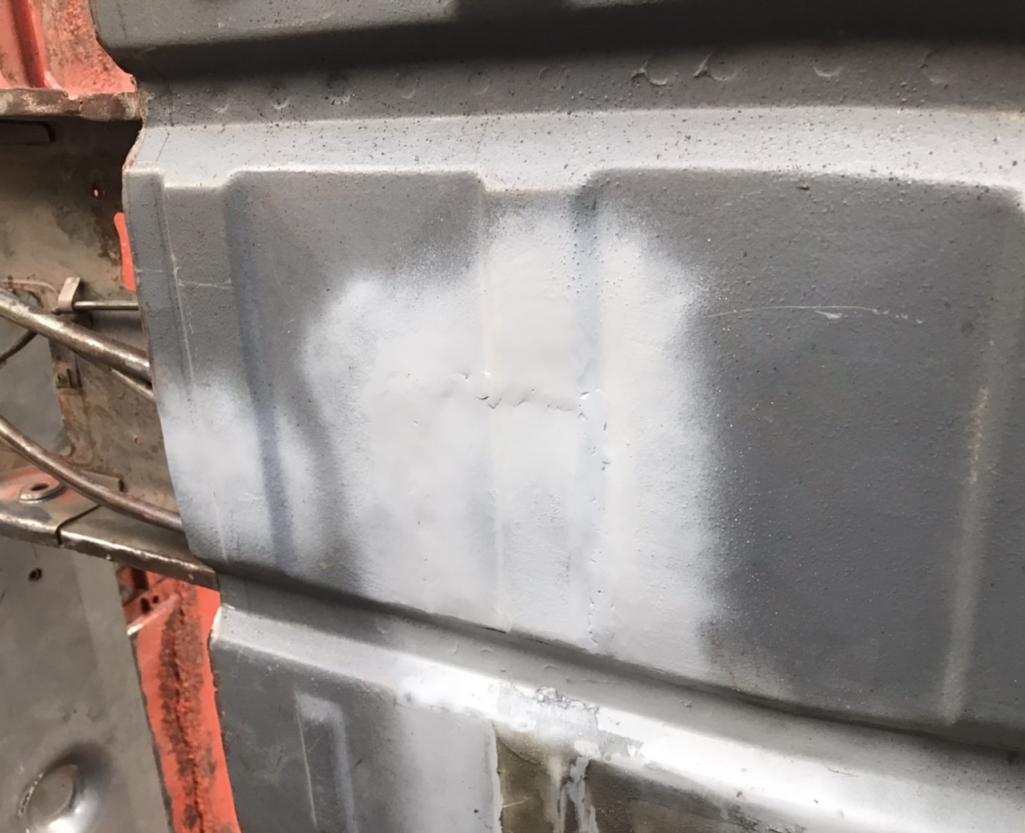
Posted by: bkrantz Sep 12 2021, 07:17 PM
Nice.
One step at a time.
Posted by: ClayPerrine Sep 13 2021, 12:09 PM
This is amazing work. I so need to come see it in person.
Clay
Posted by: Literati914 Sep 13 2021, 03:13 PM
Thanks guys! Clay I look forward to having you out at some point.. want to show you my Volvo 1800E too, it’s shoe-horned in between the house and the fence at the moment tho.
I got around to thoroughly coating the interior of the tunnel, the area between the rear firewalls, and longs (as much as possible) - with Eastwood’s Internal Frame paint.
Attached thumbnail(s)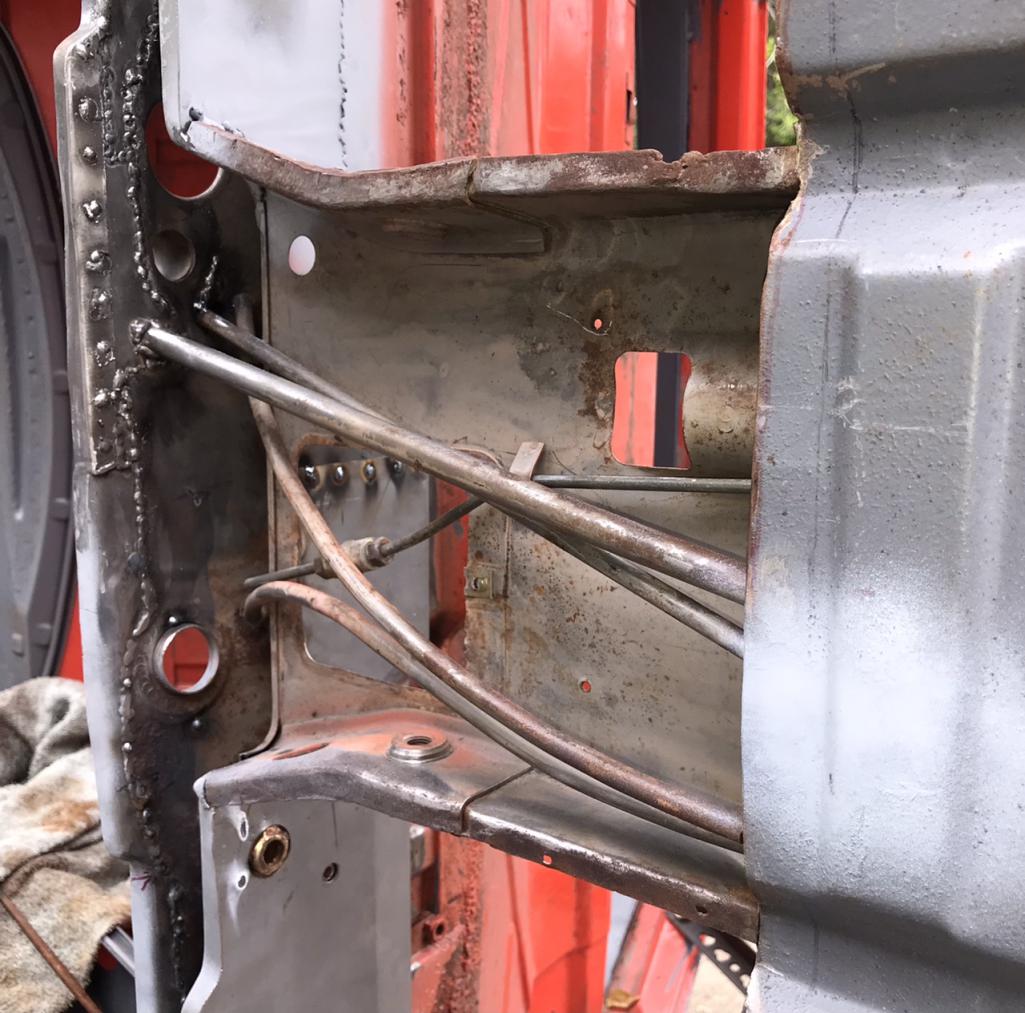
Posted by: Literati914 Sep 13 2021, 03:19 PM
I attached the flexible nozzle to a long flexy thin rod which was helpful in getting the paint where it needed to be. The nozzle sprays the paint in a radial fan pattern.
Attached thumbnail(s)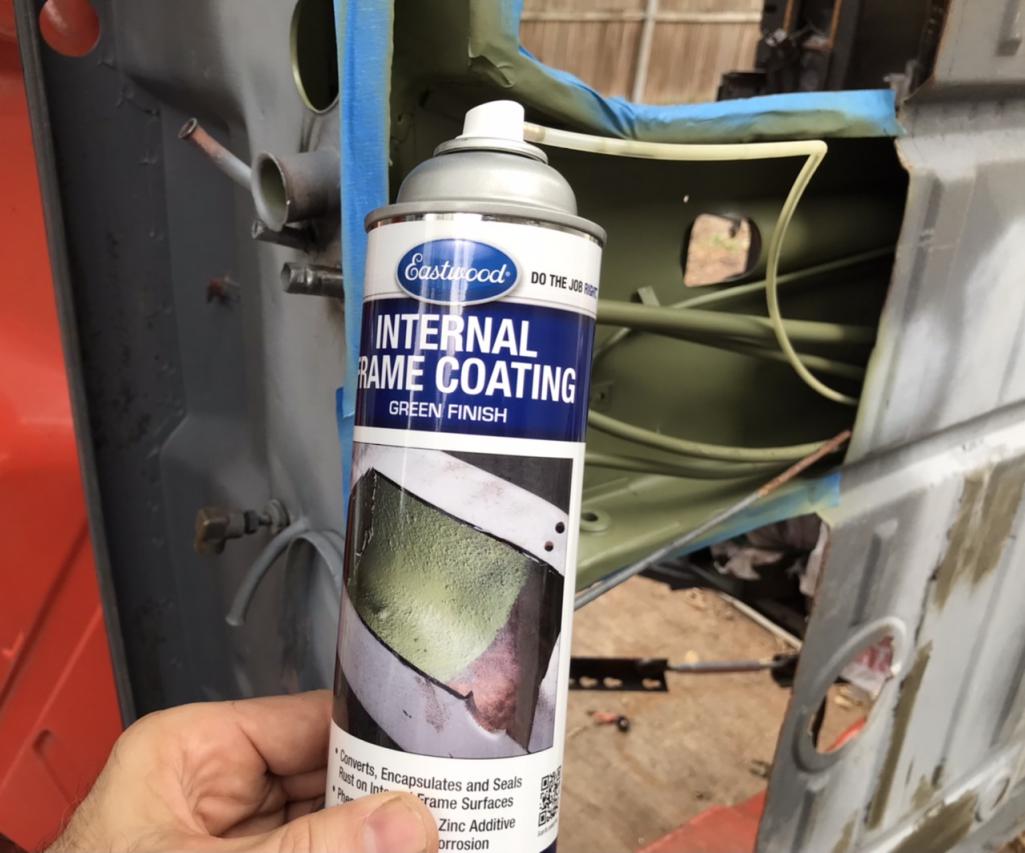
Posted by: Literati914 Sep 13 2021, 03:20 PM
Done
Attached thumbnail(s)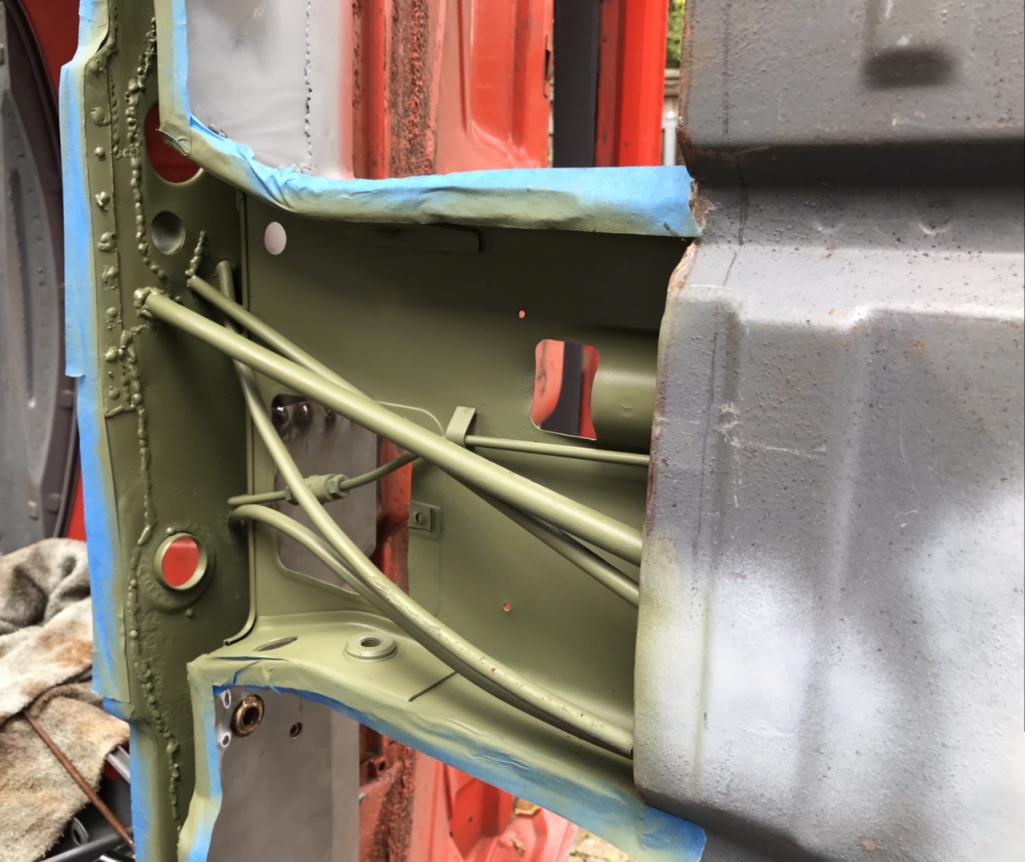
Posted by: Literati914 Sep 13 2021, 03:24 PM
I’ve got this stuff running out of the longs but could only do so much with the heater tubes installed. Still though I think I got it in the most significant areas, around where the firewalls intersect. Here’s the tunnel, topside.
Attached thumbnail(s)
Posted by: Literati914 Sep 13 2021, 06:07 PM
Wanted to polish off a bottle .. no, not that kinda bottle - welding gas! So I did some preventative work to the hinge brackets, both sides (engine lid to body).
Attached thumbnail(s)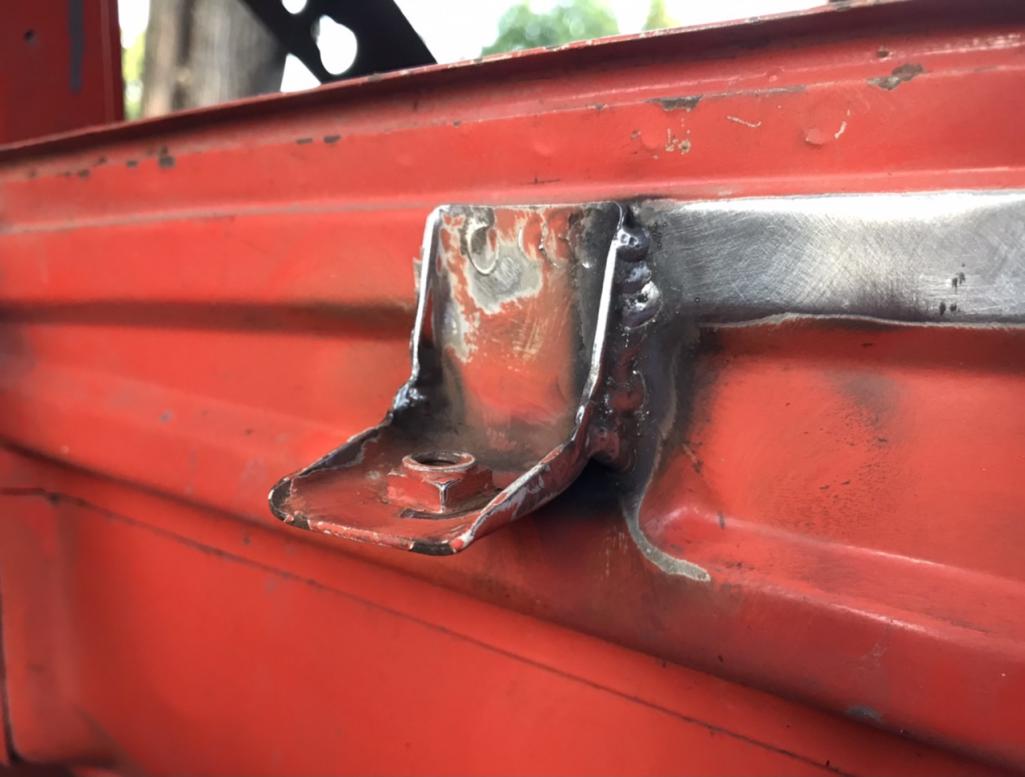
Posted by: Literati914 Sep 13 2021, 06:10 PM
Does anyone know if there is a reference measurement for the rear deck lid hinge mount… mine as all over the place on the passenger’s side. Looks like it’s been moved a couple of times and I want to weld it in, get rid of those screws .. take a look and advise please:
Attached thumbnail(s)
Posted by: ClayPerrine Sep 14 2021, 06:50 AM
Does anyone know if there is a reference measurement for the rear deck lid hinge mount… mine as all over the place on the passenger’s side. Looks like it’s been moved a couple of times and I want to weld it in, get rid of those screws .. take a look and advise please:
I am NOT a body man, I pay to have this done. But I was told by Richard Fisher that he puts the hinges on the lid and puts the lid in place, with the seal, then he tacks the hinge in place. That way everything fits correctly before the welding is done.
Hope that helps.
Clay
Posted by: Literati914 Sep 14 2021, 10:23 AM
Yes that makes perfect since, thanks!
.
Posted by: Literati914 Sep 27 2021, 07:41 PM
Rusted through areas of the floor and firewalls are officially replaced. We have fresh clean metal there and buttoned up now - feels like a bit of a milestone.
I used the internal frame paint (shown earlier) as weld thru primer between the floor and tunnel/firewall sections, which is high in zinc and worked out great. I welded these panels on the outside of the car as well as the inside.. probably over kill but at least I can say it’s thoroughly done.
Attached thumbnail(s)
Posted by: Literati914 Sep 27 2021, 07:43 PM
In process
Attached thumbnail(s)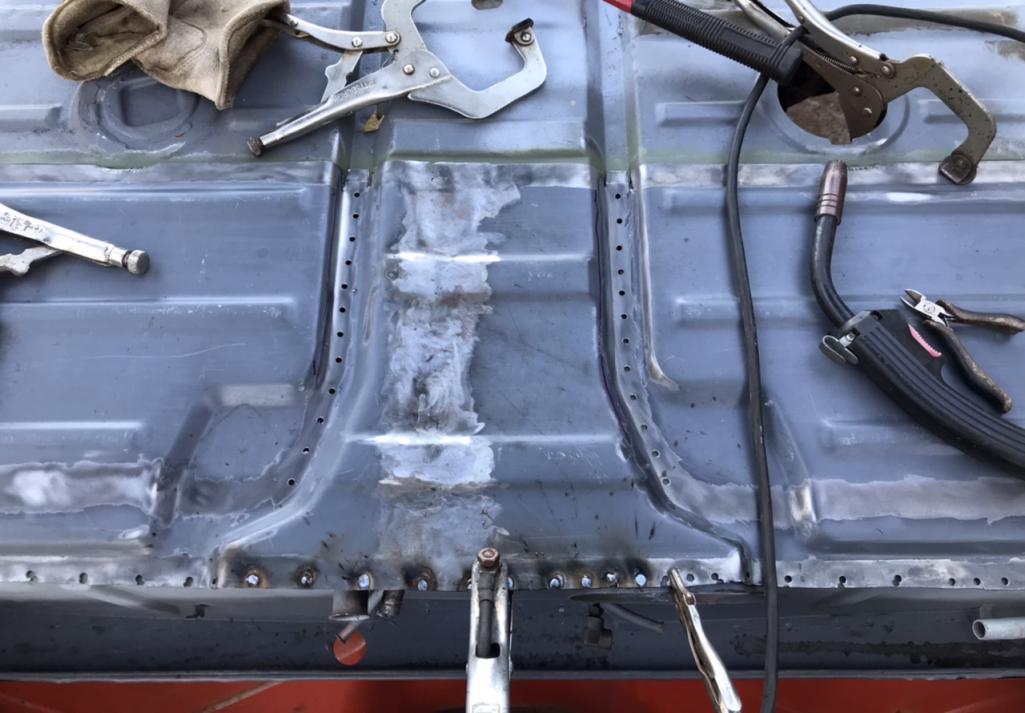
Posted by: Literati914 Sep 27 2021, 07:44 PM
.. and completed - I’ve got solid floors again !!
Attached thumbnail(s)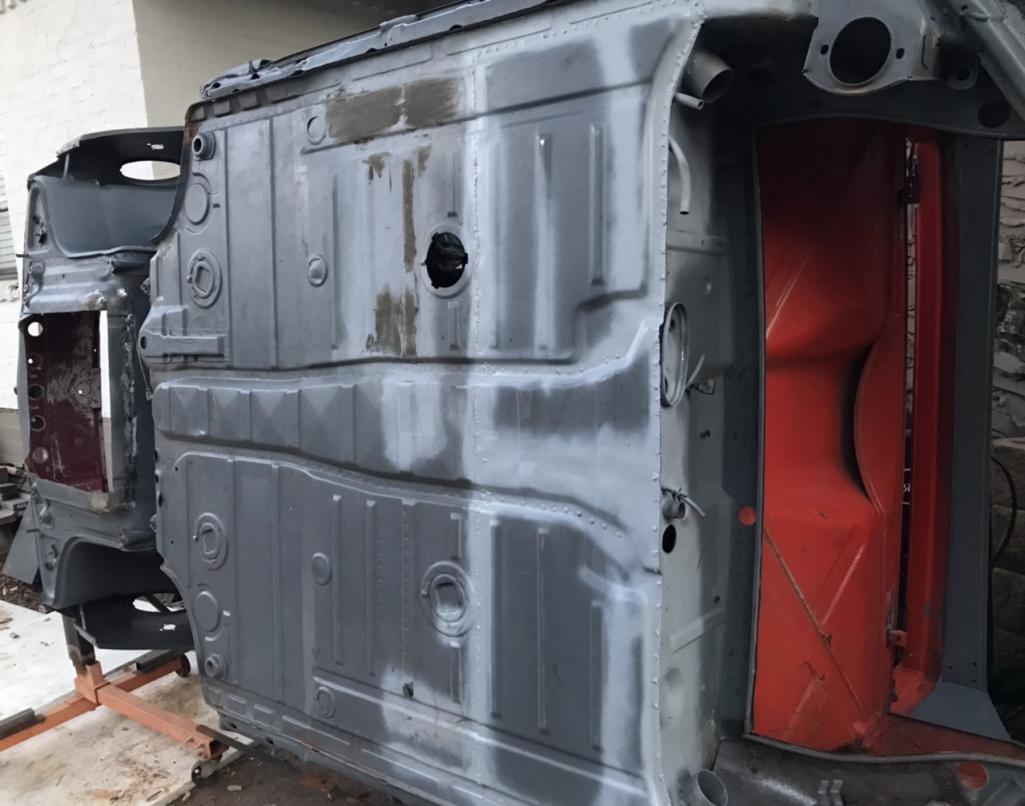
Posted by: mbseto Sep 28 2021, 06:54 AM
Good persistence, good looking progress!
Posted by: Literati914 Sep 28 2021, 07:00 PM
Good persistence, good looking progress!
Thanks, I set myself a paint date goal of mid- October.. so that’s my motivation as of late.
Ok so I installed the external seat supports .. coated the internal side with internal frame paint.
Attached thumbnail(s)
Posted by: Literati914 Sep 28 2021, 07:01 PM
Here it is all buttoned up:
Attached thumbnail(s)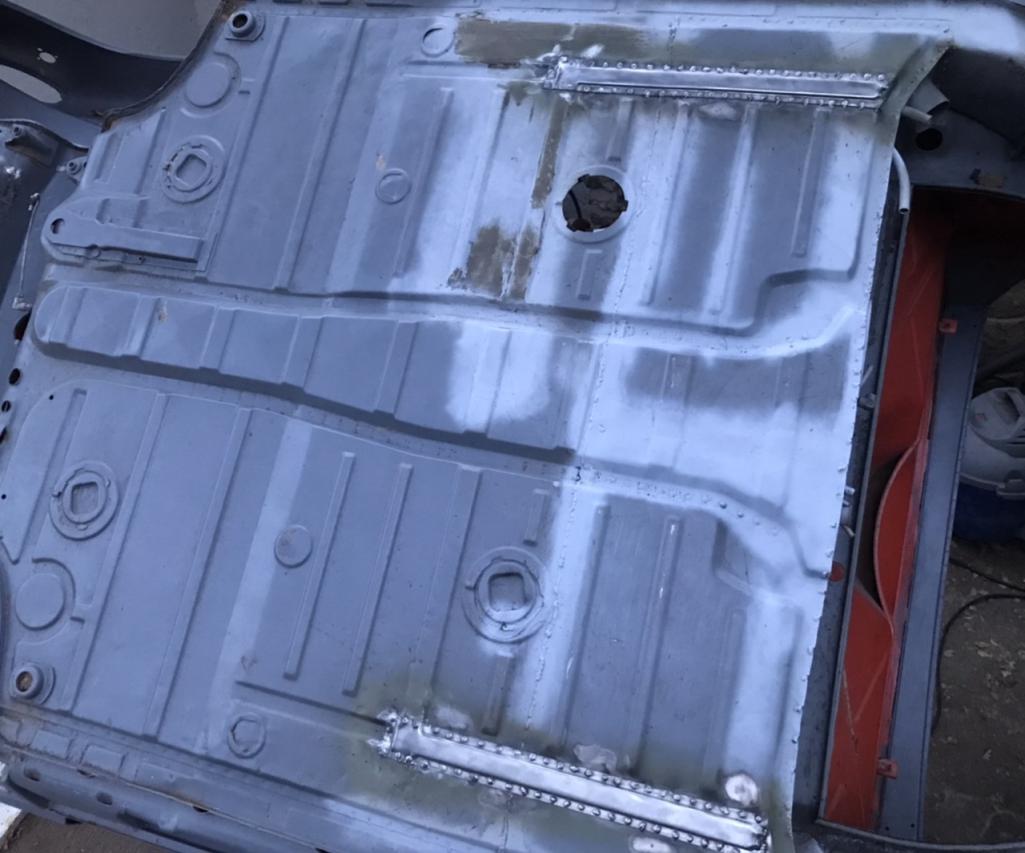
Posted by: Literati914 Sep 30 2021, 06:51 PM
Got a couple small items checked off the list
The little bracket that holds the long parking brake cable.. I finally figured out where exactly it mounts but honestly I kind of just guessed at which direction it was supposed to sit (couldn’t find a clear pic, but pretty sure this will work)
Attached thumbnail(s)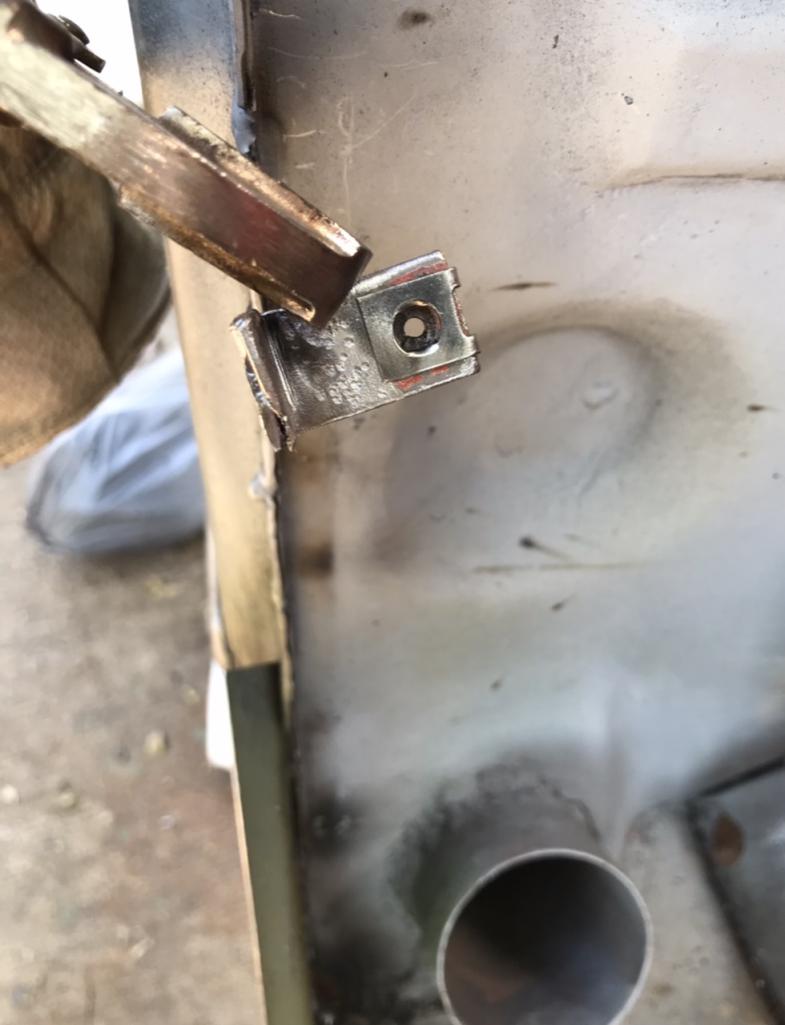
Posted by: Literati914 Sep 30 2021, 06:52 PM
Installed :
Attached thumbnail(s)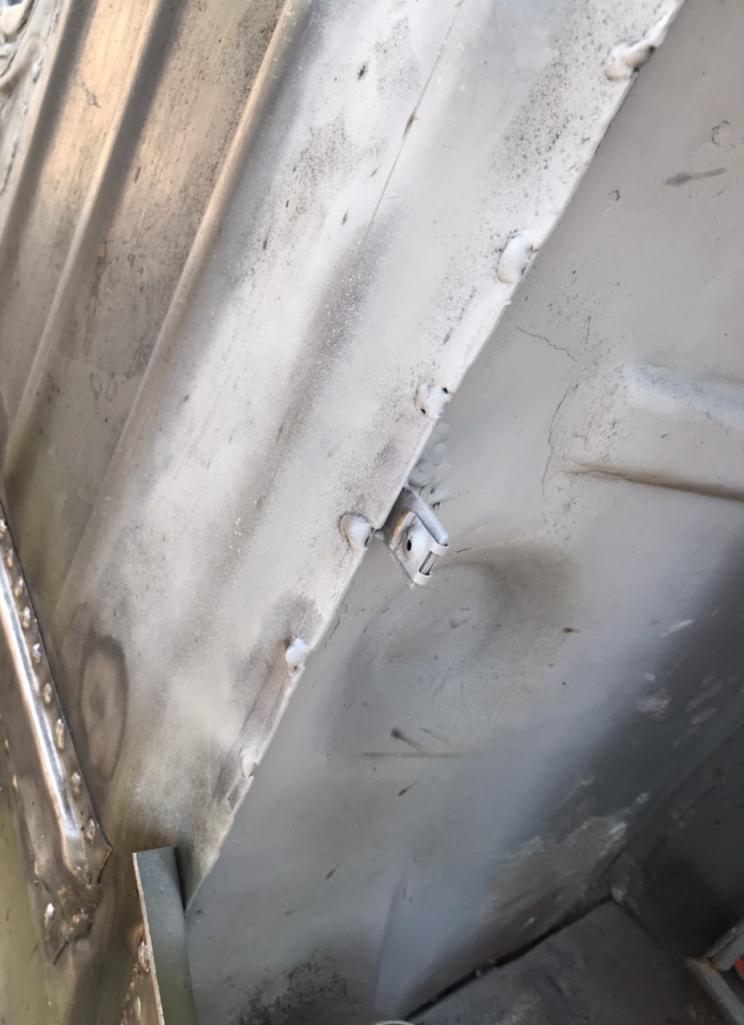
Posted by: Literati914 Sep 30 2021, 06:54 PM
Next I fabbed up a little support bracket for the tube (of the long parking brake):
Attached thumbnail(s)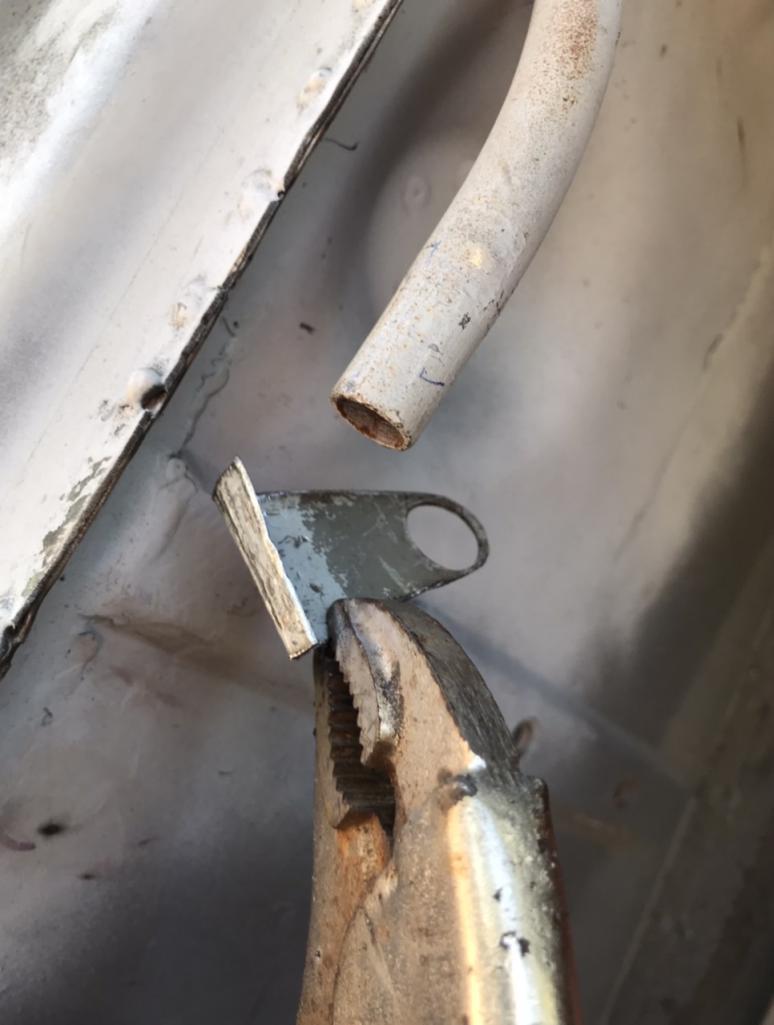
Posted by: mb911 Sep 30 2021, 06:54 PM
Well you did better than I. I forgot all together to put them on my car.
Posted by: Literati914 Sep 30 2021, 06:56 PM
.. and got that installed:
Attached thumbnail(s)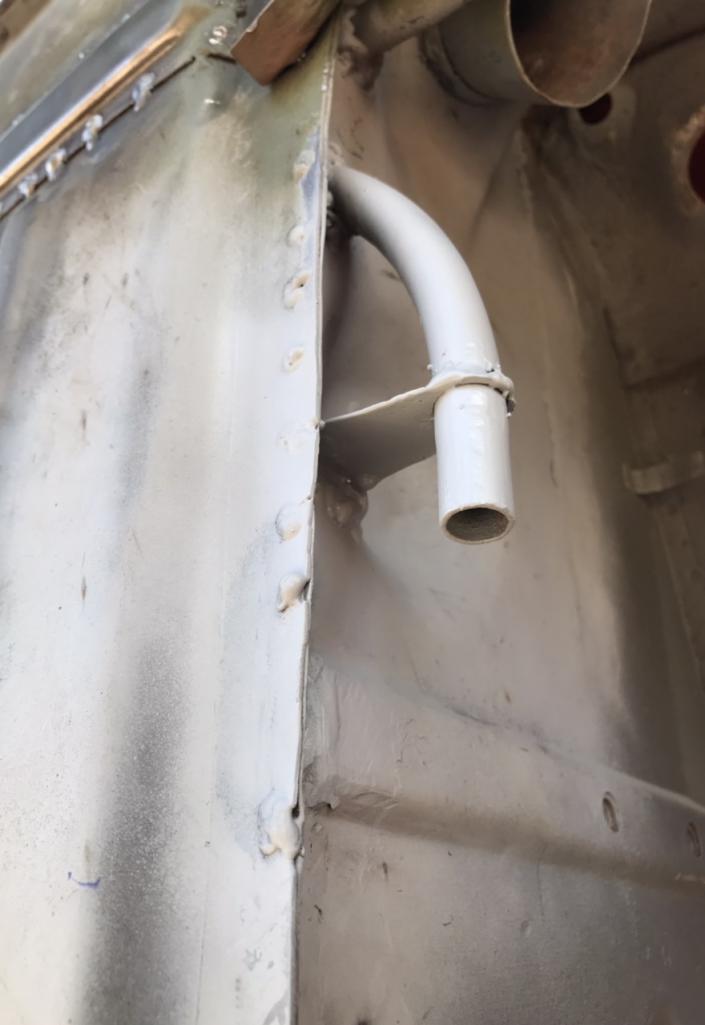
Posted by: Literati914 Sep 30 2021, 06:58 PM
.. then it was on to that pesky PS rear hinge (rear trunk lid), had to repair the bracket first:
Attached thumbnail(s)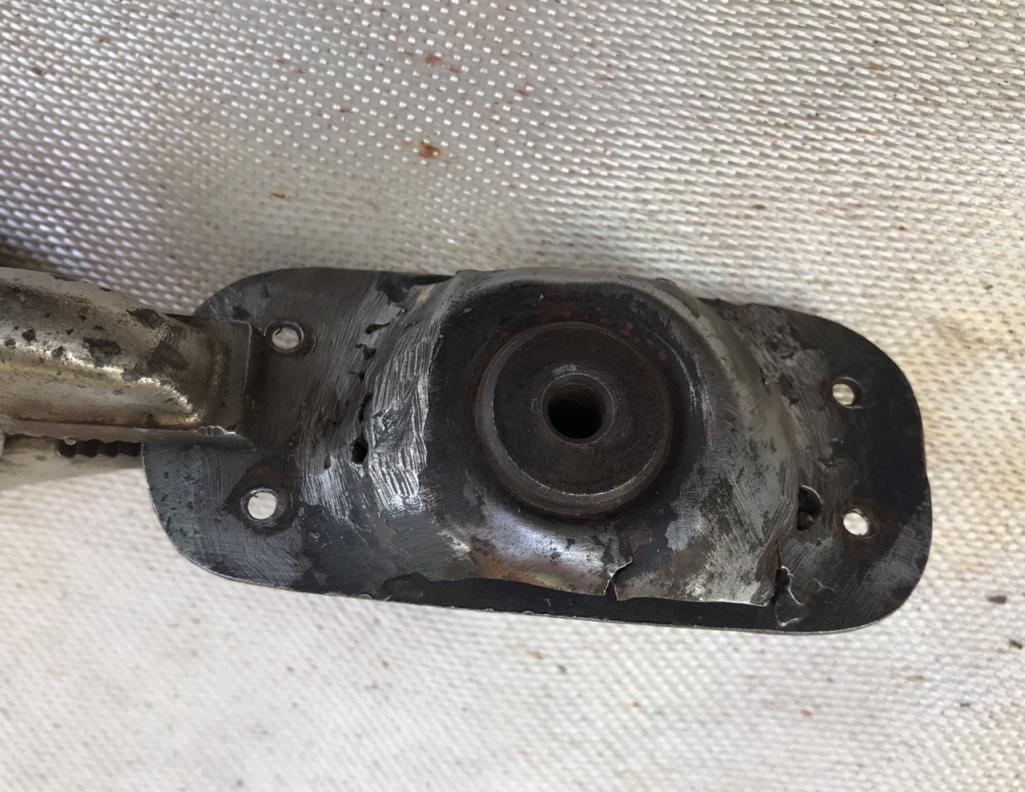
Posted by: Literati914 Sep 30 2021, 07:00 PM
Got it measured out and located properly before welding it into place:
Attached thumbnail(s)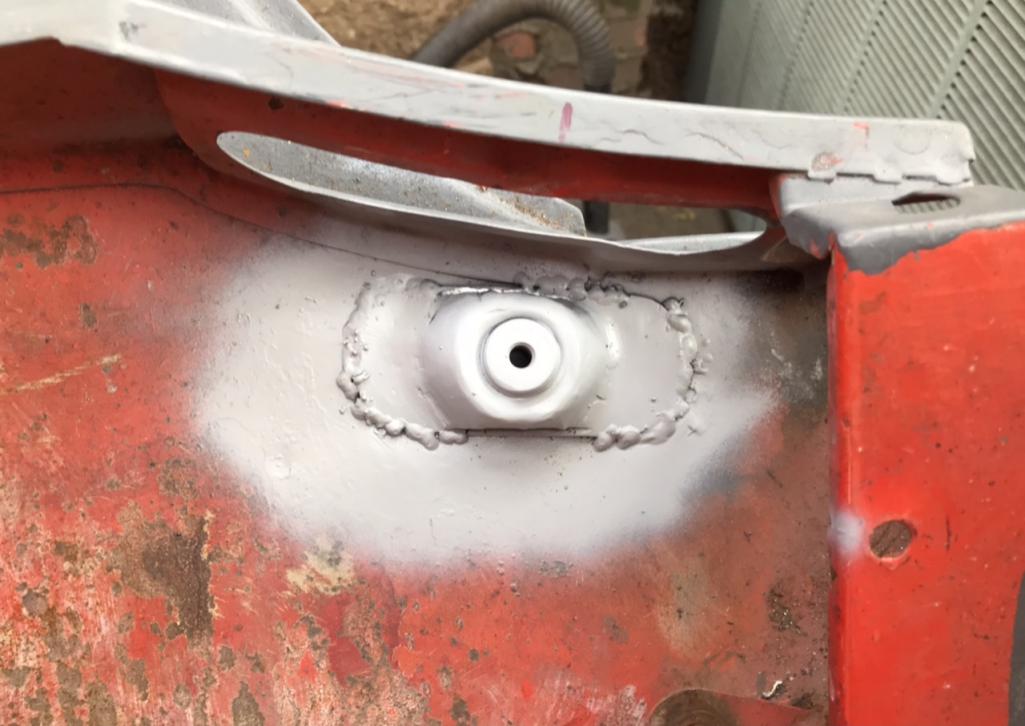
Posted by: Literati914 Sep 30 2021, 07:05 PM
The bigger accomplishment tho, was getting the corner brackets (w/ jack donuts) installed. Before:
Attached thumbnail(s)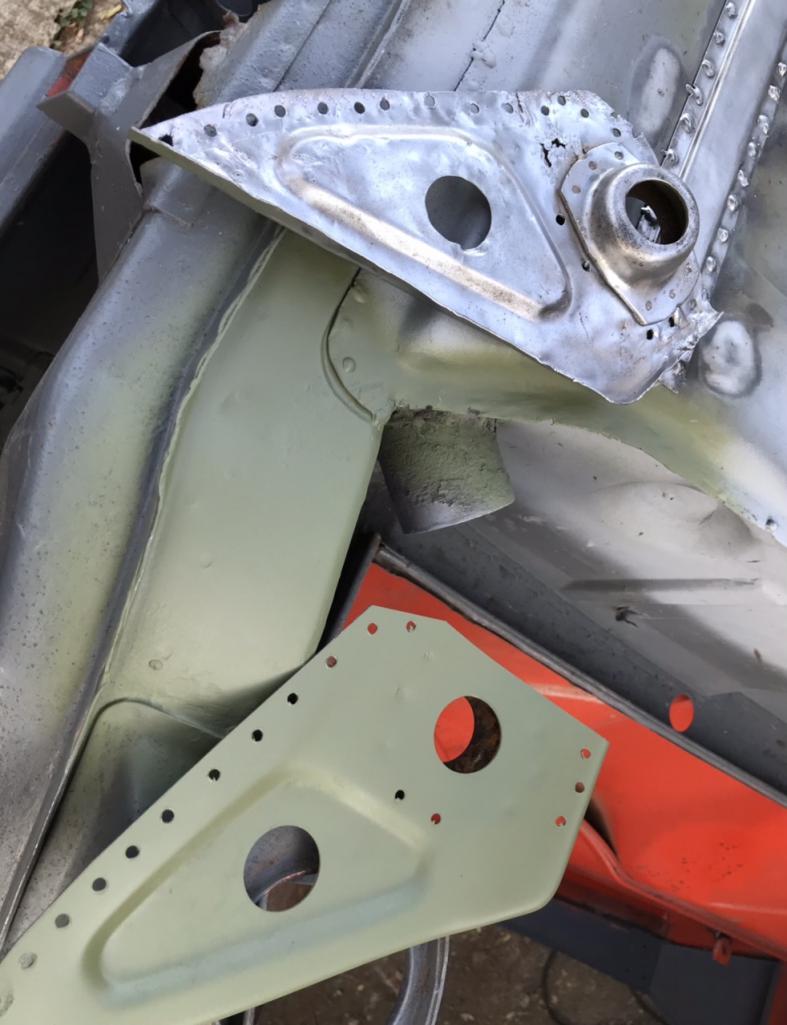
Posted by: Literati914 Sep 30 2021, 07:07 PM
Installed… I reused the DS one so it’s not as pretty but is definitely solid :
Attached thumbnail(s)
Posted by: Literati914 Oct 2 2021, 07:26 PM
Been wet for a couple days but I was able to get out and weld up those annoying factory placed openings in the floor. These -
Attached thumbnail(s)
Posted by: Literati914 Oct 2 2021, 07:27 PM
After..
Attached thumbnail(s)
Posted by: Literati914 Oct 2 2021, 07:30 PM
.. next I’ll be patching the huge hole in the frunk floor (ac condenser). AC is actually gonna be a must, but since this car is slated for a Suby engine, that huge floor opening needs to go. Stay tuned..
Posted by: nivekdodge Oct 2 2021, 07:42 PM
I Have the same issue. Im thinking of making a plate that bolts in with reinforcement around it
Posted by: Literati914 Oct 2 2021, 08:24 PM
I Have the same issue. Im thinking of making a plate that bolts in with reinforcement around it
My other 914 project car (a future build) has a generic plate of steel attached under where the opening was for a condenser… it’s all painted up nicely, but I hate the look of the generic steel plate tbh. If I was keeping that car non-ac I’d have to rip that plate patch out and source a proper replacement. But luckily the car will have ac too - and I have a condenser box for it. BTW, the replacement panel that I’m using on my current project is stock material cut out of a scrapped 914, was much cheaper than new but did have a couple small rust holes to repair.. no biggie tho.
Posted by: Literati914 Oct 3 2021, 06:41 PM
Frunk floor replacement panel ready to install.. it’s a repurposed piece obviously and is crusty but very solid - looks worse than it is. I’ll go back and clean it up later when I address the area for paint:
Attached thumbnail(s)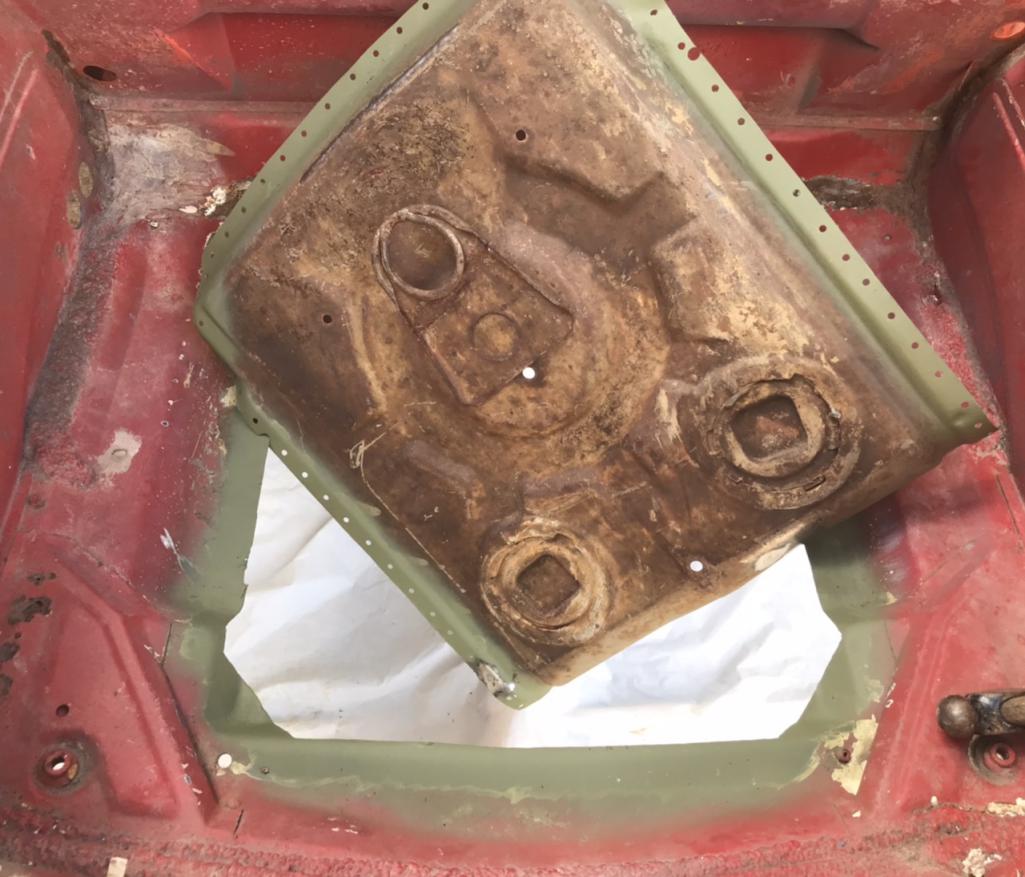
Posted by: Literati914 Oct 3 2021, 06:43 PM
.. not my best welds, as I had trouble chasing good grounds the whole time. All old metal - go figure 
Attached thumbnail(s)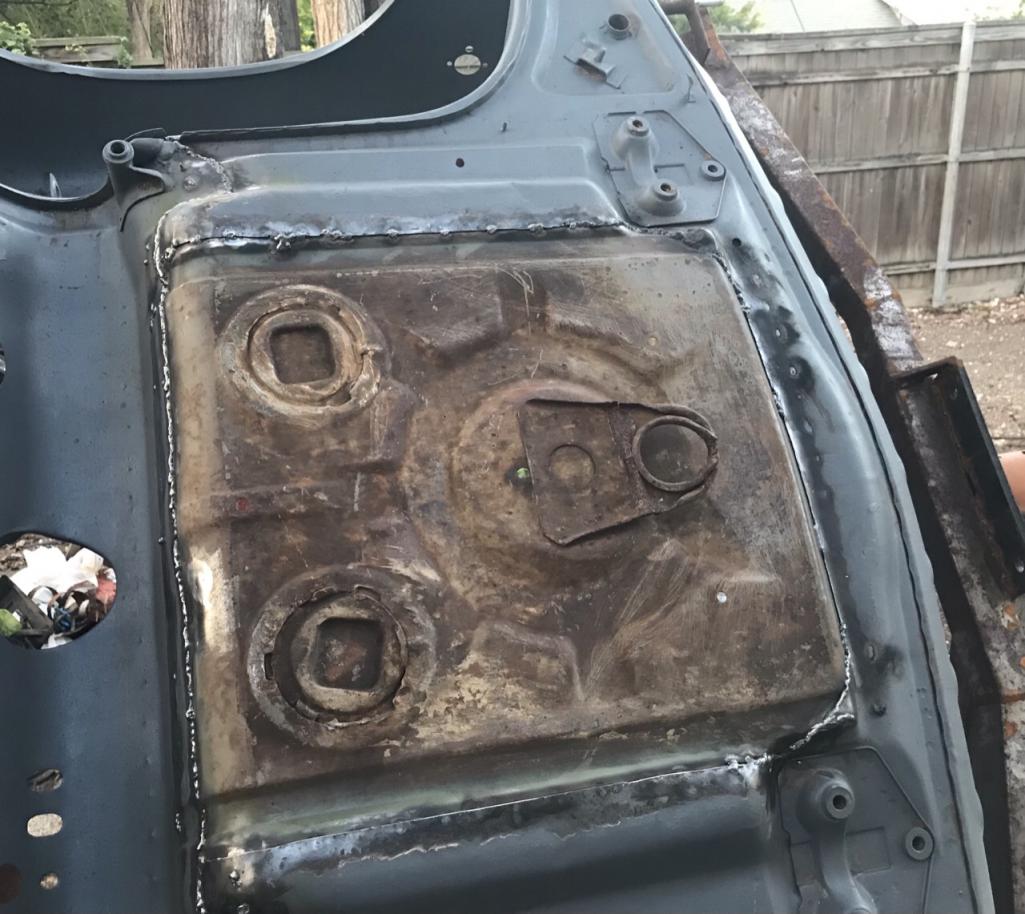
Posted by: Literati914 Oct 3 2021, 06:44 PM
.. the inside side  , I’ll go back and seem seal it at some point.
Attached thumbnail(s)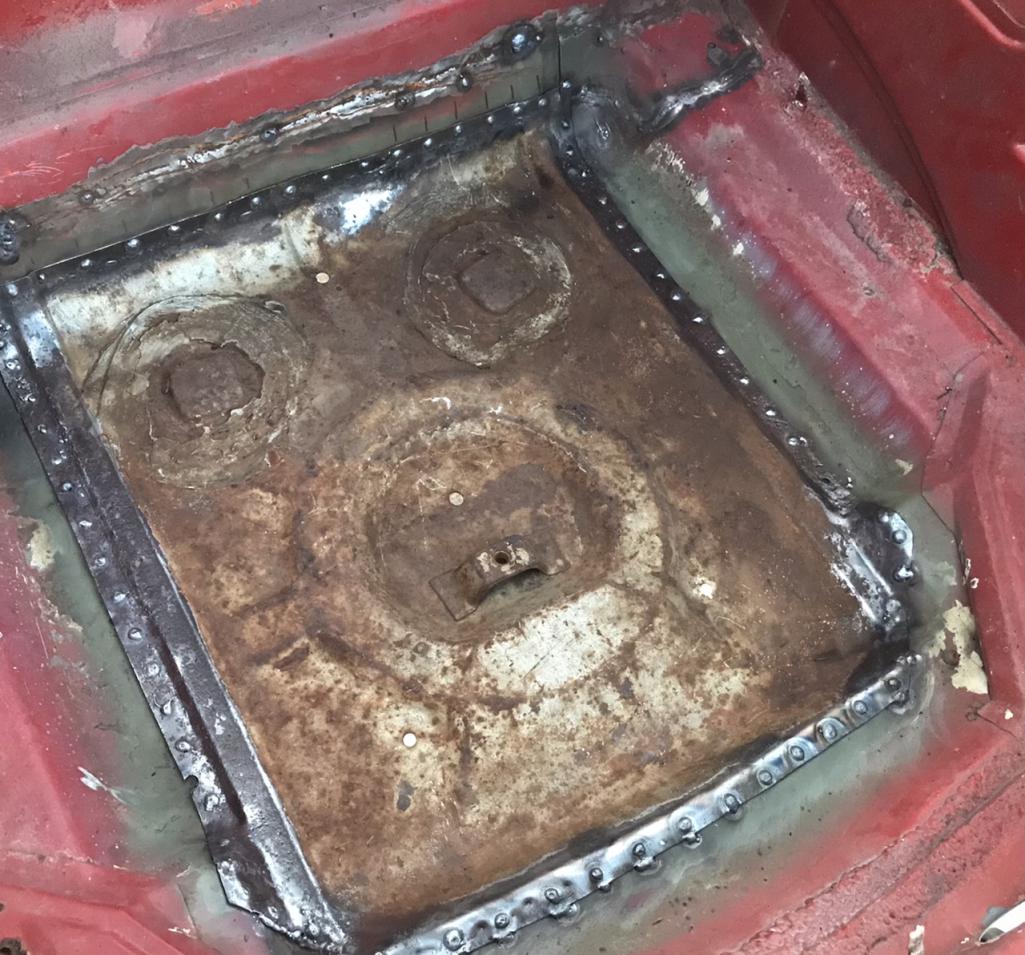
Posted by: Literati914 Oct 5 2021, 08:04 PM
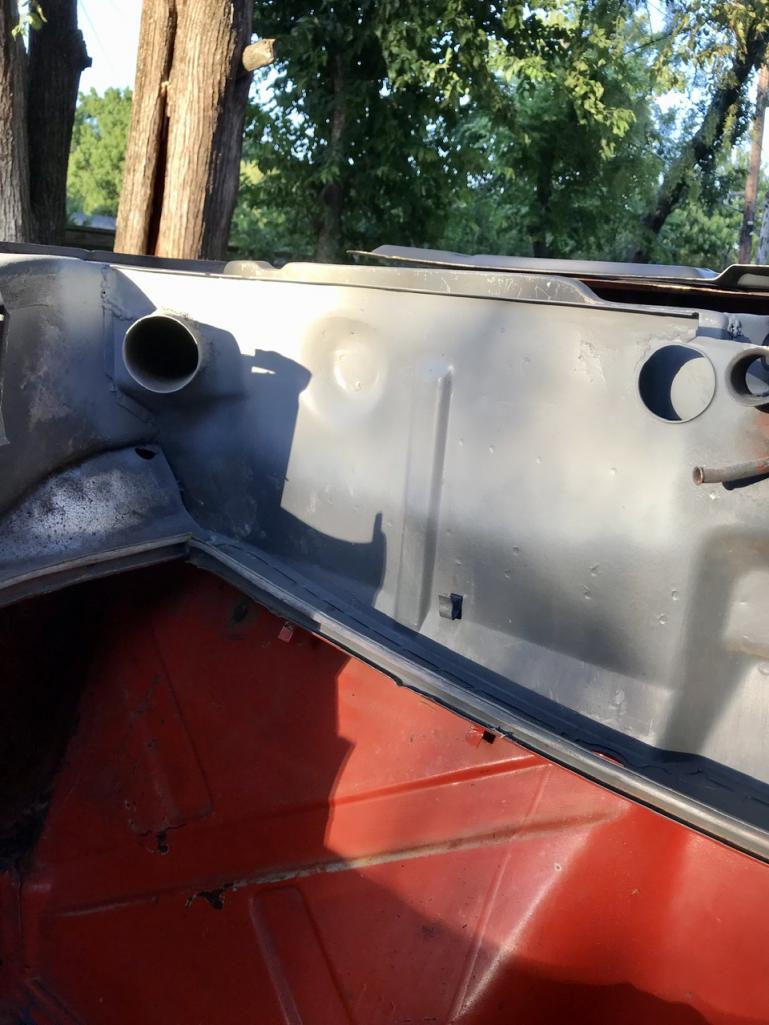
This next issue is a doozy… this car was in a front end accident in its previous life and the geniuses that made the repair, decided to graft a front section (of another 914) on in such a way that the seal channels (from the doner) we’re sitting down inside the old seal channels, and lightly tacked in . This caused all kinds of issues… not the least of which was that the seals no longer would sit low enough for the frunk lid to close properly. So I’m in the process of reversing this - ive cut away the excess doner metal in the channel and the excess original metal and am welding them together to correct the height and hood alignment issues. In the following pic you can see a long cut where my pen is pointing- doner metal on the left, original on the right. Then below that, of course you can see a section of missing metal - where rust ate thru because of the over-lap of the “repair”.
Attached thumbnail(s)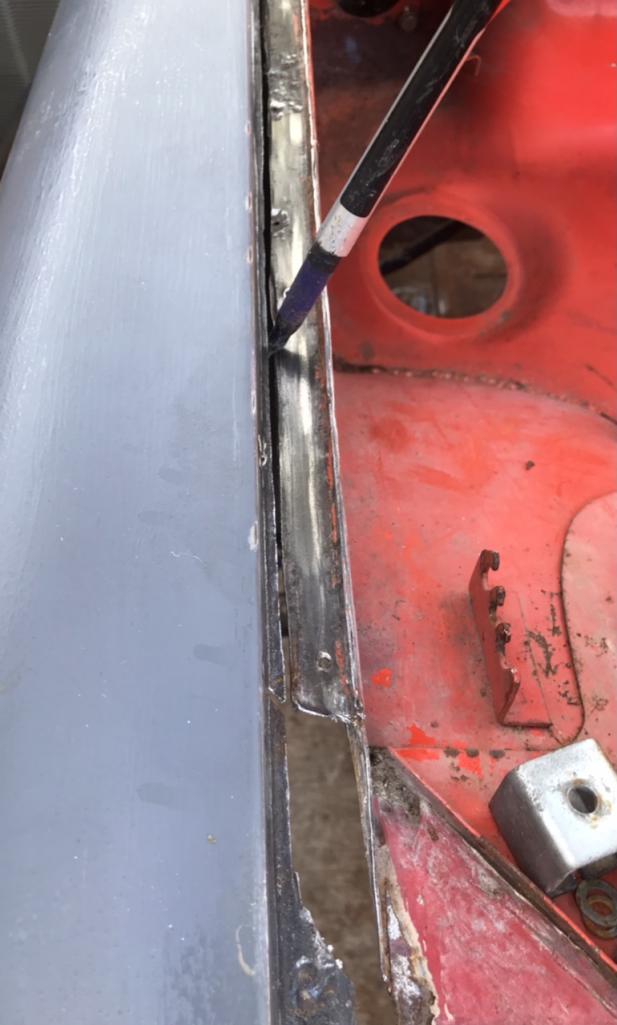
Posted by: Literati914 Oct 8 2021, 08:27 PM
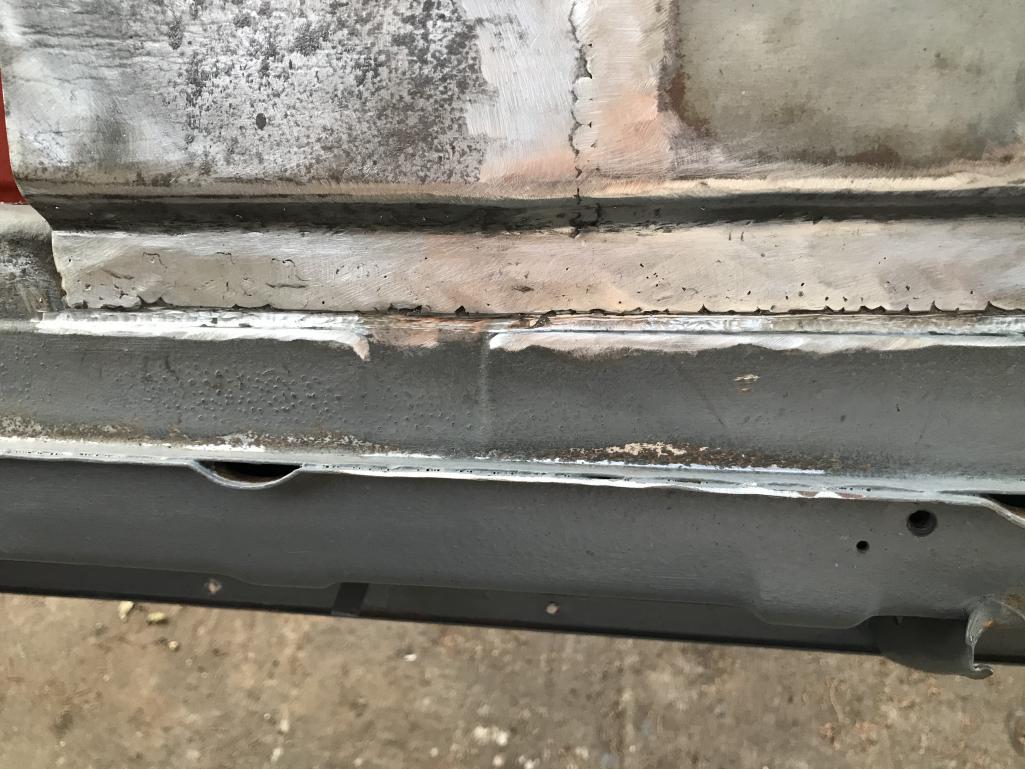
.. it was the same story on the driver's side, I butt welded the seam, ground down the highs, primed and skimmed the seam & channel with fiberglass filler for a nice level base for the seals. Here’s a shot of the DS post operation:
Attached thumbnail(s)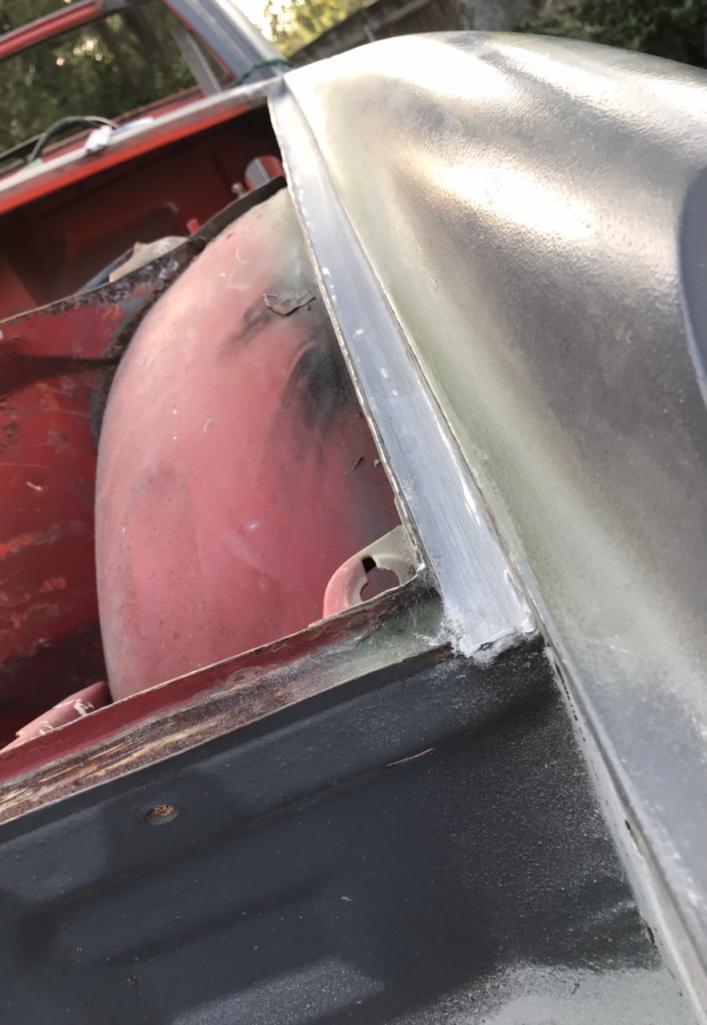
Posted by: Literati914 Oct 11 2021, 07:03 PM
I stripped down the back side of my stock heat shield..
Attached thumbnail(s)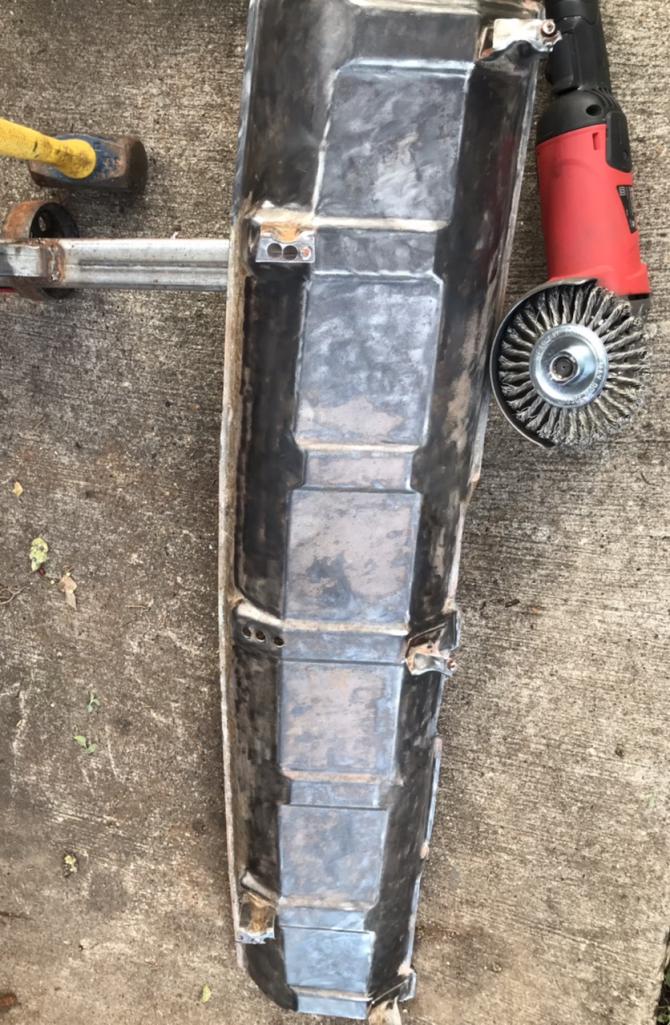
Posted by: Literati914 Oct 11 2021, 07:06 PM
Painted the back side of it with a 2000 degree heat paint.. just because I had it on hand and I really wanted to get this particular project done..
Attached thumbnail(s)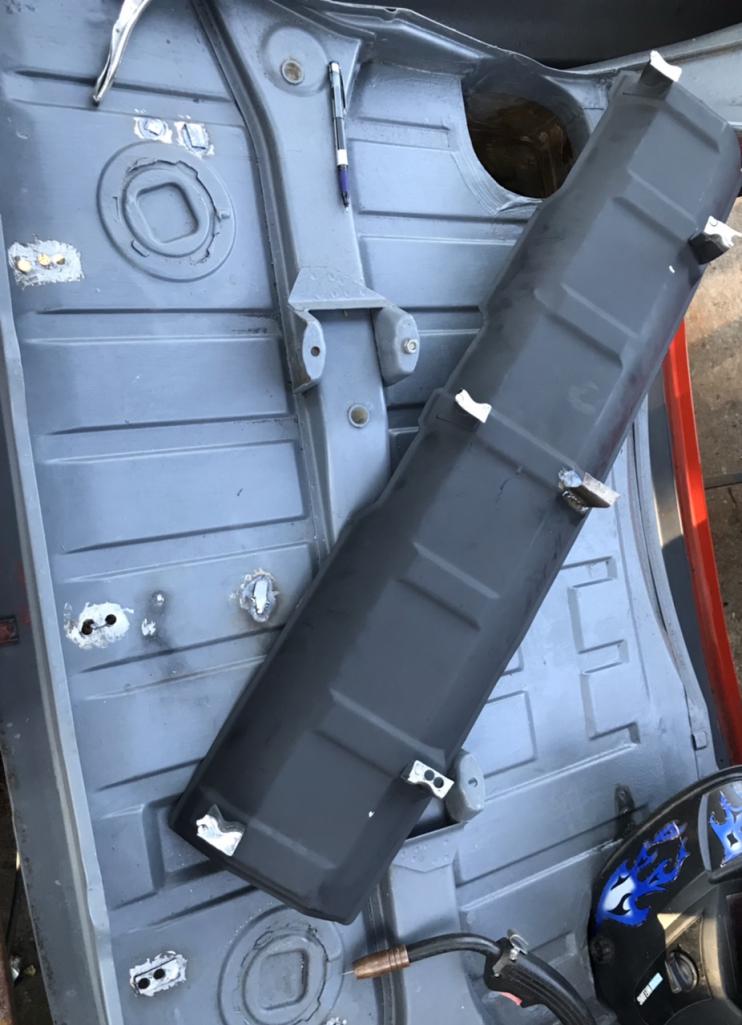
Posted by: Literati914 Oct 11 2021, 07:09 PM
I had planned to rig up some way to make this shield removable, but in the end I didn’t bother, again just wanting it done tbh. Here it is fully installed…
Attached thumbnail(s)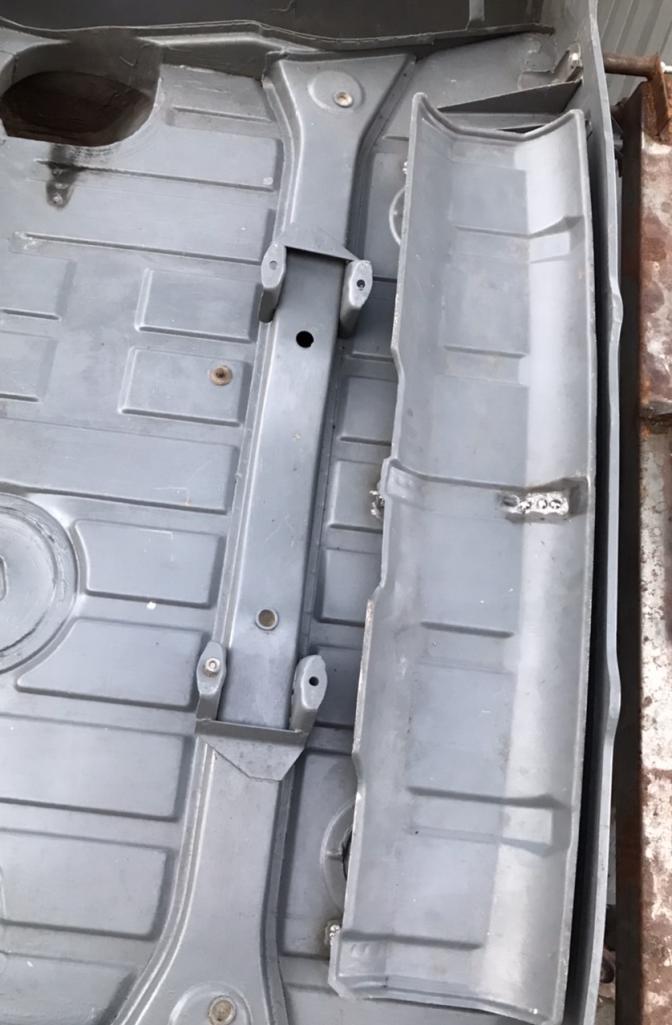
Posted by: Literati914 Oct 13 2021, 10:00 AM
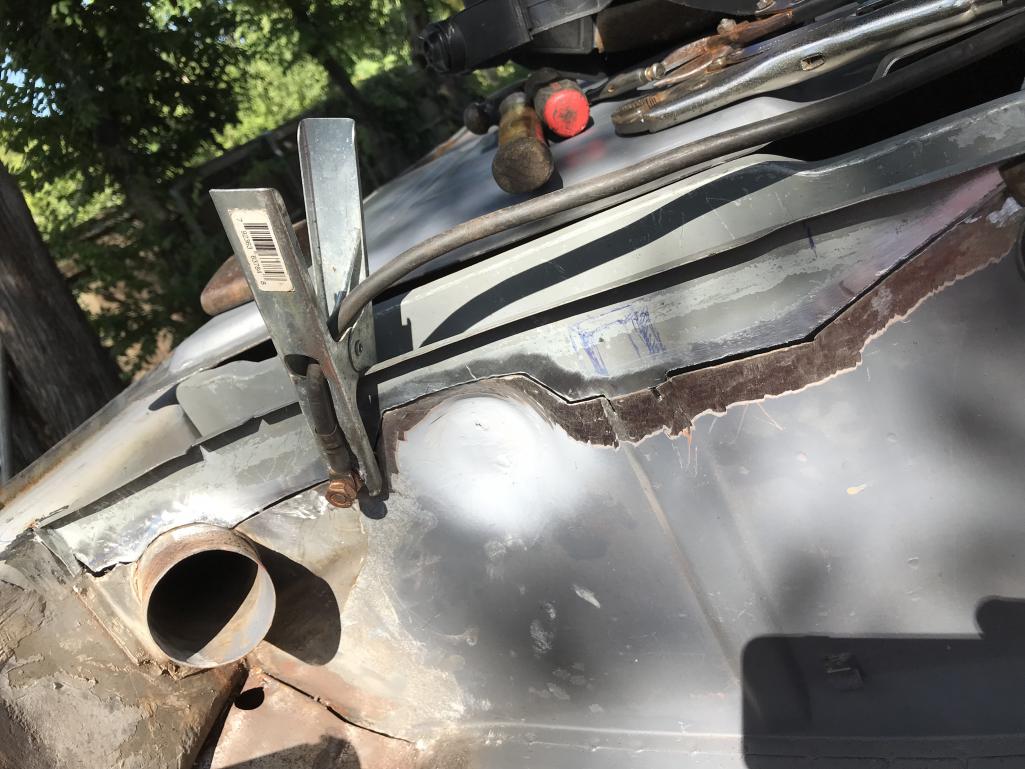
Some time back I cut open the area where the front sway bar mounts so that I could add an internal reinforcement (for the bar), then got sidetracked. So I’ve finally gotten back to it… the situation is a little different tho in that I’ll be using a 19mm H&H sway bar at the front instead of a stock bar. Also, I’ve decided to used the external reinforcement pieces from ‘Maddog’ because it’ll also help reinforce the seam where this car has had a doner front end attached at the wheel wells (two birds, one stone). But with that being the case, I still needed to add a capture nut down in the holes I’d made a while back, because of the funky way the H&H brackets mount. Here’s a shot of that:
Attached thumbnail(s)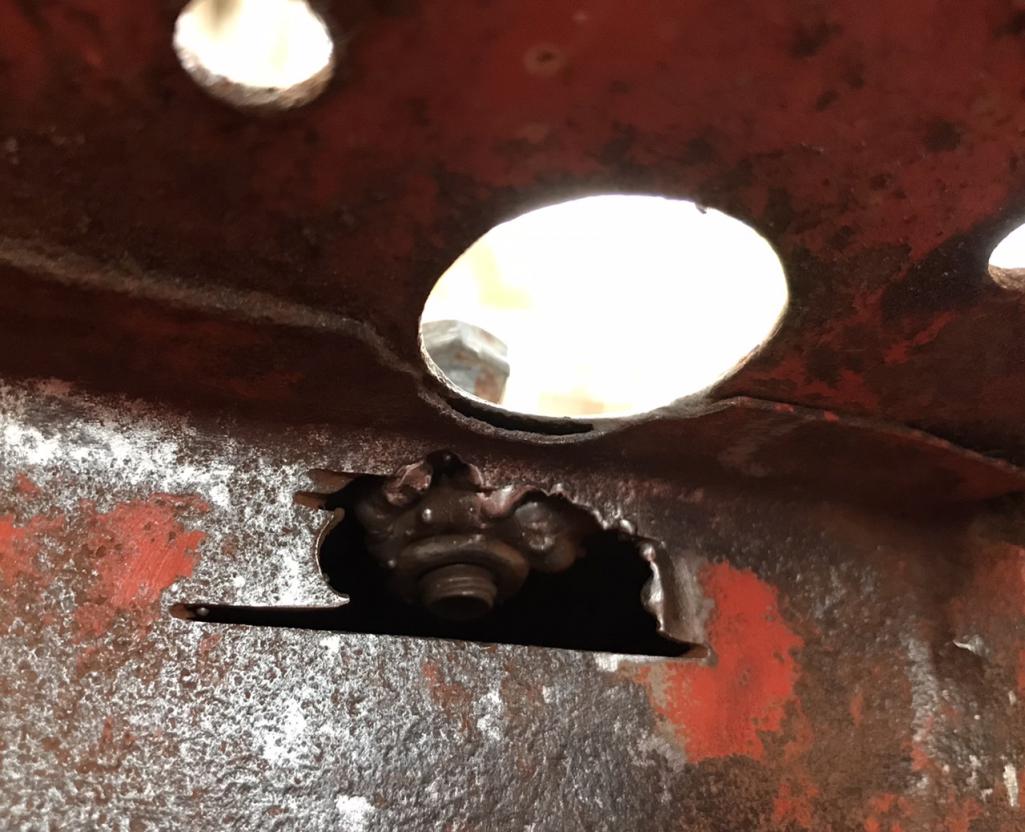
Posted by: Literati914 Oct 13 2021, 10:01 AM
And here’s where I closed it up, done the same on both sides obviously:
Attached thumbnail(s)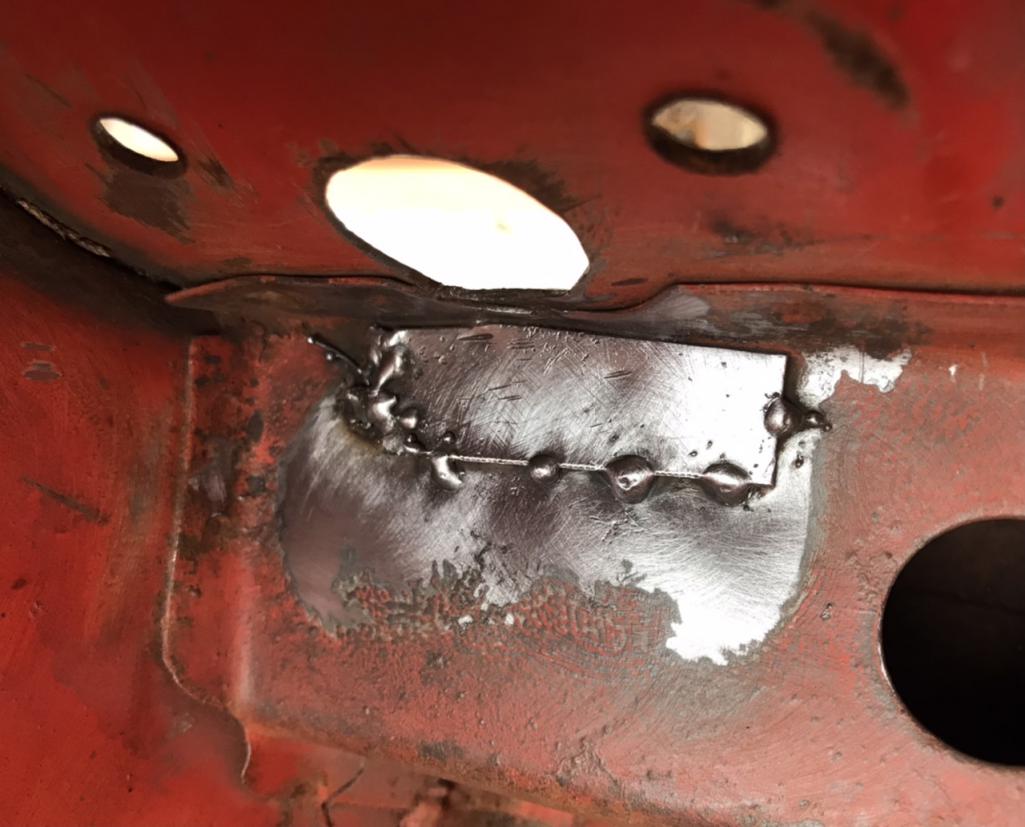
Posted by: Literati914 Oct 13 2021, 10:04 AM
Here’s the Maddog frt sway reinforcements, with a coating I’ve added to the inside before attaching:
Attached thumbnail(s)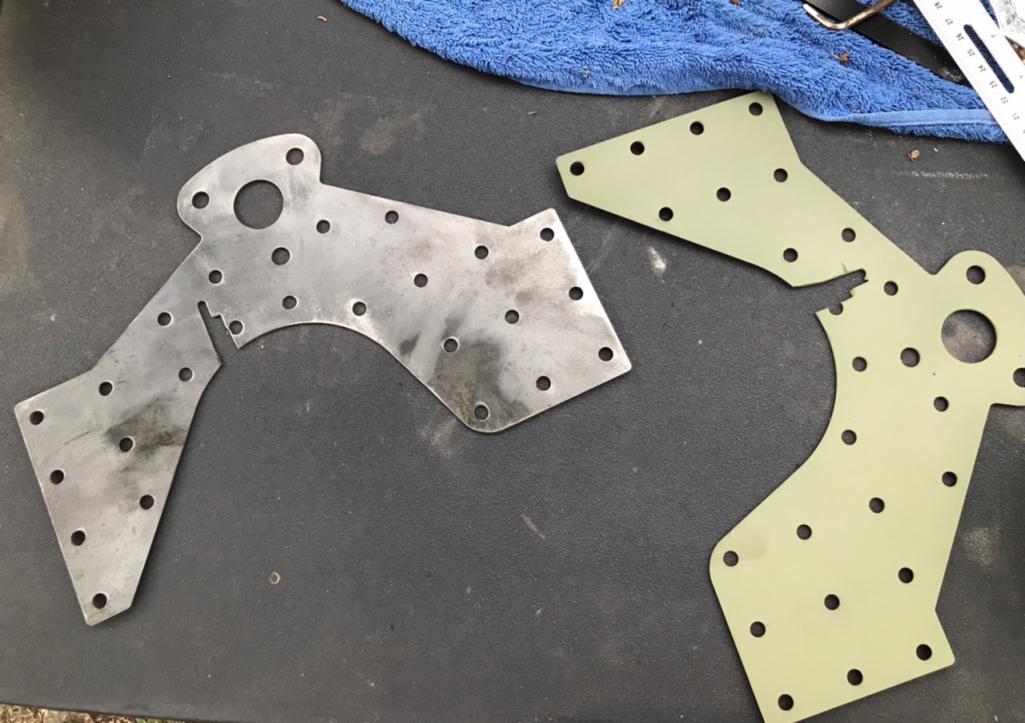
Posted by: Literati914 Oct 13 2021, 10:09 AM
Unfortunately on the PS, there is a hole left by whoever did the crash repair - that I need to address before attaching the reinforcement. Can you believe anyone would just leave that and call it done?
Attached thumbnail(s)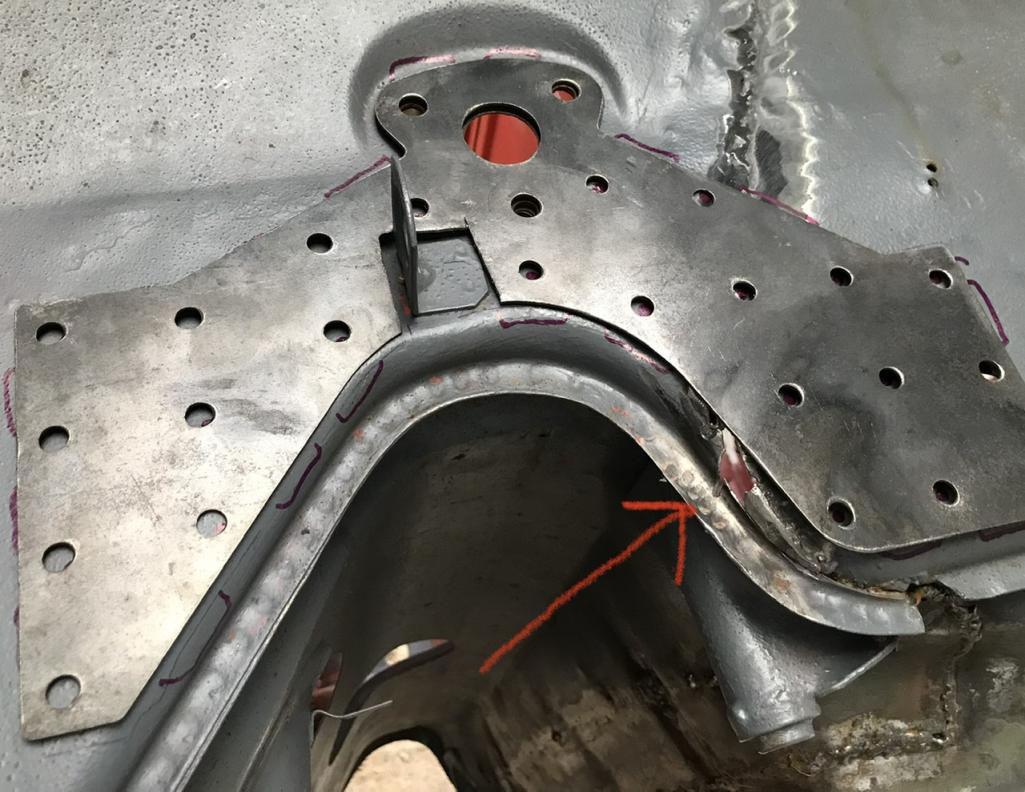
Posted by: pete000 Oct 13 2021, 10:43 AM
Looking good ! 
Posted by: Literati914 Oct 14 2021, 06:38 PM
Been slowed down by rain - remember all this is being done outdoors  , but was able to get out and patch up the hole (highlighted above ^ )
Attached thumbnail(s)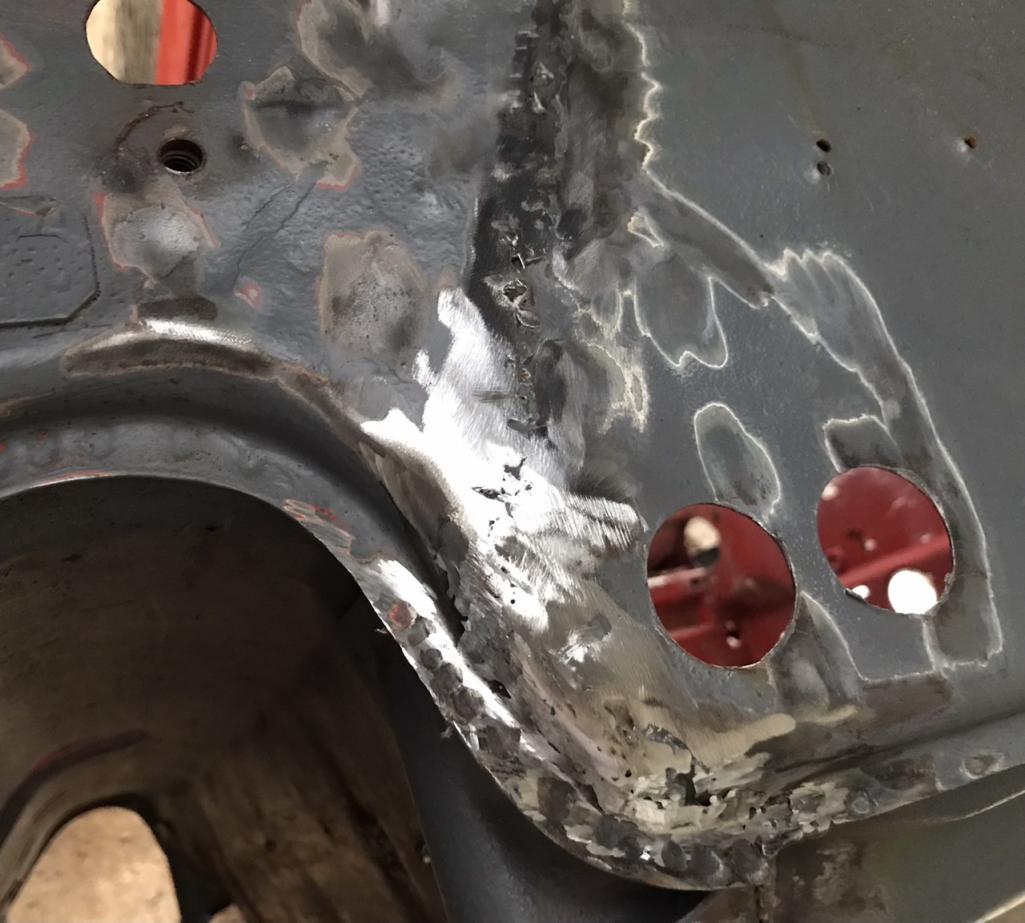
Posted by: Literati914 Oct 14 2021, 06:39 PM
.. done
Attached thumbnail(s)
Posted by: Literati914 Oct 19 2021, 08:41 PM
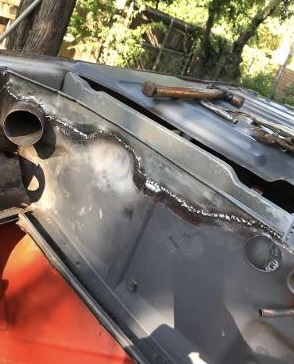
Welded in the passenger side sway bar reinforcement…
Attached thumbnail(s)
Posted by: Literati914 Oct 19 2021, 08:47 PM
..and the driver’s side.. also you can see in this pic, the seam in the wheel well where the donor section was added. Whoever did that repair used an over lap procedure - not my choice but it is solid. In the pic You can see I’ve knocked the high spots off their welds and roughed the surface for some fiberglass filler top dressing to make it all less “Frankenstein “ and more water proof ..
Attached thumbnail(s)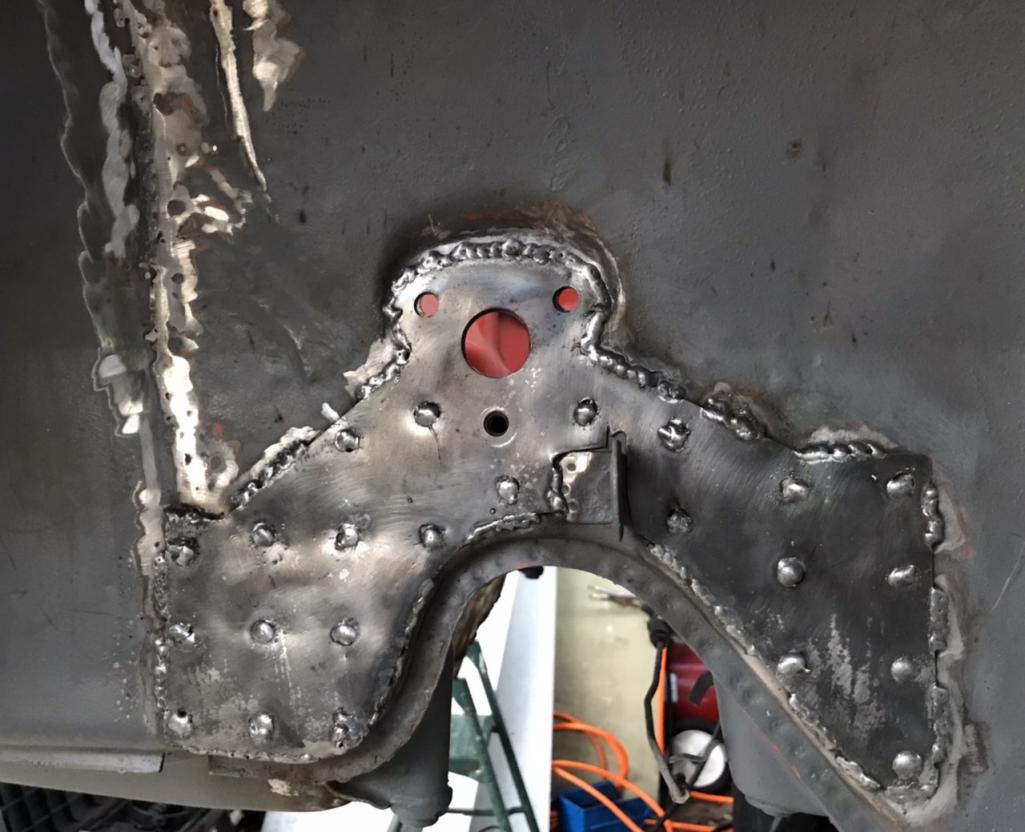
Posted by: Literati914 Oct 21 2021, 09:35 PM
Jumped to the back to add rear sway bar mounting brackets. This is more of a specific type of install because the rear sway bar I’m using on this car is not OEM 914 equipment.. I think the bar is made by H&H and is definitely a slightly thicker than stock (this car will eventually have a flat 6 of some type, probably Subaru). Anyway, the real difference in the mounting of this bar vs the stock bar comes down to the spacing of the mounts. The stock mounts are approx 39” apart (iirc) and these needed to be spaced 32-5/8” apart because of the difference in the bar’s shape. Here’s a pic showing where I drilled my initial hole for starters;
Attached thumbnail(s)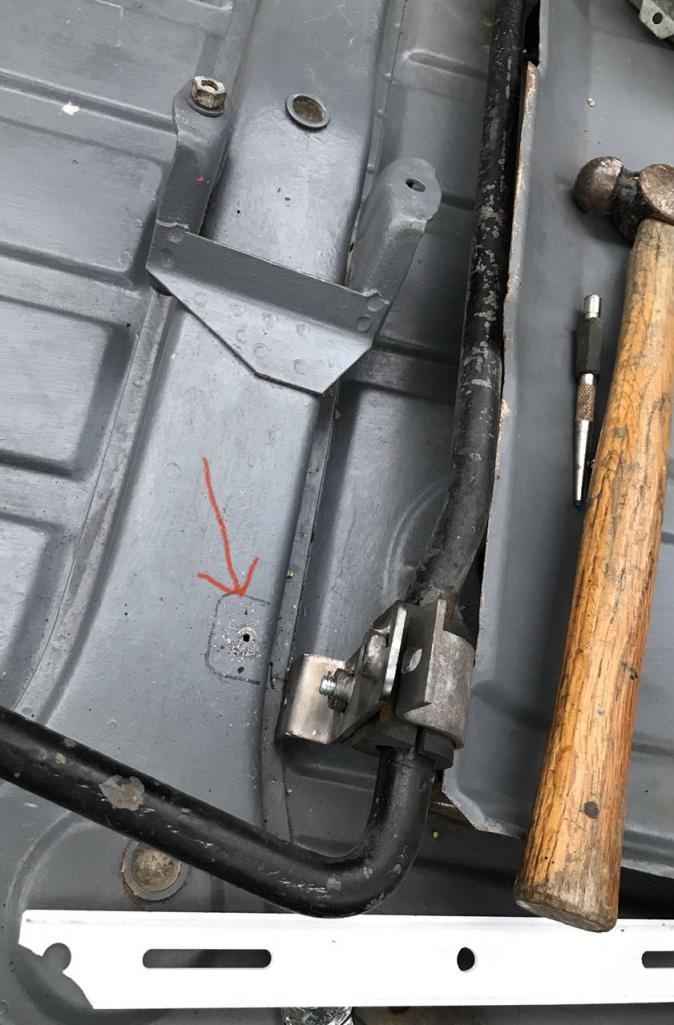
Posted by: Literati914 Oct 21 2021, 09:38 PM
Then I had to basically custom shape the holes to fit the weld pooling from the attachment of the capture nut on the back of the bracket.
Attached thumbnail(s)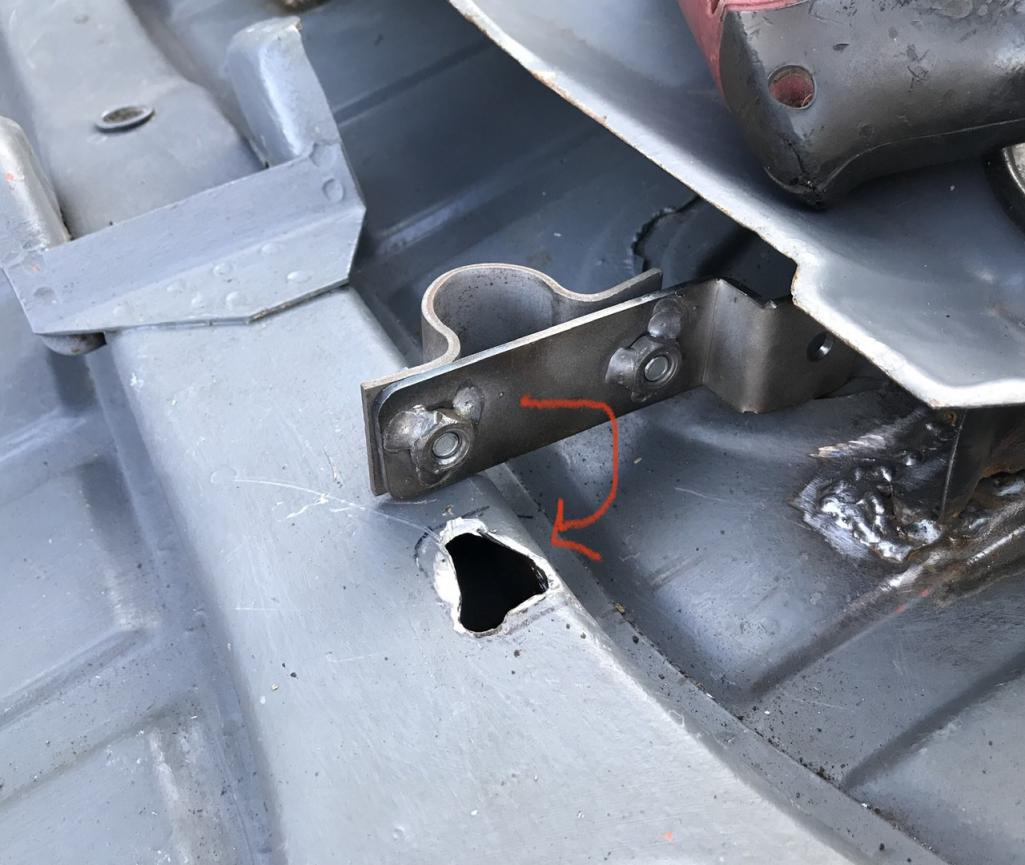
Posted by: Literati914 Oct 21 2021, 09:41 PM
Here’s one set in place waiting to be welded, I actually leveled it out a bit better by bending the end a little where it mounts under the heat shield:
Attached thumbnail(s)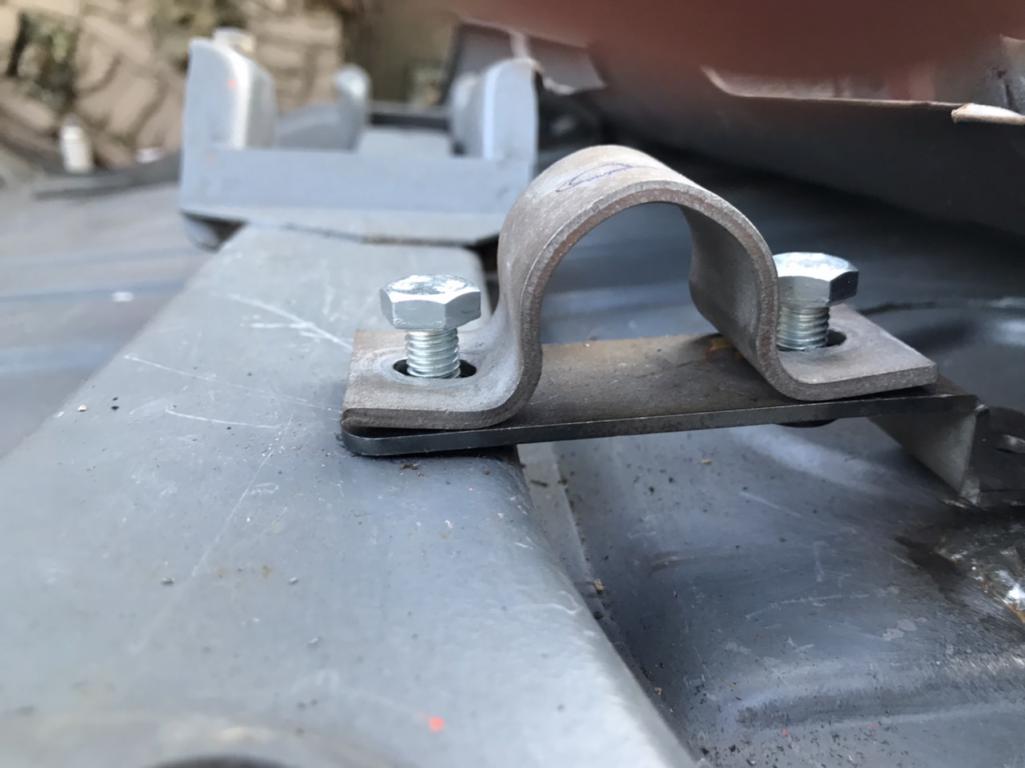
Posted by: Literati914 Oct 21 2021, 09:43 PM
.. before welding I notched the end where the hole is on the brackets to give more surface area for welding (yea I should have installed this before reattaching the heat shield):
Attached thumbnail(s)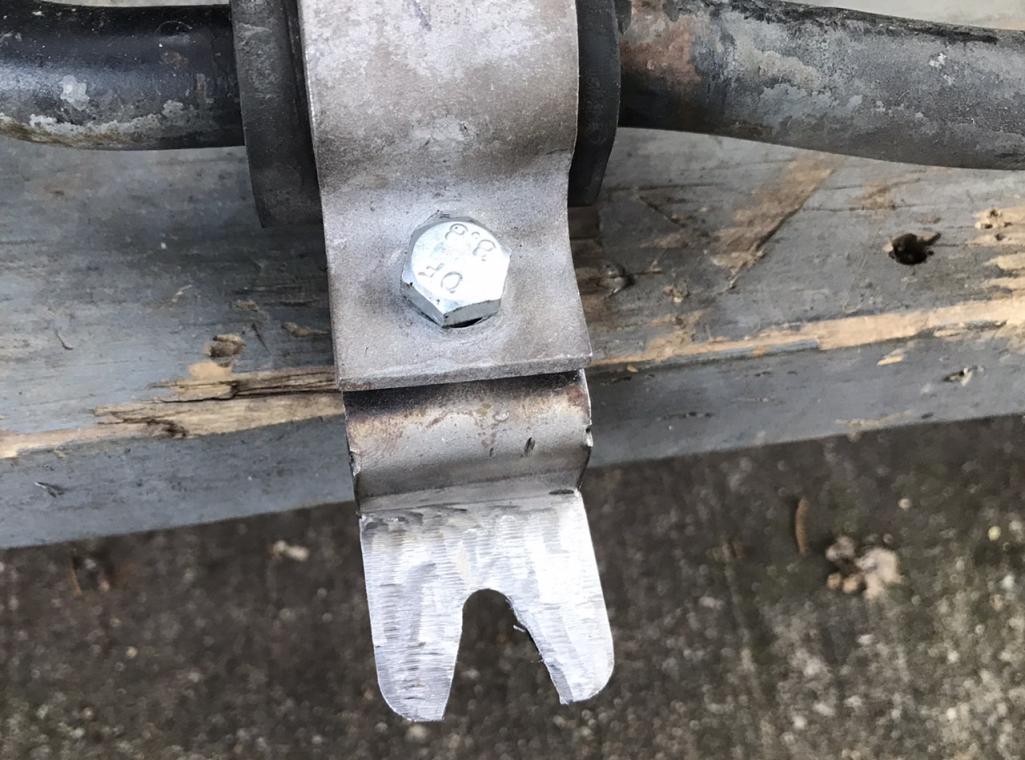
Posted by: Literati914 Oct 21 2021, 09:46 PM
.. checked that I had a gap of a couple millimeters at least, between the bar and trans mounts before welding the brackets in:
Attached thumbnail(s)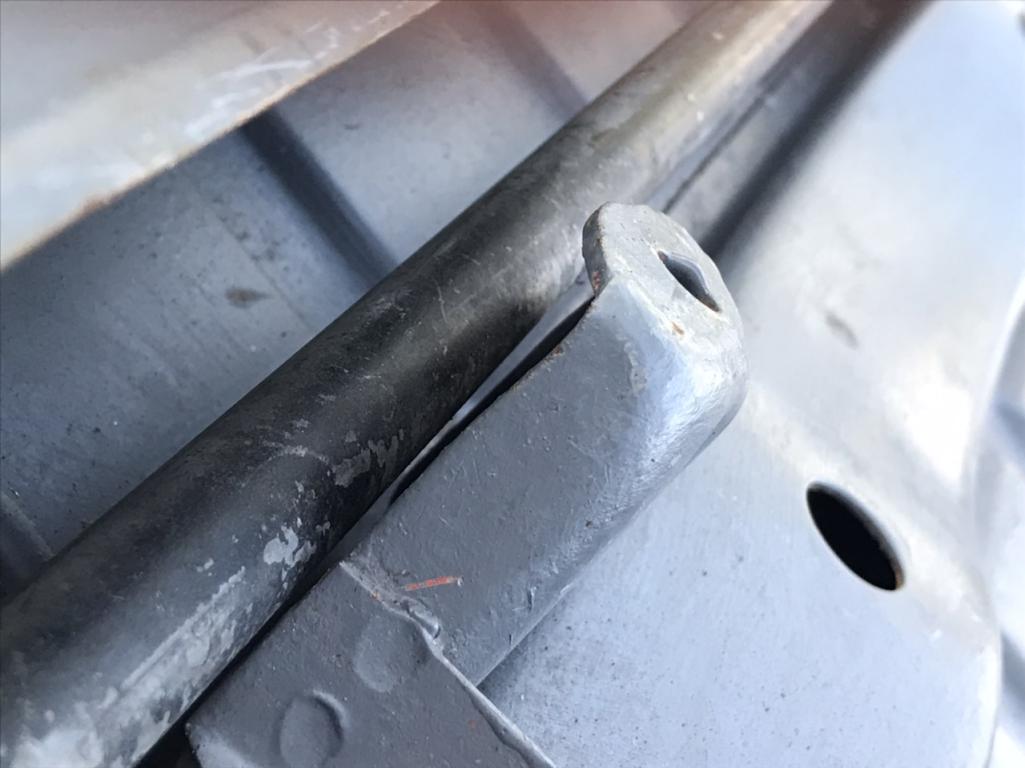
Posted by: Literati914 Oct 21 2021, 09:47 PM
And finally welded it all together:
Attached thumbnail(s)
Posted by: Literati914 Oct 21 2021, 09:53 PM
If anyone installs one of these bars, again the bracket spacing is narrower than stock - I got 32-5/8” but essentially they get installed just inside of the outer most heat shield mounts (stock is well outside of the heat shield feet).
Attached thumbnail(s)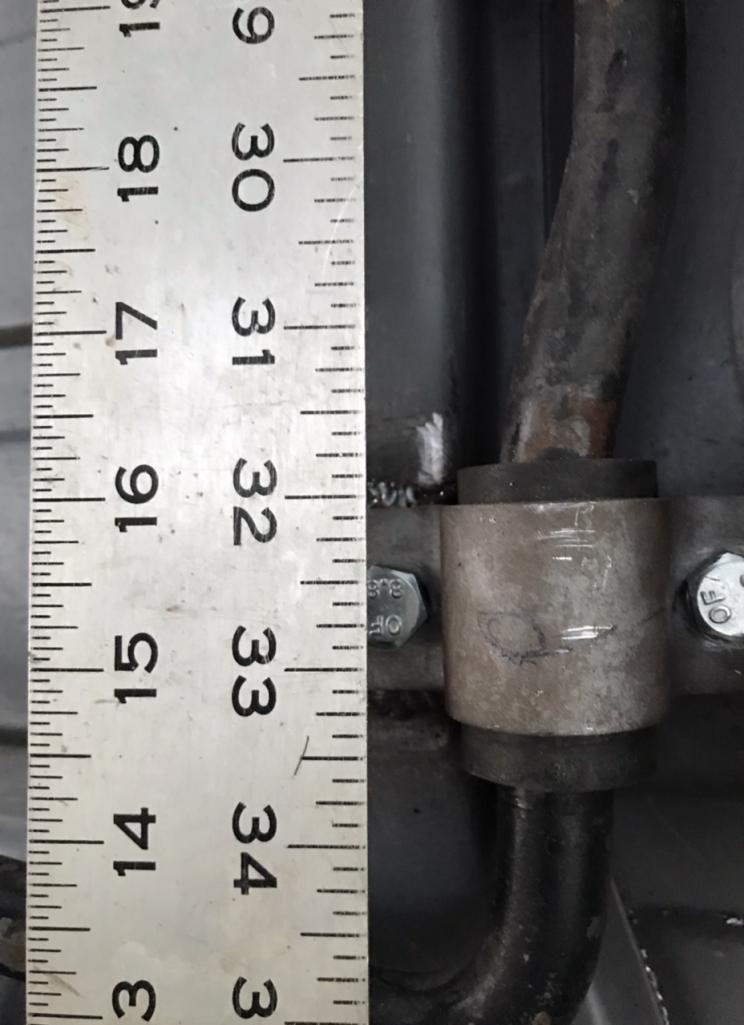
Posted by: Literati914 Oct 22 2021, 10:46 PM
I got these trailing arm mount brackets sometime back, forgot I even had them til I stumbled on them the other day… got them during a Maddog sale and figured they’d pair well with a set of boxed trailing arms that I have.
Attached thumbnail(s)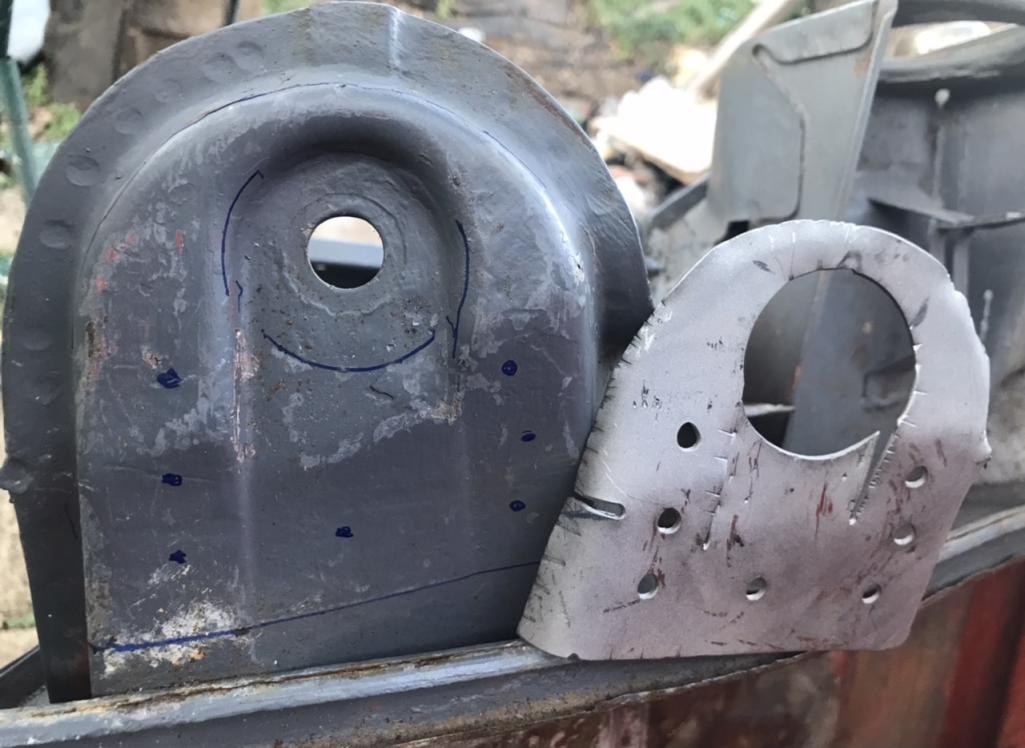
Posted by: Literati914 Oct 22 2021, 10:47 PM
Ready for welding:
Attached thumbnail(s)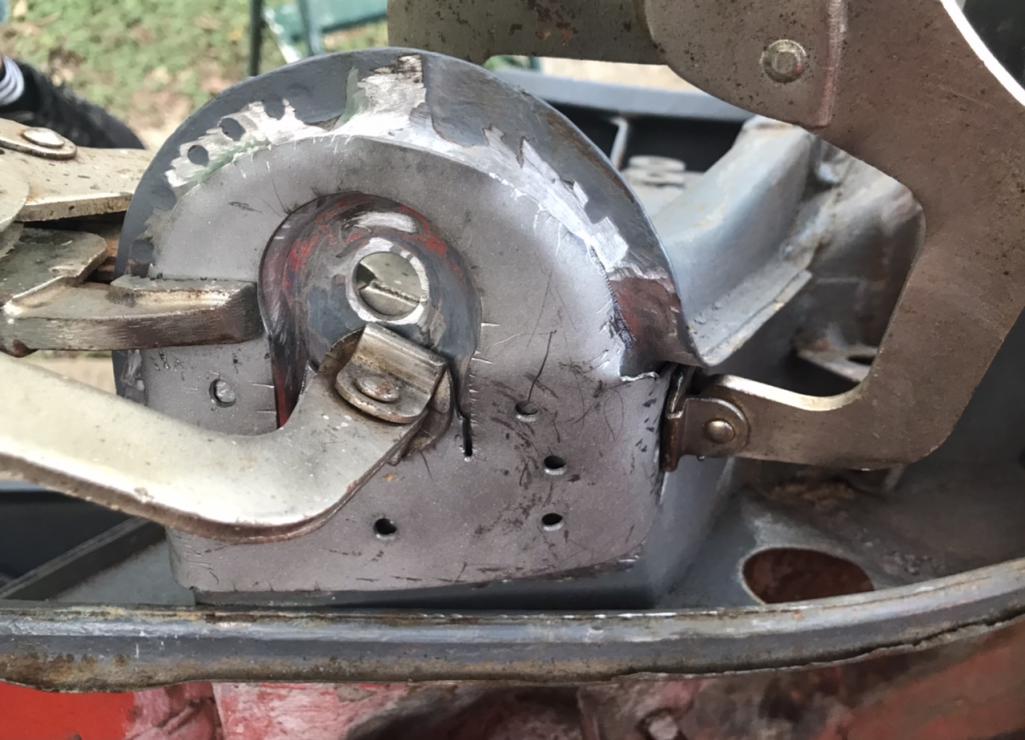
Posted by: Literati914 Oct 22 2021, 10:50 PM
Passenger side installed .. I swear I gotta quit going back to “improve” the weld 
Attached thumbnail(s)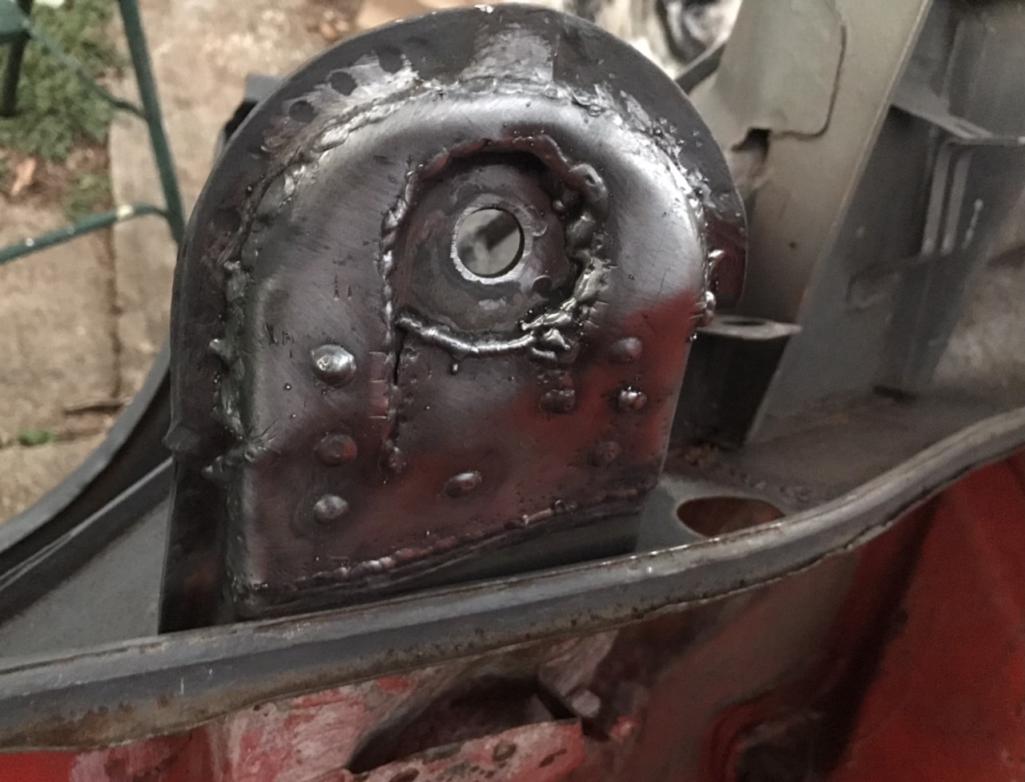
Posted by: Literati914 Oct 23 2021, 08:08 PM
Driver Side before shaping the piece to fit:
Attached thumbnail(s)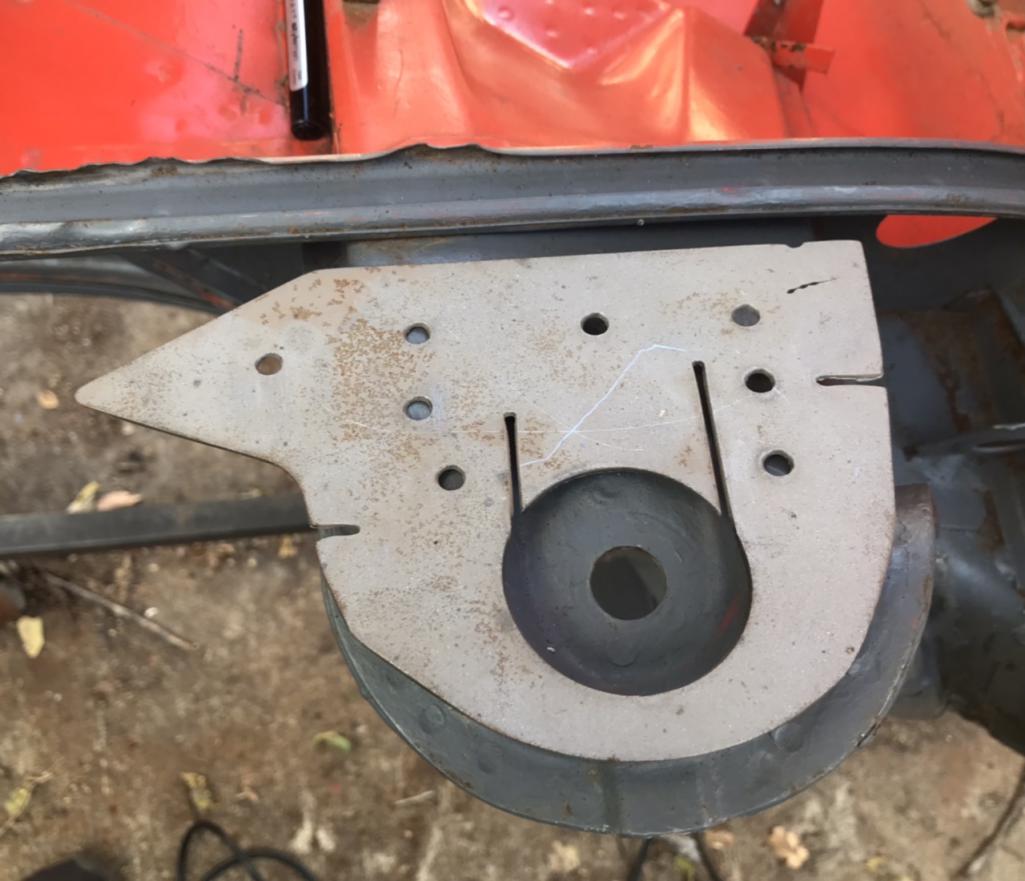
Posted by: Literati914 Oct 23 2021, 08:10 PM
..and driver side welding complete:
Attached thumbnail(s)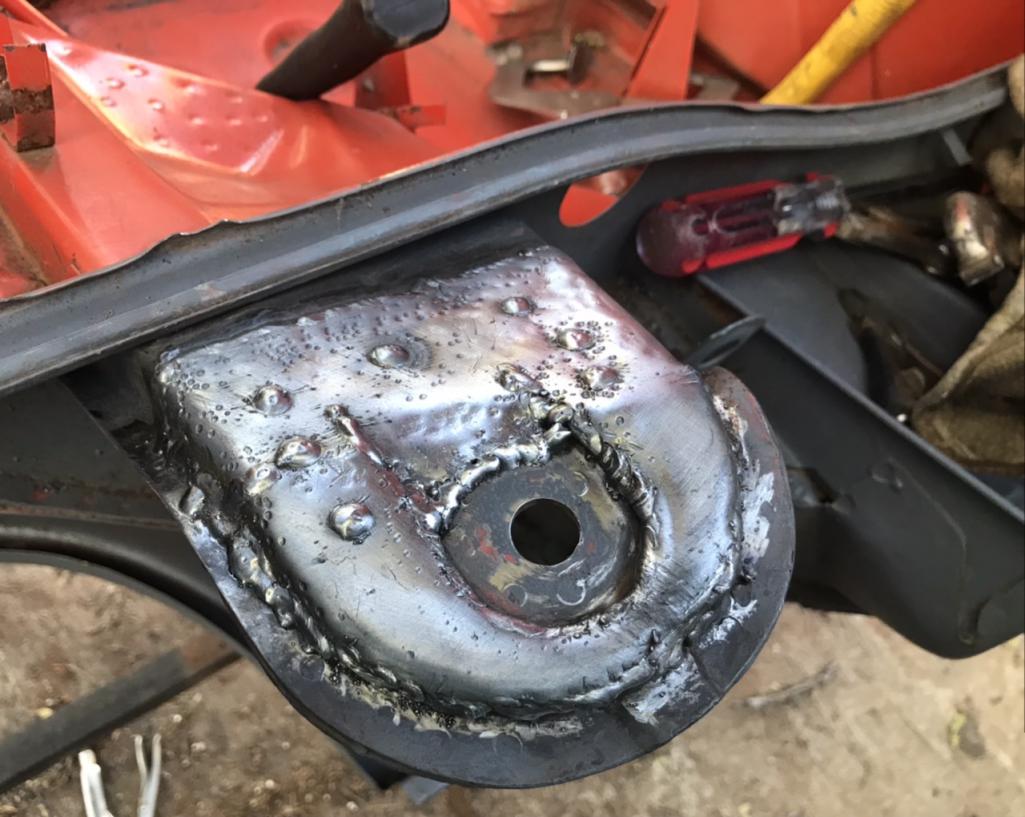
Posted by: Literati914 Oct 24 2021, 08:09 PM
Went back and installed the rear sway bar reinforcement plates inside to trunk space. Again, this is a nonstandard rear sway bar and so it was necessary to weld the plates in a slightly different location compared to stock. In this picture the plate sitting on the left side is the stock placement (just there for illustration purposes) and the one one the right is where mine needed to be welded. This illustrates the difference in bracket placement widths that I’d mentioned earlier:
Attached thumbnail(s)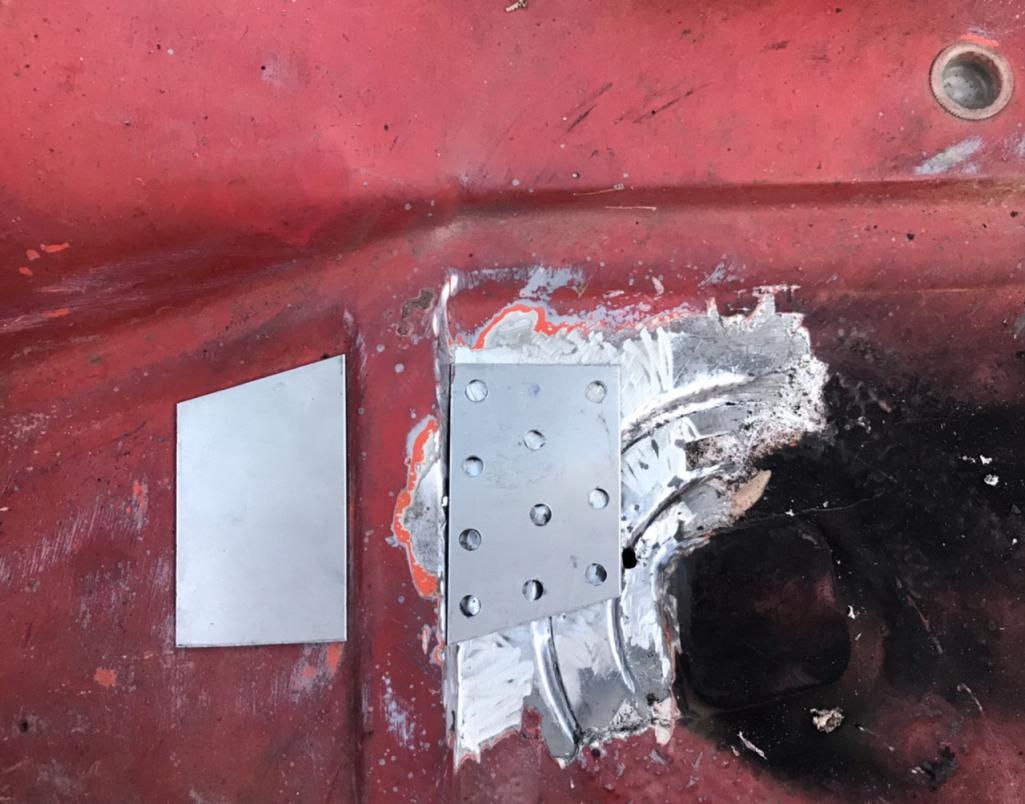
Posted by: Literati914 Oct 24 2021, 08:16 PM
Before making the welds though, I needed to weld the circular “factory access caps” so that they would not shift under hard cornering (the brackets I welded underneath are welded over the seam slightly), and not create a crack in the mount’s attachment welds. Highlighted with purple arrow:
Attached thumbnail(s)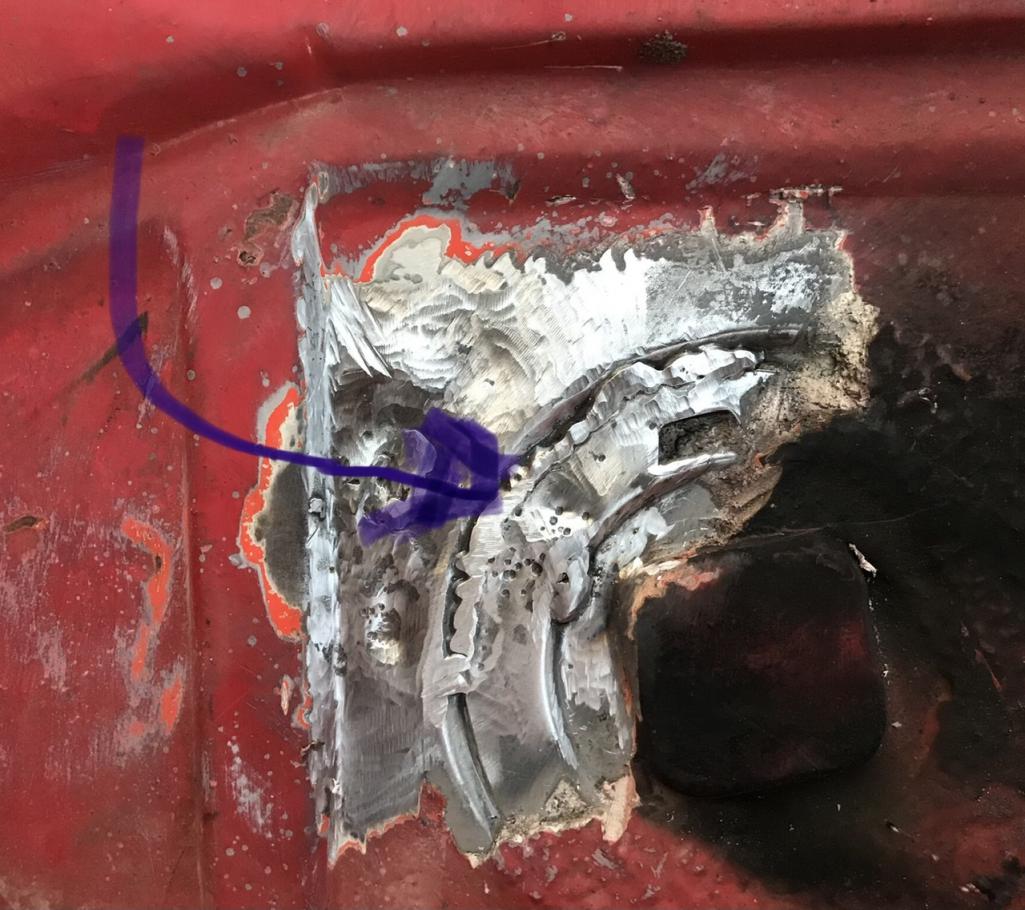
Posted by: Literati914 Oct 24 2021, 08:17 PM
Passenger side installed:
Attached thumbnail(s)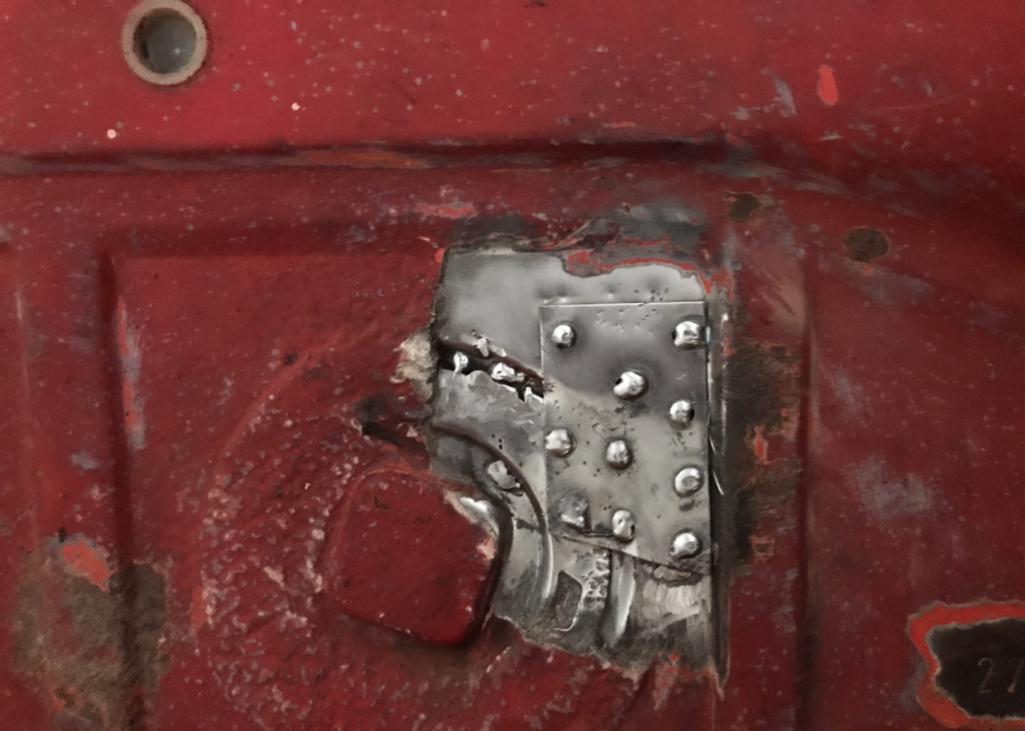
Posted by: Literati914 Oct 24 2021, 08:18 PM
Driver’s side too..
Attached thumbnail(s)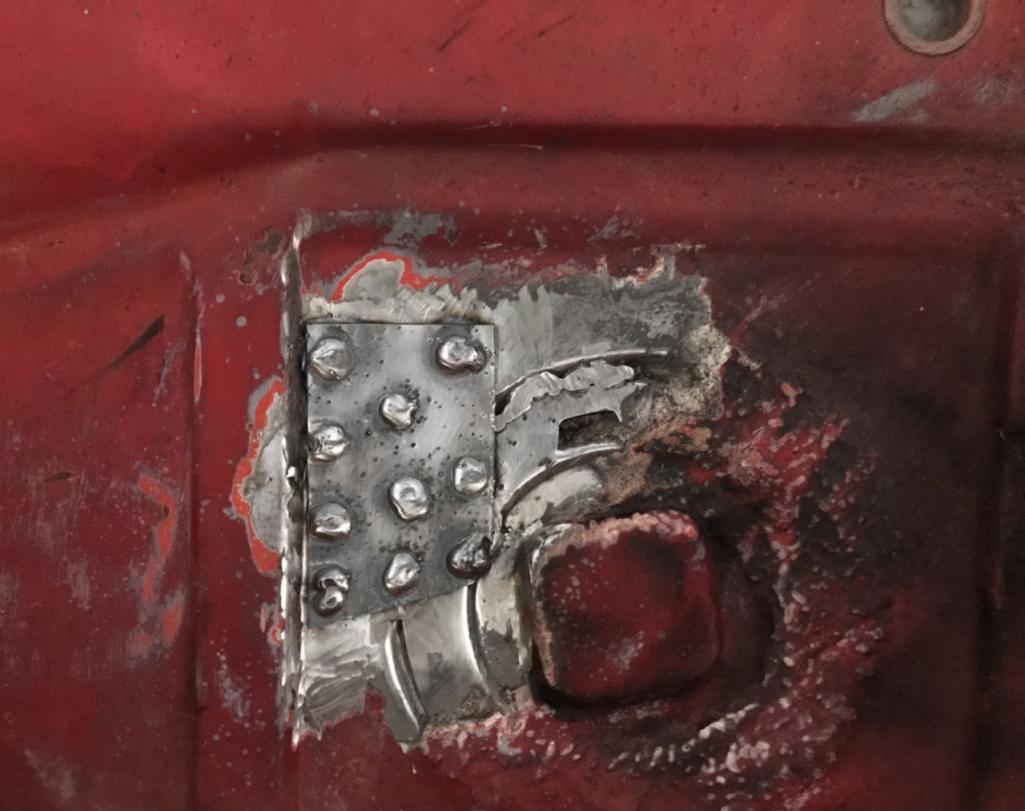
Posted by: Literati914 Oct 25 2021, 07:10 PM
Clutch cable tube forward of the shifter area is next. Remember I’ve already dealt with the other two possible failure areas regarding this tube, so mine was broken in all three spots. Started off by measuring up 3.5” and marking where the internal bracket is and also the area I’ll be using for access:
Attached thumbnail(s)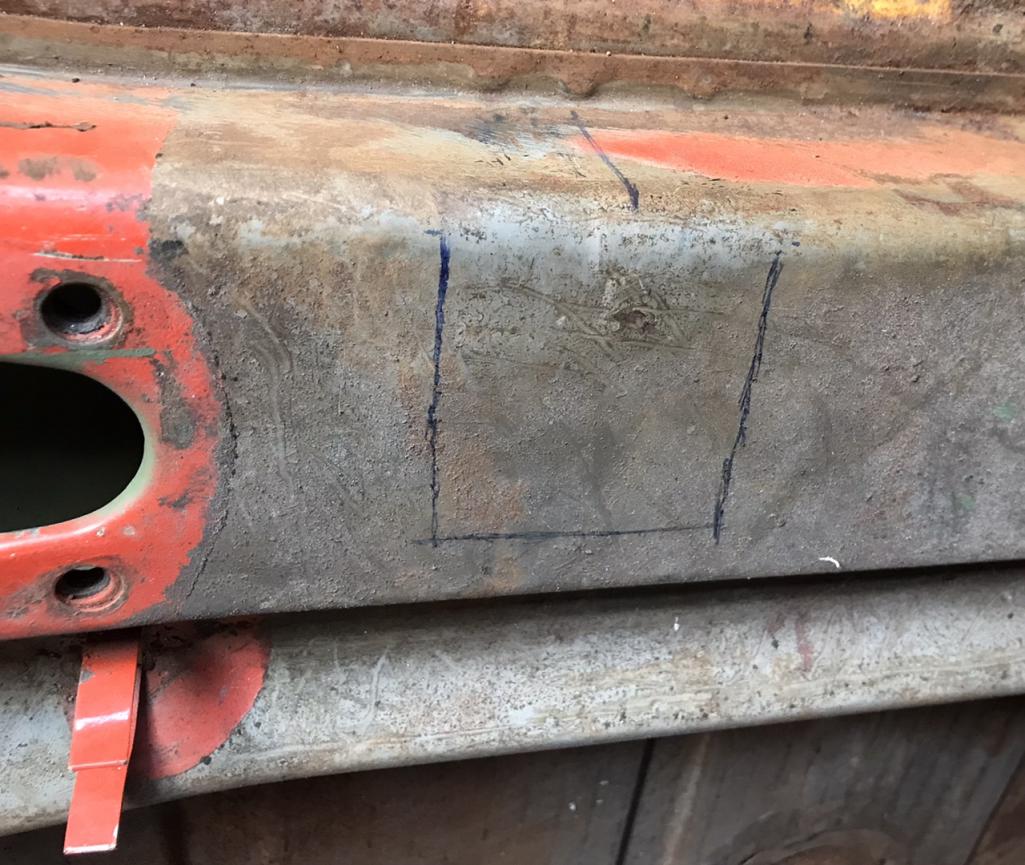
Posted by: Literati914 Oct 25 2021, 07:14 PM
..access area cut. Note I purposely cut it to hinge on the opposite from any other time I’ve seen this repair done - why? because the throttle cables mount sort of attaches to the top of the other side and I didn’t want to cut though it.:
Attached thumbnail(s)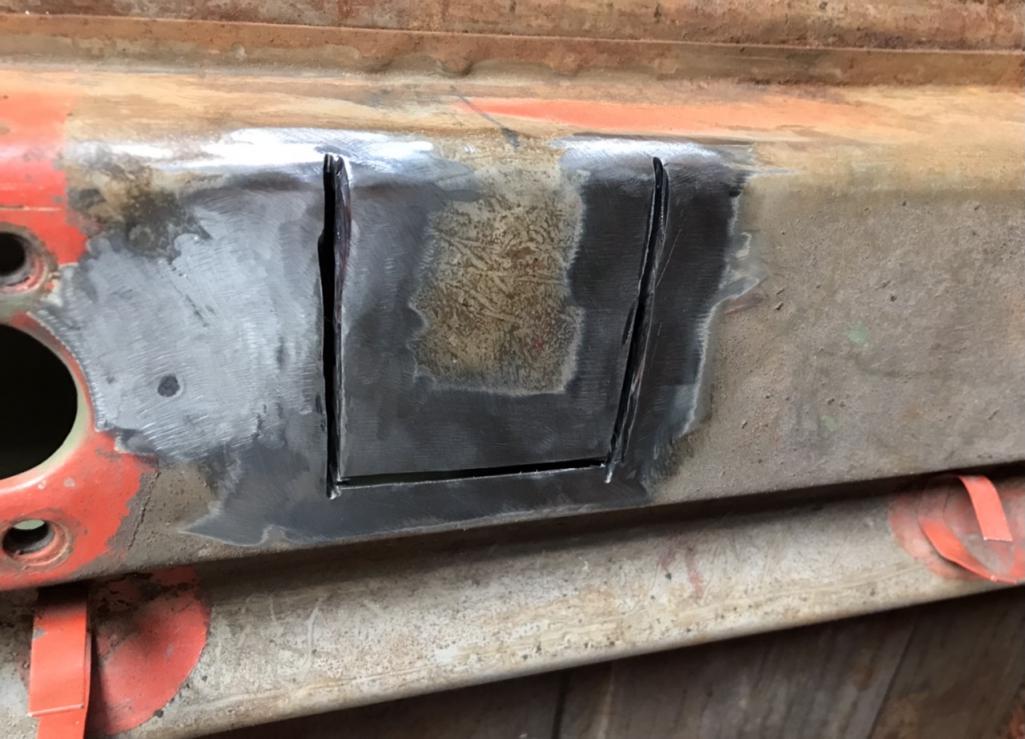
Posted by: Literati914 Oct 25 2021, 07:16 PM
Here’s what I found inside, the tube was completely pulled away from the retaining bracket :
Attached thumbnail(s)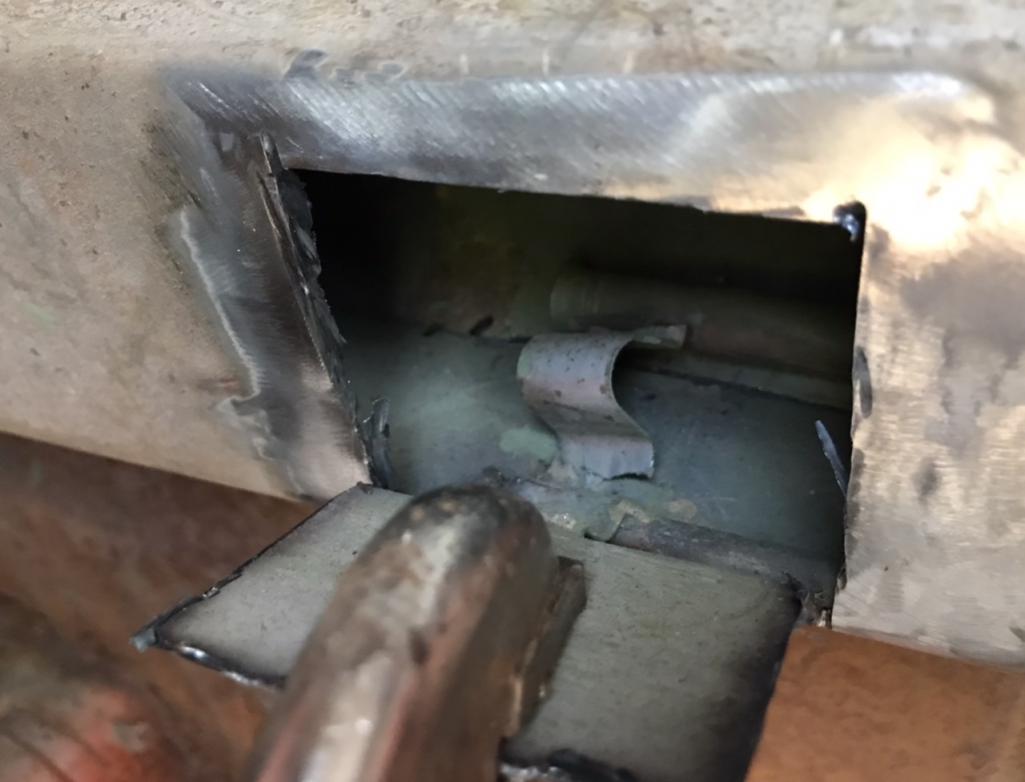
Posted by: Literati914 Oct 25 2021, 07:19 PM
Getting a good ground was a challenge (access port too small mostly) but I was able to get it firmly welded. A big ‘ol screw driver passes thru the tube with no obstruction:
Attached thumbnail(s)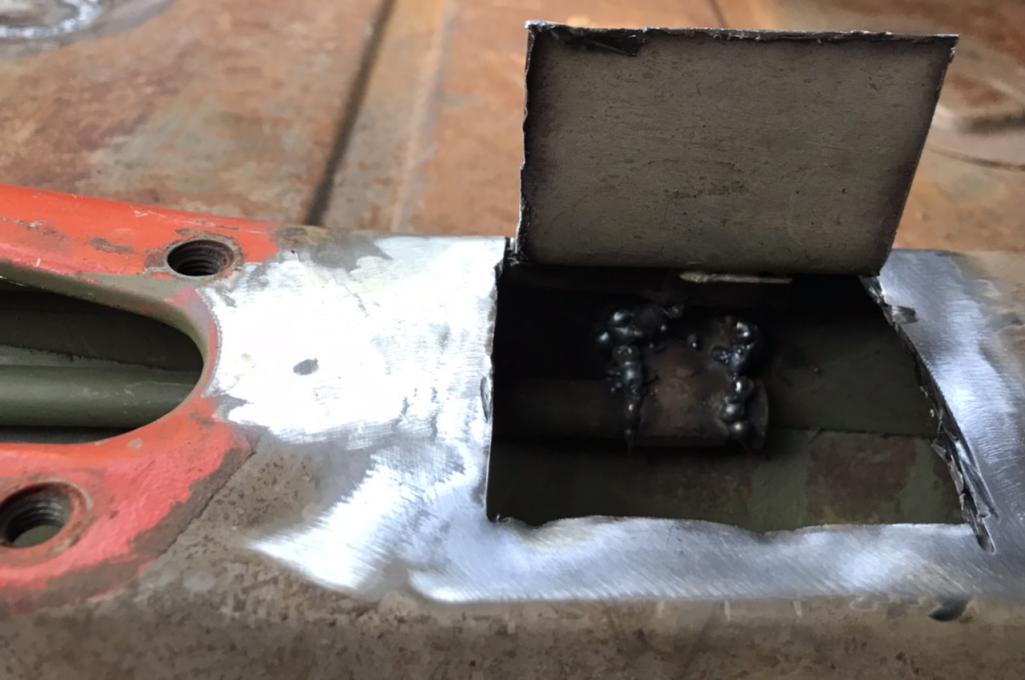
Posted by: Literati914 Oct 25 2021, 07:22 PM
The top of the original bracket was easily accessed from my port but I needed to drill a couple holes and plug weld the bottom from the outside:
Attached thumbnail(s)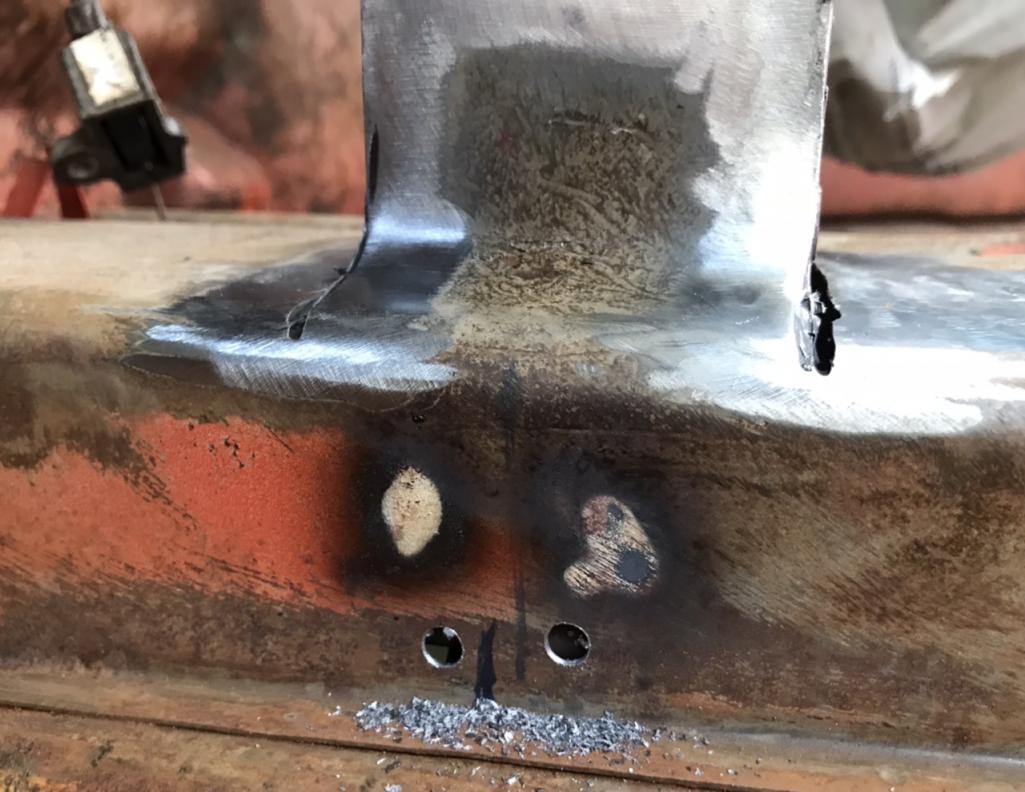
Posted by: Literati914 Oct 25 2021, 07:23 PM
..repair complete and closed up :
Attached thumbnail(s)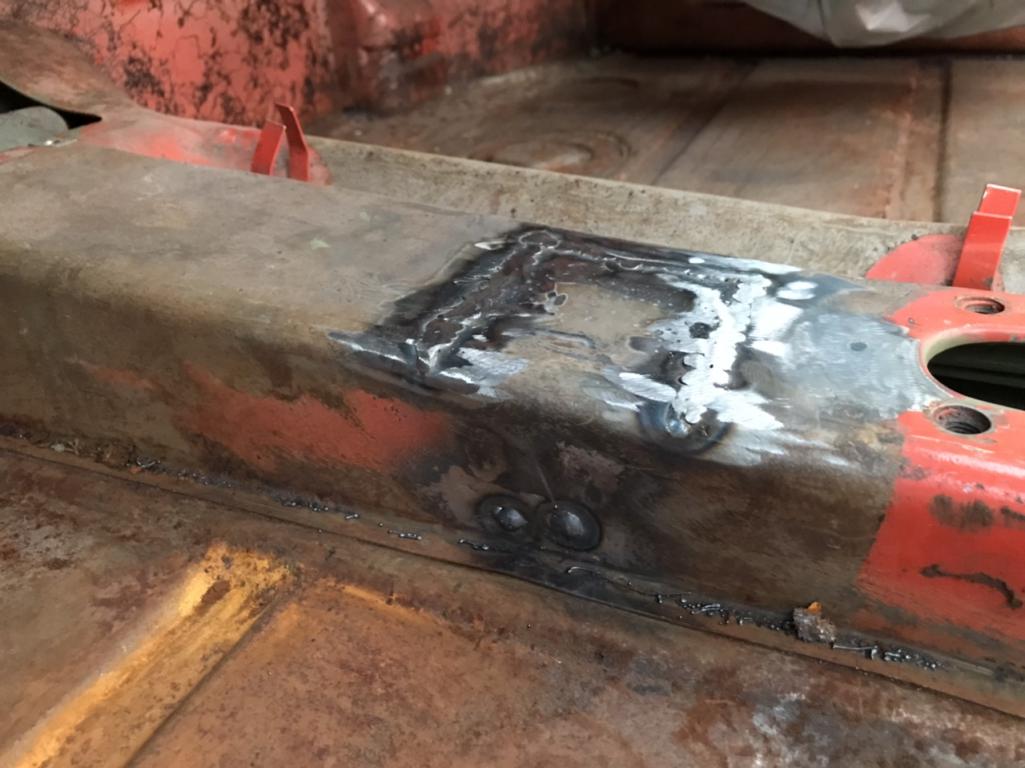
Posted by: tygaboy Oct 26 2021, 08:09 AM
Weld 'er up! Fun stuff, getting in all those fiddly areas, huh?
You're getting it done - way to keep at it.
Posted by: Literati914 Oct 26 2021, 06:40 PM
Thanks tygaboy ! 
This is next:
Attached thumbnail(s)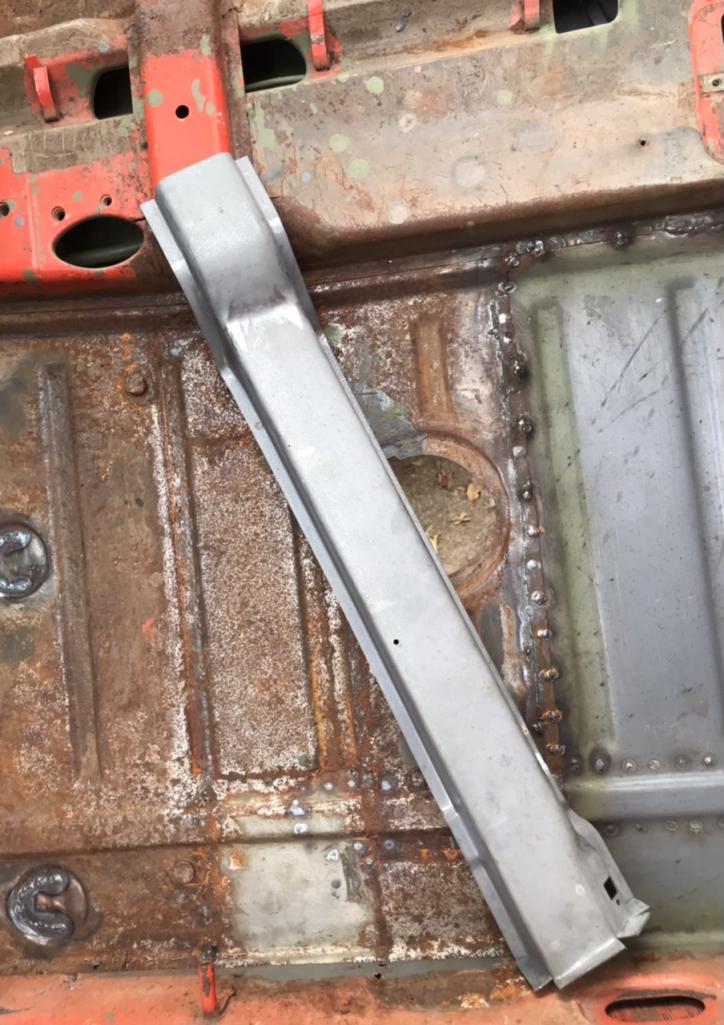
Posted by: Literati914 Oct 27 2021, 07:37 PM
I cleaned the metal up real good, and primed the metal after laying tape at the weld spots.. and then welded on the seat adjuster bracket holder that I saved from the old cross-member. I finished welding this new unit in place but it got too dark for a good pic:
Attached thumbnail(s)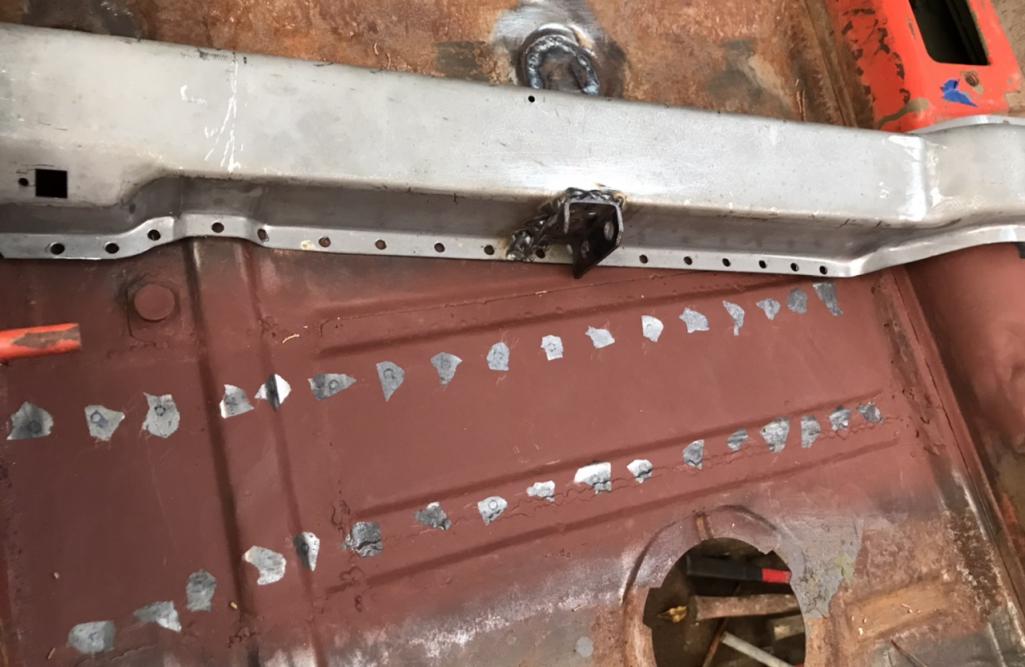
Posted by: Literati914 Oct 28 2021, 11:21 PM
Cross-member installed:
Attached thumbnail(s)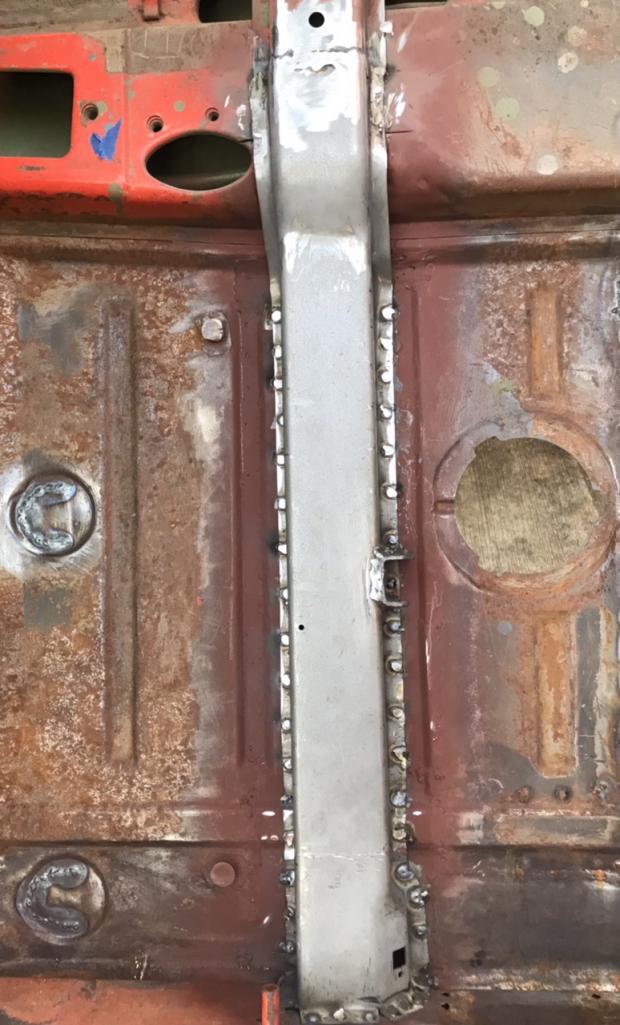
Posted by: Literati914 Oct 29 2021, 08:05 PM
Parking Brake mount went back on today. It was in good enough condition that I recycled it. I sprayed a protective coating on the backside and on the inner long side too:
Attached thumbnail(s)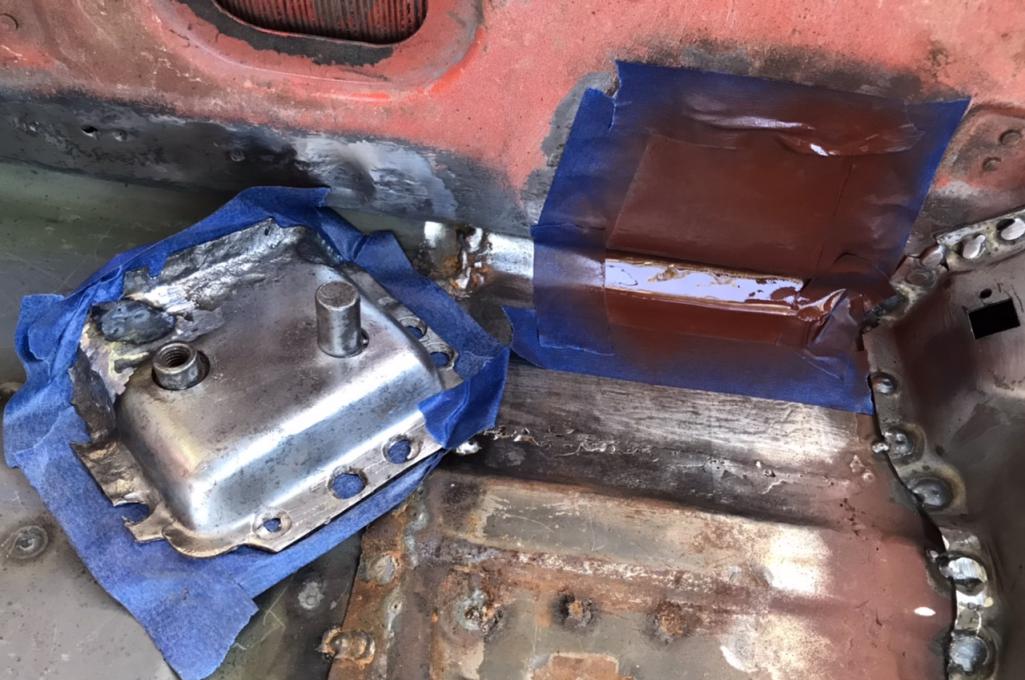
Posted by: Literati914 Oct 29 2021, 08:06 PM
.. welding process:
Attached thumbnail(s)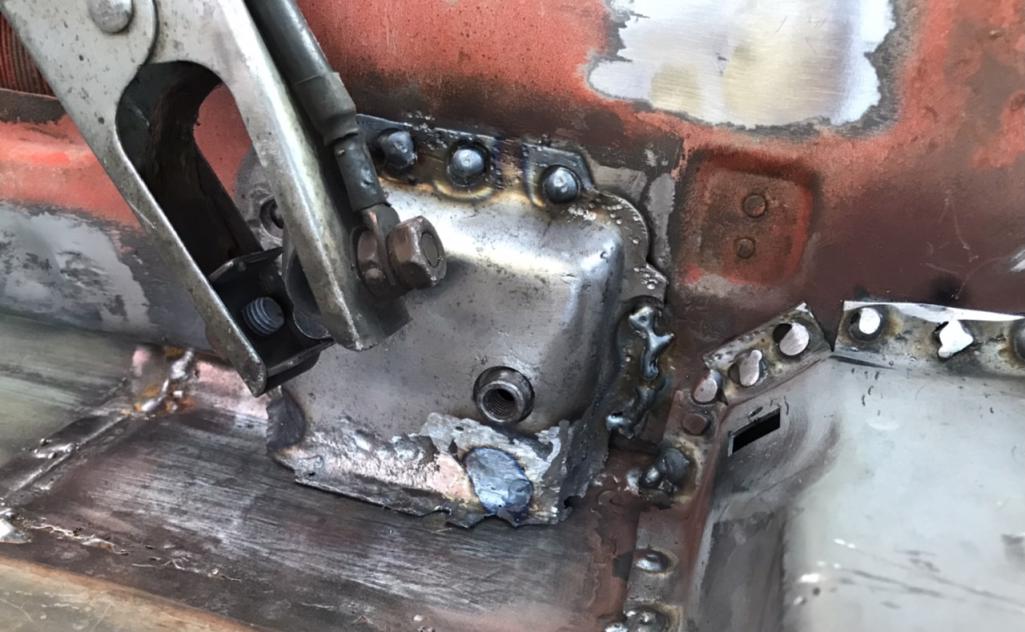
Posted by: Literati914 Oct 29 2021, 08:08 PM
After that I slapped back on the original cable cover after coating both sides with a protective coat:
Attached thumbnail(s)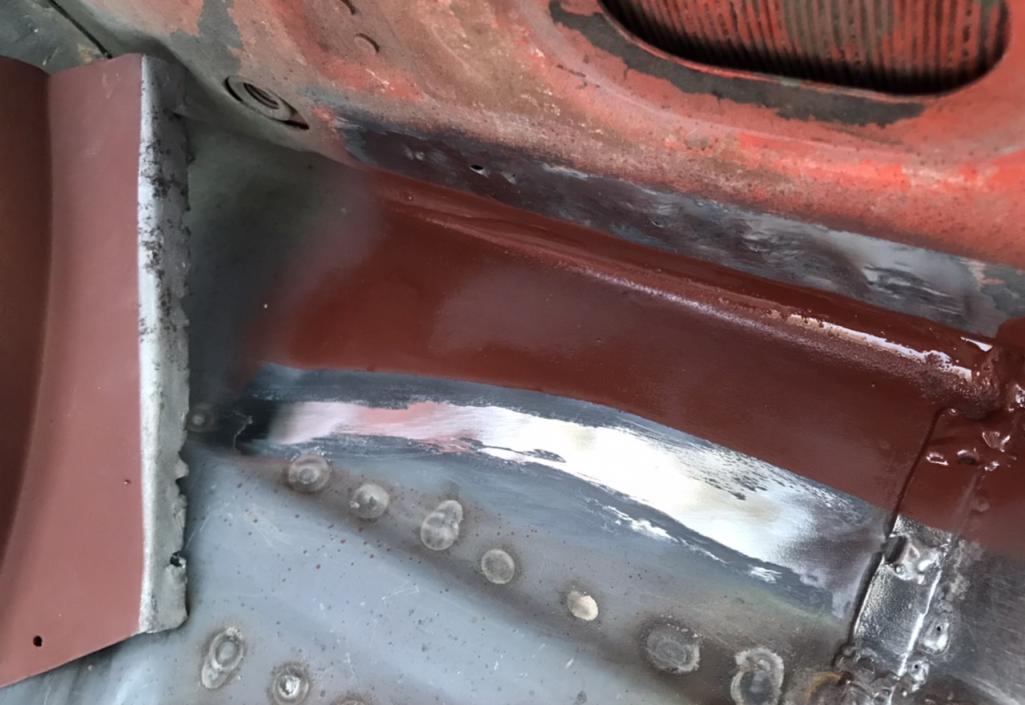
Posted by: Literati914 Oct 29 2021, 08:09 PM
done with that:
Attached thumbnail(s)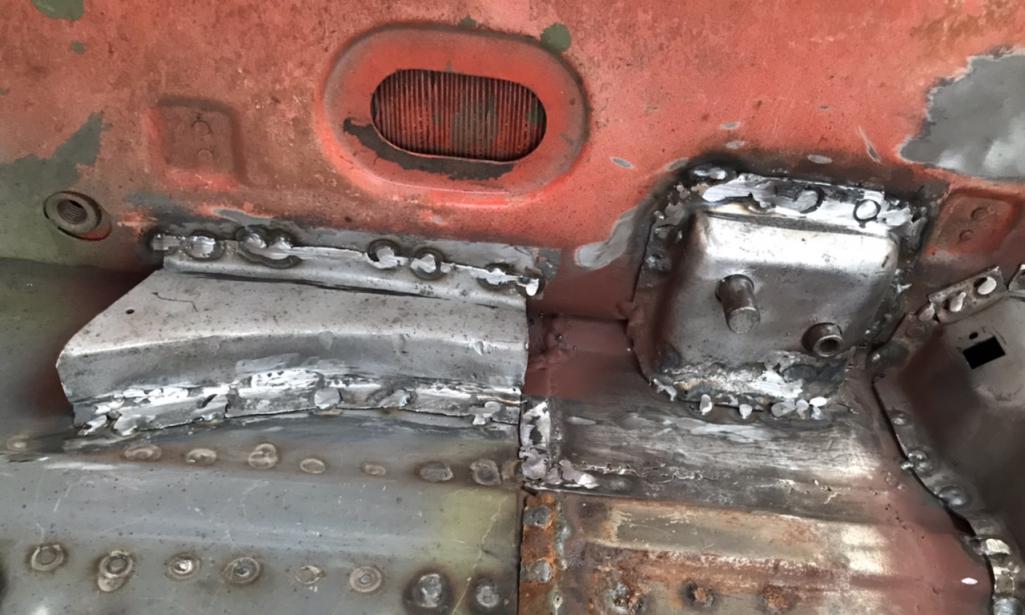
Posted by: Literati914 Oct 29 2021, 08:12 PM
Finally, I replaced the lid to the factory access hole, welding it - just ‘cause
Attached thumbnail(s)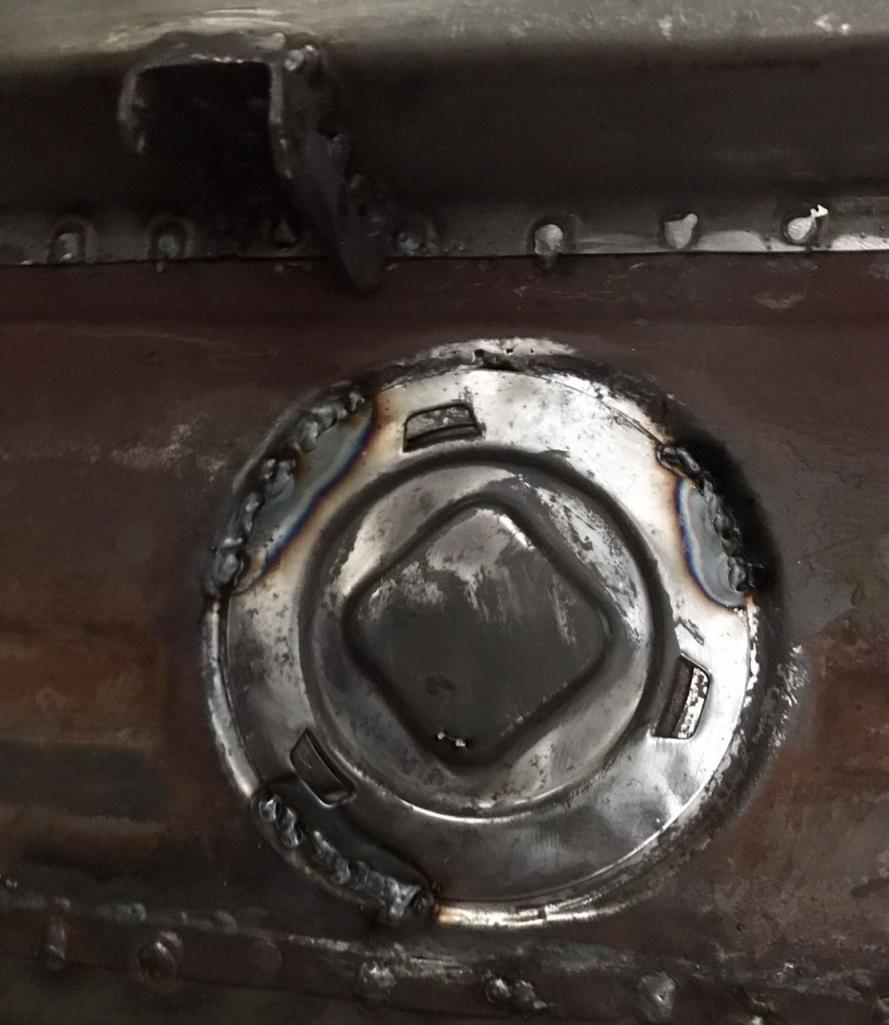
Posted by: Literati914 Nov 2 2021, 08:11 PM
Time for installing seat brackets and hinges to the floor. Here again I’m reusing the old hinges, all except one which was too rusted. There was more prep to getting these ready for welding than I assumed. So it took a couple days and both times I finished near dark.. therefor the welds were a bit chunky but the brackets ain’t going nowhere!
Attached thumbnail(s)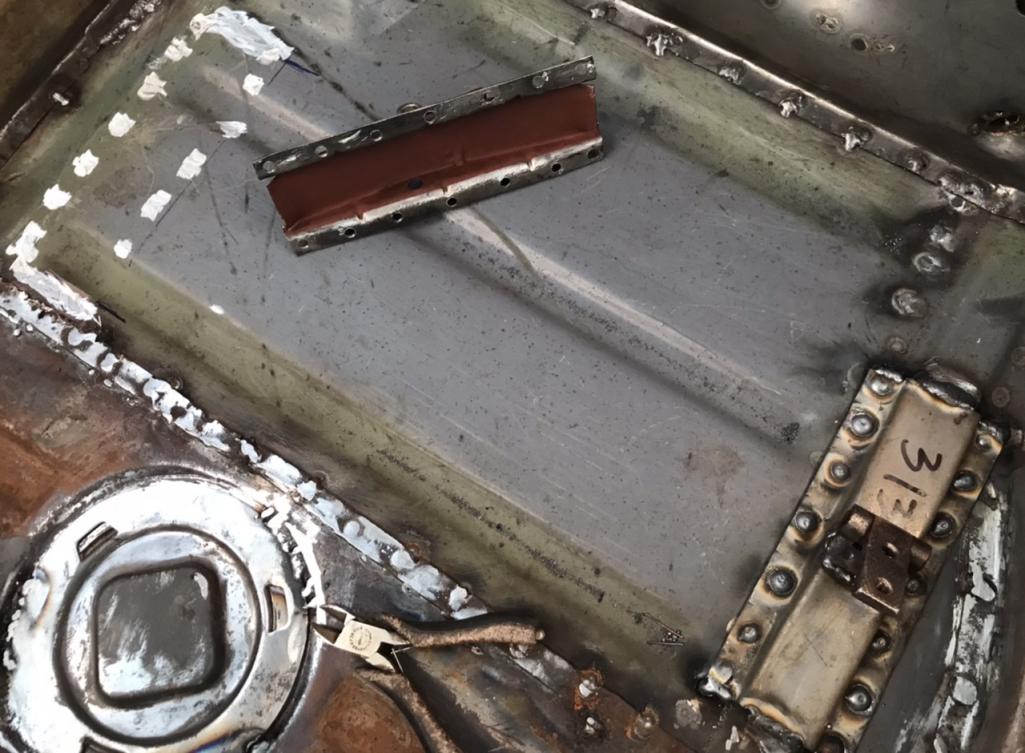
Posted by: Literati914 Nov 2 2021, 08:16 PM
Drivers side done. Had to install the brackets to the bottom of the Large seat rail assembly, then fit the middle adjuster in place to get the correct placement of the floor brackets before welding (as advised).
Attached thumbnail(s)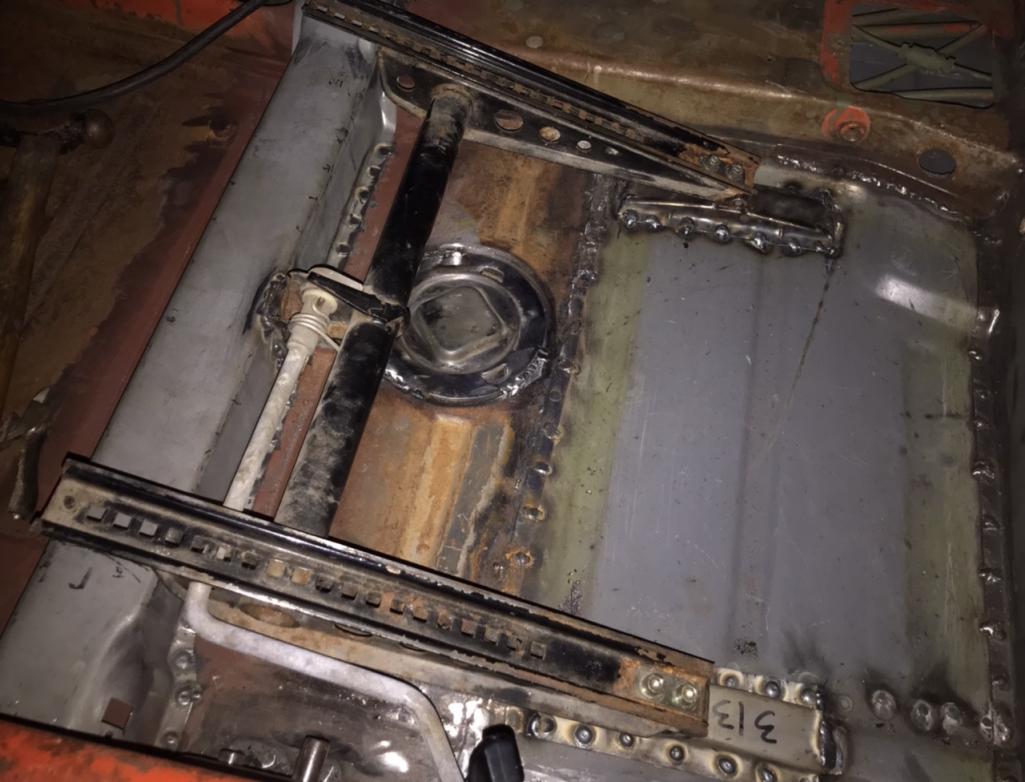
Posted by: Literati914 Nov 2 2021, 08:17 PM
Passenger Side prepared for brackets:
Attached thumbnail(s)
Posted by: Literati914 Nov 2 2021, 08:20 PM
Note: I believe you could measure 11” from the crossmember back to the middle of the pivot pin on the floor hinge and get a proper placement, but YMMV
..and, done:
Attached thumbnail(s)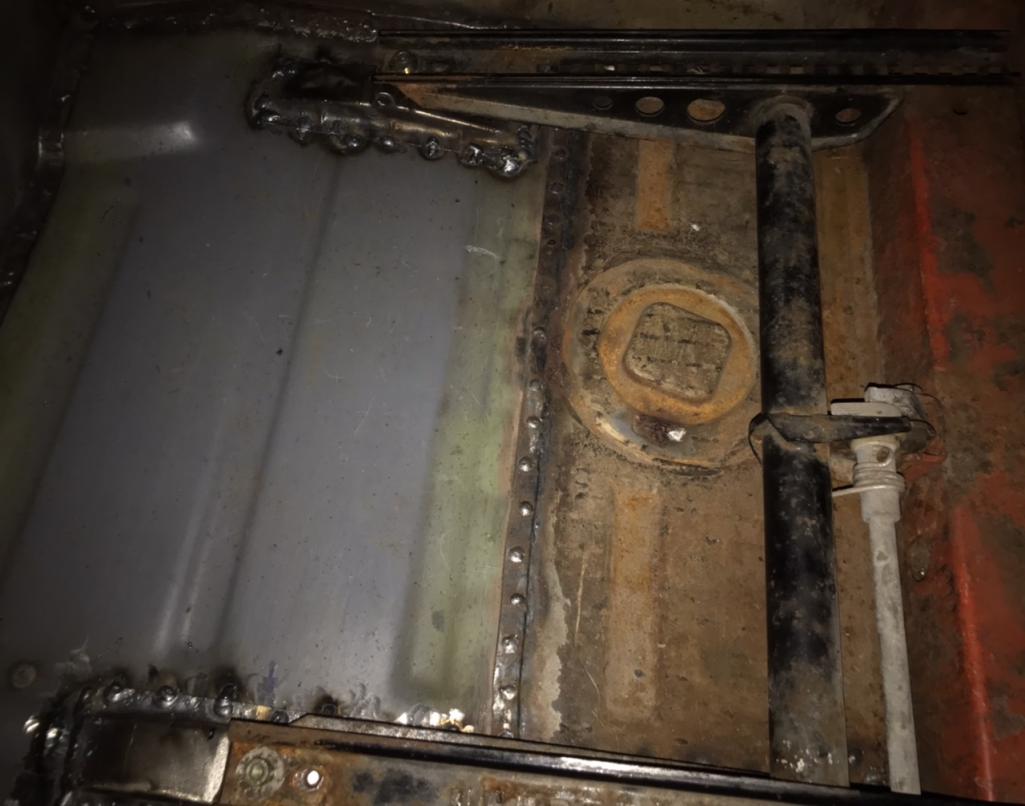
Posted by: autopro Nov 3 2021, 12:55 PM
Great! Glad it worked out for you.
Posted by: Literati914 Nov 5 2021, 08:26 PM
My stock jack points both needed a little work, neither were really all that bad but the outer shells both had some rusted out areas. Here’s where I cut away the bad area on the passenger side:
Attached thumbnail(s)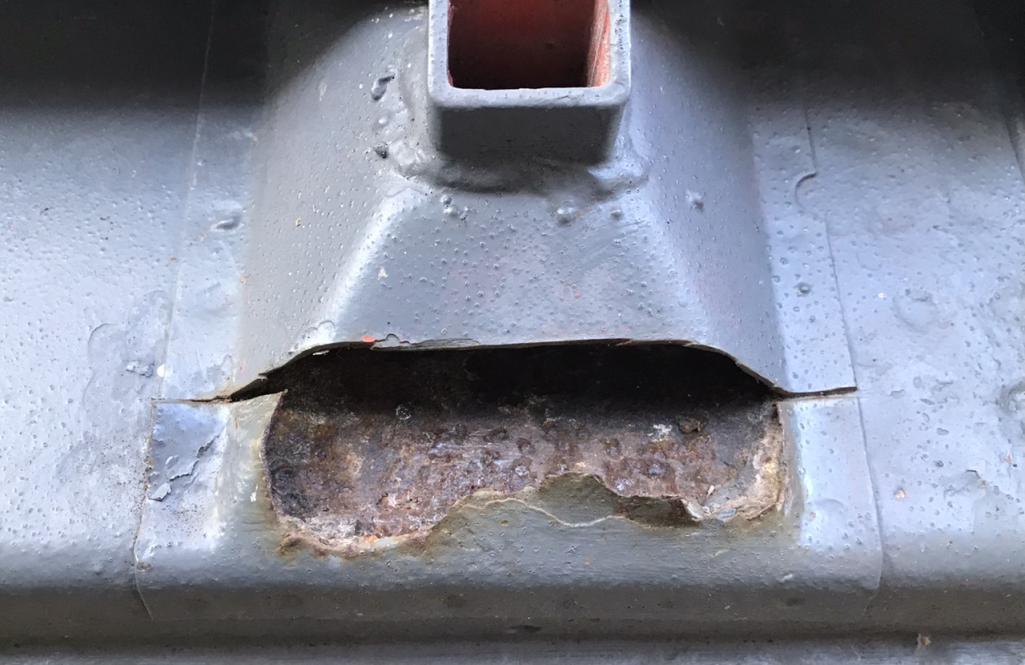
Posted by: Literati914 Nov 5 2021, 08:28 PM
The metal was pitted so I found a convenient piece of left over sheet metal to overlay and hopefully prolong the life of this area:
Attached thumbnail(s)
Posted by: Literati914 Nov 5 2021, 08:29 PM
Welded it in and smoothed it out a little :
Attached thumbnail(s)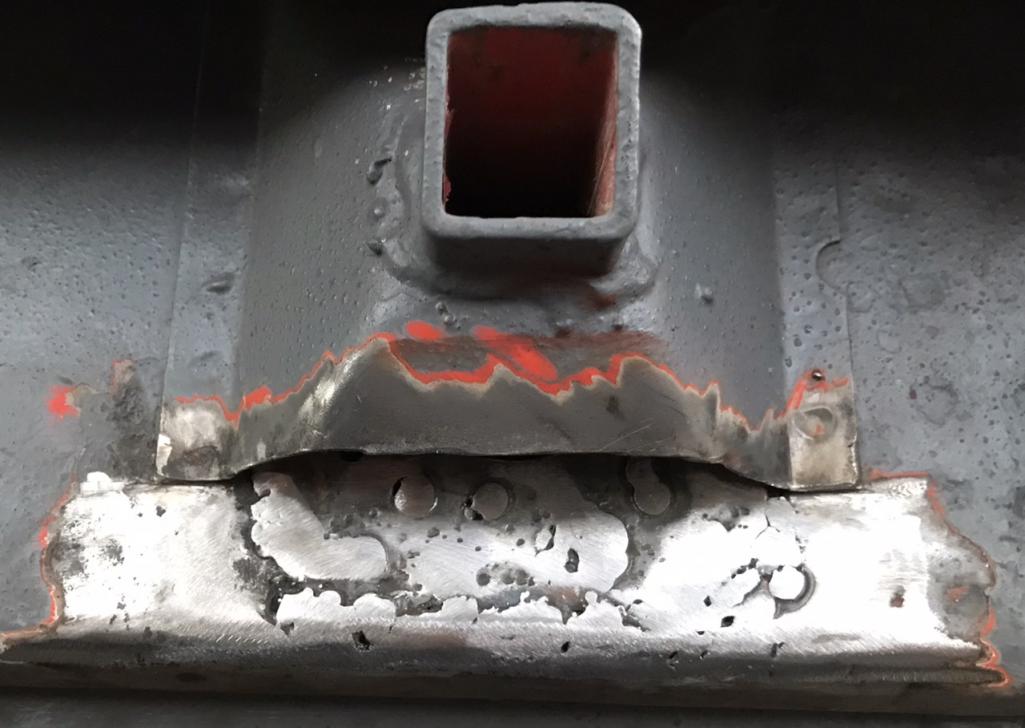
Posted by: Literati914 Nov 5 2021, 08:33 PM
Sprayed some protective paint inside the cavity and cut the needed section from a RD piece I’d picked up some time back:
Attached thumbnail(s)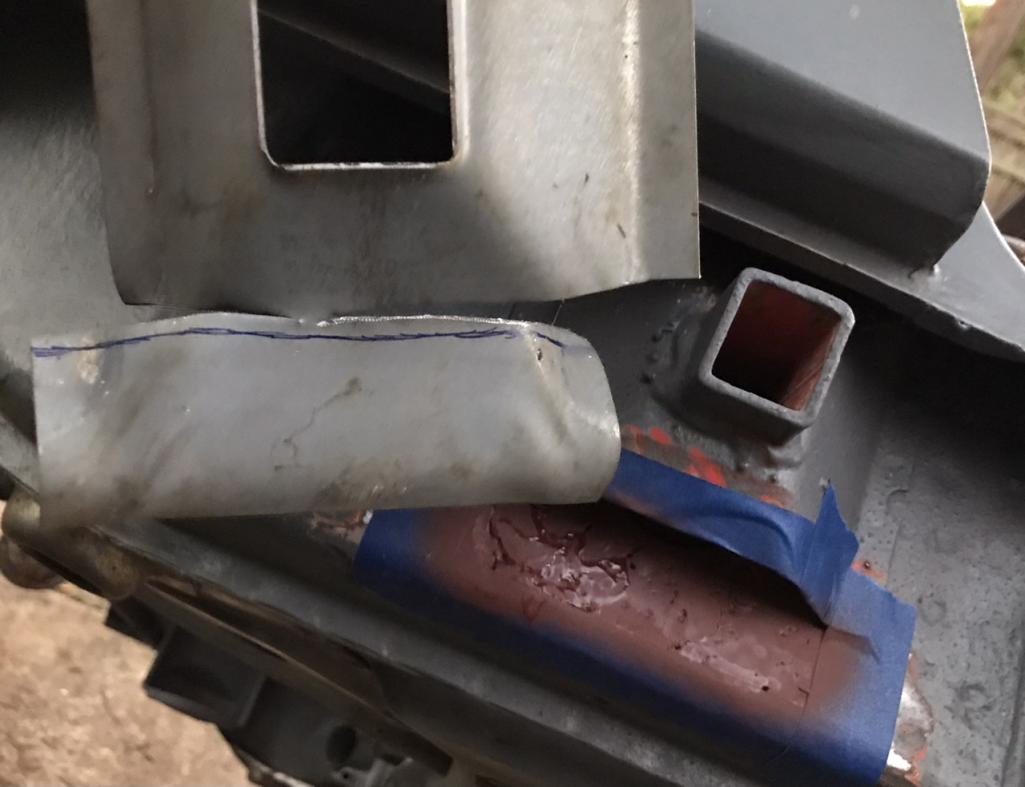
Posted by: Literati914 Nov 5 2021, 08:34 PM
Passenger side done:
Attached thumbnail(s)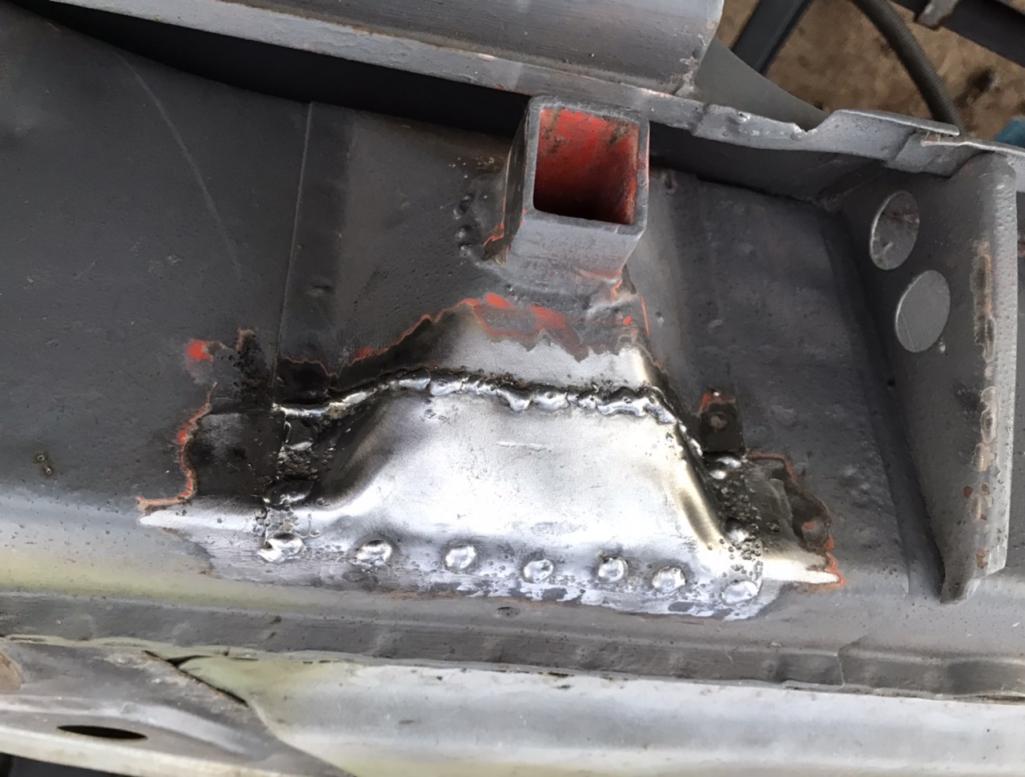
Posted by: Literati914 Nov 5 2021, 08:36 PM
Driver Side before working my magic
Attached thumbnail(s)
Posted by: Literati914 Nov 5 2021, 08:38 PM
Cut it open, painted cavity with rust incapcilater:
Attached thumbnail(s)
Posted by: Literati914 Nov 5 2021, 08:40 PM
Driver side welded up:
Attached thumbnail(s)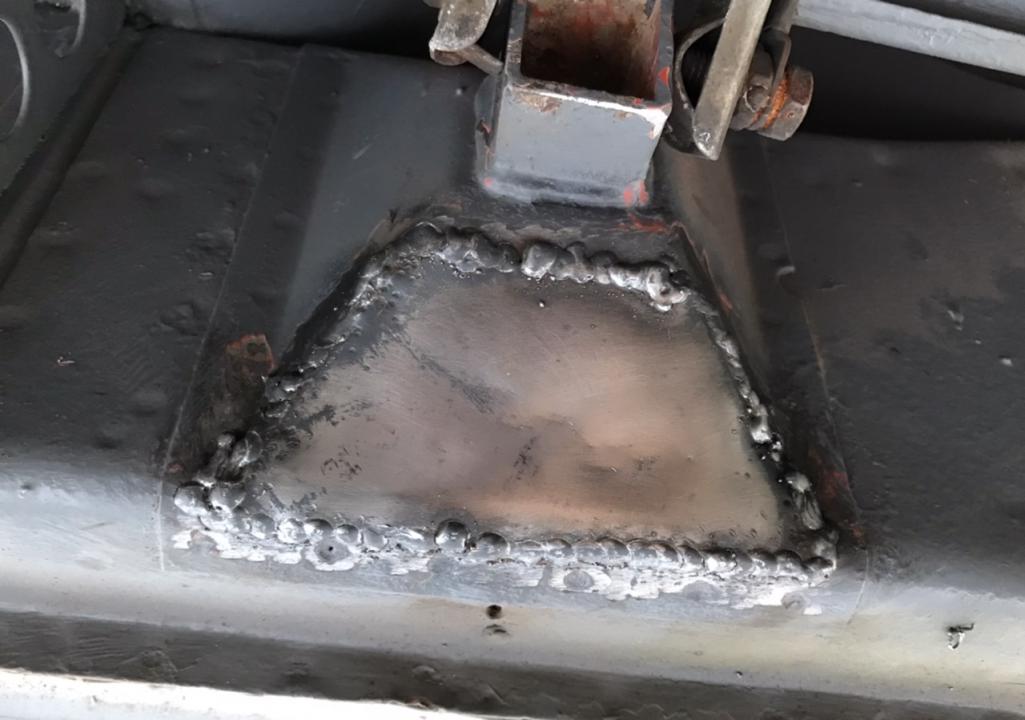
Posted by: Literati914 Nov 5 2021, 08:42 PM
Then I fabricated the tab that sits above the parking brake cable holes:
Attached thumbnail(s)
Posted by: Literati914 Nov 5 2021, 08:43 PM
Hope I got it stuck in the right place cause it was dark when I welded it in:
Attached thumbnail(s)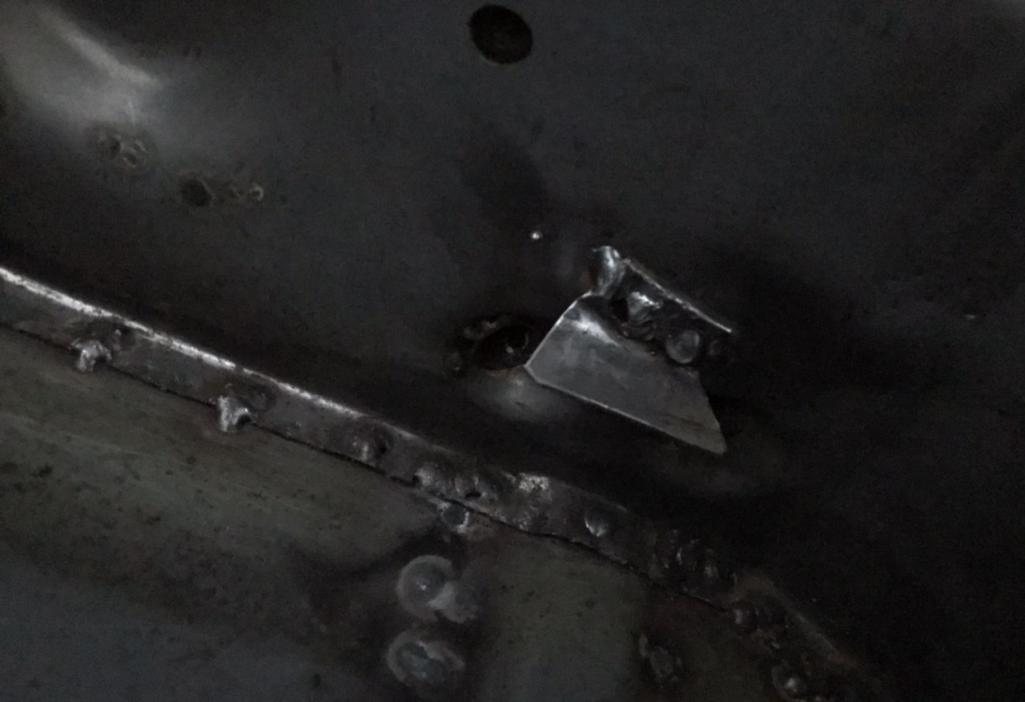
Posted by: Literati914 Nov 5 2021, 08:47 PM
And just cause I’m a glutton for punishment, I decided to continue my welding in the dark non-sense! This time, the thin little metal strap for holding down the wiring under the passenger seat:
Attached thumbnail(s)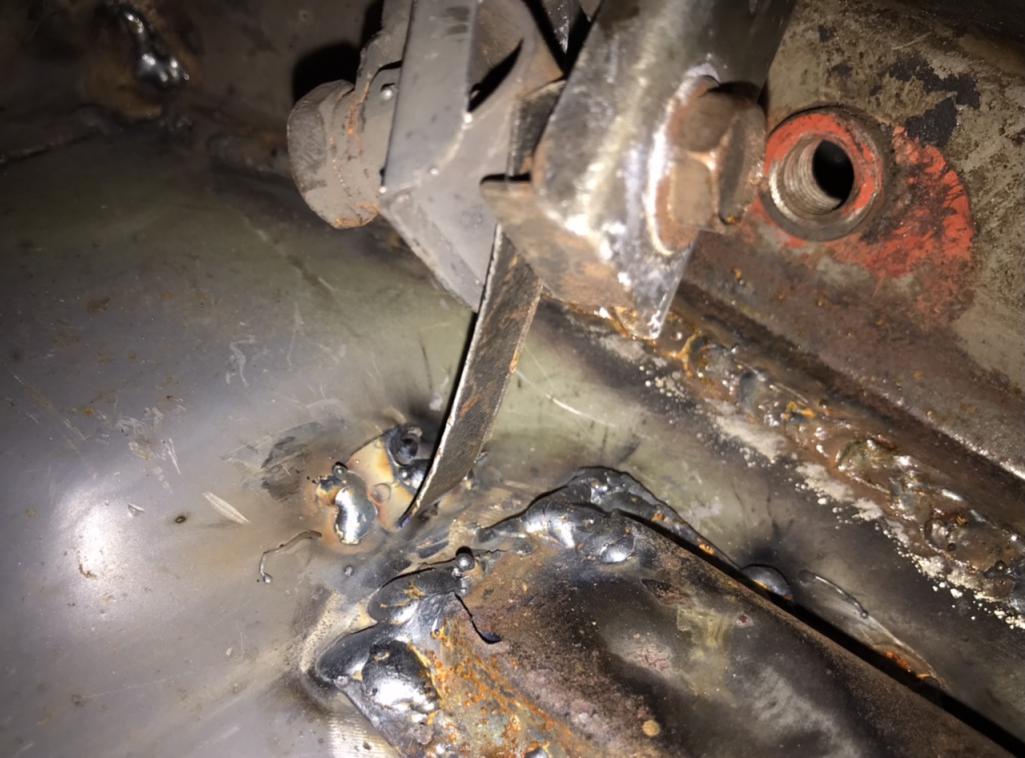
Posted by: Literati914 Nov 15 2021, 09:29 PM
Next on the agenda is to repair the rusted out area that the frunk handle pull mounts to.. under the dash on the driver’s side. I made this repair over a few days work. First picture highlights the rusted out holes, but the area in between was pitted and thin so I opted to cut a large area out:
Attached thumbnail(s)
Posted by: Literati914 Nov 15 2021, 09:31 PM
Same area from the topside:
Attached thumbnail(s)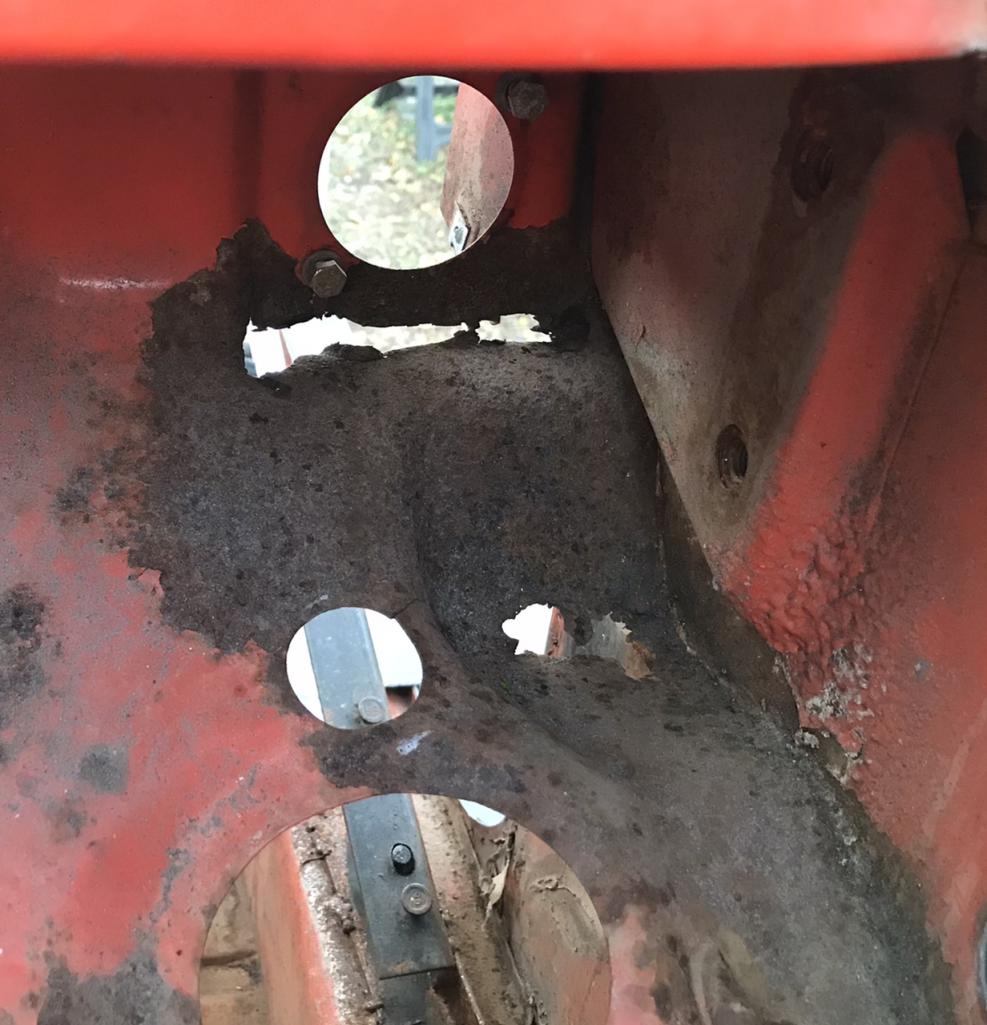
Posted by: Literati914 Nov 15 2021, 09:33 PM
The rusted area cut away:
Attached thumbnail(s)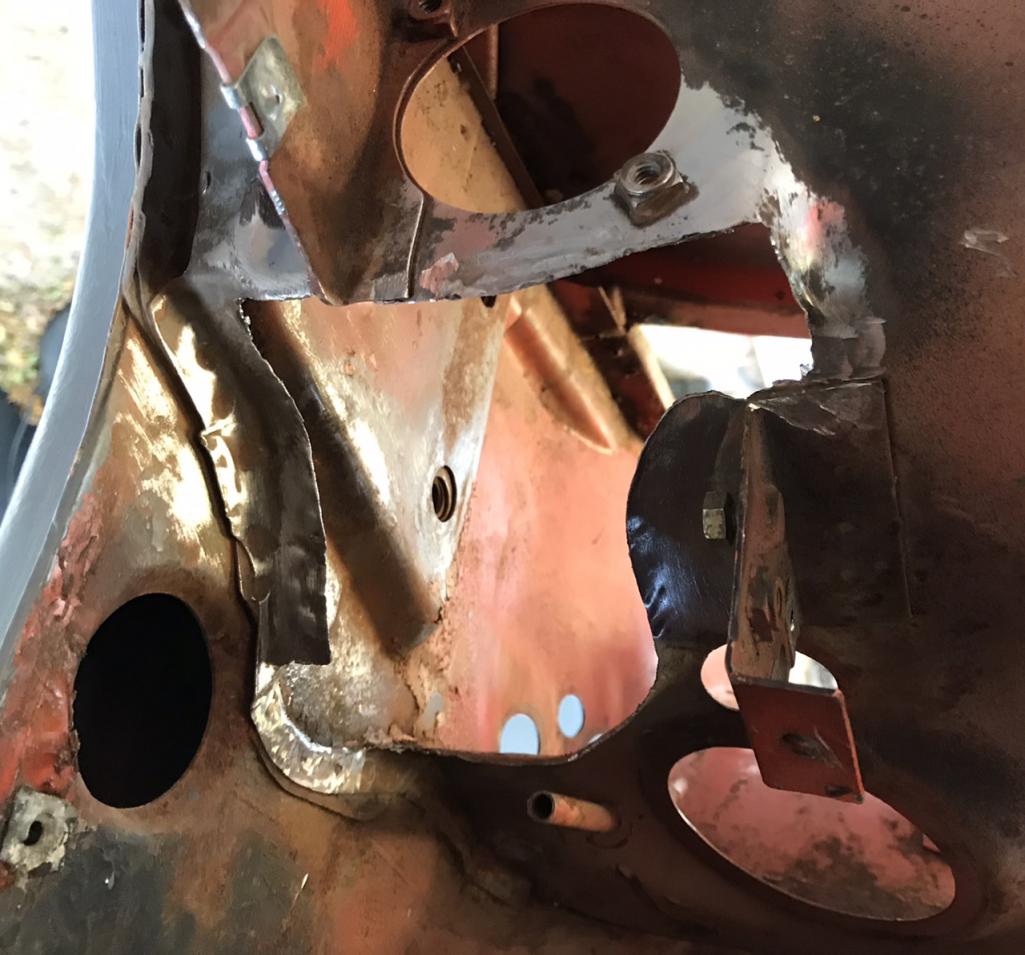
Posted by: Literati914 Nov 15 2021, 09:40 PM
Here’s an interesting detail I noticed while working under the dash… there is a curved reinforcement (highlighted in green) area on the passengers side where this piece would be welded for right-hand drive cars. You can see from the picture that the sheet metal is a flatter piece here instead of dropping down to hold the handle.
Attached thumbnail(s)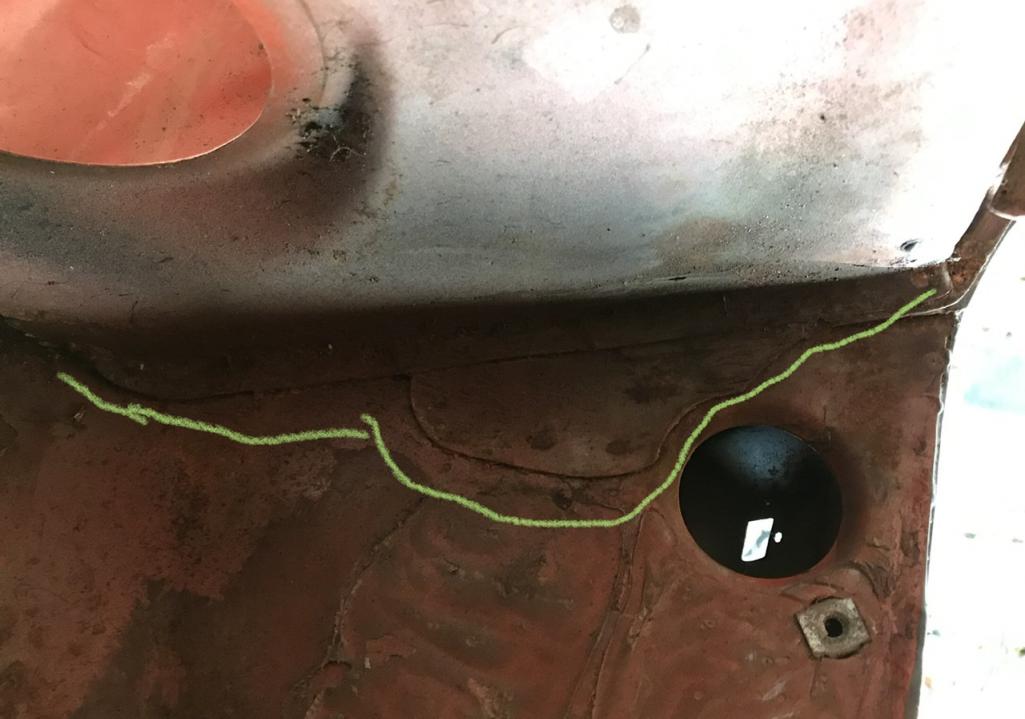
Posted by: Literati914 Nov 15 2021, 09:41 PM
Started making a repair panel:
Attached thumbnail(s)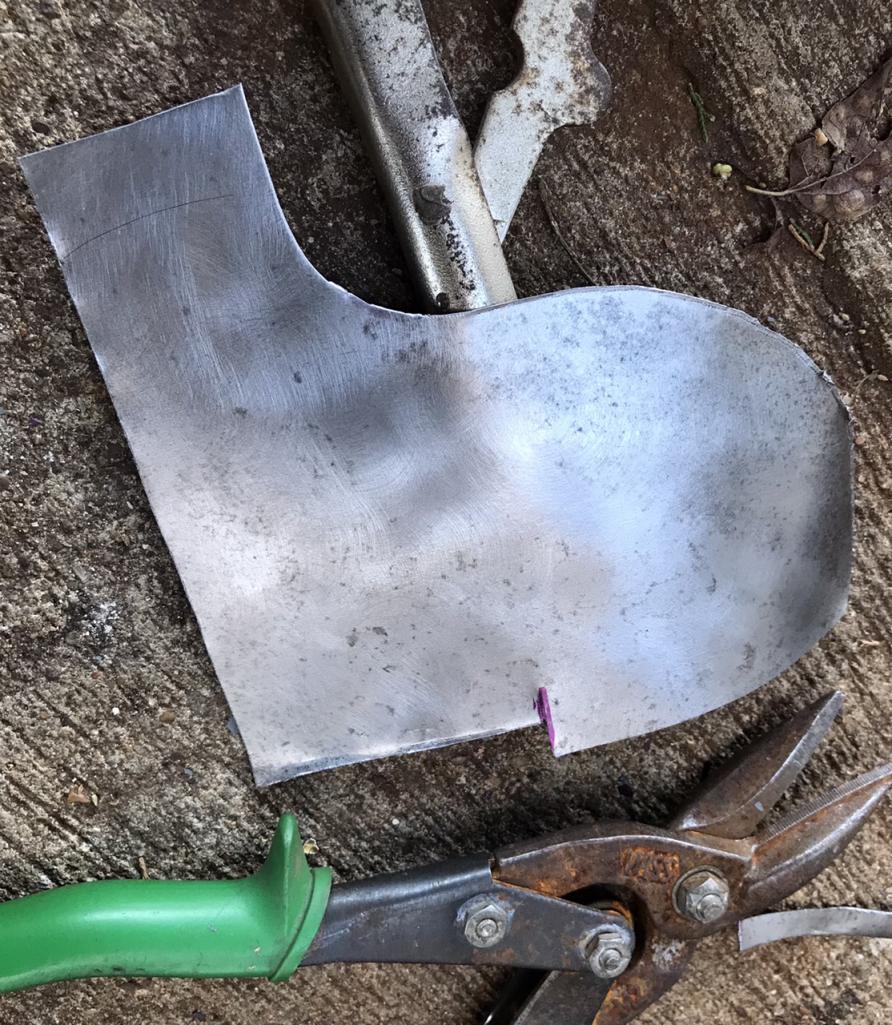
Posted by: Literati914 Nov 15 2021, 09:42 PM
Ended up looking like this:
Attached thumbnail(s)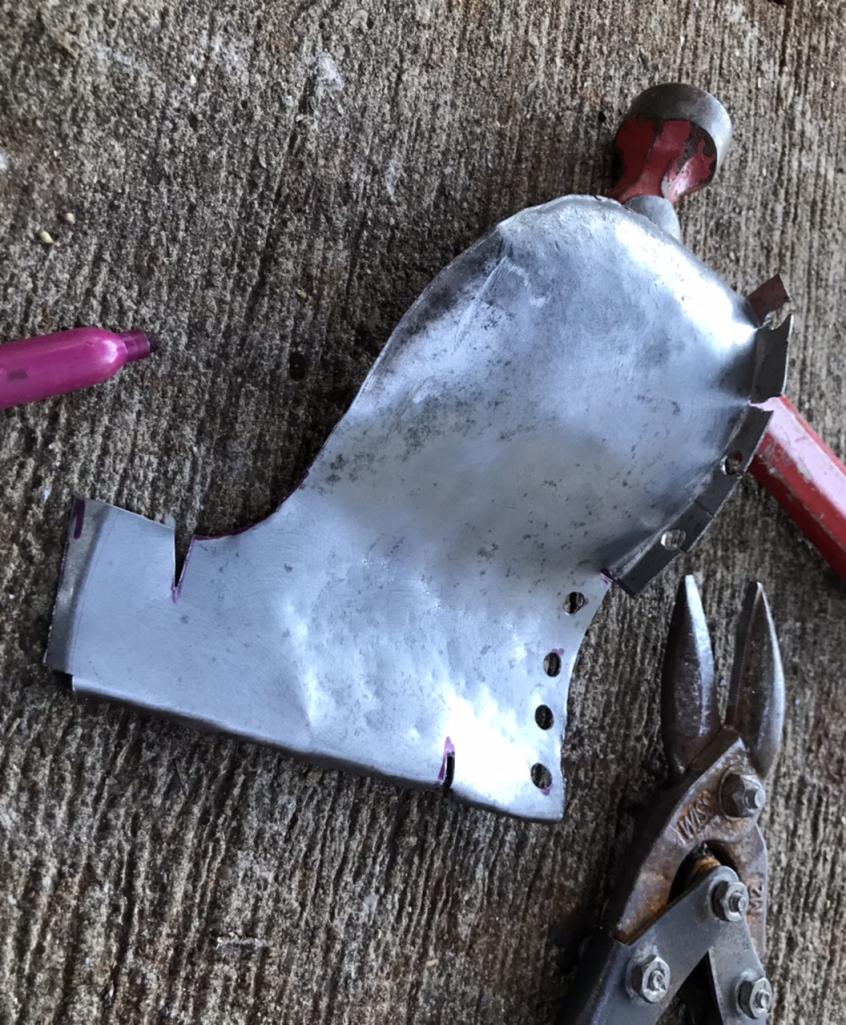
Posted by: Literati914 Nov 15 2021, 09:46 PM
Welded in, ground down highs and filled with a fiberglass fill to seal the seams. You can see the two small holes I added for fastening the cable handle to the underside. Topside view:
Attached thumbnail(s)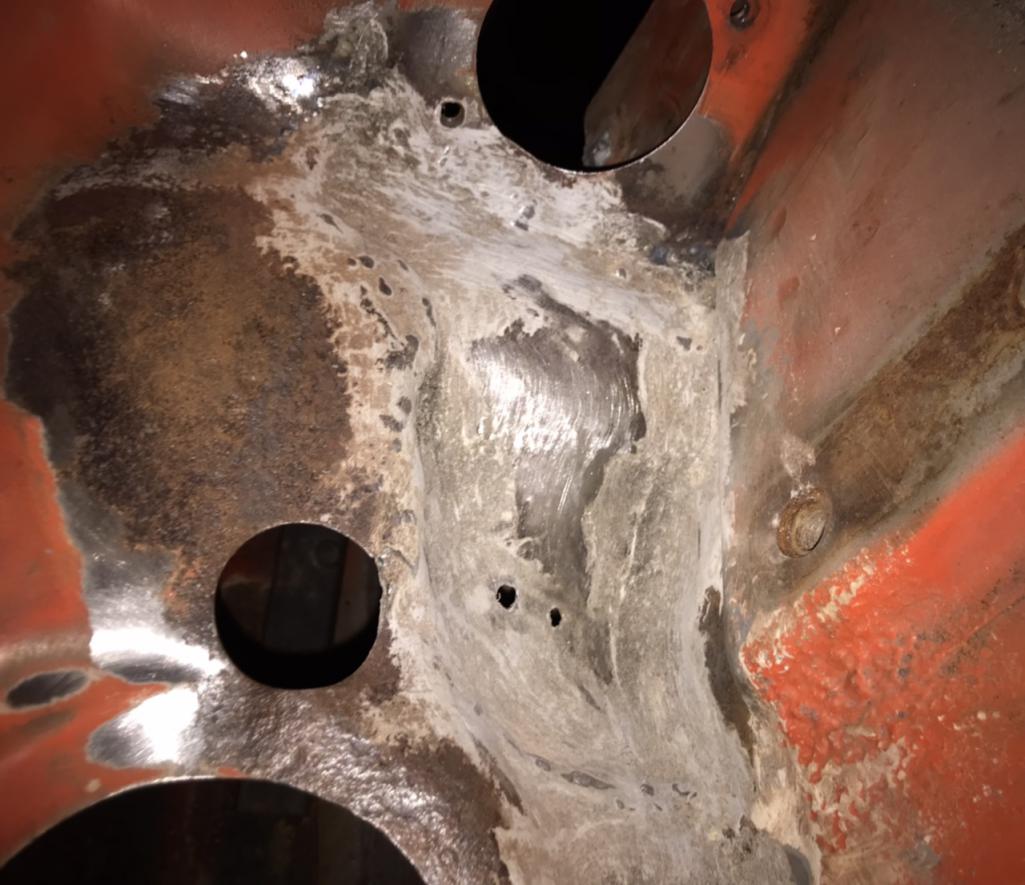
Posted by: Literati914 Nov 15 2021, 09:47 PM
… and the finished product from underneath:
Attached thumbnail(s)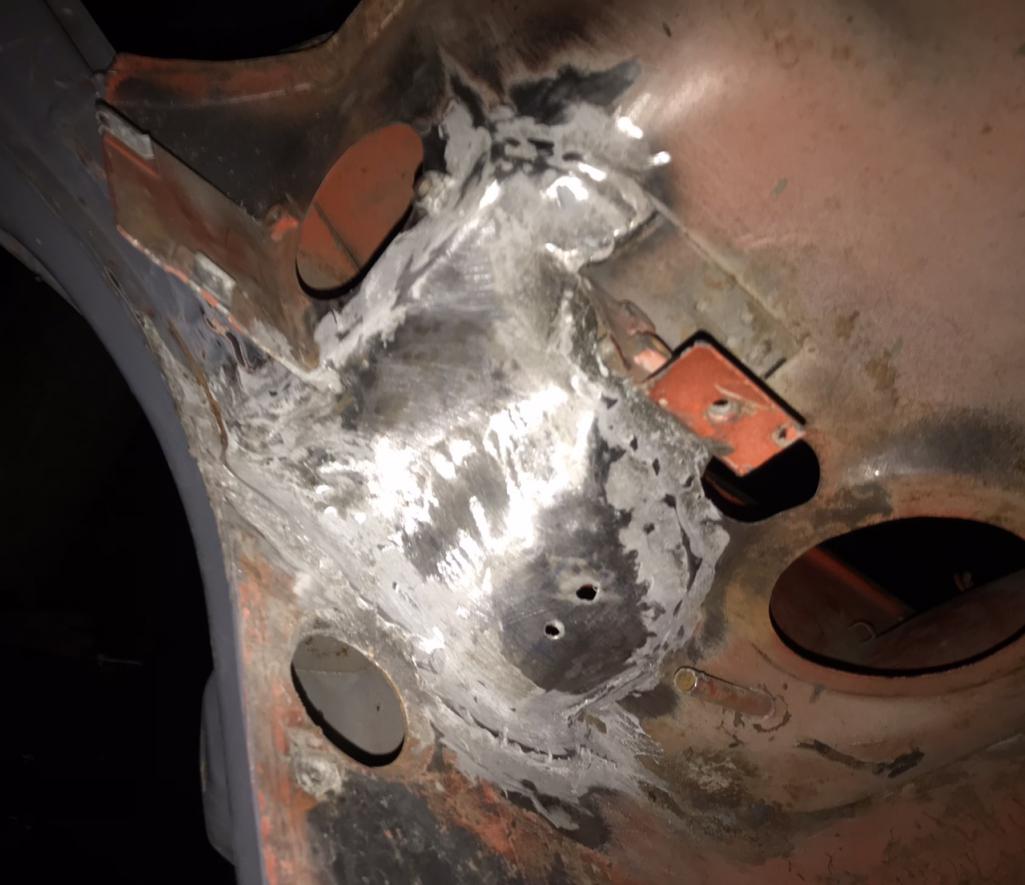
Posted by: Literati914 Nov 17 2021, 08:36 PM
Today I jumped back over to the hell-hole repair I did several months back. I had welded my fabricated panel in place but didn’t coat it with anything to protect it.. thinking I’d get back to it soon, but I didn’t until now. Anyway besides surface rust the area needed some high welds knocked down, followed by a phosphoric acid wash.
When I made this panel it seemed to be correct until I started welding, then it was somehow short by about a 1/4” at firewall side  .. I know addressing this gap is totally not necessary but since it keeps bugging me, I decided to fix it:
Attached thumbnail(s)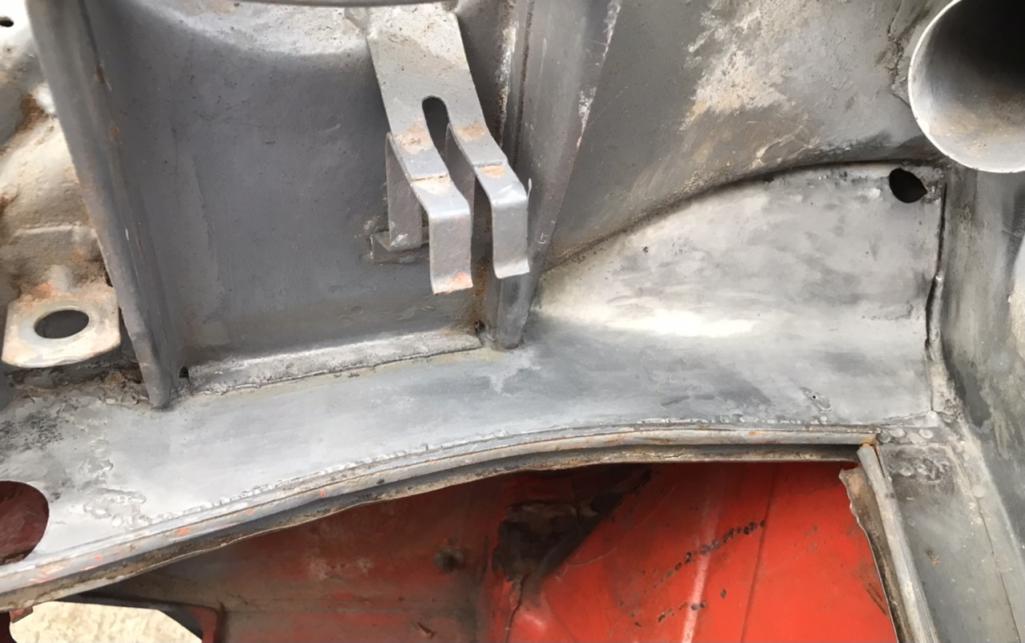
Posted by: Literati914 Nov 17 2021, 08:36 PM
…made a patch to cover the gap:
Attached thumbnail(s)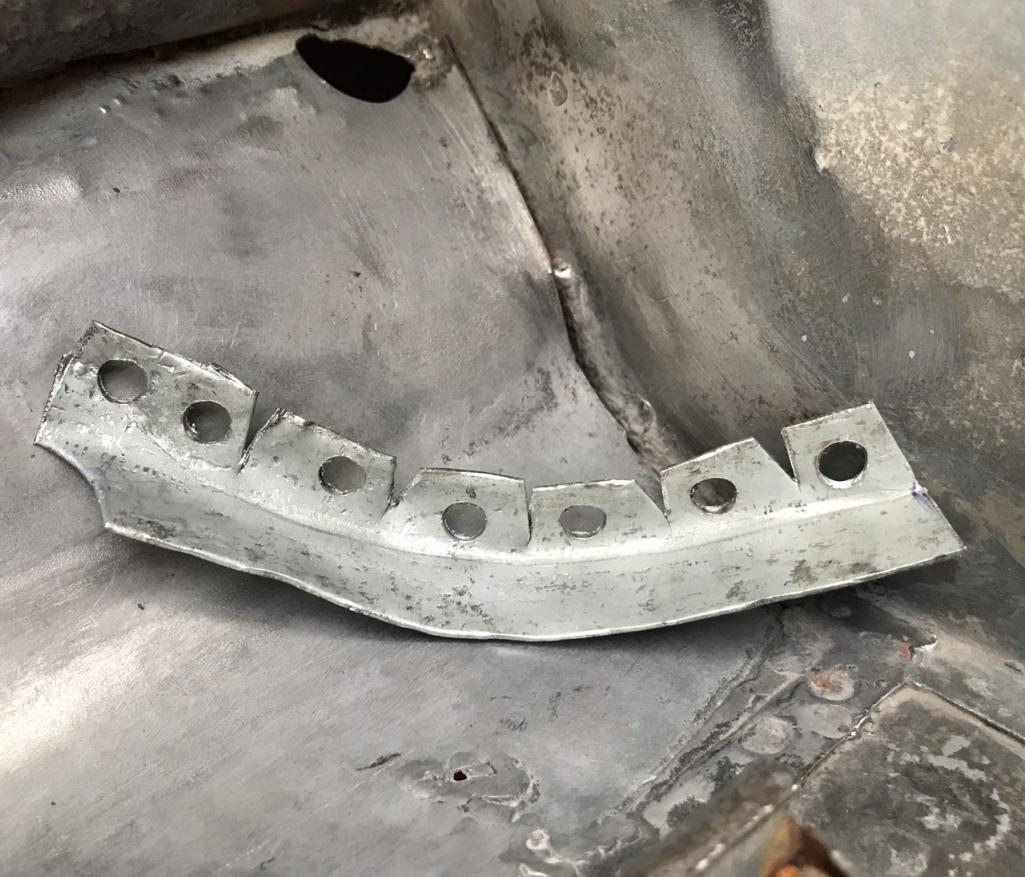
Posted by: Literati914 Nov 17 2021, 08:38 PM
.. welded into place. Will go back and fill the seams later:
Attached thumbnail(s)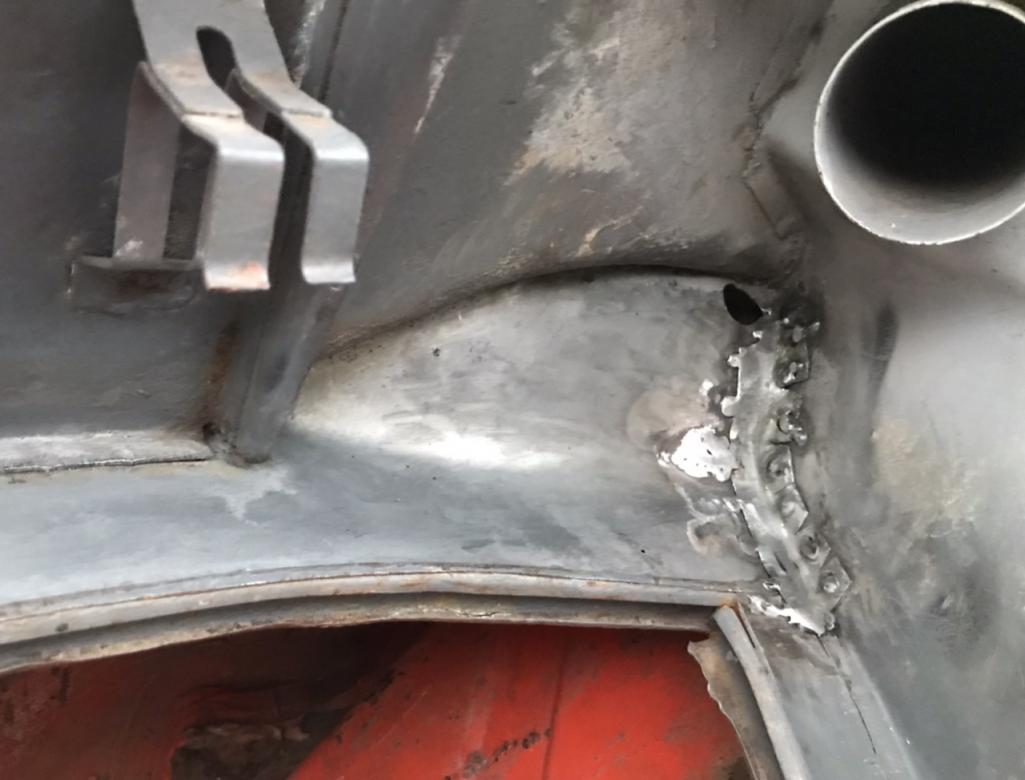
Posted by: Literati914 Nov 18 2021, 11:52 PM
Here’s the top-side of the HH repair showing FG-filler for any pin-holes, etc:
Attached thumbnail(s)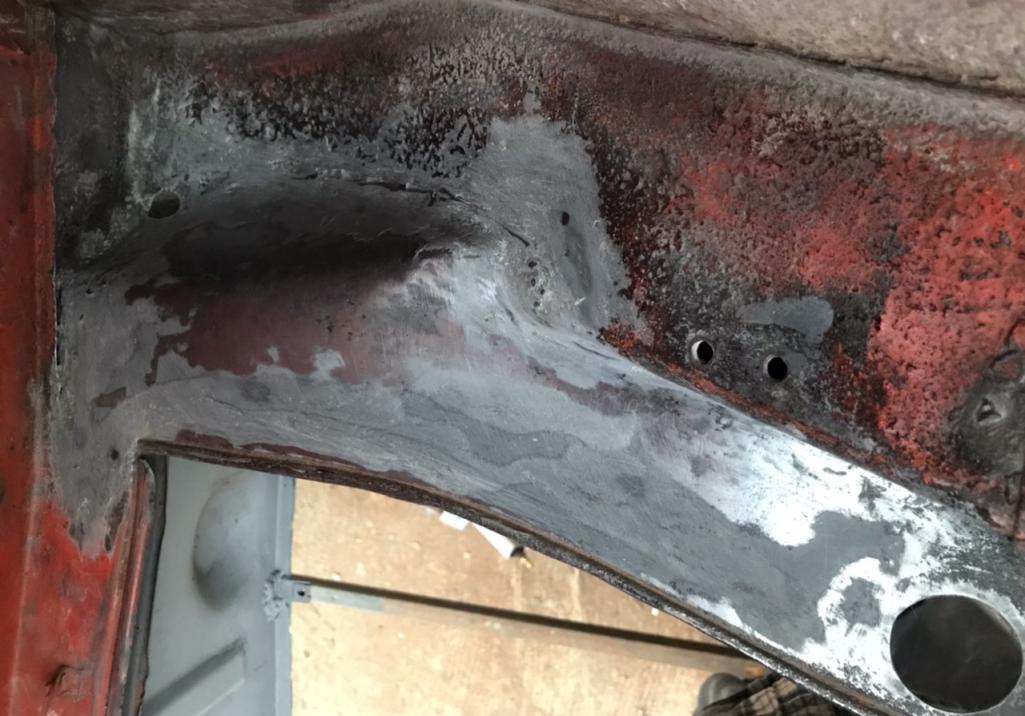
Posted by: Literati914 Nov 18 2021, 11:53 PM
Smoothed and primed:
Attached thumbnail(s)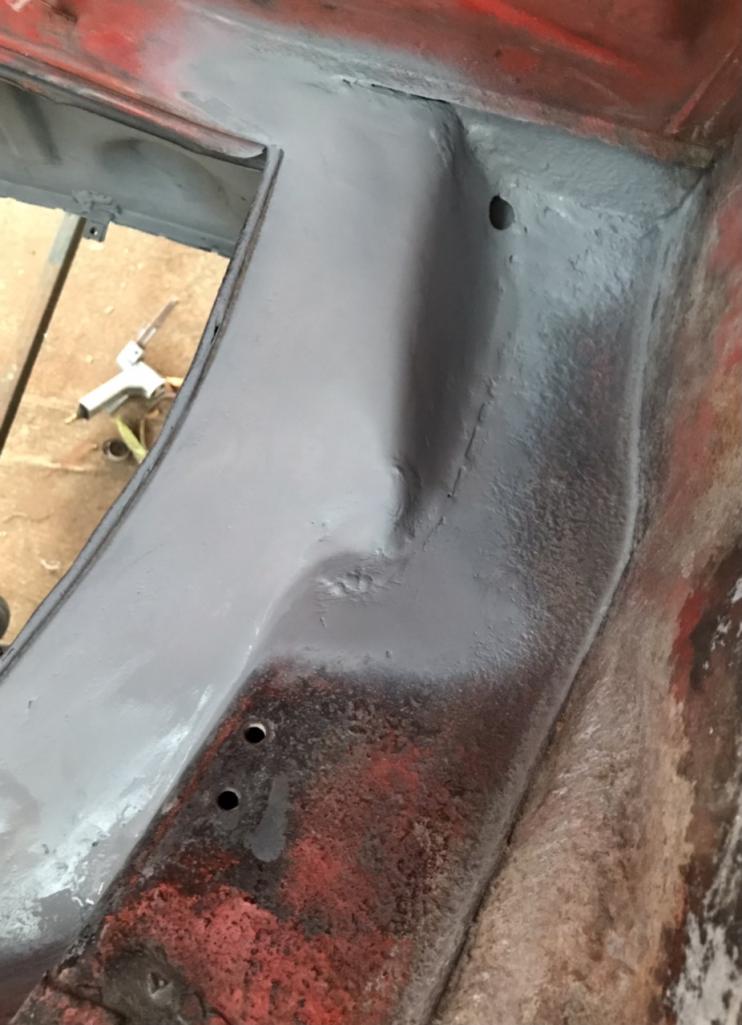
Posted by: Literati914 Nov 18 2021, 11:55 PM
And the underside done the same way:
Attached thumbnail(s)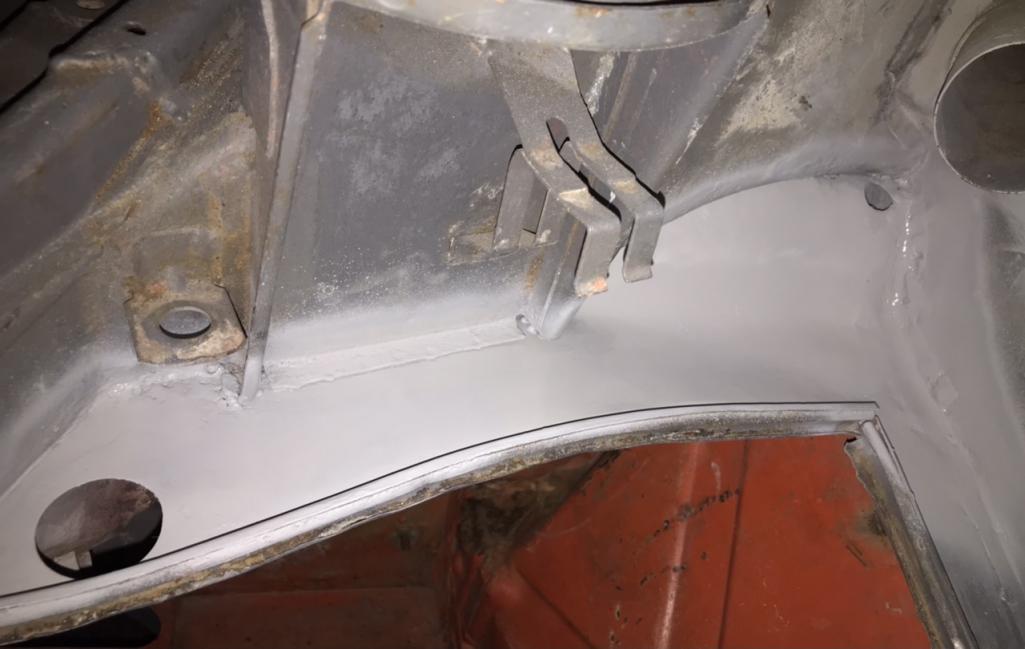
Posted by: jkb081 Nov 19 2021, 12:51 AM
I've been putting this off, but I guess I should document the restoration build for my latest 914. I finally got the car on my property and even though there no garage (YET) I can go ahead and get some things started. This will be my 3rd 914 and it'll be a bit of a second chance for this car, as it has a front end section that's been grafted on (by PO) because of a previous accident - not to mention the rusted away hell-hole and holes in the floor. The graft actually looks pretty well done and solid, and the other items will be addressed. The car came with it's original engine - a 1.7 that's freshly rebuilt with zero miles on the rebuild (uninstalled). I've also got a 2056cc 'GA' motor that'll probably end up in this car.
The car was originally L21E Tangerine and someone's gone over it with a real crappy red paint. Since my last 914(/6) was L21E Tangerine.. I'm going to paint this one something else, and will be doing all bodywork and paint myself.
This "restoration" will be considered a driver quality effort.. but I don't plan on cutting too many corners either. I plan to do a quality job but it won't be going across the block at Christies either. Lots of parts have already been sourced, but there's always more, right! Here's the BEFORE shots:
https://postimages.org/
Looks like mine! I purchased a 73 1.7 last month for $3800.00. Probably paid too much. It is also painted red, with a rattle can. Original color is “Frog Green” forgot the real name for that color. It had been painted orange and yellow previously. Has the same wheels as yours. Lol! Engine seems to run good, but the shifter needs to be sorted out. Both pans are rotted as well as the hell hole. Even worse, the pedal area is rotted out also. I had to rig the gas pedal to be able to drive it. Gauges work but lights do not. Brakes are ok. I’m only able to drive it around the block, barely!! All the rubber is cracked and the roof is just staying in place by it’s own weight. Wipers don’t work either. To ad to the fun, I was laid off last week, so now all I can do is sit and make a list of what needs to be done in order to just drive it. Never mind anything fancy. And of course look for a new job. I’m a carpenter. Millwork installer, commercial doors and hardware.
Posted by: Literati914 Nov 24 2021, 09:48 PM
Got back to it, been working on this issue for a few days on and off. When my car had its front end collision (w/ previous owner), it knocked a small gap at the bottom of each door where the seal meets the threshold, under the lower door hinge on each side (must have been a hell of a pop!). Here some pics showing what I was repairing on the driver’s side:
.
Attached thumbnail(s)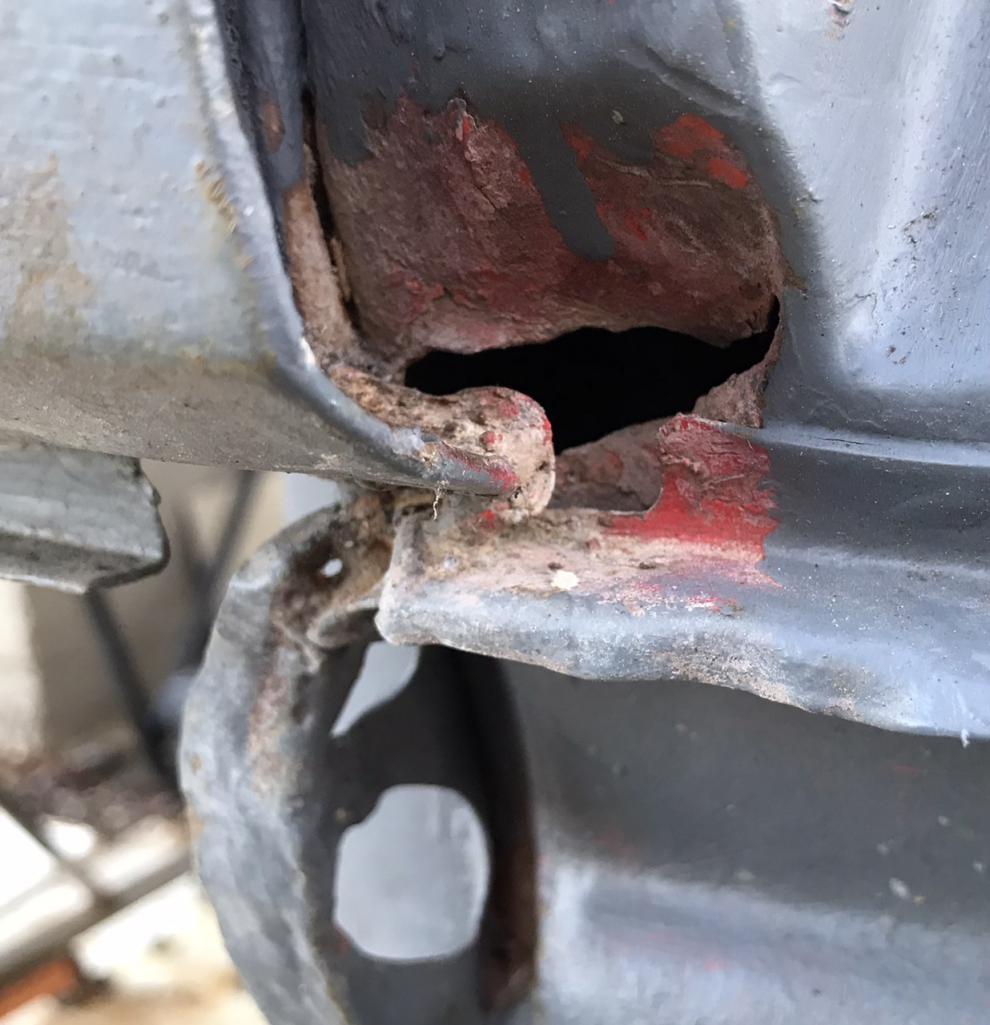
Posted by: Literati914 Nov 24 2021, 09:50 PM
Under the attachment rail for the rocker cover too:
.
Attached thumbnail(s)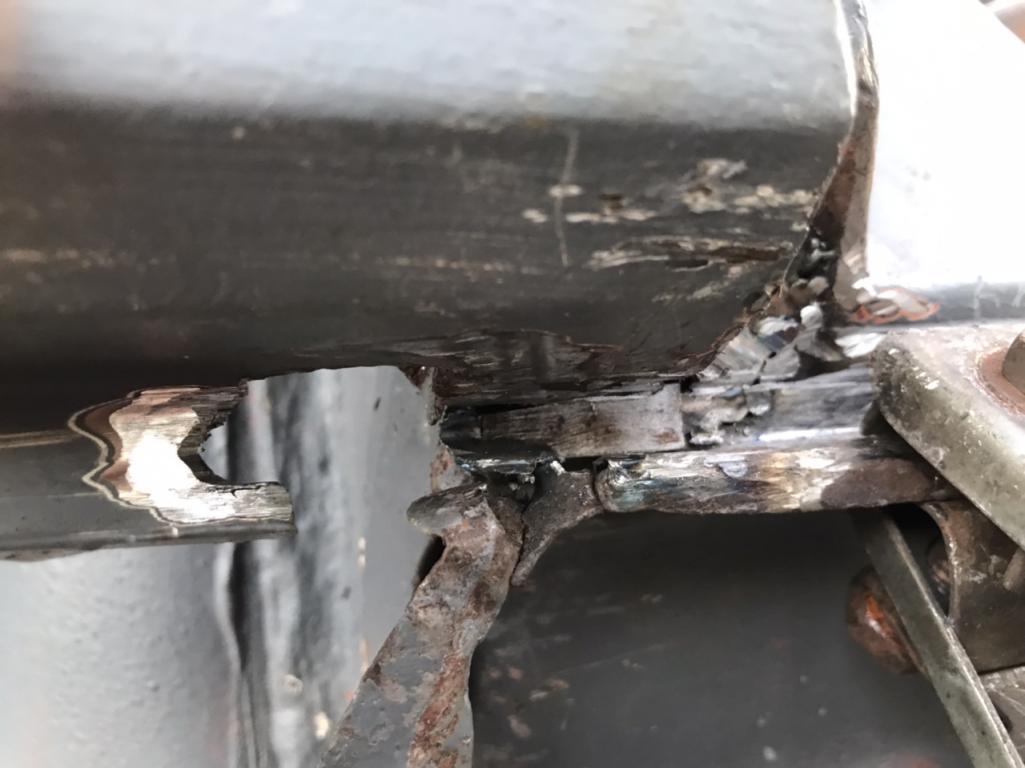
Posted by: Literati914 Nov 24 2021, 09:53 PM
Welded all this up, ground down the highs:
Attached thumbnail(s)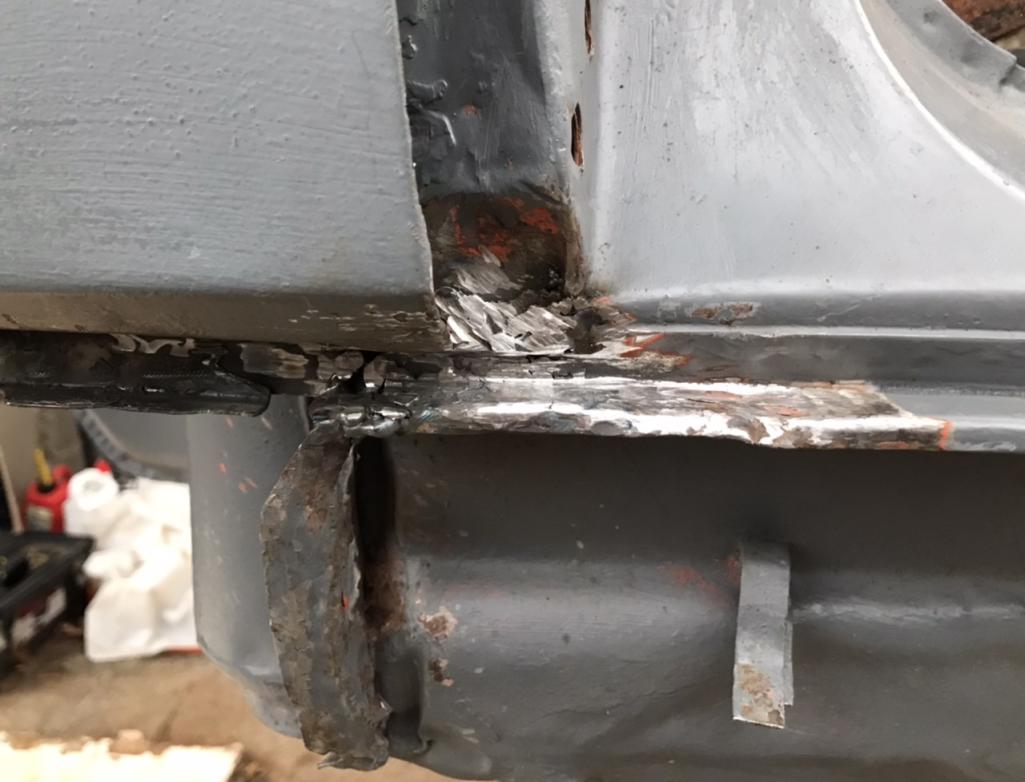
Posted by: Literati914 Nov 24 2021, 09:54 PM
finished up the driver’s side:
Attached thumbnail(s)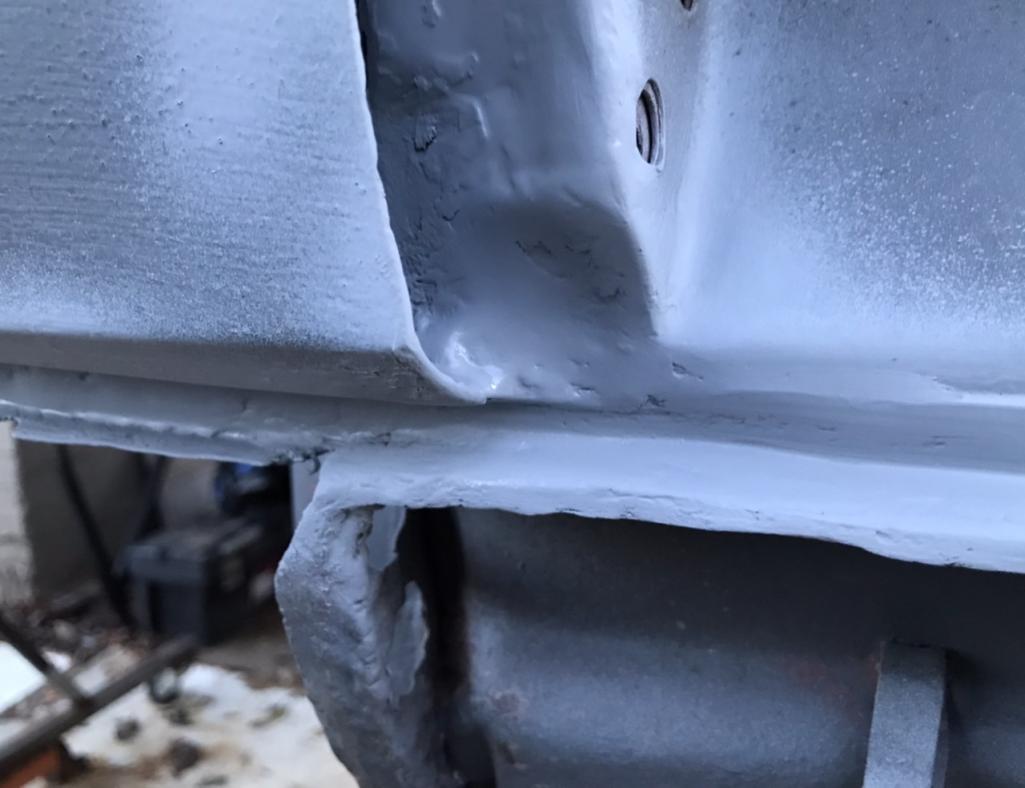
Posted by: Literati914 Nov 24 2021, 09:55 PM
Then it was over to the passenger side:
Attached thumbnail(s)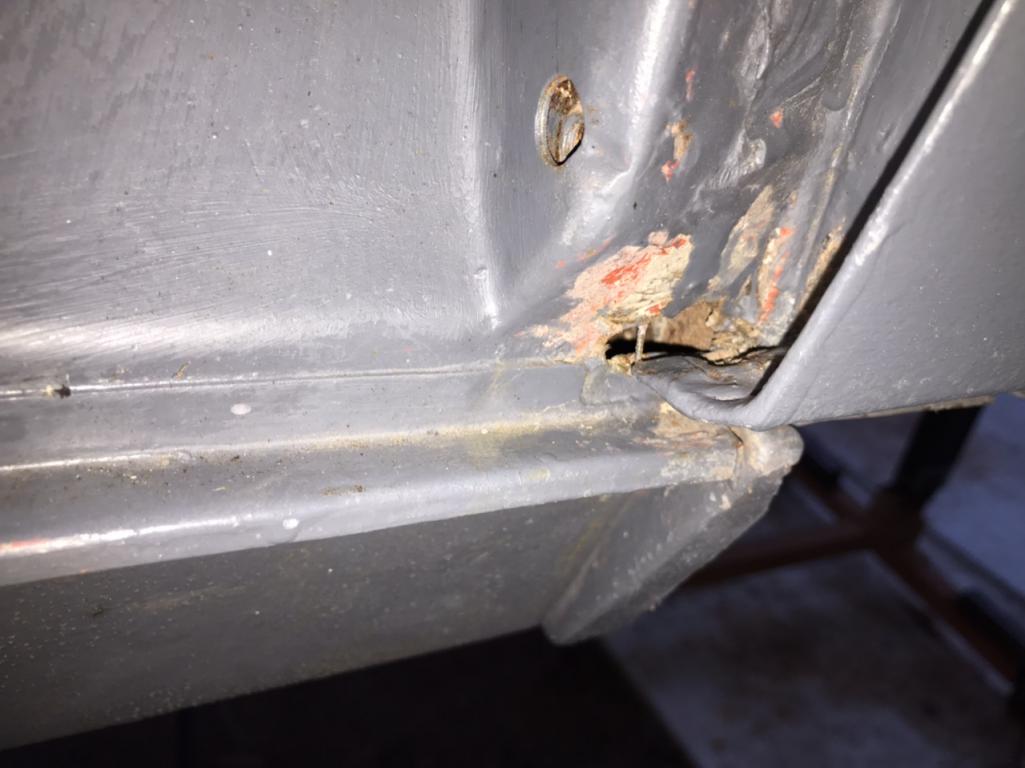
Posted by: Literati914 Nov 24 2021, 09:57 PM
the patch:
Attached thumbnail(s)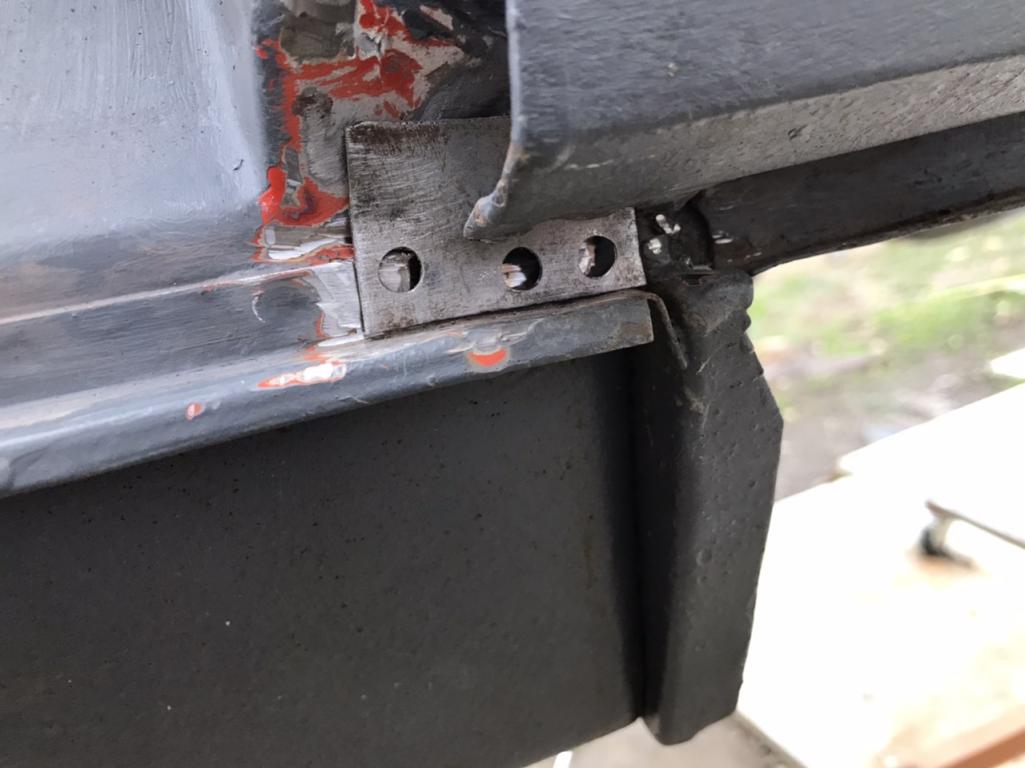
Posted by: Literati914 Nov 24 2021, 09:58 PM
… welded in, filled and lightly primed:
Attached thumbnail(s)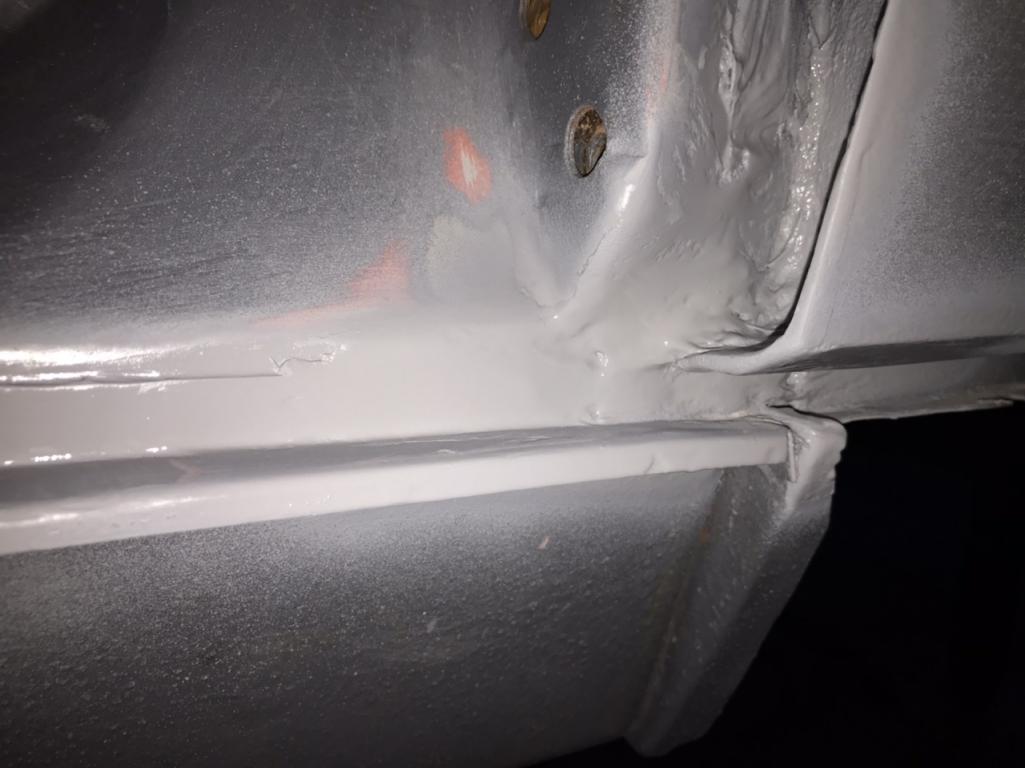
Posted by: Literati914 Dec 12 2021, 06:51 PM
Been away from this project for a while, but got back on it the other day. This time I addressed the holes that were drilled in the rear center panel when a previous owner mounted one of the long reflectors (w/ Porsche script). I began this repair yesterday after I’d misplaced my phone (camera) for half the day, so no before shots unfortunately.. and no pics where I filled the holes with metal and welded them closed. Here’s a pic of the area leveled with FG filler though:
Attached thumbnail(s)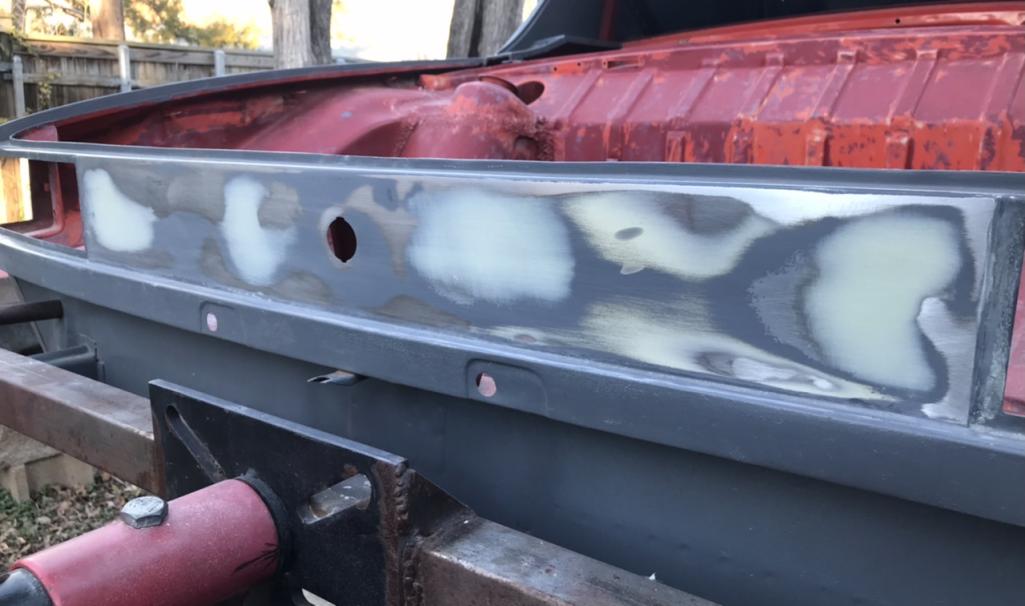
Posted by: Literati914 Dec 12 2021, 06:53 PM
Lightly primed.. and check this one off the list. Next is on to the seal channel for the front trunk (frunk  )
)
Attached thumbnail(s)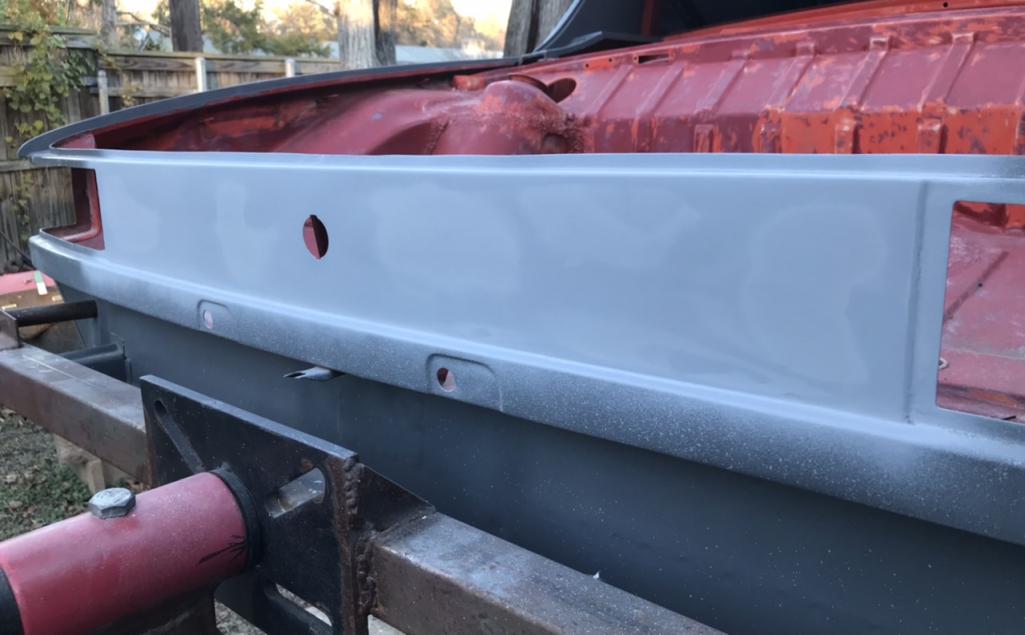
Posted by: Literati914 Dec 17 2021, 11:06 PM
Next, I needed to fix all the holes in the front part of the seal channel for the frunk.. including the perimeters of the headlight bucket areas. Here’s some before shots showing some of the rusted parts.
Attached thumbnail(s)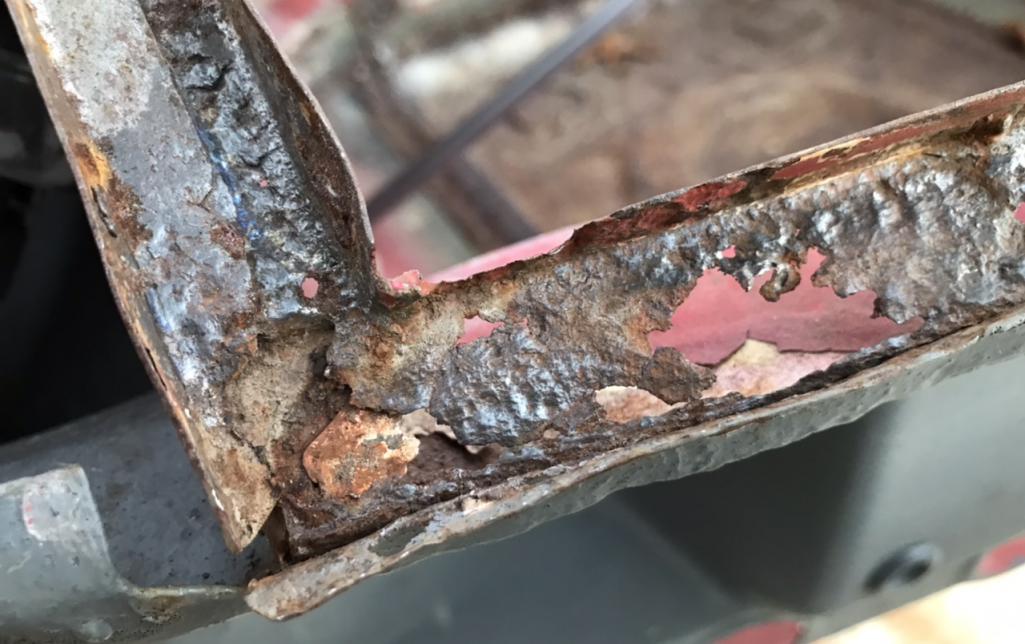
Posted by: Literati914 Dec 17 2021, 11:08 PM
More ugly :
Attached thumbnail(s)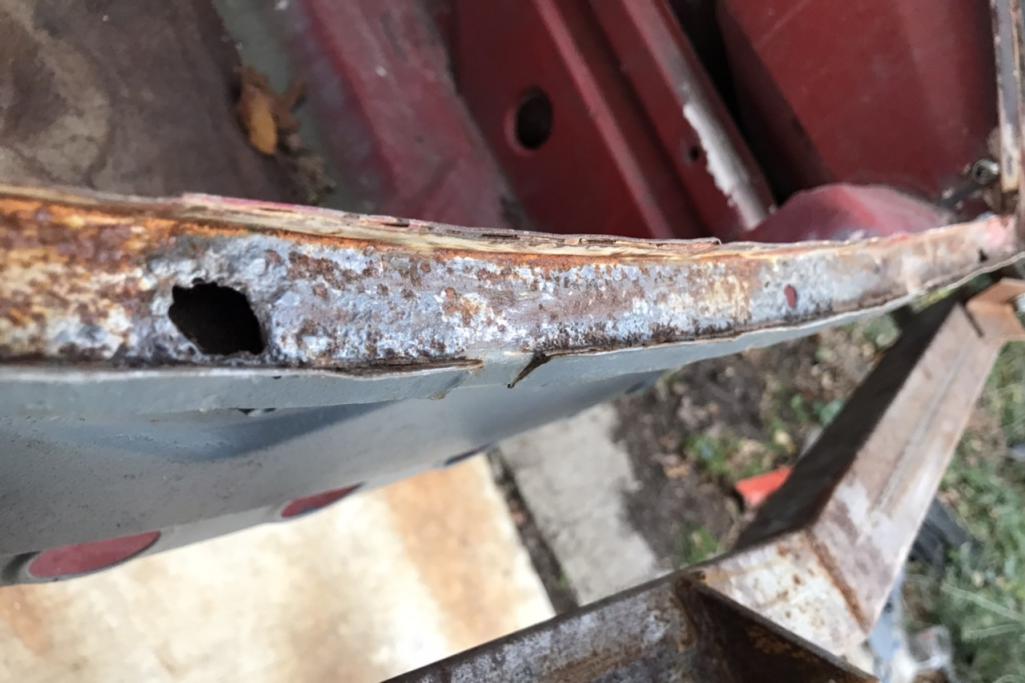
Posted by: Literati914 Dec 17 2021, 11:10 PM
just a small sample actually:
Attached thumbnail(s)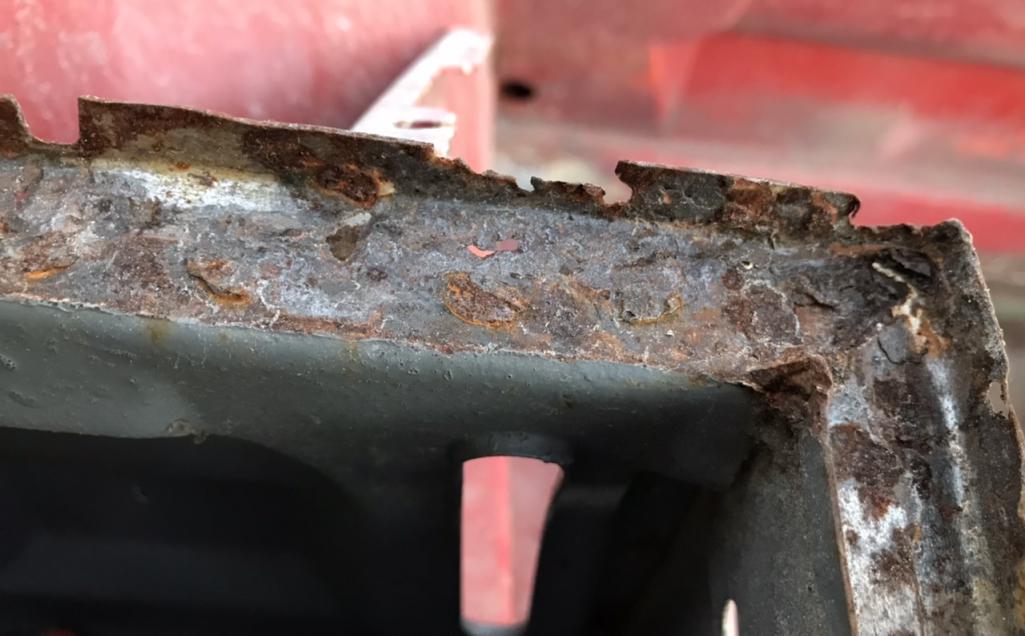
Posted by: Literati914 Dec 17 2021, 11:17 PM
Some typical repair techniques performed :
Attached thumbnail(s)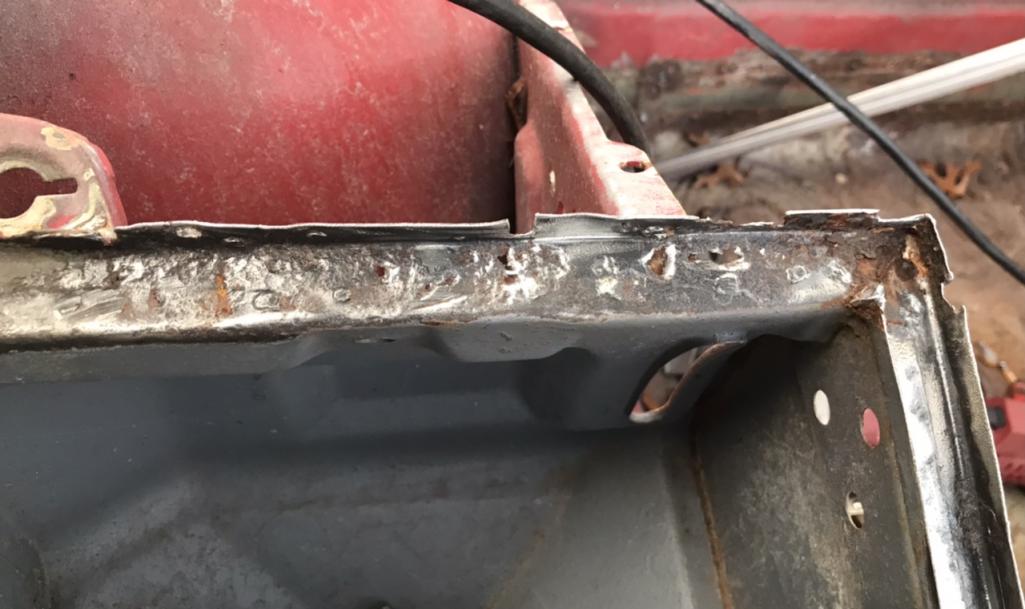
Posted by: Literati914 Dec 17 2021, 11:18 PM
Crap cut away:
Attached thumbnail(s)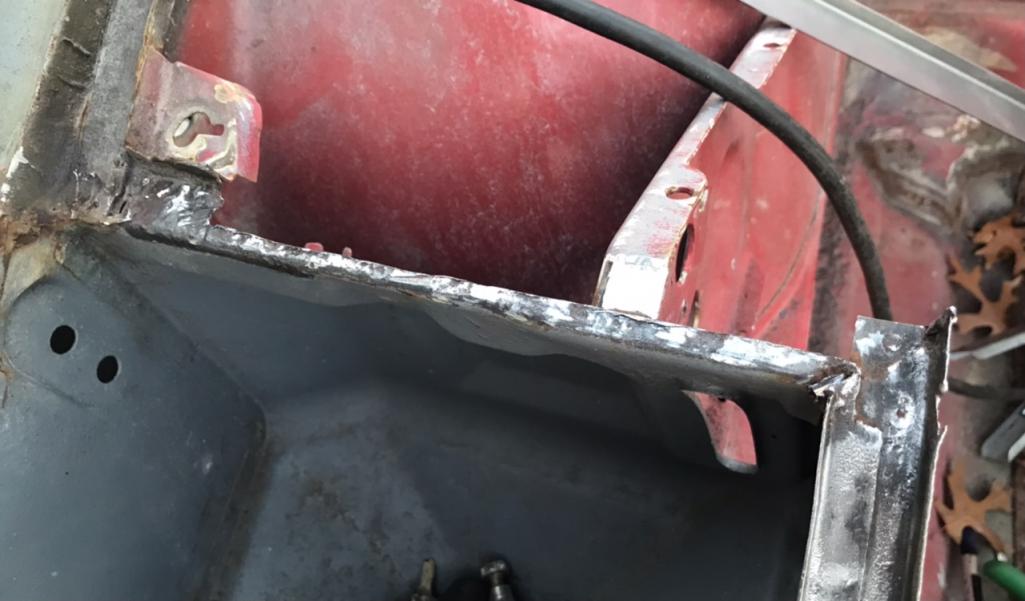
Posted by: Literati914 Dec 17 2021, 11:19 PM
Patch made and ready :
Attached thumbnail(s)
Posted by: Literati914 Dec 17 2021, 11:21 PM
And welded in place, and it’s front edge piece made up..
Attached thumbnail(s)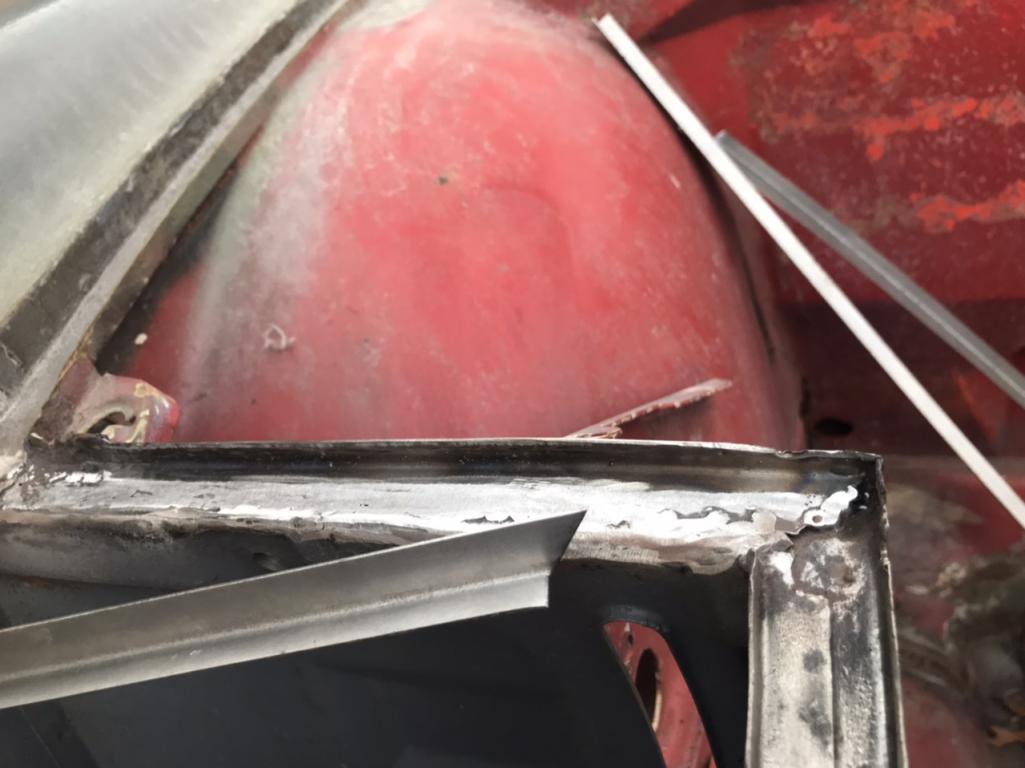
Posted by: Literati914 Dec 17 2021, 11:31 PM
A picture of the completed bucket perimeter area… took lots of pics but it’s all the same thing through out the entire main seal channel. All this took about 5 x as long as I thought it would . I only have one small dime size hole to repair in this channel now, it’s up near the driver’s side wiper arm area. More on that later. Here’s a sample of the finished work covered in rust preventative paint, just before I leveled the channel with FG filler, mainly to fill weld seams:
Attached thumbnail(s)
Posted by: Puebloswatcop Dec 18 2021, 09:34 AM
^ frustrating, when I use the forums 'attachment' buttons for pics, they get turned in all kinds of directions - is there something I can do to fix this?
My Phone makes the pictures to large and will make them fit any way the site wants. I have to go in and edit them down to about 25% of their original size.
.
Posted by: Literati914 Mar 10 2022, 10:34 PM
What !!! You mean I was finally able to get something 914 related done?
Ok not directly to car on the rotisserie but at least something. I’m having to add sway bar tabs to a set of front a-arms because my other two sets that already have them (from the factory) are still mounted on cars that’ll need to be jockied around so I can not dismantle those. So yea, I got to break the welder out for the first time in months. I will media blast this set later but for now I used the grinder to get to shined metal for welding:
Attached thumbnail(s)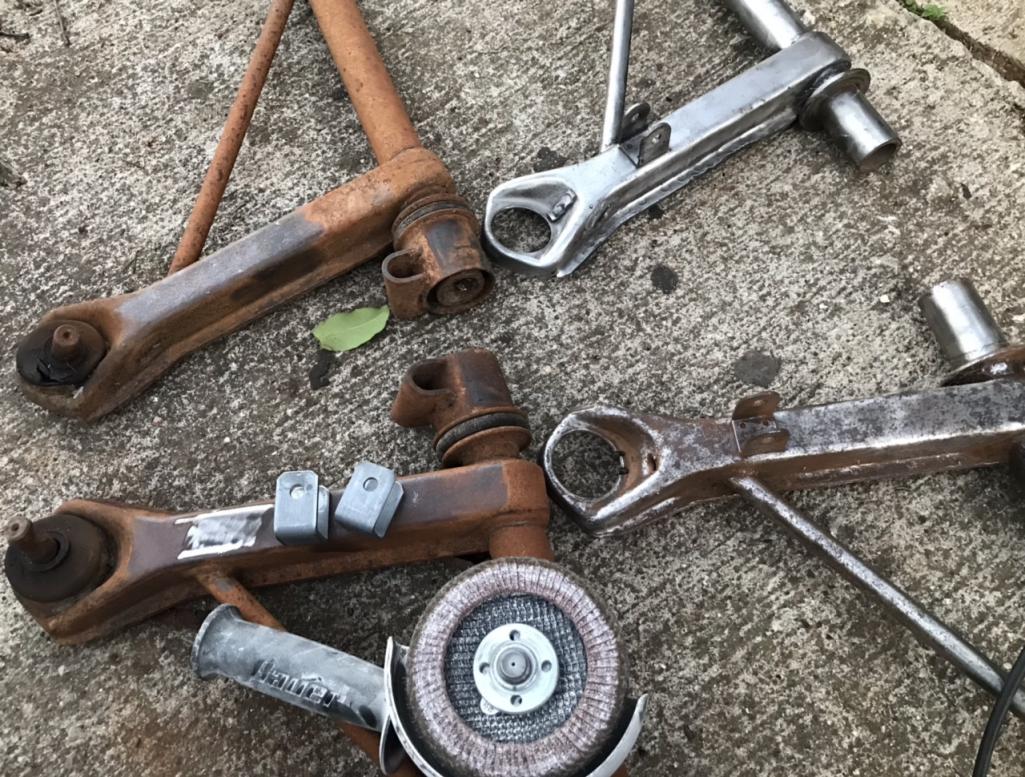
Posted by: Literati914 Mar 10 2022, 10:35 PM
I used a fourth set that I have to guide in placement of the sway bracket:
Attached thumbnail(s)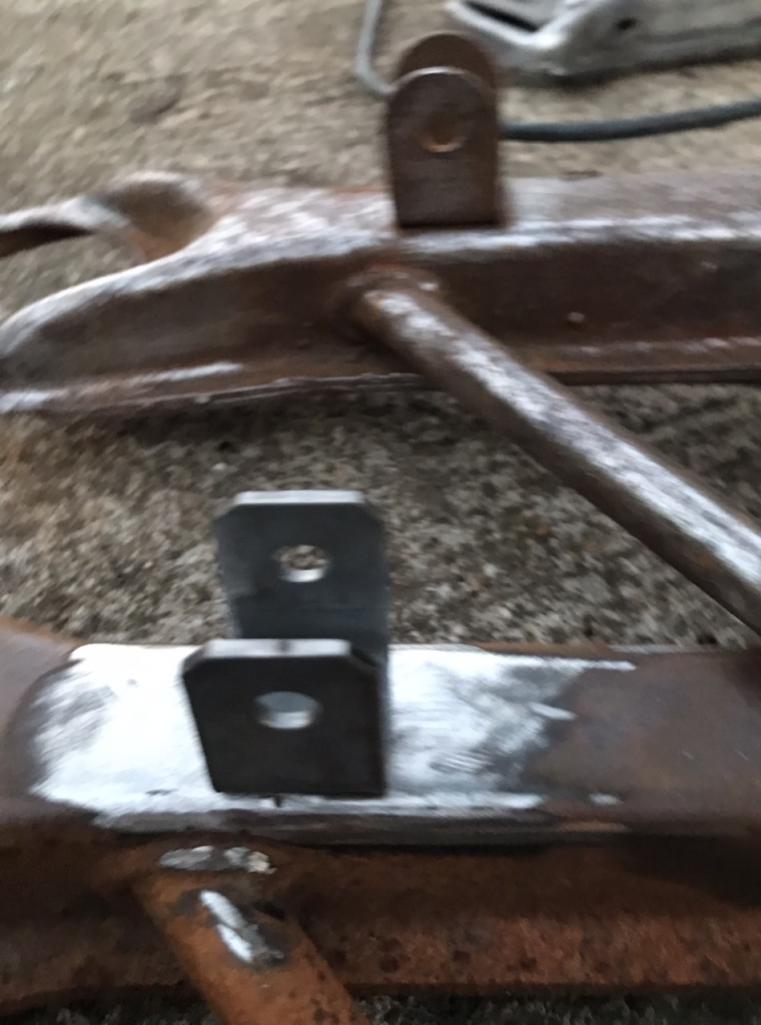
Posted by: Literati914 Mar 10 2022, 10:39 PM
I’m looking forward to getting back to this project, and this small accomplishment was kinda motivating tbh. Here the completed tabs. I’ll dissemble the arms later (Wish me luck - these things are rusty!!) :
Attached thumbnail(s)
Posted by: ClayPerrine Mar 10 2022, 10:43 PM
I’m looking forward to getting back to this project, and this small accomplishment was kinda motivating tbh. Here the completed tabs. I’ll dissemble the arms later (Wish me luck - these things are rusty!!) :
I have about a dozen sets in my garage, most of which have the sway bar tabs. You could have just come over and picked out a set.
Clay
Posted by: Literati914 Mar 10 2022, 11:11 PM
Oh well.. thanks anyway Clay! There was something I was thinking of hitting you up for the other day, but I’ve forgotten what it was now.
.
Posted by: ClayPerrine Mar 11 2022, 08:43 AM
Oh well.. thanks anyway Clay! There was something I was thinking of hitting you up for the other day, but I’ve forgotten what it was now.
.
Memory is the second thing to go... and I forgot what the first one was.
Posted by: Puebloswatcop Mar 11 2022, 07:29 PM
Coming along very nicely Doug. I should have had you come do my front trunk channel. I hate it, mine rusted through up near the fender to cowel joints.
Posted by: Literati914 Mar 20 2022, 11:24 PM
I got around to stripping these old A-arms of their bushings and ball joints - they did put up a bit of a fight I must say 
Attached thumbnail(s)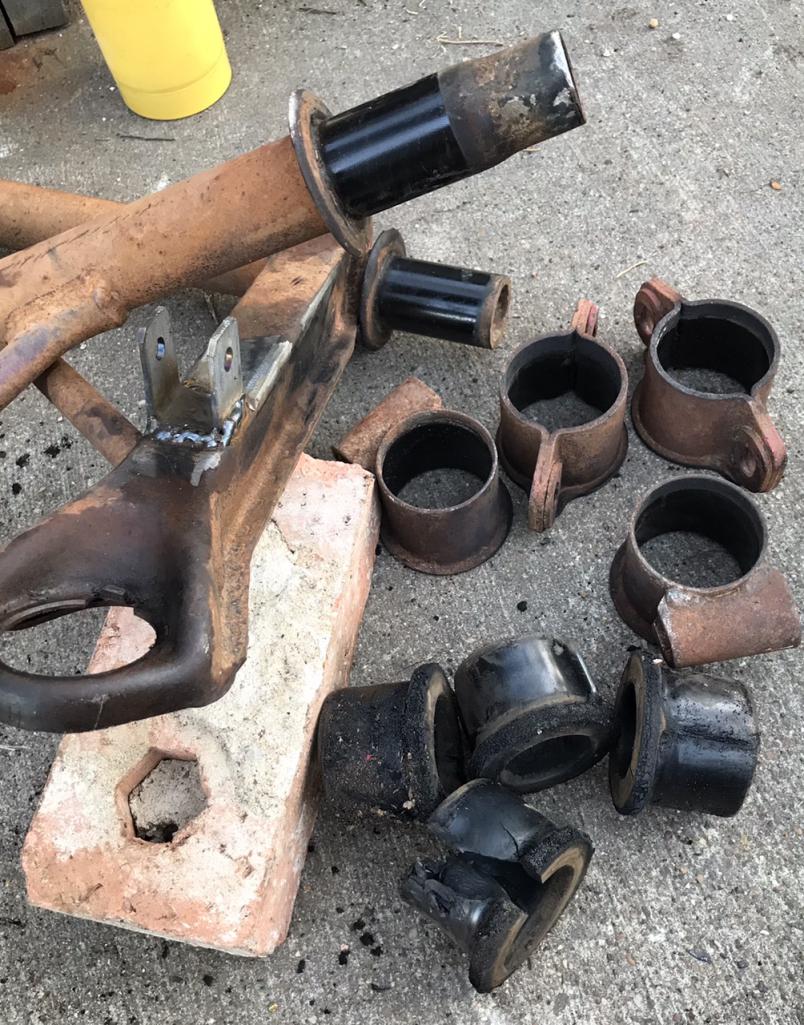
Posted by: Literati914 Mar 20 2022, 11:28 PM
Then I decided to patch a hole in the bottom of a stock 2.0L air box that I have. I’m not sure which car this will be used on, or if I’ll use it at all but I figured it needed to be repaired before I proceed with sandblasting stuff.
Before:
Attached thumbnail(s)
Posted by: Literati914 Mar 20 2022, 11:30 PM
Welded back together :
Attached thumbnail(s)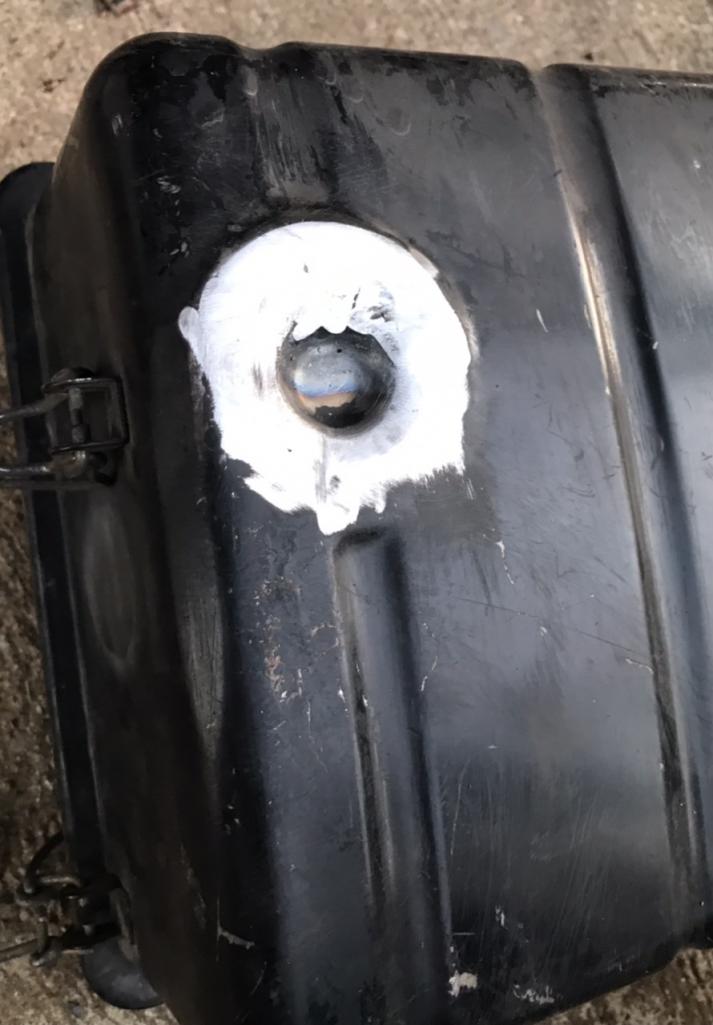
Posted by: Literati914 Mar 27 2022, 03:13 PM
I had a hole in one of my a-arms that needed attention, so I decided to fix that this afternoon:
Attached thumbnail(s)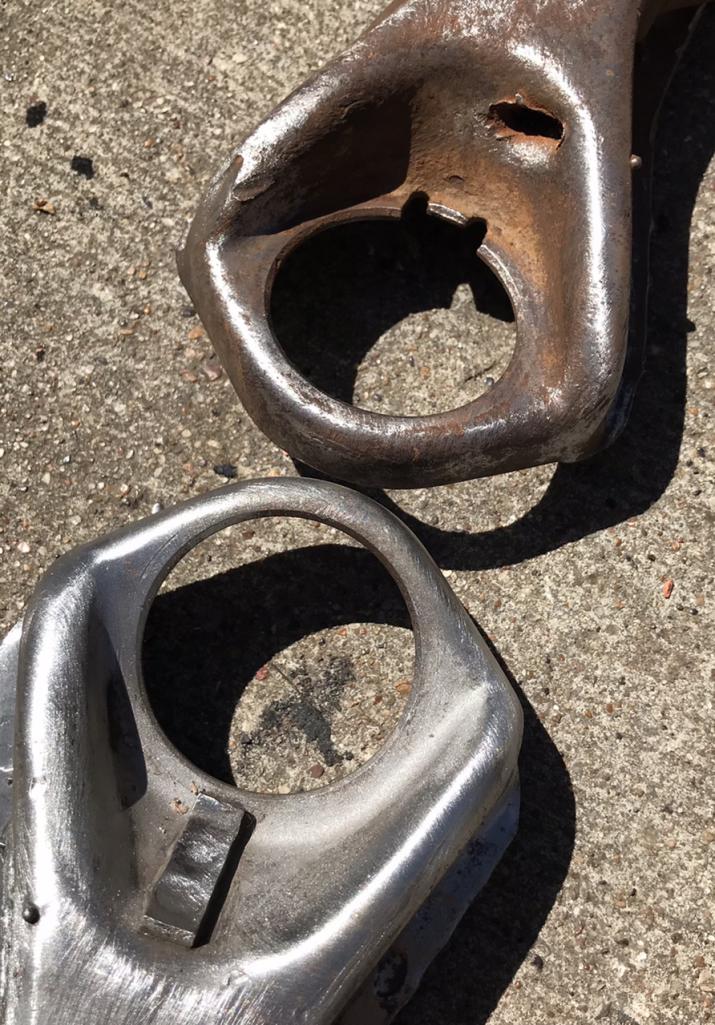
Posted by: Literati914 Mar 27 2022, 03:15 PM
.. and gone: it’s not much to report on, but it’s something:
Attached thumbnail(s)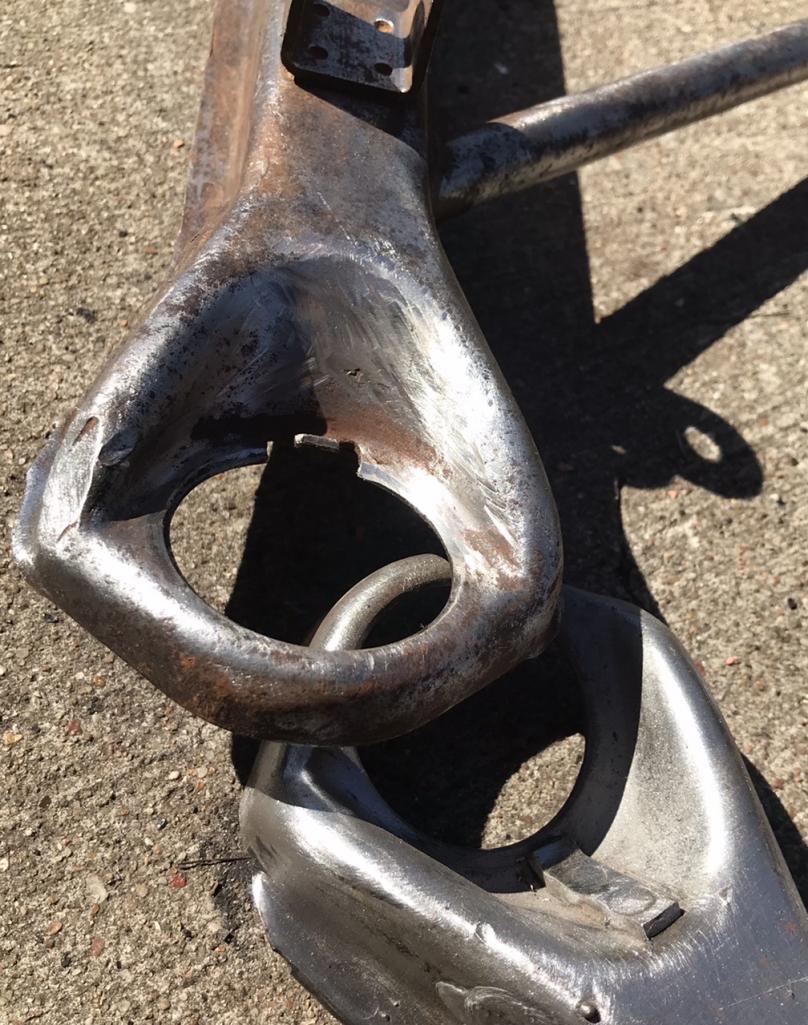
Posted by: Literati914 Mar 27 2022, 03:23 PM
So my next step is to paint the underside of the car, which is in epoxy BUT Im gonna have to figure out and buy a rig for spot blasting where I have rust (@ the areas where I’ve welded on brackets and reinforcements mostly). I figured just a simple HF setup.. suggestions? I’m not impressed with the small cabinet setup I have for blasting smaller items - but I’ve considered using it as a hopper for spot blasting the car, if only I could make it more efficient. Any ways to turbo charge those things short of buying a huge compressor?
Posted by: Literati914 Jun 10 2023, 07:16 PM
In primer:
Attached thumbnail(s)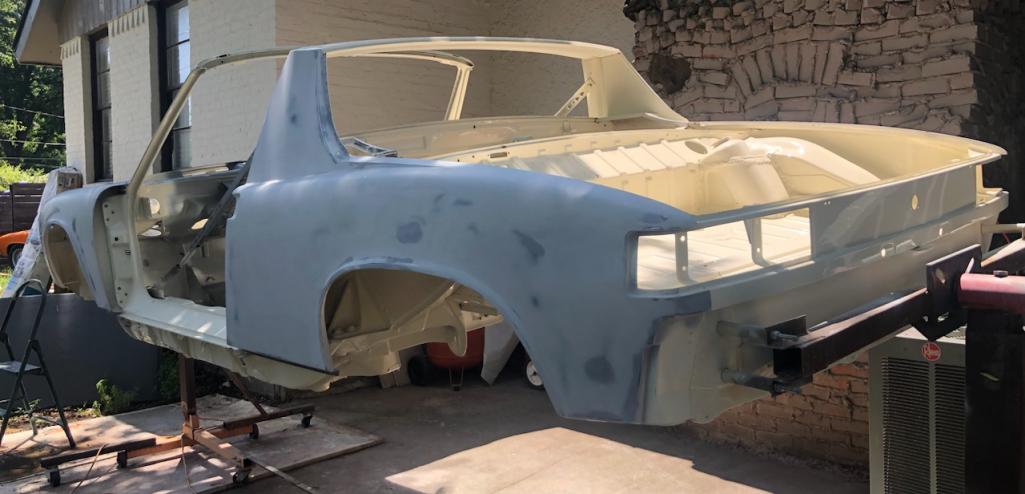
Posted by: Literati914 Jun 10 2023, 07:18 PM
Taped off:
Attached thumbnail(s)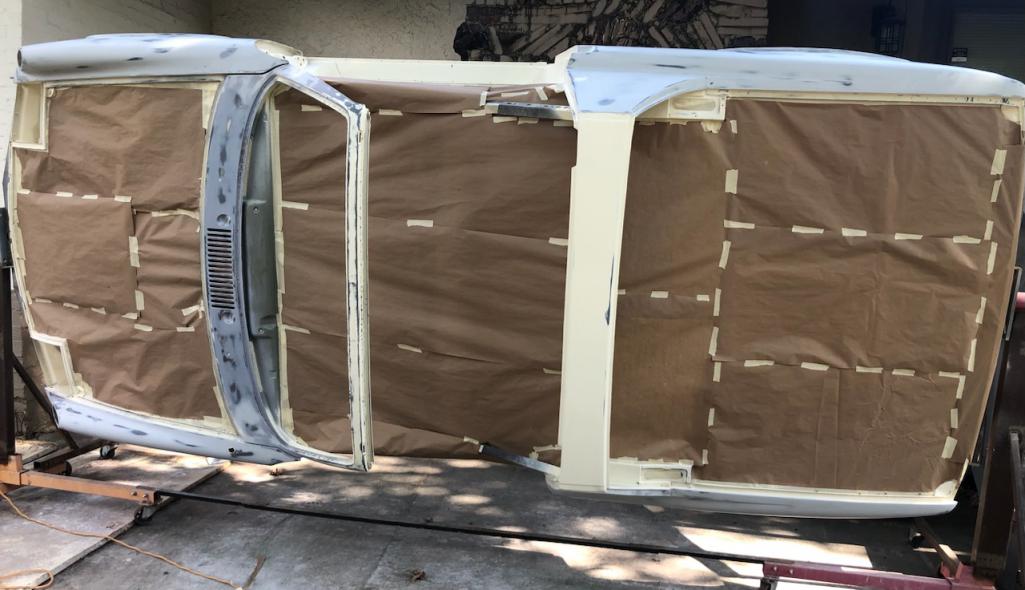
Posted by: Literati914 Jun 10 2023, 07:19 PM
And sealer coat:
Attached thumbnail(s)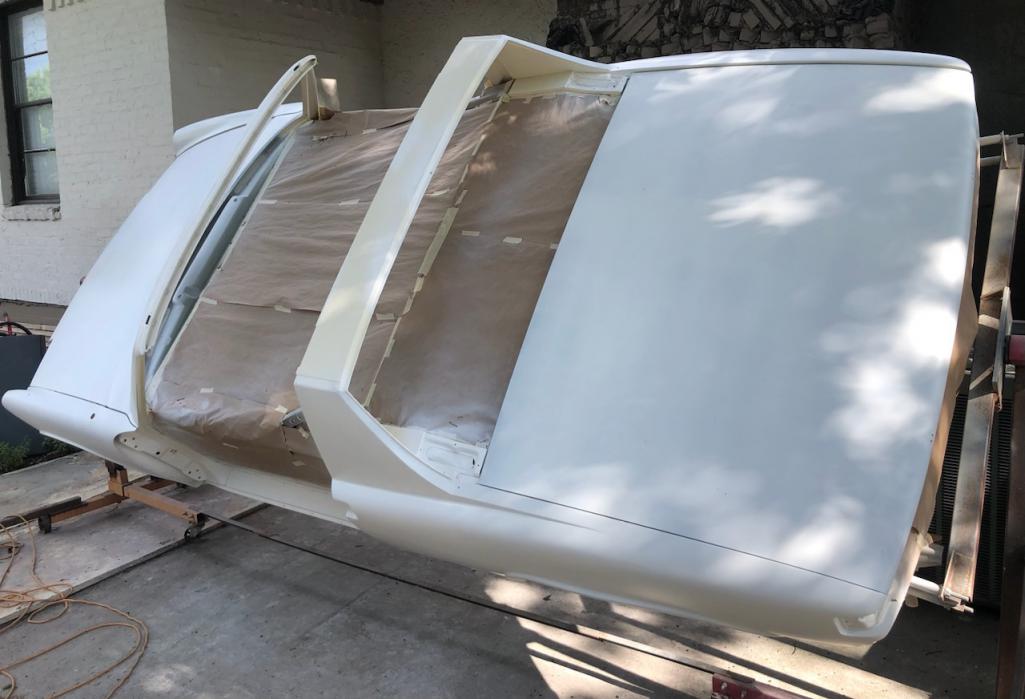
Posted by: Spoke Jun 10 2023, 10:01 PM
Looks good.
Posted by: East coaster Jun 11 2023, 06:08 AM
Looks good……isn’t masking fun?
Posted by: Literati914 Jun 11 2023, 08:55 AM
Looks good……isn’t masking fun?
Oh my god, it takes forever.. then we get rain and I have to do it over

BTW, I’d bought a temporary garage from HF, to spray paint in like I did with previous cars.. but after painting the underside and trunks (of this car, out in the open) I decided I didn’t need it. The plan is just to add enough coats to cut and buff, but we’ll see. I did get some runs in the sealer that I need to work out before proceeding.
.
Posted by: Literati914 Jun 14 2023, 07:38 PM
Added POR15 to the fender seal gaps, both sides:
Attached thumbnail(s)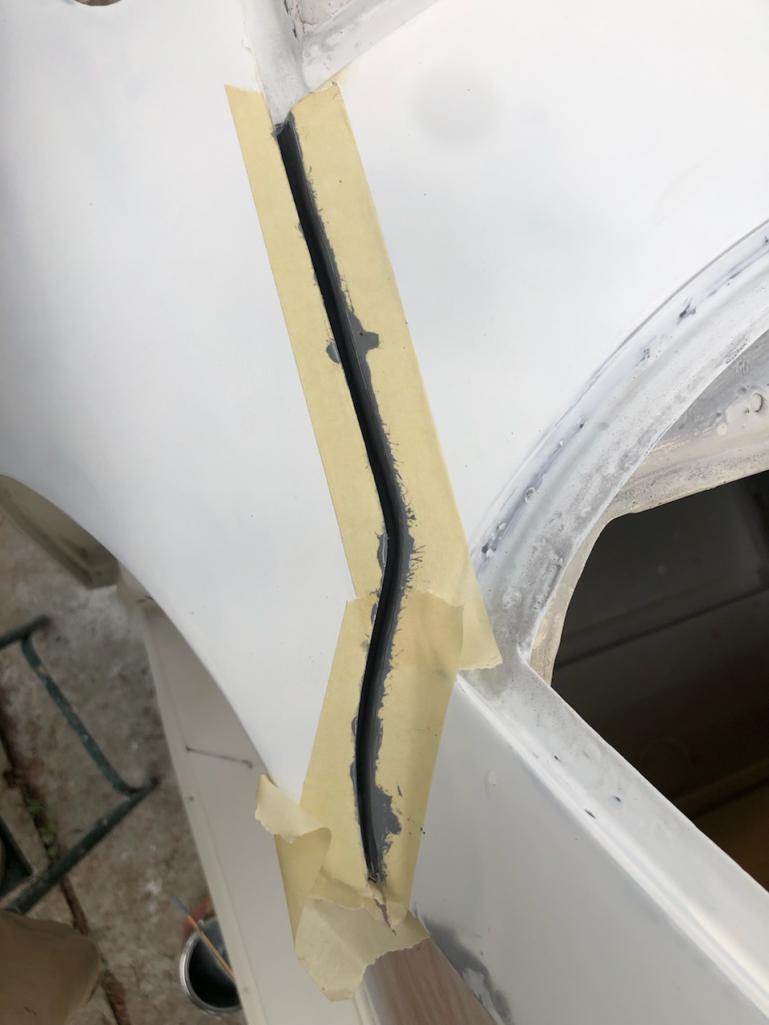
Posted by: Literati914 Jun 14 2023, 07:41 PM
This area was a major reason for not just scuffing the car and painting, so now I feel confident it’ll stay solid for a while:
Attached thumbnail(s)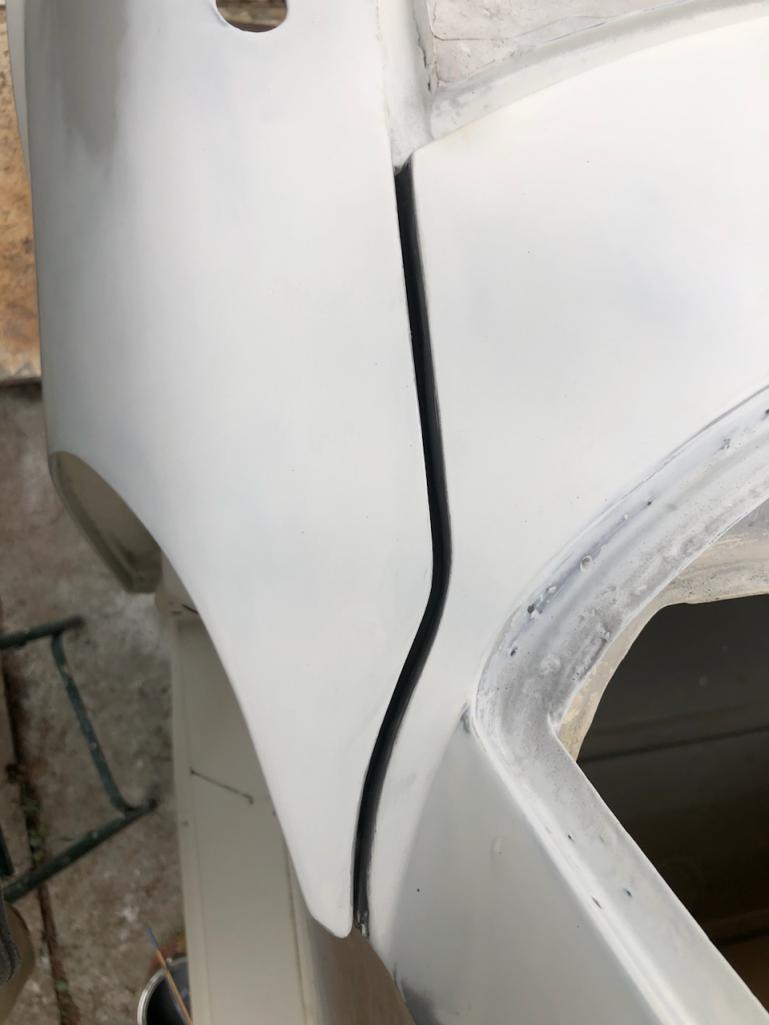
Posted by: Literati914 Jun 19 2023, 04:39 PM
Back when I finally got my plated hardware back I kept having a feeling that something was missing but I never could put my finger on what it was (I didn’t make a thorough list of items - live and learn).
Attached thumbnail(s)
Posted by: Literati914 Jun 19 2023, 04:50 PM
So I broke out the stash and finally realized what it was… I received the steering rod knuckles but not the steering rods themselves (two for two separate projects). So anyway I called the SORRY plating company to see if there’s any chance they’re still hanging out in the back of their shop. I got their highly toxic rep that I struggled to deal with months back - she’s supposed to be looking for me. Needless to say, I’m not holding my breath - never use Texas Precision Plating in Garland!! You’ve been warned. Rant over, sorry..
So anyway I ran out to the parts car and pulled an extra to paint:
Attached thumbnail(s)
Posted by: Puebloswatcop Jun 20 2023, 06:31 AM
Back when I finally got my plated hardware back I kept having a feeling that something was missing but I never could put my finger on what it was (I didn’t make a thorough list of items - live and learn).
Where did you get your Plating done? I always photograph my stuff that I send then lay it out to match the photograph when it comes back. What didn't come back?
Posted by: Literati914 Jun 20 2023, 09:14 AM
Back when I finally got my plated hardware back I kept having a feeling that something was missing but I never could put my finger on what it was (I didn’t make a thorough list of items - live and learn).
Where did you get your Plating done? I always photograph my stuff that I send then lay it out to match the photograph when it comes back. What didn't come back?
Texas Precision was the name of the plating company - the quality of the finished product is good but customer service is abysmal - you will be pissed off. I thought of taking pics but it was a big jumble/ pile and I guess I couldn’t be bothered at the time to separate and organize into groups - next rime for sure tho.
.
Posted by: Nate W Jun 20 2023, 02:52 PM
I’m enjoying this thread, I have a similar car, front clipped, floors rotted and some hellhole damage. Like yours it has pretty good longs. Anyway your project is coming together good!
Posted by: Literati914 Jun 20 2023, 03:58 PM
Thanks Nate, I’m trying to enjoy the process.. the elements are making that a struggle tho. It’s kind of liberating using a clipped car that a lot of people would have looked at as a poor candidate.. I feel like I can veer off course from stock a bit with the build and be ok with it. Plus I won’t feel so bad when I mod it later.
I have a half gallon of POR-15 left so I thought I’d burn some of it up with whatever I could, so I did up the heating system and a few other items:
Attached thumbnail(s)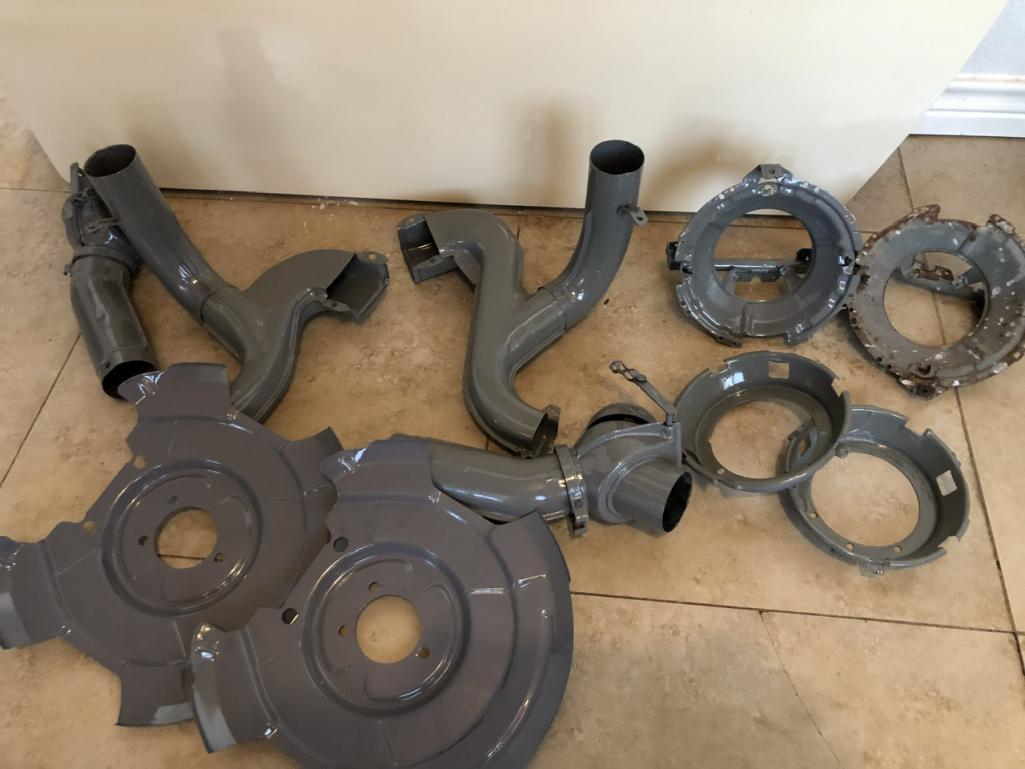
Posted by: Literati914 Jun 20 2023, 04:00 PM
Before and after on the crappy headlight buckets:
Attached thumbnail(s)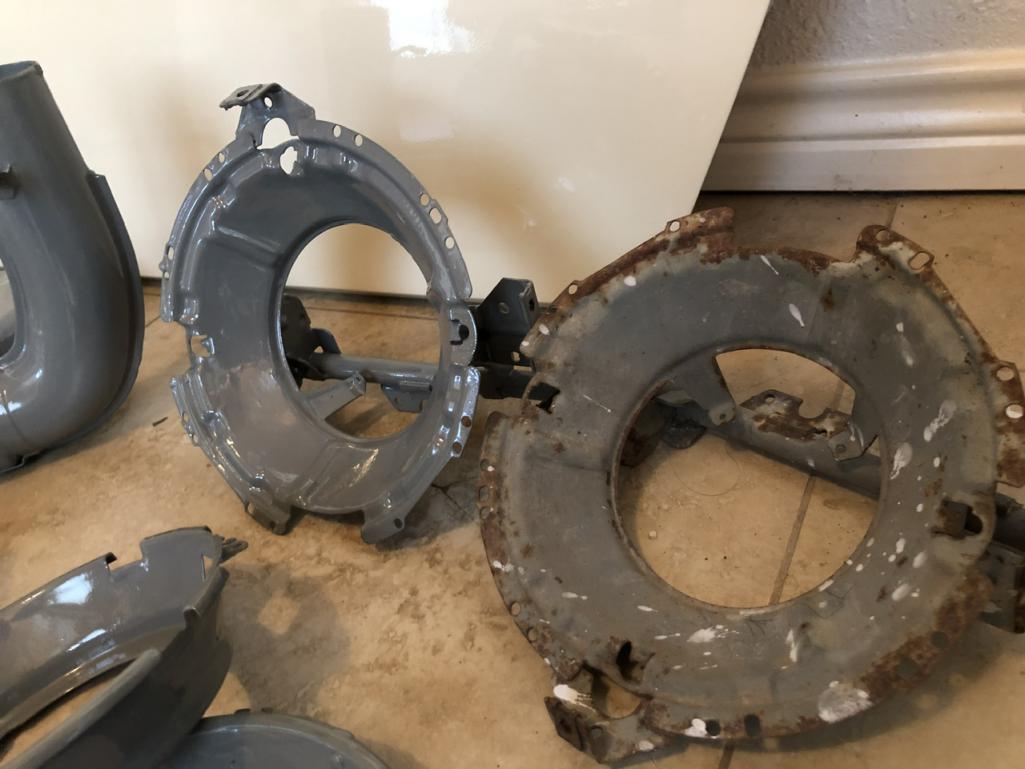
Posted by: Literati914 Jun 20 2023, 04:02 PM
I also got a chance to prime some of the small pieces that will get painted black:
Attached thumbnail(s)
Posted by: Literati914 Jun 20 2023, 04:04 PM
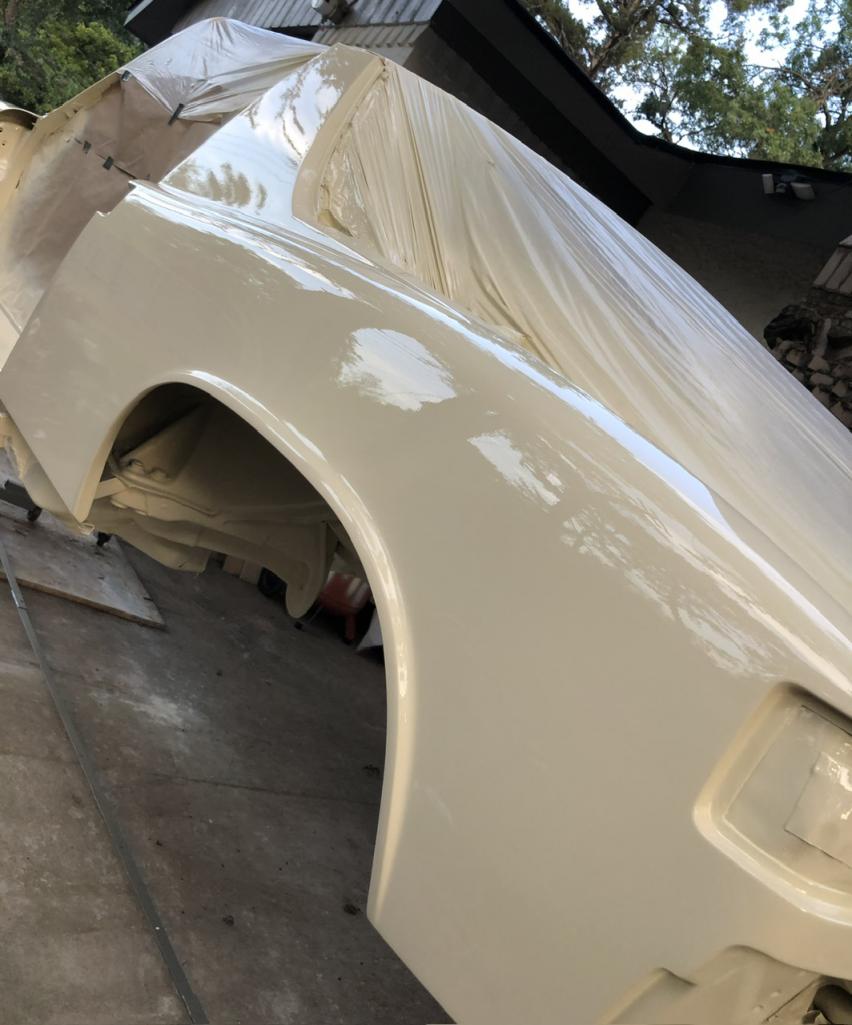
I’m painting this car in sections because I’m not in a shelter and am dodging heat, humidity and showers, etc. here’s a shot showing how it’s coming along (ignor the dirt and orange peel - it'll all be cut and buffed out eventually):
Attached thumbnail(s)
Posted by: Literati914 Jun 21 2023, 10:07 AM
Yea, a little at a time:
Attached thumbnail(s)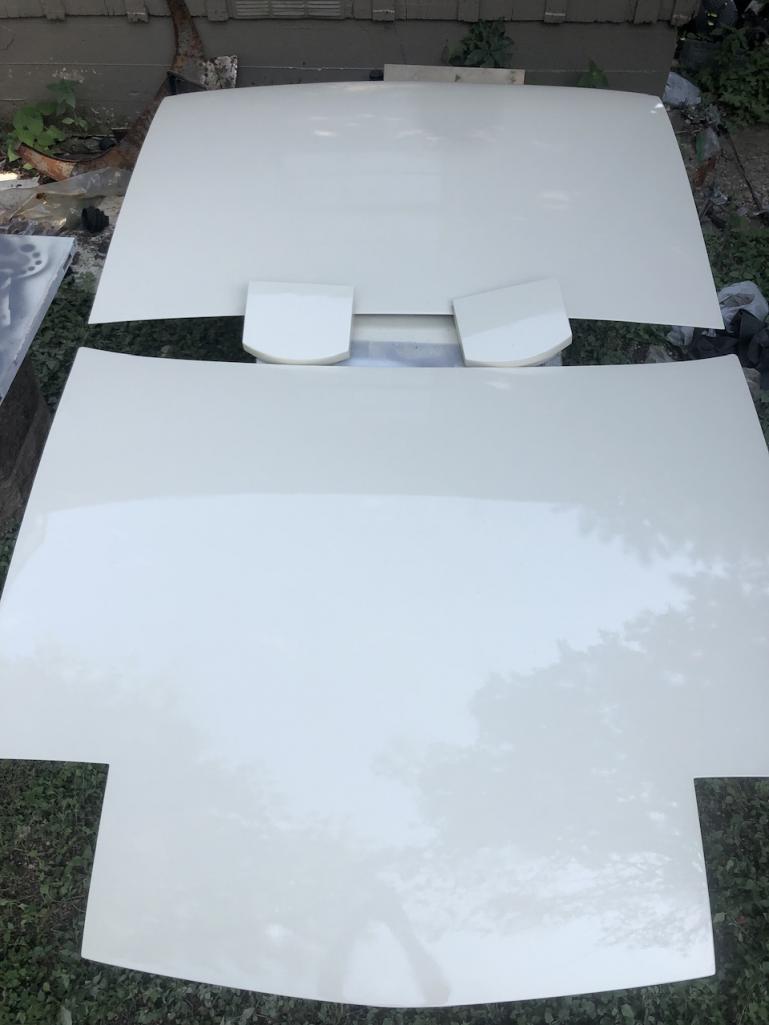
Posted by: Literati914 Jun 21 2023, 10:08 AM
Passenger side taped off, ready for paint:
Attached thumbnail(s)
Posted by: Literati914 Jun 21 2023, 10:09 AM
and Painted:
Attached thumbnail(s)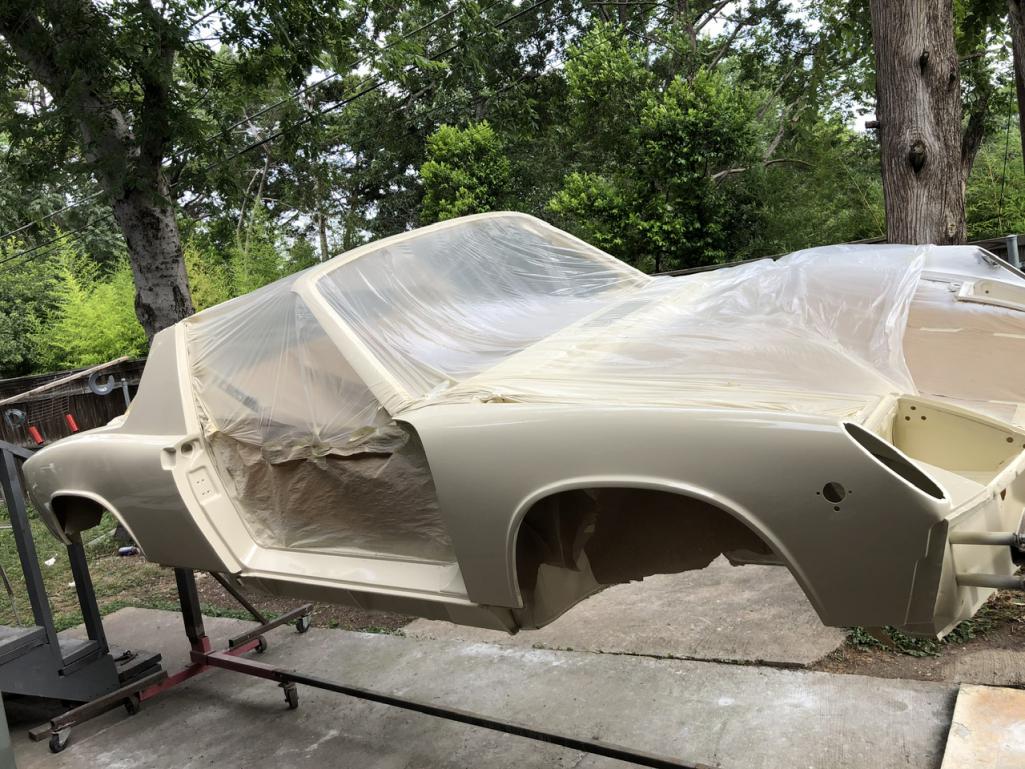
Posted by: Literati914 Jun 21 2023, 10:12 AM
The gun started shooting chunky particles of paint at one point, I guess the paint was setting up too quick.. so I’ve got some work to do to get it improved:
Attached thumbnail(s)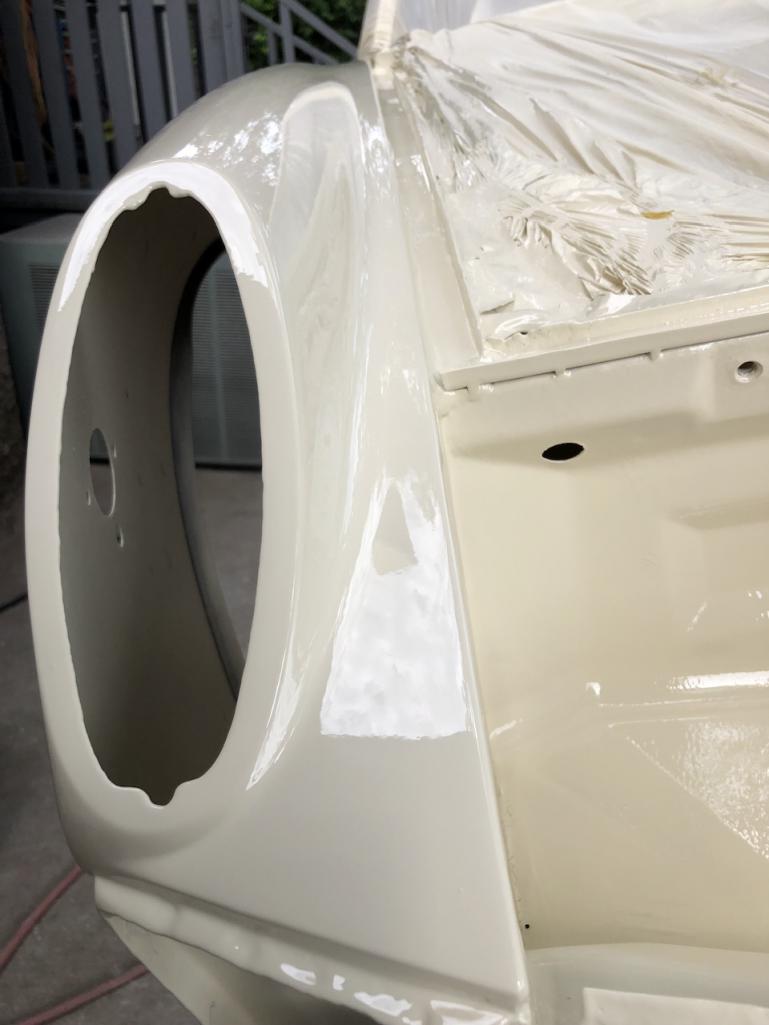
Posted by: DRPHIL914 Jun 21 2023, 12:11 PM
 very nice!
Posted by: Puebloswatcop Jun 21 2023, 05:19 PM
Hey Doug, Sorry to hear about your bad experience with the plating company. I know I had difficulties finding a good plating company locally (in Texas) and thats why I send mine to Finish and Plating services in Wisconsin. It costs in shipping, but their prices are very fair and the work is top notch. Good thing is that no matter the size of the parts I have sent, I have always gotten them back, and believe me the small parts I kind of expected to be lost, but nope.
Any way the car is coming along very nicely. This weather we are having has made it miserable to get anything done, let alone paint. My hat is off to you.
Posted by: East coaster Jun 22 2023, 06:18 PM
Nice! Painting is always a challenge in one way or another! Looks very similar to the color I’m currently painting mine, what color is it?
Posted by: Literati914 Jun 22 2023, 09:52 PM
.. Looks very similar to the color I’m currently painting mine, what color is it?
Porsche's Medium Ivory
Attached thumbnail(s)

Posted by: Literati914 Jun 22 2023, 09:59 PM
..OK, ok.. it's Porsche's Chiffon White 
I swear I can not lie for shit - it's actually Wimbledon White 
.
Posted by: slowrodent Jun 23 2023, 07:05 AM
This car looks really great. I love the "painting it in sections" approach... Sometimes you gotta do what you gotta do. Result will be beautiful... 
Posted by: Literati914 Jun 23 2023, 10:06 AM
This car looks really great. I love the "painting it in sections" approach...
Thanks.. and they said it couldn’t be done

I’m not sure that I showed any of the under side paint when I did it a few months back, so just to prove that those sections were not ignored:
Attached thumbnail(s)
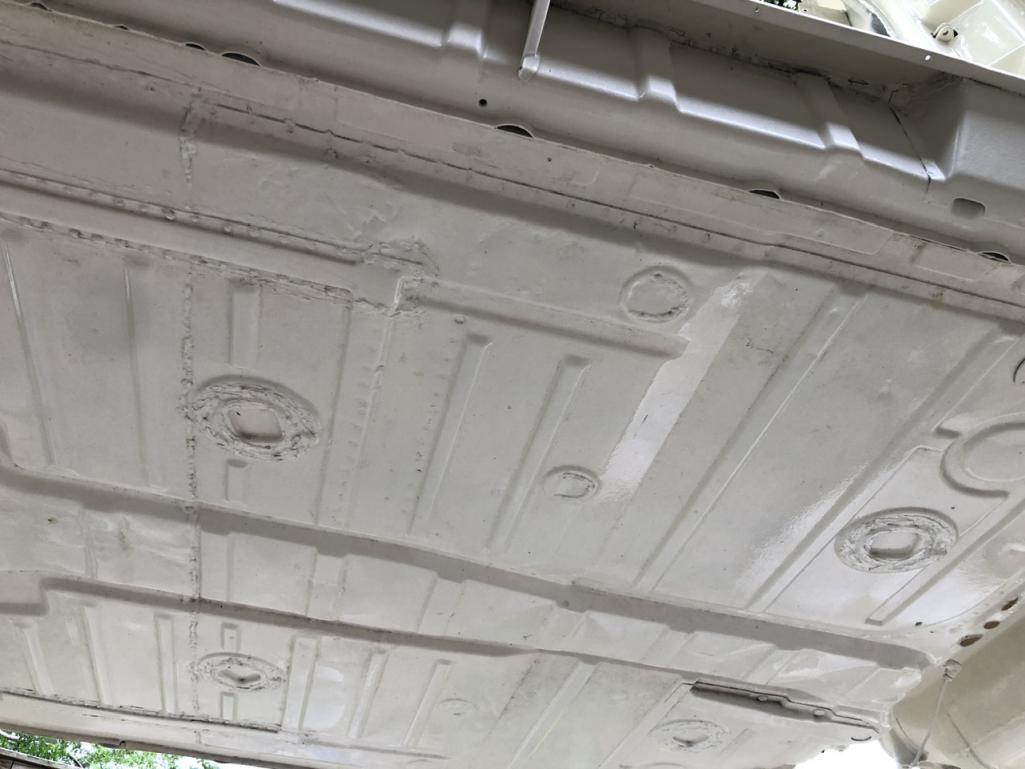
Posted by: Literati914 Jun 23 2023, 10:07 AM
Yea it’s dirty from the car being stored upside down during rain:
Attached thumbnail(s)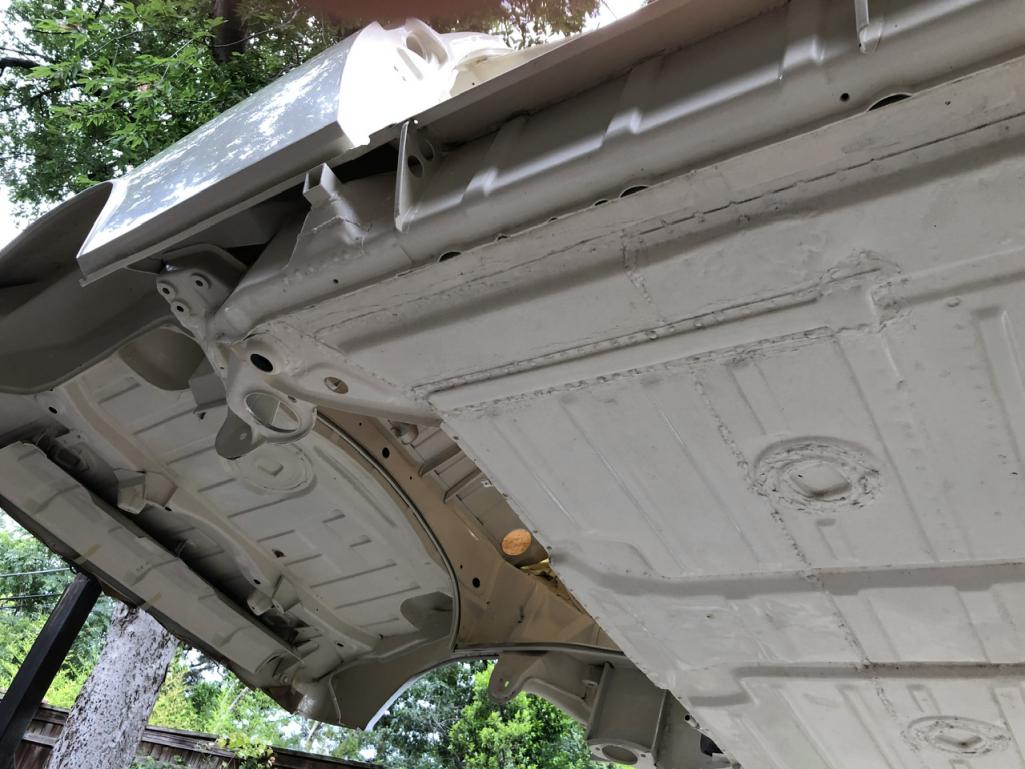
Posted by: Literati914 Jun 23 2023, 10:08 AM
The front where I replaced the floor cut away from AC box:
Attached thumbnail(s)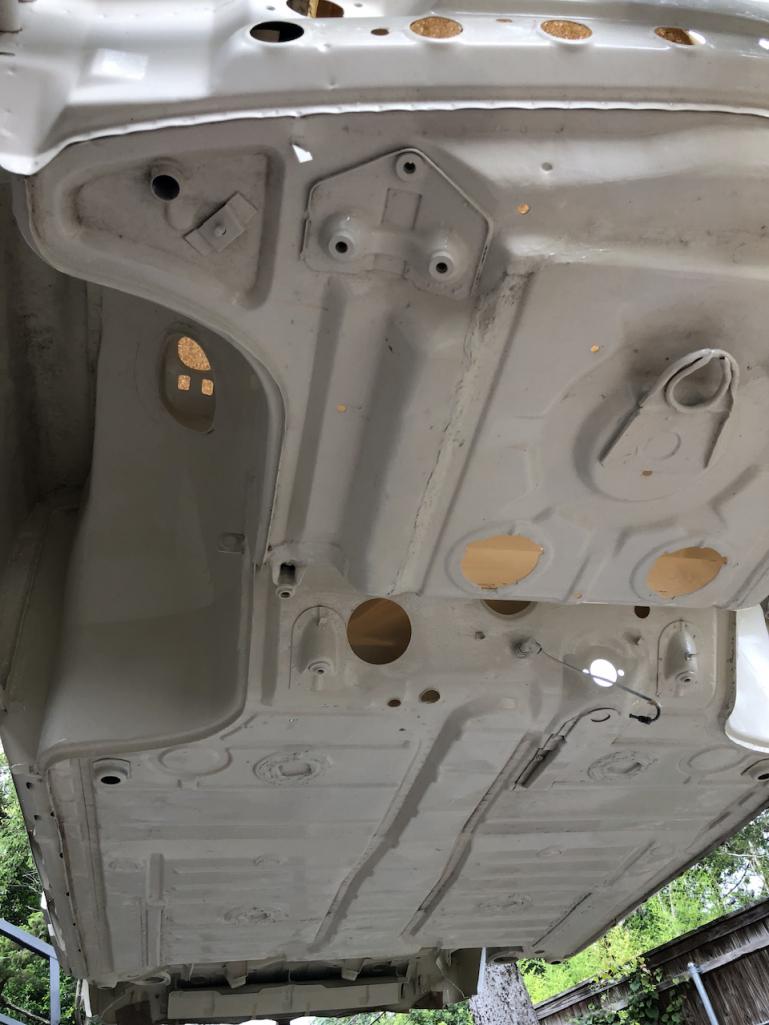
Posted by: Literati914 Jul 5 2023, 10:33 AM
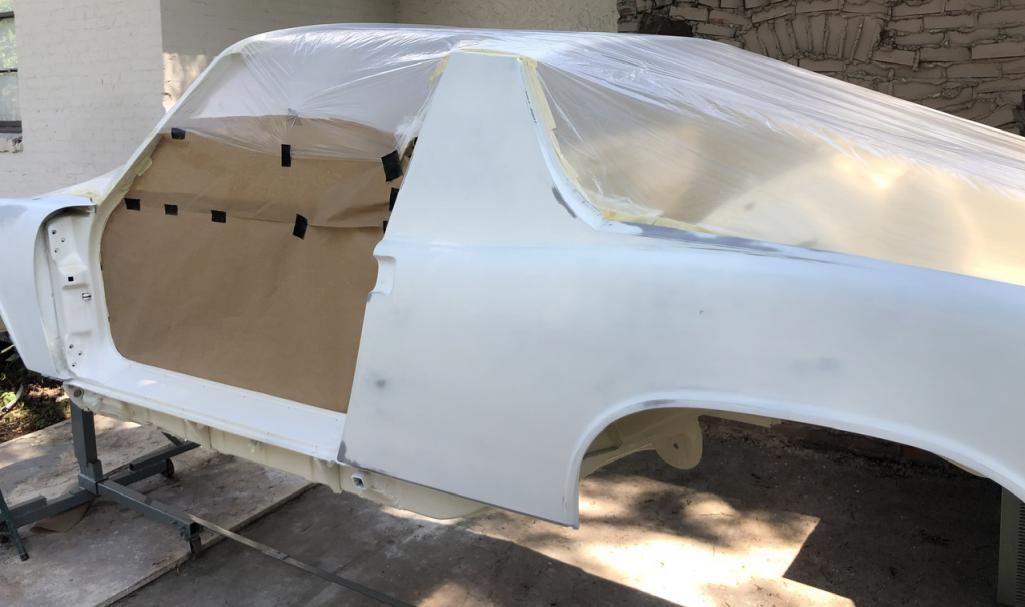
I eventually found time (and favorable weather) to get the driver side of the car painted. Here’s some shots after I masked:
Attached thumbnail(s)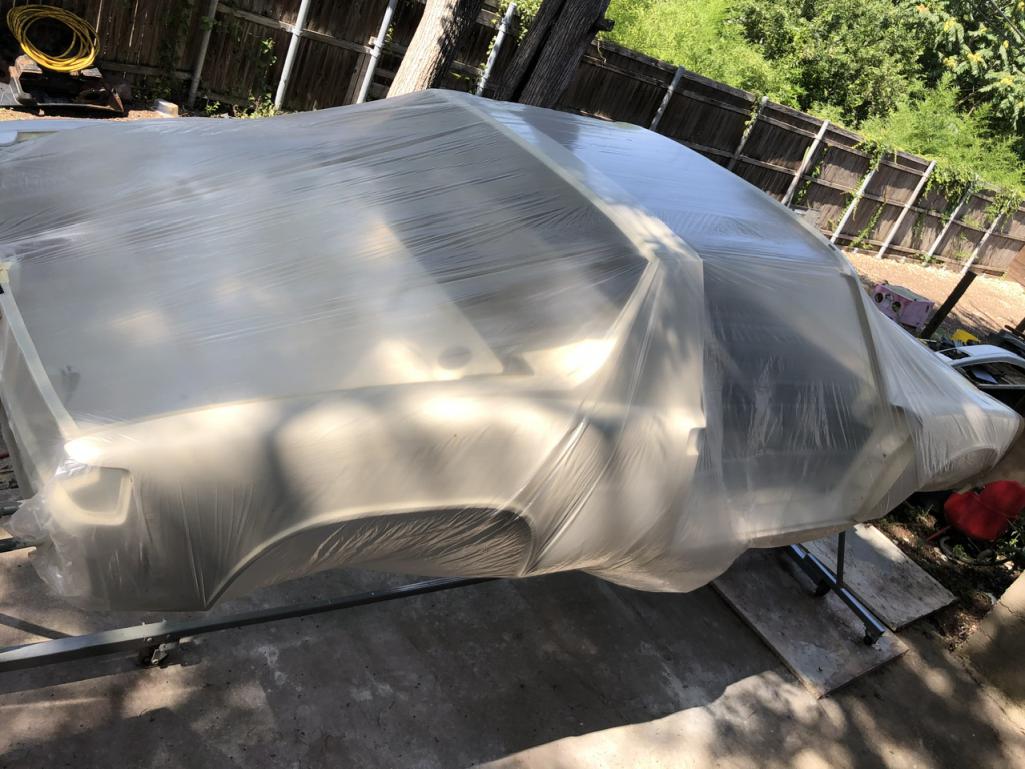
Posted by: Literati914 Jul 5 2023, 10:34 AM
Fresh paint, and I haven’t shown any pics of the doors but they’ve been done too - so the car is finally completely painted. Well I still have the engine lid, bumpers, etc to do.. but it feels good to have the car itself painted (I’ll be color sanding soon):
Attached thumbnail(s)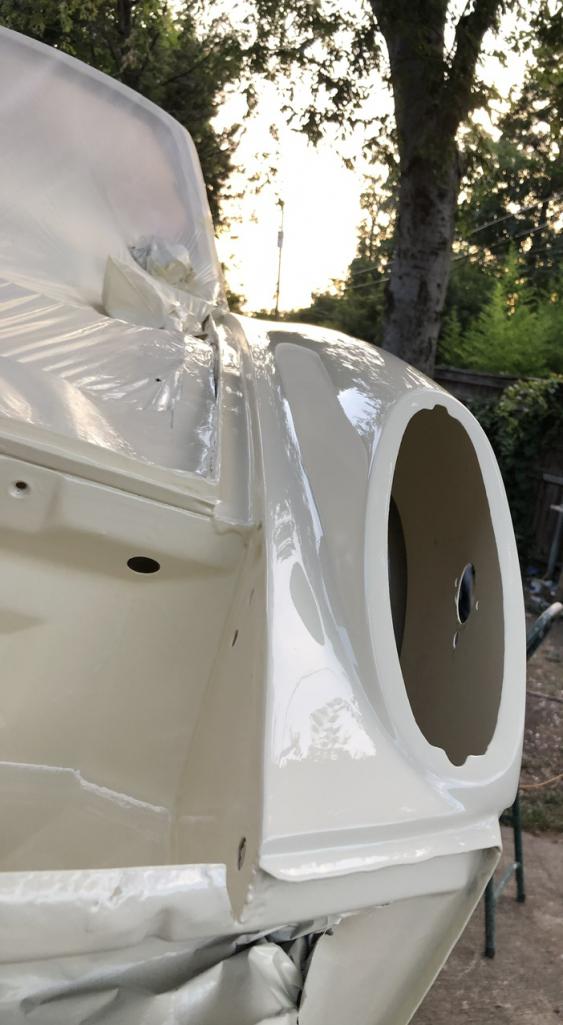
Posted by: DRPHIL914 Jul 5 2023, 02:27 PM
you are a brave soul! That is a lot of work. wish i could do that but i think being a metallic is a more involved process, it seems single stage paint would be less involved, and i am not doing to try and do 2 stage base+clear i dont think. Great color, was it offered in earlier years?
Phil
Posted by: Literati914 Jul 5 2023, 04:09 PM
you are a brave soul! That is a lot of work. wish i could do that but i think being a metallic is a more involved process, it seems single stage paint would be less involved, and i am not doing to try and do 2 stage base+clear i dont think. Great color, was it offered in earlier years?
Phil
Thanks Phil, the color is Wimbledon White, a classic ford color I used because I had a bunch of gift card credits from Summit Racing (because I’m a car guy
) and it’s one of their stocked colors.. so paint was basically free. It really closely matches Porsche’s “Chiffon White”, btw.I really like the single stage paints (this is acrylic urethane) for vintage solid color cars. Metallics are offered in single stage but my understanding is that it’s very hard to get done right unless using bc/cc .. however single stage is usually compatible with, and clears are made for, use with them, so..kinda the same thing there. Cheers!
.
Posted by: Literati914 Jul 8 2023, 09:42 AM
I probably should have thought through this detail more before proceeding to paint but I kept putting it off. On the one hand I wanted to leave the lock hole open in case I ever wanted to revert back to a stock trunk lock (so I didn’t weld up the hole), but of course if I did go back then there are three little extra holes exposed from where the roundel was. In the end I just painted. So now I need to figure a way to make this water tight. I can probably figure something out but was hoping for some ideas and suggestions from you guys. How would you handle this:
Attached thumbnail(s)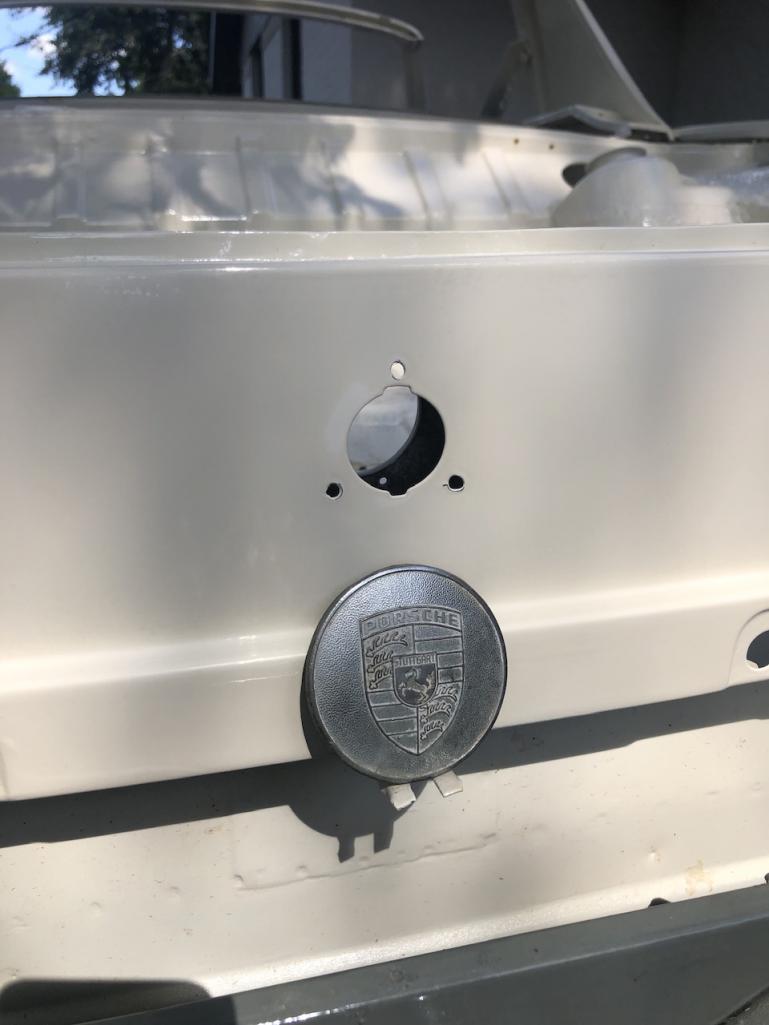
Posted by: Shivers Jul 8 2023, 11:25 AM
I would imagine a circle of butyl rubber around it and then squashed to seal with the emblem.
Posted by: Literati914 Jul 8 2023, 12:23 PM
Yeah I was thinking along those lines as a first step and whether I put something behind it. I was thinking a small rubber backed cover with a machine screw thru it and a large washer on the other side also rubber backed (sandwich the lock hole), the add the roundel with rtv along its back perimeter.
Posted by: Literati914 Oct 4 2023, 09:47 AM
Ok it’s been a while since I’ve updated my build thread so here goes: I’ve been working on my wiring harness for much too long. I add some wiring for extra accessories while it was out of the car and convenient to do so. But now I’ve finally got it (mostly) reinstalled. Here you can see that I rearranged the placement of the stock relays in order to added an extra for aux. fogs.
Attached image(s)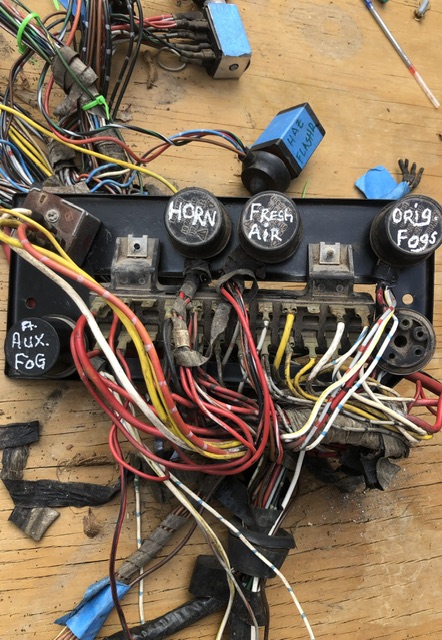
Posted by: Literati914 Oct 4 2023, 09:53 AM
And here’s my lambda controller, I’ve opened up the hole in the firewall (where the shift rod used to pivot -early shift rods ) to accommodate the lambda wiring and the CHT thermocouple wire.
Attached image(s)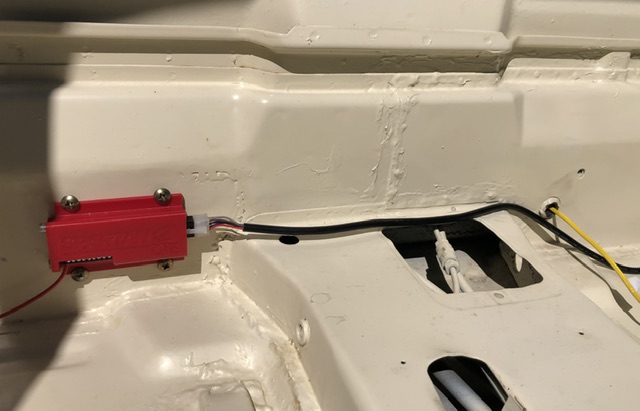
Posted by: Literati914 Oct 4 2023, 09:56 AM
Engine side.. had to buy a 3/4” drill bit to open it
Up enough and it’ll get grommets in both sides.
Attached image(s)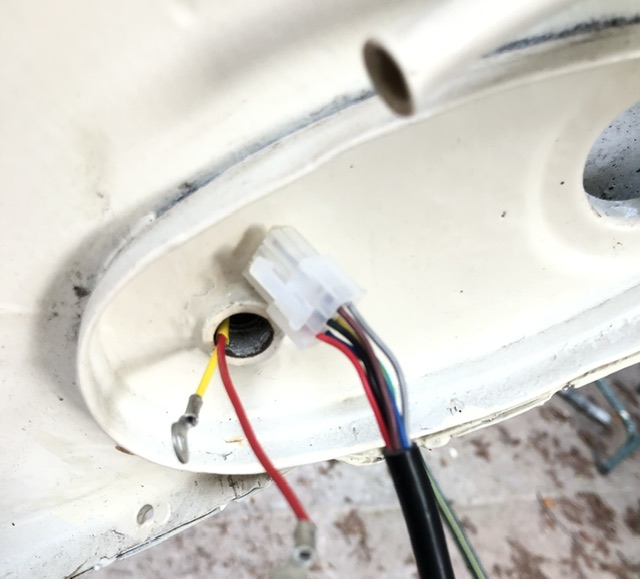
Posted by: Literati914 Oct 4 2023, 09:59 AM
I stripped my fuse block before installing the harness and cleaned all of the male and female terminals.
Attached image(s)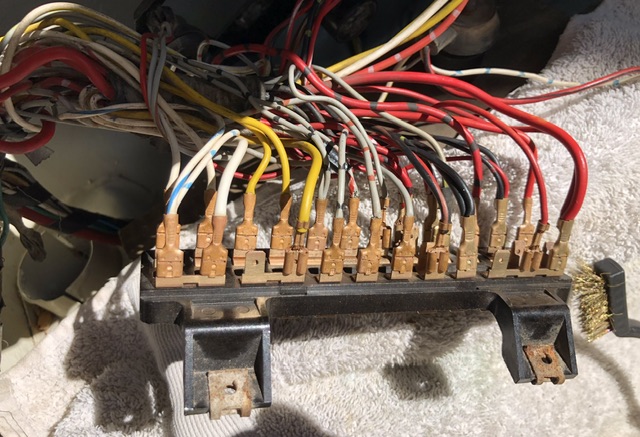
Posted by: Literati914 Oct 4 2023, 10:03 AM
This shot shows my custom dash layout. On the left of the Column I’m adding an A/F gauge (14point7) and on the right side will be the aux. fog light switch, Dakota digital CHT gauge and an analog voltmeter.
Attached image(s)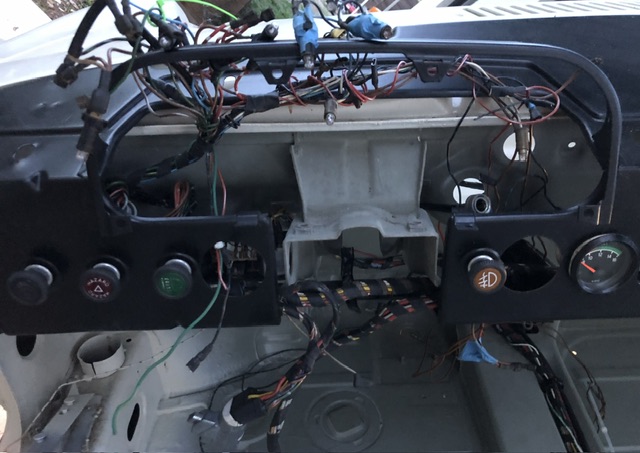
Posted by: Literati914 Oct 4 2023, 10:08 AM
Having the harness back where it belongs is nice, after all this time!! I’ve added some wires, both front and back for an eventual A/C project.
Attached image(s)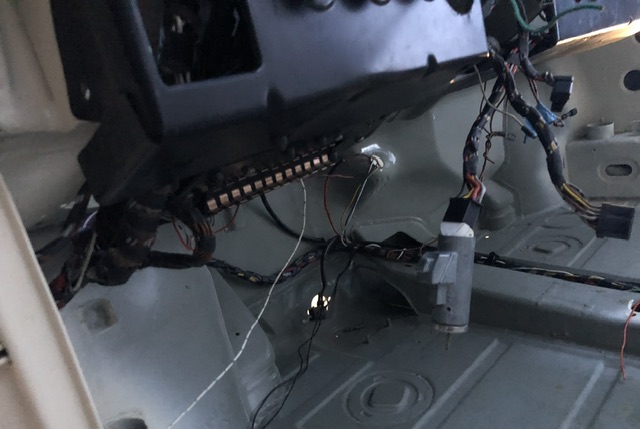
Posted by: Literati914 Oct 4 2023, 10:12 AM
Stripes.. the cars not polished out yet but you get the idea.
Attached image(s)
Posted by: Literati914 Oct 4 2023, 10:17 AM
I’m not sure if I’m in love with the paint scheme yet.. but it’s fun and I figure I could always change it.
Attached image(s)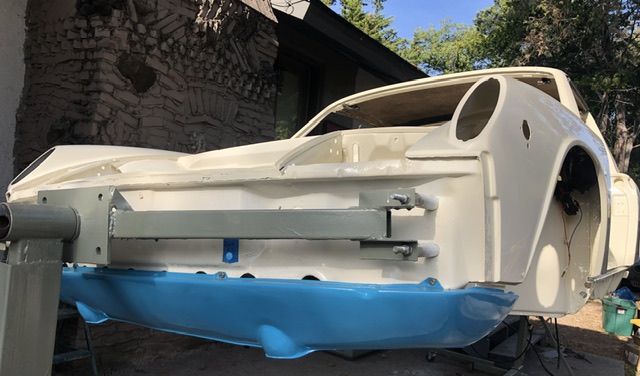
Posted by: Literati914 Dec 15 2023, 09:05 AM
I got a lot of stuff done since last report, so here’s a little update on my project. I got this car off the rotisserie a few weeks back, installed the windshield, main rubber seals (all new targa seals, a-pillar, b, doors & threshold, etc, etc), reassembled and installed the doors. In short it now stays dry when rained on
Attached image(s)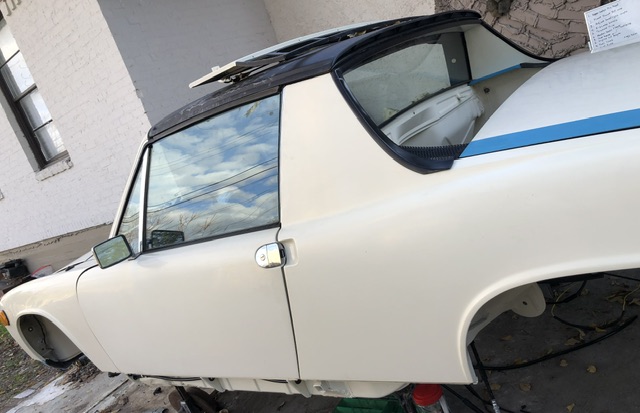
Posted by: Literati914 Dec 15 2023, 09:09 AM
Here’s a shot showing how I had to reroute the wiring loom in the engine compartment because it got too bulky for the traditional route and was fouling the trunk hinge on the driver side (because of extra wiring off the battery - more on that later)
Attached image(s)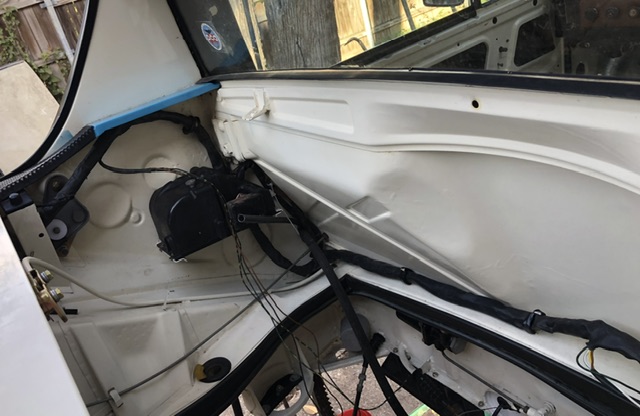
Posted by: Literati914 Dec 15 2023, 09:10 AM
And I’ve started the dash remodel
Attached image(s)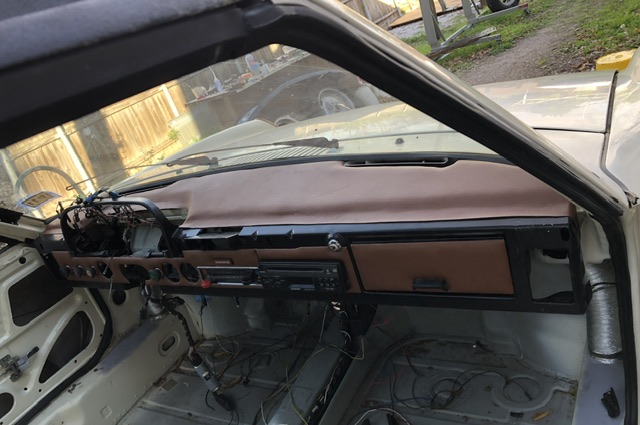
Posted by: East coaster Dec 15 2023, 09:25 AM
Looking good!
Posted by: dstudeba Dec 15 2023, 11:09 AM
I am intrigued by your dash remodel. Are you making it up or are you following/modifying a previous example?
Posted by: Literati914 Dec 15 2023, 11:40 AM
I am intrigued by your dash remodel. Are you making it up or are you following/modifying a previous example?
I guess you'd say I'm making it up, for the dash face: I've basically just taken the existing stock pieces that were covered w/basketweave (and double side taped to the face at the factory) - stripped those and upholstered them with a very thin foam and new vinyl. TBH, I would so much rather just find a matching "saddle" basketweave to use without foam as original. This will look good but the basketweave is just a little more subtle and right. For the top, I've just done the same but with slightly thicker foam.
Then my original upper dash will get a cover-lay shell (original black) and get installed with the original knee pad section below.
.
Posted by: Literati914 Mar 21 2024, 01:27 PM
Quick update :
Got my master cylinder installed, fuel pump mocked up next to the steering rack, installed the pedal box and floor board
Attached image(s)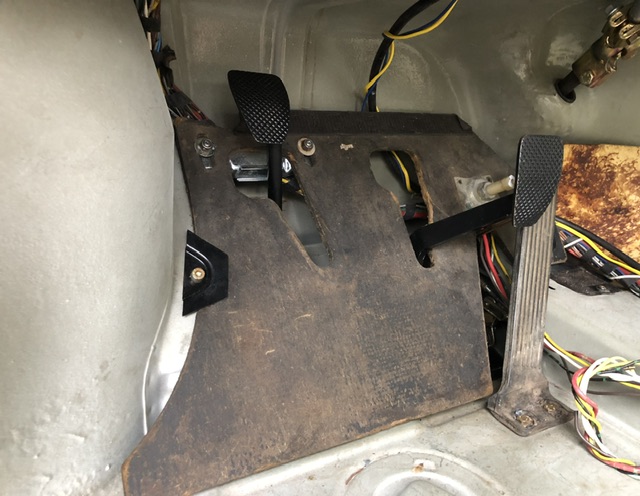
Posted by: Literati914 Mar 21 2024, 01:30 PM
I installed my upper dash (w/ dash cap), refaced the front after changing my mind on the vinyl.. this wool herringbone material with be on the seat insert also
Attached image(s)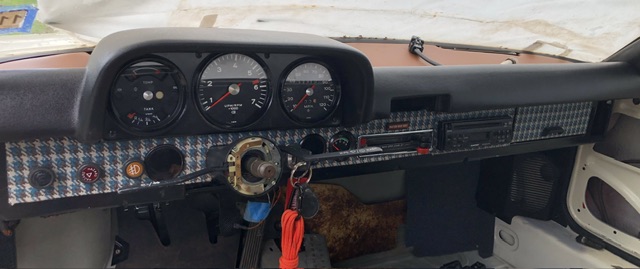
Posted by: Literati914 Mar 21 2024, 01:32 PM
Installed my AF gauge
Attached image(s)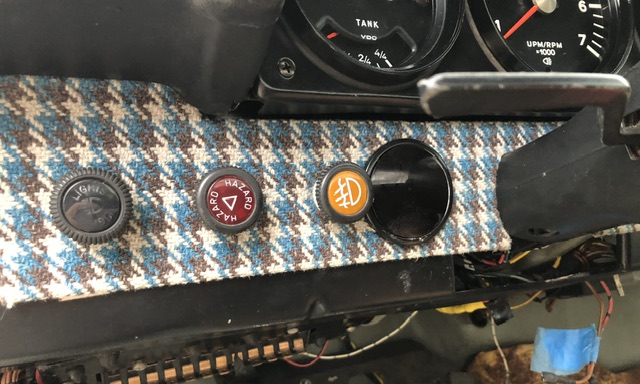
Posted by: Literati914 Mar 21 2024, 01:33 PM
CHT gauge and a voltmeter too
Attached image(s)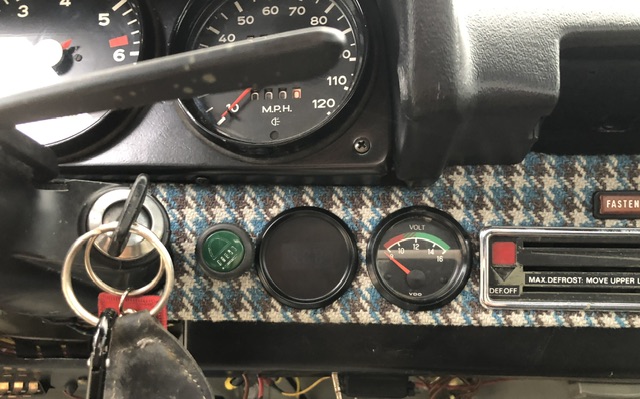
Posted by: Literati914 Mar 21 2024, 01:37 PM
I took the main gauges apart and added the strip LEDs for illumination, painted the needles and exterior rings- and of course got them installed (no small feet that), oh and added a silver dot to the combo gauge
Attached image(s)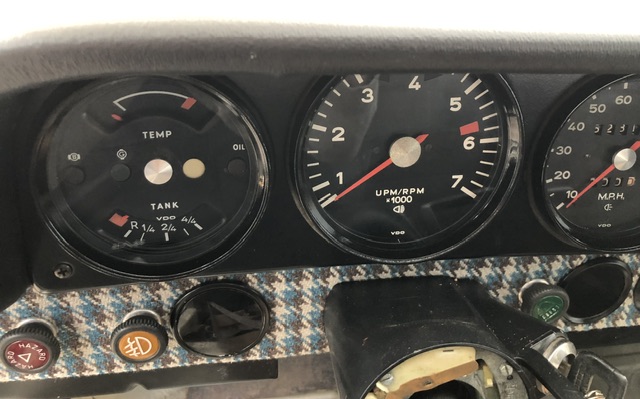
Posted by: Literati914 Mar 21 2024, 01:42 PM
I’ve also installed some sound deadener to the firewall and floor. I got more to do to the floors and doors but you get the idea. For the stuff on the floor I doubled it up back to back or (sticky side to sticky side) so that it’s not actually stuck to the floor at all and can easily be lifted out to monitor moisture and rust in the future
Attached image(s)
Posted by: Literati914 Mar 21 2024, 01:45 PM
I got the head light buckets etc completely installed as well as the front hood
Attached image(s)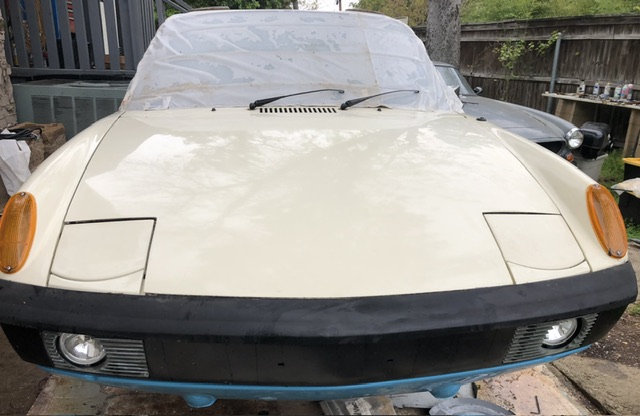
Posted by: Literati914 Mar 21 2024, 01:48 PM
I installed an old stock set of positive side stripes that had dried out in a few spots (didn’t realize it before I started the install).. needless to say they’ll need to be replaced
Attached image(s)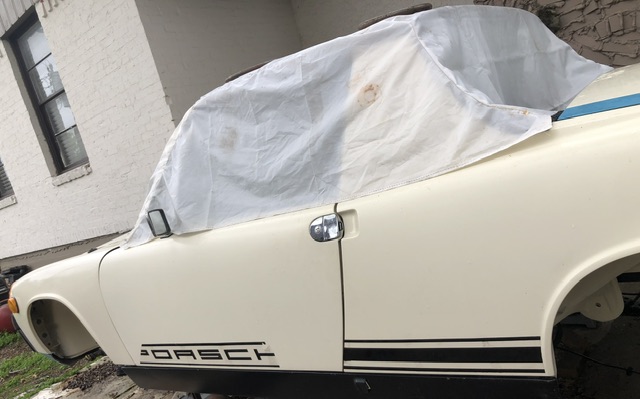
Posted by: Literati914 Apr 4 2024, 09:47 AM
I rebuilt my axle shaft / CV units a few month back and finally got around to getting them installed on the trailing arms.
Before:
Attached image(s)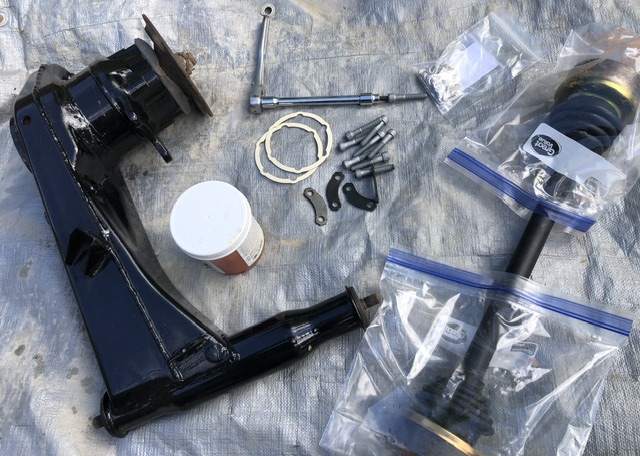
Posted by: Literati914 Apr 4 2024, 09:47 AM
After:
Attached image(s)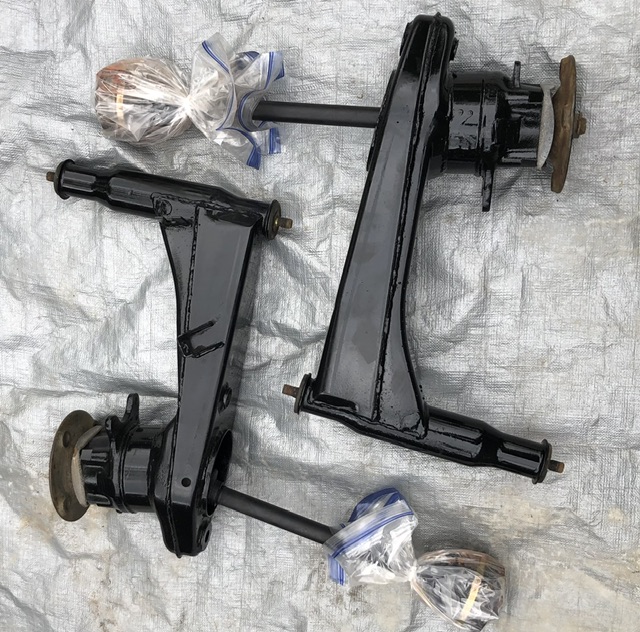
Posted by: Literati914 Apr 4 2024, 09:48 AM
And installed
Attached image(s)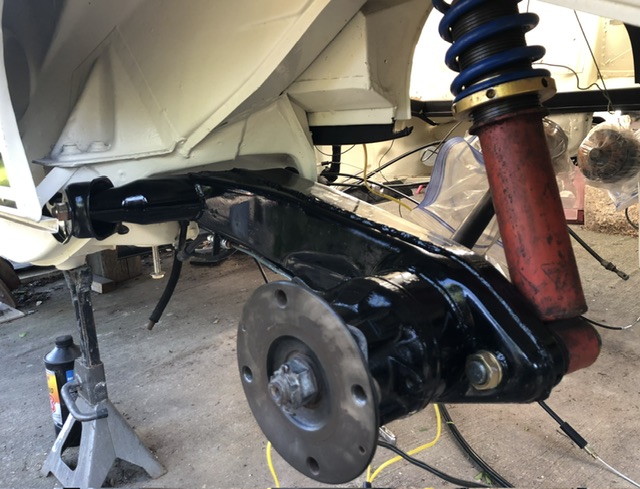
Posted by: Literati914 Apr 4 2024, 03:45 PM
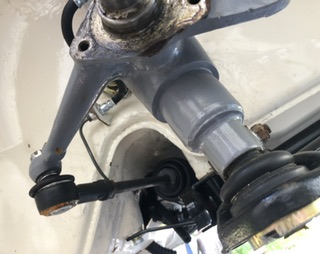
Not sure why I never posted that the front suspension had been installed, I did it a couple months ago. These are the later wedge bolt style but I’m contemplating switching over to early struts so I can use my aluminum brembo calipers. I went with the later set cause I had a usable set of late rotors on hand. Turbo Tie rods are present and accounted for too:
Attached image(s)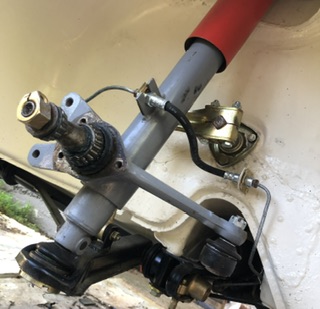
Posted by: Literati914 Apr 4 2024, 04:11 PM
I also got around to cutting and edging up my blue wool square weave carpets. This pics is before I finished off the edging but gives a good in process shot
Attached image(s)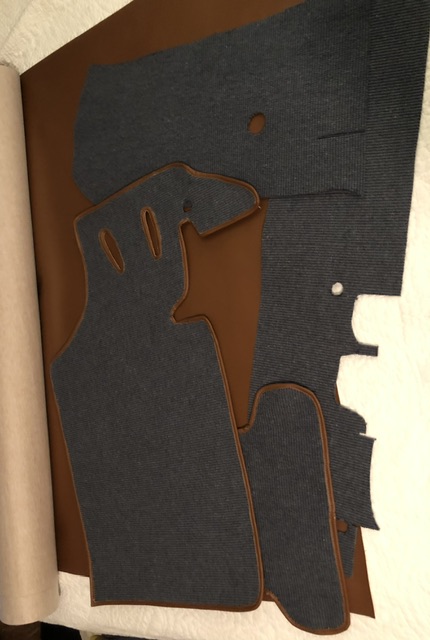
Posted by: Literati914 Apr 4 2024, 04:14 PM
Here’s a shot of the set installed. Notice I did a little something different at the passengers firewall area.. that area actually has a linear vertical curve, I like it highlighted by the trim and that’s how I did these.
Attached image(s)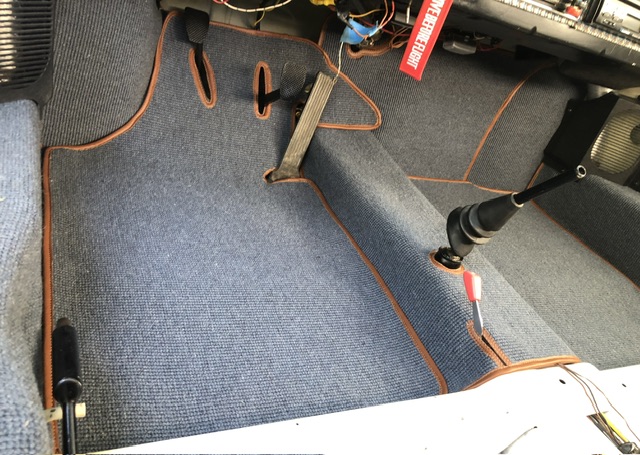
Posted by: Literati914 Apr 4 2024, 04:18 PM
I still have some automotive jute style underpayment to cut up and install, haven’t gotten around to it just yet.
The rear and long sections:
Attached image(s)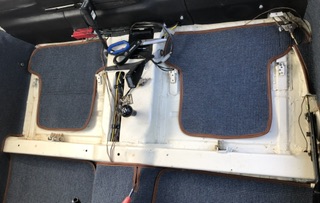
Posted by: gereed75 Apr 4 2024, 07:24 PM
Beautiful carpet set. Nice work there!
Posted by: slowrodent Apr 5 2024, 09:00 AM
Very impressive restoration thus far. Some personalization which seems to fit your car quite well. Thanks.
Posted by: ClayPerrine Apr 5 2024, 12:41 PM
Not sure why I never posted that the front suspension had been installed, I did it a couple months ago. These are the later wedge bolt style but I’m contemplating switching over to early struts so I can use my aluminum brembo calipers. I went with the later set cause I had a usable set of late rotors on hand. Turbo Tie rods are present and accounted for too:
Zims offers a service where they replace the bottom of the early pinch bolt struts and put in the wedge bolt style connectors. The wedge bolt struts are a safer, better design.
Oh, and why do you need to put in the early strust for the Brembo calipers?
Posted by: 2mAn Apr 5 2024, 03:01 PM
Went through this whole thread and WOW... from where it started to where it is today, amazing. Nice work!
Posted by: Literati914 Apr 8 2024, 06:31 PM
Zims offers a service where they replace the bottom of the early pinch bolt struts and put in the wedge bolt style connectors. The wedge bolt struts are a safer, better design.
Oh, and why do you need to put in the early strust for the Brembo calipers?
I had no idea that Zims did that alteration .. but I’ve seriously considered making the changes myself. Shouldn’t be too hard, plus I could raise the spindles at the same time
Btw - Eric at PMB did a caliper weight brake down sometime back and mentioned that the aluminum Brembos (Alfa GTV6) were only compatible with early struts on the 4 lug cars. I think there’s an offset difference at the caliper mounting point
.
Posted by: Literati914 Apr 8 2024, 06:32 PM
Went through this whole thread and WOW... from where it started to where it is today, amazing. Nice work!
Thanks for the compliments and encouragement!
Posted by: Literati914 Apr 8 2024, 06:38 PM
I messed around and reupholster my seats over the last couple days
Attached image(s)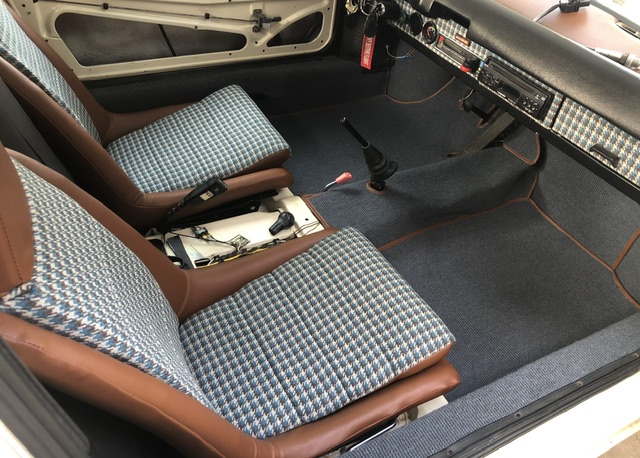
Posted by: Literati914 Apr 8 2024, 06:40 PM
They’re not bolted to the sliders yet, but I couldn’t resist setting them in the car for a look see
Attached image(s)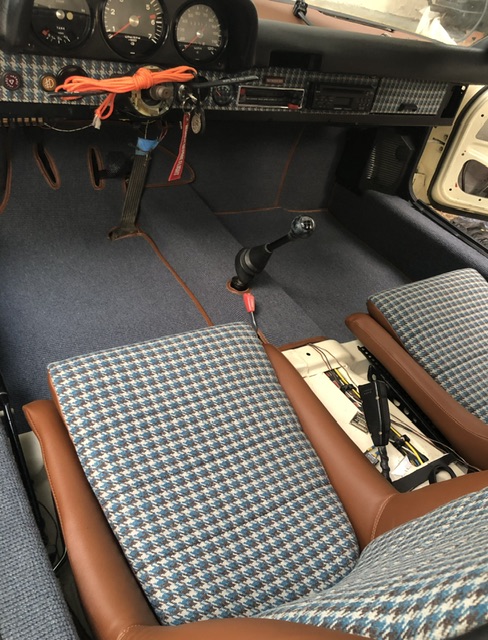
Posted by: Literati914 Apr 11 2024, 08:18 PM
I somehow acquired a partial Tangerine Racing SS fuel line replacement kit .. it only had the tunnel lines and I’d installed them several months ago. I knew eventually I’d have to do something about the shorter pieces that go up thru the engine shelf and to and from the fuel rails. So I happened to have some 3/8” tubing and custom bent up the feed line. For the return side (get this) I used the metal part that was fused to the front of the original return fuel line (CSOB ). I just had to put a few bends in it, and good to go!
Attached image(s)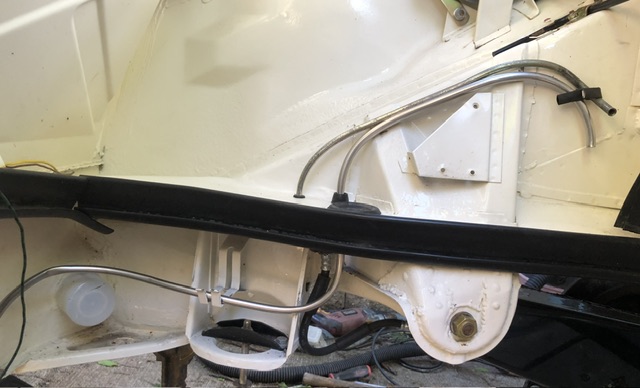
Posted by: Literati914 Apr 14 2024, 08:59 PM
Small job completed today - replaced the bushings for my shift rod coupler… well replace is not exactly accurate since there was no sign of any bushing at all to begin with.. didn’t take a bunch of pics, but this one shows the new bushings as I’m about to press the pin back into the assembly. Little steps, but it’s something.
Attached image(s)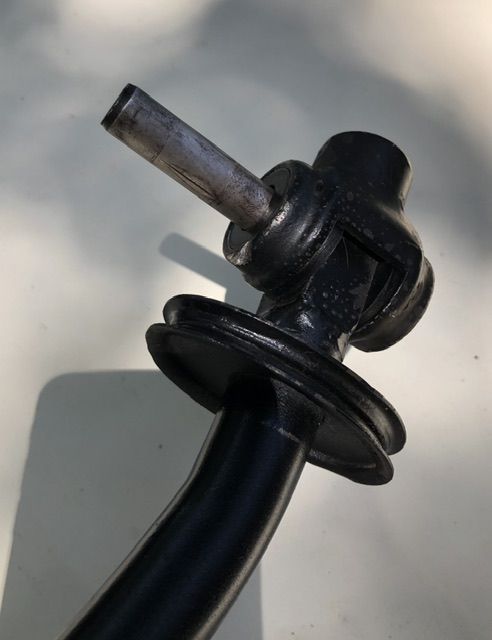
Powered by Invision Power Board (http://www.invisionboard.com)
© Invision Power Services (http://www.invisionpower.com)