Printable Version of Topic
Click here to view this topic in its original format
914World.com _ 914World Garage _ '73 914 2.0....what to do first?
Posted by: AKFish Nov 11 2019, 05:39 PM
HI there, my name is Dominic and I have an avid reader of this forum for nearly a year, now its time to get rolling on my project...
About this time last year, I purchased a 1973 914 2.0. The previous owners bought it as part of a bundle of 914's and only kept a couple.
I have some documentation from when the car was first purchased, but the more recent owners have proven elusive. It was owned by a member here named "kurbfrog" but he/she has not responded to my contact attempts, so recent history is a bit murky. Sounds like the guy I really want to talk to, headed south of the border in a bit of a hurry.
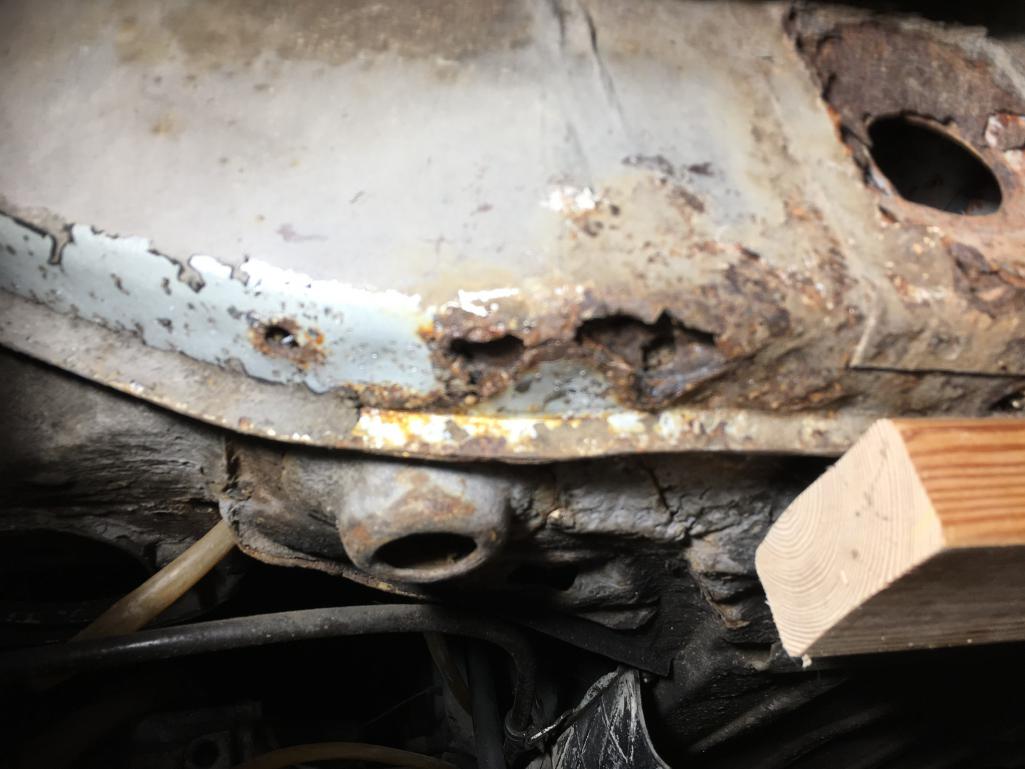
I acquired the car in a partially disassembled state. The engine, a 2.0 with it's original FI still attached, is out and pretty much everything is removed from the engine bay and the interior. Many of the removed parts are carefully bagged up and some even have labels. On the whole, the car is in pretty solid condition, however, there are some of the typical rust issues.....
The engine shelf has been cut for A/C and there is rust in the hell hole and I can see rust developing in the outer long (I think that's what it is called). My reading here would suggest that there is a lot more than meets the eye.
What I would really like to do is find out if the engine runs...and if so, just put the car back together and drive it for a while. I could decide after that, if a "rustoration" is right for me...I have zero background in fabrication/welding.
Question: What are the MUST DO items to perform on the engine while it is out, to give me the best odds of getting the car going again?
P.S. My car came with this 1975 Roller that is pretty well gutted.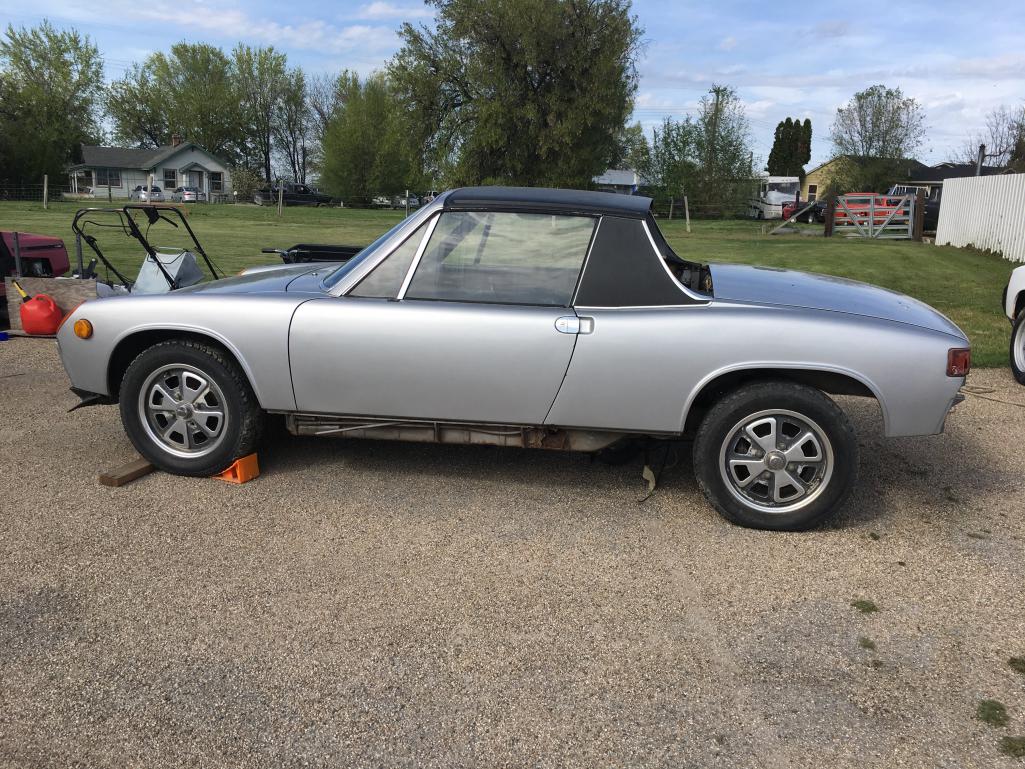 [attachmentid=718808]
Posted by: AKFish Nov 11 2019, 05:43 PM
The engine as I received it...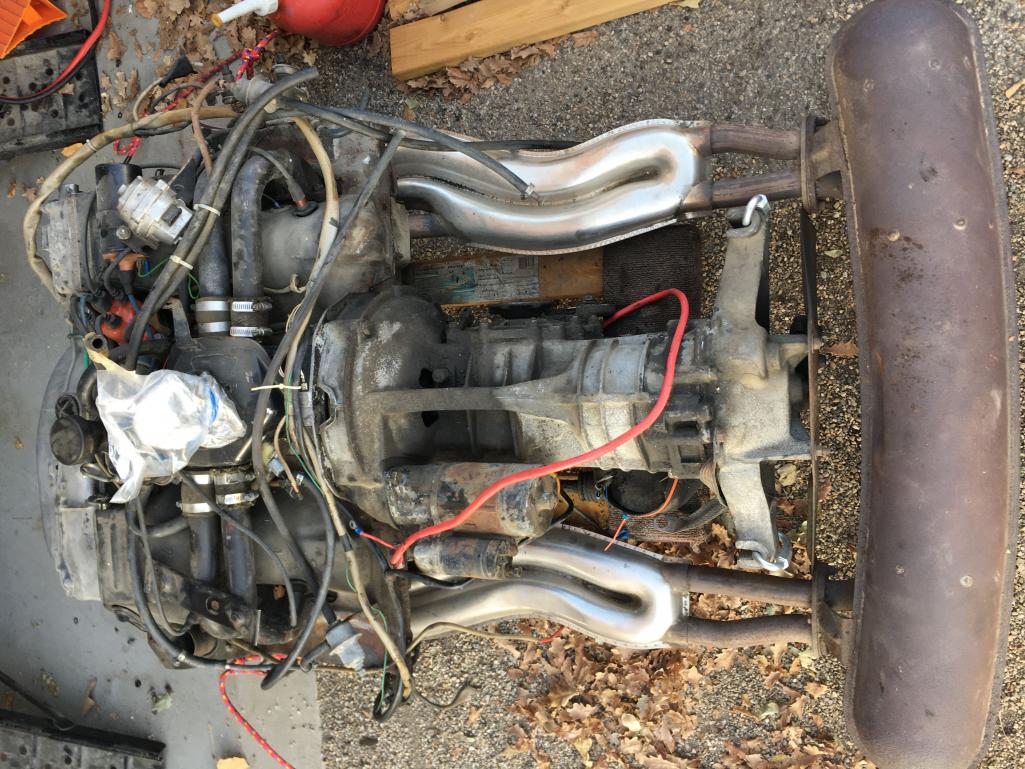
Posted by: AKFish Nov 11 2019, 05:44 PM
The bad...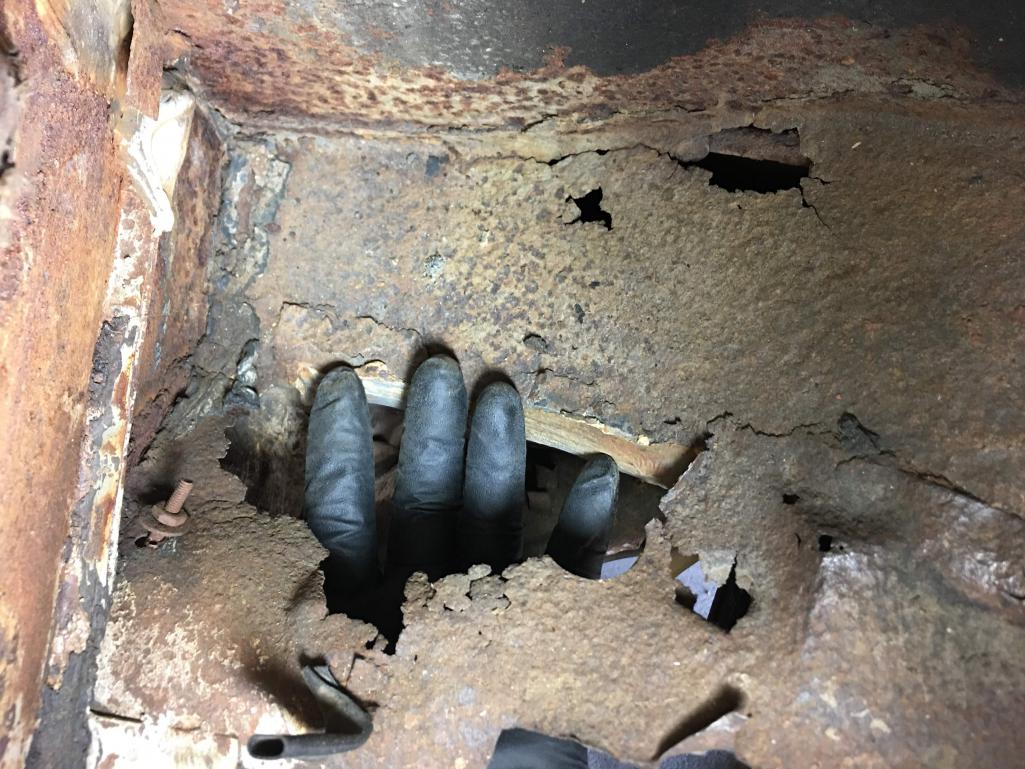
Posted by: AKFish Nov 11 2019, 05:46 PM
Outer long?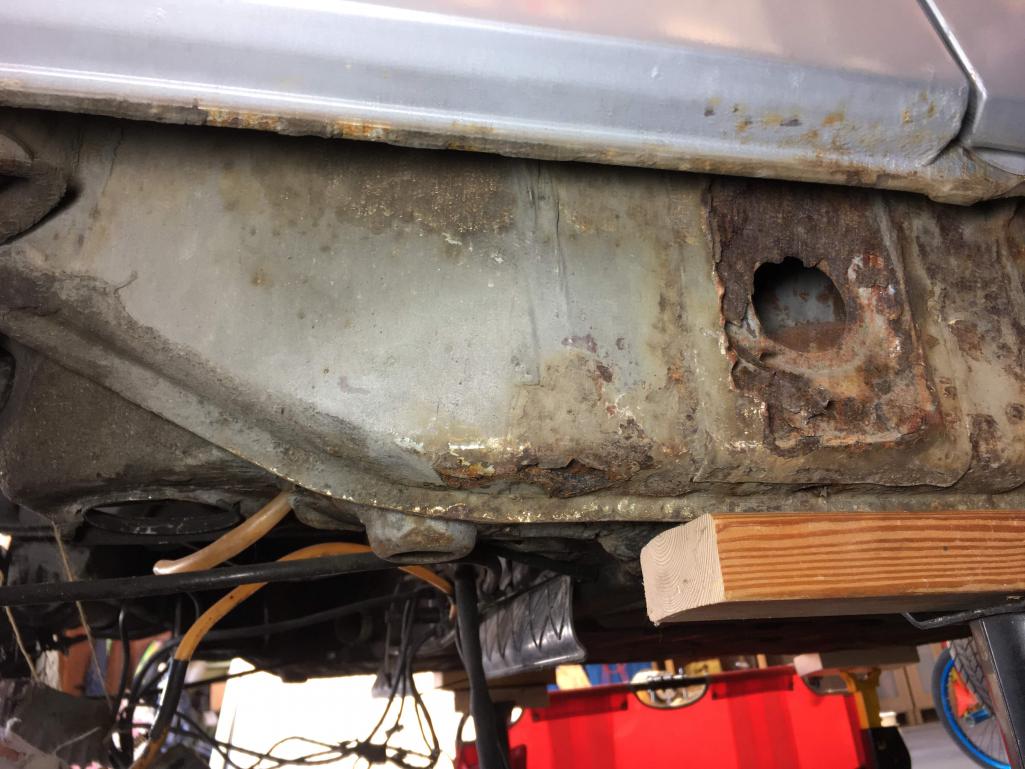
Posted by: AKFish Nov 11 2019, 05:47 PM
Cut out for A/C...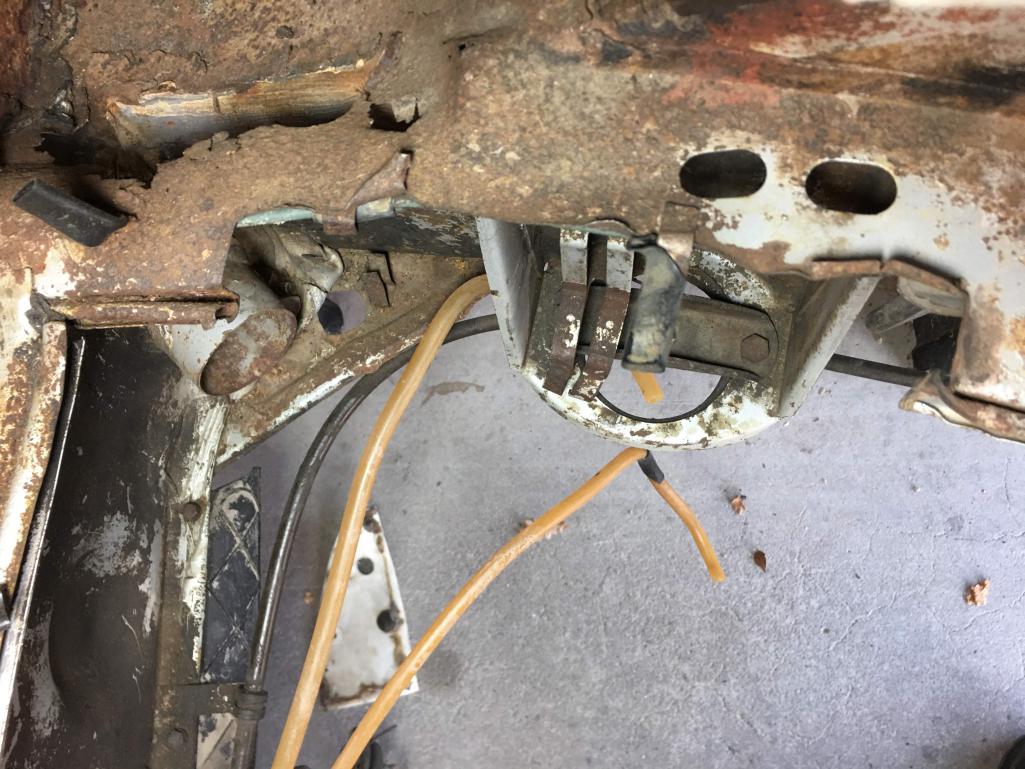
Posted by: AKFish Nov 11 2019, 05:58 PM
This 1975 came as part of the package...its been hit on the drivers rear quarter behind the door and pretty well gutted. Remarkably, there is no rust in the hell hole...
Posted by: AKFish Nov 11 2019, 06:05 PM
I included the VIN in the data base, but here it is again.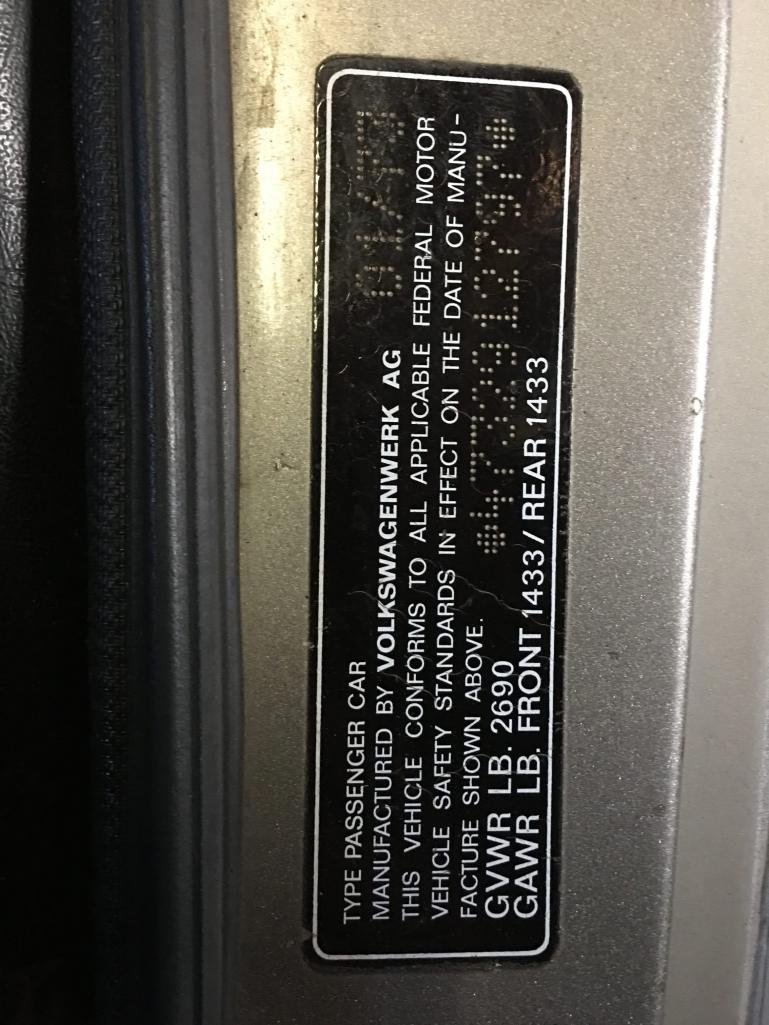
Posted by: SteveL Nov 11 2019, 06:41 PM
Step one is to identify all rust and repair. Hell hole and longs are absolutely critical.
Posted by: AKFish Nov 11 2019, 07:24 PM

Step one is to identify all rust and repair. Hell hole and longs are absolutely critical.
Oh boy...ok. 1. Buy welder. 2. Learn how to weld
Does that sound about right?
Posted by: barefoot Nov 11 2019, 07:47 PM
HI there, my name is Dominic and I have an avid reader of this forum for nearly a year, now its time to get rolling on my project..
Question: What are the MUST DO items to perform on the engine while it is out, to give me the best odds of getting the car going again?
First see if the engine will turn over. you can use a screwdriver thru the access hole by the flywheel to slowly turn the flywheel, if it turns, then set up a battery and do a compression test, or better yet buy a cheap leakdown tester and check leakdown rates.
If that passes, you can run the engine just setting on wood blocking by jurry rigging fuel supply (easier with carbs)
Posted by: AKFish Nov 11 2019, 08:14 PM
HI there, my name is Dominic and I have an avid reader of this forum for nearly a year, now its time to get rolling on my project..
Question: What are the MUST DO items to perform on the engine while it is out, to give me the best odds of getting the car going again?
First see if the engine will turn over. you can use a screwdriver thru the access hole by the flywheel to slowly turn the flywheel, if it turns, then set up a battery and do a compression test, or better yet buy a cheap leakdown tester and check leakdown rates.
If that passes, you can run the engine just setting on wood blocking by jurry rigging fuel supply (easier with carbs)
I removed spark plugs and turned the engine over by hand, replaced plugs and I can still turn over but with the resistance of compression. No audible scraping or crunching...oil appears to be new.
Can the D-Jet FI be run with the engine out? Thanks very much.
Posted by: 914_7T3 Nov 12 2019, 12:20 AM
Nice Project!
Several members including myself are currently in the process of working on 1973 2.0 Cars so feel free to reach out should you need any info.
@http://www.914world.com/bbs2/index.php?showuser=20845 can help you with welding & rustoration tips
@http://www.914world.com/bbs2/index.php?showuser=22428 really knows his engine builds
My specialty is parts sourcing
Many members will provide you with all the info that you need.

Posted by: jcd914 Nov 12 2019, 12:29 AM
You can run the engine outside the car.
It is easiest if you use an engine compartment relay panel and plug the engine harness and FI harness into the panel.
There are a few wires that normally come from the vehicle harness that will need to be hooked up to the relay panel to provide power. You will also need to wire the starter and fuel pump as well as provide a fuel source for the pump and a place for the fuel return to go.
It takes some figuring out but is not too bad.
I set mine up with jack stands under the engine crossbar and the tail of the transmission.
I also used a spare relay panel I had around and mounted it to a simple stand.
Fuel supply and return were just a 2 gallon fuel jug with fuel hoses stuffed in it.
I did move the fuel jug several feet away from the engine to keep fumes away.
Jim
Posted by: Tdskip Nov 12 2019, 10:49 AM
Good morning and welcome.
In addition to what the others have said-as strong as suggest you get a build plan together that includes the goal of how you’re going to use the car and what level of investment you are willing to make. Like any project car a 914 will consume all available money if you don’t have a clear and focus idea what you’re trying to do.
Part of that should be a realistic assessment of what you want to and can do yourself versus when you may want to get professional help. Doing as much as possible obviously will help control costs, not to mention give you proud of ownership when it’s done, but you need to budget time and make sure you’re giving yourself the leeway of having to develop skills on jobs you haven’t done before.
None of the above is designed to put you off on the project – far from it, I’ve just found the above to be very helpful in making sure her projects get done.
As you are already finding out the people here are fantastic and very willing to help. Thanks as you are already finding out the people here are fantastic and very willing to help.
Posted by: sfrenck Nov 12 2019, 11:22 AM
Consider buying a roller if you don't want to learn how to weld - that's what I ended up doing and I saved a lot of headache (and ended up with a rust free shell from California).
Posted by: dr914@autoatlanta.com Nov 12 2019, 12:04 PM
very little rust in your car, and all of the repair parts are readily available. While the engine is out leak it down check the compression adjust the valves and replace the pushrod tube seals as well as the front and rear main seals and check the clutch
Posted by: bbrock Nov 12 2019, 12:21 PM
Nice Car! Right year. Right engine. And right color! 
I think the first step should be making sure the chassis is still safe enough to drive before thinking about putting the engine back in. That means making sure your rear suspension points are still solid and there isn't any flex in the body. I'd go after the rusty spots on the longs with a screwdriver like I was trying to murder it to make sure you still have solid metal there. Somewhere there is a procedure for testing for flex but I couldn't find it. If it checks out solid enough, might as well drive and enjoy it. Warning: to drive it is to want it. 
Honestly, what you've shown so far doesn't look to bad to me. Don't get me wrong, repairing just what we know is rotted is going to be a big project and there are probably more surprises inside, but it's doable. Fixing the engine shelf where the AC was is pretty easy. Restoration Design makes nice engine shelf replacements. Worst part will be fixing the rot under the battery because that will be a fabrication job. And, of course, whatever surprises are waiting for you inside.
Posted by: Superhawk996 Nov 12 2019, 12:30 PM
Honestly, what you've shown so far doesn't look to bad to me.

@http://www.914world.com/bbs2/index.php?showuser=20845
Go look at Brent's project page. If you had started with what Brent started with, of course nothing looks bad.


His build thread highlights the power of determination and pride in workmanship. No reason your project can't be the next.
Just dig in. Once you get started the path becomes clear. Life will happen along the way, there will be detours. Just keep at it one small project at a time.
Posted by: Rand Nov 12 2019, 12:33 PM
Don't put money into drivetrain unless you want to transfer it. This carcass isn't worthy.
http://www.914world.com/bbs2/index.php?act=Attach&type=post&id=718812
Posted by: Superhawk996 Nov 12 2019, 12:36 PM
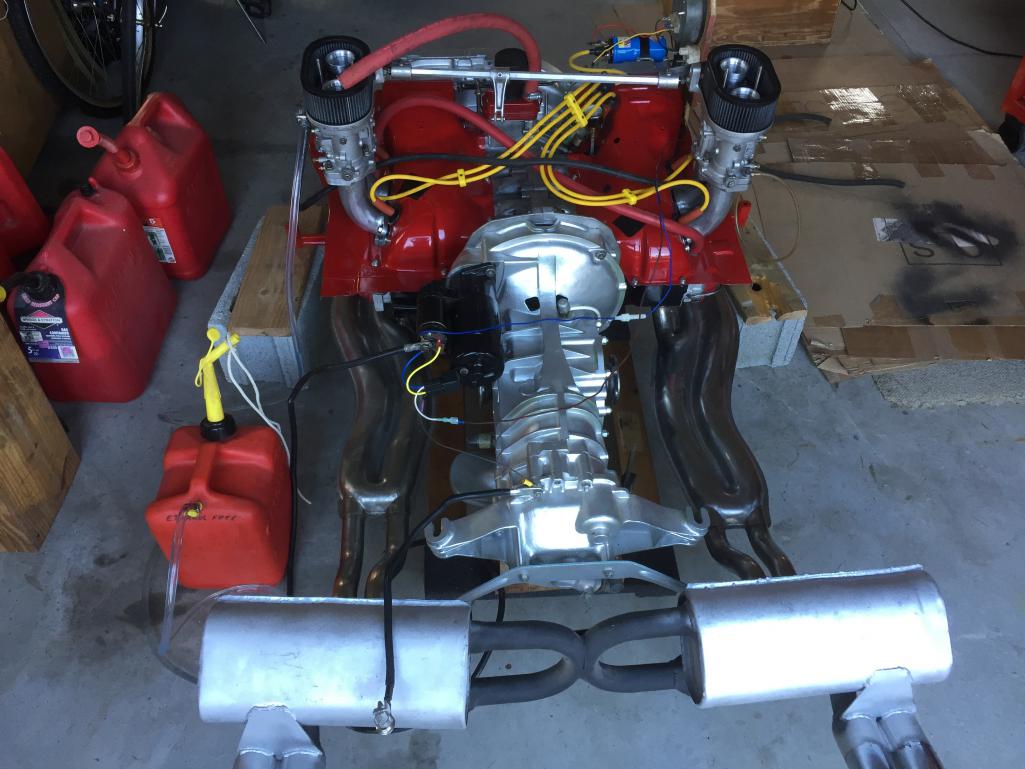
 Very nice looking engine and transmission! Well done!
Posted by: jmitro Nov 12 2019, 01:29 PM
in my opinion doing metal fab and welding takes a lot of practice, and I would not recommend you learn on this car. try another project or get someone else to do the bodywork.
maybe it would be wise to use the gutted car with nice hell hole and fix the quarter panel instead.
Posted by: bbrock Nov 12 2019, 03:18 PM
Honestly, what you've shown so far doesn't look to bad to me.
@http://www.914world.com/bbs2/index.php?showuser=20845
Go look at Brent's project page. If you had started with what Brent started with, of course nothing looks bad.
 Yeah, I was thinking I might not be the best judge. But great googly moogly, I'm amazed at how afraid some people are of a little rust.
Cutting off old metal and plug welding in new parts doesn't take a high level of skill. Butt welding and frabrication is where the real skill comes in.
What I see looking at these pics is a right long ($150), engine shelf piece ($172), and battery tray ($132.50) needing replaced. Those are not hard to do and will require less time, money, and skill than rebuilding an engine. Then there's the hard stuff. Looks like there might need to be some fab work and repair aft of that long and, of course, that massive hole under the battery. Those cost almost nothing in materials to repair. It's just sheet metal, but requires more skill. It's safe to say there is more damage we can't see, but we can only speculate at this time. As it is, it looks like a DIY repair would be feasible well under $1K. Is that too much to spend on a 73 2L? ... and it's SILVER

Posted by: AKFish Nov 12 2019, 06:41 PM
[quote name='914_7T3' date='Nov 12 2019, 01:20 AM' post='2761434']
Nice Project!
Several members including myself are currently in the process of working on 1973 2.0 Cars so feel free to reach out should you need any info.
@http://www.914world.com/bbs2/index.php?showuser=20845 can help you with welding & rustoration tips
@http://www.914world.com/bbs2/index.php?showuser=22428 really knows his engine builds
My specialty is parts sourcing
Many members will provide you with all the info that you need.
Thank you so much, I’m sure some parts will be needed!
I have been following @http://www.914world.com/bbs2/index.php?showuser=20845 and @http://www.914world.com/bbs2/index.php?showuser=22428 as well as numerous other build threads. I am supremely impressed by the level of skill and dedication applied in many of these builds. Inspirational for sure!
Posted by: 914_7T3 Nov 12 2019, 06:50 PM
[quote name='AKFish' date='Nov 12 2019, 04:41 PM' post='2761649']
[quote name='914_7T3' date='Nov 12 2019, 01:20 AM' post='2761434']
Thank you so much, I’m sure some parts will be needed!
I have been following @http://www.914world.com/bbs2/index.php?showuser=20845 and @http://www.914world.com/bbs2/index.php?showuser=22428 as well as numerous other build threads. I am supremely impressed by the level of skill and dedication applied in many of these builds. Inspirational for sure!
[/quote]
Here's mine, lots more subcontract work and tons of assistance from the Community........
http://914world.com/bbs2/index.php?showtopic=308753
Posted by: AKFish Nov 12 2019, 07:50 PM
Ok dang it, I’ll have to figure out how to respond to each reply individually...
It sounds like step one is to fully assess the extent of the rust.
Will a 4” cutting wheel on an angle grinder get me going in the right direction?
Can anyone recommend a good set of spot weld drill bits? Thanks very much!
Posted by: AKFish Nov 12 2019, 09:02 PM
Here's mine, lots more subcontract work and tons of assistance from the Community........
http://914world.com/bbs2/index.php?showtopic=308753
[/quote]
Mine was also sold at Gateway Porsche/Audi in Portland. 4/7/73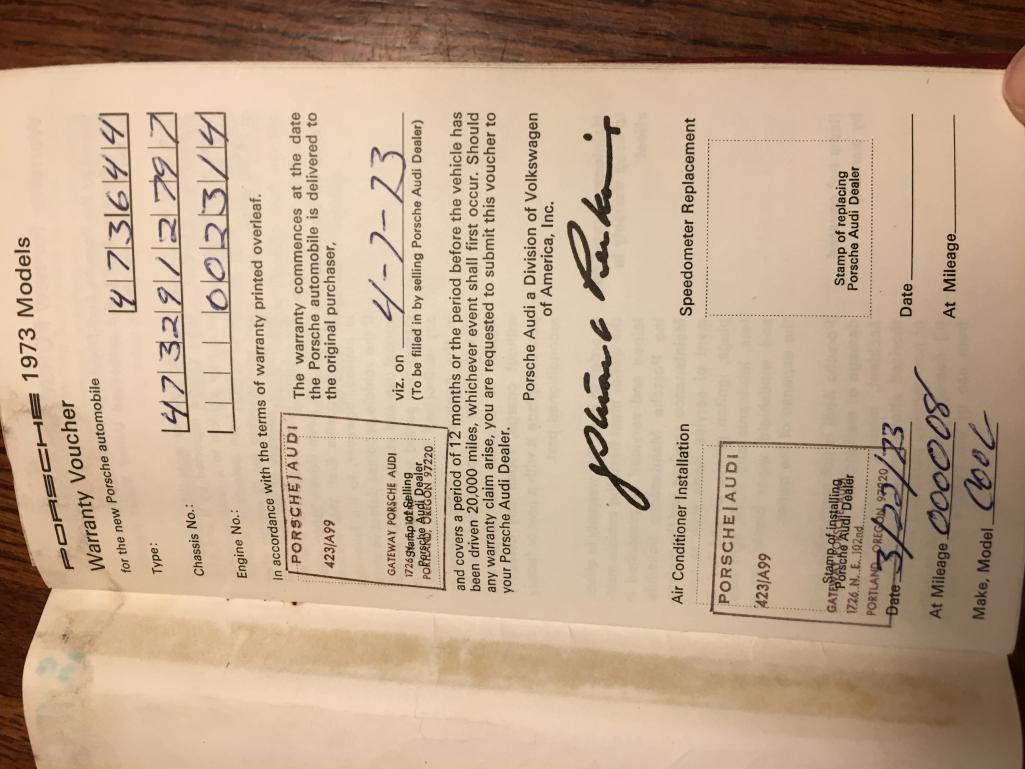
Posted by: AKFish Nov 12 2019, 09:06 PM
Honestly, what you've shown so far doesn't look to bad to me.
@http://www.914world.com/bbs2/index.php?showuser=20845
Go look at Brent's project page. If you had started with what Brent started with, of course nothing looks bad.
Yeah, I was thinking I might not be the best judge. But great googly moogly, I'm amazed at how afraid some people are of a little rust.Cutting off old metal and plug welding in new parts doesn't take a high level of skill. Butt welding and frabrication is where the real skill comes in.
What I see looking at these pics is a right long ($150), engine shelf piece ($172), and battery tray ($132.50) needing replaced. Those are not hard to do and will require less time, money, and skill than rebuilding an engine. Then there's the hard stuff. Looks like there might need to be some fab work and repair aft of that long and, of course, that massive hole under the battery. Those cost almost nothing in materials to repair. It's just sheet metal, but requires more skill. It's safe to say there is more damage we can't see, but we can only speculate at this time. As it is, it looks like a DIY repair would be feasible well under $1K. Is that too much to spend on a 73 2L? ... and it's SILVER
@http://www.914world.com/bbs2/index.php?showuser=20845 Brent what welder were you using and we’re you satisfied with it’s performance?
Posted by: Mike Bellis Nov 12 2019, 09:37 PM
Oh boy...ok. 1. Buy welder. 2. Learn how to weld
Does that sound about right?
This is the bestest and cheapest way to fix it.

Posted by: bbrock Nov 12 2019, 09:40 PM
Ok dang it, I’ll have to figure out how to respond to each reply individually...
It sounds like step one is to fully assess the extent of the rust.
Will a 4” cutting wheel on an angle grinder get me going in the right direction?
Can anyone recommend a good set of spot weld drill bits? Thanks very much!
If you have abandoned the idea of putting the engine in and driving it for awhile before diving in to the rust repair then sure, a 4" cutting wheel on an angle grinder was one of my three primary exploratory tools. The others were a cuttoff wheel on a die grinder and a 2" on a pneumatic mini angle grinder. Ninety percent of the initial inspection was done with the 4" angle grinder though. I wouldn't rule out the car being solid enough for a few more miles though, so maybe start with a less destructive evaluation before chopping on metal?

For cutting spot welds, get a https://www.amazon.com/gp/product/B002XML5HK/ref=ppx_yo_dt_b_asin_title_o00_s00?ie=UTF8&psc=1. Amazing tools and great value.
@http://www.914world.com/bbs2/index.php?showuser=20845 Brent what welder were you using and we’re you satisfied with it’s performance?
I'm really not qualified to advise on welders. Even after all the cutting and welding I did, I'm still a mediocre welder at best. But since you asked, I have an ancient 115v Hobart Handler I bought over 30 years ago. It has served me well. Almost everyone else on this forum knows more about welders and welding than I do. @http://www.914world.com/bbs2/index.php?showuser=9892 has been a great mentor for me.
Posted by: AKFish Nov 13 2019, 06:07 PM
@http://www.914world.com/bbs2/index.php?showuser=20991 just comparing our VIN #’s. They were sold at the same dealer, just a few months apart from each other, yet still 8,461 cars apart on the assembly line. Crazy.
Posted by: 914_7T3 Nov 13 2019, 11:38 PM
@http://www.914world.com/bbs2/index.php?showuser=20991 just comparing our VIN #’s. They were sold at the same dealer, just a few months apart from each other, yet still 8,461 cars apart on the assembly line. Crazy.
Totally. I saw one for sale last year 15 miles away that was only a few hundred Vin#s off. Truly remarkable considering it is 46 years after they left the factoy in Germany.
Posted by: AKFish Nov 23 2019, 08:43 PM
Drivers side jack post hole is paper thin and the long seems to be stuffed full of rodent bedding...short of opening up the long, are there any tricks to cleaning this out? 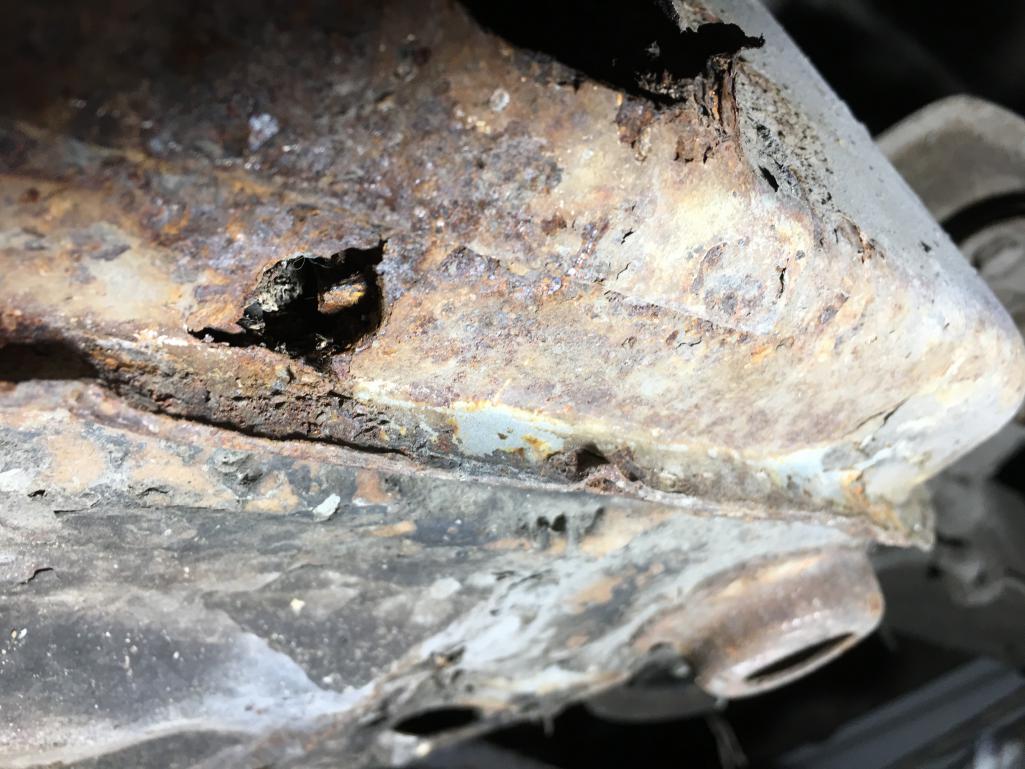 there is a 1/2” hole rotted through below the jacking hole.
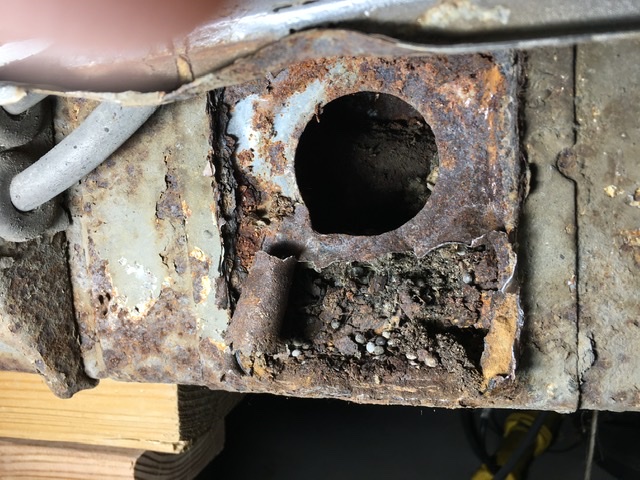
Can this repair be made without building a frame to support the chassis?
Posted by: rhodyguy Nov 23 2019, 08:53 PM
It's the work to be done before you start cutting on your car and what you're going to spend getting there. Both time and money. You're going be removing large sections. Start running the tally for the Restoration Design order.
Posted by: mepstein Nov 23 2019, 08:56 PM
You will have to cut out all the rusty metal anyway so getting to the rodent mess won't be a problem.
You can repair the car without a frame. Jack it up level with multiple jack stands and keep the doors on the car so you have a reference point for door gaps. Also measure often as you weld in metal using diagonals to keep measurements equal. Don't cut away more than one rusty area at a time.
Read some of the classic threads on rustorations including "digging into hell".
Posted by: AKFish Nov 23 2019, 10:03 PM
You can repair the car without a frame. Jack it up level with multiple jack stands and keep the doors on the car so you have a reference point for door gaps. Also measure often as you weld in metal using diagonals to keep measurements equal. Don't cut away more than one rusty area at a time.
Read some of the classic threads on rustorations including "digging into hell".
@http://www.914world.com/bbs2/index.php?showuser=10825 thank you. I’ve spent many hours reading as many of these “rustoration” threads as possible. It seems like sooner or later I will have to pick up a grinder and go to work....just not quite sure where to begin.
On the advice of @http://www.914world.com/bbs2/index.php?showuser=20845 and others I have gone poking with a screw driver and the pointy end of a slag hammer and it seems like the majority of rust is aft of the jacking point. I didn’t find any soft spots forward of the jacking point on either side....
Passenger side....I think this is the “outer long”.
Posted by: AKFish Nov 23 2019, 10:06 PM
It's the work to be done before you start cutting on your car and what you're going to spend getting there. Both time and money. You're going be removing large sections. Start running the tally for the Restoration Design order.
Thanks @http://www.914world.com/bbs2/index.php?showuser=378 , definitely tallying up the sheet metal bill!
Posted by: mepstein Nov 23 2019, 10:12 PM
Hows the right rear suspension consoles? Water runs down the battery, mixes with the acid and spills over the consoles. Their drain holes are often clogged so they rust from the inside out. Start poking with a screwdriver.
Posted by: AKFish Nov 23 2019, 10:32 PM
Hows the right rear suspension consoles? Water runs down the battery, mixes with the acid and spills over the consoles. Their drain holes are often clogged so they rust from the inside out. Start poking with a screwdriver.
@http://www.914world.com/bbs2/index.php?showuser=10825 , I believe the suspension console is in good order, but I will do some more poking tomorrow for verification.
Posted by: bbrock Nov 23 2019, 11:31 PM
Well NOW you have a project. I agree with @http://www.914world.com/bbs2/index.php?showuser=10825 about checking the suspension console. Like everything else, the tend to rust from the inside out so keep that in mind as you inspect. I'm also wondering if the damage has spread to the inner long. Now that you know you have a rusty hole full of rodent piss, who knows what you will find (I pulled a weasel bone out of mine)? You'll learn that when you cut out the rusty metal but you can also get some clues by pulling the passenger seat out and removing the carpet off the long. If you have rust on the inside, you'd got more patchwork to do. You'll have a pretty good idea of what you are are up against reading through those build threads. Jeff Hail's thread that was already mentioned is the gold standard.
At this point, I'd say the option of putting the engine in and driving it for awhile is out the window. It would be for me anyway.
Posted by: Superhawk996 Nov 24 2019, 10:57 AM
One thing to keep in mind with respect to putting in the engine and driving for a while.
When you have this level of corrosion in the longitudinal, the structural integrity of the vehicle is compromised.
Should you have a serious accident, the car may tear in half.
On my car, when I finally cut open the longitudinal I discovered that the passenger side seat belt anchor was seriously compromised by rust. In an accident, it likely would have just pulled out and left the occupant unbelted.
Here is what the inside of my longitudinal looked like on the inside. It was very similar to what yours looked like on the outside. I think yours might be a bit better but it's hard to tell via photos. See my build thread in the signature if you want to see more of what it looked like on the outside. 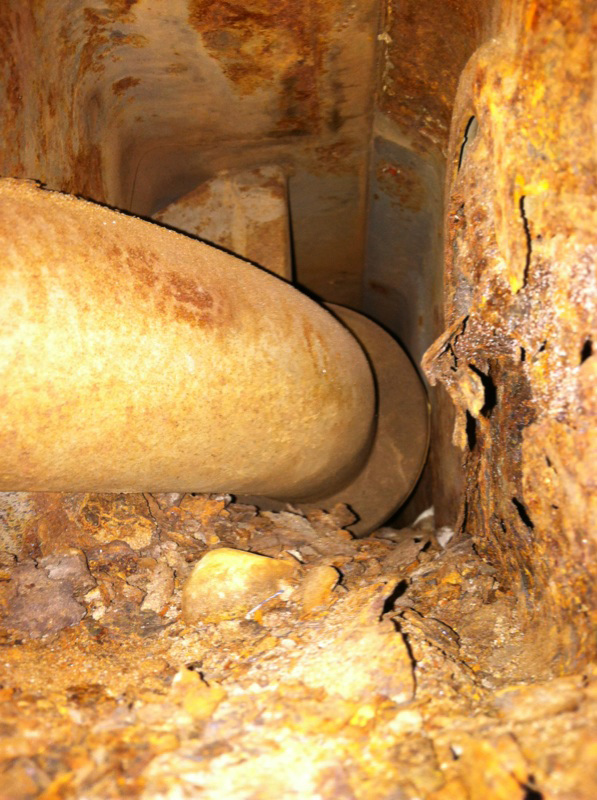
This is not meant to scare you into work you don't want to do, but, evaluate the condition of the car and the inherent risk before you just go driving it.
All of us had to start somewhere. Mabye this is your place to start. If not, there is no shame in finding a sound tub and transfereing parts over.
Posted by: AKFish Dec 9 2019, 07:36 PM
OK, enough “analysis paralysis”! Bought a grinder, some cutting wheels and a spot weld bit set and went to work. I removed the battery tray, rusted engine shelf and cut out the rusted holes on the hell hole ramp. This is double thickness sheet metal and I haven’t found a thread that addresses how to repair this correctly....do I cut two pieces of sheet metal to size and spot weld them together, then butt weld them in?[attachmentid=722087] 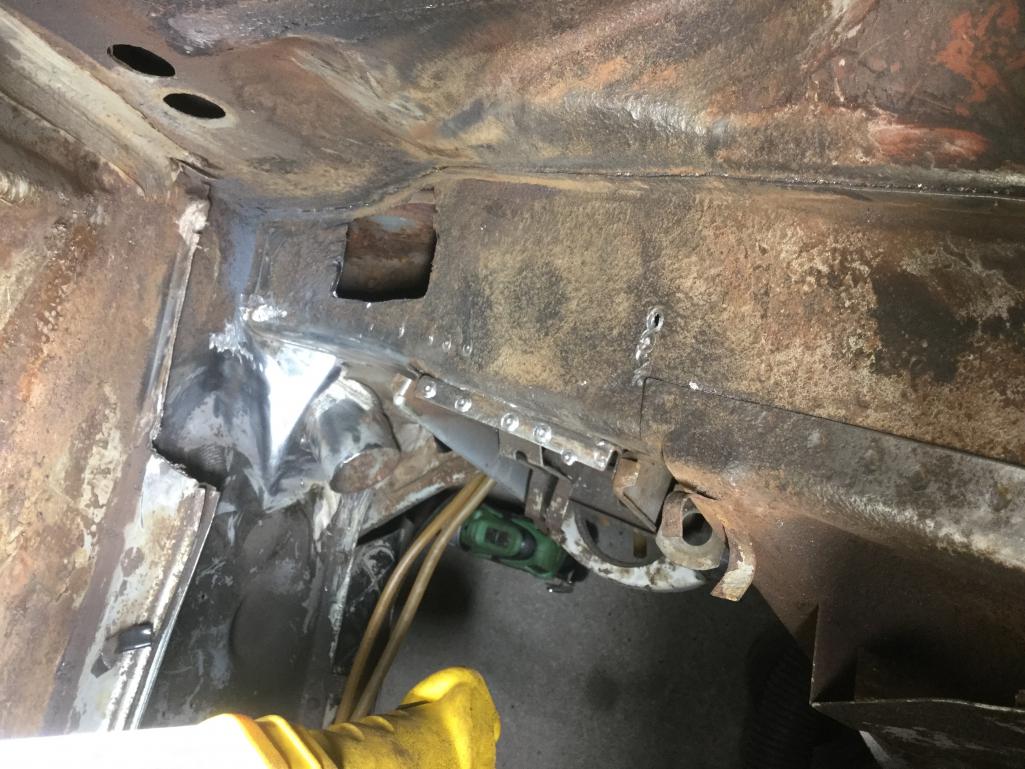
Posted by: AKFish Dec 9 2019, 07:45 PM
Today I went digging around the jack post area....I clearly need to replace a 10” section of the outer long. I have seen some pretty masterful repairs done to this area, including sleeves etc...
Is it necessary to cut the quarter panel and or door jamb to make this repair?
I’d like to make this car a nice safe driver, so whatever the right path is...I’m open to suggestions.
Thanks very much!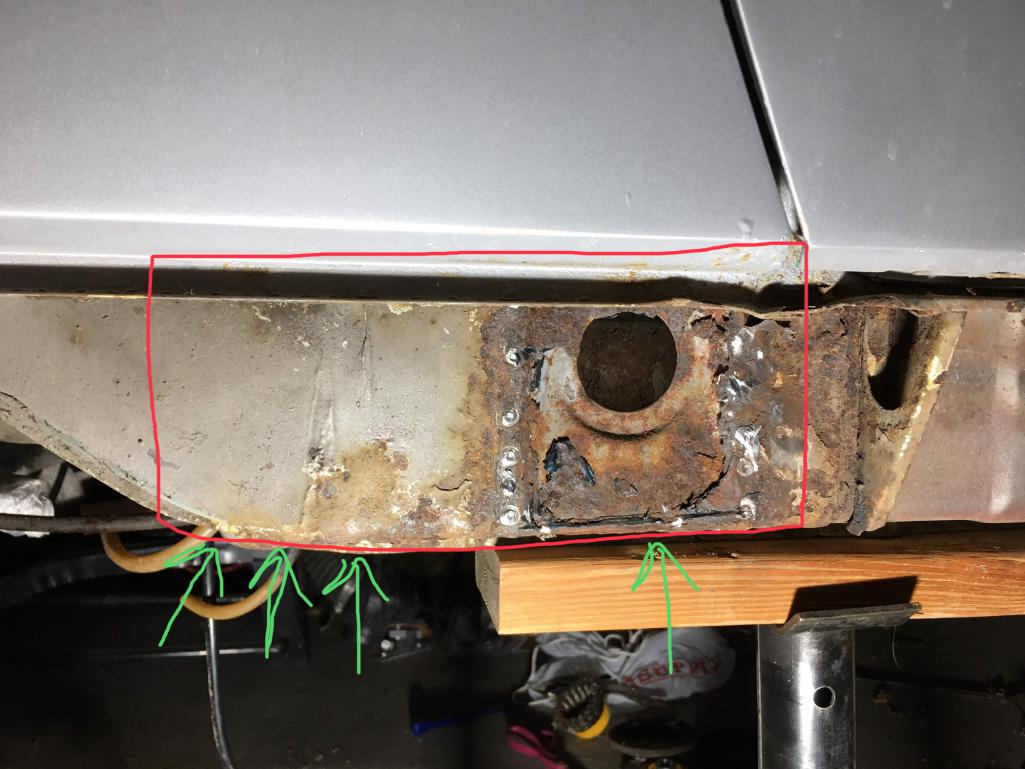
Posted by: rjames Dec 9 2019, 08:41 PM
Today I went digging around the jack post area....I clearly need to replace a 10” section of the outer long. I have seen some pretty masterful repairs done to this area, including sleeves etc...
Is it necessary to cut the quarter panel and or door jamb to make this repair?
I’d like to make this car a nice safe driver, so whatever the right path is...I’m open to suggestions.
Thanks very much!
I'd remove just the outer skin of the area circled in red to see how the layer looks underneath, bracing the car first of course. No sense in cutting out metal if it turns out it's not bad. I'm betting you won't need to fully cut out both layers.
Posted by: jmitro Dec 9 2019, 09:32 PM
I removed part of the rear quarter panel to repair my hellhole. It's not what I wanted to do, but I had much better access that way. You can see a lot of my repairs here:
http://www.914world.com/bbs2/index.php?showtopic=260933&st=40
I agree with the above recommendation to go layer by layer to see what is bad. You may be able to keep the inner sheetmetal and replace only the outer layer. Trouble is, it's very tedious and time consuming to dissect the car layer by layer
Posted by: AKFish Dec 9 2019, 09:50 PM
@http://www.914world.com/bbs2/index.php?showuser=18986 your project is an impressive feat to be sure.
I guess I need to remove sill plate and cut away a section and see what’s going on in there.
All of the rodent bedding nearly caught fire while I was cutting on the hell hole ramp...
Posted by: AKFish Dec 9 2019, 10:17 PM
Today I went digging around the jack post area....I clearly need to replace a 10” section of the outer long. I have seen some pretty masterful repairs done to this area, including sleeves etc...
Is it necessary to cut the quarter panel and or door jamb to make this repair?
I’d like to make this car a nice safe driver, so whatever the right path is...I’m open to suggestions.
Thanks very much!
I'd remove just the outer skin of the area circled in red to see how the layer looks underneath, bracing the car first of course. No sense in cutting out metal if it turns out it's not bad. I'm betting you won't need to fully cut out both layers.
@http://www.914world.com/bbs2/index.php?showuser=4467 thanks for the suggestion. Does this technique involve making very shallow cuts and “peeling” away the outer skin? Thanks again!
Posted by: rjames Dec 9 2019, 11:50 PM
Yes. I was in a similar situation. The outer layer around the jackpost on my car was bad, but I couldn’t tell if the rust went through to the inner layer. I used a Dremel with a small cutoff wheel to cut the outside layer away. I ended up only having to replace a small piece of the inner layer and a larger part of the outer. Luckily my repairs were pretty minor overall.
Link with a few pictures of my repairs.
http://www.914world.com/bbs2/index.php?showtopic=48194&hl=Patch
Posted by: dlee6204 Dec 10 2019, 03:32 AM
Yes. I was in a similar situation. The outer layer around the jackpost on my car was bad, but I couldn’t tell if the rust went through to the inner layer. I used a Dremel with a small cutoff wheel to cut the outside layer away. I ended up only having to replace a small piece of the inner layer and a larger part of the outer. Luckily my repairs were pretty minor overall.
Link with a few pictures of my repairs.
http://www.914world.com/bbs2/index.php?showtopic=48194&hl=Patch

This is typically how I approach repairs in this area. I always try to leave some of the inner structure in place and only replace if necessary. If it was double walled from the factory, you’ll want to repair it that way too.
Posted by: bbrock Dec 10 2019, 08:22 AM
On double-walled repairs, I took two approaches. My preferred option was to cut the outer layer oversized so that the patch for the inner layer was smaller than the outer and weld the patches in separately. If the original layers were spot welded together at the patch location, I would punch the outer layer patch before butt welding it in so I could plug weld the patches together after the butt welding was done. That option may have been overkill, but I felt it got me closest to how the original structure was built.
Option 2 was done when there was not enough room for option 1, and was what you are thinking. Spot/plug weld the two layers of metal in the patch together and then butt weld them in as a unit. When I did that, I ground the edges of the openings and the patch to make a 'V' and made sure my welds were striking the bottom layers to make sure both layers of the patch were solidly butt welded to the structure. It does no good to install a double-layer patch if only the top layer is welded to the surrounding structure.
Make sure you treat the rust inside those longs while you have them open. I sprayed the insides of my longs with phosphoric acid using a garden sprayer. After that sat for a day, I rinsed them out with water and very thoroughly dried them with a heat gun, making sure to bake all of the seams dry. My longs were opened wide so I followed the acid treatment with two coats of epoxy primer. After everything was welded shut again, I coated the internals with Eastwood Internal Frame Coating. Then after I had painted, I coated all the internals with 3M Cavity Wax Plus. Again, probably overkill but after all the rust I had seen, multiple belts and suspenders didn't seem so crazy.
Posted by: AKFish Jan 29 2022, 08:58 PM
Well, its been a little over two years since I updated this project….a few things have happened.
In October of 2020 we delivered the car to Cary at Middle Motors and in February 2021 he brought it back to Nampa (where we live). New drivers side floor pan, drivers side jack post and long repair, complete hell hole and passenger side long rustoration, as well as holes in trunk repaired and new frunk to complete the AC uninstall.
Then I pressed pause for a year…
Now…Along with finishing the engine bay, my next step is to determine what to do with the engine.
I performed a compression test today and found the following results.
#1 Cylinder 110 psi
#2 Cylinder 90 psi
#3 Cylinder 100 psi
#4 Cylinder 110 psi
The engine was pretty cold during this test. 17F. Not sure if that plays a role or not. Also, engine has not run for at least 5 years, but probably longer.
Number 2 seems pretty low, so I did a basic leak down check on that cylinder. I checked the valve adjustment and at TDC and pressurized the cylinder to 100 psi.
I cannot hear any air escaping from the intake or the exhaust. Maybe, possibly a slight audible hissing from the oil filler neck. Otherwise, it sure seemed to hold pretty well. The engine was supposedly removed from the car to repair oil leaks and it seems that there were a few.
I am going to replace at a minimum, the following:
1. Oil cooler seals.
2. Front crank seal
3. Rear crank seal
And anything else that appears to be leaking once its exposed…
Any other advice on what to address “while I’m in there” would be deeply appreciated.
I’ve read dozens and dozens of posts and watch all of Ian Karr’s videos multiple times, just don't want to miss anything. Thanks all!
Powered by Invision Power Board (http://www.invisionboard.com)
© Invision Power Services (http://www.invisionpower.com)