Printable Version of Topic
Click here to view this topic in its original format
914World.com _ 914World Garage _ Anyone disassembled/restored seat belt receivers
Posted by: doug_b_928 Nov 15 2019, 11:35 AM
I did a search but didn't see any posts showing the disassembly/reassembly/restoration of the female seat belt receivers. Mine are pictured below. I've ordered new stickers but would like to replate the screws on the back and the main steel portion (mine were very corroded where they bolt into the car; I put POR15 on them a couple of years ago but I'd rather disassemble, media blast and replate the whole thing). Any advice based on past experience with disassembly/reassembly would be much appreciated (as always). 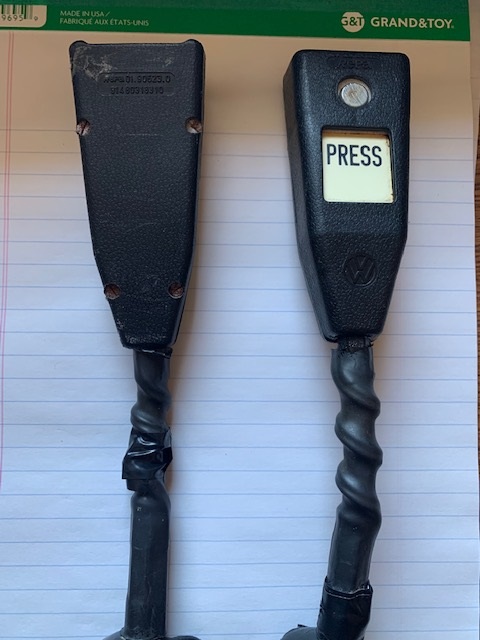
Posted by: ConeDodger Nov 15 2019, 11:46 AM
Try including as the person who posted “PRS914-6” I think?
Paul for sure did the reel side. He even sold the ‘PRESS’ stickers for a time. Then, after building one of the nicest conversions ever and selling it, he moved on to wildlife photography. I’m still in touch but I wouldn’t bother him with this. He’s moved on...
Posted by: johnhora Nov 15 2019, 01:15 PM
Just remove the 4 small screws you see on the backside and the two plastic top/bottom parts can be carefully pried apart.
The screws are small so be easy on the removal so as not to mess up the topside plastic.
Once they are removed it becomes obvious what can be cleaned up and this also lets you replace the "Press" sticker which are available.
Posted by: 914Sixer Nov 15 2019, 01:16 PM
I have never taken one apart.
Posted by: johnhora Nov 15 2019, 03:05 PM
Mark..
It's really not too bad of disassembly ...nothing springs out at you unless it's broken.
It's not like the shoulder reel belt return units on the later model 914s.
You definitely have to be very careful with these or you will be wearing a long and sharp coil spring.
This unit can be disassembled and cleaned but you just have to keep the coiled spring contained. The belt is held in by a metal rod and can be replaced or removed for cleaning.
Again I stress caution with the spring!
Neither of these jobs are difficult but you just have to take your time and be alert to the design and placement of the parts.
Posted by: doug_b_928 Nov 15 2019, 04:24 PM
Thanks, guys. I took one apart and per Jonhora they come apart easily and without drama. I'm investigating heat shrink tubing replacement and, if available, these should restore nicely.
Posted by: FlacaProductions Nov 15 2019, 04:38 PM
I know the OP is talking about the receivers but there has been mention of the retracting part as well.
I took two of them somewhat apart recently - but I did NOT take the cover (the thinner of the two) that houses the coil spring off.
Instead, I fully extended the belt and then pushed the webbing back thru the metal bar where it is held by another bar that runs through a pocket in the belt. Slide the bar out but be mindful that the bar will spin (quickly) if released.
I put a screwdriver in the slot that kept the retractor in this position while I put the belt in a bucket of Woolite-water and washed 'em out and hung them out to dry.
While they were drying, I took the screwdriver through the slot and advanced the rod to the point where it wouldn't go any more and then backed off a half-turn. It did seem to add significantly to the amount of tension in the retraction action.
I did add a small amount of silicone lube to where the bar spins and then put the belt back through the slot, securing it with the pin. It retracted quite well and I'll be putting them back in the car in a couple of weeks. I'll report back....probably in a separate thread.
Posted by: Mikey914 Nov 15 2019, 07:04 PM
I do have you covered on the PRESS stickers
https://900designs-container.zoeysite.com/seat-belt-press-decal
$2.99
Posted by: doug_b_928 Nov 16 2019, 01:36 PM
@http://www.914world.com/bbs2/index.php?showuser=3348 Mark, I didn't know that you carry the stickers or I'd have asked you to put them in with my visors (still in transit). Mine are from Pelican (I believe made by Carbone). They look nice to me but I've since been made aware that they are not a perfect reproduction because the 'R' is incorrect (see pic below the sticker next to the original). The image on your website also looks the same. If possible, it might be a good idea for you to change the R and not only have the best price but also the most correct replacement.
Attached image(s)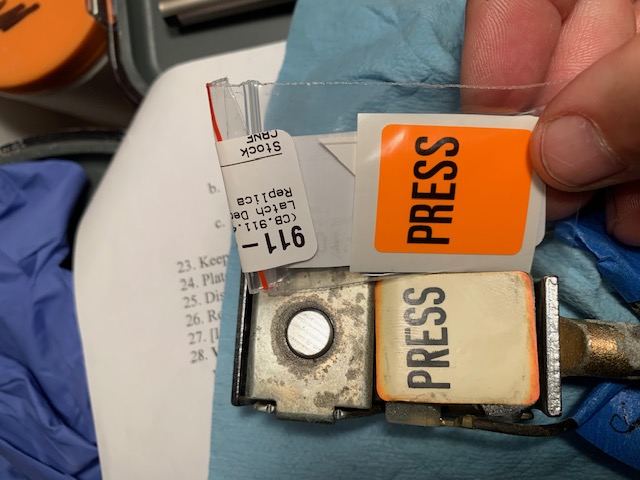
Posted by: bbrock Nov 16 2019, 01:42 PM

@http://www.914world.com/bbs2/index.php?showuser=3348 Mark, I didn't know that you carry the stickers or I'd have asked you to put them in with my visors (still in transit). Mine are from Pelican (I believe made by Carbone). They look nice to me but I've since been made aware that they are not a perfect reproduction because the 'R' is incorrect (see pic below the sticker next to the original). The image on your website also looks the same. If possible, it might be a good idea for you to change the R and not only have the best price but also the most correct replacement.
Now what kind of anal retentive a-hole would even notice such a thing?


Posted by: doug_b_928 Nov 16 2019, 01:44 PM
I'm Canadian but I'll plead the 5th anyway. 
Posted by: bahnzai Nov 16 2019, 04:07 PM
Oh man! This little exchange made me laugh my butt off...
Thanks for keeping it real 
Posted by: Mikey914 Nov 16 2019, 05:31 PM
@http://www.914world.com/bbs2/index.php?showuser=3348 Mark, I didn't know that you carry the stickers or I'd have asked you to put them in with my visors (still in transit). Mine are from Pelican (I believe made by Carbone). They look nice to me but I've since been made aware that they are not a perfect reproduction because the 'R' is incorrect (see pic below the sticker next to the original). The image on your website also looks the same. If possible, it might be a good idea for you to change the R and not only have the best price but also the most correct replacement.
Now what kind of anal retentive a-hole would even notice such a thing?
What kind of a hole would not catch this before production.
Hey every order gong out will get free seat belt PRESS stickers!
Posted by: worn Nov 16 2019, 07:16 PM
Yeah, but the Ss look pretty good.
Posted by: doug_b_928 Dec 7 2019, 10:27 PM
I finally had some time to complete the restoration on the seat belt receivers. Replated the steel bases and screws, repaired and cleaned the wires as well as the connector, new 4-1 heat shrink, new stickers, and SEM plastic paint. I'm really pleased with the result. I wish the retractable part would be this easy...
Posted by: 90quattrocoupe Dec 7 2019, 10:34 PM
^^^^Nice.
Posted by: FlacaProductions Dec 8 2019, 08:46 AM
I'm re-installing my retractors today and I'm hopeful they'll be improved. I didn't take them apart but did pull the belts all the way out and removed and washed them. I shot some penetrating lube in both sides of the axle and then re-wound it to maximum (til it stops) and then backed off half a turn. Cleaned up the other external hardware, re-installed the belt and I think i'm good to go. Lots o dirt comes off those belts even when they look clean.
Posted by: doug_b_928 Dec 8 2019, 10:18 AM
@http://www.914world.com/bbs2/index.php?showuser=20561 Thanks, I'm really happy with them.
@http://www.914world.com/bbs2/index.php?showuser=21628 Even with your description, I'm kind of at a loss of where to begin with these retractors.
My understanding is that the webbing should be replaced at this point due to age. This is one job where I wish there was a complete one-stop-shop for a like new restoration (including correct labels).
Posted by: Jett Dec 8 2019, 10:24 AM
@http://www.914world.com/bbs2/index.php?showuser=20561 Thanks, I'm really happy with them.
@http://www.914world.com/bbs2/index.php?showuser=21628 Even with your description, I'm kind of at a loss of where to begin with these retractors.
My understanding is that the webbing should be replaced at this point due to age. This is one job where I wish there was a complete one-stop-shop for a like new restoration (including correct labels).
+1 we have three sets waiting to be restored...
Posted by: Jett Dec 8 2019, 10:26 AM
I finally had some time to complete the restoration on the seat belt receivers. Replated the steel bases and screws, repaired and cleaned the wires as well as the connector, new 4-1 heat shrink, new stickers, and SEM plastic paint. I'm really pleased with the result. I wish the retractable part would be this easy...
Looks good. Where did you get the 4-1 heat shrink?
Posted by: doug_b_928 Dec 8 2019, 10:32 AM
Thanks. Brent Brock taught me about DigiKey for electronic-related items. They have a wide assortment of heat shrink (and connectors). Here's a link to the one I used:
https://www.digikey.ca/product-detail/en/Q2-F4X-1-01-QB48IN-5/Q1143-ND/1210349?utm_medium=email&utm_source=oce&utm_campaign=2980_OCE19RT&utm_content=productdetail_CA&utm_cid=396723&so=62010571& amp;mkt_tok=eyJpIjoiTWprd016Rm1NVGd4TW1FNCIsInQiOiJHeERPc202RWRaVDhOTnpIdFdNZ2Vv
UUp0MVVuaWRTZ1J4WER3RWd5VTNpTTBkZHBkSGlYSjJPK1pGeGFCSGZ2T2dVcUk1VUdcL1g1RDJIQzZo
bE1HUnh1U2cxSzMrTzRGNEkrdHNMdVwvYTZIc09FRW9hMmhKNjRRTGZQbWJ0RlwvOSJ9
Posted by: Jett Dec 8 2019, 10:51 AM
Thanks. Brent Brock taught me about DigiKey for electronic-related items. They have a wide assortment of heat shrink (and connectors). Here's a link to the one I used:
https://www.digikey.ca/product-detail/en/Q2-F4X-1-01-QB48IN-5/Q1143-ND/1210349?utm_medium=email&utm_source=oce&utm_campaign=2980_OCE19RT&utm_content=productdetail_CA&utm_cid=396723&so=62010571& amp;mkt_tok=eyJpIjoiTWprd016Rm1NVGd4TW1FNCIsInQiOiJHeERPc202RWRaVDhOTnpIdFdNZ2Vv
UUp0MVVuaWRTZ1J4WER3RWd5VTNpTTBkZHBkSGlYSjJPK1pGeGFCSGZ2T2dVcUk1VUdcL1g1RDJIQzZo
bE1HUnh1U2cxSzMrTzRGNEkrdHNMdVwvYTZIc09FRW9hMmhKNjRRTGZQbWJ0RlwvOSJ9
Thank you! Just ordered from the .com site.
Posted by: KELTY360 Dec 8 2019, 12:41 PM
Yeah, but the Ss look pretty good.
No, the ‘S’ is not right either. The transition from top to bottom is too smooth.

Posted by: bbrock Dec 8 2019, 02:45 PM
Nice work Doug  Thanks for the tip on the SEM plastic paint. I may have to steal that idea for my belts.
Posted by: burton73 Dec 8 2019, 02:53 PM
@http://www.914world.com/bbs2/index.php?showuser=3348 Mark, I didn't know that you carry the stickers or I'd have asked you to put them in with my visors (still in transit). Mine are from Pelican (I believe made by Carbone). They look nice to me but I've since been made aware that they are not a perfect reproduction because the 'R' is incorrect (see pic below the sticker next to the original). The image on your website also looks the same. If possible, it might be a good idea for you to change the R and not only have the best price but also the most correct replacement.
Now what kind of anal retentive a-hole would even notice such a thing?
A typesetter
Bob B
Posted by: KELTY360 Dec 8 2019, 03:34 PM
@http://www.914world.com/bbs2/index.php?showuser=3348 Mark, I didn't know that you carry the stickers or I'd have asked you to put them in with my visors (still in transit). Mine are from Pelican (I believe made by Carbone). They look nice to me but I've since been made aware that they are not a perfect reproduction because the 'R' is incorrect (see pic below the sticker next to the original). The image on your website also looks the same. If possible, it might be a good idea for you to change the R and not only have the best price but also the most correct replacement.
Now what kind of anal retentive a-hole would even notice such a thing?
A typesetter
Bob B
Or a forger.

Posted by: doug_b_928 Dec 8 2019, 05:27 PM
Thanks, Brent. I should add that I also washed with Dawn, scuffed with a grey scotchbrite, washed again, dried well, and used a generic adhesion prompter prior to applying the paint.
Posted by: Rob-O Dec 8 2019, 07:24 PM
How did you replate the section that bolts to the center console?
Posted by: FlacaProductions Dec 8 2019, 08:15 PM
@http://www.914world.com/bbs2/index.php?showuser=15382 and @http://www.914world.com/bbs2/index.php?showuser=17686 - just hold the mechanism in the same orientation that it is in the car so that the belt will release. Pull it ALL the way out and then grab the axle and push the belt back out thru the slot in the axle.
There is a pin that keeps the belt from pulling it back through - it slides out of the pocket in the belt and then (and this is important) WHILE STILL HOLDING THE AXLE AND PREVENTING IT FROM SPINNING, pull the belt back out of the slot.
At this point, I used a small screw driver slipped thru the slot to keep the axle from spinning out. When you're ready, you can then grab the axle, remove the screwdriver and then start spinning the axle against the tension until it stop. Then back off half a turn or so and reinsert the belt and install the pin, pulling the belt tight back into the slot.
Just be careful to not let the axle go as it'll spin out and release all tension. It's not a big deal and you can just spin it back again and all is well.
While I had the the belt off, I removed all the hardware I could and washed the belt in some warm soapy water before hanging to dry and then reinstalling....just make sure you get the hardware on in the right orientation and order.
Posted by: doug_b_928 Dec 8 2019, 10:33 PM
How did you replate the section that bolts to the center console?
The YouTube channel ‘Mike’s Restorations’ has a very detailed video on electroplating with everything you need to know and more. I highly recommend it if you’re interested in plating. Here’s a link: https://youtu.be/hTupOgImpWo
Posted by: 914_7T3 Mar 29 2020, 06:36 PM
Great call on the suggestion of Krylon plastic paint. That combined with some new stickers with the wrong font on the "R" and they're good to go!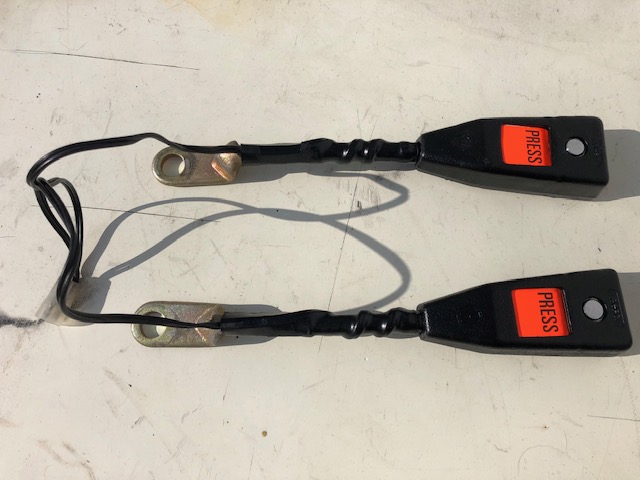
Powered by Invision Power Board (http://www.invisionboard.com)
© Invision Power Services (http://www.invisionpower.com)