Printable Version of Topic
Click here to view this topic in its original format
914World.com _ 914World Garage _ Another rustoration project…1972 914-6 Conversion
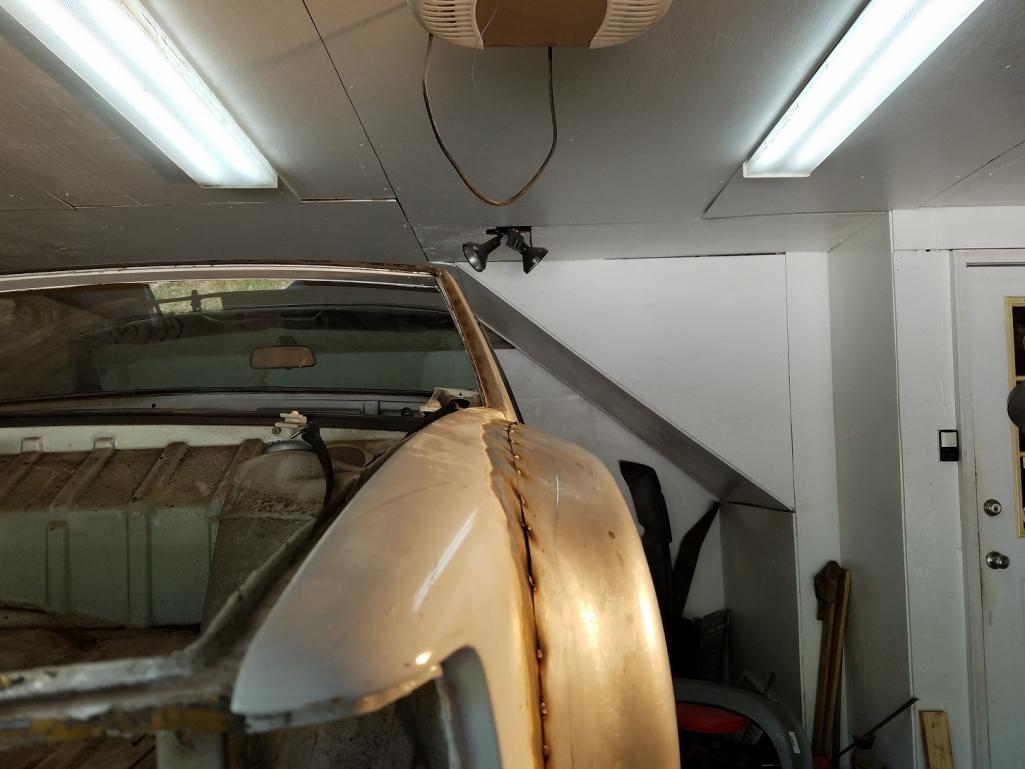
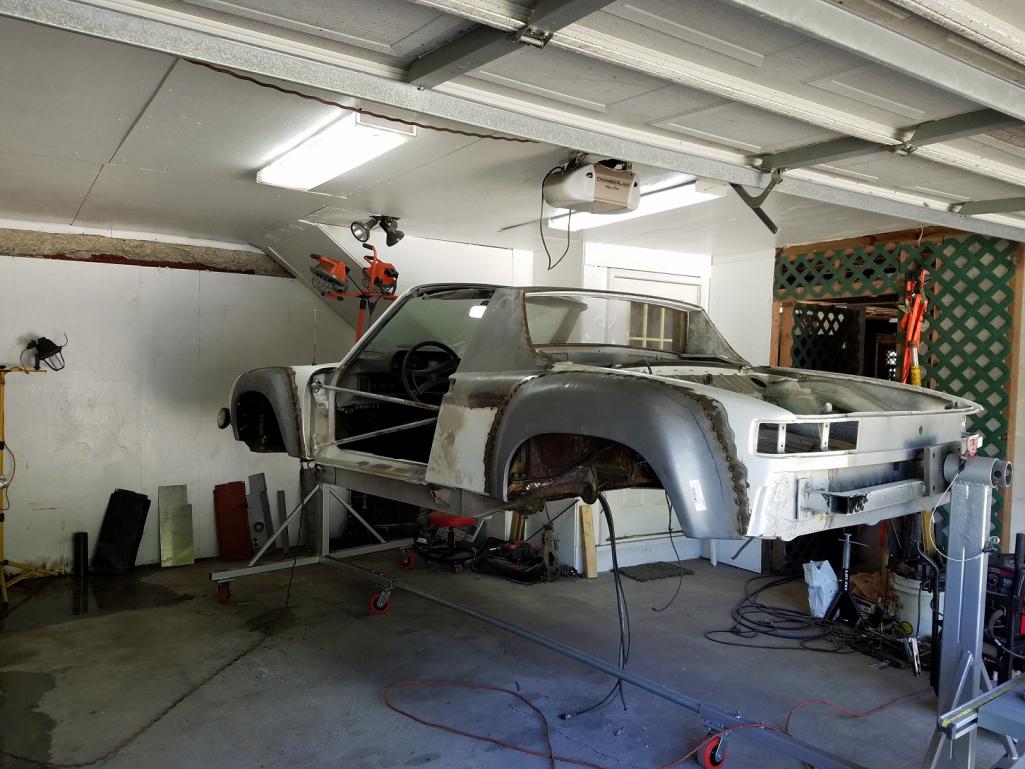
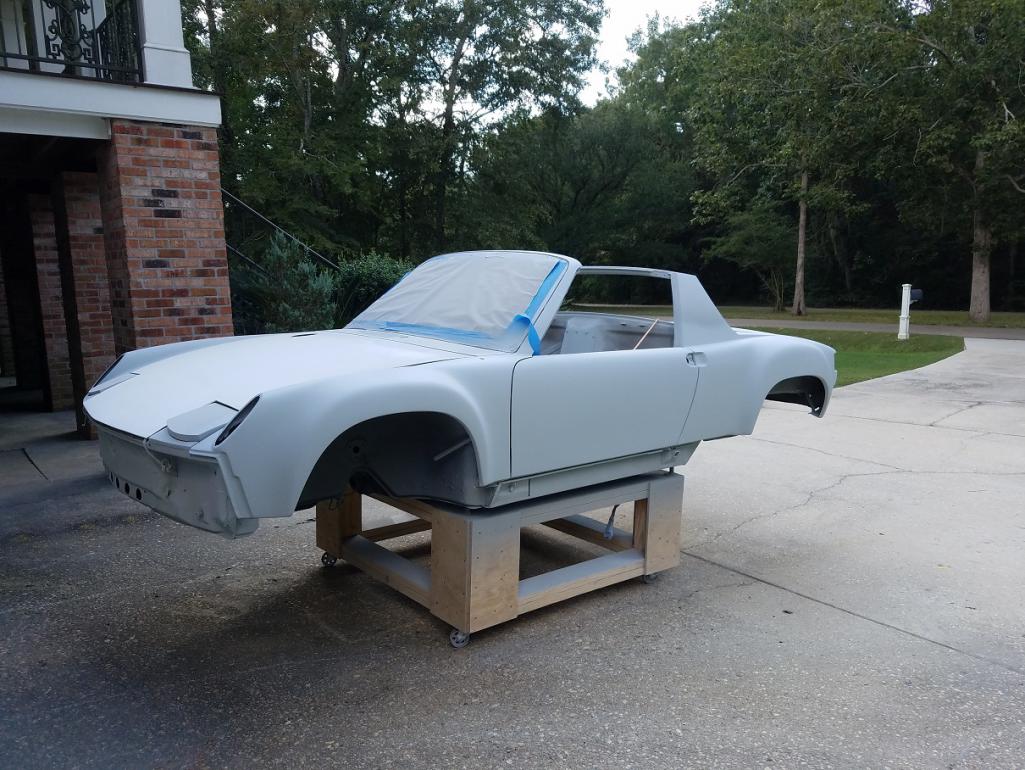
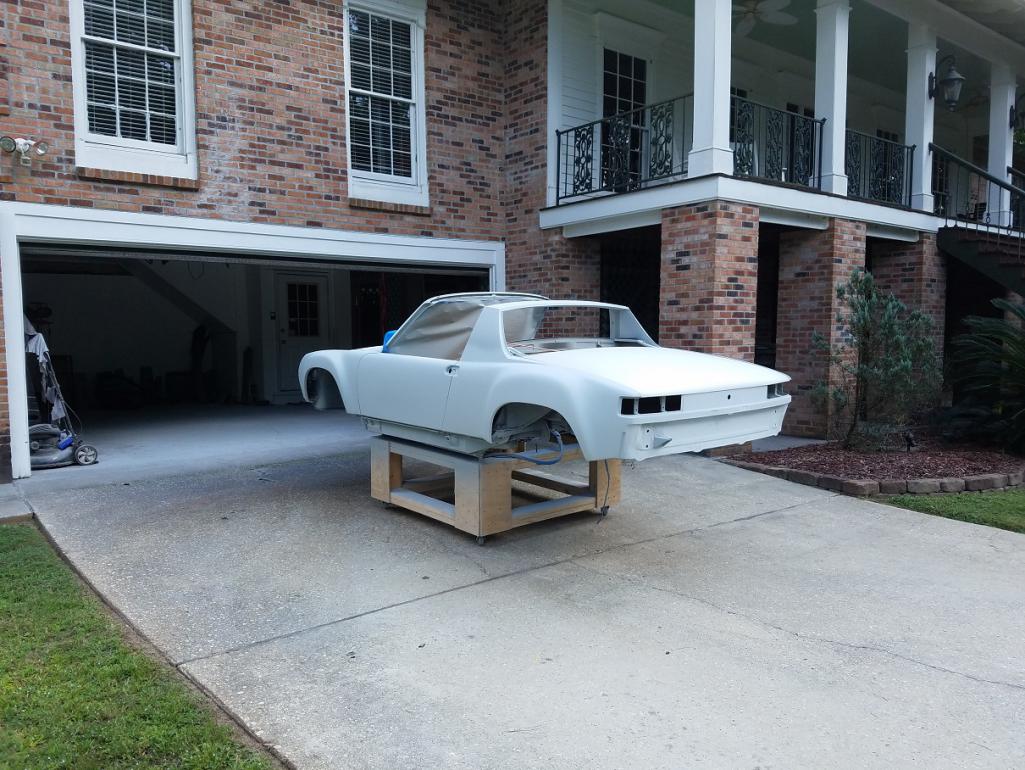
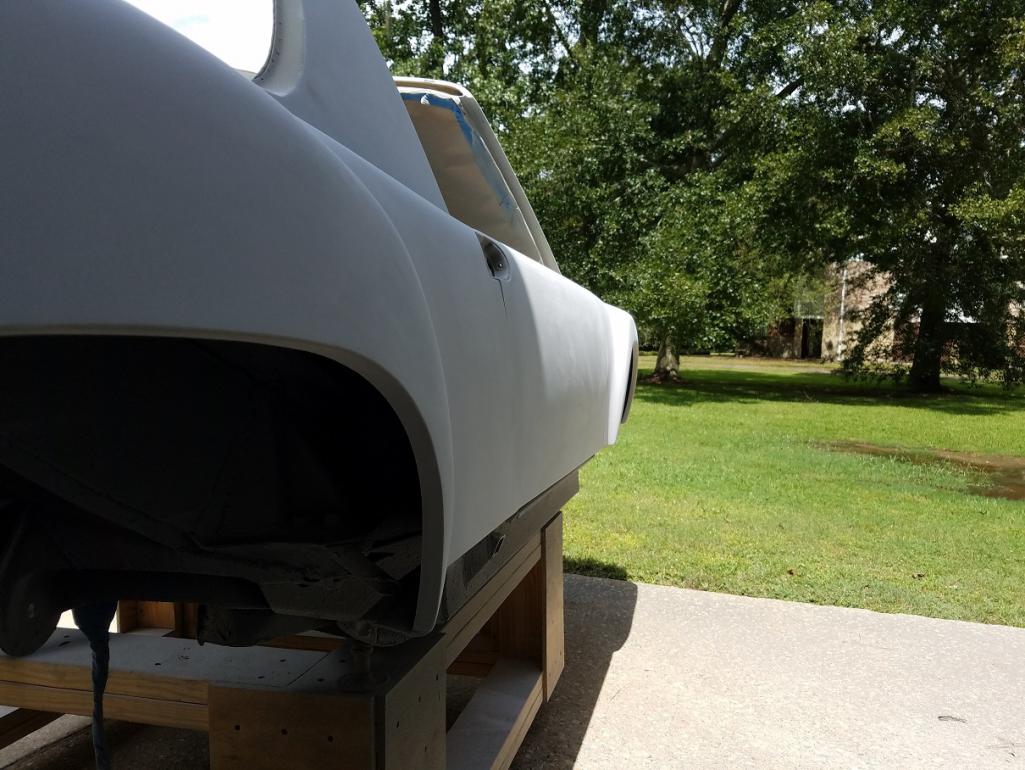
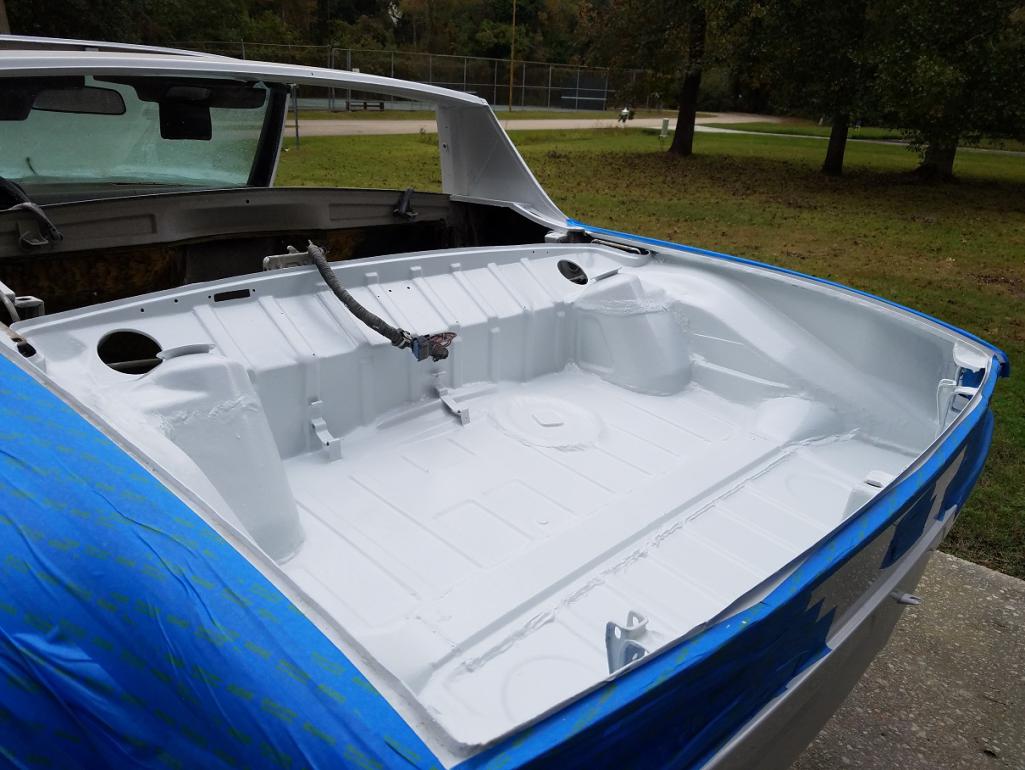
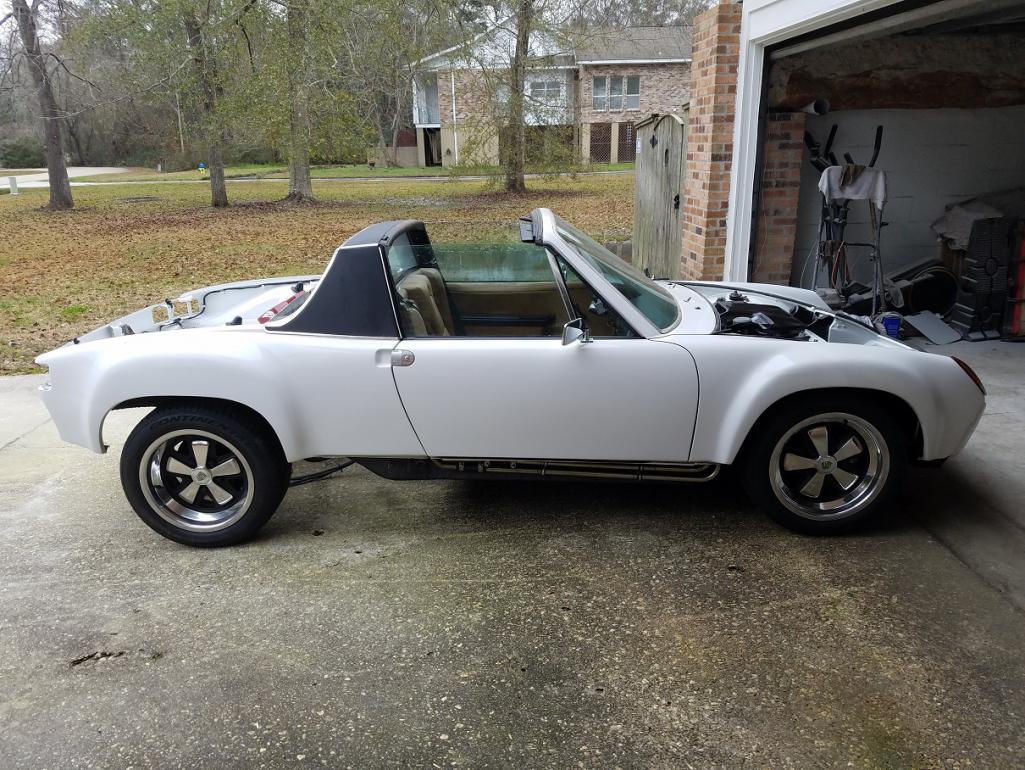
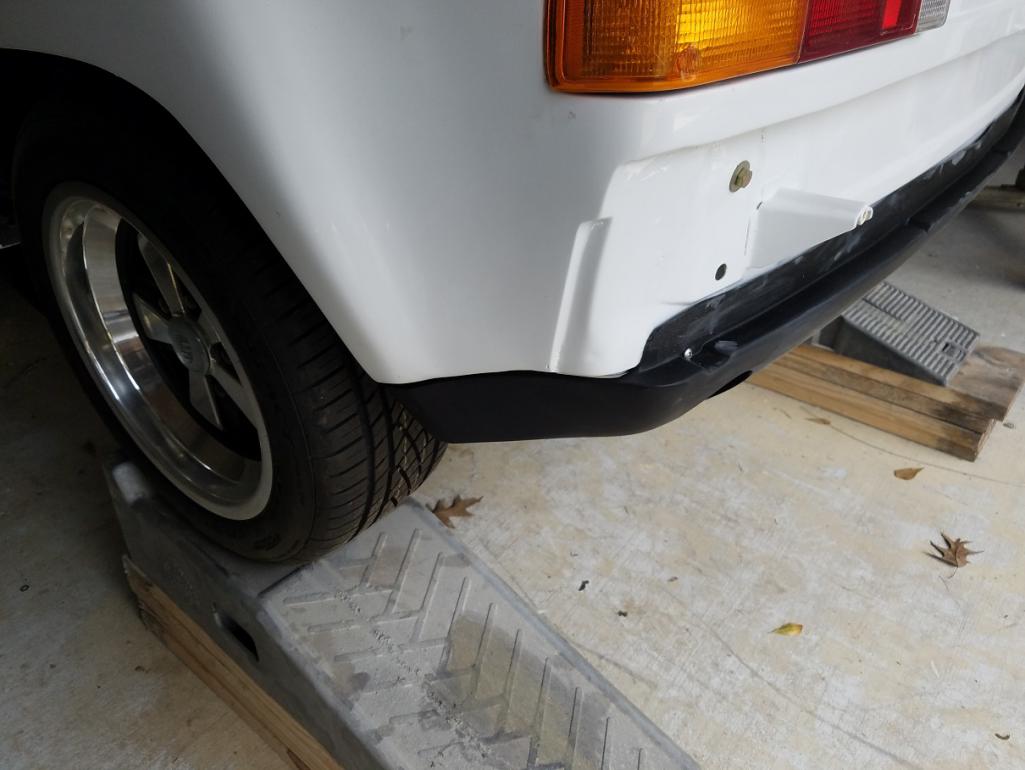
Posted by: 9146C Dec 6 2019, 02:38 PM
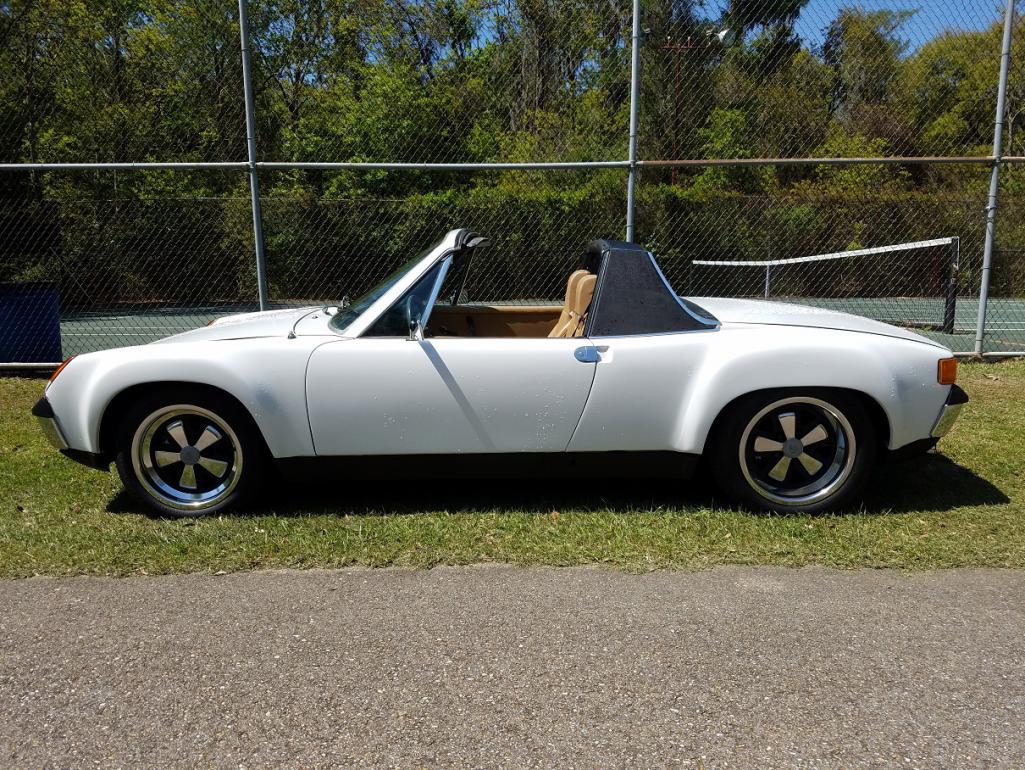
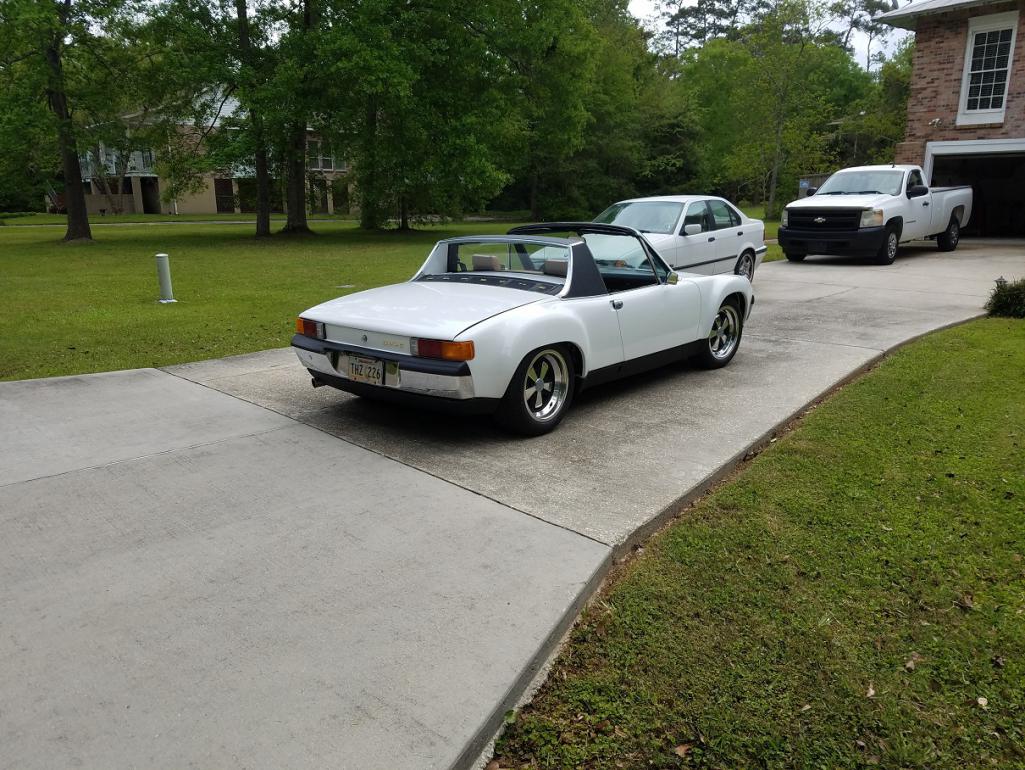
I’ve owned this car for over 17 years now. Bought her in Sept 2002 in Canton, Ohio. First projects were to replace the brakes and shifter…brakes were almost non-existent and trying to find a gear with the original shifter was like a game of chance! I’ve tried to block out the memory of the hideous plastic whale tail on the rear lid and the ridiculous front air dam that were added prior to my purchase…both were removed the day I got the car home! Added a “cheap” five lug conversion on all four corners and the after-market Fuchs and drove it on sunny Sundays for about 5 years with the original fuel injected 1.7L. During that time, I also moved from Ohio down to Northeast Louisiana (November 2003 I drove her 800 miles down from Cincinnati to Monroe, LA.).
I’d always wanted a 914-6 so I started collecting all the parts I needed for my conversion. In 2004, I bought a “bagged”, but running 2.7L on eBay for $1500 (the best part was that it had a new set of Weber carbs).
Between 2007 and 2009 I was working/living in Europe. In 2009 I set back on getting the car running…then a job transfer to South Carolina…car up on a trailer and moved to a new garage!
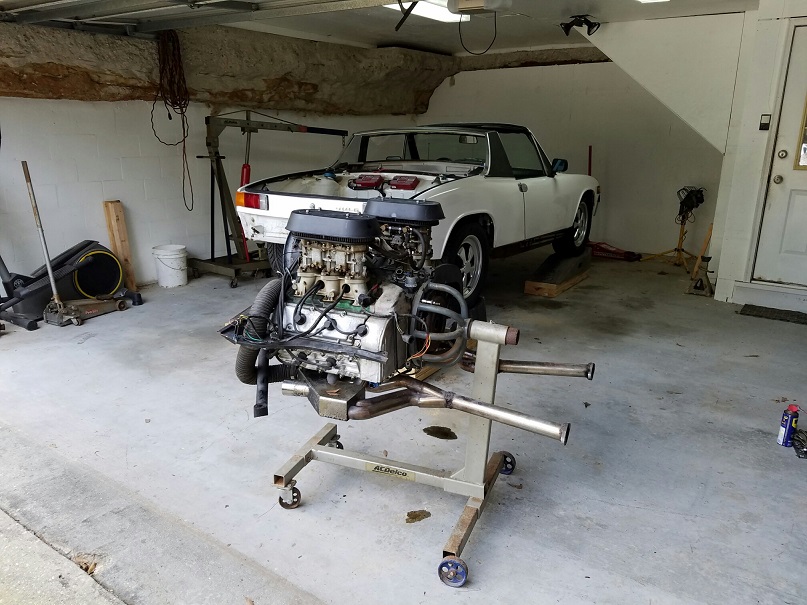
In 2010 I transferred jobs again back to South Louisiana. In 2012, I decided to start working on my project car again. Started building a 2.7L from scratch (LN Engineering Niko cylinders, forged 9-1/2:1 pistons, Pauter rods, dual plug heads, custom grind cams from Dougherty Racing Cams).
With the new six, and living in the “deep south”, I also added the external oil cooler conversion with thermostat.
Went over the transmission, replaced synchros and reverse and first gears and added a side shift conversion at that time as well.
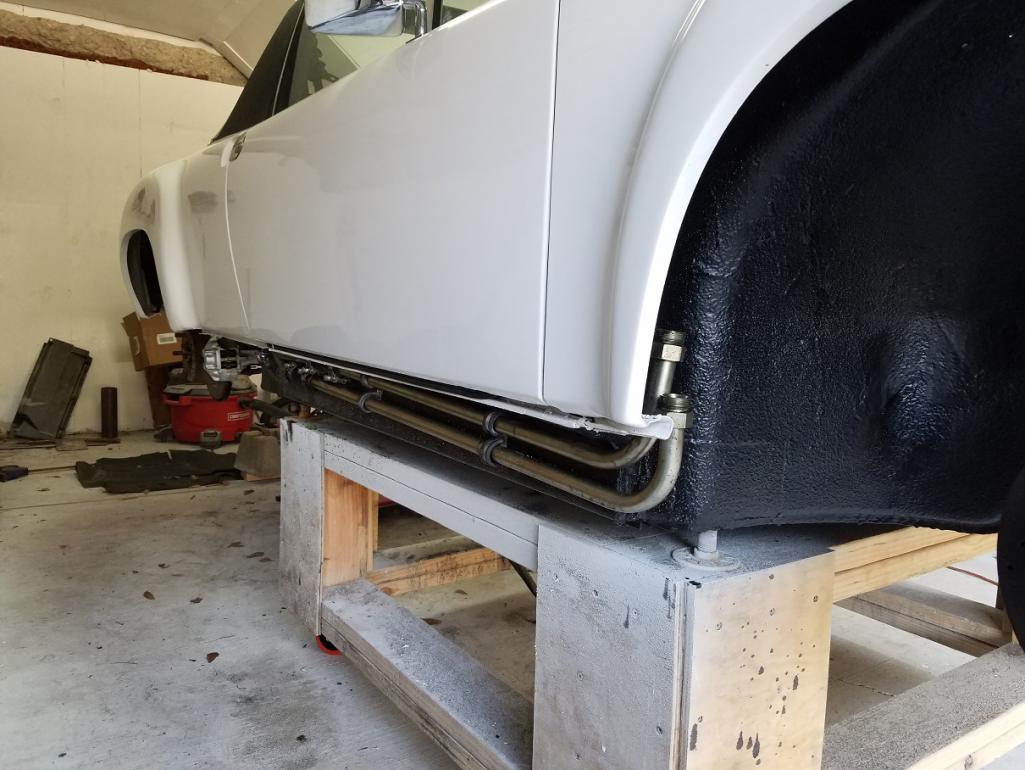
While the motor was out, completed the SS fuel line conversion/replacement as well.
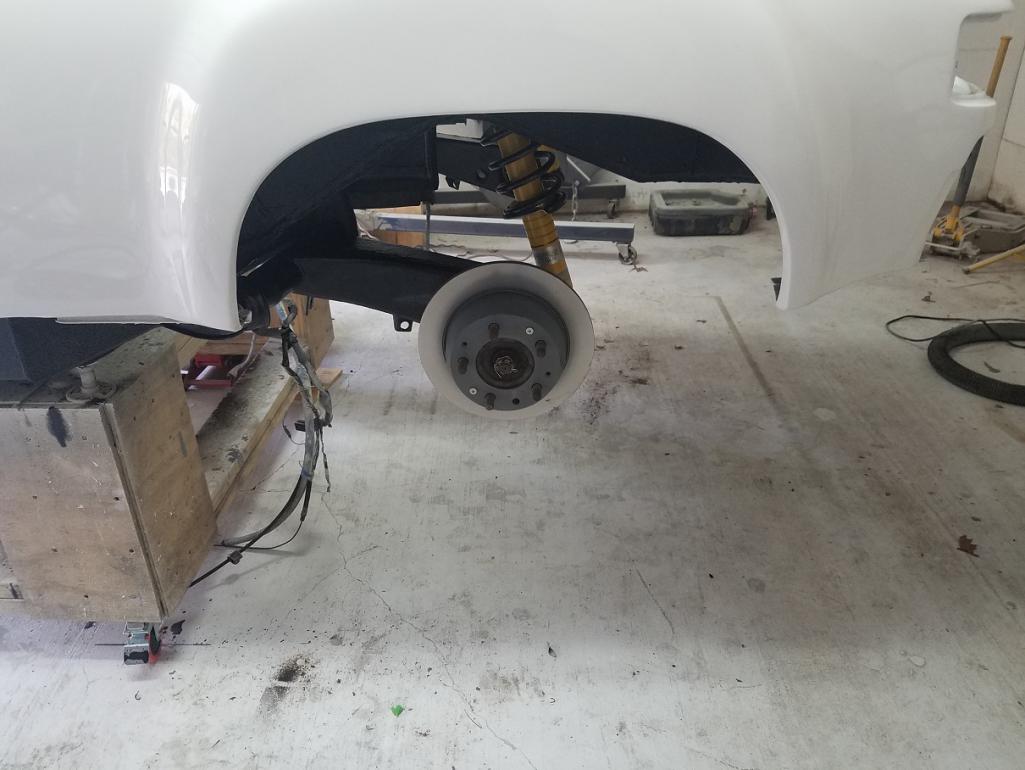
Also completed a proper 5 lug front and rear conversion with Porsche 911 parts and added 140# springs in the rear for the heavier six.
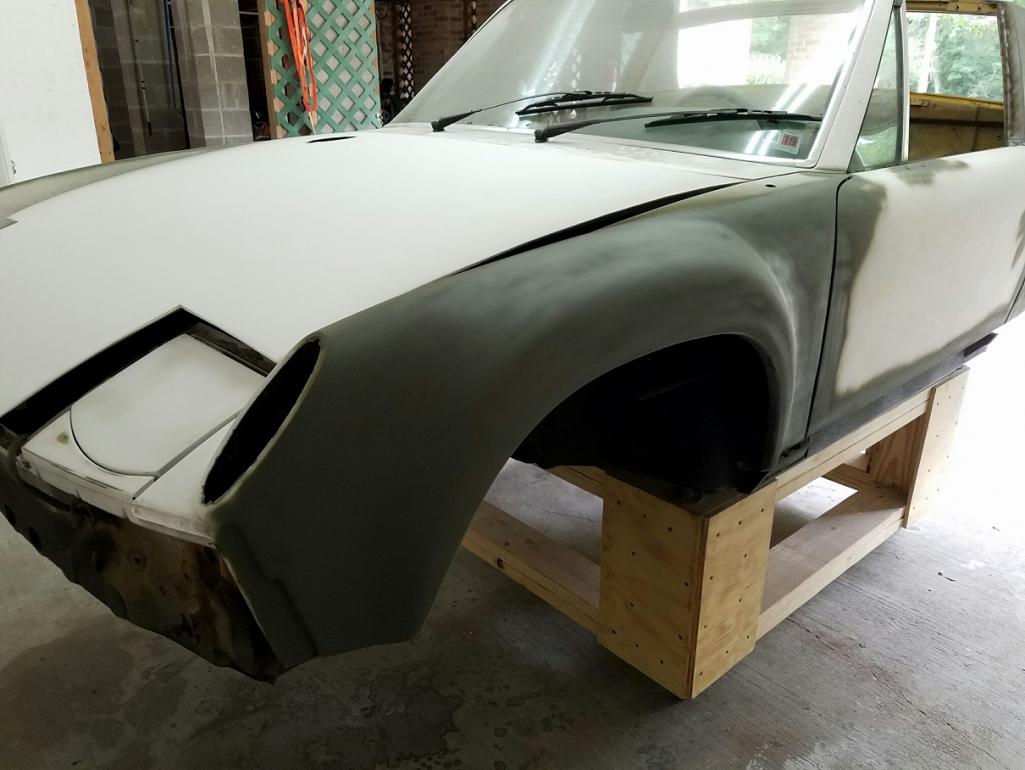
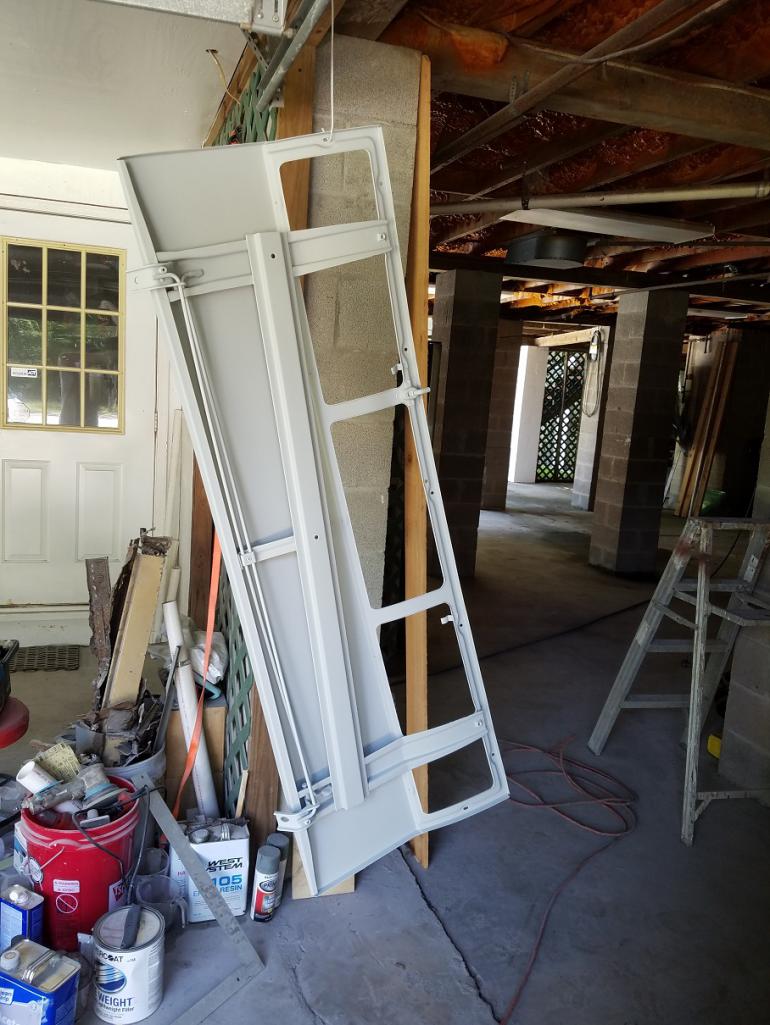
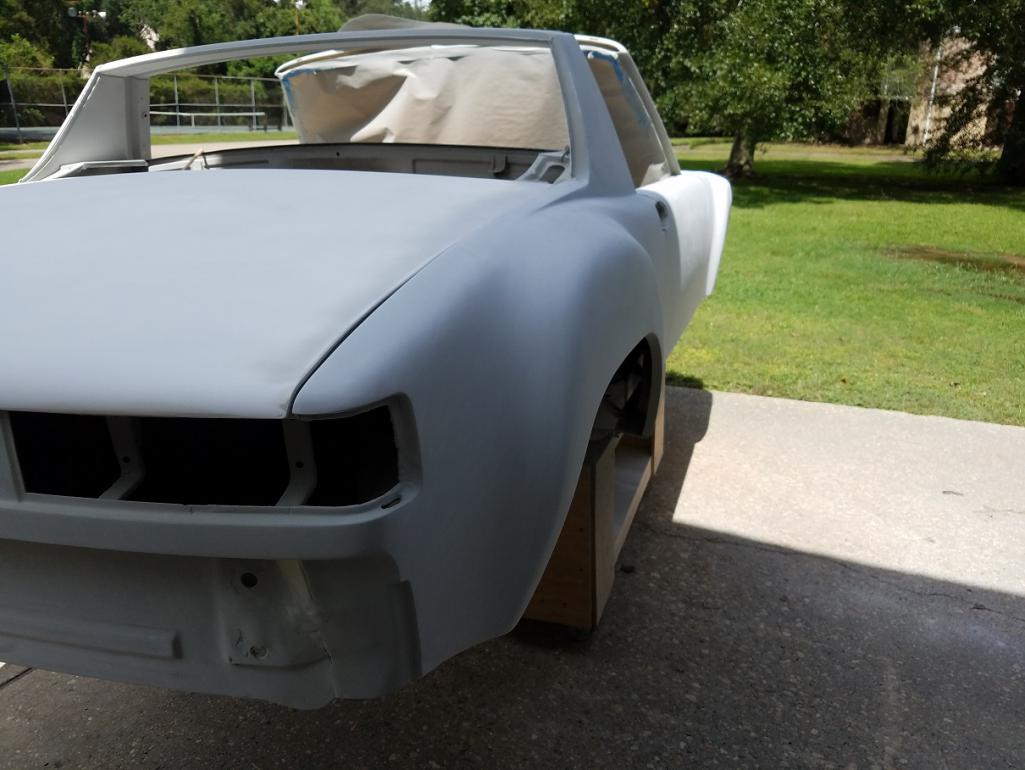
The front hood had some rust on the underside supports and the rear lid had cancer from where a previous owner had mounted the whale tail (and subsequent mounting holes). I added the QRS fiberglass replacement deck lids in 2013 as well.
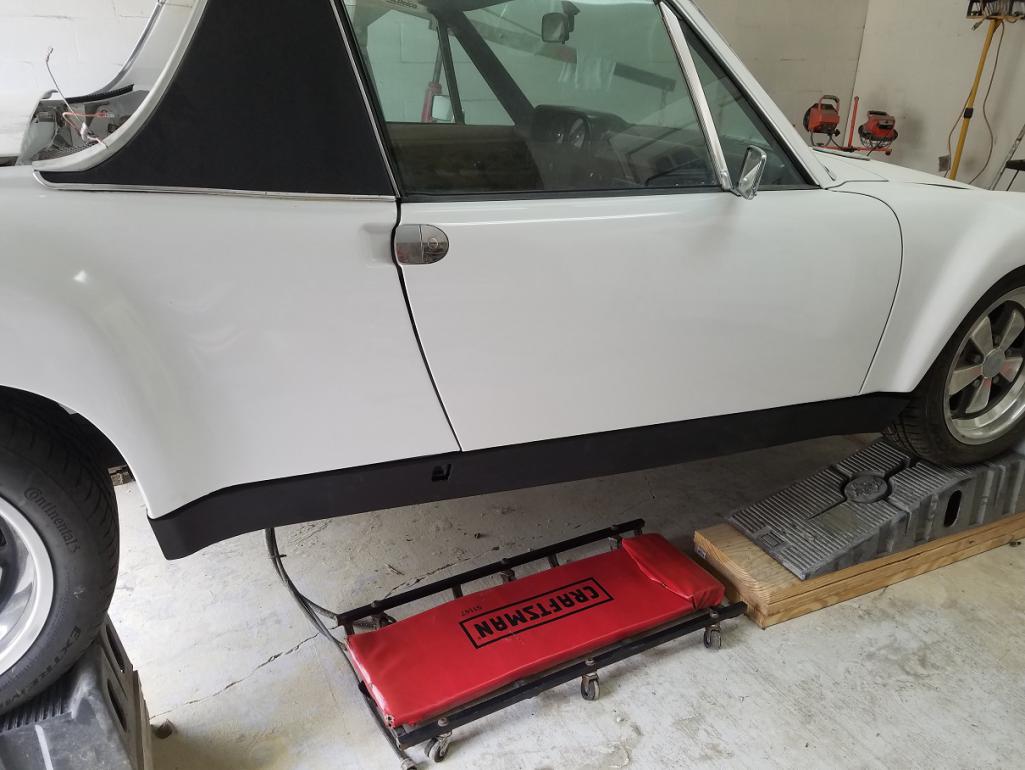
The car was finally back on the road again in 2013…and what a blast to drive!!!
One thing that was always missing for me was the “GT Look”…I’d always admired the wide body 914!
Well, this is the Winter that I start that project!
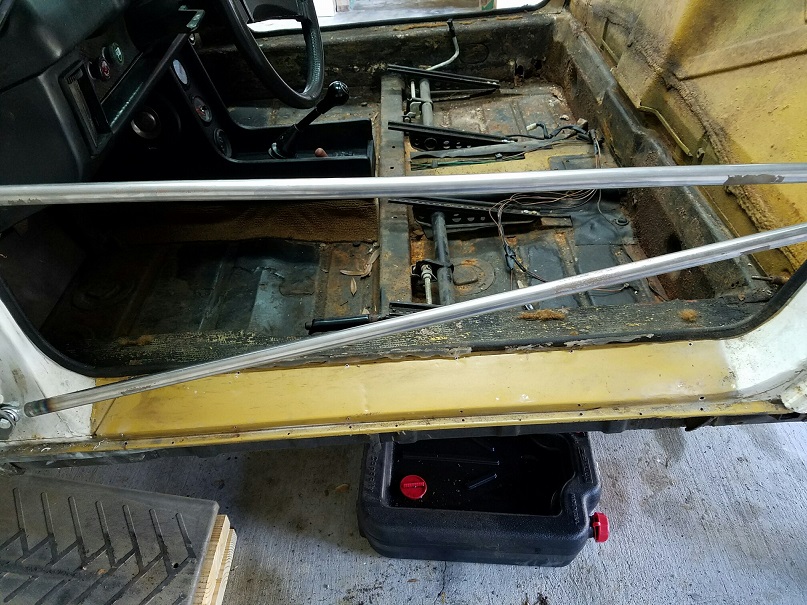
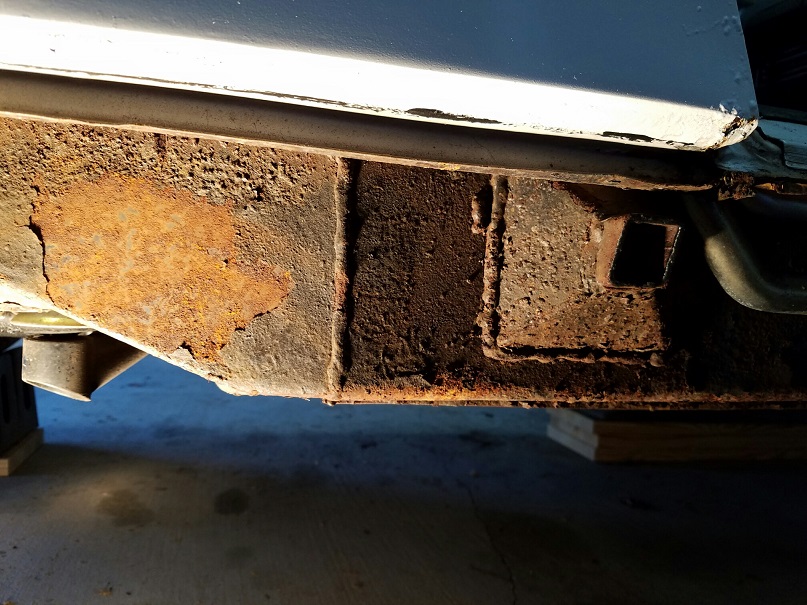
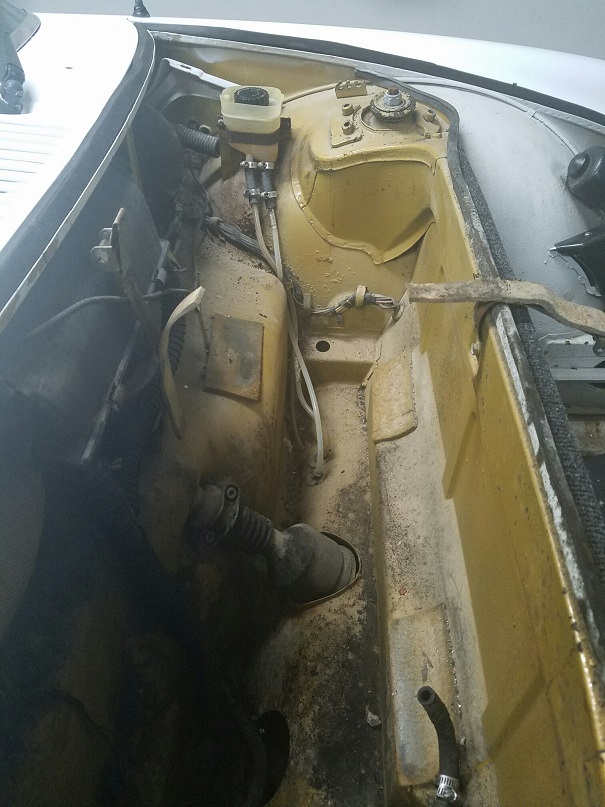
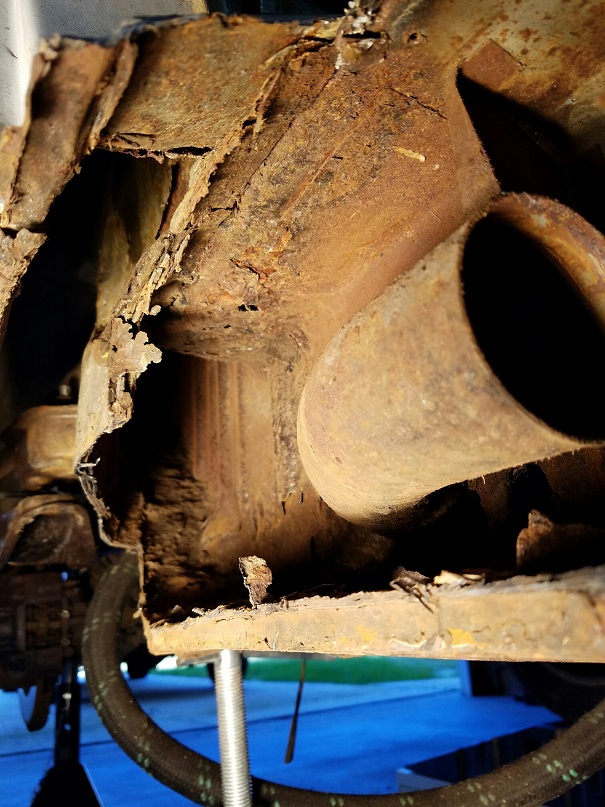
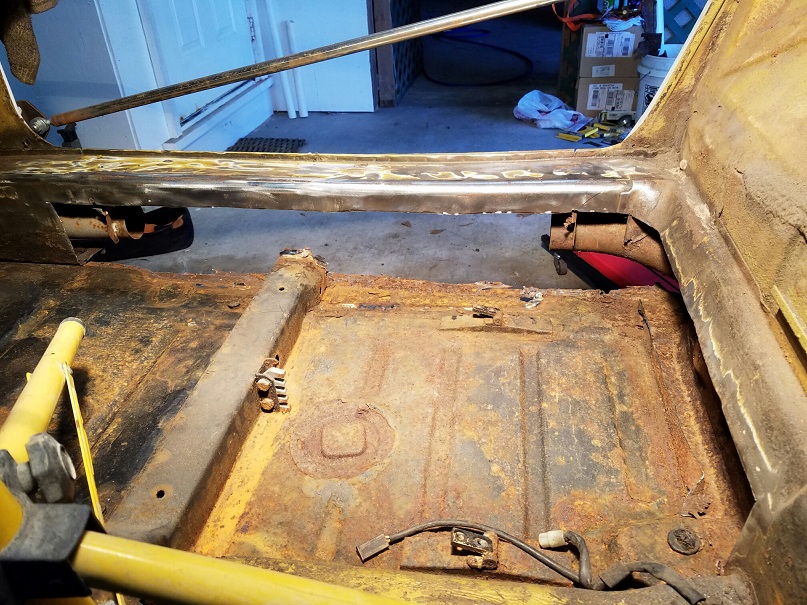
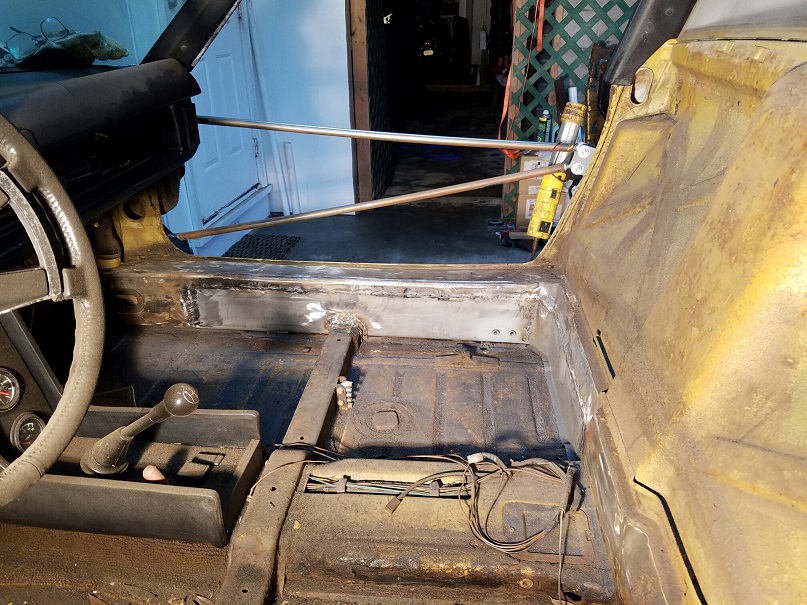
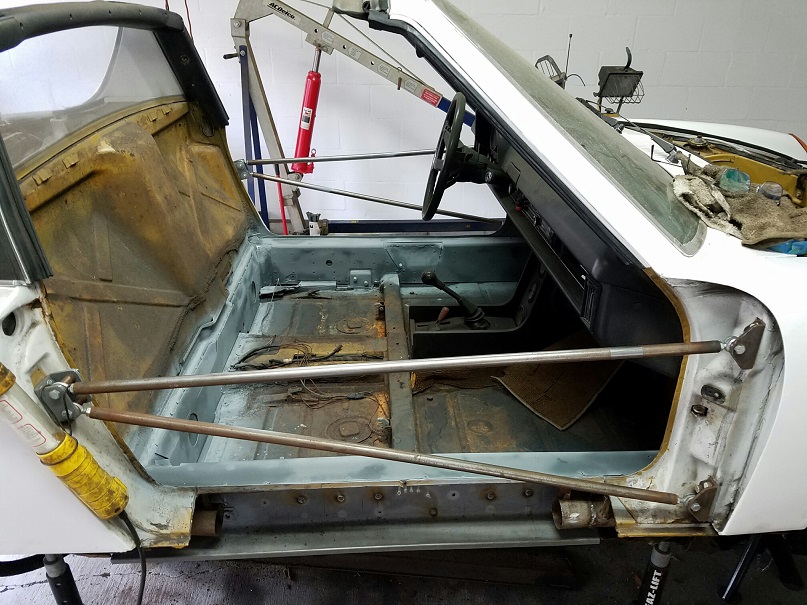
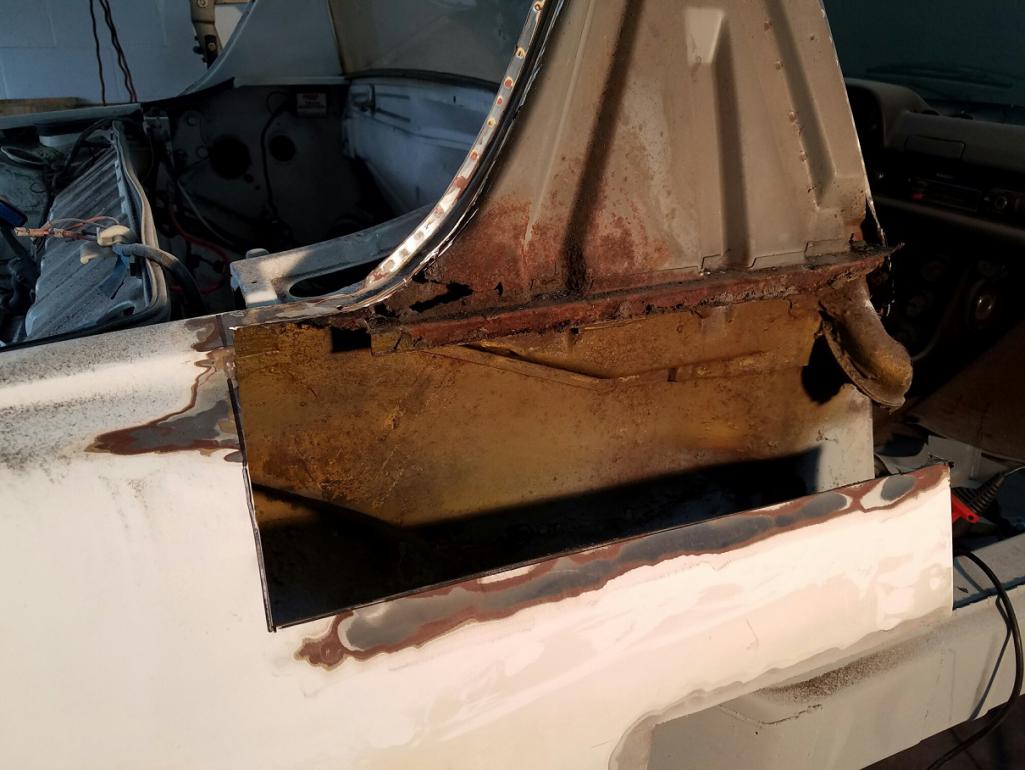
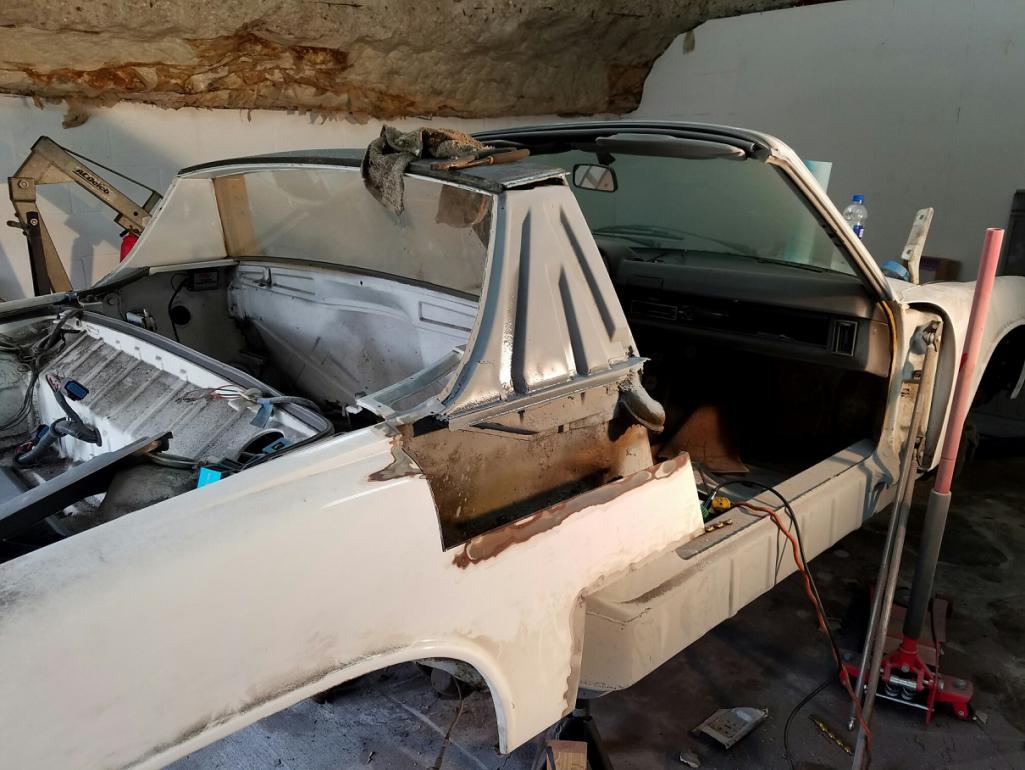
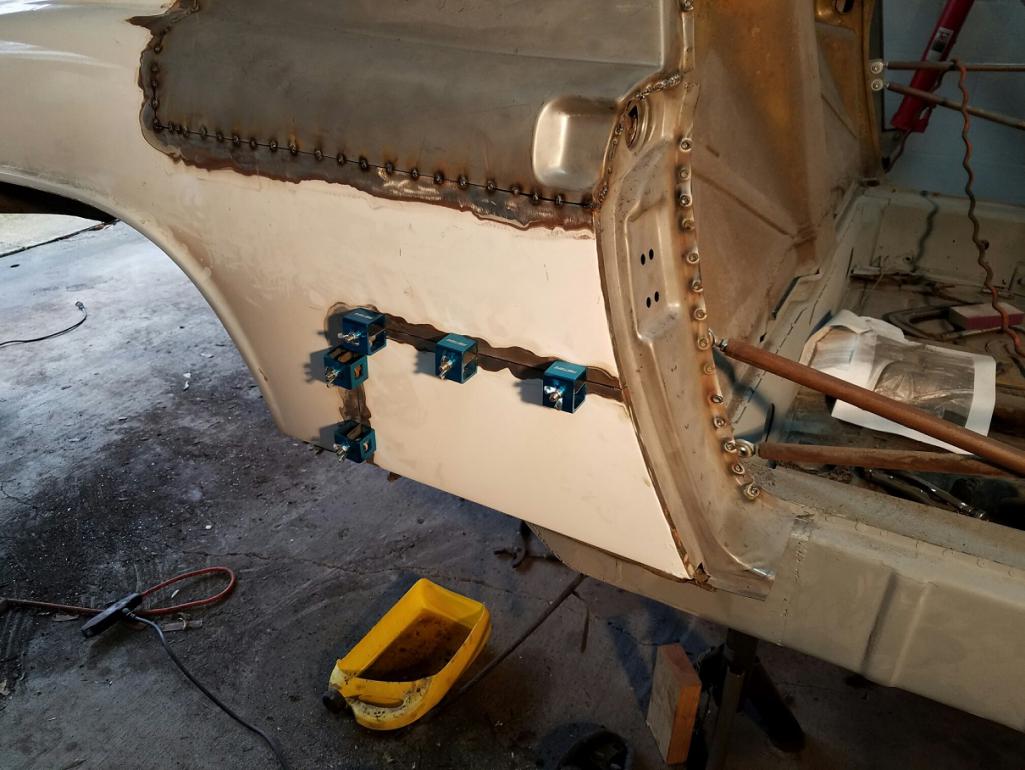
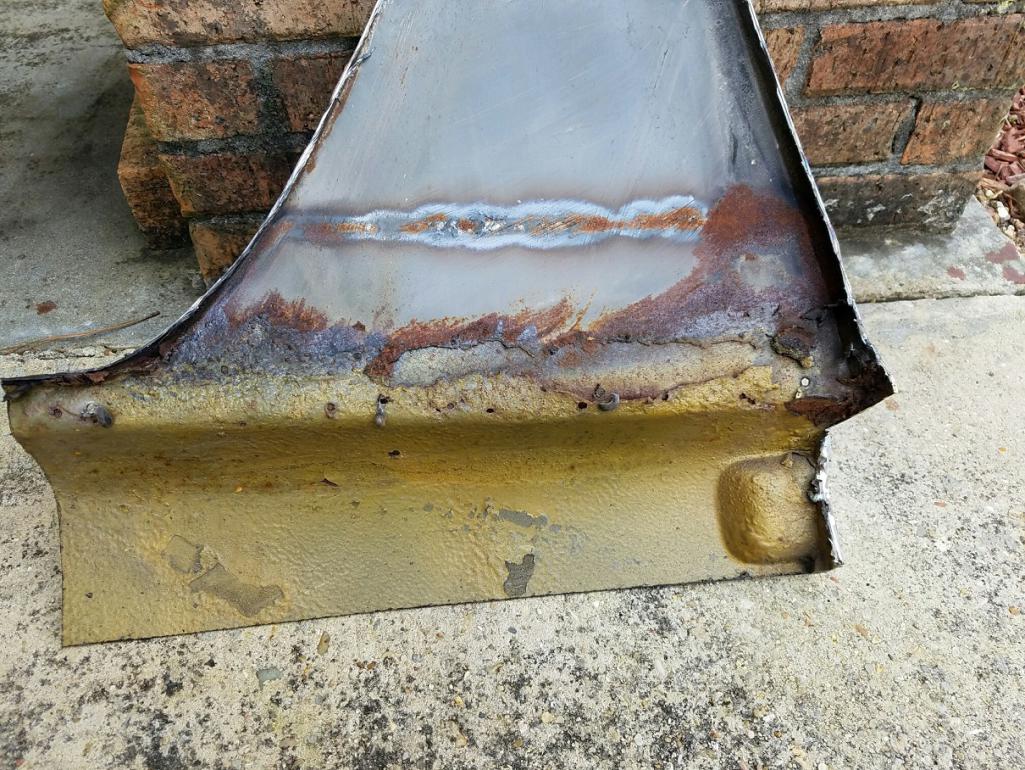
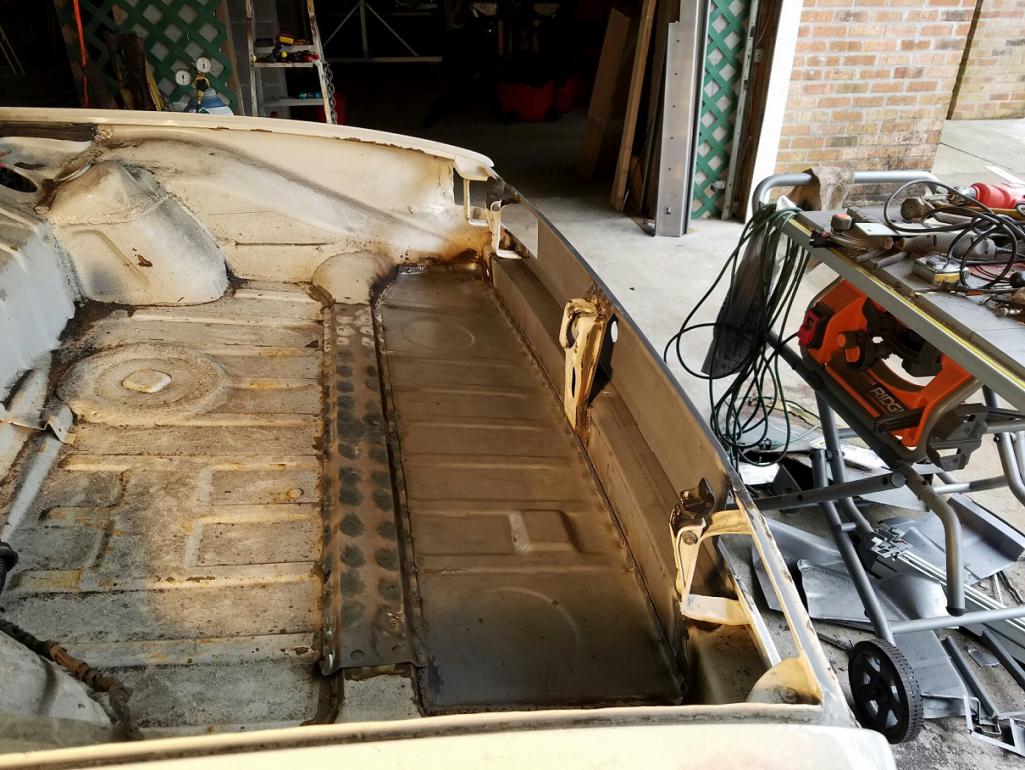
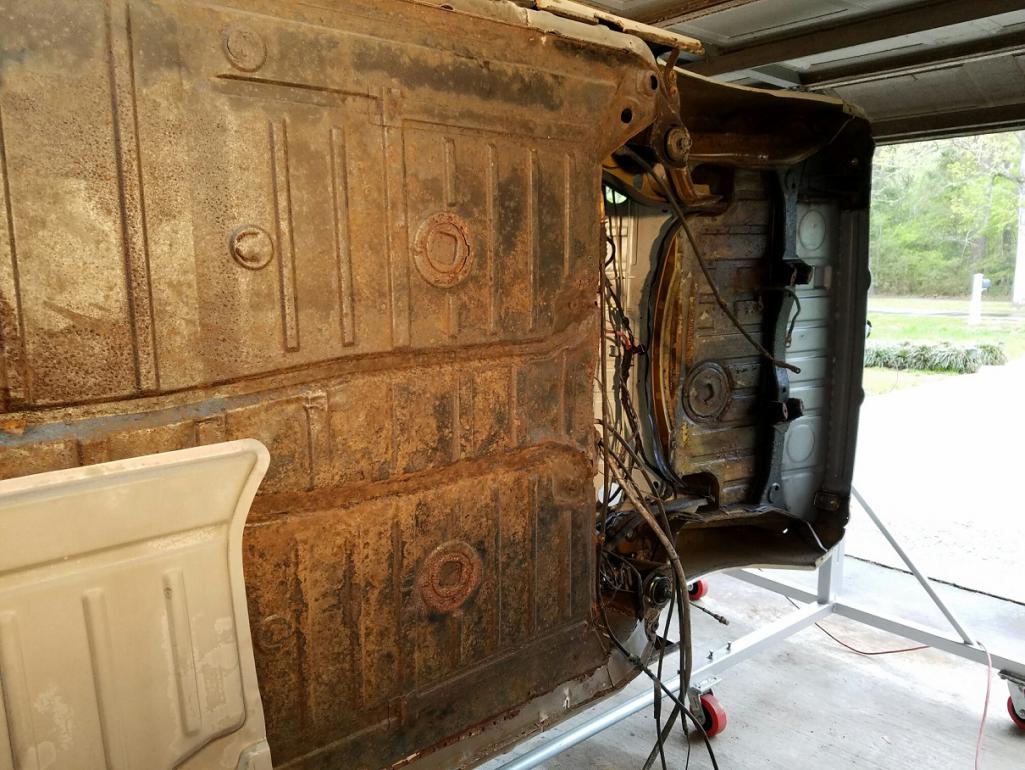
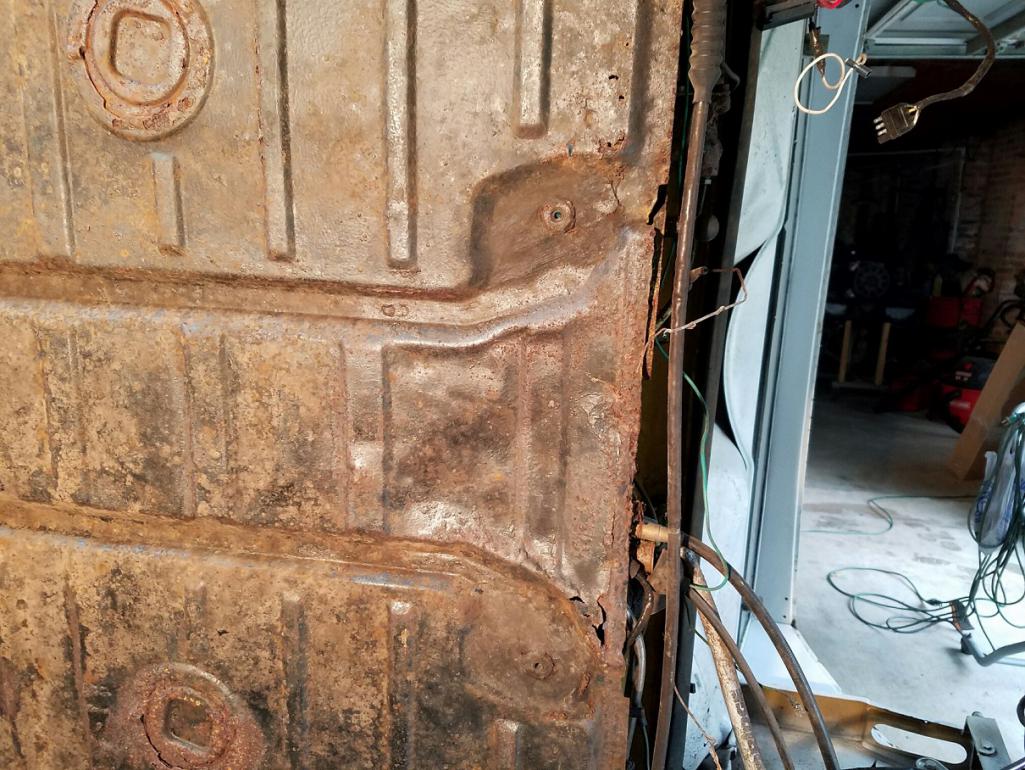
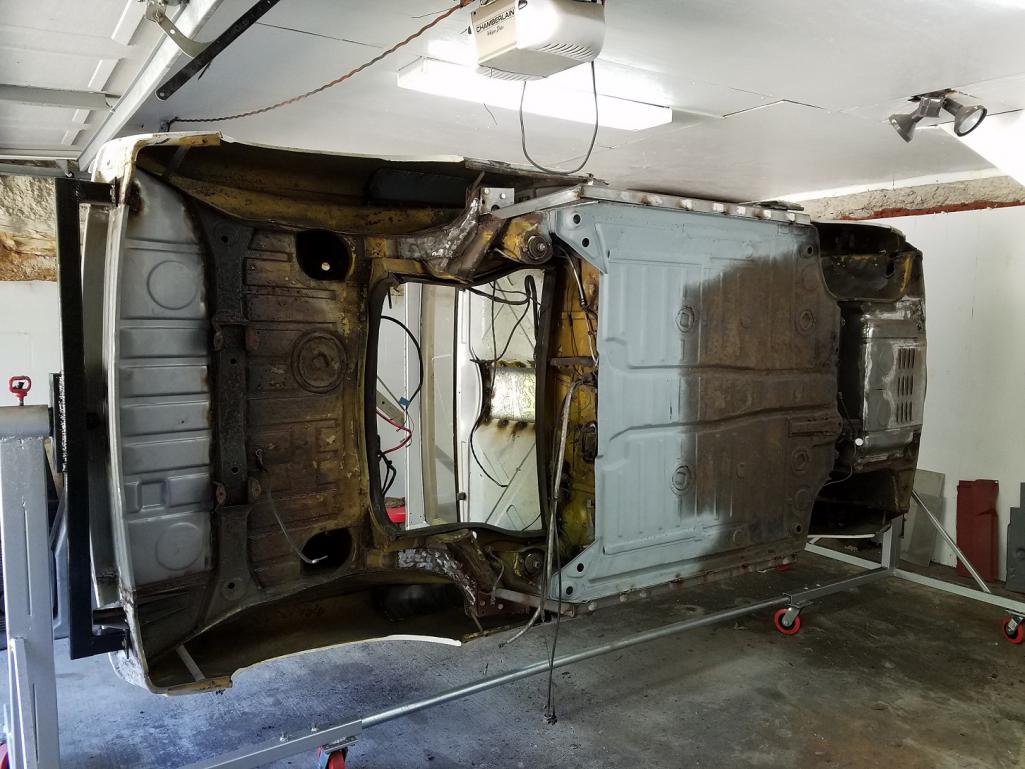
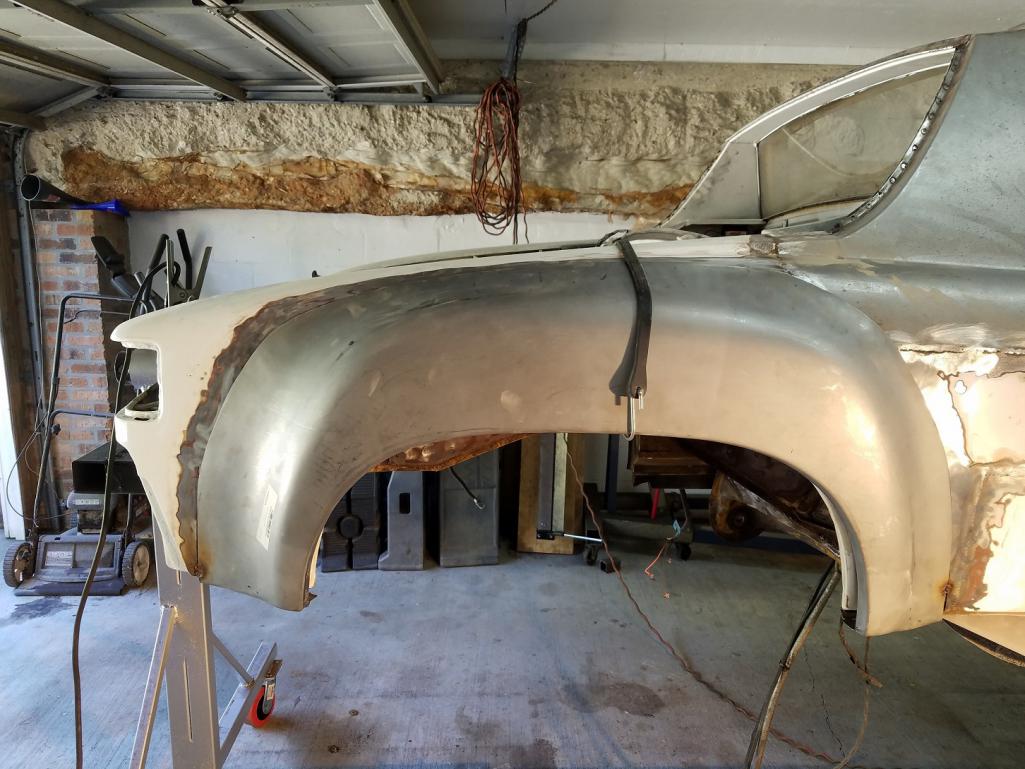
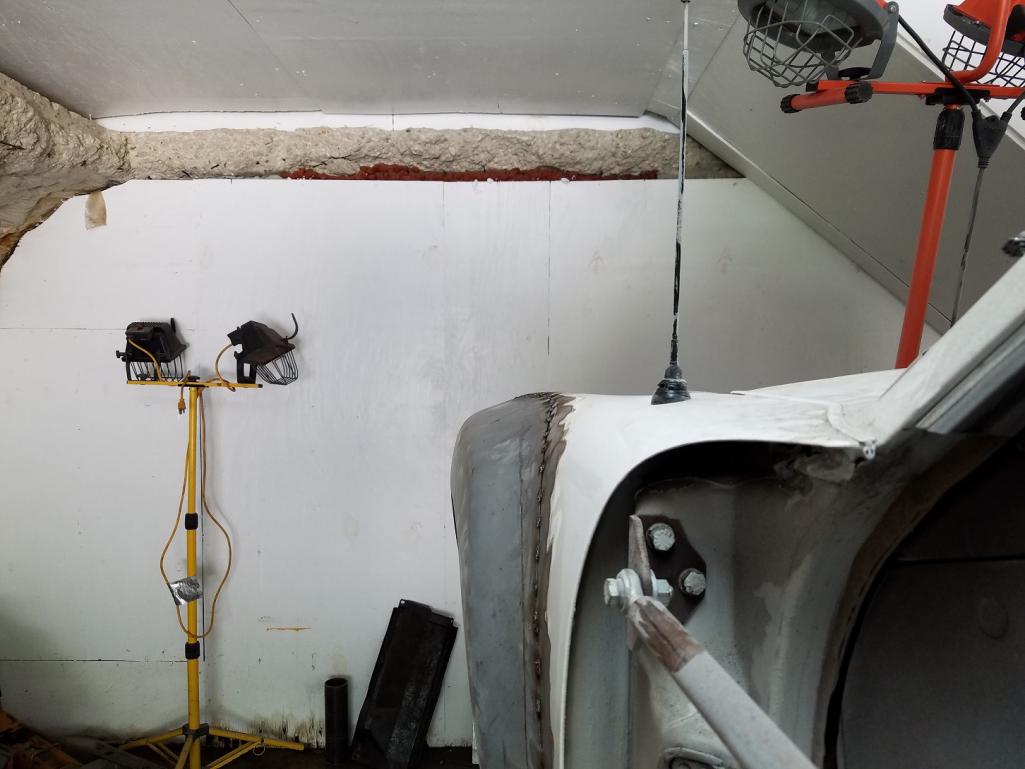
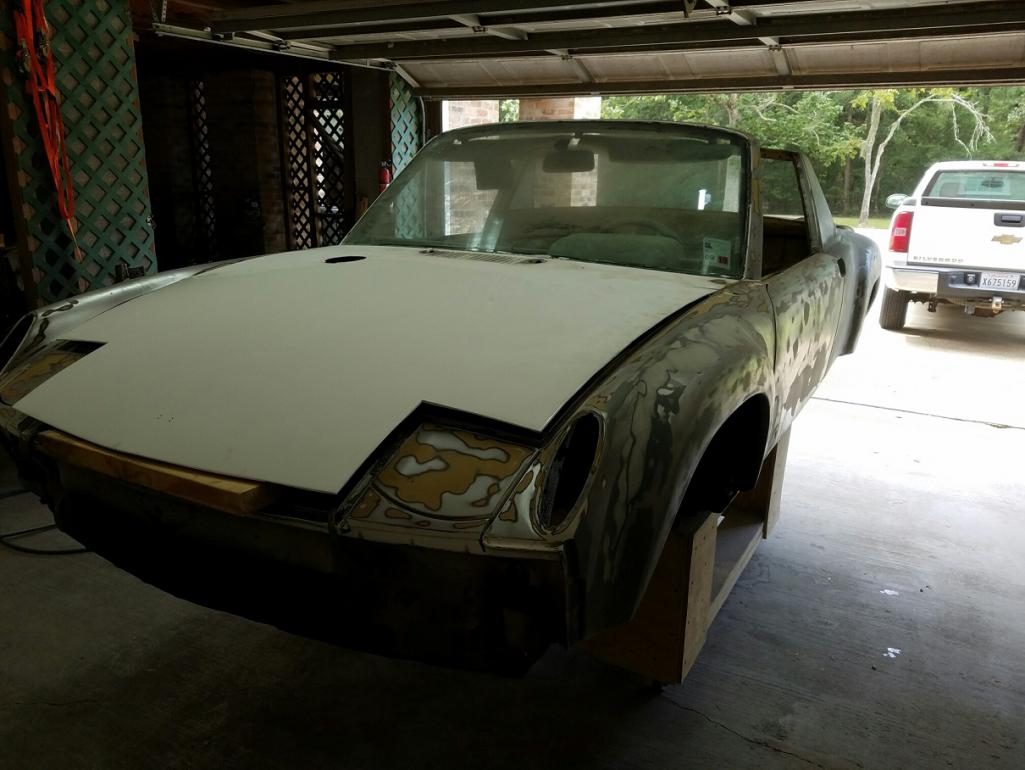
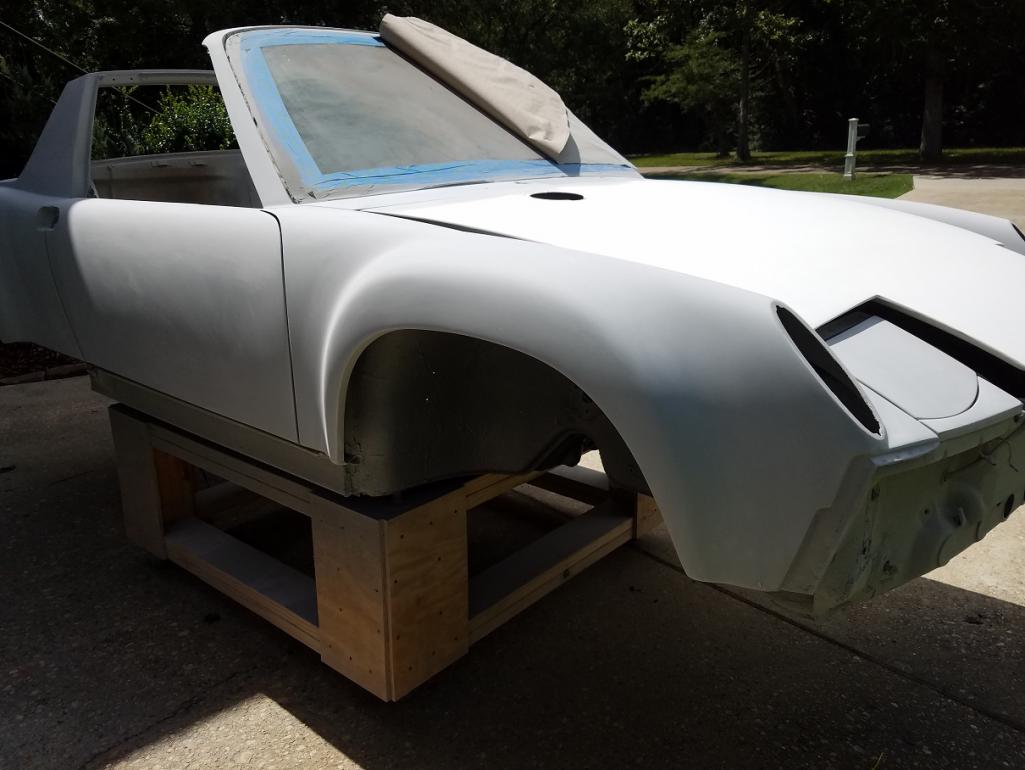
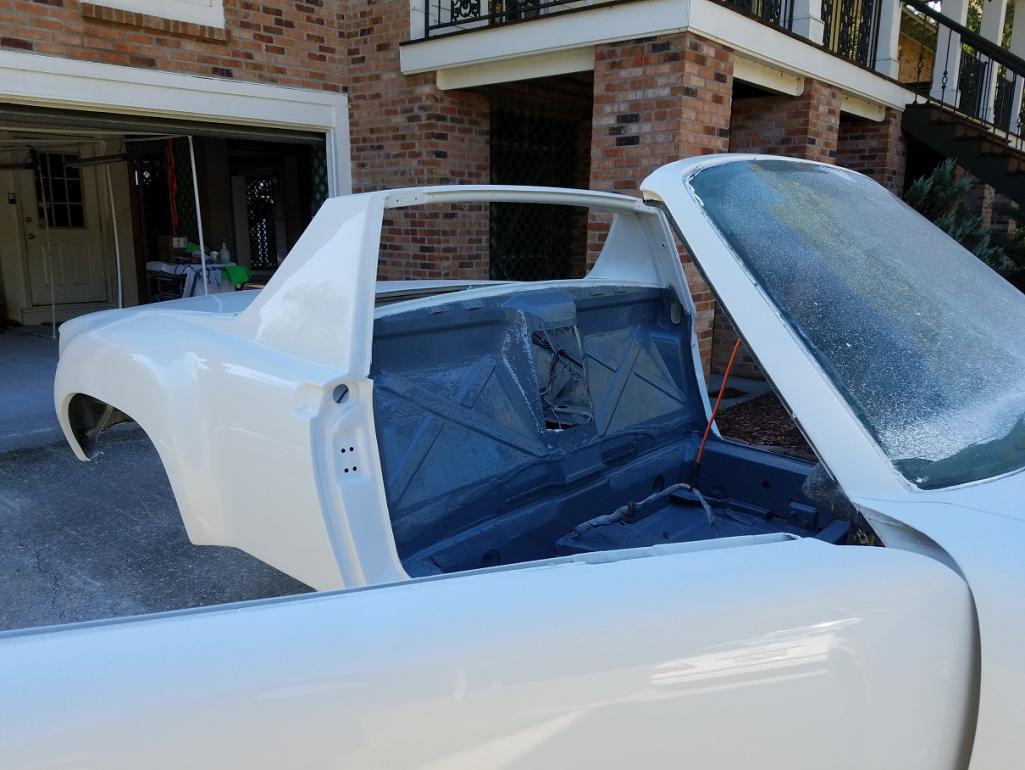
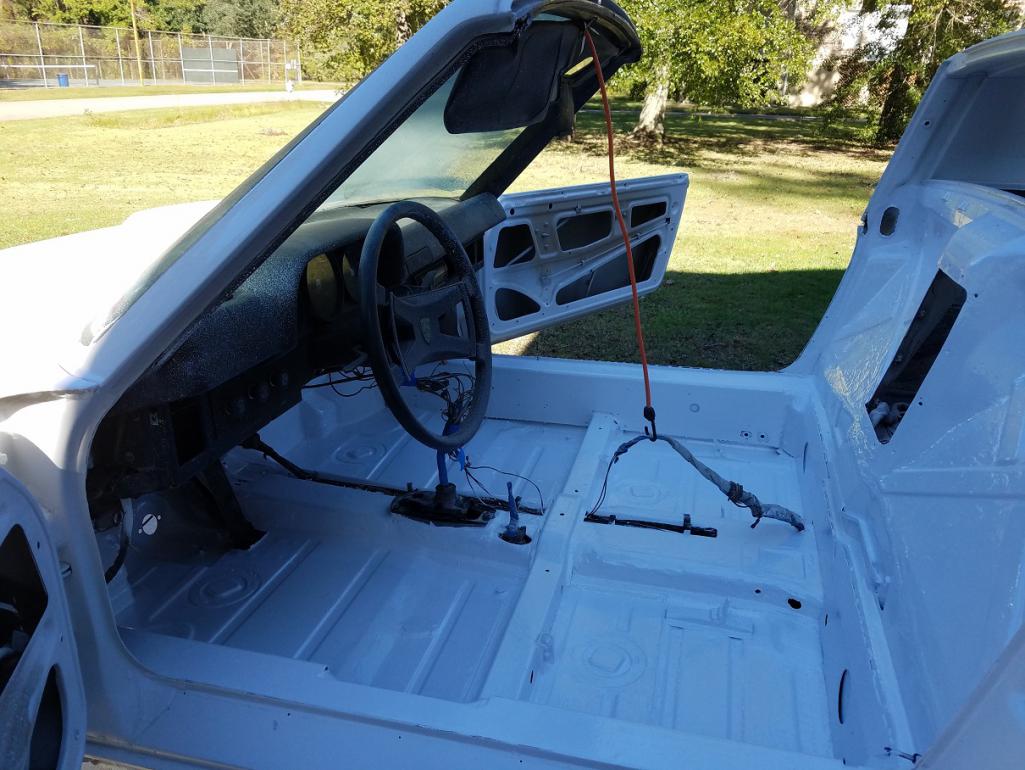
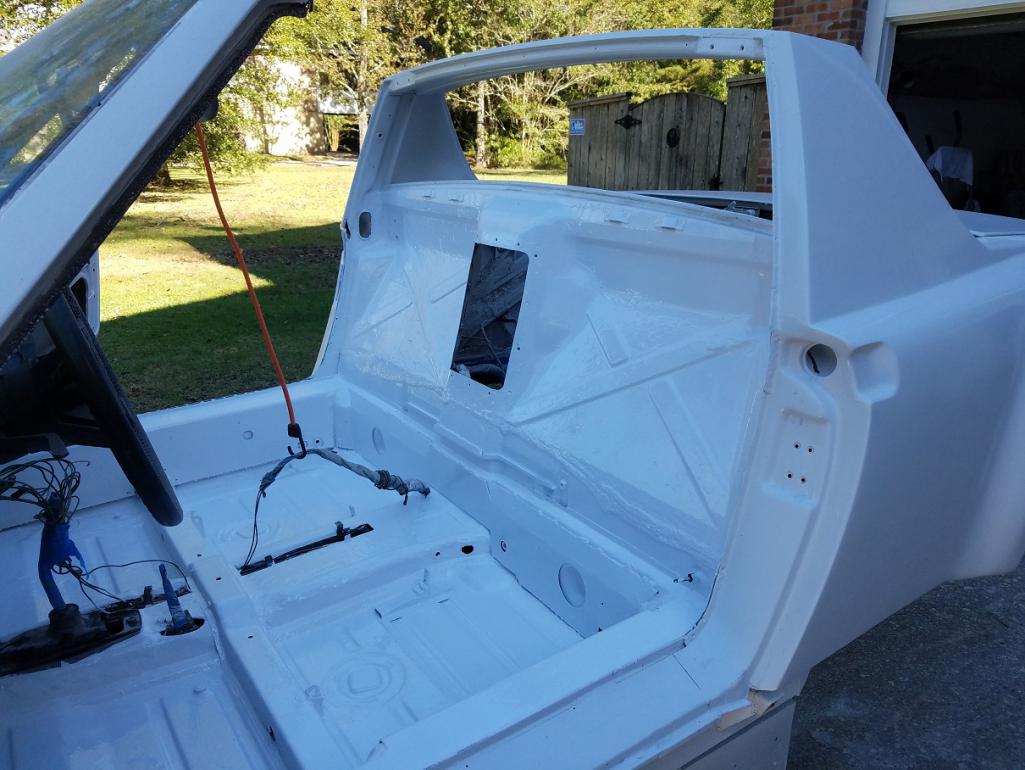
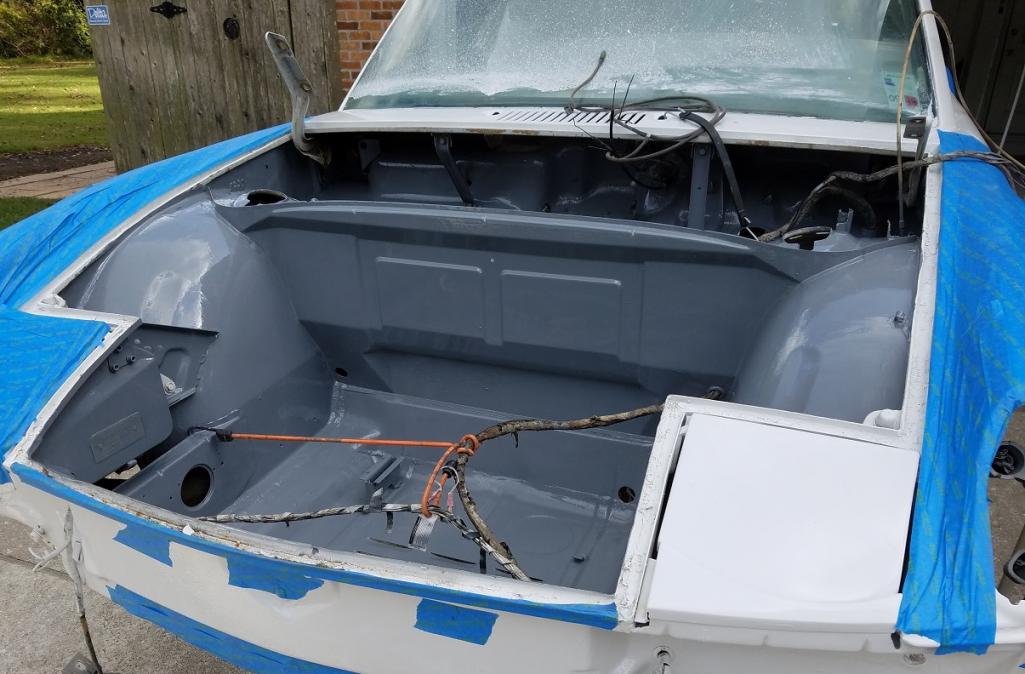
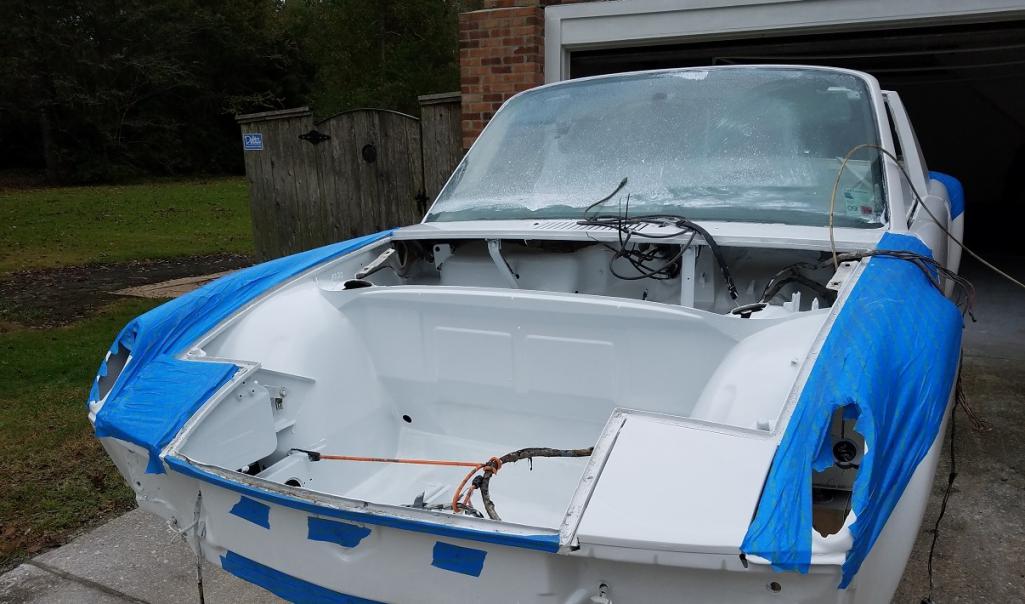
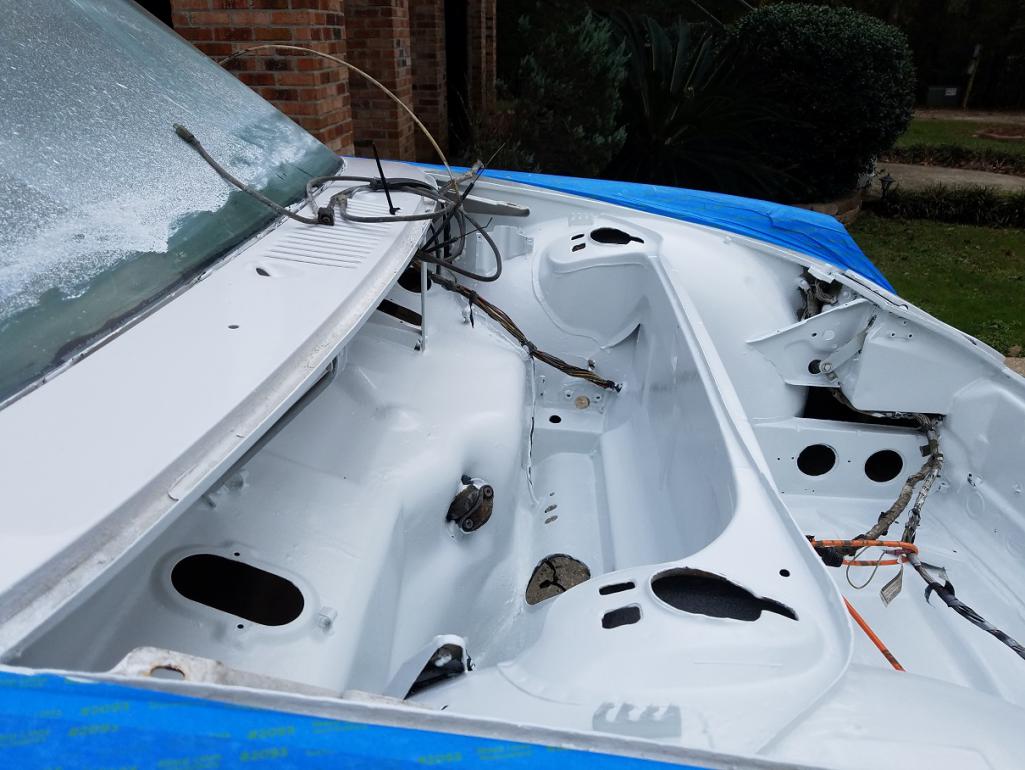
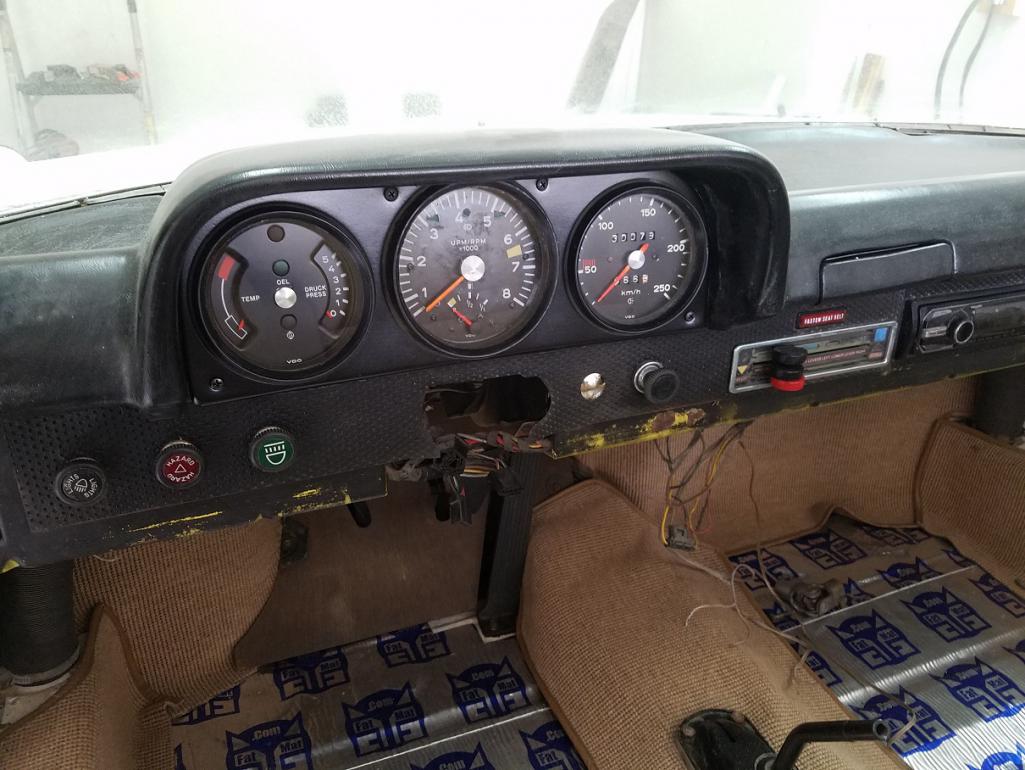
I wasn’t sure what I would find in terms of rust as I started to tear my car down…guessing by the glue on the back pad and carpeting, I’m guessing the car has never been disassembled!
I was pleasantly surprised as I started my teardown…especially considering the car started its life in Ohio!
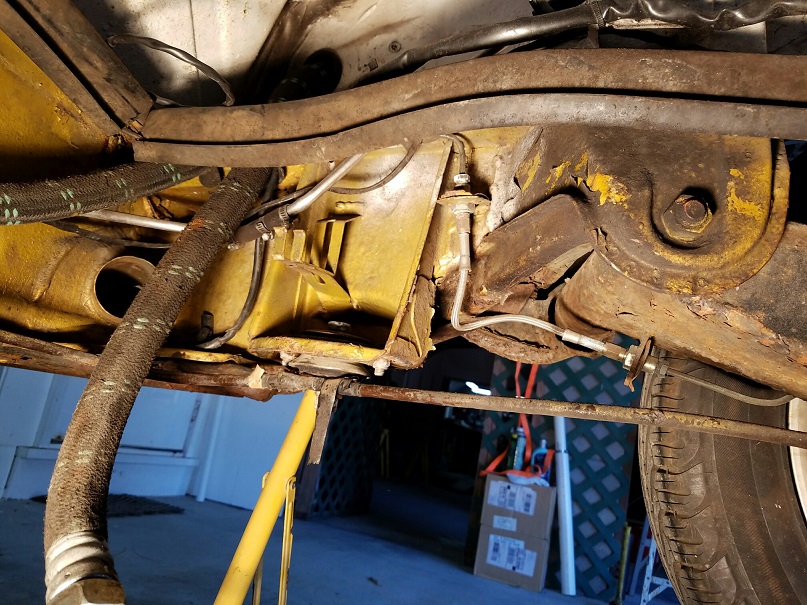
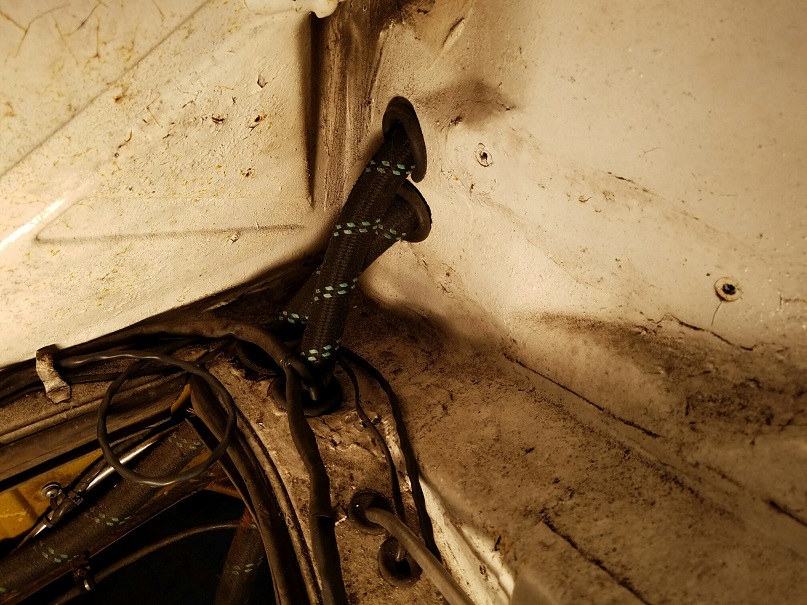
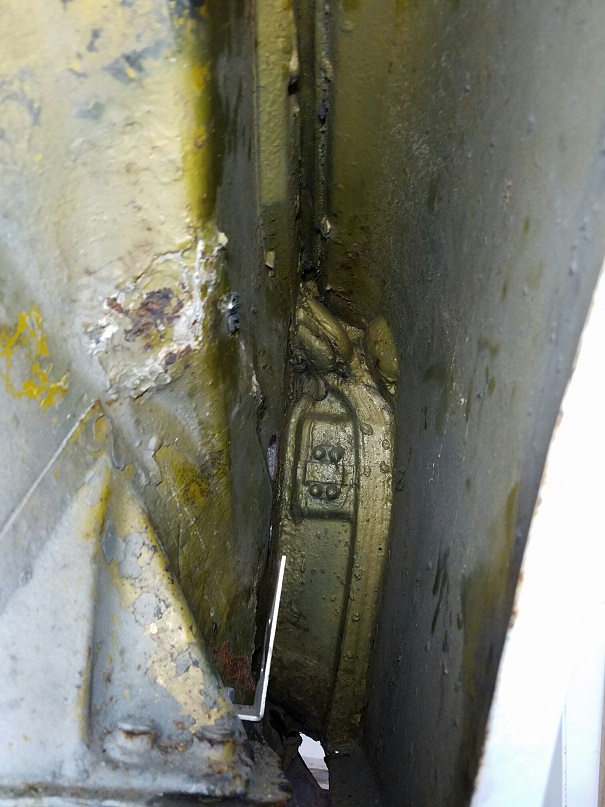
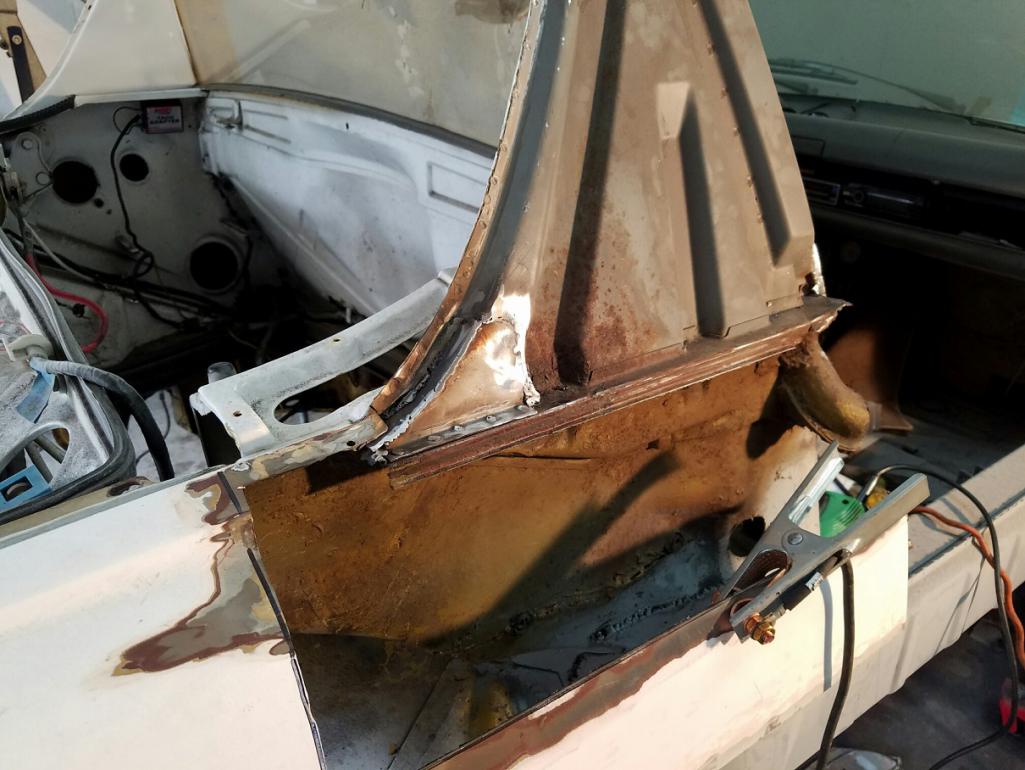
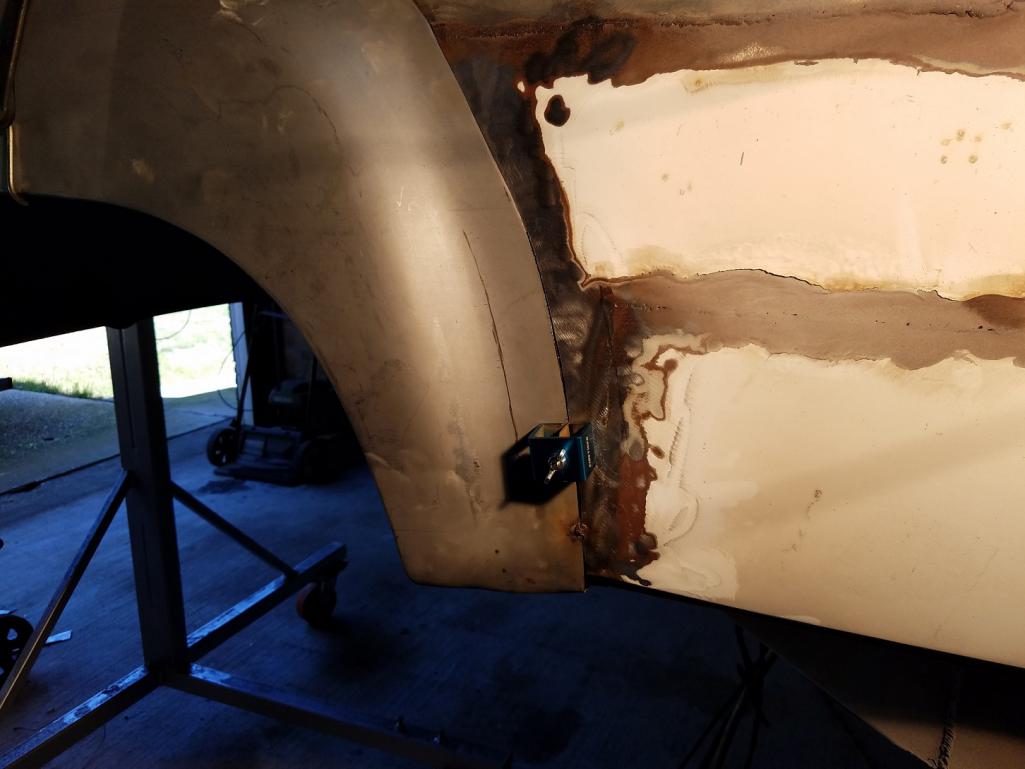
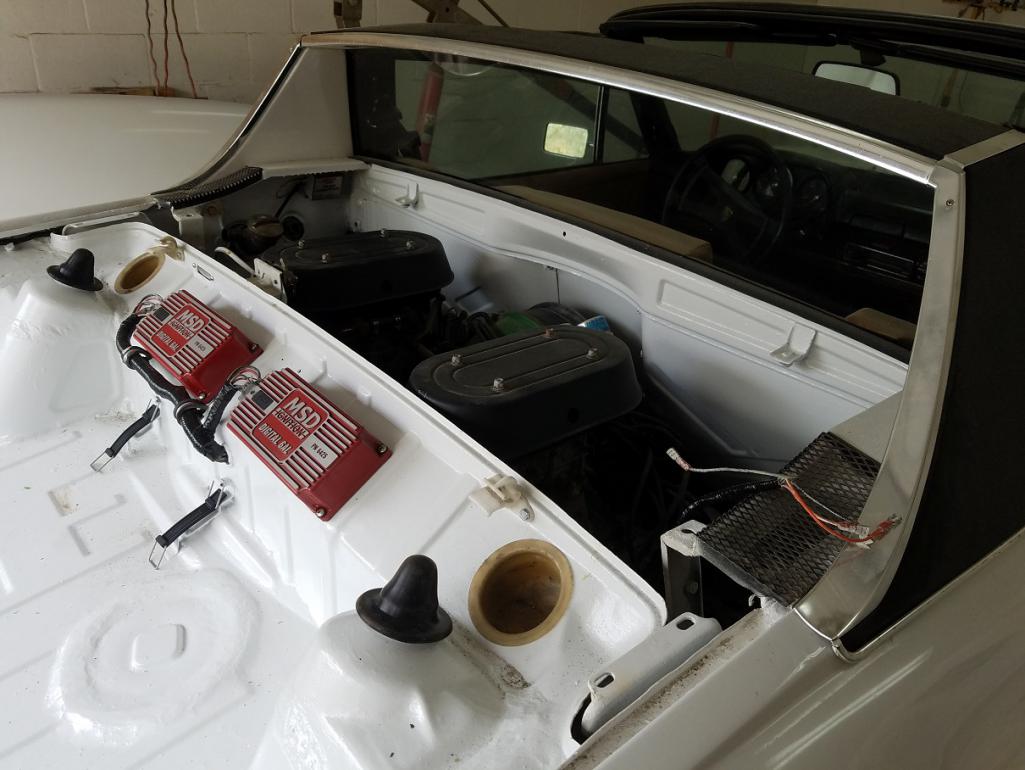
When I installed the external oil cooler along the passenger side 6 years ago, I knew that a previous owner had installed what looks like a Brad Mayeur stiffening kit on the passenger side (but, not on the driver’s side???).
I didn’t take any really good pictures when I did the engine swap 6 years ago, but, couldn’t recall any major issues when I installed it.
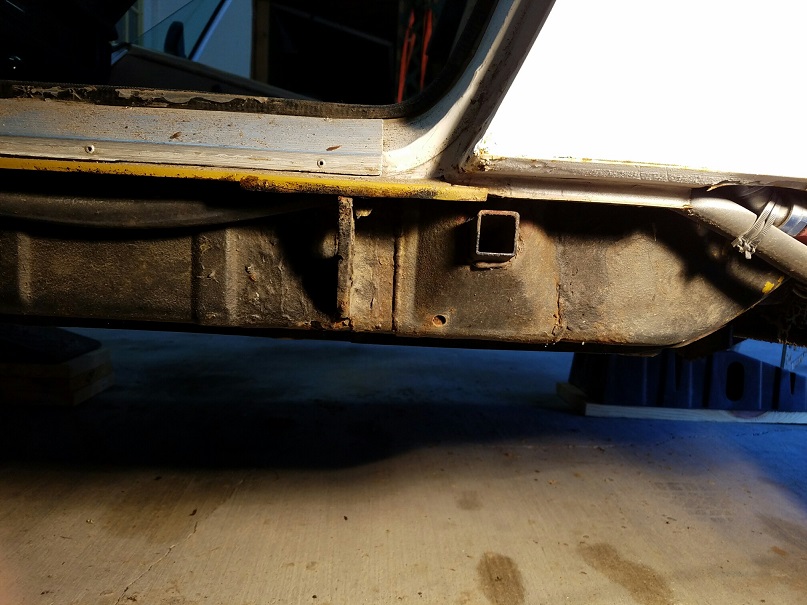
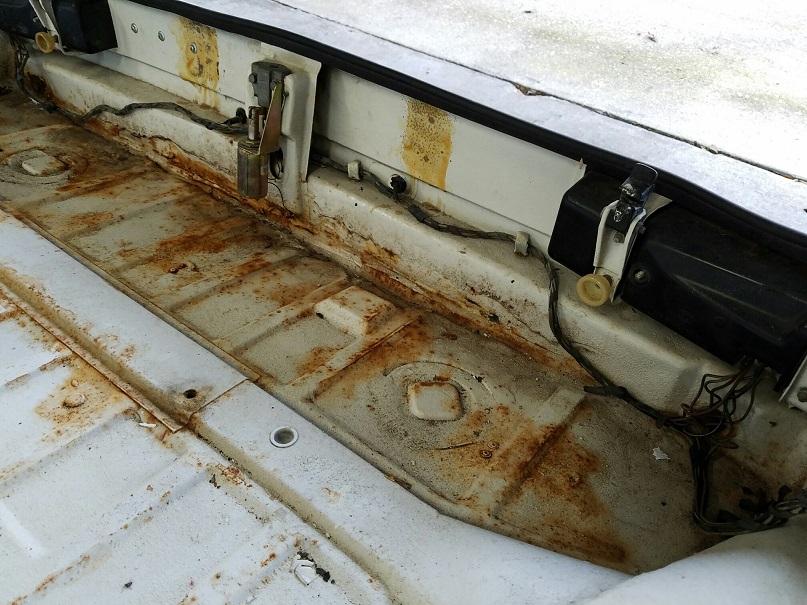
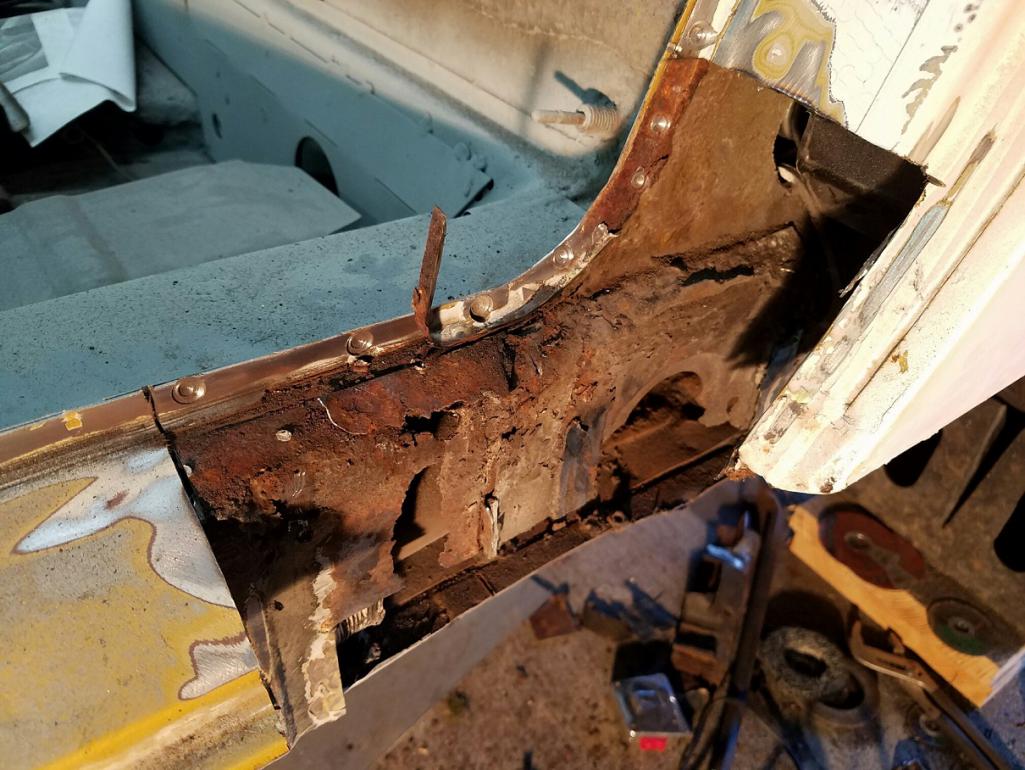
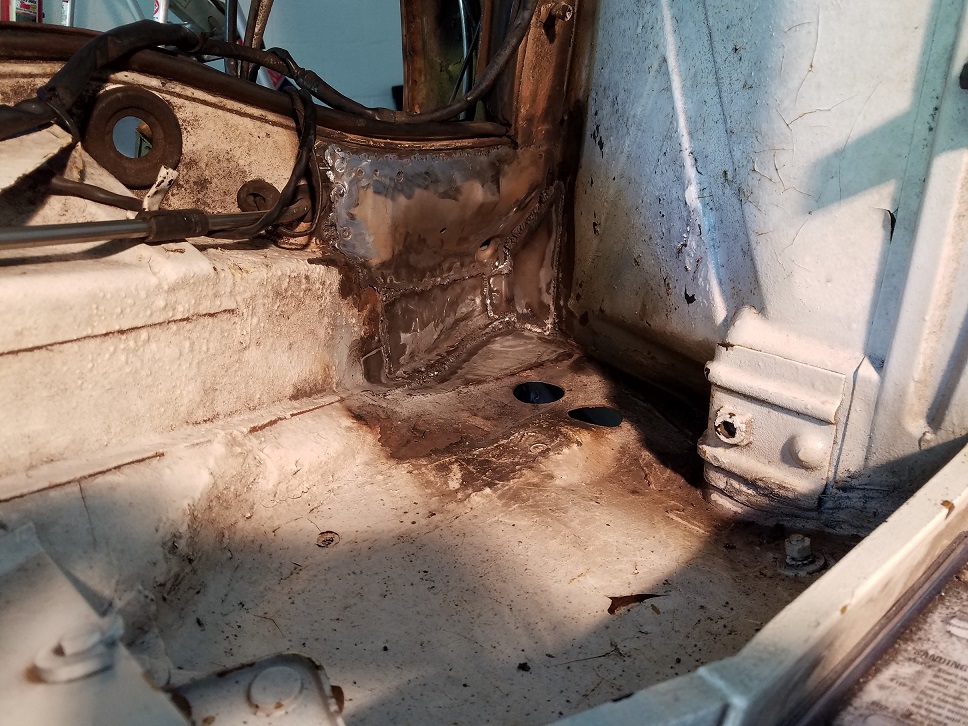
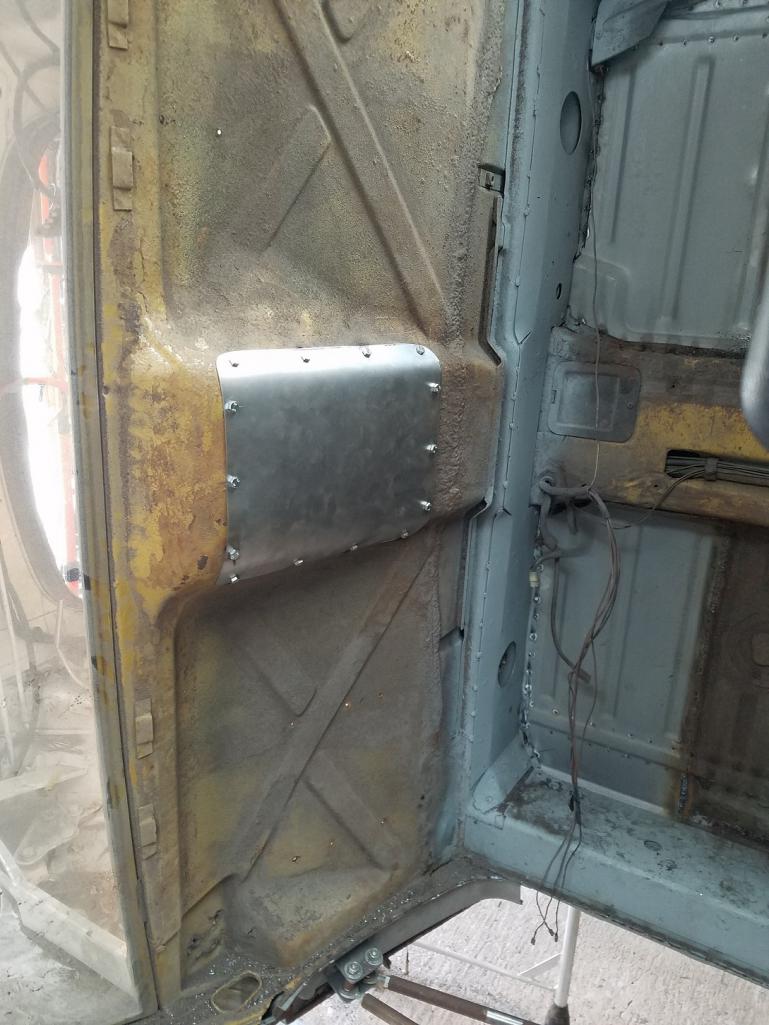
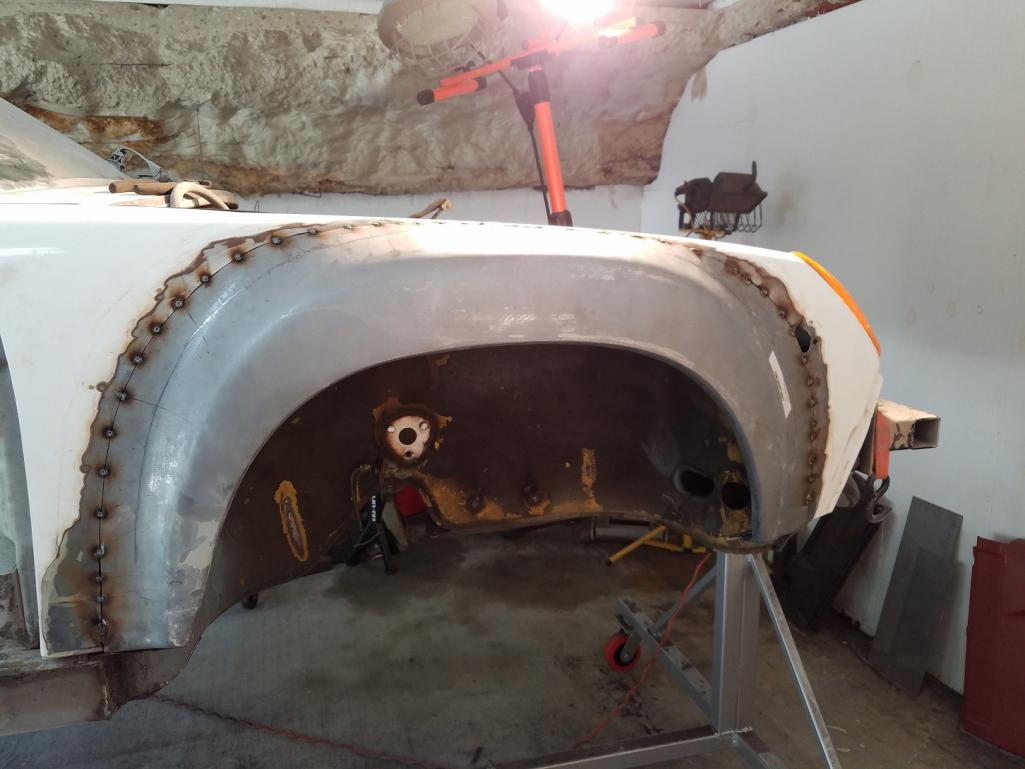
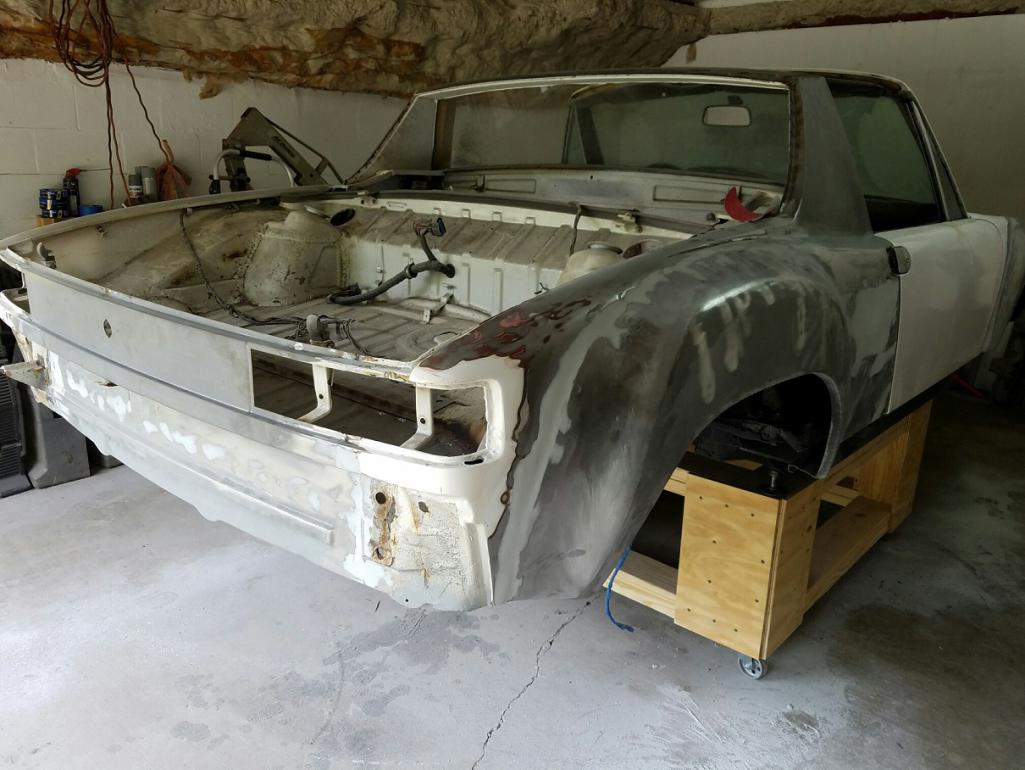
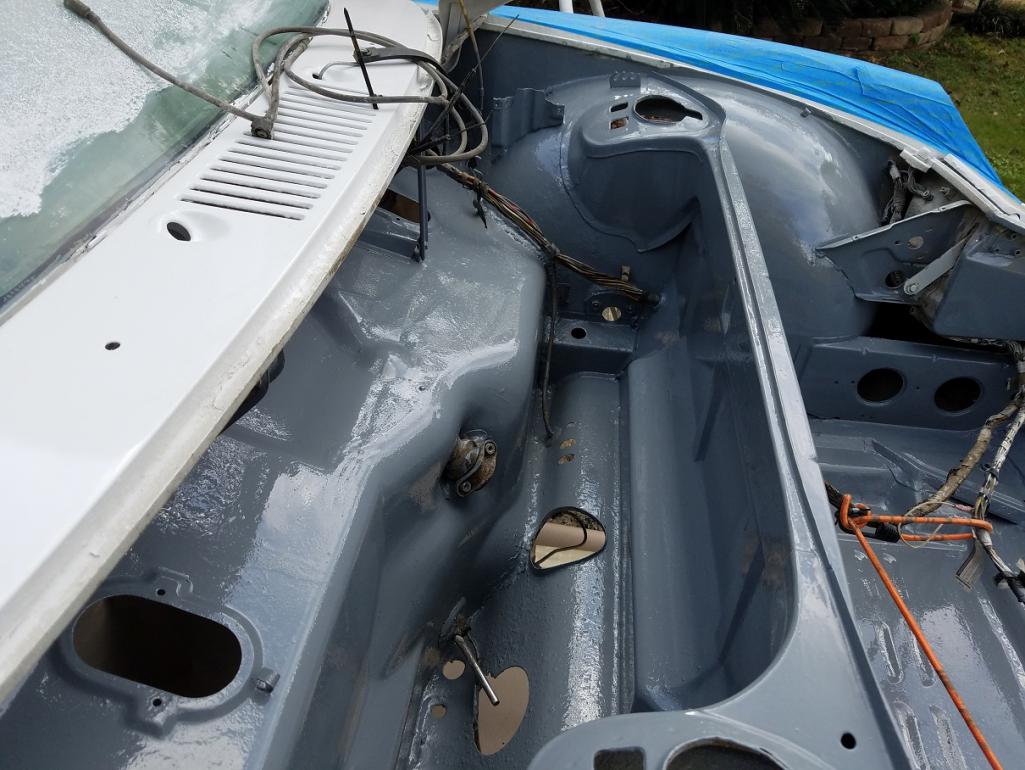
I am expecting the inner long on the passenger side to be in bad shape. There is a little bit of rust around the passenger seat belt mount area (in fact, I couldn’t remove the seat belt mounting bolt as it was just turning in the frame…had to pry it out). At least part of the inside (passenger compartment) long will have to be replaced.
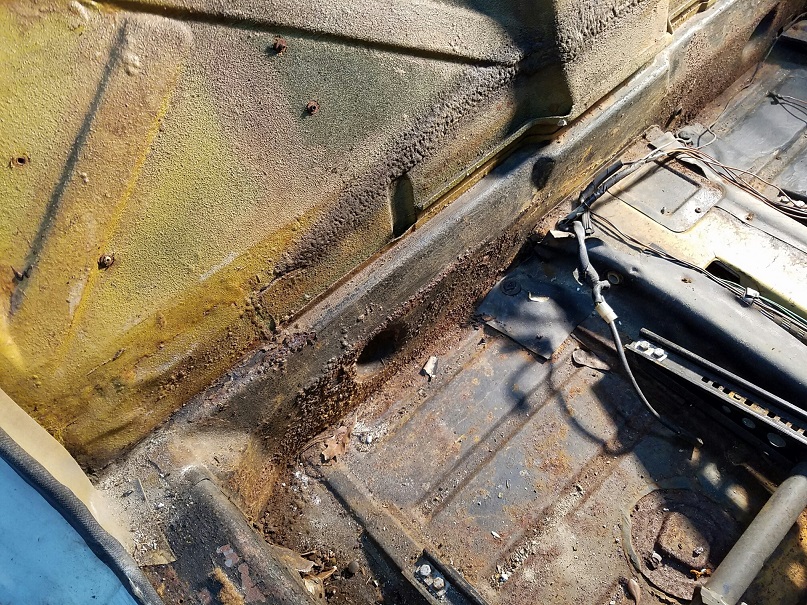
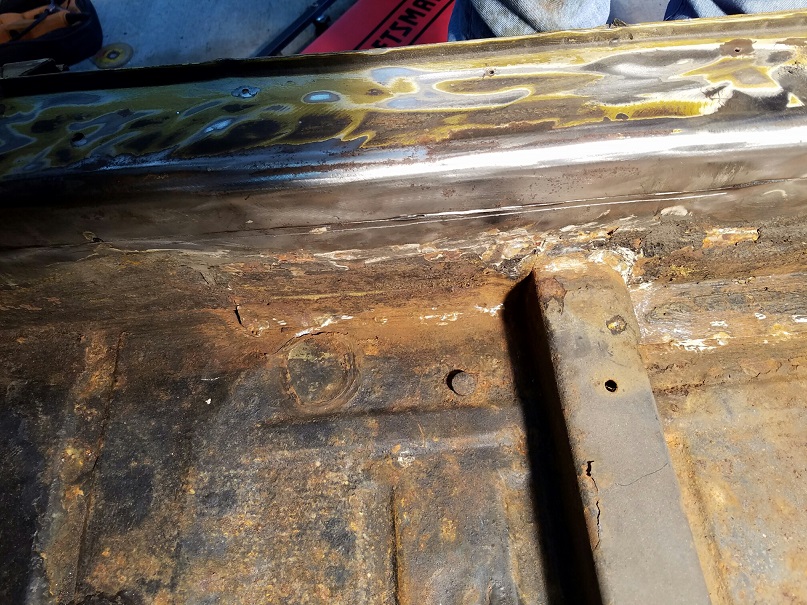
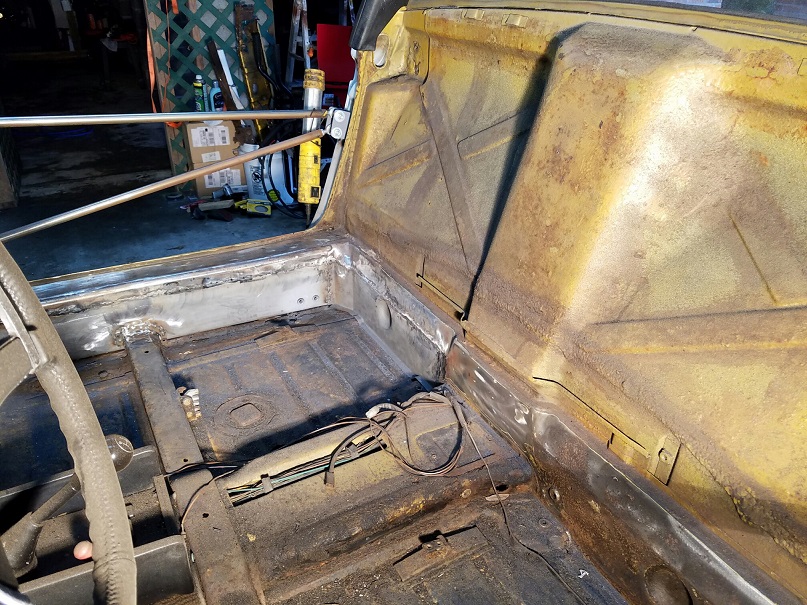
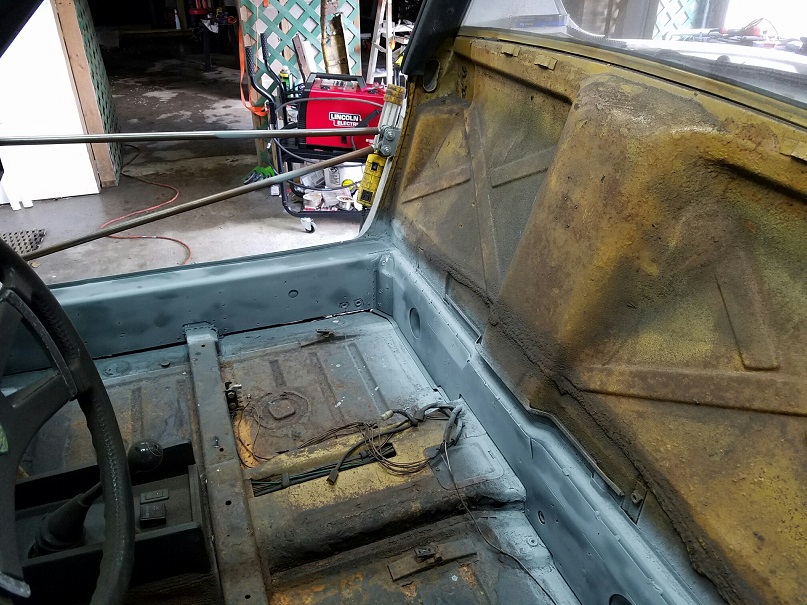
The outer firewall and floor pan are in great shape (with the exception of the surface rust on the bottom side of the pan).
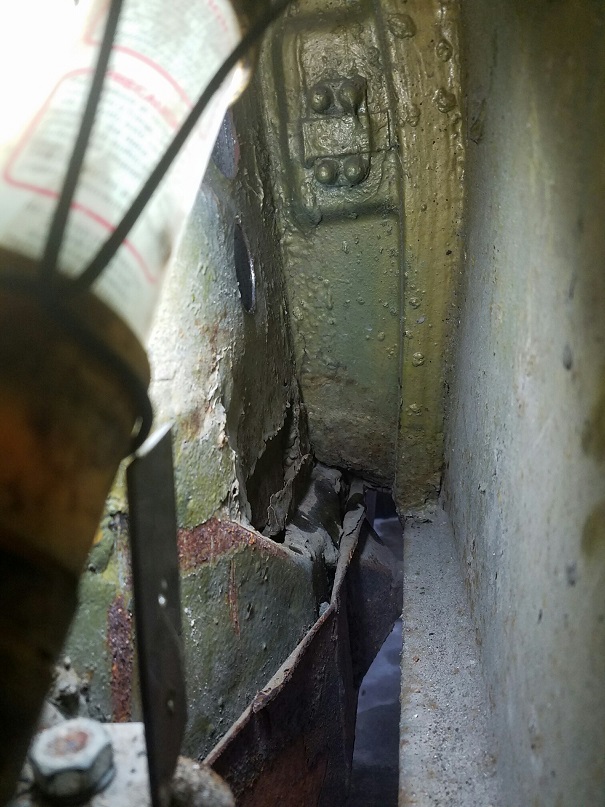
The right rear jacking post/plate has some rust and will need to be replaced. The inner firewall has some corrosion near the center tunnel on the passenger side. I’ve ordered both lower inner panel replacements.
The passenger side motor mount and suspension console looks to be in great shape. The right side engine tray has never been replaced…I still need to clean up the “hell hole” area to see what lurks beneath, but, it really doesn’t look that bad. When I installed the oil cooler transfer lines 6 years ago, I recall drilling through metal, not fiberglass.
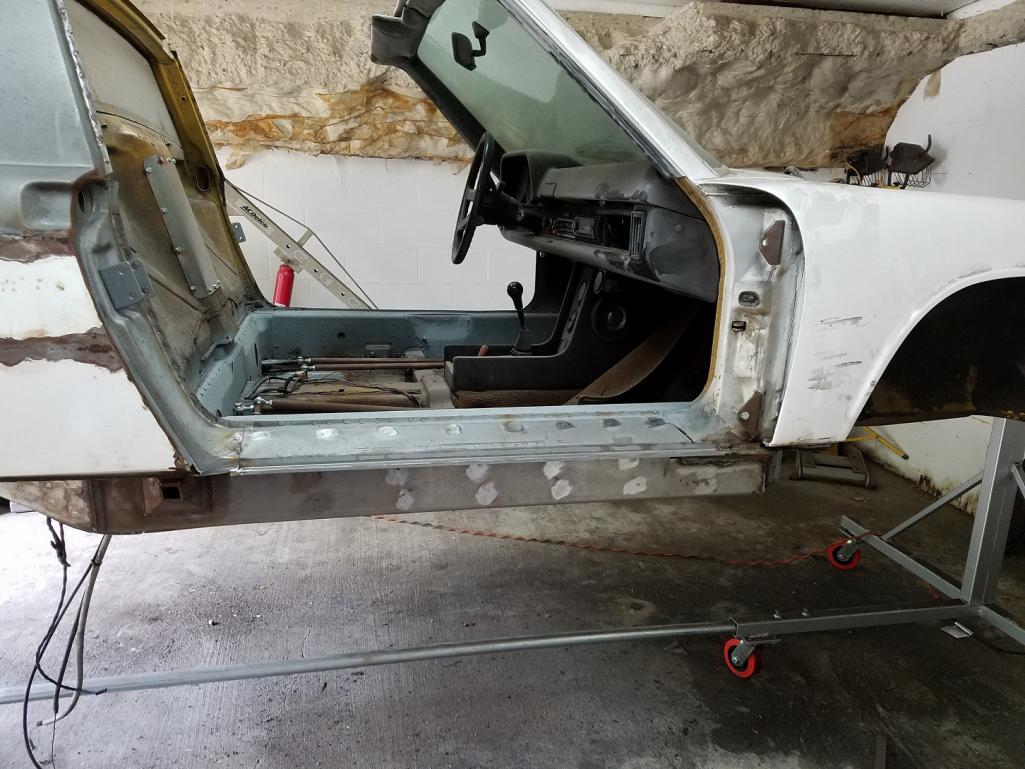
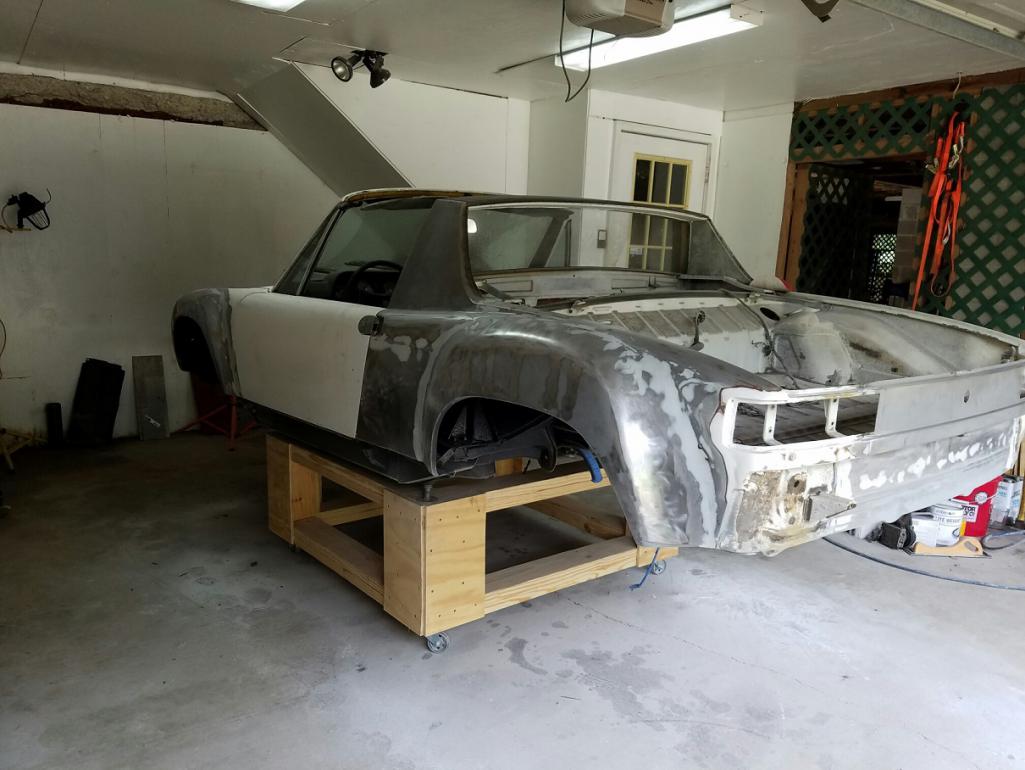
The driver’s side inner rocker has a very small crack just ahead of the jacking post…I’ll replace this inner long part as well.
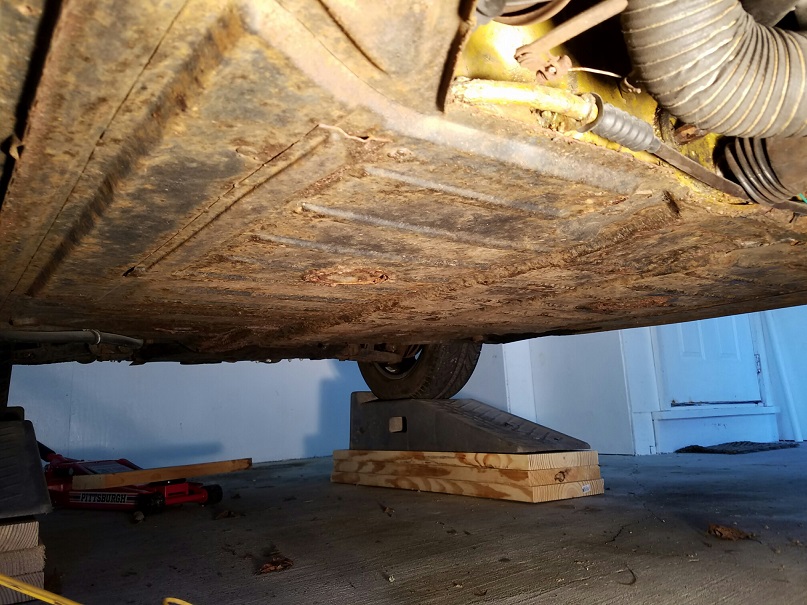
The rear trunk has surface rust, but, no holes. Lots of bondo from a previous owner on the lower rear cross panel…I’m assuming the car had minor rear end collision damage in a past life…nothing really ugly from underneath. The underside of the rear trunk is actually in really good shape considering these cars were never undercoated.
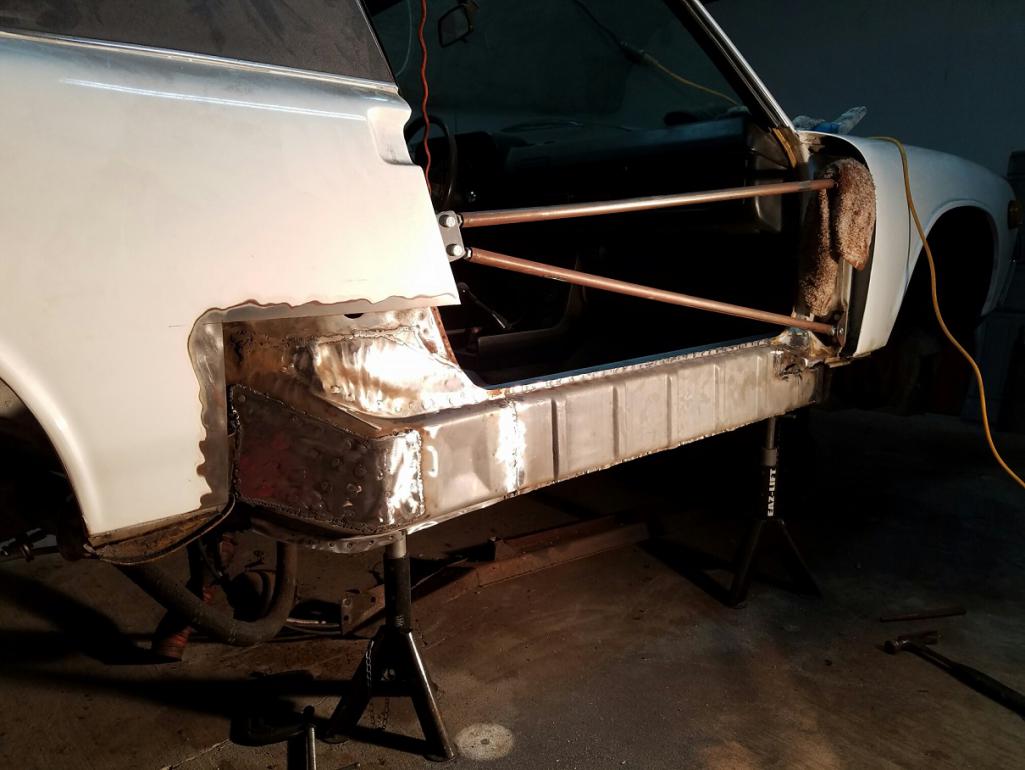
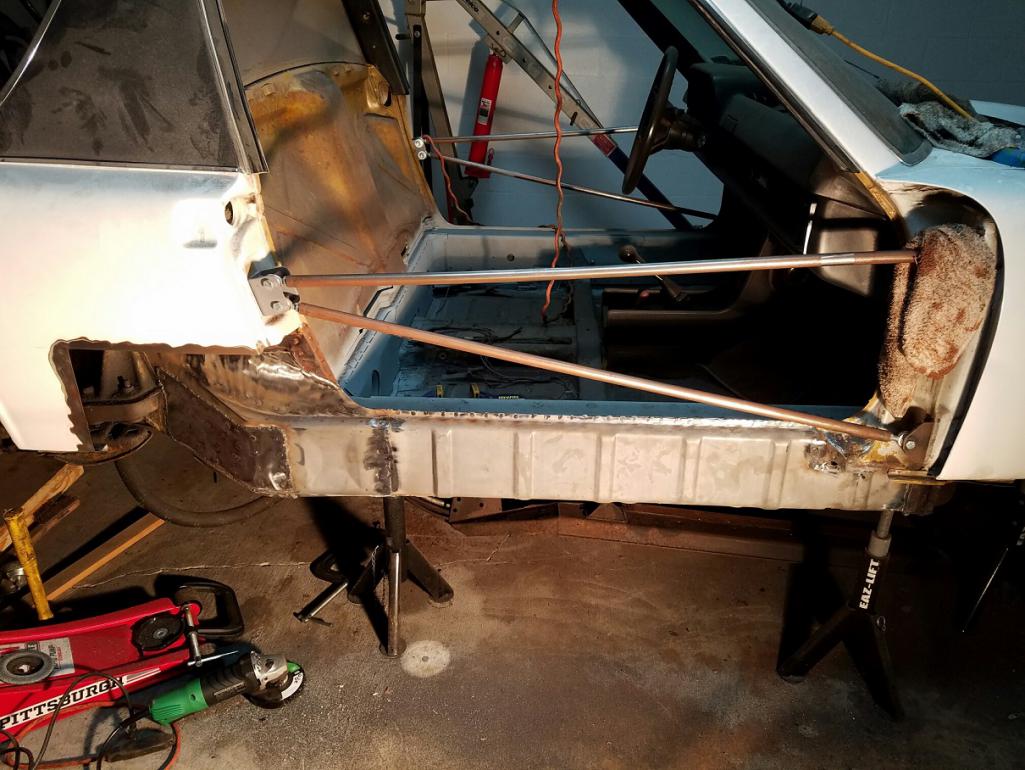
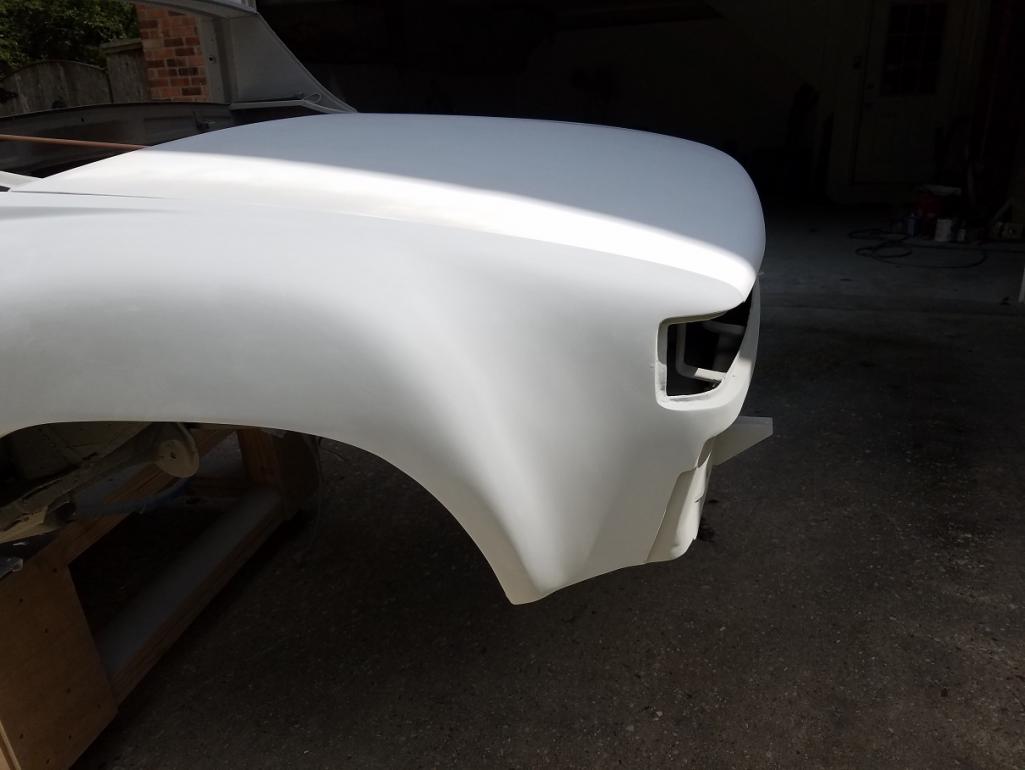
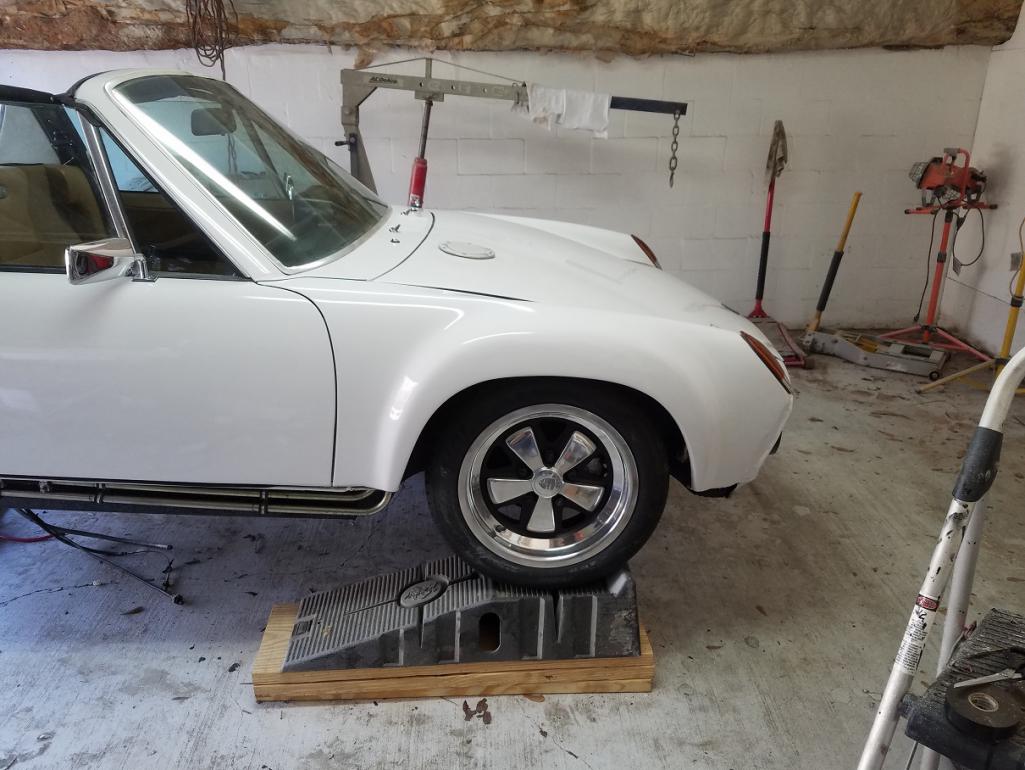
The original bumpers were painted black…I installed the chrome bumpers while I was still living in Ohio.
The front half of the car is in great shape…no issues in the trunk area (I installed the oil cooler here 6 years ago), no issues inside the fenders, nor the headlight buckets.
The front cowl/windshield support is also in great shape.
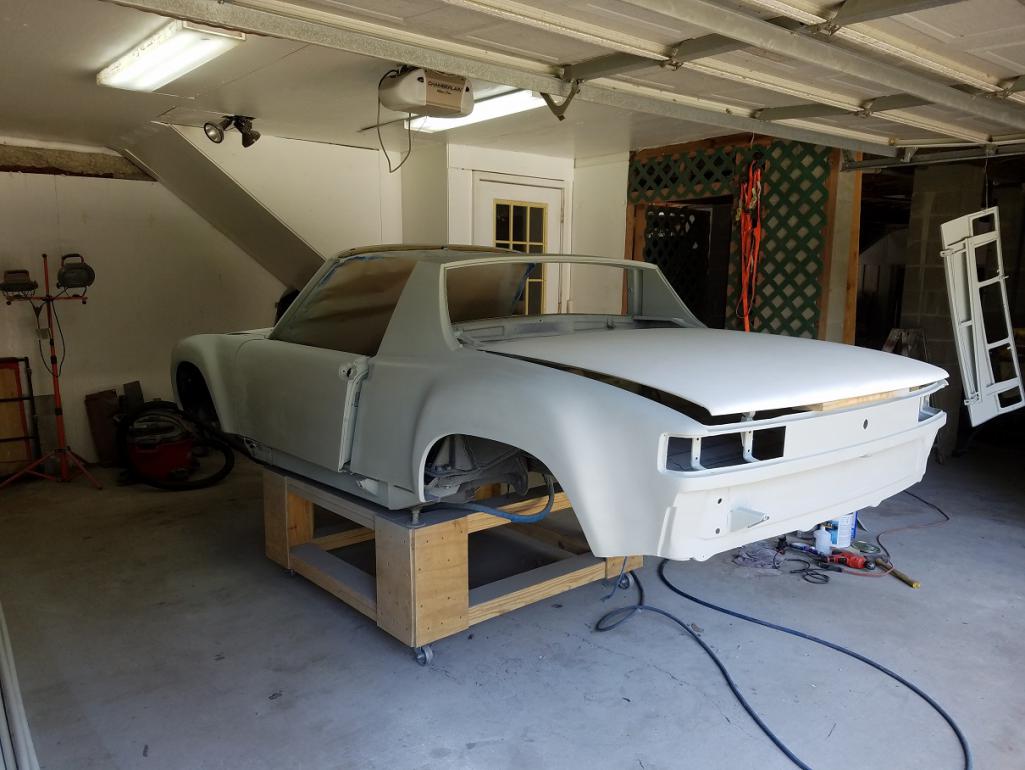
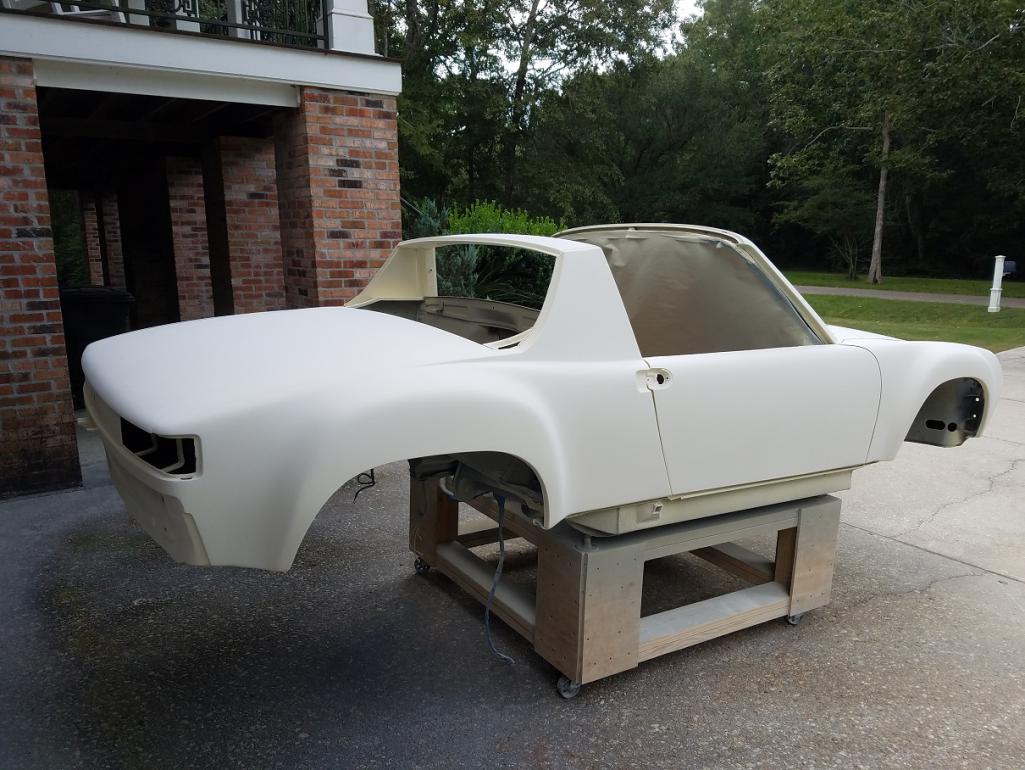
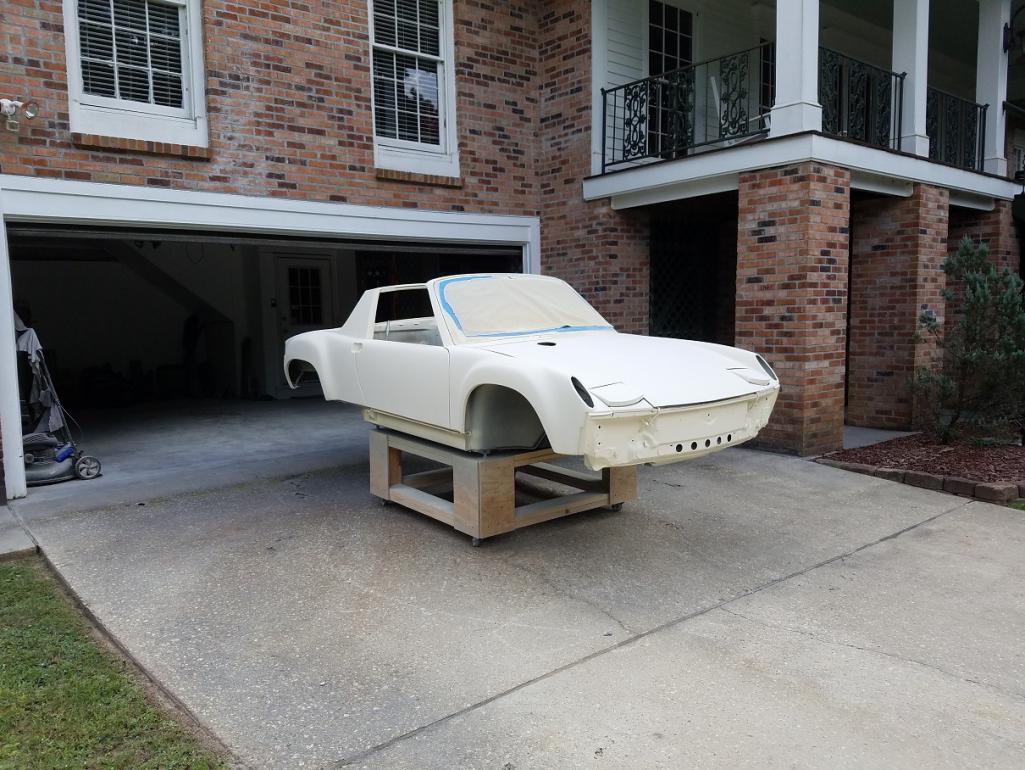
Yeah, some of the pictures look funny…the car’s original paint code is L 97 H (Gold Metalic)…a previous owner went with white…I’ll likely keep it white.
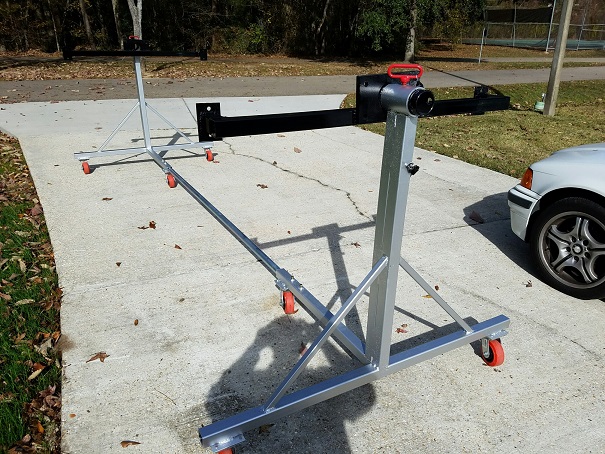
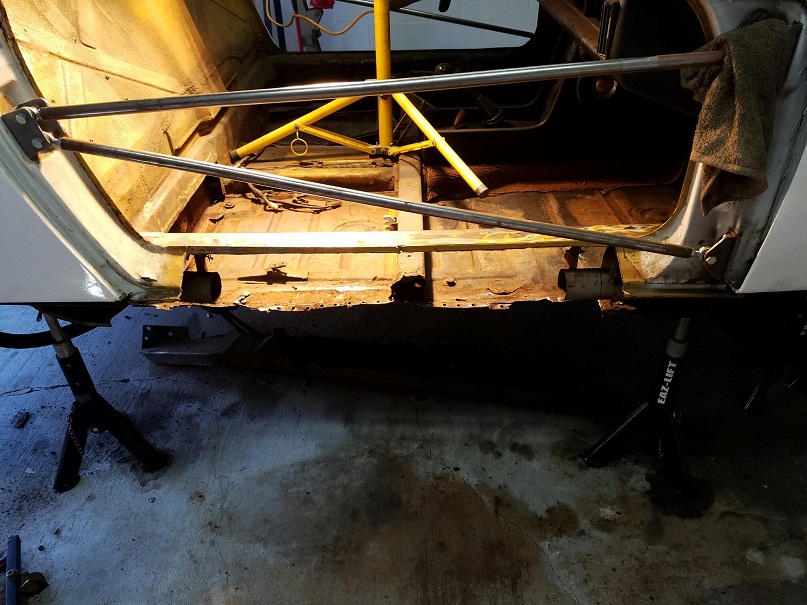
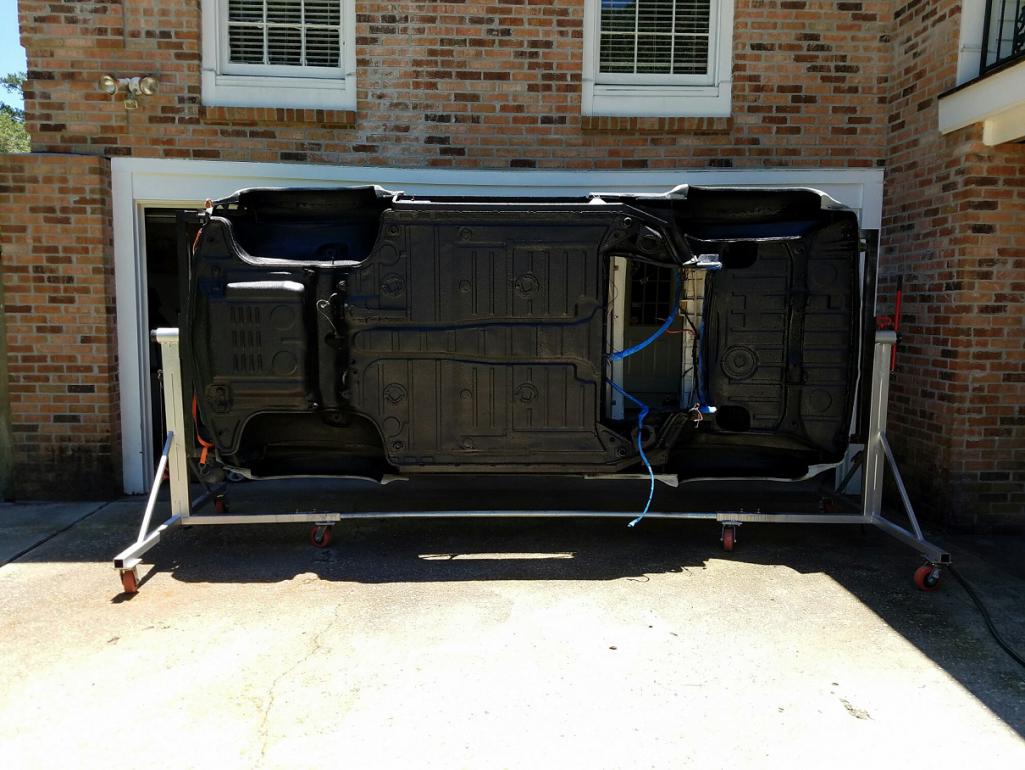
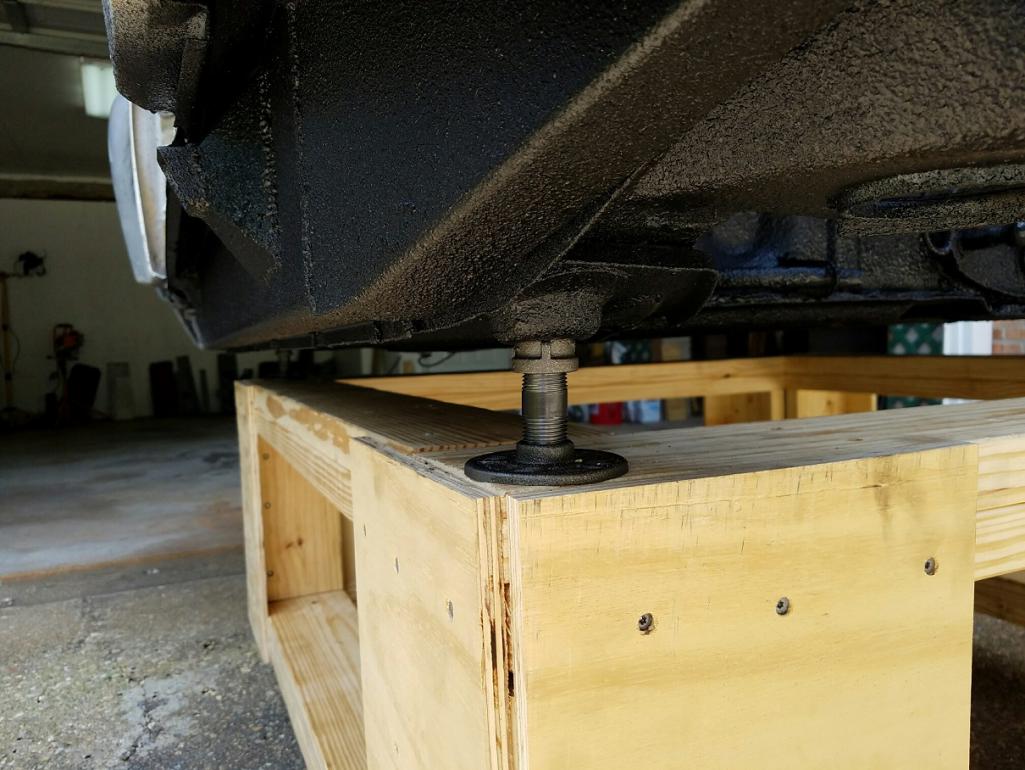
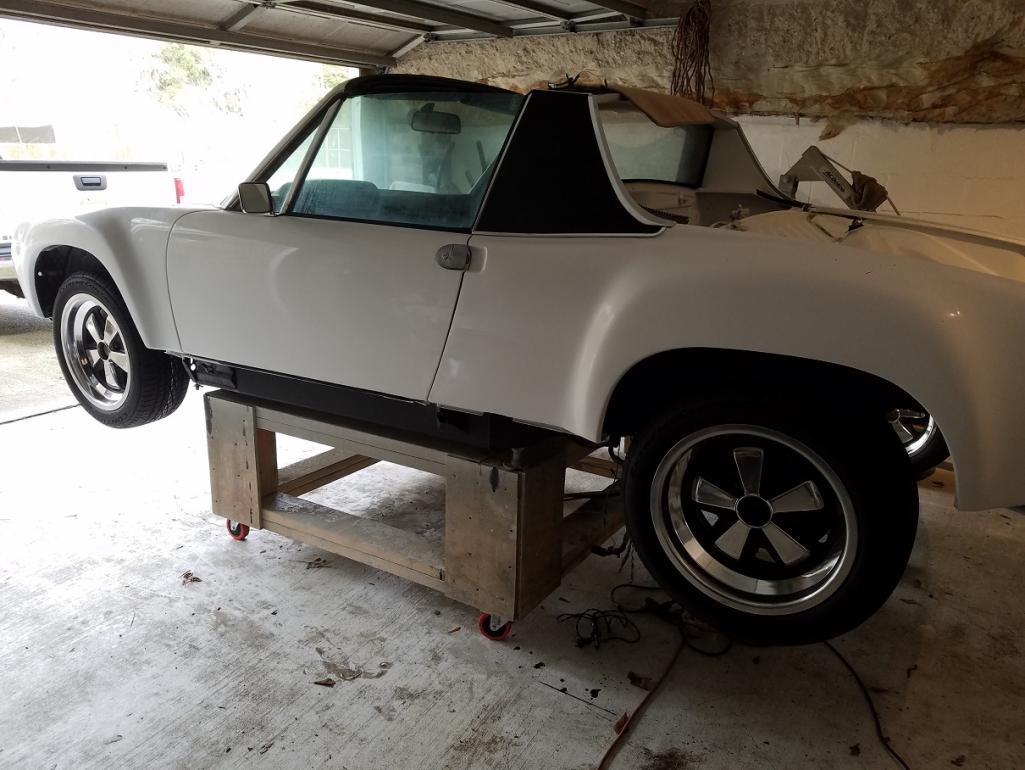
I’ve built my rotisserie, but, for now, I’m not planning to use it for the replacement of the structural longs (and the rear cross panel)…it’ll help when I do some media blasting after the structural work is done.
Overall, I’m pretty pleased with what I’ve found (or haven’t found!) so far.
Replacement panels have been ordered from Restoration Design as well as the inner long stiffening kit and GT rear suspension stiffening kit from Maddog Motor Sports. I’ve been sitting on the reproduction GT Flares from AA for about 3 months now as well as the 16” (7” & 8”) polished reproduction Fuchs from Maxilite Wheels.
Overall, I’m pleased with the starting point of my latest project!
Attached image(s)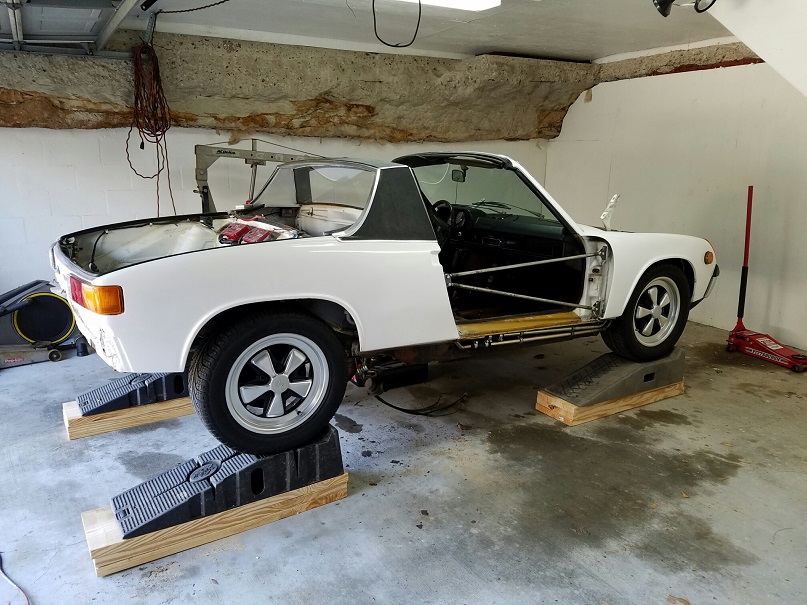
Posted by: mb911 Dec 6 2019, 03:10 PM
Cool project..
Please note those heat exchangers have proven to not produce much heat.. Ask @http://www.914world.com/bbs2/index.php?showuser=19195 and many others..
I admire your persistence with this project.
Posted by: TravisNeff Dec 6 2019, 03:14 PM
Smart thinking with the door braces and going right to the rotisserie. If I had known what kind of extra work I was going to have to do, I would have done the rotisserie right off the bat. Live and learn..
Posted by: burton73 Dec 6 2019, 03:51 PM
Looks like the right long was reworked at some time. Ck the bottom of pan with an awl. With the pan, the way it looks it may be thin there and you would want to address that.
Looks pretty good IMHO. There are guys here that will joke with you as leaving the color GOLD. They like them, but it is always best to repaint in the original color.
I painted my 6 in original yellow and I am sorry I did not paint it blue.
Welcome to the world.
Bob B

Posted by: mepstein Dec 6 2019, 03:54 PM
The PO welded the reinforcement on the right side because that's the side that rusts first.
Good luck with your project.
Posted by: 9146C Dec 6 2019, 04:13 PM
Thanks for the kind words and encouragement!
I'm still thinking about the Brad Mayeur reinforcement...I'm assuming that's what's currently installed on the pax side. I will remove it and do a proper repair on the inner and outer long (clam shell).
The car as I drove it, did not have any flex...both doors opened and closed smoothly/freely. I'm wondering if I should re-install a Brad Mayeur kit after I fix the longs for additional "firmness"??? I actually like how it bolts into the rear suspension...must be some undocumented benefit from that.
I've already purchased the inner long strengthening kit.
I'm not likely to be swayed by the "purists" about the final color...the car is so far removed from when it left the factory, the subject of "originality" seems like a moot point for a tribute build...at least for me.
Thanks again!
Posted by: Cairo94507 Dec 6 2019, 04:50 PM
Looks like a nice car to begin with and I say paint it the color you want. 
Posted by: 9146C Dec 14 2019, 03:49 PM
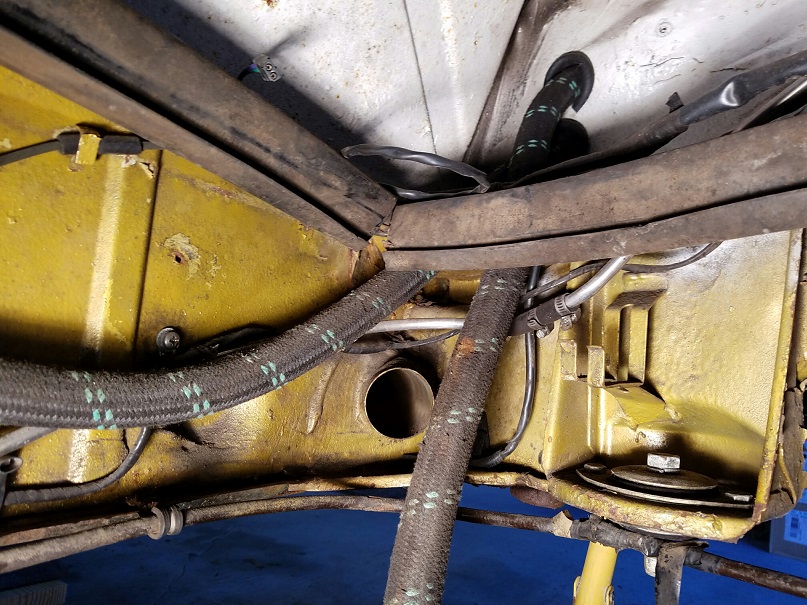
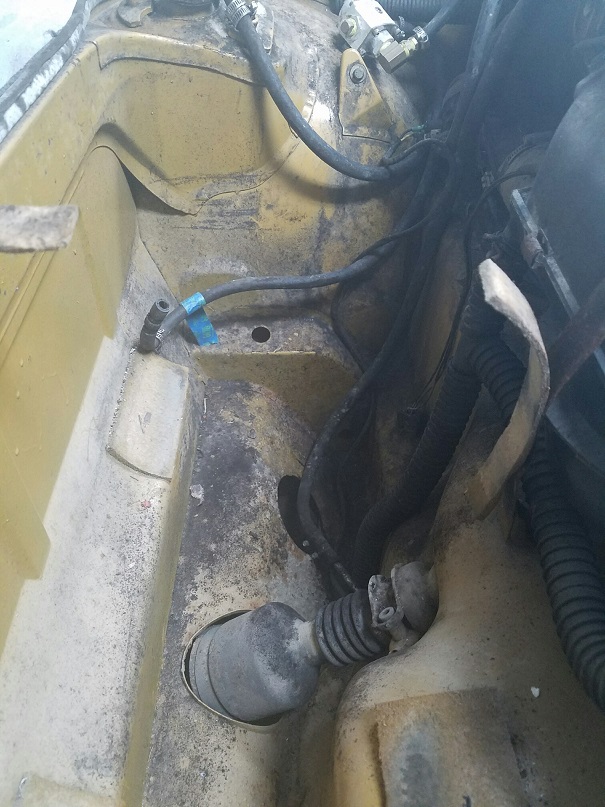
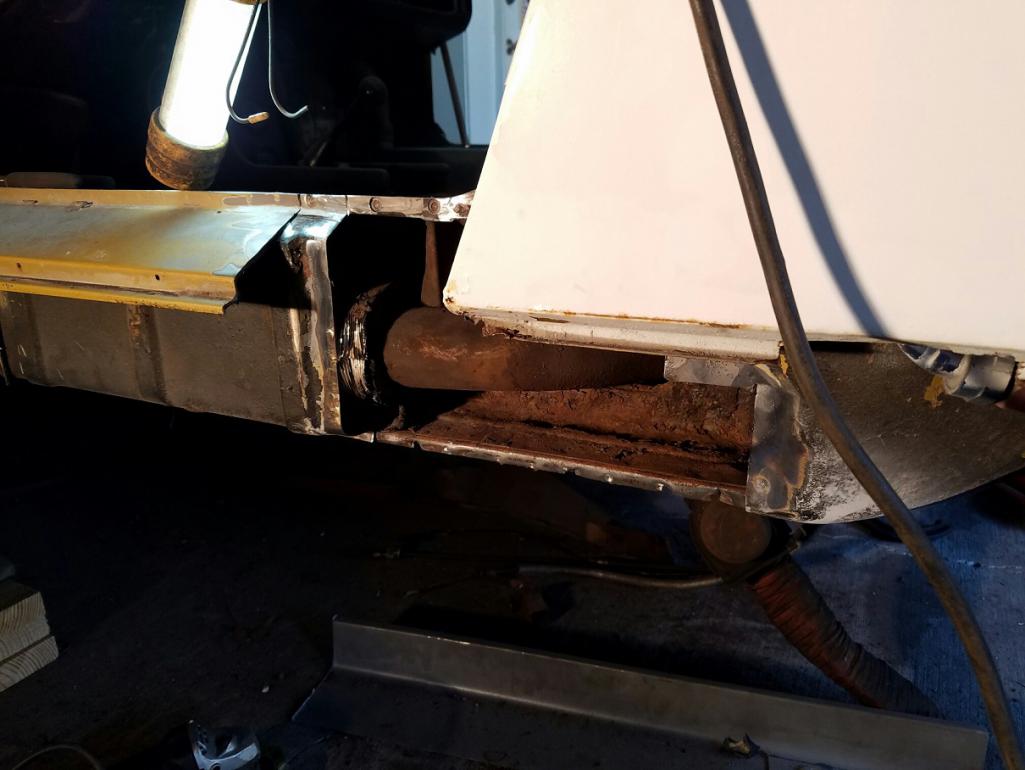
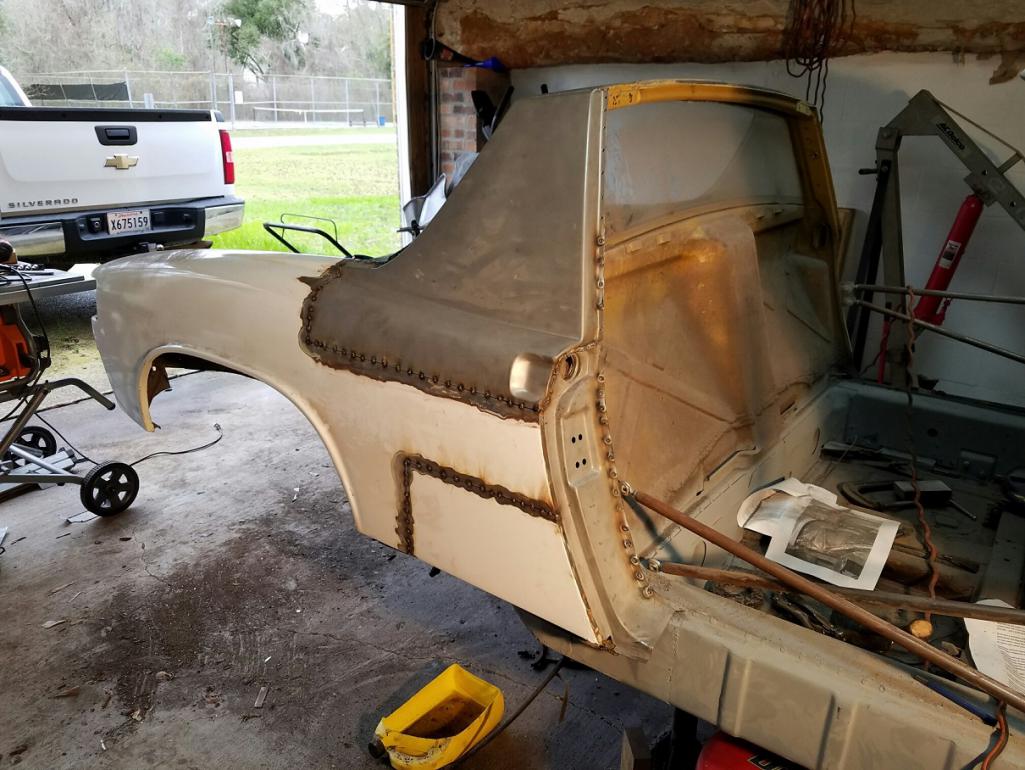
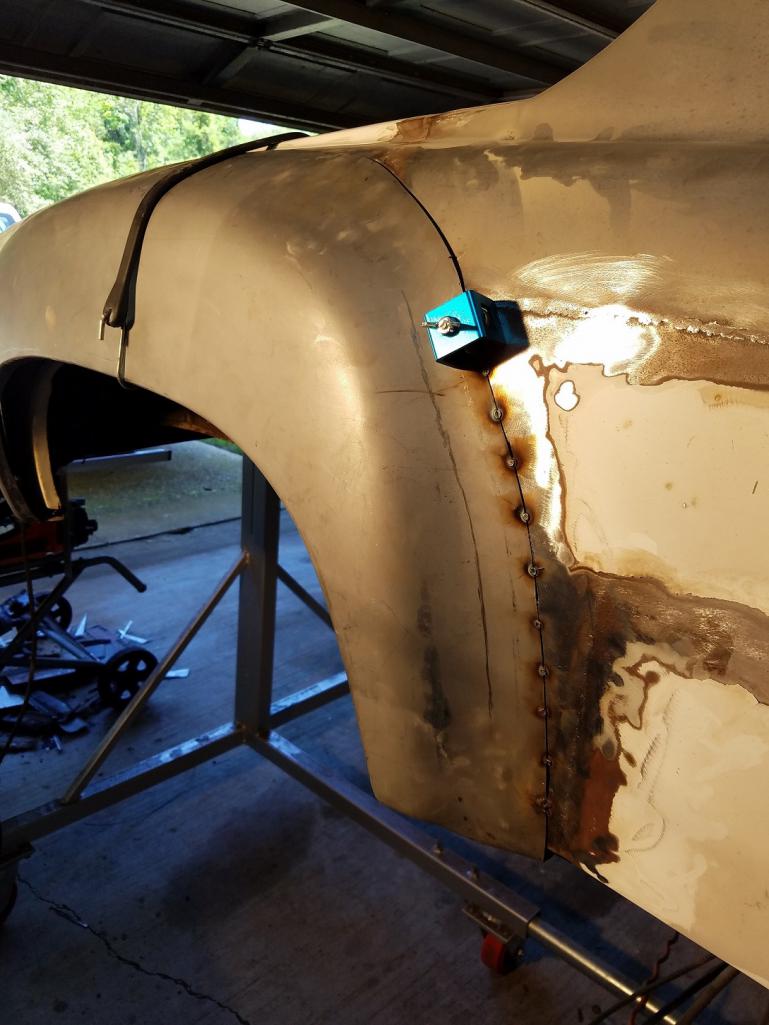
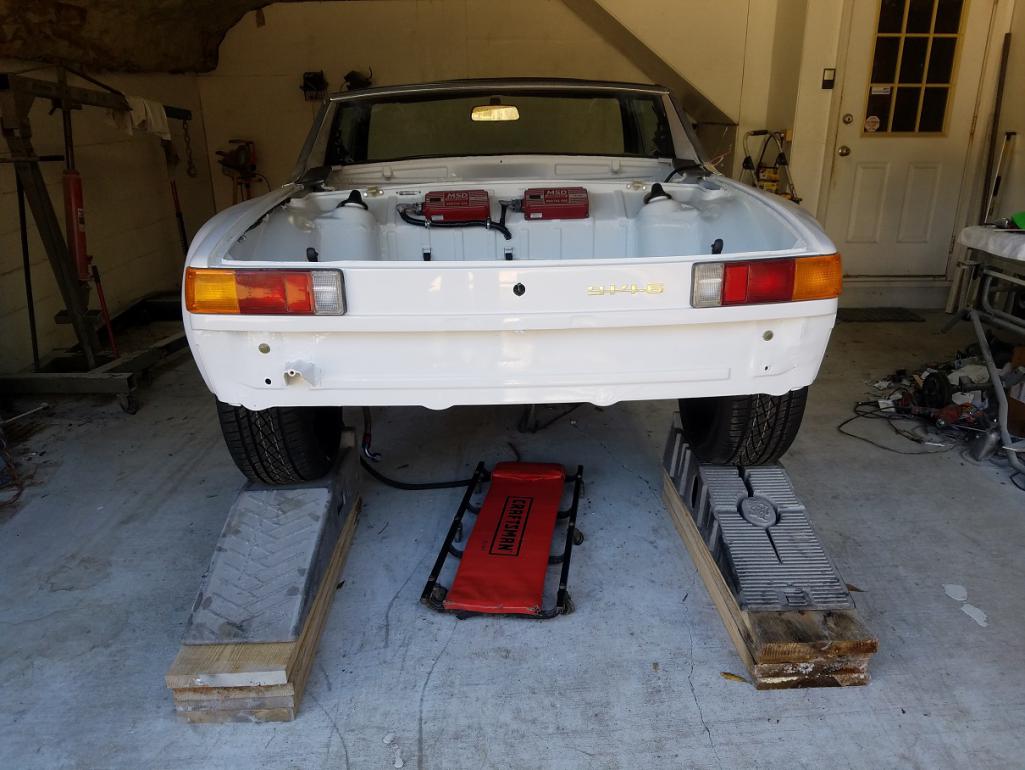
Today, I pulled out the gas tank and the external oil lines (PITA job!).
With the oil lines removed I could get some better pictures inside the fenders...the right front looks really good from the fender well side.
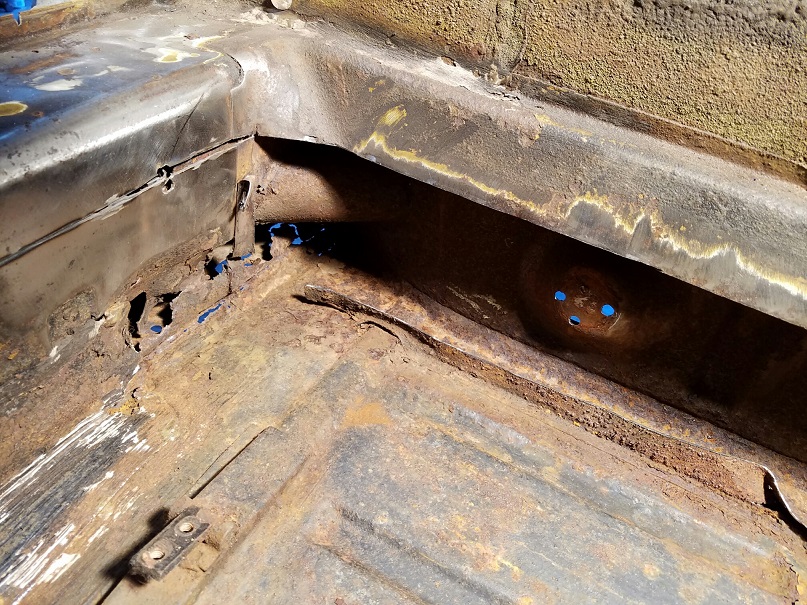
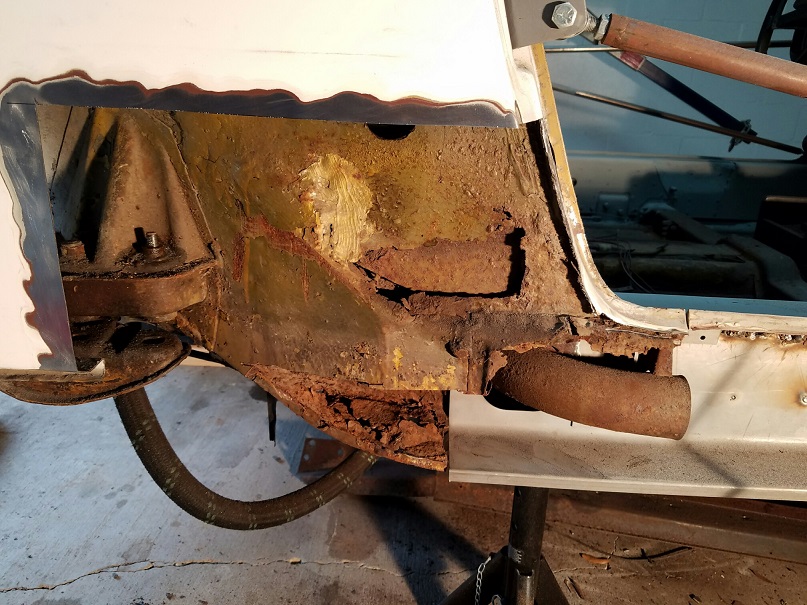
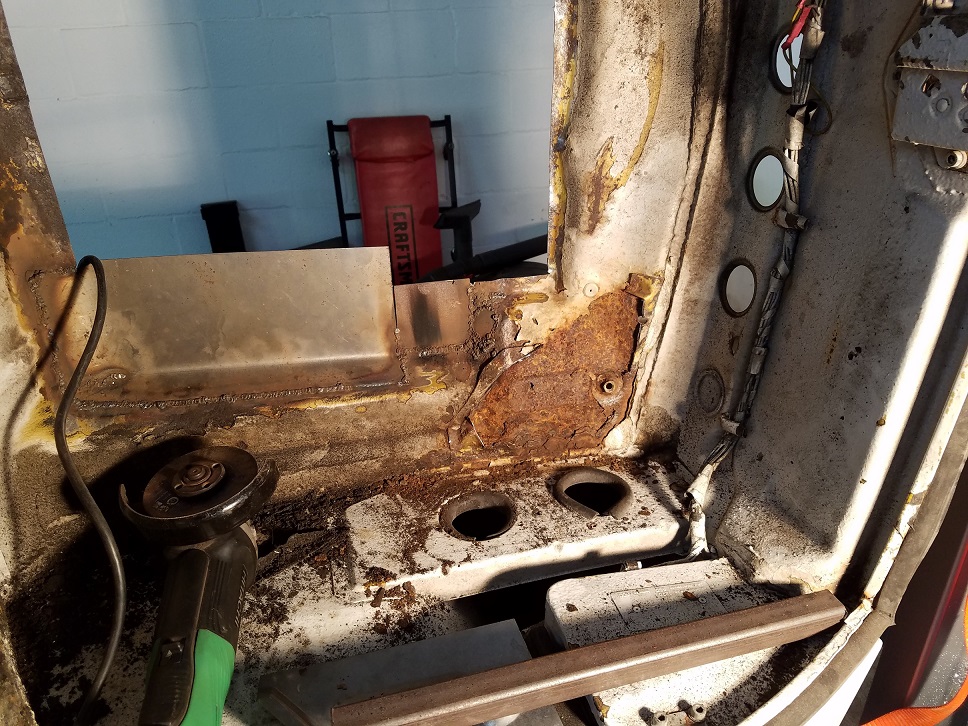
Upon closer inspection, it looks like there was a previous patch completed in the hell hole area...all metal on the inside, but, visible rust inside the right rear fender after the oil lines/thermostat were removed.
Pleased by what I don't see on the fender well side of the door jam area!
This week, I hope to get the previous longitudinal repair (Brad Mayeur kit) removed to see what lies beneath.
All my new body panels should be delivered next week as well (including panels to complete longitudinal repairs).
So far, so good...
Attached image(s)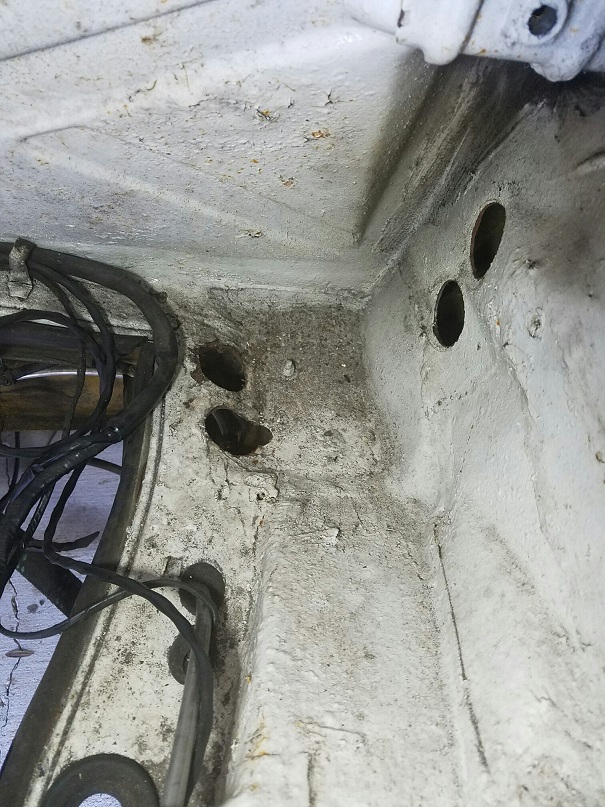
Posted by: Superhawk996 Dec 14 2019, 06:09 PM


Glad to see one from the midwest being saved before the tin worms completely devour it from the inside out. Even when you can't see them, they are still at work!
Overall looks pretty decent but, dang, these things just consume themselves.
Dig in and get it done!
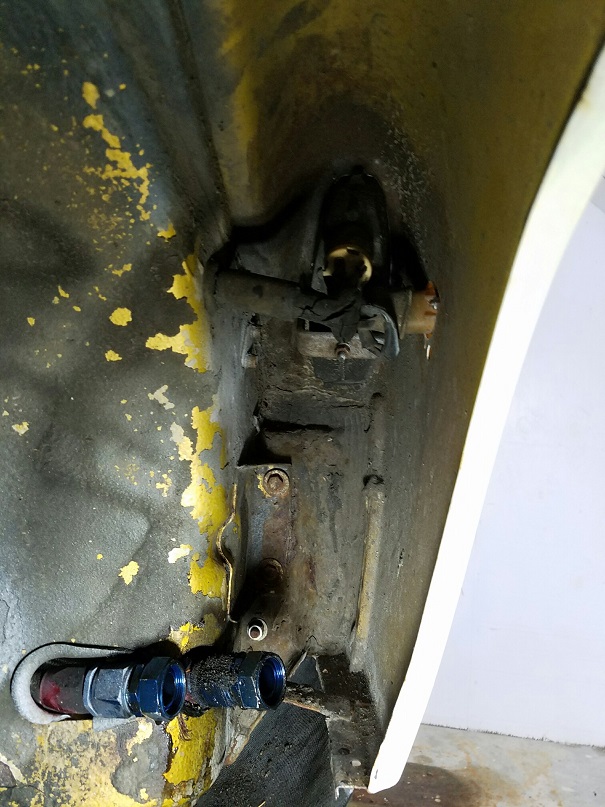
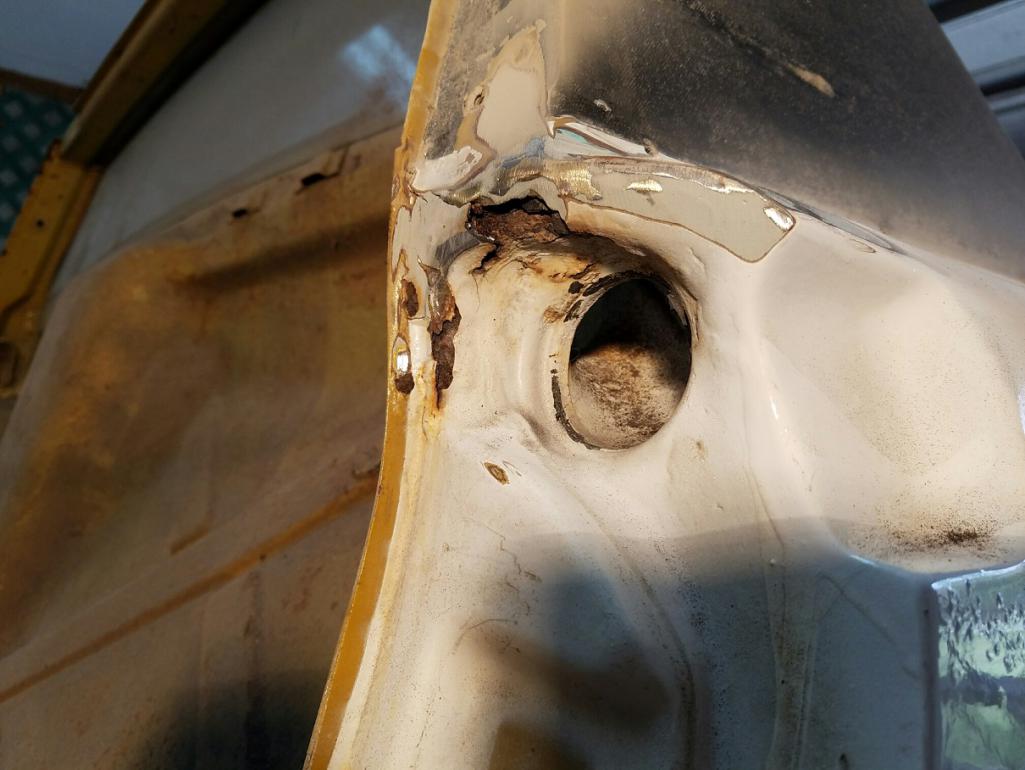
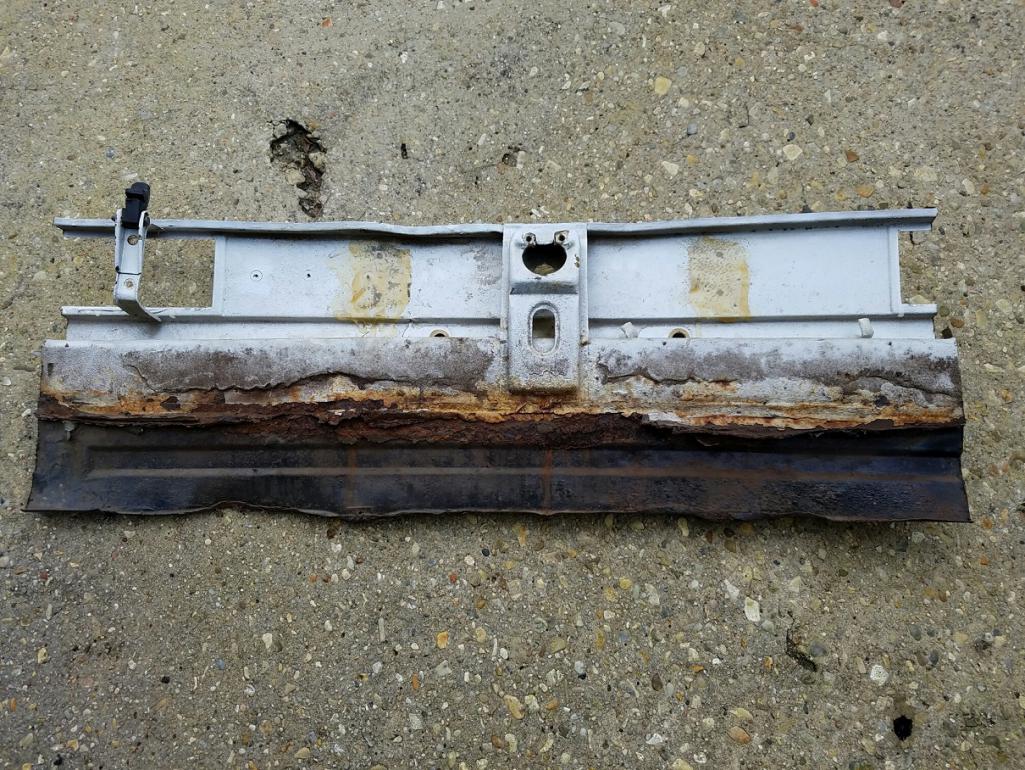
Posted by: 9146C Dec 16 2019, 12:21 PM
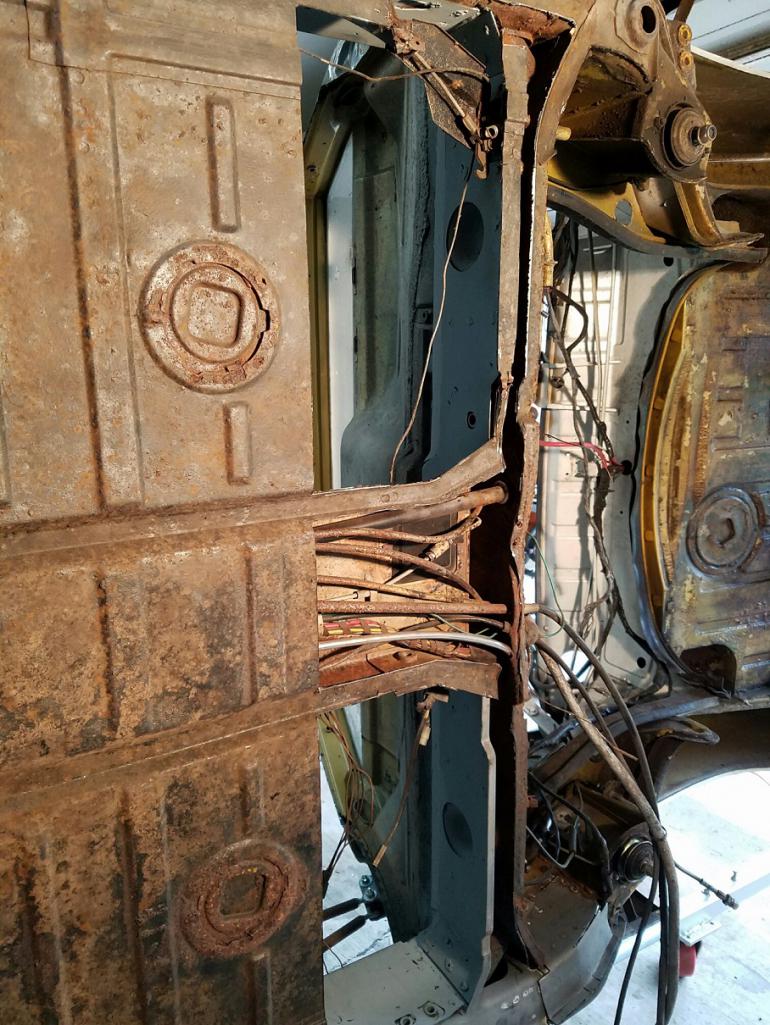
Tin worms found!!!
Already had the two clam shells for the longitudinal repair on order from Restoration Design...looks like I'll have some additional repair on the inner wheel house as well.
Attached image(s)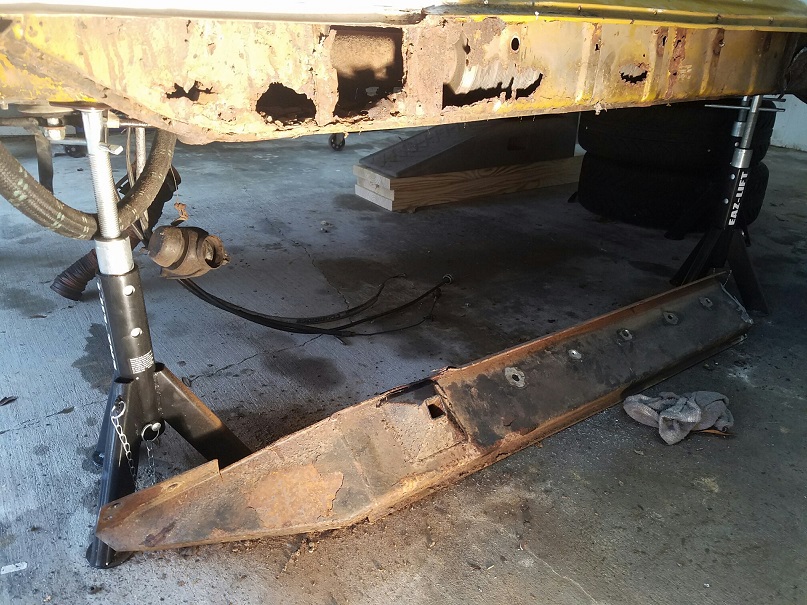

Posted by: 9146C Dec 17 2019, 09:33 AM
Santa arrived early today...replacement panels from Restoration Design, re-inforcement panels from Maddog Motor Sports and front anti-sway bar from Tarrett.
Yesterday, placed a second order with RD for the wheelhouse piece as well as the rear half floor pan (if required).
Now the fun begins!
Attached thumbnail(s)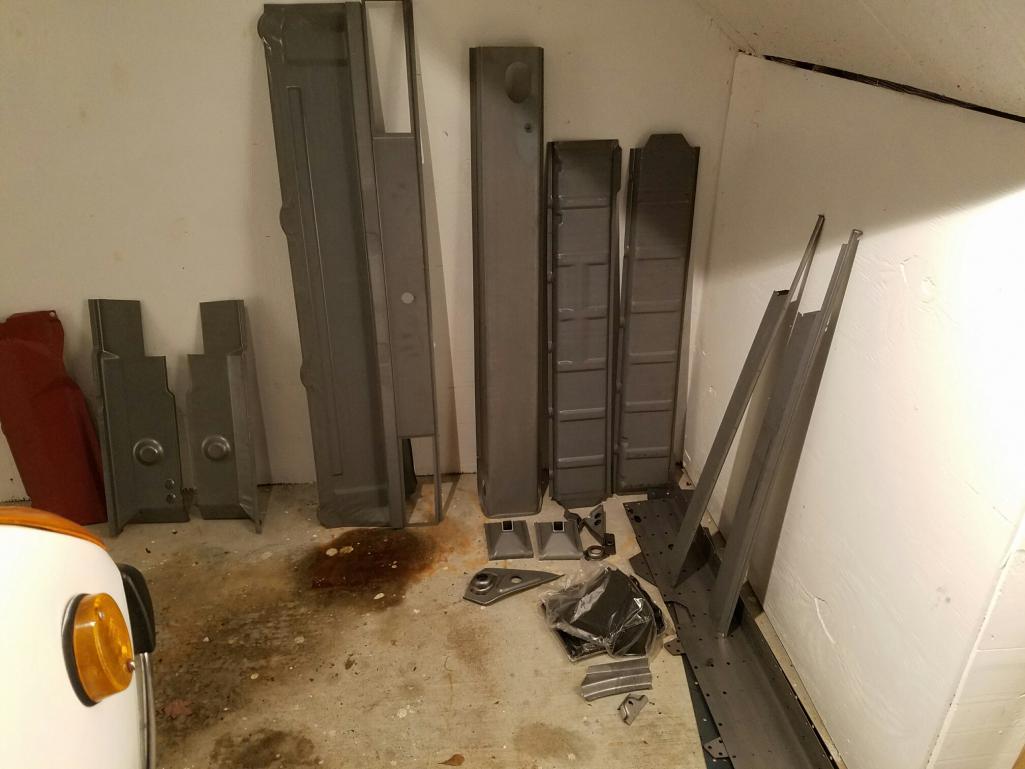
Posted by: Cairo94507 Dec 17 2019, 11:12 AM
Yikes! That long is definitely toast. Glad to see the new parts- that is going to be sweet when done.
Posted by: 9146C Dec 17 2019, 12:37 PM

Yikes! That long is definitely toast. Glad to see the new parts- that is going to be sweet when done.
I was a little surprised by the amount of rust I found in the passenger long...considering how little rust I had found up to that point.
Thanks!
Posted by: 9146C Dec 19 2019, 01:36 PM
Removed the inner rocker panel...you have to wonder if Karmen used any rust inhibitor when these cars were assembled.
The passenger long is also in pretty bad shape.
It'll be interesting when I pull off the driver's side inner rocker panel.
The right inner engine long looks to be in pretty good shape and the outer mating piece (on order) is pretty solid metal ahead of the suspension console (thankfully).
The picture I took last week inside the rear fender well (hole) ran directly into the longitudinal...good thing this car has been indoors in the years I've owned it...and fair weather driven only...suspect the long would've been a lot worse with rain water intrusion.
I'll likely have to remove a section of the rear fender/quarter panel and revisit the previous repair on the hell hole area/hole I found last week, but, thankfully it's not as bad as I was expecting.
Attached image(s)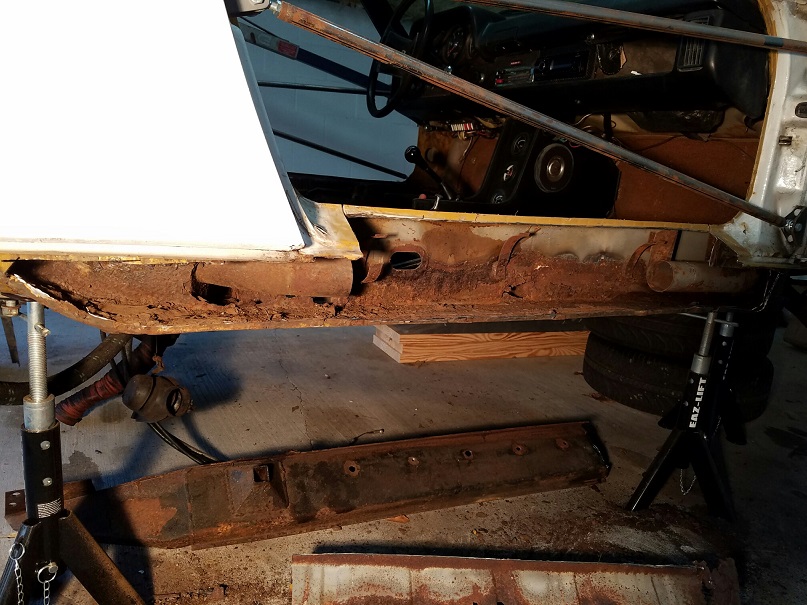
Posted by: dr914@autoatlanta.com Dec 19 2019, 02:17 PM
keep up the good work saving that 914! I had actually designed the 914 rocker clam shells years ago to go over the rusted parts just to get a rusty 914 a few more years of use. Later people were using them to strengthen the chassis. However to use for this purpose it is still necessary to install the chassis stiffening kit, and to know that when you clamshell, the prep on the clamshelled piece needs to be very thorough as not to trap rust. Finally there is some fitting required of the rocker panel cover and the sill plate as now the metal in this area is thicker.
Posted by: 9146C Dec 19 2019, 02:29 PM
Thanks for the feedback George!
Thanks, Rob
Posted by: 9146C Dec 30 2019, 03:19 PM
Well, Christmas is over and time to get back to work...
As I was starting to remove the passenger long, I came across a previous patch for what must have been pretty serious cancer 20 years ago...small metal patches brazed in place to cover the holes going through the passenger long and conveniently covered with tar!!!
I cut out the rust today and removed the cancerous section(s). I chickened out a little...originally, I was planning to splice in a complete section of the replacement longitudinal...not having a frame rack made me re-think that approach...I kept the upper portion of the long for additional support while I repair this section.
Good thing I had already ordered the short rear pan section...pin-holing in the area around the area of the hell hole. I will be replacing at least the rear passenger section of the floor pan.
Also removed the inner firewall on the passenger side...the outer firewall from the inside is in very good condition!
(Hopefully this surprise doesn't await me when I remove the inner long on the driver's side!)
Attached image(s)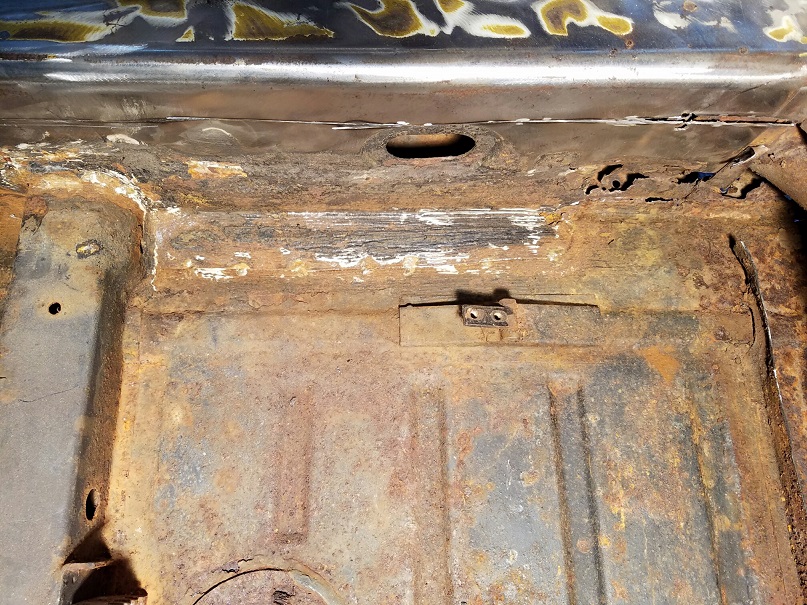
Posted by: 9146C Jan 16 2020, 02:35 PM
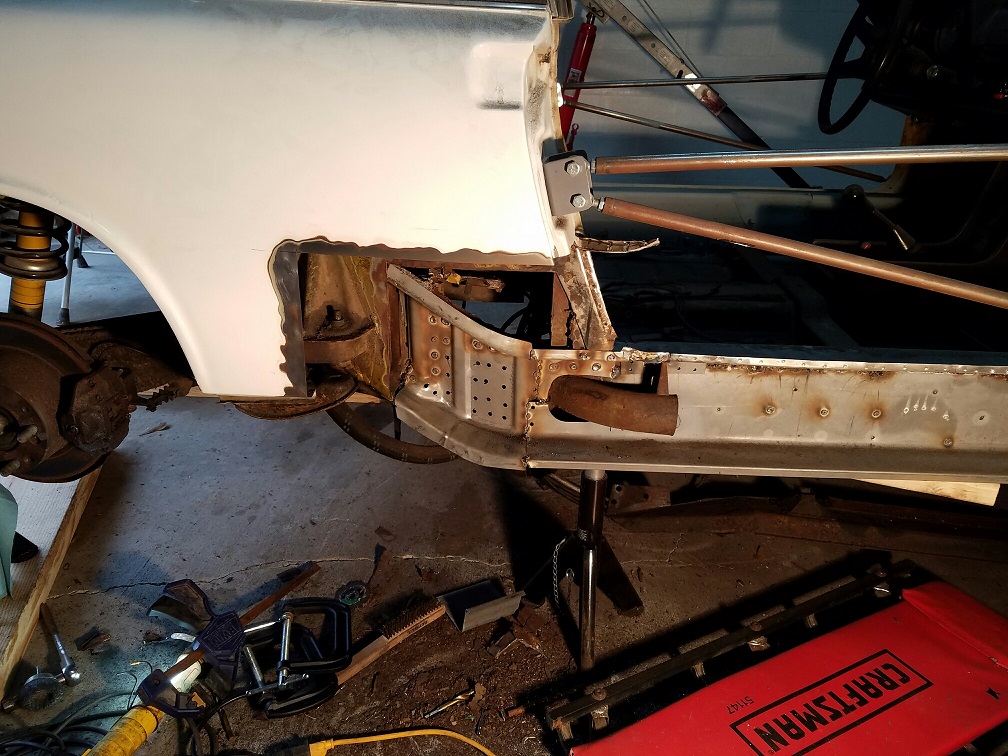
Making a little progress...
Got the replacement passenger longitudinal and right rear inner firewall panels welded in and added the Maddogs Motorsport Chassis Stiffening kit.
Measurements unchanged...thankfully!!!
Attached image(s)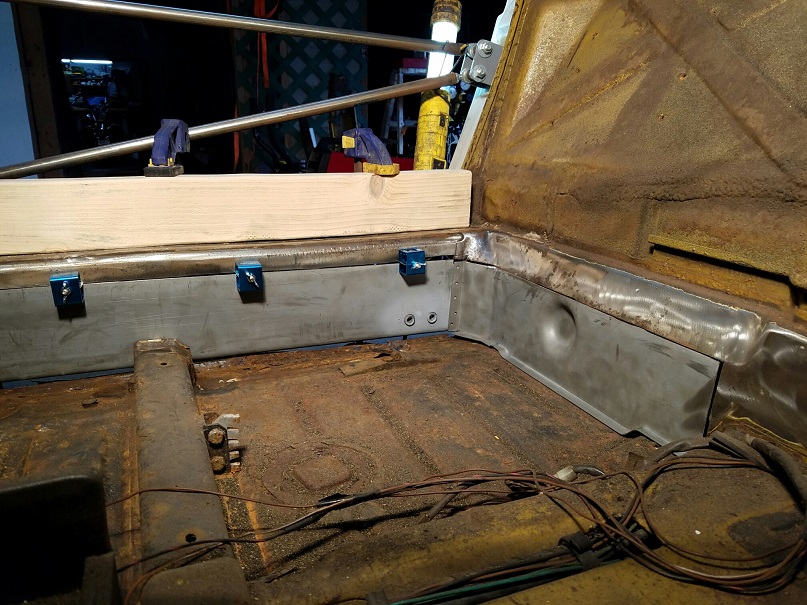
Posted by: mbseto Jan 17 2020, 12:13 PM
Distinct improvement!
Posted by: 9146C Jan 31 2020, 02:10 PM
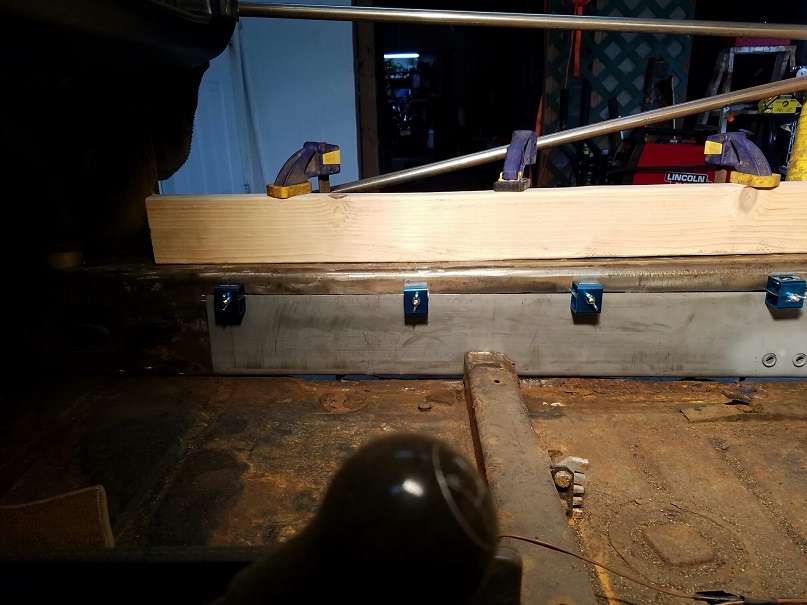
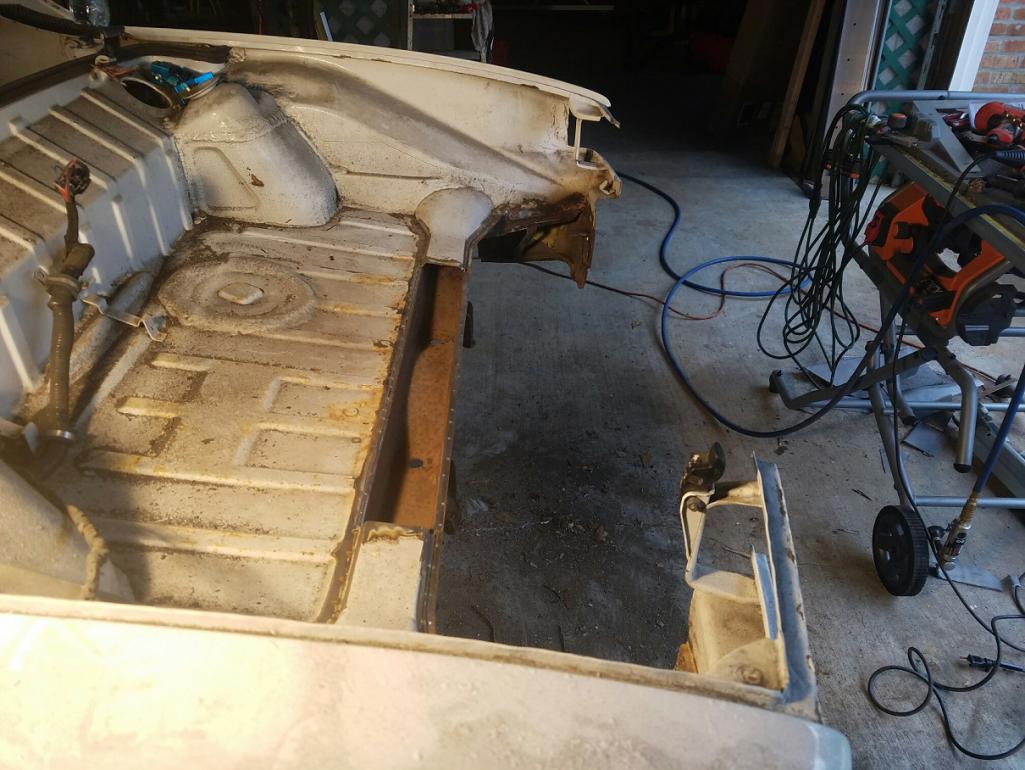
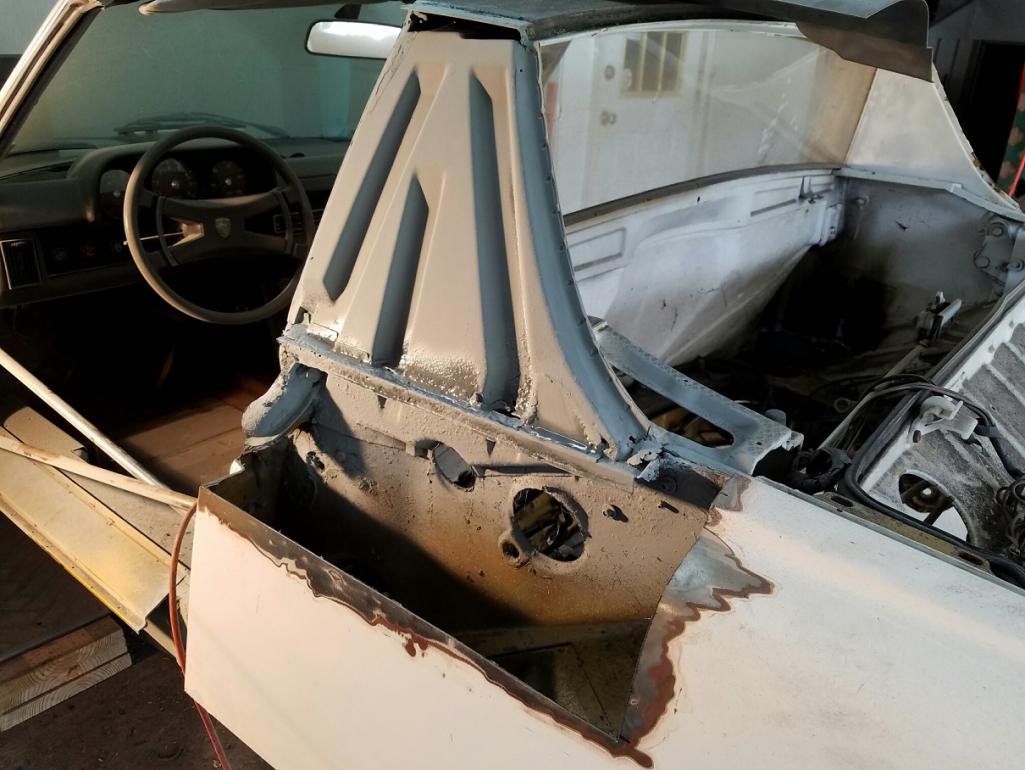
Hell hole repairs underway. Still need to finish up some welding and clean up the spot welds (not the prettiest repair yet, but it will be durable!), but, the worst looks to be done.
The section of the inner (engine bay) longitudinal has been spliced into place and the section of double wall on the backside (engine side) has been replaced/completed. Fortunately, I was able to save a part of the inner double wall to help this repair of the inner long piece. (Tough decision to either remove the consoles and replace more metal with the replacement panels, or splice in a smaller section, as I eventually choose.)
For added piece of mind, I added a "bridge piece" to secure the spliced inner longitudinal section onto both sides as well as the bottom, inner double wall overlaps the joint between the passenger longitudinal and the inner, curved longitudinal on both ends.
Right now, the double wall on the engine bay side is tack welded in place to the existing double wall...completing this repair will be much easier on the rotisserie.
Attached image(s)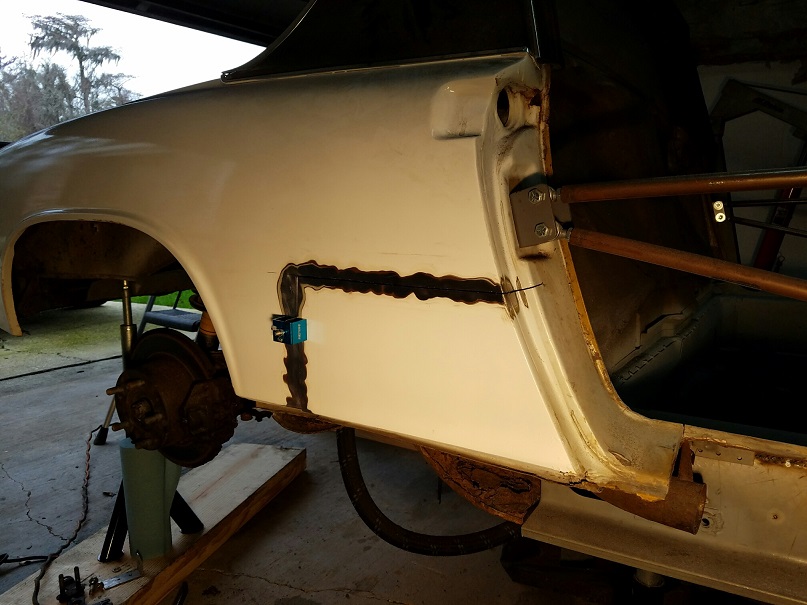
Posted by: 914forme Jan 31 2020, 08:56 PM
Wow thanks for jumping in on this one and saving it. ![popcorn[1].gif](style_emoticons/default/popcorn[1].gif)
Posted by: 9146C Feb 1 2020, 08:06 AM
Thanks for the feedback...and encouragement!
I have to remind myself that this originally started as a wide body fender modification project...never expected it to turn out like this. No regrets though...thankfully, replacement panels are available which makes the job sooooo much easier! (My original Restoration Design order has been followed up with 3 more.)
Posted by: 9146C Feb 6 2020, 03:57 PM
Coming together...
Attached thumbnail(s)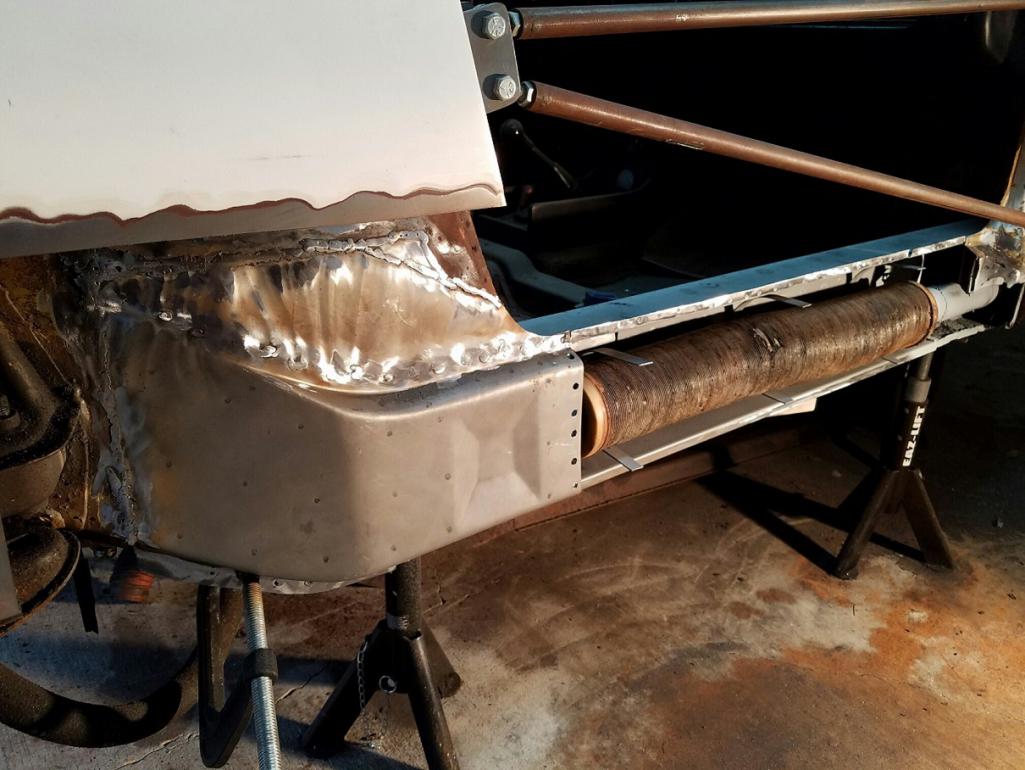
Posted by: 9146C Feb 17 2020, 04:11 PM
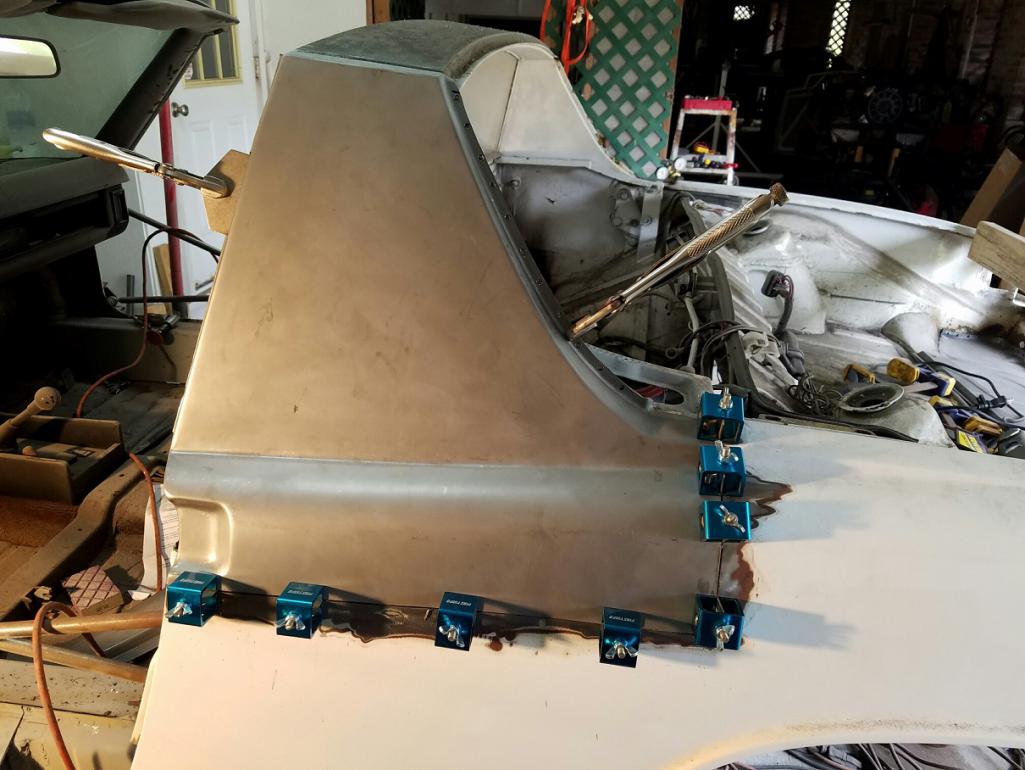
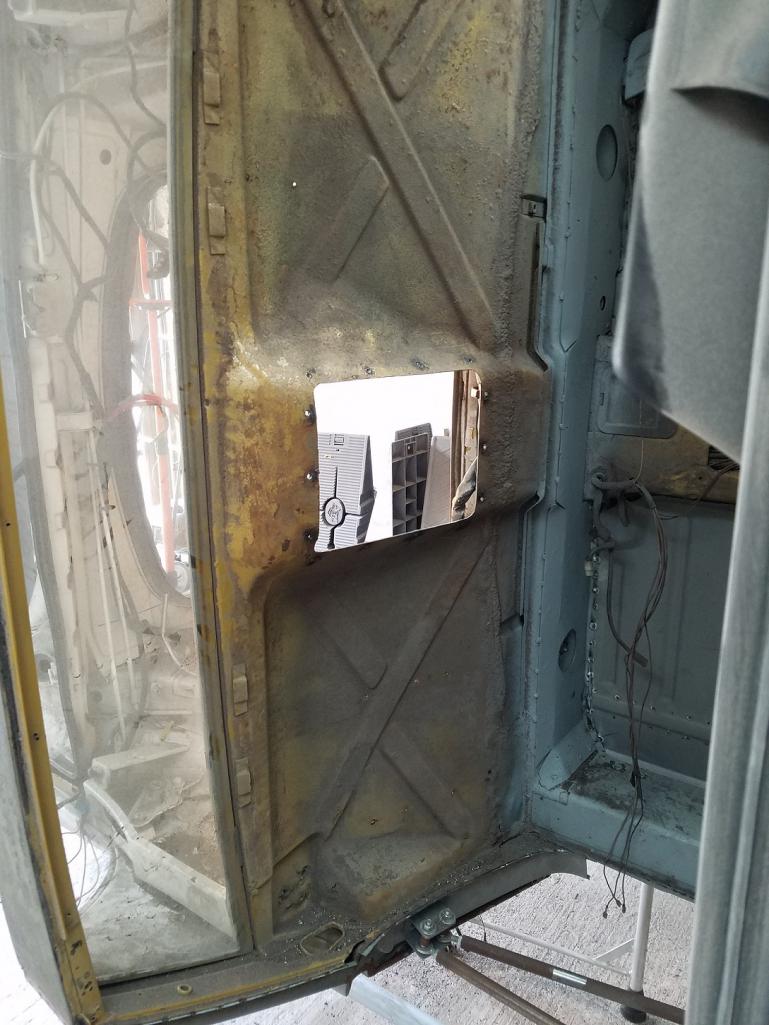
Found another Easter Egg from a previous owner...working on the driver's side long, I started to remove the paint (actually bondo!) from the lower part of the left door jam...lo and behold, a previous patch was brazed in place/bondo'd over.
Completed the repair on the driver's side jack post area...fortunately, the rust was confined to the outer part...with a boroscope/endoscope, there were no additional issue with the driver's long.
Started the rear trunk repair as well, cutting out the old (especially the previously bondo'd rear cross panel), ready for the replacement trunk floor and cross panel.
Attached thumbnail(s)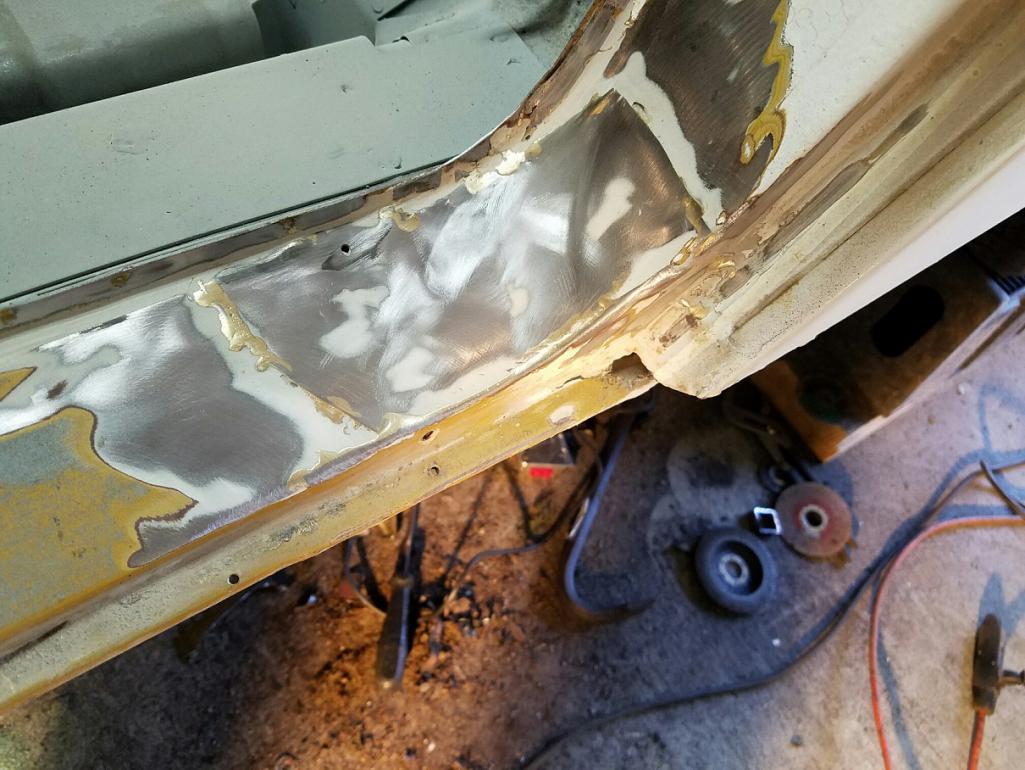
Posted by: 9146C Feb 18 2020, 04:04 PM
...and another Easter Egg!!!
I knew there was bondo around the passenger door handle. As I started to take off the paint, I hit a layer of about 3/16" thick bondo layer the full length of the sail panel. A previous metal repair had been done on the passenger sail panel in the past.
After removing the panel, the view from the inside showed where/how the panel had been repaired in the past...including a glaring rust hole near the door handle (previously un-noticed during my initial inspection) as well as gold paint that had been sprayed on the inside of the fender well to mask the previous repair.
Had a small patch to complete on the inner sail panel...at least it was in pretty good shape.
Now I'm wondering what the driver's side is going to look like?
Next step is to fit the replacement panel and install the new door jam.
Attached thumbnail(s)

Posted by: bkrantz Feb 18 2020, 08:42 PM
Keep fighting the good fight! Finding botched repairs is at least as entertaining as finding undiscovered rust.
Posted by: 9146C Feb 19 2020, 04:52 PM
Sail panel and door jam tack welded into place.
Attached thumbnail(s)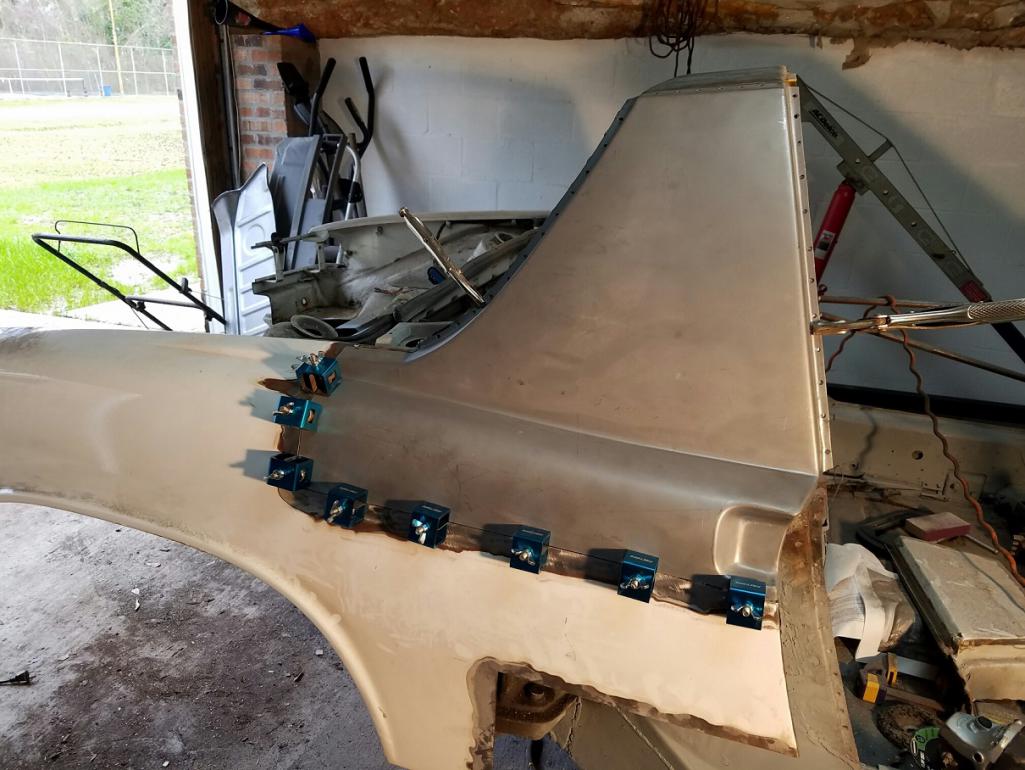
Posted by: tygaboy Feb 19 2020, 06:11 PM
Great job on a very ambitious repair! 

Posted by: 9146C Feb 19 2020, 07:16 PM
Great job on a very ambitious repair!
Thank you! I've certainly been admiring your 914 build as well!
Posted by: bbrock Feb 19 2020, 07:41 PM
Nice work!  Every panel is like a box of Cracker Jacks. There's a toy surprise inside every one.
Posted by: Dion Feb 21 2020, 08:49 PM
Just catching up on this thread, outstanding amount of work you tackled. Well
done. Will be watching your progress
Posted by: bkrantz Feb 21 2020, 09:33 PM
Nice work!
Every panel is like a box of Cracker Jacks. There's a toy surprise inside every one. If by toy you mean cancerous rust and/or botched previous repairs!
(BTW, I agree--very nice work.)
Posted by: 9146C Feb 22 2020, 07:43 AM
Thank you for the comments Gentlemen...much appreciated!
@http://www.914world.com/bbs2/index.php?showuser=23343 and @http://www.914world.com/bbs2/index.php?showuser=20845 , following your projects as well...you've both done great work on your 914 builds...and have helped me in how to tackle my project as well.
Thank you!
Posted by: 9146C Mar 3 2020, 02:15 PM
To quote Yogi Berra..."It's like Deja Vu all over again!"
Why wasn't I surprised to find the same issue with the driver's side sail panel? Started to take down the paint and found a previous patch on that side as well...plus lots of bondo to cover up the door vent area.
New panel now tack-welded into place...opted not to replace the entire door jam...just the upper and lower portions. Fortunately, the RD door jam panel is almost perfectly shaped for this spliced repair.
Attached thumbnail(s)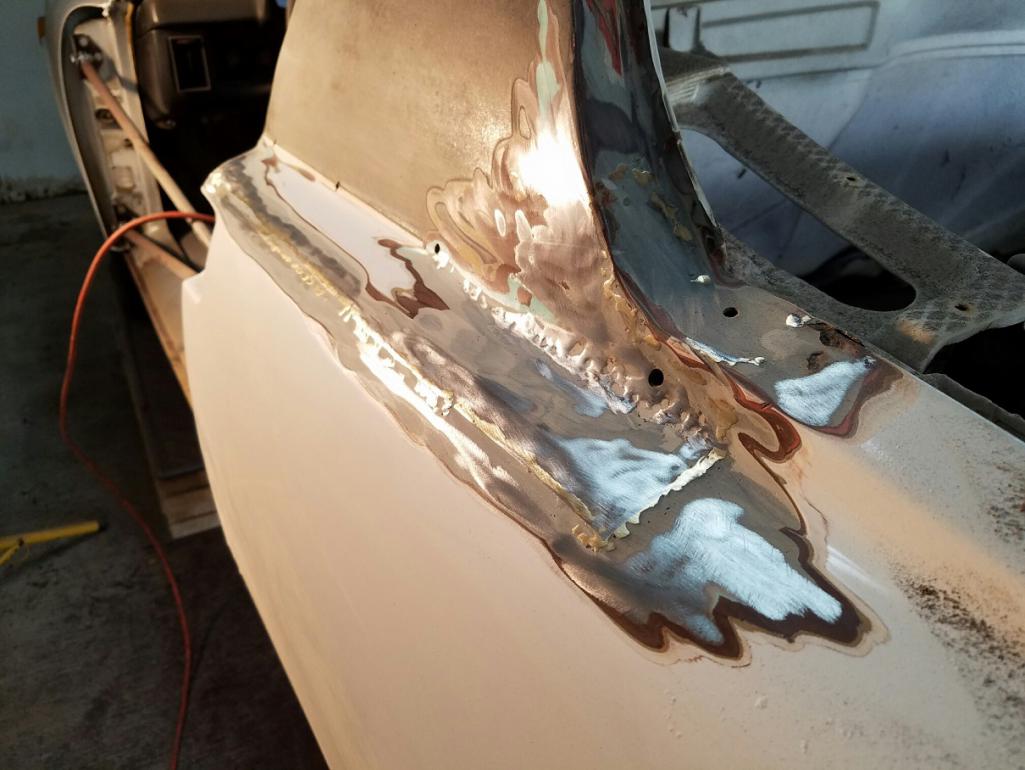
Posted by: bbrock Mar 3 2020, 02:29 PM
Nice work! FYI, if that is an RD replacement vent opening on your door jamb, make sure you test fit your plastic vent cover BEFORE you paint. Don't make the mistake I did. I found the hole as stamped is too small for the vent cover to clip in and needs a fair amount of tweaking to bend those flange edges back. Not a big deal for raw metal but it's a lot less fun to watch your beautiful fresh paint split open at the bends. 
Posted by: 9146C Mar 3 2020, 02:52 PM
Thanks for the tip on checking the vent opening before paint! I noticed the stamping was a little different on the driver's side vs. the passenger side...I will do a test fit!
I did a comparison of the RD door jam vs a competitor...they're definitely not the same!
Attached thumbnail(s)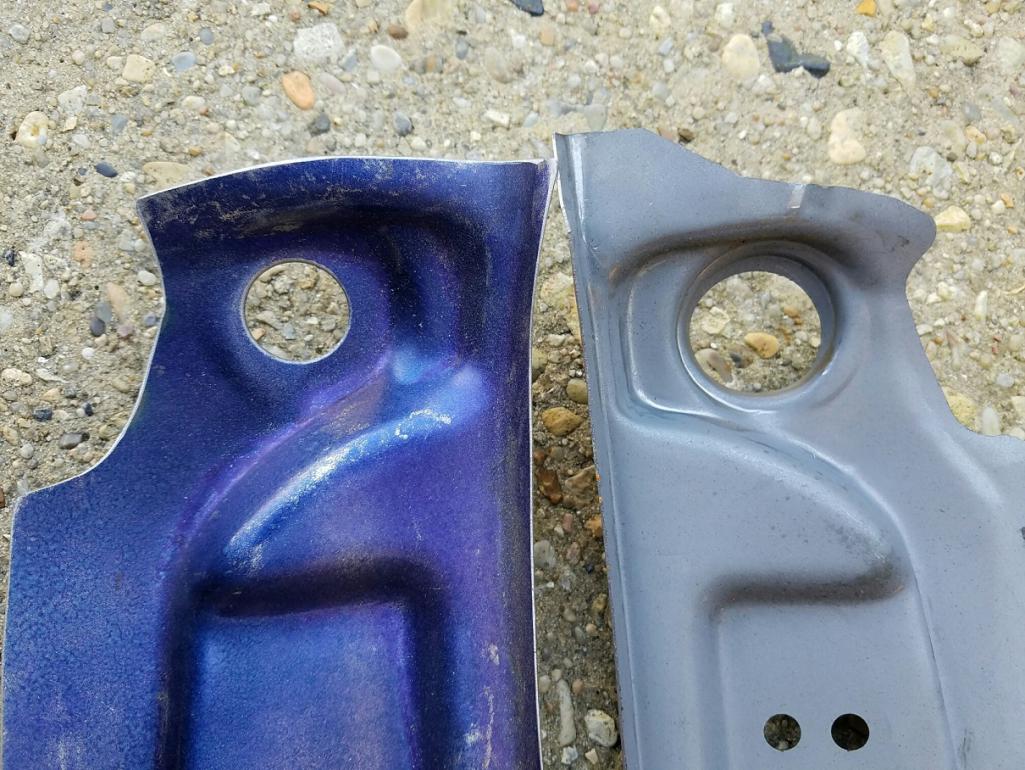
Posted by: bbrock Mar 3 2020, 03:07 PM
Thanks for the tip on checking the vent opening before paint! I noticed the stamping was a little different on the driver's side vs. the passenger side...I will do a test fit!
I did a comparison of the RD door jam vs a competitor...they're definitely not the same!
That's interesting. I think the RD panel looks closer to the original. I really like the RD piece other than not noticing I needed to tuck those vent flanges back.
Posted by: Root_Werks Mar 3 2020, 03:29 PM
Cool thread! Another 914 saved!
Posted by: 9146C Mar 5 2020, 04:39 PM
Bondo-B-Gone!!!
Almost finished with the rear trunk...funny...after I removed the old rear cross panel, it weighed close to double what the full replacement panel weighed!
I probably should've made a small wooden jig to remount the right rear taillight mounting bracket...actually glad I didn't have to cut more of the cross panel out to minimize the tedious work.
Attached thumbnail(s)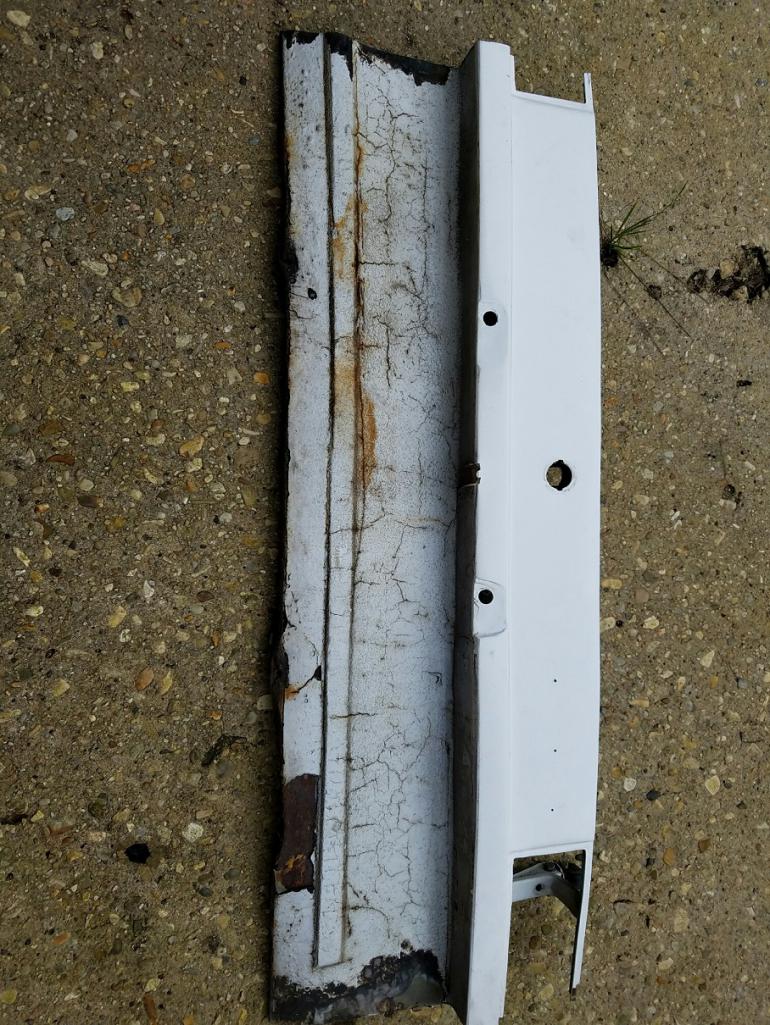
Posted by: Dion Mar 5 2020, 06:55 PM
Some serious progress being made here. Well done. 
I need to check my RD door jamb and test fit the vent and snorkel. Thanks for the heads up fellas.
Posted by: FourBlades Mar 6 2020, 04:38 PM
Wow, great work and fast too.
Most people take a couple years to get that all done.
You have some serious metal skills.
John
Posted by: 9146C Mar 7 2020, 10:02 AM
Thanks for the feedback!
Attached thumbnail(s)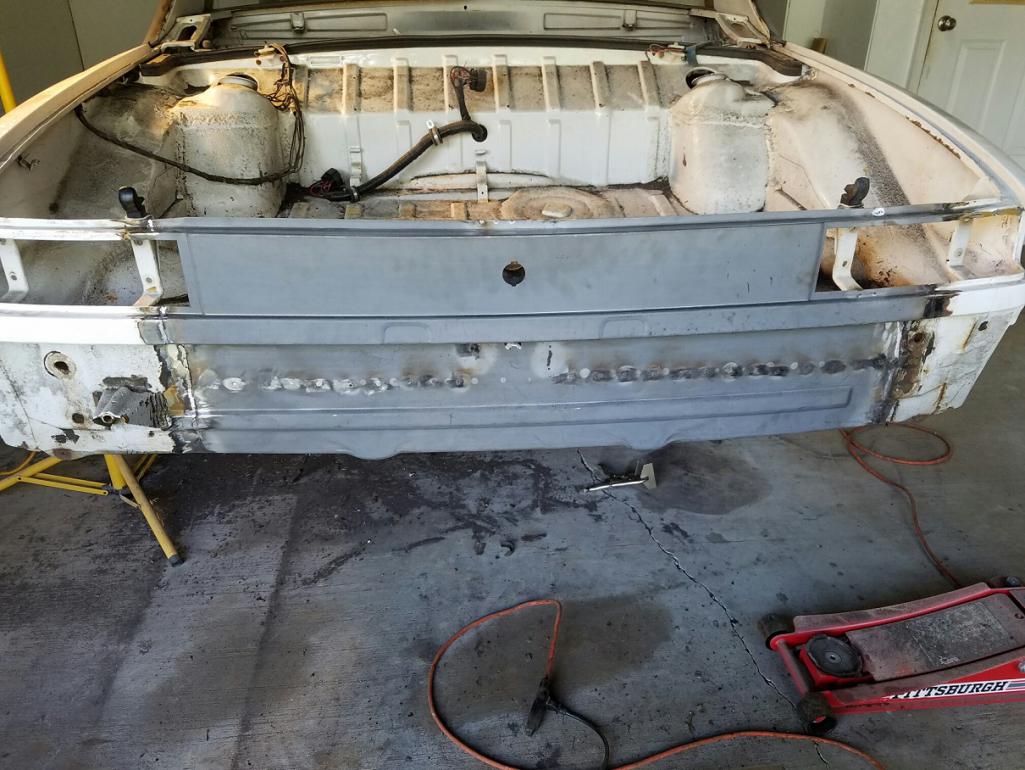
Posted by: 9146C Mar 10 2020, 01:08 PM
Finally on the rotisserie to start the rear section of the floor pan.
Happy to find a "rot-free" tunnel and "clean" area between the firewalls.
Attached thumbnail(s)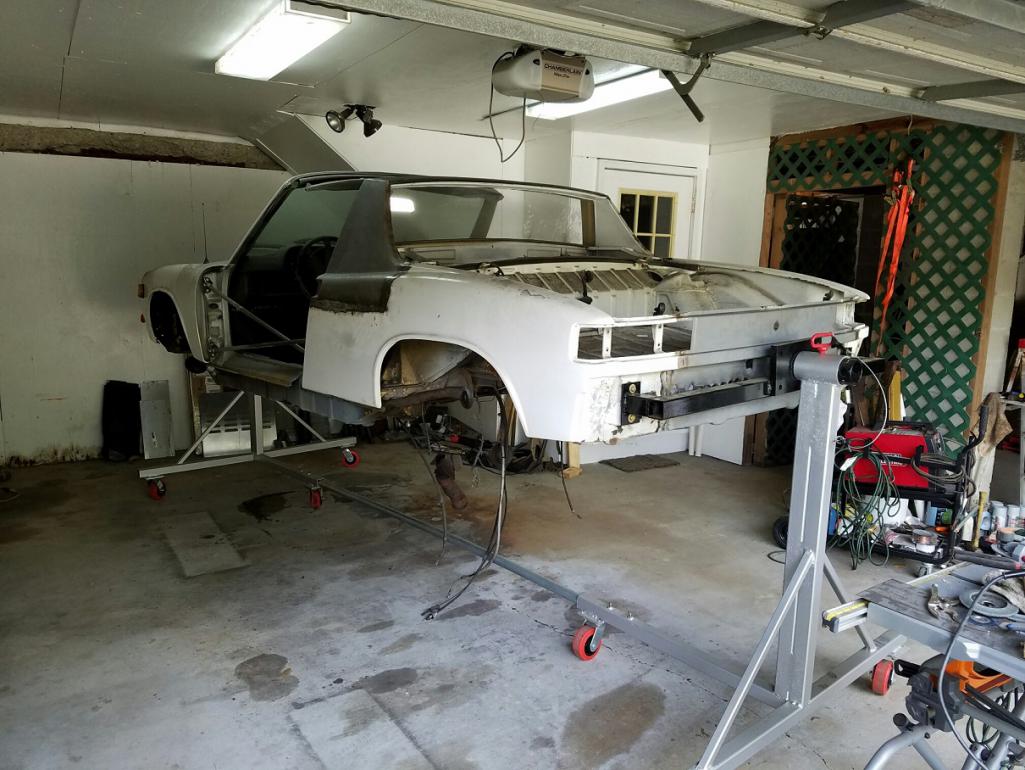
Posted by: IronHillRestorations Mar 10 2020, 04:51 PM
From my experience, you'll be better off to replace the entire tail panel. I made the mistake of sectioning it in (not wanting to get into the extra work at the sides) and that was more work. The replacement tail panel is not a direct duplicate. It's a nice piece, but some areas are not the same as OE
Posted by: 9146C Mar 10 2020, 05:06 PM
From my experience, you'll be better off to replace the entire tail panel. I made the mistake of sectioning it in (not wanting to get into the extra work at the sides) and that was more work. The replacement tail panel is not a direct duplicate. It's a nice piece, but some areas are not the same as OE
You've piqued my interest! I'm assuming you're recommending to replace the entire rear half panel?
The shorter panel from RD looked pretty close...I'll look closer tomorrow as I clean up/prep the section I cut.
Thanks!
Posted by: IronHillRestorations Mar 11 2020, 07:27 AM
From my experience, you'll be better off to replace the entire tail panel. I made the mistake of sectioning it in (not wanting to get into the extra work at the sides) and that was more work. The replacement tail panel is not a direct duplicate. It's a nice piece, but some areas are not the same as OE
You've piqued my interest! I'm assuming you're recommending to replace the entire rear half panel?
The shorter panel from RD looked pretty close...I'll look closer tomorrow as I clean up/prep the section I cut.
Thanks!
Looks like you've already installed what I call the tail panel, or rear trunk bulkhead.
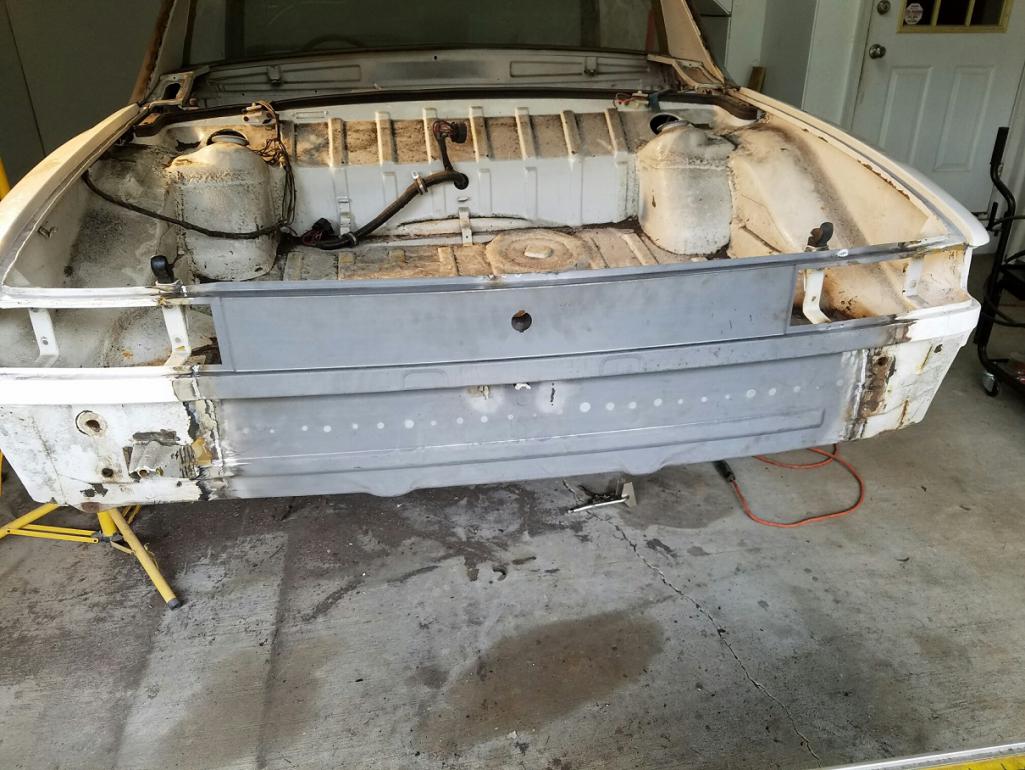
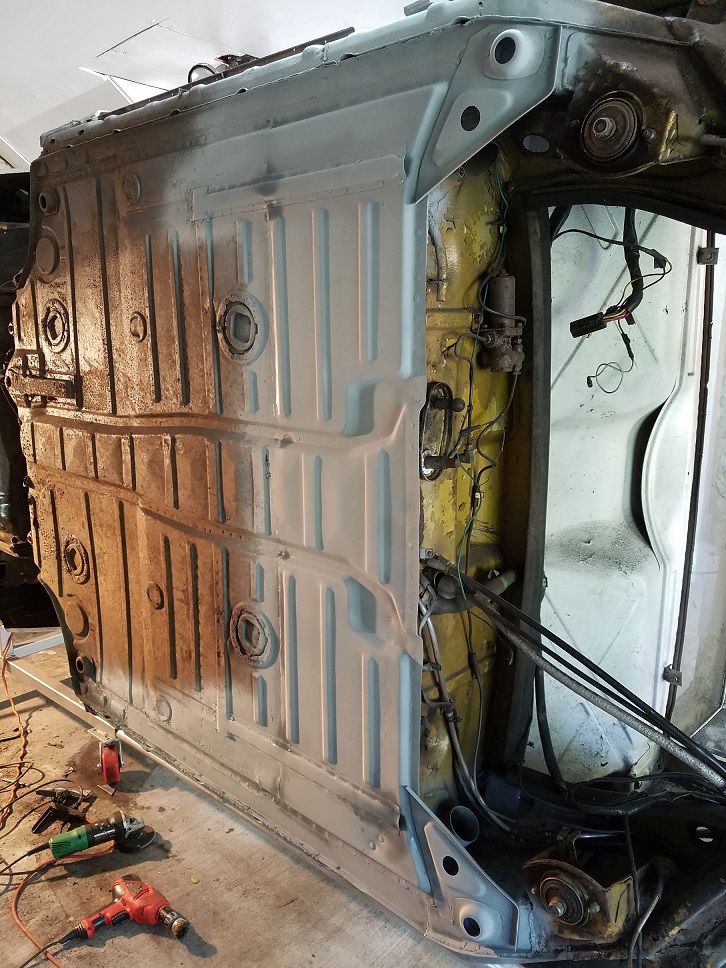
Posted by: 9146C Apr 1 2020, 03:26 PM
It's been a while since the last update...
Rear floor pan job completed!
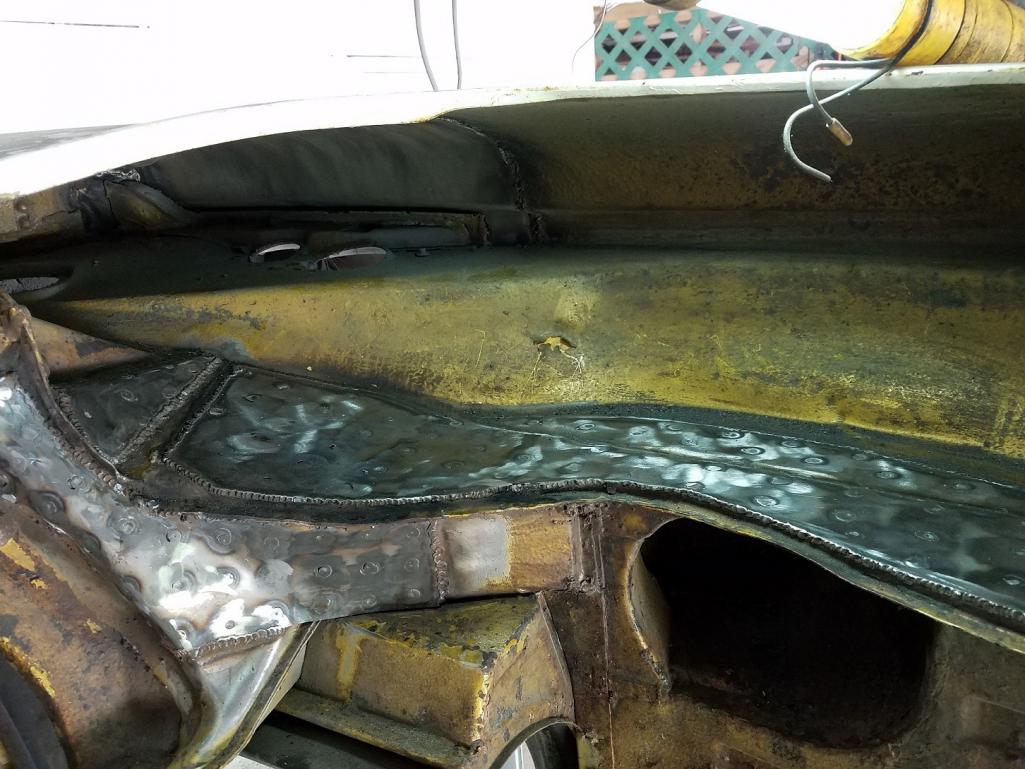
Worked on the hell hole area to finish this job up from the inside...welding/metalwork completed...just need to clean up my welds a little more...
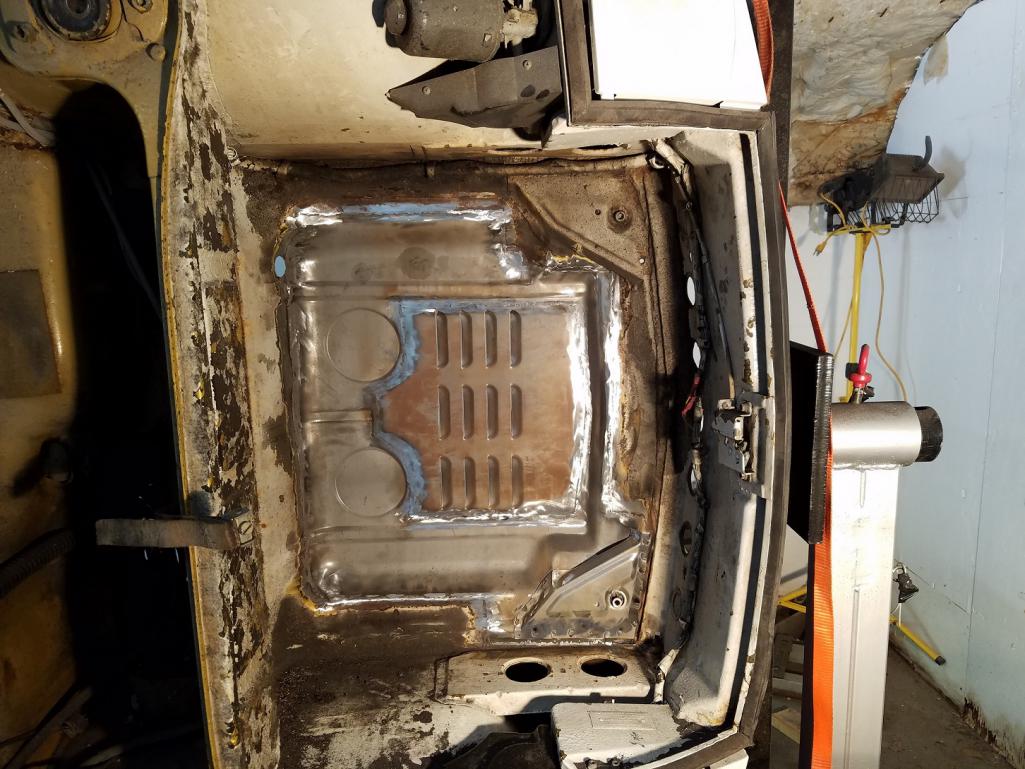
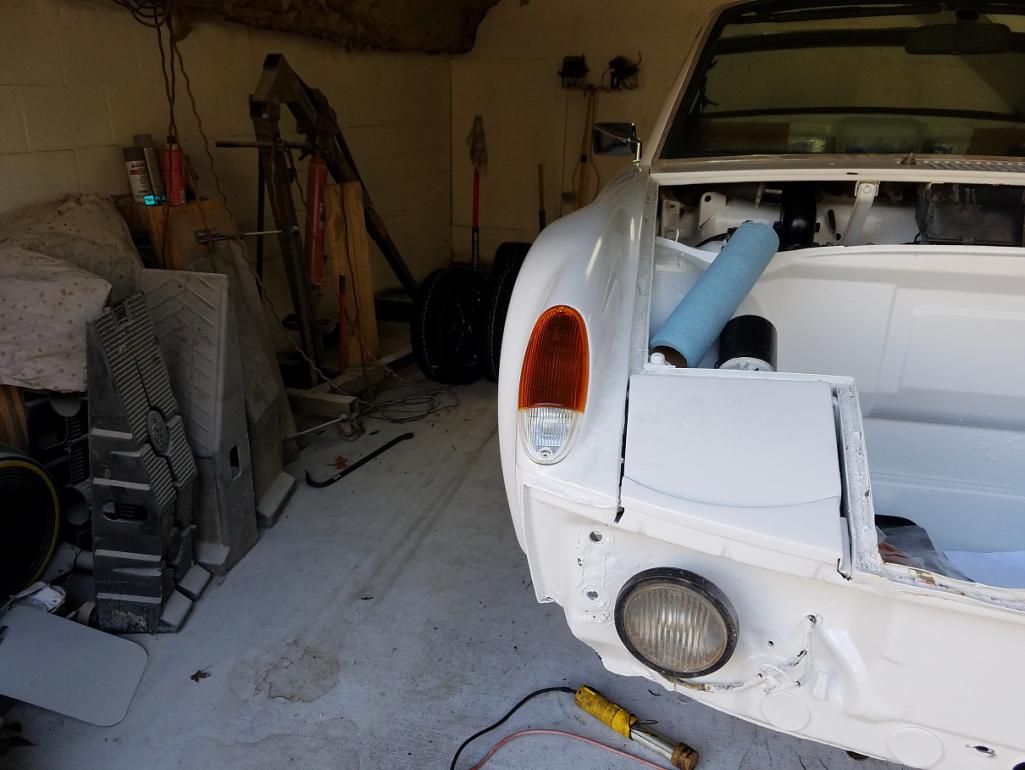
Started on the front trunk...thought that would be one of the easier jobs...
Was only expecting to correctly install the louvered panel for the front oil cooler (when I installed the cooler, I took a short cut and drilled six 1-1/2" holes rather than correctly installing the louvered vent).
Made the cut out for the louvered vent panel...found the metal in the lower pan area was pretty thin...before I knew it I was making patch panel upon patch panel.
As I started to get closer to the passenger front A-arm mount, I started to get nervous. Removed the angle panel from the inside of the front trunk and found quite a bit of rust between the two panels...opted to replace the front pan.
As I debated whether to install the whole front pan panel or splice what I needed, I elected to go the latter route.
Finally got the front pan tack-welded into place after wasting quite a bit of time trying to repair. Lesson learned...
Attached image(s)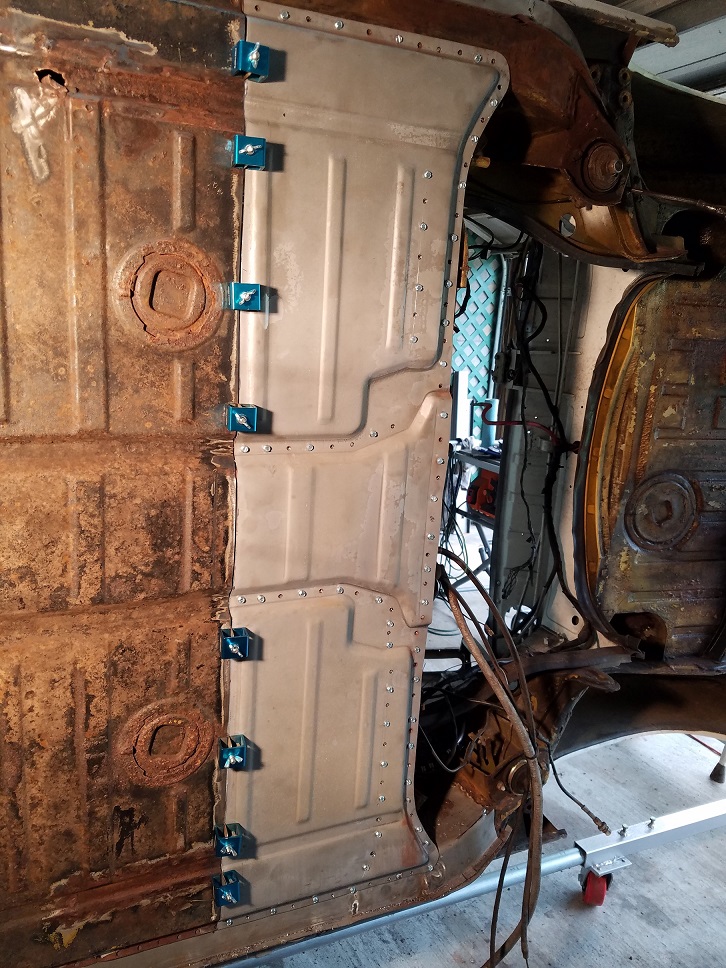
Posted by: 9146C Apr 6 2020, 01:30 PM
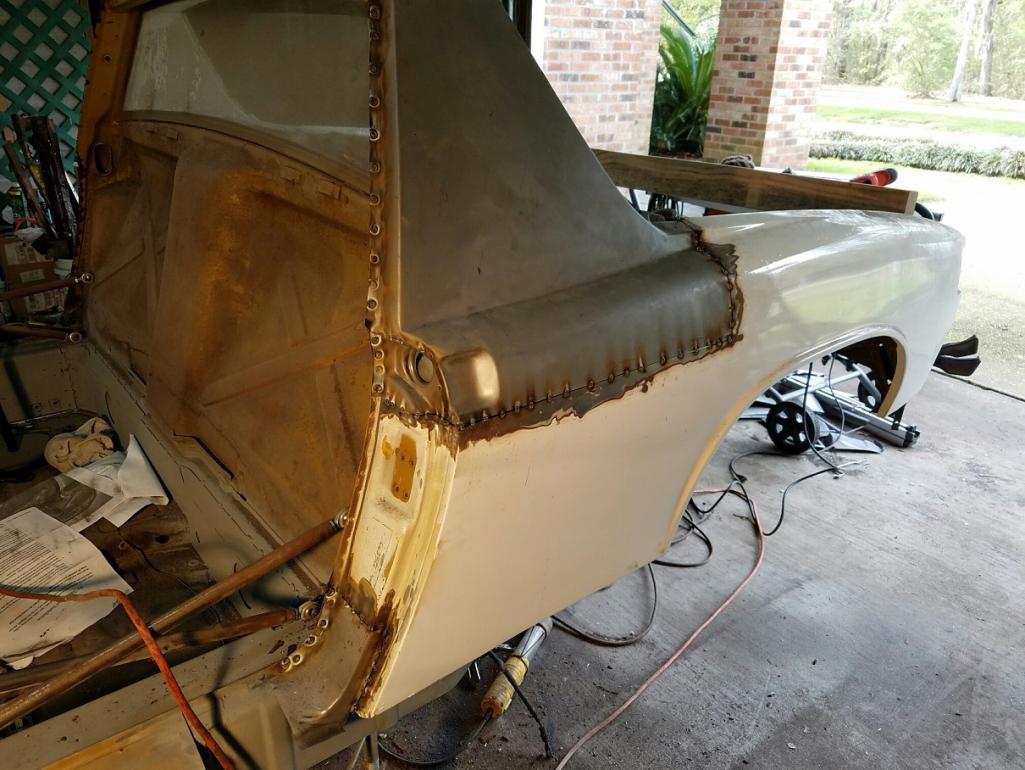
Front trunk completed (except for modification to the oil cooler inlet and hard mounts for the oil cooler shroud)...this job was a lot more than I initially anticipated...
Attached thumbnail(s)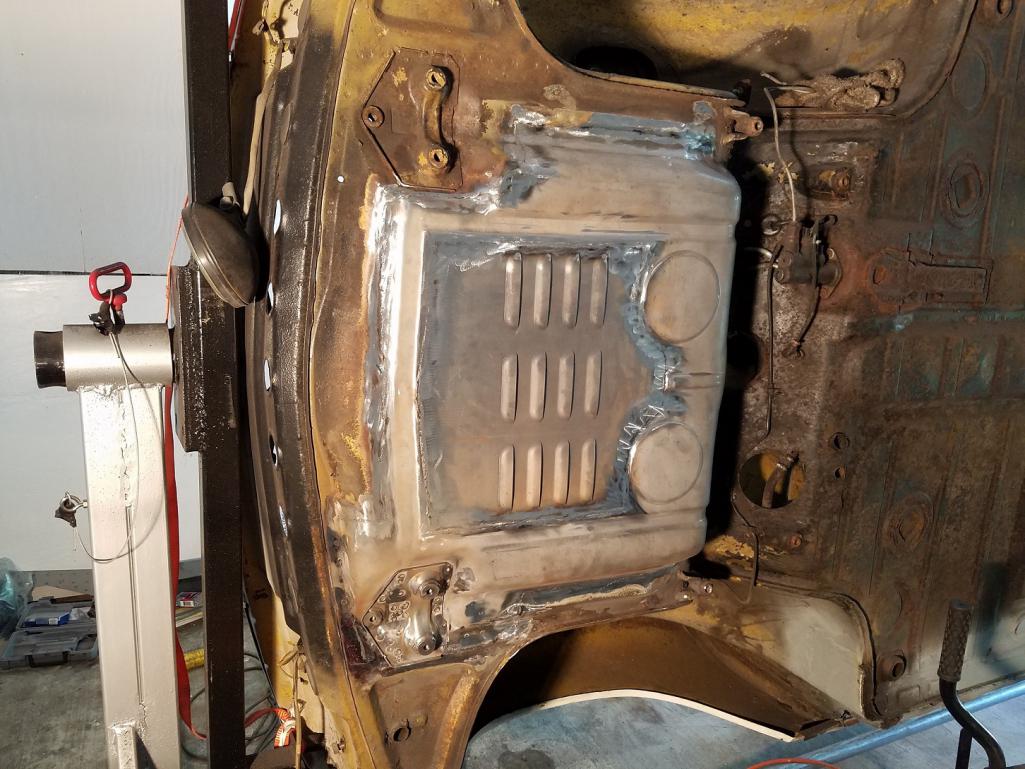
Posted by: 9146C Apr 12 2020, 10:45 AM
Some smaller jobs...
Fabbed a small bracket to relocate the new battery tray to the front trunk.
Welded in the driver's side chassis stiffening kit (Maddogs Motor Sports).
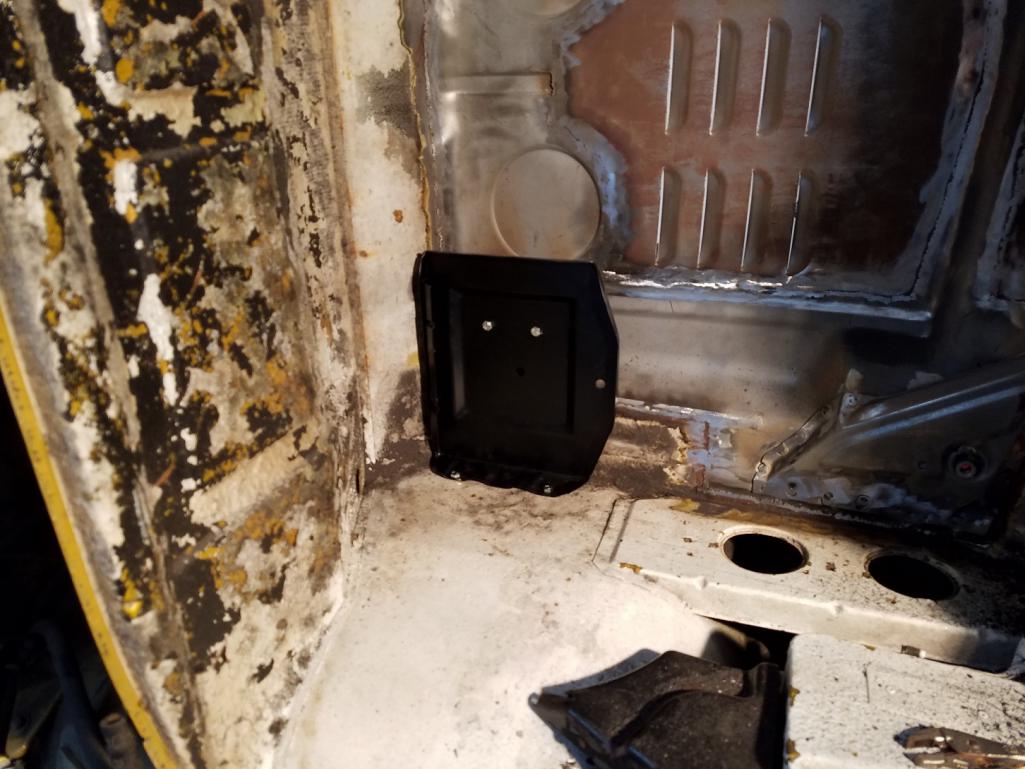
Opened up an access panel in the firewall for future maintenance.
Should be able to rotate the car, install the passenger side chassis stiffening kit and the seat mounting brackets then finally media blast the underside/trunks/inside floor pan...hoping for no more surprises...
Attached thumbnail(s)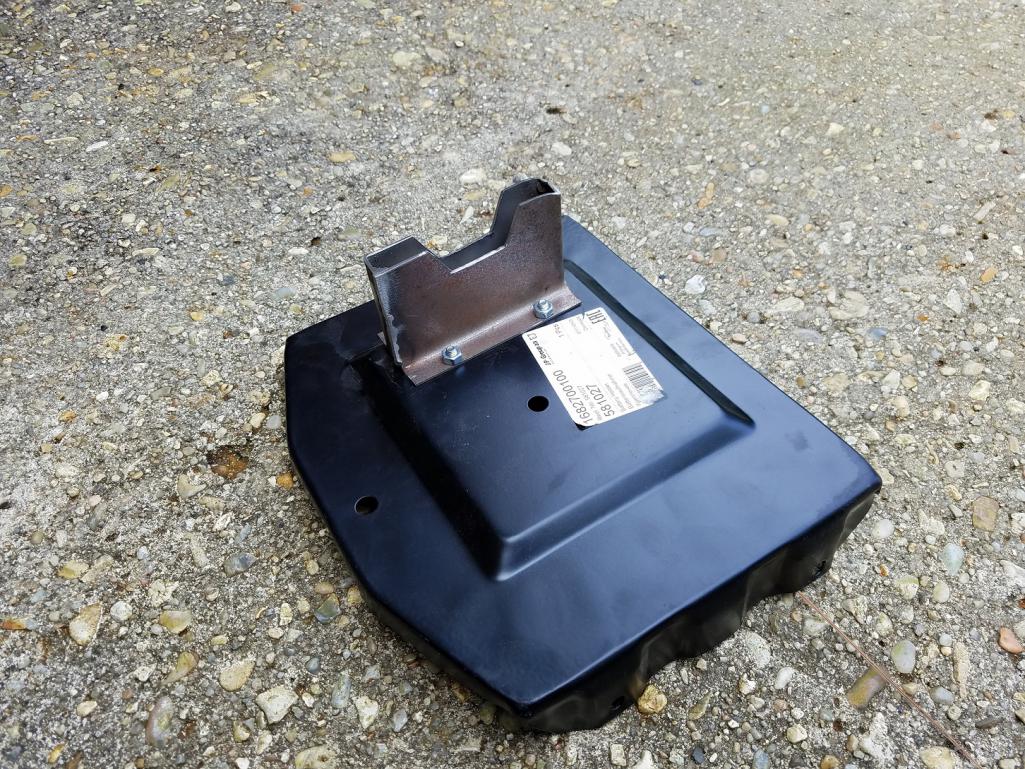
Posted by: 9146C Apr 17 2020, 04:16 PM
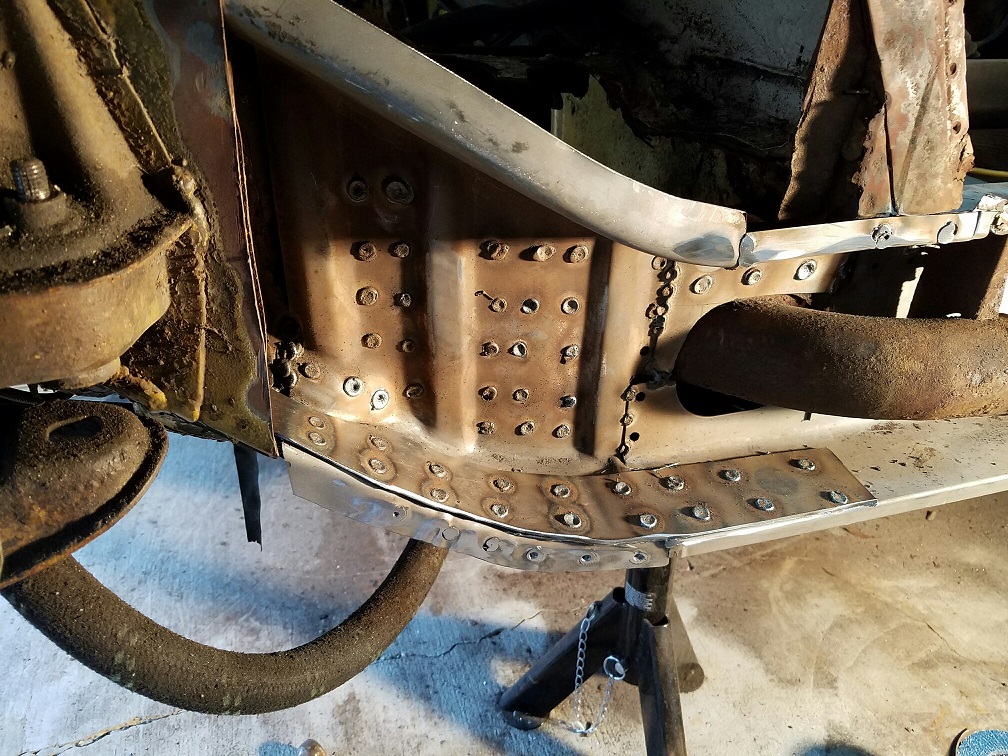
Installed the right rear chassis stiffening kit (Maddogs Motorsports).
I was "on the fence" about adding the Brad Mayeur longitudinal kit after completing the longitudinal repairs.
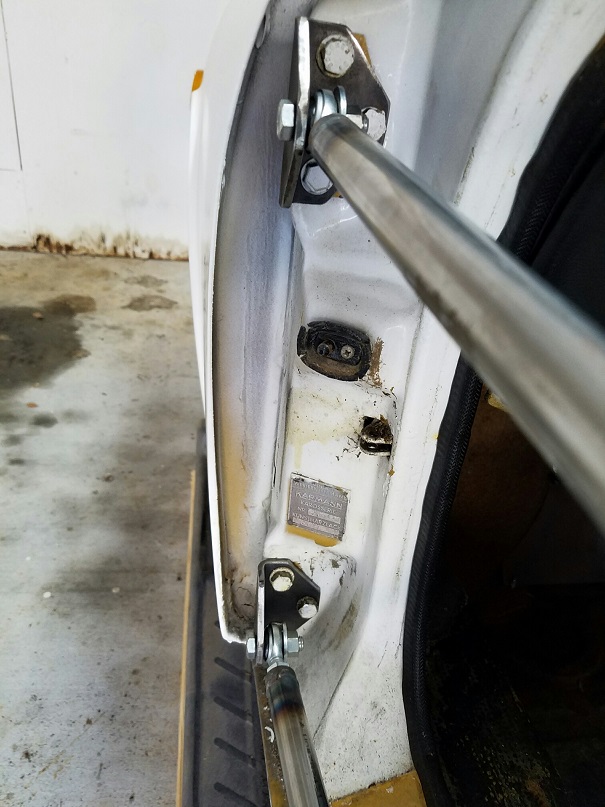
I did a check on the existing body "sag" with and without the door cross braces. With the door braces on, I had a targa bar to windshield frame distance of 25-1/8" (as per spec).
Removing the door braces, the gap between the targa bar and the windshield frame decreased by between 1/8" to 3/16" on both sides. (Of course, this is measured with the car currently supported by the bumper mounts, not the suspension points.)
Corrected the gap again with the door braces and welded in the Brad Mayeur kit on both sides. After the kit install, there is no sag/difference in the targa bar to windshield gap with or without the door braces.
Glad I went this route...I also like the added benefit of the increased strength at the jack points and the added benefit of the attachment to the suspension console.
Attached thumbnail(s)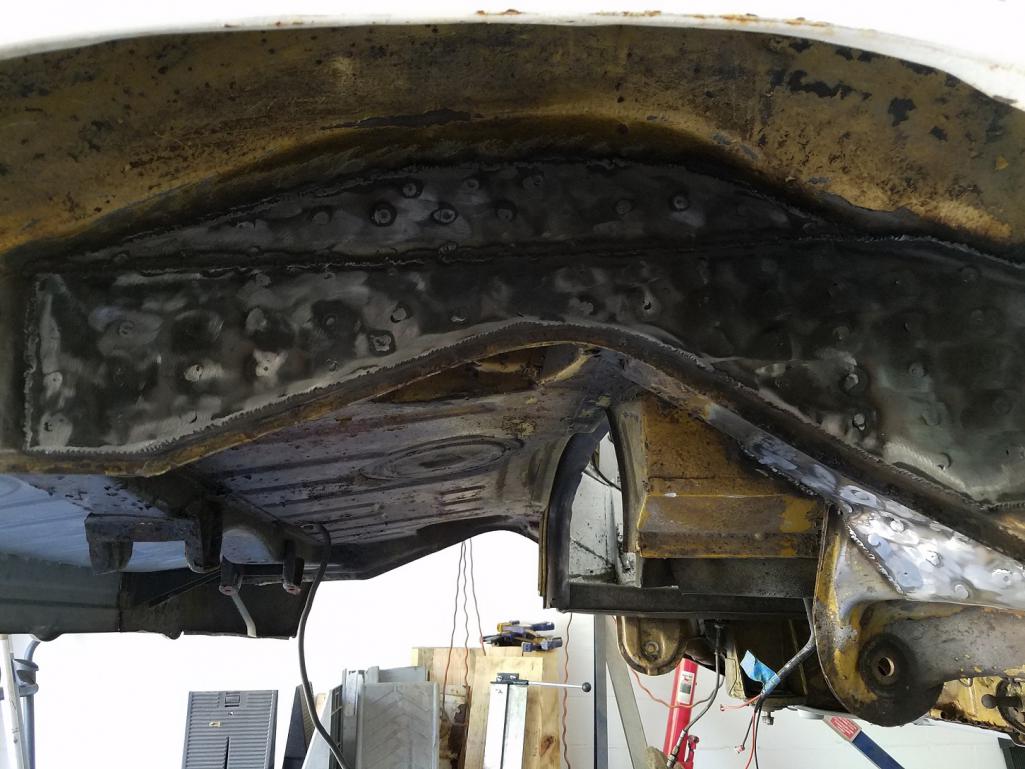
Posted by: 9146C Apr 27 2020, 03:28 PM
I appreciate those who responded to my other post last week about installing the GT fender flares.
Today, I mounted both passenger side flares (well, tacked in place anyway!).
As planned, I started by tacking on bottom both ends and slowly worked toward the middle, cutting about 12 - 14 inches at a time and tacking as I went.
I'm happy how it turned out!
I think I understand better now how some of you mention the bottoms will need reshaping...mine were installed "lower" to give me what I thought would be a better top arch blend.
Found another PO patch on the lower front fender...it was actually done well with the exception of the "lathering" of bondo!
Thank you again to everyone for the feedback prior installing these flares!
Attached thumbnail(s)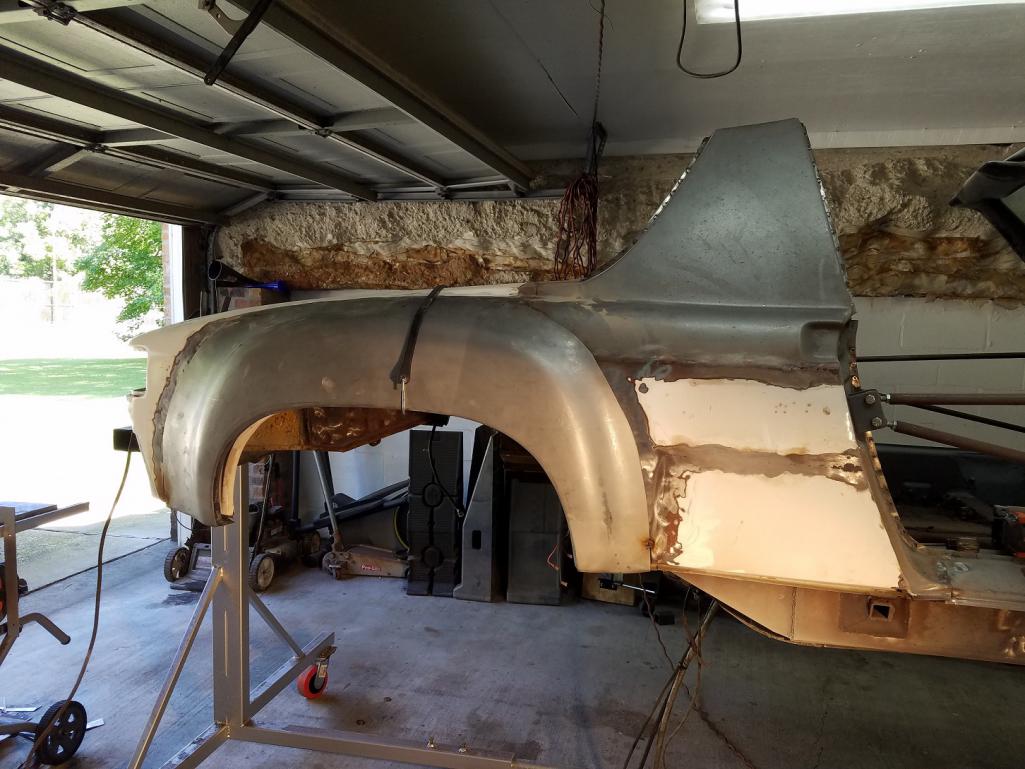


Posted by: Cairo94507 Apr 27 2020, 03:36 PM
I think your placement is spot on.
Posted by: mepstein Apr 27 2020, 04:52 PM
PRS914-6 did a write up on cutting off the bottom of the flair and reshaping it to blend in better.
Posted by: 9146C Apr 27 2020, 04:59 PM
Thank you Gentlemen!
This site has a wealth of information! Much appreciated!
Posted by: 9146C Apr 30 2020, 05:55 PM
Driver's side flares now also tacked into place.
Attached thumbnail(s)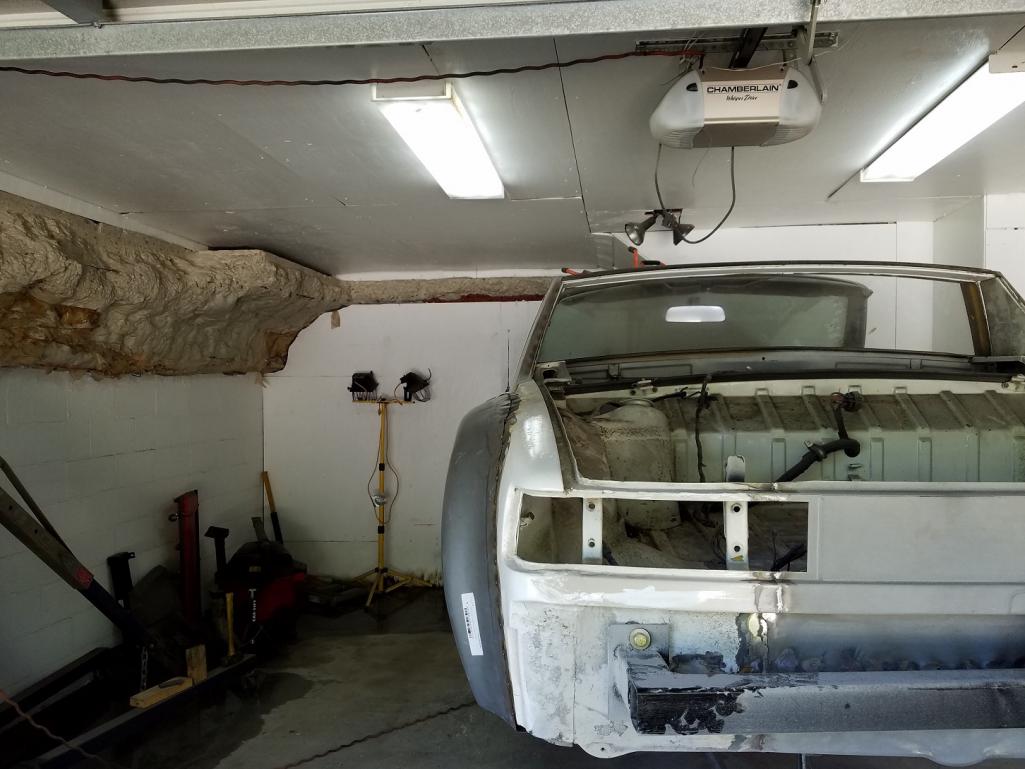
Posted by: 9146C May 12 2020, 03:13 PM
Still working on the bottom side of the fender flares and "metal shaping" them to better fit the rocker panels.
Started a small job I'd been putting off...after removing the seam sealer from the bottom of the quarter panel where I had to replace the door jam, found a pretty decent sized hole.
Fabbed up a small piece to replace in this area...still have to fit/weld it in place, but, happy how it turned out.
Attached thumbnail(s)

Posted by: 9146C Jun 12 2020, 12:38 PM
I think the bottom side is finally done! (I suspect some folks won't necessarily approve of my choice of bottom coating...)
Media blasted the entire bottom side, sealed all the seams with SEM Seam Sealer, epoxy primed the underside, then finished sprayed with UPOL Raptor Bedliner...I'm happy how it turned out...I was never a fan of colored wheel wells, although if one were inclined, I'm sure you could paint directly over the textured bedliner for a close to factory "ripple" look.
Finally on to the top side finish bodywork/filling. It's been a long six months!
Attached thumbnail(s)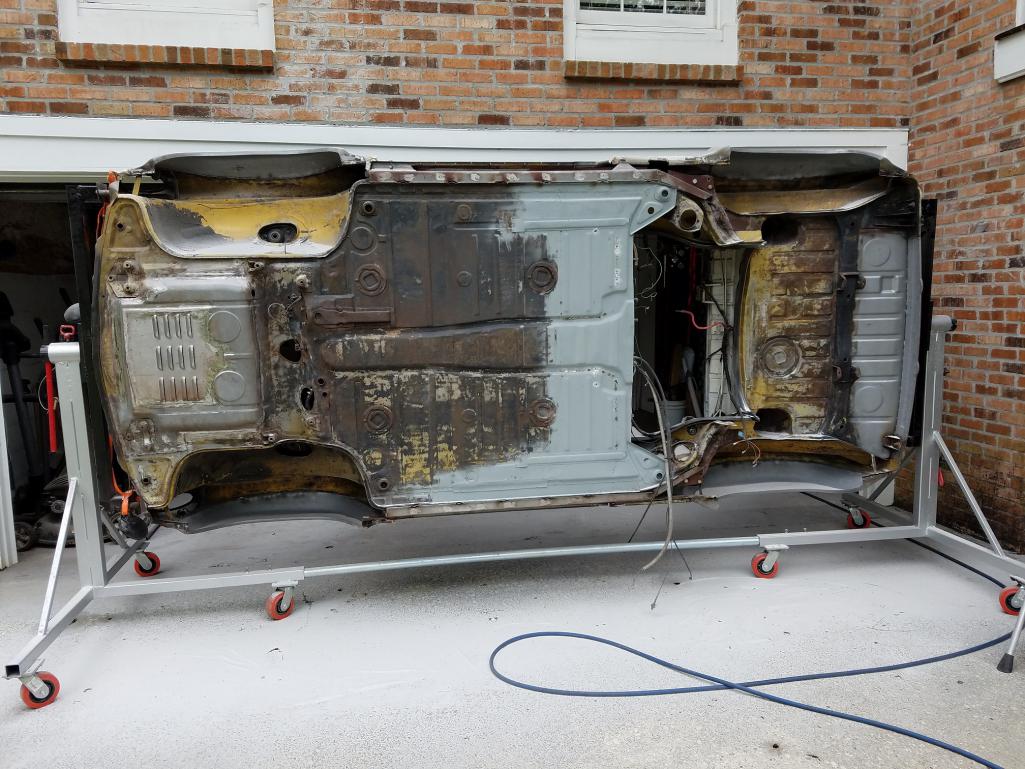
Posted by: wysri9 Jun 12 2020, 01:18 PM
Fantastic work - oh to have those welding skills..... 
Posted by: 9146C Jun 12 2020, 01:28 PM
Thanks for the feedback!
BTW, I actually lived in the Granite City between 2005-07; close to the Atholl Hotel on King's Gate. Fond memories!
Thanks again!
Posted by: 9146C Jun 19 2020, 11:59 AM
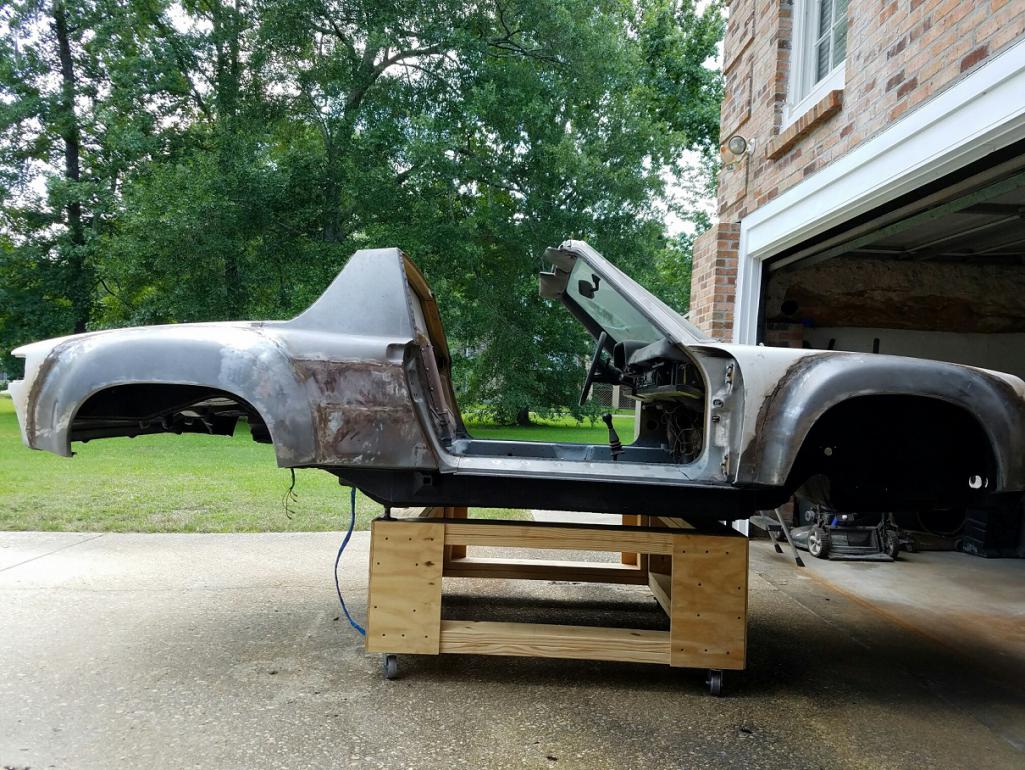
Off the rotisserie and onto a temporary car dolly.
I didn't feel like welding up a dolly so I made a cheap one out of lumber...used simple pipe fittings to match the four body mount locations (capped with a 1/2" to 3/8" reducer...worked out well).
Now onto the final body work/filling.
Attached thumbnail(s)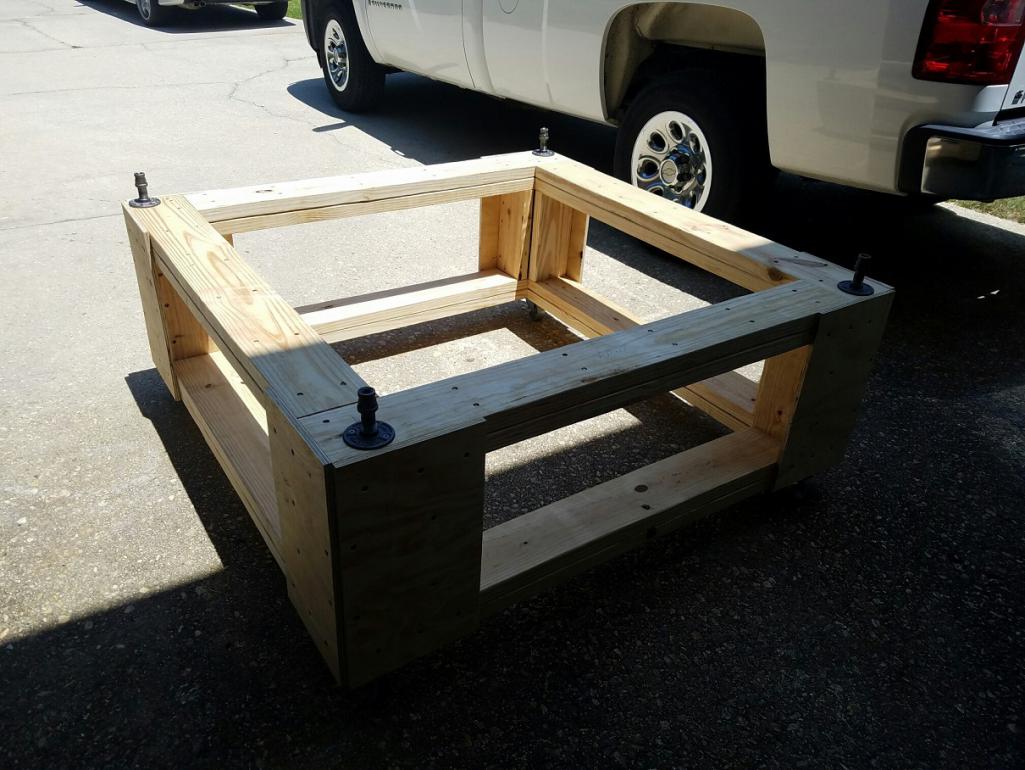

Posted by: Cairo94507 Jun 19 2020, 02:00 PM
The underside looks nice. I think a lot of people use the bed-liner type spray on the underneath. It's tough and provides a nice sound insulating benefit too.
Posted by: 9146C Jun 19 2020, 04:29 PM
The underside looks nice. I think a lot of people use the bed-liner type spray on the underneath. It's tough and provides a nice sound insulating benefit too.
Thank you for the feedback!
I'm really pleased with how the Upol coating turned out...and how relatively easy it was to apply.
As mentioned, some may not like it, but, I think it looks great and it should be very durable for the bottom side.
Thanks again!
Posted by: bbrock Jun 21 2020, 09:12 AM
I think the bottom side is finally done! (I suspect some folks won't necessarily approve of my choice of bottom coating...)
Media blasted the entire bottom side, sealed all the seams with SEM Seam Sealer, epoxy primed the underside, then finished sprayed with UPOL Raptor Bedliner...I'm happy how it turned out...I was never a fan of colored wheel wells, although if one were inclined, I'm sure you could paint directly over the textured bedliner for a close to factory "ripple" look.
Finally on to the top side finish bodywork/filling. It's been a long six months!
Great work! A lot of us use UPOL Raptor as undercoating. I had mine tinted to match the body color but a lot of cars left the dealer with black undercoating so IMHO, either works. I love the Raptor in this application.
Posted by: 9146C Jun 25 2020, 12:21 PM
@http://www.914world.com/bbs2/index.php?showuser=20845 : Great work! A lot of us use UPOL Raptor as undercoating. I had mine tinted to match the body color but a lot of cars left the dealer with black undercoating so IMHO, either works. I love the Raptor in this application.
[/quote]
Great point on the "tintability" of the UPOL Raptor Liner! Thank you!
Starting now with the surface filling. Mounted the doors temporarily...really, really happy how the door gaps turned out...that was always on my mind following the longitudinal repair, as well as the height of the replacement sail panels at the door handle.
Starting to come together.
Attached thumbnail(s)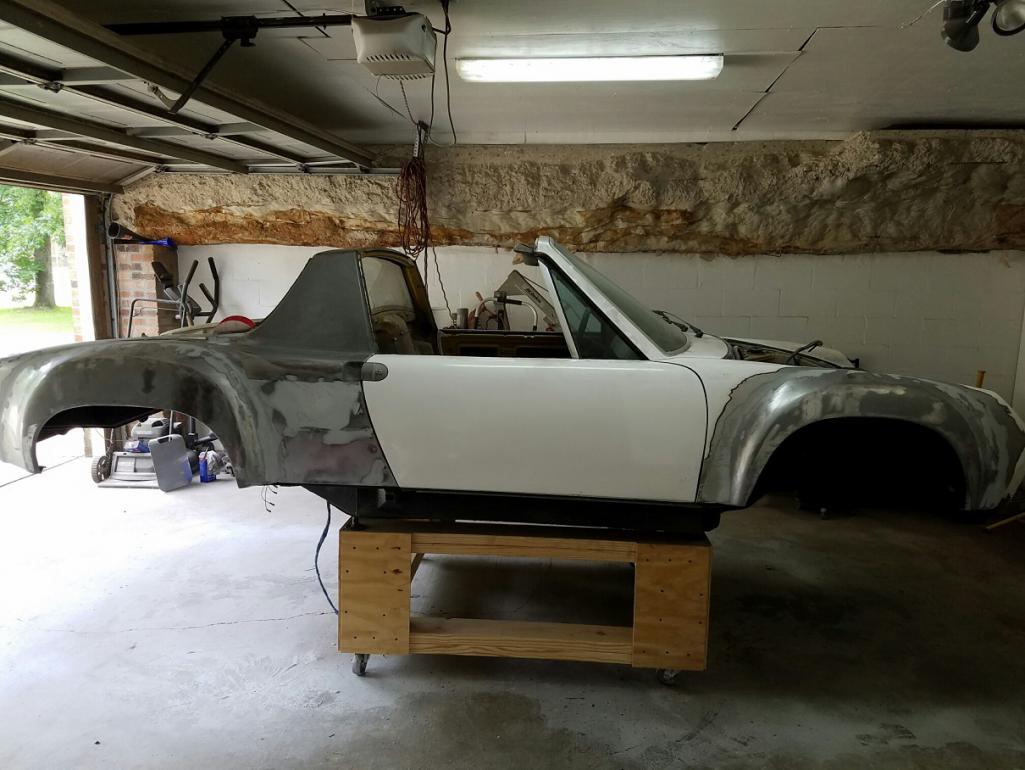
Posted by: 9146C Jul 23 2020, 03:49 PM
Fill, sand, prime, repeat...
Sometimes it seems never ending! I finally started using a half sheet of sandpaper wrapped around a 2" PVC pipe to get the contour of the fender flares...looking a whole lot better without the look of cottage cheese!
The dark primer has been my guide coat to check for smoothness...sanded off after every new application.
The "oil canning" on the flares was a little disappointing, but, that's working itself out too.
Hoping to get everything sanded down by next week to apply an initial coat of polyester primer.
Attached thumbnail(s)
Posted by: Cairo94507 Jul 23 2020, 04:38 PM
How are you addressing the oil canning? You definitely do not want to have that problem when you put color on. Torch, hammer, dolly and a compressed air line should take care to it.
Posted by: porschetub Jul 23 2020, 08:17 PM
How are you addressing the oil canning? You definitely do not want to have that problem when you put color on. Torch, hammer, dolly and a compressed air line should take care to it.
Depends how bad really and perhaps too late ,the way the OP is working he should get it right and certainly has the skills,if the car is repainted in white its less of an issue also.
Well done
.Posted by: Dion Jul 24 2020, 05:16 AM
Another thread I’ve somehow not seen before.
That’s some very nice work. Look forward to seeing and learning more.
Cheers, Dion
Posted by: rgalla9146 Jul 24 2020, 06:18 AM
At you skill level I'm sure you'll resolve the oil can issue.
Can I suggest a method to shape the flare flanges ?
There are pictures and a description in my build thread 'GT project' big day
attached is a pic of the idea.
White GT ? Great color !
Attached thumbnail(s)
Posted by: 9146C Jul 24 2020, 07:50 AM
Thanks for the feedback everyone!
The "oil canning" I experienced was primarily on the top side of the rear flares with several indentations as delivered.
The front flares were much better with only 1 or 2 imperfections.
If I had access to an English Wheel, it may have been easier to smooth out the rears before installation.
After welding the fenders on, I did heat/hammer out the worst of the indentations.
I'm actually using the Evercoat 156 body filler...very easy to work with. Surprisingly, the foot long 2" PVC pipe (using a rotating hand movement) really helped to smooth out the transition of the body/flares.
I'm really happy with the location/blend of the front and rear flares based on the numerous photos I studied prior to installing these.
@http://www.914world.com/bbs2/index.php?showuser=5176 : Certainly enjoyed viewing your thread! Thanks! (More motivation for me!)
Next week, I'll be sending my transmission up to Dr Evil to have my Wavetrac LSD installed and have an inspection performed on the internals...excited for this work to be completed as my project progresses.
Posted by: 9146C Jul 31 2020, 02:26 PM
Getting closer...maybe 3-4 small areas to complete...
Attached thumbnail(s)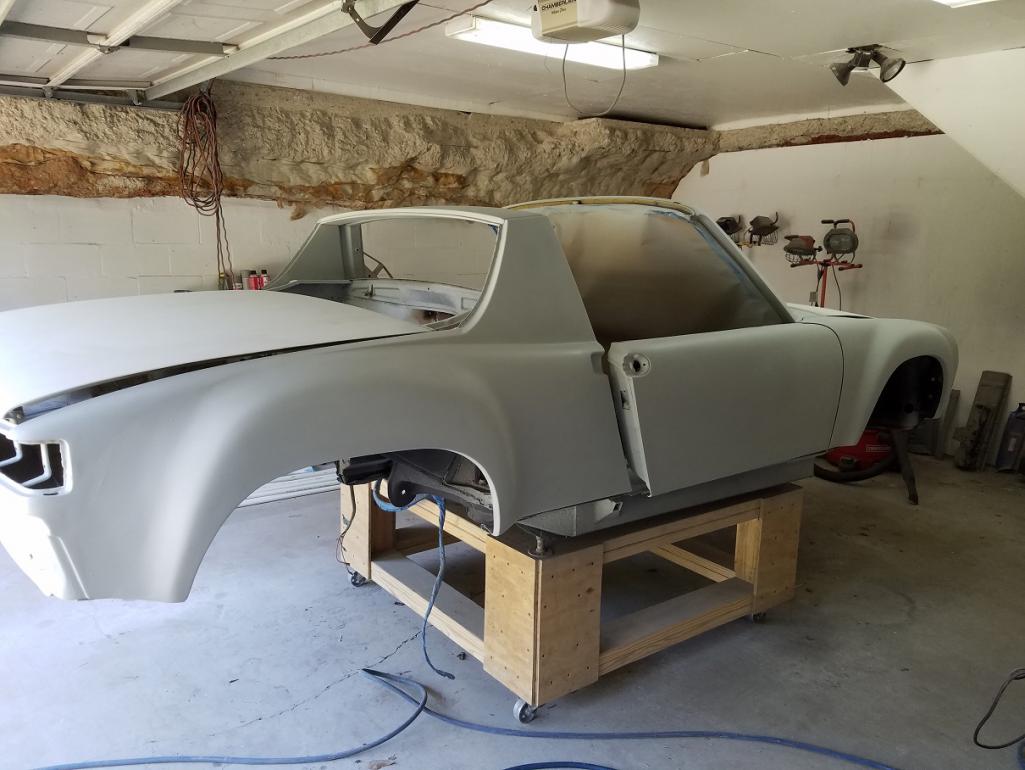
Posted by: Cairo94507 Jul 31 2020, 03:53 PM
That looks terrific. I can't wait to see it all blocked and in color.
Posted by: djway Aug 1 2020, 12:31 AM
Thats gonna make a nice coffee table once you get the car off of it .....
Posted by: 9146C Aug 22 2020, 03:12 PM
This has been an exercise in patience!!
Twice before, I thought I had it "perfect"...only to find imperfections again!
Third time is a charm! (Third coat of polyester primer that is...after finding new "issues" after the two previous coats.)
This should be my final block sand now and then apply a single coat of urethane primer prior to top coat.
Finally happy how this has turned out.
Attached thumbnail(s)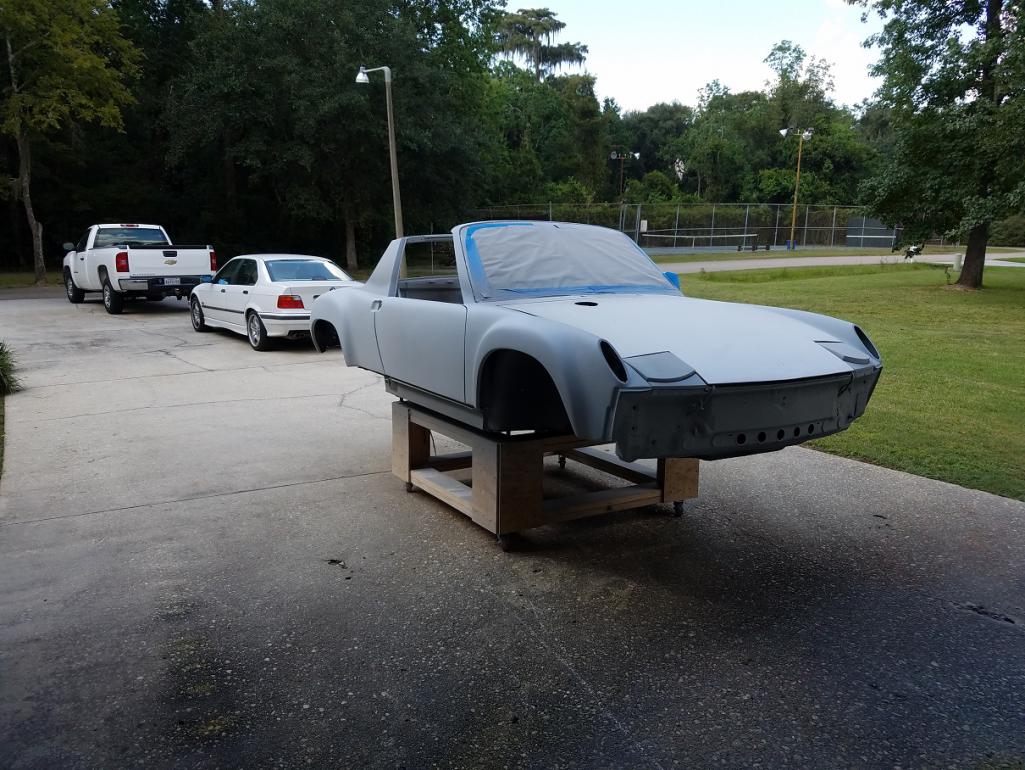
Posted by: horizontally-opposed Aug 22 2020, 03:54 PM
Your work is deeply inspiring!
Just got lost in your pics for awhile, and so cool to see where the car started and where it is now. SO much possibility and fun from here...
Posted by: bbrock Aug 22 2020, 05:49 PM
Nice! Mine took three rounds of polyester and block sanding too so I know that feeling. She's looking great!
Posted by: 9146C Aug 23 2020, 08:03 PM
Thank you for the words of encouragement Gentlemen!
Truthfully, I think I may be teetering on the brink of "project burn-out". Thankfully, I can see the light at the end of the tunnel.
Just a rough guesstimate, but, estimating I've worked on this for about 20-25 hours per week for the last 40 weeks.
I knew it wasn't going to be easy (nothing worthwhile ever is!)...I just underestimated what it was really going to take.
It's much clearer to me now why many people here have said to buy the best 914 you can afford! So true!
At least I'll have the experience under my belt when it's said and done!
I'll be taking a little bit of a breather the next few weeks...Louisiana's infamous "Love Bug Season" is not a good time for paint work!
Appreciate this community for the help and inspiration!
Posted by: 9146C Aug 28 2020, 02:04 PM
Block sanded the third coat of poly primer. Still have some sanding left to do (primarily the door jams and the engine lid), but, getting closer to spraying the urethane primer prior to top coat.
Attached thumbnail(s)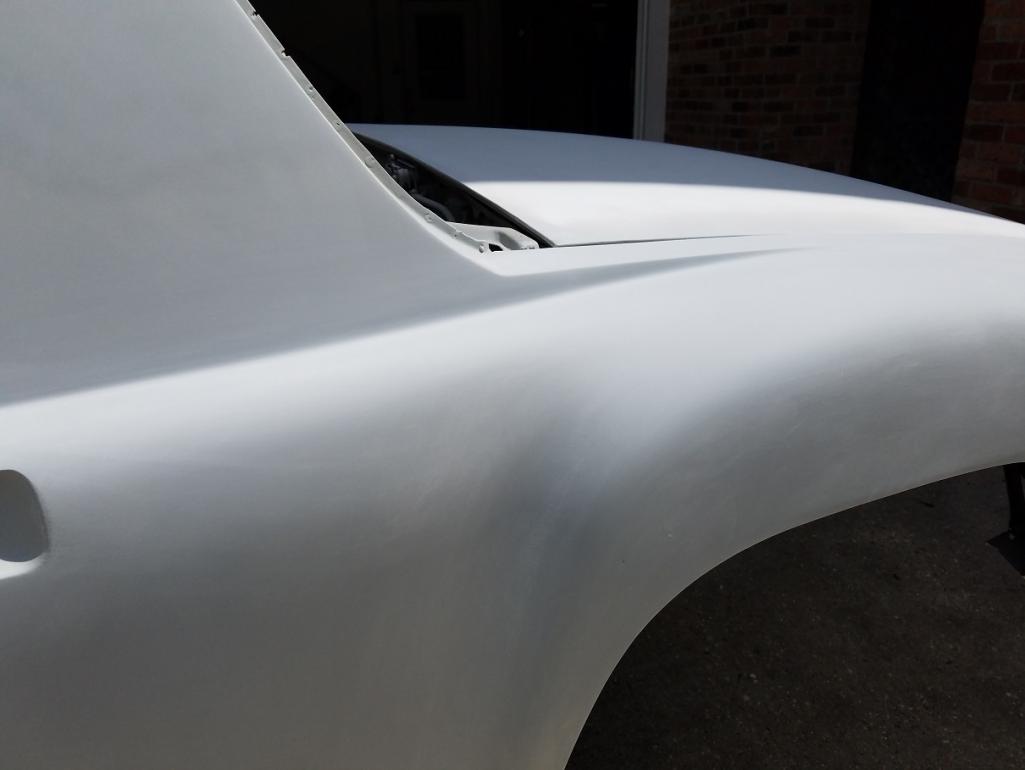

Posted by: Root_Werks Aug 28 2020, 02:24 PM
So close! Get some color on that 914! 
Posted by: Cairo94507 Aug 28 2020, 05:47 PM
Looking great.
Looks like you are but I always check the fender well lip edges and the bottoms of the fenders and doors. I see lots of painted 914s where they seem to overlook those areas when painting.
Posted by: 9146C Aug 29 2020, 02:38 PM
Thanks for the feedback Gentlemen!
Affirmative on being sure to spray the fender well lips and specifically under the doors.
Posted by: 9146C Sep 5 2020, 02:06 PM
This week, got the final layer of urethane primer applied and almost finished sanding/ready for paint. Hopefully next week it will be painted.
Just for giggles, I put together a video of my project so far...I was feeling a little burned out...this helped me to visualize the progress so far...and get me motivated to finish this up!
https://www.youtube.com/watch?v=zsE5iefe9Eg
Attached thumbnail(s)
Posted by: 9146C Sep 11 2020, 11:34 AM
Not the greatest pictures, but, I've finally got it sprayed!!! Woo-hoo!
Now to let it cure for a bit before I sand it down/polish it smooth.
Attached thumbnail(s)


Posted by: Root_Werks Sep 11 2020, 11:45 AM
That looks like paint!
Posted by: 9146C Sep 11 2020, 11:52 AM
Thank you! Today feels like a milestone day!!!
Posted by: wysri9 Sep 12 2020, 12:24 AM
That video is awesome. Fantastic work and the end result will be stunning. Now I will have to see if I have enough pictures to animate my shell repair
Posted by: Cairo94507 Sep 12 2020, 06:14 AM
Definitely cause to celebrate.
Posted by: 9146C Sep 12 2020, 06:30 AM
Thank you for the feedback, Gentlemen!
Really happy how the bodywork turned out...as frustrating as it was at times. Seeing the top coat applied makes it worthwhile.
I went with a one part Acrylic Urethane (supplied by TCP). Really pleased by how it sprayed and simple to use...didn't use any additional reducer...laid down nicely without any runs...and I applied it pretty heavy to give me ample opportunity for wet sanding/polishing.
I'll probably let it cure about 7 days before I start my wet sanding.
It's getting there.
Thanks again for the feedback!
Posted by: 9146C Oct 27 2020, 11:35 AM
It's been a while since the last update...
Car has been wet-sanded (to 2000 grit) and cut-polished (Norton 3 Part Liquid Ice system).
I need to make a second/final pass on the two deck lids...not quite happy yet with the finish on those two panels.
Attached thumbnail(s)
Posted by: djway Oct 27 2020, 01:11 PM
Beauty
Posted by: 9146C Nov 3 2020, 05:13 PM
So my approach on this project may appear a little unconventional...especially after spraying the outside.
Today, I finished up brushing the inside of the cabin with 2 coats of POR-15 followed by 2 coats of epoxy topcoat.
Happy how it turned out...now onto the engine bay and two trunks...
Attached thumbnail(s)
Posted by: Dion Nov 3 2020, 08:56 PM
Absolutely fantastic work. Car looks amazing. Feel like coming to PA and shoot some colour on mine. The time frame... man you blitzed through. Prolly doesn’t seem that way to you but wow. I can appreciate that hard work. Look forward to seeing more.
Posted by: 9146C Nov 4 2020, 08:14 AM
@http://www.914world.com/bbs2/index.php?showuser=2766 , @http://www.914world.com/bbs2/index.php?showuser=19266
Thanks for the feedback/kind words! Much appreciated!
Posted by: djway Nov 5 2020, 01:35 AM
I've done the same combo of POR and Epoxy a couple of times. Like a rock. Looks great.
Posted by: 9146C Nov 8 2020, 04:31 PM
Front and rear trunks now complete...2 coats POR-15 followed by 3 coats of epoxy topcoat.
Just the engine bay left to complete...
Attached thumbnail(s)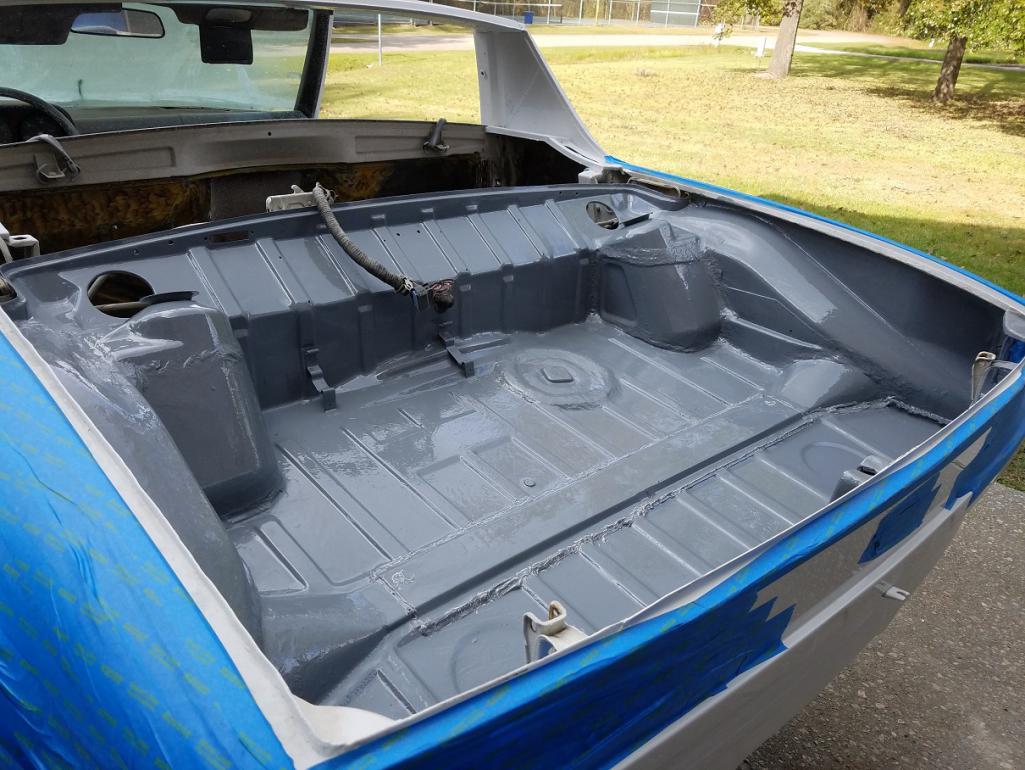
Posted by: 9146C Dec 11 2020, 04:15 PM
And now the re-assembly begins!
Almost have the heating/ventilation system completed (just need to install the hoses to finish). Checked both the wiper motor and fresh air fan (all 3 speeds) operation prior to re-assembly.
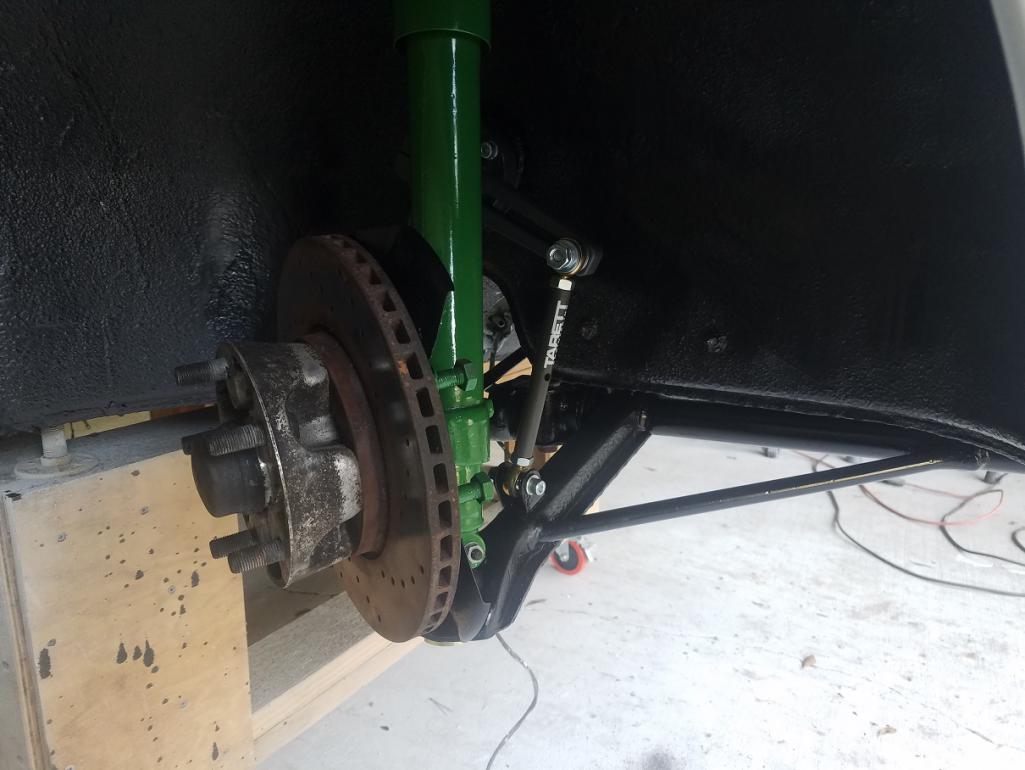
Painted the front and rear suspension components with two coats of POR-15 semi-gloss.
Shout out to @http://www.914world.com/bbs2/index.php?showuser=18749 for his excellent video on re-bushing the front control arms!
Front and rear suspensions have new rubber bushings and wheel bearings. Front also included new turbo tie-rods and new ball joints.
The master cylinder, front brake calipers and brake proportioning valve have all been rebuilt (not yet installed). Still waiting on a few small parts for the rear calipers. Should be ready now to also install the new brake line kit.
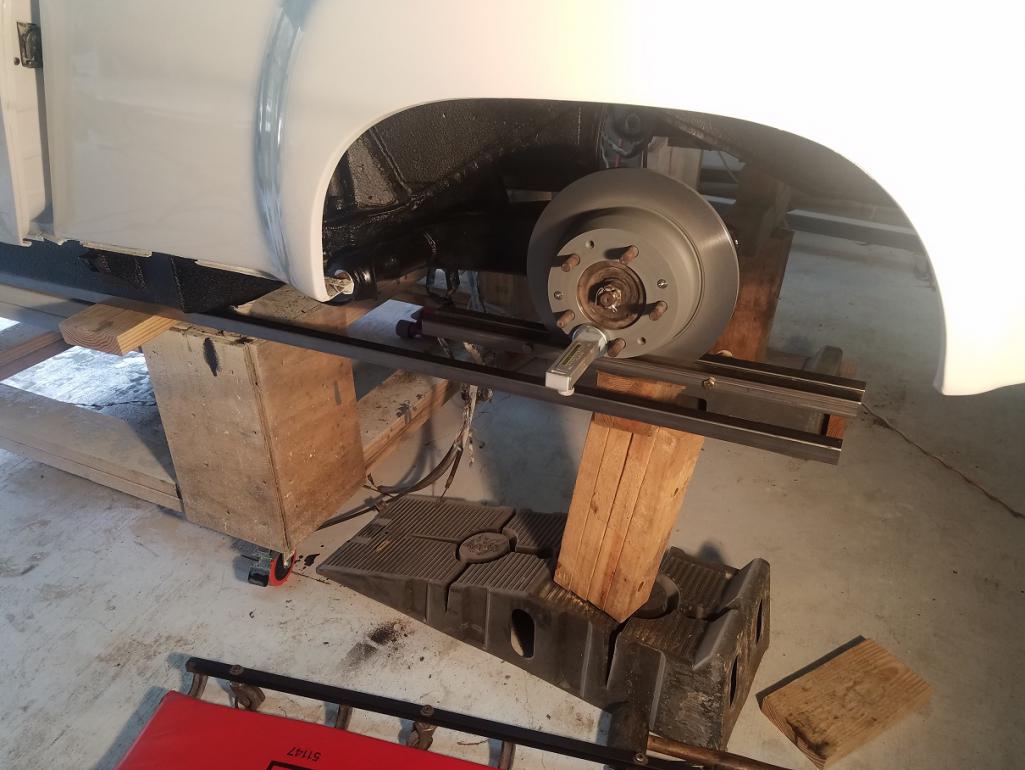
I was thinking about how I was going to set the rear alignment. The following description is what I came up with:
First, I perfectly leveled the car on the cart...level to all four corners. I then set up the rear trailing arms to be flat/parallel on the bottom side. That gave me a clearance of 185 mm from the top lug nut center to the bottom of the fender well arch (at the top, measured on both sides). Looking at a bunch of Porsche 914-6 GT pictures, I should be pretty close with that reference,
I set the camber first (-3/4 degrees...luckily I had enough, and the correct, shims available!). After setting the camber I then set the drivers side brake disc alignment perfectly parallel to the driver's side longitudinal. (You can see the 1" square tubing I used in the photo for reference.) After that, I measured the distance between the front of the disk and the rear of the disk for both sides of the car...I had a similar 1" tubing jig attached to the right rear brake disc for my measurements. I think it worked out well...I set the rear with no toe-in.
Next week, I'll start re-assembling the doors and install the dynamat sound proofing on the floor and firewall.
Attached thumbnail(s)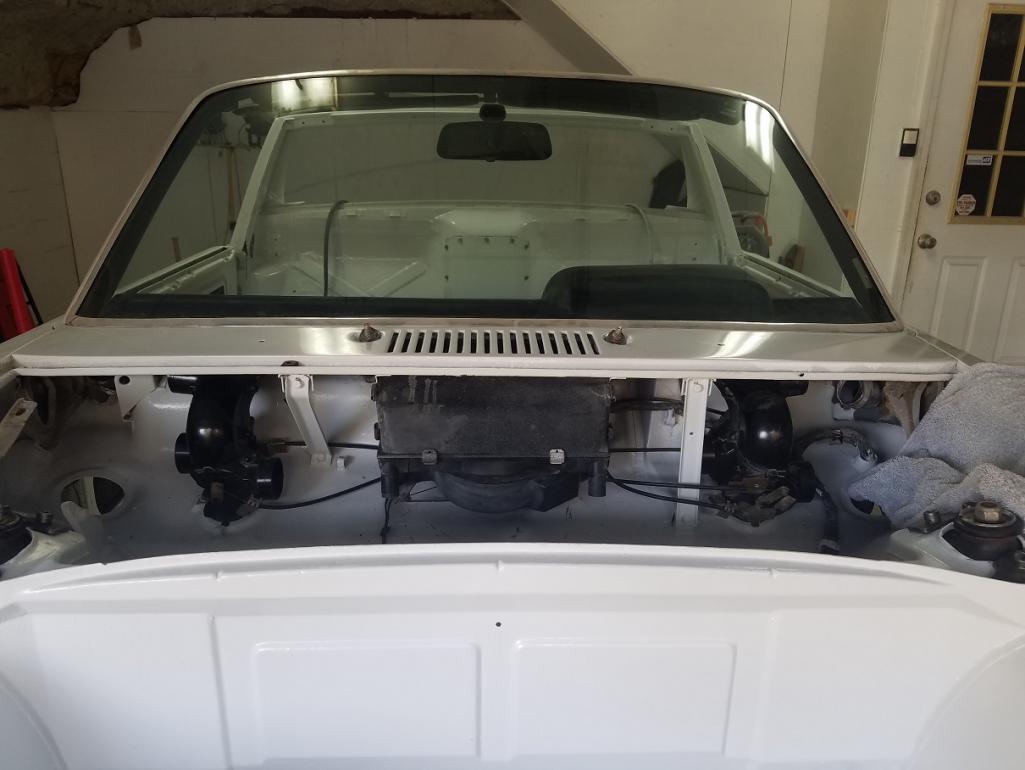
Posted by: 9146C Jan 31 2021, 04:04 PM
It's been a little while since I've provided an update...
Making progress and I can (almost!) see the finish line.
Brake calipers, master cylinder and proportioning valve have all been rebuilt. All new brake lines installed (with the exception of two smaller pieces that were missing from my kit).
All new components for the parking brake have been installed and are functioning...this'll be the first time in 20 years that my car will have a functioning hand brake!
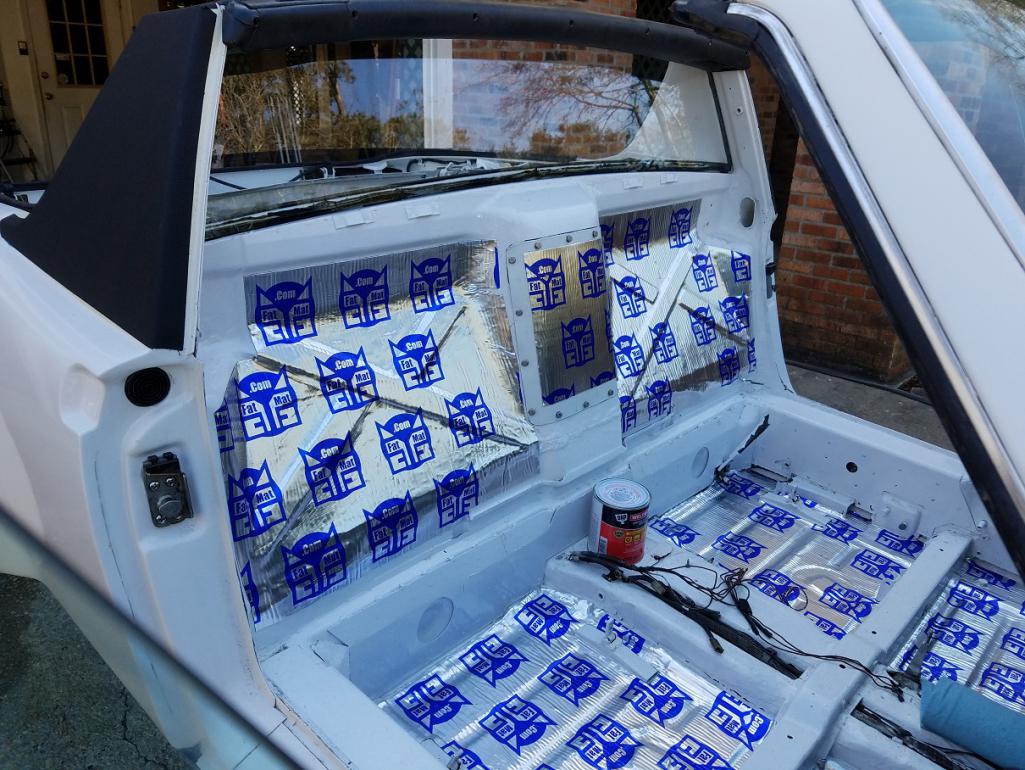
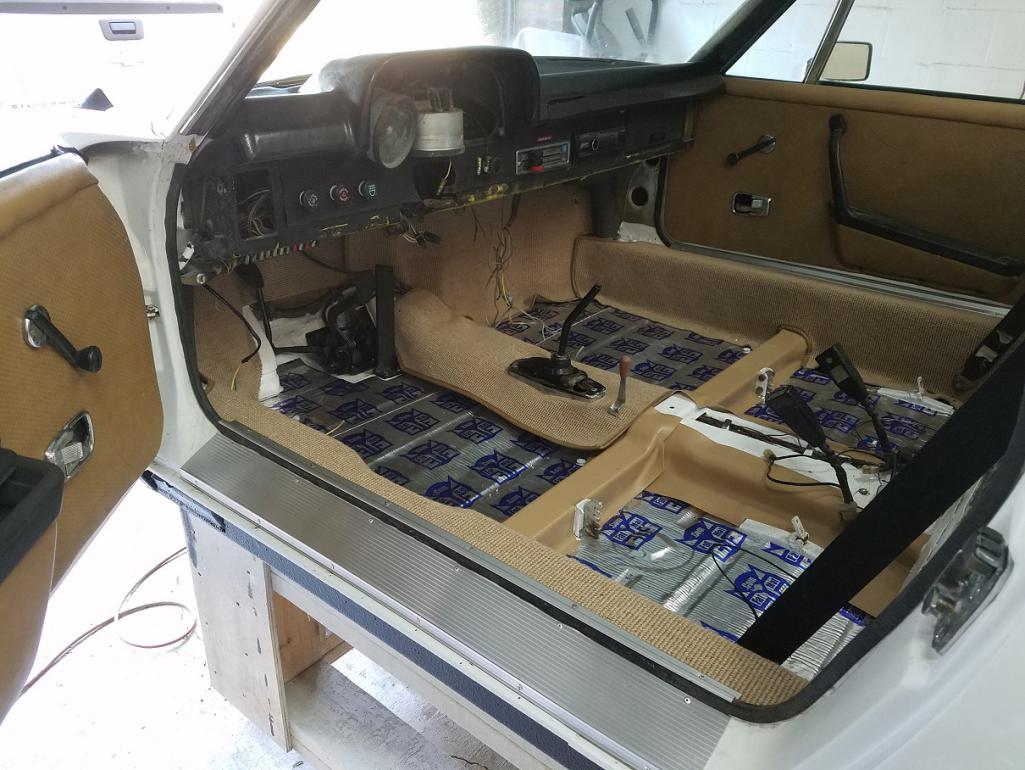
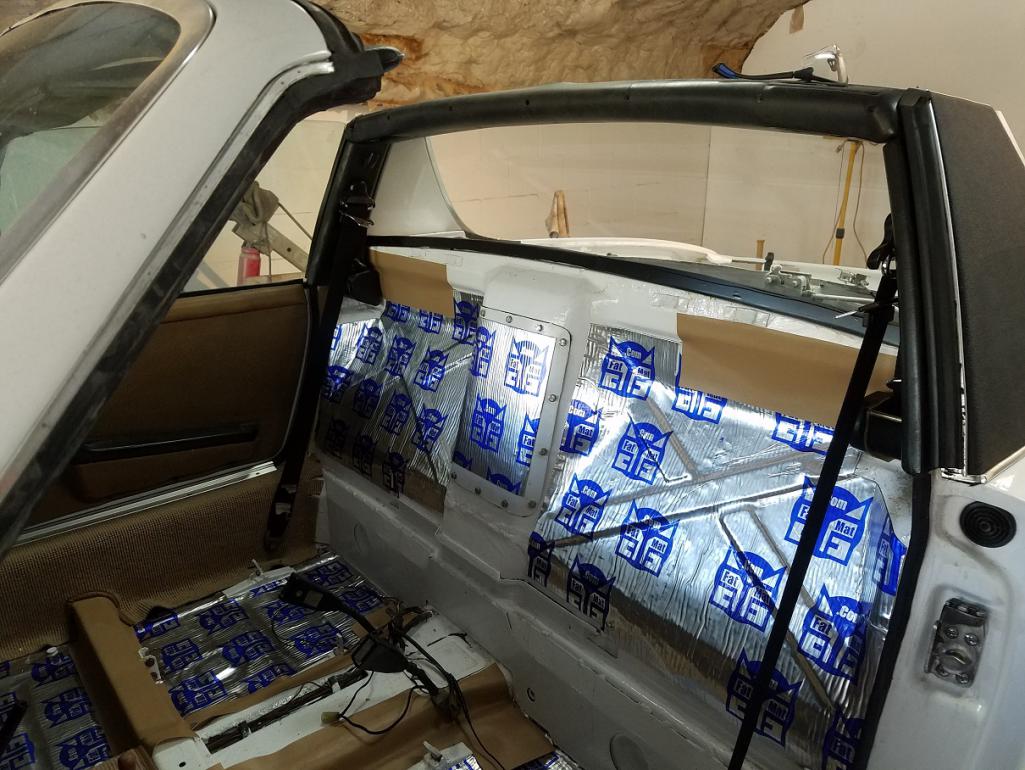
The sound deadening has been installed, and for the most part, the interior is almost finished. I still have the original, internal firewall sound proofing...the fat mat added to the rear firewall is a little redundant.
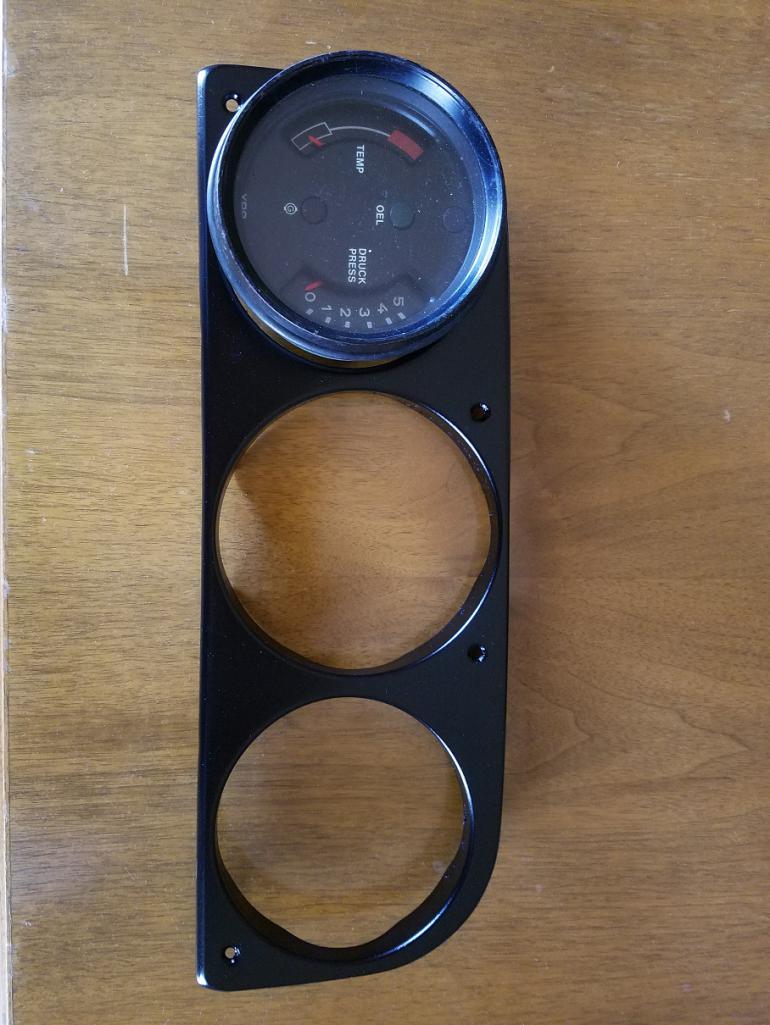
For the interior, I need to finish up my gauge cluster...which means a mod to the fuel gauge. I've decided that I'm not going to re-install my center console. I'll go with a 911 combo oil temp/pressure gauge and combine the fuel into the tach...already have my replacement VDO fuel gauge and Bosch tach internals ready to be re-assembled.
I'll also have a custom shifter boot made up to accommodate the base of my old, Weltmeister shifter base.
This week, I also picked up my new tires...Conti Exteme Contacts...205/50/16 and 225/50/16.
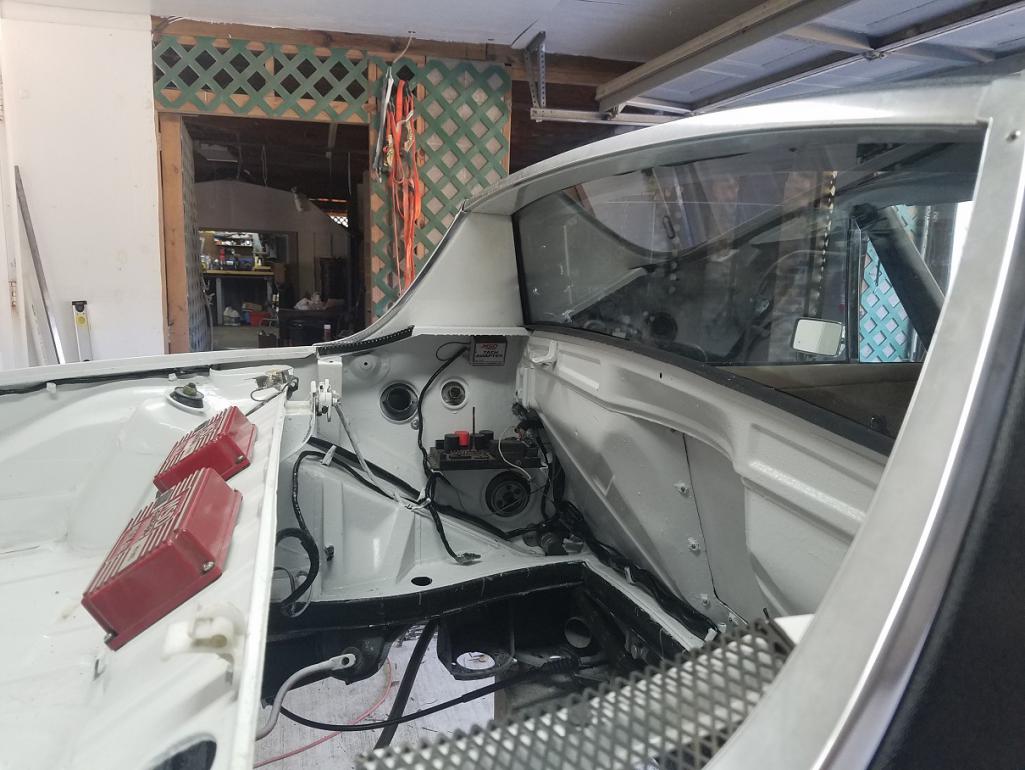
The engine bay is almost completed...re-installed the fender well oil tank as well as the oil thermostat in the right fender well. Working on completing the hard oil lines to the front oil cooler. I wanted to finish up my turn signals before I installed the hard lines through the front fender well.
This weekend, I completed making the internal brackets for my Euro turn signal conversion.
It's coming along...
Attached thumbnail(s)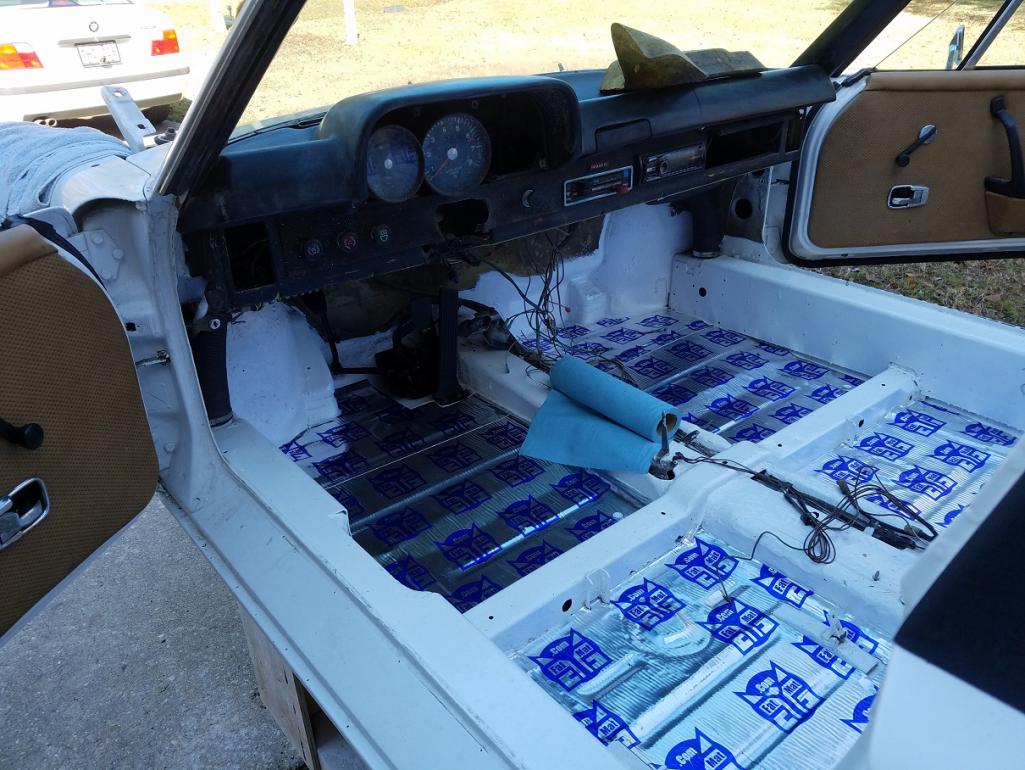
Posted by: 9146C Jan 31 2021, 04:05 PM
Cont'd photos...
Attached thumbnail(s)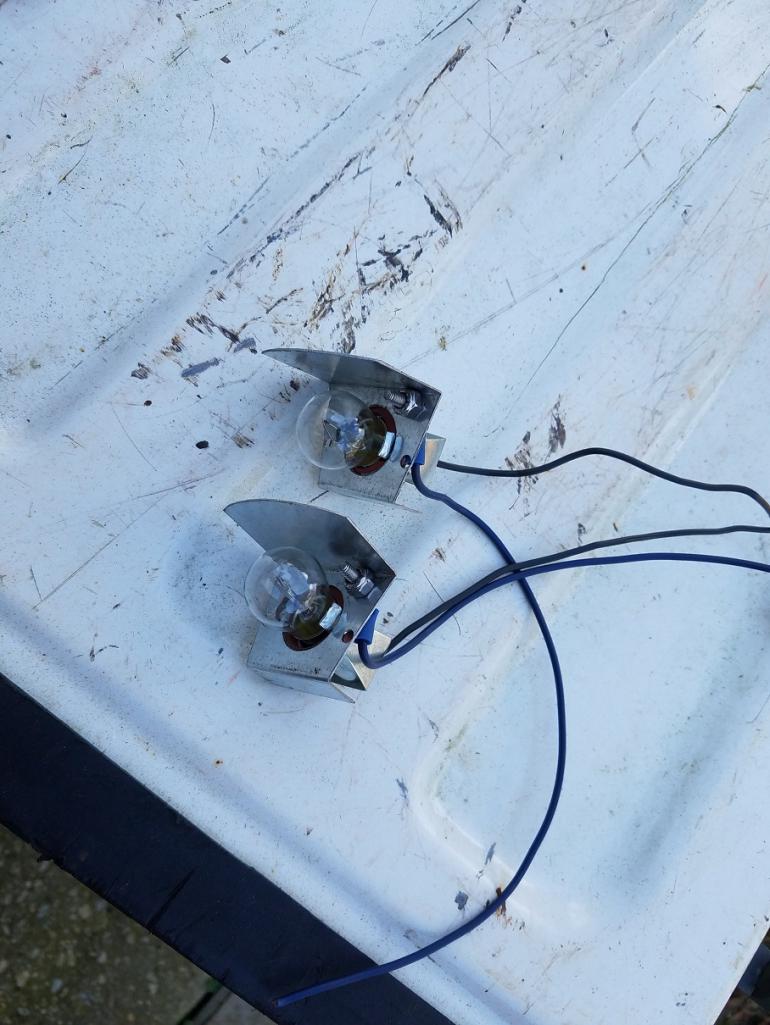

Posted by: Cairo94507 Jan 31 2021, 06:26 PM
Very nice. I like that you relocated the fuel gauge to the tachometer gauge.
Posted by: Luke M Jan 31 2021, 07:13 PM
The engine bay is almost completed...re-installed the fender well oil tank as well as the oil thermostat in the right fender well. Working on completing the hard oil lines to the front oil cooler. I wanted to finish up my turn signals before I installed the hard lines through the front fender well.
Do you have more pics of the oil line install from rear to front cooler?
Is it the same kit from Elephant Racing?
Posted by: 9146C Jan 31 2021, 07:40 PM
@http://www.914world.com/bbs2/index.php?showuser=9712 : Thank you for your feedback. The idea for the tach/fuel gauge combo came from the forums here...I think it was @http://www.914world.com/bbs2/index.php?showuser=8154 that proposed the Bosch Tach Internals upgrade to eliminate the tach "bounce". I don't recall the thread that I found the fuel gauge addition...it was here in the forums. I think the fuel gauge addition came from a thread by @http://www.914world.com/bbs2/index.php?showuser=2388 .
http://www.914world.com/bbs2/lofiversion/index.php?t216719.html
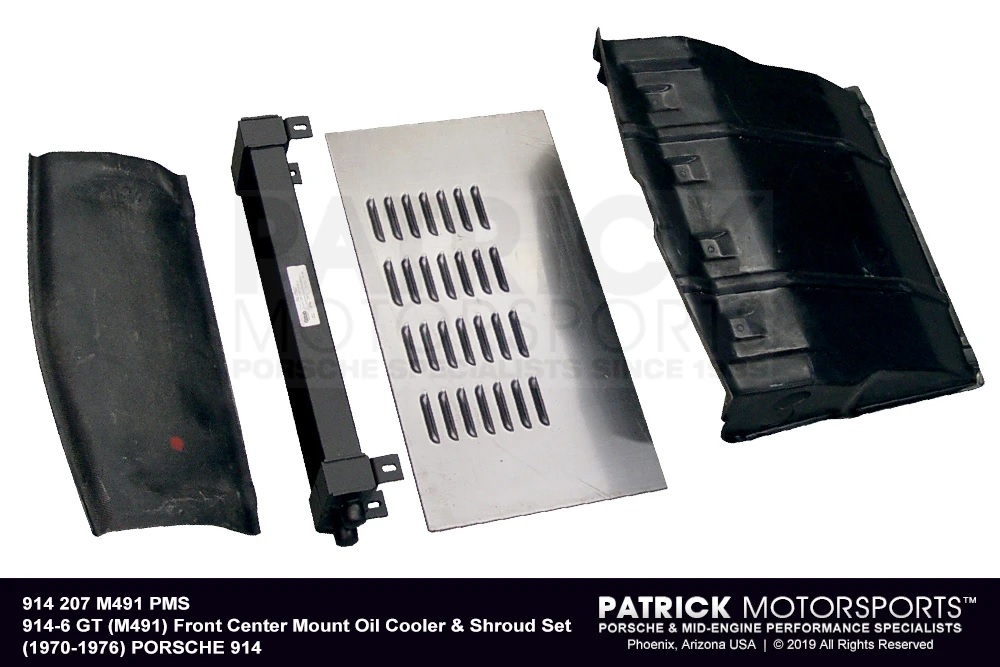
@http://www.914world.com/bbs2/index.php?showuser=6113 M: You are correct...the oil line kit I purchased is from Elephant racing...I purchased it about 7-8 years ago when I did my 6 conversion initially...the front trunk oil kit came from Patrick Motorsports.
The Elephant kit is all metric...if I recall, the Patrick kit had some SAE fittings.
Posted by: 914forme Jan 31 2021, 07:46 PM
looks good
Posted by: 930cabman Feb 1 2021, 07:30 AM
Lookin good, keep it goin, the finish line is near
Posted by: 9146C Feb 13 2021, 11:45 AM
Continuing to knock off jobs to completion...
Finally have my brakes bled out...the first time I've ever used the Russell Speed Bleeders (part # 639570)...sure makes for an easy one man job!
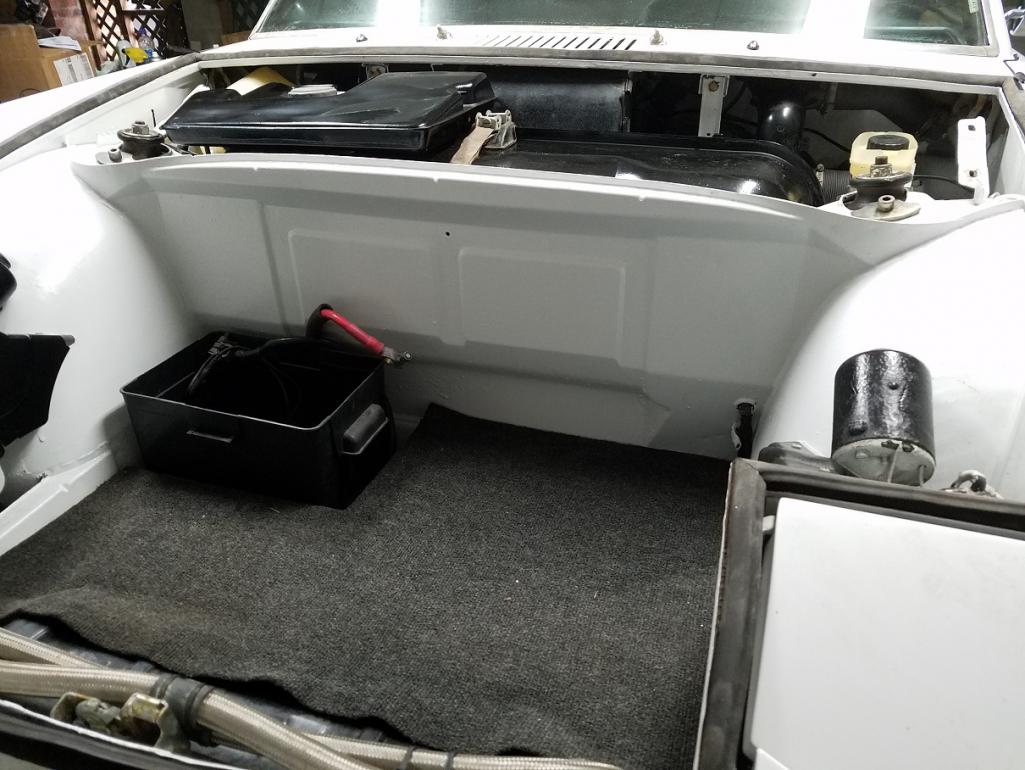
Chris Foley's fuel mount arrived this week as well...relocated the fuel pump under the steering rack. Not particularly happy with the additional fuel line (to avoid kinks) but it turned out OK. Happy to have the pump "out of the car" and finally a proper low pressure pump (to eliminate the secondary pressure reducer I had installed when I went to carbs).
Yeah, I know...I should have been more careful when I painted the inside of the trunk to prevent the runs in the photo! (The new pan from RD should cover it up nicely!)
The rubber insulated fuel pump mount is excellent!
Also converted the windshield washer system to electric...everything in the front trunk is now complete (with the exception of adding carpet to the bulkhead).
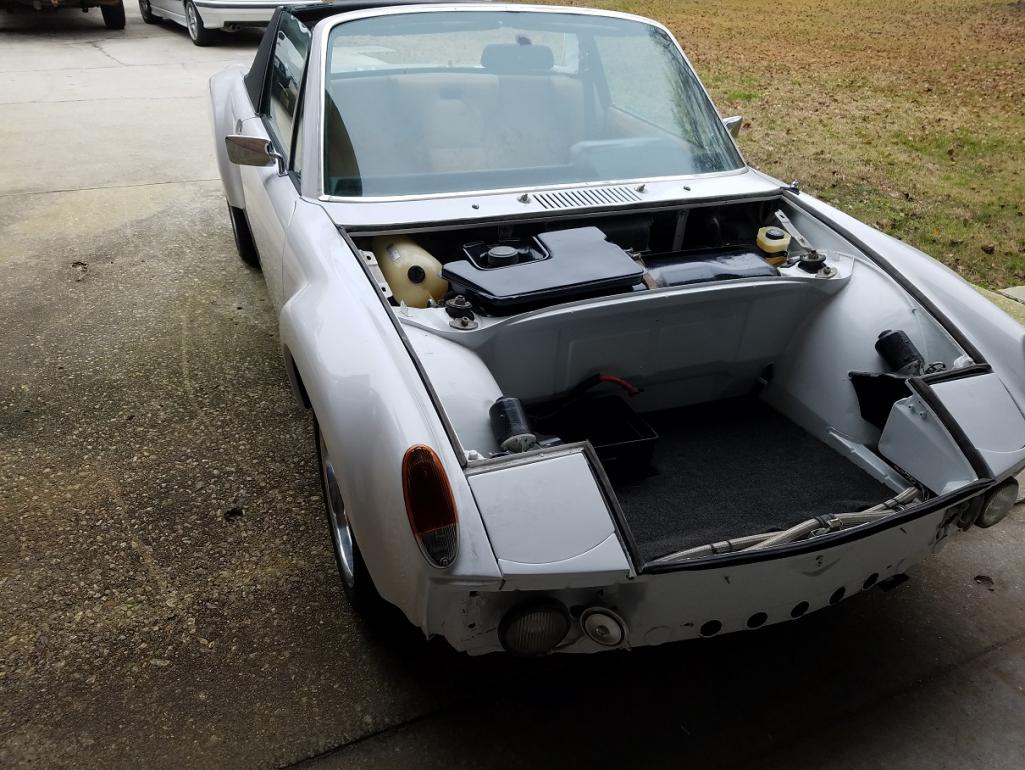
Took the car off the dolly...another milestone.
Hoping that within the next couple of weeks I'll be able to re-install the motor/transaxle.
Attached thumbnail(s)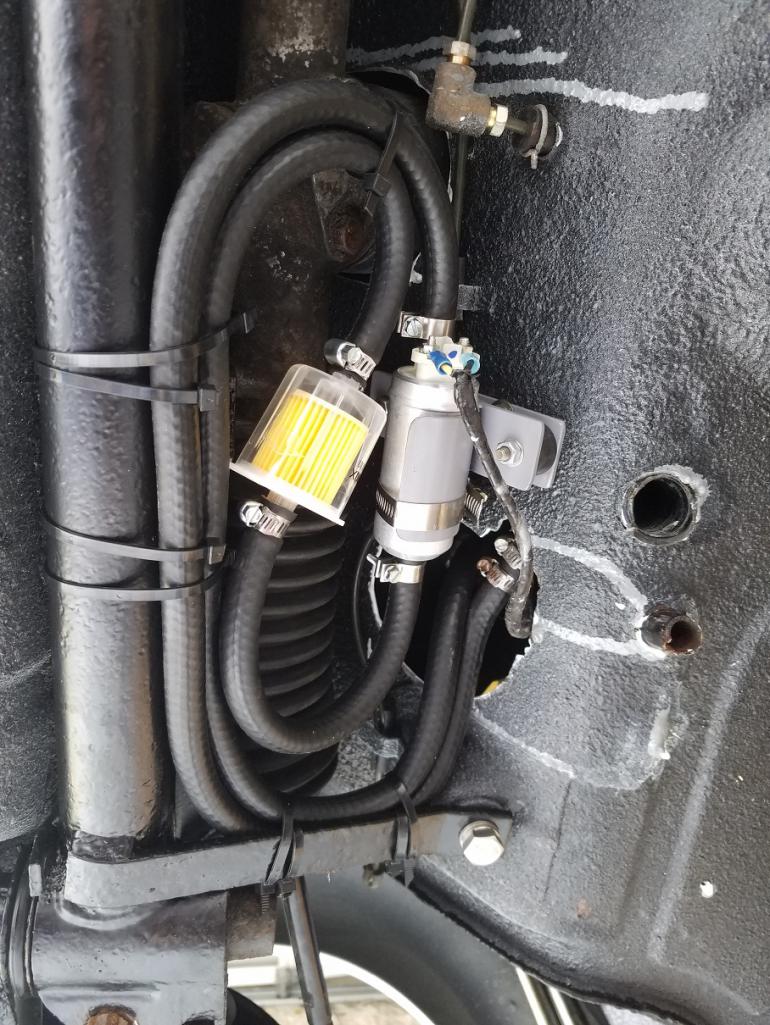
Posted by: Cairo94507 Feb 14 2021, 09:45 AM
Looking very nice.
Posted by: 9146C Feb 23 2021, 05:32 PM
Working on some odd jobs...
Painted up and re-installed the steering rack pan.
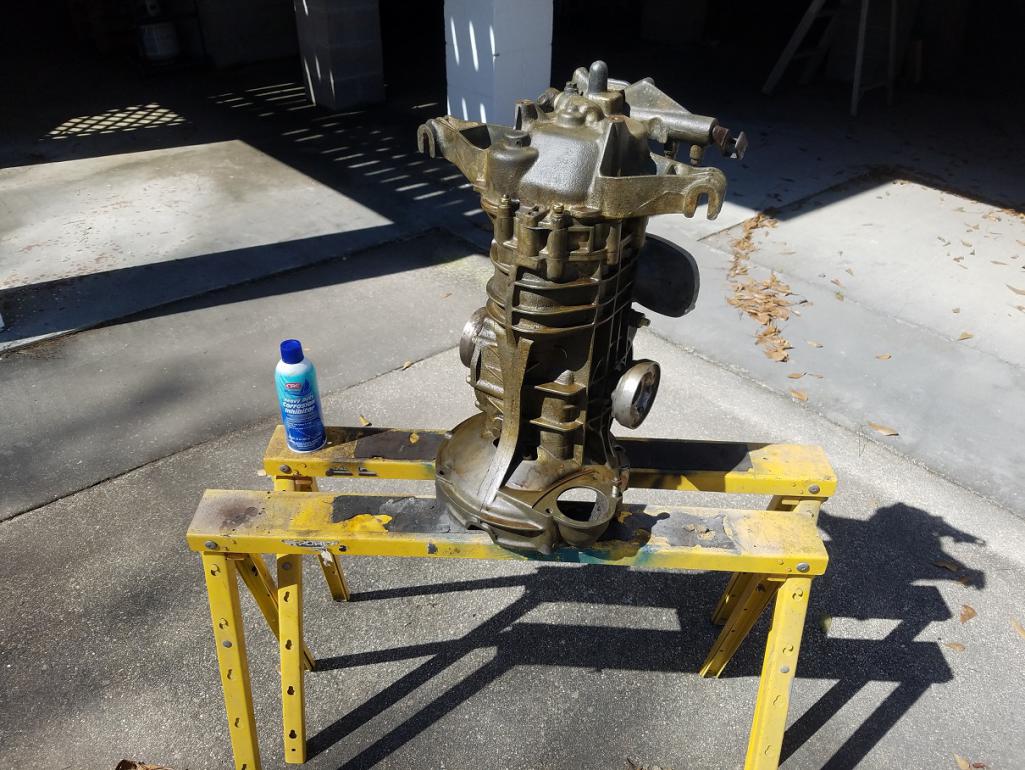
Cleaned up then coated the (rebuilt) transaxle with CRC Heavy Duty Corrosion Inhibitor (06026).
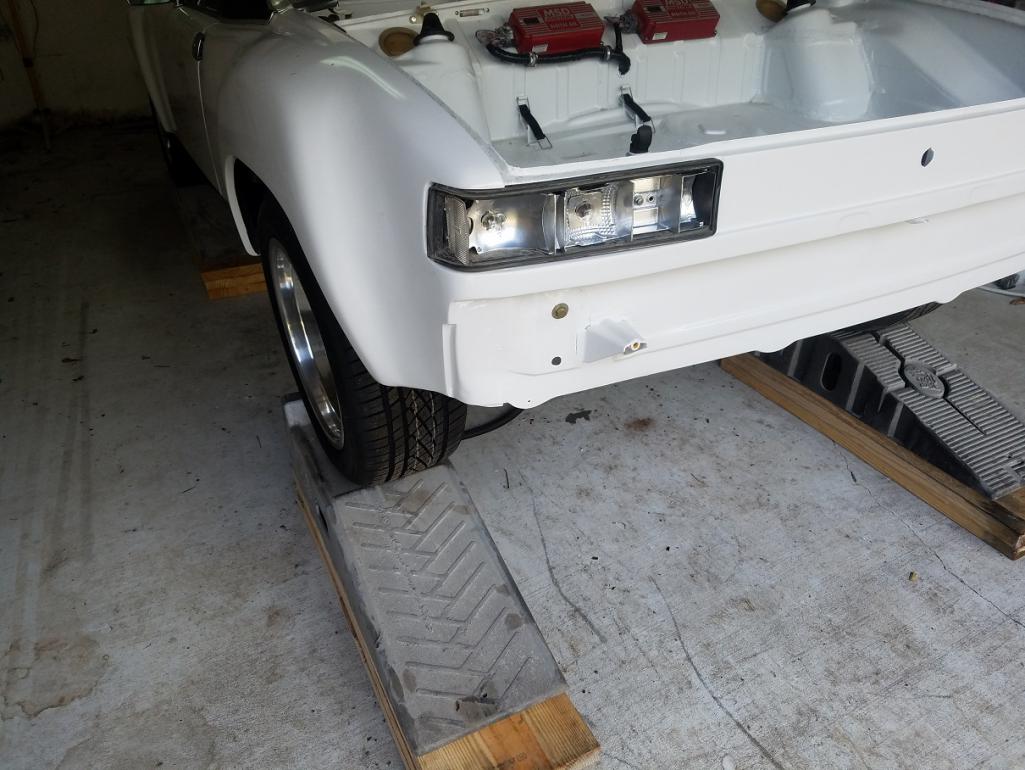
The car is back on the ramps ready for the motor to be re-installed.
Installed the firewall backpad for the interior. Just need to finish up my gauges, re-install the steering column and the carpets and seats and the interior will be done.
Everything in the front trunk is now finished (installed carpeting on the bulkhead).
Re-installed the front hood with the (aftermarket) gas lid cover and the front crest.
Dis-assembled the rear taillights to paint the reflectors with chrome paint and finished installing the rear taillights and rear emblem.
Should be ready to re-install the motor/transaxle this week.
Last major job to finish up will be the modification of the rocker covers and valences for the flares.
My car rolled down the assembly line 49 years ago on March 23rd...that'll be my target date for completion.
Attached thumbnail(s)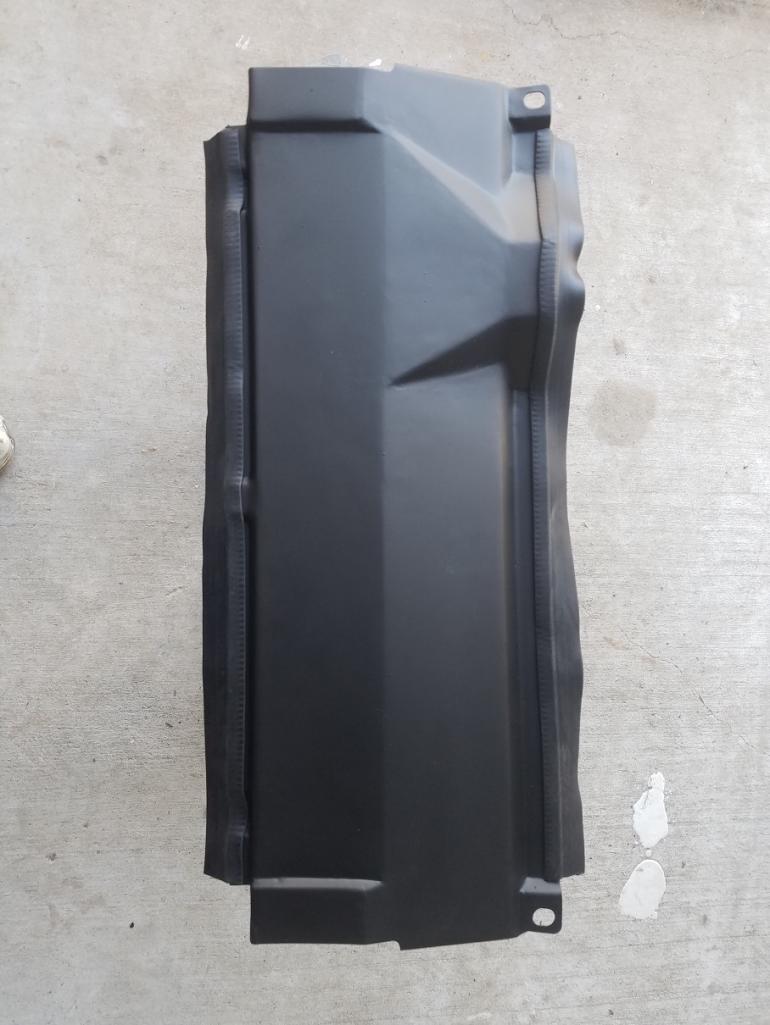
Posted by: JmuRiz Feb 24 2021, 03:48 PM
@http://www.914world.com/bbs2/index.php?showuser=9712 : Thank you for your feedback. The idea for the tach/fuel gauge combo came from the forums here...I think it was @http://www.914world.com/bbs2/index.php?showuser=8154 that proposed the Bosch Tach Internals upgrade to eliminate the tach "bounce". I don't recall the thread that I found the fuel gauge addition...it was here in the forums. I think the fuel gauge addition came from a thread by @http://www.914world.com/bbs2/index.php?showuser=2388 .
http://www.914world.com/bbs2/lofiversion/index.php?t216719.html
@http://www.914world.com/bbs2/index.php?showuser=6113 M: You are correct...the oil line kit I purchased is from Elephant racing...I purchased it about 7-8 years ago when I did my 6 conversion initially...the front trunk oil kit came from Patrick Motorsports.
The Elephant kit is all metric...if I recall, the Patrick kit had some SAE fittings.
What coolers and locations are you running? Are they in the front of the wheel wells, or are is it all hidden under the parcel shelf? I'm interested in what you're running w/o cutting up the frunk too much.
Posted by: 9146C Feb 24 2021, 04:11 PM
[/quote]
What coolers and locations are you running? Are they in the front of the wheel wells, or are is it all hidden under the parcel shelf? I'm interested in what you're running w/o cutting up the frunk too much.
[/quote]
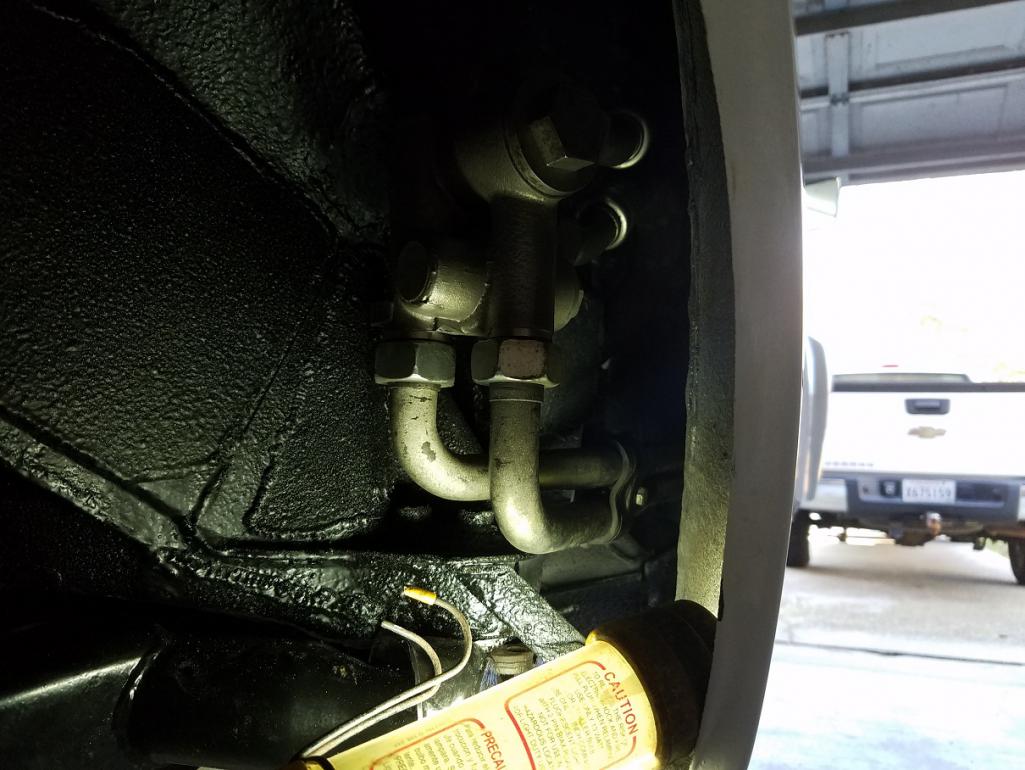
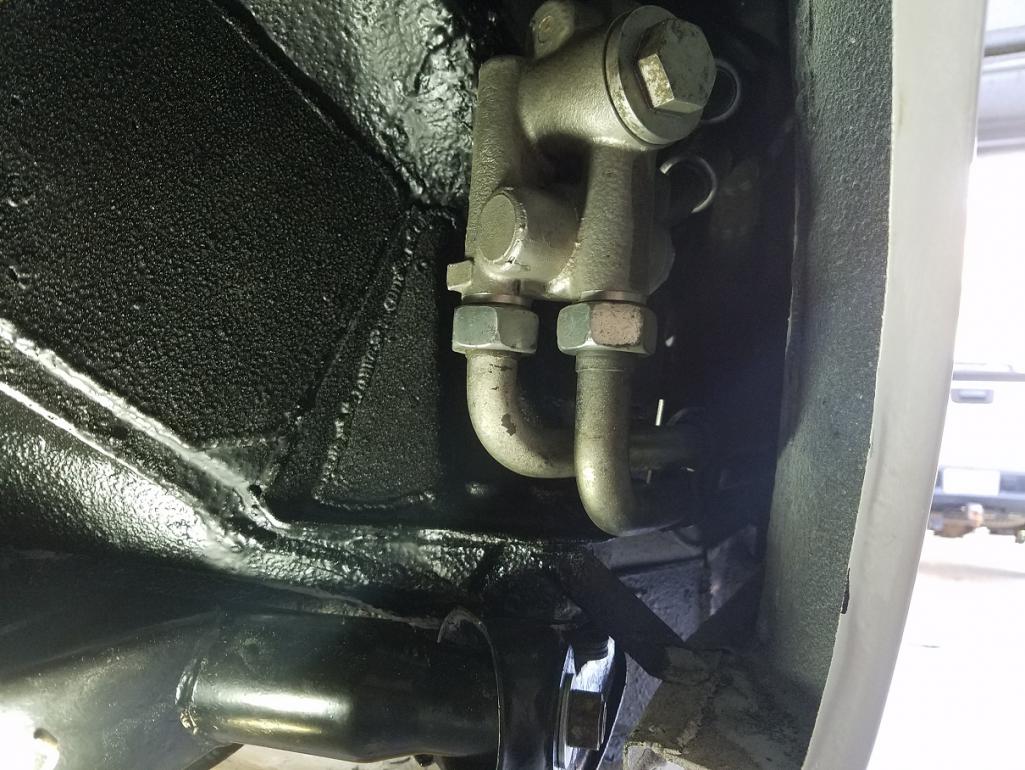
Thanks for the feedback:
I've installed the thermostat and hard oil line kit from Elephant Racing. This kit runs up to the front of the wheel well. To this, I've added the Patrick Motorsports oil cooler kit.
The Elephant Kit includes the hoses to the engine and the oil tank.
In the photos a few threads above, you can see the braided oil lines connecting the two systems.
I cannot recall where I sources the braided lines. I cut two small holes into the inner fender well to connect the hard line kit to the braided lines.
I've created a new (what you're calling the parcel shelf) slightly higher than the original floor to blend into the slope of the oil cooler shroud and give (in my opinion) a slightly cleaner finish to the front trunk.
Attached are the photos from the two supplier websites.
Attached image(s)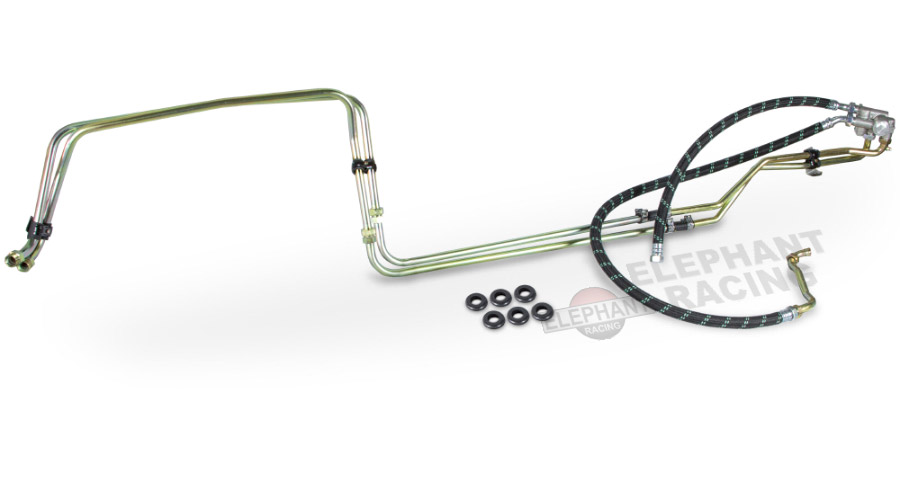
Posted by: JmuRiz Feb 25 2021, 10:01 AM
Looks very clean, excellent!!!
Posted by: 9146C Mar 9 2021, 02:53 PM
Finished up the modifications to the rocker panels and front/rear valences. When I bought the car, I replaced all 4 panels with GRP replacements...just a little fiberglass work to modify them to match the new flares.
Also finished up my dash panel with the modified Tach (with fuel gauge) and the 911 oil temp/pressure combo gauge. The speedo is now metric (with a working odometer!).
I was debating where to install a switch for the new electric washer pump...found a nice new home (with a pre-drilled hole behind the dash face material) for that switch to the left of the lighter.
Attached thumbnail(s)
Posted by: 9146C Mar 13 2021, 01:41 PM
Today feels like another milestone day!
Engine/transaxle re-installed.
Attached thumbnail(s)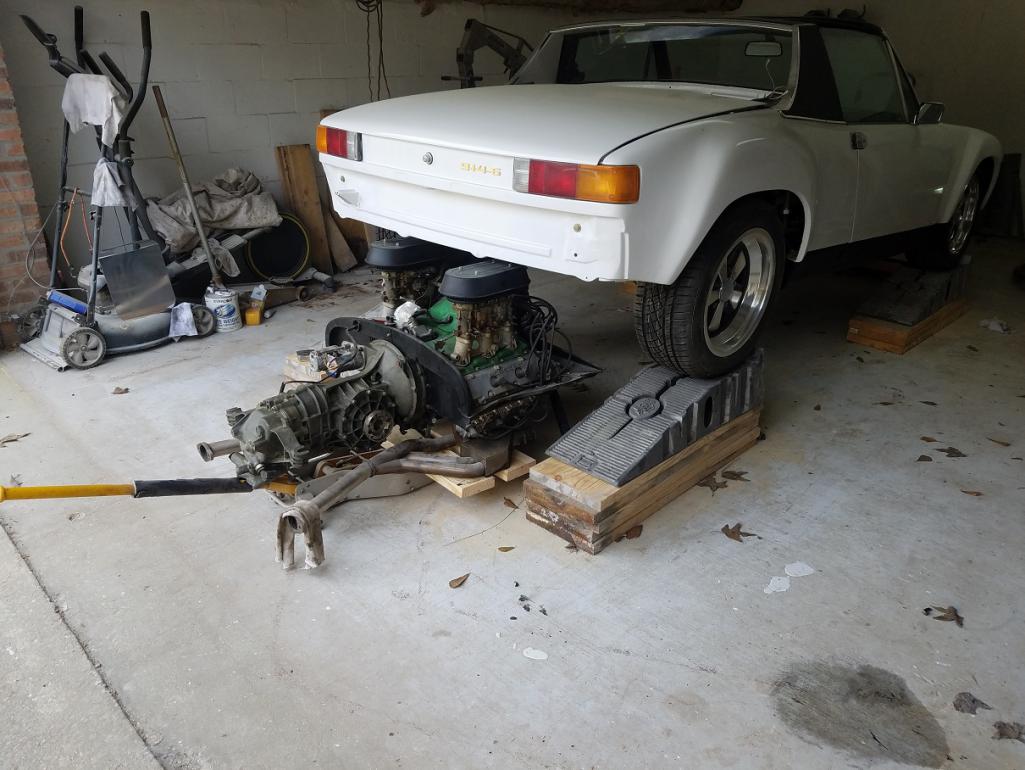
Posted by: Cairo94507 Mar 13 2021, 04:27 PM
Oh man....sleeping is difficult when you get that close.
Posted by: 9146C Mar 13 2021, 07:45 PM
Oh man....sleeping is difficult when you get that close.
Thank you Michael!
It is getting close!
Posted by: 9146C Mar 17 2021, 04:46 PM
Just a couple pictures today...a before, and current...just to remind myself of the progress...
Everything under the car is complete...just need to finish installing new fuel lines in the engine bay and that will be a wrap as well.
Down to a handful of jobs now.
Attached thumbnail(s)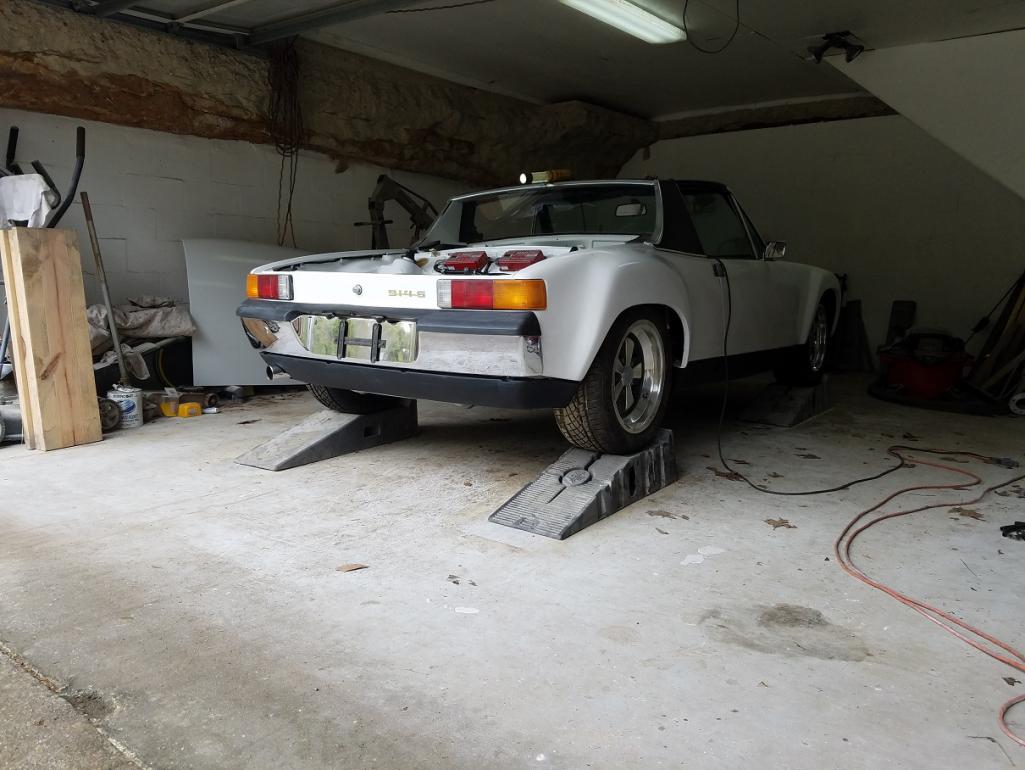
Attached image(s)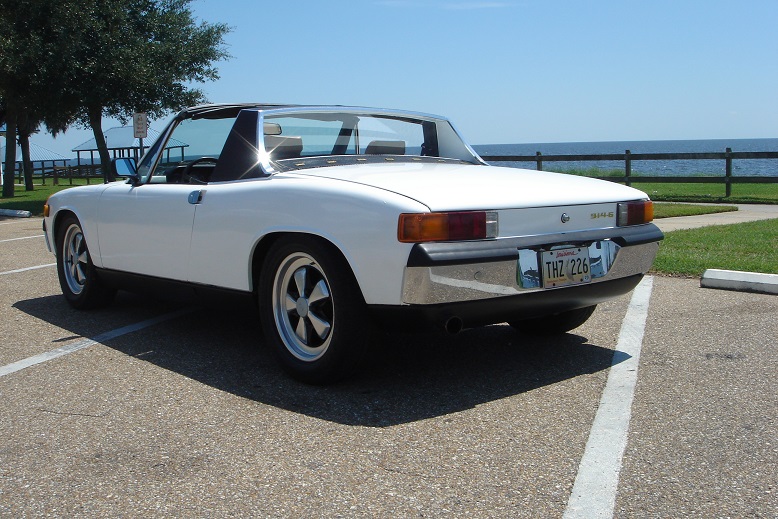
Posted by: raynekat Mar 17 2021, 05:33 PM
Love the look of those flares there man....
This will be a very nice looking car when finished.
Posted by: 9146C Mar 17 2021, 05:43 PM
Love the look of those flares there man....
This will be a very nice looking car when finished.
Thank you!
The rear suspension is set-up for an approximately 1-1/4" lower ride height (from before)...now sitting closer to the height I set the camber to. I really like the look of the new rear stance.
Posted by: 9146C Mar 23 2021, 04:48 PM
The last week has been a "mad dash" to get things wrapped up with today being the 49th Anniversary of this car rolling off the Production Line. (Missed my self-imposed completion date.)
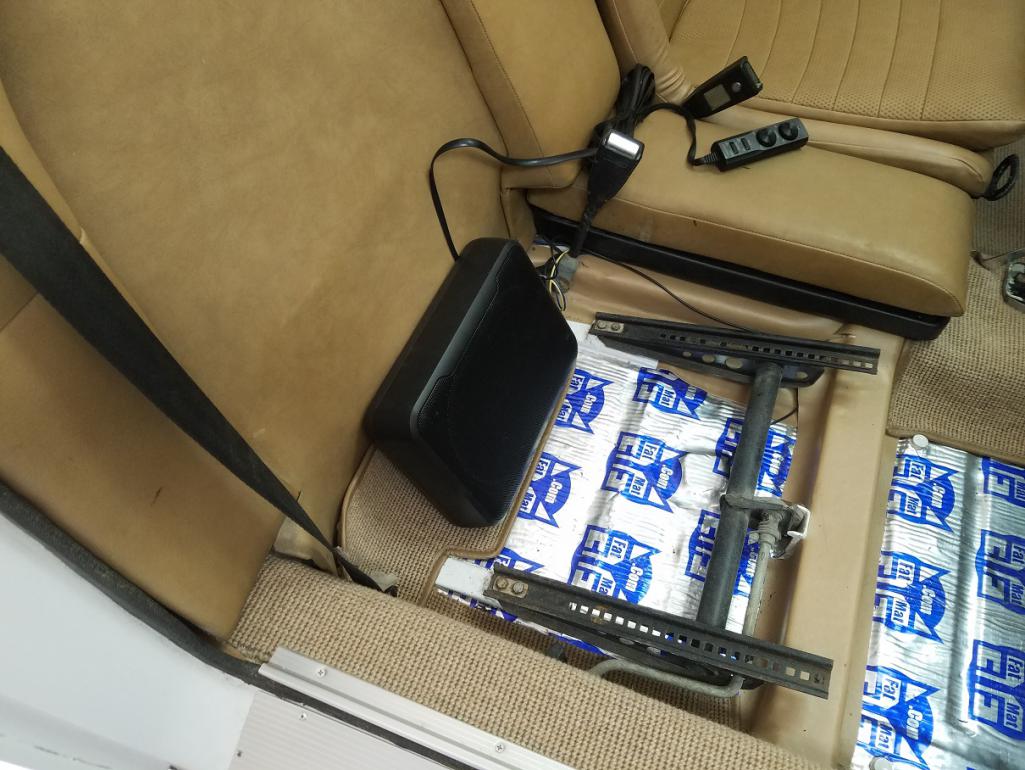
Interior is finished up...installed a Pioneer narrow amp/subwoofer behind the passenger seat (2-3/4" height/thickness)...hoping that works out.
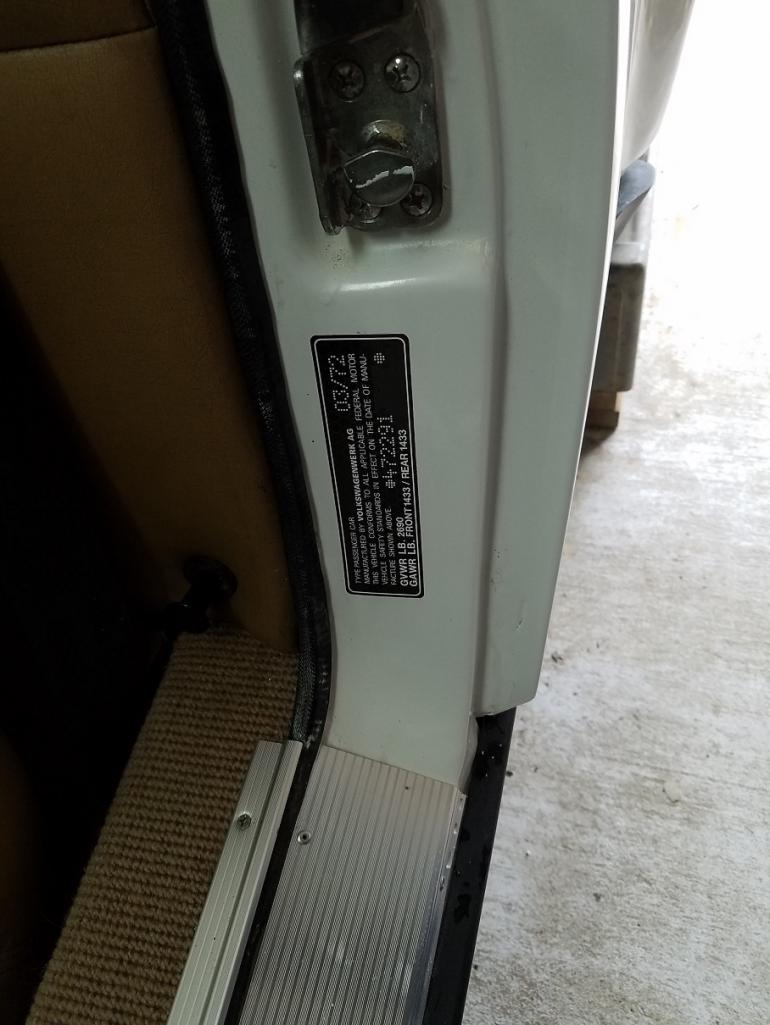
Also installed my replacement door jam VIN tag from Carbone. I looked at lots of door jam photos...seems the VIN tags are all installed slightly different in terms of position. My original VIN tag had been painted over by a PO...I never bothered to take a picture.
Spent the last three days chasing electrical gremlins...everything is now working with the exception of the fog lights (they've never worked in the time I've owned the car...popping fuses so there must be a ground in the wiring forward), the indicator light for the parking brake and now my fuel sender no longer works (replacement on order). Everything else is now working as it should.
My original (low pressure) fuel pump that I installed was faulty...was leaking from the housing. My replacement pump was delivered yesterday afternoon. Went to install it and found a poor ground on the connection wire...should be a minor fix.
The car turns over no problem and the oil pressure gauge looks to be working just from cranking it over.
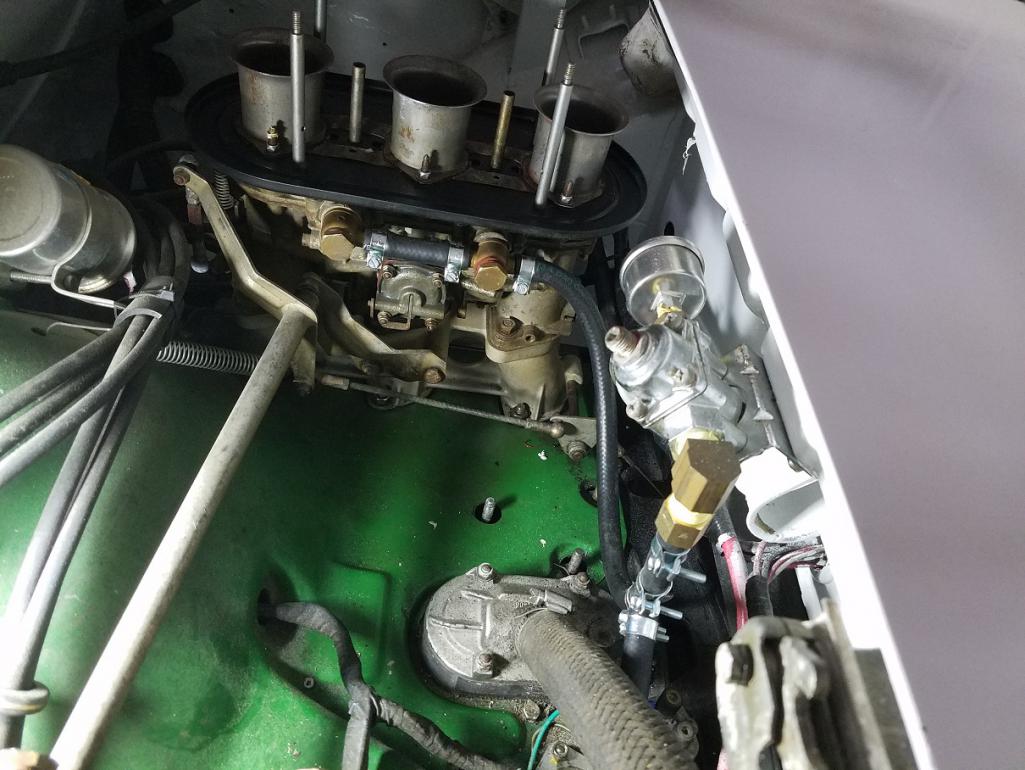
When I pressurized the fuel system, the carbs were leaking badly at the banjo fittings (where I replaced the fuel lines)...unfortunately, I used up my last set of fiber gaskets...re-ordered new spares today.
Time to give the car her first bath (she's covered in pollen!) and a coat of wax.
Now hoping to have the car running/on the road in 2-3 days once the carb fuel feed leaks are repaired. (Probably just as well with the monsoons this week in Louisiana!)
Attached thumbnail(s)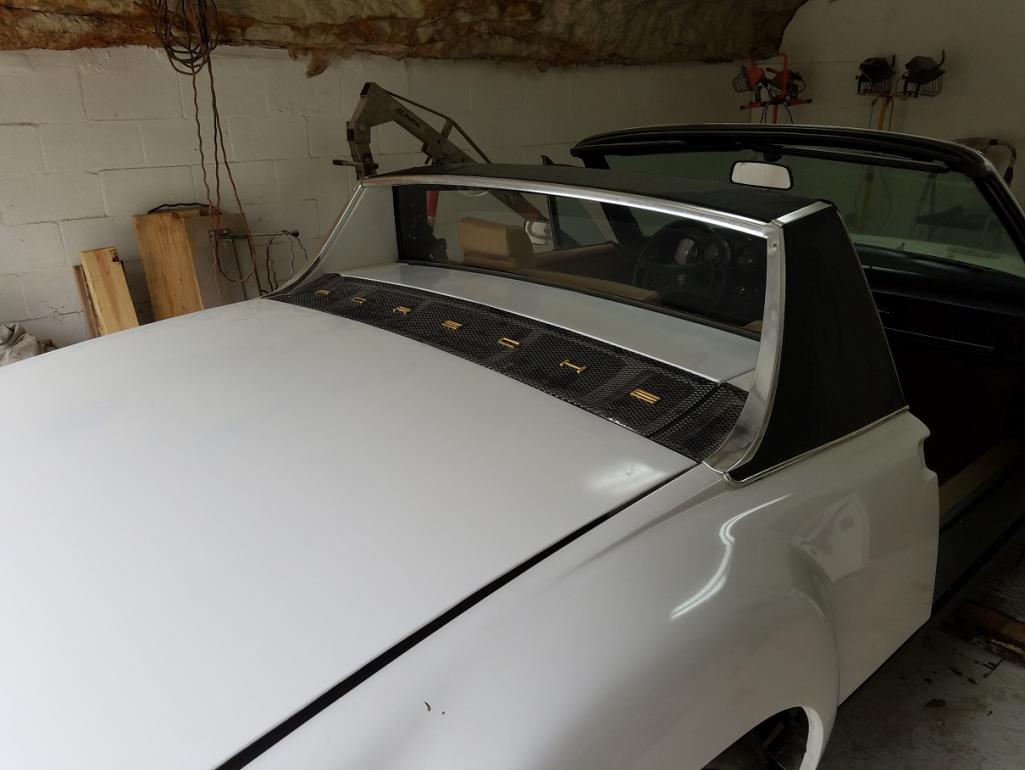

Posted by: 9146C Mar 31 2021, 03:29 PM
Three days of chasing an issue with the electronic ignition (no spark)...finally got her started today after a 16 month "nap".
https://www.youtube.com/watch?v=GctuD74k3EI
Just a couple of minor jobs to wrap up...than I can take her out for a shake-down cruise.
Posted by: Cairo94507 Mar 31 2021, 05:02 PM
Nice. Sounds good. 
Posted by: Root_Werks Mar 31 2021, 05:17 PM

Woo Hoo! Inspiring for me. My 914-6 conversion needs so much body work. Taking it apart now for body and paint.
Posted by: 9146C Apr 5 2021, 02:29 PM
I'm not entirely sure if these projects ever get "done"...happily, this one has moved from In-Op Status to Driver.
Gave it a quick bath to get all the pollen off and drove it around the neighborhood to check things out...just need to give it a coat of wax.
Attached thumbnail(s)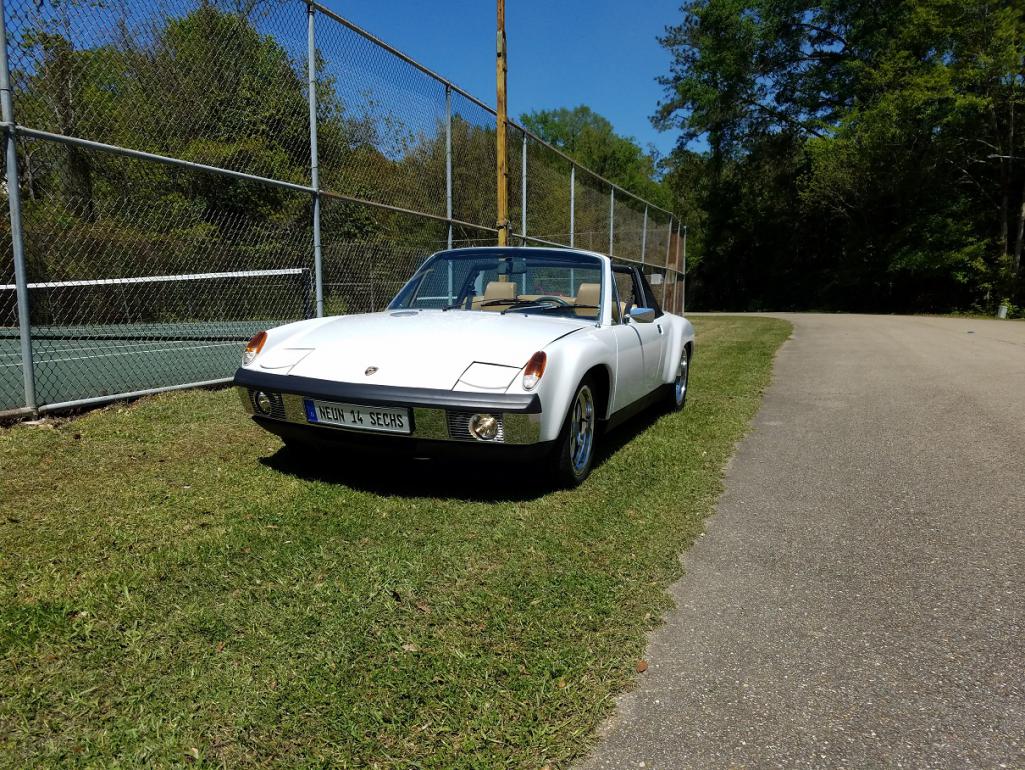

Posted by: mb911 Apr 6 2021, 05:35 AM
I agree they are never really done. I am at the same point with mine right now.
Posted by: Root_Werks Apr 6 2021, 02:07 PM
Looks great and agree, if not ever really done, certainly a big milestone to become a driver again!
Posted by: 9146C Apr 7 2021, 02:39 PM
Thanks for the feedback gentlemen!
The only issue I've had so far, the car would periodically pop out of 1st, 3rd and 5th gear.
That's a scary way to test the rev limiter!!!
I thought it would be a simple adjustment of the spline at the shifter.
That wasn't it.
Put the car back up on the ramps, crawled underneath and checked the rear shifter linkage again.
It looks like my upgraded bronze bushing was a little too long and wasn't allowing the gears to fully mesh in the 1st, 3rd and 5th gear positions.
Simple solution: just ground off about 1/8" from the bushing and everything is good.
Thought I'd share this potential bushing issue...haven't seen it mentioned before.
ps: I'd forgotten how much fun this is to drive! Feels good to have this one back on the road.
Attached thumbnail(s)
Posted by: Root_Werks Apr 7 2021, 03:07 PM
The bushing fix is a good tip, installed a few over the years and haven't had that issue before.
Posted by: 914werke Apr 7 2021, 03:39 PM
Posted by: Root_Werks Apr 7 2021, 03:47 PM
Oh duh, you're correct, flange installs on the inside. Wow, how much my little brain forgets!

Posted by: 9146C Apr 7 2021, 04:07 PM
LOL...always the simple solutions!!! Must be a senior moment! I just replaced the bronze bushing the way the plastic one came out without thinking about it.
Thanks!
Posted by: Luke M Apr 7 2021, 06:18 PM
Yup, the bushing is in backwards. Flip it around and you'll be good to go.
Posted by: 9146C Apr 10 2021, 02:27 PM
Getting more comfortable with a few miles on the odometer now. This is the fun part! Went for my LA State Inspection yesterday...all's good.
Attached thumbnail(s)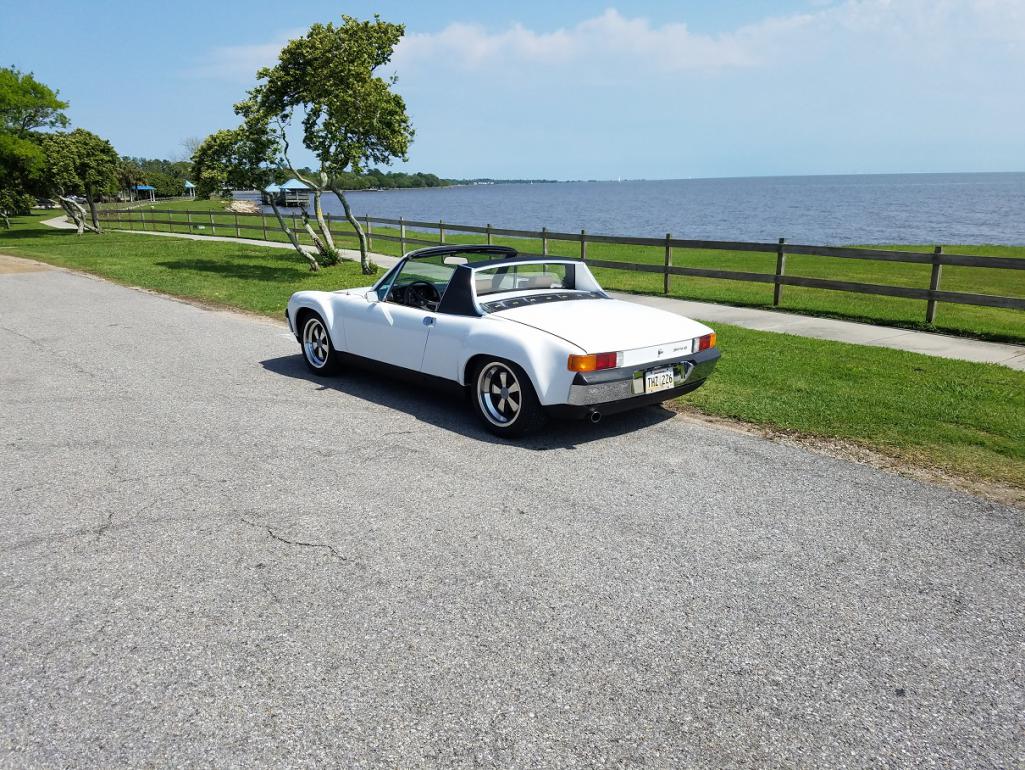
Posted by: brp986s Apr 10 2021, 08:20 PM
Congratulations and beautiful work. I've been around here for years and have seen projects like this spin out of control. But you pulled it off successfully and in very good time, too. Time to think about classic car insurance. The motoring public has no idea the amount of work involved here.
Posted by: 9146C Apr 11 2021, 06:09 AM
Congratulations and beautiful work. I've been around here for years and have seen projects like this spin out of control. But you pulled it off successfully and in very good time, too. Time to think about classic car insurance. The motoring public has no idea the amount of work involved here.
Thank you for the feedback! Much appreciated!
Posted by: 9146C Apr 15 2021, 10:14 AM
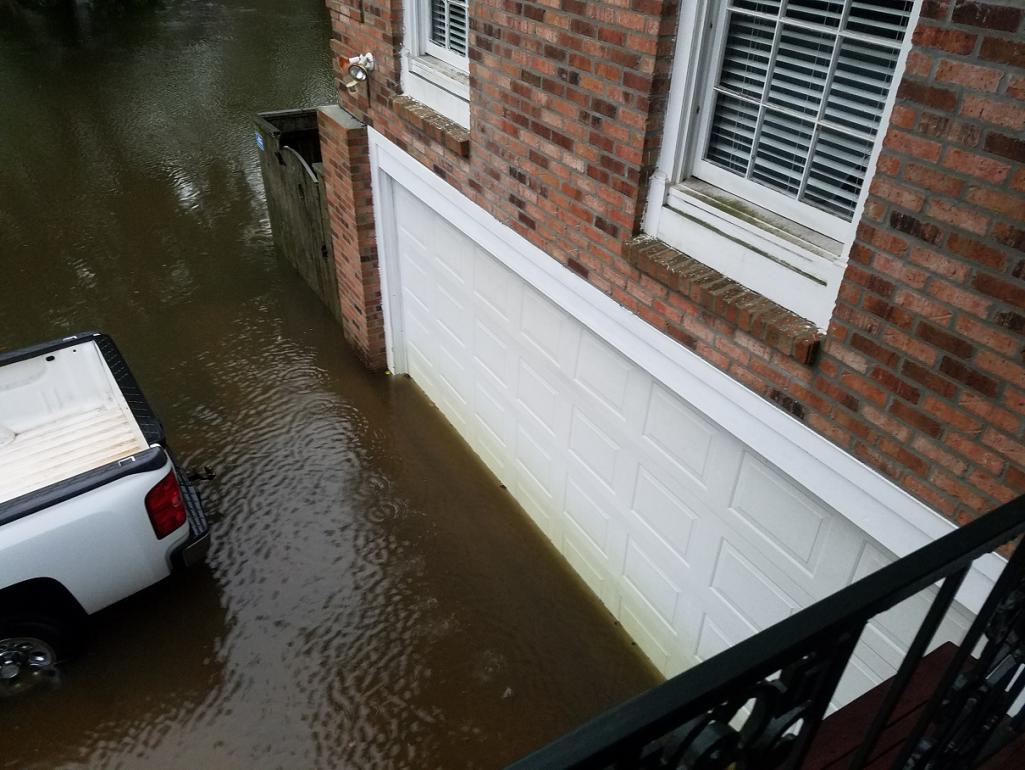
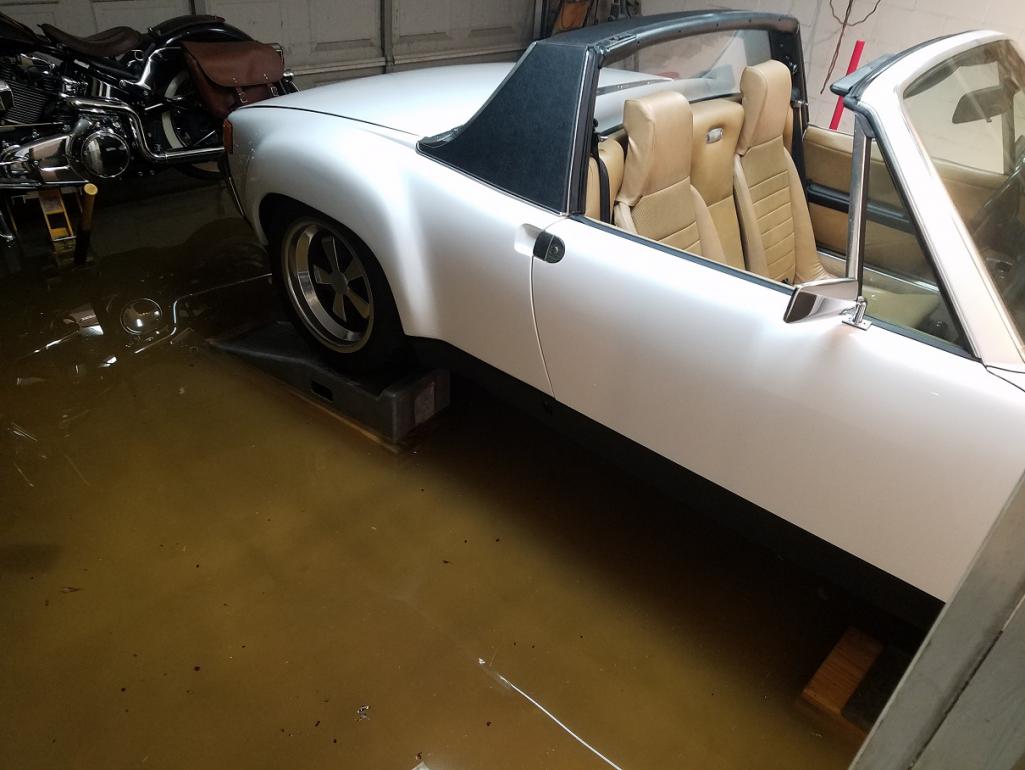
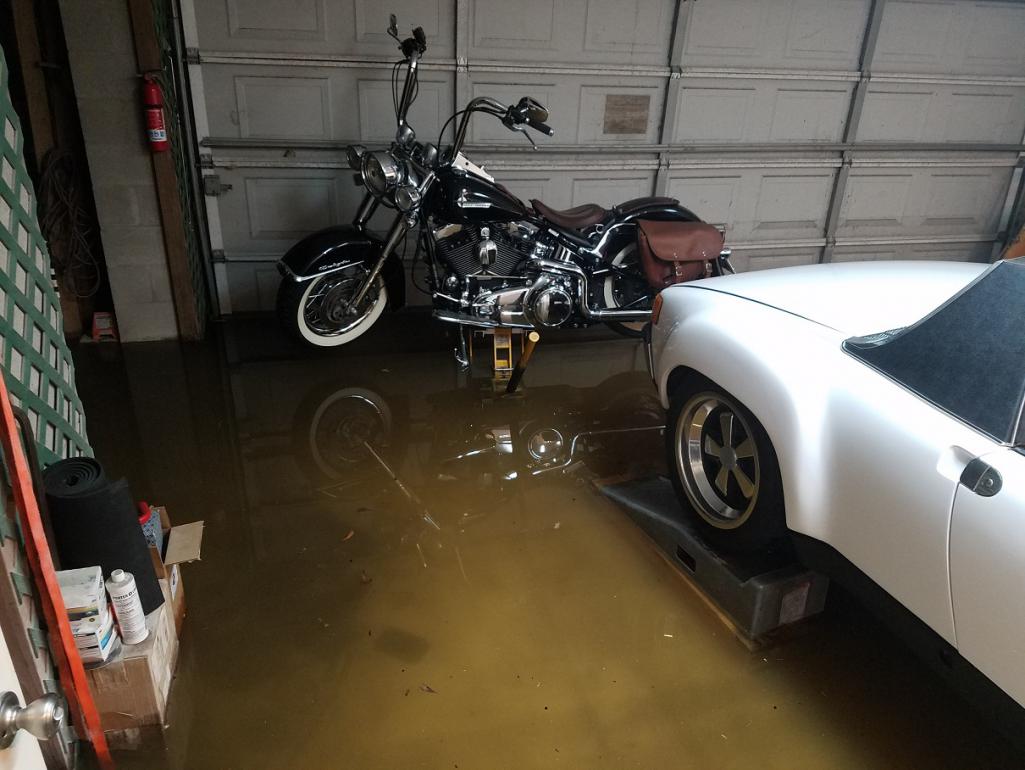
Too close for comfort!
Woke up this morning with 2" of water standing in my garage. Quickly put the car up on the ramps (with 4-2x10 spacers) and jacked my motorcycle up.
Fortunately, the rain stopped about 8:30 this morning and the flood level is starting to go down (about 3") from where it peaked at about 9:00 am (with about 6-7" of standing water under my house).
For reference, my slab foundation sits about 18 - 20" higher than the road in front of my house.
This flooding wasn't even forecasted on the 10:00 pm news last night. Got, very, very lucky!
Attached thumbnail(s)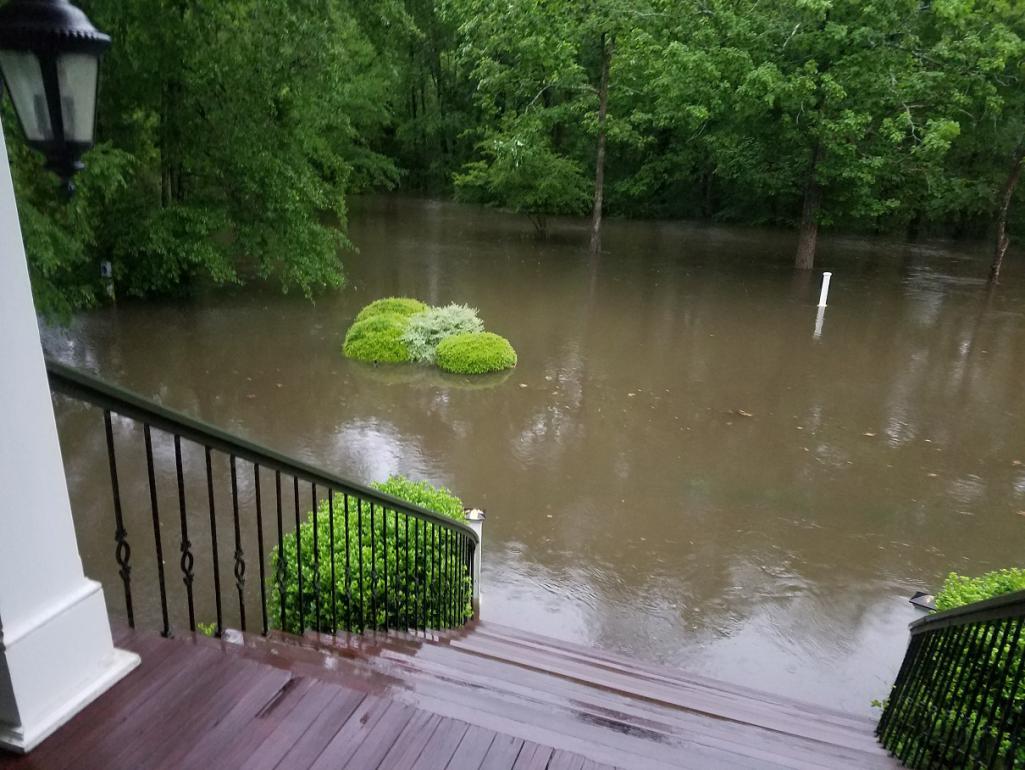
Posted by: Van914 Apr 15 2021, 10:18 AM
Scary! You might want to invest in a lift!
Posted by: Cairo94507 Apr 15 2021, 11:05 AM
Man that is crazy. Was it pouring rain all night? Or did a storm drain get plugged up and cause water to back up?
I had a home about 43 years ago I just bought and when the first rains hit I came home to 12" of water under my home and about 4" of water in my back yard. I kind of freaked out. I looked over the fence at the end of the street, and the vacant lot was flooded too. I call the County and they sent a huge Roto-Rooter type truck out and within 30 minutes they cleared the storm sewer line and it was like someone flushed a toilet. All the lots drained in about 10 minutes to the point there was no water. After that I called the county yearly to make sure they cleared that drain while I owned that home.
Posted by: 9146C Apr 15 2021, 11:13 AM
Man that is crazy. Was it pouring rain all night? Or did a storm drain get plugged up and cause water to back up?
I had a home about 43 years ago I just bought and when the first rains hit I came home to 12" of water under my home and about 4" of water in my back yard. I kind of freaked out. I looked over the fence at the end of the street, and the vacant lot was flooded too. I call the County and they sent a huge Roto-Rooter type truck out and within 30 minutes they cleared the storm sewer line and it was like someone flushed a toilet. All the lots drained in about 10 minutes to the point there was no water. After that I called the county yearly to make sure they cleared that drain while I owned that home.
This was totally unexpected. Not much rain last night where I live. When I went to bed at 11:30 last night, there was no water at all.
Tucked into the trees across the street from my house is the Chinchuba River (a small creek). It typically carries surface water (from heavy rains) in Mandeville/Covington into Lake Pontchartrain. I can only assume that Covington (just north of me) got some pretty heavy rains last night...but that wasn't even in the forecast.
This is the worst I've seen here since Hurricane Isaac in 2012. Usually, the flooding never comes up past the middle of my driveway.
Got very, very lucky!
Posted by: Dion Apr 23 2021, 09:01 AM
Car looks amazing. Congrats, wow that was fast. Lots of enjoyable miles wished for ya.
Glad the waters have stayed low!
Posted by: 9146C Apr 23 2021, 12:56 PM
Car looks amazing. Congrats, wow that was fast. Lots of enjoyable miles wished for ya.
Glad the waters have stayed low!
Thank you! Much appreciated!
I'd almost forgotten how much fun the car is to drive! That flooding caught me way off guard...not even Hurricane Season yet! Even with that, I've only seen a little water under my house once (Hurricane Isaac) in the dozen years since I've lived here. It would've been heart-breaking to "lose" the car to unexpected flooding after only having it on the road for about 2 weeks! Thankful there was no damage!
Thanks again for the feedback! Definitely enjoying it again!
Posted by: Root_Werks Apr 23 2021, 02:19 PM
Wow! That was close! Good job getting the 914 UP!
Posted by: bkrantz Apr 23 2021, 07:43 PM
Great looking car!
And if you want to store it on higher ground, my garage is at 7100 ft above sea level.
Posted by: 9146C Apr 23 2021, 08:11 PM
@http://www.914world.com/bbs2/index.php?showuser=2026 Werks: Thank you for the feedback! It was an adrenaline rush at the time!
@http://www.914world.com/bbs2/index.php?showuser=23343 : Thank you as well...I've been following your build since the beginning...a very impressive (and extremely well detailed) restoration! I'll let you know about that offer!  Although, I'm not sure how the carbs will respond to that elevation!
I just realized, I never posted my Part II Video to this thread:
https://www.youtube.com/watch?v=pgQzDg4PQxk
Posted by: 9146C Jun 3 2021, 02:13 PM
Going through some old files (spring cleaning!) and I came across an old photograph of my car.
This was from the eBay ad when I purchased it in September 2002...plastic rockers, front air dam, whale tail and all!
Sure am enjoying driving it now!
Posted by: 9146C Jun 3 2021, 02:14 PM
Old Photo
Attached thumbnail(s)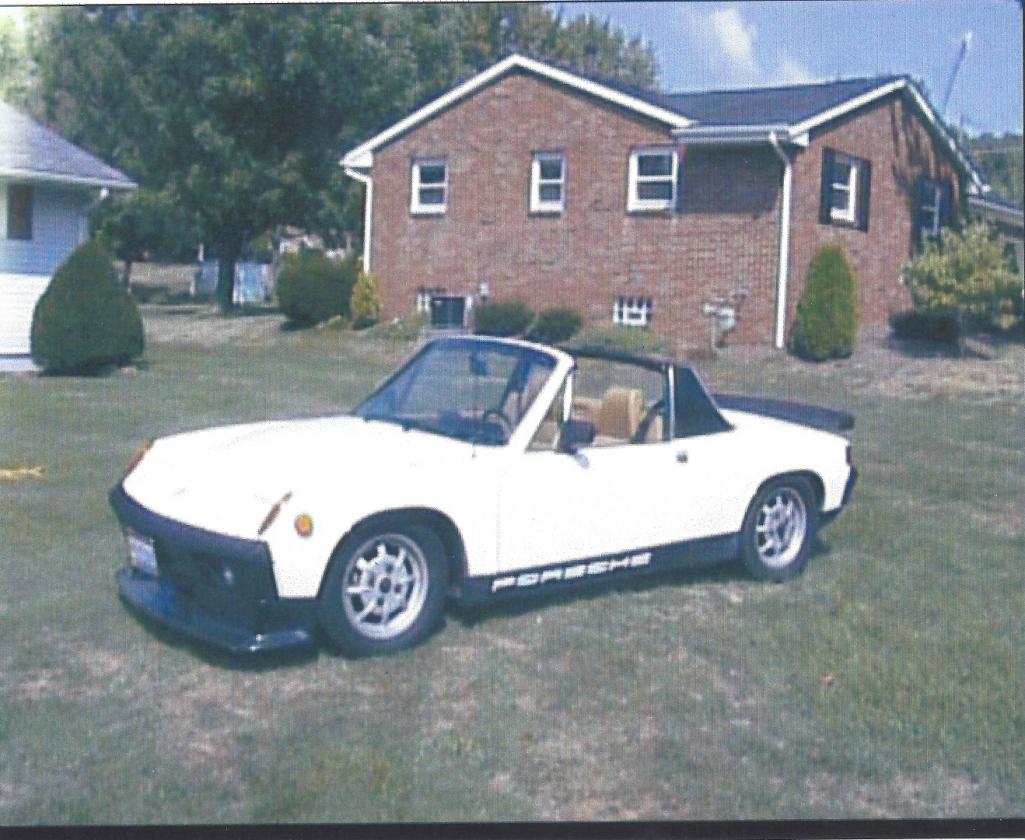
Posted by: bkrantz Jun 3 2021, 07:37 PM
Plastic mirrors, too! 
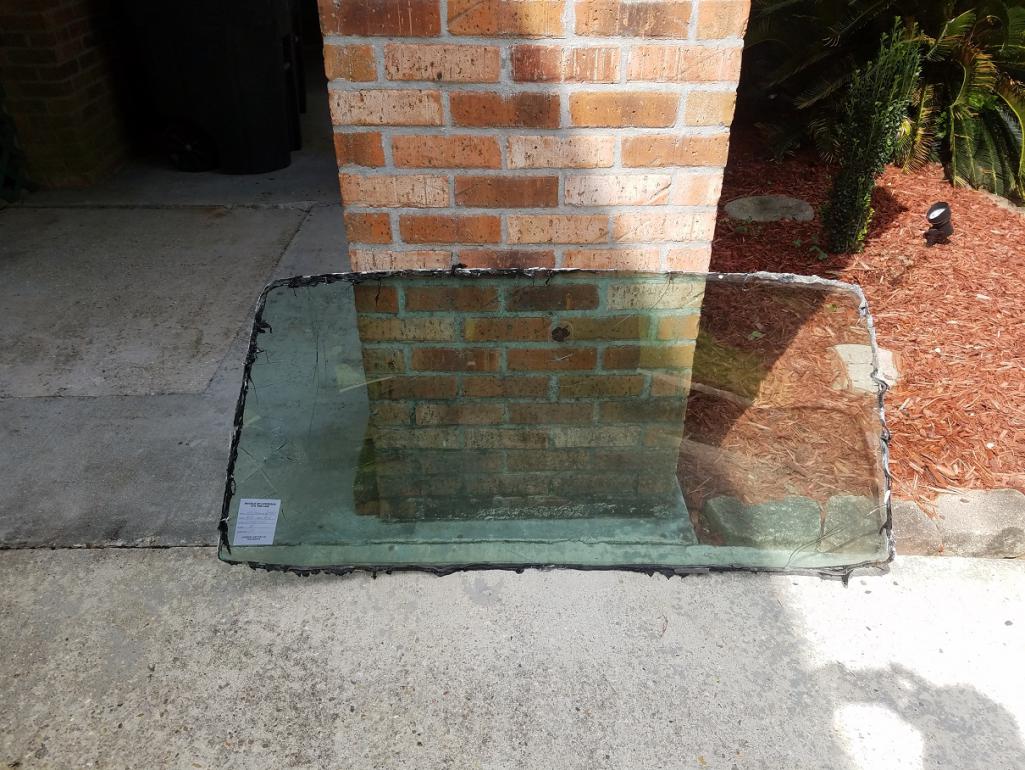
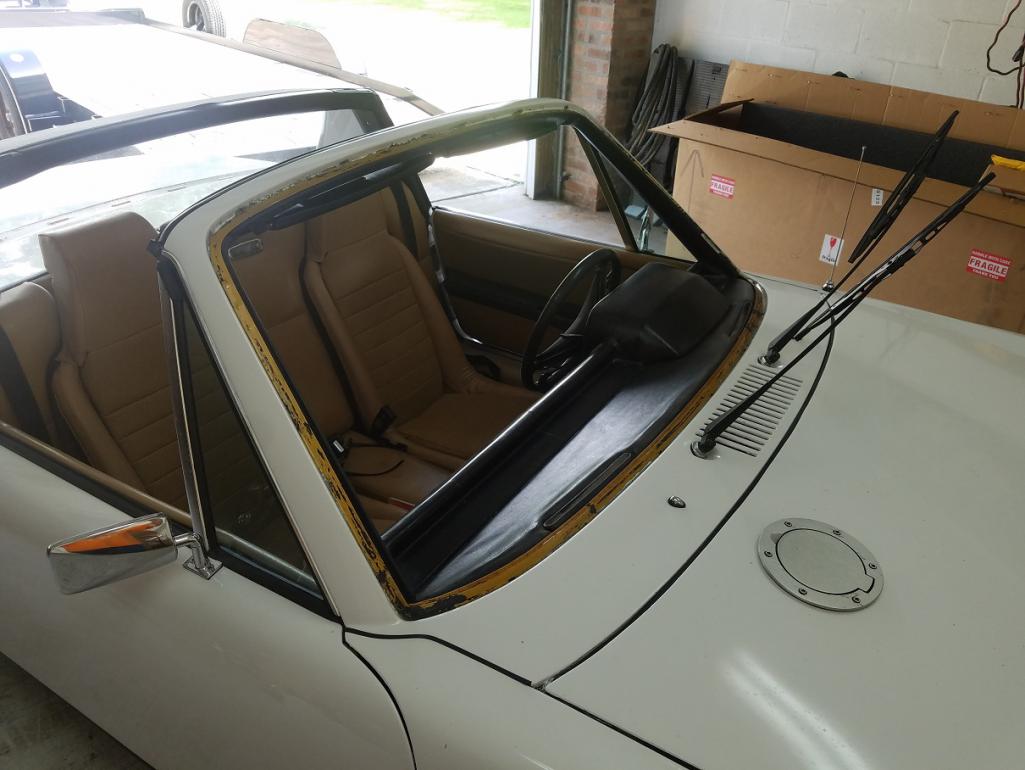
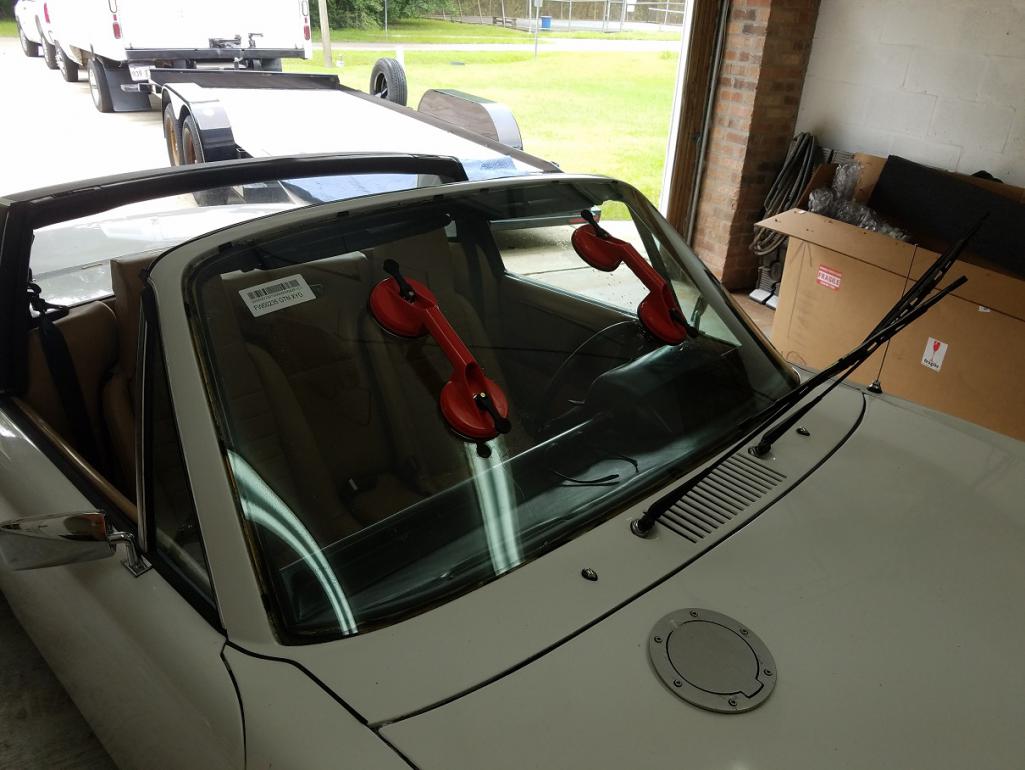
Posted by: 9146C Jul 11 2021, 02:05 PM
I was especially careful during my project not to damage the front windshield (I think it may have been original).
I had only driven the car about a month when an unfortunate rock chip on the lower passenger side developed into a crack before I even got the car back home.
Ordered the installation kit from AA, the dash moulding from Stoddard and the XYG (green tint) windshield from KoolKatz.
Also picked up a pair of inexpensive grips from Harbor Freight.
The windshield was delivered on Friday and installed today. Actually was a much easier job than I had planned.
I know there has been a fair bit of discussion about windshields...Porsche OEM (which I couldn't find), the XYG and the PGW. At first glance, the XYG looks pretty good and sealed well to the butyl tape all around.
No complaints so far.
PS: I did have to order an additional rear view mirror pad this afternoon...I mucked the first one up...should've been the easiest step of the install!
Attached thumbnail(s)

Posted by: Root_Werks Jul 12 2021, 05:02 PM
Nicely done! My painter wants to pull my windshield. Pretty much expecting it'll break.
Posted by: Dion May 20 2022, 10:43 AM
How’s the car Rob? @http://www.914world.com/bbs2/index.php?showuser=23460 Hope you are driving it, Don’t let it be a garage queen!
Anything else done to it? Not that it needs more. Beauty as is.
Posted by: 9146C May 20 2022, 03:36 PM
Hello Dion!
I can't believe it's already been a year since I completed my build. Fortunately, no significant issues since I put her back on the road...yeah, she does/is driven...always a smile on my face when behind the wheel.
Haven't taken on any new projects with her...just enjoying her for the time being.
Hope you're enjoying your car as well...you did a great job on your build BTW! (I'm a little jealous of your choice of colors!)
Regards, Rob
Powered by Invision Power Board (http://www.invisionboard.com)
© Invision Power Services (http://www.invisionpower.com)