Printable Version of Topic
Click here to view this topic in its original format
914World.com _ 914World Garage _ 914/6 GT Cibie Spotlight mount fab
Posted by: Retroracer Feb 7 2020, 07:24 PM
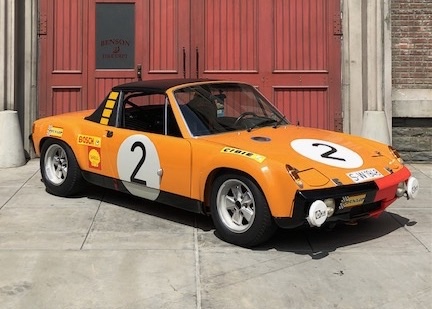
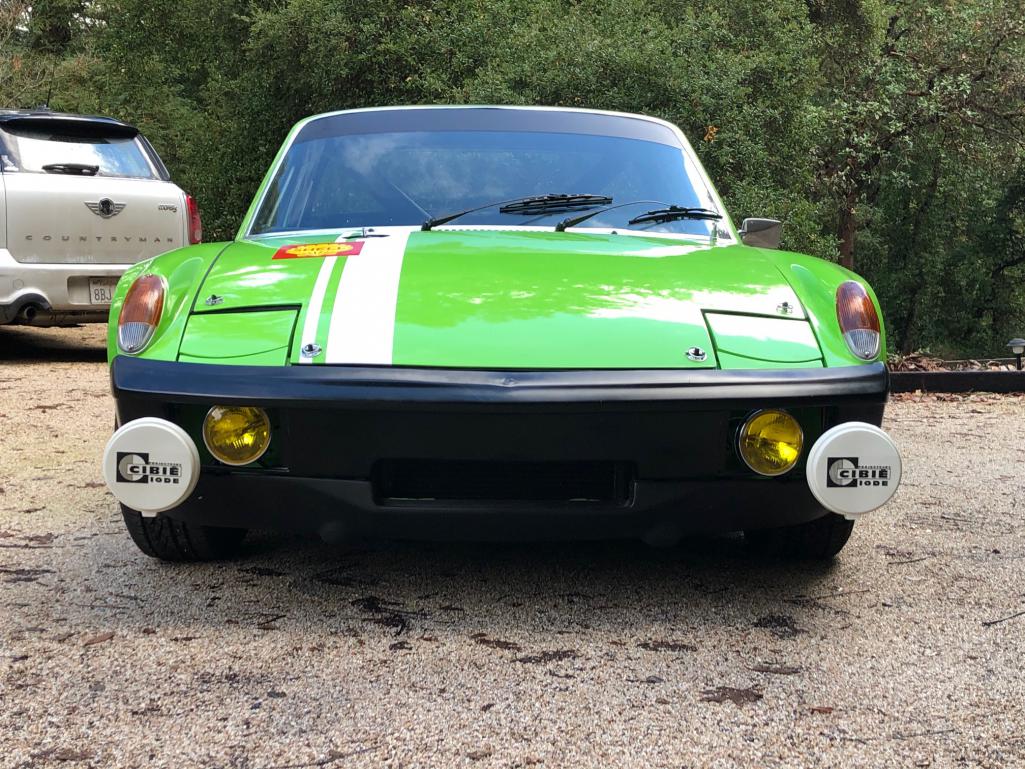
I’ve always been fascinated by the front lower spotlight mounting that appears on some of the GT cars, notably the winning 1970 Marathon de la Route cars. A few years ago I got a chance to obtain some original Cibie Iode 45 lamps from a seller in France. These had yellow lenses – one fog, one driving - which matched the yellow Cibie Tango’s I have mounted in my GT tribute car already, in the “standard” fog light position within the fiberglass front bumper.
Not clear to me was how the factory fabricated brackets were designed. The inverted “T” cut into the fiberglass bumper meant that the brackets must somehow get fed through that to get mounted; also somehow they mount to the body and may / may not hold the bumper on? Searching in-period as well as recent pictures did not yield many clues; a few detailed the outside construction and bracing, but I had no clear idea of what was behind the bumper cut out. Until: luckily last summer I did get a chance to see the original “Number 2” Marathon car up close at Luft 6, so took the opportunity to crawl around under the front of the car to try and see what was going on.
That is, until folks who were waiting to take unobstructed pictures of the legendary vehicle were bored of waiting for the strange geezer lying on his back peering into the oil cooler opening….! 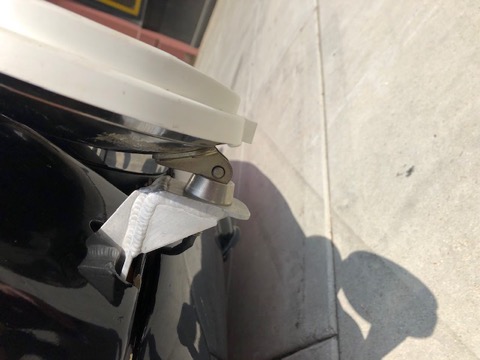
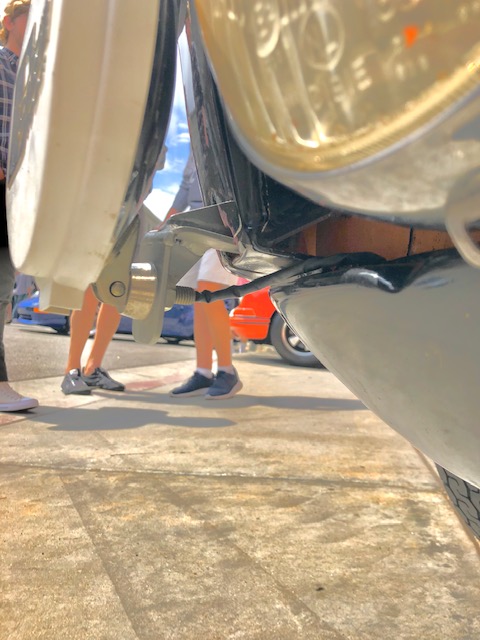
I took some detailed pics and thought that attempting to make up some brackets might be a good winter project. It is not clear to me (on olde number 2) whether the brackets were the originals or replicas – but I learned enough to want to try and replicate them.
So the brackets themselves (as the pics show) look pretty basic on the face of it. But some thought obviously went into the design, as they need to meet multiple criteria:
- be shaped such that they can be fed through the inverted “T” cut in the bumper
- secure the bumper to the body
- have welded in bracing to prevent the lights vibrating & flexing
- clear the front valance mounting tabs (which are just below the bumper mount holes)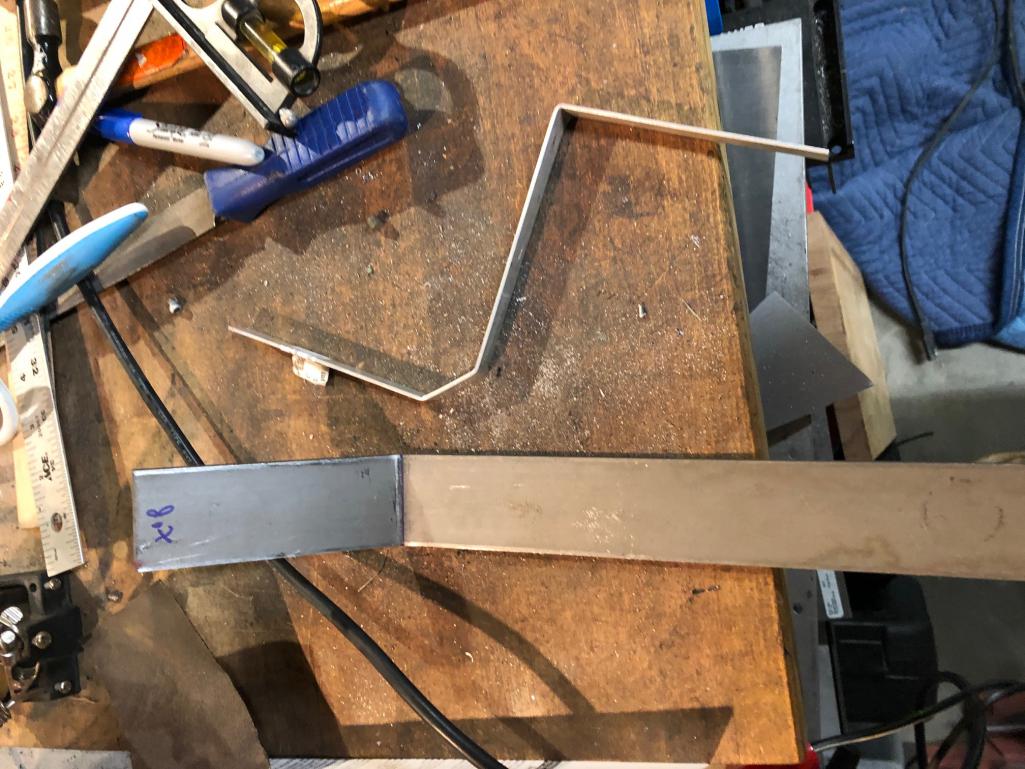
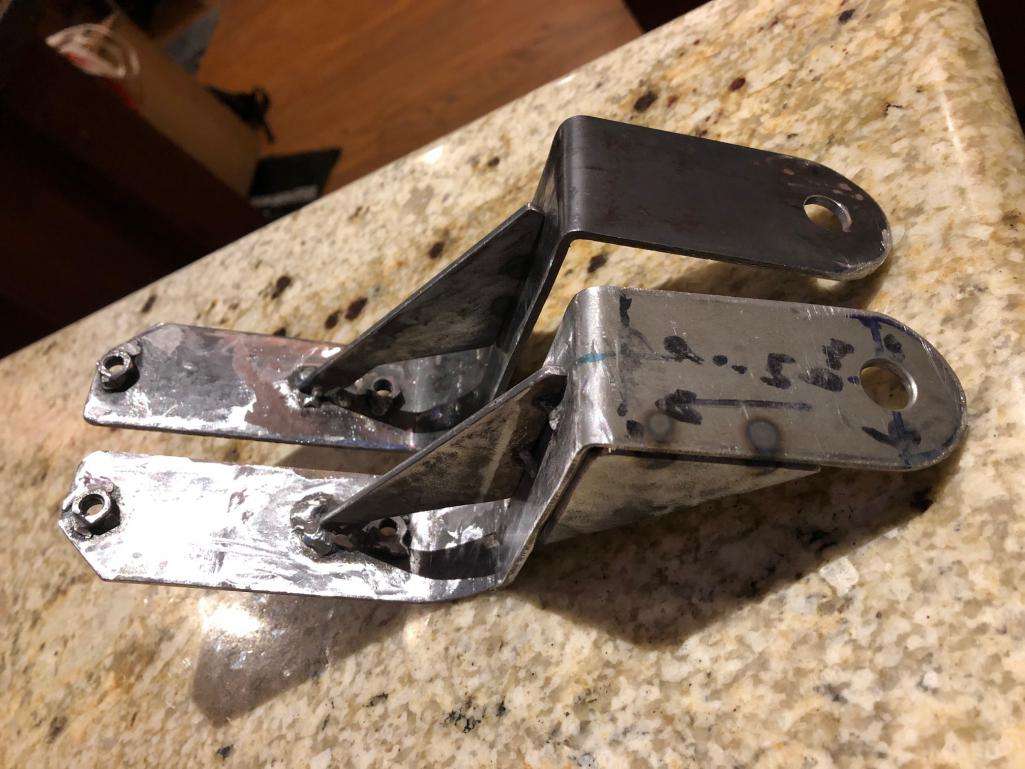
The upper piece in this shot shows the side profile I went for, bent up in aluminum as a test for clearance; one of the main bracket is being fab'ed using mild steel.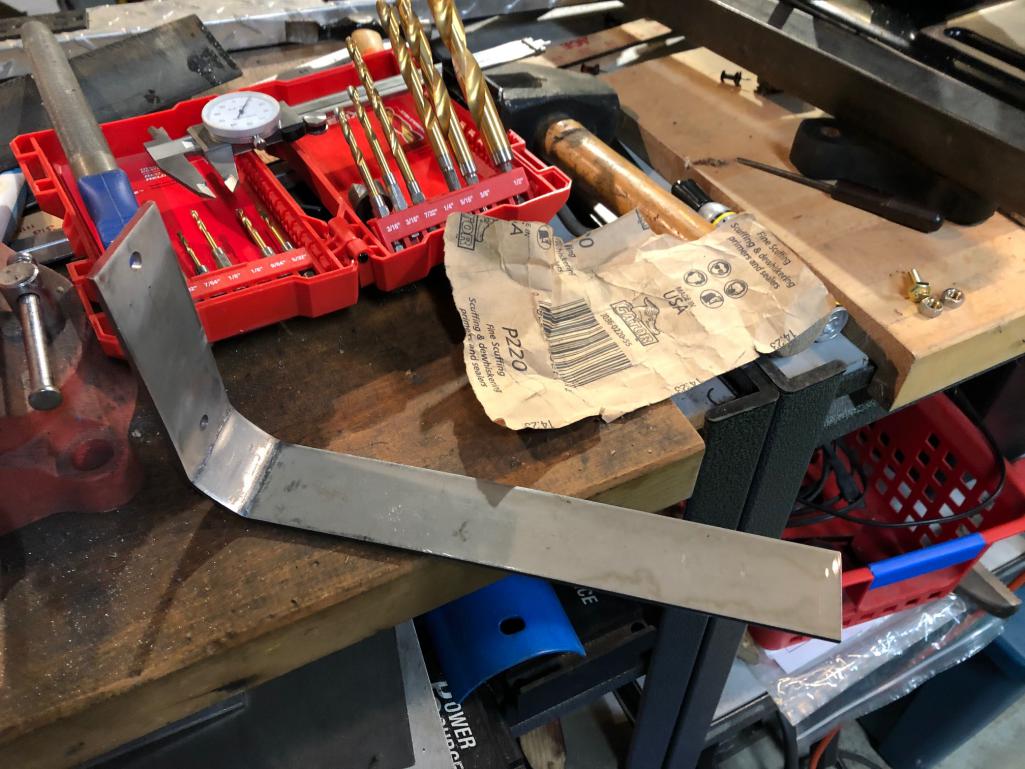
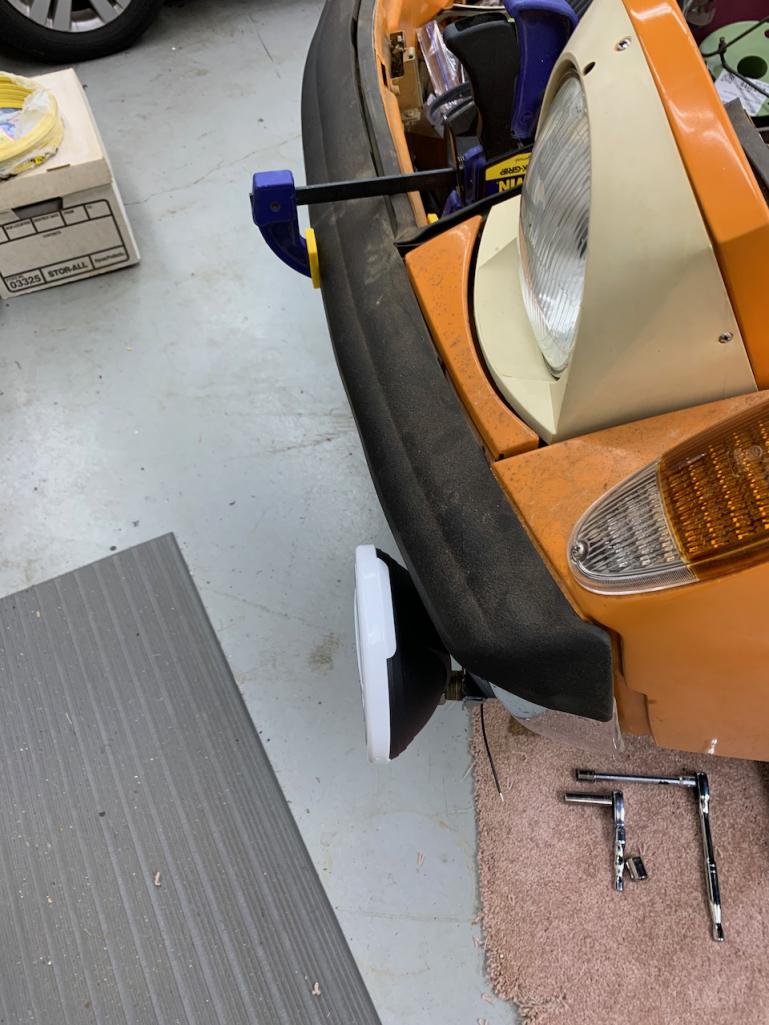
The cut in the bumper (fiberglass) was done with fingers crossed but turned out to be correct, the shot below shows a test fit & alignment check before cutting the vertical: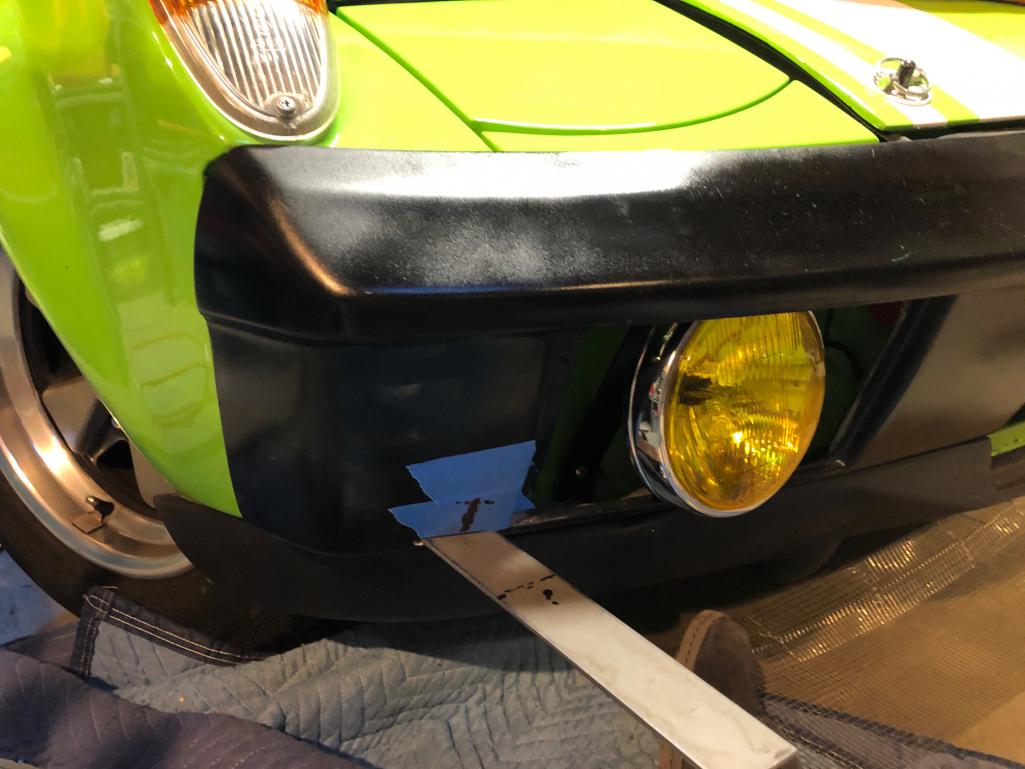
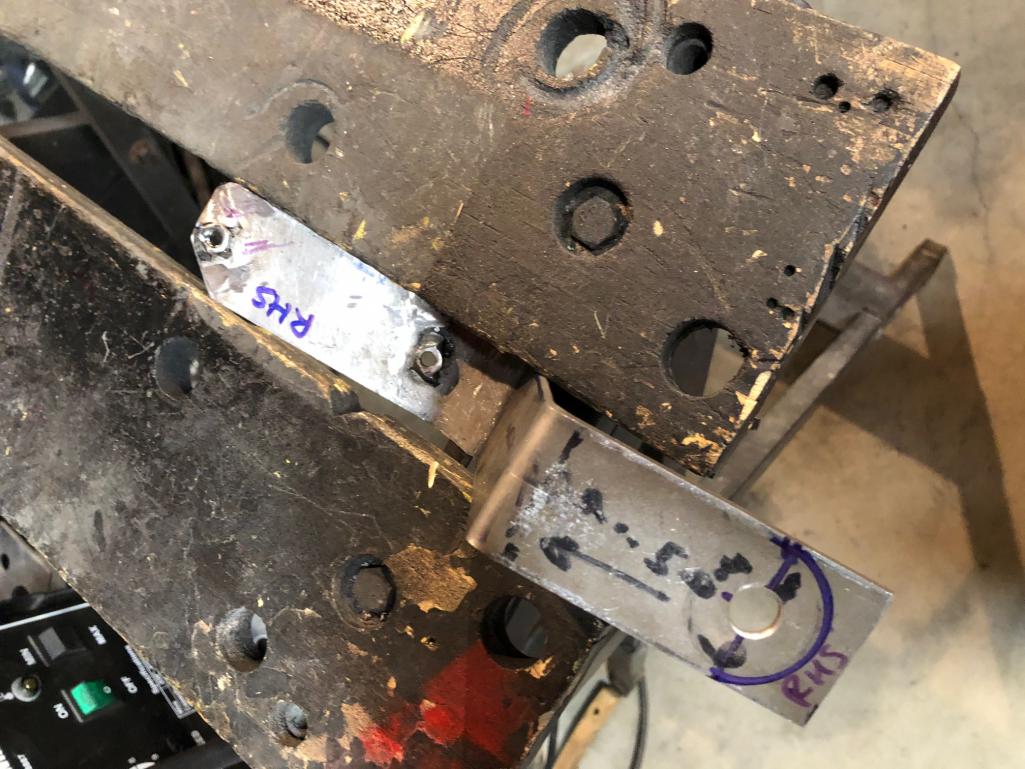
I welded some M6 nuts to the strips to use as mounts, aligned with the holes in the bumper and the body. Cutting the bracing pieces needed some experimentation and mocking up, as looking carefully at the existing photos of the OUTSIDE, it was hard to judge overall dimensions – extension, drop, etc. – so in the end it was basically a visual judgement call. 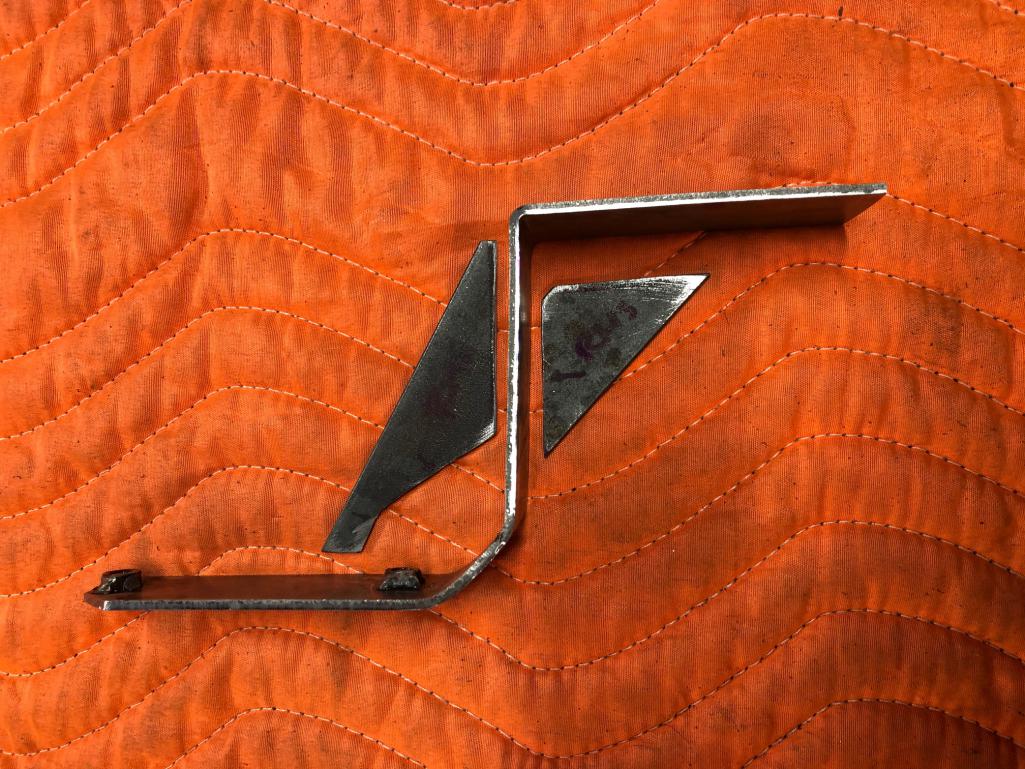
and....
Posted by: Retroracer Feb 7 2020, 07:31 PM
So on to welding and shaping (lower shot shows braces tacked in):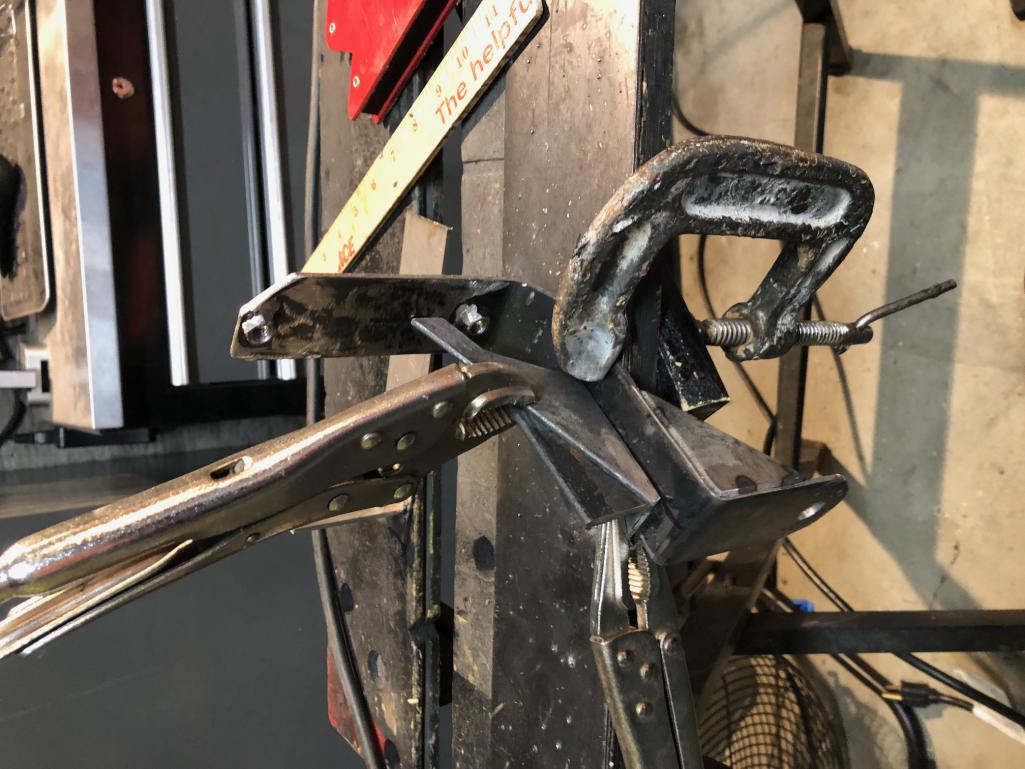
My welding is quite poor, but I am a dab hand with a grinder ;-) so I went for adding metal and grinding back for a smooth finish on the brace pieces – rather than the “stack of dimes” welds on the originals which I assume were done using aluminum stock - and stitched together by a competent welder. One element that took some degree of hand fettling was the profile of the bracket so that it could be fed into the front of the bumper, so the central brace required some metal removed, as well as the upper part too – not obvious, but part of the three dimensional insertion problem!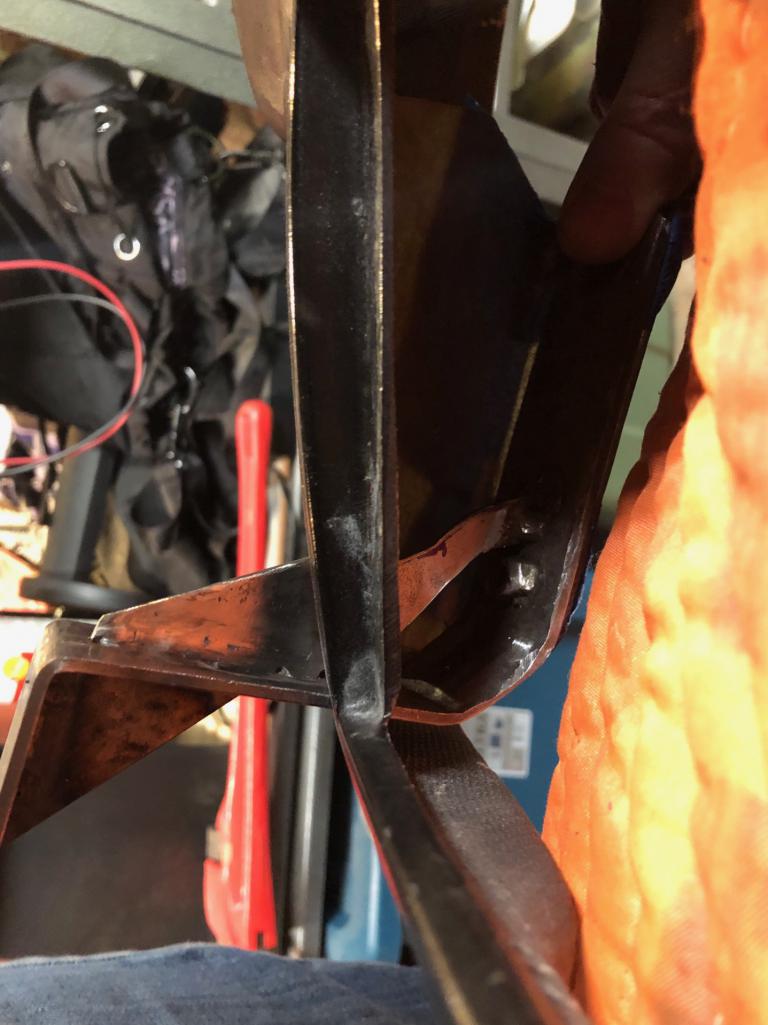
Posted by: Retroracer Feb 7 2020, 07:36 PM
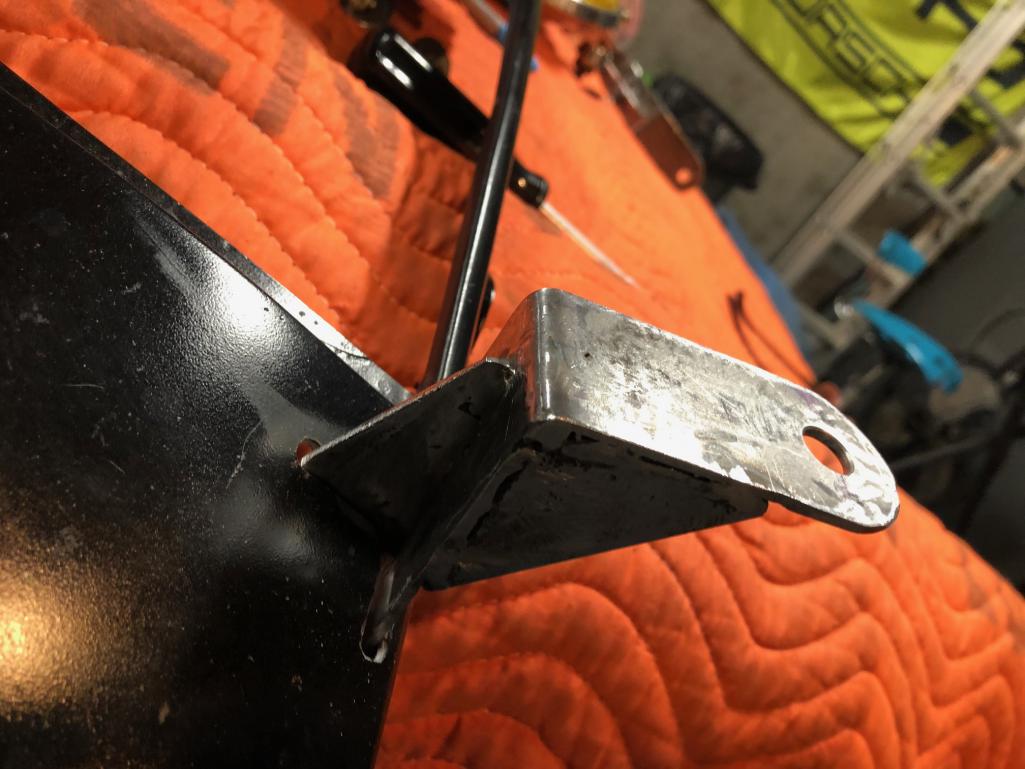
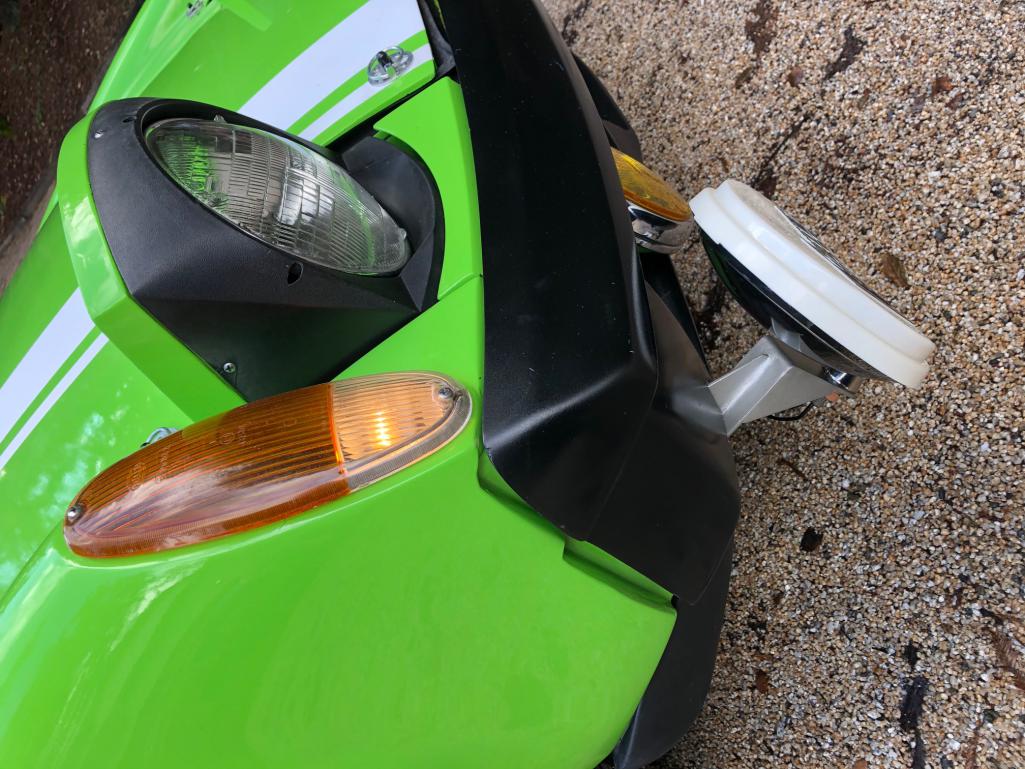
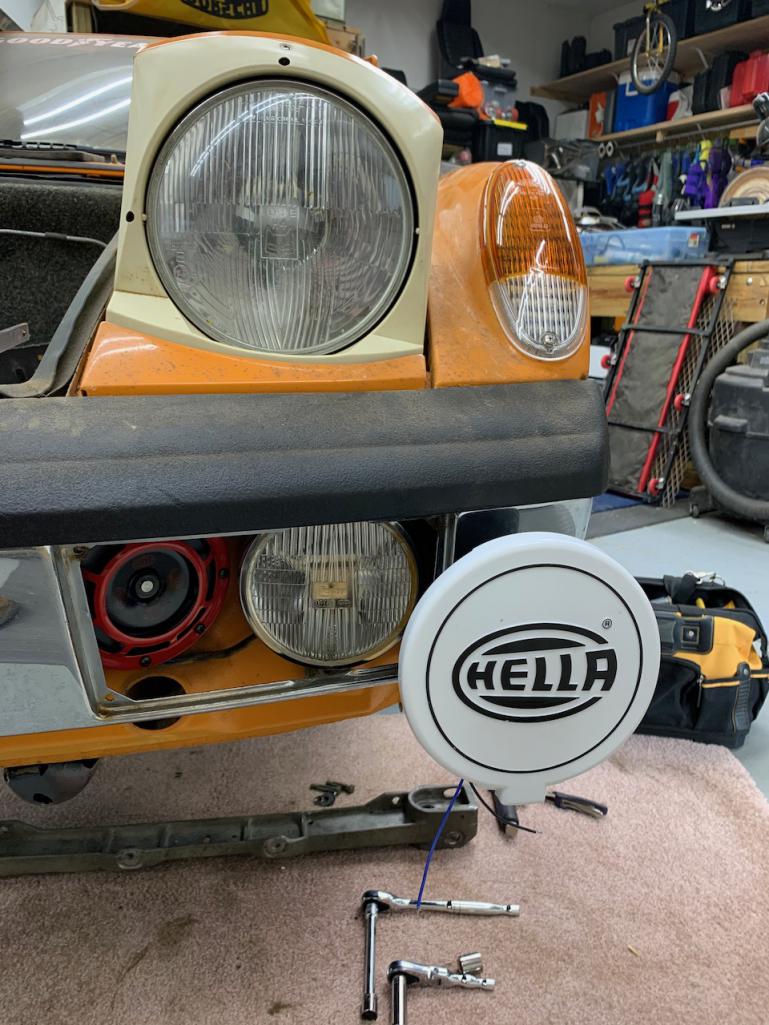
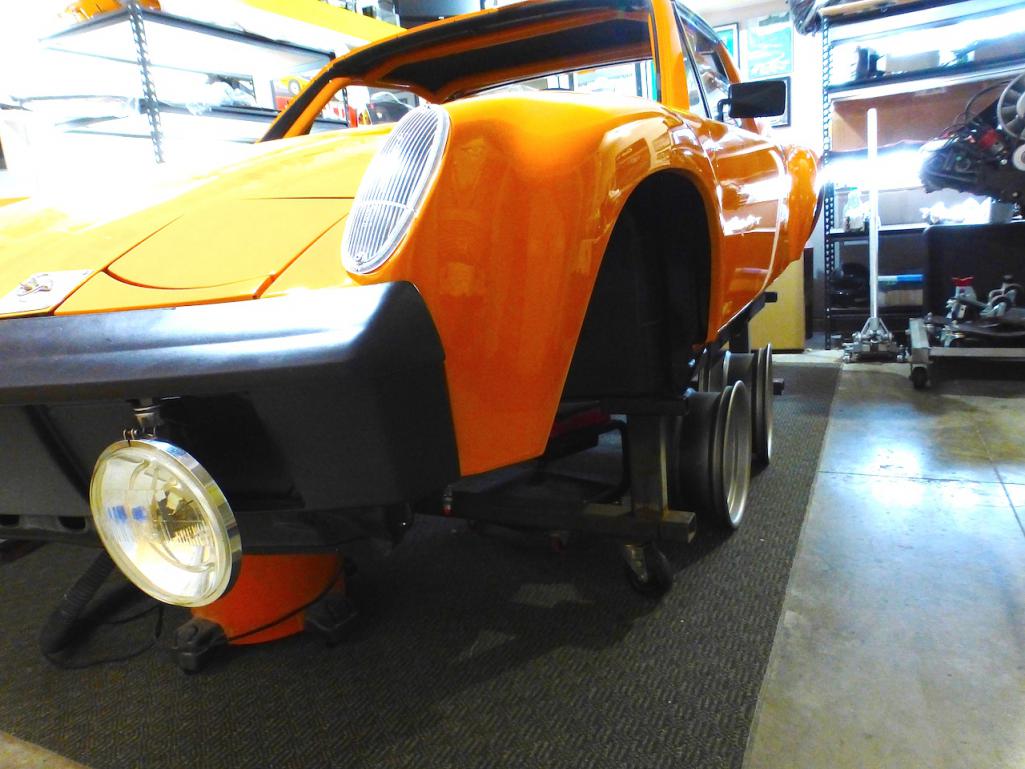
I may get them powder coated at some later point, but for now I rattle-canned them for a “cast metal” style finish, bolted on the Iode 45’s and reassembled the front of the car. When I originally did the GT conversion wiring, I added switching, relays and loom for both fogs and spots, knowing I would get to this at some point; but I still need to hook the wiring up and test to complete the job.
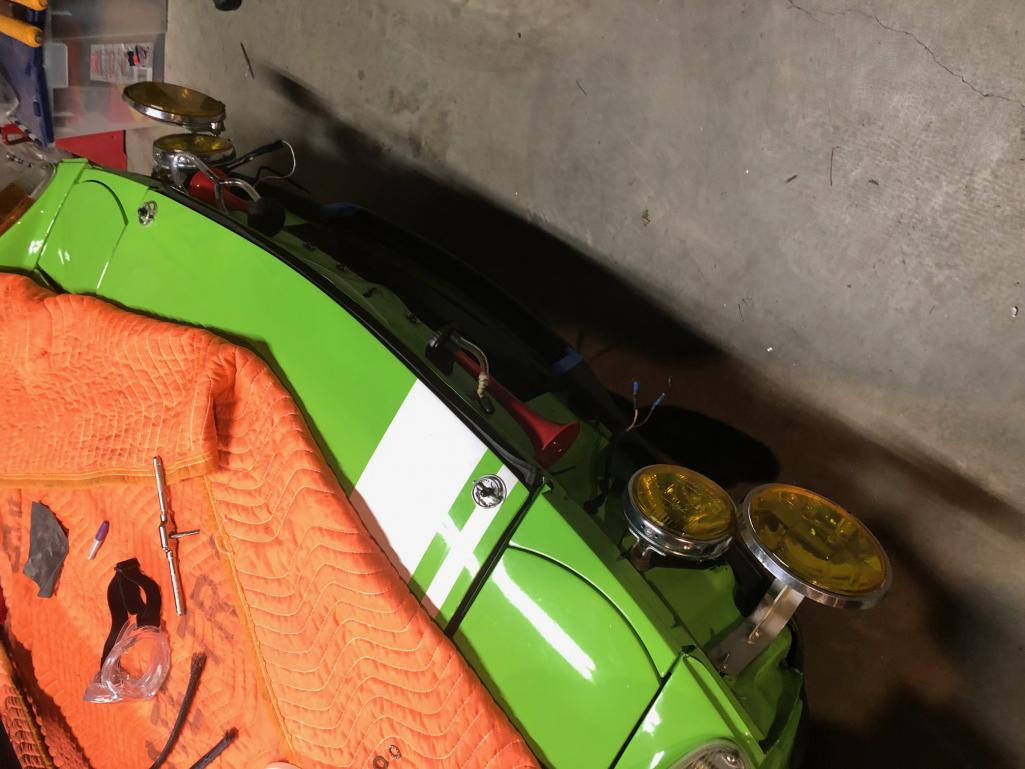
You do see some GT’s with Cibie hood lights (which the factory rally cars ran), but few with the Endurance race look, low mounting. The Iode 45’s will be wired so they are optional to low beams, with the Tango’s sync’ed to high beam if needed.
If anyone wants more detail on the brackets – again, I struggled to find details on the web, even combing through Armando’s awesome Pbase site – then am happy to share more info, dimensions, etc. Better would be someone with access to OG factory units and getting them 3D scanned so we have a reference point!
- Tony
Posted by: Retroracer Feb 7 2020, 07:40 PM
couple more shots (apologies for photo orientation):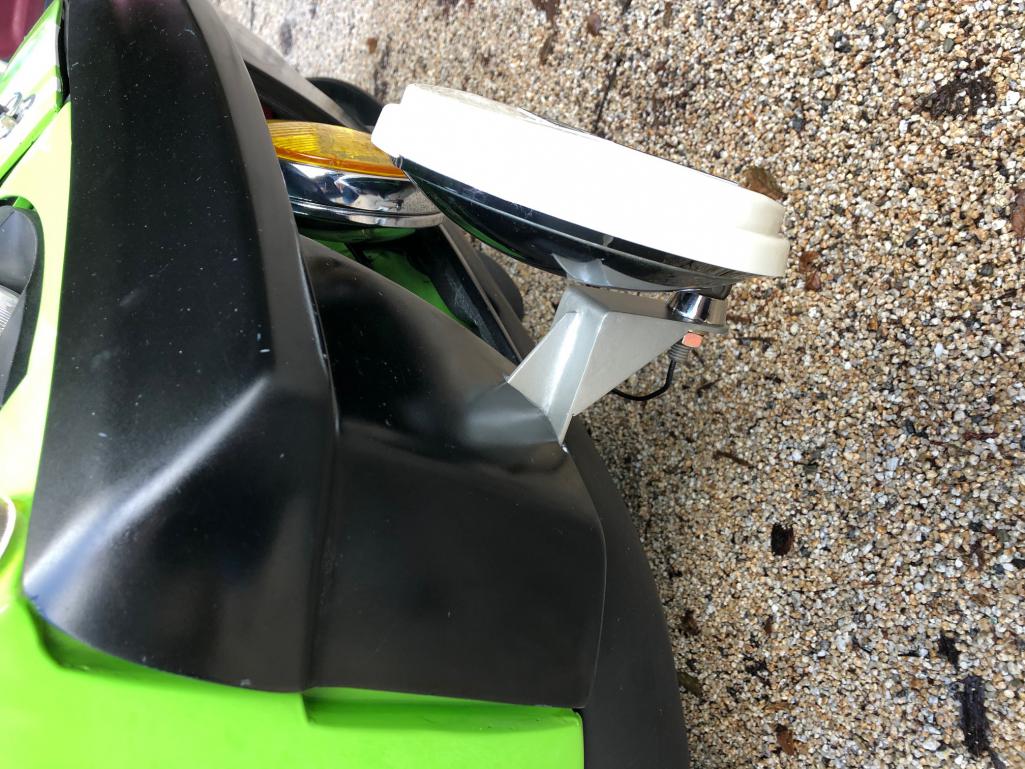
Posted by: Sway Bar Feb 7 2020, 08:01 PM
Nicely done, looks the part...Ctrl-C, Ctrl-V, for me.
I have the same idea in mind for my project, still need the bumper mind you but I have the lighting set-up awaiting.
I'll gladly take some specs for a starting point.
Thanks,
Marlon
Posted by: Sway Bar Feb 7 2020, 08:12 PM
For interest sake, I saved this pic a long time ago and maybe its the appropriate bracket? Only difference would be the interior mount position since it would push the light slight outward from the alignment you did.
Again, yours does the trick too.
Posted by: Retroracer Feb 7 2020, 09:09 PM

For interest sake, I saved this pic a long time ago and maybe its the appropriate bracket? Only difference would be the interior mount position since it would push the light slight outward from the alignment you did.
Again, yours does the trick too.
I've seen this pic before - so this bracket works for sure, but is subtley different from the GT factory ones; they have a strengthening rib running down the center (which matches up with bumper inverted "T" cut out).
Thanks for posting. As you say, it seems it pushes the light slightly further outboard?
- Tony
Posted by: 914forme Feb 7 2020, 09:19 PM
Nice job on the bracket.
Second bracket was done by Rennmetal. Wish I had gotten my set for supplying the parts for prototype and mockup. Oh well, win some loose some.
Posted by: pete000 Feb 8 2020, 12:22 AM
Wish they would make those for the masses.
Posted by: eric9144 Feb 9 2020, 09:20 PM
Wish they would make those for the masses.
If someone can get me accurate drawings I have a plasma table and sheet metal bender —I’d love to make some 914 stuff

Posted by: maf914 Feb 10 2020, 08:15 AM
Retroracer,
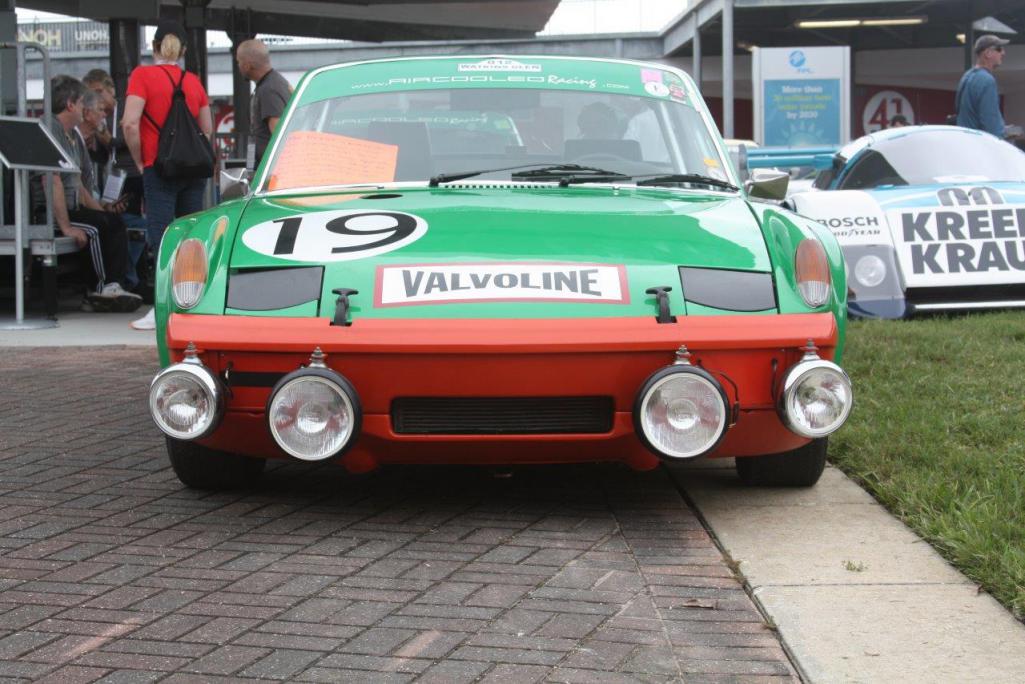
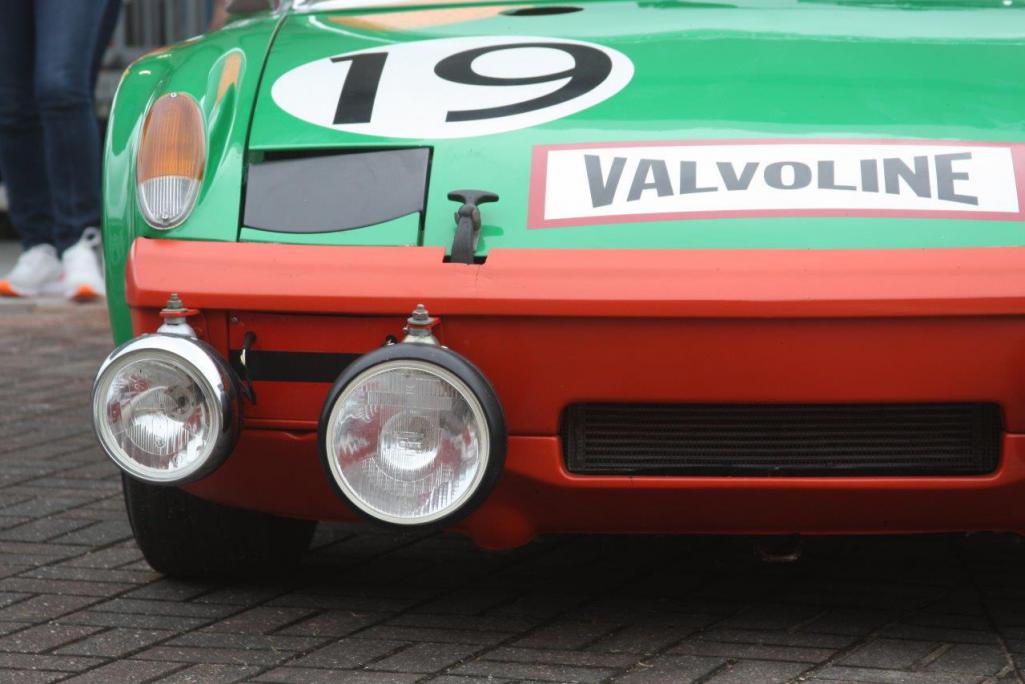
Nice work on your brackets. When I read your thread I thought of the historic 914/6 GT I took photos of at this years Rolex 24. The auxiliary lights were mounted differently and appear to be mounted to the exterior of the bumpers. If I had seen your thread before the race I would have checked the mounting more closely.
Attached thumbnail(s)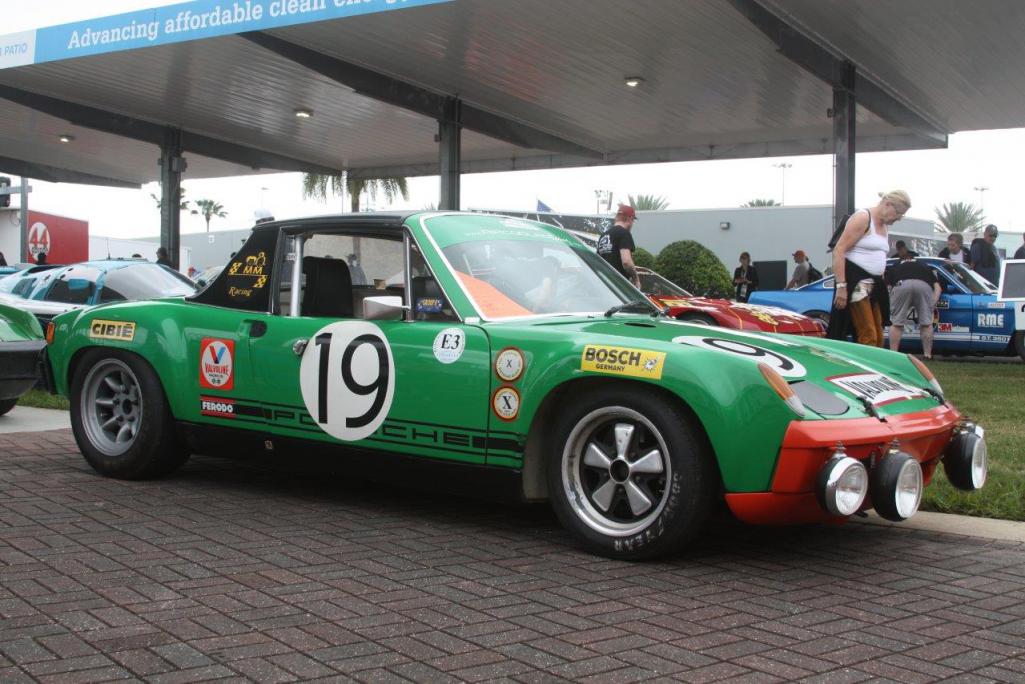
Posted by: 914forme Feb 10 2020, 08:38 AM
Wish they would make those for the masses.
If someone can get me accurate drawings I have a plasma table and sheet metal bender —I’d love to make some 914 stuff
Yep in the works, but with a design change to make them easier to be sold in both done and kit form.
If you are good with a welder, you can get the kit, follow the remarked bends, weld it up. Simple tab and bend design, bolts to the bumper.
Will sell sets premade also, with a choice of powder-coating - like Henry Ford, your choice will be a semi-gloss black.

Also do the rear fog light mounts that do not require body drilling, that is what I don't like about the factory fog light mount.
And then a few other times to come also.

Posted by: Mueller Feb 10 2020, 10:53 AM
Nice brackets, those lights look great on the car.
Posted by: tygaboy Feb 10 2020, 11:07 AM
Nice! Wonderful custom fab work. 
Posted by: Retroracer Feb 10 2020, 01:19 PM
@http://www.914world.com/bbs2/index.php?showuser=19241 and @http://www.914world.com/bbs2/index.php?showuser=87 @http://www.914world.com/bbs2/index.php?showuser=2388 - thanks guys!
@Sway_Bar and @http://www.914world.com/bbs2/index.php?showuser=12876 - At one point I will post dimensions, as there seems to be interest in this version of the bracket. I don't have these in a coherent form  , but I think I can figure out all the main dimensions. Stay tuned.
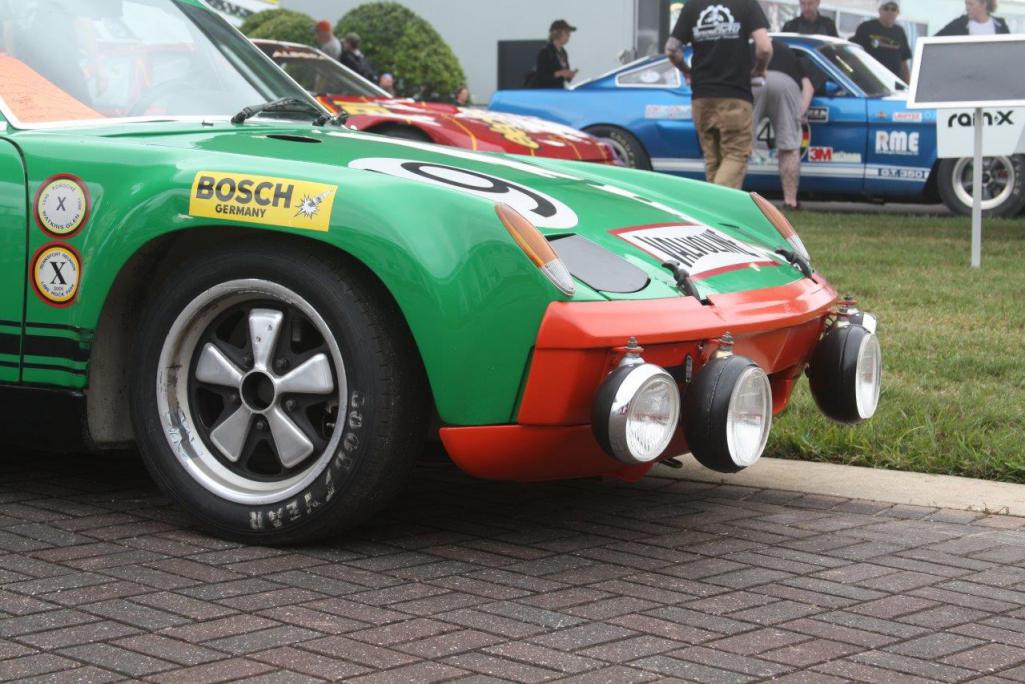
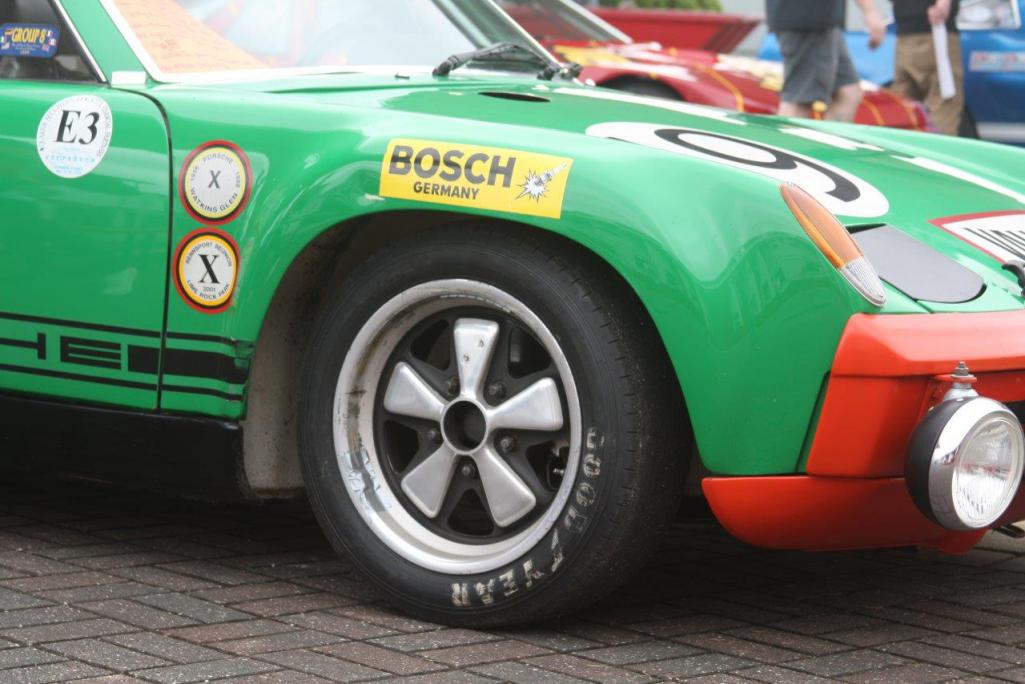
@http://www.914world.com/bbs2/index.php?showuser=632 : So this is one of those areas where some detail differences among the "GT" cars become obvious. I believe the green car you have in your pix is one of the "privateer" GT builds, which along with the yellow Daytona winning car, took a completely different approach to mounting auxiliary lights. The light unit themselves are different too (instead of Cibie Iode 45's, these look like a combo of Oscars and Super Oscars). Whether these were designed and added at the factory, or later in the US (prior to race events) I don't know, but the positions and bracket hardware are very different from (say) the Marathon cars.
BTW, the Sonauto Le Mans class winning car also has signs of having the "center rib" brackets being fitted at one point: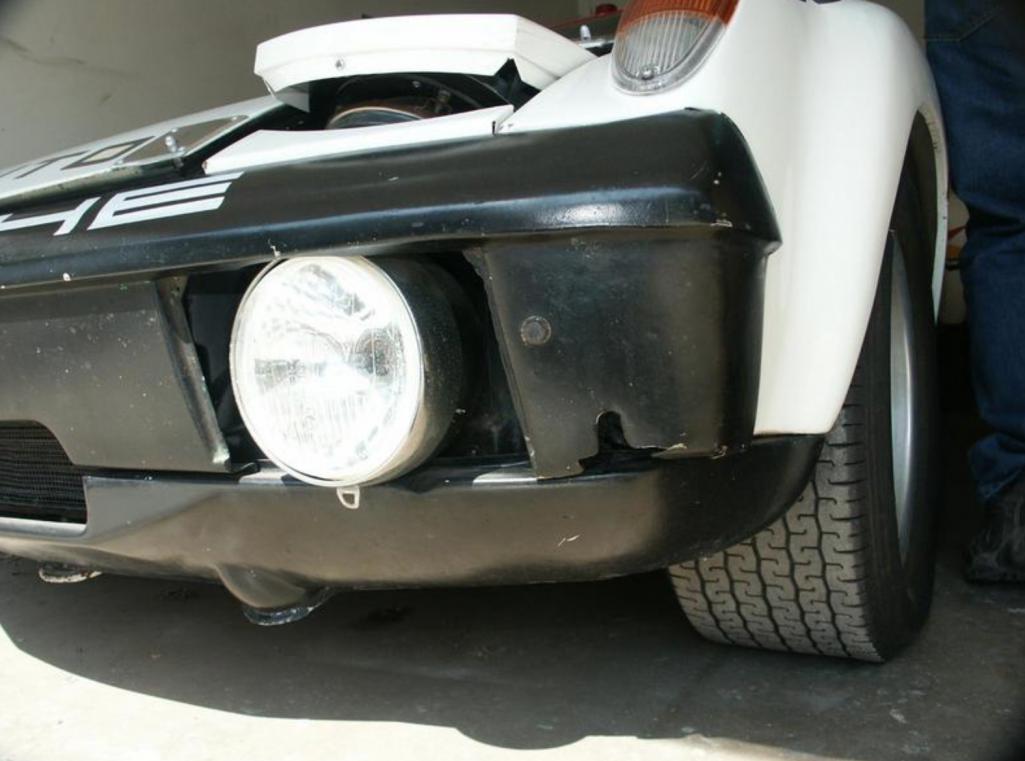
you can clearly see the "inverted T" cut out in the bumper.
If anyone is thinking about a bracket that works with steel bumpers, you may want to look at something similar to the Rennmetal piece. My interpretation is probably more suited to the fiberglass bumpers, where the bracket actually secures the bumper to the car; the Rennmetal version looks as though to fits between the car and the dog bone and gets clamped in place?
- Tony
(photo credit to Mr. Serrano)
Posted by: eric9144 Feb 10 2020, 01:44 PM
@Sway_Bar and @http://www.914world.com/bbs2/index.php?showuser=12876 - At one point I will post dimensions, as there seems to be interest in this version of the bracket. I don't have these in a coherent form
, but I think I can figure out all the main dimensions. Stay tuned.the Rennmetal version looks as though to fits between the car and the dog bone and gets clamped in place?
Yes and that was the appeal of the Rennmetal bracket, if it bolts in and doesn't require cutting etc it's a win. Would be super easy to crank out with a plasma table with solid consistent results...That's not my day job but if I could create something for the community I'd be pretty happy.
Posted by: porschetub Feb 11 2020, 02:02 PM
So the green car in reply #11 has a mixture of Oscars and Super Oscars ?,I have a set with will go on my car but how do you tell between the 2,is the "super" the larger of the two? mine have 150mm lenses if that means anything.
Just wondering how solid these brackets are ? personally don't like light beams that bounce around.
How did these cars handle the power demand for these lights considering the original were very low output,I have a relay setup with my Cibie's that uses heavier wire thinking I could use that.
Posted by: maf914 Feb 11 2020, 03:05 PM
@http://www.914world.com/bbs2/index.php?showuser=632 : So this is one of those areas where some detail differences among the "GT" cars become obvious. I believe the green car you have in your pix is one of the "privateer" GT builds, which along with the yellow Daytona winning car, took a completely different approach to mounting auxiliary lights. The light unit themselves are different too (instead of Cibie Iode 45's, these look like a combo of Oscars and Super Oscars). Whether these were designed and added at the factory, or later in the US (prior to race events) I don't know, but the positions and bracket hardware are very different from (say) the Marathon cars.
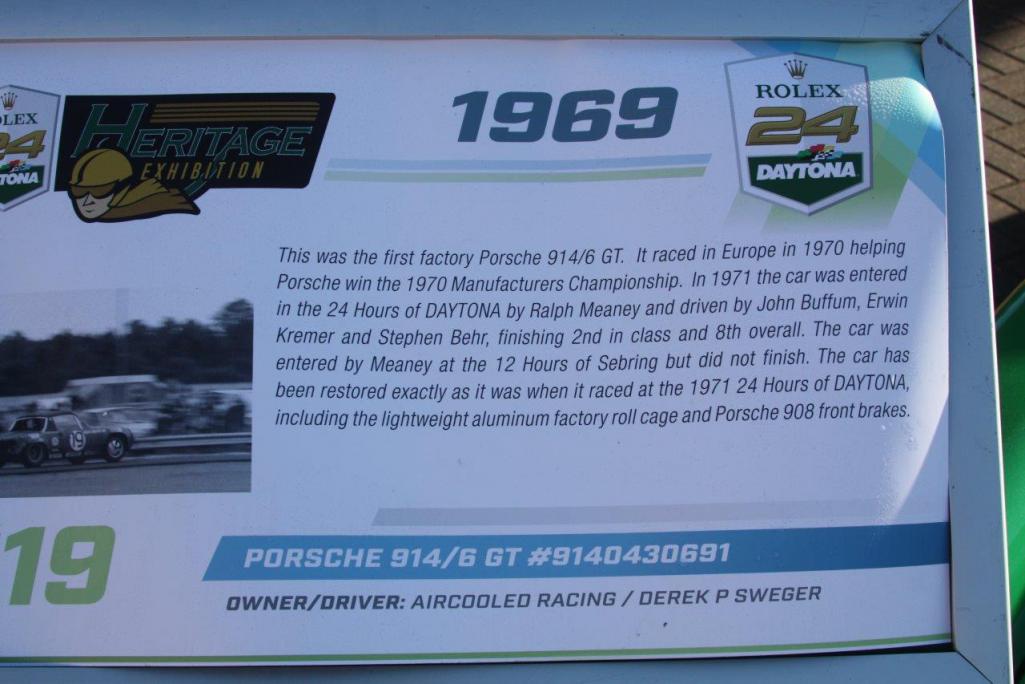
Here is the placard placed with the green GT.
Attached thumbnail(s)
Posted by: Retroracer Feb 11 2020, 04:06 PM
So the green car in reply #11 has a mixture of Oscars and Super Oscars ?,I have a set with will go on my car but how do you tell between the 2,is the "super" the larger of the two? mine have 150mm lenses if that means anything.
Just wondering how solid these brackets are ? personally don't like light beams that bounce around.
How did these cars handle the power demand for these lights considering the original were very low output,I have a relay setup with my Cibie's that uses heavier wire thinking I could use that.
On Cibies: First off - am not an expert! - but I found this on Super Oscars:
https://www.ozautoelectrics.com/cibie-super-oscar-spread-beam-driving-light-12v-100w-220mm.html
and regular Oscars:
https://www.ozautoelectrics.com/cibie-oscar-hi-lo-beam-auxiliary-headlamp.html
..and the sizes seem to scale for what's on the green Meaney car...? So yes, seems the Super is bigger.
On brackets: yes, have been in a few cars where driving light wobble from flexing brackets can make you quite nauseous! The ones I fabbed up for my car are from 3mm mild steel and maximally braced - so no flexing there.
On power demand: so all my aux lights are relayed and fused in pairs. As for alternator power, I'm not sure if higher output alternators were used in period or not, but for endurance racing, en engine spending most of its time on high speed tracks at high revs will allow maximum current output from the alternator; lots of time spent at low revs and idle would be relying on the battery reserve more to power the lights?
- Tony
Posted by: Retroracer Feb 11 2020, 04:15 PM
Here is the placard placed with the green GT.
@http://www.914world.com/bbs2/index.php?showuser=632 Thanks for posting that; it seems to be this car from the chassis number:
https://pbase.com/9146gt/dealer_9146gt_race_cars_sn9140430691_maxmoritz_19
Exploring around some of the historical shots from that page, there are early shots of the GT showing no extra driving lights brackets at all - just to add to the mystery,
- Tony
Posted by: porschetub Feb 12 2020, 12:36 PM
So the green car in reply #11 has a mixture of Oscars and Super Oscars ?,I have a set with will go on my car but how do you tell between the 2,is the "super" the larger of the two? mine have 150mm lenses if that means anything.
Just wondering how solid these brackets are ? personally don't like light beams that bounce around.
How did these cars handle the power demand for these lights considering the original were very low output,I have a relay setup with my Cibie's that uses heavier wire thinking I could use that.
On Cibies: First off - am not an expert! - but I found this on Super Oscars:
https://www.ozautoelectrics.com/cibie-super-oscar-spread-beam-driving-light-12v-100w-220mm.html
and regular Oscars:
https://www.ozautoelectrics.com/cibie-oscar-hi-lo-beam-auxiliary-headlamp.html
..and the sizes seem to scale for what's on the green Meaney car...? So yes, seems the Super is bigger.
On brackets: yes, have been in a few cars where driving light wobble from flexing brackets can make you quite nauseous! The ones I fabbed up for my car are from 3mm mild steel and maximally braced - so no flexing there.
On power demand: so all my aux lights are relayed and fused in pairs. As for alternator power, I'm not sure if higher output alternators were used in period or not, but for endurance racing, en engine spending most of its time on high speed tracks at high revs will allow maximum current output from the alternator; lots of time spent at low revs and idle would be relying on the battery reserve more to power the lights?
- Tony
Thanks Tony,I will go with your design or similar as I will try to sink mine into bumper cutouts as much as I can,mine appear to be standard Oscars
 .
.Posted by: RickS Feb 12 2020, 09:13 PM
Only real Dicks add aux lights, says Richard.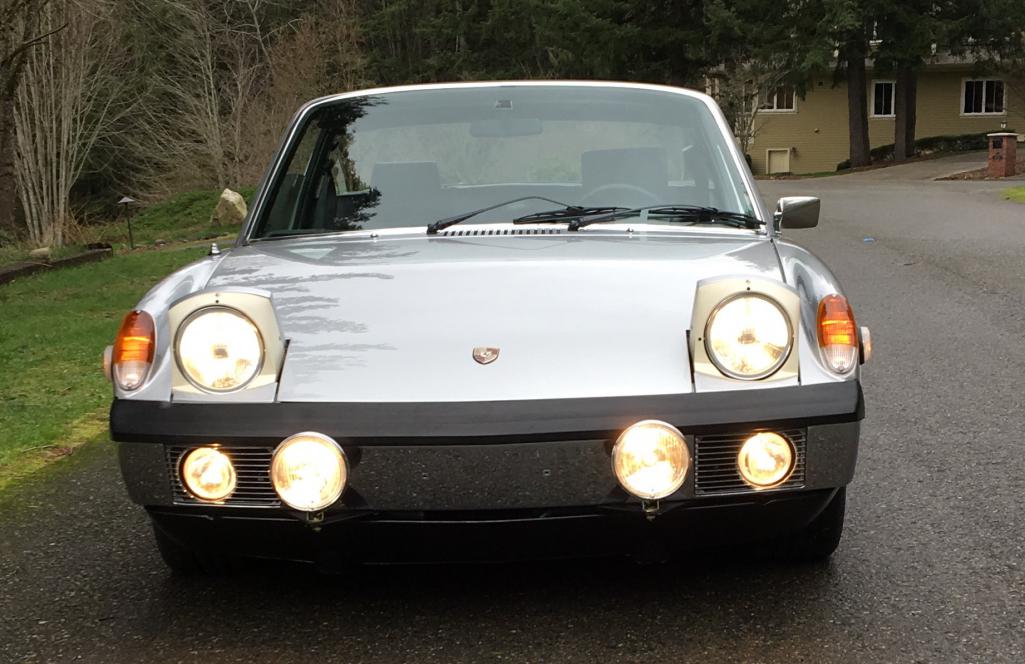
Posted by: campbellcj Feb 15 2020, 09:59 AM
I'm inferring the Rennenmetal brackets are NLA - I have a new uninstalled set in storage which I don't want to sell but would loan out for someone to measure/scan for duplication... PM if anyone wants to pursue that.
Posted by: eric9144 Feb 15 2020, 11:02 AM
PM if anyone wants to pursue that.
PM sent
Posted by: eric9144 Apr 9 2020, 10:55 AM
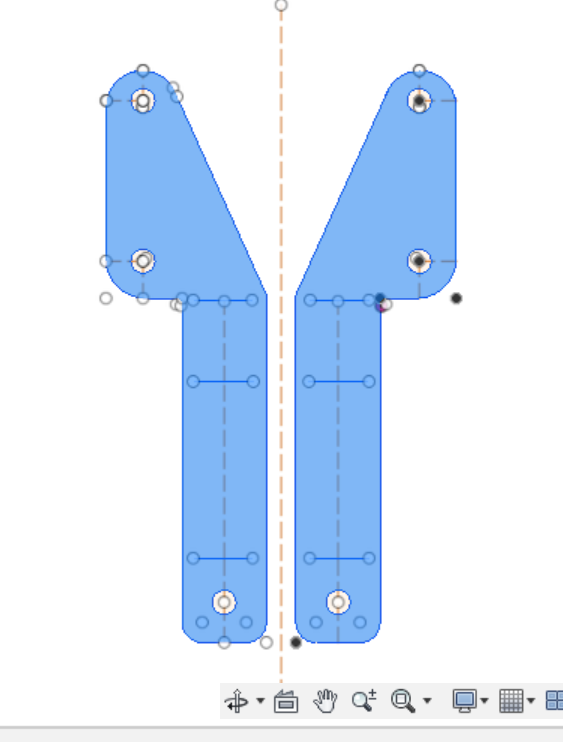
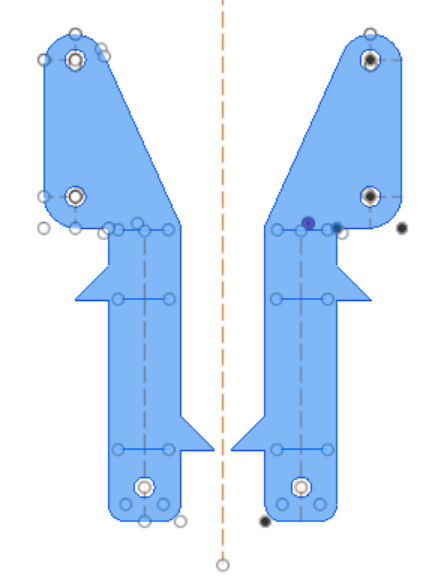
Finally had some time to start copying out the brackets, sketch has measurements in mm (sorry for the crappy penmanship) and I've cad'ed out of version of them with and with out a little brace piece. Rennenmetal had added a little weld in gusset, I was going to try sheet bending in a tab and welding it after the next bend.
I still haven't set up my new plasma table so haven't had a chance to cut them and compare to the originals but that shouldn't be too far out.
Posted by: carlislebill Jul 22 2020, 08:41 AM
Has anyone produced these brackets yet? I am interested in 2 sets. Please email me if I can purchase them Bill3@CarlisleEvents.com
Thanks
Bill III
Posted by: eric9144 Jul 22 2020, 08:47 AM
Has anyone produced these brackets yet? I am interested in 2 sets. Please email me if I can purchase them Bill3@CarlisleEvents.com
Thanks
Bill III
I'm 90% there, but haven't finished setting up my new plasma table and have been focused on remodeling our house during the "shut down"--should be getting back on this shortly and will come back and update this thread.
Posted by: carlislebill Jul 22 2020, 04:09 PM
Thanks Eric. Please email me as soon as you are ready. i am just finishing 2 (wife and husband) 914 race cars and would love to add some driving lights before i offer them for sale. Thanks again.
Posted by: campbellcj Jul 23 2020, 07:31 AM
Such a weird coincidence, I was just wondering about how this was coming along, and then the thread gets revived 
Posted by: 914forme Jul 23 2020, 09:10 AM
PM'd about production idea, I can get these cut for you with out the slag associated with plasma, tighter tolerances, and many more material options at your disposal.
Wish I saw this earlier, I would have taken Chris up on the offer to duplicate these. I helped with the prototype work on the original brackets, and was offered a set for the help, never got them.
But will gladly pay for a set as I want to have them around.
Posted by: eric9144 Jul 23 2020, 10:38 AM
I can get these cut for you with out the slag associated with plasma, tighter tolerances
These aren't mechanical parts and if the plamsa cutting is done well, you get not only pretty good precision in terms of measurement but also very little to no slag anywhere. The original brackets IMO are pretty sloppy in spec, but they could be, because they were only there to mount lights and not really serve a mechanical purpose.
Responded to PM
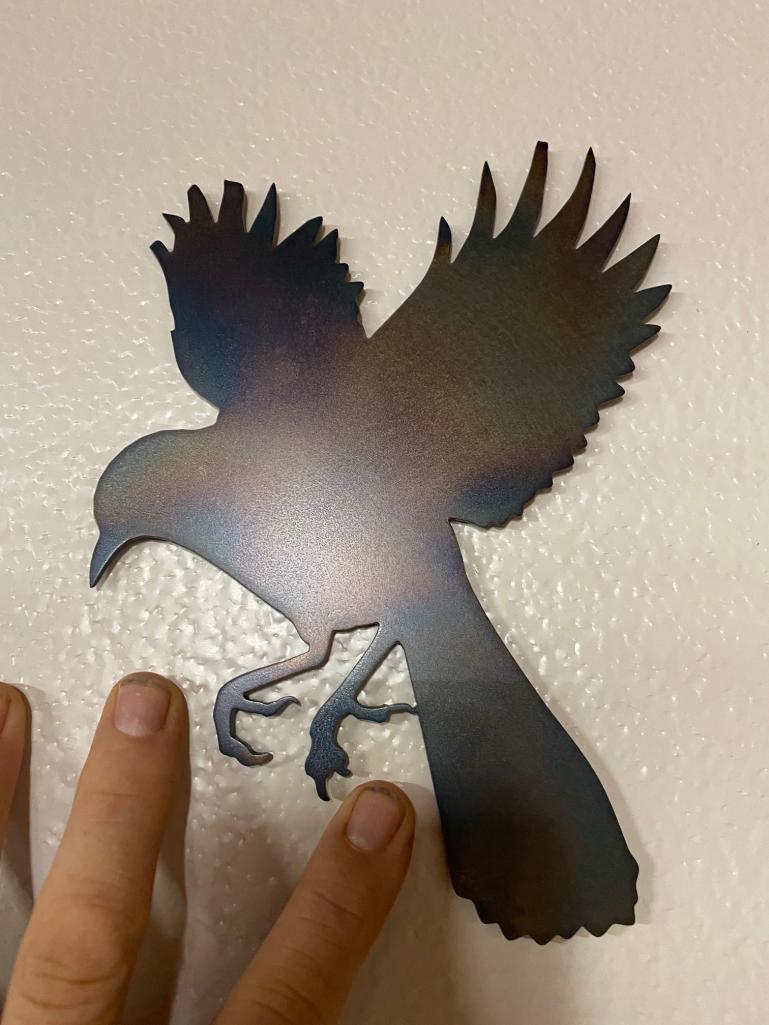
Example of plamsa cut, this came off the table like this, I just torch blued it to make it look more interesting, note the detail etc, plenty good for doing light brackets and then some:
Posted by: pete000 Jul 23 2020, 10:41 AM
Water jet?
If these brackets get produced, put me down for a set !
Posted by: R1200rider Jul 23 2020, 11:00 AM
I’m in for a set too!
Posted by: 914forme Jul 23 2020, 01:42 PM
Eric, has shared with me his work on this. I will run it trough my cad and do a laser cut in Cardboard Aided design. Then clean up the design a bit to make it easier for production.
None of these issues are from anything Eric has done, it is from the original design.
Eric I agree with you Plasma can make some great cuts. and has it's place. I tend to use laser based on the wider range of materials and higher tolerances that I tend to work with.
Posted by: eric9144 Jul 23 2020, 02:06 PM
@http://www.914world.com/bbs2/index.php?showuser=2388 I just sent you a bunch of pictures to help the process along
Posted by: porbmw Jul 24 2020, 02:30 PM
Hi
Also in for a set, if possible.
Thanks
Paul
Posted by: Larmo63 Jul 24 2020, 11:46 PM
I have a nice set of those Cibie Iode lights with correct covers I might part with.....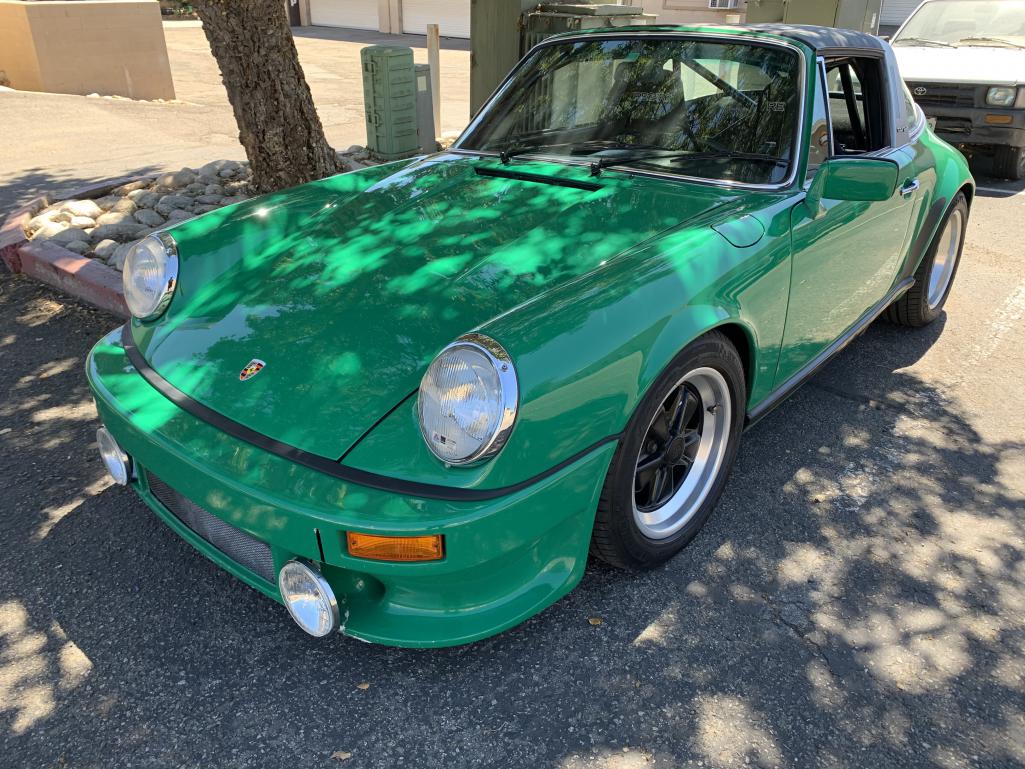
Posted by: silverg Jul 25 2020, 05:08 AM
I would like to buy a set
Posted by: carlislebill Aug 12 2020, 08:12 AM
Don't forget I was first! lol Just kidding but I am still interested. Bill3@CarlisleEvents.com
Thanks
Posted by: wes Aug 12 2020, 11:14 PM
Put me in for one set please.
Posted by: 914forme Aug 13 2020, 09:52 AM
Project still on track, I have made a few design changes. should have the parts back end of next week, and will snap some pictures, and update on production costs.
Posted by: wes Sep 2 2020, 12:17 PM
I’d like a set also if not too late, Thanks!
Posted by: dakotaewing Sep 2 2020, 01:34 PM
Please put me on the list of folks who are interested in a set (or 2).
Thanks ! Thom
Posted by: 914forme Sep 2 2020, 02:17 PM
Will do I hope to have the prototypes for this weekends assembly, LOL, after the first one piece design, I have thought of other ways of building these. Bit more CAD time, and I might have something I am proud of.
Not to late the design will allow these to be produced in two ways. One completely done in any color you want as long as its a non color that would be black.
Or a DIY kit that all once done all you have to do is say I want one, and it will be manufactured and sent off as a bare metal piece. You get the fun of bending, clearly marked via engraving and relief cuts. And then welding, after that you can coat it in any color you want and any method you choose.
Must say, Sorry Tony for the thread hyjack
Posted by: 914forme Sep 14 2020, 08:42 AM
Alpha test unit, this was mocked up, I need to grab a set of Cibi Oscars. That Hella looks out of place with the other lights.
Have a few changes to make. And an idea to make it easier to hold onto the bumper mount to make installation a bit less of a hassle. Right now you need at least 3 hands, in my case, two hands and a leg.
But here it is, the cost will be based of final material choice, an TIG weld time. Lots of little dimes to be added 
And I found out an interesting item on my -6 the bumper was being held on by friction and gravity. No nuts on the inside of the bracket. That is the reason for the large clamp in the picture.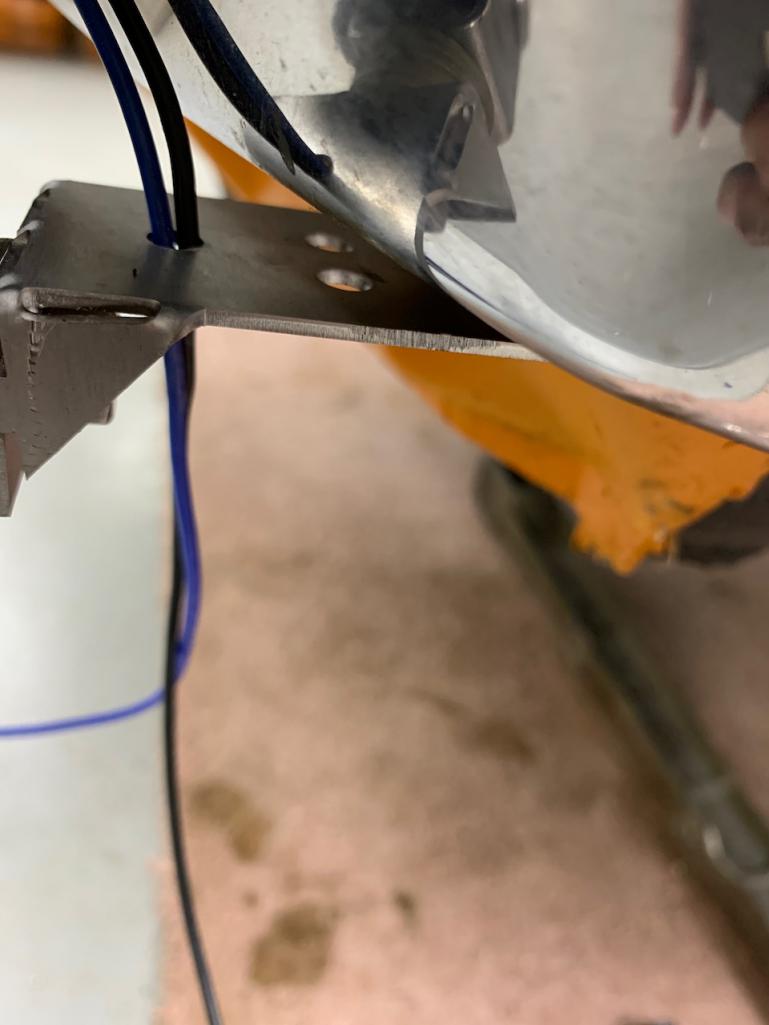
I added a few holes to allow for better wire management. The hole that the two wires drop into will be upsized for a grommet and the grommets will be included in the kit. There is a set of rear holes that can be used for a zip tie to hold the wires close to the brake to get them behind the bumper.
Also note the Alpha Prototype was made out of mild steel, no welding was done yet. Metal is strong enough to hold the weight with just the physical bends. I will weld it and do a stress test at a latter date to failure.
As I said I have a couple of changes I need to make to the design, and it will be ready for production.
Want to test fitment with a Set of Cibie Oscars, and Cibie LED Oscars. As I think the back space will be different for each.
These can be made out of various metals, I laser cut these.
Mild Steel $$
Stainless Steel $$.$
Titanium $$$ roughly 4x the price, but would be 
Posted by: PWS1205 Sep 14 2020, 02:22 PM
I'm in for a set too! Looks great. Let us know when you are able to do a small production run.
Posted by: mlindner Sep 14 2020, 03:01 PM
I went a little the other way...from the top down. Just seems hanging from the top is better than the bottom. Mark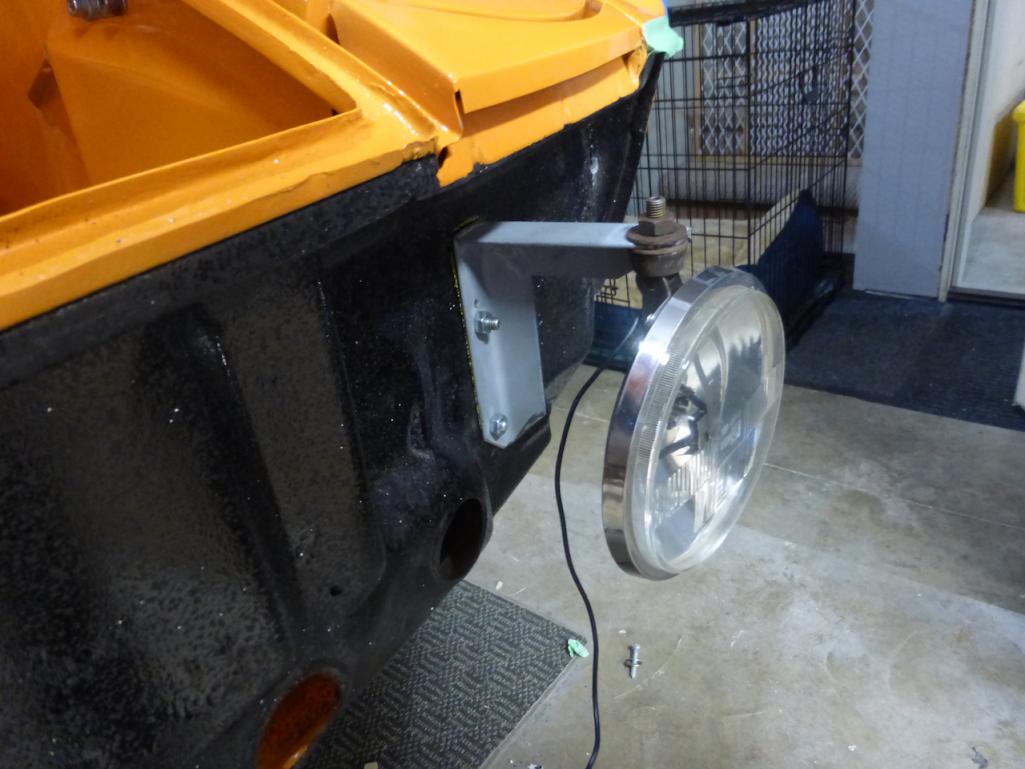
Posted by: anglophone1 Sep 26 2020, 02:04 AM
Just been directed to this thread.
I’m interested in a set if European shipping doesn’t kill it 
Just one thought - if they are top mounted will the covers fit upside down?
C
Posted by: KSCarrera Sep 26 2020, 03:33 AM
Just been directed to this thread.
I’m interested in a set if European shipping doesn’t kill it
Just one thought - if they are top mounted will the covers fit upside down?
C
The chrome bezel (and the lens) can be rotated 180 degrees, so that the covers will fit the correct way up. Cibie included a small notch in the body of the lamp to accommodate the lens used the opposite way up to normal.
Posted by: 914forme Sep 26 2020, 08:20 PM
If your running fiberglass bumpers I would not feel bad about putting in the tabs and making them like several GT pictures.
Lots of way to skin this cat.
The reason they are done this way is they slip between the button of the bumper, and the lower valance.
Version number 4 has been sent to my cutter, we will see how this version turns out.
Posted by: BillJ Jan 29 2023, 12:12 AM
Thread revival. Are these available in ready to mount format? Need two sets.
Posted by: CCE Jan 31 2023, 12:06 PM
I like the clean look on mine, 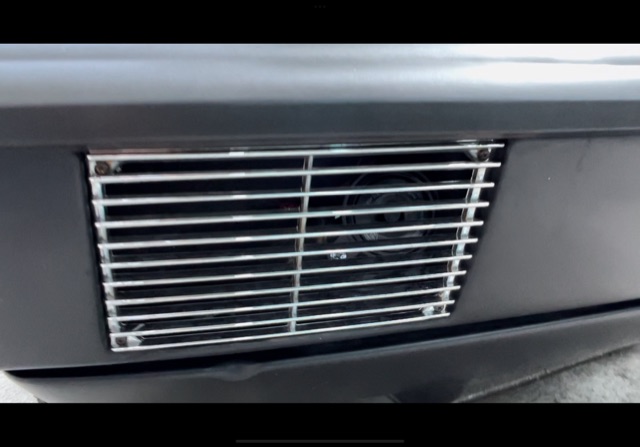
but I am also into the large round lamps on some GT’s.
Is that a special bumper?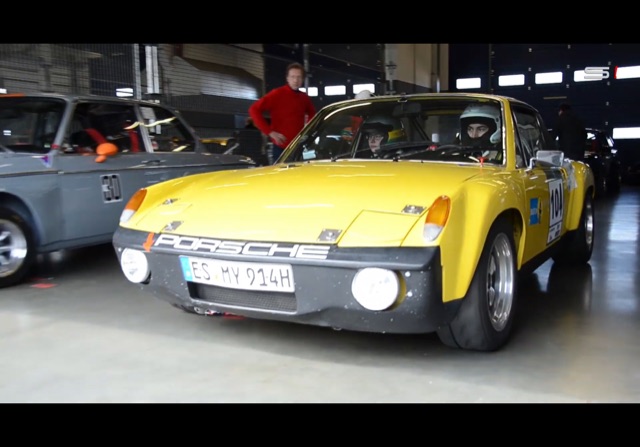
Posted by: CCE Jan 31 2023, 12:26 PM
I like the clean look on mine,
but I am also into the large round lamps on some GT’s.
Is that a special bumper?
Posted by: BillJ Jan 31 2023, 01:57 PM
Neat bumper. Definitely custom.
I hope to do a night race this year so will need the extra lights for sure. I plan to mount two white and two yellow. Already have the cibies ready to go. Just need these mounts. @http://www.914world.com/bbs2/index.php?showuser=2388
Powered by Invision Power Board (http://www.invisionboard.com)
© Invision Power Services (http://www.invisionpower.com)