Printable Version of Topic
Click here to view this topic in its original format
914World.com _ 914World Garage _ Scottish Reincarnation...., The start of my final build thread.... mk iii
Posted by: RickS Feb 20 2020, 10:33 PM
Fascinating
Posted by: halr75 Feb 20 2020, 10:34 PM
Son of OP here - having some technical difficulties getting post up, working to resolve!
Posted by: wysri9 Feb 20 2020, 10:43 PM
OK guys and gals
I live in Scotland about 20 miles West of Aberdeen, and have been hanging around this forum for years asking the odd question and throwing in the occasional comment. Oh and learning, learning, learning from all the wonderful contributions from the members. I could not have got to where I am without this forum for sure.
Anyway I recently saw the return of my painted body shell and its time to build her up. Exciting!
So the inspiration for my build came from three places, firstly the whole project started with a conversation on a Channel Ferry returning from the Le Mans 24 hrs in 2009 when I heard about the 914 project that had been started and now could not be finished. That led to a phone call, a visit and a deal which saw me transport several trailer loads of parts and cars in various stages of dismantling back to my place. Secondly I fell in love with the Marathon de la Route cars and their success, and finally at the Le Mans classic I saw an MG Midget which had been refreshed in a way that was not original but more street racer with a modern twist. Oh and there was also a final twist - my son was living in Salt Lake City and encountered a yellow 914-6 which happened to belong to a chap called Eric Shea…..that resulted eventually in some dealings, and a memorable ride in that same car that Jay Leno rode in later!
So fast forward several years and I have the following to put together.
Fully restored and painted body shell with slightly flared rear arches only for the 16x7 Fuchs rear wheels I acquired along the way. Fronts are 16x6.
2258cc Type 4 engine with Porsche fan, Bugpack 3 stage dry sump pump with remote front mounted thermostat, cooler and dry sump tank. 78mm forged crank and 96mm Keith Black pistons on Carillo rods with ARP fasteners, Webcam 86c camshaft, new AMC cylinder heads with n44mm intake and 38mm exhaust valves with Elephant foot adjusters, twin Weber 44IDF carbs with Pertronix ignition and Flame Thrower coil. Compression ratio was set at 9.1. All engine parts and crankcase work supplied by James at Stateside Tuning in Gloucestershire. Finally decided that a tired old starter motor was not up to the job and bought a high torque starter from Powerlite.
Gearbox has been rebuilt as a close ratio box by Mike Bainbridge in Kendal, with sprints and hillclimbs in mind. 5th is stock as an overdrive.
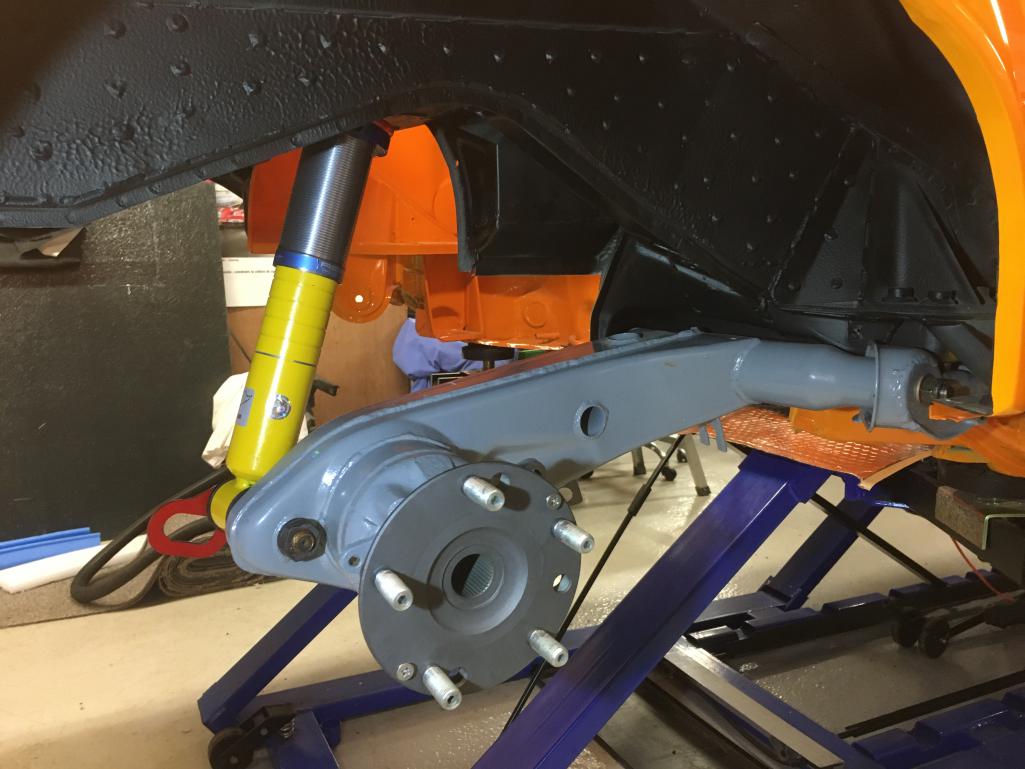
Suspension is via Elephant racing bushings front and rear, with Koni inserts front with 911 control arms and Sway Away 21mm torsion bars. A Weltmeister front anti-roll/sway bar completes the set up. Rear suspension also has Koni shocks with Rebel Racing coil overs and 150Lb Eibach springs. Rear control arms are strengthened as per PMB pattern (thanks Eric!), and have rose jointed toe-in adjusters fitted to the outer mounting bracket.
Front hubs, rotors and calipers are from a 911, whilst rear hubs, rotors and calipers are stock but modified for 5 bolt wheels by PMB. A 19mm master cylinder will be fitted with adjustable brake bias.
Internally a full bolt in Safety Devices cage will be fitted, whilst a chassis strengthening kit has been applied to the “longs” rear section. A plumbed race extinguisher will be fitted. Heat exchangers have been deleted from the motor, and so a heated windscreen will be fitted along with Lexan side and rear windows. Fibreglass boot and bonnet (trunk and hood!) lids have been procured as per the original 914-6GT cars, as well as fibreglass bumpers and sills.
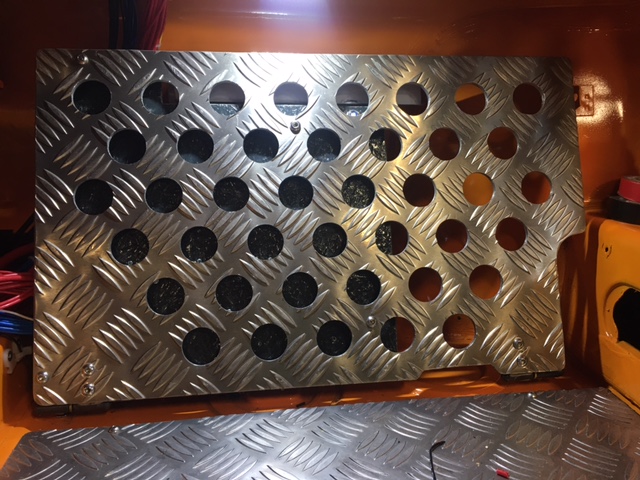
Given the state of the old electrical loom, and the deletion of multiple electrical items (heater, headlight motors, fuel injection) a custom loom has been designed and will be fitted with additional relays on all key circuits to protect the older switches. Protection will be via circuit breakers. The new relay panel and power distribution board will sit under a custom passenger footrest which pivots down to reveal the electrics.
The stripped interior will be finished with a pair of Cobra Classic RS seats, fitted with 4 point harnesses.
I am currently on an extended holiday visiting my children and grandchildren in far-flung places but on return in early March will be full speed ahead with the final assembly. All major components have been fitted prior to painting, so it should all go back together well…..
To date I have fitted most of the suspension, and started the interior fit-out. The engine has run in a custom frame outside of the car and this has revealed some (hopefully…) minor leaks which will be fixed prior to installation in the car. The complex oil system has proven one of the most challenging aspects to get right, but I think we are close. I am super-aware that getting the in-car installation of this right first time will be a real priority - especially the long lines up the front.
I will post a few pictures of my journey to date, and will keep you updated on progress. Some of you may be as terrified as I am that I have booked ferry tickets for my son and I to attend the 2020 Le Mans Classic this July - and the 914 will be our vehicle of choice……I do have a couple of other options but my mates will rib me remorselessly if I miss the deadline with the 914……..
Wish me luck!!
Simon
Posted by: wysri9 Feb 20 2020, 10:44 PM
Where it all started...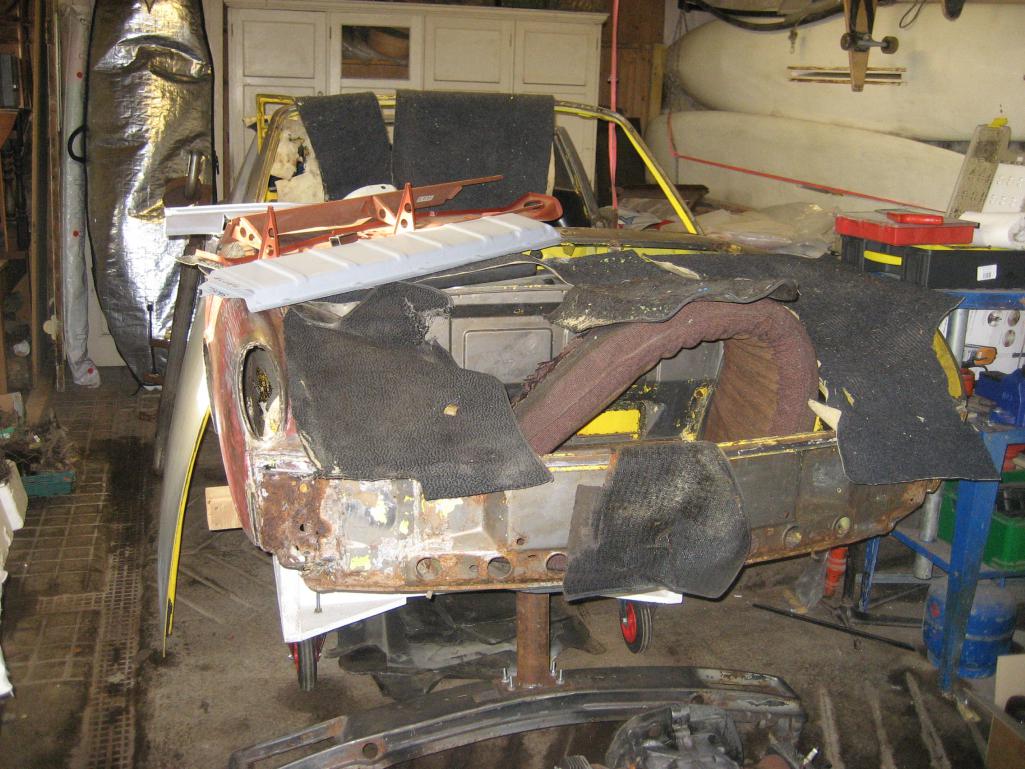
Posted by: wysri9 Feb 20 2020, 10:46 PM
..and where this build thread now starts....
I will fill in some more background as we go along - promise!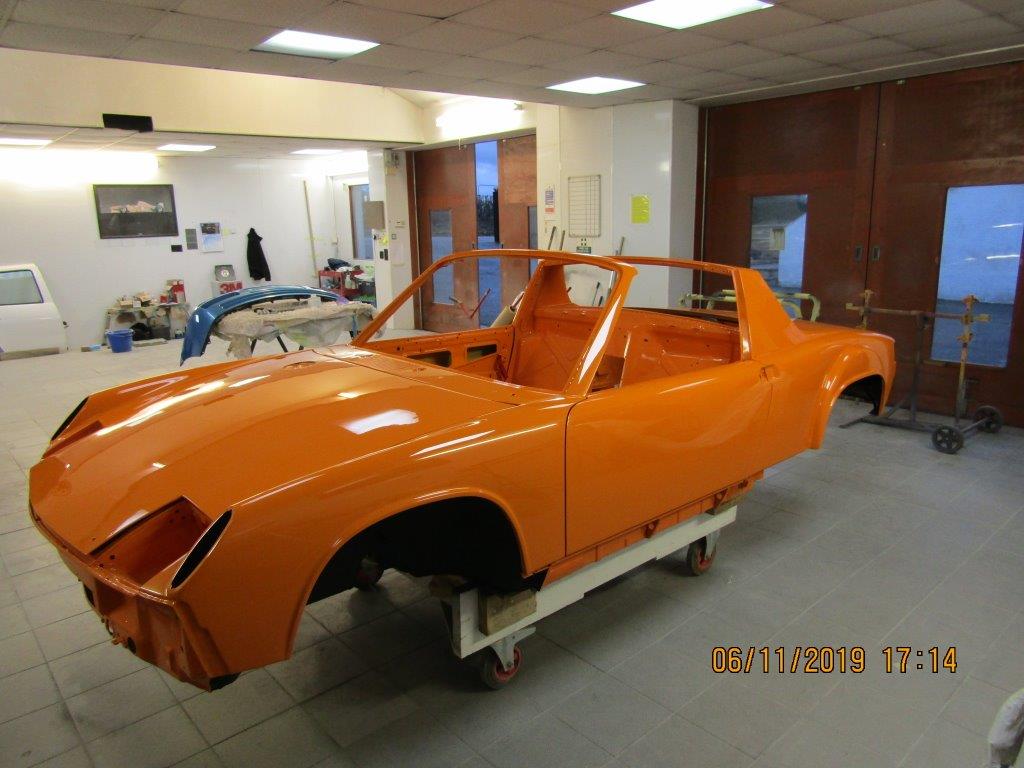
Posted by: Dion Feb 21 2020, 05:27 AM
Quite a journey so far. Look forward to seeing more. I like the subtle flare technique.
LeMans Classic is certainly on my bucket list to attend.
I hope you make it happen with your 914!
Posted by: BeatNavy Feb 21 2020, 06:57 AM
A freshly painted tub -- what a beautiful sight (and color)!
Was in Scotland 2 years ago but never made it to Aberdeen/Aberdeenshire even though I gather my family name comes from the area. Wow, are there some nice twisty roads and canyons to carve in the highlands. That build should be a blast 
Look forward to seeing more pics and hearing more about your restore 
Posted by: wndsrfr Feb 21 2020, 07:52 AM
Awesome work...you're going to be extending the knowledge base with your experiences and contributions--looking forward to enjoying your journey.
Noted the vintage windsurfing boards in the "where it started" photo--I learned windsurfing at age 50--25 years ago & I'm still racing now & then here near Virginia Beach, Va. but racing Kermee has taken over much of my sailing time...
Posted by: wysri9 Feb 29 2020, 08:46 PM
Guys
Thanks for the encouraging comments!
Windsurfing has been a passion ever since taking an original Ten Cate Windsurfer to Brunei in the late 70's! Spend more time cyclin and driving these days!
As for the Scottish roads, I can drive on awesome rods from my front door - indeed the road takes me to the Queens Scottish residence at Balmoral - its a wonderful drive. Come and share it one day!
More pics and story to follow shortly once travels are done. I am back home Tuesday and the real work starts!
SR
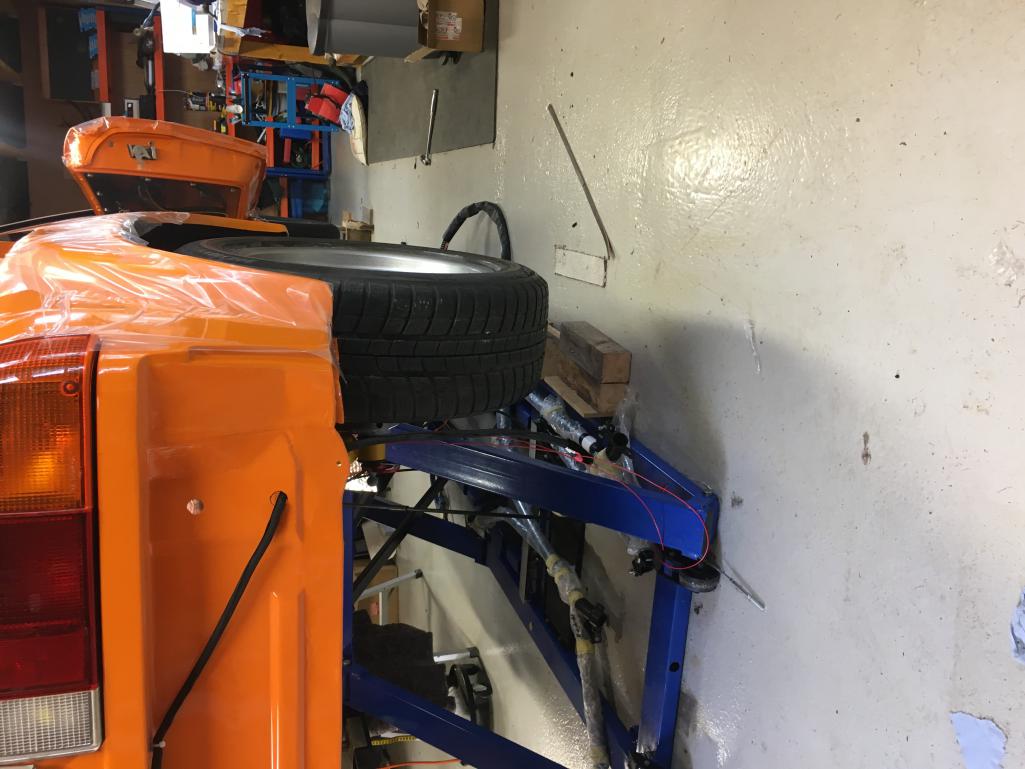
Posted by: wysri9 Feb 29 2020, 08:58 PM
[attachmentid=732565]
Rear suspension with powder coated control arms, Elephant Racing bushings and Rebel Racing coil over.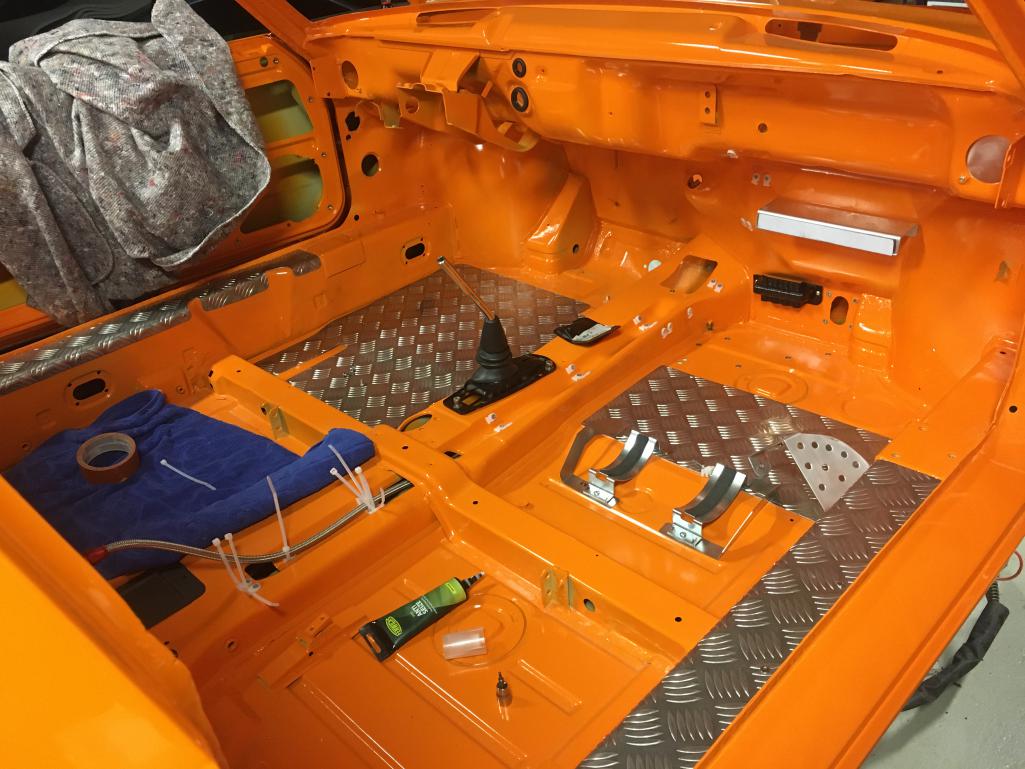
The start of the interior fit out. It will be stripped (and noisy!). Fixed fire extinguisher mount is there, and the start of my electrical installation under the passenger footboard....
Posted by: wysri9 Feb 29 2020, 09:24 PM
And here IS the rear suspension picture
(Note - I seem to have trouble loading multiple photos - any advice??)
Posted by: bkrantz Feb 29 2020, 10:23 PM
Looks great!
Aberdeen is a great city, and I got to visit at least 20 times over years of company work. Some good friends live in Banchory.
Posted by: RickS Feb 29 2020, 10:47 PM
Substantially more fascinating. 
Posted by: wysri9 Mar 1 2020, 12:52 AM

Substantially more fascinating.
Sort for the false start- I seem to have been fighting the system. Hopefully now resolved.
Posted by: Cairo94507 Mar 1 2020, 02:12 AM
What a great looking build you have there. I like the subtle rear wheel flares. I look forward to watching your car come together. 
Posted by: theer Mar 1 2020, 07:11 AM
And here IS the rear suspension picture
(Note - I seem to have trouble loading multiple photos - any advice??)
The photos are probably too big. Each post is limited in size to 3mb (I think). You’ll have to save & resize the photos to load more than one... I’m not exactly sure how to do that, though.
Also, On the rear shock... I assume you you know to add springs to those Bilsteins and cool overs- have you decided on the stiffness?
Posted by: wysri9 Mar 1 2020, 06:54 PM
i will try the resize - the system said I still had space but maybe smaller files will work better. 150Lb Eibach springs are already fitted but just out of sight! I know I will also need helper springs bu need to wait until I can load the rear suspension and set ride height before measuring for the helpers.
Posted by: wysri9 May 5 2020, 02:20 AM
Ok two things have happened - one Le Mans Classic 2020 has been cancelled - I can relax and enjoy the build....
I also managed to get myself involved in a COVID response project in Africa which has sucked up way more time than I had intended....its in a good cause though.
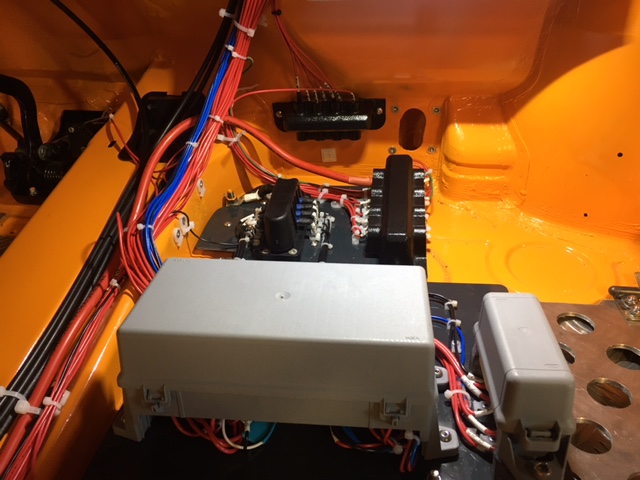
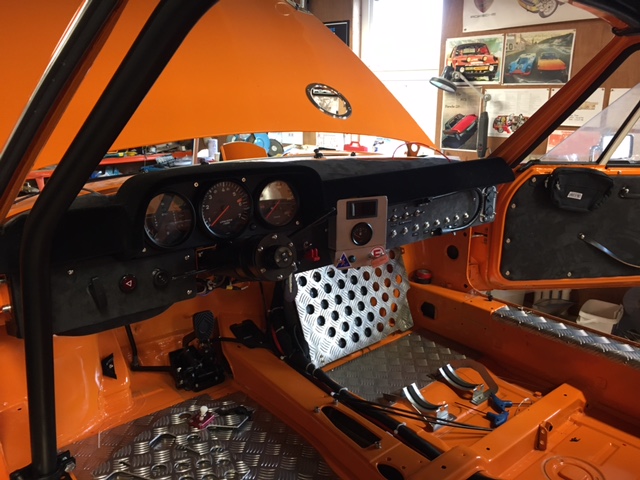
Anyway I have managed to make some progress albeit a little slow. Here is a picture of the custom dash, which starts to show off the custom electrics. I'll also tease you with a picture of the new relay box mounted on its base plate.
More to follow....slowly!
Attached thumbnail(s)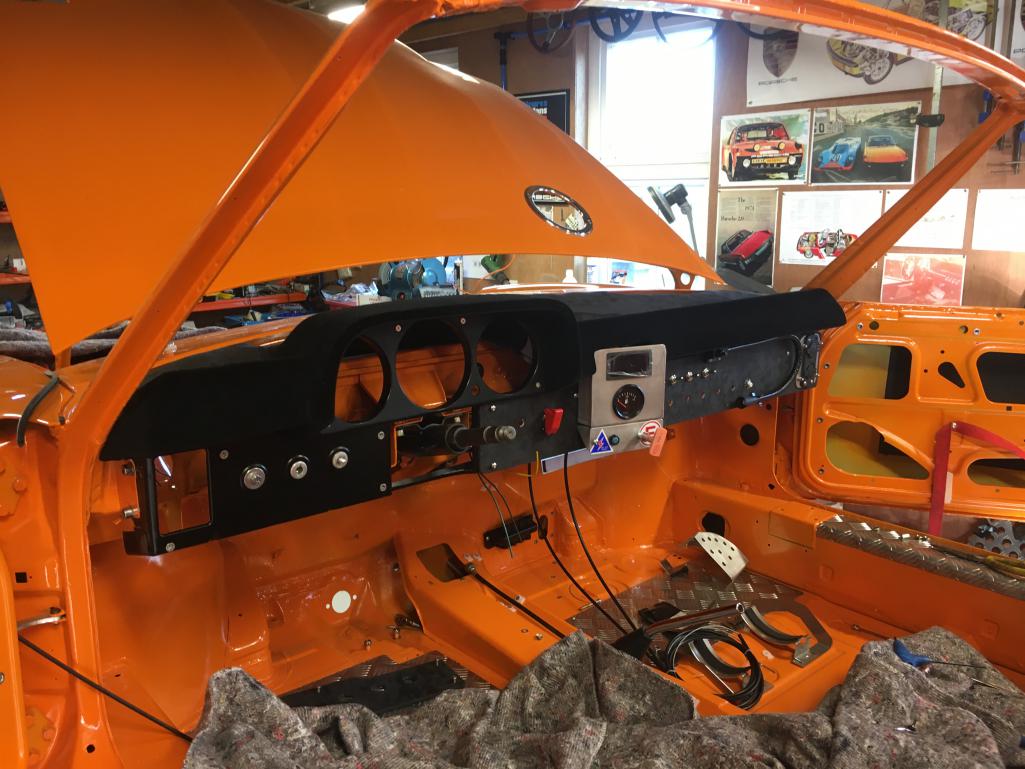
Posted by: wysri9 May 5 2020, 02:21 AM
And here is the relay box...
Attached thumbnail(s)
Posted by: frostyf May 7 2020, 08:42 PM
And here is the relay box...
Simon, the shell looks great. I'm a Brit who's also been hanging around the forum for years and originally looked to import a 914. I visited Aberdeen in 2003 looking for offshore work but ended up in a differwnt line and have spent some time further South in Rosyth and Faslane off and on. Fortunately I got the chance to work over in Virginia for a few years and arriving last year, managed to buy a slightly rough 73 which I'm slowly getting back to a roadworthy level.
This site and the community that supports it is absolutely great. There is so much experience and people who are very generous with their help and advice particularly when you get stuck and usually on something that should be obvious. I hope when I finally return my car will be reliable enough for a tour of Scotland! Your build looks fantastic, and I can't wait to see it come together!
Best,
Nick
Posted by: RiqueMar May 7 2020, 11:18 PM
Looking great! Can't wait to see more photos!
Posted by: Detroit May 8 2020, 06:32 AM
I'm so glad you started this thread1 Grafting the factory fender lips onto flared rear arches (while keeping the front end stock) is exactly what I want to do, but I've never seen another 914 done that way.
Can't wait to see this with wheels on it, but if you could post a few more pics showing the front and rear arches together, I'd be grateful...
Posted by: wysri9 May 11 2020, 05:06 AM
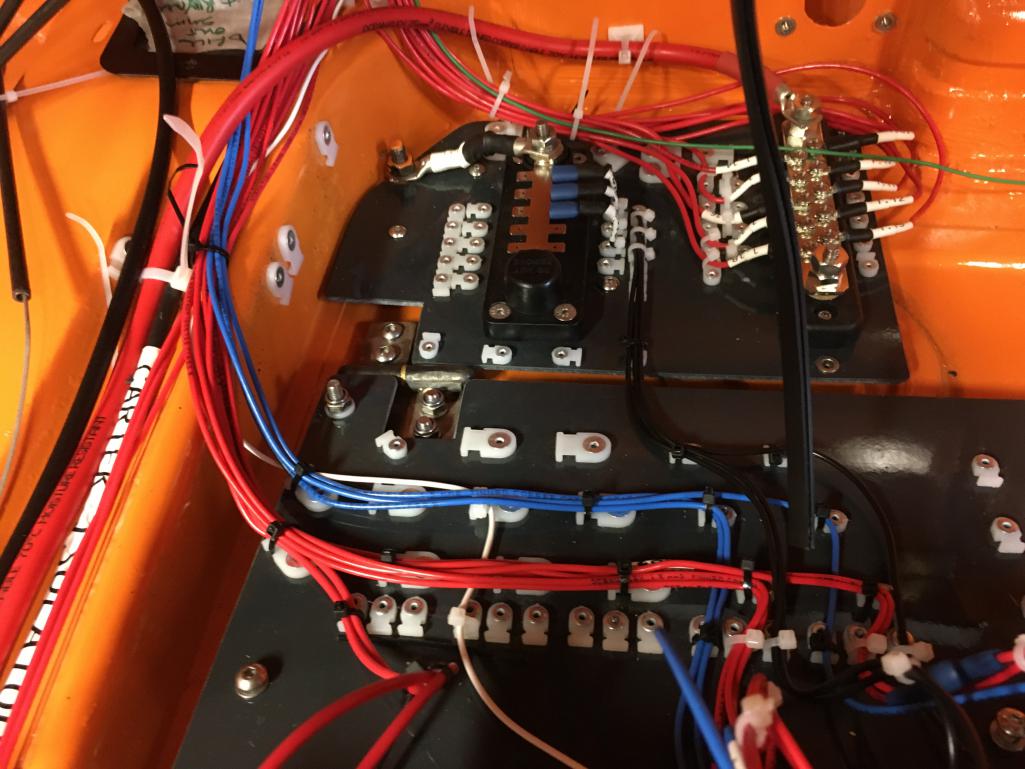
So the major electrical components are now in the car. Let the wiring begin.......
Attached thumbnail(s)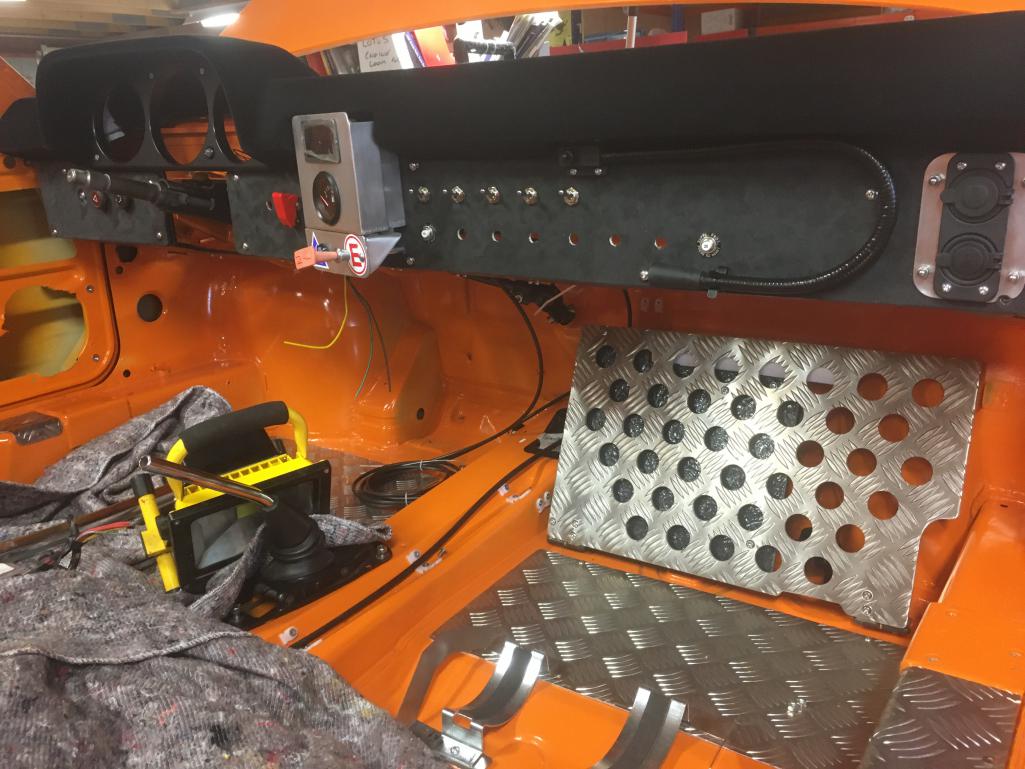
Posted by: wysri9 May 11 2020, 05:07 AM
and underneath the footboard lies......
Attached thumbnail(s)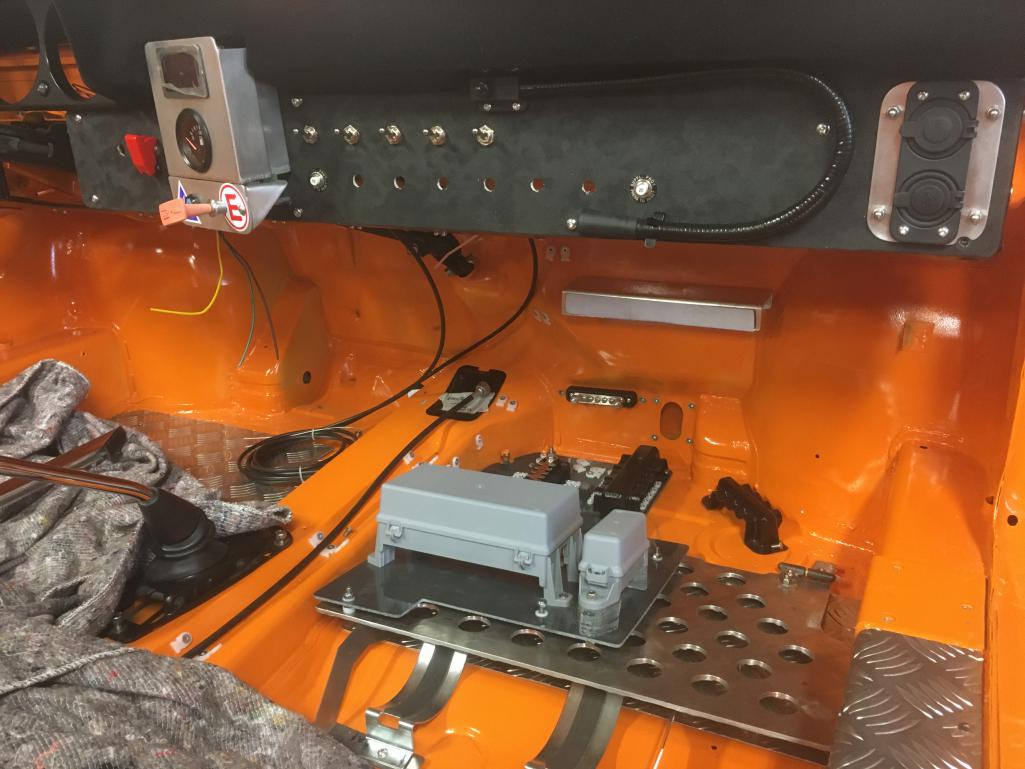
Posted by: wysri9 May 11 2020, 05:08 AM
Heres a closer look. The big relay board is because I am protecting old switches from high current....
Attached thumbnail(s)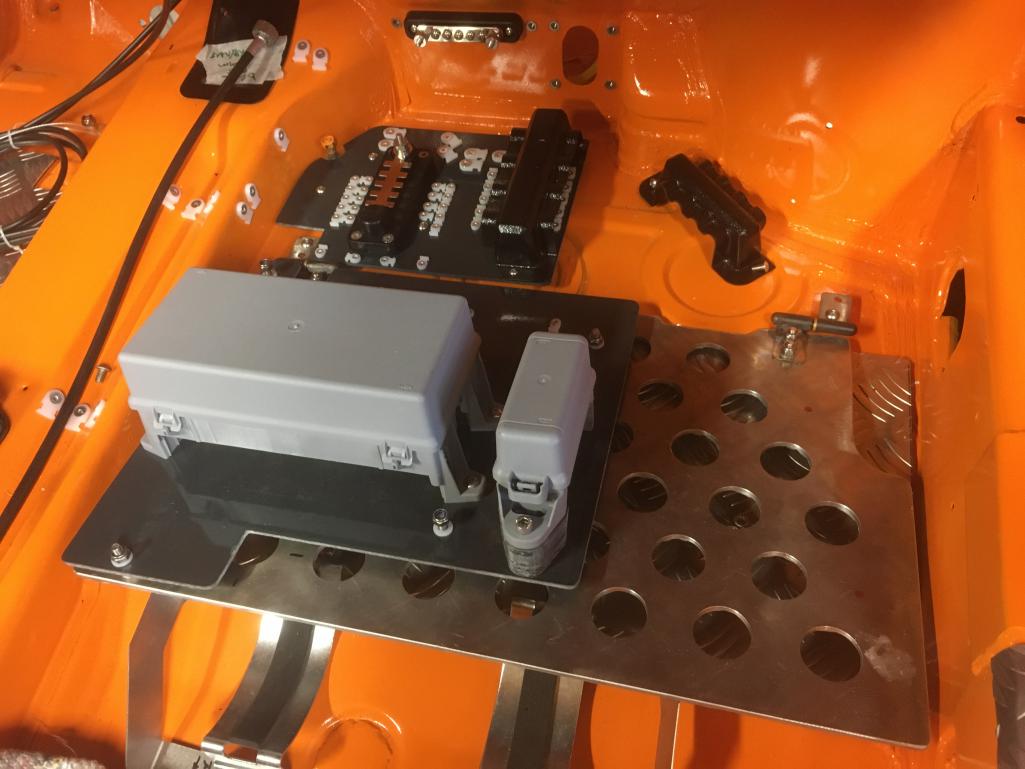
Posted by: jd74914 May 11 2020, 07:42 AM
And here is the relay box...
Who makes this relay box? I've not seen one quite like it before and it looks nicer than the Bussman boxes typical in the US.
Posted by: wysri9 May 11 2020, 07:47 AM
I got mine here:-
https://www.12voltplanet.co.uk/mta-modular-fuse-relay-holding-system.html
Its made by MTA. Really nicely made although the two relay box and the multi relay box come with different stands so I had to make extra legs to put the 2 relay base at the same height as the other one..... 
Posted by: johnlush May 11 2020, 02:54 PM
Simon,
It's great to see your build thread. You've made some nice progress since we last emailed. Looking great!
John
Posted by: wysri9 May 12 2020, 12:00 AM
All - thanks for the encouragement! When you set off down a different path you never quite know how it is going to be received. With several "standard" cars in the garage, I was very keen to have something a bit different. Lets see how it turns out.
John - hope you are well and coping with COVID restrictions?
Nick - I hope when that Scottish tour takes place you find time to stop off in Banchory! You would be most welcome, and a joint blast up Royal Deeside would be fun
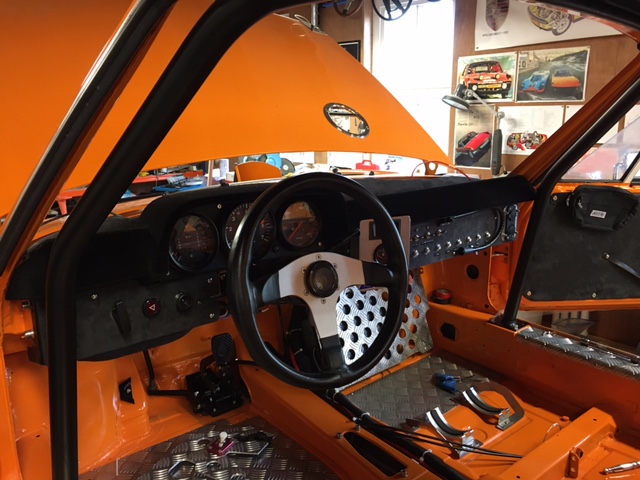
Ill post more pics showing the sides of the car with standard front and modified rear arches. The genesis for this was a comment from a respected previous owner and car builder who advised against going too big on the tyres without enough power. Im going 6 and 7J x 16inch Fuchs and just waiting for the lockdown to ease to try the best tyre combinations. We have a local mobile tyre dealer who has said he will work with me to find the best wheel/tyre combination. I'm thinking 205/55 at the front and 225/50 at the rear as a starting point. I am hoping for 150 bhp from my 2.2L engine. Might be time for some pics of that although its not quite finished.....
Posted by: wysri9 May 13 2020, 09:22 AM
Some more pics of the car as it stands
Attached thumbnail(s)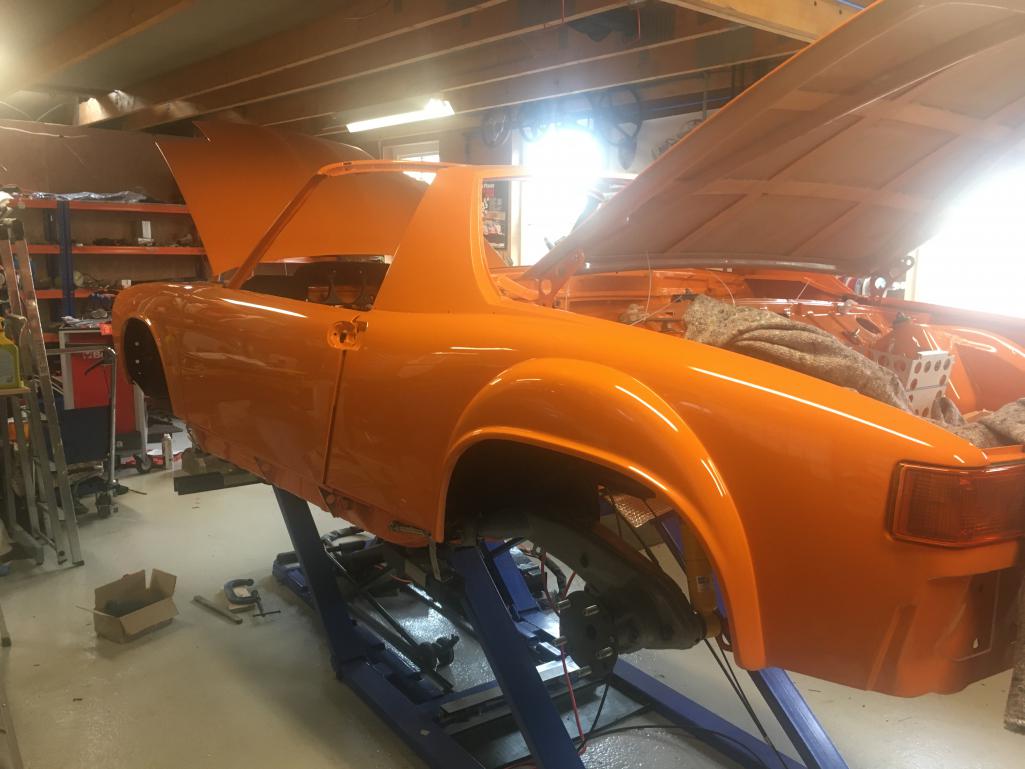
Posted by: wysri9 May 13 2020, 09:24 AM
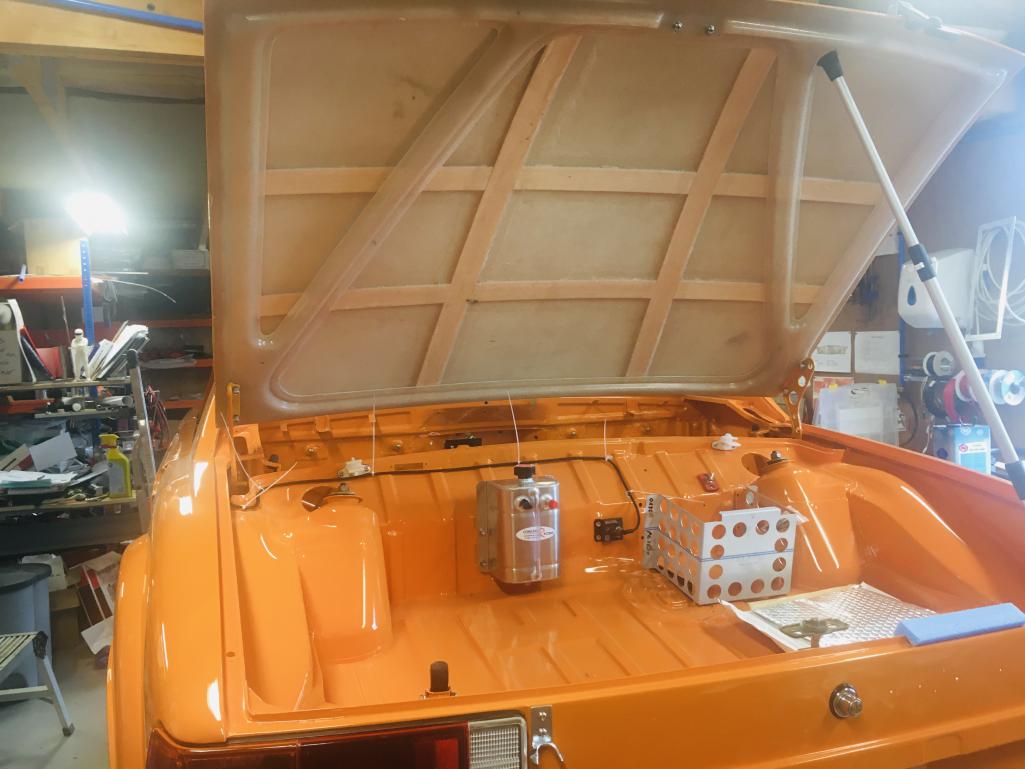
and from the front and a view in the rear trunk (boot!) showing the oil catch tank and battery position
Attached thumbnail(s)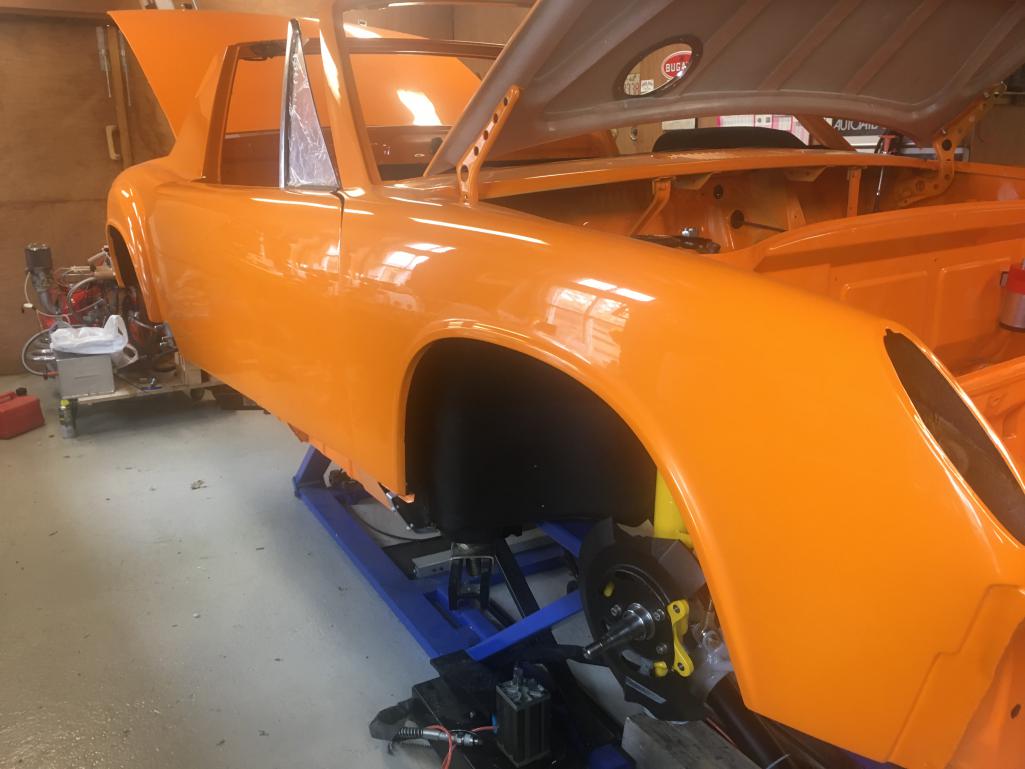
Posted by: wysri9 May 13 2020, 09:25 AM
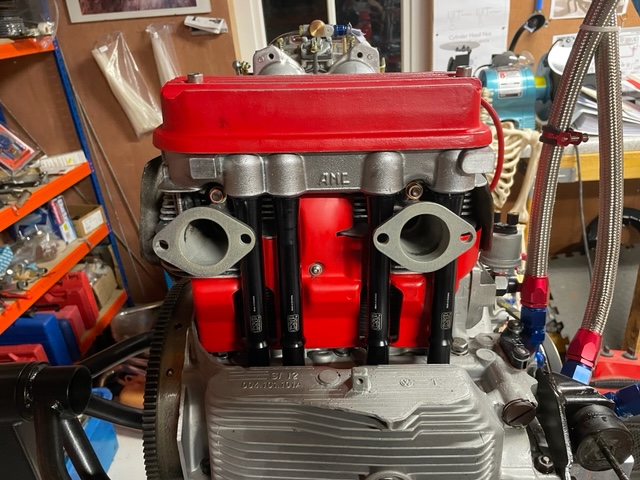
And I thought it time I shared the engine build. Have some pushrod tube leaks to sort, but hopefully then its good to install....
Attached thumbnail(s)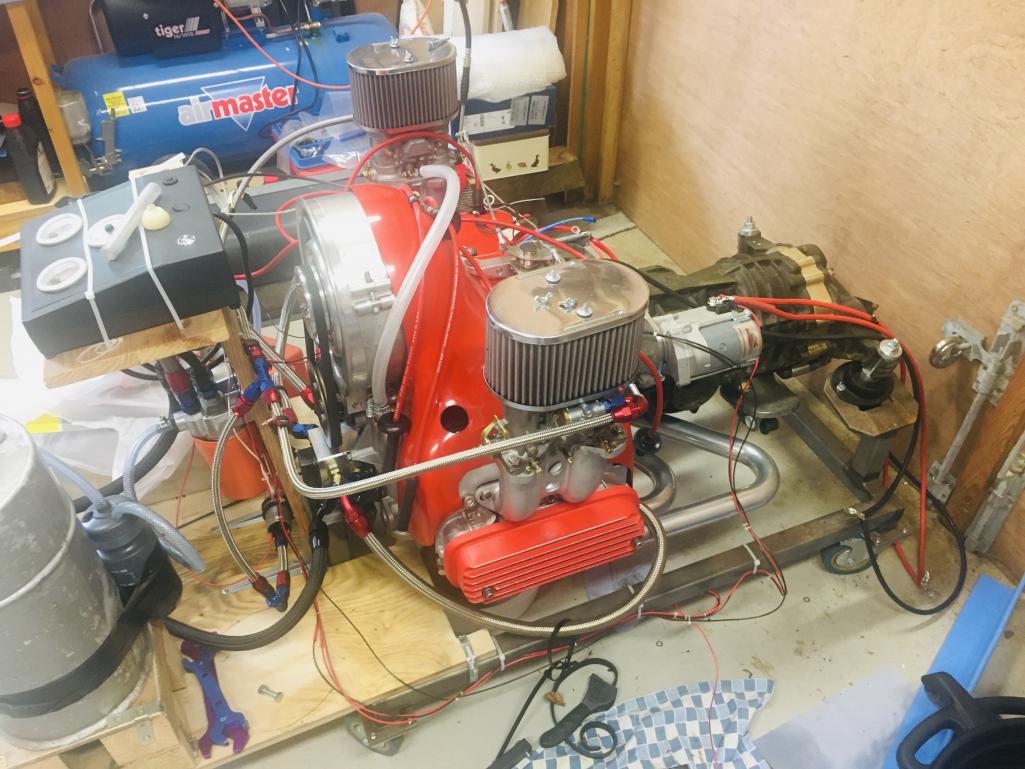
Posted by: 76-914 May 13 2020, 01:37 PM
Nice work. I'll bet the finished product will be stunning.
Posted by: wysri9 Jun 1 2020, 03:41 AM
And so the electrical installation has commenced finally. Took a while to work up the courage but here we go 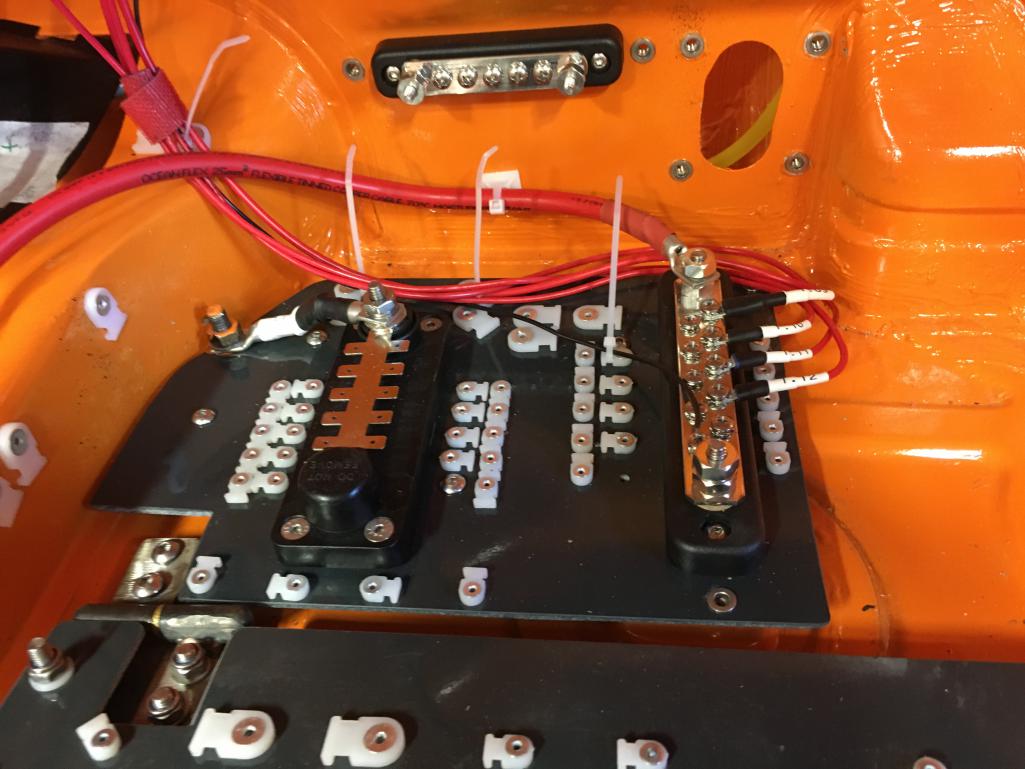
Posted by: wysri9 Jun 1 2020, 03:43 AM
And here is the back of the custom dash panel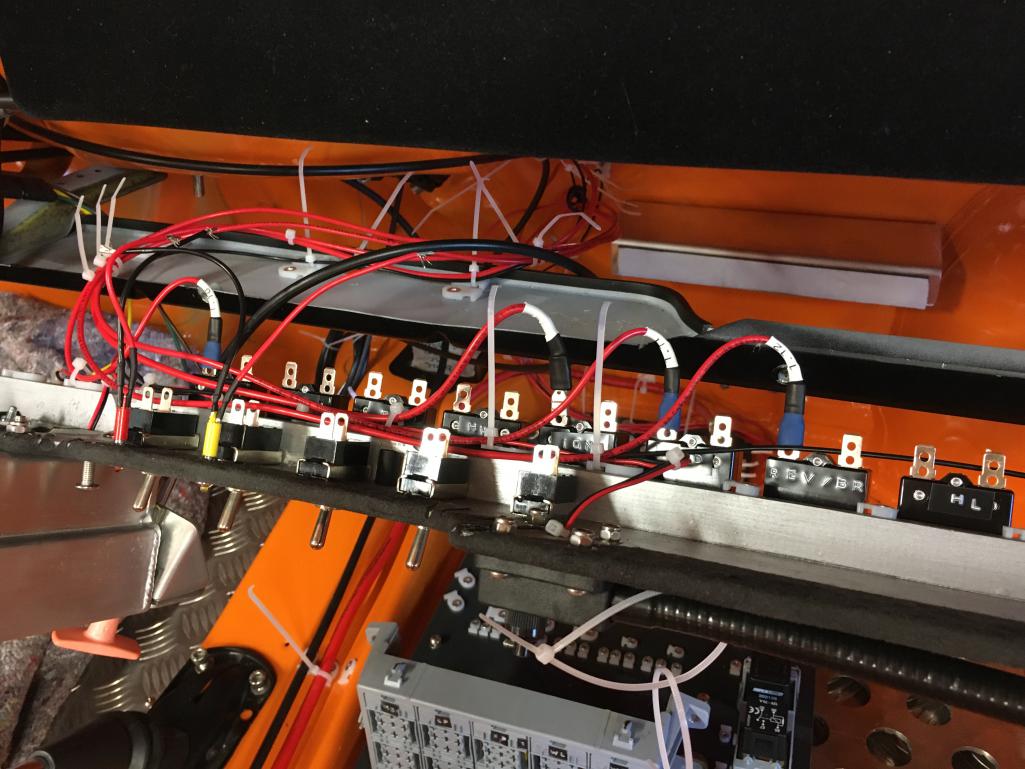
Posted by: wysri9 Jul 2 2020, 08:26 AM
The electrical work progresses largely according to my plan....its slow going building the loom in the car. Every wire needs to be terminated one end, run in the car, fitted, cut to length and then terminated at the other end. With crimps, and double heat shrink each termination takes a while....my supply of cheap tie wraps is also disappearing fast.....
[attachmentid=751082]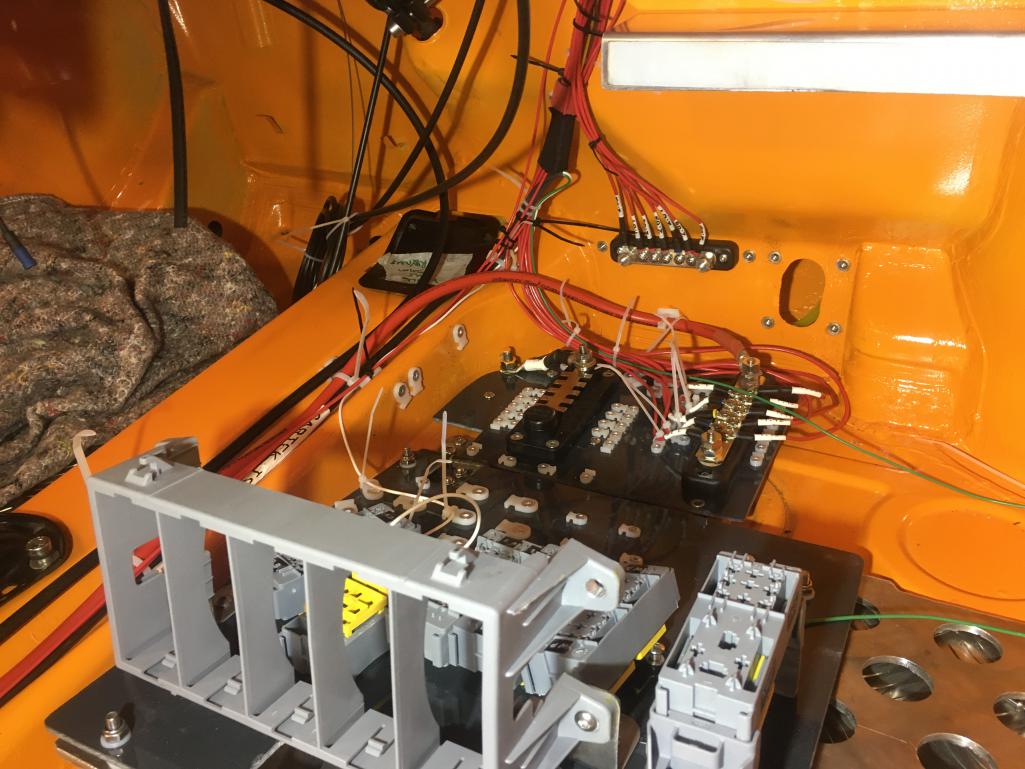
Posted by: wysri9 Jul 2 2020, 04:22 PM
I was also quite pleased the way the headlights and bonnet came together,,,, IMG_9036.mov ( 1.62mb )
Number of downloads: 104
IMG_9036.mov ( 1.62mb )
Number of downloads: 104
Posted by: wysri9 Jul 2 2020, 04:24 PM
The GT headlight system looks pretty good and works well after a lot of fettling.....
Posted by: wysri9 Jul 2 2020, 04:27 PM
And while I was at the lights and bonnet I thought I would finally nail the bonnet pins....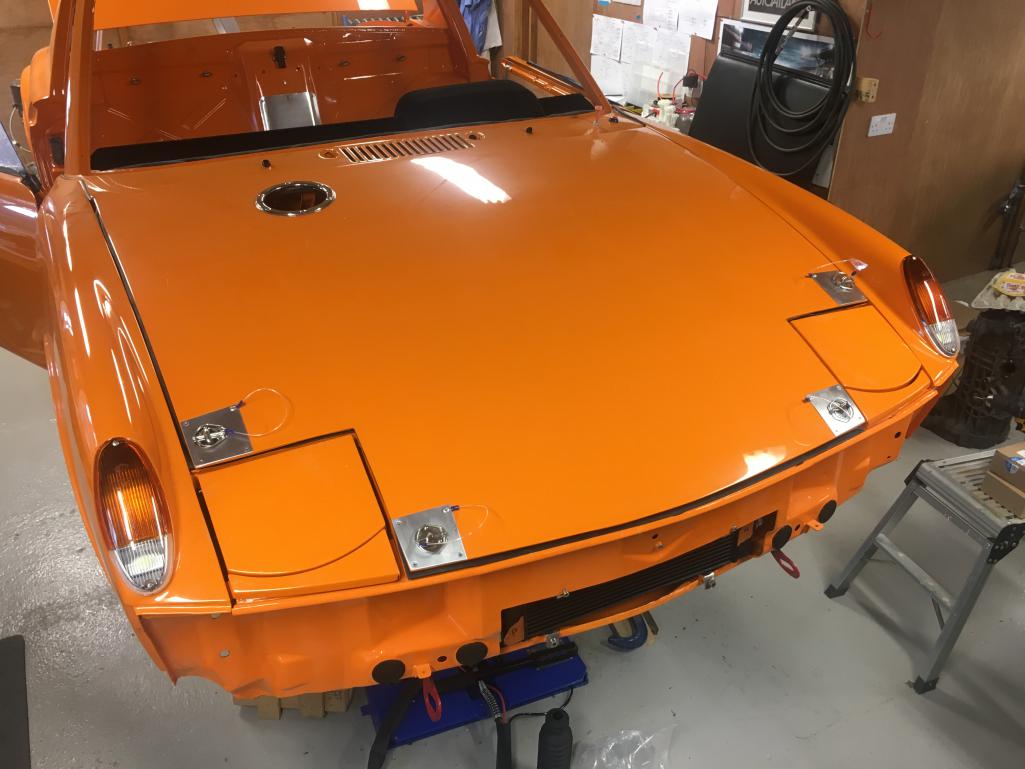 not authentic I know, but I think they look ok.....??
Posted by: Cairo94507 Jul 2 2020, 04:27 PM
Making nice progress. ![popcorn[1].gif](style_emoticons/default/popcorn[1].gif)
Posted by: wysri9 Aug 4 2020, 04:00 PM
Ok so work continues...albeit more slowly than one might like....Here are some pictures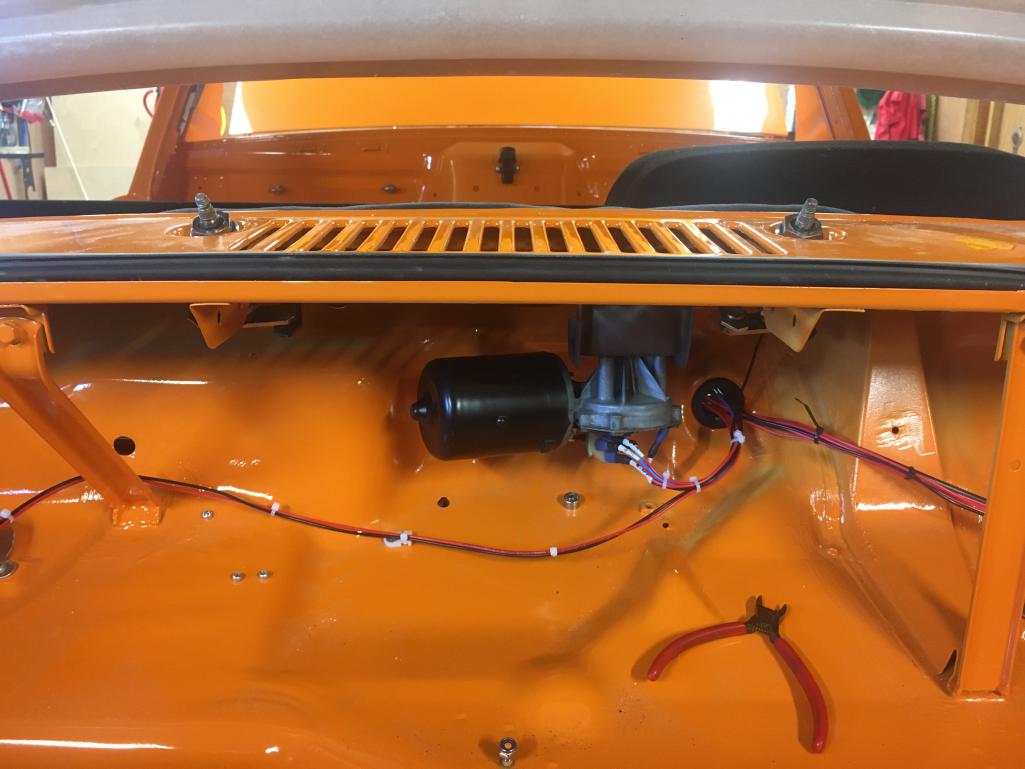
With the help of my son Jack we got the windscreen wiper assembly in, followed by....
Posted by: wysri9 Aug 4 2020, 04:02 PM

The first front strut in and torqued up. I damaged the powder coat on the top can of the second one so that will have to wait.... 
Posted by: wysri9 Aug 4 2020, 04:07 PM
Then we refitted the passenger side quarter light (its polycarbonate). My first attempt was just not good. This looks much better (no idea why the picture is rotated....)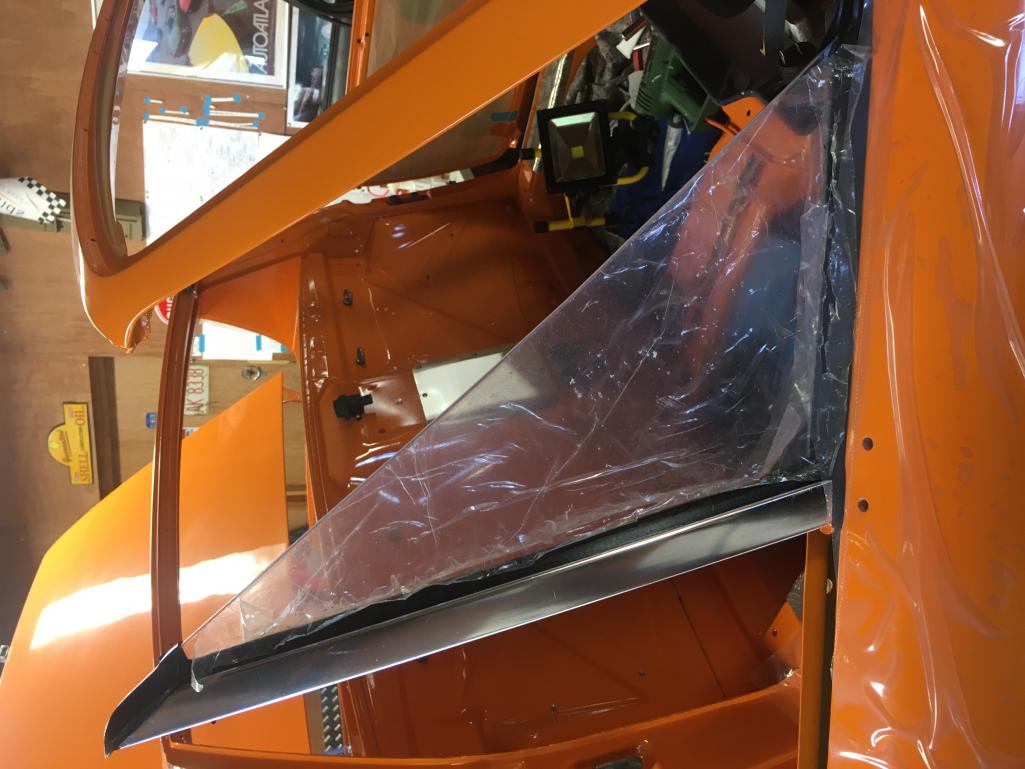
Posted by: wysri9 Aug 4 2020, 04:10 PM
The electric are also continuing at a slow pace - it just takes a lot of time to lay individual cables in.....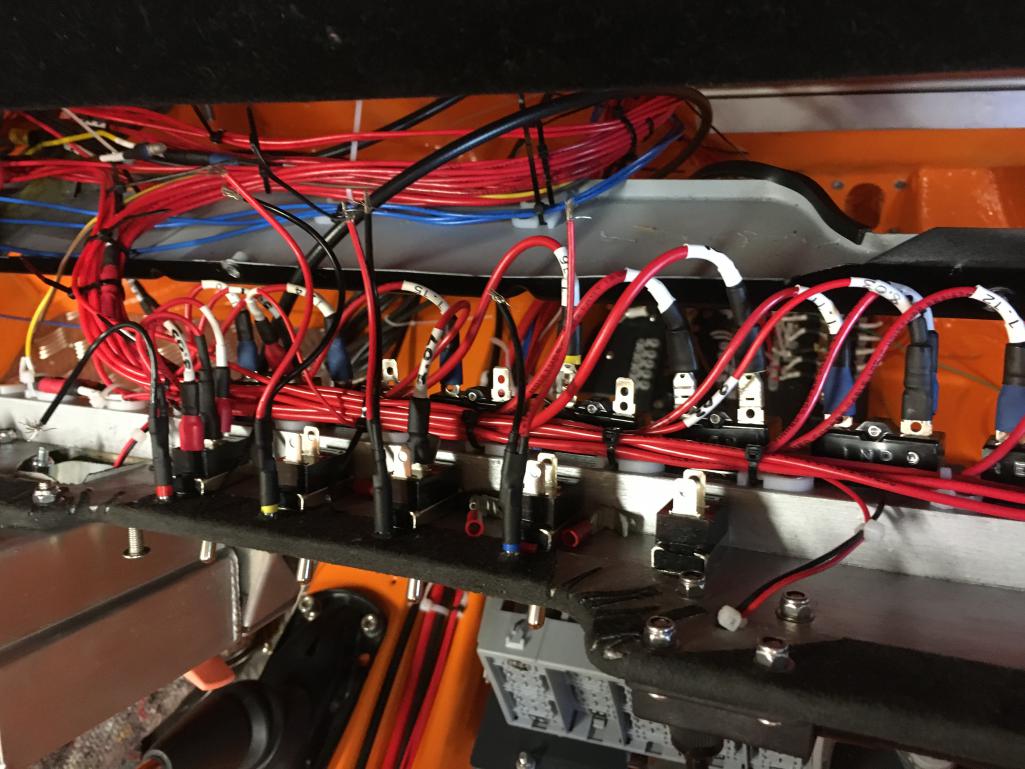
Posted by: wysri9 Aug 4 2020, 04:11 PM
Posted by: Ian Stott Aug 5 2020, 05:50 AM
Watching this with great interest! My parents are from Aberdeen, I am the first of the family born in Canadaand my family has a strong connection to the Royal family, apparently my grandfather worked on the roof of Balmoral Castle, feel free to tell people you know me after that revelation!
My younger brother and I were planning a trip to Aberdeen as we have lots of relatives there, but covid has put that on the back burner.
Your teener will end up being a huge influence with other teener owners, good luck to you in your build, look forward to watching your progress.
Ian Stott
Moncton
Canada
Posted by: wysri9 Aug 6 2020, 04:32 AM
Watching this with great interest! My parents are from Aberdeen, I am the first of the family born in Canadaand my family has a strong connection to the Royal family, apparently my grandfather worked on the roof of Balmoral Castle, feel free to tell people you know me after that revelation!
My younger brother and I were planning a trip to Aberdeen as we have lots of relatives there, but covid has put that on the back burner.
Your teener will end up being a huge influence with other teener owners, good luck to you in your build, look forward to watching your progress.
Ian Stott
Moncton
Canada
Ian thanks for the comments. PM sent to connect properly!
Posted by: wysri9 Aug 12 2020, 11:57 PM
Some more recent progress to report. Thanks to @http://www.914world.com/bbs2/index.php?showuser=23209  for the inspiration to mask and spray my instrument dial rings...
Posted by: wysri9 Aug 13 2020, 12:01 AM
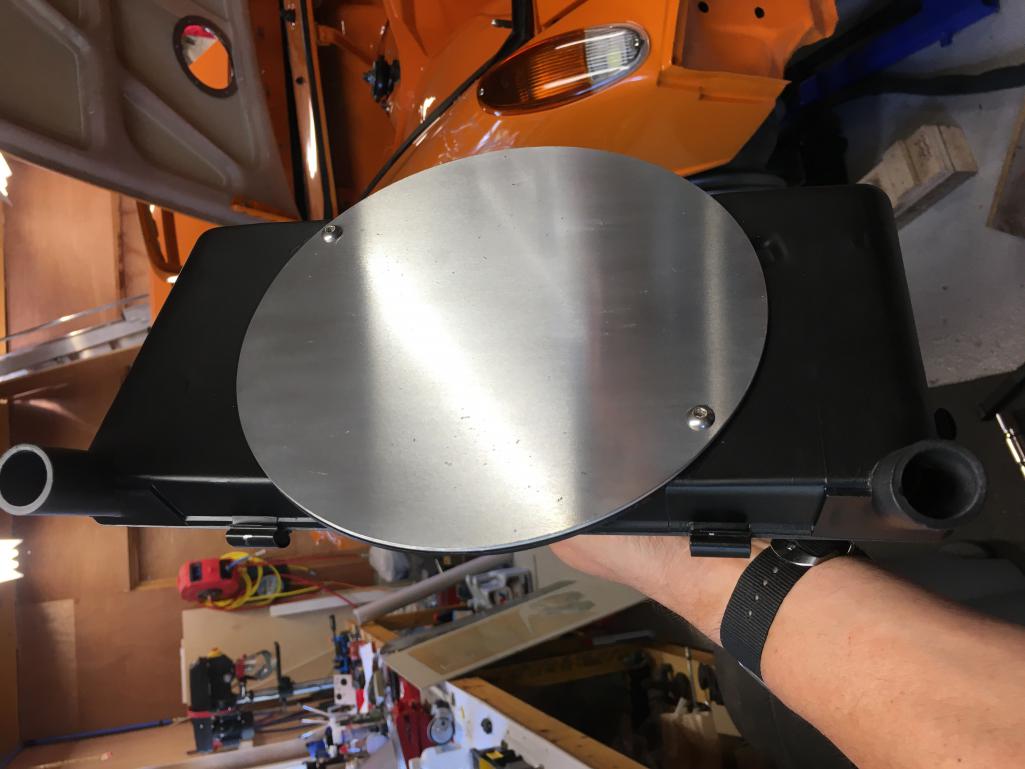
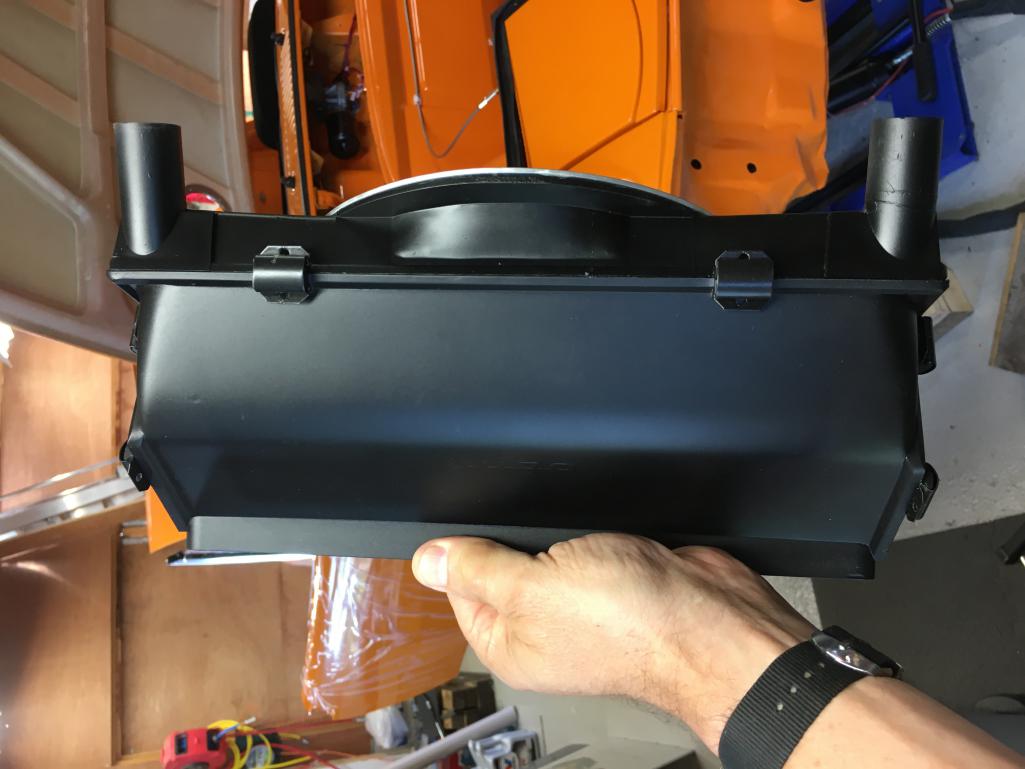 There is no heater or blower in my build (heated windscreen the only concession to comfort...) but still needed to catch the water from the scuttle intake. Decided to just use the original air entry box and blank off where the blower motor attaches. It seems more than one PO had sprayed the car without removing this and so it needed a good clean which ended up as a paint job
Posted by: wysri9 Aug 13 2020, 12:03 AM
Posted by: wysri9 Aug 13 2020, 12:05 AM
My good friend John had these hiding in his garage - he kindly donated them......They cleaned up well 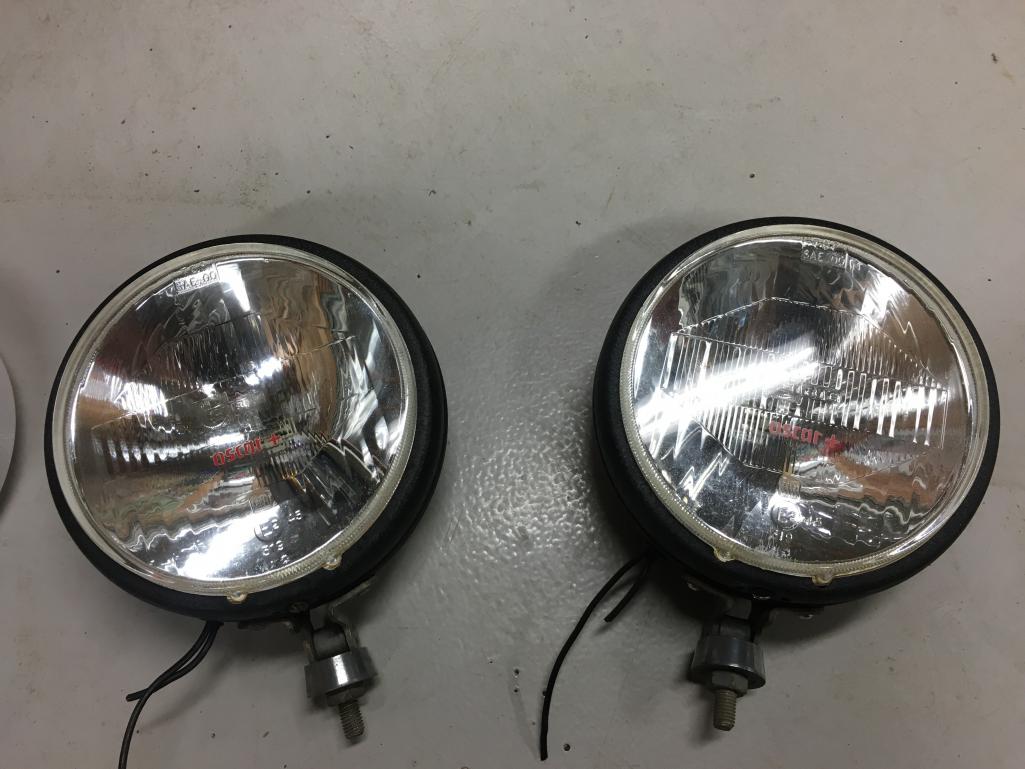
Posted by: tygaboy Aug 13 2020, 07:42 AM
Great and very tidy job on your wiring! Tedious and time consuming. Ask me how I know...
And the same kudos on your other work. Your craftsmanship and attention to detail are top level. You're building a beautiful car! 


Posted by: jaredmcginness Aug 13 2020, 02:07 PM
Nice work! Nothing like a clean gauge. Defogging the glass made a huge difference in appearance.
Posted by: wysri9 Aug 20 2020, 12:26 AM
Thanks for the encouraging words guys! Nice to know that others think you are headed down a good track....
Posted by: wysri9 Aug 20 2020, 12:32 AM
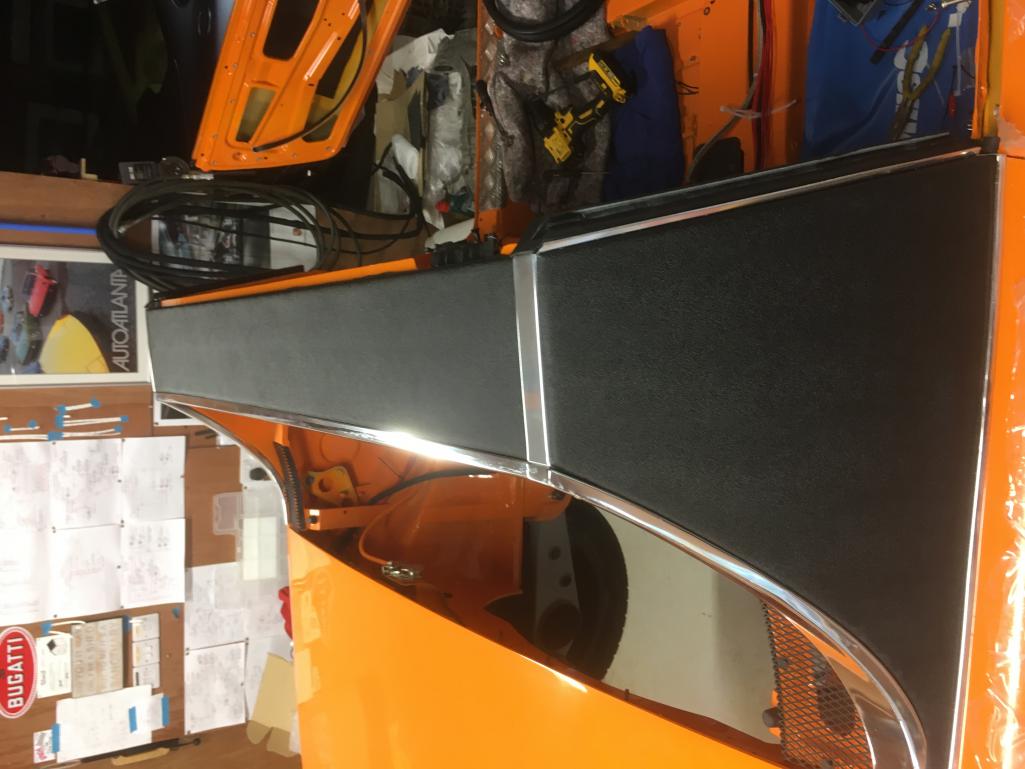
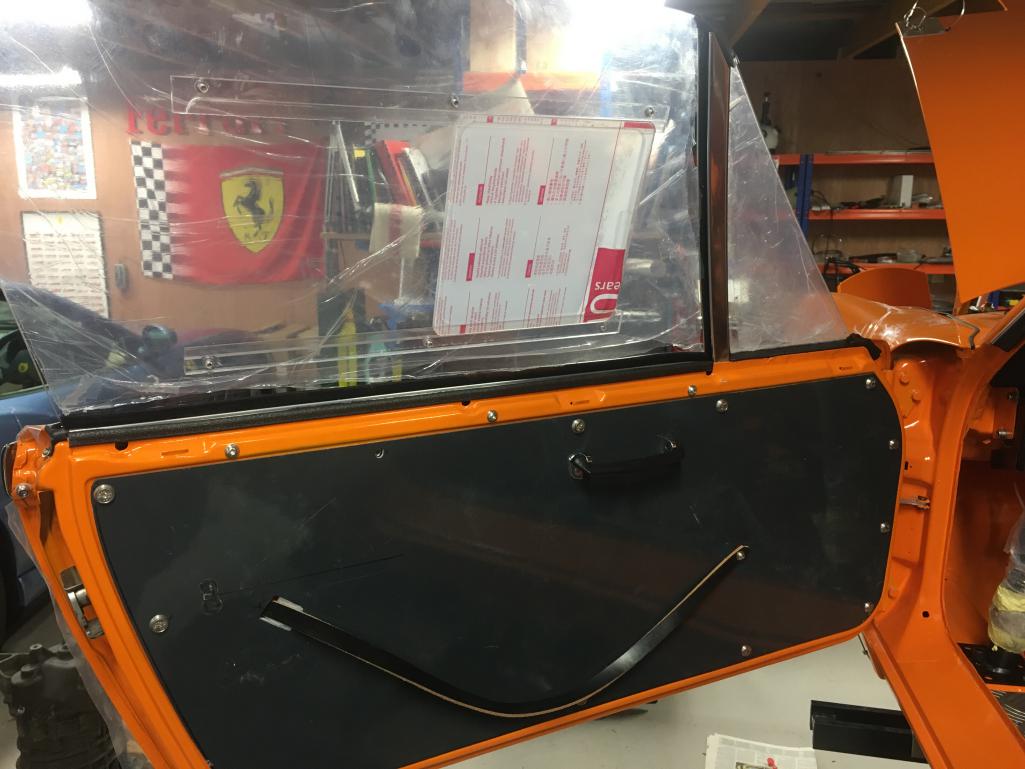
So a bit more progress. Door cards finally fitted and the GT door release made up and fitted. 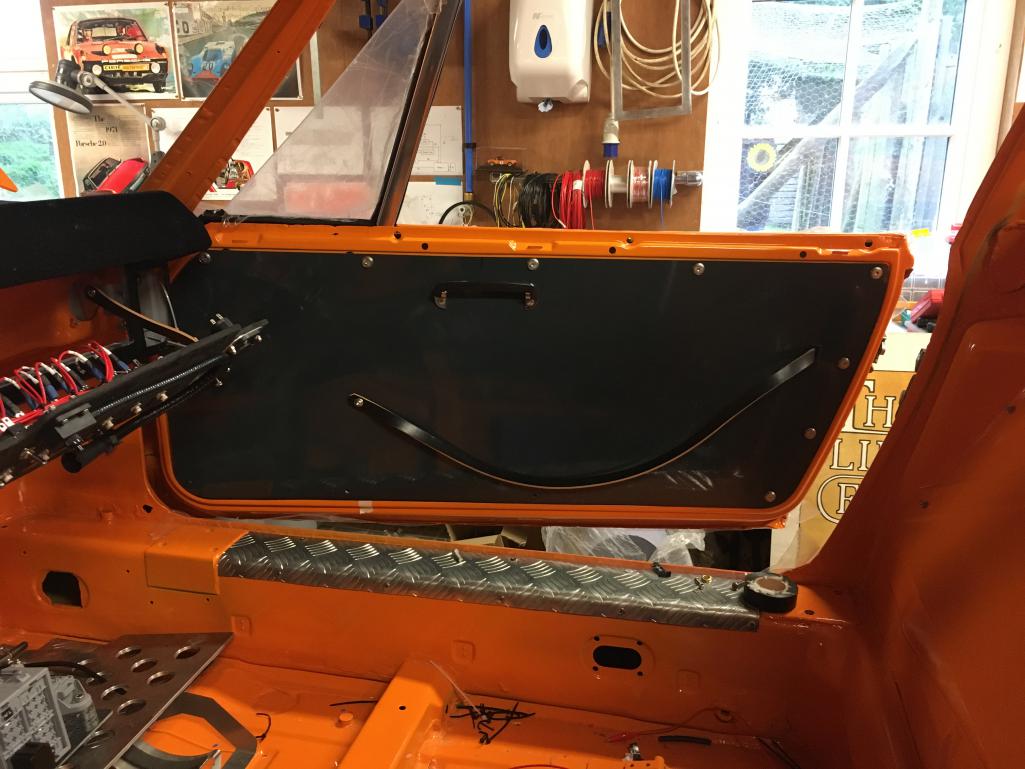
So the GT release works but only just.....you have to grab hard and pull sharply forward. Downward pressure on the strap does not seem to do much..... Anyone any ideas for how to make this work better???
Posted by: wysri9 Aug 20 2020, 12:37 AM
Another problem I have on the passenger door is this.....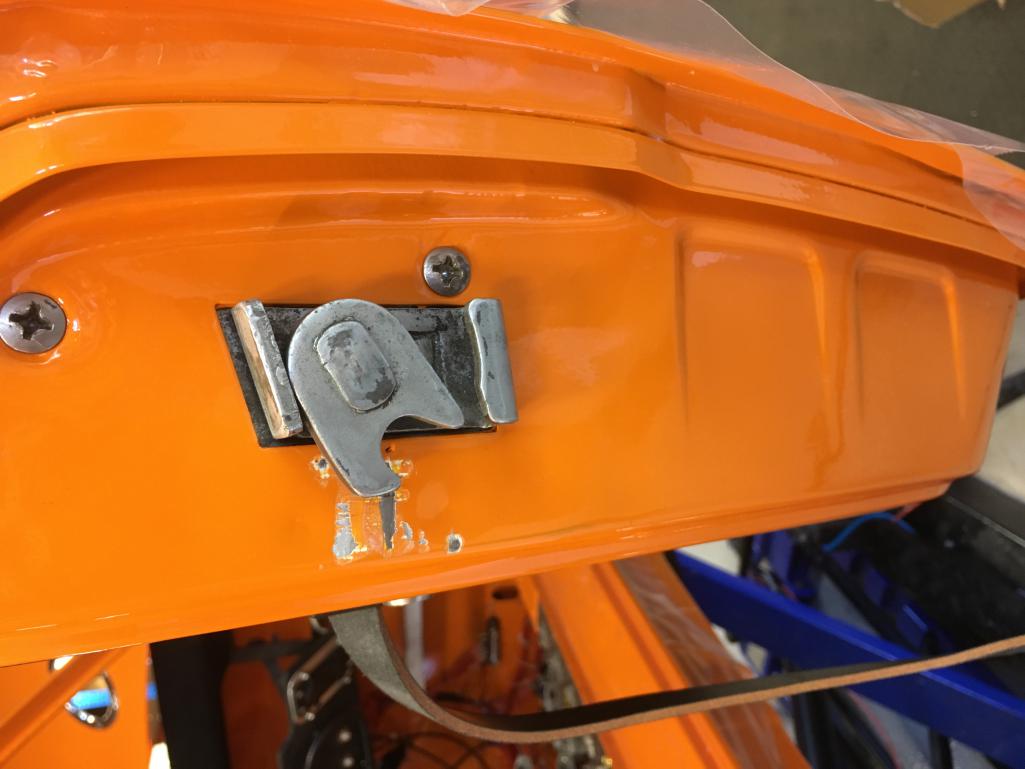
There is contact (just) between the door and striker plate The paint damage is very annoying but I am sure we can fix that. Trouble is the door looks good and the gaps are great. What adjustment is left open to fix this....????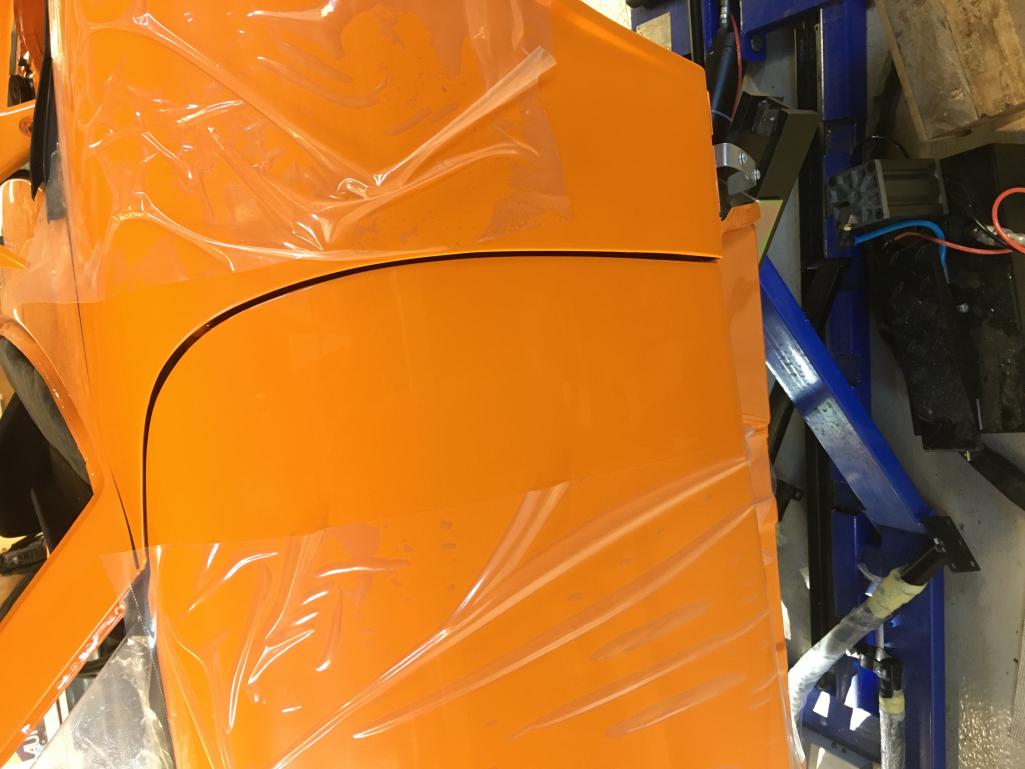
Posted by: 914forme Aug 20 2020, 05:28 AM
 Door sticker plate is out a bit from where it should be.
You have two areas you can add just the jamb side of the rear pillar or the door latch side.
Posted by: wysri9 Aug 31 2020, 04:49 AM
Given the very small contact I plucked up courage and picked up the BFH.....it worked  Door now shuts without contact. Took just a couple of blows to make the difference and no ill effects......
GT door release still very stiff - maybe that is just how it is?????
Posted by: wysri9 Aug 31 2020, 04:56 AM
Finally had an opportunity to test wheels and tyres. Found a big difference left to right......
Right side would accept a 225/55/16, left would only accept a 205......
205 rears and 195 fronts maybe not such a bad selection....? Any thoughts on rolling the left side to get more clearance for the 225?????
I think I read on here somewhere that the stub axles must be installed and torqued before setting the car on its wheels and rolling. Can someone confirm that?? I have still to build the CV's and axles up.....
Apologies for the rotated pictures again......
Posted by: tazz9924 Aug 31 2020, 02:36 PM
Finally had an opportunity to test wheels and tyres. Found a big difference left to right......
Right side would accept a 225/55/16, left would only accept a 205......
205 rears and 195 fronts maybe not such a bad selection....? Any thoughts on rolling the left side to get more clearance for the 225?????
I think I read on here somewhere that the stub axles must be installed and torqued before setting the car on its wheels and rolling. Can someone confirm that?? I have still to build the CV's and axles up.....
Apologies for the rotated pictures again......
It would certainly be good to torque the stub axle before setting it on the ground, it may even pull your hubs in a little bit so you can get that 205 under there. Id be worried about just setting it on the hubs and ruining the bearing.
Posted by: wysri9 Sep 22 2020, 04:30 AM
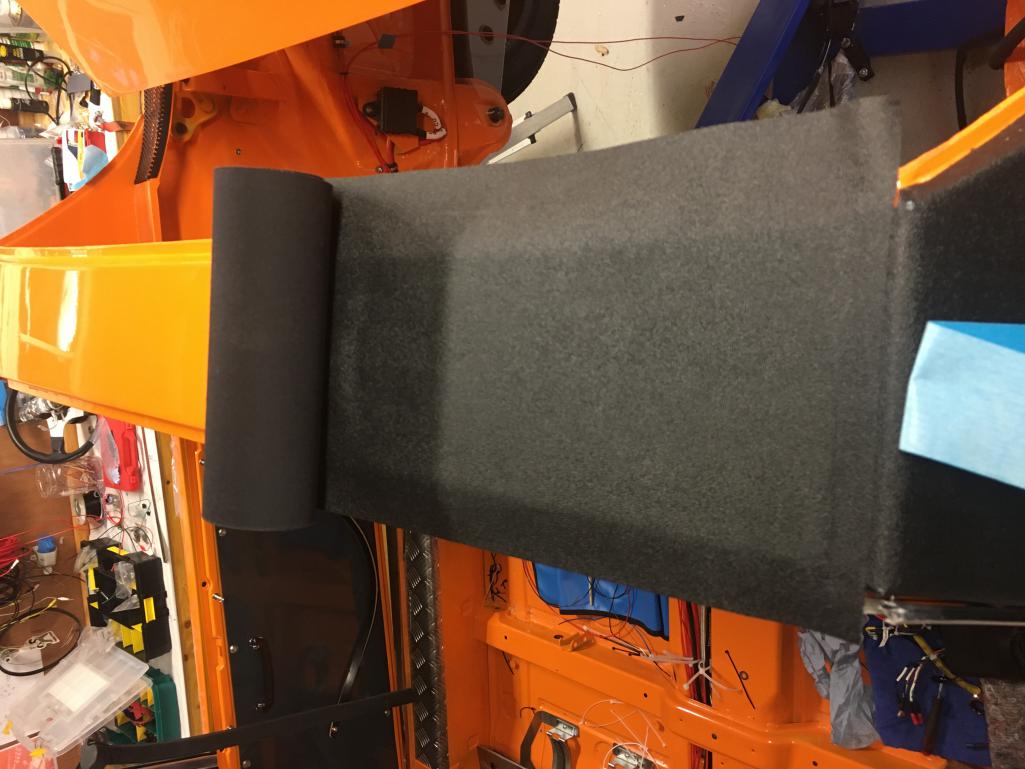
Diverted from electrics and mechanics to do some beautifying....
Vinyl install going well using double sided tape rather than spray adhesive. Seems to do the trick.....
I have been putting off the targa top for a long time but finally got stuck in. Using this:-
https://trimrestorer.com/products/solution-finish-black-plastic-vinyl-restorer?variant=13860567973947
made it look great! Its nearly all back together with everything freshly painted and new stainless fasteners throughout. More pictures to follow....
Posted by: wysri9 Sep 22 2020, 04:31 AM
Posted by: wysri9 Sep 22 2020, 04:32 AM
Posted by: wysri9 Sep 22 2020, 04:34 AM
Here is the large top half done....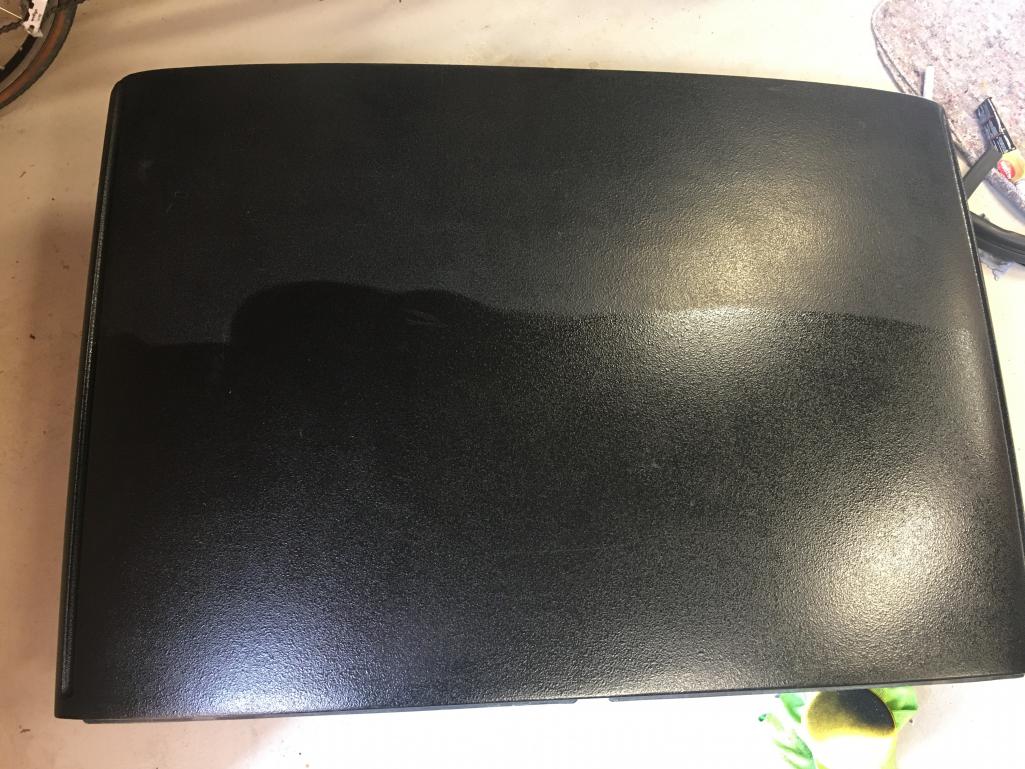
Posted by: wysri9 Sep 22 2020, 04:35 AM
And here are all the bits laid out for the targa rebuild.....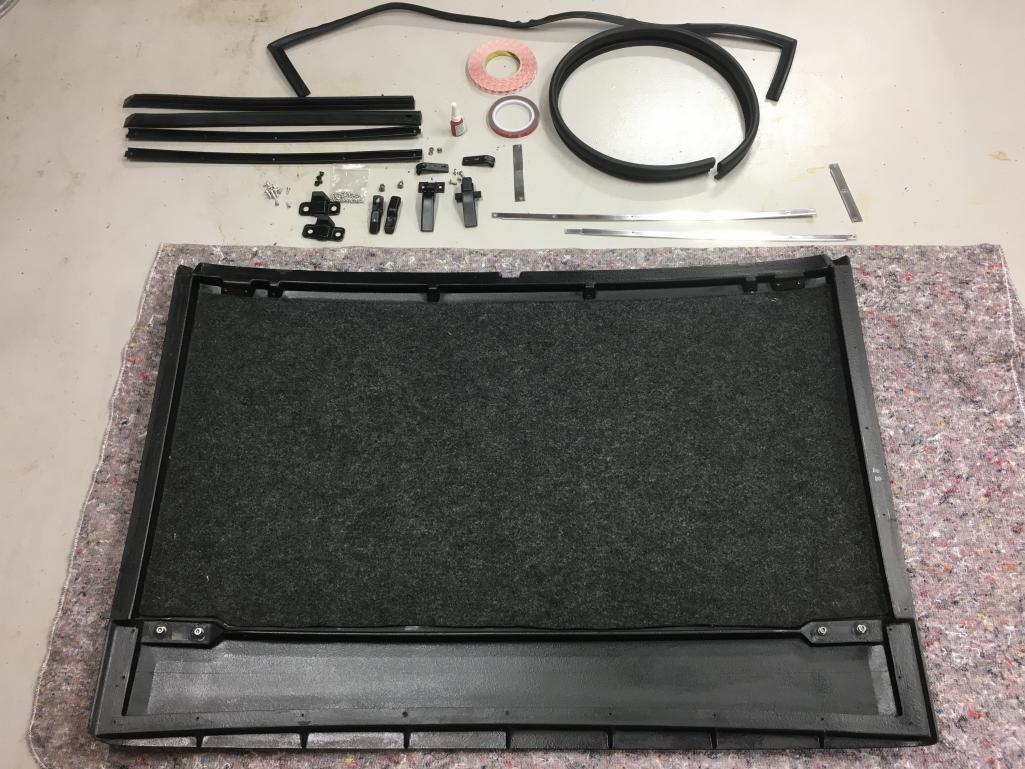
Posted by: Ian Stott Sep 22 2020, 05:15 AM
Watching with interest, I need to redo my top and what you are using looks real good.
Two weekends ago was a long weekend here, I picked up a buddy and off we went as the weather was good, ended up doing just over 800 KM! Teener was working beautifully, got caught in the rain and had to put the roof on, of course the car got pretty dirty as it was immaculate when we headed out! That kinda stuff is in your near future, i love every minute of it, and yes when I stop for gas or a bite to eat there is always a few that come over and want chat about the car, will happen to you as well, hope you are looking forward to that kinda thing! Your teener looks amazing and look forward to hearing about your upcoming adventures!
Ian Stott
Moncton
Canada
Posted by: Cairo94507 Sep 22 2020, 05:41 AM
Love your build. I am not sure about double-stick tape for the vinyl, but heck, let's see how it works. You can always remove it and use spray adhesive. Other than that concern, absolutely beautiful build.
Posted by: wysri9 Oct 6 2020, 07:33 AM
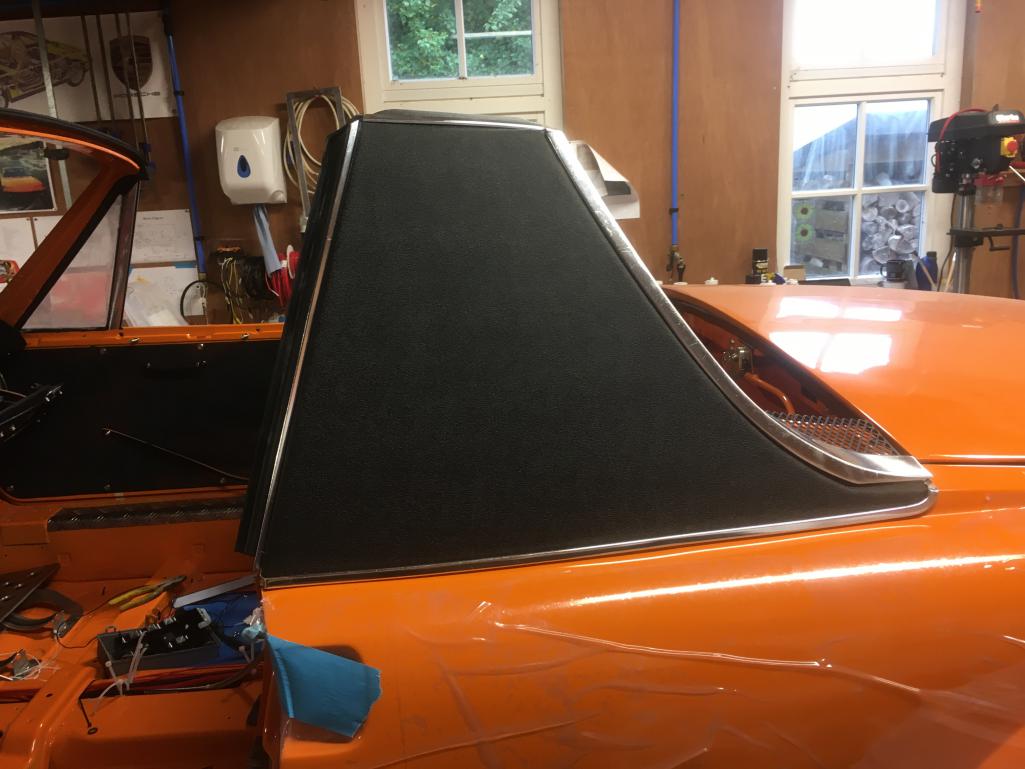
OK so finished the vinyl install using double sided tape. Found that the wrap around was struggling to stay attached with the double sided tape but the flat surfaces are great. On the back edge I put some 3M VHB tape where the thickness would not cause an issue (under the large chromed aluminium piece). On the front side screwing on the channel for the rubber seal did the trick. Also used VHB tape to hold down the wrap around portions of the roll hoop top piece. Pics below. Should there be that gap between sail panel rear trim and the lower trim piece?? Can I reduce that by twisting the sail panel trim support bracket...??
Posted by: wysri9 Oct 6 2020, 07:34 AM
Posted by: wysri9 Oct 6 2020, 07:36 AM
Posted by: wysri9 Oct 6 2020, 07:38 AM
Also completed the engine lid......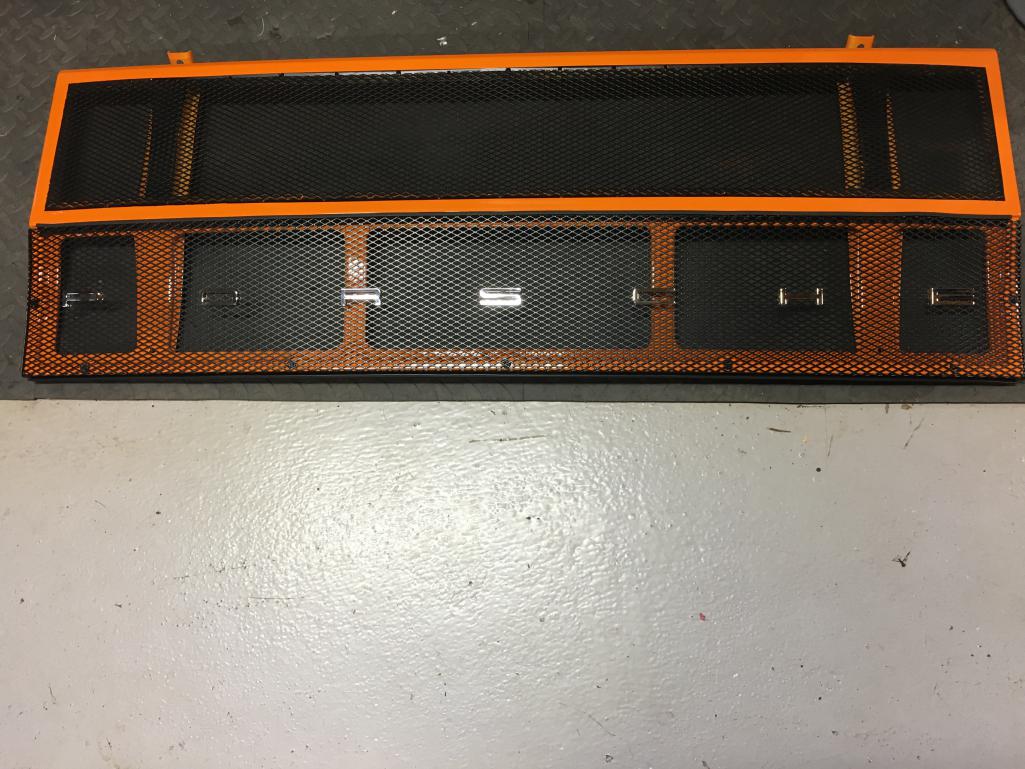
Posted by: TRS63 Oct 8 2020, 12:31 AM
Really cool project, thanks for sharing!
Antoine
Posted by: 914-300Hemi Oct 8 2020, 06:14 AM
Great job and very detailed
Posted by: wysri9 Oct 8 2020, 07:33 AM
Thanks for the positive comments guys....always provides a bit of impetus for the next step.....its back on the electrics this week
Posted by: PanelBilly Oct 8 2020, 08:02 AM
My doors have a similar mark where there’s contact with the body.
It’s a small world after all
Posted by: wysri9 Jan 3 2021, 05:35 AM
Its been a bit off and on on the project for a wee while. Several areas worked and quite a bit of time but not that much to show.....
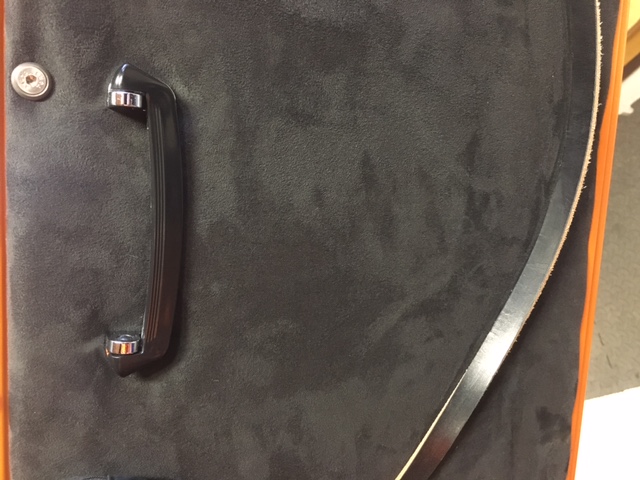
One area I am now happy with is the door cards. After struggling with the GT style opener strap and its passage through the door I decided I could not live with it as it was. Decided an exit through the card which followed the line of the strap was a better option and got a much better result. Fabricated an alloy surround etc. and then covered the card with Alcantara fabric.
It now looks like this:-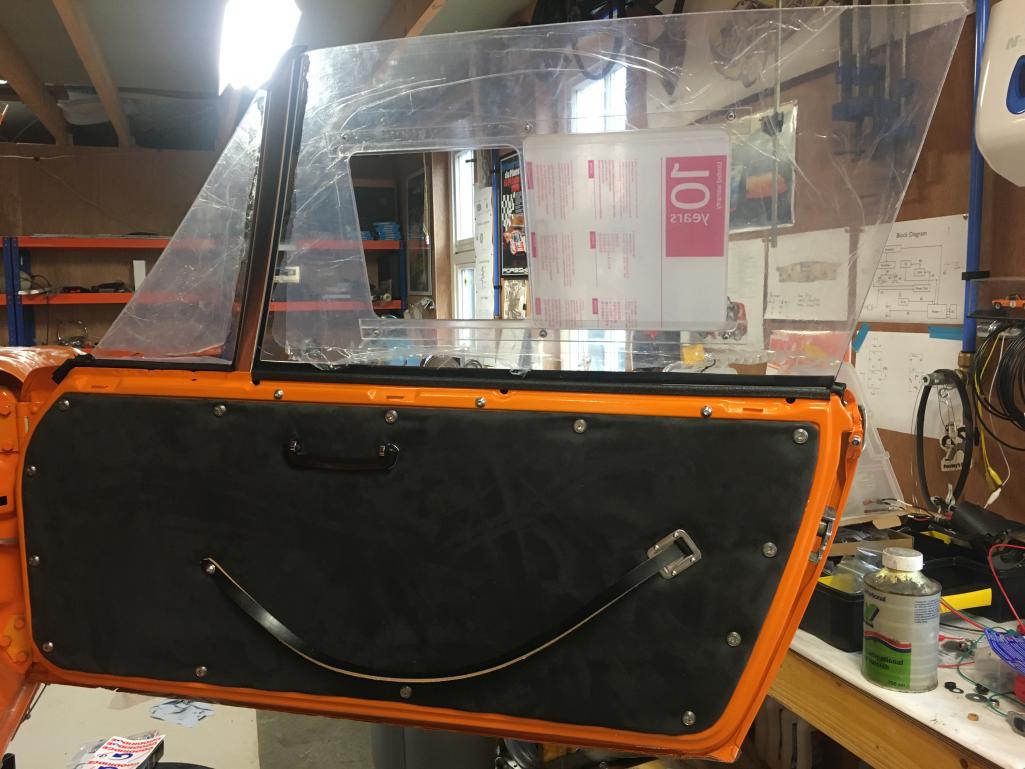
Posted by: wysri9 Jan 3 2021, 05:38 AM
And here is a detail of that exit through the card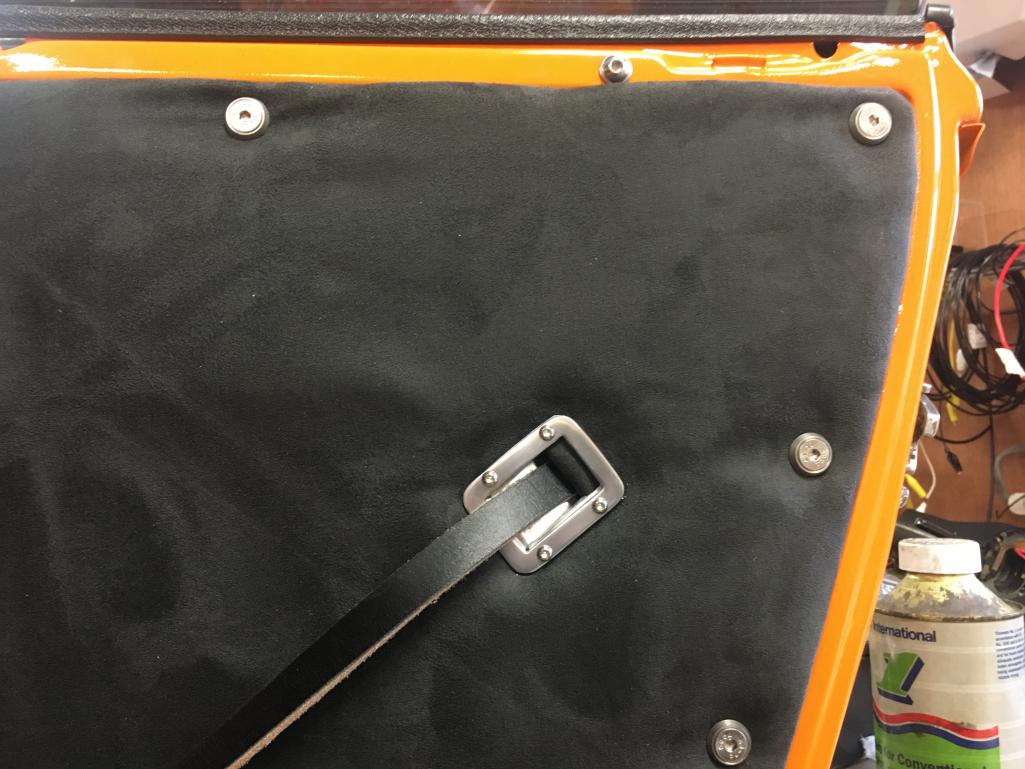
So thats the passenger door done. Drivers will follow and think I know how to get slightly better tension on that fabric on the second one.....
Posted by: wysri9 Jan 3 2021, 05:42 AM
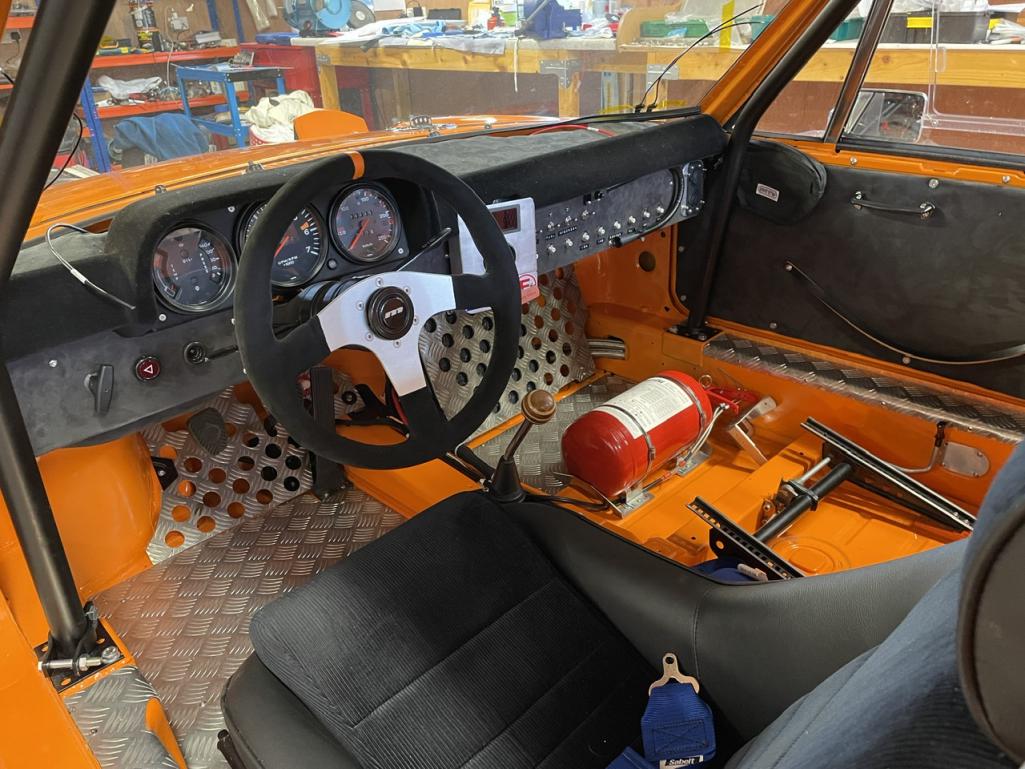
I have also done some work to tidy up installation of the instruments. I acquired some neat connectors courtesy of my son and then put tails onto each of the three major instruments terminating in the connectors which sit in a small tray mounted above the drivers knees. Here is a photo.....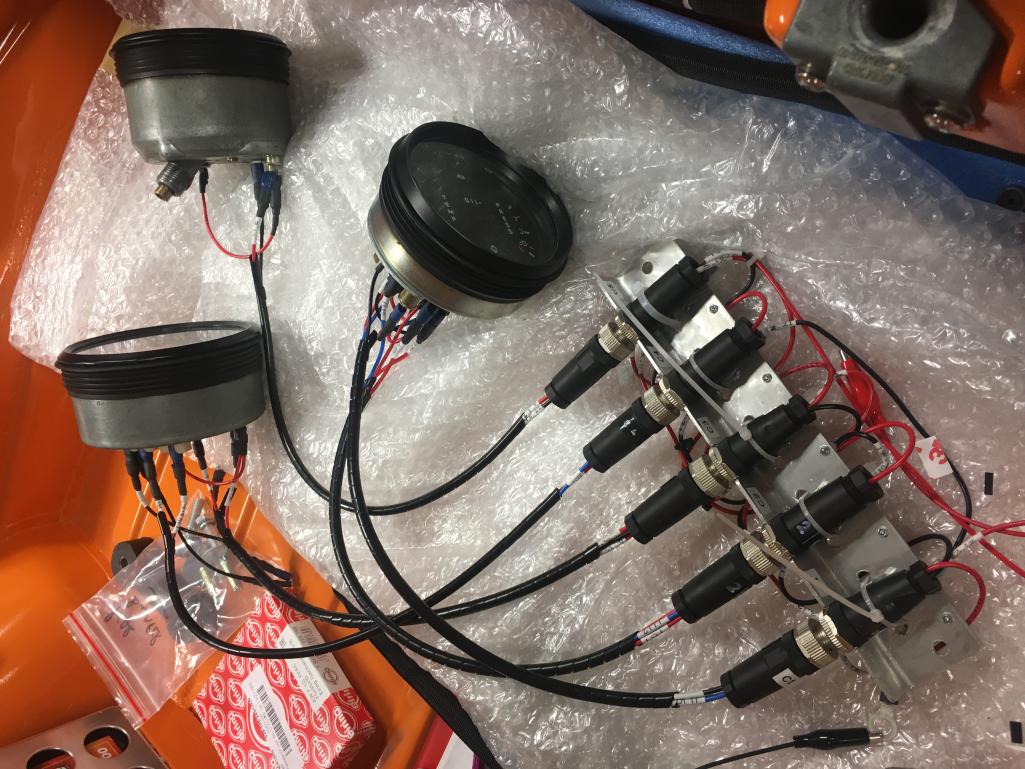
Posted by: wysri9 Jan 3 2021, 05:50 AM
I also forgot to mention that the side windows (Lexan) went in as well as you can see in the photo above. Still need to do a bit of tweaking to get them to sit well on all the seals. The main issue is the vertical seal on the sail panel. I seem to have an overlap which I cannot seem to correct via adjustment of the rake of the aluminium rail. i think the Lexan is a really close copy of the original window. Any ideas how to get better alignment before I start trimming the window..... 
 Heres another photo of the drivers window.
Posted by: wysri9 Apr 6 2021, 11:48 AM
Somebody asked where my interior door handles came from. Here they are with invoice details and E Bay link:-
https://www.ebay.co.uk/itm/KIT-CAR-SPECIAL-BUILD-INTERIOR-DOOR-PULL-HANDLES-x-2-GLZ118/352389996929?hash=item520c14a181:g:t34AAOSwqxdTrVcJ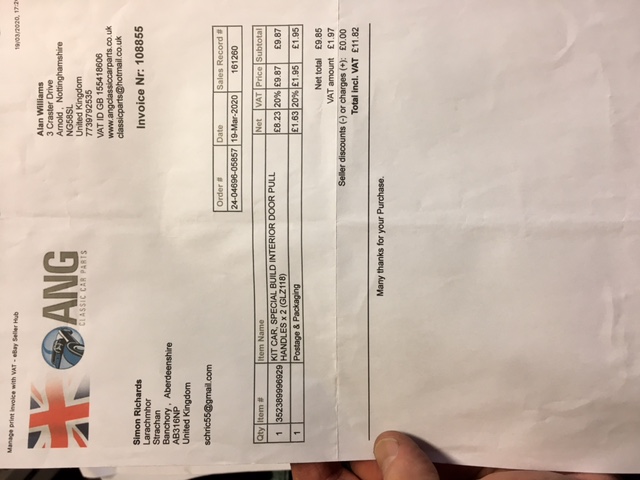
Posted by: wysri9 Apr 6 2021, 11:59 AM
The electrics have taken a big step forward one the last weeks culminating in power in the car a few days ago. Now some fault finding to do to chase down the errant circuits but nothing fried and no smoke so real progress! Few pictures to follow. The main relay box and distribution boards are behind the passenger foot board, and hidden by it when it is hinged up.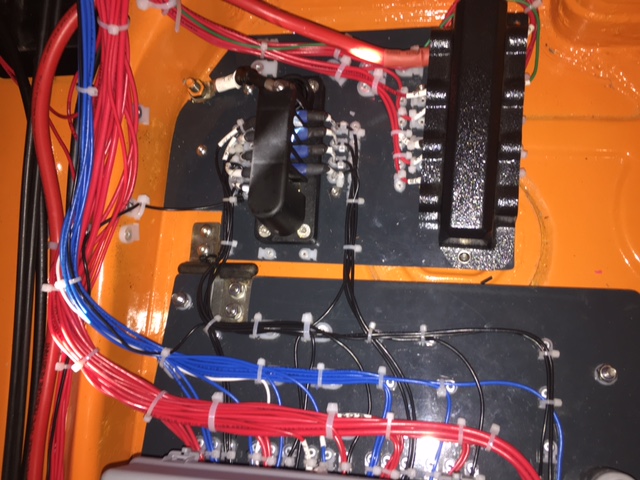
Posted by: wysri9 Apr 7 2021, 11:54 PM
OK so a very exciting day yesterday. Powered up the car having fixed a loose connection or two, and....everything works! Only things missing are flashing of the indicators and headlight dip, oh and the windscreen low and high speed connections are the wrong way round! Need to check the flasher unit (and it is the correct one for LED bulbs), and the latching relay for the headlights. Once fixed that means i can complete the final wrap of th exposed cables and button up the dash.....Then its back to the motor and fixing some pushrod tube leaks......
Posted by: TRS63 Apr 8 2021, 11:33 AM
Really cool project with some innovative solutions.. I really like it!
Cheers
Antoine
Posted by: wysri9 May 4 2021, 12:43 PM
Well thats the electric done......Everything works and now its all buttoned up.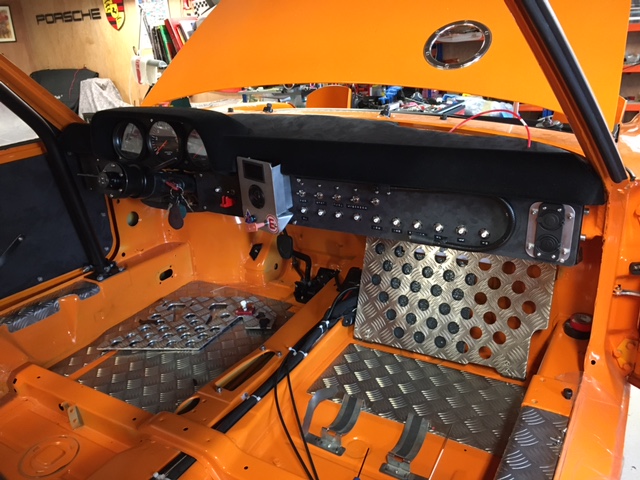
Now on to fix the oil leaks on the engine and get that in the car.....dare I say the end is almost in sight.......
Posted by: wysri9 Oct 5 2021, 12:40 PM
Apart from being diverted by other projects and gardening over the summer I thought I had missed out on Notifications and didn't know what had happened until I saw Sir Andy's note on the problems with e mail providers etc.
Anyway Autumn approaches and i think I have enough tokens in the tin to divert from home projects back tot he car and the finishing straight.....
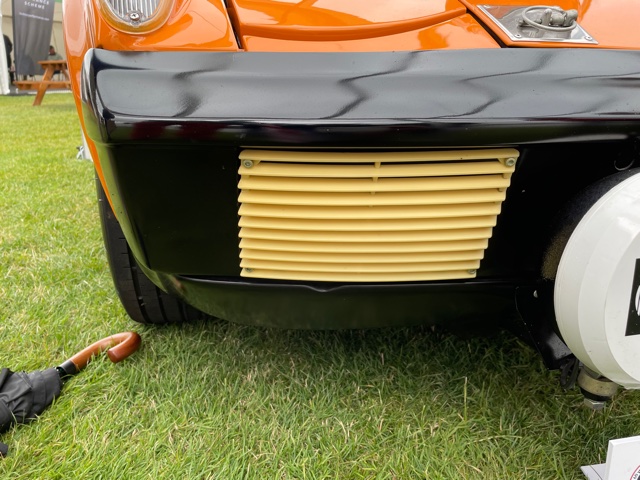
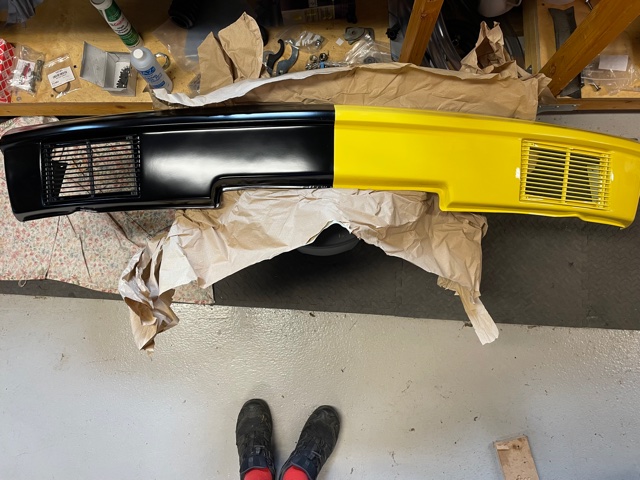
In the meantime I did manage to fill the holes in my front bumper with some nice 3D printed grills after spotting a real GT at Silverstone with similar grills. Here are a couple of pictures to show off my new found CAD and 3D printing skills.......
Posted by: wysri9 Oct 5 2021, 12:42 PM
Posted by: wysri9 Oct 5 2021, 12:42 PM
Posted by: wysri9 Oct 5 2021, 12:50 PM

Posted by: wysri9 Jan 31 2022, 10:32 AM
So finally I was able to tackle my leaking pushrod tubes and over-size exhaust stubs. My son Harry came up to see us in BC at Xmas and brought with him the new exhaust stubs from Joel at GT Racing in Colorado Springs. Together with new CSP pushrod tubes I think I have a set up that looks the part and seals solidly. I am sure the experienced guys here know only too well to fettle the O ring receptacles in new heads to ensure a smooth entry. I know now......after carefully cleaning the sharp edges I found once I had the first set of tubes out the new tubes and O rings slipped in just fine. Have also resealed behind the flywheel where I have a couple of oil gallery plugs which I hadn't sealed well enough it would seem and put in a new main oil seal while I was at it just to be sure......Another couple of wee jobs and we can get the engine and gearbox back together and set up for a further run in my test stand. Here's a couple of pics......[attachmentid=822657]
Attached image(s)
Posted by: wysri9 May 2 2022, 01:18 PM
And so the engine and gearbox are in the car. Engine run and tuned in the test stand and running well!
Hooking up in progress. Car running in the next week.....???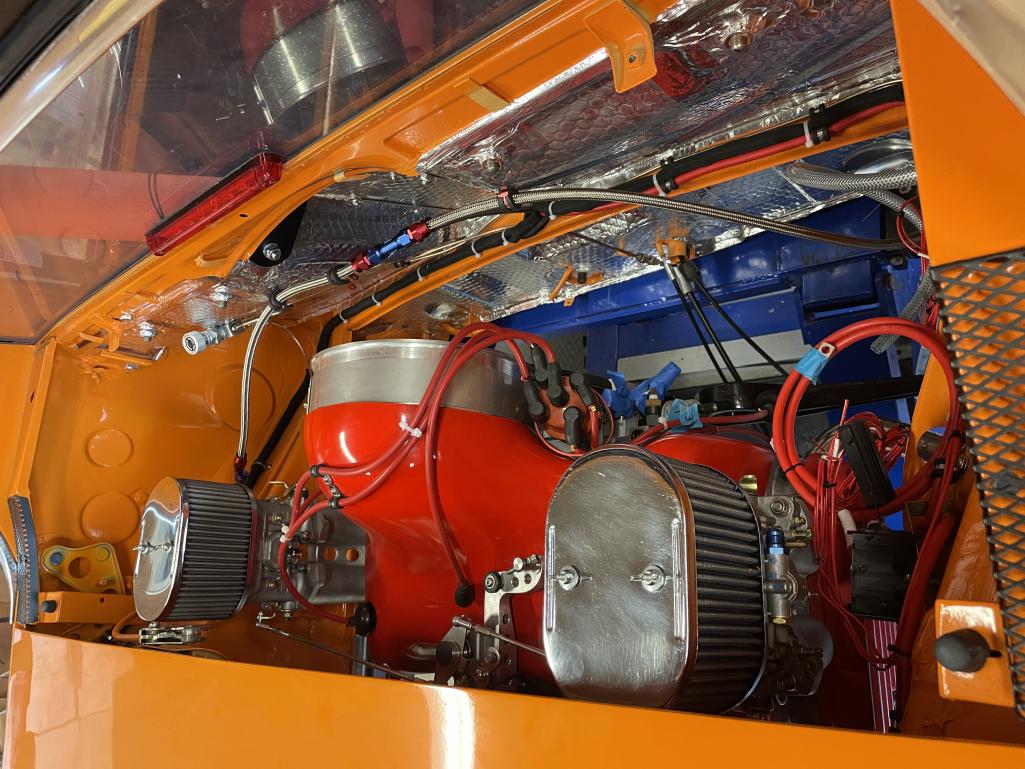
Posted by: TRS63 May 2 2022, 10:43 PM
Great progress, keep us updated!
Antoine
Posted by: wysri9 May 19 2022, 02:23 PM
She drives…..
Took her to the local test station for my friend Douglas and his mechanic to cast their eyes over her. Soft brake pedal was the only comment otherwise clean bill of health from a safety point of view. Still a bit of oil finding its way out and the gear change is a bit random but hopefully both fixable…..
So onwards and upwards - completion beckons and then running in before the big trip at the end of June to Le Mans for the classic….
Attached thumbnail(s)
Posted by: Shivers May 19 2022, 03:01 PM
Looks like a really fun car. Nice work
Posted by: 9146C May 19 2022, 04:07 PM
Congratulations!!!
Pretty roads up there in the Highlands...time to enjoy!
Powered by Invision Power Board (http://www.invisionboard.com)
© Invision Power Services (http://www.invisionpower.com)