Printable Version of Topic
Click here to view this topic in its original format
914World.com _ 914World Garage _ Update Buick V6 in 914
Posted by: dbledsoe Jul 5 2005, 11:03 AM
Got the engine & transaxle into the car, bolted up at the back, and ready to fabricate a few minor parts to make the new forward crossmember mate to the body. The forward crossmember was bought from Speedway Motors in Lincoln Nebraska for a grand total of $58 to my door (http://www.speedwaymotors.com/). The crossmember clears the shift linkage just fine. 
Attached thumbnail(s)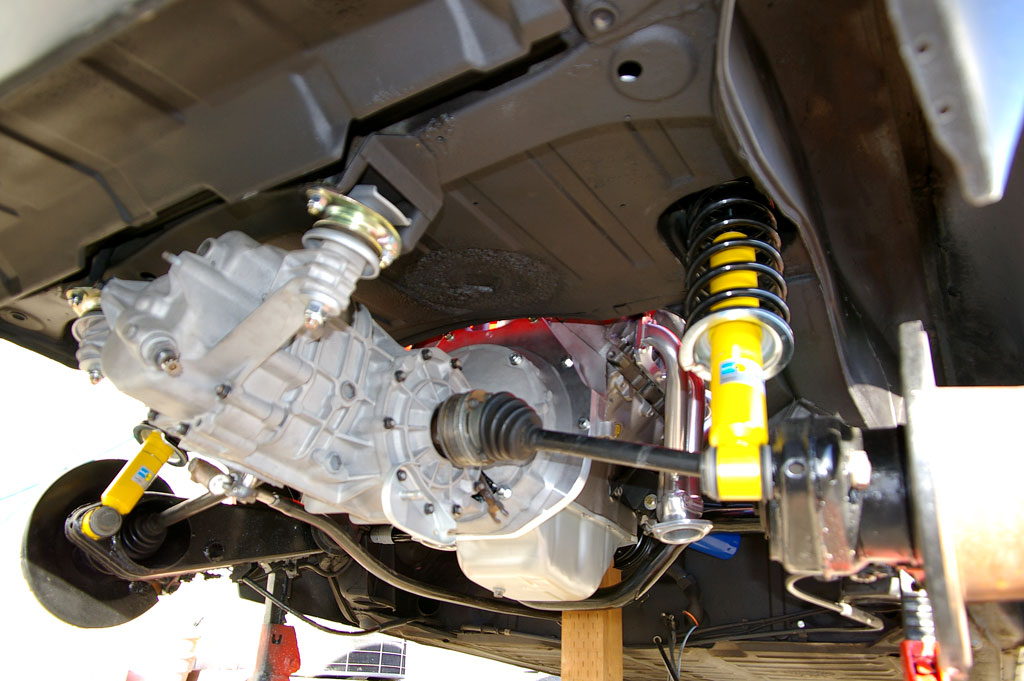
Posted by: dbledsoe Jul 5 2005, 11:05 AM
And another
Attached thumbnail(s)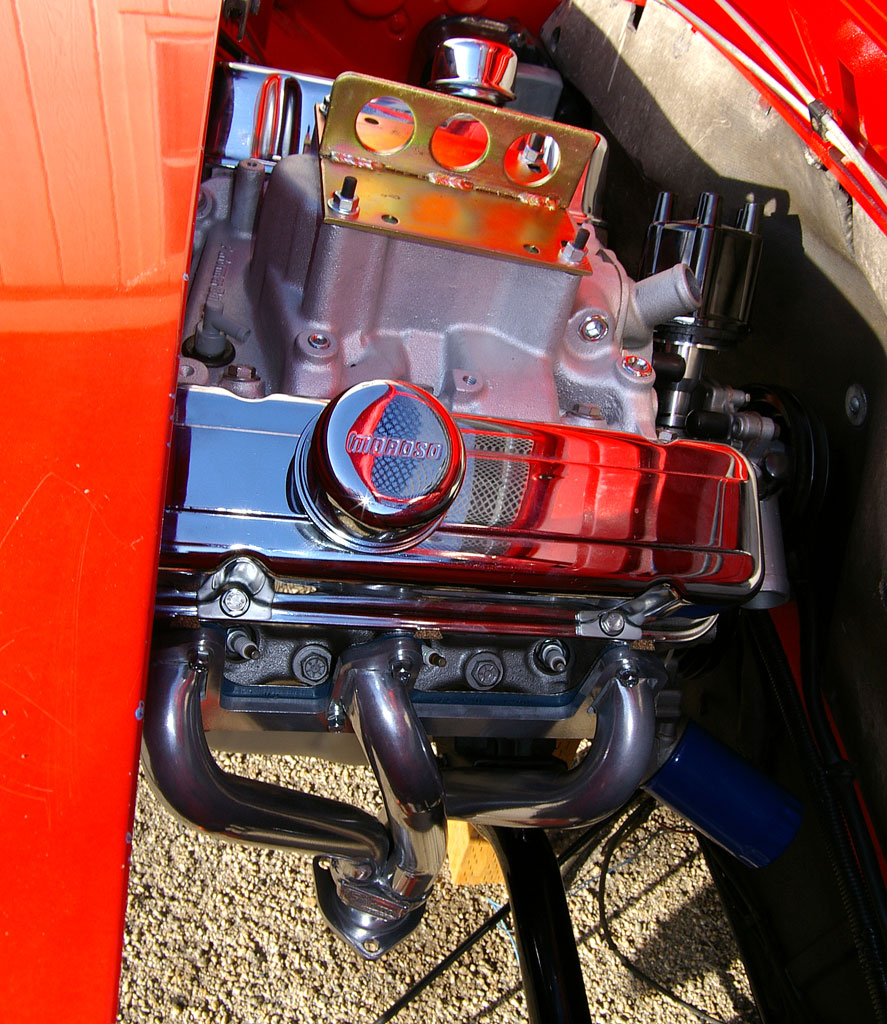
Posted by: dbledsoe Jul 5 2005, 11:06 AM
And another
Attached thumbnail(s)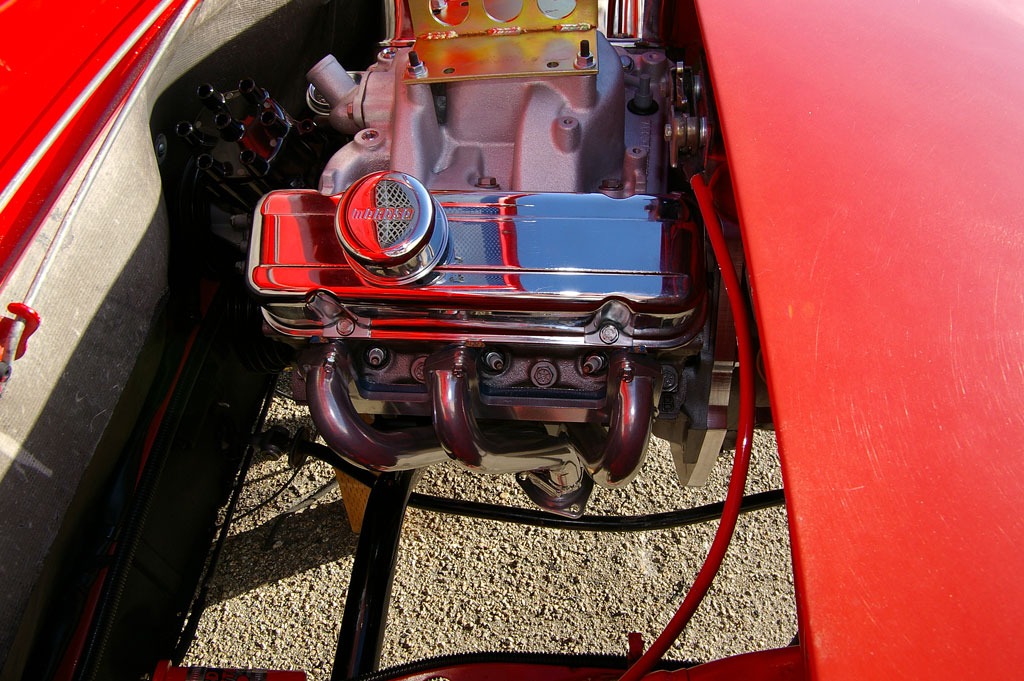
Posted by: bondo Jul 5 2005, 11:06 AM
NICE!!! And I don't think I have EVER seen such a clean transmission.. what did you do to it? 
Posted by: 914GT Jul 5 2005, 11:08 AM
Looks sweet! Great job!
Posted by: dbledsoe Jul 5 2005, 11:08 AM
And another
Attached thumbnail(s)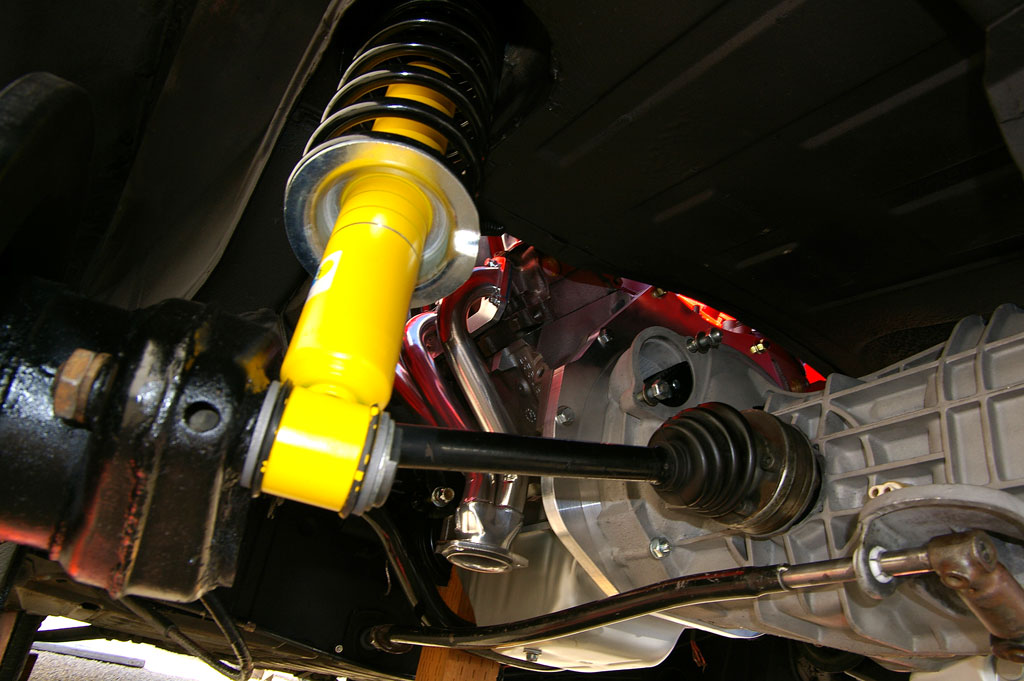
Posted by: ClayPerrine Jul 5 2005, 11:10 AM
That is one funny looking carburetor!! 
Posted by: Rotary'14 Jul 5 2005, 11:12 AM
Looks like a clean install! Congrats on a great install! 
It looks to me like you bead blasted the transmission, how much does getting your transmission that clean cost? 
Posted by: 914GT Jul 5 2005, 11:12 AM
Have you figured out how you'll make the bend off the header to clear the shift bar?
Posted by: dbledsoe Jul 5 2005, 11:12 AM
| QUOTE (bondo @ Jul 5 2005, 09:06 AM) |
| NICE!!! And I don't think I have EVER seen such a clean transmission.. what did you do to it? |
Thank you for the compliment.
I covered the input and output shafts, shifter, and vent hole with old socks and ductape then sand blasted it thoroughly using 30 grit silica sand. I tried just about everything else but nothing seemed to get it clean so I went the sandblast route. It worked out great.
Posted by: neo914-6 Jul 5 2005, 11:15 AM
 very nice!
Posted by: dbledsoe Jul 5 2005, 11:16 AM
| QUOTE (914GT @ Jul 5 2005, 09:12 AM) |
| Have you figured out how you'll make the bend off the header to clear the shift bar? |
There's a little more room than it looks like in the photo for the header to clear the linkage. It'll take a tight bend of the exhaust pipe right off the header flange but that shouldn't be to difficult for a good exhaust guy, and we have a pretty good one here in Boise.
Posted by: dbledsoe Jul 5 2005, 11:21 AM
| QUOTE (Rotary'14 @ Jul 5 2005, 09:12 AM) |
| Looks like a clean install! Congrats on a great install! It looks to me like you bead blasted the transmission, how much does getting your transmission that clean cost? |
Thank you!
I bought a 40 pound pressurized sand blaster from Harbor Freight Tools here locally for $80, and a 100 pound sack of #30 silica sand cost $5. Even though I bought it specifically to do the transaxle it comes in very handy for many other projects.
Best regards,
Don
Posted by: Rand Jul 5 2005, 11:27 AM
| QUOTE |
| That is one funny looking carburetor!! lol2.gif |
Funny Clay... yeah, it's a side-draft 3-barrel.
Nice job Don! Looks damn nice.
Posted by: ClayPerrine Jul 5 2005, 12:11 PM
| QUOTE (Rand @ Jul 5 2005, 11:27 AM) | ||
Funny Clay... yeah, it's a side-draft 3-barrel. Nice job Don! Looks damn nice. |
Iffin it's a 6 cylinder.. they youse is gonna need 2 of them there side draft 3 barrell carbonators.....

Seriously.. it's looking good. When do you expect to have it running?
Posted by: neo914-6 Jul 5 2005, 12:50 PM
| QUOTE (ClayPerrine @ Jul 5 2005, 10:11 AM) | ||||
Iffin it's a 6 cylinder.. they youse is gonna need 2 of them there side draft 3 barrell carbonators..... Seriously.. it's looking good. When do you expect to have it running? |
I thought it was a GT gas cap...

I have one to lift my V8 but haven't used it yet. I still have reservations about loading all that weight pulling on four studs in an aluminum manifold.

Posted by: dbledsoe Jul 5 2005, 12:55 PM
| QUOTE (ClayPerrine @ Jul 5 2005, 10:11 AM) |
| [QUOTE=Rand,Jul 5 2005, 11:27 AM] [QUOTE] That is one funny looking carburetor!! lol2.gif Seriously.. it's looking good. When do you expect to have it running? |
It'll probably be at least another month. I have the radiator sitting in the front trunk, but that's all it's doing, just sitting there. Once I get the finishing touches on the forward cross member/motor mount,

then I expect to tackle mounting the radiator and plumbing it to the motor. From there it'll just be wiring and a few other things that always crop up unexpectedly when doing a conversion.

Posted by: dbledsoe Jul 5 2005, 01:02 PM
| QUOTE (Neo914 @ Jul 5 2005, 10:50 AM) |
| I have one to lift my V8 but haven't used it yet. I still have reservations about loading all that weight pulling on four studs in an aluminum manifold. |
I had the same reservations until I saw a guy lifting a big block Chevy engine with the same setup and, seemingly, no concern at all. I'm not sure I could be that brave with a big block, but what the hey?

Posted by: Phoenix-MN Jul 5 2005, 01:17 PM
Don,
How did you end up modifying your front mounting bar to get the engine to sit up higher? Looks like it fits in there real nice. Did you have to cut off the end of the waterpump shaft for any extra clearance at the firewall?
Paul
Posted by: 914GT Jul 5 2005, 01:33 PM
| QUOTE (dbledsoe @ Jul 5 2005, 12:02 PM) | ||
I had the same reservations until I saw a guy lifting a big block Chevy engine with the same setup and, seemingly, no concern at all. I'm not sure I could be that brave with a big block, but what the hey? |
A single 5/16" stud torqued to just 25 ft-lbs is already preloaded to about 6200 lbs. So basically you have nothing to worry about.
Posted by: dbledsoe Jul 5 2005, 02:19 PM
| QUOTE (Phoenix-MN @ Jul 5 2005, 11:17 AM) |
| Don, How did you end up modifying your front mounting bar to get the engine to sit up higher? Looks like it fits in there real nice. Did you have to cut off the end of the waterpump shaft for any extra clearance at the firewall? Paul |
Hello Paul,
The cross member came with two 1/4" thick uprights welded to it and a 3/4" tube welded into the upright that that extends about 1" from each side of the upright, fore and aft. The tube is what the rubber engine mount bolts pass through when bolting the engine in place. Luckily the uprights are off set about 1/3" from the centerline of the cross member (as viewed when looking down on the cross member). I cut off 1" of the 3/4" tube on the forward side of the cross member. Between that and the approx 1/3" off set I was able to get the cross member in place when bolted to the rubber engine mounts and slid all the way to the forward end of the rubber mounting blocks. That places the cross member slightly aft of the centerline of the original cross member. I then cut a pair of replacement bars to bolt to the engine cross member body mounting points from 1" wide x 1/4" thick 4140 steel bar stock (they replace the stamped steel pieces that the original cross member bolted to). I now plane to drill the mounting holes in the 4140 bar to match those of the body mounting points and will then drill a hole in the bar stock to mate up with the new cross member centerline. Since my cross member sit on top of the body mounting point, rather than hanging below it, I will have my machinist make a pair of round bar stock spacers to raise/lower the engine to the correct height for proper orientation i.e., level with the car fore and aft. I also cut a pair of 1 1/2" round bar 6" long that slip inside the tubular cross member. Those can be slid in or out to get the correct width to the mounting body points (the cross member as bought from Speedway is too short to span the full width of the centerline to centerline of the original cross member bolting holes so had to have its width extended).
It sounds more complex than it is. Once I get all the pieces fabricated I'll snap some photos of it to give you a better idea what I'm talking about. Right now the front of the engine is actually supported by a 4x4 block of wood so I can get the cross member in and out to fabricate the additional pieces to complete the forward mount.
I took your advice and cut 1" off the front of the water pump shaft. I did that before trying slip the engine up in there. That is some very hard material they make the shaft from. I started to, or should say attempted, to cut it with a brand new 32 teeth/inch hack saw and blade. Didn't even make a mark on the shaft! So I got out the trusty die grinder and cut-off wheel and went to work on it, and even that took some time. I'm glad you mentioned that in your other message because I would have found out while trying to lift the engine into the body that it would need to come out again to cut 1" of the shaft off.
It looks like the best place to mount the alternator will be on the lower left side front of the engine. I suspect I'll need to fabricate a bracket for that.
Best regards,
Don
Posted by: xsboost90 Jul 5 2005, 02:54 PM
awwww. i was looking for a grand national turbo laying on top of that sucker! Super clean install though.
Posted by: Mueller Jul 5 2005, 02:59 PM
wow, super clean....another person I don't like very much, LOL
the V6 looks great in there, I always thought a nice V6 seemed like a better choice than a V8 in a 914 
Posted by: dbledsoe Jul 5 2005, 03:11 PM
| QUOTE (xsboost90 @ Jul 5 2005, 12:54 PM) |
| awwww. i was looking for a grand national turbo laying on top of that sucker! Super clean install though. |
Not this one, unfortunately. This is a 3.8L pretty much stock except for the Edlebrock intake, Edlebrock Performer cam, Sanderson headers, and MSD distributor/ignition. This is, for lack of better words, sort of a "proof of concept car." It'll be my daily driver. I've got a 4.1 liter bare block on the engine stand in the garage getting ready to go to the machine shop for hot tanking, line honing, boring to .030" over, and decking the block head surfaces. When that one is built it'll be a bit more radical than the 3.8 and will go in my 76 914 (The 3.8L is in my 75 914).
Posted by: dbledsoe Jul 5 2005, 03:16 PM
| QUOTE (Mueller @ Jul 5 2005, 12:59 PM) |
| wow, super clean....another person I don't like very much, LOL the V6 looks great in there, I always thought a nice V6 seemed like a better choice than a V8 in a 914 |
The V6 is defintiely a much easier conversion than a V8, and as most know a V6 can make a lot of horsepower if one wants it.
I did the engine installation into the car (lifting and getting it in place) completely by myself yesterday... well I did use an engine hoist and floor jack.

Posted by: propricer Jul 5 2005, 03:25 PM
Wow ... absolutely gorgeous work ... I'm jealous !!!
Posted by: dbledsoe Jul 5 2005, 04:16 PM
| QUOTE (propricer @ Jul 5 2005, 01:25 PM) |
| Wow ... absolutely gorgeous work ... I'm jealous !!! |
Thanks Ed! I consider that a a great compliment coming from someone who appears to have been around a lot of conversions.
Best regards,
Don
Posted by: dbledsoe Jul 5 2005, 04:23 PM
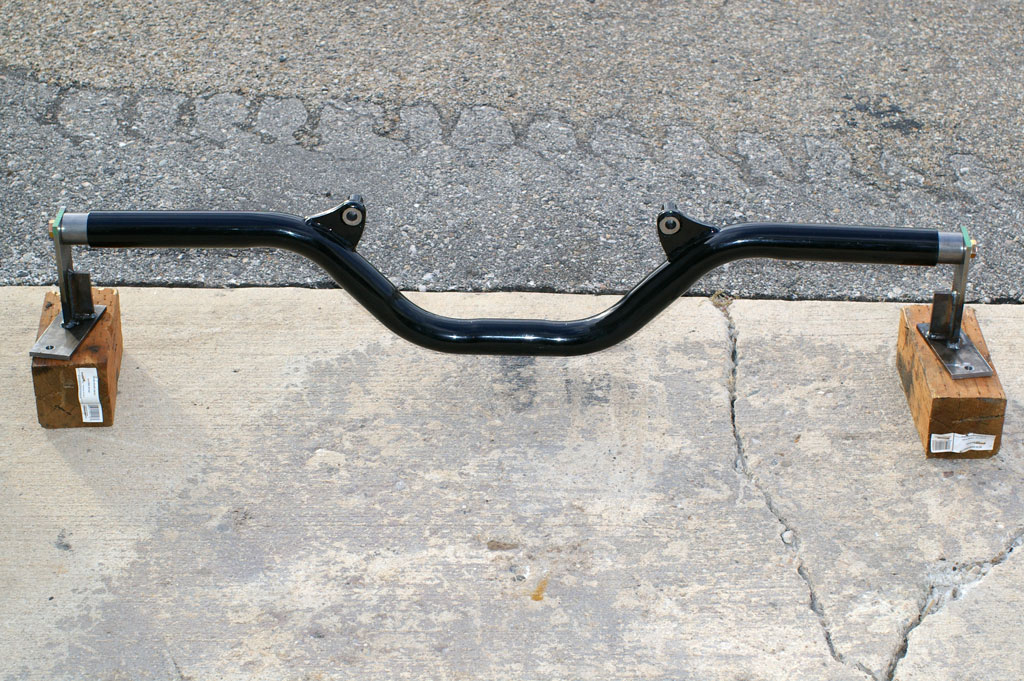
Here's a picture from the Speedway Motors web site showing what the cross member looks like.
Attached image(s)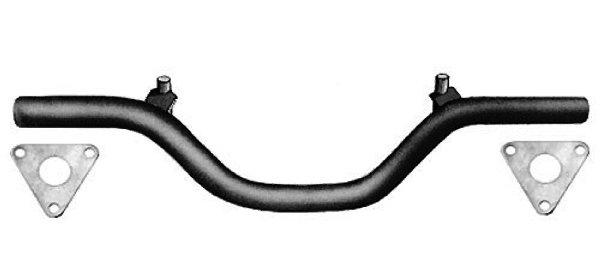
Posted by: drive-ability Jul 5 2005, 07:03 PM
Very clean job, really can't imagine anything cleaner. All due respects however sand blasting a transmission as you did in my opinion is not a good idea. Again its beautiful.
Posted by: hargray2 Jul 5 2005, 07:23 PM
Sounds like a good idea to me.
LOOKS like a good idea too! 
Posted by: Brent Jul 5 2005, 07:28 PM
Don,
The best pics I've seen (clarity) on this site. Thanks for not using a camera phone.
What kinda camera? (I'm back in the market after lens failure due to tripod fall).
Posted by: dbledsoe Jul 5 2005, 09:17 PM
| QUOTE (Brent @ Jul 5 2005, 05:28 PM) |
| Don, The best pics I've seen (clarity) on this site. Thanks for not using a camera phone. What kinda camera? (I'm back in the market after lens failure due to tripod fall). |
Brent,
Thank you for the compliments on the pictures.
The camera is a Pentax digital SLR (*ist DS) with their SMC DA 16-45 ED-AL lens. That lens is definitely a far cut above, when compared to the 18-55 lens they supply with the camera if bought in kit form.
I've owned Canon digital SLR's and a number of Canon lenses, but prefer the compact size and features of the Pentax, not to mention that it will accept all Pentax lenses dating back to the screwmount lens days. But my favorite cameras and lenses are Leica M and R of the 35mm film generation. Should be no surprise to anyone who likes German autos.
I'm by no means a professional, just am enthusiastic hobby photographer, same as with my 914 projects.
Best regards,
Don.
Posted by: dbledsoe Jul 5 2005, 09:19 PM
| QUOTE (drive-ability @ Jul 5 2005, 05:03 PM) |
| Very clean job, really can't imagine anything cleaner. All due respects however sand blasting a transmission as you did in my opinion is not a good idea. Again its beautiful. |
How come?
Posted by: Randal Jul 5 2005, 11:29 PM
Maybe I missed it on the posting, but what do you put on that "beautiful" transmission to keep it the same way as it is now?
All in all nice work; looks like a show car.
Posted by: 914GT Jul 5 2005, 11:46 PM
| QUOTE (dbledsoe @ Jul 5 2005, 08:19 PM) | ||
How come? |
There's the good possibility of sand getting into and past the seals. You could have oil leaks or worse, like damaged bearings and races. But you know all that and you protected sand from getting into those areas. The magnesium will look nice for awhile but will eventually turn dark, and dirt/oil/grease will adhere to the etched surface. But it does look great now. Hope you can keep it that way.
Posted by: nine14cats Jul 5 2005, 11:55 PM
Wow! I really like the looks of that V6 in there....very pretty! 
Bill P.
Posted by: Brent Jul 6 2005, 12:59 AM
| QUOTE (dbledsoe @ Jul 5 2005, 08:17 PM) |
| Pentax digital SLR |
I didn't know Pentax even made those. I thought Cannon was the popula choice, nice to hear some realistic point of view.
Keep up the pics though, the more of yours is the better my six will look. I always wondered what my 231 would look like with Edlebrock intake and such.
-B
Posted by: yahthatsright Jul 6 2005, 07:41 AM
What kind of hp/torque will the six make?
Posted by: dbledsoe Jul 22 2005, 10:33 AM
I finally got around to completing the forward motor mount/cross member (see photos below). Since I couldn't find any already made I came up with my own design using the cross member for a Buick V6 into a street roadster available from Speedway Motors ( http://www.speedwaymotors.com/xq/aspx/display_id.3272/qx/product.htm ) for $50. The photo shows a close up of how I adapted it to fit the 914 chassis. My cross member sits on top of the 914 forward frame/body mounting points rather than hanging below them as do other V6/V8 conversion forward cross member/engine mount set ups. And because mine sit atop there must be a provision in the mount to make it narrower for installation and removal. To accomplish that I used 1.5" steel bar stock to slip inside the cross member allowing the mounting pad to telescope in and out for installation. Once installed they are held in position by a pair of 3/8" bolts running though the cross member and the bar stock tying both together. Total cost was about $80 for the complete motor mount/cross member.
Tonight I'll paint the end pieces and do the final installation in the car. That will complete the engine end of the car and then I can concentrate on the colloing system.
Attached thumbnail(s)
Posted by: dbledsoe Jul 22 2005, 10:34 AM
Close up of end piece.
Attached thumbnail(s)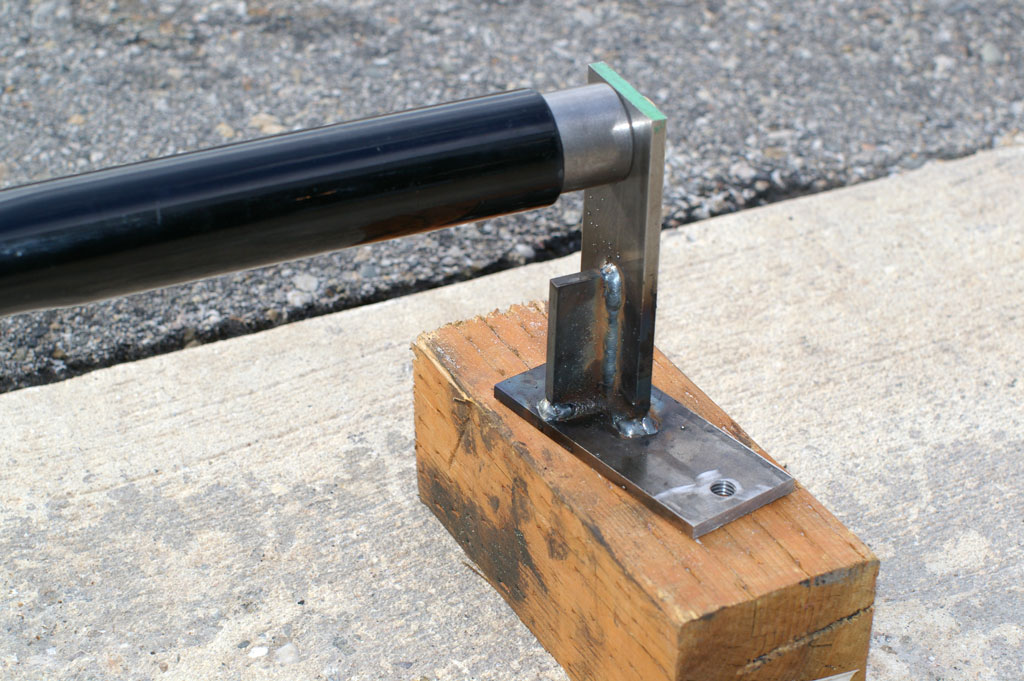
Posted by: dbledsoe Oct 1 2005, 08:35 PM
OK!!! We have ignition. 
After six months of working all my spare time (I work two jobs so spare time is at a premium), I lit off the Buick V6 conversion in my 914 last night (Friday September 30th). I like to think that it is in honor of James Dean since it was on the 50th anniversary of his untimely death.
Damn it sounds good. Open headers and no exhaust system on yet. I let it run 30 minutes at 2500 rpm to break in the cam and lifters. No over heating problems, oil pressure very good at 60 PSI that slowly dropped to 40 psi as the engine came up to operating temperature, held at 40 psi throughout. The electric fans kicked in at 180 degrees (my own radiator and fan setup, not the high dollar RH system) and every thing stayed between 180 and 190.
It's still up on jack stands in consideration that I have some additional things to do beneath the car but I hope to let it down about mid-week, weather permitting, and take it for a test drive. I'm hoping to get the remainder of the work done before next Saturday so the wife and I can attend the PCA Silver Sage Region Oktoberfest run in Eagle Idaho. I'll do my best to make it, man I sure would love to!
A ton of thank yous’ to all who helped me here on 914world.com to get through this conversion, it's my first conversion. And to everyone who answered my multiple 914 questions unrelated to the conversion.
I’ll post additional pictures as I get the chance.
Don
Posted by: redshift Oct 1 2005, 08:47 PM
WOOHOO!
Bet THAT was loud!
M
Posted by: 914GT Oct 1 2005, 09:46 PM
Great news Don! Looking forward to more pictures.
Posted by: dmenche914 Oct 1 2005, 11:01 PM
do you have any photos to document the radiator / fan / and water line setups? Most interested to see them.
nice ride!
Posted by: Gint Oct 1 2005, 11:21 PM
More pics!
Posted by: pjhaun Oct 2 2005, 12:08 AM
Don:
What carburator are you using? Also what type of air cleaner are you using?
From the looks of the pictures you do not have much room to close the engine lid with a carburator and an air cleaner.
Thank You!!!!!
Phillip J. Haun
Oak Harbor, Wa.
Posted by: MecGen Oct 2 2005, 02:37 AM
Hey
This post shows clearly:
Clean work
Amazing pics (I noticed this right away)
I bet you have an amazing appartment or home ...correct?
Your my HERO 
Later
Posted by: dbledsoe Oct 2 2005, 07:57 PM
| QUOTE (redshift @ Oct 1 2005, 08:47 PM) |
| WOOHOO! Bet THAT was loud! M |
Oh yea, it was. But it was a nice loud.
Posted by: dbledsoe Oct 2 2005, 08:00 PM
| QUOTE (914GT @ Oct 1 2005, 09:46 PM) |
| Great news Don! Looking forward to more pictures. |
Guy,
Thank you for you help on my questions and thanks for posting so much interesting and valuable info on your conversions. They really helped me out, and were inspiration.
I've been working all weekend so haven't had time to do any more work or take additional photos. I'll do that tomorrow after work while I still have good light and post them on Tuesday.
Don
Posted by: dbledsoe Oct 2 2005, 08:06 PM
| QUOTE (dmenche914 @ Oct 1 2005, 11:01 PM) |
| do you have any photos to document the radiator / fan / and water line setups? Most interested to see them. nice ride! |
Dmenche,
Thank you for the compliment. I'll take some detailed photos of the (mostly) completed radiator/fan setup tomorrow after work and post them on Tuesday. Work keeps interfering with my hobbies.

Don
Posted by: dbledsoe Oct 2 2005, 08:07 PM
| QUOTE (Gint @ Oct 1 2005, 11:21 PM) |
| More pics! |
Should be up on Tuesday. Work is getting in my way.

Posted by: dbledsoe Oct 2 2005, 08:28 PM
| QUOTE (pjhaun @ Oct 2 2005, 12:08 AM) |
| Don: What carburator are you using? Also what type of air cleaner are you using? From the looks of the pictures you do not have much room to close the engine lid with a carburator and an air cleaner. Thank You!!!!! Phillip J. Haun Oak Harbor, Wa. |
Phillip,
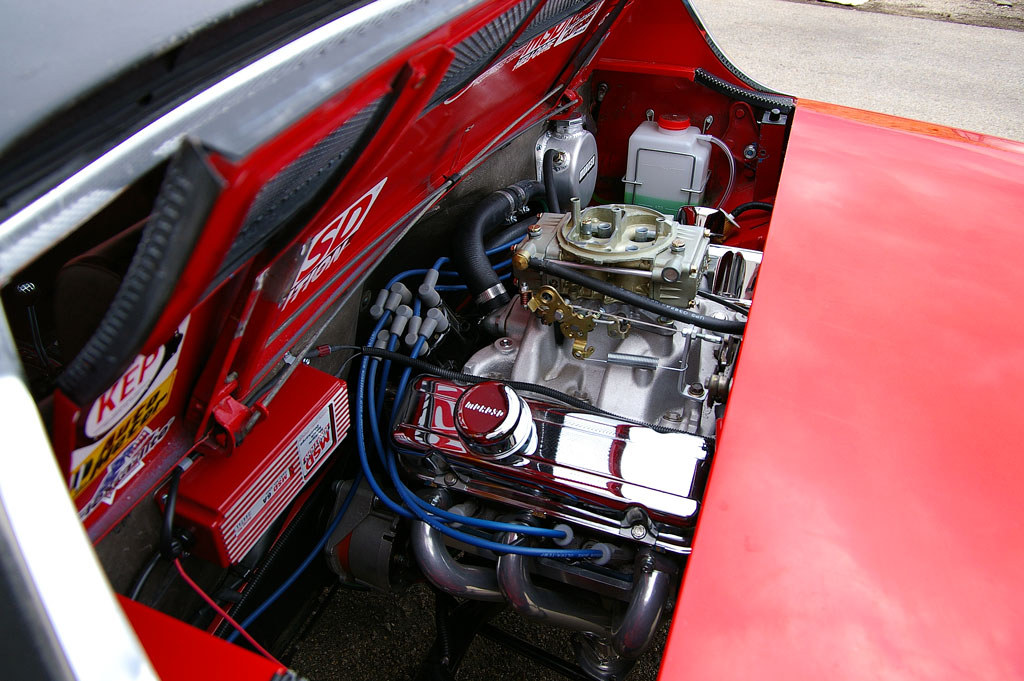
Currently I have a Holley 9776 450 CFM four barrel on the 3.8L Buick. I also have a Holley 8007 390 CFM with vacuum secondaries to try. The 9776 is the cheapest Holley four barrel I could find so I bought that due to deck lid clearance problems knowing I would likely have to modify the air intake (choke) housing to get the clearance I need. I cut the choke housing down and it clears the deck lid but not much room for any type of air cleaner. I bought a K&N plenum with two snorkels coming off that I can run tubes from to separate individual air cleaners, and it's about as low a profile as I could fine, but not low enough. I'll have to cut a hole in the deck lid for clearance. It won't protrude above the deck lid by more than 1/4" but it does require cutting a hole.
All of that is because of the Edlebrock Performer dual plane intake manifold. It is tall. I latter bought a Weiand X-cellerator single plane intake and it is about 3/4" to 1" shorter and would eliminate the need to modify the deck lid. But that will go on the 4.1L Buick V6 I am building to go into my white 76 914. I also have the original Buick 4.1L aluminum intake that takes a Rochester Q-Jet carb. It has a very low profile and would accept just about any air cleaner and have plenty of room to clear the deck lid with no modifications.
Don
Posted by: dbledsoe Oct 2 2005, 08:44 PM
| QUOTE (MecGen @ Oct 2 2005, 02:37 AM) |
| Hey This post shows clearly: Clean work Amazing pics (I noticed this right away) I bet you have an amazing appartment or home ...correct? Your my HERO Later |
MecGen,
Thank you for the wonderful compliments! Unfortunately I have to disappoint you on the house. It's clean, thanks to my wife, but my garage is most often a mess. I work two jobs. My day job is for the Idaho Department of Environmental Quality and my second job is as the Range Manager on a 60-acre public shooting range outside of Boise, Idaho. I also live in two houses, well sort of. We have a standard 3-bedroom ranch house in town that is mostly lived in by my son. On the range we live in a singlewide mobile home. Kind of odd I suppose but it's quiet (at night) out here and beautiful in the winter time.
My other hobby is long range target rifle shooting (Palma/fullbore) at 800, 900, & 1000 yards, which is how I ended up living on and running a shooting range. I had the good fortune to be a firing team member of a USA Goodwill Team to Canada in 1999 and 2000 shooting against the Brits and your fellow Canadians in Chiliwack, BC. Beautiful country!!!
I like to make my projects as clean as possible but this conversion will be my daily driver so it isn't quite as nice as the pictures might lead you to believe. I also own a white 76 914 that I plan to do a tub up rebuild on since the body is a lot nicer than my red 75. That one will get a 4.1L Buick V6.
Don
Posted by: dbledsoe Oct 4 2005, 09:36 AM
Radiator and fans installed, although I still have a bit of work to do on top and side shrouds.
Attached thumbnail(s)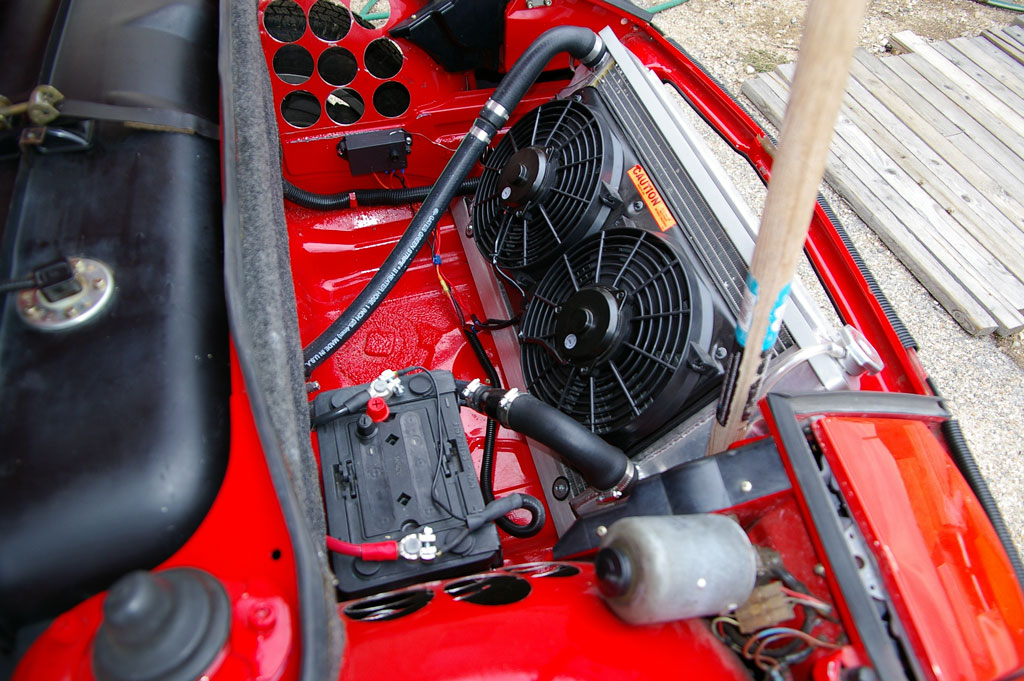
Posted by: dbledsoe Oct 4 2005, 09:37 AM
another
Attached thumbnail(s)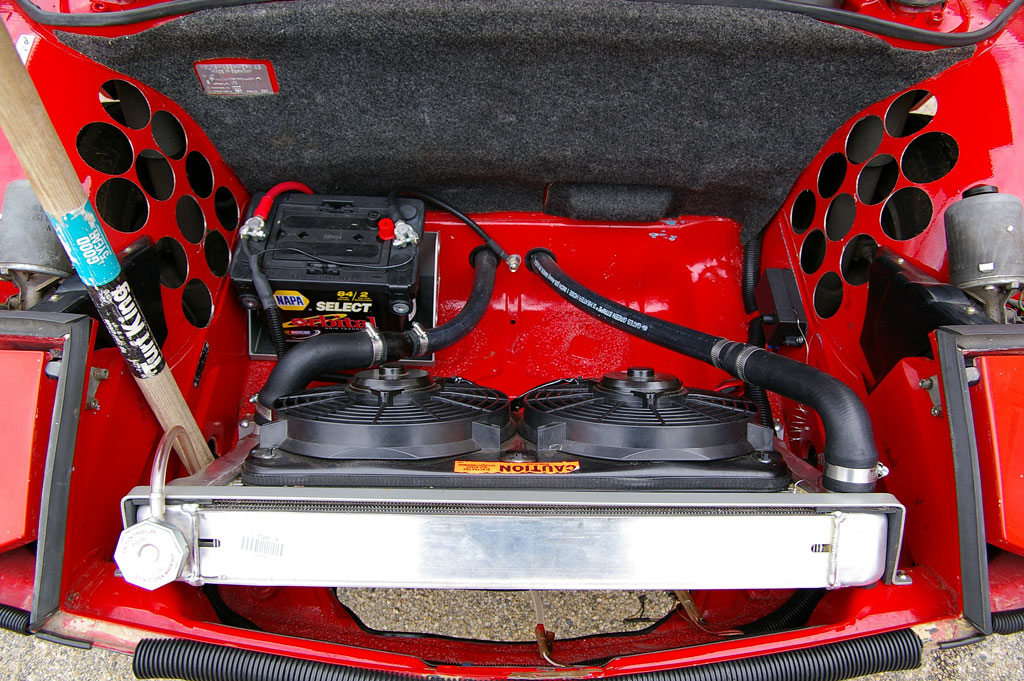
Posted by: dbledsoe Oct 4 2005, 09:37 AM
another
oops!
Posted by: dbledsoe Oct 4 2005, 09:40 AM
a real another
Still some clean up work to do on the fan wiring, a job for next weekend... along with a few other things.
Attached thumbnail(s)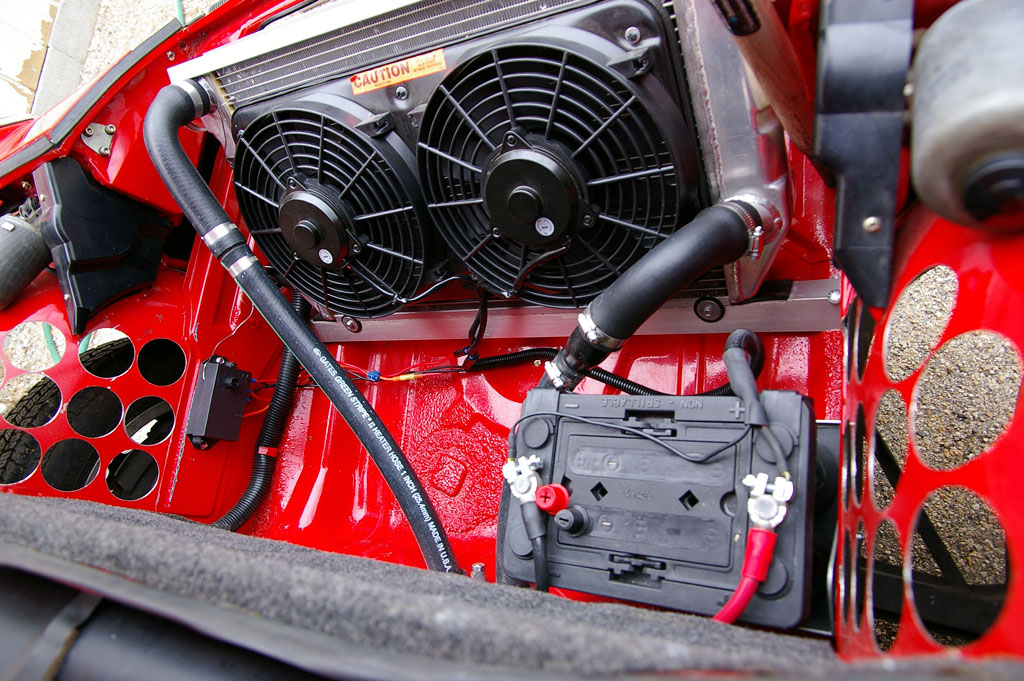
Posted by: dbledsoe Oct 4 2005, 09:42 AM
another
Attached thumbnail(s)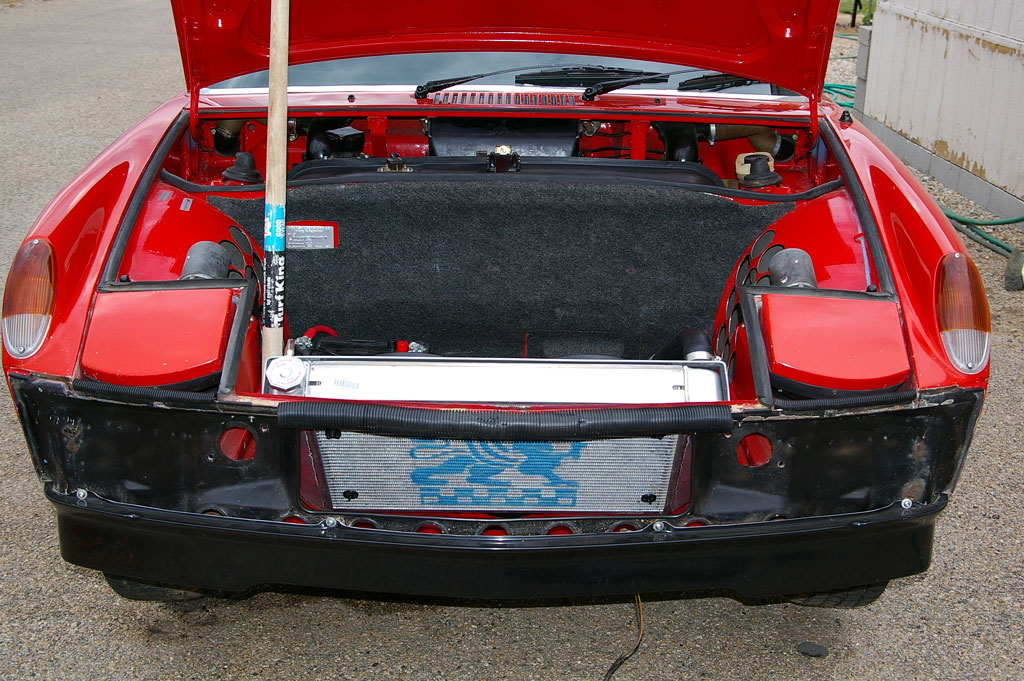
Posted by: jimkelly Oct 4 2005, 09:45 AM
I wonder what percentage of air is gonna be able to get over the top of the radiator? May not be substantial enough to be a problem ??
Jim
Posted by: dbledsoe Oct 4 2005, 09:49 AM
| QUOTE (jimkelly @ Oct 4 2005, 09:45 AM) |
| I wonder what percentage of air is gonna be able to get over the top of the radiator? May not be substantial enough to be a problem ?? Jim |
Jim,
According to others, it appears a significant amount will go around (path of least resistance). Probably not a problem in the fall/winter but others have reported problems in summer without the shrouding.
Don
Posted by: 914GT Oct 4 2005, 09:50 AM
Nice clean radiator install Don. I was thinking of trying punching the holes out in the wheelwells too but opted for the easy way. Probably plenty of airflow for a V6. Are you going to shroud the radiator or do you think it will be necessary? Does that radiator cap overflow go off to a tank somewhere so it doesn't suck in air when cooling? Again, very nice job.
Posted by: dbledsoe Oct 4 2005, 09:54 AM
I have other images to upload but for some reason the club server is now sending me back this error message "you cannot upload this type of file" even though I just did as can be seen by the photos about. 
I guess the culprit was simply one of my image files. The others all uploaded just fine. 
Posted by: dbledsoe Oct 4 2005, 09:56 AM
lines beneath the car
Attached thumbnail(s)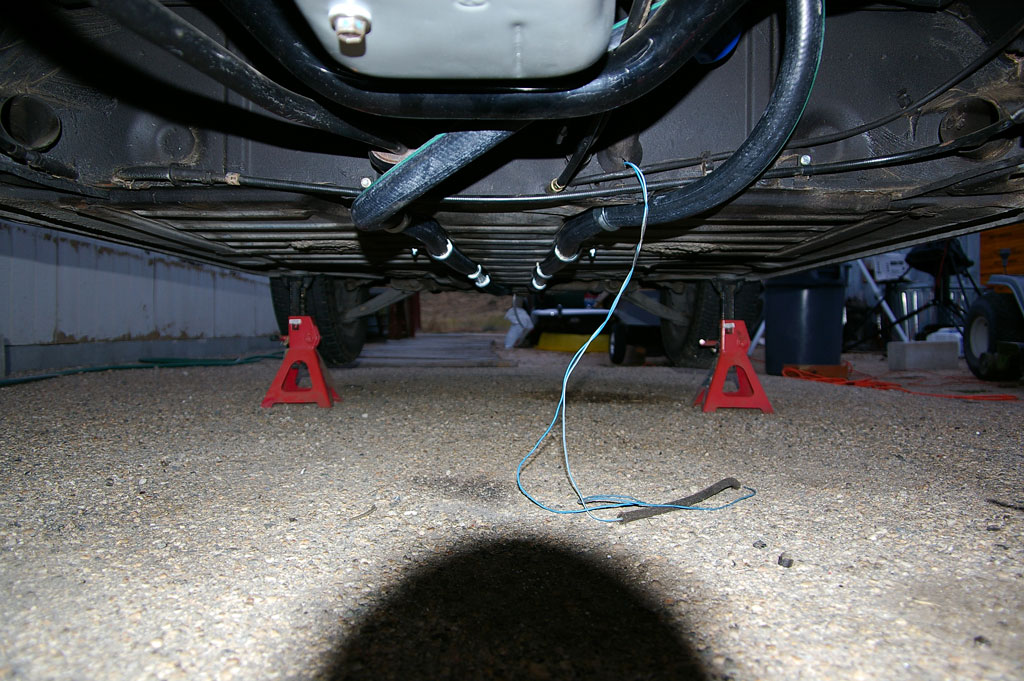
Posted by: dbledsoe Oct 4 2005, 09:56 AM
Another beneath
Attached thumbnail(s)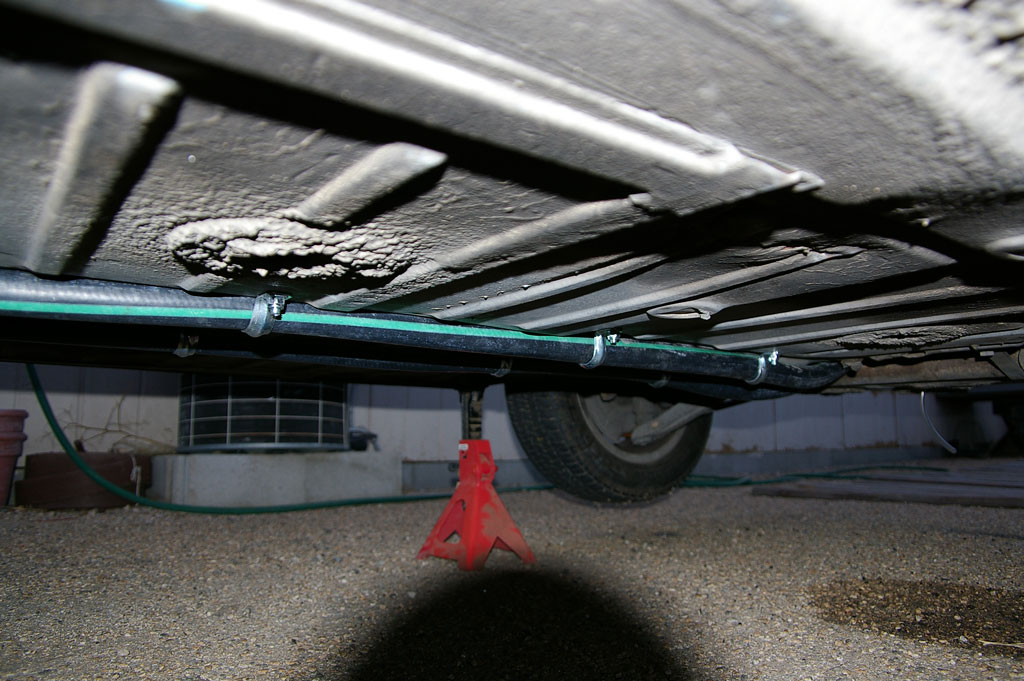
Posted by: dbledsoe Oct 4 2005, 09:58 AM
Expansion/fill tank
Attached thumbnail(s)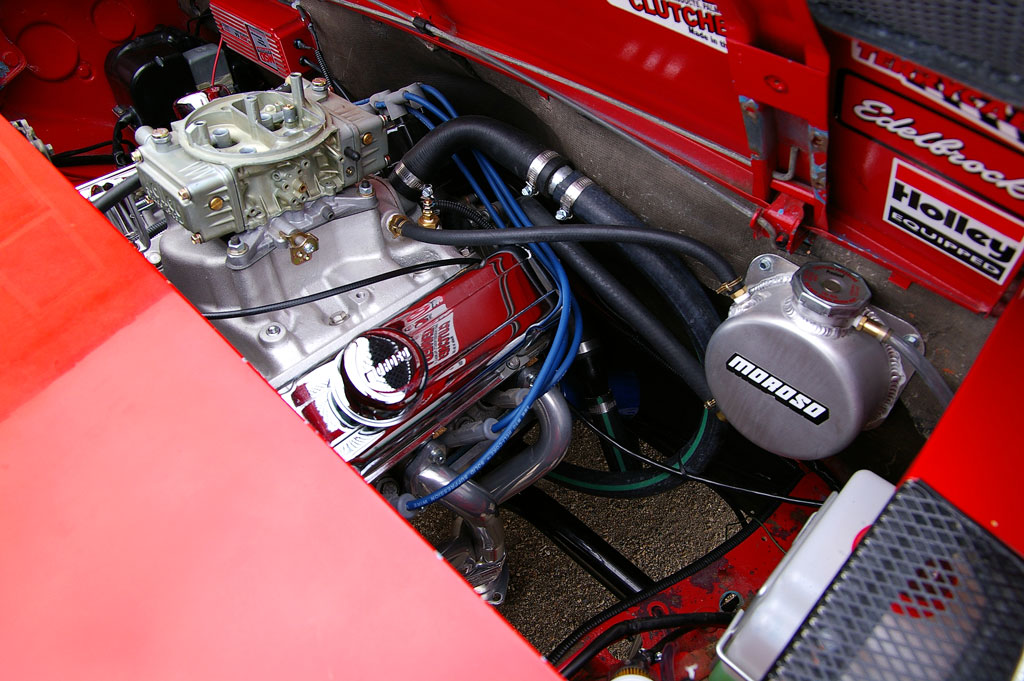
Posted by: dbledsoe Oct 4 2005, 10:02 AM
| QUOTE (914GT @ Oct 4 2005, 09:50 AM) |
| Nice clean radiator install Don. I was thinking of trying punching the holes out in the wheelwells too but opted for the easy way. Probably plenty of airflow for a V6. Are you going to shroud the radiator or do you think it will be necessary? Does that radiator cap overflow go off to a tank somewhere so it doesn't suck in air when cooling? Again, very nice job. |
Thank you Guy! After reading your conversions I consider that a real compliment!
The front radiator cap is a 25psi cap. The overflow shouldn't be needed but I added one anyway. It now vents beneath the car. The expansion/fill tank has a 16psi cap and vents to an overflow tank in the engine bay.
Attached thumbnail(s)
Posted by: dbledsoe Oct 4 2005, 10:05 AM
I mounted the coil to the old heater blower mount base with a couple of hose clamps. That seemed like a nice location since the Buick V6 has a front mounted distributor.
Attached thumbnail(s)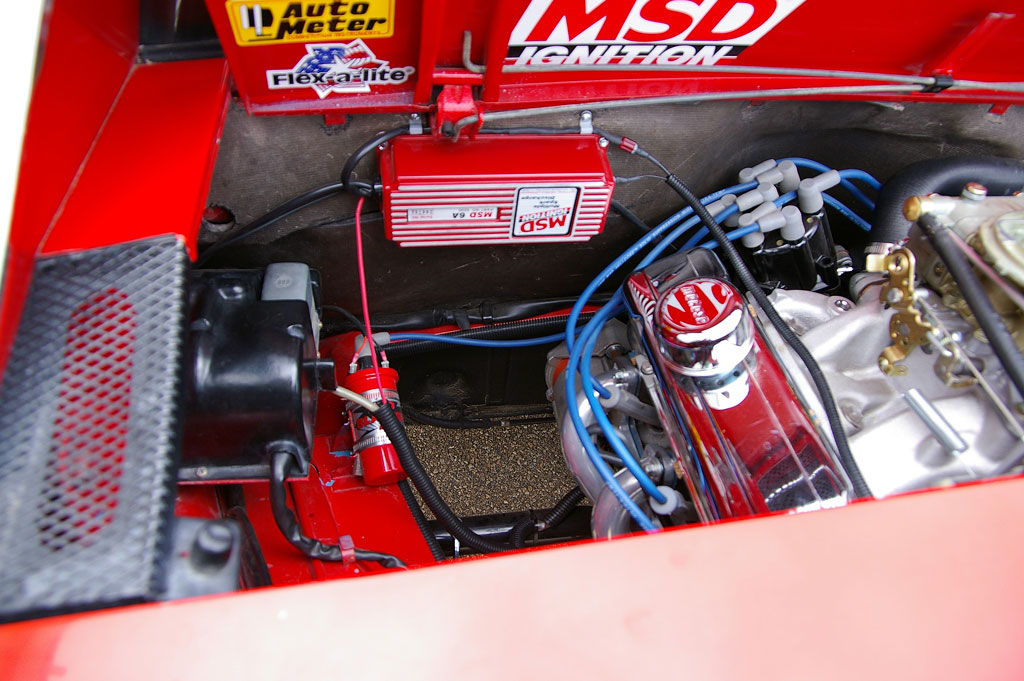
Posted by: dbledsoe Oct 4 2005, 10:07 AM
A tad short on carb to engine lid clearance thanks to the Edelbrock dual plane "Performer" intake manifold.
Attached thumbnail(s)
Posted by: dbledsoe Oct 4 2005, 10:10 AM
I can close the engine lid but I had to cut out the cross brace to do so. I have a K&N plenum with a pair of snorkels that will run to remote air cleaners that almost clears, but not quite. Needless to say I'll have to make a cutout in the engine lid to clear.
Attached thumbnail(s)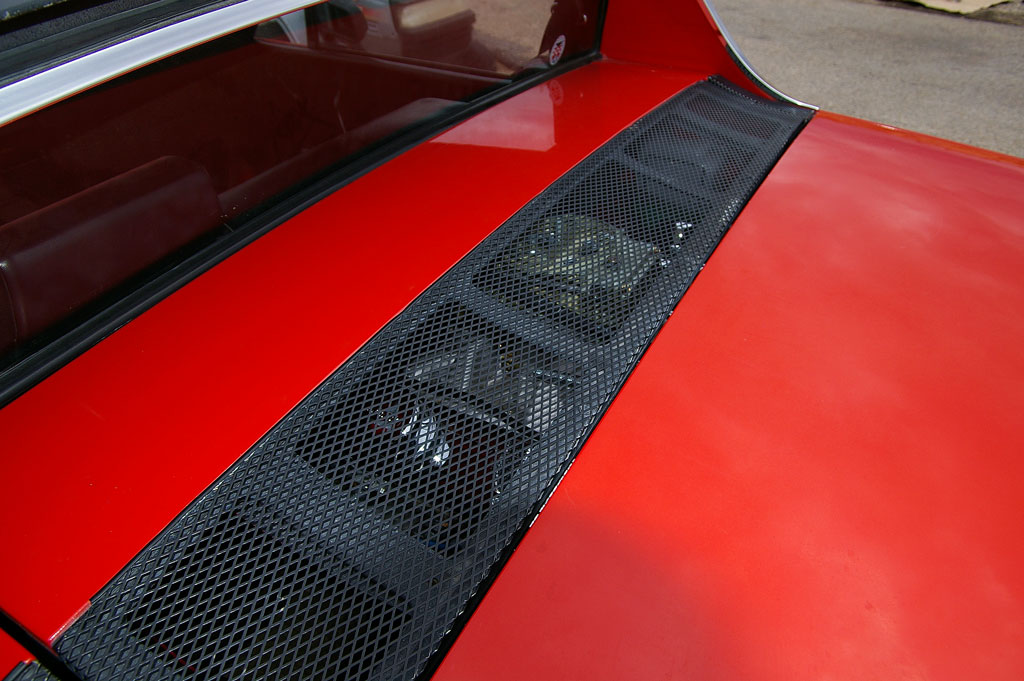
Posted by: nine14cats Oct 4 2005, 10:13 AM
Beautiful Work!
Between you and Guy T. it makes me want to take my V8 conversion out of the garage and get working on it....
Keep the pics coming....I need to keep my inspiration up...
Bill P.
I saw that you have a '67 Sunbeam Alpine. My first car was a '66 Alpine. I sold it one year later and had a '67 Tiger with a 289. I was 17 and sold it when I was 19. If I knew what I had I would never have sold the car.
Posted by: dbledsoe Oct 4 2005, 10:15 AM
| QUOTE (nine14cats @ Oct 4 2005, 10:13 AM) |
| Beautiful Work! Between you and Guy T. it makes me want to take my V8 conversion out of the garage and get working on it.... Keep the pics coming....I need to keep my inspiration up... Bill P. I saw that you have a '67 Sunbeam Alpine. My first car was a '66 Alpine. I sold it one year later and had a '67 Tiger with a 289. I was 17 and sold it when I was 19. If I knew what I had I would never have sold the car. |
Bill,
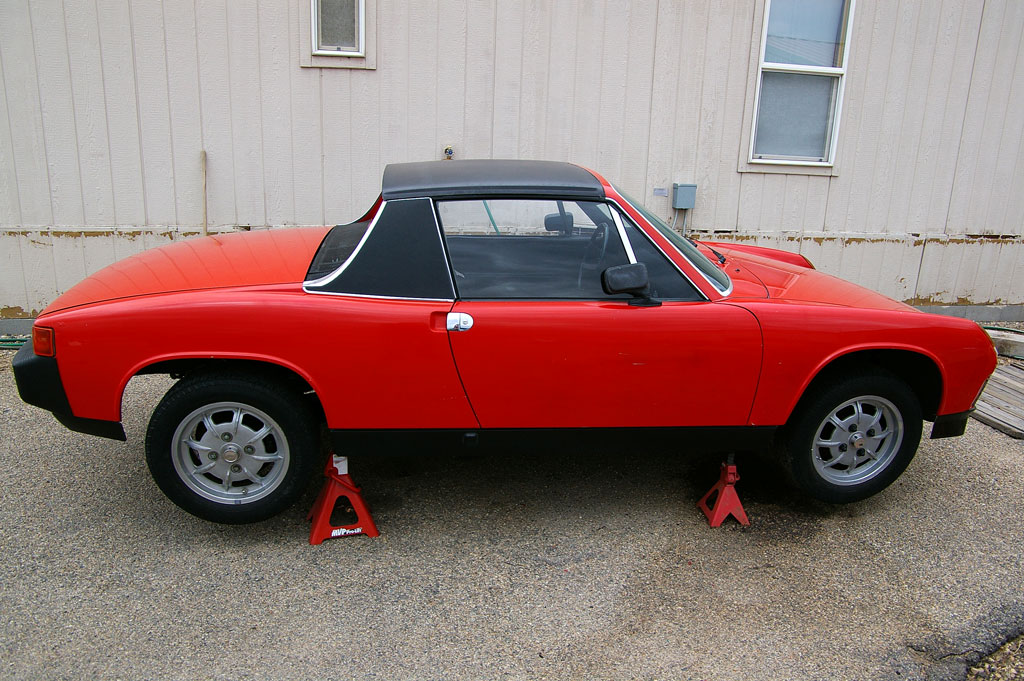
Thank you! I know exactly how you feel. Mine has looked like this for about a year, until yesterday that is.
Attached thumbnail(s)
Posted by: dbledsoe Oct 4 2005, 10:17 AM
Now it looks like this. And I actually drove it for a bit last night! 

Attached thumbnail(s)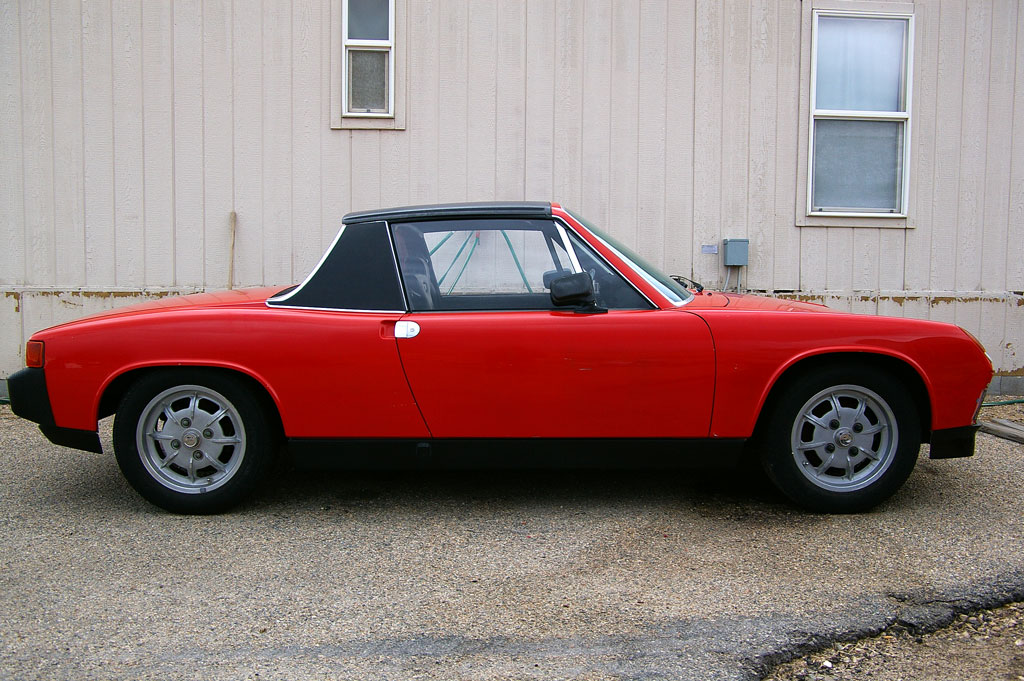
Posted by: jimkelly Oct 4 2005, 10:33 AM
Simply awesome - marianne on the outside - but ginger on the inside - I guess is how I would characterize her : )
Jim
The more I think/see the hoses underneath the less the idea seems like a questionable one. It really depends on how low the car will ride and tire selection.
Posted by: dbledsoe Oct 4 2005, 10:36 AM
This is the image I couldn't get to upload. I reworked in PS to change the file info.
Attached thumbnail(s)
Posted by: 914GT Oct 4 2005, 10:41 AM
Don, good idea on the front radiator cap with the higher pressure. And you have an easy way to bleed the radiator when filling the system. How much flex resulted from cutting out the engine lid brace? I'm considering that for my yellow car to get more air cleaner options. I was looking at the K&Ns and also a low profile oval billet cleaner. I'll still avoid cutting it if I can. I lost 1/2" by using a carb. spacer. I needed the spacer because my carb was getting too hot in +105 deg temps and stuck in traffic.
I'd like to see a view of your front bumper and the intake opening.
Posted by: dbledsoe Oct 4 2005, 10:42 AM
| QUOTE (jimkelly @ Oct 4 2005, 10:33 AM) |
| Simply awesome - marianne on the outside - but ginger on the inside - I guess is how I would characterize her : ) Jim The more I think/see the hoses underneath the less the idea seems like a questionable one. It really depends on how low the car will ride and tire selection. |
Jim,
I like the Marianne/Ginger analogy!

The hoses under the car seem to be the defacto standard, not to mention the easiest to do.
My car sits pretty low so I reckon I'll soon find out how well they really work. 
Posted by: dbledsoe Oct 4 2005, 10:58 AM
| QUOTE (914GT @ Oct 4 2005, 10:41 AM) |
| Don, good idea on the front radiator cap with the higher pressure. And you have an easy way to bleed the radiator when filling the system. How much flex resulted from cutting out the engine lid brace? I'm considering that for my yellow car to get more air cleaner options. I was looking at the K&Ns and also a low profile oval billet cleaner. I'll still avoid cutting it if I can. I lost 1/2" by using a carb. spacer. I needed the spacer because my carb was getting too hot in +105 deg temps and stuck in traffic. I'd like to see a view of your front bumper and the intake opening. |
Guy,
It defintely flexs but not as bad as I thought it might. I can still close the lid from either side and it closes all the way down on the bumpers/stops/rubber thingies just fine fine from either side of the car.
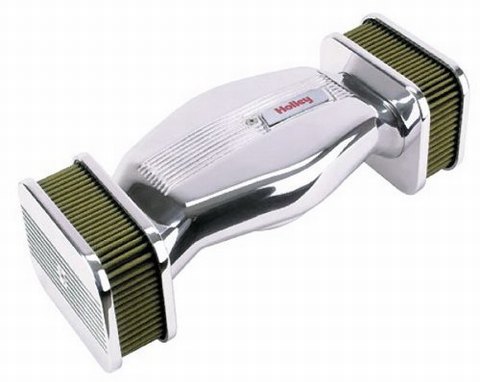
The K&N plenums are ridiculously over priced but it seemed to be about my only option, and not that great of one at that. Cutting the cross brace defintely provides more room. There is a ver low profile air cleaner that uses two filter elements, one off to each side (see picture below) available from Speedway Motors
http://www.speedwaymotors.com/SearchResults.aspx?keyword=air+cleaners
but it sells for $229 and shipping. I've seen one on a 914 SB Chevy conversion here locally.
 about avoiding cutting. I'm still looking for other options. Cutting will be the last thing I do.
The front bumper is still as delivered from GT Racing. I haven't cut the hole in it yet. That's my next step in this project after I get the Auto Meter gauges in (tomorrow night hopefully) and the interior put back together. I'll post photos here once I get the bumper installed.
Attached image(s)
Posted by: Brian Mifsud Oct 4 2005, 11:06 AM
Hi,
Sure is nice work. How does the engine's torque curve match up with the transmission? Do you feel it is overrevving on the freeway? I'm guessing you have stock final drive ratio?
V-6 certainly seems to have the right "sound" for a 914. I had that V-6 in my '78 El Camino.. engine was great, but the emissions system and "intelligent" carb where a constant nightmare.
Posted by: 914GT Oct 4 2005, 11:07 AM
Thanks for the air cleaner info. Here's how I modified the stock 76 bumper. From usual standing height the opening is hardly noticeable so retains nearly original look. So far seems to be enough airflow (it can pull from the bottom front of the trunk too). Look forward to seeing your new bumper mounted in place.
Attached image(s)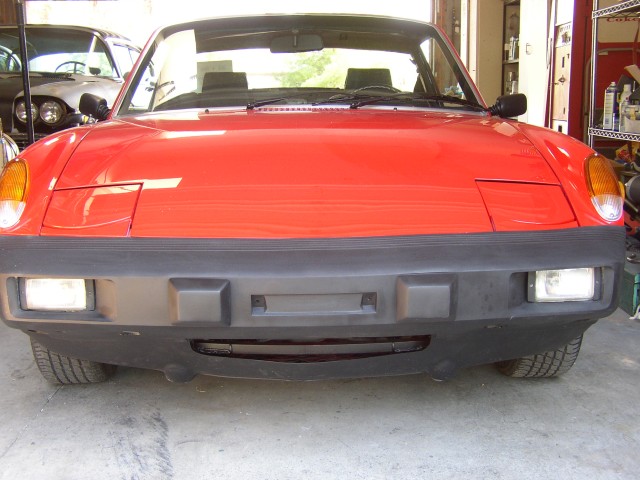
Posted by: pjhaun Oct 4 2005, 12:43 PM
| QUOTE (dbledsoe @ Oct 4 2005, 07:58 AM) |
| Expansion/fill tank |
Where does the bottom of the expension tank go to? Also can you provide a picture of how you connected the engine mount to the frame of the 914.
Thank You!!!!
Phillip J. Haun
Oak Harbor, Wa.
Posted by: dbledsoe Oct 4 2005, 12:45 PM
| QUOTE (914GT @ Oct 4 2005, 11:07 AM) |
| Thanks for the air cleaner info. Here's how I modified the stock 76 bumper. From usual standing height the opening is hardly noticeable so retains nearly original look. So far seems to be enough airflow (it can pull from the bottom front of the trunk too). Look forward to seeing your new bumper mounted in place. |
Guy,
That is difficult to see from just about any position except the one the photo was taken from, or from underneath. Very slick! How many square inches would you estimate your opening is? Mine can pull from the bottom of the front trunk too as I have a smaller opening cut in there. I would prefer to keep the bumper opening as small as possible but am not sure just how many square inches I should start with.
Posted by: dbledsoe Oct 4 2005, 01:43 PM
| QUOTE (pjhaun @ Oct 4 2005, 12:43 PM) | ||
Where does the bottom of the expension tank go to? Also can you provide a picture of how you connected the engine mount to the frame of the 914. Thank You!!!! Phillip J. Haun Oak Harbor, Wa. |
Hello Phillip,
The expansion tank has three lines to/from it. The upper line from the tank body goes to the intake manifold water passage near the thremostat housing. The lower line from the tank body runs to the inlet side of the water pump. The highest line (clear plastic) is the overflow line and it runs to the plastic overflow tank you see in the photos.
The engine mount crossmember bolts to the same place as the original Porsche engine mount crossmember except that it bolts to the frame from the top side rather than the bottom side. The phot below shows what it looks like out of the car but that is the exact smae position it will have installed. The welded feet you see in the photo replace the original plate that the original engine mount crossmember bolted to. The two ends of the crossmember telescope to facilitate installation into the chassis and are then pulled out to mate to the engine mounting points on the chassis. The feet of my crossmemebr are drilled and threaded to accept two 3/8" bolts on each side. Once the crossmemeber is in place the bolts are run up from beneath the care and tightened down. Once that is complete I then drilled a pair of 1/4" holes through each end of the crossmemeber and into and through the 1 1/2" bars on the ends. I put a pair of quick 1/4" release pins in each of those holes to keep the crossmember from sliding side to side or rotating on axis.
I hope that makes sense.
I'll try to get a better picture of how the mount bolts to the chassis tonight and post it tomorrow.
Don
Attached thumbnail(s)
Posted by: dbledsoe Oct 4 2005, 01:49 PM
| QUOTE (Brian Mifsud @ Oct 4 2005, 11:06 AM) |
| Hi, Sure is nice work. How does the engine's torque curve match up with the transmission? Do you feel it is overrevving on the freeway? I'm guessing you have stock final drive ratio? V-6 certainly seems to have the right "sound" for a 914. I had that V-6 in my '78 El Camino.. engine was great, but the emissions system and "intelligent" carb where a constant nightmare. |
I think the trans final ratio (fifth gear) is going to be a bit low for continued freeway speed type driving with the V6. But I don't do much freeway driving so am not too concerend with it. The bulk of my driving is on rural two lane roads or around town. But I haven't actually had it out on the freeway yet to confirm that.
Posted by: 914GT Oct 4 2005, 03:33 PM
For sure it would be nice to have a higher gear for fuel economy reasons. Lower rpms would help bring the noise level down a bit too, depending on the engine, exhaust, and sound dampening inside the car. But if your V6 is well balanced it should be fine on the highway and have way more power and throttle response above 3000 rpm than the original 4. My V8 cruises all day at 3200 rpm and is quiet. These engines spin just fine at high rpms.
Posted by: dbledsoe Oct 4 2005, 08:58 PM
| QUOTE (914GT @ Oct 4 2005, 03:33 PM) |
| For sure it would be nice to have a higher gear for fuel economy reasons. Lower rpms would help bring the noise level down a bit too, depending on the engine, exhaust, and sound dampening inside the car. But if your V6 is well balanced it should be fine on the highway and have way more power and throttle response above 3000 rpm than the original 4. My V8 cruises all day at 3200 rpm and is quiet. These engines spin just fine at high rpms. |
Guy,
Not sure if you read my earlier message but I am curious as to what the approximate square inches of your inlet to the radiator might be?
After doing the Buick V6 conversion I am now seriously reconsidering the conversion I plan to do in my white 76 914. I think I just may go with Chevy SMB engine rather than doing Buick 4.1L V6 conversion. I'll build the 4.1L Buick engine (and hot rod it a good deal more than the current 3.8 V6) but just may drop it into the red 75 914 instead.
You're a fantastic inspiration in that respect, in all respects!
Thank you for all you words of encouragement and for your excellent threads on your conversions!
Don
Posted by: 914GT Oct 4 2005, 09:35 PM
Don,
I made the intake opening on the red 76 the same as my yellow 74. The opening is divided into two sections by a piece of 1" square tubing rolled to match the original curvature of the front end. This tubing adds reinforcement where the original front panel and bottom trunk were spot welded together. The bottom trunk floor opening is approx. 22" x 7". The top opening behind the bumper is approx. 22" x 4.5". Therefore the total intake area is 253 sq. in.
The bumper cutout on my 74 allows for more direct airflow into the front of the car, where the big bumper and valence on the 76 tend to 'shadow' part of the opening. Air can still get around them but I'm sure there's more turbulance at highway speeds. However when stopped and using only the fans, I'm sure the air flow is the same for both cars. I thought of making a small air dam at the rear of the trunk opening on my 74 to try to create a high-pressure area in front of the trunk cutout. I never did and since my car always runs cool I have never been motivated to try it.
Appreciate your kind words. I learned much from other folks that have been doing this for a lot longer than me. I like experimenting and trying new things, and it's great seeing others like you doing the same thing and seeing what ideas you come up with.
Posted by: pjhaun Oct 5 2005, 12:09 AM
Don:
I forgot to ask you, What kind/type alternator bracket did you use? Do you happen to have pictures of the front of the engine with the belts and brackets in place?
Thank You!!!!!
Phillip J. Haun
Oak Harbor, WA.
Posted by: dbledsoe Oct 5 2005, 09:40 AM
| QUOTE (pjhaun @ Oct 5 2005, 12:09 AM) |
| Don: I forgot to ask you, What kind/type alternator bracket did you use? Do you happen to have pictures of the front of the engine with the belts and brackets in place? Thank You!!!!! Phillip J. Haun Oak Harbor, WA. |
Phillip,
below is a close up of one end of the mount I made and the photo below that is the same end of the mount as installed in the 914. I hope they give you a better idea of how I mounted my engine. The circled item in the upper left corner of the second photo below is the 1/4" quick release pin that keeps the mount from moving side to side when bolted in place in the car.
Attached thumbnail(s)

Posted by: dbledsoe Oct 5 2005, 09:41 AM
Installed
Attached thumbnail(s)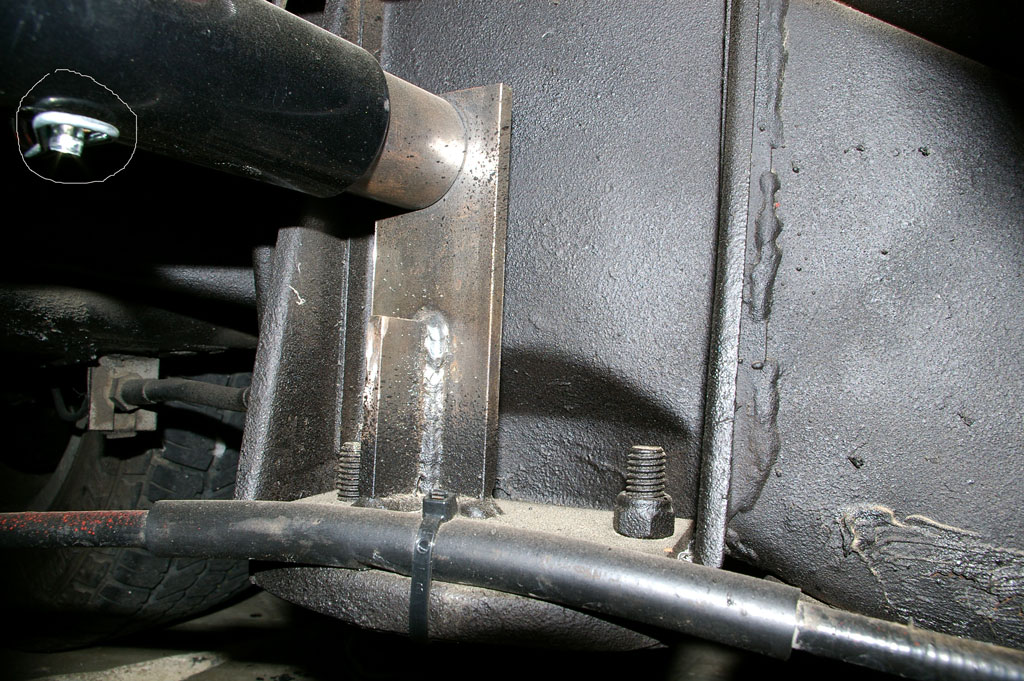
Posted by: 914GT Oct 5 2005, 09:52 AM
It would be interesting to apply this motor mount bar concept to a V8 - to improve the ground clearance and eliminate the need to notch the shift rod. Maybe the next conversion project....
Posted by: dbledsoe Oct 5 2005, 09:59 AM
I used the original 914 alternator minus the back plate. I have no idea how long it will last because it has no fan on it and doesn't get air forced through it as it would if in use on the type IV engine. But since it was a new rebuilt alternator only a year old and saw very little use before my type IV engine died I decide to go with it and see how long it lasts.
I didn't actually make or use a mounting bracket. I made up a pair of spacers that I could slip a long (6") 3/8" bolt through. The spacer goes between the alternator and cylinder head bolt hole circled in the photo below (the lower of the two circled in the photo) and bolted the alternator directly to the cylinder head. Then I used a slightly modified small block Chevy alternator adjustment bracket with another 3/8" bolt and long spacer bolted to the upper of the two bolt holes circled in the photo below. The bracket is available at most FLAPS that carry chrome goodies. I had to shorten it a little and redrill a 3/8" hole.
It's difficult to explain so I'll try to get a photo of it tonight that shows what I'm talking about. I don’t know how good the photo will show what I’m talking about because it may be difficult to get the camera down there as its pretty tight quarters.
If you find a source for an alternator bracket that will mount a standard GM alternator low on the driver’s side of the engine let me know as I imagine I'll need one sooner or later. I don't expect the original Bosch alternator I'm using to last too long when it gets hot again next summer.
Attached thumbnail(s)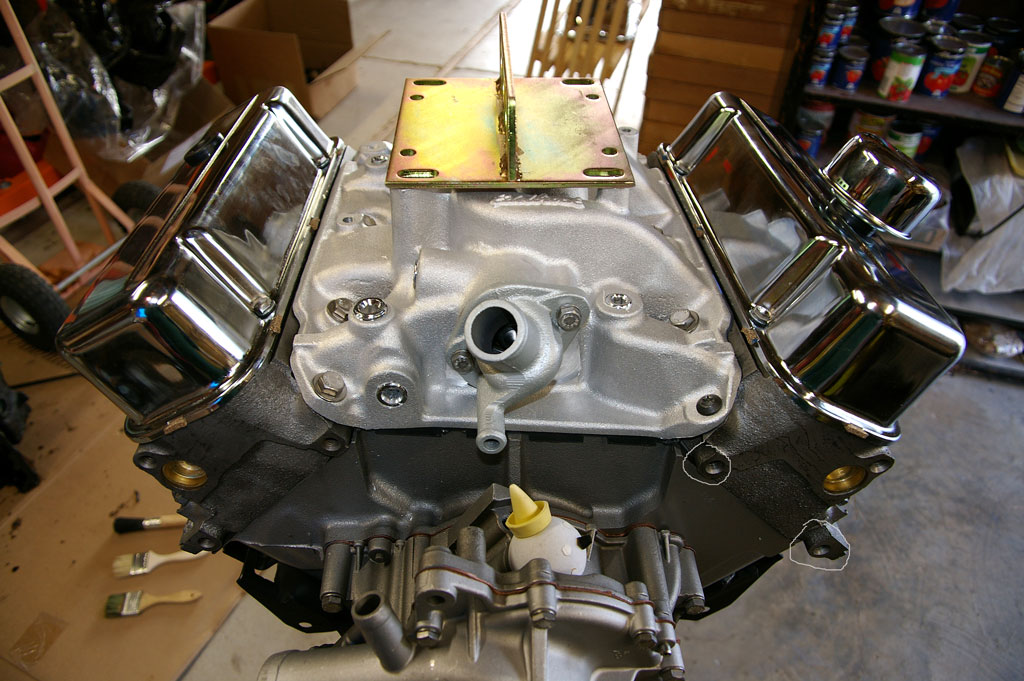
Posted by: dbledsoe Oct 5 2005, 10:55 AM
| QUOTE (914GT @ Oct 5 2005, 09:52 AM) |
| It would be interesting to apply this motor mount bar concept to a V8 - to improve the ground clearance and eliminate the need to notch the shift rod. Maybe the next conversion project.... |
Guy,
It's a pretty simple design but appears that it will work just fine. It defintely gives a lot more ground clearance and leaves plenty of room for shift rod clearance.
Don
Posted by: dbledsoe Oct 14 2005, 11:34 AM
OK, it's getting there. Got the new GT Racing fiberglass front bumper installed. I won't be cutting  an opening in it just yet. I'm going to build some ducting from the fog lamp grill openings to the radiator to see how that works. I'm sure it will get me through the winter/spring months up here and will take a wait and see on how it does during the summer months before cutting anything. I've still got two more hood pins to install yet, which is why the hood looks like it doesn't come down all the way in the photo below. It won't without the hood pins and clips.
Next Tuesday morning (October 18th) I have an appointment with the muffler shop that does all the local hot rods to get an exhaust system installed. and then it will be legal to drive  and then it will be time to celebrate.
Attached thumbnail(s)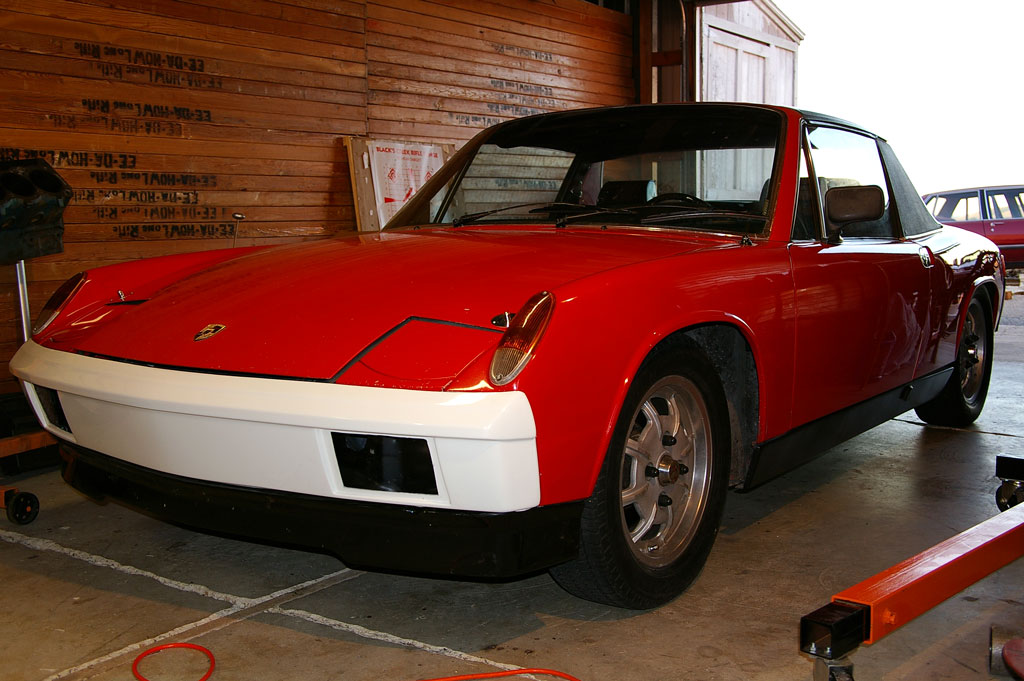
Posted by: dbledsoe Oct 14 2005, 11:35 AM
Attached thumbnail(s)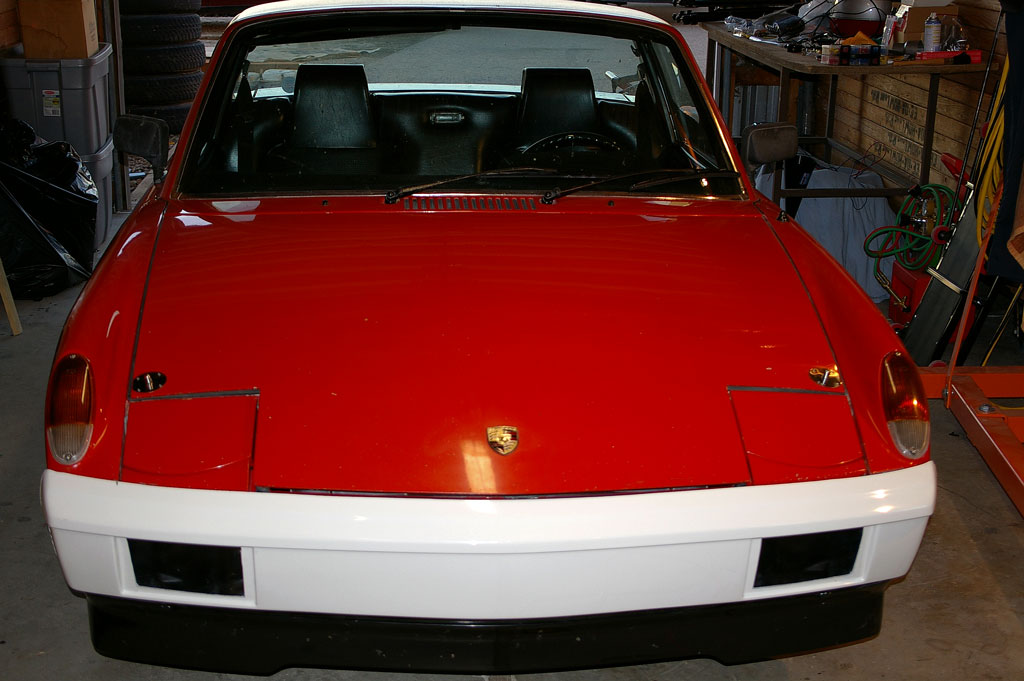
Posted by: dbledsoe Jan 19 2006, 03:49 PM
Another update on my Buick V6/914 conversion.
I did my conversion last spring and summer and got the 914 up and running but ran into a little problem with vibration at 2000 RPM. The flywheel wasn’t balanced correctly to the internals of the engine. When I built/rebuilt the engine it was as stock with the exception of a mild cam, Edelbrock intake manifold, 390 cfm Holley four barrel carb, Sanderson headers, and MSD billet distributor and ignition box. The conversion was pretty straight forward once all the parts and pieces got into place. But because of the vibration I decided to go ahead and drive it as is while I build another engine, then I'll do a weekend swap of the new engine for the current engine. The engine that’s currently in my 914 is a 3.8 liter Buick V6 and the new engine I’m building is a 4.1 liter Buick V6, which was in production for only for 4 years and I was lucky enough to find a good motor with no block or head cracks.
This time around I found a machinist who is very familiar with the Buick V6 and together we’re doing it right. By right I mean align hone the mains, deck the block to match the deck height of the new piston/rod configuration, and bore the block (with torque plates in place), Manley stainless valves, JE forged 9 ½ : 1 pistons, completely rebuilt connecting rods bushed for free floated pins, and the addition of ARP rod bolts. I also added an Isky cam of .470” lift/270 duration, Isky lifters, valve springs and retainers, combustion chambers CC’d to equal volume (45cc, talk about tiny combustion chambers volumes for a 4" bore!), and a bunch of other stuff. All the machine work on the engine is complete and I’m now waiting on a new flywheel from Kennedy Engineering so the whole assembly can be balanced correctly.
I find the 3.8 liter V6 in the 914 to be impressive in its current configuration in terms of power, so this new 4.1 liter should be REALLY impressive. It’ll be a couple of months yet before I do the engine swap out due to cold ass weather here in the northwest and still waiting on a few parts to come in. I’ll update this again when the swap is complete.
Oh yeah, this  is gonna be good!
Posted by: MecGen Jan 19 2006, 06:29 PM
Sweet
Ya its frikken cold here too...
I remember that you were having vibration problems...I was kinda hoping it worked out for you.
The 4.1 is a hard choice to beat tho
Thanx for the 914 porn and thinking outside of the box.
Later

Posted by: dbledsoe Jan 19 2006, 09:26 PM
| QUOTE (MecGen @ Jan 19 2006, 06:29 PM) |
| Sweet Ya its frikken cold here too... I remember that you were having vibration problems...I was kinda hoping it worked out for you. The 4.1 is a hard choice to beat tho :shoot2kill: Thanx for the 914 porn and thinking outside of the box. Later |
MecGen,
I've photgraphed through the entire conversion and will post it all to my 914world.com blog as I get the chance.
Thank you for the compliments. Agreed, the V6 conversion isn't much welcomed here amongst the type four groupies (0r so it seems), but then I consider them to be gluttons for punishment (I paid my type four dues and it sucked!). My V6 conversion, in spite of its problems, has been ran hard and then has set in the garage for the winter without a single drop of oil leaking from it. It starts on the first or second revolution (as it did when I first fired it up) in low teen temperatures and idles like a dream. Need a bit of a thrill, step on the gas and you'll get plenty! Can't wait for the 4.1!
I can only imagine what the small block Chevy conversion guys experience, but it's gotta be incredible! 
Posted by: budman5201 Feb 5 2010, 04:45 PM
Hey whats the horsepower on your engine and weight compared to my subaru 2.0 turbo??? Very curious. oh can you pm me with answer so i dont miss it??
thanks!
Powered by Invision Power Board (http://www.invisionboard.com)
© Invision Power Services (http://www.invisionpower.com)