Printable Version of Topic
Click here to view this topic in its original format
914World.com _ 914World Garage _ SpeedHut gauge panel, possible limited run - Any interest?
Posted by: tygaboy Jun 11 2020, 02:15 PM
EDIT on 6/6/2021
I made 6 SpeedHut gauge panels today. See my post on page 4 of this thread for a "fresh off the plasma table" pic.
If you're still interested, I should have these ready to go in a week or so.
- these are .063 3003 aluminum
- they will not be painted
- they do not have the raised stamping for the dimmer
- they are set up for a 4.5" center gauge, 4" outer gauges
- 3 have holes for the dimmer, 3 don't
$35 plus shipping from 94952.
Yes, I'd said $20 earlier but that was a year ago and I was being too generous with my time and consumables. Just be thankful I'm not making them out of wood. 
Let me know if you're interested. I'll probably make more once I get more material.
Thanks again for your patience.
Chris
EDIT on 6/24/20:
To the interested parties who've already contacted me or posted here to date:
The plasma table is back in action so now I'm tuning the design. See my post from today (6/24) for the latest updates re: what's new and what I still have to do.
_______________
As to price, it'll be the same thing I try and pull off whenever I do stuff for friends:
Cost of materials and consumables and you buy me a coffee if we ever meet.
I'm thinking $20 plus shipping.
Thanks for your patience.
Chris
_____________
For those using or contemplating SpeedHut gauges, you'll find they are just a bit undersized compared to the stock gauges and require some sort of wrapping or spacer in order to fit well in the stock panel.
I opted to give a go to working up a replacement panel and as I was making it, I thought, while I'm cutting one, I could cut a few more, if there was interest.
This is V1 and it needs a couple minor tweaks, but you get the idea.
Note that it has a 90 degree fold along the bottom edge that I'll stretch so the panel curves a bit, like the factory part.
This one is .060 aluminum but I could do steel, too.
Would anyone be interested in one?
PM me, thanks,
Chris
Attached thumbnail(s)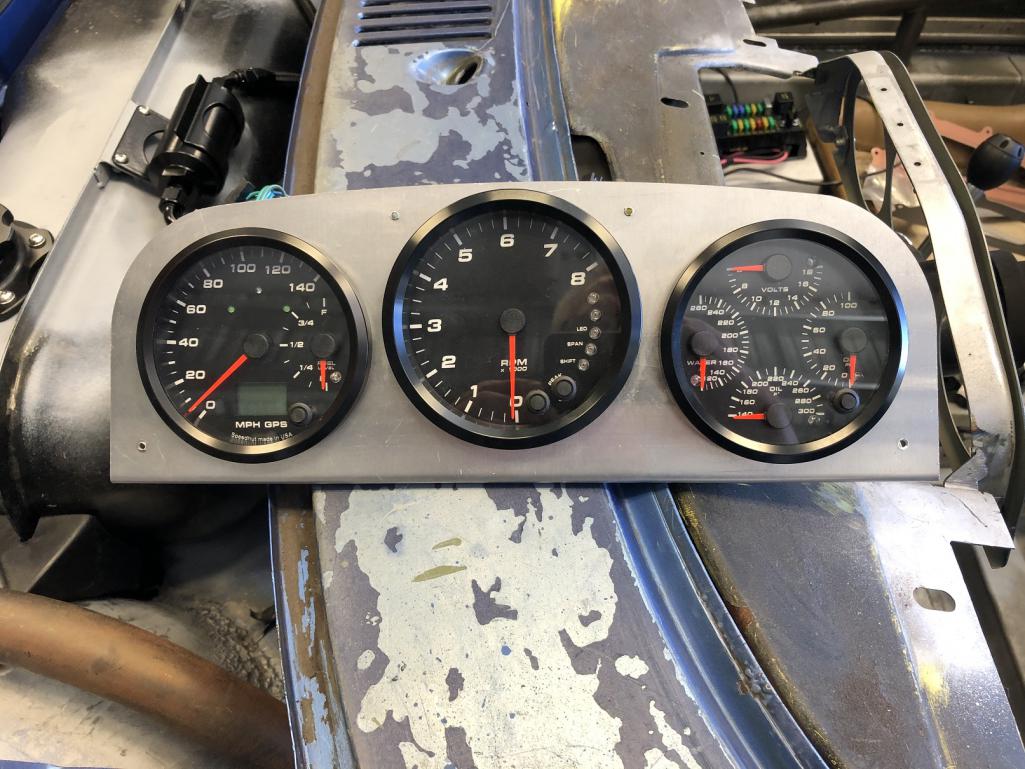
Posted by: Tdskip Jun 11 2020, 02:53 PM
Looks like a brand new / modern cluster. Neat.
Posted by: Rotary'14 Jun 11 2020, 03:49 PM
I'd be interested, how much do you plan on selling them for?
Posted by: GermermanCarGuy Jun 11 2020, 03:57 PM
I'd be interested, price dependent.
RobF
Posted by: flmont Jun 11 2020, 06:10 PM
I might need one.aswell
Posted by: ahycaramba Jun 11 2020, 07:46 PM
I am interested! Count me in please.
Posted by: Chris H. Jun 12 2020, 10:17 AM
Interested for sure! Been thinking about doing the same thing.
Posted by: 76-914 Jun 12 2020, 01:43 PM
Chris, I'm the "there's always one in the crowd" guy. I'd like one that uses just the Speed Hut Speedo as I use the other two OEM gages. I made my last one out of Aluminum but didn't have the capability to flange the opening so you can imagine what it looks like behind the panel. 
Posted by: pdlightning Jun 12 2020, 11:26 PM

For those using or contemplating SpeedHut gauges, you'll find they are just a bit undersized compared to the stock gauges and require some sort of wrapping or spacer in order to fit well in the stock panel.
I opted to give a go to working up a replacement panel and as I was making it, I thought, while I'm cutting one, I could cut a few more, if there was interest.
This is V1 and it needs a couple minor tweaks, but you get the idea.
Note that it has a 90 degree fold along the bottom edge that I'll stretch so the panel curves a bit, like the factory part.
This one is .060 aluminum but I could do steel, too.
Would anyone be interested in one?
PM me, thanks,
Chris
I would be interested also.PM sent
Posted by: tygaboy Jun 16 2020, 10:46 AM
To the interested parties who've already contacted me or posted here to date:
Apologies - this effort is on hold while I work through an issue I'm having with my plasma table. Hopefully, I can get it resolved quickly.
As to price, it'll be the same thing I try and pull off whenever I do stuff for friends:
Cost of materials and consumables and you buy me a coffee if we ever meet.
I'm thinking $20 plus shipping.
Thanks for your patience.
Chris
Posted by: Chris H. Jun 16 2020, 11:31 AM
Thanks for the update Chris. No rush at all, but I would love to have one.
Posted by: fiacra Jun 16 2020, 12:09 PM
To the interested parties who've already contacted me or posted here to date:
Apologies - this effort is on hold while I work through an issue I'm having with my plasma table. Hopefully, I can get it resolved quickly.
As to price, it'll be the same thing I try and pull off whenever I do stuff for friends:
Cost of materials and consumables and you buy me a coffee if we ever meet.
I'm thinking $20 plus shipping.
Thanks for your patience.
Chris
Chris,
As always, amazed at the work you do and your willingness to share your expertise, tools, and time with everyone else. Thanks for that. You've really paid it forward and I hope you will let us know if you ever need anything.
Posted by: tygaboy Jun 16 2020, 06:02 PM
@http://www.914world.com/bbs2/index.php?showuser=22920 - Thanks Broheen, you're too kind.
The good news is that ArcLight Dynamics (my table mfg) has awesome support and when I told them what I was struggling with, they said "OK, we'll e-mail you a quick 'how-to' that enables you to check/reset a value that should correct your issue..."
I ran the test and, sure enough, I needed to update the value that is key to correcting my issue.
I didn't have time to verify it with a test cut but I'm pretty confident I'll be back in business tomorrow!
I'll update this thread as I make progress on the panel design and fab.
Posted by: GregAmy Jun 16 2020, 07:58 PM
I have interest in two ways.
First, I have the tach for my race car. But I use data acq and a separate DASH-4 so I'd like one with only the center tach hole cut.
Second, I'm actually Ok with the stock speedo and combo gauge, but would like to add a Speedhut tach...how about one with the stock holes cut left and right but the smaller hole in the center for the Speedhut tach?
I'm curious on others' experience on the total cost, including sensors, for replacing the whole thing as in the first post?
Posted by: pdlightning Jun 16 2020, 09:42 PM
Chris, we appreciate your work and your desire to help the group out. I would gladly pay you more than asking because it saves me a lot of work!
I still want mine and again thanks!
Posted by: Jack Standz Jun 16 2020, 10:27 PM
Please include me for either aluminum or steel (plan to wrinkle powder coat anyway). Thanks very much I appreciate your generous offer.
Posted by: tygaboy Jun 24 2020, 05:35 PM
I've updated the outer panel shape and it now fits and looks better. I also moved the tach hole down a bit - I think it looks better with less space at the bottom.
I also remembered that the SpeedHut gauges offer a gauge lighting dimmer so I opted to add the dimmer knob to the front of the panel.
Others may want to mount it elsewhere so I can offer the panel with or without this hole.
Next, I'm going to stamp a small raised circular area around that knob, just to break up all the flatness of the panel. We'll see how I like that...
Anyway, here's a front and back shot as things stand now.
Attached thumbnail(s)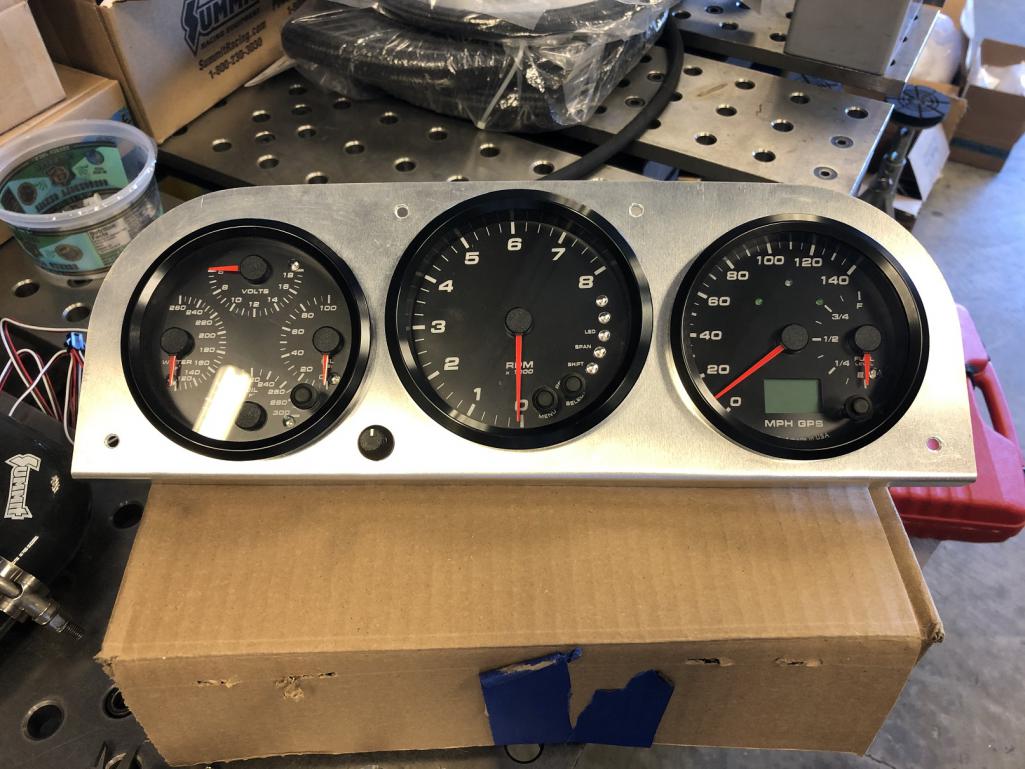
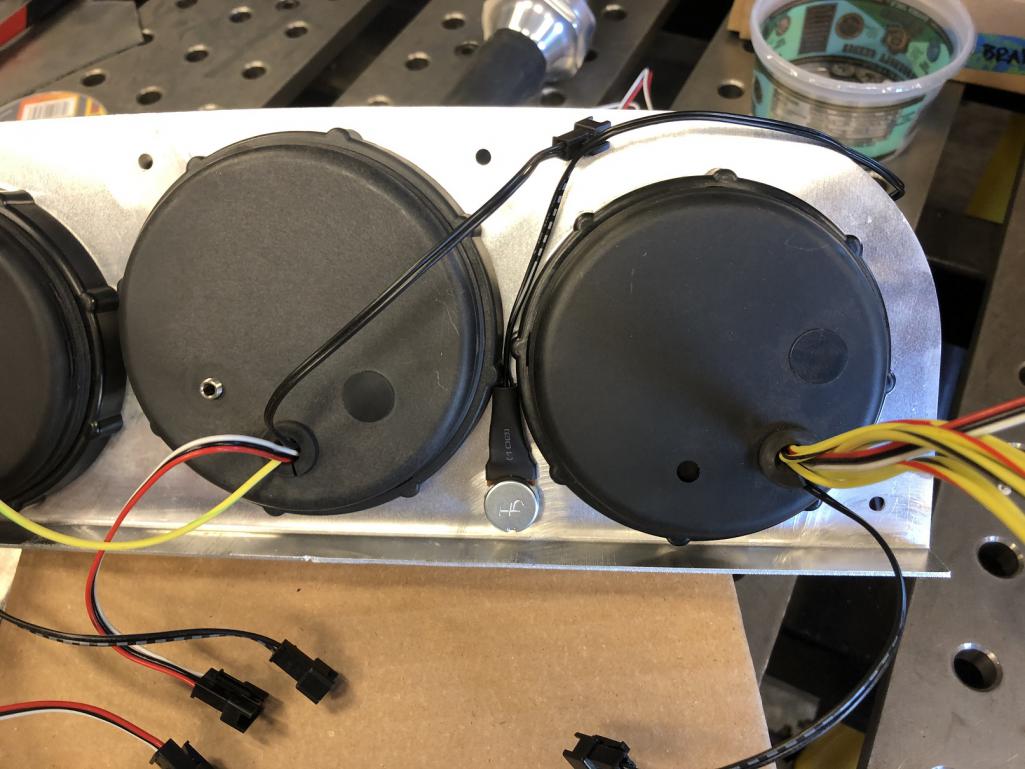
Posted by: tygaboy Jun 24 2020, 05:41 PM
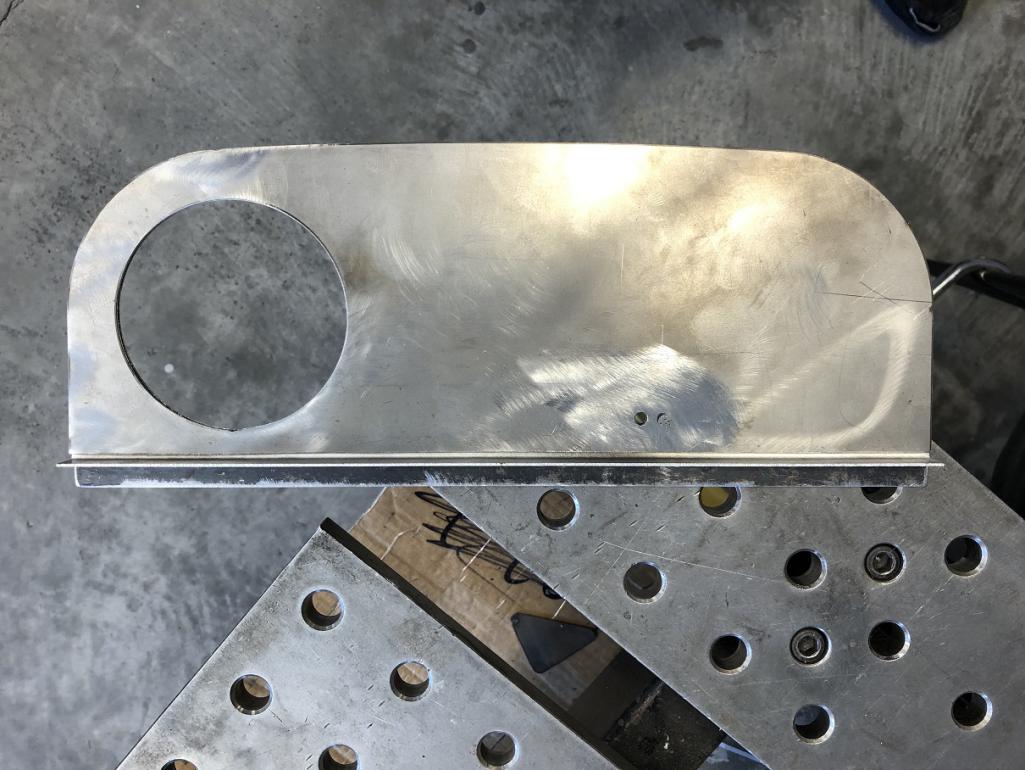
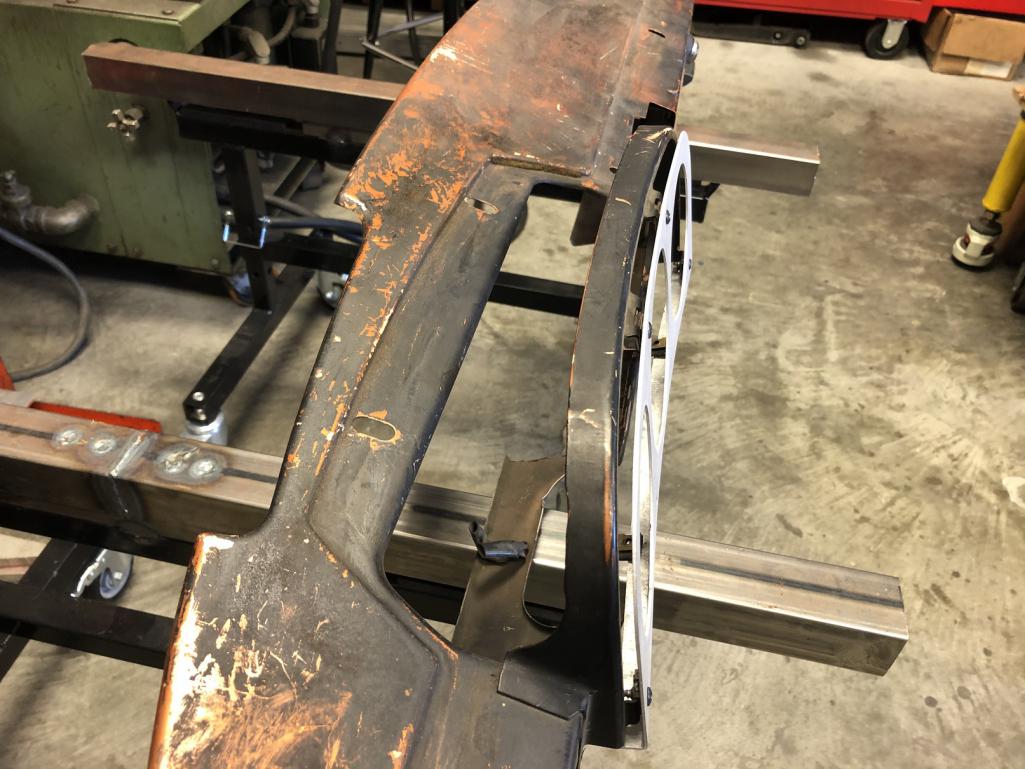
A bit of stretching to get things to sit nicely against the dash frame.
One item I still have to work up is a stamp/punch to set the recesses in the mounting holes so those stock tapered back screws sit nicely.
Though I could opt to use a nicer looking fastener and change out the stock screw plates for something else... 
Attached thumbnail(s)
Posted by: Cairo94507 Jun 24 2020, 06:22 PM
I have to say those gauges look so darn nice that if I had another 914 that would absolutely be the gauge panel and gauges for that car. 
Posted by: sixnotfour Jun 25 2020, 01:01 AM
Please include me for either aluminum or steel
Posted by: 76-914 Jun 25 2020, 11:53 AM
A bit of stretching to get things to sit nicely against the dash frame.
One item I still have to work up is a stamp/punch to set the recesses in the mounting holes so those stock tapered back screws sit nicely.
Though I could opt to use a nicer looking fastener and change out the stock screw plates for something else...
https://www.aircraftspruce.com/search/search.php?s=dimple%20dies%203/16
Posted by: tygaboy Jun 25 2020, 12:19 PM
A bit of stretching to get things to sit nicely against the dash frame.
One item I still have to work up is a stamp/punch to set the recesses in the mounting holes so those stock tapered back screws sit nicely.
Though I could opt to use a nicer looking fastener and change out the stock screw plates for something else...
https://www.aircraftspruce.com/search/search.php?s=dimple%20dies%203/16
@http://www.914world.com/bbs2/index.php?showuser=9964 OK, that's what I'm talking about! Thanks for the lead!
Posted by: tygaboy Jun 25 2020, 12:21 PM
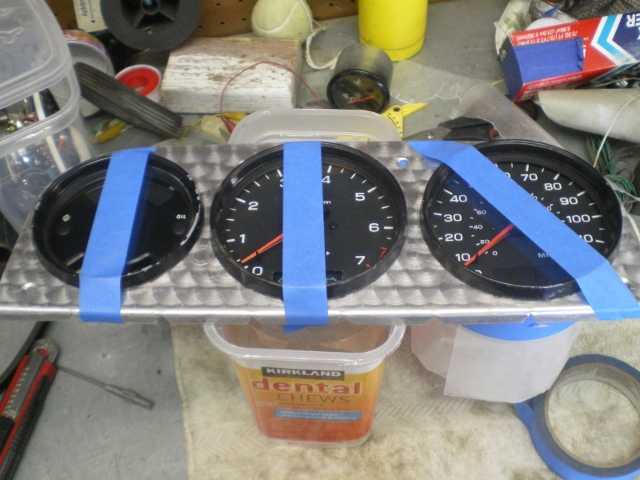
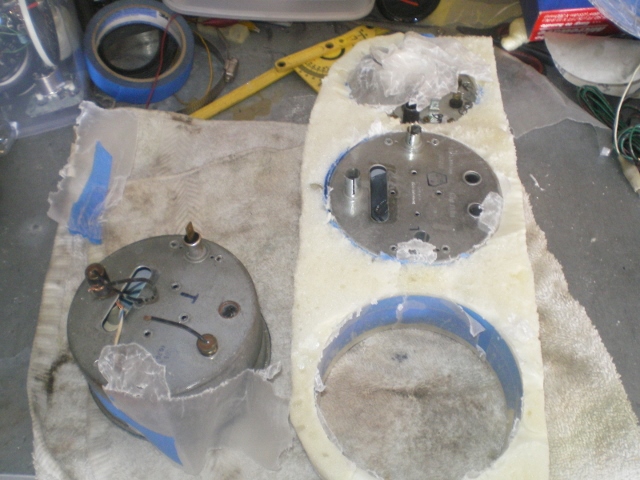
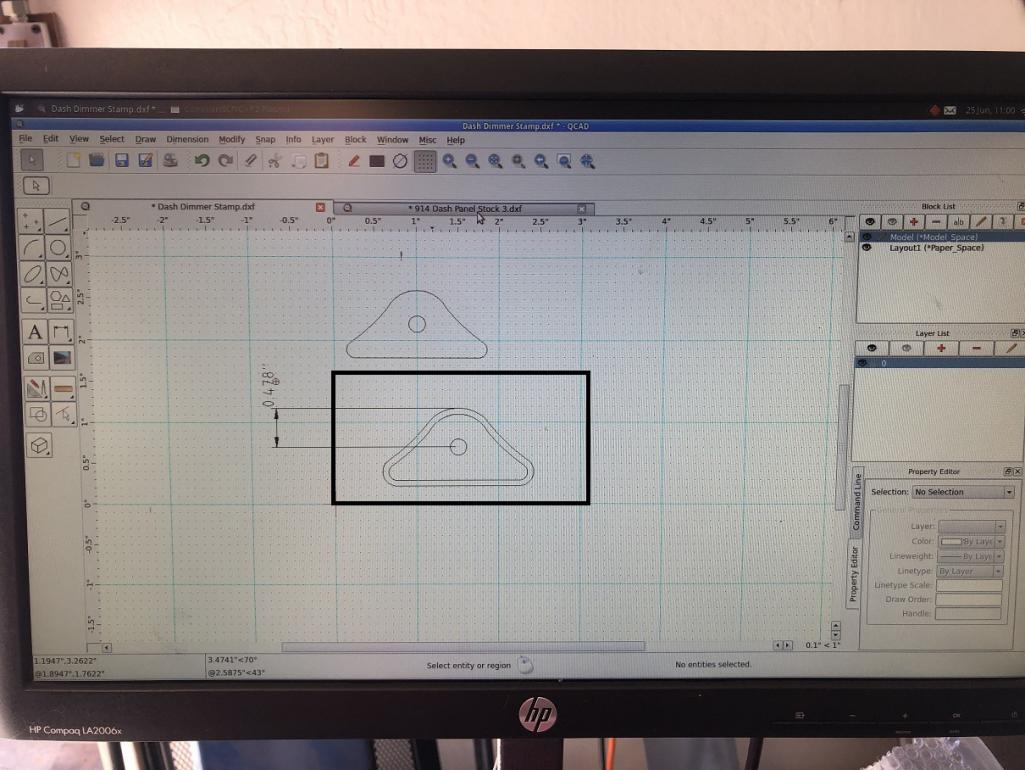
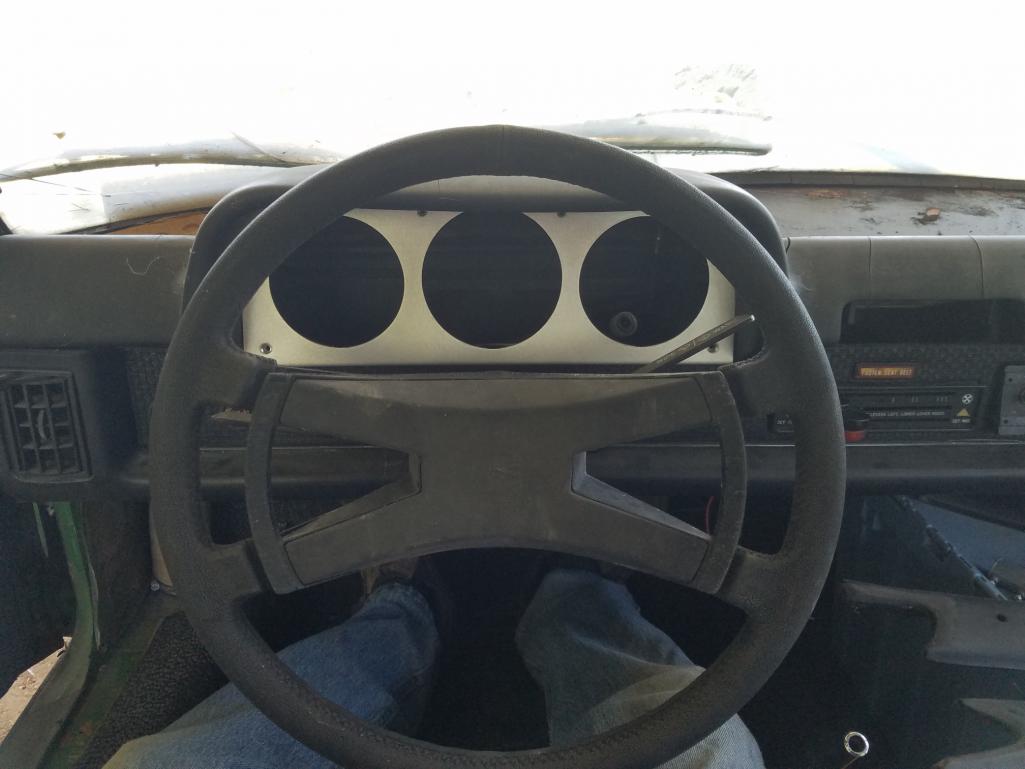
Something I want to be sure and point out is that while the tach is essentially centered in the same place as the stock tach, I moved the outer gauges down and in a bit. This make it easier to see more of the gauges, especially for those of us with aftermarket steering wheels that have thicker rims and smaller diameters.
Here's a comparison with the stock panel set on top of mine.
Attached thumbnail(s)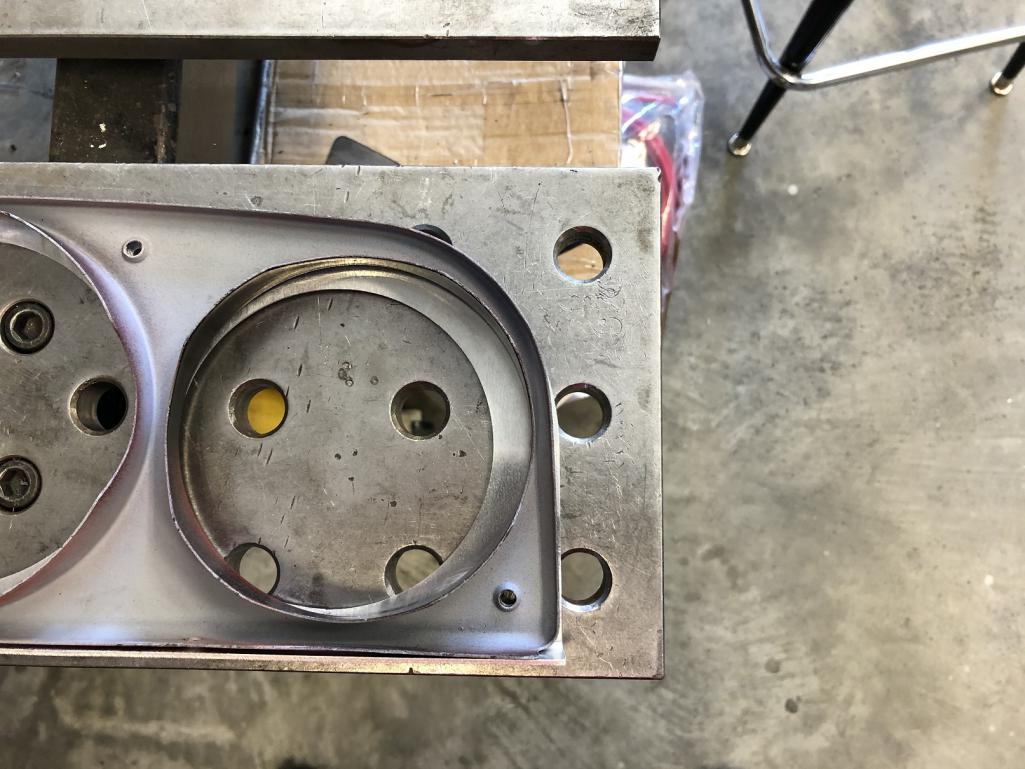
Posted by: tygaboy Jun 25 2020, 12:24 PM
Why, oh why do I seem unable to keep things simple? 
I figured I'd go for a few more style points and rather than raise a circle around the dimmer knob, I went with this.
Attached thumbnail(s)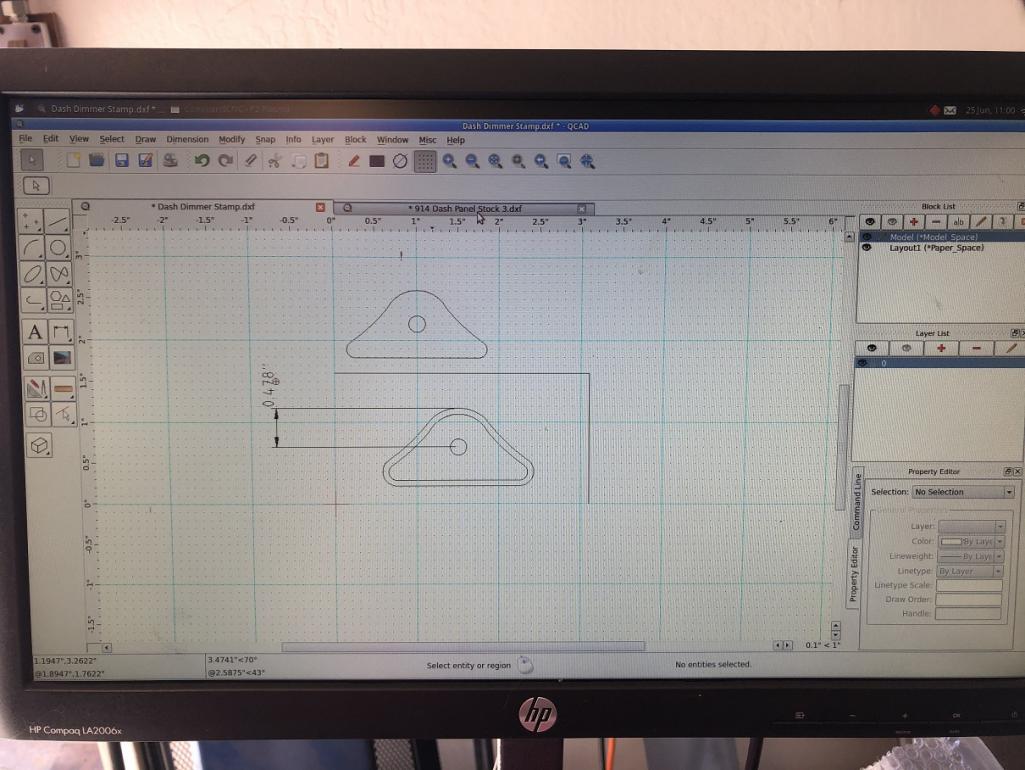
Posted by: tygaboy Jun 25 2020, 12:27 PM
I ended up with a small flaw in one of the dies so there's a hiccup at the 1:00-ish position of the stamped area. It's more visible in the next pic.
I may be able to address it with a bit of careful filing.
But I think I'll end up redoing the die set and making a whole new panel because:
Tygaboy...
The panel is totally serviceable so I'm happy to offer it to someone willing to live with this horror!
Attached thumbnail(s)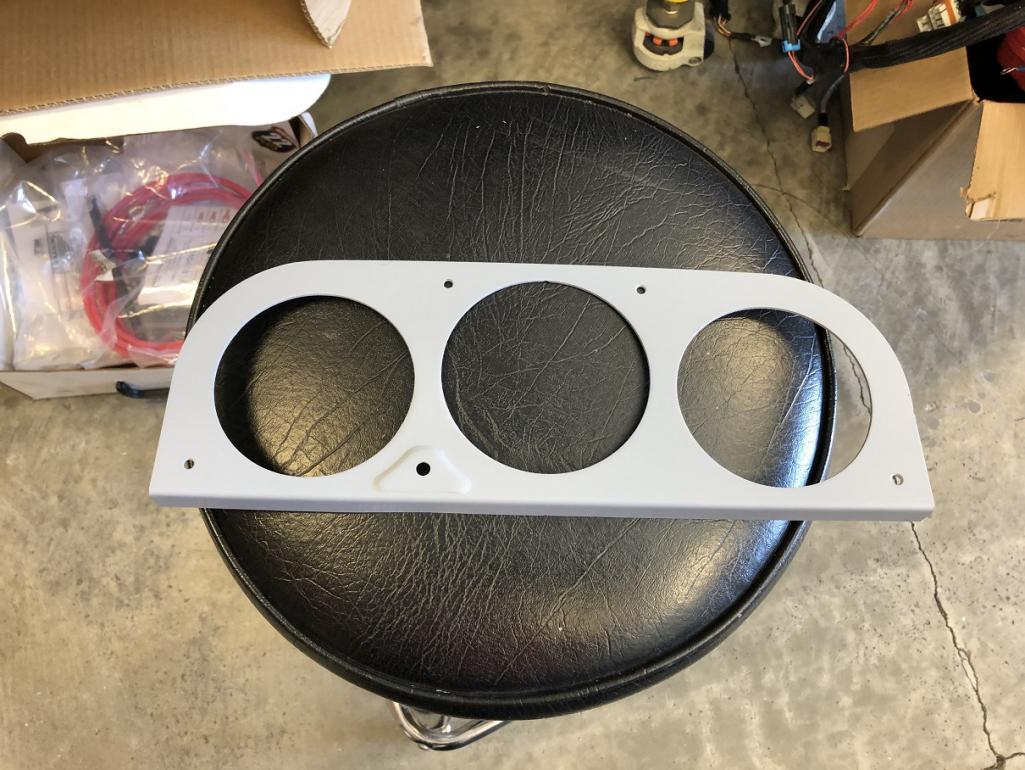
Posted by: tygaboy Jun 25 2020, 12:29 PM
Then I gave it a squirt of SEM trim black and assembled everything.
I will say, I think it looks pretty good, that one flaw aside. That raised area is the sort of thing that most folks won't even notice and is the very reason I think it's such a neat little detail.
Note: Stamping the raised area for the dimmer is a real fiddly process. So unless the solution I use to make my personal panel turns out to be reliable and repeatable, it likely won't be practical for me to offer this feature.
Fingers crossed I can pull it off.
Attached thumbnail(s)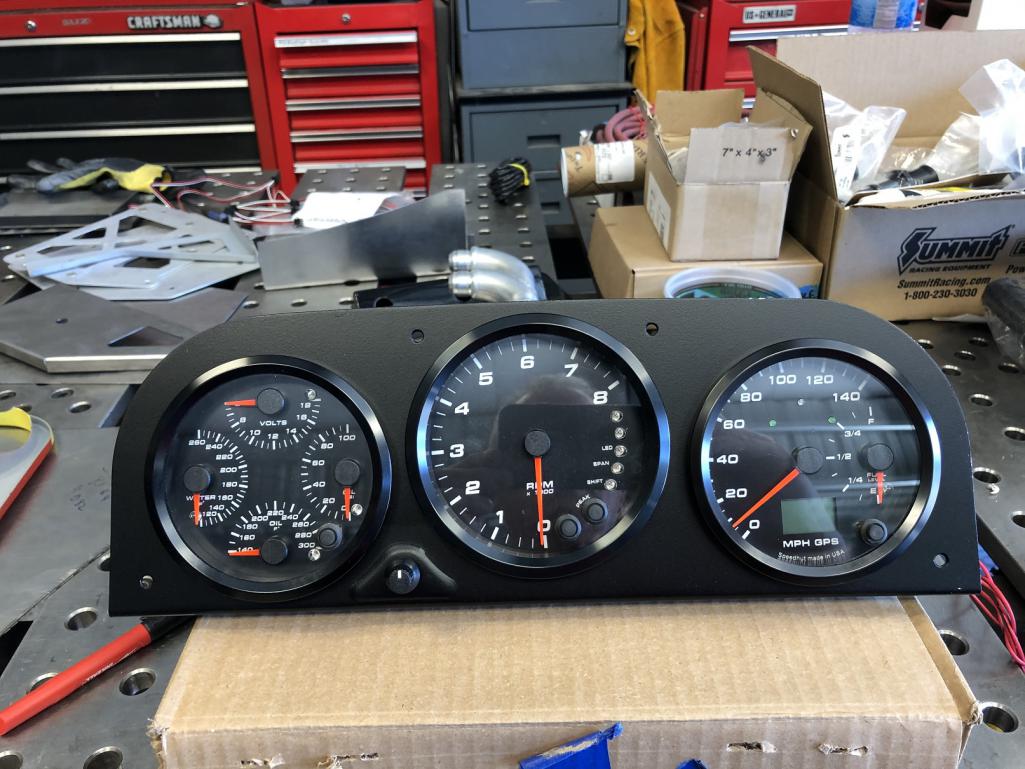
Posted by: dakotaewing Jun 26 2020, 09:24 PM
Then I gave it a squirt of SEM trim black and assembled everything.
I will say, I think it looks pretty good, that one flaw aside. That raised area is the sort of thing that most folks won't even notice and is the very reason I think it's such a neat little detail.
Note: Stamping the raised area for the dimmer is a real fiddly process. So unless the solution I use to make my personal panel turns out to be reliable and repeatable, it likely won't be practical for me to offer this feature.
Fingers crossed I can pull it off.
DAMN!
I'm in -
Tell me where to send my money!
Posted by: pdlightning Jun 26 2020, 09:34 PM
Then I gave it a squirt of SEM trim black and assembled everything.
I will say, I think it looks pretty good, that one flaw aside. That raised area is the sort of thing that most folks won't even notice and is the very reason I think it's such a neat little detail.
Note: Stamping the raised area for the dimmer is a real fiddly process. So unless the solution I use to make my personal panel turns out to be reliable and repeatable, it likely won't be practical for me to offer this feature.
Fingers crossed I can pull it off.
That looks great, those Are the same gauges I purchased and we appreciate you doing this! Thanks
Posted by: no1uno Jun 27 2020, 06:54 AM
Please add me to the list.
Posted by: Cairo94507 Jun 27 2020, 04:31 PM
That gauge set and bezel look so good I want to get one and cut it into the top of my desk....and it ain't a cheap desk.
Posted by: kid914 Jun 27 2020, 04:43 PM
I've updated the outer panel shape and it now fits and looks better. I also moved the tach hole down a bit - I think it looks better with less space at the bottom.
I also remembered that the SpeedHut gauges offer a gauge lighting dimmer so I opted to add the dimmer knob to the front of the panel.
Others may want to mount it elsewhere so I can offer the panel with or without this hole.
Next, I'm going to stamp a small raised circular area around that knob, just to break up all the flatness of the panel. We'll see how I like that...
Anyway, here's a front and back shot as things stand now.
Where are those gauges from?
Posted by: Gearup Jun 27 2020, 08:55 PM
I’m in. I have 2 speedhut 4 inch gauge and the center tach is 4.5 speedhut. If that’s your dimensions I definately want one. Brett
Posted by: tygaboy Jun 28 2020, 09:56 AM
I've updated the outer panel shape and it now fits and looks better. I also moved the tach hole down a bit - I think it looks better with less space at the bottom.
I also remembered that the SpeedHut gauges offer a gauge lighting dimmer so I opted to add the dimmer knob to the front of the panel.
Others may want to mount it elsewhere so I can offer the panel with or without this hole.
Next, I'm going to stamp a small raised circular area around that knob, just to break up all the flatness of the panel. We'll see how I like that...
Anyway, here's a front and back shot as things stand now.
Where are those gauges from?
@http://www.914world.com/bbs2/index.php?showuser=12811 @http://www.914world.com/bbs2/index.php?showuser=18660 They are from SpeedHut. 4.5" tach, 4" speedo and quad. Check out their site - they offer a lot of great options.
Posted by: Chris H. Jun 29 2020, 06:31 AM
DAMN!
I'm in -
Tell me where to send my money!
Yeah that looks GREAT! Excellent idea adding the dimmer. Just tell us when/where to send money!
Posted by: tygaboy Jul 5 2020, 07:05 PM
So I went all in and made a stamping die set so I can reliably create the dimmer knob element. What can I say? I love you guys and want to provide a nice piece so what the heck...
Here's the die set and an earlier version panel I "repaired" with it. It's not perfect but you get the idea.
Attached thumbnail(s)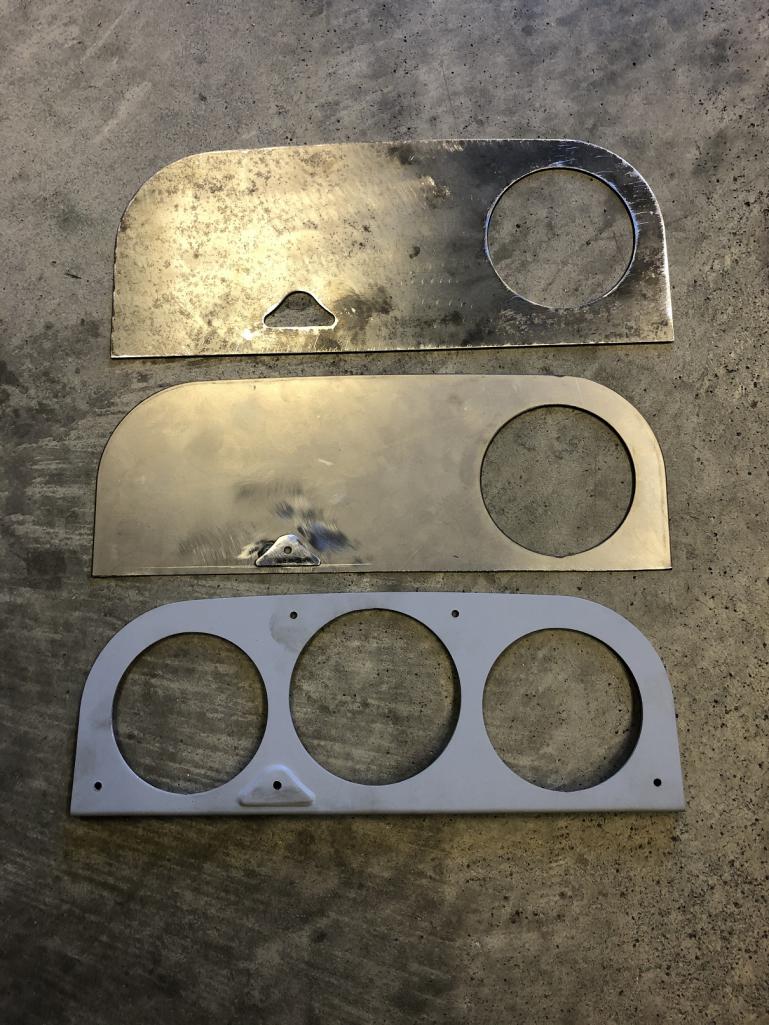
Posted by: tygaboy Jul 5 2020, 07:13 PM
Each of these three panels have some sort of flaw so I'm willing to part with them for cost of shipping.
You can have one of these OR wait a bit and for $20 plus shipping, you can have a "good" one.
PM me and it'll be first come, first served for this lot.
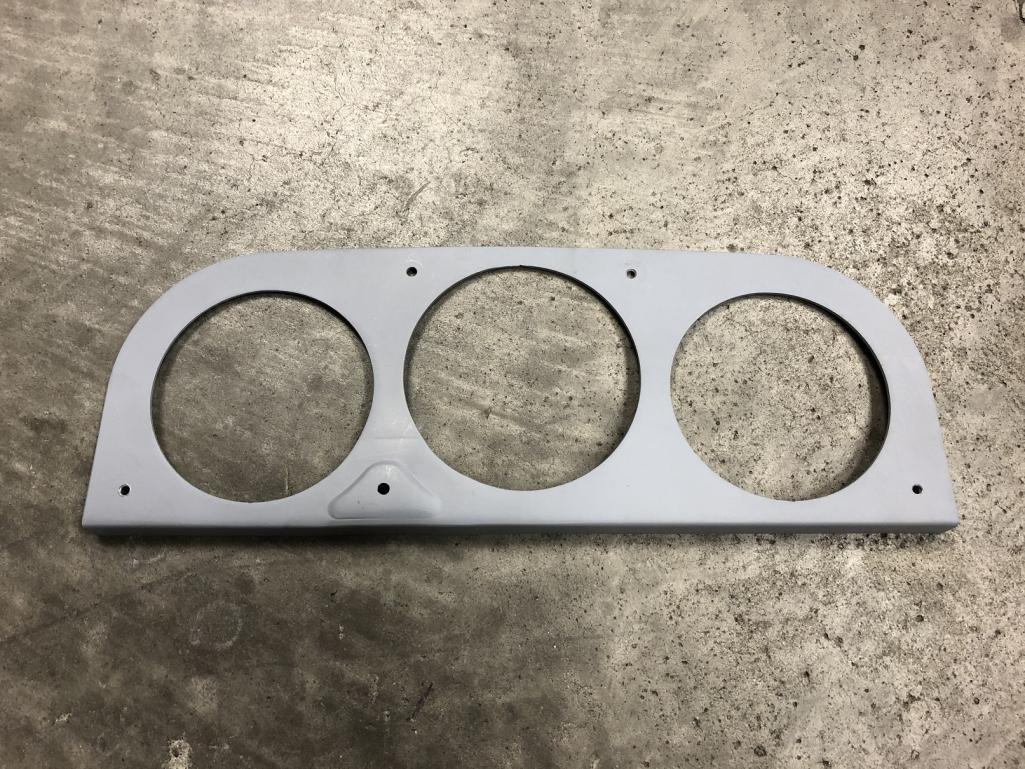
#1, the black one with no gauges in it: the dimmer knob stamp isn't even around it's perimeter.
#2, the grey one with no gauges: you can see it's got a small crease above the dimmer area and the stamping itself isn't great. What do you expect for free? 
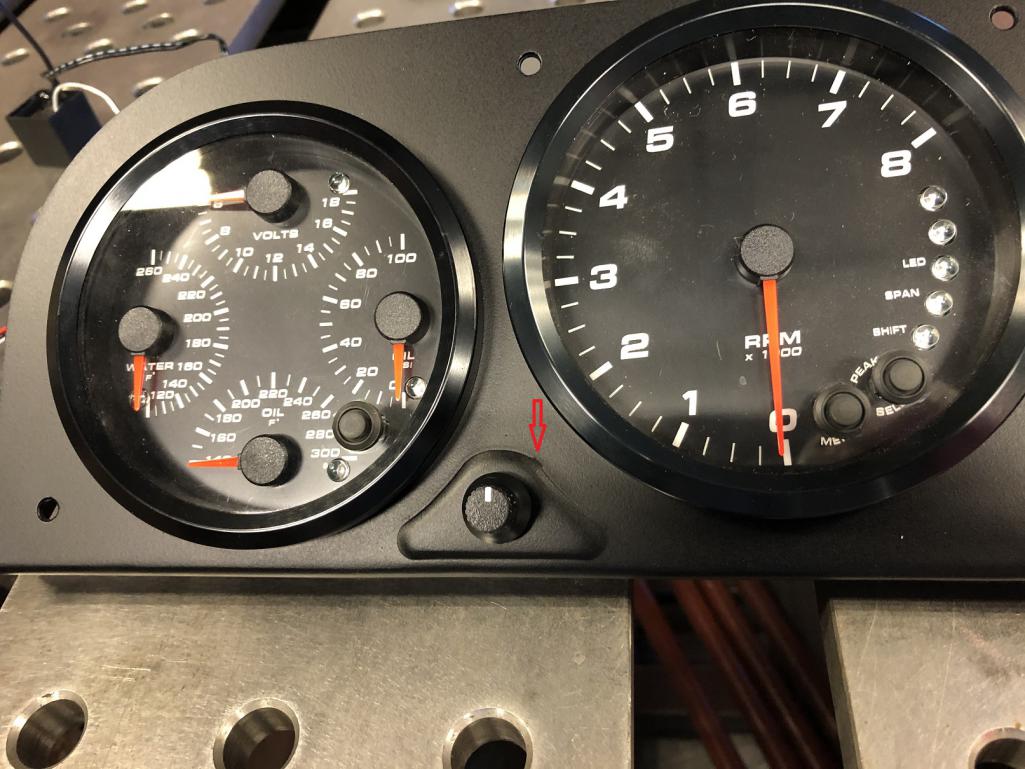
#3, the black one with gauges (no, they aren't included) has a hiccup at the 1:30-ish position of the dimmer knob area, called out by the red arrow.
Attached thumbnail(s)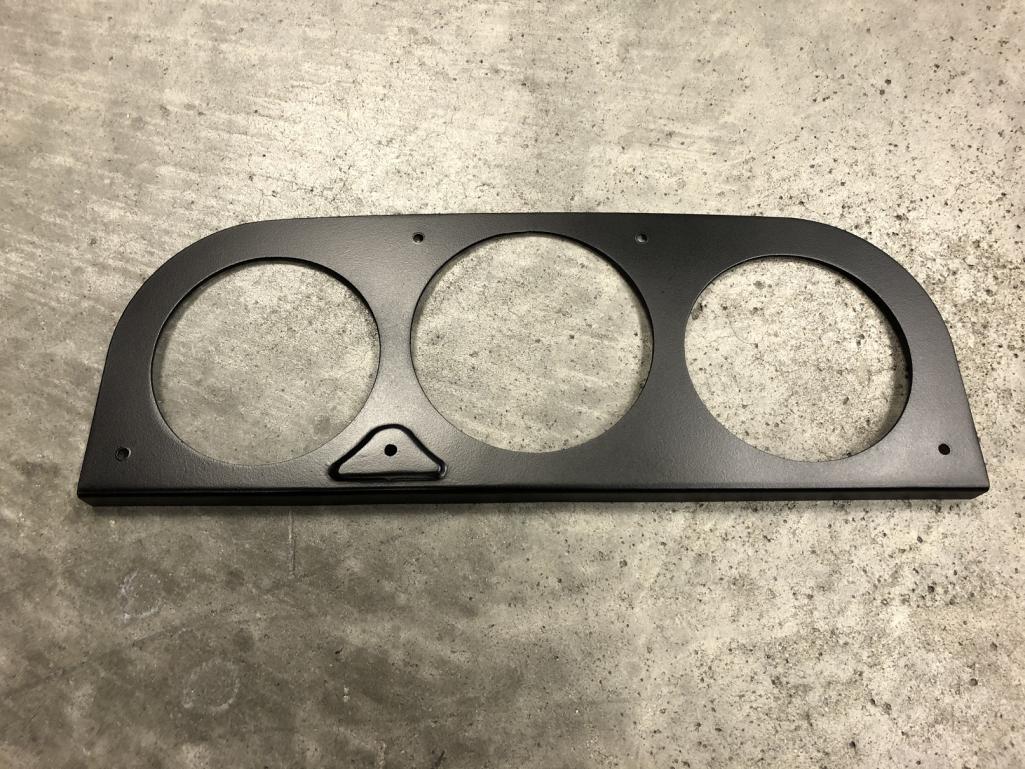
Posted by: 76-914 Jul 5 2020, 07:21 PM
Just curious. What stumbling blocks, if any, were incurred during the development phase Chris? e.g warpage, distortion, etc. What is used for pressing the dies together? Vise, hammer, press? Something tells me a few hours went into making the dies. Nice job.
Posted by: ValcoOscar Jul 5 2020, 08:13 PM
@http://www.914world.com/bbs2/index.php?showuser=19241
Sweet Chris 
D'MAN OF THE DAY 
Oscar
Posted by: tygaboy Jul 5 2020, 09:25 PM
Just curious. What stumbling blocks, if any, were incurred during the development phase Chris? e.g warpage, distortion, etc. What is used for pressing the dies together? Vise, hammer, press? Something tells me a few hours went into making the dies. Nice job.
@http://www.914world.com/bbs2/index.php?showuser=9964 Kent - All three panels pictured were done with the "quick & dirty" die set pictured below. It's too small (which allowed its edges to damage the panel, as in #2, above). It required manual positioning of both pieces on either side of the panel so it was a total crap shoot that things would turn out well... hence the freebie panels with the various issues.
I should know better by now that, getting lucky aside, if I want a quality result, I need to do what I know works: build a die set that is the same size as the panel.
Note that on the male side of this "full size" die set, I welded the dimmer area stamp to its panel. With the die set and the panel all cut to the exact same shape, it's easy to be sure everything is aligned and I get the best result.
As to warpage or distortion, I get none! Why? I use a powered H press and a sizable set of aluminum plates on both sides of the dies. It stamps the shape and flattens any distortion as it completes it's cycle.
When I make the next panel, I'll video the whole process and post it so you can see how it all works.
Attached thumbnail(s)
Posted by: 76-914 Jul 5 2020, 09:41 PM
Just curious. What stumbling blocks, if any, were incurred during the development phase Chris? e.g warpage, distortion, etc. What is used for pressing the dies together? Vise, hammer, press? Something tells me a few hours went into making the dies. Nice job.
@http://www.914world.com/bbs2/index.php?showuser=9964 Kent - All three panels pictured were done with the "quick & dirty" die set pictured below. It's too small (which allowed its edges to damage the panel, as in #2, above). It required manual positioning of both pieces on either side of the panel so it was a total crap shoot that things would turn out well... hence the freebie panels with the various issues.
I should know better by now that, getting lucky aside, if I want a quality result, I need to do what I know works: build a die set that is the same size as the panel.
Note that on the male side of this "full size" die set, I welded the dimmer area stamp to its panel. With the die set and the panel all cut to the exact same shape, it's easy to be sure everything is aligned and I get the best result.
As to warpage or distortion, I get none! Why? I use a powered H press and a sizable set of aluminum plates on both sides of the dies. It stamps the shape and flattens any distortion as it completes it's cycle.
When I make the next panel, I'll video the whole process and post it so you can see how it all works.
![popcorn[1].gif](style_emoticons/default/popcorn[1].gif) Interested in seeing that. Thx
Interested in seeing that. Thx
Posted by: Gearup Jul 5 2020, 10:38 PM
Tygaboy,
I want one in black.
I already have the 2 4 inch speedhut and 1
41/2. Let me know where to send the money.
Brett
Posted by: tygaboy Jul 6 2020, 11:00 AM
@http://www.914world.com/bbs2/index.php?showuser=9964 - Kent , here's an overview of the process, complete with some exciting video!
First, here's the assembly order, top to bottom:
- male die
- panel
- female die
Then, the assembly aligned, using the dimmer hole and the one gauge hole.
This isn't a perfect "indexing" set up so there is some opportunity for minor alignment error.
But isn't that part of the beauty of "handmade"?
Attached thumbnail(s)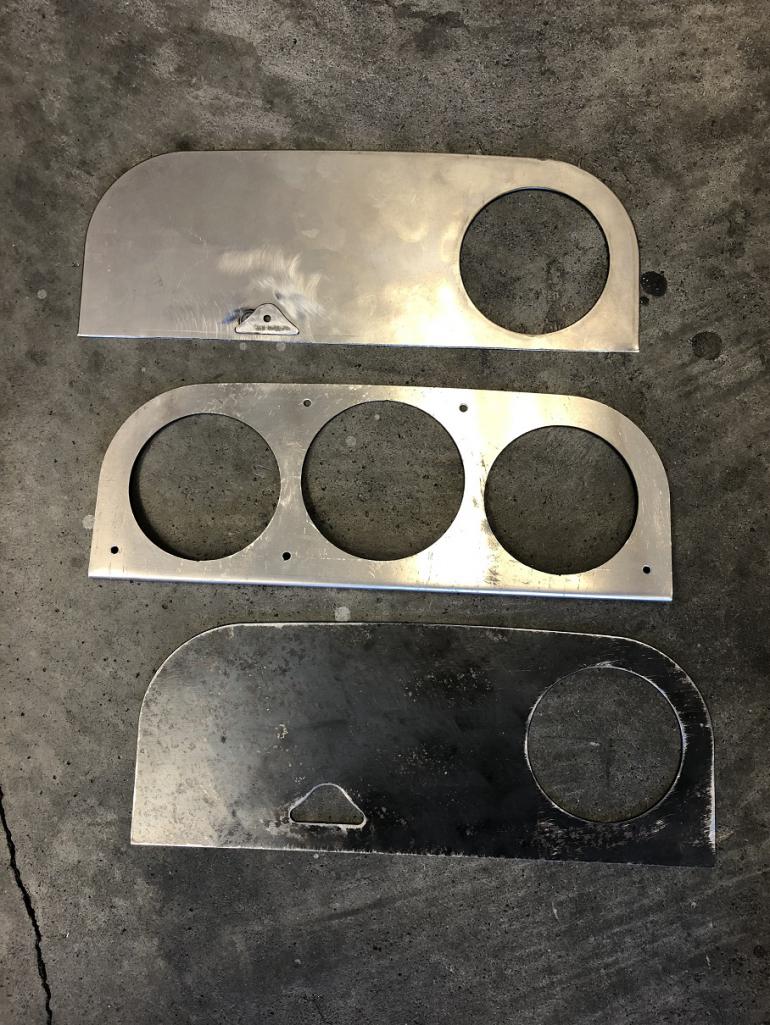
Posted by: tygaboy Jul 6 2020, 11:02 AM
For anyone who may be interested, let me back up and show you the plasma table in action, wrapping up the final cuts on the latest panel.
https://www.youtube.com/watch?v=7u-BEwS66oo
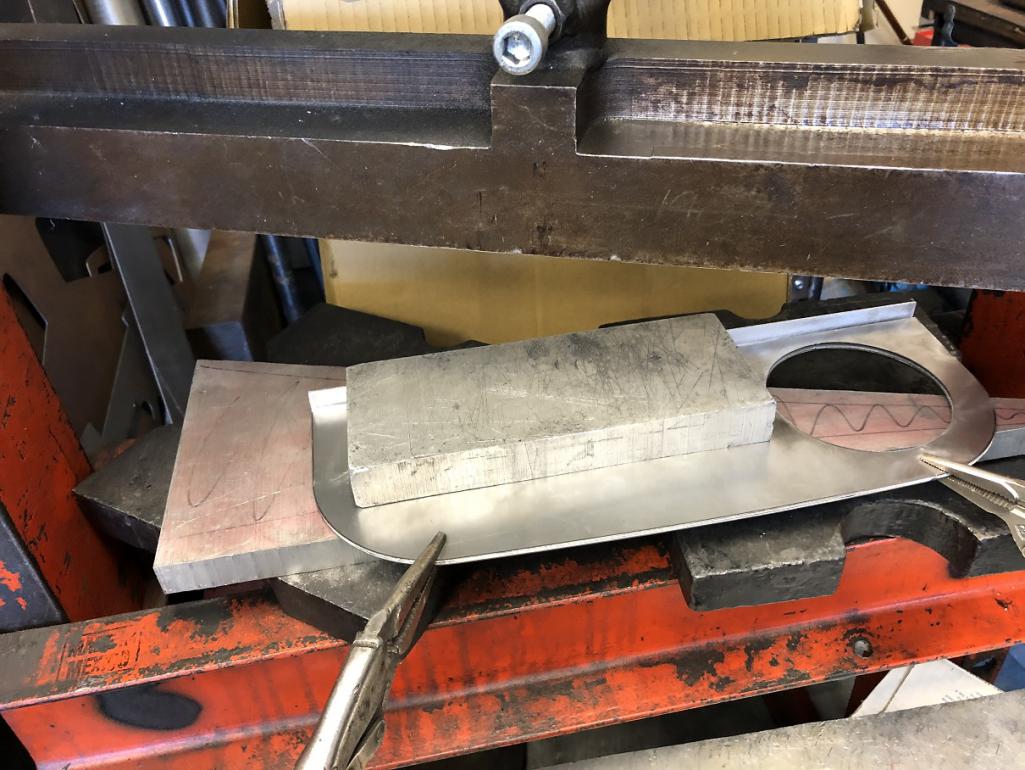
Posted by: tygaboy Jul 6 2020, 11:07 AM
I use a couple Vice Grips to hold things in place. Into the press it goes, then I set the aluminum block on top of the area that will be pressed.
This all but guarantees there's no distortion anywhere on the panel as it mashes everything back to flat.
Oh, and don't forget to be sure the blocks are tall enough to clear any flanges AND that you don't get one of the Vice Grips in a spot where they'll be part of the stamping area.
Ask me how I learned those lessons... 
Attached thumbnail(s)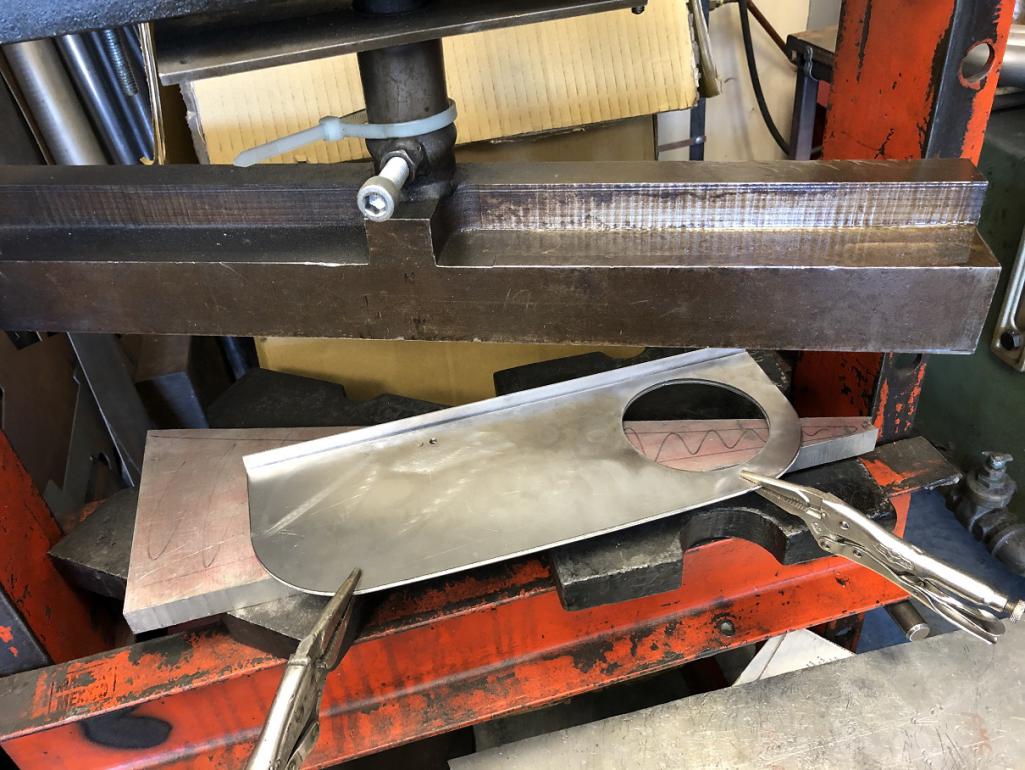
Posted by: tygaboy Jul 6 2020, 11:08 AM
Here's the pressing process and the result. It works like a charm!
https://www.youtube.com/watch?v=QmlvB9JlPZw
Posted by: tygaboy Jul 6 2020, 11:11 AM
A trip to the stretcher to get the needed curve so it sits nicely against the dash frame, a lick of paint and:
I tried to get the pic to really show the dimmer stamp area.
I think I can live with this version.
Hope you enjoyed the details about how I make these panels.
Attached thumbnail(s)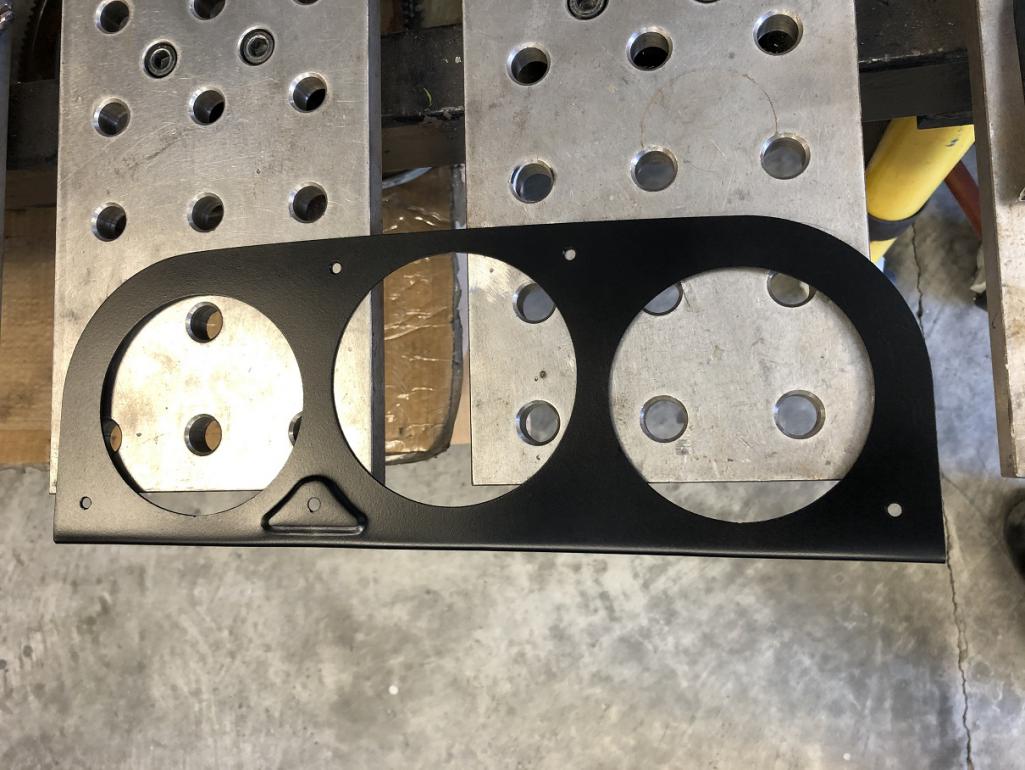
Posted by: 76-914 Jul 6 2020, 11:28 AM
Loved the videos! Thx Chris, you've satisfied my curiosity for the moment. 
Posted by: 76-914 Jul 6 2020, 11:29 AM
For anyone who may be interested, let me back up and show you the plasma table in action, wrapping up the final cuts on the latest panel.
https://www.youtube.com/watch?v=7u-BEwS66oo
That cutter is the Cat's Meow.

Posted by: Gearup Jul 21 2020, 03:52 PM
Then I gave it a squirt of SEM trim black and assembled everything.
I will say, I think it looks pretty good, that one flaw aside. That raised area is the sort of thing that most folks won't even notice and is the very reason I think it's such a neat little detail.
Note: Stamping the raised area for the dimmer is a real fiddly process. So unless the solution I use to make my personal panel turns out to be reliable and repeatable, it likely won't be practical for me to offer this feature.
Fingers crossed I can pull it off.
Must have One. I have the same gauges. Beautiful work
Posted by: pploco Oct 1 2020, 11:30 AM
Hi Chris, if it's not too late I'll take one too.
Posted by: dakotaewing Oct 1 2020, 07:47 PM
I would really like one too !?
PM works good to discuss -
Posted by: Tdskip Oct 1 2020, 09:35 PM
What an awesome thread!
Posted by: 914-300Hemi Oct 1 2020, 09:49 PM
I would like one in black.
Posted by: Alain V. Oct 2 2020, 09:12 AM
If I'm not too late,,,,,
I'll buy one in aluminum from ya. (painted black is fine)
This will work great for my speedhuts, when I do my subie conversion on my 72.
Posted by: anglophone1 Oct 2 2020, 04:05 PM
I have the same Sppedhut tach ( with a custom dial ) in my 911 hot rod- shift light is very cool!
I have just bought a 914 as my birthday present and would be very interested in this setup for it.
More info- prices etc. Please!
C
Posted by: anglophone1 Oct 2 2020, 04:06 PM
I have the same Sppedhut tach ( with a custom dial ) in my 911 hot rod- shift light is very cool!
I have just bought a 914 as my birthday present and would be very interested in this setup for it.
More info- prices etc. Please!
C
Posted by: anglophone1 Oct 2 2020, 04:07 PM
I have the same Sppedhut tach ( with a custom dial ) in my 911 hot rod- shift light is very cool!
I have just bought a 914 as my birthday present and would be very interested in this setup for it.
More info- prices etc. Please!
C
Posted by: anglophone1 Oct 2 2020, 04:11 PM
Sorry about last duplicate posts- can’t work out how to delete
Posted by: pdlightning Mar 15 2021, 04:26 PM
Please include me for either aluminum or steel
Greetings Chris. Wondered how the gauge panels are coming?
I would be willing to drive and pick one up from you!

Thanks for your great work and I love the dimmer knob addition.
Mike
Posted by: Curbandgutter Mar 16 2021, 11:32 AM
Hey Chris great work! There's alot of thinking that went into that seemingly simple looking piece. Couple of questions ( well 3 1/2 actually): 1) Did you do the stretching and shrinking before or after opening the hole for the gauges? 2) what procedure did you use to flange the inside of the gauges? Did you use a huge dimple die? 3) did you use the tipping die to get the flange along the perimeter of the guage cluster? (3-1/2) If so, how did you deal with the distortion? I asking since I was planning on doing my gauge cluster out of aluminum but for the Getty dash? Thanks in advance.
Posted by: Curbandgutter Mar 16 2021, 11:36 AM
Hey Chris great work!
There's alot of thinking that went into that seemingly simple looking piece. Couple of questions ( well 3 1/2 actually): 1) Did you do the stretching and shrinking before or after opening the hole for the gauges? 2) what procedure did you use to flange the inside of the gauges? Did you use a huge dimple die? 3) did you use the tipping die to get the flange along the perimeter of the guage cluster? (3-1/2) If so, how did you deal with the distortion? I asking since I was planning on doing my gauge cluster out of aluminum but for the Getty dash? Thanks in advance.Never mind on questions 2, 3 and 3 1/2. I just noticed that I was looking at the back side of the factory piece.
Posted by: tygaboy Mar 16 2021, 06:30 PM
Hey Chris great work!
There's alot of thinking that went into that seemingly simple looking piece. Couple of questions ( well 3 1/2 actually): 1) Did you do the stretching and shrinking before or after opening the hole for the gauges? 2) what procedure did you use to flange the inside of the gauges? Did you use a huge dimple die? 3) did you use the tipping die to get the flange along the perimeter of the guage cluster? (3-1/2) If so, how did you deal with the distortion? I asking since I was planning on doing my gauge cluster out of aluminum but for the Getty dash? Thanks in advance.Never mind on questions 2, 3 and 3 1/2. I just noticed that I was looking at the back side of the factory piece.
@http://www.914world.com/bbs2/index.php?showuser=15637 Rudy, I do all the hole cutting, then bend the flange along the lower edge, then stamp, then shrink/stretch the flange as needed.
Posted by: tygaboy Mar 16 2021, 06:37 PM
NOTE TO ALL PARTIES interested in one of these panels:
Apologies, guys. I let this effort get put on a back burner. My 914 build, helping on a buddy's race car, and now my own RacerBenz build, have sucked me in pretty deep. Not trying to make excuses, just telling you what's up.
It seems there's a lot of interest so give me a bit and I'll do a run of these. I'll fill the requests in order your replies were posted. I can't promise everyone will get one, let's see how my time plays out. Thanks in advance for understanding.
Chris
Posted by: GregAmy Mar 16 2021, 08:09 PM
What are you kids doing for turn signal and high beam indicators with these tachs? Just dropping an LED somewhere in the panel? Just going without?
Posted by: Chris H. Mar 16 2021, 08:57 PM
Hey Greg,
The Speedhut speedo has turn signals and high beam indicators in it.
Posted by: GregAmy Mar 17 2021, 07:43 AM
Ah, OK. I'm just doing the tach (stock panel).
I'll drill in some small LEDs.
Posted by: GregAmy May 20 2021, 03:27 PM
Quick follow up.
I bought some LEDs off eBay and made my own warnings after replacing the tach with a Speedhut.
- Red - oil pressure (I have no idea why Porsche decided to use GREEN for oil pressure)
- Yellow - GEN failure
- Blue - Brights
- Green - turn signals
https://www.amazon.com/gp/product/B01AHQJ06G
Works great.
I may do a Speedhut speedometer, but not really wanting to spend that coin right now...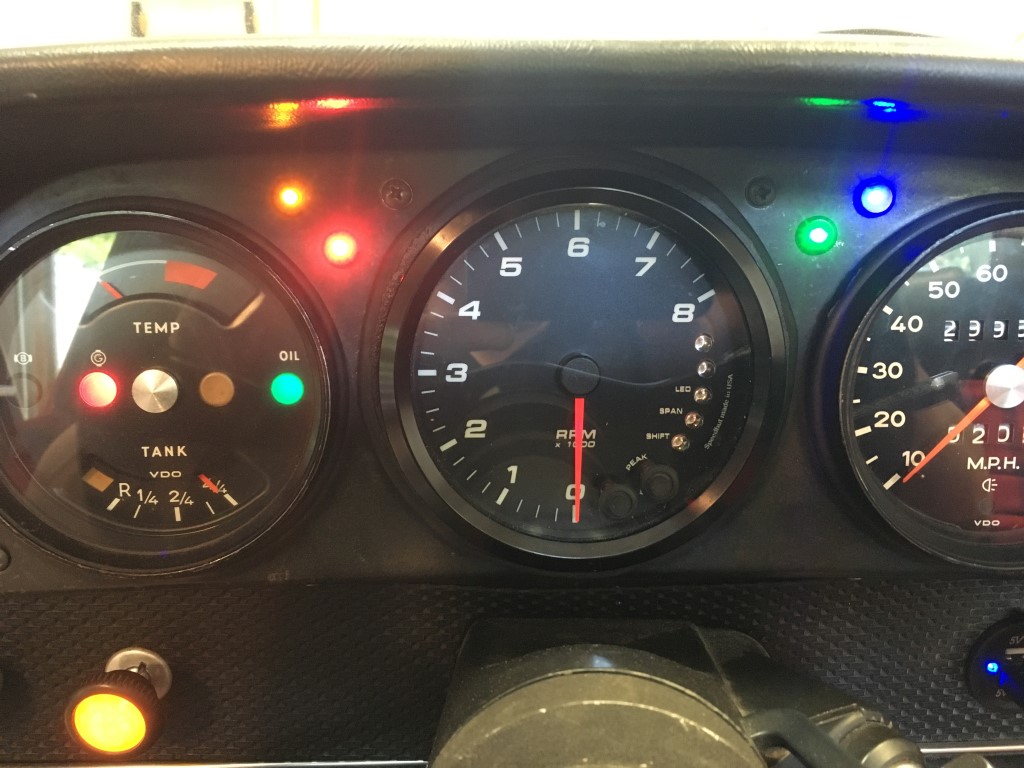
Posted by: AZBanks May 20 2021, 06:19 PM
I'll take 2 if you get time to make them. Aluminum is my preference but I'd be happy with steel if that's what you have available.
Posted by: tygaboy Jun 6 2021, 05:13 PM
While I had the plasma table fired up to make a new gauge panel for the Holley digital dash, I figured I may as well make as many of the SpeedHut panels as the material would support.
Six will be available. Three have the hole for the dimmer, three don't. I figured some folks may not want to mount the dimmer in the dash, others would.
One has a flaw (a gack in the edge, pointed out in the pic) on what will be the tipped flange. This flaw can't be see once installed but I'll knock off $10 for that one.
Anyway...
If you're still interested, I should have these ready to go in a week or so.
- these are .063 3003 aluminum
- they will not be painted
- they do not have the raised stamping for the dimmer
- they are set up for a 4.5" center gauge, 4" outer gauges
$35 plus shipping from 94952.
Yes, I'd said $20 earlier but that was a year ago and I was being too generous with my time and consumables. Just be thankful I'm not making them out of wood. 
Let me know if you're interested. I'll probably make more once I get more material.
Thanks again for your patience.
Chris
Attached thumbnail(s)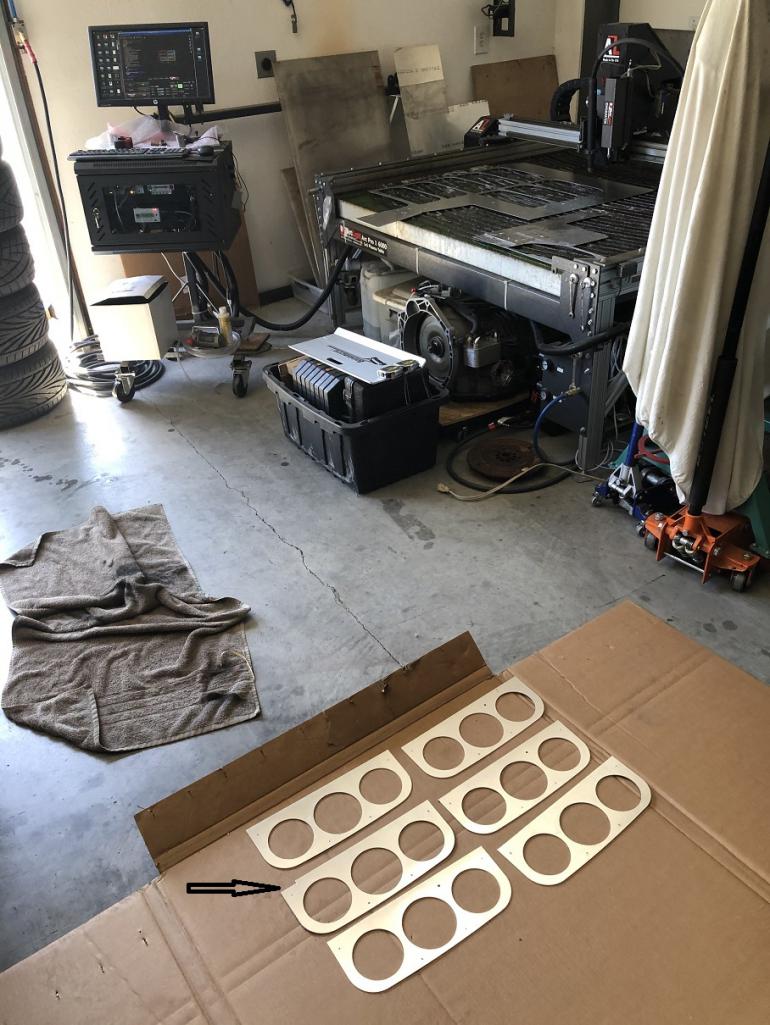
Posted by: Chris H. Jun 7 2021, 12:28 PM
Well worth $35. Chris was kind enough to send me one of his prototypes. The gauges fit PERFECTLY. Not a mm of play. It looks stock and you can paint it any color you want. I hogged out the dimmer hole and made it my brake warning light. If you have speedhut gauges and don’t have the ability to make one of these you may want to act quickly! 
Posted by: Alain V. Jun 7 2021, 06:09 PM
I'll take one. will send a pm
Posted by: tygaboy Jun 18 2021, 05:52 PM
When you're a tool whore like me, you look for any reason/excuse for more shop goodies!
Since I'm making a few of these gauge panels for others, I simply couldn't deliver them without duplicating the stock panel's screw dimples.
So I treated myself to a Tatco hand squeezer with a rivet and dimple die set.
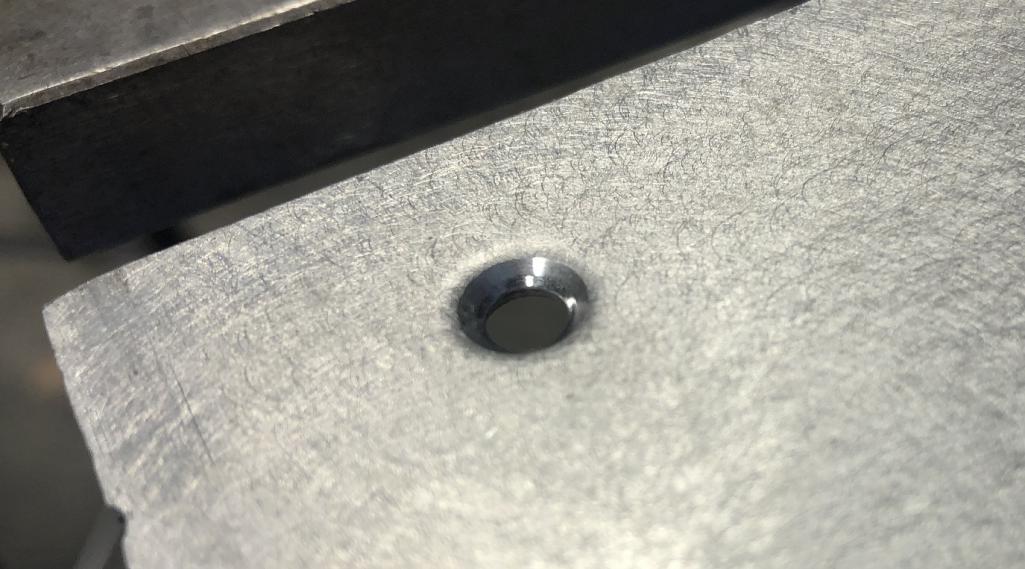
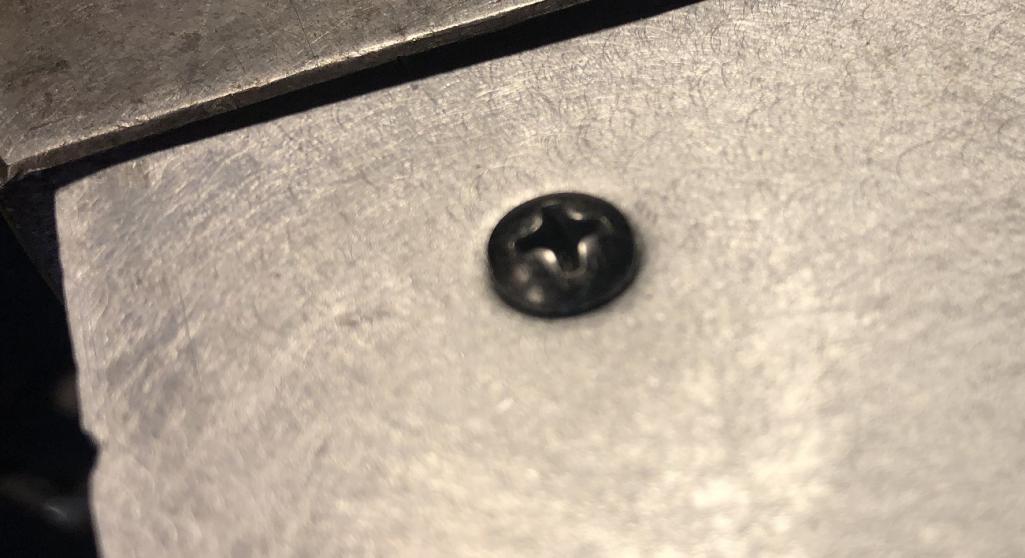
1. Drill an appropriate hole
2. Select the desired die
3. Position the die in the hole (orientation matters!)
4. SQUEEZE!
A dimple is created and the factory fastener sits just like we'd want it to. It's the little details like this that I really like.
It's great having the right tool for the job and now that I have it, I'll wrap up the gauge panels for those who've asked for one.
Attached thumbnail(s)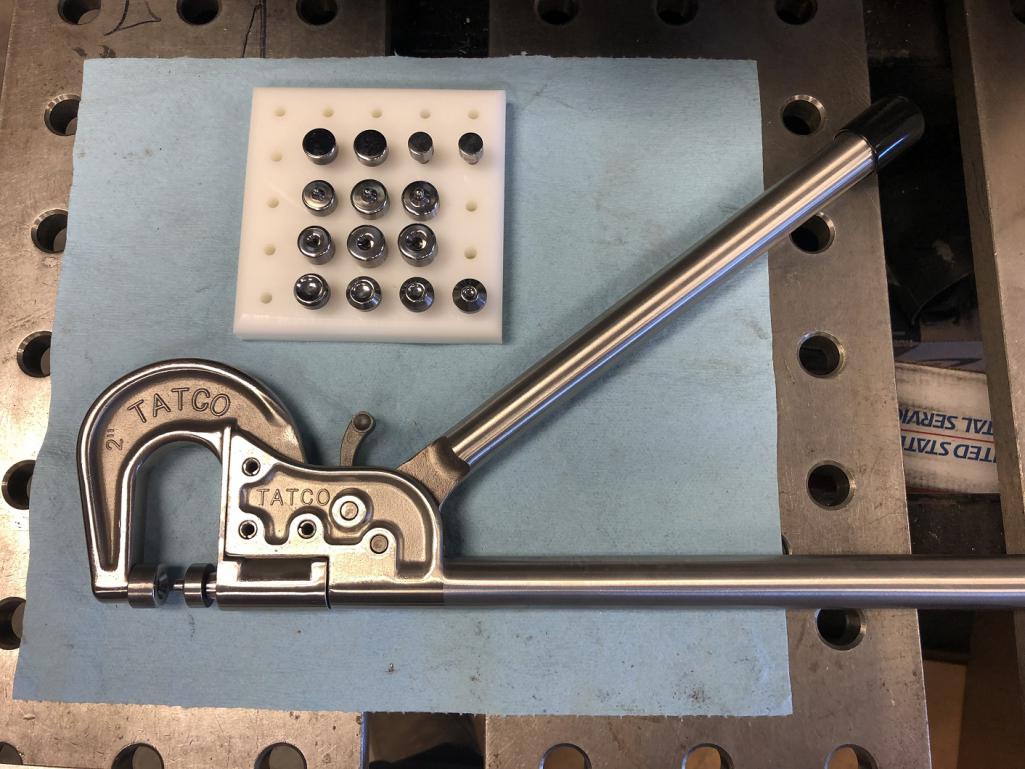
Posted by: FL 000 Jun 19 2021, 11:37 AM
If any of these are still available I will gladly take one.
Posted by: 808 WRX Jun 19 2021, 02:19 PM
Hi Chris,
I'd like one of these too, if there are any left (preferably without the dimmer hole).
Posted by: Jack Standz Jun 19 2021, 02:51 PM
Chris, I still want one - with a dimmer hole.
Thanks again!
Posted by: tygaboy Jun 19 2021, 05:08 PM
Hi Chris,
I'd like one of these too, if there are any left (preferably without the dimmer hole).
@http://www.914world.com/bbs2/index.php?showuser=24349 Efren - We can finish up a "no hole" panel when you come to pick up the wheel. Better yet, YOU can add the dimples to yours!
Posted by: pdlightning Jun 19 2021, 08:54 PM
EDIT on 6/6/2021
I made 6 SpeedHut gauge panels today. See my post on page 4 of this thread for a "fresh off the plasma table" pic.
If you're still interested, I should have these ready to go in a week or so.
- these are .063 3003 aluminum
- they will not be painted
- they do not have the raised stamping for the dimmer
- they are set up for a 4.5" center gauge, 4" outer gauges
- 3 have holes for the dimmer, 3 don't
$35 plus shipping from 94952.
Yes, I'd said $20 earlier but that was a year ago and I was being too generous with my time and consumables. Just be thankful I'm not making them out of wood.
Let me know if you're interested. I'll probably make more once I get more material.
Thanks again for your patience.
Chris
EDIT on 6/24/20:
To the interested parties who've already contacted me or posted here to date:
The plasma table is back in action so now I'm tuning the design. See my post from today (6/24) for the latest updates re: what's new and what I still have to do.
_______________
As to price, it'll be the same thing I try and pull off whenever I do stuff for friends:
Cost of materials and consumables and you buy me a coffee if we ever meet.
I'm thinking $20 plus shipping.
Thanks for your patience.
Chris
_____________
For those using or contemplating SpeedHut gauges, you'll find they are just a bit undersized compared to the stock gauges and require some sort of wrapping or spacer in order to fit well in the stock panel.
I opted to give a go to working up a replacement panel and as I was making it, I thought, while I'm cutting one, I could cut a few more, if there was interest.
This is V1 and it needs a couple minor tweaks, but you get the idea.
Note that it has a 90 degree fold along the bottom edge that I'll stretch so the panel curves a bit, like the factory part.
This one is .060 aluminum but I could do steel, too.
Would anyone be interested in one?
PM me, thanks,
Chris
Greetings and Thank you Chris. I am one of the lucky ones who want one with the hole. Post your Paypay account and I will gladly send you BIG dollars for mine. We appreciate your great work!
Thanks, Mike CC PM
Posted by: 808 WRX Jun 19 2021, 11:51 PM
808 WRX Efren - We can finish up a "no hole" panel when you come to pick up the wheel. Better yet, YOU can add the dimples to yours!
Even better! That sounds like fun
Posted by: tygaboy Jun 20 2021, 04:26 PM
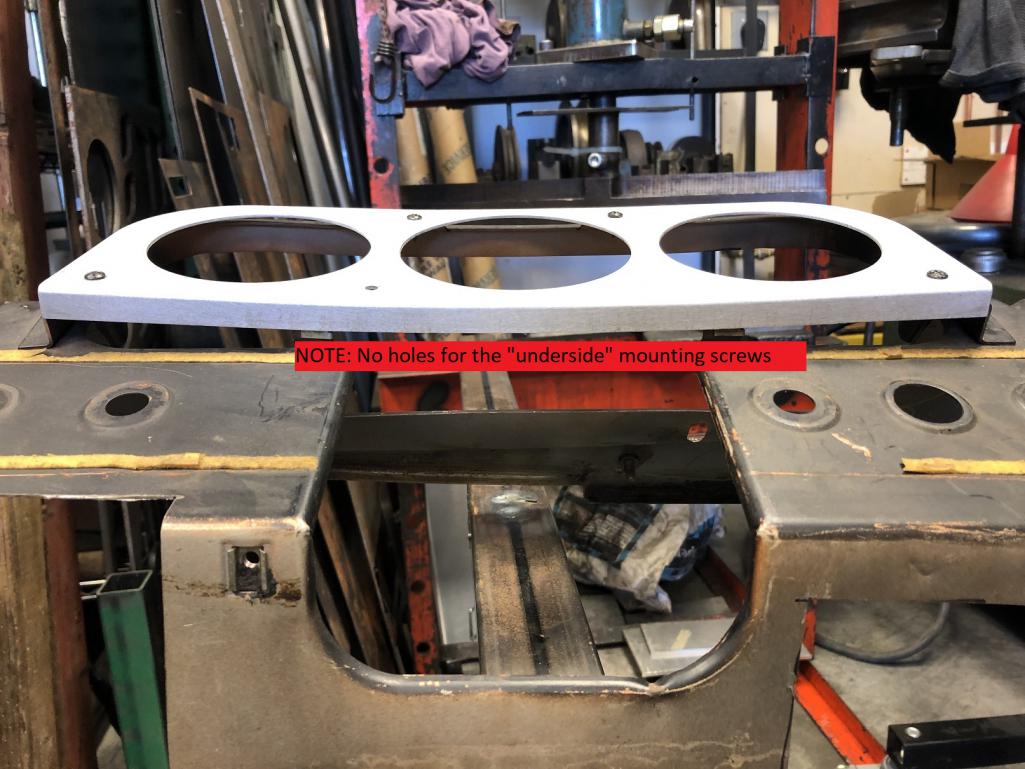
Panels are ready to ship and I'll be contacting the interested parties to get shipping info.
The final update, and please check the pics, is:
- the panel front is sanded w/80 grit on an orbital and is essentially ready to install as is, or paint
- the panel rear surface has just been tidied up a bit
- each panel has through the stretcher and fully mounted to verify fit to a stock dash
- these panels DO NOT have holes for those two "under side" mounting screws
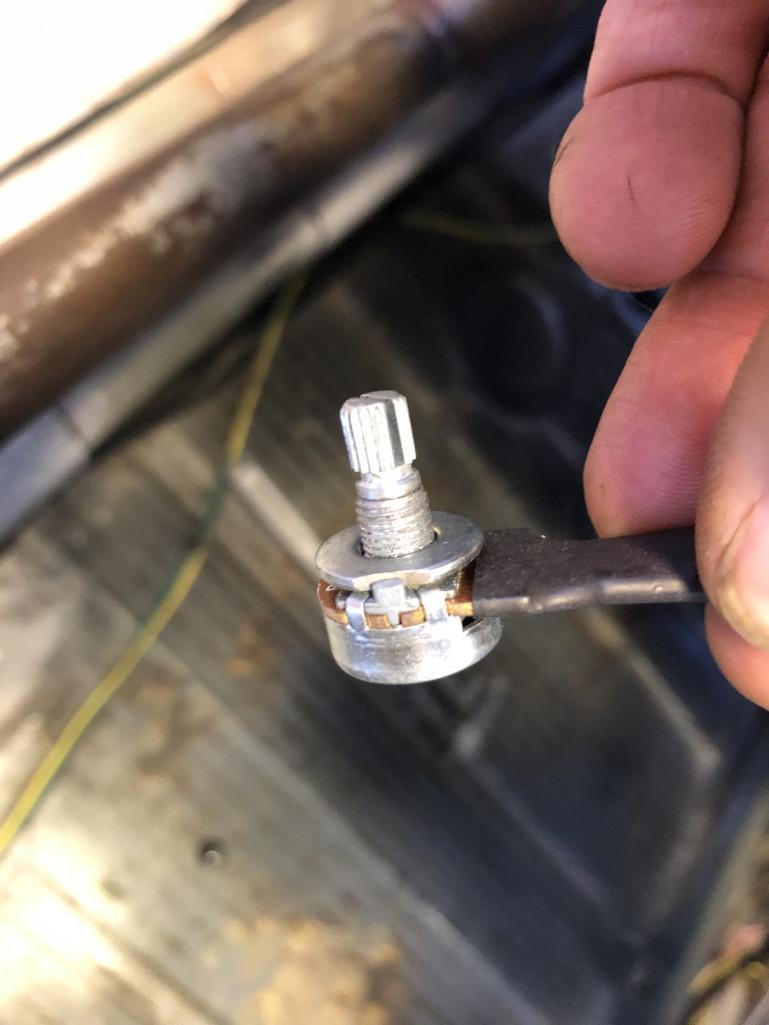
- for those who are getting a "with hole" for your dimmer knob, I've included a flatted washer that you'll need to slip over the dimmer shaft before installing it in the panel. As I mentioned earlier, it's the little things!
NOTE: When fitting your gauges, you may find you have to "screw" the gauge into the hole. Once it's in past the threads on the gauge body, there's a little bit of movement within the hole. I like to position the gauge so it's "resting" on the bottom, then tighten up the mounting ring.
Once you receive your panel, if you have any questions or issues, just contact me and we'll work it out.
Finally, if you would, please post up some pics, once you get your gauges installed.
Thanks and I hope you like them!
Attached thumbnail(s)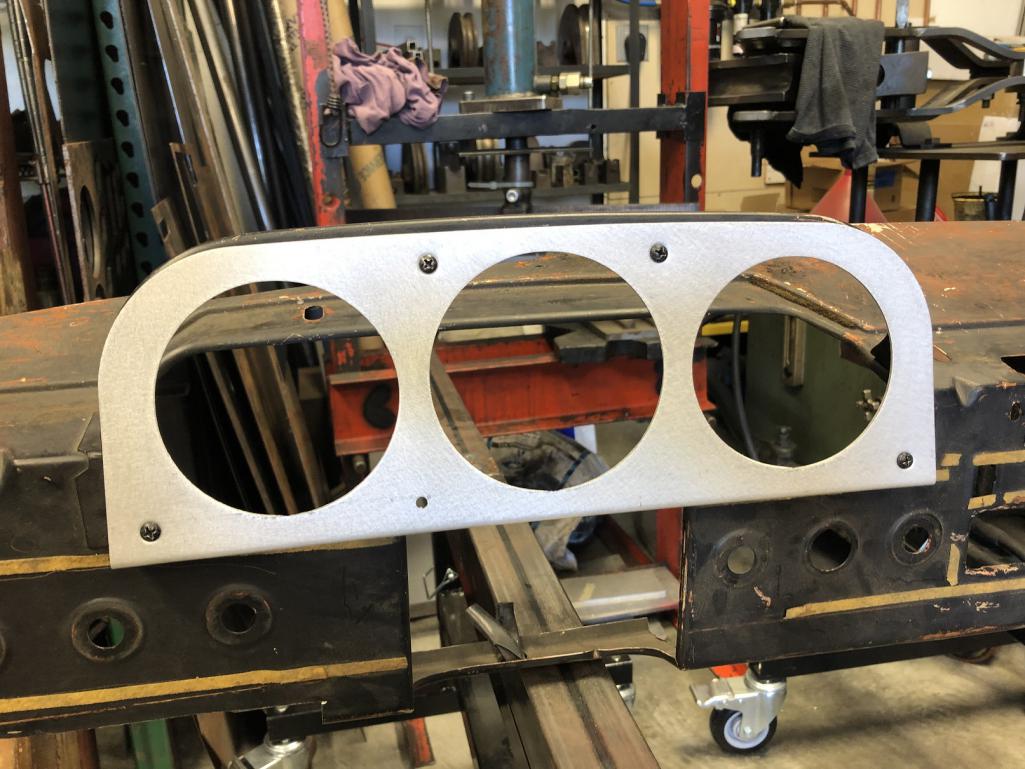
Attached image(s)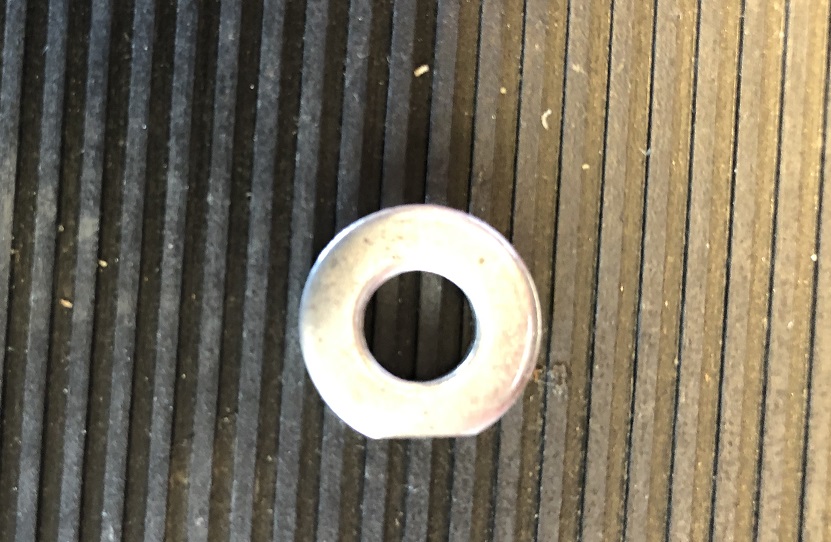
Posted by: tygaboy Jul 6 2021, 04:17 PM
I shipped all the ordered panels today. Those who ordered one have a PM with the payment details.
Thanks and lets see some pics once you get it installed.
Chris
Posted by: 808 WRX Jul 7 2021, 09:47 AM
Here is mine in place with some "phantom" gauges
Thanks again Chris! It was great catching up too
Attached thumbnail(s)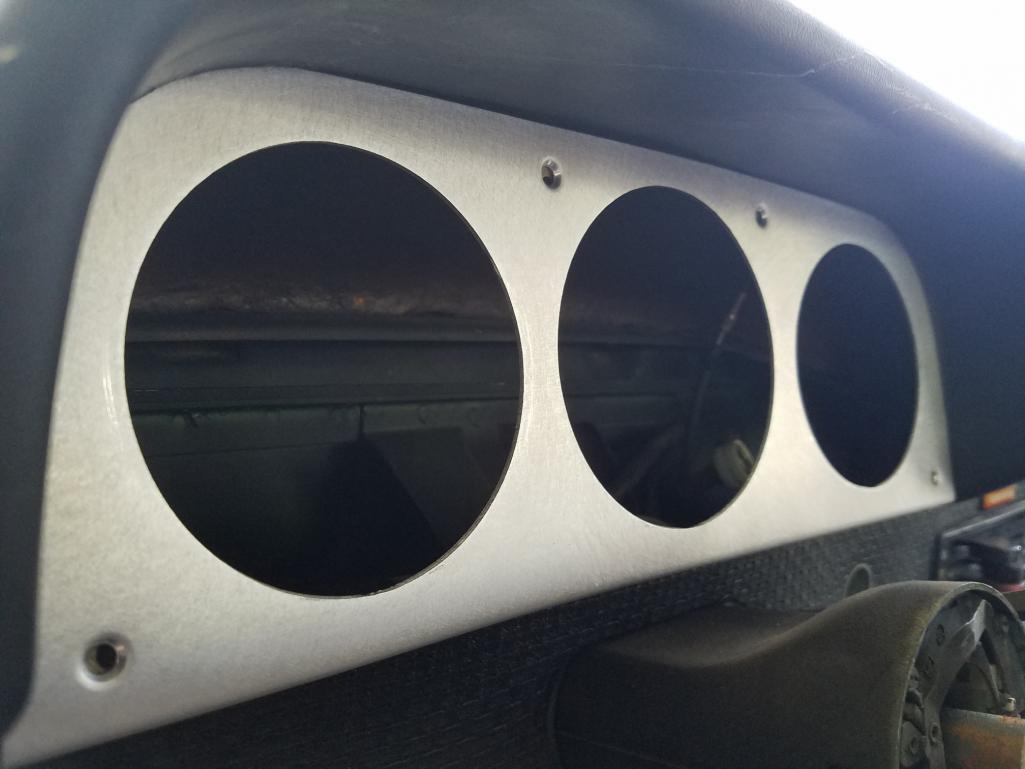
Posted by: FL 000 Jul 10 2021, 11:30 AM
Thanks again @http://www.914world.com/bbs2/index.php?showuser=19241 . I need to order a combo gauge and will paint it to look factory color. Saved me a ton of time 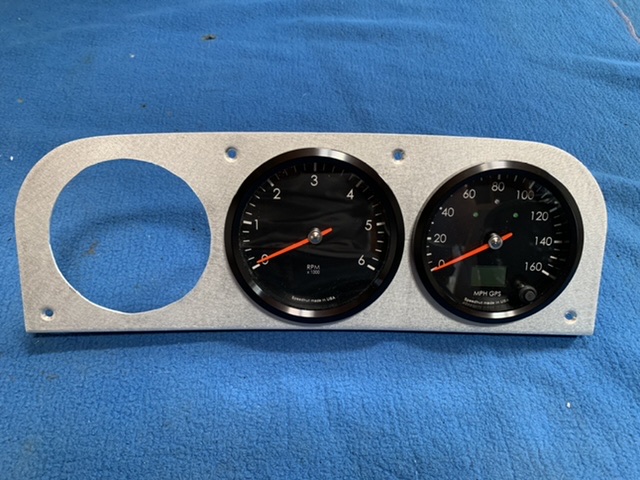
Posted by: harlespeed@yahoo.com Jun 13 2022, 06:47 PM
Hi Chris,
I came across the post for custom instrument cluster face. I am interested in purchasing one if you are still making them. I live locally, so can even pick up and pay cash. Thanks, Jonathan
Posted by: tygaboy Jun 14 2022, 02:39 PM
Hi Chris,
I came across the post for custom instrument cluster face. I am interested in purchasing one if you are still making them. I live locally, so can even pick up and pay cash. Thanks, Jonathan
@http://www.914world.com/bbs2/index.php?showuser=26046 Jonathan - Since you're local (and I'm all about the social aspects of our community, enjoy meeting fellow 914 fans, etc.), you come by and you can make one. I'll show you how to plasma cut the panel and how to use the various tools to complete the part. You end up with something custom and get to say "I made it!" Yes, this will take longer than if I just did it for you but what fun is that?
You pay for materials (about $10) and buy me a coffee.
If that sounds OK to you, let me know and we'll get something on calendar.
Posted by: harlespeed@yahoo.com Jun 14 2022, 07:18 PM
Hi Chris,
I came across the post for custom instrument cluster face. I am interested in purchasing one if you are still making them. I live locally, so can even pick up and pay cash. Thanks, Jonathan
@http://www.914world.com/bbs2/index.php?showuser=26046 Jonathan - Since you're local (and I'm all about the social aspects of our community, enjoy meeting fellow 914 fans, etc.), you come by and you can make one. I'll show you how to plasma cut the panel and how to use the various tools to complete the part. You end up with something custom and get to say "I made it!" Yes, this will take longer than if I just did it for you but what fun is that?
You pay for materials (about $10) and buy me a coffee.
If that sounds OK to you, let me know and we'll get something on calendar.
Chris, That sounds like a fun deal! I assume you will PM me and we can trade #s and let me know times and dates that work for you. Thanks! Jonathan
Posted by: tygaboy Jun 14 2022, 09:25 PM
@http://www.914world.com/bbs2/index.php?showuser=26046 Jonathan - PM sent
Posted by: 76-914 Jun 14 2022, 11:07 PM
Hi Chris,
I came across the post for custom instrument cluster face. I am interested in purchasing one if you are still making them. I live locally, so can even pick up and pay cash. Thanks, Jonathan
@http://www.914world.com/bbs2/index.php?showuser=26046 Jonathan - Since you're local (and I'm all about the social aspects of our community, enjoy meeting fellow 914 fans, etc.), you come by and you can make one. I'll show you how to plasma cut the panel and how to use the various tools to complete the part. You end up with something custom and get to say "I made it!" Yes, this will take longer than if I just did it for you but what fun is that?
You pay for materials (about $10) and buy me a coffee.
If that sounds OK to you, let me know and we'll get something on calendar.
I wish there was a "Like" feature for moments like this.
Posted by: GregAmy Jun 15 2022, 05:08 AM
So, harlespeed, you gonna make a bunch extra while you're there for us too...?

Posted by: Mayne Jun 15 2022, 08:42 AM
+1 for making a few extras! New Mexico is a bit far to travel to make my own, though almost worth just to say “I made it!”
Posted by: vitamin914 Jun 15 2022, 10:00 AM
I am in for one also. I would be wiling to pay $75 (plus a case of beer  to help the social part).
I just bought a Speedhut speedometer but now I'm thinking why not replace all the gauges to make them the same. Doubt it would be plug and play...Difficultly level with new senders etc?
Chris, Other maybe you could put Jonathan on the production line?
Posted by: SLKWrx May 1 2024, 06:57 AM
Sorry about the necro-revival, but any chance that these will ever make a comeback in production? Found them through searching and man would they fit nicely in my project.
Posted by: tygaboy May 1 2024, 08:07 AM
Sorry about the necro-revival, but any chance that these will ever make a comeback in production? Found them through searching and man would they fit nicely in my project.
@http://www.914world.com/bbs2/index.php?showuser=2845 - My first thought was "Nope, I already have too many projects going."
Then I thought maybe videoing how I make these would be an OK episode for my "At The Red Barn" YouTube channel.
I need to make some sort of dash panel for the 914 Ferrari so I'll be all set up to do these...
OK, sure. I'll make some. Material costs are up so the price needs to be $40 plus shipping.
Anyone who'd like to order: Let me know if you want the dimmer hole or not.
PM me your shipping address, too.
I'll probably need a couple/few weeks to get these done because of the aforementioned other projects.
Anyone who'd like can come to The Red Barn and help/make their own. You'll get it for the cost of materials, plus you buy me that coffee.
Posted by: SLKWrx May 1 2024, 10:48 AM
@http://www.914world.com/bbs2/index.php?showuser=19241 You rock, thanks man! And you've got a new subscriber, love the channel!
I'll send you a PM now.
Posted by: racer914 May 1 2024, 11:13 AM
I'd like to have one of these too! PM Sent.
Posted by: GregAmy May 1 2024, 01:01 PM
In for one sized in the middle for the Speedhut tach but stock outers...?
Powered by Invision Power Board (http://www.invisionboard.com)
© Invision Power Services (http://www.invisionpower.com)