Printable Version of Topic
Click here to view this topic in its original format
914World.com _ 914World Garage _ My '74 Budget GT Tribute build
Posted by: pencap914 Jun 18 2020, 02:21 PM
Hi all,
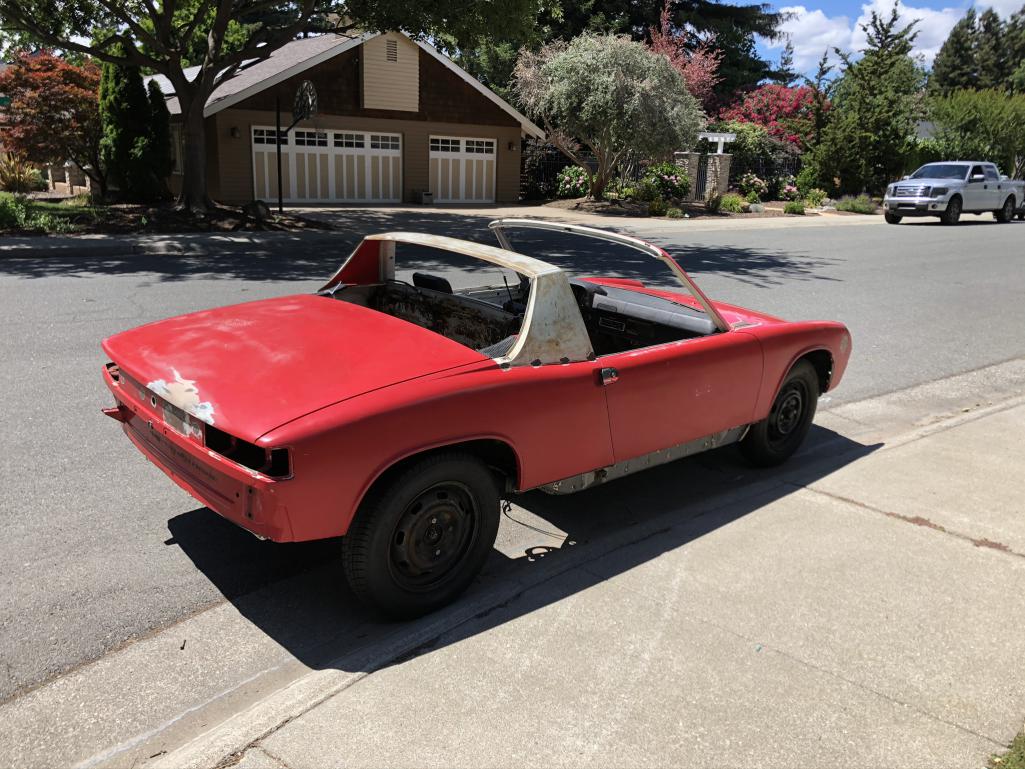
Picked up project car about 2 weeks ago. I'm very excited to get started on this build, I'll try to document and share my progress as I go. I originally created a profile here at 914World back in 2006 when I was in High school, and had bought a 74 914 as my first car for $1200. It was a great first car, I had a lot of fun fixing it up while using it as my daily. When I went off to college, I sold the car, but felt like I had unfinished business to do.
Recently I started lurking here again looking to get back into a project 914 to hopefully take the car where I wanted to, but didn't have the funds, skills, or space to do so.
I posted a WTB ad, and was contacted by a member here who had a good start to a project I plan on finishing (Thanks Montreal914!)
My plan is to build my dream 914 that I absolutely drooled over when I was in High School. I've always loved the GT look, so my plan is to basically create as close to a GT clone as my budget will allow. Steel GT flares, 5-lug Fuch's (or replicas...) and a tastefully somewhat period correct interior. The car I recently purchased did include a freshly rebuilt 2.0 4cyl engine, so I need to make a decision on if I would want to run that engine for a while, and save my pennies to slowly build a 2.2, 2.4 or 2.7 flat 6 then do a swap later down the road.
I'm happy to see the 914 community thriving. Back in 2004 when I first bought the 914, Porsche snobs seemed to turn their nose at them which made them affordable enough for a high-school kid to own one. It seems like the 914 is getting more recognition in the collector community, so I'm happy I picked one up before they become too out of my price range!
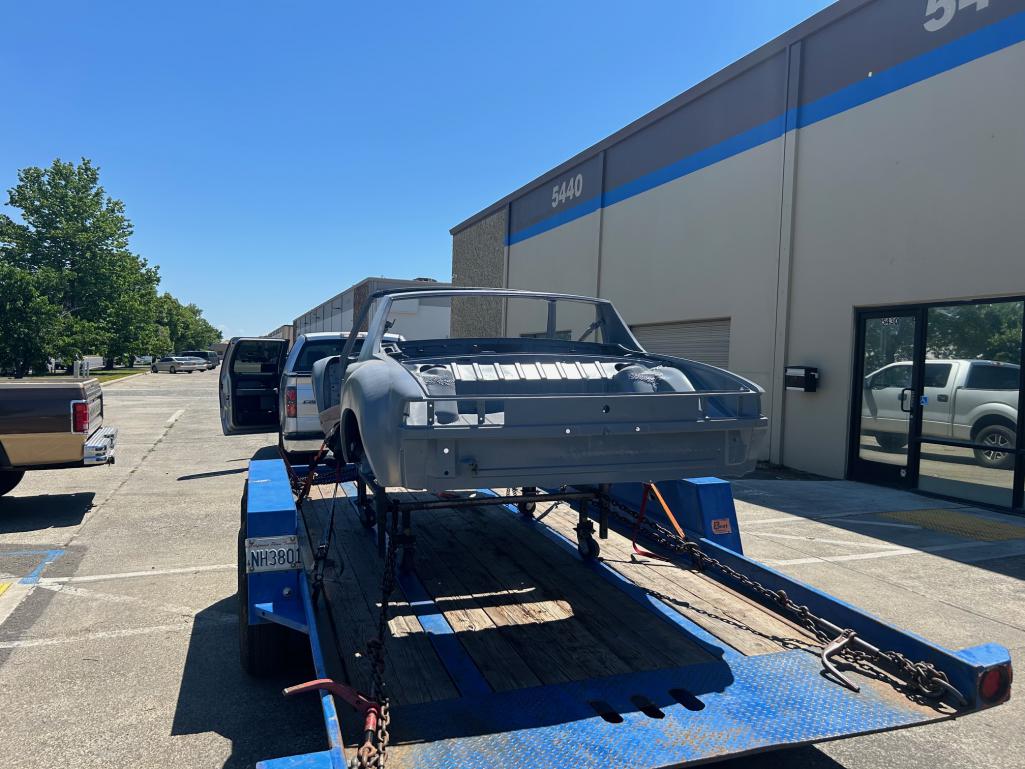
I'll post some progress photos tonight and general status of the car tonight after work, but here's a few shots of the day I unloaded it off the trailer.
Cheers,
pencap914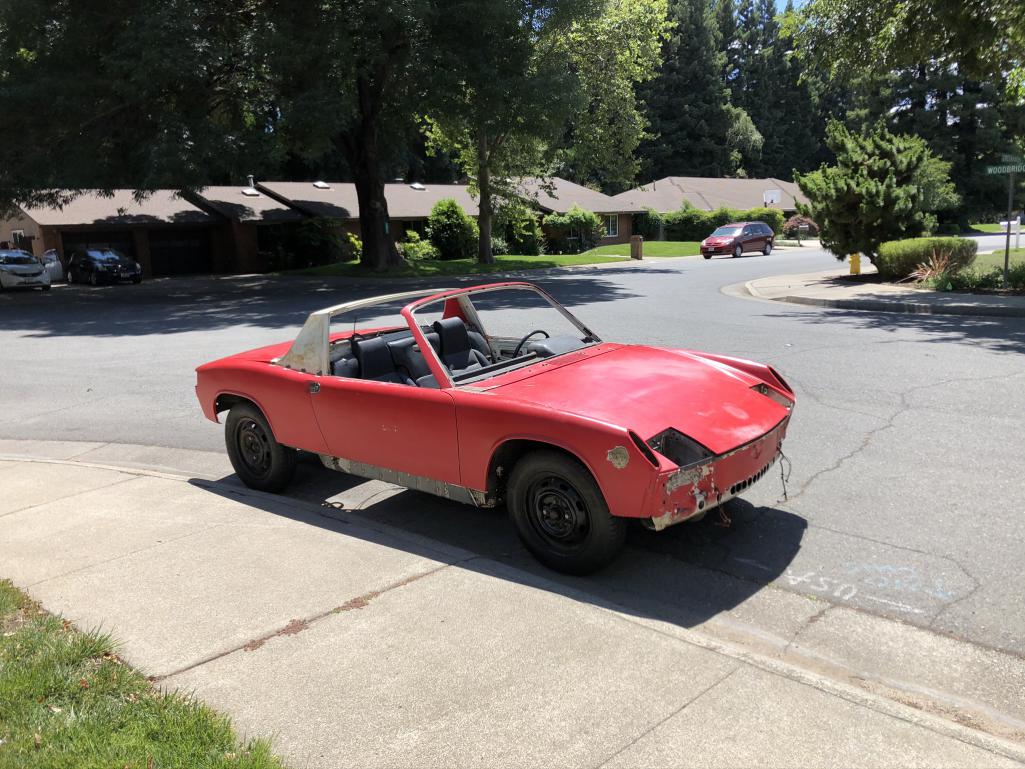
Posted by: cuddy_k Jun 18 2020, 02:31 PM
Welcome back! Excited to see how your build progresses. Lots of helpful people here....
Posted by: ValcoOscar Jun 18 2020, 02:41 PM
Great @http://www.914world.com/bbs2/index.php?showuser=5872
What a great decision to jump in headfirst. Montreal914 is a good guy!
You have my attention as I have 5 widebodies in my P stable. Powered by 4's, 6's & 8's
None are Concours but are sound.
You're more than welcome to come look anytime you're in OC (90621).
Keep your dream alive. 
Oscar
Posted by: Cairo94507 Jun 18 2020, 03:32 PM
 Welcome back to the fold. You will have a ball getting that car ready to drive. I would run the 4 cylinder and drive the car while you source/collect all of the bits you will need for the 6 conversion. As you likely already know, rust is the death nail on these cars so address any and all rust issues first and build from a solid rust-free chassis.
Posted by: pencap914 Jun 19 2020, 12:05 PM
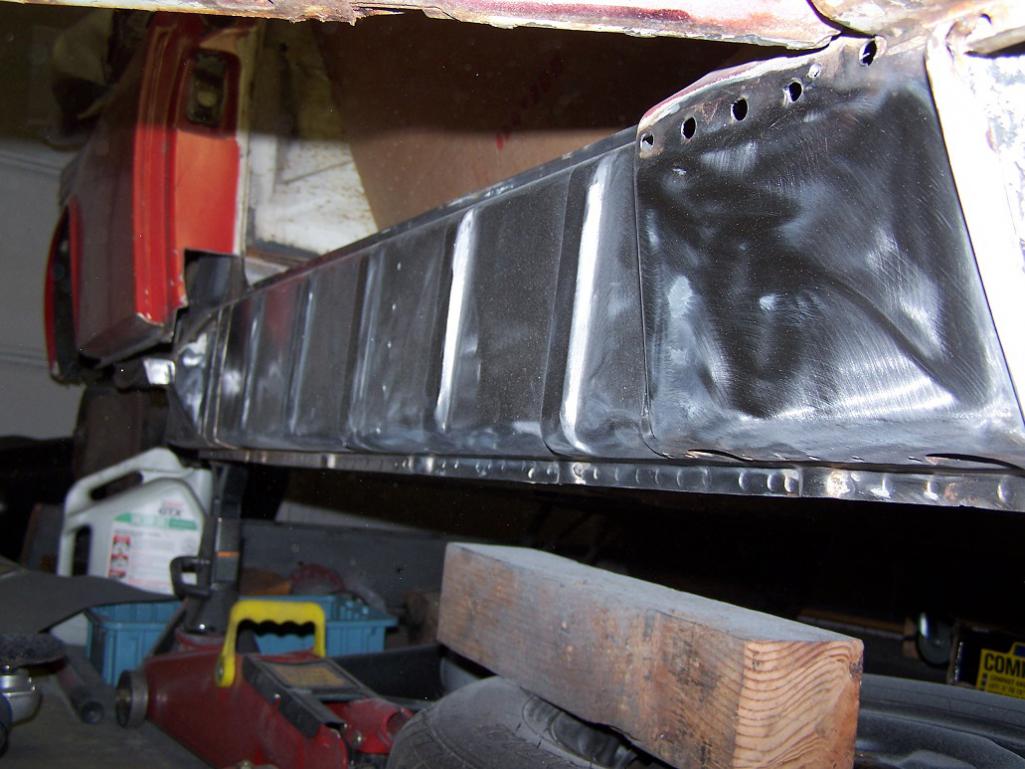
Previous to the last owner, the rear floor pans, hell hole, battery tray, and part of the fire wall were repaired using panels from restoration designs. Which works great for me, because I have some welding experience, but almost none with thin automotive sheet metal. It would have been a brutal learning curve to attempt to fix everything on my own, so I'm happy to report the car is virtually* rust free.
Inner and outer longitudinal stiffening kits were installed before I acquired the car, however the inner kit (Engman?) did tweak the pan to close the gap between the windshield frame and the roll bar by about 1/8" on each side. (Measuring 25" almost dead even on each side currently) So the door gaps are a little off as well.
It looks like this is a know risk of installing this kit, and it looks like a few members here have been able to correct this issue by simply making a few strategic cuts in the stiffening kit, jacking the car then re-welding it back into place.
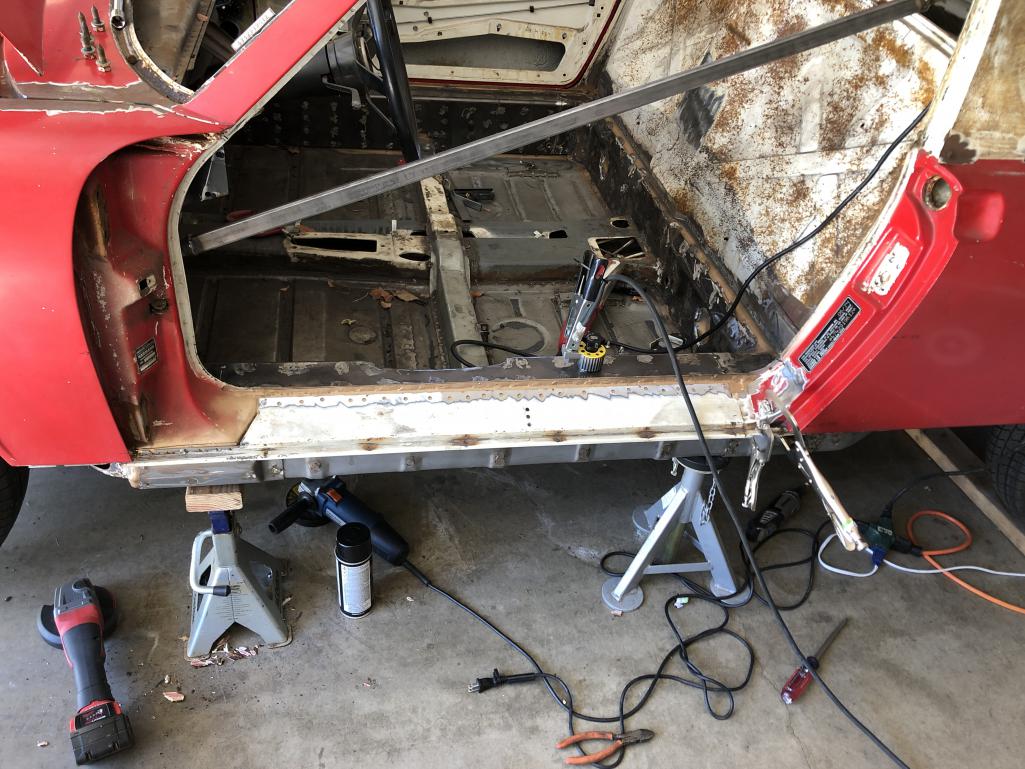
I bought the car with the drivetrain and most of the interior removed, all that was left for me to remove was the wiring harness, dashboard, and the HVAC. So currently, the car is an empty shell with wheels to roll it around if needed.
I have more photos to share if I could only get iCloud to sync.... I miss the days of SD cards.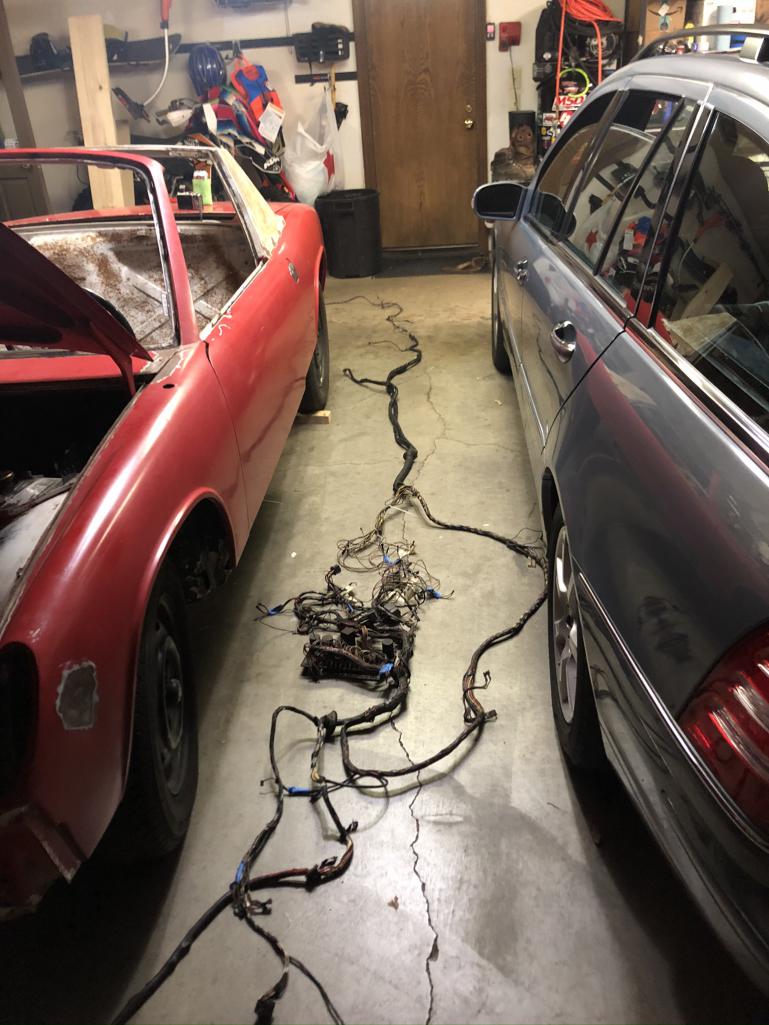
Posted by: Nojoah Jun 19 2020, 03:11 PM
Seems like a good car to start your build. More pictures... damn iCloud!
Posted by: pencap914 Oct 5 2020, 08:54 PM
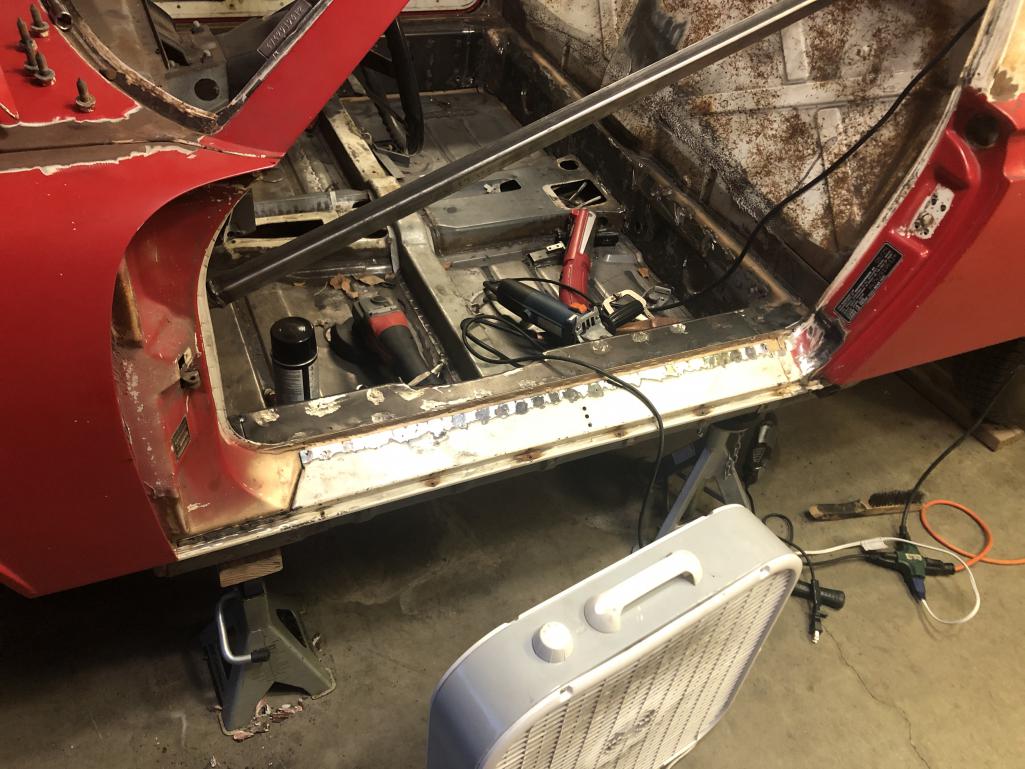
Summer is the busy season for work, so I haven't had much time to work on the car, but I was able to create door braces, and weld back the lower door panels that were removed to install the outer long stiffening kit.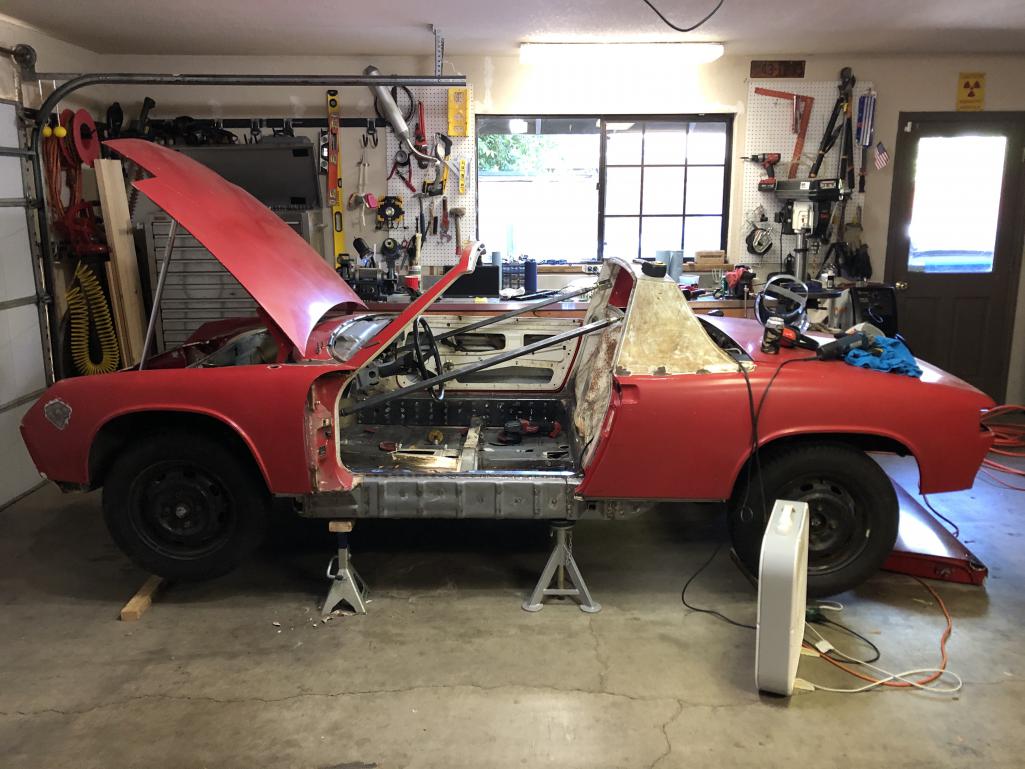
Posted by: pencap914 Oct 5 2020, 08:55 PM
Posted by: pencap914 Oct 5 2020, 08:55 PM
Posted by: pencap914 Oct 5 2020, 08:57 PM
Posted by: pencap914 Oct 5 2020, 09:04 PM
Next move: Steel Flare installation :-)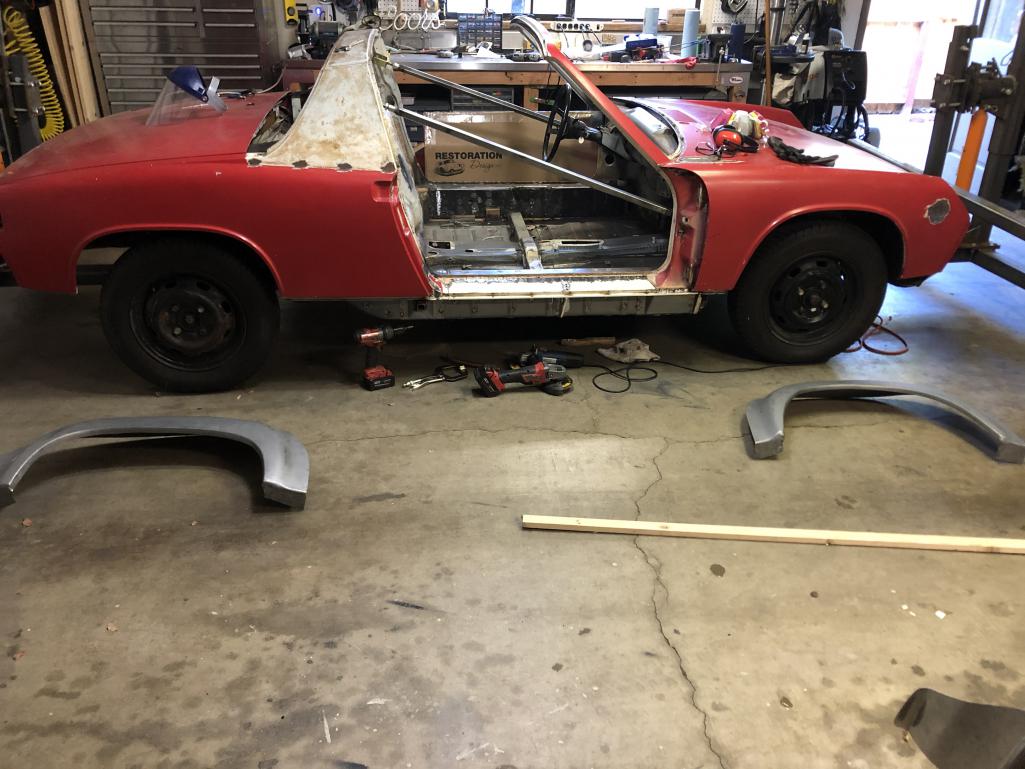
Posted by: JeffBowlsby Oct 5 2020, 09:10 PM
Nevermind, carry on.
Posted by: pencap914 Nov 17 2020, 11:16 PM
Made some progress on adding the flares. Still a bit of a luddite for finding the best way to share photos here...
https://drive.google.com/drive/folders/1Z9XmHTFCnhaRlCzShB0f7CFQAnO_R8JD?usp=sharing
Posted by: seanpaulmc Nov 18 2020, 06:00 AM
Sweet work!
Not looking budget to me. What size is that six?
Going back to white? GT flared cars look great in white IMO.
Question and request:
How did you attach the door braces under the dash?
Would you show some pictures of that area.
Did you have a lot of work on the longs and need to take the doors on and off to check?
Thanks and keep up your super work.
Sean
Posted by: mb911 Nov 18 2020, 06:59 AM
Looks great so far. Let me know if I can help with any parts in the future..or just advice.
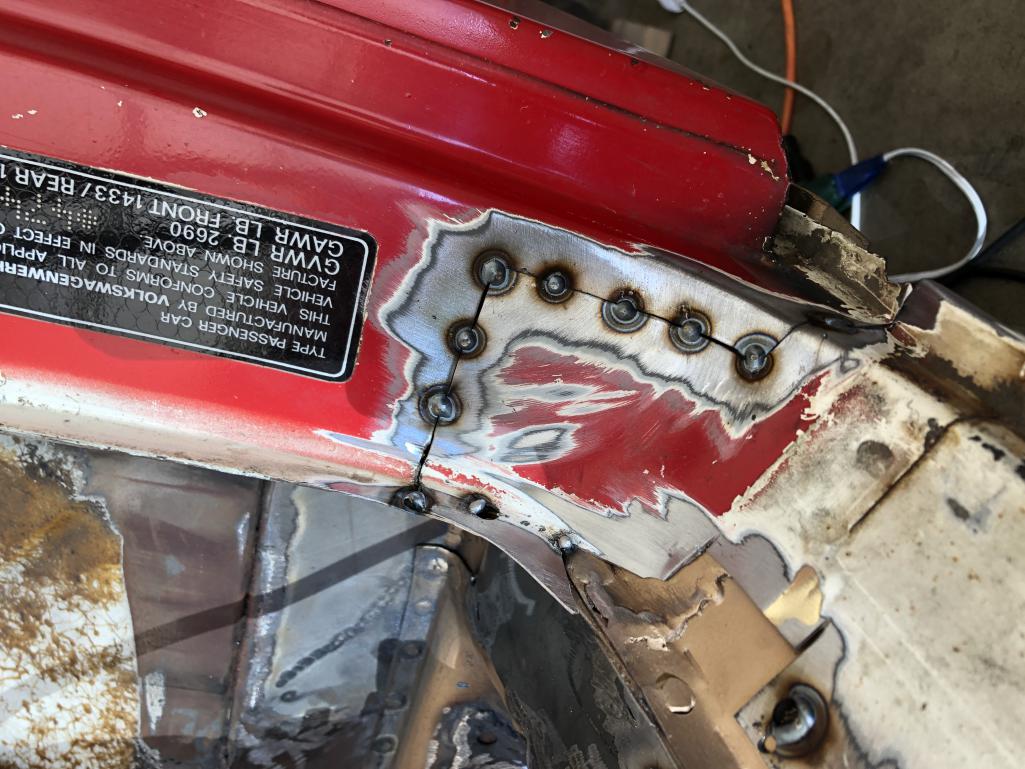
Posted by: rgalla9146 Nov 18 2020, 07:19 AM
Your welding skills are just fine if the patch under the compliance sticker is any
indication.
The original white is the optimum, finest, fastest, most beautiful, easiest, lightest
and sneakiest color. That's what I'VE heard. 
Great start.... carry on !
Posted by: pencap914 Nov 18 2020, 04:50 PM

Sweet work!
Not looking budget to me. What size is that six?
Going back to white? GT flared cars look great in white IMO.
Question and request:
How did you attach the door braces under the dash?
Would you show some pictures of that area.
Did you have a lot of work on the longs and need to take the doors on and off to check?
Thanks and keep up your super work.
Sean
Thanks for the kind words! I certainly wouldn't mind going back with Light Ivory. I originally picked up a 2.4 "7R" engine, but I found a pretty good deal on a 2.7 engine from a 75 that should kick this thing along just fine.
The PO did the inner and outer stiffening kits, so I never got to see how the original longs looked before they got encased. Judging by the rest of the car, I would imagine they had little notable damage. See below for how I attached the door brace to the front of the car. I made it so it (shouldnt) be difficult to dremel cut the weld tacks then grind flat like it never happened.
Posted by: seanpaulmc Nov 18 2020, 06:41 PM
Sweet work!
Not looking budget to me. What size is that six?
Going back to white? GT flared cars look great in white IMO.
Question and request:
How did you attach the door braces under the dash?
Would you show some pictures of that area.
Did you have a lot of work on the longs and need to take the doors on and off to check?
Thanks and keep up your super work.
Sean
Thanks for the kind words! I certainly wouldn't mind going back with Light Ivory. I originally picked up a 2.4 "7R" engine, but I found a pretty good deal on a 2.7 engine from a 75 that should kick this thing along just fine.
The PO did the inner and outer stiffening kits, so I never got to see how the original longs looked before they got encased. Judging by the rest of the car, I would imagine they had little notable damage. See below for how I attached the door brace to the front of the car. I made it so it (shouldnt) be difficult to dremel cut the weld tacks then grind flat like it never happened.
Perfect. Just what I needed.
Been thinking of something similar but helps to see it done already.
Thank you!
Posted by: pencap914 Nov 18 2020, 07:13 PM
Looks great so far. Let me know if I can help with any parts in the future..or just advice.
Thanks Ben! Got your oil tank and engine sheet metal. I haven't yet done the research for what its going to take to mount that 914/6 oil tank... I'll need to cut the car for the oil here pretty soon, so I'll need to gather the hardware to mock-mount that. Any suggestions on where to find the mounting hardware for the tank? I was just going to use a parts diagram from Auto Atlanta and either source the parts from the hardware store or just purchase them from AA.
Posted by: mb911 Nov 18 2020, 07:16 PM
Looks great so far. Let me know if I can help with any parts in the future..or just advice.
Thanks Ben! Got your oil tank and engine sheet metal. I haven't yet done the research for what its going to take to mount that 914/6 oil tank... I'll need to cut the car for the oil here pretty soon, so I'll need to gather the hardware to mock-mount that. Any suggestions on where to find the mounting hardware for the tank? I was just going to use a parts diagram from Auto Atlanta and either source the parts from the hardware store or just purchase them from AA.
You just really need 2 8mm bolts through the bolt holes you will drill in the factory locations. Once you have that make a template of the tank to transfer the hole layout. The trickiest hole is the return line.
Be on the look out for black friday deals..
Posted by: pencap914 Jan 5 2021, 01:37 PM
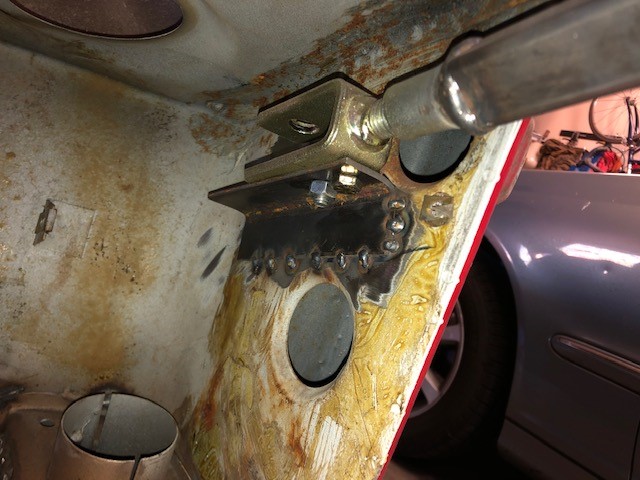
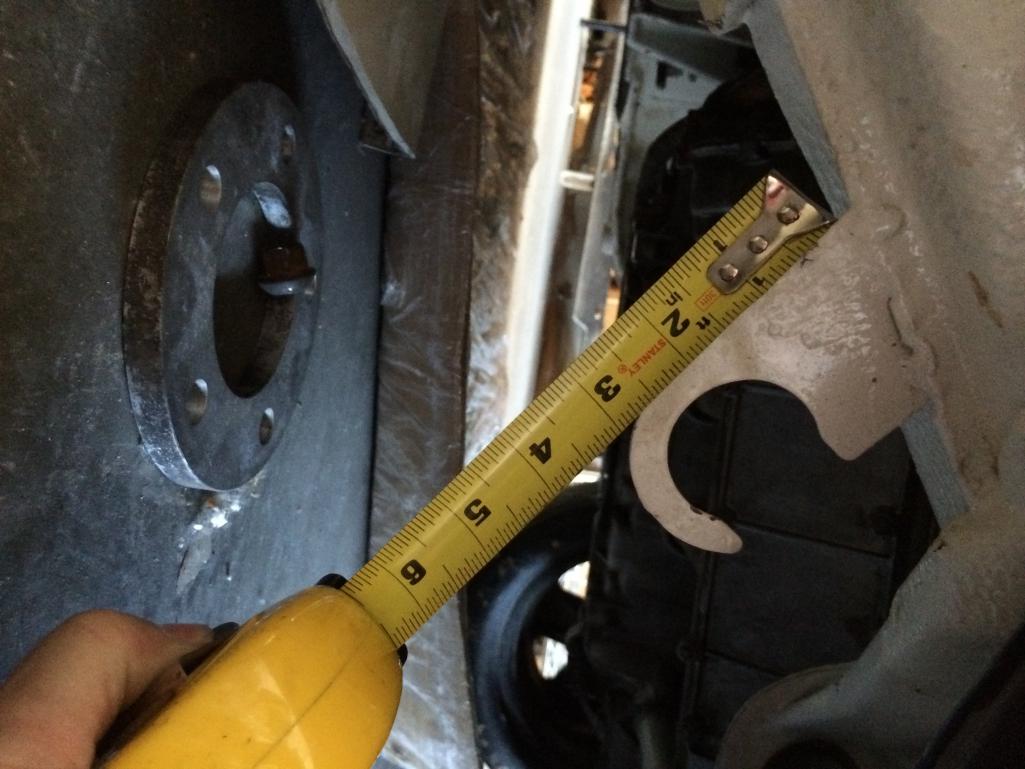
Almost finished with the flat plate that I'll weld in between the two suspension pivot points to mount the oil cooler and perhaps add some rigidity.
Found someone in town that has a dimple die set. Wish I squeezed a few more holes to keep things light as possible... 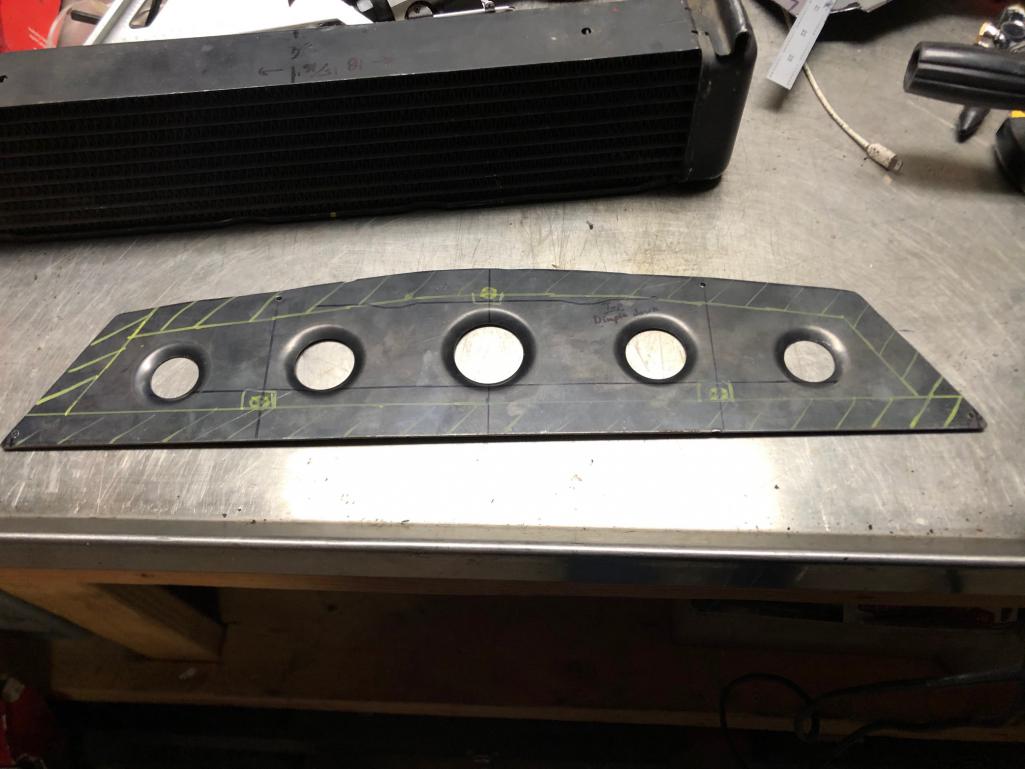
Posted by: 930cabman Jan 5 2021, 06:11 PM
Great looking work so far, I missed your favorite beer?
Keep it going and keep us in the loop with your progress
Posted by: Montreal914 Jan 6 2021, 09:59 AM
I am seeing this for the first time and am very happy to look at the progress! Very nice Glenn! 
As for the condition of the longs before the installation of the RD outer clamshell, below are a few pictures from the work done.
Here the original long was stripped from the original paint to see what was underneath 
Then the metal was painted with PPG 2 component epoxy primer. Round stickers were applied where the welds would be to mask the metal in these spots. Weld through primer was then sprayed in these spots.
Then the RD panels were also given the same preparation treatment on their inside.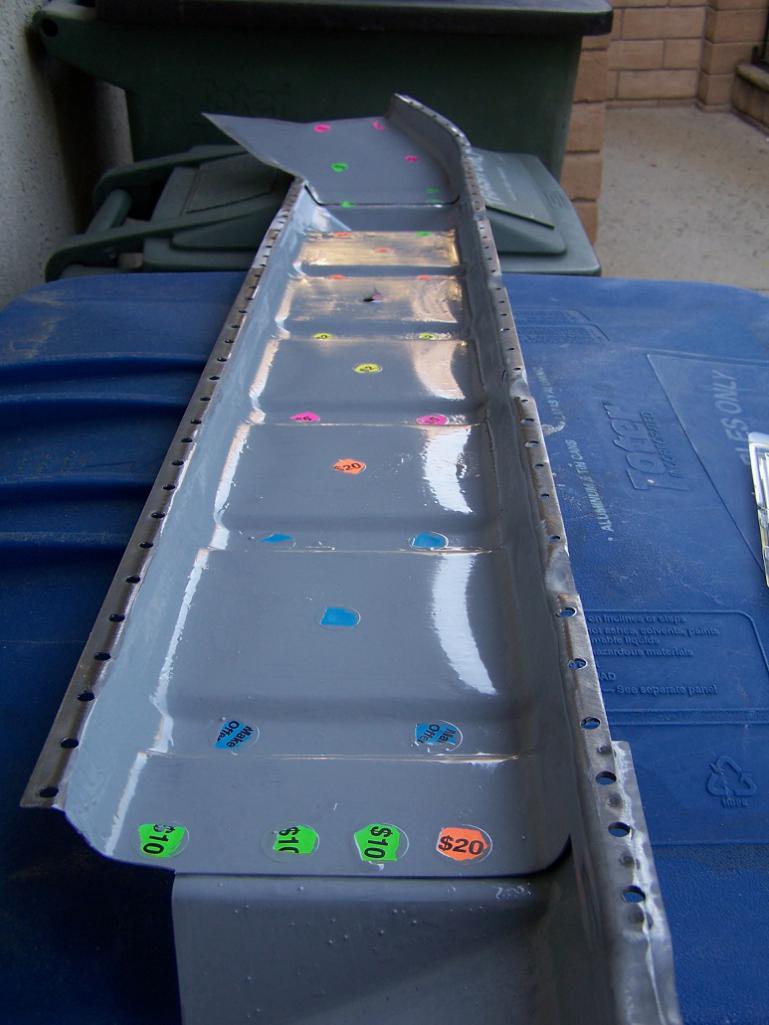
And the clam shells were installed on the car.
Good luck with your project. I will follow this thread with great intererest ![popcorn[1].gif](style_emoticons/default/popcorn[1].gif)
BTW, I think I might recognize that tall FedEx box near the car @http://www.914world.com/bbs2/index.php?showuser=5872 
Posted by: pencap914 Jan 6 2021, 10:19 AM
BTW, I think I might recognize that tall FedEx box near the car @http://www.914world.com/bbs2/index.php?showuser=5872
Just sent the gas tank yesterday! Should arrive by Thursday.
Posted by: pencap914 Mar 14 2021, 10:29 PM
Update:
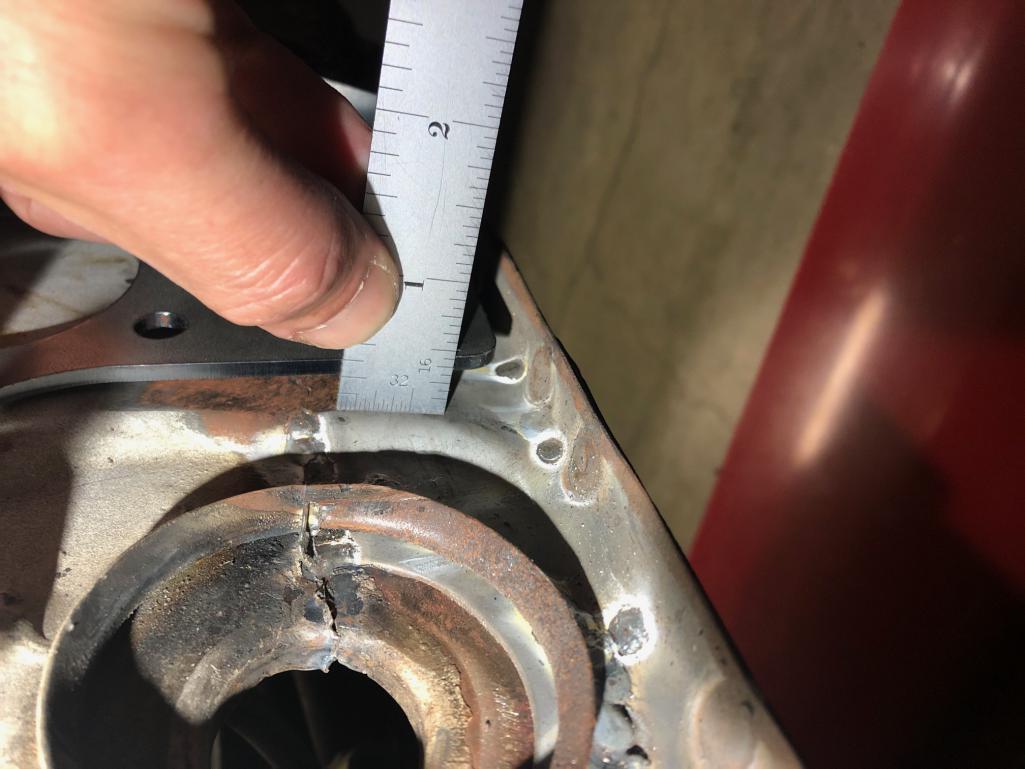
So I bought this car knowing the tub was slightly curled inwards due to the installation of the inner/outer longitudinal strengthening kit. The door gaps to the rear were a little tight, and the measurement between the Targa bar and the windshield frame was measured to be 25" even, about 1/8" closer than it should be.
I tried a few different things to straighten the chassis after an installation of the inner longitudinal kit curled the tub a bit. I followed a few threads on this forum for a "how-to" first using a lengthened turnbuckle purchased from tractor supply.
I attached the turnbuckle from the upper seatbelt bolt to a piece of angle iron tacked in place just inside of the door, then actually welded a tab just in front of where the heater pipe exits the longitudinal, because I found I needed to apply force lower down in front.
I cut the inner long in 3 places and reefed the turnbuckles until I stretched the tub to 25-5/16" between the targa bar and windshield frame. (I only chose this to stop because I felt I was really wrenching on those turnbuckles... Then tacked the inner longs.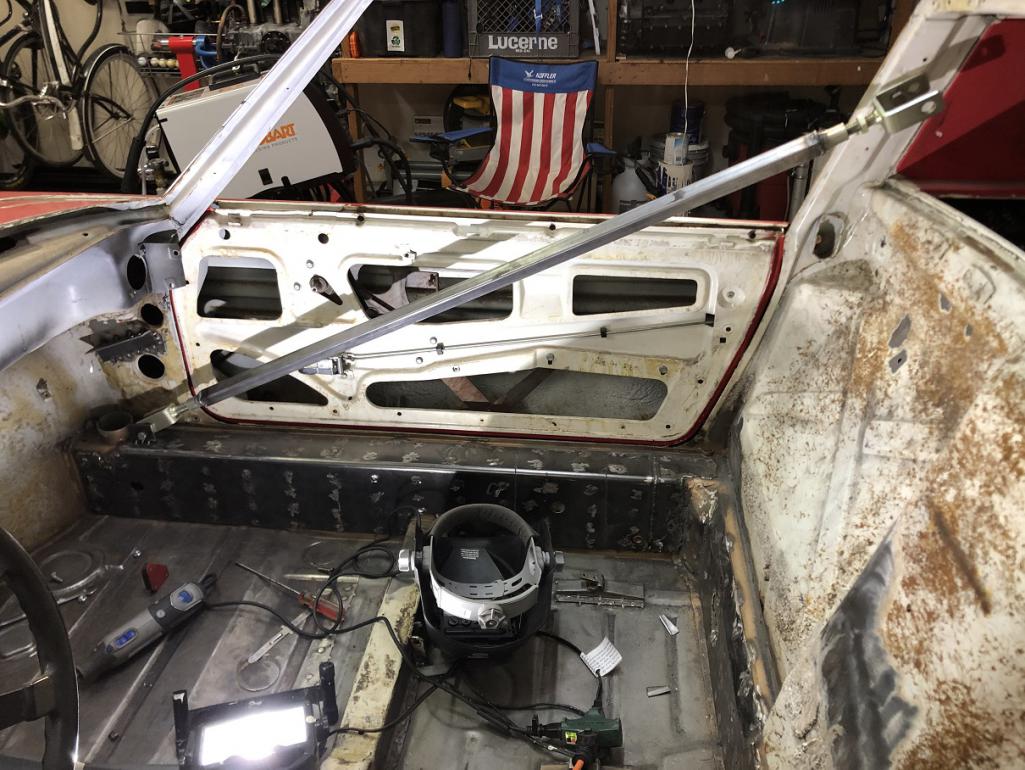
Long story short, I think I got the tub to only go about 1/16" back... about halfway there.
I don't know if anyone tried to re-straighten the tub after installing both the inner and outer long kit, but I just cant apply any more force to using the turnbuckles, since I found that I had actually bent the seatbelt bolt: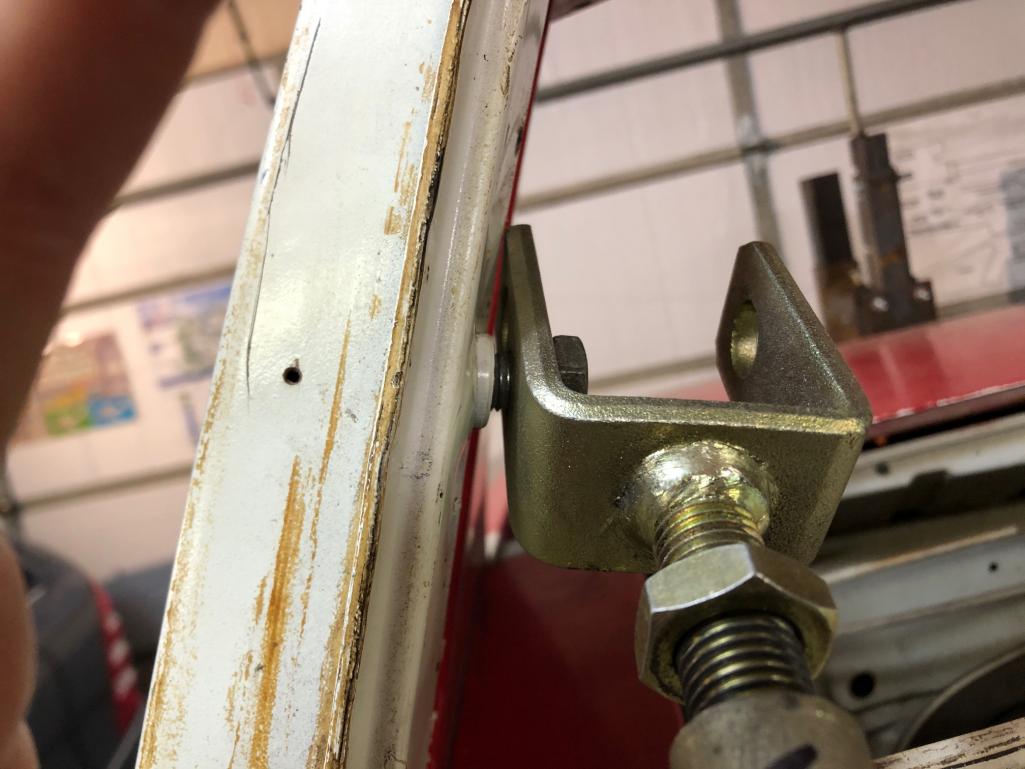
After finding the bent seatbelt bolt, I brought out the big guns: The hydraulic ram.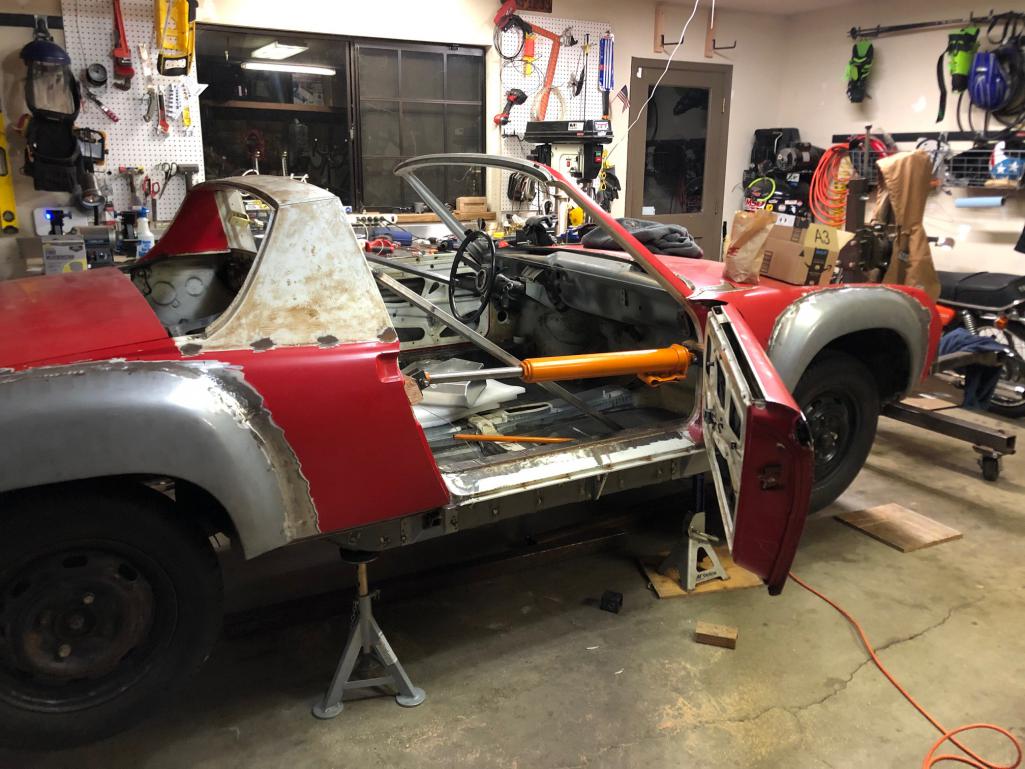
I tried pushing the tub apart using the ram, but had the same results. The tub sprung right back to the 25-1/16" measurement. Albeit, the attempt with the hydraulic ram was with the inner longs tacked from the previous attempt with the turnbuckle.
I kinda feel like I had one shot and blew it with welding the inner longs back before attempting with the hydrauilc ram. I could grind out the welds and try again, but I have little confidence that the juice is worth the squeeze. Perhaps I can live with slightly tight door gaps and let this be a cautionary tale about why you need to be careful when welding stiffening kits.
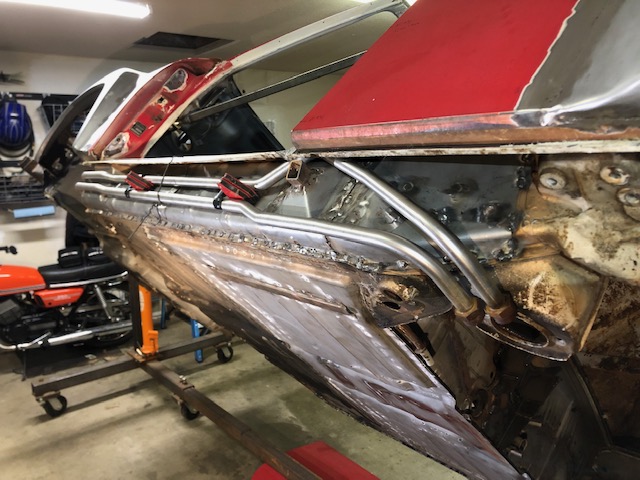
To maintain forward progress with this project, I decided to just mount the car on the rotisserie to make a few minor repairs to the underside of the car, and get it ready for media blasting. So here's how she sits today: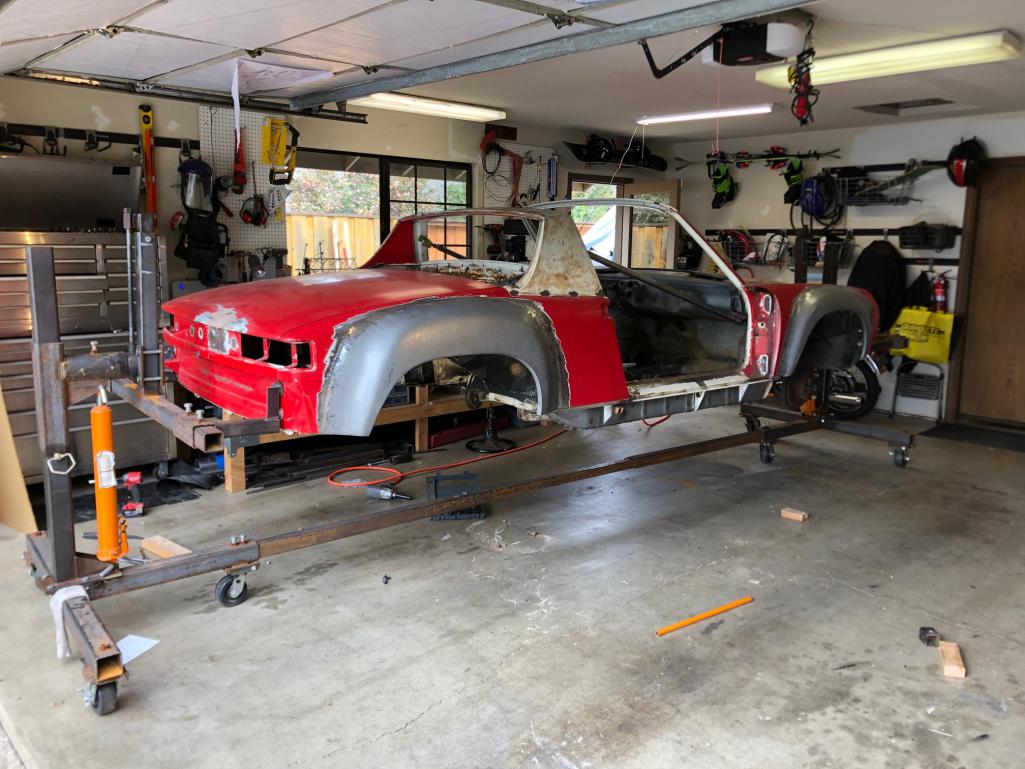
Posted by: mate914 Mar 15 2021, 07:27 AM
Most all of the rear pillar strength comes from behind, where battery tray is.
I'm not sure how much time I would invest in this 1/16'' space. If your going to fix this, I would make a few cuts inside and out side.
I'm not even sure they came perfect from factory.....
Matt
Posted by: pencap914 Mar 15 2021, 10:15 AM
Most all of the rear pillar strength comes from behind, where battery tray is.
I'm not sure how much time I would invest in this 1/16'' space. If your going to fix this, I would make a few cuts inside and out side.
I'm not even sure they came perfect from factory.....
Matt
Thanks Matt,
That's what I was thinking. If I really needed to stretch the car back I would probably have to cut the outside longitudinal stiffener too. I just don't see it being worth it. I feel as if any sort of chassis straightening attempt without a Cellete bench is guesswork anyhow. Its possible I could invest another weekend in trying to get it absolutely perfect, but end up worse off than it is now. I care less about the door gaps being perfect and more about how the suspension pickup points line up.
I wonder if I could borrow those Brunson precision optical levels from work to perform a suspension survey....
Meh I don't want this to be a science project. I need to maintain forward progression. Next on the list:
Finish fender flare installation (need to weld undersides)
Repair clutch tube
Install 6cyl engine mounts
Install rear sway bar mounts
Posted by: pencap914 Mar 23 2021, 11:04 PM
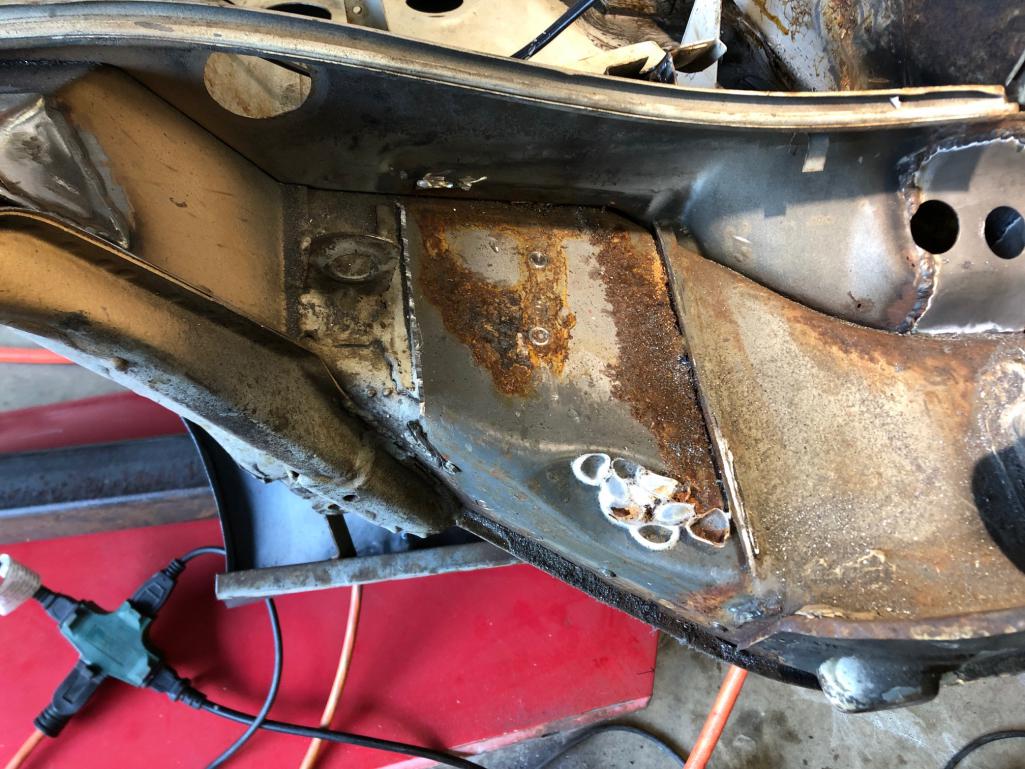
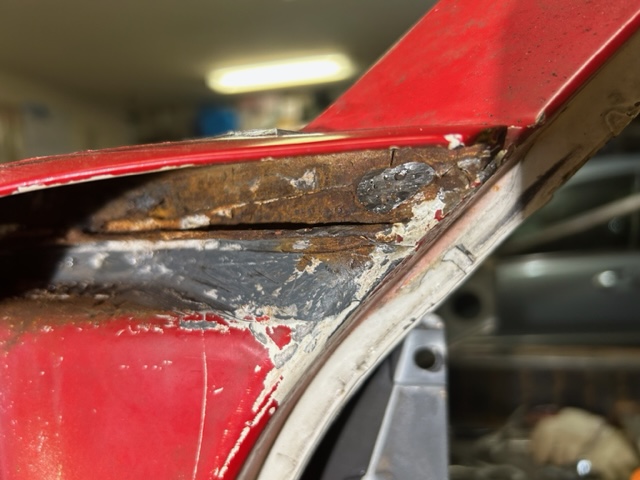
Well, finding more issues with some of the previous to the previous owners repairs...
The rear floor pan and bottom half of the rear firewall had been replaced with panels from restoration design, and the shop that did the work didnt bother to use a straight-edge to line things up. So now, upon receiving the Maddogs Motorsports OEM style mount I see about a 3/8" gap at the bottom: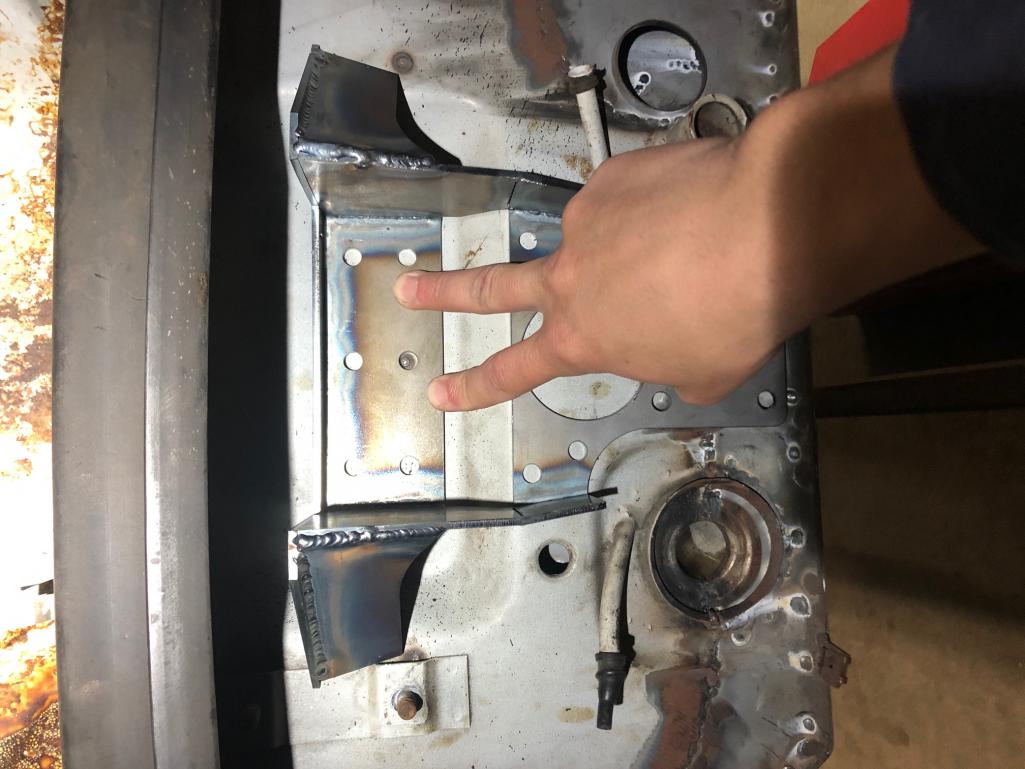
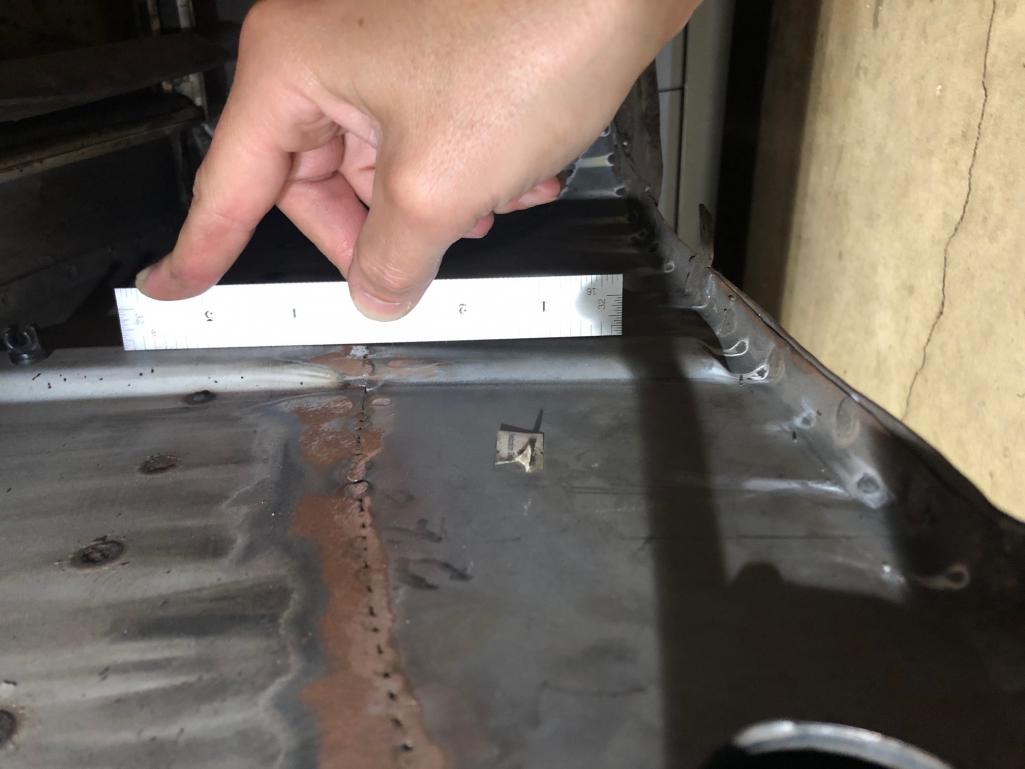
So I think I'll have to make a cut in the Maddog motor mount to get the bottom portion to line up correctly with the inward caved in bottom portion of the firewall... 
Its going to be painful to have to butcher up such a nice piece of fabrication from Maddogs motorsports. Oh well, it looks like I'll need to trim off a bit to make clearance for the brake pressure equalizer valve too.
Posted by: Luke M Mar 24 2021, 07:17 AM
Almost finished with the flat plate that I'll weld in between the two suspension pivot points to mount the oil cooler and perhaps add some rigidity.
Found someone in town that has a dimple die set. Wish I squeezed a few more holes to keep things light as possible...
I like this approach to the front cooler mount/reinforcement.
Anymore pics you could add/share? What was the steel thickness used for this?
Keep up the the great work.
Posted by: mate914 Mar 24 2021, 09:02 AM
Well, finding more issues with some of the previous to the previous owners repairs...
The rear floor pan and bottom half of the rear firewall had been replaced with panels from restoration design, and the shop that did the work didnt bother to use a straight-edge to line things up. So now, upon receiving the Maddogs Motorsports OEM style mount I see about a 3/8" gap at the bottom:
So I think I'll have to make a cut in the Maddog motor mount to get the bottom portion to line up correctly with the inward caved in bottom portion of the firewall...
Its going to be painful to have to butcher up such a nice piece of fabrication from Maddogs motorsports. Oh well, it looks like I'll need to trim off a bit to make clearance for the brake pressure equalizer valve too.
Just leave the bottom hang out. Start your welding on the top, by the time you get to the bottom its going to be hot enough and will bend with a blow of 5lb hammer.
Matt
Posted by: pencap914 May 23 2021, 03:18 PM
[/quote]
I like this approach to the front cooler mount/reinforcement.
Anymore pics you could add/share? What was the steel thickness used for this?
Keep up the the great work.
[/quote]
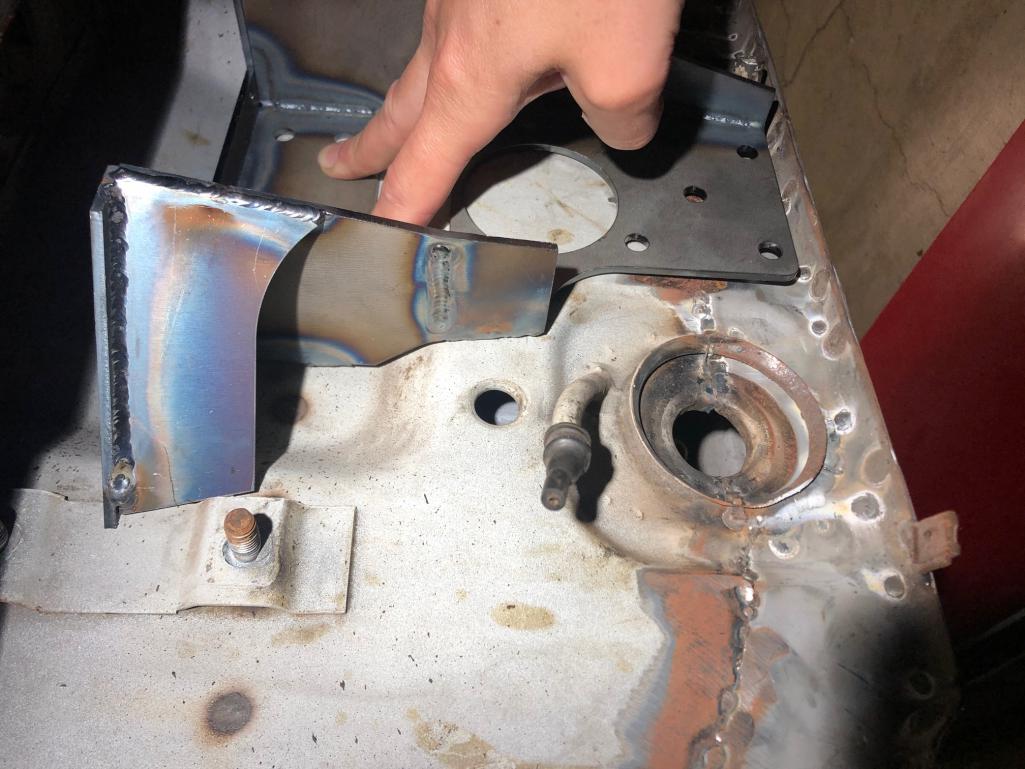
The main plate with the dimples is 14 gauge steel, which I'll admit seems overkill for this application, but the price was right (free scrap!). I welded a few M6 nuts on the bottom of the plate for retaining clips for the oil cooler. Then welded a 3/4" -1/16" wall square tube between the two suspension plates set this 14 gauge steel plate on top.
Hopefully, will add some rigidity to the front suspension pickup points, but probably nothing really noticeable.
It took me a while to get the shape correct for the side walls of the duct, as you can see its a pretty complicated shape. A pin contour gage and using CAD (Cardboard Aided Design...) came in handy for this.
I removed the upper portion of the steel that was spot welded to the front of the car, just under where the hood latch mechanism lives, welded a few M6 nuts to the bottom of it to secure the top of the duct, which I plan on fabricating out of aluminum.
Seen here is the extra holes punched in the front for air intake:
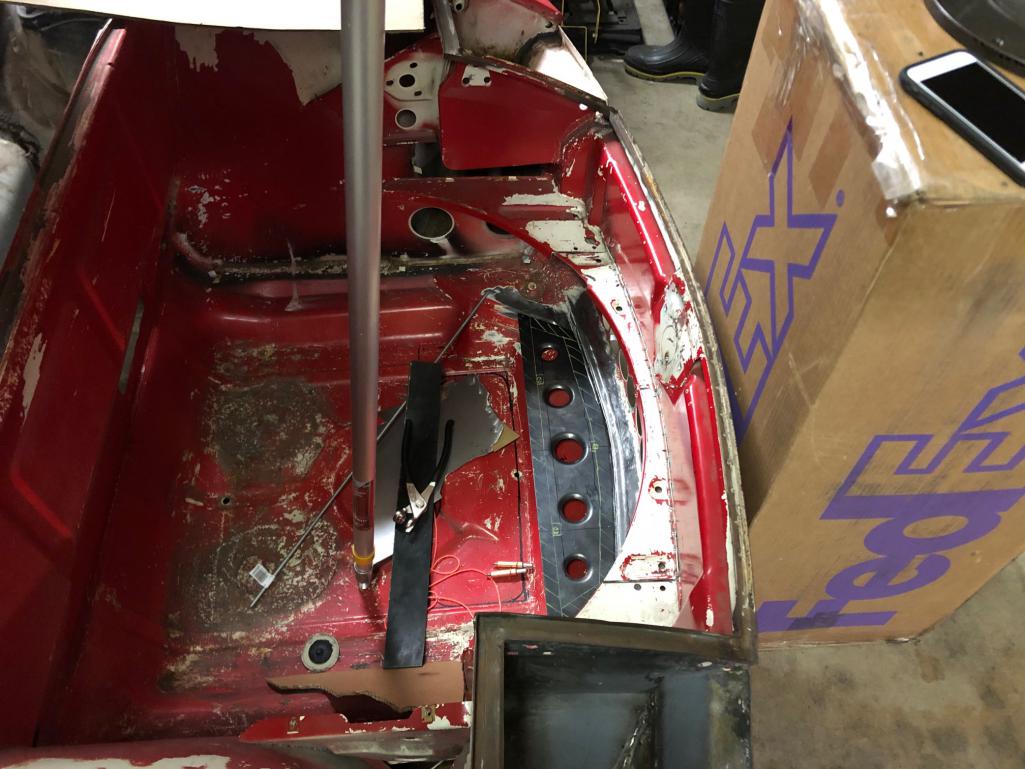
Oil cooler, rubber 1/8" rubber pad and sidewalls to direct airflow: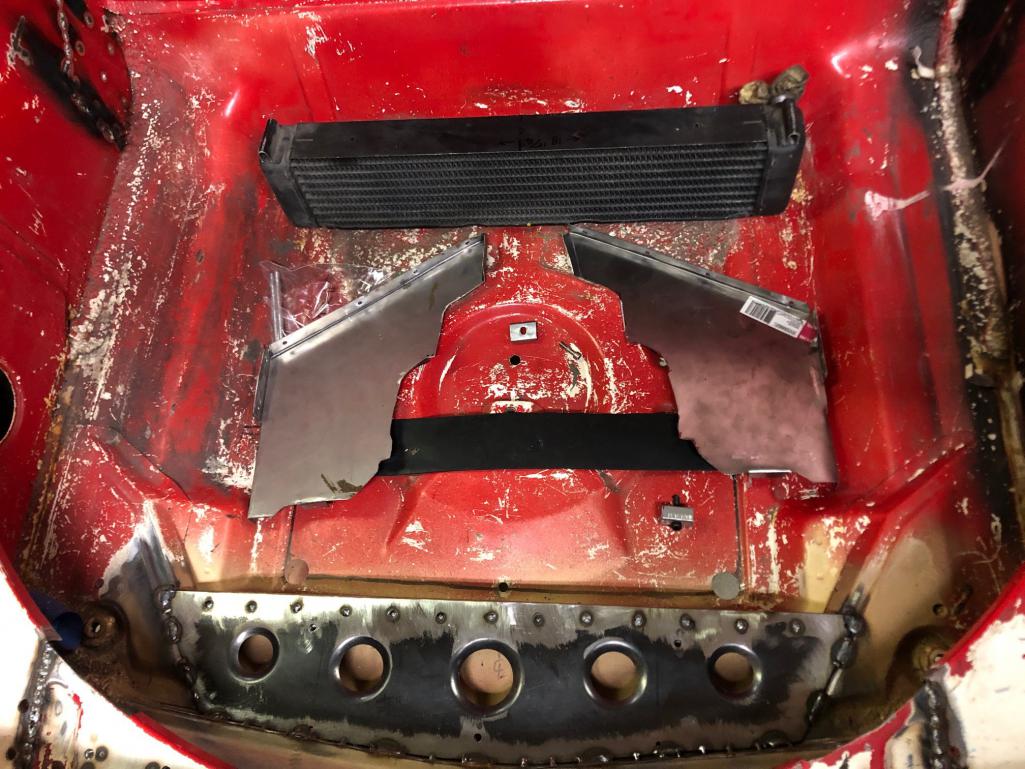
And how it sits in the car:
Top left you can see a M6 all-thread to secure the top, and bottom center of the photo one of my clips to secure the bottom of the oil cooler. 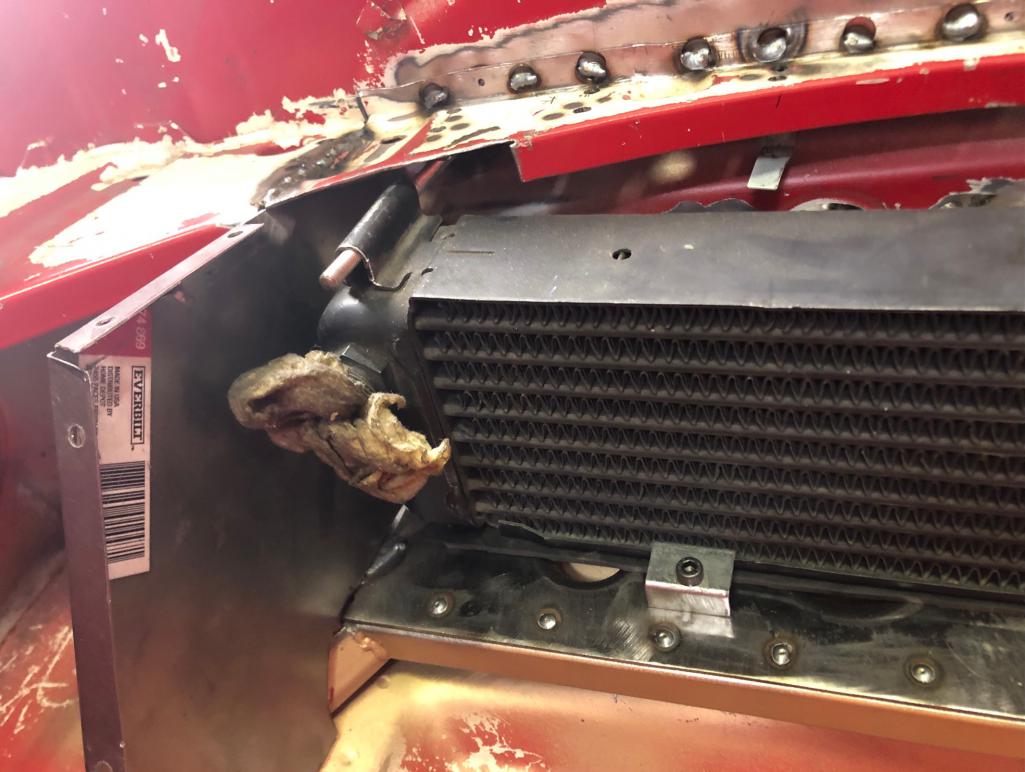
Posted by: pencap914 May 23 2021, 03:35 PM
Well before I weld on the motor mount for the 911 engine, I should address the broken clutch tube inside the tunnel. I'm debating how to approach this.
I purchased a replacement section of steel tube, just need to pull the trigger on cutting an access hole in the bottom of the tunnel to make the fix then weld the bottom pan back.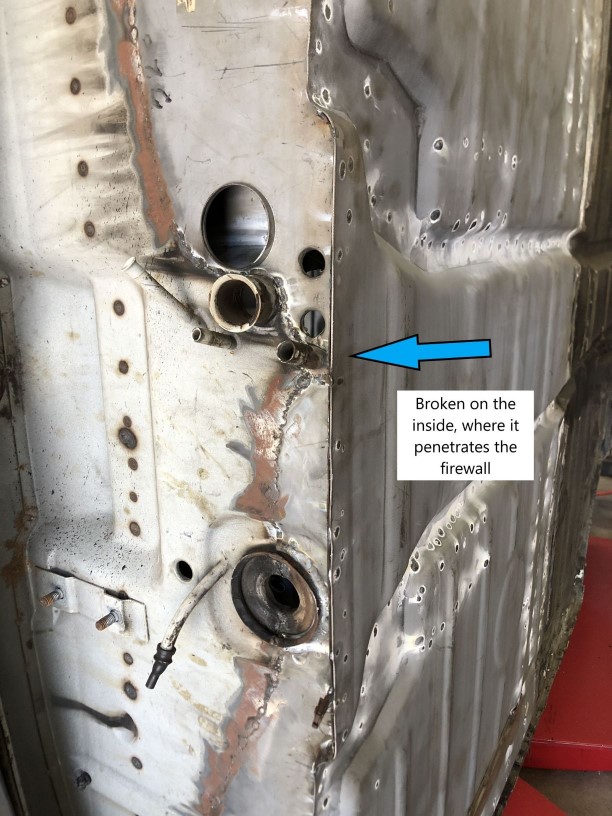
Also, debating what to do about the replaced floor board.... The shop that did this work did a simple lap joint, then tacked it in. this obviously creates a path for moisture, so should I just fully weld this joint to seal it up?
Posted by: bkrantz May 23 2021, 08:36 PM
I fixed some lap joints the PO left on my car, including the outer right rear fender. Maybe I am aiming too high, but I prefer to have butt joints wherever possible.
Posted by: gereed75 May 24 2021, 06:06 AM
Where possible, you might consider the “cut and butt” technique promoted in the Fitzzee Fabrication videos on YouTube. Looks like it might work on many of the panels shown in your pictures.
Posted by: pencap914 May 24 2021, 07:01 PM
I fixed some lap joints the PO left on my car, including the outer right rear fender. Maybe I am aiming too high, but I prefer to have butt joints wherever possible.
Yeah I've skimmed through your build thread. Quite impressive!
I can understand the fenders wanting to upgrade this splice to a butt joint, but underneath the car I'm wondering if its worth the effort. I would just be doing it for longevity.
Posted by: pencap914 May 24 2021, 07:11 PM
Where possible, you might consider the “cut and butt” technique promoted in the Fitzzee Fabrication videos on YouTube. Looks like it might work on many of the panels shown in your pictures.
Yeah I've seen that video where he takes a thin blade and makes a 45 degree cut... that's what I'm debating on doing. on the transition between the front floor pan and rear.
Posted by: nditiz1 May 24 2021, 07:31 PM
I too have the same 3/8 gap at the bottom of my maddog mount.
Also my clutch was previously repaired with a hack job. I did my best to correct it.
Lastly, the rear pans on mine were also replaced with restoration design ones and the job was sub par. I know I'm on the east coast, but I'm wondering if these two "welders" purchased their welding degrees from the same dollar store academy.
Posted by: pencap914 Sep 2 2021, 10:34 PM
Made some progress this summer:
Clutch tube repair: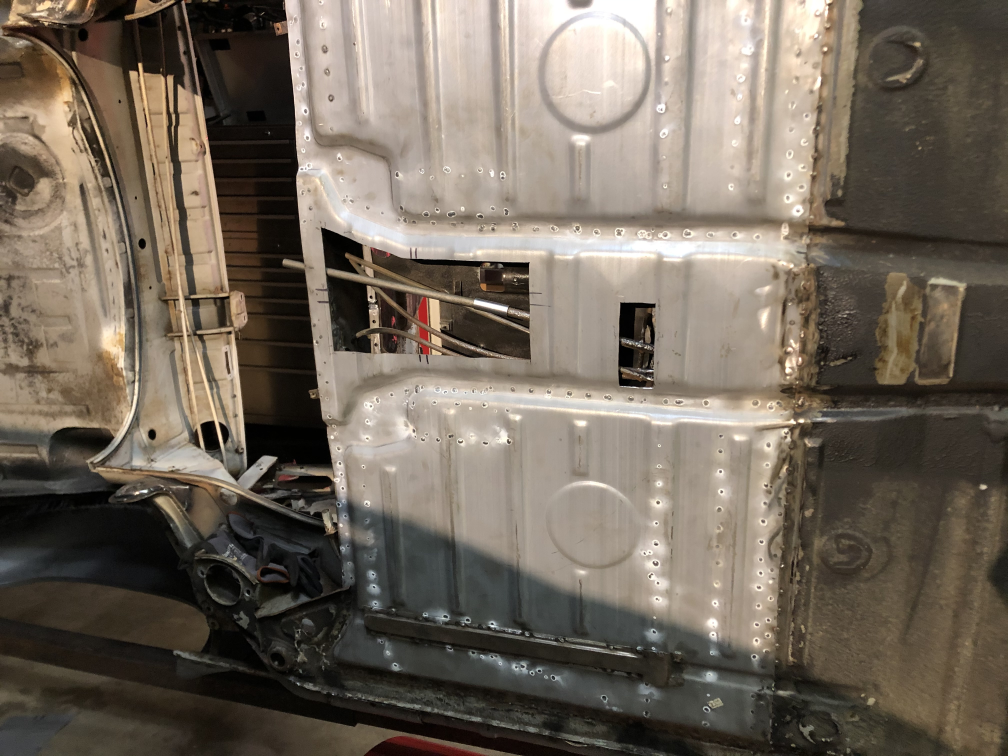
Found the oval bracket inside the tunnel was broken, leaving the throttle and clutch tubes pretty floppy: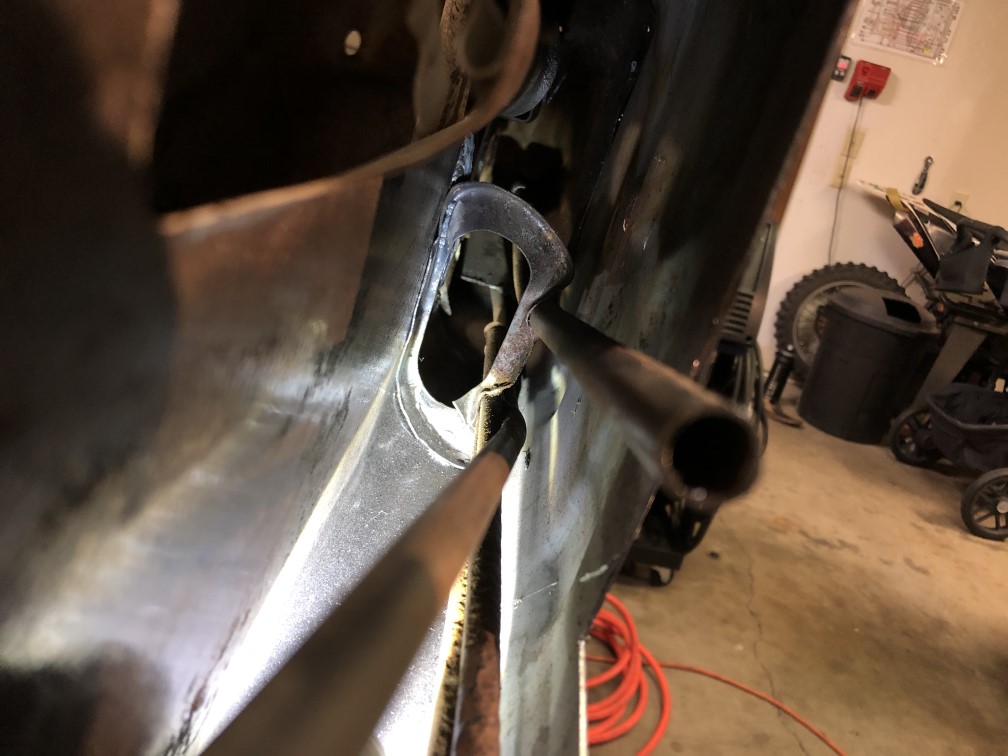
Couldn't reach the inside exactly where it was broken, so I just made a little bracket and closed the oval. Tubes are rock solid now. 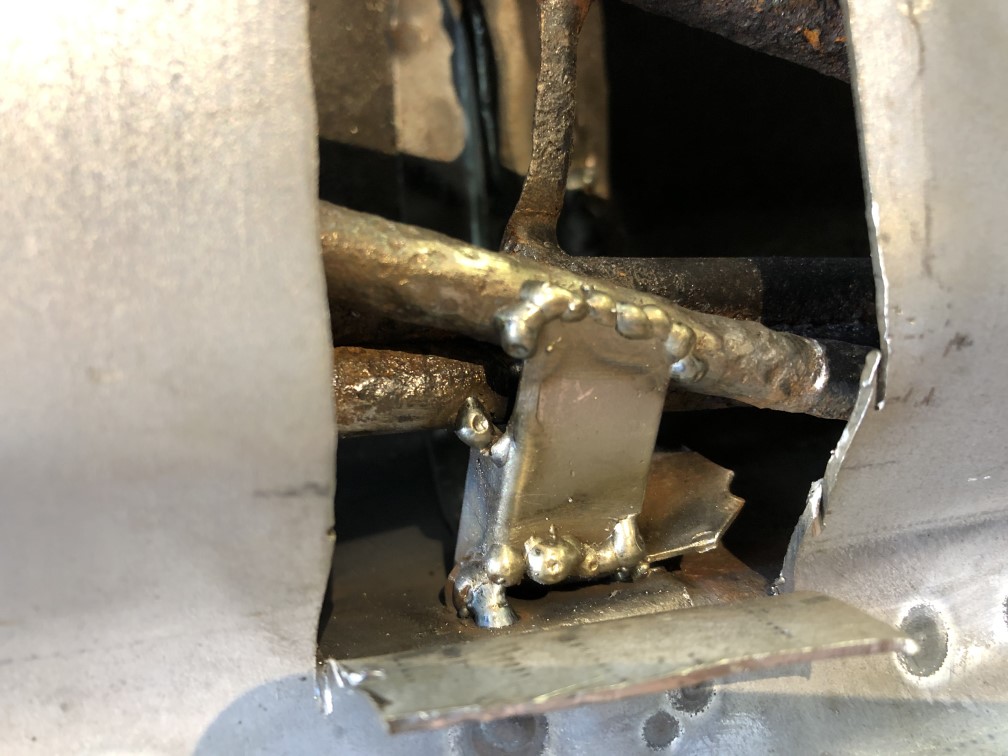
New clutch tube at the back end, with a sleeve around butt joint. 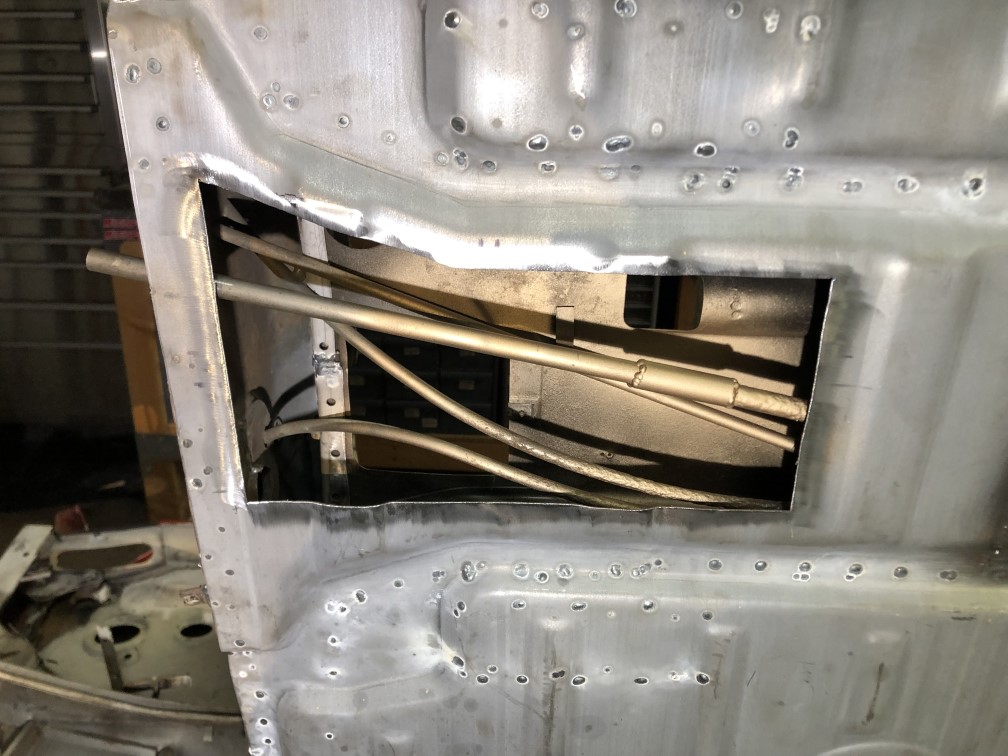
Floor pans welded back up. Surgery scars still visible before ground smooth with flap disc. 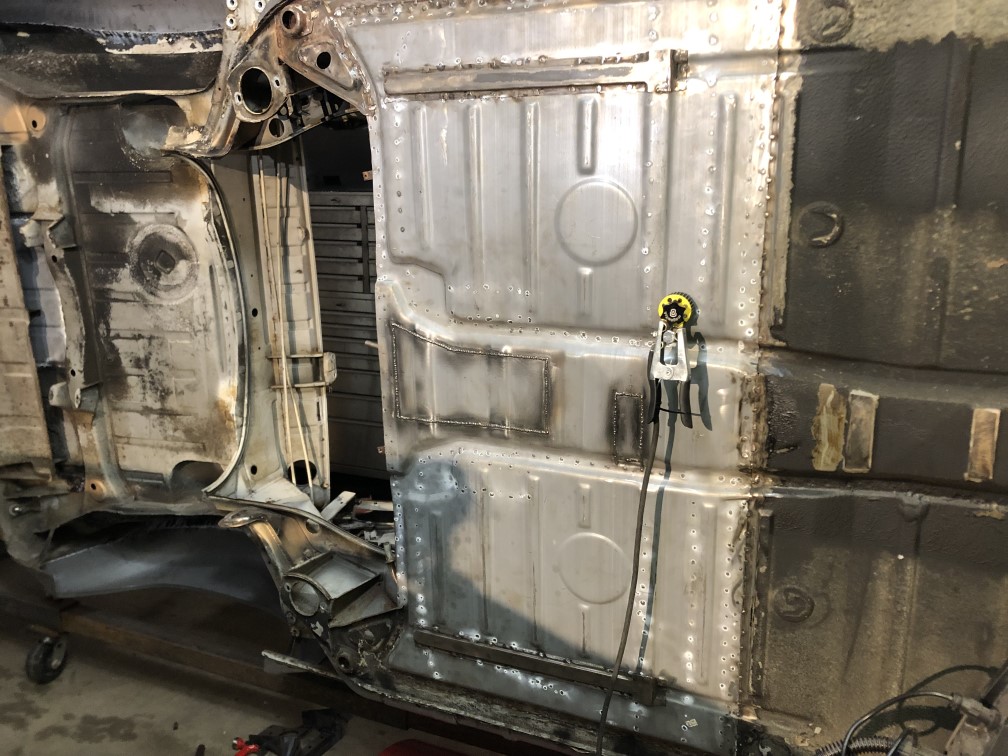
Posted by: pencap914 Sep 2 2021, 10:51 PM
I had a few distractions this summer... Not to mention its construction/vacation season. So time is in short supply. 
Posted by: pencap914 Sep 2 2021, 11:13 PM
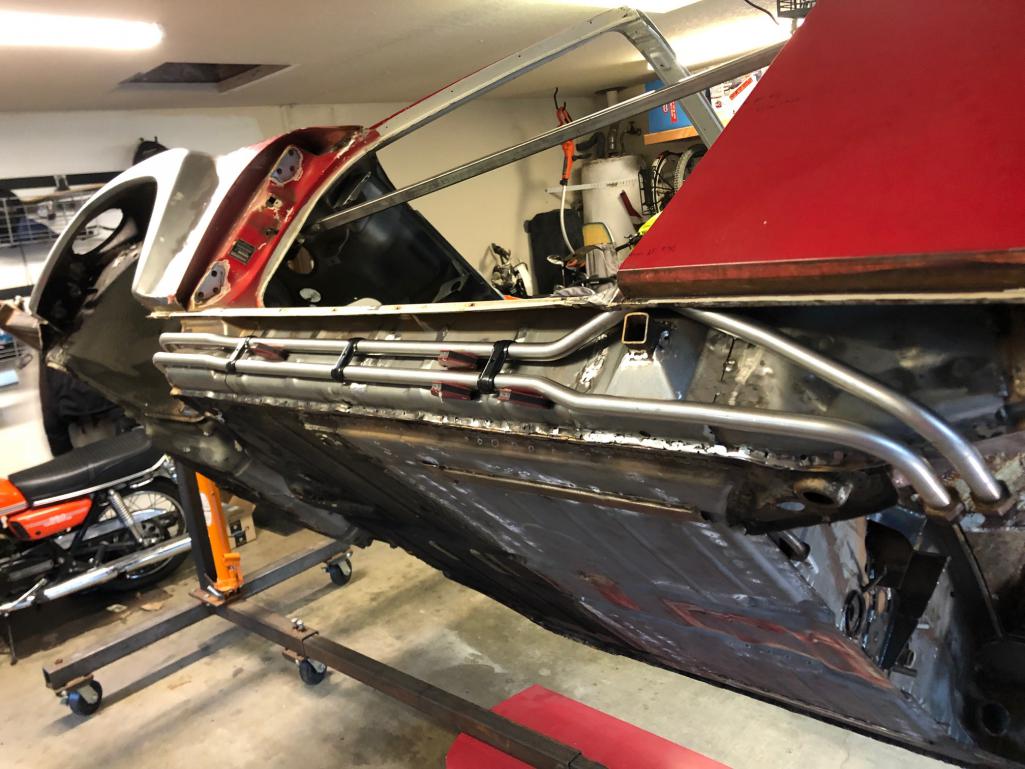
Installed the rear suspension stiffening kit: Was in between doing this or the Heim joint stiffening kit. This will probably suffice for 8" wide DOT legal tires on curvy mountain roads. 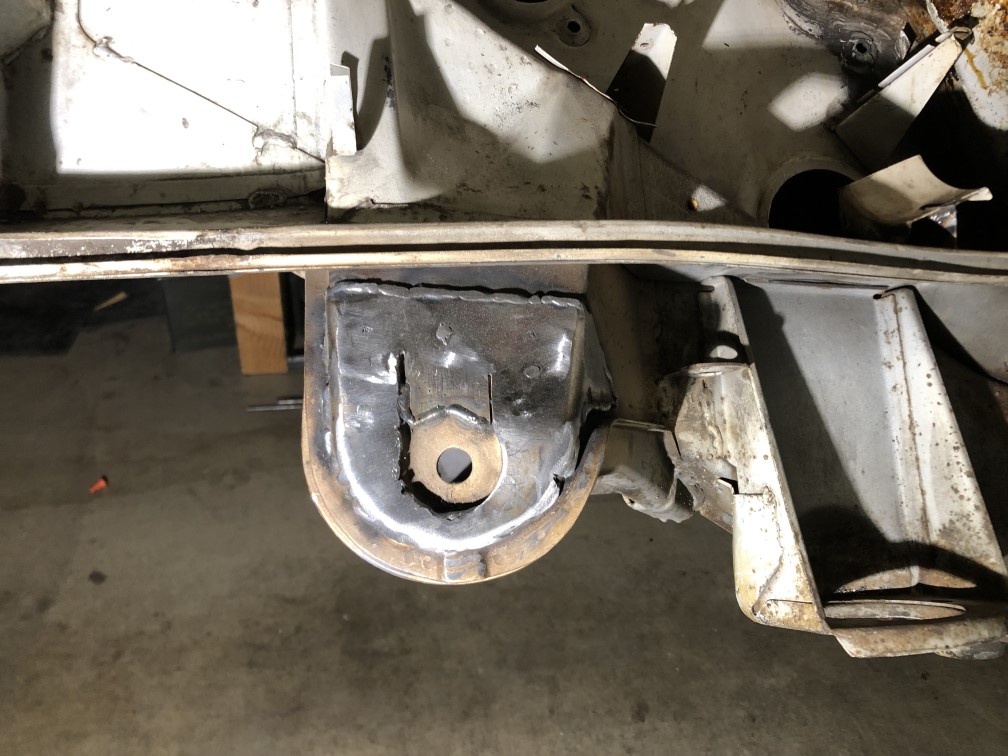
Also added the front sway bar stiffening kit. Probably overkill for my application, but its an excuse to drink beer in the garage while listening to 70's British Metal. 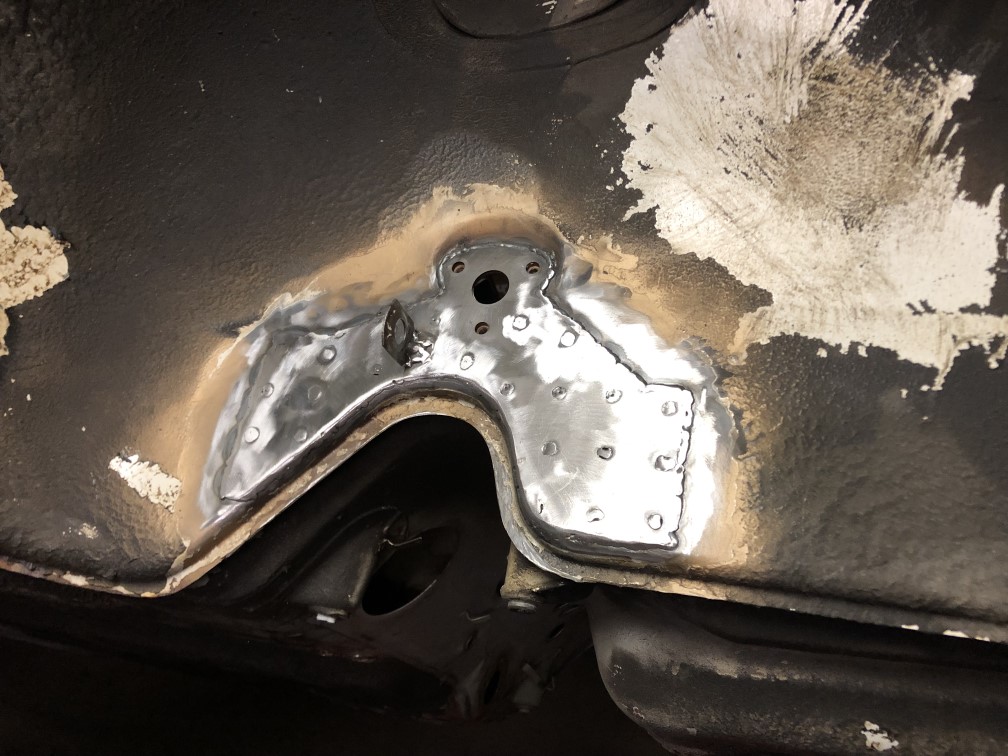
Also cut the holes for the oil tank: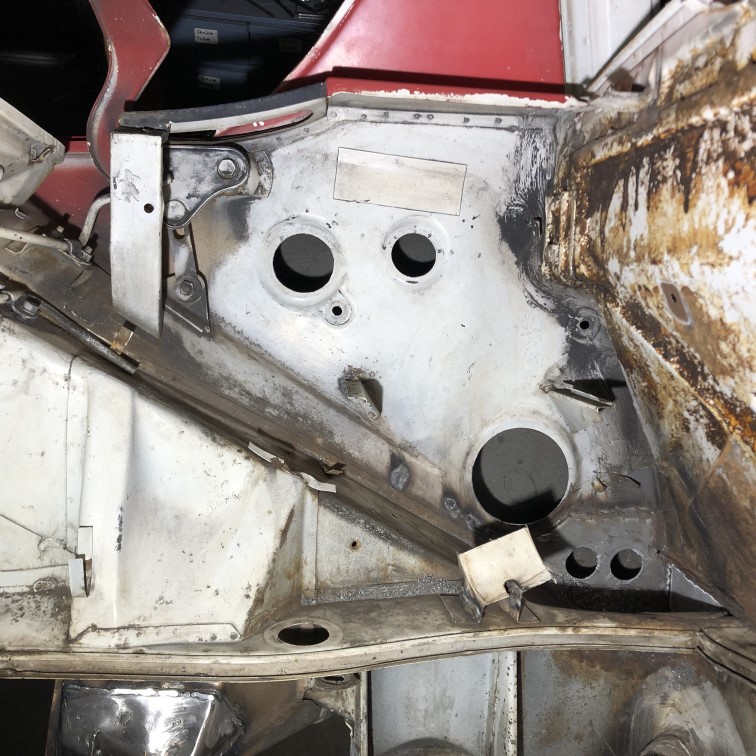
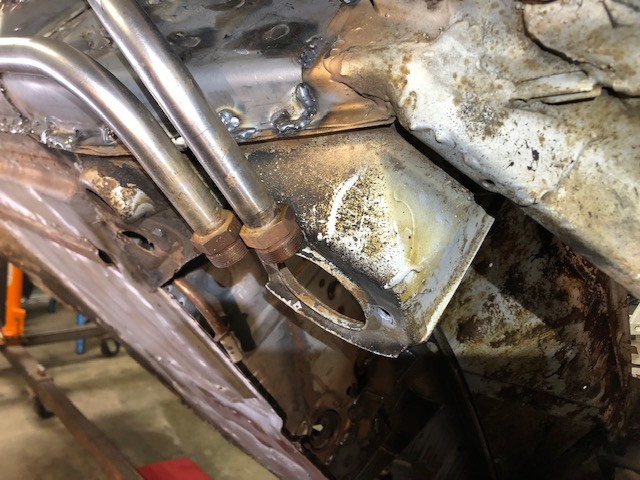
And mounted the Mad dog OEM 6cyl motor mount: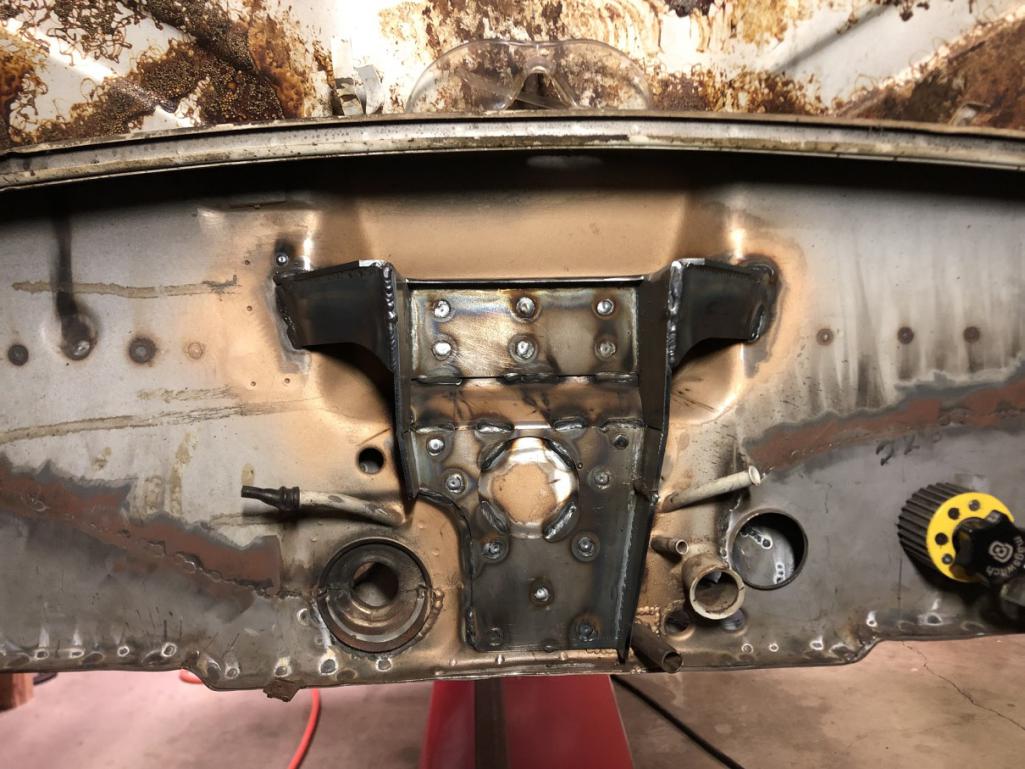
Posted by: pencap914 Sep 2 2021, 11:29 PM
So now I have a problem to solve: What to do about the brake proportioning (err.. pressure equalizer?) valve. My car is a late 74 build so its the later style more commonly found on 75-76 cars, so I had to remove the valve and bracket to make way for the /6 engine mount. I may see if PMB would be willing to take this one as a core for a rebuilt early valve, then find some hard lines from an early car, or bend my own.
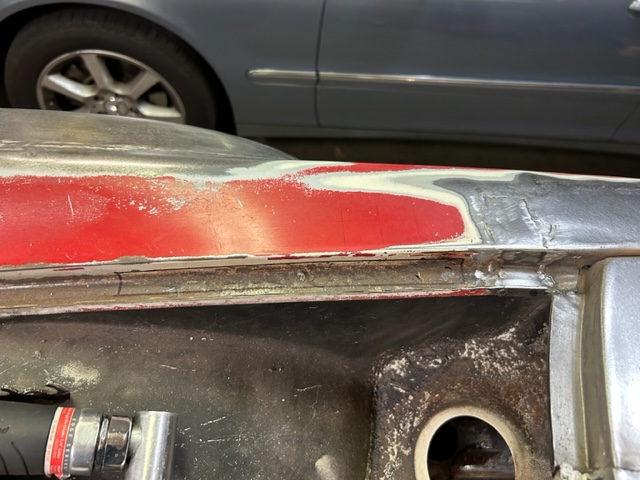
Next big project: Take on this ugly mess found on both sides of the car: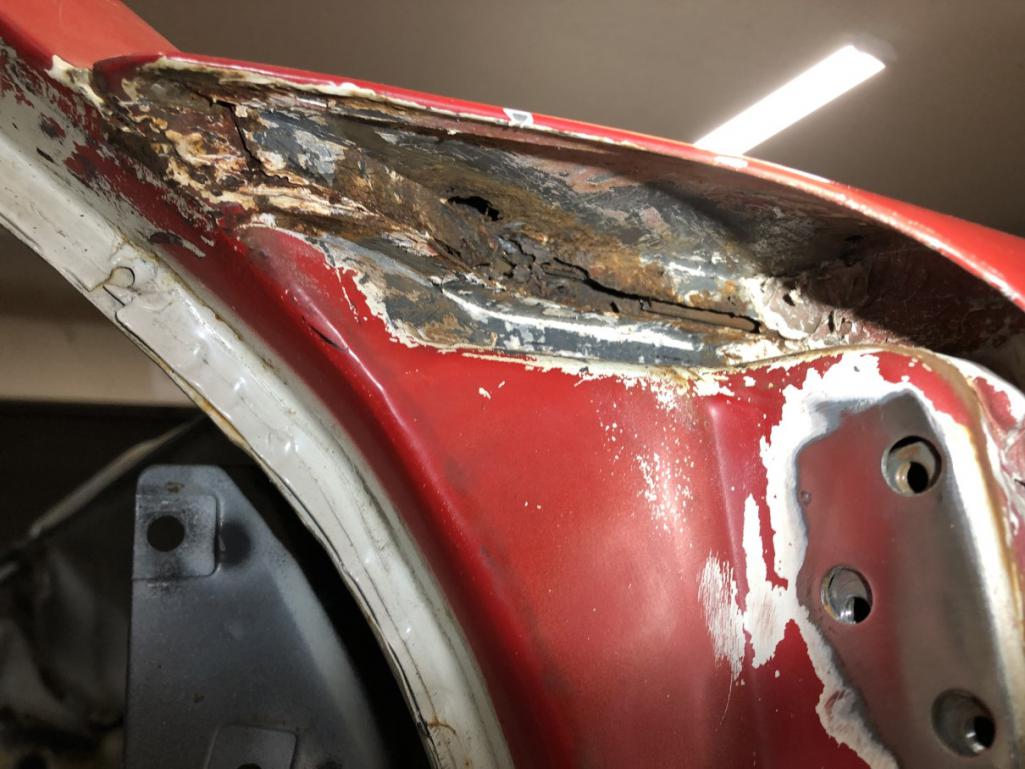
A previous repair attempt was made, but unfortunately its just insufficient. I purchased the cowl repair panels from AA. Not really looking forward to this repair, but it has to be done. This certainly will push my skills to the max. Lets hope I don't c**k it up too bad! 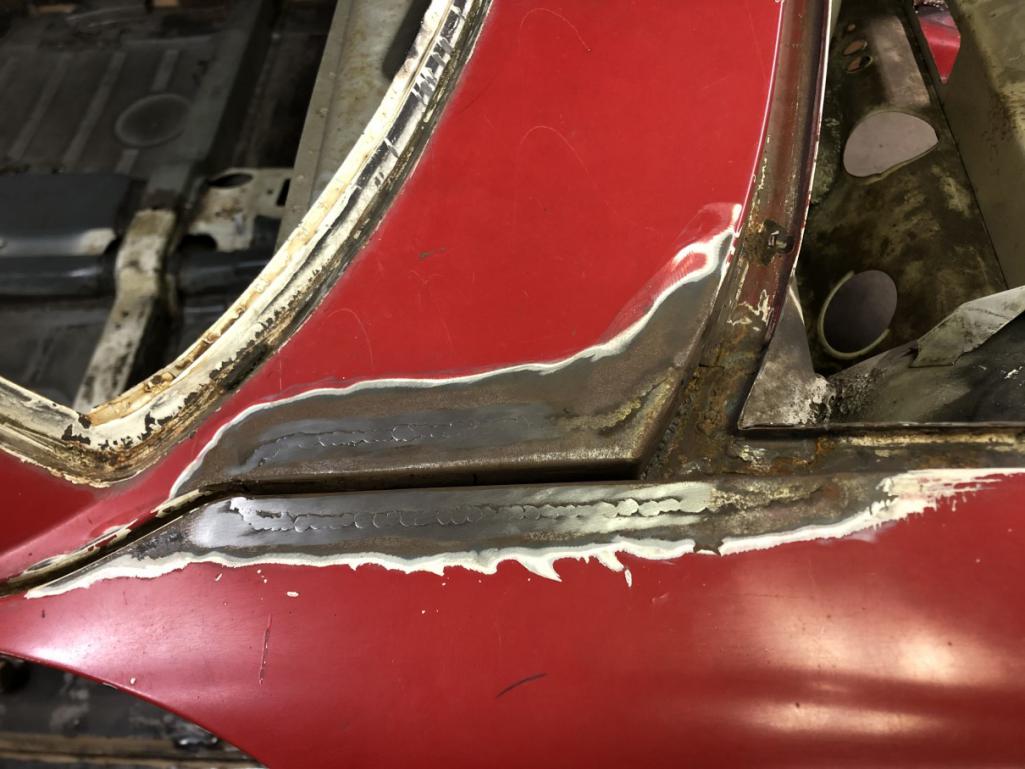
Posted by: Cairo94507 Sep 3 2021, 06:30 AM
Posted by: Montreal914 Sep 3 2021, 12:14 PM
Glad to see all of this progress being done on the car!
I originally purchased this car in hopes of making it my dream 914 while still driving my DD 73. I felt the condition of the white 74 was a better base than my 73. After doing some of the work (inner and outer kit) the project car sat in the garage for a couple of years. It also made me realize that my dream 914 was my 73 DD because of its sentimental value, even though I didn’t think it was as good of a foundation as thé 74, now yours.
I am sad to see all of the issues you are having with the repairs that were done before my ownership. One thing I never understood was why they cut the lower firewall through the shifter port... 
For the front fender, you saw and commented on the work I recently did on mine. I wasn’t impressed by AA’s repair piece and that is why I got an original fender part from Vince (Hesperia area) but I took my sweet time to find the right one in his yard.
I will send you AA’s part if you want it. This repair definitely pushed my level of craftsmanship and I am happy with my modest work. Go very slowly and analyze. I did get excellent inputs from Cary. 
This will be a very nice car when completed, keep up the good work! 
Posted by: pencap914 Sep 3 2021, 09:41 PM
Thanks Eric! Yeah its been a great project for me.
I am sad to see all of the issues you are having with the repairs that were done before my ownership. One thing I never understood was why they cut the lower firewall through the shifter port...
I know right?!? And why would someone replace the entire rear part of the floor without repairing the blatantly obviously busted clutch tube? I saved the invoice you gave me for the shop that did all that work, if I remember correctly, it was over $3000. Someone paid a lot of money for some sloppy work.

I will send you AA’s part if you want it.
Ah shoot I should have reached out to you earlier, but I bought it months ago, I doubt AA would take it back. I think I can make use of them rather than chopping up a good original fender. I think I have a plan...
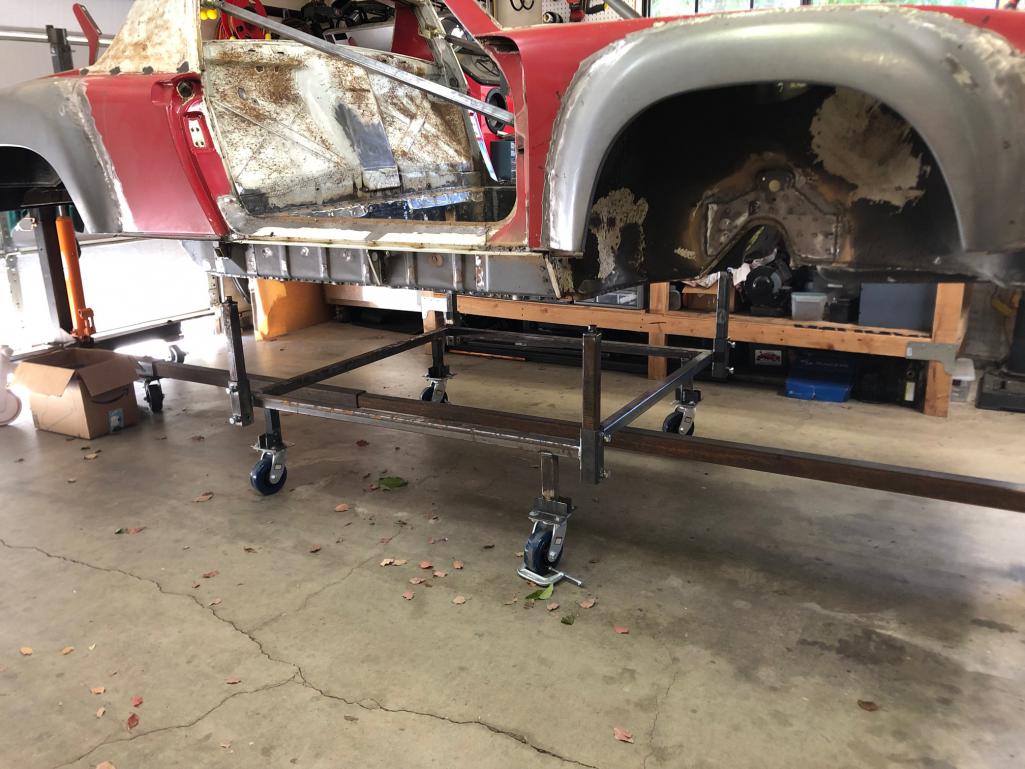
I'll get started on that later in fall. I'm thinking the car will have to come down off the rotisserie and onto a frame dolly before I start on the cowl repair. I'd imagine the rotisserie puts a lot of stress on this area of the car.Anyone have a frame dolly they want to sell?

Posted by: pencap914 Nov 7 2021, 10:22 AM
Figuring out the oil system for the 2.7. Was on the fence about using Ben's SS oil lines since I didn't realize the 4-cyl engine mounts are going to have to be cut off for these to work. I've read from others here that its not an easy task getting those off. However, after closer at the mounts, and figuring out a "demolition plan" I think I know how to take them off without much issue. 
Posted by: pencap914 Nov 7 2021, 10:26 AM
Also working on restoring the fiberglass engine shroud for the 2.7. Few cracks in the fiberglass will have to be addressed, then sanded and painted. This week I'll stop buy the automotive paint shop to talk about what would the best paint options would be for this. A fiberglass engine shroud is a challenging place for automotive paint....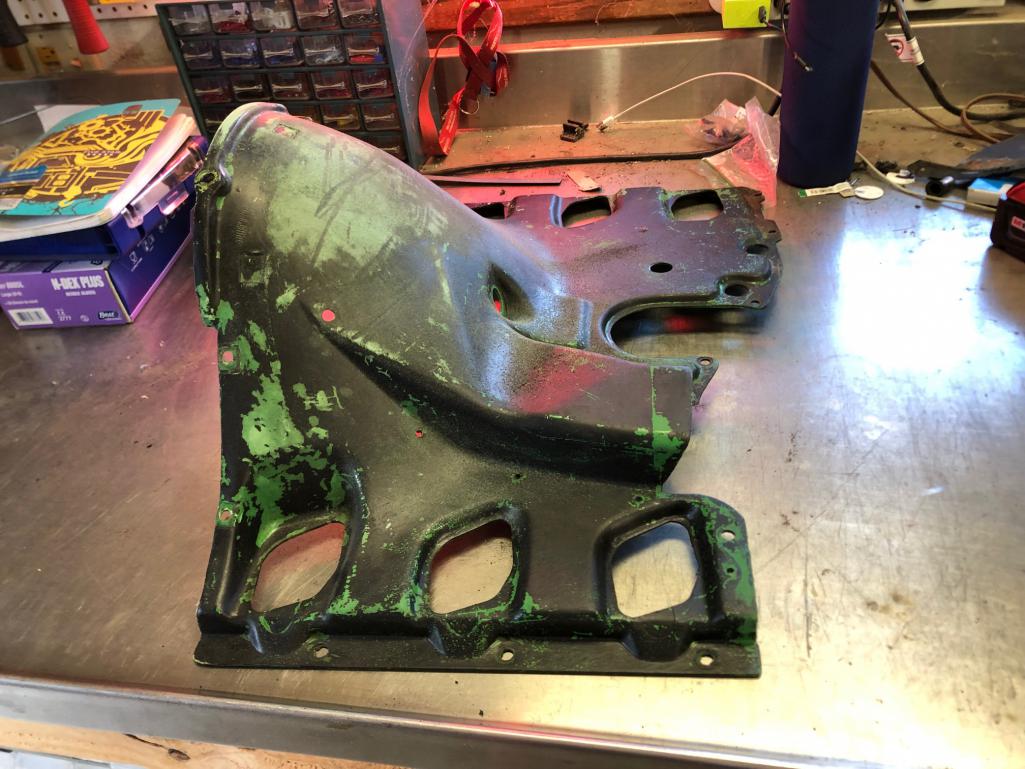
Posted by: tscrihfield Nov 7 2021, 08:18 PM
Really like where this thread is headed!
Fantastic work thus far!
Posted by: pencap914 Nov 12 2021, 02:16 PM
Got the 4cyl motor mount removed yesterday! Wasn't too bad to remove, a spot weld cutter and a 90 degree die grinder with a 3" cutoff wheel did most of the heavy lifting. Clean-up took a variety of tools to polish off the old welds. (Forgot to snap a pic of the finished product before leaving the house this morning...)
Now on to final fitup for the SS hard oil lines, and more weld cleanup on the outer longitudinal stiffening kits. 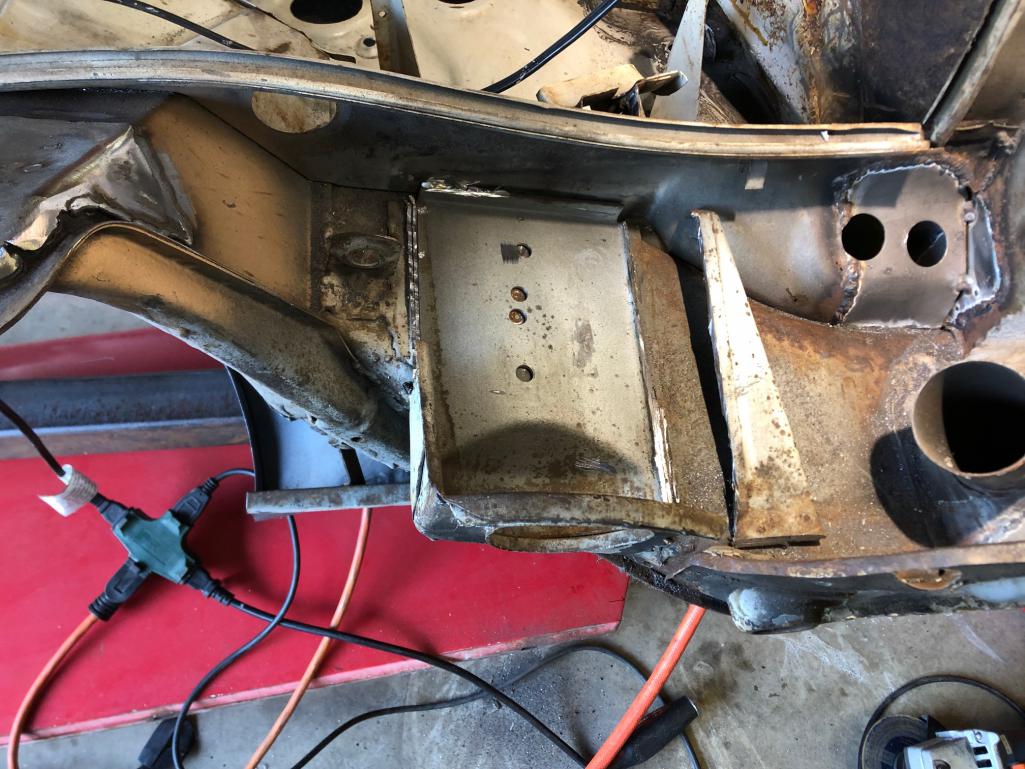
Posted by: Retroracer Nov 13 2021, 04:00 AM
Thx for posting progress on this build!
Lots of parallels to my GT build (not well documented here), some very similar issues with rust repairs; good to see you getting the stiffening panels in and removing the -4 mounts. On a real -6 there is a small bracket which holds up the oil feed pipe - which you might want to add "while the welder is out". I had a car I could measure dimensions off of, and cut it out of flat plate. I have pics somewhere if you're interested....
Also: oil cooler looks like the Behr Mercedes one?
- Tony
Posted by: Luke M Nov 13 2021, 08:57 AM
Your car is coming along well. I'm at the point of plumbing a 3.0 to the front oil cooler. I'm looking at Ben's SS GT oil lines as well. What's your plan on a T-stat location and hose layout ?
Post pics please.
Posted by: Montreal914 Nov 13 2021, 12:22 PM
Great progress Glenn!
I really like the craftsmanship!
Those oil lines look really nice!
Have you started looking at paint shop? I am slooowly making progress on the preparation of my roller for paint. I will be interested in hearing about your findings.
Posted by: pencap914 Nov 15 2021, 10:38 AM
Tony-
Just found your handle on IG. Holy cow that's a nice build you have there. Hoping my build will turn out similar!
In the near future I'll need to weld on that oil feed pipe bracket. I saw someone made these and had them for sale (Perhaps tangerine racing?) I thought about making one too, looks pretty simple. Nothing a body saw and a die grinder couldn't handle. If you have pix and dimensions handy that would be much appreciated if you sent that over!
Good eye, yeah that's a Behr oil cooler from a Mercedes. Eric (Montreal914) included it when I bought the car from him.
Luke-
I'm noodling through the T-stat location now, still might go with a Mocal t-stat since they're about half the price of a Porsche unit off an SC or something. I Like what Ben (mb911) has done with his t-stat setup. (See the "914-6 GT oil cooler set up install and prototyping thread") I think my T-stat will go somewhere in a similar location, about where the old left side 4cyl engine mount went. I'll certainly post more pictures as I make progress!
Eric-
Thanks! I've only been casually asking around for a paint shop, no solid leads yet. A friend of mine recommended a place in Reno where he's had a few classic cars painted. His logic is outside of California, shops can use better paints since California is restrictive on the chemicals used.... not sure if this is true or not. There are a few shops outside of Sacramento that I may call to get quotes from as well.
I'm even considering hauling the shell up to Brosseau's coachworks in Oregon City to have him chuck up the shell on a Cellete bench, then media blast and epoxy primer. However, he's about 9-12 months out from having availability at the moment...
Let me know if you find a good shop! As you know, I have friends that live in SoCal and don't mind the haul down there.
Posted by: Luke M Nov 15 2021, 12:05 PM
I've been following Ben's thread on the oil lines stuff. Just wanted to see what others where doing and compare. If you plan on running a 6 oil tank in the factory location you may want to remove that fan mount. We left my brothers in place and couldn't get the oil filter on with it there.
Posted by: pencap914 Nov 15 2021, 12:24 PM
I've been following Ben's thread on the oil lines stuff. Just wanted to see what others where doing and compare. If you plan on running a 6 oil tank in the factory location you may want to remove that fan mount. We left my brothers in place and couldn't get the oil filter on with it there.
Good to know. I'm using one of Ben's oil tanks, so that fan mount is not long for this world.

Posted by: Retroracer Nov 15 2021, 04:16 PM
re: Just found your handle on IG. Holy cow that's a nice build you have there. Hoping my build will turn out similar!
- Thx so much
In the near future I'll need to weld on that oil feed pipe bracket. I saw someone made these and had them for sale (Perhaps tangerine racing?) I thought about making one too, looks pretty simple. Nothing a body saw and a die grinder couldn't handle. If you have pix and dimensions handy that would be much appreciated if you sent that over!
- These pics were what I based mine on: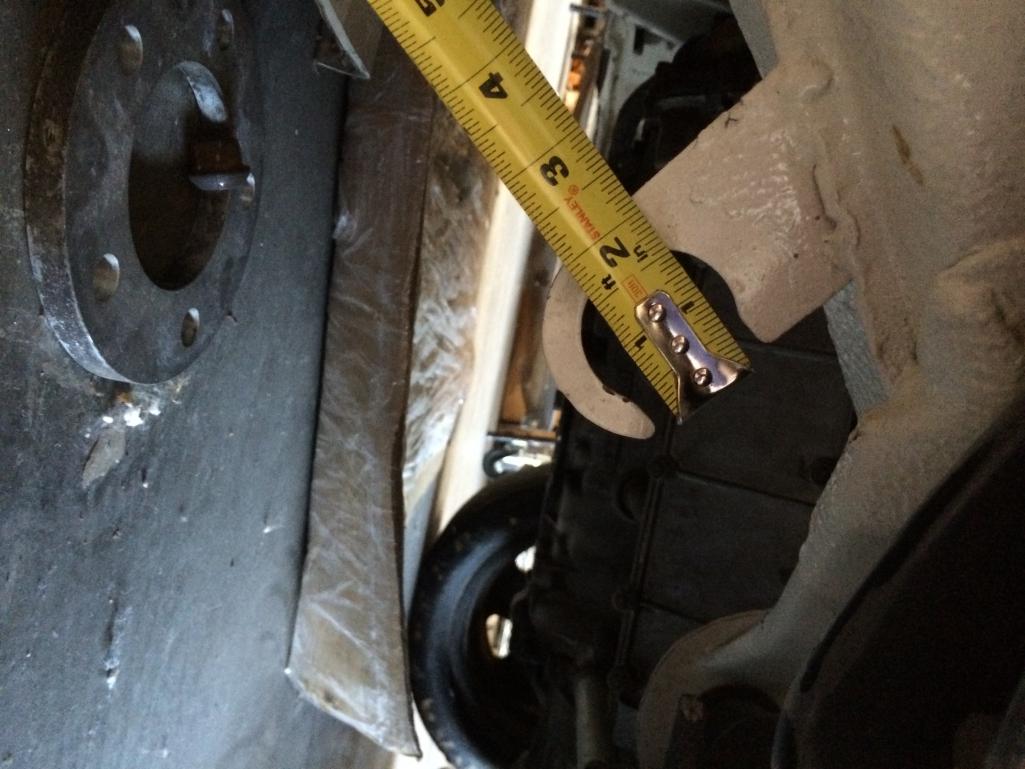
These pics are from a real -6 chassis NOTE the bad welding (factory!), and the thickness is the same as the metal on the engine lid. I made mine out of the leftover metal remaining when I cut out my GT engine lid. Hope this helps!
- Tony
Posted by: pencap914 Nov 16 2021, 02:48 PM
Thanks Tony! I should be able to work from that.
Posted by: Luke M Nov 18 2021, 10:24 AM
Question on the SS oil lines going down the drivers side. Did you have to make any adjustments to the jack post or did the lines fit perfect like in your pic above?
Posted by: pencap914 Nov 30 2021, 05:30 PM
Question on the SS oil lines going down the drivers side. Did you have to make any adjustments to the jack post or did the lines fit perfect like in your pic above?
Sorry just saw this Luke, The jack post never moved. It may look a bit different because of the outer stiffening kit over the top of the longitudinal. Its a bit of a maneuver to fish the upper SS line in between the jack post and the body skin, but I'm impressed how well the SS lines fit and line up. I'm glad they do, because they would be a bear to bend.
Hoping to get the final fit-up in the next week or so and start welding in the mounting studs.
Posted by: Luke M Dec 1 2021, 05:49 PM
Question on the SS oil lines going down the drivers side. Did you have to make any adjustments to the jack post or did the lines fit perfect like in your pic above?
Sorry just saw this Luke, The jack post never moved. It may look a bit different because of the outer stiffening kit over the top of the longitudinal. Its a bit of a maneuver to fish the upper SS line in between the jack post and the body skin, but I'm impressed how well the SS lines fit and line up. I'm glad they do, because they would be a bear to bend.
Hoping to get the final fit-up in the next week or so and start welding in the mounting studs.
Thanks for the reply. That's what I needed to know.. Now to hit up Ben for a set.
Posted by: pencap914 Apr 7 2022, 01:38 PM
Slowly pecking away at the tub, getting distracted playing with the engine now.
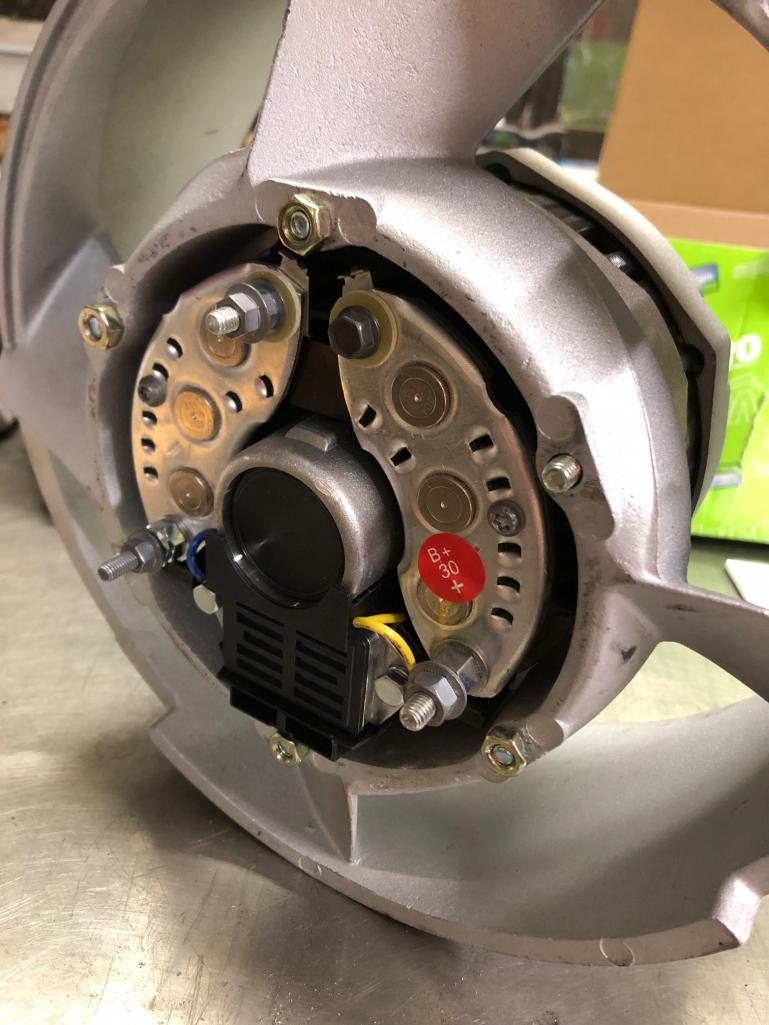
The 1975 2.7 911 engine I purchased last year included an alternator that looks and feels a little rough. Diode readings were also indicating the need for a refresh, so being uneducated on the subject of 911 alternators, I ordered one from Autohausaz, and it turns out its the later style alternator that will need to have the housing hogged out for it to fit. (See 2nd photo, bolts are too short)
Now the question is, do I send my original Motorolla unit out for a rebuild (~$250) or do I keep this $330 Valeo unit, and pay to have my fan housing cut out (~$100+)
I believe my original SEV/Motorolla unit is 50(?) amps with an external voltage regulator (VR), and the Valeo unit is 75 amps with an internal VR. I've heard folks complaining about having the VR integrated to the alternator, since it sits on top of the engine getting baked by engine heat all the time. So my question is it really worth the upgrade for more output? I plan on running a set of vintage 55A Marchal auxiliary driving lights on the 914, so I'm wondering if my current Motorolla unit would be beefy enough to handle my demand. Any thoughts on this subject?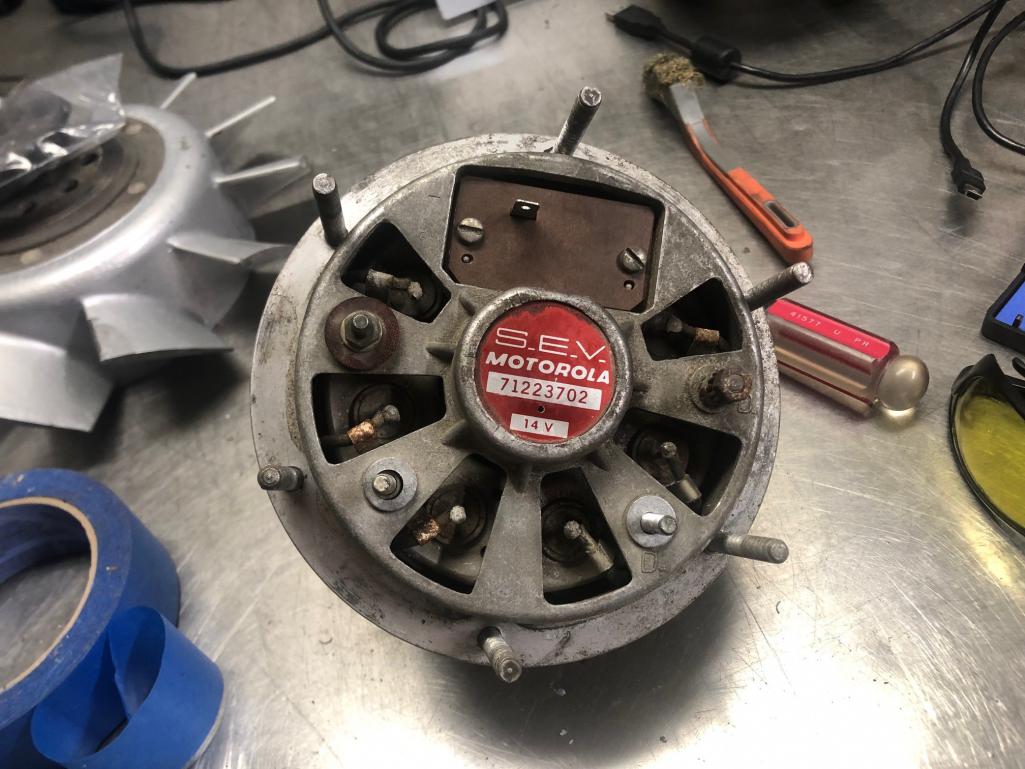
Posted by: roundtwo Apr 7 2022, 05:06 PM
Inspirational metal work! Way to solder on through the tougher work.
Posted by: pencap914 Sep 18 2022, 10:14 PM
Well progress has been slow this spring/summer. Had my KTM grenade, so had to get the engine rebuilt, then had a 2nd kid, so live has gotten in the way of progress on the 914.
Since my last update;
- Built a frame dolly
- Had the alternator rebuilt by Rite-Way electric in San Francisco
- Painted the fiberglass shroud
- Did more hammer/dolly work on the welded fenders
- Contacted Perry Kiehl to have a engine harness built
Really not looking forward to the front two cowl repairs where the windshield frame meets the front fenders.... That will be next on the list along with some other minor fabrication for oil cooling system.
Halfway through sanding the old rattle can black paint off.
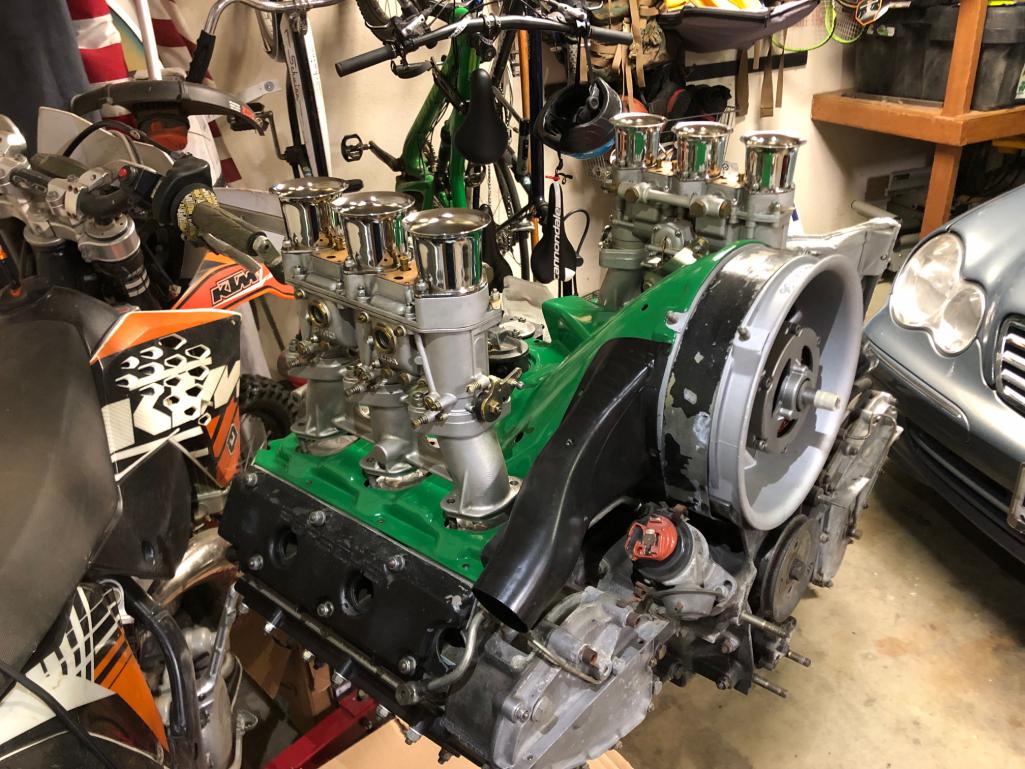
Cowl painted and placed on engine. Carburetors mock placed just to get me all fizzy about the project again.
Frame dolly fabrication in progress
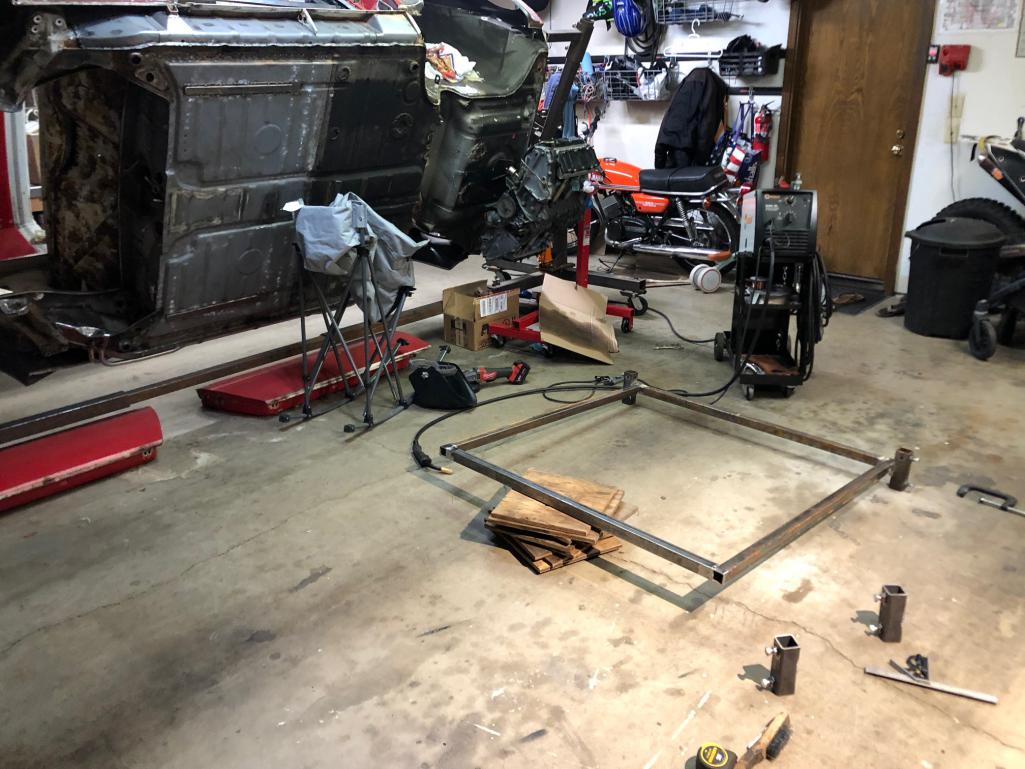
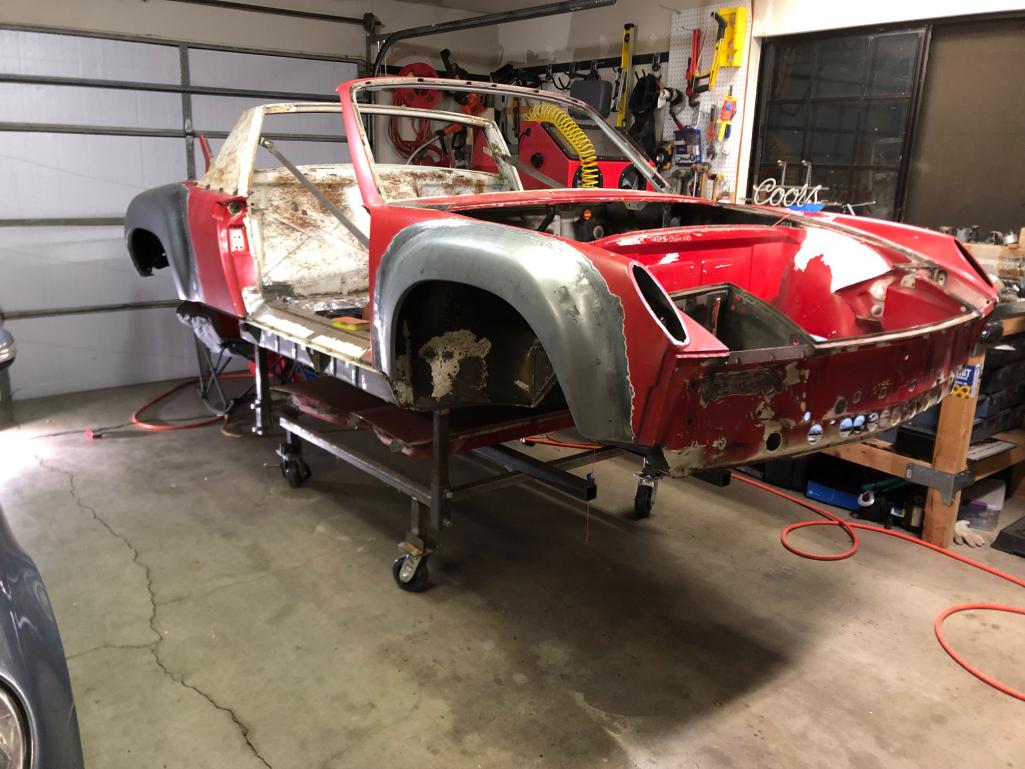
Frame dolly completed and placed under the rotisserie.
How she sits today:
Posted by: pencap914 Sep 18 2022, 10:27 PM
KTM engine mid-rebuild. Hopefully it will get some use this fall, but with the fresh baby its hard to get the green light to get away for a weekend!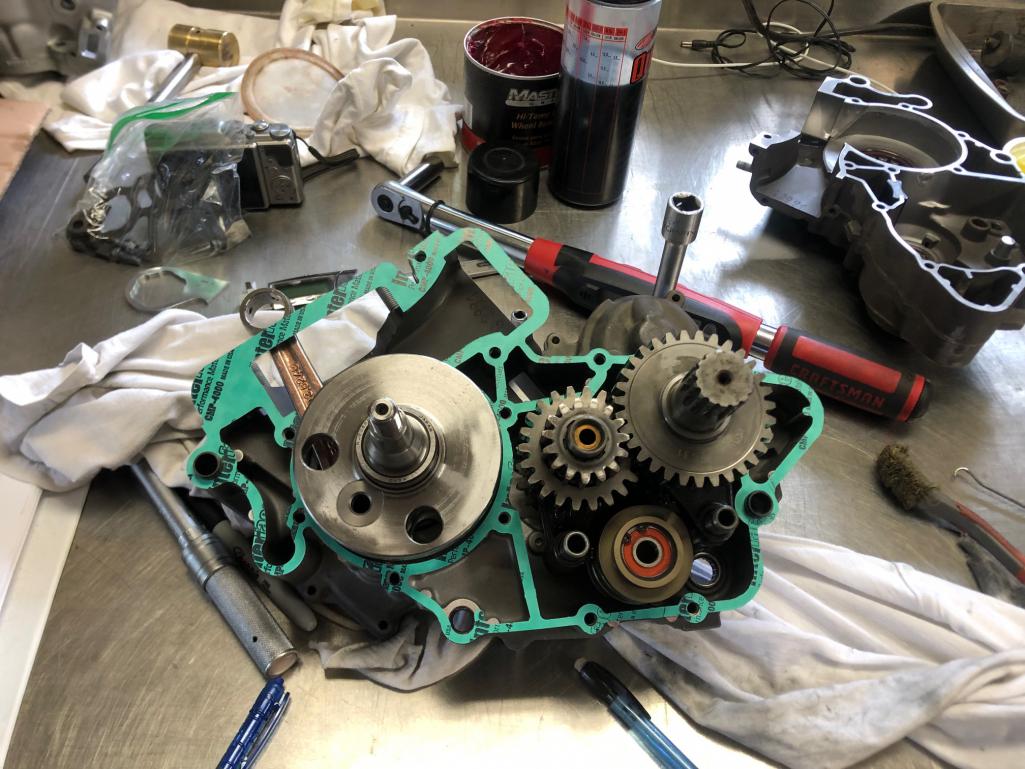
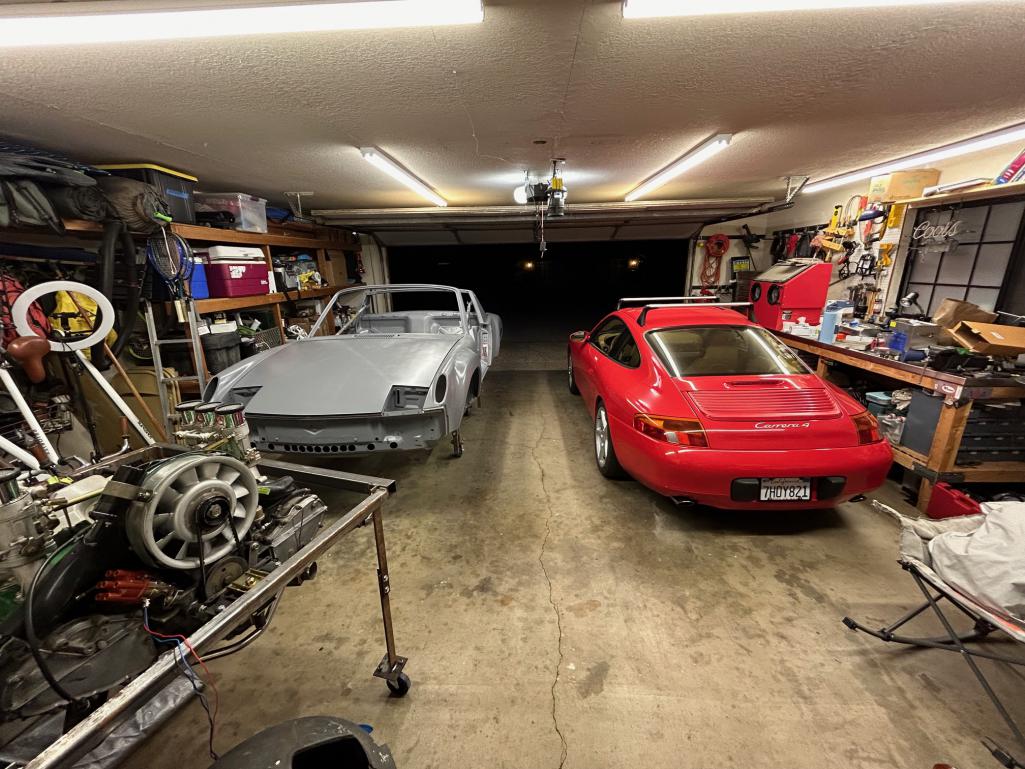
Also, the other P-car is in constant need of attention....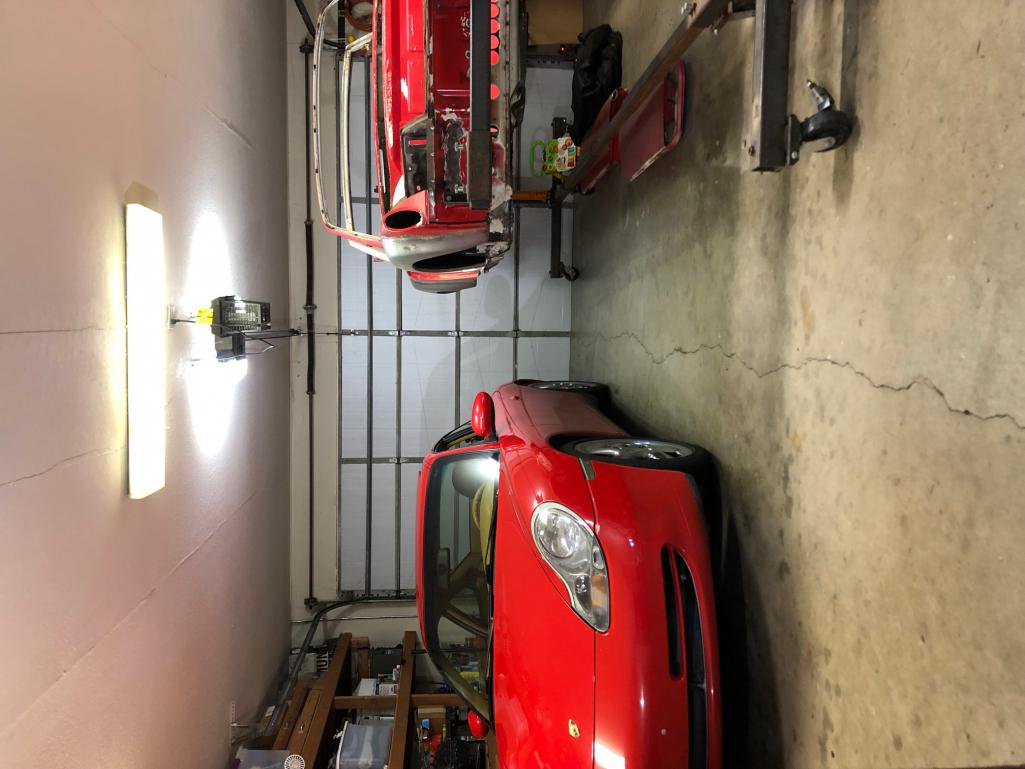
Anyway enough distractions. Back in the garage I go. 
Posted by: Graydingo Sep 20 2022, 08:34 AM
Great thread! Thanks for documenting the 4cyl mount delete and front cooler pics. Very helpful.
Posted by: pencap914 Sep 29 2022, 08:48 PM
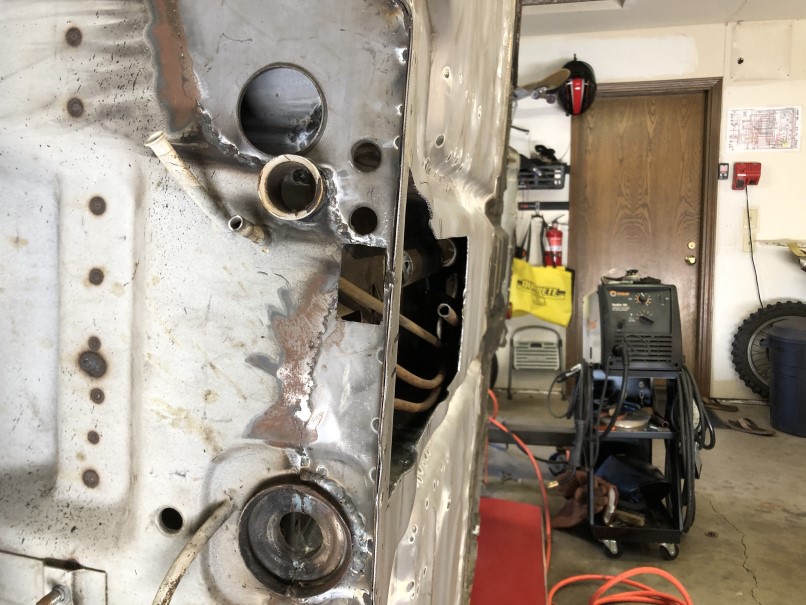
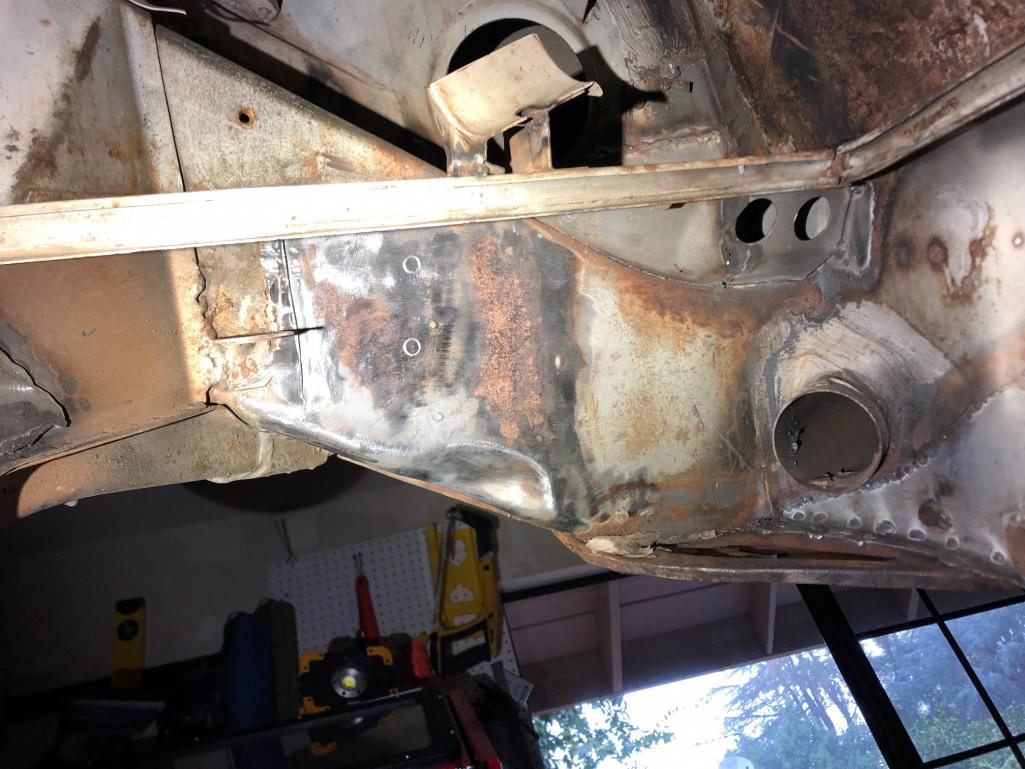
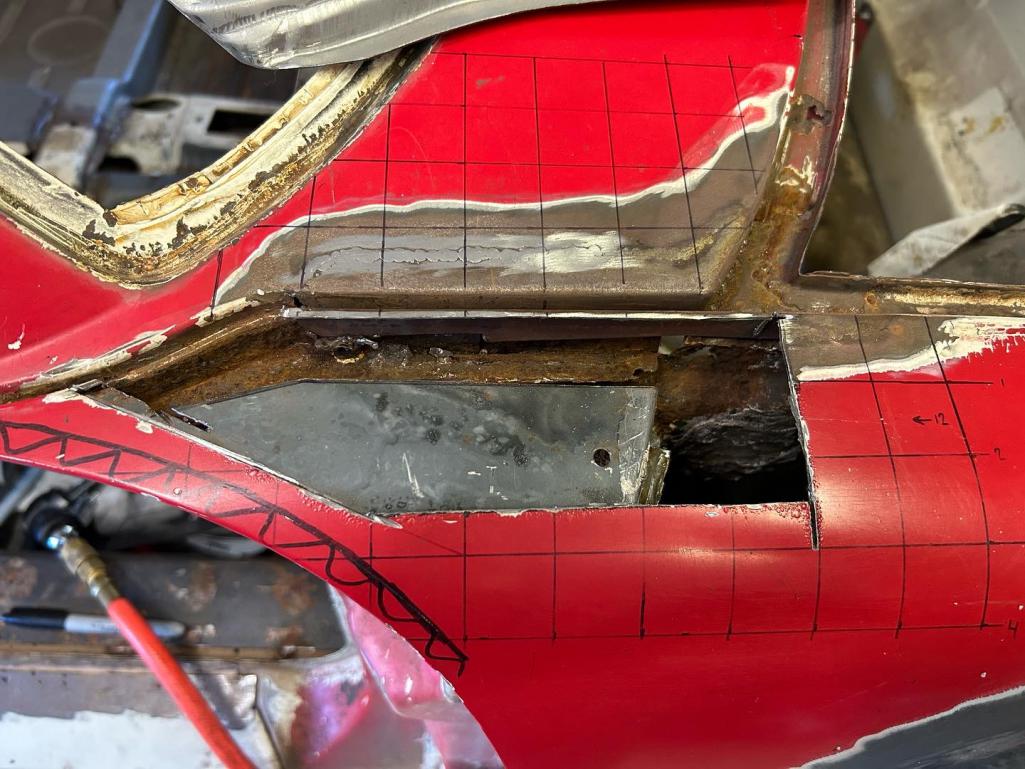
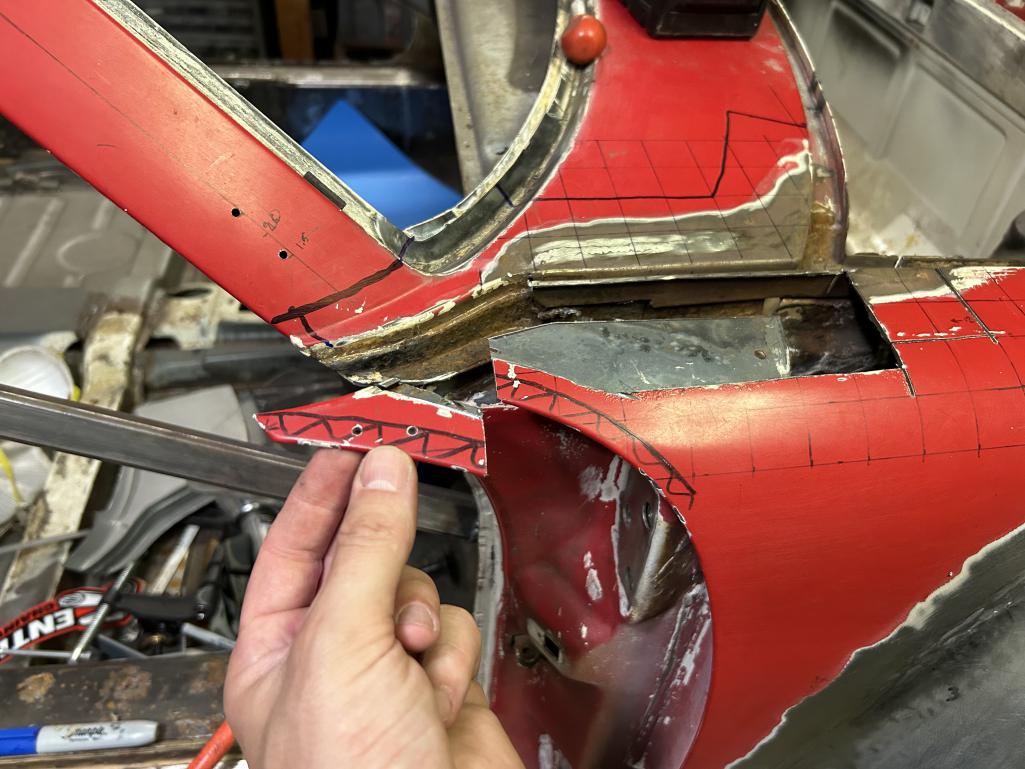
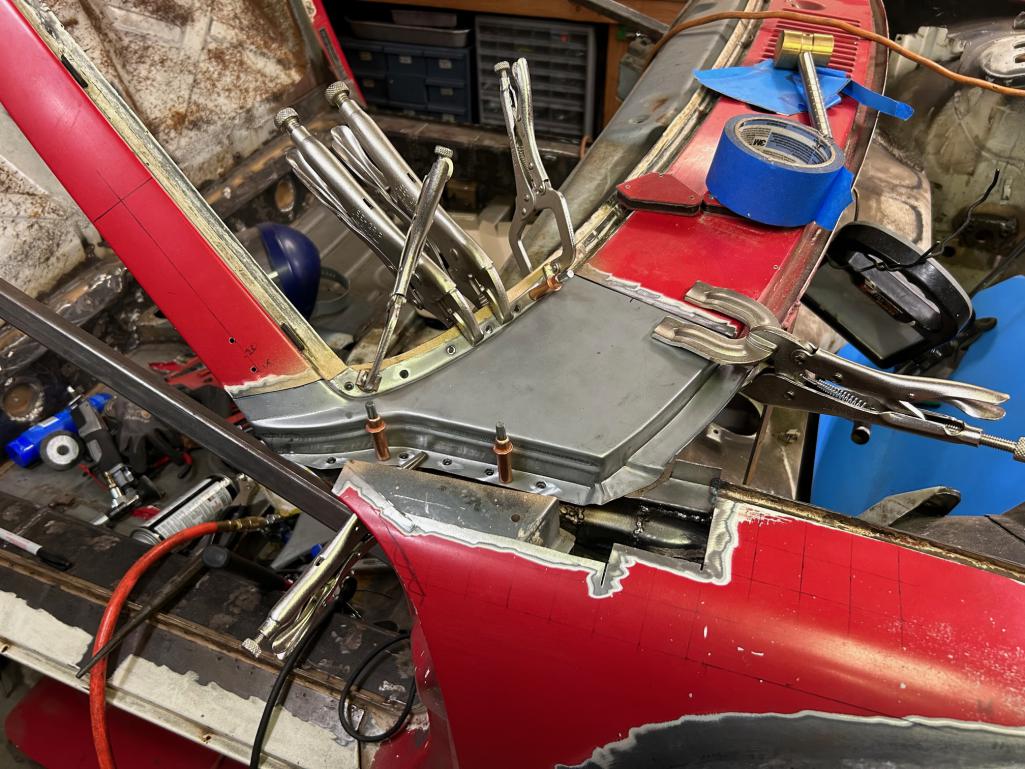
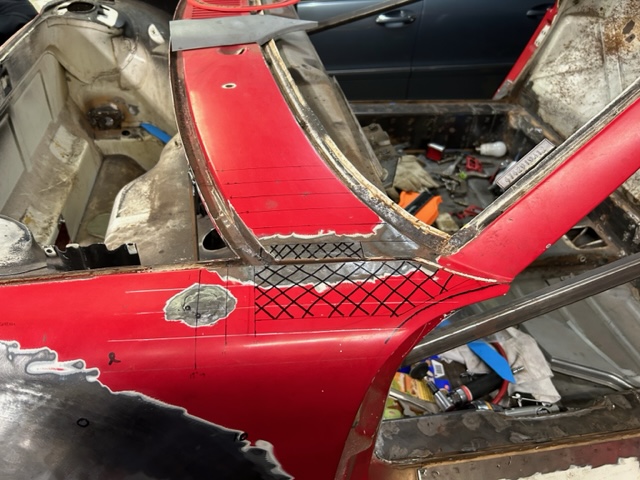
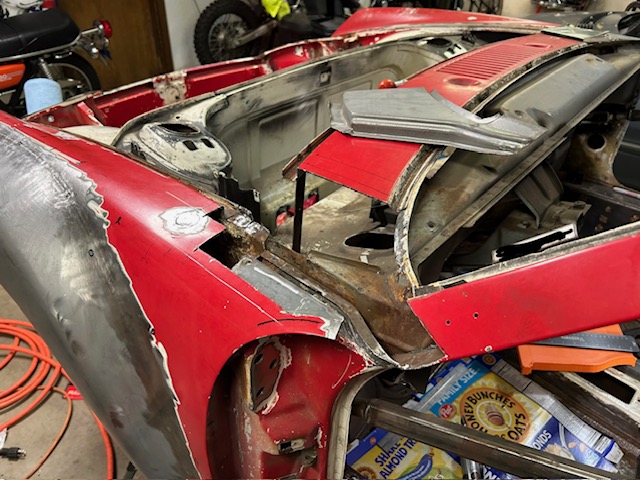
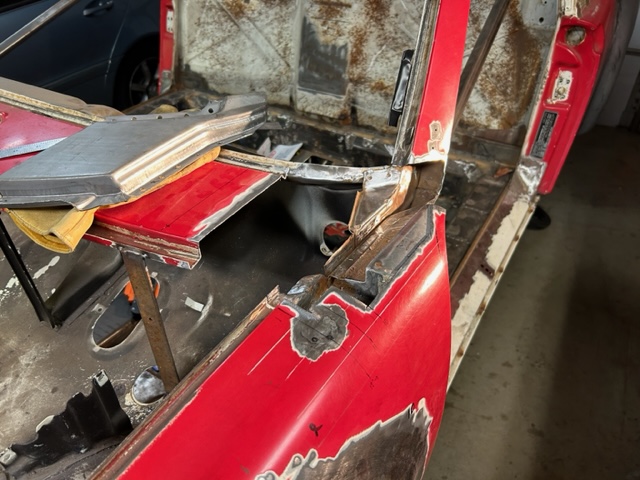
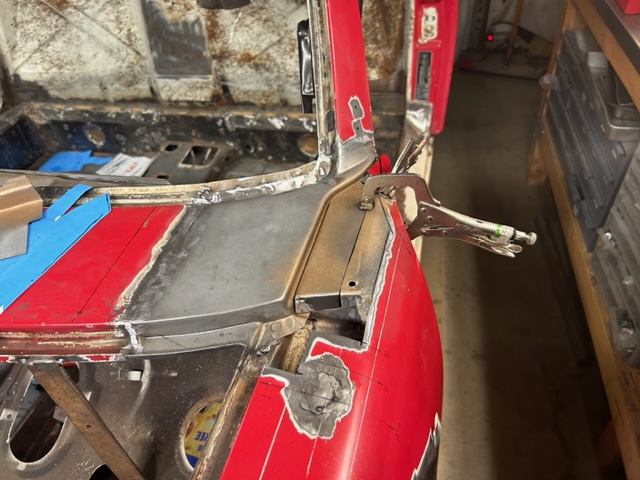
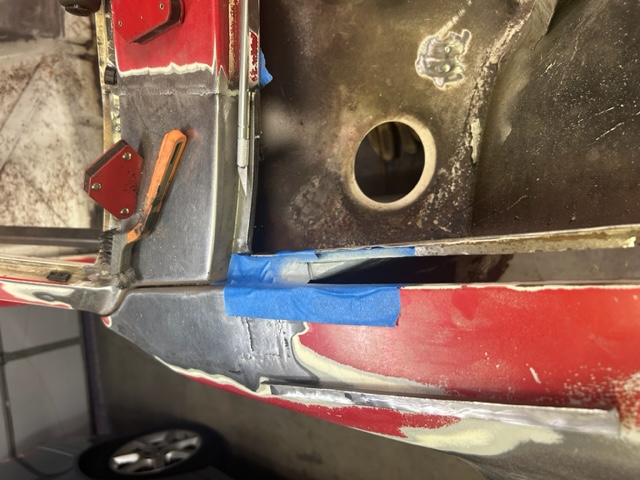
Finally after a year of avoiding it I decided to open the can-o-worms that is the front cowl repair. I'm just a home hobbyist who dabbles in this sort of thing so naturally I was a bit intimidated. Once again, a repair attempt was made (by a professional shop) under previous ownership. But they only did minimal surficial repairs that I had concerns that would come back to haunt me later if I didn't address it properly. So here's the first few cuts I made. Trying to avoid disturbing the folded corner of the fender to not mess with the door gap but it looks as if there's no way around chopping it off to get to the areas needed. I found a few good threads to click through photos, so hopefully it turns out better than it's status quo. 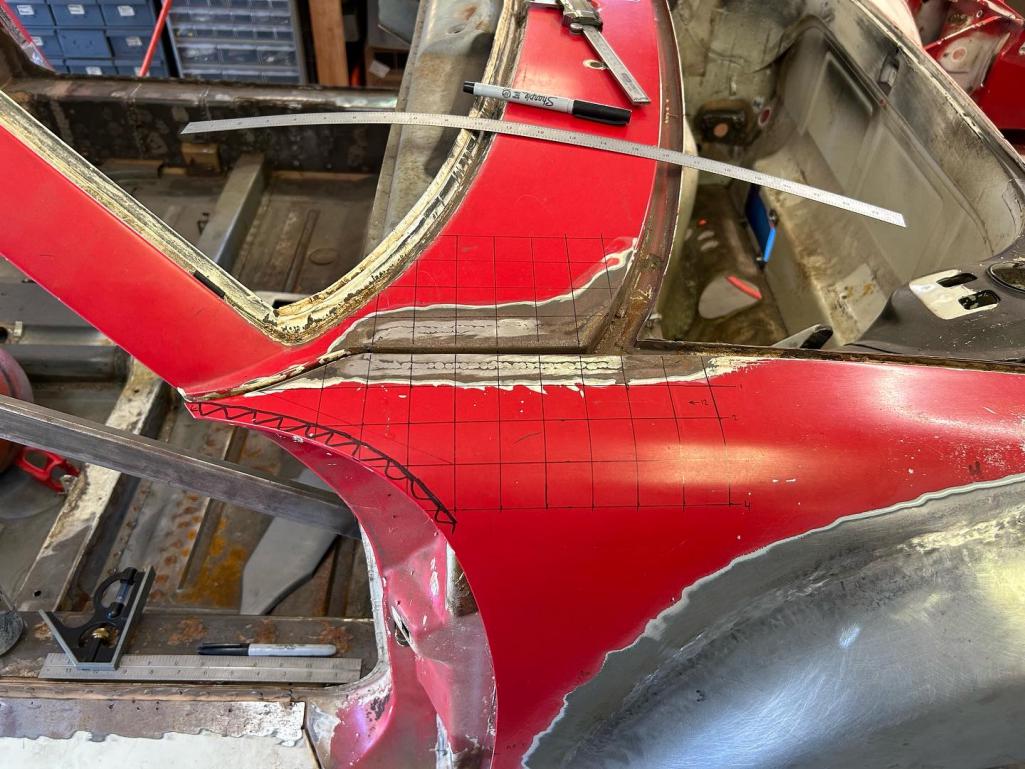
Posted by: Montreal914 Sep 29 2022, 09:29 PM
I like the approach you are using. Seems like you are getting to the heart of the matter. I am wondering if you couldn't fabricate the missing replacement metal.
The fender top AA replacement piece has a really large radius where the rubber strip will go at the joint fender/cowl. That is one reason why I decided not to use it. The other reason was the fold at the door gap (or lack thereof ), but you kept the original in place, so you are good there, good idea!
I was not comfortable working that area, but overall, I am happy with my humble results. I am sure you will be fine. 
Good luck and keep on sharing!
...Oh and that 2.7, yes that shine is very motivating!!
Posted by: Montreal914 Sep 29 2022, 09:37 PM
This is what I am referring to... 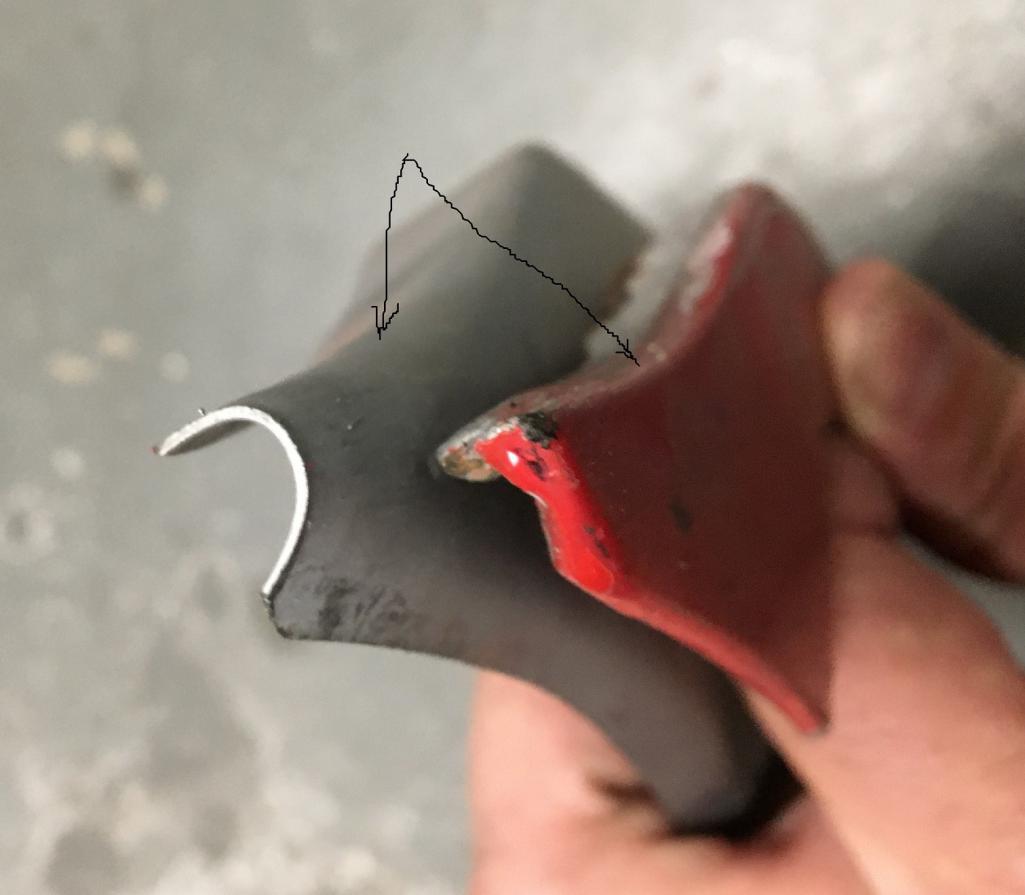
This large radius will not look good with the T shaped rubber strip in there. There will be gaps. This need to be pretty much square on both sides.
Posted by: pencap914 Sep 29 2022, 11:23 PM
@http://www.914world.com/bbs2/index.php?showuser=12023
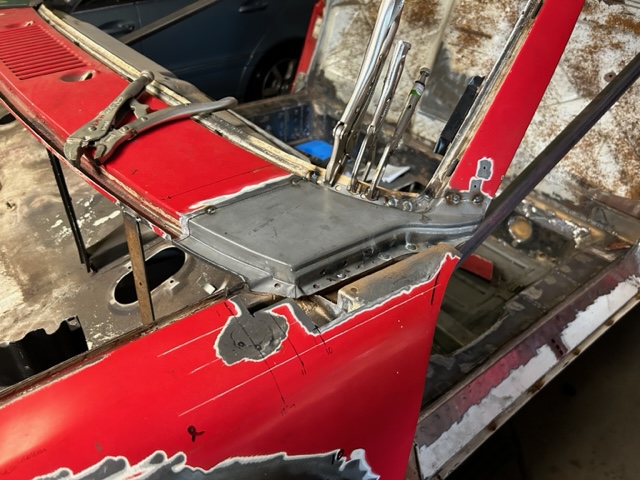
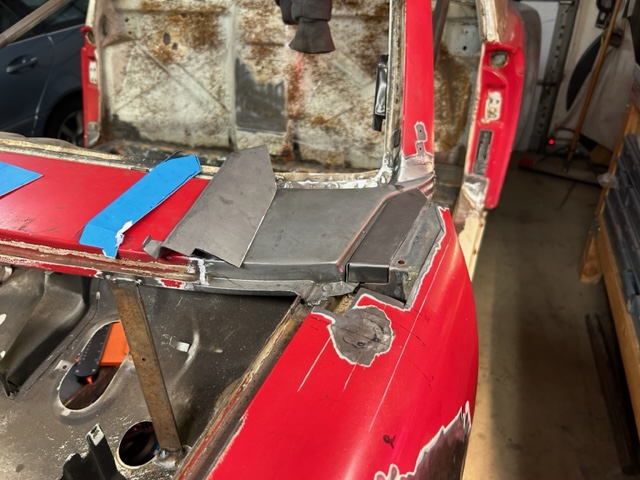
Thanks for sharing that. Yeah I'm going to do my best to re-use the outer "folded" piece original to the car. The inner radius issue I'll have to cross that bridge when I get to it. Hopefully I can massage the AA piece enough to tighten up that radius. Some hammering will be in my future. I used cleko's to "save the spot" where the corner piece goes to hopefully preserve the door gap.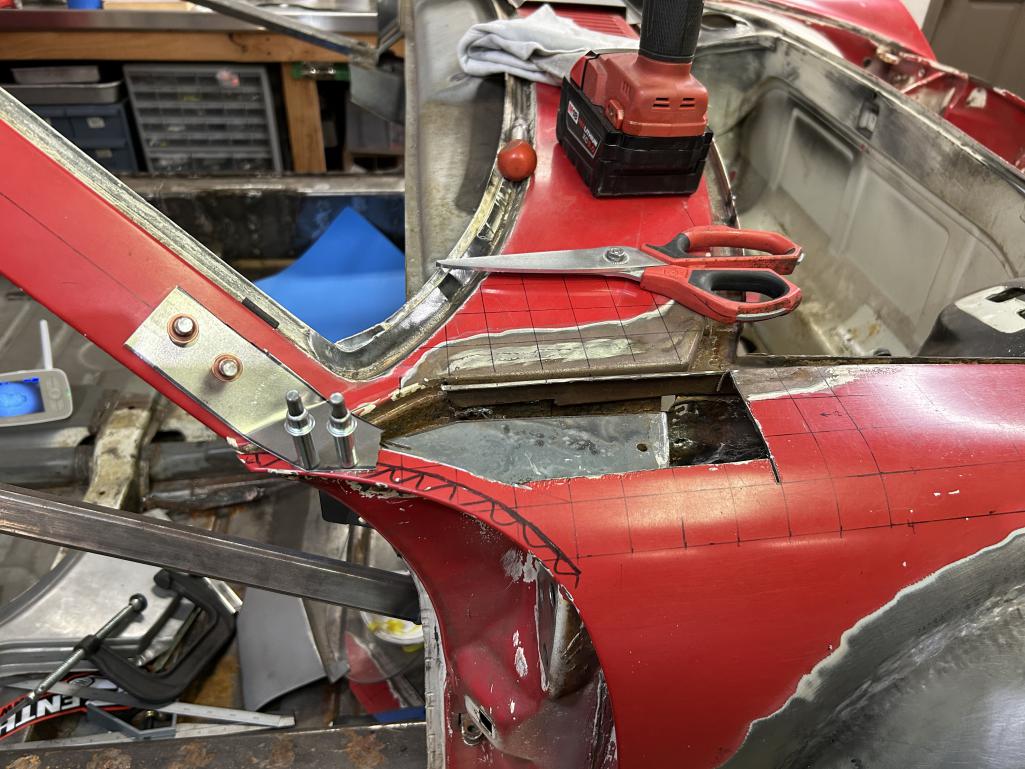
Posted by: pencap914 Sep 29 2022, 11:24 PM
Posted by: pencap914 Oct 23 2022, 08:42 PM
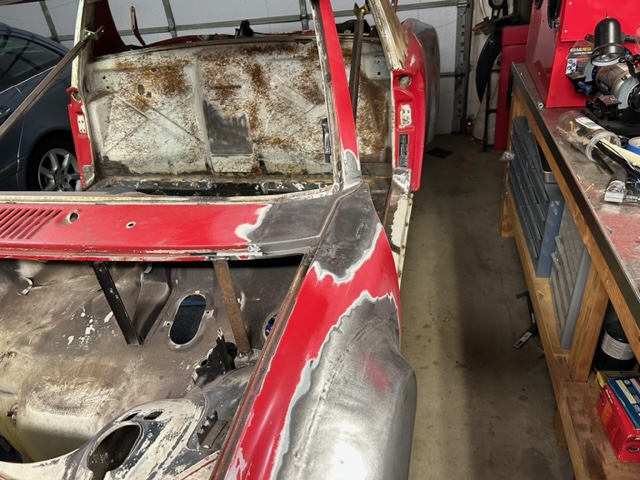
Made some more progress on the cowl repair:
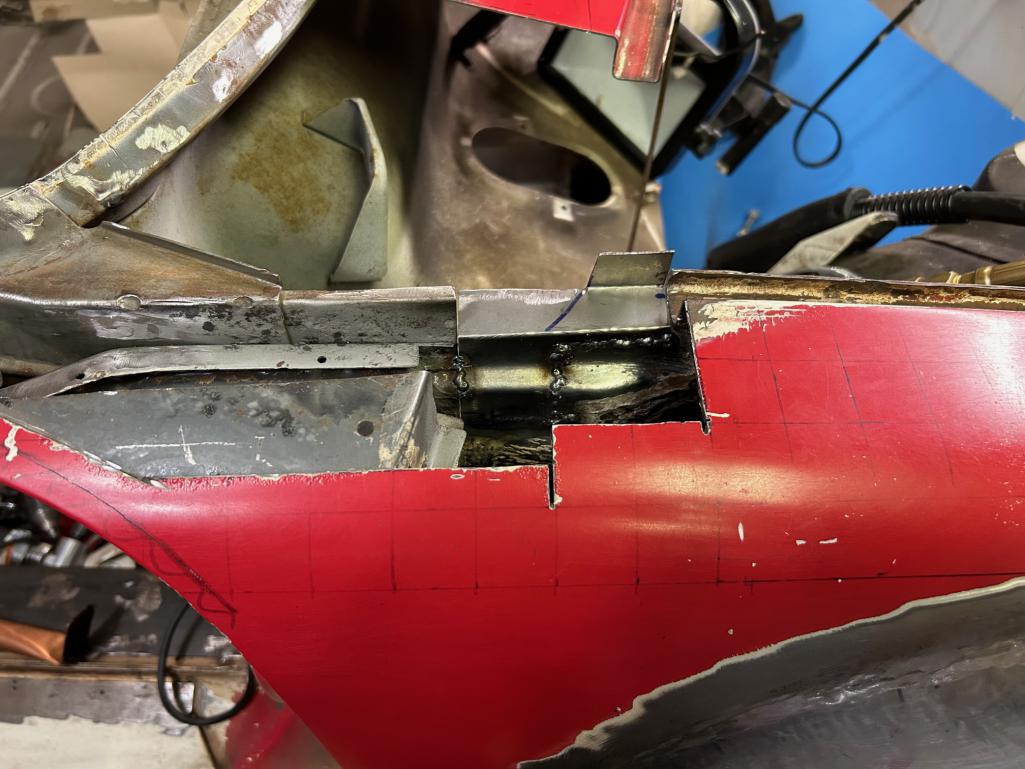
Posted by: pencap914 Oct 23 2022, 08:45 PM
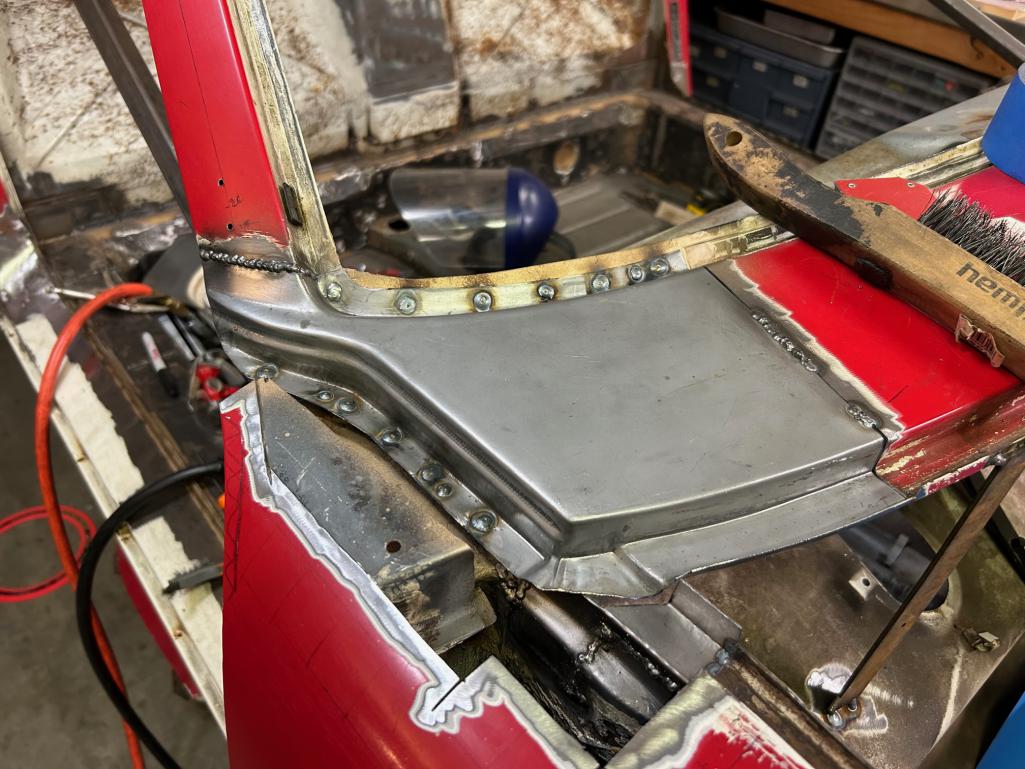
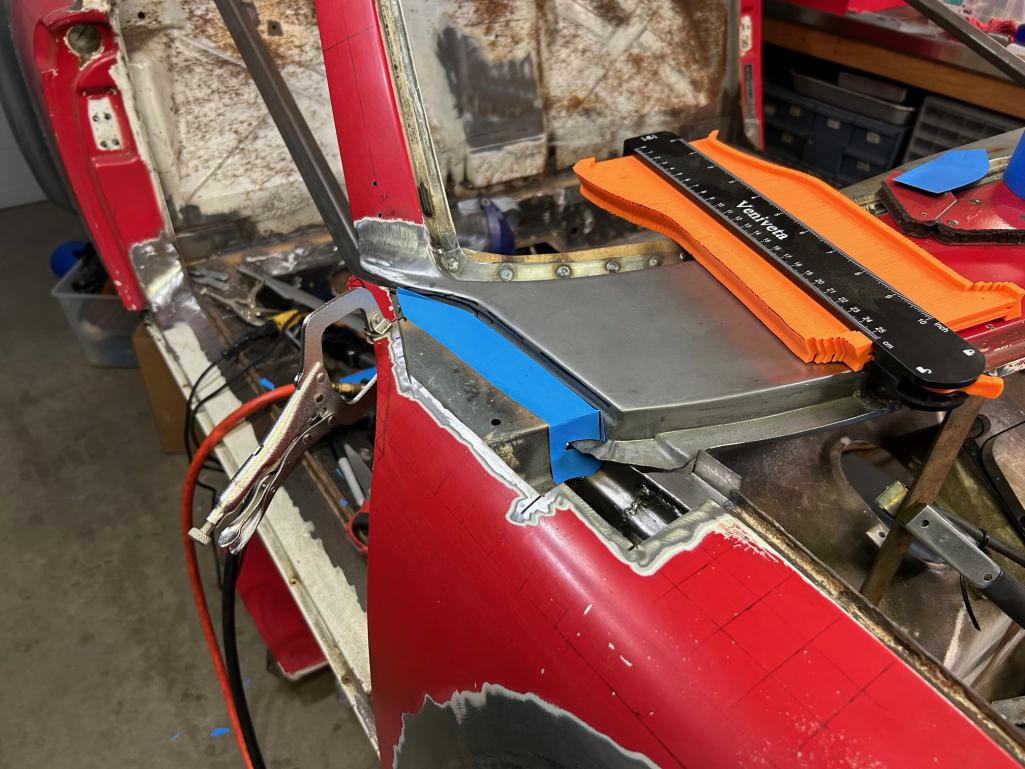
Posted by: pencap914 Oct 23 2022, 08:46 PM

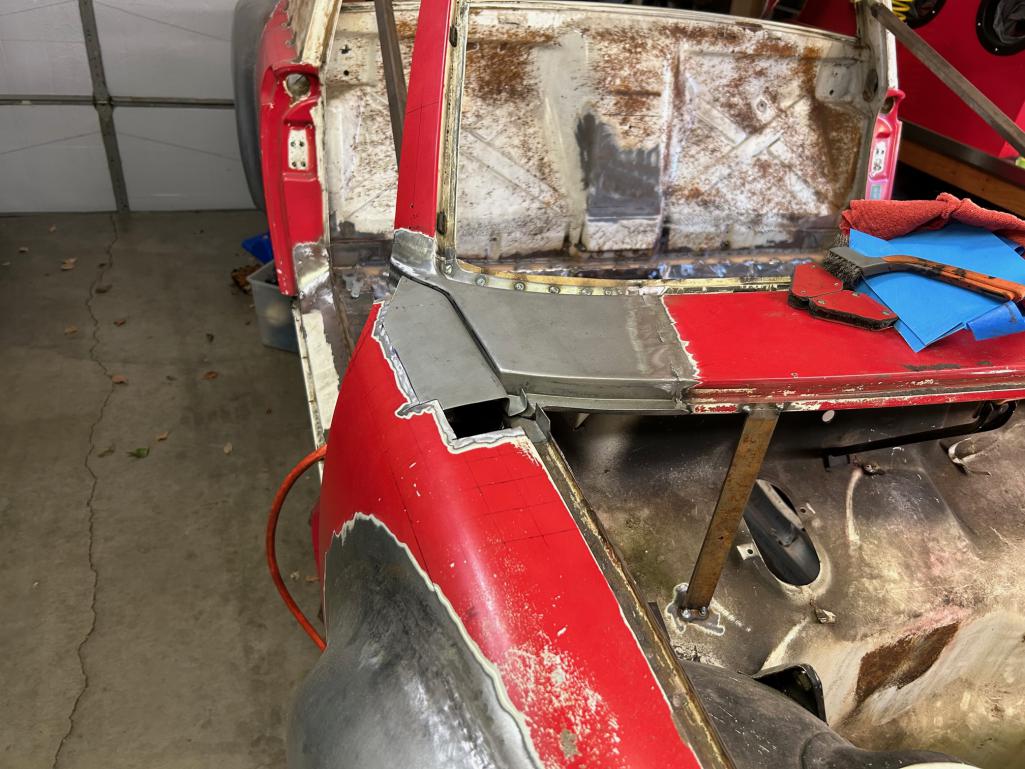
Posted by: Graydingo Oct 24 2022, 06:15 AM
Inspiring metal work!
Posted by: Cairo94507 Oct 24 2022, 06:42 AM
That is looking very, very good.
Posted by: Retroracer Oct 24 2022, 02:55 PM
Nice skills there! Keep the posts coming....
- Tony
Posted by: roundtwo Oct 25 2022, 11:19 AM
[quote name='pencap914' date='Nov 7 2021, 09:26 AM' post='2958276']
Also working on restoring the fiberglass engine shroud for the 2.7. Few cracks in the fiberglass will have to be addressed, then sanded and painted. This week I'll stop buy the automotive paint shop to talk about what would the best paint options would be for this. A fiberglass engine shroud is a challenging place for automotive paint....
Inspiring work!
I'm at a cross roads as to what paint to use on my engine shroud (3.0 Carrera ) that's resistant to fuel and oil. Did you find a good product. I'm think about PPG single stage. thanks, Todd
Posted by: pencap914 Oct 27 2022, 10:12 AM
Todd,
I used a PPG 2K paint in a "SprayMax" can where the hardener is built into the can. My local automotive paint shop mixed it on site and said it should hold up to heat/fuel better than regular ol' spray paint. Here's the photo of what shade of green matched pretty close to the original green color the shroud was. 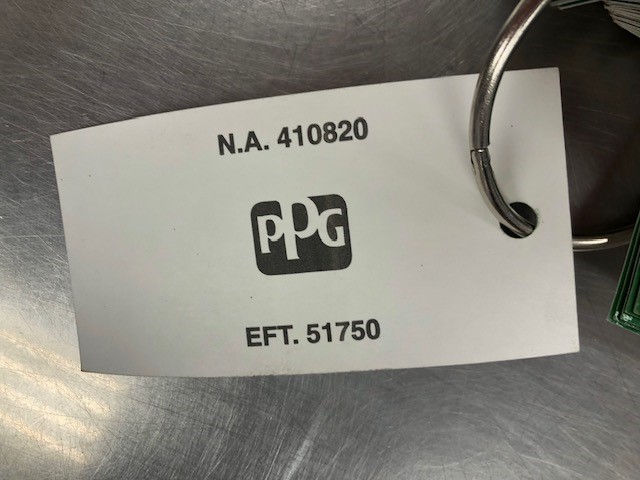
Posted by: pencap914 Aug 7 2023, 10:01 PM
I know its been...*looks at watch* 10 months since I've posted progress. But here's a few update photos: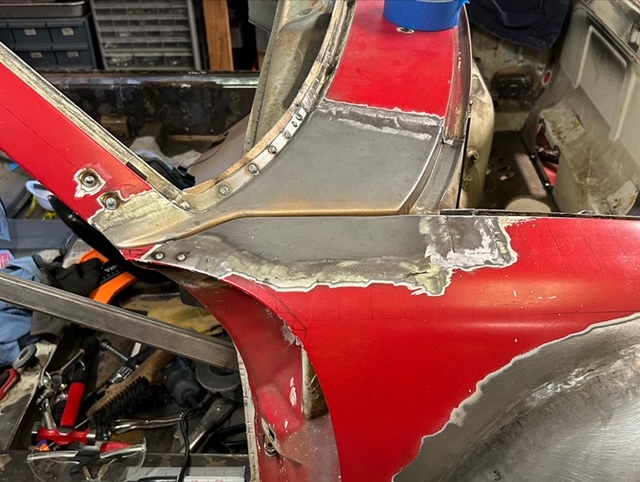
Some of the South Lake Tahoe WCR photos:
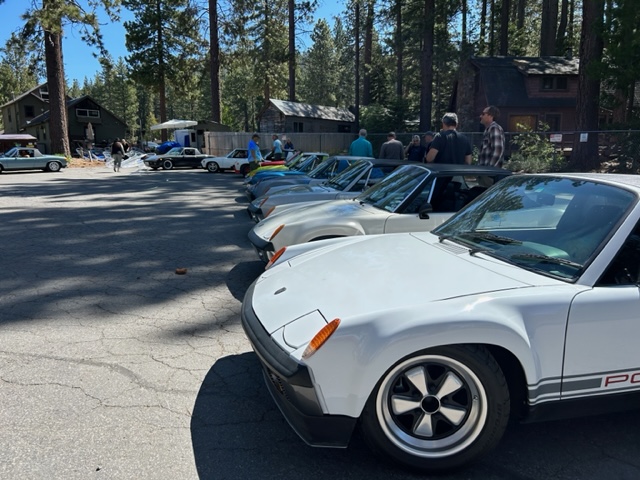
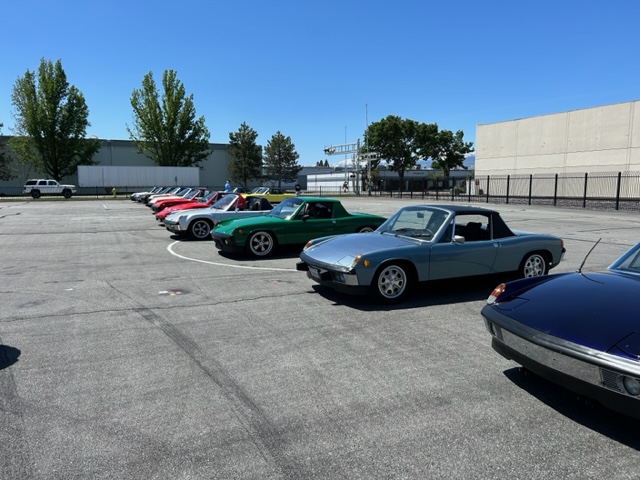
Attached image(s)
Posted by: pencap914 Aug 7 2023, 10:18 PM
Made a patch panel inside the passenger side frunk weatherstip channel and some engine bits arrived! New wiring harness, 123 ignition distributor, studs to mount the PMO carburetors, and oil line restrictors from a 930. (IDK... Wayne D recommended them in his book...)
I know I know, the fan and shroud strap look ugly. This is where I have to say to myself "perfection is the enemy of progress." I've got bigger fish to fry with this project. I've acquired a 7R 2.4 block that I plan to build as the hotrod engine that will be all shiny. This 2.7 will hopefully just get me on the road.... someday...
Next on the agenda: Mount MOCAL oil T-stat, oil lines and oil cooler shroud. 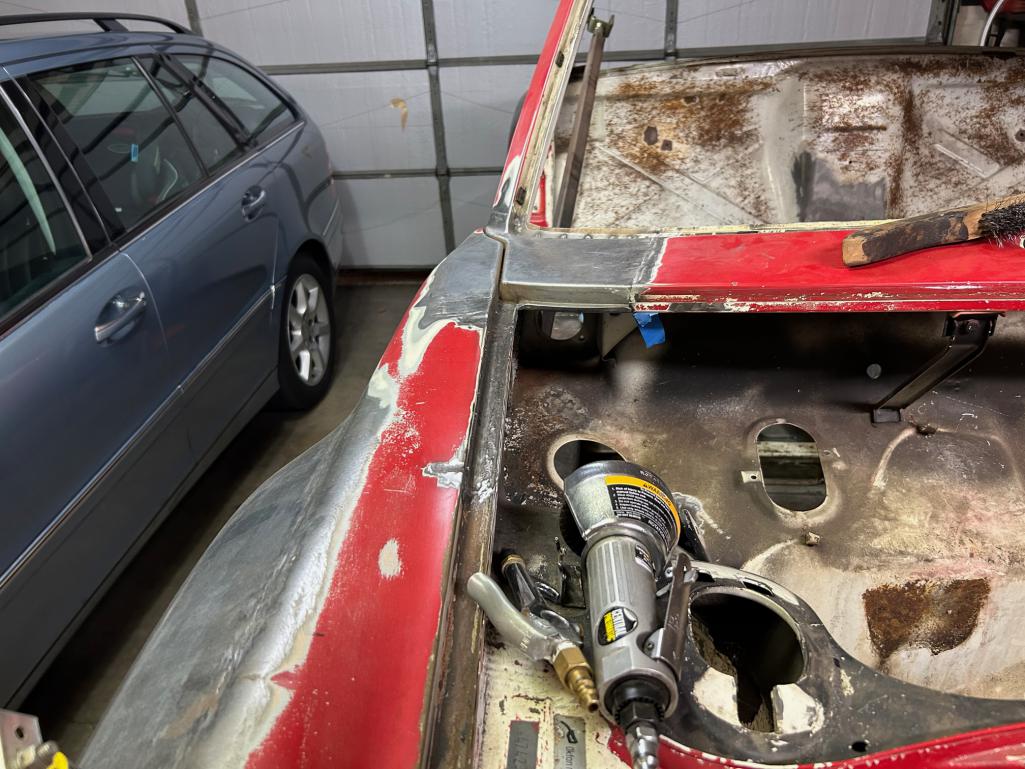

Posted by: TRS63 Aug 8 2023, 02:47 AM
Slowly but surely you will be driving it ! Thanks for sharing !
Antoine
Posted by: Montreal914 Aug 8 2023, 07:37 AM
Very nice progress! Both of these cowl repairs look very good!
That engine surely is a good motivator. Keep going at it, you will be at the painting stage before you know it. Have you found a shop near your area?
Posted by: pencap914 Aug 8 2023, 09:58 PM
Very nice progress! Both of these cowl repairs look very good!
That engine surely is a good motivator. Keep going at it, you will be at the painting stage before you know it. Have you found a shop near your area?
Thanks! I used your thread as inspiration to tackle the cowl repairs. I've thought about a few shops for painting, just talking with others with car projects like this. Thinking of a shop in Nevada, because they can use paints that aren't subject to California laws...? Something about VOC limits...? I haven't looked into it much, I'm just trying to put one foot in front of the other. I do have a media blasting place lined up in Sacramento. Just need to finish fiddling with the tub and get it to him to have it stripped and primed. My goal is to now have it blasted for me to do all the block sanding, high-build primering, and general paint prep in time to have it painted by summer 2024. I've even started researching into painting it myself.
Classic case of "Ok how hard can this be?" I'm sure I'll eat those words...
From what I understand here's the recipe for successful painting:
- Clean/Dry air supply
Well I have a 40 gallon compressor, nameplate states 11.5 SCFM @ 90psi. Just need to rig up a way to keep the air clean and dry. Looking at using home-brew copper coil and an ice bucket in combination with some kind of cooler between the compressor and tank with a water catch drain.
- Ventilated Clean room/paint booth
This one will take some construction, but seems totally doable. I've seen a few guys fabricate a homemade paint booth using a carport, plastic, box fans and filters. Keeping dust out is key!
- Proper environmental conditions (Temp/Humidity)
Living in the central valley in Northern California, its pretty easy to find a string of days where we would be in temp range, and humidity hovers around 40-50%. Shouldn't be much of a problem.
- Attention to temperature/mixing of materials
Just read the manufacturer's spec sheet on the paint materials....right?
- Technique
I cant do much about my lack of painting experience other than Youtube videos, and perhaps a practice run on my wheel barrow and kids RadioFlyer wagon... I'm already ok with this car not winning any concourse events anyhow. I'm building this car for me to enjoy behind the wheel, not sitting in a lawn chair behind it at car shows. (No offense to those who enjoy that!) [indent]
Posted by: pencap914 Dec 6 2023, 10:07 PM
Car is back on the rotisserie to take care of a few things before sending off to media blasting.
Next task: Install the GT stiffening kit. I was debating on if this was worth it, but after talking with Eric Shea at Rennsport reunion at Laguna Seca, he's convincing me its a good idea if I'm going to run a 6cyl engine with wide tires. Who knows I may end up autocrossing or taking the car to the occasional track day so a few extra pounds of metal can't hurt.
Anyone have any tips/tricks or pitfalls to avoid? 
Since the car already has the "outer longitudinal stiffening kit" installed, I don't think I'll be using the left piece of this kit. 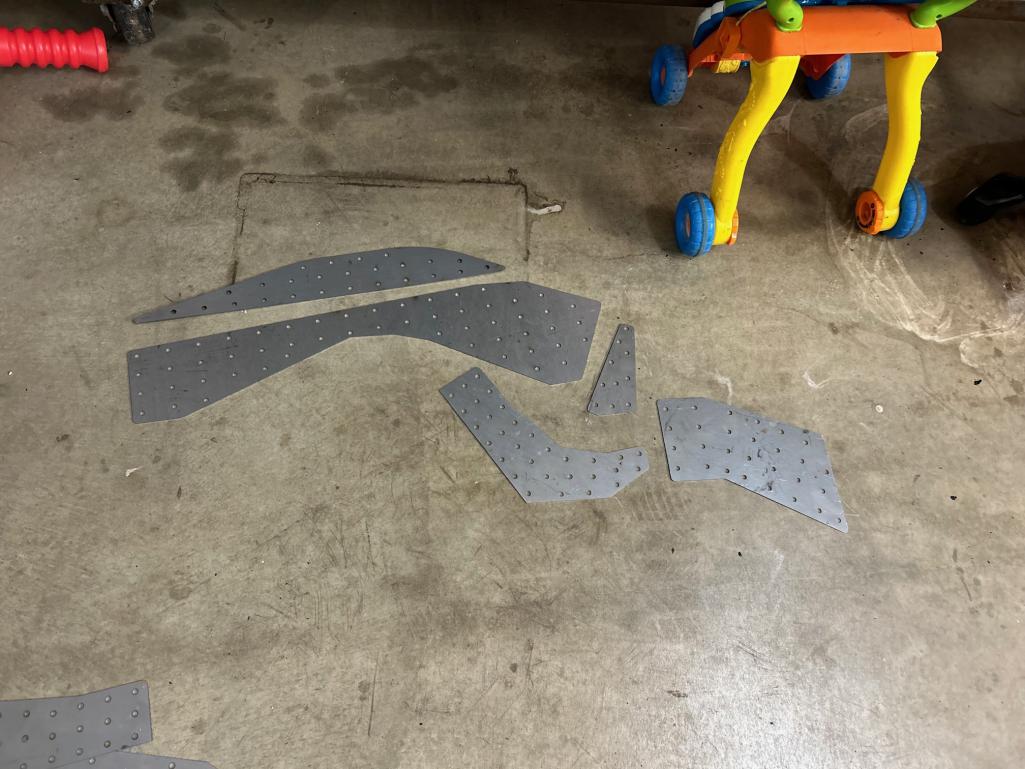
Posted by: pencap914 Dec 13 2023, 05:21 PM
Well this idea backfired a bit...I painted the weld-through primer over these dots for where the rosette weld holes line up with the outer stiffening kit, but peeling off the dots leaves a sticky residue, or worse, top layer of paper rips off completely leaving the adhesive layer behind. No more stealing cheap Amazon.com colored dot stickers from my kids art supplies...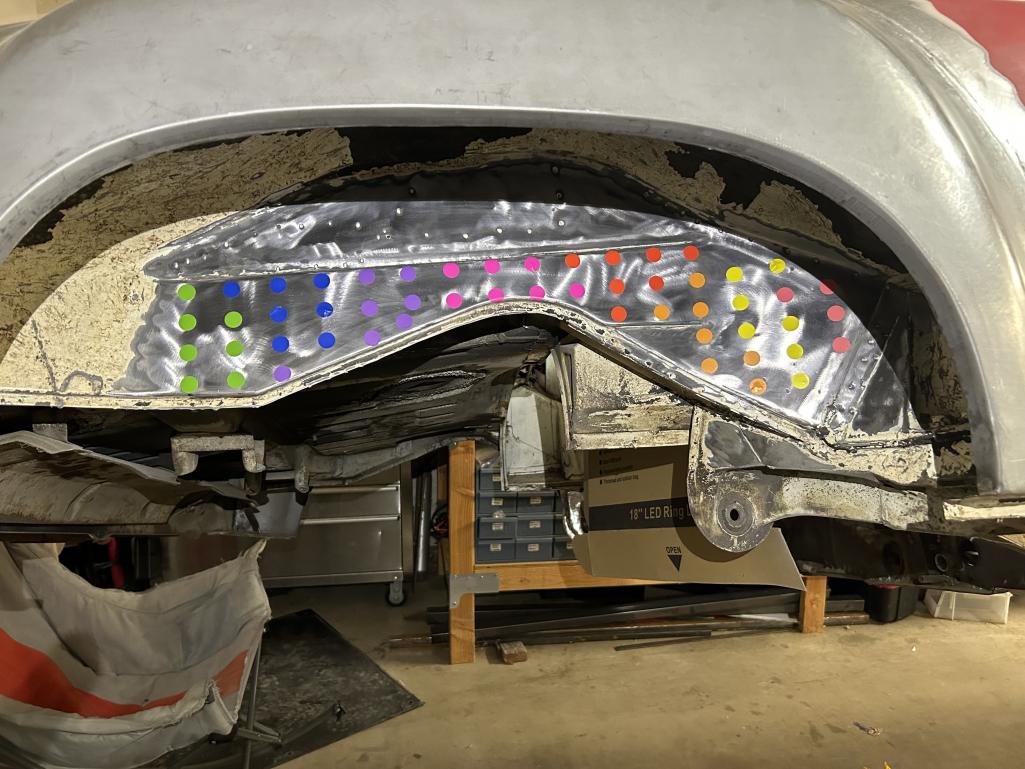
Posted by: TheRuttmeister Dec 13 2023, 07:12 PM
On clean dry air:
There are lots of options for in-line filters, ones that will filter dirt down to silly sizes (like, they will filter out viruses) plus oil and water. If your compressor allows it, its even better to put them in between the actual pump and the tank, that way your tank doesn't get full of water.
Just get those. Dirty air would ruin everything.
And air temp should only be a problem if you are really working your compressor really really hard, remember that the air cools as its being uncompressed!
Although I don't paint cars, so I'll defer to others if they disagree.
Posted by: Ishley Dec 19 2023, 09:18 PM
I paint the inside of both panels… then use a sharpie to mark all the welds… and use a small 1/2 belt sander and sand the spots. It’s how I did it.
Posted by: rhodyguy Dec 22 2023, 09:35 AM
What is the continuous duty cycle pressure for your comp?
Posted by: pencap914 Mar 11 2024, 02:50 PM
What is the continuous duty cycle pressure for your comp?
I'm not sure actually, Its a Husky 60-gallon single stage compressor with a single phase 240v motor with a thermal overload switch. From my experience running mostly body saws, impact guns, sanders and die grinders I've never had it "thermal out."
I think its rated for 11.5 CFM @ 90psi...?
Posted by: pencap914 Mar 11 2024, 02:58 PM
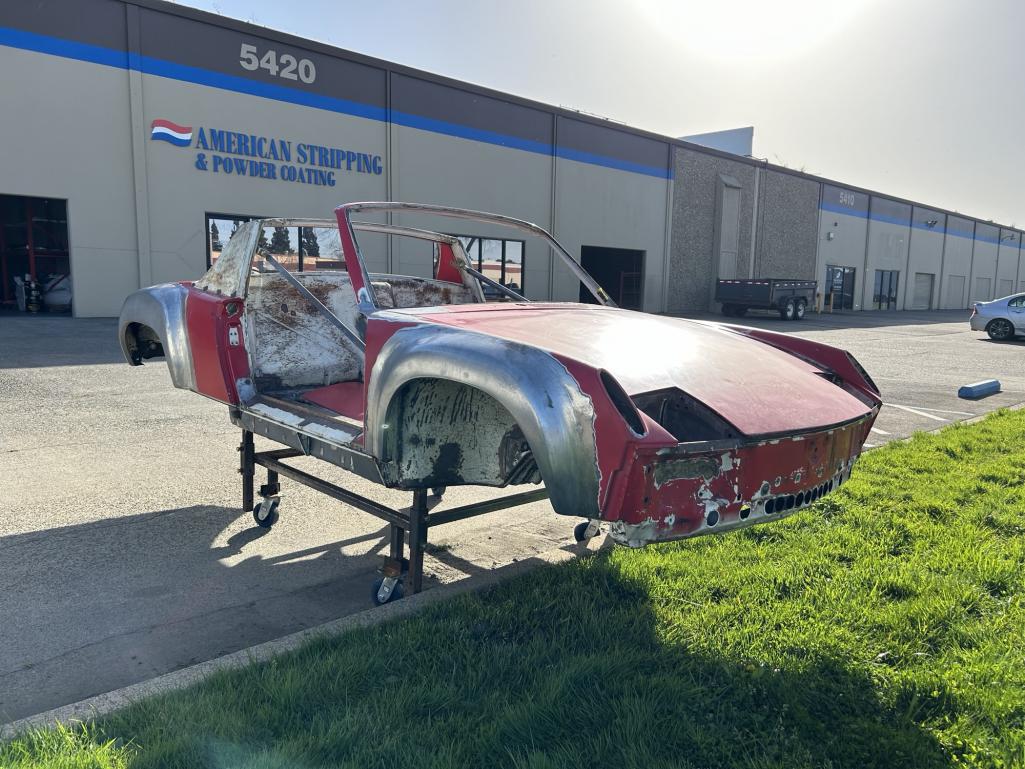
Finally got the shell dropped off at the media blasting place!  Now freeing up garage space to finish the engine test stand, and hopefully get this thing fired up and ready to go by the time it gets back. (~2 months).
There will be a few patches that will be needed but I don't expect anything big. Mostly in the driver side door there was a rust hole on the bottom front corner that will need repair. Lucky its in a spot that's inconspicuous.
Now to research what undercoating I want to use... I'm in between the three following products:
- 3M Dynatron Dyna-pro 544
- Wurth SKS
- LizardSkin
Felt cute, had to add the tail lights. This makes me want to build a single seat open-wheel racer from tube steel
Posted by: mepstein Mar 11 2024, 04:22 PM
I’m using lizard skin. I’m not sure it’s the best but it’s the one I’ve chosen. I’m also using it inside the cabin for sound and temp control. The guys at my shop have used it before and it’s easy to diy. It can be painted which I intend to do.
Posted by: pencap914 Apr 24 2024, 09:55 AM
While the car is off to media blast/epoxy primer, I'm doing some of the plumbing. I noticed the pre-bent oil pipe from Patrick Motorsports hangs too low to be used with Ben's heat exchangers. Hopefully they allow returns on this thing, since it cost quite a bit.
I did acquire a pre-bent oil pipe from another member here, which I believe this is Ben's work, but upon bolting it up I noticed it contacts the heat exchangers. I can't move this up any further, since its already in contact with the oil return tube between cylinder 2-3.
Anyone running this setup of the pre-bent stainless hard line with Ben's heat exchangers?
Patrick Motorsports oil pipe:
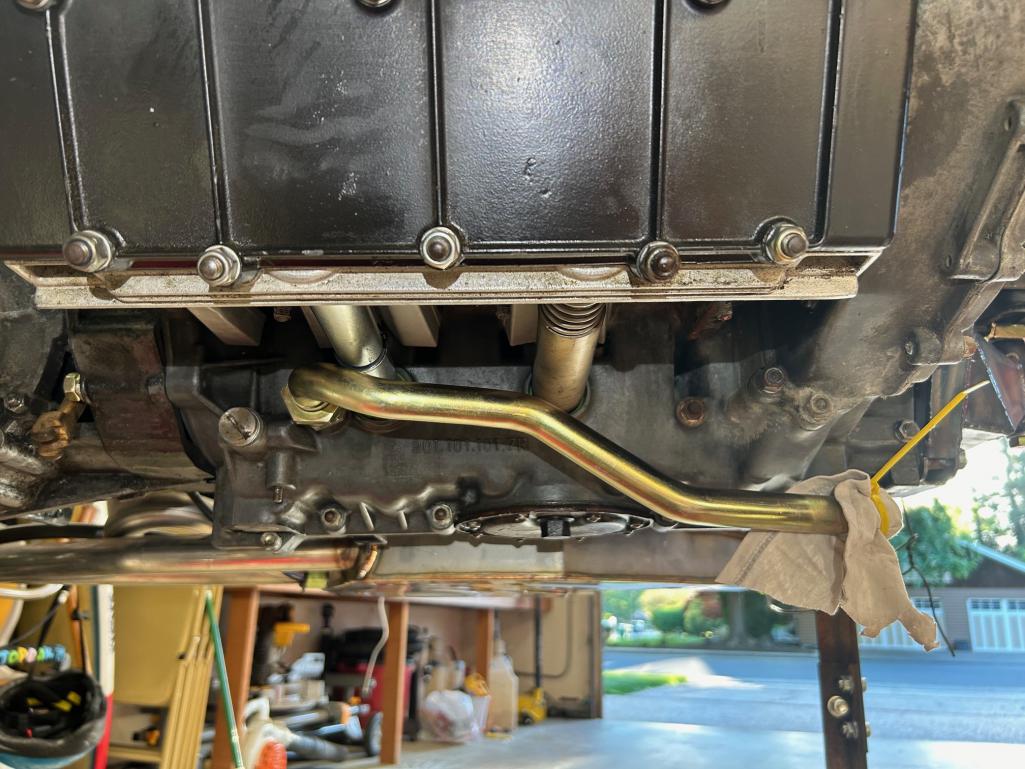
Stainless pre-bent oil pipe: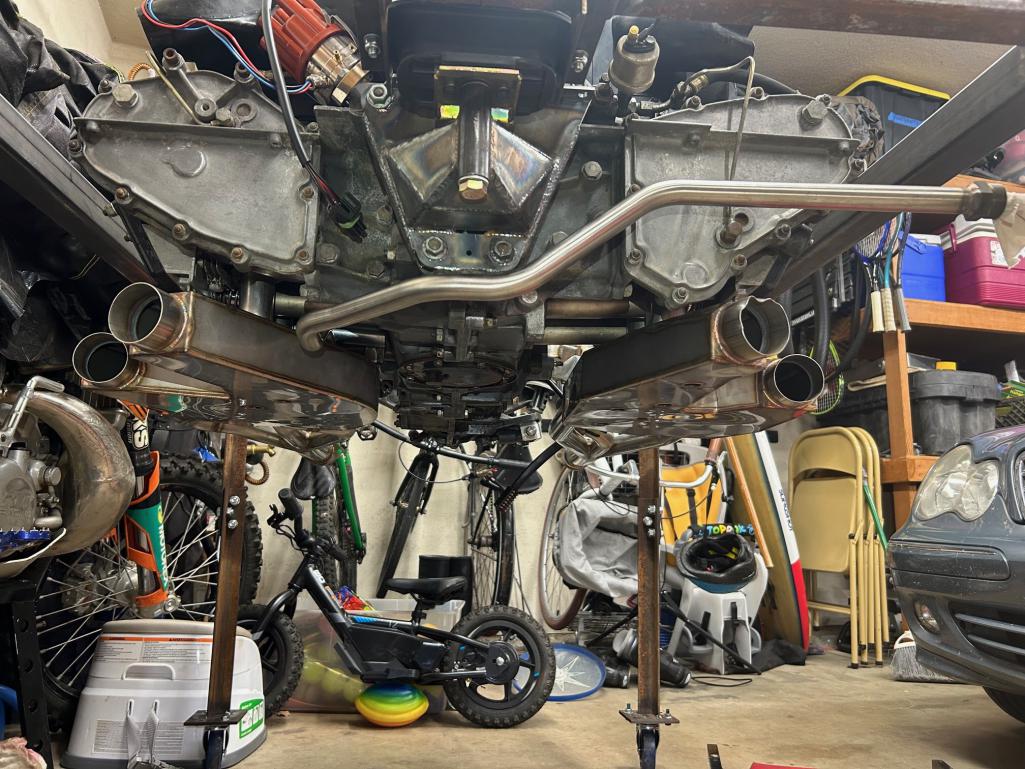
Posted by: pencap914 Nov 22 2024, 06:05 PM
Some overdue progress photos from summer:
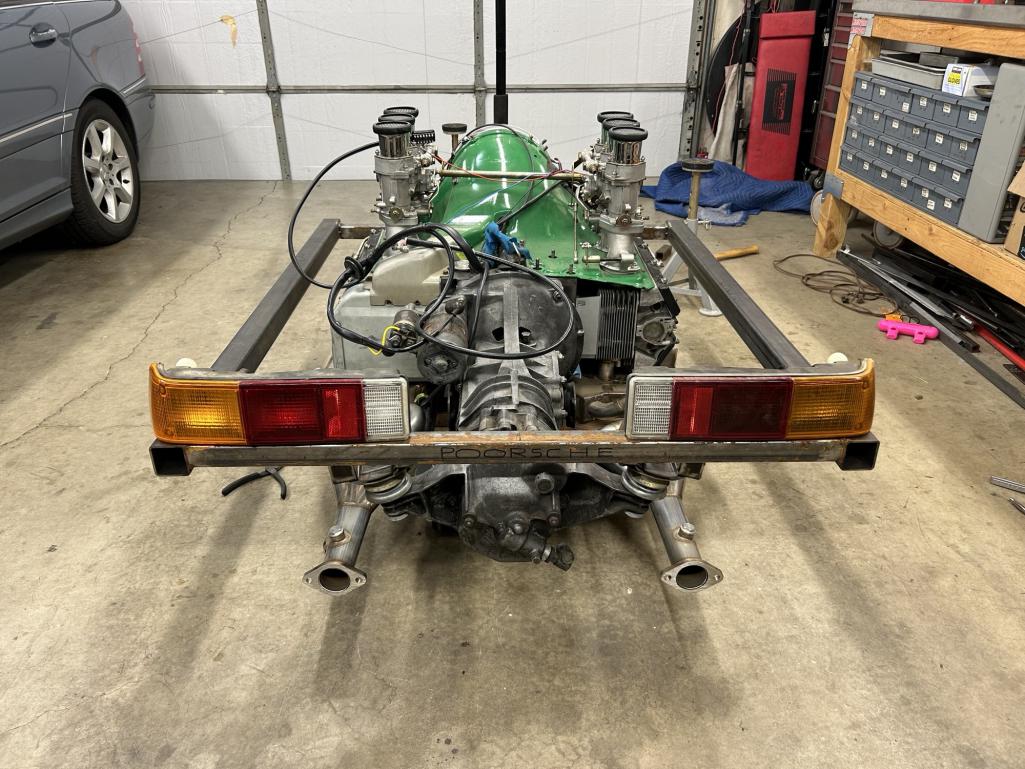
Biggest milestones: Picked up the shell from the media blast/primer guy in Sacramento, and got the engine fired up on the test stand.
Next steps will be doing minor repairs to the shell fixing the little "surprises" as result of the media blasting and tuning the engine.
I'm only a few years behind schedule at this point but at least progress is being made. 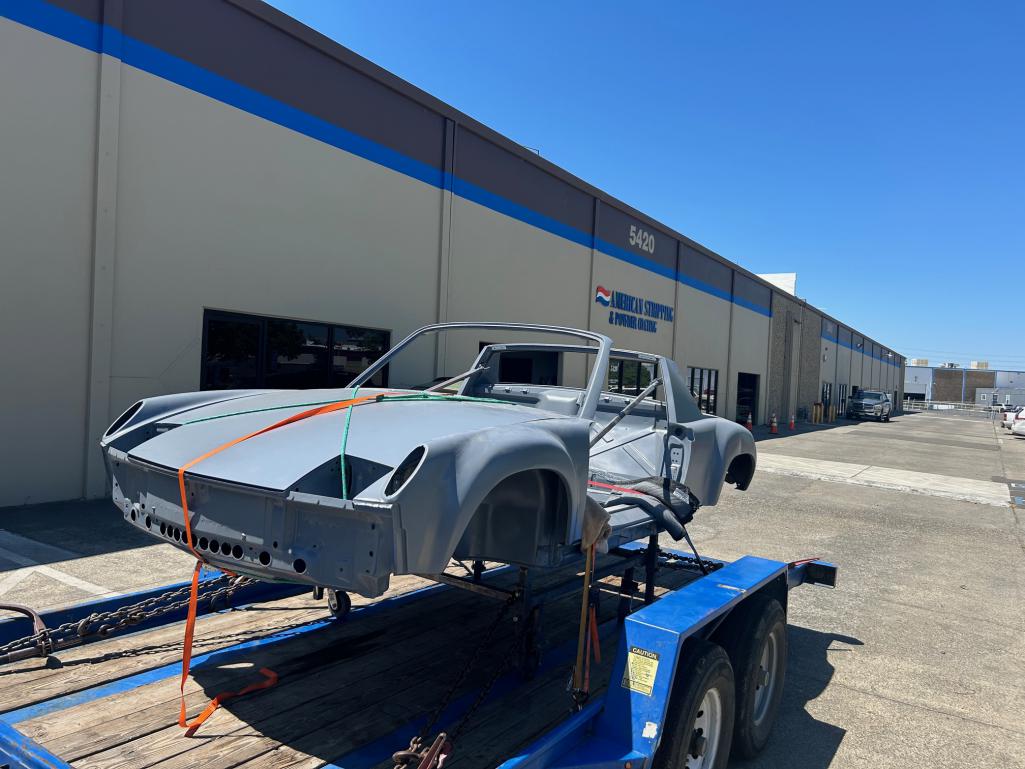
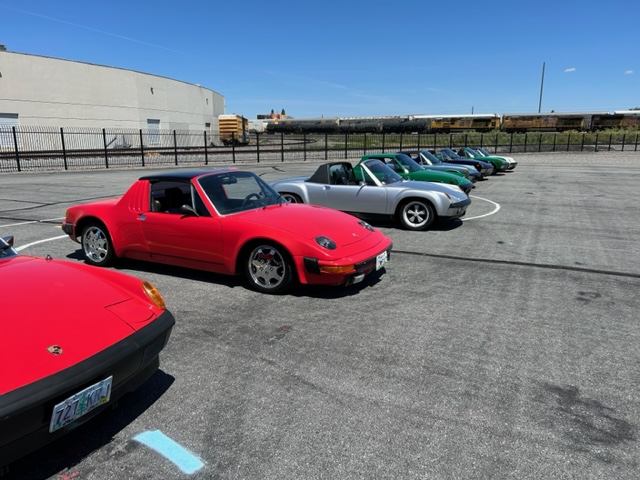
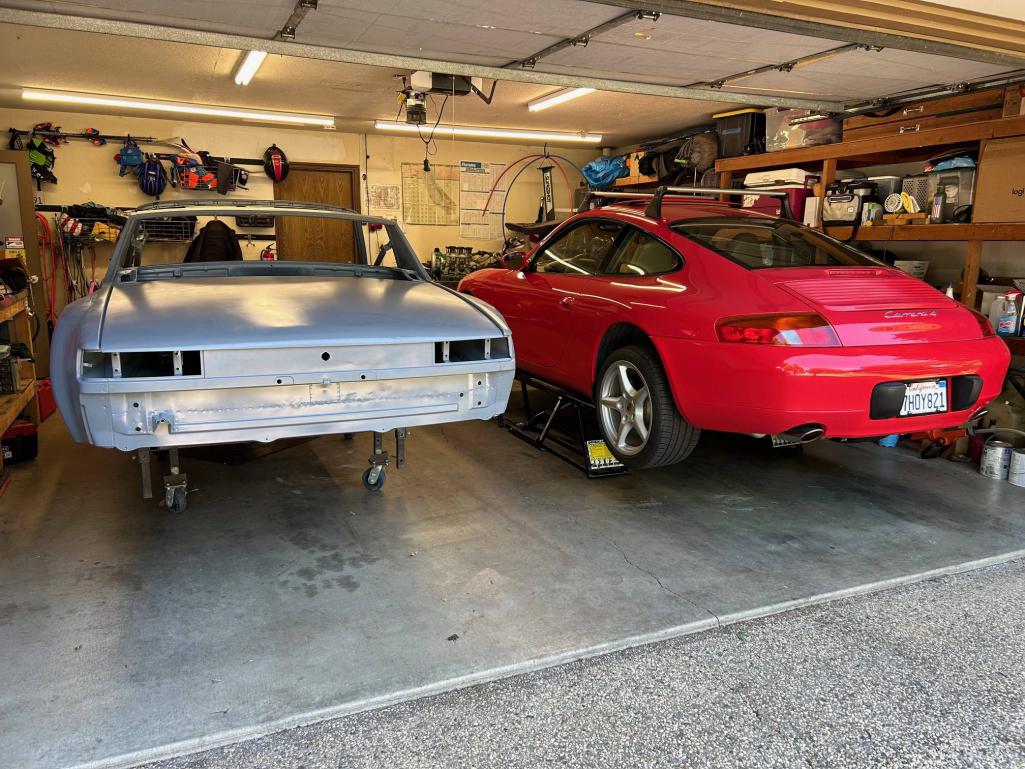
Sitting next to the other vehicle that competes for my attention. 
https://www.youtube.com/watch?v=xBpemDWBFeE
Posted by: Cairo94507 Nov 22 2024, 06:40 PM
Excellent progress. It just takes time but you will be there soon.
Posted by: Montreal914 Nov 23 2024, 10:09 AM
Very nice progress!! 
Did you resolve the oil line routing issue?
Thanks for sharing!
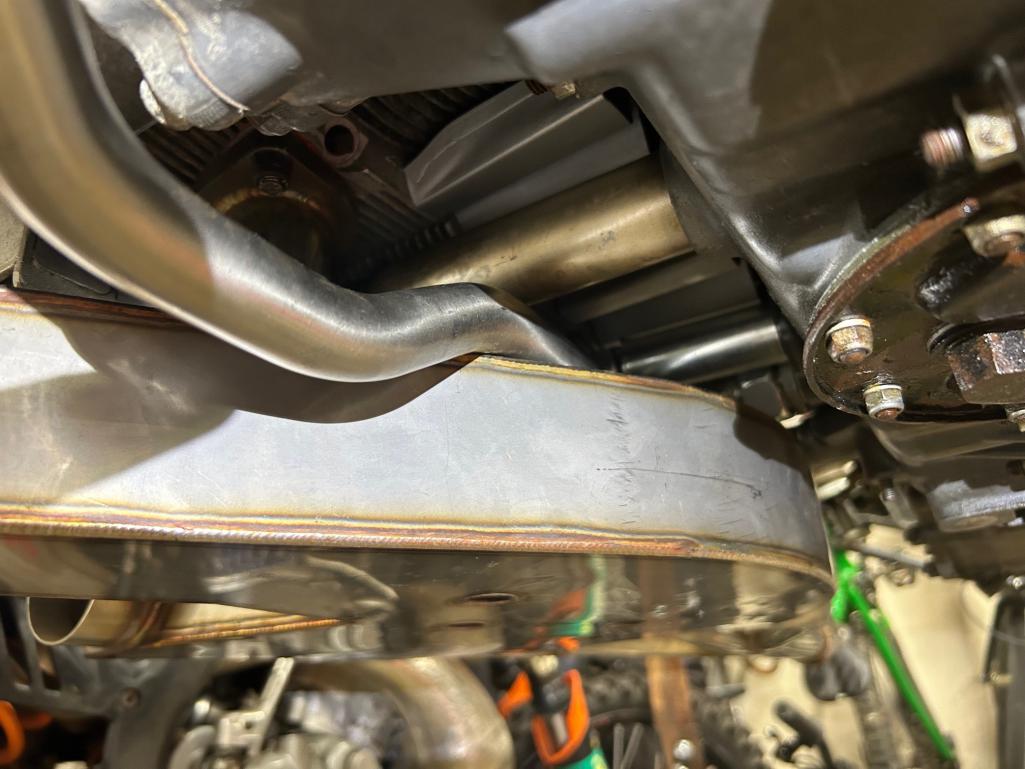
Posted by: pencap914 Nov 25 2024, 05:35 PM
Did you resolve the oil line routing issue?
I think so, the stainless one I believe was fabricated by Ben himself so it fits with his heat exchangers by a hair. So far I don't have any leaks from this return pipe to the oil filter. only leaks I have are the suction line/oil tank interface, currently sealed with an aluminum crush washer and one of the valve covers is leaking.
When I get the engine tin powder coated/installed and the heater hoses temporarily blocked off I'll feel confident enough to run the engine for extended periods of time to get the tuning dialed in. But until all that happens, back to the boredom of fixing little pinholes in the unibody.
Powered by Invision Power Board (http://www.invisionboard.com)
© Invision Power Services (http://www.invisionpower.com)