Printable Version of Topic
Click here to view this topic in its original format
914World.com _ 914World Garage _ Laguna Blue '75 build
Posted by: andrewck Jul 26 2020, 11:30 AM
Greeting from Denver. I was at a 996 meetup a few weeks ago and started talking to a guy selling his 914 project car. A week later, I am said owner of a 1975 Laguna Blue 914 with two 2.0L motors, a couple of transmissions, and lots of parts to put it together. To top it all off, I made a new friend in the PO and have had a warm welcome into the 914 world.
PO spent a lot of money and effort to addressing rust so I'm starting off with a fantastic chassis. I'm spoiled as I come from the 996 world where I don't have to worry about many of the issues that come with 45+ year old cars. I'm decent with a wrench, though I have no fabricating skills and have never rebuilt a motor, so this is all a learning experience.
The plan is to clean the "complete" motor and redo seals, belts, gaskets, other basic things to get it running and just drive it. Meanwhile I'll explore options on the second block, and am already looking into a 2056 build. Step one of getting the car back on the road looks relatively straightforward, but the catch is I don't have a garage/shop to work on the car, so much of it will be done in my livingroom and parking spot.
Already appreciate all the knowledge posted here and I'm finding inspiration in a lot of your builds. The search function has been my friend, but I'm sure I'll be asking questions going forward.
-Andrew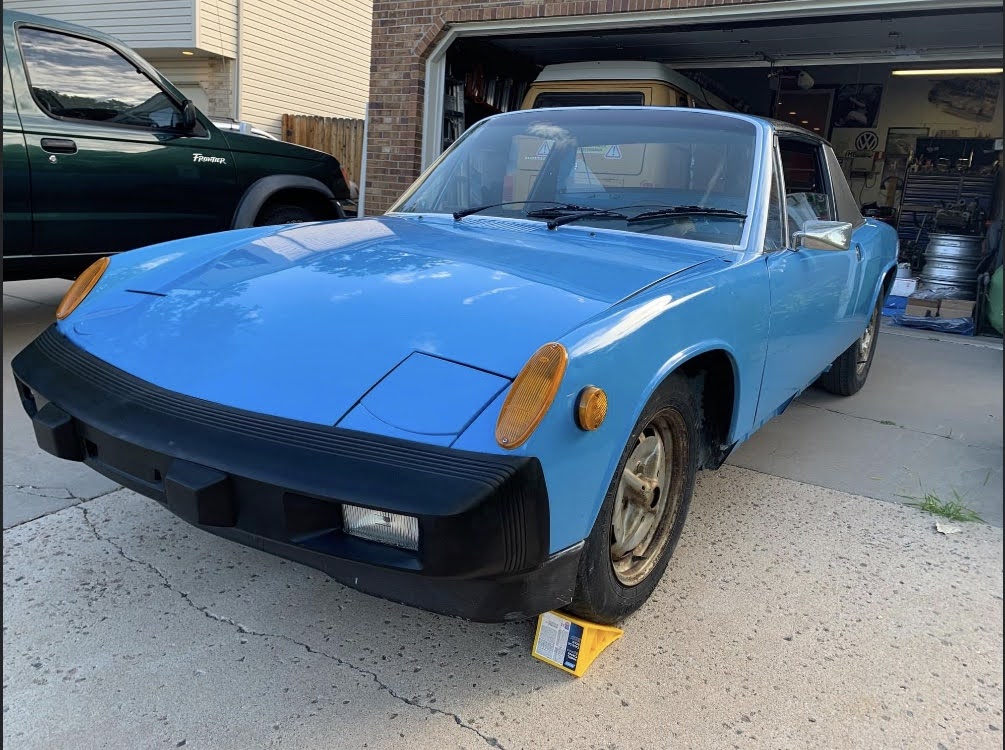
Posted by: andrewck Jul 26 2020, 11:37 AM
Yes, I do mean it when I said I'm tearing down the motor in my livingroom. I have a very understanding girlfriend.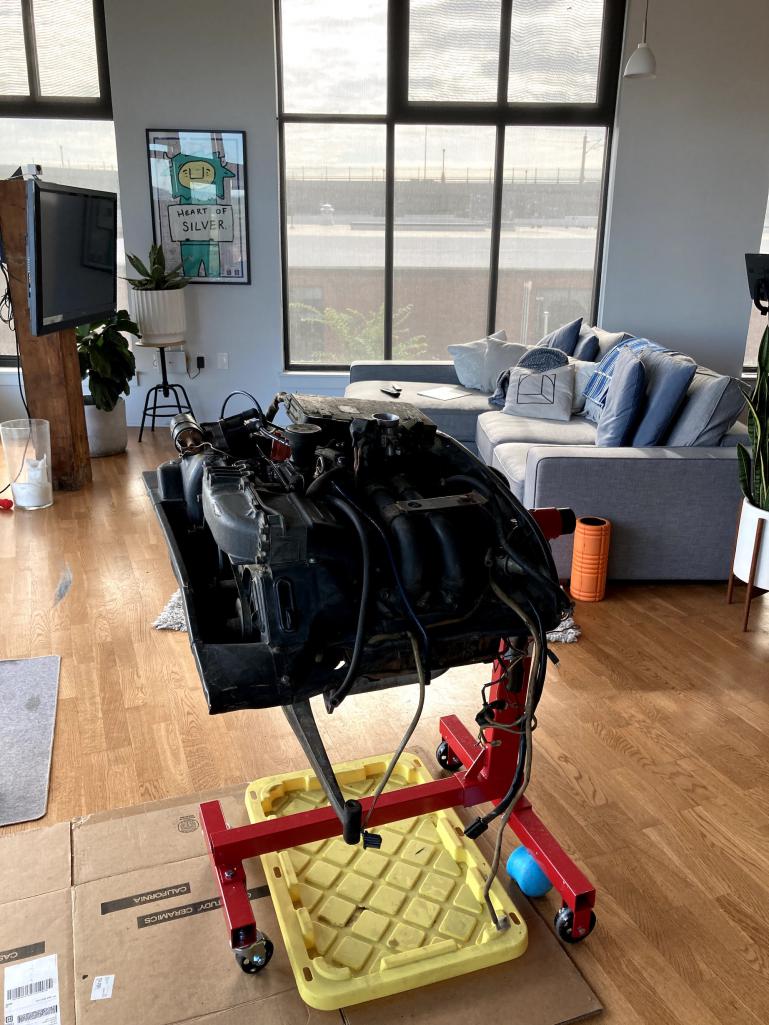
Posted by: Nojoah Jul 26 2020, 11:44 AM
 Looks like you have a great car to start with. You definitely picked the right girlfriend.
Posted by: Cairo94507 Jul 26 2020, 01:45 PM
What a terrific color and nice chassis. I don't think I could get away with the engine in our home, but you got a keeper there if she allows it. 
Posted by: andrewck Jul 31 2020, 02:27 PM

What a terrific color and nice chassis. I don't think I could get away with the engine in our home, but you got a keeper there if she allows it.
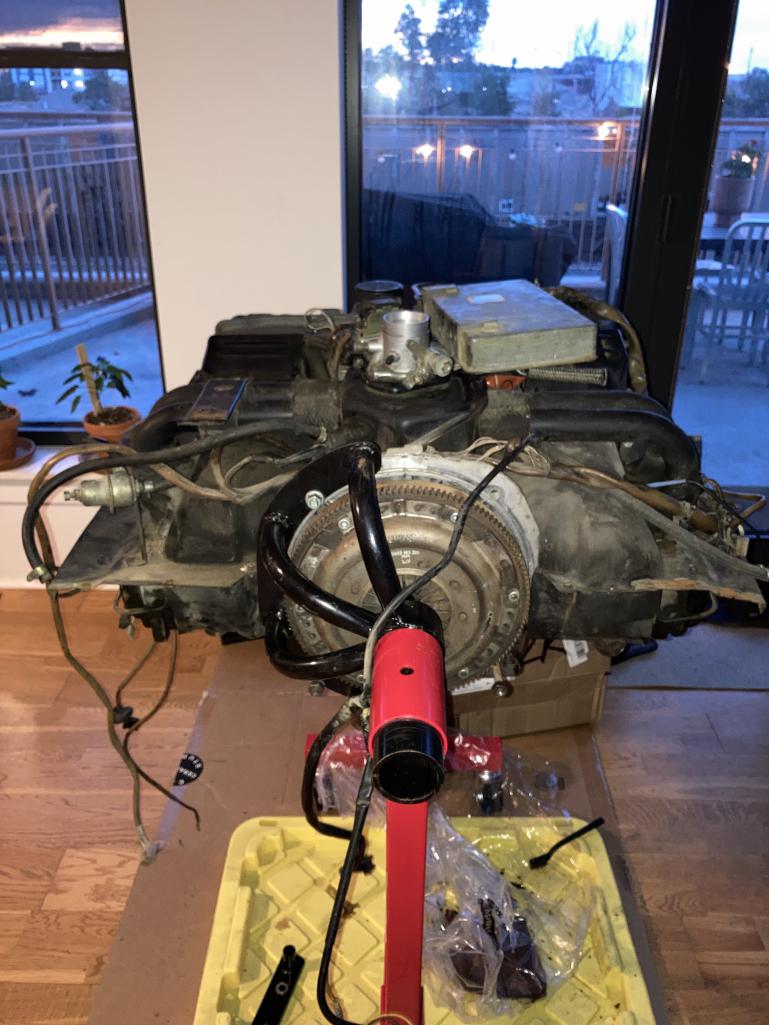
Just a few days in and I already have a scare. I’ve pulled tin off the engine, cleaned everything I could, and ordered hoses, hardware, and seals. I just opened the oil filler neck and saw something at the bottom of the chamber. I grabbed a magnet, and this 1” piece of metal shot out.
Does anybody have a clue as to what this might be? I’m hoping it’s a foreign object and not a piece of the case, but I’m stumped as to where it came from. My hope with this motor was to run it without splitting the case, but that plan is in doubt now. The metal piece has jagged edges and is shiny. Any guesses are appreciated.
Posted by: Root_Werks Jul 31 2020, 04:46 PM
Looks like a solid starting point (little to almost no rust). Love that color!
Posted by: andrewck Jul 31 2020, 05:18 PM
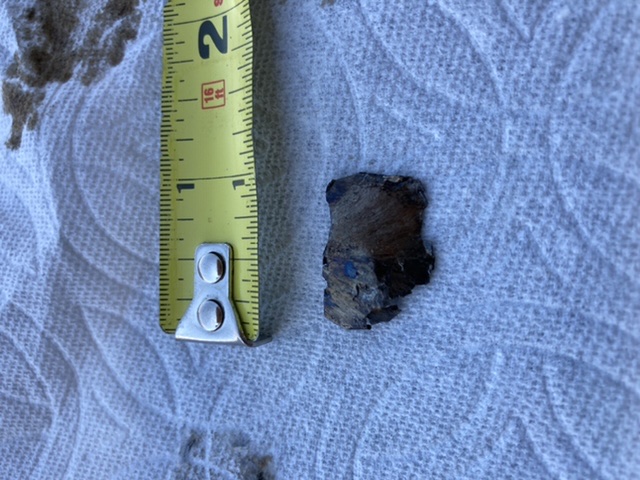
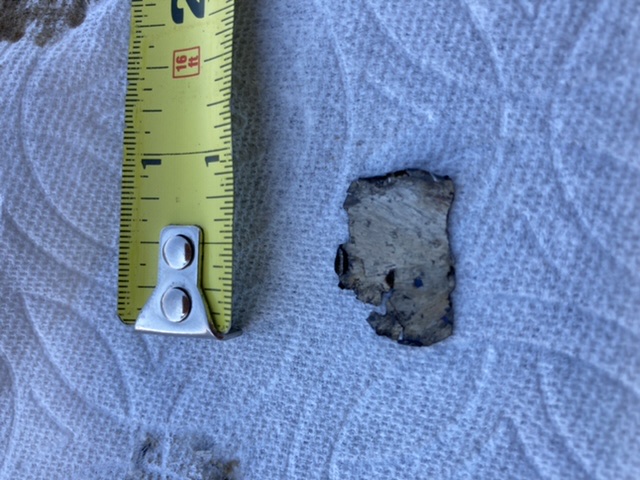
Opened the sump plate and it’s metal city! Looks like it’s time to split the case and check the damage.
Posted by: Jamie Jul 31 2020, 07:54 PM
What a terrific color and nice chassis. I don't think I could get away with the engine in our home, but you got a keeper there if she allows it.
Just a few days in and I already have a scare. I’ve pulled tin off the engine, cleaned everything I could, and ordered hoses, hardware, and seals. I just opened the oil filler neck and saw something at the bottom of the chamber. I grabbed a magnet, and this 1” piece of metal shot out.
Does anybody have a clue as to what this might be? I’m hoping it’s a foreign object and not a piece of the case, but I’m stumped as to where it came from. My hope with this motor was to run it without splitting the case, but that plan is in doubt now. The metal piece has jagged edges and is shiny. Any guesses are appreciated.
I hate to say it, but that looks like a piece of a bearing.

Posted by: bkrantz Jul 31 2020, 08:05 PM
Congrats, welcome, ,and good luck. Tearing down a 914 motor is not that difficult (actually, very easy to tear down and only moderately harder to rebuild).
And I love your work location. We my wife and I were still kinda newly-weds I tore down a BMW 4 cylinder in the apartment kitchen. 40 years later, we are still married (but I am not allowed to bring motors into the house any more).
Posted by: andrewck Aug 1 2020, 07:33 AM
Congrats, welcome, ,and good luck. Tearing down a 914 motor is not that difficult (actually, very easy to tear down and only moderately harder to rebuild).
And I love your work location. We my wife and I were still kinda newly-weds I tore down a BMW 4 cylinder in the apartment kitchen. 40 years later, we are still married (but I am not allowed to bring motors into the house any more).
What are all the manuals that I need? So far I have the 1) original workshop manuals, 2) Haynes manual, 3) 700 tech tips. I am thinking of buying the Bug Me video as well. Think between those and the knowledge on this board, I should be in a good position.
Posted by: Tdskip Aug 1 2020, 07:48 AM
Shoptalk has a good Type4 community too, worth taking a look.
Might also be worth connecting with a good local shop.
Welcome and please keep up posted on your porgress.
Posted by: andrewck Aug 2 2020, 09:54 PM
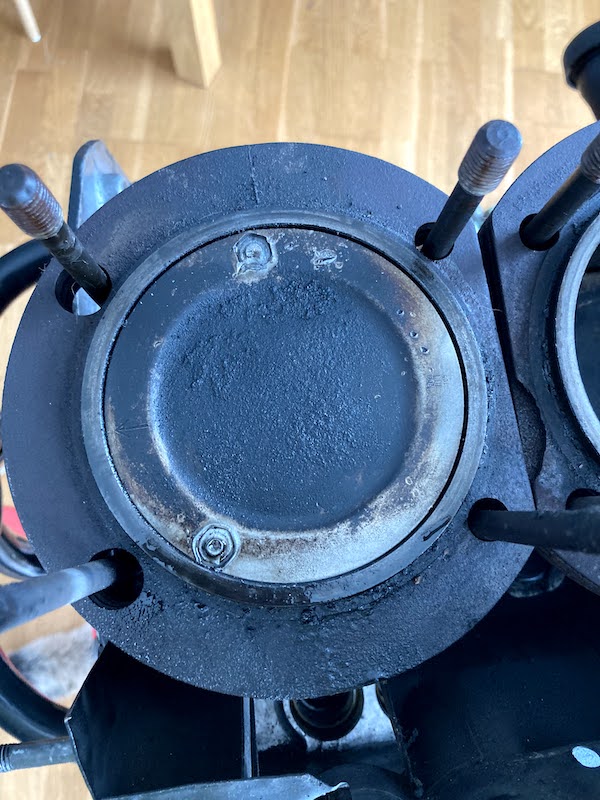
I'm well on my way towards splitting the case and still no sign of where the metal originated from. I am hung up on removing the pistons now and stopped for the night
1) can anybody recommend a good set of snap ring pliers? The ones I purchased at Harbor Freight dont seem to apply enough pressure to remove the snap ring. Is it easiest to use the straight or 90 degree attachment?
2) do i need to label cylander heads when I put them away. Understand most other components it's critical to label, but unsure if that matters here.
The house is much dirtier than I promised my girlfriend, and hoping to have this motor completely broken down this week. Then time to break down the other motor and see if it's a better starting point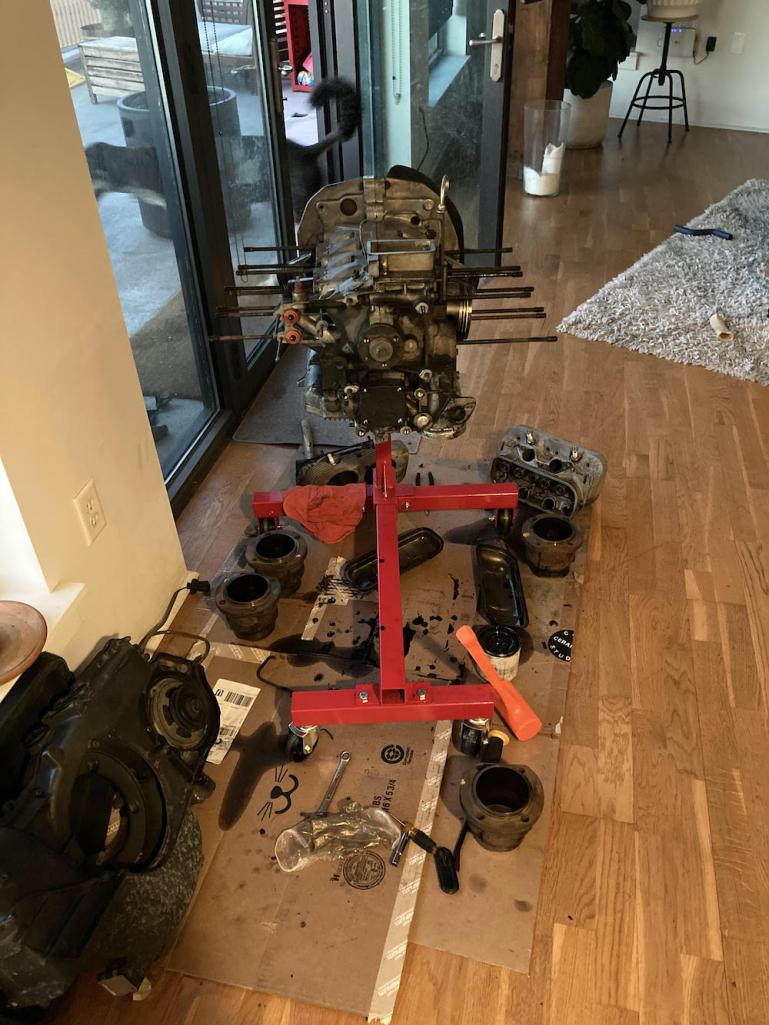
Posted by: cuddy_k Aug 3 2020, 10:52 AM
Wow...engine work INSIDE the house? I salute you! 
I really like this upgraded snap ring I got from HF. One knob to change direction....
https://www.harborfreight.com/snap-ring-pliers-with-reversible-action-63938.html
Highly recommend Jake's type iv video - volume 8 from Bug Me....
If you end up needing pistons and cylinders, go with KB (european motor works carries them). The ones I got from AA were out of spec...
Posted by: ctc911ctc Aug 3 2020, 12:23 PM
GIRLFRIEND?
Marry that girl!
Posted by: andrewck Aug 3 2020, 04:33 PM
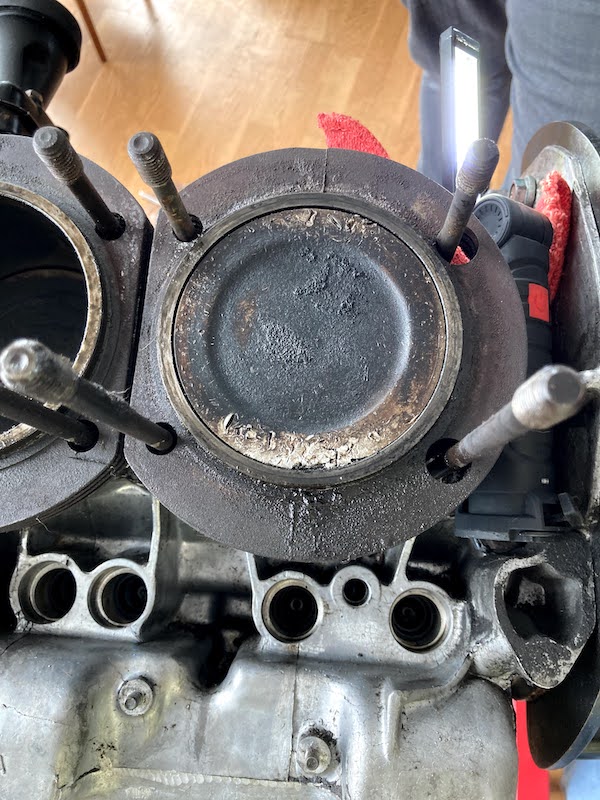
If I were a betting man, I’d say this could be the problem. The remains of piston #1...how does this even happen?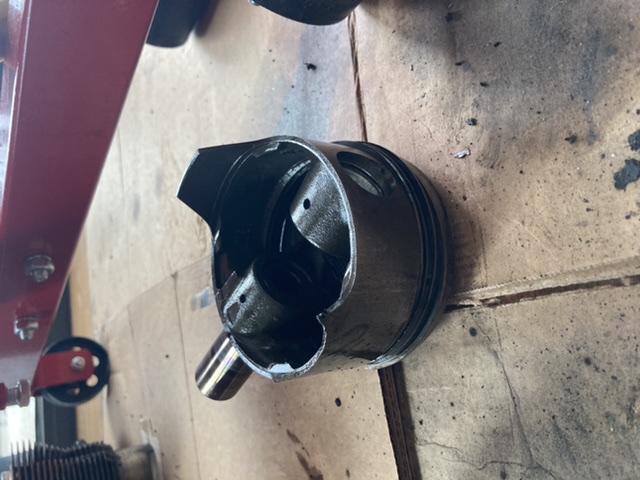
Posted by: IronHillRestorations Aug 3 2020, 08:11 PM
Friction from worn rings, or a bad rebuild
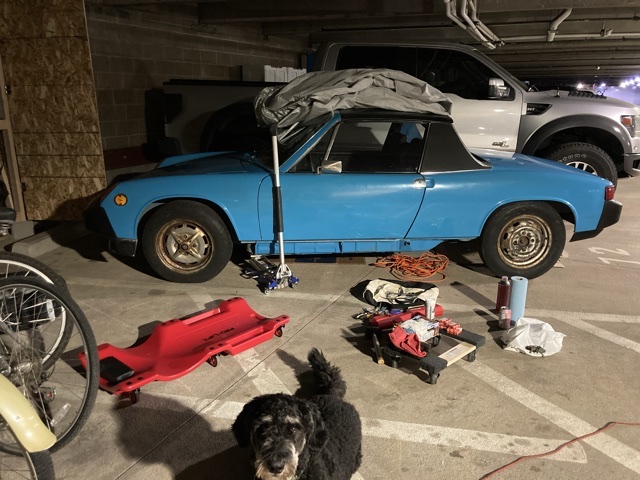
Posted by: andrewck Aug 15 2020, 09:17 PM
The car made its way home with me today and is ready to be reassembled! It's amazing how small the 914 is compared to my 996 2S. Having not run across major issues yet, my super ambitious and 'straight forward" plan is:
Interior
- Test electric and start to button up the cabin
- Replace dash
- Install door cards
- Install perlon backing
- Install carpet
- Install seats
- Door cards
Suspension & brakes
- Get tires mounted
- Install new front/rear rotors and hubs (5 lug conversion)
- Mount rebuilt calipers
Fuel
- Install all new hard lines
- Install all new fuel hoses and filter
- Install gas tank
Exterior
- Paint side skirts
Motor
- Reassemble 2nd 2.0 that came with the car and run it ASAP
- Build out the second 2.0 into 2056 perhaps over the next 1-2 years
- Rebuild the second transmission using Dr. Evil's course
Having just typed out that list, it feels a bit daunting but really excited to get going and build my first car! Also, the dog is already upset about how much attention the car is taking away from him. Hope to reward him with a wind-filled drive this fall.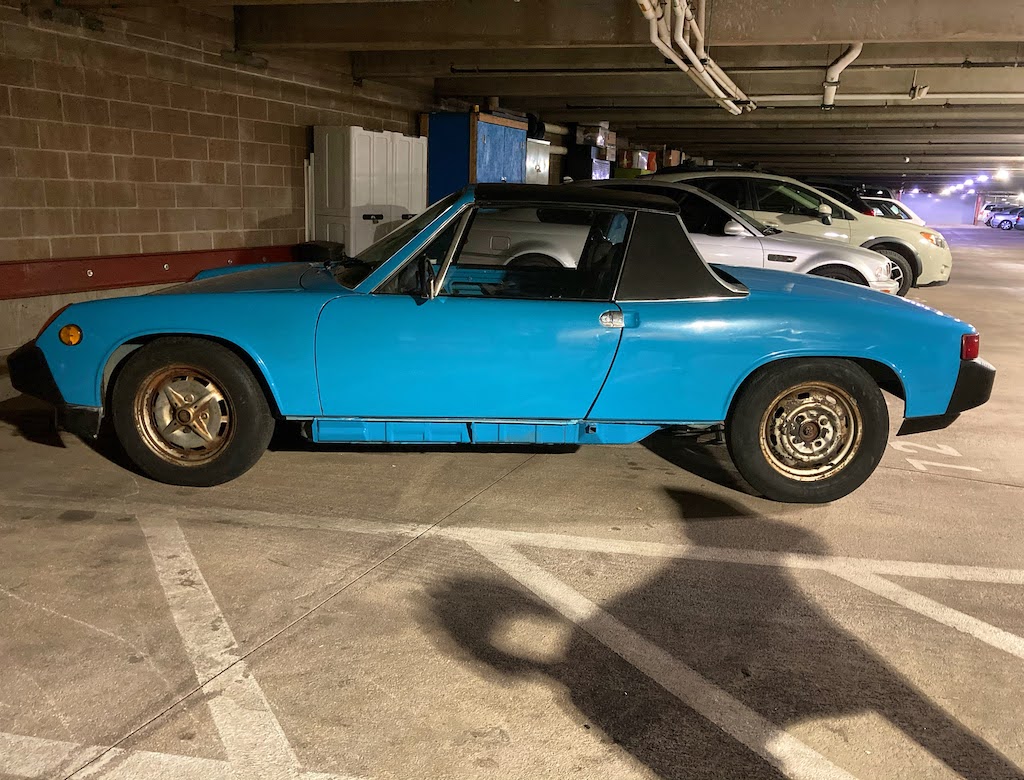
Posted by: djway Aug 16 2020, 01:12 AM
The car made its way home with me today and is ready to be reassembled! It's amazing how small the 914 is compared to my 996 2S. Having not run across major issues yet, my super ambitious and 'straight forward" plan is:
Interior
- Test electric and start to button up the cabin
- Replace dash
- Install door cards
- Install perlon backing
- Install carpet
- Install seats
- Door cards
Suspension & brakes
- Get tires mounted
- Install new front/rear rotors and hubs (5 lug conversion)
- Mount rebuilt calipers
Fuel
- Install all new hard lines
- Install all new fuel hoses and filter
- Install gas tank
Exterior
- Paint side skirts
Motor
- Reassemble 2nd 2.0 that came with the car and run it ASAP
- Build out the second 2.0 into 2056 perhaps over the next 1-2 years
- Rebuild the second transmission using Dr. Evil's course
Having just typed out that list, it feels a bit daunting but really excited to get going and build my first car! Also, the dog is already upset about how much attention the car is taking away from him. Hope to reward him with a wind-filled drive this fall.
Posted by: Rleog Aug 16 2020, 04:05 AM
You definitely have a “keeper” in your girlfriend. How about a pic of your dog.
Posted by: andrewck Aug 16 2020, 09:53 AM
You definitely have a “keeper” in your girlfriend. How about a pic of your dog.
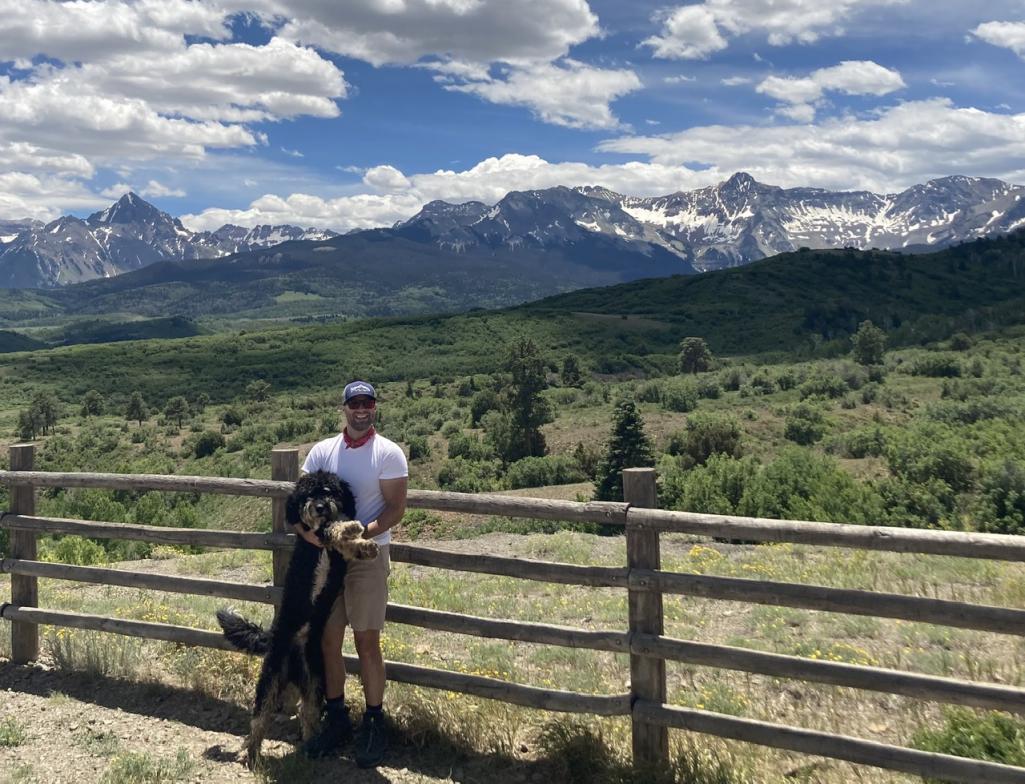
Bridger the dog posing with me on a recent fishing/camping trip in Telluride. His hobbies include putting his nose in between myself and whatever I’m working on, and helping make a bigger mess than I possibly could do myself. Wouldn’t have it any other way.
Posted by: andrewck Aug 16 2020, 10:23 AM
I’ll actually take a step further back and do a proper intro since I joined and came in here pistols blazing with questions on my build thread.
I’m in business turnarounds and based out of Denver, so life up until COVID is typically spent on the road. When I’m not wrenching, you can find me fly fishing in the Rocky Mountains, looking for a great burger or on the hunt for good tequilas enjoyed with a view.
A couple of years ago I started a website by the name of https://bookgaragetime.com/ - we are essentially Airbnb for DIY workspace. I was fed up with working on my BMW K75 on the roof of a Whole Foods parking deck in Chicago, and started the site to put DIYers together with garage owners. It’s still very much a side project, but something I’m deeply passionate about as a DIY enthusiast.
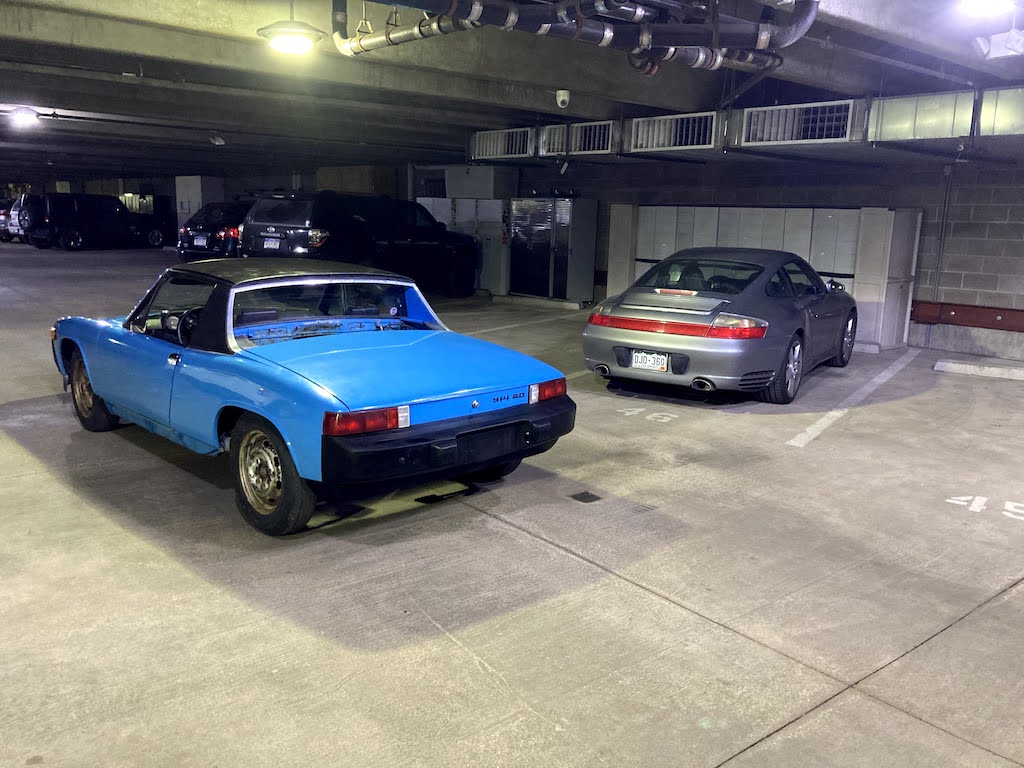
As mentioned above, my first love was a 1990 BMW K75S - which I stripped down from a sport touring bike to…cafe racer is the wrong term, but more of a sport bike (https://www.motobrick.com/index.php/topic,6172.0.html). About 6 years ago I purchased my first Porsche - a 2002 996 4S. I love the car and it’s my daily, but was not really impressed with the weight and ability of the AWD…so I pulled it out. Now my 996 2S is the car I thought Porsche should have released from the factory - almost a GTS. It’s got wide body and wheels, turbo suspension, turbo brakes, RWD, and is relatively analog. The car does everything I could ask for…great for around town, winter wheels make it a good ski/mountain car, high enough that it can handle fire roads for fishing access, comfy for long trips. It’s a keeper for sure. The problem is the car feels very modern, and as a minimalist I wanted something more mechanical. I was originally on the hunt for a dirtbag 912, but during a 996 meetup in Denver stumbled upon the laguna blue 914 just purchased.
This car isn’t going to be a show car, will likely never be detailed, may not end up period correct, will always be mechanically sound, and earn a patina from getting driven hard and enjoyed with friends. If you’re ever looking to fish, grab a drink, hit the slopes, or rip around canyons, give me a shout and look forward to meeting many of you.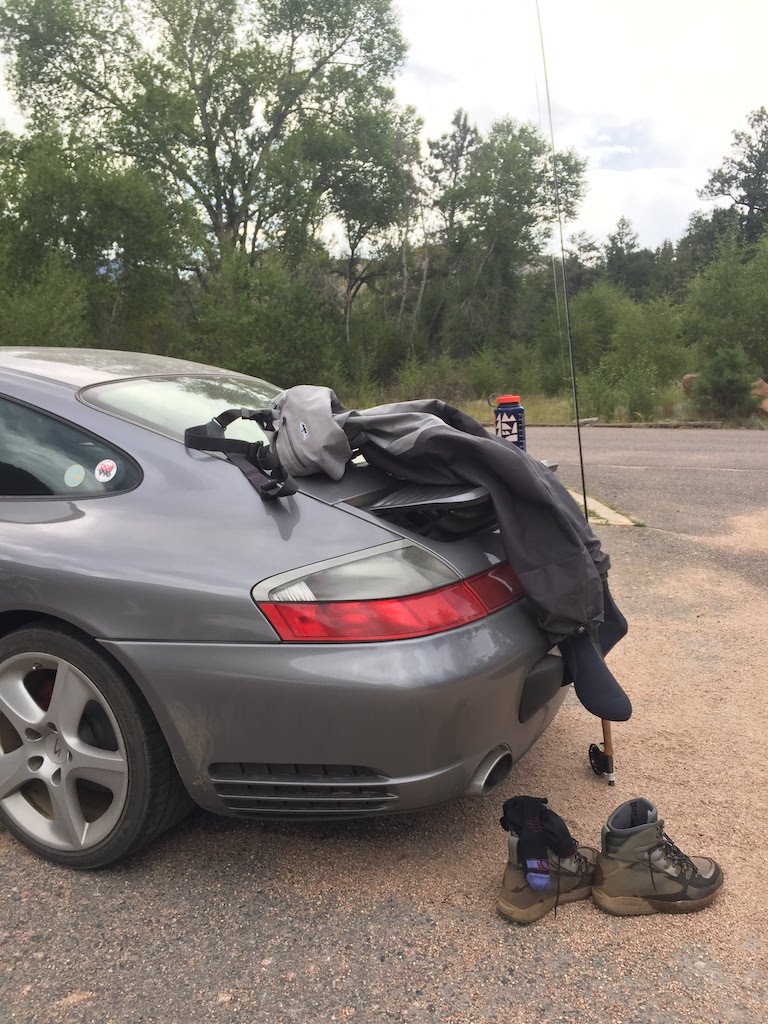

Posted by: andrewck Aug 31 2020, 03:51 PM
Nothing is ever easy.
Just got back from Woody's Wheel Works in Denver and none of my cookie cutters are straight (some more than others). Trying to evaluate my options for 5-lug wheels now. Would consider replica Fuchs, a matching set of 4, 2 pairs of wheels, or anything else that may work with my upcoming 5-lug conversion. Anybody have extra 15x6 rims they are looking to get rid of?
Goal this weekend is to tackle interior, fuel lines, and button up the motor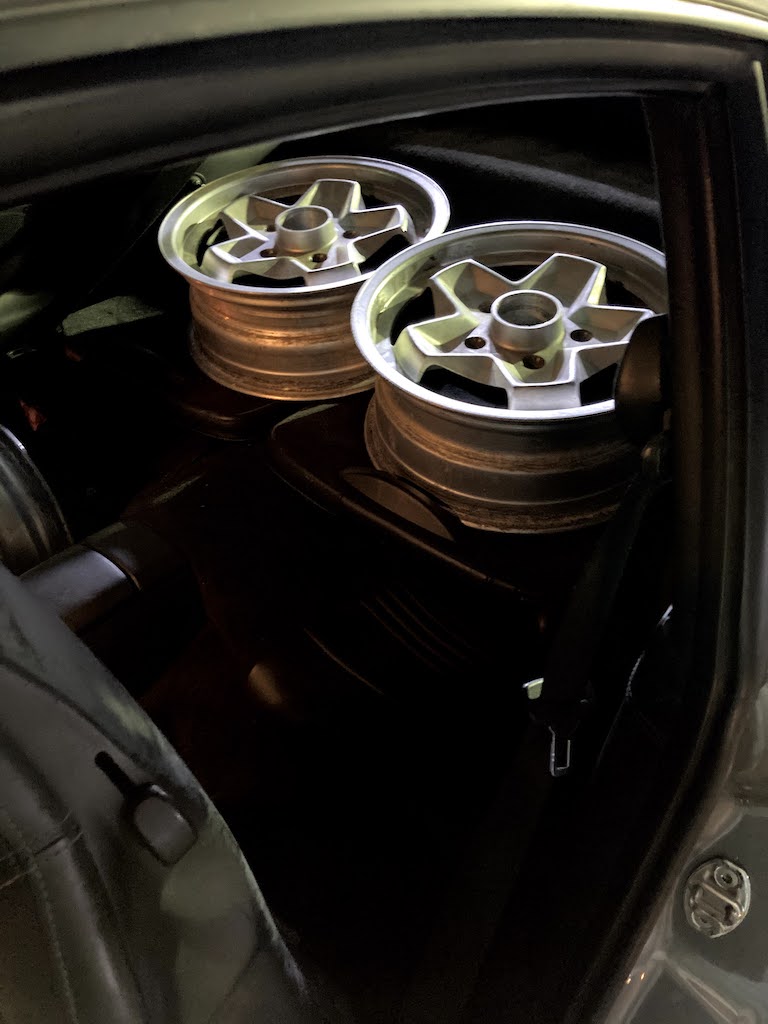
Posted by: DRPHIL914 Sep 1 2020, 06:54 AM
the airbnb garage idea is really cool, there is a similar place near us here in SC.
my first bike was a '73 Bmw r90/6 , wish i had kept it! Dad was into all aircooled stuff. cars and bikes. Colorado is a beautiful place been there many times while living in MN and Iowa, but ended up east in SC so NC and Tn blue ridge mountains now are our playground when not at the beach, plenty of fun roads for the bike and cars for sure. I have friends in Longmount and in Berthoud Co. but love the Frasier and Winter Park area.
Good luck with the 914 build, i think what you need to do based on that bio is turn it into a rally car! big knobby tires probably fiberglass or rubber flares, light bar front and top with of course a ski and fishing pole rack on top too. But you need more power so put that 2.o original motor aside for now and put in a suby, if you are on a tight budget but have the ability to do most of the work yourself, this would be a great way to go.
Just a thought but... if iwere living in Colorado, or even up full time herein the blue ridge, that would be my next project. Good luck and keep us posted on the progress.
Phil
Posted by: andrewck Sep 6 2020, 09:03 PM
the airbnb garage idea is really cool, there is a similar place near us here in SC.
my first bike was a '73 Bmw r90/6 , wish i had kept it! Dad was into all aircooled stuff. cars and bikes. Colorado is a beautiful place been there many times while living in MN and Iowa, but ended up east in SC so NC and Tn blue ridge mountains now are our playground when not at the beach, plenty of fun roads for the bike and cars for sure. I have friends in Longmount and in Berthoud Co. but love the Frasier and Winter Park area.
Good luck with the 914 build, i think what you need to do based on that bio is turn it into a rally car! big knobby tires probably fiberglass or rubber flares, light bar front and top with of course a ski and fishing pole rack on top too. But you need more power so put that 2.o original motor aside for now and put in a suby, if you are on a tight budget but have the ability to do most of the work yourself, this would be a great way to go.
Just a thought but... if iwere living in Colorado, or even up full time herein the blue ridge, that would be my next project. Good luck and keep us posted on the progress.
Phil
That's quite the thought. Has the 'safari' trend hit 914s yet? This first one is going to become my canyon/weekend car, and maybe the 996 gets sold to fund another 914 offroad build? haven't looked into how these do with snow tires yet, but now you have me thinking....
Posted by: andrewck Sep 6 2020, 09:18 PM
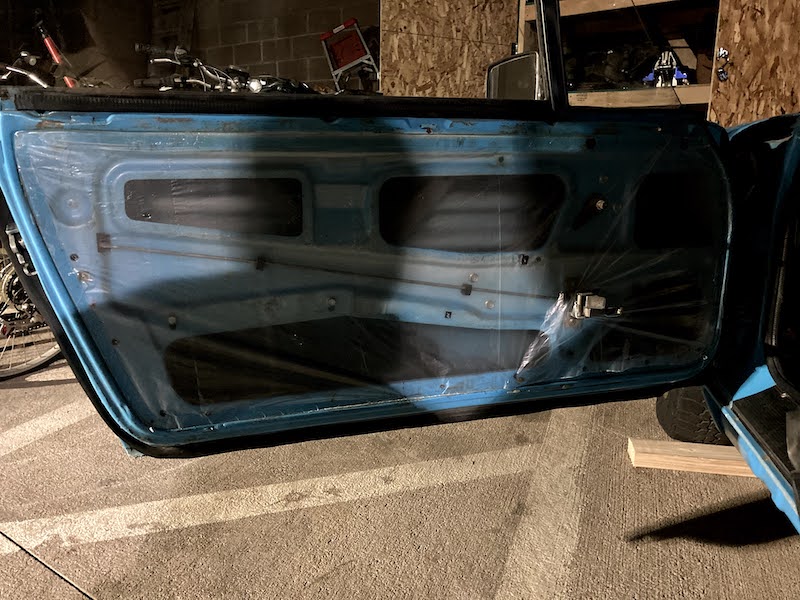
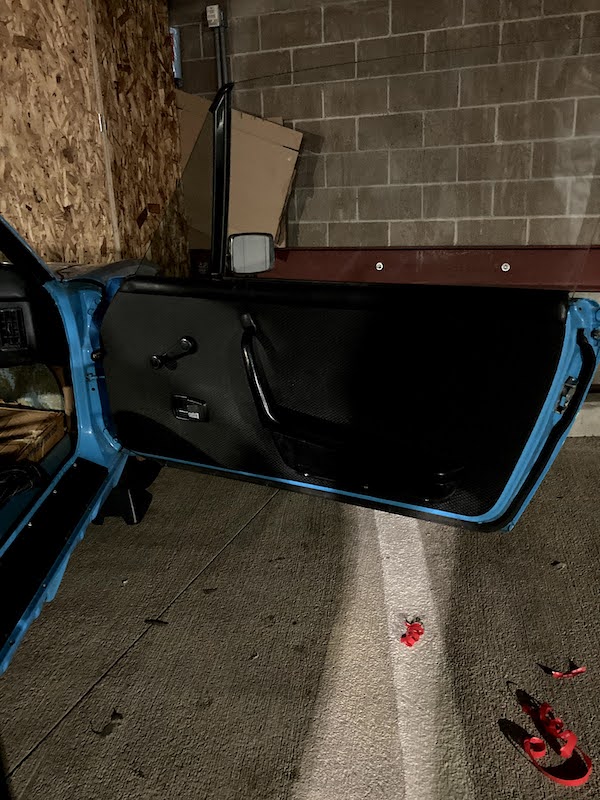
So I started the weekend off with an easy project - getting the door cards out of my storage unit and mounted. There are a number of writeups on the topic, but I purchased some 3M double sided tape from Amazon, HDX 2mm drop cloth (had laying around), and the Auto Atlanta door panel hardware kit.
Despite having 15ft of tape, I still ended up about 1.5 feet short on the bottom of the drivers' side door. If I were to do it again, I would left a 9" opening in the middle of both sides.
The AA kit comes with 3 rubber nipples that I assume are supposed to go into some of the holes. I couldn't find a good diagram online or in any writeup as to where to place these, so I ended up leaving them out. The 9 plastic rivets clipped in securely and I regret not ordering more speed clips as some were missing from my door.
Posted by: andrewck Sep 6 2020, 09:22 PM
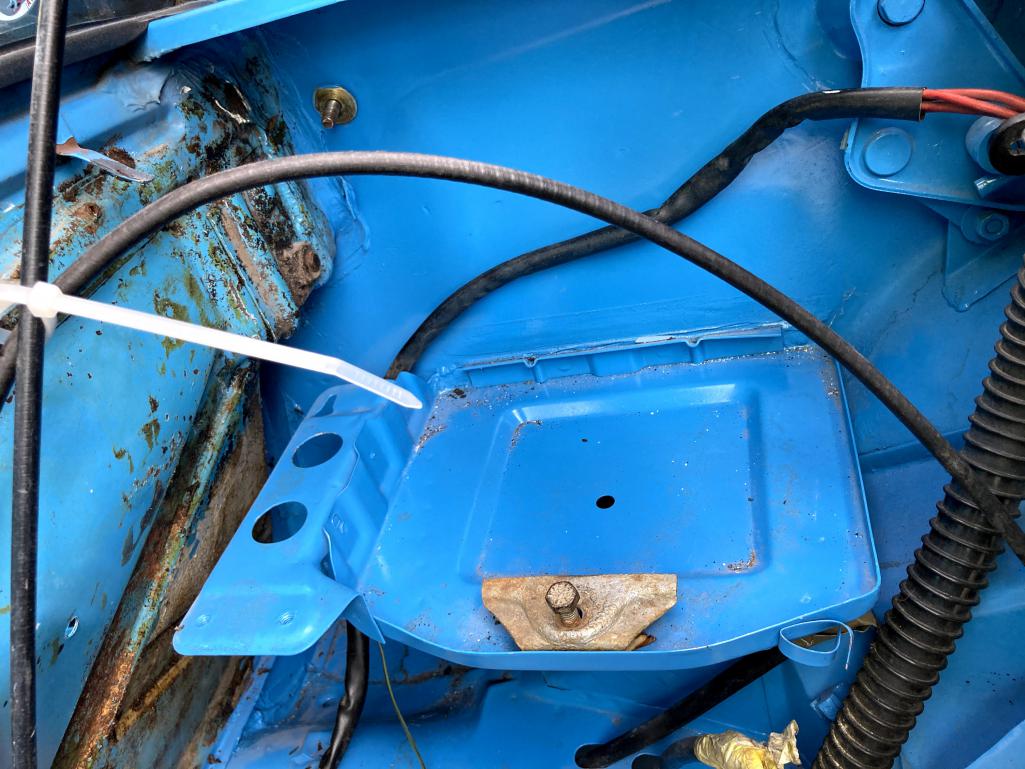
Thanks to @http://www.914world.com/bbs2/index.php?showuser=22920 and @http://www.914world.com/bbs2/index.php?showuser=15499 for the battery write-ups. I ended up purchasing an Odyssey PC925, as well as ebay battery tray and SAE terminals. Battery fits very snug in the mount, but the lip seems to stick out too far to allow the Porsche battery bracket to fit over it. I've got to play with it still, but materials-wise I;m sitting pretty at the moment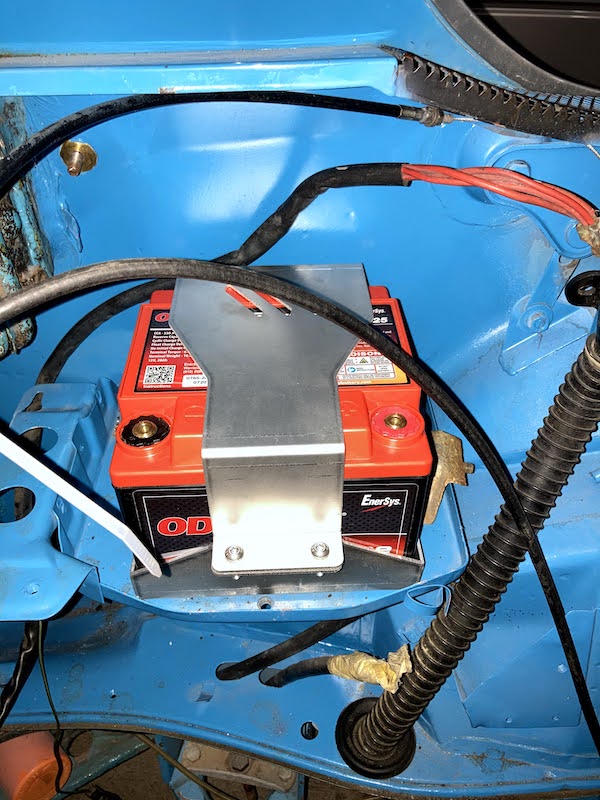
Posted by: andrewck Sep 6 2020, 09:26 PM
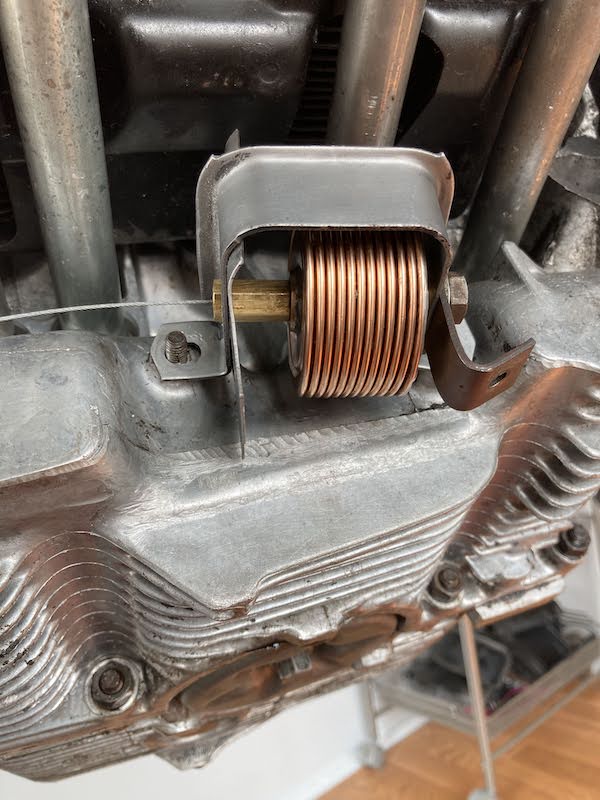
Thermostat bellows were blown, so a quick search pointed me (and my wallet) in the way of Awesome Powdercoat.
The new brass hex screw that came with the kit was slightly larger diameter than the old one, so 5 minutes with the Dremmel opened up the hold in the side of the bracket enough to ensure the thermostat can expand without binding.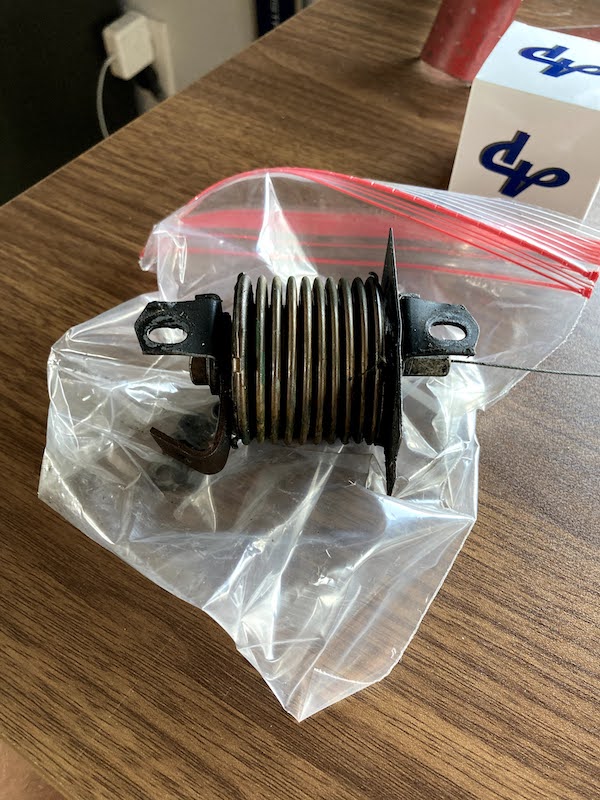
Posted by: andrewck Sep 6 2020, 09:59 PM
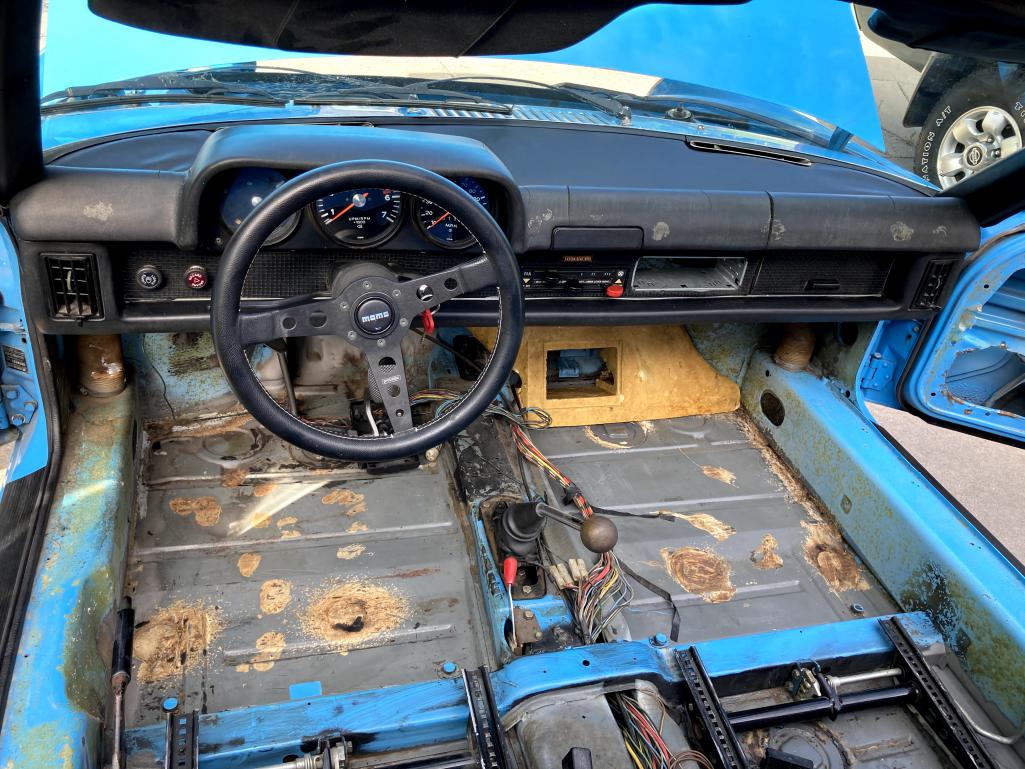
My car came with a cracked dash, as well as 2 spares (one in worse condition, and another in ehh shape, but better than the installed one). I'm having a drink now, but I sure should have had 3 before taking on this project.
I was able to get the lower dash (knee pad) off easily, but with it can clouds of dust and dirt. I took my hand and banged on the metal bar that the knee pad attaches to and with each thump saw waterfalls of debris coming out from the dash. I did this for 5 minutes until there was nothing left to rain down. I don't know how so much crap got lodged up there, but I filled up a vacuum canister from what came down.
Now on to the upper dash. This took way too much trial and error even with forum instructions. Maybe I'm bad at following directions and have too large of hands, but please see below for what worked for me to access the hidden nuts. I worked my way from left to right, ripping off disentegrated dash as I moved on. FYI all nuts are 13mm
1. Used a crow foot wrench inside the vent to loosten, then removed by hand
2 used a 1/4" 13mm deep socked and extension. Started from the hood release and worked back up towards the dash to access the nut
3 I did not remove the instrument cluster or steering wheel. I removed oil temp gauge and used a 13mm wrench to slowly access the nut hidden way back under the sheet metal. This was the most difficult one to access and because I don't have thin/narrow wrenches, it was a drawn out process of 1/3 turns and resetting the wrench
4 same as #3, but removed the speedo to access
5 red arrow should be pointing straight up as I used the same methodology as with nut #2. A long extension and deep socket should allow you to loosten and remove while looking up from underneath the dash. To reinstall, keep the speedo out and use a crow foot wrench and your fingers to tighten the nut just to the right of the opening.
6 make sure your radio is out to get access. again get under the dash and look up. you should be able to use a nut driver or crow foot to loosten the nuts and then pull them out by hand
7 see #6, you should be able to access both nuts at the same time
8 remove the glove bot metal strap. it is next to nut #7 and held on by a 4mm?? nut, . you don't need to pull out the entire glovebox, just loosten the strap. at that point you can get back on the floor and use same method as #2 and #5. Long extension to loosten, pull out by hand
9 crow foot wrench going through the vent up and to the right. probably 5 small turns to loosten it and then unscrew by hand
By now, your back is sore, your fingers are dirty/bloody, and your neighbors have learned a couple of new curse words. Congratulations! You should have 9 plastic nuts and metal washers. The dash should pull up and out. installation is the reverse. you now deserve another drink.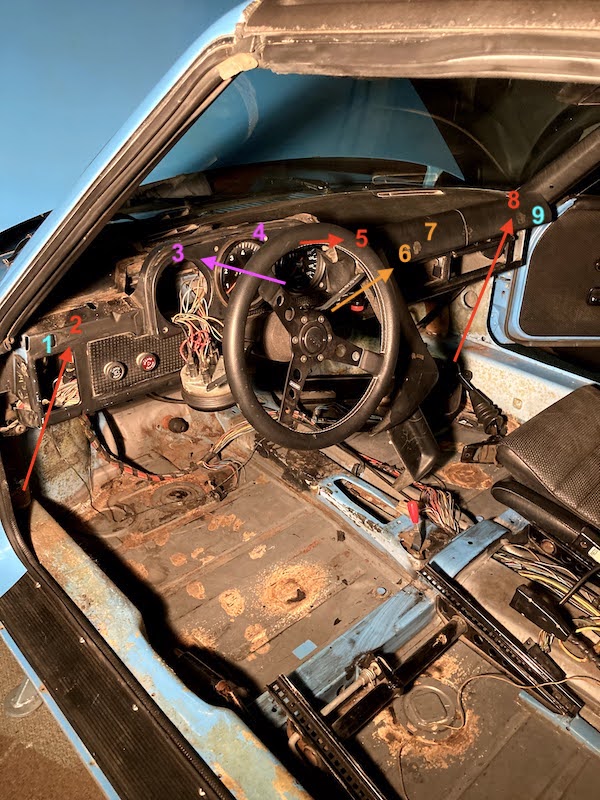
Anyways, I hope this helps at least one person out there that is frustruated with removing the dash and is wondering why no combination of socket set is getting the job done.
Posted by: Greycarrera Sep 7 2020, 08:49 AM
There is a pretty good video of 914 dash removal on 914 Rubber's web
Link: https://914rubber.com/dash-top-for-porsche-914
P.S. Also have 02 996 and 74 914
Posted by: Gint Sep 9 2020, 12:15 PM
I think that was Pete's old car. Did Doug give you the details on prior ownership?
Posted by: andrewck Sep 9 2020, 09:50 PM
There is a pretty good video of 914 dash removal on 914 Rubber's web
Link: https://914rubber.com/dash-top-for-porsche-914
P.S. Also have 02 996 and 74 914
what a fine car combo
Posted by: andrewck Sep 9 2020, 10:00 PM
I think that was Pete's old car. Did Doug give you the details on prior ownership?
There are some receipts from Peter from the mid-90s. Looks like it had a few owners since then, but if there are some fun stories/details you might know, I'm all ears!
Posted by: Tdskip Sep 10 2020, 08:24 AM
Thanks for the updates and write up. Good stuff.
Garagetime is a cool project btw, great idea.
Posted by: Gint Sep 15 2020, 08:45 AM
I think that was Pete's old car. Did Doug give you the details on prior ownership?
We need to do a fall drive... Did you ever attempt to join the Colorado-914 email group? I haven't seen a notification.
Posted by: andrewck Sep 15 2020, 09:40 AM
I think that was Pete's old car. Did Doug give you the details on prior ownership?
We need to do a fall drive... Did you ever attempt to join the Colorado-914 email group? I haven't seen a notification.
I sent an email to the address you gave me. Guess it was unsuccessful if you didn’t see it
Posted by: Frankvw Sep 15 2020, 10:47 AM
I like the updates and build, good luck with the rest !
The airbnb-garage is top ! it would for sure work over here. We do have a bigger place where you rent space and tools by the hour or day, but not like your website where just people rent out their garage (in various shapes and forms...and prices I see).
We have a European website where aircooled enthusiasts can register and when you are on a road trip and get stranded or need a tool for a repair you can check who is closest. I really loved that idea (it is free and help is given for free, it is a karma kind of thing) and I registered of course, so I am on the map. After all these years....nobody needed me sofar ! 
Good luck !
Posted by: andrewck Sep 18 2020, 12:51 PM
I like the updates and build, good luck with the rest !
The airbnb-garage is top ! it would for sure work over here. We do have a bigger place where you rent space and tools by the hour or day, but not like your website where just people rent out their garage (in various shapes and forms...and prices I see).
We have a European website where aircooled enthusiasts can register and when you are on a road trip and get stranded or need a tool for a repair you can check who is closest. I really loved that idea (it is free and help is given for free, it is a karma kind of thing) and I registered of course, so I am on the map. After all these years....nobody needed me sofar !
Good luck !
Thanks Frankvw (and to @http://www.914world.com/bbs2/index.php?showuser=21666 ) for the kind words on Garagetime. It's a side project and passion of mine to make DIY space more accessible to all. I'm younger and see a gap in DIY skills among many of my peers. Not sure where the website goes, but it's deffinitly my goal to lower the barriers of entry for automotive work and get/keep more people involved in the DIY community.
Posted by: andrewck Sep 18 2020, 12:58 PM
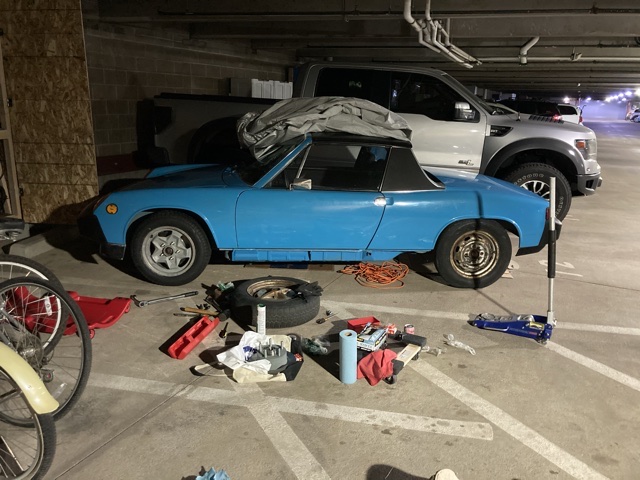
I am tackling the 5 lug hub conversion this weekend. 2 concerns right now:
- I have brand new front hubs in a box. It would appear that the PO fully installed and seated the inner and outer races into the front hub assembly, but I do not see any signs of grease. Do I need to remove the races to ensure they are greased, or would these be ready to install?
- It appears that Swepco 101 is the hub/bearing grease of choice. Can't find it anywhere in Denver on short order. Have others had success with Lucas X-TRA heavy duty grease? It looks like what @http://www.914world.com/bbs2/index.php?showuser=18749 uses in his install video, but always nice to get group feedback.
Posted by: Tdskip Sep 18 2020, 03:40 PM
[*]It appears that Swepco 101 is the hub/bearing grease of choice. Can't find it anywhere in Denver on short order. Have others had success with Lucas X-TRA heavy duty grease? It looks like what @http://www.914world.com/bbs2/index.php?showuser=18749 uses in his install video, but always nice to get group feedback.
[/list]
I doubt that any high quality grease you want to go with will be an issue.
Posted by: andrewck Sep 19 2020, 07:24 PM
[*]It appears that Swepco 101 is the hub/bearing grease of choice. Can't find it anywhere in Denver on short order. Have others had success with Lucas X-TRA heavy duty grease? It looks like what @http://www.914world.com/bbs2/index.php?showuser=18749 uses in his install video, but always nice to get group feedback.
[/list]
I doubt that any high quality grease you want to go with will be an issue.
Fronts done. Rims look rough, but really happy with how the 5 lug conversion bolted up. Tried to remove the nut on the rears and broke my socket extension. Off to HD for an impact driver and to try the rear again tomorrow
Posted by: andrewck Sep 20 2020, 03:01 PM
Old bearing out, new bearing....stuck. Had these in the freezer over the last week, used grease, nothing!
On to plan B...bearing kit rental from Oreilly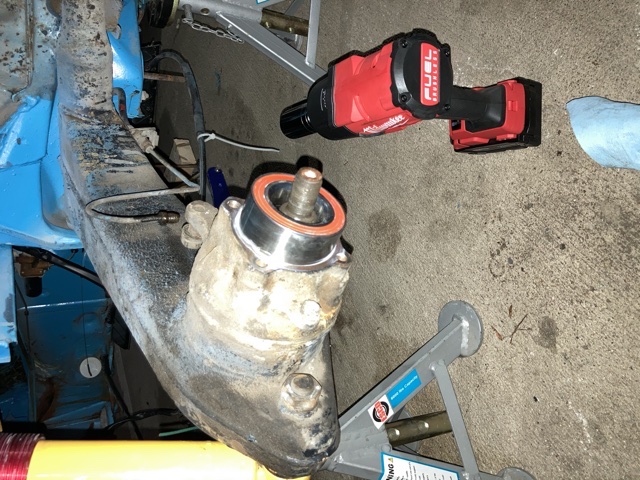
Posted by: iankarr Sep 20 2020, 04:31 PM
Tough to tell for sure, but from the picture it looks like the bearing went in crooked. Decent chance that bearing won't be re-usable, so you prob want to have another on-hand in case...
Posted by: andrewck Sep 20 2020, 10:08 PM
Tough to tell for sure, but from the picture it looks like the bearing went in crooked. Decent chance that bearing won't be re-usable, so you prob want to have another on-hand in case...
Well a bearing press made easy work of re-inserting the bearing. Based off your comment, not sure it may be a great idea to reuse it. How will I know if I made a mistake in re-inserting it. It certainly didn't feel wobly or lose when I got it seated.
Posted by: andrewck Oct 7 2020, 07:24 PM
Tough to tell for sure, but from the picture it looks like the bearing went in crooked. Decent chance that bearing won't be re-usable, so you prob want to have another on-hand in case...
Well a bearing press made easy work of re-inserting the bearing. Based off your comment, not sure it may be a great idea to reuse it. How will I know if I made a mistake in re-inserting it. It certainly didn't feel wobly or lose when I got it seated.
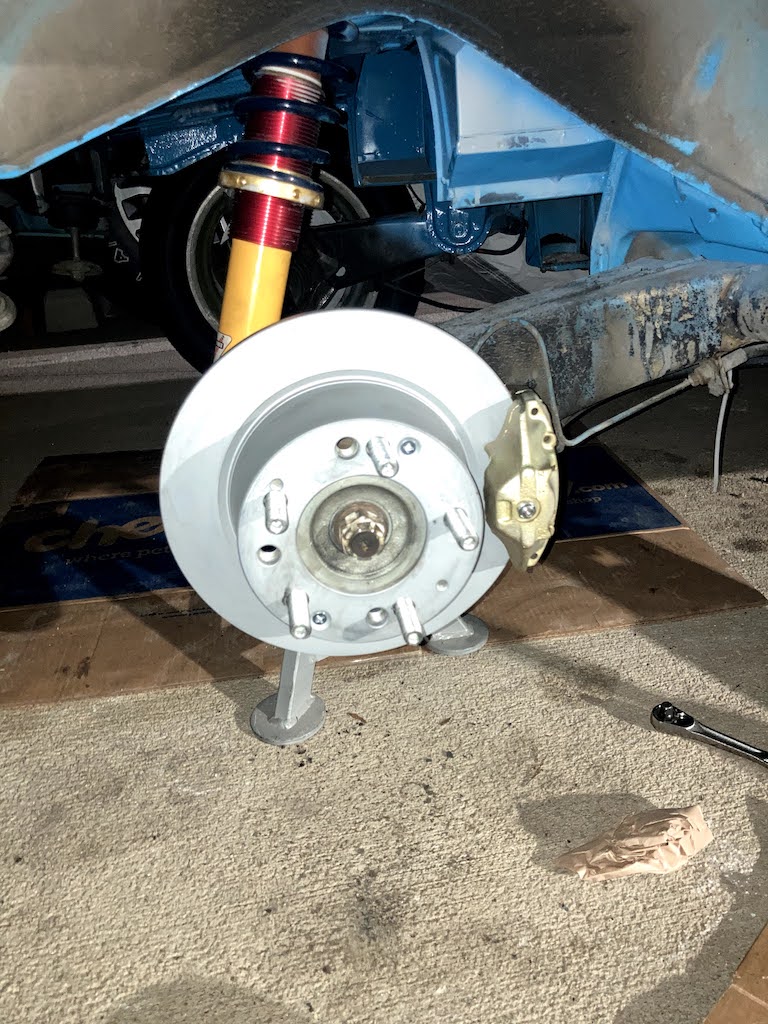
Rotors, pads, and calipers installed. There is binding between pads and rotors, so will need to adjust the calipers...which I hear is not fun. Calipers won't sit flush to the trailing arm, so need to also figure out how to torque them down.
Had a friend help install the stainless fuel lines through the tunnel and in the engine compartment. Hope to get fuel lines installed this weekend and the fuel system buttoned up. One more thing off the list.
Posted by: andrewck Oct 25 2020, 03:44 PM
Got around to working on the replacement motor today. Turned it, and it spun 359 degrees, then stuck. Tried it again...same result. Pulled the motor apart and found this mess. It appears that a PO dropped a nut into the motor and at some point it went BOOM. But I was told the motor was good when it last ran...
At this point, I'm 0/2 on motors that came with this car. There is a 3rd motor, but I'm not willing to chance anything even though that motor turns over. Complete teardown and rebuild coming and I'll go to a shop for machine work. The question is do I go 2056 at this point? Will start calling shops in the Denver area starting tomorrow, and explore what my other options are.
To say I'm disappointed is putting it lightly.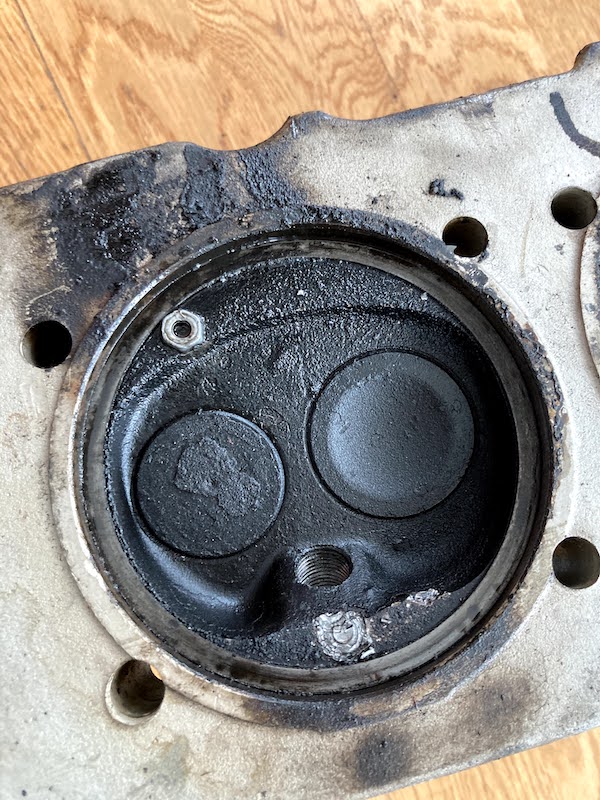
Posted by: andrewck May 11 2021, 05:59 PM
It's been a while since I've posted progress, but the car has slowly been coming together. All parts ordered for the 2056 motor rebuild and assembly should start in the coming weeks.
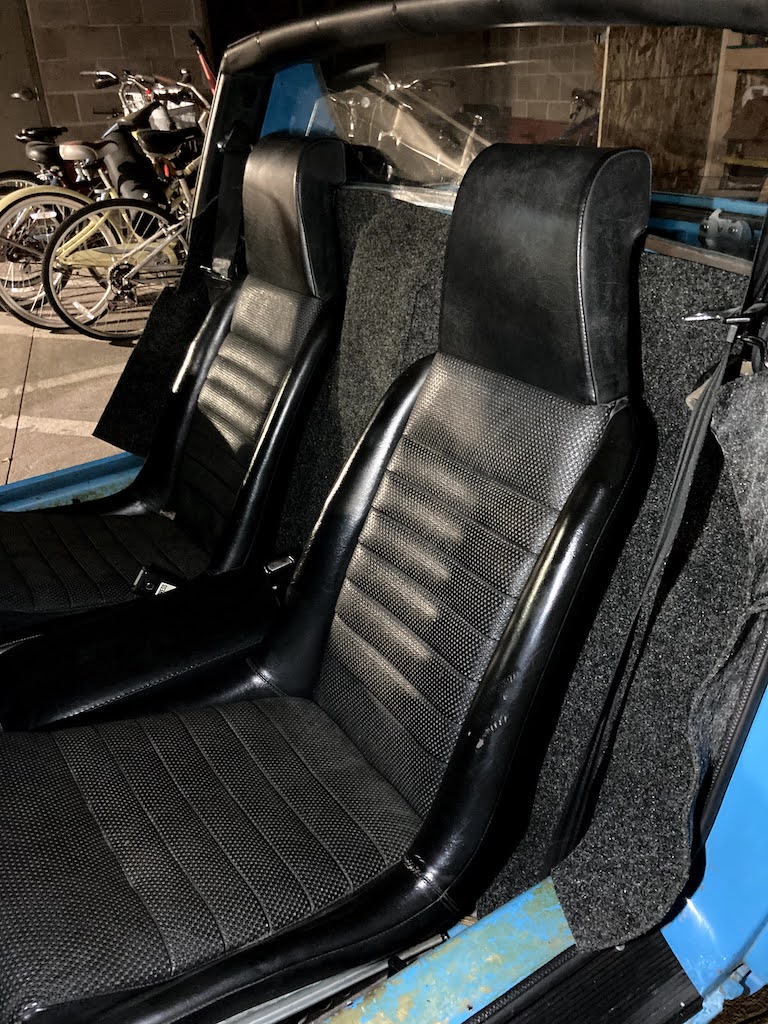
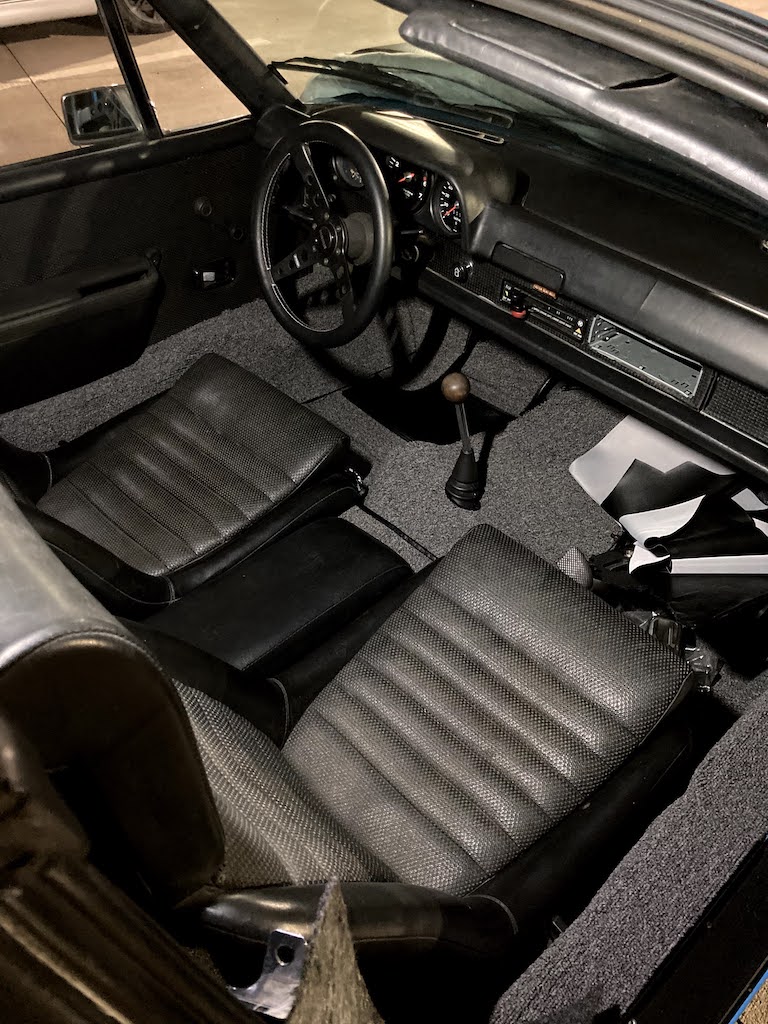
Interior has been finished (perlon backing off ebay) and a newer carpet kit
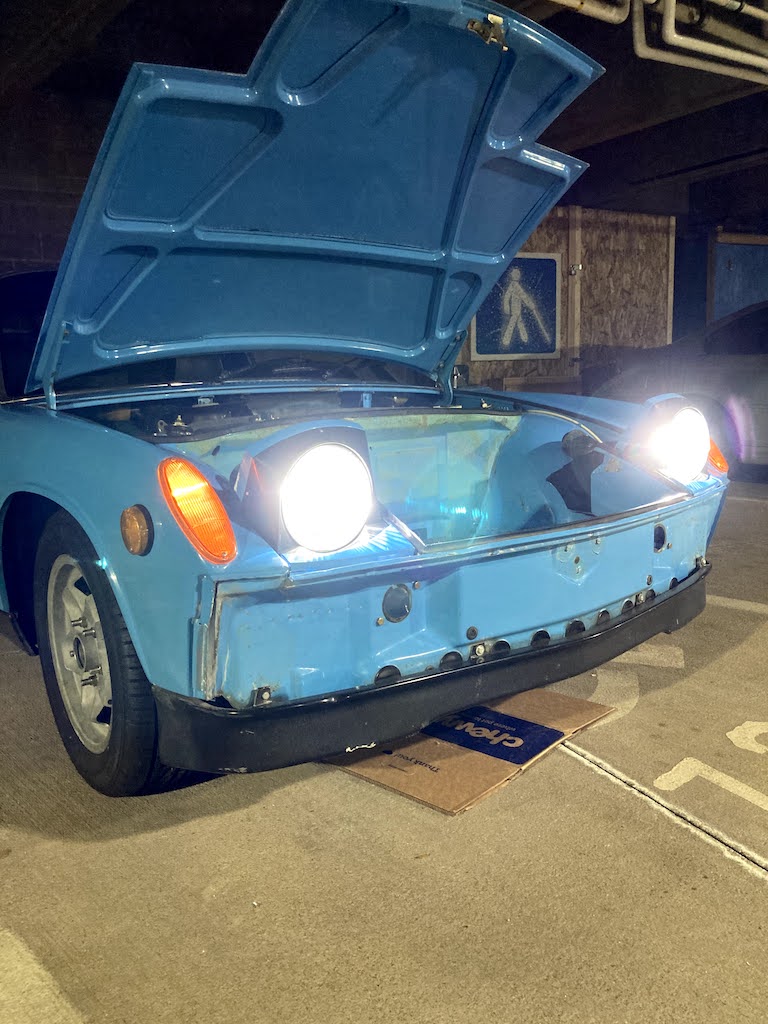
LED headlight kit from 914Rubber arrived the other day and got install this morning
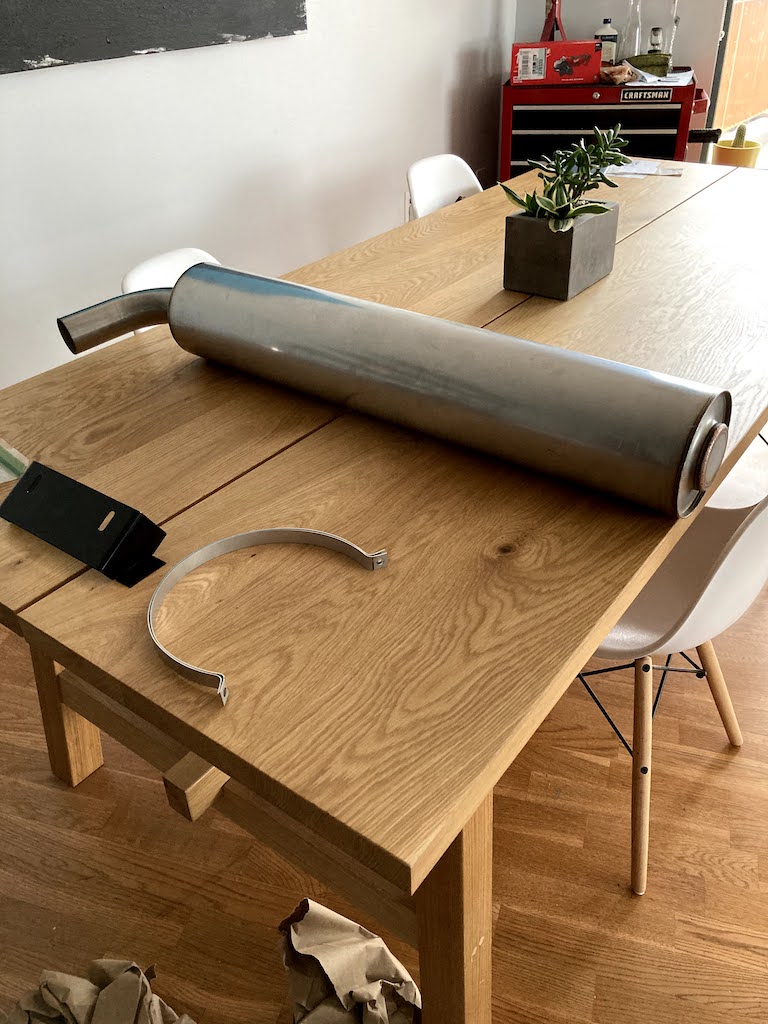
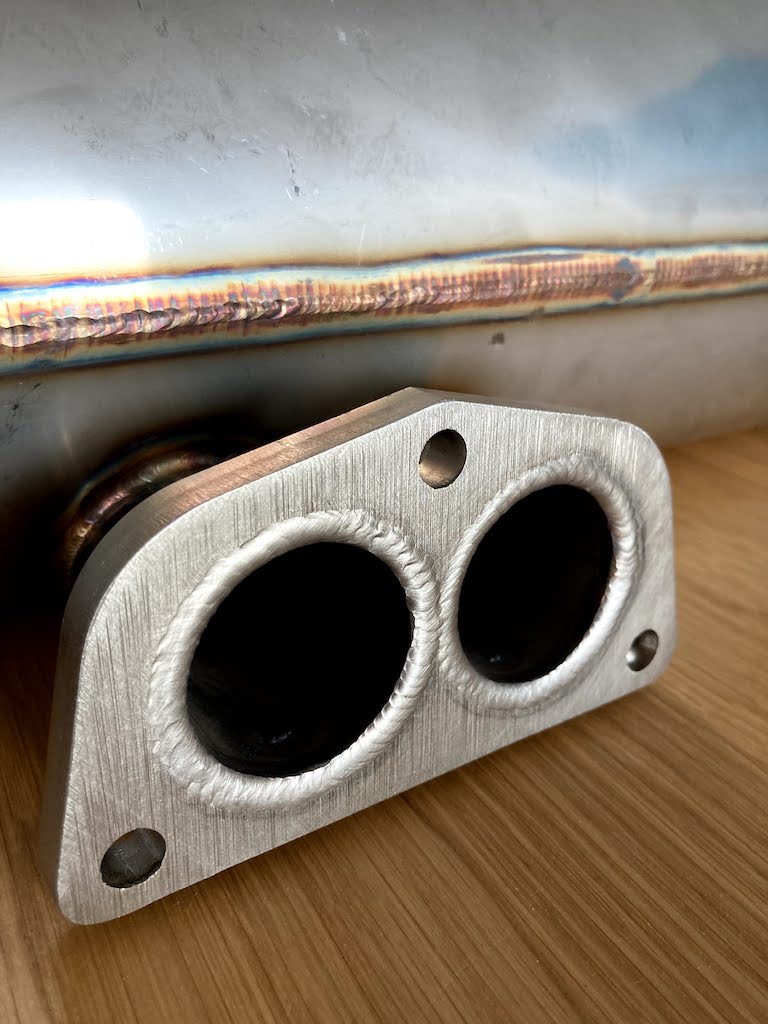
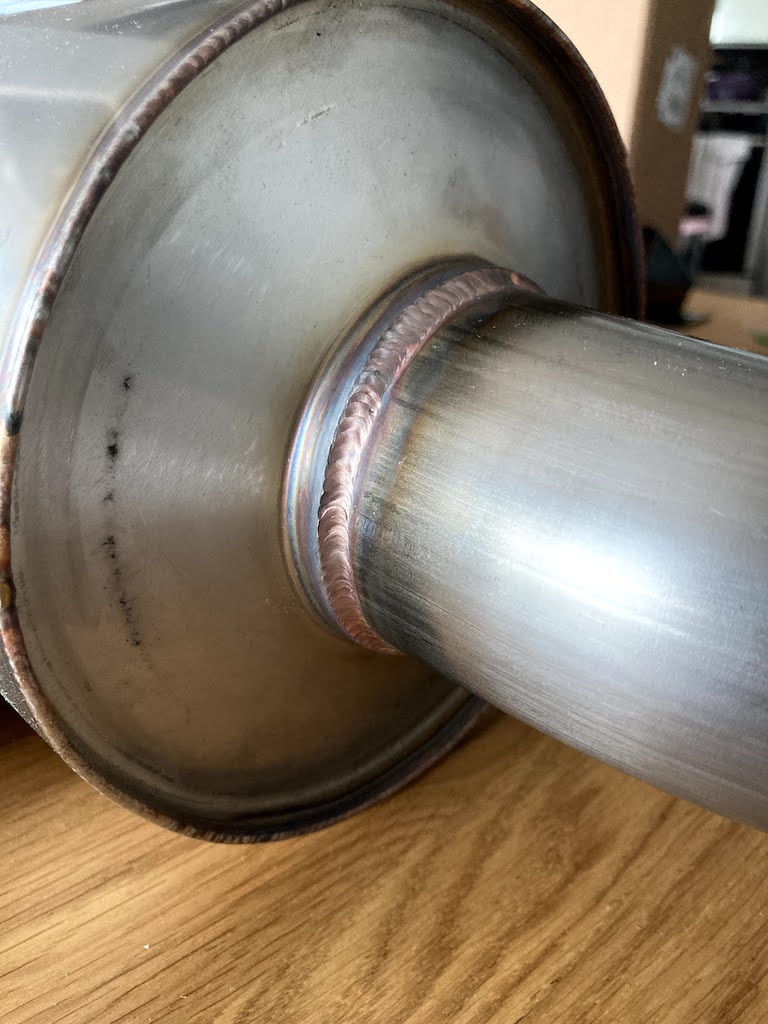
Ben's muffler arrived this afternoon, and....well you just have to see it to believe it. The welds are art and I feel bad to cover them up.
Excited for the next few weeks as things hopefully come together quickly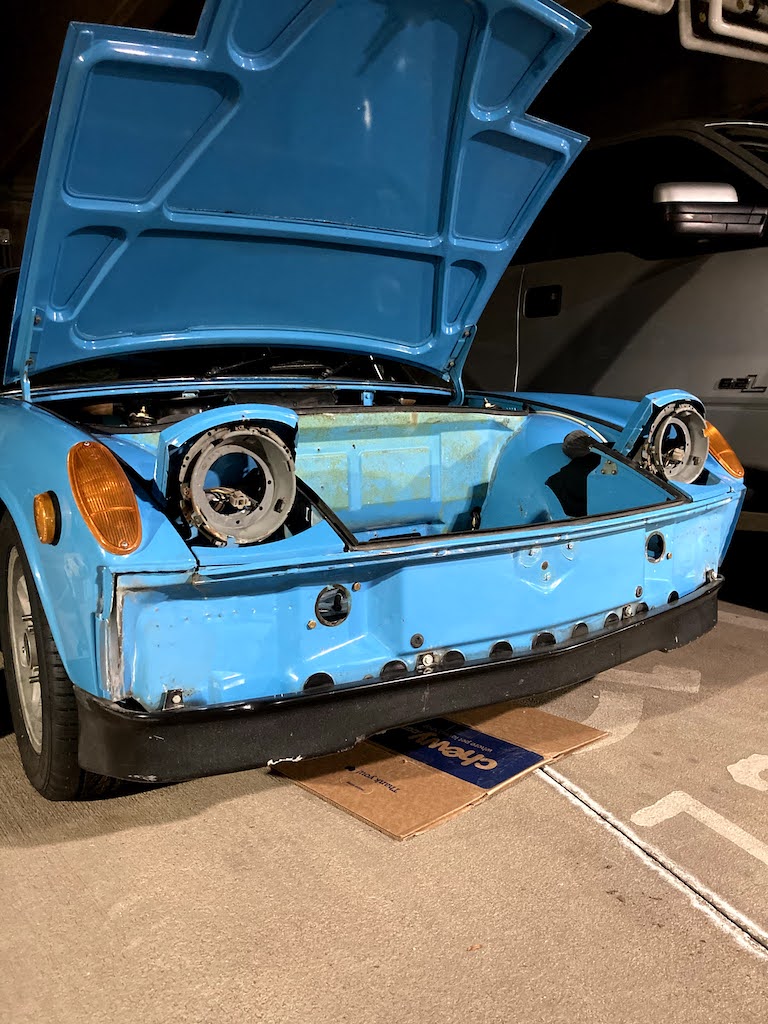
Powered by Invision Power Board (http://www.invisionboard.com)
© Invision Power Services (http://www.invisionpower.com)