Printable Version of Topic
Click here to view this topic in its original format
914World.com _ 914World Garage _ Looking for hell hole welding advice
Posted by: AndrewBlyholder Aug 15 2020, 12:36 PM
Launching in my hell hole rust repair. Need some advice on the usual welding technique for patching.
Many of the patch parts have flanges that match the factory stampings. I assume the factory spot welded these things together. Is that correct?
Don't have a spot welder, and probably couldn't reach most of these locations if I did. What's the usual technique then? Drill holes in the flanges and fill with rosette welds? Or just weld the edges of the flanges?
I'm replacing some sections of the main longitudinal tubes under the battery. That tube was a double walled on both the inside and outside faces. The replacement panel I have from AA has the double wall spot welded onto it. But how do I go about getting both panels weld together at the butt joint where the patch meets the original? Grind/cut the outer face back a little bit more than the inner panel, weld the inner first, and then weld up the outer?
Battery tray replacement questions:
- The lower support has three flanges on it. The front and side flange are easily accessible for welding, but the rear flange is turned inward. Do you weld that one too or leave it unwelded? What did the factory do there?
- The easy way to attach the battery tray to the support would be to weld them together first. Is that recommended? But if you do that, then there would be no way to weld the inward turned rear flange of the support.
Thanks for any and all suggestions.
Andrew Blyholder
Posted by: Superhawk996 Aug 15 2020, 01:00 PM
Andrew - no easy answers to all of your questions.
Yes - flanges were spot welded at factory. Yes - you can rosette weld the new panels. No - don't weld just the edges of the flanges. Without the rosette welds along the flange you'll lose stiffness. Yes -- you can add some intermittent stich welds at the edges but don't rely on that exclusively.
The rest of the questions basically come down to your skills, your equipment on hand, and the quality of the end result you desire.
Bottom line, there is no "right" way. It sort of comes down to experience on a case by case basis. As you noted, it also comes down to the order of assembly. In my case I've done a lot of things differently since I'm trying to preserve the paint on my quarter panels rather than undertake a full exterior paint job at the end.
Would strongly recommend checking out other legendary build threads here by Jeff Hail and Brent Brock. Lots of pictures, lots of step by step. Lots of sharing what tools and techniques were used.
http://www.914world.com/bbs2/index.php?showtopic=307290
http://www.914world.com/bbs2/index.php?showtopic=76791
Pictures of your specific concerns will garner a better, more educated response.
Many here will chime in and be happy to help. I'd suggest posting pictures of your situation as you encounter them rather than in lump sum. Sounds like you've got a project on your hands 
Posted by: bkrantz Aug 15 2020, 09:09 PM
One more thing to watch for: Even the relatively intact sheet metal around the below the battery have probably been etched by corrosion, and may also have surface contamination. Trying to weld onto that provides additional challenge, so get to clean metal as much as possible.
Posted by: SirAndy Aug 15 2020, 09:59 PM


As for the battery tray, i did mine in two parts, support first (including the rear part) with drilled holes emulating spot welds. Then added the tray part on top since it's the least structural as long as you have a solid base.

Posted by: mtndawg Aug 15 2020, 11:29 PM
I’ve welded the stand in, then bolted the tray so it’s removable.
Attached thumbnail(s)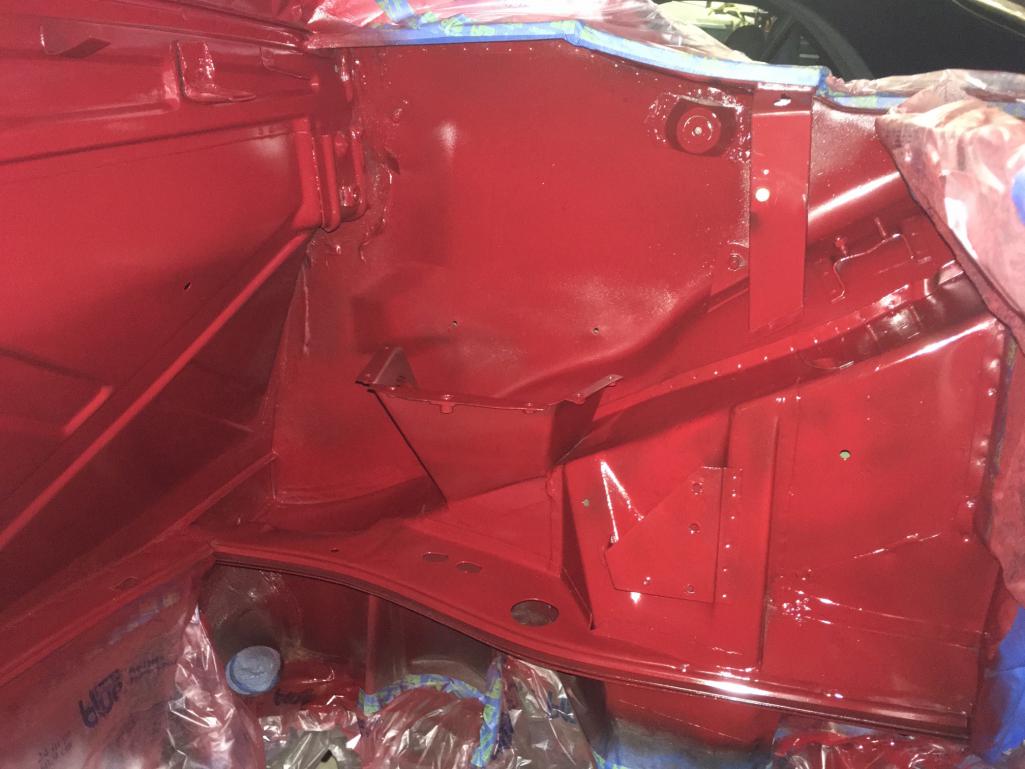
Attached image(s)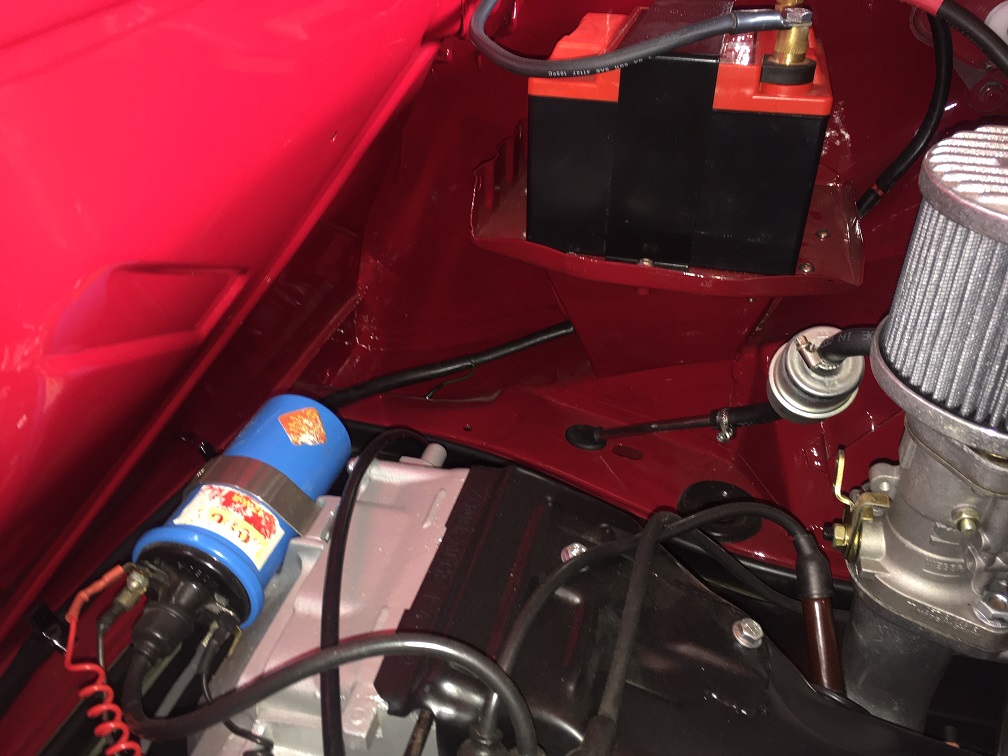
Posted by: BillC Aug 16 2020, 02:27 PM
I’ve welded the stand in, then bolted the tray so it’s removable.
That is a fantastic idea! I will take a long, hard look at doing that when I install my new battery tray. Although, I may weld studs to the tray and hold it down with the nuts underneath and inside the fender well. The thought of being able to easily remove the tray for maintenance and/or future restoration is very appealing.
Posted by: AndrewBlyholder Aug 16 2020, 02:30 PM
Thanks for the advice.
I'll check out the specific threads. Good to have particular favorites because I'm sure there are many, many similar, as this is right of passage we almost all go through. My specific situation is complicated by the factor that I'm the second person to work on this car. This project was already done once by a previous owner, and unfortunately, done not so well. So I'm also trying to fix some sloppy previous work too.
I'll try to post more specific photos and questions as they come up.
Andrew
Posted by: bkrantz Aug 16 2020, 08:18 PM
Thanks for the advice.
I'll check out the specific threads. Good to have particular favorites because I'm sure there are many, many similar, as this is right of passage we almost all go through. My specific situation is complicated by the factor that I'm the second person to work on this car. This project was already done once by a previous owner, and unfortunately, done not so well. So I'm also trying to fix some sloppy previous work too.
I'll try to post more specific photos and questions as they come up.
Andrew
The famous 914 PO lament.
Posted by: bbrock Aug 16 2020, 09:37 PM
Thanks for the advice.
I'll check out the specific threads. Good to have particular favorites because I'm sure there are many, many similar, as this is right of passage we almost all go through. My specific situation is complicated by the factor that I'm the second person to work on this car. This project was already done once by a previous owner, and unfortunately, done not so well. So I'm also trying to fix some sloppy previous work too.
I'll try to post more specific photos and questions as they come up.
Andrew
Ha! At least you get to blame the PO. A lot of the dumbass
 I had to fix was done by me 35 years ago - including letting the car darn near rot into the ground in the first place.
Posted by: AndrewBlyholder Aug 17 2020, 10:32 AM
Ok, backing up a bit to give the background on my rustoration project. Here's what I started with: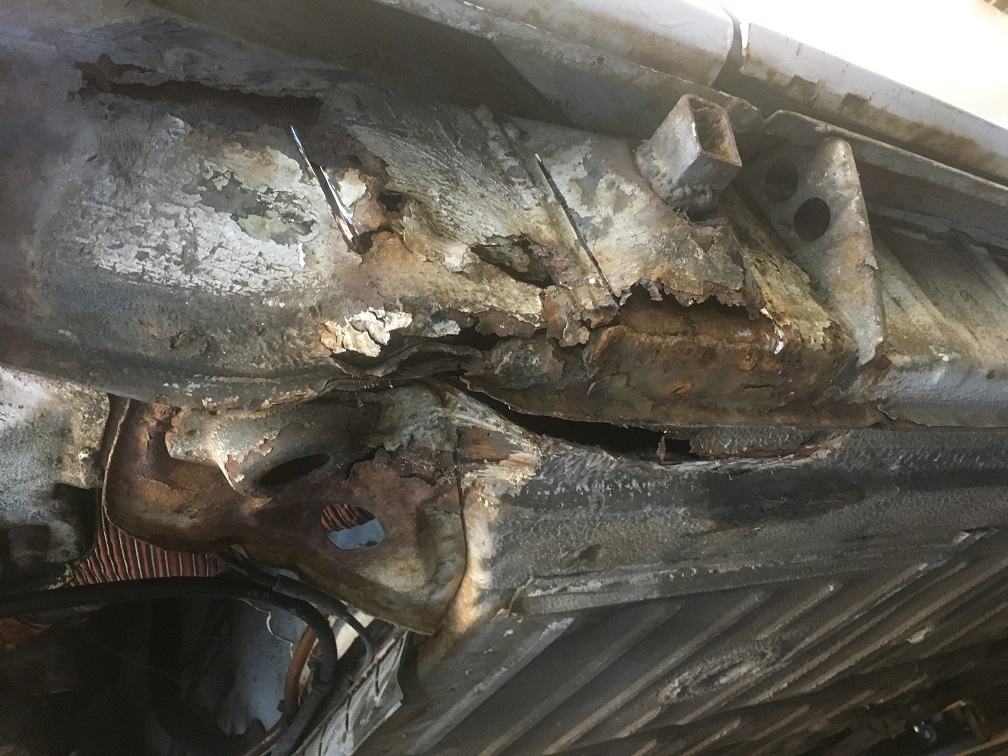
And here is it after cutting out all the rusty and essentially non-functional metal: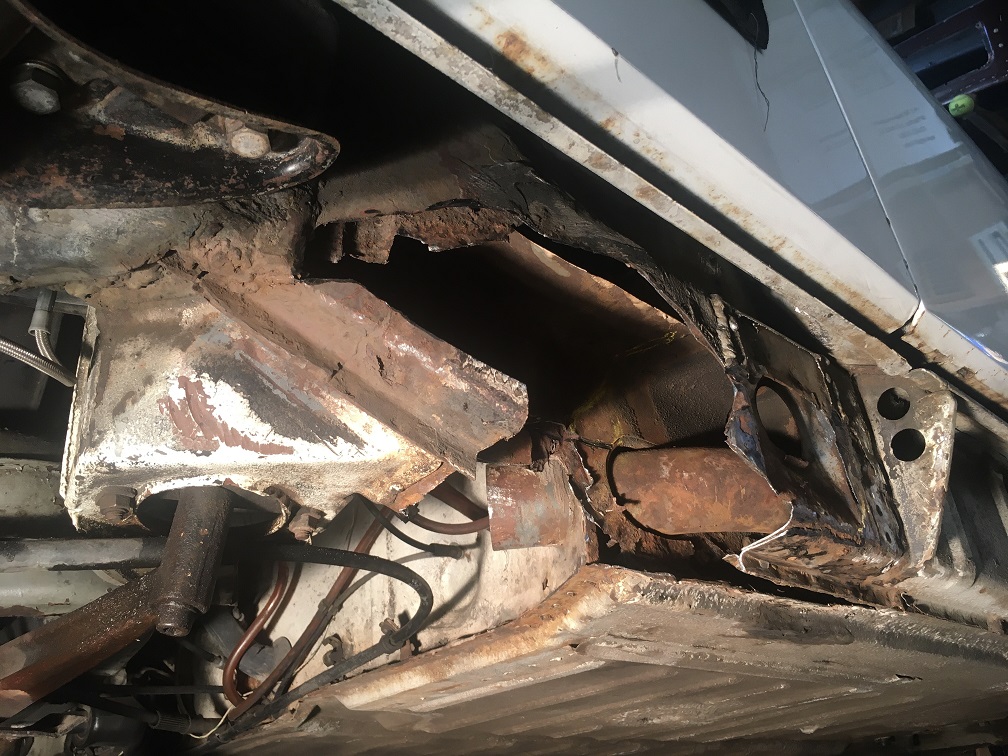
Mind you, I got into all this just after running an autocross with this car. I've heard many complaints that the 914 chassis is pretty flexy over the years, but I'm pretty impressed myself that I was cornering this car at 1.2 gees in this condition with no noticeable body flex issues. The passenger door shows no sagging in the door gaps and continues to open/close normally.
Forgot to take any pictures of my battery tray, but suffice to say, after removing the collection of hardware angles and self-tapping screws I'd been patching it up with over the years, I was able to remove both the trey and support by just yanking on it by hand!
Andrew
Posted by: AndrewBlyholder Aug 17 2020, 10:53 AM
Also found that the inner trailing arm ear was badly cracked on both sides:
Outer face: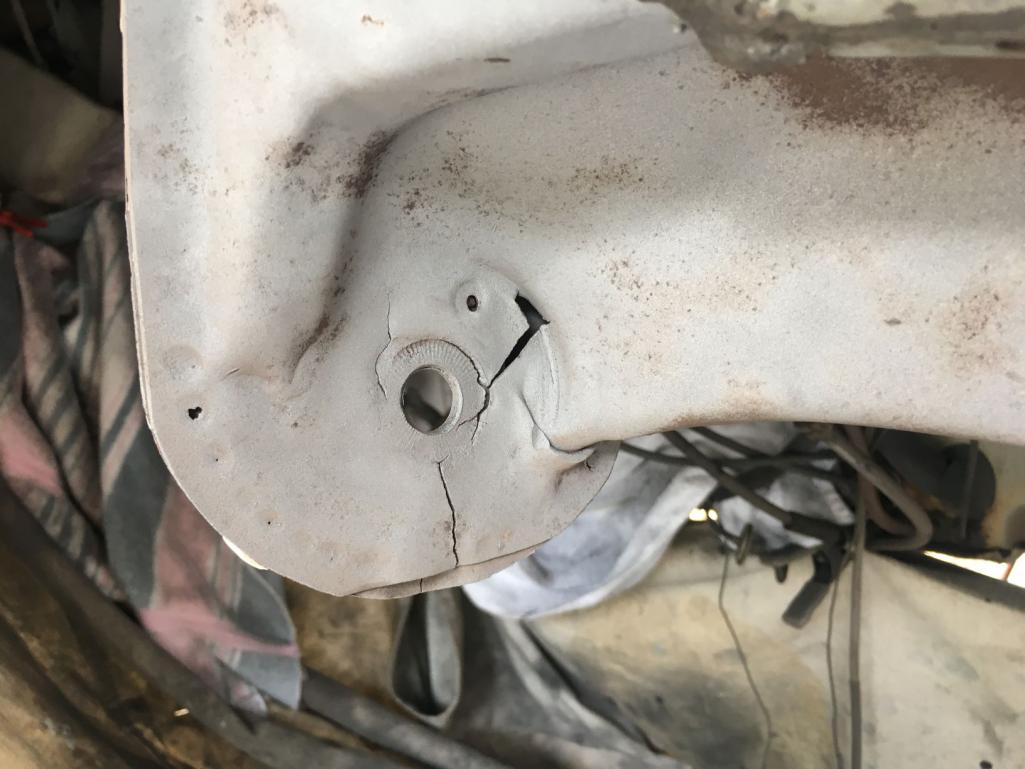
Inner face: (haven't figured out how to rotate protrait photos yet, so please excuse the sideways rotation)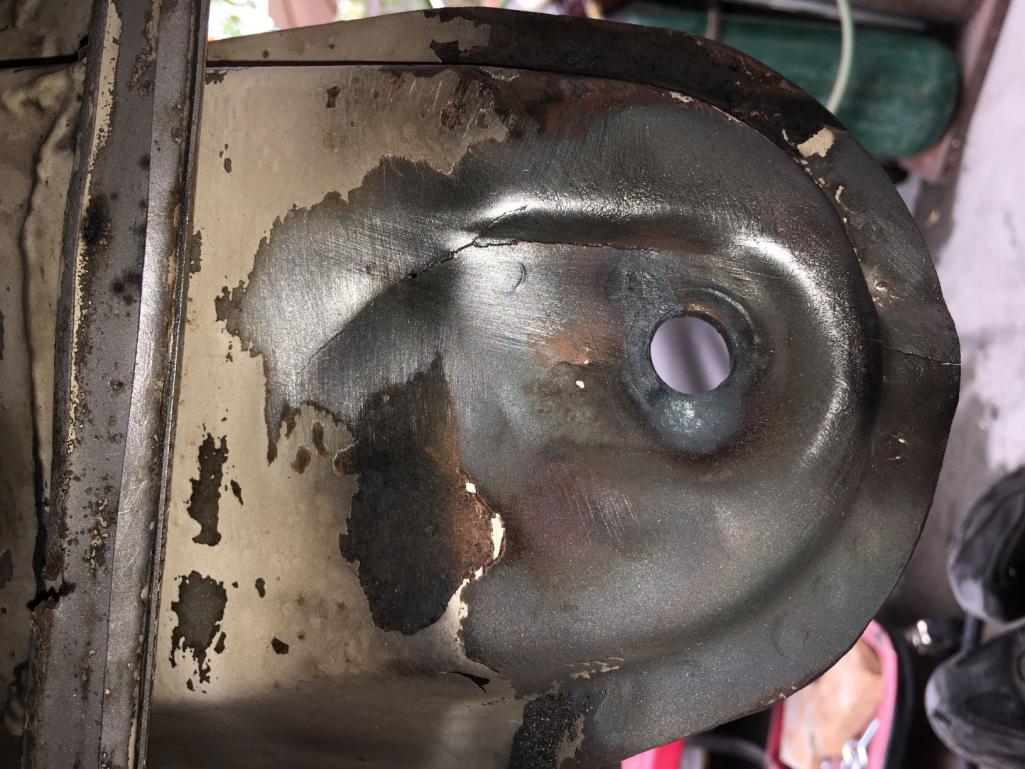
I cleaned these up with a Habor Freight 20# media blaster. Worked pretty well on things that are just painted, but doesn't do much against the thick undercoating and seam sealer. For removing that, I found a wire wheel to be much faster.
Here's the ears after welding up the cracks: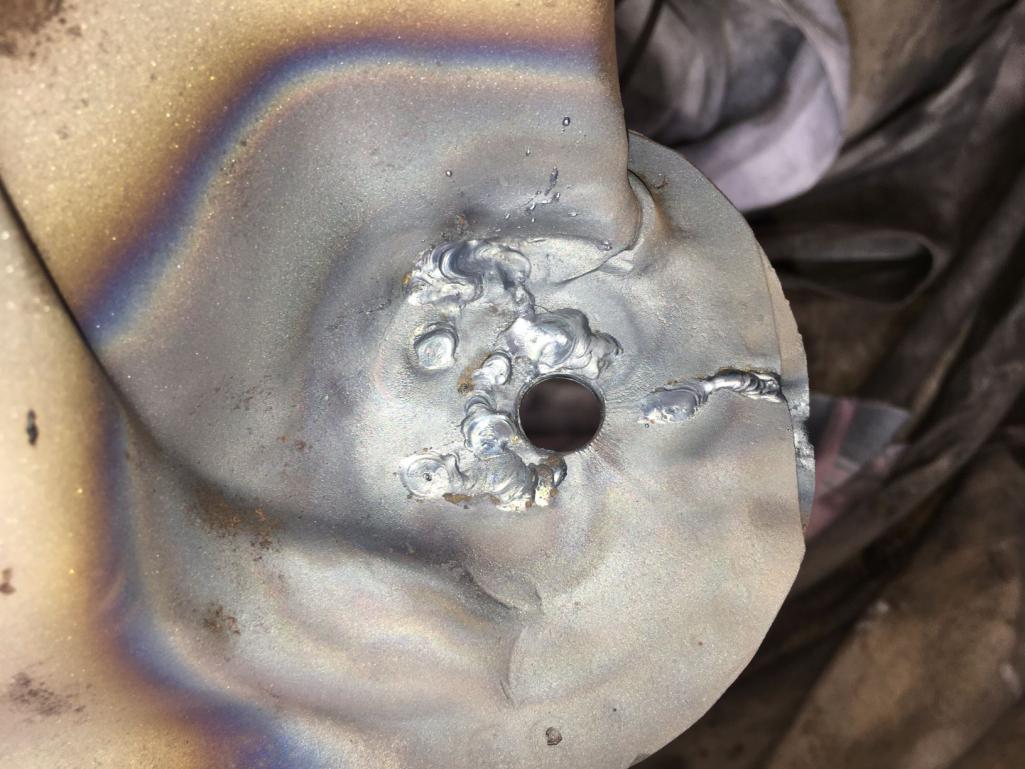

I consider myself just an ok welder, and my overhead and vertical skills are still pretty weak. So no haters on the weld beads. Hopefully I'll get better as this project goes along.
The welders I have available to me are gas and TIG. A friend who is a master welder with many, many years of old car restoration experience recommended I use gas for this as it's much more tolerant of rusty metal. I'm trying to clean/grind everything I weld completely, but it will be impossible to get perfect prep on this type of project.
Andrew
Attached thumbnail(s)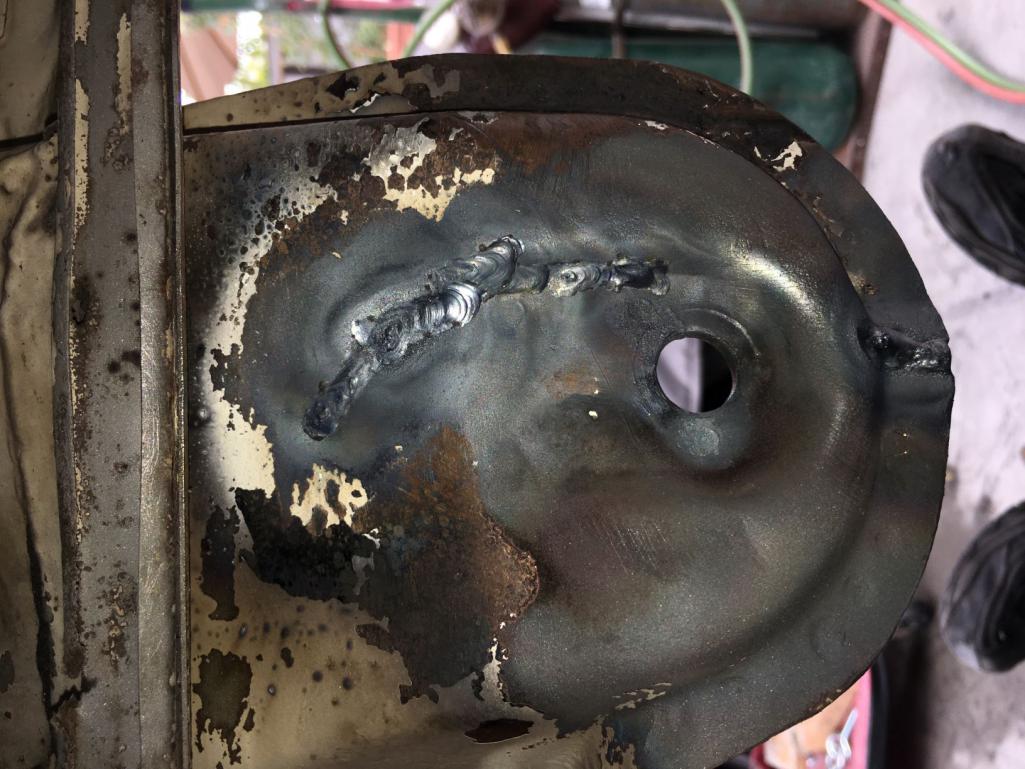
Posted by: AndrewBlyholder Aug 17 2020, 11:02 AM
In my enthusiasm of cutting out the rust, I cut off a bit of the flange for the floor panel. I figured I'd need that flange back when I splice in my patch for the inner longitudinal. Again, forgot to take a proper "before" picture, but here it is with a small patch panel welded in. I've outlined the patch in red: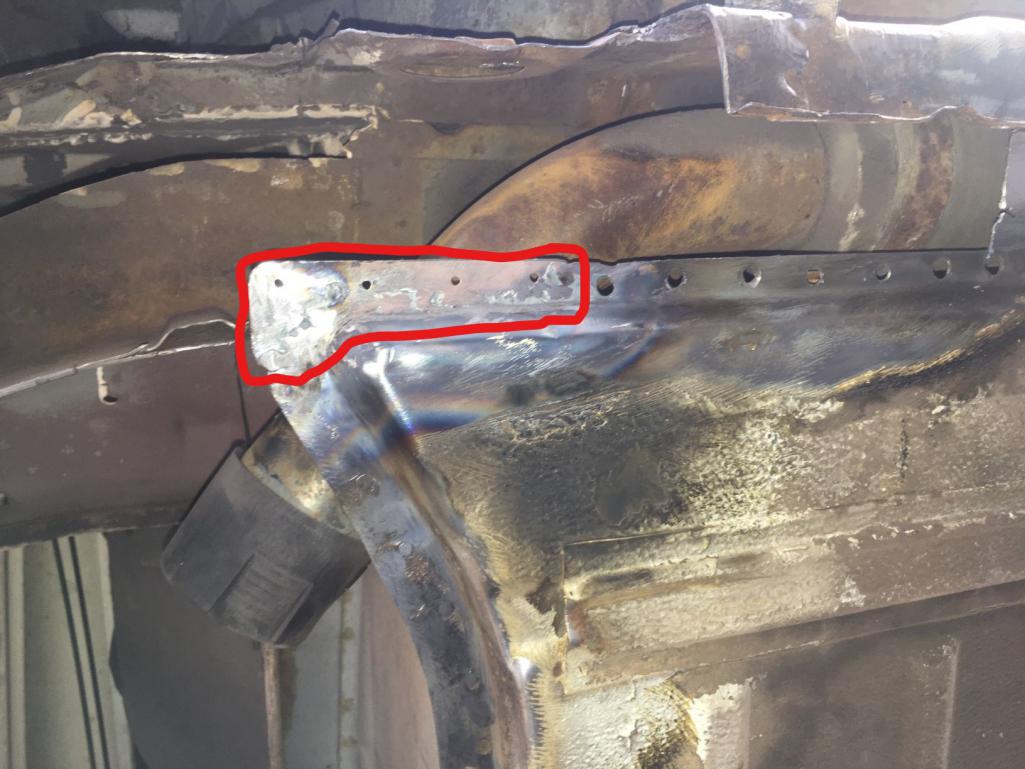
That's it for yesterday's work. Today I'll start working on fabricating the patch for the inner longitudinal.
My plan of attack is to put pieces back in from inside to outside:
- outer layer of the inner longitudinal
- inner layer of the inner longitudinal
- outer longitudinal (I have an AA stamping for this part, which already has the inner layer attached.)
- new jack pad
- battery support
- battery tray
Andrew
Posted by: Superhawk996 Aug 17 2020, 11:19 AM
Yup . . . you've got a project on your hands. Looks suspisciouly like what I started with.
You're off to a great start. 
Depending on your goals, you may want to consider replacing that supension console. By the time you get to that level of cracking you already have a lot of work hardening and metal fatigue. You can weld one area but new cracks will form pretty quickly especially if you intend to autocross it again in the future.
At a bare minimum check out Tangerine Racing. They make a doubler for the inboard ear of the console which is cheap and a quick weld-on affair.
Posted by: bbrock Aug 17 2020, 12:26 PM
Depending on your goals, you may want to consider replacing that supension console. By the time you get to that level of cracking you already have a lot of work hardening and metal fatigue. You can weld one area but new cracks will form pretty quickly especially if you intend to autocross it again in the future.
I would be strongly inclined to replace those consoles, especially if you see 1.2 G in its future. It looks like one of them is even wrinkled which makes me wonder if the geometry is still in spec.Posted by: brant Aug 17 2020, 01:02 PM
Depending on your goals, you may want to consider replacing that supension console. By the time you get to that level of cracking you already have a lot of work hardening and metal fatigue. You can weld one area but new cracks will form pretty quickly especially if you intend to autocross it again in the future.
I would be strongly inclined to replace those consoles, especially if you see 1.2 G in its future. It looks like one of them is even wrinkled which makes me wonder if the geometry is still in spec.the crack repair introduced a lot of heat into the console.
the metal will be more brittle now and I'd be worried about that console also
brant
Posted by: SirAndy Aug 17 2020, 02:27 PM
@http://www.914world.com/bbs2/index.php?showuser=2791
Racer Chris at Tangerine Racing makes an excellent reinforcement piece for this:
http://www.tangerineracing.com/chassis.htm

Posted by: Krieger Aug 17 2020, 11:54 PM
If you had smaller, harder tires you wouldn't have this problem and you'd save a bunch of money!  You might want to run a brace from that area of the trailing arm forward to the firewall. I did a set and made them removable.
Posted by: Krieger Aug 18 2020, 12:01 AM
This is how PMB did it. I copied this from a very recent post they had on their Facebook page. There are a few more pics there if you want more details. 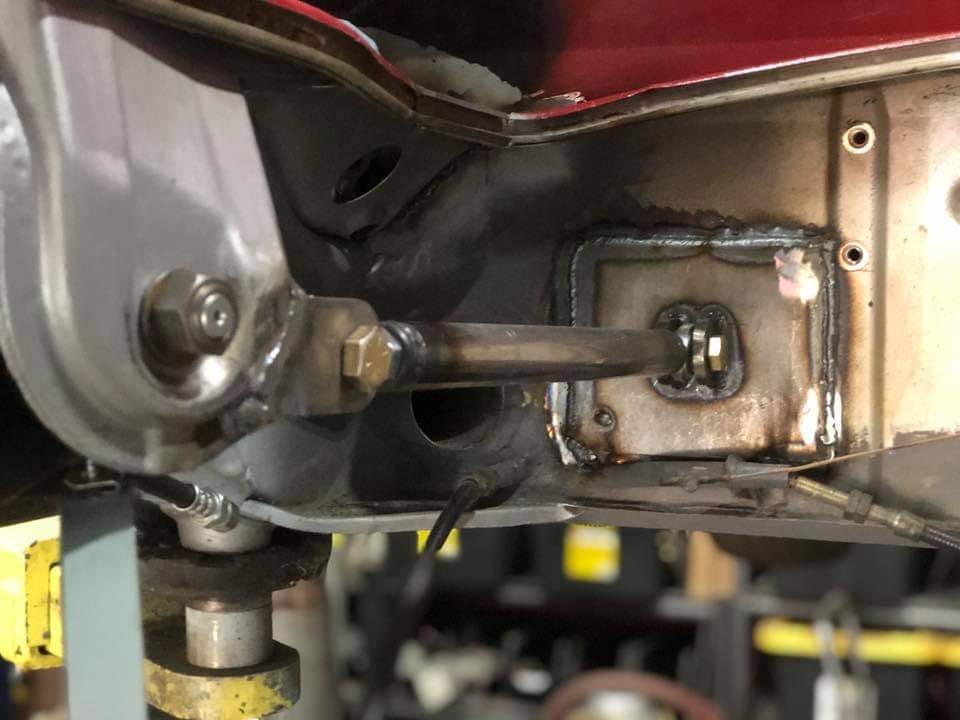
Posted by: DRPHIL914 Aug 18 2020, 06:24 AM
I’ve welded the stand in, then bolted the tray so it’s removable.
sorry to OP not ment to high jack the thread but just had to say "wow" that just looks so super!!! great job! maybe its that red too but wow!
Posted by: AndrewBlyholder Aug 18 2020, 10:36 PM
All good advice on the trailing arm ear.
This car won't be an autocross car for very long. It only got pressed into service because Carrillo is being so damned slow making the pistons for my race car. So this one I want to keep stock. It's also a Limited Edition creamsicle. It had lost it's decals and Pheonix Red bumpers before I got it. Eventually, I want to fully restore it back to it's original creamsicle glory. For that project, I think the advice to replace the entire console is the right path. What's there now is obviously a replacement because it was welded in so poorly. But that can be later project.
Andrew
Posted by: AndrewBlyholder Aug 21 2020, 10:37 AM
More progress:
20 years ago, I totaled my previous street 914 in a front end accident (beware geriatric doctors in Cadillacs!) Put a deep vee in the nose that wrinkled everything back to the windshield posts. Let the insurance co. total the car, but bought the chassis back to strip it for parts. Cut up and tossed the bend chassis, but.... I did save the two back quarter panels thinking they might be useful for rust repair someday. Well, that day has come!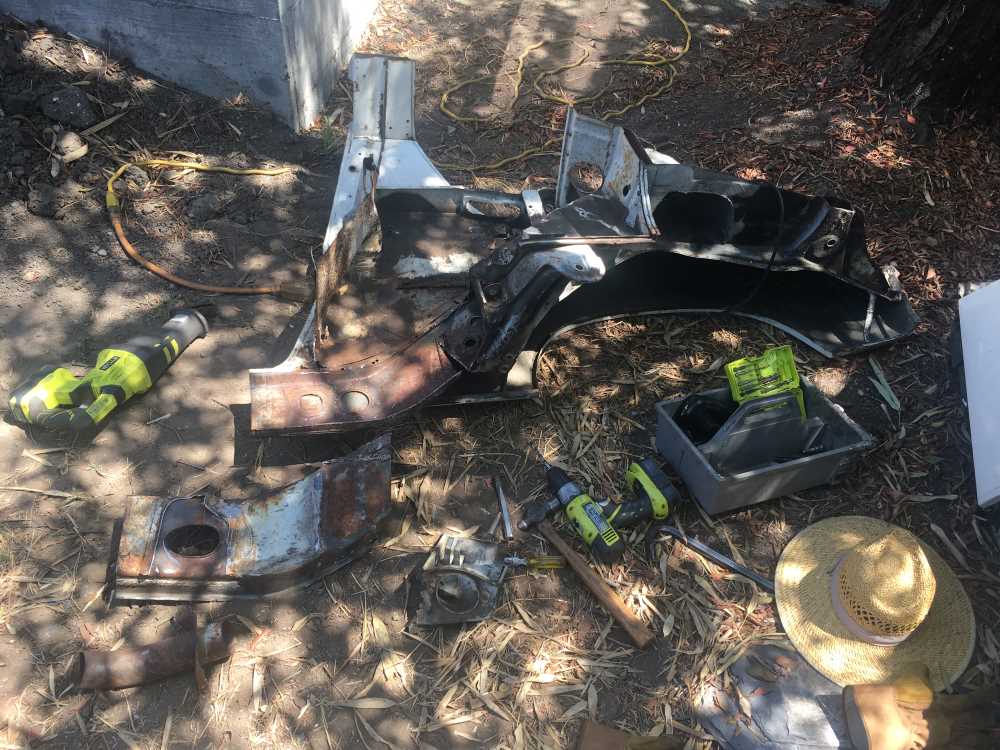
The top size of the longitudinal was pretty rust pitted, but the bottom side was still pretty good. Here's the piece I cut out: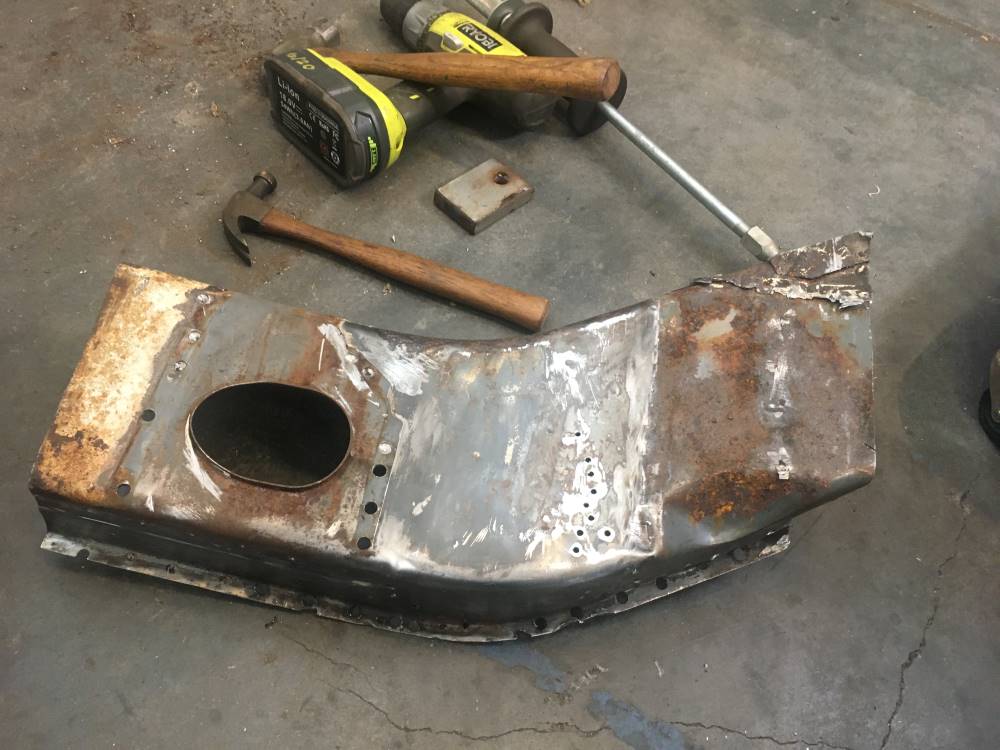
Welded up all the holes I had to put into it to drill out the spot welds:
Then made a cardborad template: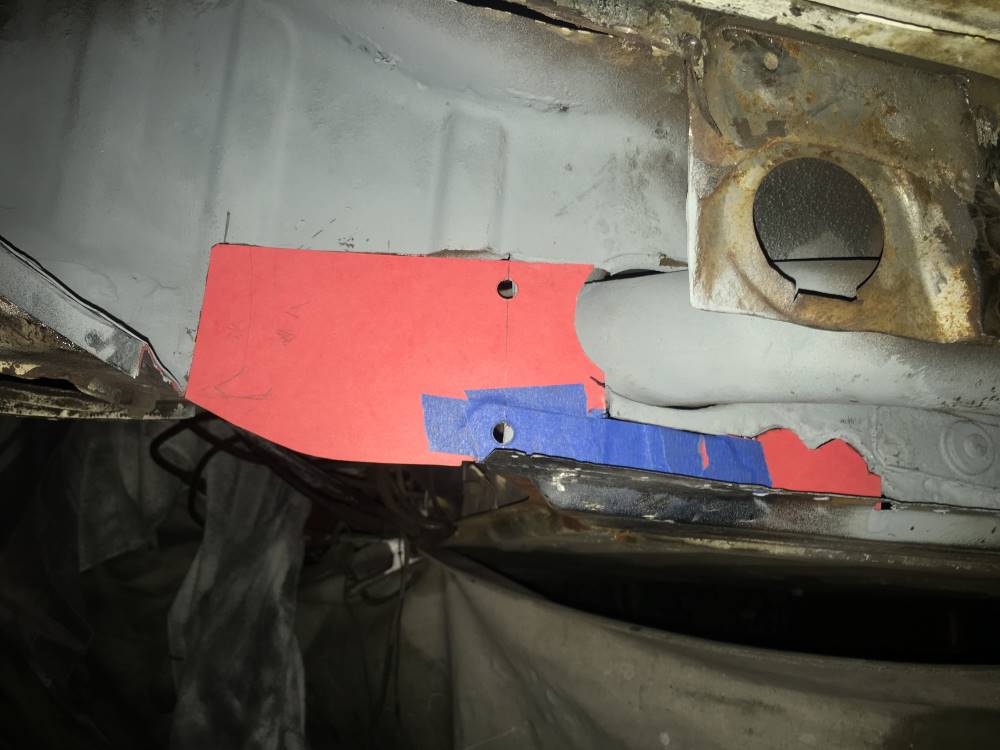
Transferred the template to the part and cut it out (leaving about 1/8" extra all around.) 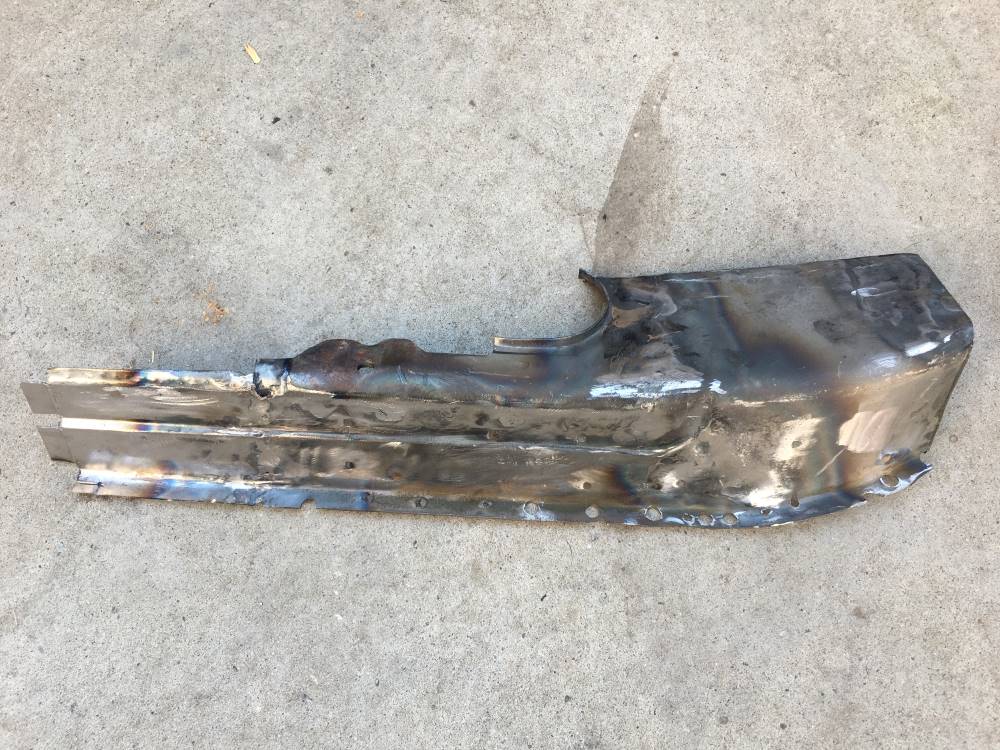
My donor rear quarter was just a few inches short of where the rust ran to on the floor plan, so I had to fabricate and weld on an extension at the end: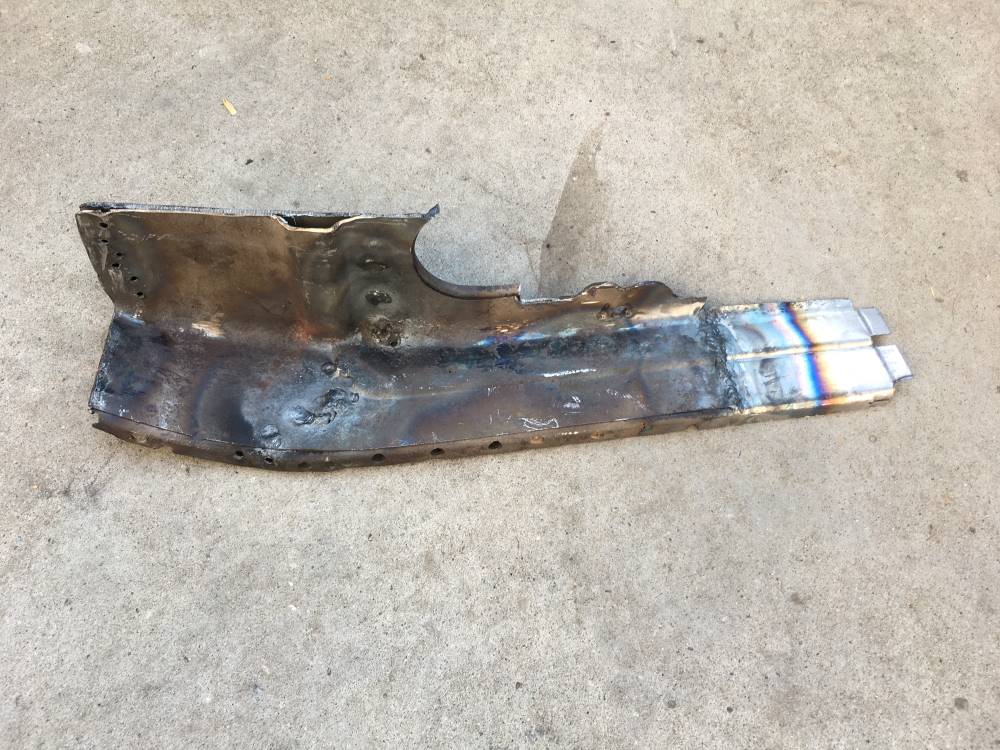
Here it is all nicely painted with weld-thru cold galzanizing paint: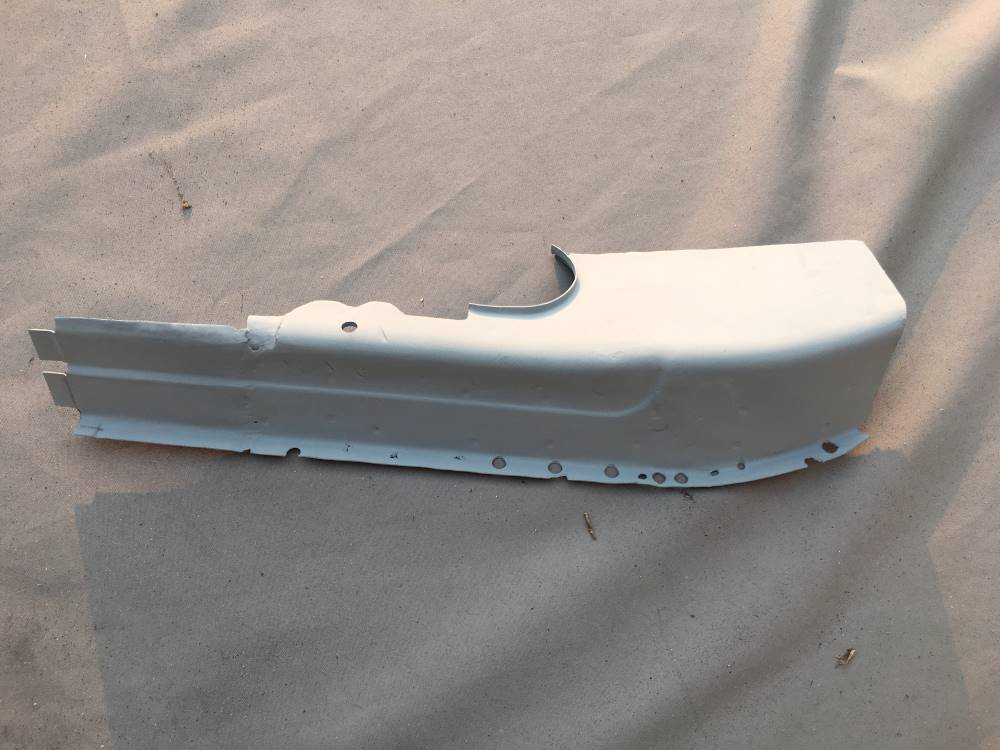
And finally, the patch fit into the hole: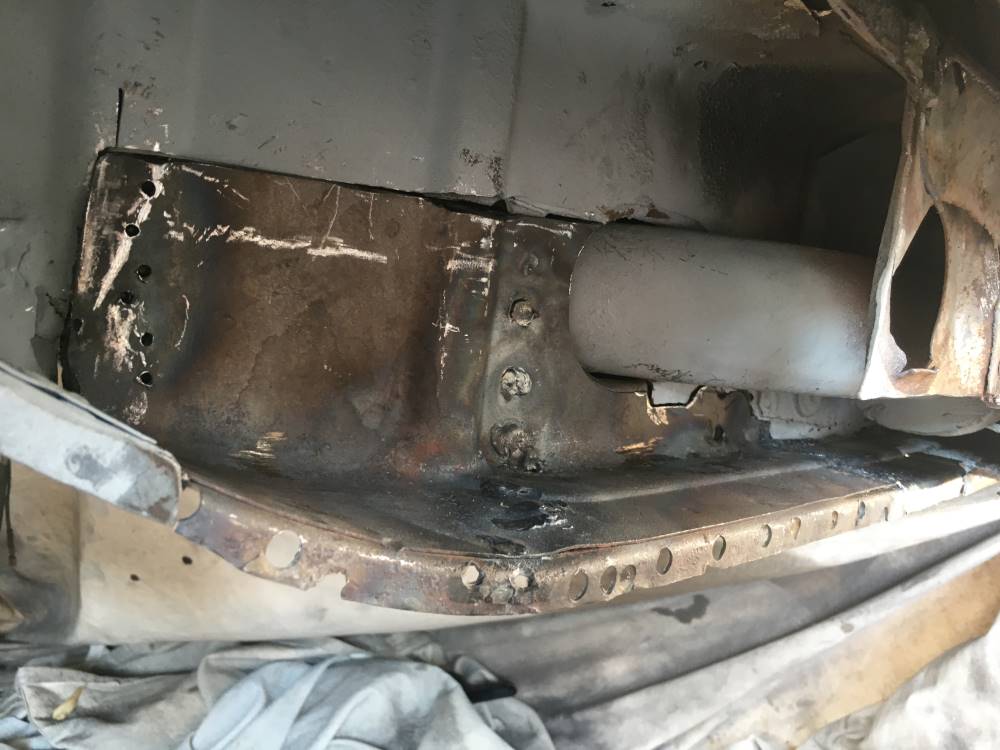
Today I'll start welding it back in!
Andrew
Posted by: SirAndy Aug 21 2020, 12:45 PM
Always good to see some progress, rust repair can be a daunting task.

Posted by: Krieger Aug 21 2020, 04:36 PM
Awesome! That was the hard part!
Posted by: IronHillRestorations Aug 21 2020, 04:53 PM
Looking good! I was concerned about the cracked inner mount, but it looks like you've changed course and headed in the right direction.
Cold galvanizing paint welds through very poorly. I'd suggest scratching or sanding off where you've got to weld. You don't want to breathe the zinc fumes it puts off either, it's bad news. I've used several brands and if you want to use weld through primer, UPol is the best. I still scratch off where I'm going to weld though, it makes it easier to strike an arc, especially if the metal has any thin spots.
I'd suggest making some strategically placed holes and going back over your enclosed box sections with Eastwood's internal frame coating https://www.eastwood.com/eastwood-internal-frame-coating-14oz-aerosol.html I used a piece of welding rod (that I bent as needed) and taped the spray tube to it, to get in the box sections. Be sure and get their pre paint prep, you use it for purging the spray tube and nozzle. https://www.eastwood.com/low-voc-pre-paint-prep-aerosol-12-oz.html Of course it's a good product for prep cleaning. I did a total chassis (on a rotisserie) and it took about a dozen cans to do the whole car really good.
Posted by: Tdskip Aug 23 2020, 06:35 AM
Thanks for the updates.
@http://www.914world.com/bbs2/index.php?showuser=179 referred me to this link, providing it here as it is relevant to the work you are doing and may be helpful.
http://www.914world.com/bbs2/index.php?showtopic=16748
In any case press on and good luck.
Posted by: AndrewBlyholder Aug 23 2020, 01:17 PM
Ok, here's the part where you learn by seeing other people's screw up.
First the lame excuse: I didn't bother with a door opening brace before starting this work because despite all the rust holes and cracks, the chassis had shown no signs of sagging. The passenger door was opening/closing fine with a normal panel gap that hadn't changed. And I was in a hurry of course to get the car back into operation for the next autocross.
After getting my first big repair piece welded in - the inner half of longitudinal under the battery - I noticed that the door gap had opened up .1" at the top of the door. I had been worried about that gap closing down due to sag, but apparently the cooling shrinkage from all the welding had pulled the rear firewall/door jamb backwards.
So off to the store to buy the biggest turn-buckle I could find and spent the afternoon fabricating a door brace: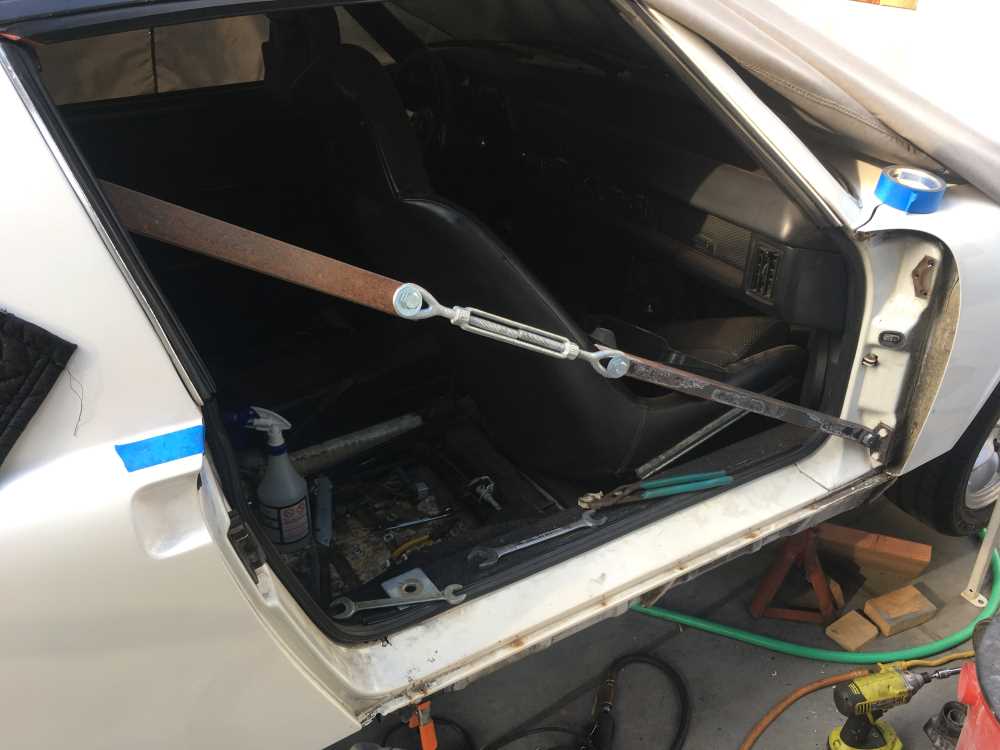
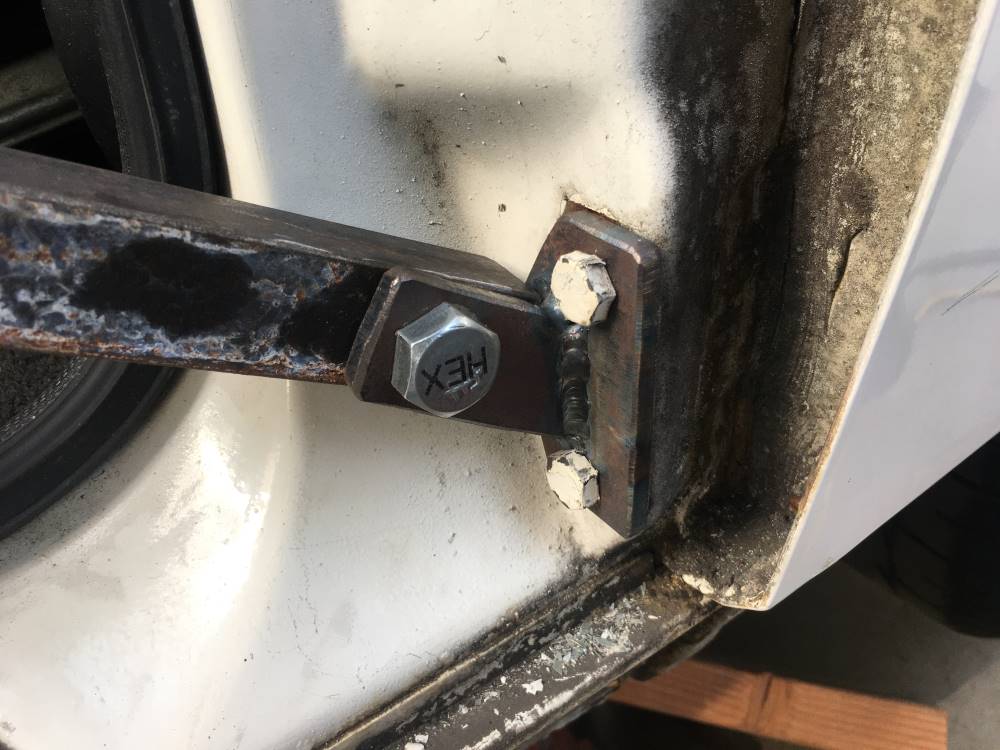
A 1/2" dia. turn-buckle, a couple of pieces of scrap angle iron, a couple 1/2" dia. bolts, and a fabricated 1/4" plate at the hinge mount.
I went to the lower door hinge location rather than the top hinge because I didn't want to be flexing the front door jamb any. This way, when I tighten the brace, I should be just moving the rear jamb forwards.
I measured across the top of the door opening before tightening the brace. Turning the turn-buckle to tighten the brace, I can decrease the top of the door opening by about 1/8" . That's enough to get my door panel gap back where it should be. But how much will it relax back after I'm done welding? I still have the outer half of the longitudinal to weld back into place. Will that stabilize it at the braced dimension, or will it still relax back some. If so, how much?
Any advice out there?
Andrew
Posted by: AndrewBlyholder Aug 23 2020, 01:28 PM
Thanks for the updates.
@http://www.914world.com/bbs2/index.php?showuser=179 referred me to this link, providing it here as it is relevant to the work you are doing and may be helpful.
http://www.914world.com/bbs2/index.php?showtopic=16748
In any case press on and good luck.
Thanks, that's a good thread. Very much exactly what I'm doing. A big compromise I'm currently making is that I didn't want to remove the exterior fender. I very much consider what I'm doing now as a "temporary" repair. Eventually, I plan to do a better, concourse quality repair that I'm sure will require fully removing the exterior fender so that I can replace the longitudinal and the suspension consoles with new stampings.
Andrew
Posted by: AndrewBlyholder Aug 23 2020, 01:33 PM
Another question: Am I crazy for doing this with gas welding? Is that making the shrinkage issue much worse? Should I go out and buy a MIG?
Doing the rosette welds in rusty, thin flanges is very frustrating with gas. So easy to overheat the flange and have it disintegrate in a flash. Often end up having to built it back, which takes a lot of heat. I end up with a very large area of red hot metal by the time I'm done. I'm getting better with each one, but still very tricky to do well. I'm assuming that a MIG will allow me to work much faster and therefore will less heat in the panel.
Andrew
Posted by: IronHillRestorations Aug 23 2020, 02:59 PM
I'd use a MIG
Posted by: Superhawk996 Aug 23 2020, 03:36 PM
Before you go buy a MIG. Try a smaller tip.
Too much heat and burn though is usually a sign that you can go down a size or two on the tip. Likewise, make sure you're not running more than a couple of PSI of gas pressure. The pressure of the gas coming out the tip will tend to blow your puddle though on the thin stuff.
People underestimate what can be done with OxyAcetylene. It welded up many war birds back in the day before MIG and TIG came into thier own. A torch can weld thin gauge aluminum (with flux) and will often have better penetration and will actually visually blend the weld better than either TIG or MIG.
A good welder with the right setup can do amazing things with a torch.
However, when it's all said and done, MIG is faster and easier to learn.
Posted by: AndrewBlyholder Aug 28 2020, 11:51 AM
Ok, been so busy working on this trying to get the car put back together for the autocross this weekend I wasn't taking any time out to post. But the autocross has now been cancelled due to the wild fires around here, so I can slow down a bit and provide some updates.
This corner of the car had already seen some rust repair sheet metal replacement. Among other things, they cut away the top of the outer half of the longitudinal in the area under the battery and welded in a patch, but they only patched half of the whole opened up. They left a big hole in the top of the longitudinal at the low point next to the fire wall: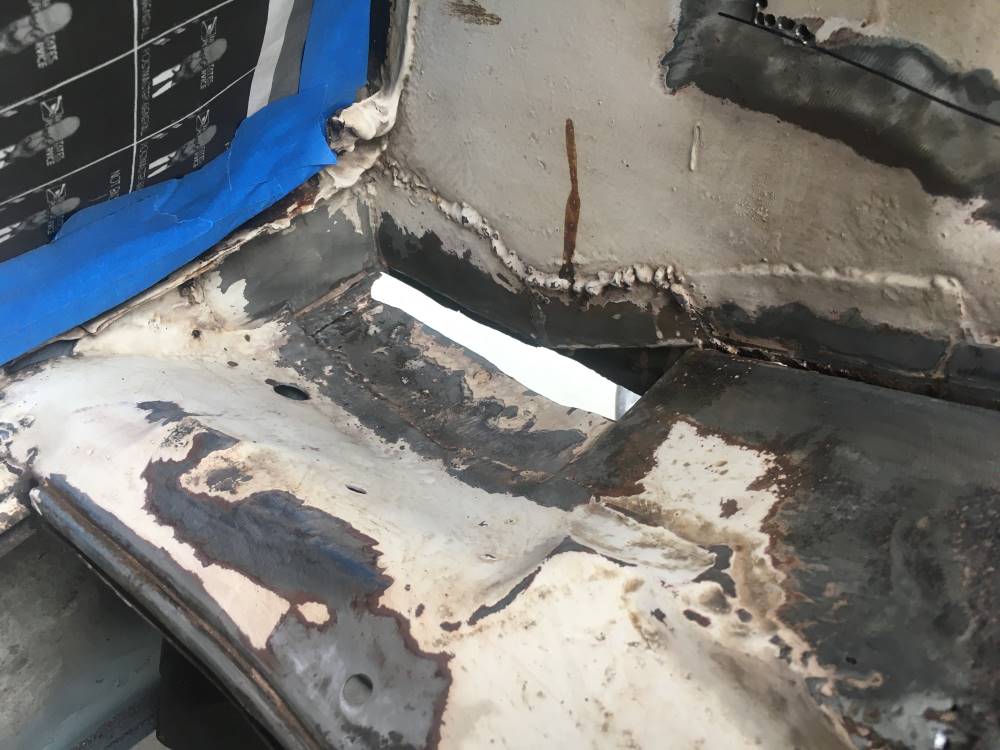
Maybe they thought they were leaving a nice big drain hole, but that hole drains into the interior of the longitudinal tube! The tube also has small drain holes in it's bottom, but as as a enclosed area, it will be very slow to dry out. And indeed, I'm now fixing the rust this situation caused.
So here's my patch to close the hole: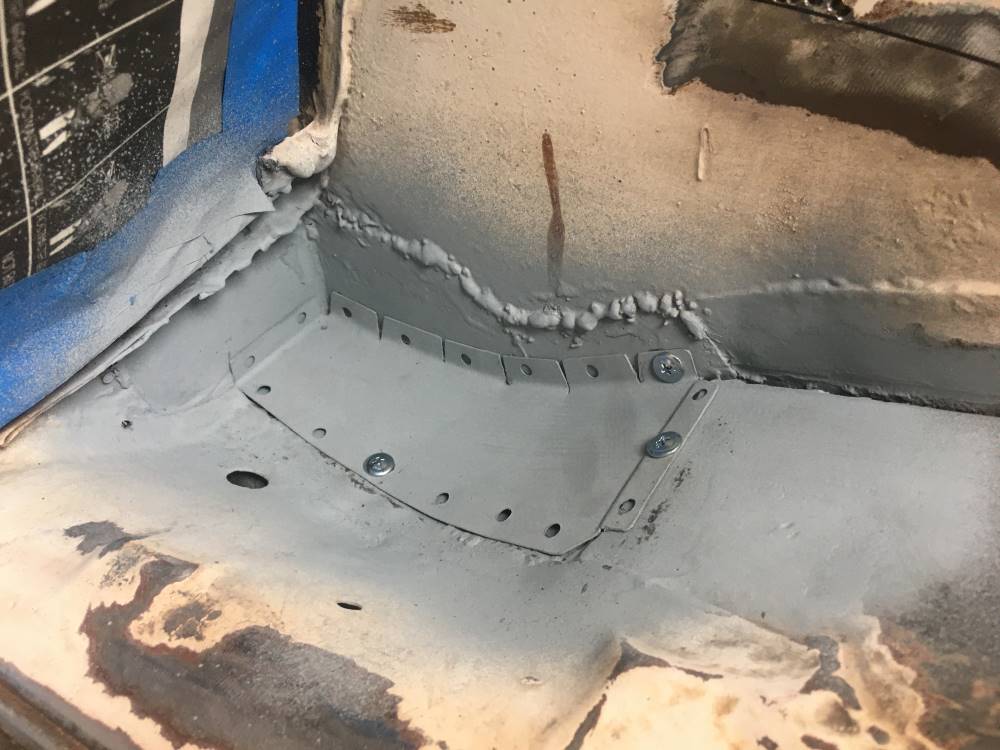
Did it as a spot weld rather than continuously welded. Will make it watertight with seam sealer.
Where the battery tray attached to the vertical inner fender wall was also completely corroded away. Cut out the bad part and laid it on my new stamping from AA to trace for the replacement patch: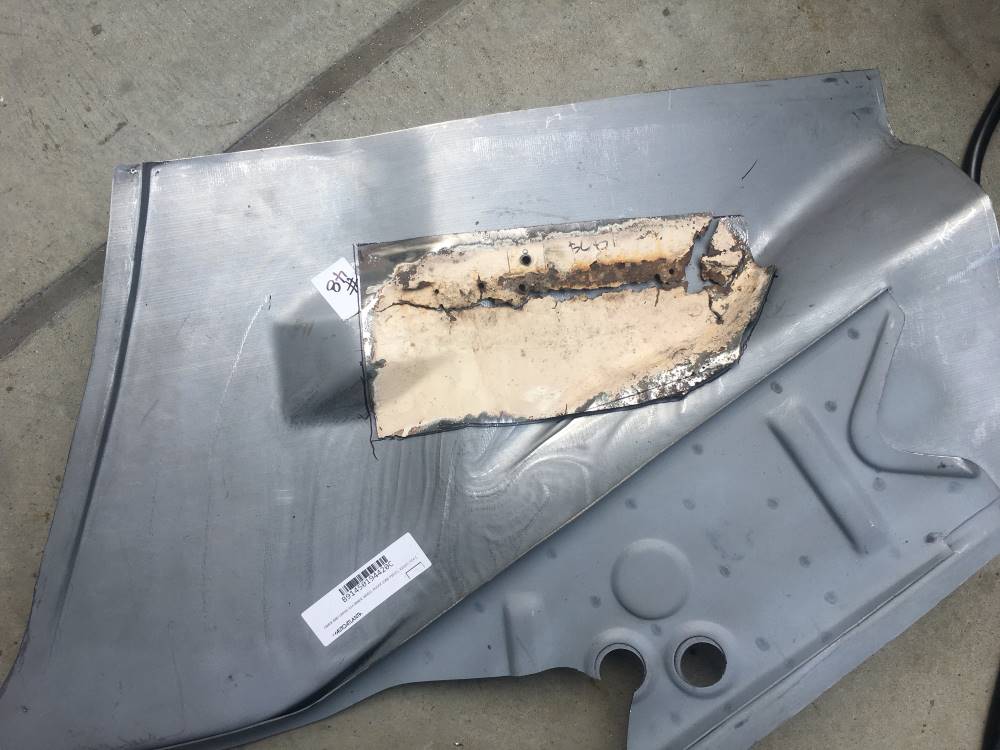
And here's the patch clamped in place: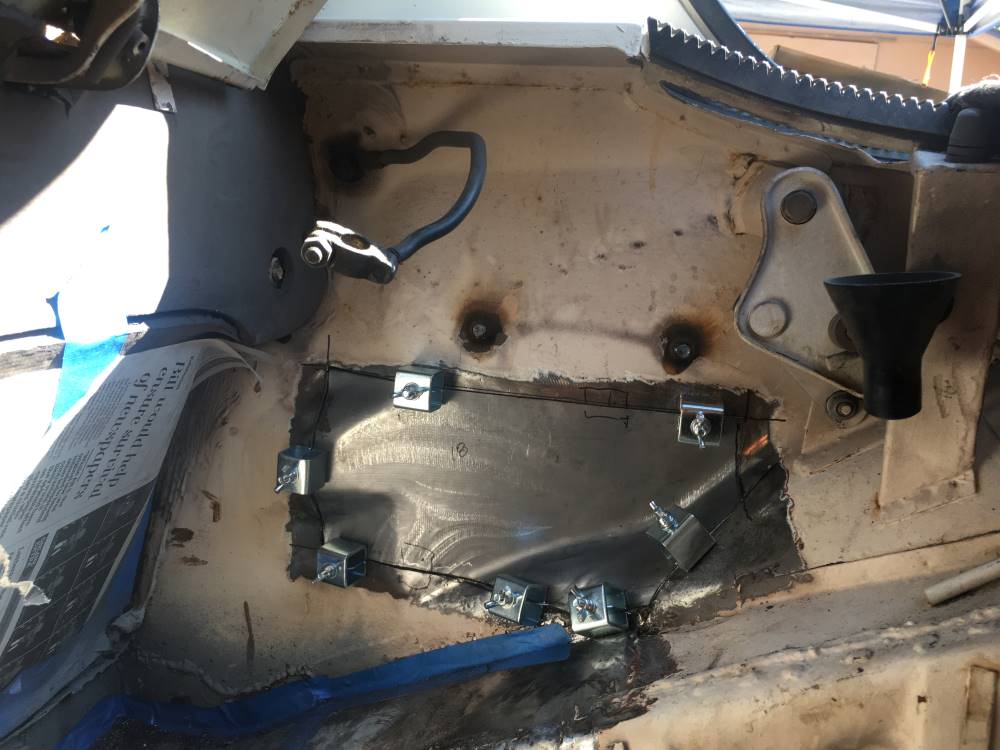
Love these panel clamps. Another great Harbor Freight buy!
Here it is welded back in: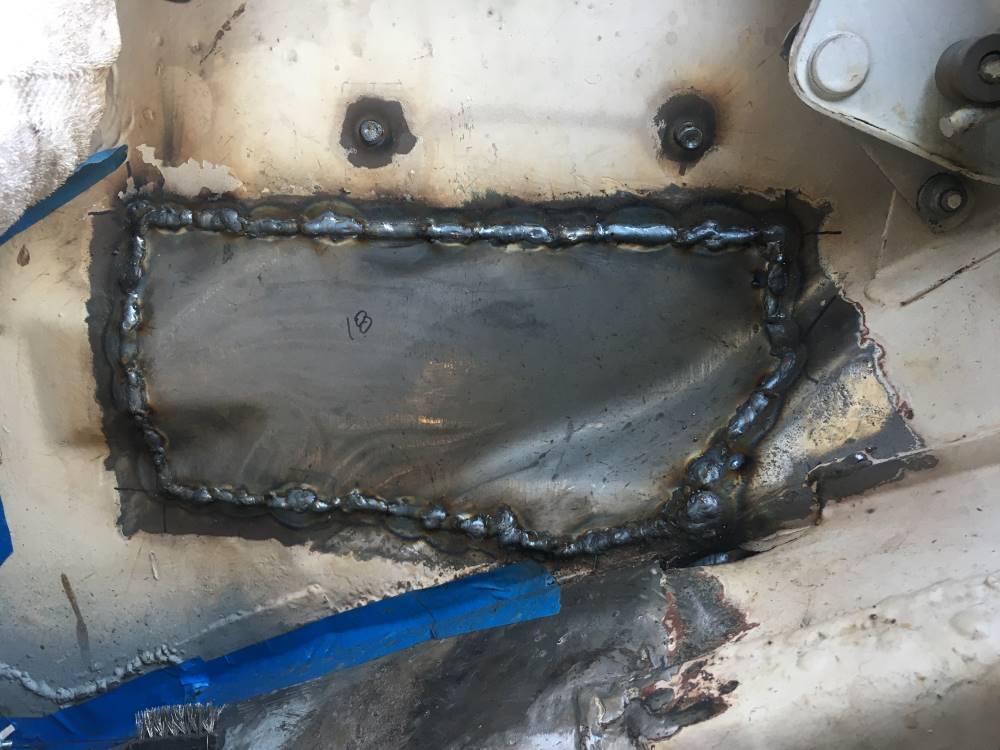
And just because I'm anal retentive, I ground down all my functional but horrible looking welds and smoothed everything out with a quick swipe of body putty:
Spot welded a new battery tray support into place, then coated everything with two coats of Por-15, then applied Wurth brushable seam sealer to all the seams that needed to be sealed: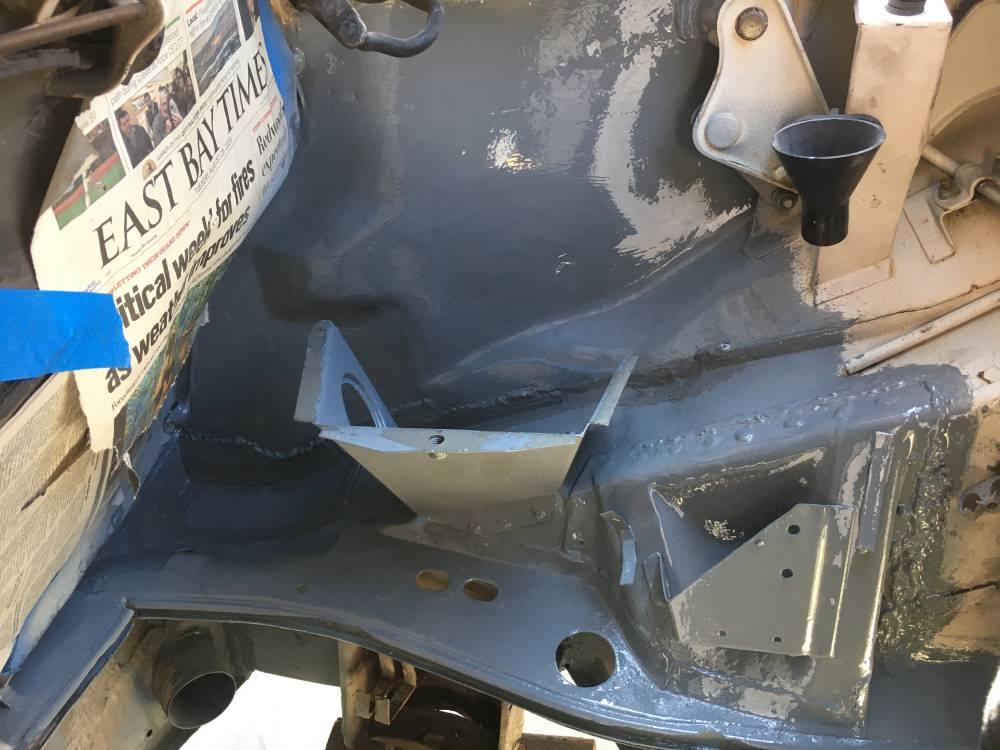
A close up of the seam sealer at the low point patch:
The last job is now to patch the outer half of the longitudinal. I did all this work on the upper side of the longitudinal first because I didn't want anything falling into an already sealed up longitudinal. Now that all the top side, engine bay work it done, I can brush and vacuum out the inside of the longitudinal and be assured that it's pretty clean before sealing it up by welding on the outer half patch.
My outer patch was also cut from the same AA stamping I used for the battery tray fender wall patch. But fitting it into place, it became clear that the stamping didn't exactly match my car, so I had to modify it:
And here's the part after welding in a patch for the split. Also welded on the jack tube because once this is in place, there would be no way for me to get a torch tip on the top side of the tube: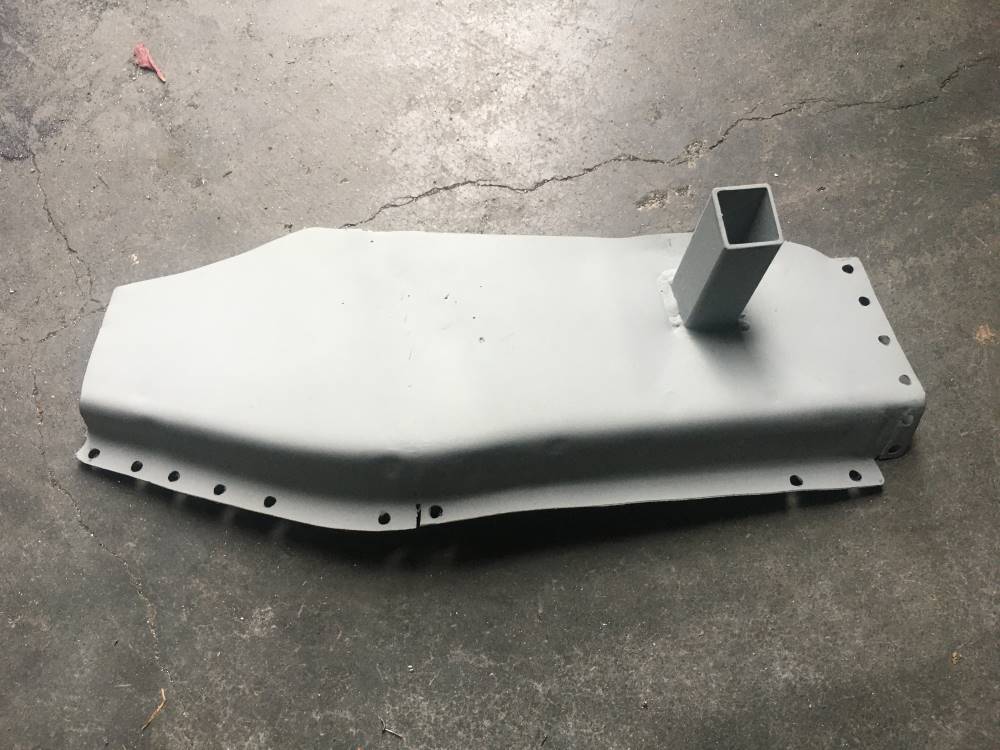
And here it is, welded into place and the welds ground down flat: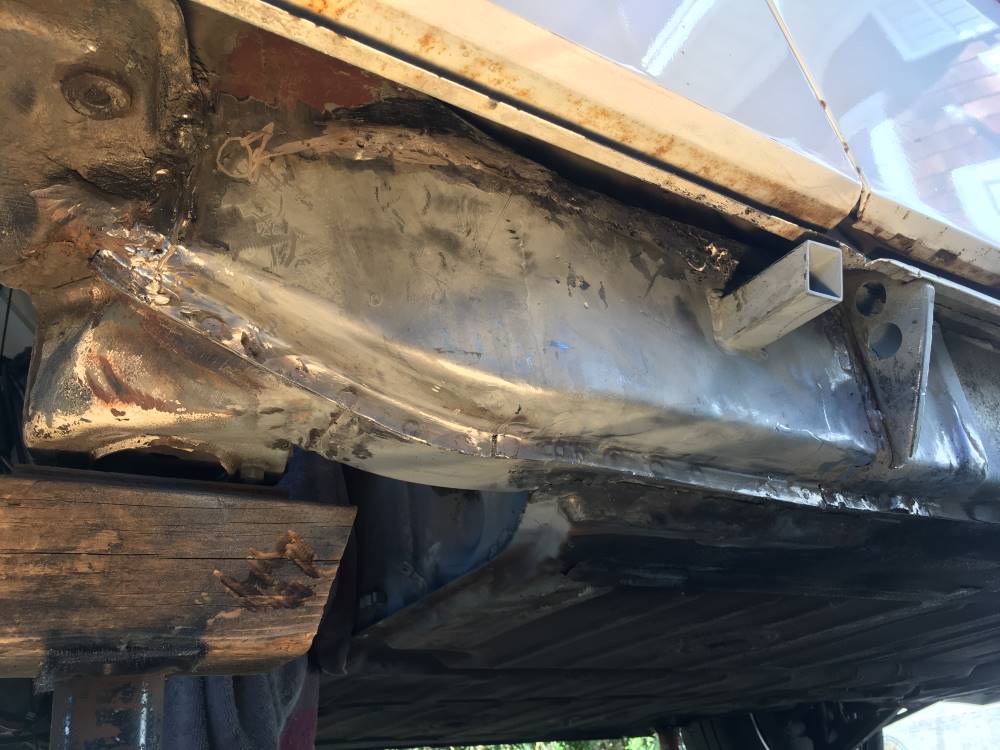
Now, how do you get the outer jack tube reinforcement plate on? I couldn't put it on the patch before welding the patch because it would have covered over the patch's edge that needed to be welded. And I couldn't have made the patch bigger to move it's edge up above the jack reinforcement because then I couldn't have reached it with the outer fender in place.
So this was my solution: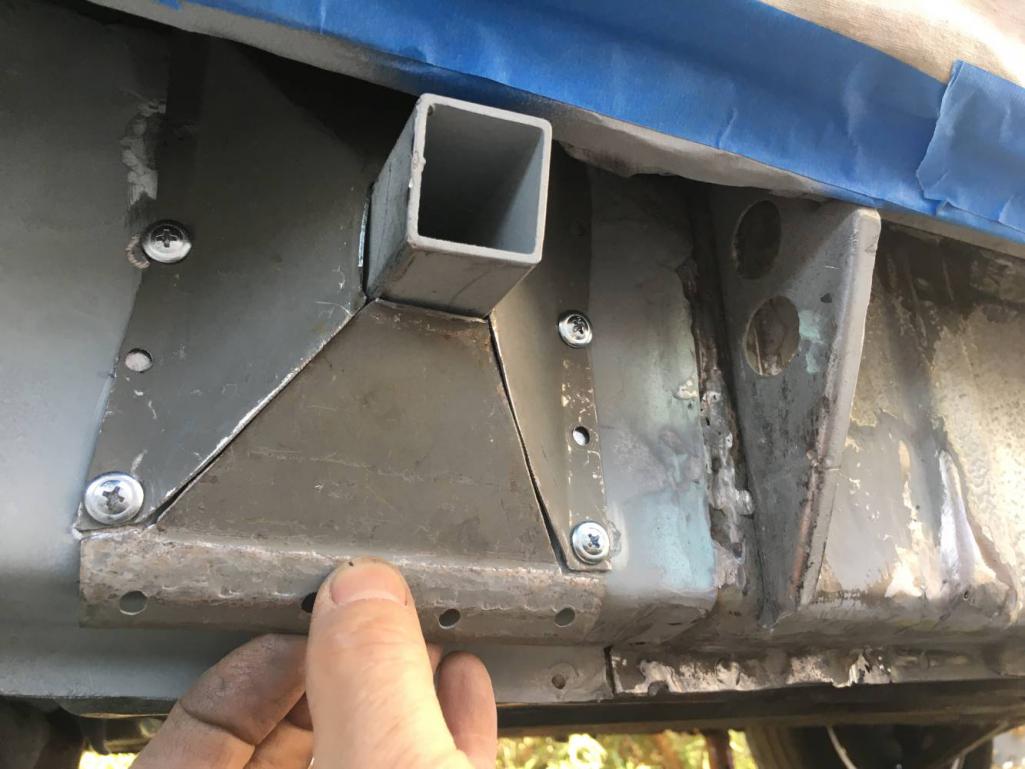
I cut the reinforcement plate into two pieces, threaded the upper half on, and then I'll weld the lower portion back together. Got it screwed into place temporarily but didn't have time to weld it last night. That's where I pick up today.
Andrew
Posted by: AndrewBlyholder Aug 28 2020, 12:04 PM
Before you go buy a MIG. Try a smaller tip.
Too much heat and burn though is usually a sign that you can go down a size or two on the tip. Likewise, make sure you're not running more than a couple of PSI of gas pressure. The pressure of the gas coming out the tip will tend to blow your puddle though on the thin stuff.
People underestimate what can be done with OxyAcetylene. It welded up many war birds back in the day before MIG and TIG came into thier own. A torch can weld thin gauge aluminum (with flux) and will often have better penetration and will actually visually blend the weld better than either TIG or MIG.
A good welder with the right setup can do amazing things with a torch.
However, when it's all said and done, MIG is faster and easier to learn.
Totally agree with you about the versatility of gas welding. Have you heard of Kent White? He's a big proponent of gas welding and particularly for aluminum. He worked at the Harrah's car collection in Reno for many years, restoring vintage race cars and such, and then after that was sold off and split up, he's moved into the Warbird airplane restoration area. He's a genius aluminum welder and fabricator. I've seen him several times doing lectures at the EAA Air Venture fly-in at Oshkosh. An inspiring craftsman.
I did manage to borrow a MIG welder from a friend. Unfortunately, it wasn't feeding the wire smoothly and consistently, so it's hard to make good looking beads with it, but even with that issue, it's much better for getting a spot weld on with minimal heating of the panel. After a day of tolerating the feed problem, I then took the time to look at the wire feed roller and found it was slipping on it's drive shaft. Tightened down it's attachment bolt and it seems to be working much better now. Now only some of my beads look like shit instead of all of them.

Andrew
Posted by: Superhawk996 Aug 28 2020, 04:32 PM
Have you heard of Kent White? He's a big proponent of gas welding and particularly for aluminum. He worked at the Harrah's car collection in Reno for many years, restoring vintage race cars and such, and then after that was sold off and split up, he's moved into the Warbird airplane restoration area. He's a genius aluminum welder and fabricator. I've seen him several times doing lectures at the EAA Air Venture fly-in at Oshkosh. An inspiring craftsman.
Andrew
Yup, Agree - Kent's work is awesome. I bought a set of his special lenses for welding aluminum with gas. They are pricey but worth every penny - you can really see the aluminum weld puddle clearly though the flux flare.
His company TM Technologies also has some really awesome power hammers but they are way out of my price range. Maybe someday

https://www.tinmantech.com/about/kent-white-the-tin-man.php
Cafe Racer gas welded tank I did a back around 2012 based on study of Kent's techniques, Ron Fournier Metal Fab book, and workshop that I attended that was given by one of Ron's former apprentices that now runs Voodoo Choppers.
http://voodoochoppers.com/
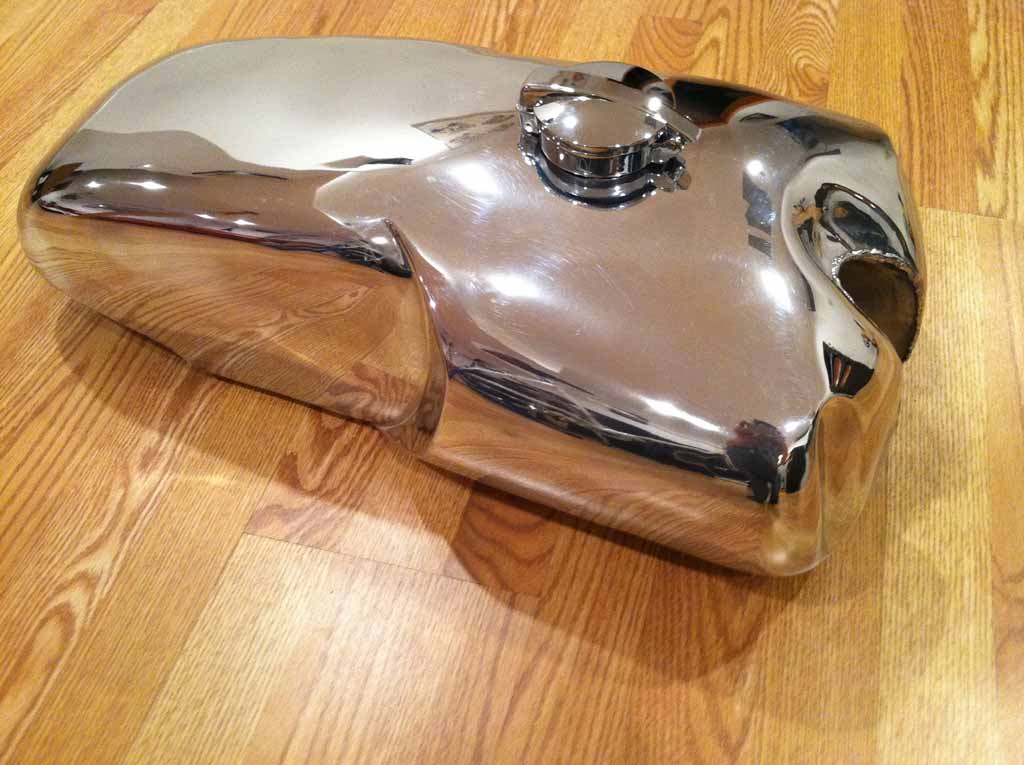
Gas can do some awesome things. Never underestimate it!
Posted by: Krieger Aug 28 2020, 06:01 PM
Good job Andrew! 
Posted by: Tdskip Aug 29 2020, 07:06 AM
Nice work and thanks for the updates.
Posted by: AndrewBlyholder Aug 29 2020, 11:33 AM
Have you heard of Kent White? He's a big proponent of gas welding and particularly for aluminum. He worked at the Harrah's car collection in Reno for many years, restoring vintage race cars and such, and then after that was sold off and split up, he's moved into the Warbird airplane restoration area. He's a genius aluminum welder and fabricator. I've seen him several times doing lectures at the EAA Air Venture fly-in at Oshkosh. An inspiring craftsman.
Andrew
Yup, Agree - Kent's work is awesome. I bought a set of his special lenses for welding aluminum with gas. They are pricey but worth every penny - you can really see the aluminum weld puddle clearly though the flux flare.
His company TM Technologies also has some really awesome power hammers but they are way out of my price range. Maybe someday
https://www.tinmantech.com/about/kent-white-the-tin-man.php
Cafe Racer gas welded tank I did a back around 2012 based on study of Kent's techniques, Ron Fournier Metal Fab book, and workshop that I attended that was given by one of Ron's former apprentices that now runs Voodoo Choppers.
http://voodoochoppers.com/
Gas can do some awesome things. Never underestimate it!
Beautiful!!
Posted by: AndrewBlyholder Aug 29 2020, 11:45 AM
Forgot to include in my last update the status of the door opening - Success!!
When I started, the door gaps at the rear of the door were .15" at the bottom and .20" at the top. After the first round of welding on the inner long. patch, the top gap had widened out to .30". That's when I realized I had a problem and installed the door brace.
Tightening down on the door brace, I was able to close up the dimension across the top of the door by .20" That should have reduced my top door gap to .10". I figured I needed to go a bit beyond my target value of .15" because I expected, even with the brace now in place, that it would relax back a bit when I removed the tension on the brace.
All done with the longitudinal repairs now, took the brace off and reinstalled the door. Top and bottom gaps are now .15". Whohoo! Ended up better than when I started. Nothing like dumb luck! 
Posted by: AndrewBlyholder Oct 20 2020, 12:30 PM
Just to finish off this thread, thought I'd post some final beauty shots of the finished product...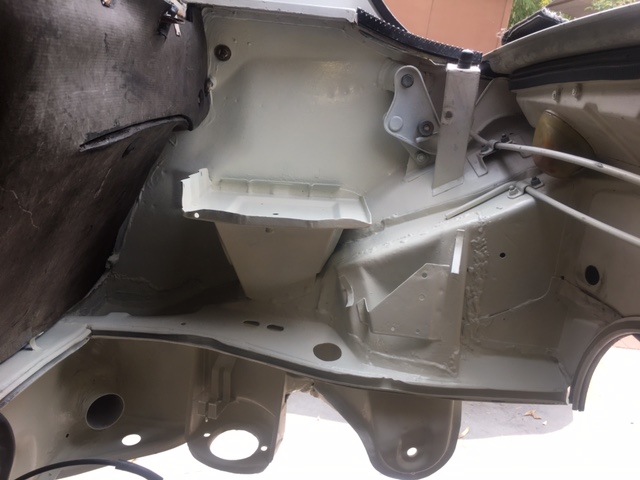
Engine compartment view of new battery support and tray, fender wall behind the battery tray patched, inner face of longitudinal frame between heating duct and engine mount patched, inner trailing arm ear cracks welded.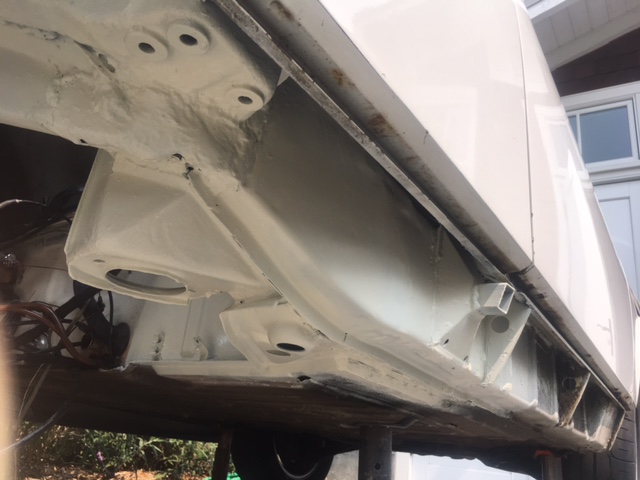
Outer view of patched longitudinal frame with new jack point gusset and new rocker jack tube. (Disclaimer: previous owners replaced the inner and outer trailing arm consoles, so all the crappy, lumpy welding around those is NOT ME. Didn't take the time to grind all that away. As bad as it looks, its seems to be holding up ok. A future project...)
Before all this work, the targa top squeaked horribly. Have only been driving the car fairly short distances around town lately so that problem hadn't risen to the top of the to-do list yet. But now, those squeaks have mostly disappeared!!  Hmmm...perhaps the chassis is flexing a bit less now!
So glad to have this done and over with!!!
Andrew
Posted by: AZBanks Oct 20 2020, 02:22 PM
Nice work. It looks good.
Posted by: Superhawk996 Oct 20 2020, 05:25 PM
(Disclaimer: previous owners replaced the inner and outer trailing arm consoles, so all the crappy, lumpy welding around those is NOT ME. Didn't take the time to grind all that away. As bad as it looks, its seems to be holding up ok. A future project...)
Andrew
That's what I'm going to tell eveyone too after I'm done. 
Seriously. You did a great job and tackled work that many won't take on! Keep an eye on it especially if you go back to AX'ing.
Posted by: AndrewBlyholder Oct 22 2020, 11:46 AM
(Disclaimer: previous owners replaced the inner and outer trailing arm consoles, so all the crappy, lumpy welding around those is NOT ME. Didn't take the time to grind all that away. As bad as it looks, its seems to be holding up ok. A future project...)
Andrew
That's what I'm going to tell eveyone too after I'm done. Seriously. You did a great job and tackled work that many won't take on! Keep an eye on it especially if you go back to AX'ing.
Go back to AX'ing? Well, that would be this weekend! Two day event at the San Francisco Cow Palace lined up. Wohoo!
Powered by Invision Power Board (http://www.invisionboard.com)
© Invision Power Services (http://www.invisionpower.com)