Printable Version of Topic
Click here to view this topic in its original format
914World.com _ 914World Garage _ relay board continuity check
Posted by: potomacmidget Feb 7 2021, 06:50 PM
Hi -
as a winter project I am cleaning up a relay board (removing all the old potting material, etc.) and doing a general clean up. I used the attached drawing from a fellow member (I would give credit but can't remember the thread I saved if from...) and everything seemed to check out minus a couple of findings...
For the fuse connections - drawing has F4 connected to C9 - ok, that checked out.
For the 12 pin connection it has C9 connected to F3 - but I don't have any continuity. Is that correct or is the schematic wrong?
Also for Relay R2 - hole E2 for the 4 pole ECU plug, I get not continuity from the R2 E2 hole to E2 spade connector, but I do get continuity from the E2 hole on the relay plug to the E3 spade on the 4 pole plug.
Any advice appreciated - of course the superbowl is on....
thanks,
Reg relay_board_with_notes.pdf ( 3.81mb )
Number of downloads: 54
relay_board_with_notes.pdf ( 3.81mb )
Number of downloads: 54
Posted by: ClayPerrine Feb 7 2021, 07:25 PM
This may help....
Posted by: bob164 Feb 7 2021, 07:31 PM
Here is a recent thread by Clay Perrine that has a much better diagram, hope this helps.
Bob
http://www.914world.com/bbs2/index.php?showtopic=351033&hl=Relay+board
Posted by: Beebo Kanelle Feb 7 2021, 07:33 PM
I hope this helps. It helped me.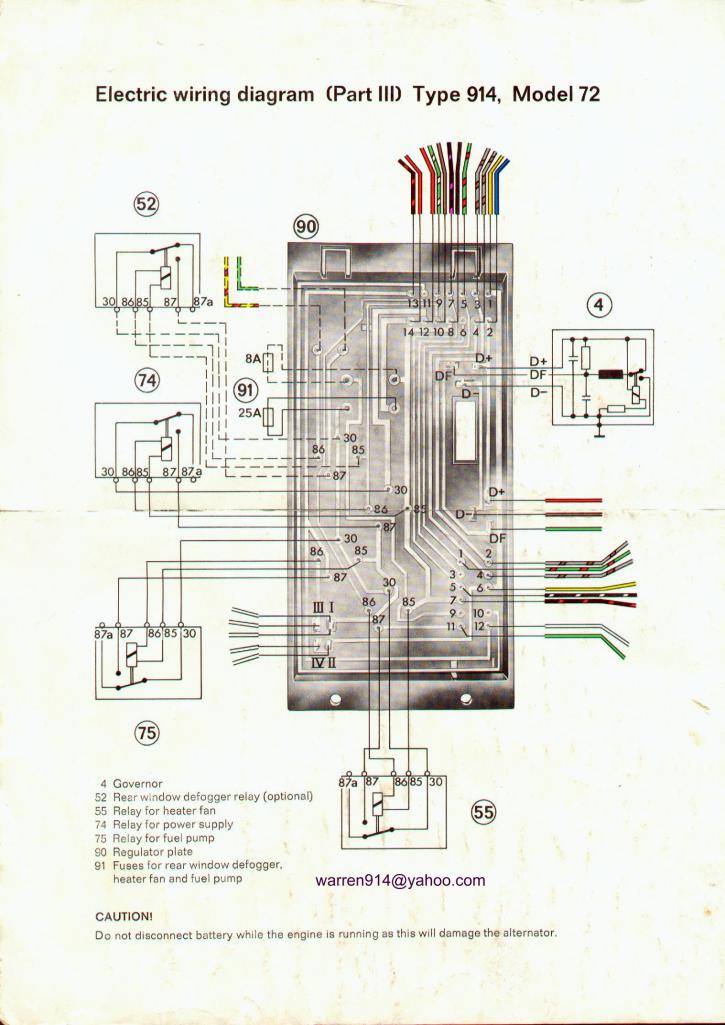
Posted by: 914_teener Feb 7 2021, 08:36 PM
So after you have soaked and cleaned away the old buitumen potting material....clean all the traces throughly.
Then visually check the rivet connections for signs of loosness.
I soldered them after cleaning to make sure there are no issues. Took 15 minutes or so.
Ring out on your DVM the traces accross the rivets....to check to make sure you are good to go.
Then I used a dielectric epoxy potting compound. Make SURE you have blocked out the openings where the potting compund can flow through...IIRC there are several there that will flow through to the topside of the board.
Think there are several threads on this as you have discovered.
Worked fine after that.
Posted by: potomacmidget Feb 9 2021, 04:56 PM

So after you have soaked and cleaned away the old buitumen potting material....clean all the traces throughly.
Then visually check the rivet connections for signs of loosness.
I soldered them after cleaning to make sure there are no issues. Took 15 minutes or so.
Ring out on your DVM the traces accross the rivets....to check to make sure you are good to go.
Then I used a dielectric epoxy potting compound. Make SURE you have blocked out the openings where the potting compund can flow through...IIRC there are several there that will flow through to the topside of the board.
Think there are several threads on this as you have discovered.
Worked fine after that.
Hi All - thanks for the assistance, I appreciate it - the color drawing already helped me figure out board was ok, but will check all the rivets and repot...thanks again, Best, Reg
Powered by Invision Power Board (http://www.invisionboard.com)
© Invision Power Services (http://www.invisionpower.com)