Printable Version of Topic
Click here to view this topic in its original format
914World.com _ 914World Garage _ Relay Board
Posted by: Puebloswatcop Feb 7 2022, 06:23 PM
Can anyone tell me how they have soldered their relay board, without melting any of the plastic? I was thinking maybe silver solder, but the iron is still hot enough to melt the plastic, Any guidance would be appreciated.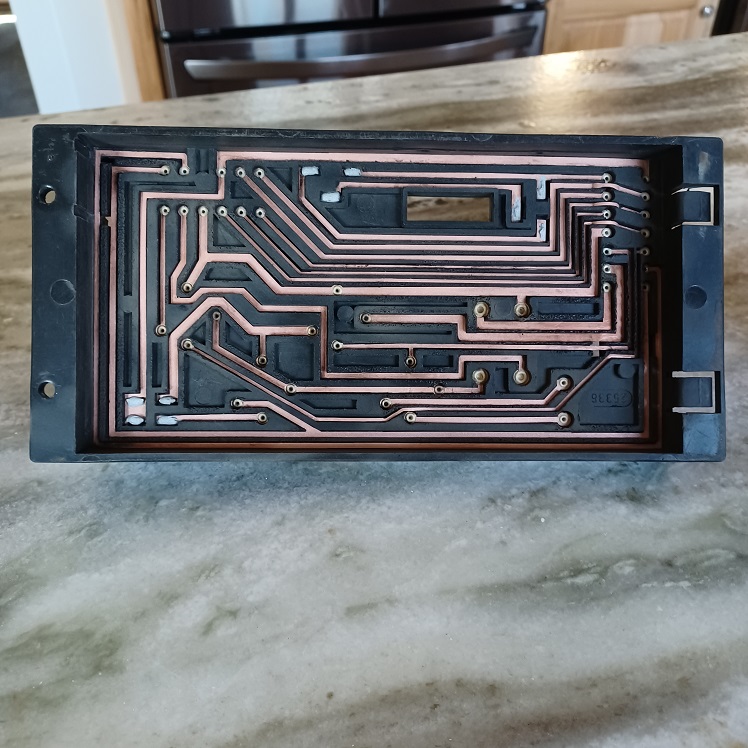
Posted by: 914Sixer Feb 7 2022, 08:56 PM
You DO NOT need to solder the relay board. I have seen the copper eaten up but the rivets have never failed in any board I have done in the past 5 years. Be sure to hold the relay board up to a bright light. You will see ALL the holes you need to block (I use silicone) BEFORE pouring compound. Also take a square pencil eraser ($1 Store) and cut it into wedge to fit in square hole. Be sure and tape up across end with splits. You will also need tape on the screw holes where the voltage regulator mounts. Failure to do this and you will have compound running out all over the place.
Posted by: Puebloswatcop Feb 8 2022, 06:59 AM

You DO NOT need to solder the relay board. I have seen the copper eaten up but the rivets have never failed in any board I have done in the past 5 years. Be sure to hold the relay board up to a bright light. You will see ALL the holes you need to block (I use silicone) BEFORE pouring compound. Also take a square pencil eraser ($1 Store) and cut it into wedge to fit in square hole. Be sure and tape up across end with splits. You will also need tape on the screw holes where the voltage regulator mounts. Failure to do this and you will have compound running out all over the place.
Thanks for the tips Sixer, I have heard of some of the nightmare stories where people have poured the compound without plugging all of the holes, what a royal mess. Thanks also for the erasure idea, I was tryng to figure the best way to plug that hole. I have tested each and every lead and had good continuity throughout, so I guess they did do a pretty good job of riveting the leads together. Will post how it comes out.
Posted by: SirAndy Feb 8 2022, 09:54 AM
Should be easy enough to check if any of the rivets are lose.

Posted by: Shivers Feb 8 2022, 10:19 AM
There are products like this. It cures at 250* F for an hour. I'm pretty sure the plastic would survive that. So if you find some high resistance or no contact at all, it might be worth a try.
https://conductivex.com/Silver-Mixed-Epoxy-Electrically-Conductive-Adhesive-EMI-RFI-Sheilding-System-1-Part-Heat-Cure?cmp_id=402219008&adg_id=23421667208&kwd=&device=c&gclid=Cj0KCQiAxoiQBhCRARIsAPsvo-xbNLxdigtKG0RytEddWHLJD91TN6JqUO_6RHHg9JeoLzJjMMTCpI8aAheKEALw_wcB
Posted by: walterolin Feb 8 2022, 11:09 AM
I you want to be sure, check the resistance on each circuit with a good DMM such as a Fluke 179.
Posted by: 914_teener Feb 8 2022, 05:26 PM
You DO NOT need to solder the relay board. I have seen the copper eaten up but the rivets have never failed in any board I have done in the past 5 years. Be sure to hold the relay board up to a bright light. You will see ALL the holes you need to block (I use silicone) BEFORE pouring compound. Also take a square pencil eraser ($1 Store) and cut it into wedge to fit in square hole. Be sure and tape up across end with splits. You will also need tape on the screw holes where the voltage regulator mounts. Failure to do this and you will have compound running out all over the place.
Thanks for the tips Sixer, I have heard of some of the nightmare stories where people have poured the compound without plugging all of the holes, what a royal mess. Thanks also for the erasure idea, I was tryng to figure the best way to plug that hole. I have tested each and every lead and had good continuity throughout, so I guess they did do a pretty good job of riveting the leads together. Will post how it comes out.
I disagree. The rivets are of a different alloy if memory serves. Place the soldering iron on the rivet only and apply the solder to the trace near the rivet. BTDT. Use a very small iron and solder for electronics will do the trick. Use 50/50 solder if you can find it in a very small dia.....silver solder takes a much higher temperature so not necessary.
I had loose rivets on mine and when hot they become more loose because of the Coeff of expansion on copper, particulary on the skiiny long traces for the fuel pump and the aux fan along the outside of the board. At a MINIMUM iI'd do those and ditto on making sure ALL the holes are plugged, you only get one chance with the di-electric epoxy.
Good luck.
Posted by: Puebloswatcop Feb 8 2022, 06:01 PM
Thanks for your feedback guys. I have checked all the circuits and all of the rivits, they all checked good, just dont want to seal this thing up and then find out one decides to take a crap. Guess I will go ahead and seal it up when I return from my next trip.
Powered by Invision Power Board (http://www.invisionboard.com)
© Invision Power Services (http://www.invisionpower.com)