Printable Version of Topic
Click here to view this topic in its original format
914World.com _ 914World Garage _ Another 914-6 GT Tribute Project
Posted by: Tom1394racing Feb 14 2022, 01:04 PM
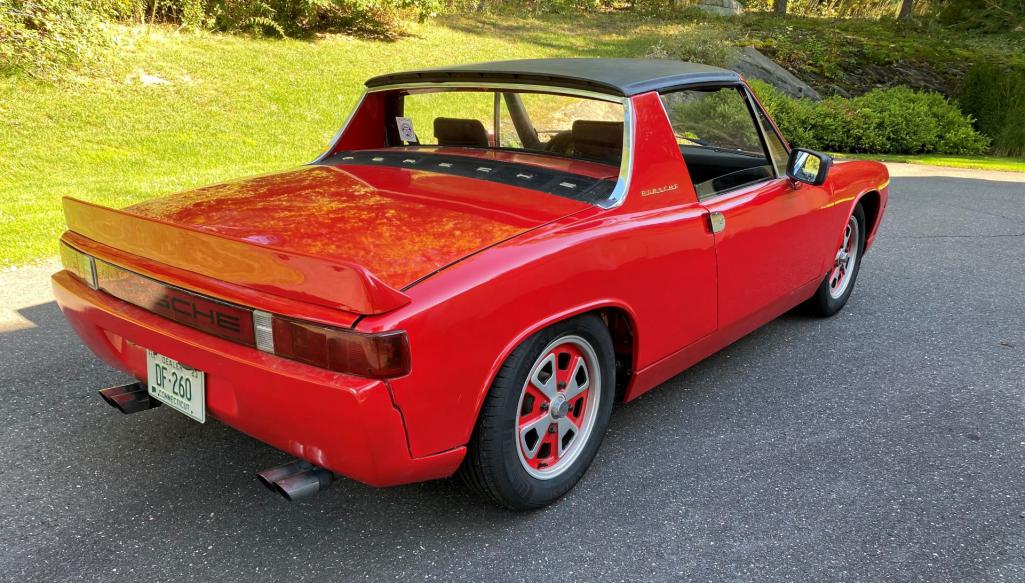
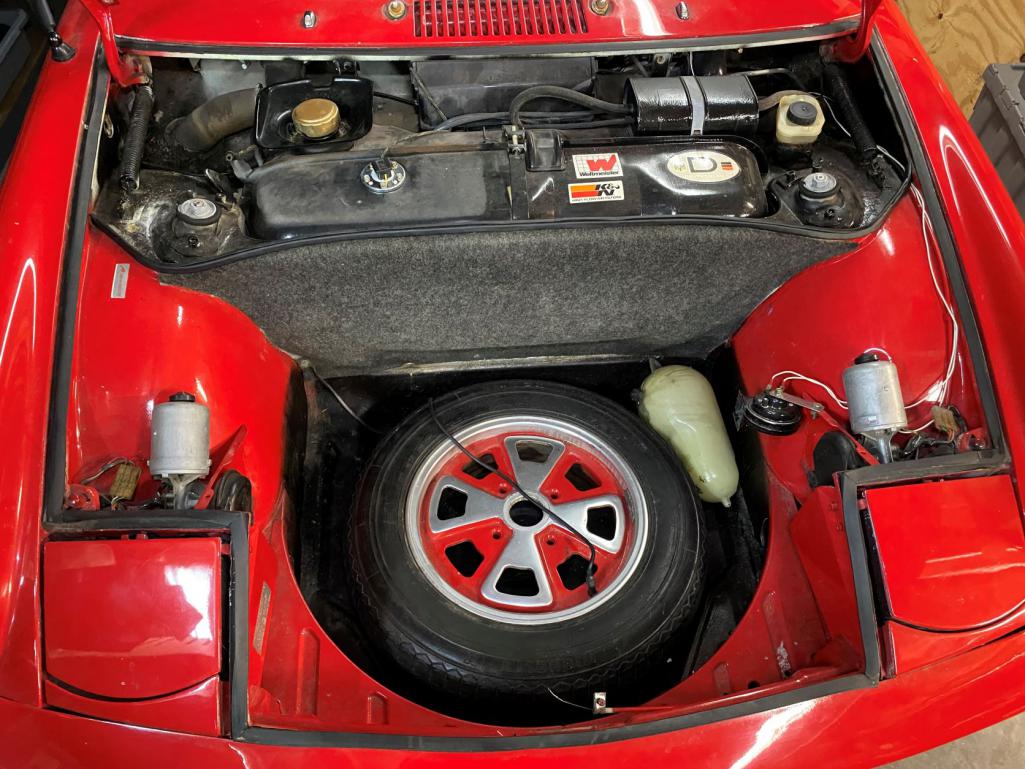
After having enjoyed several 911’s over the past 40 years, I decided about a year ago that my next project would be a 914-6 GT Tribute car. I had been thinking for some time about a mid-engine open car but the Boxster is just not my cup of tea. I am more of a 70’s air cooled hot rod type and I love my ’73 Signal Orange 911 RSR tribute car. So a 914-6 GT seemed like an obvious choice. It ticked all my boxes and I have always admired the ‘70’s GT race cars.
My friends at Auto Associates in Canton, CT knew I was considering a 914-6 GT project so when a customer’s ’73 914 2.0 became available there last fall we put it up on their lift, took a close look and deemed it an acceptable starting point. The project plan is to follow the same process I have used on my RSR and my ‘70E restoration projects. I strip the car in my home shop, send the shell to Auto Associates for the metal work, chassis stiffening and paint. The painted shell comes back to me and I do the mechanical work and reassembly.
My plan is not to do a 100% accurate GT tribute but rather to build a car that looks, sounds and drives like a street friendly GT. I am not planning on any serious track or autocross but more of a fun spirited street hot rod. I know there is a ton of expertise and experience on this forum so I will be looking for some sage advice as I document the build in this thread. So here are my thoughts:
Exterior
GT flares front and rear. I will likely leave the decision of metal vs FG to Auto Associates. I would like the car to be as light as is practical. I have FG flares on my RSR and they have held up very well over the 15 years since the original restoration. I am also planning to do the lightweight, balsa reinforced front and rear trunk lids. I also would like to do the GT style double grill engine cover. Not sure if anyone makes these or if I will have Auto Associates fabricate one from my existing cover. I will go with the hood pins front and bungees rear for lid closure. Not sure whether to go with the motor operated headlights or if the cable operated system is reliable enough. I do not plan to do a lot of night driving. For wheels, I am thinking Minilites on the rear and Fuchs on the front. I also want to keep the removable top as open air driving is one of my key objectives. I am liking Mexico Blue for the color.
Interior
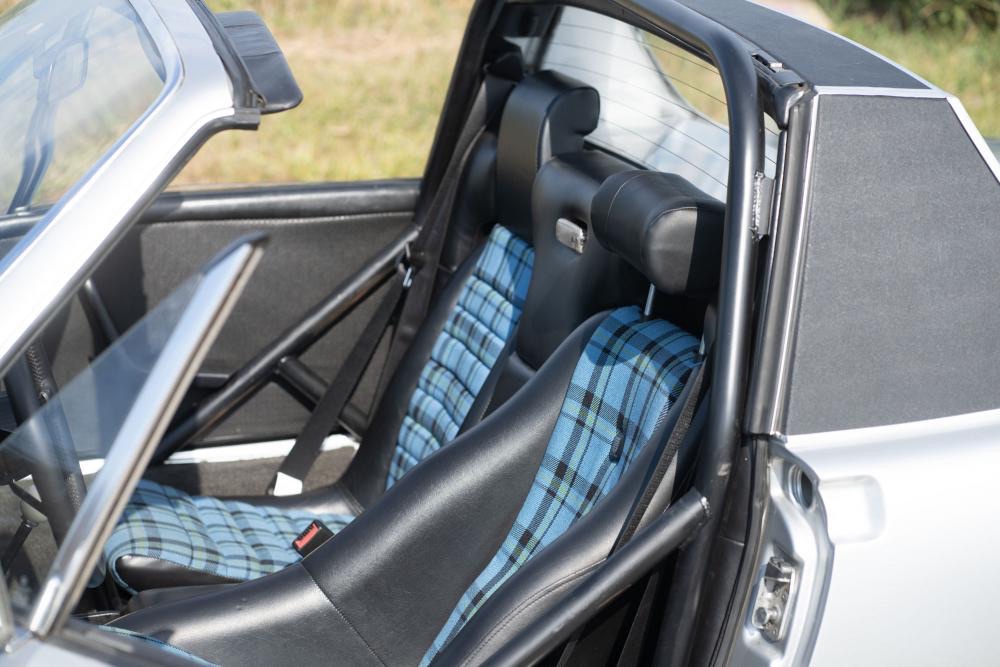
I plan to go with a 911 steering column and LHS 911 ignition switch as well as 911 turn signal, wiper switches and clamshell. I am also thinking of a reproduction 911 style hockey puck steering wheel. Door panels would be the GT style with strap operated pulls for door opening. I am also thinking of a pair of GTS Classic vintage seats perhaps the LeMans series. Gauges will mimic the GT type.
Drivetrain
I have a 3.0 L SC long block that I plan to use as a basis for power. I am thinking 9.5 CR with ModS type cams and a twin plug distributor. I am also toying with the idea of EFI. I am thinking 200-225 HP. I will stick with the 901 gearbox and the special 215 mm 9 bolt flywheel. I would use 911 output stubs, Sway Away free floating axles, and 911 stubs axles & hubs. I will use a front cooler and oil plumbing similar to the GT. Not sure which option to take with regard to the motor mounts.
Suspension
Other than 911 3.5” caliper spaced front struts, and 911 front hubs, I have not given the suspension much thought as yet. I do not want the car to be so stiff and jarring that it knocks my fillings out on the pothole strewn roads here in CT. That said, I also do not want the car to roll and lean like my stock ‘70E. I like the stock type of front and rear roll bars, maybe a little bigger than the stock size. I am thinking early 911S Aluminum calipers in the front. No sure about the rear calipers. I like the 15” Michelin TB’s for tires.
Chassis Stiffening
Like all 914’s this one is not rust free. After the rust repairs, I am planning to have Auto Associates install the chassis stiffening kits for the front torsion bar area, sills and rear suspension including the rear trailing arms. I am also planning on a weld-in roll bar with diagonals tied into the door sills that will allow for reasonably easy entry and exit. I want the chassis to be as stiff as possible yet still allow for the removable Targa roof.
Well…That is the current plan. I am very interested in suggestions and input from those of you who have been down this road before me. I plan to post progress with photos as I go forward and I look forward to all your comments.
Posted by: BadToTheBown Feb 15 2022, 02:16 PM
Some of us will be watching, think I want to do the very same, only I want a 916, best of luck...
Posted by: mlindner Feb 16 2022, 01:57 PM
I was thinking of the exact same thing....forgot, just did that. You are going to have so much fun, post lots of pictures often. Best, Mark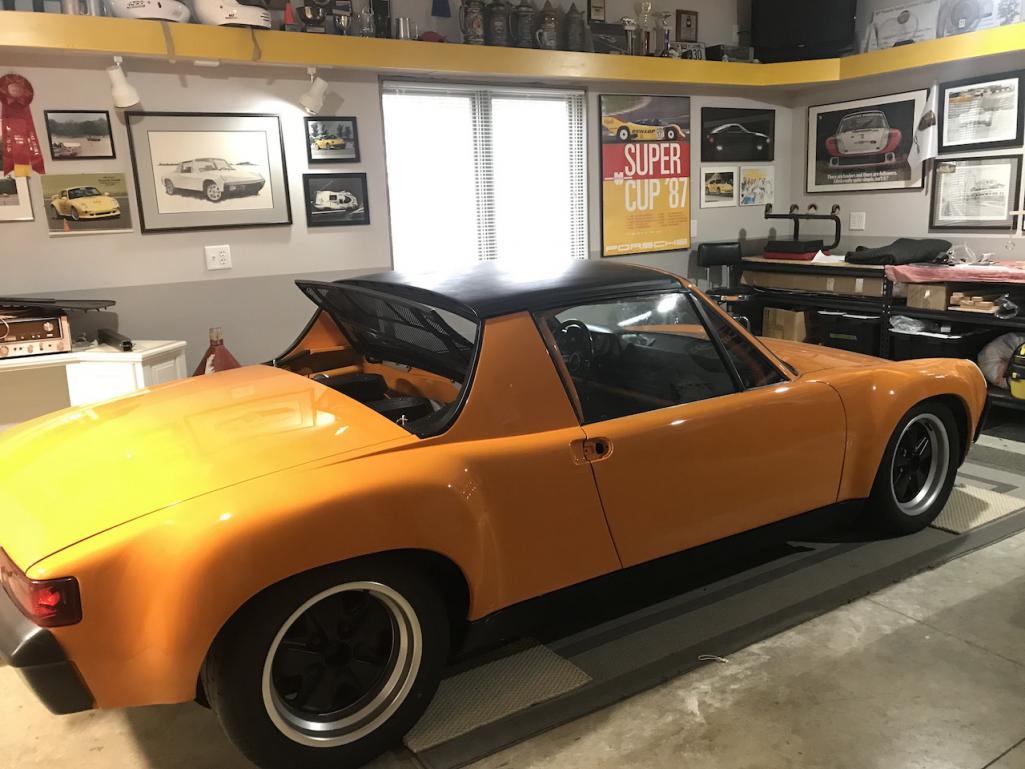
Posted by: mlindner Feb 16 2022, 02:20 PM
Tom, a lot of people will want to see this build. Should have Admin move it to Garage. Mark
Posted by: Tom1394racing Feb 16 2022, 04:22 PM

Tom, a lot of people will want to see this build. Should have Admin move it to Garage. Mark
I'm kinda new here. How do I make that happen?
Posted by: mlindner Feb 16 2022, 04:28 PM
Sir Andy, can you change this to 914World Garage. Mark
Posted by: Tom1394racing Feb 16 2022, 04:43 PM
I was thinking of the exact same thing....forgot, just did that. You are going to have so much fun, post lots of pictures often. Best, Mark
Wow...That's a beauty. I love Signal Orange.
Where did you get the double grill engine cover?
Posted by: BadToTheBown Feb 16 2022, 10:25 PM
[quote name='Tom1...That's a beauty...[/quote]
+1
Posted by: infraredcalvin Feb 17 2022, 08:58 PM
Where did you get the double grill engine cover?
A member here makes them:
http://www.914world.com/bbs2/index.php?showtopic=332067
Or make your own:
http://www.914world.com/bbs2/index.php?showtopic=6167
Posted by: Tom1394racing Feb 22 2022, 11:04 AM
Admin Edit: Duplicate post removed.
Attached thumbnail(s)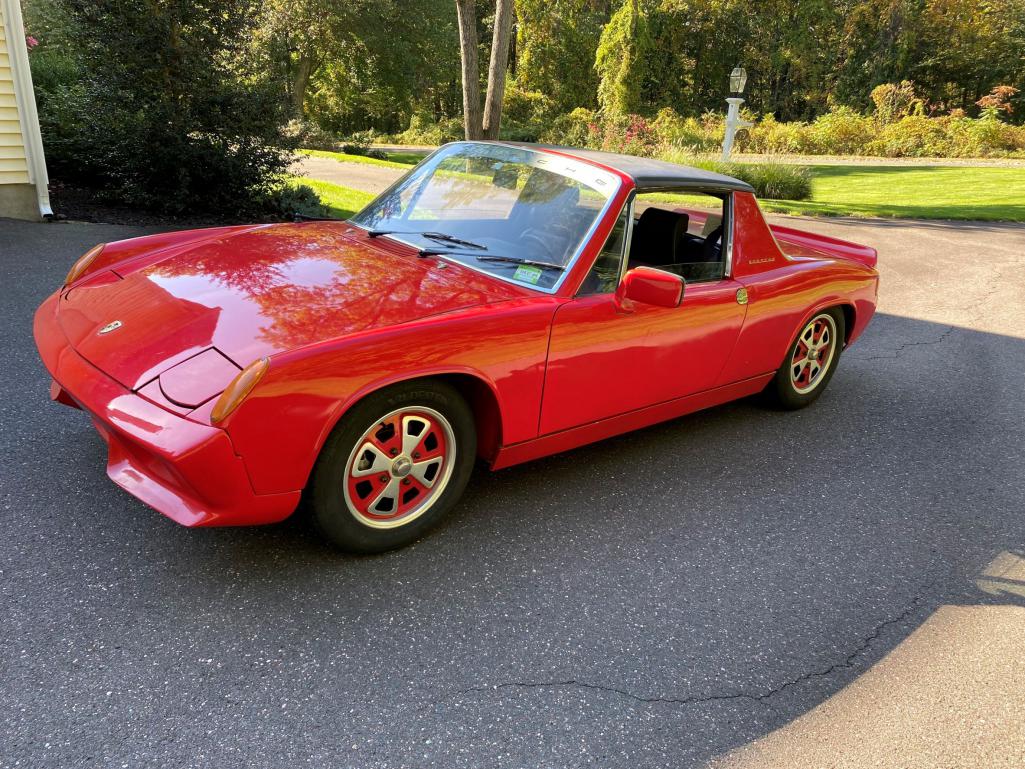
Posted by: Tom1394racing Feb 22 2022, 11:06 AM
Sir Andy, can you change this to 914World Garage. Mark
I did a copy and paste move to the Garage
Posted by: ClayPerrine Feb 22 2022, 11:30 AM
Please consider a stiffener kit for the longitudinals. The 914 flexes badly through the middle because of the open top.
Brad Mauyer makes a great kit that goes on the outside of the longitudinals. The original structure is a zig zag piece of steel on top of a flat piece of steel. The kit adds another layer on top of the zig zag, making it like corrugated cardboard. And we all know how stiff corrugated cardboard is.
I have that kit on my big six, and it is on the repaired chassis for Betty's car.
Also, there are some kits to re-enforce the front sway bar holes and the area around the rear shocks. Both are recommended kits for high horsepower cars.
Posted by: Cairo94507 Feb 22 2022, 02:43 PM
Sounds like a nice build. Like Clay said, I think you might consider a chassis stiffening kit. I have the inner chassis stiffening kit that goes on the interior side of the longs and the firewall. It is invisible once the car is carpeted and in my opinion really stiffens the chassis. I chose not to reinforce the trailing arms because if I lose control and slid it into a curb, I would rather the trailing arm bend and not the chassis.
I think the front sway bar reinforcement is a must. I went with stock later 914 F&R sway bars as well as Bilstein shocks/struts and Elephant Racing rubber bushings all around. I have 140 pound rear springs. My car rides very nice and does not lean and even more importantly, does not squeak.
I have a 3.2 with Motronic injection, 964 cams, Steve Wong custom chip, large-tube SS heat exchangers and muffler. I am at around 240 HP running through a 901 with a side-shifter conversion. My car runs great and pulls strongly. Of course, with Ben's exhaust, it sounds terrific.
I know you are leaving it to the body shop re the flares.....personally, I would go with steel flares. The increase in value is well worth the extra cost. I love Mexico Blue and that will look great on a flared car.
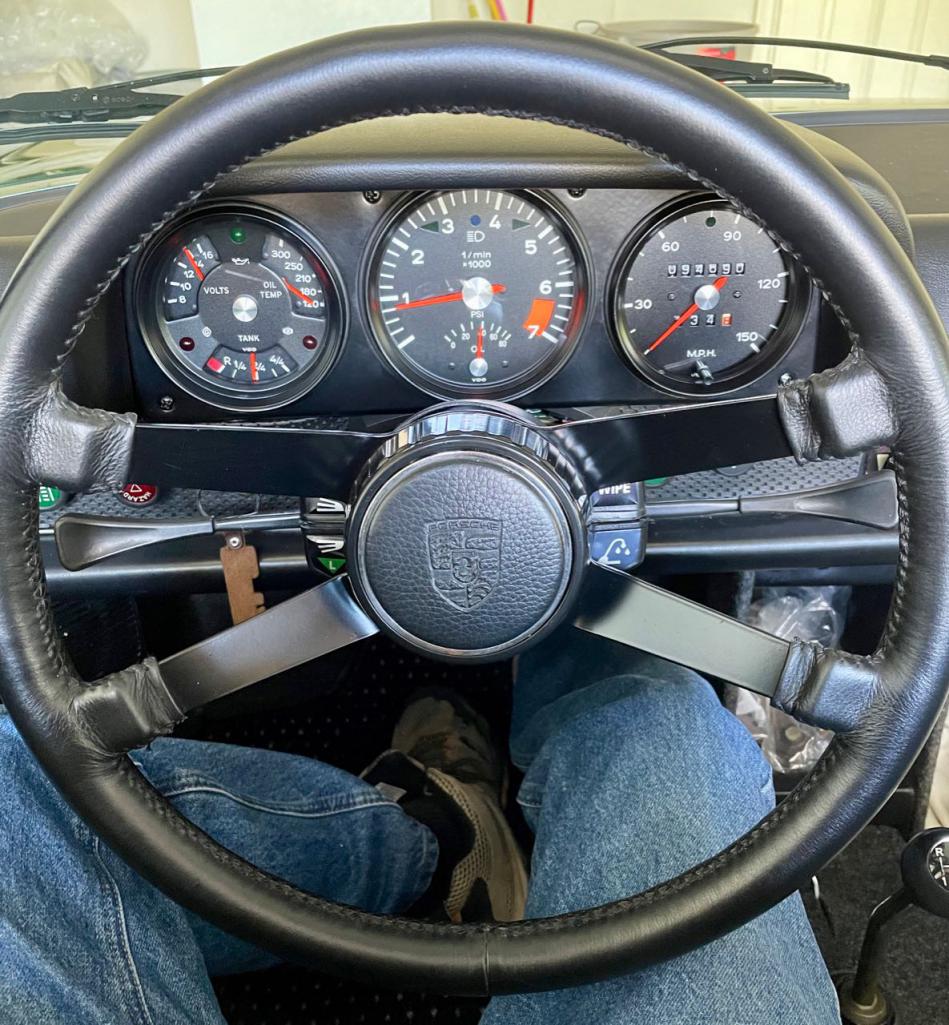
Here is a picture of my steering wheel and gauges:
Posted by: mb911 Feb 22 2022, 02:59 PM
Let me know if I can help. I make a good amount if parts for these cars and conversions.
Posted by: jim dorociak Feb 22 2022, 03:48 PM
I currently have the front 911 hubs/ new SC brake rotors and even SC calipers listed for sale. I have an early 911 steering column and a wiper switch available listed as well. Just a start for what you are looking for. Ben makes a great oil tank, bumper modification for oil cooler cut out, Hard GT oil lines to plumb cooler in the front nose. Jim. jdorociak@gmail.com
Posted by: Tom1394racing Feb 22 2022, 07:08 PM
Please consider a stiffener kit for the longitudinals. The 914 flexes badly through the middle because of the open top.
Brad Mauyer makes a great kit that goes on the outside of the longitudinals. The original structure is a zig zag piece of steel on top of a flat piece of steel. The kit adds another layer on top of the zig zag, making it like corrugated cardboard. And we all know how stiff corrugated cardboard is.
I have that kit on my big six, and it is on the repaired chassis for Betty's car.
Also, there are some kits to re-enforce the front sway bar holes and the area around the rear shocks. Both are recommended kits for high horsepower cars.
I am considering the inner longitudinal stiffening kit, the 914 six GT stiffening kit, the box trailing arm kit and the front sway bar stiffening kit.
Posted by: Tom1394racing Feb 22 2022, 07:10 PM
Let me know if I can help. I make a good amount if parts for these cars and conversions.
Hi Ben…I will be in touch
Posted by: Tom1394racing Feb 22 2022, 07:12 PM
Sounds like a nice build. Like Clay said, I think you might consider a chassis stiffening kit. I have the inner chassis stiffening kit that goes on the interior side of the longs and the firewall. It is invisible once the car is carpeted and in my opinion really stiffens the chassis. I chose not to reinforce the trailing arms because if I lose control and slid it into a curb, I would rather the trailing arm bend and not the chassis.
I think the front sway bar reinforcement is a must. I went with stock later 914 F&R sway bars as well as Bilstein shocks/struts and Elephant Racing rubber bushings all around. I have 140 pound rear springs. My car rides very nice and does not lean and even more importantly, does not squeak.
I have a 3.2 with Motronic injection, 964 cams, Steve Wong custom chip, large-tube SS heat exchangers and muffler. I am at around 240 HP running through a 901 with a side-shifter conversion. My car runs great and pulls strongly. Of course, with Ben's exhaust, it sounds terrific.
I know you are leaving it to the body shop re the flares.....personally, I would go with steel flares. The increase in value is well worth the extra cost. I love Mexico Blue and that will look great on a flared car.
Here is a picture of my steering wheel and gauges:
Great looking dash. Original or repro wheel? Who did the gauges?
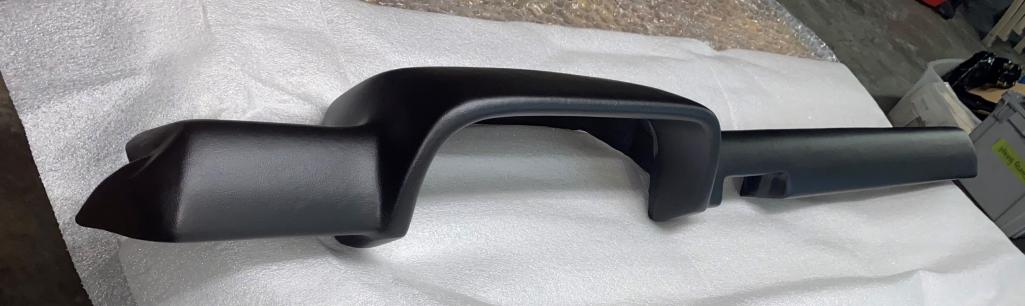
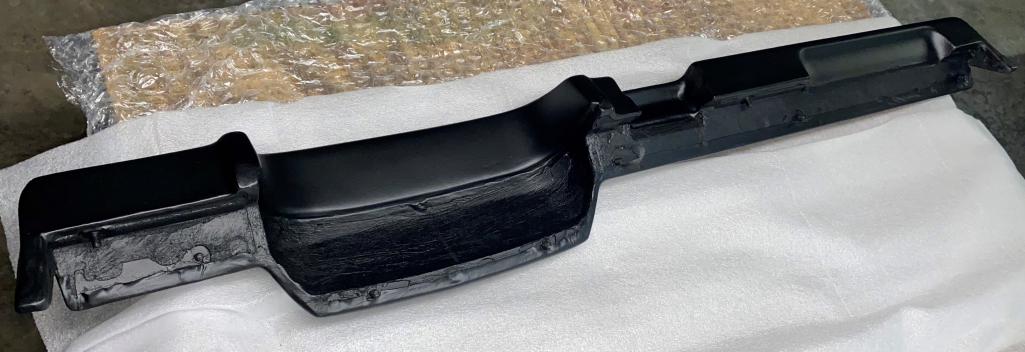
Posted by: SirAndy Feb 22 2022, 08:58 PM
That 916 front bumper does not look like any of the crappy aftermarket ones you usually see.
I'm intrigued ...

Posted by: TRS63 Feb 23 2022, 07:06 AM
Sounds like a great plan, looking forward to follow it ![popcorn[1].gif](style_emoticons/default/popcorn[1].gif)
Antoine
Posted by: rgalla9146 Feb 23 2022, 08:29 AM
Hey Tom,
You have like-minded company close by. I'm North Jersey. My white car has many of the features you've focused on. A 3.0 is in the works right now. http://www.914world.com/bbs2/index.php?showtopic=310032 I'm glad to talk anytime.
-Rory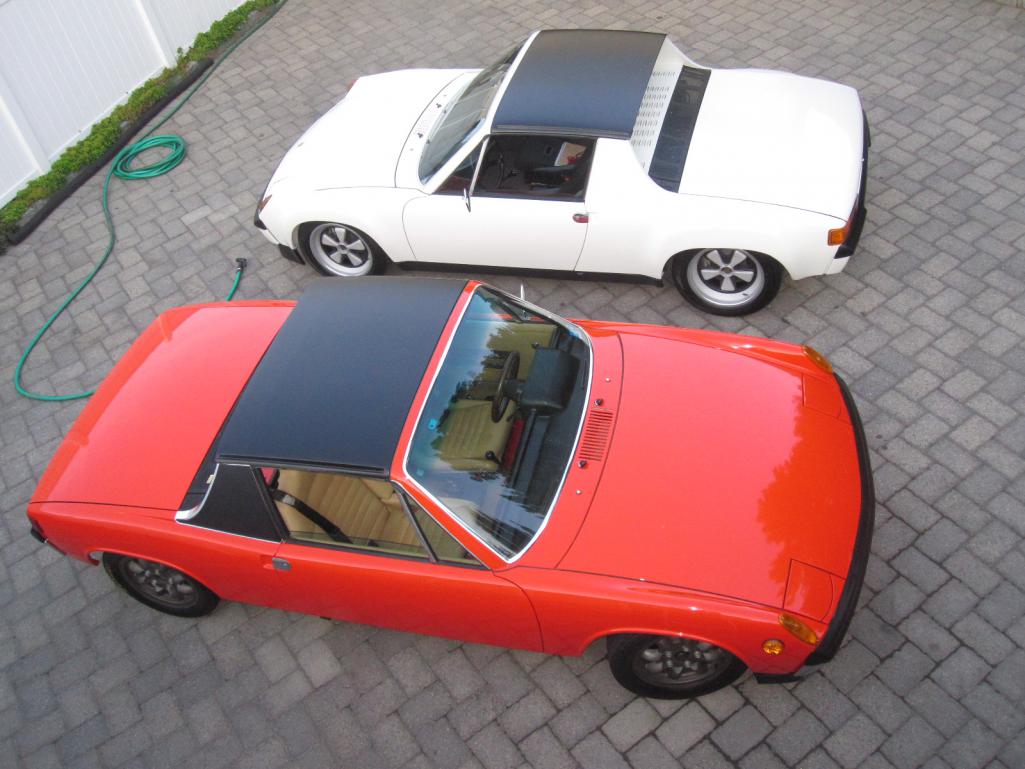
Posted by: Luke M Feb 23 2022, 08:56 AM
That 916 front bumper does not look like any of the crappy aftermarket ones you usually see.
I'm intrigued ...
Andy,
That 916 front bumper looks to be an 80's to early 90's unit.
I have two of them that look just like that. Also the correct style 916 rear.
It has the consistent shape at the top front not like the newer ones that shrink in the middle. I purchased a set brand new in 1988 or 89 from Tweeks IIRC.
Maybe the molds where redone but diffidently not correct.
Posted by: Cairo94507 Feb 23 2022, 10:37 AM
@http://www.914world.com/bbs2/index.php?showuser=8039 - Hi Tom, Original steering wheel, padded and wrapped. Also, Hartmut at Palo Alto Speedometer in Palo Alto, CA did my gauges. 
Posted by: mb911 Feb 23 2022, 01:59 PM
Let me know if I can help. I make a good amount if parts for these cars and conversions.
Hi Ben…I will be in touch
Sounds good. I have worked with Scott @automobile associates for 15 years or so. Great people over there.
Posted by: mb911 Feb 23 2022, 02:02 PM
http://www.914world.com/bbs2/index.php?showtopic=269606&hl=
This is my build thread check it out for my GT Tribute.
Posted by: Tom1394racing Feb 23 2022, 06:47 PM
http://www.914world.com/bbs2/index.php?showtopic=269606&hl=
This is my build thread check it out for my GT Tribute.
Yes Ben…. I read the entire thread as part of my education process. Very informative and inspirational. You do great work. Will be in contact with regard to oil tanks oil lines and other products you make.
Posted by: Tom1394racing Feb 24 2022, 10:16 AM
Updating his thread....
I had to put the car in the basement as my lift space is occupied by my '70E and my RSR tribute for winter storage and there is no extra room in the garage. 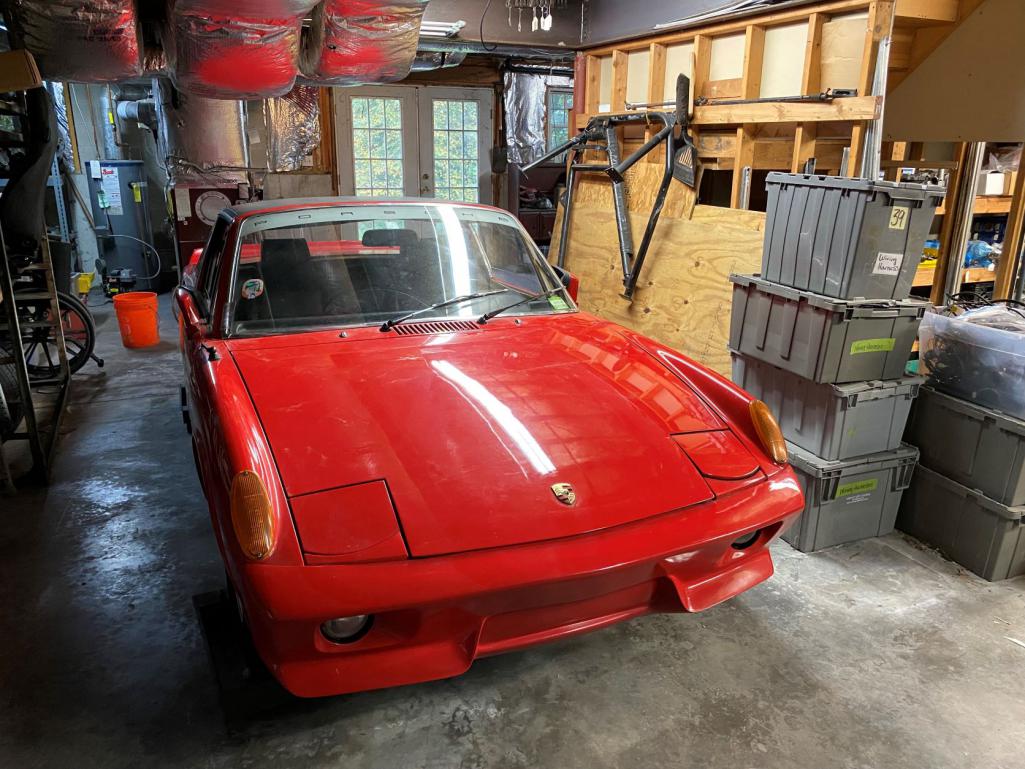
All the take-off parts will be available for sale.
Posted by: Tom1394racing Feb 24 2022, 11:54 AM
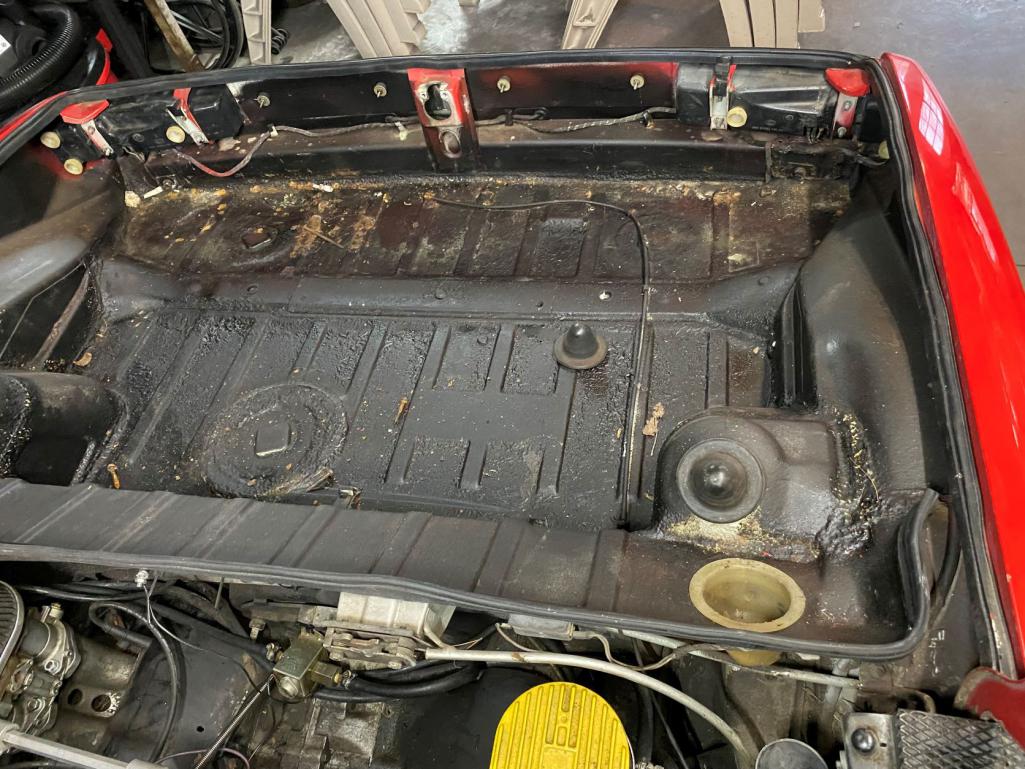
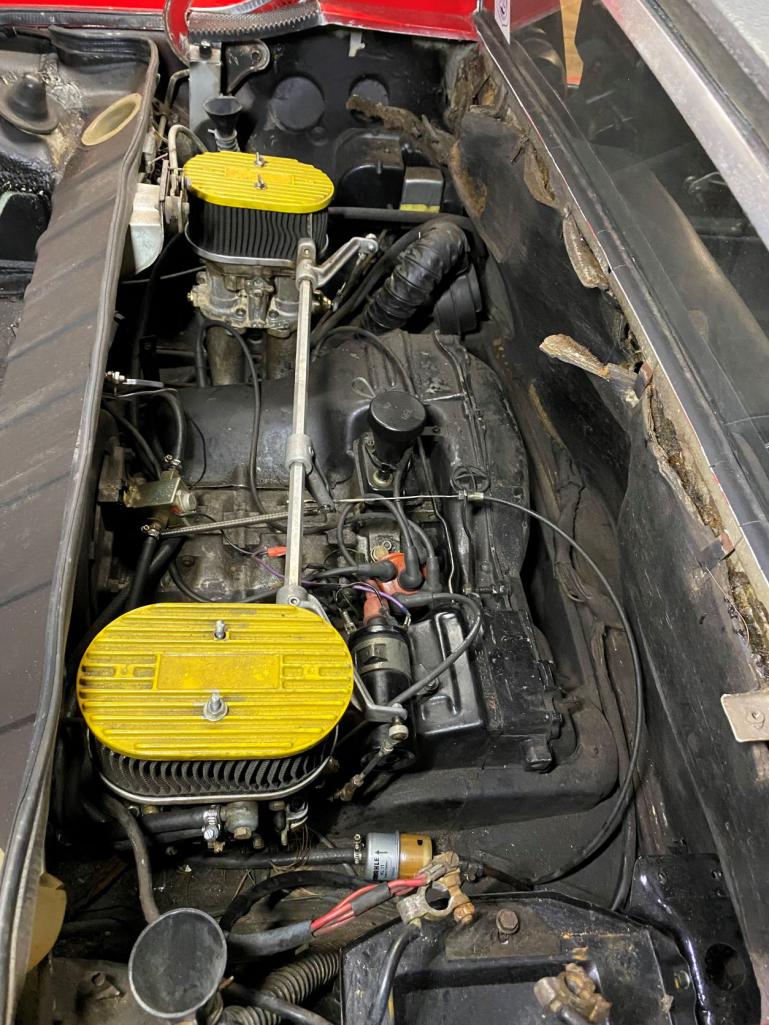
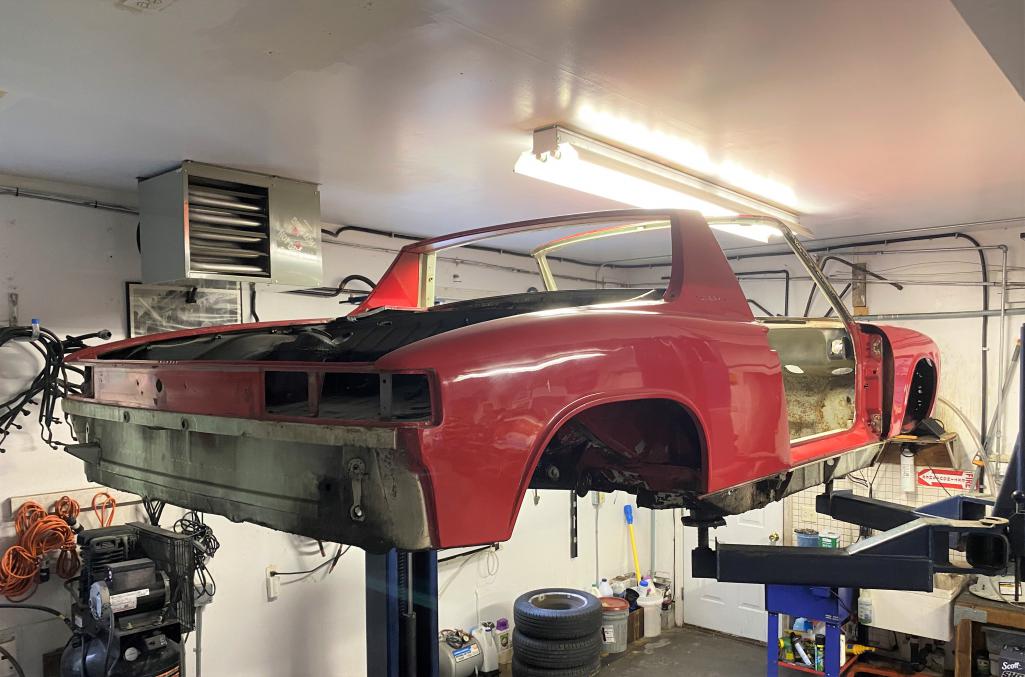
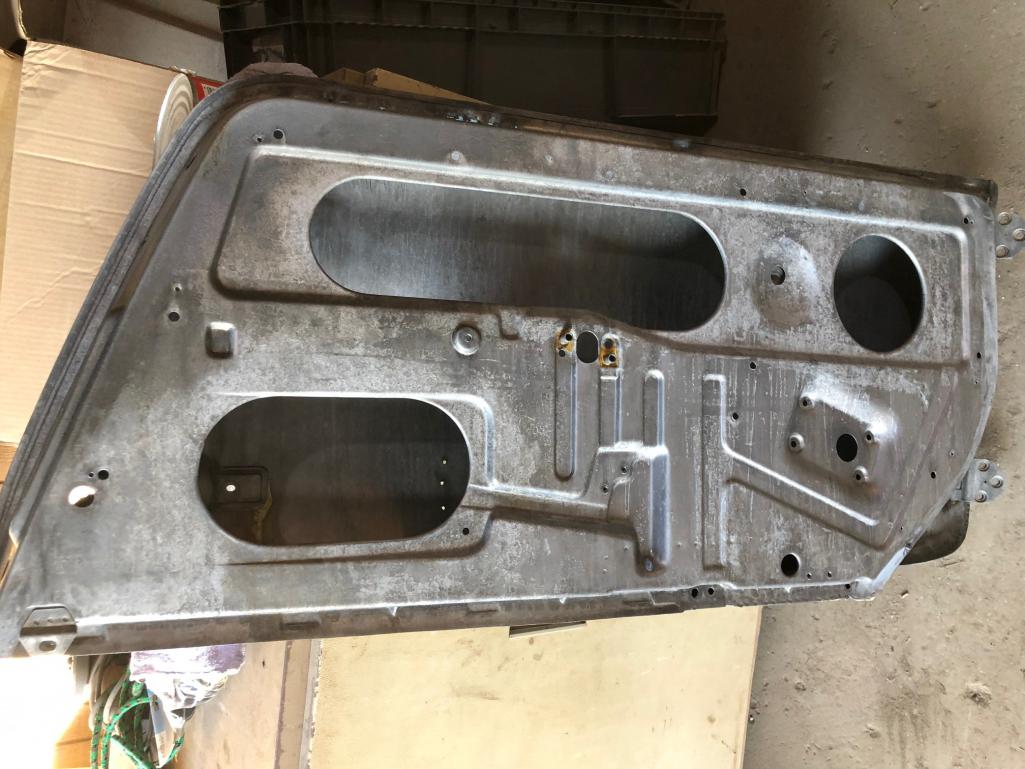
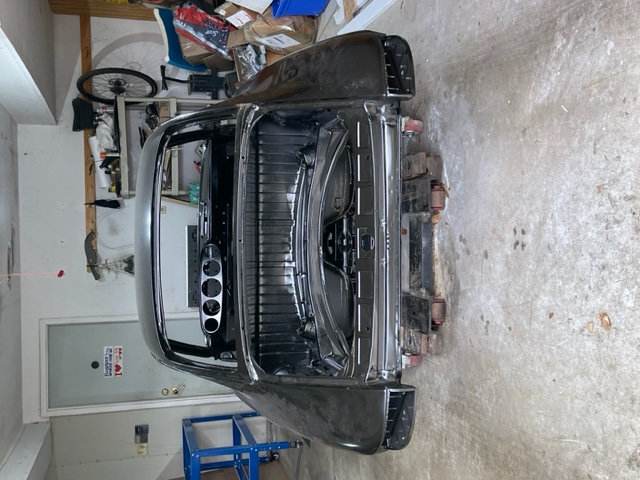
Over the past month, I have slowly been stripping the car down and discovering the rust.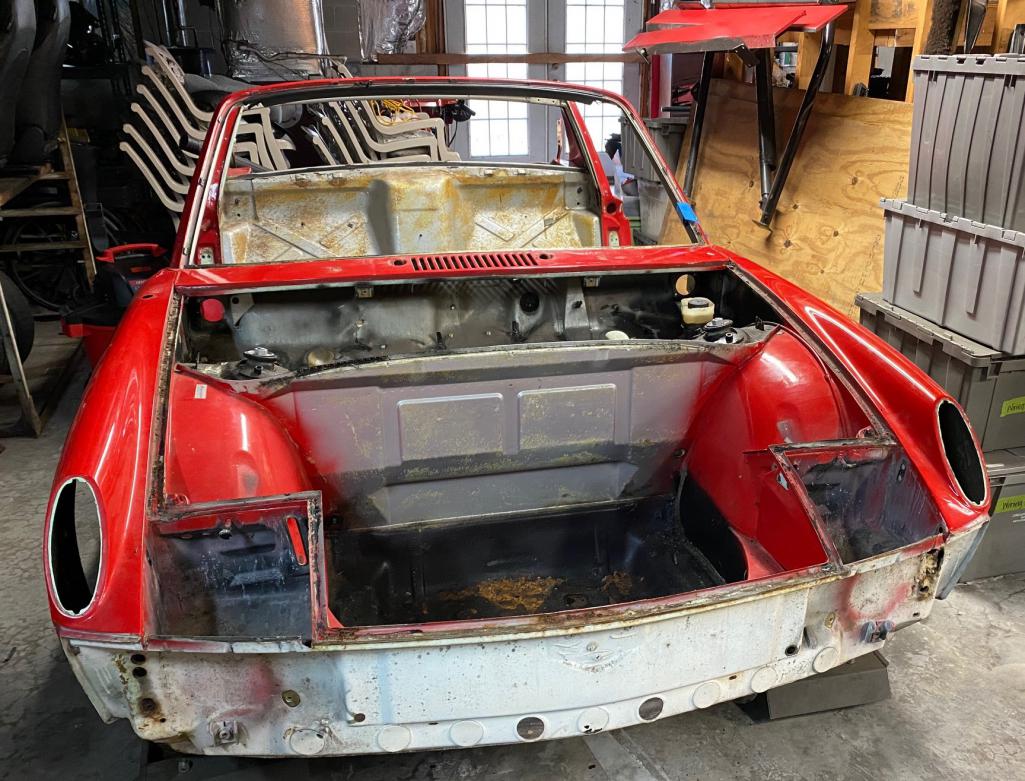
Posted by: Tom1394racing Feb 24 2022, 01:27 PM
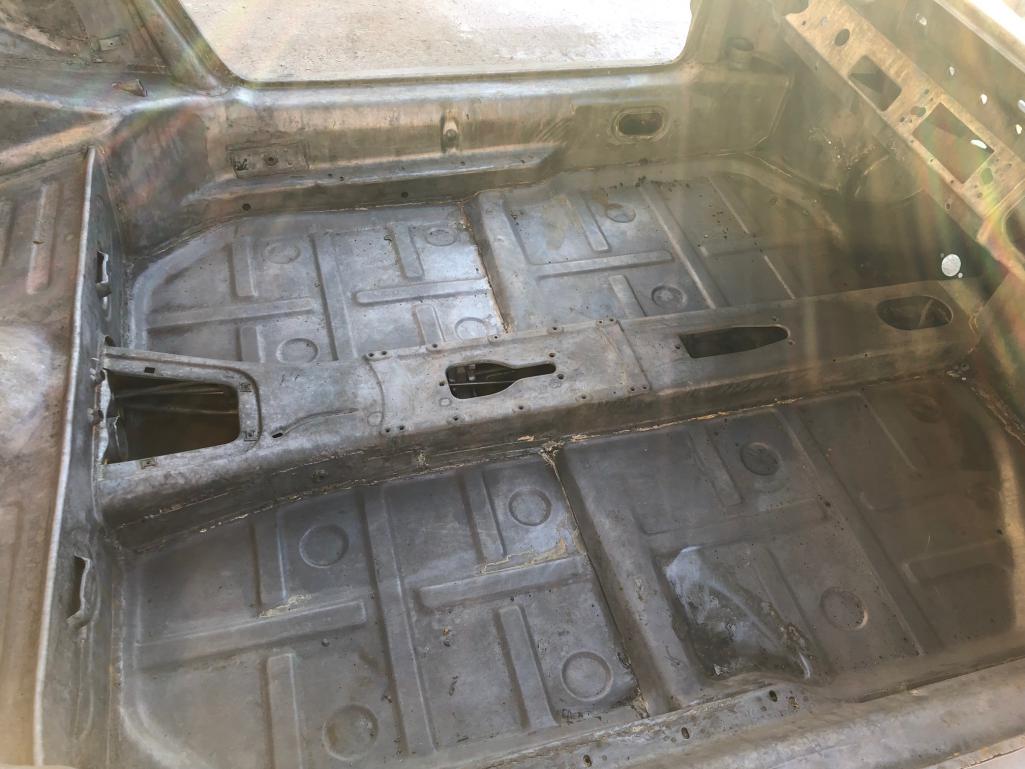
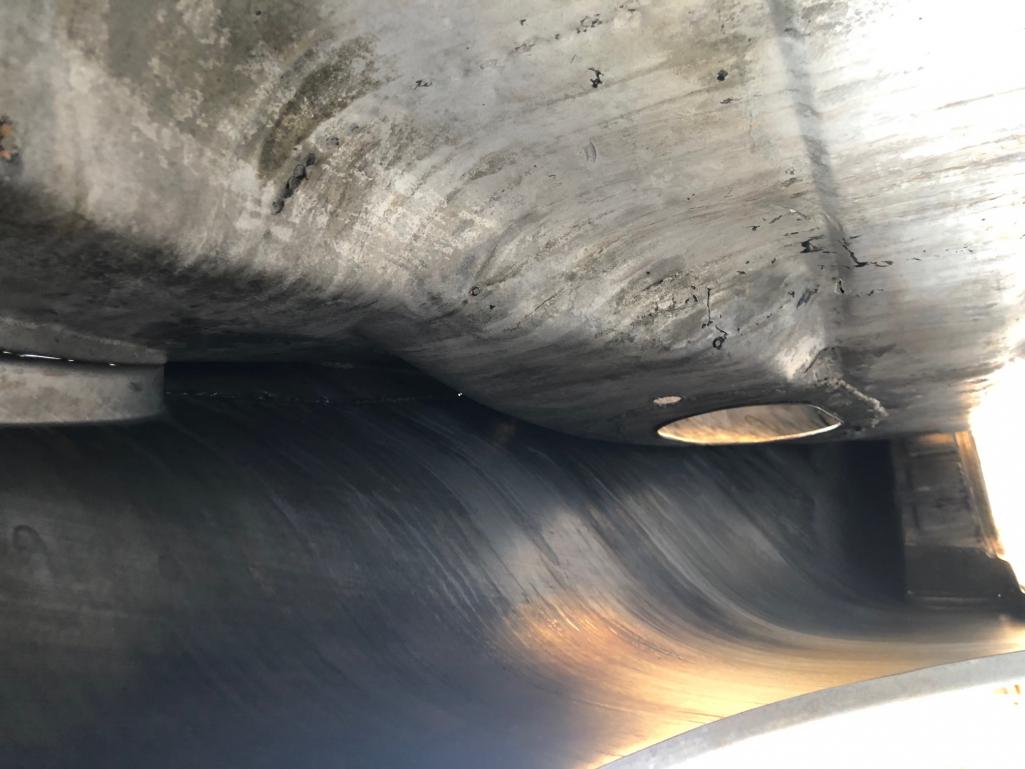
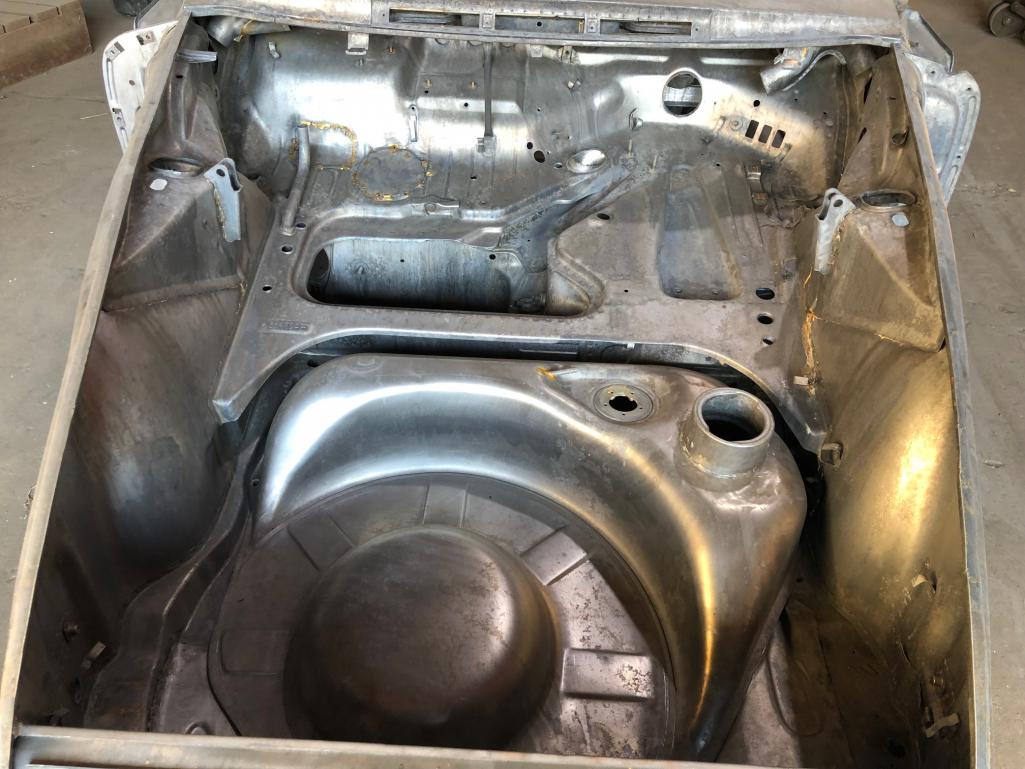
More rust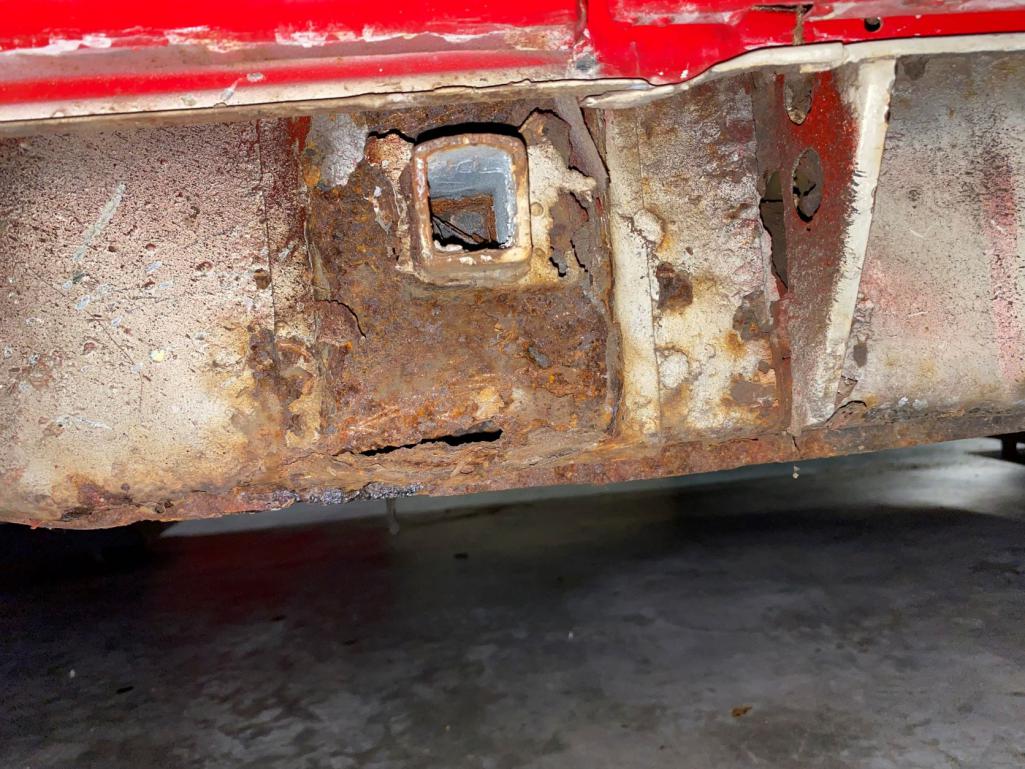
I think I have gone about as far as I can with stripping the car until I move it into my garage and onto my lift. Then I can remove the engine & gearbox and the suspension and get a good look at the underside.
Posted by: ChrisFoley Feb 24 2022, 03:37 PM
No surprises there. The CA car on my lift is worse.
BTW, did you get my email reply last month?
Posted by: IronHillRestorations Mar 4 2022, 07:56 PM
Let me know if I can offer any advice Tom. You’ve been helpful with parts over the years. I can make a custom engine harness for you, when you get to that point.
Posted by: Tom1394racing Mar 7 2022, 09:51 AM
Let me know if I can offer any advice Tom. You’ve been helpful with parts over the years. I can make a custom engine harness for you, when you get to that point.
Perry
Thanks for your generous offer. I am in a parts gathering mode right now. I will not hesitate to reach out for help and advice as I move forward.
Posted by: Lucky9146 Mar 7 2022, 10:32 AM
Tom
Happy to help in any way possible.
I was fortunate to start with a car that was an abandoned project and already flared and painted. 3.0 engine Webers. I recommend metal flares.
I have a thread which may help with some of your build.
http://www.914world.com/bbs2/index.php?showtopic=261197&hl=
Posted by: Tom1394racing Apr 2 2022, 08:59 AM
I have been able to source some cool parts for this project.
Early sandcast 250 mm fan/shroud & 2 bolt strap to go with the 3.0L I'll be building 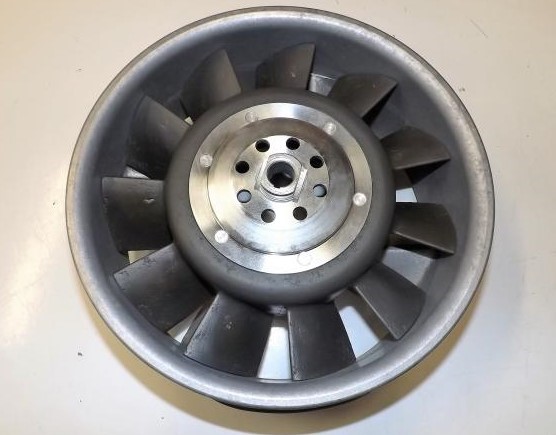
"69-73 911 rear hubs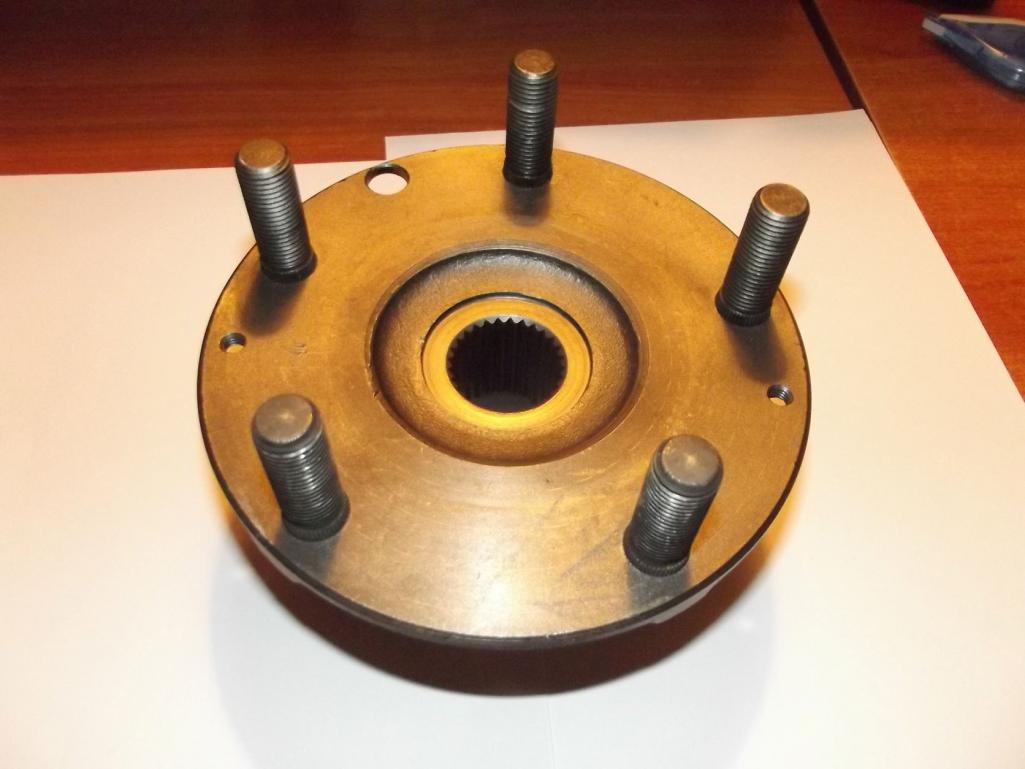
Pair of Early 911S front calipers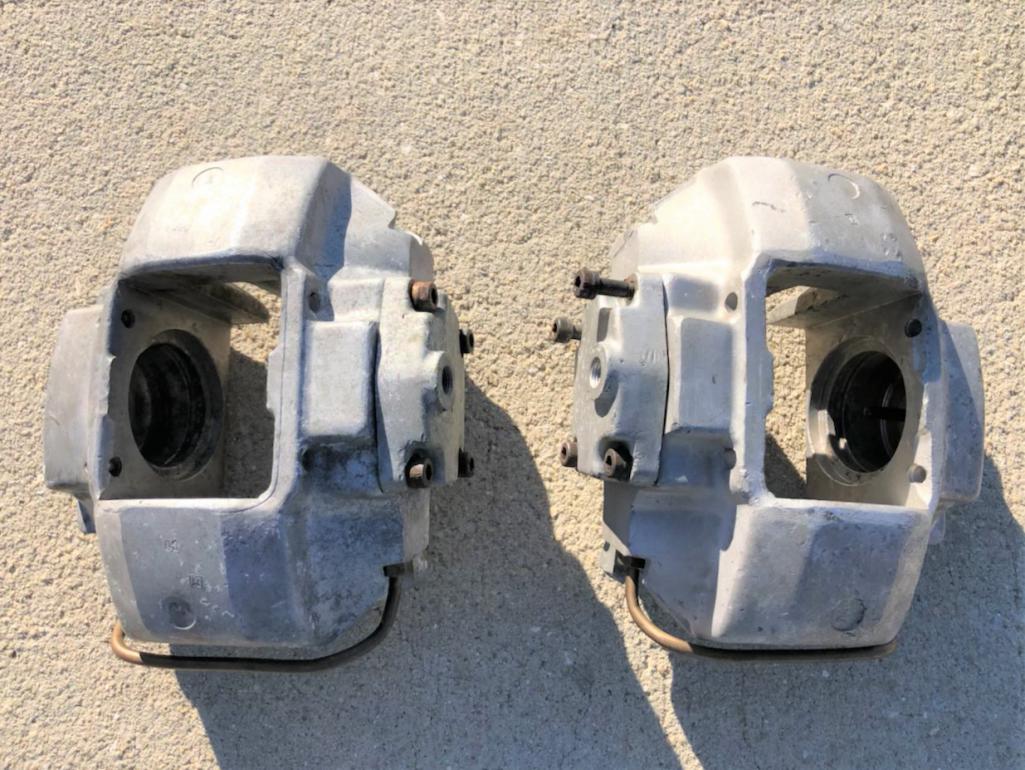
Unused pair of Ben's heat exchangers
Bilstein front struts with early 911 hubs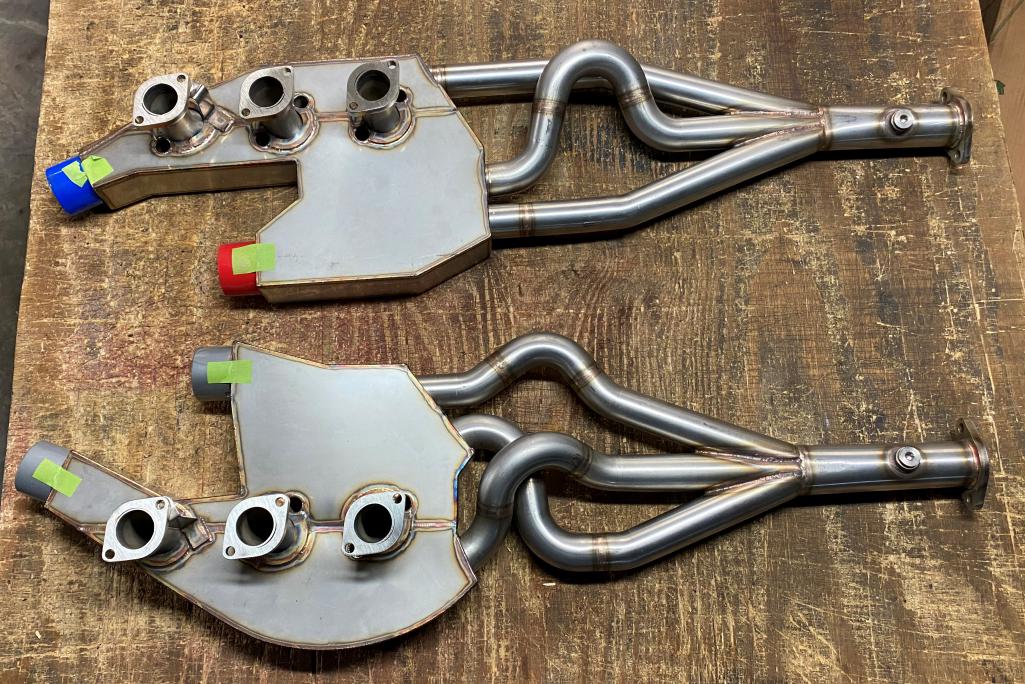
Posted by: BadToTheBown Apr 2 2022, 11:17 AM
Unused pair of Ben's heat exchangers
Really digging those headers, where did you get them?
Posted by: mb911 Apr 2 2022, 12:56 PM
Tom working on tanks now let me know when your ready.
Posted by: Tom1394racing Apr 6 2022, 02:49 PM
Look what showed up today from the UK.
Posted by: ibmiked Apr 6 2022, 07:58 PM
For anyone who doesn’t know, Tom is an invaluable resource in the early 911 community and an all around great and generous guy.
Tom, we fabricated this roll bar that ties into the longitudinals but has a low ‘climb over’. It also fits under the targa top. It works wonders and doesn’t make getting in or out measurably more difficult. I’m sure you can find a competent welder to make you one too.
Posted by: jjeffries Apr 10 2022, 07:48 PM
Hi Tom, here’s my first post on 914World … I’ve been reading some amazing threads here for the past few months. Didn’t realize you’d started your 914 journey; will be watching with much interest.
Tom was instrumental in helping me with my 82 SC which I bought disassembled in 2014 and had on the road two years later.
I still have the SC and am also rehabilitating the other VW/Porsche lovechild, a 924, albeit an 87 S.
Kind regards,
John, also in Conn.
Posted by: Tom1394racing Apr 12 2022, 06:58 AM
For anyone who doesn’t know, Tom is an invaluable resource in the early 911 community and an all around great and generous guy.
Tom, we fabricated this roll bar that ties into the longitudinals but has a low ‘climb over’. It also fits under the targa top. It works wonders and doesn’t make getting in or out measurably more difficult. I’m sure you can find a competent welder to make you one too.
Hi Mike
Good to hear from you. I am thinking about the GT style roll bar with diagonals similar to those on yours. Auto Associates will do the fabrication and installation. Love those seats!
Posted by: brant Apr 12 2022, 07:42 AM
I still think a roll bar in a street legal car is dangerous
Why would someone put themselves into a “make re dangerous vehicle?”
Unless your wearing your helmet on your coffee run
Posted by: mepstein Apr 12 2022, 09:35 AM
I still think a roll bar in a street legal car is dangerous
Why would someone put themselves into a “make re dangerous vehicle?”
Unless your wearing your helmet on your coffee run
I don’t have the paper handy but it was proven to be very dangerous in an accident. There’s a good reason why every interior surface is padded. Just take a look at an in cockpit video of a car accident. People flail around a lot more than you think.
Posted by: blabla914 Apr 12 2022, 12:43 PM
Tom,
Excited to see how this build turns out.
If people want a little preview of what's to come, the RSR in Tom's signature was featured in Excellence in December of 2006. Armando also has a some nice pictures of his 911 on PBase.
Kelly
Posted by: ibmiked Apr 13 2022, 08:01 PM
Agreed, a roll bar is dangerous without a helmet. So too though is driving a 50 year old car that was designed and built before crumple zones and high strength steel in a world of 6,000lb SUVs driven by people whose attention is partially focused on their phones. We all accept a certain amount of risk when enjoying our cars.
Posted by: mepstein Apr 13 2022, 08:33 PM
Agreed, a roll bar is dangerous without a helmet. So too though is driving a 50 year old car that was designed and built before crumple zones and high strength steel in a world of 6,000lb SUVs driven by people whose attention is partially focused on their phones. We all accept a certain amount of risk when enjoying our cars.
914’s do have built in crumple zones. Why add something that’s proven to injure or kill you in an accident?
Posted by: ibmiked Apr 14 2022, 07:19 PM
Agreed, a roll bar is dangerous without a helmet. So too though is driving a 50 year old car that was designed and built before crumple zones and high strength steel in a world of 6,000lb SUVs driven by people whose attention is partially focused on their phones. We all accept a certain amount of risk when enjoying our cars.
914’s do have built in crumple zones. Why add something that’s proven to injure or kill you in an accident?
Why ride a motorcycle? Or a bicycle on a public road? This kind of talk is silly.
Posted by: davehg Apr 14 2022, 10:02 PM
I modded my roll bar in a similar fashion to the above pix, and during a discussion with the race shop that welded it, decided I would add roll bar pads in the areas around my head and neck. It may not look pretty, but I’ve seen what a TBI injury can do to a family, and it’s not worth the result of having my pretty shiny roll bar.
To each their own. Now back on the topic - fun project to follow. I’ve completed my 3.2 and nearly done with my 2.7 twin plug. Ben’s tank and heat exchangers and muffler are in my 2.7 and his sport GT muffler is in my 3.2. Lots of great help here on the forum, and shout out for Rich Johnston’s motor mount and throttle assembly, Eric at PMB, and Tangerine Racing’s shift rod kit, fuel lines, and brake lines, and folks like Bruce Stone and Rich at 914werke who have provided odds and sods parts.
And of course the incomparable Bernie Buschen who has thoughtfully and methodically built both engines and assembly - what a real mensch.
Posted by: brant Apr 15 2022, 06:43 AM
[/quote]
Why ride a motorcycle? Or a bicycle on a public road? This kind of talk is silly.
[/quote]
Nope
A brain injury is not silly
On a motorcycle you should also wear a helmet
Just like a car with a roll cage
Not silly
Actually smart
Posted by: ClayPerrine Apr 15 2022, 09:23 AM
[quote name='brant' date='Apr 15 2022, 07:43 AM' post='2995390']
[/quote]
Why ride a motorcycle? Or a bicycle on a public road? This kind of talk is silly.
[/quote]
Nope
A brain injury is not silly
On a motorcycle you should also wear a helmet
Just like a car with a roll cage
Not silly
Actually smart
[/quote]

You are less likely to be hurt in an accident when not wearing a seat belt than you are getting into an accident on a motorcycle while not wearing a helmet, but we still have mandatory seat belt laws for cars. And you are way less likely to be hurt at an Autocross than you are when riding a motorcycle on the street. But we still wear helmets when running in an Autocross.
Personally I think the people who get on a motorcycle in shorts, a wife beater t-shirt, flip flops, and sunglasses are stupid. And we as the general public have to support their long term medical care when they get squished by an 18 wheeler on the highway and somehow manage to live through it. 
My $.02.... To ride a motorcycle without a helmet should require you to sign a waiver stating that you agree that you or your family will pay all medical costs resulting from injuries that could have been prevented by wearing a helmet.
Sorry.. this is one of my pet peeves. In Texas it is perfectly legal to ride a motorcycle without a helmet, but if you don't put your seat belt on in a car, you get a ticket. That is hypocrisy of the stupidest level. I am a seatbelt fanatic. They save lives. And when I did ride a motorcycle on the street, I wore a helmet. But I think they should either repeal the seatbelt law or re-instate the mandatory helmet law.
I will get off my soap box now.
Clay
Posted by: ibmiked Apr 16 2022, 04:16 AM
Getting on a motorcycle or bicycle, even with a helmet, is always going to be a less safe choice than a car when it comes to being in an accident. That is an undeniable fact that I think we can all agree on. And yet every day millions of people choose to ride on public roads. They make a risk/reward choice and the pleasure they derive from something is strong enough that they are willing to accept the risk.
I think it’s safe to say that no one here has only their 914 as transportation. If your other car was built in the last 30 years, it has airbags which make it dramatically safer than our old Porsches. And yet, we all accept the fact that we are choosing a less safe alternative when we drive them, because of the joy we get. Everyone’s threshold is different and no one is denying that a roll bar is less safe.
Posted by: VegasRacer Apr 16 2022, 10:34 AM
A car with a roll bar is indeed dangerous.
Several times I have cut myself on one of the zip-ties used to hold the roll bar padding in place.
Posted by: lesorubcheek Apr 16 2022, 10:48 AM
You are less likely to be hurt in an accident when not wearing a seat belt than you are getting into an accident on a motorcycle while not wearing a helmet, but we still have mandatory seat belt laws for cars. And you are way less likely to be hurt at an Autocross than you are when riding a motorcycle on the street. But we still wear helmets when running in an Autocross.
Personally I think the people who get on a motorcycle in shorts, a wife beater t-shirt, flip flops, and sunglasses are stupid. And we as the general public have to support their long term medical care when they get squished by an 18 wheeler on the highway and somehow manage to live through it.
My $.02.... To ride a motorcycle without a helmet should require you to sign a waiver stating that you agree that you or your family will pay all medical costs resulting from injuries that could have been prevented by wearing a helmet.
Sorry.. this is one of my pet peeves. In Texas it is perfectly legal to ride a motorcycle without a helmet, but if you don't put your seat belt on in a car, you get a ticket. That is hypocrisy of the stupidest level. I am a seatbelt fanatic. They save lives. And when I did ride a motorcycle on the street, I wore a helmet. But I think they should either repeal the seatbelt law or re-instate the mandatory helmet law.
I will get off my soap box now.
Clay
Very well said Clay. In my opinion you nailed it.
Dan
Posted by: bahnzai Apr 16 2022, 11:20 AM
Hey guys, you know we are kinda walking all over the OP Tom’s 914-6 GT Tribute Project thread here…(me included now)
Good lively discussion, but he may need some space for some project pictures:)
Posted by: Tom1394racing Nov 1 2022, 12:14 PM
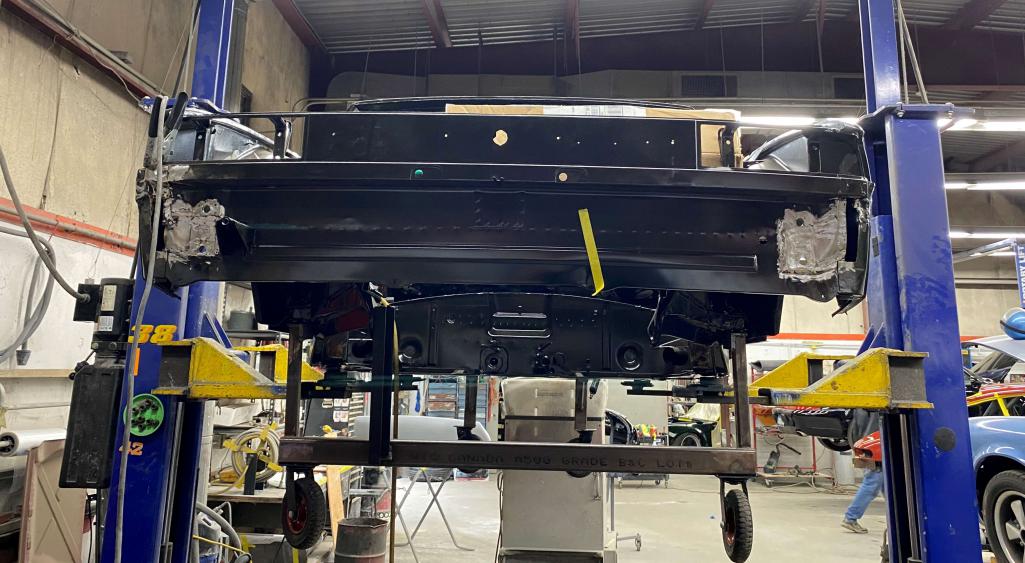
Time for an update on my GT project. After a long delay while waiting to clear garage space, I sold my 1970 911E restoration and moved the 914 from the basement to the garage and onto my lift. The car is now stripped to a bare shell. After consulting with Ken (body shop manager & co-owner) at Auto Associates, we have decided to send the shell out to be dipped, stripped and E-coated prior to starting the chassis restoration at Auto Associates.
Ken recommended a shop in Livonia, MI that does a multi step process consisting of:
1. Hot tank cleaning dip
2. Pressure wash to remove all dirt, gunk and paint
3. Acid dip to dissolve all rust
4. Neutralizing dip to stop the acid process
5. Epoxy primer for rust protection
The hot tank cleaning dip will dissolve anything that is not steel on the shell. This would include the longitudinal heater tubes. So we have decided to cut out the inner longs prior to the dipping and then replace the heater tubes and the longs as part of the chassis restoration. This should give us a chassis that is completely devoid of any rust and is also protected against any further rusting.
This will require an 11 hour one way drive from my home in CT to the shop in MI. I have searched and tried to locate a shop closer to my home that offers the cleaning, de-rusting and E-coating but have not located one. If anyone knows of a shop within a 6 hour radius of Hartford, CT that offers this process, I would be interested in checking them out.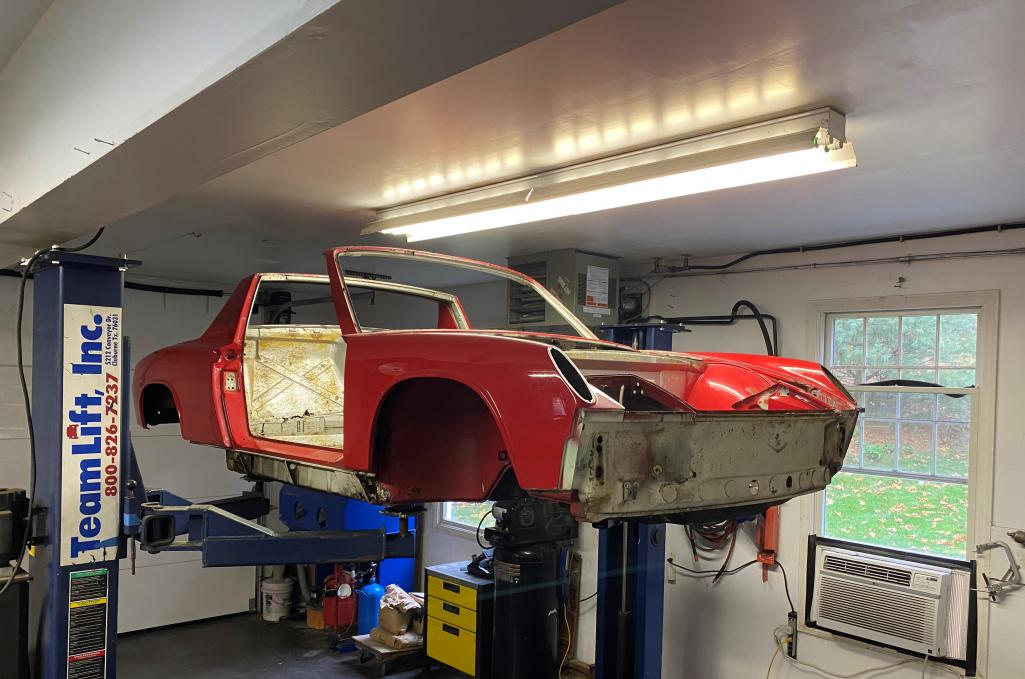
Posted by: Cairo94507 Nov 1 2022, 12:38 PM
As long as that trip will be, it will be well worth it once you begin chassis work, metal work, etc.
Posted by: mepstein Nov 1 2022, 06:45 PM
There’s a chemical strip shop west of Harrisburg PA. 3S chemicals llc. They quoted me ~ 3k for my 912. 3-6 month wait and 1k deposit. I ended up shipping the car to - pro strip Indy in Indianapolis IA. They had a good rep from people I know and I was very happy with their service. They charged $2300 and took 2 weeks once they received it. The other reason I sent it there is because there is a company near by that e-coats the chassis in a tank. Both companies have been great to deal with and only take money when the job is done.
If you chemically strip a chassis in a tank, I believe you need to e-coat it in a tank. The chemical strip removes everything including every bit of metal protection in between the seams and in all the hollow chambers. There’s no way to coat the metal between the seams unless you dip it. Normal paint is too thick. Cavity wax will coat the cavities but only a thin liquid like they use for e-coat will actually get between all the seams. At least this is what I have read, researched, experienced first hand on other cars and have decided is the right process. I also believe the past problems with chemical dip “leaking out of the seams” month later is not actually chemical leaking but moisture attacking the bare metal and rusting it. Chemically stripped metal starts rusting immediately, even neutralized, because it’s bare metal. The only way to protect it is to dip it again to get to all the metal that is raw.
So to get back to my car, the 912 is at the Ecoat place and should be done by the end of the week. It’s a 12 step process to clean the metal of all the flash rust and then e-coat. The chem dip exposed some additional corrosion but we’ll fix it when it gets home. The e-coat process is ~$3,500 and it was $900 each way to ship and $500 to ship between shops. Not cheap at all but I want a solid car that I can trust not to have issues down the road. I wouldn’t have minded trailering it out but having to make a second trip to pick up means I really wouldn’t have saved any money when all was done. Plus that’s a lot of time to make two up and back trips.
The thing that was in my favor on the early 912 is it has steel heater tubes. After 67/68, Porsche moved to the paper tubes.
Posted by: mepstein Nov 1 2022, 06:56 PM
Pics so far
Attached thumbnail(s)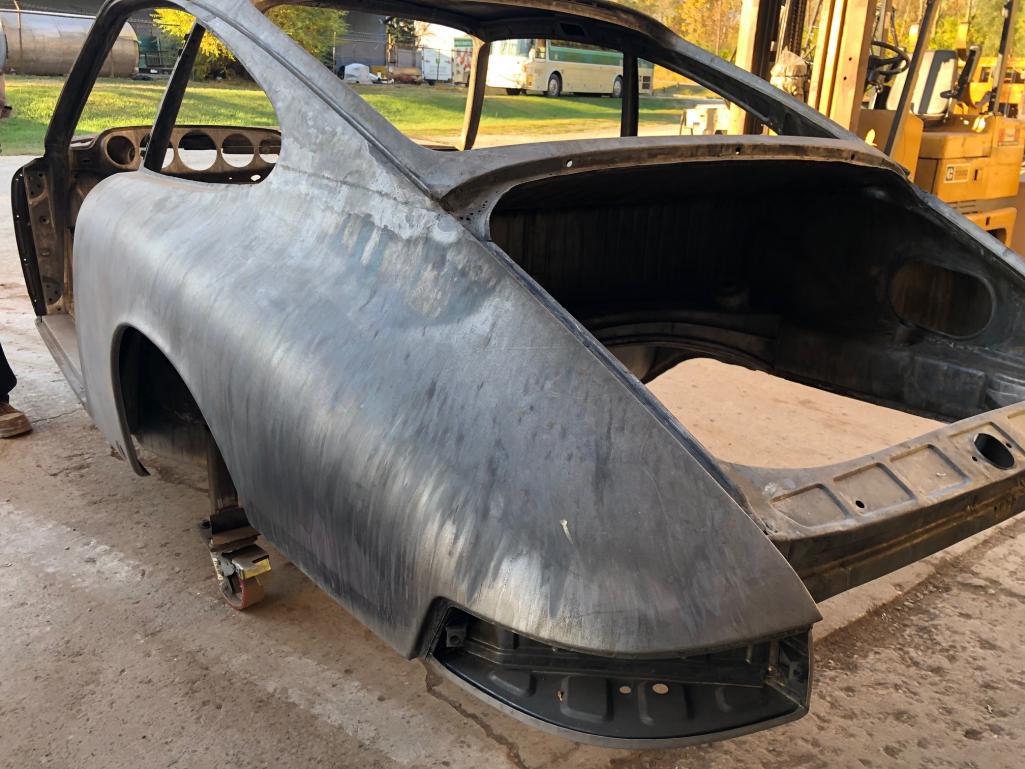
Posted by: Freezin 914 Nov 1 2022, 07:22 PM
Tom, Like most people here, I can’t wait until next update, keep them coming
Posted by: wonkipop Nov 1 2022, 07:51 PM
[quote name='ClayPerrine' date='Apr 15 2022, 09:23 AM' post='2995420']
[quote name='brant' date='Apr 15 2022, 07:43 AM' post='2995390']
[/quote]
Why ride a motorcycle? Or a bicycle on a public road? This kind of talk is silly.
[/quote]
Nope
A brain injury is not silly
On a motorcycle you should also wear a helmet
Just like a car with a roll cage
Not silly
Actually smart
[/quote]
You are less likely to be hurt in an accident when not wearing a seat belt than you are getting into an accident on a motorcycle while not wearing a helmet, but we still have mandatory seat belt laws for cars. And you are way less likely to be hurt at an Autocross than you are when riding a motorcycle on the street. But we still wear helmets when running in an Autocross.
Personally I think the people who get on a motorcycle in shorts, a wife beater t-shirt, flip flops, and sunglasses are stupid. And we as the general public have to support their long term medical care when they get squished by an 18 wheeler on the highway and somehow manage to live through it.
My $.02.... To ride a motorcycle without a helmet should require you to sign a waiver stating that you agree that you or your family will pay all medical costs resulting from injuries that could have been prevented by wearing a helmet.
Sorry.. this is one of my pet peeves. In Texas it is perfectly legal to ride a motorcycle without a helmet, but if you don't put your seat belt on in a car, you get a ticket. That is hypocrisy of the stupidest level. I am a seatbelt fanatic. They save lives. And when I did ride a motorcycle on the street, I wore a helmet. But I think they should either repeal the seatbelt law or re-instate the mandatory helmet law.
I will get off my soap box now.
Clay
[/quote]
yep
my business partner has been riding motorcycles for 40 years.
high powered high end italian bikes.
never gets on without full leathers, boots and full face.
he has hit the deck several times. and has always gotten up intact!
whenever i ride around in the car with him he is always commenting on the delicate asian university students getting about on motor scooters around here, in sandles, t shirts and non full face helmets. his standard remark, she might look pretty now, but she isn't going to be attractive with only half a jaw. 
i can still remember my time in chicago. guys on big harleys and gold wings would thunder past with no helmet and wearing a t shirt. on the interstate.
used to blow my mind. not in a good way.
seat belts are not even debated in australia. its been mandatory to have them and to have them on since the 1960s. no big deal. but each to his own i guess. i am surprised to hear its law in texas as i can still recall all the hoo haa in the USA in the late 80s over compulsory seat belt laws. as far as i can remember you guys did not have those laws back then. i remember the cars with those wacko auto seat belts that ran on tracks around the heads of the doors. i laughed every time i got in a car with those things.
you need to pad cages inside a car. even on the track. at least down here. no such thing as an unpadded roll cage in this neck of the woods. street or track.
Posted by: Cairo94507 Nov 2 2022, 07:10 AM
@http://www.914world.com/bbs2/index.php?showuser=10825 - Mark, I love that you are preparing that chassis to last forever. The end result will be a stunning example that will age perfectly. A bit of cash up front, but well worth all the effort and expense in my opinion.  Cheers, Michael
Posted by: mepstein Nov 2 2022, 08:43 AM
@http://www.914world.com/bbs2/index.php?showuser=10825 - Mark, I love that you are preparing that chassis to last forever. The end result will be a stunning example that will age perfectly. A bit of cash up front, but well worth all the effort and expense in my opinion.
Cheers, MichaelIt wouldn’t be happening if Jared Mcginness hadn’t taken over the metalwork. It needed a lot and Jared dove in and made it a solid car again. It will need some touch ups now that the chemicals uncovered some more corrosion but all expected and will be delt with.
A pretty good f-up on my part was having Jared do the lead work (there’s a good amount on these old cars) before the chemical dip. Now I know the dip removes lead. I just did it that way to give Jared more practice- LOL!
There’s a fair amount of lead on these cars that can’t be replaced with body plastic. We tried it at the old shop and it just cracked. Jared stepped up and learned how to fill with lead
Posted by: Tom1394racing Nov 4 2022, 08:56 AM
There’s a chemical strip shop west of Harrisburg PA. 3S chemicals llc. They quoted me ~ 3k for my 912. 3-6 month wait and 1k deposit. I ended up shipping the car to - pro strip Indy in Indianapolis IA. They had a good rep from people I know and I was very happy with their service. They charged $2300 and took 2 weeks once they received it. The other reason I sent it there is because there is a company near by that e-coats the chassis in a tank. Both companies have been great to deal with and only take money when the job is done.
If you chemically strip a chassis in a tank, I believe you need to e-coat it in a tank. The chemical strip removes everything including every bit of metal protection in between the seams and in all the hollow chambers. There’s no way to coat the metal between the seams unless you dip it. Normal paint is too thick. Cavity wax will coat the cavities but only a thin liquid like they use for e-coat will actually get between all the seams. At least this is what I have read, researched, experienced first hand on other cars and have decided is the right process. I also believe the past problems with chemical dip “leaking out of the seams” month later is not actually chemical leaking but moisture attacking the bare metal and rusting it. Chemically stripped metal starts rusting immediately, even neutralized, because it’s bare metal. The only way to protect it is to dip it again to get to all the metal that is raw.
So to get back to my car, the 912 is at the Ecoat place and should be done by the end of the week. It’s a 12 step process to clean the metal of all the flash rust and then e-coat. The chem dip exposed some additional corrosion but we’ll fix it when it gets home. The e-coat process is ~$3,500 and it was $900 each way to ship and $500 to ship between shops. Not cheap at all but I want a solid car that I can trust not to have issues down the road. I wouldn’t have minded trailering it out but having to make a second trip to pick up means I really wouldn’t have saved any money when all was done. Plus that’s a lot of time to make two up and back trips.
The thing that was in my favor on the early 912 is it has steel heater tubes. After 67/68, Porsche moved to the paper tubes.
Hey Mark
Thanks for the info on your choices for chemical stripping and E-coating. The shop I am considering in MI quoted me $3600 for hot tank dip/pressure wash/acid dip/neutralizing dip/e-coat dip. They do it all in house. Seems like the best choice for me especially when they are recommended by the shop that will be doing my chassis and paint work. 11 hours will be a long drive to make four times but I think it will be cheaper than shipping.
Posted by: mepstein Nov 4 2022, 11:29 AM
Just got done e-coat
Attached image(s)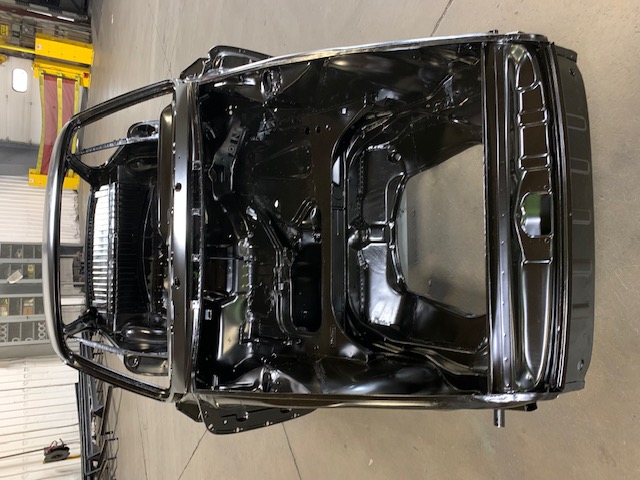
Posted by: TJB/914 Nov 4 2022, 11:52 AM
Just got done e-coat
M
Outstanding

Tom
Posted by: Cairo94507 Nov 4 2022, 01:22 PM
That is really cool Mark.
Posted by: rgalla9146 Nov 4 2022, 04:26 PM
Just got done e-coat
That's beautiful Mark. Absolutely the right way to go.
Structural work and repair has to be done before ?
How is bodywork done from this point forward without damaging the e-coat ?
The body looks like the current OEM replacement panels for 356s and 911s. Brand new.
Posted by: mepstein Nov 4 2022, 05:44 PM
Just got done e-coat
That's beautiful Mark. Absolutely the right way to go.
Structural work and repair has to be done before ?
How is bodywork done from this point forward without damaging the e-coat ?
The body looks like the current OEM replacement panels for 356s and 911s. Brand new.
The e-coat is really just primer that’s thin enough to flow into the seams (helped along by an electrostatic charge, like wet powder coat) and spots that a normal sprayed on primer wouldn’t get to. The very best way to handle chemical dip and e-coat is to dip, do metalwork dip again and then e-coat. But that’s two trips to the chem dip and an extra $5k. I have some touch ups to do. There was at least one spot on a door with holes where someone used a slide hammer. I also need to have some spots leaded in like the original. I actually had the lead done but unknown to me, it dissolves in the Chen dip. Learned a lesson on that. So I did not really care that the surface coating will get damaged. It’s doing its job below the surface. The chassis will probably sit for a while while I finish d a painter and save up to pay for it.
Posted by: dlee6204 Nov 4 2022, 05:55 PM
Just got done e-coat
Mind sharing the business that did the E-coat?
Posted by: mepstein Nov 4 2022, 06:14 PM
Just got done e-coat
Mind sharing the business that did the E-coat?
I used pro strip Indy for the chemical dip and they referred me to a business that they worked with and the Porsche shop where I used to work has used. I don’t know the name of the business, I just talk to the owner. If you want his name, pm me. Both shops do the job and then take payment. Some of the shops that I felt uneasy about wanted half up front and had waits up to 6+ months. These guys each took a week or two. It’s not cheap. Plan on spending around 8k by the time you pay to ship the car around. This chassis was pretty corroded inside and out and I felt this was the only way to have a solid, corrosion free chassis going forward.
Posted by: mb911 Nov 5 2022, 08:25 AM
Just got done e-coat
Mind sharing the business that did the E-coat?
I used pro strip Indy for the chemical dip and they referred me to a business that they worked with and the Porsche shop where I used to work has used. I don’t know the name of the business, I just talk to the owner. If you want his name, pm me. Both shops do the job and then take payment. Some of the shops that I felt uneasy about wanted half up front and had waits up to 6+ months. These guys each took a week or two. It’s not cheap. Plan on spending around 8k by the time you pay to ship the car around. This chassis was pretty corroded inside and out and I felt this was the only way to have a solid, corrosion free chassis going forward.
For 8 k that’s a great deal. I wish I had a chassis I could send out for that process. Well maybe I do. Hmm I have a 74 that could use this setup.
Posted by: mepstein Nov 5 2022, 11:23 AM
Just got done e-coat
Mind sharing the business that did the E-coat?
I used pro strip Indy for the chemical dip and they referred me to a business that they worked with and the Porsche shop where I used to work has used. I don’t know the name of the business, I just talk to the owner. If you want his name, pm me. Both shops do the job and then take payment. Some of the shops that I felt uneasy about wanted half up front and had waits up to 6+ months. These guys each took a week or two. It’s not cheap. Plan on spending around 8k by the time you pay to ship the car around. This chassis was pretty corroded inside and out and I felt this was the only way to have a solid, corrosion free chassis going forward.
For 8 k that’s a great deal. I wish I had a chassis I could send out for that process. Well maybe I do. Hmm I have a 74 that could use this setup.
It would be a lot less for someone in the mid west who can drop off and pick up. Closer to 6k. It just didn’t make sense for me to do the drive, stay over and drive home - 2X. That’s four 10 hour days of driving to save a couple hundred dollars.
Posted by: r_towle Nov 6 2022, 07:16 PM
What happened to the guy building a GT tribute 914?
I got to “I’m dipping it”
I’m at that decision, so please update the choice, Heater tube solution…and how things are going with the 914 please.
Rich
Posted by: Tom1394racing Nov 29 2022, 09:01 AM
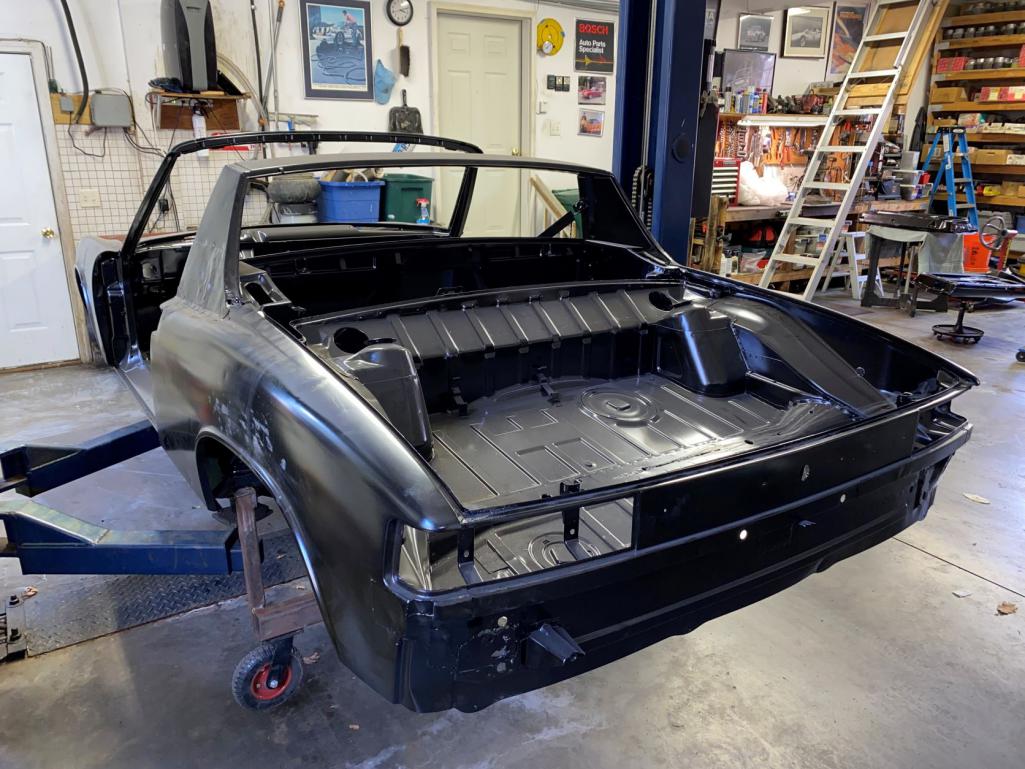
The shell has been stripped and mounted on a custom cart for transport. The car will go next to Auto Associates where the inner longs will be removed along with the Al heater tubes. In addition, they will install longitudinal braces. Then the shell will be shipped to International Paint Stripping in Romulus, MI. They are the closest shop that does the Hot Tank/Acid/E-Coat Dipping all under one roof. Once the dipping has been completed the car will go back to Auto Associates for the chassis restoration and GT conversion.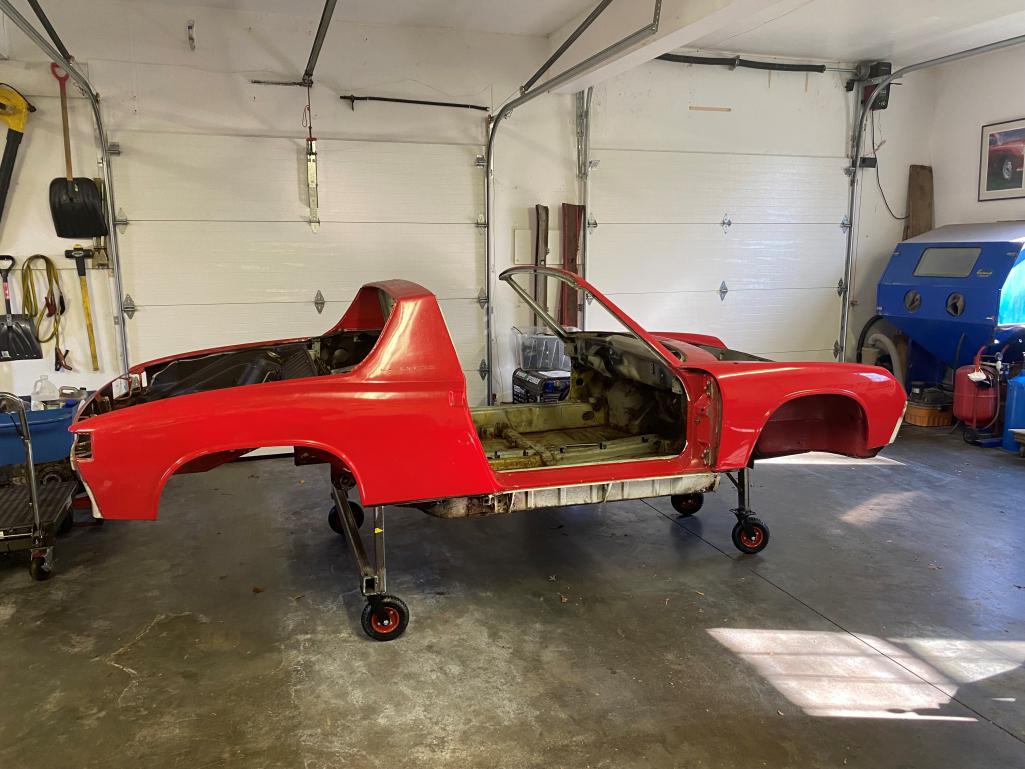
Posted by: Lg914 Nov 29 2022, 05:58 PM
[quote name='Tom1394racing' post='3038974' date='Nov 1 2022, 01:14 PM']
Time for an update on my GT project. After a long delay while waiting to clear garage space, I sold my 1970 911E restoration and moved the 914 from the basement to the garage and onto my lift. The car is now stripped to a bare shell. After consulting with Ken (body shop manager & co-owner) at Auto Associates, we have decided to send the shell out to be dipped, stripped and E-coated prior to starting the chassis restoration at Auto Associates.
Ken recommended a shop in Livonia, MI that does a multi step process consisting of:
1. Hot tank cleaning dip
2. Pressure wash to remove all dirt, gunk and paint
3. Acid dip to dissolve all rust
4. Neutralizing dip to stop the acid process
5. Epoxy primer for rust protection
Be sure to let us know how it goes. I am very interested in the process.
Good luck.
Posted by: Tom1394racing Jan 11 2023, 03:25 PM
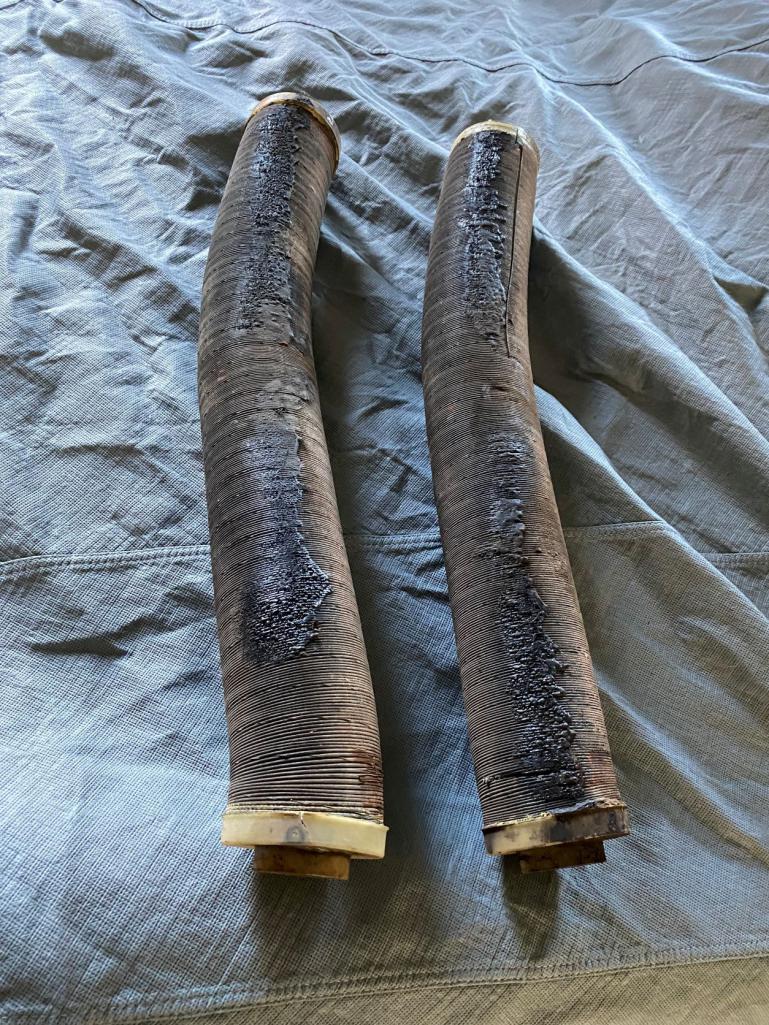
Since my last posting, the external longs were opened up and the heater tubes removed. Stiffening diagonals were also installed and the car was shipped to Livonia, MI for the triple dip process.
Attached thumbnail(s)
Posted by: Tom1394racing Jan 11 2023, 03:29 PM
Inner longs don't look too bad and the heater tubes should be reusable.
Attached thumbnail(s)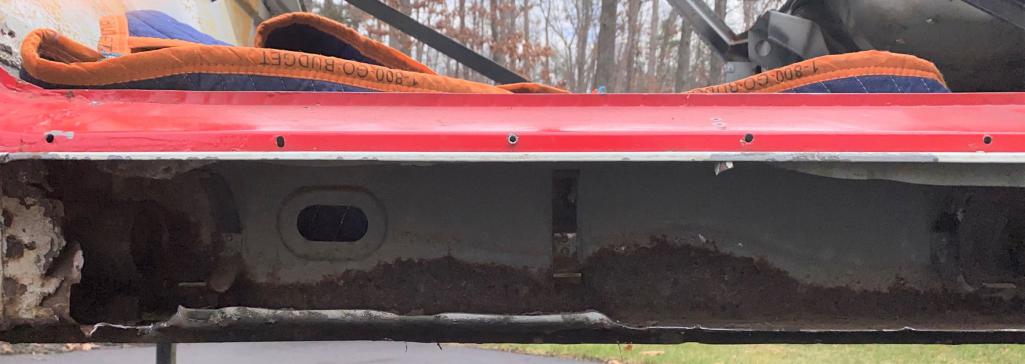
Posted by: -JR- Jan 11 2023, 04:27 PM
Time for an update on my GT project. After a long delay while waiting to clear garage space, I sold my 1970 911E restoration and moved the 914 from the basement to the garage and onto my lift. The car is now stripped to a bare shell. After consulting with Ken (body shop manager & co-owner) at Auto Associates, we have decided to send the shell out to be dipped, stripped and E-coated prior to starting the chassis restoration at Auto Associates.
Ken recommended a shop in Livonia, MI that does a multi step process consisting of:
1. Hot tank cleaning dip
2. Pressure wash to remove all dirt, gunk and paint
3. Acid dip to dissolve all rust
4. Neutralizing dip to stop the acid process
5. Epoxy primer for rust protection
The hot tank cleaning dip will dissolve anything that is not steel on the shell. This would include the longitudinal heater tubes. So we have decided to cut out the inner longs prior to the dipping and then replace the heater tubes and the longs as part of the chassis restoration. This should give us a chassis that is completely devoid of any rust and is also protected against any further rusting.
It's too bad I can't get service like that around Vancouver BC. I was quoted $17,000 for the strip job alone. There doesn't even seem to be any shops left doing chassis sized media blasting here either. Getting a chassis across the US boarder is a whole-nother issue too and don't need to get black listed as I have a lot of work states side.
I'm doing the next best, I figure. I'm going to muriatic acid treat it at home. Setting up sprayers and wands to get into those tough spots between panel and through the longs. After that's done I'll bust out my water blaster system to strip the exterior panels to uncover any other creative body work that might be lurking. Still need to figure out a spray system to get epoxy primer back into those places once done.
Posted by: TJB/914 Jan 11 2023, 06:11 PM
Inner longs don't look too bad and the heater tubes should be reusable.
Tom,
Reaching out if you need someone to do a looksee here in Michigan.
Born & raised in Romulus/Livonia & know about the shop.
Just wondering, so PM me if interested.
Tom 914er Michigan
Posted by: mepstein Jan 11 2023, 06:38 PM
Have to wait and see what it looks like after the dip. Sometimes it's just light corrosion, sometimes it's swiss cheese.
Posted by: gereed75 Jan 11 2023, 06:40 PM
JR, not sure what you are hoping to accomplish spraying muriatic acid (HCl) on your car. It will not strip paint or any other typical automotive coating. It could remove rust but it will most likely cause more damage than it will prevent or remove. It is also a very corrosive material to healthy steel not to mention living tissue.
Actually the whole term " acid stripping" is a bad misnomer. Immersion paint striping is actually done in alkaline solutions, not acidic ones.
Most rust removers are based on phosphoric acid. It is much less aggressive on clean steel (and human tissue), has some preference for attack on iron oxide and leaves a phosphate coating on clean steel that provides some flash rust protection and enhances paint adhesion. It does not remove coatings including oils and greases.
Not a chemist (maybe you are) but have a lot of real world experience using organic acids and metals and.... I have stayed in a Holiday Inn Express.
Posted by: Alain V. Jan 11 2023, 07:07 PM
Time for an update on my GT project. After a long delay while waiting to clear garage space, I sold my 1970 911E restoration and moved the 914 from the basement to the garage and onto my lift. The car is now stripped to a bare shell. After consulting with Ken (body shop manager & co-owner) at Auto Associates, we have decided to send the shell out to be dipped, stripped and E-coated prior to starting the chassis restoration at Auto Associates.
Ken recommended a shop in Livonia, MI that does a multi step process consisting of:
1. Hot tank cleaning dip
2. Pressure wash to remove all dirt, gunk and paint
3. Acid dip to dissolve all rust
4. Neutralizing dip to stop the acid process
5. Epoxy primer for rust protection
The hot tank cleaning dip will dissolve anything that is not steel on the shell. This would include the longitudinal heater tubes. So we have decided to cut out the inner longs prior to the dipping and then replace the heater tubes and the longs as part of the chassis restoration. This should give us a chassis that is completely devoid of any rust and is also protected against any further rusting.
It's too bad I can't get service like that around Vancouver BC. I was quoted $17,000 for the strip job alone. There doesn't even seem to be any shops left doing chassis sized media blasting here either. Getting a chassis across the US boarder is a whole-nother issue too and don't need to get black listed as I have a lot of work states side.
I'm doing the next best, I figure. I'm going to muriatic acid treat it at home. Setting up sprayers and wands to get into those tough spots between panel and through the longs. After that's done I'll bust out my water blaster system to strip the exterior panels to uncover any other creative body work that might be lurking. Still need to figure out a spray system to get epoxy primer back into those places once done.
You might want to look into a product called "Rust 911". I used it on my project. I hung a cheap tarp under the car and fed a submersible pump in a plastic tote to pump the fluid in varius spots on my tub.
It worked pretty good, but it is time consuming. see post #44 on my link
http://www.914world.com/bbs2/index.php?showtopic=357523&hl=
Posted by: gereed75 Jan 11 2023, 07:20 PM
rust 911 appears to be a chemically engineered phosphoric based product.
Posted by: -JR- Jan 11 2023, 08:33 PM
JR, not sure what you are hoping to accomplish spraying muriatic acid (HCl) on your car. It will not strip paint or any other typical automotive coating. It could remove rust but it will most likely cause more damage than it will prevent or remove. It is also a very corrosive material to healthy steel not to mention living tissue.
Actually the whole term " acid stripping" is a bad misnomer. Immersion paint striping is actually done in alkaline solutions, not acidic ones.
Most rust removers are based on phosphoric acid. It is much less aggressive on clean steel (and human tissue), has some preference for attack on iron oxide and leaves a phosphate coating on clean steel that provides some flash rust protection and enhances paint adhesion. It does not remove coatings including oils and greases.
Not a chemist (maybe you are) but have a lot of real world experience using organic acids and metals and.... I have stayed in a Holiday Inn Express.
Don't want to hijack the thread, but the the hope would be to eliminate and neutralize corrosion in areas that I don't want to cut open. The idea would not be to leave it on the metal though, it's a whole process. I've restored many Triumphs before, if you want to go down the rust rabbit hole. heh
All kidding aside the muriatic acid should do nicely and if properly post treated and sealed will be as close to new as I can get.
Thanks for the feedback!
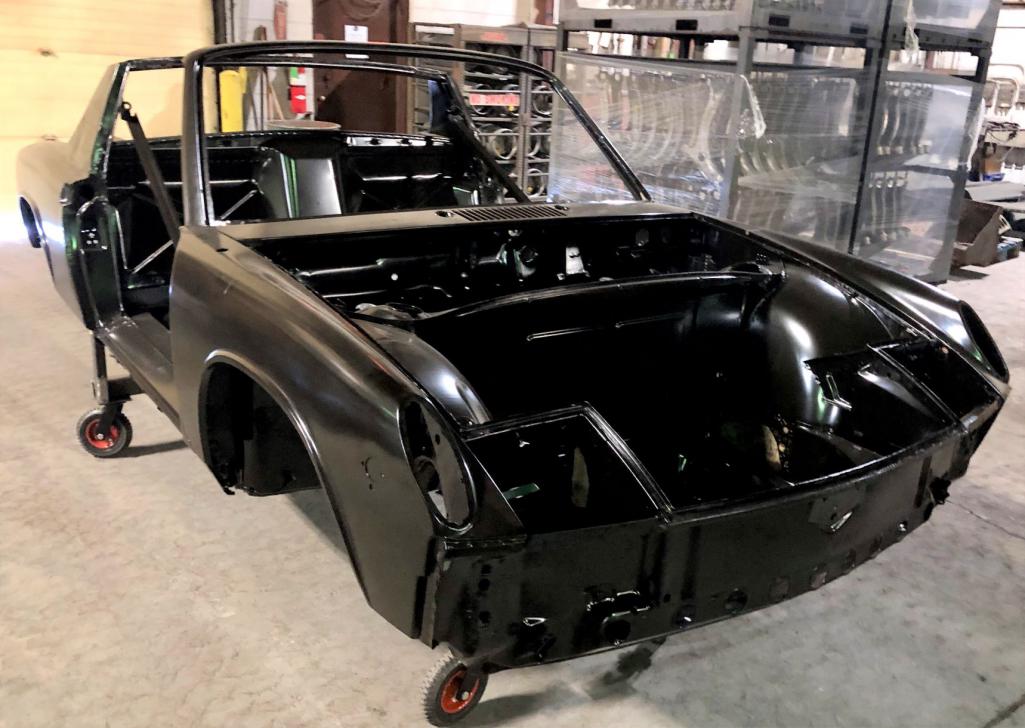
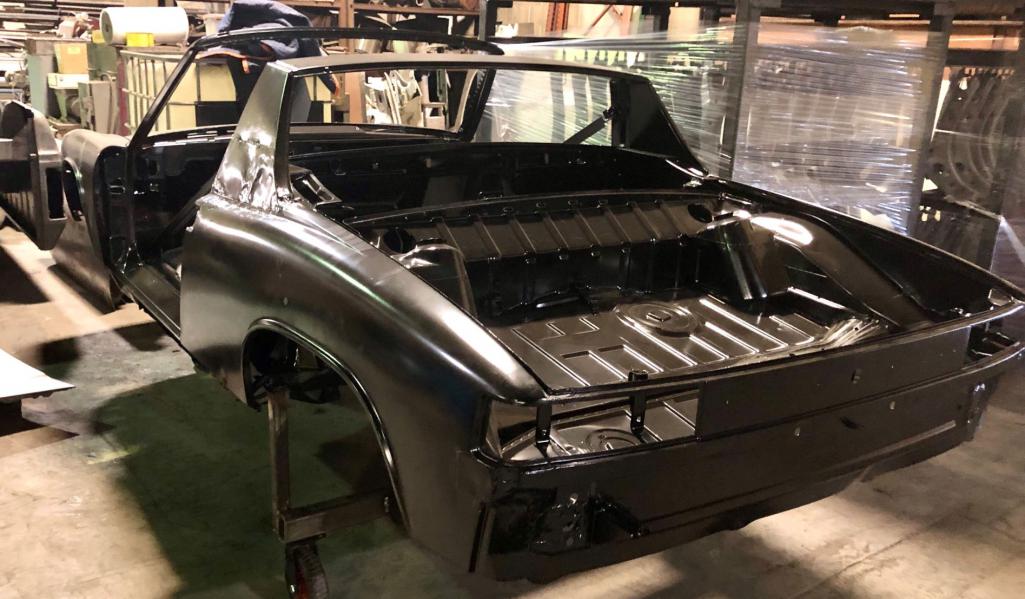
Posted by: Tom1394racing Jan 27 2023, 01:39 PM
The chassis has now completed the dipping/E-coat process. One of our fellow 914 World members was kind enough to drop by the shop in MI to snap a few pics. It will be shipped back to me in the next week or so. So far I am pleased with the overall process. More to come once I get it back home. Anyone who would like details on the shop, please PM me.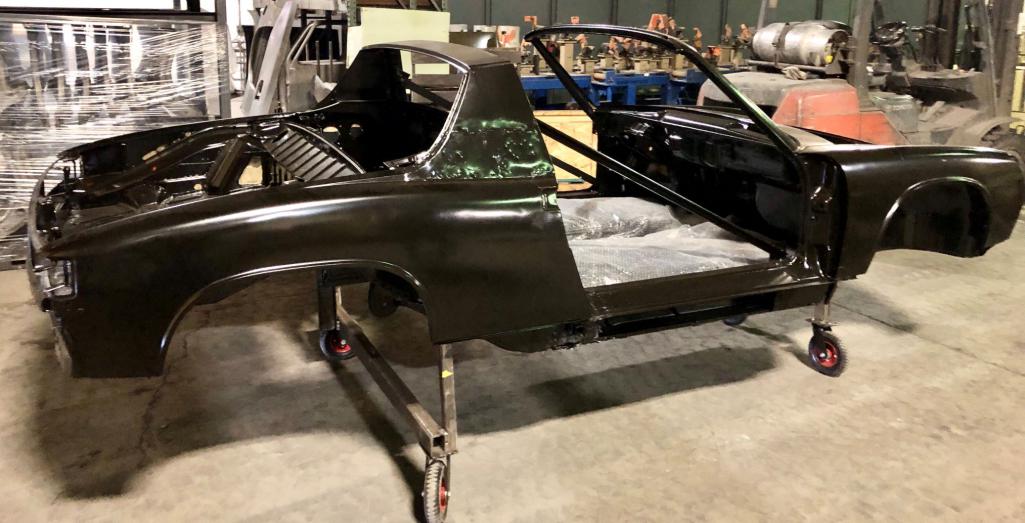
Posted by: mepstein Jan 27 2023, 03:22 PM
I just talked to Neil the other day. Our cars might come home together.
Posted by: Tom1394racing Jan 27 2023, 04:03 PM
Yes Mark...I spoke to Neil this afternoon.
Posted by: mepstein Feb 26 2023, 07:13 PM
We had to take your car off the truck to get to mine. So it’s touched ground in Landenberg PA for a moment. Then back on the truck.
Had to pull mine up my hill to get it into the garage.
Attached image(s)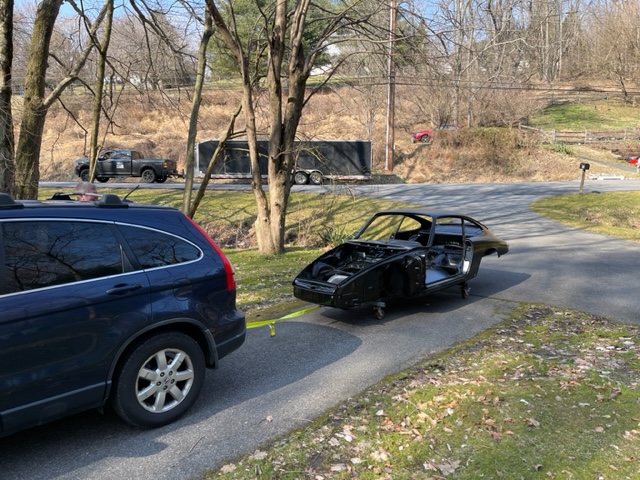
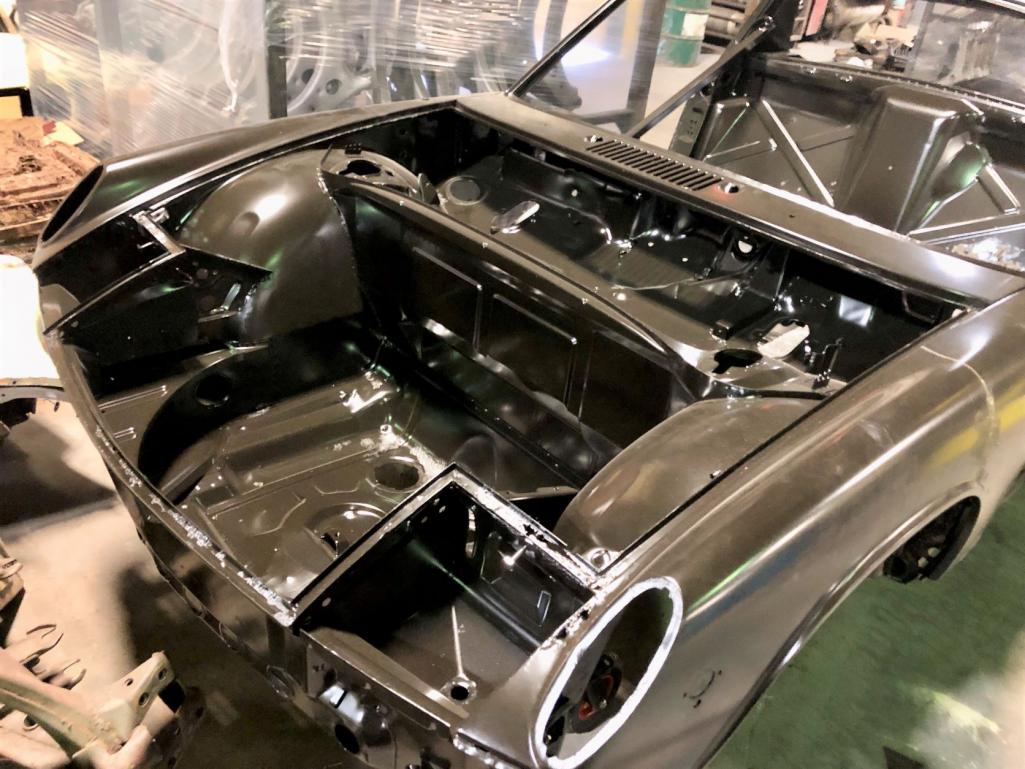
Posted by: Tom1394racing Feb 28 2023, 03:40 PM
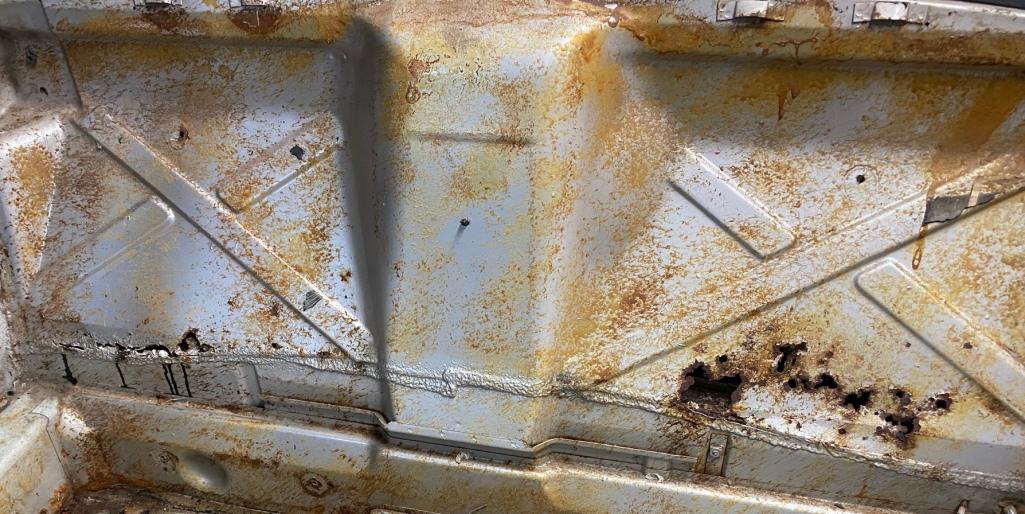
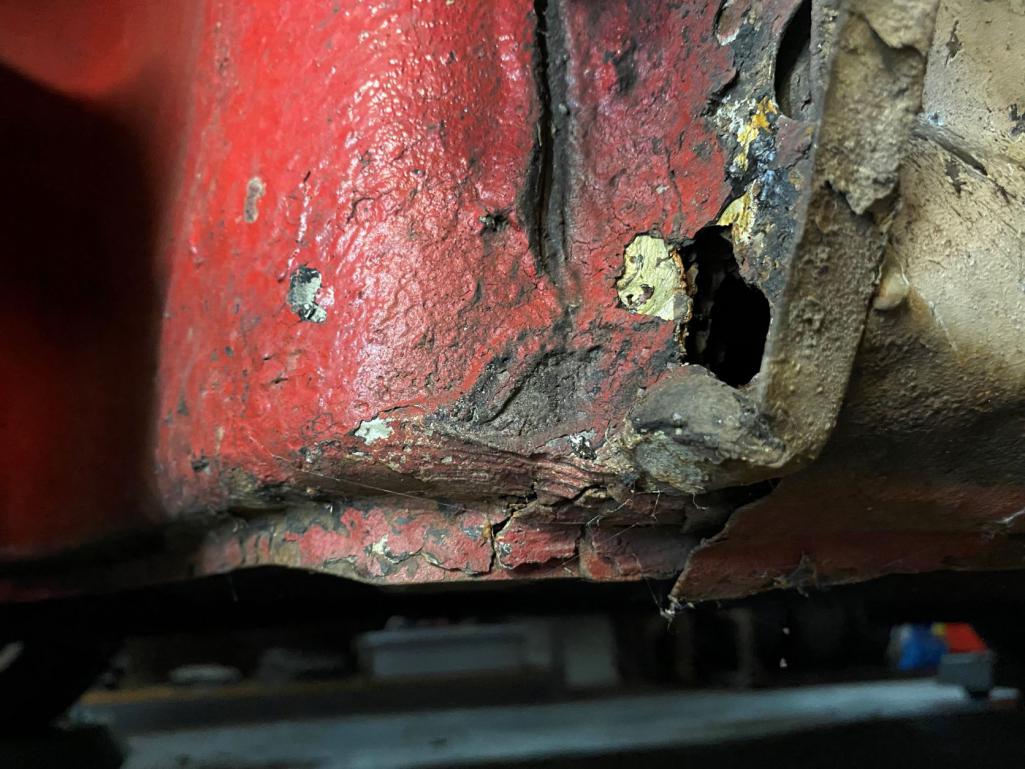
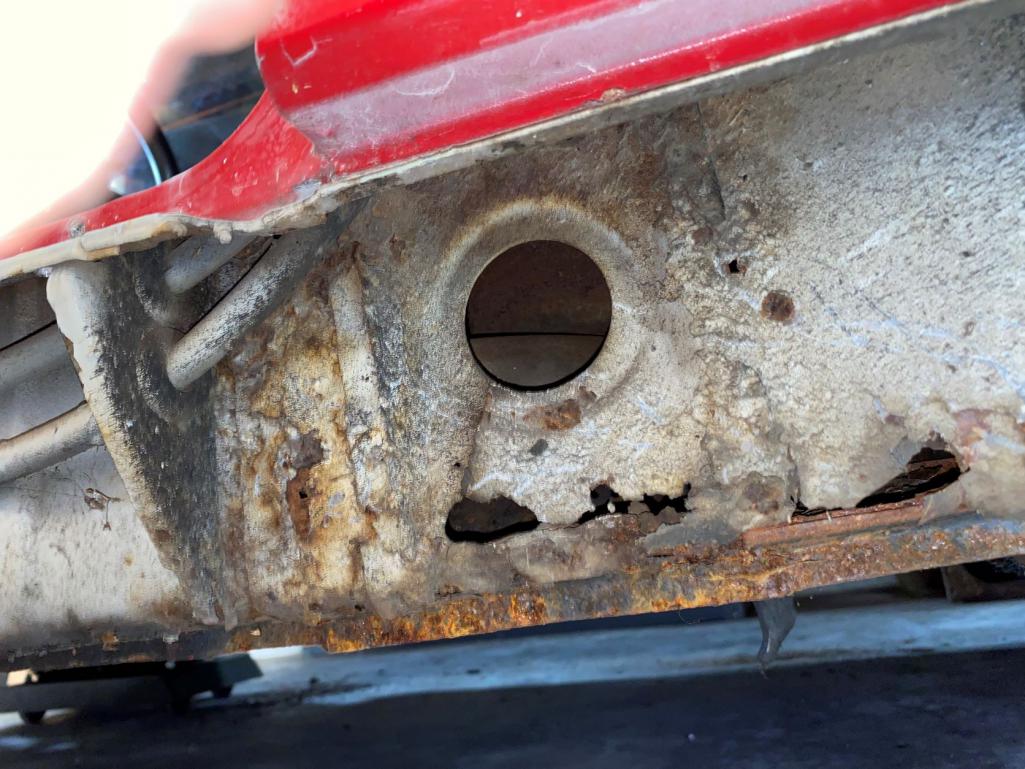
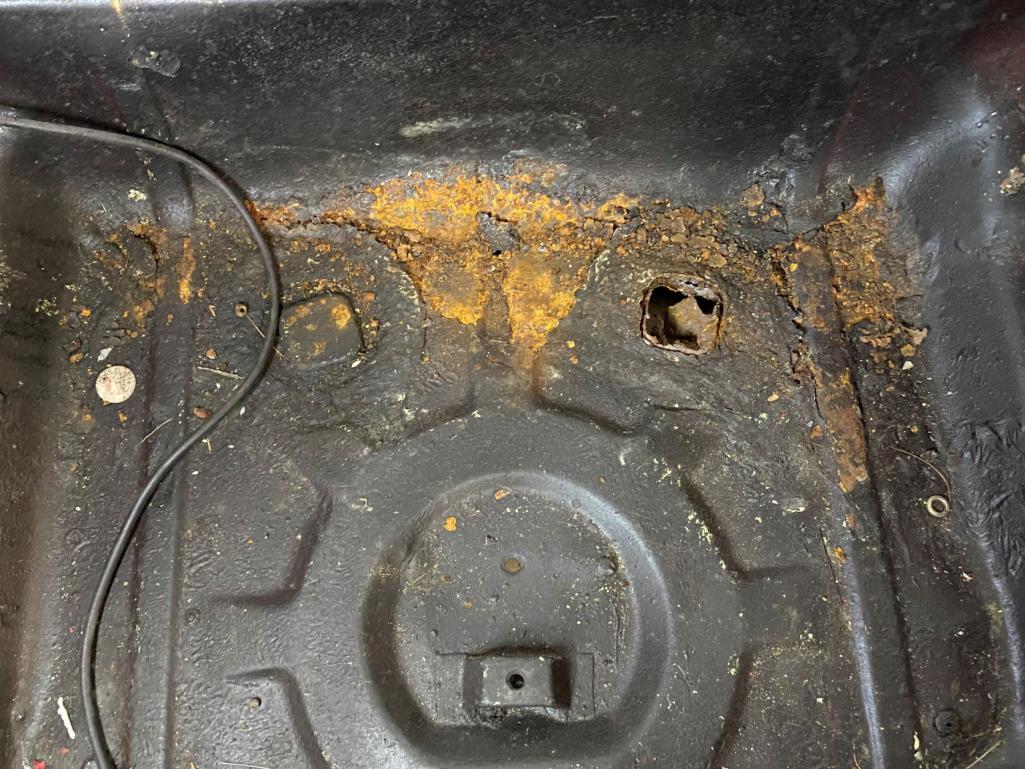
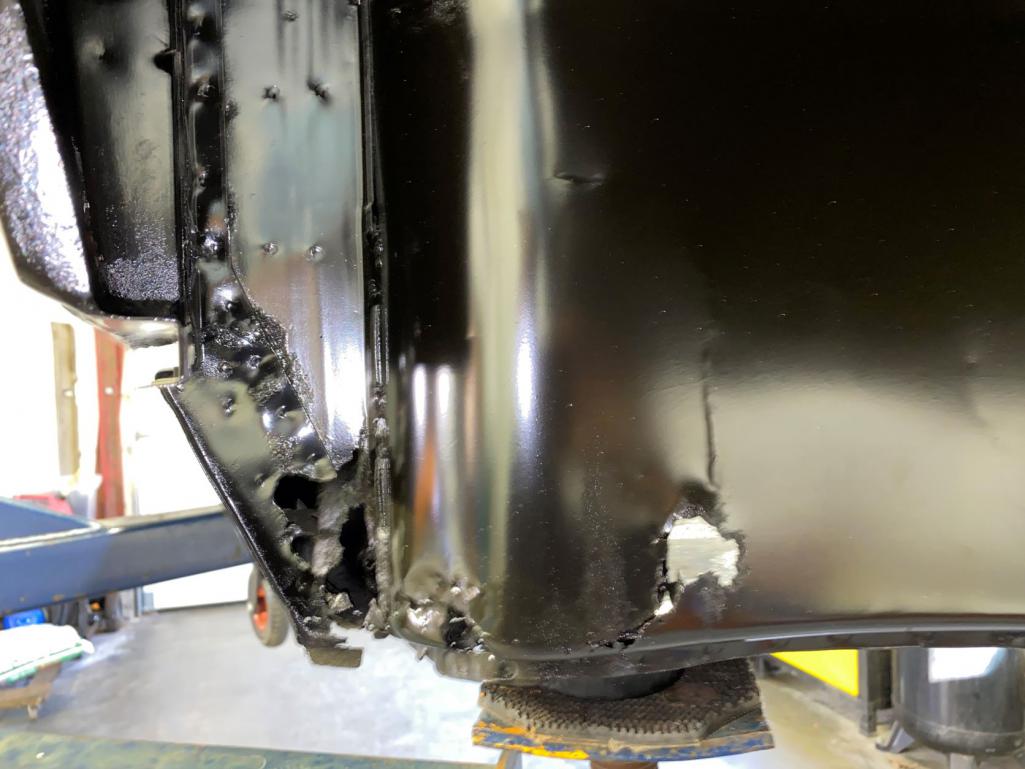
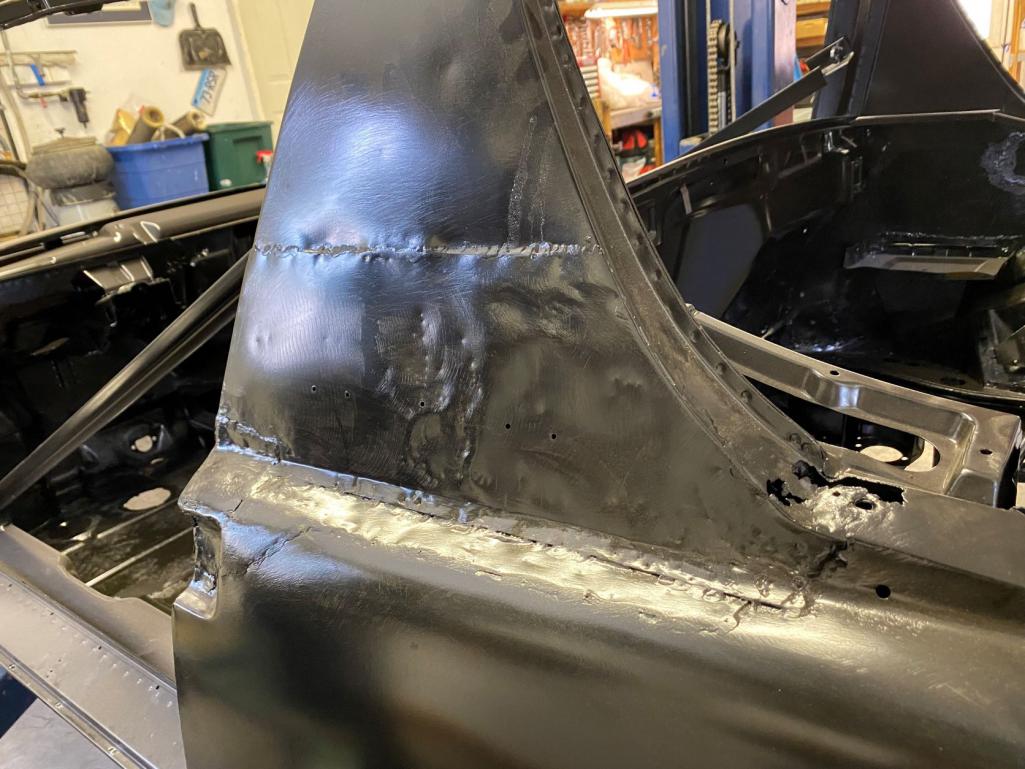
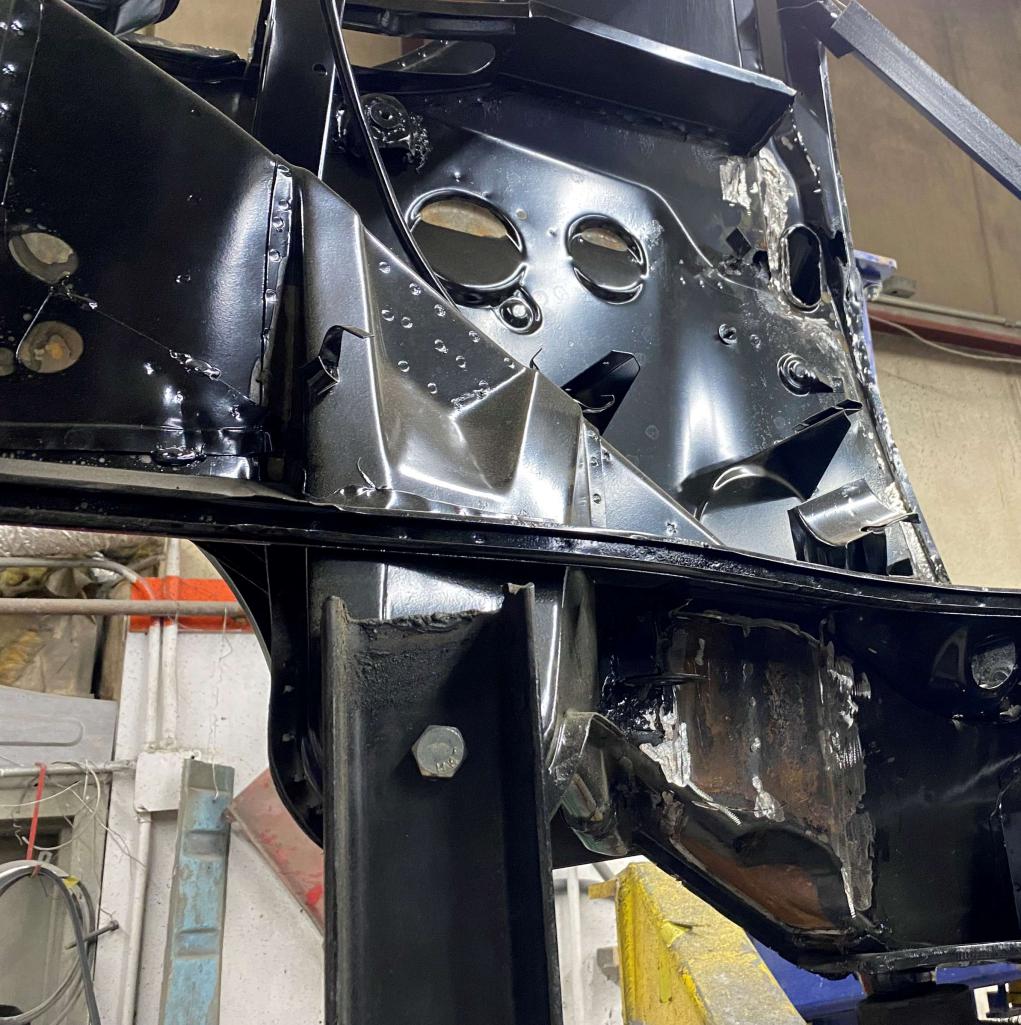
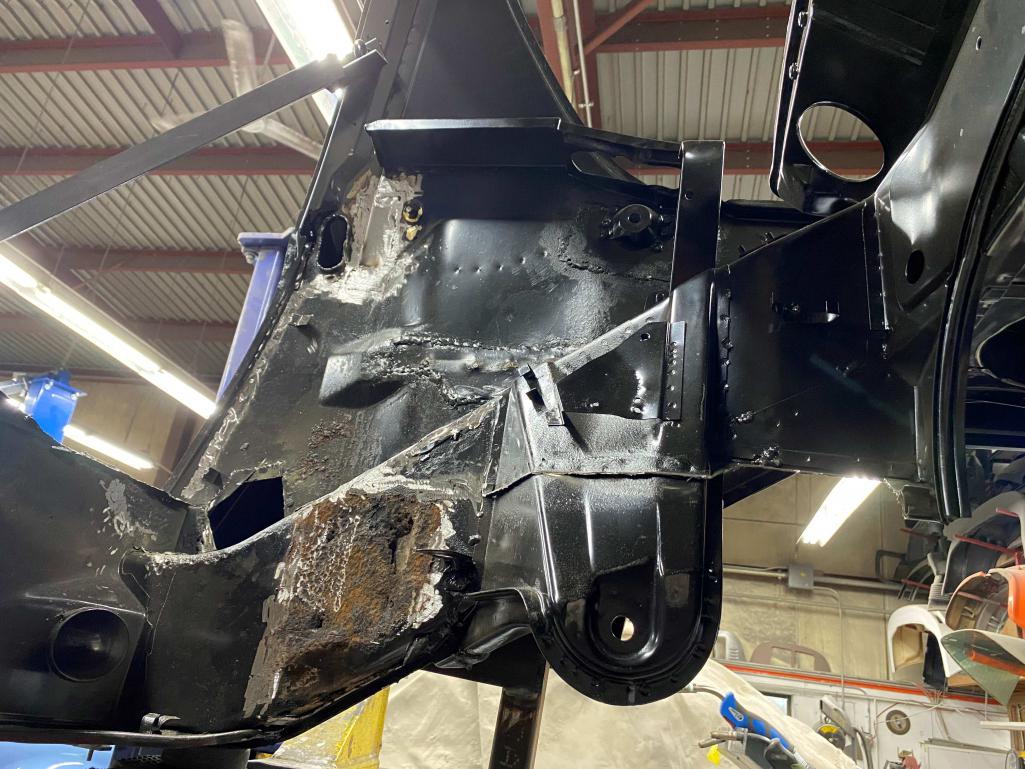
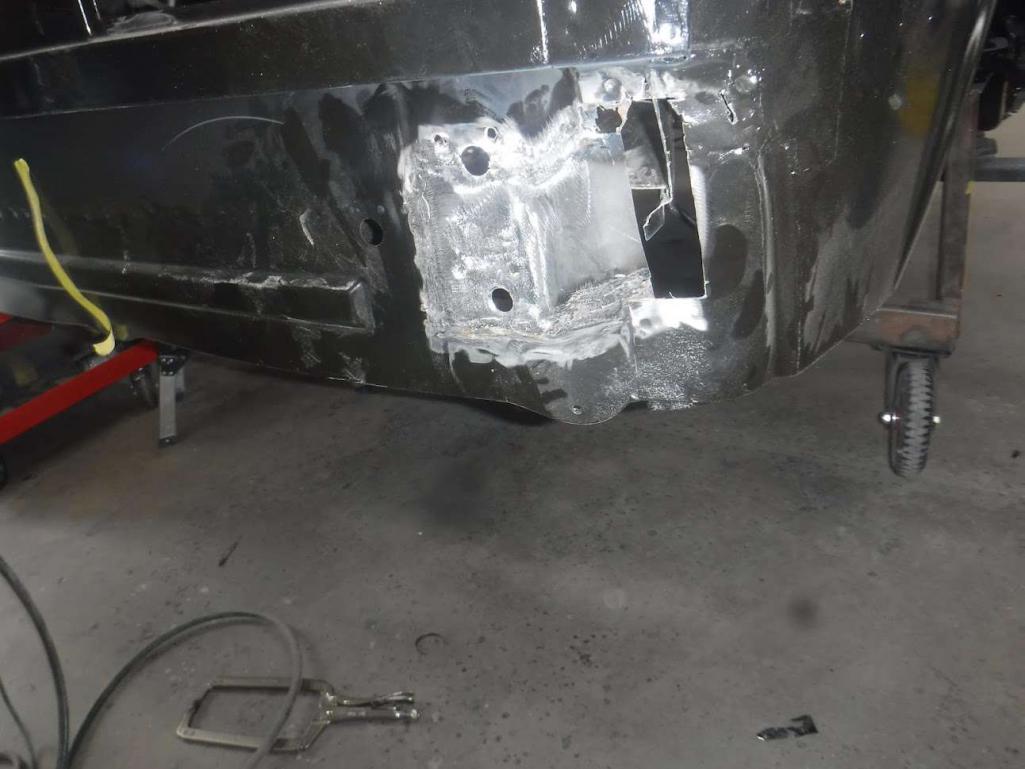
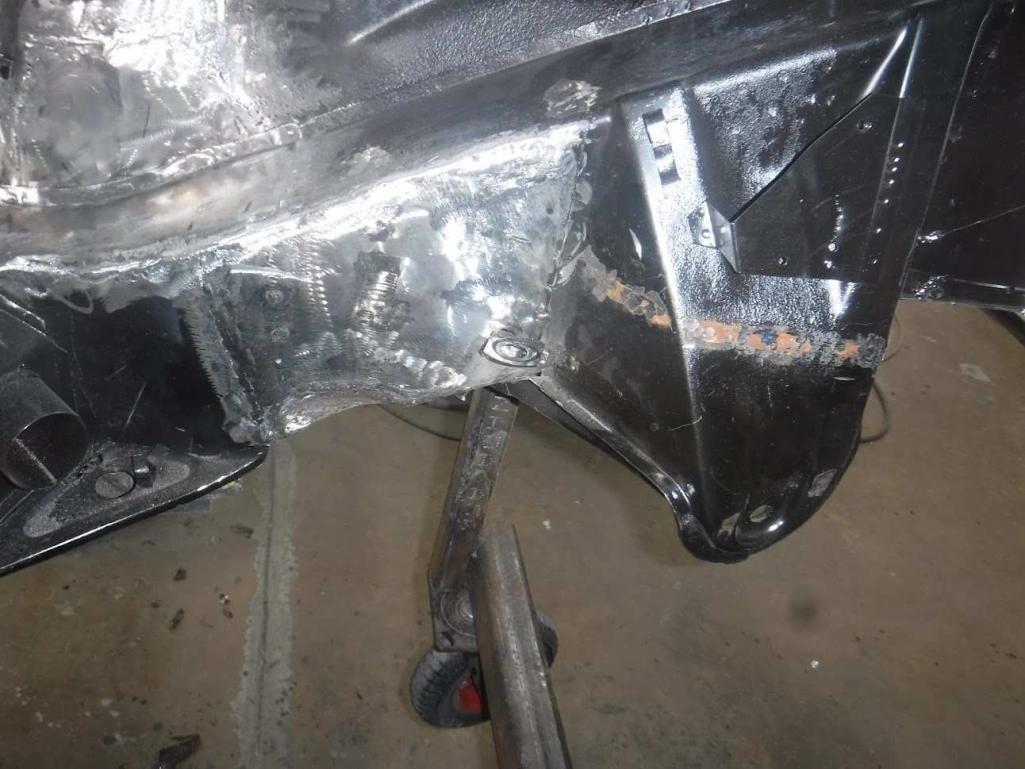
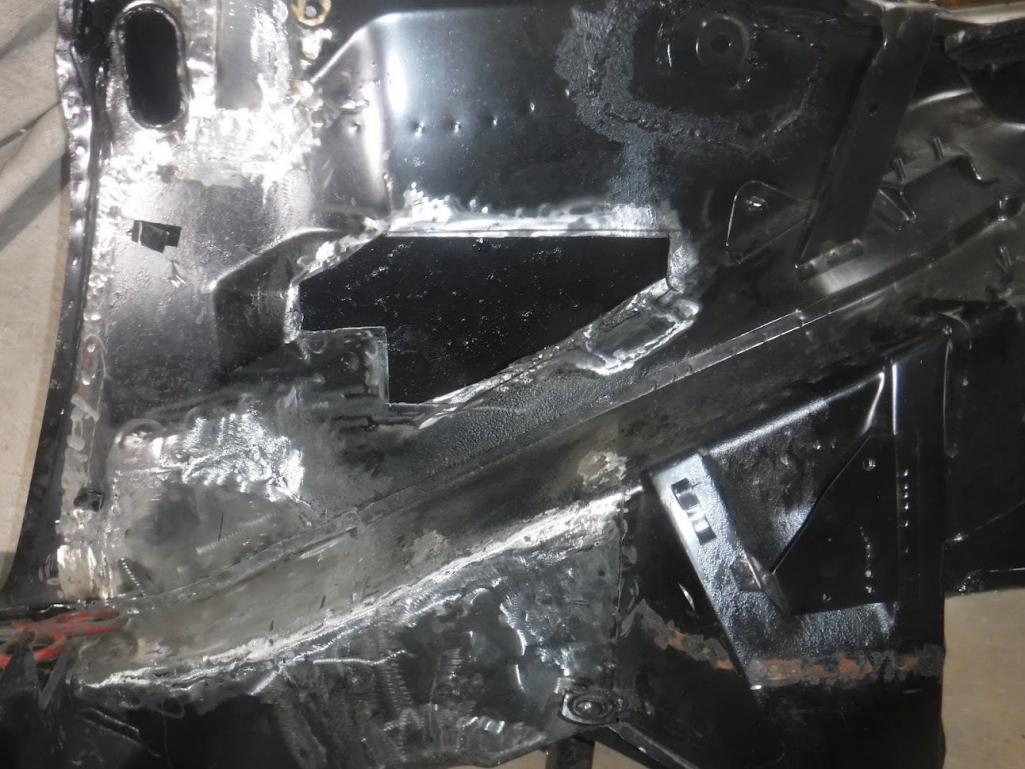
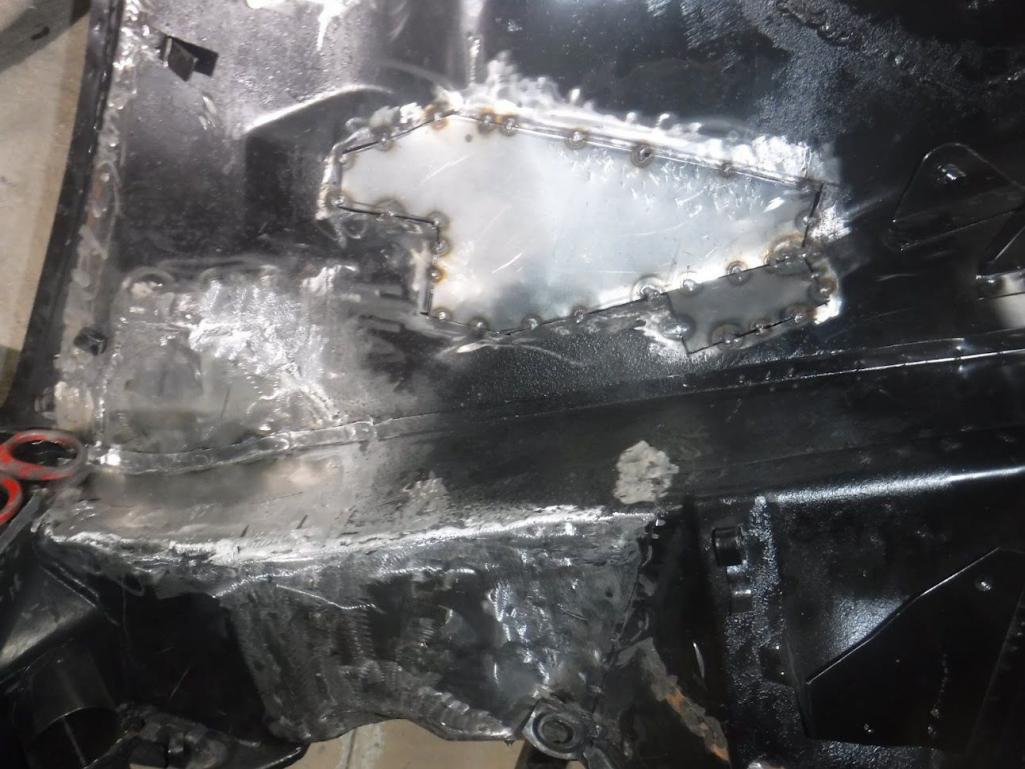
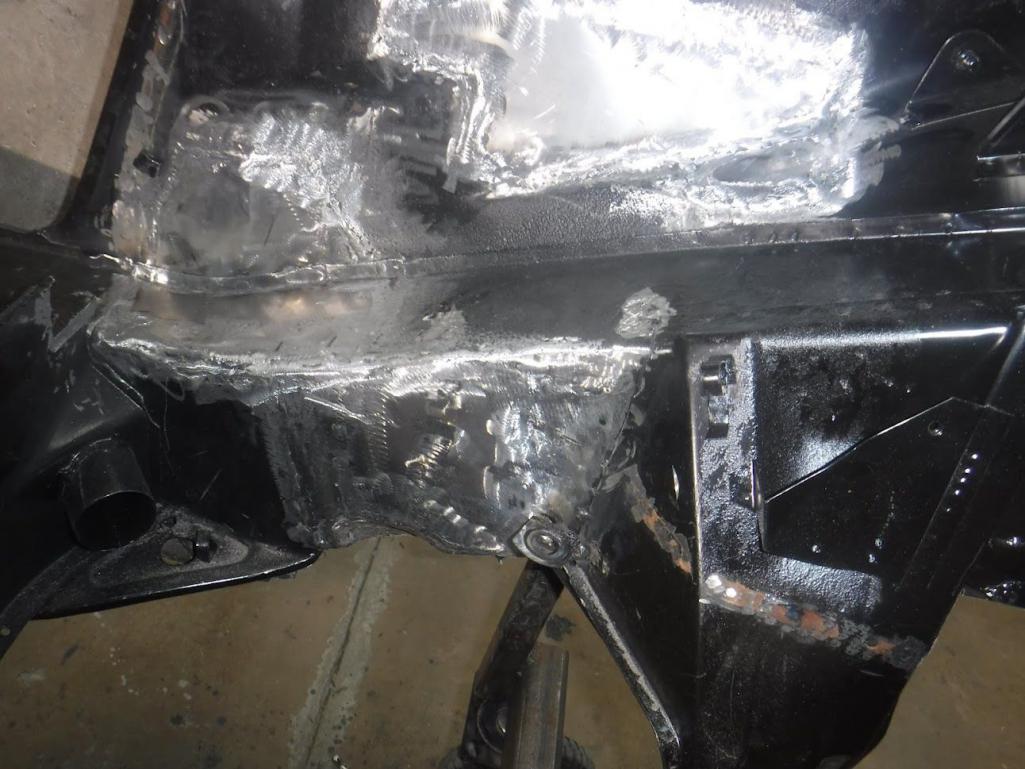
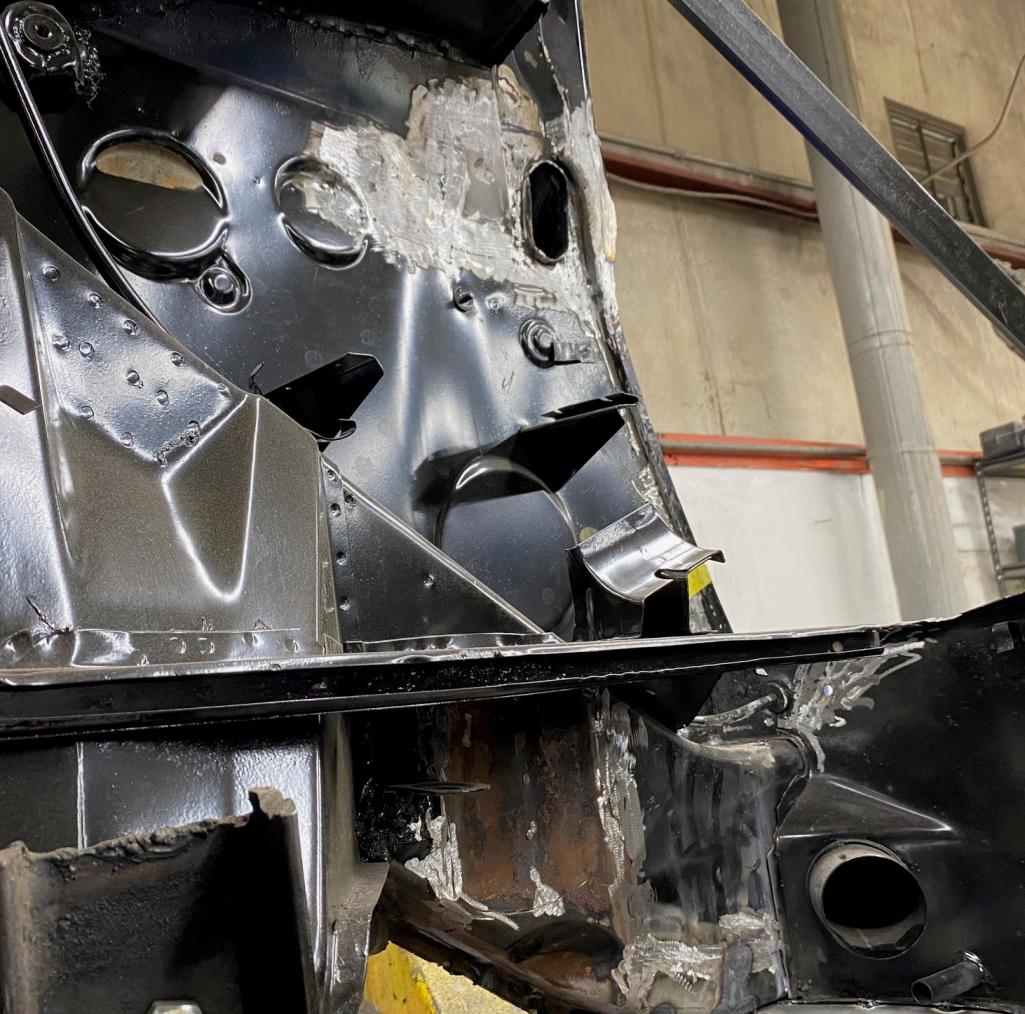
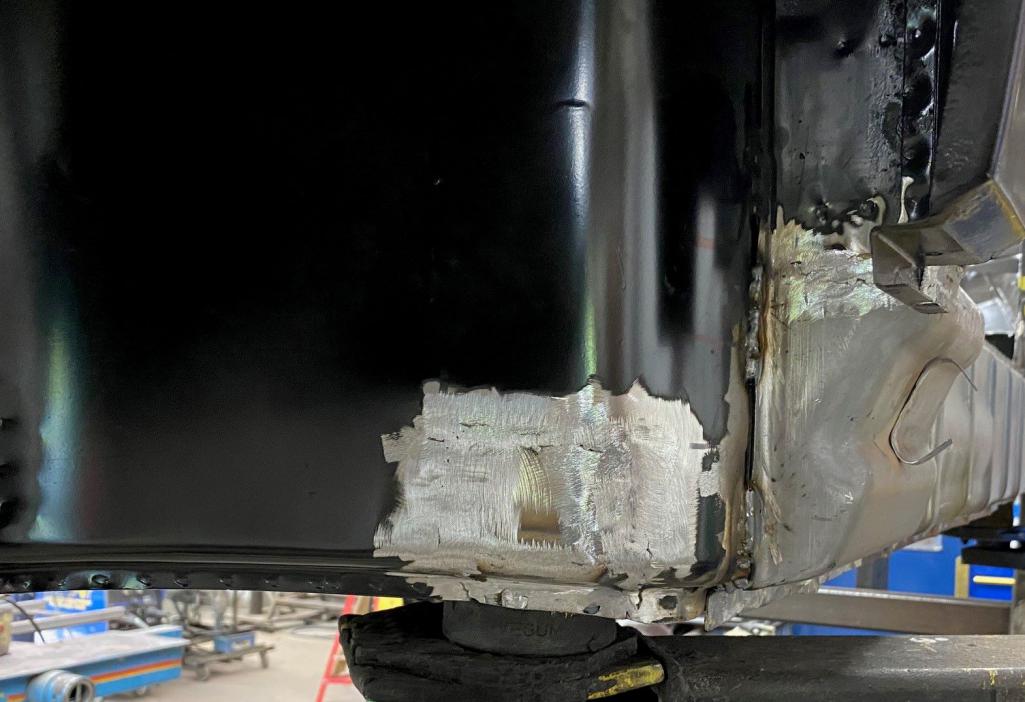
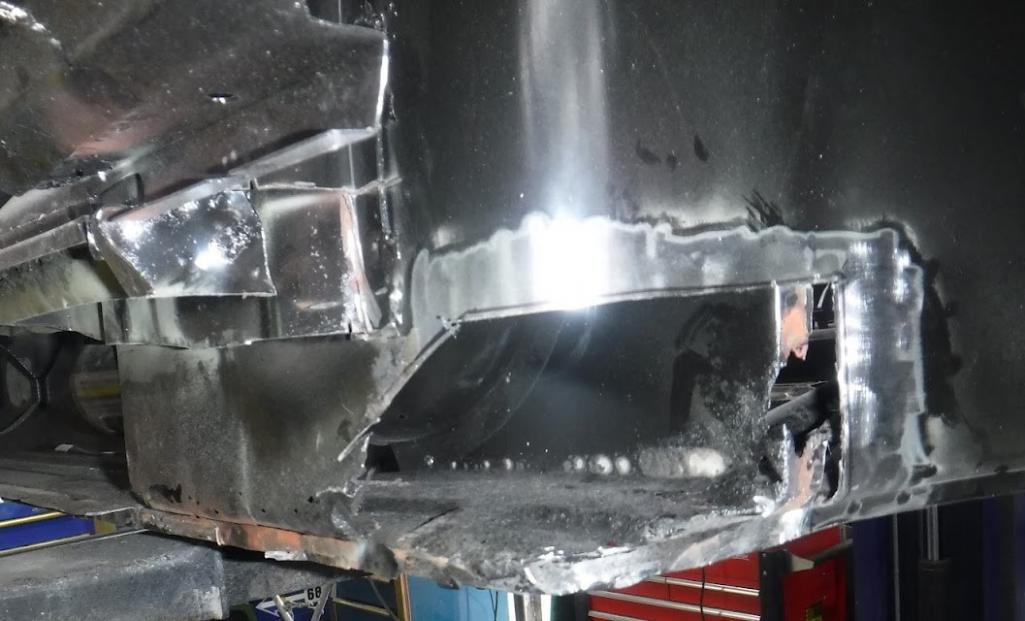
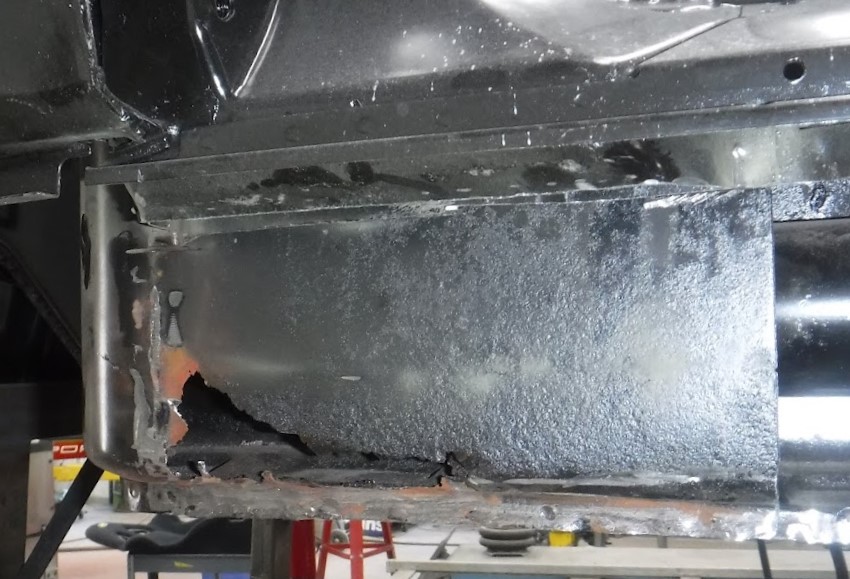
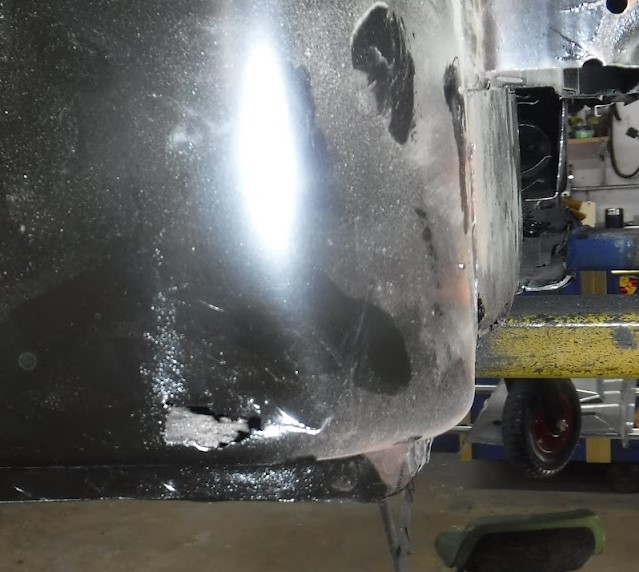
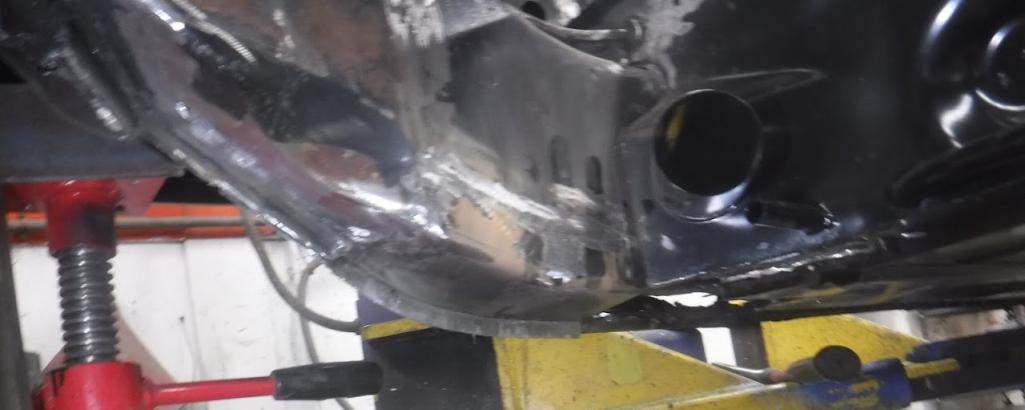
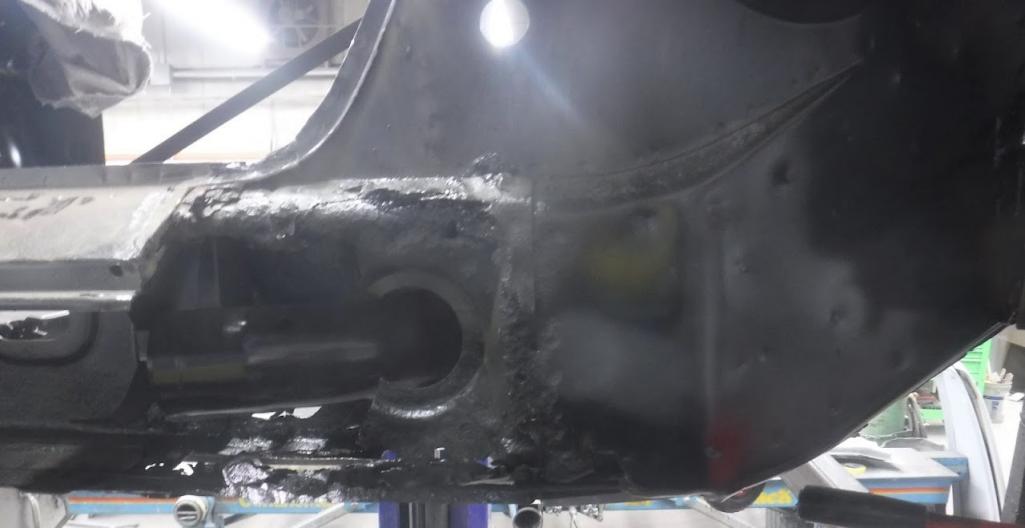
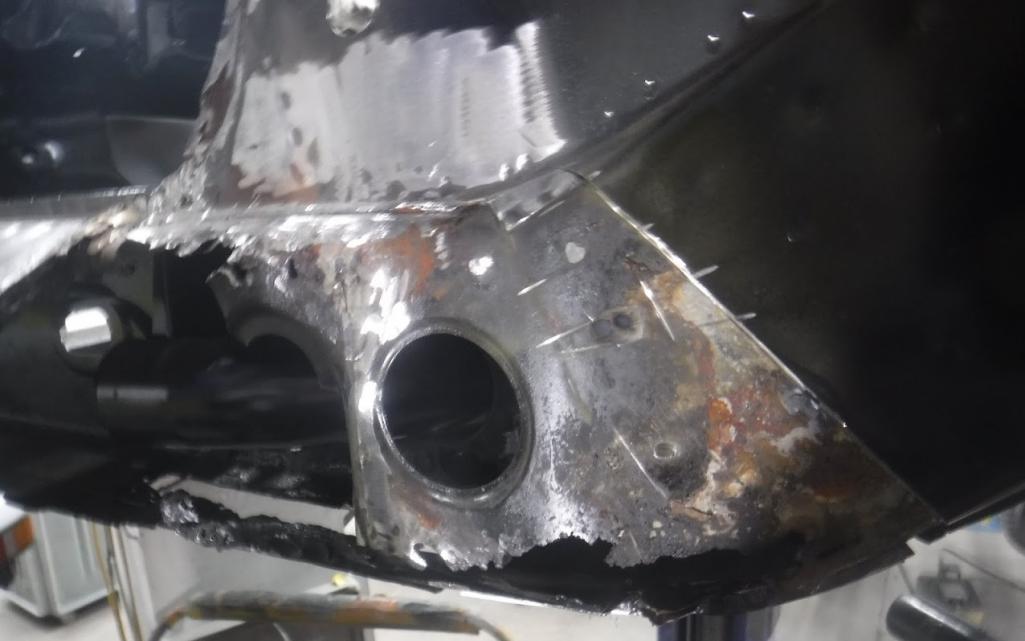
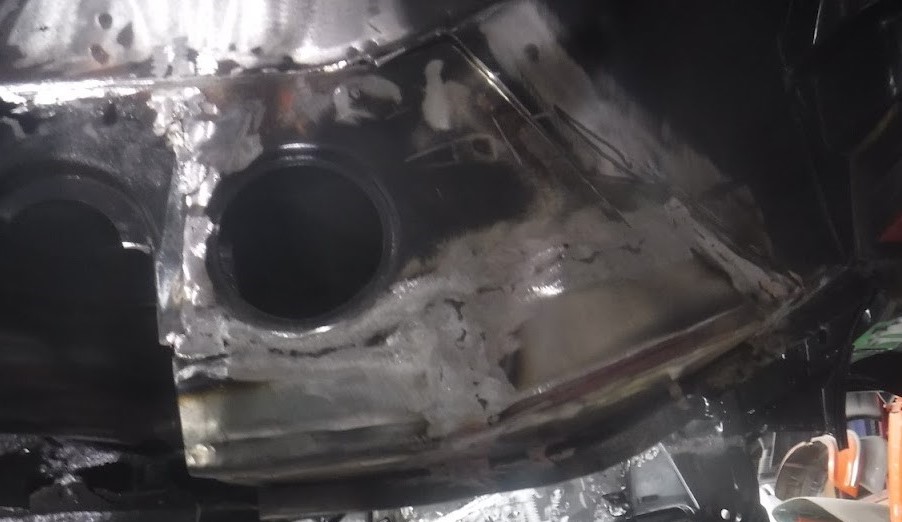
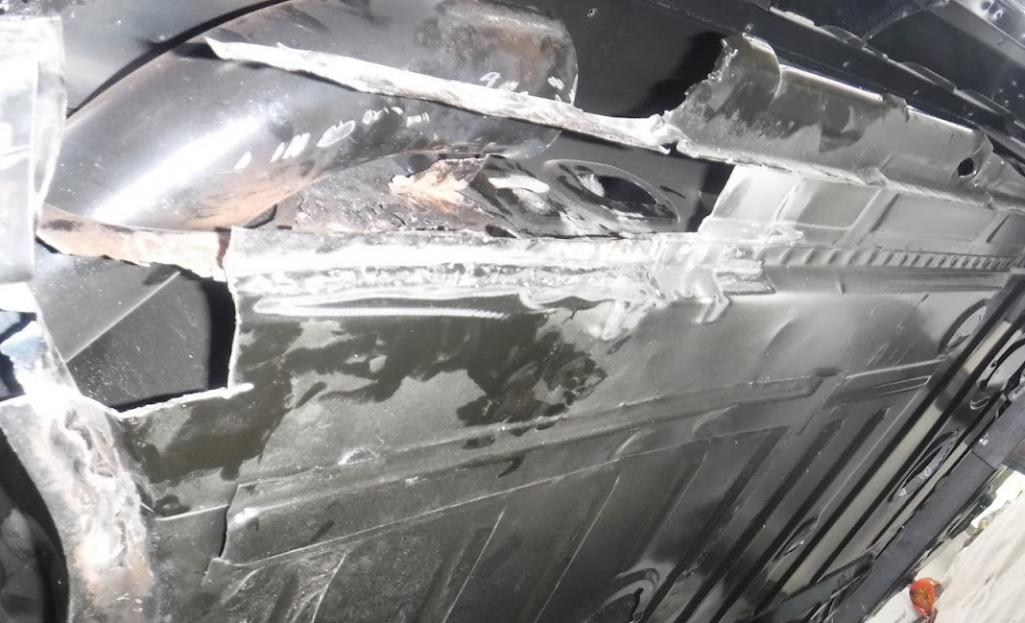
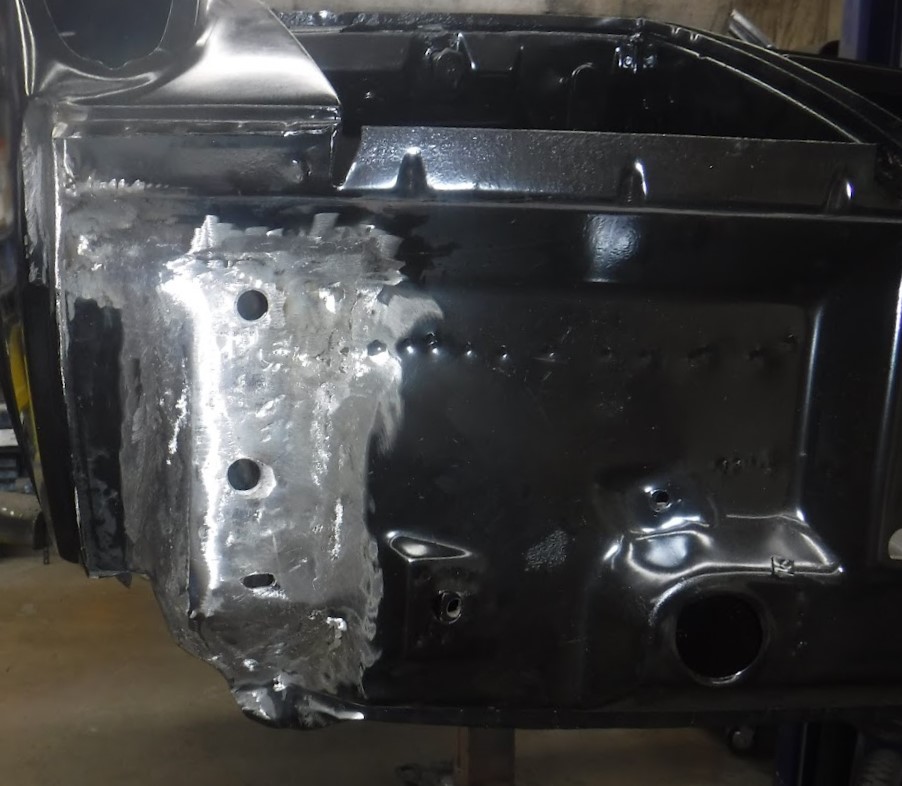
Mine is back home as well. I am pretty happy with the overall process. Car looks really clean but now all the nasty sins have been exposed.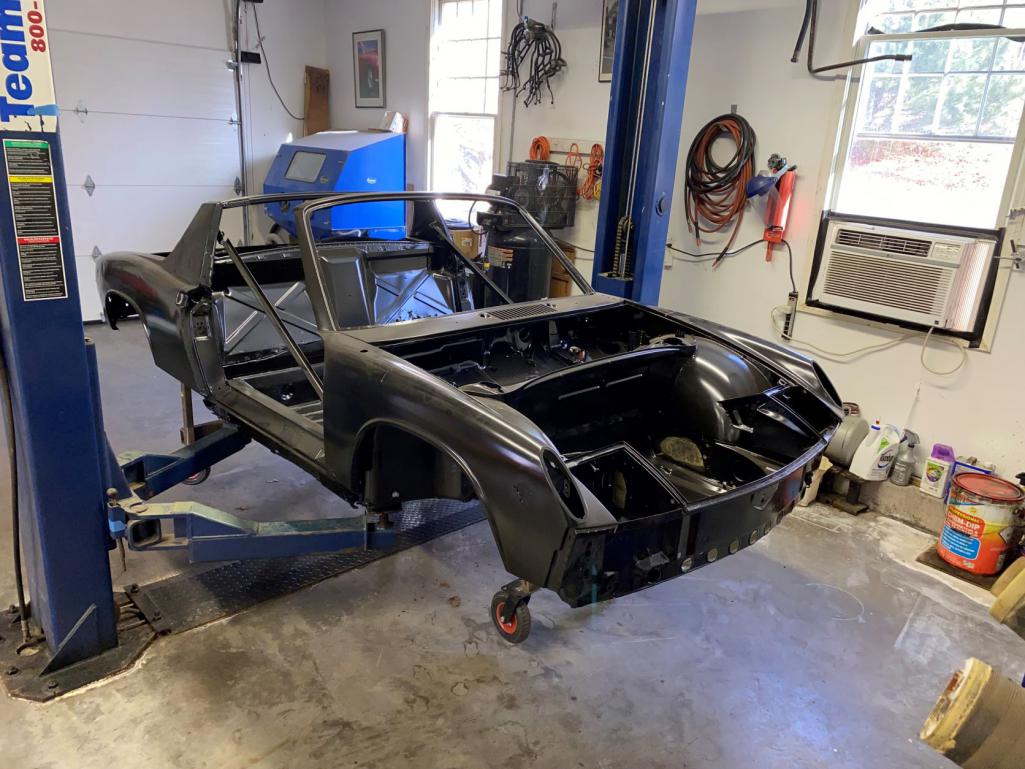
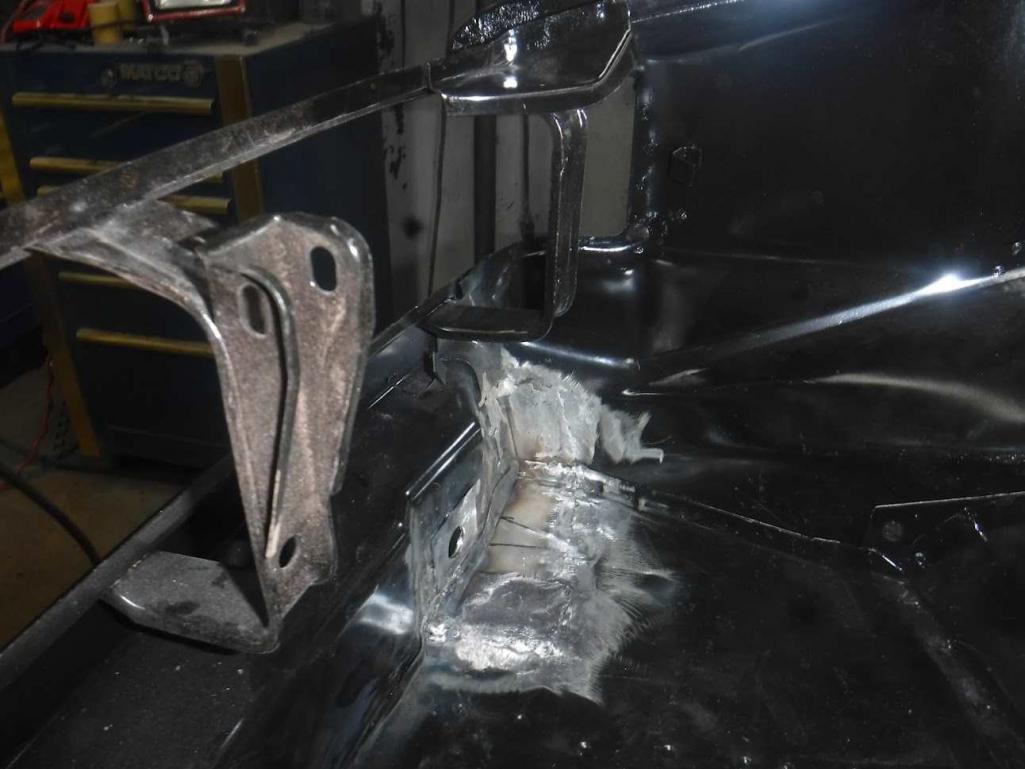
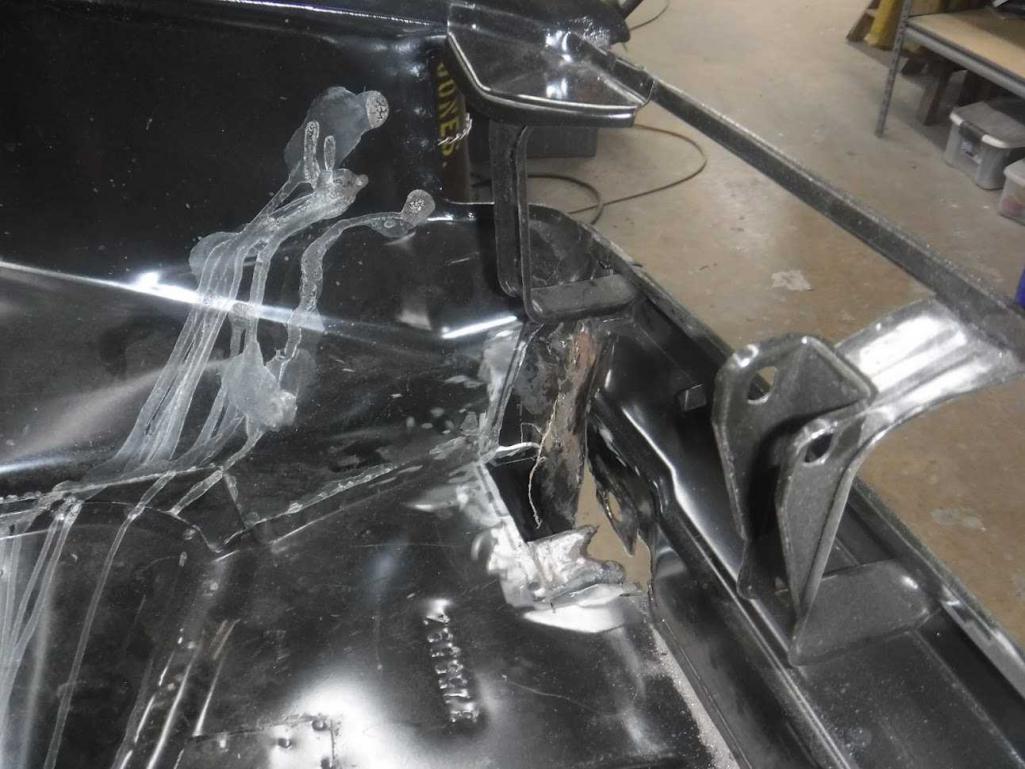
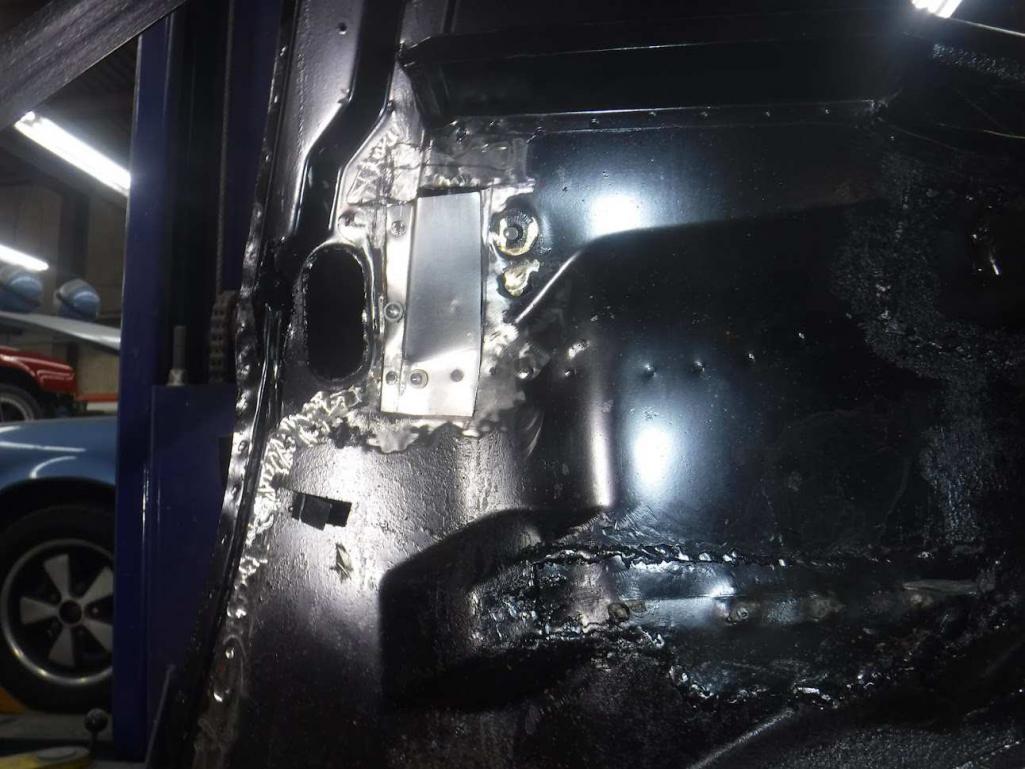
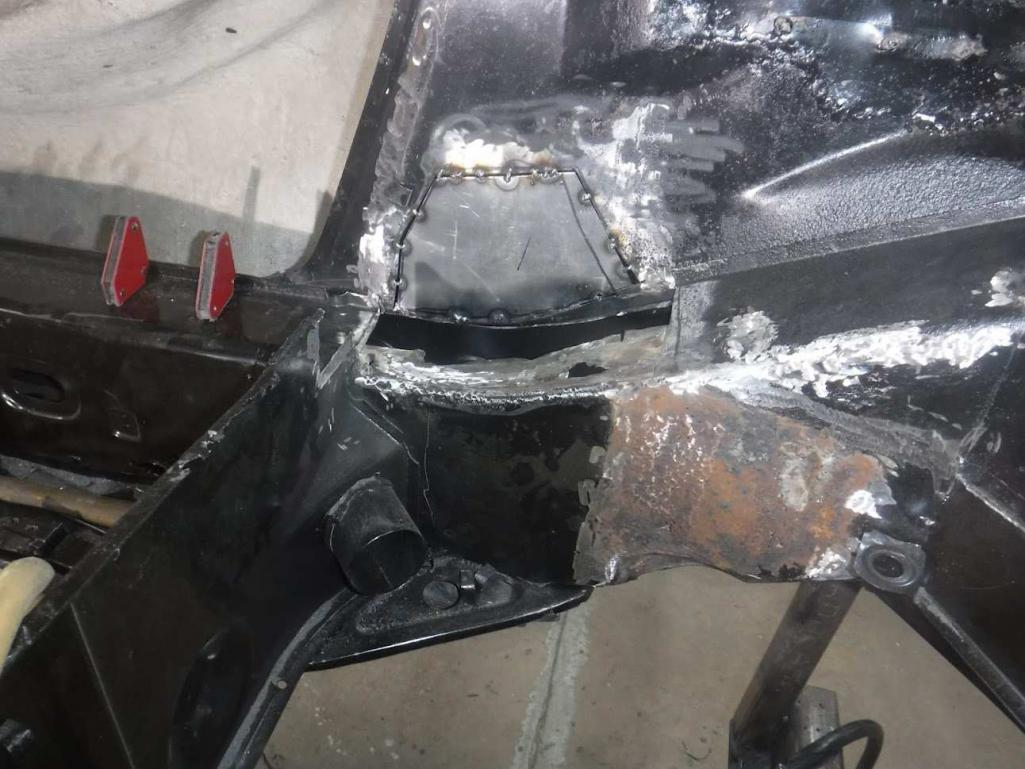
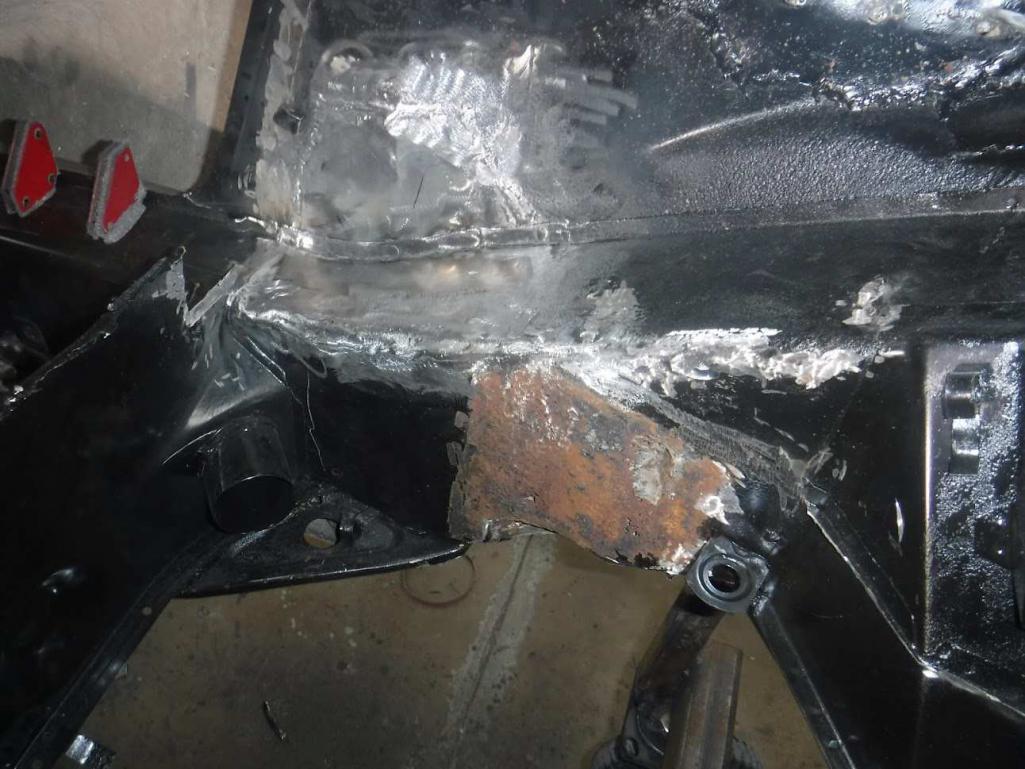
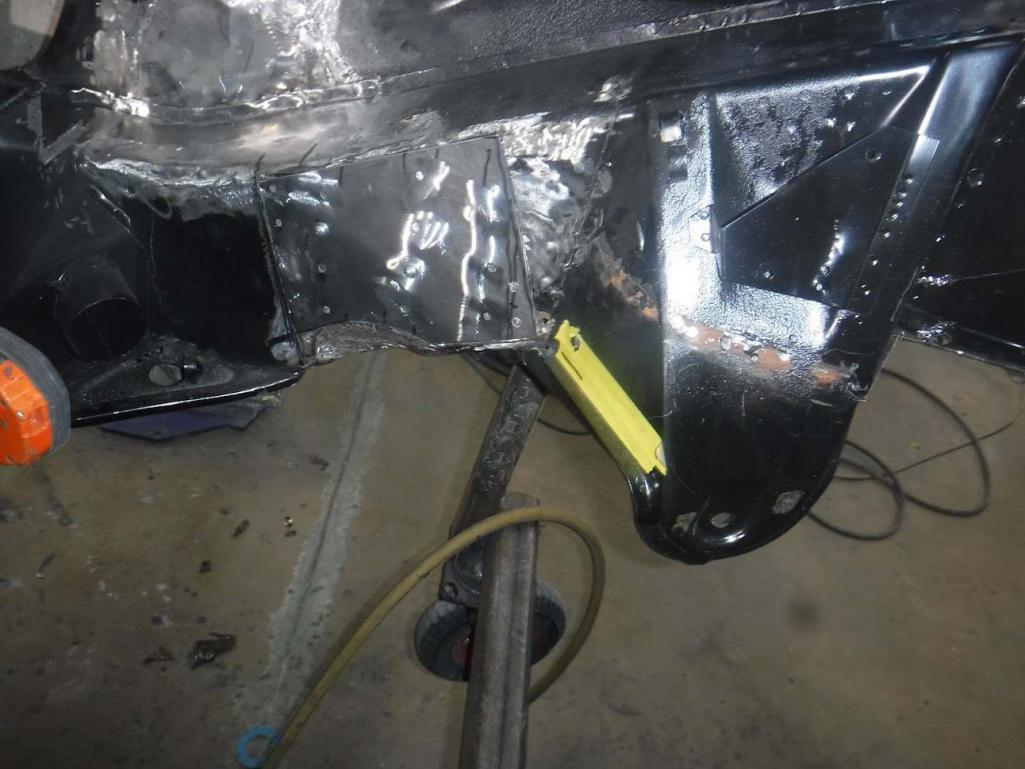
Posted by: Tom1394racing Feb 28 2023, 04:02 PM
Here are some examples of the nasty hidden sins that will be corrected by Auto Associates 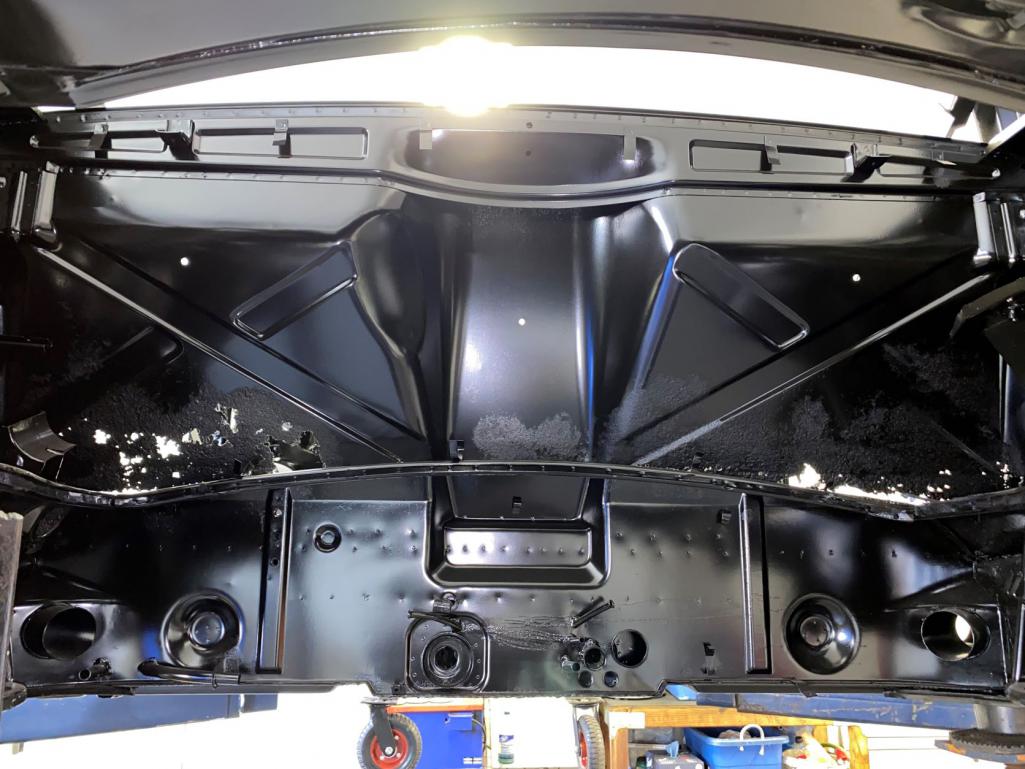

Posted by: Tom1394racing Feb 28 2023, 04:09 PM
After the extensive rust repair, the GT conversion punch list for Auto Associates looks like this:
1. Longitudinal stiffening -inner-longitudinal-stiffening-kit
2. Front sway bar reinforcement
3. Chassis stiffening - GT-chassis-stiffening-kit
4. 914-6 bulkhead motor mount
5. Rear suspension pivot point reinforcement
6. Front cooler ducting & cooler mount brackets
7. GT style roll bar with sill diagonals
8. Bulkhead access panel
9. Steel GT flares
10. Fiberglass/Balsa reinforced F&R lids
11. Through holes for oil tank & oil cooler lines
12. Modify front lid and gas tank for through lid gas fill
13. Firewall seatbelt anchors
14. Oil catch tank holding bracket in rear trunk
Posted by: mepstein Feb 28 2023, 04:56 PM
The dip and e-coat make the good metal look really clean and the bad metal look terrible. I’m sure it will all look great when you are done. At least you didn’t not have to worry about flash rust while waiting on paint.
We replaced a lot of body panels on my car but there are still some touch ups before paint.
Posted by: Tom1394racing Apr 18 2023, 12:54 PM
Update - The car was delivered to Auto Associates last week along with the chassis stiffening kits and bulkhead motor mount from Mad Dog. First up will be rust repair. This will be followed the GT chassis stiffening and GT mods with the exception of body panels and flares. The plan is for the car to come back to me for mechanical and electrical reassembly before installation of the doors and flares and final paint. Ken (co-owner and Body Shop Manager) would prefer to have wheels and tires mounted to properly install the flares. He also prefers to have the chassis weighted with gearbox and engine to set the door gaps.
[attachmentid=873438]
[attachmentid=873440]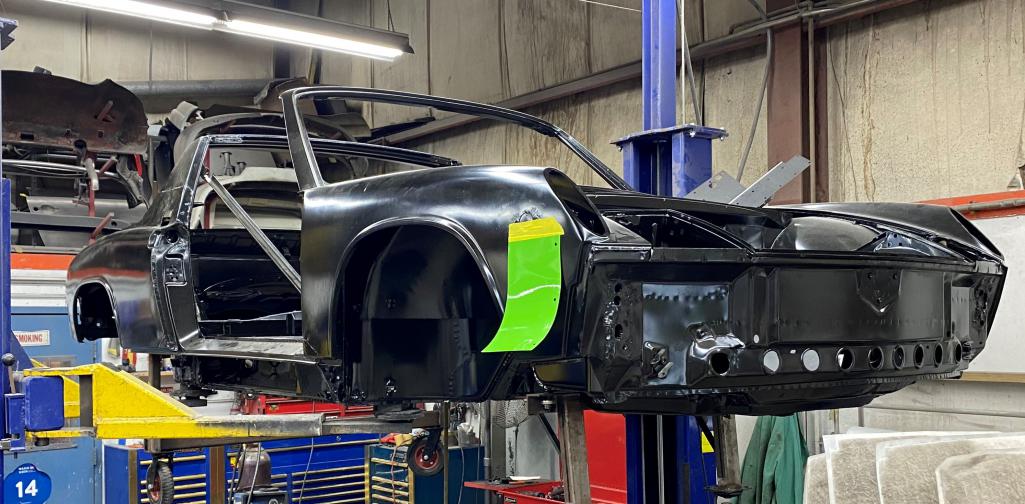
Posted by: Tom1394racing Apr 18 2023, 01:07 PM
The rust repair has started with removal of the rusted firewall, 4 cyl engine mounts and the improper repairs to the hell hole area. Luckily, Ken was able to source a NOS replacement firewall panel.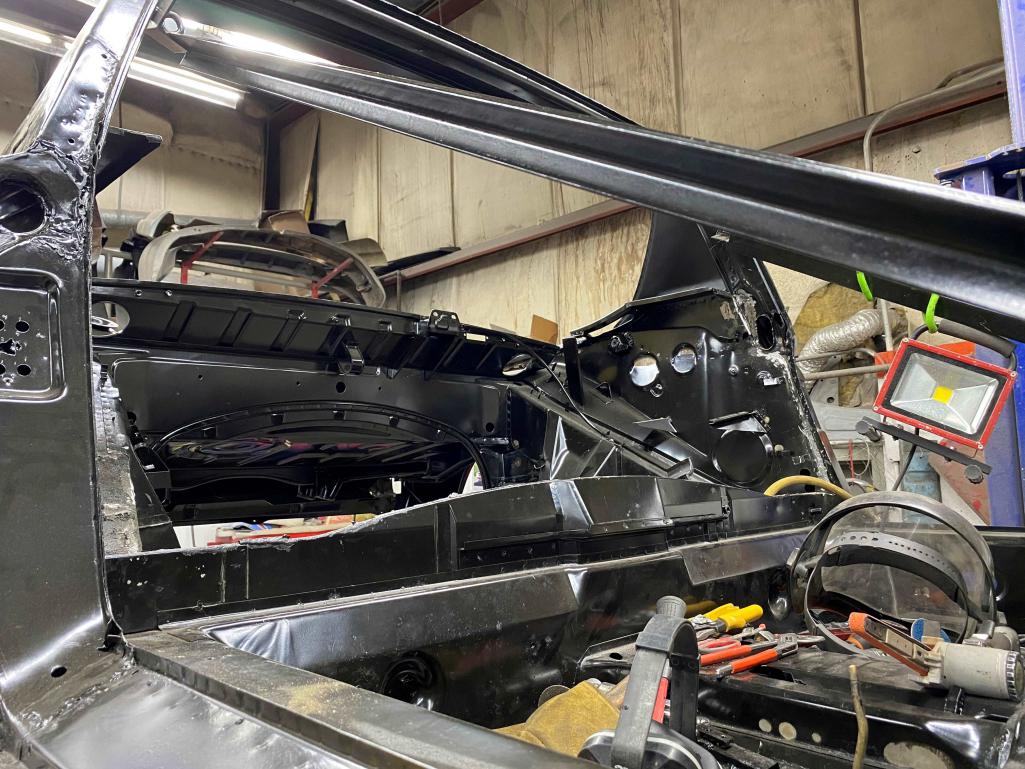
Posted by: Cairo94507 Apr 18 2023, 03:48 PM
Oh, this is going to be fun to watch.
Posted by: Tom1394racing Apr 18 2023, 06:37 PM
So the plan for the car is as follows:
Engine
3.2 Short Stroke based on a '78 SC long block
10.5 CR, 98 mm Mahle Motorsport P&C set
JB Racing twin plug dizzy
DC 60 cams
PMO 46 Carbs
Ben Mcfarland heat exchangers and oil tank
Mocal front cooler with Patrick Motorsports front cooling duct
Gearbox & Clutch
Rebuilt stock 914 side shift with Aluminum intermediate plate
Kennedy Engineering 915/901 clutch conversion kit
Front Suspension
Late model 911 Bilstein struts
911 front a-arms
19 mm Sway Away torsion bars
Bilstein HD shocks
Stock 16 mm front sway bar
Elephant Racing rubber bushings
914 Steel front crossmember
Early 911S front calipers
911 vented discs
Rear Suspension
Ground Control adjustable rear coil overs
150 lb Eibach springs
Bilstein HD shocks
Elephant Racing rubber bushings
Stock 914 calipers
911 non-vented discs
Sway Away custom axles with 108 mm 911 CV's, hubs and stub shafts
Wheels & Tires
Front - Minilite 7X15 with Michelin TB 15 18/60R15 tires
Rear - Minilite 8X15 with Michelin TB15 23/62HR15 tires
Cockpit
911 steering column with 911 switches
911 ignition switch
Custom 3-way oil temp/press/fuel level gauge
380 mm hockey puck steering wheel
GTS Classic Lemans seats
Color
I have been wrestling with different color options. I had settled on Lizard Green (2019 GT3 color). Then this week I saw a new Speed Yellow Cayman GT4. So for now the color will be Speed yellow.
Posted by: mepstein Apr 18 2023, 07:29 PM
Looks like a great combo.
Maybe think about M calipers on back with 911 e-brakes and tangerine conversion kit. Not very pricey, especially with your parts supply and would compliment the front brakes.
Posted by: infraredcalvin Apr 18 2023, 08:07 PM
Looks like a great combo.
Maybe think about M calipers on back with 911 e-brakes and tangerine conversion kit. Not very pricey, especially with your parts supply and would compliment the front brakes.
Or get 914-6 calipers, keep the 914 e brake and get the larger caliper pistons 38 mm, same as m calipers.
Posted by: Tom1394racing Apr 19 2023, 06:02 AM
Looks like a great combo.
Maybe think about M calipers on back with 911 e-brakes and tangerine conversion kit. Not very pricey, especially with your parts supply and would compliment the front brakes.
Or get 914-6 calipers, keep the 914 e brake and get the larger caliper pistons 38 mm, same as m calipers.
Great suggestions on rear brakes. I am not familiar with the Tangerine kit. I would imagine 914-6 calipers would be tough to find.
Since my trailing arms have already been powder coated, my 914-4 calipers are finishing up restoration at PMB and I already have the 911 non-vented rotors that have been turned by 3 mm, I am inclined to keep that setup. Since the car will be primary street driven, other than the visual and cool factor, how much downside is there to the stock 914-4 calipers?
Posted by: Cairo94507 Apr 19 2023, 06:58 AM
Wow- that 3.2 combo is going to produce a very nice engine that should pull strong to 7K easily.
Posted by: Dion Apr 19 2023, 07:11 AM
Looks to be a formidable machine. Best of luck. Will be following.
Posted by: mepstein Apr 19 2023, 07:30 AM
Looks like a great combo.
Maybe think about M calipers on back with 911 e-brakes and tangerine conversion kit. Not very pricey, especially with your parts supply and would compliment the front brakes.
Or get 914-6 calipers, keep the 914 e brake and get the larger caliper pistons 38 mm, same as m calipers.
Great suggestions on rear brakes. I am not familiar with the Tangerine kit. I would imagine 914-6 calipers would be tough to find.
Since my trailing arms have already been powder coated, my 914-4 calipers are finishing up restoration at PMB and I already have the 911 non-vented rotors that have been turned by 3 mm, I am inclined to keep that setup. Since the car will be primary street driven, other than the visual and cool factor, how much downside is there to the stock 914-4 calipers?
I have stock 914-4 calipers on my conversion car with M calipers on the front. It’s a narrow body with 3.2. My GT car will get S calipers on front and 914-6GT calipers on the rear. The GT calipers are just expensive M calipers with an e-brake. My Suby 3.2 car has M calipers f&r with the tangerine kit. When everything is finished I’ll let you know what works best(for me) lol.
Posted by: infraredcalvin Apr 19 2023, 08:12 AM
Looks like a great combo.
Maybe think about M calipers on back with 911 e-brakes and tangerine conversion kit. Not very pricey, especially with your parts supply and would compliment the front brakes.
Or get 914-6 calipers, keep the 914 e brake and get the larger caliper pistons 38 mm, same as m calipers.
Great suggestions on rear brakes. I am not familiar with the Tangerine kit. I would imagine 914-6 calipers would be tough to find.
Since my trailing arms have already been powder coated, my 914-4 calipers are finishing up restoration at PMB and I already have the 911 non-vented rotors that have been turned by 3 mm, I am inclined to keep that setup. Since the car will be primary street driven, other than the visual and cool factor, how much downside is there to the stock 914-4 calipers?
Since you’ve got some items at pmb already, they will be your best source for advice, but if you want to maintain the factory engineered front to rear bias, calipers should be matched as a system. You’re increasing caliper piston size and brake pad size at the front with the early s calipers, so rears should be increased as well. The factory paired M calipers with the S calipers, which is why Mark suggested. Ms are cheap and plentiful, but you lose the stock 914 e brake. The 914-6 calipers have the same size piston and pad as the M, but you are correct they may be tough to source.
There are other methods to adjust the bias, many have gone your path without problems, others use a manually adjustable bias valve. PMB used to offer a 914-6 gt repop caliper, but I don’t see them advertised anymore.
Along with PMB, if you ever want more info on Porsche brakes than you can handle, look up user Bill Verburg on the bird 911 forums.
Posted by: Tom1394racing Apr 23 2023, 07:12 AM
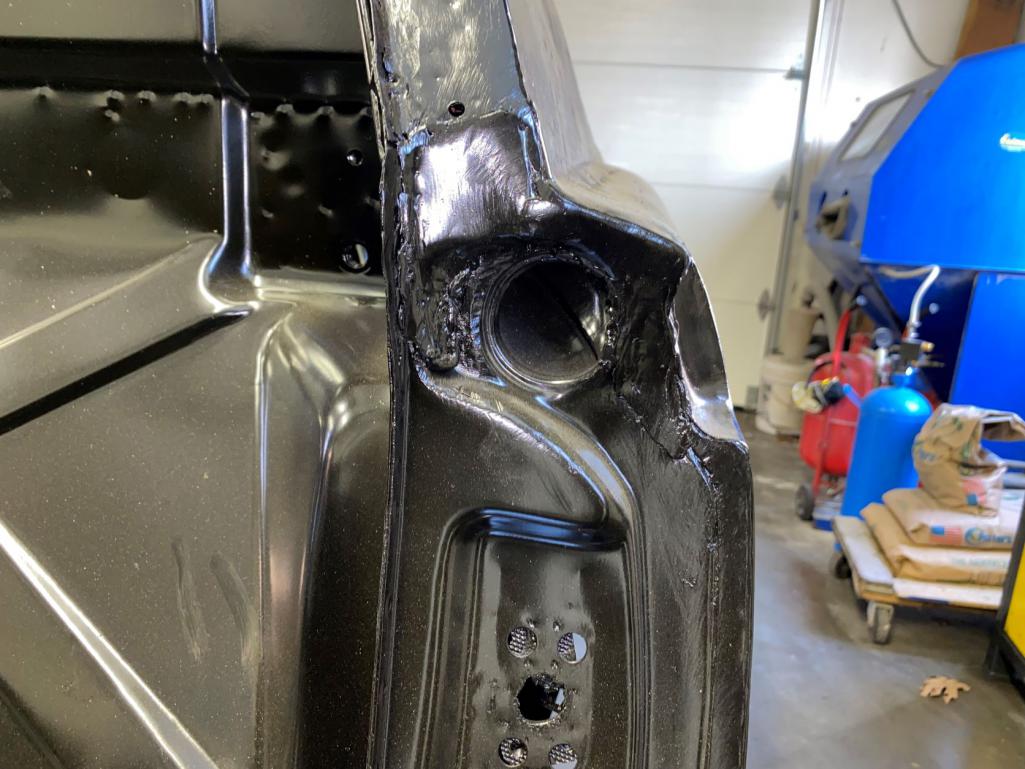
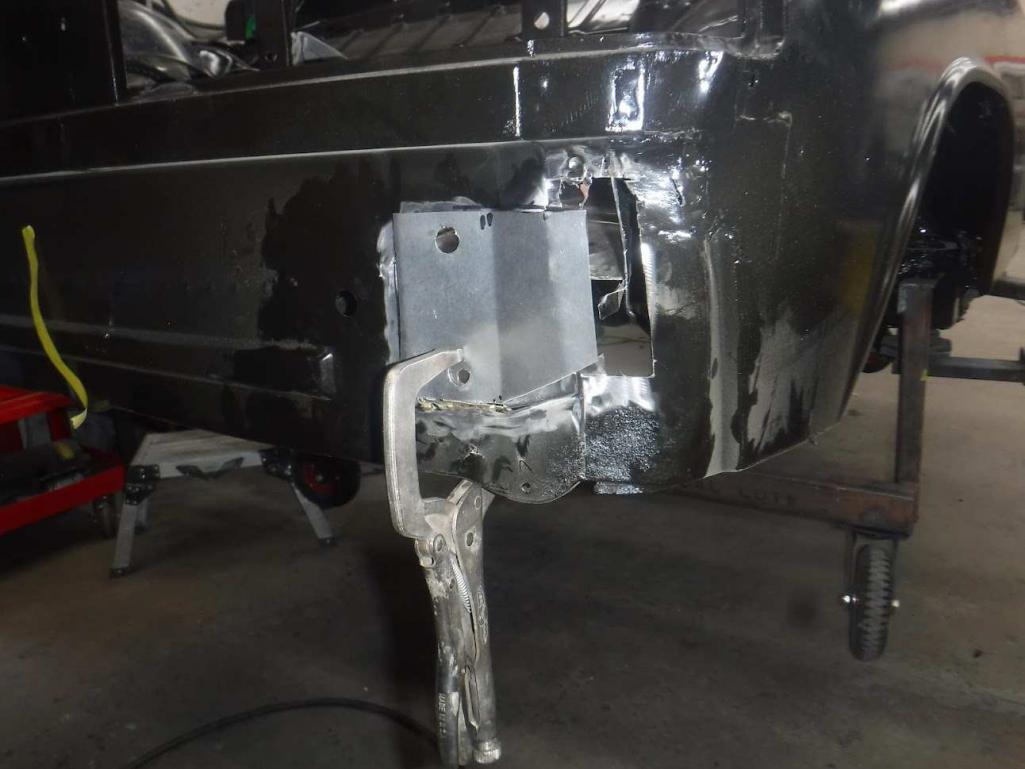
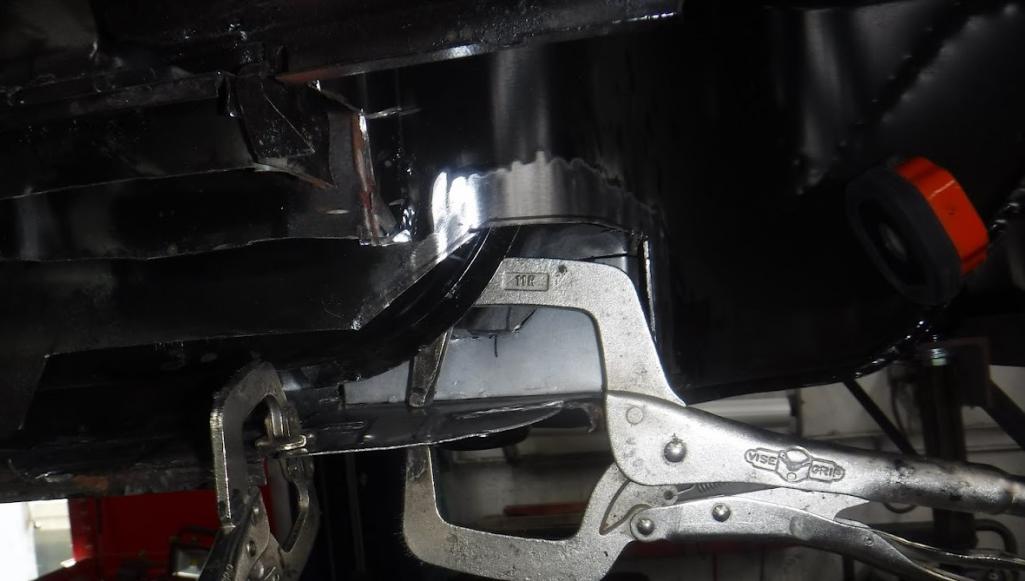
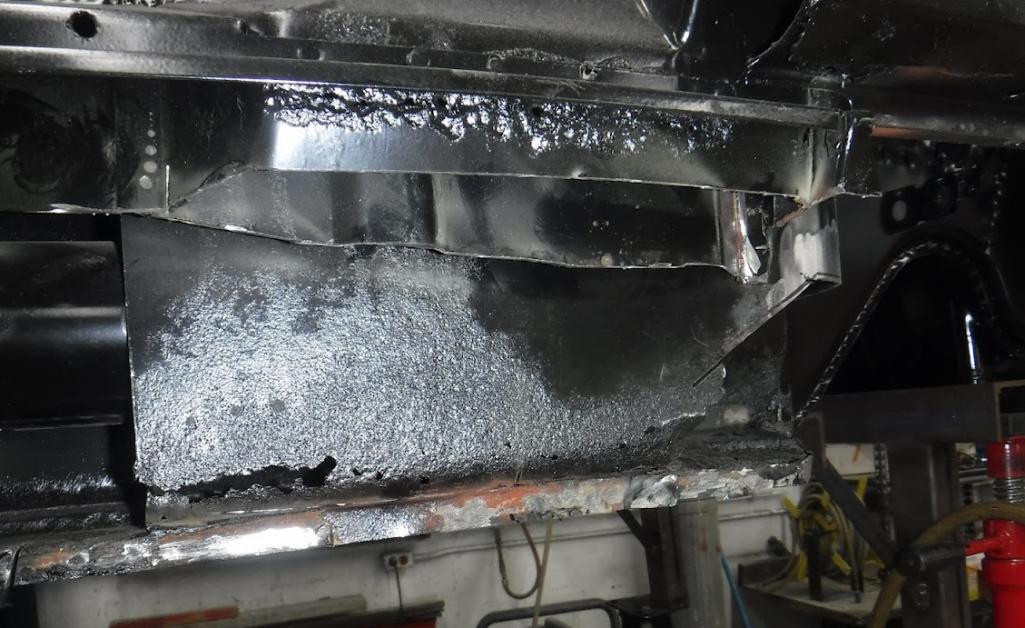
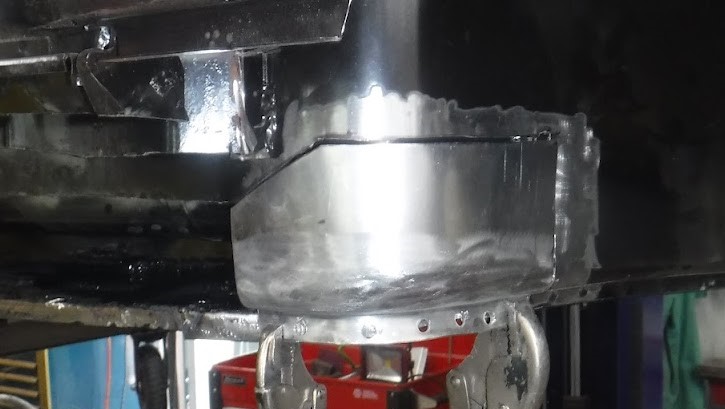
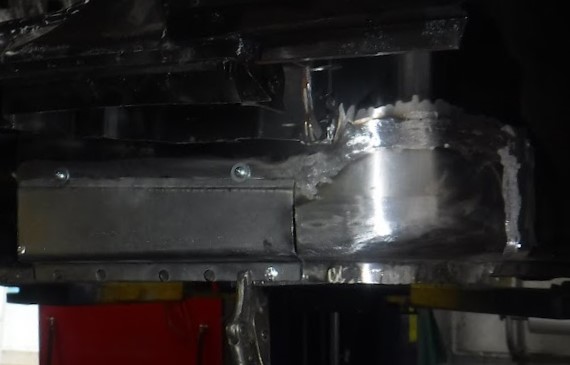
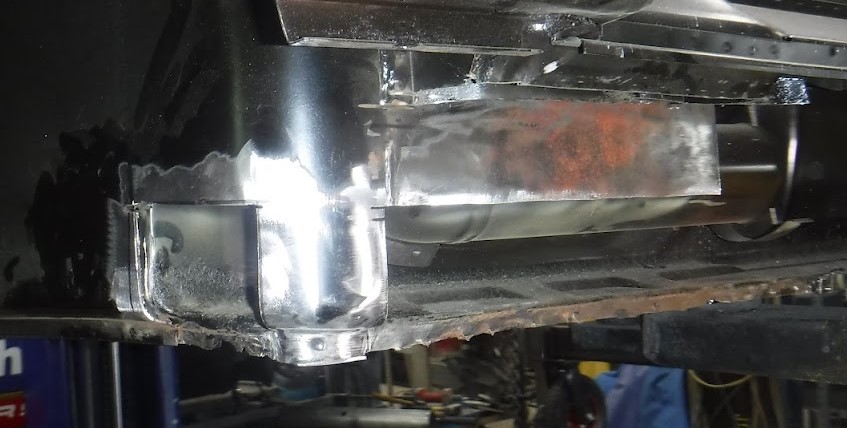
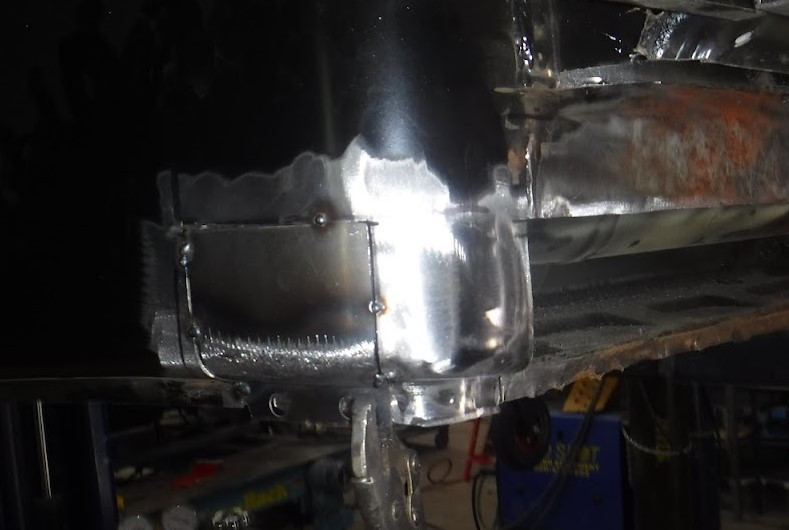
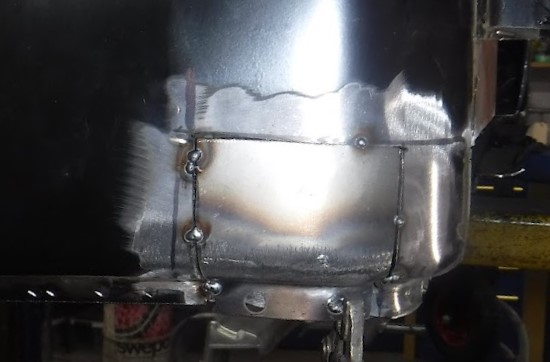
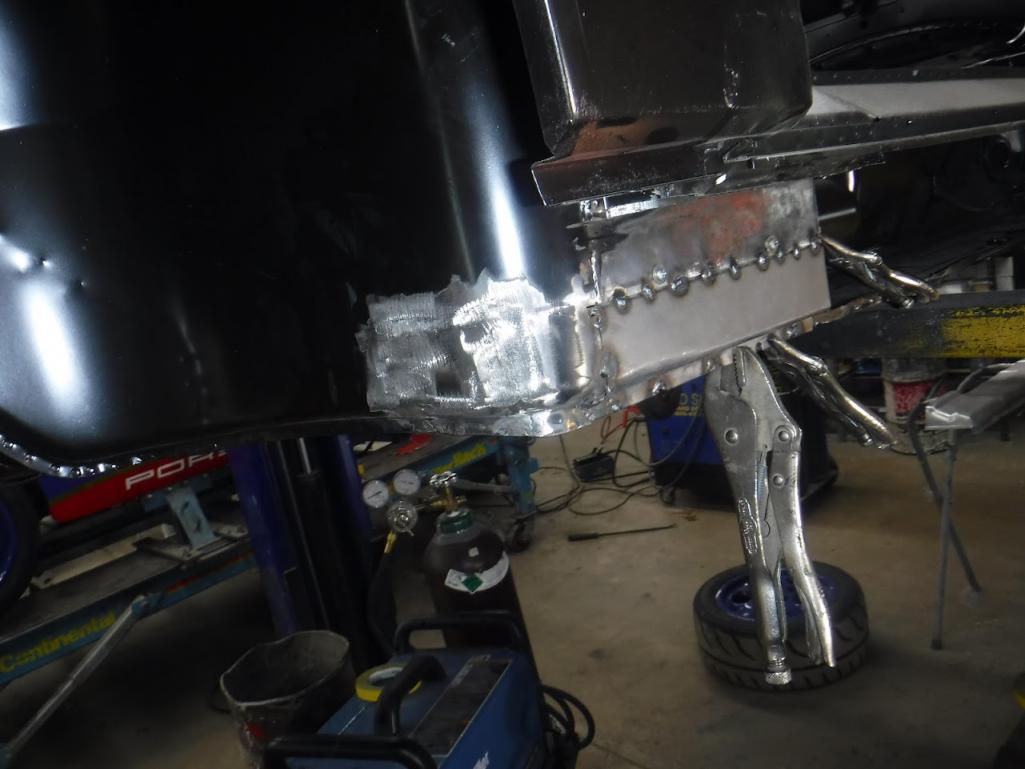
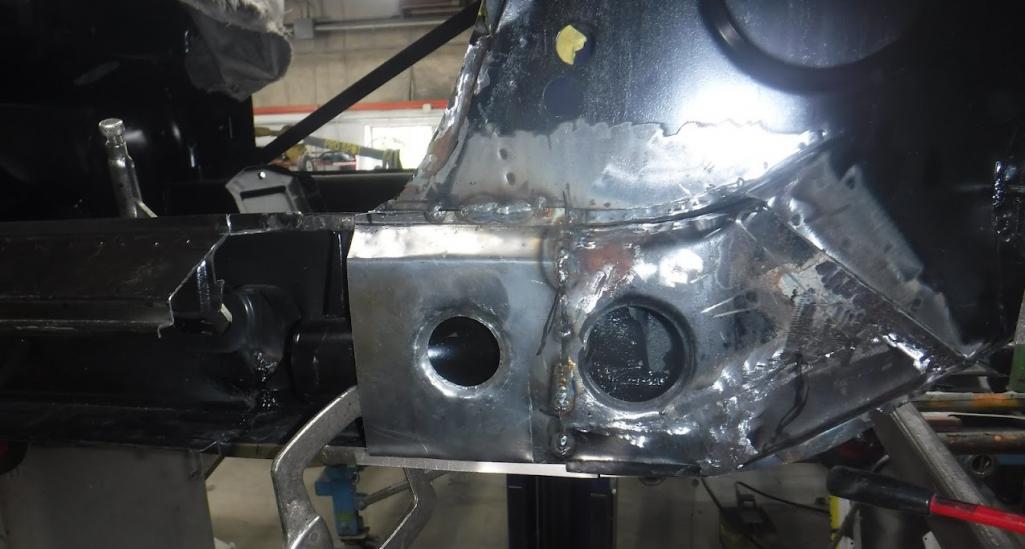
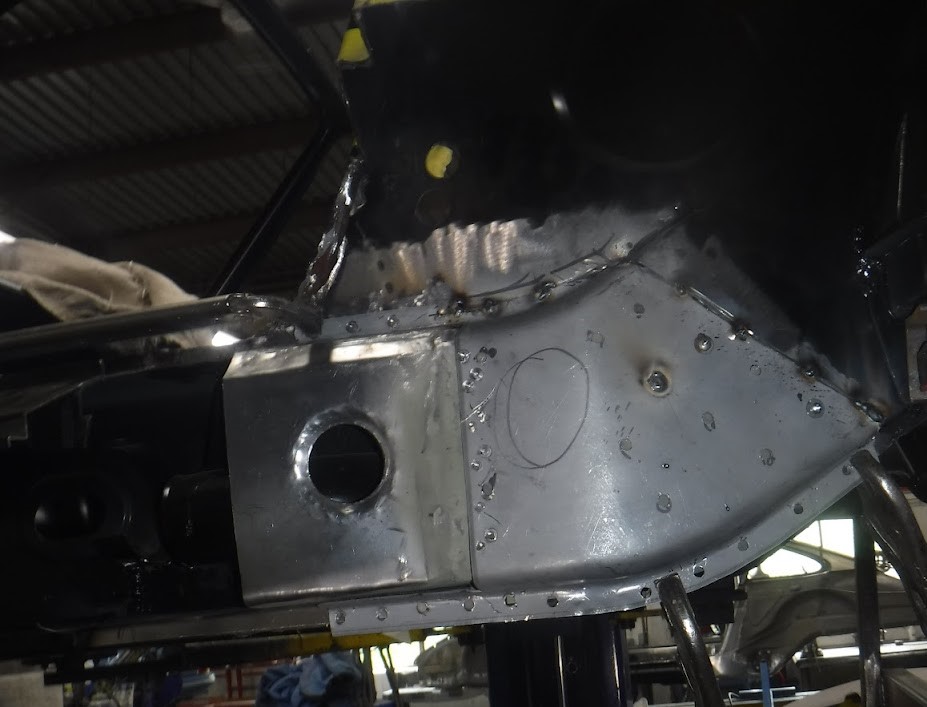
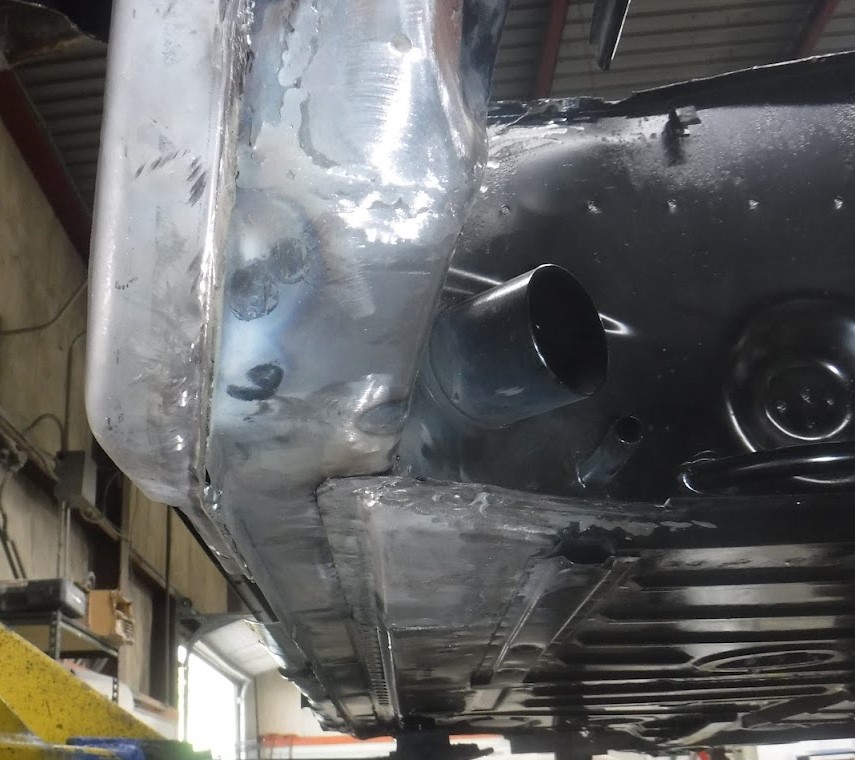
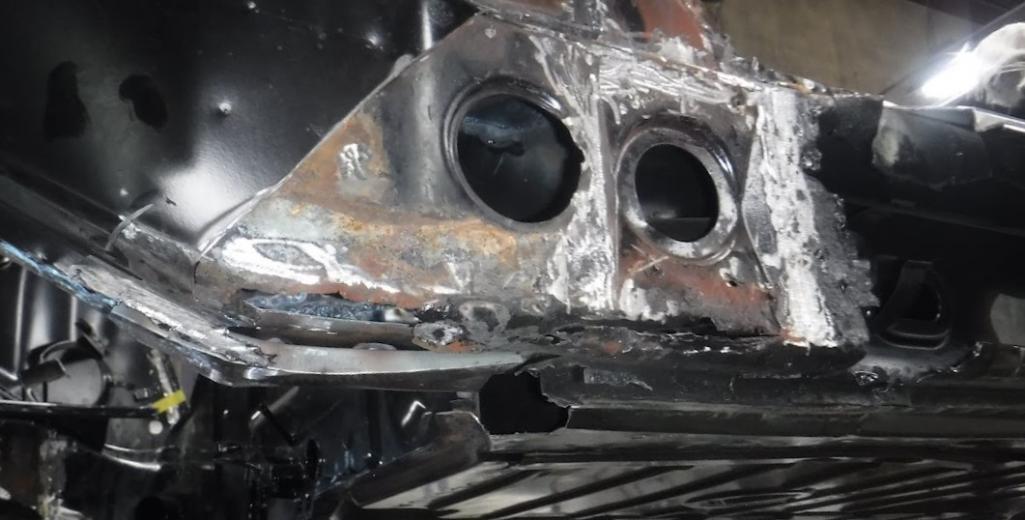
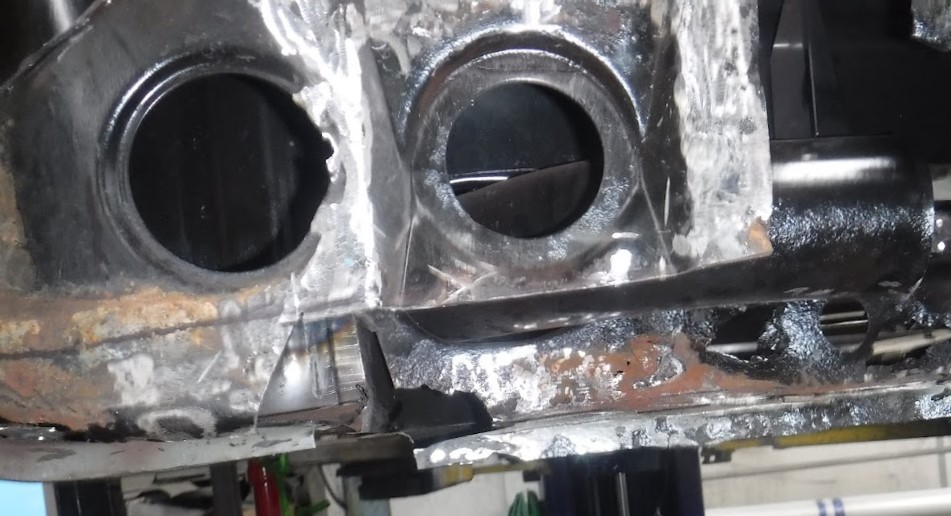
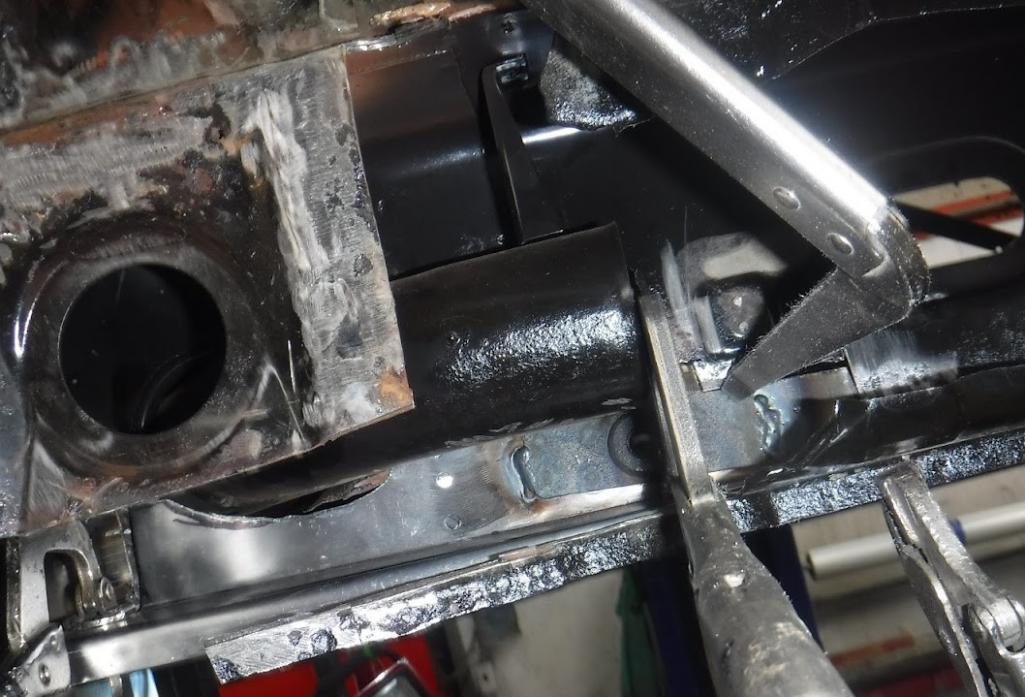
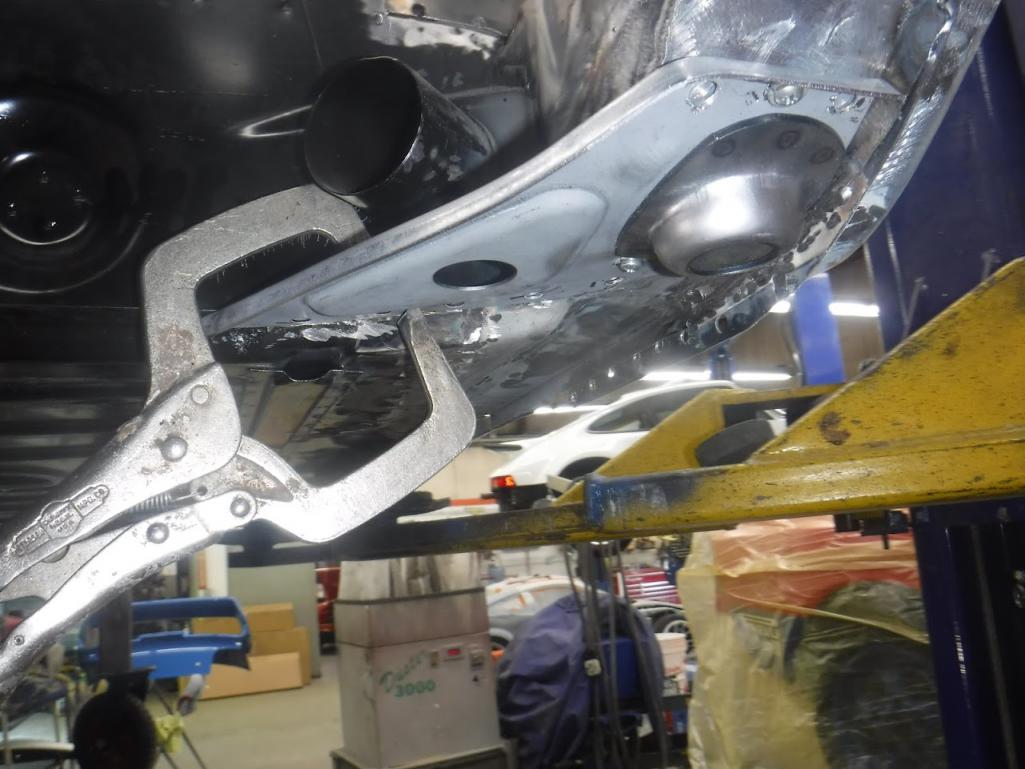
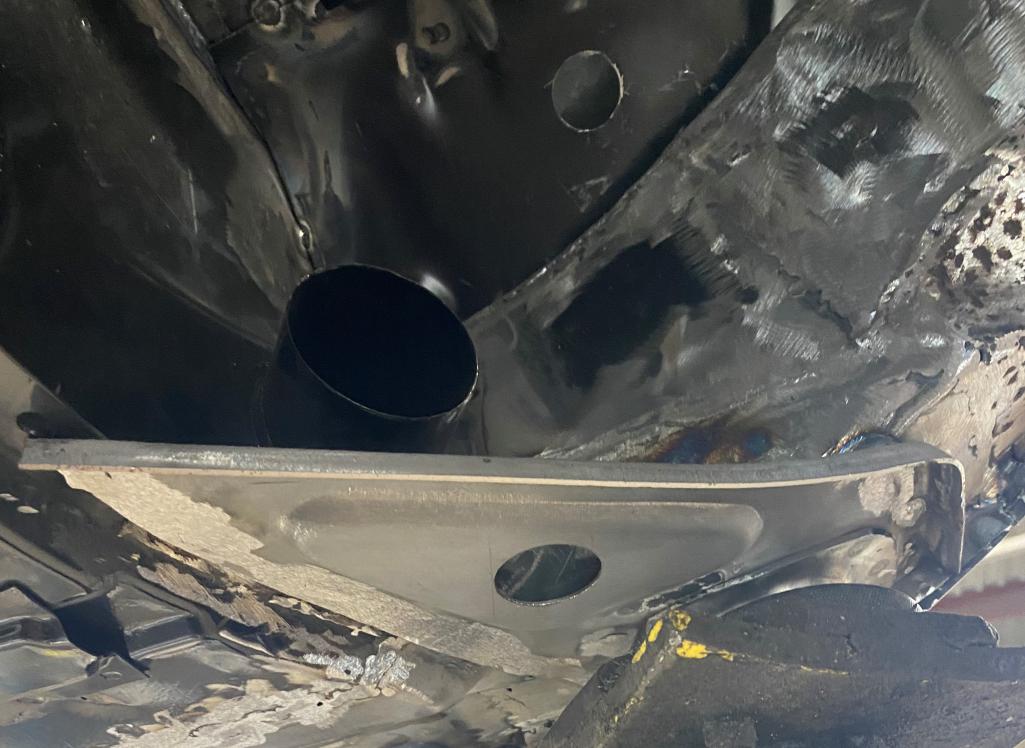
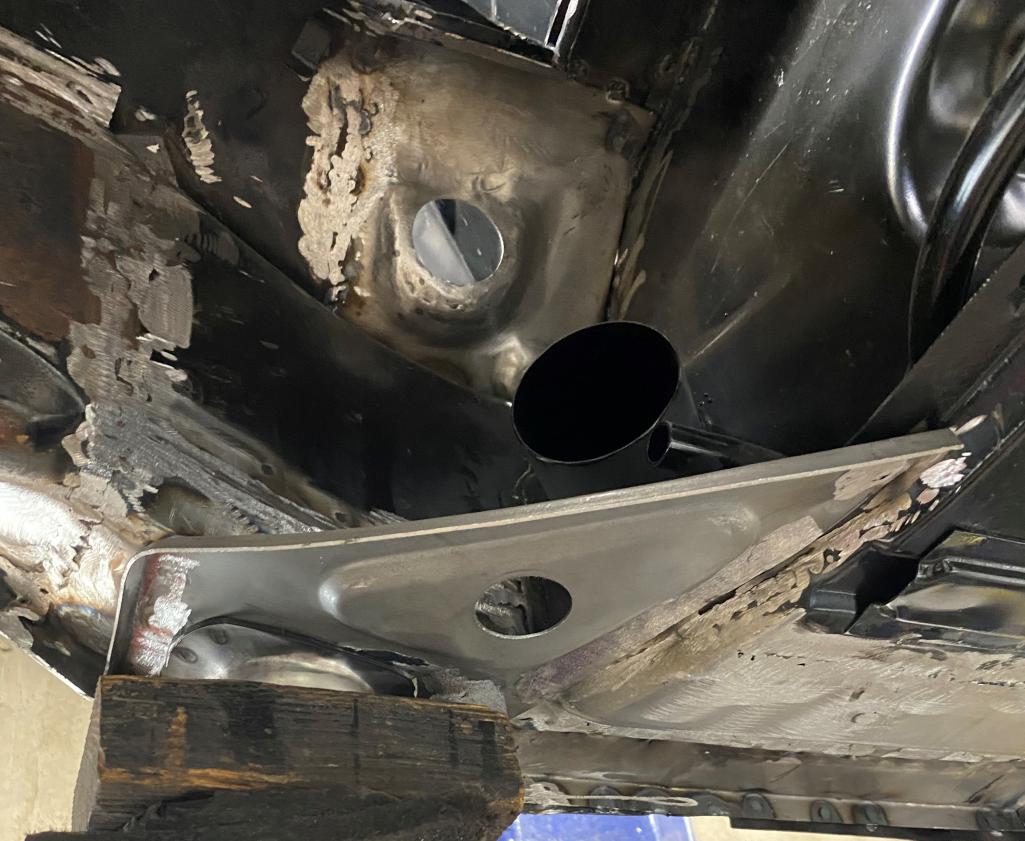
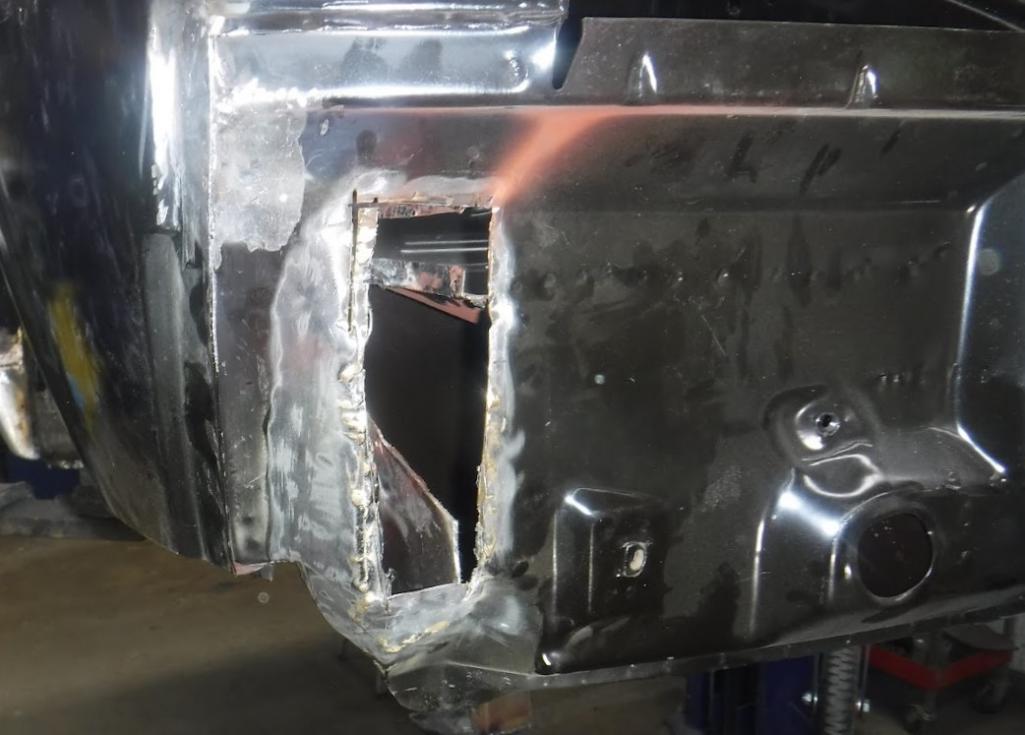
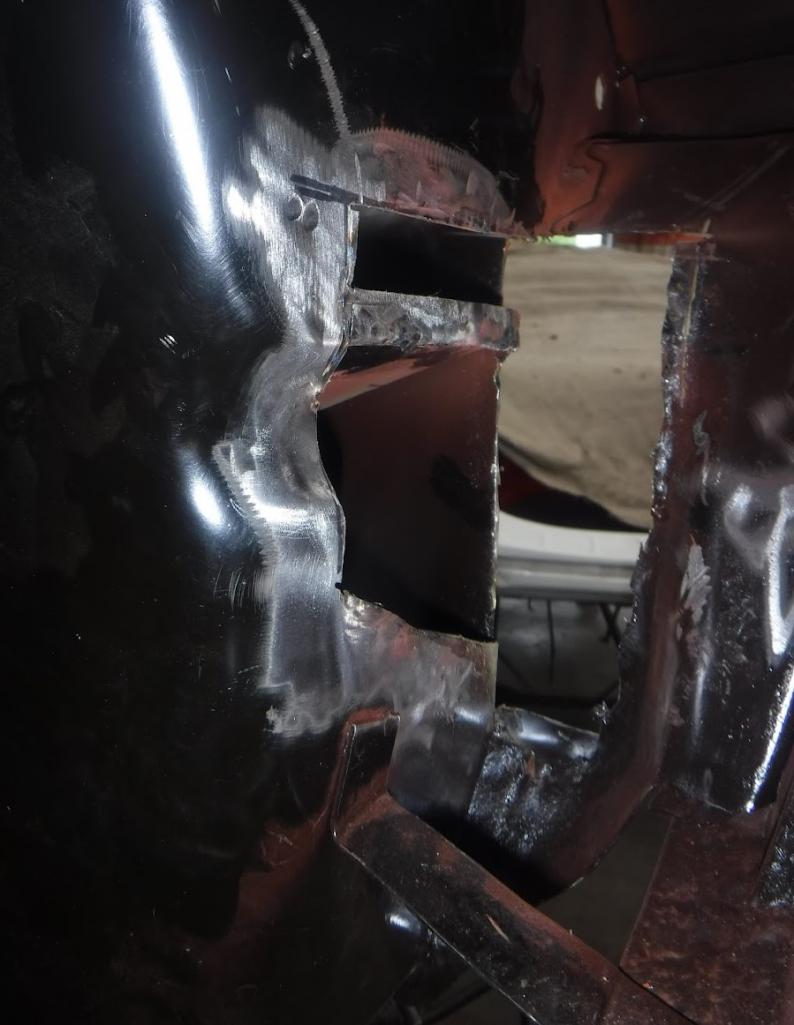
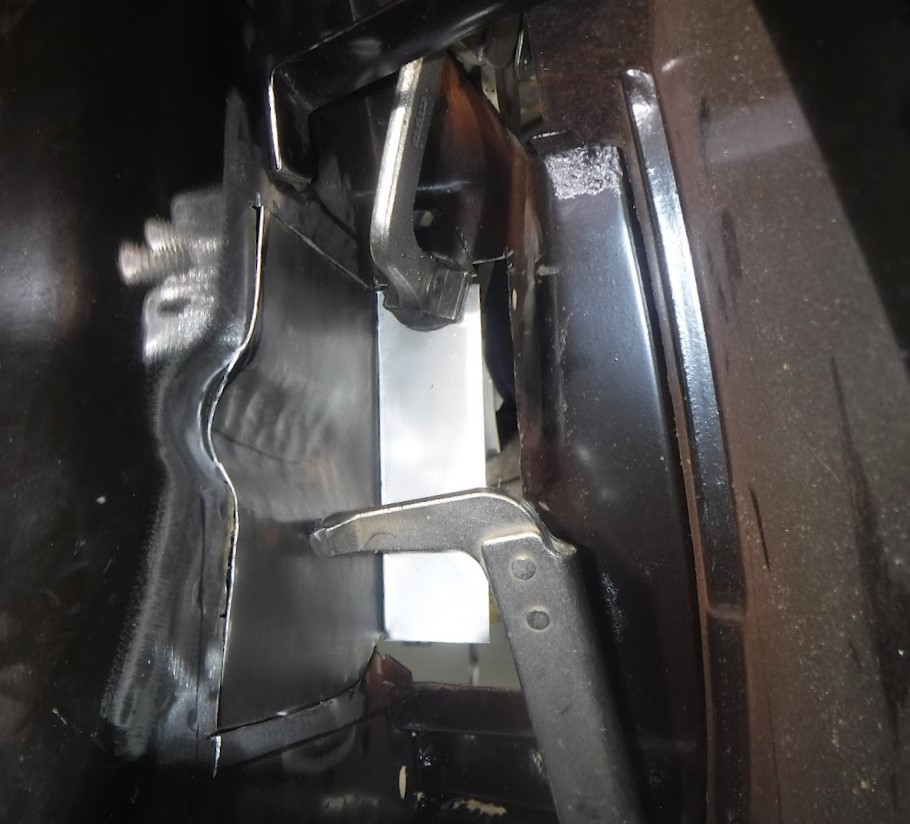
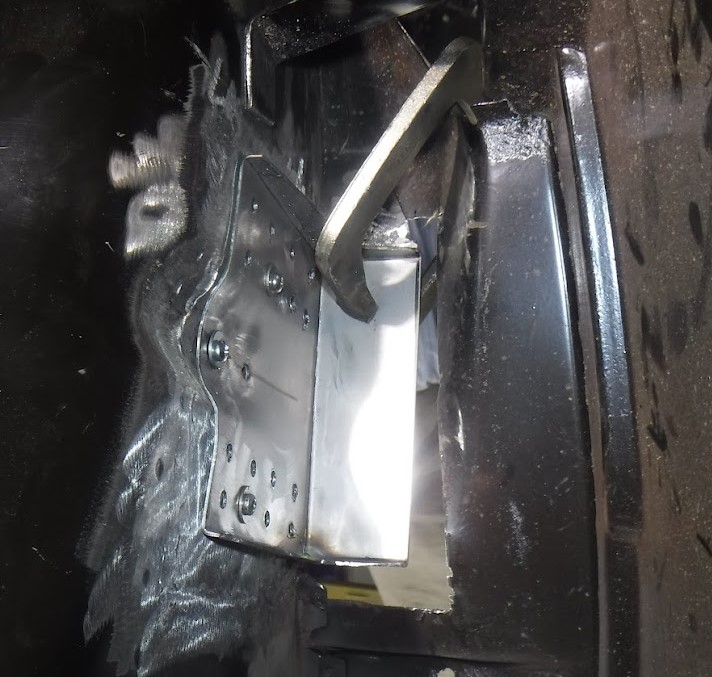
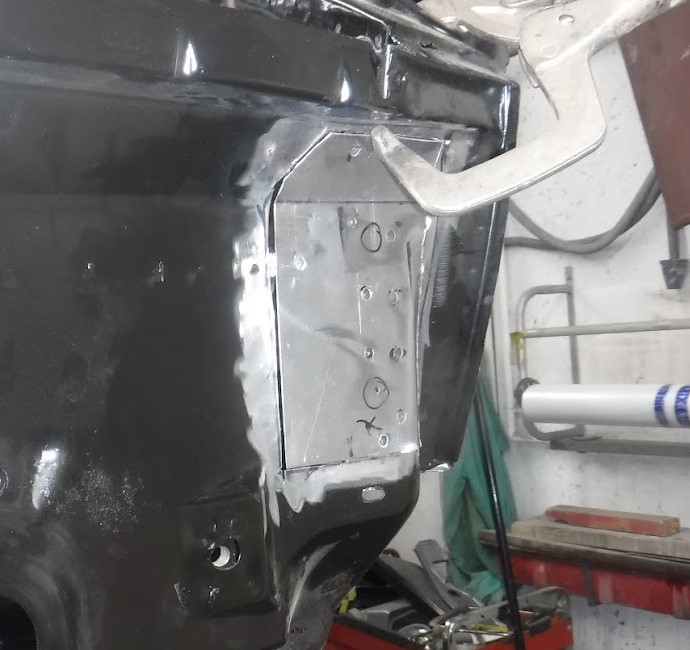
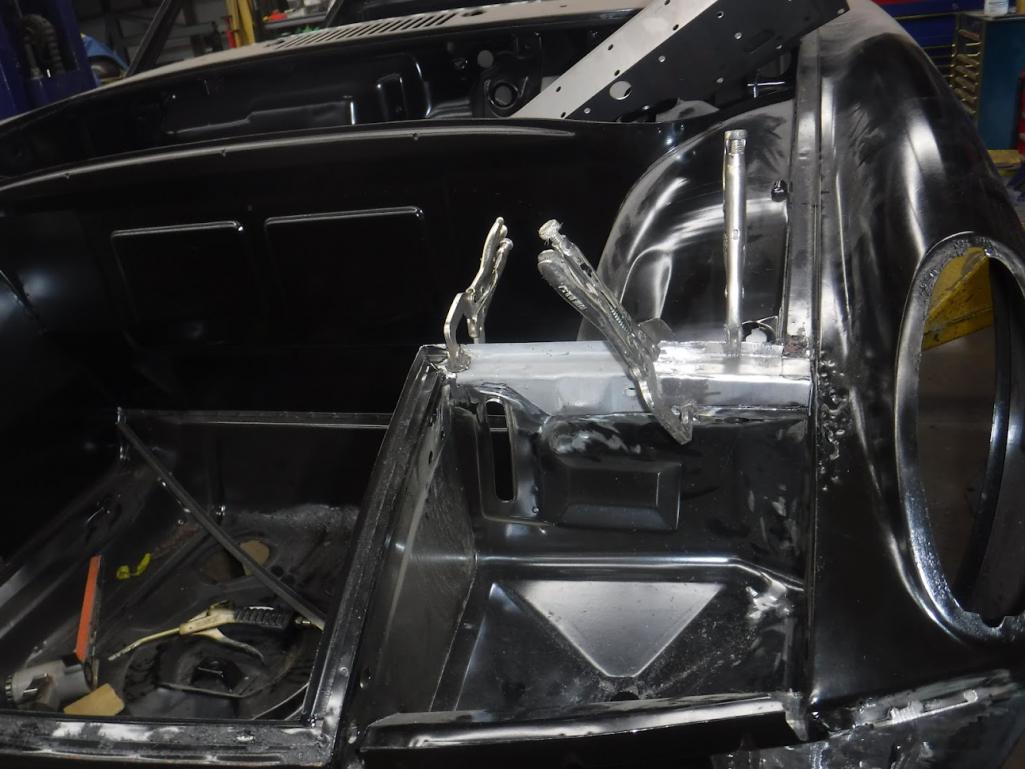
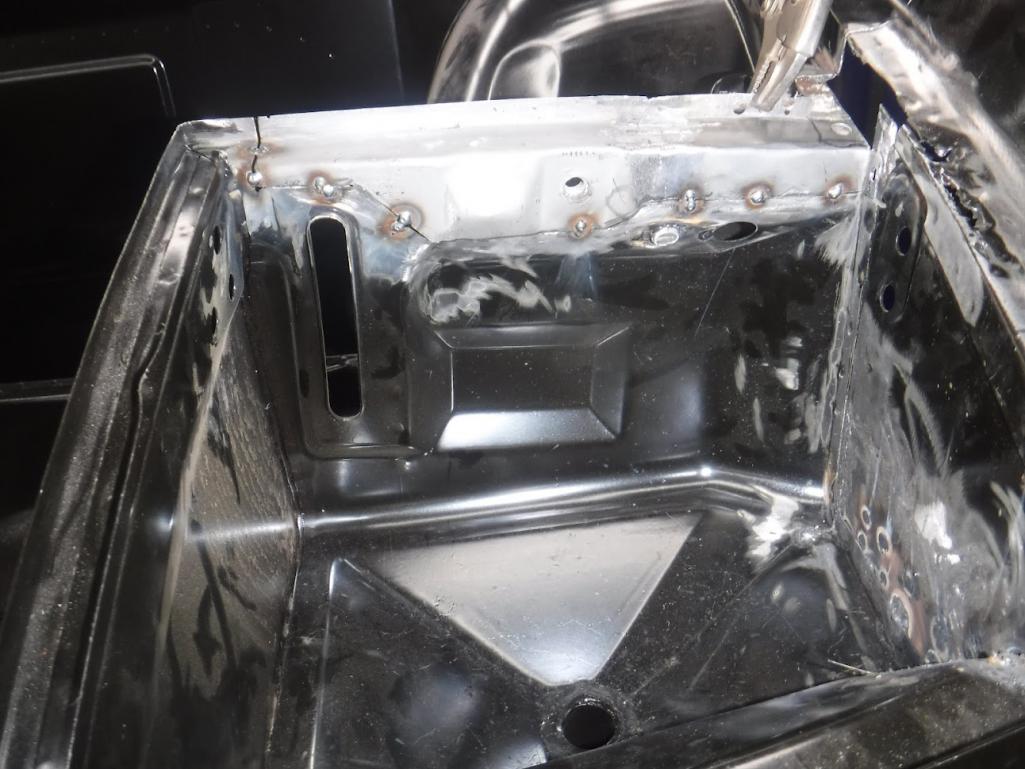
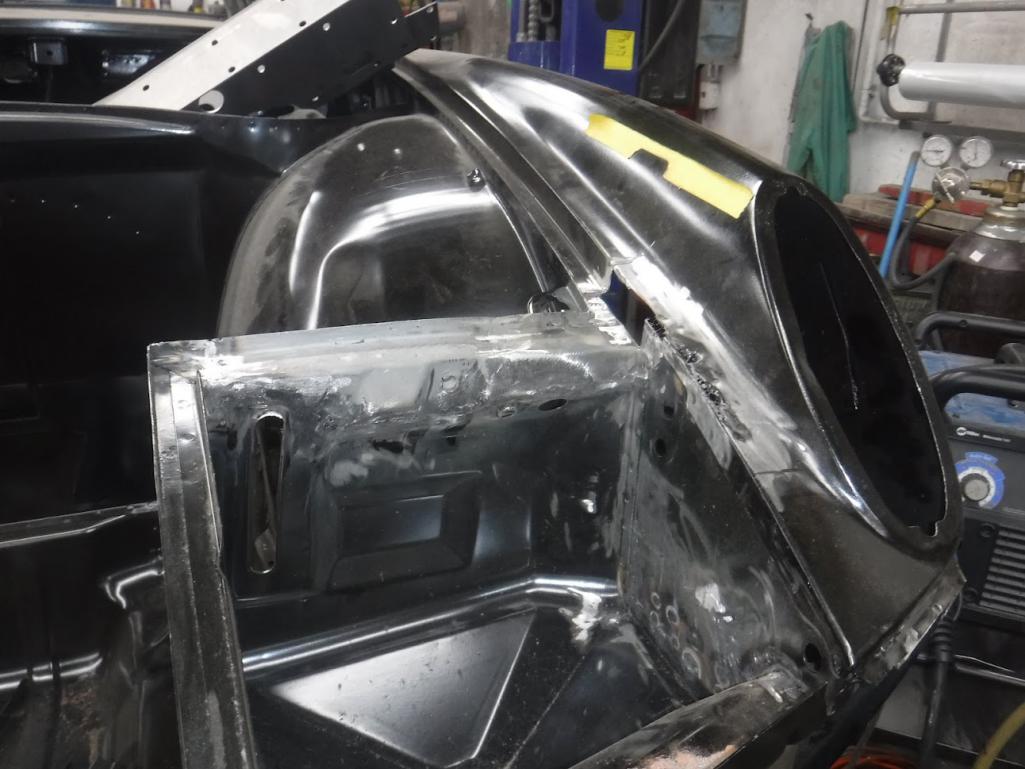
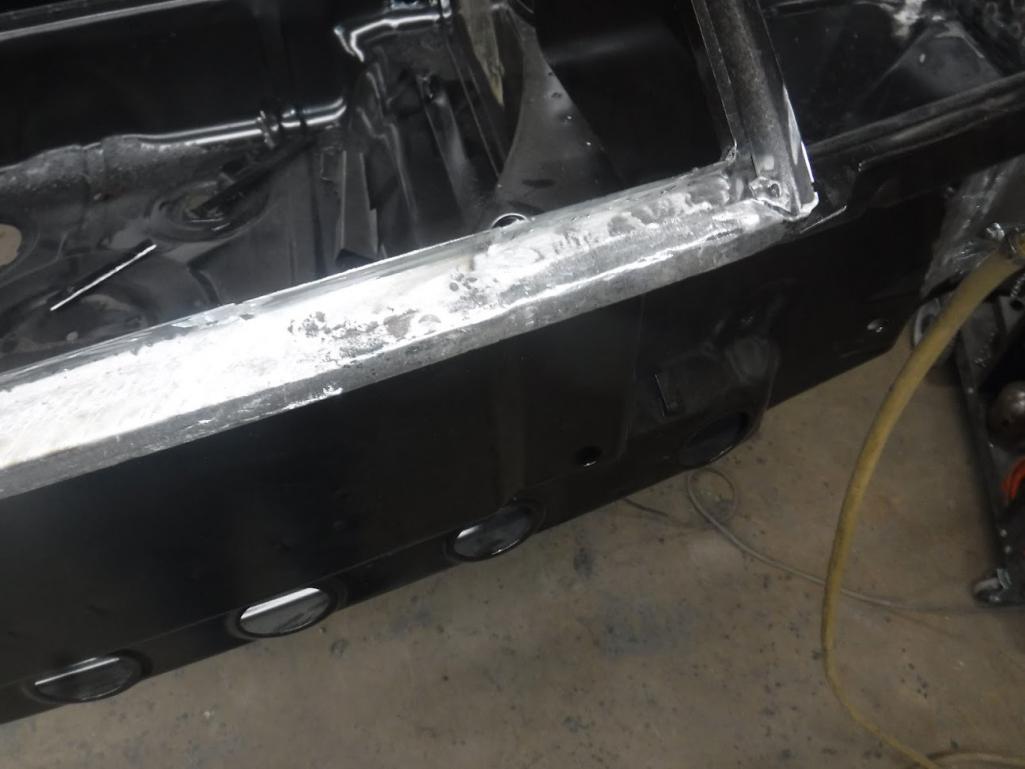
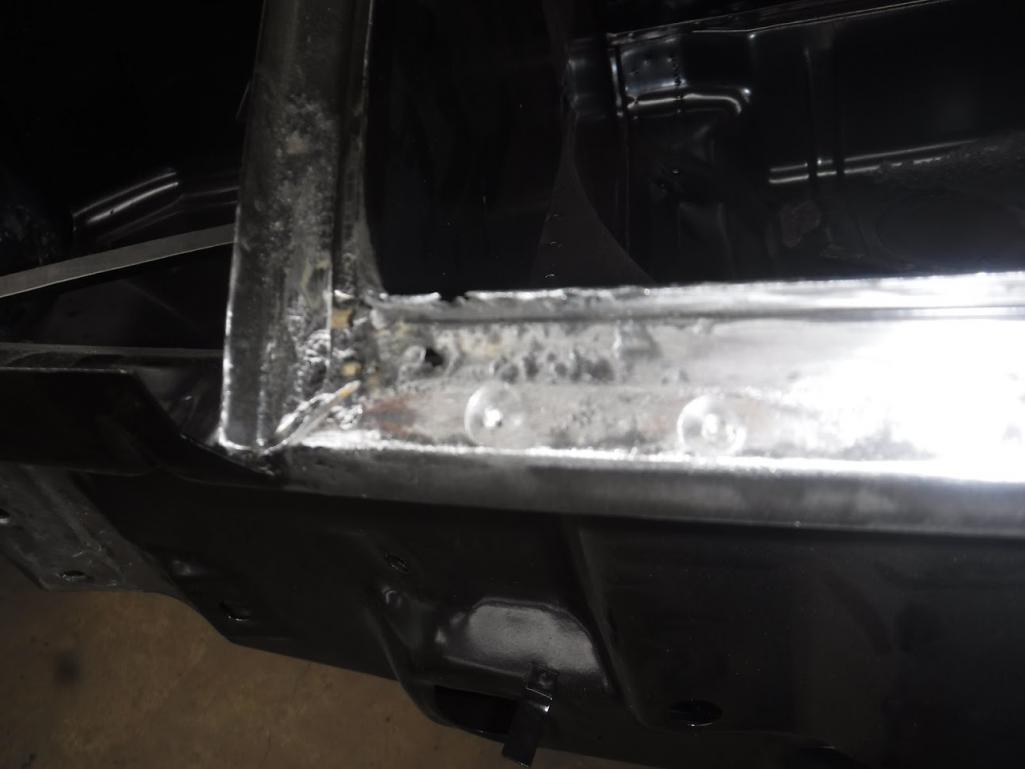
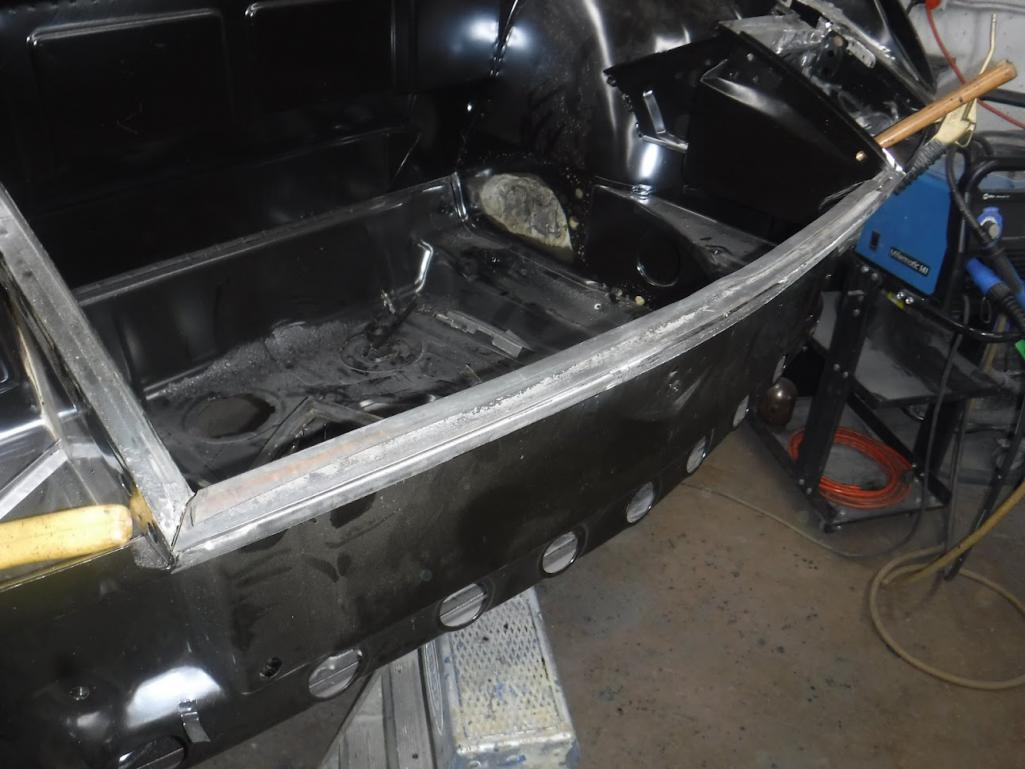
Here are some photos of the repairs in the rear bumper mount area
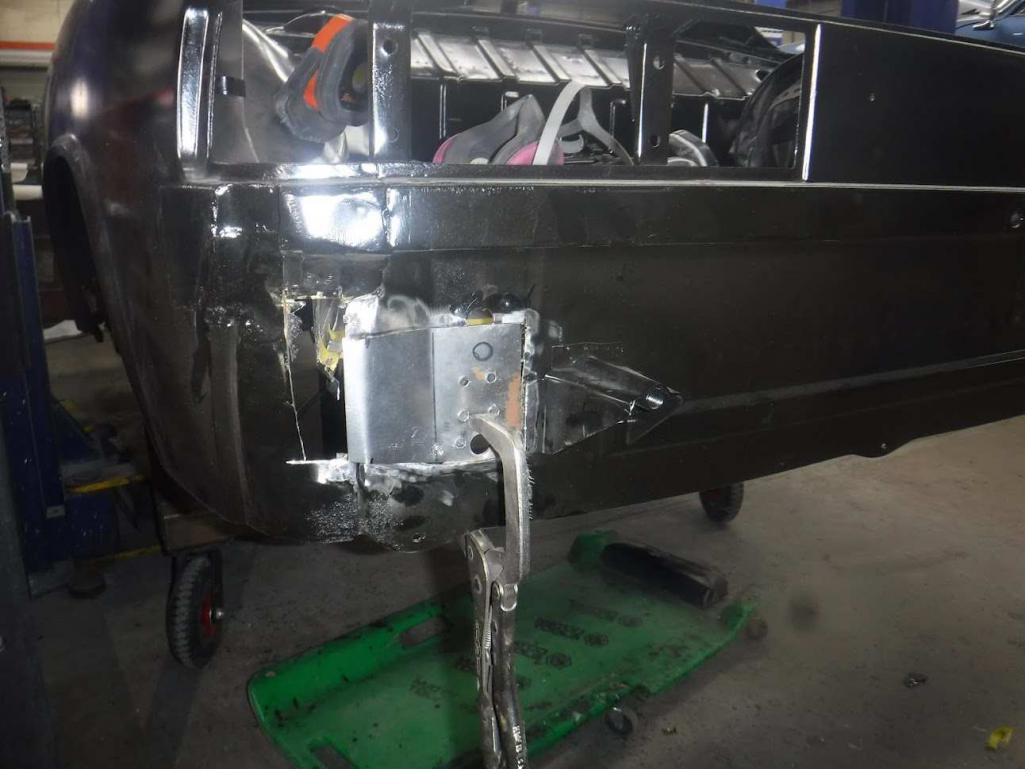
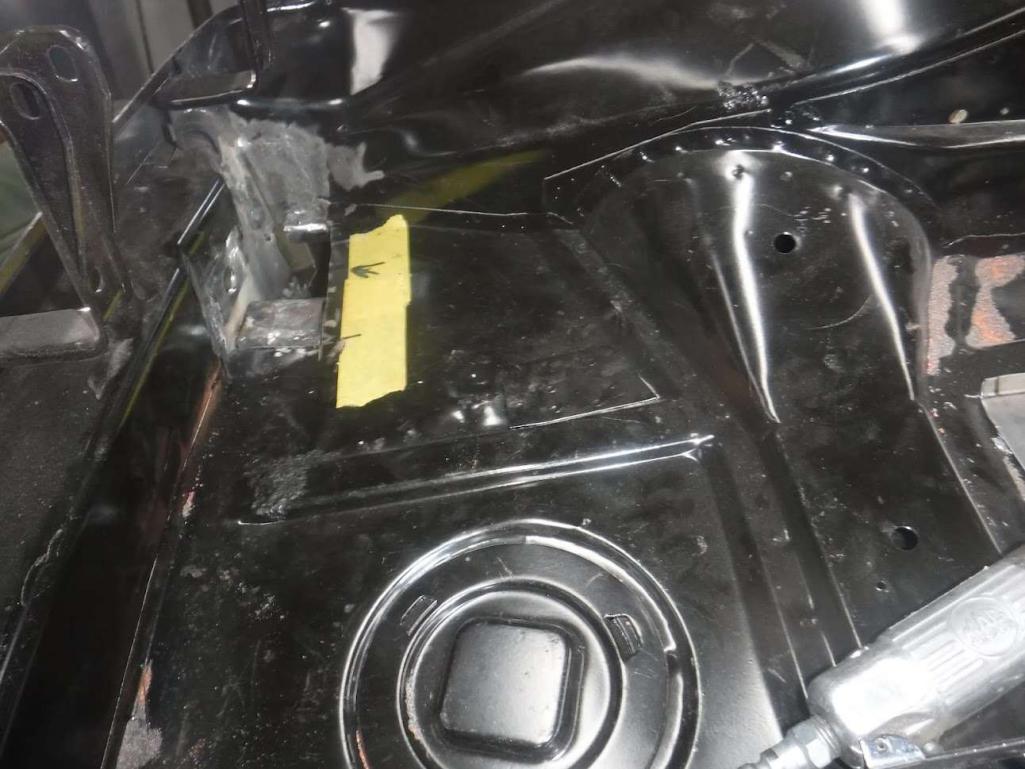
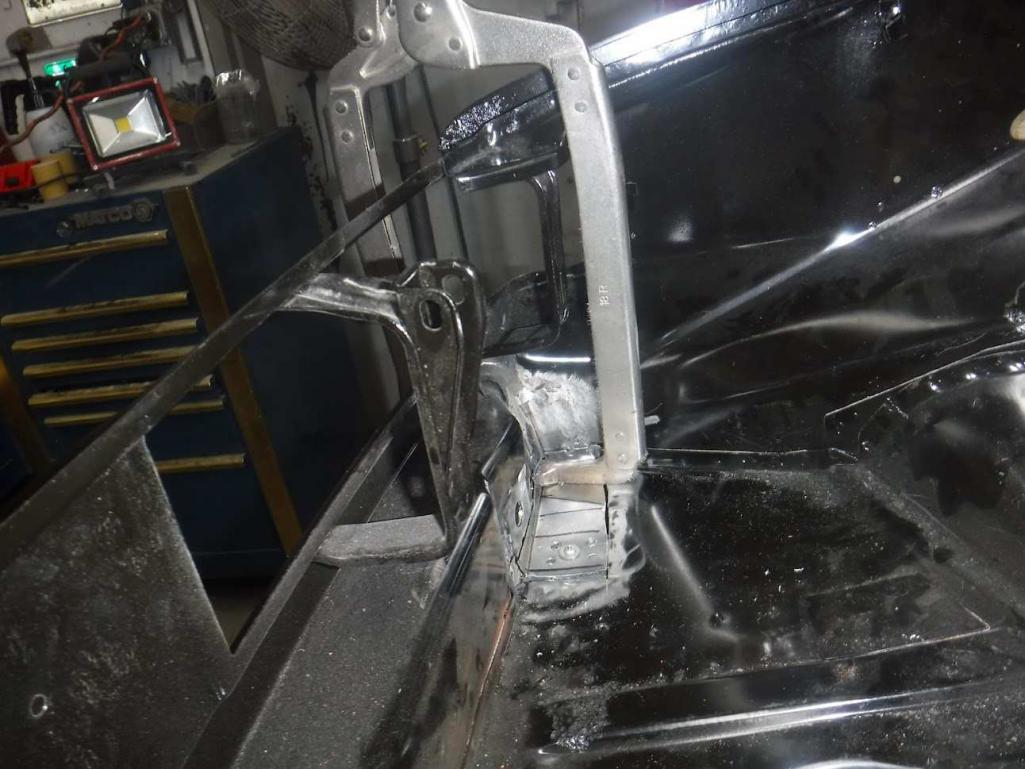
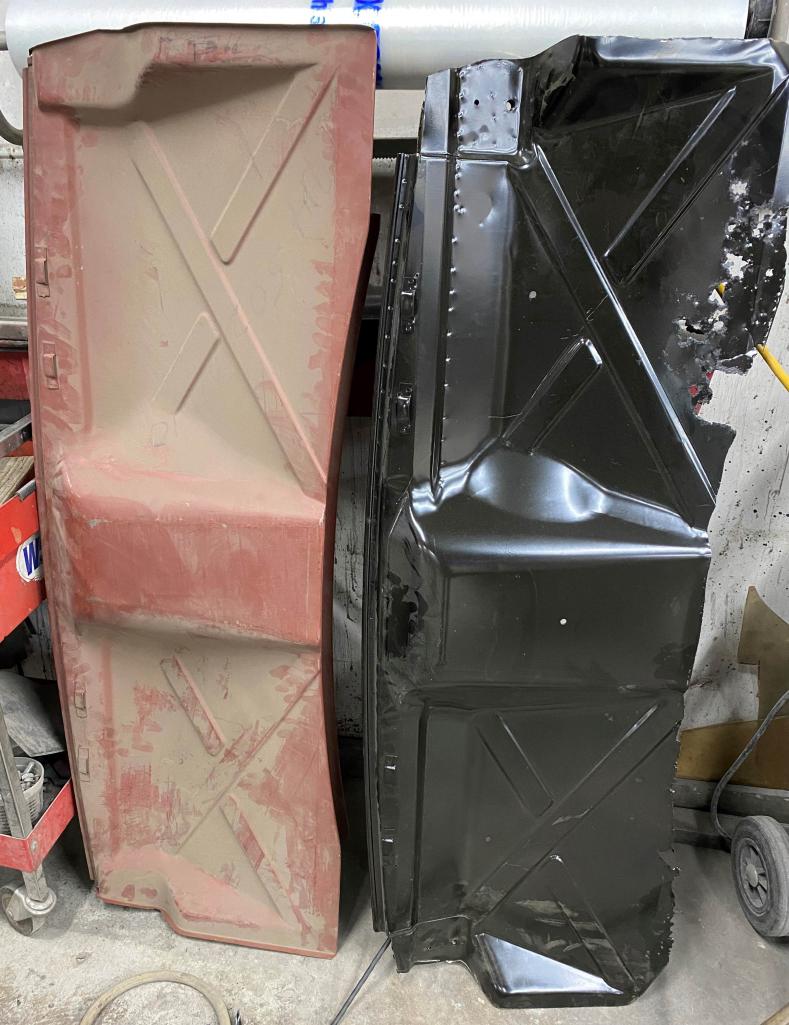
Posted by: Tom1394racing Apr 23 2023, 07:19 AM
RHS Rear bumper support.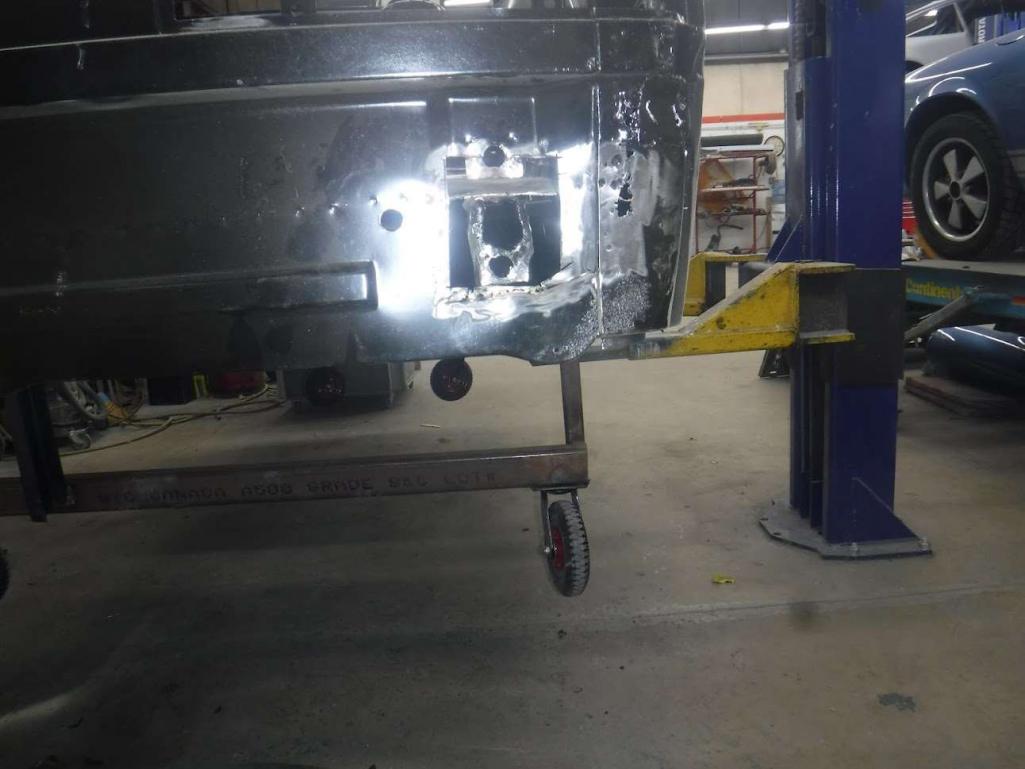
 [attachmentid=873
925]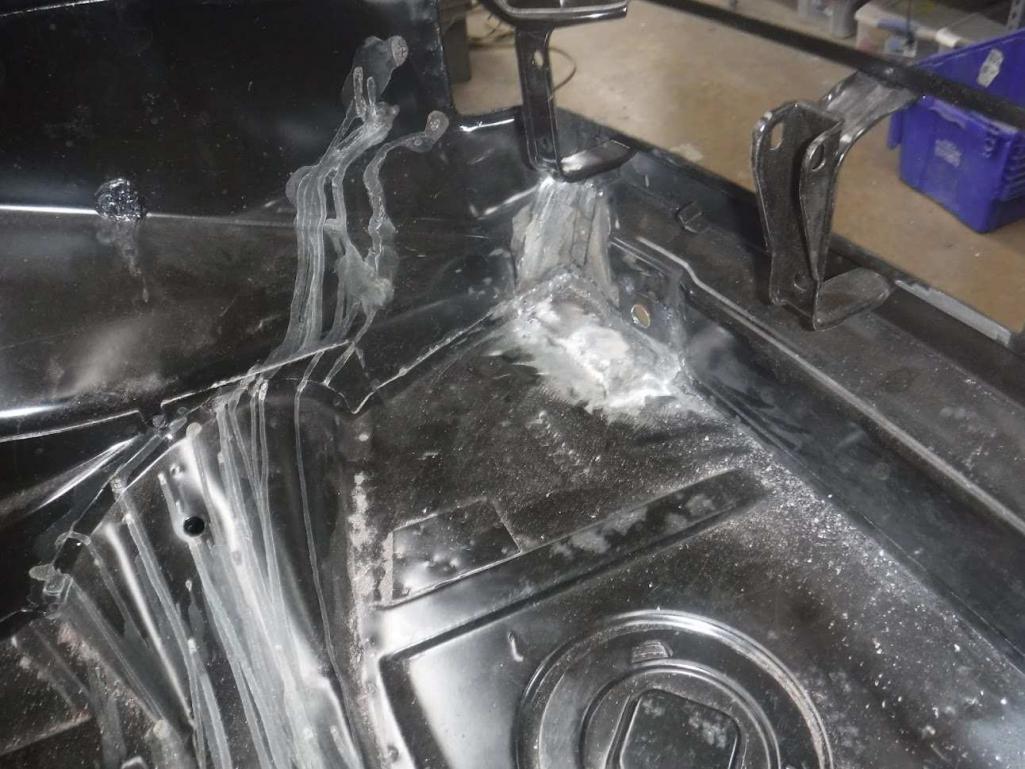
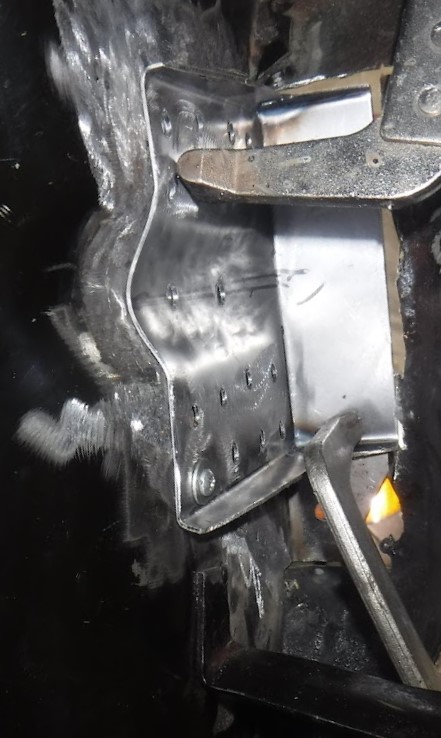
Posted by: Tom1394racing Apr 23 2023, 07:22 AM
Ready for NOS rear firewall.
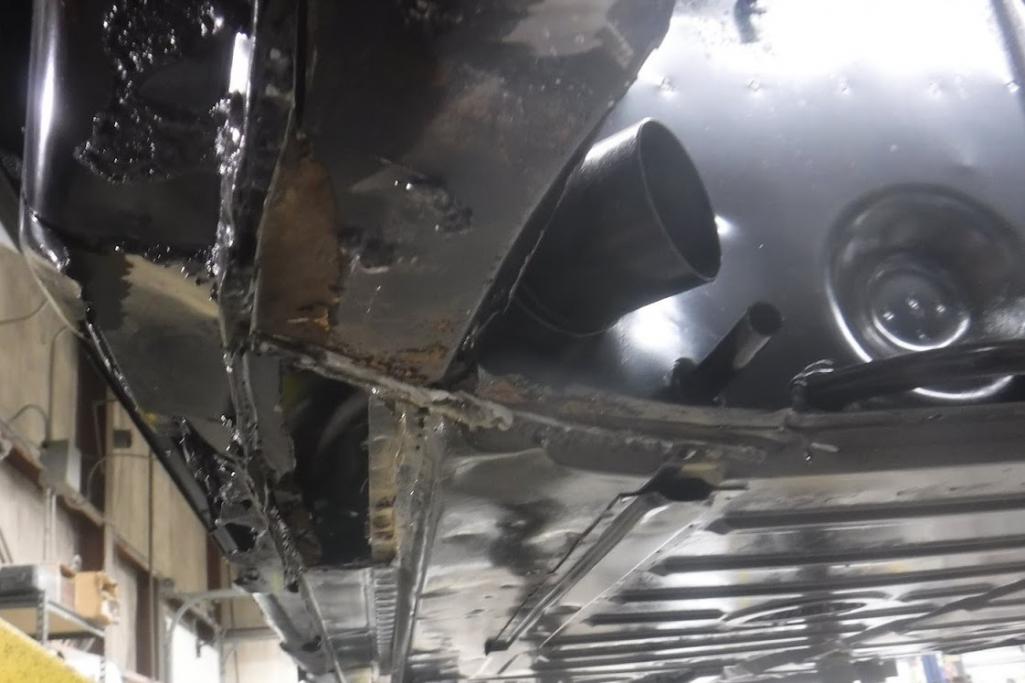
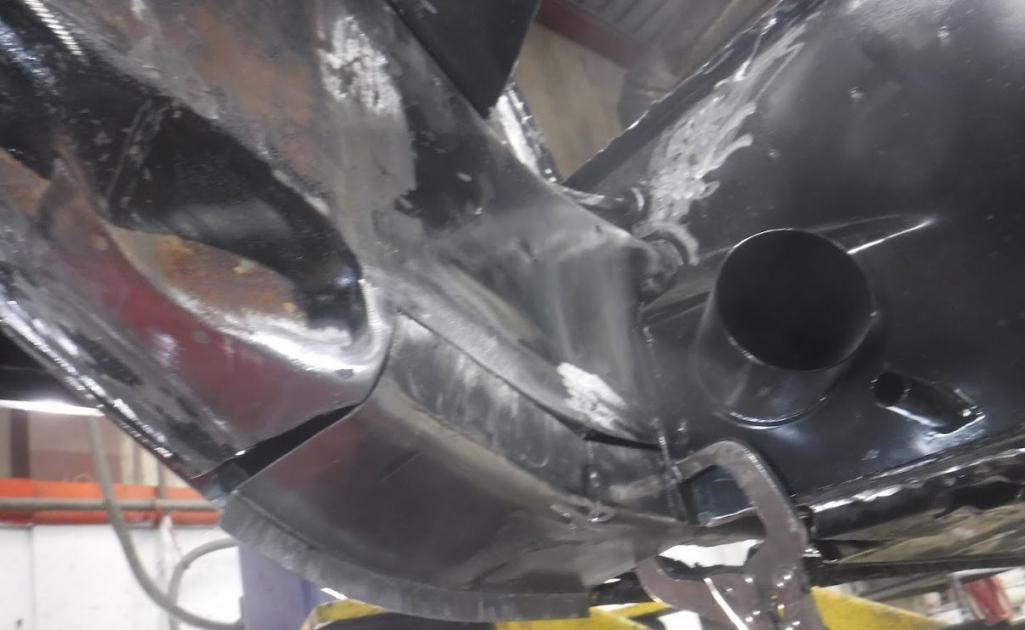
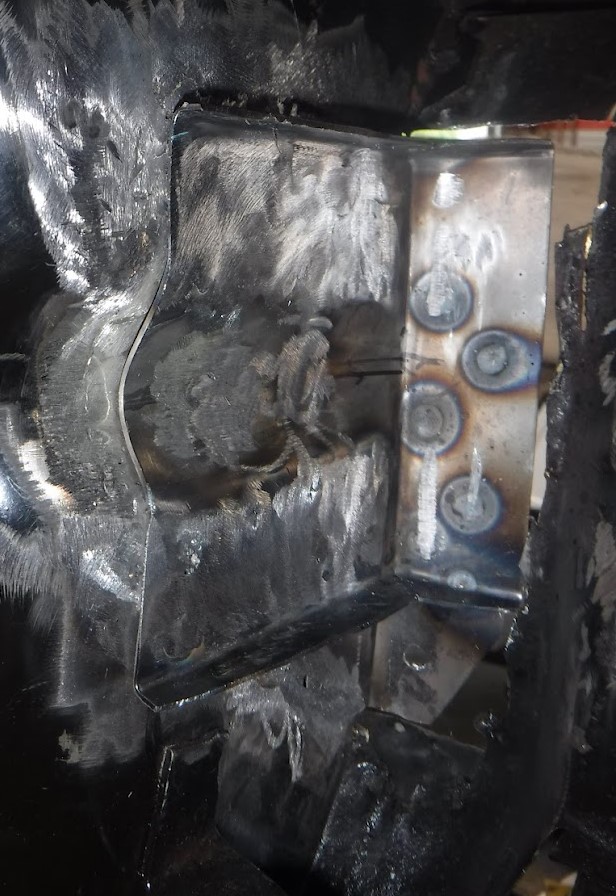
Posted by: Tom1394racing Apr 23 2023, 07:36 AM
Hell Hole repairs.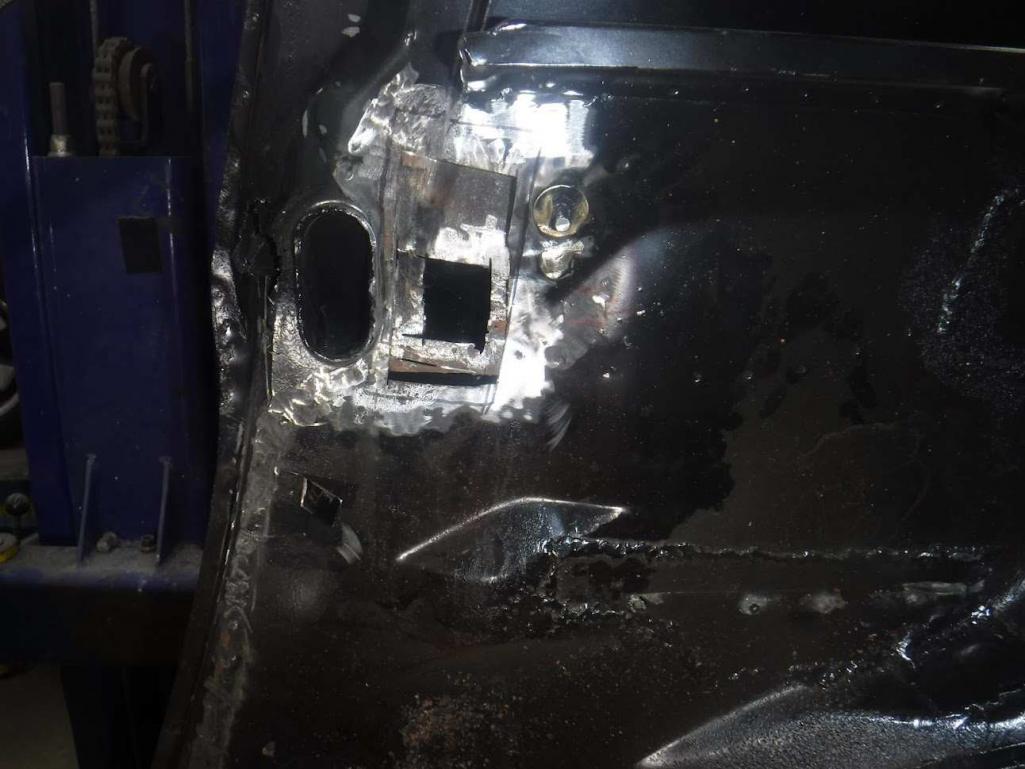
Posted by: Speedo Apr 23 2023, 08:55 AM
Thanks Tom for the updates. Looking at the metal repairs makes me smell welding fumes...mmm.  Time to head to the shop to work on the 6.
Have you started on the engine yet?
Posted by: Tom1394racing Apr 23 2023, 09:19 AM
Thanks Tom for the updates. Looking at the metal repairs makes me smell welding fumes...mmm.
Time to head to the shop to work on the 6.Have you started on the engine yet?
The case is at Ollies. I am still about 3 months out from delivery. I have almost everything else ready for the build.
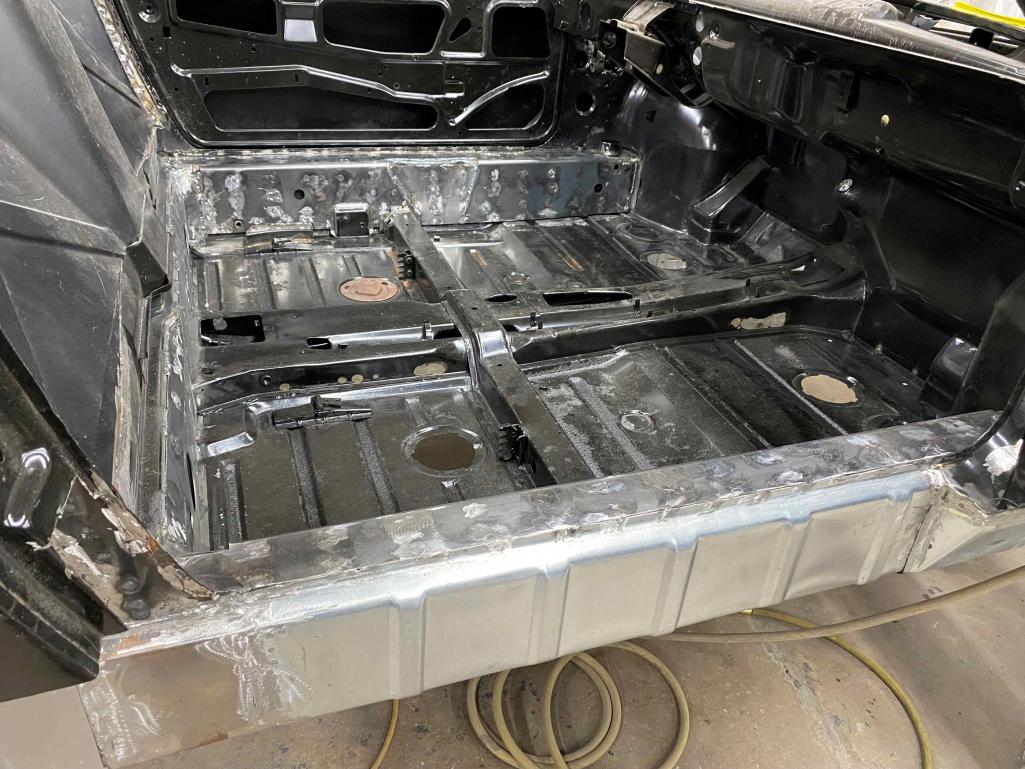
Posted by: Tom1394racing May 27 2023, 07:48 AM
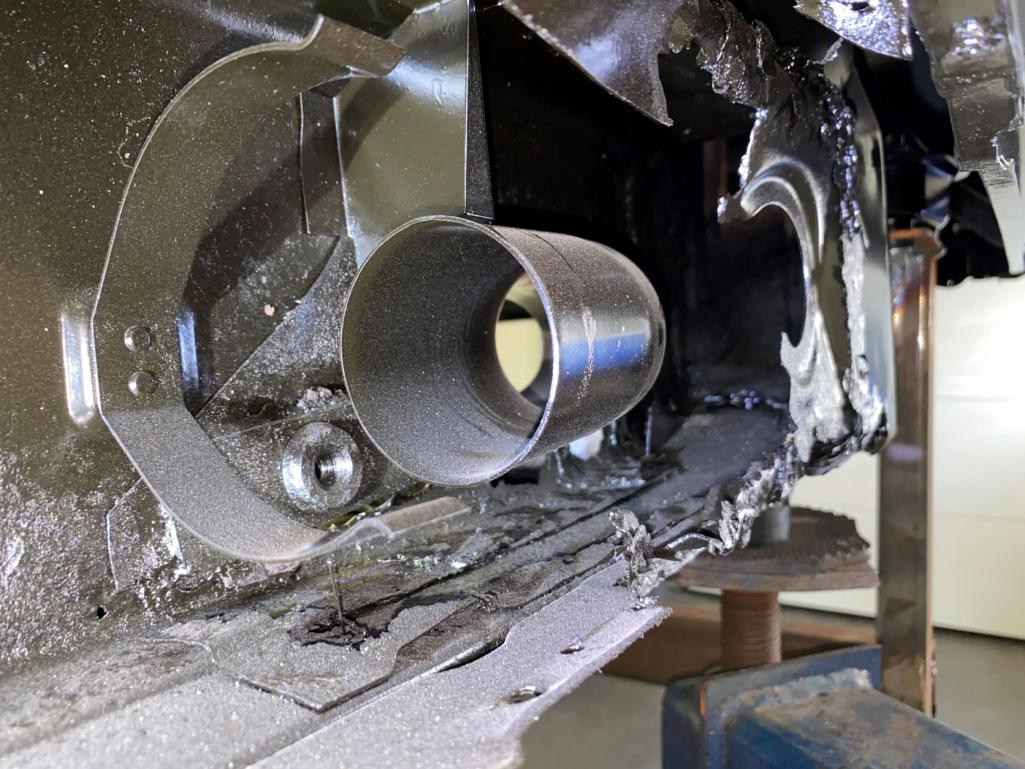
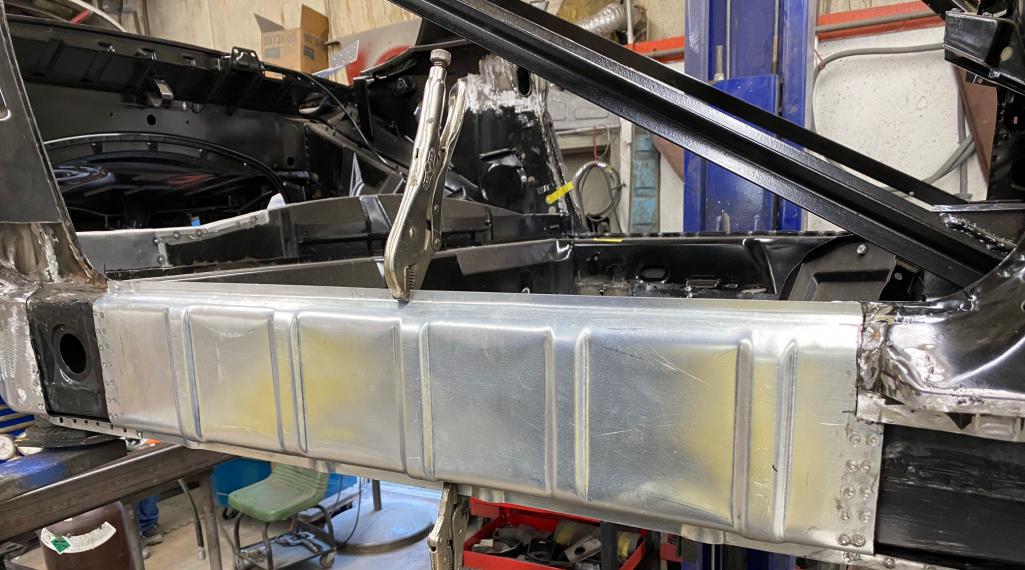
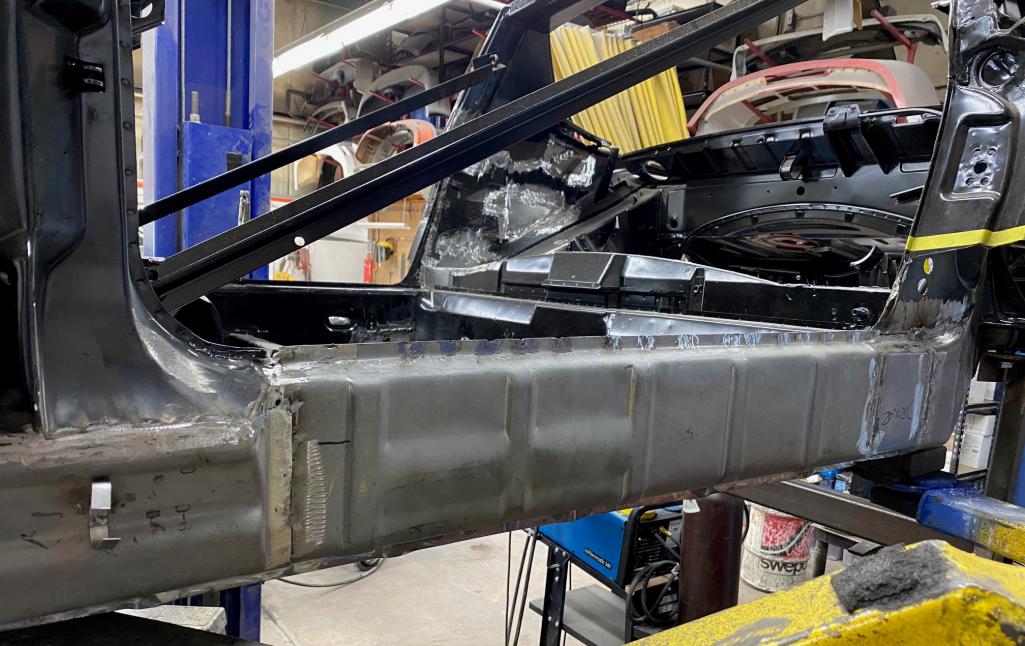
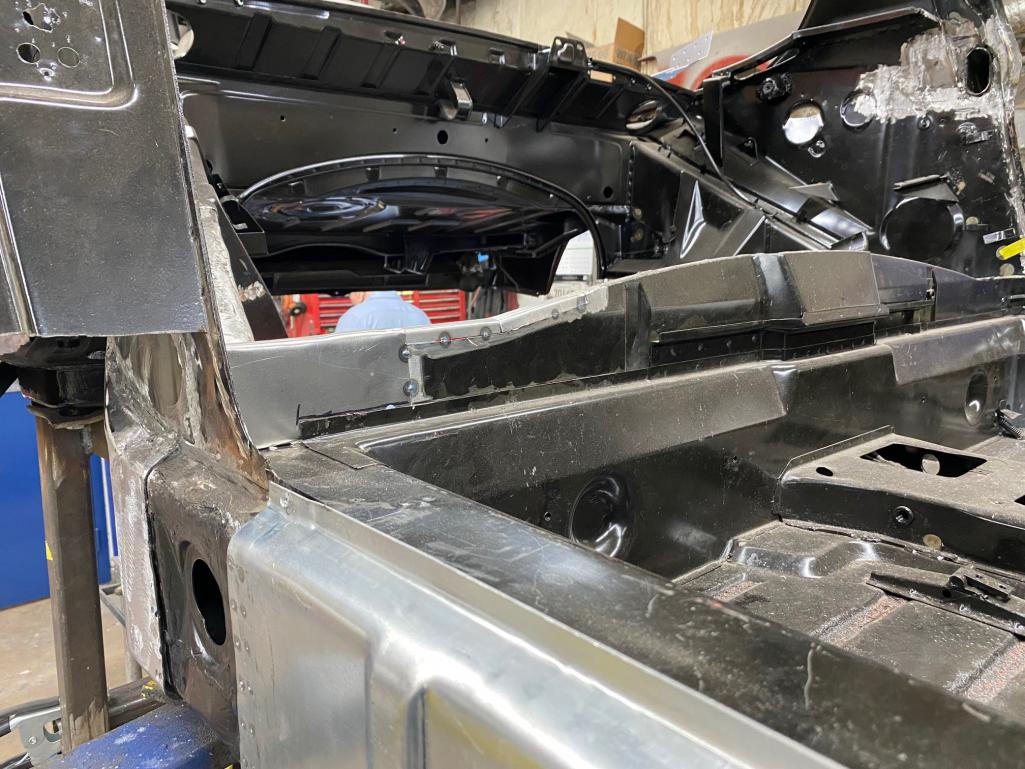
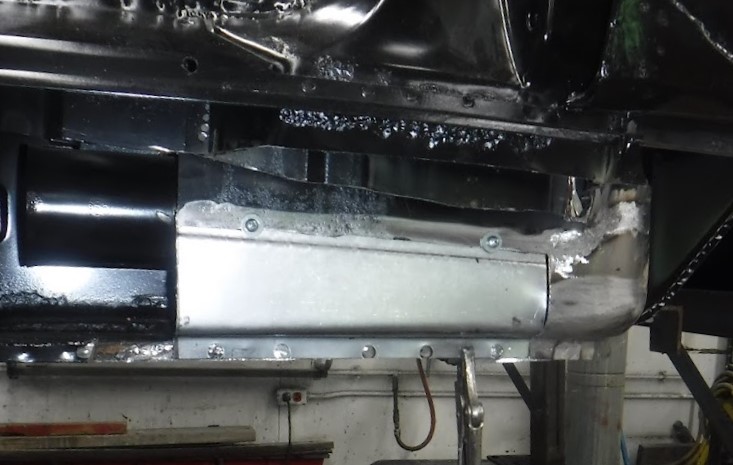
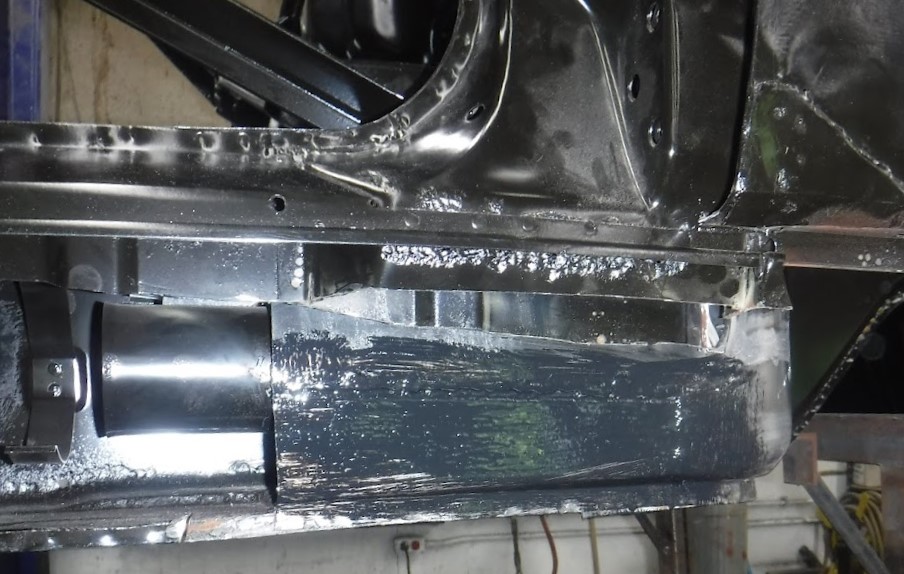
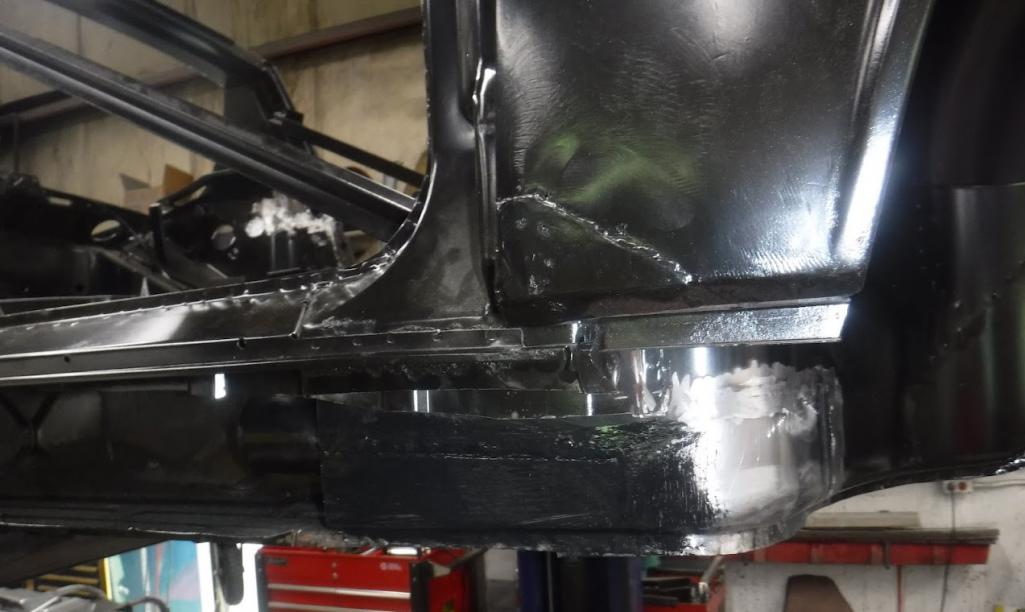
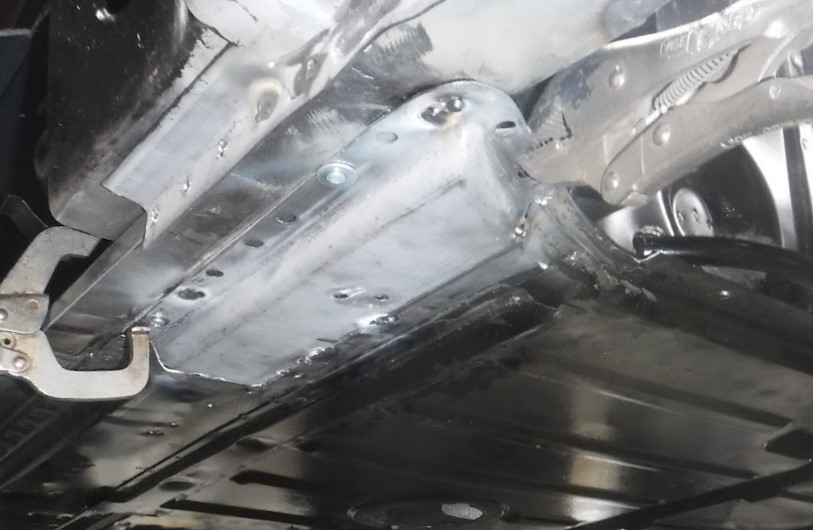
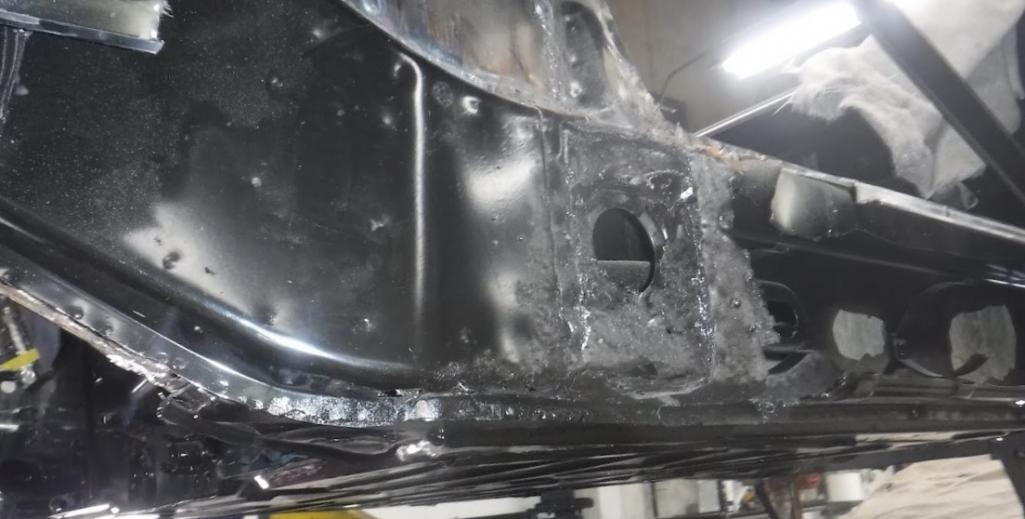
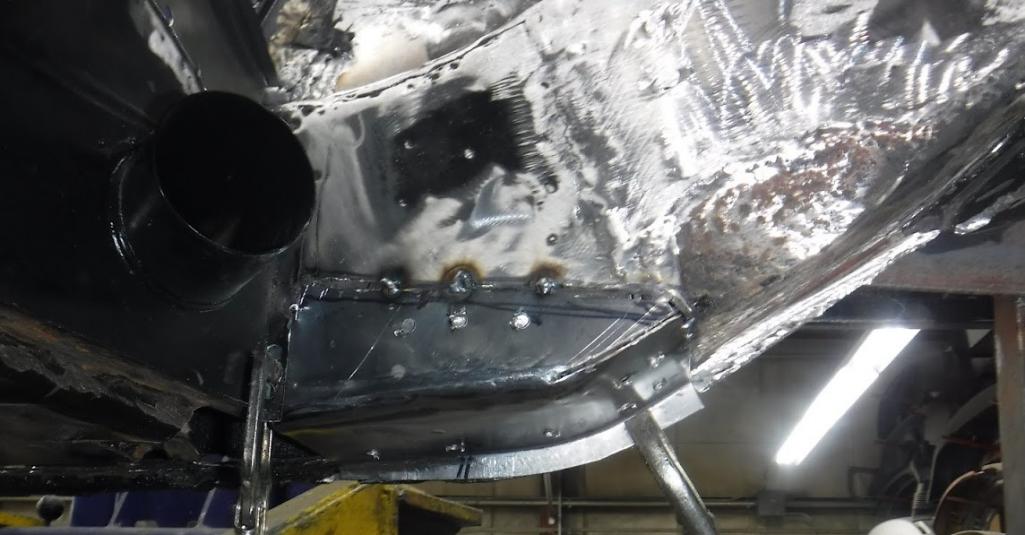
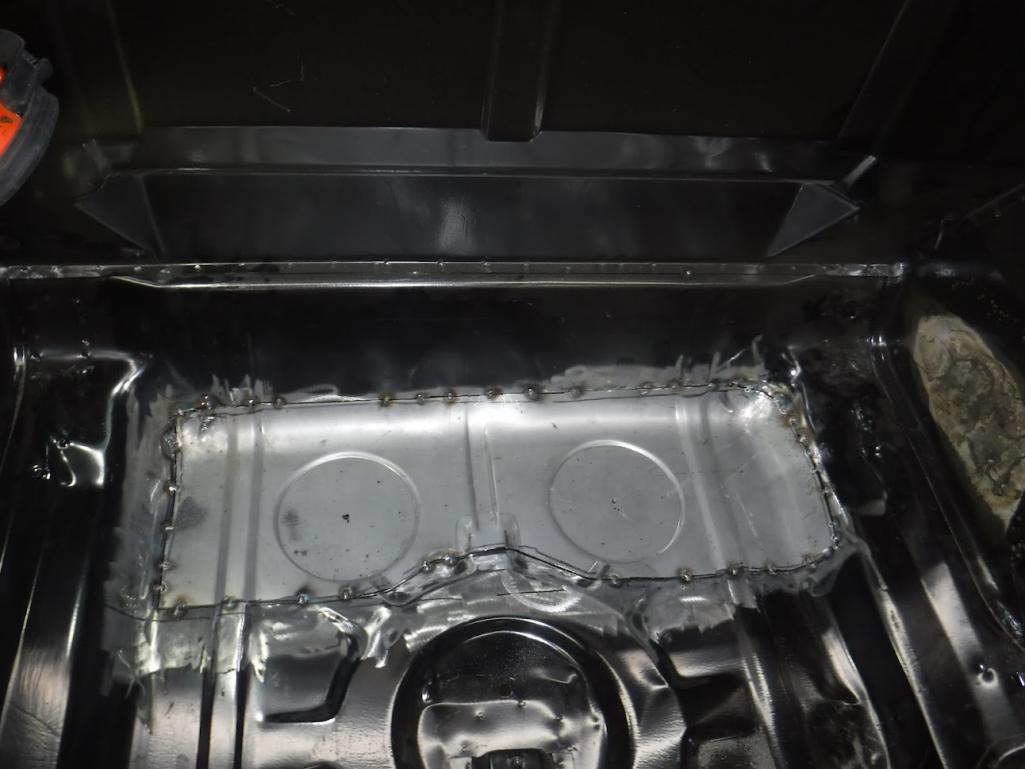
More progress on rust repair at Auto Associates. Engine bay L&R (hell hole) side rust repaired. Heater tubes reinstalled and outer longitudinals being replaced. Interesting note on the acid/e-coat dip. We have found some spots where neither the acid nor the e-coat penetrated. Fortunately, these areas also had only light surface rust.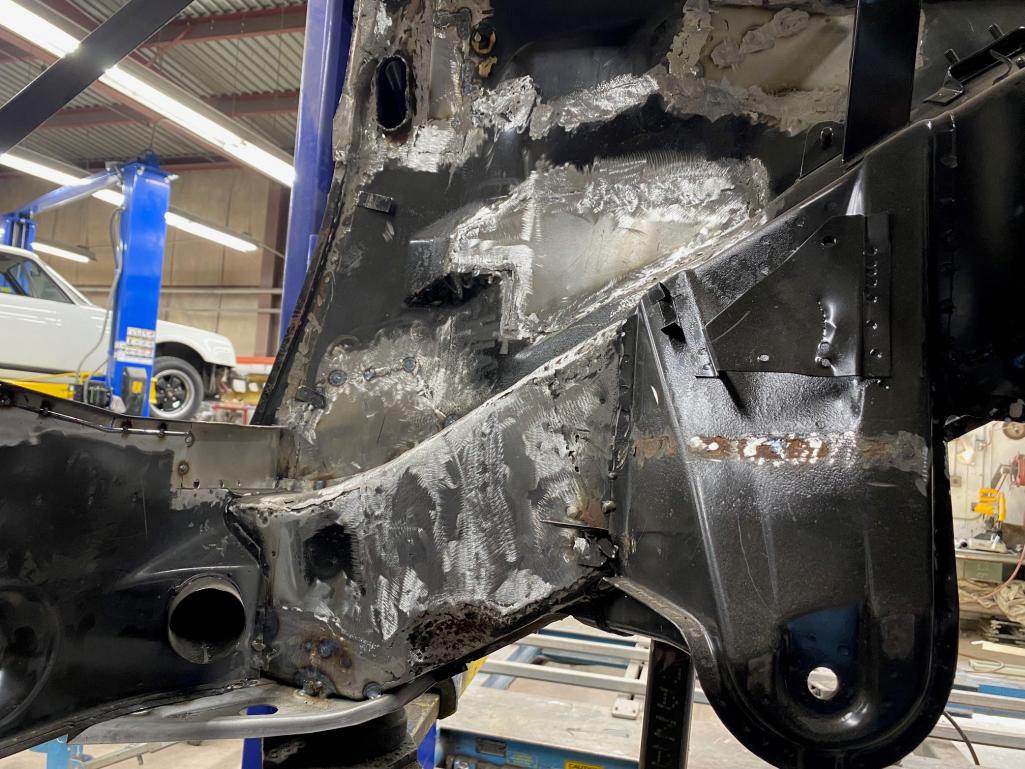
Posted by: Tom1394racing May 27 2023, 08:07 AM
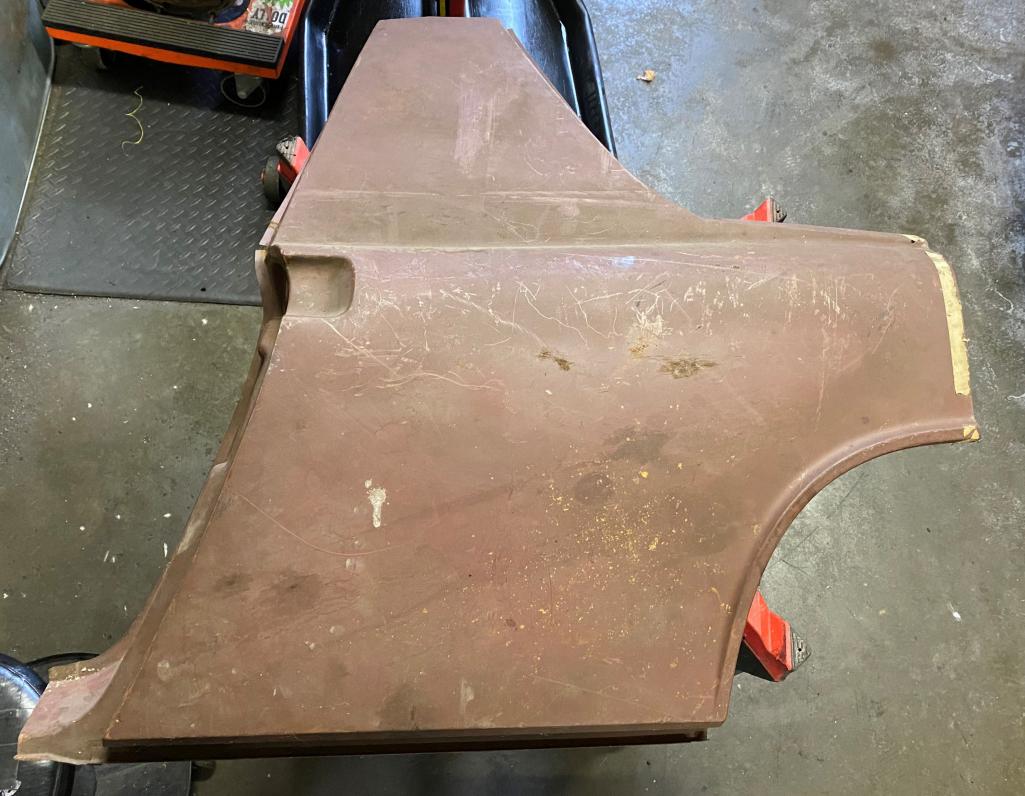
I was able to find some good replacement panels. A LHS sail/rear quarter at Carlisle and a rear panel from our friend Chris Foley. We will use only the taillight section of the rear panel. However, if anyone has a good RHS sail/rear quarter panel like the LHS I found, we could make good use of it.
Front fender well repairs are also completed.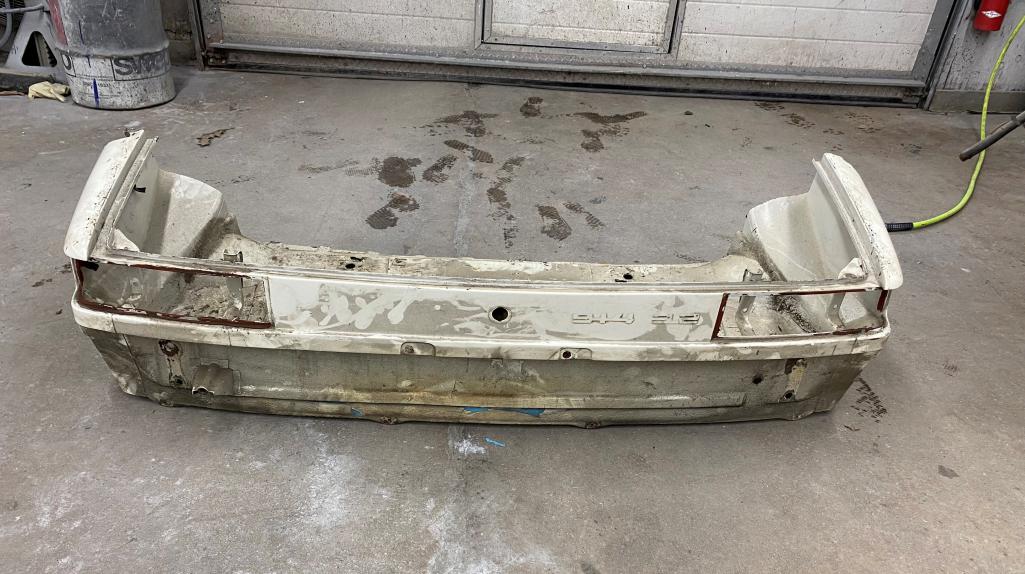
Posted by: Tom1394racing May 27 2023, 08:16 AM
In the meantime, the original '73 side shift gearbox has been rebuilt with a billet Al intermediate plate and 108 mm output shafts to mate with sway away axles and 911 108 mm CV's. The intermediate plate was drilled and tapped to accept the 914-6 throttle bell crank. The gear box will also get the Tangerine Racing precision shift coupler.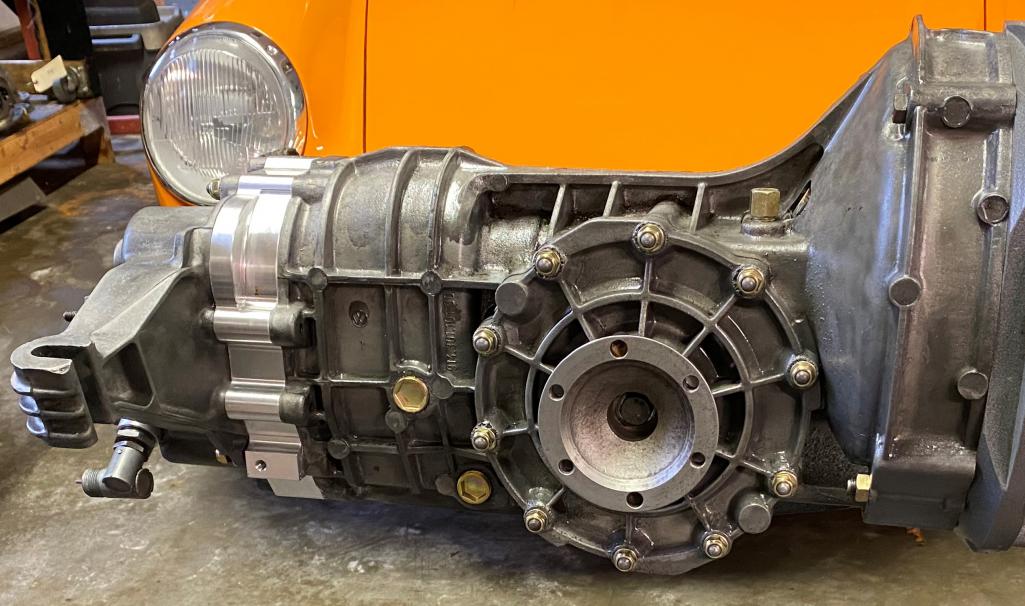
Posted by: Tom1394racing Jun 13 2023, 03:31 PM
Rust repairs are continuing at Auto Associates. I thought it might be useful to post more detailed photos of the process. Here are repairs to the right front corner.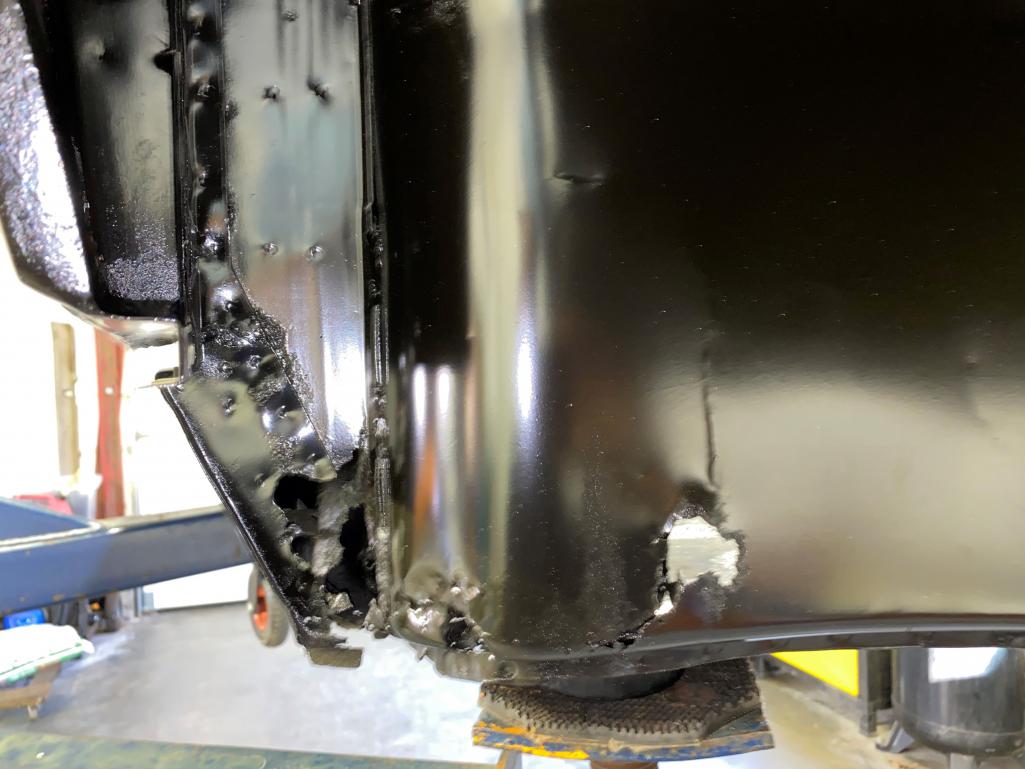
Attached thumbnail(s)
Posted by: Tom1394racing Jun 13 2023, 03:40 PM
Here are the repairs to the left front corner.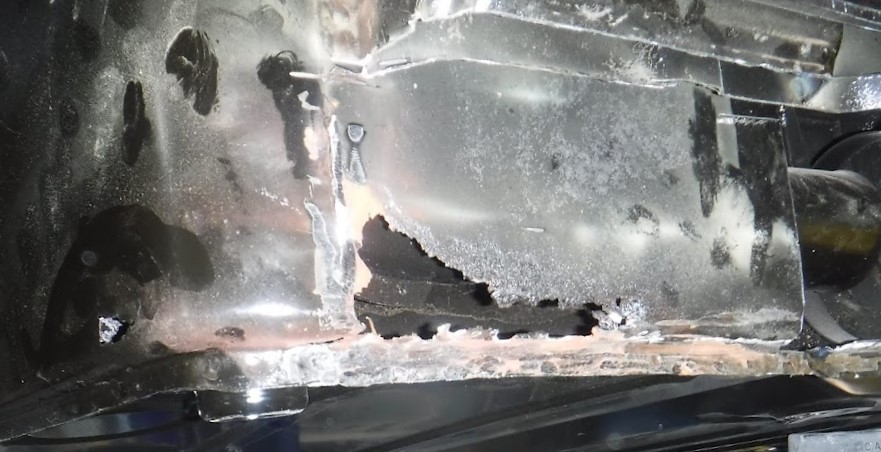


Posted by: Tom1394racing Jun 13 2023, 03:48 PM
Here are the repairs to the left rear corner.
Posted by: pfreiburger Jun 13 2023, 09:48 PM
Thanks for taking the time to post all these pictures, watching the progress is really fun. Your cookbook sounds great, can't wait to see it all come together. BTW, I know the green color that was your first choice - I would vote for that!
Posted by: Tom1394racing Jun 14 2023, 04:35 AM
Here are the repairs to the right rear corner.
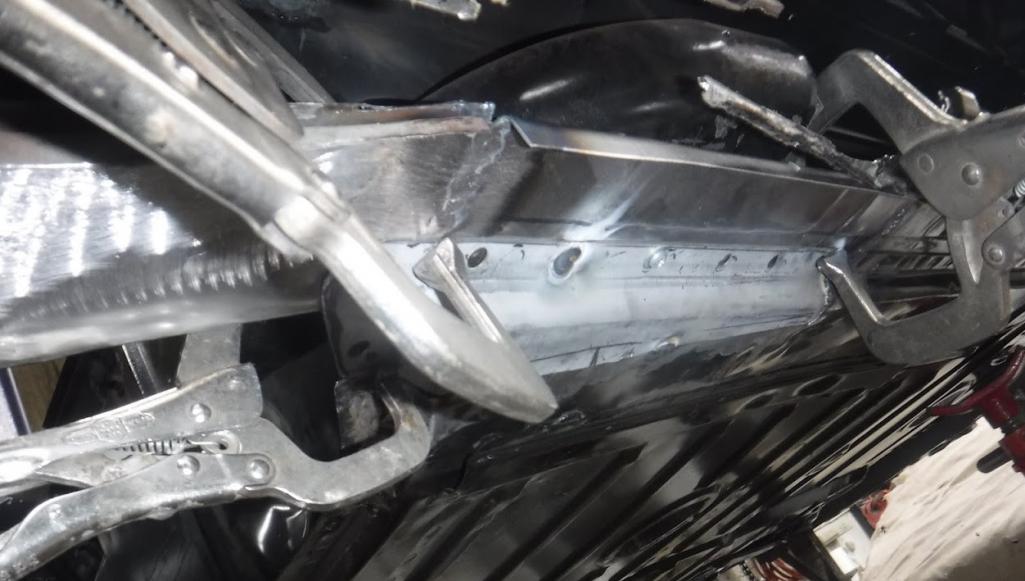

Posted by: Tom1394racing Jun 14 2023, 04:42 AM
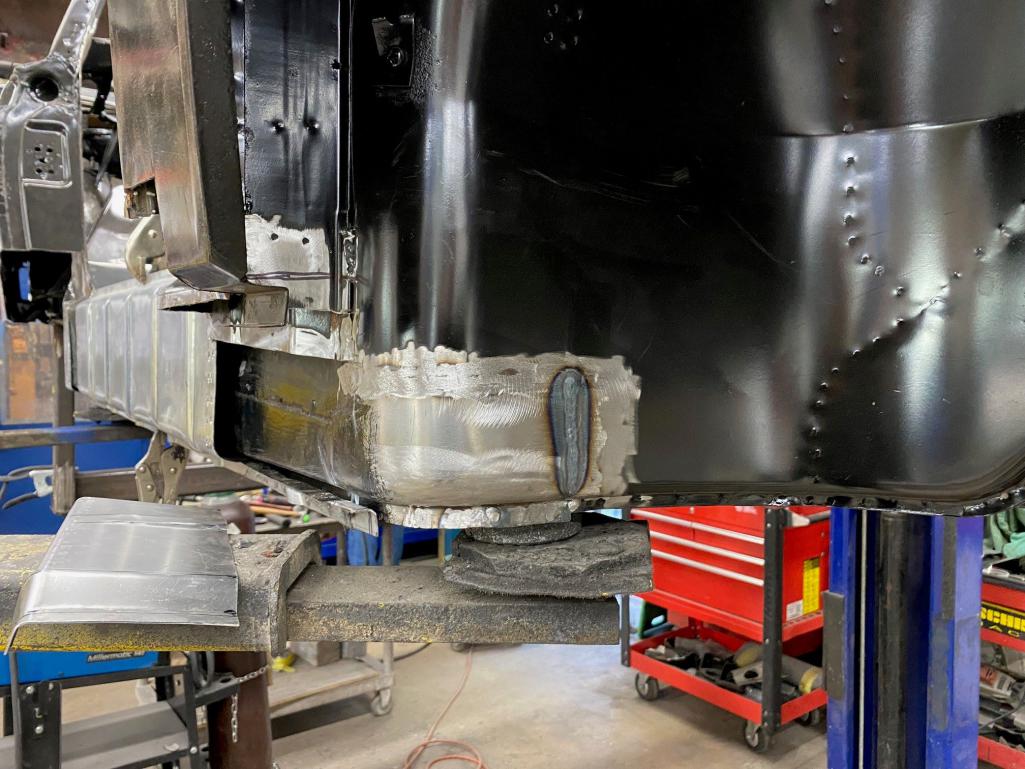
Here are the repairs to the RHS outer longitudinal.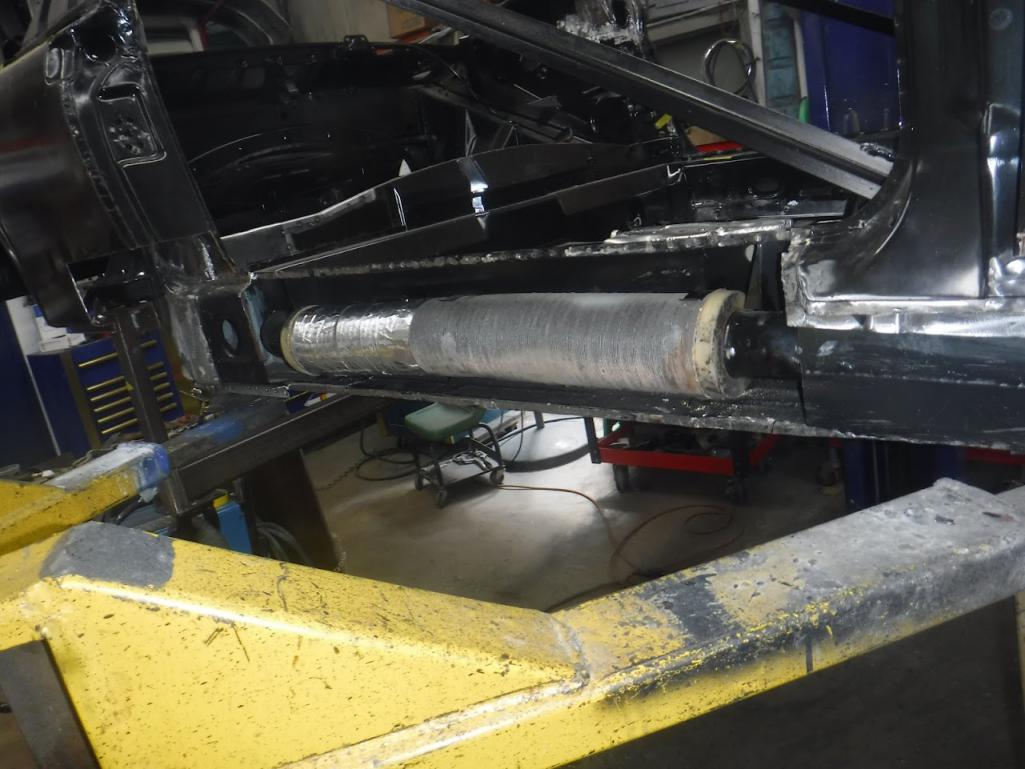
Attached thumbnail(s)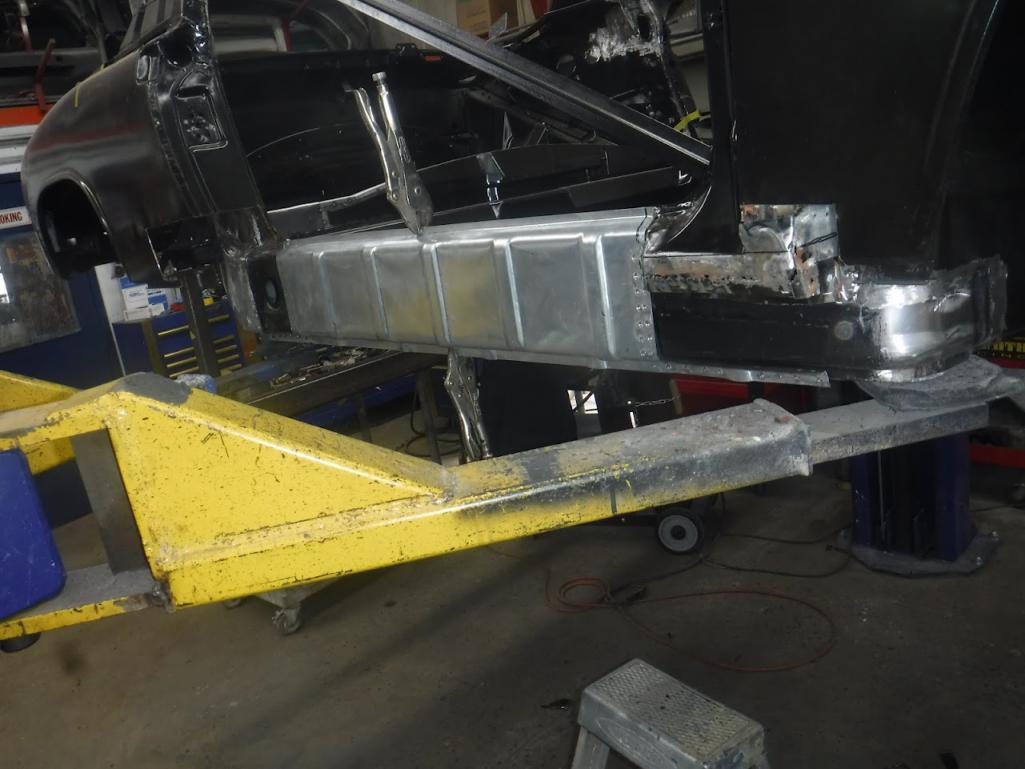
Posted by: Tom1394racing Jun 14 2023, 05:56 AM
Thanks for taking the time to post all these pictures, watching the progress is really fun. Your cookbook sounds great, can't wait to see it all come together. BTW, I know the green color that was your first choice - I would vote for that!
Planning on Lizard Green for the color.

Posted by: BillJ Jun 14 2023, 08:29 AM
Intense restoration on the chasis. Love it.
Posted by: rhodyguy Jun 14 2023, 08:39 AM
WOW! Going deep on this one.
Posted by: Tom1394racing Jun 17 2023, 12:35 PM
Here are the repairs/replacement of the rear floor jack points.
All of the prefabricated replacement panels used so far have been supplied by Restoration Desing and have fit nicely.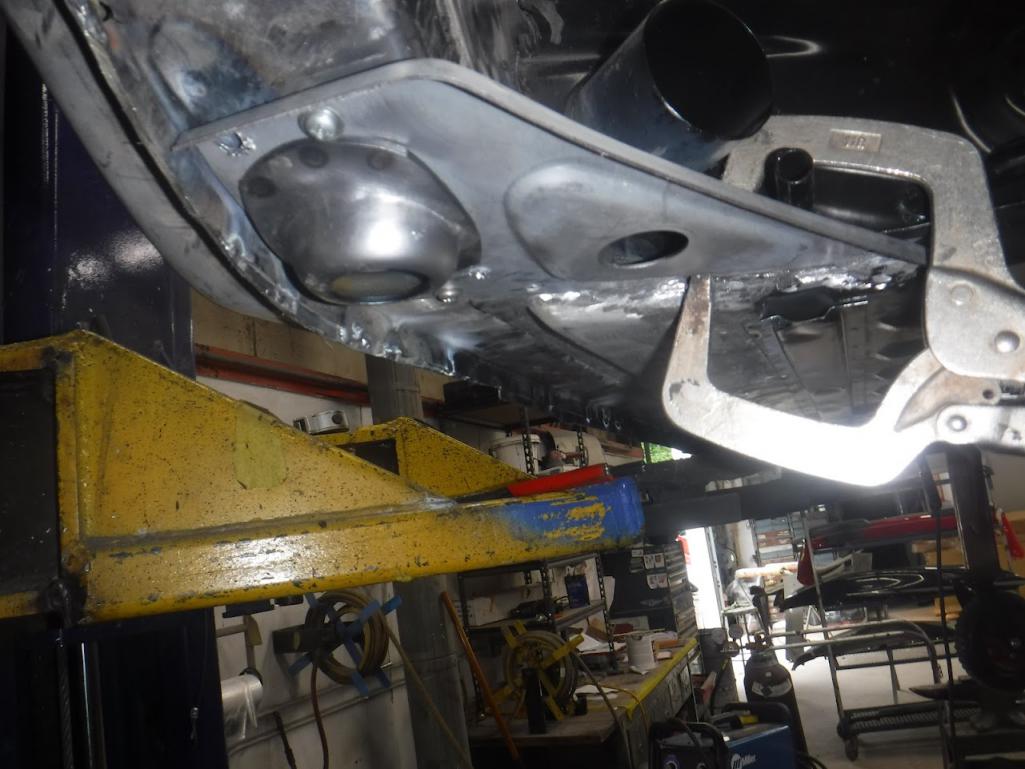
Posted by: Tom1394racing Jun 24 2023, 07:22 AM
While the chassis rust repair has been ongoing, I have been restoring and procuring the mechanical bits.
Rear springs and shocks. Ground Control adjustable 150 lb coil overs with helper springs and Bilstein HD's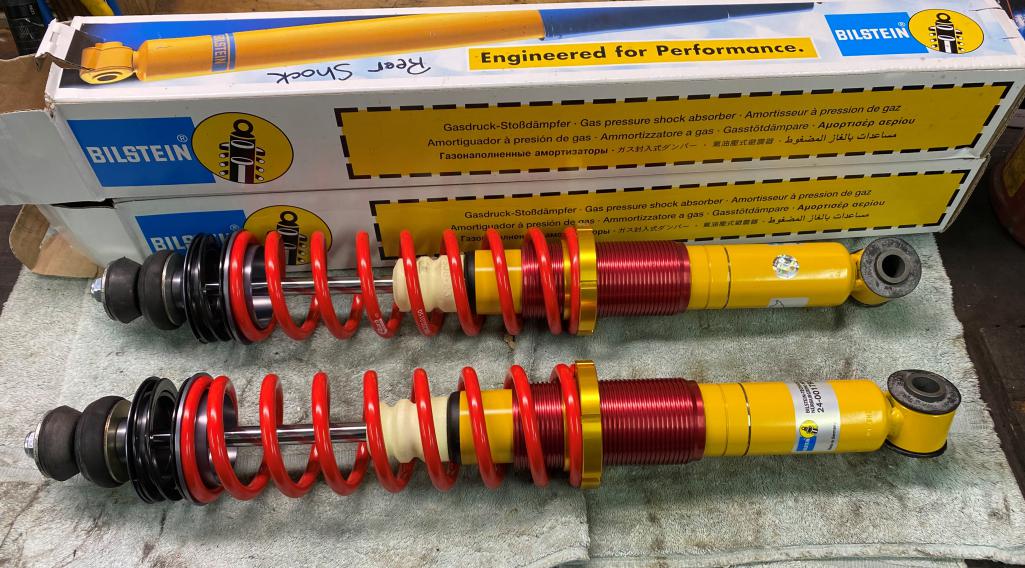
Posted by: Tom1394racing Jun 24 2023, 07:24 AM
Restored seat rails.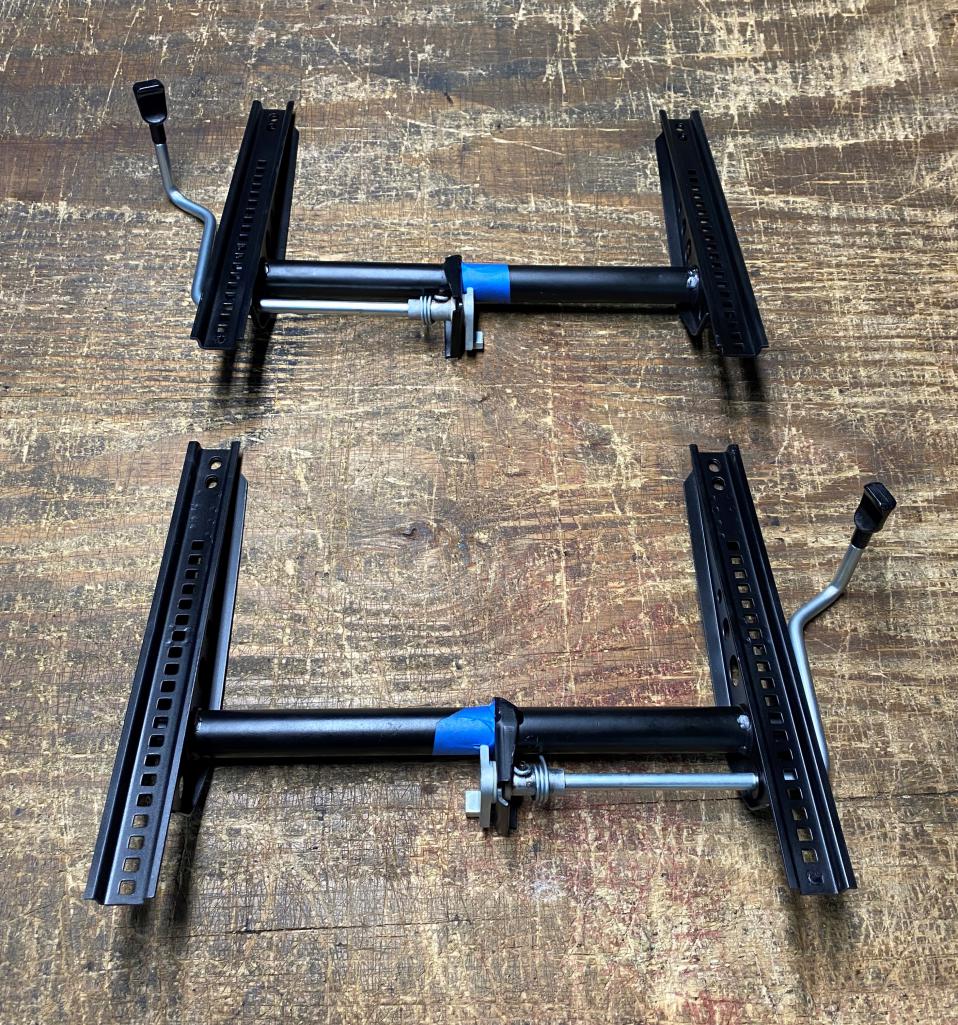
Posted by: Tom1394racing Jun 24 2023, 07:25 AM
Restored pedal cluster.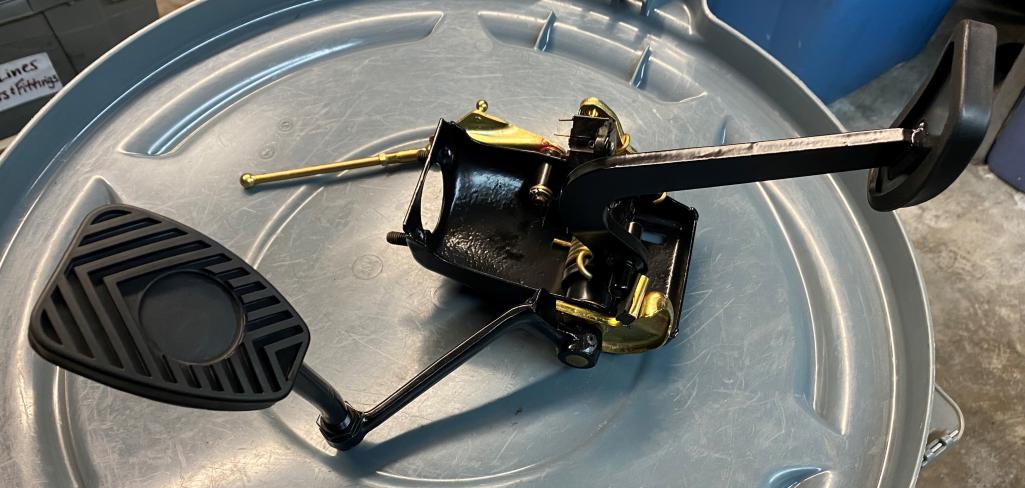
Posted by: Tom1394racing Jun 24 2023, 07:30 AM
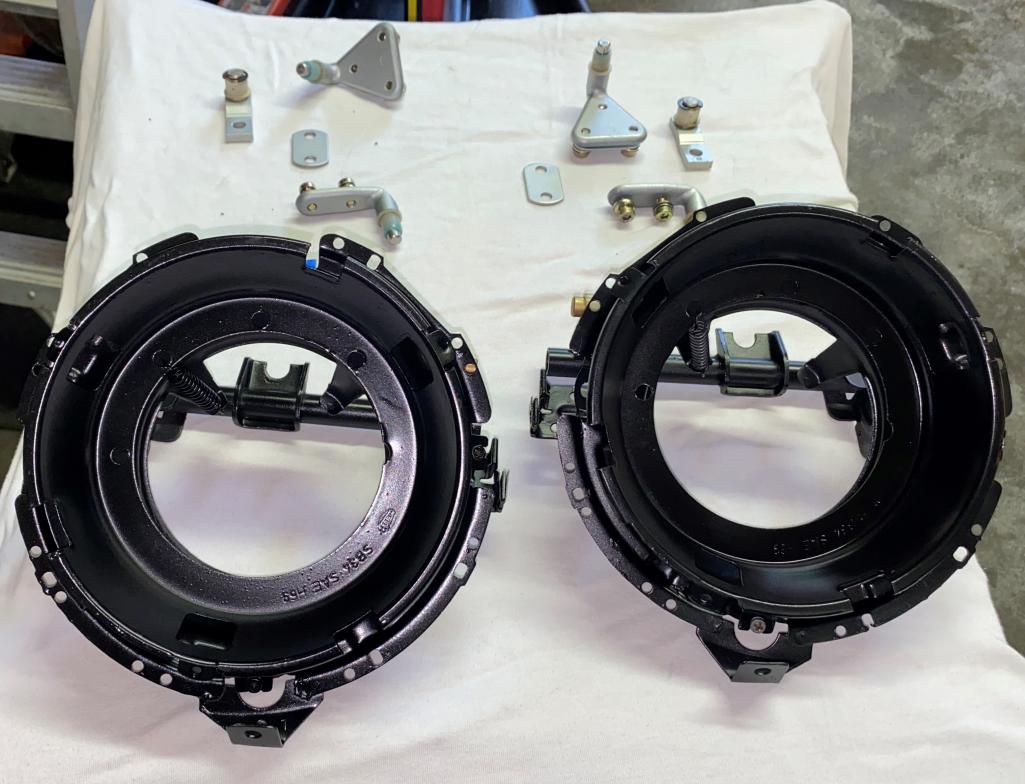
Restored headlight buckets with MittleMotor GT release kit. Auto Associates will do the welding and cutting and test fit in the headlight area before paint.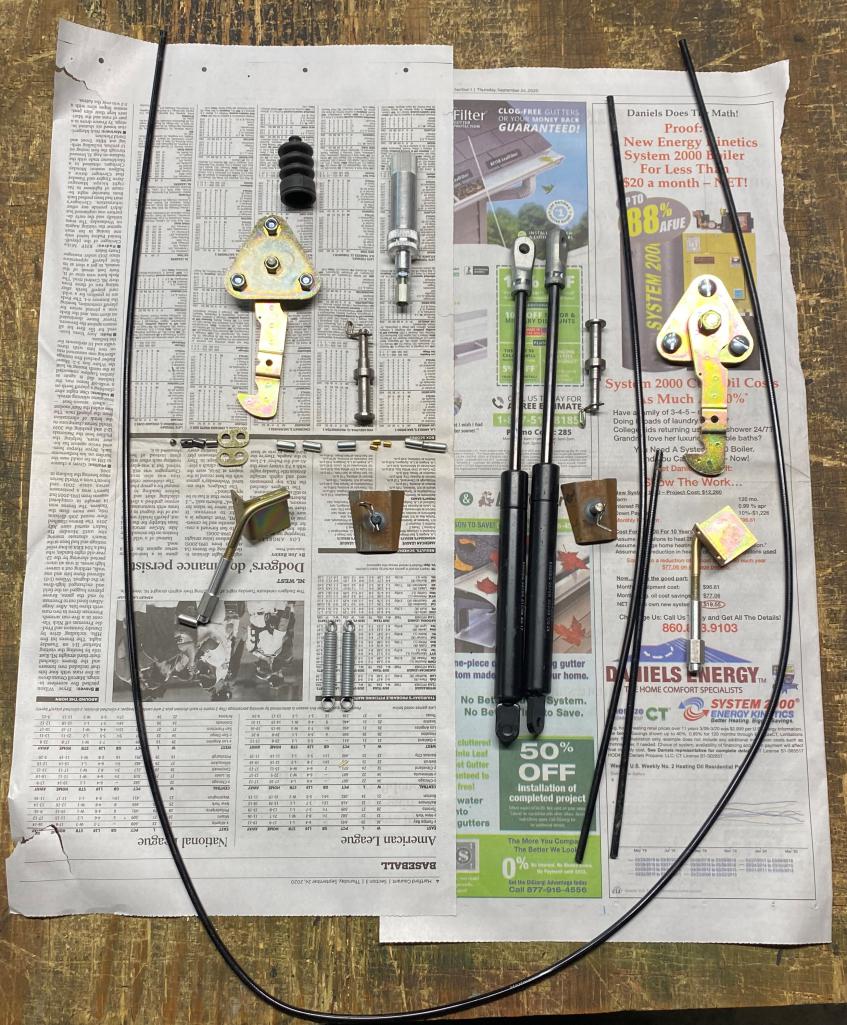
Posted by: Tom1394racing Jun 24 2023, 07:32 AM
Door stops restored with hardware kit.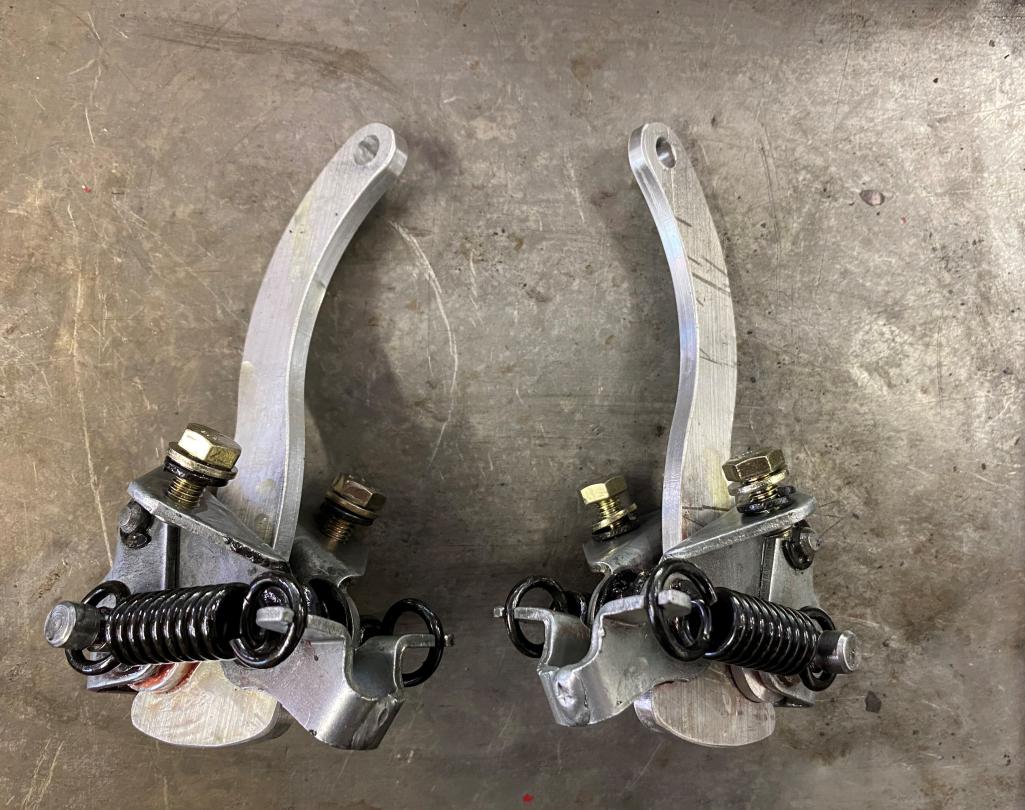
Posted by: Tom1394racing Jun 24 2023, 07:35 AM
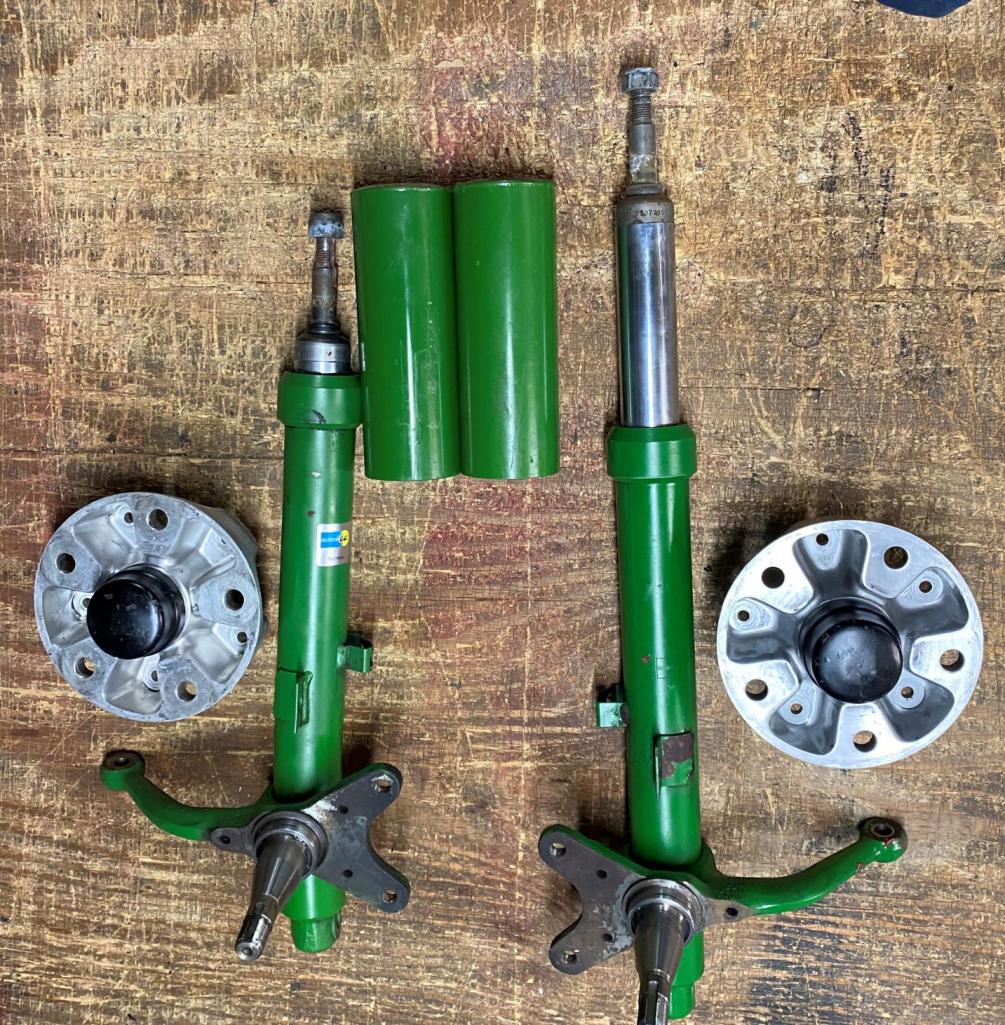
Bilstein front strut with HD inserts and PMB restored early S calipers.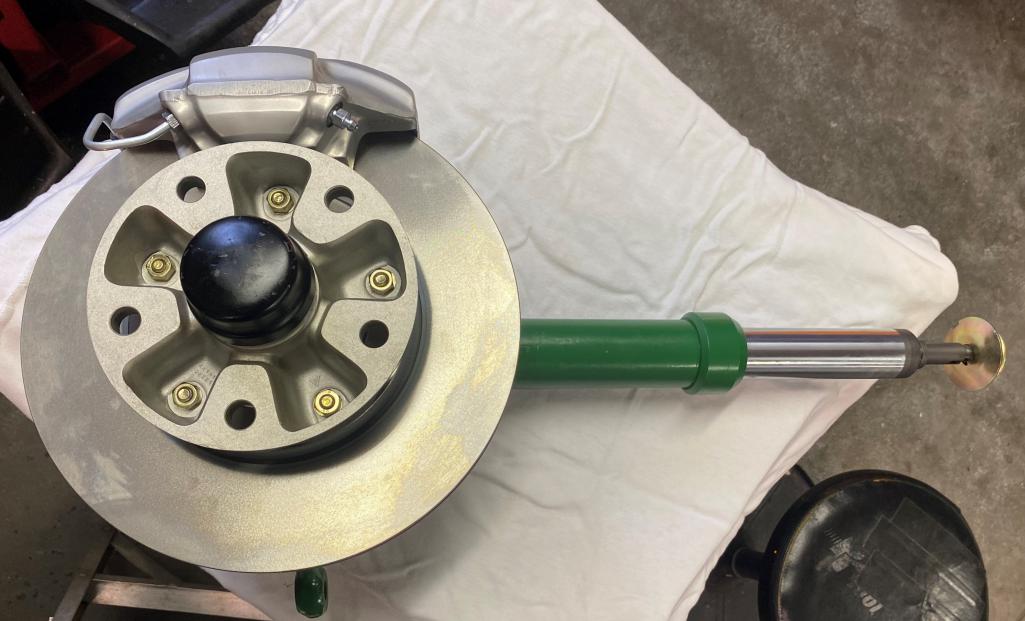
Posted by: Tom1394racing Jul 18 2023, 07:48 AM
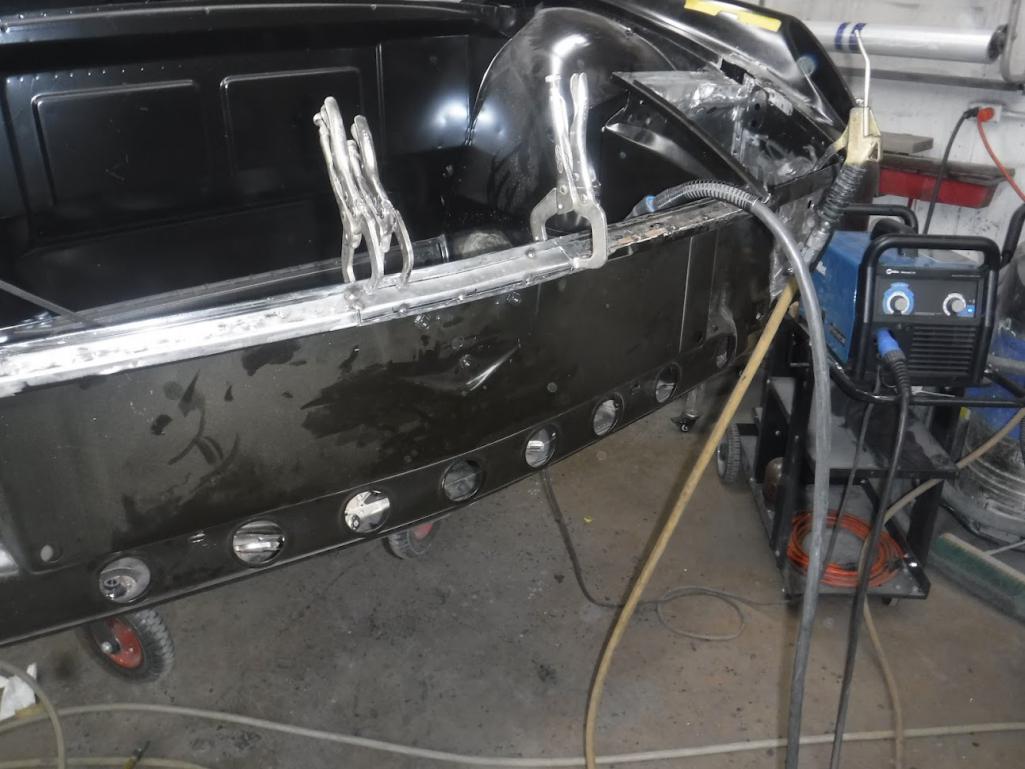
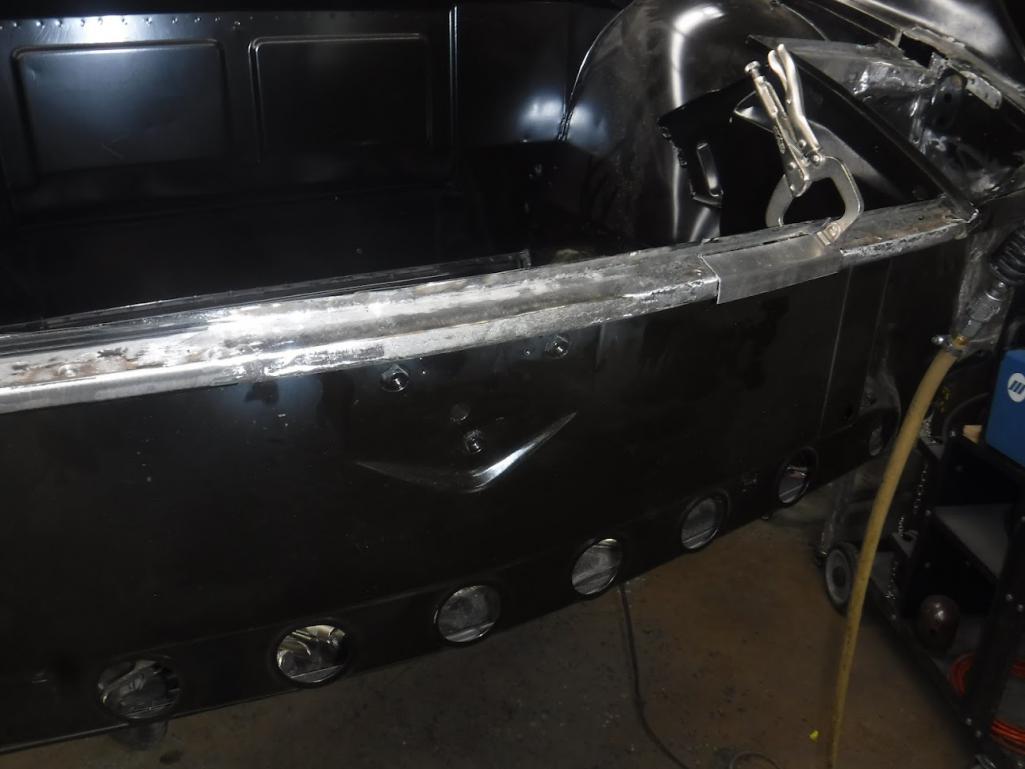
Rust repairs are continuing at Auto Associates. Here is the repair of the L/F bumper support.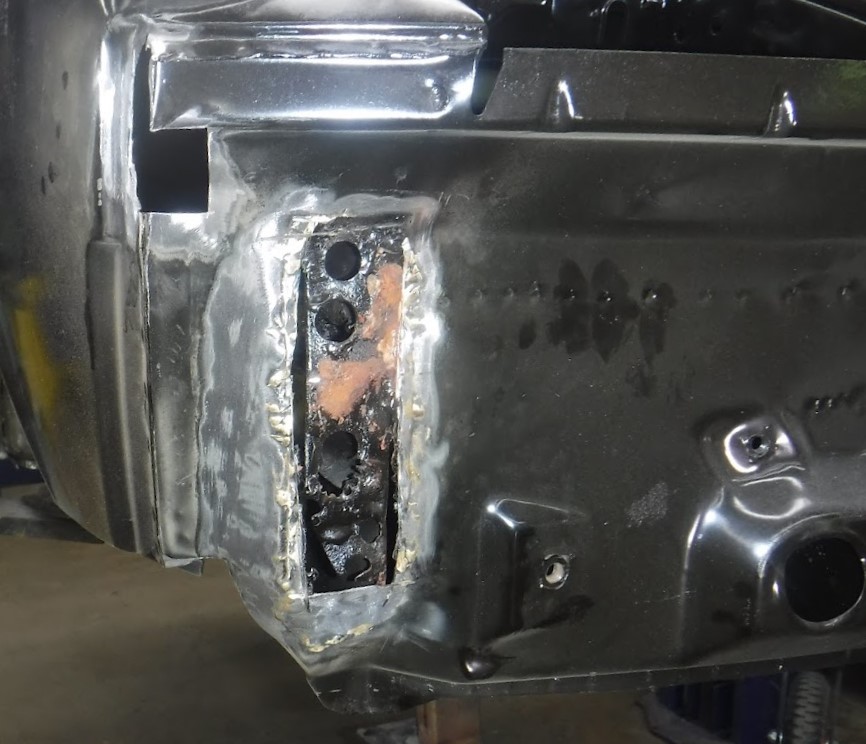

Posted by: Tom1394racing Jul 18 2023, 07:52 AM
Here is the repair of the L/F bumper support.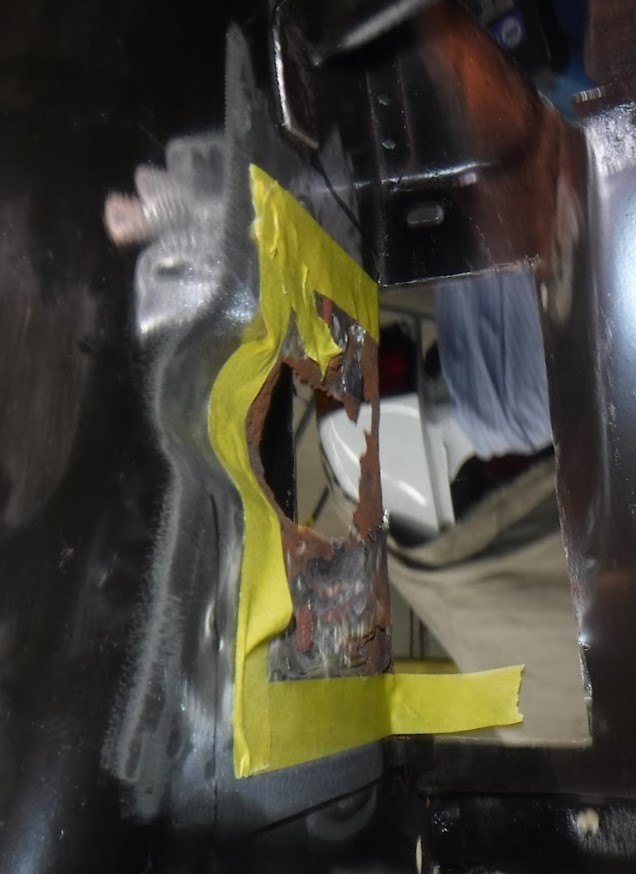

Posted by: Tom1394racing Jul 18 2023, 07:56 AM
The front lid headlight and trunk seal channels also needed repair. Here is the L/F headlight seal.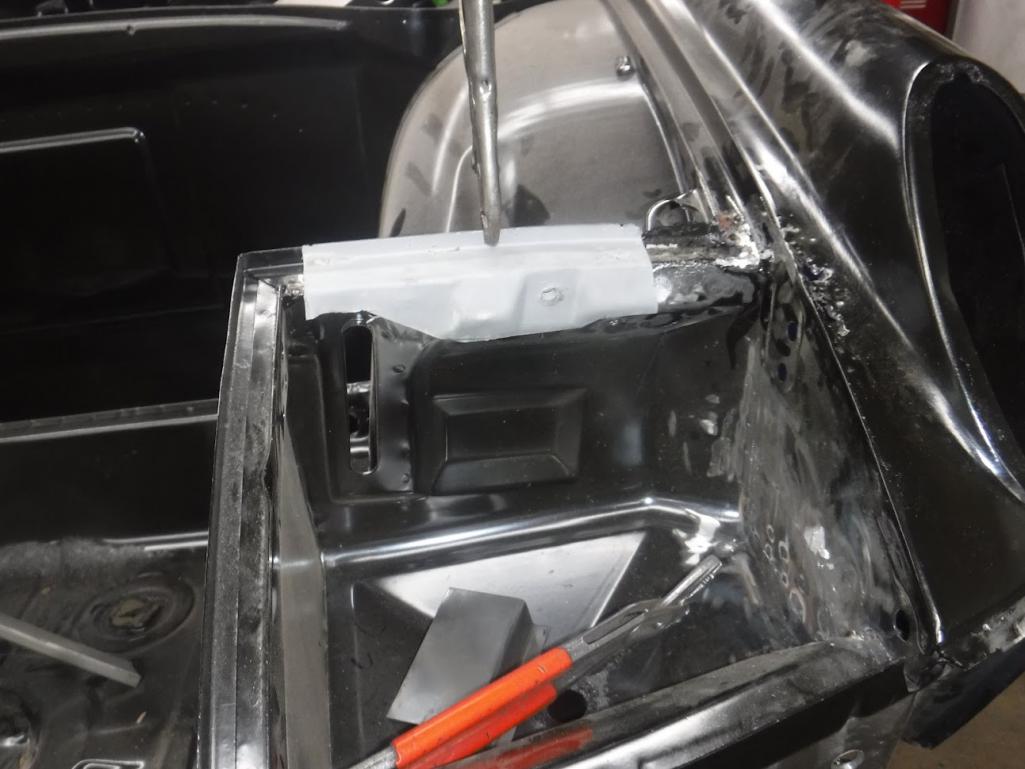
Posted by: Tom1394racing Jul 18 2023, 08:01 AM
The front lid channel seal.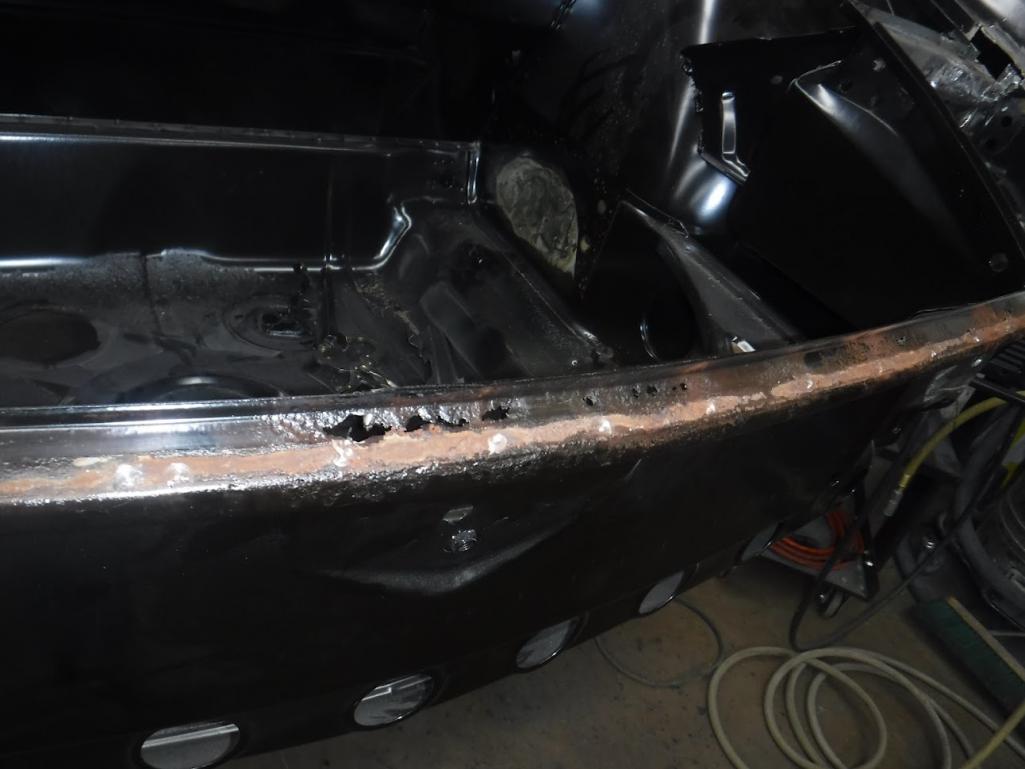
Posted by: Tom1394racing Jul 18 2023, 08:10 AM
Also, the rear floor in the front trunk compartment needed replacement.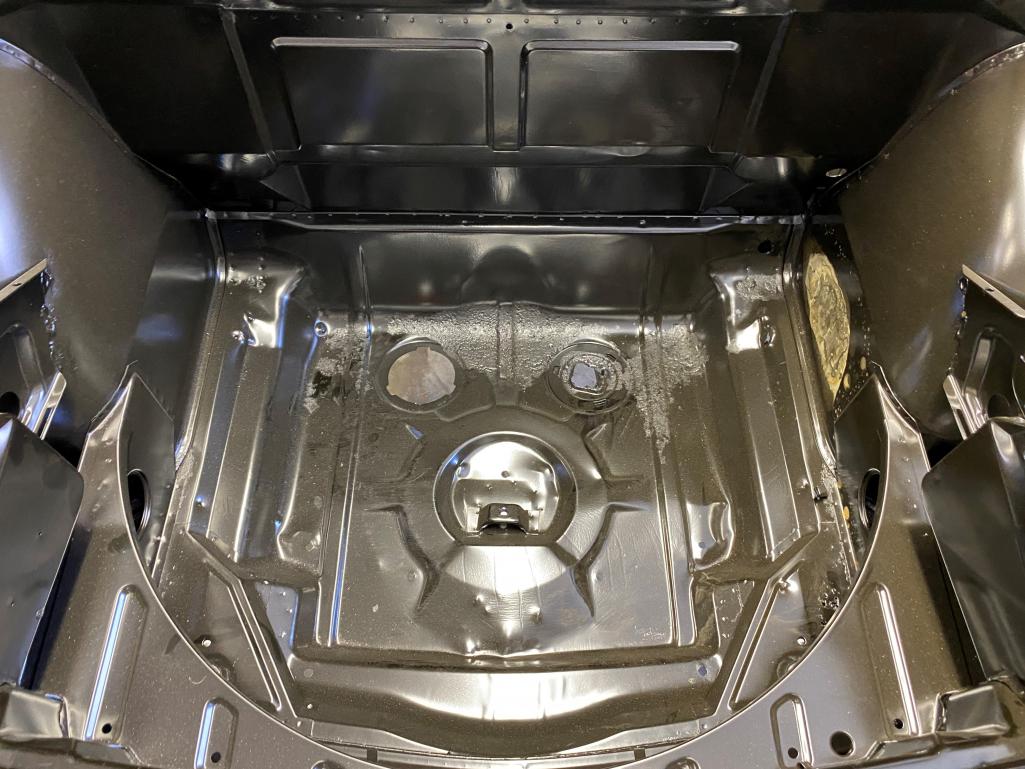
Posted by: Cairo94507 Jul 18 2023, 08:17 AM
Moving right along; nice work.
Posted by: TRS63 Jul 18 2023, 09:20 AM
Great progress and clean work 
Antoine
Posted by: Dion Jul 18 2023, 11:16 AM
Fantastic, you have to love new shiny bits!
Posted by: East coaster Jul 19 2023, 06:15 AM
Nice job on those bumper mount areas! I just did mine a couple months ago and it’s a pain in the ass place to work, there’s really no room in there.
Posted by: r_towle Jul 19 2023, 06:56 AM
I love the hellhole repair method.
Step one: remove firewall.
Great work
Rich
Posted by: Tom1394racing Jul 20 2023, 08:35 AM
I love the hellhole repair method.
Step one: remove firewall.
Great work
Rich
Actually, the bottom of the firewall was rusted through. We needed to replace it anyway and we found a NOS panel so the old one came out. It did make access to the hell hole easier.
Posted by: Tom1394racing Jul 23 2023, 04:18 AM
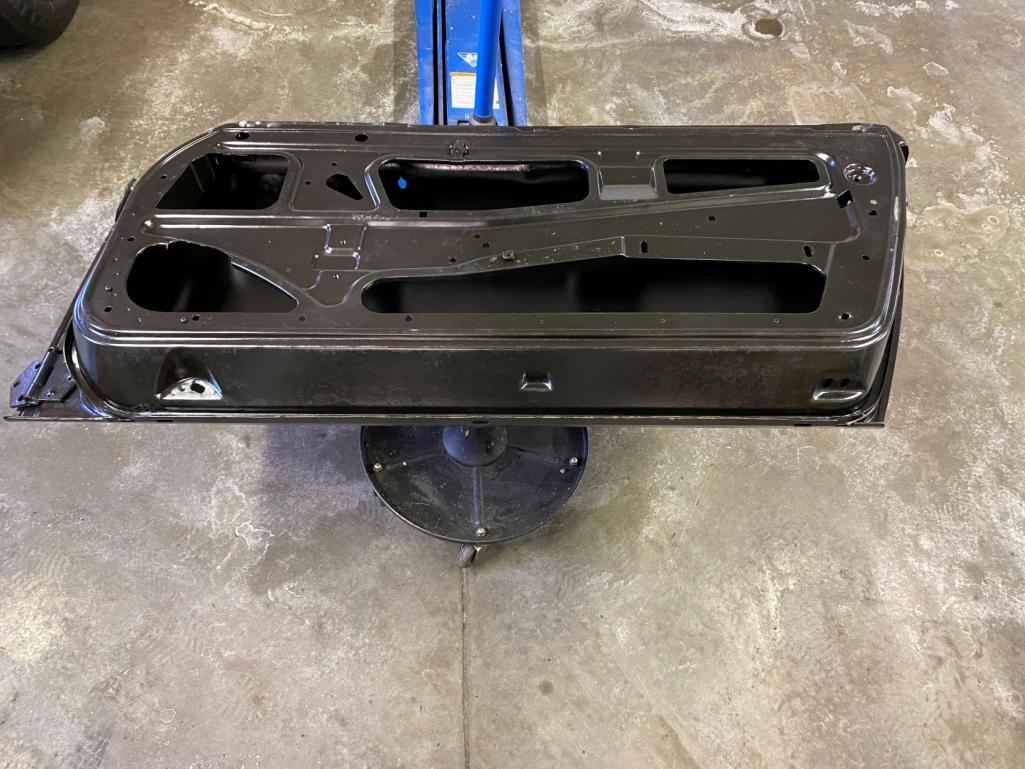
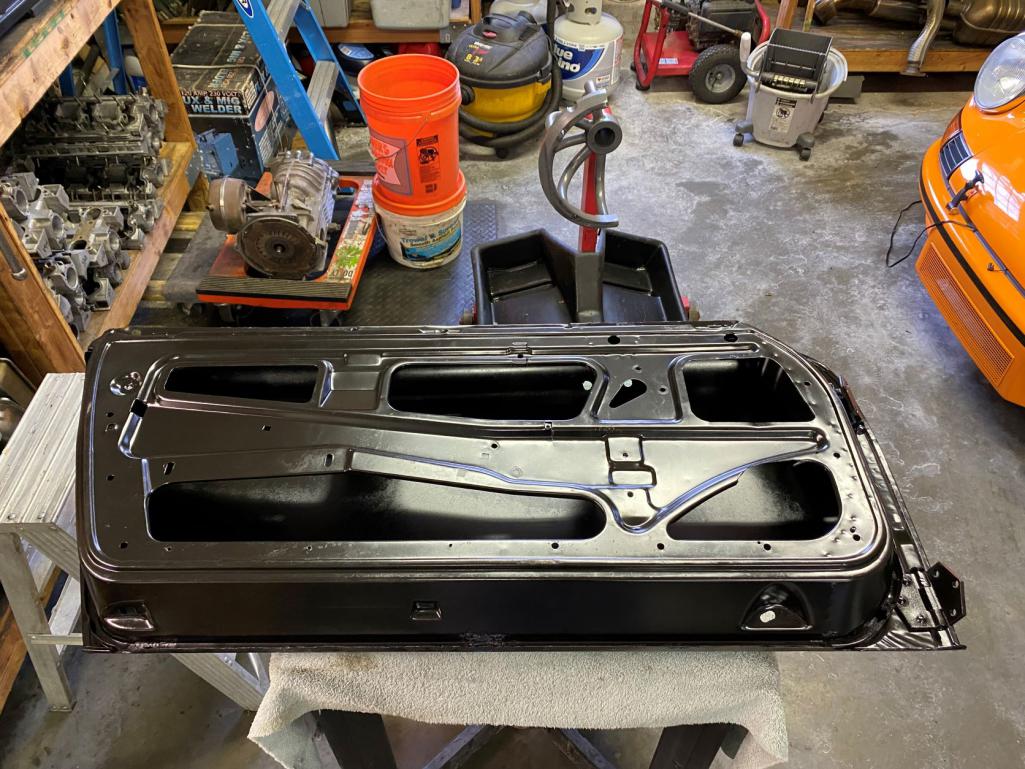
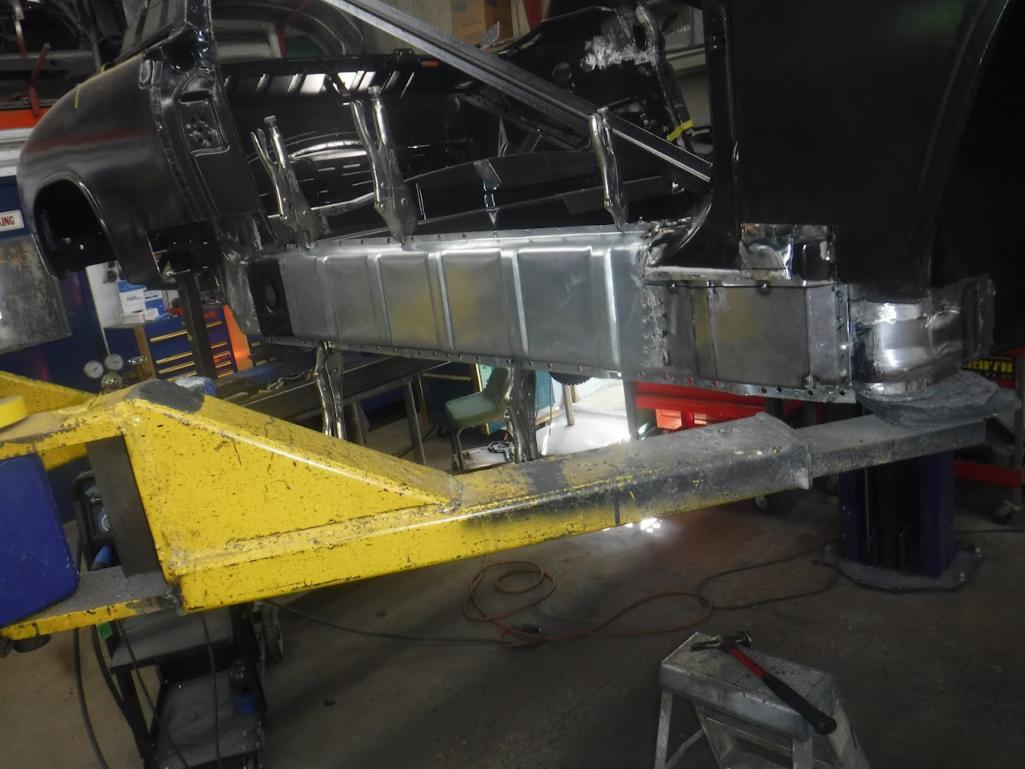
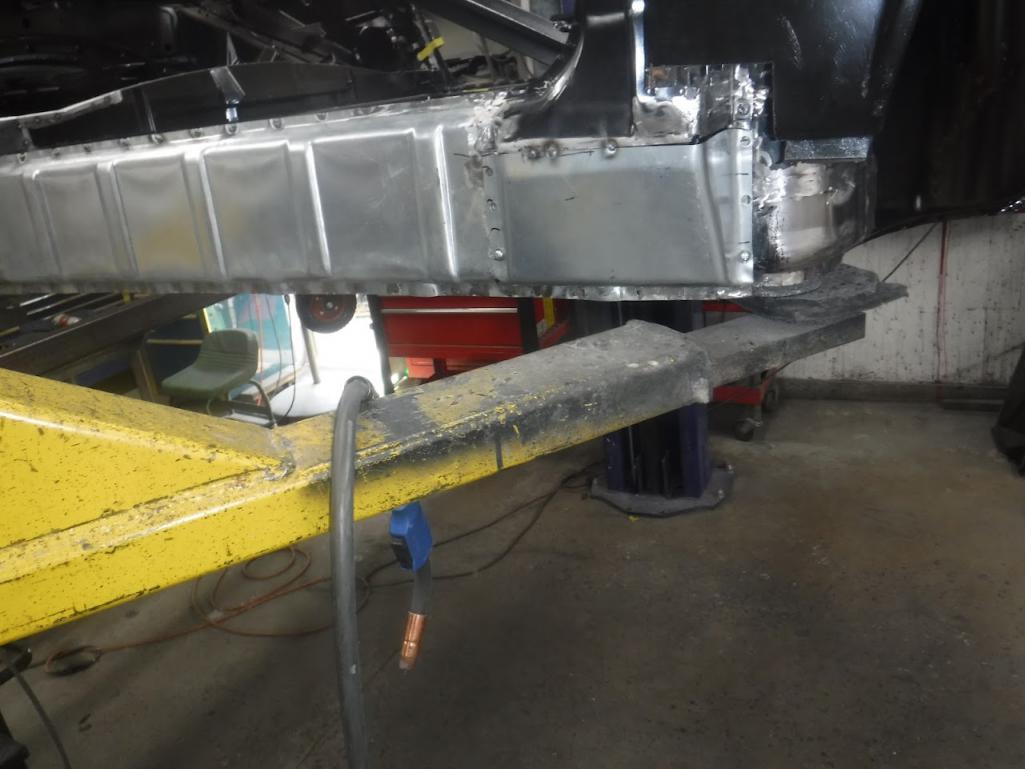
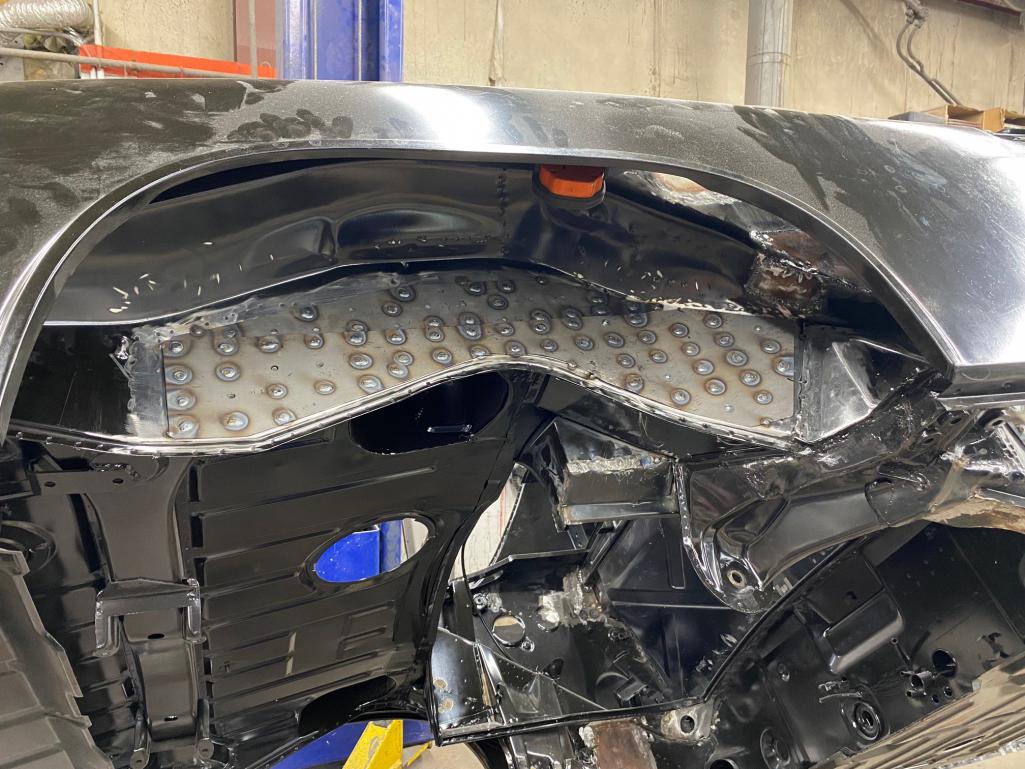
The car is now on the rotisserie and Mad Dog's chassis stiffening parts are being installed.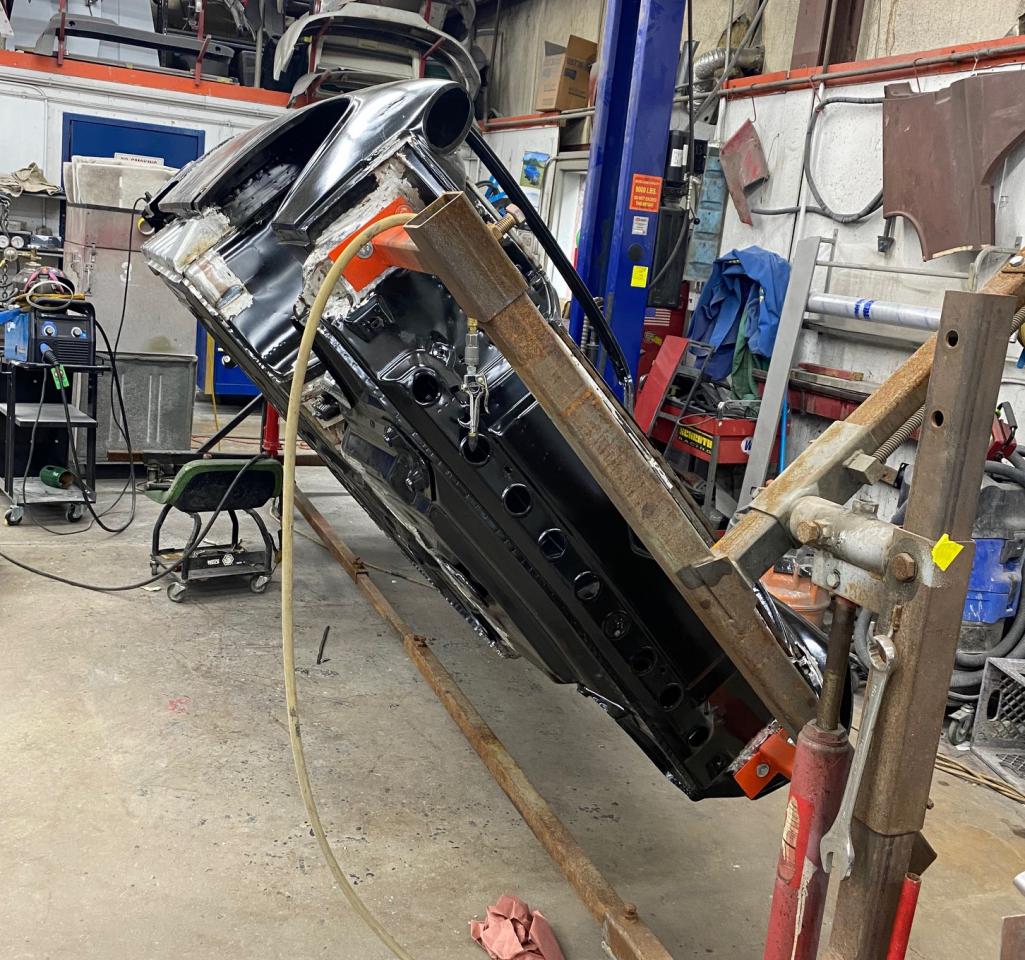
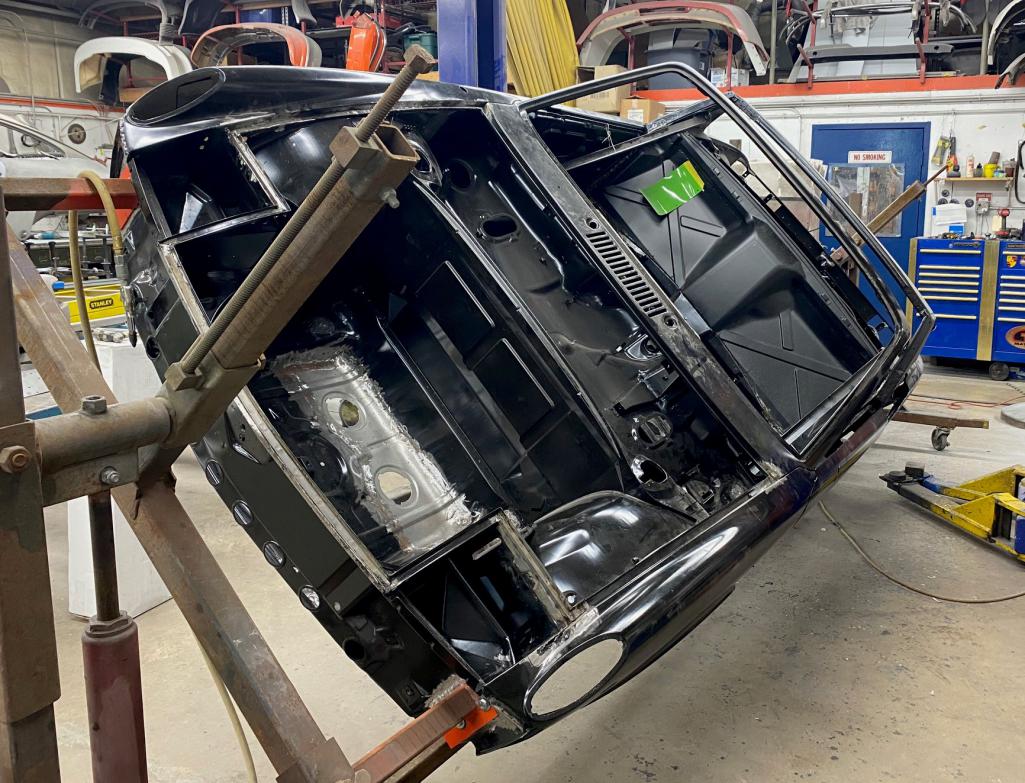
Posted by: Tom1394racing Jul 23 2023, 04:24 AM
Starting to look like a GT.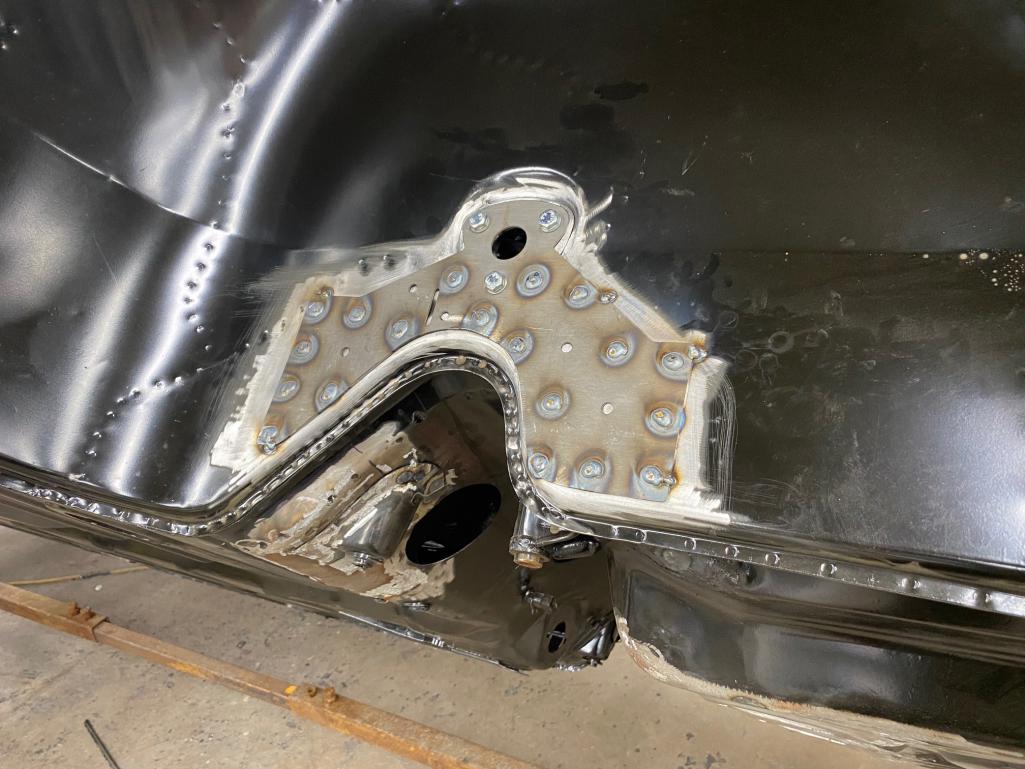

Posted by: Tom1394racing Jul 23 2023, 04:32 AM
Meanwhile I am continuing to restore the components and getting ready for reassembly.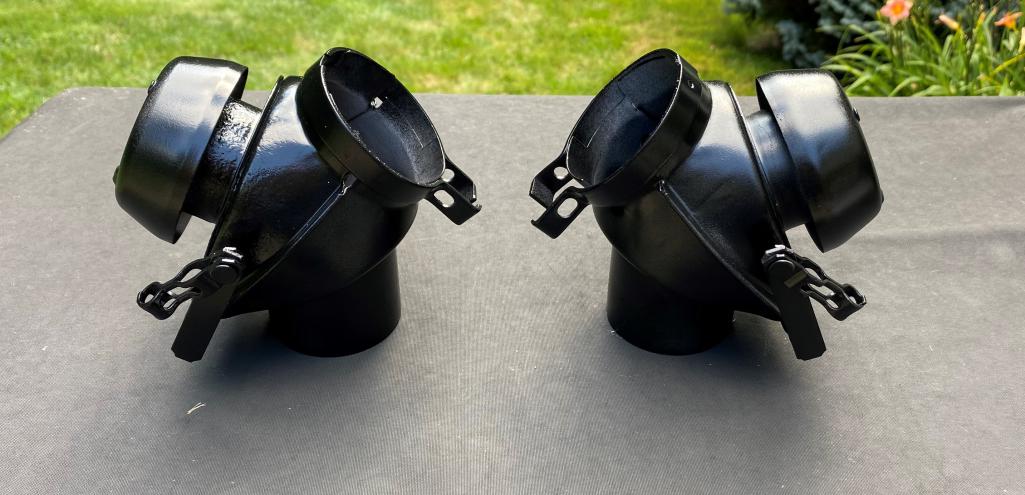
Posted by: Tom1394racing Jul 27 2023, 07:30 AM
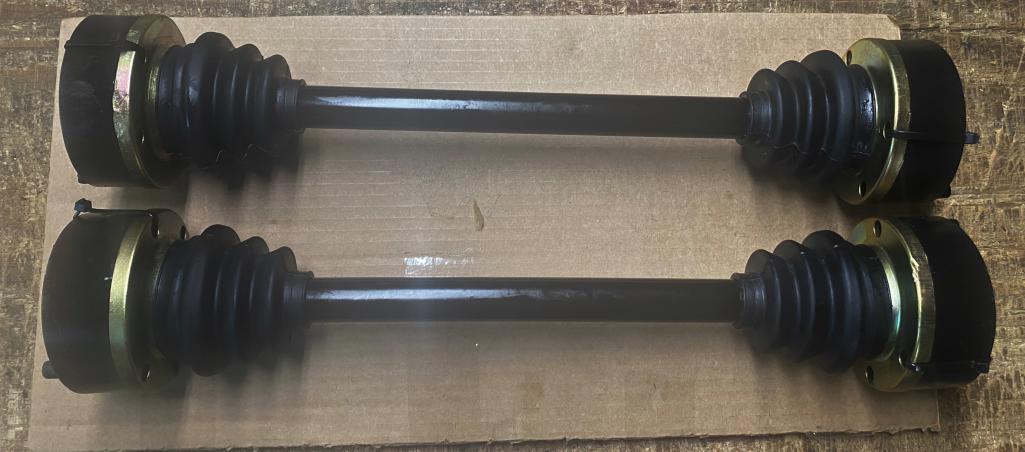
A few more pieces restored and ready for assembly. The axles are the Empi free floating with '69-'73 911 108 mm CV's. These will match up with the same size rear stub axles and differential output shafts.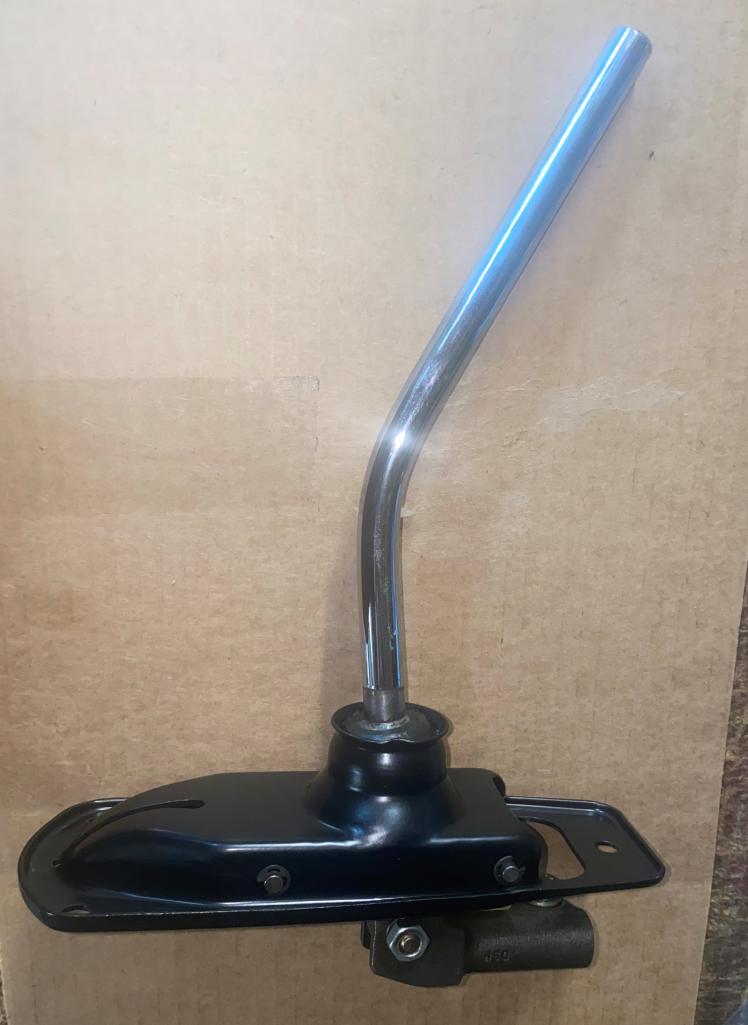
Posted by: Bullethead Jul 27 2023, 09:05 AM
Coming along very nicely... great work. 
Posted by: PanelBilly Jul 27 2023, 09:23 AM
You might want to add the fuel pump cut out in the frunk while your at this stage
Posted by: Tom1394racing Jul 27 2023, 01:40 PM
You might want to add the fuel pump cut out in the frunk while your at this stage
I am thinking of doing something like this.
https://pbase.com/9146gt/image/22285871
Posted by: TRS63 Jul 28 2023, 03:18 AM
Really like to follow your progress, that is going to be one really cool 914!!
Antoine
Posted by: Tom1394racing Aug 3 2023, 11:46 AM
A few more restored parts ready for reassembly.
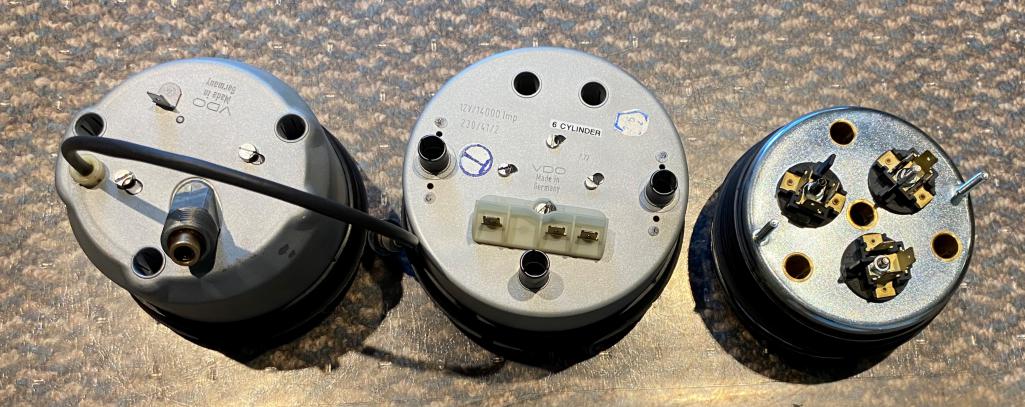
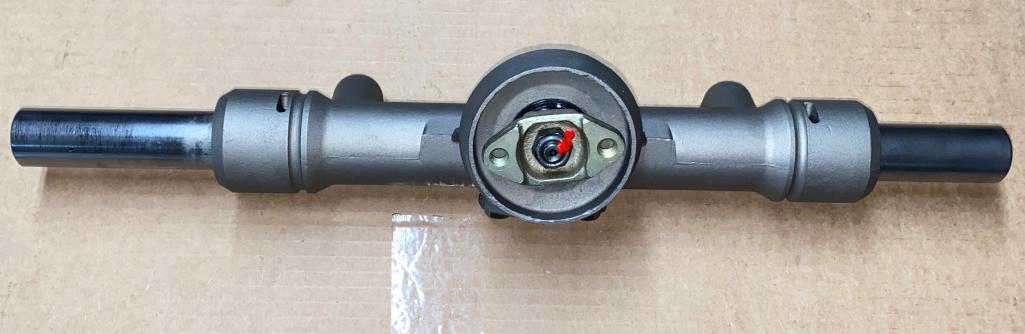
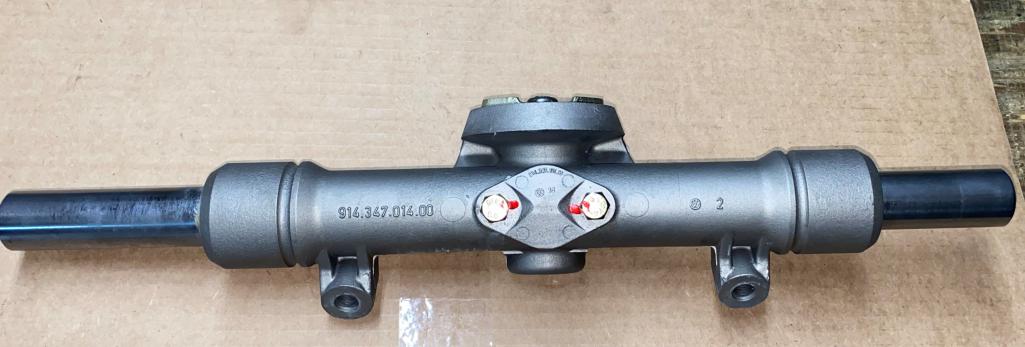
Gauges from North Hollywood and steering rack for 914 Rubber.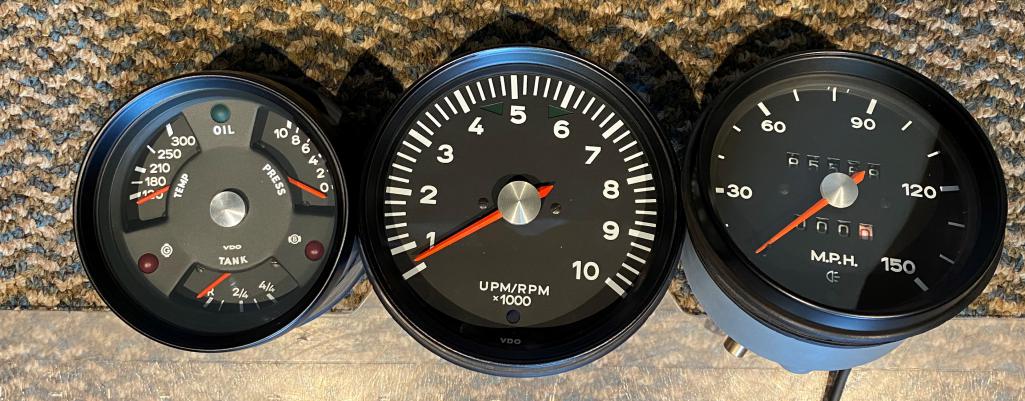
Posted by: Tom1394racing Aug 3 2023, 11:53 AM
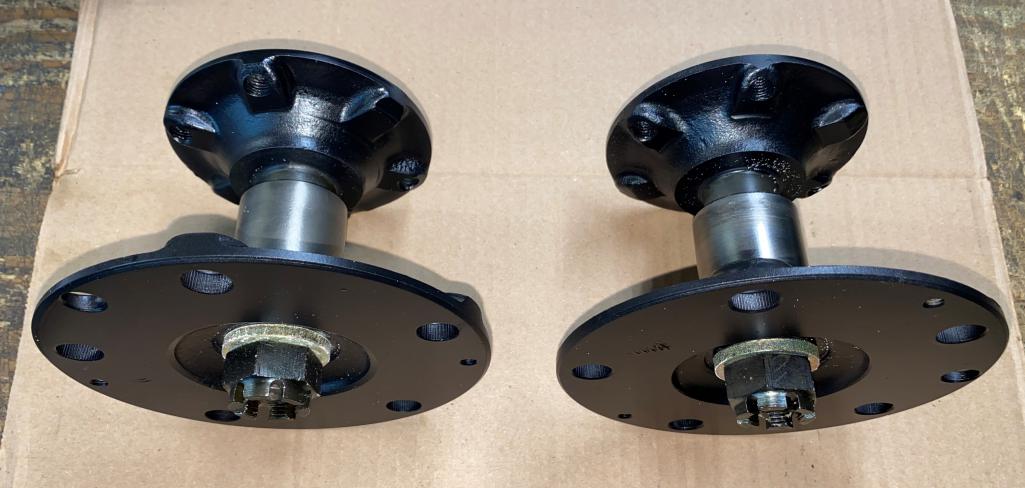
Rear trailing arms along with '69-'73 911 rear hubs and stub axles. 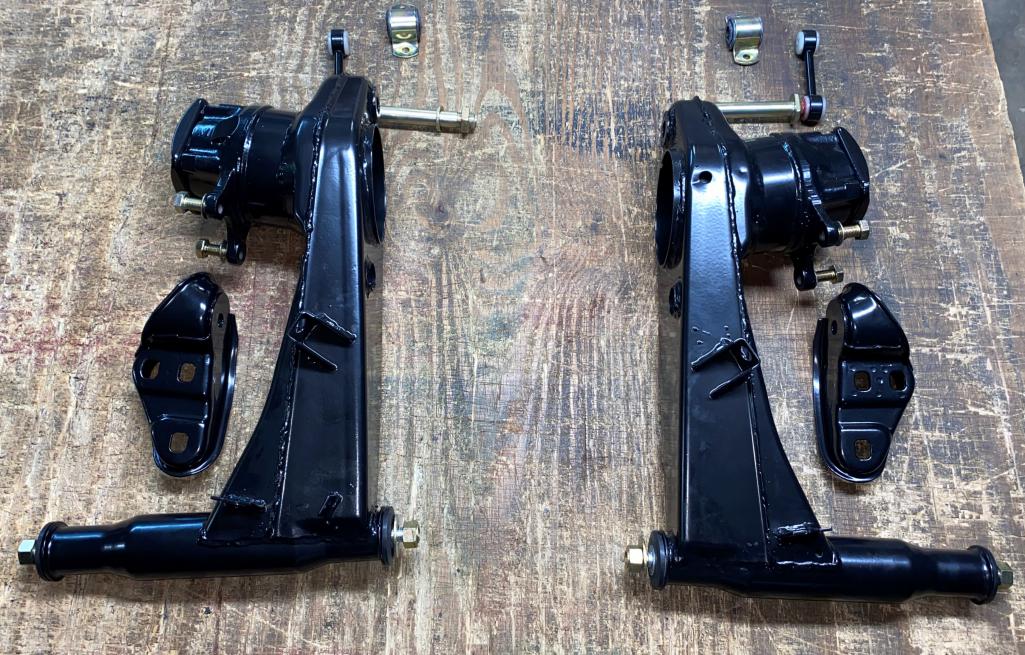
Posted by: BillJ Aug 3 2023, 11:59 AM
These parts are too dirty to install. I think i saw a spec of dust on one the gauges...
Posted by: Tom1394racing Aug 4 2023, 05:47 AM
911 A-Arms and 914 crossmember. Elephant racing rubber bushings all around, front and rear.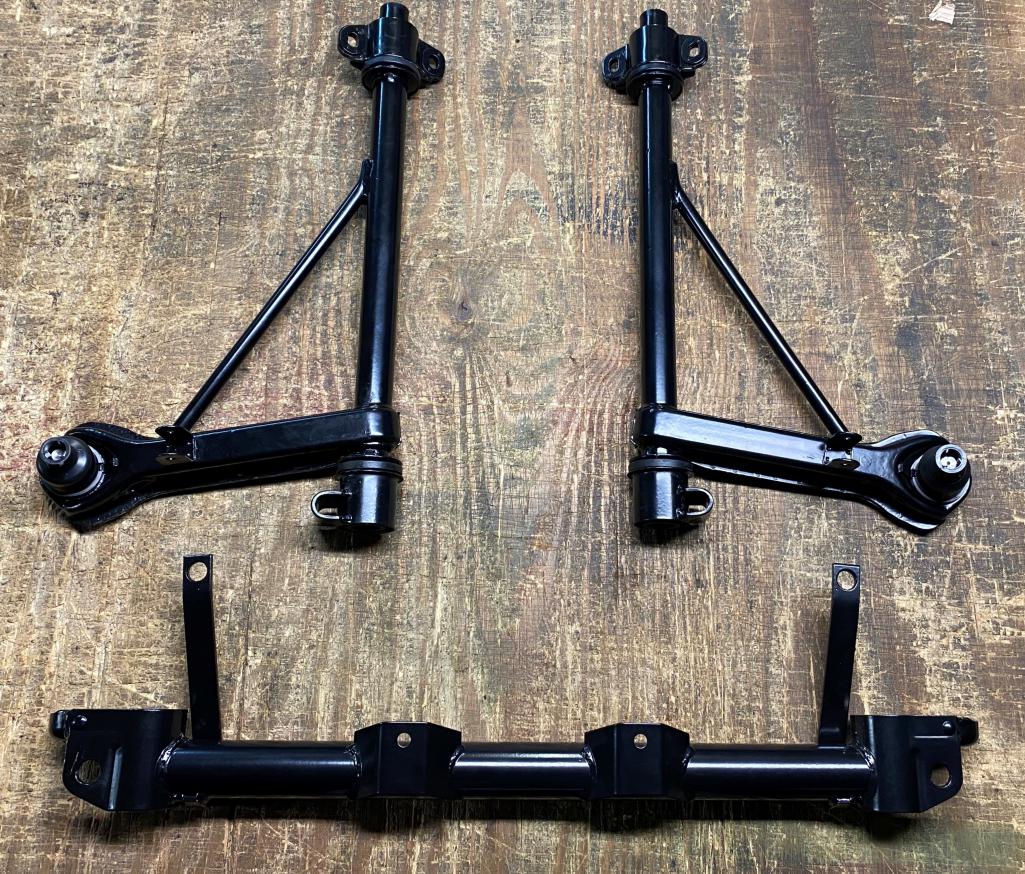
Posted by: Justinp71 Aug 4 2023, 09:10 AM
A few more restored parts ready for reassembly.
Gauges from North Hollywood and steering rack for 914 Rubber.
I love your build! I am also recently converting my 914-6 conversion to more of a GT interior. Curious are you going to install the classic gauge pod over the stereo or keep the radio (maybe do afr or ?)? I'm currently debating over this, I think I am going to run the gauge pod for awhile and see if I miss the actual radio (keeping a hidden stereo).
Posted by: Shivers Aug 4 2023, 10:05 AM
Great work.
Posted by: Tom1394racing Aug 4 2023, 02:18 PM
A few more restored parts ready for reassembly.
Gauges from North Hollywood and steering rack for 914 Rubber.
I love your build! I am also recently converting my 914-6 conversion to more of a GT interior. Curious are you going to install the classic gauge pod over the stereo or keep the radio (maybe do afr or ?)? I'm currently debating over this, I think I am going to run the gauge pod for awhile and see if I miss the actual radio (keeping a hidden stereo).
I am planning for a "GT Like" interior with no radio or gauge pod.
Posted by: Tom1394racing Aug 4 2023, 02:22 PM
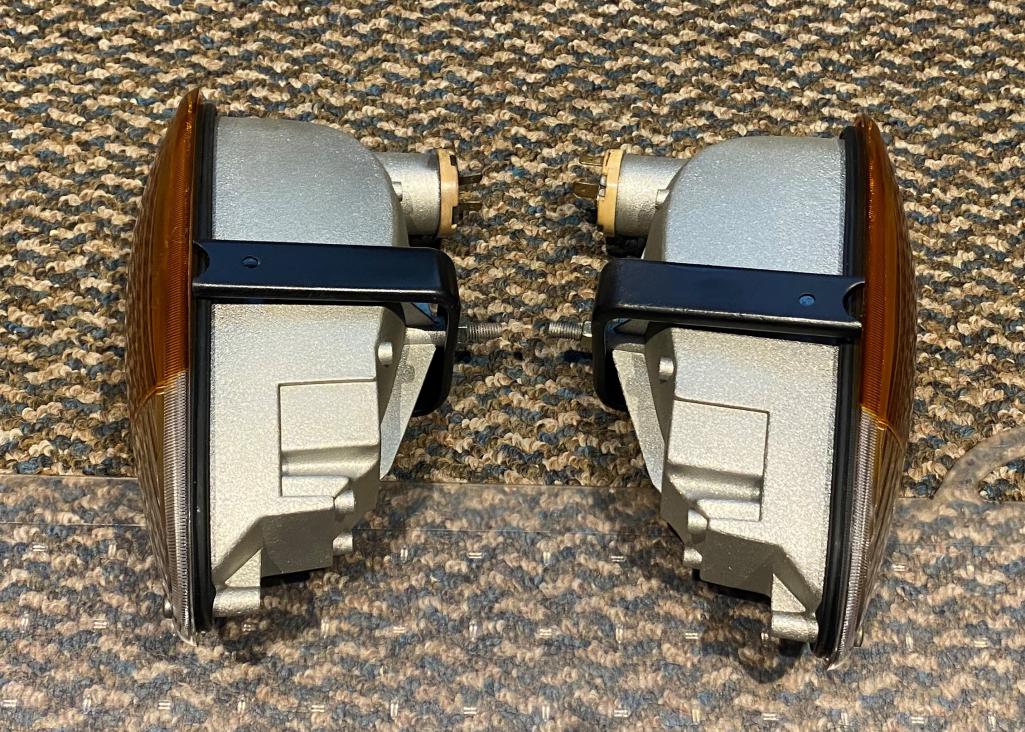
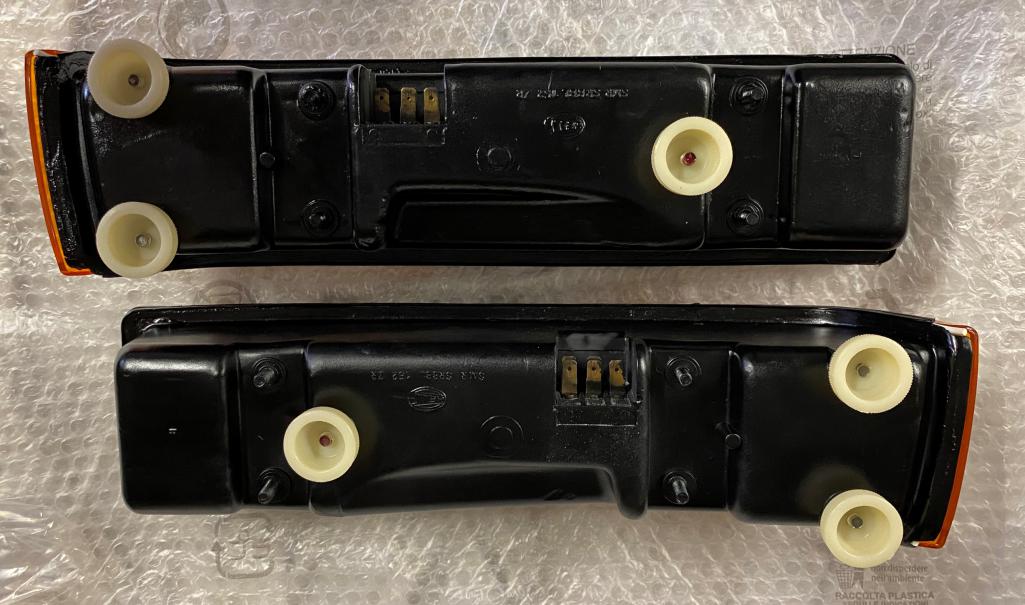
Front turn signals ready to install.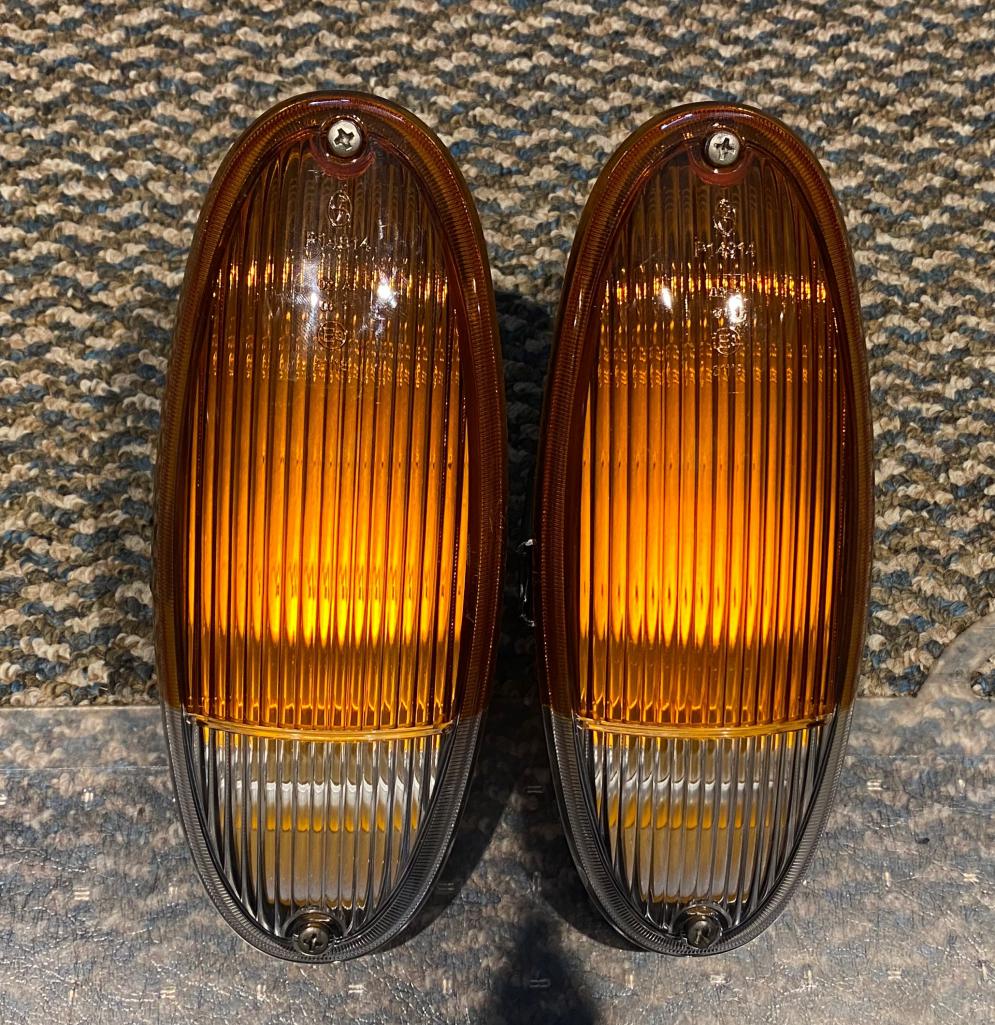
Posted by: Tom1394racing Aug 4 2023, 02:24 PM
Also, the taillights are ready. 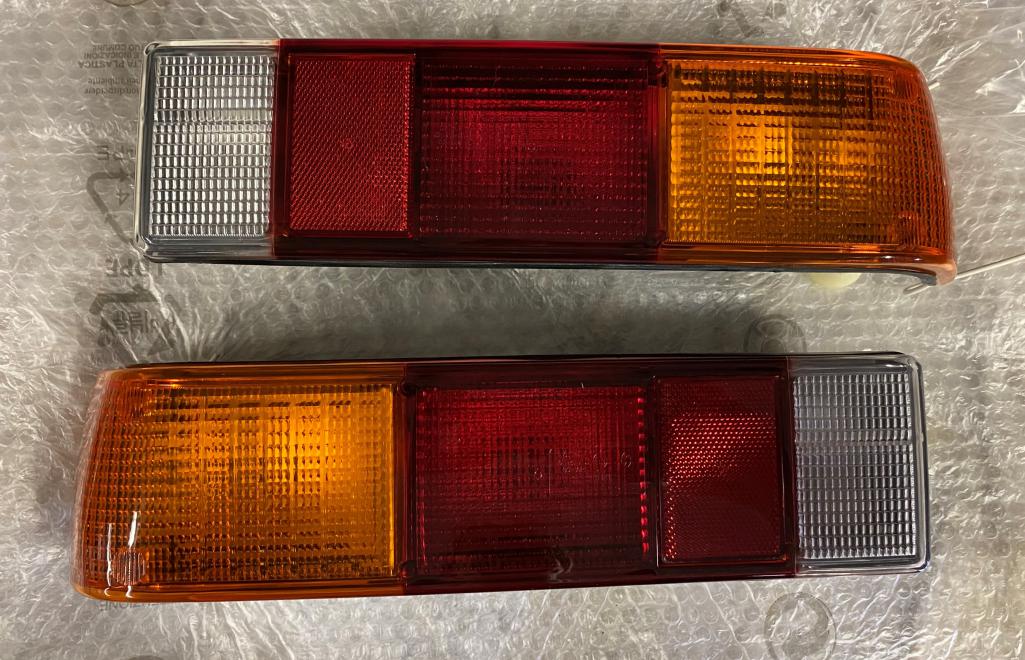
Posted by: Justinp71 Aug 4 2023, 02:26 PM
A few more restored parts ready for reassembly.
Gauges from North Hollywood and steering rack for 914 Rubber.
I love your build! I am also recently converting my 914-6 conversion to more of a GT interior. Curious are you going to install the classic gauge pod over the stereo or keep the radio (maybe do afr or ?)? I'm currently debating over this, I think I am going to run the gauge pod for awhile and see if I miss the actual radio (keeping a hidden stereo).
I am planning for a "GT Like" interior with no radio or gauge pod.
Ok cool. Have you looked into the door panels yet? Leather panels are available, the original handles can be purchased on ebay/auto atlanta. I just made some leather straps.
Posted by: Tom1394racing Aug 4 2023, 02:35 PM
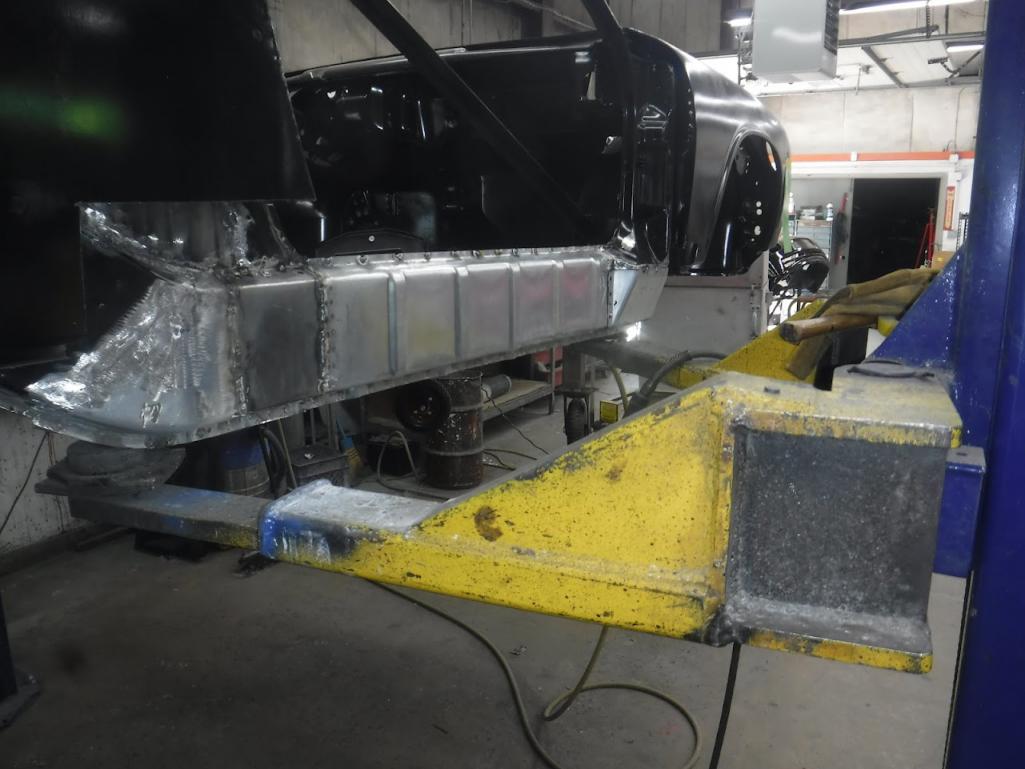
Meanwhile at Auto Associates, Mad Dog's stiffening kits have been installed.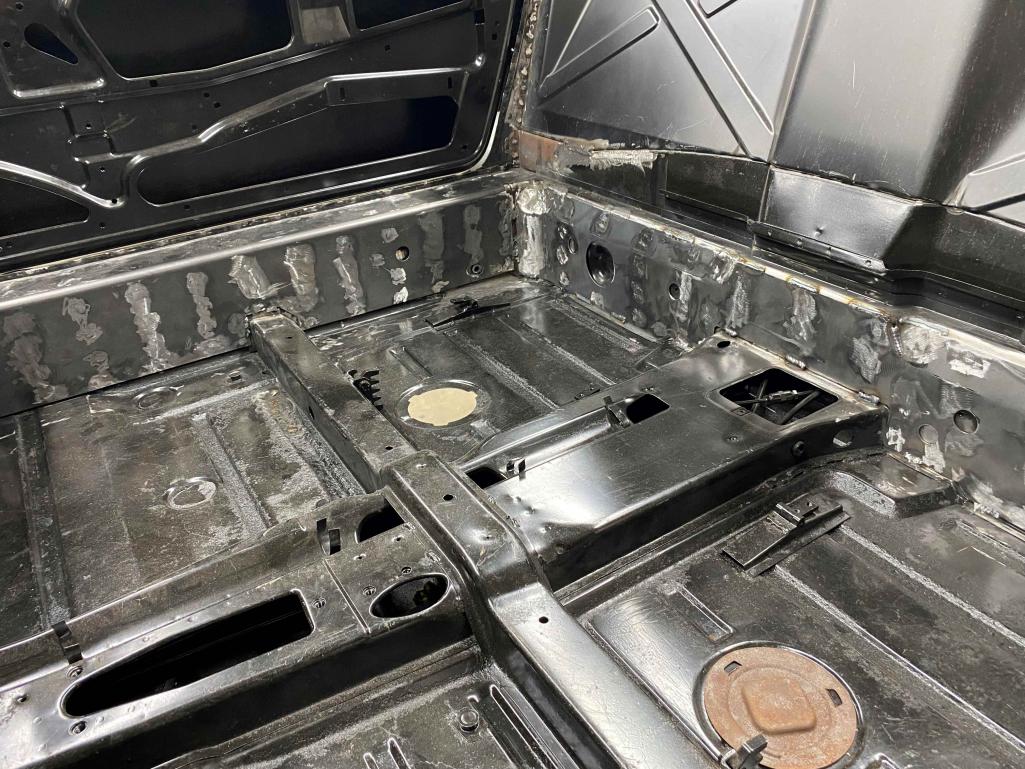
Posted by: Tom1394racing Aug 5 2023, 04:34 AM
A few more restored parts ready for reassembly.
Gauges from North Hollywood and steering rack for 914 Rubber.
I love your build! I am also recently converting my 914-6 conversion to more of a GT interior. Curious are you going to install the classic gauge pod over the stereo or keep the radio (maybe do afr or ?)? I'm currently debating over this, I think I am going to run the gauge pod for awhile and see if I miss the actual radio (keeping a hidden stereo).
I am planning for a "GT Like" interior with no radio or gauge pod.
Ok cool. Have you looked into the door panels yet? Leather panels are available, the original handles can be purchased on ebay/auto atlanta. I just made some leather straps.
I have a pair of blank leatherette t door panels that I bought from 914 rubber. I also have the leather strap and the bezels for where the leather strap passes into the door panel near the door lock. I plan to use the original window winder handles and the GT style door pull handles that seem to be widely available. There seem to be some really great threads with Photos on how to locate the bezels on the door panels. I am a little concerned about the amount of pulling force required to actuate the door locks with the leather strap. I’ve cleaned and lubed my door locks as best as possible and hopefully it will not be an issue. I have similar door panels, leather straps, and pulls on my RSR clone. Those have worked flawlessly for 15 years.
Posted by: TRS63 Aug 5 2023, 10:57 PM
Good work!
Antoine
Posted by: Tom1394racing Aug 18 2023, 01:50 PM
Restored dash from Just Dashes arrived today. Looks flawless as you would expect from them.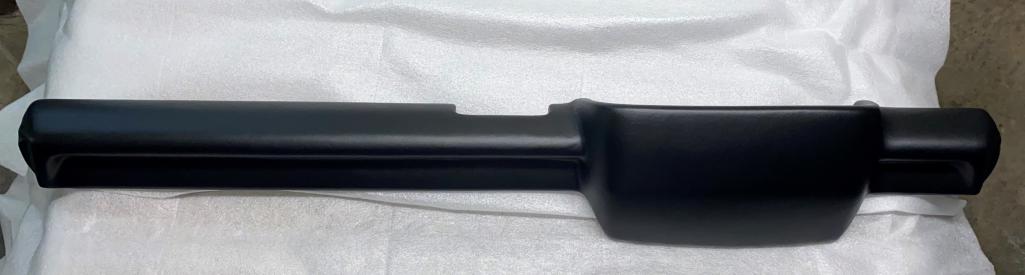
Posted by: Tom1394racing Aug 18 2023, 01:55 PM
Fuel tank has been cleaned, sealed, pressure tested and painted. I may decide to give it a final satin black coat before install.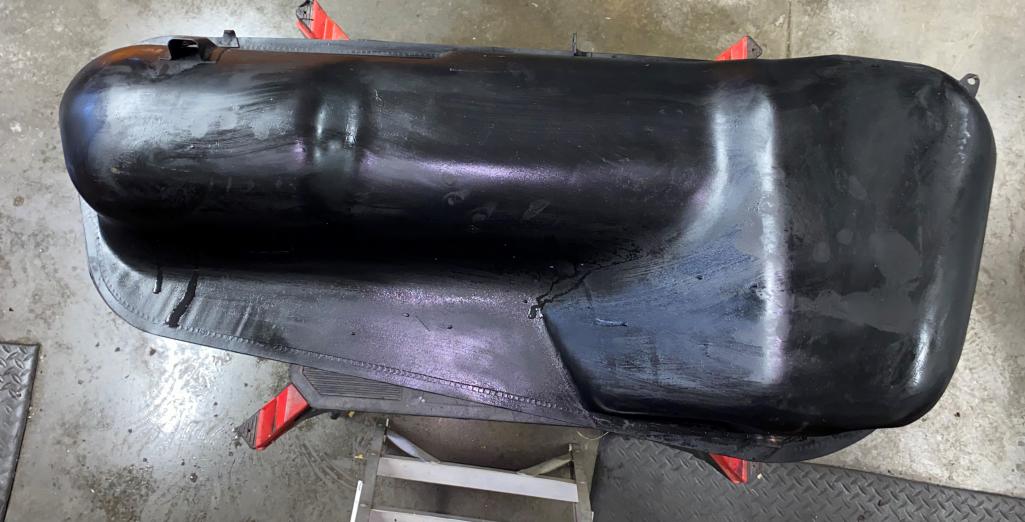
Posted by: Justinp71 Aug 18 2023, 03:29 PM
A few more restored parts ready for reassembly.
Gauges from North Hollywood and steering rack for 914 Rubber.
I love your build! I am also recently converting my 914-6 conversion to more of a GT interior. Curious are you going to install the classic gauge pod over the stereo or keep the radio (maybe do afr or ?)? I'm currently debating over this, I think I am going to run the gauge pod for awhile and see if I miss the actual radio (keeping a hidden stereo).
I am planning for a "GT Like" interior with no radio or gauge pod.
Ok cool. Have you looked into the door panels yet? Leather panels are available, the original handles can be purchased on ebay/auto atlanta. I just made some leather straps.
I have a pair of blank leatherette t door panels that I bought from 914 rubber. I also have the leather strap and the bezels for where the leather strap passes into the door panel near the door lock. I plan to use the original window winder handles and the GT style door pull handles that seem to be widely available. There seem to be some really great threads with Photos on how to locate the bezels on the door panels. I am a little concerned about the amount of pulling force required to actuate the door locks with the leather strap. I’ve cleaned and lubed my door locks as best as possible and hopefully it will not be an issue. I have similar door panels, leather straps, and pulls on my RSR clone. Those have worked flawlessly for 15 years.
I just did this. The straps work good, I ended up pulling out the spring in the door handle made it a little easier to pull. But what I really liked is it put less pressure on the handle grommet.
Posted by: Bullethead Aug 18 2023, 05:03 PM
The dash looks terrific Tom, what was the cost and turnaround? Any fitment issues?
Posted by: Tom1394racing Aug 19 2023, 08:30 AM
A few more restored parts ready for reassembly.
Gauges from North Hollywood and steering rack for 914 Rubber.
I love your build! I am also recently converting my 914-6 conversion to more of a GT interior. Curious are you going to install the classic gauge pod over the stereo or keep the radio (maybe do afr or ?)? I'm currently debating over this, I think I am going to run the gauge pod for awhile and see if I miss the actual radio (keeping a hidden stereo).
I am planning for a "GT Like" interior with no radio or gauge pod.
Ok cool. Have you looked into the door panels yet? Leather panels are available, the original handles can be purchased on ebay/auto atlanta. I just made some leather straps.
I have a pair of blank leatherette t door panels that I bought from 914 rubber. I also have the leather strap and the bezels for where the leather strap passes into the door panel near the door lock. I plan to use the original window winder handles and the GT style door pull handles that seem to be widely available. There seem to be some really great threads with Photos on how to locate the bezels on the door panels. I am a little concerned about the amount of pulling force required to actuate the door locks with the leather strap. I’ve cleaned and lubed my door locks as best as possible and hopefully it will not be an issue. I have similar door panels, leather straps, and pulls on my RSR clone. Those have worked flawlessly for 15 years.
I just did this. The straps work good, I ended up pulling out the spring in the door handle made it a little easier to pull. But what I really liked is it put less pressure on the handle grommet.
Justin...I seem to remember a posting where someone removed the spring. Was that yours?
Posted by: Tom1394racing Aug 19 2023, 08:36 AM
The dash looks terrific Tom, what was the cost and turnaround? Any fitment issues?
I did only the dash top, not the bottom piece. My bottom piece was in very good shape.
6-month lead-time door to door. $1534 total cost. I had seen their work on a couple of local cars and was convinced of the value as there did not seem to be any good alternatives.
Posted by: flyer86d Aug 19 2023, 02:31 PM
Work of this quality and detail makes me want to barf. You are doing a way too nice job on everything. It is going to be great!
Charlie
Posted by: Tom1394racing Aug 24 2023, 06:17 PM
More parts getting ready for installation.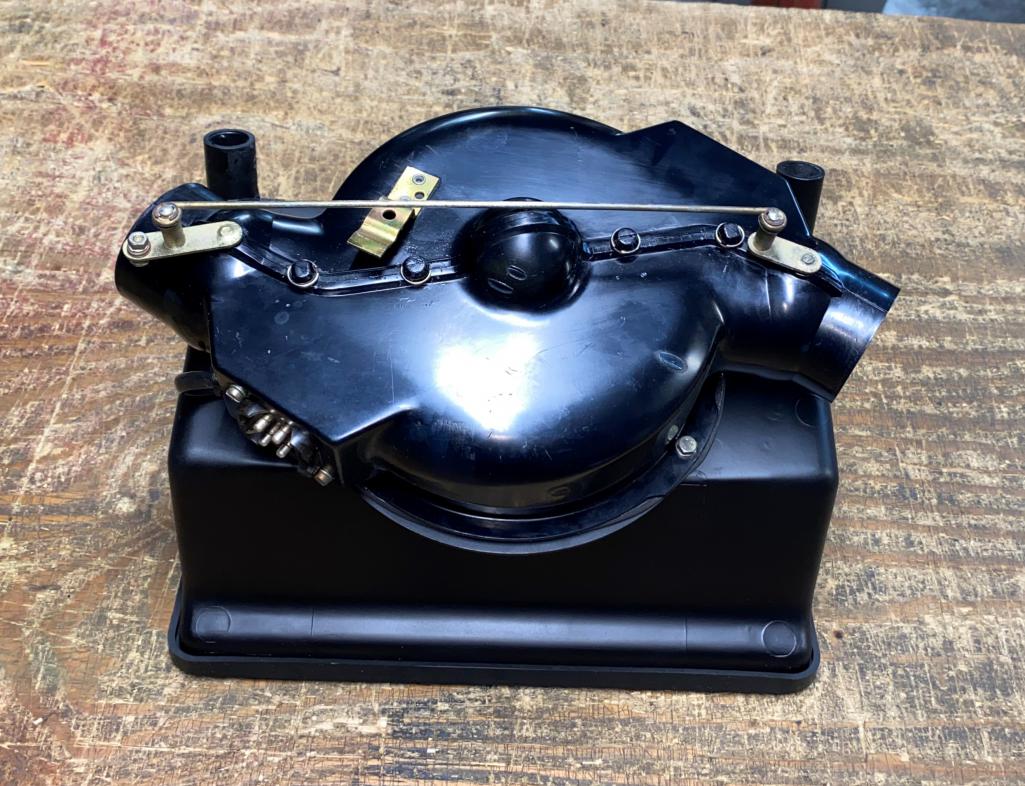
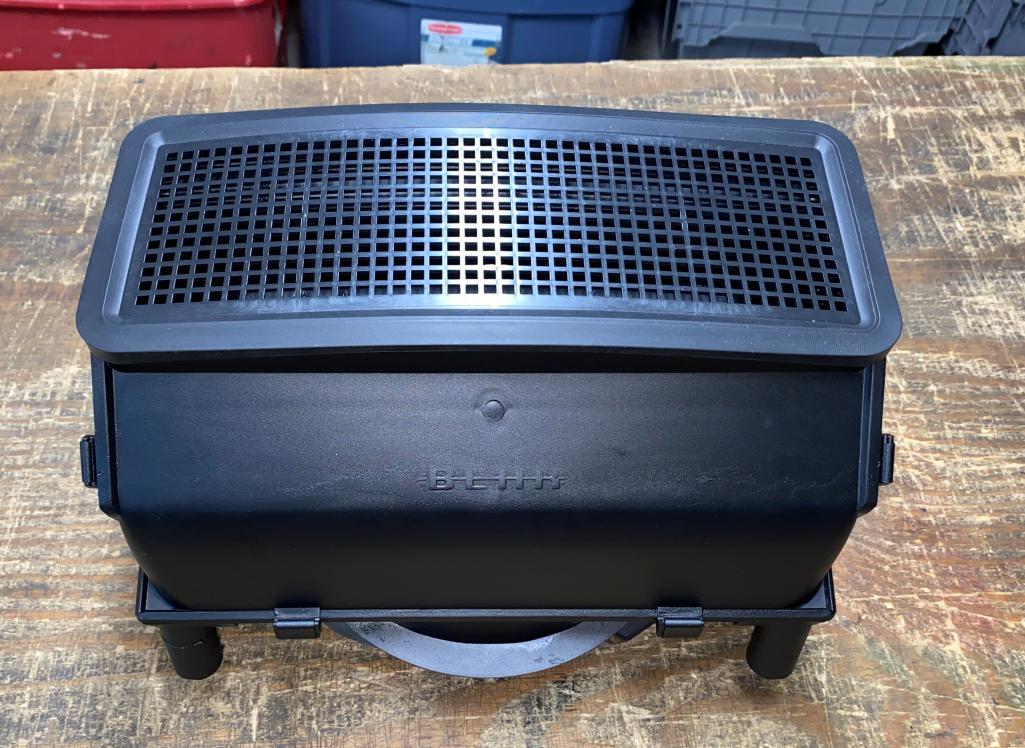
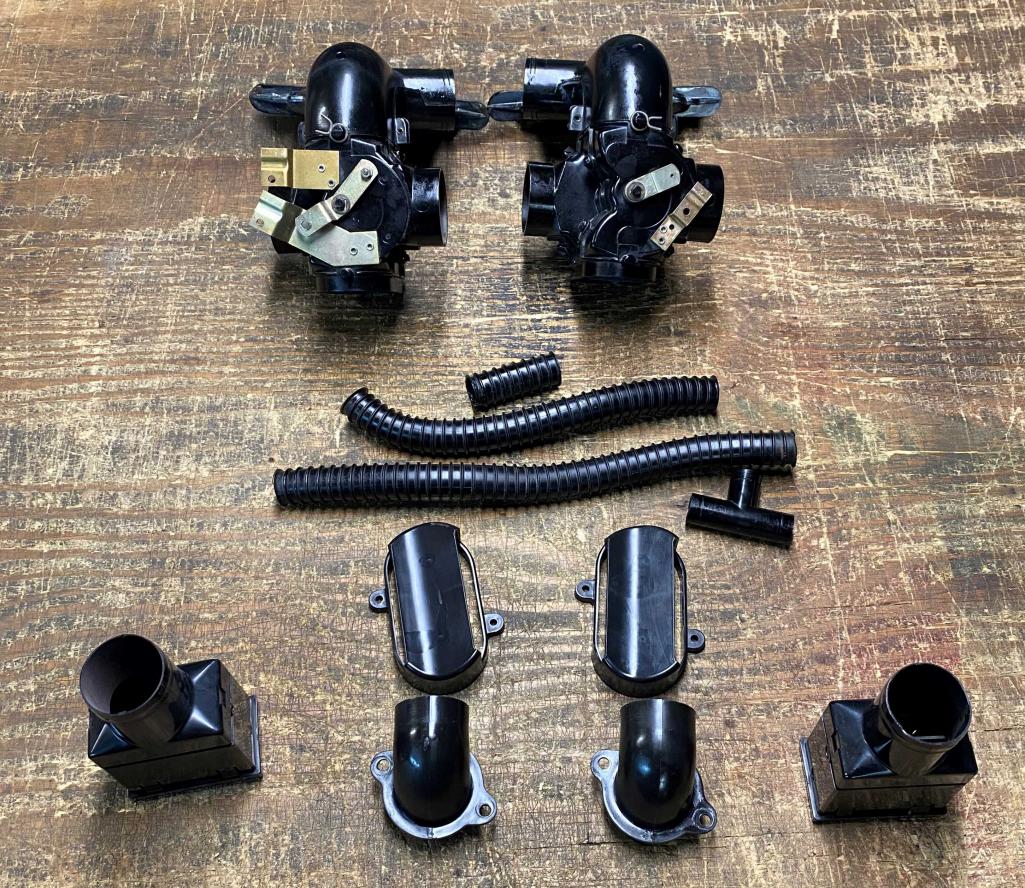
Posted by: Tom1394racing Aug 24 2023, 06:18 PM
380 mm hockey puck steering wheel.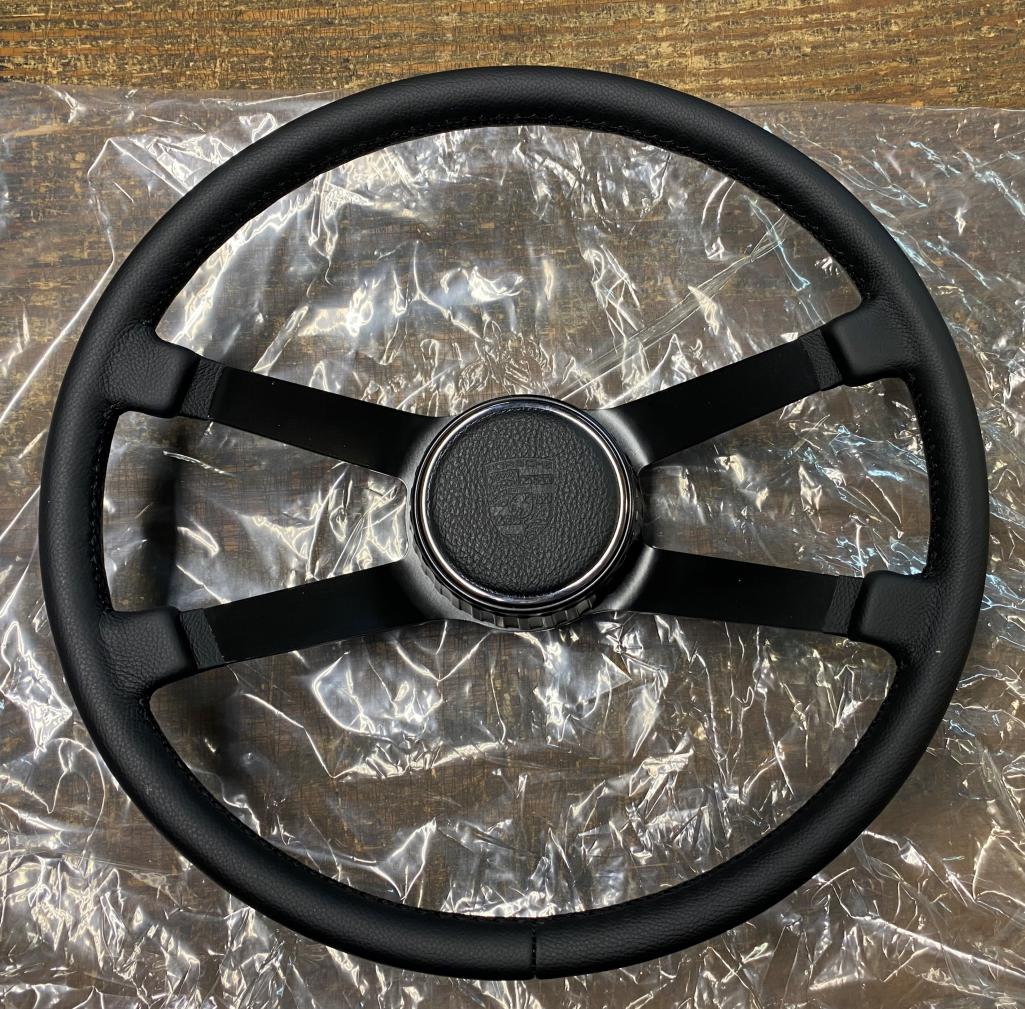
Posted by: Tom1394racing Aug 24 2023, 06:21 PM
46 mm PMO kit. Once I get the case back from Ollie's, I can start the engine build.
[attachmentid=885738] 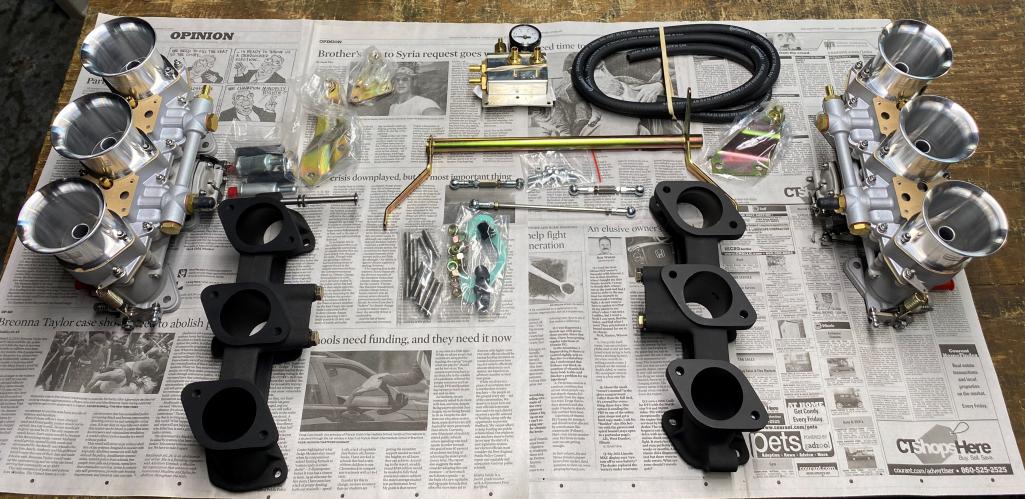
Posted by: JmuRiz Aug 24 2023, 07:26 PM
Soooo nice, restored to new (or better) state. Want to finish my car 
Posted by: Tom1394racing Aug 25 2023, 07:50 AM
Bottom side rust repairs and chassis stiffening had been completed and the repairs dressed and e-coated.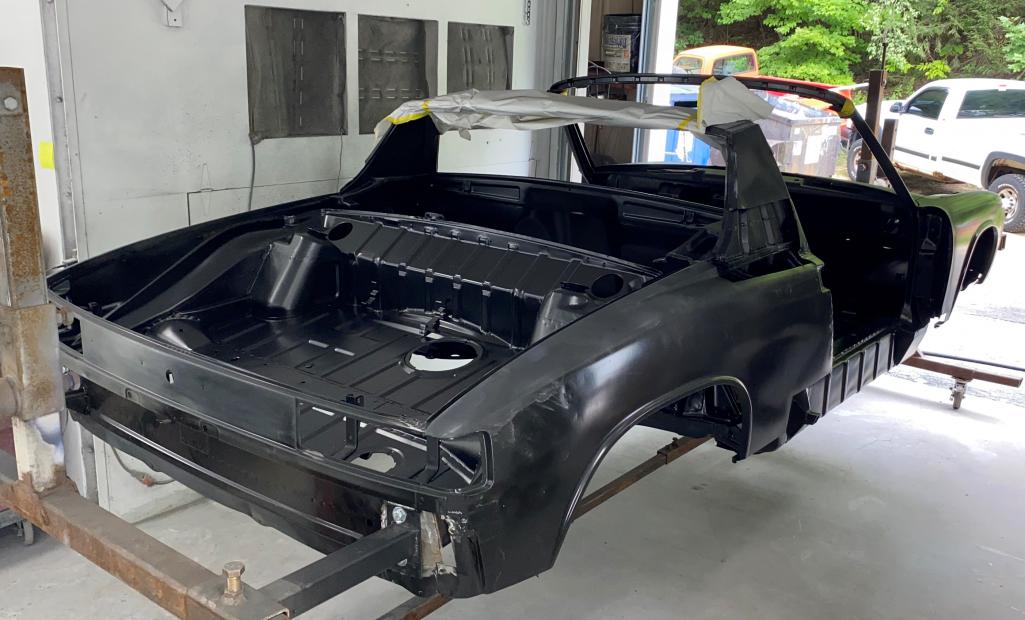


Posted by: Tom1394racing Aug 25 2023, 07:56 AM
Mad Dog interior chassis stiffening.
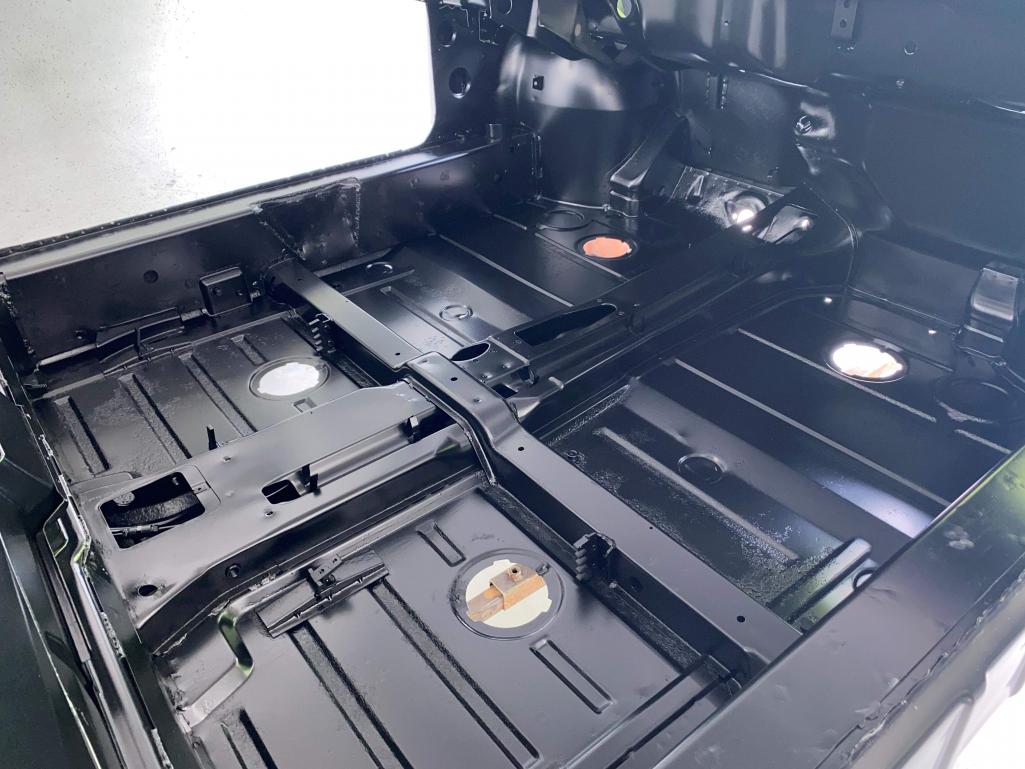
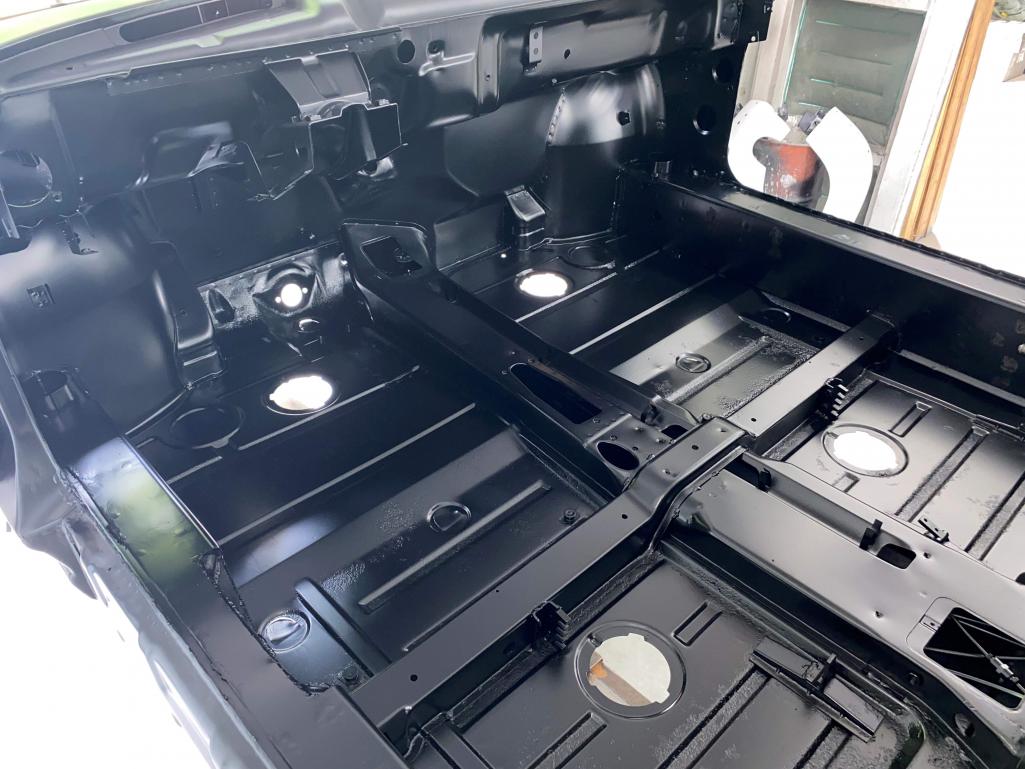
Posted by: Tom1394racing Aug 25 2023, 08:01 AM
Mad Dog exterior chassis stiffening.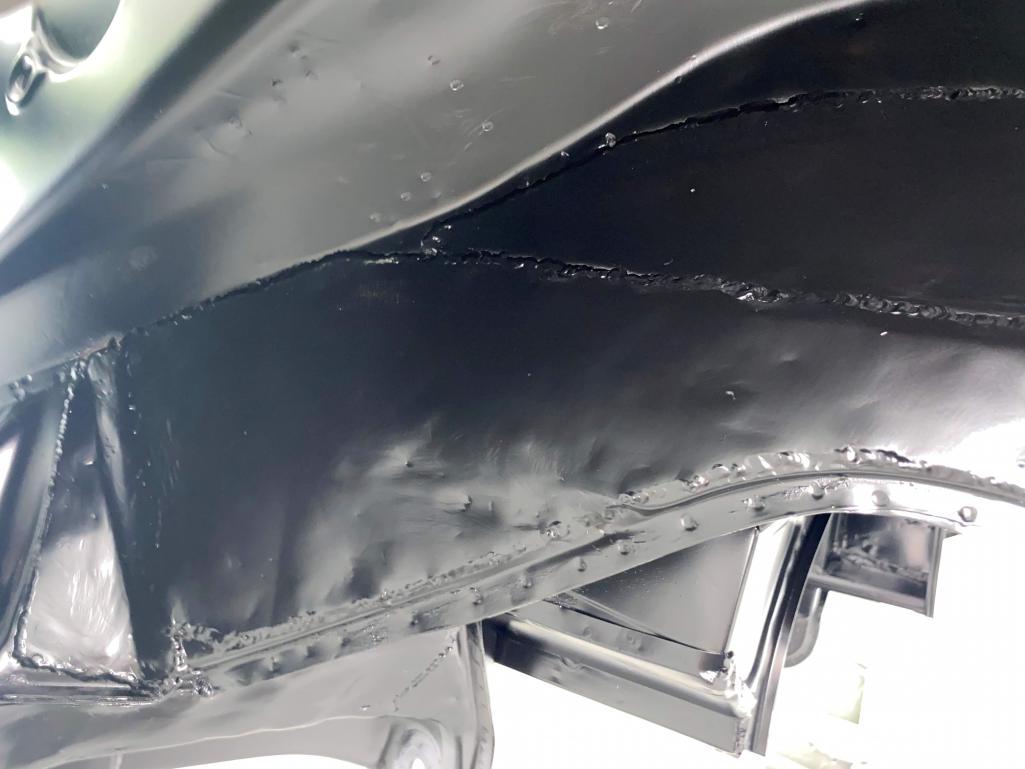
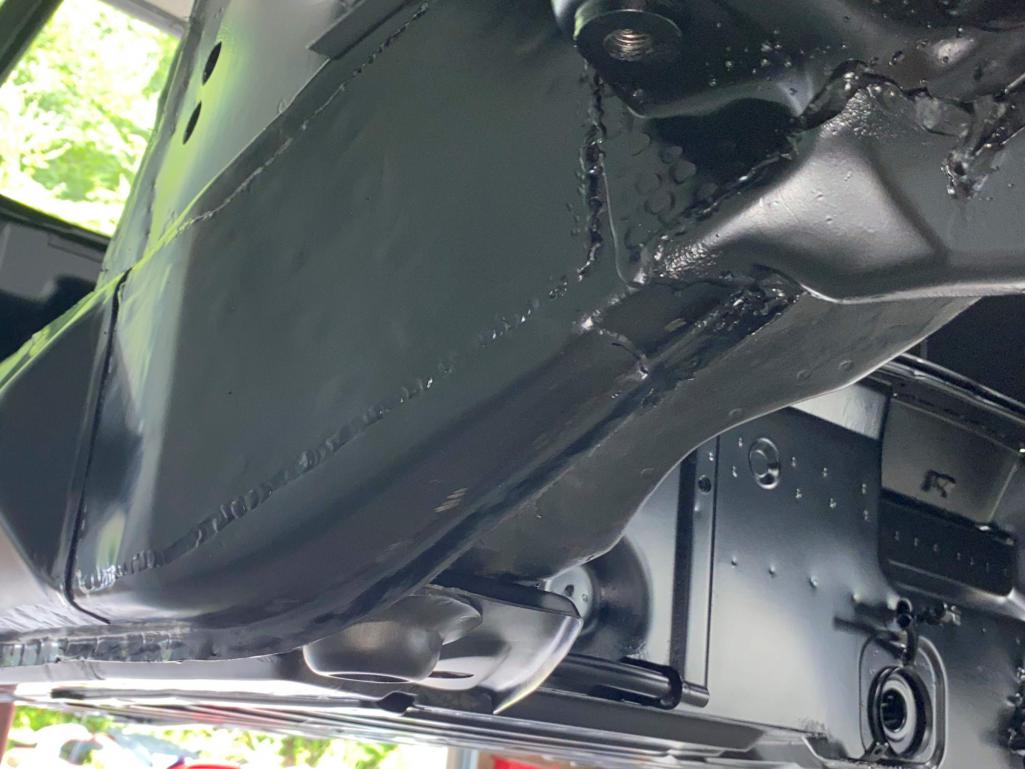

Posted by: Tom1394racing Aug 25 2023, 08:18 AM
Front and rear trunk compartments. Still to do:
1. GT Roll bar from Tangerine Racing
2. Front cooler ducting
3. -6 Engine mount from Mad Dog
4. Shoulder belt anchors on firewall
5. Engine access panel on firewall
6. Rear suspension pivot point reinforcements
7. Through holes for oil tank & oil cooler lines
8. Front truck mods for Mittlemotor GT headlight cable release system
9. Modify and install 911 steering column
10. Paint bottom side, both trunks and cockpit in Lizard Green
The car will then come back to me for partial reassembly including electricals, engine and gearbox, suspension and interior components. Then back to Auto Associates for mounting of the flares and final body and paint. 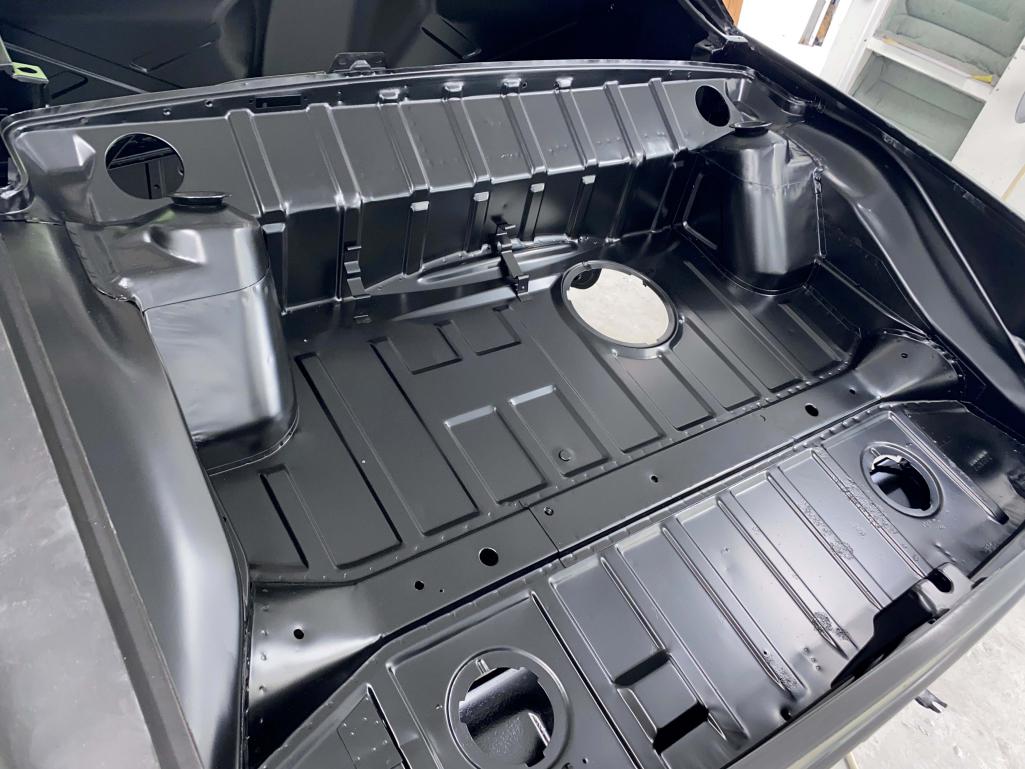

Posted by: Tom1394racing Aug 26 2023, 07:12 AM
Installed the Tangerine Racing side shift bracket on the gearbox yesterday.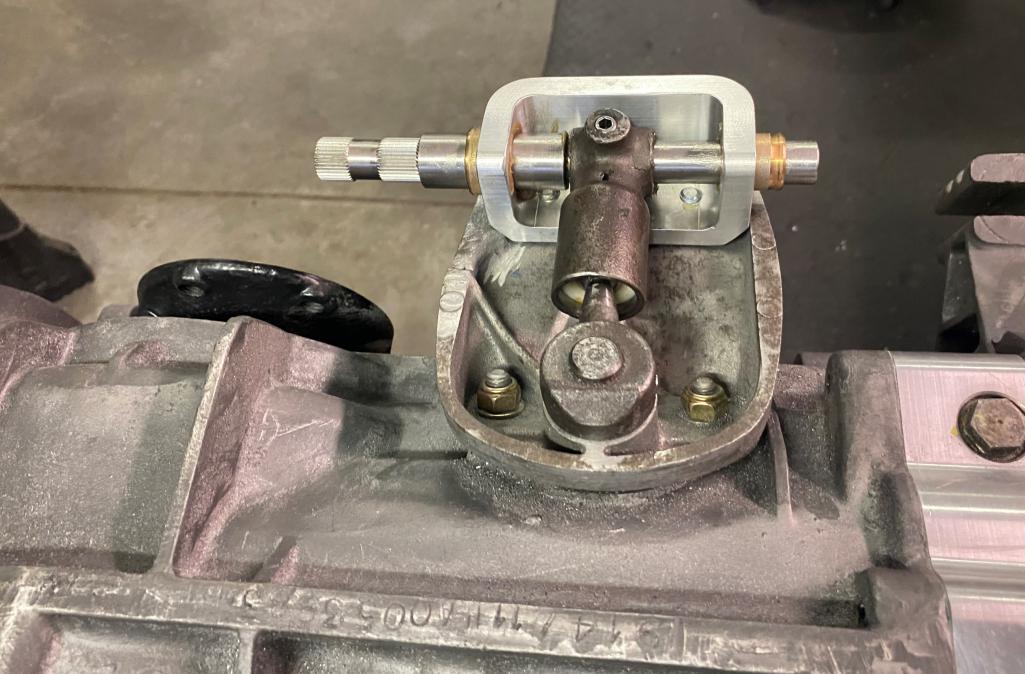
Posted by: Tom1394racing Sep 4 2023, 03:13 PM
Last Friday I had the pleasure of visiting Rory Gallagher (rgalla9146) to pick up a set of NOS rear quarters and front fenders and look over his pristine GT clone. It turns out that Rory also had an original 914-6 throttle bracket. I will be using the rear quarters and the throttle bracket for this project and the front fenders will be for sale sometime in the near future.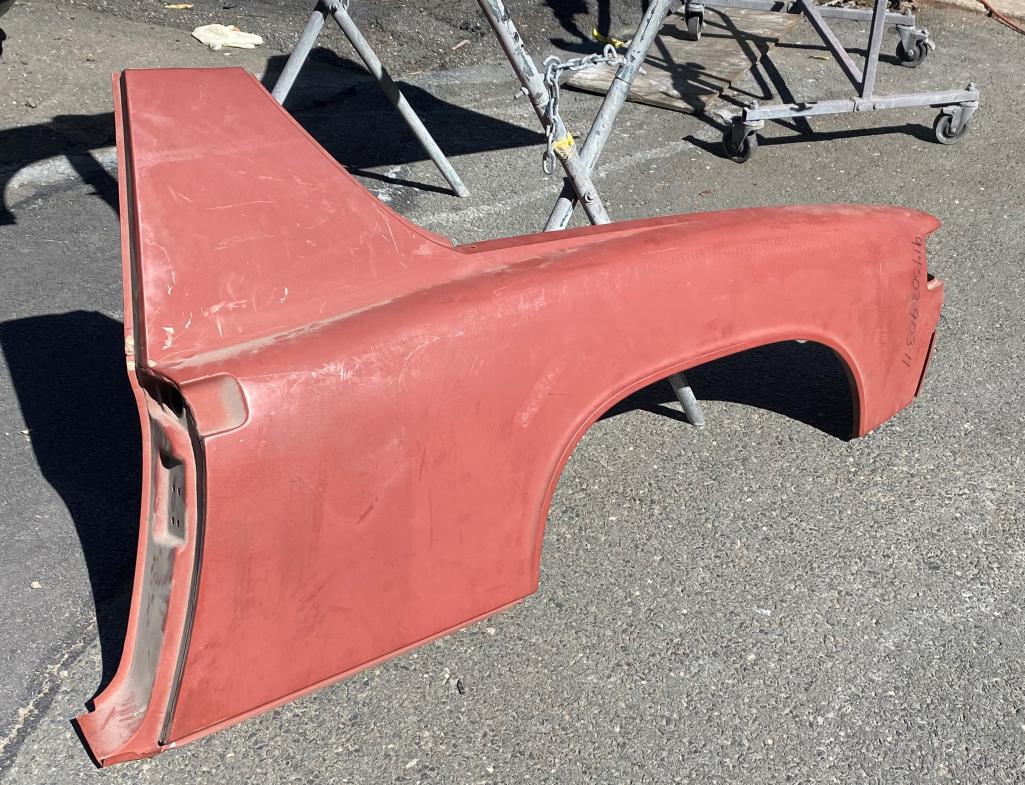
[attachmentid=886987]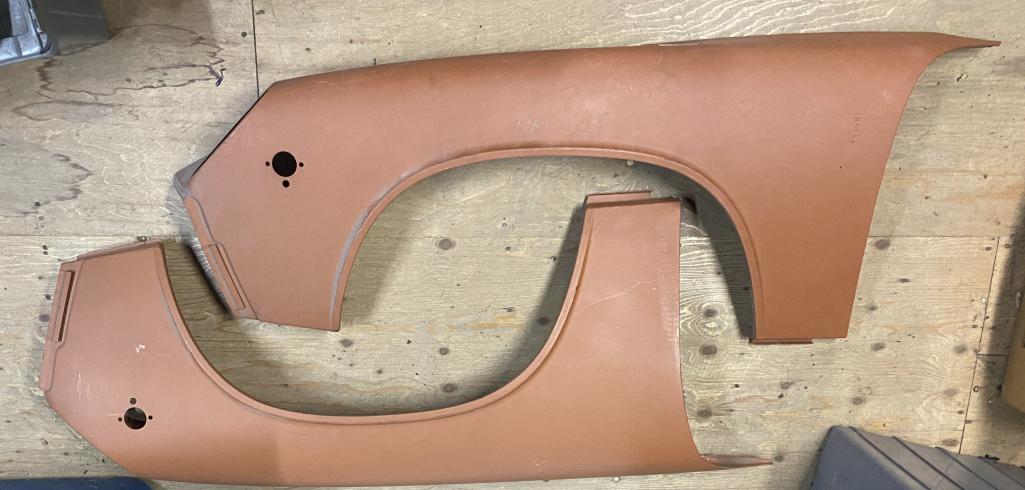

Posted by: TRS63 Sep 5 2023, 01:21 AM
Project moving great,thanks for sharing !
Antoine
Posted by: mepstein Sep 5 2023, 06:14 AM
Rory has some great treasures along with invaluable knowledge. His build has a bunch of special features that he’s helped me make aware so I could steal borrow.
Posted by: Tom1394racing Sep 5 2023, 08:36 AM
Rory has some great treasures along with invaluable knowledge. His build has a bunch of special features that he’s helped me make aware so I could
I'll second that! Here is the 914-6 throttle bracket that he pulled out of his attic after I mentioned that I needed one.
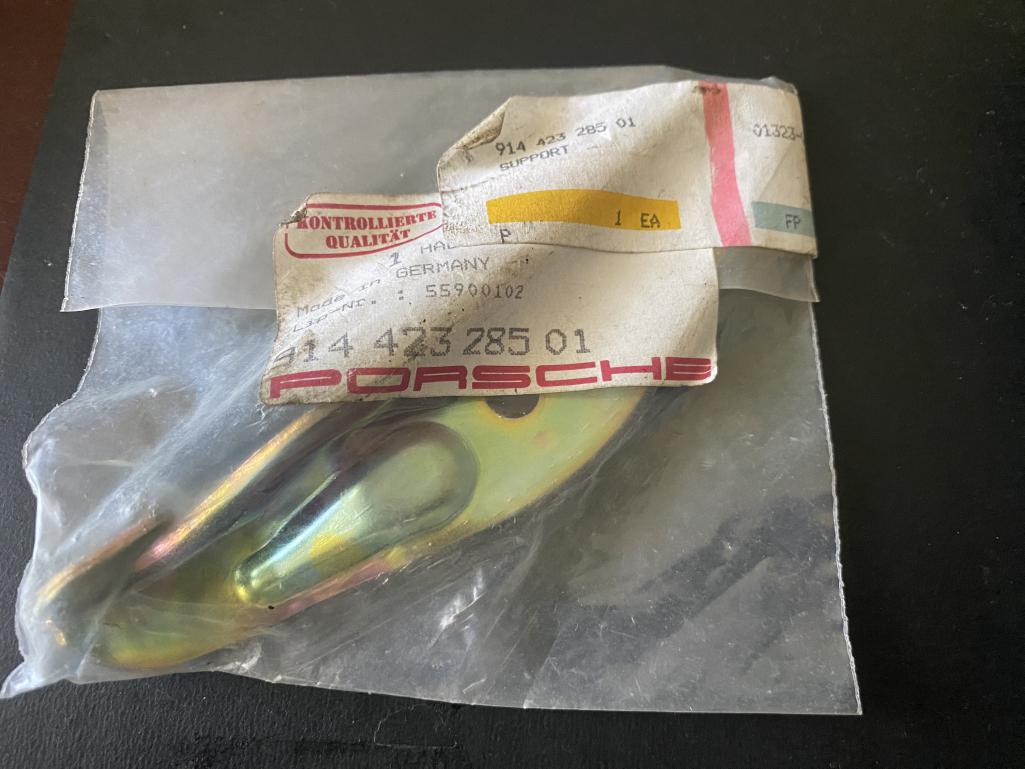
Posted by: Tom1394racing Sep 5 2023, 04:01 PM
Ben McFarland's oil tank had been installed.
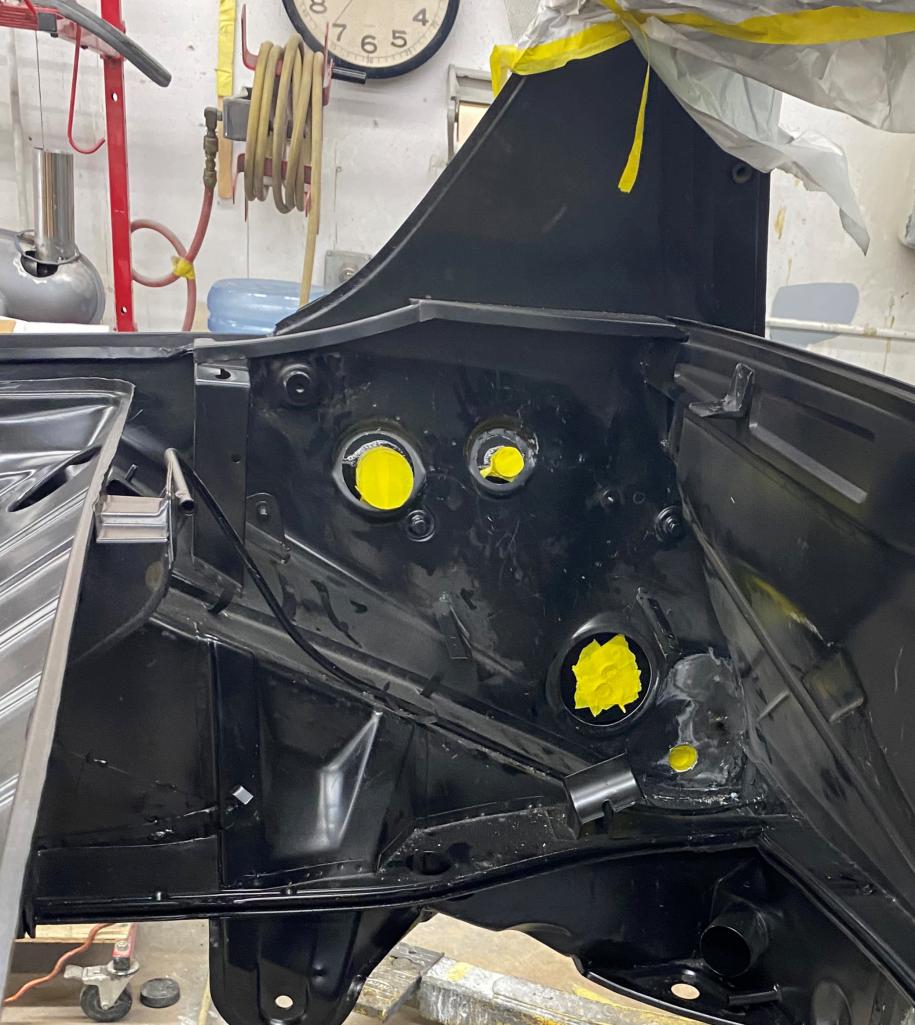
Posted by: Tom1394racing Sep 5 2023, 04:04 PM
Mad Dog's engine mount installed.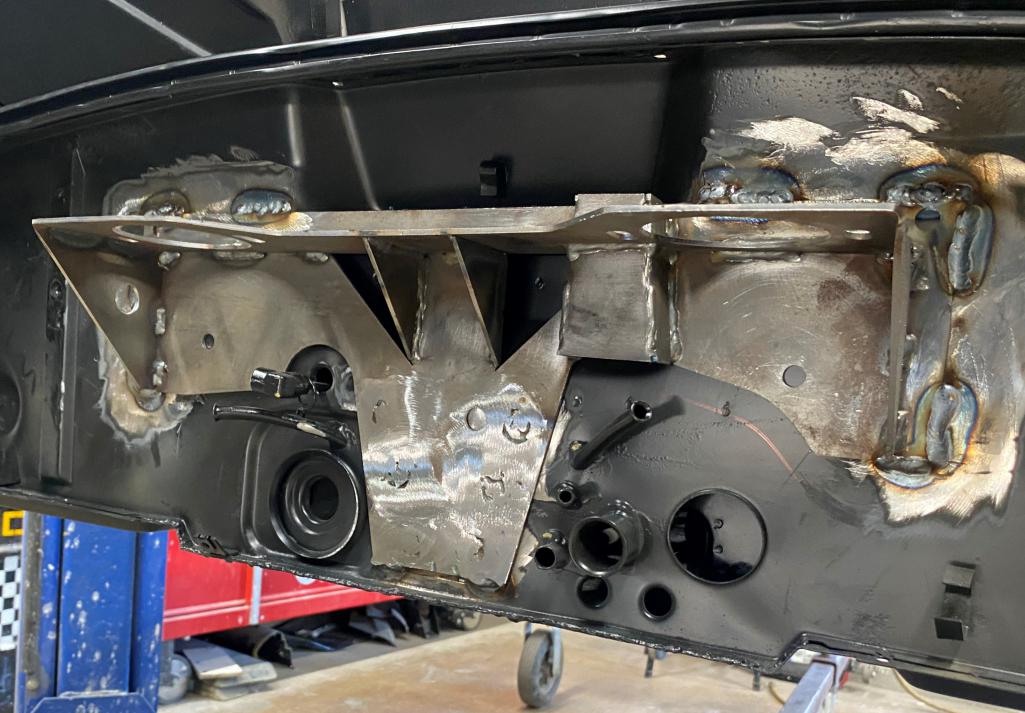
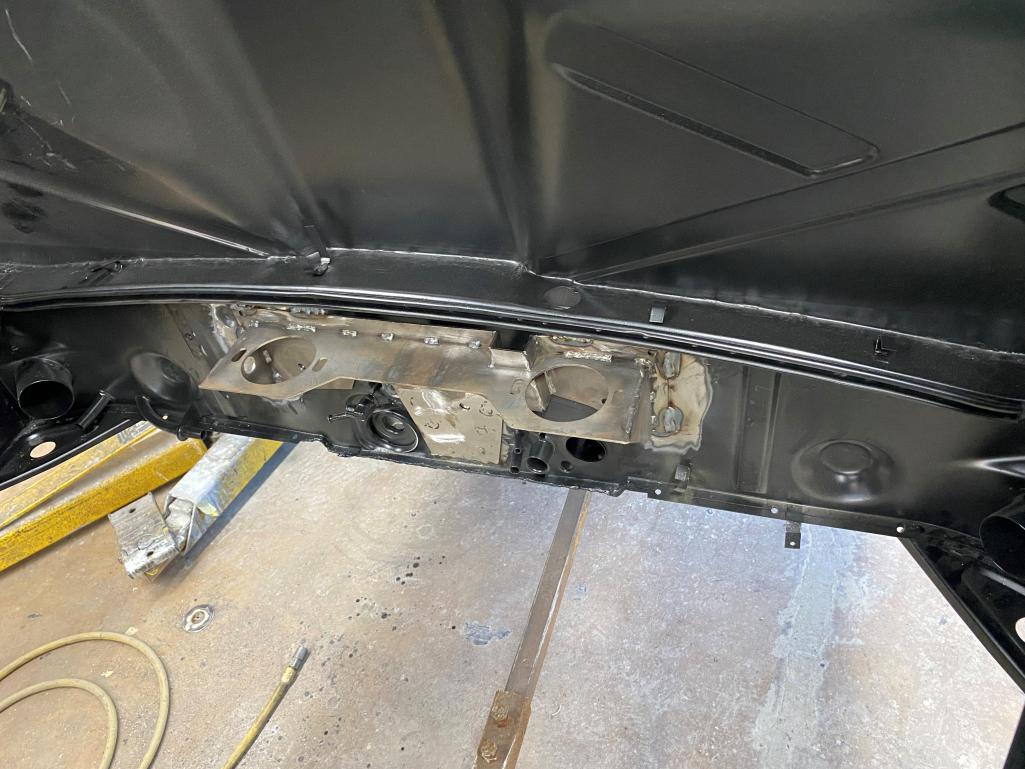
Posted by: Tom1394racing Sep 5 2023, 04:08 PM
Balsa reinforced front and rear lids from Getty arrived last week.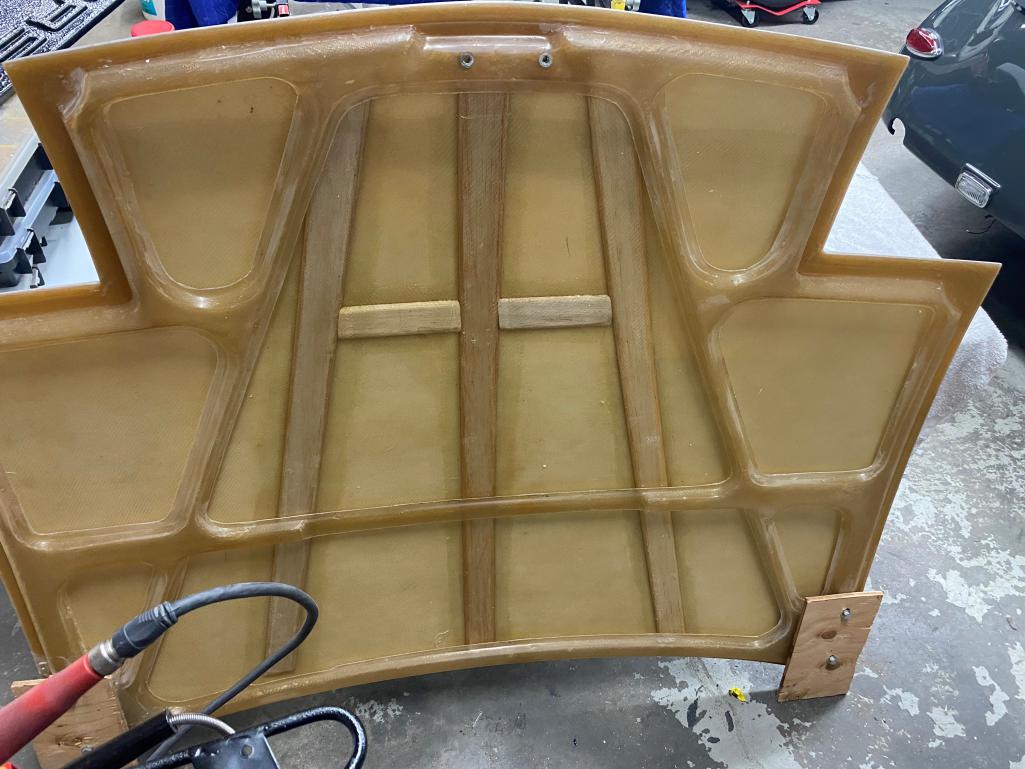

Posted by: Tom1394racing Sep 5 2023, 04:13 PM
Working on the front cooler and engine access panel.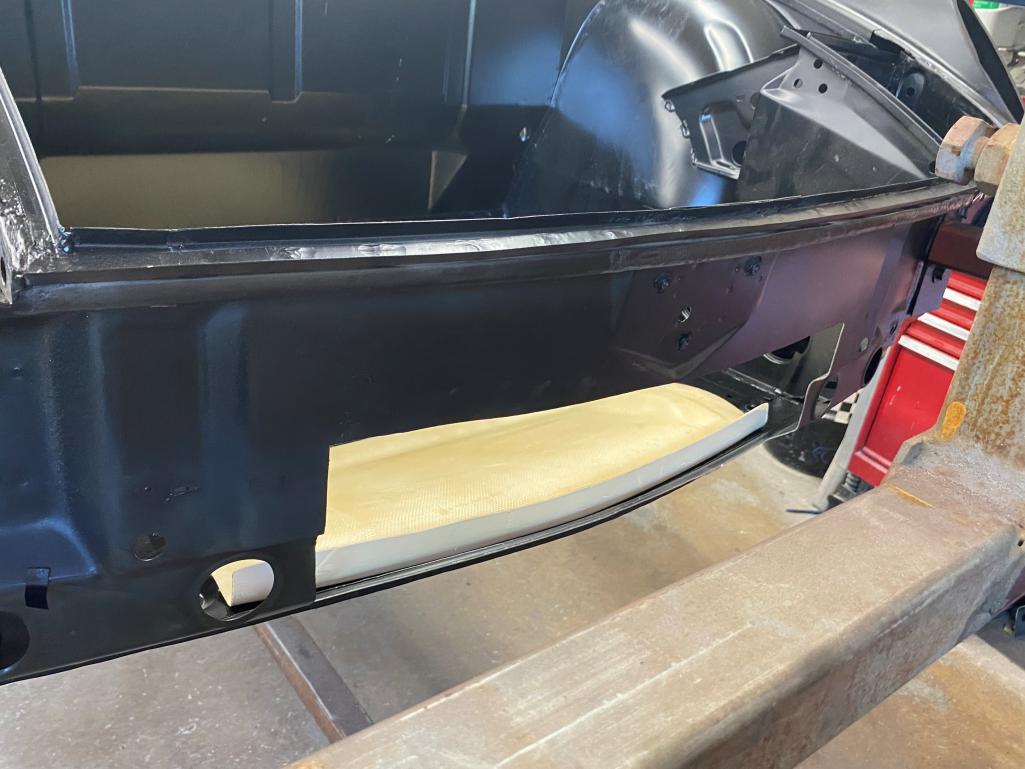
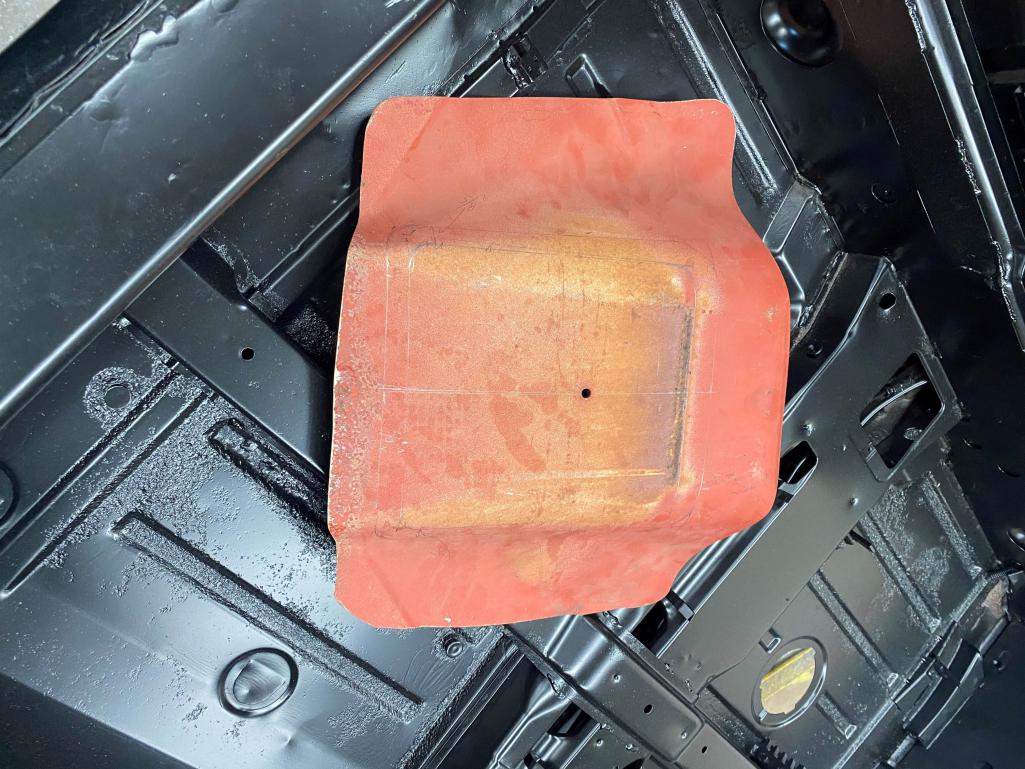
Posted by: Bullethead Sep 5 2023, 07:31 PM
 Nice, steady progress Tom... final product will be worth all the effort.
Posted by: live free & drive Sep 5 2023, 09:22 PM
I went looking for Armando's GT Build he featured on the Pbase site. It seems to have been removed from the site, but after poking around it's still there; here's the link:
https://pbase.com/9146gt/the9146gt
I always liked the oil cooler reinforcement he did here:
https://pbase.com/9146gt/the9146gt_front_oil_cooler_install
He also did the windshield frame reinforcements that you rarely see:
https://pbase.com/9146gt/my9146gt_windshield_frame_reinforcements
The Pelican site GT build thread is here:
http://forums.pelicanparts.com/porsche-914-914-6-technical-forum/632760-last-new-914-6-gt-project.html
Posted by: mepstein Sep 5 2023, 09:30 PM
I went looking for Armando's GT Build he featured on the Pbase site. It seems to have been removed from the site, but after poking around it's still there; here's the link:
https://pbase.com/9146gt/the9146gt
I always liked the oil cooler reinforcement he did here:
https://pbase.com/9146gt/the9146gt_front_oil_cooler_install
He also did the windshield frame reinforcements that you rarely see:
https://pbase.com/9146gt/my9146gt_windshield_frame_reinforcements
Did he ever finish the build?
Posted by: live free & drive Sep 6 2023, 06:15 AM
Seems like he ran out of steam on the project around 2014.
I talked with him on the phone several times while buying parts he was offering in the 2018-19 time frame. We did not specifically talk about what was going on with his build.
He had a boatload of Porsche racing parts - a lot of engine stuff for 906's etc. maybe somebody made him an offer he couldn't refuse?
Posted by: Luke M Sep 6 2023, 09:08 AM
Hi Tom,
Project looks good. I see you went shopping at Rory's place. He has a pretty good stash of nos parts. I sold him the chassis that he turned into the GT clone. How I wish I kept that one.
One thing you may want to do is remove that blower fan bracket on left engine shelf. It'll get in the way of installing/removing the oil filter. I ran into that issue on my brothers 6 conv but didn't find out til after the engine bay was painted...
Attached image(s)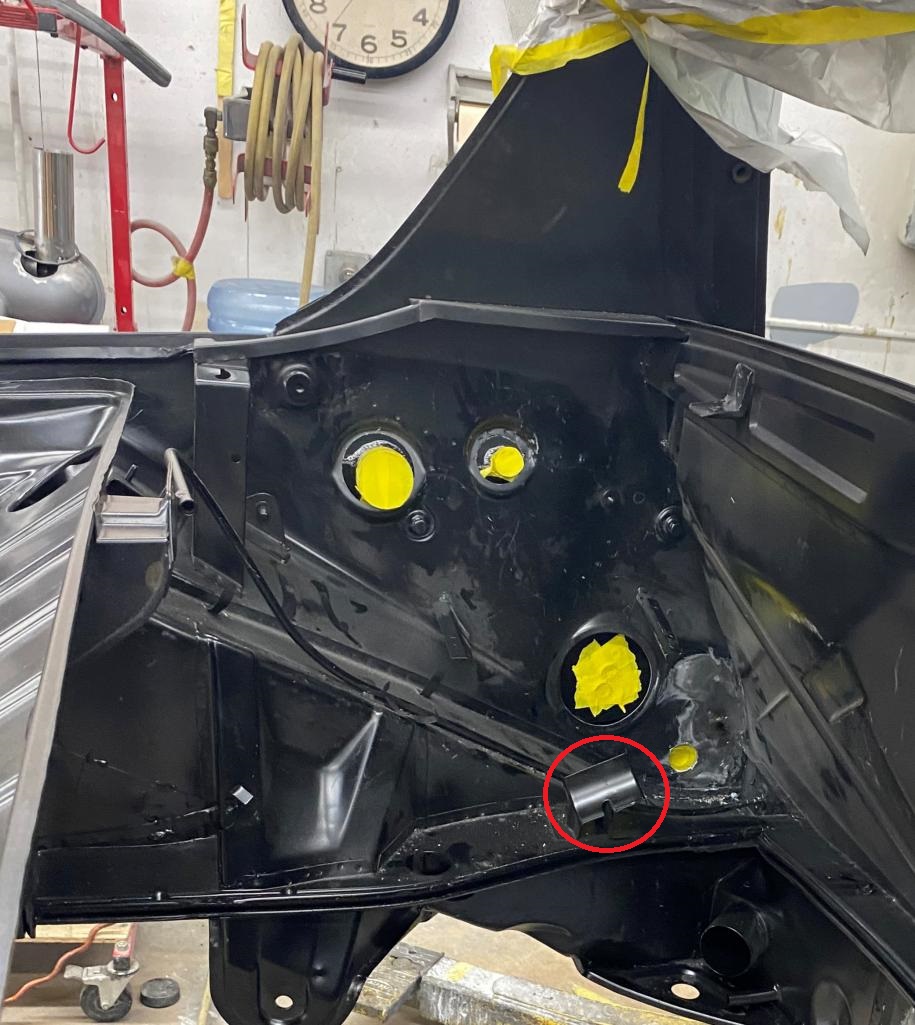
Posted by: Tom1394racing Sep 6 2023, 10:26 AM
I went looking for Armando's GT Build he featured on the Pbase site. It seems to have been removed from the site, but after poking around it's still there; here's the link:
https://pbase.com/9146gt/the9146gt
I always liked the oil cooler reinforcement he did here:
https://pbase.com/9146gt/the9146gt_front_oil_cooler_install
He also did the windshield frame reinforcements that you rarely see:
https://pbase.com/9146gt/my9146gt_windshield_frame_reinforcements
The Pelican site GT build thread is here:
http://forums.pelicanparts.com/porsche-914-914-6-technical-forum/632760-last-new-914-6-gt-project.html
Yes...We have been following Armando's lead and using many of his ideas and detailed descriptions and documentation of factory GT cars. The oil cooler duct reinforcement has been done as well.
Posted by: Tom1394racing Sep 6 2023, 10:28 AM
Hi Tom,
Project looks good. I see you went shopping at Rory's place. He has a pretty good stash of nos parts. I sold him the chassis that he turned into the GT clone. How I wish I kept that one.
One thing you may want to do is remove that blower fan bracket on left engine shelf. It'll get in the way of installing/removing the oil filter. I ran into that issue on my brothers 6 conv but didn't find out til after the engine bay was painted...
Luke...Thanks for pointing that out. It is on the "to do" list. Any other suggestions, I am all ears!
Posted by: Tom1394racing Sep 6 2023, 01:46 PM
Things are moving forward quickly at Auto Associates. Here is the engine access panel along with the center mount for the GT roll bar.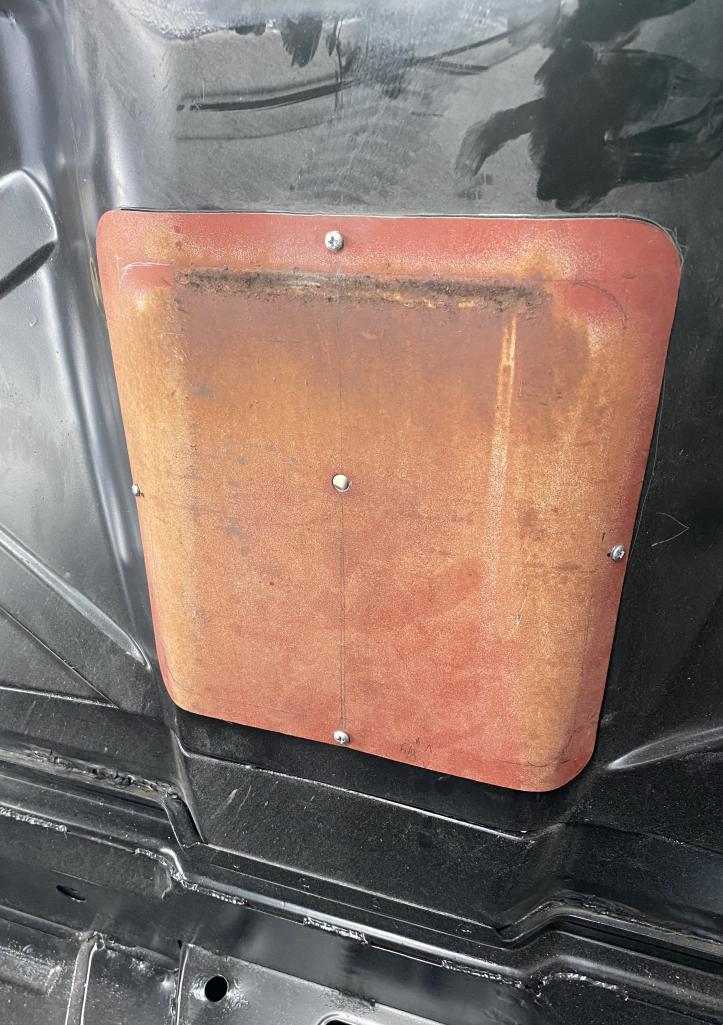
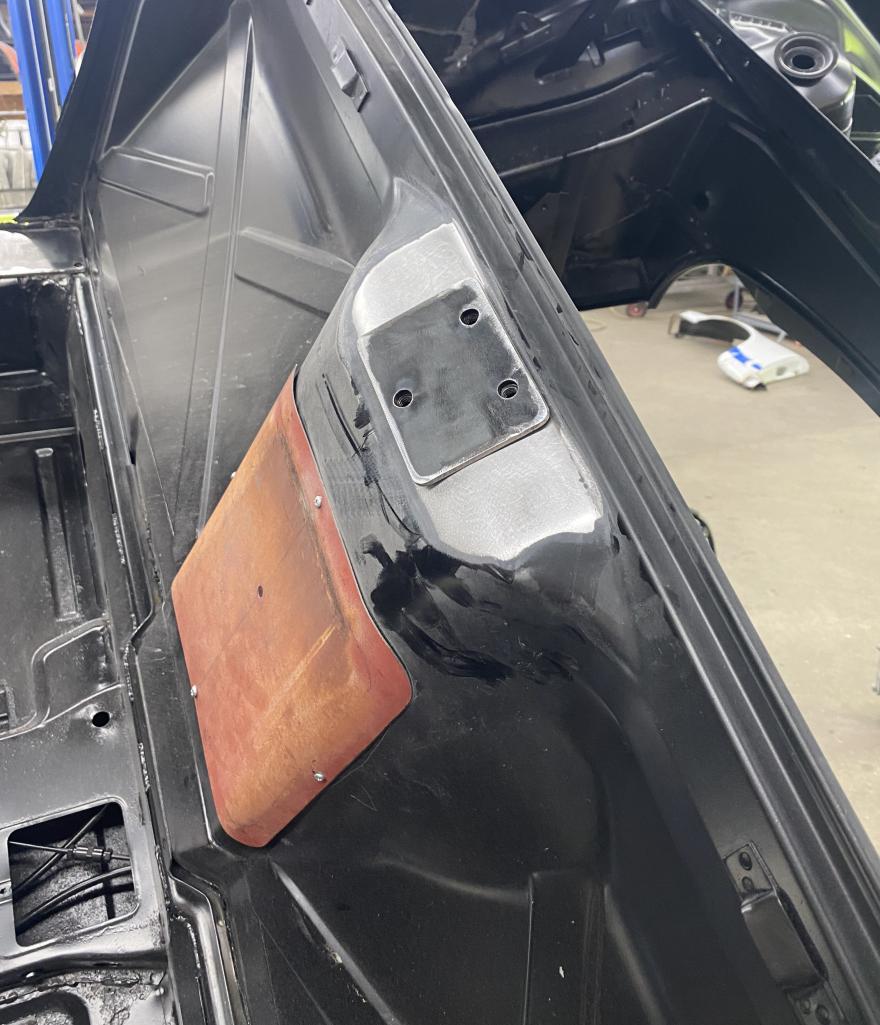
Posted by: Tom1394racing Sep 6 2023, 01:48 PM
The front cooler reinforcement has been added and the cooler & ducting test fitted.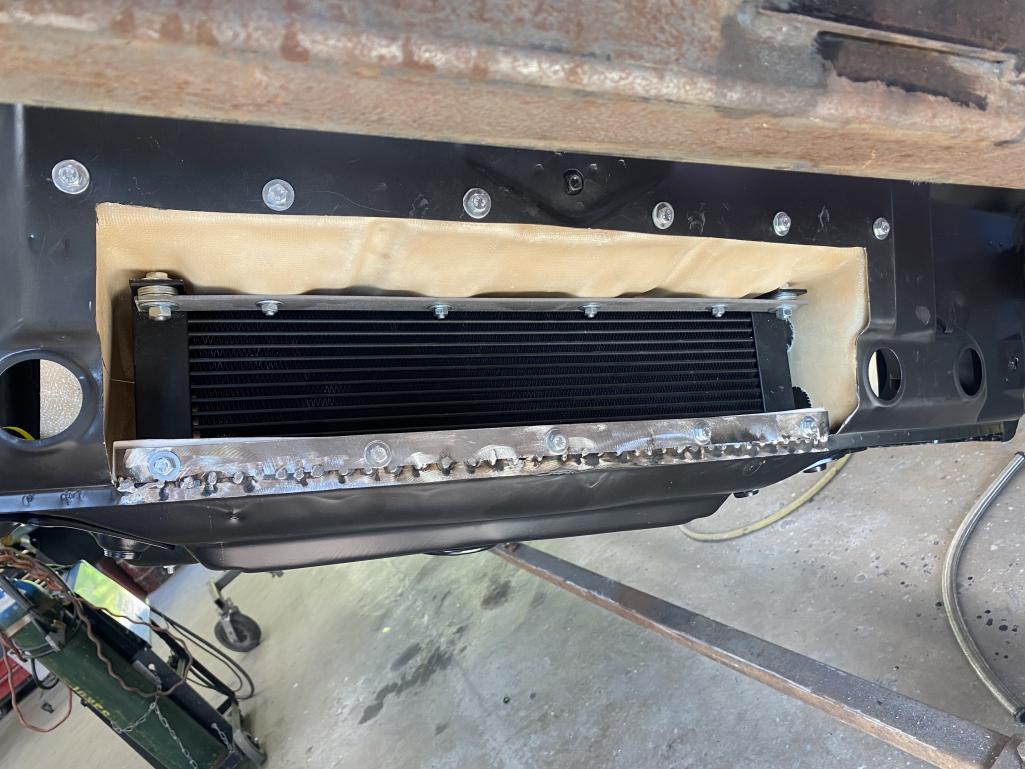
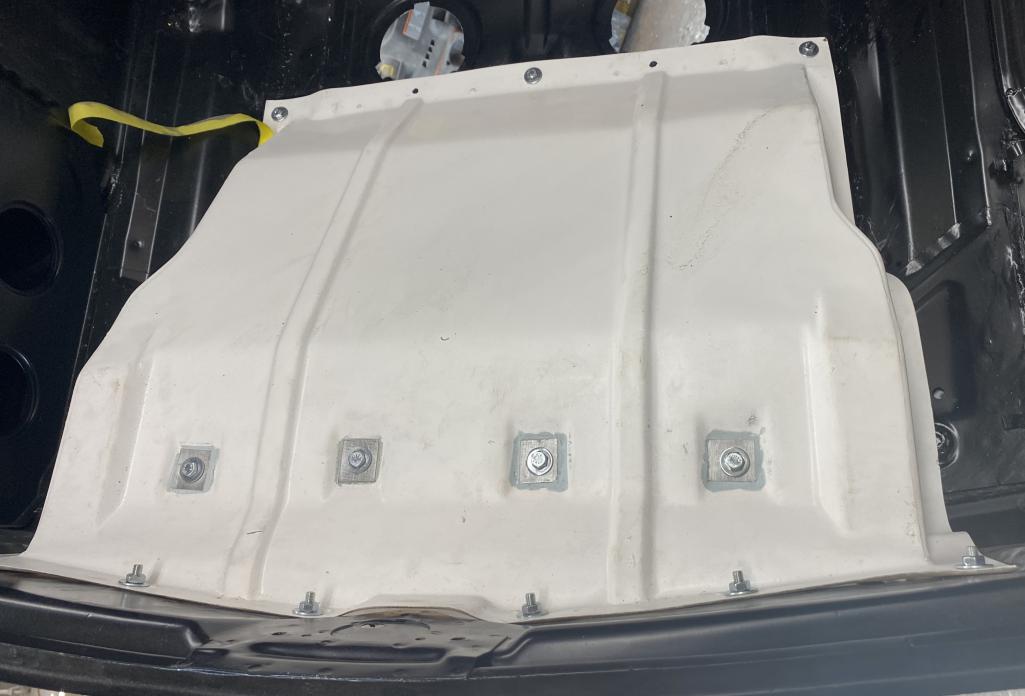
Posted by: Tom1394racing Sep 6 2023, 01:50 PM
Also, the early 911 steering column has been modified to fit the 914 chassis. 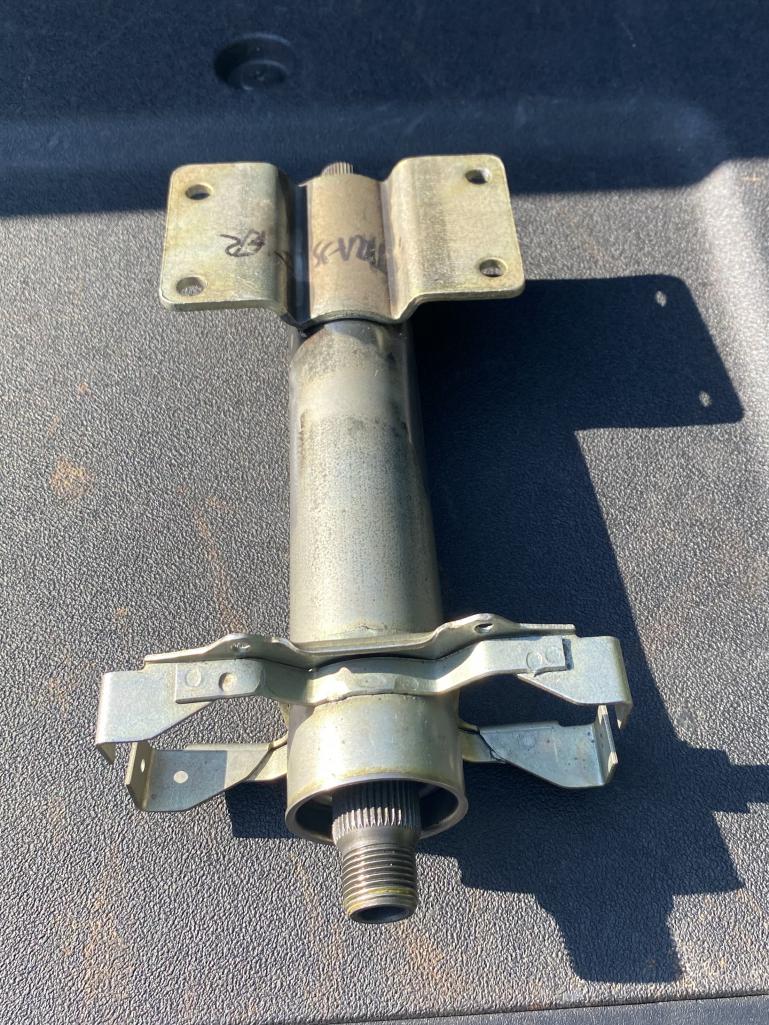
Posted by: sixaddict Sep 7 2023, 10:13 AM
Tom
Your work on this gives me indigestion………it is above and beyond great! Process shows a level commitment I’m having trouble finding.
Question……
What was your procedure for restoring plastic parts of ventilation system?
Thanks,
Terry
Posted by: Tom1394racing Sep 7 2023, 05:57 PM
Tom
Your work on this gives me indigestion………it is above and beyond great! Process shows a level commitment I’m having trouble finding.
Question……
What was your procedure for restoring plastic parts of ventilation system?
Thanks,
Terry
First, a thorough cleaning with soap and water. Then removal of any, and all overspray with Goo Gone and a soft Scotch-Brite pad. Then I used Maguires Cericoat wipes to restore luster. I did not remove any of the hardware and haven’t re-plated as I was able to polish to my satisfaction.
Posted by: JmuRiz Sep 8 2023, 07:17 AM
Tom
Your work on this gives me indigestion………it is above and beyond great! Process shows a level commitment I’m having trouble finding.
Question……
What was your procedure for restoring plastic parts of ventilation system?
Thanks,
Terry
First, a thorough cleaning with soap and water. Then removal of any, and all overspray with Goo Gone and a soft Scotch-Brite pad. Then I used Maguires Cericoat wipes to restore luster. I did not remove any of the hardware and haven’t re-plated as I was able to polish to my satisfaction.
GREAT info, it gives a normal garage guy hope on similar results.
Thanks!
Posted by: Tom1394racing Sep 11 2023, 05:19 PM
Tangerine Racing GT roll bar installation in process. This will be welded in and will get diagonals from the bar to the inner longitudinals. 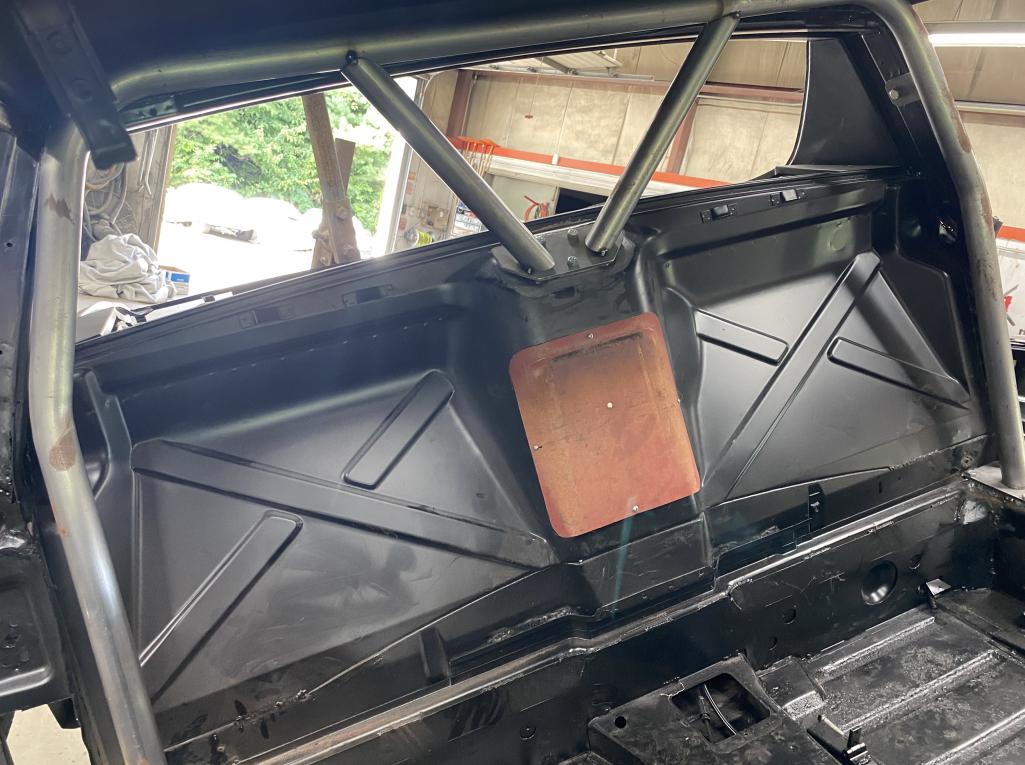
Posted by: Tom1394racing Sep 11 2023, 05:21 PM
Rear quarter prepped for installation of the NOS quarter panel.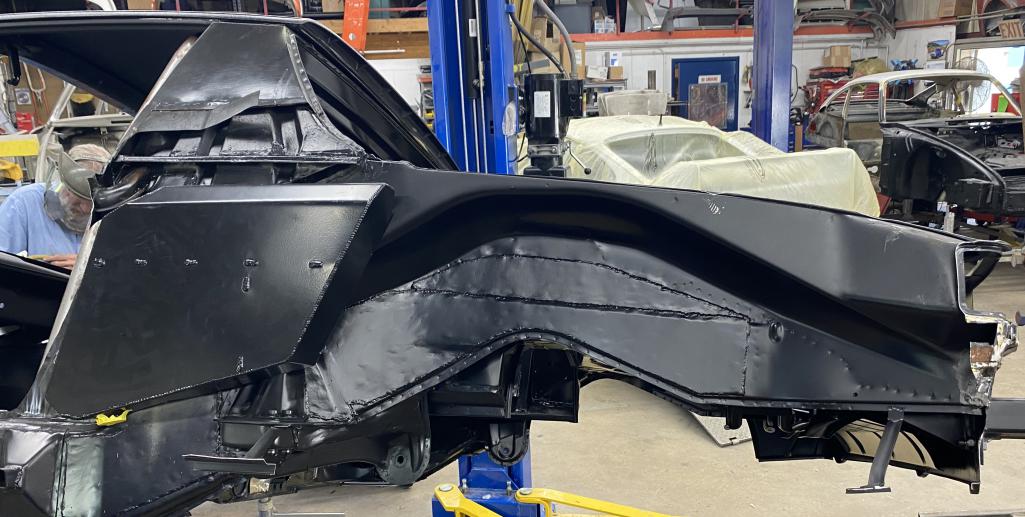
Posted by: Tom1394racing Sep 11 2023, 05:22 PM
Sergio's GT engine lid with the diagonal removed for a more authentic GT look.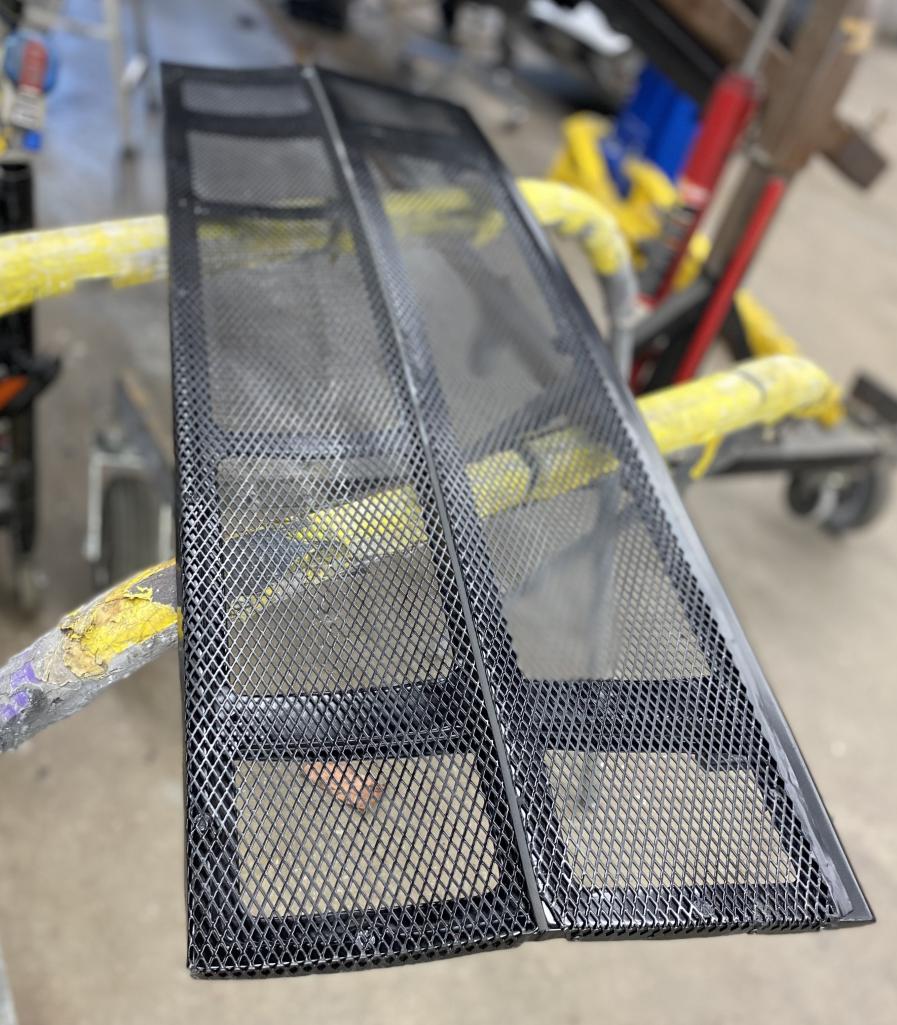
Posted by: TRS63 Sep 13 2023, 12:02 PM
Fantastic project and thanks for sharing the details with us!
Antoine
Posted by: Tom1394racing Sep 22 2023, 02:02 PM
Another trip up to Auto Associates today to check on the project. The chassis is getting some final touch up before another coat of epoxy primer, then light undercoating on the floor bottom and backsides of the inner fender wells. Then the undersides, front trunk, engine compartment and rear trunk will get final paint in Lizard Green. After that, sometime in October, the car will come back to me for mechanical and electrical assembly including the engine build and installation. The plan is to get the car in running condition before it goes back to Auto Associates for final body work and paint including the installation of the GT flares, both trunk lids and doors. This will ensure the flares are properly aligned with the wheels & tires and the door gaps are set perfectly. 
Posted by: Tom1394racing Sep 22 2023, 02:07 PM
The doors and NOS rear quarters have been primed. The "Dent Magician" will make sure all the panels are perfectly smooth.
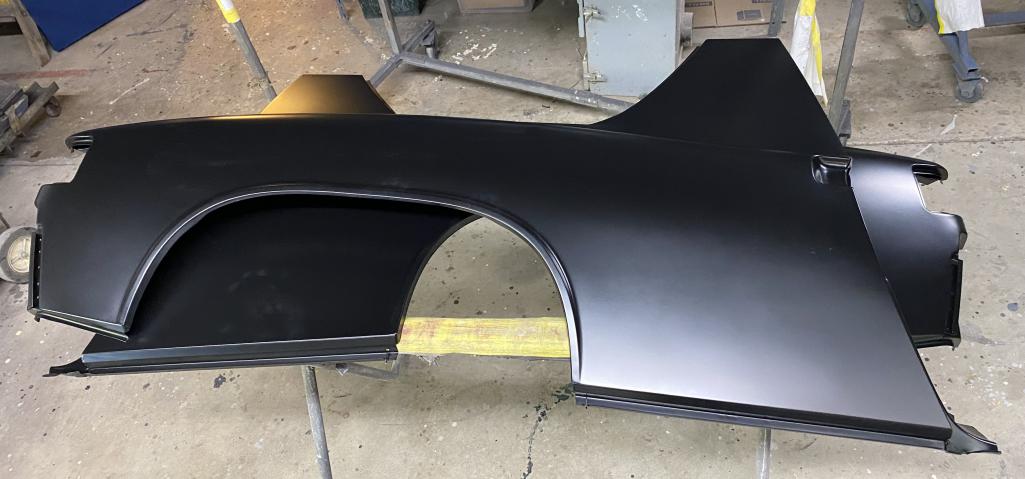
Posted by: Tom1394racing Sep 22 2023, 02:10 PM
The engine lid is getting some final touch up and the GT Roll bar is awaiting the installation of the longitudinal diagonals.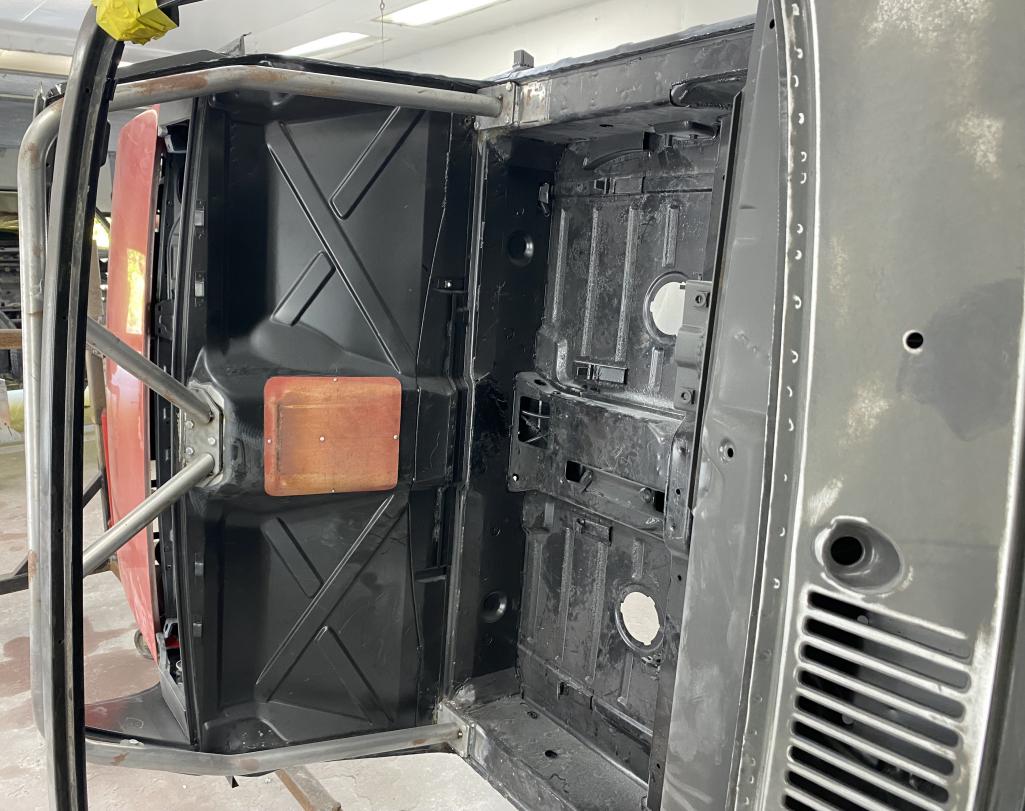

Posted by: Tom1394racing Sep 22 2023, 02:13 PM
The rear suspension pivot point reinforcements have been installed. The support rods are adjustable and removeable.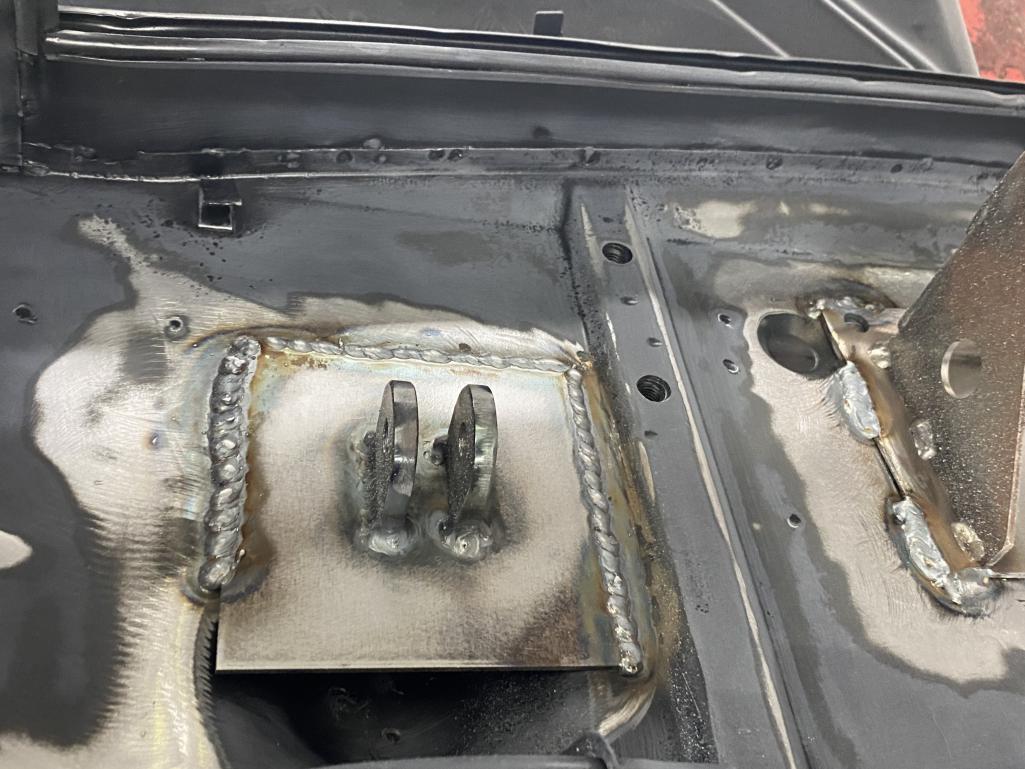
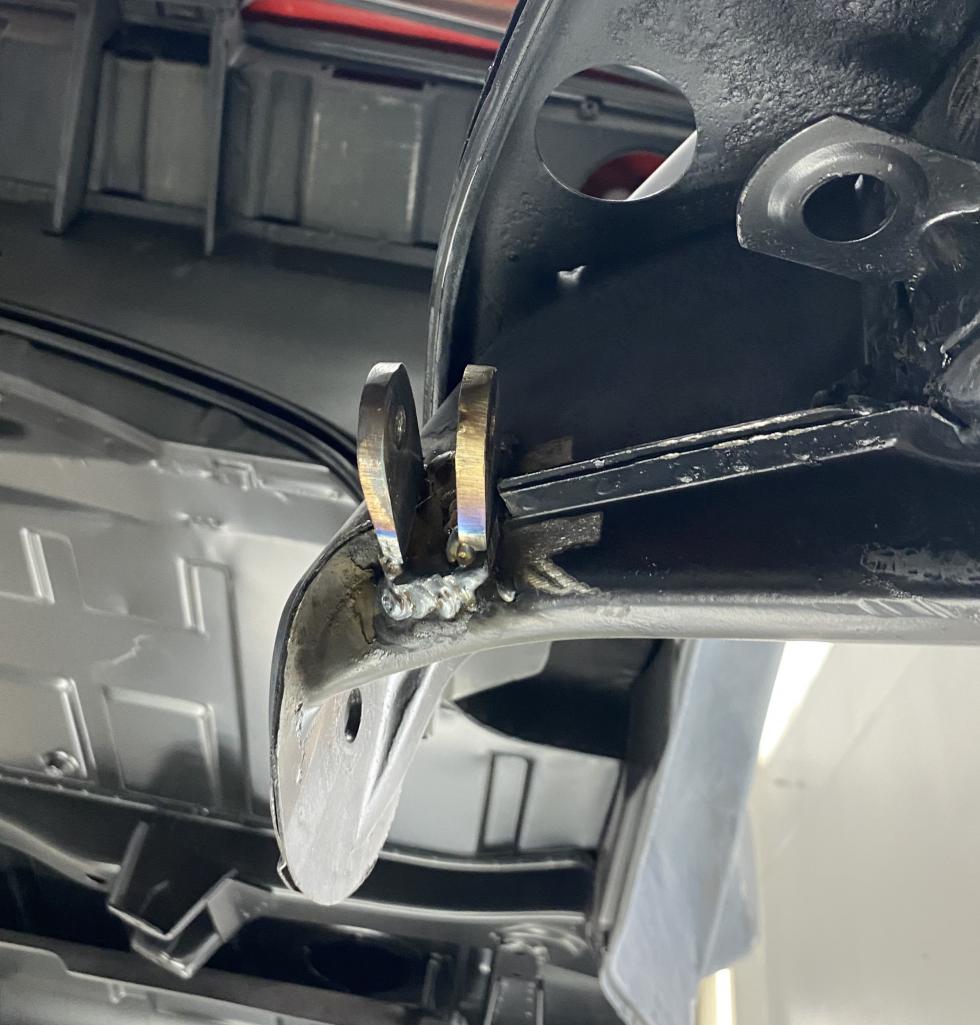
Posted by: Tom1394racing Sep 22 2023, 02:19 PM
The kit for the through lid fuel filler funnel had arrived. 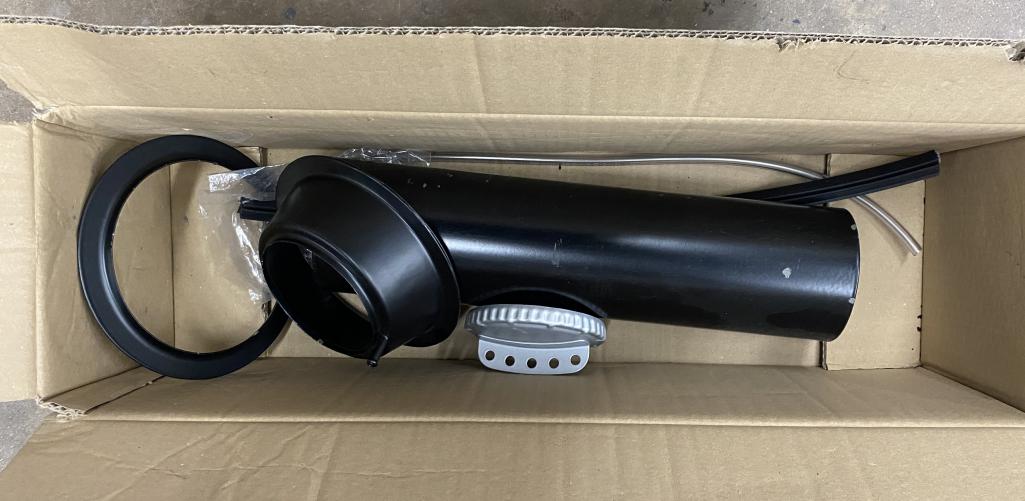
We also had to move the wiring harness through hole in the engine shelf to align with the Mad Dog engine mount.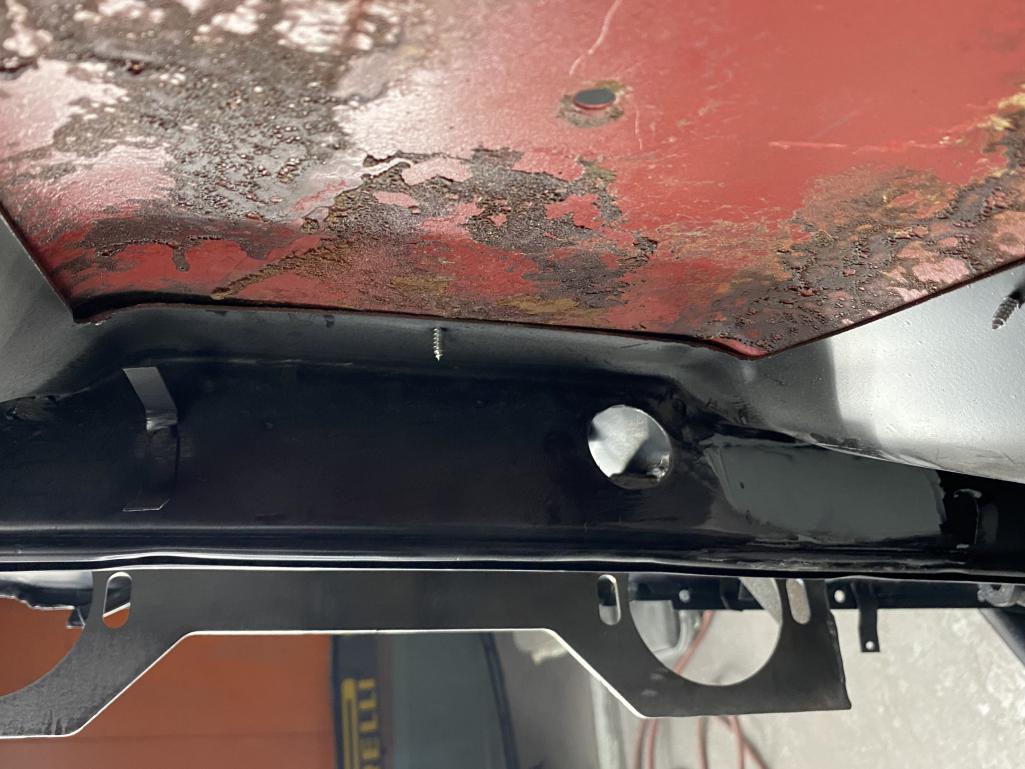
Posted by: Tom1394racing Sep 22 2023, 02:23 PM
Here are the front through holes in the front trunk and cockpit for the oil lines to the cooler.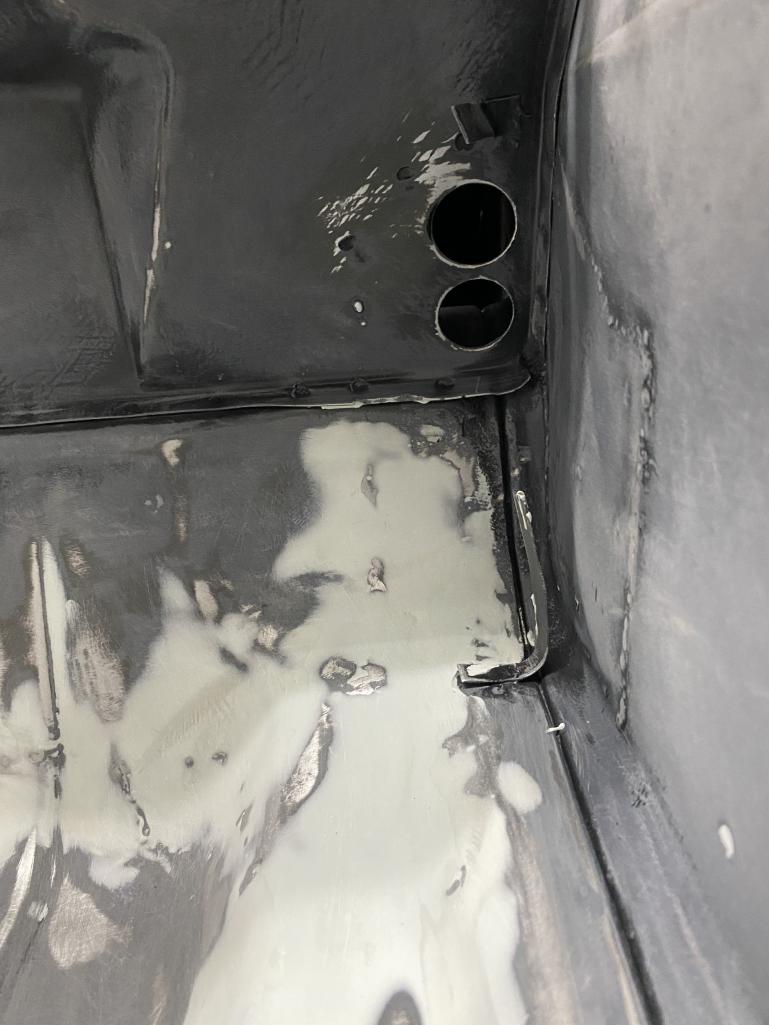
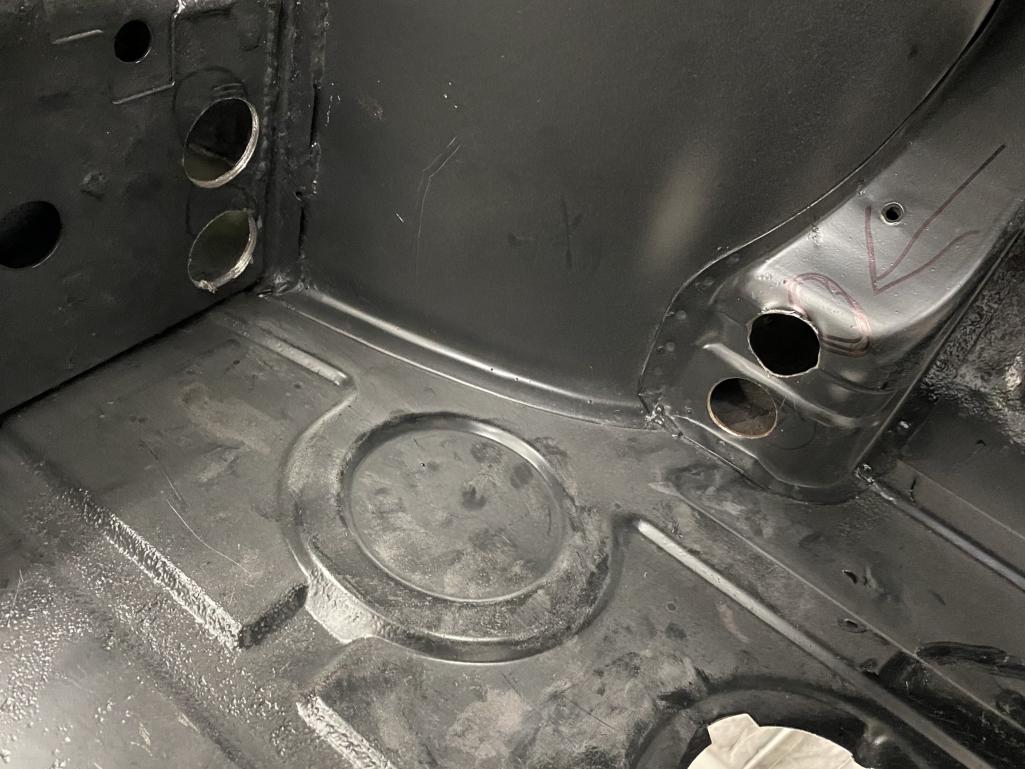
Posted by: Cairo94507 Sep 22 2023, 03:01 PM
Making nice progress; looks like it is going to be an epic build.
Posted by: sixnotfour Sep 22 2023, 03:07 PM
connect the holes = oval....be happy
Posted by: Bullethead Sep 22 2023, 03:37 PM
Nice work...
Posted by: Bullethead Sep 22 2023, 03:47 PM
BTW, you'll want one of Ben's @http://www.914world.com/bbs2/index.php?showuser=9892 very tidy oil line covers: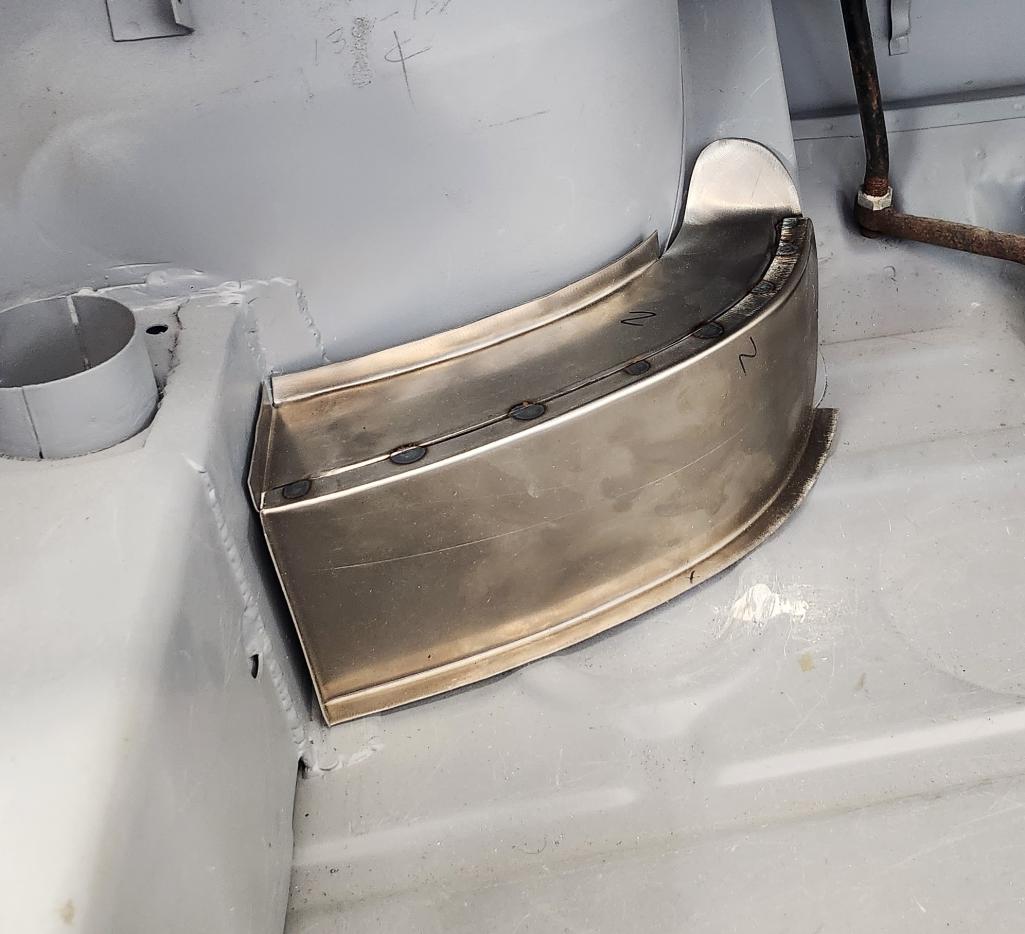
Posted by: rgalla9146 Sep 22 2023, 04:19 PM
The doors and NOS rear quarters have been primed. The "Dent Magician" will make sure all the panels are perfectly smooth.
Tom make sure to remove the small brackets below the tailights of each rear fender.
Those are only for '75-'76 impact bumper cars
Posted by: Tom1394racing Sep 22 2023, 04:24 PM
BTW, you'll want one of Ben's @http://www.914world.com/bbs2/index.php?showuser=9892 very tidy oil line covers:
Is Ben still making these? I will have to check in with him. Thanks for the tip.
Posted by: Tom1394racing Sep 22 2023, 04:26 PM
connect the holes = oval....be happy
Yeah...Been thinking about that. Should make installing the oil lines easier. Good tip. Thanks
Posted by: Tom1394racing Sep 23 2023, 12:59 PM
The doors and NOS rear quarters have been primed. The "Dent Magician" will make sure all the panels are perfectly smooth.
Tom make sure to remove the small brackets below the tailights of each rear fender.
Those are only for '75-'76 impact bumper cars
Rory...Thanks for the tip.
Posted by: Tom1394racing Sep 28 2023, 09:36 AM
My engine parts came back from Ollie's yesterday. Nine months turnaround time. Now I have almost everything to start the engine assembly.
Cam towers and valve covers. Lower covers were drilled for twin plug, and the ribs were milled to allow added clearance for ease of removal. Both upper and lower covers were tumbled and resurfaced. The cam towers got new plugs and spray bars and were also tumbled.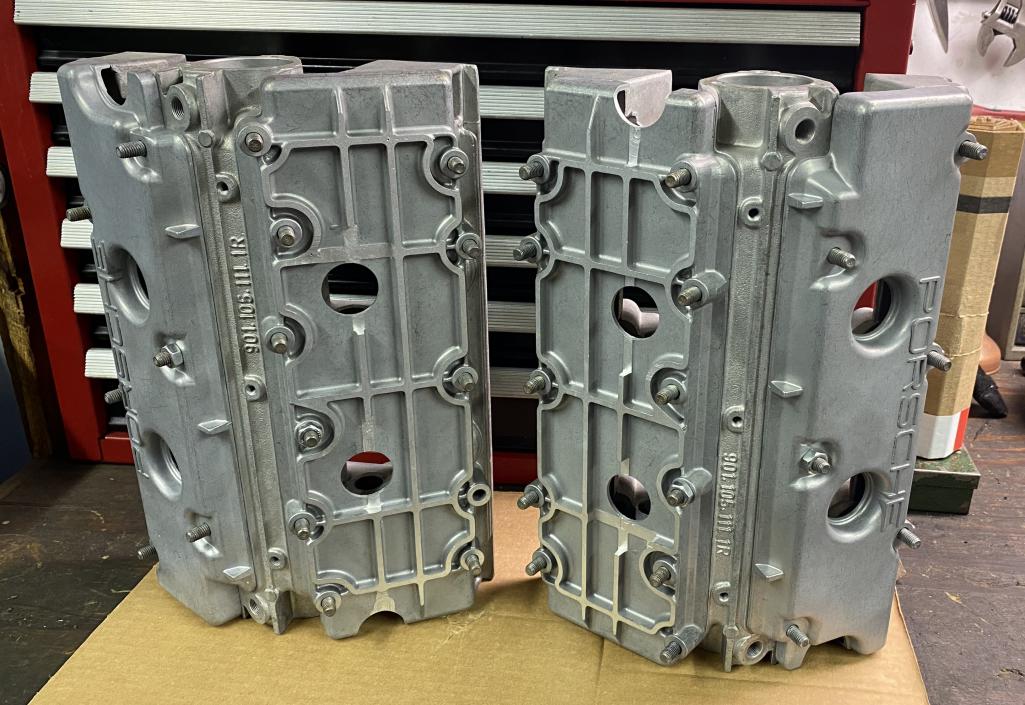

Posted by: Tom1394racing Sep 28 2023, 09:39 AM
Connecting rods. The rods were inspected for damage, resized and re-bushed. These will get new ARP rod bolts.
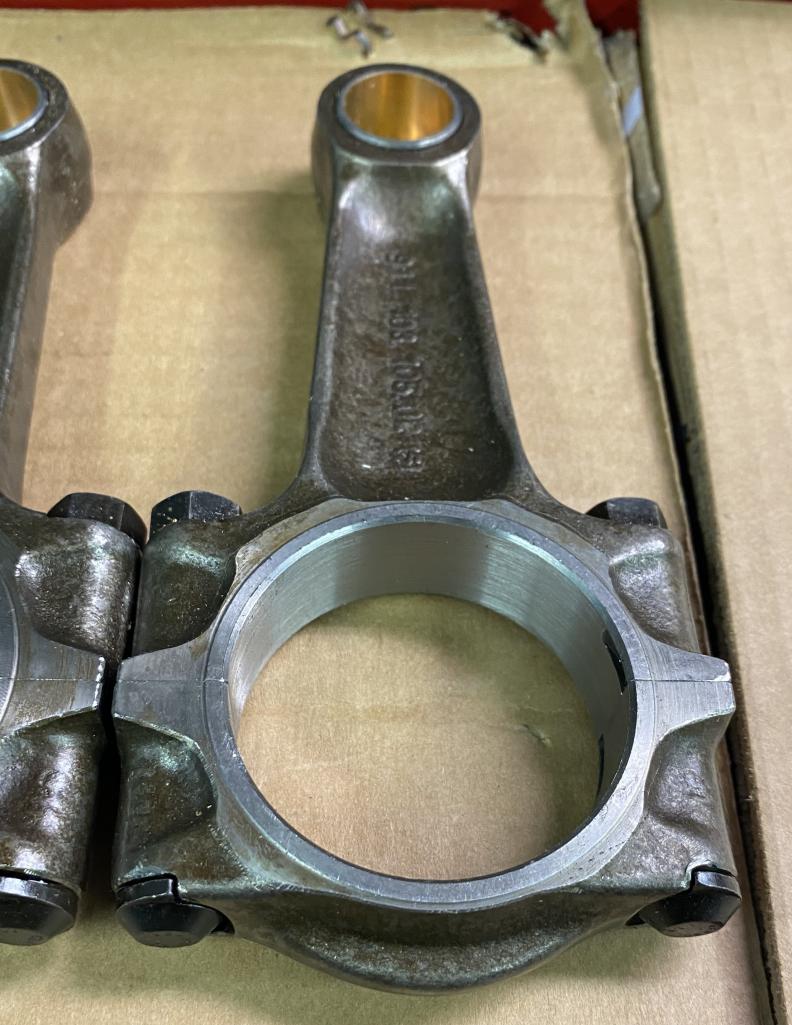
Posted by: Tom1394racing Sep 28 2023, 09:42 AM
Chain boxes and covers. These were cleaned, tumbled and re-surfaced.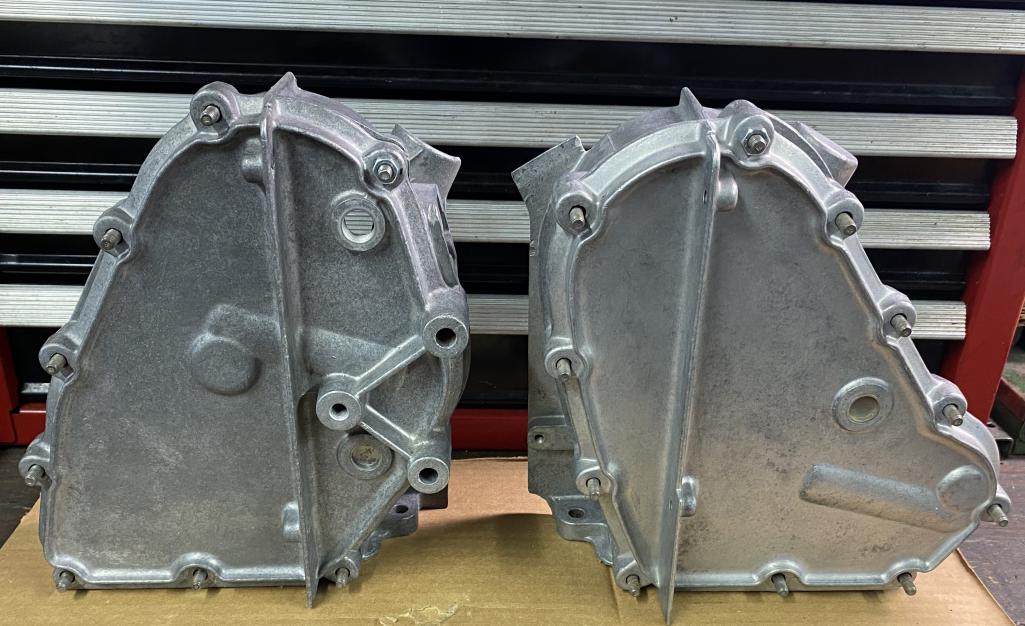
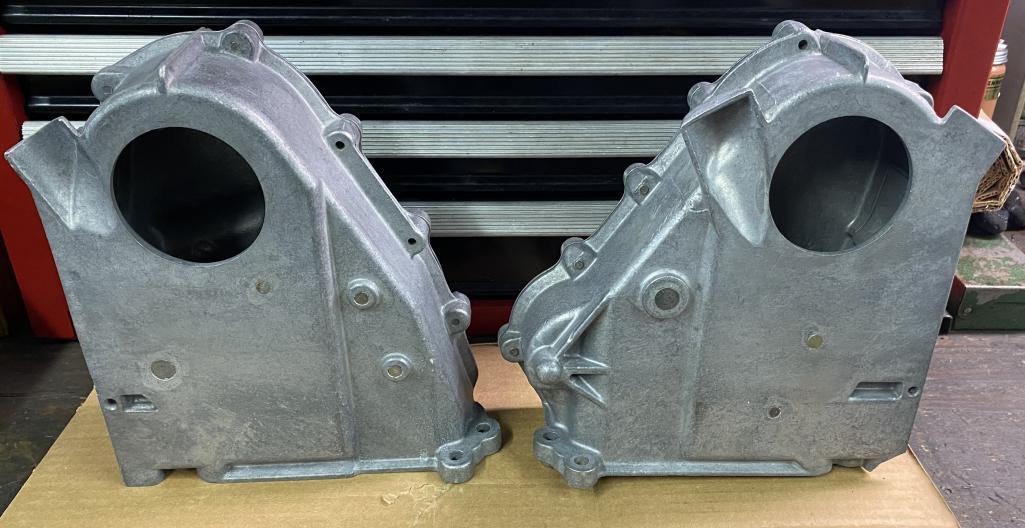
Posted by: Tom1394racing Sep 28 2023, 09:49 AM
Most important...The crankcase. The case was inspected and resized to std. Through bolt holes were spot faced, oil squirters were cleaned and replaced as needed, the oil plugs were replaced, and the case was tanked and tumbled.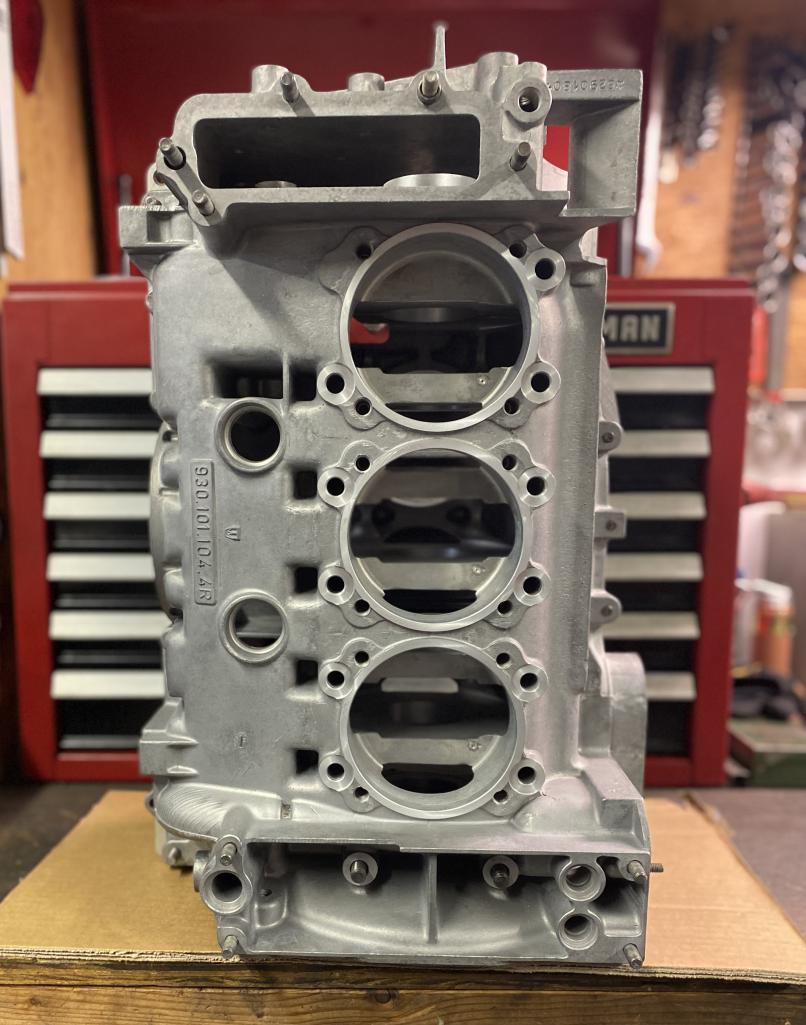

Posted by: Cairo94507 Sep 28 2023, 09:57 AM
That engine case and those parts look beautiful; going to be a great engine.
Posted by: NS914 Sep 28 2023, 05:13 PM
The kit for the through lid fuel filler funnel had arrived.
Hi Tom,
Can you tell me who you ordered the through the lid fuel filler funnel kit from?
One more project on my '74 that I would love to incorporate.
Regards,
Grant
Posted by: Gint Sep 29 2023, 07:45 AM
Great project! And some beautiful work.
Posted by: Tom1394racing Sep 29 2023, 11:41 AM
More progress at Auto Associates. The NOS rear quarters have been welding in place and have made a beautiful repair. Also the engine lid release cable tube has been modified for the GT type release.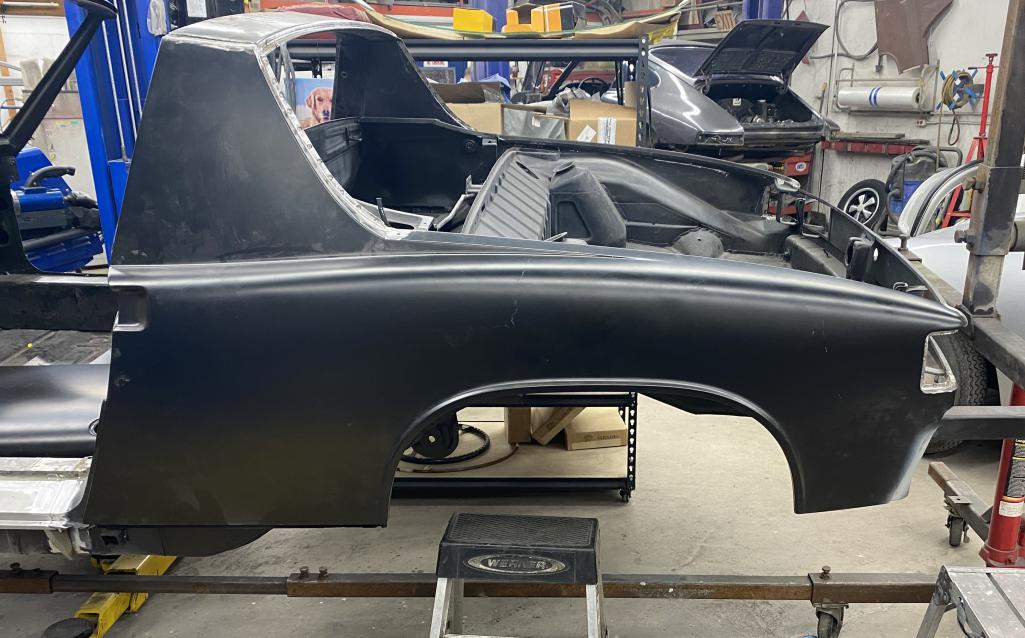
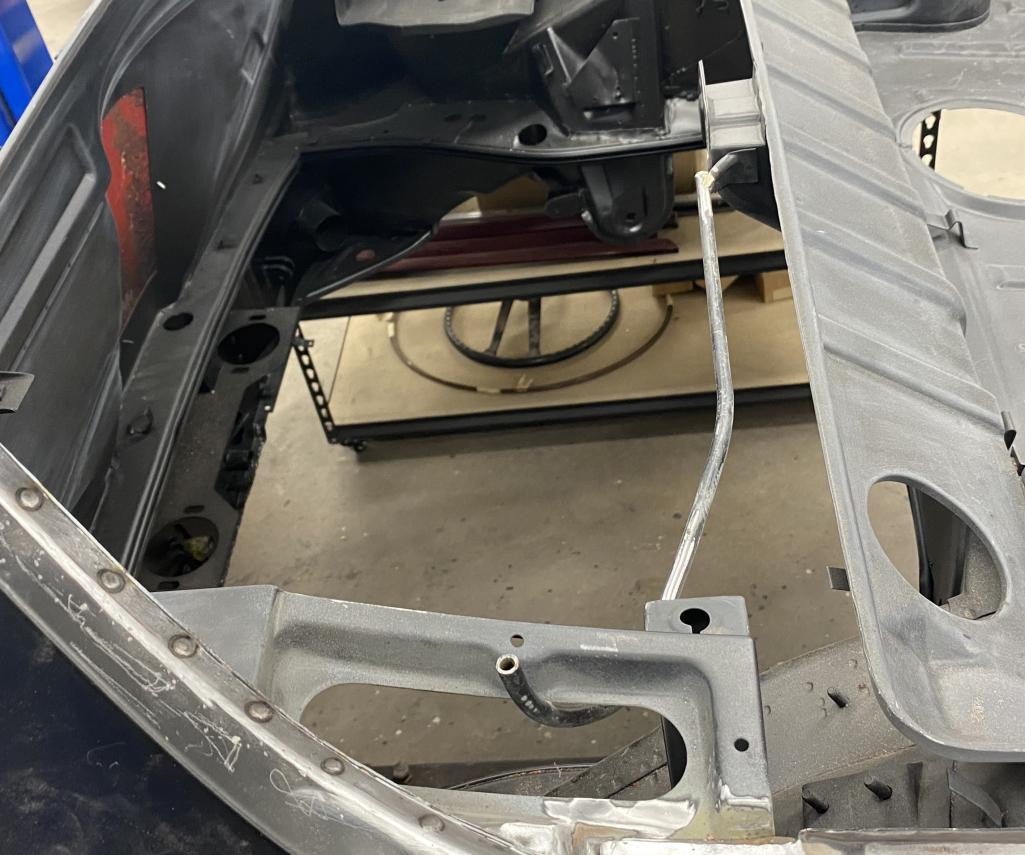
Posted by: Tom1394racing Sep 29 2023, 11:45 AM
The MittleMotor manual head light release parts have been added. I will tweak these and get them working once I get the car back at my place.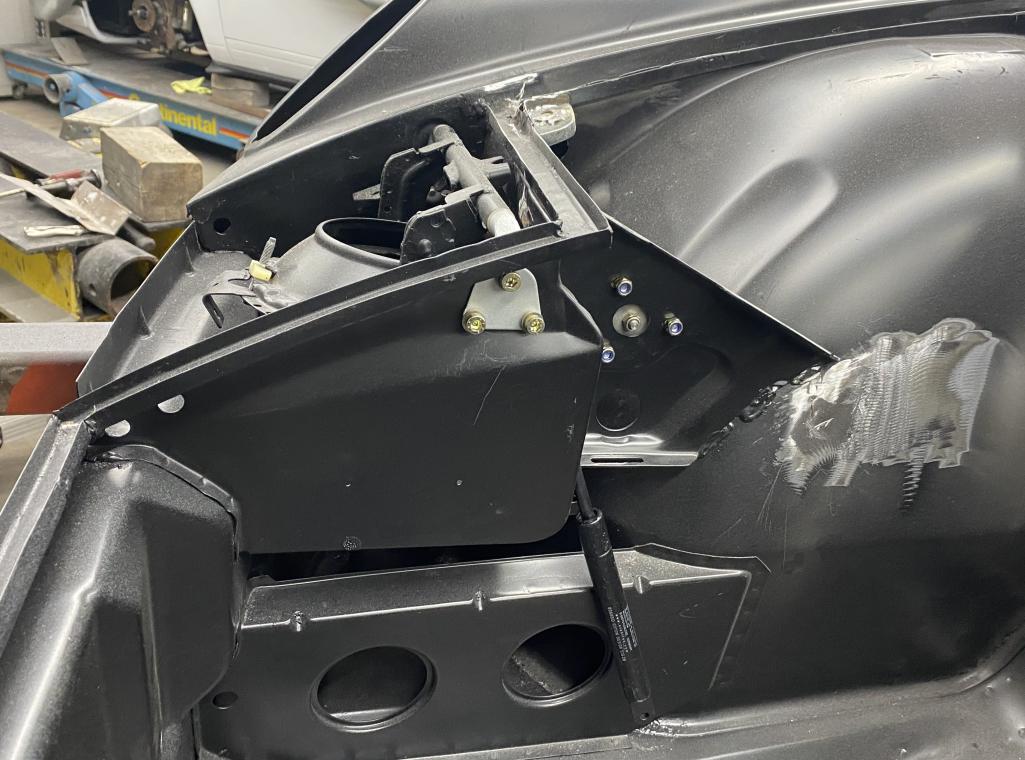
Posted by: Tom1394racing Sep 30 2023, 07:38 AM
The kit for the through lid fuel filler funnel had arrived.
Hi Tom,
Can you tell me who you ordered the through the lid fuel filler funnel kit from?
One more project on my '74 that I would love to incorporate.
Regards,
Grant
Grant
here is a link to the fuel filler kit
https://sierramadrecollection.com/products/911-rsr-style-front-hood-center-filler-kit-p55866
Posted by: Tom1394racing Oct 9 2023, 03:00 PM
Another trip up to Auto Associates today. More progress. The hood & fuel filler have been fitted and the final pieces for the headlight kit have been welded in place. Next up will be paint for the bottom, front & rear compartments and cockpit. Then delivery to me for interim assembly. 
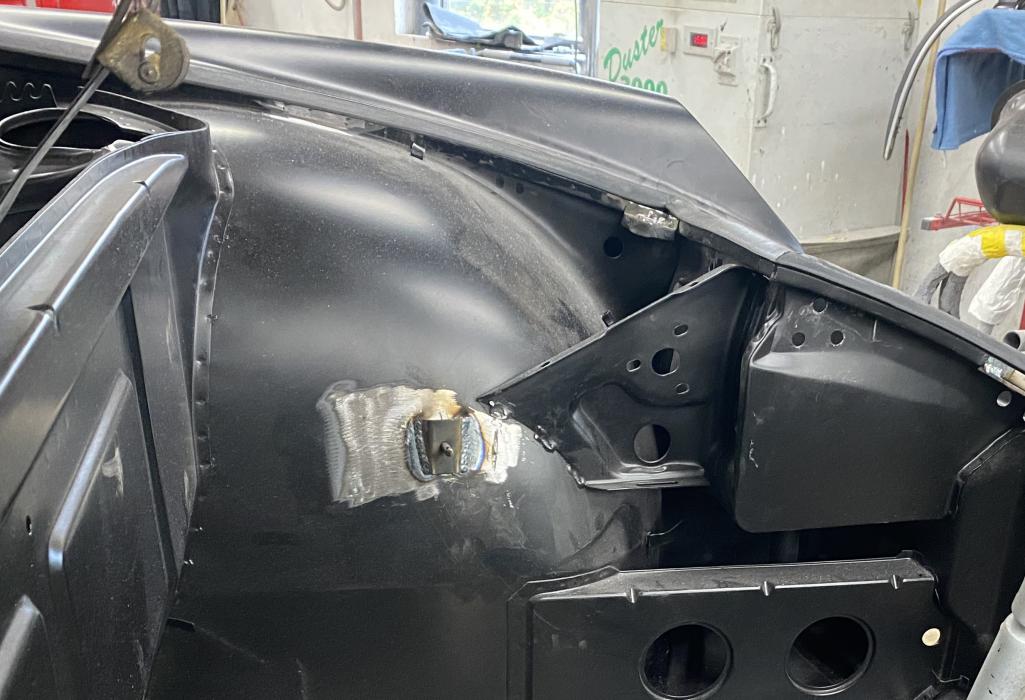
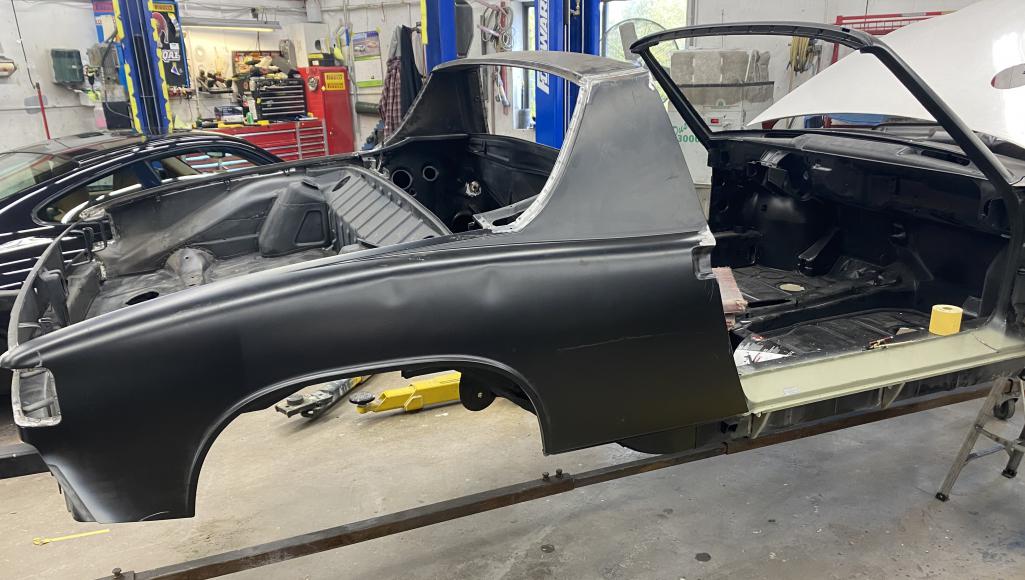
Posted by: ChrisFoley Oct 9 2023, 03:08 PM
It looks a lot different from what I saw in your garage a year ago Tom. 
Posted by: Cairo94507 Oct 9 2023, 06:08 PM
Amazing progress. One of the prettiest things is a chassis coming together for body work and paint.
Posted by: TRS63 Oct 10 2023, 05:19 AM
Great progress, thanks for sharing !
Antoine
Posted by: rgalla9146 Oct 10 2023, 06:32 AM
Tom were those dents in the rear fender ?
Posted by: Dion Oct 10 2023, 08:08 AM
This is looking so good. Well done on the progress. Like the details you are doing. That engine should be quite strong now. Peace of mind doing what you have done. So nice.
Posted by: Tom1394racing Oct 10 2023, 08:15 AM
Tom were those dents in the rear fender ?
Yes Rory...I think they were. You can see them in the original photo when I dropped them off at Auto Associates
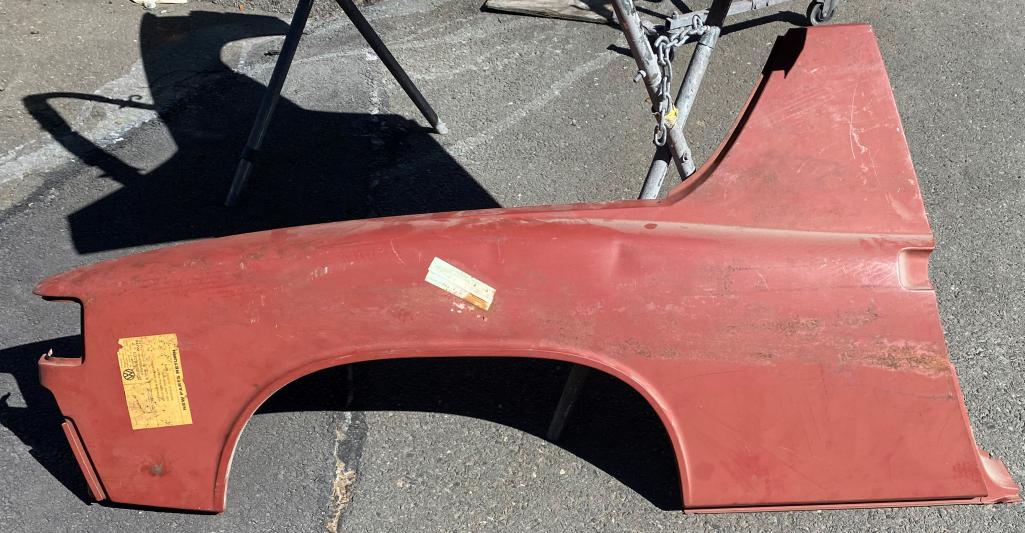
No worries as they will be taken out as part of the final body work and flare installation.
Posted by: Tom1394racing Oct 19 2023, 07:30 AM
The Phase I rust repair and chassis stiffening is now complete at Auto Associates. The car is coming home to me for the Phase II assembly work before going back to Auto Associates for final, phase III GT body work, roll bar installation and paint. The color is Lizard Green.
My plan is to start with the electrical first. I will be installing a new 914-6 wiring harness. I plan to get all the lights fit checked and working using my 12V DC power supply. Then I will install the front crossmember, rebuilt steering rack and converted steering column along with the dash to allow completion of the wiring for the T/S, wipers and gauges. After that, I plan to install the front and rear suspensions as well as all the through tunnel fuel lines, brake lines and cables.
The final step in phase II will be the engine build and installation. Ideally, I will have a running chassis before the car goes back to Auto Associates for phase III. My target for phase III is late spring 2024.
Any constructive comments or suggestions on the plan from those of you who have down this road before will be appreciated.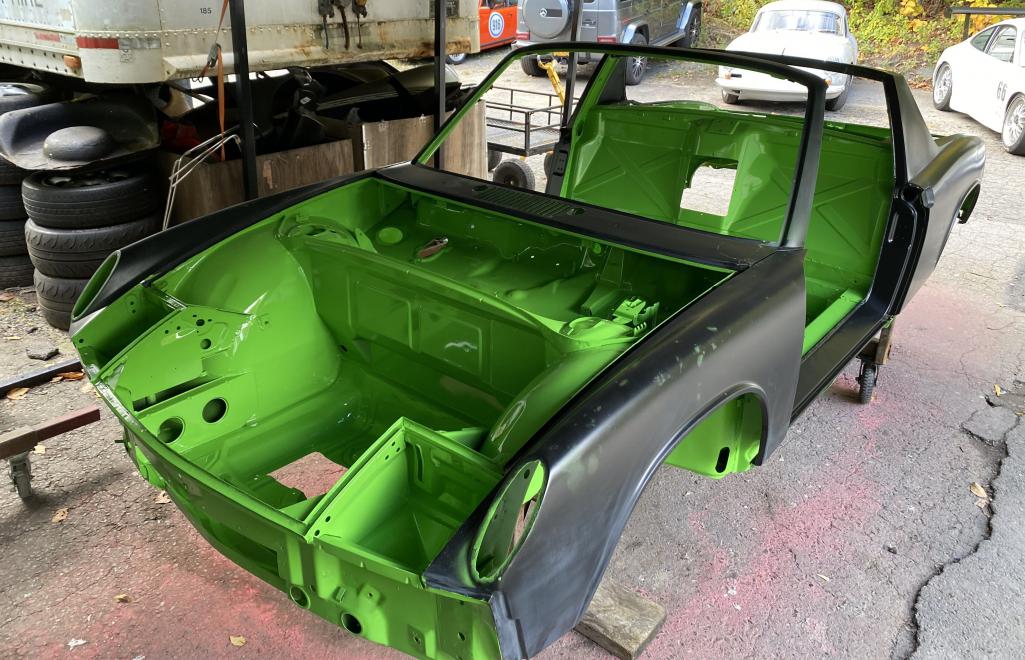
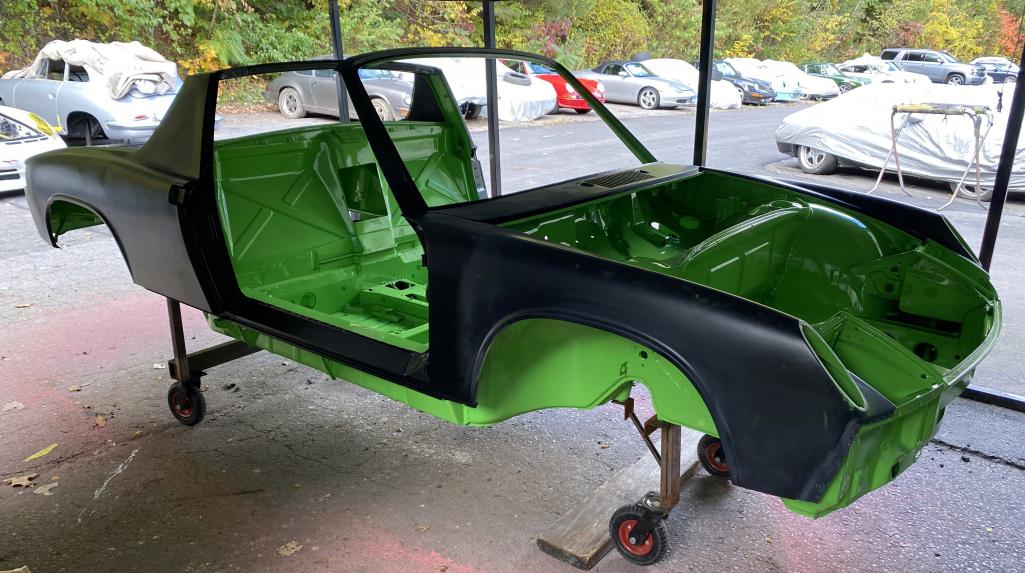
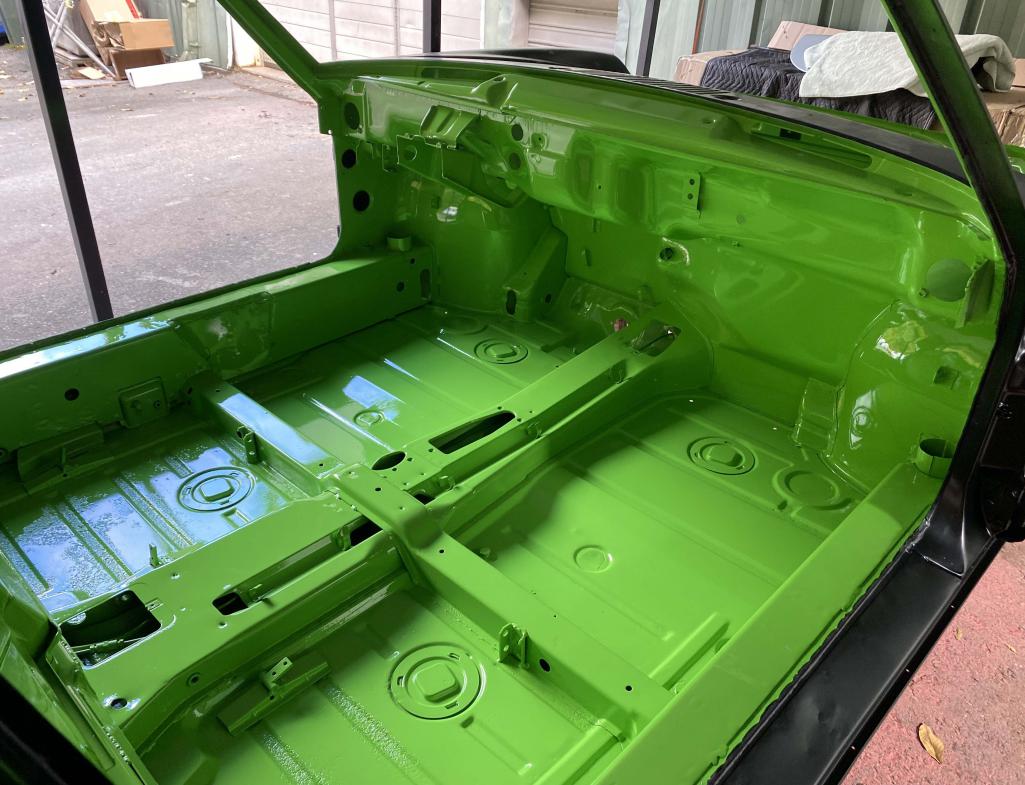
Posted by: Tom1394racing Oct 19 2023, 07:33 AM
A couple more photos.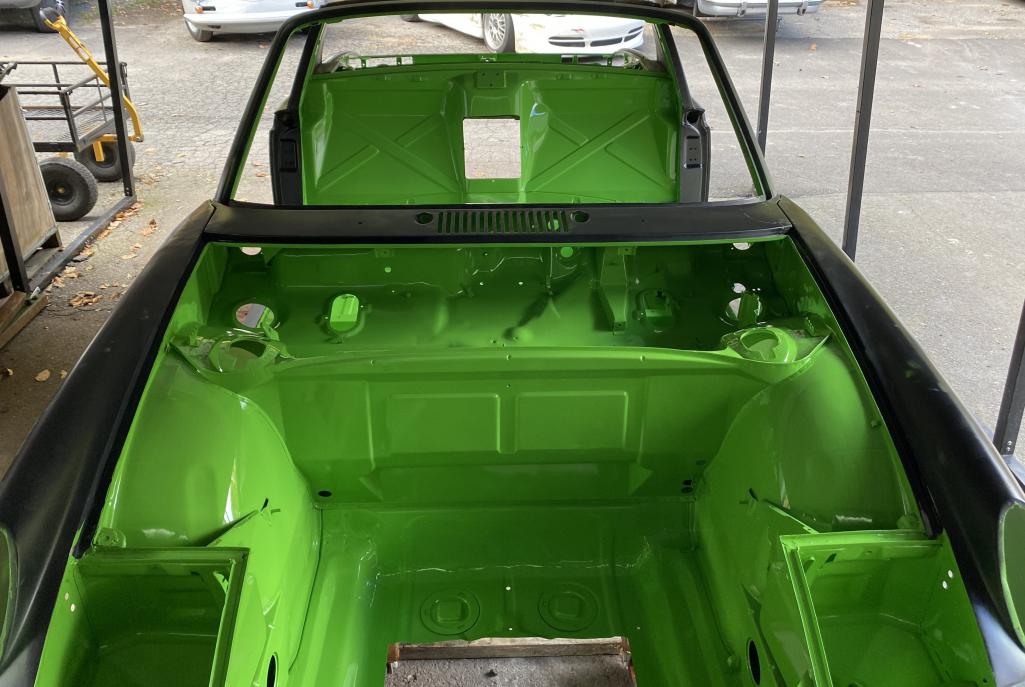

Posted by: Bullethead Oct 19 2023, 11:50 AM
Love the color!
Posted by: mepstein Oct 19 2023, 01:42 PM
Love the color!
Posted by: Cairo94507 Oct 19 2023, 02:00 PM
Great color!!!!
Posted by: rick 918-S Oct 20 2023, 05:07 AM
Nice progress!
Posted by: mb911 Oct 20 2023, 06:00 AM
Looks great. Very nice
Posted by: Tom1394racing Nov 3 2023, 03:06 PM
Now that I have the car back home, time for phase II reassembly.
My original plan was to start with the wiring harness, When I unpacked the brand new 914-6 harness from Restoration Design, I found that they had not relocated the fuel pump wiring to the front trunk for the GT dual front fuel pumps as we had discussed. Peter at RD was very helpful in agreeing to expedite return shipping and correction of the harness at no cost.
In the meantime, I decided to begin installation of the front suspension, in particular to check to ensure the modified early 911 steering column would fit and work with the rebuilt 914 steering rack. No problems here...Butter smooth turning action. Note the Momo steering wheel is only temporary as I have a good 380 mm original style wheel I will be using once completed.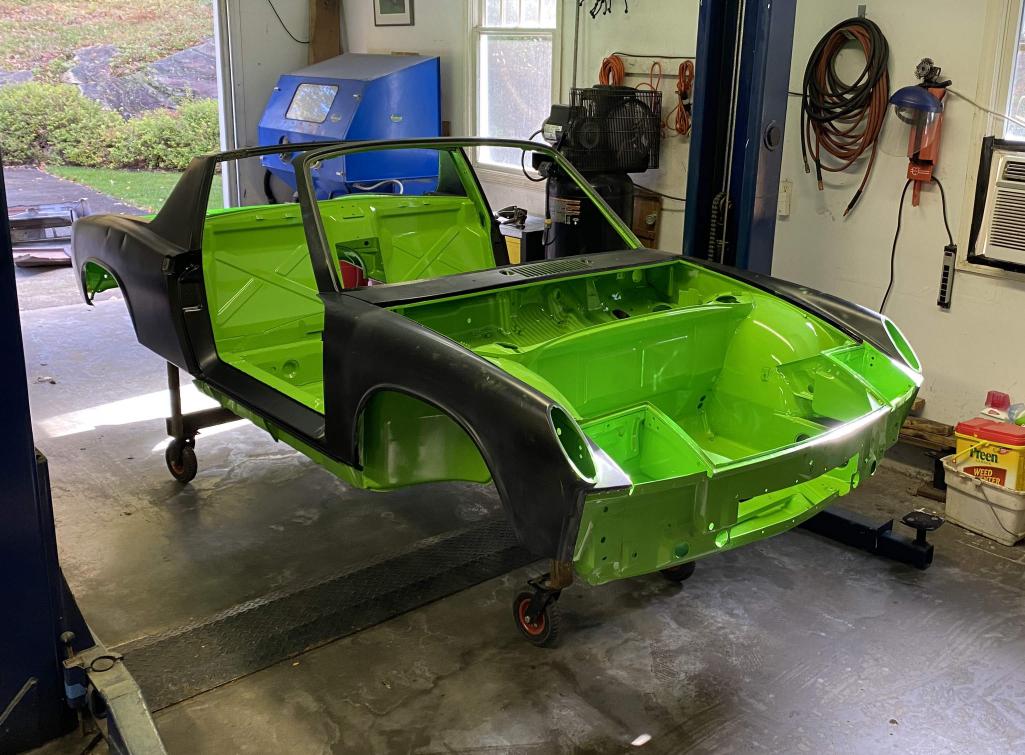
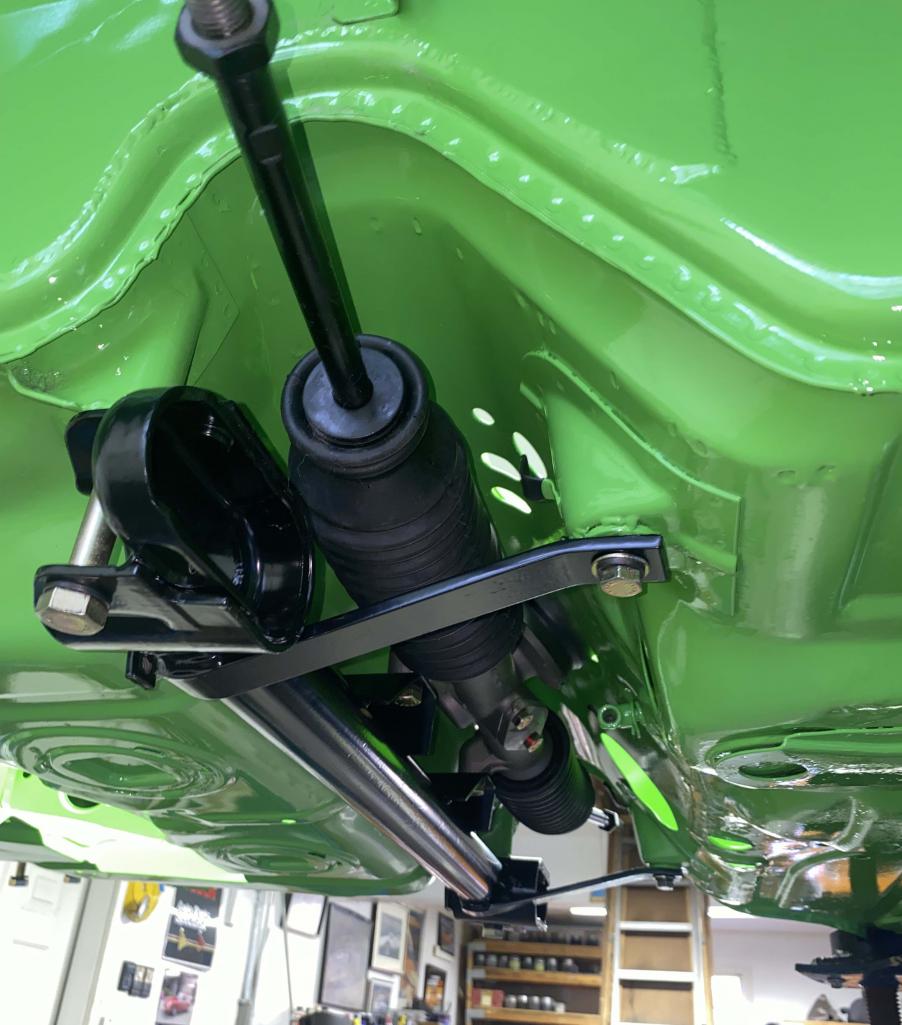
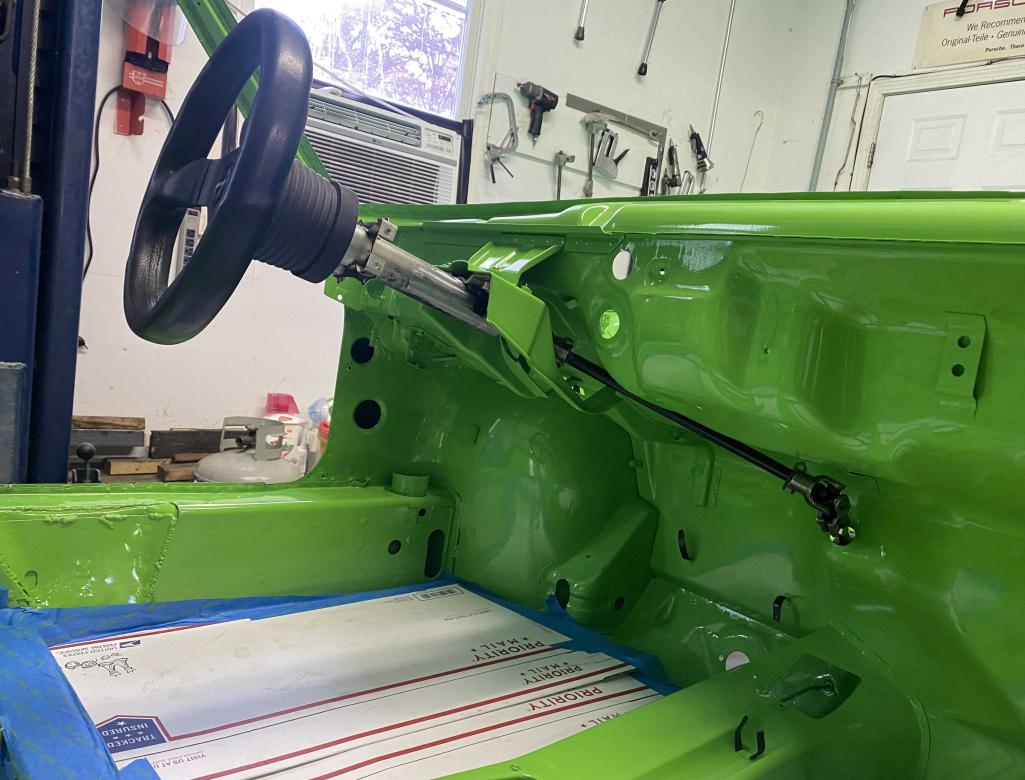
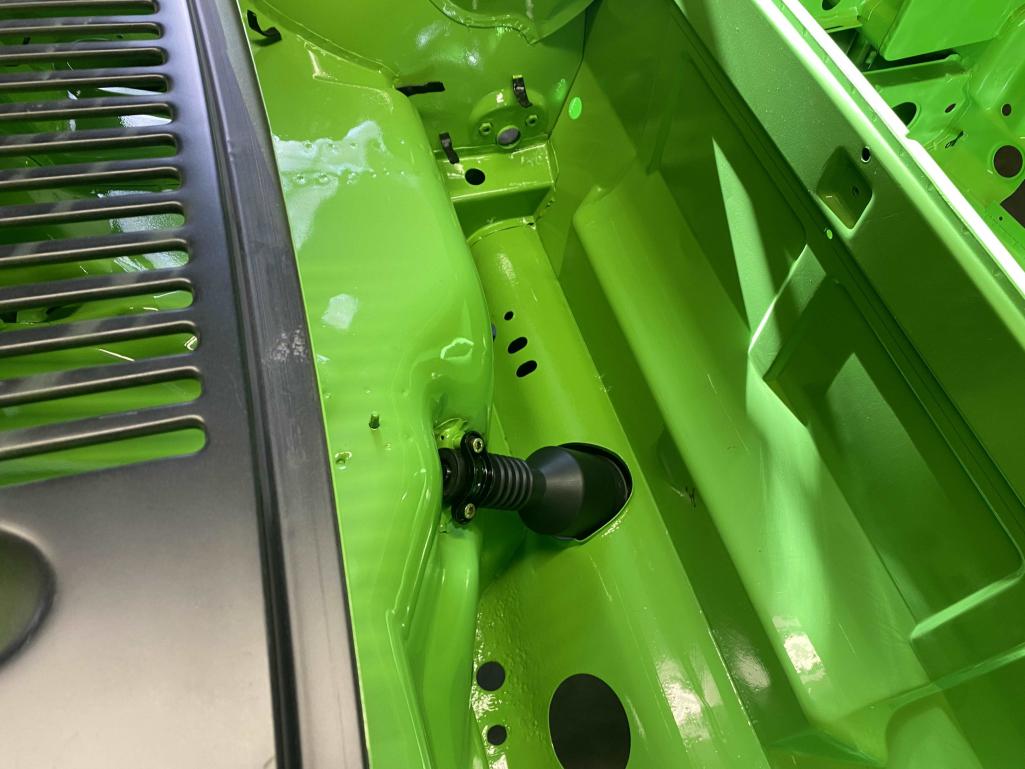
Posted by: Tom1394racing Nov 3 2023, 03:11 PM
So what is the deal on the thru hole for the steering rack shaft? It seems there should be some type of grommet to close up the hole?? I could not see anything on the parts diagram. What do we do about this?
Posted by: siverson Nov 3 2023, 03:58 PM
Looks great!
Posted by: Bullethead Nov 3 2023, 04:45 PM
So what is the deal on the thru hole for the steering rack shaft? It seems there should be some type of grommet to close up the hole?? I could not see anything on the parts diagram. What do we do about this?
This flummoxed me, too... there had to be something. Whether it's correct or not, I'm making a grommet work here.
Posted by: gms Nov 3 2023, 05:19 PM
So what is the deal on the thru hole for the steering rack shaft? It seems there should be some type of grommet to close up the hole?? I could not see anything on the parts diagram. What do we do about this?
This flummoxed me, too... there had to be something. Whether it's correct or not, I'm making a grommet work here.you must be missing a piece

Posted by: mepstein Nov 3 2023, 06:40 PM

Attached thumbnail(s)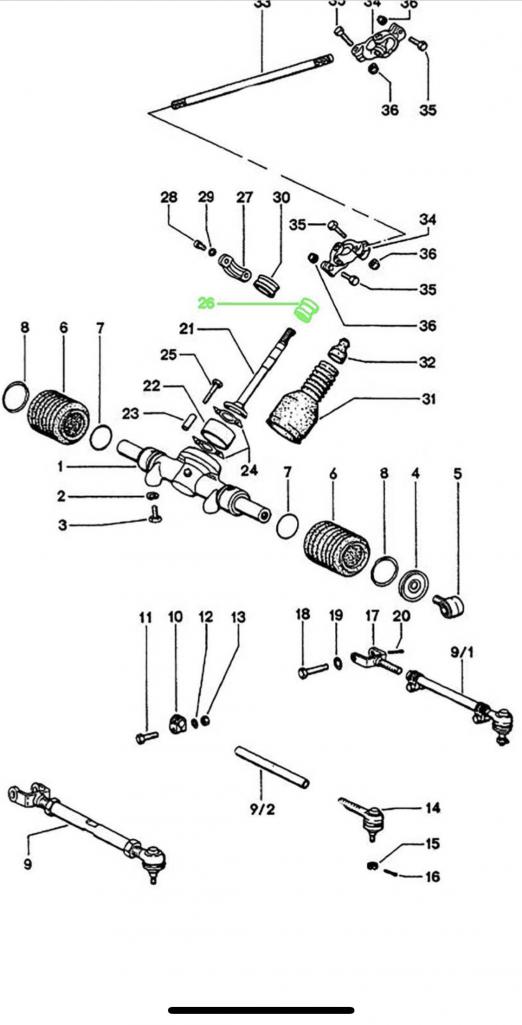
Posted by: rgalla9146 Nov 3 2023, 09:04 PM
Tom the black collar/bearing that slips over the first shaft on the rack should press
against the tank side of that hole. I has a small lip to form a seal there.
Could it be reversed ?
I think you'll have to lower the rack/crossmember
Posted by: Tom1394racing Nov 4 2023, 04:51 AM
Thanks Mark
Any idea what that part is and where to get one?
Posted by: mepstein Nov 4 2023, 07:35 AM
Thanks Mark
Any idea what that part is and where to get one?
I may be missing something here but this is what came to mind when I saw your first post. Pretty reasonable price at 914 rubber.
Attached thumbnail(s)
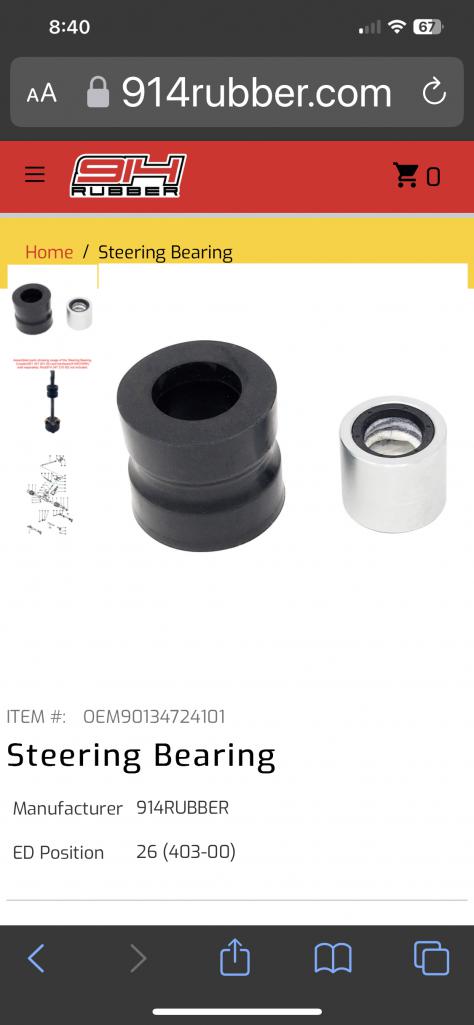
Posted by: Tom1394racing Nov 4 2023, 08:04 AM
Thanks Mark
Any idea what that part is and where to get one?
I may be missing something here but this is what came to mind when I saw your first post. Pretty reasonable price at 914 rubber.
I think that is the rubber, two-piece steering bearing that is clamped to the chassis shown in my photo. The parts diagram shows it as two separate pieces but they fit together.
Posted by: Bullethead Nov 4 2023, 08:38 AM
So what is the deal on the thru hole for the steering rack shaft? It seems there should be some type of grommet to close up the hole?? I could not see anything on the parts diagram. What do we do about this?
This flummoxed me, too... there had to be something. Whether it's correct or not, I'm making a grommet work here.you must be missing a piece
Ah! Thank you!
Posted by: gms Nov 4 2023, 08:53 AM
It is not the bearing it is the collar above it.
Calling @http://www.914world.com/bbs2/index.php?showuser=865 !
I bet he has 100 of them
Posted by: gms Nov 4 2023, 09:01 AM
91434770601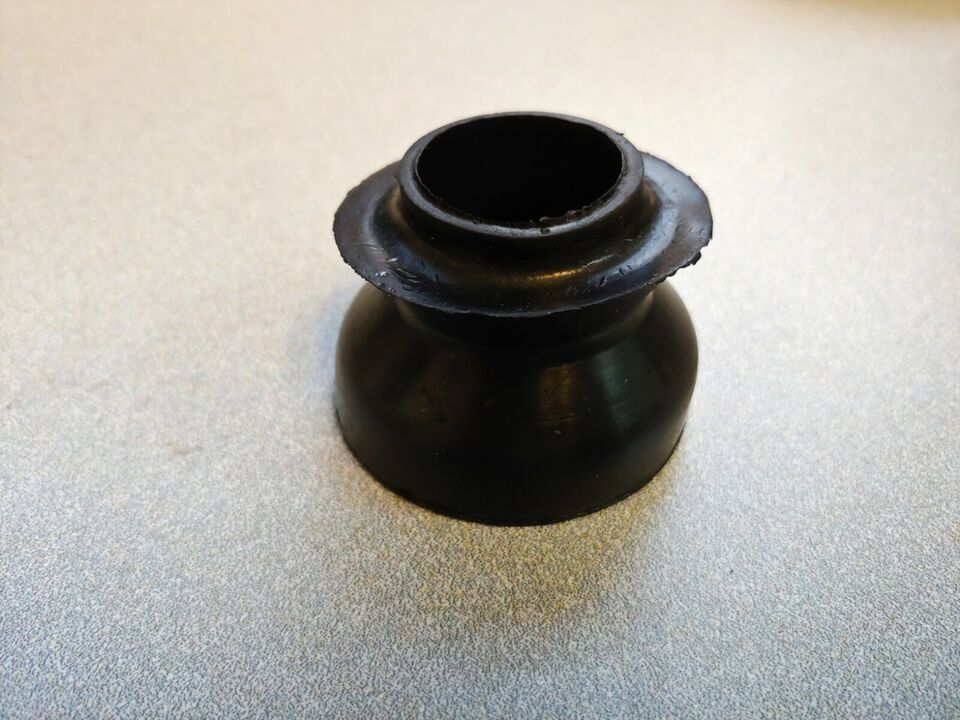
Posted by: rick 918-S Nov 4 2023, 10:38 AM
It is not the bearing it is the collar above it.
Calling @http://www.914world.com/bbs2/index.php?showuser=865 !
I bet he has 100 of them
He has everything.
Posted by: mepstein Nov 4 2023, 10:52 AM
91434770601
I knew someone smarter than me would figure it out.
Once Tom gets set up with one, I could use one.
Posted by: Tom1394racing Nov 5 2023, 07:22 AM
I emailed Garold to see if He has any of these. I am not inclined to disassemble the front suspension to slide this on to the streeting column. I bet I could split it and fit it over the end of the column and then glue it back together with weather stripping adhesive.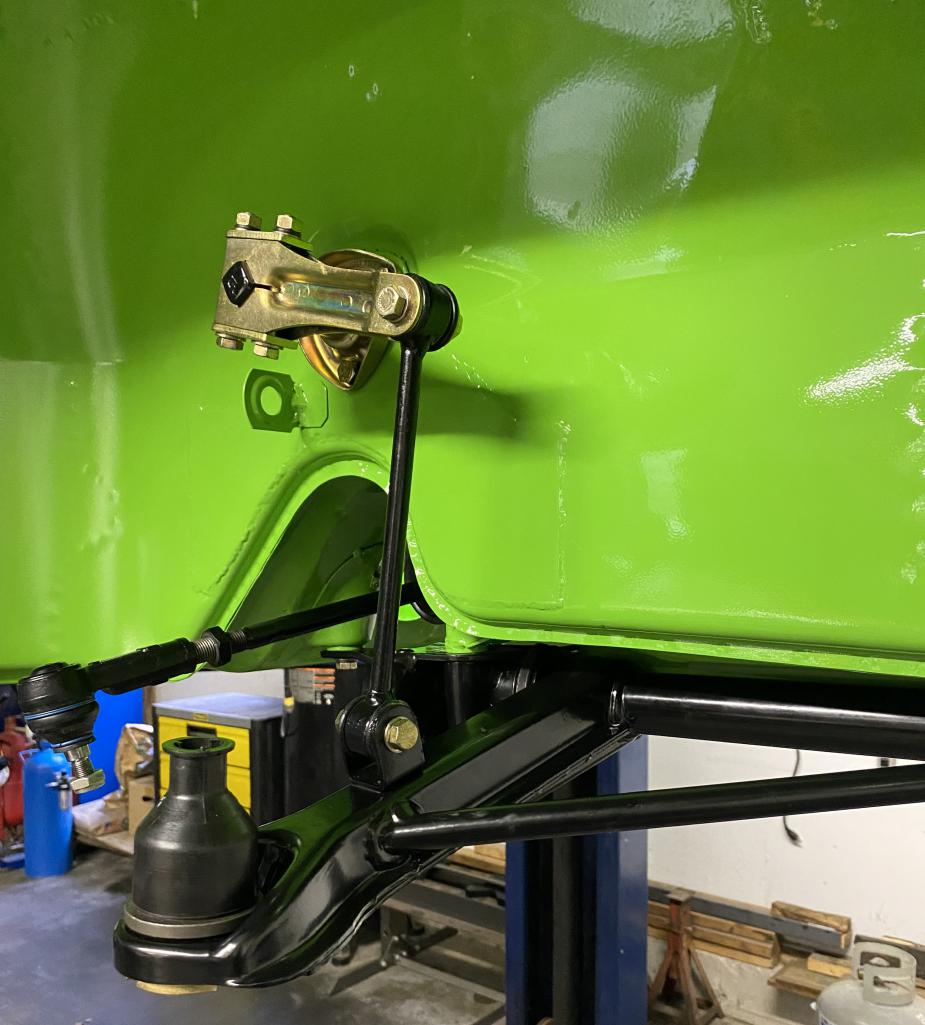
Posted by: ChrisFoley Nov 5 2023, 07:33 AM
I looked around my shop but didn't find one. I'll take a look around my garage too.
Posted by: Tom1394racing Nov 7 2023, 06:41 PM
No luck on finding a replacement steering shaft bushing/seal so I improvised and tried a rear shock top bushing pair. The ID matches the steering shaft pretty close and closes up the hole nicely. Since I had gone ahead and completed the front suspension, I split the lower side of the bushing and fitted it over the steering shaft. Seems to work OK.
Next I will move to the rear suspension while I await the corrected new wiring harness from Restoration Design.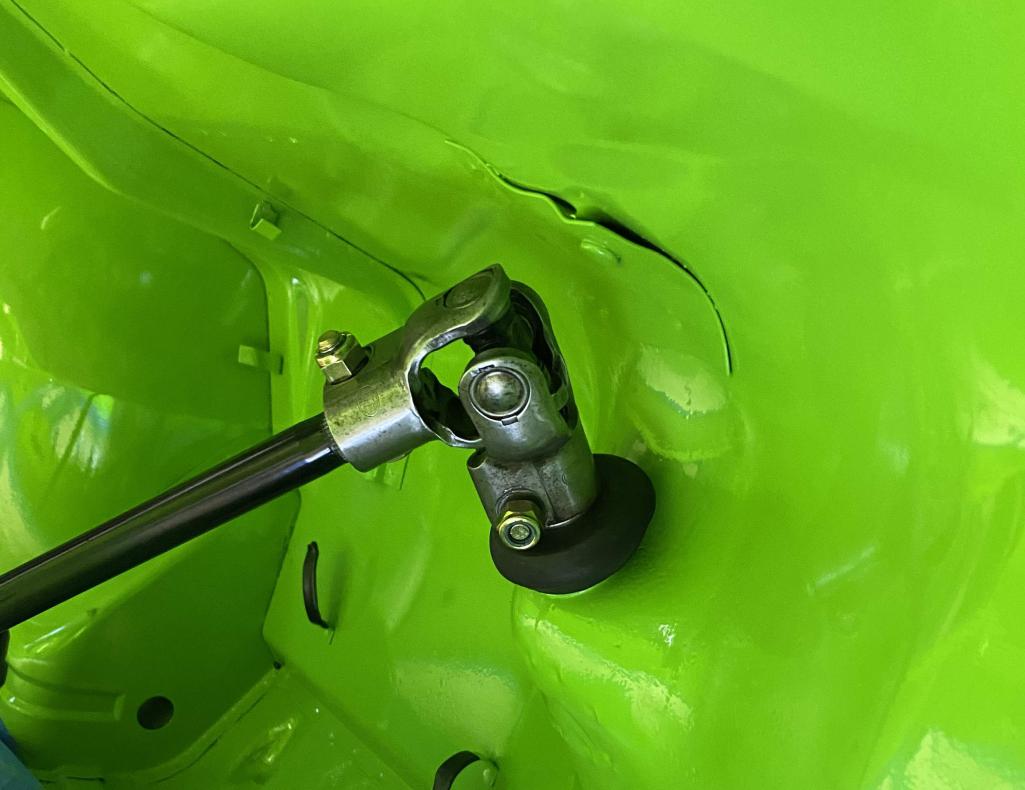
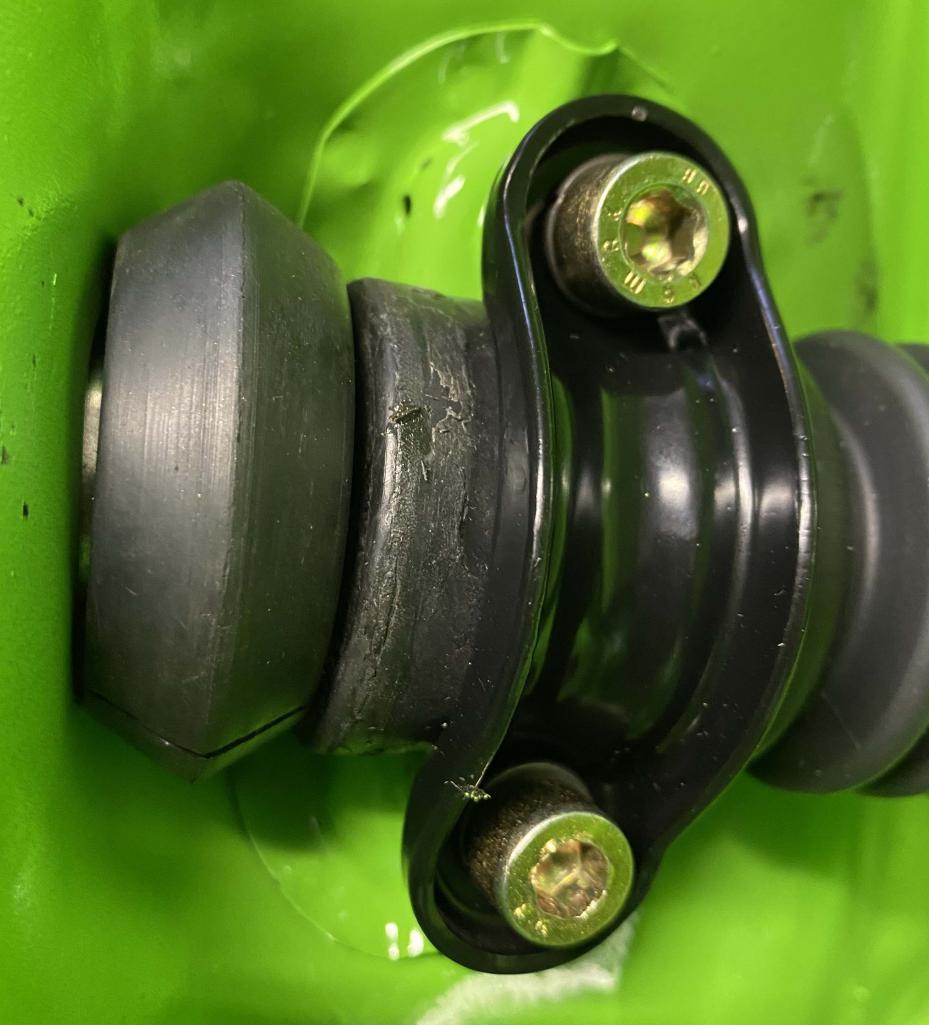
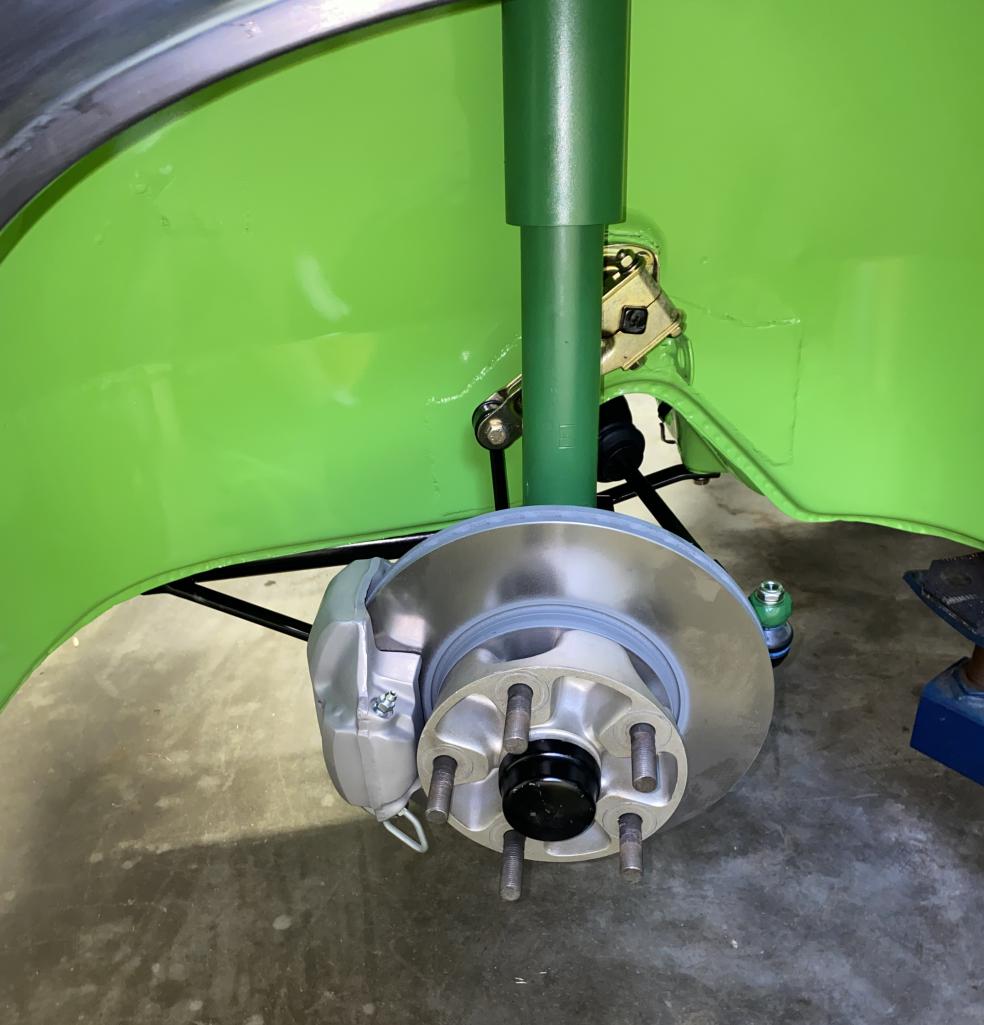
Posted by: Tom1394racing Nov 9 2023, 06:12 AM
With the front suspension together and torqued to spec, I moved to the rear suspension.
Yesterday I installed the rear bearings and hubs in the trailing arms and proceeded to install the RHS arm, shock and brake rotor. 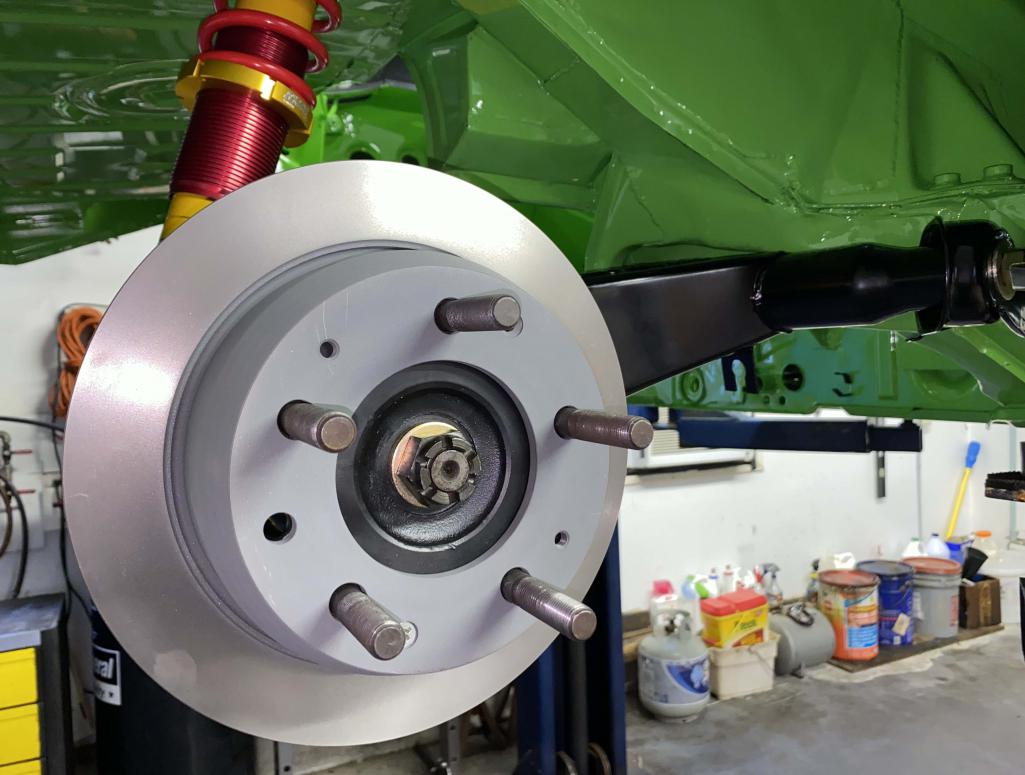
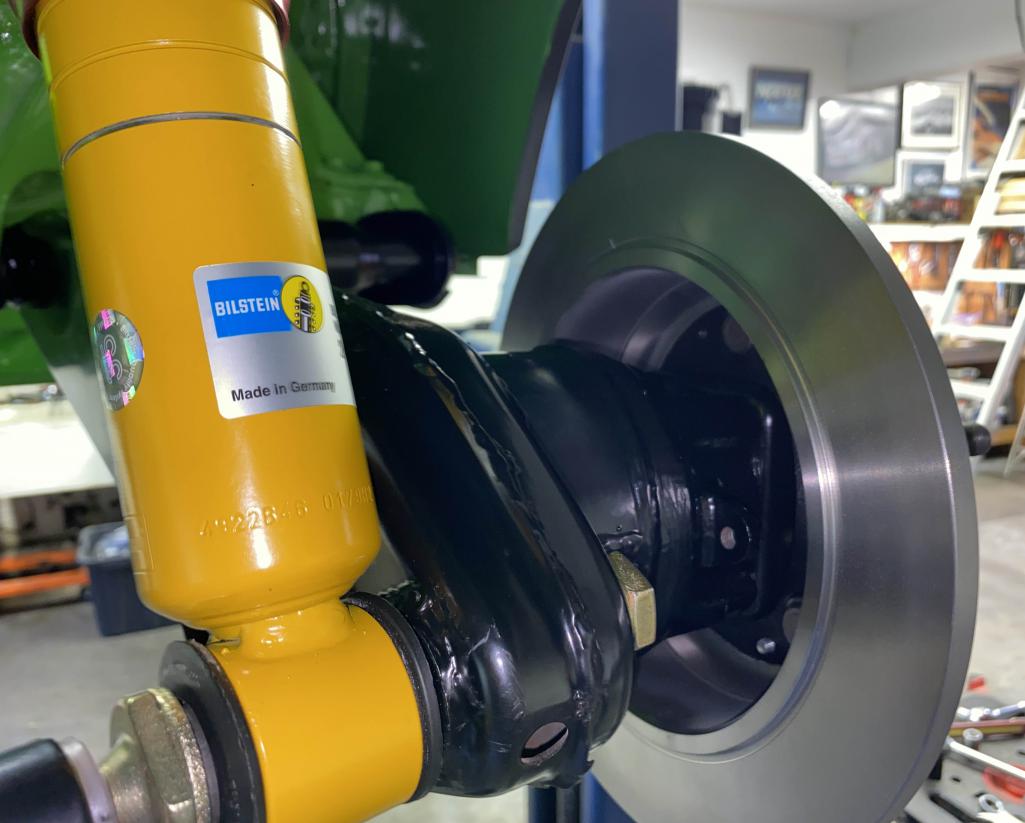
All seemed to going as planned until I tried to install the brake caliper. A significant misalignment problem. 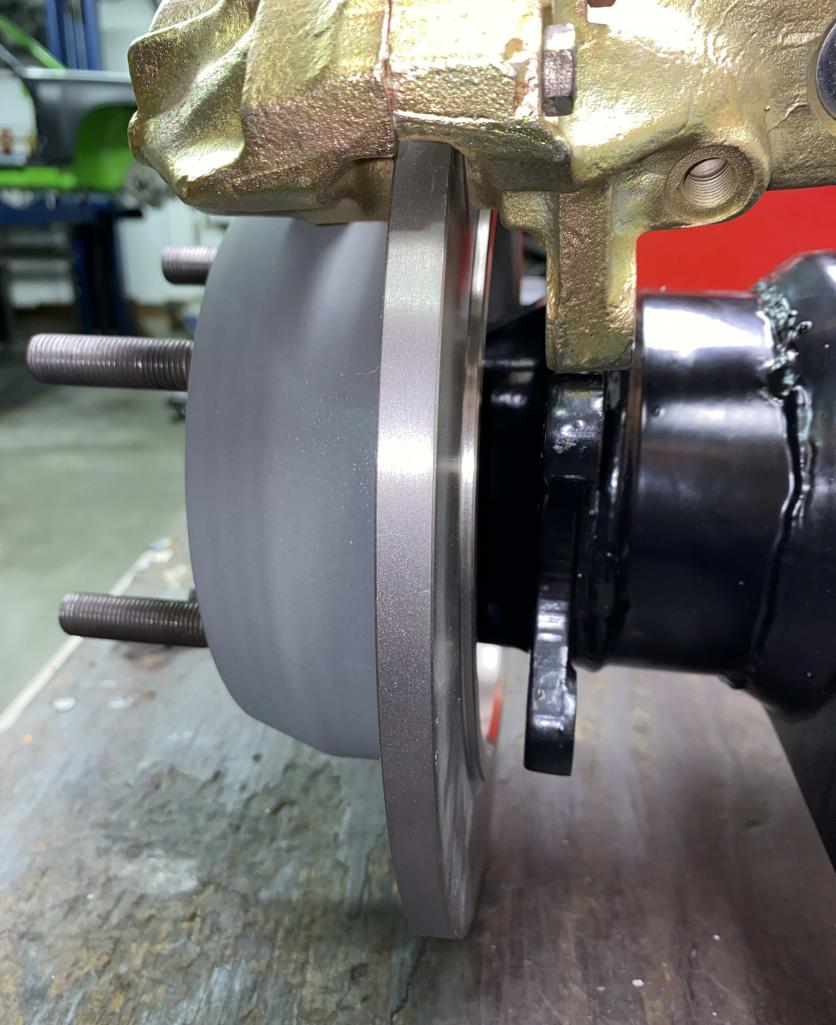
It seems like the rotor is a good 1/2" too far outboard to align with the trailing arm tabs and the caliper. The combination of parts is:
'69-'73 911 hubs and stub axles
Early non vented 911 rotors with the diameter trimmed as recommended
Stock '73 914-4 rear calipers
I based this combination on recommendations from our members with previous experience.
http://www.914world.com/bbs2/index.php?showtopic=363935&hl=
I was not expecting a problem. Any suggestions? I am stuck at this point.
Posted by: rgalla9146 Nov 9 2023, 07:23 AM
Tom if I remember correctly the hat of a 911 rotor is shorter than that of a 914 or
914 6.
Also, if you intend to run dust shields the bracket has to be included.
Posted by: Luke M Nov 9 2023, 07:42 AM
Tom,
You'll need the 914-6 rear rotors as the 911 offset is different.
If using the 914-4 rear calipers you have to turn down the o/d of the rotor to clear the caliper. Pretty sure that's how it all works together. Maybe Eric can chime in on this to confirm.
I have a sets of 911, 914-4, 914-6 rotors around. I'd have to dig them out and see what's off with all of them.
Otherwise looks good.
Posted by: Tom1394racing Nov 9 2023, 08:51 AM
Luke and Rory
Thanks for chiming in. I was aware the solid rotors needed to be turned down 3 mm. I did that to these rotors. I did not realize that the 914-6 rotors had a different offset as compared to the 911 rotors.
The 911 solid rotors I am using have an offset distance (from the inside mount face to the inside friction surface) of around 62 mm.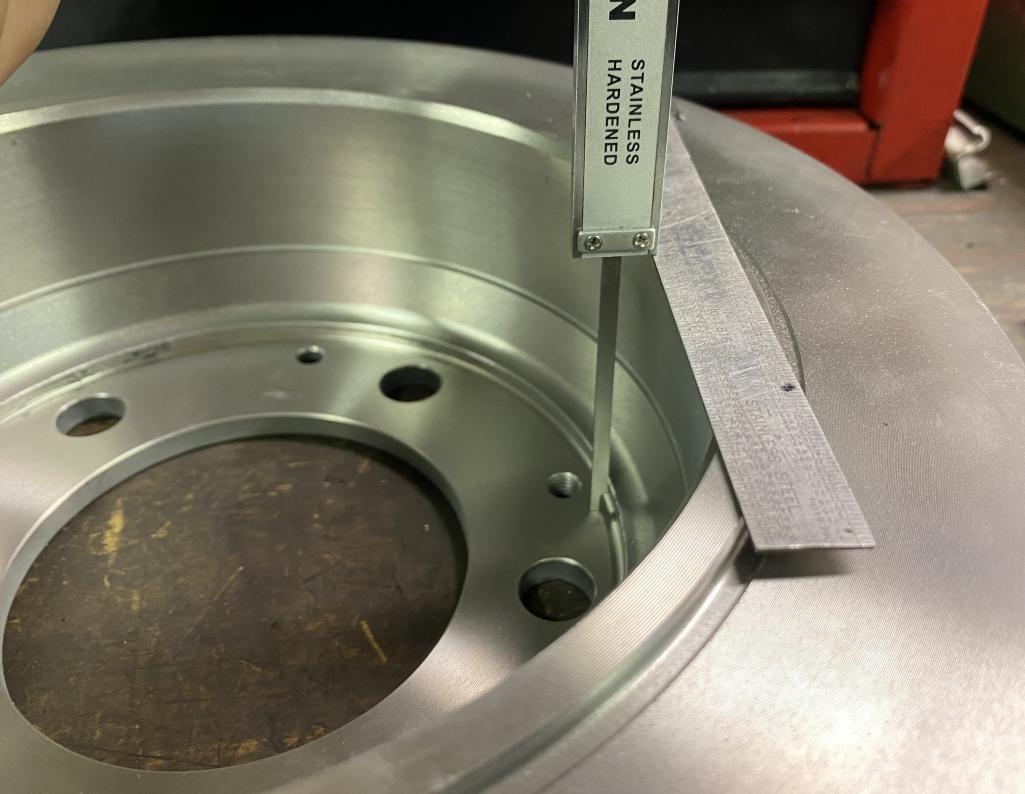
Luke or Rory....If either of you could check the offset on your 914-6 rotors, that would be most helpful.
Posted by: Tom1394racing Nov 9 2023, 09:40 AM
Another update...I checked the P/N on my rotors and found that I am using the SWB 911 version of the solid rotor (P/N 901-352-401-10). I was advised that the LWB version of the solid rotor (P/N 901-352-4-1-17) for the '69T and 912 would work. I am guessing that this rotor has the same offset as the 914-6 and is very different that the SWB rotors I have now. I do not have one of these in my stash to check.
Posted by: Tom1394racing Nov 9 2023, 11:03 AM
Luke and Rory
Thanks for chiming in. I was aware the solid rotors needed to be turned down 3 mm. I did that to these rotors. I did not realize that the 914-6 rotors had a different offset as compared to the 911 rotors.
The 911 solid rotors I am using have an offset distance (from the inside mount face to the inside friction surface) of around 62 mm.
Luke or Rory....If either of you could check the offset on your 914-6 rotors, that would be most helpful.
Rory measured the offset on a 914-6 rotor. He got 73 mm which is about 11 mm deeper than the 911 SWB rotor I have. That is about the thickness of the mount flange on the trailing arm so I think my mystery is solved. I believe the 911 LWB solid rotor has the same offset and will work for me once I trim 3 mm off the OD.
My mistake...I bought the wrong rotors.
Posted by: Tom1394racing Nov 10 2023, 07:09 AM
Having solved the mystery with my rear brake rotors, I went on the complete the rear suspension minus the brakes.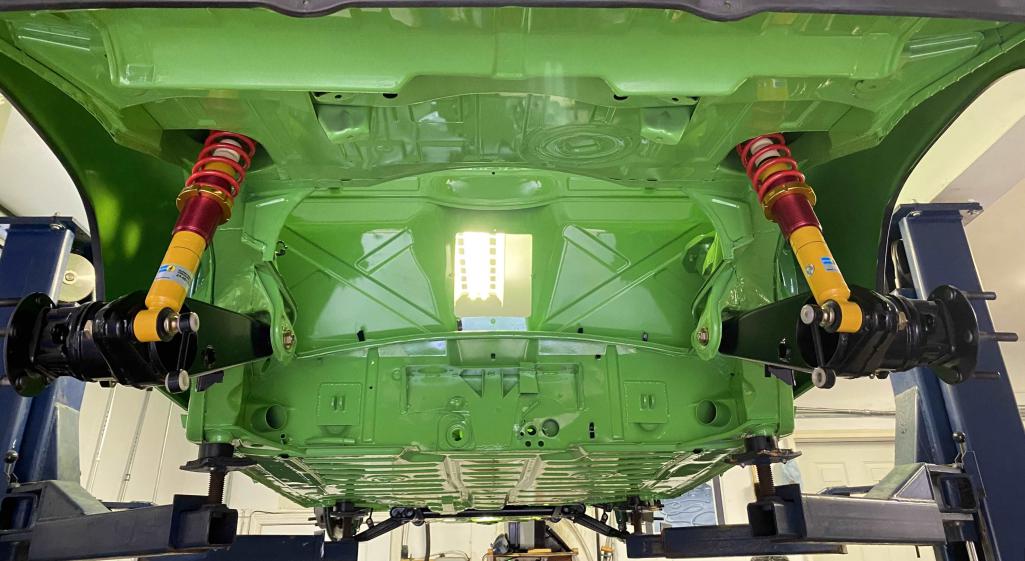
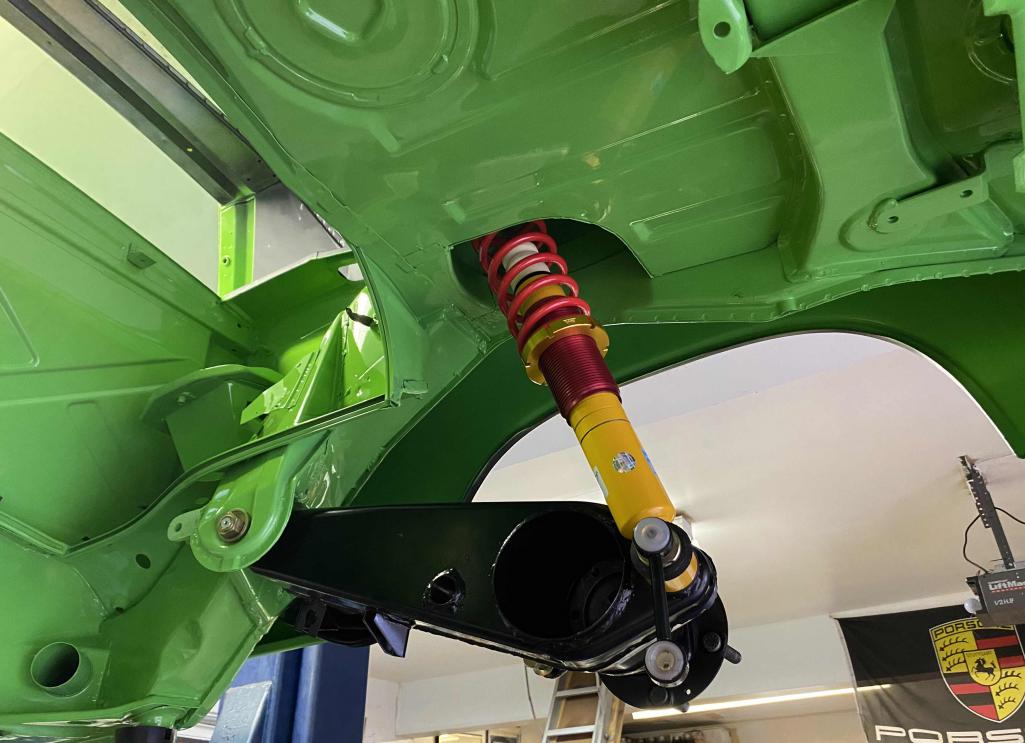
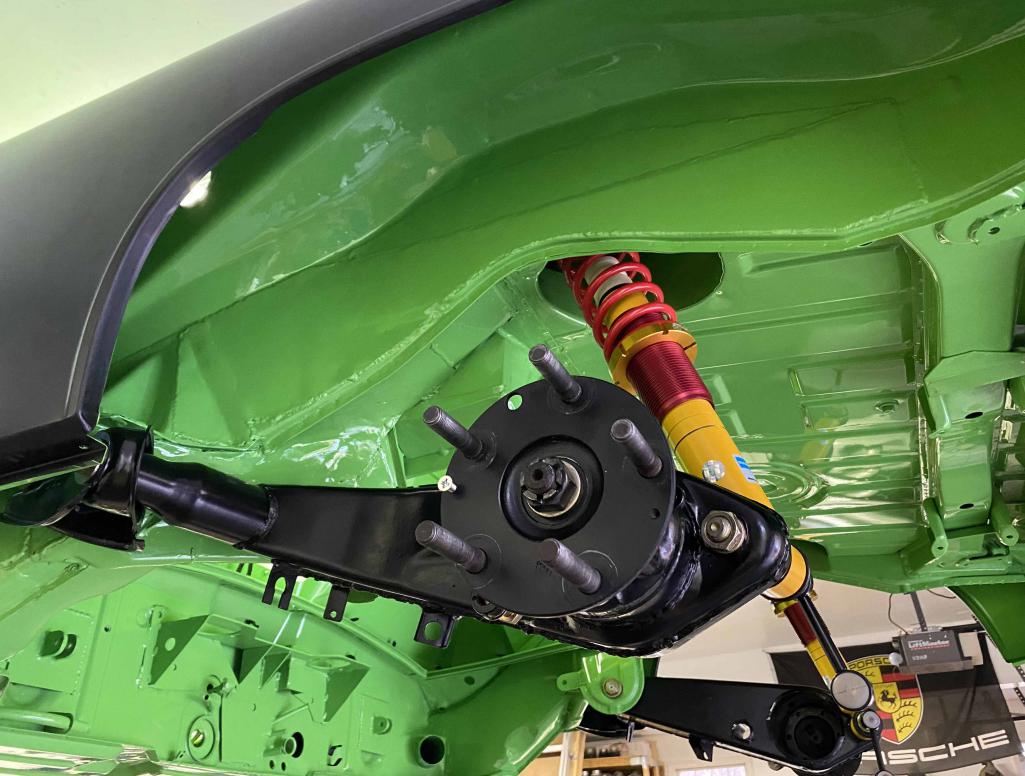
So now I need a pair of non-vented rear brake rotors. I think either the 914-6 rotors or the '69 911T or 912 rotors will work. I think the 911T/912 rotors will need to be reduced in OD by 3 mm. What is the difference between these and the 914-6 rotors?
Anyone have a NOS pair to sell?
Posted by: mskala Nov 10 2023, 07:37 AM
Hi Tom, I have a new pair (but need to doublecheck tonight that they are true 914-6). Do you ever get near north of boston? These are heavy to ship
Posted by: mepstein Nov 10 2023, 08:02 AM
Having solved the mystery with my rear brake rotors, I went on the complete the rear suspension minus the brakes.
So now I need a pair of non-vented rear brake rotors. I think either the 914-6 rotors or the '69 911T or 912 rotors will work. I think the 911T/912 rotors will need to be reduced in OD by 3 mm. What is the difference between these and the 914-6 rotors?
Anyone have a NOS pair to sell?
I got my 911T/912 rotors at flaps. Advanced auto. They are owned by Worldpac so they can order most anything. These days you can order online as well.
I don’t believe 914-6 rotors have provisions for the 911 ebrake. That’s more of an Eric Shea question than for me. Mine actually fit right out of the box but it had 2mm taken off just in case they expanded when hot.
Posted by: Tom1394racing Nov 10 2023, 08:04 AM
Hi Tom, I have a new pair (but need to doublecheck tonight that they are true 914-6). Do you ever get near north of boston? These are heavy to ship
Hi Mark
Thanks for your reply. It seems like these are available new retail at around $100 each plus shipping. Much less than the '69T rotors. I am not sure what the differences are between the two types. I could be a buyer if they will work for my application.
Posted by: rgalla9146 Nov 10 2023, 10:27 AM
OEM 6 rear rotor no provision for ebrake shoes.
Sorry Tom, no spares to sell.
Attached thumbnail(s)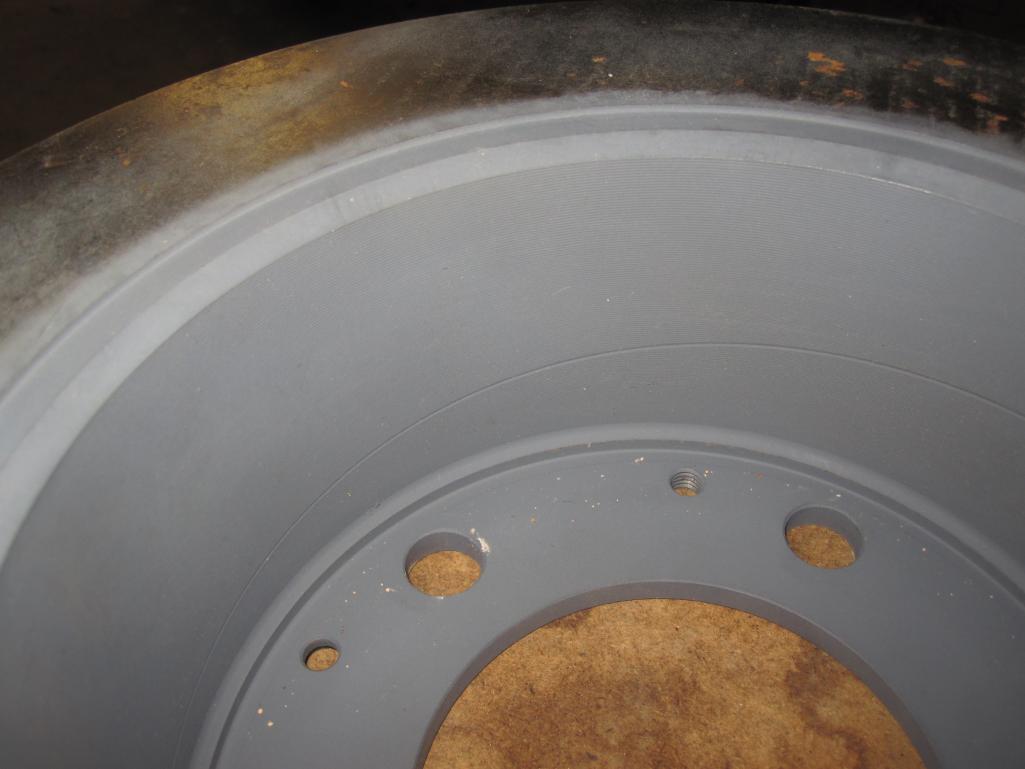
Posted by: Tom1394racing Nov 12 2023, 01:23 PM
As luck would have it, I was up in the Boston area this weekend visiting family and was able to meet up with Mark. He sold me a nice NOS set of 914-6 rear rotors that fit my hubs, calipers and trailing arms perfectly. 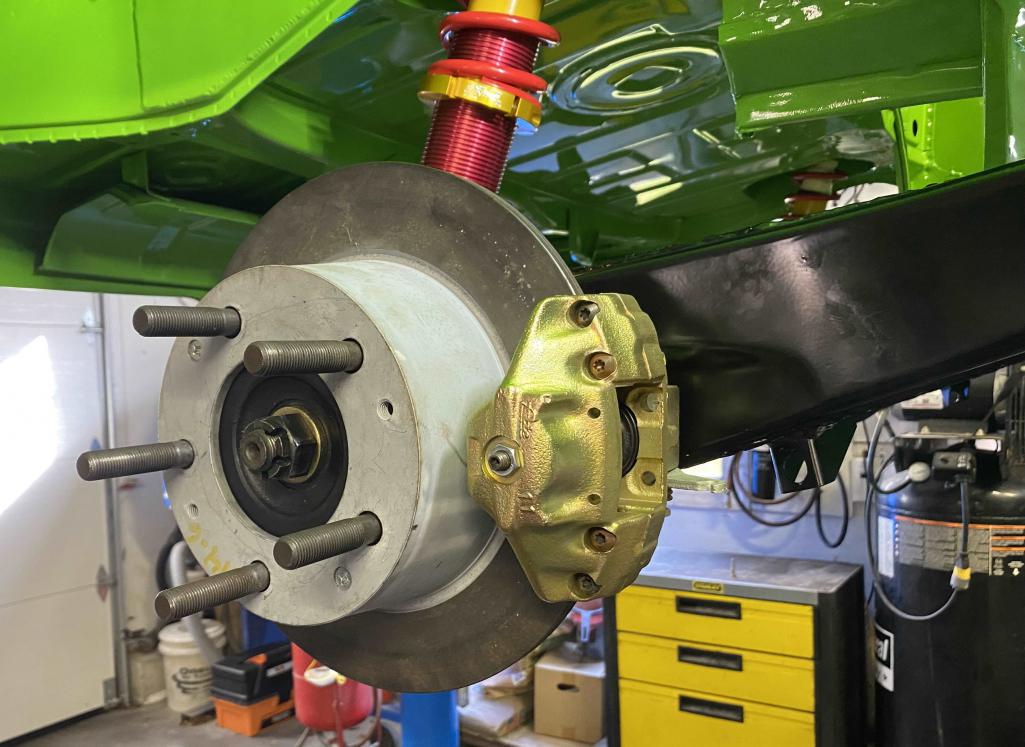

I will clean this up, reinstall, torque down the suspension and move forward.
Thanks for all the help and suggestions!
Posted by: sixnotfour Nov 12 2023, 02:14 PM
dust shield bracket ... thickness ...missing
Posted by: Tom1394racing Nov 12 2023, 07:23 PM
dust shield bracket ... thickness ...missing
Yeah...I am not planning to run the dust shields, but I will see if the brackets make a difference in centering the calipers on the rotors.
Thanks
Posted by: Tom1394racing Dec 1 2023, 08:33 AM
I figured out my rear brakes and got the spacing correct with thin washers instead of the dust shields. Fitted a set of SWB 911 drilled pads to the LHS but the RHS inner caliper piston needed adjustment to slip the new pad in. As luck would have it, no inner adjuster gear in the caliper. PMB did the brakes. Called them, no explanation why, but they are sending me near gears.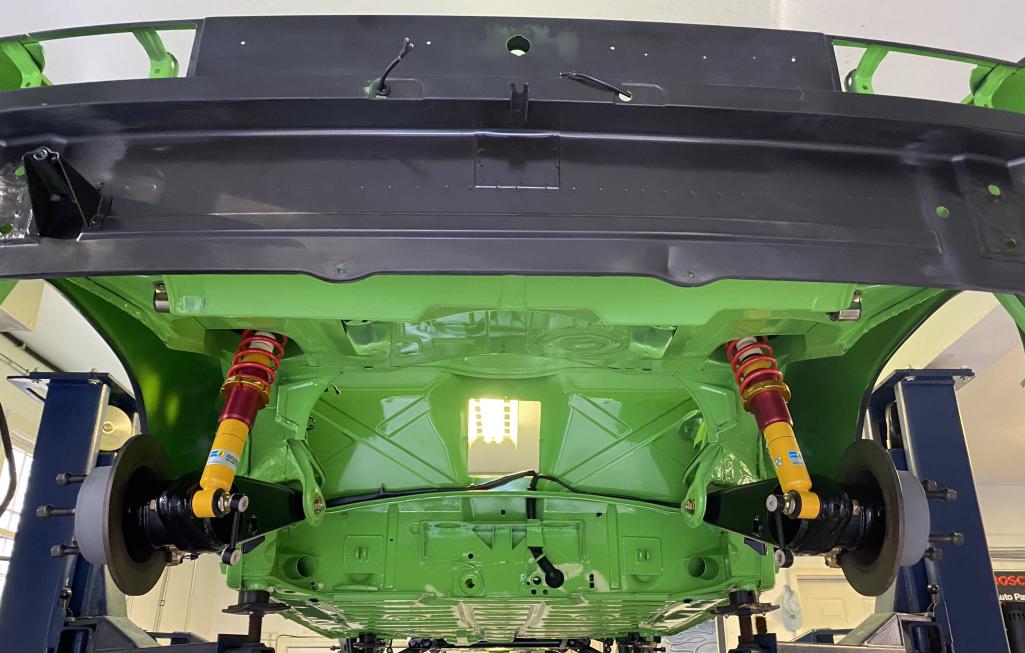
Posted by: Tom1394racing Dec 1 2023, 08:45 AM
In the meantime, my corrected, new 914-6 wiring harness came back from Restoration Design. Thanks to Peter who corrected it for the front dual fuel pumps and had it back to me in less than 2 weeks. I am very happy with the quality and workmanship on this harness. The installation YouTube video made it a breeze. I am in the process of finalizing the exact placement especially in the front trunk where the original wire routing will clash with the oil cooling system.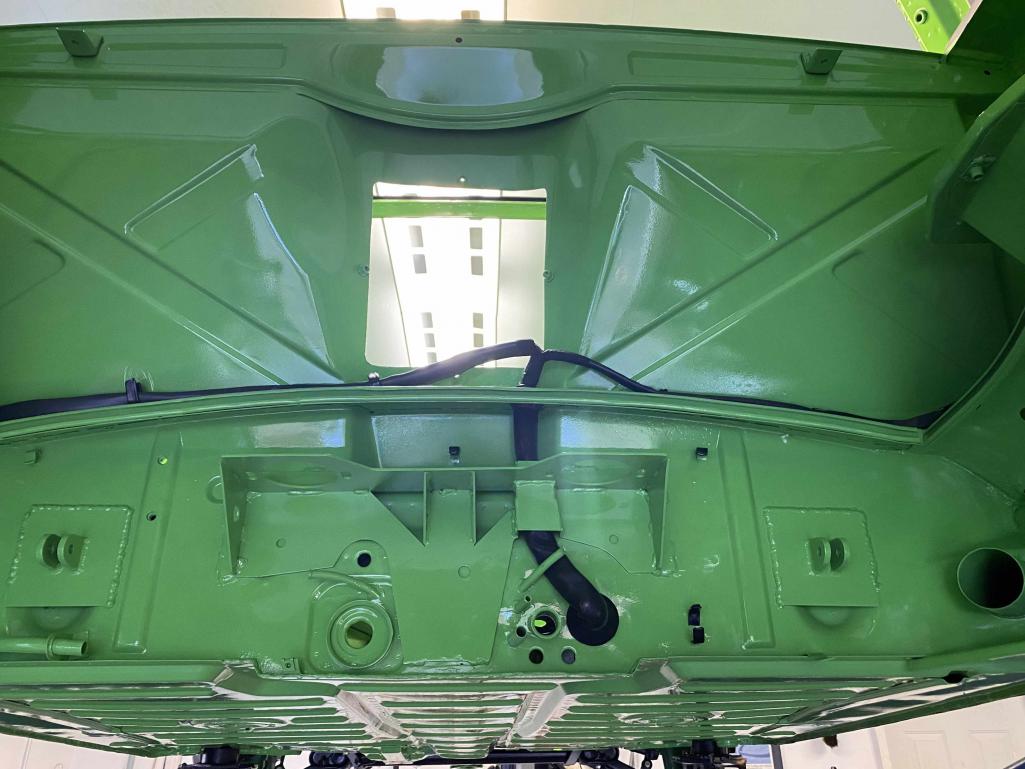
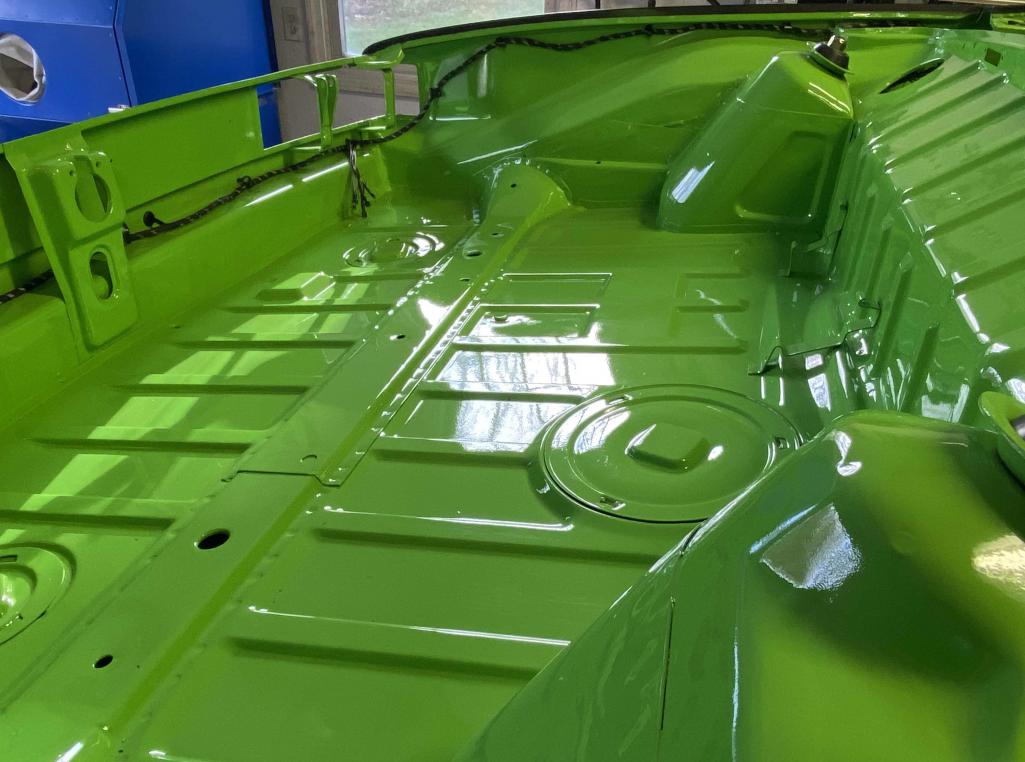
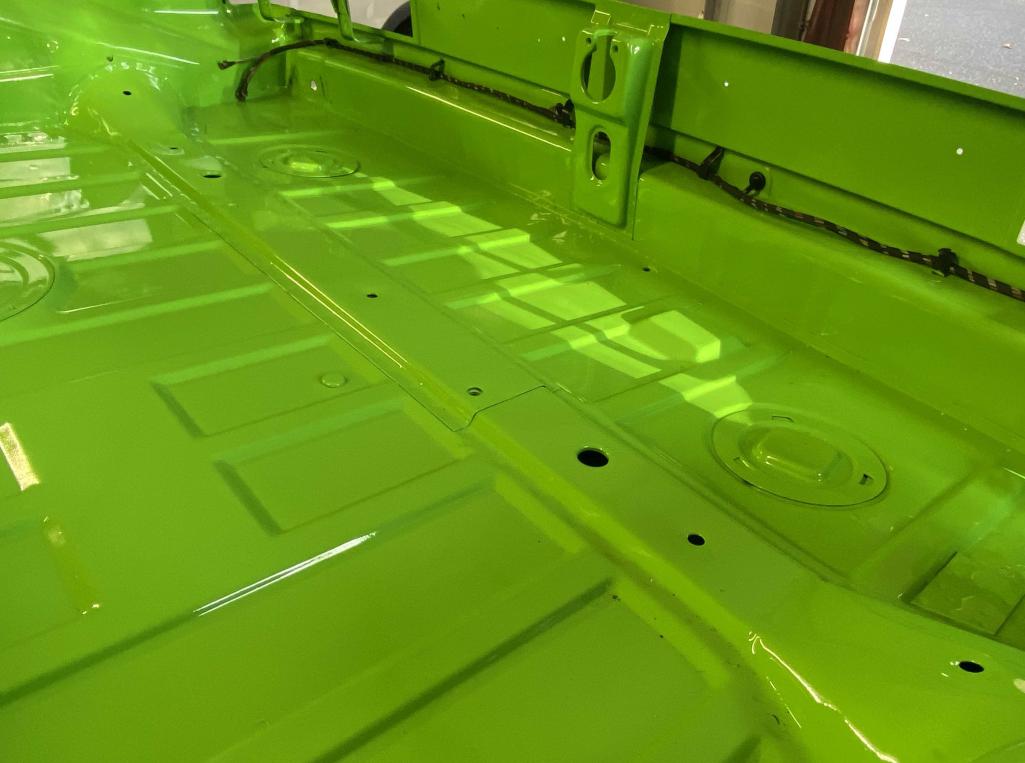
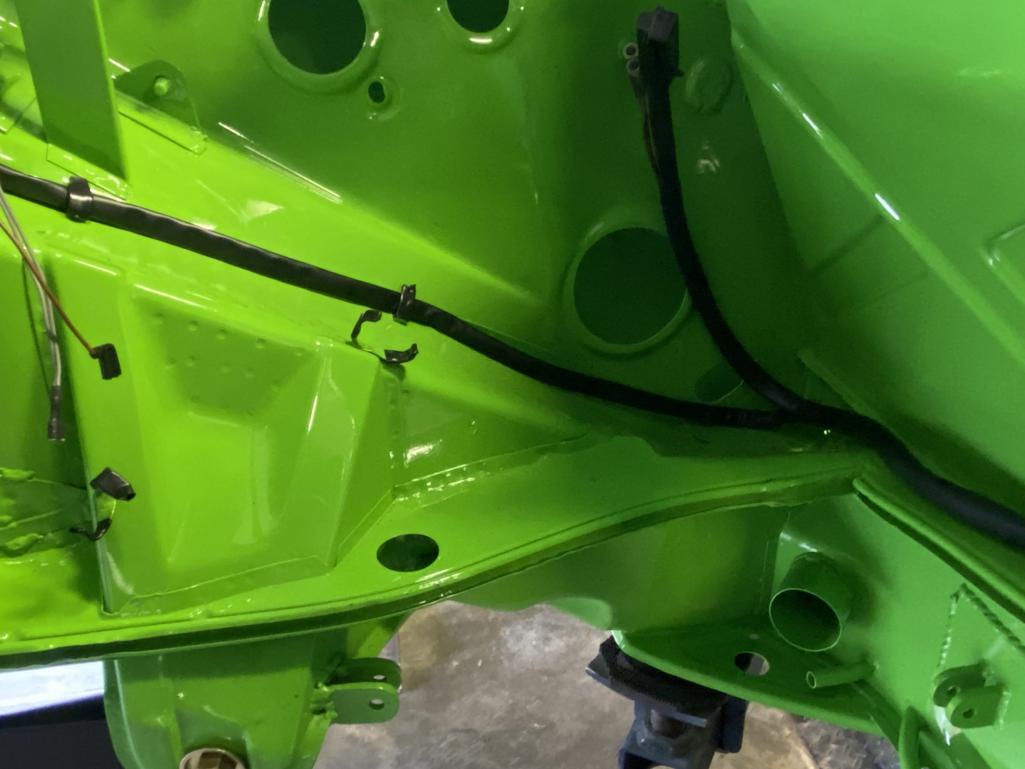

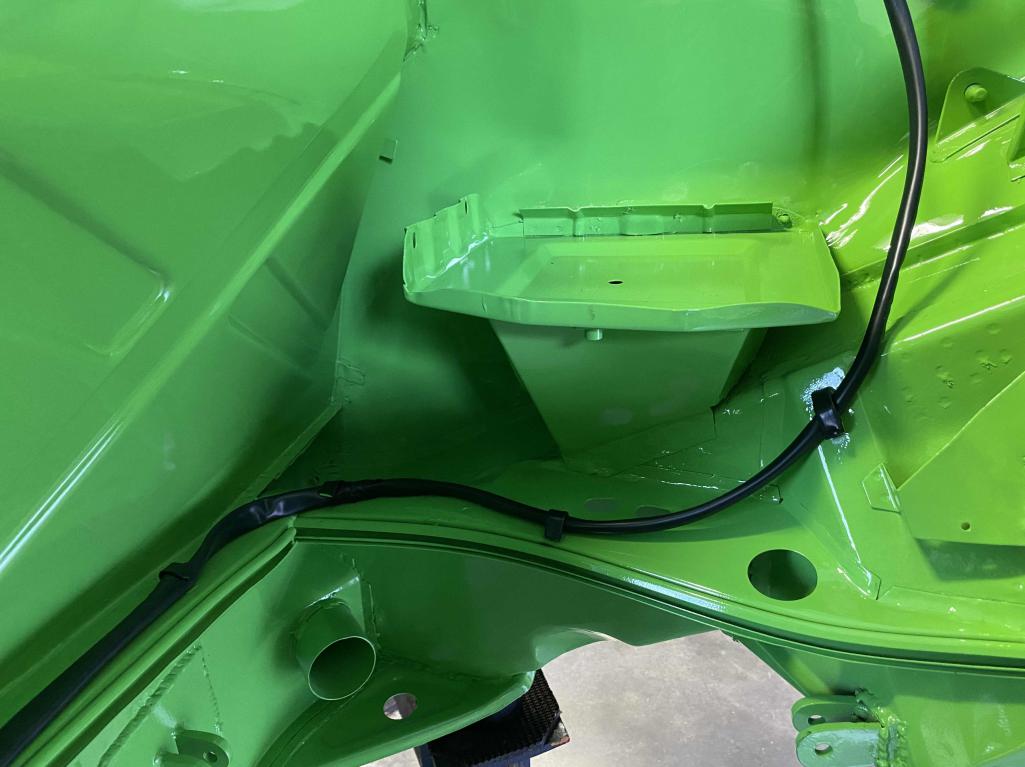
Posted by: Cairo94507 Dec 1 2023, 08:50 AM
Outstanding progress; that is going to be so beautiful.
Posted by: Tom1394racing Dec 1 2023, 08:52 AM
More wiring pics. It seems like every factory GT did things a little differently with regards to the front trunk wiring.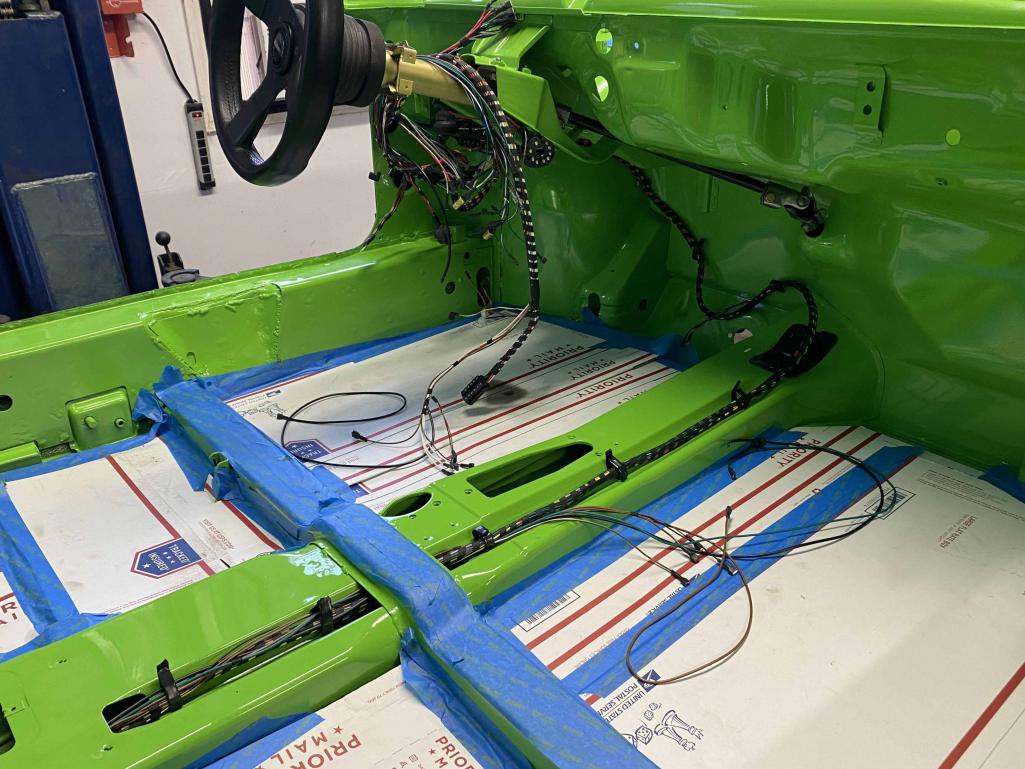
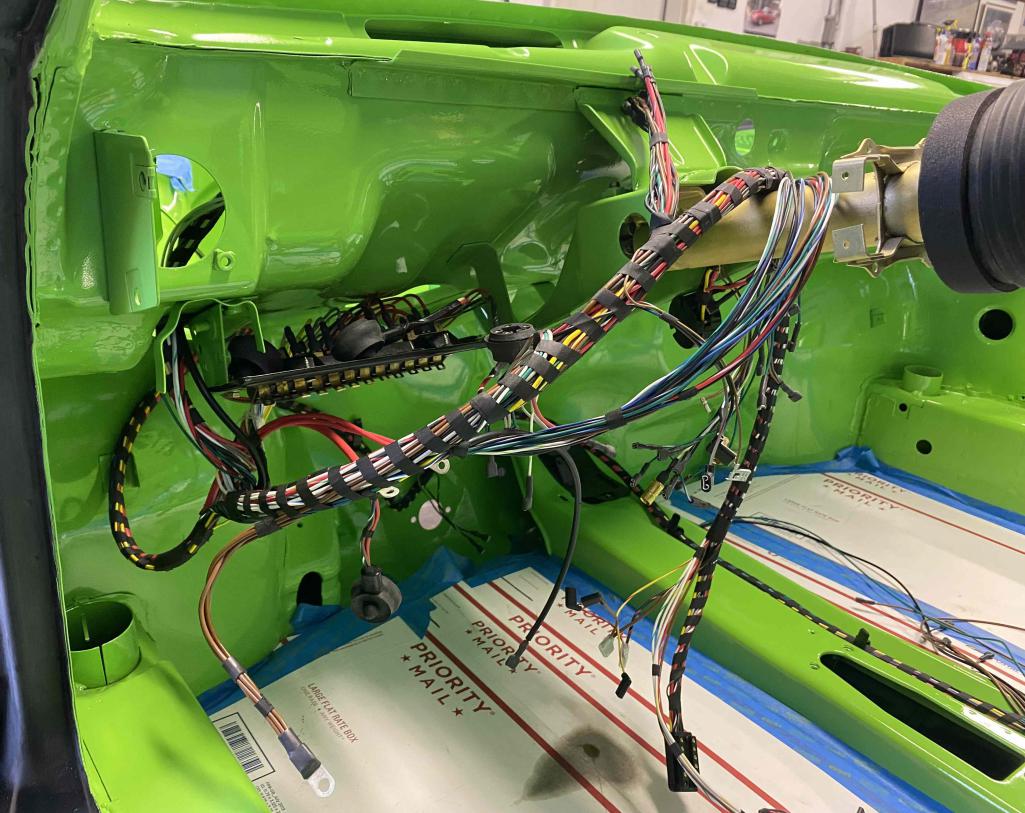
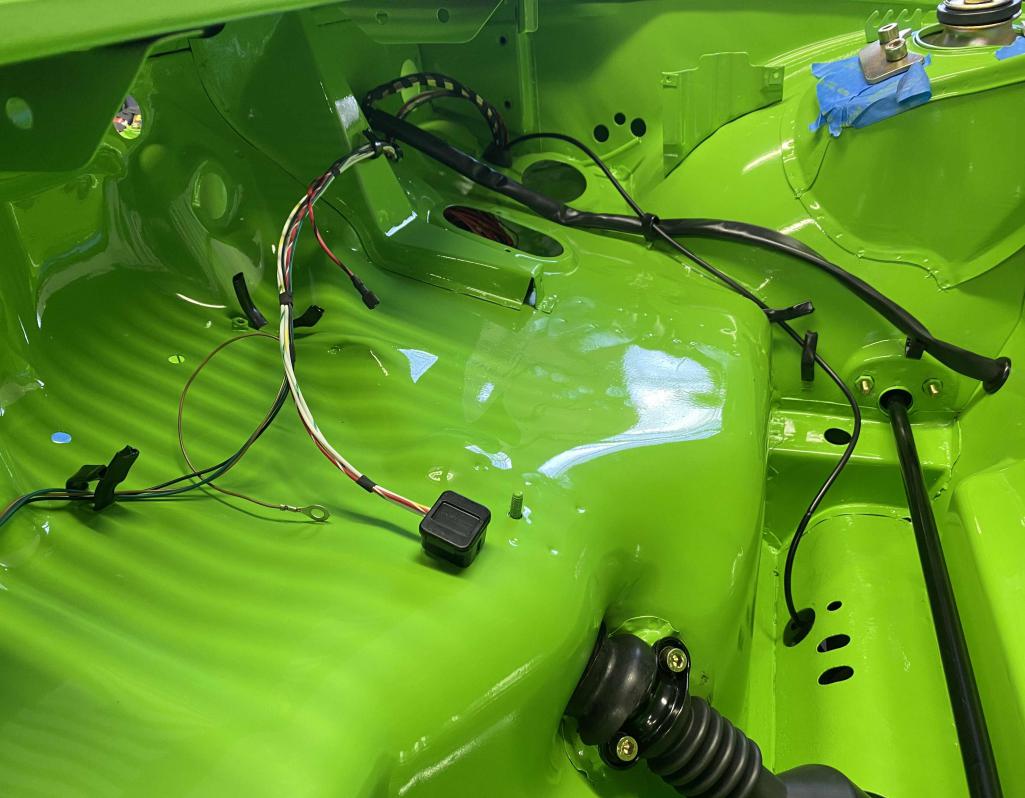

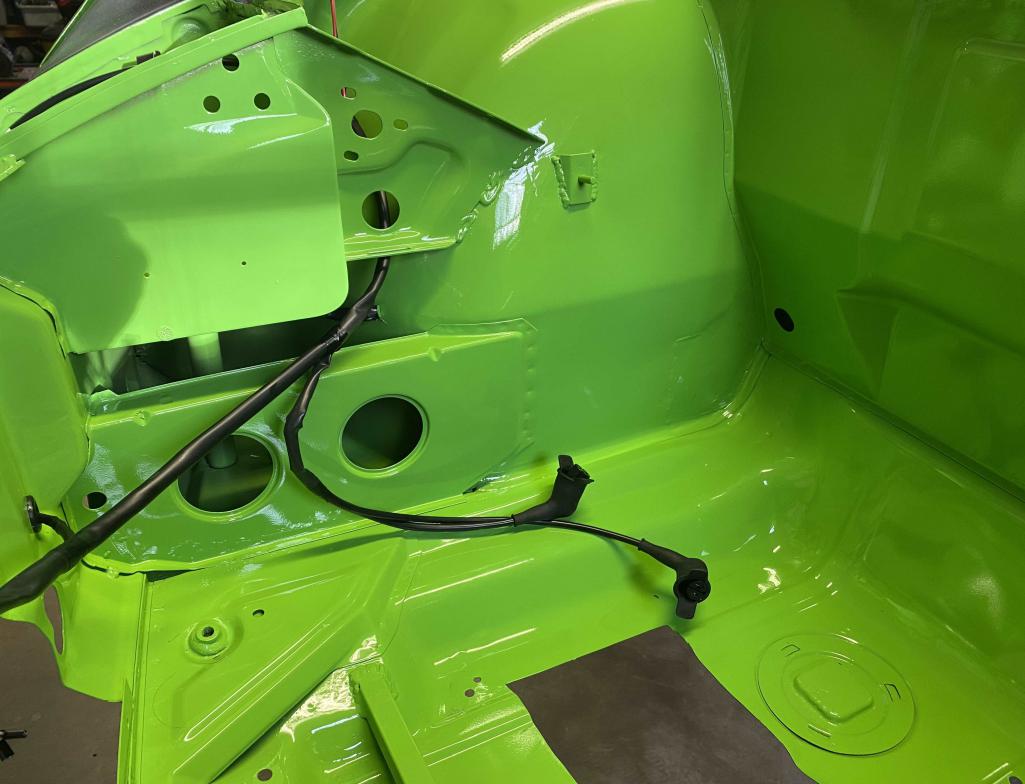
Posted by: campbellcj Dec 1 2023, 04:59 PM
Looking great, I love the color and feel like I need a bright green car in the stable.
Posted by: pfreiburger Dec 2 2023, 10:23 PM
Wow, paint looks beautiful, you are doing a first class job! I also love the color, perfect for a -6.
Posted by: Front yard mechanic Dec 3 2023, 06:41 AM
Sweet ! really like the car without seam foam sprayed all over the place. Supper 
Posted by: mepstein Dec 3 2023, 08:40 AM
Tom - did you use seam sealer on the car or are you leaving it bare?
Posted by: Tom1394racing Dec 5 2023, 07:20 AM
Tom - did you use seam sealer on the car or are you leaving it bare?
That is a good question...I don't believe that Auto Associates used any seam sealer. I will confirm that with them. There is a very light undercoating on the bottom and in the rear of the wheel wells.
Posted by: mepstein Dec 5 2023, 07:51 AM
Tom - did you use seam sealer on the car or are you leaving it bare?
That is a good question...I don't believe that Auto Associates used any seam sealer. I will confirm that with them. There is a very light undercoating on the bottom and in the rear of the wheel wells.
I was wondering the need for it on an e-coated car. I haven’t decided yet.
Posted by: Tom1394racing Dec 6 2023, 11:58 AM
Tom - did you use seam sealer on the car or are you leaving it bare?
That is a good question...I don't believe that Auto Associates used any seam sealer. I will confirm that with them. There is a very light undercoating on the bottom and in the rear of the wheel wells.
I was wondering the need for it on an e-coated car. I haven’t decided yet.
I spoke with Ken, co-owner & Body Shop Manager at Auto Associates.
Seam sealer was used mostly under the fenders and qtrs, where gaps were a little large. Nothing in the top side or interior. Based on the photos of other GT cars, it looked like they did not have any and they most certainly did not put the spray seam sealer on seams like factory cars.
Posted by: Dion Dec 6 2023, 01:17 PM
Car looks fantastic! Colour pops against the parts being added. Yes i'm sure there is a significant lack of seam sealer on the R cars as weight saving was the name of the game.
cheers
Posted by: Tom1394racing Dec 7 2023, 01:06 PM
Had a chance to spend a few hours on the car today. I fit the front turn signals and rear taillights. These will of course be removed before final body work and paint but I want to complete and check out the electrical system first.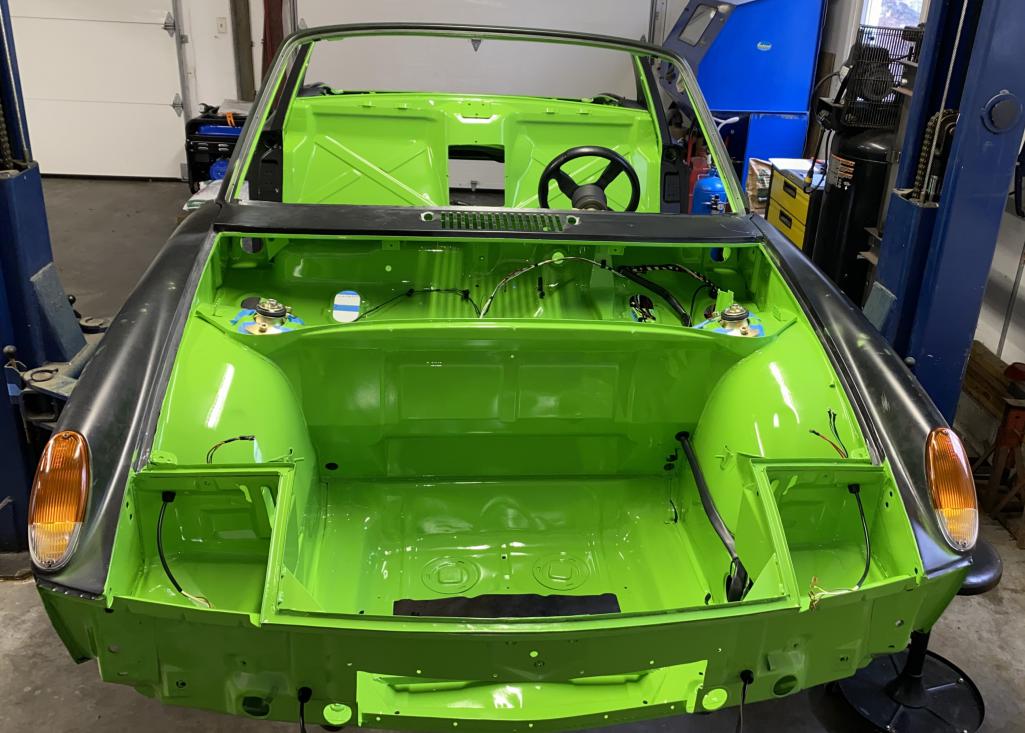
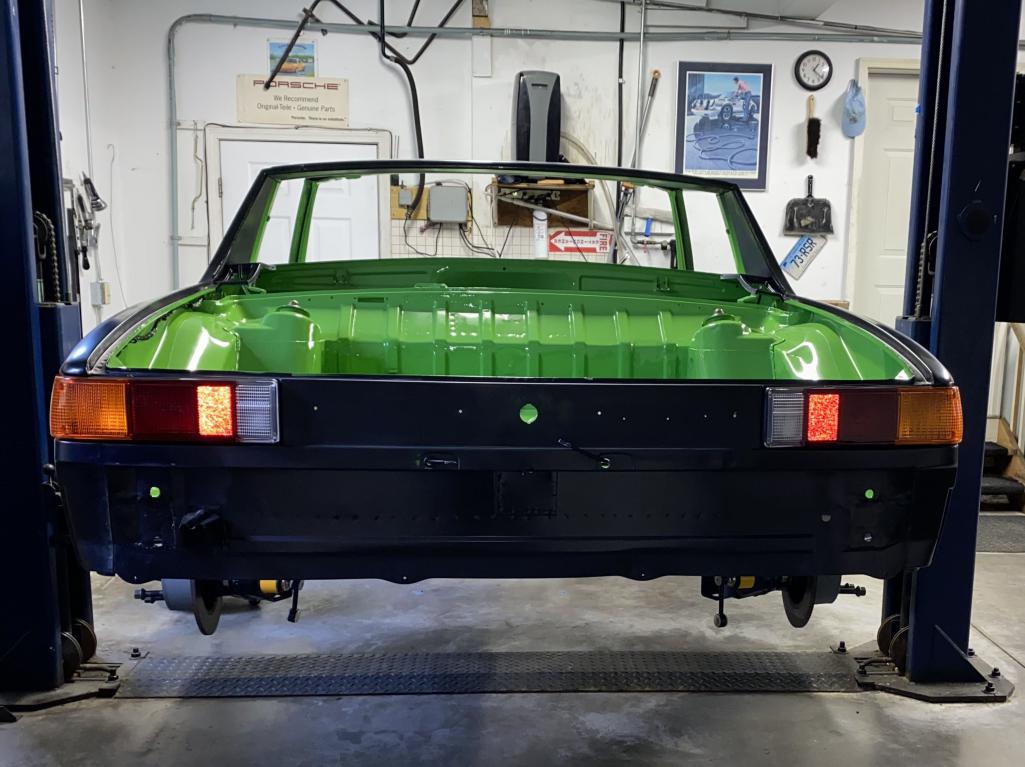
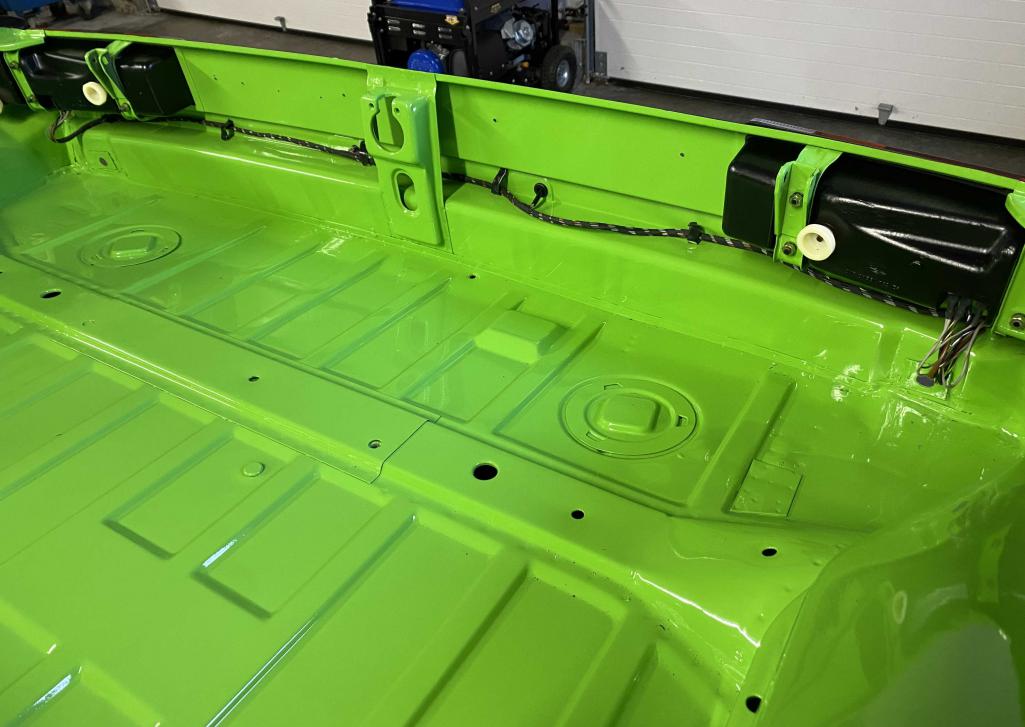
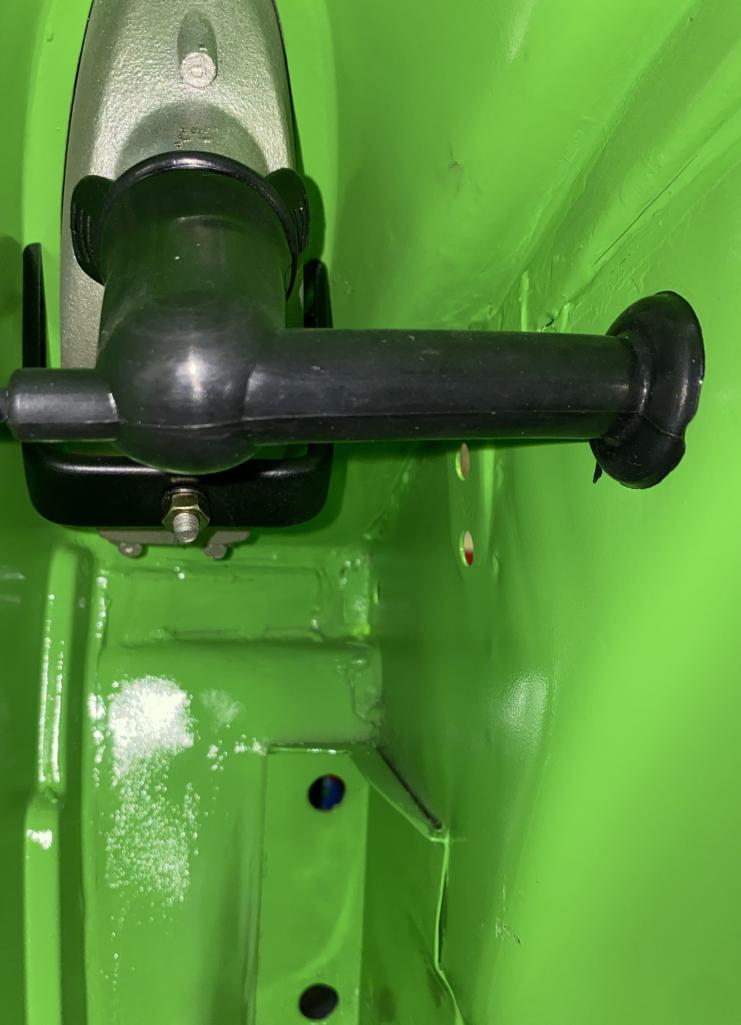
Posted by: Tom1394racing Dec 18 2023, 06:40 AM
I installed the front headlights and then decided to fit the mechanical GT headlight kit to make sure I had all the pieces and understood how to make the system work. I had purchased a partial kit from a member of our board but it was missing all the wire cables, a couple of the cable barrel keepers and any assembly/installation instructions. The detailed photographs provided by Armando Serrano in his epic 914-6 GT posting on Pelican saved my butt and more than made up for the lack of instructions.
I used spare 911 hood release wire cables that I have in my stash of parts and was able to fabricate the missing cable barrel keepers for the cable splitter. It was a trial-and-error process with many assembly/test/disassembly cycles before I finally managed to get both headlights to lock and release.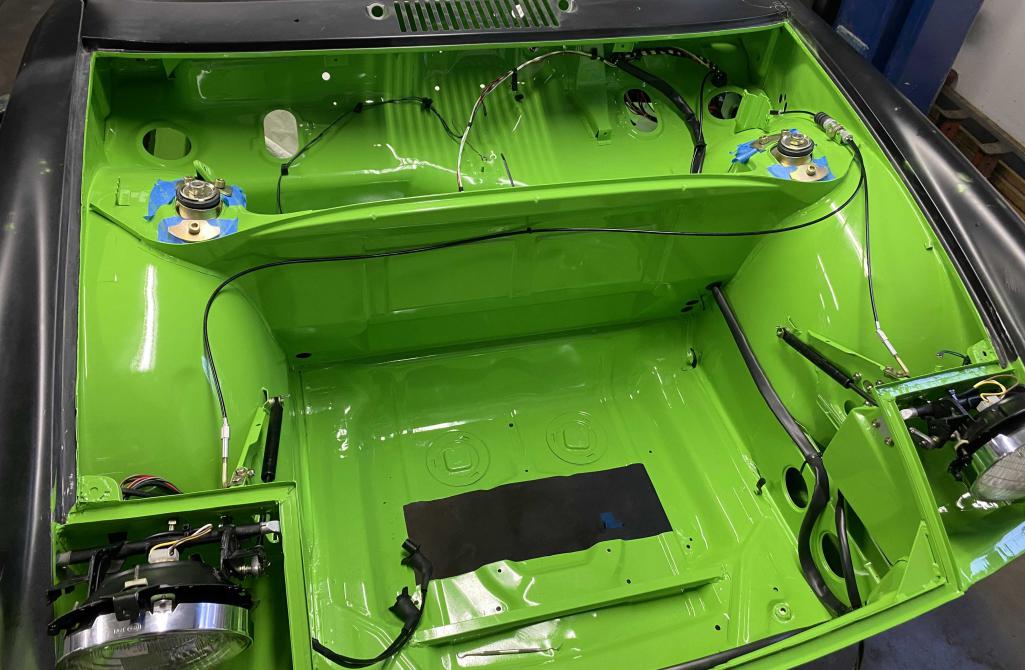
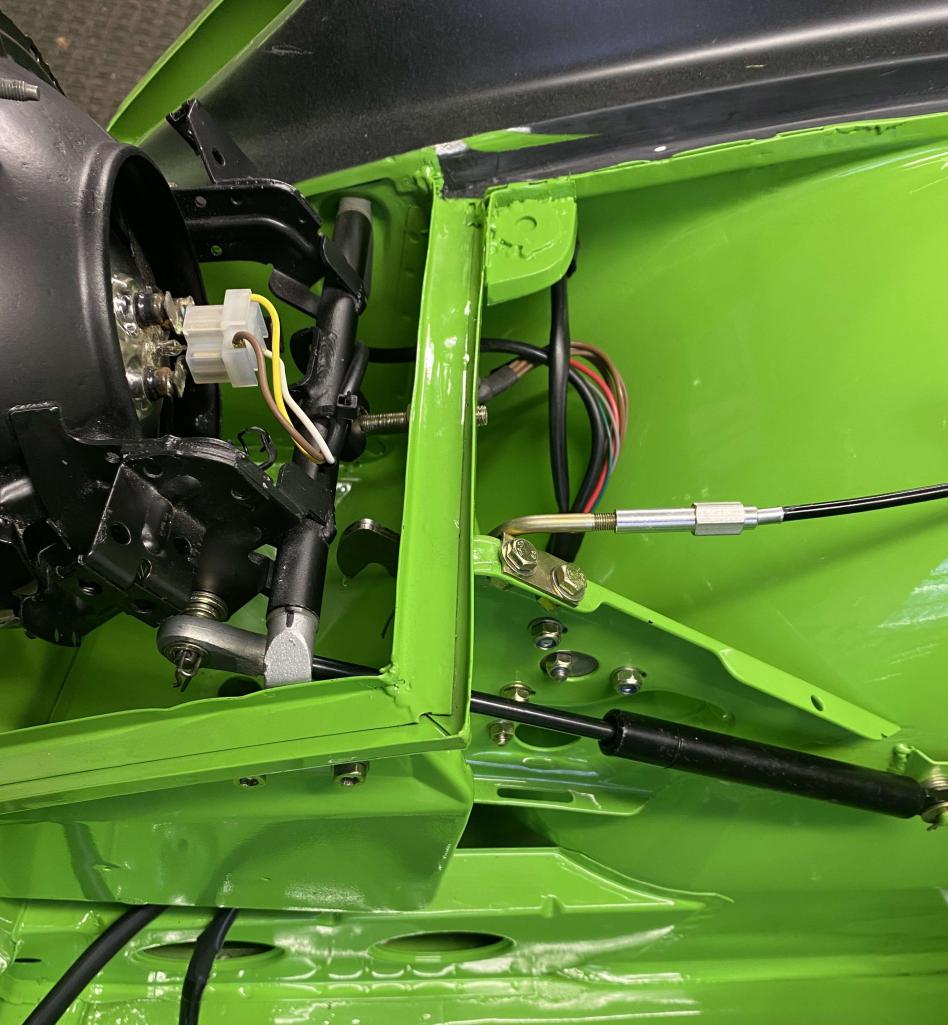
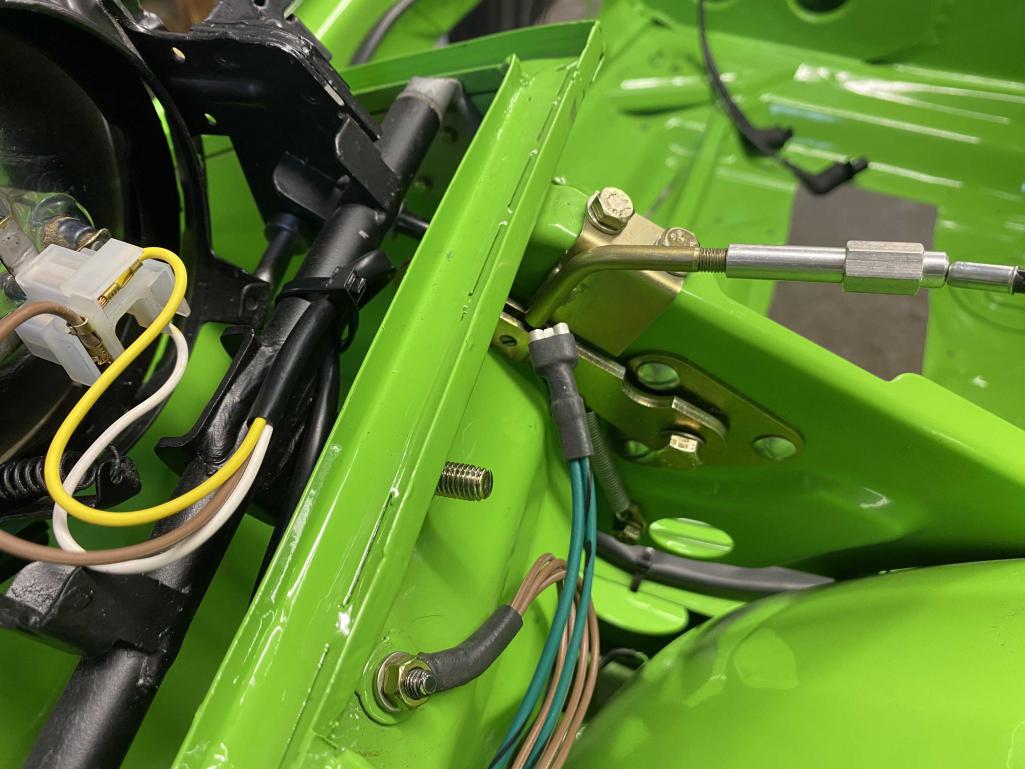
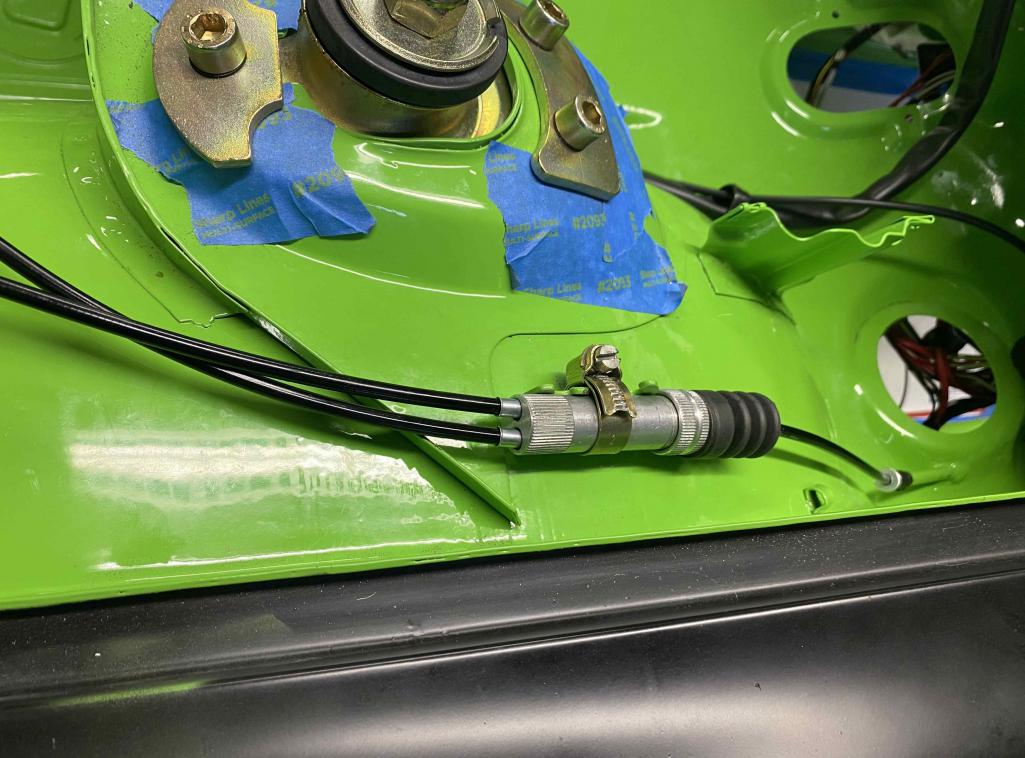
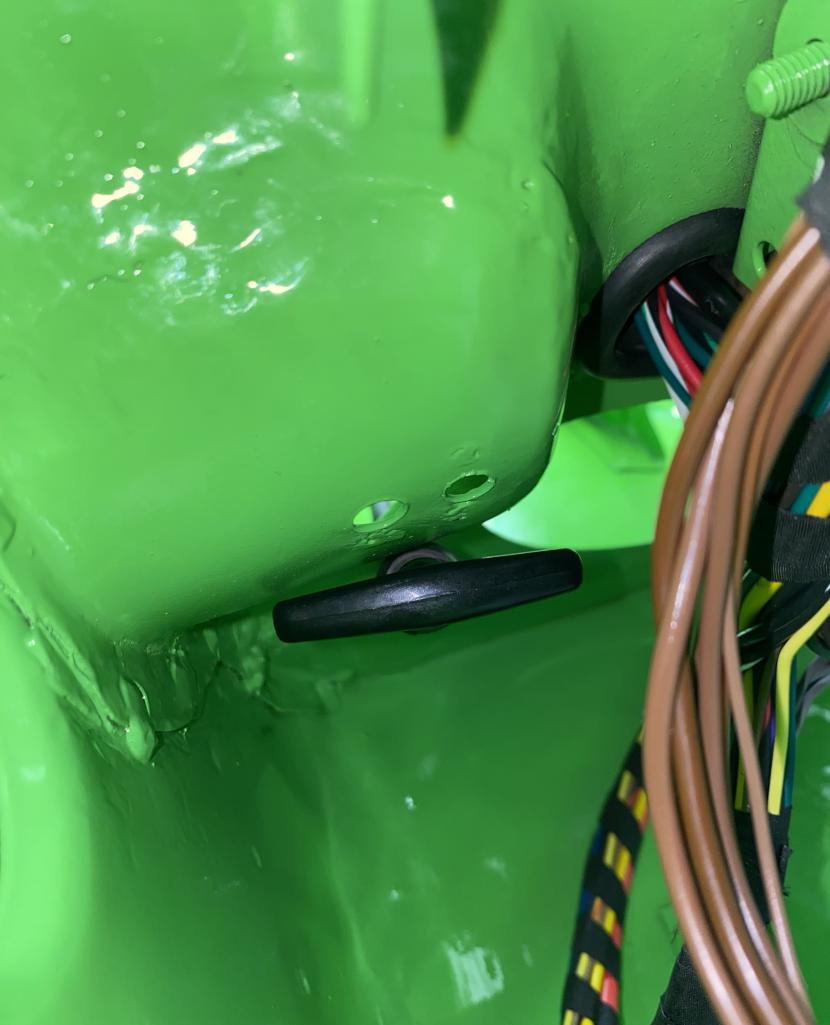
Posted by: Tom1394racing Jan 18 2024, 02:13 PM
Wow...I can't believe it has been a month since my last posting. Holiday get togethers and a post-Christmas bout with Covid kept me away from the car for a few weeks.
Since getting back into it, I have focused on the electricals for the dash switches and gauges. The detailed wiring diagram provided by Restoration Design that came along with the new harness I purchased from them is making the job much easier. Next up will be the turn signal/high beam switch and the wiper switch. I expect that I will need to make up some custom harnesses to make the connections from the 911 switches I am using to the 914-6 harness.
One question for the experts....I have (3) wires that I have yet to identify. I circled these in the last photo. I am guessing that the red wires are unswitched power leads for things like an alarm system or a clock. The single black wire is a mystery to me. Behing the black wire sheath are twin brown leads that do not connect to ground. I do not see them in the wiring diagram and I can't trace them to the fuse box. Any ideas what these are?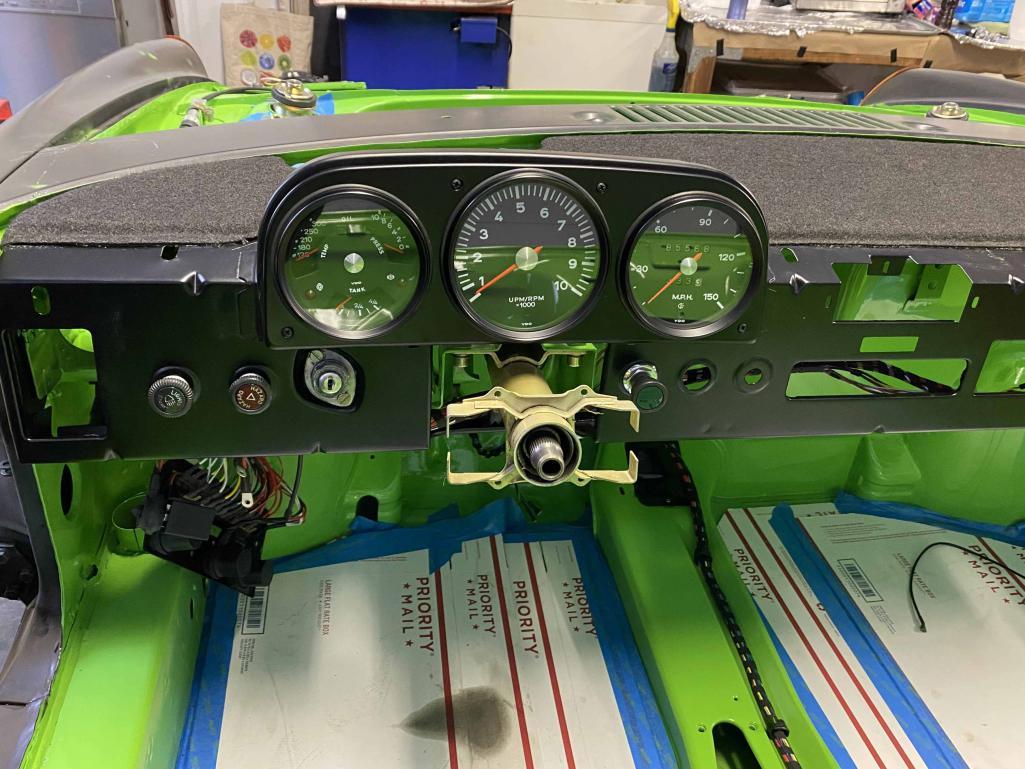
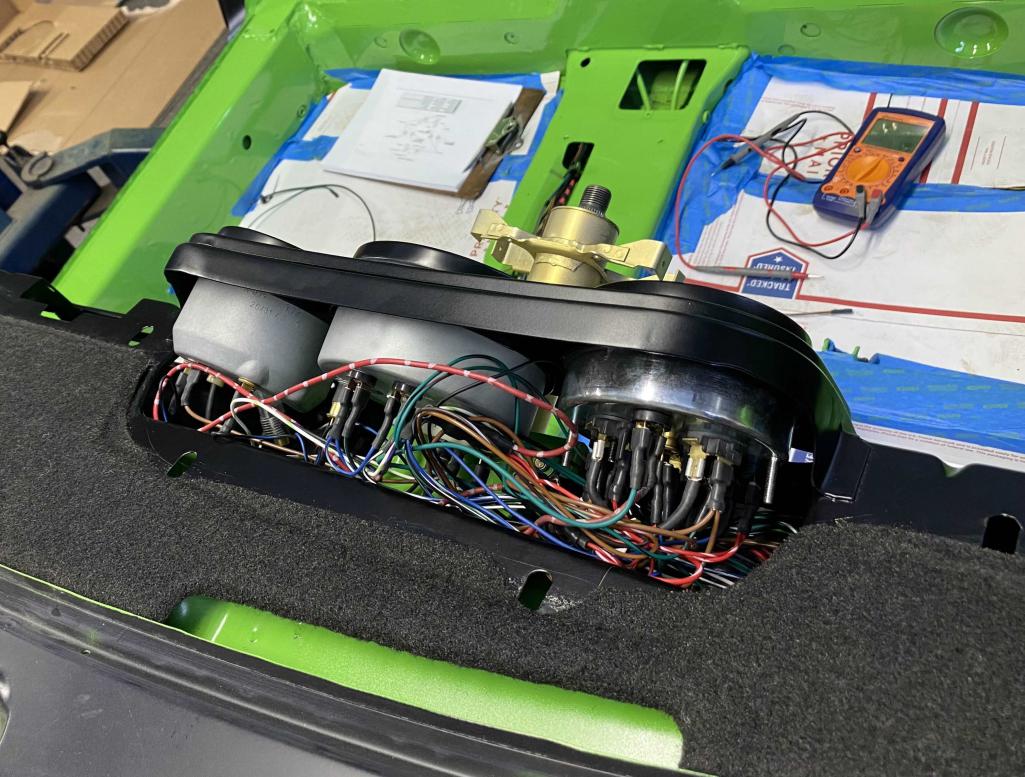

Posted by: mate914 Jan 18 2024, 02:25 PM
Wow...I can't believe it has been a month since my last posting. Holiday get togethers and a post-Christmas bout with Covid kept me away from the car for a few weeks.
Since getting back into it, I have focused on the electricals for the dash switches and gauges. The detailed wiring diagram provided by Restoration Design that came along with the new harness I purchased from them is making the job much easier. Next up will be the turn signal/high beam switch and the wiper switch. I expect that I will need to make up some custom harnesses to make the connections from the 911 switches I am using to the 914-6 harness.
One question for the experts....I have (3) wires that I have yet to identify. I circled these in the last photo. I am guessing that the red wires are unswitched power leads for things like an alarm system or a clock. The single black wire is a mystery to me. Behing the black wire sheath are twin brown leads that do not connect to ground. I do not see them in the wiring diagram and I can't trace them to the fuse box. Any ideas what these are?
I’m not sure what wiring harness you’re using. On the factory 9146 there is a kind of power distribution point. I will get a picture in a few minutes.
Matt
Posted by: mate914 Jan 18 2024, 02:54 PM
Upside down but you can see the red wires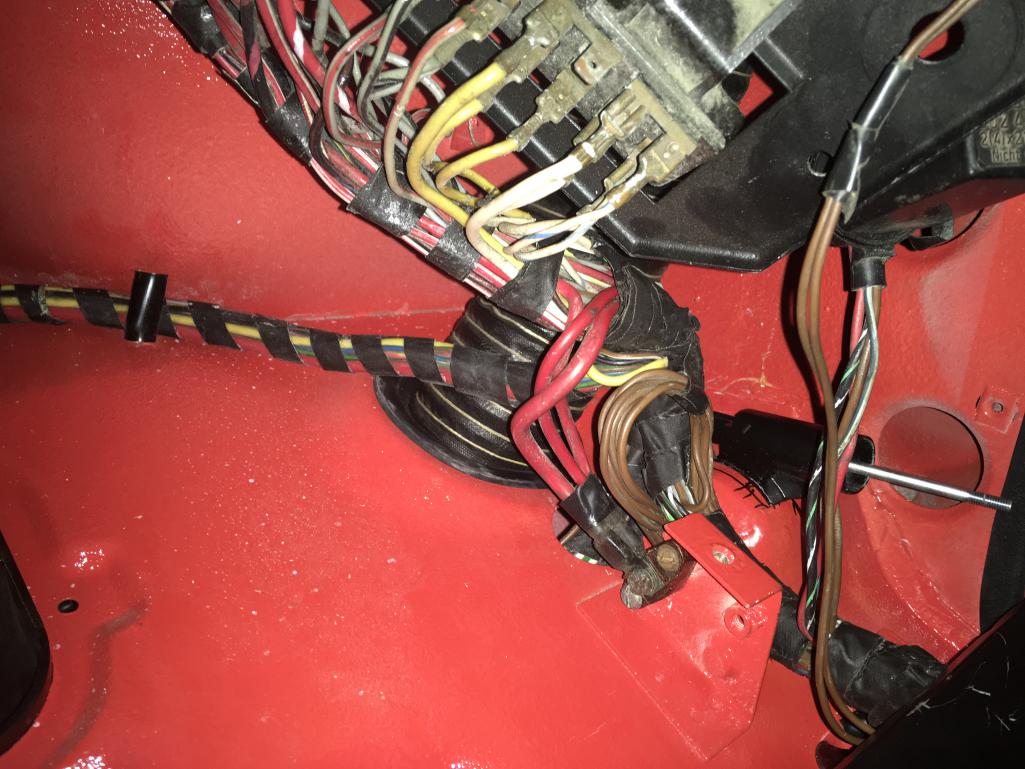
Posted by: JmuRiz Jan 18 2024, 03:33 PM
What's the best way to re-attach the gauge wiring. Mine sure looks like a rats-nest of wires after removing them for rebuild.
Posted by: mate914 Jan 18 2024, 04:38 PM
What's the best way to re-attach the gauge wiring. Mine sure looks like a rats-nest of wires after removing them for rebuild.
Looks to me like not putting the dash top on would make wiring the gauges. Much easier.
Matt
Posted by: Tom1394racing Jan 18 2024, 07:17 PM
Upside down but you can see the red wires
Thanks Matt.
Your explanation makes perfect sense to me. The connection between the two sets of red wires must provide the power feed to the dash harness. It looks like some sort of insulating block is used as a bracket to connect the two wires together and then secure it to the chassis. Is that correct? I think I’ll have to search for that part. Any ideas on the black sheath wire with the two browns beneath the sheathing?
Posted by: Retroracer Jan 19 2024, 12:14 PM
Tom - just found this thread and "binged" through it. Excellent build and great color choice! For my own GT build, I chose Gelbgrun as a color, not too far from Lizard green I suspect.
The pix of the metalwork alone was complex enough and made me thankful for how solid my starting point was on my build. Keep the posts coming!
- Tony
Posted by: mate914 Jan 19 2024, 02:40 PM
Upside down but you can see the red wires
Thanks Matt.
Your explanation makes perfect sense to me. The connection between the two sets of red wires must provide the power feed to the dash harness. It looks like some sort of insulating block is used as a bracket to connect the two wires together and then secure it to the chassis. Is that correct? I think I’ll have to search for that part. Any ideas on the black sheath wire with the two browns beneath the sheathing?
The best part about you trying to figure out what this is. I also was trying to figure out what the two brown wires were for. The 914 six I restored has not been driven and has been tore apart for over 20 years. It’s a learning game for me too. Thanks, Pete at restoration design for answering it.
Matt
Posted by: Tom1394racing Jan 19 2024, 04:54 PM
I found the insulator block in my stash and installed it. All good now with keyed power to the switches and gauges. I also realized that the black wire is for the door switches.
Thanks All!
Posted by: Tom1394racing Feb 2 2024, 03:42 PM
Finally finished up the electrical wiring today. As always, one of the more challenging tasks to get everything to function properly. The job was pretty straight forward with the new 914-6 harness and wiring diagram from Restoration Design. The most challenging part was creating a custom harness to mate the NOS 1969 911 T/S switch to the chassis harness. It took several days of head scratching and studying the wiring diagrams to get it right. I had a nice, bare 12 pin connector and 6 pin plug in my stash that allowed me to create a mating harness without having to modify the 911 T/S switch. It looks ugly but it works. The 911 wiper switch was straight forward plug and play into the Restoration Design 914-6 wiper harness.
Next up will be fitting and possibly modifying the 911 clamshell to fit the steering column and dash.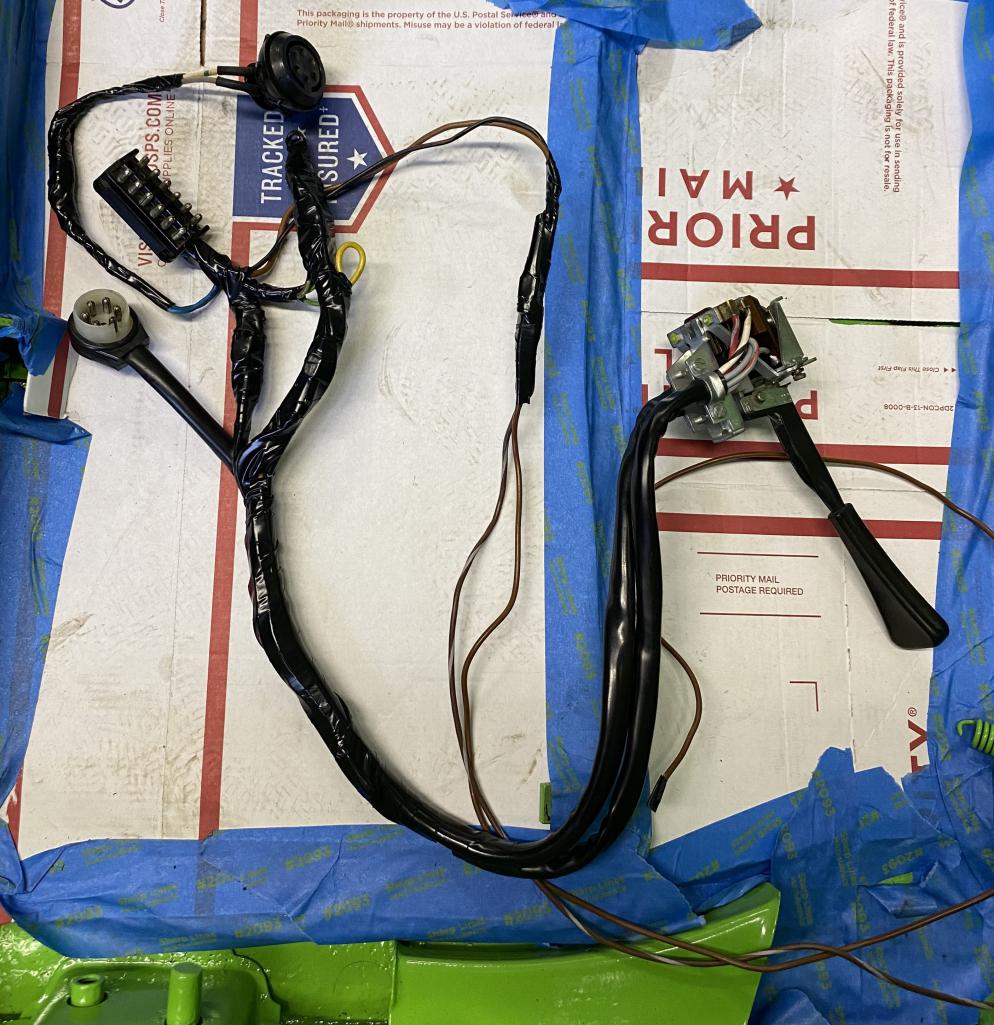
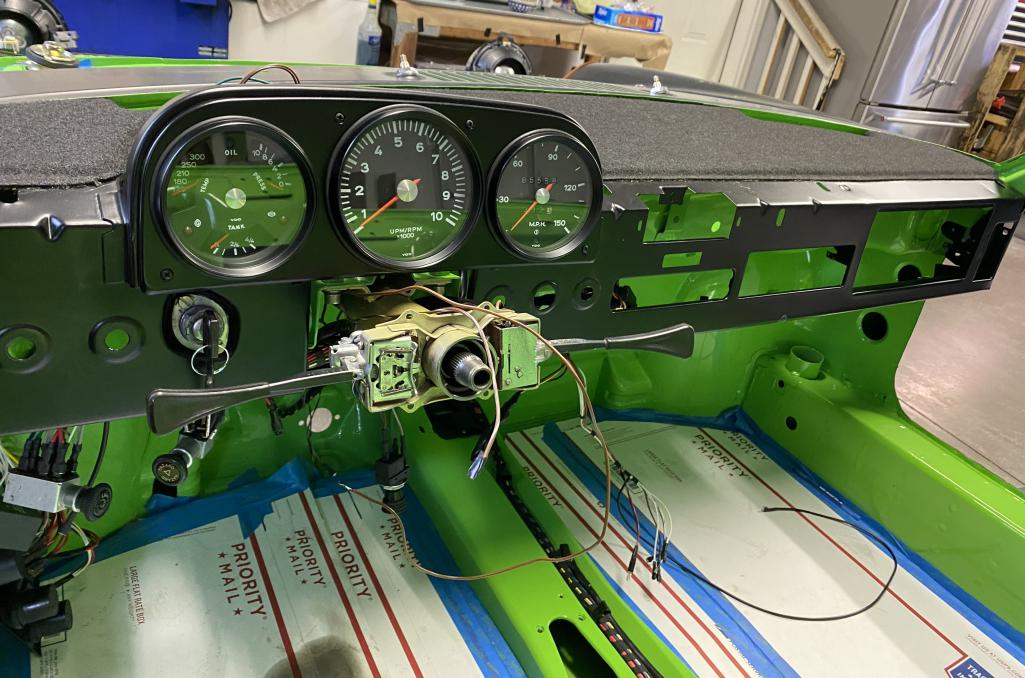
Posted by: Tom1394racing Feb 3 2024, 02:08 PM
I did a trial fit of my 911 steering clamshell onto the 911 steering column today expecting that I would need to modify it to fit. Many of the threads I have read mentioned modifying both the top and bottom sections. I found that the clamshell fit nicely without any need for modification. I am guessing that the dash trim fascia plate will need some trimming to clear the bottom of the clamshell or that there may be a problem with interference with the dash kneepad. Am I on the right track with this or am I missing something?

Posted by: Tom1394racing Feb 6 2024, 03:42 PM
Well.... I found out, as did many before me, that the 911 clamshell interferes with the dash facia plate and the knee pad. I ended up having to trim the fascia plate and the bottom of the clamshell to get everything to fit properly.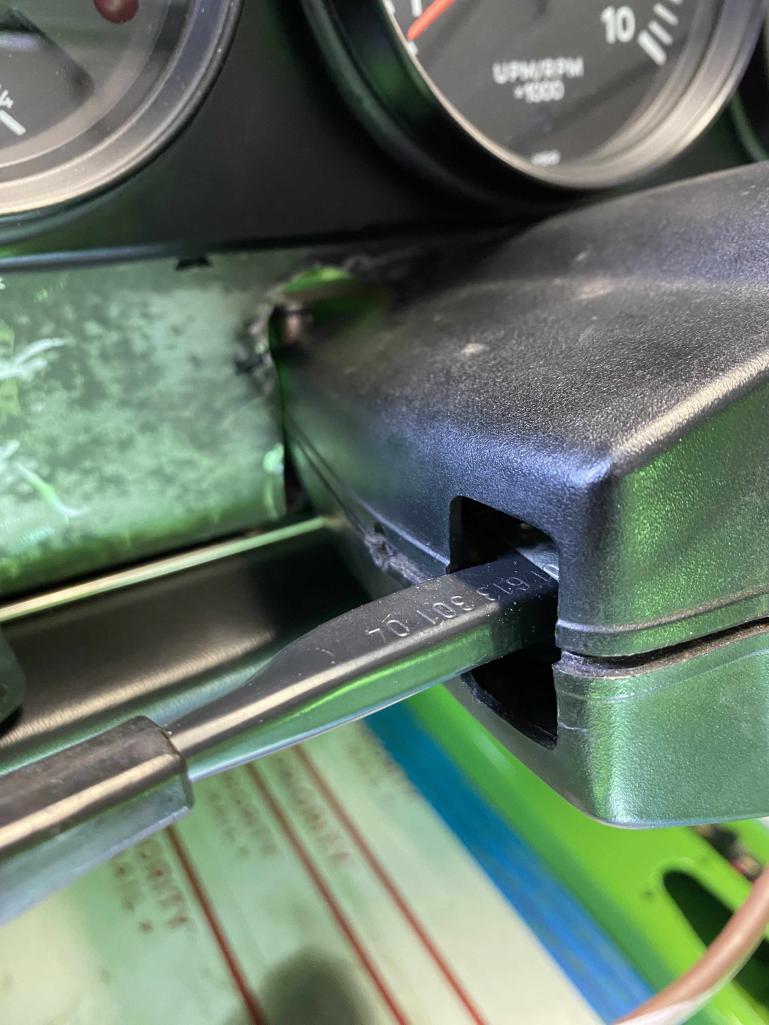
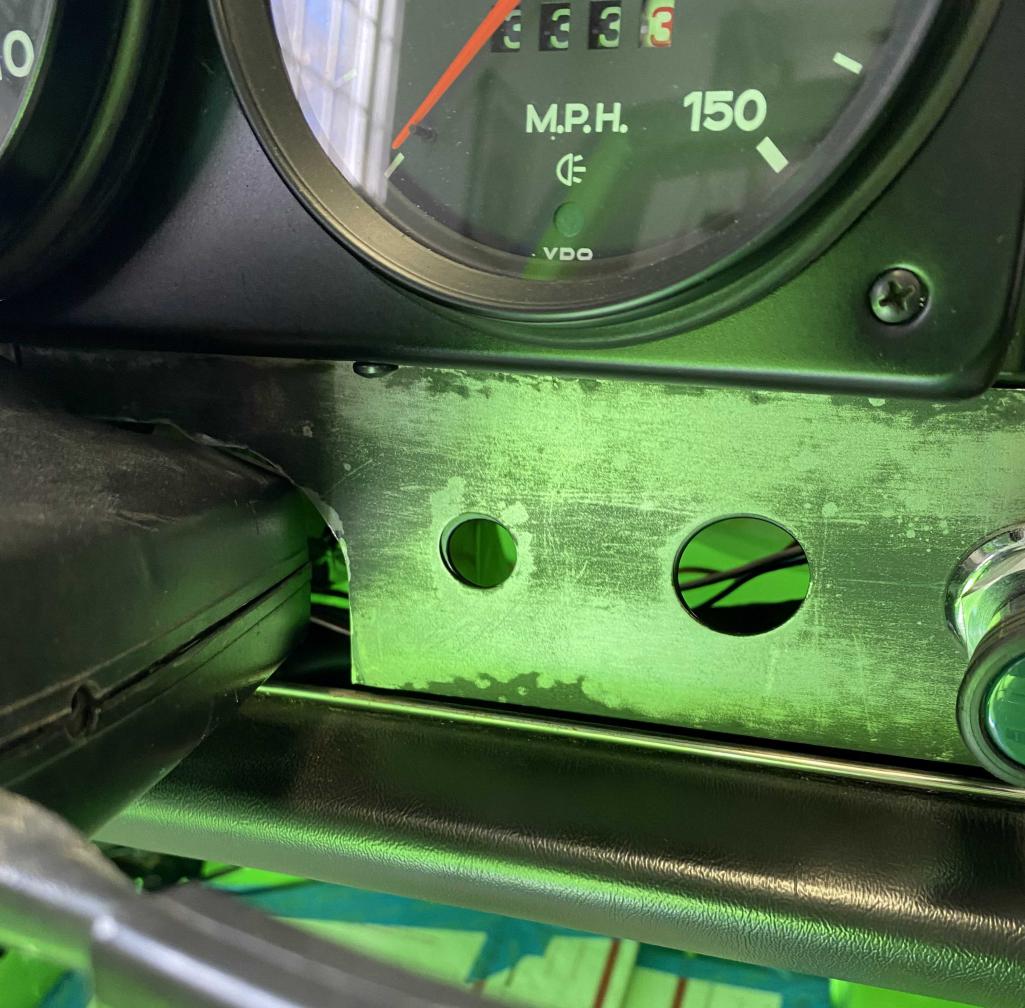
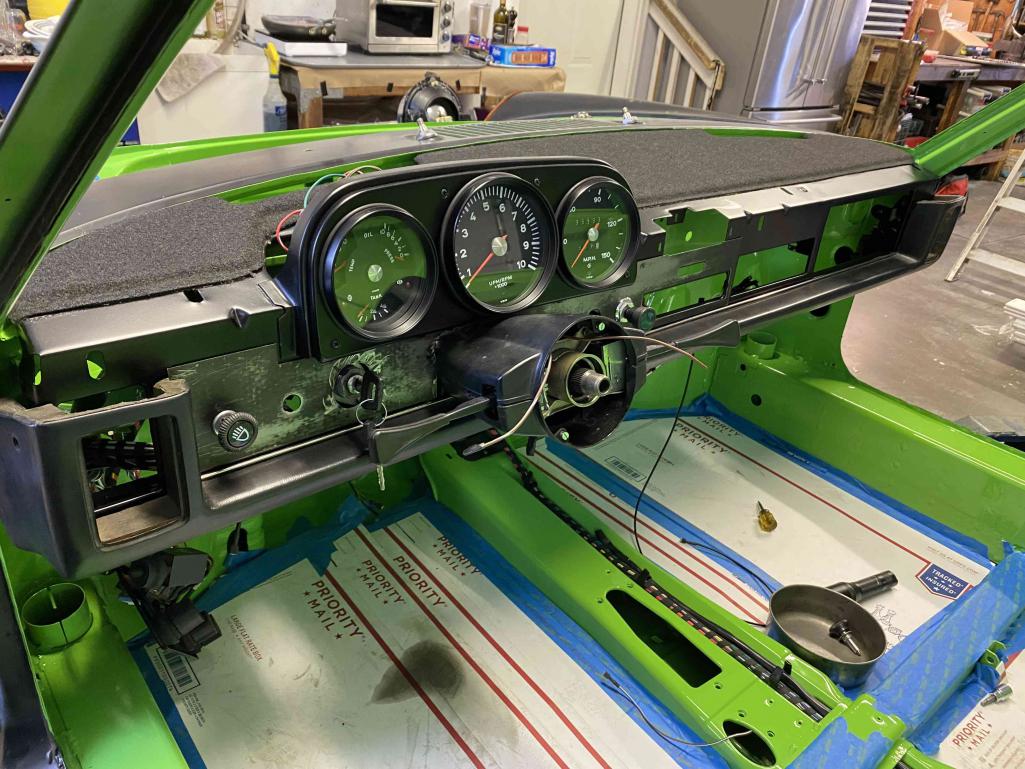
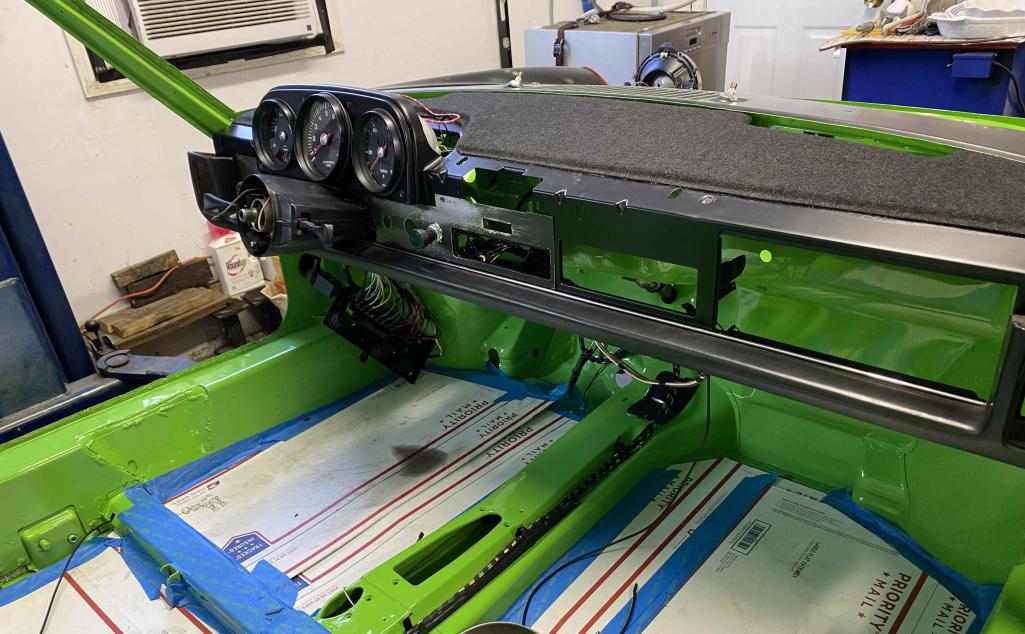
Posted by: Speedo Feb 8 2024, 12:50 PM
Tom,
I missed why you swapped to a 911 steering and clamshell?
Posted by: Tom1394racing Feb 9 2024, 05:52 AM
Tom,
I missed why you swapped to a 911 steering and clamshell?
Hi Lars
Since this is -6 GT tribute project, I wanted the GT look and feel in the cockpit. LHS ignition switch, 911 style T/S and wiper switches all required a swap to the early 911 steering column and clamshell.
Posted by: rick 918-S Feb 9 2024, 06:30 AM
Very nice. Love the color

Posted by: mb911 Feb 9 2024, 10:17 AM
Tom looks good. I need to revisit this on my car. It’s time to finish up some things I saved for later. Well it’s later.
Posted by: Tom1394racing Feb 9 2024, 04:26 PM
Tom looks good. I need to revisit this on my car. It’s time to finish up some things I saved for later. Well it’s later.
Thanks Ben. The turn signal switch was the biggest challenge. Had to study the wiring diagrams for both the early 911 and the 914 six to figure it out. I have plenty of notes so if I can help in anyway let me know.
Posted by: mb911 Feb 9 2024, 06:10 PM
Tom looks good. I need to revisit this on my car. It’s time to finish up some things I saved for later. Well it’s later.
Thanks Ben. The turn signal switch was the biggest challenge. Had to study the wiring diagrams for both the early 911 and the 914 six to figure it out. I have plenty of notes so if I can help in anyway let me know.
Thanks I need to address that very soon. Turn signals work great. No horn though. Need to get that figured out.
Posted by: Tom1394racing Feb 10 2024, 05:45 AM
Tom looks good. I need to revisit this on my car. It’s time to finish up some things I saved for later. Well it’s later.
Thanks Ben. The turn signal switch was the biggest challenge. Had to study the wiring diagrams for both the early 911 and the 914 six to figure it out. I have plenty of notes so if I can help in anyway let me know.
Thanks I need to address that very soon. Turn signals work great. No horn though. Need to get that figured out.
I’m using a 914 six wiring harness. On that, the horn connections came through the 12 pin connector in the chassis harness.
Posted by: mb911 Feb 10 2024, 06:24 AM
Tom looks good. I need to revisit this on my car. It’s time to finish up some things I saved for later. Well it’s later.
Thanks Ben. The turn signal switch was the biggest challenge. Had to study the wiring diagrams for both the early 911 and the 914 six to figure it out. I have plenty of notes so if I can help in anyway let me know.
Thanks I need to address that very soon. Turn signals work great. No horn though. Need to get that figured out.
I’m using a 914 six wiring harness. On that, the horn connections came through the 12 pin connector in the chassis harness.
Oh so I used a 4 harness and that’s what I need to trace back.
Posted by: Tom1394racing Feb 10 2024, 09:46 AM
Moving forward, I started the install of the oil cooling system. After some persuasion and fitting of weather stripping, I got the ductwork to fit over the chassis reinforcement bar near the inlet cut out and seal up nicely. I'll be using some stainless steel mesh screen to cover the outlet in the floor.
I am using two 11 foot sections of 12AN steel braided hose to run from the cooler to the T-stat. This seemed like the simplest solution and the hoses fit nicely in the enlarged openings in rocker sill brackets. I’ll be using a Mocal T-stat located somewhere in the lower RHS of the engine compartment. 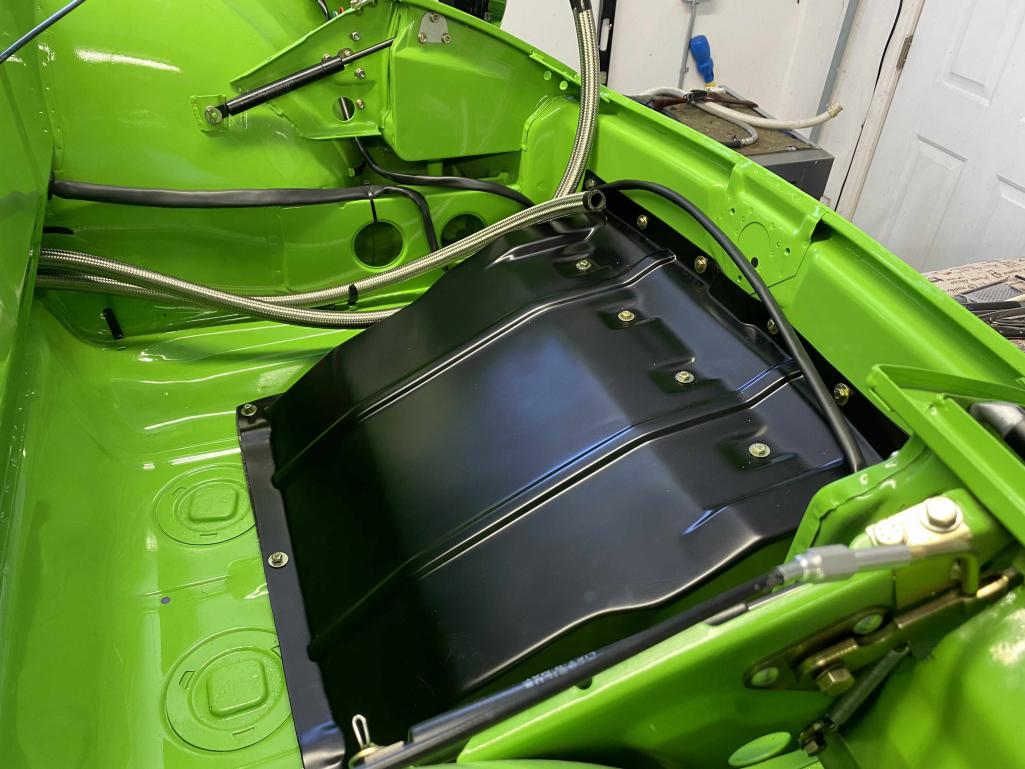
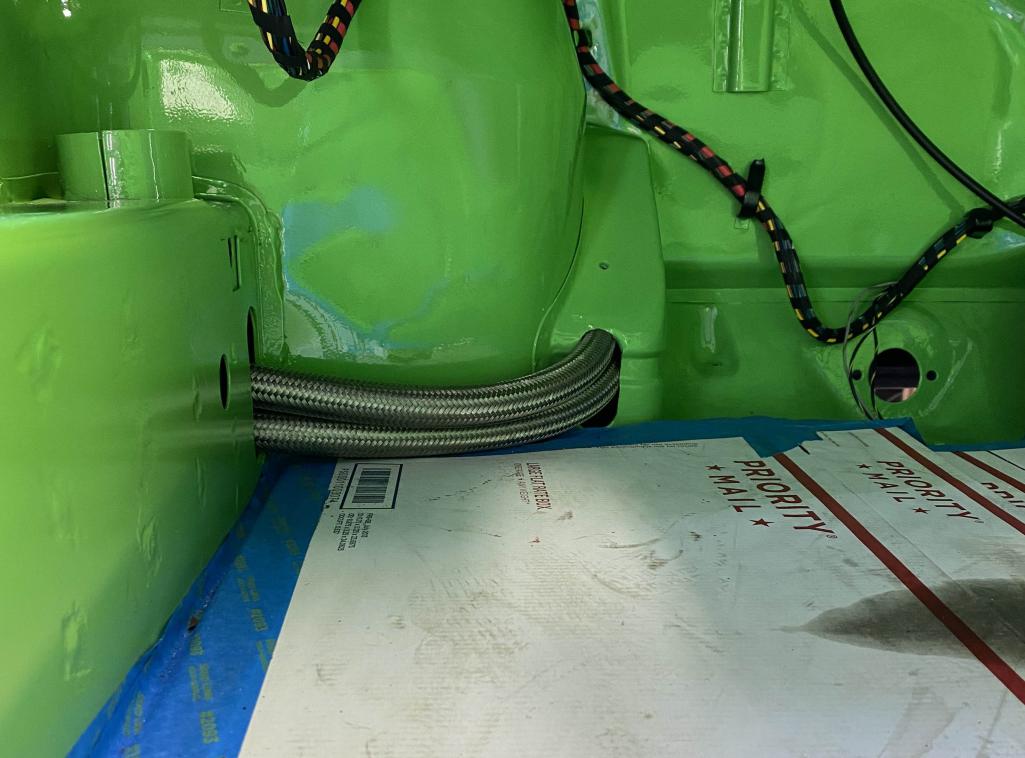
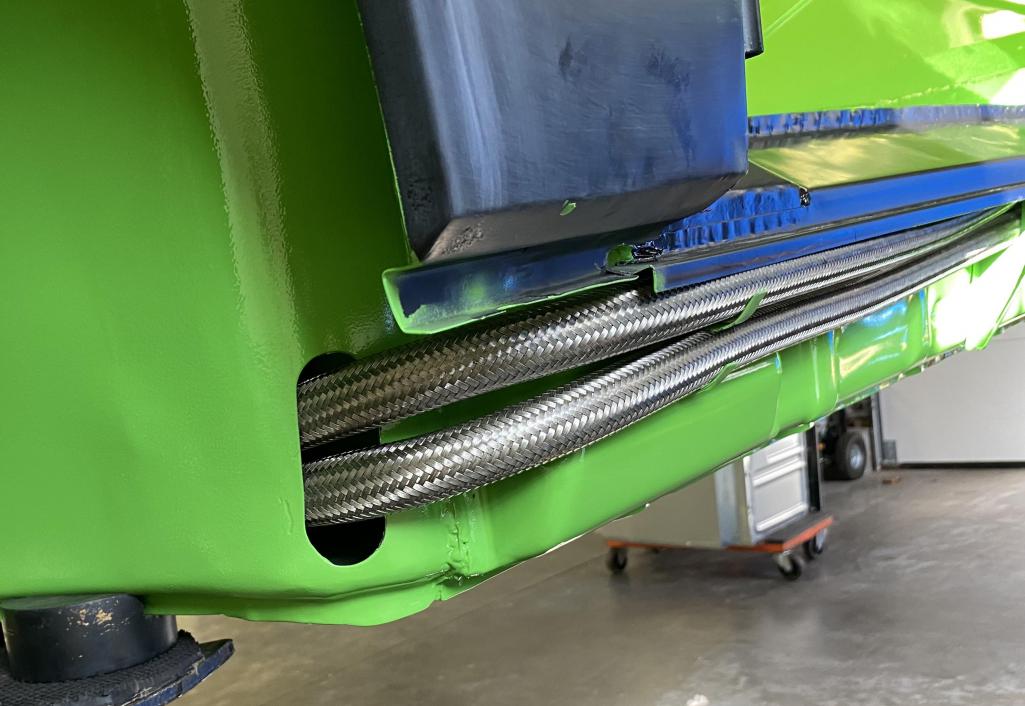
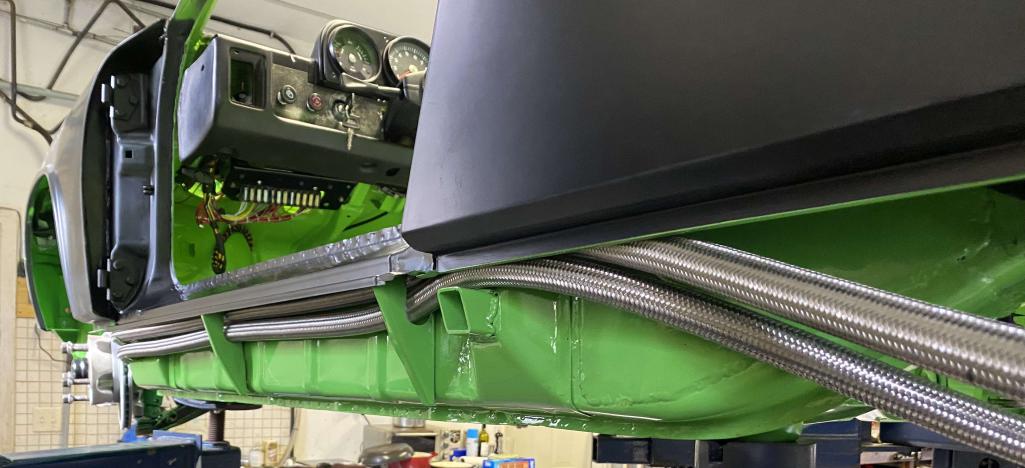
Posted by: mb911 Feb 10 2024, 09:51 AM
Very clean
Posted by: Tom1394racing Feb 16 2024, 06:07 AM
My seats from Stefan at GTS Classics finally arrived yesterday. They are the Spa Francorchamps model. Well worth the wait!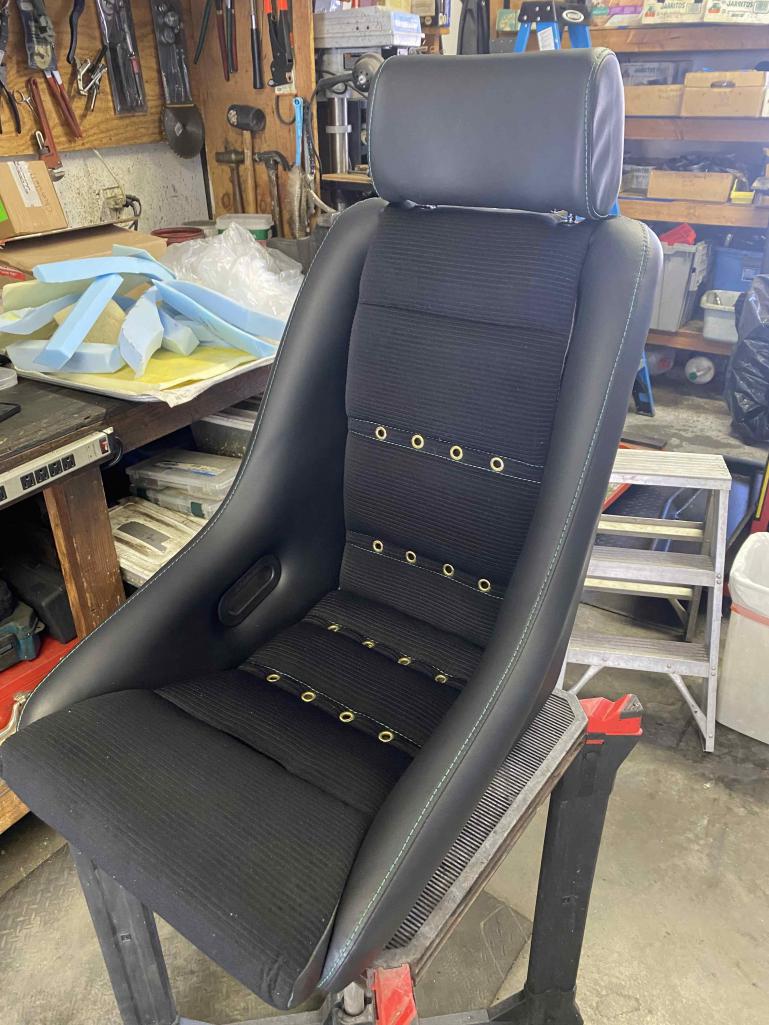
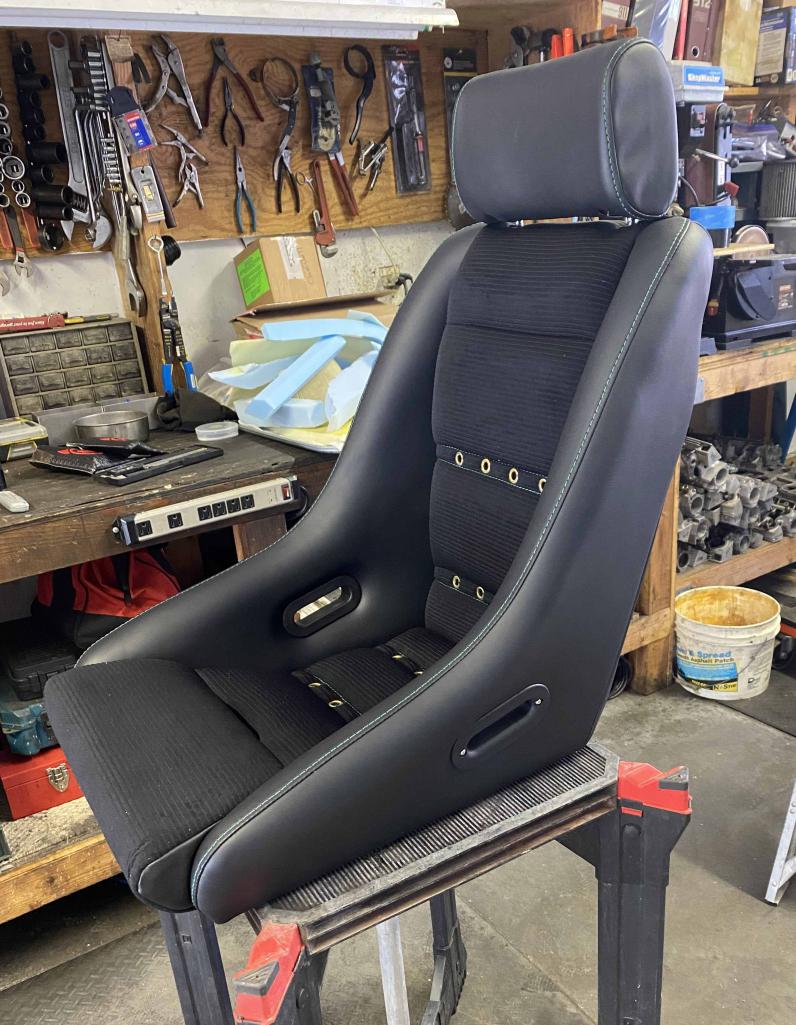

Posted by: Luke M Feb 16 2024, 07:58 AM
Hi Tom,
The Gt project looks like is coming along great.
Question about the front oil cooler install.
Are you using the PMS/Setrab oil cooler kit?
It looks like the cooler itself is mounted to the upper cooler housing (per post #192)
is that correct? Reason I ask is that I've seen it where some coolers are mounted to the chassis side vs the cooler cover. I purchased a steel replica GT oil cooler cover made by Mittlemotor in Germany to use on my 6 project. I never really saw a full install of this cooler setup being installed from start to finish. I've installed a cooler in my brothers 6 GT but mounted the cooler to the chassis side. I did use rubber insulators on my brothers cooler mounting points but still feel like that wasn't the correct way to do it.
I'm just wondering which way would be best or the correct way to do the install.
Thanks,
Posted by: Tom1394racing Feb 16 2024, 10:17 AM
Hi Luke
The cooler is a Setrab 464 that I purchased from BAT. The cooling shrouds are fiberglass from Getty.
The cooler is bolted to a custom mount bar that then bolts to the top FG shroud.
Fitting this system to the chassis did present somewhat of a challenge as the added stiffness bar behind the cooler opening did interfere with the lower shroud. The FG construction did allow the lower shroud to be bent over the bar. The resulting gaps in the fit between the upper and lower shroud were filled with weather stripping form Home Depot.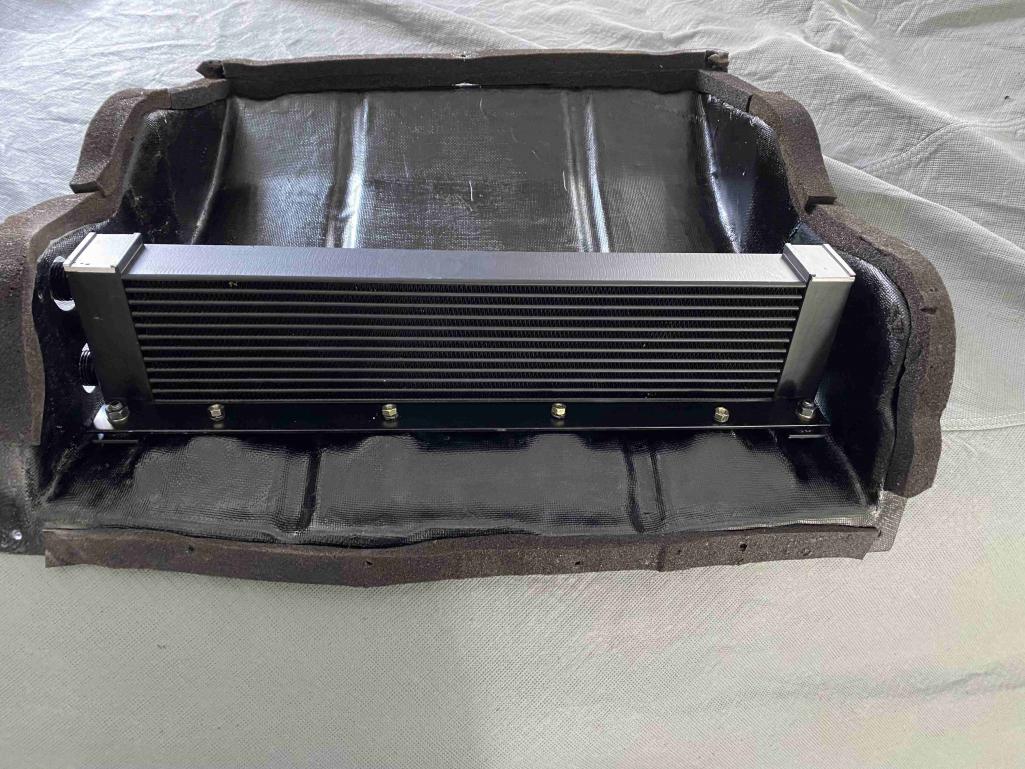
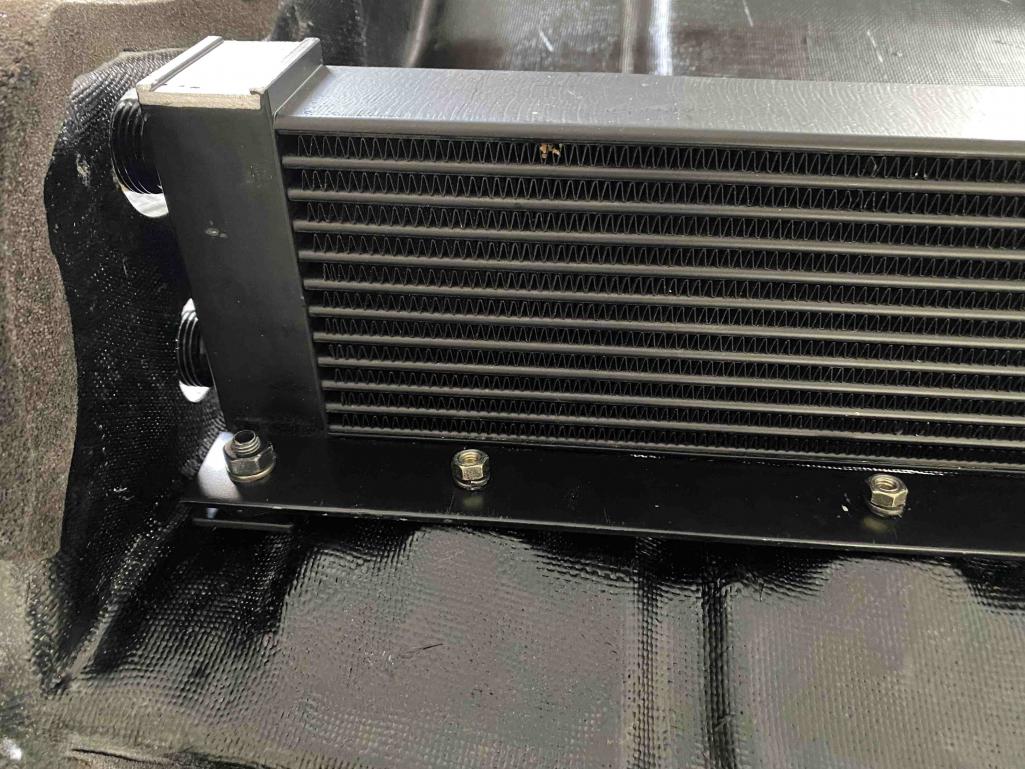
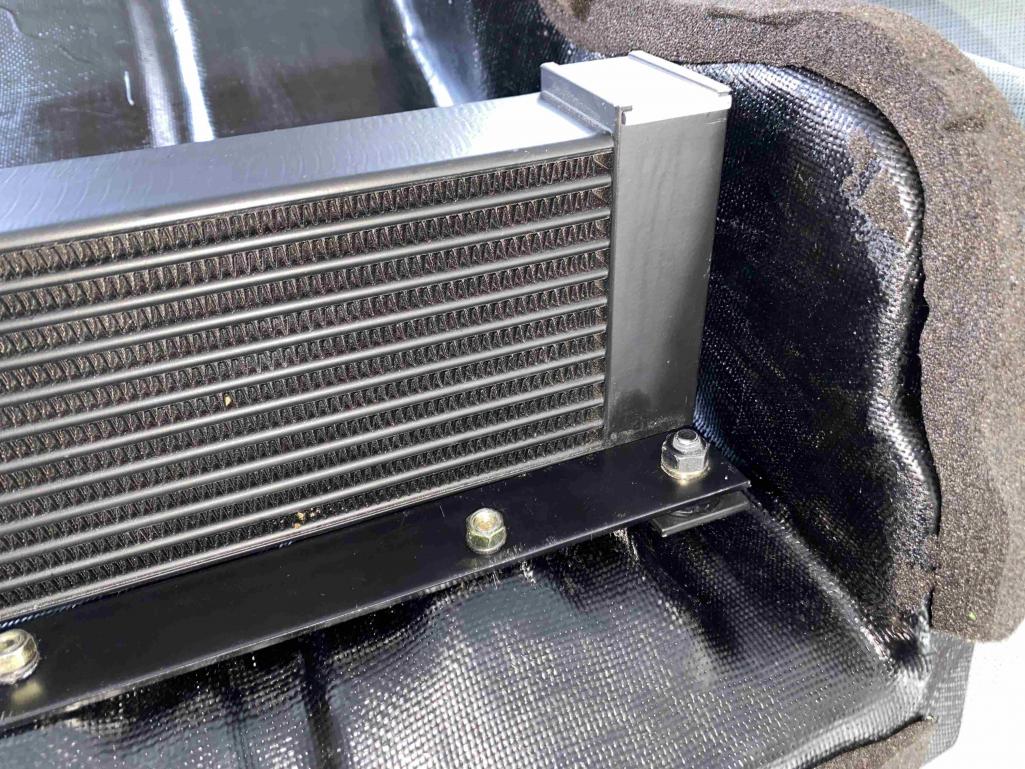
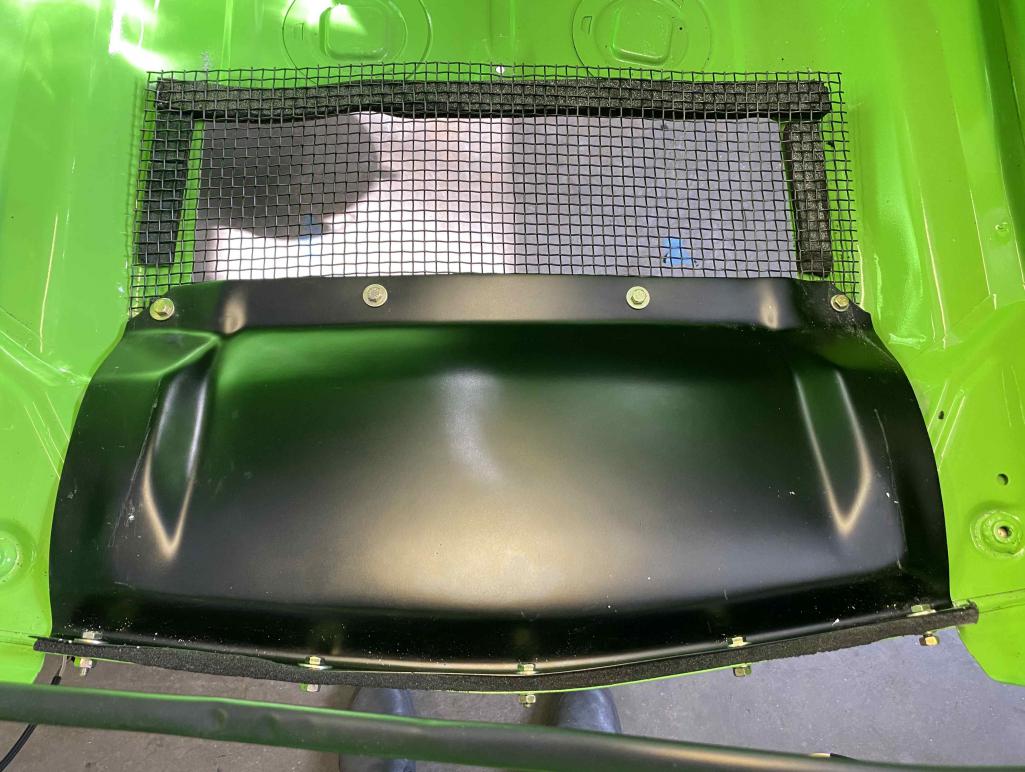
Posted by: Tom1394racing Feb 21 2024, 12:40 PM
After some adjusting of the seat rails, I was able to install my new seats from GTS Classic. They look and fit great especially with the 380 mm repro steering wheel and new retro Repa belts.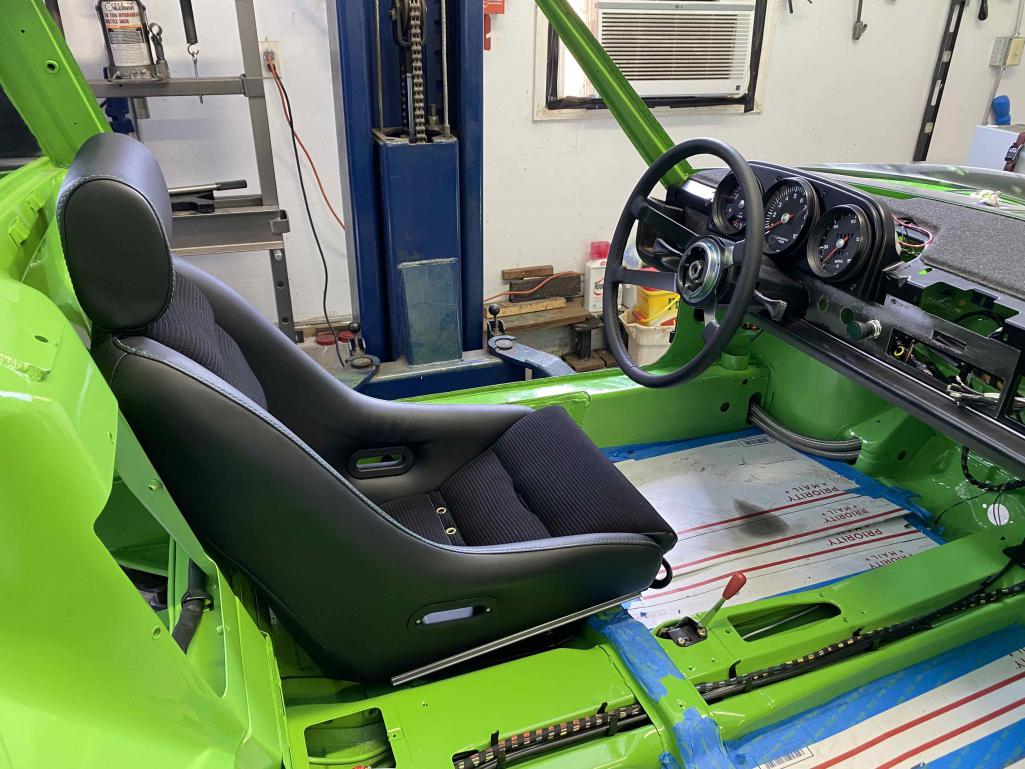
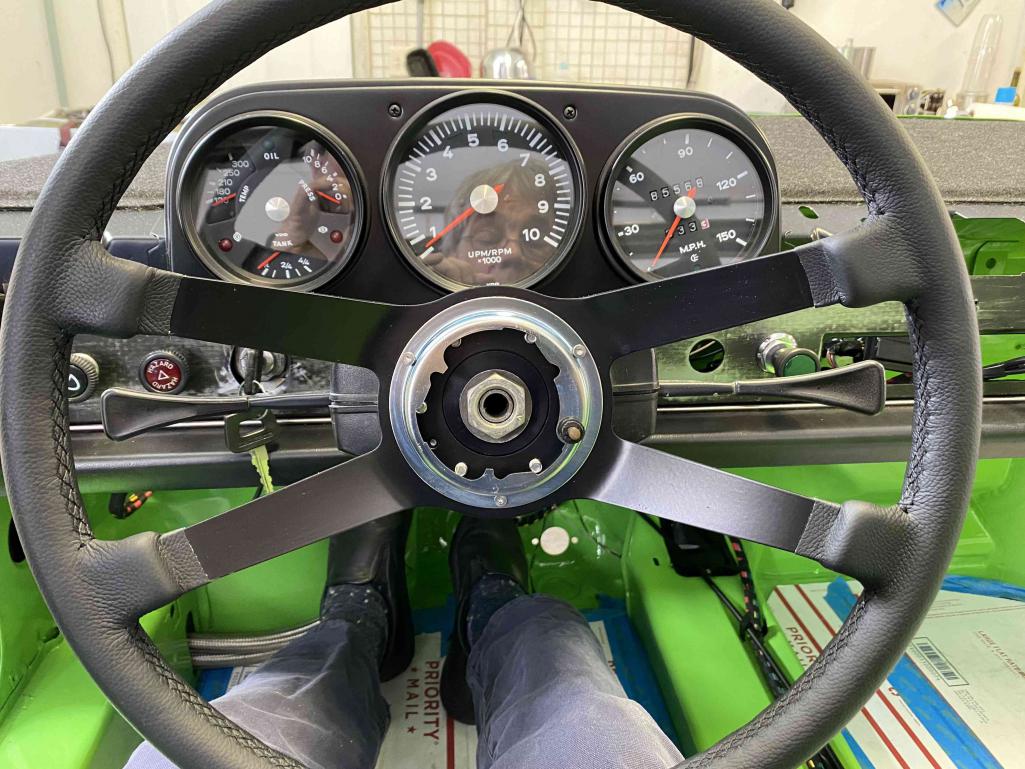
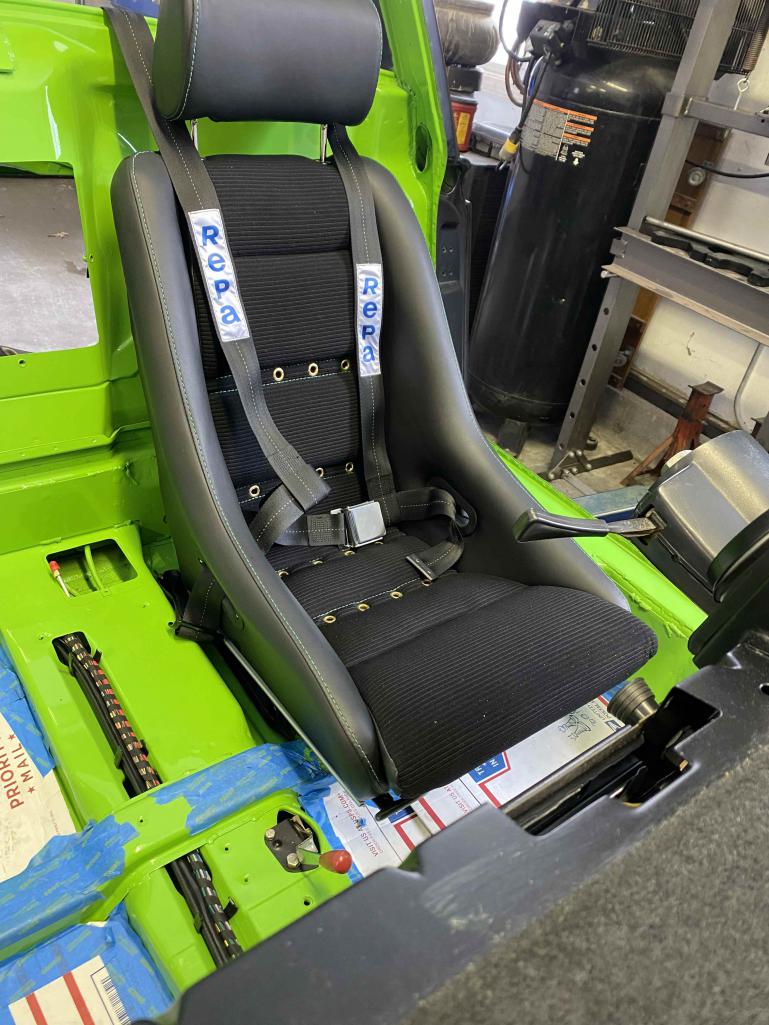
Posted by: SirAndy Feb 21 2024, 12:56 PM
Put some black tar goo on top of the front shock towers, not only will it be period correct but it will also throw the concours guys for a loop.
Posted by: racer914 Feb 21 2024, 05:08 PM
Car looks great Tom! I wish I was this far along...I should have it back from paint next month and I can start the reassembly process.
Posted by: Retroracer Feb 22 2024, 09:38 AM
Tom - I went for a similar plan & routing for the oil lines to/from the cooler; flexible AN lines from the thermostat (rear LHS in my build) up the rocker panels and popped through to the frunk. Less in-line connections to fail/weep than the hard lines.
Nice seats BTW! Keep the posts coming,
- Tony
Posted by: Tom1394racing Feb 22 2024, 09:40 AM
Put some black tar goo on top of the front shock towers, not only will it be period correct but it will also throw the concours guys for a loop.
In the plan, after alignment...Thanks
Posted by: Retroracer Feb 22 2024, 09:48 AM
Production sixes had the black goop on the front strut towers for water ingress; in the photo records, I have noticed NO goop on any factory built GTs. FWIW,
- Tony
Posted by: eric9144 Feb 22 2024, 11:12 AM
Love the seat choice 
Posted by: TRS63 Feb 24 2024, 01:03 AM
Seats are looking fantastic!
Antoine
Posted by: Tom1394racing Mar 15 2024, 08:01 AM
Time for another update. Lots of distractions the past couple of weeks have kept me out of the garage.
Since my last update, one of the seats had to go back to Stefan for a headrest correction. I have to say that he was very responsive and turned the seat around very quickly.
I installed all the tunnel lines, cables, the Tangerine Racing shift bushing, the pedal cluster and the brake system. Just waiting on the rear soft lines and some crush washers to complete the system and do the bleeding. I was pleased to see that all the components seemed to fit nicely around the Mad Dog engine mount.
With the electricals now sorted, next up I plan to remove the metal dash, paint the cowl area satin black, complete the dash fascia, install the restored dash top and reinstall the dash. Once those tasks are complete, I plan to build the engine.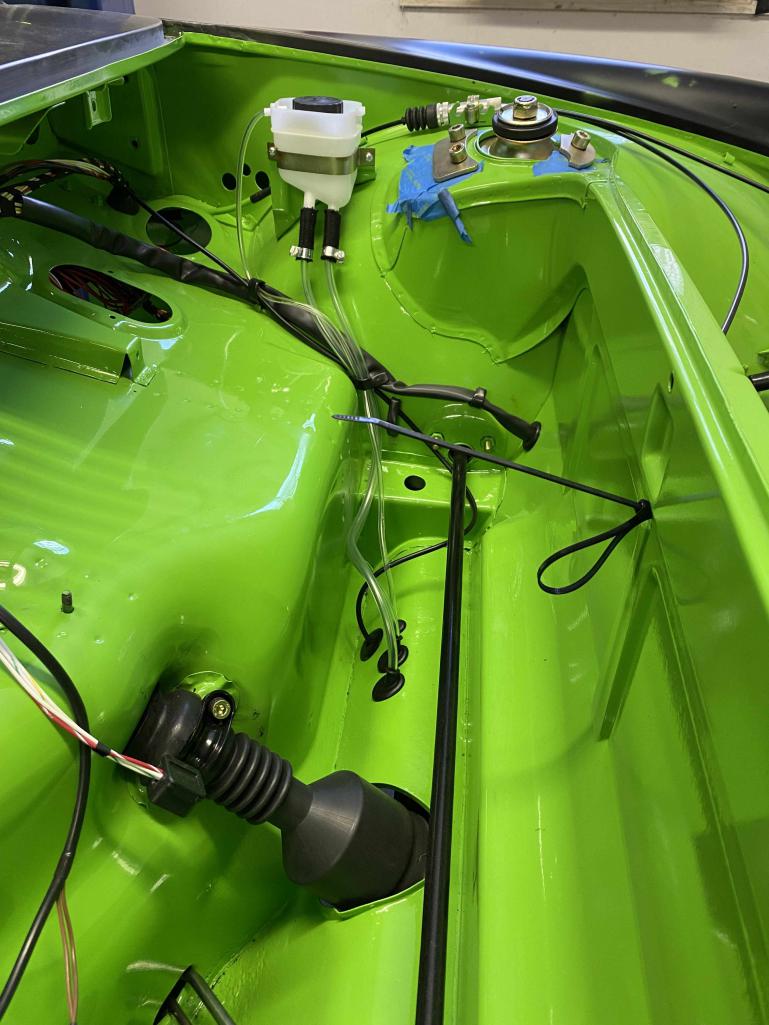

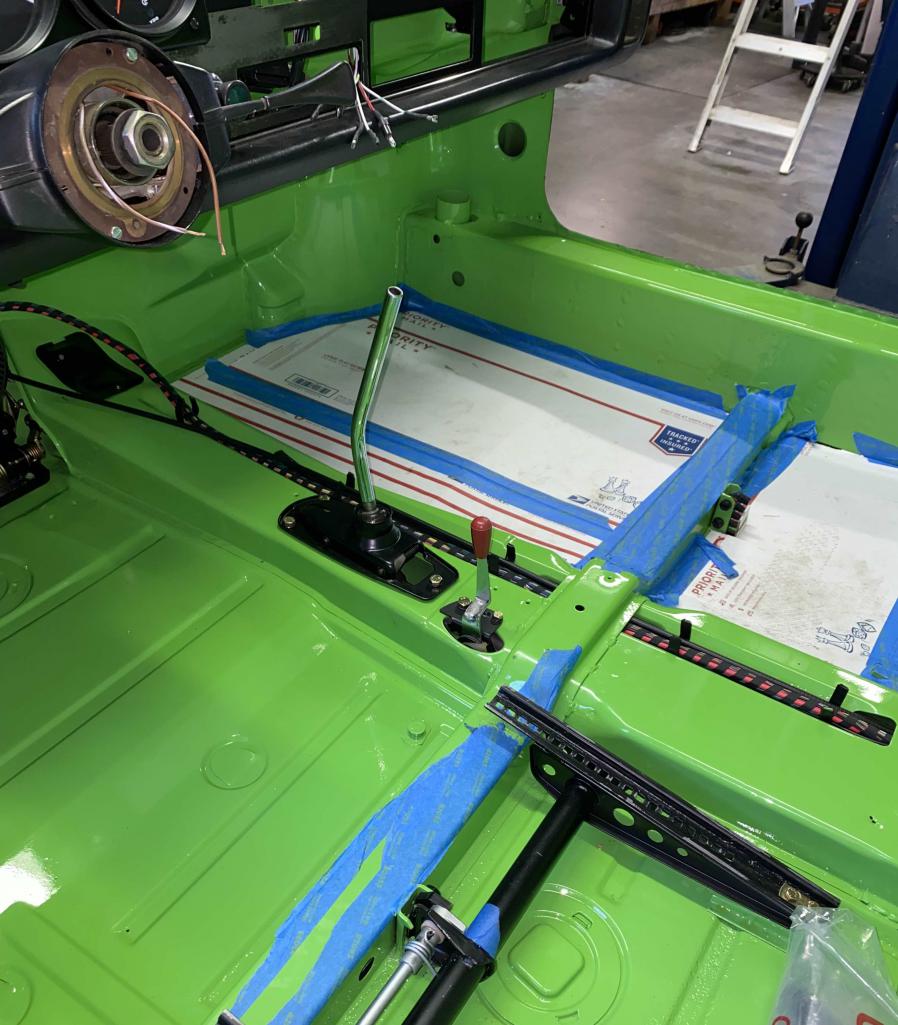
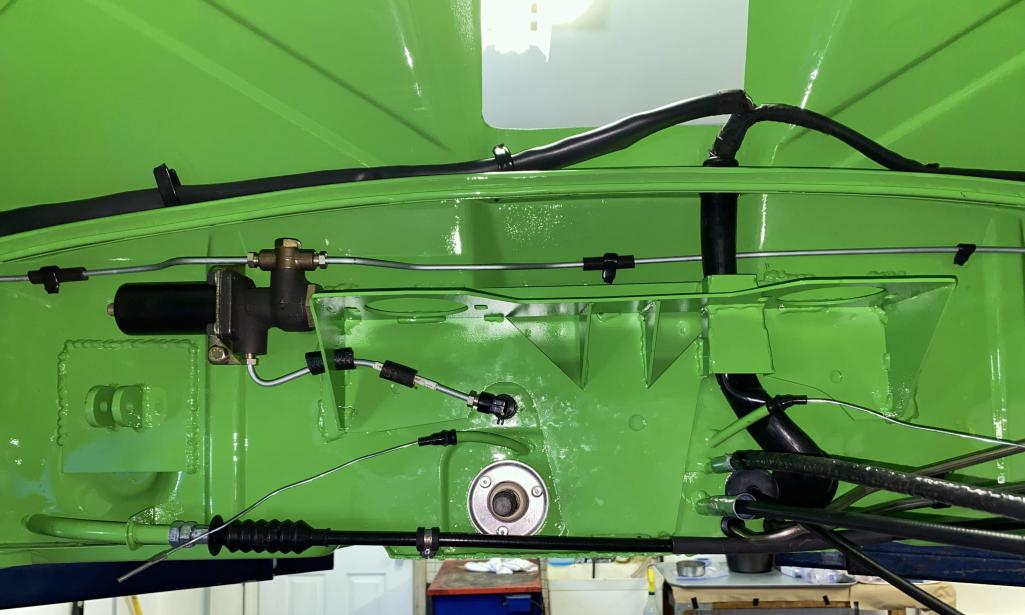
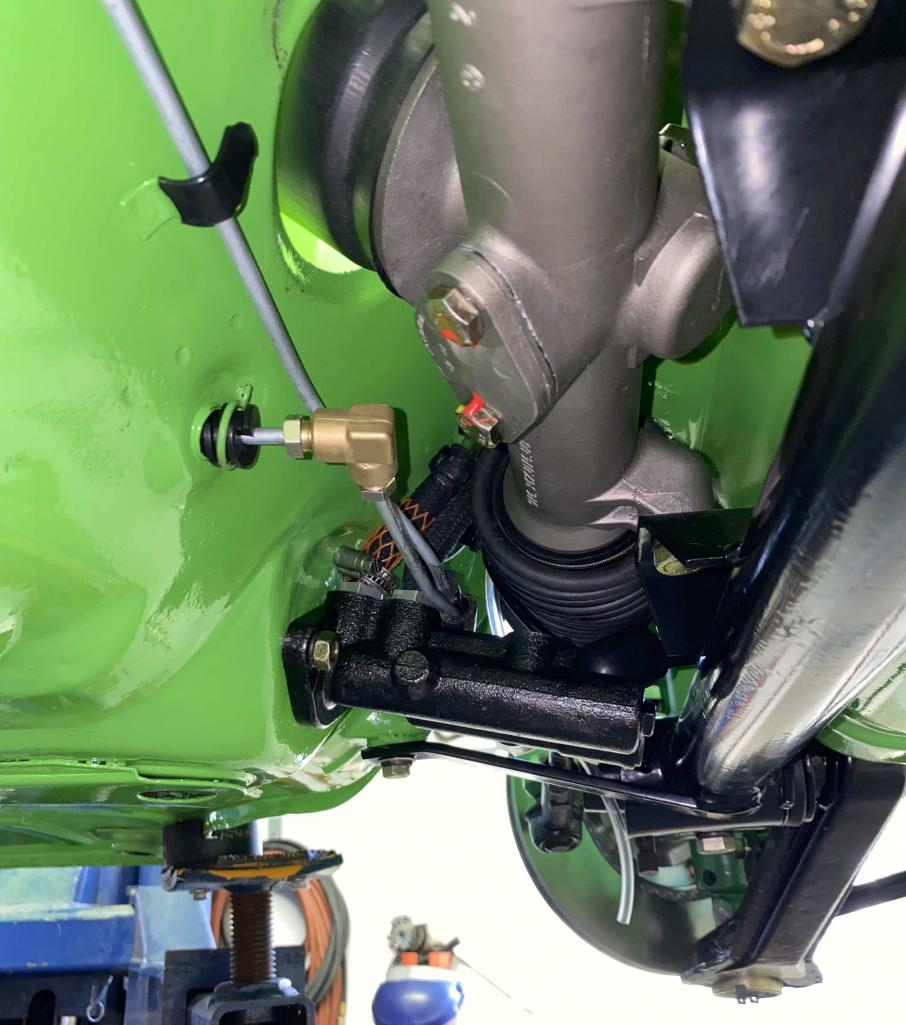
Attached thumbnail(s)
Posted by: mepstein Mar 15 2024, 10:08 AM
Looks super clean.
Is this for the tangerine kit?
Attached image(s)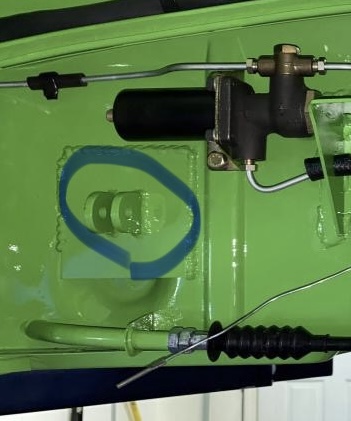
Posted by: Tom1394racing Mar 15 2024, 02:34 PM
Looks super clean.
Is this for the tangerine kit?
Thanks Mark
Those are the "dog-eared" attachments for the trailing arm pivot points stabilizers. Most factory GT cars used these. I am hoping the stabilizing rods will not interfere with my oil lines and T-stat that I am planning to locate underneath the engine sheet metal on the LHS of the engine compartment.
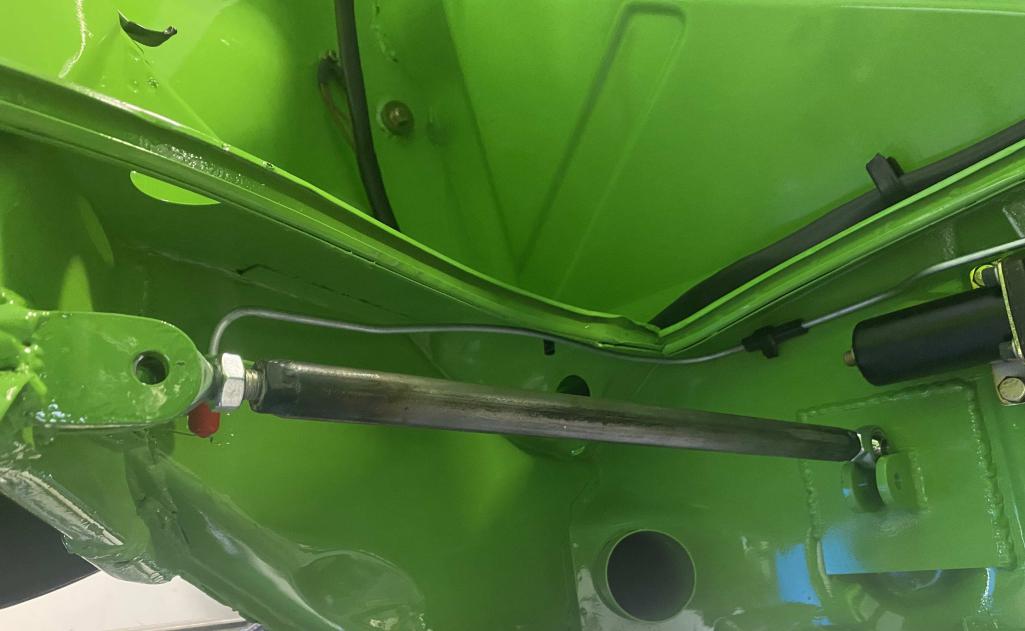
Posted by: mepstein Mar 15 2024, 05:25 PM
Looks super clean.
Is this for the tangerine kit?
Thanks Mark
Those are the "dog-eared" attachments for the trailing arm pivot points stabilizers. Most factory GT cars used these. I am hoping the stabilizing rods will not interfere with my oil lines and T-stat that I am planning to locate underneath the engine sheet metal on the LHS of the engine compartment.
I have the same kit and same as you, planning on hanging the thermostat in that location. Thanks for being the test pilot.
Posted by: Tom1394racing Mar 16 2024, 05:15 AM
I am planning to use Ben McFarland‘s kit for the engine oil lines. The case suction line runs around the back of the engine and over the gearbox to the thermostat. Just like the Early 911. I’ll be using a Mocal thermostat . I know it’s a little tricky making some of the connections to the oil tank. My plan is to mount the engine first and then finalize the locations of the thermostat oil lines, CD boxes, coils, fuel lines, and throttle cable.
Posted by: Tom1394racing Mar 25 2024, 06:04 PM
Another update.
With the electricals mostly sorted out, I decided to remove the dash and install the dash top and dash facia off the car. Everything I've read and seen says it much easier to install these on the bench. The dash top is the original that was restored by Just Dashes, Very nice. Since I am going with the GT look without the glovebox door and radio, we removed the lock surround on the dash and I fabricated a radio delete plate.
I also painted the dash cowl while the dash was out.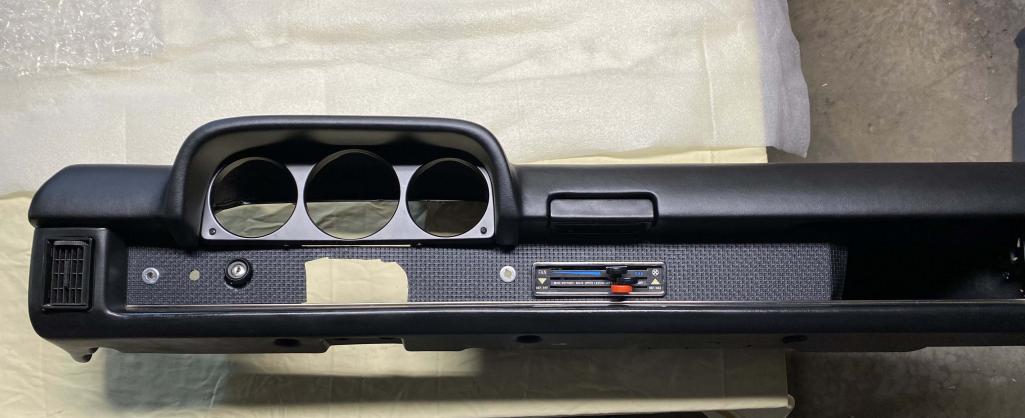
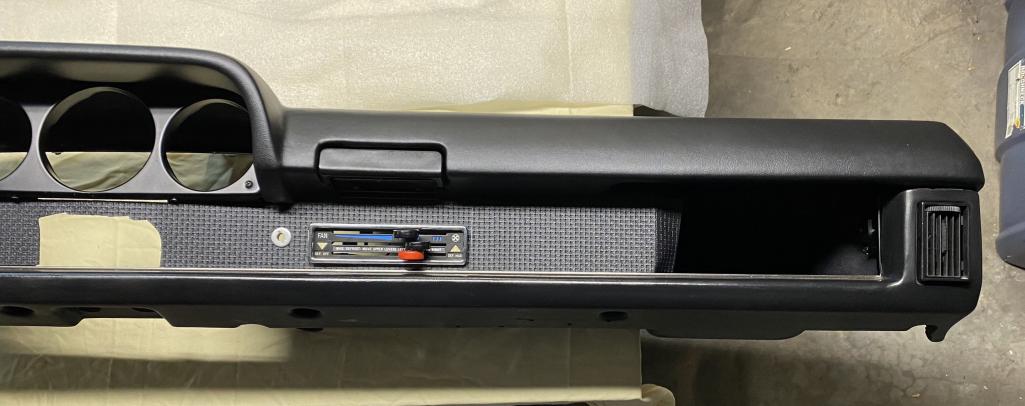
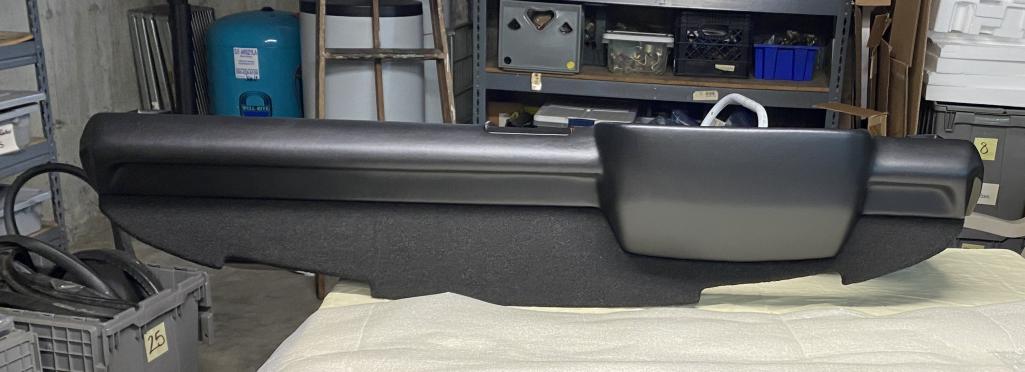
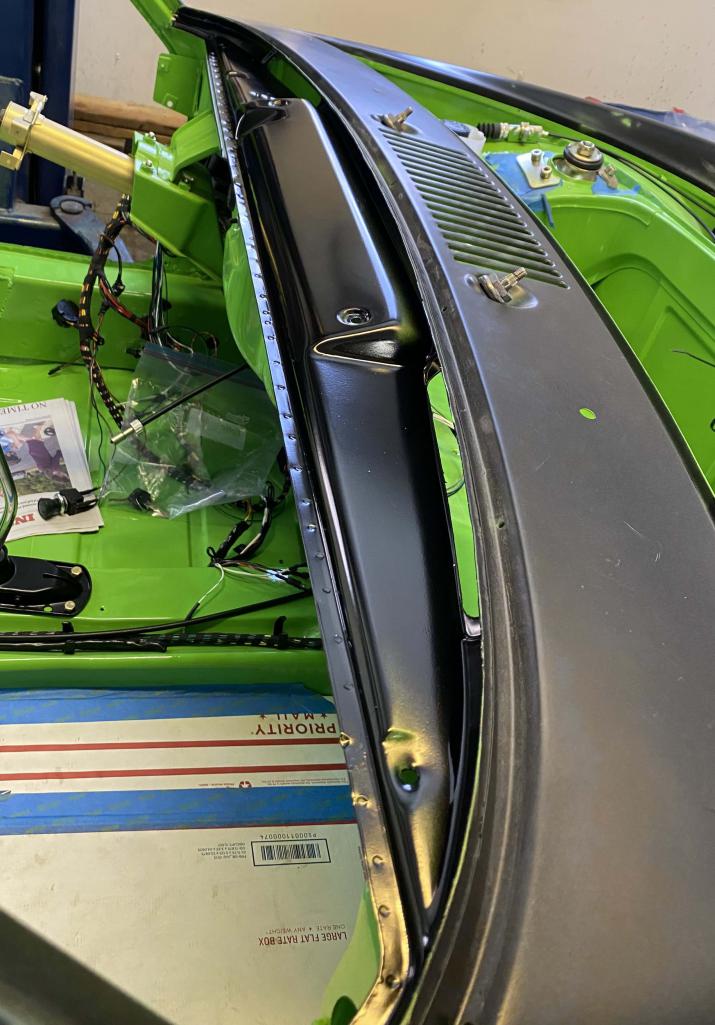
Posted by: Tom1394racing Mar 29 2024, 07:24 AM
Had the chance to spend a few consecutive days in the garage this week working on the 914.
I reinstalled the dash, reconnected the gauges & switches and rechecked the electricals. All good.
I then focused on the ventilation system. A lovely control panel from Dion arrived last week and found a home on my restored dash. I also installed the control boxes and cables following the great writeup from ElectroClassics EV.
https://914electric.wordpress.com/2011/03/18/take-the-heat/
I had to belt sand some of the plastic surface on the bottom of the LHS control box to get it to fit without too much force. Now I am looking forward to the control box holding clips courtesy of John Hora
The challenging task of installing the fan and fresh air plenum will wait until after the car has been painted to avoid any overspray through the cowl grills.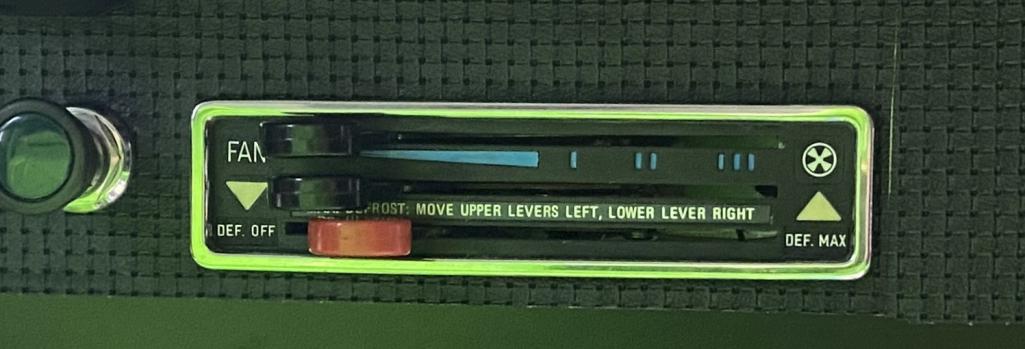
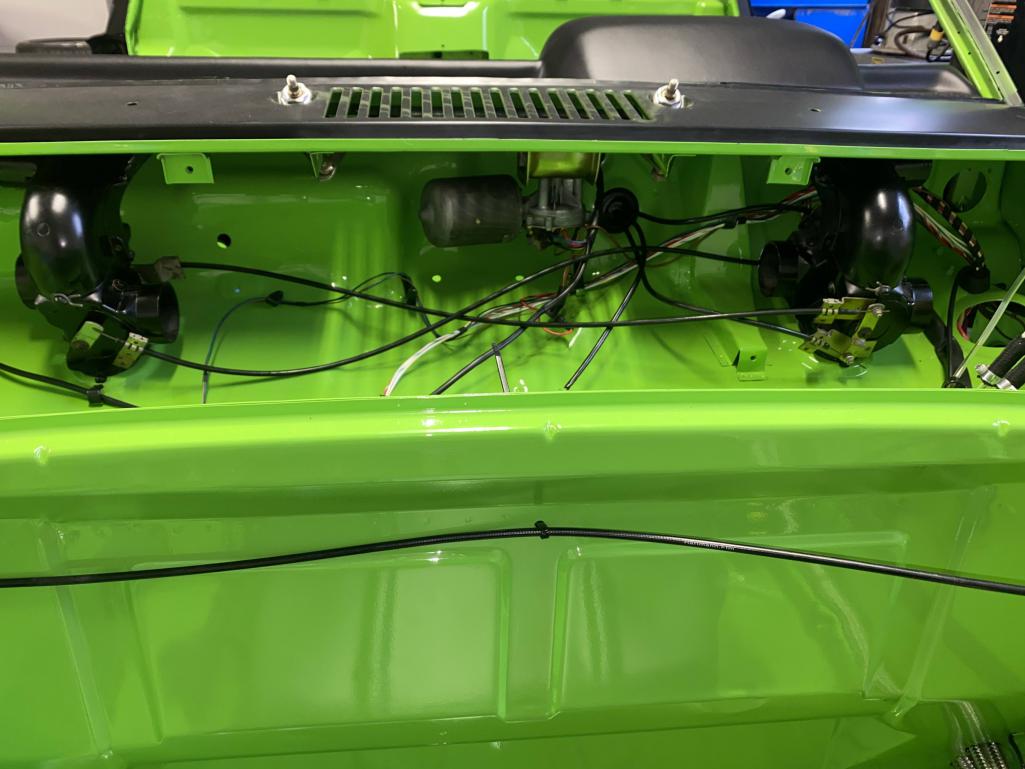
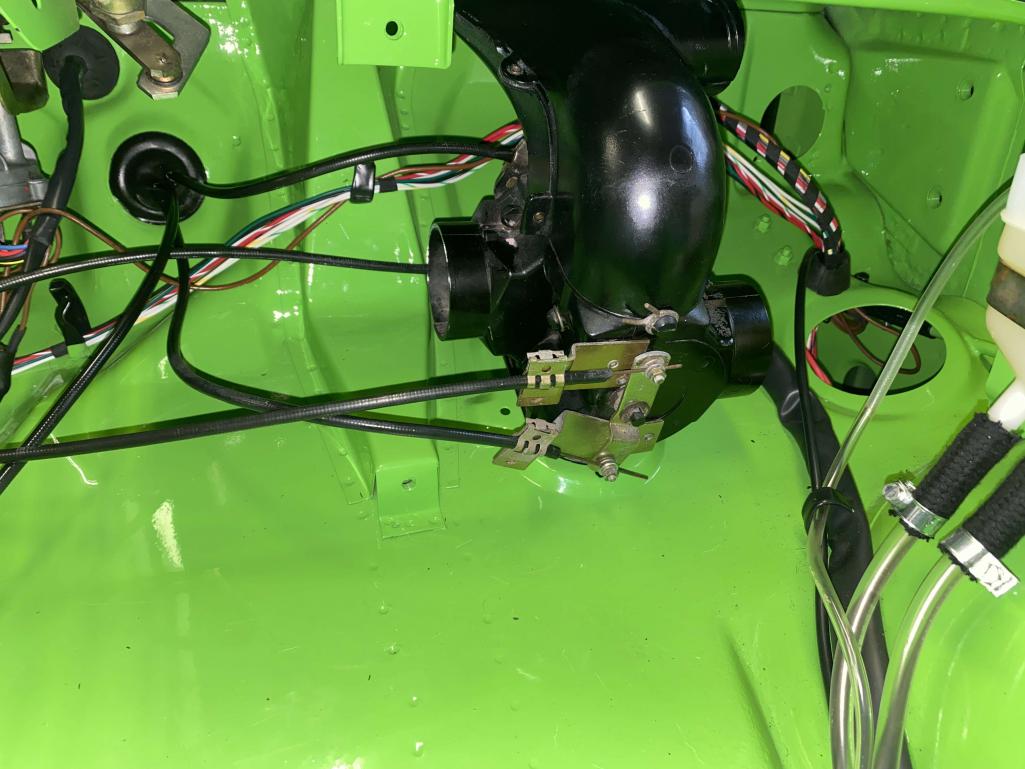
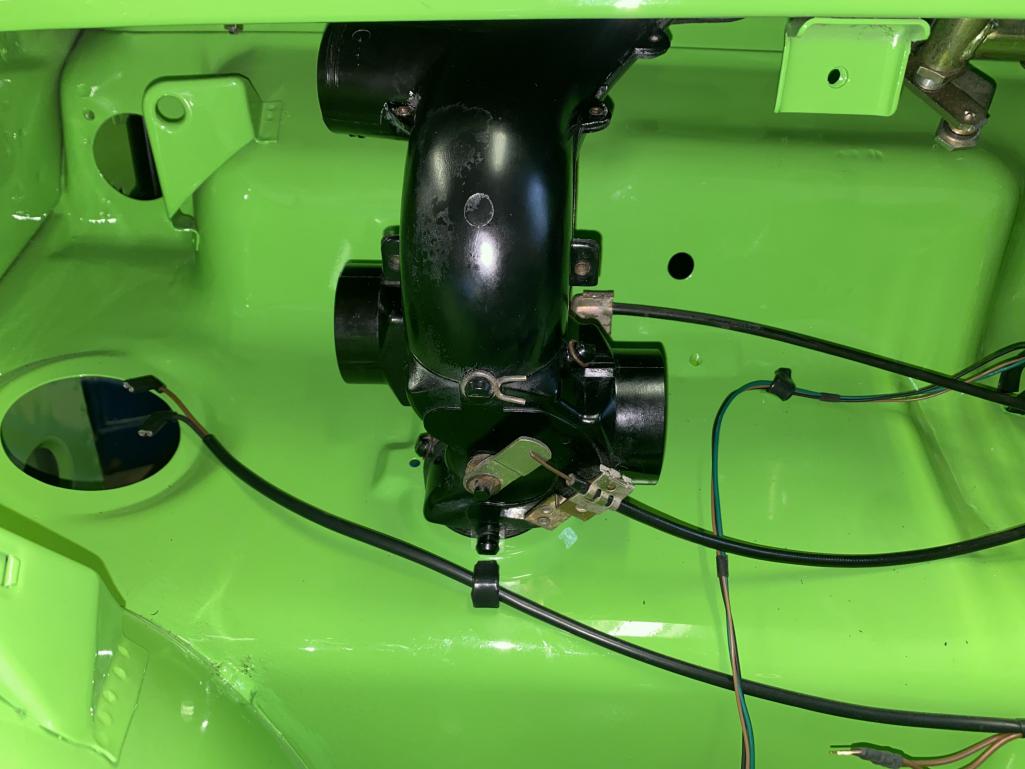
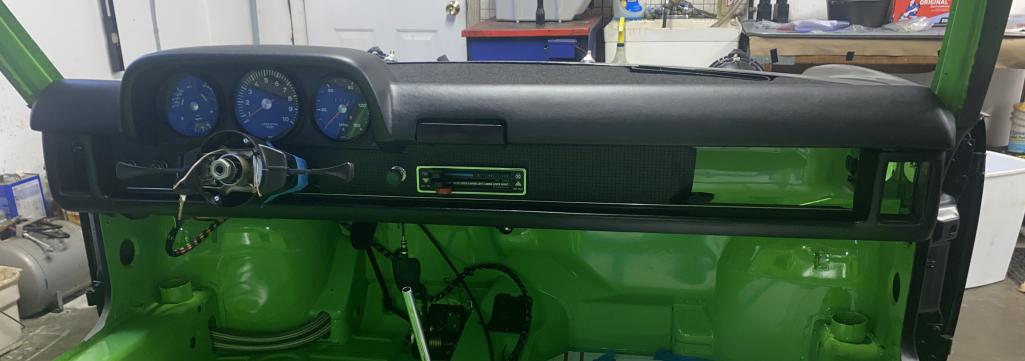
Posted by: East coaster Mar 29 2024, 08:18 AM
Looks fantastic! Just curious why the wipers were installed before paint?
Posted by: Cairo94507 Mar 29 2024, 08:18 AM
That looks beautiful Tom; great work.
Posted by: Tom1394racing Mar 29 2024, 09:03 AM
Looks fantastic! Just curious why the wipers were installed before paint?
I talked this over with the painter, Ken at Auto Associates, who has a tooling to cover the wiper shafts.
Posted by: Dion Mar 30 2024, 10:15 AM
The Dash looks awesome!
Just beautiful work.
Posted by: rick 918-S Mar 30 2024, 10:34 AM
One of the best colors
Posted by: Tom1394racing Apr 4 2024, 12:05 PM
I finished installing the seats & dash and then put the car on roller wheels & tires for some photos. Starting to look and feel like a car again. Next up will be the engine build.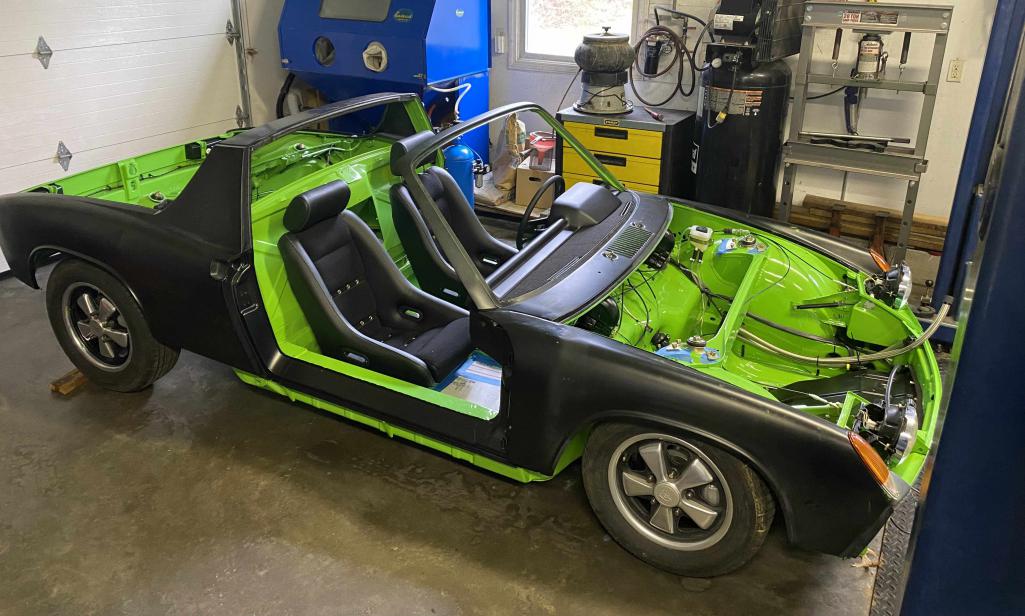
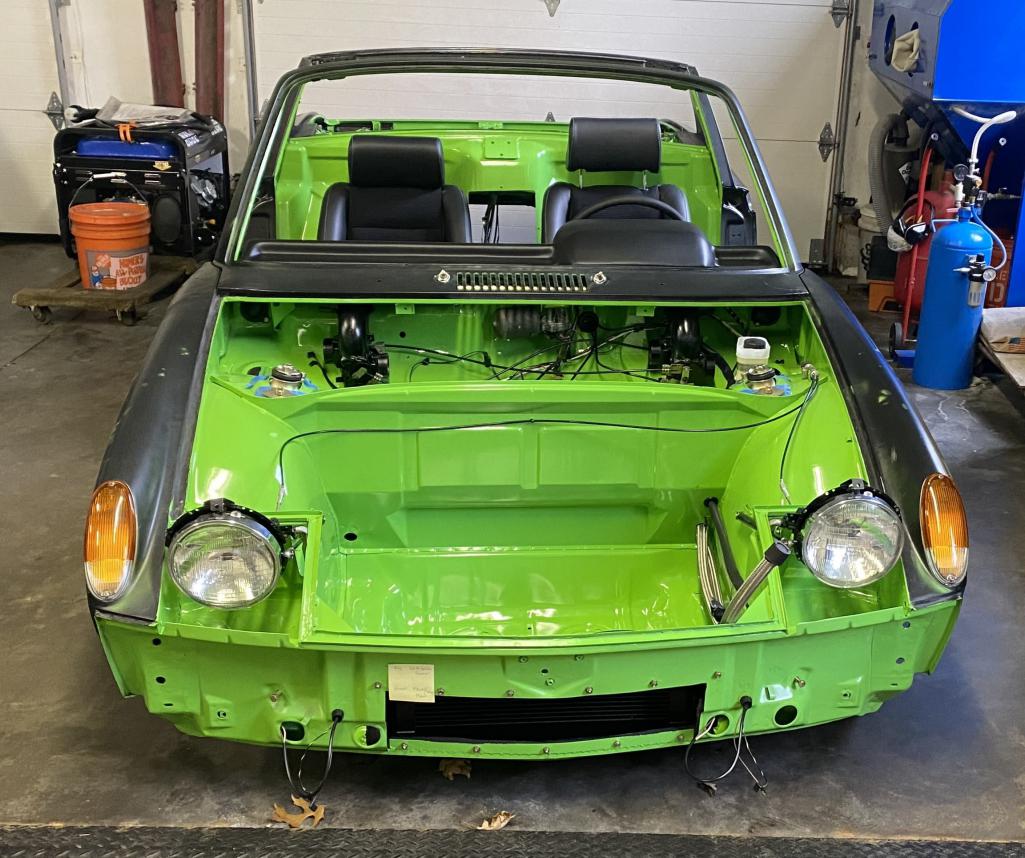
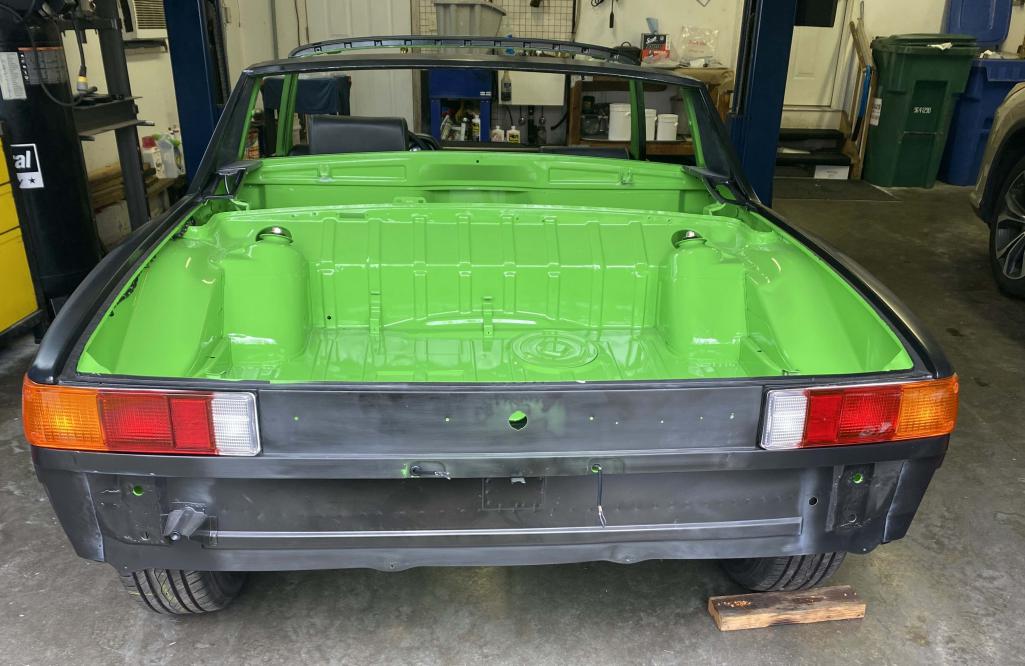
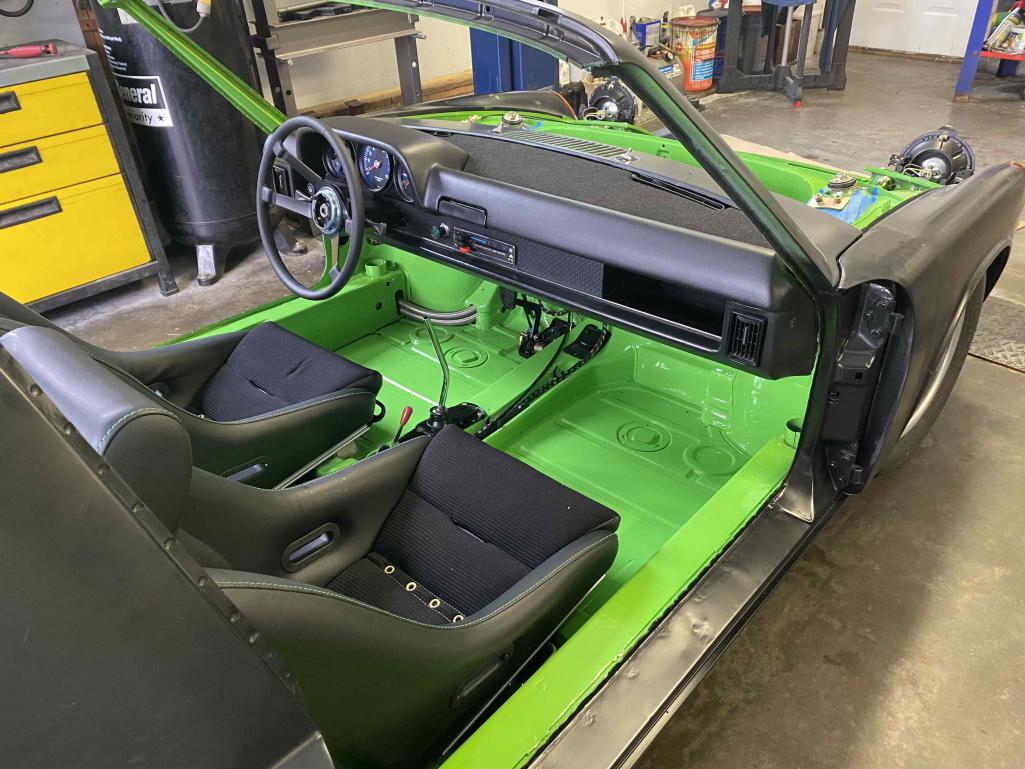
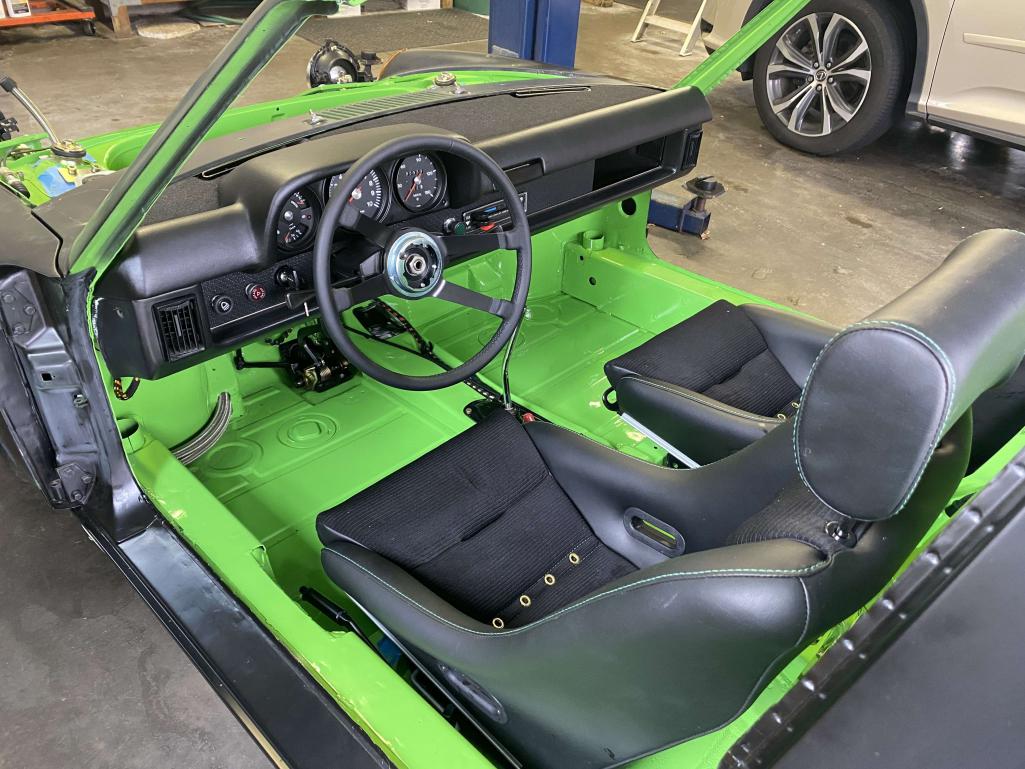
Posted by: Cairo94507 Apr 4 2024, 02:14 PM
Posted by: TRS63 Apr 5 2024, 12:36 AM
Wonderful seats!
Antoine
Posted by: Tom1394racing Apr 12 2024, 06:57 AM
A few odds and ends before starting the engine build.
Made the AN connections to the front cooler. Also installed a pair of aftermarket horns (you can't see them through the grills...Right?). I also found a nice pair of Hella TN4's in my stash and installed them as well.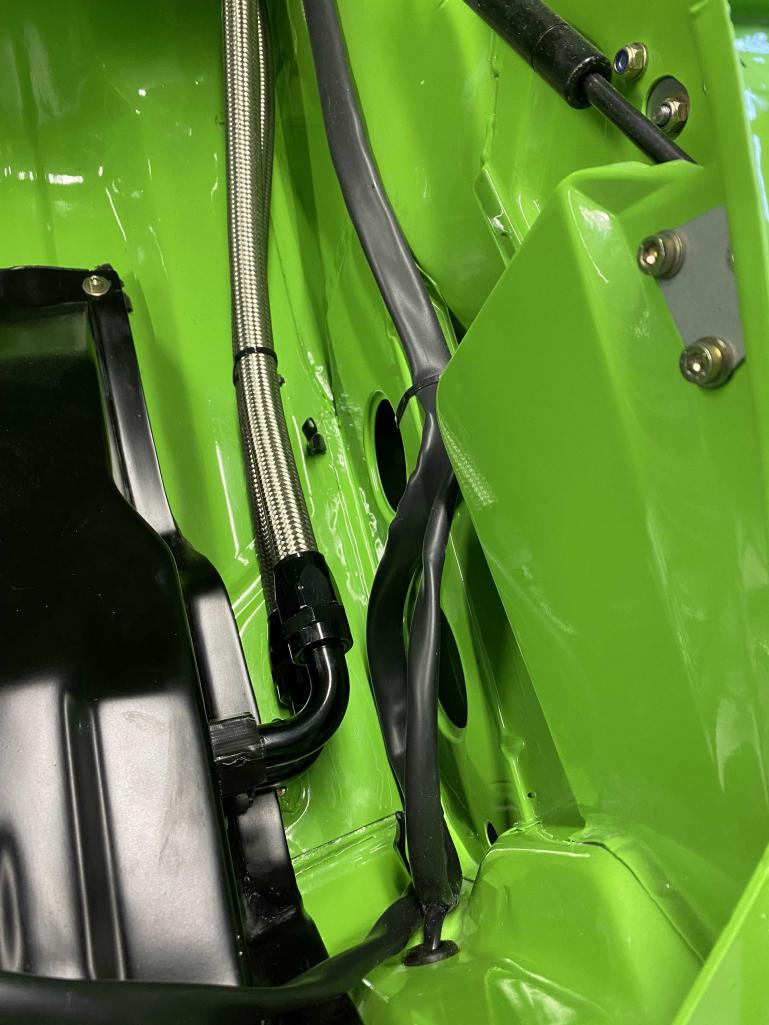
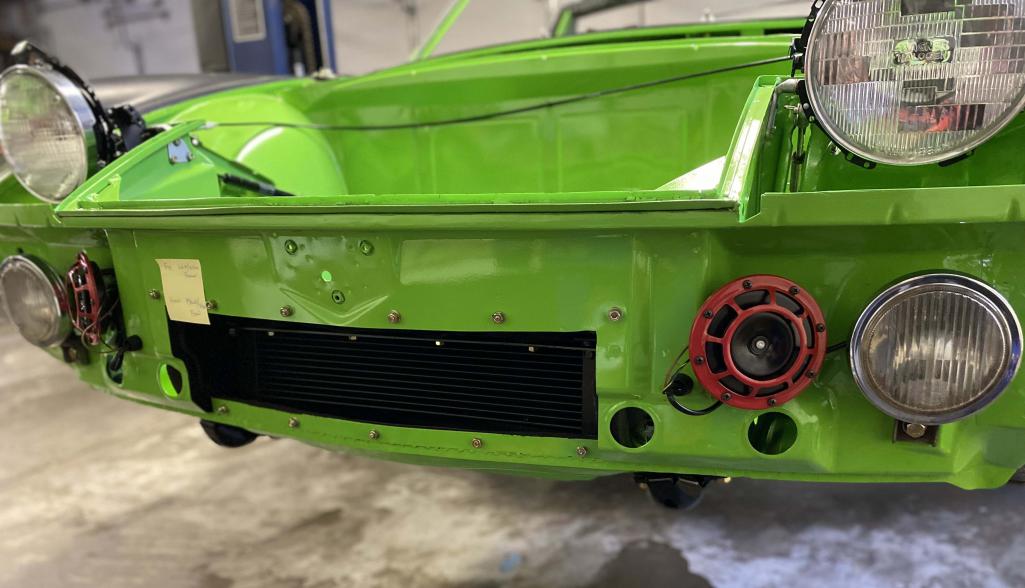
Posted by: Tom1394racing Apr 23 2024, 03:31 PM
Started the engine build this week. As a reminder, the engine will be a 3.2 short stroke base on a 3.0 SC case and crank. I will be using new 98 mm Mahle Motorsport 10.2 CR P&C's along with a JB Racing twin plug distributor and DC-60 cams from John Dougherty. The case, rods, cam towers, chain boxes and valve covers all went to Ollies for refurbishment. The heads were rebuilt and twin plugged by Bob Hirst at Anchor Atlantic and the SC oil pump was blueprinted by Glen Yee Motorsports. The crankshaft was cleaned, crack checked, cross drilled and micro polished by Armando at CCR. At Armando's recommendation, the main bearings were coated by HM Elliot to bring the main bearing clearances into spec. Induction will be 46 MM PMO's.
The first order of business was to check the main bearing clearances. I used plastic gauge and found the clearances were all between 0.002-0.003" right on target. I then reinstalled the crank without the plastic gauge and check for smooth even crank rotation. All good here as well.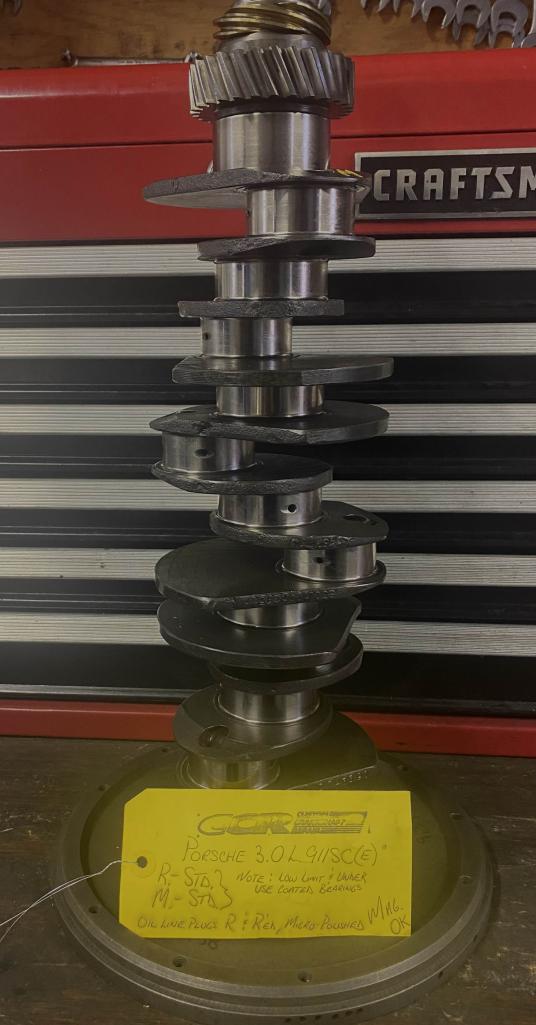
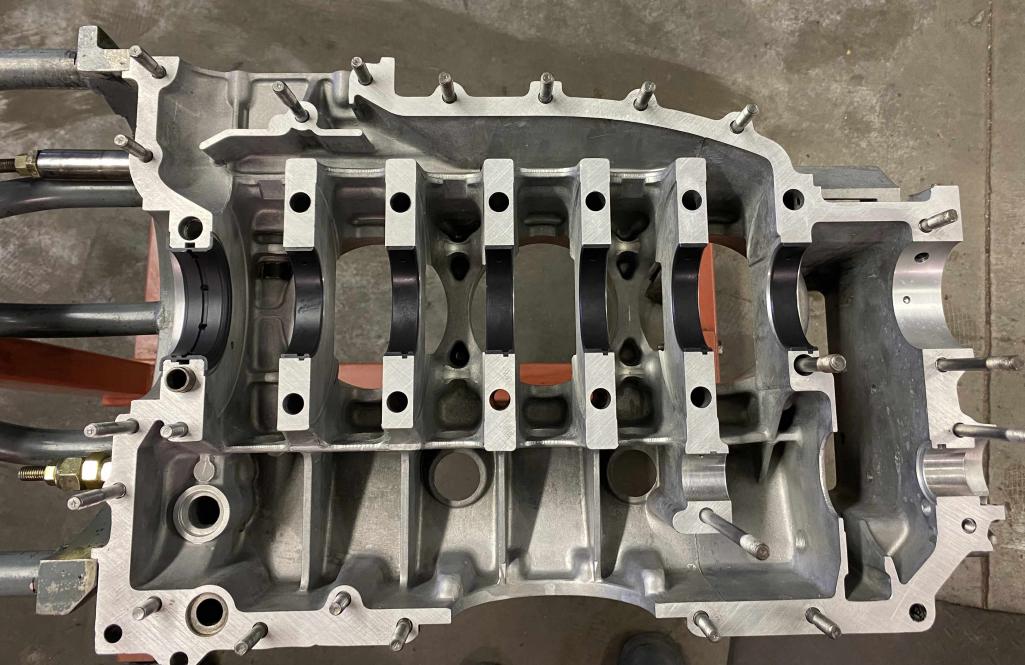
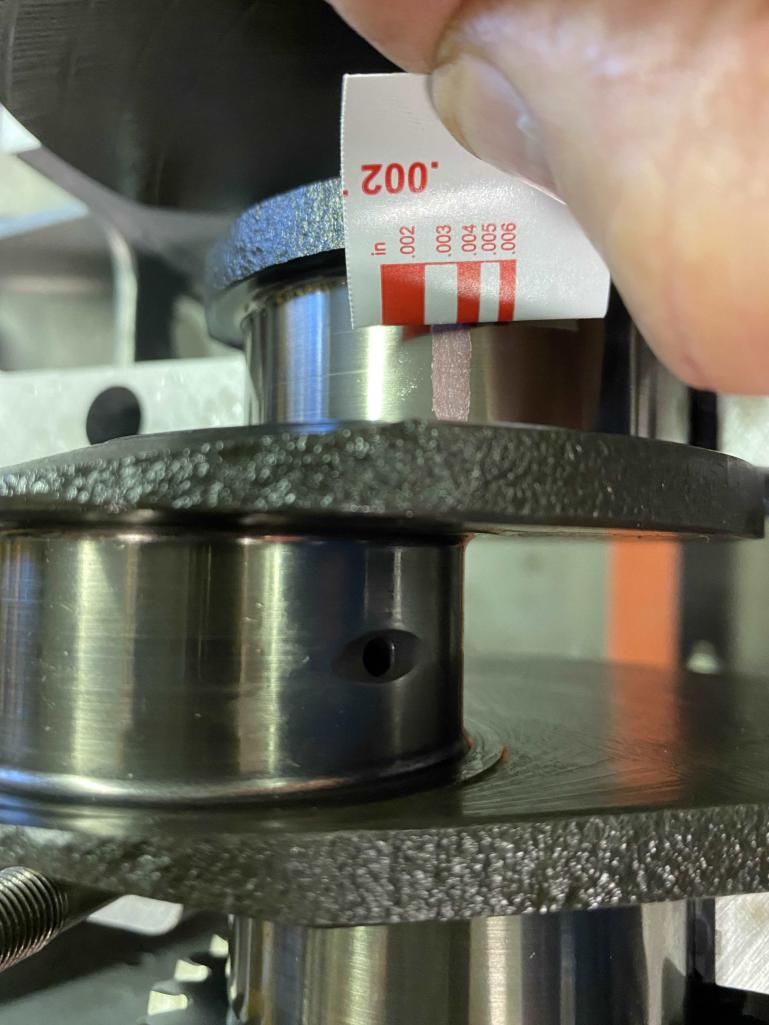
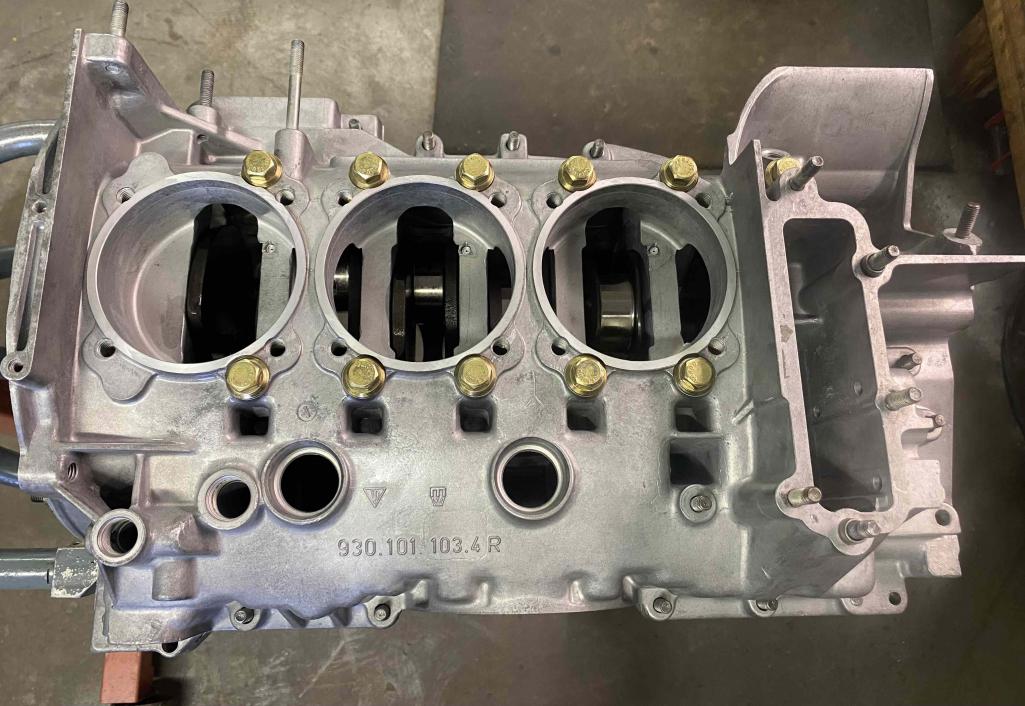
Posted by: Tom1394racing Apr 25 2024, 07:37 AM
I moved on to check the rod bearing clearances. For these I used the dial bore gauge rather that the plastic gauge. I am using coated Clevite bearings from Auto Associates for the rod bearings. I installed the bearings in the rods, torqued them to spec using the old rod bolts and then measured the inner bearing diameters with my dial bore gauge zeroed on the average rod journal. Clearances measure between 0.002-0.003". Right where they should.
I then decided as a verification double check to weight each rod. I was not expecting any significant variation as they had been refurbished by Ollie's. To my surprise, one rod was heavy by about 10 grams. I removed the bearings and reweighed them and the results were the same. So goes the old saying, "Trust but Verify".
Needless to say, the rods are on their way back to Ollie's who promised to expedite and rebalance them at no charge.
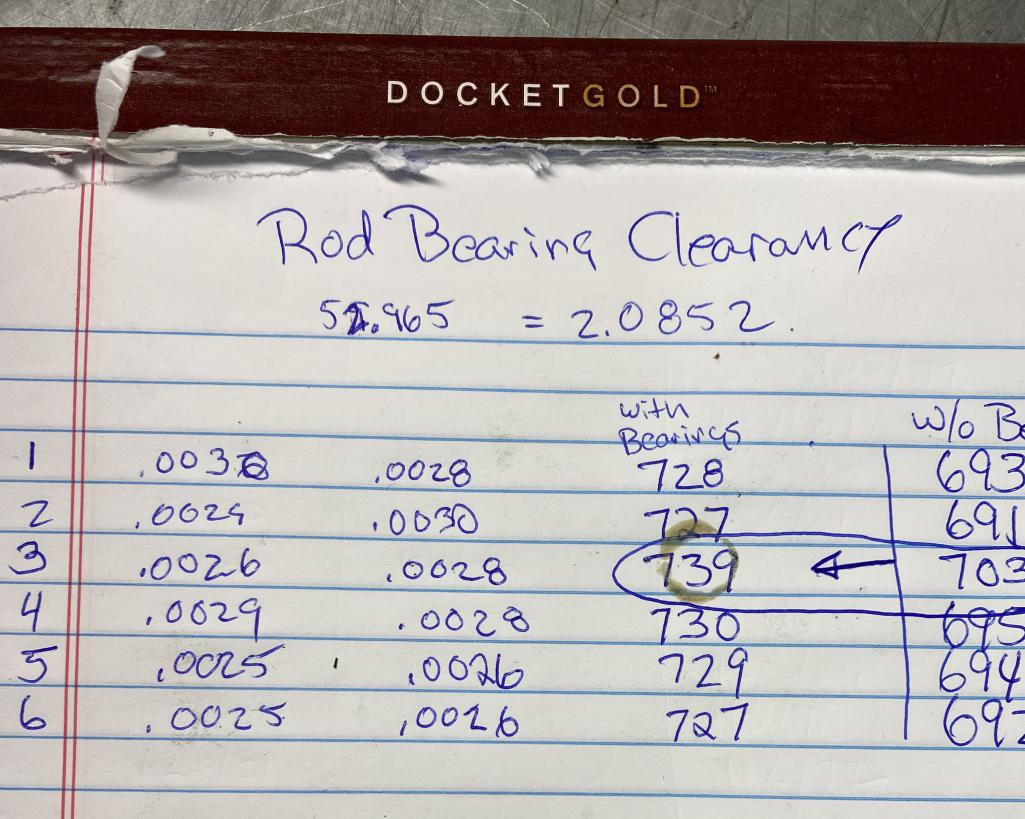
Posted by: live free & drive Apr 26 2024, 01:20 PM
Odd question for you - about your crank from Armando - I see the tag, but does Armando etch or otherwise permanently mark either crank end with any markings?
I have a motor supposedly with one of Armando's cranks and would see if there is a way to verify.
Posted by: Tom1394racing Apr 26 2024, 02:22 PM
Odd question for you - about your crank from Armando - I see the tag, but does Armando etch or otherwise permanently mark either crank end with any markings?
I have a motor supposedly with one of Armando's cranks and would see if there is a way to verify.
Hi Jon
I have had a few cranks done by Armando and I am not aware of any special markings.
Posted by: Tom1394racing Apr 26 2024, 02:37 PM
With the rods back off to Ollie's, I moved on to inspecting the pistons and cylinders, Installing the rings on the pistons and installing the pistons into the cylinders.
Everything checked out nicely on the P&C inspection as expected for a new Mahle set. Minimum variation in piston weights, good cylinder bore roundness and minimal taper Also good piston to cylinder clearances.
I then installed the piston rings and very carefully installed the pistons in the cylinders.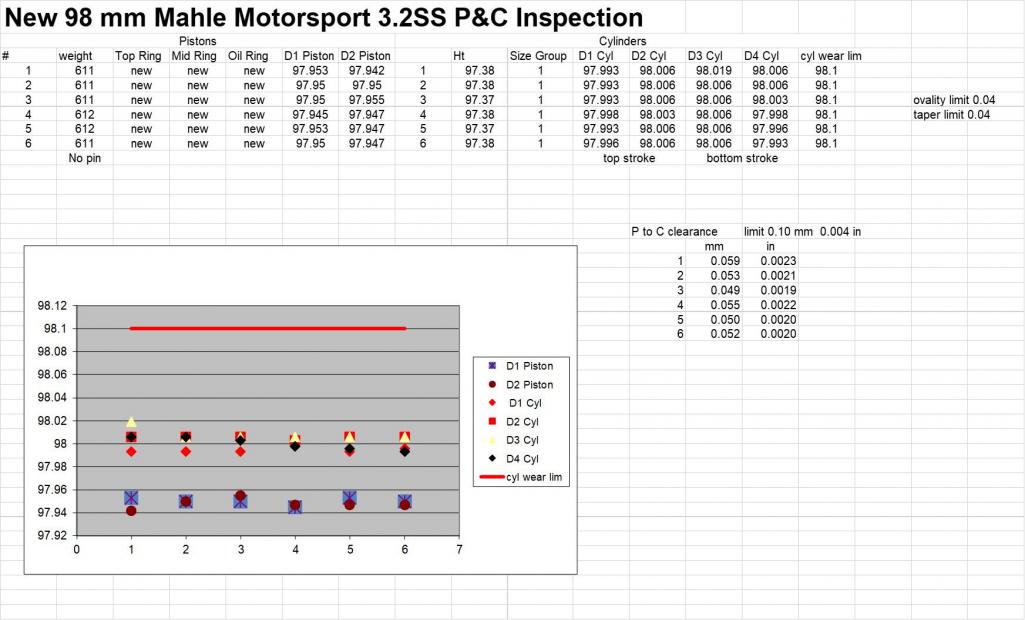
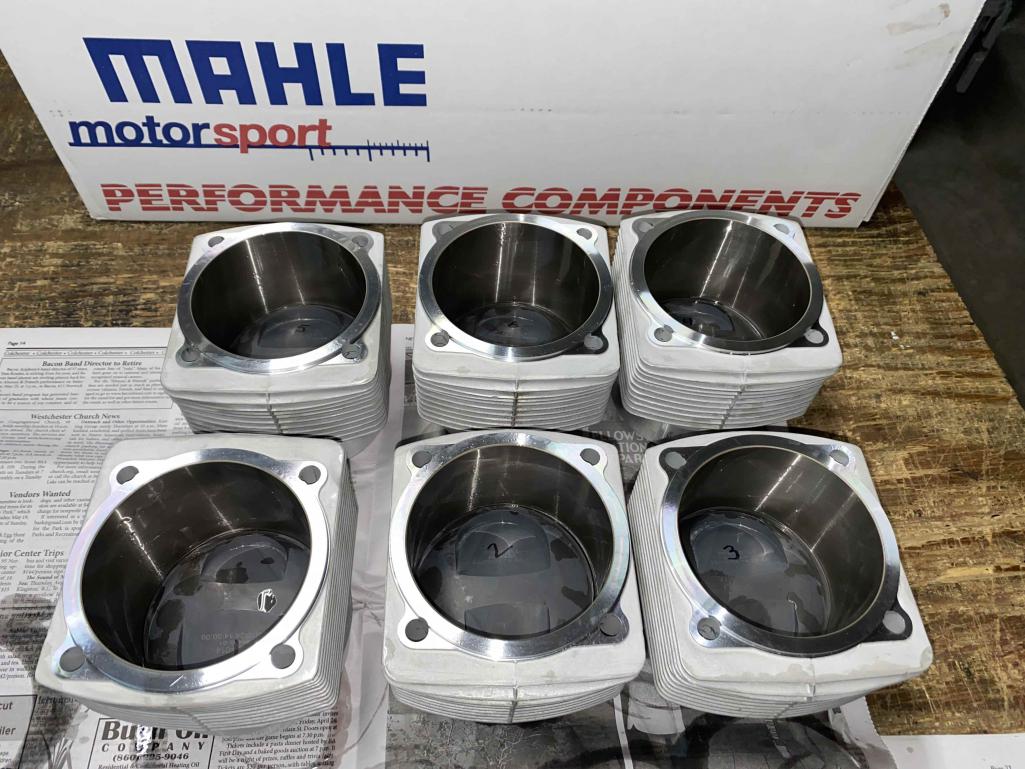
Posted by: Tom1394racing May 4 2024, 06:42 AM
I continued on the engine build while waiting for my connecting rods to come back from Ollie's.
I checked the IMS backlash to make sure it was within acceptable limits. I got 0.05 mm movement on the dial gauge. 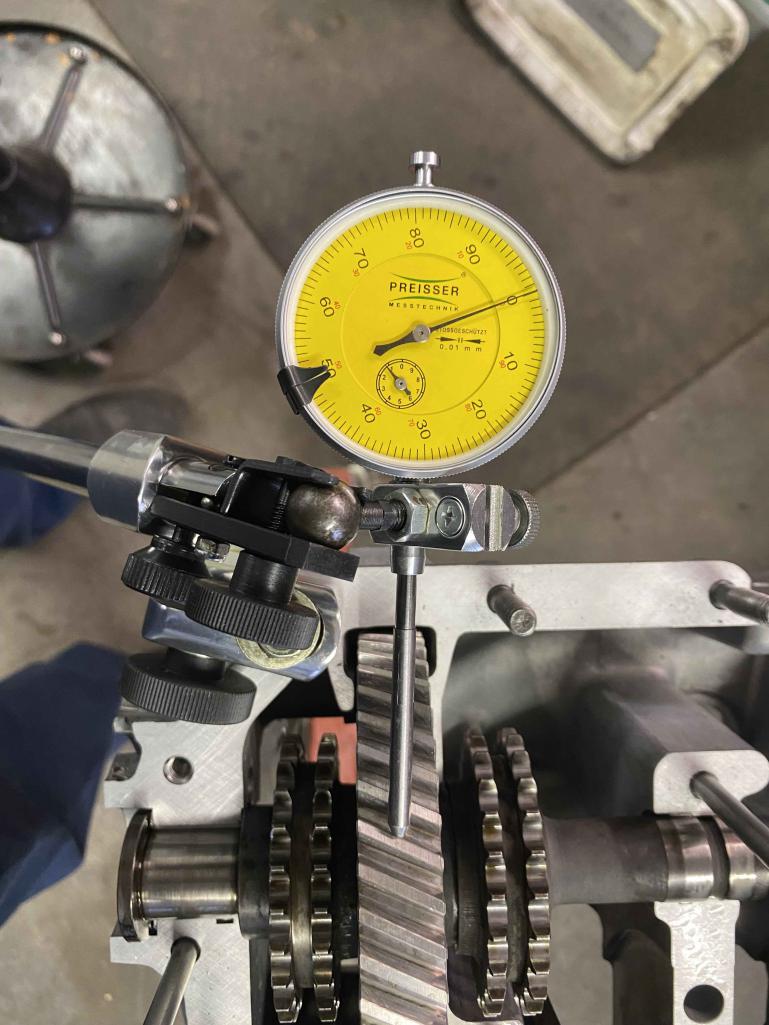
I then moved on to check the compression ratio using my CC burette volume checking setup. I checked each freshly rebuilt cylinder head to find the combustion chamber volume. All (6) measured between 89.5 and 90 cc's as expected for a 3.0 SC cylinder head. I then checked the piston dome volume using the same system and found piston #1 to be at 40 cc just as expected for this particular Mahle Motorsport piston. I only checked one piston assuming that the variation between brand new Mahle pistons will be insiginificant. Assuming I get 1 mm deck ht once I seal up the case and check, this will result in my target CR of 10.2:1.
Powered by Invision Power Board (http://www.invisionboard.com)
© Invision Power Services (http://www.invisionpower.com)