Printable Version of Topic
Click here to view this topic in its original format
914World.com _ 914World Garage _ 914 GT 3.6 Ferrari Build
Posted by: tygaboy Apr 22 2022, 01:58 PM
Hi 914 World -
A bit of an intro, if you'll indulge me.
I've always been a believer in fate and karma. A believer in serendipity. A believer that the universe presents thing to us for a reason. Sometimes good, sometimes not. Fortunately, the journey of adventure I'm about to begin is one of the good ones!
Maybe a year or so ago, @http://www.914world.com/bbs2/index.php?showuser=2104 Andy calls and says he has a buddy looking to buy a rear valance for a 914 and do I have one I'd sell. I said that I do, give my contact info to your friend. A few days later, this guy calls and we arrange for him to come by the Red Barn and see if the valance meets his needs. He arrives and we start "the dance of the car guys"!  He talks about his car experiences, I talk about mine. We talk 356s. We talk 911s. We talk 914s. Obviously, we have a ton in common, including a love for my LS build. He pours over my car, noticing not only the big stuff, but all the little things I've done, too. On this day, he buys the valance and we agree we'll stay in touch. And we do!
Over the course of the following months, he stops by pretty regularly, I visit his place and it's clear that beyond the car stuff, he's a good guy, we get along well and we're going to be friends.
So, one day, we're chatting about RacerBenz. my 2001 Mercedes CL500, Corvette suspension, mid engine, center seat track car build. Yes, I know, a horrific waste of time and money. But anyway, I say "What would be cool is to build "Benzo Ferrari! Find a Ferrari engine and trans and..." He interrupts and says "I have one! From a 360 Modena. And the trans, harnesses, ECUs, etc. I'd love to see it get used for something. Why don't you come get it?"
Wait, what? 
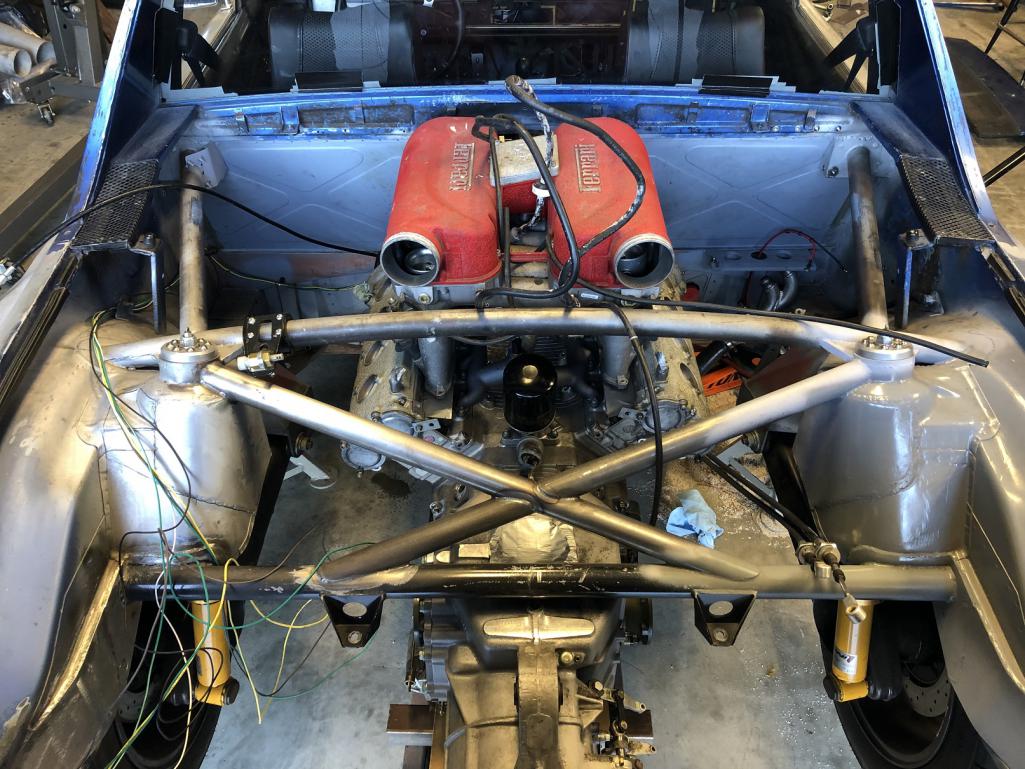
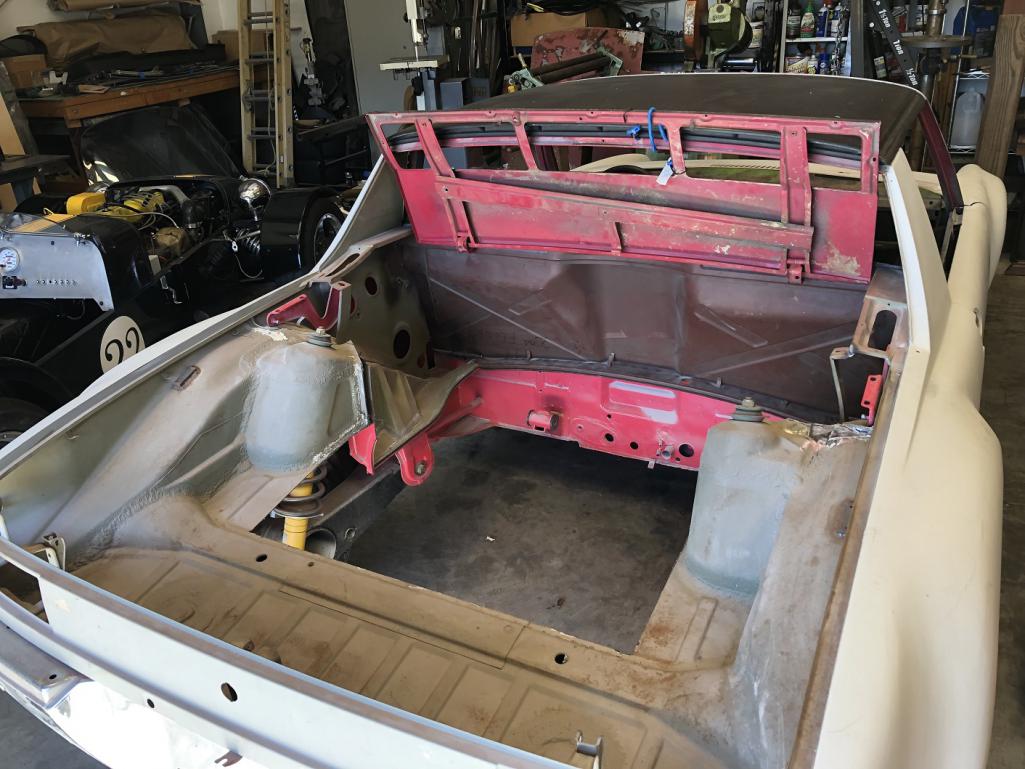
Fast forward to last week where I do just that. Here's what's in the Red Barn now: 3.6 liters, 400 hp and 275 lb/ft of Italian automotive porn.
Attached thumbnail(s)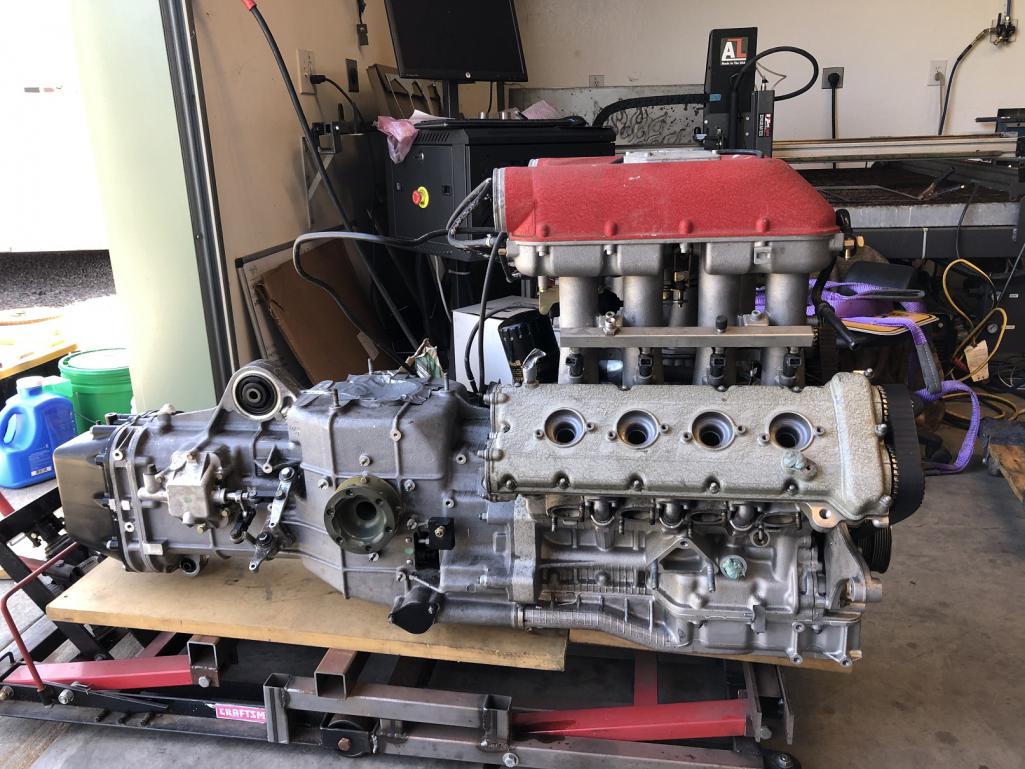
Posted by: 76-914 Apr 22 2022, 01:58 PM
You need help. 
Posted by: tygaboy Apr 22 2022, 02:02 PM
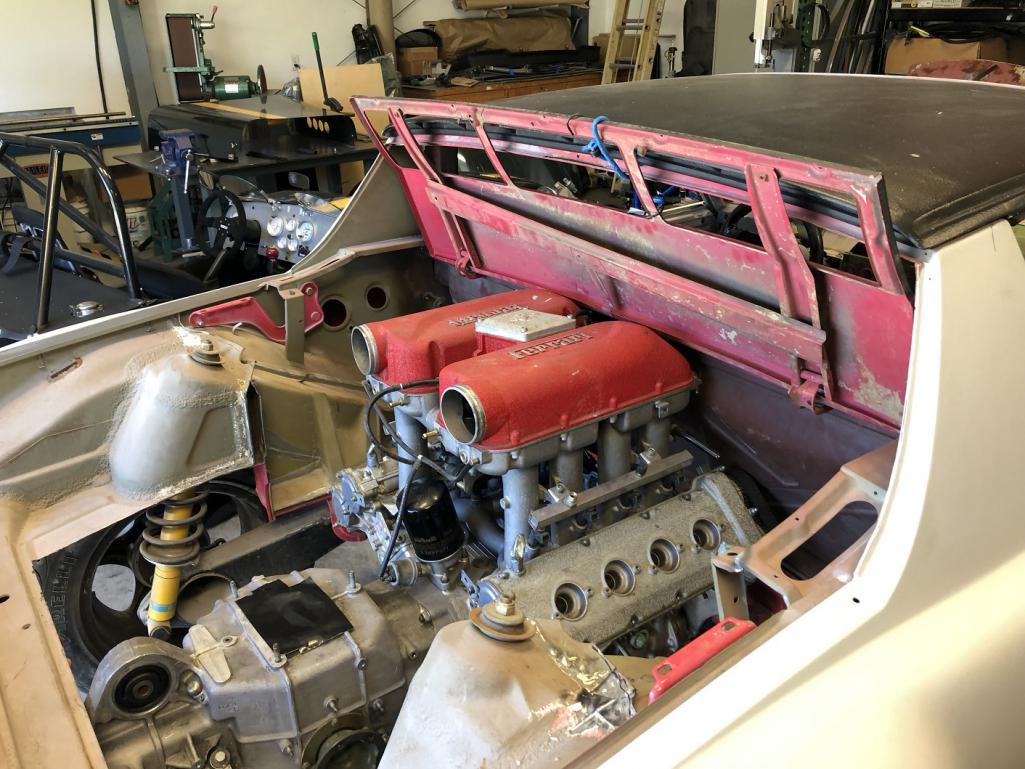
As those who've followed my LS build know, I'm a sucker for what I call "style points". You can imagine how long I sat in the shop just staring at this contraption. It is spectacular. The finishes look so purposeful. It really does look like it was plucked from a race car, not a production car.
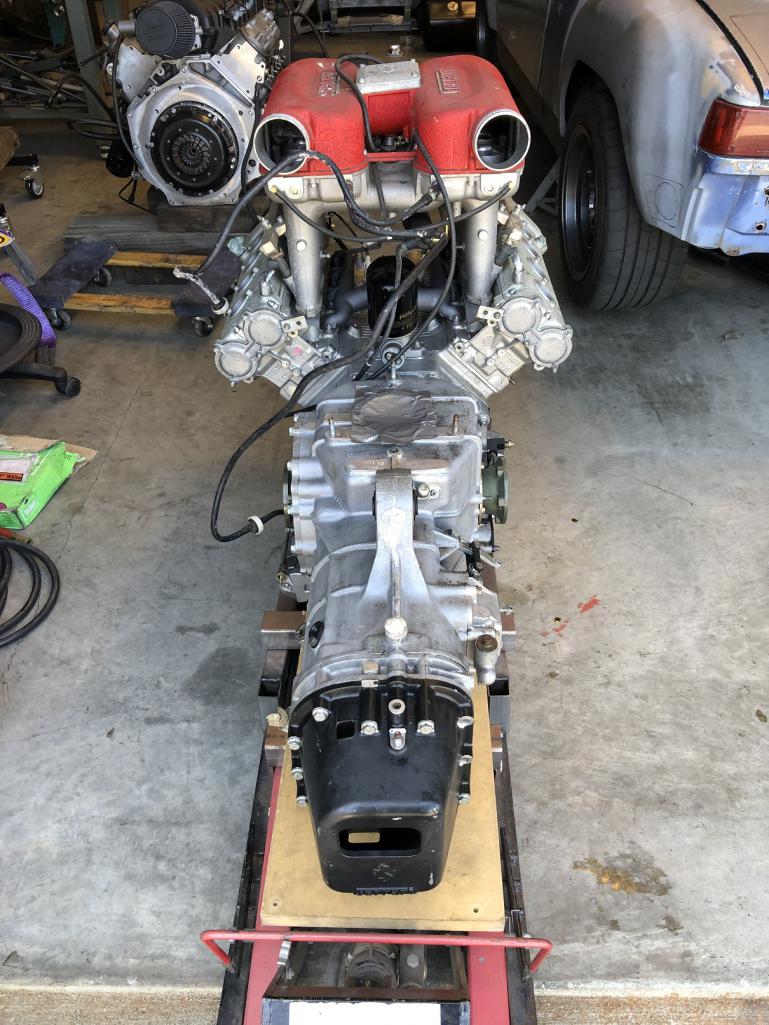
It's sitting there and all I can think is "there's just no way it'd fit in a 914".
But at the same time, there's my car, drive train out for the latest round of upgrades. How could I not at least try?
Attached thumbnail(s)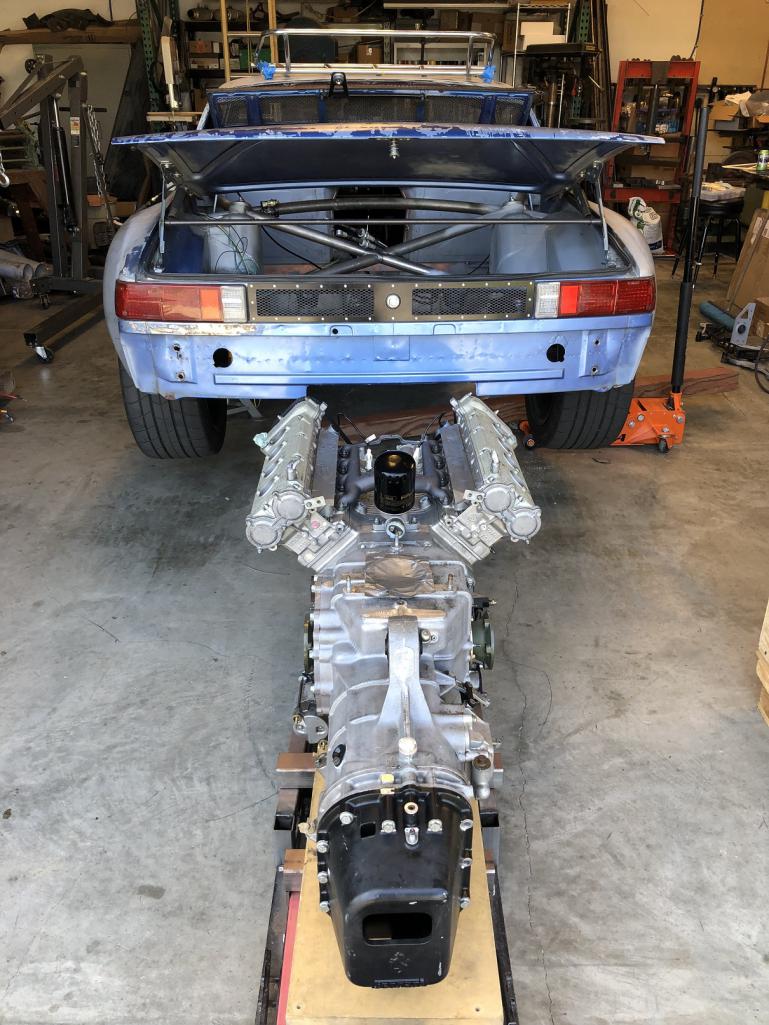
Posted by: tygaboy Apr 22 2022, 02:03 PM
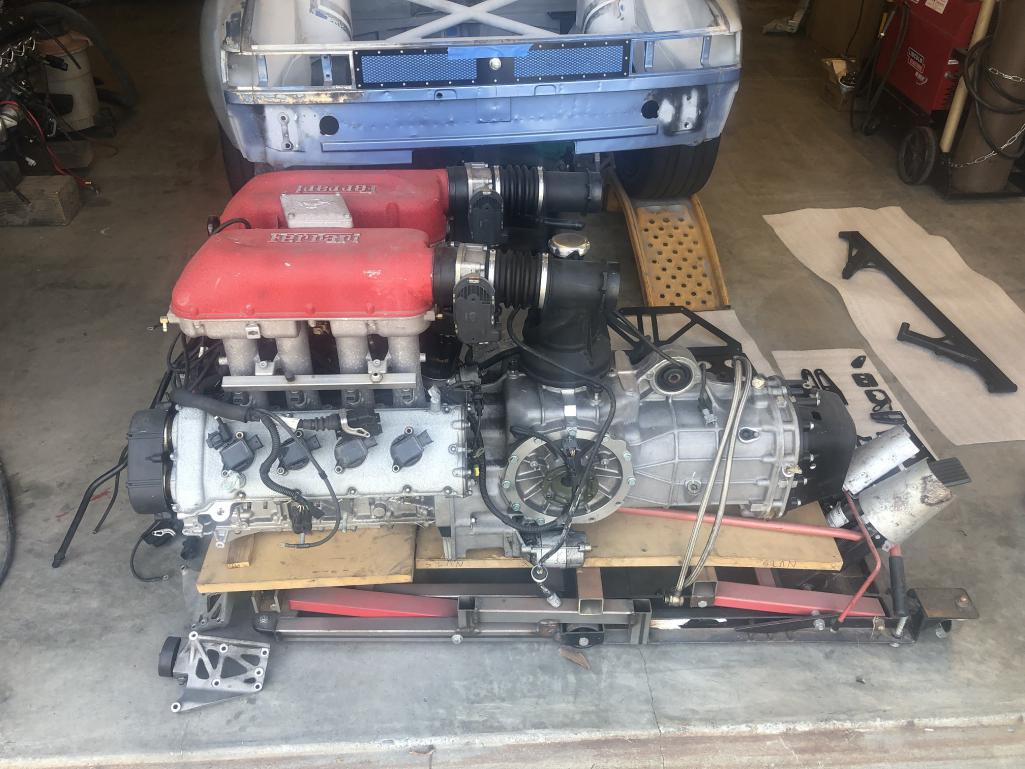
Hmmm, this looks more promising than I expected.
Attached thumbnail(s)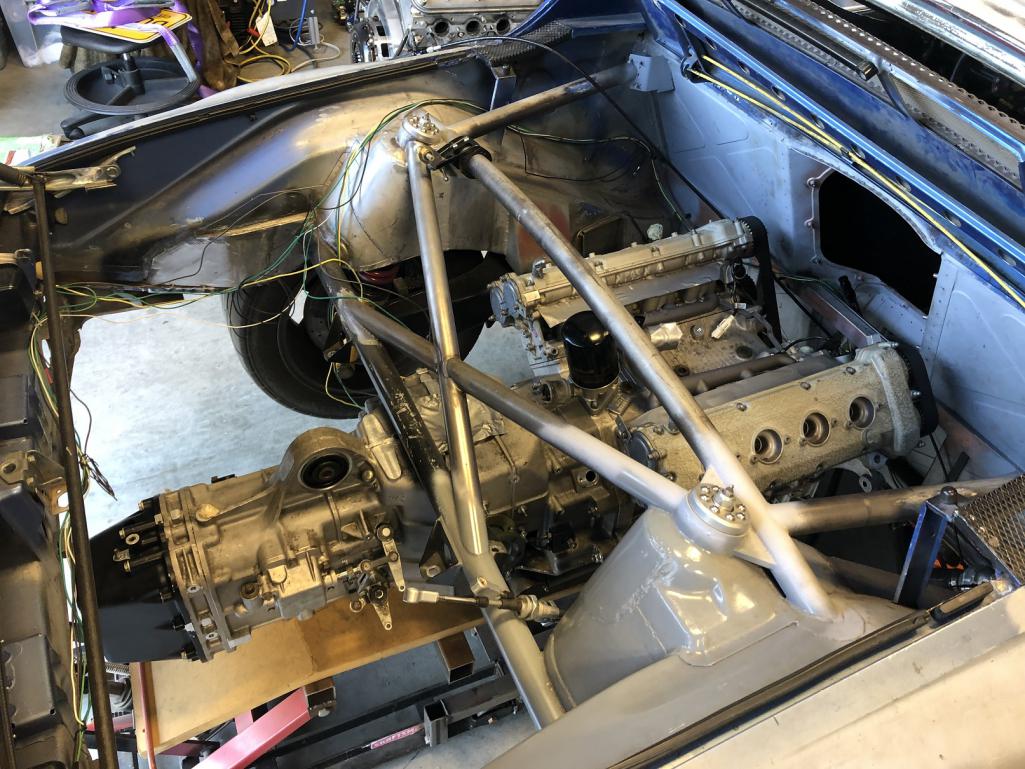
Posted by: Root_Werks Apr 22 2022, 02:03 PM

You need help.

That is a Monstrous engine!
Posted by: tygaboy Apr 22 2022, 02:06 PM
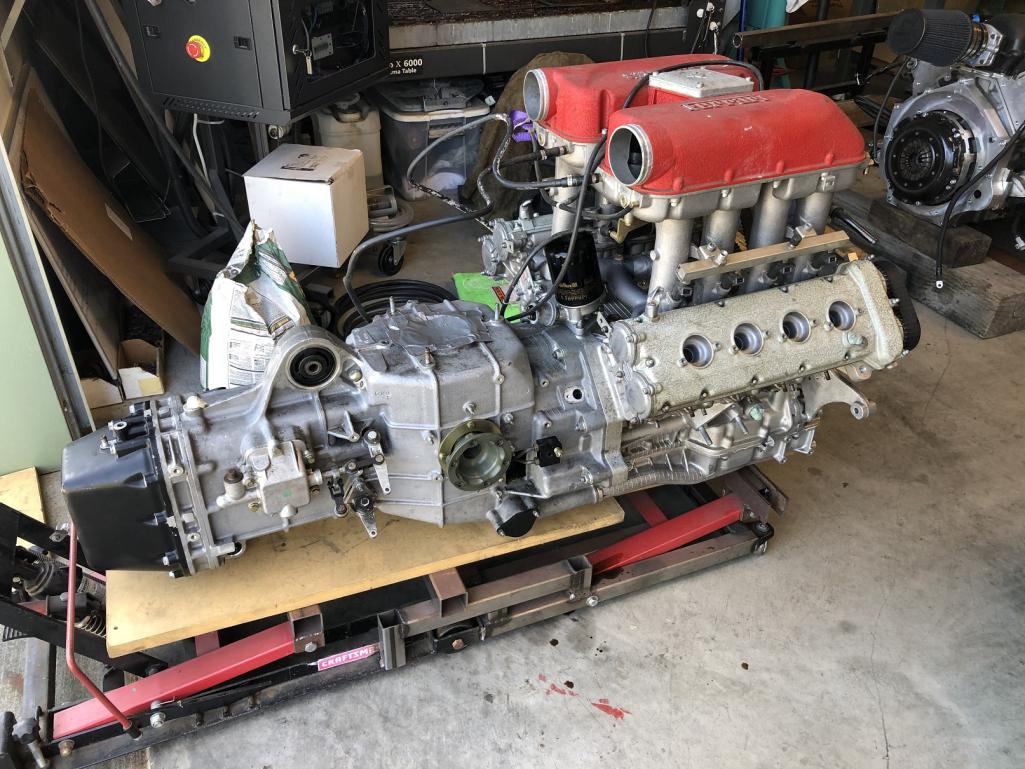
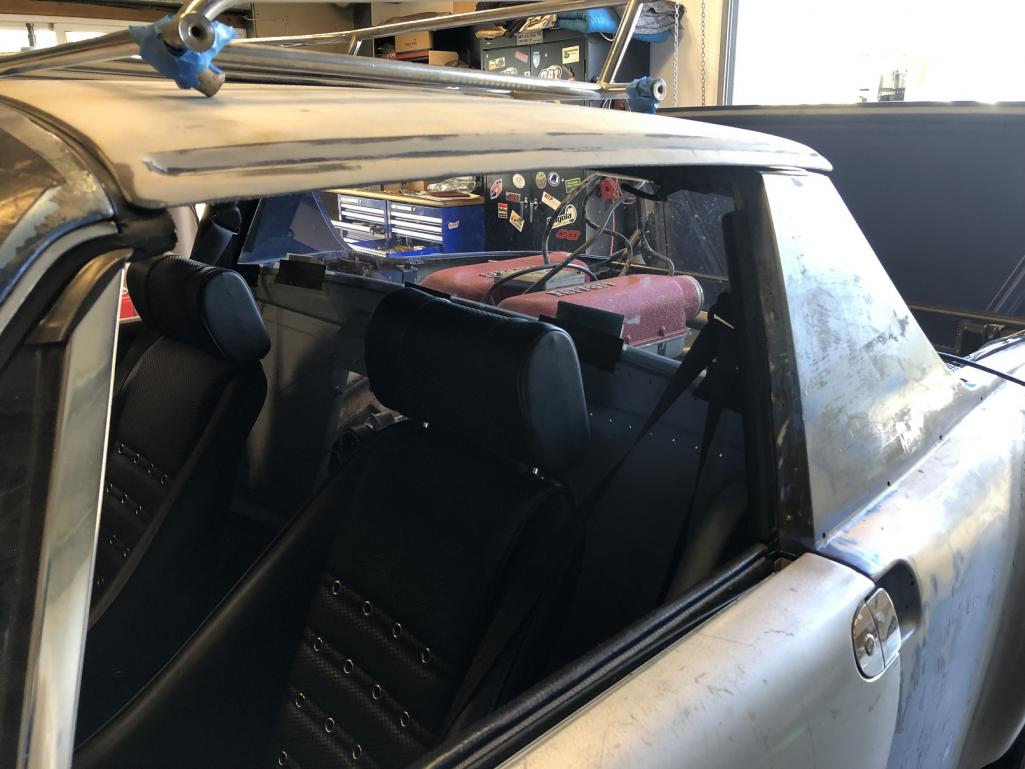
Well, would you look at that! It fits. 


Attached thumbnail(s)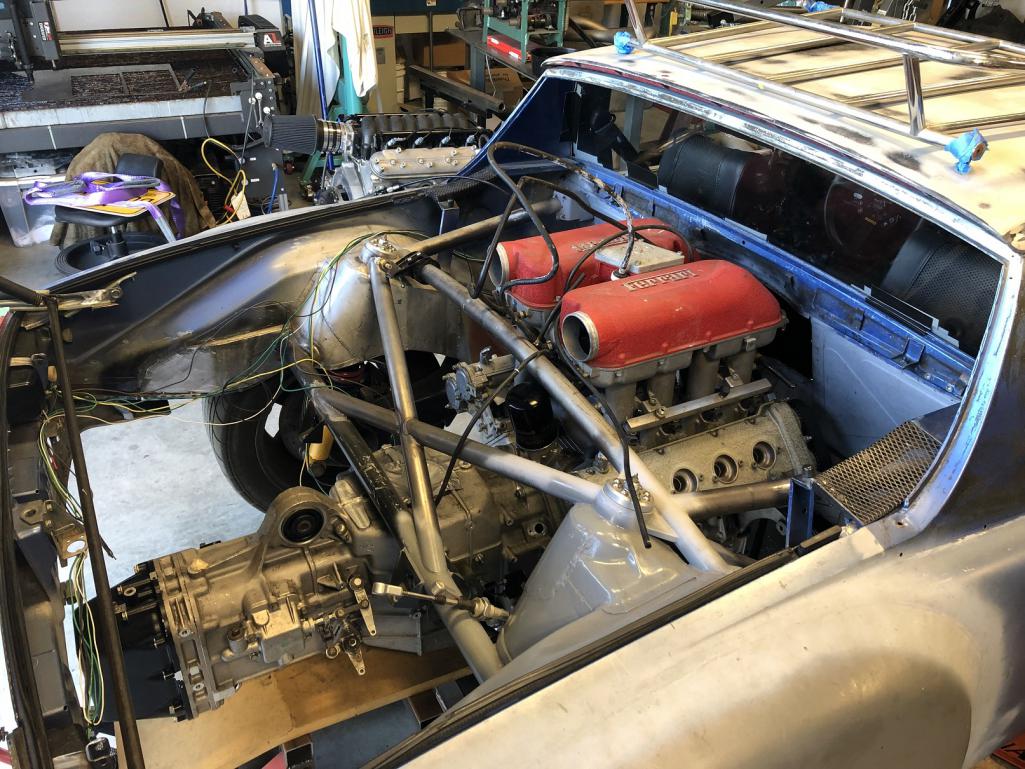
Posted by: tygaboy Apr 22 2022, 02:07 PM
You need help.
That is a Monstrous engine!
@http://www.914world.com/bbs2/index.php?showuser=9964 @http://www.914world.com/bbs2/index.php?showuser=2105 You're right, I do need help. What time can you be here?

Posted by: tygaboy Apr 22 2022, 02:08 PM
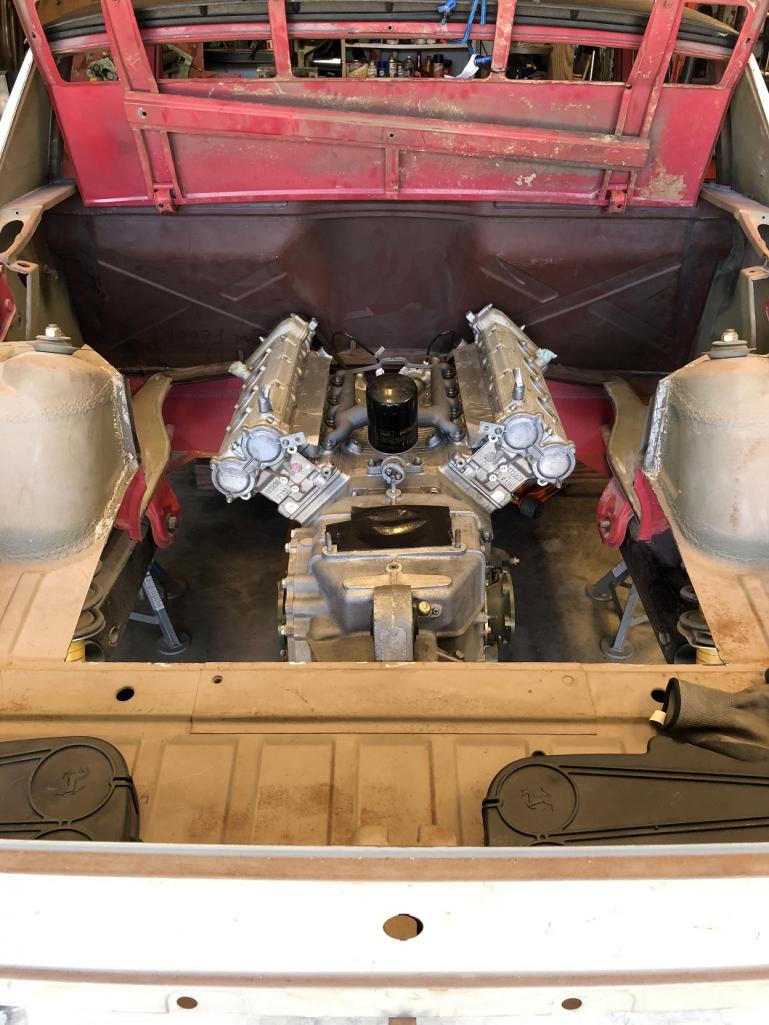
More
Attached thumbnail(s)
Posted by: tygaboy Apr 22 2022, 02:14 PM
But wait, it gets better!
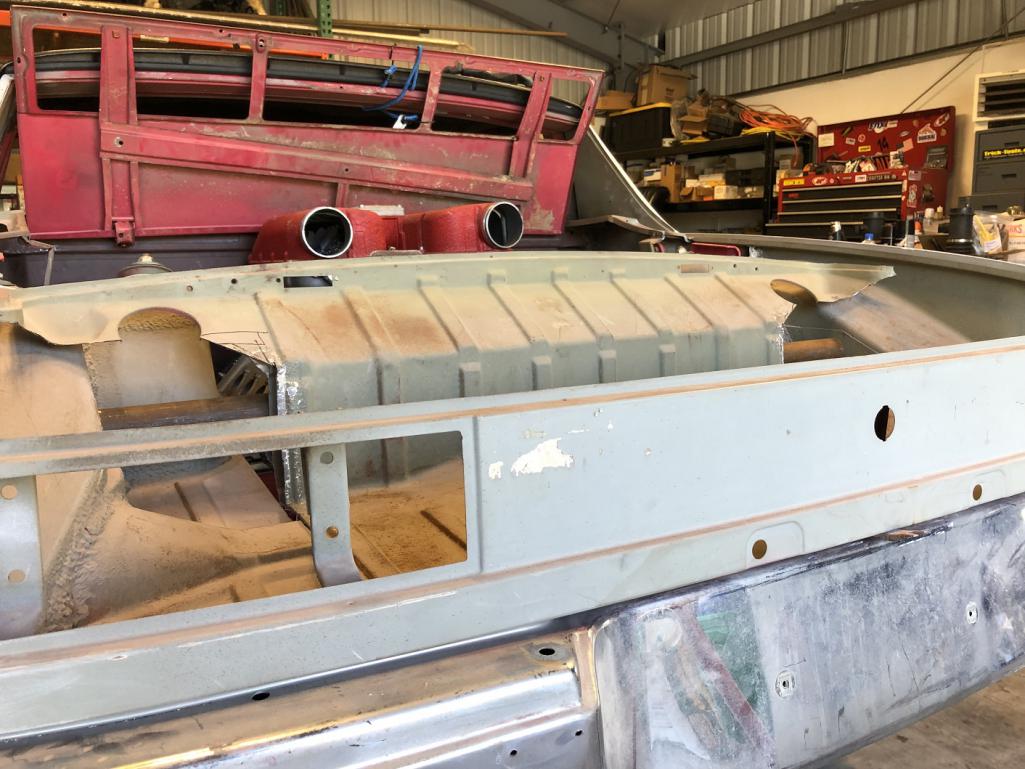
I forward these pics to the engine owner and we talk, basically agreeing "I'm in if you're in!" But, I tell him, while it looks good in the pics, to REALLY make it work, I'd have to chop all that rear X-bracing out of my chassis. And I'm not going to do that.
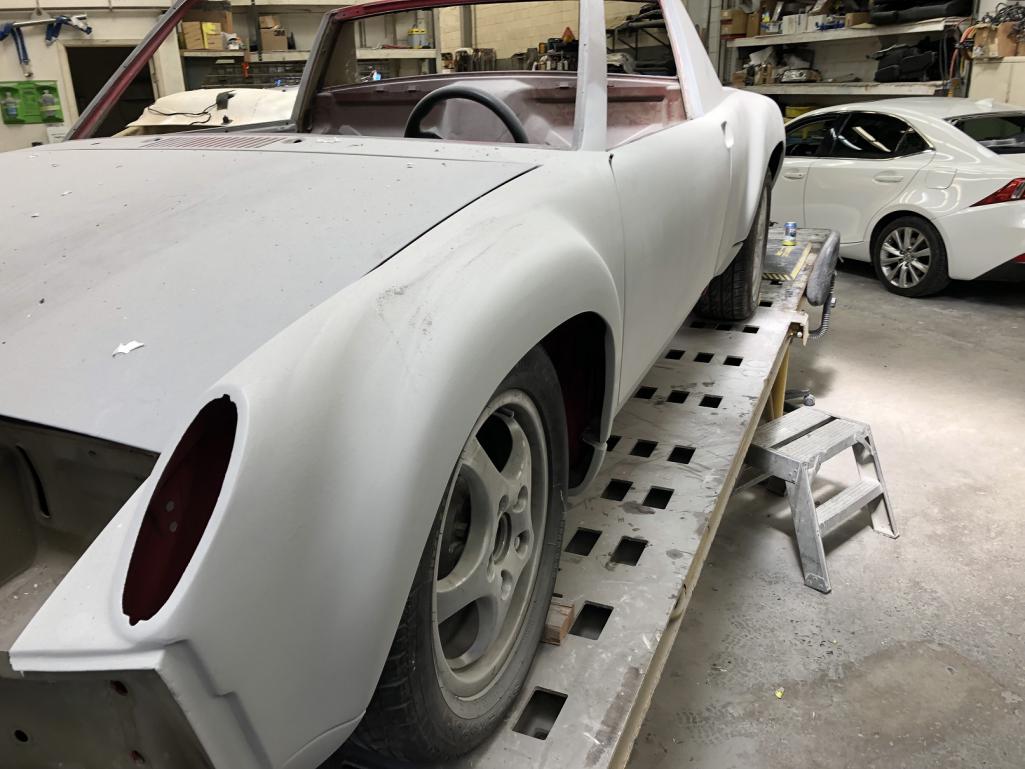
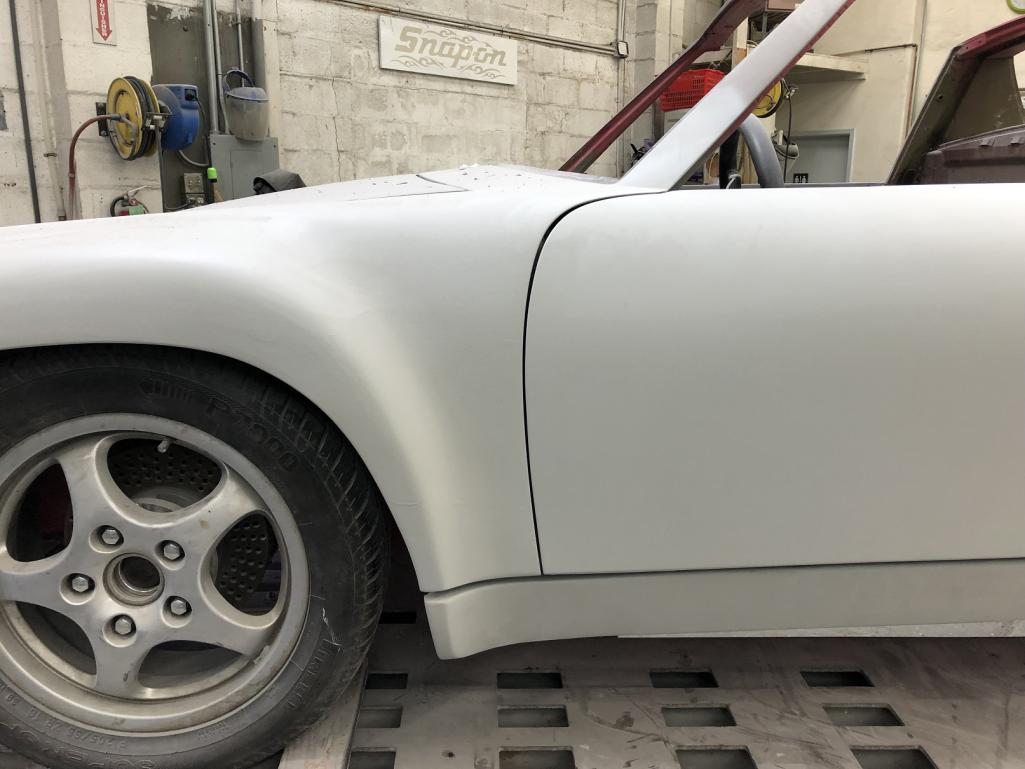
He reminds me that he has a '72 914 chassis with GT flares, metal finished valances and rockers, chassis stiffening on the longs, 5-lug and essentially ready for paint.
We went and looked at it today. It's as nice a chassis as I've ever seen.
Attached thumbnail(s)
Posted by: tygaboy Apr 22 2022, 02:16 PM
more
Attached thumbnail(s)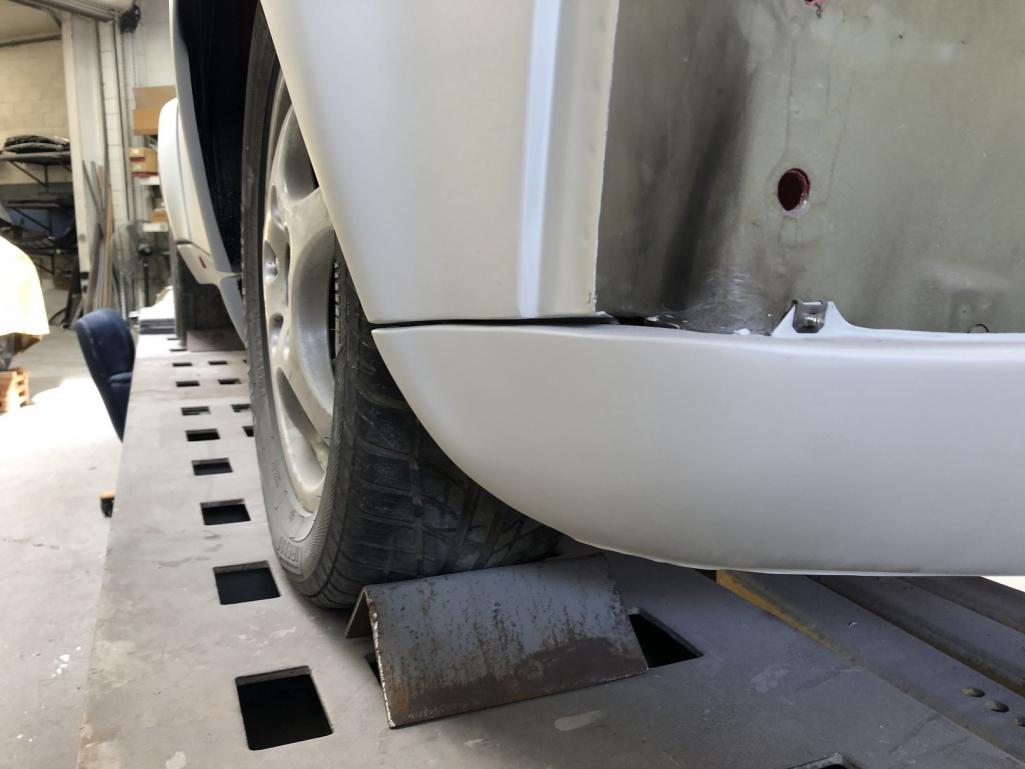
Posted by: tygaboy Apr 22 2022, 02:22 PM
So. There it is: the next build.
There is one major thing that could bring this to a screeching halt. Most critically, the very first step is the engine is going to a Ferrari expert for a quick look-see. If there are any show-stoppers, this engine is this chassis won't happen. Should that be the case, the good news is there's a Porsche 3.6 sitting in the wings.
So, no chassis cutting is happening until we know the Ferrari engine, she is good!
We hope to have that done in the next couple weeks. And assuming it's all a GO, my outrageous goal is:
Debut the running/driving car at Red Rocks Classic in Sept.
Wish me luck!
Posted by: 76-914 Apr 22 2022, 02:24 PM
You need help.
That is a Monstrous engine!
@http://www.914world.com/bbs2/index.php?showuser=9964 @http://www.914world.com/bbs2/index.php?showuser=2105 You're right, I do need help. What time can you be here?
How does 2:30 work Chris? Say around July 2024. Busy until then. Can't wait to hear it run.

Posted by: SirAndy Apr 22 2022, 02:38 PM
Posted by: markhoward Apr 22 2022, 03:56 PM
This is going to be amazing! Hope it stays the factory color.
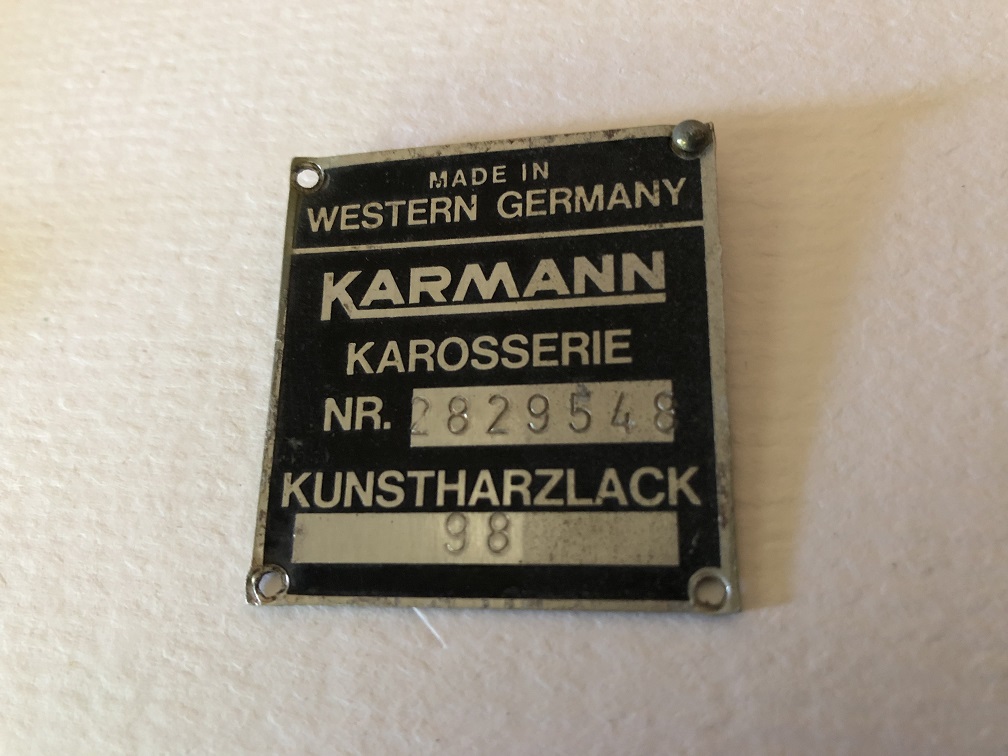
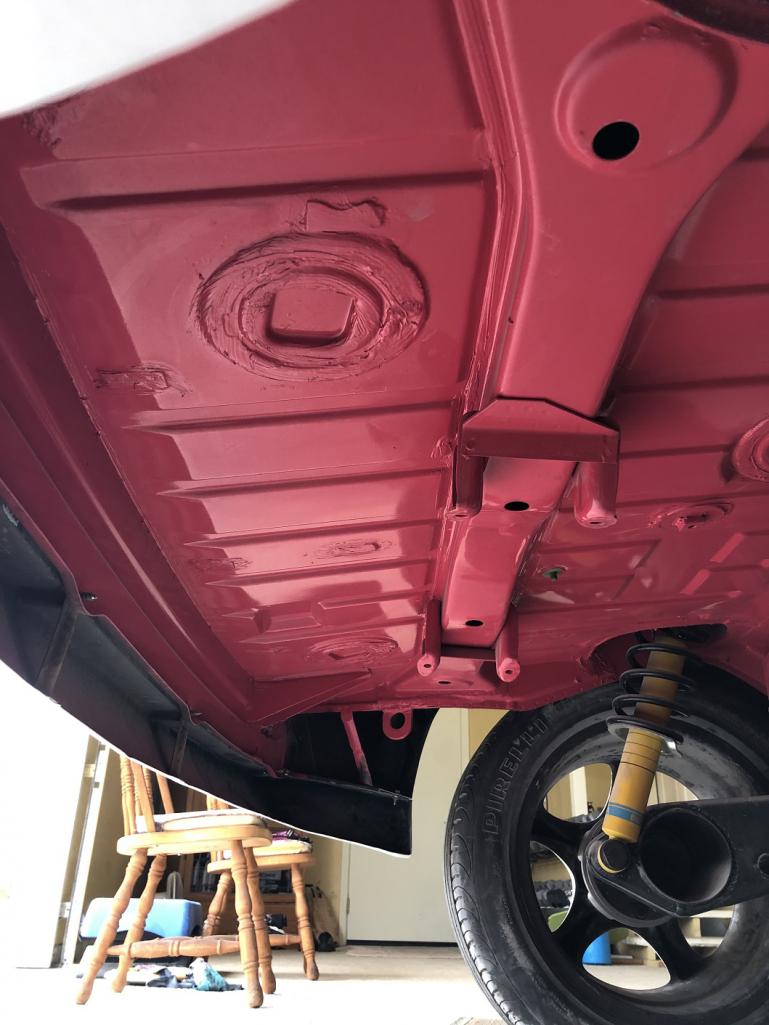
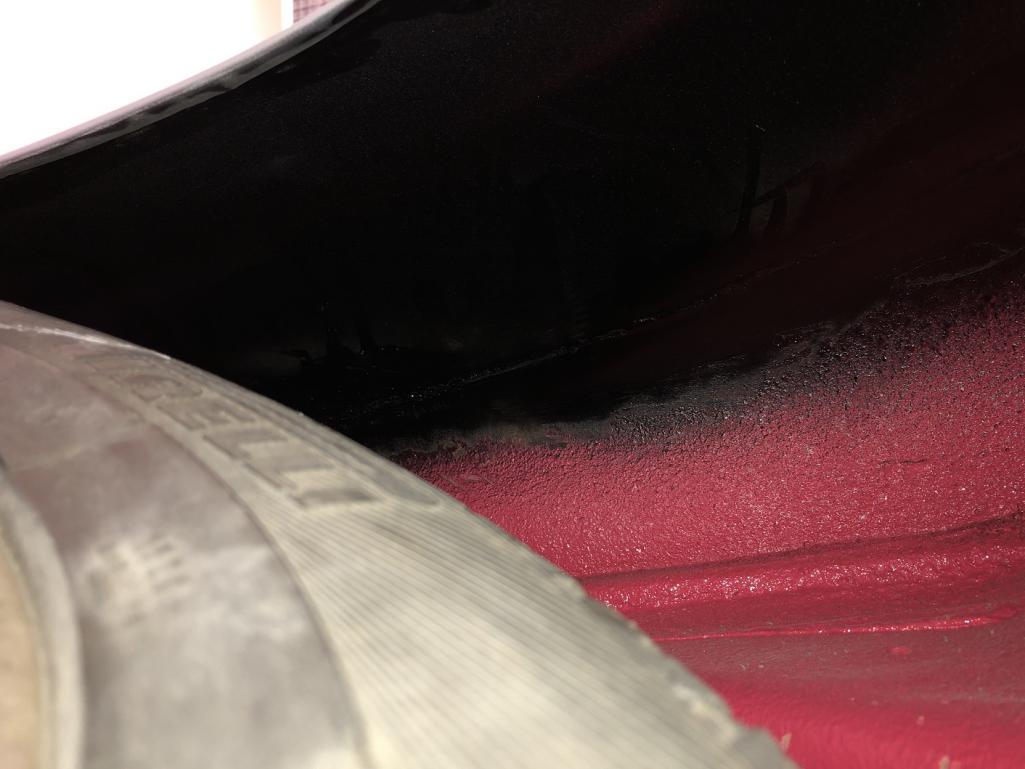
Posted by: tygaboy Apr 22 2022, 04:31 PM
This is going to be amazing! Hope it stays the factory color.
@http://www.914world.com/bbs2/index.php?showuser=20897 Mark - Interesting, as you already know, in that the COA shows it as Paint to Sample / 9990. The paint tag supports this, too. No specific color called out but the factory color looks like Raspberry.
Attached image(s)
Posted by: Andyrew Apr 22 2022, 04:36 PM
That’s some of the best valance work I’ve seen!
I’m completely down for this project!!!!
And there is so much room on either side of the engine for a pair of GT35 turbos… 
Posted by: napasteve Apr 22 2022, 05:02 PM
Exactly (in a good way)
Posted by: mepstein Apr 22 2022, 05:40 PM
I would put a Porsche six in the flared 914 and build a tube frame car without any bodywork to showcase the engine.
Posted by: Krieger Apr 22 2022, 06:17 PM
It's all my fault! Two wild and crazy guys 
Posted by: tygaboy Apr 22 2022, 06:25 PM
It's all my fault! Two wild and crazy guys
@http://www.914world.com/bbs2/index.php?showuser=2104 Andy - first it's suggesting my cross-member mod, next this match making! I sooooo owe you!
Posted by: siverson Apr 22 2022, 06:34 PM
That's awesome! Do it!
-Steve
Posted by: Chris914n6 Apr 22 2022, 06:54 PM
I'd totally paint it Rosso Red.
To match the intake of course...
Posted by: rgalla9146 Apr 22 2022, 07:53 PM
Are the output flanges in line with the hubs ? they look a bit to the rear.
What's the taped up hole in the top of the trans ?
Posted by: SirAndy Apr 22 2022, 08:00 PM
@http://www.914world.com/bbs2/index.php?showuser=19241
I was wrong about the year btw., it looks like the Playboy raspberry cars were from '73, not '75.
Built date should be around 10/72 and the VIN close to 4732905940 ...

Posted by: KELTY360 Apr 22 2022, 08:04 PM
Beware of Ferrari fanatics named Guido. 
Posted by: Cairo94507 Apr 23 2022, 06:52 AM
@http://www.914world.com/bbs2/index.php?showuser=19241 - Man, that is a nice, straight, perfect looking chassis. I like the idea about painting her Rosso Red.
I really do think you need to expand the Red Barn, like double it's size. Wait, was that too much?
Posted by: Chris H. Apr 23 2022, 07:15 AM
That’s some of the best valance work I’ve seen!
I’m completely down for this project!!!!
And there is so much room on either side of the engine for a pair of GT35 turbos…
The lines on that thing are amazing. Very high quality work. Would be an awesome build. Hope the engine checks out!
Posted by: Superhawk996 Apr 23 2022, 07:34 AM
Hope the engine checks out - this will be cool.
Posted by: tygaboy Apr 23 2022, 08:40 AM
I figured some of you might like this - thanks for the encouragement.
A couple things:
- Color: The owner is a fan of "nothing to give away what's up until you're right there on the car". For this reason, it absolutely won't be painted red. Too obvious a choice. But near 100% probability it'll be a Ferrari color. The owner is a fan of blue (me too!) and the current leaders are something along the lines of "Blu Scozia" or "Tour de France Blue". Look them up - both great colors.
- History: The chassis is PTS what looks like Raspberry and there's some speculation it might have been a Playboy car. @http://www.914world.com/bbs2/index.php?showuser=179 Andy, I'll be in touch with more details to see if we do have something with an interesting history. But even if that's the case, the car has been flared and prepped for a /6 swap so, Ferrari engine swap aside, it won't be going back to anywhere near factory spec. Interestingly - and those who've followed my LS build will see why I think this build was fated to happen - this chassis has had its fire wall cut out and modified! It has subsequently been replaced with an NOS firewall but, come on! Are you kidding me?!?
- My involvement. At this point, I'm only building the car and don't own any of what you're seeing. This may change. We may partner on it, we may work out a trade. Lots of stuff, lots to work out. But one thing for sure, it's gonna be a fun project and learning experience.
Posted by: Shivers Apr 23 2022, 08:58 AM
Wow. I hope it is good, but the back up plan is nice too. Some cool stuff happening at the Red Barn
Posted by: Chris H. Apr 23 2022, 09:13 AM
A pink 914 with a Ferrari engine...that would be something.
Posted by: tygaboy Apr 23 2022, 09:43 AM
Are the output flanges in line with the hubs ? they look a bit to the rear.
What's the taped up hole in the top of the trans ?
@http://www.914world.com/bbs2/index.php?showuser=5176 - An acceptable axle angle was one of the first items to verify. The Ferrari output flanges look like they'll sit a bit further forward than those of my LS/Boxster. And I'd moved my LS drive train forward 1.5" from where the Renegade kit puts it.
Short answer is that fore/aft is well within range. Up/down should be OK but until the package is positioned and the chassis is at ride height, I won't have those specifics.
But there are high angle CVs available for the off road market that should be able to handle this set up - if that's even needed. Onward!
Posted by: rgalla9146 Apr 23 2022, 10:54 AM
You'll have to have some hidden GoPros when you pull into a Ferrari gathering.....
....... especially when you lift the hood
Priceless.
Posted by: Gearup Apr 23 2022, 11:40 AM
If you decide against the flared body because the engine or something doesn’t check out I am interested in it.
Posted by: TRS63 Apr 23 2022, 01:36 PM
What a cool project, looking forward to it !
Antoine
Posted by: tygaboy Apr 24 2022, 12:30 PM
Another typical Tygaboy post: virtually no 914 content! (but the gear heads will likely love it!) 
I figured folks might enjoy some additional info and a closer look at the 360 engine/trans so here you go.
https://www.youtube.com/watch?v=XDNVP4PwC0k
Posted by: sixnotfour Apr 24 2022, 12:42 PM
Great Video..DrySump Tank built into trans,,crazy...cool..
Posted by: Superhawk996 Apr 24 2022, 03:18 PM
flat plane crank and 8500 rpm - audio porn.
Well stated.
How about i start sending you $300 a month from now to . . . uh . . . . forever and we'll start a payment plan while you build it. 
My bet on the hollow rear trans cover is to meet rear impact requirement. Want energy absorbed before the impact sled hits the "solid" transaxle and begins to push the whole engine / transaxle forward to passenger compartment.
Posted by: tygaboy Apr 24 2022, 05:15 PM
Because it was such a cool picture. I end up just standing there, staring at it. It is so crazy cool... I am so fortunate to have this sort of stuff essentially fall into my lap. Yes, I'm sure there are more than a couple frustrating days ahead but, this build simply has to happen.
Attached thumbnail(s)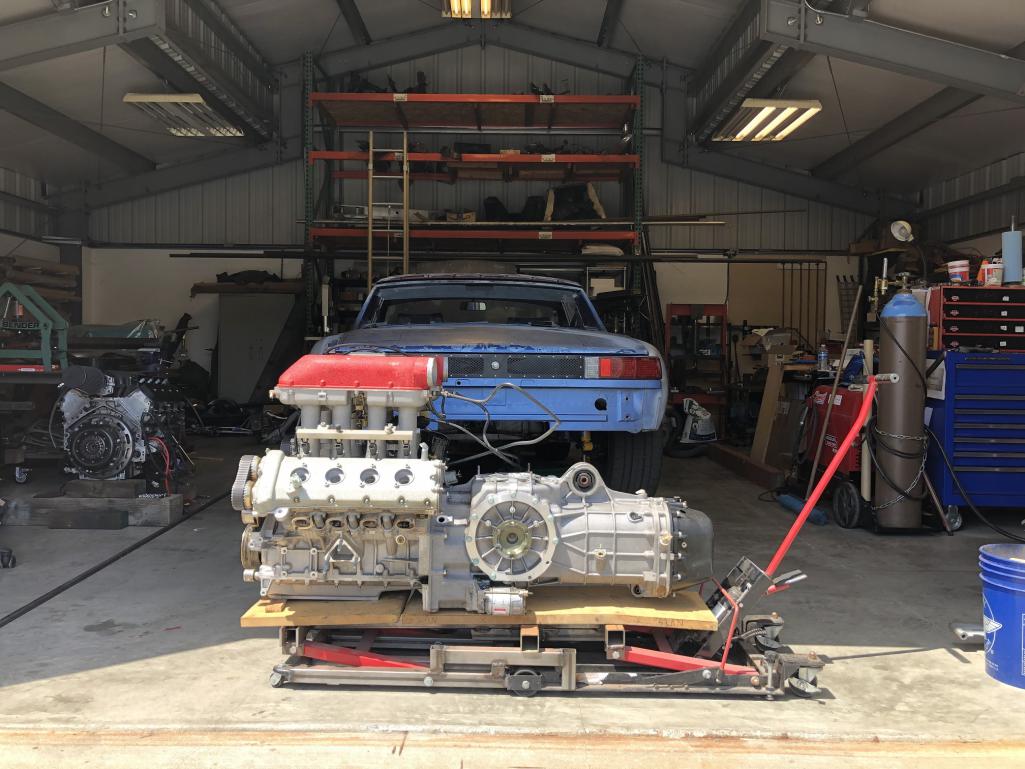
Posted by: sixnotfour Apr 24 2022, 05:38 PM
100% 
Posted by: Cairo94507 Apr 25 2022, 07:21 AM
That 914 could be the ultimate "sleeper". Even flared it will sail under the radar of most until they hear that engine. By then, it's too late.
Posted by: tygaboy Apr 26 2022, 09:13 AM
The stars align again. I can't remember if I mentioned this yet but:
Turns out a recent acquaintance is a Motec dealer and owns a 360 Challenge car and a 360 street car! He knows these engines.
I had a nice, long chat with him yesterday and he's agreed to come by, inspect the engine, provide a list of "to do before firing" items and, once the parts are here, perhaps even do the work.
Progress!
Posted by: Cairo94507 Apr 26 2022, 01:09 PM
That is great! I would love to be able to be there when you fire that baby for the first time.
Posted by: ClayPerrine Apr 26 2022, 01:29 PM
And I thought my flat fan and ITB conversion was mega cool... 
Betty and I have been debating going to Red Rocks or to Okteenerfest this year. If this is going to be at Red Rocks, I want to see it in person.
Posted by: infraredcalvin Apr 26 2022, 01:35 PM
This is such an awesome project, I’m waiting for the clever name….
Posted by: ClayPerrine Apr 26 2022, 01:37 PM
This is such an awesome project, I’m waiting for the clever name….
914 Modena
Posted by: tygaboy Apr 26 2022, 02:28 PM
That is great! I would love to be able to be there when you fire that baby for the first time.
@Cairo - Michael, I suspect that, as with my LS build, I'll schedule the first start. Anyone who'd like to be here is welcome to attend.
Posted by: tygaboy Apr 26 2022, 02:40 PM
This is such an awesome project, I’m waiting for the clever name….
@http://www.914world.com/bbs2/index.php?showuser=9463 - I'm sure we'll come up with something, sooner or later. I've noodled on a couple, including Project 2.538 which is how many time 360 goes into 914.
Or maybe "NARF"? Too bad that's not currently available as a CA vanity plate. Yes, I checked.
But NARPOFF (Not A Real Porsche Or F-ing Ferrari) is!
So clearly a ways to go. Feel free to submit your suggestions!
Attached image(s)
Posted by: tygaboy Apr 26 2022, 02:48 PM
And I thought my flat fan and ITB conversion was mega cool...
Betty and I have been debating going to Red Rocks or to Okteenerfest this year. If this is going to be at Red Rocks, I want to see it in person.
@http://www.914world.com/bbs2/index.php?showuser=1143 Clay, the goal is to have it running/driving at that point. Given the focus I'm putting on this project, within a few weeks I should have a pretty good idea if that'll be doable. I'll be posting progress as it's made and if that timing starts to look at all questionable, I'll let everyone know. Now, if you're looking for a lousy excuse to treat Betty to a Napa area wine country vacation...
And if it's far enough along to be worth looking at, I may trailer it to WCR so folks can check it out. Big if and may, but we'll see.
Posted by: Chris914n6 Apr 26 2022, 02:56 PM
Moteena
Mule = donkey + horse
Posted by: eric9144 Apr 26 2022, 02:58 PM
914NARF 
Took me too long to dig this up, but for perspective, here's a 3.6 with a 915
Intakes on this are also pretty tall but clear the engine lid (barely) the F360 looks taller still ...Can't wait to see how this project progresses 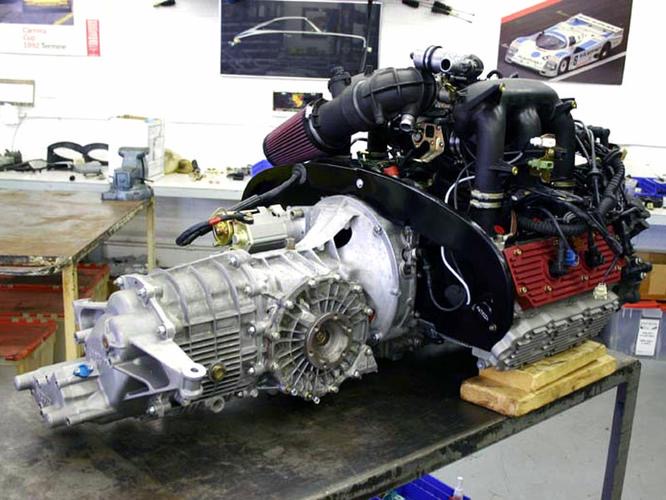
Posted by: tygaboy Apr 26 2022, 03:28 PM
Moteena
Mule = donkey + horse
@http://www.914world.com/bbs2/index.php?showuser=431 - Oh, I kinda like that! It's certainly a contender, thanks!
Posted by: infraredcalvin Apr 26 2022, 11:59 PM
I like it! Could always go with the “PORRARI”
Posted by: tygaboy Apr 27 2022, 05:31 PM
Let's keep with the "it was meant to be" theme. I've been sitting and staring at the drive train because, well, "Ferrari" and noticed the output flanges just begging to have something test fit to them. With my car apart, my axles were handy.
You now know the answer and can confidently state when you're next asked at this weekend's Cars & Coffee, "Why yes, Carrera axles do bolt right on to Modena trans output flanges."
You're welcome and can thank me later.
Seriously though, I suspected this might be the case. Nice that it's now verified. Even better is that once I get my Boxster trans back, all I have to do is some simple math and I'll know the length the axles need to be. I suspect they'll need to be shorter than the Carrera spec, but we'll know soon enough.
A successful first step, and I'll take it!
Attached thumbnail(s)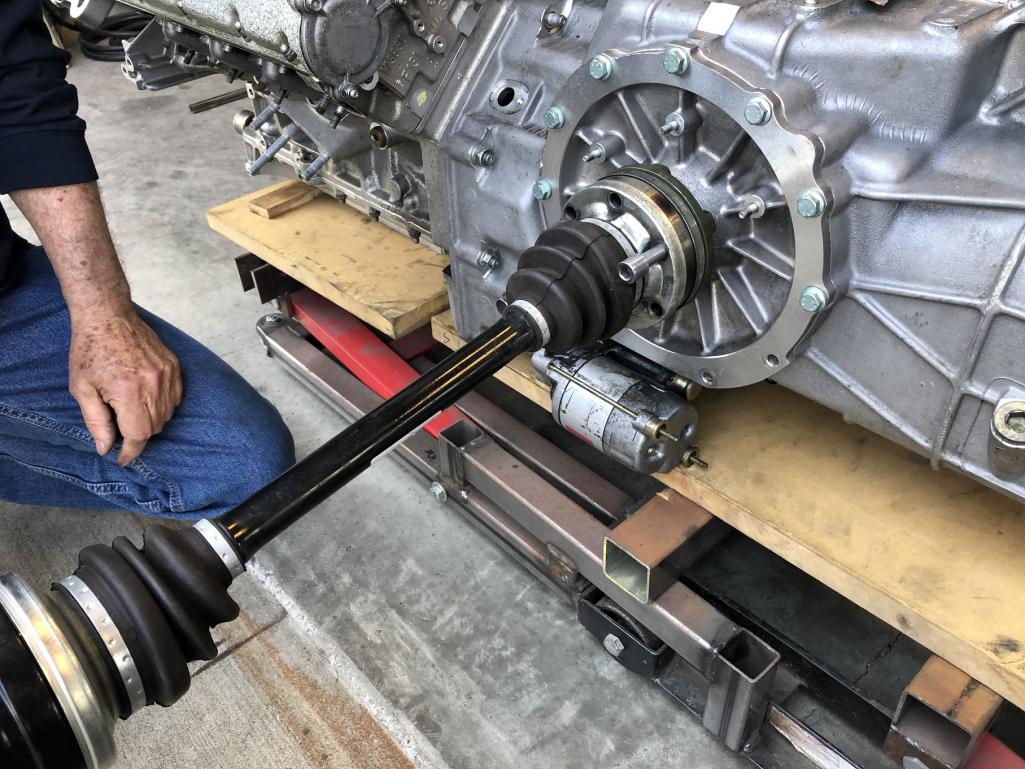
Posted by: tygaboy Apr 27 2022, 05:37 PM
One other major decision has been made. I asked the owner what would happen if the engine needed major work. He said "I'll fix it.". So there it is. Decision made.
I'm going to pick up that lovely chassis in the next day or so and the clearance surgery will begin soon after.
Here.
We.
Go.


Posted by: Shivers Apr 27 2022, 05:56 PM
One other major decision has been made. I asked the owner what would happen if the engine needed major work. He said "I'll fix it.". So there it is. Decision made.
I'm going to pick up that lovely chassis in the next day or so and the clearance surgery will begin soon after.
Here.
We.
Go.
That is great news. Nine Fourtony ? Or is that strictly a Fiat thing
Posted by: Dion Apr 27 2022, 06:36 PM
This is fascinating. The fact the Italian & German flanges could line up. Two competitors
sharing a 3rd party supplier? Crazy. I would have thought a piece like this would be “in house”.
Anyway. I love this. Can’t wait to see where this one goes.
So cool of the Ferrari engine owner to concede a rebuild if necessary.
Wow, just wow. Chris you never fail to educate us!!
Posted by: mepstein Apr 27 2022, 08:22 PM
Ferrari and Porsche did share the 914-6/308 rear caliper. Small differences but same castings.
Posted by: mgp4591 Apr 27 2022, 09:45 PM
Moteena
Mule = donkey + horse
@http://www.914world.com/bbs2/index.php?showuser=431 - Oh, I kinda like that! It's certainly a contender, thanks!
Moteener...kinda fits...
Posted by: JamesJ Apr 28 2022, 04:38 PM
Hey Chris,
I was thinking 94dena or 914ena.
Looking forward to seeing this build!
Posted by: Andyrew Apr 29 2022, 06:43 AM
Big win on the axles!!!!
Posted by: tygaboy Apr 30 2022, 01:56 PM
Subtle badging
Attached thumbnail(s)
Posted by: tygaboy May 2 2022, 09:29 AM
We found a pic of the car from when the previous owner was starting some of the mods/updates. Hard to tell from this but that's the original PTS Raspberry - with matching wheels!
And so no one freaks out: No, it's not a factory /6.
Attached thumbnail(s)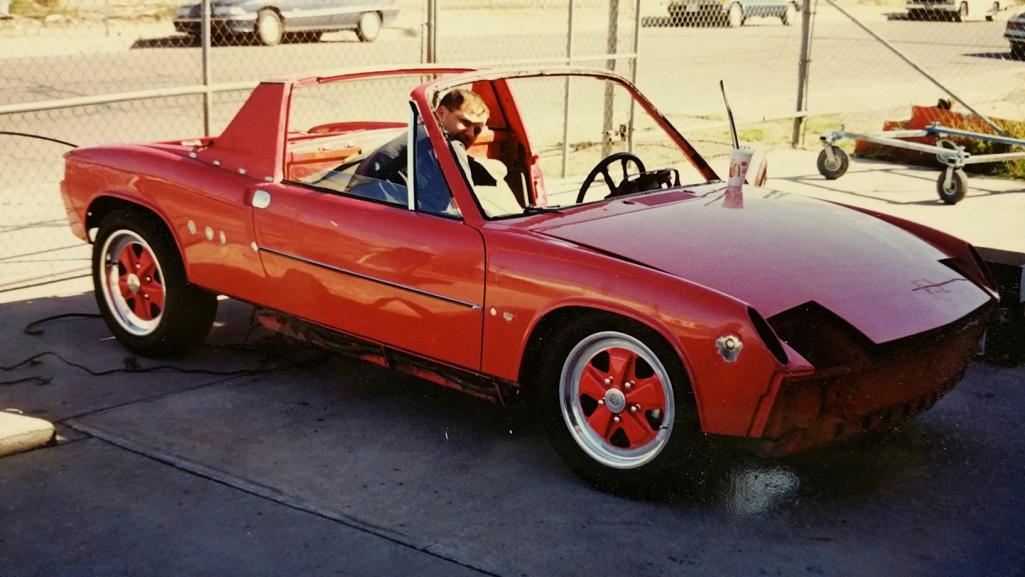
Posted by: Chris H. May 2 2022, 10:10 AM
Looks like they're in process of taking the ^*&%ing dealer bump strip side mouldings off. I'm about to do that myself. Can't take looking at them any more.
Posted by: Morph914 May 2 2022, 12:32 PM
Chris, this is so cool! Nothing beats the music of a Ferrari engine? I’ll be in Napa starting next week, just saying…
Cheers,
John
Posted by: tygaboy May 2 2022, 01:34 PM
Chris, this is so cool! Nothing beats the music of a Ferrari engine? I’ll be in Napa starting next week, just saying…
Cheers,
John
@http://www.914world.com/bbs2/index.php?showuser=20326 John, Awesome! Please let me know when it's convenient for you to come by!
It'll be great to see you and catch up.
Posted by: Retroracer May 2 2022, 03:57 PM
We found a pic of the car from when the previous owner was starting some of the mods/updates. Hard to tell from this but that's the original PTS Raspberry - with matching wheels!
And so no one freaks out: No, it's not a factory /6.
So seeing that pic - and being the massive Rush nerd I am - have to add to the name suggestion list: "Red Barchetta"
For the guy who works out of the Red Barn...
- Tony
PS. Is BRCHTTA available from CA DMV?
Posted by: ClayPerrine May 3 2022, 06:44 AM
So seeing that pic - and being the massive Rush nerd I am - have to add to the name suggestion list: "Red Barchetta"
For the guy who works out of the Red Barn...
- Tony
PS. Is BRCHTTA available from CA DMV?
100%.(Another massive Rush nerd.....
)Clay
Posted by: Mueller May 3 2022, 05:03 PM
The stars align again. I can't remember if I mentioned this yet but:
Turns out a recent acquaintance is a Motec dealer and owns a 360 Challenge car and a 360 street car! He knows these engines.
I had a nice, long chat with him yesterday and he's agreed to come by, inspect the engine, provide a list of "to do before firing" items and, once the parts are here, perhaps even do the work.
Progress!
Perhaps you can convince him to visit the Red Barn in one of those said vehicles. I’d gladly buy him lunch for a ride about your neighborhood.
Such a cool project.
Posted by: tygaboy May 3 2022, 05:22 PM
The stars align again. I can't remember if I mentioned this yet but:
Turns out a recent acquaintance is a Motec dealer and owns a 360 Challenge car and a 360 street car! He knows these engines.
I had a nice, long chat with him yesterday and he's agreed to come by, inspect the engine, provide a list of "to do before firing" items and, once the parts are here, perhaps even do the work.
Progress!
Perhaps you can convince him to visit the Red Barn in one of those said vehicles. I’d gladly buy him lunch for a ride about your neighborhood.
Such a cool project.
@http://www.914world.com/bbs2/index.php?showuser=87 Mike - He's planning to come up on Thursday but doubt it'll be in his Ferrari. I believe his Challenge car is apart. I replied to your e-mail so give a call when you can and let's get together?
Posted by: tygaboy May 4 2022, 11:30 AM
Milestone morning:
The Ferrari SwapRod (as I've taken to calling it) chassis arrived at the Red Barn!
Now all I need to do is get that there drive train into that there car. I mean, how hard can that be?
Attached thumbnail(s)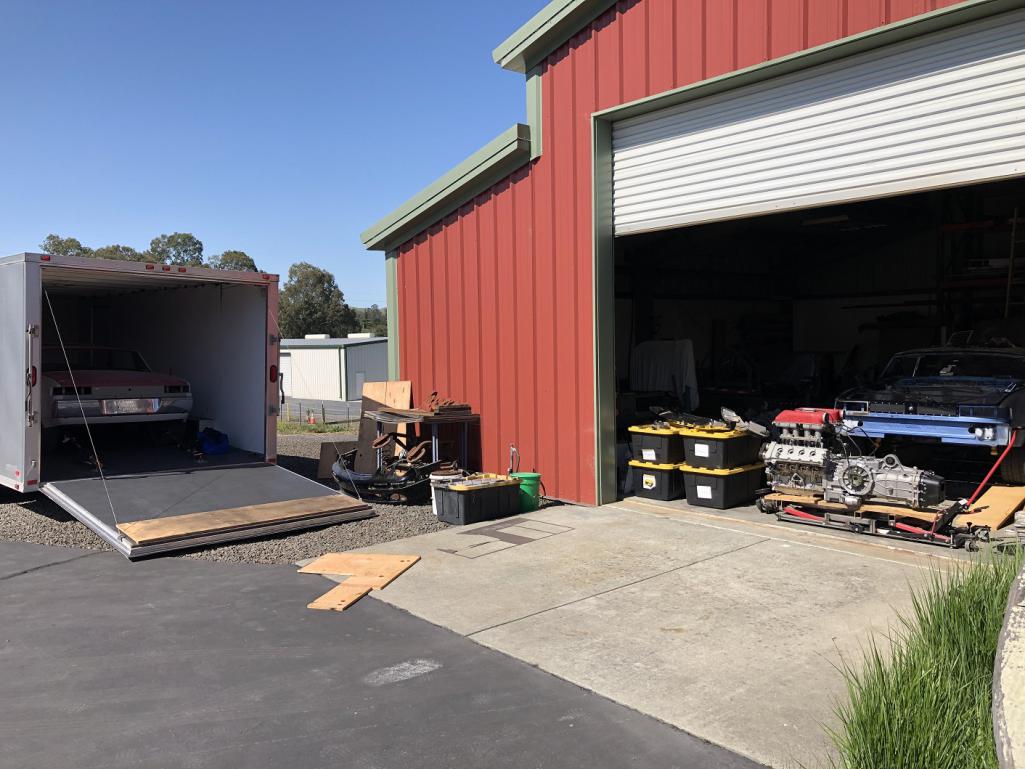
Posted by: Cairo94507 May 4 2022, 12:08 PM
![popcorn[1].gif](style_emoticons/default/popcorn[1].gif)
Posted by: Mueller May 4 2022, 12:53 PM
I think you need a bigger barn now.
Posted by: tygaboy May 4 2022, 01:28 PM
And now, some pics of the chassis:
Boy, I'm really unsure of slicing this one up for a swap like this. Take a look at what's already been done - and how nicely.
Let's start with the engine bay:
- 4-cyls mounts removed
- /6 mount installed
- oil tank prep complete
- prepped for A/C line
- suspension consoles reinforced w/bars to the firewall
- heater tube delete (some sort of electric heat was planned)
Attached thumbnail(s)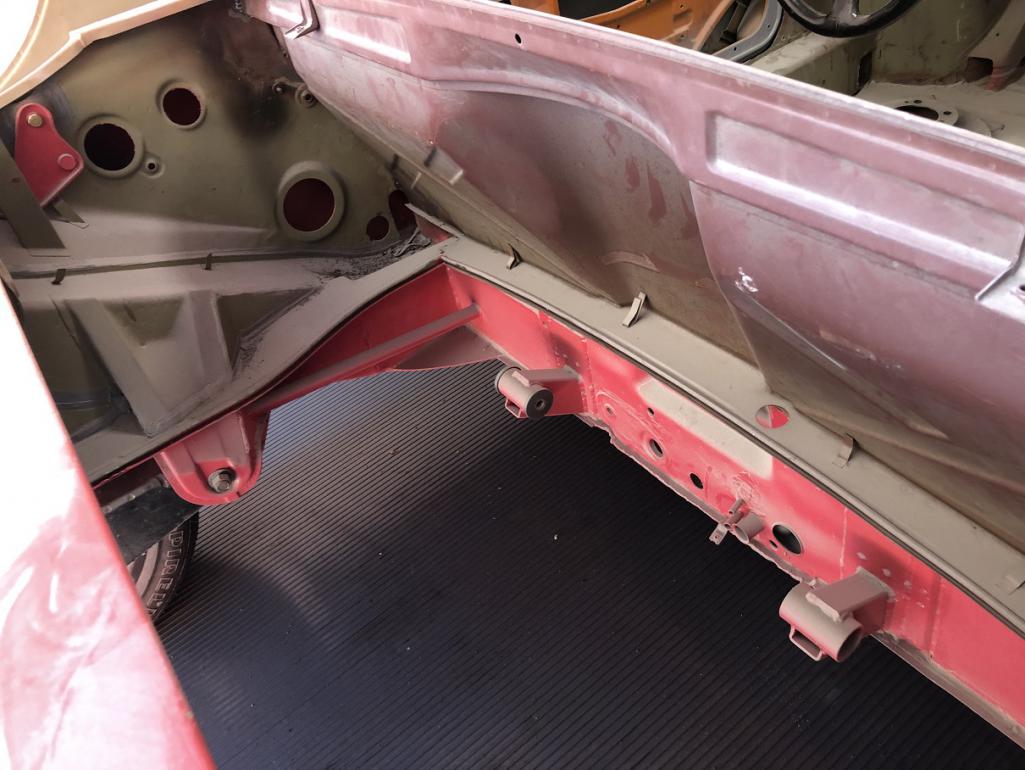
Posted by: tygaboy May 4 2022, 01:31 PM
But it's up frunk where things get interesting:
There's this really nicely constructed, 2-part false floor. It's aluminum with counter sunk holes for the fasteners.
Any guesses what we'll find underneath?
Attached thumbnail(s)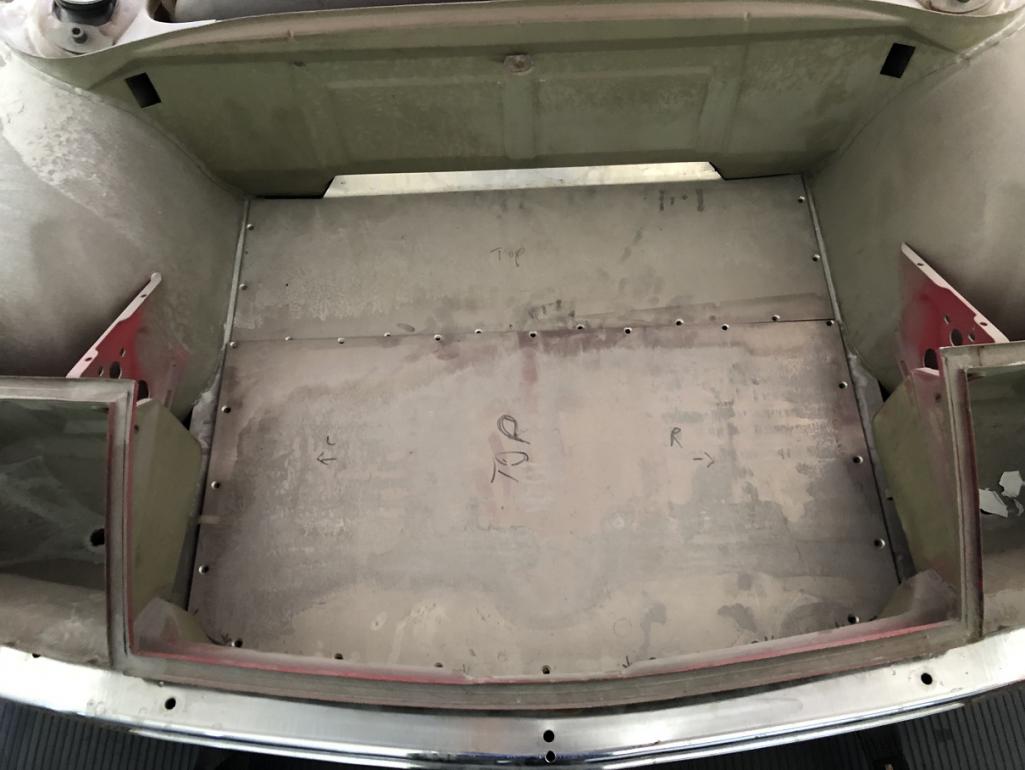
Posted by: tygaboy May 4 2022, 01:35 PM
Were to begin?
- louvered floor
- custom base plate
- prepped for what I understand is a 993 3.6 cooler and A/C condenser
- front suspension mounts tied together with that round support bar
Attached thumbnail(s)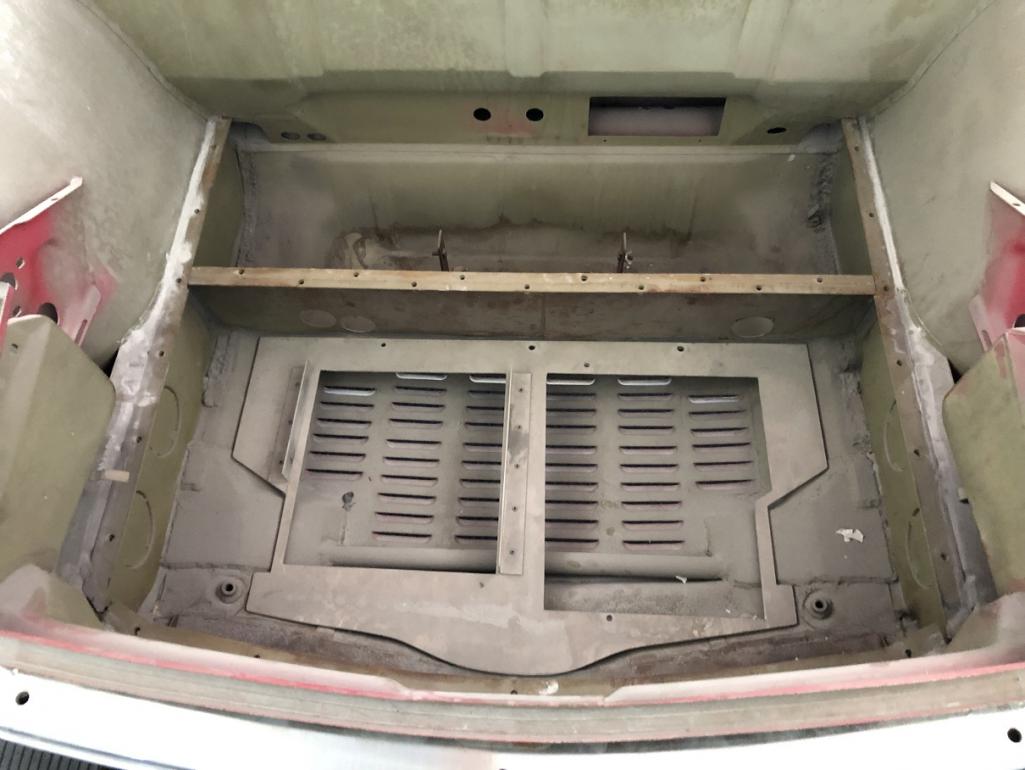
Posted by: tygaboy May 4 2022, 01:36 PM
The nose, bumper and front valance are prepped for the GT opening. All steel, all the time.
And the fog light openings have been modded. Not sure what the plan is/was for them.
Attached thumbnail(s)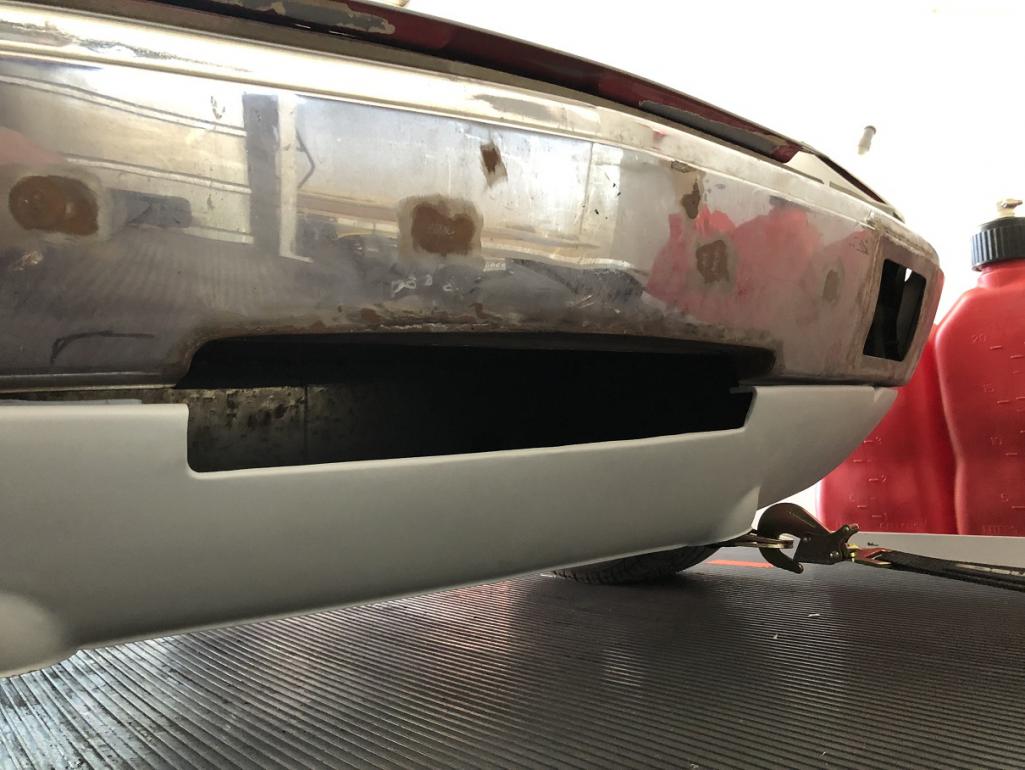
Posted by: tygaboy May 4 2022, 01:39 PM
Another view.
Attached thumbnail(s)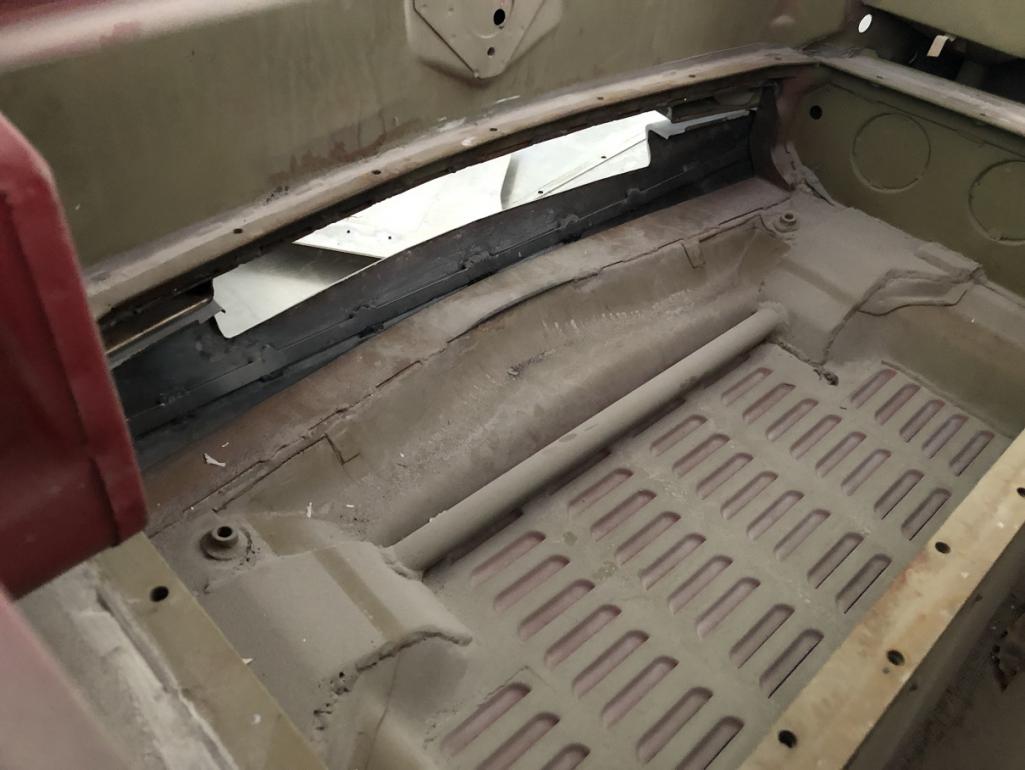
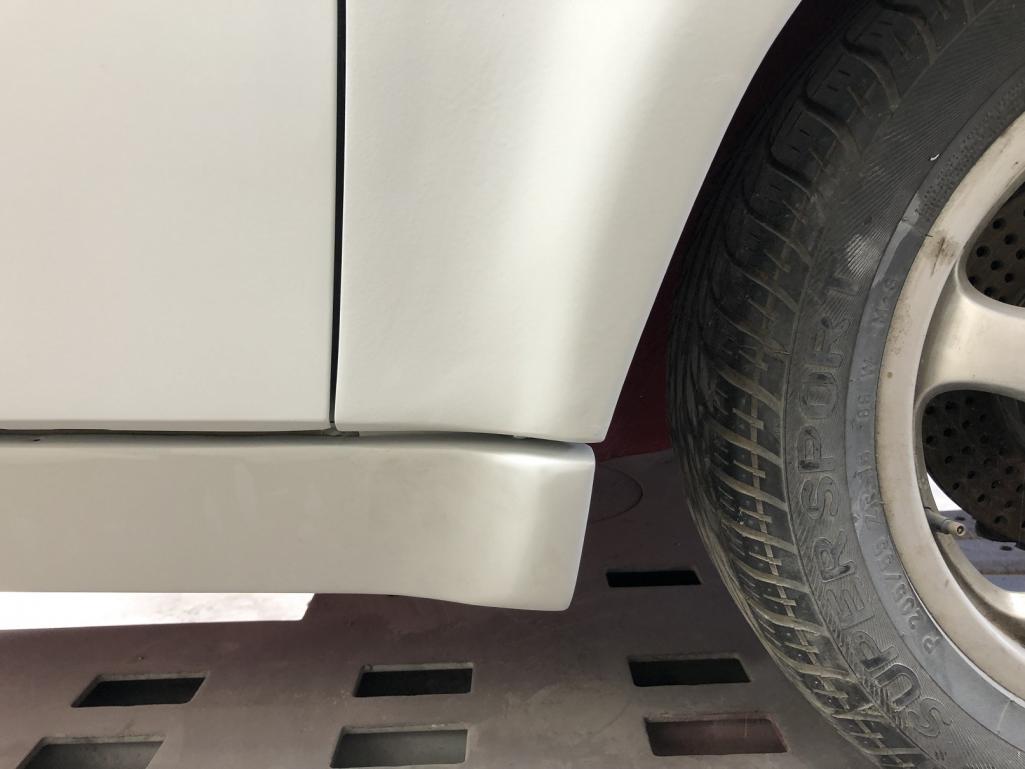
Posted by: tygaboy May 4 2022, 01:41 PM
Really nice gaps. But yes, somewhere along the way, the fender/cowl seams got welded closed. Done by the previous, previous owner, not the current owner.
Attached thumbnail(s)
Posted by: tygaboy May 4 2022, 01:55 PM
So there it is. Let the debate begin about how this one is too nice to not finish as a /6 conversion. Especially considering all the parts, including a 993 3.6, are accounted for.
I happily admit, I'm torn myself.
Or, I dunno, maybe someone has an equally nice chassis and they want to try and talk the owner into some sort of trade? I'm just putting that out there. Worst that could happen is he says "no".
My Ferrari buddy is coming up on Thursday to check out the engine. Assuming things look OK, I'm being instructed to commence surgery soon.
Posted by: tygaboy May 4 2022, 02:37 PM
The factory headers arrived today. Surprisingly light, considering how big they seem to look.
Attached thumbnail(s)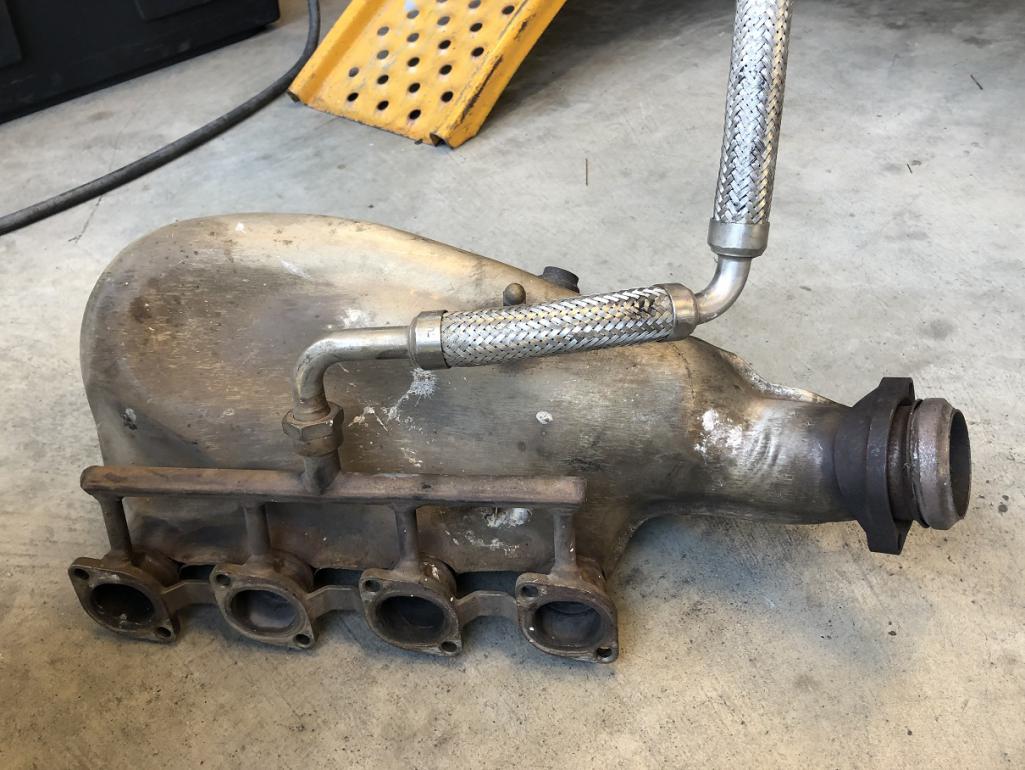
Posted by: tygaboy May 4 2022, 02:50 PM
And in place, they look the business. You can see how the tubes sweep up, forward then back around.
I did some guesstimeasuring on the width and fore/aft size and in checking the space between the suspension consoles, they may actually fit. The real issue is that the O2 sensors stick out the sides so those may not fit.
This may be OK in that 360 headers tend to rot from the inside out, being wrapped in the shielding that you see here. It seems good ones, which these are (!) are quite desirable/valuable. We can sell/swap these and get a set to cut up to better suit the needs of this build. Or make something from scratch that's modeled on the factory tubes. We shall see.
Speaking of those O2 sensors, here's some interesting stuff you likely don't care about: This engine has a flat plane crank, which is what virtually all 4-cylinder engines use. So what did Ferrari decide to do? Run this engine as two, separate 4-cylinders!
There are two of everything: cam sensors, crank sensors, knock sensors, O2 sensors, fuel tanks, fuel pumps, throttle bodies and engine ECUs. Yep, two. Each ECU runs 1/2 the engine.
Won't this just be the best, trying to figure out all this stuff? 
Attached thumbnail(s)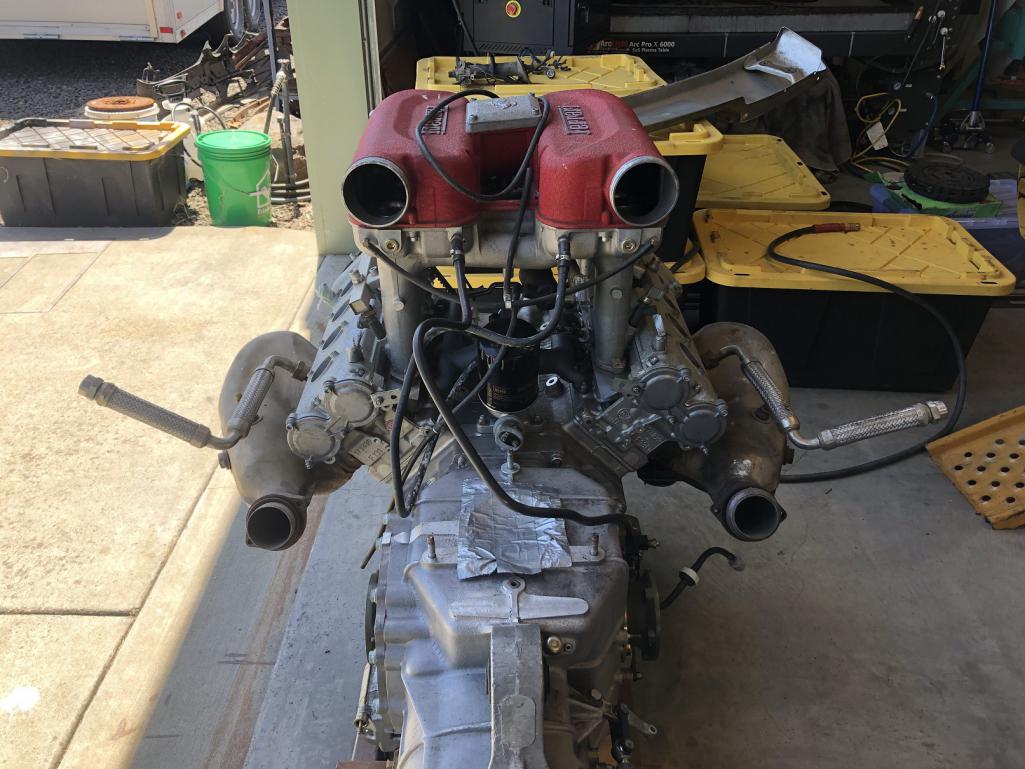
Posted by: FourBlades May 5 2022, 02:35 PM
Another amazing project!
Can't wait to watch this unfold.
Definitely in the right hands to make this happen.
John
Posted by: tygaboy May 5 2022, 02:53 PM
The Milestone mornings just keep coming!
Yesterday, the chassis arrived. Today, my Ferrari-savvy buddy came by and gave the engine, trans and some other components the once over. Spoiler Alert:
It passed with flying colors!
He kept saying how nice everything looked, none of the typical corrosion on the various external surfaces, etc. Stop here if don't care about the details.
Details:
Up first, he outlined the maintenance services and related parts I need to take care of ahead of attempting to fire it: the most obvious being cam belts, pulleys and tensioners. He also advised on a couple other "while you're at it" seals and gaskets.
Then we pulled the plugs and borescoped the cylinders. So little carbon on top of the pistons that you could easily see the machining marks. Beautiful cross-hatching visible on all the cylinder walls. And the plugs all read "nice burn".
Then off came the induction and he did a quick inspection of the back sides of the intake valves. Nothing make you breath easy like hearing an expert say, "Wow. This all looks really nice..."
You already know this but I'll repeat it: The motor, she is good!
An additional bonus is he knows all the places to get parts and happens to be a dealer for some of the components I need.
It's things like where to get parts to re-core the water pump vs buying new, contacts at a place the modifies the clutch to make them last far longer, a source for a greatly improved throw-out bearing. The list went on.
It was great to have a knowledgeable person get me pointed in the right direction and even better to know we can proceed with confidence that we have a solid drive train.
A great day at the Red Barn!
Posted by: Cairo94507 May 5 2022, 03:09 PM
Congratulations. That is the way to start a project; great chassis and great drivetrain.
Posted by: Andyrew May 5 2022, 09:58 PM
Awesome!!!! I am really glad to hear that it’s fully green lit!
Posted by: Shivers May 5 2022, 10:45 PM
Won't this just be the best, trying to figure out all this stuff? wacko.gif
@http://www.914world.com/bbs2/index.php?showuser=19241
Was there such a wide variation between the two banks that made that necessary? Or was this a "Ford has a better idea" thing. Well, after watching you wire up the LS car, you are probably their best chance of success. Good luck
Posted by: jcd914 May 6 2022, 12:31 AM
Won't this just be the best, trying to figure out all this stuff? wacko.gif
@http://www.914world.com/bbs2/index.php?showuser=19241
Was there such a wide variation between the two banks that made that necessary? Or was this a "Ford has a better idea" thing. Well, after watching you wire up the LS car, you are probably their best chance of success. Good luck
Ferrari has done this before, I ran into it on an F40 I had the pleasure of maintaining for a few years.
Two Weber FI & Ignition control units each running 1 bank of the engine separately, although 1 also controlled the idle speed and the other controlled the boost pressure.
It was an interesting system.
Jim
Posted by: tygaboy May 6 2022, 08:54 AM
@http://www.914world.com/bbs2/index.php?showuser=24781 - I'm a newbie to all things Ferrari so I can only guess as to why a "two of everything" approach.
My guess is it was lower cost and quicker time-to-market to employ available, well proven 4-cyl tech (these are Bosch ECUs and used on other model cars) than to spec something unique.
Clearly it works! This same set up is used on both the street 360s and the Challenge Stradale (CS) model. The only difference being a reflash done on the CS units that give a 10 hp bump. And I'm assuming I'll have to reflash anyway to eliminate the immobilizer function. Maybe we go CS spec?
My Ferrari buddy is, as mentioned, a MoTec dealer and he STRONGLY recommended staying with the factory ECUs, given how well the stock tune works. The induction system on this engine is pretty complex and he suspected it'd take a TON of dyno time/testing to even come close to what the stock set up delivers.
I'm going with the expert's advice.
Posted by: tygaboy May 6 2022, 09:35 AM
Drive train mounting: Initial planning
I initially assumed this part would be easy. Just do it like my LS. I mean, the Ferrari has mounts on the side of the block, same as the Chevy, so just run a cross bar underneath and work out how that'll mount to the chassis. Easy!
Turns out, not so much. Being a dry sump, there's no room for a cross bar. We'll there is a small area towards the rear of the engine, but it's in the way wrong place, relative to the mounts on the block. So, I started looking for info on how the engine mounts in the 360 chassis.
SURPRISE! The one video I found shows it being removed out the top of the car. Not what I'd expected. You can see in the pic, the chassis has the two outriggers that support the engine mounts. I could do something like this but then the engine would have to go in/out from above - which means all the rear of car chassis stiffening and transaxle mount would have to bolt in. I don't think I want to go that way.
I'll get into more detail later but at this point, it's looking like there will be a couple removeable, intermediate "hanger mounts" that will bolt to reinforced areas on the chassis to provide those "landing pads" for the engine mounts. These will bolt in once the engine is raised up from underneath. For transaxle mount, there'll be a cross bar/support structure, similar to what's in my LS car, that will grab that single trans mount.
Lots more planning to do but I think I'm getting an idea of how it'll all work.
Attached thumbnail(s)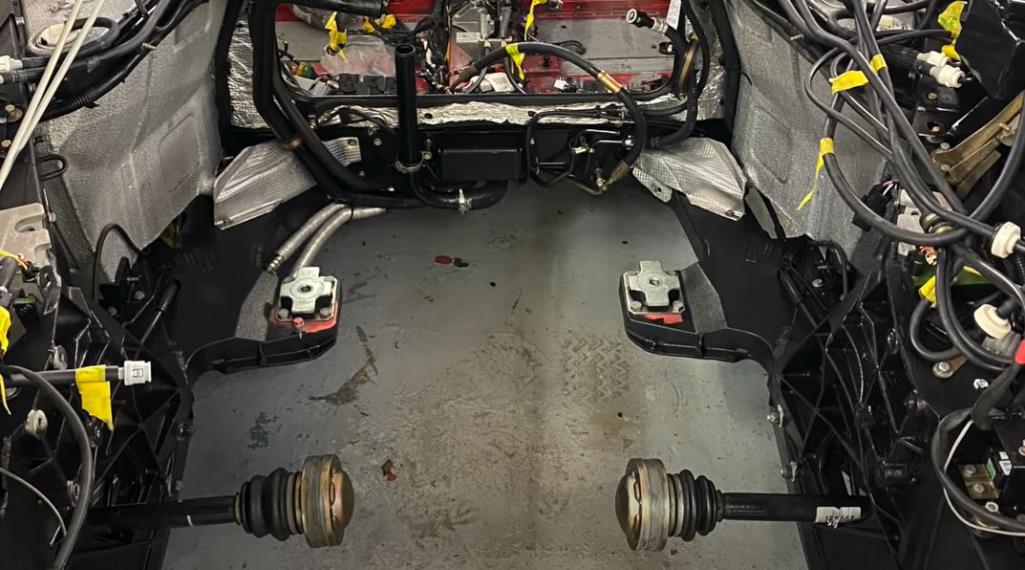
Posted by: ClayPerrine May 6 2022, 11:04 AM
Drive train mounting: Initial planning
I initially assumed this part would be easy. Just do it like my LS. I mean, the Ferrari has mounts on the side of the block, same as the Chevy, so just run a cross bar underneath and work out how that'll mount to the chassis. Easy!
Turns out, not so much. Being a dry sump, there's no room for a cross bar. We'll there is a small area towards the rear of the engine, but it's in the way wrong place, relative to the mounts on the block. So, I started looking for info on how the engine mounts in the 360 chassis.
SURPRISE! The one video I found shows it being removed out the top of the car. Not what I'd expected. You can see in the pic, the chassis has the two outriggers that support the engine mounts. I could do something like this but then the engine would have to go in/out from above - which means all the rear of car chassis stiffening and transaxle mount would have to bolt in. I don't think I want to go that way.
I'll get into more detail later but at this point, it's looking like there will be a couple removeable, intermediate "hanger mounts" that will bolt to reinforced areas on the chassis to provide those "landing pads" for the engine mounts. These will bolt in once the engine is raised up from underneath. For transaxle mount, there'll be a cross bar/support structure, similar to what's in my LS car, that will grab that single trans mount.
Lots more planning to do but I think I'm getting an idea of how it'll all work.
Why couldn't you make a support frame that bolts to the engine/transmission. Then make the support frame bolt to the 914-6 mounts on the firewall and to the factory trans mounts in the rear. You can then just raise up the front of the engine, hook it to the mounts on the firewall, and pivot it up into place.
Just a thought
Posted by: tygaboy May 6 2022, 12:26 PM
Drive train mounting: Initial planning
...
Why couldn't you make a support frame that bolts to the engine/transmission. Then make the support frame bolt to the 914-6 mounts on the firewall and to the factory trans mounts in the rear. You can then just raise up the front of the engine, hook it to the mounts on the firewall, and pivot it up into place.
Just a thought
@http://www.914world.com/bbs2/index.php?showuser=1143
Great minds... As I was out noodling on it I stumbled on that same sort of idea. A cradle, not a cross bar. Funny how looking at my LS set up for so long put me in a particular mind set and how sometimes it's hard to see a new/different approach.
Still a lot to work out and not sure where it'll end up but please keep the input coming!
Posted by: Chris914n6 May 6 2022, 12:30 PM
My best guess for the 2 ECUs is 2 MAFs. Not a signal that is easy to combine and average at 8700 rpm.
If the senders are 180 apart then it's likely the same ECU for both and any difference is a pin-out.
I'd try fab a cradle and use the existing -6 mounts, but I haven't seen the factory isolators.
Posted by: racerbvd May 6 2022, 12:45 PM
Subscribed
Posted by: targa72e May 6 2022, 05:00 PM
Two ECU's is not just a Ferrari thing. The BMW 850 ( V12) used two separate ECU's as well.
I had a roommate in the 80's that worked at a Porsche shop that also serviced some customers exotic cars as well. I would go and help out for fun when I could. They had a grey market Lamborghini Countach they were working on. It was federalized with BMW CIS systems, one on each side of the engine. I got to go for a ride from there shop over to one across town that specialized in BMW's so they could get the CIS system adjusted correctly. Car would not run well below 3K so we had to keep the reves up. It was quite fun. Car also had straight pipes and sounded wonderful.
john
Posted by: Andyrew May 7 2022, 06:48 PM
Or you could build removable mounting points from the chassis. Triangulated or whatnot. Would be lighter than a sub frame and less tubes to get in the way.
Posted by: Retroracer May 8 2022, 10:22 AM
Chris - RE: Engine cradles and such: More food for thought in the shape of what Ferrari did with the 348 model (see pic). The removable cradle extended to mounting the suspension components, actually forming part of the car chassis. Boxster struts and lower links might be substituted...?
You would likely end up removing a lot of metal in the rear of the 914 chassis to do something like this which you may not be comfortable with.
Something to think about,
- Tony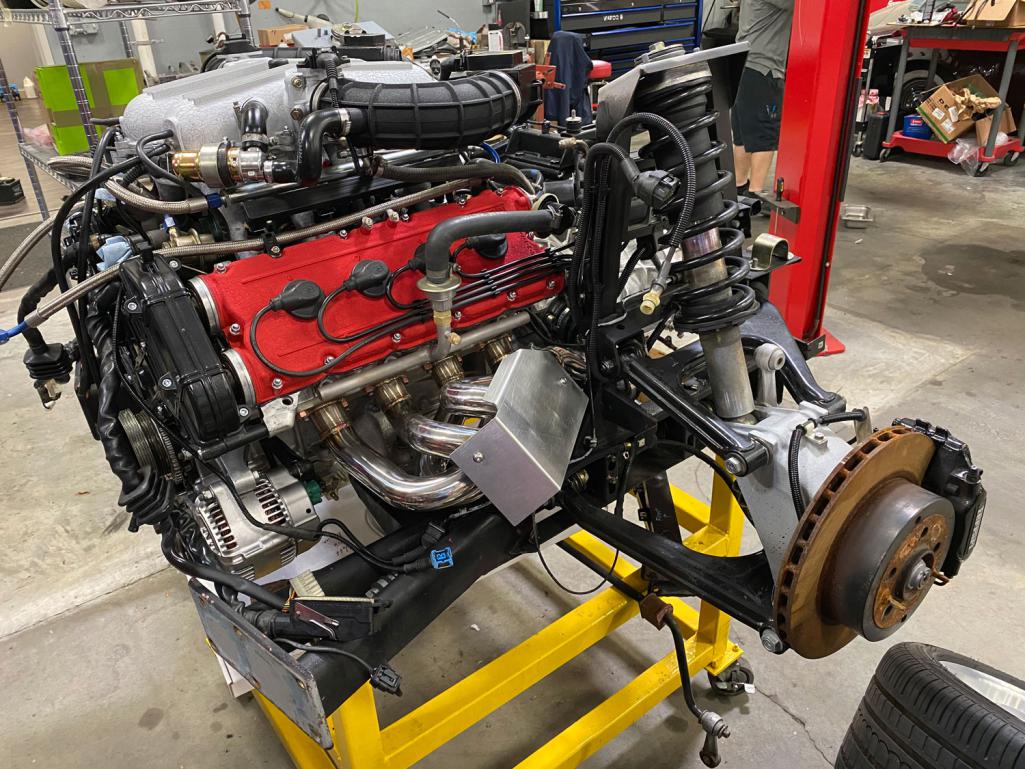
Posted by: r_towle May 8 2022, 09:49 PM
Is it running yet?
Posted by: Superhawk996 May 9 2022, 05:29 AM
Is it running yet?
Posted by: Cairo94507 May 9 2022, 06:37 AM
You would likely end up removing a lot of metal in the rear of the 914 chassis to do something like this which you may not be comfortable with.
I had to laugh at this -great way to start the day.
Posted by: tygaboy May 9 2022, 09:33 AM
Chris - RE: Engine cradles and such: More food for thought in the shape of what Ferrari did with the 348 model (see pic). The removable cradle extended to mounting the suspension components, actually forming part of the car chassis. Boxster struts and lower links might be substituted...?
You would likely end up removing a lot of metal in the rear of the 914 chassis to do something like this which you may not be comfortable with.
Something to think about,
- Tony
@http://www.914world.com/bbs2/index.php?showuser=9712 Michael - I suspect @http://www.914world.com/bbs2/index.php?showuser=16100 Tony may not be joking with the "not be comfortable" comment. That ain't a simple task and I really DON'T want to do that level of modification, at least not at this point - and I don't think I'll have to.
I'm meeting with the owner this morning to give him one last chance to change his mind about this chassis. I'm 100% sure he's going to tell me, yet again, to "Stop asking and start cutting!"
I'm pretty sure mounting the drive train is going to be the easiest part of the build.
I've been spending most of my time trying to understand what it'll take to make the engine run stand-alone. There's an immobilizer that has to be bypassed. Good news is that there are a few companies able to supply the needed black box for that, as well as reflashing the ECUs to account for the bypass.
It's now a matter of getting hold of a wiring diagram and working out which circuits in the chassis harness have to be retained. Good news is the key has no transponder so it SOUNDS like the bypass will address the biggest issue.
The wiring stuff I just did for my LS car is child's play in comparison, given thousands of people have "been there, done that."
We'll figure it out, one way or another!

Posted by: Cairo94507 May 9 2022, 09:45 AM
Yeah, I knew Tony was just pulling your chain. I know you are quite capable when it comes to cutting and welding, etc.
Posted by: SirAndy May 9 2022, 10:16 AM
Yeah, I knew Tony was just pulling your chain. I know you are quite capable when it comes to cutting and welding, etc.
"capable" and "comfortable" are two completely different things though ...

Posted by: tygaboy May 9 2022, 04:19 PM
Yeah, I knew Tony was just pulling your chain. I know you are quite capable when it comes to cutting and welding, etc.
"capable" and "comfortable" are two completely different things though ...
At this point, there's no compelling reason to go crazy on the chassis. This build is focused on the swap and making the car run/drive. Focus people, focus!
Posted by: tygaboy May 9 2022, 04:30 PM
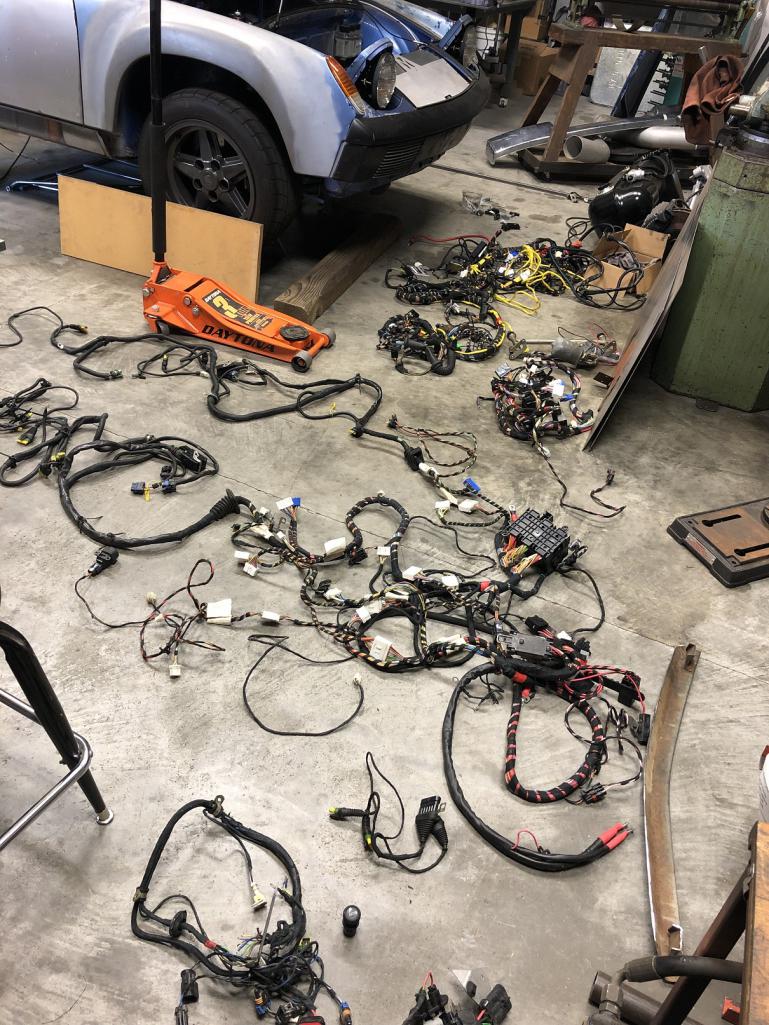
Then the owner said, "Come get the rest of the parts..." This is the first load. A bit of the back story is there were at least two 360s that contributed to the parts stash. One was an F1 paddle shift car, one was a manual. One was a spyder, one not. There are boxes of parts, not labeled other than "Ferrari". There's some F1 wiring, some manual wiring...
These are only some of the bins I've got to go through.
Who speaks/reads Italian? I'll need it to figure out which of these parts I need.
In cosa mi sono cacciato? ( )
Attached thumbnail(s)
Posted by: tygaboy May 9 2022, 04:50 PM
Some folks have asked about the intake set up. It really is quite the engineering marvel. If you're like me and find this sort of thing interesting, the link below will take you to a detailed write up about it.
At the very least, know this:
There are dual, DBW throttle bodies that control the air flow into the plenums, just like you'd expect. But those butterflies in the intake runners AND the valve that connects the plenums? They're operated pneumatically.
https://aldousvoice.com/2013/01/07/ferrari-360-air-intake-system/
Remember, all this was available on the '99 360 (maybe on some earlier models, I don't know). Want to see something interesting? Google the new 'Vette Z06 engine and look the design of its intake. Sure, its a bit more refined but it certainly seems Ferrari was onto a good idea.
Crap, I'm starting to like Ferraris...
Attached thumbnail(s)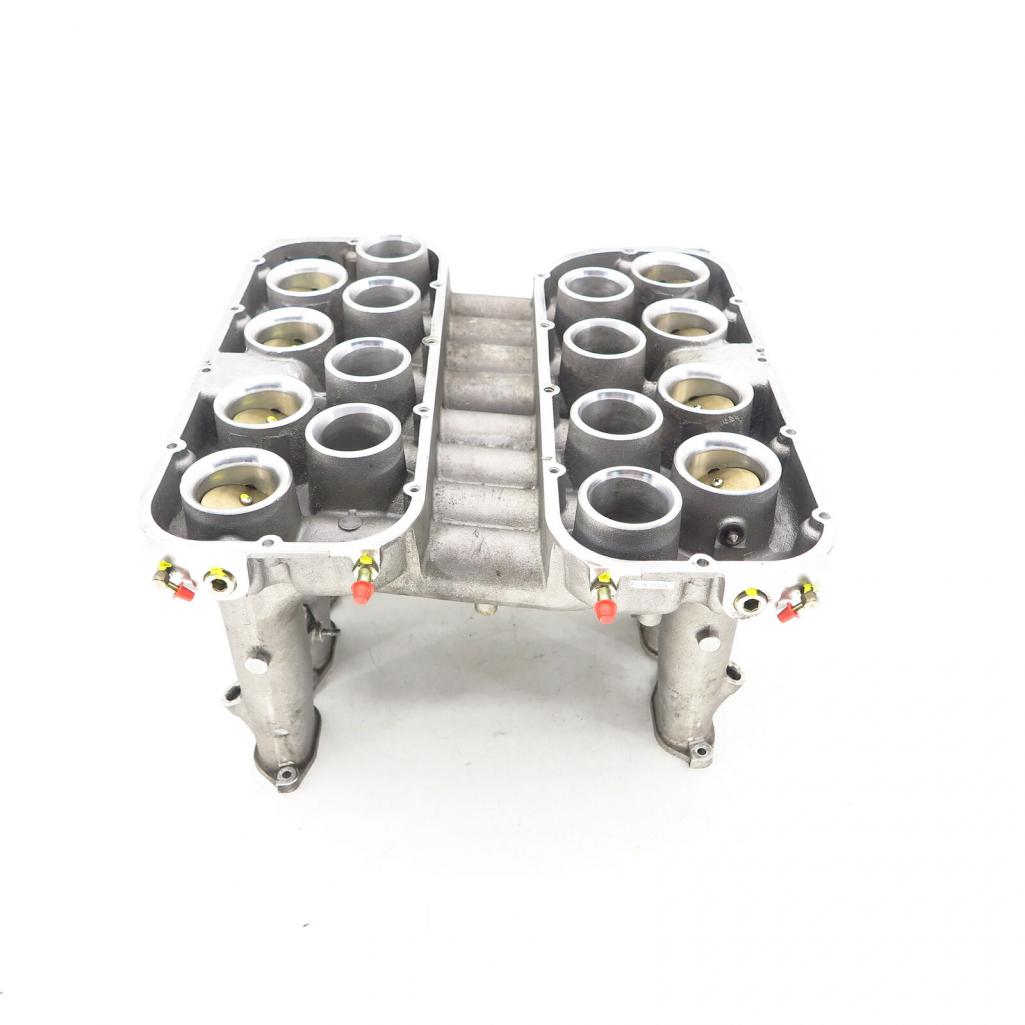
Posted by: Cairo94507 May 9 2022, 05:34 PM
Oh my . . . you are going to be busy for a minute or two.
Posted by: tygaboy May 10 2022, 04:20 PM
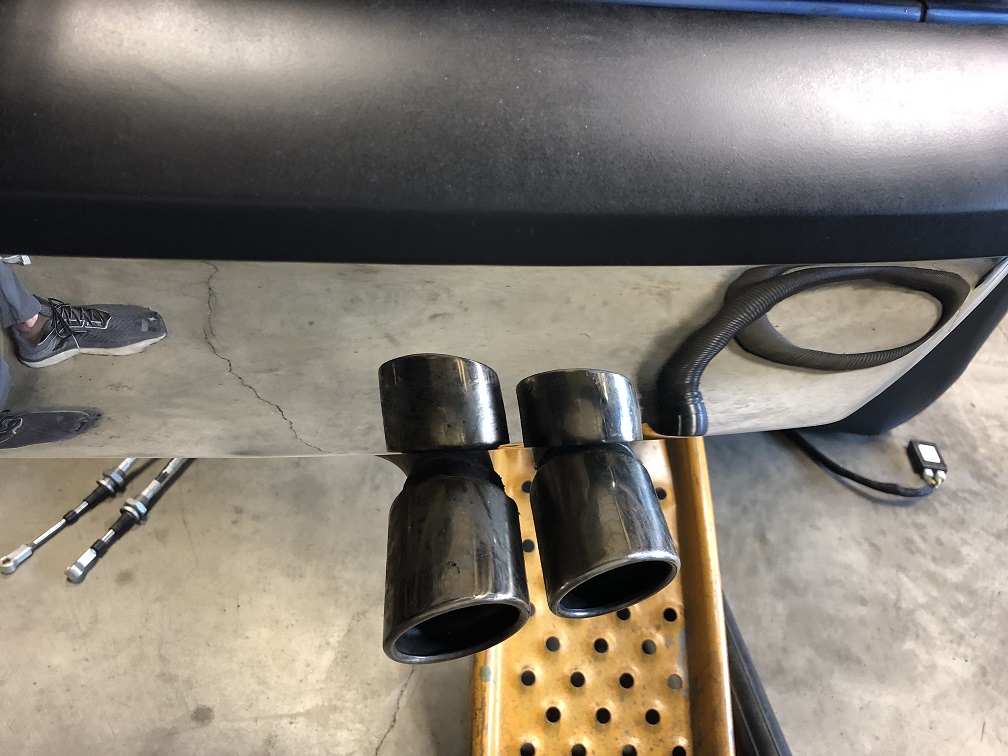
After scaring the crap out of myself with the wiring, I needed something to make myself feel better so when I came across part of the exhaust, I couldn't resist a "test fit".
It actually looks pretty good. Certainly better in real life than in these pics.
And yes, that exhaust bypass is actuated electro-pneumatically. An ECU signal triggers a valve to open and that same pneumatic accumulator that controls the intake manifold pops open a less restrictive exhaust path.
Attached image(s)
Posted by: Andyrew May 10 2022, 09:50 PM
I love butterfly valved exhausts… such a cool idea. I planned on it with my car but didn’t have room.
When I did my cars wiring I used my phone with a translation app. Also lots of stickers had numbers that I was able to look up on Google.
Posted by: Krieger May 10 2022, 10:16 PM
After scaring the crap out of myself with the wiring, I needed something to make myself feel better so when I came across part of the exhaust, I couldn't resist a "test fit".
It actually looks pretty good. Certainly better in real life than in these pics.
And yes, that exhaust bypass is actuated electro-pneumatically. An ECU signal triggers a valve to open and that same pneumatic accumulator that controls the intake manifold pops open a less restrictive exhaust path.
The flange on that exhaust looks like a 914 2.0
Posted by: roundtwo May 10 2022, 11:25 PM
Then the owner said, "Come get the rest of the parts..." This is the first load. A bit of the back story is there were at least two 360s that contributed to the parts stash. One was an F1 paddle shift car, one was a manual. One was a spyder, one not. There are boxes of parts, not labeled other than "Ferrari". There's some F1 wiring, some manual wiring...
These are only some of the bins I've got to go through.
Who speaks/reads Italian? I'll need it to figure out which of these parts I need.
In cosa mi sono cacciato?
( )You'll be my first call when I start building a space shuttle.
Posted by: Mueller May 11 2022, 08:24 AM
Do you have access to the wiring schematics? Curious how well made or not they are.
Posted by: Cracker May 20 2022, 07:01 PM
I think so...I've been asking for "space and time" once the Benz project was completed...what happened Chris? Ford Transit Connect...
Cracker
Oh my . . . you are going to be busy for a minute or two.
Posted by: 2mAn Jun 6 2022, 04:17 PM
Absolutely love this build, and after the other one Im so eager to see what this ends up looking like. That chassis would've been the perfect car to get forgiveness from my wife, bring that purple is her favorite color and the fact that I plan to build a flat 6 soon
Oh well, I wont try to derail this plan... and quite the opposite. A few plate ideas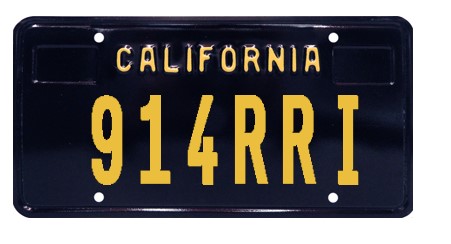

Posted by: SirAndy Jun 6 2022, 05:37 PM
Attached image(s)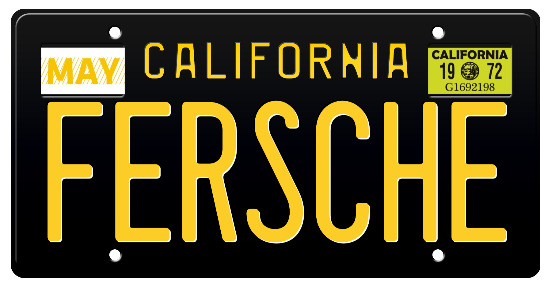
Posted by: tygaboy Jun 22 2022, 04:50 PM
Too many projects, not enough time. Well, that and we were searching for all the Ferrari parts that were somewhere amongst a very large (I mean LARGE) parts stash of air-cooled 911 stuff.
And it always takes longer when your searching is interrupted when you stumble on something, umm, "unique".
Factory 935 rear suspension, center locks and calipers anyone? 
Attached thumbnail(s)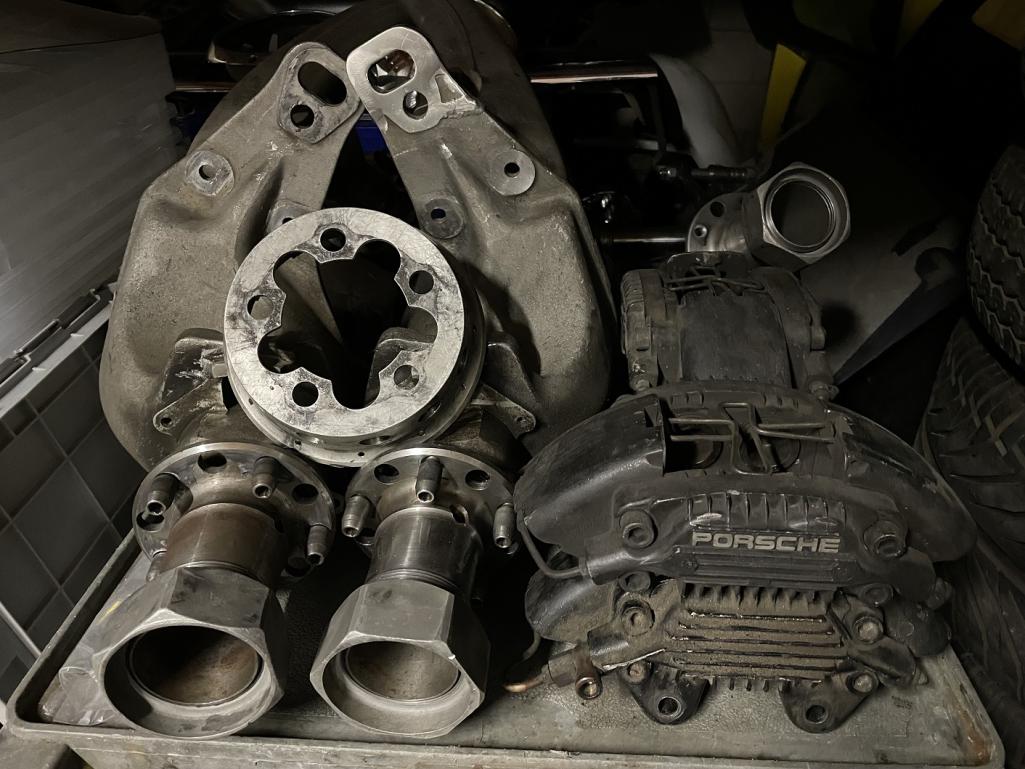
Posted by: tygaboy Jun 22 2022, 04:55 PM
But back to this build. We found all the parts that were there, most importantly, the engine ECUs, oil separator tank (and cap w/dipstick) and the throttle bodies/MAF sensors.
And you thought the engine looked big before...!
Back to the parts. Just some perspective in a "and you thought Porsche parts were pricey!" sort of way:
The ECUs (remember, there are two) command ~$2500 - $3000. Each. That oil tank cap/dipstick? Used, they're about $200.
So finding all the parts we possibly can is a good thing.
Attached thumbnail(s)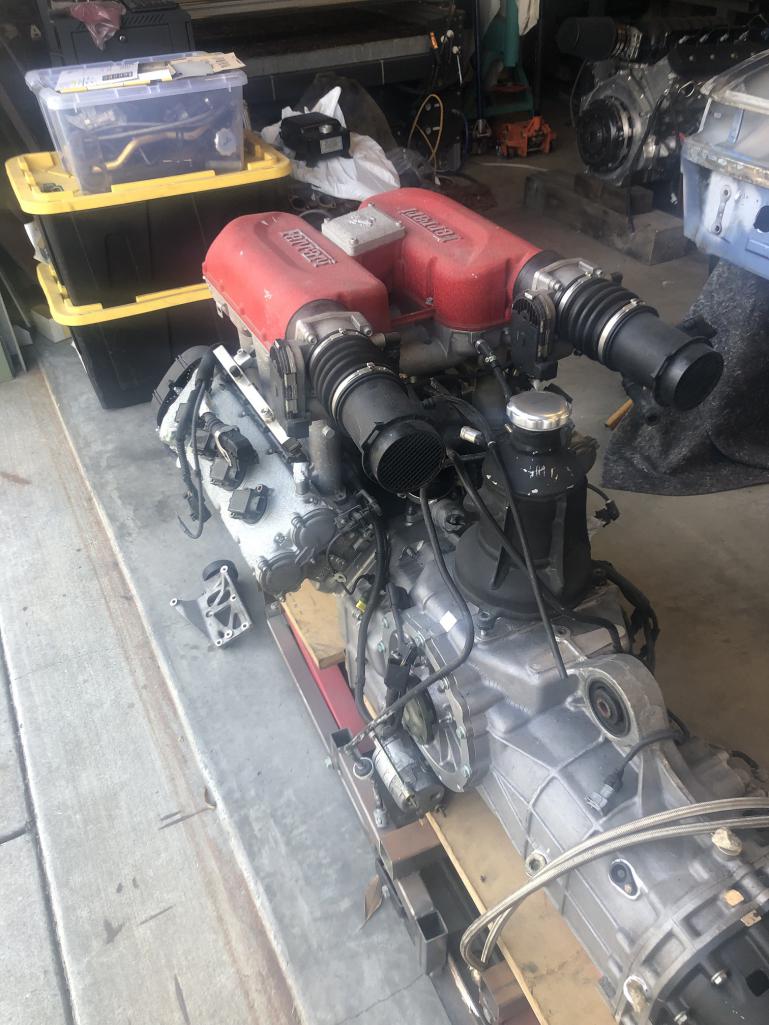
Posted by: tygaboy Jun 22 2022, 04:59 PM
As soon as my 914 is back together (hopefully in less than 2 weeks), I'll move the other chassis into the Red Barn and get started on fitting this drive train! I'm psyched to get started!
Posted by: ClayPerrine Jun 22 2022, 05:07 PM
Too many projects, not enough time. Well, that and we were searching for all the Ferrari parts that were somewhere amongst a very large (I mean LARGE) parts stash of air-cooled 911 stuff.
And it always takes longer when your searching is interrupted when you stumble on something, umm, "unique".
Factory 935 rear suspension, center locks and calipers anyone?
Damn... I would love to have those to go with my flat fan on my 914-6.
I even looked up how much wheels would cost....
Clay
Posted by: SirAndy Jun 22 2022, 06:16 PM
Attached thumbnail(s)

Posted by: tygaboy Jul 7 2022, 04:49 PM
If you watched the earlier video, you heard me mention how advantageous it is that the Ferrari's transmission output flanges are higher than the Boxster trans. I thought it'd be nice to have a comparo pic.
Granted the Ferrari is a dry sump engine but just look how much lower that will sit in the chassis while not adding all sorts of up angle to the axles. Quite a difference, eh?
Attached image(s)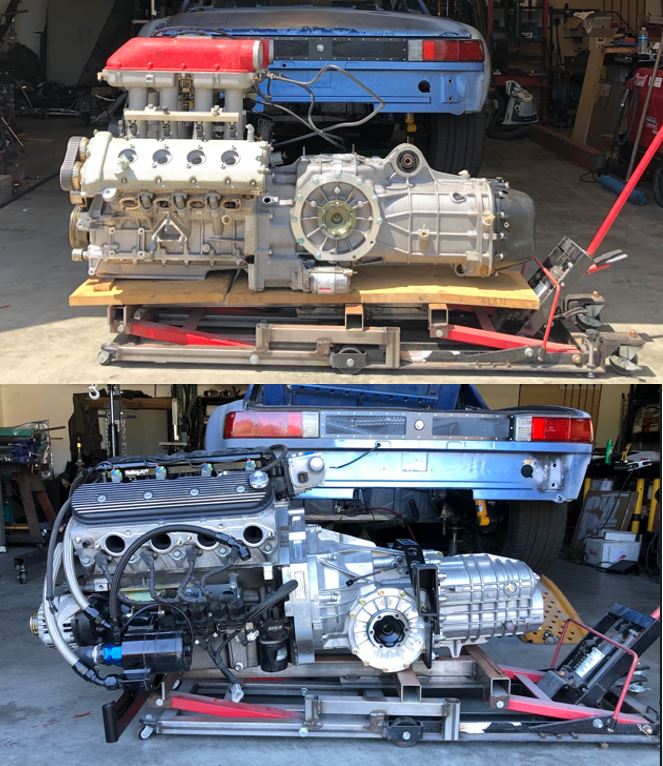
Posted by: tygaboy Jul 21 2022, 07:33 AM
Let's get this party started!
Attached thumbnail(s)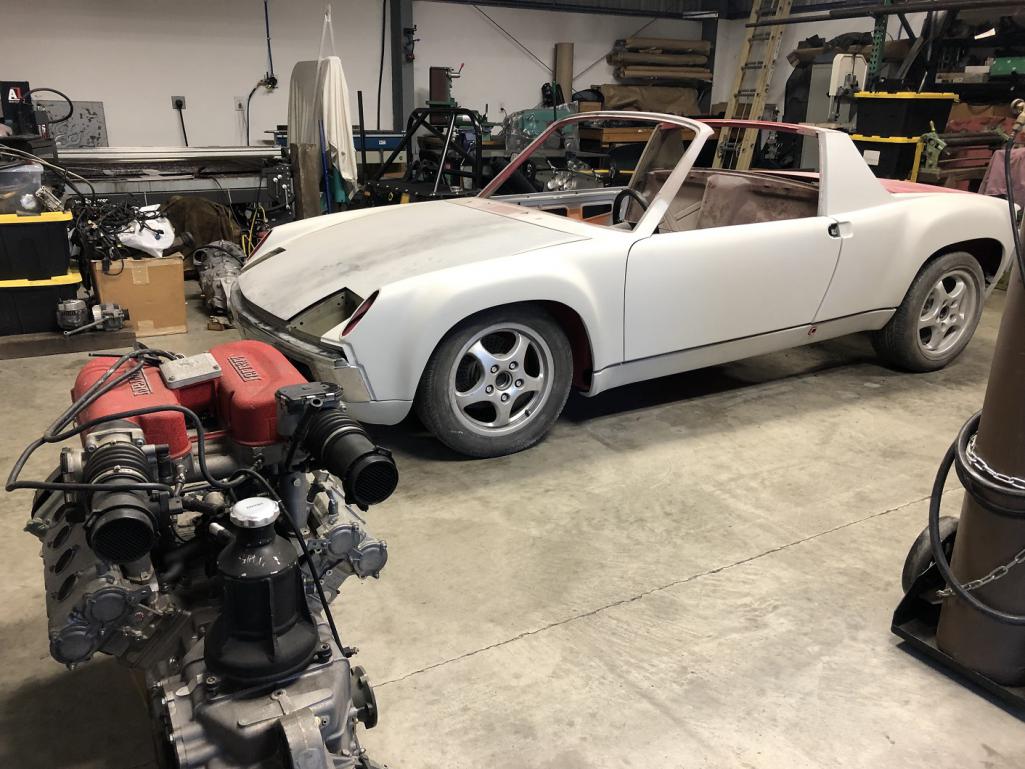
Posted by: TRS63 Jul 22 2022, 05:50 AM
Looking forward to see it progressing
Antoine
Posted by: tygaboy Jul 25 2022, 11:00 AM
Happy, happy, joy, joy!
I just got off the phone with John Reed of John Reed Racing. He's the guy who did all the magic to get a Ferrari 458 engine running in this Toyota drift car. F-ing ridiculous stuff.
https://johnreedracing.com/
In any case, I gave him an overview of this build and we had a long chat about making the 360 run on a stand alone MoTec ECU - including swapping out the pneumatic induction components for servo-based actuation. He liked that idea!
The best ever news is that "the 360 is not nearly as complicated as the 430 or the 458 we did..."
So that is the MAJOR hurdle cleared! It was the one thing holding me back from breaking out the Sawzall on this lovely chassis. With this news, the build is full speed ahead!
This is going to be so epic...
Attached thumbnail(s)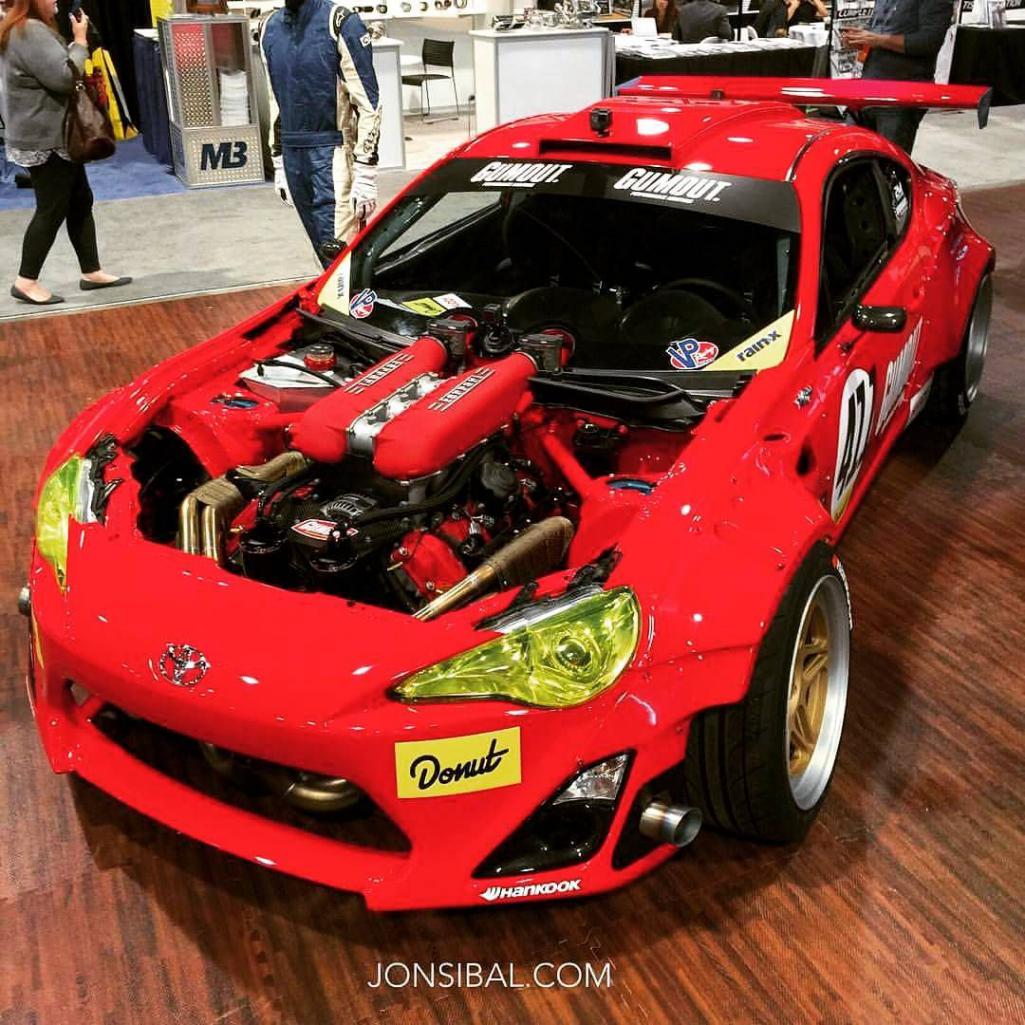
Posted by: ClayPerrine Jul 25 2022, 11:02 AM
PLEASE PAINT IT PINK AGAIN!
It is a 914, which is a bastard child of a 911 and a VW bus, powered by a Ferrari engine. So pink seems to be a really appropriate color for it.
Clay
Posted by: tygaboy Jul 25 2022, 11:09 AM
PLEASE PAINT IT PINK AGAIN!
It is a 914, which is a bastard child of a 911 and a VW bus, powered by a Ferrari engine. So pink seems to be a really appropriate color for it.
Clay
Funny you mention that, @http://www.914world.com/bbs2/index.php?showuser=1143 . I was looking at it yesterday and was thinking the very same thing, meaning 'keep it that color'. We shall see. A ways to go before I need to worry about color.
Posted by: tygaboy Jul 31 2022, 04:30 PM
I started inventorying what's there and what's going to be needed and stumbled upon this. I guess there's no choice on color now!
They're even more shocking in real life and yes, they are expired. Not that I'm interested in running a harness like this in a street car, even forgetting the color.
Hard to believe maybe but I have to admit, these are maybe a bit much, even for me!
Attached image(s)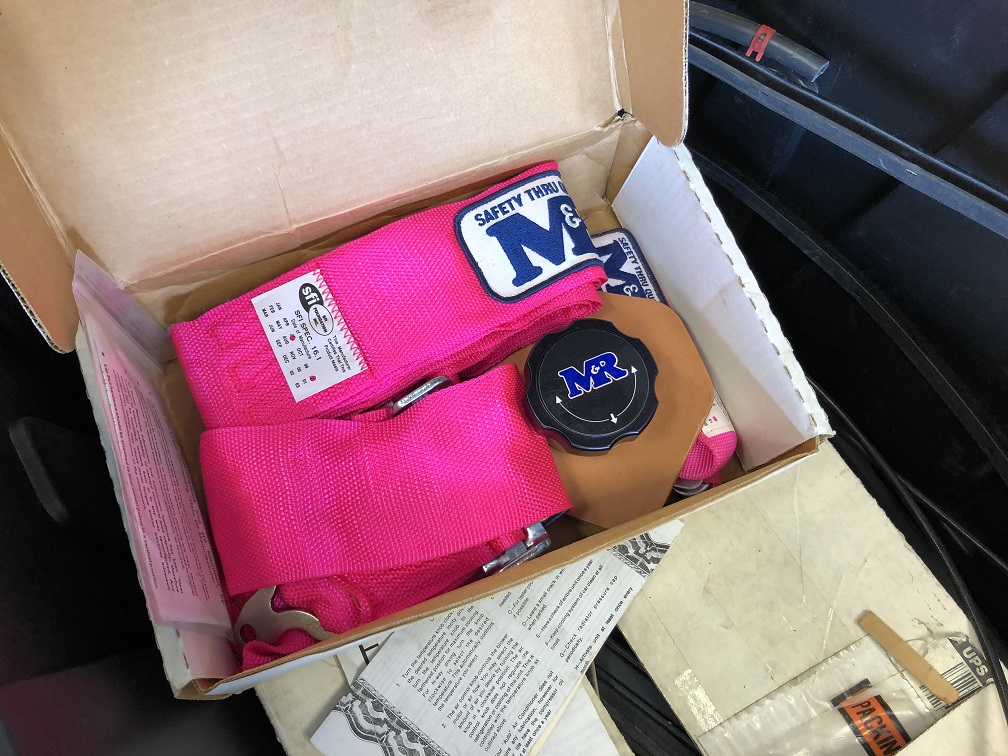
Posted by: tygaboy Jul 31 2022, 04:33 PM
On the other hand, this was in the parts stash: new, never installed A/C system! We've all seen the shape most of these are in (crappy, rotted/cracked) so I have to say, they look pretty nice when they're new. The chassis is already set up for A/C so this may actually get used in the build. If not, I'll sell it and someone will get a super nice set up.
Attached image(s)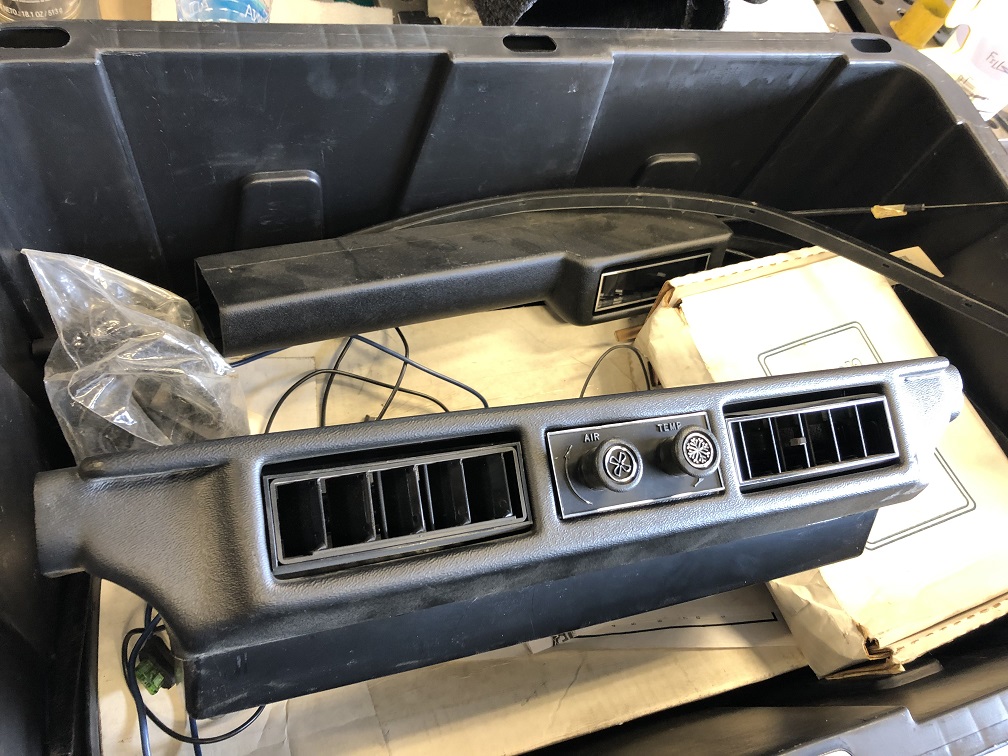
Posted by: tygaboy Aug 1 2022, 01:56 PM
As I get planning what to cut to fit the drive train, I started taking a closer look at the chassis. I'd only ever really poked around the top side. As I got under it, I was surprised to see it is / was essentially done! Bondo dust aside, everything looks really good. The flare install is particularly tidy and as mentioned, the rockers and valance metal work is top notch.
Final thoughts for today? Man, oh man, this is one "interesting" color!
Attached thumbnail(s)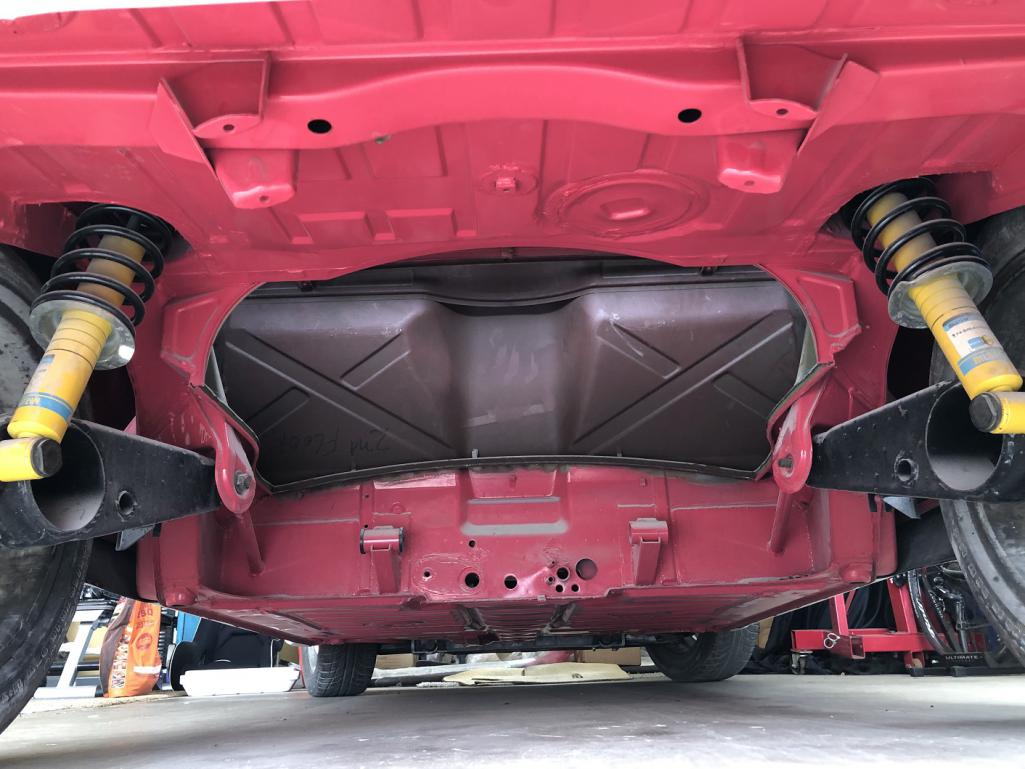
Posted by: markhoward Aug 1 2022, 01:59 PM
Keep it pink!
Posted by: JmuRiz Aug 1 2022, 03:06 PM
Keep it pink!
I love it
Posted by: Cairo94507 Aug 1 2022, 05:01 PM
Of course I find myself at odds with others. Pink is not my choice for a seriously nice 914. Yeah, I get the whole "pig" car, but that's different. Sorry, but this is sure to be a top-drawer car and I believe pink will hurt the cars appeal.
Posted by: tygaboy Aug 1 2022, 05:38 PM
I go back and forth. Raspberry is actually a nice looking color, if a bit feminine for the build. Something else to consider, as was pointed out to me by @http://www.914world.com/bbs2/index.php?showuser=16100 Tony, is this color would likely clash with the Ferrari red on that intake.
I could always paint the car Raspberry to keep it PTS then wrap it whatever I like at that point.
Lots to work out - and plenty of time to do it.
Attached image(s)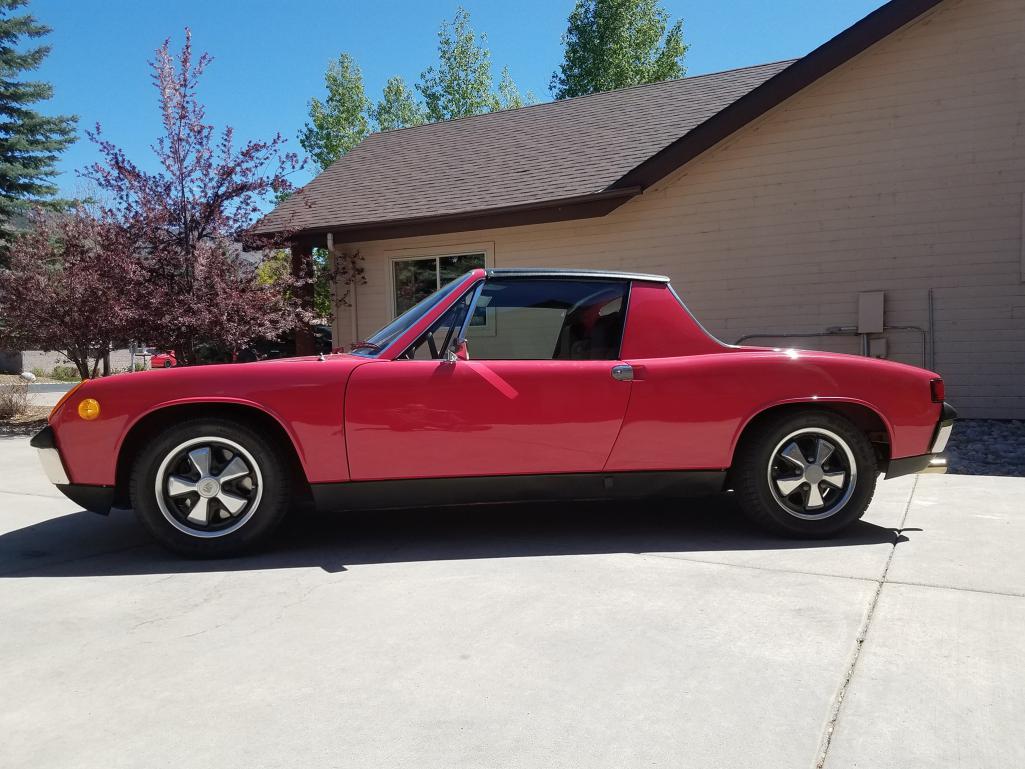

Posted by: KELTY360 Aug 1 2022, 06:51 PM
Of course I find myself at odds with others. Pink is not my choice for a seriously nice 914. Yeah, I get the whole "pig" car, but that's different. Sorry, but this is sure to be a top-drawer car and I believe pink will hurt the cars appeal.
Pretty tough to hurt the appeal of a Ferrari powered 914.

Posted by: SirAndy Aug 2 2022, 11:07 AM
It's not pink, it's raspberry ...
Posted by: waltonsm Aug 3 2022, 11:39 AM
I was thinking further about the location and orientation of the engine/trans. What is the oiling strategy for the transmission? Are there any specific angles or pickup
Levels you are going to need to maintain?
Posted by: Cairo94507 Aug 3 2022, 03:34 PM
Yes, I saw the color yesterday- the bottom of the car is nicely finished and in color; it's raspberry. I told Chris, if it were mine, it would likely remain the factory PTS raspberry. I don't think it looks pink.
Posted by: Dion Aug 3 2022, 04:23 PM
I’d rock the raspberry all day. I always thought it to be a cool colour.
That power plant and colour. Win!
So glad to hear the chassis is sound.
Posted by: tygaboy Aug 3 2022, 04:26 PM
I was thinking further about the location and orientation of the engine/trans. What is the oiling strategy for the transmission? Are there any specific angles or pickup
Levels you are going to need to maintain?
@http://www.914world.com/bbs2/index.php?showuser=17561 - There's nothing special required. The drive train sits dead level in the car. It does have an interesting (factory) H20-to-transmission gear oil heat exchanger that normally sits in the valley, under the intake plenum, but I plan to replace that with a standard trans cooler.
And I saw your comment in the WCR thread about this being at the 2024 event. But I ain't waiting that long: it'll be running/driving at the 2023 event.
Posted by: Cairo94507 Aug 3 2022, 05:05 PM
Mighty bold words partner.....
Posted by: waltonsm Aug 3 2022, 05:26 PM
I was thinking further about the location and orientation of the engine/trans. What is the oiling strategy for the transmission? Are there any specific angles or pickup
Levels you are going to need to maintain?
@http://www.914world.com/bbs2/index.php?showuser=17561 - There's nothing special required. The drive train sits dead level in the car. It does have an interesting (factory) H20-to-transmission gear oil heat exchanger that normally sits in the valley, under the intake plenum, but I plan to replace that with a standard trans cooler.
And I saw your comment in the WCR thread about this being at the 2024 event. But I ain't waiting that long: it'll be running/driving at the 2023 event. :shades2:
Cool!
I know that in the VR6/dsg we have in the corrado race car that the coolant/trans cooler is also intended as a heater to get the oil up to temp quick. We looked into removing it for a while, but ultimately we are still running it.
Posted by: tygaboy Aug 11 2022, 11:33 AM
Thursday, August 11, 2022: Project F-NARP officially begins. @http://www.914world.com/bbs2/index.php?showuser=2058 Pete - it's really happening!
The pristine chassis has been sliced and diced - and haters gonna hate but I did it anyway.
Some before and after to get things going.
I'm going to try and preserve the rear section of the trunk and use the factory metal to build an abbreviated sorta golf bag sized trunk area so there's at least some sealed storage/luggage capability.
Attached thumbnail(s)
Posted by: tygaboy Aug 11 2022, 03:07 PM
Successful first day's work with the initial clearance cuts made and a first attempt at drive train fit. So, what do we know at this point?
- the whole thing needs to come up about 2" which means the 914 trans cross bar and the trunk floor immediately behind the Ferrari trans hanger mount need to be notched and raised maybe 3-4".
- the cam belt drives are contacting the firewall so either the drive train moves back or the firewall gets notched, or a little of both.
- the axle angle is great and I can move things forward or back and still be well in range of acceptable to the CVs.
- it looks awesome!
Attached thumbnail(s)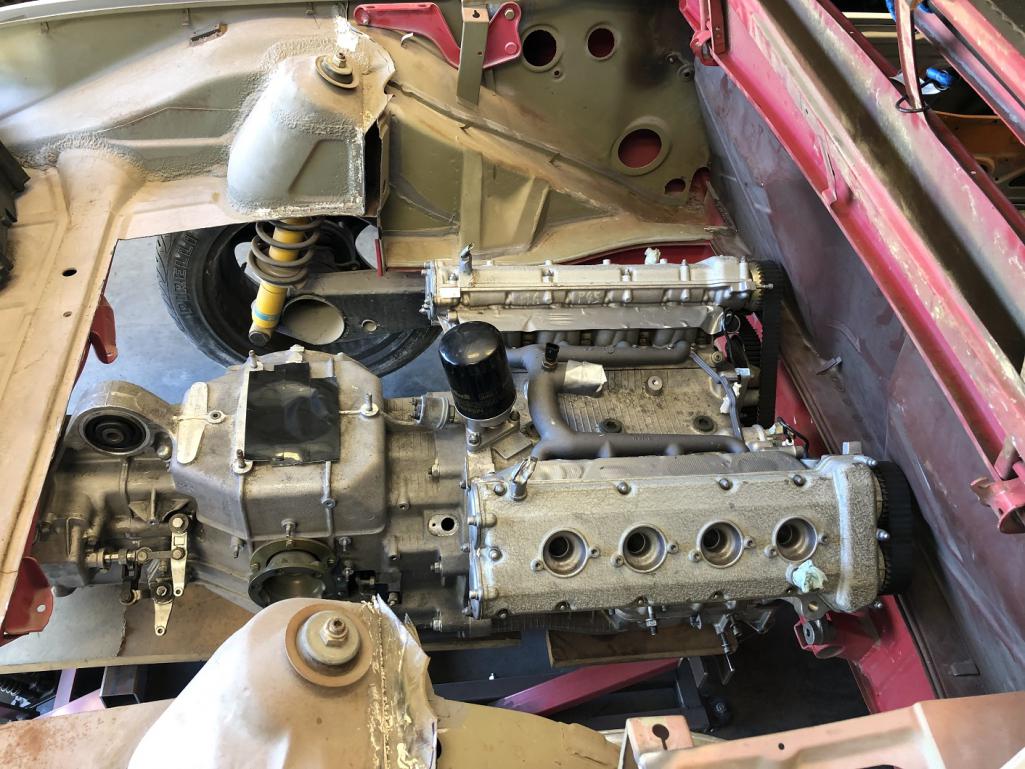
Posted by: tygaboy Aug 11 2022, 03:09 PM
Rear of trans showing how close things are. What you wouldn't know is there are transmission cooler lines that need to fit up there, too. So, as I mentioned, it'll get notched.
Attached thumbnail(s)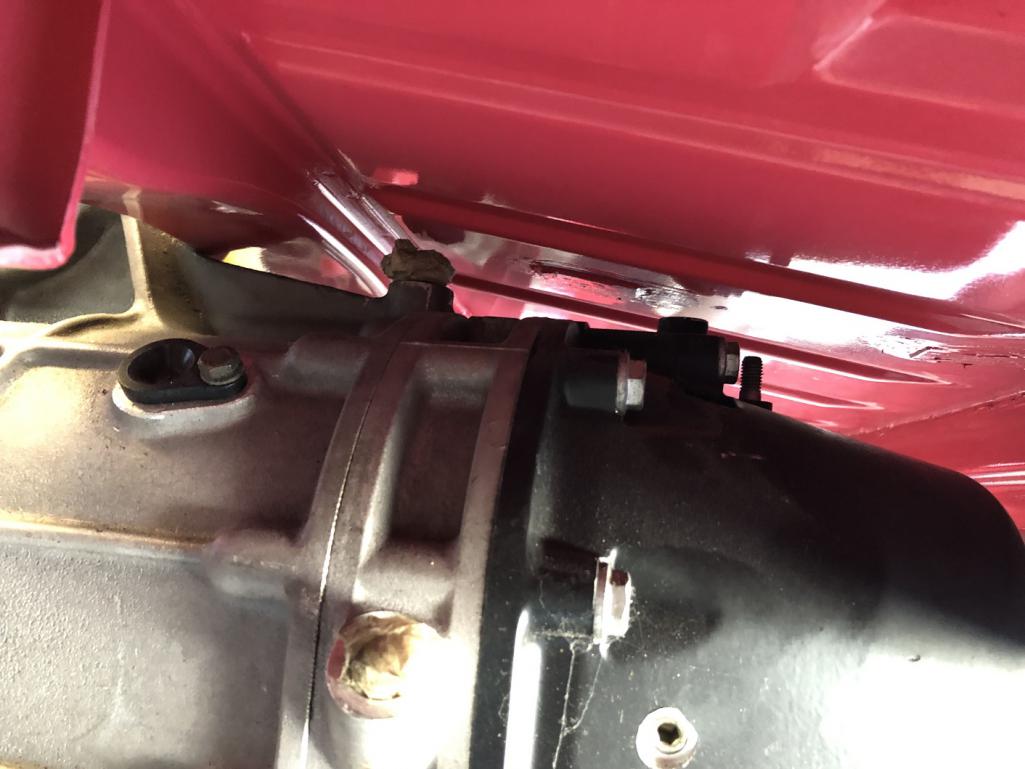
Posted by: tygaboy Aug 11 2022, 03:10 PM
Nice output flange-to-stub axle alignment, with room to go forward or backward and still have happy CV joints.
Attached thumbnail(s)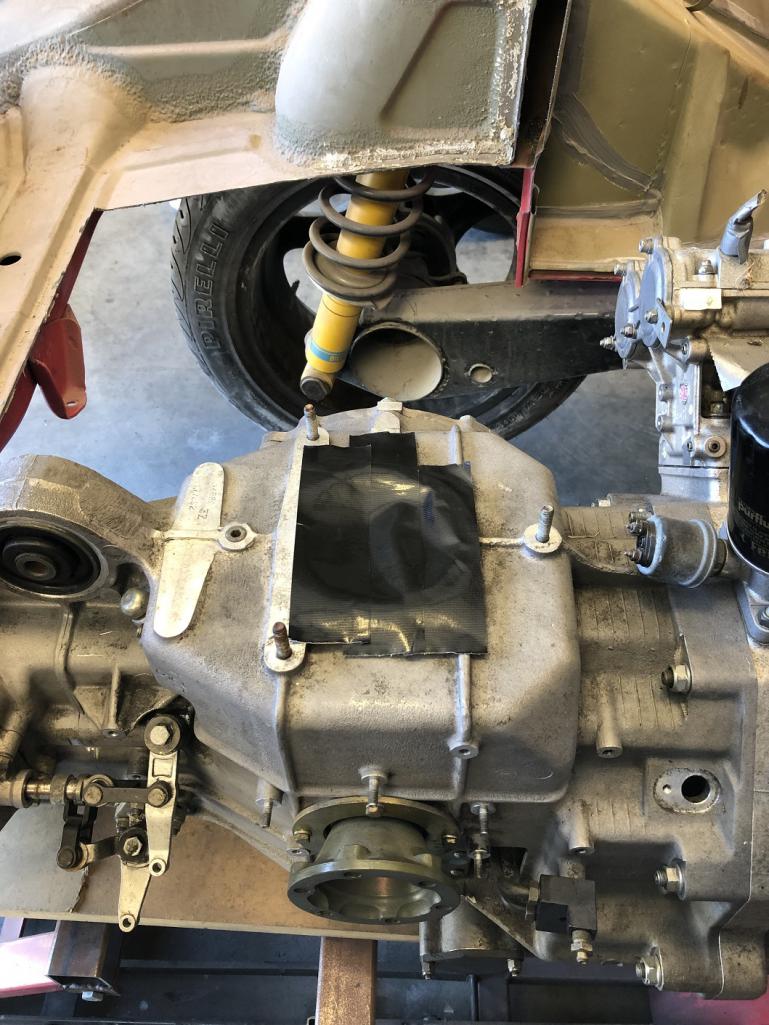
Posted by: tygaboy Aug 11 2022, 03:15 PM
The engine seems so small - and it is, compared to the LS. Well, untill you remember to put the intake back in place!
Attached thumbnail(s)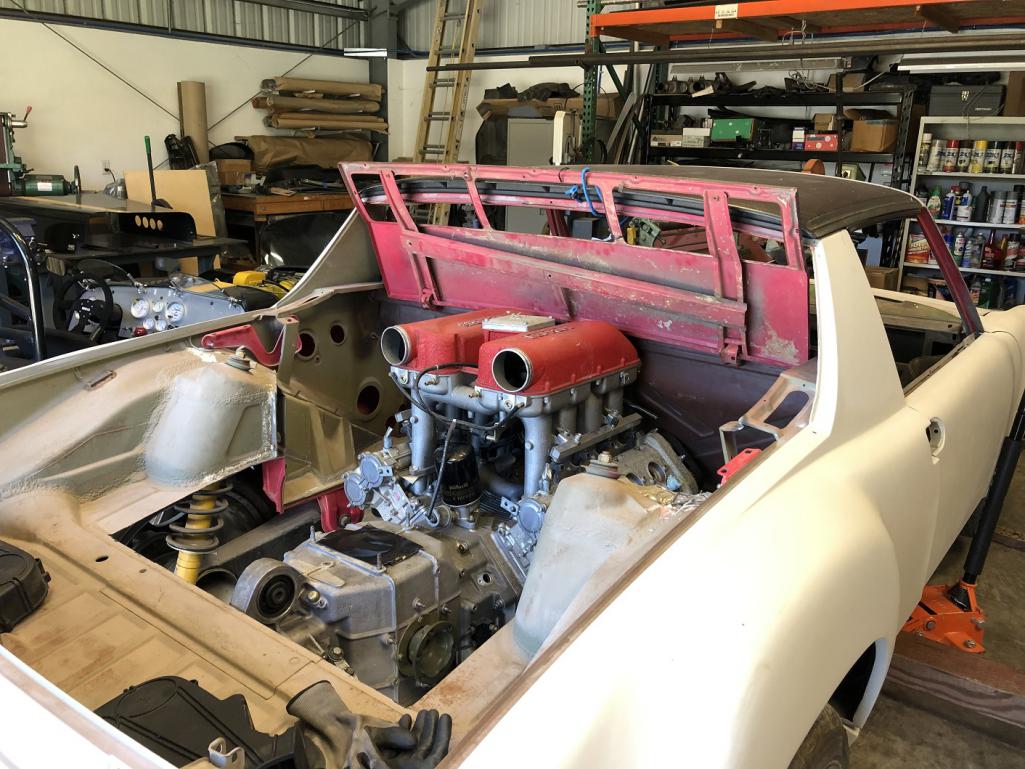
Posted by: mikey63 Aug 11 2022, 03:17 PM
Looking good Chris!
Posted by: SirAndy Aug 11 2022, 03:53 PM

Posted by: Superhawk996 Aug 11 2022, 04:31 PM
This one is gonna be really cool.
Posted by: tygaboy Aug 11 2022, 04:36 PM
A couple more pics to finish out Day 1:
Even though it's a relatively small engine, by the time you get all the ancillary system components bolted on, it ends up a pretty large overall size envelope. Here it is with the rest of the intake and the oil/air separater.
Note that the ECU I'm planning to use eliminates those MAF (mass air flow) sensors in favor of MAP (manifold absolute pressure) so everything from those corregated bellows on back will be gone.
Also, I'll cut and tip the ends of the plenums so the throttle bodies aim downward and dive down under the trunk.
That cross bar will have tabs added and it'll serve as the main upper trans mount, as well as adding some strength to that area of the chassis. It'll also be tied into the chassis in ways I haven't yet worked out...! There's also a lower trans mount tab that I think I can tie up to the factory 914 trans mounting points, so that's pretty cool.
Attached thumbnail(s)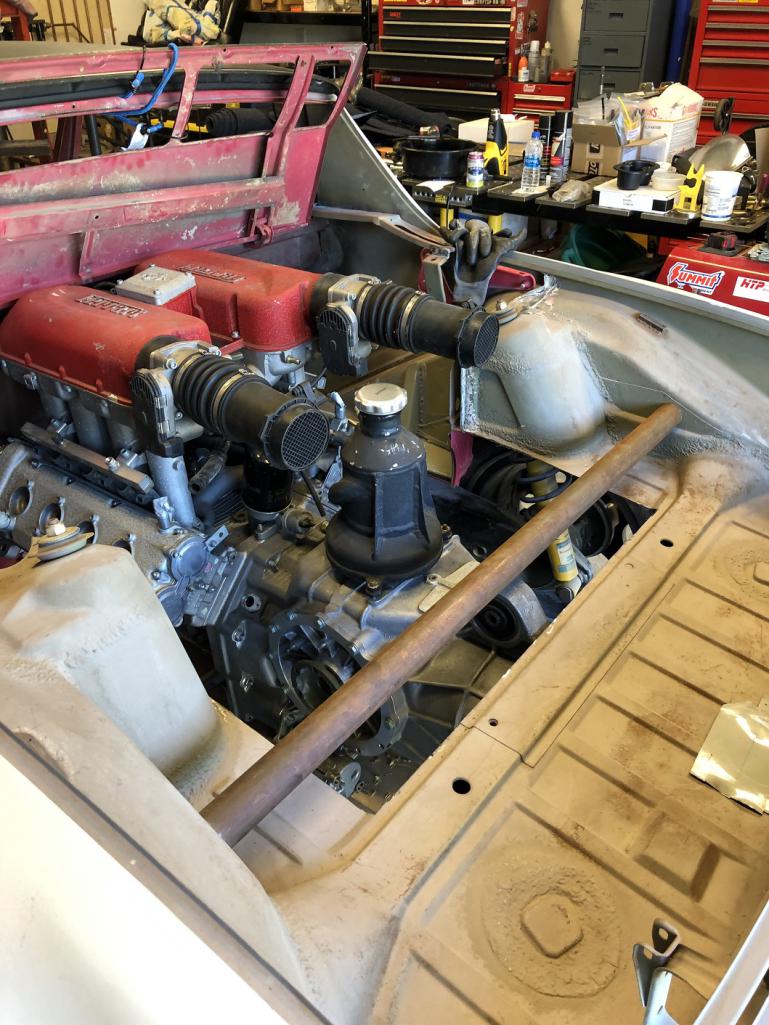
Posted by: tygaboy Aug 11 2022, 04:43 PM
And finally, a super rough idea of the abbreviated trunk - and yes, it'll seal against the underside of the trunk lid! It'll probably be a bit smaller than what's implied here, and clearly needs a bunch of fab, but you get the idea.
I'm digging this, big time!
Attached thumbnail(s)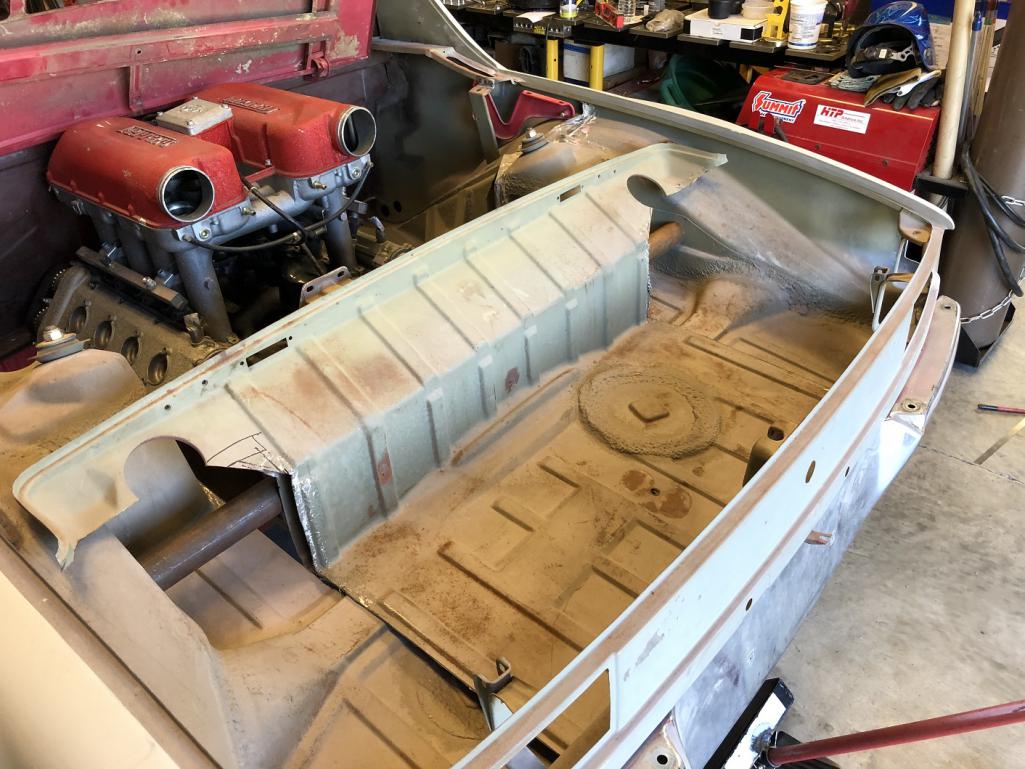
Posted by: Cairo94507 Aug 11 2022, 05:13 PM
@http://www.914world.com/bbs2/index.php?showuser=19241 - Hey Chris, Nice progress. And, a mini-trunk is better than no trunk. I think that is going to look cool.
Posted by: SirAndy Aug 11 2022, 05:29 PM
Are you going to cut the top down to fit? That would be awesome!
Posted by: tygaboy Aug 11 2022, 05:33 PM
Are you going to cut the top down to fit? That would be awesome!
@http://www.914world.com/bbs2/index.php?showuser=179 - Better than that is I'm noodling on modifying an early 911 targa top - the ones that fold up - to work on this car. It would fit in this trunk! No promises but...
Posted by: jb_11 Aug 12 2022, 06:46 AM
tygaboy, I followed you here from the RacerBenz thread at GRM and have been watching your builds with admiration for awhile. Amazing work. Thanks for sharing so many details (good and bad). It's great to see the process.
That mini trunk mockup really reminds me of a Cayman rear trunk. 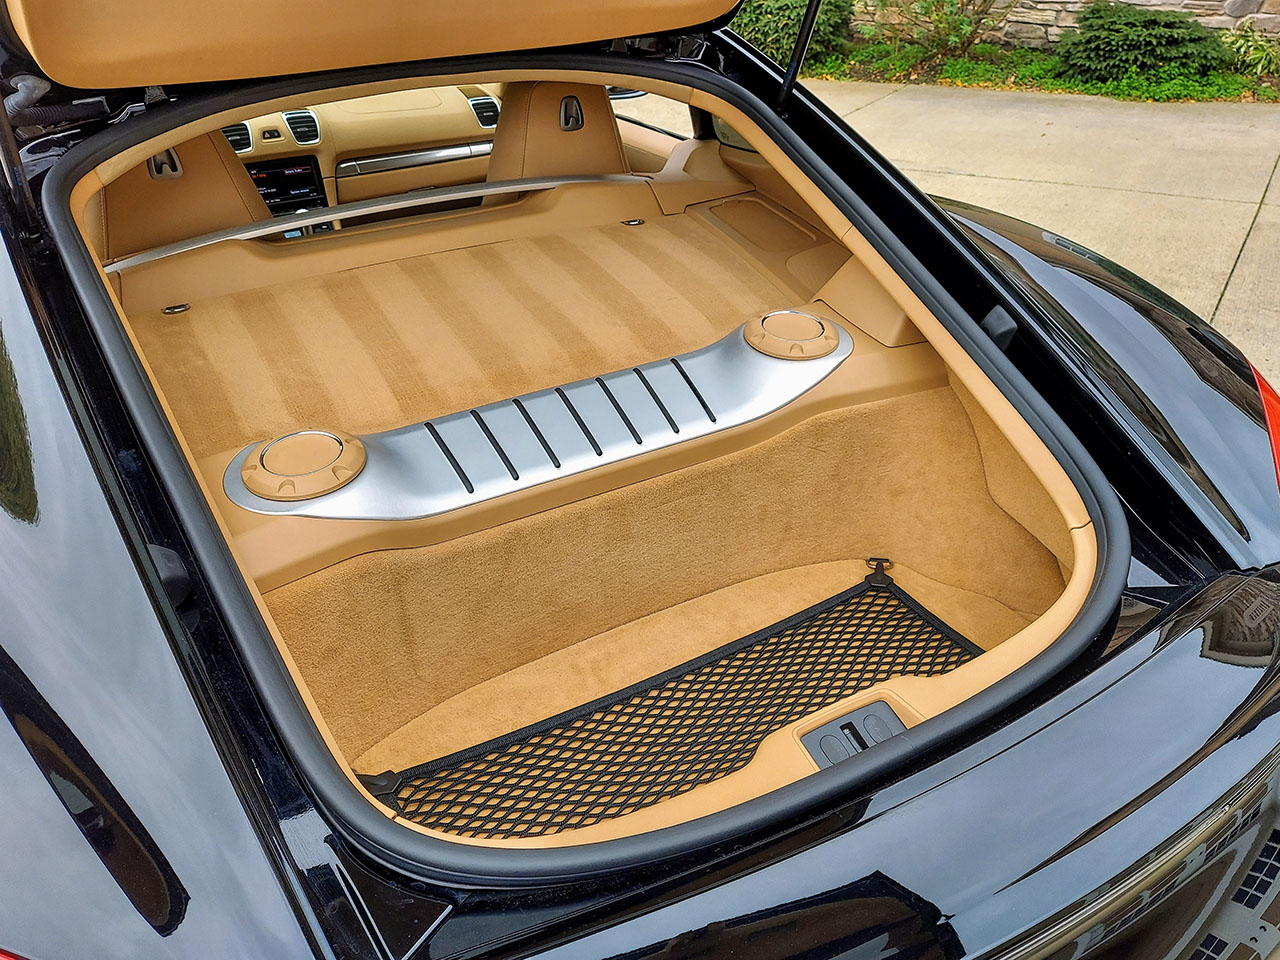
Posted by: markhoward Aug 12 2022, 07:05 AM
Love the trunk Chris. Can’t wait to put my eyes on the car.
Posted by: eric9144 Aug 12 2022, 09:28 AM
Posted by: tygaboy Aug 12 2022, 10:56 AM
F-NARP build, Day 2.
Let's start with the obvious: No, I likely won't keep up this pace. I'm just so excited to be back to fabrication and noodling on design and "engineering"
But I was back at it bright and early this morning and rough cut the rear of the trunk so I could get the drive train to final height. Here's where we ended up at the back.
I didn't fully remove that floor piece as I was thinking I may be able to bend it and retain the factory seam where it attaches the the rear panel. It'll need cutting at some point but I want to do as little re-work as possible.
Attached thumbnail(s)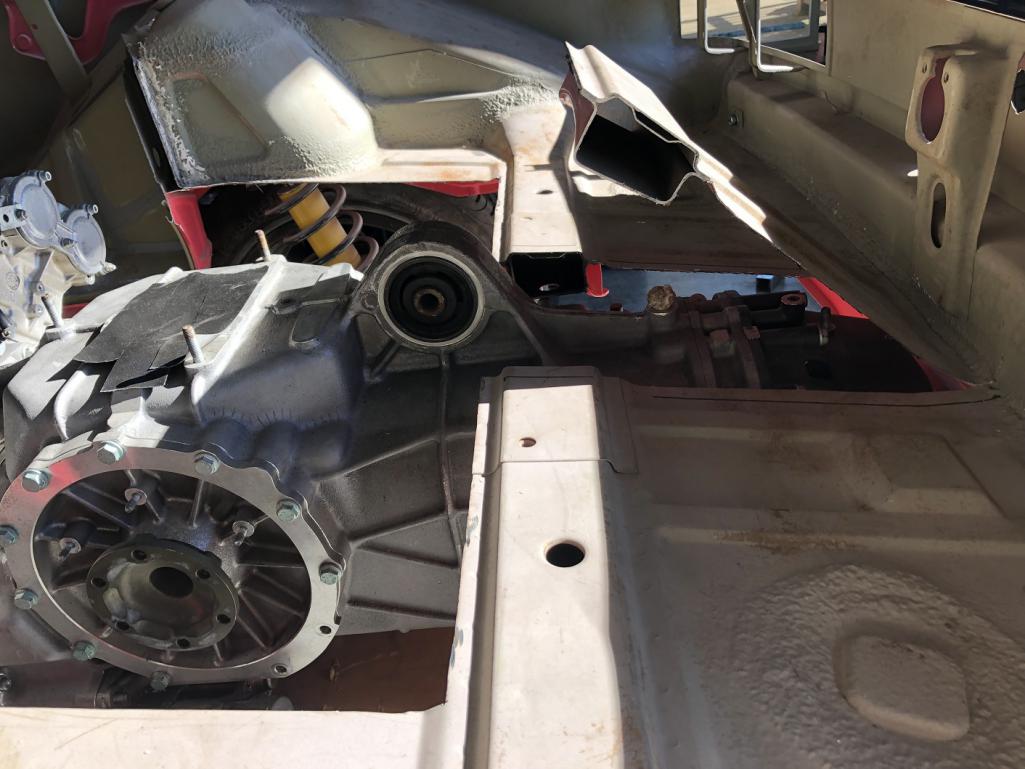
Posted by: tygaboy Aug 12 2022, 10:59 AM
There's now clearance at the cam belts but I don't have the covers on there so it's likely thing will have to move rearward a bit.
Attached thumbnail(s)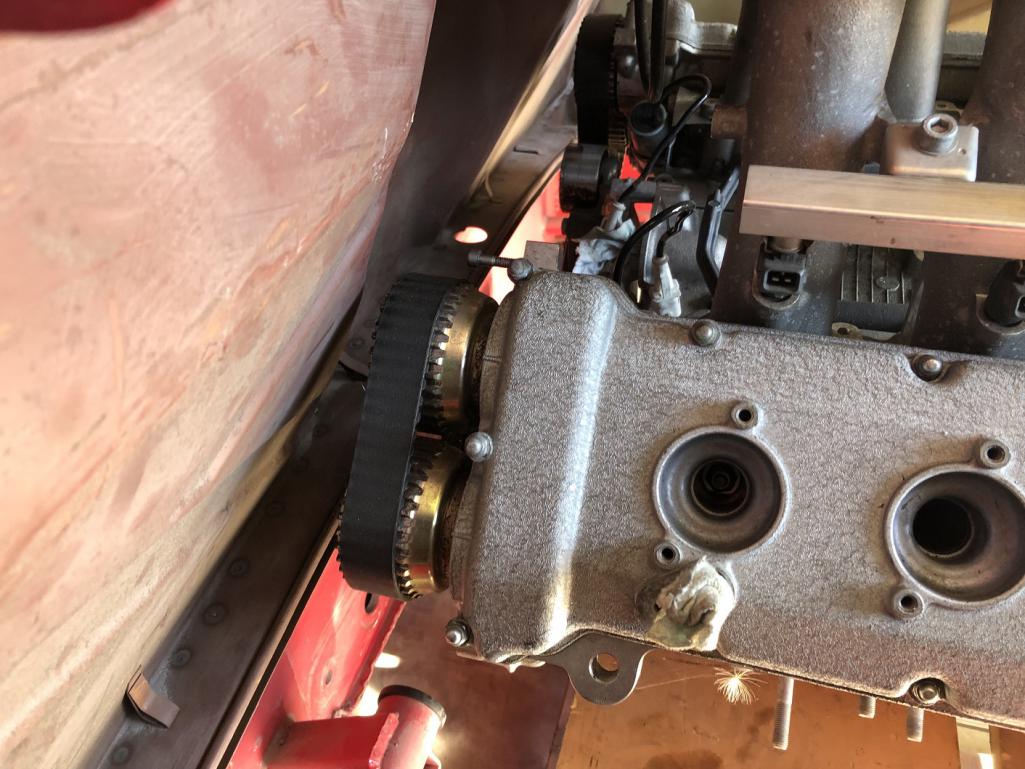
Posted by: tygaboy Aug 12 2022, 11:01 AM
Here's the important part: the bottom of the drive train is higher than the bottom of the chassis. Maybe hard to tell from this pic but it's higher.
And just LOOK at that COLOR! It's so cool...
Also, before you get too excited, those /6 mounts will have to come out. The driver's side colides with the alternator and it just doesn't make sense to try and use them "just because they're already there".
Attached thumbnail(s)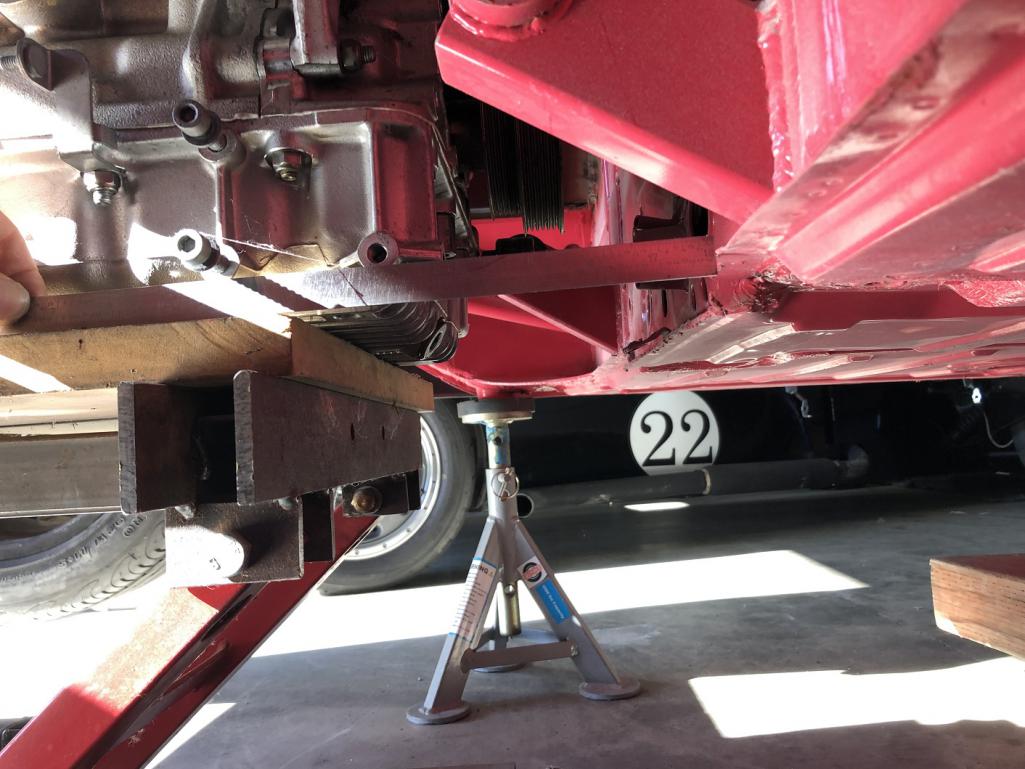
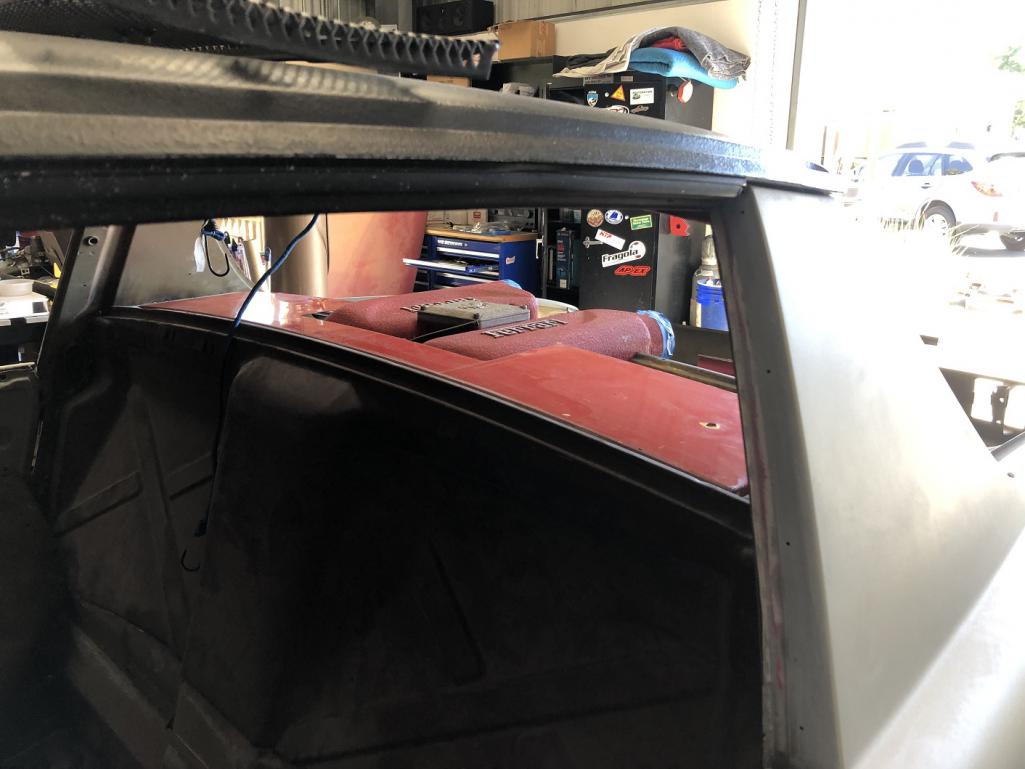
Posted by: tygaboy Aug 12 2022, 11:05 AM
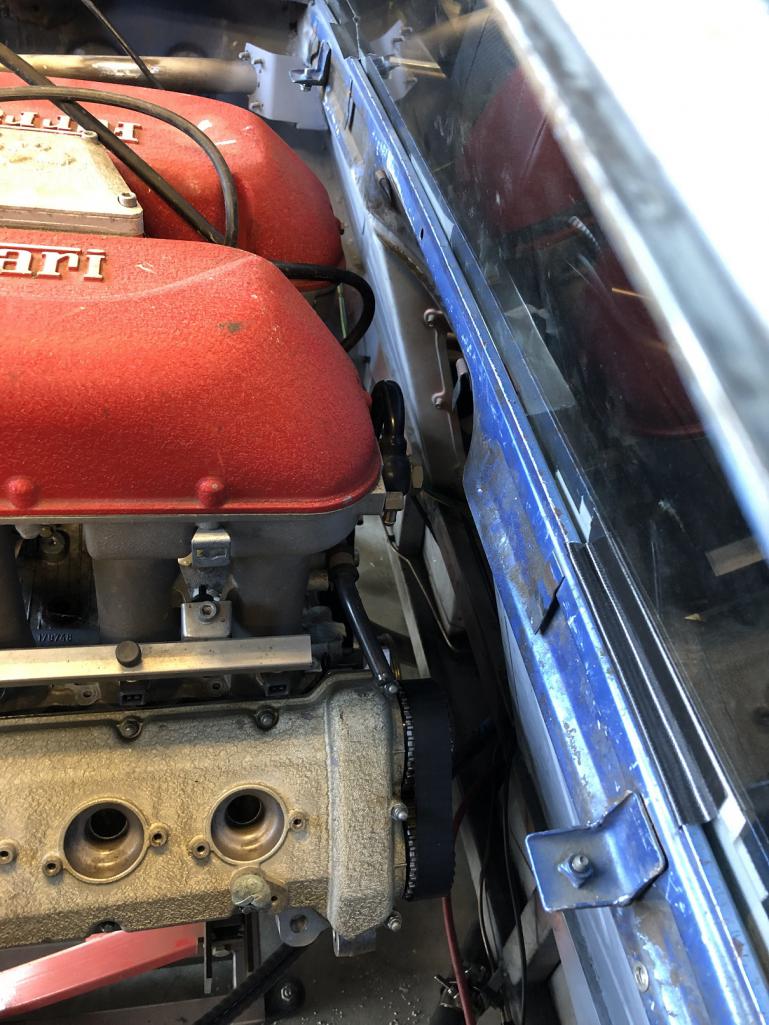
Quick poll: Yikes! or Oh, YEAH!
Just look where that plenum is going to be!
I'm voting "Oh, Yeah!
I have an old engine lid I'm going to cut it so we'll know exactly what this thing will look like.
Attached thumbnail(s)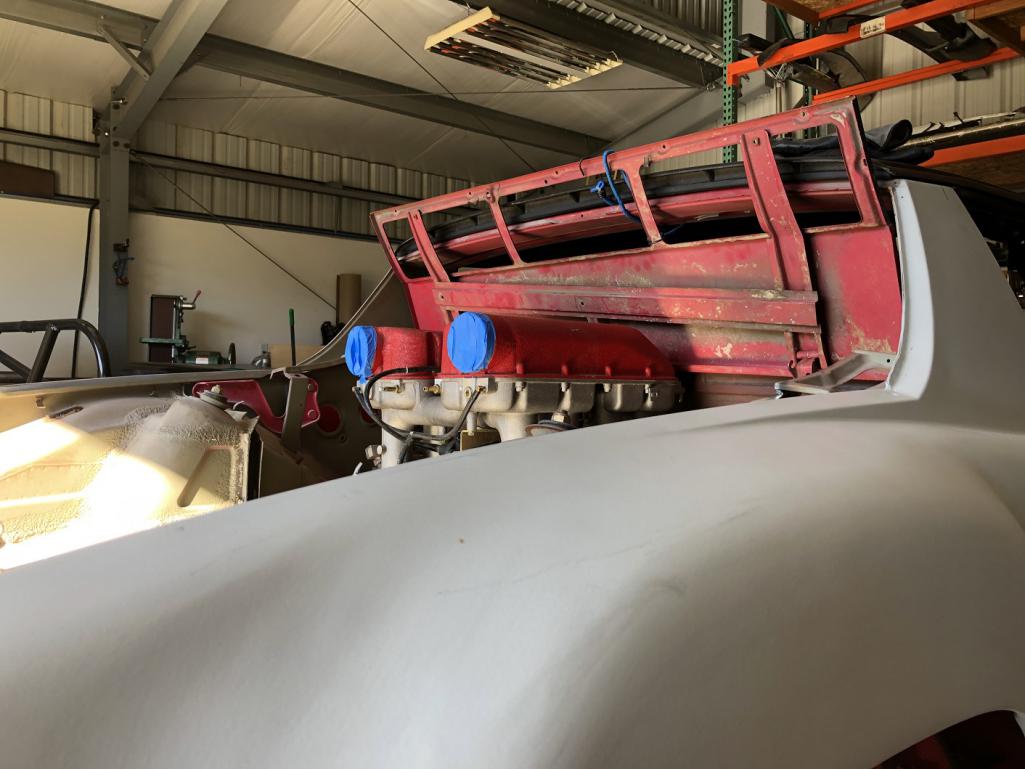
Posted by: tygaboy Aug 12 2022, 11:07 AM
And before you get all excited and think you've done all the needed clearancing...
As Max said: "Missed it by THAT much!"
Attached thumbnail(s)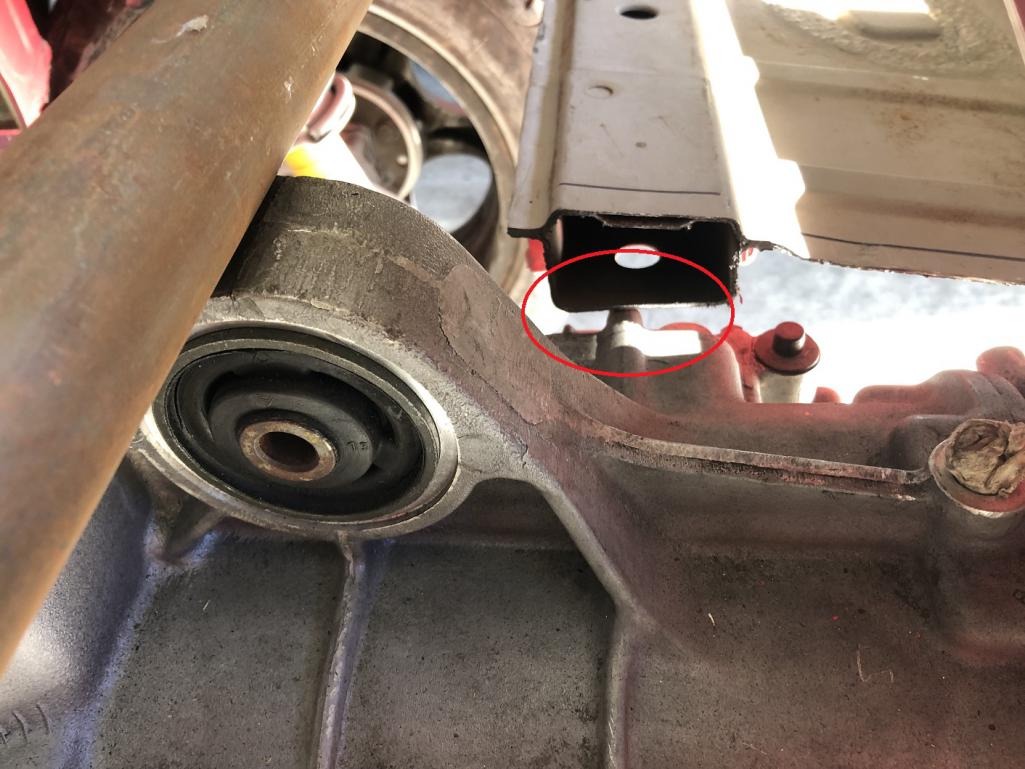
Posted by: SirAndy Aug 12 2022, 11:18 AM
What's the angle on the drive shafts? I'd rather reshape the firewall a bit to make the front covers fit than moving everything even further back.
The less angle on a drive shaft, the better.
PS:
Posted by: tygaboy Aug 12 2022, 11:42 AM
What's the angle on the drive shafts? I'd rather reshape the firewall a bit to make the front covers fit than moving everything even further back.
The less angle on a drive shaft, the better.
PS:
@http://www.914world.com/bbs2/index.php?showuser=179 The angle is WAY better than on my LS car. Nothing is finalized and forward is better for fitment of that trans mount, too. Still work to do, for sure.
Posted by: sportlicherFahrer Aug 12 2022, 12:38 PM
Cut engine lid would look pretty rad. That idea gives me another. Have you settled on a name for the project? If not, might I suggest Roter Kopf as an homage to another car sharing similar attributes? I think it translates right, but @http://www.914world.com/bbs2/index.php?showuser=179 may have a better translation on that one.
Looking forward to seeing this build at the next WCR! 
Posted by: tygaboy Aug 12 2022, 01:09 PM
Thanks to Robert @http://www.914world.com/bbs2/index.php?showuser=3898 , I had this spare engine lid. A bit of measuring and cutting and... BAM! There it is! Not even going to obstruct rearward vision! As expected, the trunk is going to need some surgery but that'll wait until the rest of the intake is worked out.
But holy jeebus, this thing is going to be so cool. 
If you voted "Yikes" earlier, well, I'm sorry. You're wrong!
Attached thumbnail(s)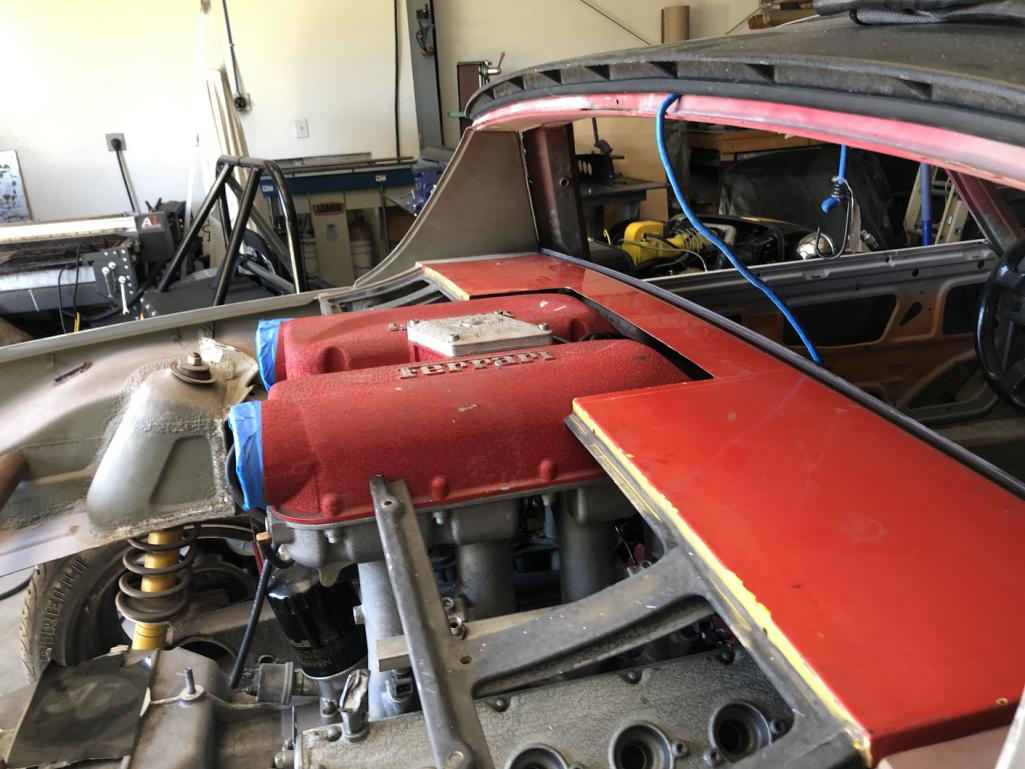
Posted by: Jett Aug 12 2022, 02:10 PM
Thanks to Robert @http://www.914world.com/bbs2/index.php?showuser=3898 , I had this spare engine lid. A bit of measuring and cutting and... BAM! There it is! Not even going to obstruct rearward vision! As expected, the trunk is going to need some surgery but that'll wait until the rest of the intake is worked out.
But holy jeebus, this thing is going to be so cool.
If you voted "Yikes" earlier, well, I'm sorry. You're wrong!
Amazing!!
Now you need an acrylic cover like the F cars have.
Posted by: autopro Aug 12 2022, 02:33 PM
Oh God that is going to look good with the engine peaking out like that
Posted by: ssuperflyoldguy Aug 12 2022, 05:14 PM
You are KILLING me... And prob a few others
Posted by: Front yard mechanic Aug 12 2022, 05:48 PM
Enzoenvy
Posted by: worn Aug 12 2022, 06:17 PM
Thanks to Robert @http://www.914world.com/bbs2/index.php?showuser=3898 , I had this spare engine lid. A bit of measuring and cutting and... BAM! There it is! Not even going to obstruct rearward vision! As expected, the trunk is going to need some surgery but that'll wait until the rest of the intake is worked out.
But holy jeebus, this thing is going to be so cool.
If you voted "Yikes" earlier, well, I'm sorry. You're wrong!
You know that cutting the lid doesn’t exactly solve the problem. In the same way that you cannot quite look past that cool supercharger up front in the hot rods. Which you need to add. Couldn’t be in better hands. Rock on.
Posted by: DTMLGND Aug 13 2022, 08:51 AM
Subcribed!! This is very cool.
Posted by: Krieger Aug 13 2022, 10:13 AM
Posted by: horizontally-opposed Aug 14 2022, 12:12 PM
Gotta say…as much as I loved the idea of lowering the plenum to make this a sleeper, this is gonna look great—and people are going to trip out.
"Yeah but the engine in those—hey, waitaminute…what?!"
I've been a longtime fan of engine swaps, but this one may just take the cake...
Posted by: Chris914n6 Aug 14 2022, 01:36 PM
At this point I think I would seriously consider making the trunk lid shorter and engine lid longer.
For the inlets I'd make a slip fit down turn instead of cutting/welding the intake. It's going to be visible so make it pretty.
I'd also keep the factory oil/water cooler. They chose to do it that way for a reason plus it works fine.
Posted by: horizontally-opposed Aug 14 2022, 02:00 PM
^^ Interesting points.
But engine lid longer, with its seam moved further back, will violate a key 914 graphic established by the ends of its targa bar—as will, of course, a Ferrari engine…though that kinda gets a pass.
I wonder about some of Porsche's early attempts to make a single-piece, rear-engined decklid and engine cover for the 914…something Chris is certainly aware of. Then it's "just" one hole in the middle-ish for that red intake plenum. Just thinking out loud…
Fully agree on making the turndown(s) pretty, but have no worries with Chris at work...
Posted by: roundtwo Aug 14 2022, 02:31 PM
.....and here were go again! ...
Posted by: tygaboy Aug 14 2022, 07:47 PM
Not much progress this weekend as Saturday was dedicated to finishing up the intercooler install on the Lotus 7 replica. Then this morning, @http://www.914world.com/bbs2/index.php?showuser=2104 Andy came by to drive my 914 and give me some advice on alignment / spring rates, as well as some input on this build.
In the afternoon, @http://www.914world.com/bbs2/index.php?showuser=16100 Tony stopped by on his way from Bend to the South Bay. We geeked out on the Ferrari build and he gave me his usual excellent input on a few things. Then we took the E9 for a short drive to grab lunch. Best of all, he presented me with the COOLEST gift! I need to take some time and get pics before I post about it but let me just say, it's one of the neatest things I've ever received. I hope when you see it, you'll agree.
Anyway, once the always important social stuff wrapped up, I was able to do a rough cut of removing the engine tray tin and the /6 mounts - and remember, those mounts interferred with things like the alternator so they simply weren't going to work. Removal of all this allows me to get a complete understanding of the room I have for things like exhaust and what I'm thinking will be a cradle-style engine/trans mount. Just a bit more clearancing and I'll be able to start in on fabbing the mounts!
Attached thumbnail(s)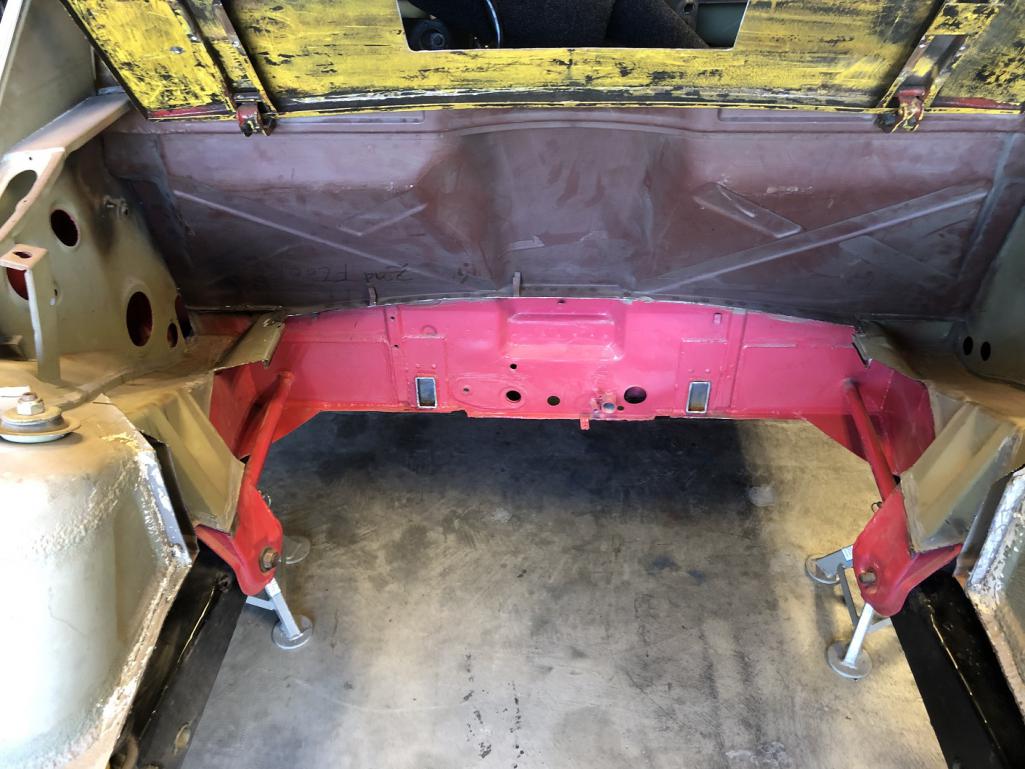
Posted by: Spoke Aug 14 2022, 09:43 PM
That induction system peeking out of the bodywork reminds me of the 917.
Attached thumbnail(s)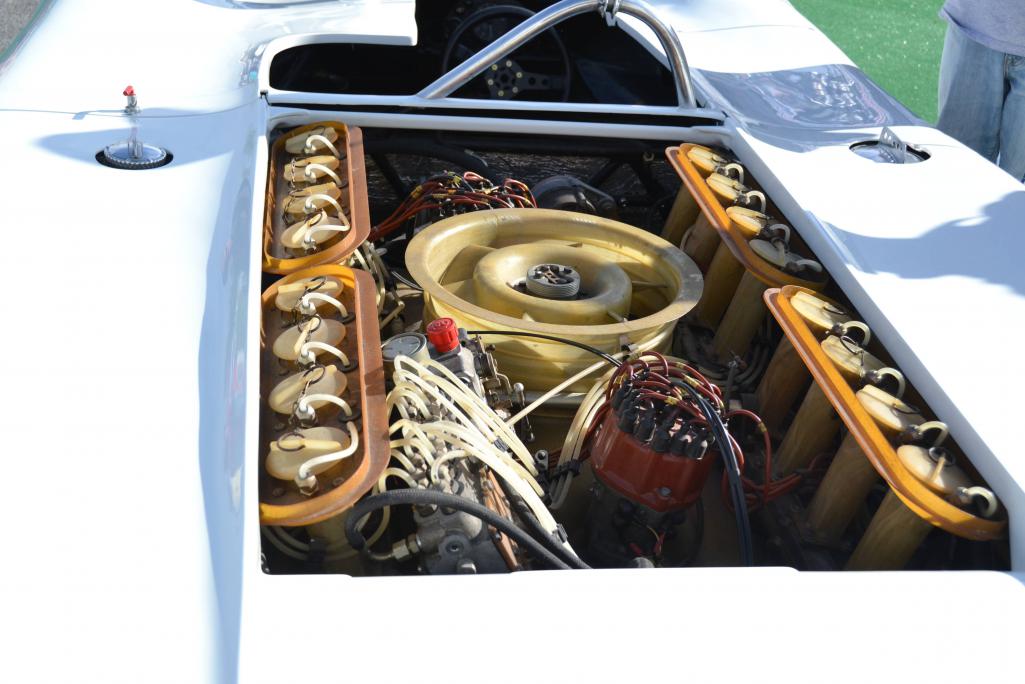
Attached image(s)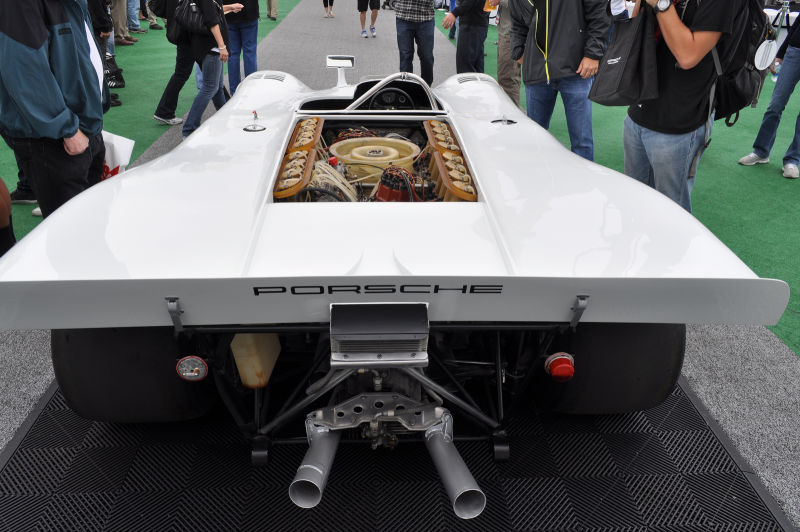
Posted by: Krieger Aug 14 2022, 10:58 PM
Chris, your car is blazing fast and drives very nicely! Thank you for sharing that driving experience with me! Your work is impressive!
Posted by: tygaboy Aug 15 2022, 09:12 AM
@http://www.914world.com/bbs2/index.php?showuser=431 - I was toying with the idea of making a short "trunk lid" that was sized to work with the abbreviated trunk. But as @http://www.914world.com/bbs2/index.php?showuser=2058 Pete points out, I'd end up with a body line in a location unrealted to any other design queues - so that's off the table. So, what to do?
@http://www.914world.com/bbs2/index.php?showuser=16100 Tony to the rescue! Let me first say that if it weren't for Tony and his "quick sketches" (which are auto art, IMO!), I likely wouldn't have hood vents on my LS build. Or, if I did, they'd certainly be less cool! So, to be clear, I regularly consulted with him on styling ideas for my LS build and he was always willing to listen to my silly "I wonder if..." then noodle up a few ideas - most of which I just love! And this build is no different:
I've been talking with Tony and texting him various pics for the past few weeks. When he stopped by yesterday, he gave me this (among other drawings that I'll share later) as one of a few ideas for the engine cover/trunk. It's a leading contender at this point.
Yes, minor shape and dimension changes will be needed to work in the real world, just like with his hood vents, but it's the inspiration that's most important to me. Well, that and knowing there are other folks out there that want to see this project come togther in the best possible way.
Tony - Thank you, my friend! I couldn't do this without you. Literally. It's so great to get your fingerprints on this build, too.
Attached thumbnail(s)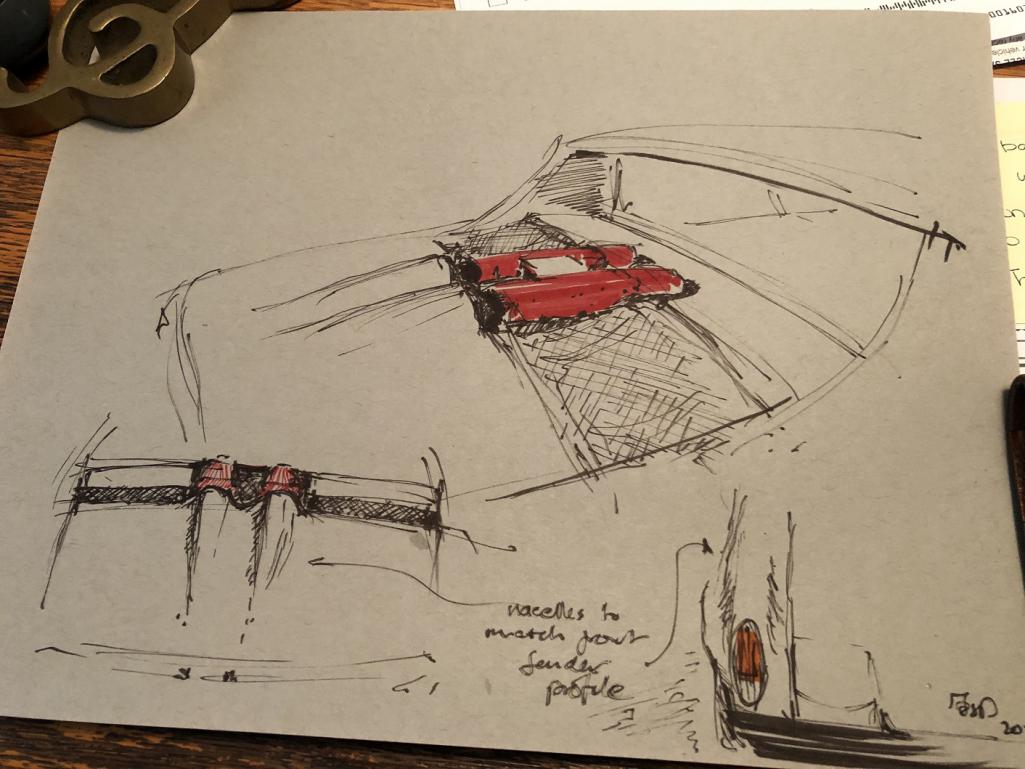
Posted by: Superhawk996 Aug 15 2022, 09:21 AM
YES!
Posted by: KELTY360 Aug 15 2022, 09:59 AM
OMG!! How perfect is that?!! ![shocked[1].gif](style_emoticons/default/shocked[1].gif)
Posted by: tygaboy Aug 15 2022, 06:03 PM
Back to the mundane stuff like getting the drive train mounted.
In a blast from the past, I spent a couple hours on the phone with my fab buddy Martin to get another set of eyeballs on the design I worked up for the cradle. If it's not already clear, I fully expect any number of folks to have significant input on this build. I have no ego around asking for/paying for help. Especially if it means the outcome is what I want it to be.
But back to Martin: As expected, he had a number of great suggestions, both structurally and design-wise. Best is that, overall, we agreed the cradle approach is a solid base design. Yea!
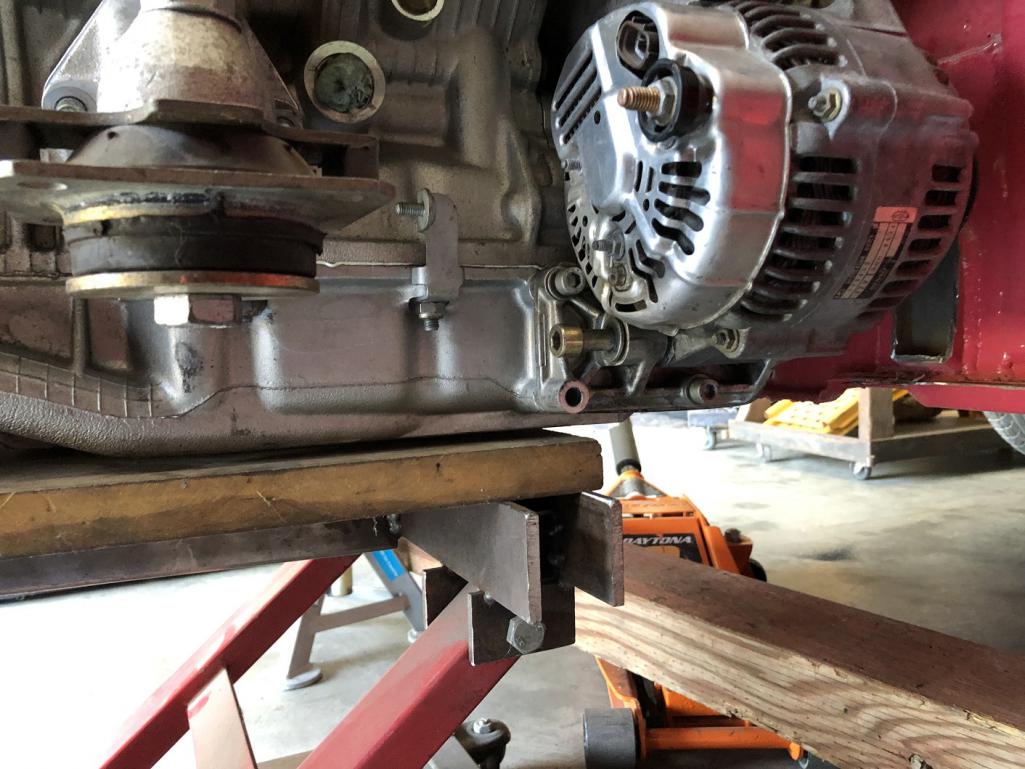
And for those interested, the pic shows the water-to-oil heat exchanger that helps initially heat and then stabalize the trans fluid temps. The arrows are pointing at the connections for the factory, belt-driven water pump which lives at the front of the valley. You can also see how they decided to get the water into the block near each cylinder via that "spider" looking H2O distribution component (external vs the GM internal circulation approach...) as well as the braided lines that get the oil in/out to the trans. The trans fluid pump is inside the trans.
So there's today's "how Ferrari decided to do it" lesson! Be preparred for a quiz tomorrow!
Still tbd if I'm going to run the factory water pump or go with an electric pump and just route to the in/out locations you see here.
Just a few days into this and I can confidently state: This is WAY more complicated than just stuffing things into the chassis, because Ferrari. But hey, if it were easy, everyone would be doing it.
Attached thumbnail(s)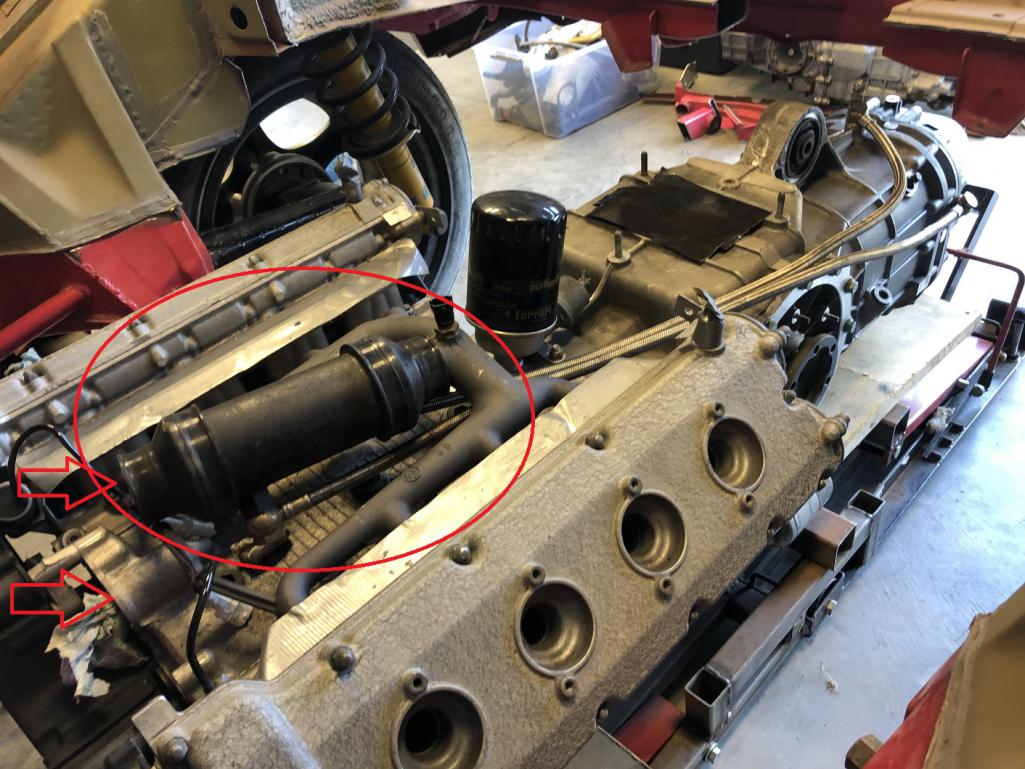
Posted by: tygaboy Aug 15 2022, 07:09 PM
Seems everyone on my contributing team likes to sketch! Here's Martin's cut at one side of the cradle we noodled up. The tabbed bracket on the right if the sketch welds to the lower firewall, the "j" shape tube is one side of the cradle, the bracket on it is where the Ferrari engine mount sits and the part with the "?" and arrow is the rear mounting bracket that'll weld on between the 914 factory trans mount/cross bar and the round tube cross bar you saw in the earlier pics.
Then once the headers are sorted (which is a "whole 'nother" packaging challenge), I'd like to see a bar that ties from the long, just ahead of the suspension console, down to the J tube at/near the engine mounting pad.
Coming along and nearly to the point where it's time to start fabbing all this. Exciting times!
Attached image(s)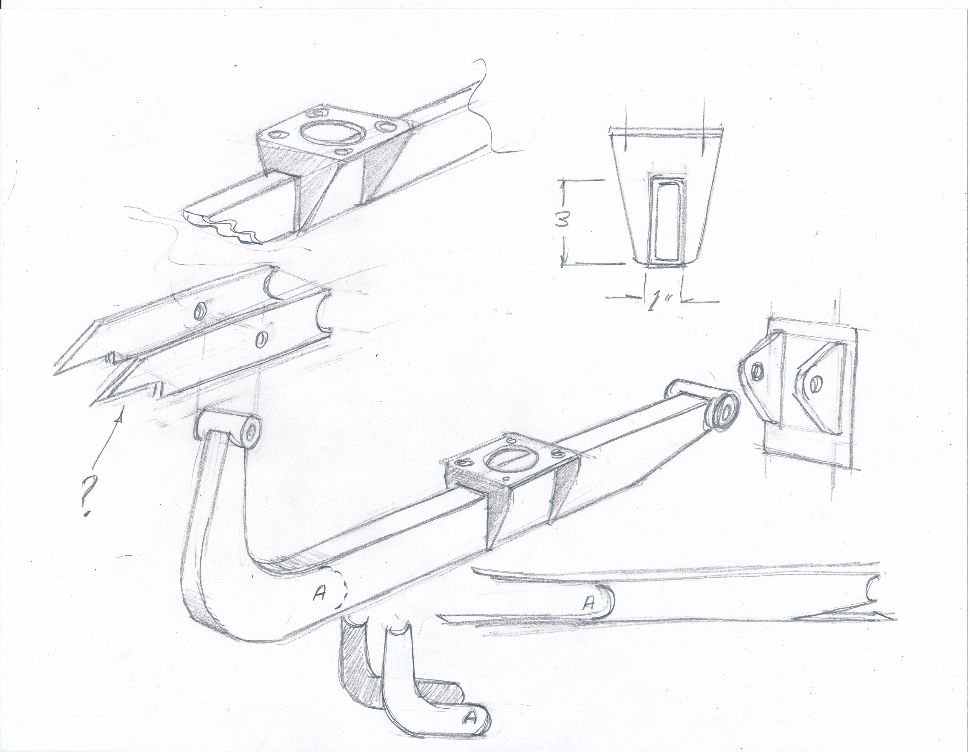
Posted by: bkrantz Aug 15 2022, 08:55 PM
You know, if you really want to give old man Enzo (and old man Ferdinand and just about everyone else) a heart attack, you could turn the drive train around, and make a rear-engine VW-Porarri.
Posted by: Krieger Aug 15 2022, 10:46 PM
WOW! Tony's sketches of the humps are a perfectly natural addition!
Posted by: Cairo94507 Aug 16 2022, 06:23 AM
I agree with Andy, love Tony's sketch and that he is matching the "humps" to the front fenders. Looks great.
Posted by: tygaboy Aug 17 2022, 08:59 AM
Design refinement. After more chassis clearancing and getting the drive train in what I'm pretty sure is final location, I bolted on the alternator. Good thing because is sits right where I was thinking a front engine mount could go. Not that I was close to welding anything, but... Sort of a "pants first, then shoes" moment. But you know me: You're going to get full transparency as I make my way through this.
Attached thumbnail(s)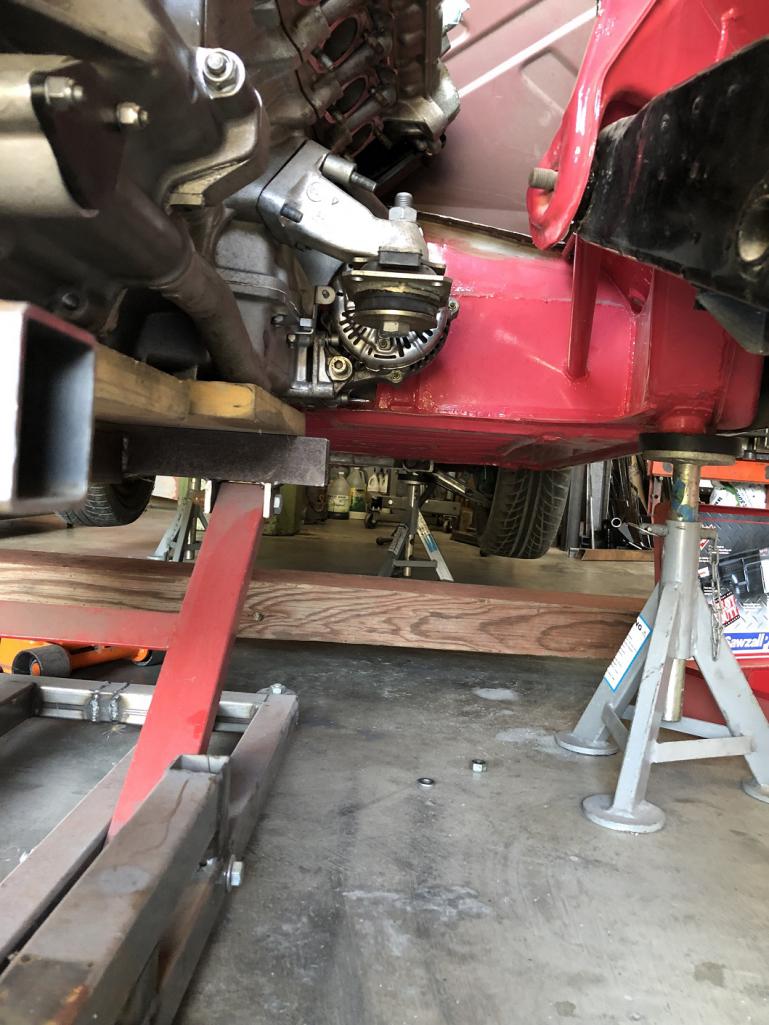
Posted by: tygaboy Aug 17 2022, 09:06 AM
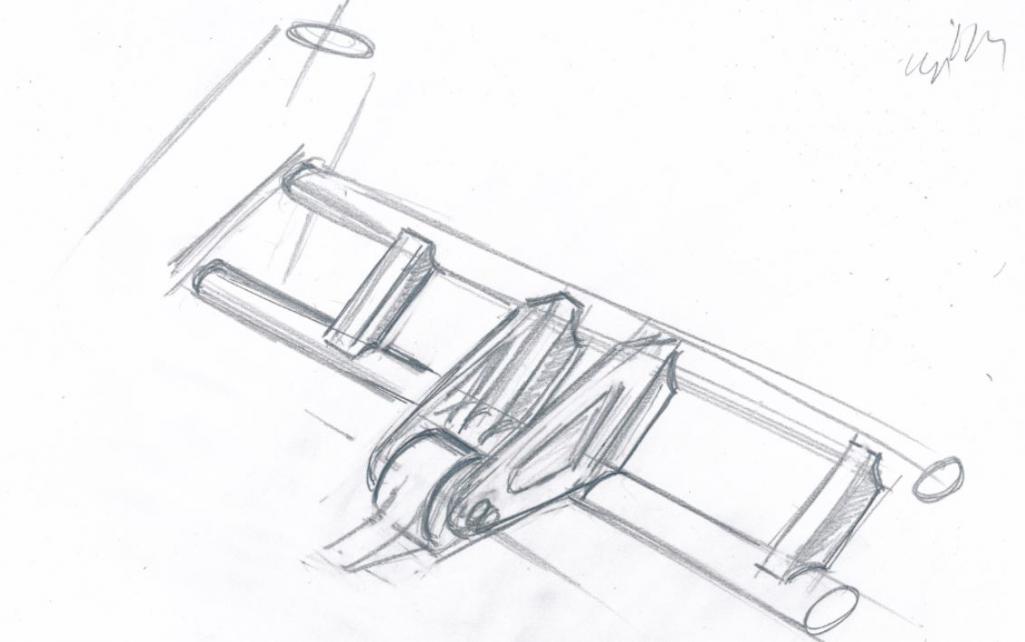
I passed this new info and the pics along to Martin, we kicked around a couple ideas and he sent a sketch of the latest thinking. Note it's not to scale, just "to concept". The plan is 3" x 1" .095 wall for those main tubes, even though the sketch makes them look far larger.
It's just not possible to get a cross bar to sit directly under the engine mounts so the one you see fits in a raised section just ahead of the trans, a bit behind the mounts.
And yes, this drawing it's missing the rear section. Which is OK as it's far more straight forward than working out these main engine mounts.
Today's IRL exercise will be to get some tubes mocked into position and work out more accurate dimensions.
Hey, it's a process. And this is the part I just LOVE. Driving them is fine, I like makin' stuff!
Attached thumbnail(s)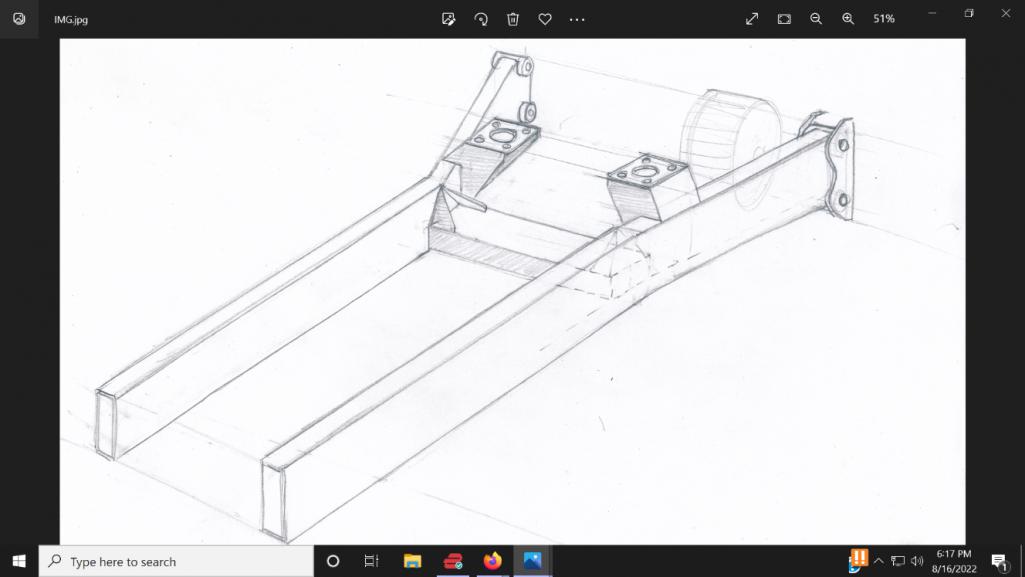
Posted by: ClayPerrine Aug 17 2022, 03:26 PM
Hey, it's a process. And this is the part I just LOVE. Driving them is fine, I like makin' suff!
I am exactly the same. I can't leave well enough alone. I even have plans on how to put a full Cayman rear suspension under a 914 chassis........
We definitely need a bad idea smiley.
Clay
Posted by: tygaboy Aug 20 2022, 09:26 AM
When you don't have a 3d scanner, skills with Fusion 360 (or the like) or even a lift:
1. stand there looking at the drive train in the chassis
2. imagine how some design might work
3. try and keep track of things that aren't there - shift cables, water lines, wiring, exhaust system...
4. crawl around / scoot around / reach around trying to measure
5. mock up ideas with scrap and other random parts
6. take pics
7. get on the phone with Martin, email pics and noodle on the latest info
8. wait a bit for Martin to email his latest drawing
9. Repeat steps 2 through 8
Slower than it might otherwise be, but we're making progress. These latest designs account for the engine cradle and the rear transmission mounting system (TMS) - it will live between the rear suspension towers - but they're missing the mount where the engine cradle's vertical elements tie to the TMS. I've sent a rough drawing to Martin with an idea I like and expect later today he'll send an updated set of drawings. Almost ready to cut parts!
As I mentioned earlier, mounting this drive train is turning out to be a bit more complicated than I expected. I suspect this will be a recurring theme on this build.
Attached thumbnail(s)
Posted by: tygaboy Aug 20 2022, 12:15 PM
My, how quickly plans can change. Another round of planning w/Martin this morning and...
To optimize the Ferrari trans hanger mount, and with all the other stuff planned for this build, it started making more sense to lose the factory trunk and trans cross bar. So out it comes.
Attached thumbnail(s)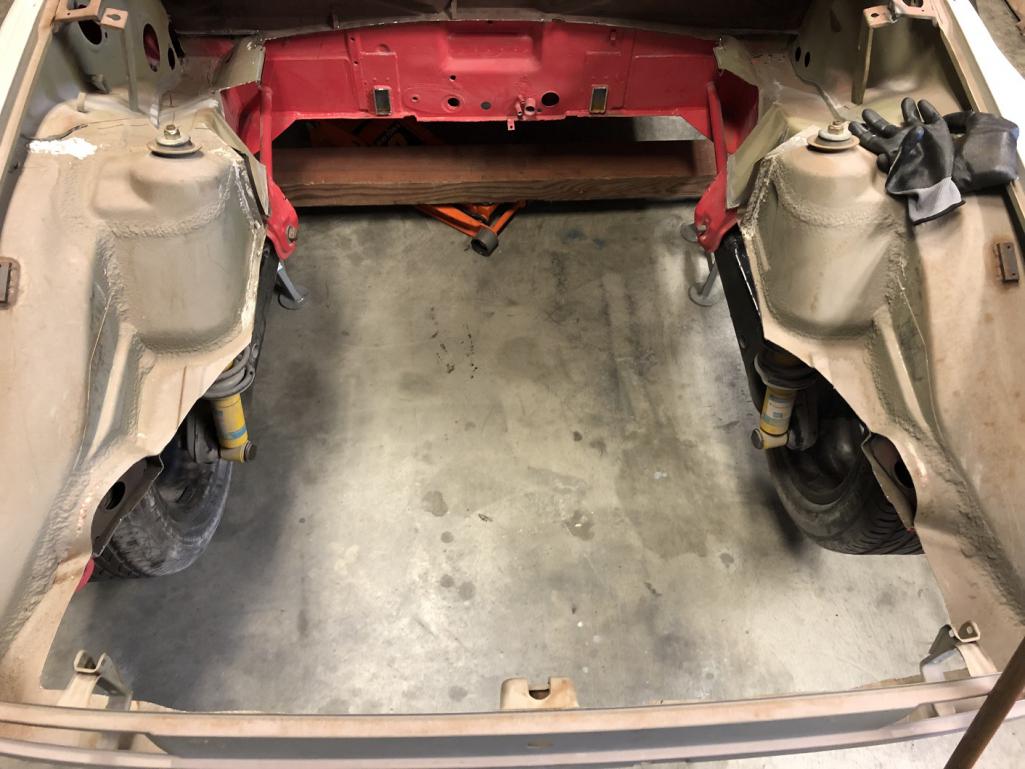
Posted by: tygaboy Aug 20 2022, 12:18 PM
And a better, no-twisting-moment, trans mount system can be installed. Just mocked in approximate location, as you can see, but the transmission mounting tab will sit between these bars. Structurally better, for sure.
I'll fab a removable trunk floor/wall that can seal against the trunk lid but be taken out to show off all the mechanicalness.
Attached thumbnail(s)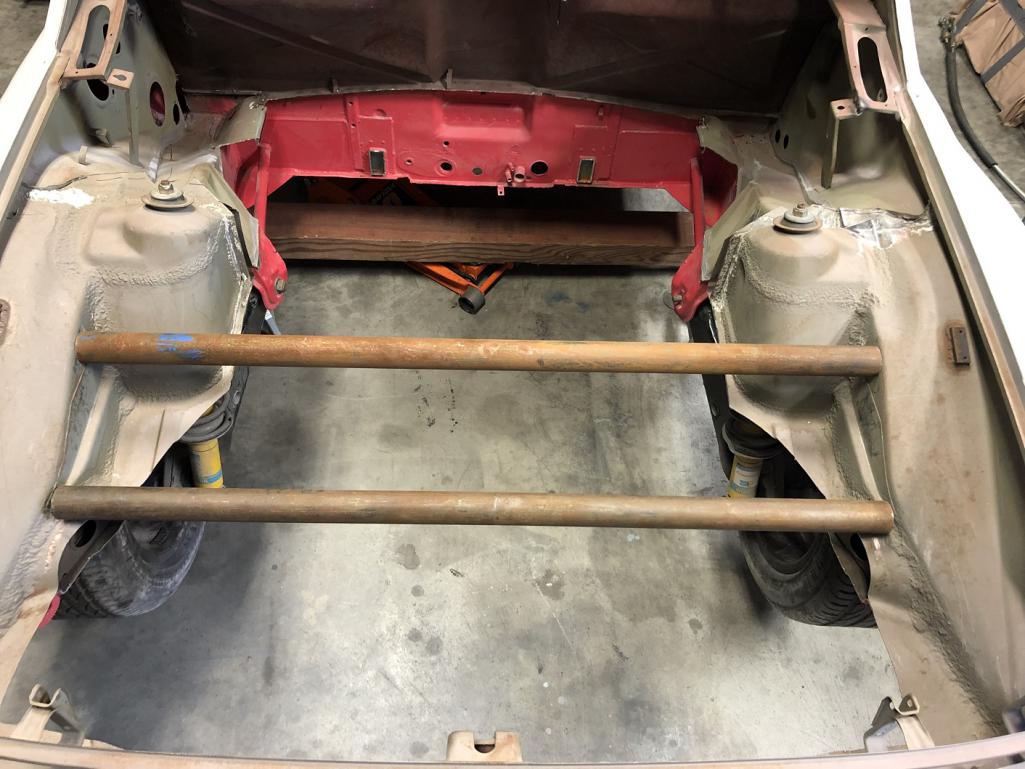
Posted by: tygaboy Aug 20 2022, 12:21 PM
And the updated, not-to-scale sketch of the trans mount with the bracket to connect the engine cradle vertical. One of those tabs on each side of the vertical.
Attached image(s)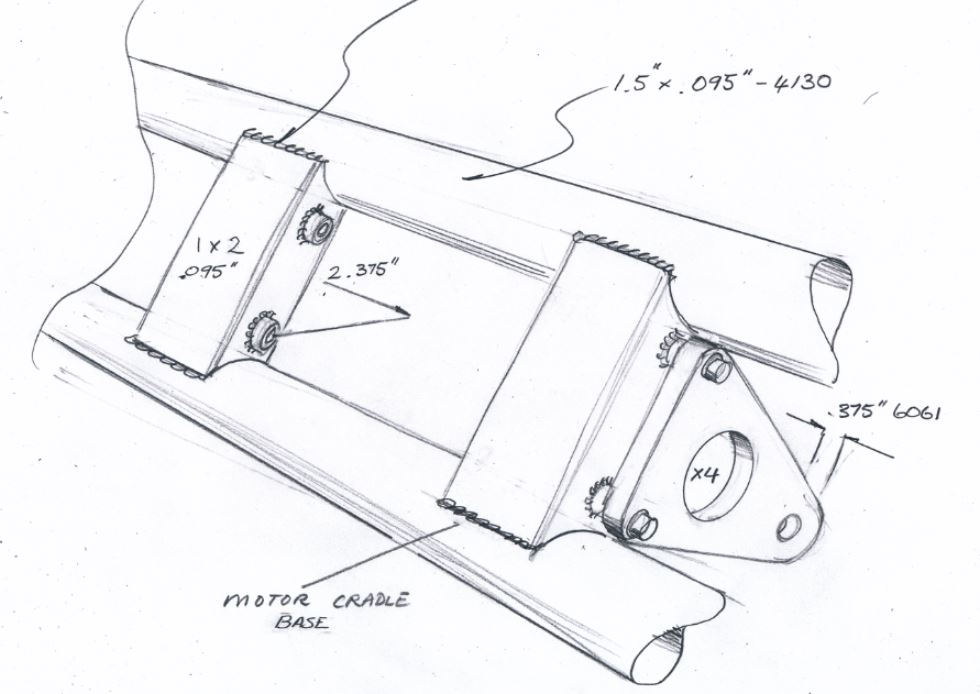
Posted by: tygaboy Aug 20 2022, 12:25 PM
And I hope you enjoy seeing this level of development process vs me just posting when something is actually complete. I like to document for posterity's sake.
Posted by: davep Aug 20 2022, 02:16 PM
You bet, this is an Epic build!
Posted by: Montreal914 Aug 20 2022, 07:18 PM
Although I can see the performance benefits, I am not into conversions with with non-P power train.
BUT, this one is clearly something else!
Please continue to share all of the development and these wonderful period correct work of art hand made sketches . I grew up learning mechanical engineering from my dad (mechanical draftsman and all around craft person) and always admired his hand sketch skills. No modern CAD can transmit the artistic aspect of engineering like those hand sketches.
You and Martin make a wonderful duo. This will be a nicely engineered and well built car!
Posted by: tazz9924 Aug 20 2022, 09:22 PM
When you don't have a 3d scanner, skills with Fusion 360 (or the like) or even a lift:
1. stand there looking at the drive train in the chassis
2. imagine how some design might work
3. try and keep track of things that aren't there - shift cables, water lines, wiring, exhaust system...
4. crawl around / scoot around / reach around
trying to measure5. mock up ideas with scrap and other random parts
6. take pics
7. get on the phone with Martin, email pics and noodle on the latest info
8. wait a bit for Martin to email his latest drawing
9. Repeat steps 2 through 8
Slower than it might otherwise be, but we're making progress. These latest designs account for the engine cradle and the rear transmission mounting system (TMS) - it will live between the rear suspension towers - but they're missing the mount where the engine cradle's vertical elements tie to the TMS. I've sent a rough drawing to Martin with an idea I like and expect later today he'll send an updated set of drawings. Almost ready to cut parts!
As I mentioned earlier, mounting this drive train is turning out to be a bit more complicated than I expected. I suspect this will be a recurring theme on this build.
My process is very similar except when step 7 comes around, instead of getting on the phone i get on the computer and want to punch it sometimes. Then realize i messed it up hopefully before waiting a week for laser cut parts to arrive and repeat.
Posted by: nathanxnathan Aug 21 2022, 12:30 PM
I love the drawings — speaking my language
Posted by: tygaboy Aug 21 2022, 04:45 PM
Well, sorry to report there will be no more drawings as I've decided to cancel this project.
This piece of crap chassis is rusty and I just don't think I can deal with it...
Interesting though and another example of "Every 914 has rust. You just haven't found it yet..." No sign of failure anywhere along the seam sealer but mositure found its way in. Granted, it's right behind the rear tire so I'm sure this area got hammered from underneath, but anyway, there you go.
Attached image(s)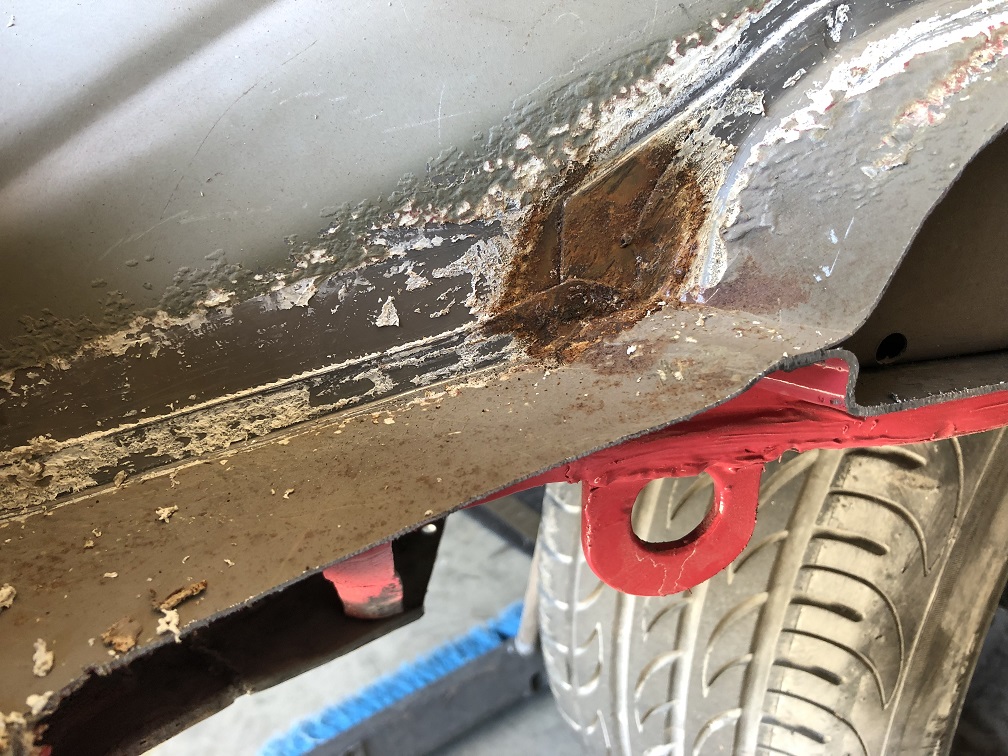
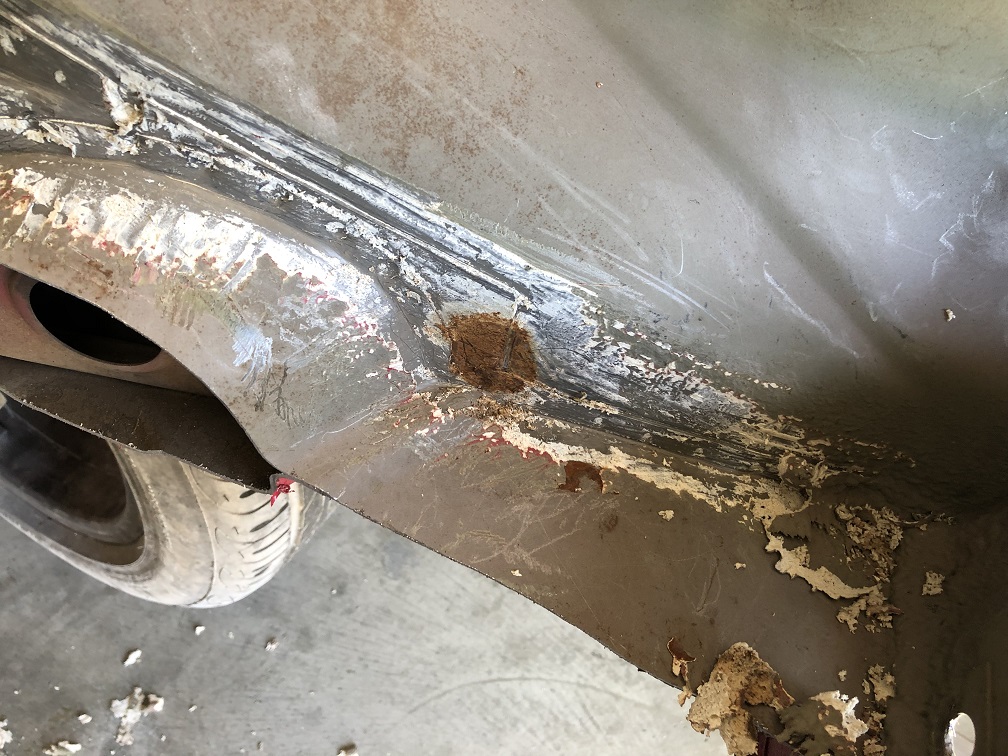
Posted by: tygaboy Aug 21 2022, 04:52 PM
The rust discovery was part of removing aaaaaaallllll the remnants of the factory trans mount cross bar and trunk floor panel. Messy, messy work. I need to get all this out of the way so I can weld in the spreader plates that will support the Ferrari trans mount cross bars.
You can see the approach was to remove all the unneeded material. That "hole" is where the factory trans mount cross bar used to attach.
With the removal complete, I reshaped the open area to accept the spreader plate.
Attached thumbnail(s)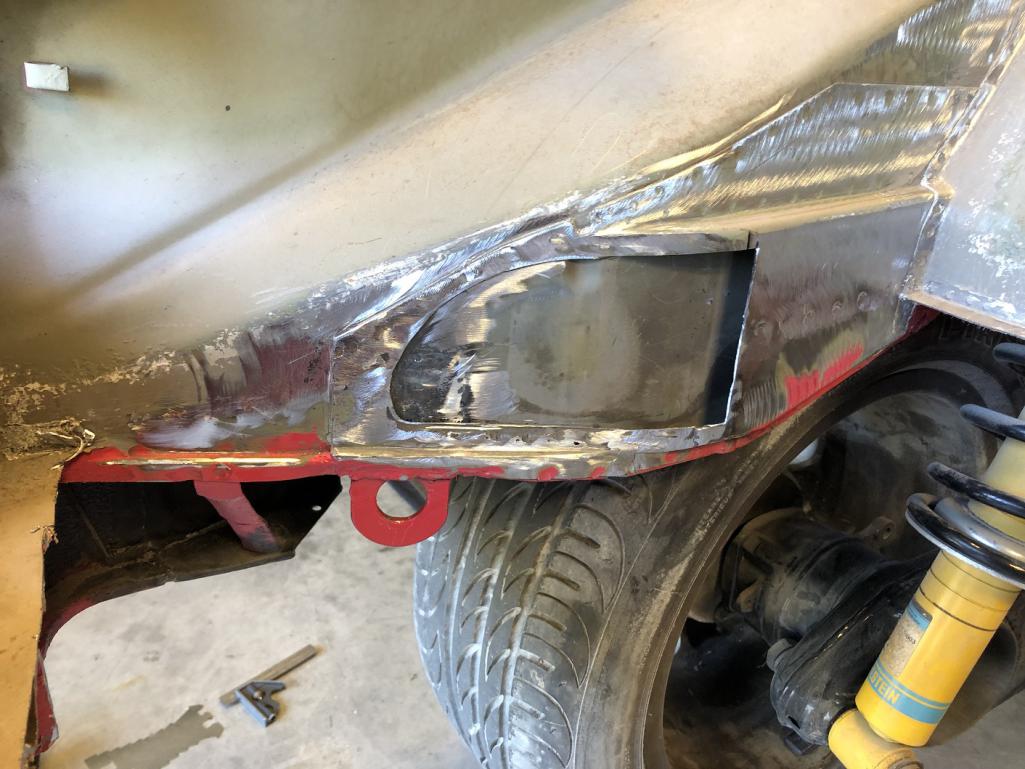
Posted by: tygaboy Aug 21 2022, 04:59 PM
Then it's the typical fab process:
- make a cardboard template of the needed shape
- transfer it to metal
- cut, fit, trim, fit
- bend to match the curve of the area to which it'll be welded
- fit, trim, bend, rebend, un-bend, fit...
You get the picture.
You can see how the spreader plate will weld to the inside wall of that opening then turn 90 degrees and get welded to the outer wall of the box section.
Attached thumbnail(s)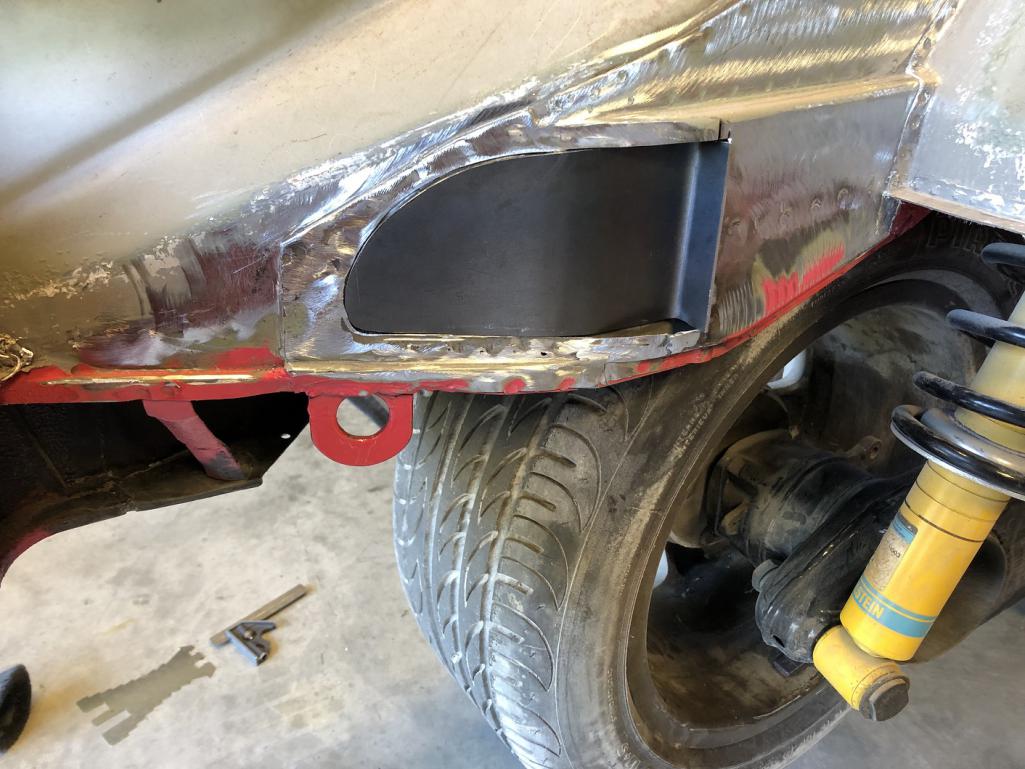
Posted by: tygaboy Aug 21 2022, 05:08 PM
I'm really happy with the fit I was able to get. And with that done, I drilled for the plug welds. With those complete, the part is clamped in place. A quick check of each hole shows that the spreader plate sits flush against the inner panel, just like it should.
Note that there will be another spreader plate that covers this one and extends to support the upper cross bar. It'll make sense once I get to that piece.
Attached thumbnail(s)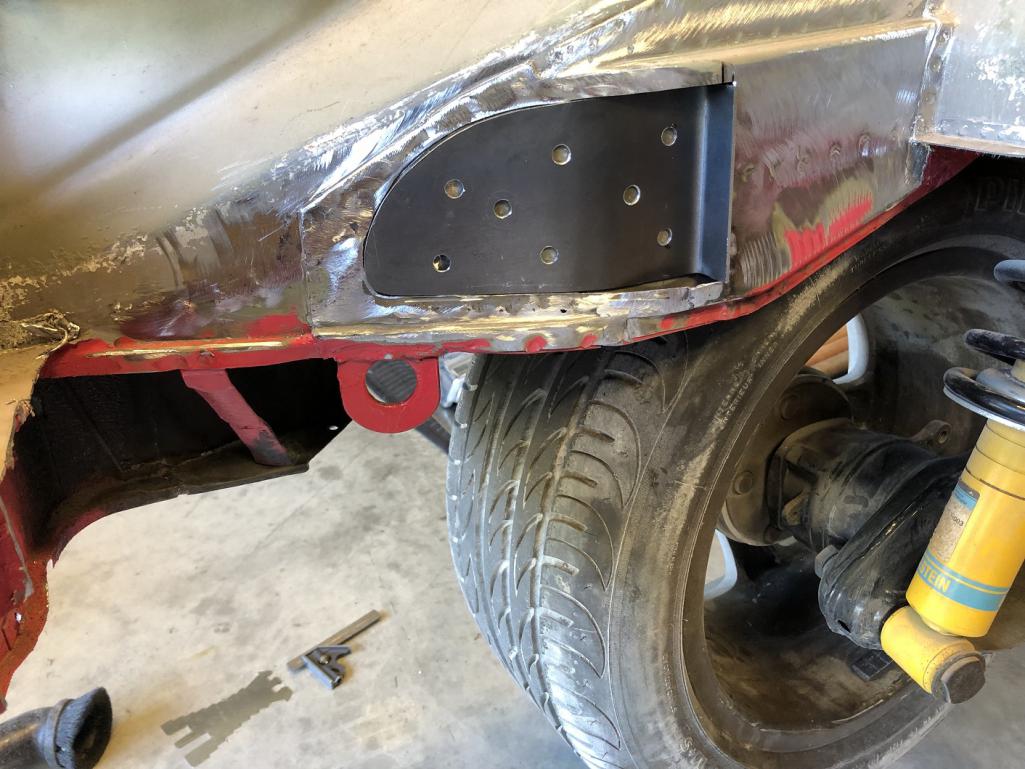
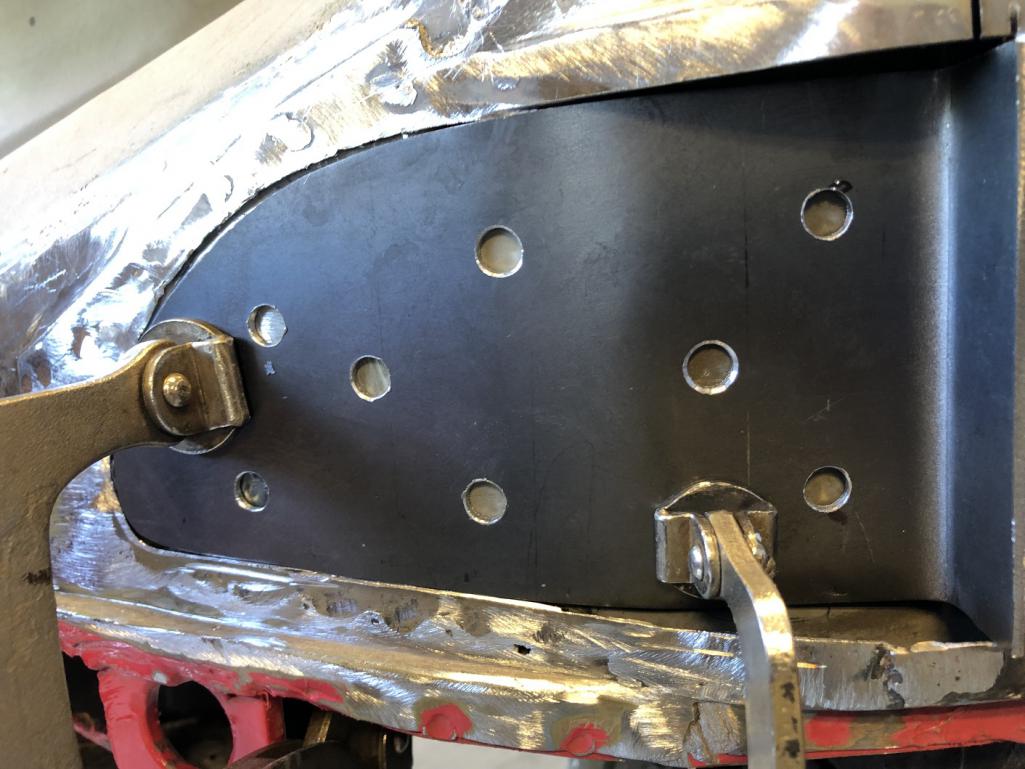
Posted by: tygaboy Aug 22 2022, 05:09 PM
More messy work grinding all those factory spot welds and removing sheetmetal to prep the passenger side for the lower cross bar's inner spreader plate. But it's all set to go. I got a nice fit here, as well. Tommorrow I'd like to get these welded in and maybe even get the outer spreader plates fab'd, too.
Probably one more messy session and I'll have all the unneeded sheet metal removed from engine bay/trunk area.
Attached thumbnail(s)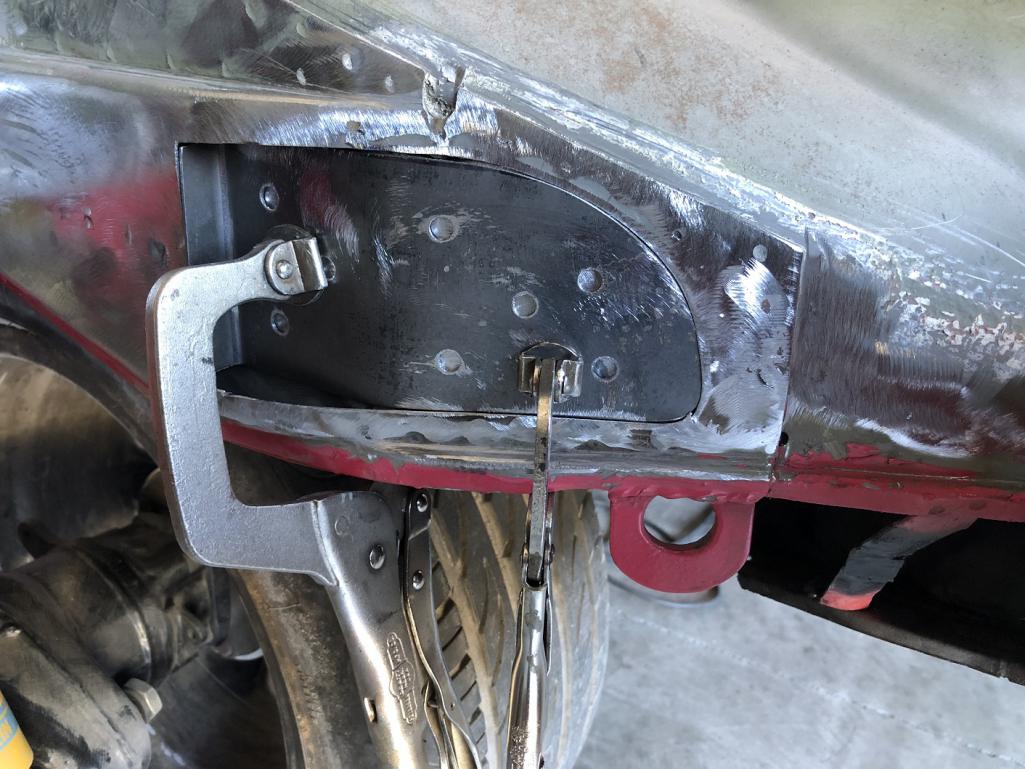
Posted by: mgarrison Aug 23 2022, 01:15 PM
Such outstanding, uber cool fab work as usual Chris!
Posted by: Cairo94507 Aug 23 2022, 01:24 PM
A master fabricator for sure.
Posted by: tygaboy Aug 23 2022, 02:41 PM
Prep'ing the inner spreader plates includes coating the surfaces with weld through primer.
Your PSA for today:
Don't weld directly on weld through primer - never weld anything but clean metal.
Weld through primer is designed to liquify and galvanize the metal around the weld to help protect from future corrosion. It helps provide permanent rust protection on the inner edges of the welded metal pieces.
So, prep the area by spraying on the primer (the stuff I used happens to be black in color) then remove it completely from the area where you'll be welding. I just positioned the spreader plate and scratched where the plug welds would be then came back with a cheap-o Harbor Freight 3/8 belt sander and cleaned each weld location.
Attached thumbnail(s)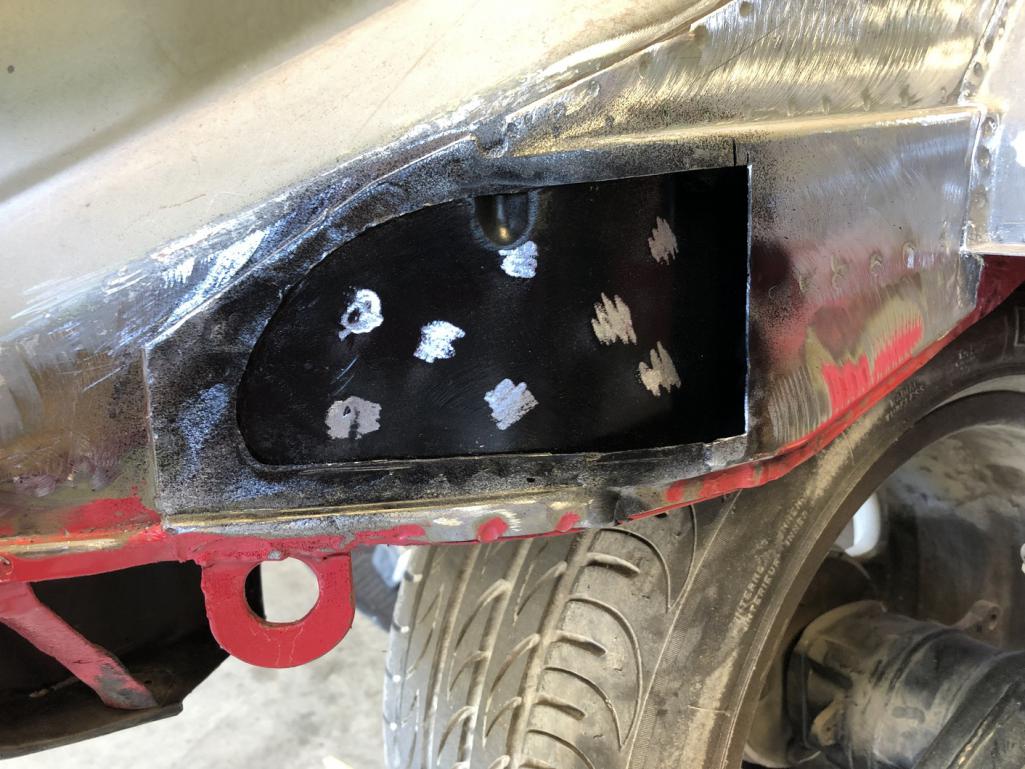
Posted by: tygaboy Aug 23 2022, 02:43 PM
Plug welded! I use MIG for this as it's faster and easier, at least for me. I get what I think is a really nice result without having to worry about getting all comfortable, like I would need to do if TIGing.
I'll come back and edge weld in a few locations, just to lock the plate in a bit more.
Attached thumbnail(s)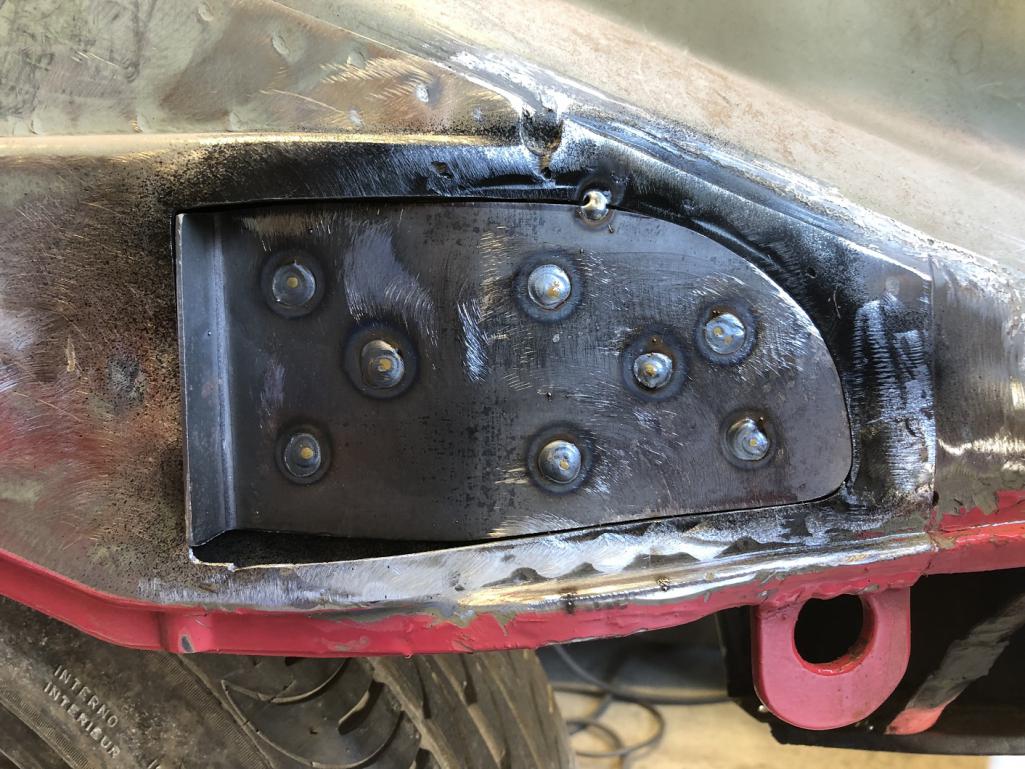
Posted by: tygaboy Aug 23 2022, 02:46 PM
Next was to final trim the 90 degree return and weld that edge from top to bottom.
A bit of sanding to smooth out all the areas where the outer spreader plate will sit then hit the whole area with weld through primer.
Ready for the outer plate fab and installation.
Attached thumbnail(s)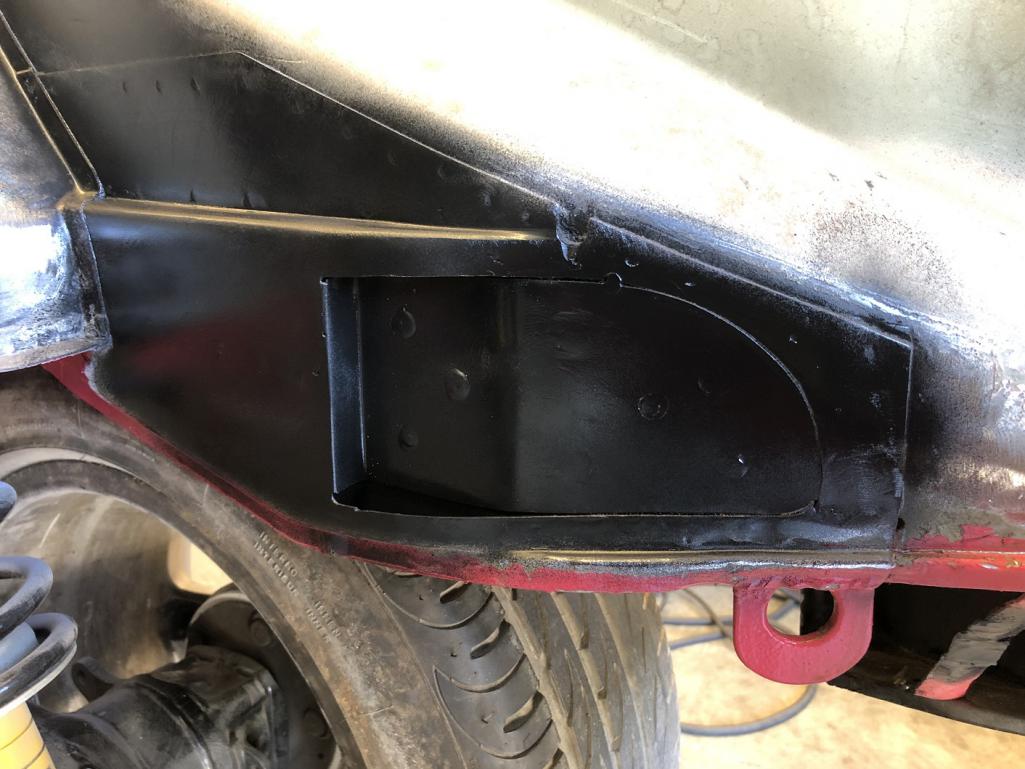
Posted by: tygaboy Aug 23 2022, 03:03 PM
@http://www.914world.com/bbs2/index.php?showuser=23922 @http://www.914world.com/bbs2/index.php?showuser=9712 - Thanks for the kind words, gentlemen.
I will say that this build has me really pushing to do the best I possibly can, not that I don't do that all the time, just that this car feels like it could turn out to be something really special.
Posted by: tygaboy Aug 24 2022, 02:31 PM
Today, I grabbed the factory 360 trans mount. This is quite a piece! It's WAY lighter than it looks and a quick rough fit suggests it could be adapted to work in the 914 - but it's quite bulky looking and hides a lot of the cool-factor. Maybe it can be sliced up and that rear hanger section could be used?
The good news is that if this gets used or not, the plating I've done is still required so no lost effort... so far.
Anyway, multiple options are always good. Much more to do before final decisions are made.
Attached thumbnail(s)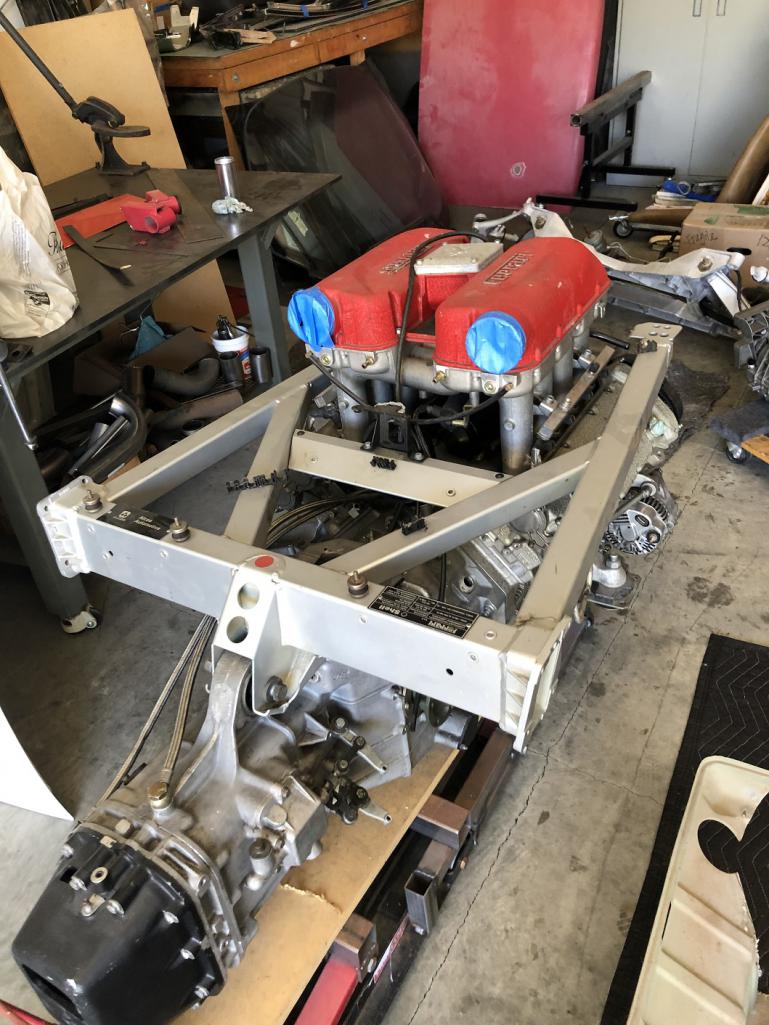
Posted by: ClayPerrine Aug 24 2022, 02:39 PM
Today, I grabbed the factory 360 trans mount. This is quite a piece! It's WAY lighter than it looks and a quick rough fit suggests it could be adapted to work in the 914 - but it's quite bulky looking and hides a lot of the cool-factor. Maybe it can be sliced up and that rear hanger section could be used?
The good news is that if this gets used or not, the plating I've done is still required so no lost effort... so far.
Anyway, multiple options are always good. Much more to do before final decisions are made.
Suggestion... use the rear portion of the factory 360 trans mount in the back. Then take the remains of the mount after you cut the trans crossbar off of it, and put it under the engine to support the motor mounts. Then add risers on the rear to reconnect it it to the trans crossbar. Make it bolt to the trans crossbar so you can remove it to get the engine out of the car.
My mental 3d modeling says it should work. But I am not there to examine it in person.
Clay
Posted by: tygaboy Aug 24 2022, 05:47 PM
Suggestion... use the rear portion of the factory 360 trans mount in the back. Then take the remains of the mount after you cut the trans crossbar off of it, and put it under the engine to support the motor mounts. Then add risers on the rear to reconnect it it to the trans crossbar. Make it bolt to the trans crossbar so you can remove it to get the engine out of the car.
My mental 3d modeling says it should work. But I am not there to examine it in person.
Clay
@http://www.914world.com/bbs2/index.php?showuser=1143 - Clay - After playing around with that mount (note that it's aluminum), it's just too much not the look I want. Your suggestion about reusing part of it? The wall thickness is way too thin for a support structure.
When you put this piece in context with the rest of the 360 chassis, it's pretty clear it's about tying together the right/left sides of the rear section of the Ferrari and providing places to mount a few light weight items. A case of "close, but no cigar".
I went to the metal store today and stocked up on 1" x 3" x .095 wall tube. Martin and I worked up some changes to the last design that adds an outrigger from the cradle to the long, just ahead of the suspension console.
Give me a few days and I hope to have V1 of the cradle underway.
Posted by: steuspeed Aug 25 2022, 01:13 AM
100%.(Another massive Rush nerd.....
)Clay
Couple walks by by place last summer. Takes a look at my collection. 2 914s, Alfa Alfetta, Scirocco Mk1. Working Man playing out the garage. He says, all these cars are turning into Red Barchettas. I say, Yes.... yes they are.
Posted by: steuspeed Aug 25 2022, 01:44 AM
I would go with the Raspberry, but with those red valve covers it needs to be silver or gunmetal imo. Something like that to show it off. I would be looking at paint chips next to the covers. Porsche Marathon Blue Metallic might be an option?
Ferrari Grigio Ferro
https://rossoautomobili.com/blogs/magazine/15-shades-of-ferrari-silver
Trunk mods, excellent!
POORARI love it!
Posted by: tygaboy Aug 25 2022, 01:05 PM
Before plating for the upper cross bar, I have to get that whole area to be in the same plane so the spreader plate has no gaps behind it.
A quick trim of some 18 ga and I have that piece ready to weld in.
Attached thumbnail(s)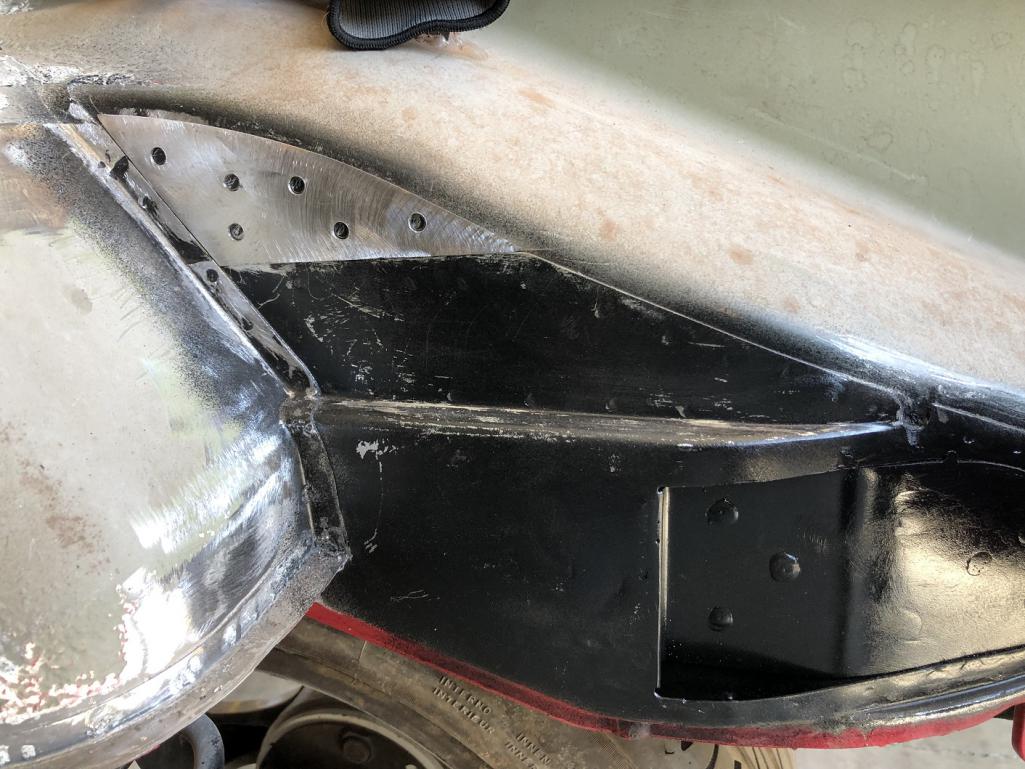
Posted by: tygaboy Aug 25 2022, 01:06 PM
First rough fit of the 12 ga upper spreader plate. Still some trimming / fitting to do but you get the idea.
Attached thumbnail(s)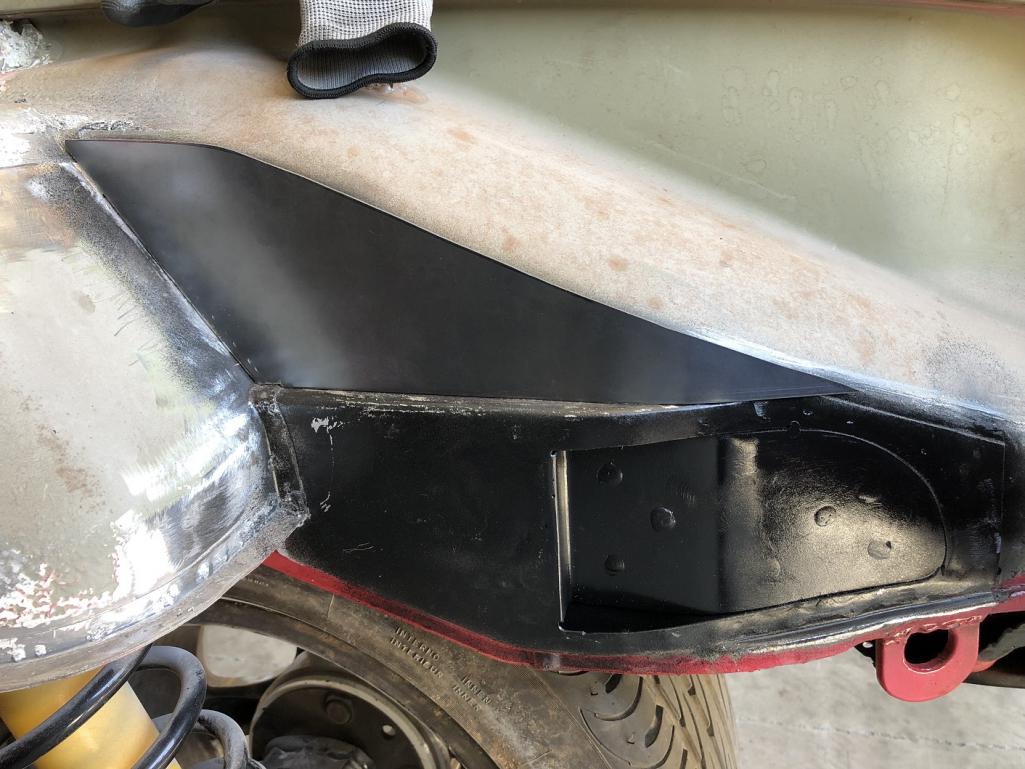
Posted by: ClayPerrine Aug 26 2022, 06:16 AM
Just a suggestion...
Get Ferrari Modena brakes for it. They are Brembo monoblocks, the exact same as the Boxster brakes, but they have Ferrari on the face of them. So you don't have to engineer anything, just bolt them on. Put them behind Fuchs with the Porsche crest in the center.
That would mess with both the Porsche and Ferrari purists big time.
Clay
Posted by: tygaboy Aug 26 2022, 09:17 AM
Just a suggestion...
Get Ferrari Modena brakes for it. They are Brembo monoblocks, the exact same as the Boxster brakes, but they have Ferrari on the face of them. So you don't have to engineer anything, just bolt them on. Put them behind Fuchs with the Porsche crest in the center.
That would mess with both the Porsche and Ferrari purists big time.
Clay
@http://www.914world.com/bbs2/index.php?showuser=1143 Clay, Well timed, sir! The conversation and initial decison about caliper labeling happened yesterday afternoon! And what is that decision?
Well, you'll just have to stay tuned to hear about it and a couple of other big changes in direction...
Posted by: tygaboy Aug 26 2022, 09:32 AM
Messy, boring, necessary prep for the outer spreader plate.
Attached thumbnail(s)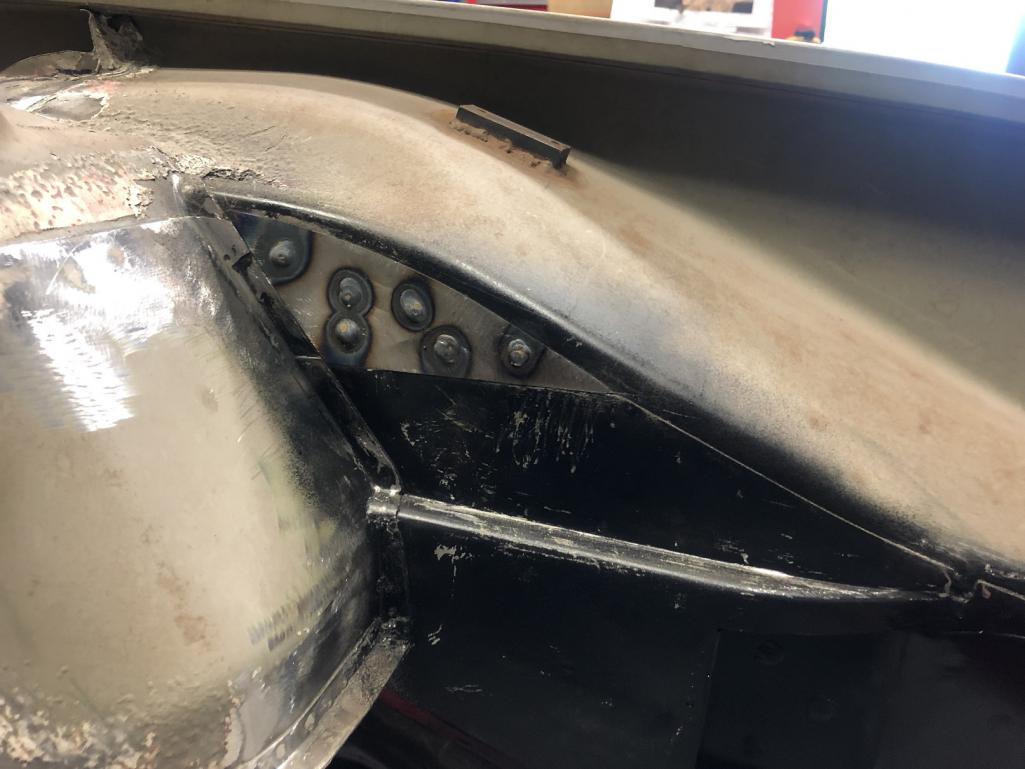
Posted by: ClayPerrine Aug 26 2022, 11:54 AM
Just a suggestion...
Get Ferrari Modena brakes for it. They are Brembo monoblocks, the exact same as the Boxster brakes, but they have Ferrari on the face of them. So you don't have to engineer anything, just bolt them on. Put them behind Fuchs with the Porsche crest in the center.
That would mess with both the Porsche and Ferrari purists big time.
Clay
@http://www.914world.com/bbs2/index.php?showuser=1143 Clay, Well timed, sir! The conversation and initial decison about caliper labeling happened yesterday afternoon! And what is that decision?
Well, you'll just have to stay tuned to hear about it and a couple of other big changes in direction...
You have probably heard the old saying "Great minds run in the same channel." In our case, too bad it's the gutter.
Clay
Posted by: tygaboy Aug 26 2022, 05:34 PM
And there's the right side, outer spreader plate plug welded. It'll get some skip welds along its edges, too. I just haven't gotten to that.
And to appease the fabrication gods so they ensure nothing fails, at the completion of any particular area, it's always a good idea to say, out loud, "OK! That's not going anywhere!"
Note that all the plug welds will be sanded smooth and all edges will be seam sealed.
Attached thumbnail(s)
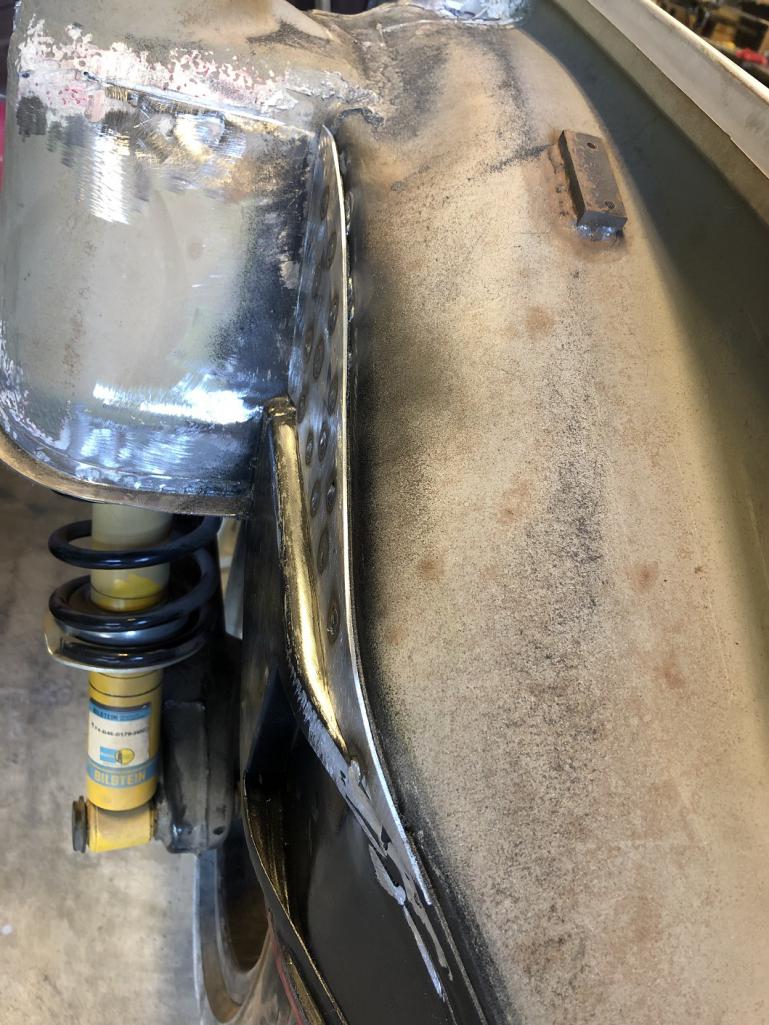
Posted by: tygaboy Aug 26 2022, 05:36 PM
Left side upper, inner plate plug welded, sanded, primed and ready for the outer spreader.
Attached thumbnail(s)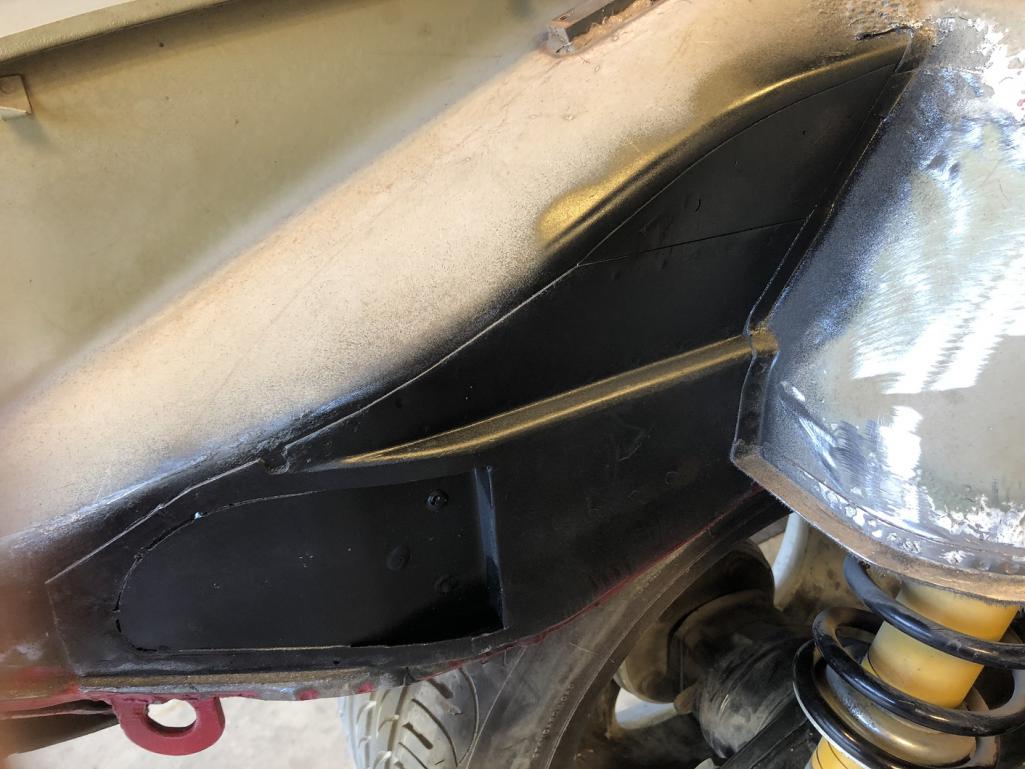
Posted by: tygaboy Aug 26 2022, 05:41 PM
Without going into the excrutiating details I'm working to understand, it's V4-ish of the rear transmission mount system, including some style points for the upper shock mount area. Just kicking ideas around...
Attached thumbnail(s)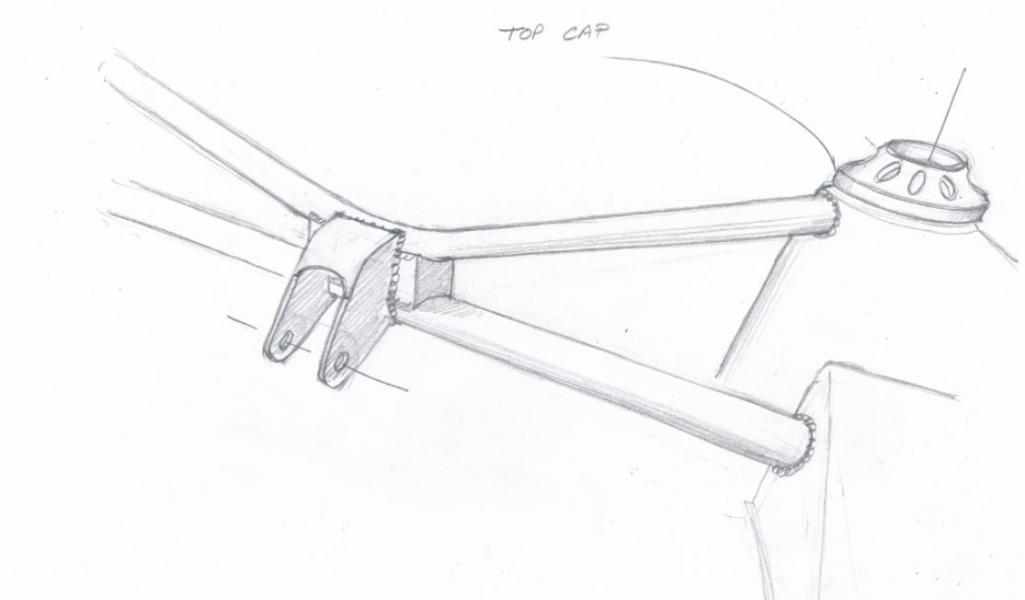
Posted by: tygaboy Aug 27 2022, 06:02 PM
Left side upper spreader in place. I clamp near each hole as I'm plug welding it to be sure the plate is firmly contacting the parent material.
Attached image(s)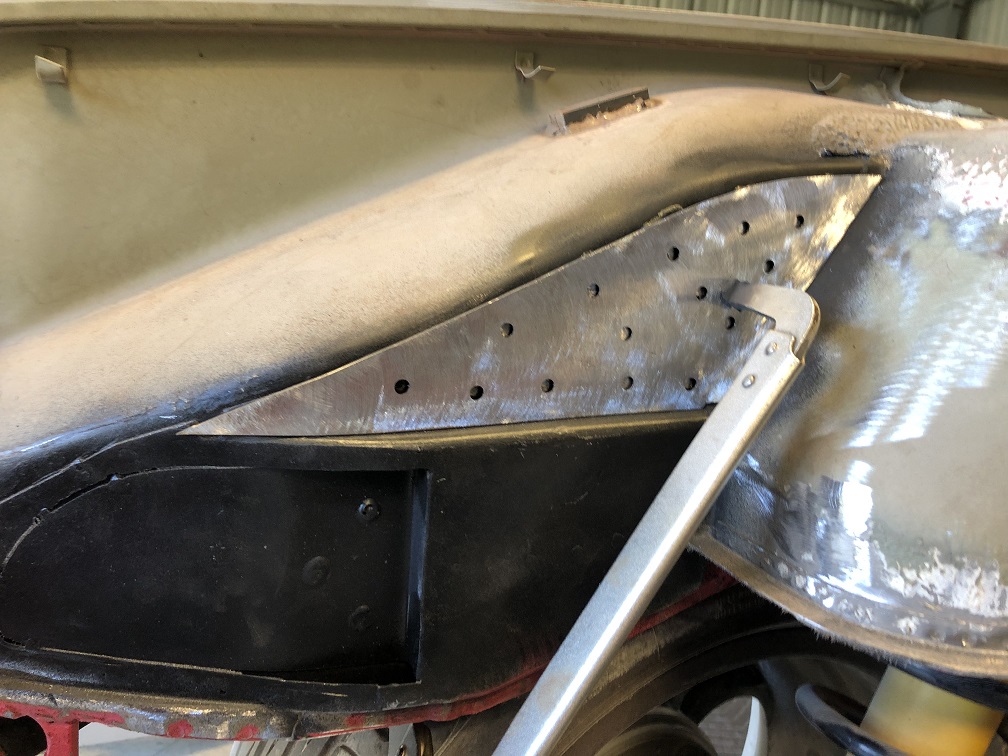
Posted by: tygaboy Aug 27 2022, 06:03 PM
Both upper spreaders are welded and sanded.
Attached image(s)
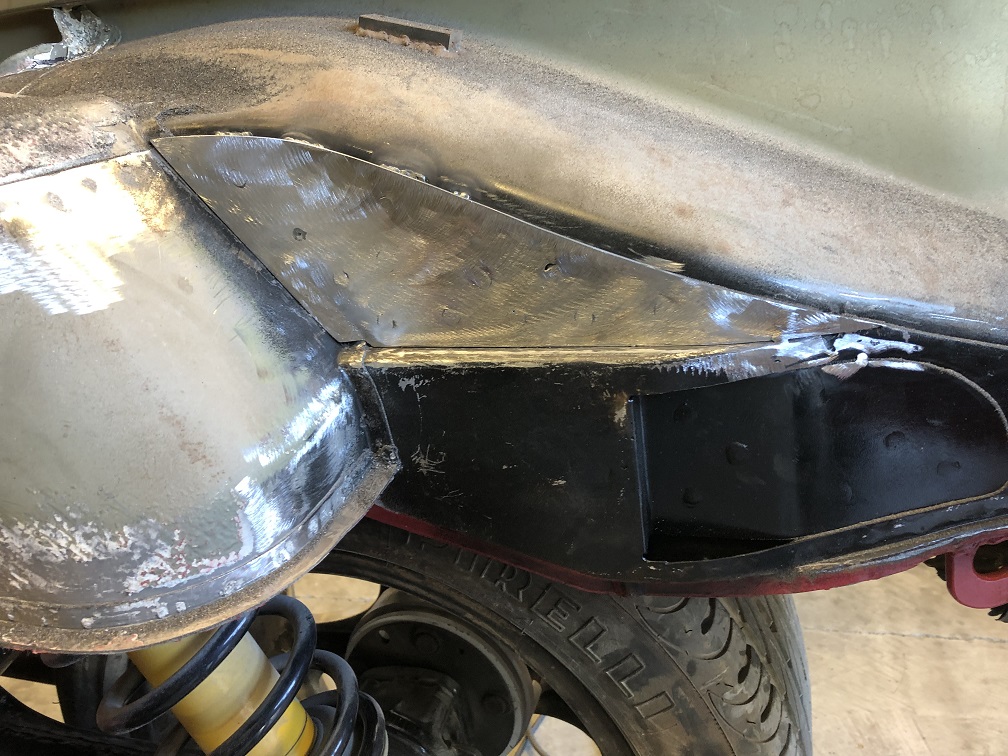
Posted by: tygaboy Aug 27 2022, 06:05 PM
Now to determine the location for the upper trans mount cross bar.
I thought my LS set up was cool, but this thing...man.
Attached thumbnail(s)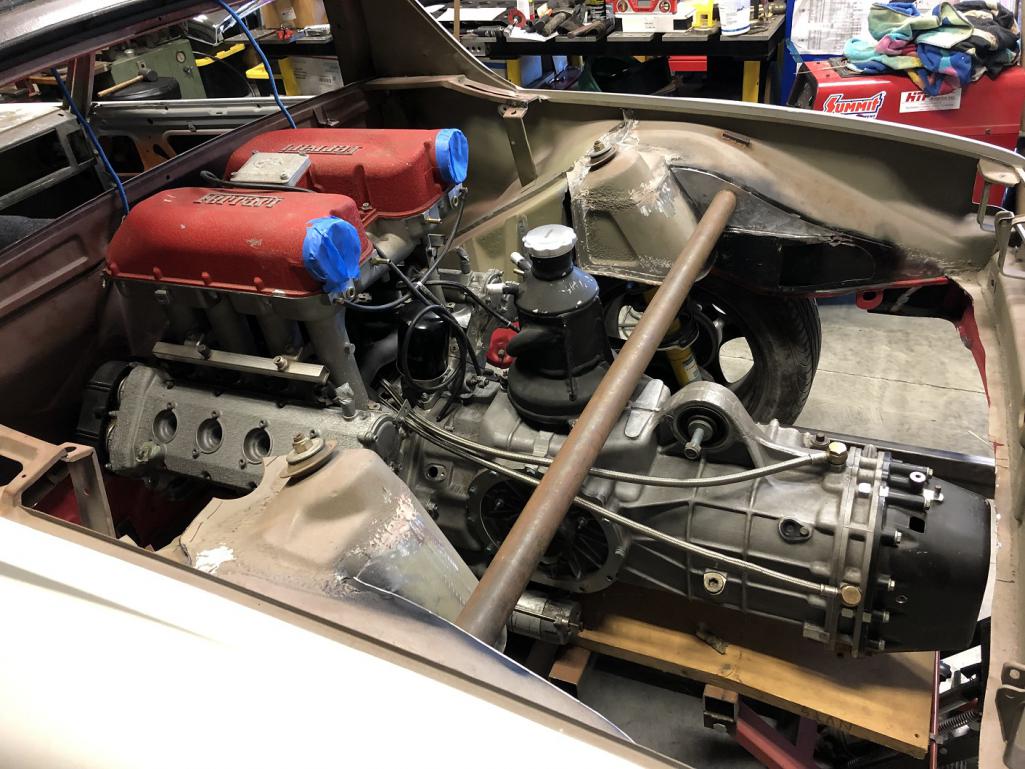
Posted by: tygaboy Aug 28 2022, 11:25 AM
Engine mounting fun:
The tricky part is that the Ferrari has a chassis that's shaped to support the engine mounts - these supports are a fixed part of the chassis. And becaure the engine is wider at the top than the mount width, the drive train has to come out the top of the car. That's not something I want to have to do, if I can at all help it.
So I have to come up with an intermediate "something" that's removeable and allows the engine to be lowered out the bottom.
Much noodling and head scratching has yeilded this design for what I've taken to call the "landing pads". Essentially, it's a permanent addition to the 914 chassis that's as wide as it can be while still allowing the engine to clear. Then we have a removable chunk of a mount that connects to this structure and serves as the landing pad.
This structure isn't quite final as that tube that heads outward is only a place-holder and will need to angle up to the long. There will also be gusseting from this up to as high as practical on the chassis / cage tubing to combat any twisting force.
Today's goal is to cut a few of these pieces and mock this up in the chassis.
Note that this current design eliminates any tubing from the motor mount rearward: no more cradle approach. This eliminates any potential interference or "no-go" zones for things like the axles, exhaust or, in the case of the right side, the shifter cables.
Attached image(s)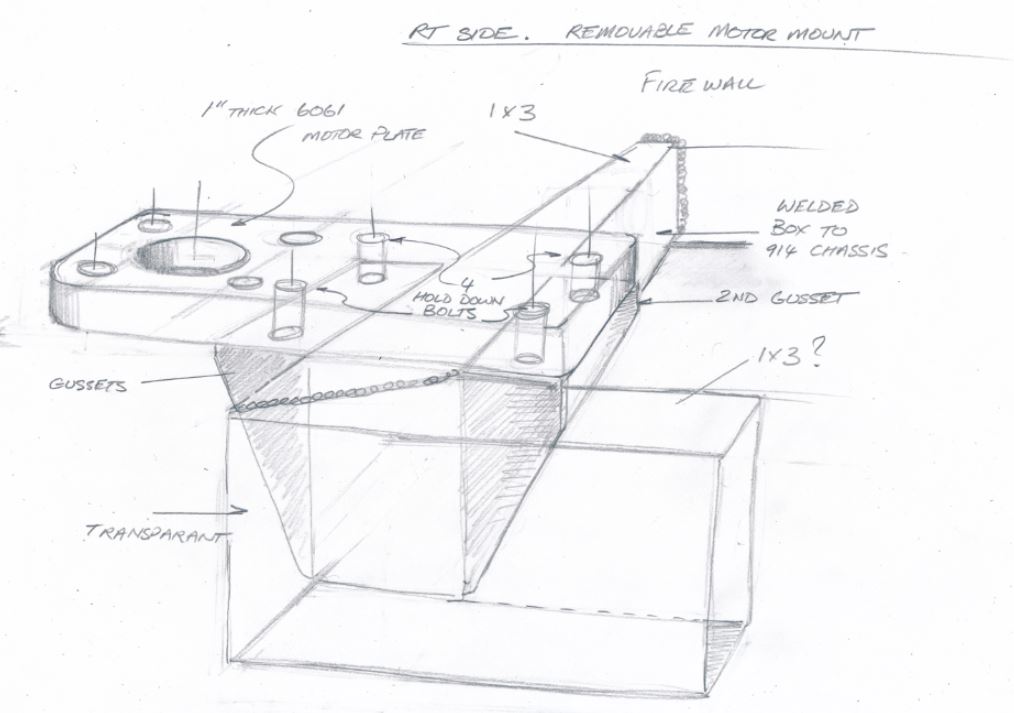
Posted by: Van B Aug 28 2022, 01:14 PM
Random suggestion: you should count all the times you had to put the powertrain in place for mock ups. I’ve often wondered how many times should be expected for a custom build… probably close to 100 or more by the time it’s all done!
Posted by: tygaboy Aug 28 2022, 02:17 PM
Random suggestion: you should count all the times you had to put the powertrain in place for mock ups. I’ve often wondered how many times should be expected for a custom build… probably close to 100 or more by the time it’s all done!
That's the sort of thing, along with adding up receipts, that I really do not want to do!
But to date, I'm probably approaching ten to get to this point. Fortunately, Most of what's been going on requires the drive train be in place.
One of the ideas I had was to make a fixture that duplicates the motor mount locations and the trans mount tab. It'd be made such that when it was leveled front/back and side/side in the leveled chassis, all I'd have to know is the distance from the fire wall to the motor mount location and I could build all the mounts to the fixture.
Posted by: Chris914n6 Aug 28 2022, 03:44 PM
I simplified it. Loosen the motor mount bolt, remove 4 bolts, repeat, drop. Weld the nuts to the chassis mount to make it easier. Pretty much standard formula for cars with multiple engine options. Tough part is the chassis mount as that area is not the strongest or best shaped part of the car. The trailing arm branch might need to be repurposed round tube. If you are concerned about bolt sheer add a dowel pin or two, plus they work great as locating pins. 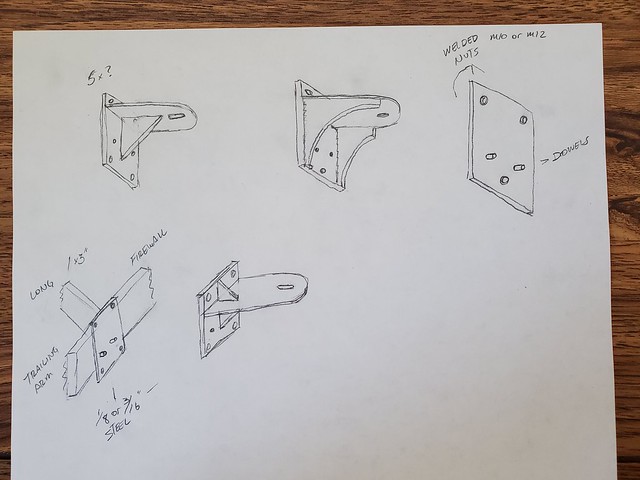
Random suggestion: you should count all the times you had to put the powertrain in place for mock ups. I’ve often wondered how many times should be expected for a custom build… probably close to 100 or more by the time it’s all done!
I only did it a handful of times. Once the trunk was trimmed and the motor was is in it's final place I cut and welded the crossbar together in car. Helps that I kept the 914 trans and had room under the motor for a typical crossbar. I had the trans bolted in and a crossbar on top of the car with the motor suspended by straps -- plenty of room under to move around.
HTH
Posted by: Van B Aug 28 2022, 05:35 PM
Random suggestion: you should count all the times you had to put the powertrain in place for mock ups. I’ve often wondered how many times should be expected for a custom build… probably close to 100 or more by the time it’s all done!
That's the sort of thing, along with adding up receipts, that I really do not want to do!
But to date, I'm probably approaching ten to get to this point. Fortunately, Most of what's been going on requires the drive train be in place.
One of the ideas I had was to make a fixture that duplicates the motor mount locations and the trans mount tab. It'd be made such that when it was leveled front/back and side/side in the leveled chassis, all I'd have to know is the distance from the fire wall to the motor mount location and I could build all the mounts to the fixture.
Oh man, I don’t EVER add up receipts! I hear you there for sure
Posted by: tygaboy Aug 28 2022, 05:48 PM
Cut the lower spreader outline to shape, clamp it to the chassis at the front and start working it to get the needed curve.
Attached thumbnail(s)
Posted by: tygaboy Aug 28 2022, 05:49 PM
All shaped and curved and clamped in place to verify fit in all areas. It turned out nicely.
Attached thumbnail(s)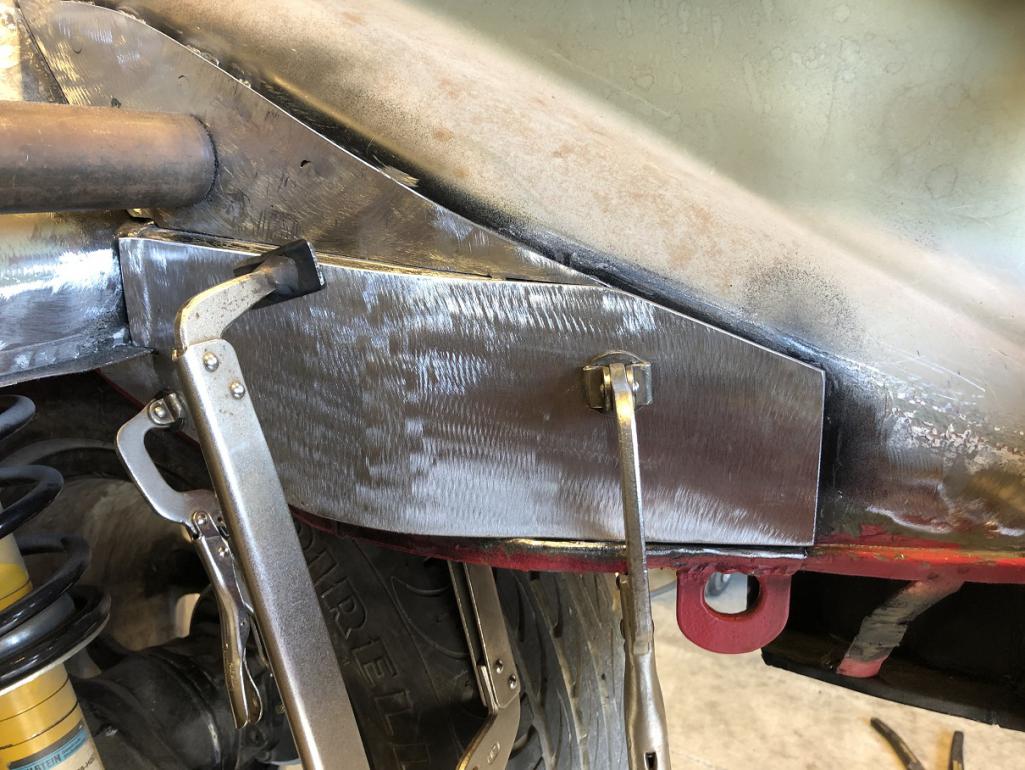
Posted by: tygaboy Aug 28 2022, 05:51 PM
All plug welded and ready for sanding. Repeat on the other side and add a bit of edge welding and I'll be ready to add the rear cross bars. Things are moving right along!
Attached thumbnail(s)
Posted by: tygaboy Aug 28 2022, 05:55 PM
I simplified it. Loosen the motor mount bolt, remove 4 bolts, repeat, drop. Weld the nuts to the chassis mount to make it easier. Pretty much standard formula for cars with multiple engine options. Tough part is the chassis mount as that area is not the strongest or best shaped part of the car. The trailing arm branch might need to be repurposed round tube. If you are concerned about bolt sheer add a dowel pin or two, plus they work great as locating pins.
HTH
@http://www.914world.com/bbs2/index.php?showuser=431 - Thanks for the input. It's certainly a process and yep, all the odd shapes make it a bit more complex. In the end, whatever the design ends up being, it'll be over built for safety's sake.
Posted by: tygaboy Sep 4 2022, 02:48 PM
Careful what you wish for. I thought it was a super duper thing that the Ferrari transmission output flanges were higher than the Boxster S. Turns out they are really high. Too high? I'm working on figuring out exactly this.
Here's a really rough mock up with the drive train at proper-ish height in the chassis and the trailing arm set to approximate ride height.
Because of the output flange height, the wheel-side CV will never be higher than the trans output CV; it's all droop, all the time.
What I need to work out is: Can a 930 CV (which has a max limit of 28 degrees) stay in range during operation? I'm pretty sure I'll have to add limit straps to stop things drooping too far when I jack the rear wheels off the ground.
It may also require lowering the drive train in the chassis and building a rub bar/skid plate. It wouldn't be any worse than doing a dropped floor, in terms of ground clearance.
So. Many. Items. To. Work. Out.
Attached thumbnail(s)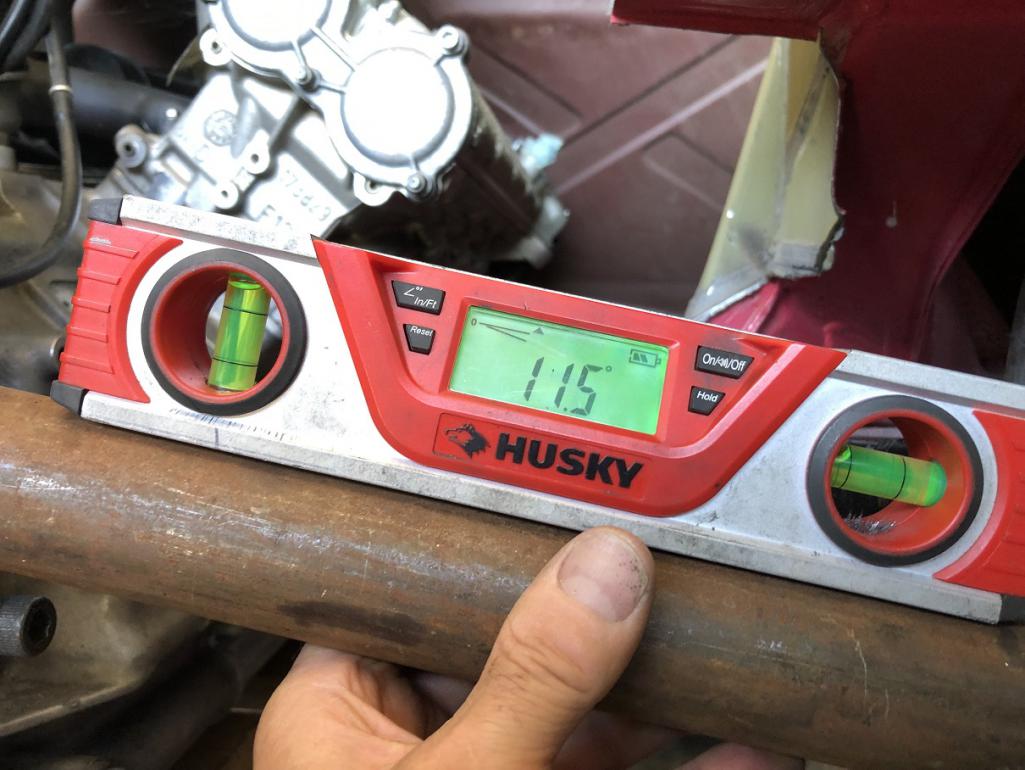
Posted by: tygaboy Sep 4 2022, 03:08 PM
On a simpler note, the left side, lower rear spreader plate has been completed.
I got a nice fit on this side, too. A bit of grinding and it'll be ready for the transmission mount cross bars!
Attached thumbnail(s)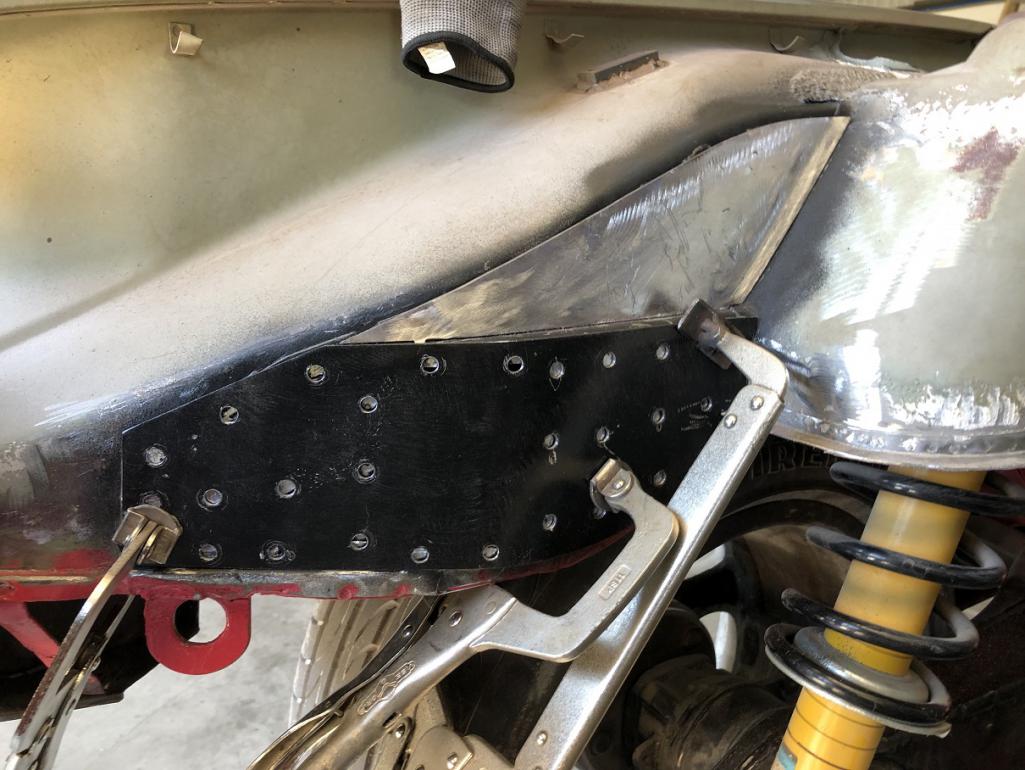
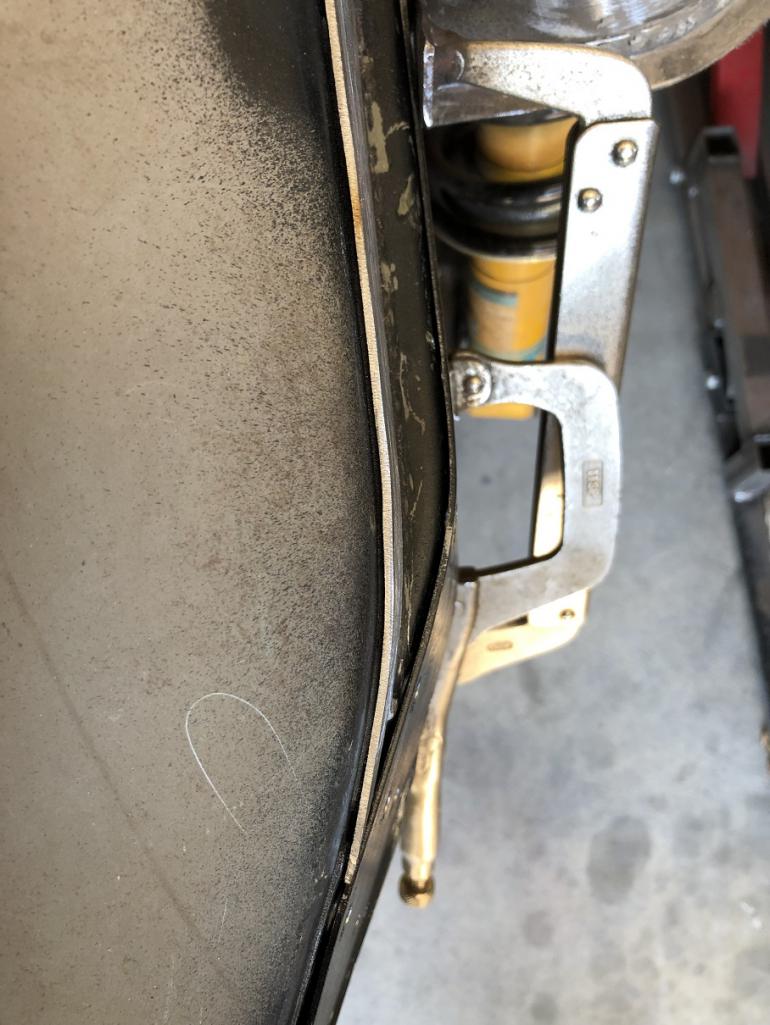
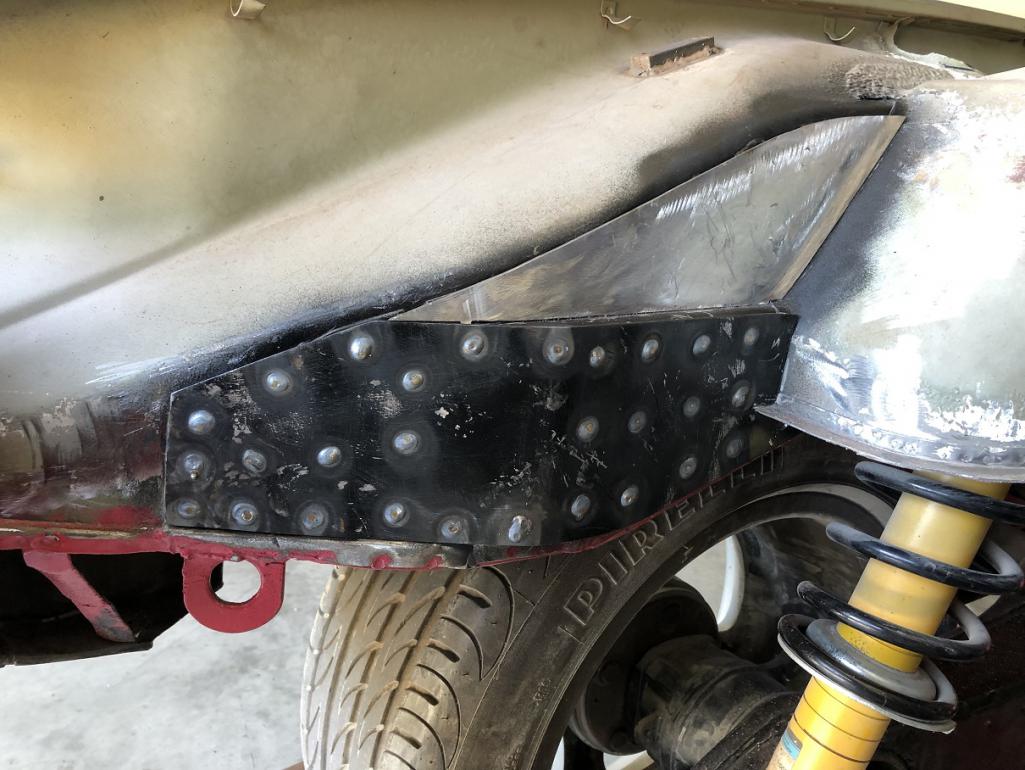
Posted by: tygaboy Sep 4 2022, 04:16 PM
Transmission mount cross bar locating in process. I have a fair bit of leeway so much of it is down to aesthetics.
That last pic shows the mounting tab sits well under the plane of the top of the bars. Important because that's where the floor of the removable trunk will sit.
Attached image(s)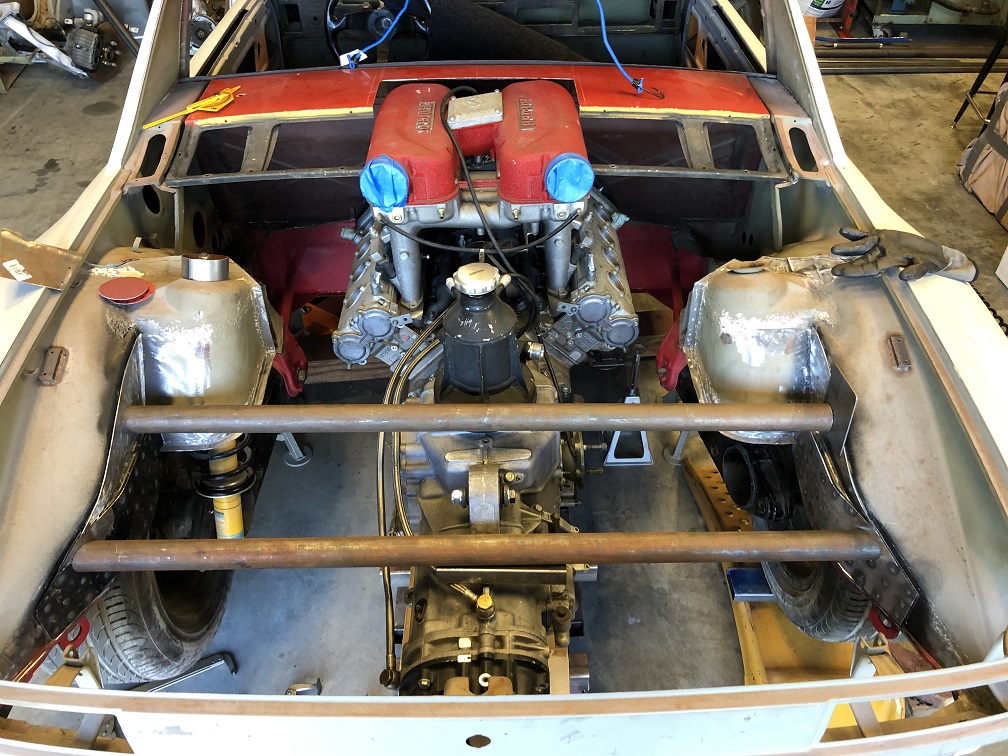

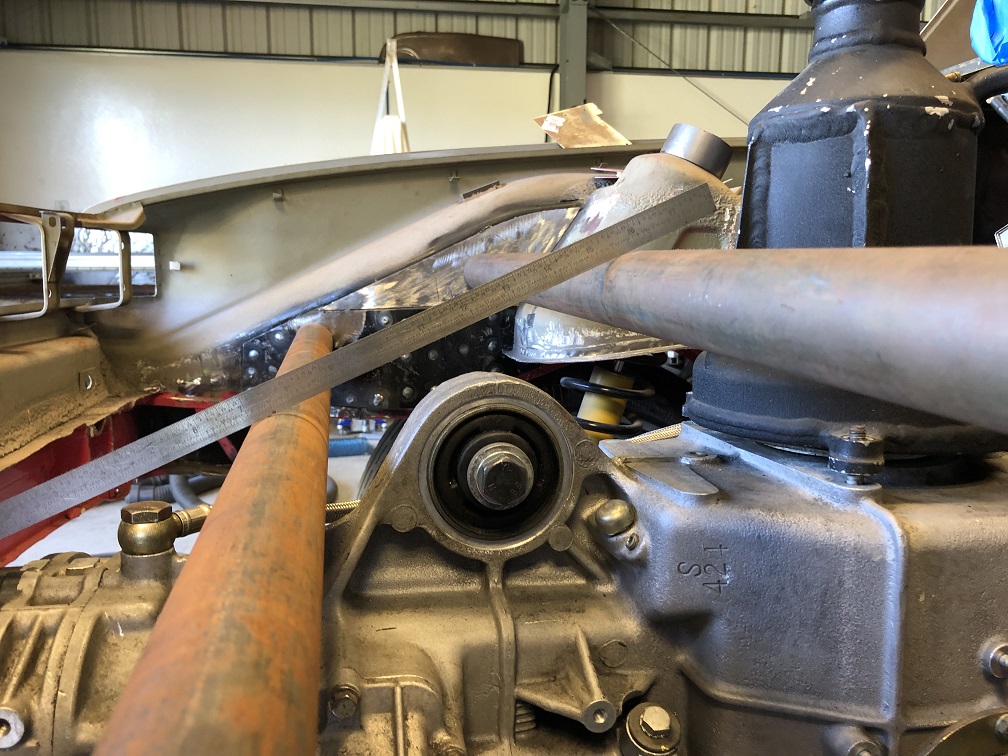
Posted by: Maltese Falcon Sep 4 2022, 09:07 PM
Careful what you wish for. I thought it was a super duper thing that the Ferrari transmission output flanges were higher than the Boxster S. Turns out they are really high. Too high? I'm working on figuring out exactly this.
Here's a really rough mock up with the drive train at proper-ish height in the chassis and the trailing arm set to approximate ride height.
Because of the output flange height, the wheel-side CV will never be higher than the trans output CV; it's all droop, all the time.
What I need to work out is: Can a 930 CV (which has a max limit of 28 degrees) stay in range during operation? I'm pretty sure I'll have to add limit straps to stop things drooping too far when I jack the rear wheels off the ground.
It may also require lowering the drive train in the chassis and building a rub bar/skid plate. It wouldn't be any worse than doing a dropped floor, in terms of ground clearance.
So. Many. Items. To. Work. Out.
Leather limit straps were used in the 935s in the past in order to deal with the suspension droop being over the limit for the on-board air jacks to allow for tire changes. Modern days with the introduction of nitrogen filled + adjustable specs (JRZ, Moton, KW, etc.), the internal discs can be internally adjusted to customer specs for any dedicated droop limit.
These JRZs out of the box had major rear suspension droop. Cary from ERP suspension came by to measure the JRZ units, took over to their shop for mods and now perfect.
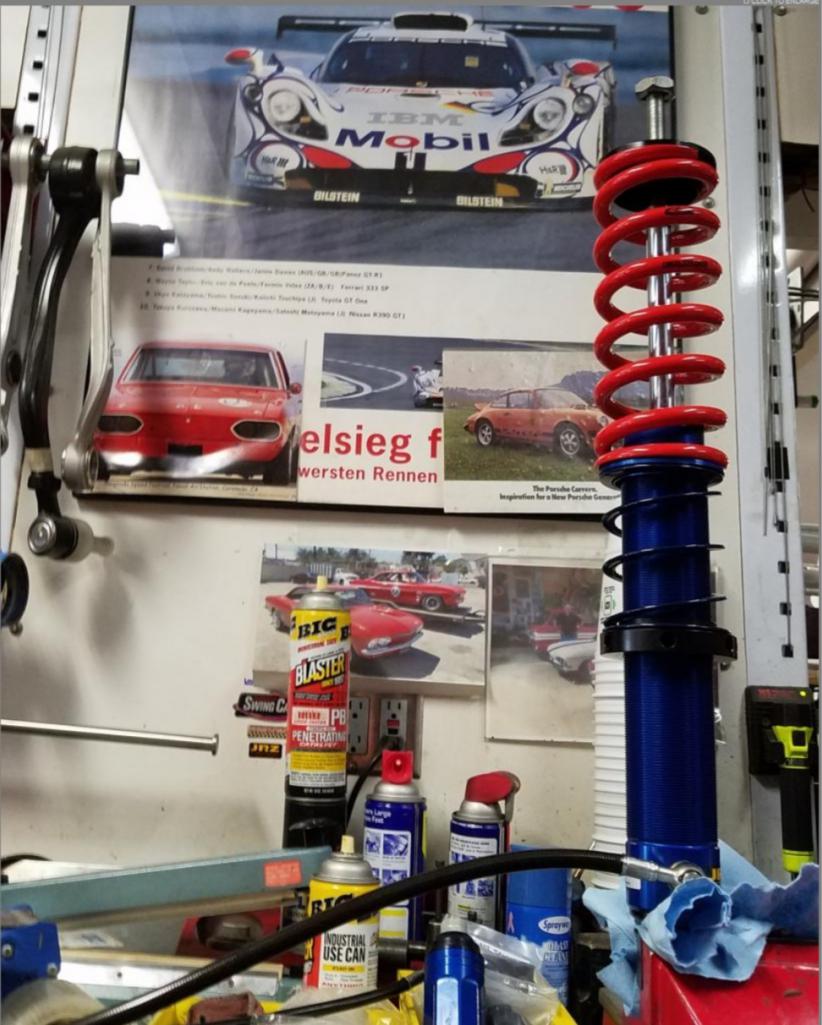
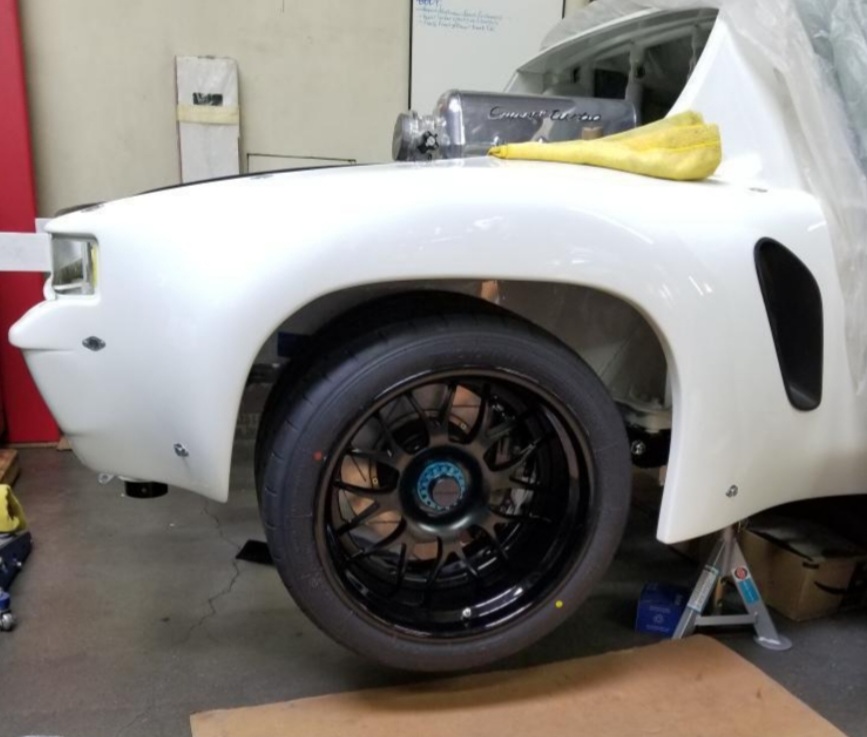
Posted by: tygaboy Sep 4 2022, 09:20 PM
What I need to work out is: Can a 930 CV (which has a max limit of 28 degrees) stay in range during operation? I'm pretty sure I'll have to add limit straps to stop things drooping too far when I jack the rear wheels off the ground.
Leather limit straps were used in the 935s in the past in order to deal with the suspension droop being over the limit for the on-board air jacks to allow for tire changes. Modern days with the introduction of nitrogen filled + adjustable specs (JRZ, Moton, KW, etc.), the internal discs can be internally adjusted to customer specs for any dedicated droop limit.
These JRZs out of the box had major rear suspension droop. Cary from ERP suspension came by to measure the JRZ units, took over to their shop for mods and now perfect.
@Maltese Falcon - I may need to give you a call to talk details. Thanks for chiming in!
Posted by: stownsen914 Sep 5 2022, 07:16 AM
I've used bolt-on limiting straps to limit droop, and also plastic disks inside the shocks like Maltese Falcon mentioned to limit droop on different racecars. Either will do the trick.
Posted by: stownsen914 Sep 5 2022, 07:17 AM
I've used bolt-on limiting straps to limit droop, and also plastic disks inside the shocks like Maltese Falcon mentioned to limit droop on different racecars. Either will do the trick. As long as you leave 2-3 inches of droop below normal ride height, you're good.
Posted by: tygaboy Sep 5 2022, 12:02 PM
For the trans mount cross bars, it looks like it's back to a revised version of a previous design. Shocking, I know. But there is a bit of a surprise / some style points when you see the overall design.
I also started in on the motor mounts. Many pieces yet to be fabbed but it gets a key item into CAD and proven to fit.
Hopefully, the drive train will be mounted in a week or so.
Attached image(s)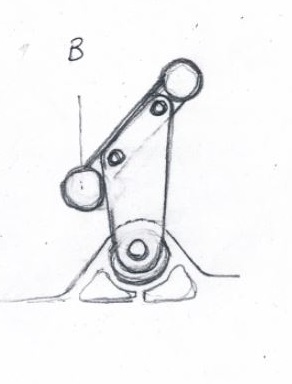
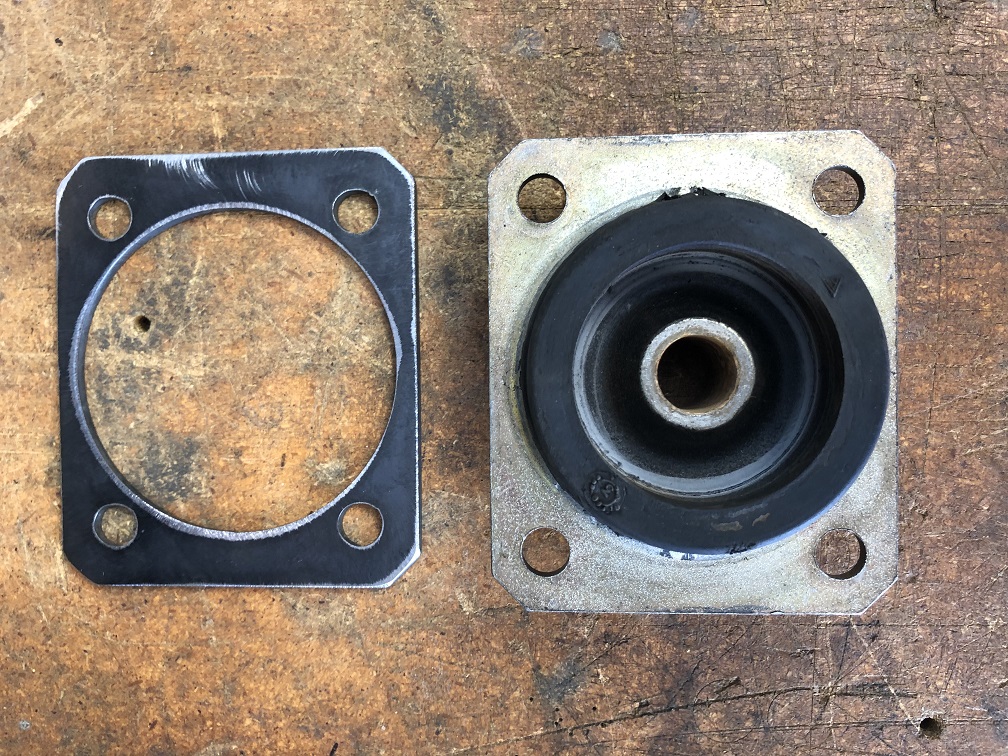
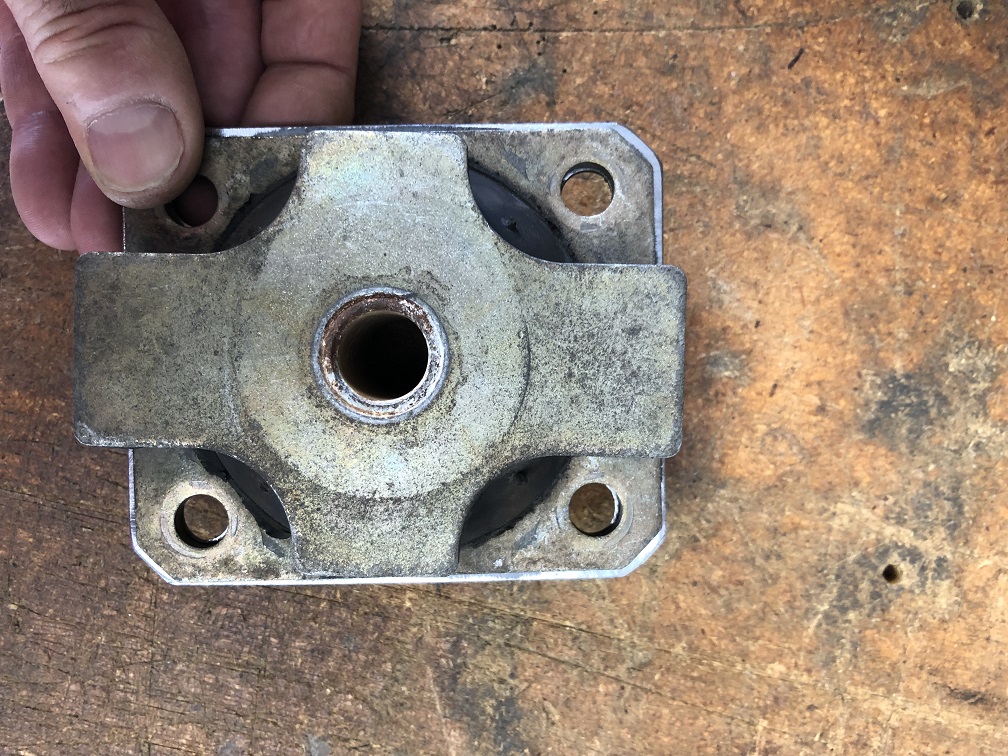
Posted by: Van B Sep 5 2022, 03:57 PM
That poor mount… oh the abuse it will suffer lol
Posted by: tygaboy Sep 5 2022, 06:05 PM
With a pretty good idea of the trans mount design, I started in on how to make it as simple as possible to locate the engine mount "landing pads". Rather than deal with taking the drive train in and out 100 times, leveling it each time, etc, etc, etc., the approach is going to be to make a fixture that replicates the locations of the transmission hanger tab and the engine mounts. The drawing shows the basic design. This will be made level to the engine so when it's level, I know the engine will be, too.
Then "all I have to do" is:
- Level the car (fore/aft and side-to-side)
- BIG IMPORTANT PART: locate the engine fore/aft and up/down and determine the transmission hanger bolt location. Not that hard really...
- fab and install the transmission cross members and hanger brackets to support the above location. The trans tab is dead center in the car so getting things properly located is reasonably straight forward
- bolt the fixture to the trans mount and swing it up until it's level
I'll then have the locations in space that represent where the Ferrari mounts need to be.
See how easy?
Attached thumbnail(s)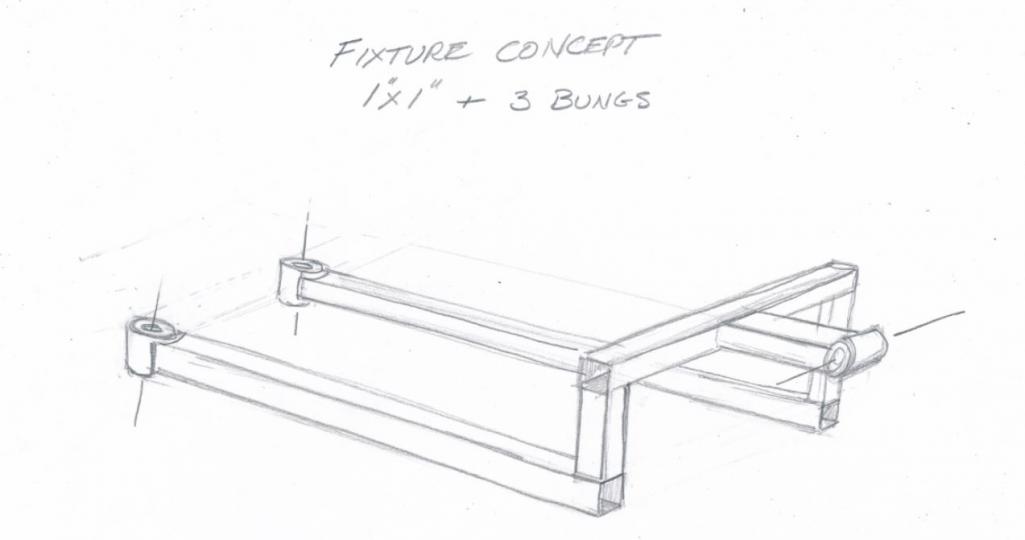
Posted by: tygaboy Sep 5 2022, 06:24 PM
Then I got it in my head to verify some of the key measurements. I first made up a test piece for the landing pad. This isn't the final outer dimension, it's to validate the hole locations and get a better feel for how much room there will be for fasteners, to determing if I want to have permanent, threaded bungs as part of the part, etc.
My measurements were fine and it did uncover some info. Not a lot of room for fasteners with the holes that close to the rubber. Also, this mount is pretty soft. Surprising how much it can be moved by hand. I'll check with the Ferrari crowd but I think I'll play it safe and get new ones.
Also, notice that the upper "X" plate isn't clocked straight to the lower plate. When I looked online at the new part, they seemed in-line with each other. More info that you'll never use is that these mounts use 2 collared spacers, which means that if you're not careful when tightening the main mount bolt, you can twist the rubber and clamp it "out of alignment". That can't help with longevtiy of the mount...
More stuff to think about during final assembly.
See Post #245 above for pics.
Posted by: tygaboy Sep 5 2022, 06:33 PM
Then, to get another measurement I can use for validation during the landing pad fab process, I went after getting the distance from engine mount to engine mount.
I removed the mounts from the cast aluminum bosses on the engine, dropped a plumb bob through the bosses and marked the location on the floor. Repeat on the other side, move the engine and measure distance between the dots on the floor.
Next I used this distance (561 mm, if anyone needs to make a 360 engine mount ) and, using that test plate CAD file, I made up what's essentially a "go/no go" gauge.
If this bolts to the engine mounts, I know my measurements are a "go".
They are!
I may be able to repurpose this for use with the fixture. I plan to start making that tomorrow. Slow progress, but progress nontheless. I'll take it.
Attached thumbnail(s)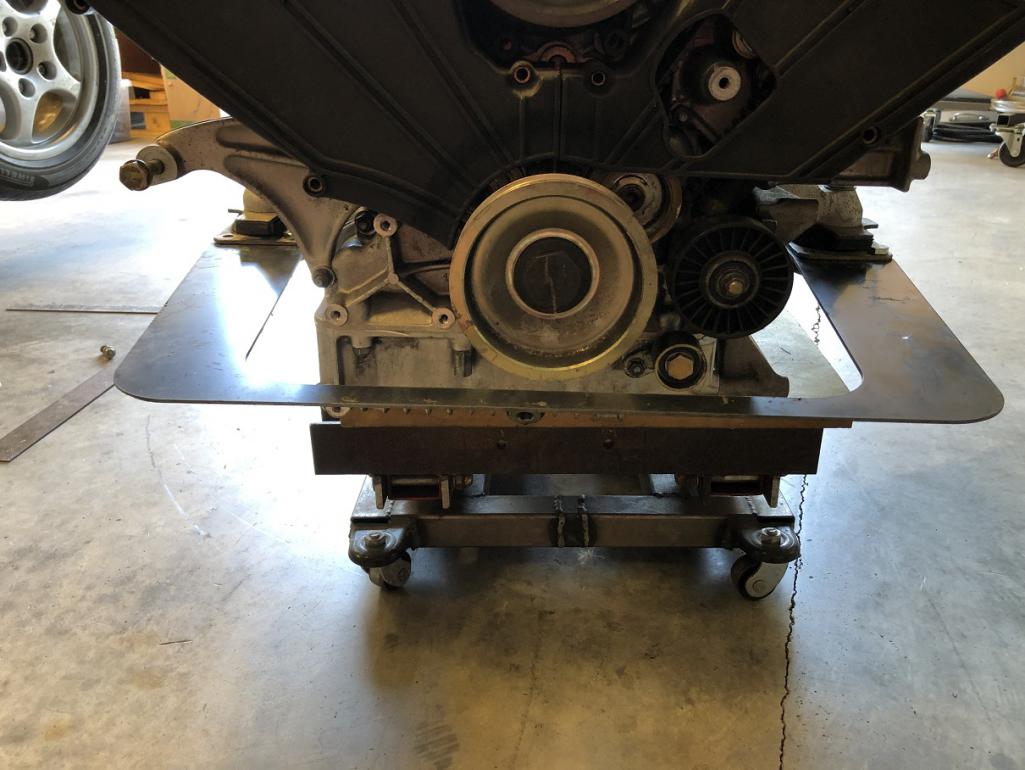
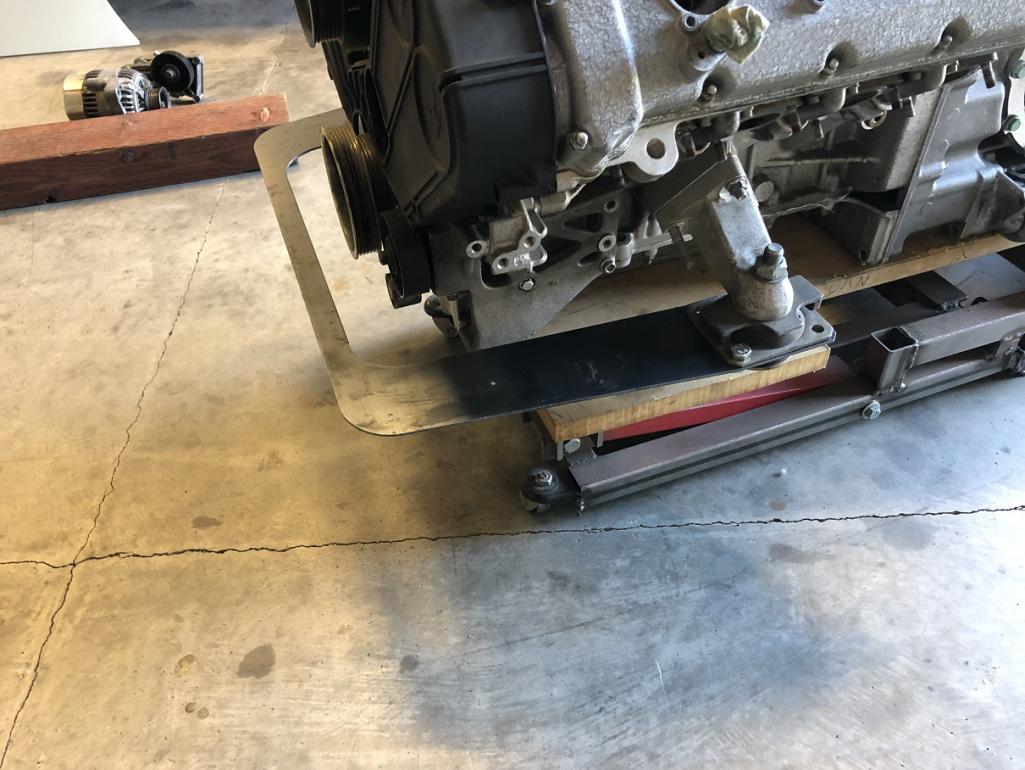
Posted by: mfennell Sep 6 2022, 08:32 AM
I hope you don't mind me registering to throw in a few cents of Ferrari info. Saw your build on grassrootsmotorsports.
Yes to replacing those engine mounts. They are not great. I helped my friend replace the ones in his 11k mile F430. They fell apart once the weight of the engine was off them! Also the trans mount. Unless it still has the new-trans-mount smell, you should replace it.
Mike
Posted by: tygaboy Sep 6 2022, 05:40 PM
I hope you don't mind me registering to throw in a few cents of Ferrari info. Saw your build on grassrootsmotorsports.
Yes to replacing those engine mounts. They are not great. I helped my friend replace the ones in his 11k mile F430. They fell apart once the weight of the engine was off them! Also the trans mount. Unless it still has the new-trans-mount smell, you should replace it.
Mike
@http://www.914world.com/bbs2/index.php?showuser=26827 Mike - Are you kidding? I'll take all the help I can get! Please don't ever hesitate to toss information, suggestions or constructive critisism my way.
Posted by: tygaboy Sep 6 2022, 05:50 PM
It was about 105 degrees in the Red Barn today but I can take the heat and I'm staying in this kitchen!
As you know, I like to make a part and see it in real life before I know if I like it. Today was playing with a couple different designs/layouts for the transmission cross bars.
In both of these, there will be a box that connects the bars and bosses in that box will have aluminum plates that drop down and pick up the transmission tab.
I think I like the one that has the bars in front of the trans tab. This would require plates that cantilever off the back. If you look back at the Ferrari mount, it has that same sort of design so I think it'll work just fine. Still TBD but it's nice to see things "in the metal".
And if I get lucky, the bend in that top tube will match the V of the engine! Talk about style points!
Note too, that these bars will form the basic shape of the removable trunk so if you squint real hard, you can see how cool that shape is going to be.
Attached thumbnail(s)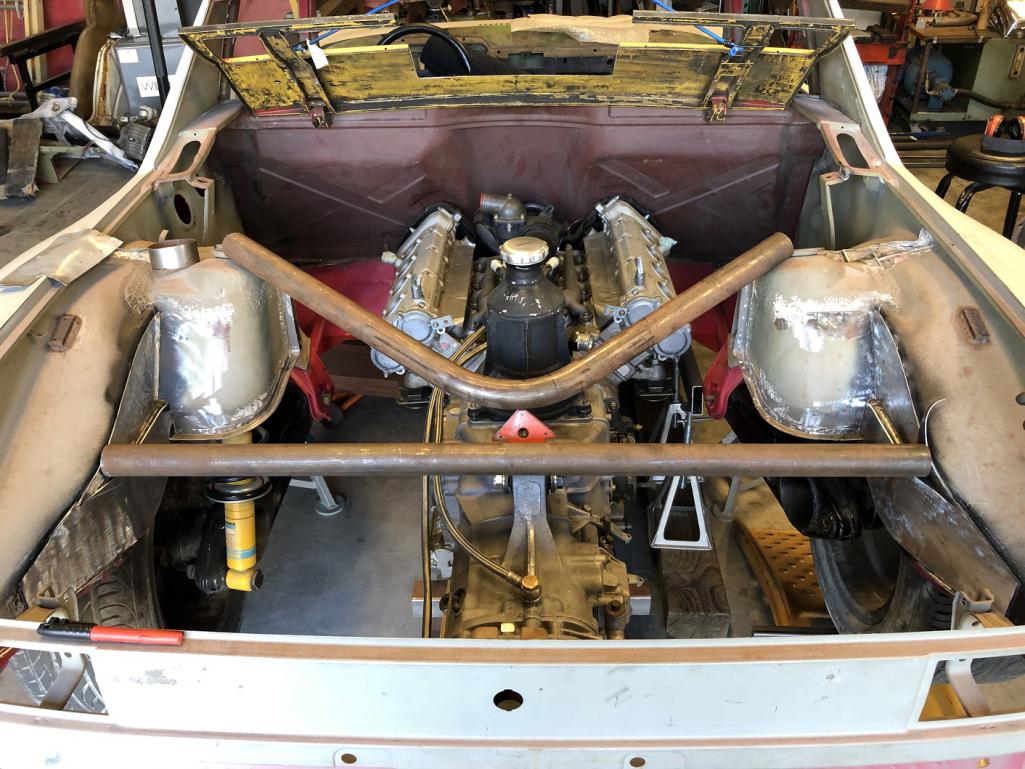
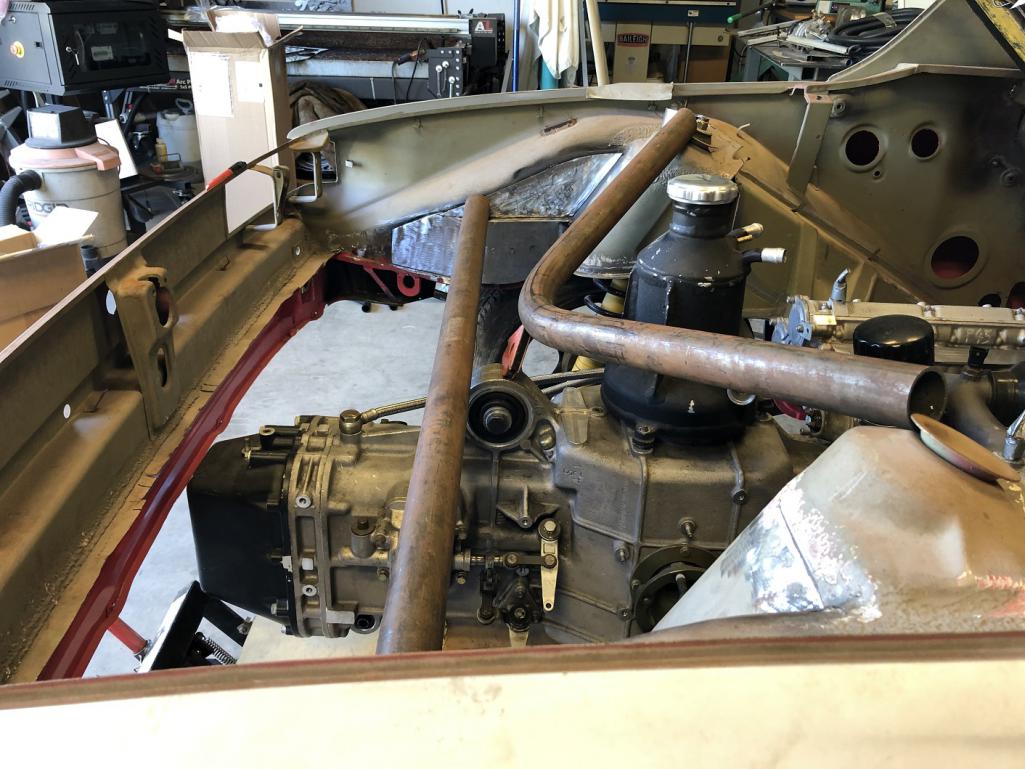
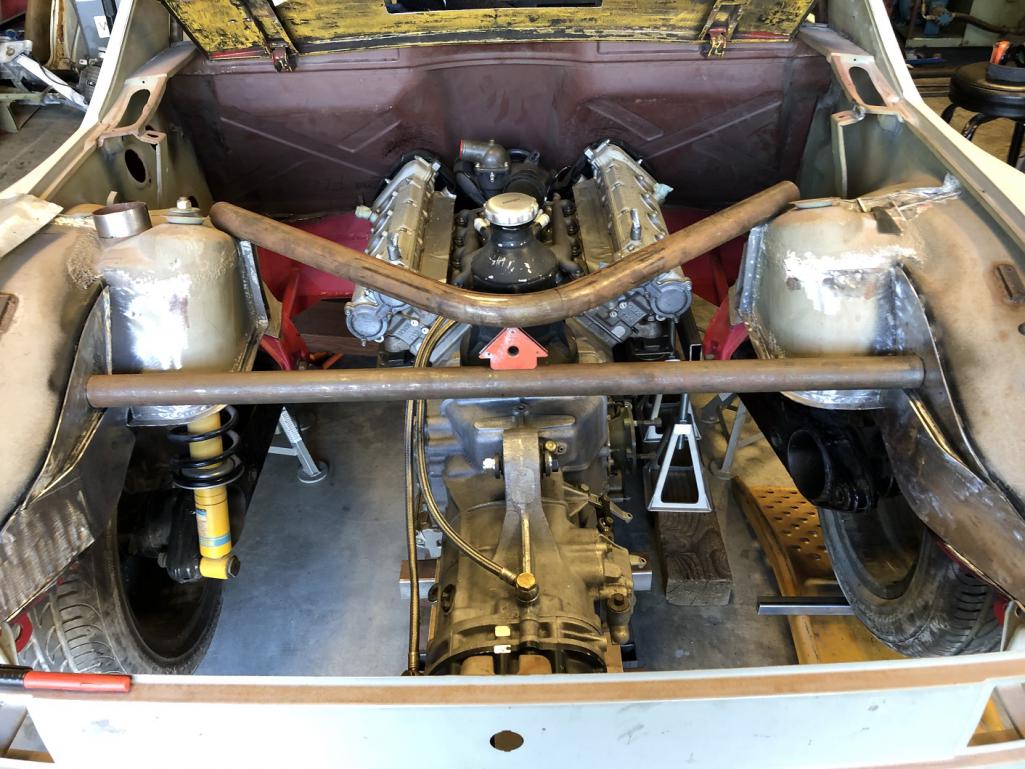
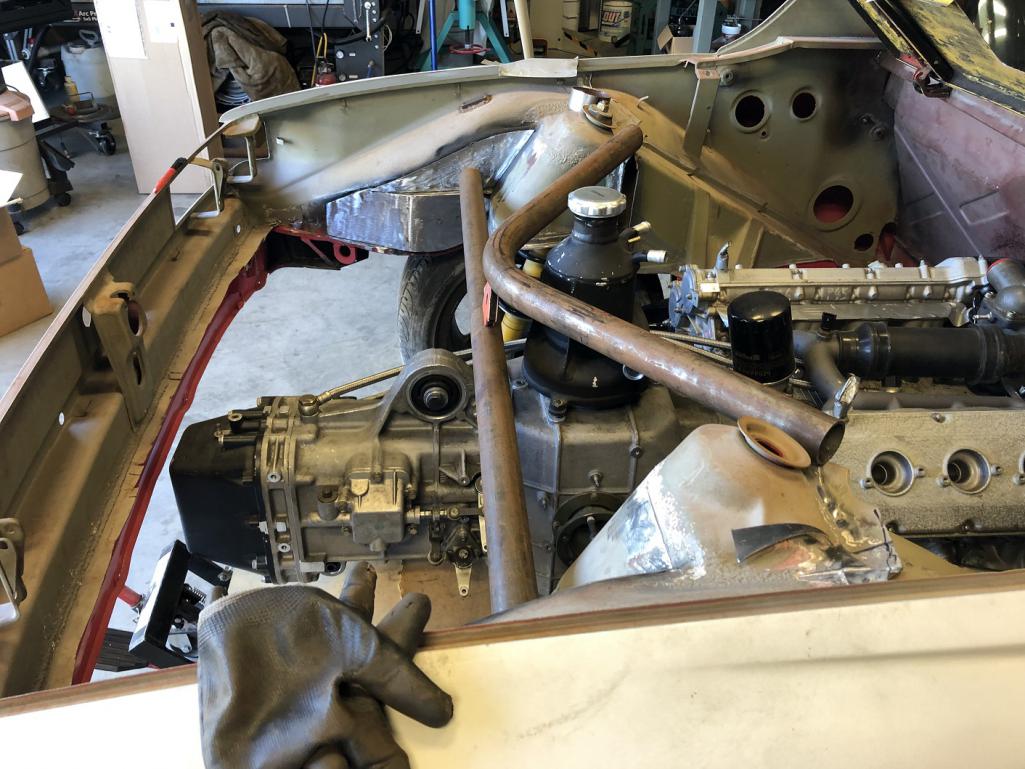
Posted by: tygaboy Sep 6 2022, 07:01 PM
On 3rd thought, maybe it's this version. Better support for the hanger plates and a nice match to the engine V. The tape approximates the box that'll house the hanger mount bosses.
Attached thumbnail(s)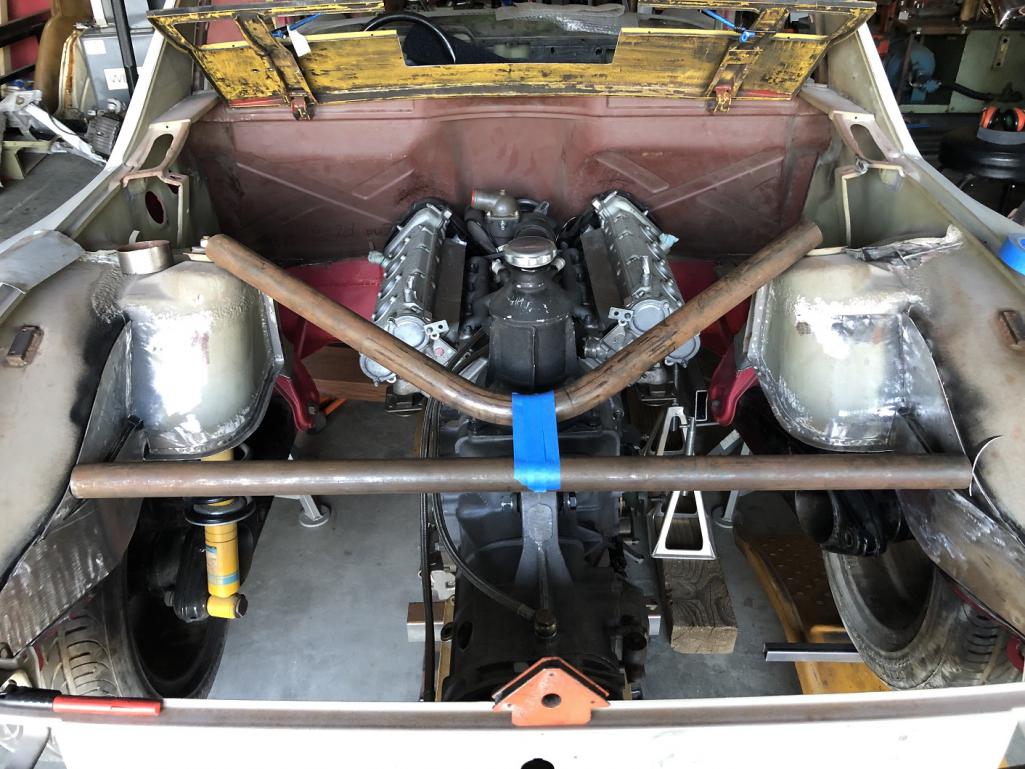
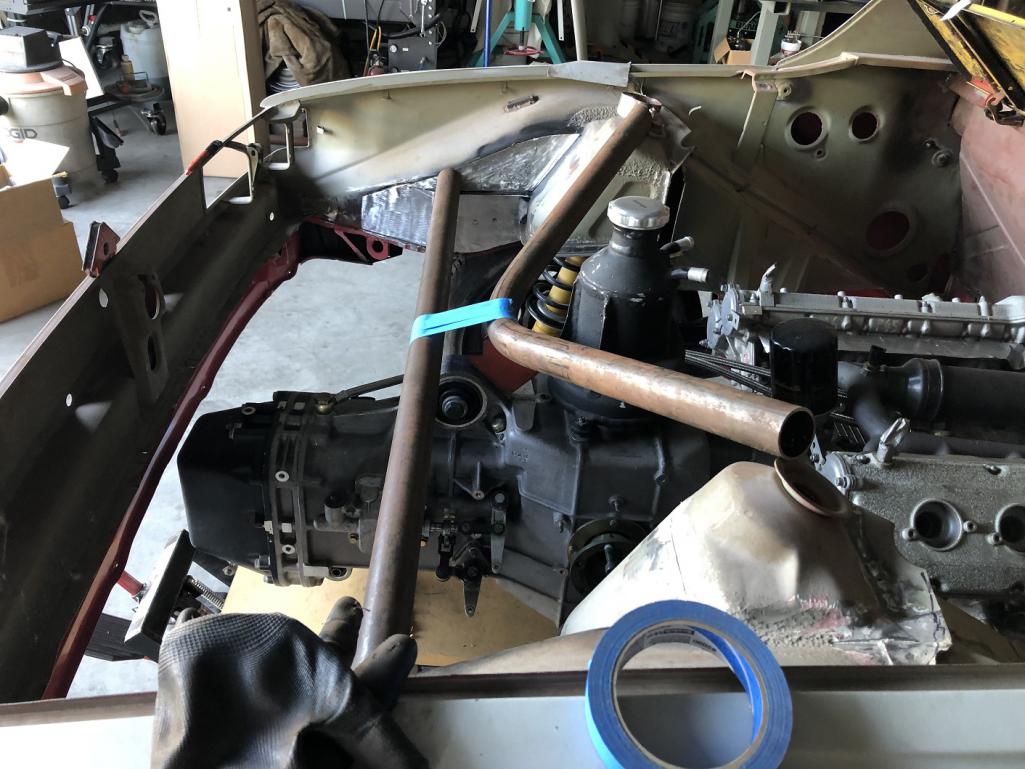
Posted by: Front yard mechanic Sep 6 2022, 07:42 PM
I’m liking her curvature
Posted by: horizontally-opposed Sep 6 2022, 09:09 PM
I’m liking her curvature
Ha, curious to see straight runs to a pointed V—to each their own.
Curious: Which setup would be stronger? Trying to think of OE setups, whether Ferrari or Porsche or McLaren etc? If you went with straight pipes, and they are stronger, could the "V" pipes be thinner—or even removable for service?
Have to imagine either are going to be pretty with Chris' fab work.
Posted by: Retroracer Sep 6 2022, 11:13 PM
I like the lines /flow. Looks like it'll do the job; obvi you need to think about clearance / placement for airboxes, intake piping, filters, etc. Keep the posts coming!
- Tony
Posted by: steuspeed Sep 6 2022, 11:50 PM
Shock tower bracing seems like a 2 for 1 here.
Posted by: ClayPerrine Sep 7 2022, 06:04 AM
I would use the straight crossbar.
Any bends in a pipe make is somewhat weaker and prone to more distortion at the bend in the pipe.
Function over form.
Clay
Posted by: rick 918-S Sep 7 2022, 06:15 AM
Nice build
My transaxle is moved back (rearward) 2" and I do not have axle issues with stock axles. Except when I broke a worn out CV dropping the clutch. 
 http://www.914world.com/bbs2/index.php?showtopic=7725&hl=
Posted by: ClayPerrine Sep 7 2022, 06:31 AM
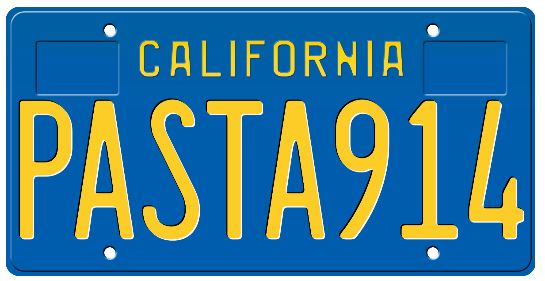
Posted by: tygaboy Sep 7 2022, 08:11 AM
I’m liking her curvature
Ha, curious to see straight runs to a pointed V—to each their own.
Curious: Which setup would be stronger? Trying to think of OE setups, whether Ferrari or Porsche or McLaren etc? If you went with straight pipes, and they are stronger, could the "V" pipes be thinner—or even removable for service?
Have to imagine either are going to be pretty with Chris' fab work.
@http://www.914world.com/bbs2/index.php?showuser=2058 Pete - You know me: I need to play around with various options. Good call/great minds on the tube diameter. That's 1.75" in the pics and I'm leaning toward 1.5". A bit better scale for the car - and this engine. It's tiny compared to the LS, intake aside. And note that in my LS car, the main trans cross bar is 1.75" and everything else in the car is 1.5".
Another thing to consider is that I used a 6" radius die on that bend. General race cage rules call out a minimum bend radius of 3x tube diameter so I could go as small as 4.5" radius, assuming 1.5". That would tighten up the look of that area.
More noodling, for sure.
Keep the input coming!
Posted by: tygaboy Sep 7 2022, 08:22 AM
I would use the straight crossbar.
Any bends in a pipe make is somewhat weaker and prone to more distortion at the bend in the pipe.
Function over form.
Clay
@http://www.914world.com/bbs2/index.php?showuser=1143 Clay - Function over form... Have you met me?
But seriously. One of the designs uses a bent tube, with the bend set vertically, just behind the trans mount. This tube would see forces trying to "unbend" it, make it longer and forcing the chassis wider where its welded at the inner fender. Think "arched doorway". That vs a straight tube where forces are trying to shorten it and pull the fender weldment location inward. Bending moments, bending moments...
In the end, whichever design wins out, it'll be overbuilt given the car's use case.
We want Function AND Form!
Posted by: horizontally-opposed Sep 7 2022, 10:56 AM
Pete - You know me: I need to play around with various options. Good call/great minds on the tube diameter. That's 1.75" in the pics and I'm leaning toward 1.5". A bit better scale for the car - and this engine. It's tiny compared to the LS, intake aside. And note that in my LS car, the main trans cross bar is 1.75" and everything else in the car is 1.5".
Another thing to consider is that I used a 6" radius die on that bend. General race cage rules call out a minimum bend radius of 3x tube diameter so I could go as small as 4.5" radius, assuming 1.5". That would tighten up the look of that area.
More noodling, for sure.
Keep the input coming!Ooh, good point re: scale of engine—and now consider the scale of the torque between these V8s, and how it comes in. Normally aspirated Ferrari V8s are a little like normally aspirated flat sixes—not exactly torque rich and what is there is at higher rpm.
Tubes might even be able to slighter still...
Posted by: tygaboy Sep 7 2022, 01:59 PM
Ooh, good point re: scale of engine—and now consider the scale of the torque between these V8s, and how it comes in. Normally aspirated Ferrari V8s are a little like normally aspirated flat sixes—not exactly torque rich and what is there is at higher rpm.
Tubes might even be able to slighter still...
@http://www.914world.com/bbs2/index.php?showuser=2058 Pete - On the torque thing: yep, exactly! My LS is something like 460 lb/ft and the Ferrari is 275. Easier on everything.
On the slighter tubes: I follow the SCCA/NASA tech rules and for a car this weight, the spec is nothing smaller than 1.5" .095 wall. So that's what it's getting. Speaking of which, here we go!
Posted by: tygaboy Sep 7 2022, 02:16 PM
Here's some stuff for those interested in fab tips and tricks. Well, at least how I do this particular sort of thing:
The rear cross bar ends have to be cut at an angle. I measured the angle with a large protractor and got 25 degrees. The first cut is easy enough - just set the cold saw angle and cut it.
The 2nd cut is the money cut in that it will set the length AND the angle has to be clocked so it's a mirror to the first one.
First, the length: I determined where I wanted the tube to positioned in the chassis and measured between the chassis locations where the rear edge of the bar would land. Since the chassis is getting wider the farther back things go, this is the "long edge" of the tube.
Being sure to have the tape measure at the tip (long part) of the first angle cut, I mark the measured distance on the tube then carefully spin the tube so I have that mark all the way around it.
Then I position the saw's adjustable jaw to serve as a guide for the blade and position the tube with the mark at the edge of that jaw. That's what's shown in the pics. That last one is from under the saw head with the blade set on the tube, just so I can check things are where I want them.
Of course, if you ever mark to cut stuff, you have to play the game of "do I leave the line or cut on the line?" Whatever works for you, just plan, mark and position things accordingly!
Attached image(s)
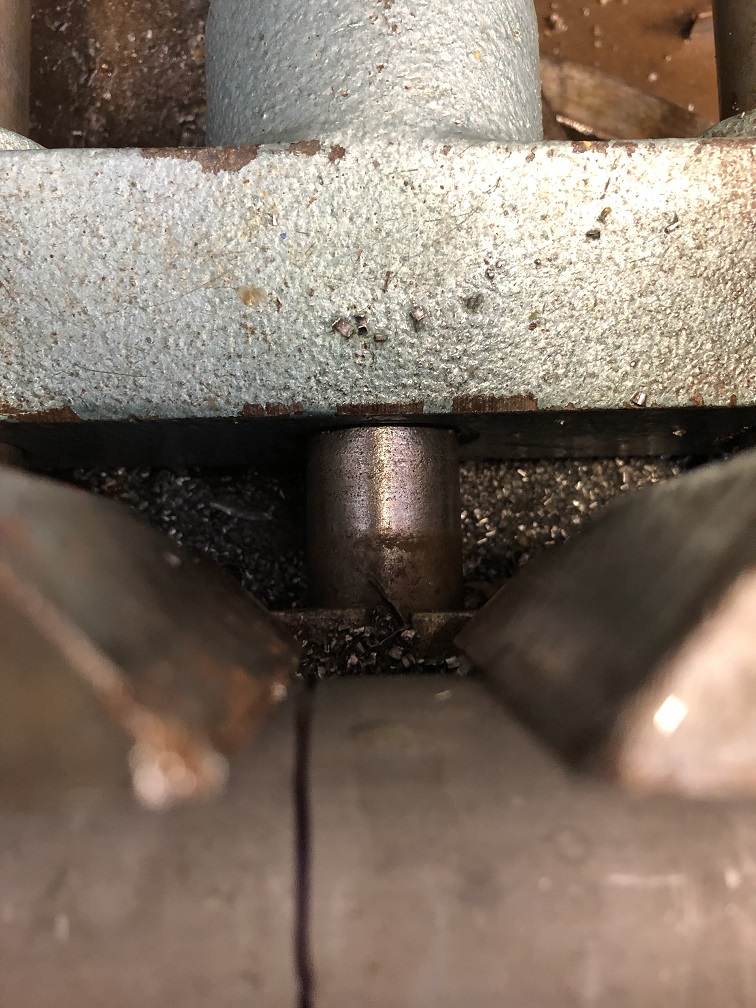
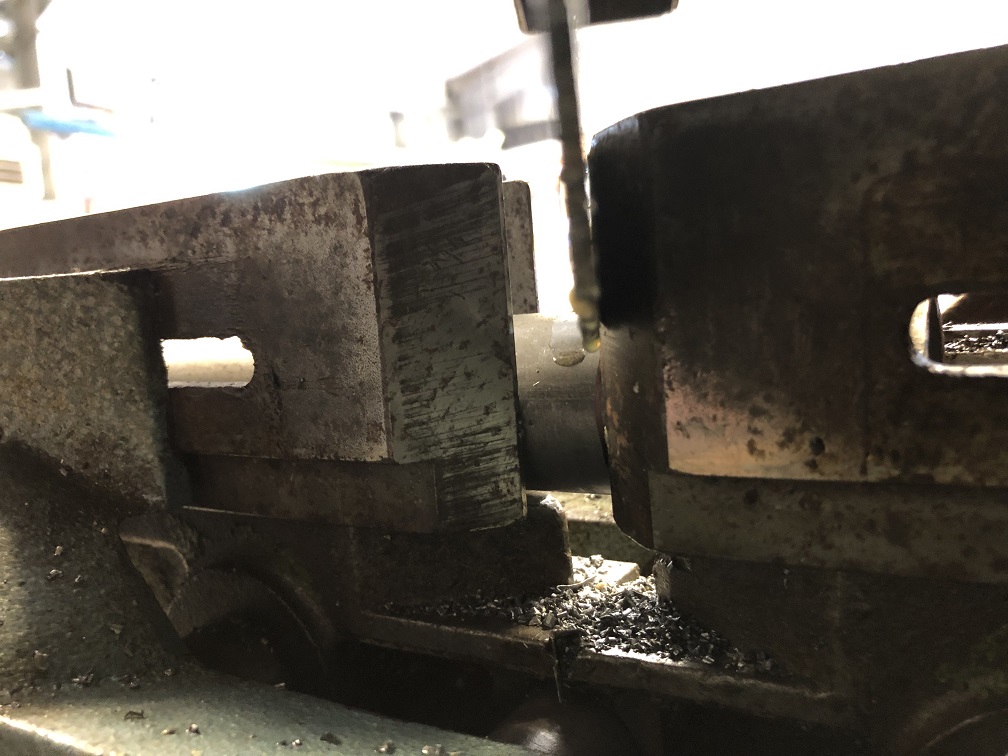
Posted by: tygaboy Sep 7 2022, 02:22 PM
The next step is the clocking of the cut:
Hold a digital level fast to the face of the first cut. Simply rotate the tube until the level shows 0.0 degrees and you know the faces will be aligned! Simple, no?
DO BE CAREFUL that you have the tube oriented in the saw so the cuts will be in the proper orientation else you'll have parallel angled ends not mirrored angled ends!!!
I didn't make that mistake on this tube but... Ask me how I know. 
Attached image(s)
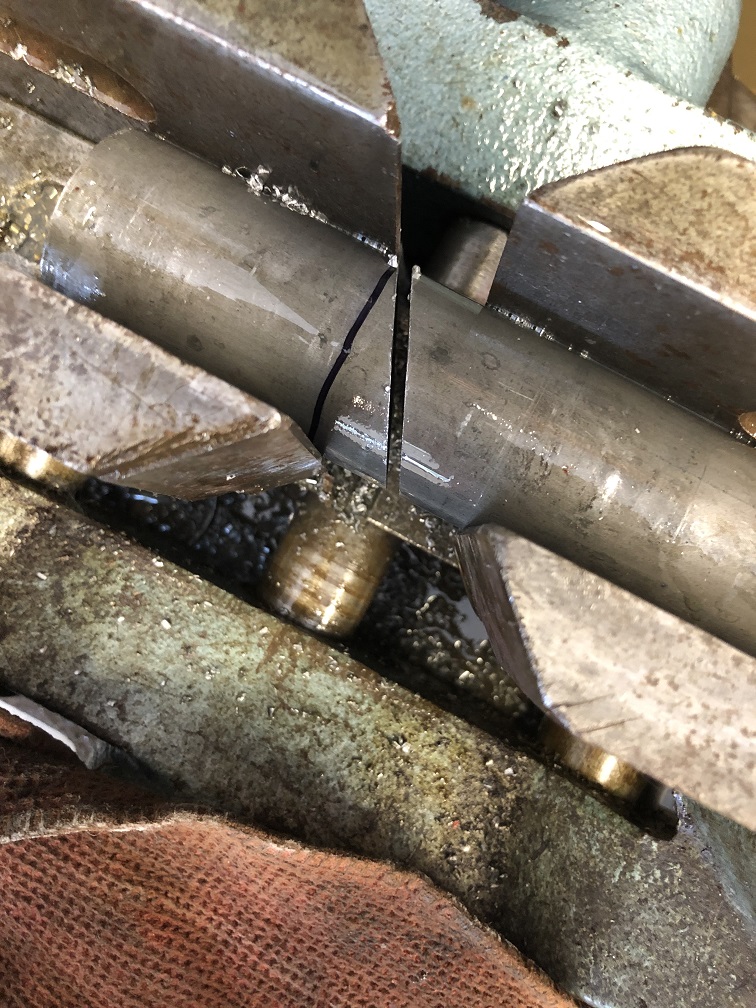
Posted by: tygaboy Sep 7 2022, 02:23 PM
BAM! I love it when a plan comes together!
Attached image(s)
Posted by: tygaboy Sep 7 2022, 04:54 PM
With the tubes (essentially) located, I went after a proof-of-concept hanger. This is how I do things: prove that the measurements are correct with something simple, adjust as needed until it's what it needs to be then make it "for real".
In this case, the for real pieces will start as 1x3 tube that'll get pie cut and welded to pretty much replicate this shape. And the hole will be replaced with a steel boss. It'll be plenty strong and should look pretty neat, too.
And that gap at the back, between the bracket and the rear tube? That's due to the fact that the jack contraption I use doesn't hold the drive train perfectly vertical and that slight tip is causing things to not quite fit. Plus, that tube is trying to fall out of position and is sorta being held in place by that piece of scrap there behind it. Hey, I do what I have to...
I also may need to trim the rear tube to get it into its happy place - it has to end up flush to the chassis on both sides and smack in the notches of the final hanger brackets.
The good news is that I can move the drive train fore/aft a little, if needed, with no risk of anything colliding.
I'm calling this a pretty productive day.
Attached thumbnail(s)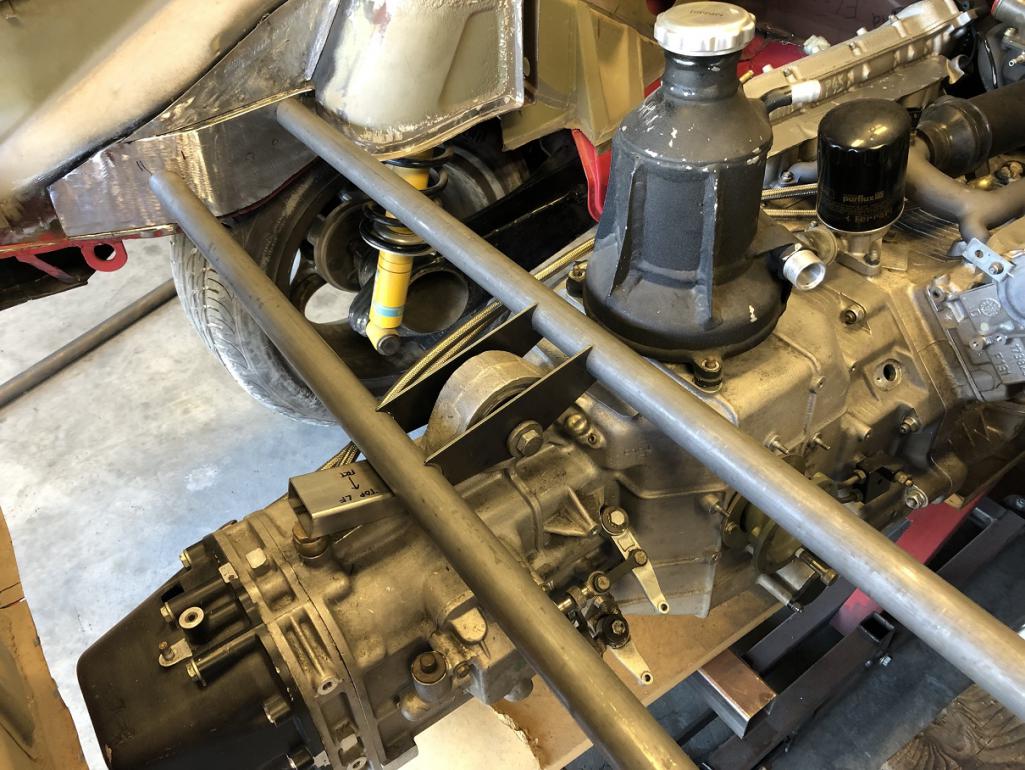
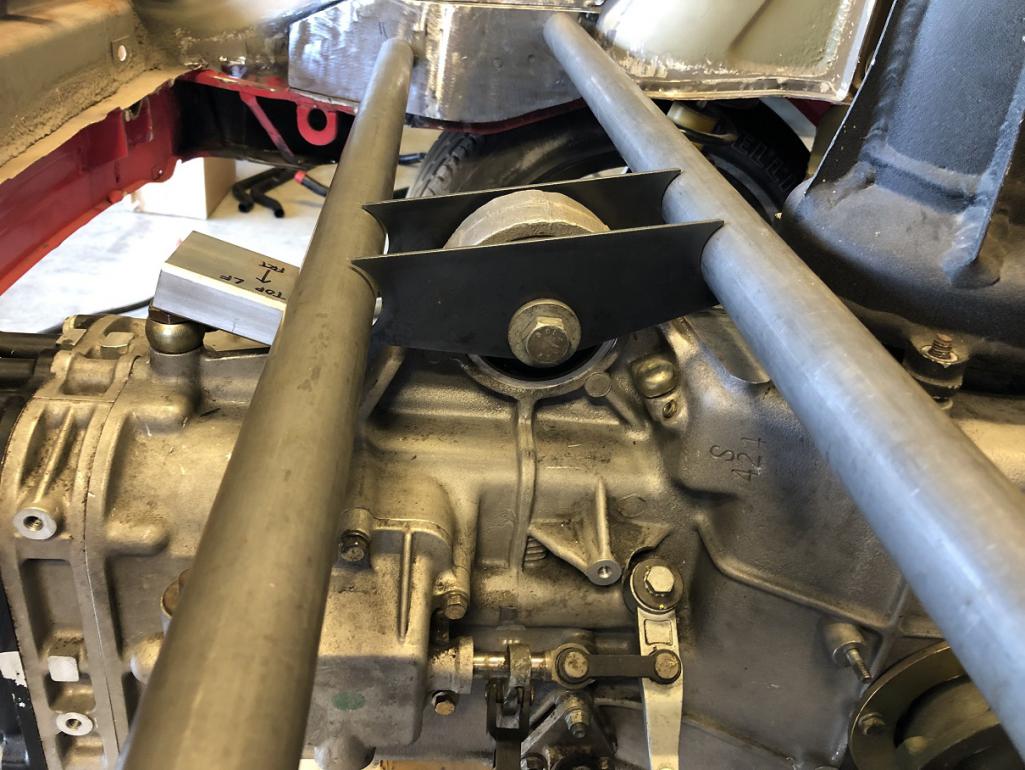
Posted by: tygaboy Sep 7 2022, 05:10 PM
Probably should have started with this: Here's the final design I landed on, exact cross tube location aside. Pardon my MS Paint hackery.
It's simple and strong, leaves room for a reasonably sized trunk and, most importantly, gives @http://www.914world.com/bbs2/index.php?showuser=2058 Pete his straight V!
The things I do for you guys...
Attached image(s)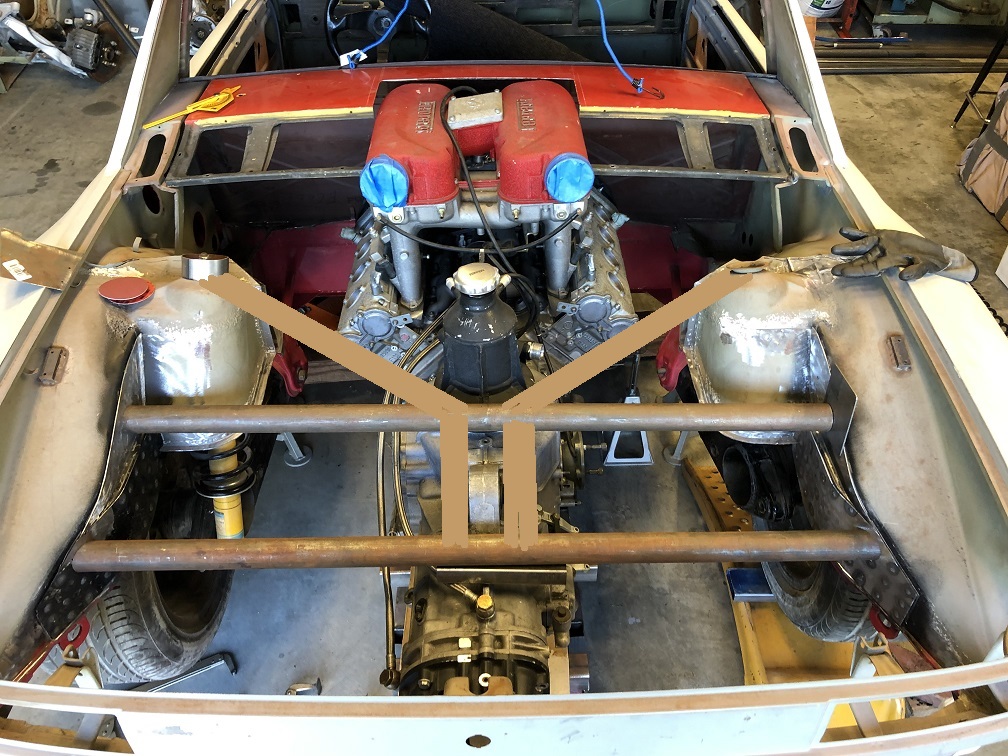
Posted by: Van B Sep 7 2022, 08:41 PM
I appreciate the rust colored brush lines lol… it shows a solid effort
Personally though, I think it’s too much for the single point transmission mount. Consider the 996/997 cars, a simple hanger is all you need. The engine mounts are what stabilize the engine from torque twist.
Posted by: Shivers Sep 7 2022, 08:41 PM
Cool
Posted by: tygaboy Sep 7 2022, 09:04 PM
I appreciate the rust colored brush lines lol… it shows a solid effort
Personally though, I think it’s too much for the single point transmission mount. Consider the 996/997 cars, a simple hanger is all you need. The engine mounts are what stabilize the engine from torque twist.
@http://www.914world.com/bbs2/index.php?showuser=8571 B - I appreciate the input. I've looked pretty closely at the Ferrari mounting system as used in the 360 chassis, have had my hands on all the mounts and talked in detail about all this with a friend who has a 360 street car and a 360 Challenge car.
I'll simply say that this isn't as straight forward as it looks. For example, what I haven't pointed out is the 4th mount/bracket. This bolts to a small tab on the underside of the trans and to a yet-to-be-worked-out "lower cross bar".
I don't mean to come across as defensive, just that there's more going on with all this than it might otherwise appear. Plus, I'm a fan of over-building important structural areas.
Keep the cards and letters coming.
Attached thumbnail(s)
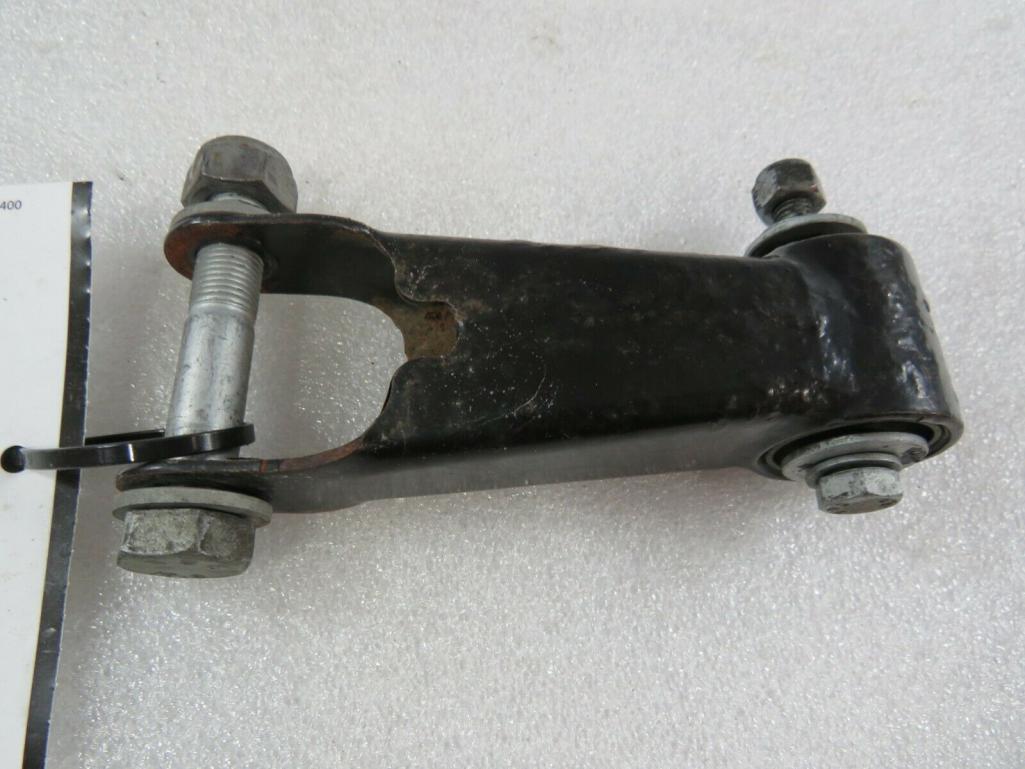
Posted by: Van B Sep 7 2022, 09:19 PM
Well, I definitely didn’t mean to infer that your direction is wrong. I just think it’s serious overkill. And a fourth mount means you need even less from the top rubber mount. Your un-gusseted plate attachments will be the weakest joint and even that mock up looks stout as whiskey in a plastic bottle lol!
Posted by: horizontally-opposed Sep 8 2022, 09:38 AM
I appreciate the rust colored brush lines lol… it shows a solid effort
^ Lol!
Personally though, I think it’s too much for the single point transmission mount. Consider the 996/997 cars, a simple hanger is all you need. The engine mounts are what stabilize the engine from torque twist.
The big double bars also feel like overkill to me—and a bit Chevy truck-ish. Not an engineer, and won't pretend to play one, but tend to agree this is a place to "replicate" the factory setup with a boxed beam (maybe thicker) under your proposed trunk floor and maybe something else befitting your capabilities, but now hidden from view: The world's coolest firewall. Probably a lot stronger, too...
Then again, that central mount requires a different approach and maybe this here peanut gallery needs to butt out.
Posted by: ClayPerrine Sep 8 2022, 10:30 AM
If I were doing this, I would not have cut the trunk floor out. I would have cut a small hole in it and made a raised box for the trans mount, adding doublers to the trunk floor where needed. I realize I would have had to cut a relief in the rear wall for the oil tank, but the rest would still be there.
And it would still be able to store the targa top in the trunk.
Clay
Posted by: tygaboy Sep 8 2022, 03:53 PM
...Then again, that central mount requires a different approach and maybe this here peanut gallery needs to butt out.
@http://www.914world.com/bbs2/index.php?showuser=2058 Pete - Bring on the Peanuts!! I think I've demonstrated I'm open to input. I listen, noodle, then make up my mind - but may change it later, then again after that!
That said, I do think Gallery members need to check with @http://www.914world.com/bbs2/index.php?showuser=16100 Tony first. Remember with all their input on the hood vents of my LS build, we agreed going forward that Tony would be:
Assistant Chairman,
Design by Committee,
914world inc.
Posted by: tygaboy Sep 8 2022, 04:57 PM
If I were doing this, I would not have cut the trunk floor out. I would have cut a small hole in it and made a raised box for the trans mount, adding doublers to the trunk floor where needed. I realize I would have had to cut a relief in the rear wall for the oil tank, but the rest would still be there.
And it would still be able to store the targa top in the trunk.
Clay
@http://www.914world.com/bbs2/index.php?showuser=1143 Clay - still looking at designs, including one that may allow the top to fit.
Posted by: tygaboy Sep 8 2022, 05:34 PM
Proving yet again that I'm all ears when it comes to build ideas, the comments from @http://www.914world.com/bbs2/index.php?showuser=26011 and @http://www.914world.com/bbs2/index.php?showuser=2058 got me thinking about other transmission mount designs. I have to admit, while that cross bars design is functional, it really isn't that attractive. And as I already mentioned, I'm after function AND form. So...
This is what happened today.
No, it's not final. And I'm not going to attempt to explain what's still planned for the overall design, other than to say, I'm liking it better, so far.
It's loads simpler and the beam sets the planes for a couple of the trunk panels. I'm also liking the extended shape of the suspension console that ties to the beam, complete with stampings to match the factory panel. I may extend them all the way along the shape of the spreader plates. TBD.
The four holes on each side of the hanger echo the cylinder count - but those may give way to something different... So, as usual for this stage of my approach, still a way to go.
Attached thumbnail(s)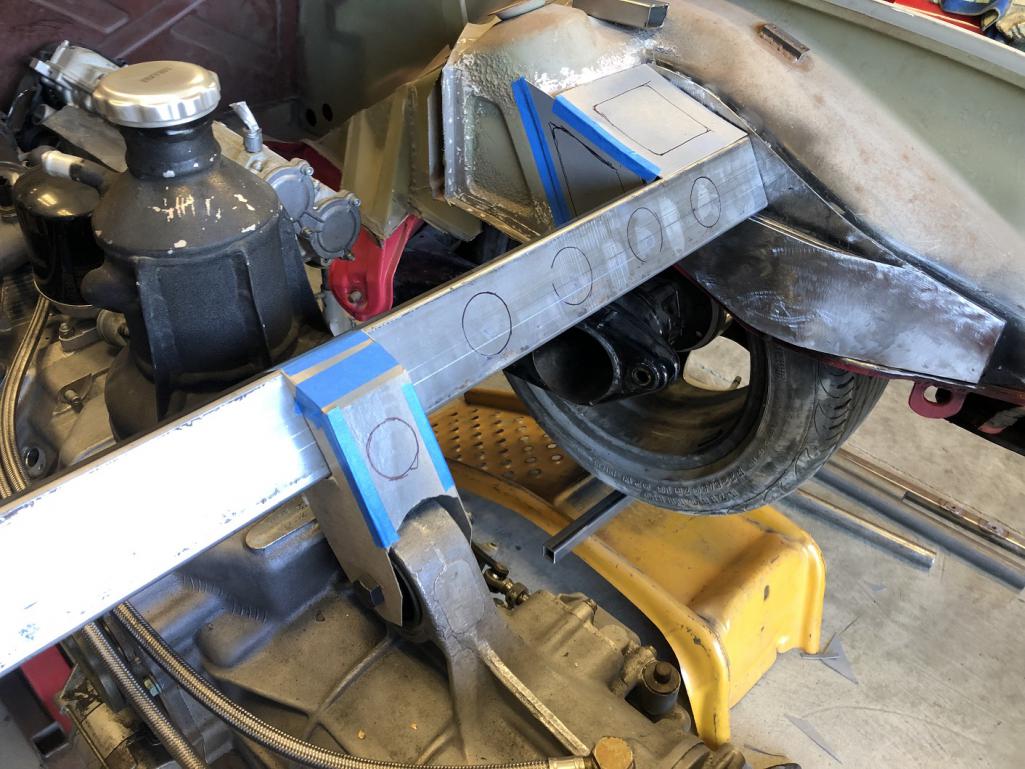
Posted by: tygaboy Sep 8 2022, 07:36 PM
Then again, that central mount requires a different approach and maybe this here peanut gallery needs to butt out.
@http://www.914world.com/bbs2/index.php?showuser=2058 Pete - Let's agree I'll stop tagging you so often! I did want to address your comment about how this mounting system might be "different". Yep, you're spot on.
A few things: That lower transmission mount "link" isn't a solid mount - it's a double pivot. The engine mounts are rather soft and have built in bump stops (!) and the upper trans mount is on the soft side too.
Why? I suspect it's because of the flat plane crank, which makes for an inherently, let's say, "less than smooth", engine. It needs to be better, or at least differently, isolated than usual. And that means the drive train actually moves around quite a bit during operation.
In trying to understand what Ferrari is up to, it appears it's about allowing the drive train to rotate (a little) around the trans output shafts in reaction to torque, but limiting torsional rotation around the length of the drive train. That lower mount has to allow the trans to rotate around the upper mount, hence the dual pivot, but help that upper mount resist twist.
I won't go further than that other than to add that ahead of commenting, folks may want to consider they don't have the same info I do - not that I'm right, just that I have hands and eyes on all these parts and I'm researching a drive train that's a bit different that what we're all used to.
Hope everyone understands the intent of this post. And again, please keep the comments and suggestions coming, just note the above. Thanks!
Posted by: Van B Sep 8 2022, 08:23 PM
That is a very clean look! And as long as the cardboard doesn’t get wet, it should hold up beautifully!
Seriously though, I see where you’re going here and I think it will really come together well.
Posted by: ClayPerrine Sep 9 2022, 05:27 AM
That is a very clean look! And as long as the cardboard doesn’t get wet, it should hold up beautifully!
Seriously though, I see where you’re going here and I think it will really come together well.
You beat me to it... I was going to make a joke about his CAD (cardboard aided design) process.
I actually like this better than the tubes. It looks more like something that would be done in Maranello rather than Mobile.
Clay
Posted by: tygaboy Sep 9 2022, 08:17 AM
If you're curious why I may appear overly concerned about mounting the drive train, here's a vid about replacing the motor mounts in the 360. What's awesome is that he videoed before and after to show the improvement after replacing the mount.
There's a nice before/after comparo that runs from 15:41 - 15:53.
But even with the new mounts that thing sure dances around. And that engine note!
https://www.youtube.com/watch?v=D5kS19nXgsI&t=943s
Posted by: davep Sep 9 2022, 08:49 AM
I certainly like the idea of a bent beam support for the transmission. Just like a heavy equipment flatbed float is curved so that it straightens out under load instead of sagging. I was going to suggest it, but you beat me to it. When going over bumps there will also be dynamic loads that have to be allowed for.
Porsche's maxim: form follows function
Posted by: tygaboy Sep 9 2022, 08:59 AM
...
Porsche's maxim: form follows function
@http://www.914world.com/bbs2/index.php?showuser=1244 And I think Ferrari's is the exact opposite (!), or Engine Bays: Who wore it best?
Attached thumbnail(s)
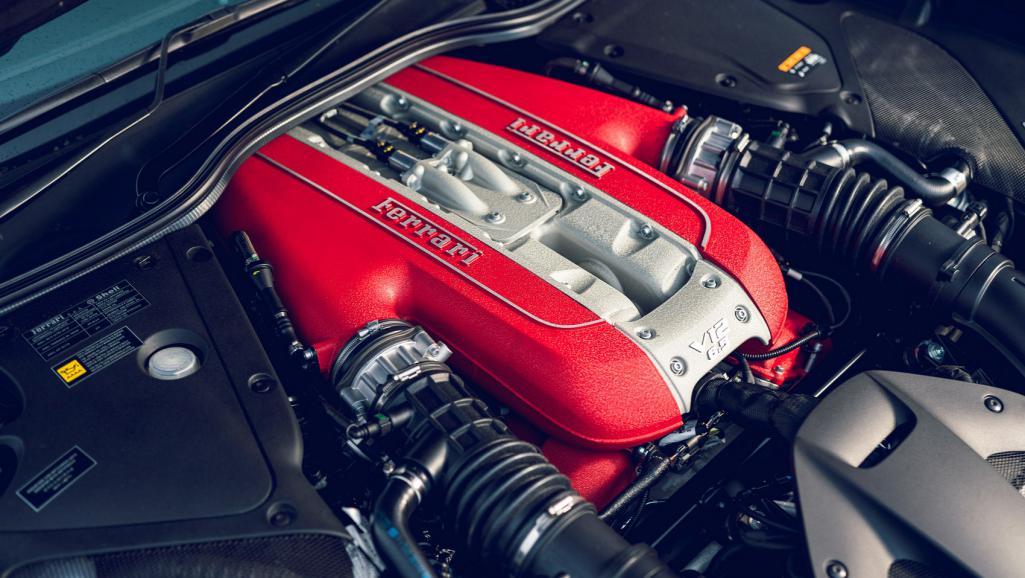
Attached image(s)
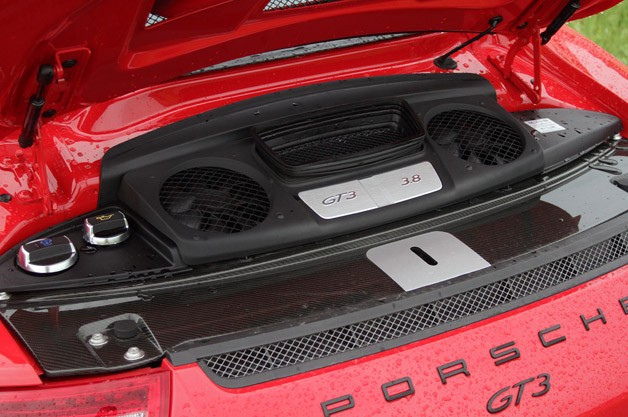
Posted by: davep Sep 9 2022, 09:22 AM
Maybe that is why I like the pre 1990 cars so much better.
Posted by: Krieger Sep 10 2022, 09:23 AM
For that rectangular crossbar this would look much better than a bunch of holes/tube collecting dust and add some strenght.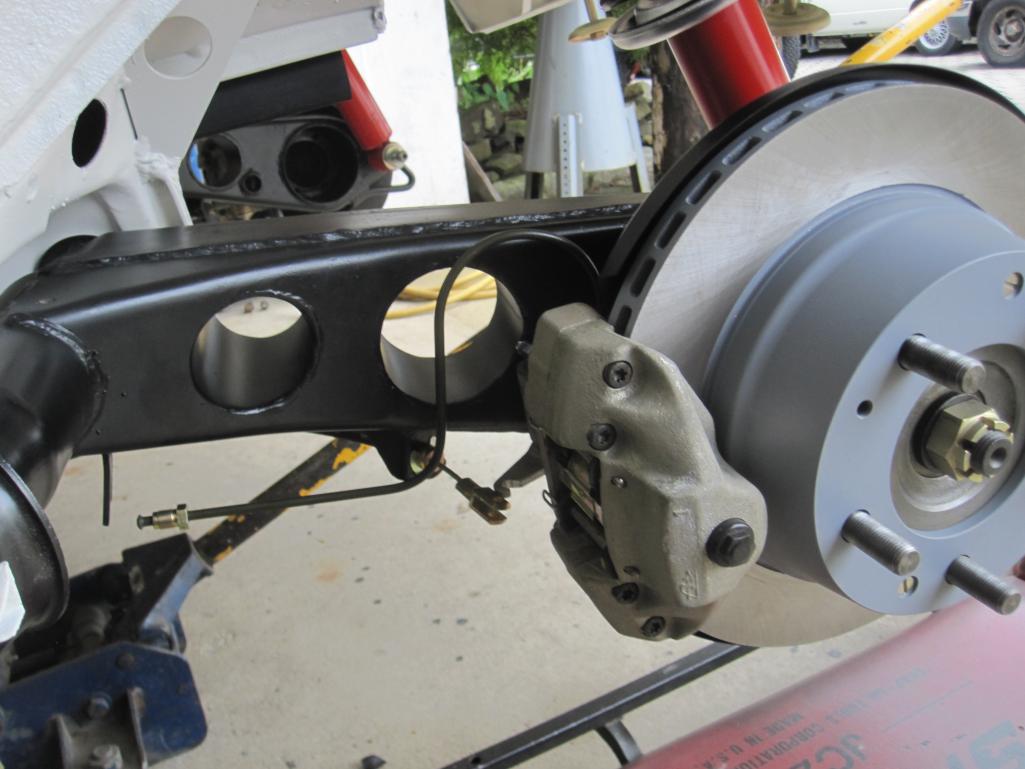
Posted by: rgalla9146 Sep 10 2022, 02:45 PM
For that rectangular crossbar this would look much better than a bunch of holes/tube collecting dust and add some strenght.
Mmmmmm......... what a nice compliment and a nice surprise.
I'm taking a bow right now !
Thank you
Rory
Posted by: tygaboy Sep 10 2022, 04:41 PM
While I do like the beam, it's maybe too industrial looking? So here's the newest revision - and it's my current favorite.
With that curved tube, when it's parked next to my LS build, that will let folks know they're related.
Attached thumbnail(s)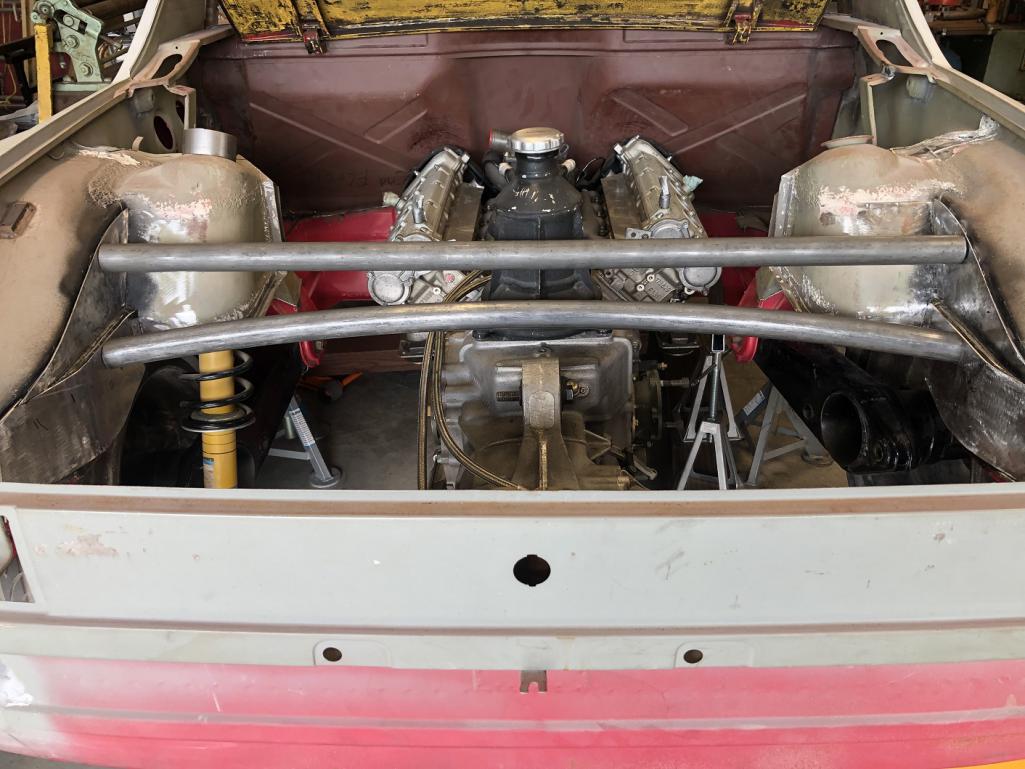
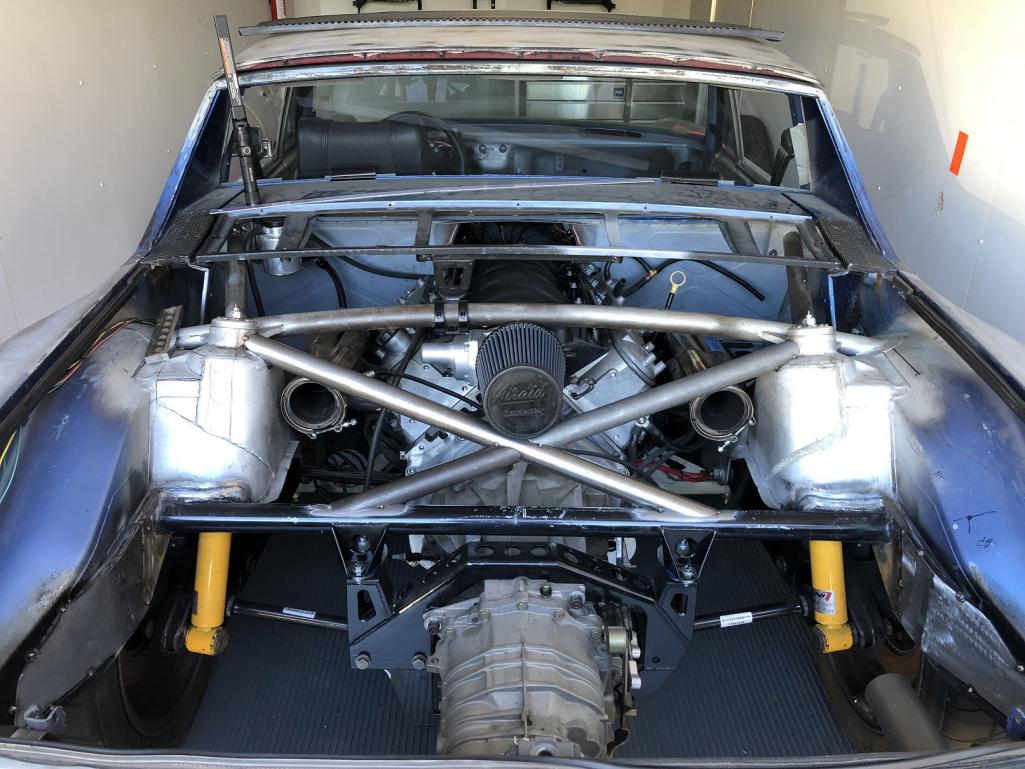
Posted by: tygaboy Sep 10 2022, 04:47 PM
Next it was on to working out the hanger bracket dimensions. There will be a couple 1.5 x 1 rectangular tubes that'll fill the open section in between the cross bars and provide a weld surface for the entire inner edge of the hanger bracket. The actual hanger will be made from 1x3 tube with an adjustable fastening system to locate and secure the transmission mount tab.
Last pic is a mock up of some of the other structure, modded to support this tubular design.
With the curved tube and the boxing at the ends, I think I can get away with no support tubes from the shock towers.
Attached thumbnail(s)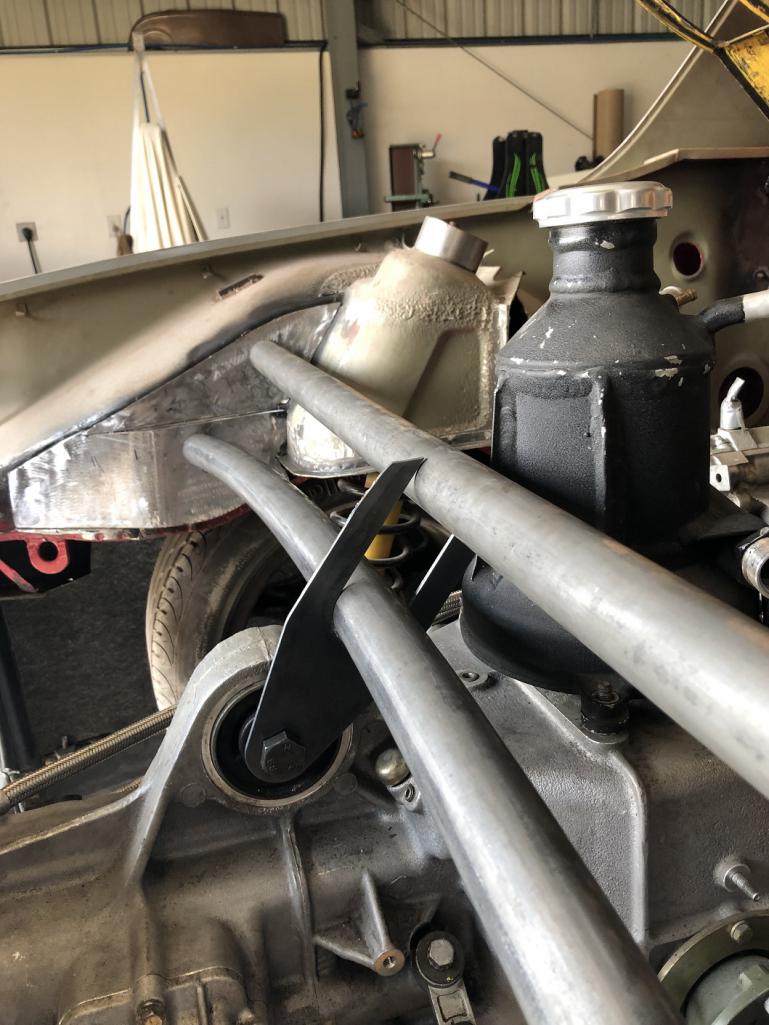
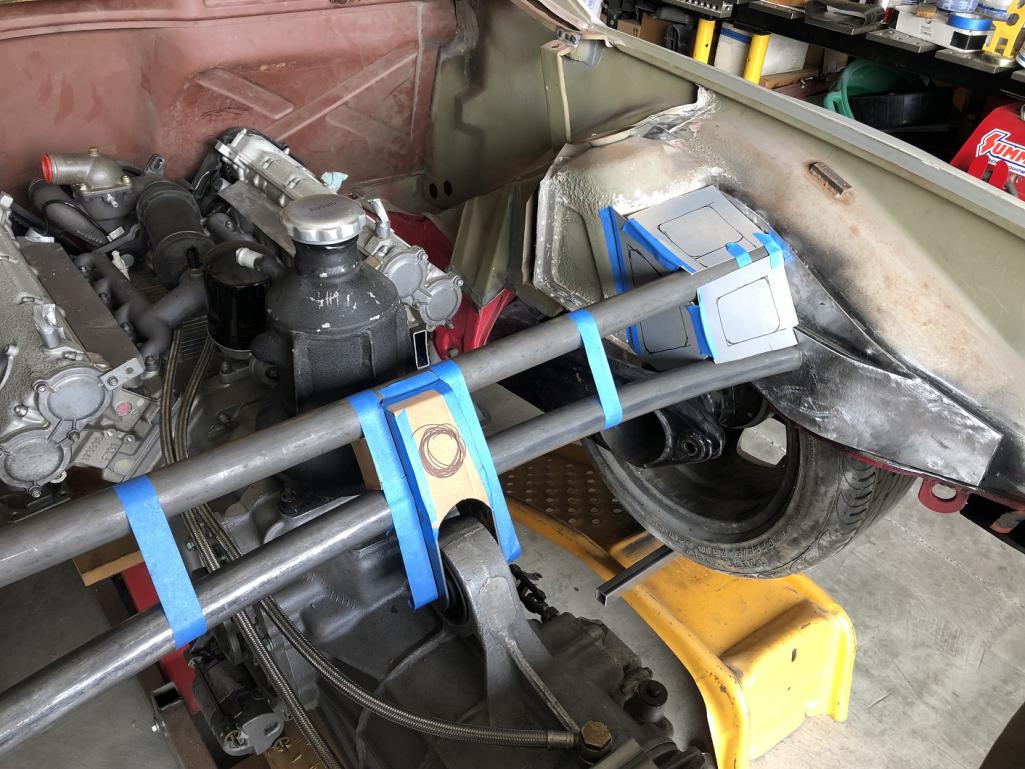
Posted by: tygaboy Sep 10 2022, 04:56 PM
I wanted a break from the transmission mount so I disected one of the Ferrari headers. They didn't fit but I was hoping that, maybe, if I got rid of the heat shielding, I might be able to squeeze them in. Nope...
This means aftermarket headers likely won't fit either, so custom headers it will be.
Essentially, I'll copy the factory design but move the "bundle of snakes" part forward about 3-4 inches. There's plenty of room at that point, as you can see.
I'll cut off and reuse the header flange section as it's intricately shaped. Leveraging the factory part will save a bunch of time/money.
Attached thumbnail(s)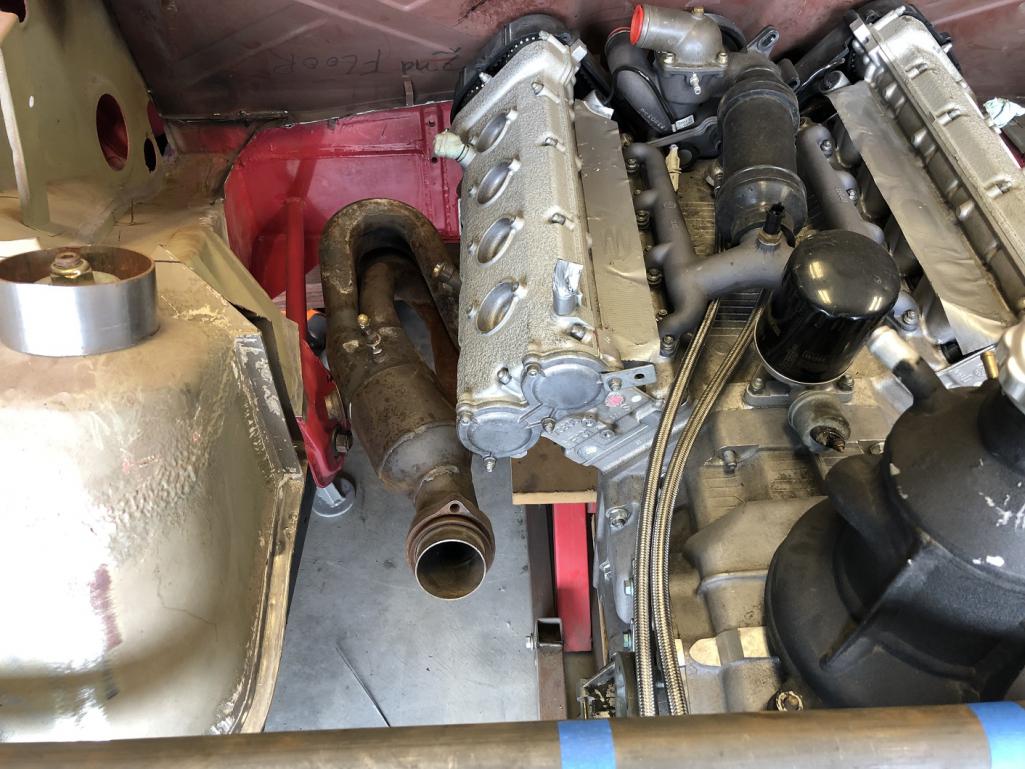
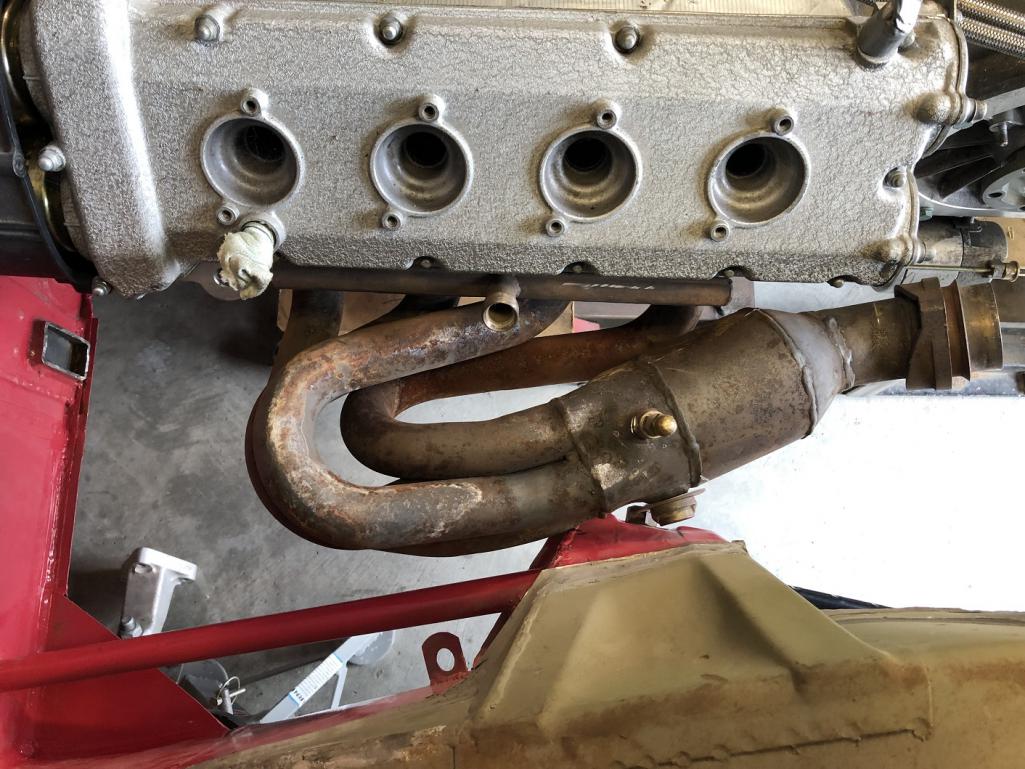
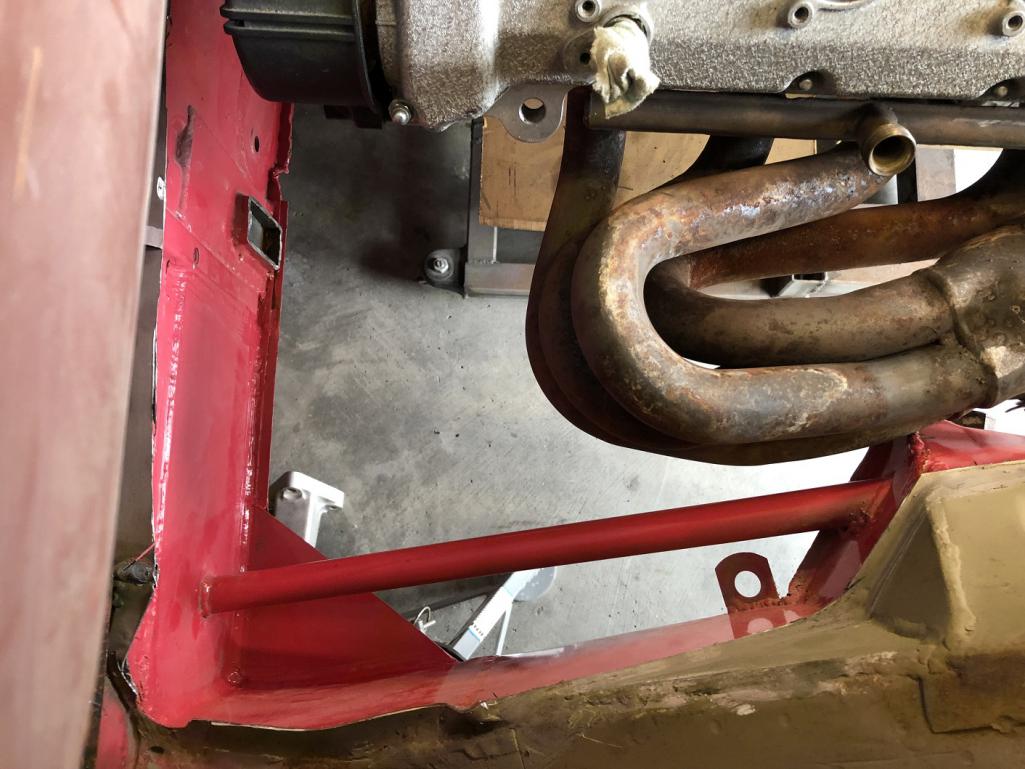
Posted by: tygaboy Sep 12 2022, 07:49 AM
I spent some time on the phone with Martin discussing the header interference issue. We kicked around a few ideas until he made one of those "duh, why didn't I think of that?" suggestions. A few minutes later and: problem solved!
Before I post any pics, would any of you like to guess?
Be careful because if you come up with the solution (or maybe a better one?!), I'll be calling you all the time to help me with things like this!
And btw, these headers are being used to prove out what'll work. Once that's decided, I'll either refurb these and do things like remove the pre-cat (that 4" diameter section between the collector and the reducer) and get them refinished or start over with an aftermarket set, now that I know what I need to do to fit them.
Posted by: Cairo94507 Sep 12 2022, 08:07 AM
Why do the headers have to sweep forward at all?
Posted by: Lilchopshop Sep 12 2022, 08:14 AM
I spent some time on the phone with Martin discussing the header interference issue. We kicked around a few ideas until he made one of those "duh, why didn't I think of that?" suggestions. A few minutes later and: problem solved!
Before I post any pics, would any of you like to guess?
Be careful because if you come up with the solution (or maybe a better one?!), I'll be calling you all the time to help me with things like this!
And btw, these headers are being used to prove out what'll work. Once that's decided, I'll either refurb these and do things like remove the pre-cat (that 4" diameter section between the collector and the reducer) and get them refinished or start over with an aftermarket set, now that I know what I need to do to fit them.
Switch sides for the header so that the pipe junction/ bundle is below the suspension mount? Would this put the outlet pipes too low relative to the axles?
Posted by: tygaboy Sep 12 2022, 08:19 AM
Why do the headers have to sweep forward at all?
@http://www.914world.com/bbs2/index.php?showuser=9712 Michael - The goal of most N/A exhausts is to have equal length header tubing ahead of the collector. Within reason, the routing of those tubes isn't critical, but getting length, plus length of the post-collector exhaust, does make a difference. If I start the headers going back right at the engine, I'll end up with a challenge in terms of mounting the mufflers. And yes, wicked as it'd sound without them
, it'll have mufflers.
Posted by: tygaboy Sep 12 2022, 08:23 AM
I spent some time on the phone with Martin discussing the header interference issue. We kicked around a few ideas until he made one of those "duh, why didn't I think of that?" suggestions. A few minutes later and: problem solved!
Before I post any pics, would any of you like to guess?
Be careful because if you come up with the solution (or maybe a better one?!), I'll be calling you all the time to help me with things like this!
And btw, these headers are being used to prove out what'll work. Once that's decided, I'll either refurb these and do things like remove the pre-cat (that 4" diameter section between the collector and the reducer) and get them refinished or start over with an aftermarket set, now that I know what I need to do to fit them.
Switch sides for the header so that the pipe junction/ bundle is below the suspension mount? Would this put the outlet pipes too low relative to the axles?
@http://www.914world.com/bbs2/index.php?showuser=23932 - logical suggestion, and I tried it but swapping sides makes the collision worse and if things did clear the suspension console, the header would end up lower than the engine.
Posted by: sb914 Sep 12 2022, 08:31 AM
Cut off flanges and reverse them . 
Posted by: SirAndy Sep 12 2022, 09:42 AM
Raise the engine an inch or two.
Posted by: tom.esh Sep 12 2022, 10:26 AM
Heat and bend to fit? Or a big hammer. Just kidding about the hammer.
Posted by: tazz9924 Sep 12 2022, 10:27 AM
A good ole dent.
Posted by: Van B Sep 12 2022, 11:37 AM
Since you’re not playing by euro 4 emissions on this, why not move the cat further down stream so you can get rid of some bulk and reduce heat in the bay?
Posted by: tygaboy Sep 12 2022, 02:56 PM
Many interesting guesses and suggestions but here's Martin's comment:
"Well, if all you need to do is move everything forward, why not just cut off the flange, move each tube forward by one cylinder and remake the one tube?"
Other than his use of the word "just", he nailed it!
Note, this is just tack/hack welded as proof of concept. But the interesting thing is that, you can see the there's plenty of room to get that front cylinder tube back to the collector while keeping appropriate length.
With this no longer an unknown, I can purchase a set of aftermarket headers knowing I can make them work.
Attached thumbnail(s)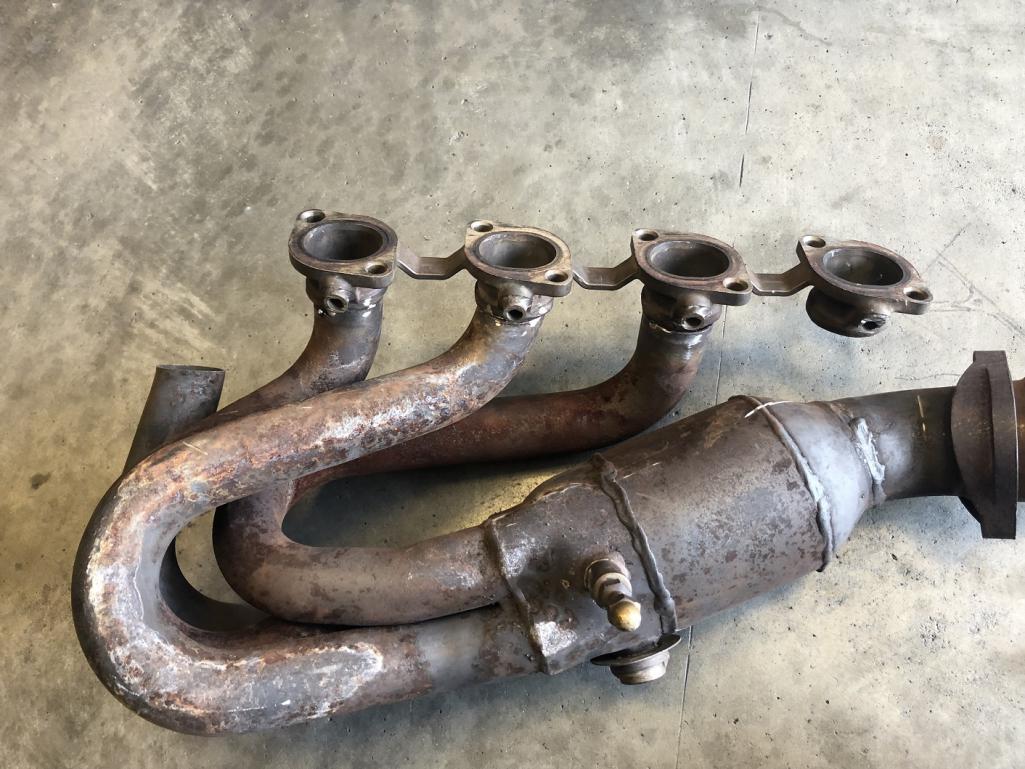
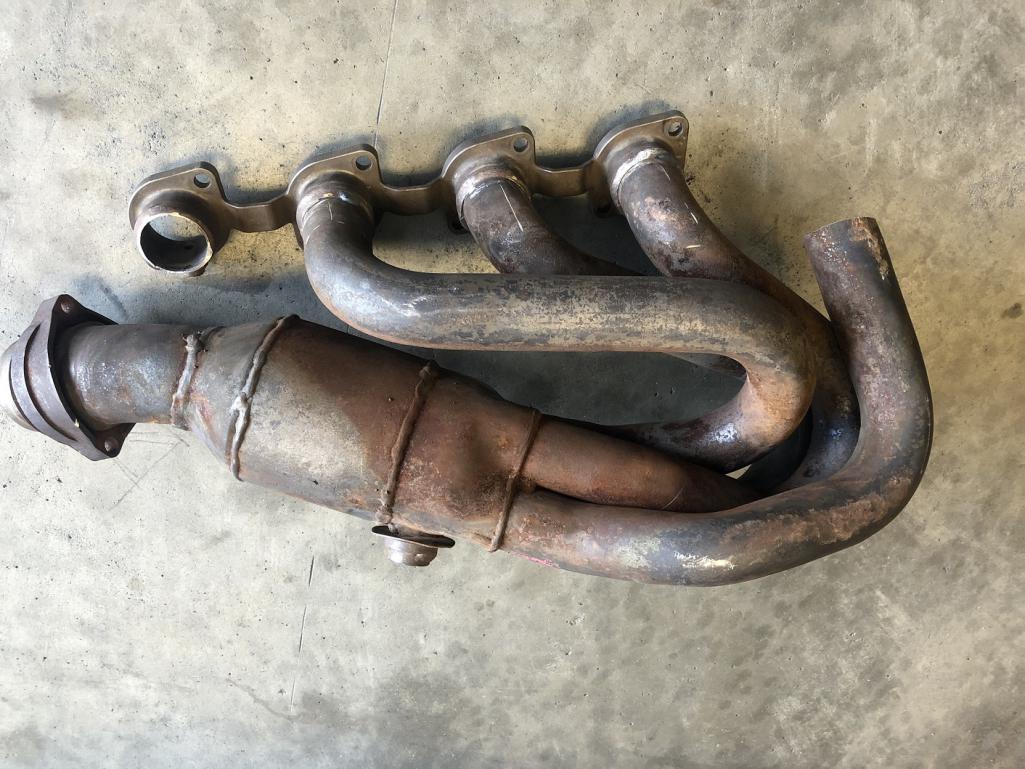
Posted by: tygaboy Sep 12 2022, 03:04 PM
Like it was made for it!
And that O2 bung was never going to work so don't worry about that.
Attached thumbnail(s)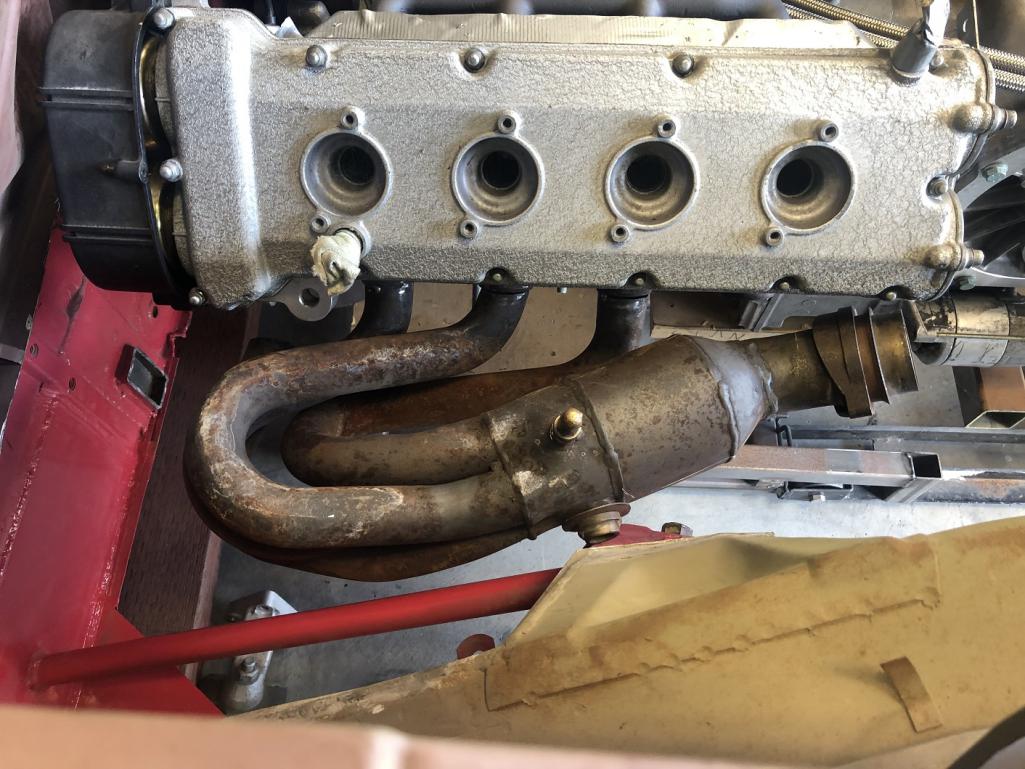
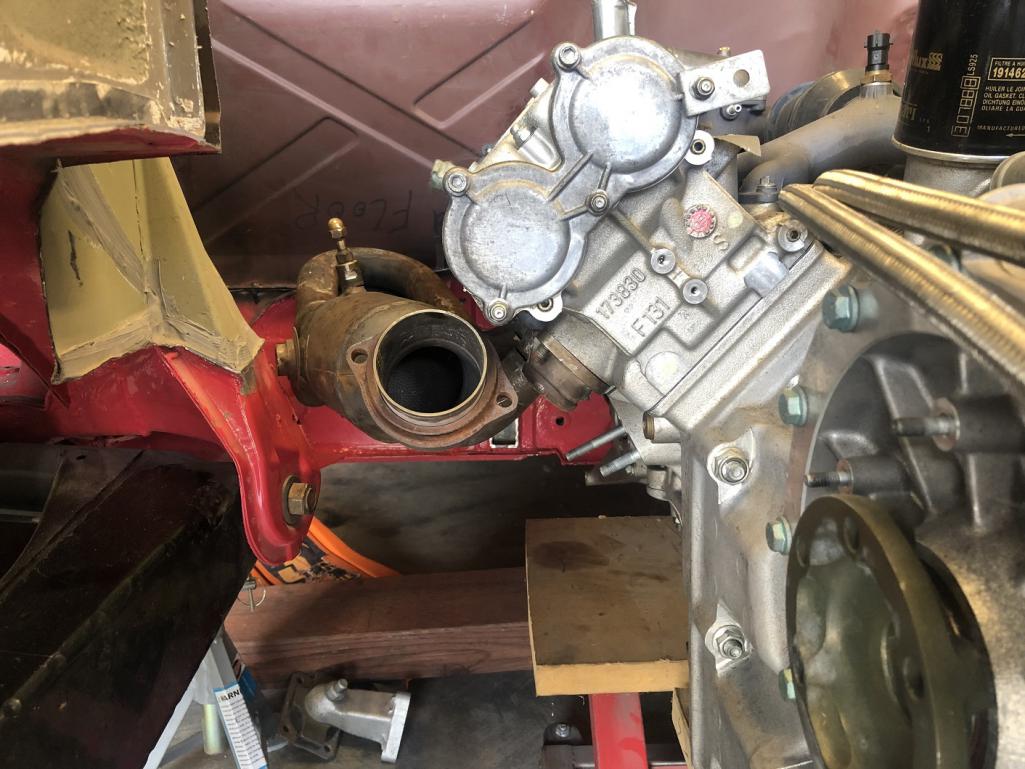
Posted by: Andyrew Sep 12 2022, 08:48 PM
I like simple solutions  loooks good in there!!
Posted by: horizontally-opposed Sep 13 2022, 12:04 AM
That Martin…pretty crafty.
Posted by: Cairo94507 Sep 13 2022, 07:02 AM
Very nice and practical.
Posted by: tygaboy Sep 13 2022, 04:51 PM
The build may be seeing a major change. I'm looking into what it'll take to work up an adapter to get the Ferrari engine mated to a Boxster S trans. I got a great deal on a G86-20 and in putting together a pro/con list, the Boxster trans comes out ahead by a fair bit.
Things like off the shelf axles, no need for limiting straps, far lower costs, shifters that are actually available (!)...
It won't be a simple adapter in that, the Ferrari trans houses the dry sump tank and the low pressure oil return is in the lower right side of the engine block. That's it, circled in the pic below. This means the adapter has to have account for that passage and accommodate an oil line fitting that pokes out the side.
Oh, and like @http://www.914world.com/bbs2/index.php?showuser=1143 Clay, I have to make room for a starter on the trans side of things.
So, this will delay things a bit and I may end up going back to the Ferrari trans. Just need to see what's what before committing to the chassis fab.
Another example of "if were easy, everyone would be doing it."
Attached image(s)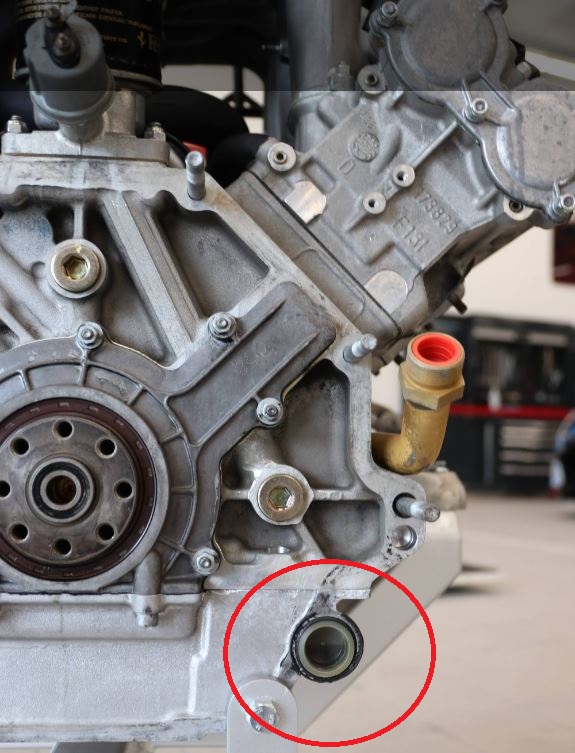
Posted by: horizontally-opposed Sep 13 2022, 05:43 PM
Something rather poetic about a 914/6 oil tank feeding a Ferrari V8, if it can be done and is sufficient…
Posted by: tygaboy Sep 13 2022, 06:11 PM
Something rather poetic about a 914/6 oil tank feeding a Ferrari V8, if it can be done and is sufficient…
@http://www.914world.com/bbs2/index.php?showuser=2058 Pete - it's better than that. If the Boxster trans is a go, I want to do a mirror image oil tank on the right side of the 914 - this because the oil return is on the right side of the Ferrari engine. Not that a cross-over line is a problem, more "because I can/mine is different."
And better yet: given this chassis is a '72, let's give a nod to the 72 911 and have an exterior oil door!
Posted by: Chris914n6 Sep 13 2022, 07:27 PM
The build may be seeing a major change. I'm looking into what it'll take to work up an adapter to get the Ferrari engine mated to a Boxster S trans.
You asked for it

I looked it up real quick... no difference in function between the 360 and Box shifter so no reason you couldn't use it. You will likely have to make cables the right length anyways. Since you have both trannys you can easily measure the lever throw.
I also don't fathom how an adapter/flywheel/starter cutout/oil tank could be less work than Sway-a-way making axles
You might find 911/Bus/944/Box/996 axles fit just right since the Ferrari looks wider.
Have you measured the actual CV angle with the trans in place? I don't think it will be that much to worry about. You will need 930 size CVs anyways for the power.
Posted by: horizontally-opposed Sep 13 2022, 09:43 PM
Ooh, all inputs very interesting. Including 72 oil door (lol) as well as Chris's thoughts above.
Am I at 50/50? Not yet. But tell me this: Would there be a chance that the Ferrari box would have its diff peeking out from the rear, a la 288 GTO?
Posted by: SirAndy Sep 13 2022, 10:06 PM
Easy fix, sell me the G86-20 and stick with the Ferrari transmission.
Posted by: Retroracer Sep 13 2022, 10:31 PM
A pro/con list you say? So it seems you're applying rational logic to the act of stuffing a modern(ish) Ferrari V8 into a 50 year old sports car that'll need rampantly extensive metal & chassis modifications to accommodate it?
Pls, tell me more about your rational, logical approach.
- Tony
PS. I jest, of course. And, please keep the Ferrari transmission and definitely that funky oil container/ air separator. Someone went to the trouble of "clocking" the Ferrari logo (on the cap) in the correct orientation to the rear of the car when it is fully hand tight; how could you not honor that obsessive detail? ;-)
PPS. Genius approach on the headers BTW
Posted by: rgalla9146 Sep 14 2022, 01:39 AM
In all these years I never realized the similarity of our 914 6s to '72 911s with the oil
tank in front of the rear wheel !
Our 6s could have had the oil fill door on the drivers rear quarter.
On the other hand.....our gas filler under the hood allows the entire car to be free of
extraneous "details"
This thread and the creative work it requires is very cool.
Great to see.
Thank you for allowing us to watch the process.
Posted by: mb911 Sep 14 2022, 05:34 AM
Something rather poetic about a 914/6 oil tank feeding a Ferrari V8, if it can be done and is sufficient…
@http://www.914world.com/bbs2/index.php?showuser=2058 Pete - it's better than that. If the Boxster trans is a go, I want to do a mirror image oil tank on the right side of the 914 - this because the oil return is on the right side of the Ferrari engine. Not that a cross-over line is a problem, more "because I can/mine is different."
And better yet: given this chassis is a '72, let's give a nod to the 72 911 and have an exterior oil door!
@http://www.914world.com/bbs2/index.php?showuser=19241
Let me know if you need laser blanks of the oil tanks for your application. I have plenty of them.
Posted by: tygaboy Sep 14 2022, 07:58 AM
Let me know if you need laser blanks of the oil tanks for your application. I have plenty of them.
Hey Ben - Great minds! As soon as the idea of running a 914 tank popped into my head, I immediately thought "I wonder if Ben's parts could be used...?" I have a way to go before I abandon the Ferrari trans but I will absolutely be in touch if I need a tank/parts.
Thanks for your support!
Chris
Posted by: Montreal914 Sep 14 2022, 08:19 AM
My vote is for the Ferrari gearbox, no need for a third party to get involved in this.
Amazing project, wonderful daily entertainment for the readers!
Posted by: tygaboy Sep 14 2022, 09:16 AM
The build may be seeing a major change. I'm looking into what it'll take to work up an adapter to get the Ferrari engine mated to a Boxster S trans.
You asked for it
I looked it up real quick... no difference in function between the 360 and Box shifter so no reason you couldn't use it. You will likely have to make cables the right length anyways. Since you have both trannys you can easily measure the lever throw.
I also don't fathom how an adapter/flywheel/starter cutout/oil tank could be less work than Sway-a-way making axles
You might find 911/Bus/944/Box/996 axles fit just right since the Ferrari looks wider.
Have you measured the actual CV angle with the trans in place? I don't think it will be that much to worry about. You will need 930 size CVs anyways for the power.
@http://www.914world.com/bbs2/index.php?showuser=431 - Is that how you're doing it in your Ferrari swap?
Look, I know my posting style invites all sorts of input but, come on - you all should know by now that I don't give up easily. If I abandon the Ferrari trans, it'll be for reasons well beyond a set of custom axles.
And here's a pic to give you something to chew on: While I don't need an entire conversion kit, I do need some of these hen's teeth parts. I'm happy to accept donations to support the project!
Speaking of swaps, did the parts I made for your project work out?
Attached thumbnail(s)
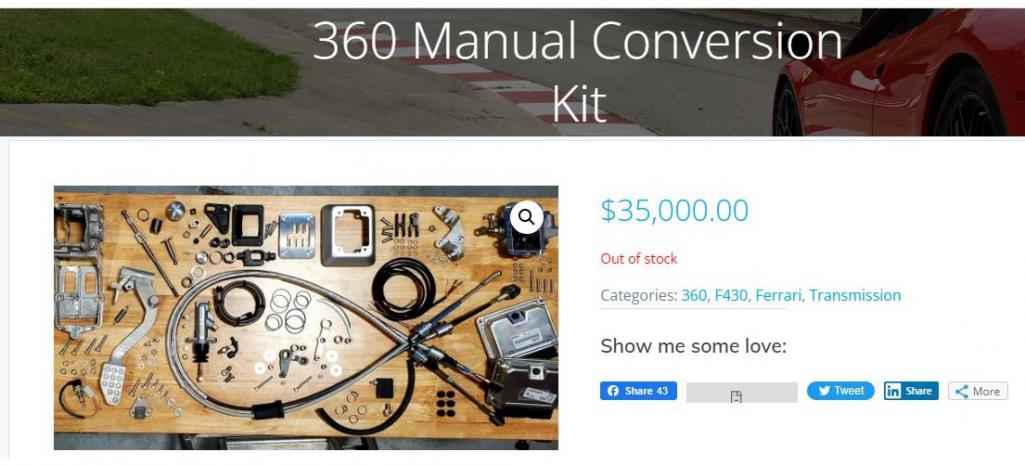
Posted by: tygaboy Sep 14 2022, 10:28 AM
No screwing around here! Some of you may be aware of Home Built by Jeff's Alfarrari build on YouTube. He's putting a 360 engine in the front of a vintage Alfa. He got wind of my build and I've been communicating with him. He was kind enough to share his adapter file! This is the Ferrari side of things, including the oil return passage.
Ignore the other side as it's for a Subbie BRZ trans (!).
Anyway, this get's me a good way down the "what'll it take" road. And let me say it again:
I haven't decided which trans I'll use. But knowledge is power and I'll know more, regardless.
Attached thumbnail(s)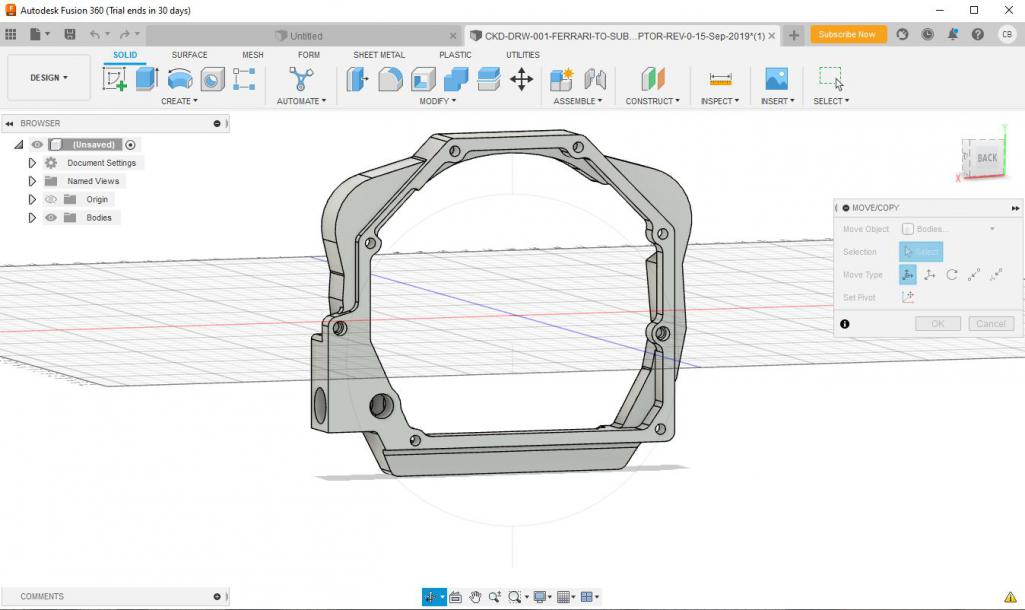
Posted by: Chris914n6 Sep 14 2022, 11:54 AM
@http://www.914world.com/bbs2/index.php?showuser=431 - Is that how you're doing it in your Ferrari swap?
Look, I know my posting style invites all sorts of input but, come on - you all should know by now that I don't give up easily. If I abandon the Ferrari trans, it'll be for reasons well beyond a set of custom axles.
And here's a pic to give you something to chew on: While I don't need an entire conversion kit, I do need some of these hen's teeth parts. I'm happy to accept donations to support the project!
Speaking of swaps, did the parts I made for your project work out?
Just working with what you posted
10,000 car repairs later and everything looks the same... Ferrari isn't that special when all the engineers are schooled the same. Plus I have a 20 year head start on conversions starting before the stint at Renegade. My Nissan is getting a Subaru trans because it's easy and the BoxS is just too involved. Just trying to help and share wisdom.
I take it now you are working with the F1 trans? What are the issues and what parts do you need?
Your parts came out great
Posted by: rick 918-S Sep 14 2022, 07:24 PM
Very cool project. Some the challenges with adapters are the added length for input shafts and starter depth. I really like the computer rendering. I don't have those skills. But with a tape measure and a router it can be done. 
Posted by: Mueller Sep 15 2022, 07:50 AM
I like that exhaust solution, pretty slick!
$35K for the conversion kit and I think that is for parts only and they must do the install, figure another $10K or so.
Posted by: ClayPerrine Sep 15 2022, 08:04 AM
The biggest issue I had with my Boxster trans adapter was the flywheel. A 964 uses a pull type clutch.
A Boxster uses a push type clutch. Making an adapter to fit a push type pressure plate to a 964 flywheel took some work. And a 944 turbo racing pressure plate. I would love to find a Boxster flywheel that would bolt to a 964 crankshaft.
The second issue was the starter. Not making a hole, but adding a mount in the right position so the starter would engage without grinding or sticking.
There are pictures in my build thread. I posting from a cell phone and can't get the link.
Clay
Posted by: tygaboy Sep 15 2022, 01:24 PM
While I'm pretty good with my 2D CAD program, I've not spent any time in the 3D world. So after playing around with that file, I chose a far faster path and contacted @http://www.914world.com/bbs2/index.php?showuser=87 . Let me give a HUGE thanks to Mike for jumping right on verifying the file, dimensioning it for me and going the extra mile to locate a Boxster engine file and doing a quick overlay.
Yes, I have all the 3rd D to work out but this is a really big help to get me going.
Let me say it again: Mike - THANKS!! Simply couldn't do it without you.
Attached thumbnail(s)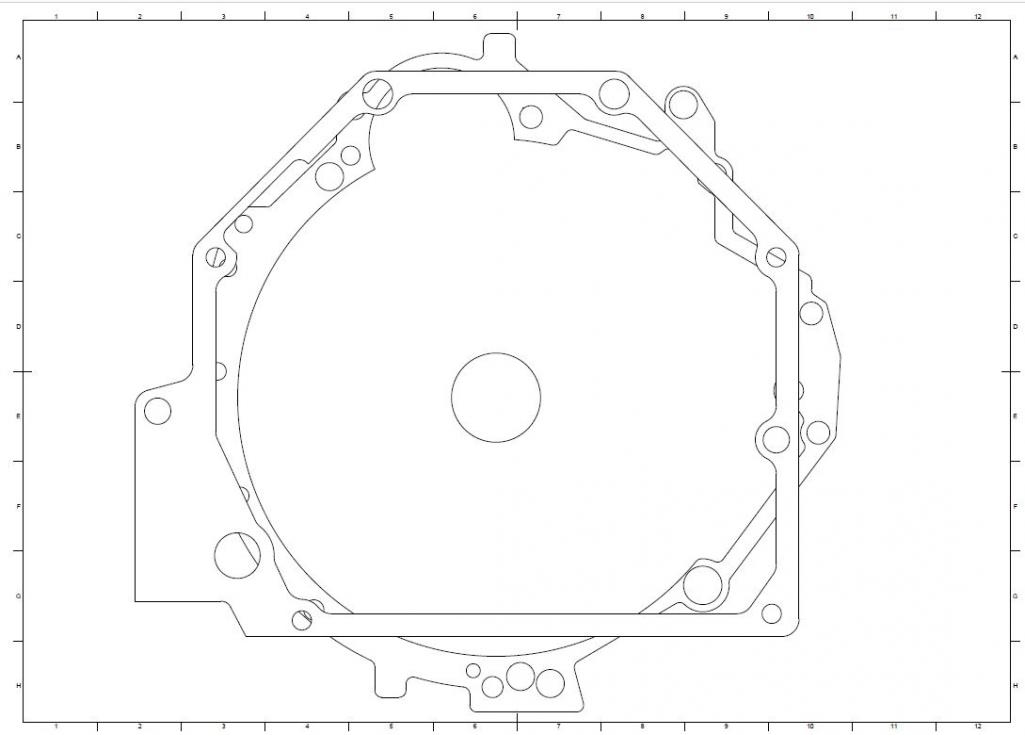
Posted by: Mueller Sep 15 2022, 02:57 PM
No problem at all, this is almost like owning a 914 again without the cost or heartache
Posted by: tygaboy Oct 3 2022, 04:44 PM
If I'm going to have any hope of having this running for WCR 2023  , I better get back at it.
My LS car is back on the road so the Ferrari build is back in the Red Barn. Today was spent fine-tuning the drive train location and taking final measurements so design, fab and welding can begin on the trans and engine mounts.
The trans mount cross bars and hanger are almost ready to be welded in - can't hardly wait!
But waiting is sometimes a good thing: Remember how excited I was to see the header in place, "just" moved up one cylinder? Good thing I didn't get too excited. Turns out that with the adjustments I made to get the drive train in optimal position for the axle height, that modded header no longer fit! Everything got lowered by about 3/4" and that was all it took for the header to, once again, foul on the suspension console. What to do? Well, if moving things forward by one cylinder helped the first time, I gambled it'd help again.
And it did. It actually looks better, too. The primary tube bundle nicely fills the area outboard of the front cylinders and I gain even more length for the post-collector exhaust.
In this location, there's more room under the bundle to re-route the two tubes that need to be re-connected to the flange.
As before, the collector still needs to be sliced off and clocked to clear the rear of the cylinder head. But overall? Win-win!
Attached thumbnail(s)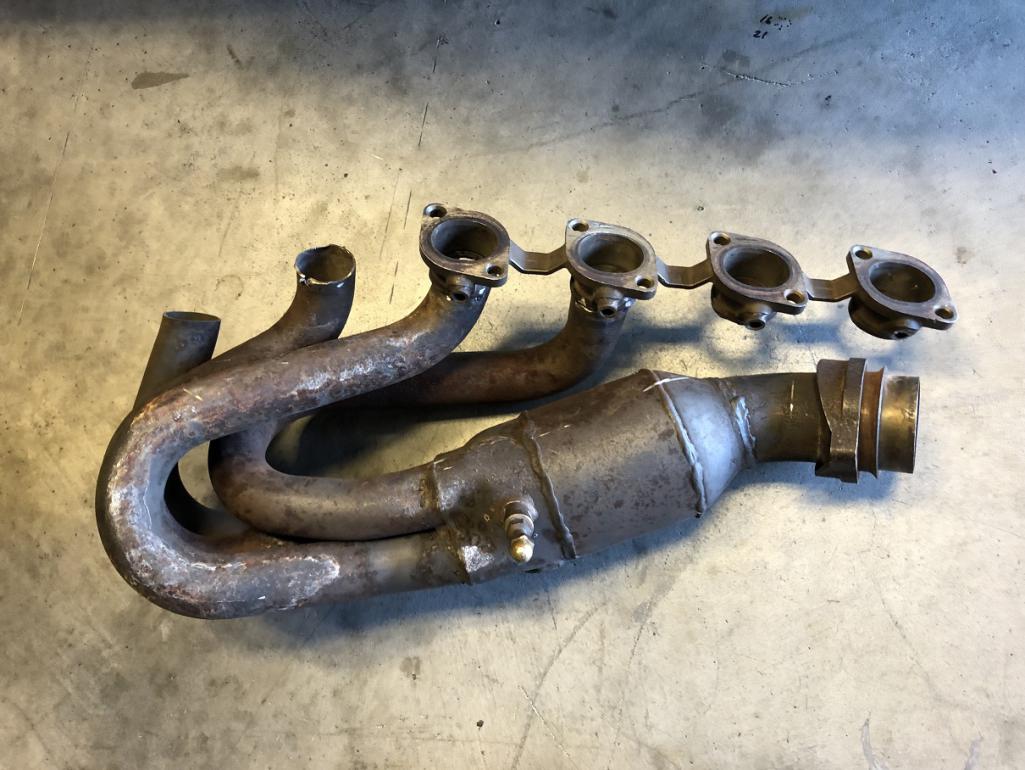
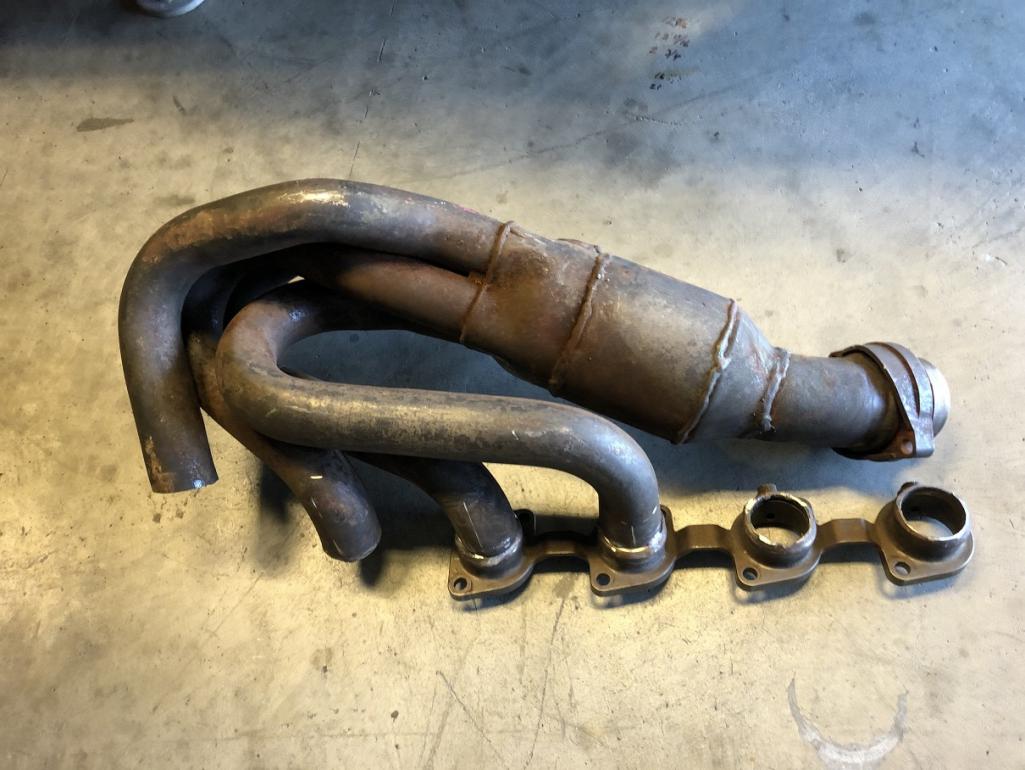
Posted by: tygaboy Oct 3 2022, 04:44 PM
The under side, not that anyone will ever see this view...
Attached thumbnail(s)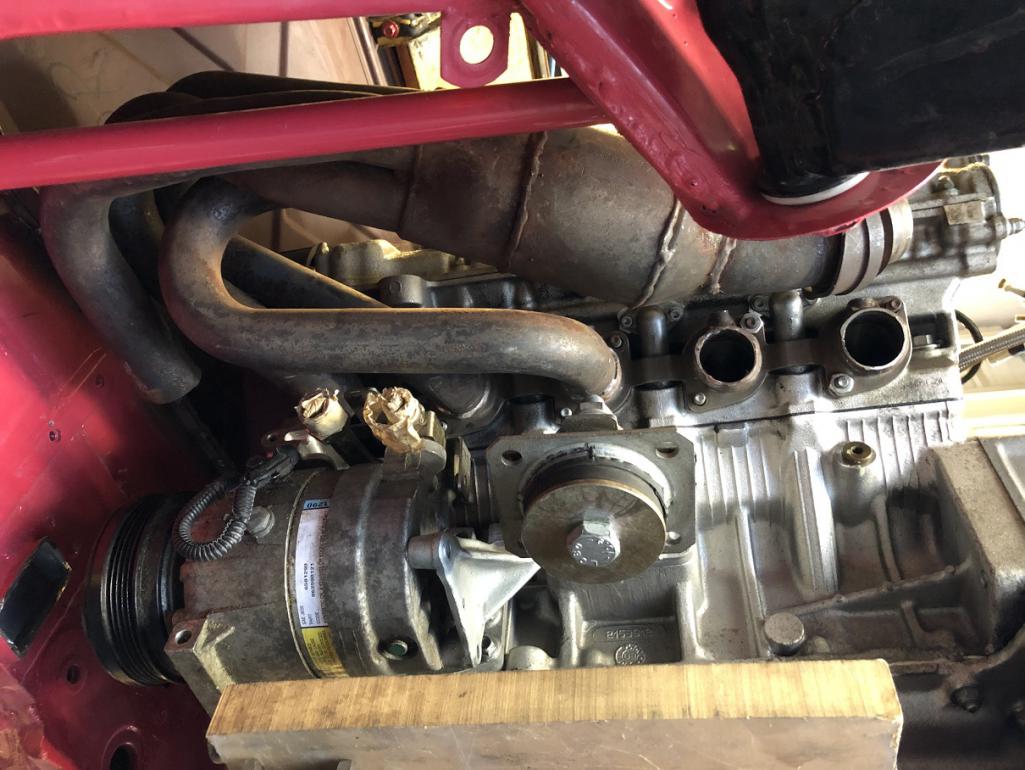
Posted by: tygaboy Oct 4 2022, 04:33 PM
Let's make some parts, eh? Here's the final design for the transmission hangers. One will live on each side of the trans mounting tab. Fabrication is underway!
Attached image(s)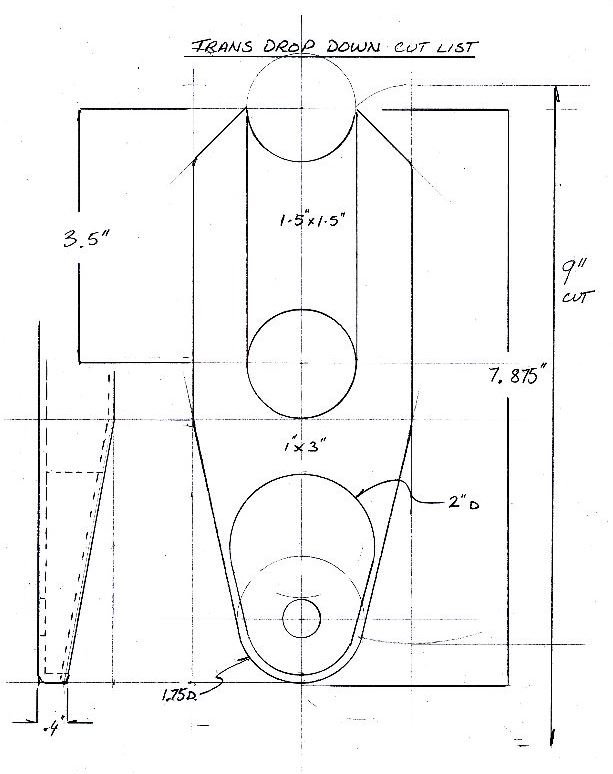
Posted by: tygaboy Oct 4 2022, 05:21 PM
Let's back up and get a better view of the "two forward" header. As mentioned, it nicely fills that area outboard of the front of the heads but will need re-clocking of that last section where it will join the rest of the exhaust.
That odd fastener sticking out of the collector? I'm told that's an EGT sensor location. Not sure if it was used on euro cars or the Stradale maybe but that's how these headers came to me...
Attached thumbnail(s)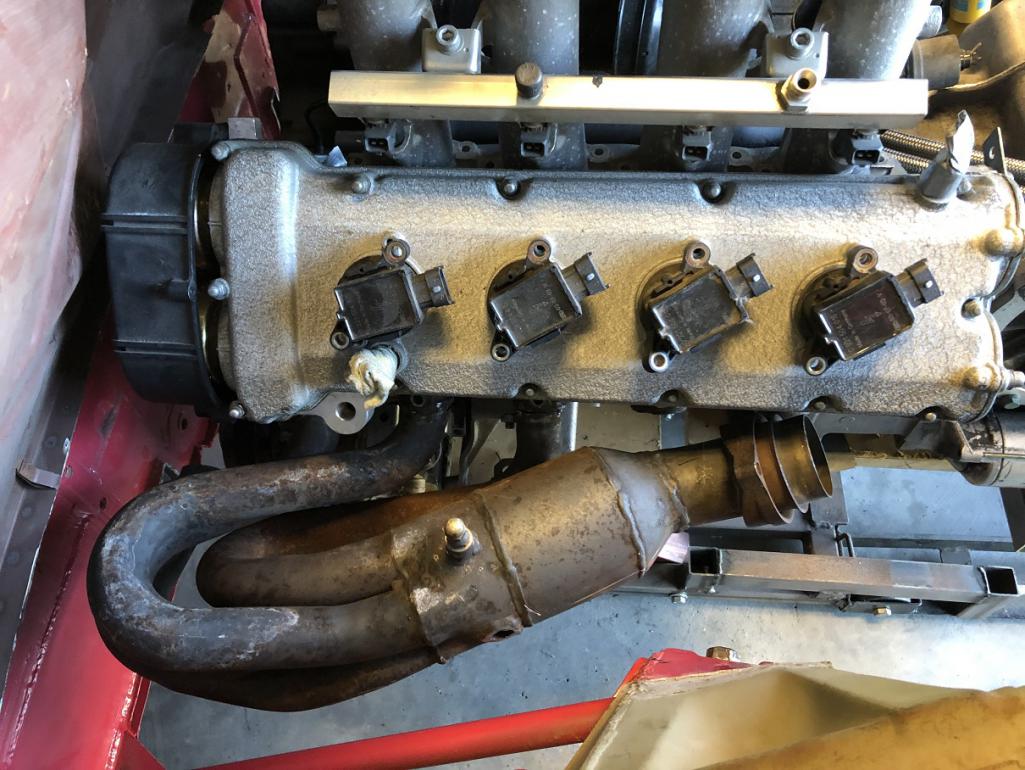
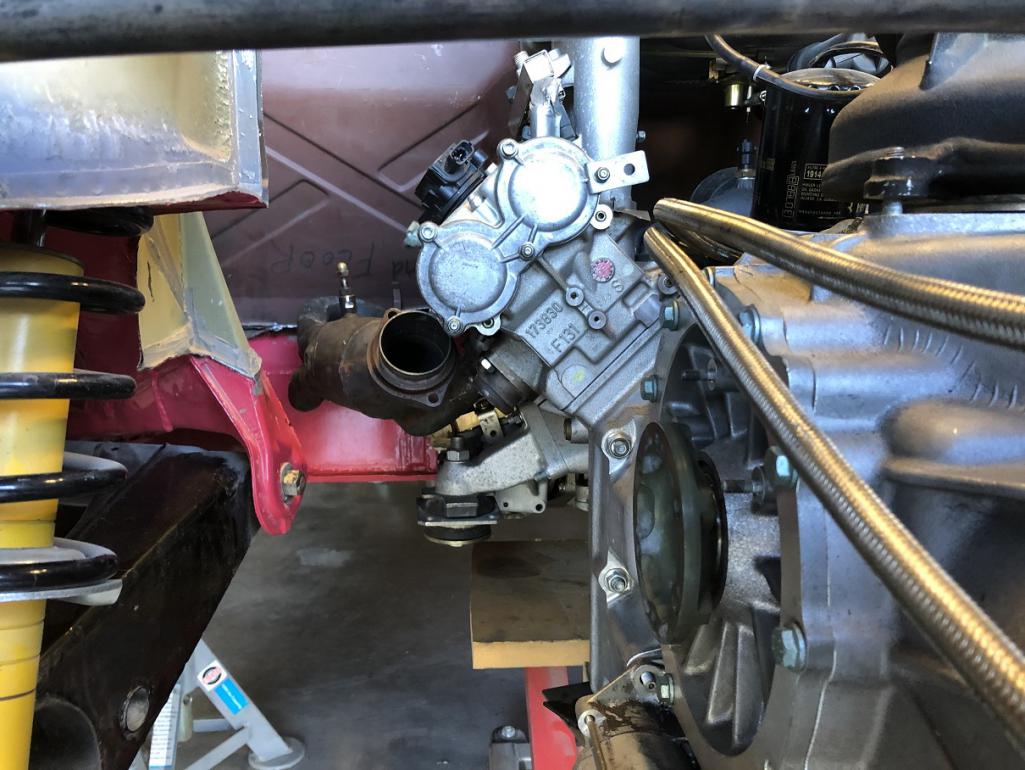
Posted by: tygaboy Oct 4 2022, 05:35 PM
Speaking of the exhaust, even though I can't use the factory muffler, the muffler bracket looks like it can be used. It mounts to the trans but is too long for the 914. A little sectioning (it originally had two of those oval holes in the outside walls - I removed one) and we're all set.
Attached thumbnail(s)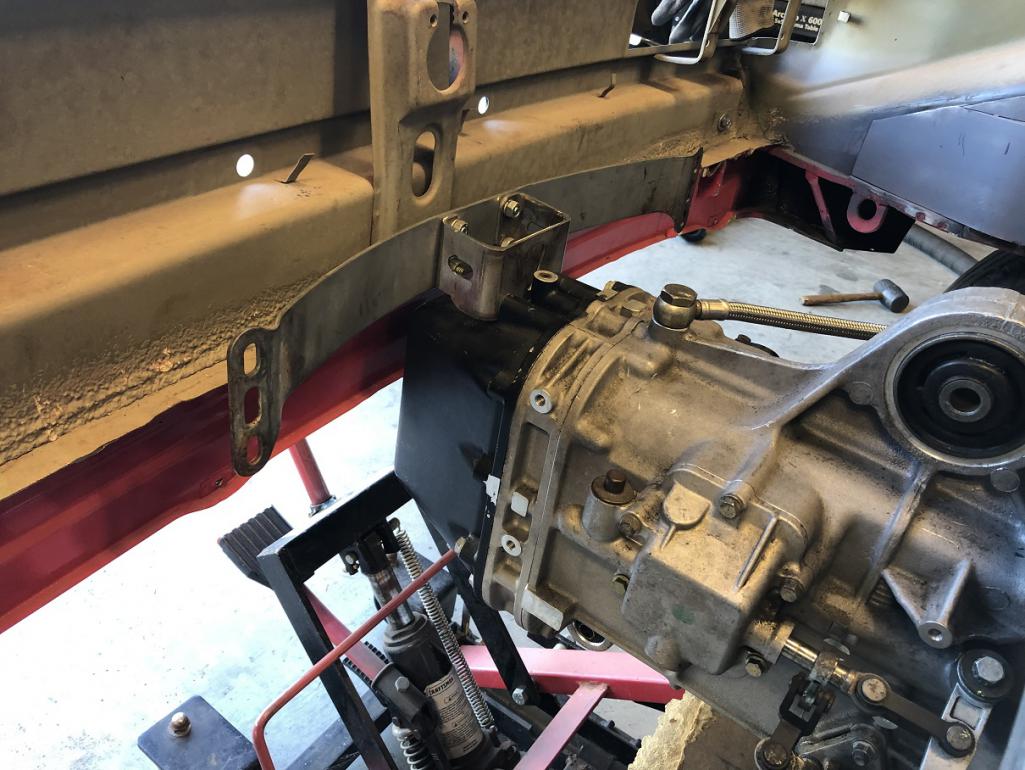
Posted by: ClayPerrine Oct 5 2022, 12:15 PM

Posted by: tygaboy Oct 8 2022, 11:28 AM
Transmission mounts nearly done, courtesy of Martin, his skills and machine shop. We make a pretty good team: He's got a great eye for design and unmatched fabrication talents - and I've got projects that need those things!
It starts as a 9" length of 1" x 3", .095 wall tube. It's interesting what comes up when moving from "how about we do this?" to actually making the parts. In this case, the design for these hangers changed because as the material was cut away to get the cool tapers on all the different surfaces, the remaining material wouldn't stay in plane during the follow-on machining operations. So the taper on the 3" face had to start farther from the lower hole than originally planned. In the end, no one will know and even I didn't notice until Martin pointed it out to me.
With a bit of luck, the trans mount will be in the chassis in the next couple days!
Attached thumbnail(s)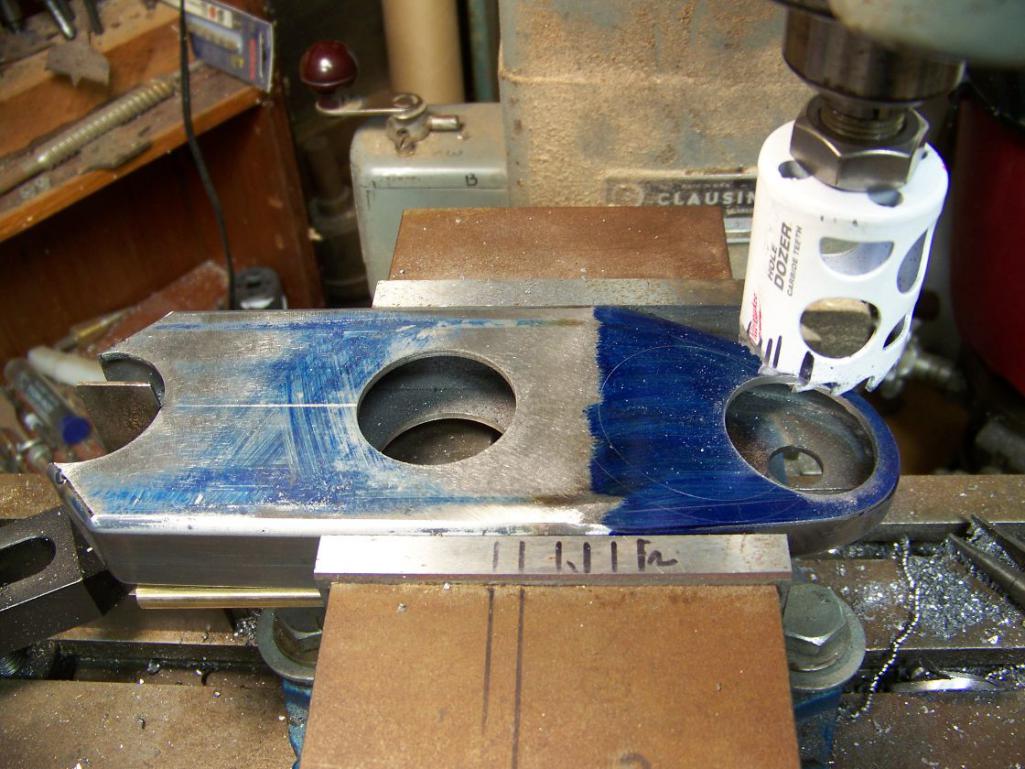

Posted by: tygaboy Oct 10 2022, 08:57 PM
Wrapping up the wrap-around on the 2nd hanger then they both get a 2" hole and a final tidy up. A couple days of work. Worth the effort just so the hangers end up with a few style points?
Oh, hell yeah!
Attached thumbnail(s)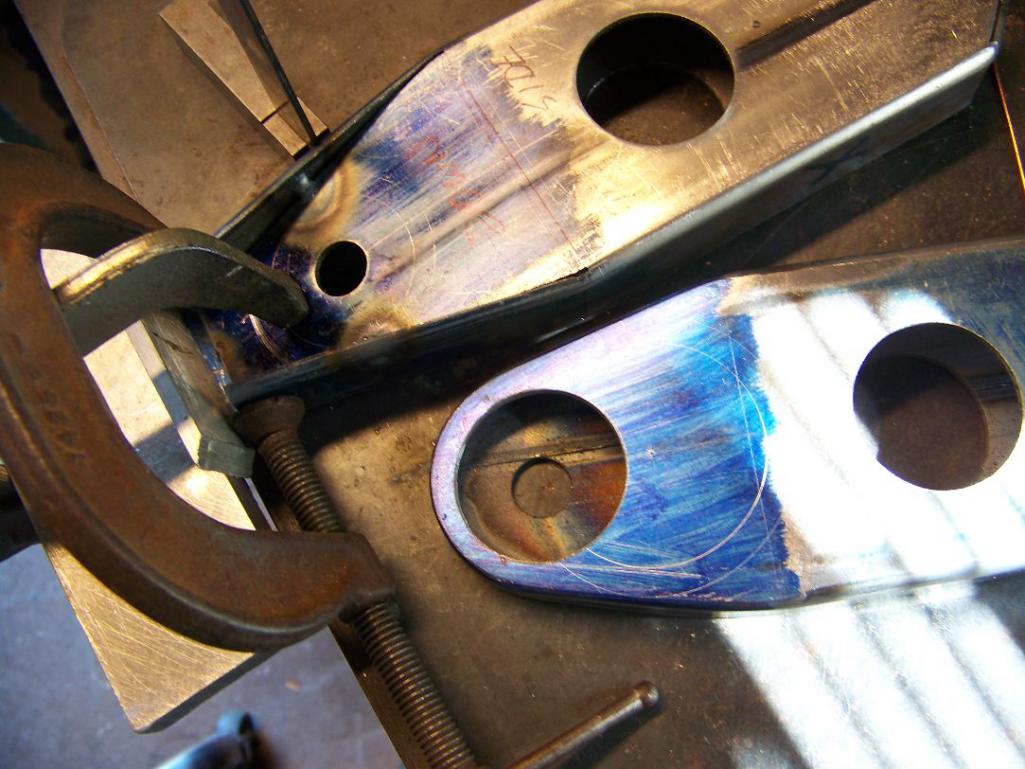
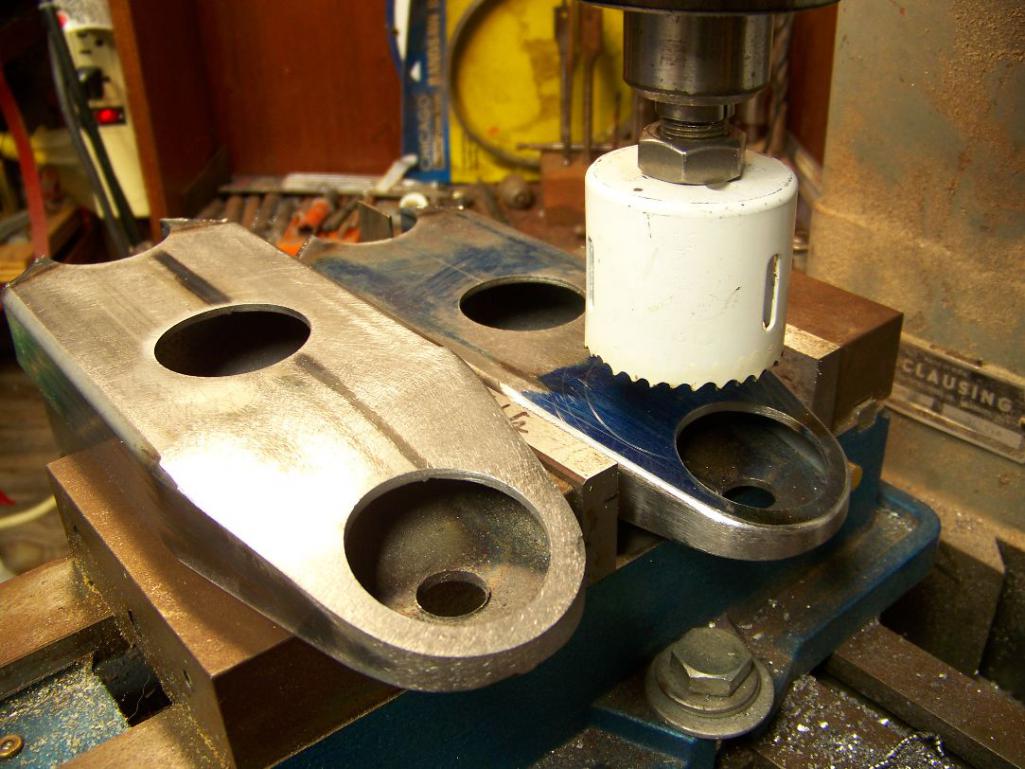
Posted by: tygaboy Oct 11 2022, 05:58 PM
Test fitting the transmission mount. That bit of paper is just to model the "insert" that will close off the inner area of the hanger tubing. I wanted to see these in the car and determine if they really needed the insert. Yep, they do.
But other than that, I'm super happy with how they turned out! They are LOVELY.
And can I just say: It's so great to be working with Martin again.
Attached thumbnail(s)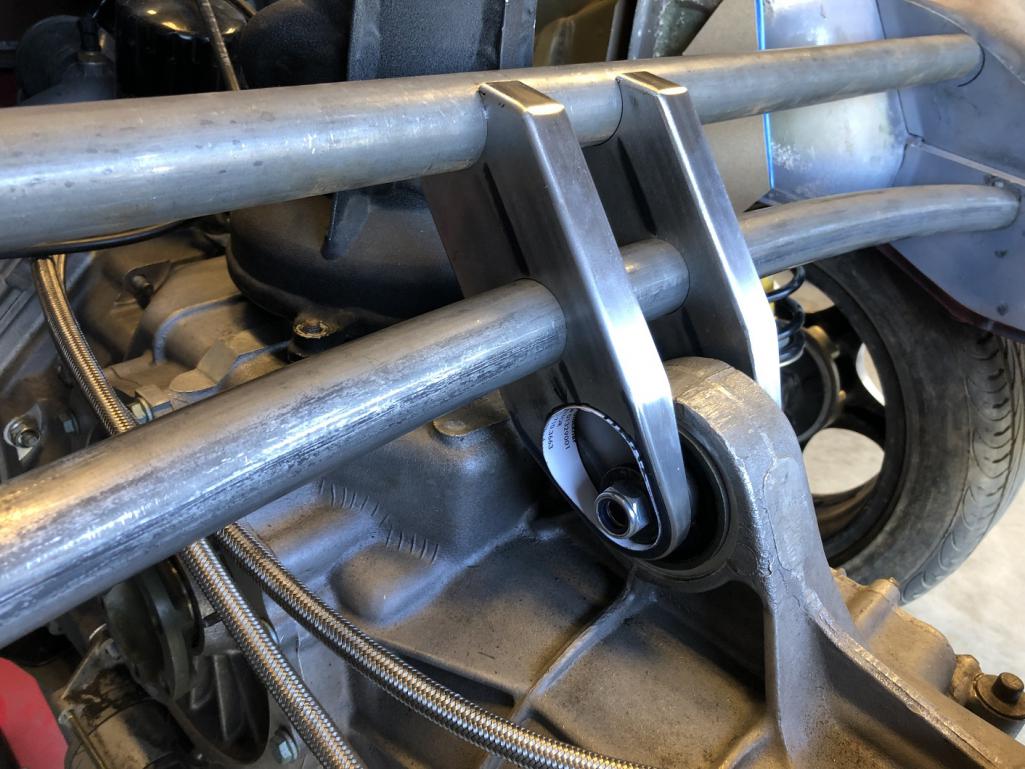
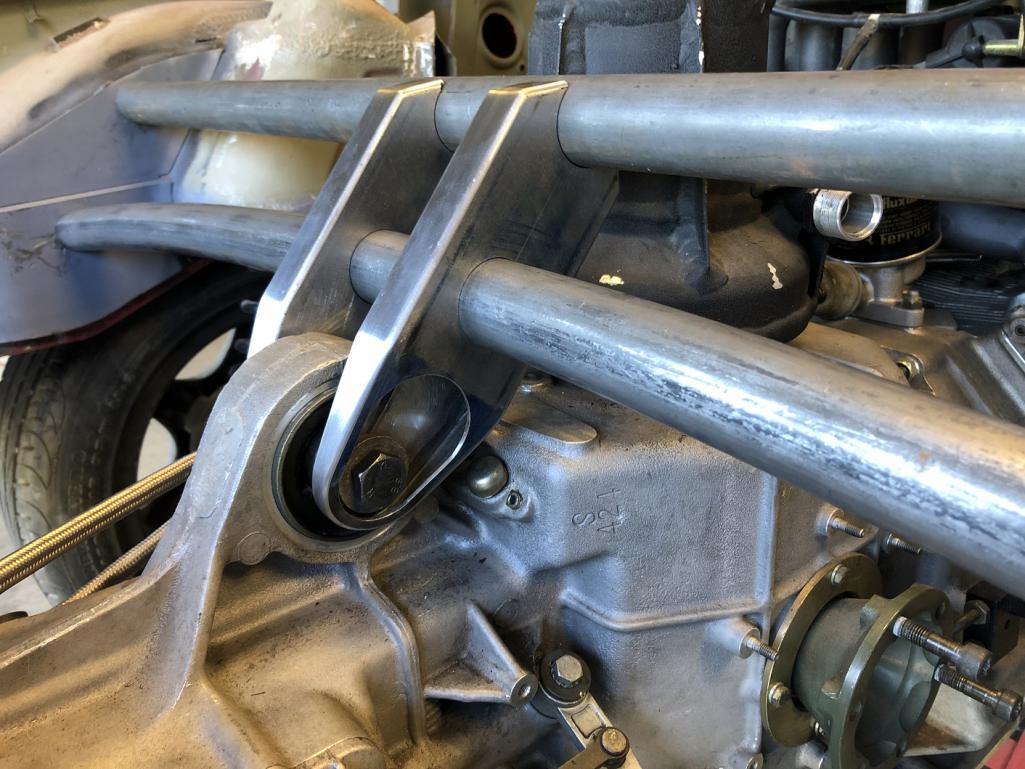
Posted by: tygaboy Oct 11 2022, 06:04 PM
As much as I generally like the full mechanical, simple look, I'm not a fan of the gap between the hangers, purposefull though it may be. I cardboarded up a few different cover panels - one that ran side to side of the hangers with a single, large dimple die hole, one that sat on center of the tubes, just between the hangers...
Then this one showed up and I think it's the winner.
It'll be removable, too, which means it could be made of nearly any material.
Attached thumbnail(s)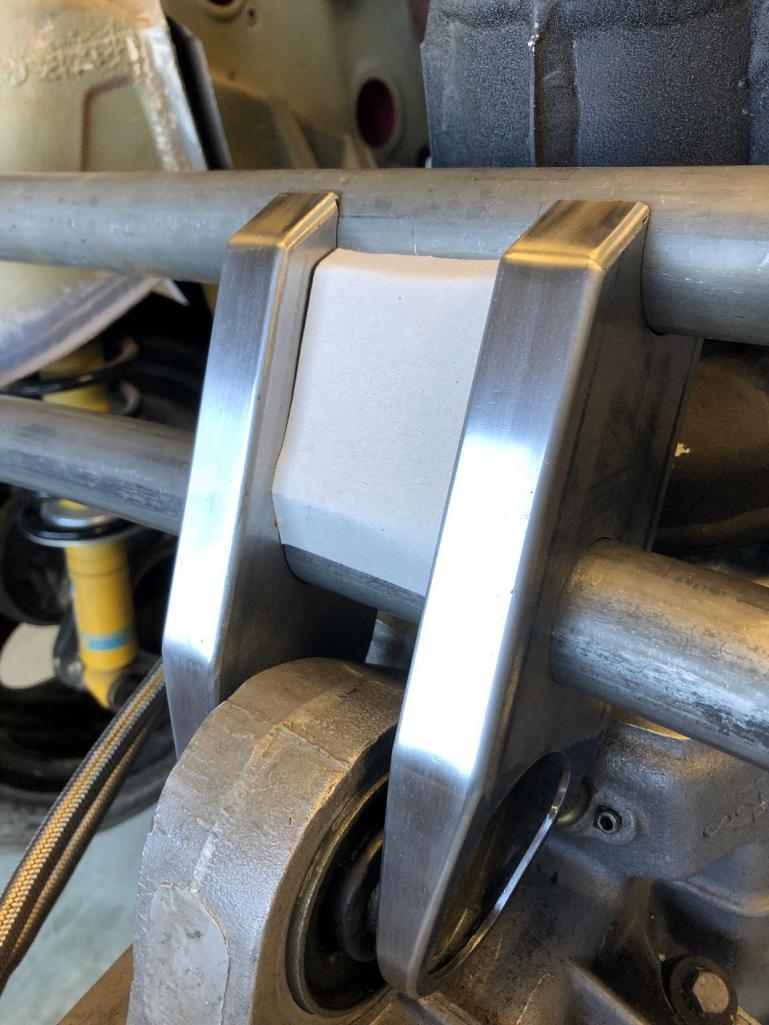
Posted by: Chris914n6 Oct 11 2022, 07:58 PM

Posted by: KELTY360 Oct 11 2022, 08:48 PM
So clean and so beefy. I like the unadorned look that shows the fabrication detail. A spot where function is beautiful.
Posted by: partwerks Oct 12 2022, 09:38 PM
more
Is that a Chief Automotive frame machine? Those rectangular holes sure look familiar.
Posted by: tygaboy Oct 13 2022, 03:59 PM
As usual for me, we're way far away from 914 content but I assume many of you enjoy this sort of thing.
Here's another look at just how time consuming custom fab can be. These are "just" the transmission mount hangers, as I've come to call them. Look back at what Ferrari used: essentially, just two plates with a break along one edge. These could have been largely the same and that would have taken almost no time to make. But I suspect you all know that simply wouldn't do, because, well, Tygaboy and Style Points!
So, along with all Martin's fancy pie cutting, welding and dressing to get those lovely tapers and a factory-looking edge radius all around the hangers, I asked him to close up the open area of the tube created when that cool shape of an opening was made in the outside wall.
A bit of 18 ga sheet metal trimmed and bent to fit and we have the wall.
That gets clamped in place, tacked all around and trimmed, leaving enough proud of the surface to fuse weld to the outer wall of the hanger.
Attached thumbnail(s)
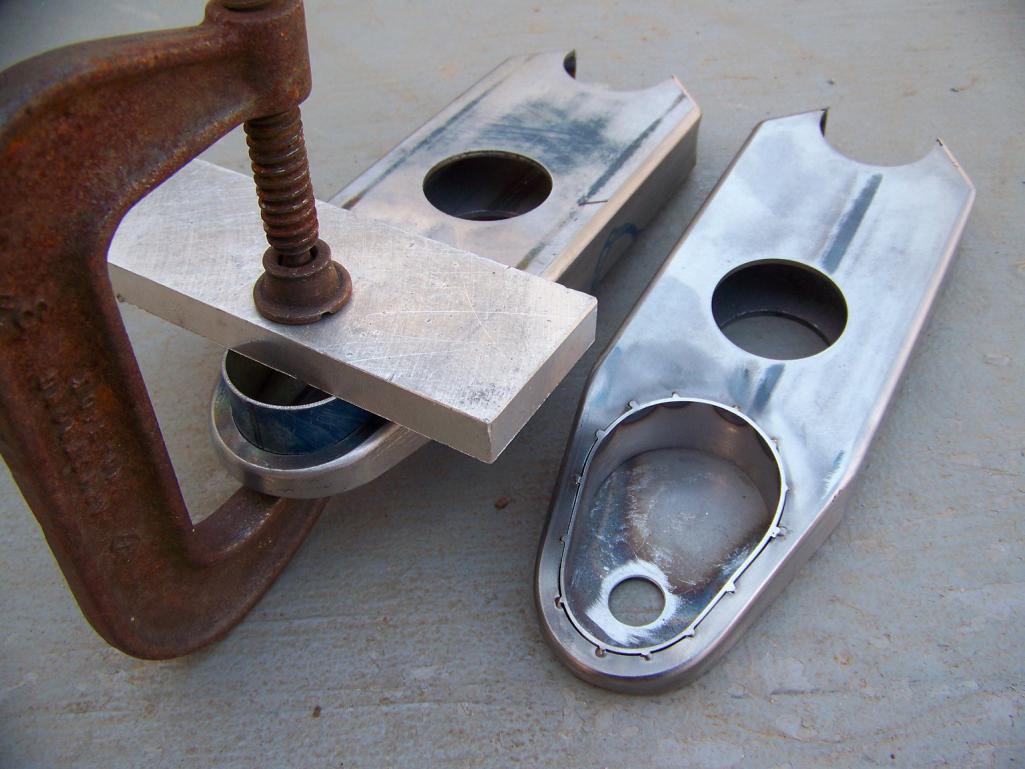
Posted by: tygaboy Oct 13 2022, 04:17 PM
Both sides all set for fuse welding and final dressing. After that, these lovlies get welded to the cross bars and into the chassis.
All said, there'll be over 20 hours into making these. Call your local fab guy to get an hourly rate and do the math...
Forgetting cost, folks generally have no idea of the time it takes to do one-off stuff like this.
But just look at those things. Works of art.
And I have to say: TOTALLY worth it!!
Attached thumbnail(s)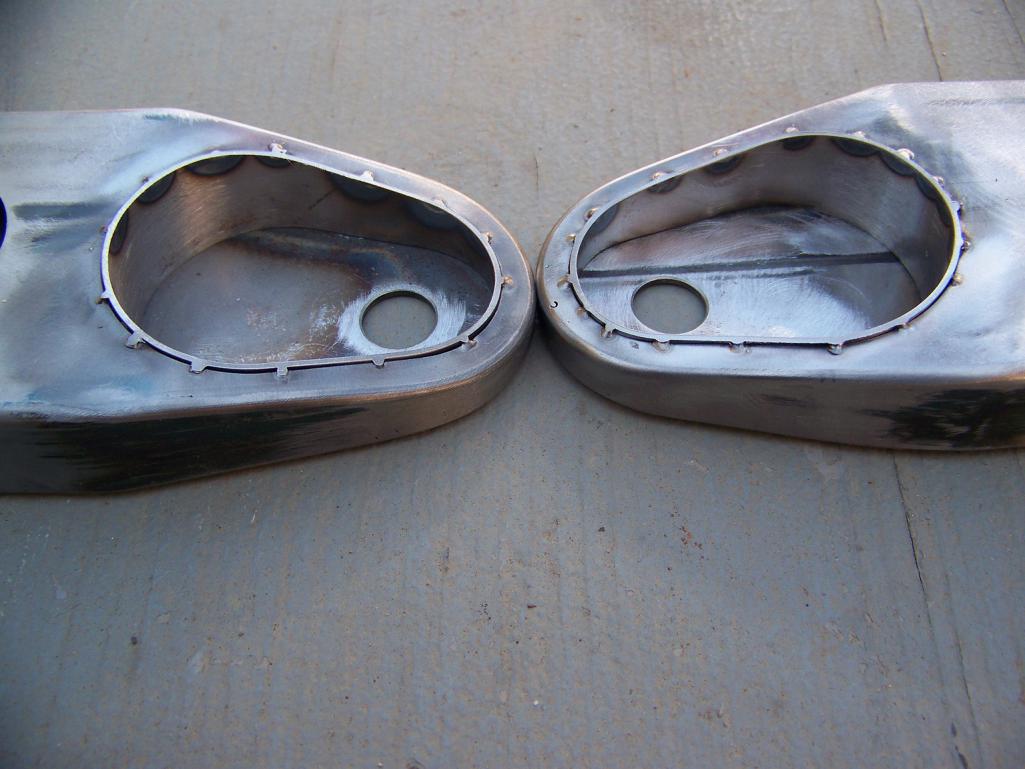
Posted by: horizontally-opposed Oct 13 2022, 10:06 PM
Gorgeous work, Chris!
Posted by: Cairo94507 Oct 14 2022, 06:40 AM
I am looking forward to seeing all this when I next travel to the Red Barn.
Posted by: tygaboy Oct 18 2022, 05:50 PM
That's the hangers done with the inner wall all tidied up. The goal is to get these and the associated cross bars welded in this week!
Attached thumbnail(s)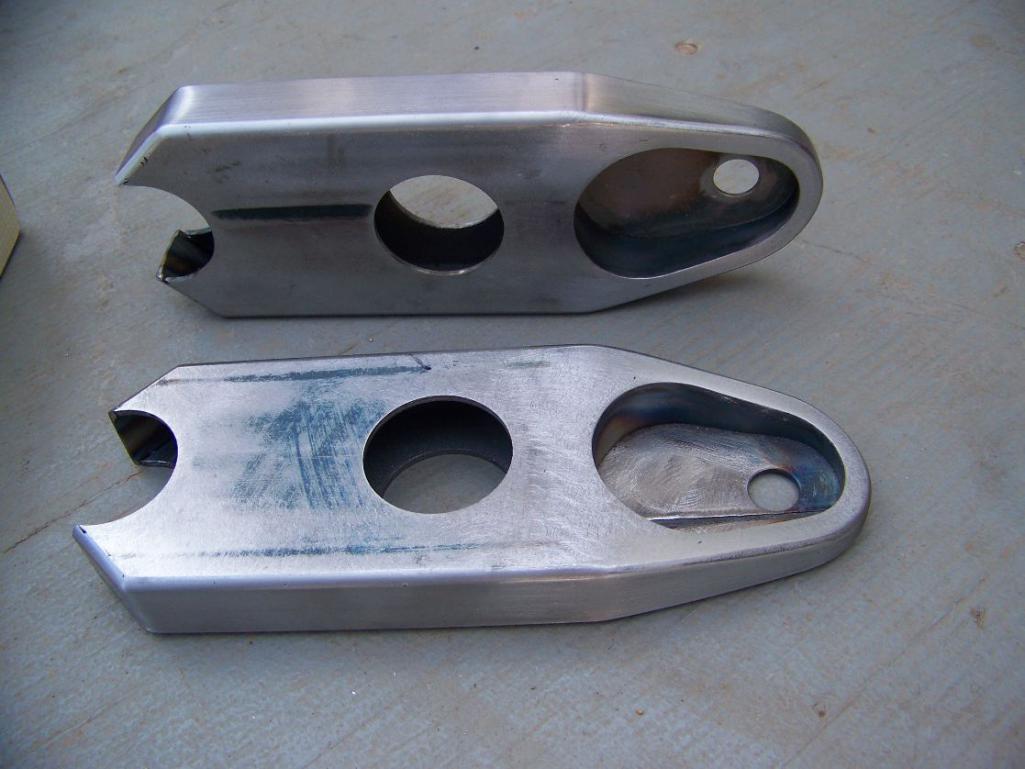
Posted by: Van B Oct 18 2022, 06:17 PM
So very tidy. Well done sir.
BTW, do you have a favorite marking dye and scribe combo? I bought a protractor from eastwood a few months back and it couldn’t even make a dent in sharpie ink on carbon steel lol…
Posted by: tygaboy Oct 18 2022, 07:52 PM
So very tidy. Well done sir.
BTW, do you have a favorite marking dye and scribe combo? I bought a protractor from eastwood a few months back and it couldn’t even make a dent in sharpie ink on carbon steel lol…
@http://www.914world.com/bbs2/index.php?showuser=26011 it's just blue dykem layout fluid. Any scribe will mark it. It's way better than Sharpie ink. I generally use a "regular ol'" scribe or one tip of the caliper.
Posted by: Van B Oct 18 2022, 10:19 PM
Dykem. Awesome thank you! It’s only in this past year that I’ve been doing the kind of fab projects that made me wish I had some lol. Placing my amazon order right meow.
Also, I was thinking about those brackets and I think you should TIG them onto the tubing and see how it looks if you leave the weld as opposed to grinding smooth. I think a little fab signature might look good there.
Posted by: tygaboy Oct 18 2022, 10:27 PM
Dykem. Awesome thank you! It’s only in this past year that I’ve been doing the kind of fab projects that made me wish I had some lol. Placing my amazon order right meow.
Also, I was thinking about those brackets and I think you should TIG them onto the tubing and see how it looks if you leave the weld as opposed to grinding smooth. I think a little fab signature might look good there.
@http://www.914world.com/bbs2/index.php?showuser=26011 - It'll all be TIGed. Those hangers were TIGed, too. But the goal was to have consistant corner radii and look manufactured vs fabricated. All the other TIG welds will be left "as welded", just like in my LS build. Pic of my door bar as an example.
Attached image(s)
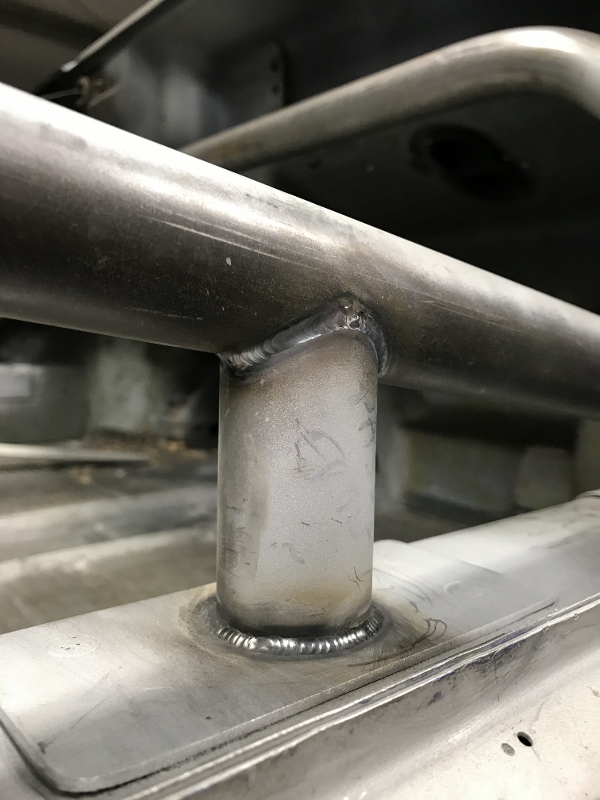
Posted by: Van B Oct 19 2022, 12:33 PM
TBH, I couldn't give two shits about a F360 engine in a P914. I only follow this thread because I like your approach to fab. You and I think a lot a like with regard to it being more of an art project vs a construction project. That's why I think about things like what welds to show and which ones to smooth. A weld is like hand writing, unique to each person.
Posted by: tygaboy Oct 20 2022, 04:41 PM
"Weld it in time" for the trans mount! But to get the various pieces of the mount in the correct location, we first fit the upper bar: leveled to the car and positioned equally fore/aft on each side. Then, based on a handful of different measurements, located center.
Next, we got the hangers fitted to the upper bar, jacked the drive train into position, bolted the trans to the hangers and after ensuring one side's hanger as in the correct location, tacked it to the bar.
With the first hanger located, the assembly was removed and clamped to the fixture table.
I'd previously measured the desired distance needed between the hangers (trans mount boss + washers) and Martin whipped up a spacer block that we used to locate the 2nd hanger.
Here's the fixturing and one of Martin hard at work with the TIG.
Attached thumbnail(s)

Posted by: tygaboy Oct 20 2022, 04:43 PM
With the upper/hanger assembly tacked, we slipped the curved lower tube into place.
Presenting one Ferrari 360 trans mount, ready for final fitting!
Attached thumbnail(s)
Posted by: mikey63 Oct 20 2022, 04:47 PM
Nice work!!
Posted by: tygaboy Oct 20 2022, 04:49 PM
The above mount was then fit back into the chassis and the trans bolted to the hangers.
I then held a large aluminum plate against both tubes and rotated the lower tube until the plate would not rock at all. This ensures the curved tube is completely in plane with the upper bar.
With that done, the lower tube was tacked to the hangers, the complete assembly pulled out and returned to the fixture table.
The spacer block went back in and all joints were welded. I welded parts of the underside (the side you're seeing here) and asked that Martin take care of all welds in areas that will be easily seen. My welding skills are really coming along and much as I "want to do it all", when I have access to someone as skilled as Martin, it makes sense to me that I leverage the opportunity.
Attached thumbnail(s)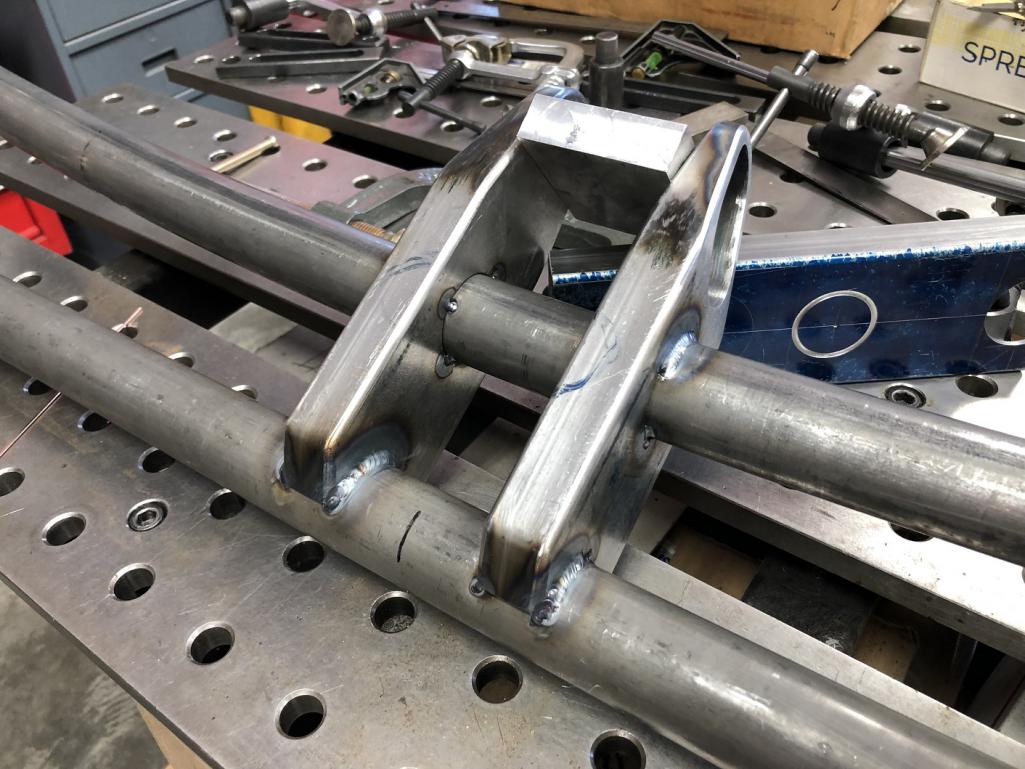
Posted by: tygaboy Oct 20 2022, 04:52 PM
One more trip from the fixture table back into the chassis. Bolt the trans to the mount, verify the tubes are all correctly located and final weld the trans mount in place!
Attached thumbnail(s)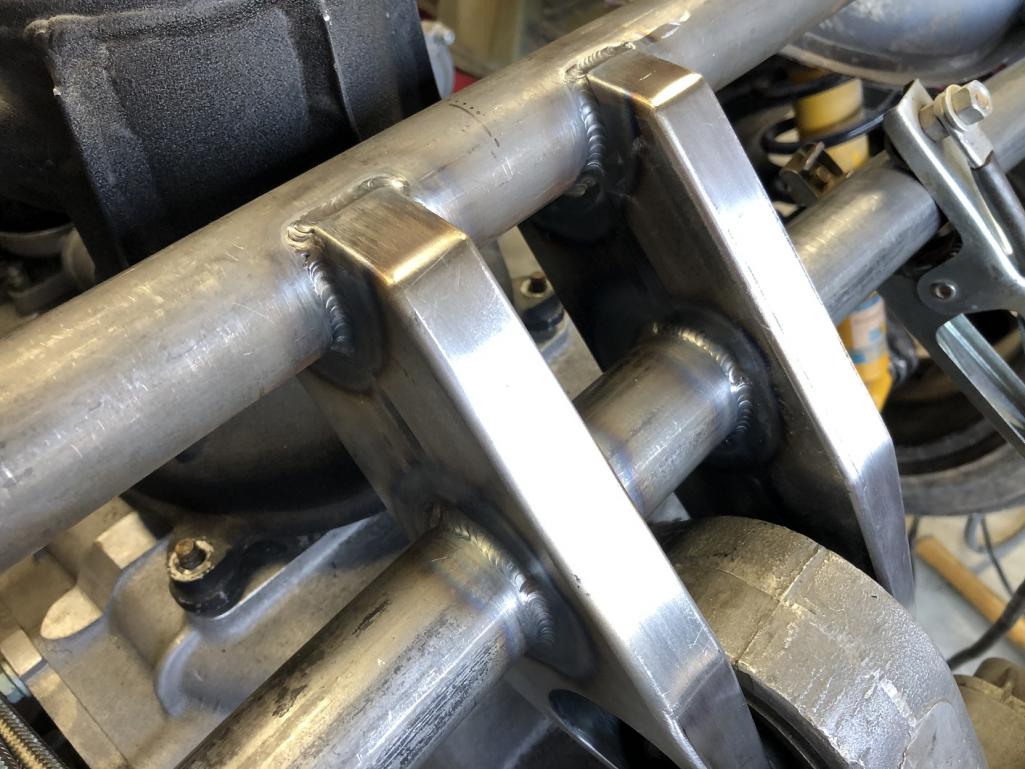
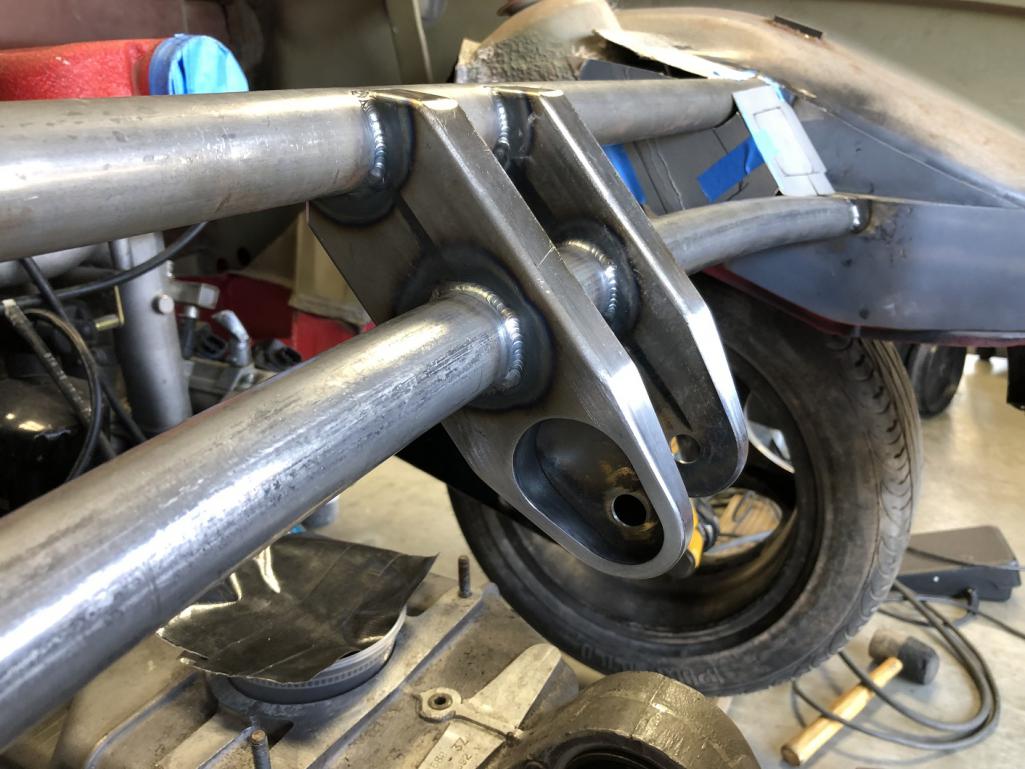
Posted by: tygaboy Oct 20 2022, 04:57 PM
So there it is. After a ton of head scratching and numerous design changes, the car has its first "Ferrari specific" mod all but completed. There are a couple inches of welding left to do on the underside of the cross bars at the chassis but things are plenty strong to safely work on the car.
Major milestone, for sure.
Attached thumbnail(s)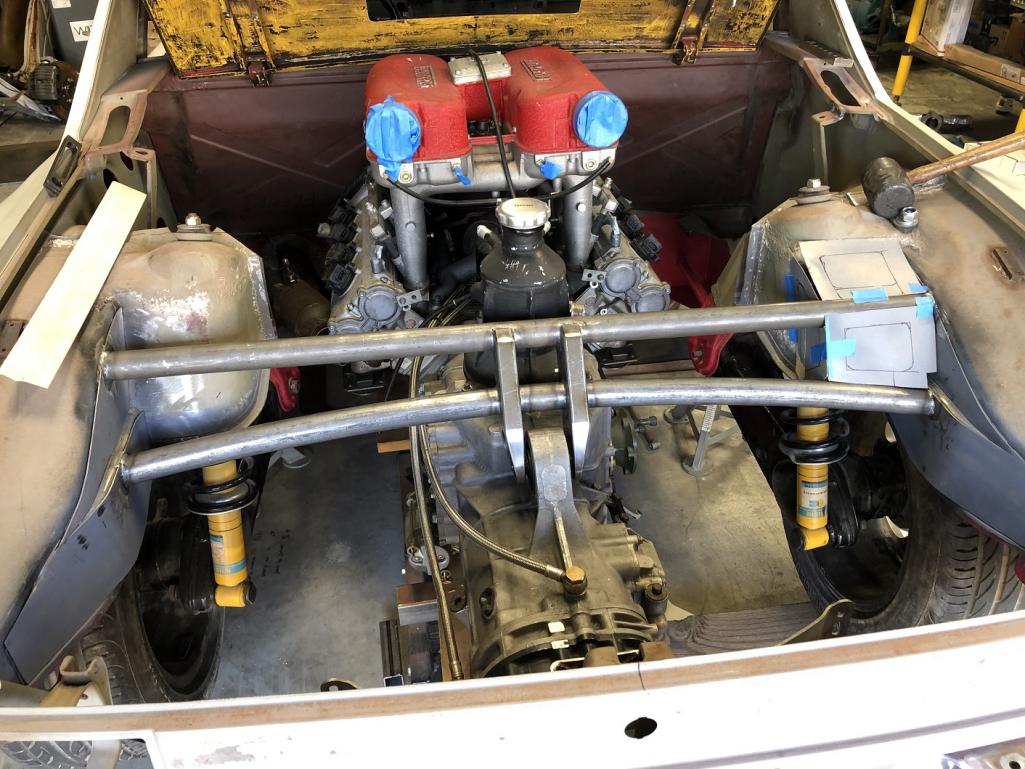
Posted by: Cairo94507 Oct 20 2022, 04:59 PM
That looks very cool Chris.
Posted by: KELTY360 Oct 20 2022, 05:30 PM
Very clean. Will the truncated trunk hide this handiwork?
Posted by: tygaboy Oct 20 2022, 05:38 PM
Very clean. Will the truncated trunk hide this handiwork?
@http://www.914world.com/bbs2/index.php?showuser=5344 - It will, but the trunk will be removable. And I probably won't run with it in, just use it when/if I need to carry a soft bag, etc. All that assumes I can come up with an exhaust that allows for a trunk!
(I think I can...)
Posted by: Krieger Oct 20 2022, 07:39 PM
Very nice work!
Posted by: cassmcentee Oct 20 2022, 08:31 PM
Beautiful
"The Little Engine That Could"
Posted by: Van B Oct 20 2022, 09:40 PM
Oh man that came out great. Definitely worth the effort to go back and forth to the fixture table, the welds are gorgeous!
Posted by: Dion Oct 21 2022, 04:34 AM
Outstanding.
Posted by: Shivers Oct 21 2022, 05:18 AM
Nice work. Great table!
Posted by: horizontally-opposed Oct 21 2022, 06:27 AM
So there it is. After a ton of head scratching and numerous design changes, the car has its first "Ferrari specific" mod all but completed. There are a couple inches of welding left to do on the underside of the cross bars at the chassis but things are plenty strong to safely work on the car.
Major milestone, for sure.
Ok, this looks FANTASTIC.
Nice work, Chris! Saw some hinges recently that had me thinking of you (lol...), but this pic has me thinking about the reverse-hinge, one-piece trunk we were talking about—and it would be a shame to remove this viewing angle from the car. One of the best parts of looking at a Pantera is this angle.
So I am wondering…what about finding a way to attach a CF trunk to the factory engine lid? Suspect it would need bigger hinges at the firewall, and struts to make it nice to open and safe in wind, but could be a lovely thing…as could the nicer hinges so long as you're on the case.
Posted by: rgalla9146 Oct 21 2022, 01:37 PM
Very clean. Will the truncated trunk hide this handiwork?
'truncated trunk'......
Posted by: rgalla9146 Oct 21 2022, 01:39 PM
So there it is. After a ton of head scratching and numerous design changes, the car has its first "Ferrari specific" mod all but completed. There are a couple inches of welding left to do on the underside of the cross bars at the chassis but things are plenty strong to safely work on the car.
Major milestone, for sure.
Phd. in Fabrication and Welding
Stupendous.
Posted by: KELTY360 Oct 21 2022, 01:52 PM
Very clean. Will the truncated trunk hide this handiwork?
'truncated trunk'......
I was hoping someone would notice.....
Posted by: tygaboy Nov 2 2022, 04:09 PM
Cardboard to steel. This is just a test piece to see if I like the shape. I have a couple other designs I want to try before committing.
Attached thumbnail(s)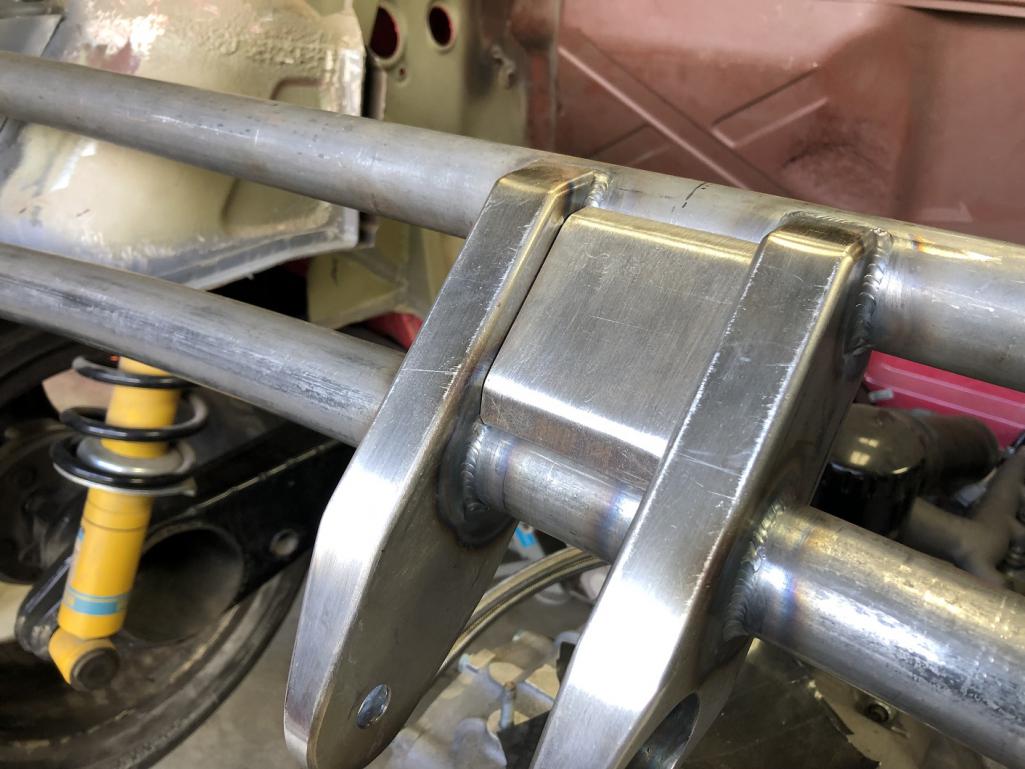
Posted by: tygaboy Nov 2 2022, 04:39 PM
With the trans mount essentially done, it's time to focus on the engine mounts.
At this point, the design has come full circle: all elements of the engine mount have to be removable. Why? Glad you asked! If the aren't, I have to remove the headers to install/remove the drivetrain. I'd rather not have to do that so removable things shall be.
As usual, I need to see things in real life to develop a better understanding of what's what and where so today's effort was to mock up a rough guestimate of the "intermediate" assembly and see how things might fit.
This mock up is just that: not the real dimensional material, barely triagulated, etc. Again, it's just to help me work though design and fitment. Anyway...
The fire wall end of things is pretty straight forward: there will be a set of tabs on the fire wall that will receive a pair of tubes. One tube will run to the front area of the mount, one to the outside.
The other end will have one, possibly two, tubes: for sure, one will run to a spot high on the long and if there are two, the other will run to a lower spot on the long.
In noodling on all this with Martin, we both came to the conclusion that we should chuck the Ferrari headers and build a set from scratch as that'll allow us to get things right where we want them without having to work around a less than optimal situation.
Attached thumbnail(s)
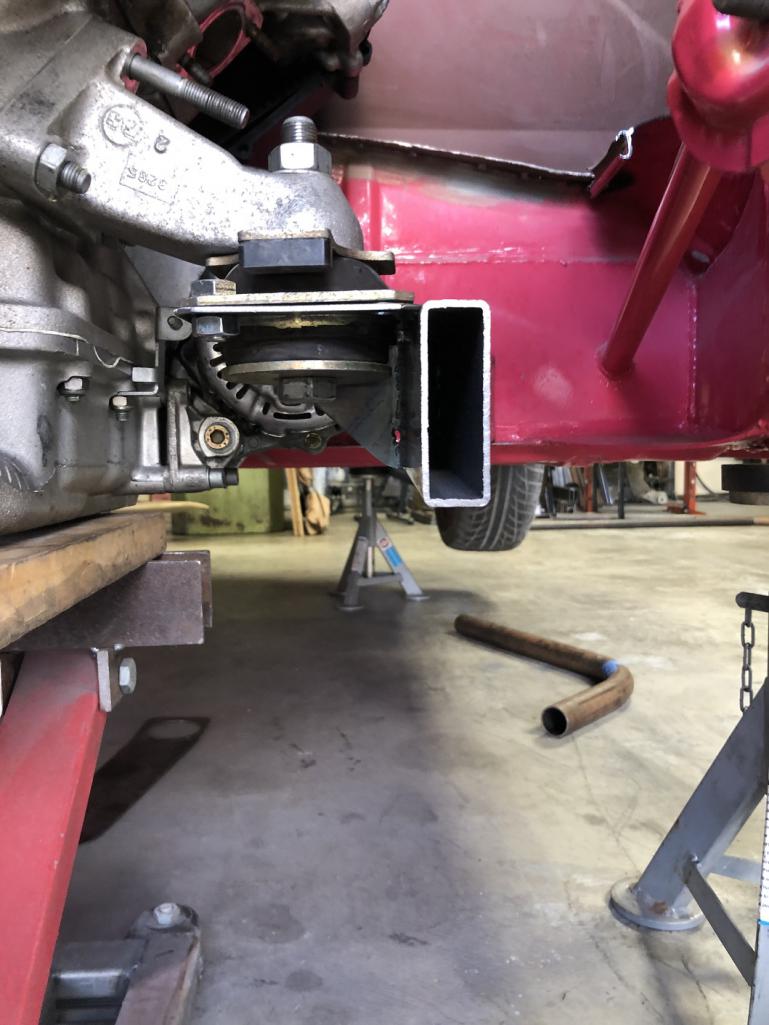
Posted by: tygaboy Nov 2 2022, 06:17 PM
Martin's latest sketch of the removable motor mount. This after seeing what I'd mocked up and chatting for a bit about options.
Working with him is so much fun. We work together really well: Neither if us has much ego around our ideas, there's no holding back on constructive critisism, we're both easily able to say "Oh yeah, I shoulda thought of that."
Best of all, he's got a great eye for style points!
Attached thumbnail(s)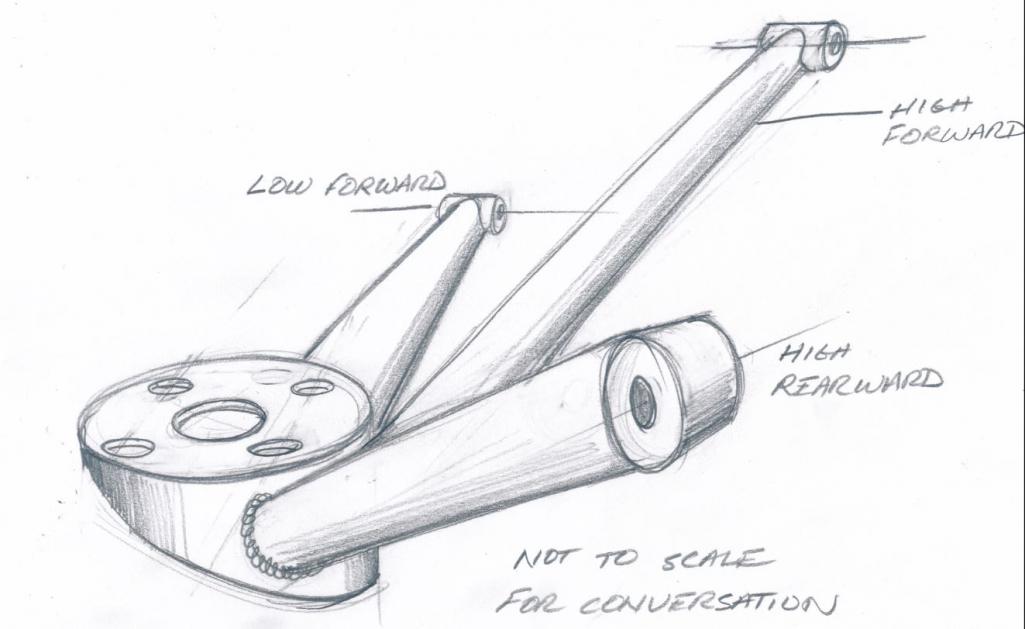
Posted by: Archie Nov 2 2022, 06:57 PM
Very nice!!
Posted by: Bullethead Nov 2 2022, 07:03 PM
Mind boggling.
Posted by: ClayPerrine Nov 3 2022, 06:00 AM
Martin's latest sketch of the removable motor mount. This after seeing what I'd mocked up and chatting for a bit about options.
Working with him is so much fun. We work together really well: Neither if us has much ego around our ideas, there's no holding back on constructive critisism, we're both easily able to say "Oh yeah, I shoulda thought of that."
Best of all, he's got a great eye for style points!
Just my $.02...
It looks like it would work, but I am not a fan of a cantilevered mount. Too much stress on the welds due to all that weight being on the end of the arm.
I can't tell from the pictures, but is there a way to tie the two mounts together with a cross bar? It would help with the twisting a cantilevered mount will experience.
Something to think about?
Clay
Posted by: Superhawk996 Nov 3 2022, 07:40 AM
Regarding mount stiffness for a cantilevered mount:
If you can find any rate information on the engine mount from Ferrari or aftermarket parts, the attaching structure should be 10x the mount stiffness as a rule of thumb.
You could even set up a test rig to measure the mount yourself to get a close approximation the rate if you had the inclination.
That stiffness ratio between the engine mount and the structure will ensure you get proper isolation from the mount and avoid low frequency driveline bounce modes that will lead to a very unpleasant ride. You want to avoid ending up with a engine vertical bounce mode that is in the 4-6Hz range which will interact with the natural frequency of the human body (seated).
Enjoy watching the progress - great build thread.
Posted by: tygaboy Nov 3 2022, 08:39 AM
Just my $.02...
It looks like it would work, but I am not a fan of a cantilevered mount. Too much stress on the welds due to all that weight being on the end of the arm.
I can't tell from the pictures, but is there a way to tie the two mounts together with a cross bar? It would help with the twisting a cantilevered mount will experience.
Something to think about?
Clay
@http://www.914world.com/bbs2/index.php?showuser=1143 - Clay - Let me start by saying that there's a lot of engineering/measuring/discussion that I've not covered in these posts. We've been looking at how a cross bar might be incorporated. At the very start, I assumed I could just run a cross bar under the engine, just like in my LS build. The problem is that with the dry sump design, a cross bar (in a convenient location) would hang too far below the engine and raising the drive train to solve that problem means even worse news for the height of the trans output shafts/CV angles.
The decision has already been made that the bottom of the sump is going to be below the bottom of the chassis by about 3/4" and a ramp/skid plate is planned.
As you can see in the pic, the only place for a cross bar is well back from the engine mounts and there's only room for about a 1" tall piece of material.
Remember, this motor moves around a fair bit so some additional clearance is needed on top of that.
Again, nothing is off the table at this point and whatever we end up doing, it'll be over-engineered.
Attached thumbnail(s)
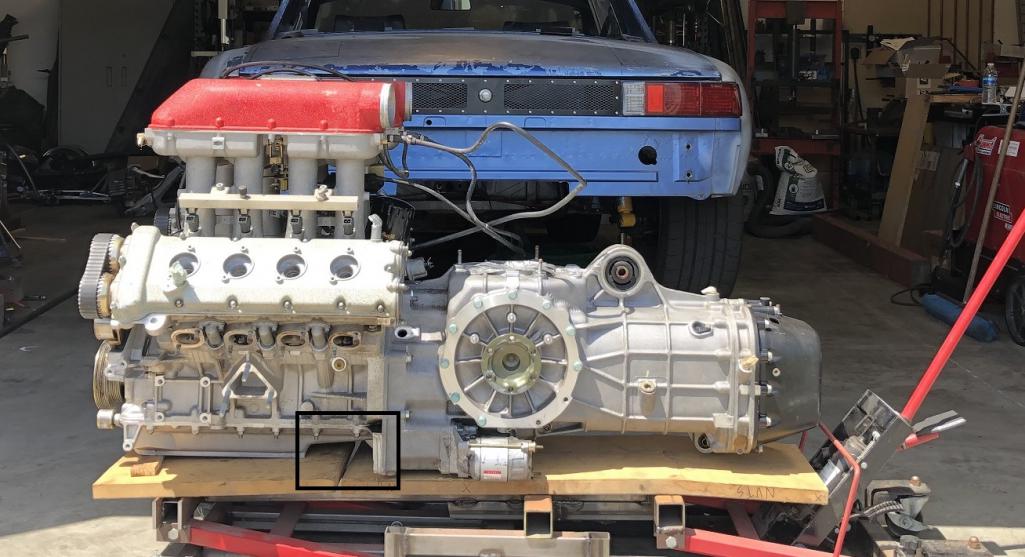
Posted by: tazz9924 Nov 3 2022, 12:01 PM
Martin's latest sketch of the removable motor mount. This after seeing what I'd mocked up and chatting for a bit about options.
Working with him is so much fun. We work together really well: Neither if us has much ego around our ideas, there's no holding back on constructive critisism, we're both easily able to say "Oh yeah, I shoulda thought of that."
Best of all, he's got a great eye for style points!
He even shades his drawings, attention to detail i need in this world.
Posted by: Chris914n6 Nov 4 2022, 05:22 PM
A 1" crossbar is sufficient, it's not structural, it just needs to tie both sides together to stop flex. It would also give you a rear mounting point for the skid plate.
If you think of the assembly as a cradle, I think you will end up with an easy solution.
Posted by: tygaboy Nov 4 2022, 06:05 PM
After another day of design conversation and trying to work out the "best" mount, we came up with this concept. That cross bar / ladder fits into the gap I pointed out in the pic above.
No, it's not to scale, the implied dimensions and angles aren't correct, etc. But it does seem to check all the boxes that we've identified need checking.
And it's likely overkill, which is just what I'm looking for.
I'm thinking it'll be 1.5", .095 wall DOM.
One thing that may change is going to a single tube to connect the side sections vs. the ladder struture you see here.
The rear section is there to pick up that lower trans mount. Based on my research, and given how soft the trans and motor mount rubber components are, that small link/mount is critical to preventing fore/aft movement of the entire drive train. It's got to be accounted for.
What's not shown is how that rear section will tip up and tie into the back of the chassis.
On to fab and fitment!
Attached thumbnail(s)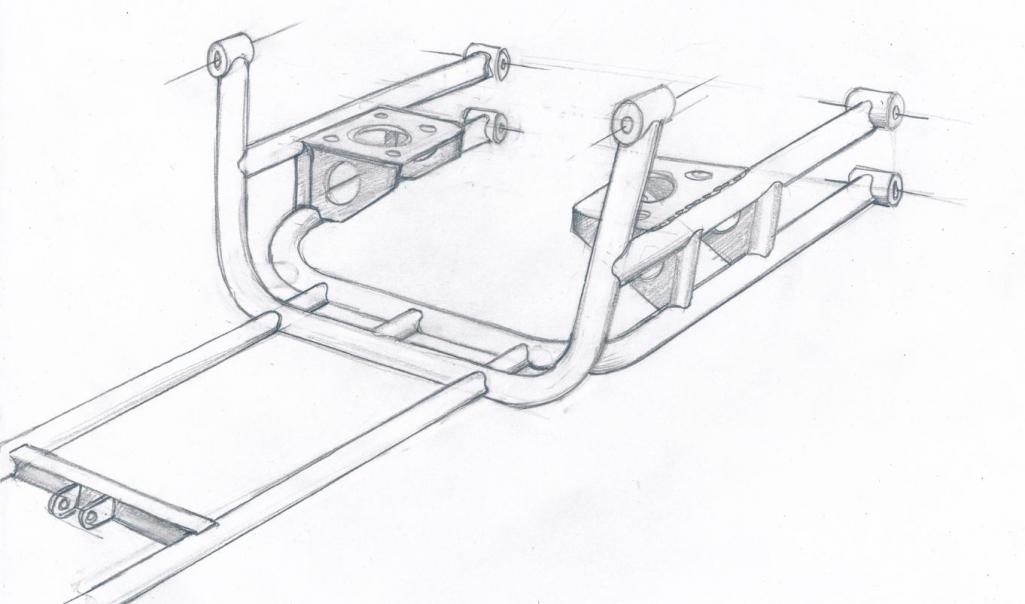
Posted by: 930cabman Nov 5 2022, 09:35 AM
You need help.
Hoping you have checked into a competent facility
late to the thread, is this mill from a 360? looking great, cant wait to see her finished
Posted by: roundtwo Nov 5 2022, 11:54 AM
Martin's latest sketch of the removable motor mount. This after seeing what I'd mocked up and chatting for a bit about options.
Working with him is so much fun. We work together really well: Neither if us has much ego around our ideas, there's no holding back on constructive critisism, we're both easily able to say "Oh yeah, I shoulda thought of that."
Best of all, he's got a great eye for style points!
Very cool. Reminds me of the lost art of story boarding, HAND DRAWN concepts in the field. Totally inspiring. I can smell the metal from here.
Posted by: roundtwo Nov 5 2022, 11:56 AM
One more trip from the fixture table back into the chassis. Bolt the trans to the mount, verify the tubes are all correctly located and final weld the trans mount in place!
The intersection of art and skill! Looks amazing.
Posted by: Maltese Falcon Nov 5 2022, 01:46 PM
Chris, hoping that your client has some good "Comeback remarks" to all of the Ferrari peeps that ask him why
When I dropped the flat fan engine in my black six/gt tribute...the 935 guys were hunting me down with their checkbooks: "Hey we can put that fan to good work"
Keep up your amazing skills Chris !

Posted by: tygaboy Nov 9 2022, 07:02 PM
Proof of concept of the "center" tab bracket. This is just a first effort based on a card board template and while I got pretty close, I have a couple changes to make to get a better fit. Plus the final version of all the tabs will be cut from 3/16" plate.
The cradle's upper bar will bolt to the outside of this where another tab will be, while the lower bar bolts to the inside of this with its other tab farther inboard. So, yes, the cradle walls will be slightly angled.
And that ramp that heads forward under the floor will help establish the front section of the under-drive train skid plate/flat floor. I hope to be able to sneak tunnels on both sides with a difusser at the rear.
Attached thumbnail(s)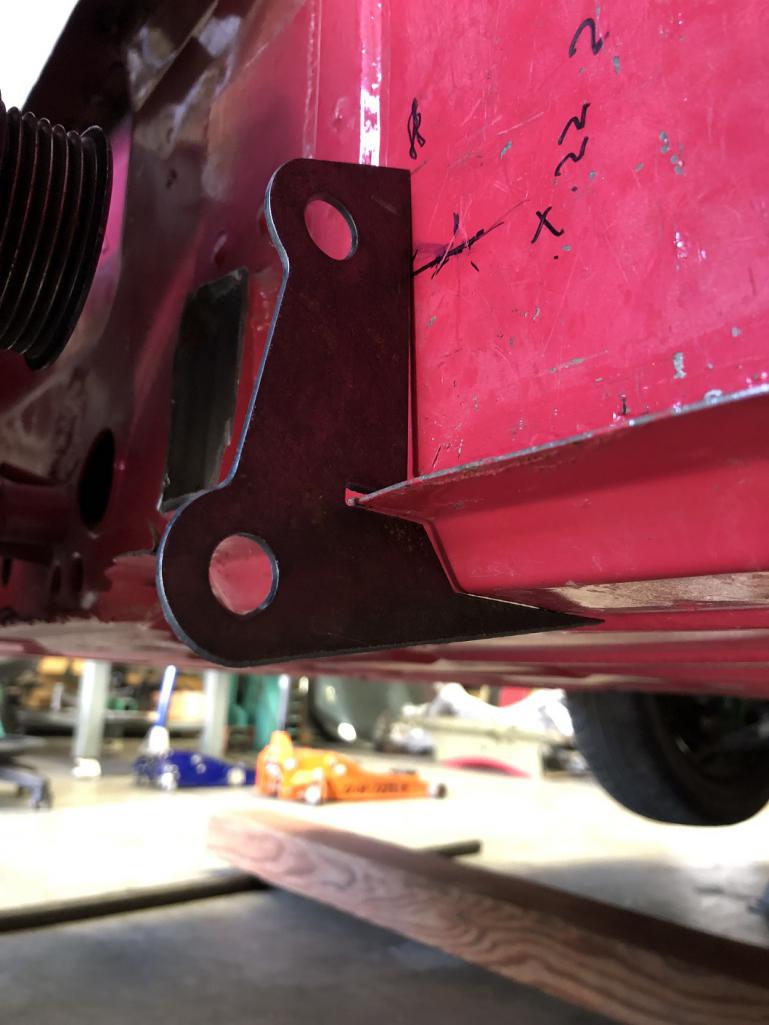
Posted by: tygaboy Nov 9 2022, 07:05 PM
Here's the CAD rear view of the cradle geometry showing the 1.25" tubing and a 1" OD bung that'll bolt to the above mentioned set of tabs.
Attached image(s)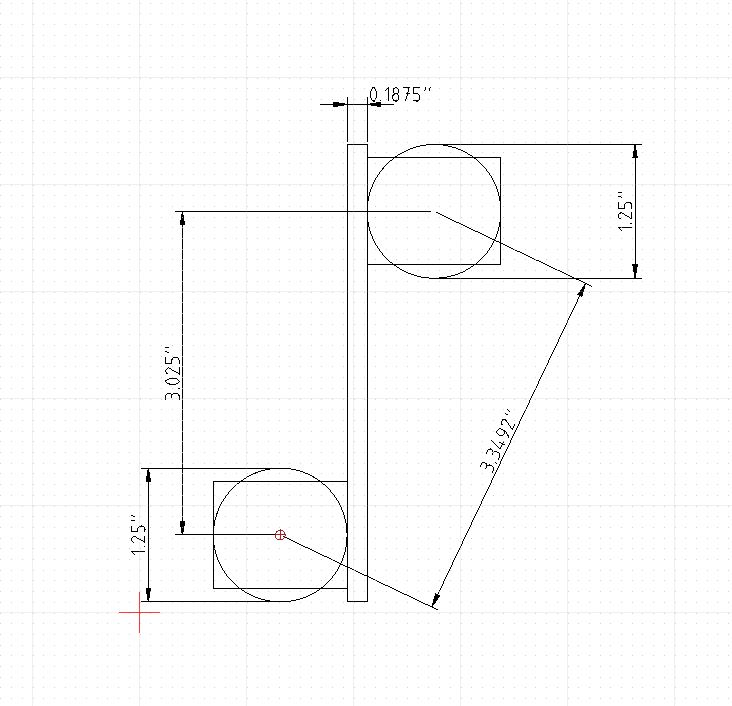
Posted by: willieg Nov 10 2022, 09:53 AM
Chris
Seeing yesterday what you are doing with the cradle and bracket, I do have some thoughts. Yes, there is one in every crowd. Cut (2) pieces of 1.25 tubing, 1” long. Fish eye one of the ends of the 1” tubing on both pieces. Weld the fish eye end to the ends of your cradle. Weld a nut onto the other end of the 1” piece of tubing. Run a bolt through your bracket into the nut welded onto the short tubing to secure your cradle the the bracket. BTW: awesome build!
Posted by: Andyrew Nov 11 2022, 05:18 AM
Proof of concept of the "center" tab bracket. This is just a first effort based on a card board template and while I got pretty close, I have a couple changes to make to get a better fit. Plus the final version of all the tabs will be cut from 3/16" plate.
The cradle's upper bar will bolt to the outside of this where another tab will be, while the lower bar bolts to the inside of this with its other tab farther inboard. So, yes, the cradle walls will be slightly angled.
And that ramp that heads forward under the floor will help establish the front section of the under-drive train skid plate/flat floor. I hope to be able to sneak tunnels on both sides with a difusser at the rear.
Jebus… how tight fitting do you need it Chris?
I mean it’s just gonna be welded, wouldn’t you want a nice 1/16” gap in there for weld space? Man that looks good!
Posted by: tygaboy Nov 11 2022, 02:29 PM
Jebus… how tight fitting do you need it Chris?
I mean it’s just gonna be welded, wouldn’t you want a nice 1/16” gap in there for weld space? Man that looks good!@http://www.914world.com/bbs2/index.php?showuser=172 Andrew, You've met me, right?
As I mentioned after my visit to Singer, my shop mantra is now "Plus or minus less than yesterday!"I'm happy with the latest design's fit.
Attached image(s)
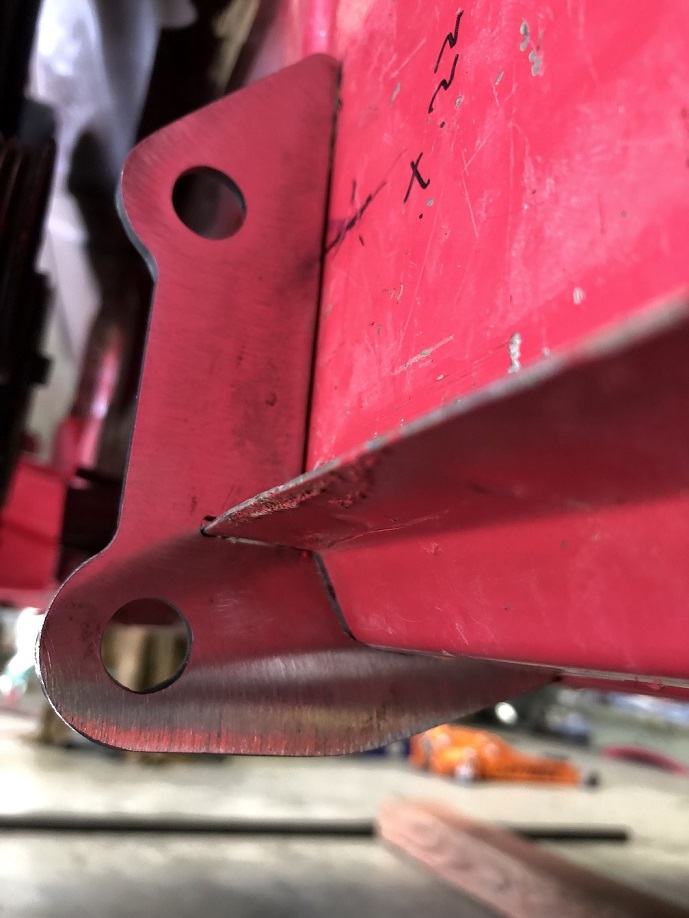
Posted by: Cairo94507 Nov 11 2022, 03:36 PM
Wow- that is a very nice fit.
Posted by: dr914@autoatlanta.com Nov 11 2022, 03:48 PM
I have a 914 but always wanted a ferrari so made my 914 into one: LOL

Posted by: tygaboy Nov 11 2022, 05:35 PM
And here are the final parts in 7 ga (3/16"), fitted with approximate width bungs, just to get a look at whereabouts everything will be positioned.
The undersides of the lower cradle tubes will serve as the location for the drive train skid plate.
Attached thumbnail(s)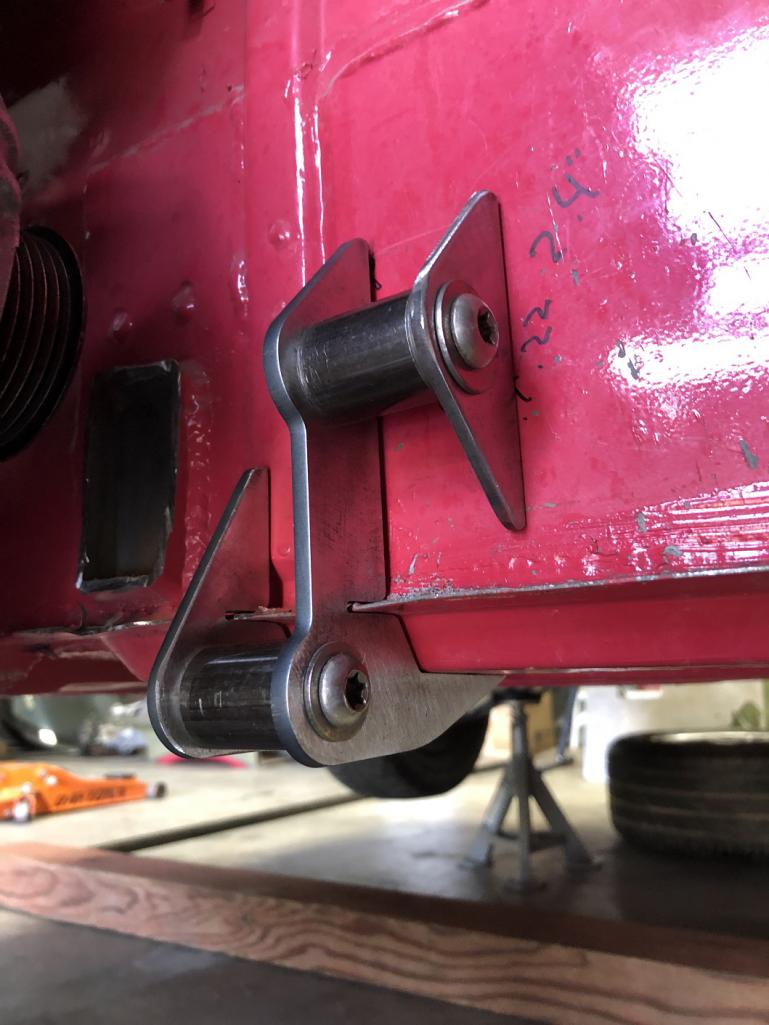
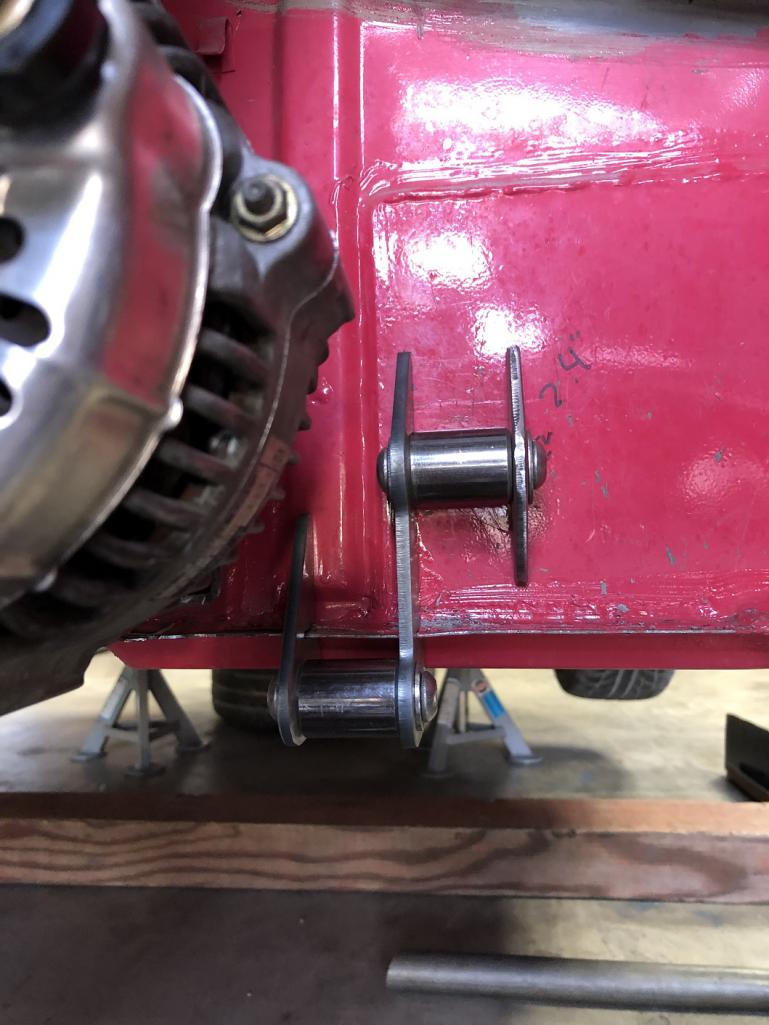
Posted by: Krieger Nov 11 2022, 06:16 PM
Very nice! Now I understand Martin's sketch of the removable mount. Does the third leg of the mount go to the long or is the exhaust the way?
Posted by: tygaboy Nov 11 2022, 06:34 PM
Very nice! Now I understand Martin's sketch of the removable mount. Does the third leg of the mount go to the long or is the exhaust the way?
@http://www.914world.com/bbs2/index.php?showuser=2104 - Andy, Martin's latest sketch was close but changes were made, based on real dimensions. So at this point, the plan is that there will be similar tabs added low on the suspension console that will pick up a wide bung that's aligned with a 3" x 1" cross bar that runs in that gap under the drive train and ties up to the two cradle tubes.
I hope to have the whole cradle mocked in place this weekend so clarifying pics should be coming soon.
Or, just swing by and see it!
Posted by: horizontally-opposed Nov 11 2022, 07:34 PM
When "mere" engine mounts are prettier than whole cars…
Posted by: tygaboy Nov 12 2022, 02:30 PM
One Ferrari-in-a-914 engine cradle kit. Some machining and welding required.
Attached thumbnail(s)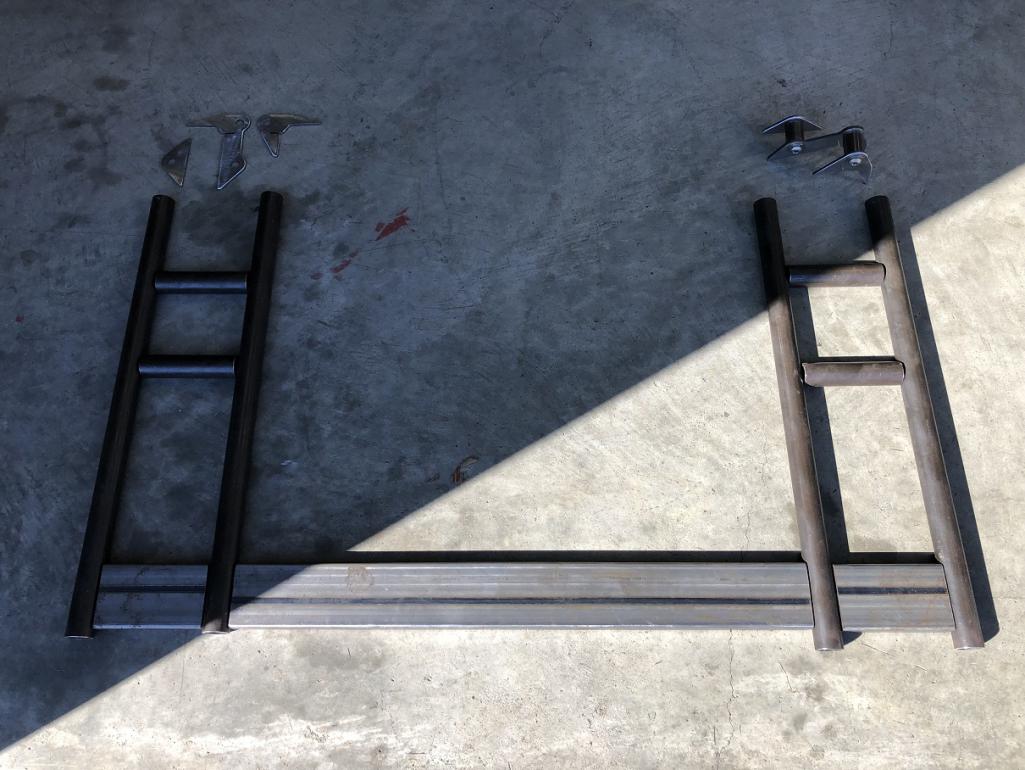
Posted by: tygaboy Nov 12 2022, 06:09 PM
Today Martin and I went to another buddy's shop to borrow his lathe and mill.
First was the lathe, to face both ends of the bungs, then measure and trim them to final length.
Attached thumbnail(s)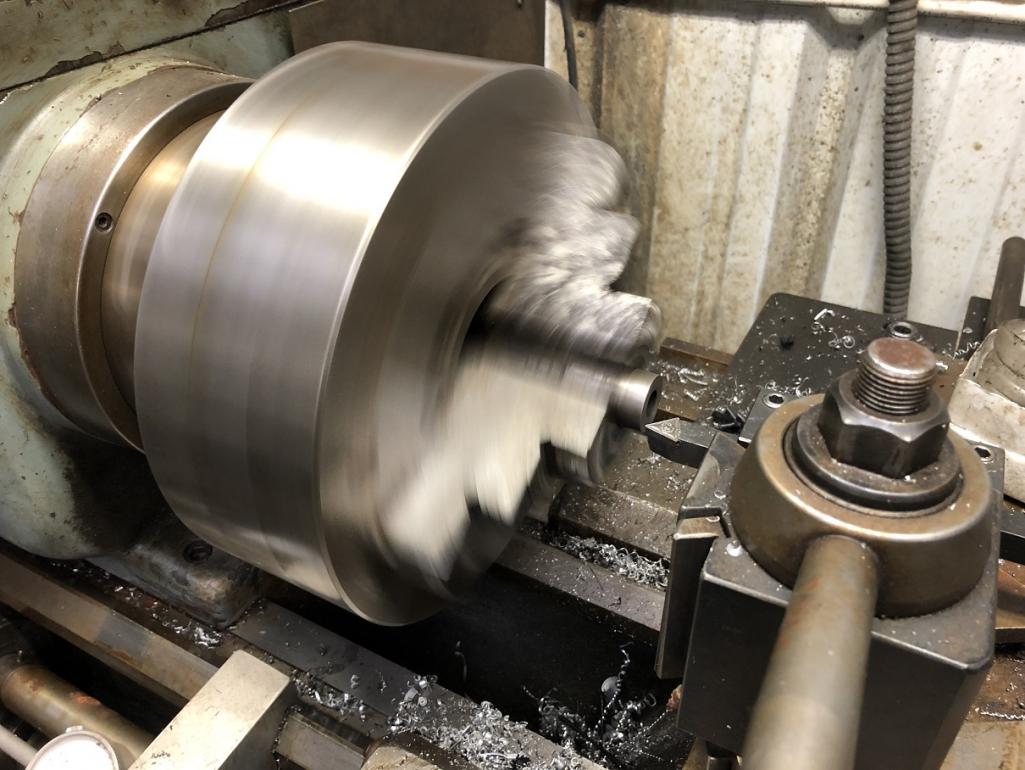
Posted by: tygaboy Nov 12 2022, 06:10 PM
Next, it was into the mill with the cradle tubes to cut the... wait for it... bung hole! 
Attached thumbnail(s)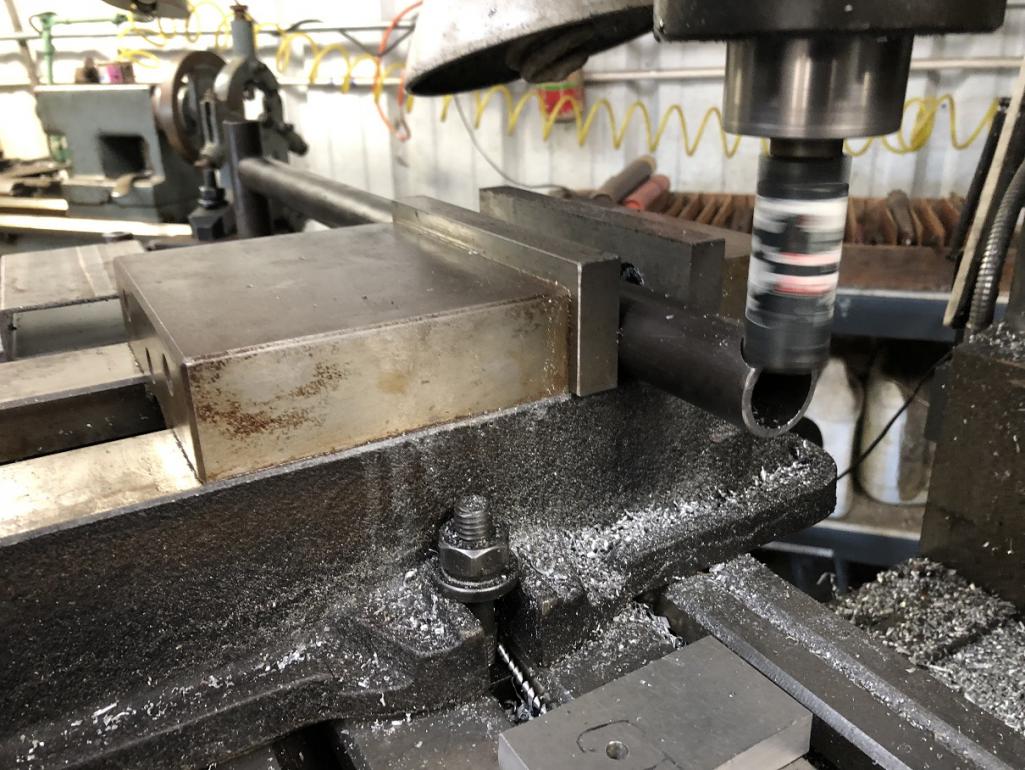
Posted by: tygaboy Nov 12 2022, 06:13 PM
Nothing like having the proper tools available. Super nice result!
The outer edges of that excess material will be trimmed back and the remaining will be wrapped around the bung ahead of welding.
Attached thumbnail(s)
Posted by: Cairo94507 Nov 28 2022, 08:40 AM
Looking forward to some new pictures on this after 2 weeks of no World.
Posted by: tygaboy Nov 28 2022, 09:21 AM
You'd think I'd have made a ton of progress in the past couple weeks. Well, if you count design changes, I did!
Remember, this cradle will be attached to the drivetrain and the entire set up then offered up to the chassis. So, after seeing the "vertical tabs" model mocked into the chassis, I realized the odds of being able to get all of the mounting bungs to slip into those slots, at the same time, at the necessary angle, on my contraption jack set up would be, um, "low".
Why don't I think these things through on paper before I make parts?
Look at the how things mount in the 914. In the 911. All the mounts are horizontally oriented. I am such a doofus sometimes. OK, many times...
The good news is all I had to do was rotate the cradle tubes 90 degrees, update the fire wall tab system to account for a horizontal orientation and cut the new parts. With that done I could fixture up the cradle tubes and get things tacked.
Here are a few pics of the fixture set up being used to build each cradle side, then to position the cross bar. Again, having this table is like cheating.
Attached thumbnail(s)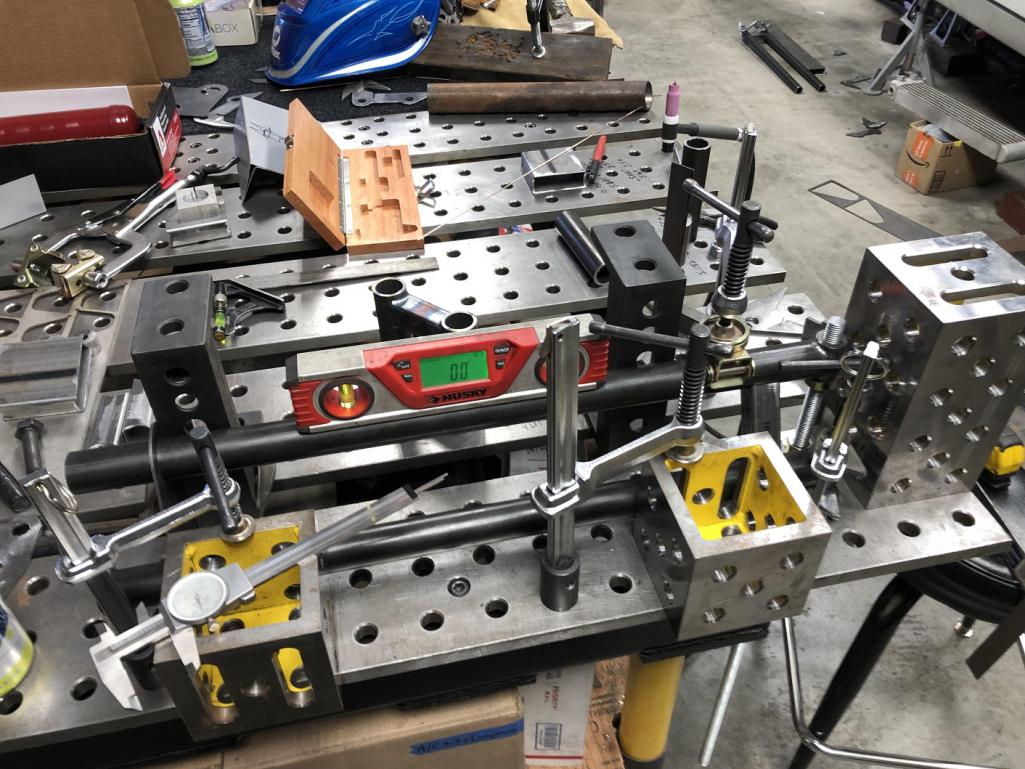
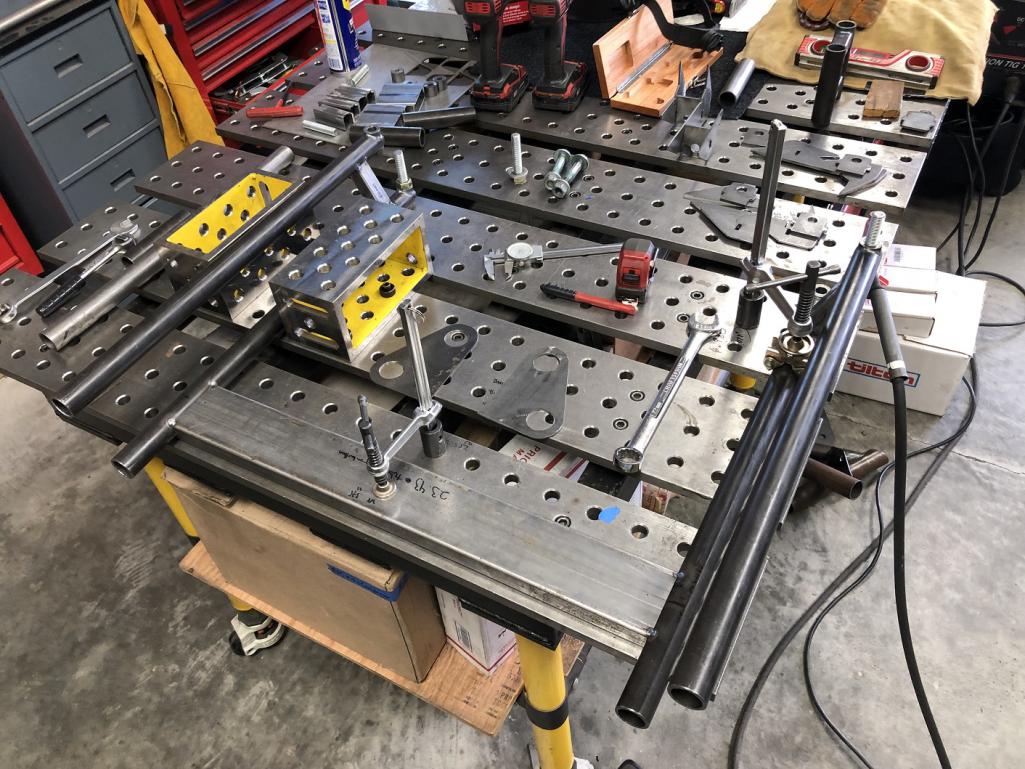
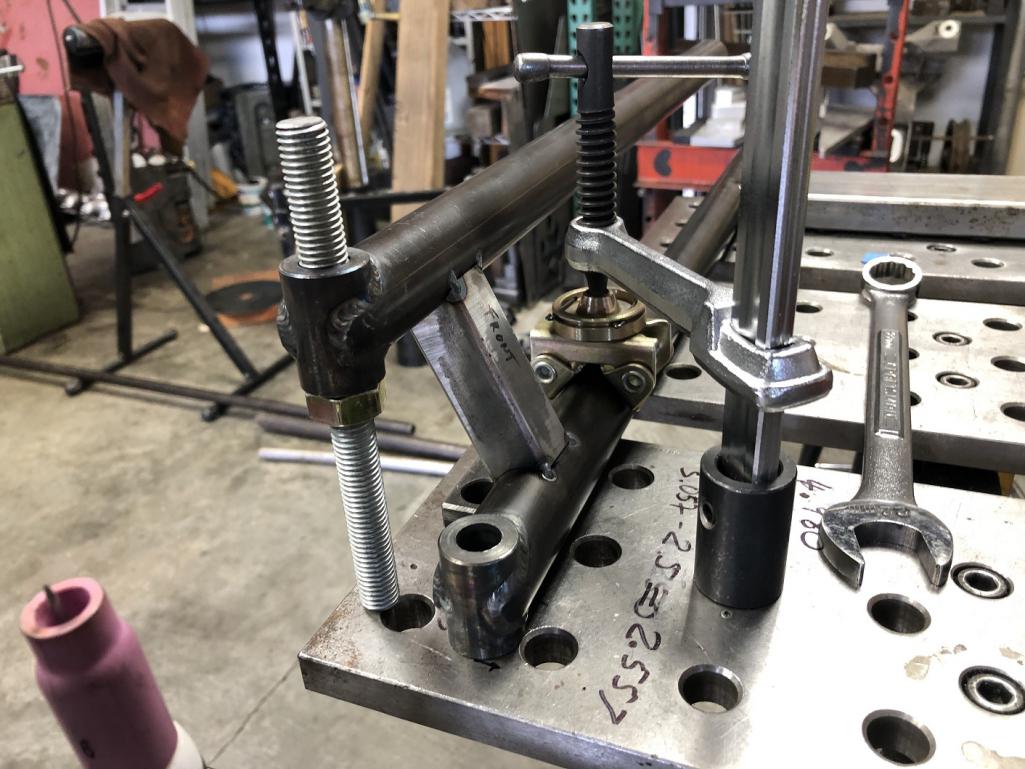
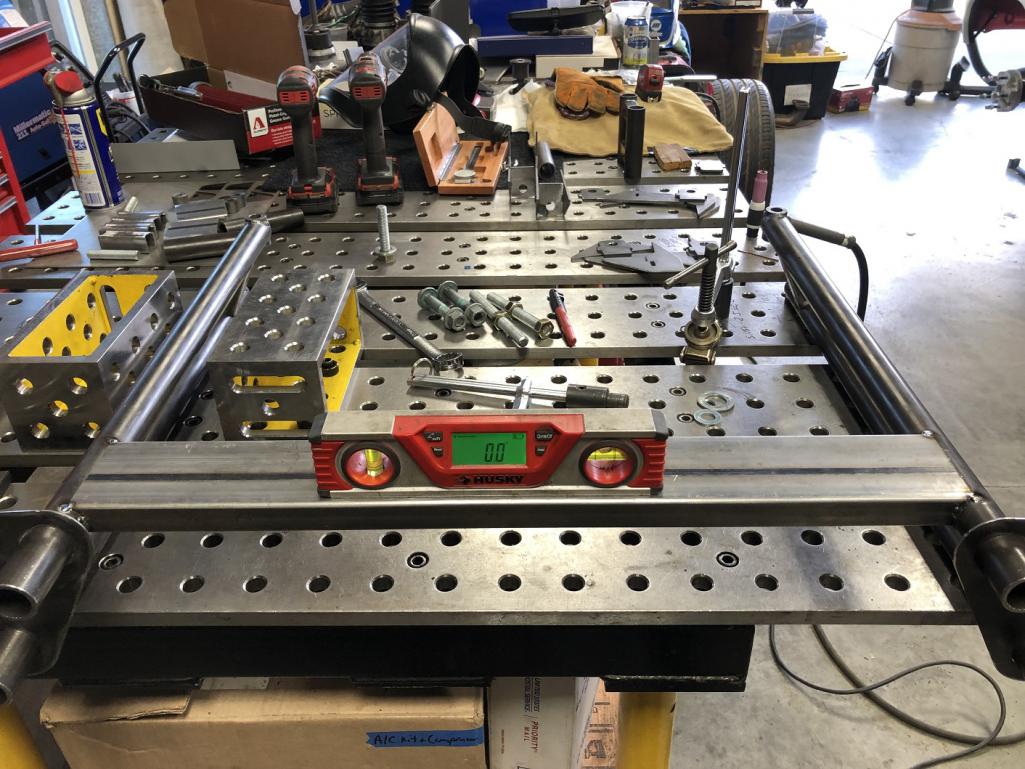
Posted by: tygaboy Nov 28 2022, 09:29 AM
And here's the horizontal tab set. One thing I did account for is that the fire wall isn't necessarily 90 degress to the chassis. To account for that, I used a tab/slot approach with the tabs and mounting plates so that once the tabs are tight against the fire wall and the cradle is mocked into position, the mounting plates have enough slop that they can rotate to their "happy place" within the tabs and self-locate to the exact position needed.
See? Sometimes I'm all over a good approach!
Note, too, that I went after the edges of the mounting tabs with my little metal router. It makes for a really nicely finished part.
Attached thumbnail(s)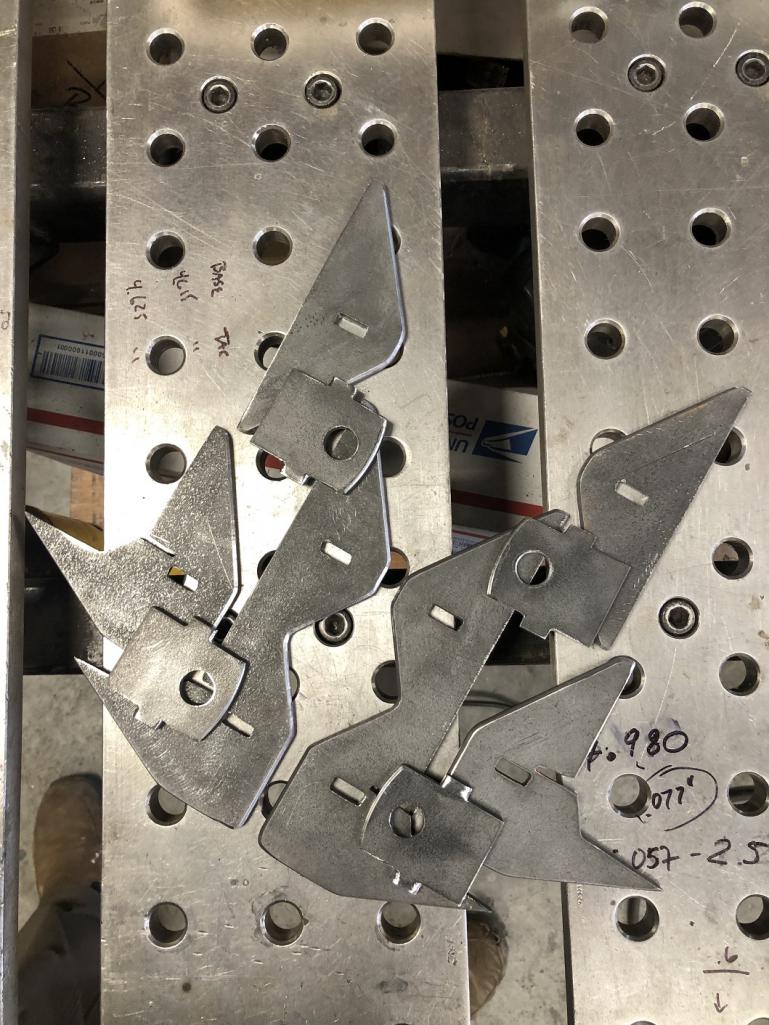
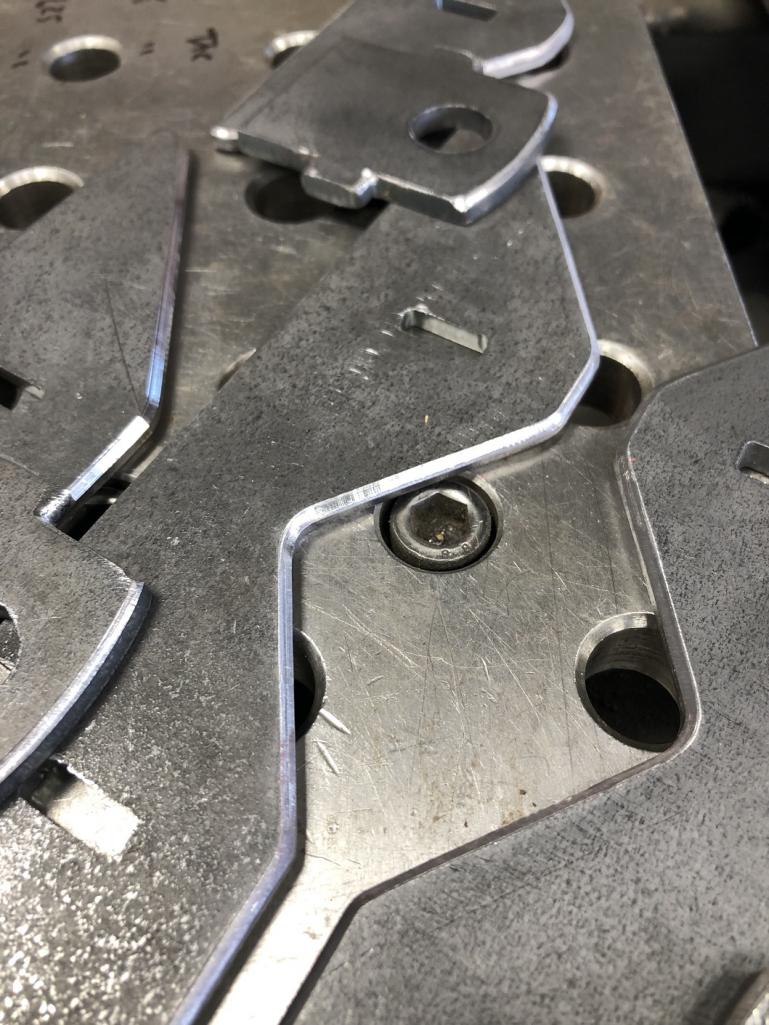
Posted by: tygaboy Nov 28 2022, 09:33 AM
Cradle mocked in place, successfully demonstrating that all the measuring was accurate. I have the needed clearance at the alternator and the cross bar sits just where I wanted it, with plenty of clearance to the drivetrain.
Attached thumbnail(s)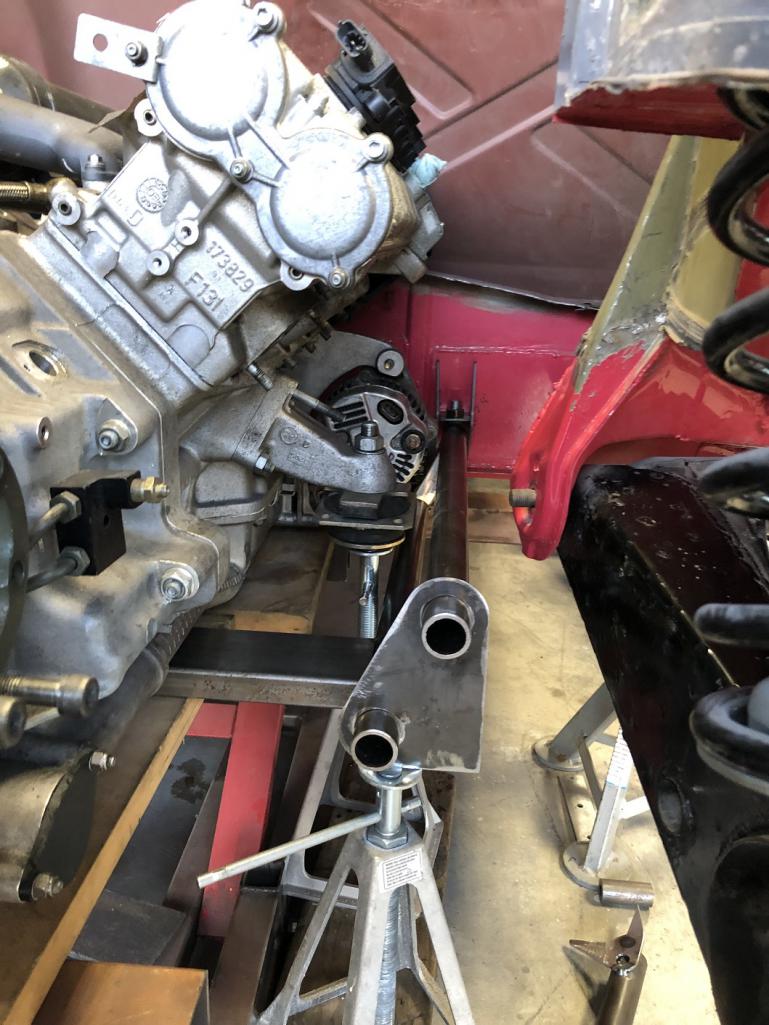
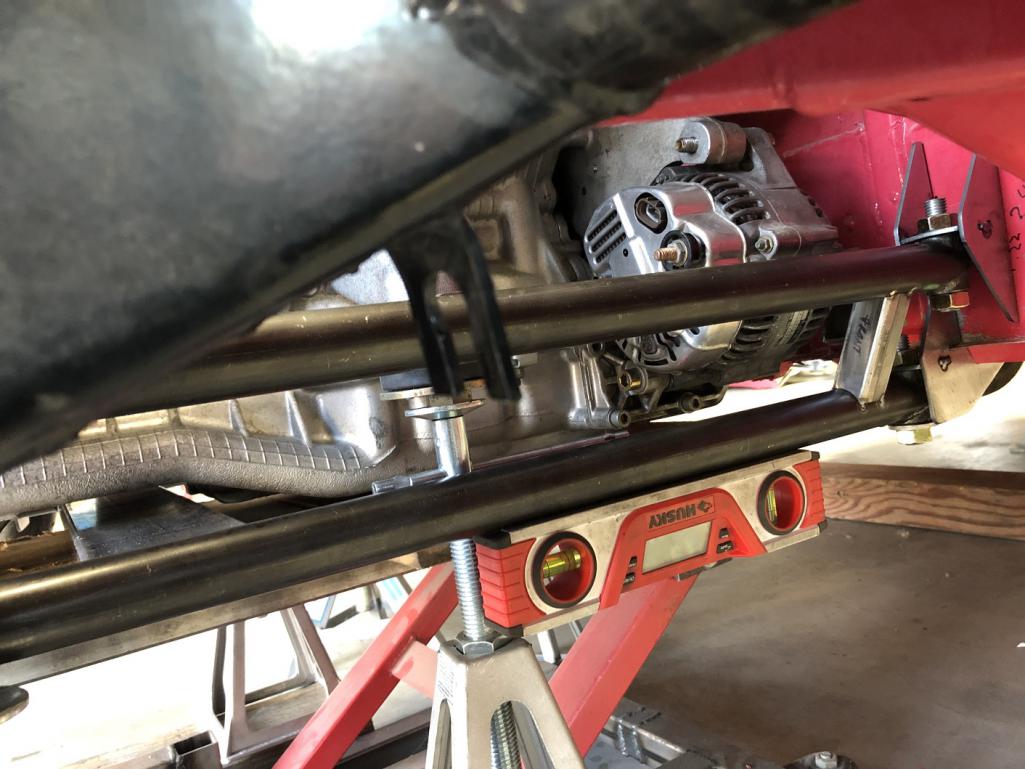
Posted by: tygaboy Nov 28 2022, 09:42 AM
Next, it was on to the engine mount brackets. Here's the current design.
What's neat is that you can cut the holes with a bit over 180 degrees remaining and "snap" the piece over the tube. It really helps simplify mocking it into position as it pretty much holds itself in place.
There will be one of these plates on each side of the mount with a vertical plate between them.
Note that I routered the opening but didn't yet get to the outside edges.
Attached thumbnail(s)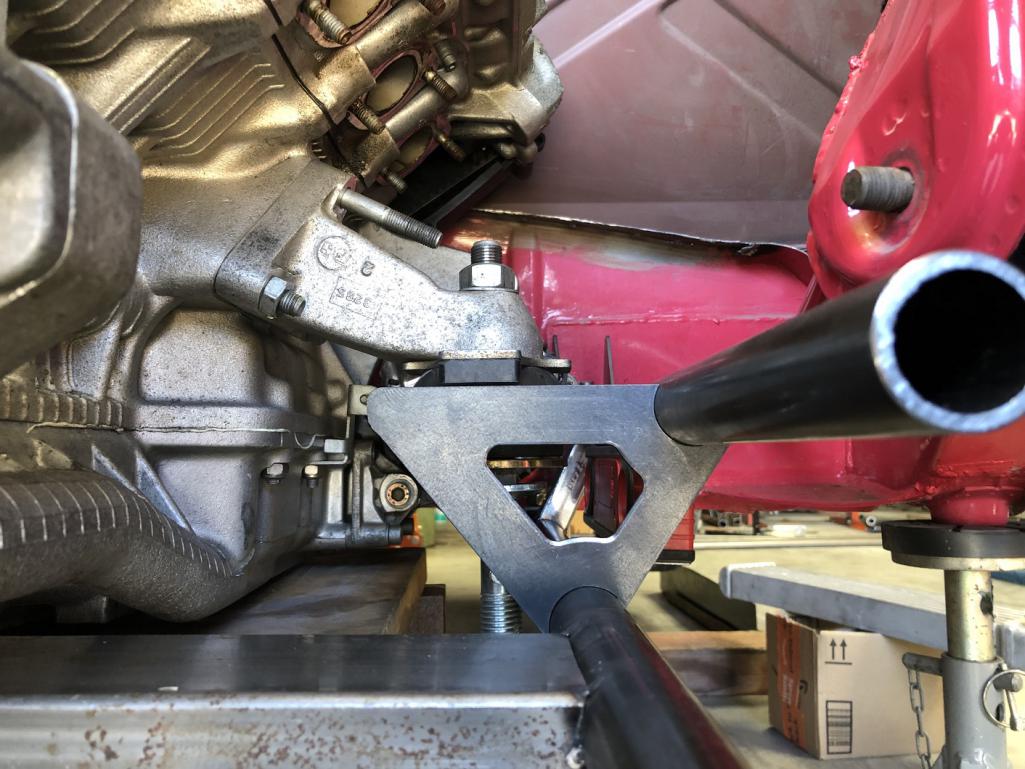
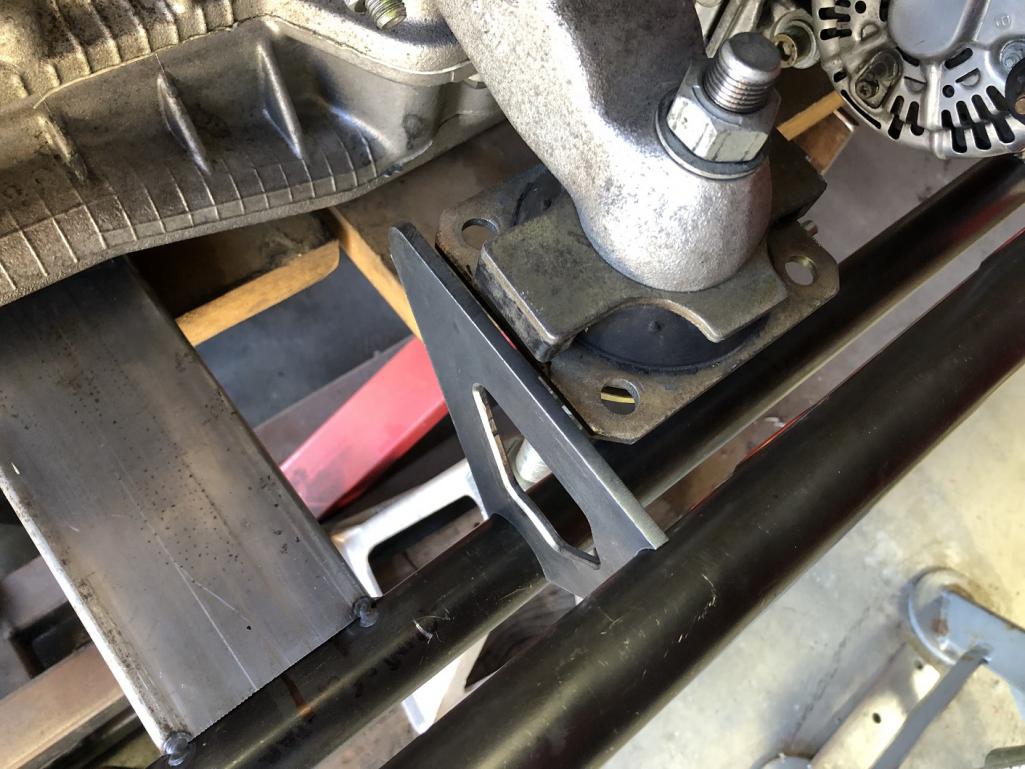
Posted by: tygaboy Nov 28 2022, 09:59 AM
The last piece of the cradle puzzle is the rear mount. There will be a mounting point coming off the suspension console that picks up a mount at the end of the cradle, essentially in line with the cross bar, sorta like this 1st grader's drawing.
Attached thumbnail(s)
Posted by: tygaboy Nov 28 2022, 10:00 AM
This is the support bracket design for the cradle's side of the rear mount. That dimensioned surface will support the mounting plate that'll be picked up by the bracket on the suspention console.
All this will be made from 7 ga plate and, like the rest of the cradle mount, will use 14mm fasteners. Say it with me:
"That's not going anywhere!"
Attached thumbnail(s)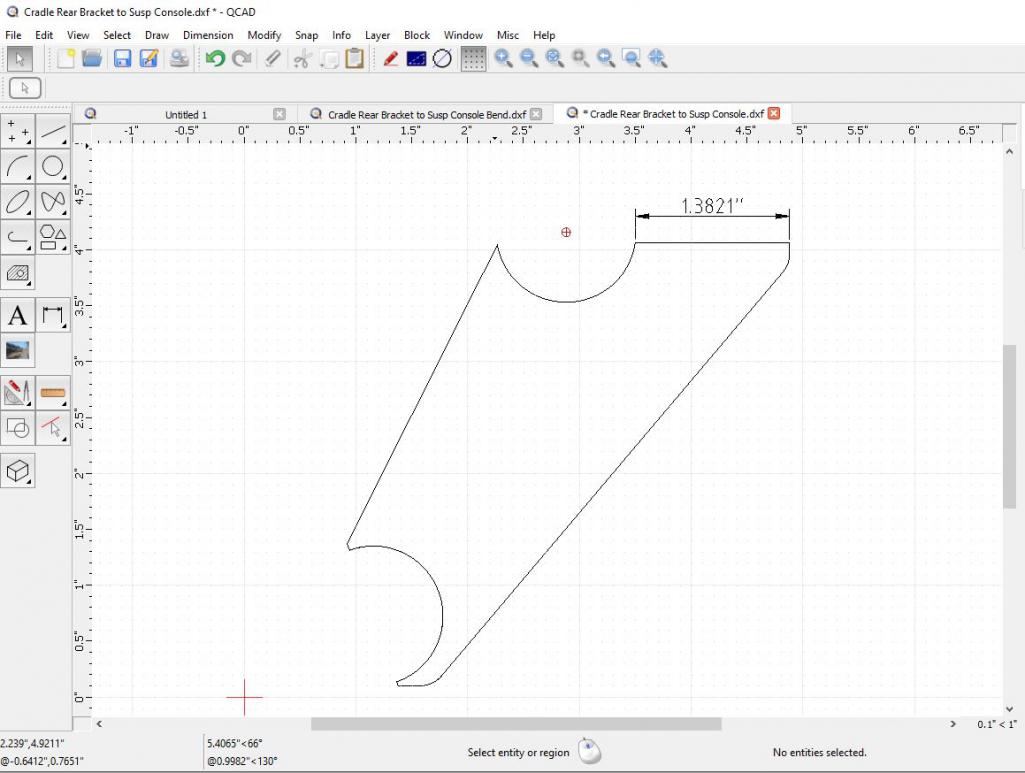
Posted by: tygaboy Nov 29 2022, 04:45 PM
Playing with ideas for the rear cradle mount. The side plates would be .125" with a 7 ga plate at the base for the fastener.
The upper shape isn't final as I think I want to box it all in, leaving access for the trailing arm pivot bolt.
As usual, we'll see.
Attached thumbnail(s)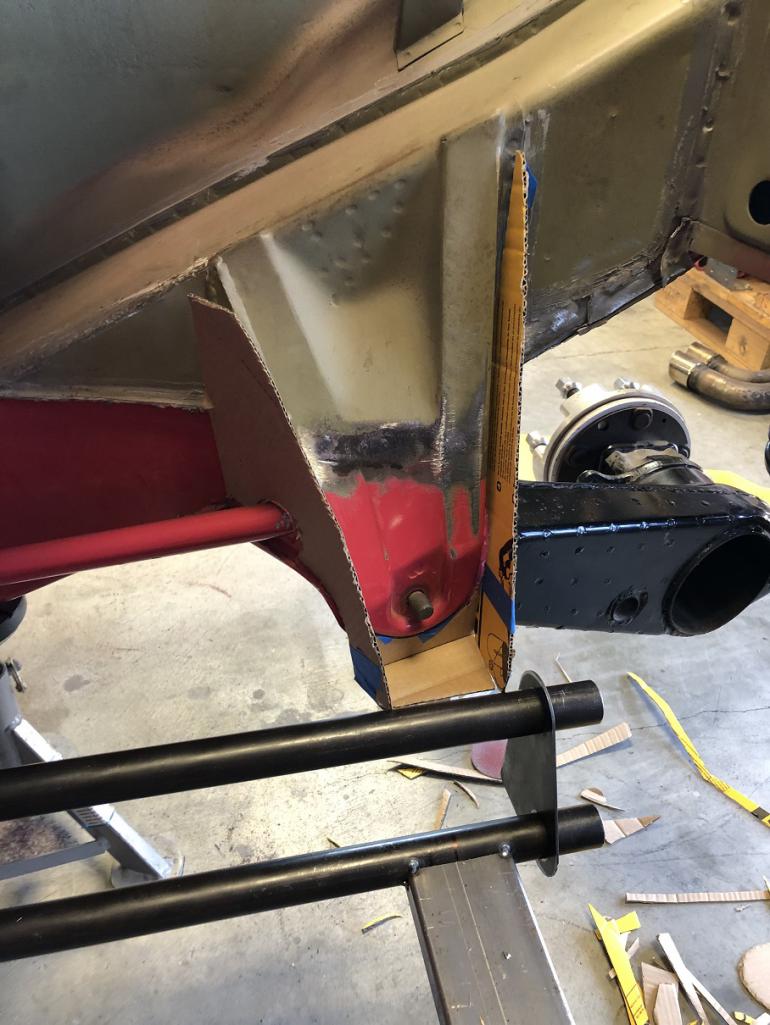
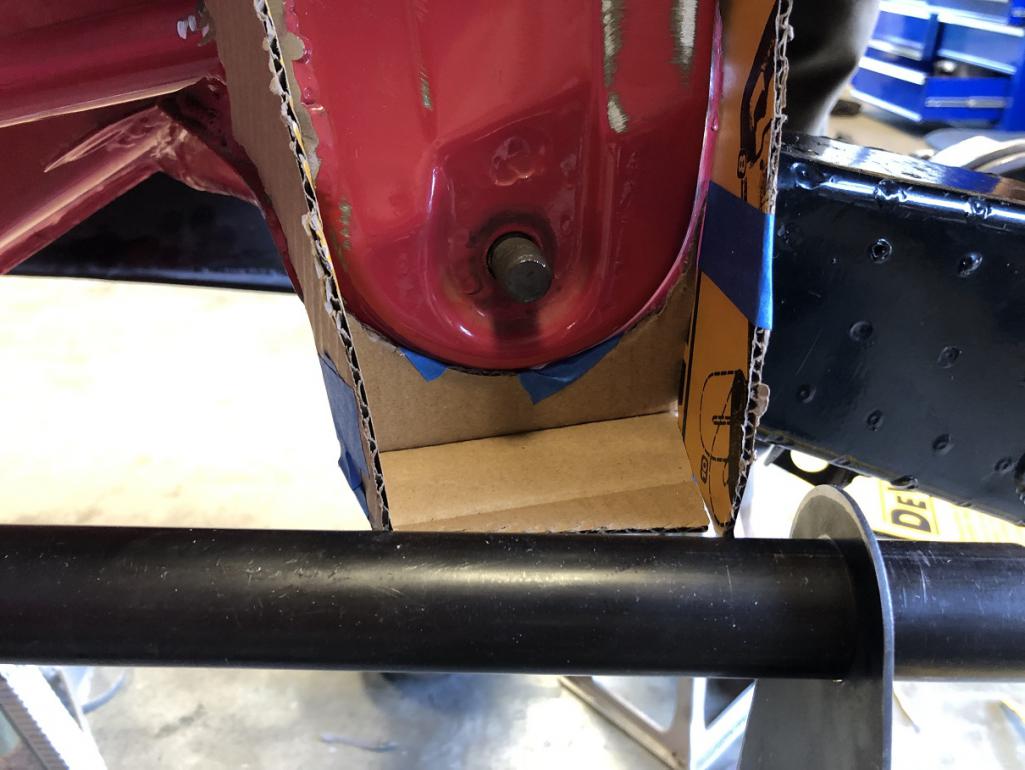
Posted by: tygaboy Nov 29 2022, 04:50 PM
The cradle is still missing a number of parts but it's far enough along to start working out and prepping the locations for each fire wall tab.
This pic gives a good sense of the cradle's overall design/fit. Note the ends of the tubes are yet to be trimmed to length. And a threaded bung will be welded in at the end of each tube. The lower ones will serve as mounting points for the skid plate and the uppers have no current plan. No telling if they'll ever be used but I don't want to look back and wish I had another mounting point.
Attached thumbnail(s)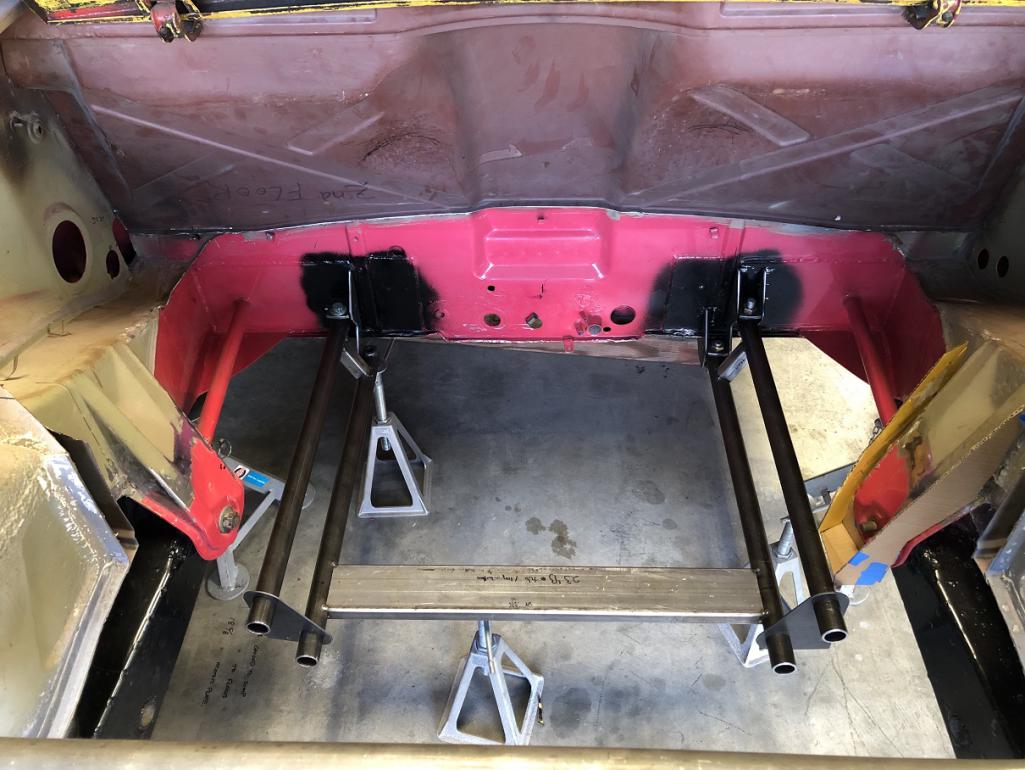
Posted by: ClayPerrine Nov 30 2022, 09:47 AM
I like the idea of using the suspension pickups to mount the cradle. It accomplishes two things in one fix. It supports the cradle, and ties the rear suspension pickups together for more structural rigidity.
Clay
Posted by: Krieger Nov 30 2022, 12:56 PM
I like the idea of using the suspension pickups to mount the cradle. It accomplishes two things in one fix. It supports the cradle, and ties the rear suspension pickups together for more structural rigidity.
Clay
And you’ll be able to cut out those other raspberry braces!
Posted by: tygaboy Nov 30 2022, 04:52 PM
Today was cutting components for the cradle side of the cradle-to-console mount.
The original plan called for carrying the 1x3 up between each side's tubes but I think I prefer this design.
That said, when I first test fit the side pieces, it struck me that they could use a brace to help stabilize them and add more "anti-rack" strength so I added that connector plate between them.
I'll probably make a couple minor design tweaks to a couple of the pieces but this is essentially it for these mounts.
Note that all these parts are fresh off the plasma table and look pretty rough. I'll hit all the edges with the metal router and they'll look way better and have a much more finished look.
On to the console side of things!
Attached thumbnail(s)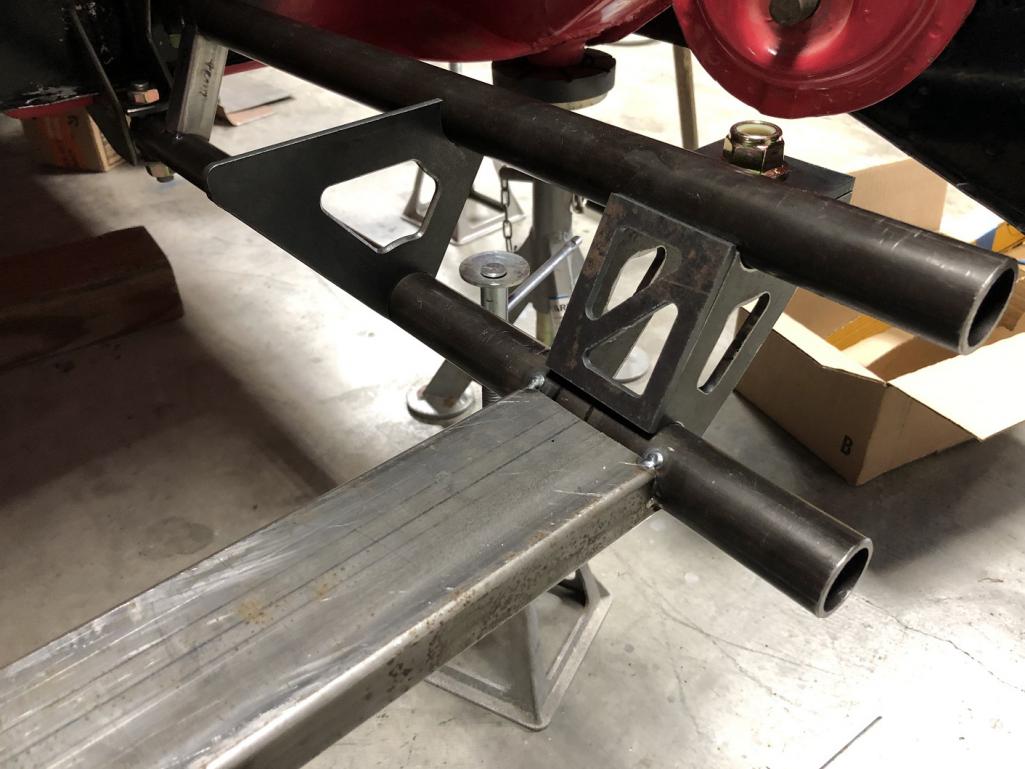
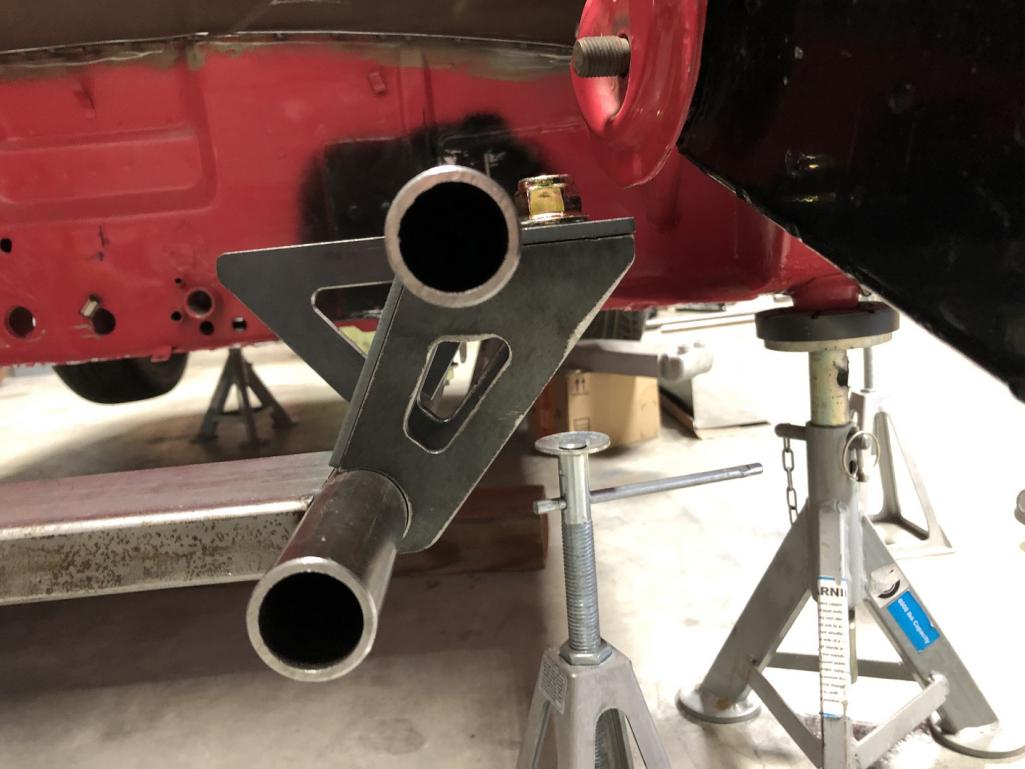
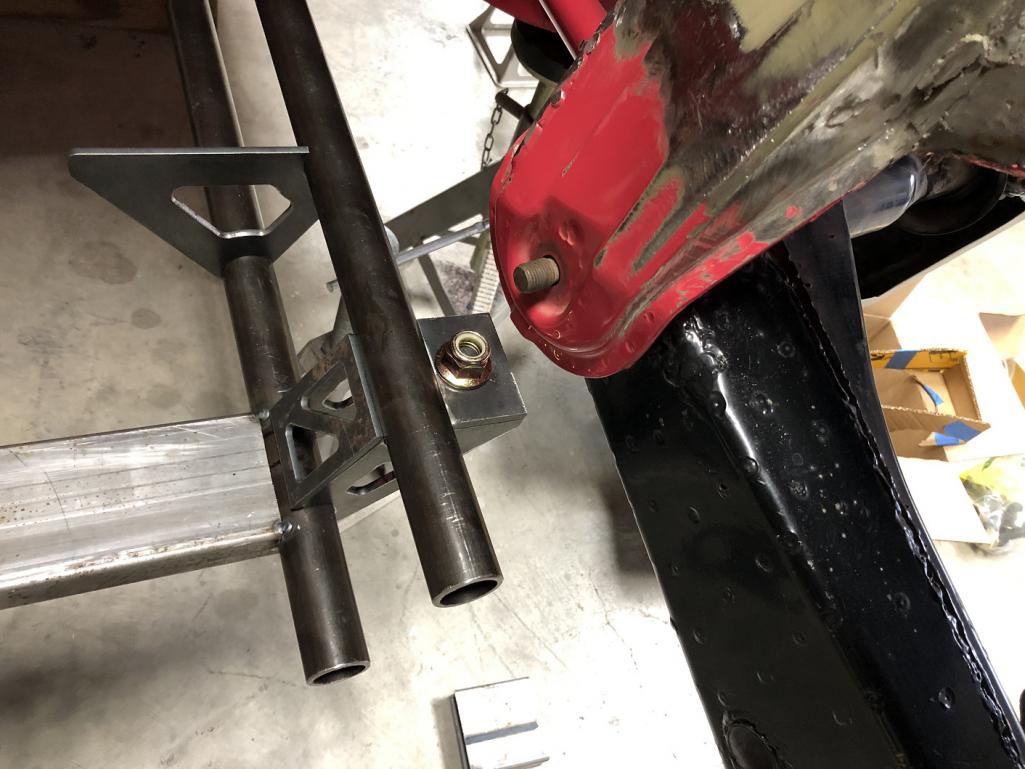
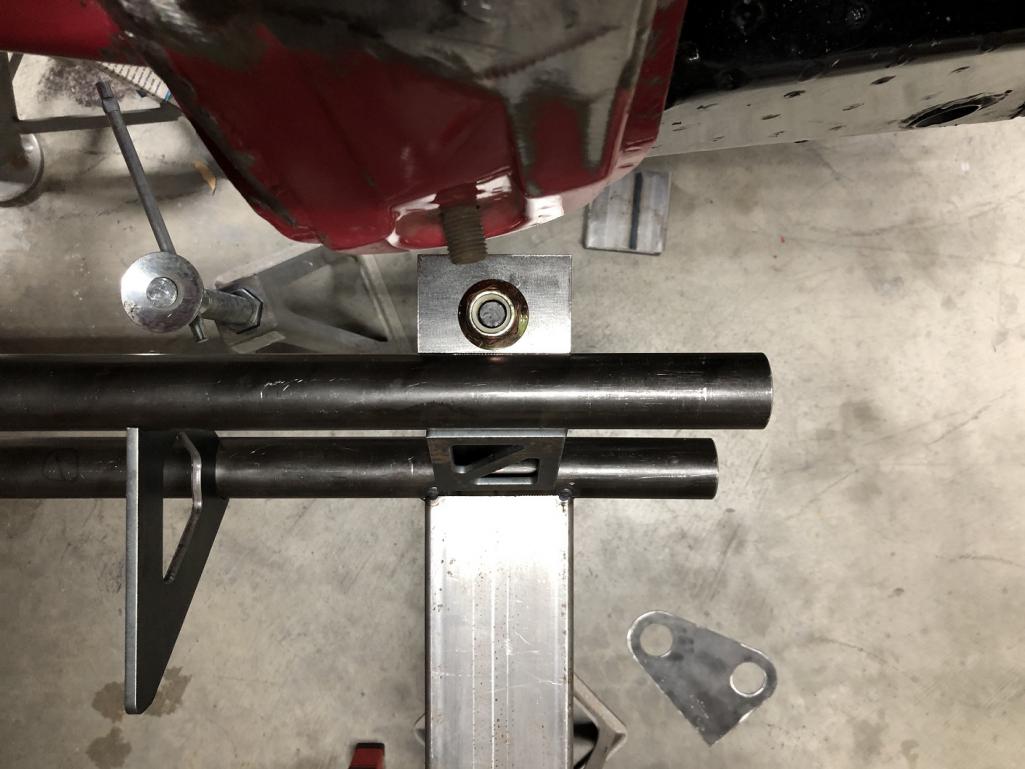
Posted by: tygaboy Dec 1 2022, 01:02 PM
Is this the end of some of my "DIY" processes? Are my plasma table's days numbered?
I can get two of these from SendCutSend for under $45 delivered. Bent and ready to go. Laser cut so better quality than what I can get on my table.
Attached thumbnail(s)
Posted by: Superhawk996 Dec 1 2022, 08:56 PM
Is this the end of some of my "DIY" processes? Are my plasma table's days numbered?
I can get two of these from SendCutSend for under $45 delivered. Bent and ready to go. Laser cut so better quality than what I can get on my table.
Maybe . . . But if you do that to the extreme when does it become bought not built?
Plus when you realize that the radius of a bend should have been larger / smaller or that the cutout could be a trapezoid instead of a hole, you’ll get to spend another $45 and wait while they turn around the parts.
You are an inspiring fabricator, why outsource that?
Posted by: jd74914 Dec 2 2022, 09:33 AM
Yours? Nah. But it does get to be a tougher sell for anyone who hasn't already spent the capital...
Posted by: tygaboy Dec 2 2022, 09:52 AM
@http://www.914world.com/bbs2/index.php?showuser=22428 @http://www.914world.com/bbs2/index.php?showuser=1659 I agree that my sunk costs are a consideration but it really is something to think about. The table takes up a lot of space, too, which is a major contributor to my thinking of selling. The other solution I'm considering is adding on to the Red Barn so I end up with a "dirty room" for the plasma table and other cutting / grinding operations. That'd be the best of all worlds.
And on the "bought vs built" front, I'm pretty confident I'll find plenty of things to do that will still qualify as "built"!
Posted by: Cairo94507 Dec 2 2022, 11:05 AM
I 100% vote for the "dirty" room add-on if you can do it.
Posted by: horizontally-opposed Dec 2 2022, 01:26 PM
There's a lot of value in the love you put into the details, Chris.
Get the temptation, and would probably go that way myself (ok, I know I would), but not sure it's the right path for you. The details like these are what make your builds IMO.
Just two cents…
Pete
Posted by: Chris914n6 Dec 2 2022, 03:16 PM
I doubt the bends would be precise enough to fit like you planned.
Plus you still have to change your mind one more time....
Posted by: tygaboy Dec 2 2022, 03:22 PM
Well, I'd already worked up the design and purchased the material so figured I may as well move forward with a weld-together mount.
The plasma table really does make quick work of all this and to @http://www.914world.com/bbs2/index.php?showuser=22428 Phil's comment, I did update the design, if you can imagine that... I opted to widen the mount and have the center brace sit inside the side plates vs on their edges. This required shortening them a bit and reshaping the lightening holes.
Then I treated all the edges (that won't be welded) to some style points, courtesy of the metal router.
And I agree, @http://www.914world.com/bbs2/index.php?showuser=2058 Pete, it is more satisfying to look at things and say "I designed AND made that".
Time for some
Attached thumbnail(s)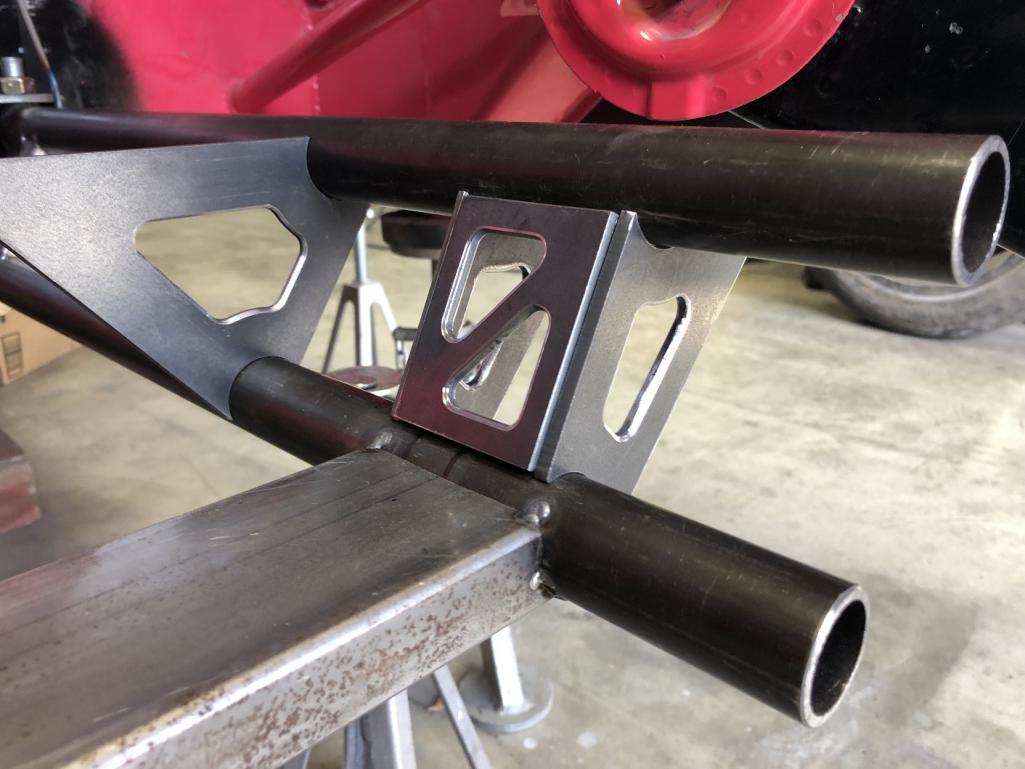
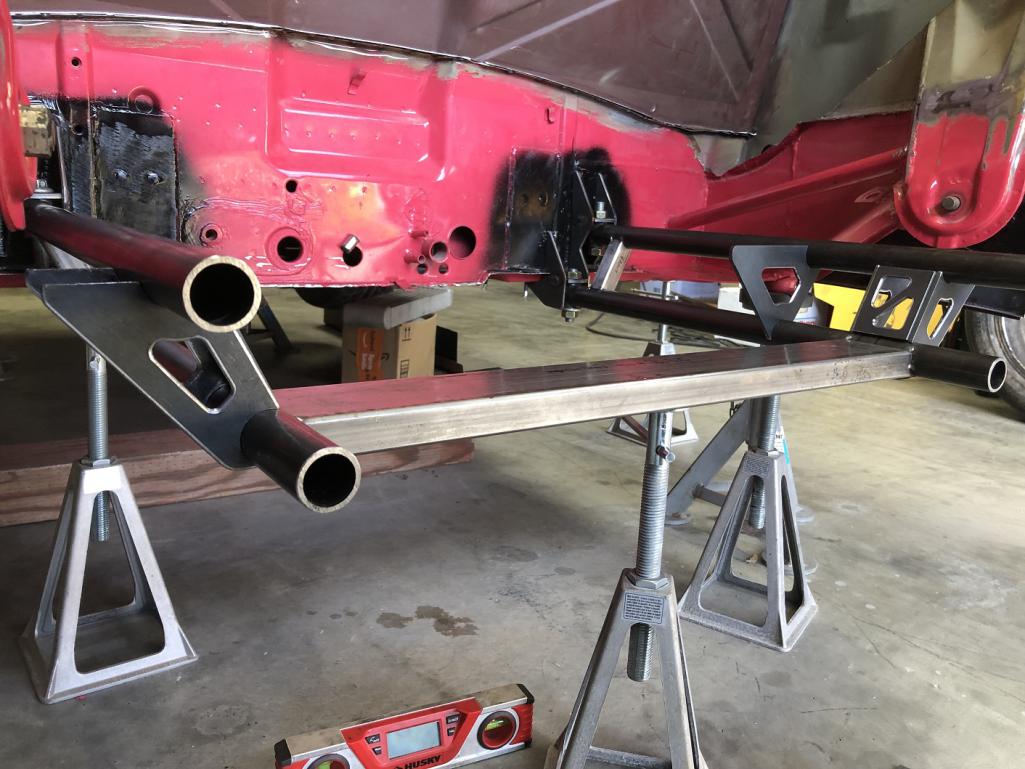

Posted by: Cairo94507 Dec 2 2022, 03:48 PM
Love the metal router edges.
Posted by: tygaboy Dec 2 2022, 06:53 PM
@http://www.914world.com/bbs2/index.php?showuser=431 Chris for the win! It seems you guys know me better than I know myself.
After looking at the mounts for a bit longer, it struck me they looked somehow incomplete. So another revision later and I have what I think is a more functional, stronger design. Tying the cross bar to the mount provides better support at that corner.
But the real question is, am I really done changing things?
Attached thumbnail(s)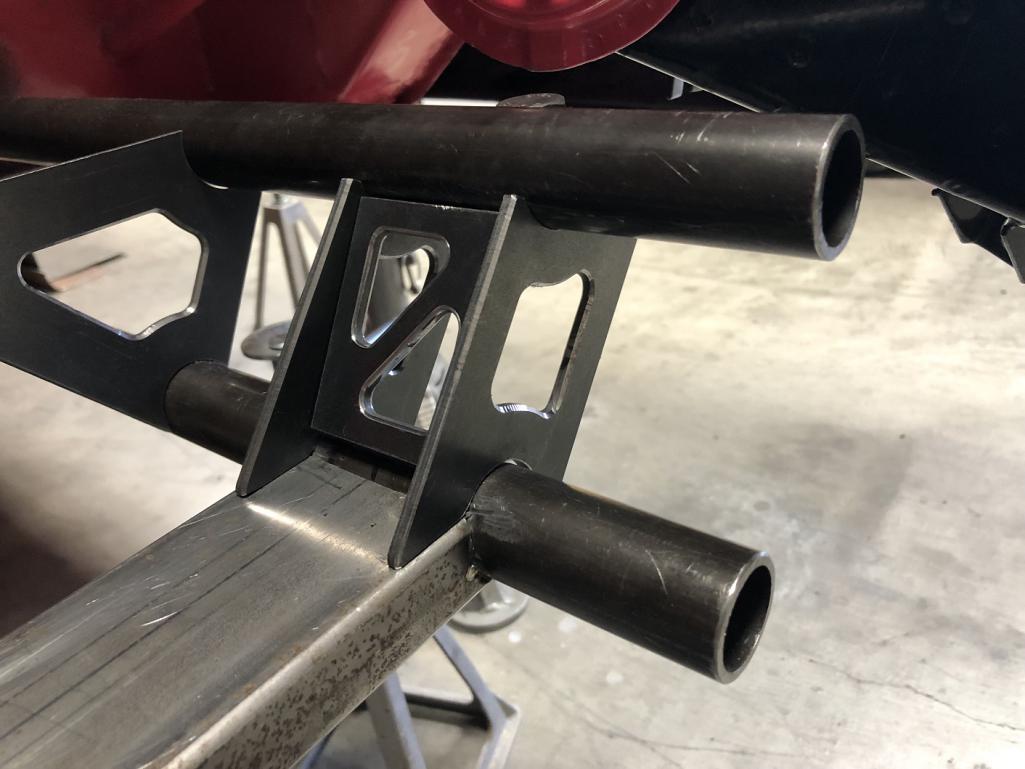
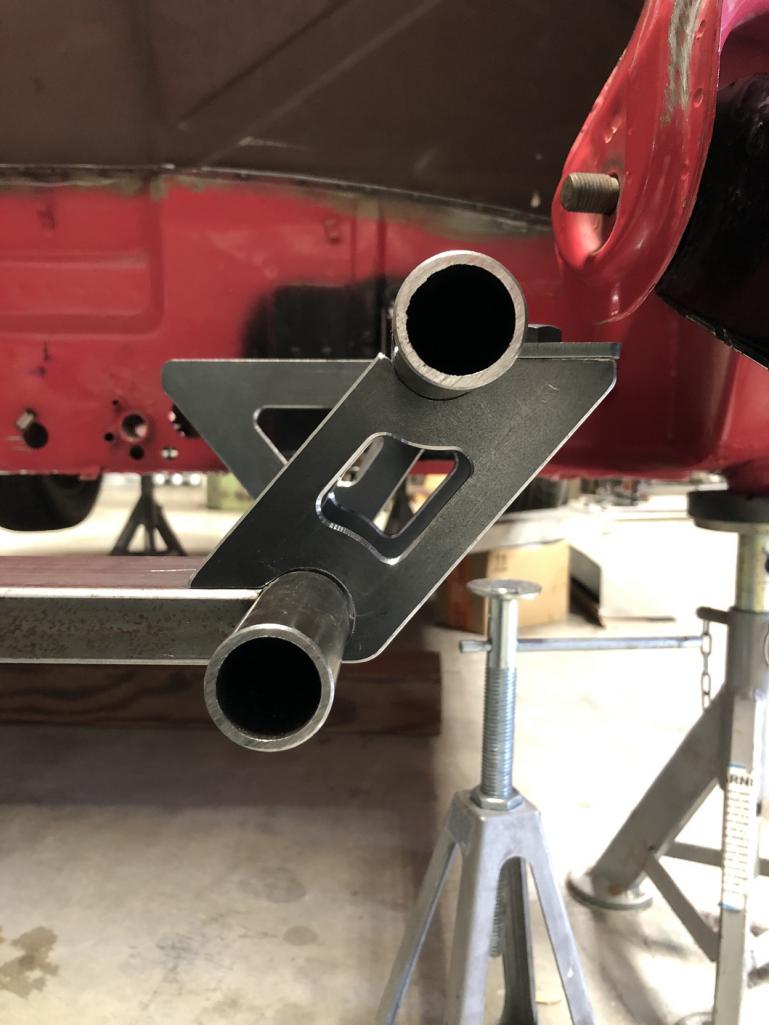
Posted by: Chris914n6 Dec 2 2022, 07:48 PM
I knew something better was coming.
I feel the center brace could be more interesting than 2 triangles. Thinking a nod to Ferrari since that's its job.
Posted by: SirAndy Dec 2 2022, 10:39 PM
Not even close ...

Posted by: Mike Bellis Dec 3 2022, 10:24 AM
I could have made a much prettier cradle if I had them fancy part cutters. Mine weighs 41 lbs, how about yours?
Keep up the good work!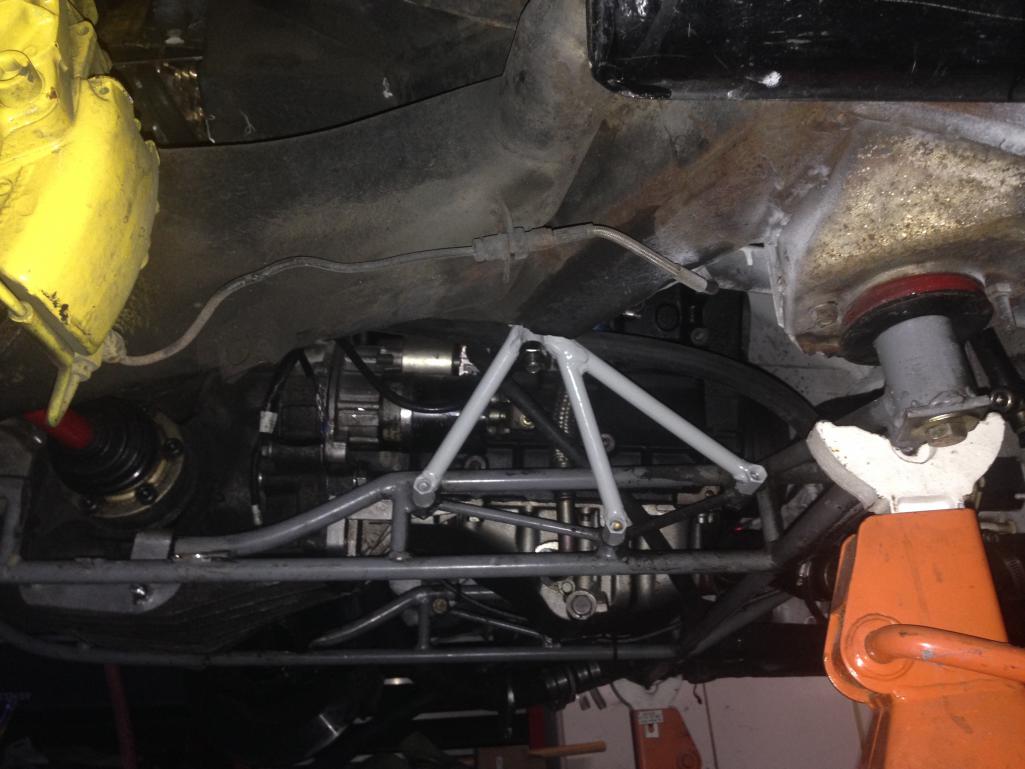
Posted by: tygaboy Dec 3 2022, 03:37 PM
I could have made a much prettier cradle if I had them fancy part cutters. Mine weighs 41 lbs, how about yours?
Keep up the good work!
@http://www.914world.com/bbs2/index.php?showuser=10496 Mike, Once my cradle is complete, I'll weigh it and post the results. I've been curious about this, too.
Posted by: tygaboy Dec 3 2022, 03:42 PM
And that's the motor mount components set to go. With that done, all needed pieces are ready (minus the metal routing) and I just had to do a quick mock up of one side and get a look at the overall vibe of the cradle.
Yep, that'll do!
Attached thumbnail(s)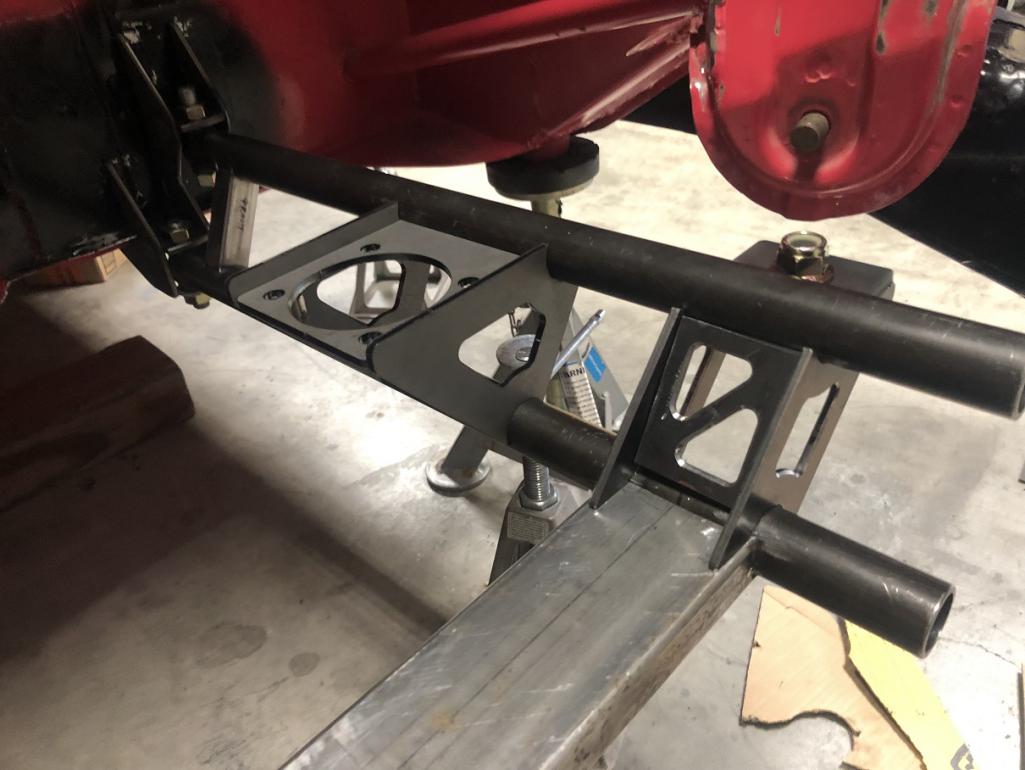
Posted by: tygaboy Dec 3 2022, 03:48 PM
But that anti-rack brace wasn't doing it for me so I took a swing at a couple alternate designs. Note that I made these taller so they now reach from the upper tube to the cross bar.
Style-wise, I'm leaning toward the "circle in the middle" design as it echos the motor mount's big hole.
And before anyone gets too worked up about any of this, remember: once everything is installed, the entire cradle is essentially blocked from view.
But yes, we'll all know it's there...
Attached thumbnail(s)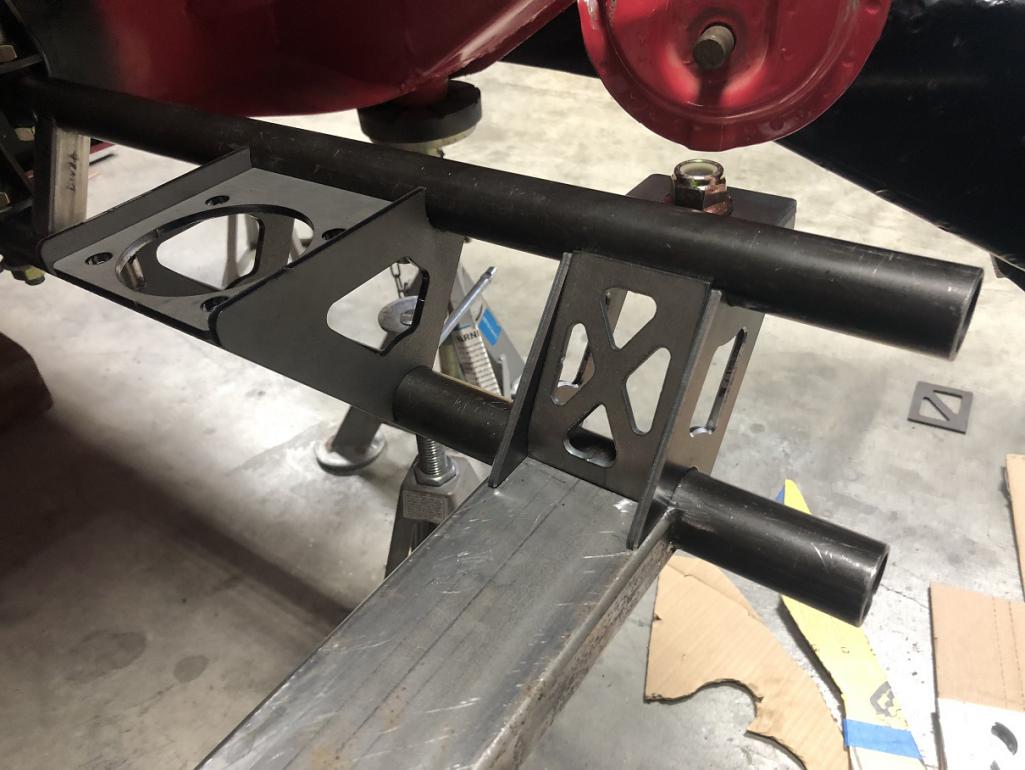
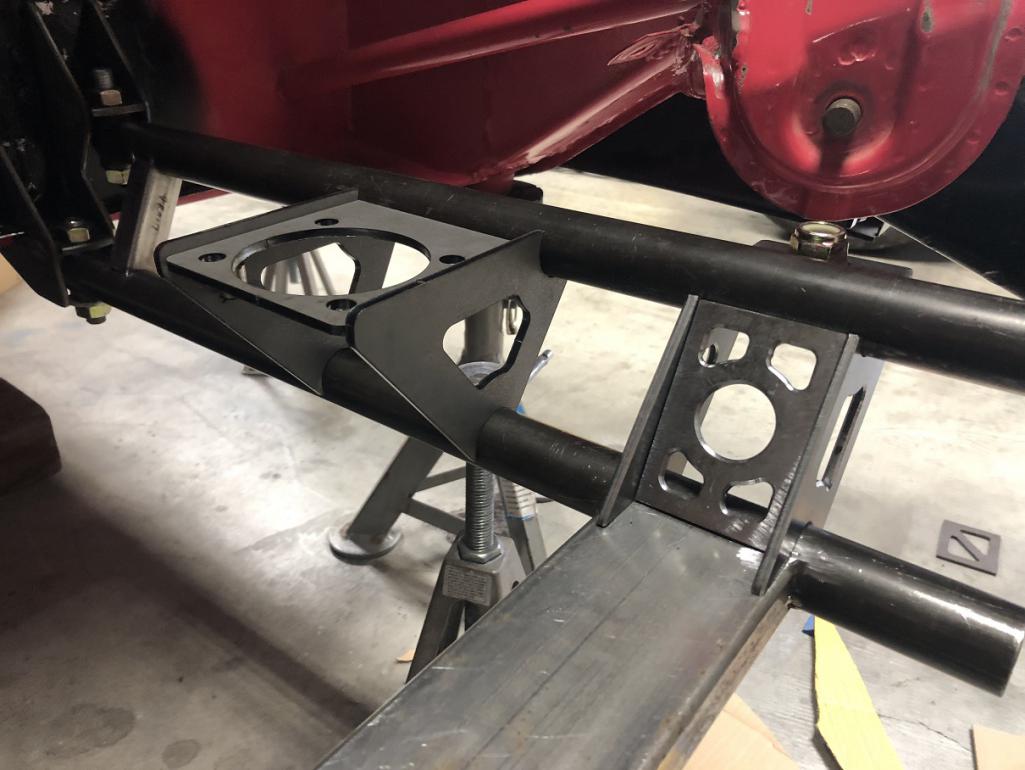
Posted by: SirAndy Dec 3 2022, 04:09 PM
Not even close ...
Called it!
Posted by: tygaboy Dec 4 2022, 06:26 PM
Not even close ...
Called it!
And today, it's @http://www.914world.com/bbs2/index.php?showuser=179 with the double, double win! Yep, more changes.
In looking at things mocked in place, it was obvious I was creating a craptrap under that anti-rack brace. Not wanting that, I created an exit route for any debris that may find it's way into that space.
It'll be trimmed to length, once everything else is tacked in.
Attached thumbnail(s)
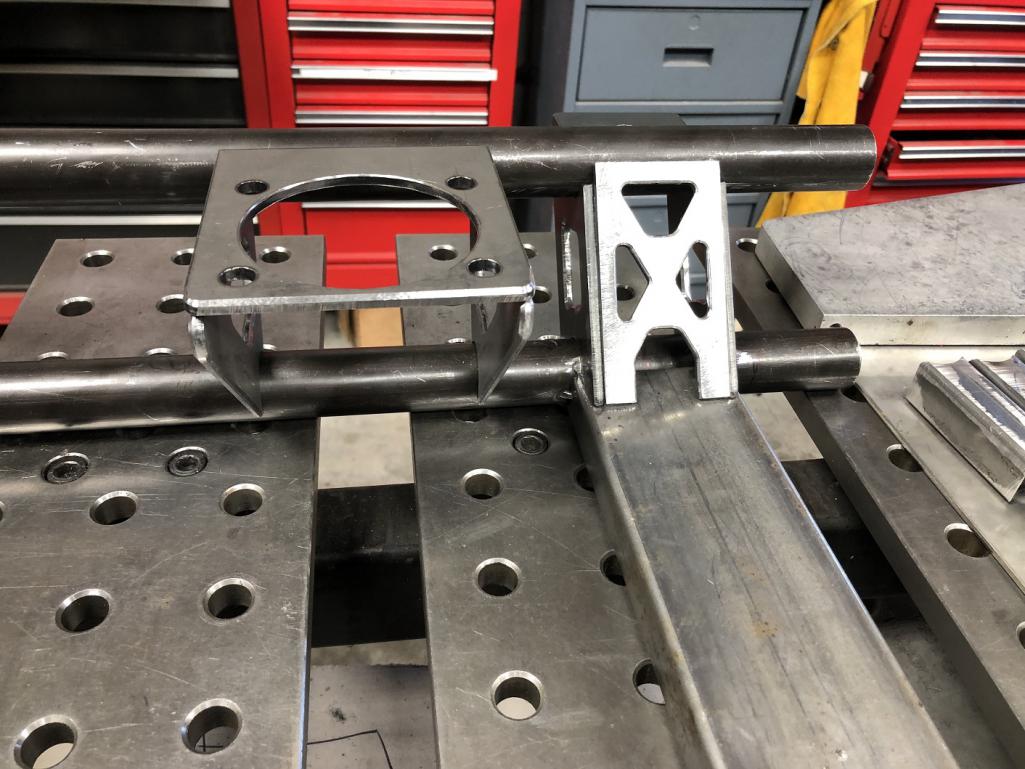
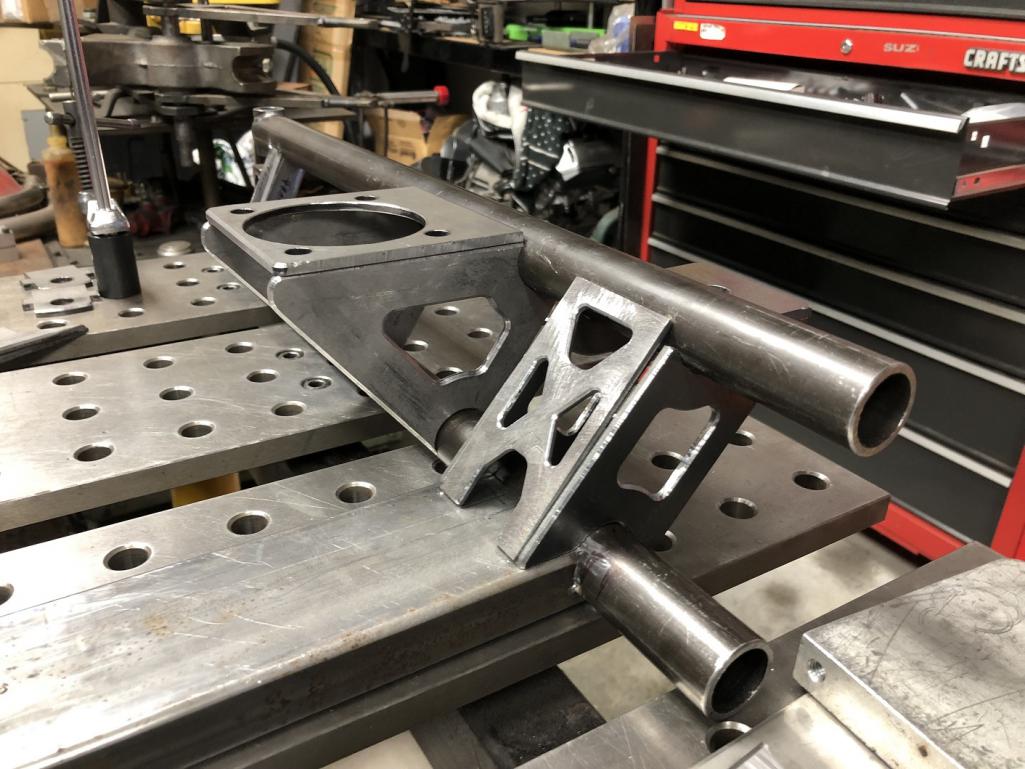
Posted by: tygaboy Dec 4 2022, 06:32 PM
Do you suddenly wake up in the middle of the night realizing you've missed something on your build?
Last night, around 2AM, I wake up thinking: "Wait a second, if the firewall tabs wrap under the floor, I need a spreader plate under there! Bad idea to simply weld 7ga plate to a single layer of 18 ga!"
A quick measure and cut (and a bit of plug welding yet to go) and that's problem solved. Critical thinkers will also note this changed the dimensions of the center and inner fire wall tabs. Nothing a bit of band saw and sanding couldn't quickly address.
Attached thumbnail(s)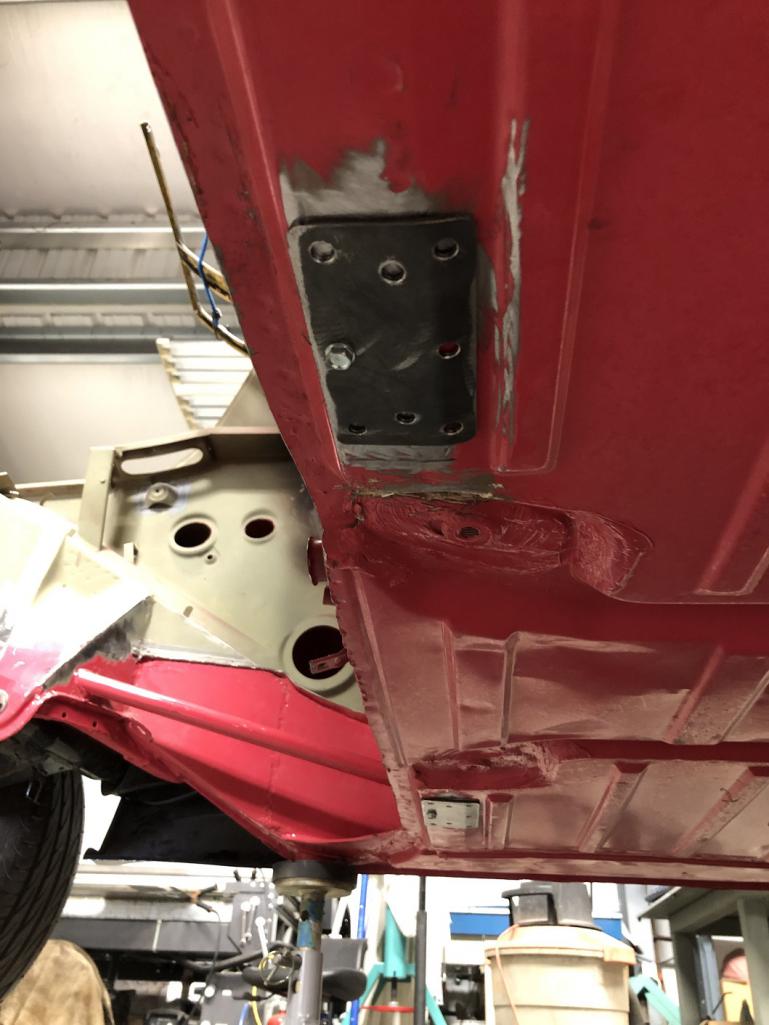
Posted by: tygaboy Dec 4 2022, 06:37 PM
And speaking of band saws, here's one for the tool whores:
Swag Offroad's portable band saw stand. This. Thing. ROCKS! Highly recommended!
It stores under a bench, is easily carried to wherever it's needed and it cuts like butta'!
If you're considering a band saw, take a look at these. They make models for virtually any portable band saw, from HF on up, cordless and wired. Did I say highly recommended?
Attached thumbnail(s)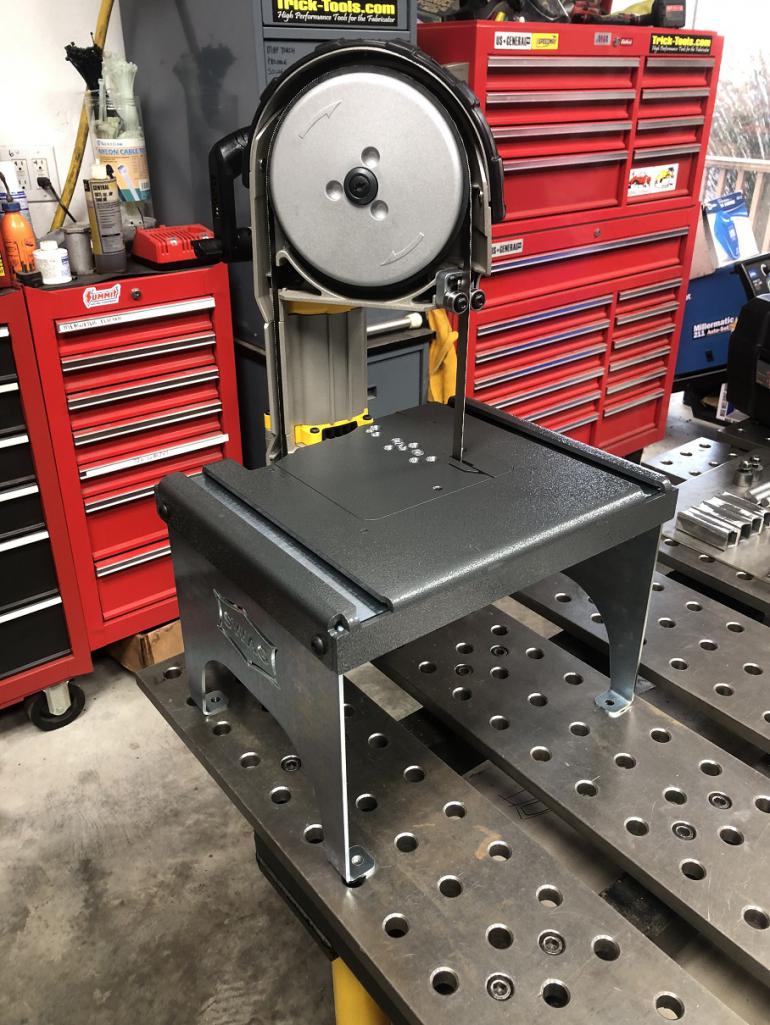
Attached image(s)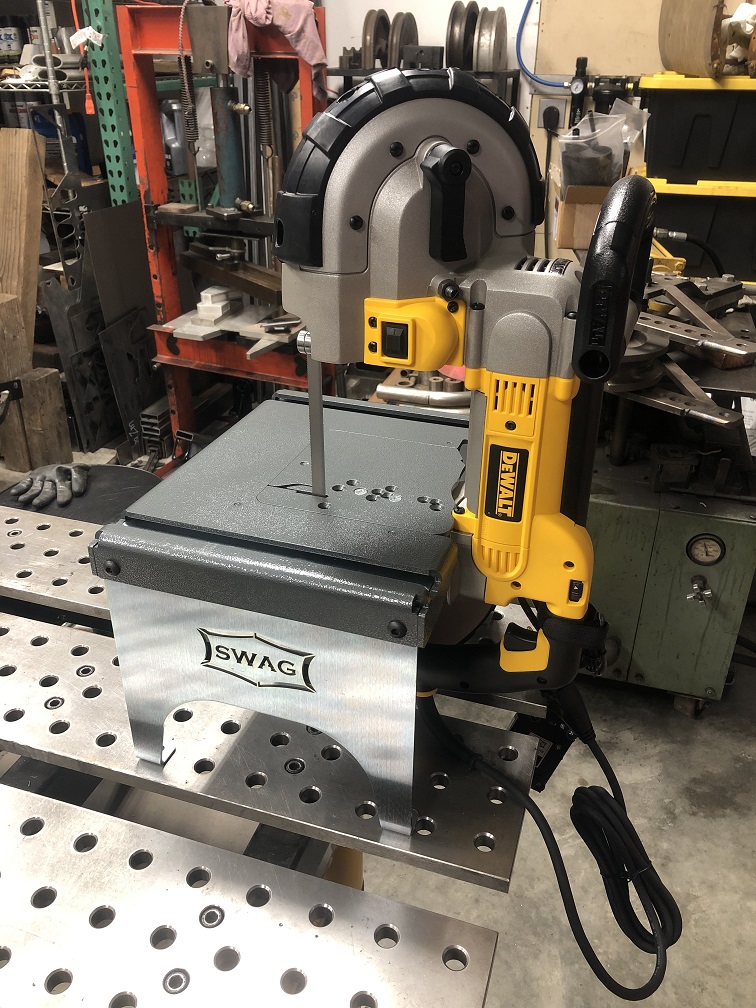
Posted by: tygaboy Dec 4 2022, 06:41 PM
So, after all that, here's a Ferrari 360 engine cradle kit. Some welding still to go, but everything is essentially ready, including all edges routered and final hardware.
With any sort of luck, this will get done and the drive train will be mounted in the car in the next couple of days.
Attached thumbnail(s)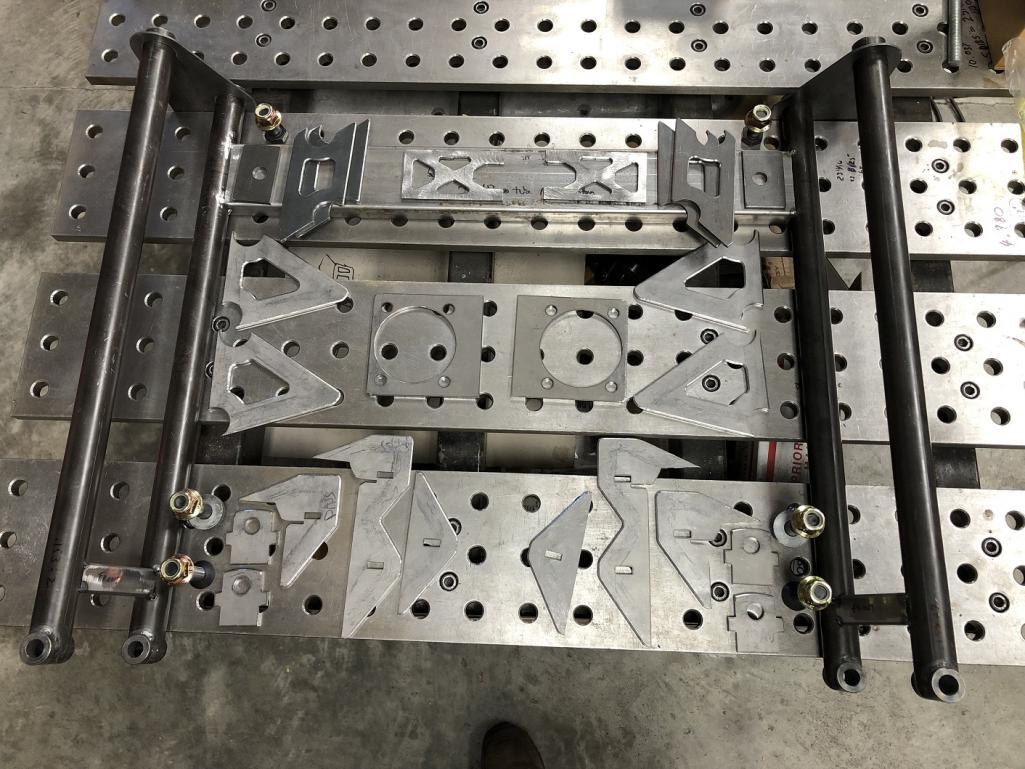
Posted by: tygaboy Dec 4 2022, 06:55 PM
And here's one for @http://www.914world.com/bbs2/index.php?showuser=2058 Pete. When I was working out the hood vents for the LS car, Pete noted in the background of one of the pics was a stack of different vents that represented my "rejected designs". It was yet another example of how I need to make something and look at it before I can determine if I like it, that it'll work, etc.
Well, I'm nothing if not consistent! Rather than make Pete have to look for them, I went ahead and got a pic of the "well, that's not gonna work!"/ rejected design parts from this engine cradle effort.
Prolly I need to keep my plasma table, eh?
Attached thumbnail(s)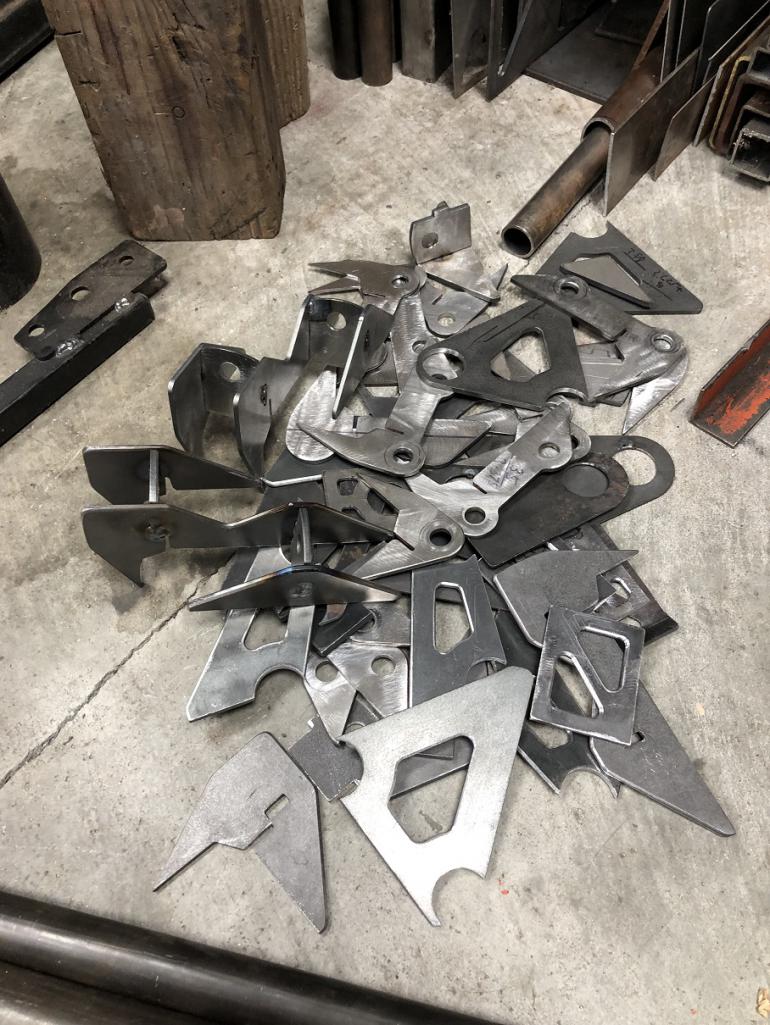
Posted by: Krieger Dec 4 2022, 11:10 PM
yup!
Posted by: cassmcentee Dec 5 2022, 05:25 AM
Looks so good Chris!
From that scrap pile I can see an Alexander Calder mobile in the making.
Posted by: Craigers17 Dec 5 2022, 06:02 AM
You should make this a "Kit" for all of those folks who do a "Ferrari 360" engine swap in the future.
In all seriousness....again...just amazing work!
So, after all that, here's a Ferrari 360 engine cradle kit. Some welding still to go, but everything is essentially ready, including all edges routered and final hardware.
With any sort of luck, this will get done and the drive train will be mounted in the car in the next couple of days.
Posted by: tygaboy Dec 5 2022, 12:39 PM
Console bracket design in progress with this as the initial piece.
Attached thumbnail(s)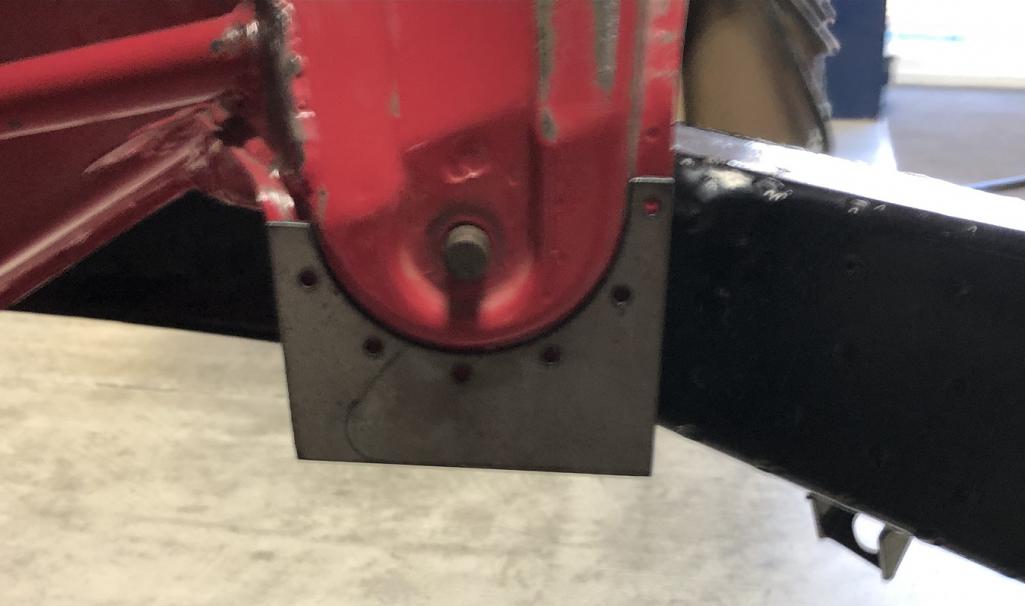
Posted by: Superhawk996 Dec 5 2022, 12:41 PM
You should make this a "Kit" for all of those folks who do a "Ferrari 360" engine swap in the future.
I’m just going to wait for this one to show up on BAT.
Posted by: tygaboy Dec 5 2022, 06:27 PM
You should make this a "Kit" for all of those folks who do a "Ferrari 360" engine swap in the future.
I’m just going to wait for this one to show up on BAT.
In all likelihood, that's where it's headed. Do I dare go with no reserve?
Posted by: tygaboy Dec 5 2022, 06:29 PM
Final design (only took four tries! ) for what I've taken to calling the "console lower plate". Well, final less the update I made to the shape of the weep hole clearance. It fits nicely.
Attached thumbnail(s)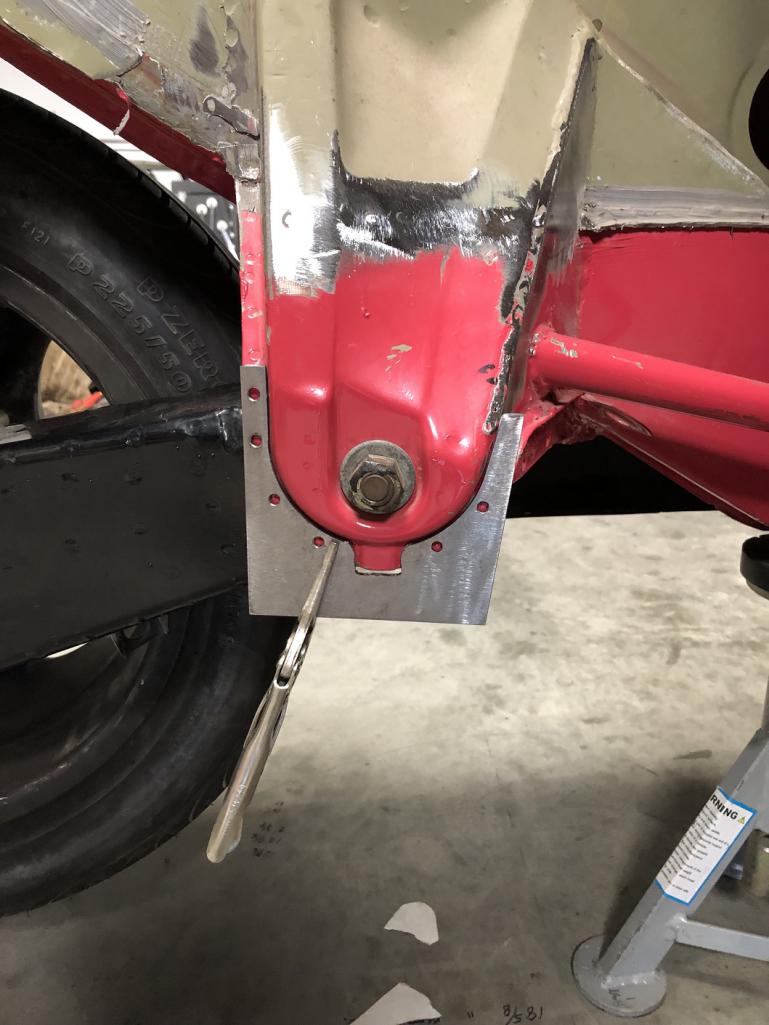
Posted by: tygaboy Dec 5 2022, 06:43 PM
Then it was on to versioning the side plates. (can I make a verb out of "version"? )
I'm using thin gauge material to work out the final shape in CAD, then it'll get made in 10 ga, with the exception of the actual mounting plate for the fastener - that'll be 7 ga, like the cradle's mounts.
You can see the idea is to get a plate that runs from the top of the long and is gradually getting more proud of the console as it descends. This plate will be plug and stitch welded to the console.
There will be a matching-ish plate of the console's front side and I'll add a plate between the two side plates, boxing everything over the console. Boxes being super strong.
Once completed, it should look nice, not protrude into the space I need for the header/collector and be nicely over-built.
Attached thumbnail(s)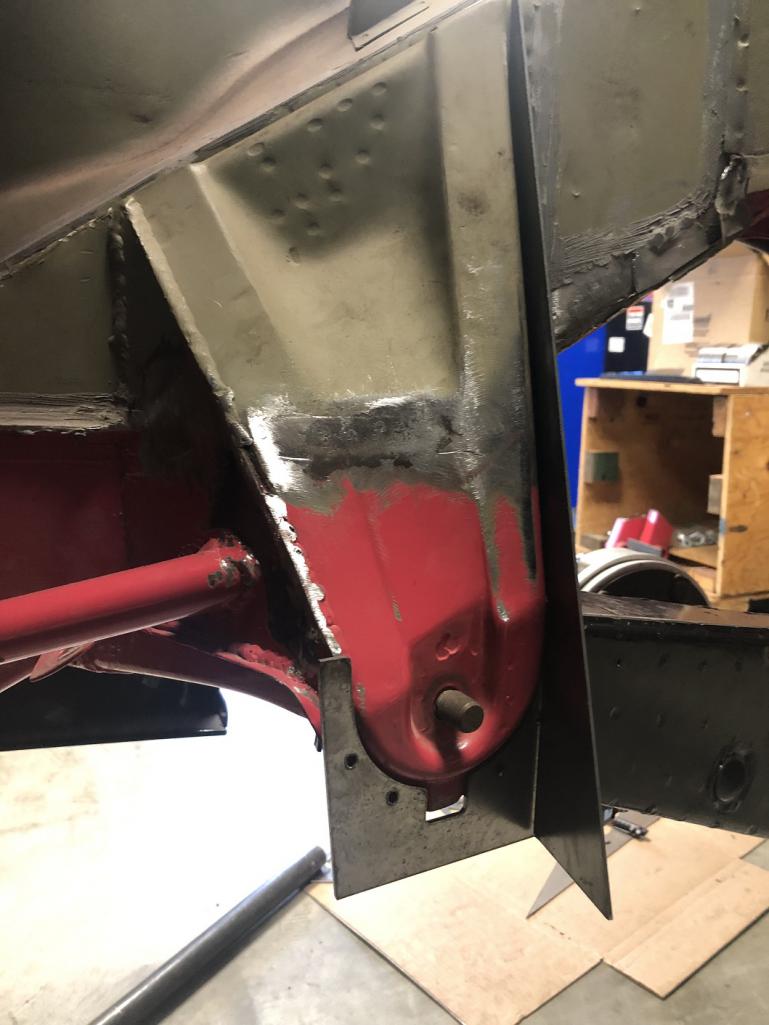
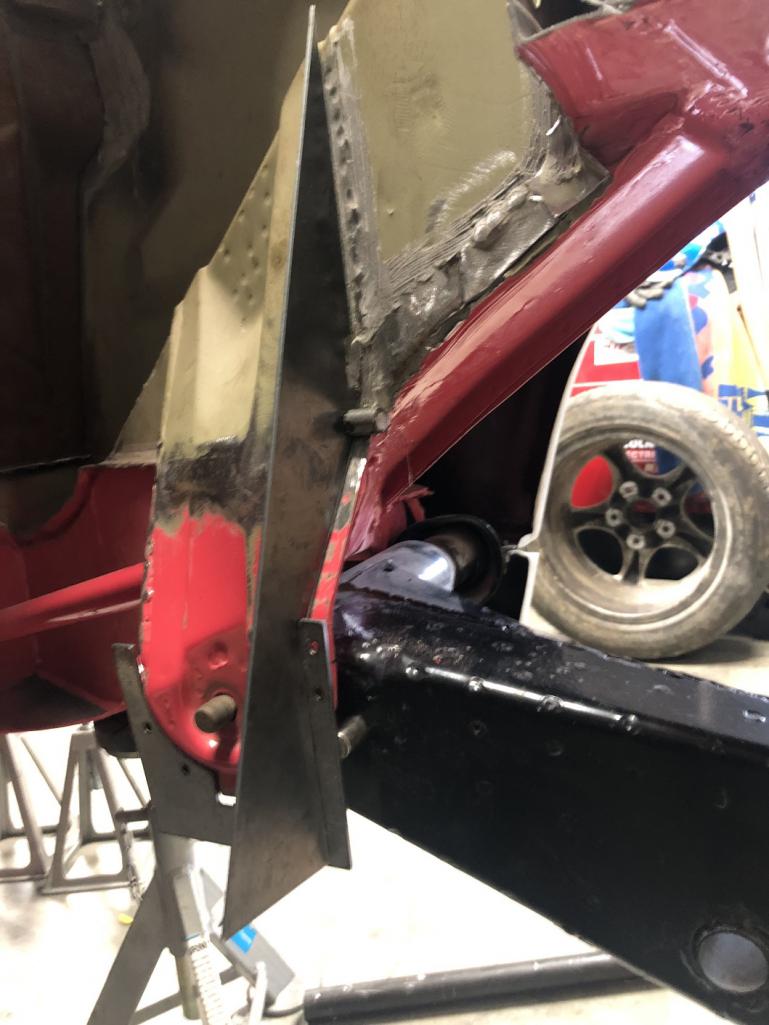
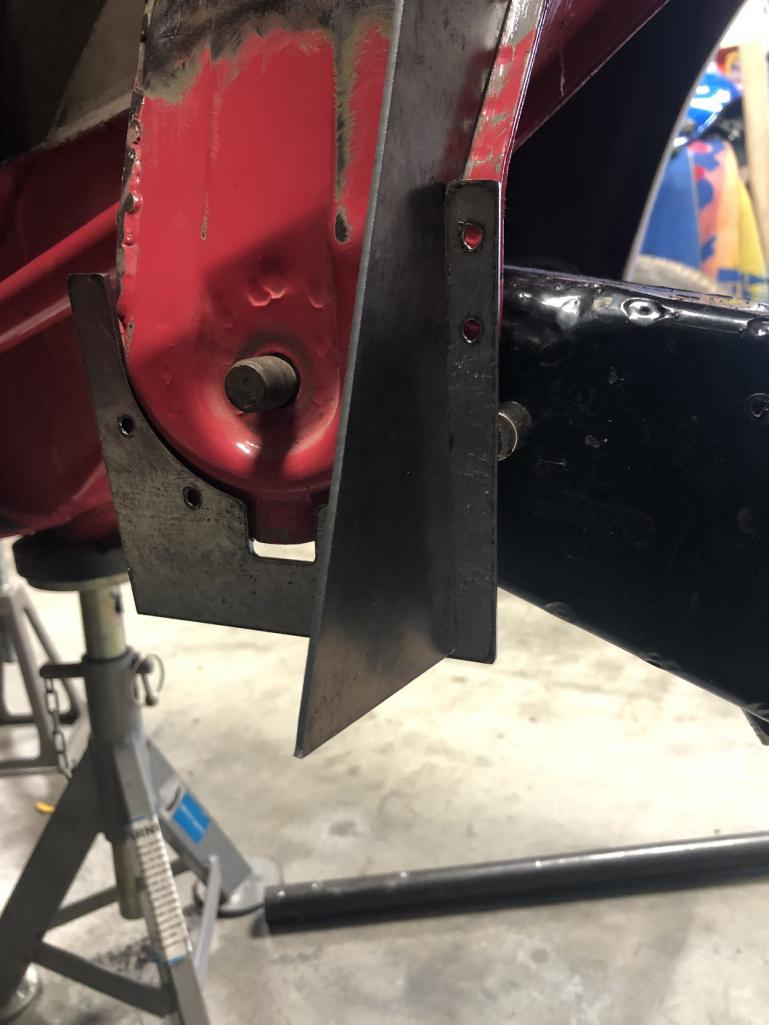
Posted by: strawman Dec 6 2022, 12:39 PM
I bought one of those SWAG mini-bandsaw setups last year. I love it, too! But I still drool over your plasma cutting setup...
Posted by: cooler Dec 6 2022, 05:21 PM
nice work!
I hope your exhaust manifolds clear!
Posted by: tygaboy Dec 6 2022, 08:16 PM
Today was getting the cradle's rear mount components all fit and tacked in. It's far enough along as an assembly that it can now be used to position the fire wall tabs. That's on the docket for tomorrow.
Getting closer!!
Attached thumbnail(s)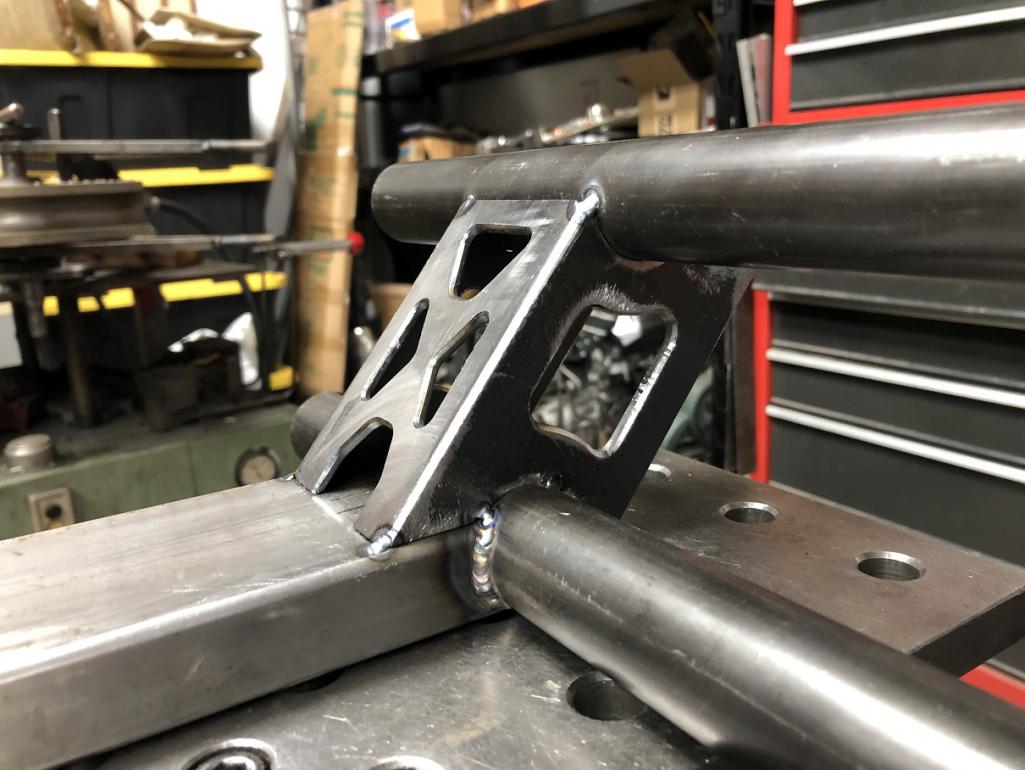
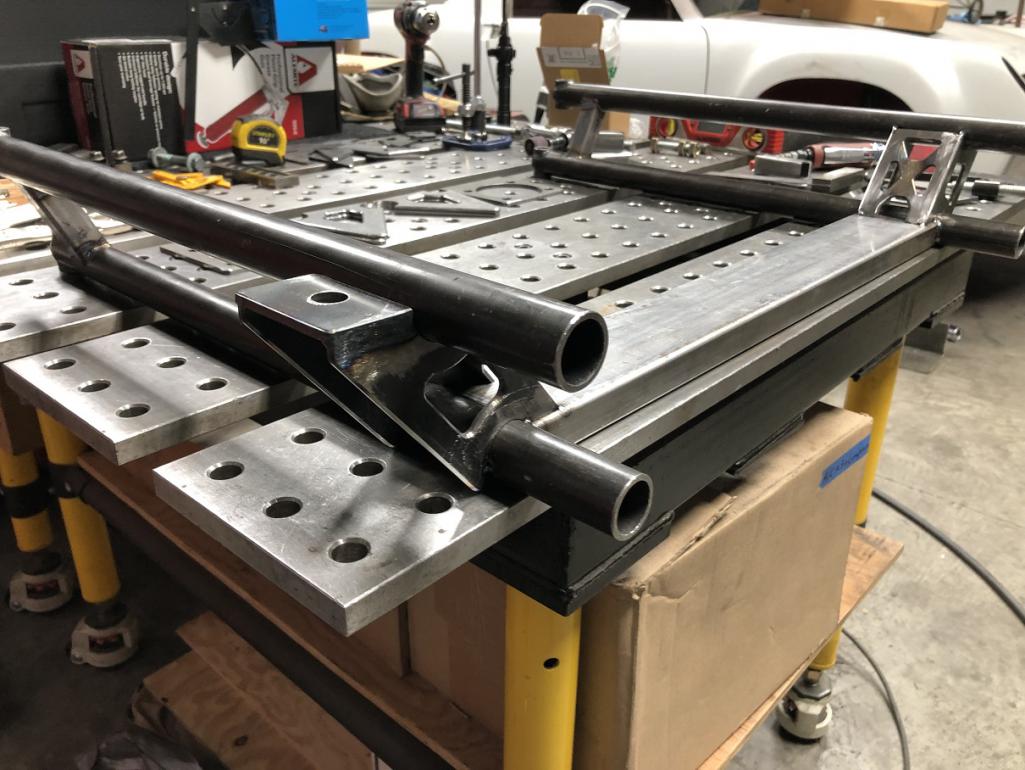
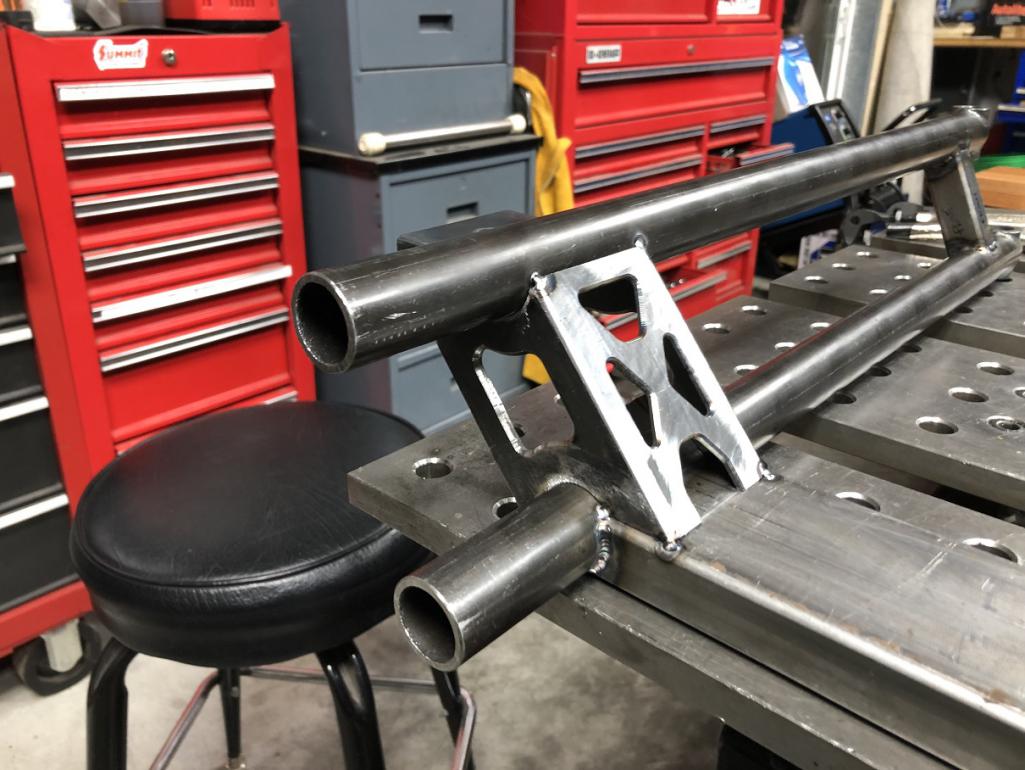
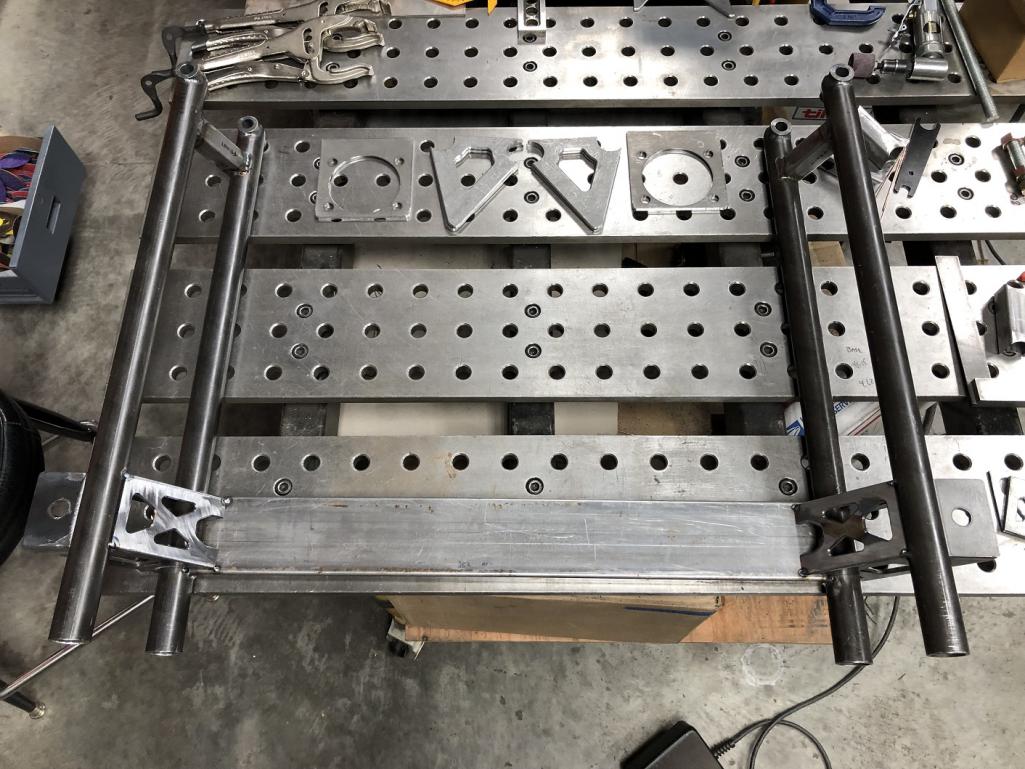
Posted by: Retroracer Dec 6 2022, 08:26 PM
Chris - something to think about: will you still be able to get a socket/spanner on the inner axle pivot bolt with the engine/headers in place? Might a well placed slot in the console "beard" side braces be prudent?
Trying to think ahead here.... and, stunning work thus far!
- Tony
Posted by: Krieger Dec 6 2022, 08:26 PM
That is the perfect Ferrari to 914 engine mount! It seems so obvious now!
Posted by: tygaboy Dec 6 2022, 11:30 PM
Chris - something to think about: will you still be able to get a socket/spanner on the inner axle pivot bolt with the engine/headers in place? Might a well placed slot in the console "beard" side braces be prudent?
Trying to think ahead here.... and, stunning work thus far!
- Tony
@http://www.914world.com/bbs2/index.php?showuser=16100 - Tony - yes, the design allows for a wrench to be able to get at the pivot shaft fastener. It'll be clear once I get to boxing in the console. That said, I'm OK sacrificing (some) service access, but only as a last resort.
Posted by: tygaboy Dec 7 2022, 06:20 PM
Action photo! The cradle's lower bars hang below the chassis so to minimize chance of the fastener snagging, I opted to run a flat head allen - and that requires a 90 degree counter sink. A bit of time spent locating and leveling in both directions and some "mill as a drill press" and we're all set.
Attached thumbnail(s)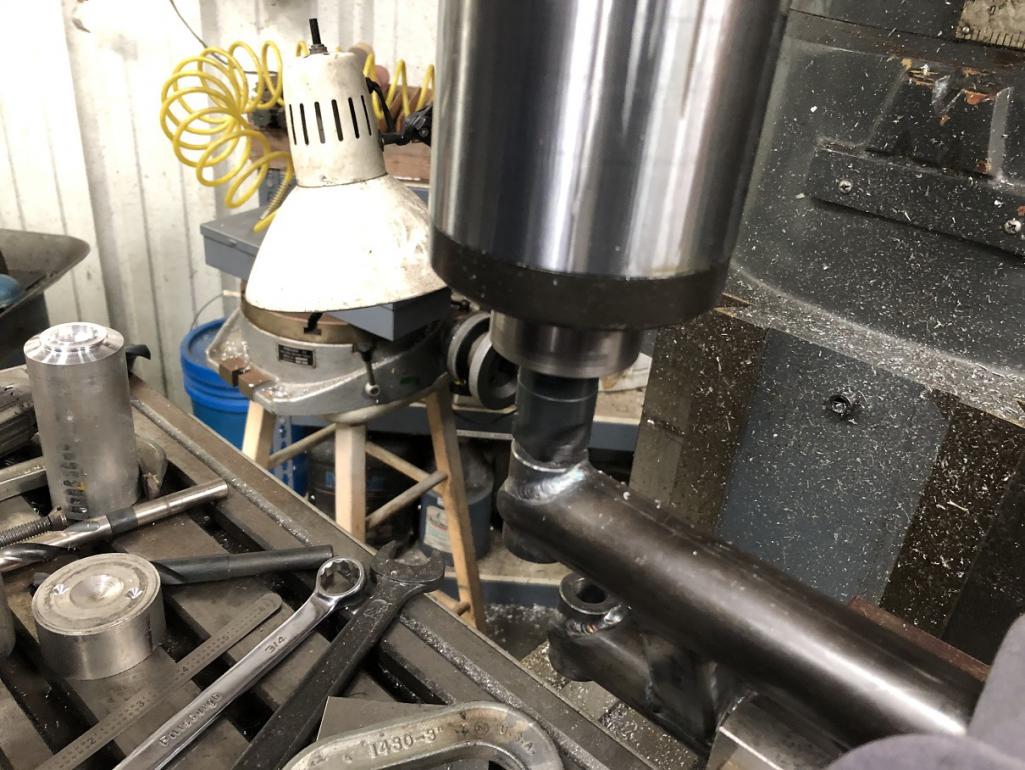
Posted by: tygaboy Dec 7 2022, 06:22 PM
Countersink, meet fastener. Fastener, Countersink. I predict you won't become simply friends, I know you'll become very close...
Attached thumbnail(s)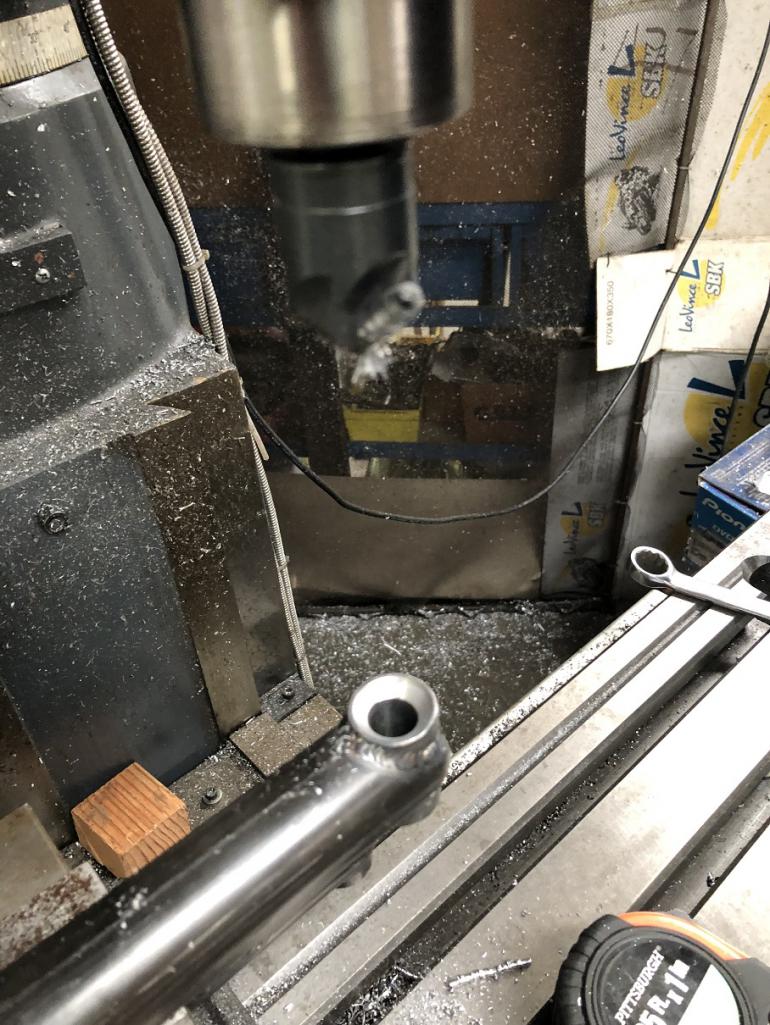
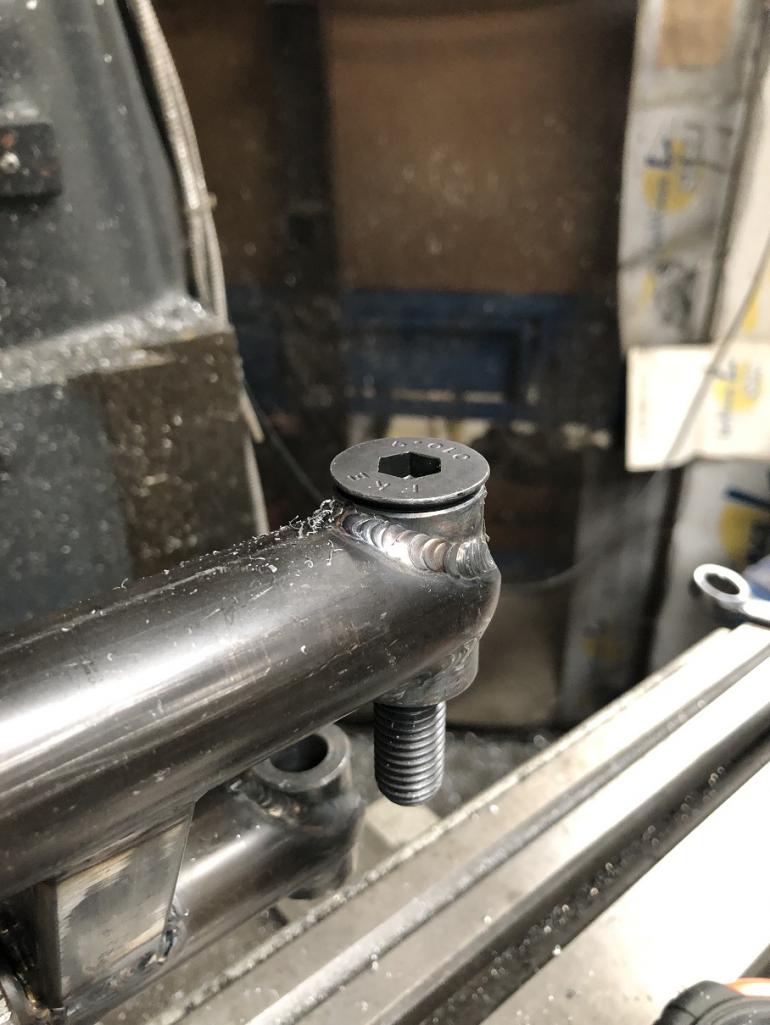
Posted by: tygaboy Dec 7 2022, 06:28 PM
Next was to cut the bars to length and weld in the threaded bungs. Martin broke out his NHRA rule book experience and mentioned that whenever there was a plug weld, you had to leave a bit of the inner material visible through the outer material and weld so the tech inspector could validate things met the requirements and safety specs. Like you weren't trying to sneak in thinner wall than is required, etc.
The good news is that I can now officially pass tech and drag race this thing! Street Outlaws/No Prep Kings, here I come!
Attached thumbnail(s)
Posted by: tygaboy Dec 7 2022, 06:30 PM
Martin did a super cool job fuse-welding the bungs to the tubes.
Attached thumbnail(s)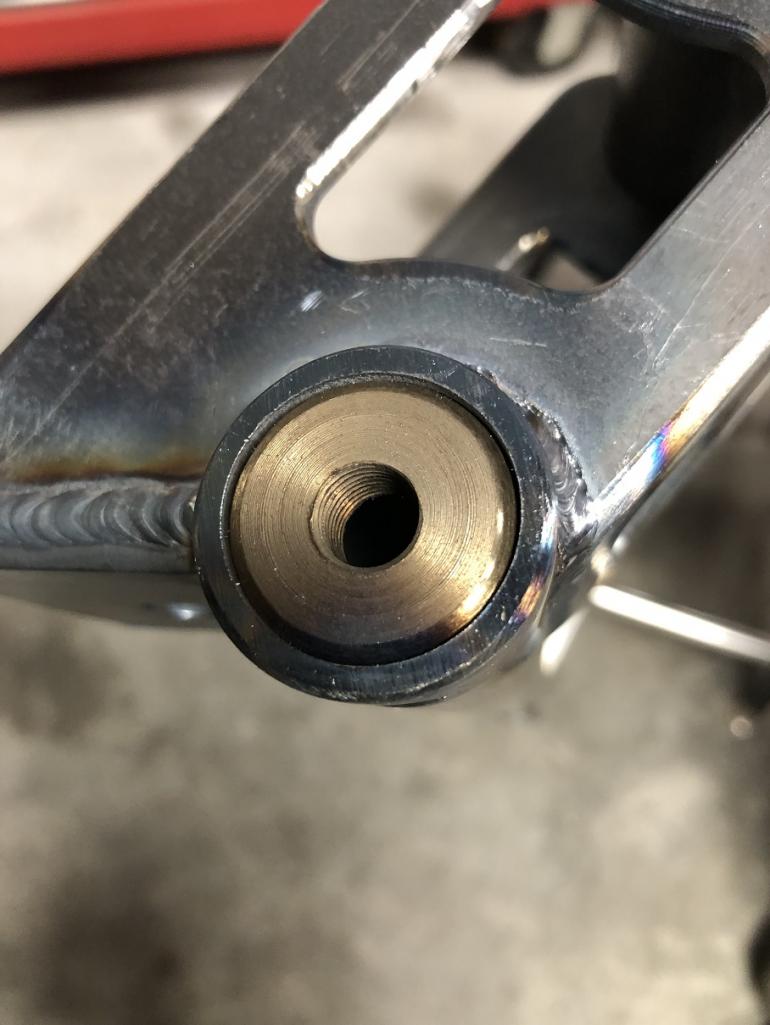
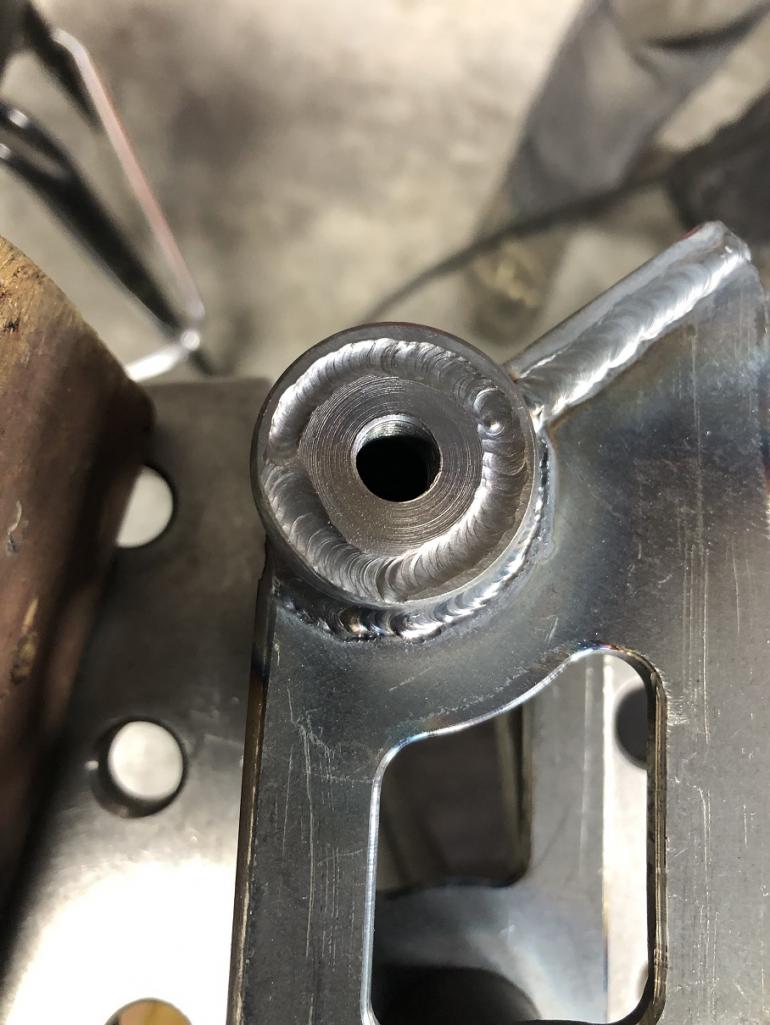
Posted by: tygaboy Dec 7 2022, 06:34 PM
Major milestone for the cradle: all final welding is complete!
The fire wall tabs are also fit and ready to go. The plan is that tomorrow sees them welded in place.
With that done, I'll be able to complete the design and CAD work to make the suspension console pick up mounts.
So.
Close.
Attached thumbnail(s)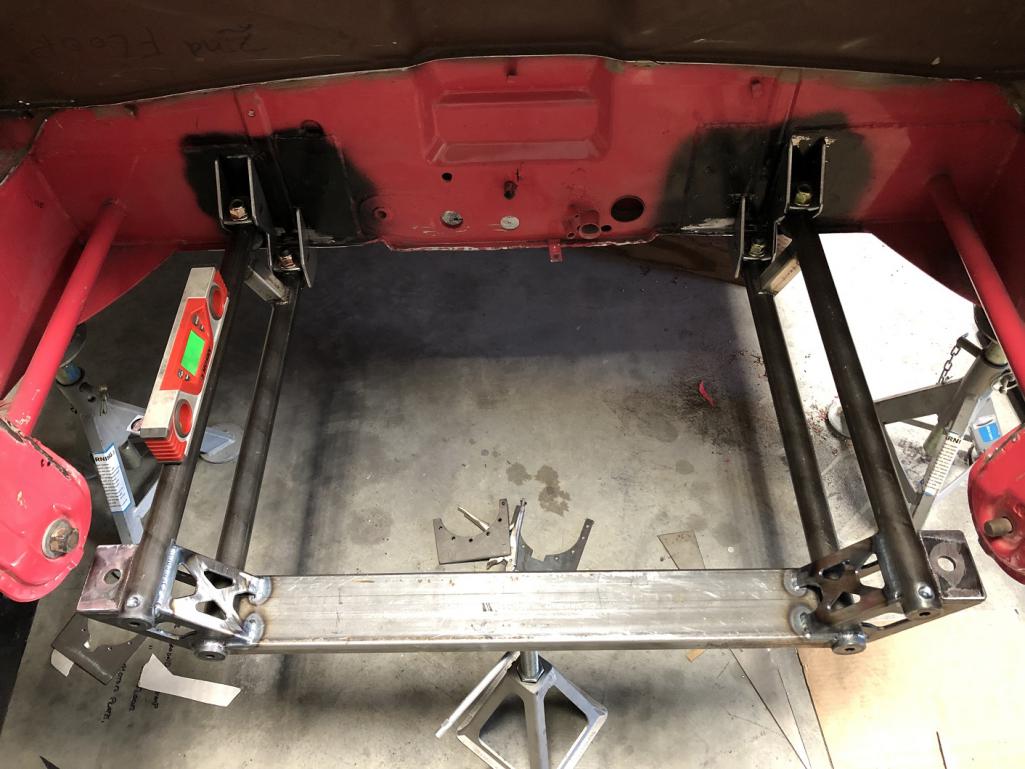
Posted by: BillC Dec 7 2022, 07:10 PM
Very cool!
Posted by: Tferrer Dec 8 2022, 09:45 AM
Just catching up with this thread. AMAZING work, Chris. Utterly amazing...
Posted by: Cairo94507 Dec 8 2022, 09:49 AM
Wow- Martin's welds are works of art. The whole cradle is amazing.
Posted by: tygaboy Dec 8 2022, 03:25 PM
OK, let's see just how far away I can take this from 914 content.
WARNING: Potentially boring content alert!!
Whenever making mounts that locate other items using a bolt, it's obvious you want to align all the holes as accurately as possible. In production situations with their plus/minus and variation, alignment is generally accomodated with slots and/or holes with a bit more 'slop' than you'd think was needed. Look at the 914 engine bar's outside mount - there's the vertical bolt and its slop to the hole in the bar, then the bolt's slop to the U-shaped plate that sits on the chassis' mounting plate and the slop between the two bolts to the U-shaped plate and to the chassis mount plate... In all, LOTS of room to move things around so everything can be assembled.
Jokes about how I do things over and over aside (!), I don't have to think about "production" so I get to (have to? ) work with tighter tolerances. In the case of the cradle mounts, I do have clearance between the bolts and everything through which they'll pass. But how to control the available fastener clearance? I don't want to risk the slop all ending up to one side, making things tight on the other side. That'd make assembly lots less fun.
So, to manage that, here's a fabrication best practice: slice up an aluminum can and wrap the fastener and anything it passes through to ensure the fastener is centered in everything! Now you know you've removed any "slop bias" and things will be nicely aligned, come assembly time.
Is this sort of prep tedious and time consuming? Yes, it is. Especially that 1/8" strip for the tab! But also a worthwhile. Particularly if you're a bit OCD, like me.
Attached thumbnail(s)
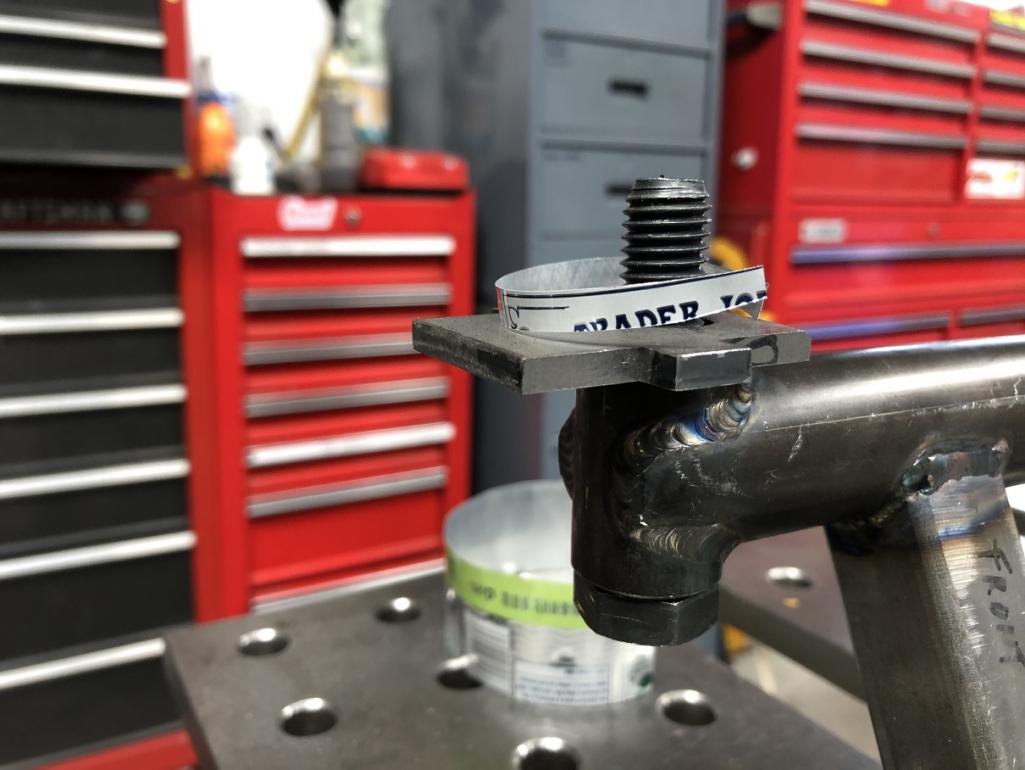
Posted by: cooler Dec 9 2022, 01:02 PM
beautiful fabrication work! Are you going to add any triangulation members or rely completely on moment transferring connections?
Posted by: tygaboy Dec 9 2022, 03:31 PM
beautiful fabrication work! Are you going to add any triangulation members or rely completely on moment transferring connections?
The engine mounts and related bracing have yet to be added. Once that's all in place, we'll see what's what and if it appears it'll need anything more.
Posted by: roundtwo Dec 10 2022, 12:42 AM
Martin did a super cool job fuse-welding the bungs to the tubes.
Slick

Posted by: horizontally-opposed Dec 10 2022, 10:57 AM
Look at the 914 engine bar's outside mount - there's the vertical bolt and its slop to the hole in the bar, then the bolt's slop to the U-shaped plate that sits on the chassis' mounting plate and the slop between the two bolts to the U-shaped plate and to the chassis mount plate... In all, LOTS of room to move things around so everything can be assembled.
Question warning, as you might get mad at me for asking it now (maybe it was discussed earlier and I missed it), but: What's the plan for NVH isolation?
I remember Richard Parr telling me about a customer who had a rough go trying to get his engine running right until they figured out the problem was driven by vibrations from the engine being hard-mounted to the chassis.
(And no, I didn't think about this until you reminded me of the design of the 914 engine mounts…which include the transmission mounts…which got me to thinking about the cool solid engine/trans mounts Parr was talking about.)
Posted by: tygaboy Dec 10 2022, 11:45 AM
Look at the 914 engine bar's outside mount - there's the vertical bolt and its slop to the hole in the bar, then the bolt's slop to the U-shaped plate that sits on the chassis' mounting plate and the slop between the two bolts to the U-shaped plate and to the chassis mount plate... In all, LOTS of room to move things around so everything can be assembled.
Question warning, as you might get mad at me for asking it now (maybe it was discussed earlier and I missed it), but: What's the plan for NVH isolation?
I remember Richard Parr telling me about a customer who had a rough go trying to get his engine running right until they figured out the problem was driven by vibrations from the engine being hard-mounted to the chassis.
(And no, I didn't think about this until you reminded me of the design of the 914 engine mounts…which include the transmission mounts…which got me to thinking about the cool solid engine/trans mounts Parr was talking about.)
@http://www.914world.com/bbs2/index.php?showuser=2058 Pete - Yes, the cradle will be hard-mounted to the chassis but the factory Ferrari rubber mounts are being retained at the trans hanger and both sides' engine mounts. So isolation-wise, it's identical to how it was mounted in the 360.
Posted by: tygaboy Dec 10 2022, 11:48 AM
OK, I'm a slacker. I had designs on doing a big(ger) deal YouTube channel for this build but that's just not in the cards. So, I'll just start and keep posting the vids I've done. Note these are essentially raw footage so no complaining!
For a while, these'll take you back to previously completed work but maybe you'll enjoy seeing some add'l details on what's gone into this build.
Here's "Day 1":
https://www.youtube.com/watch?v=9ONAEuWHrIc
Posted by: KELTY360 Dec 10 2022, 03:45 PM
Particularly if you're a bit OCD, like me.
A bit OCD.....?
Sorry, couldn't let that pass unnoticed.
Posted by: tygaboy Dec 10 2022, 05:16 PM
More about how the sausage is made:
Getting ready to final weld the fire wall tabs. To make it simple to get everything centered, I took a piece of scrap and made up a "centering plate". The center is marked in Sharpie / pointed out with the arrow. This will align with a center mark on the fire wall and set the left/right location.
What about up/down, you ask? The fire wall tabs were designed with with a notch that fits the lip on the lower edge of where the fire wall meets the floor. Those locations were determined by eyeballing where I wanted the bottom of the drive train to end up in relation to that lip.
Attached thumbnail(s)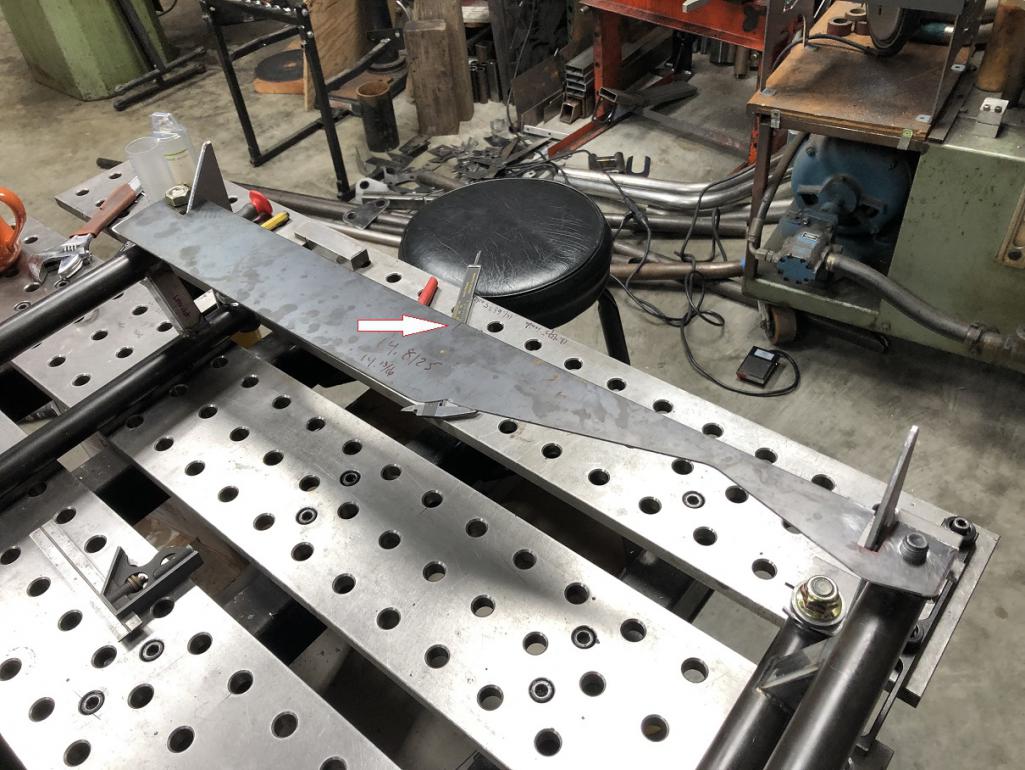
Posted by: tygaboy Dec 10 2022, 05:32 PM
What a pain. Getting the cradle under the engine while it's on the jack is impossible. I have to jack the engine into place, install the trans mount bolt, put screw jacks under the engine mounts, lower the jack, wrestle the cradle onto the jack/under the engine and jack the cradle up into place. Did I say "what a pain..."?
But the payoff/sighs of relief are real! All the eyeball guestimation measurements worked. Things fit. Thank heavens...
Attached thumbnail(s)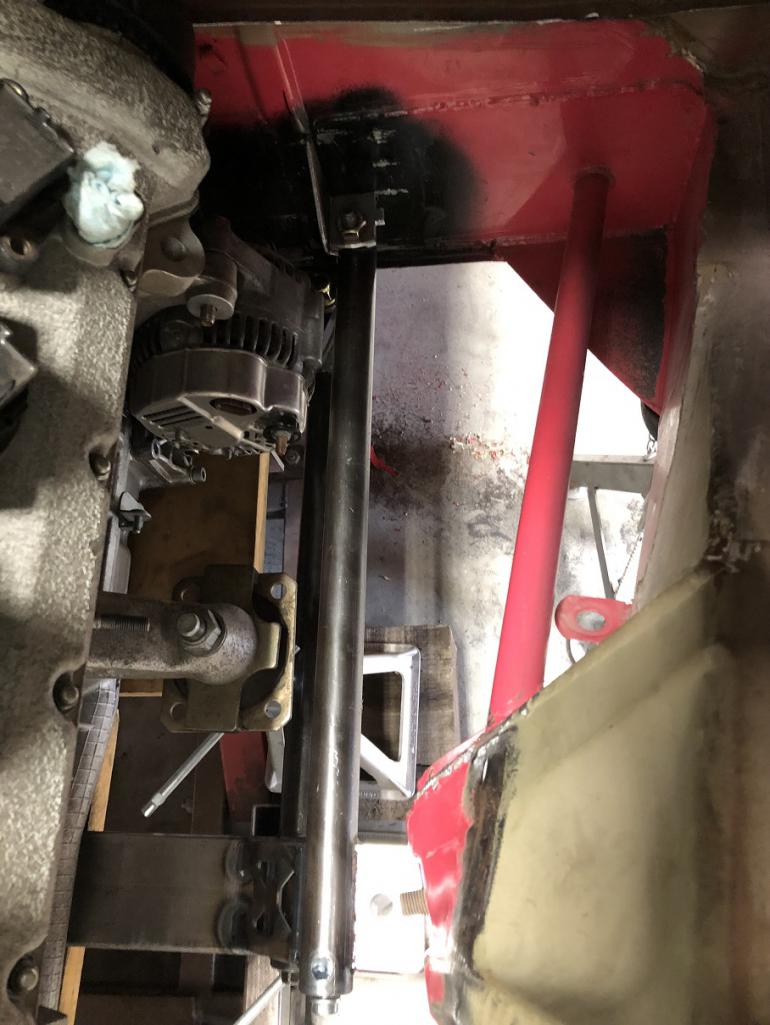
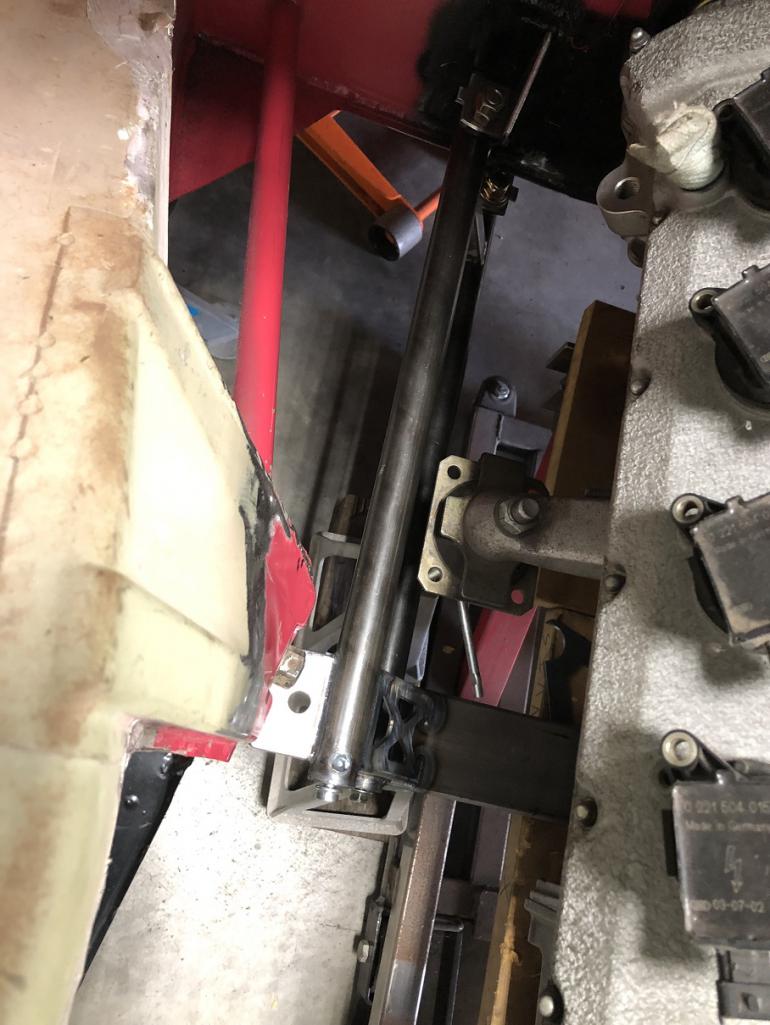
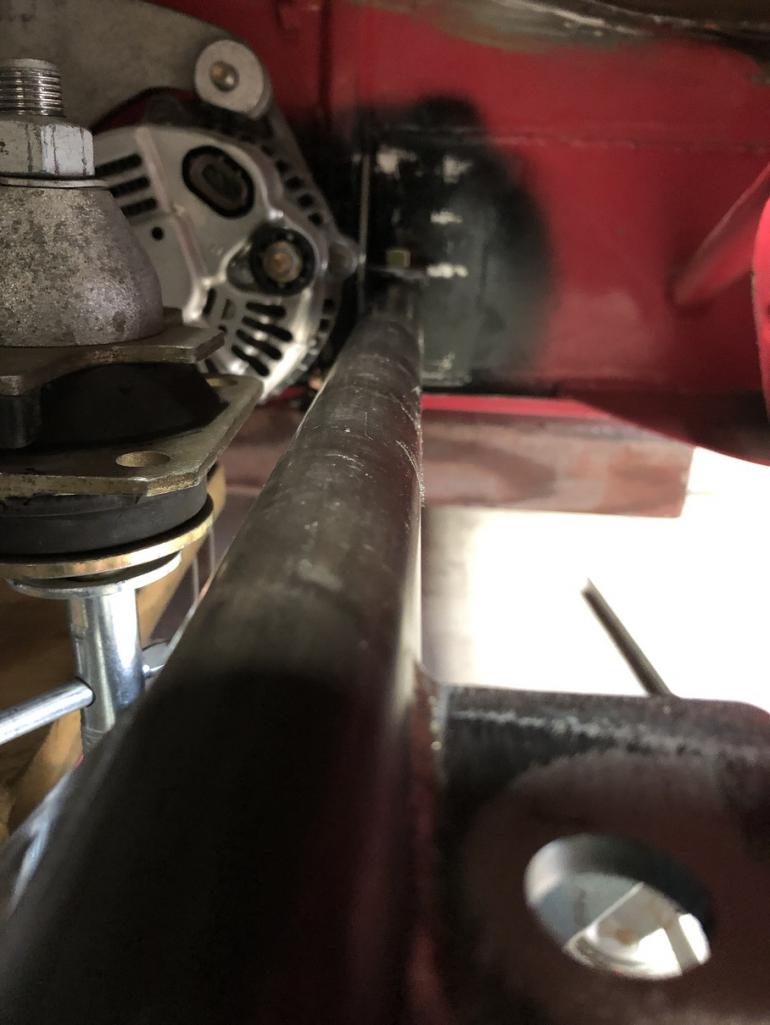
Posted by: tygaboy Dec 10 2022, 05:44 PM
Once the fire wall tabs are tacked in place, I can fab the suspension console-to-cradle mounts. Then once that's done, I can FINALLY, locate the engine mount side and top plates.
But I couldn't resist a test fit to see how I did on this set of eyeball measurements.
Pretty well, it turns out. Again, thankfully.
Something folks may not appreciate is that even though every cradle component was designed in CAD, when it comes to fitting all the parts in the real world, and welding distortion happens as the building progresses, each piece needs to be dry fit and tuned, as needed.
So for all you aspiring comedians, that "PR" doesn't stand for Personal Record, it's "passenger rear", indicating this piece has a particular home.
Attached thumbnail(s)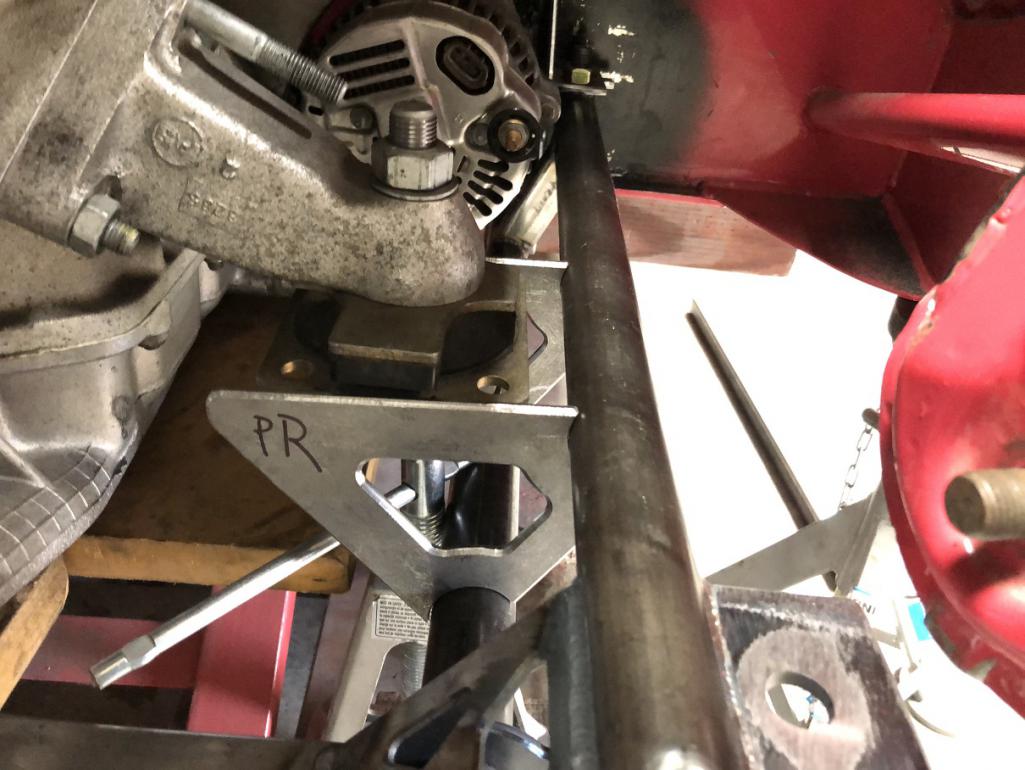
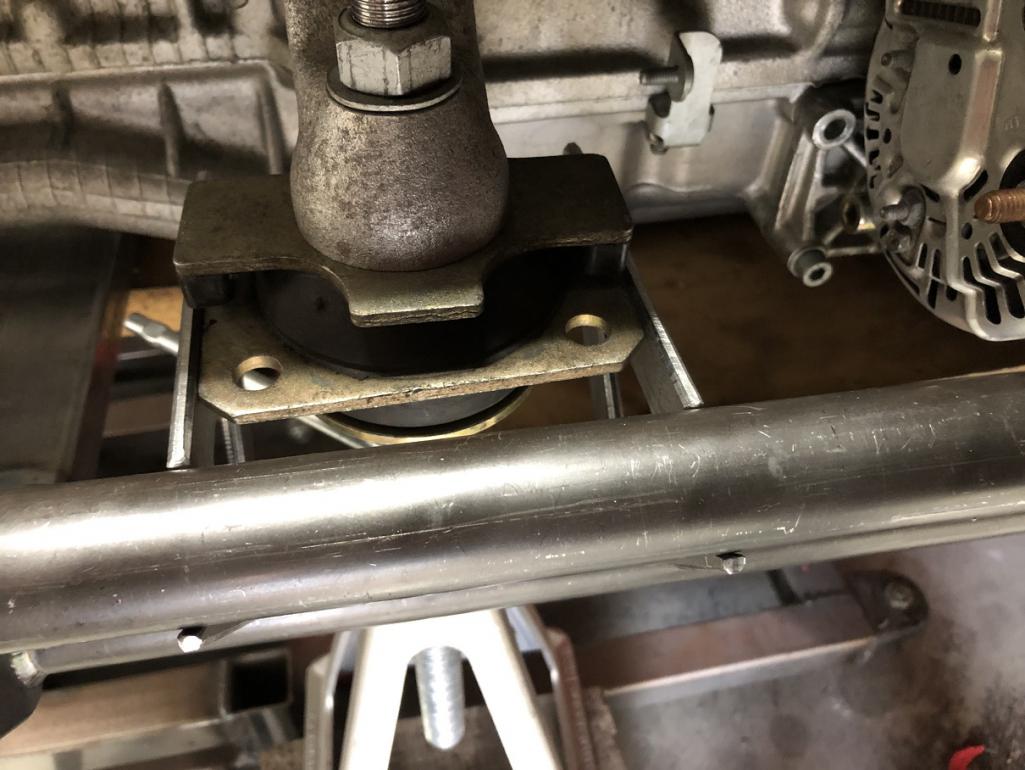
Posted by: tygaboy Dec 10 2022, 05:48 PM
And here's another "catch you up on the past efforts" vid. Note that I explain a bit about the 914 that all y'all know about. This is for any folks who may follow the build via YouTube and don't necessarily know 914s. Thanks for your understanding.
https://www.youtube.com/watch?v=JebyCNFblro
Posted by: Cairo94507 Dec 10 2022, 06:10 PM
@http://www.914world.com/bbs2/index.php?showuser=19241 Hey Chris, Great update video. Thanks, Michael
Posted by: tygaboy Dec 11 2022, 09:57 AM
Here's the last catch-up video. I'll make one more that brings everything current then start doing a better job of keeping up-to-date video coming.
https://www.youtube.com/watch?v=Bfb7mdkAzPE
Posted by: siverson Dec 11 2022, 10:33 AM
Nice work and great videos!
-Steve
Posted by: markhoward Dec 11 2022, 01:13 PM
Looking great Chris! Need to make my way to the Barn to see what you have been up to first hand.
Posted by: horizontally-opposed Dec 12 2022, 11:34 AM
Once the fire wall tabs are tacked in place, I can fab the suspension console-to-cradle mounts. Then once that's done, I can FINALLY, locate the engine mount side and top plates.
But I couldn't resist a test fit to see how I did on this set of eyeball measurements.
Pretty well, it turns out. Again, thankfully.
Something folks may not appreciate is that even though every cradle component was designed in CAD, when it comes to fitting all the parts in the real world, and welding distortion happens as the building progresses, each piece needs to be dry fit and tuned, as needed.
So for all you aspiring comedians, that "PR" doesn't stand for Personal Record, it's "passenger rear", indicating this piece has a particular home.
^ Shoulda known, and looking good Chris!
Posted by: tygaboy Dec 12 2022, 06:06 PM
I need to become more self-sufficient, particularly when it comes to TIG welding. But it's just so hard when Martin is available and does such incredible work. But I did finally man-up and did the welding on the cradle's front cross brace. I'm getting there.
Attached thumbnail(s)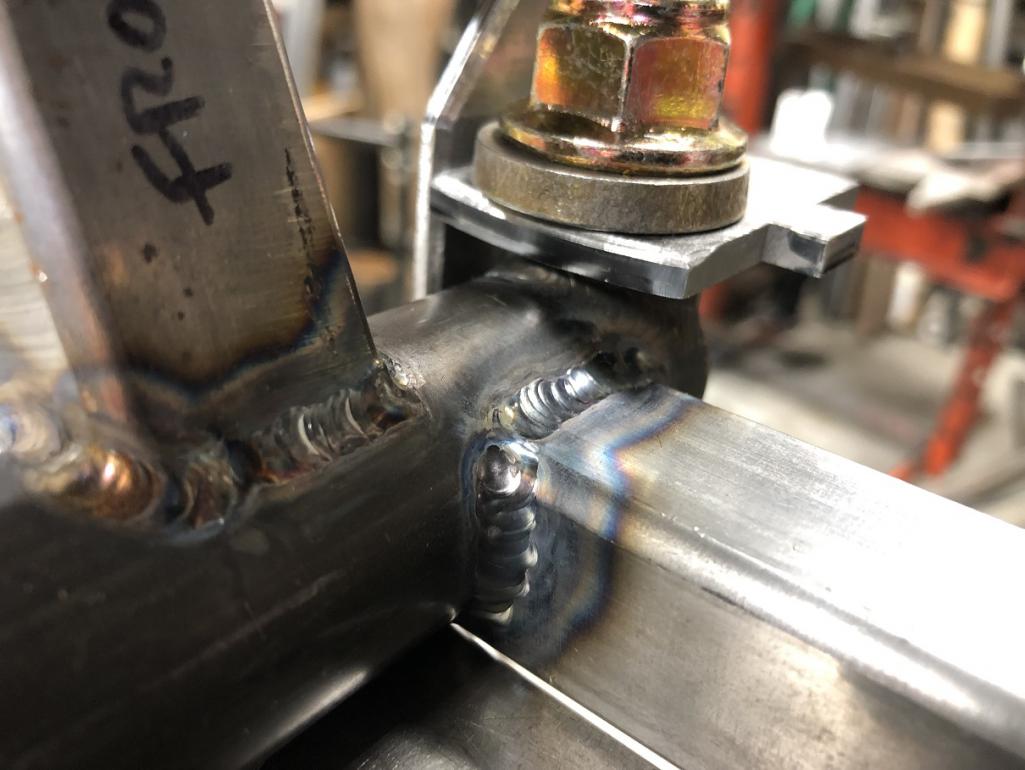
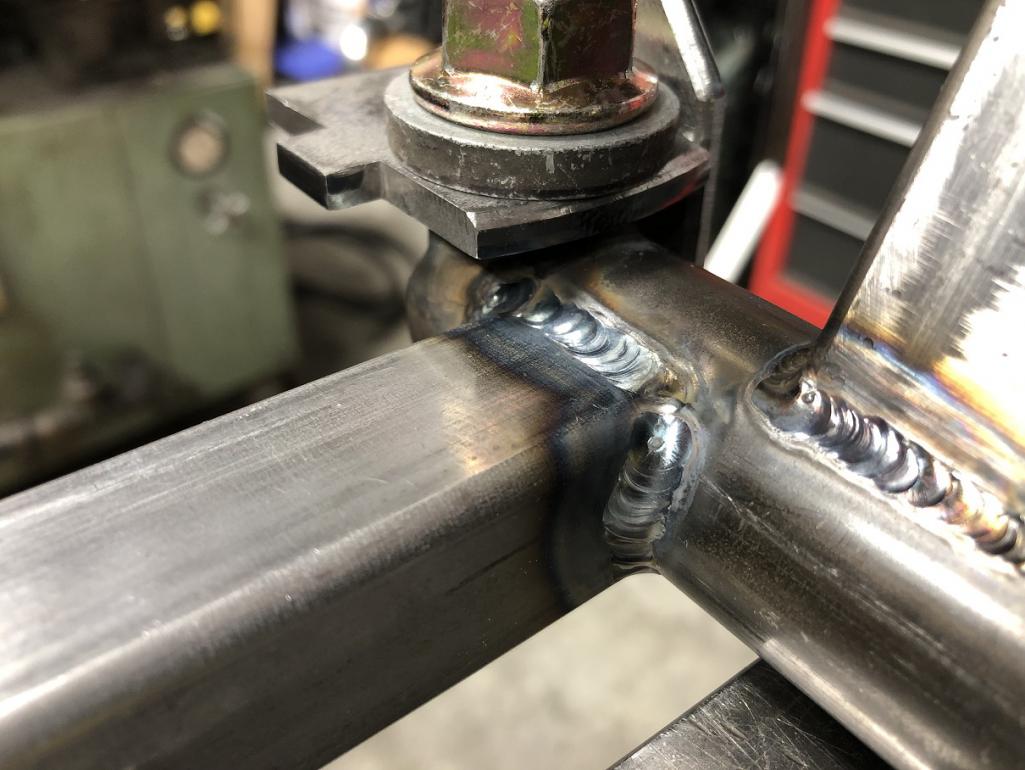
Posted by: tygaboy Dec 12 2022, 06:08 PM
With the cradle all welded up and the fire wall tabs shimmed in place, the assembly gets final fit, leveled and centered, and the mounting plates are tacked to the fire wall tabs. This ensures everything is in the correct orientation and mounts meet dead on with the surfaces they each bolt to.
With that done, everything was removed and the tabs/mounting plates were bench welded. Then it all goes back in, is checked for center and level and the fire wall tabs are FINALLY tacked to the fire wall!
Attached thumbnail(s)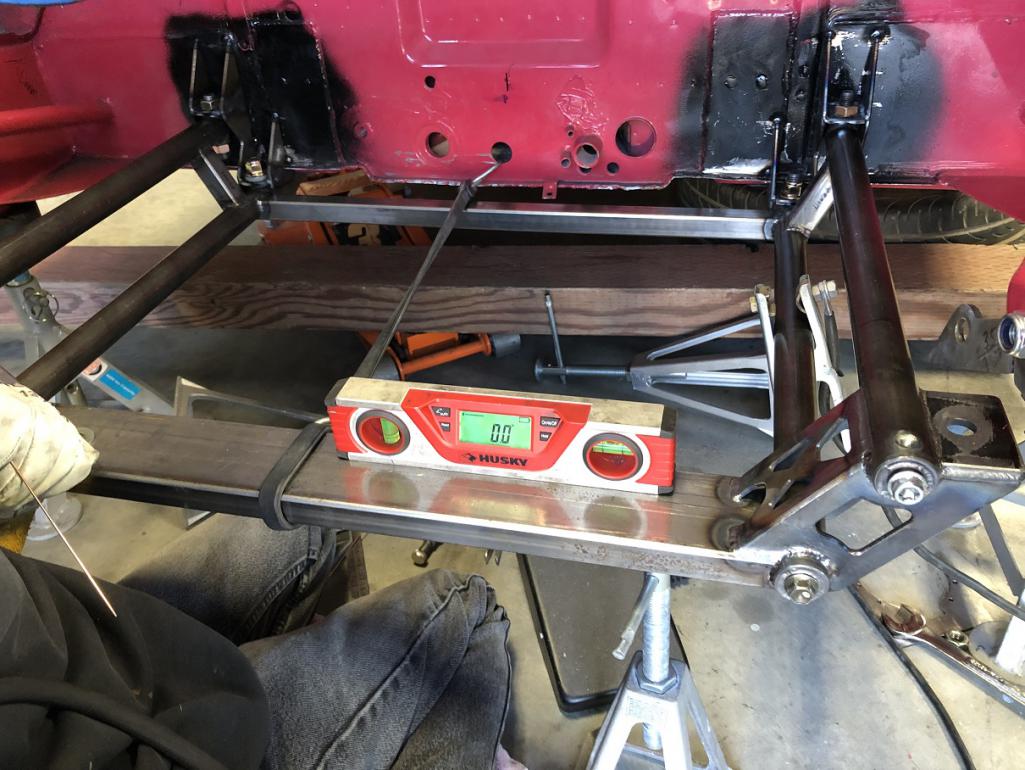
Posted by: tygaboy Dec 12 2022, 06:13 PM
Unbolt the cradle and fully weld the tabs.
Attached thumbnail(s)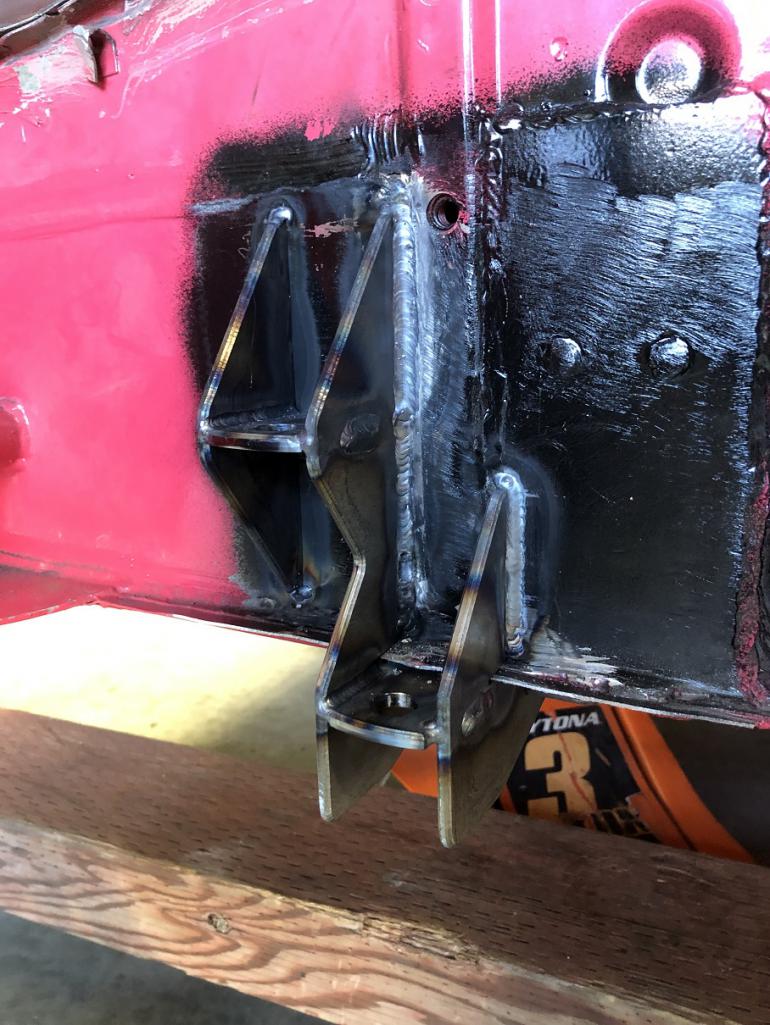
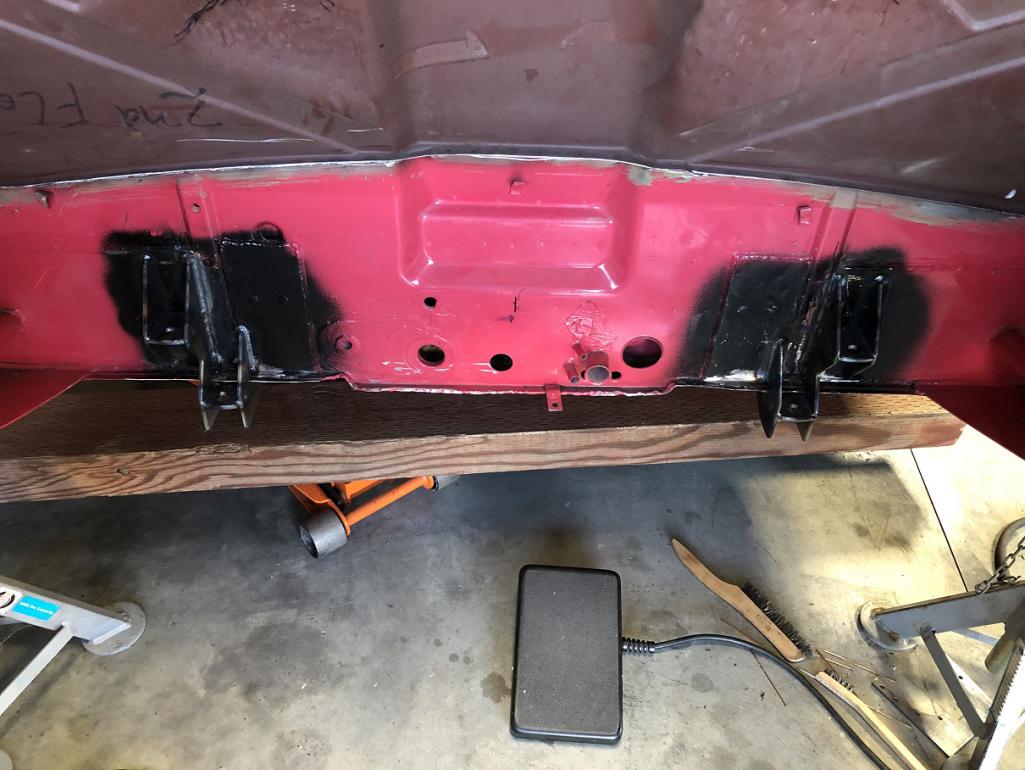
Posted by: tygaboy Dec 12 2022, 06:16 PM
Rememer these aluminum can shims? Well, how'd they work out?
All four mounting bolts slide right through the bungs and the mounting plates with even slop all around. And btw, there's not much of it. I didn't leave much room for error and, thankfully, didn't make one. In all seriousness, the fit is essentially perfect. I couldn't be happier.
Attached thumbnail(s)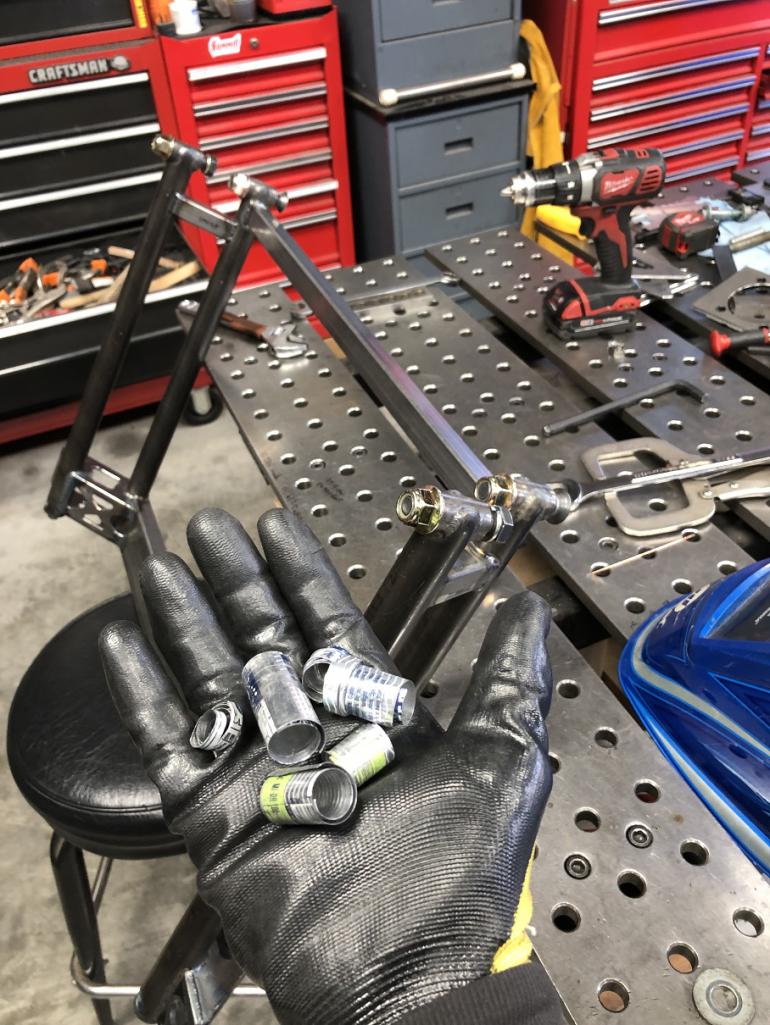
Posted by: tygaboy Dec 12 2022, 06:18 PM
@http://www.914world.com/bbs2/index.php?showuser=172 Andrew - I thought of you every time I checked the gaps...
Again, I couldn't be happier with how all this fits! Sure, there's a bit of upside down welding to go, but with gaps like that, how hard can that be?
Attached thumbnail(s)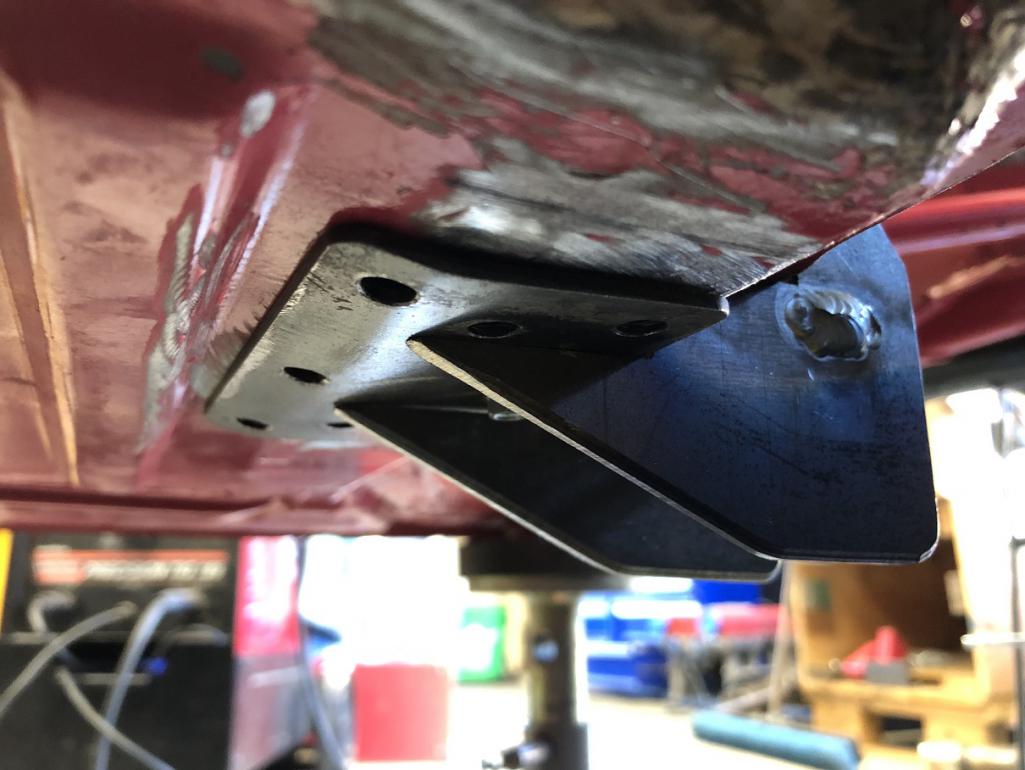
Posted by: tygaboy Dec 12 2022, 06:21 PM
And the final acid test. Here's the cradle, bolted in place - only at the fire wall mounts - "floating" at the back. Yep, that reads dead level.
It was a great day at the Red Barn.
Attached thumbnail(s)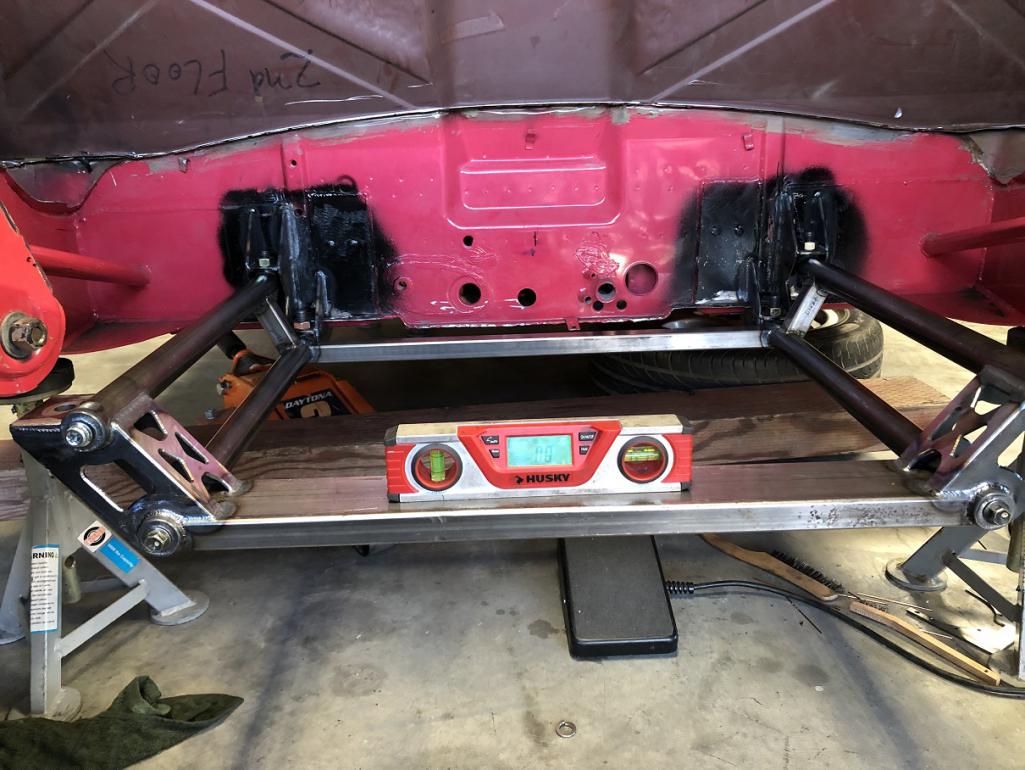
Posted by: fiacra Dec 12 2022, 07:26 PM
And the final acid test. Here's the cradle, bolted in place - only at the fire wall mounts - "floating" at the back. Yep, that reads dead level.
It was a great day at the Red Barn.
Chris, great work! Thanks for letting me visit yesterday. Good seeing you and seeing your amazing work. Your approach to your projects and ability to problem solve is inspirational.
Posted by: Tferrer Dec 13 2022, 11:07 AM
Wow- Inspirational is an understatement. Maybe I'll just have YOU restore the CSL instead of shipping it off?!
Posted by: tygaboy Dec 13 2022, 11:16 AM
Wow- Inspirational is an understatement. Maybe I'll just have YOU restore the CSL instead of shipping it off?!
@http://www.914world.com/bbs2/index.php?showuser=26896 Tyson - Careful, it might end up with an LS or a Ferrari swap!
But something I just noticed: "Ferrer" shares a whole lotta letters with "Ferrari"... maybe it's meant to be?
Posted by: plymouth37 Dec 13 2022, 11:31 AM
Awesome work, I can't wait to hear the exhaust note from this beast, it's going to howl!
Posted by: Tferrer Dec 13 2022, 03:46 PM
Wow- Inspirational is an understatement. Maybe I'll just have YOU restore the CSL instead of shipping it off?!
@http://www.914world.com/bbs2/index.php?showuser=26896 Tyson - Careful, it might end up with an LS or a Ferrari swap!
But something I just noticed: "Ferrer" shares a whole lotta letters with "Ferrari"... maybe it's meant to be?
Well, that's one way of getting rid of the D-jet...
Posted by: 76-914 Dec 13 2022, 04:18 PM
Love that rolling bender Chris. You have nice toys . Don't you love how that Chromoly welds? Have you been able bend the .095 45-60 degree w/o any small kinking. Great build as always.
Posted by: tygaboy Dec 13 2022, 07:09 PM
Love that rolling bender Chris. You have nice toys
. Don't you love how that Chromoly welds? Have you been able bend the .095 45-60 degree w/o any small kinking. Great build as always. @http://www.914world.com/bbs2/index.php?showuser=9964 Kent - Are you talking about bends for something like a roll cage? The tubing will bend fine to 180 degrees, assuming the proper die. The smallest radius you're suppsed to use is 3x OD so on the 1.5, it's a 4.5" radius. I used a 6" radius on all the 1.5" chassis stiffening tubes in my LS build. Hope that helps.
Posted by: 76-914 Dec 13 2022, 08:33 PM
Love that rolling bender Chris. You have nice toys
. Don't you love how that Chromoly welds? Have you been able bend the .095 45-60 degree w/o any small kinking. Great build as always. @http://www.914world.com/bbs2/index.php?showuser=9964 Kent - Are you talking about bends for something like a roll cage? The tubing will bend fine to 180 degrees, assuming the proper die. The smallest radius you're suppsed to use is 3x OD so on the 1.5, it's a 4.5" radius. I used a 6" radius on all the 1.5" chassis stiffening tubes in my LS build. Hope that helps.
Yes it did, thx.
Posted by: tygaboy Dec 14 2022, 02:12 PM
Right side rear engine cradle mount fabbed and tacked in.
While I added that plate on the rear of the suspension console, as I looked at everything, I ended up simply adding an extension to the plating that had been previously added to the front side. I think it makes for what will look more cohesive, once it's all done.
Note that the base mount is 3/16" plate. It has a slight bevel on the underside edge to help in clear a weld on the cradle and this makes it look much thinner than it really is.
Still some trimming/tuning to go, then boxing across the face but this should give a good idea of how it'll all work.
On to the left side - which should go lots quicker, now that the design and approach have been worked out.
Attached thumbnail(s)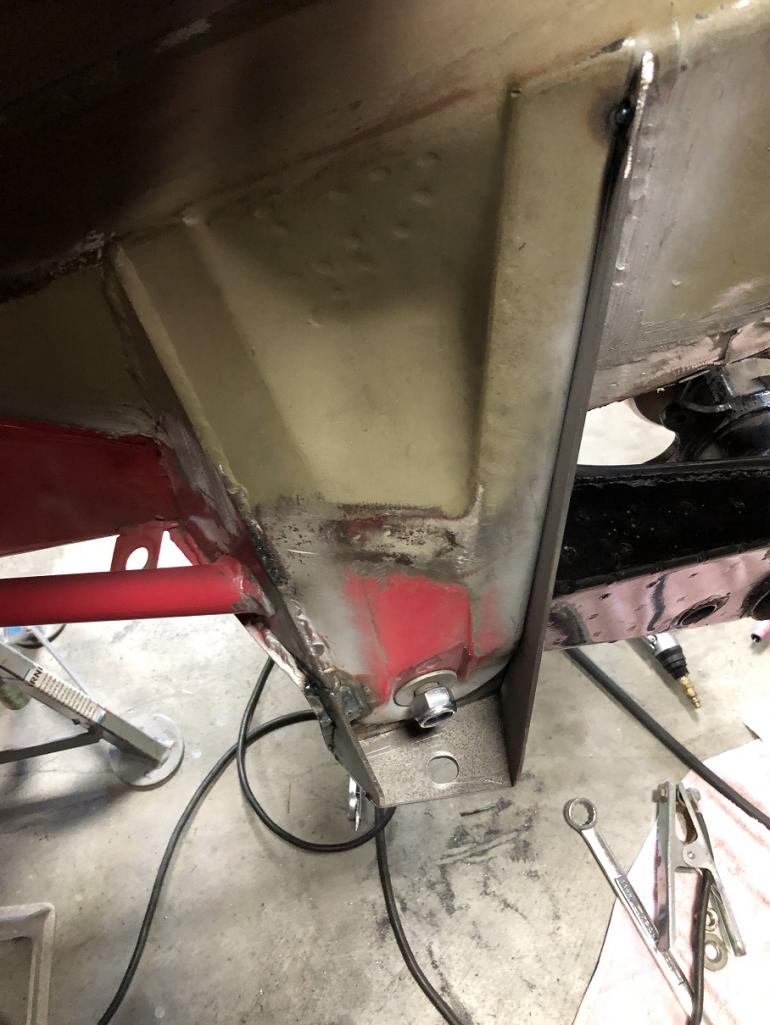
Attached image(s)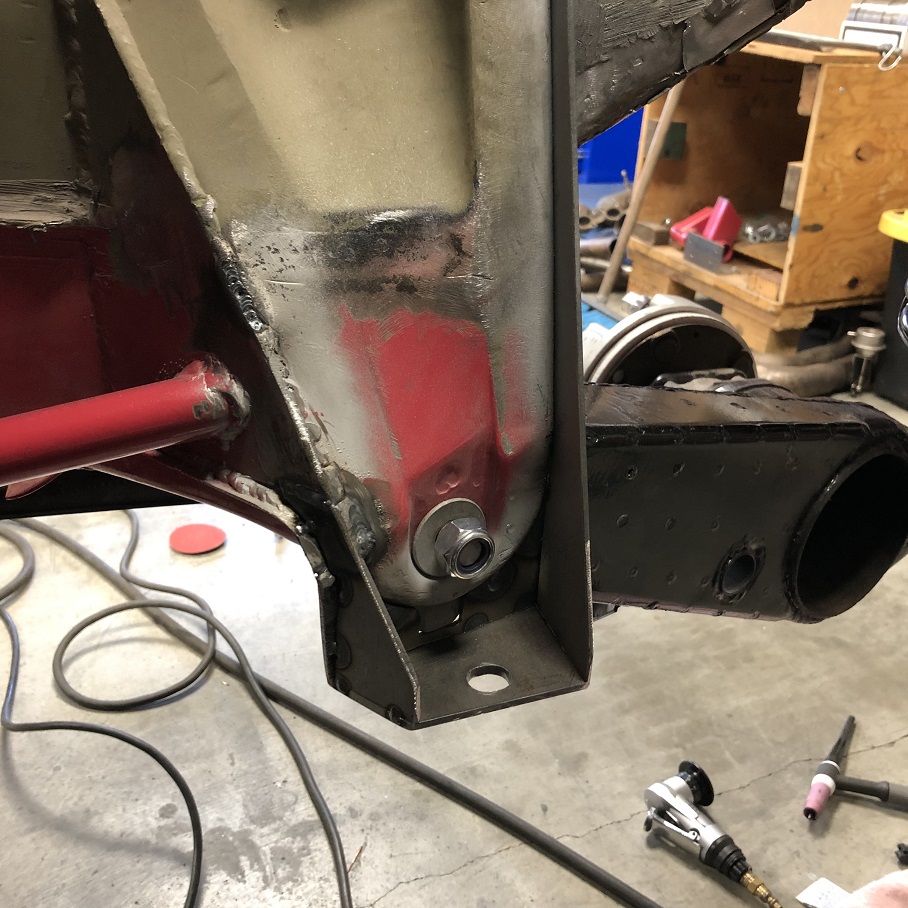
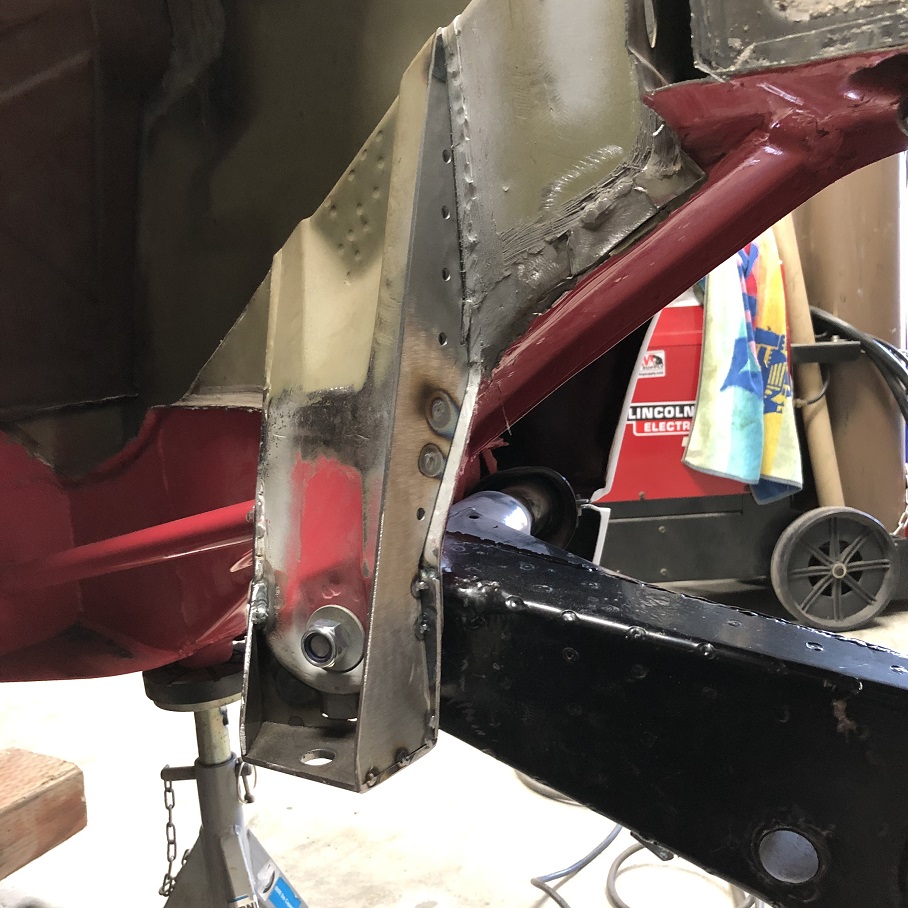
Posted by: tygaboy Dec 14 2022, 06:02 PM
Left side in process with console vertical extension rosetted in place and rear plate tacked in postion.
The vertical piece will also be welded to the console on the backside, too.
Attached thumbnail(s)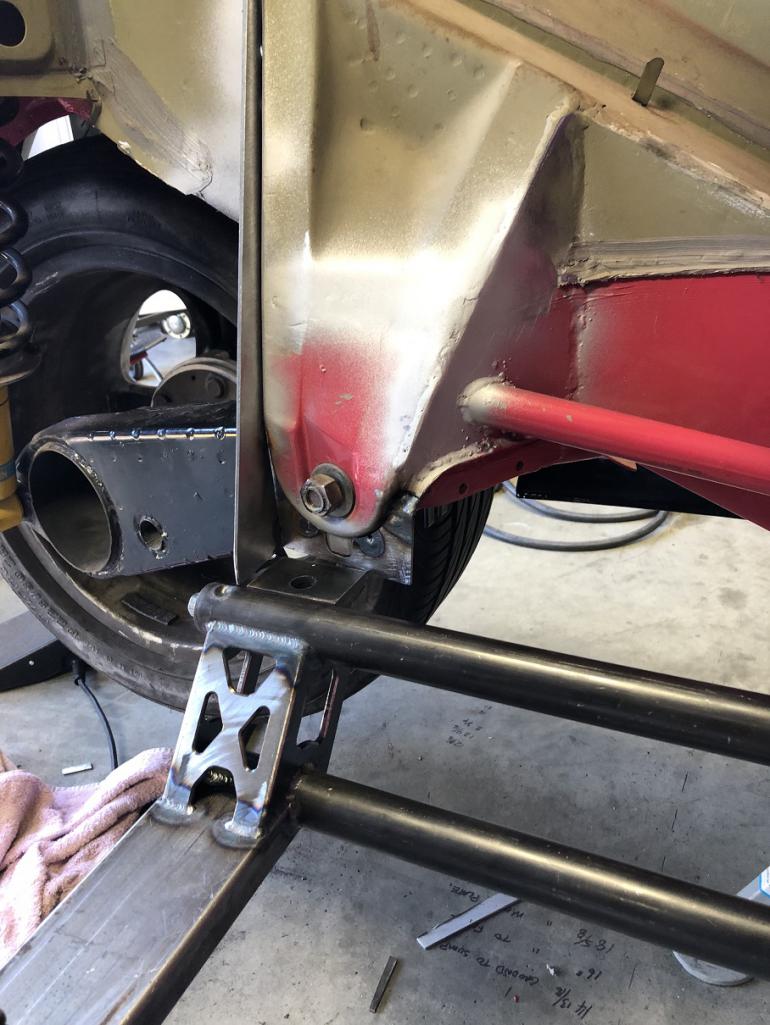
Posted by: tygaboy Dec 14 2022, 06:19 PM
Yep, the second time was WAY faster. After adding the same small, front plate extension, the cradle was bolted in at the front and at the right rear. I verified level then placed a scrap 3/16" plate on the cradle mount and scribed a line on each of the plates.
Remove the cradle, use a zip wheel to slice off the excess material, bolt the cradle back in, prep the actual 3/16" mount base, verify everything AGAIN and tack everything in place.
So after what seems like forever, the engine cradle mounts are fabbed, fit and (if I do say so myself) FABULOUS!
OK, OK, so I still need to install the engine mounts but, come on! I couldn't be happier.
Attached thumbnail(s)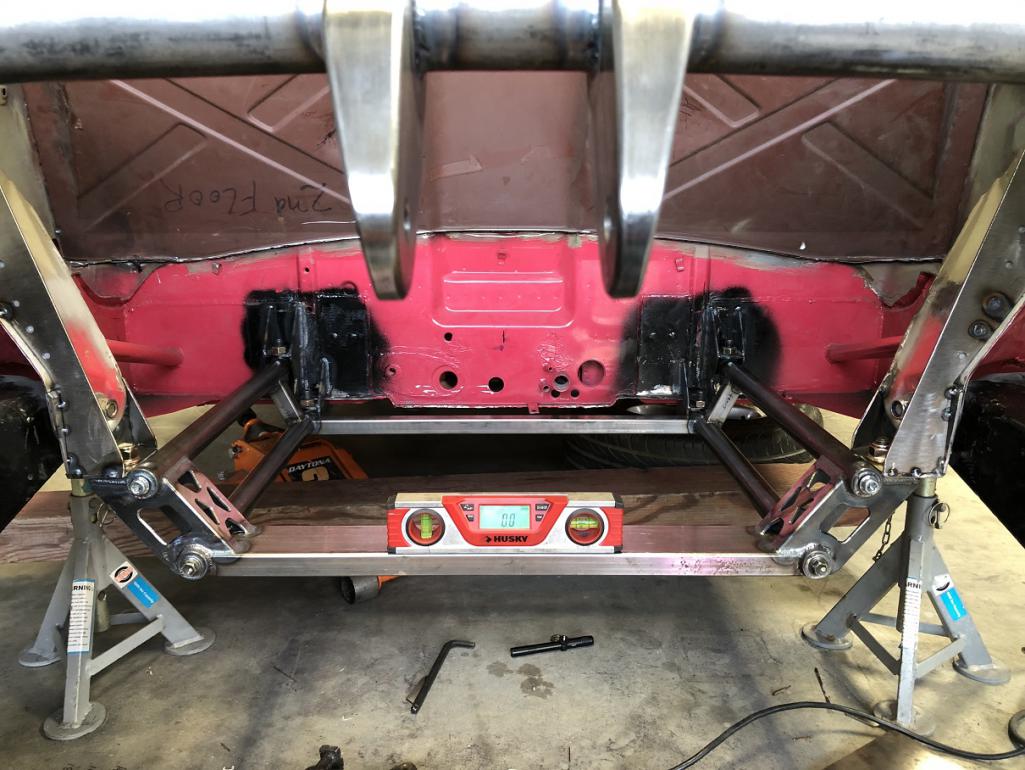
Posted by: tygaboy Dec 14 2022, 06:22 PM
I'll level with you, it's good to see this is a match.
(Thanks, I'm here all week! Don't forget to tip your servers!)
Attached thumbnail(s)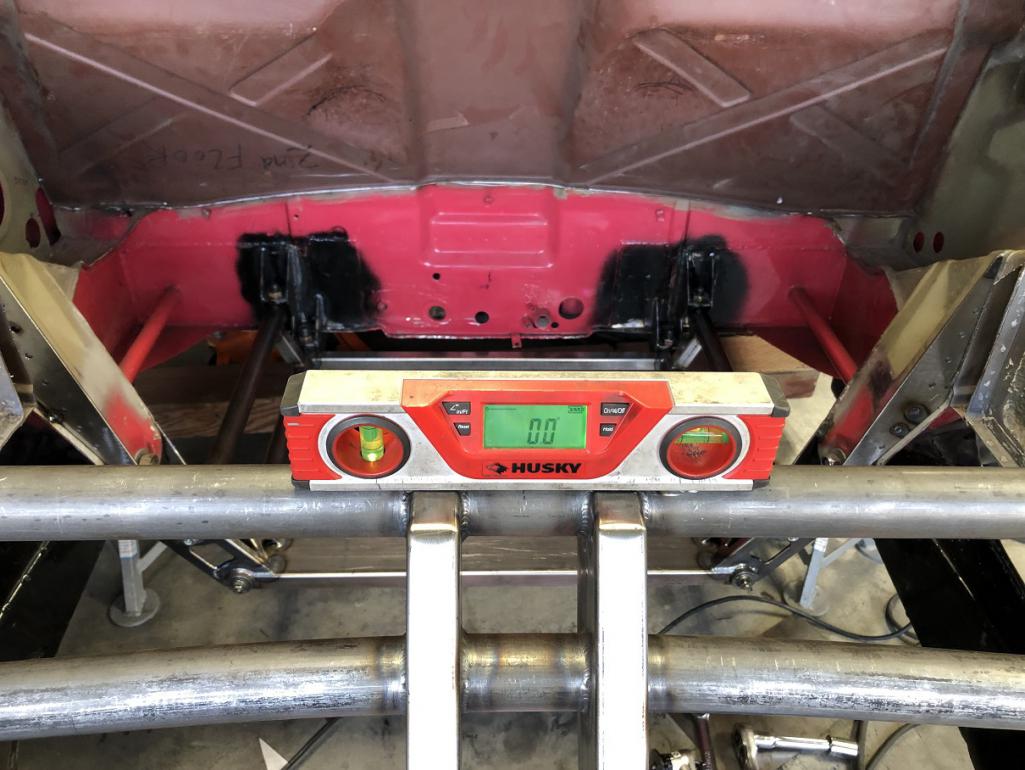
Posted by: tygaboy Dec 14 2022, 06:23 PM
And here's something you don't see every day: one 914 chassis, essentially ready to receive a Ferrari 360 drive train.
Attached thumbnail(s)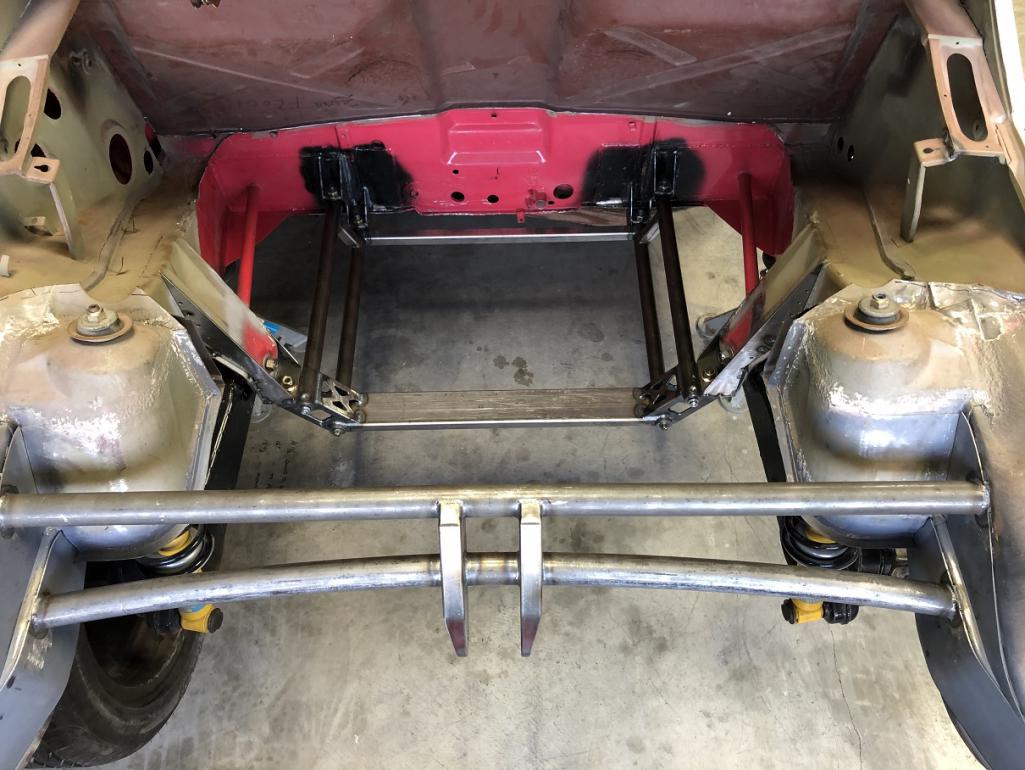
Posted by: Maltese Falcon Dec 14 2022, 06:44 PM
Awesome build Chris, this will send the precious pasta people to the Nut House when this rolls into Cars und Coffee
Posted by: SirAndy Dec 14 2022, 09:09 PM
Awesome build Chris, this will send the precious pasta people to the Nut House when this rolls into Cars und Coffee
Especially if he keeps the "Ferrari Pink" color ...
Posted by: plymouth37 Dec 15 2022, 11:30 AM
And here's something you don't see every day: one 914 chassis, essentially ready to receive a Ferrari 360 drive train.
Posted by: tygaboy Dec 15 2022, 02:52 PM
What's the opposite of "clamp"? The console's odd angles made it awkward to get the plate firmly pressed against it for rosette welding. Use a clamp backwards and "presto"!
Anyway, it worked a treat and the plate is welded on.
Attached image(s)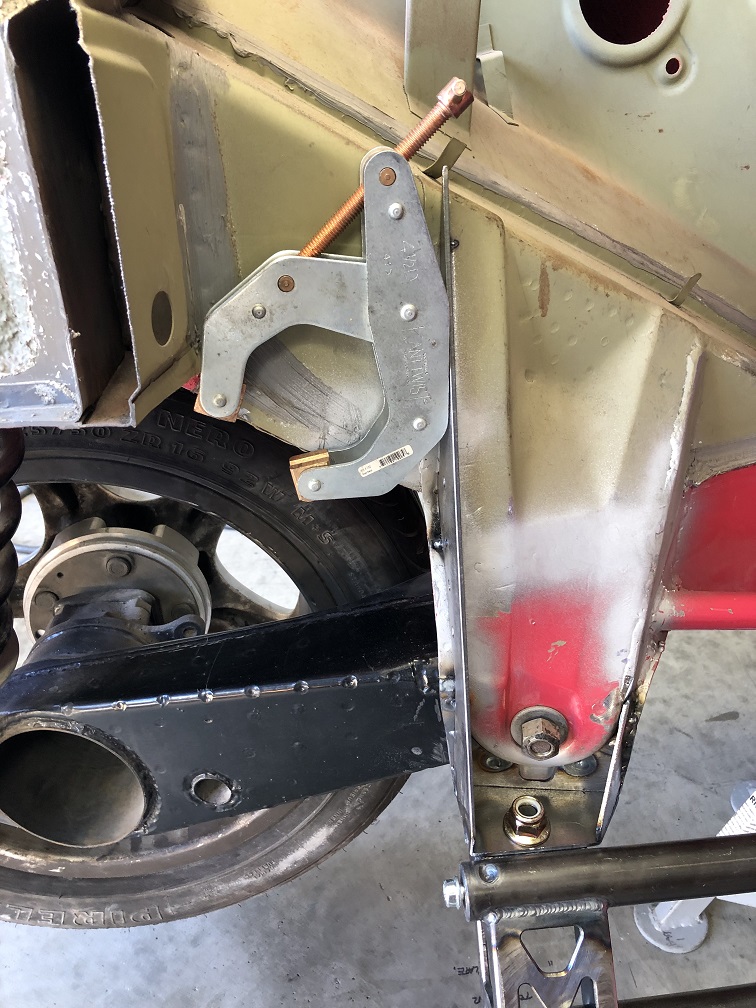
Posted by: tygaboy Dec 15 2022, 02:55 PM
Noodling on ideas for boxing, with this design leading at the moment. The height of the opening allows access to the mounting fastener. Looks kinda cool, too.
Attached image(s)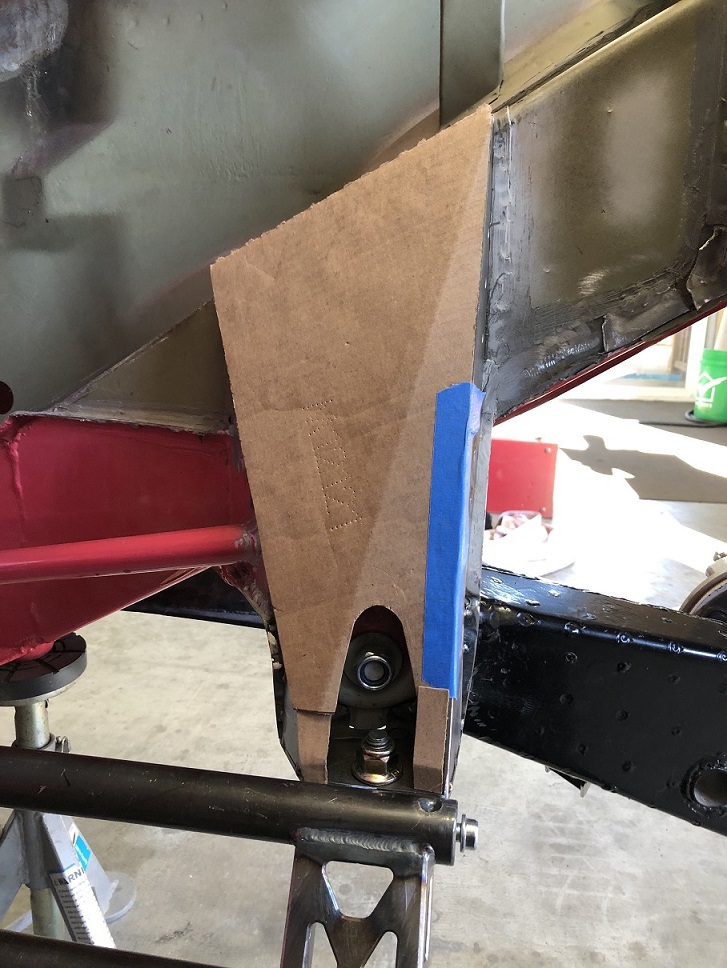
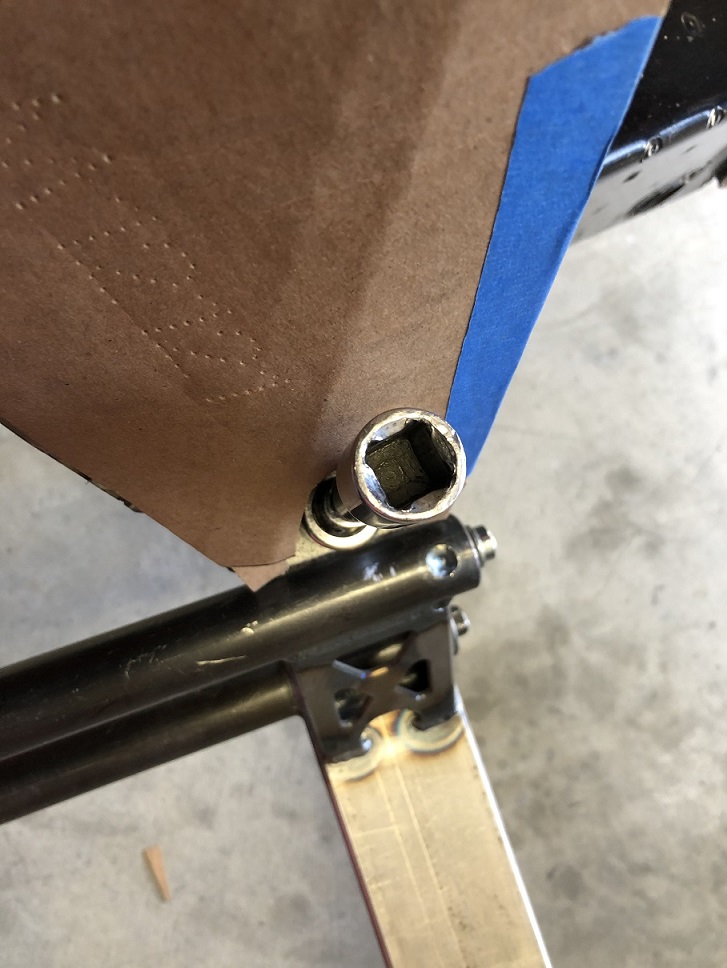
Posted by: Maltese Falcon Dec 15 2022, 04:30 PM
Awesome build Chris, this will send the precious pasta people to the Nut House when this rolls into Cars und Coffee
Especially if he keeps the "Ferrari Pink" color ...
From "Cannonball Run" Ferrari driver, 'And now my friend The first rule of Italian driving...what's a behind me isa not important'
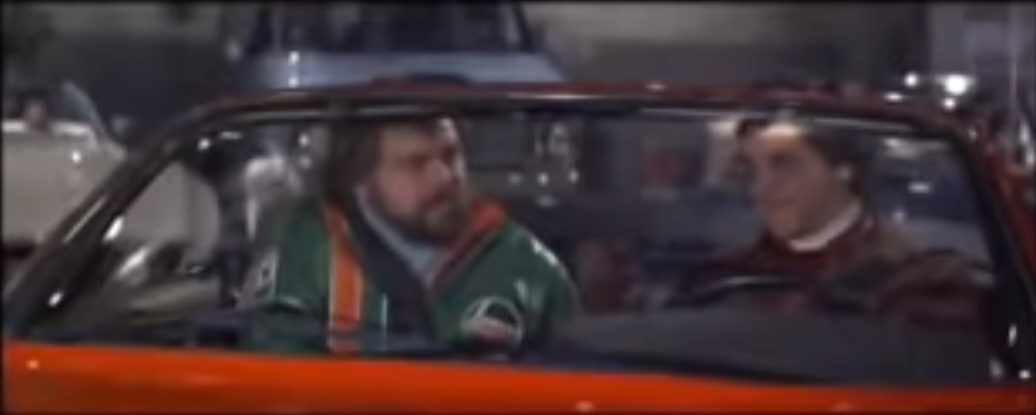
Posted by: tygaboy Dec 15 2022, 04:48 PM
Today was me welding on my own, rosetting the spreader plates to the chassis, then the tabs to the spreader plates.
It was extra challenging because it was out of position welding: upside down with the car only about 18" off the ground so I couldn't get my head to an optimal viewing distance from the work area. Such fun! But I got it done.
Attached thumbnail(s)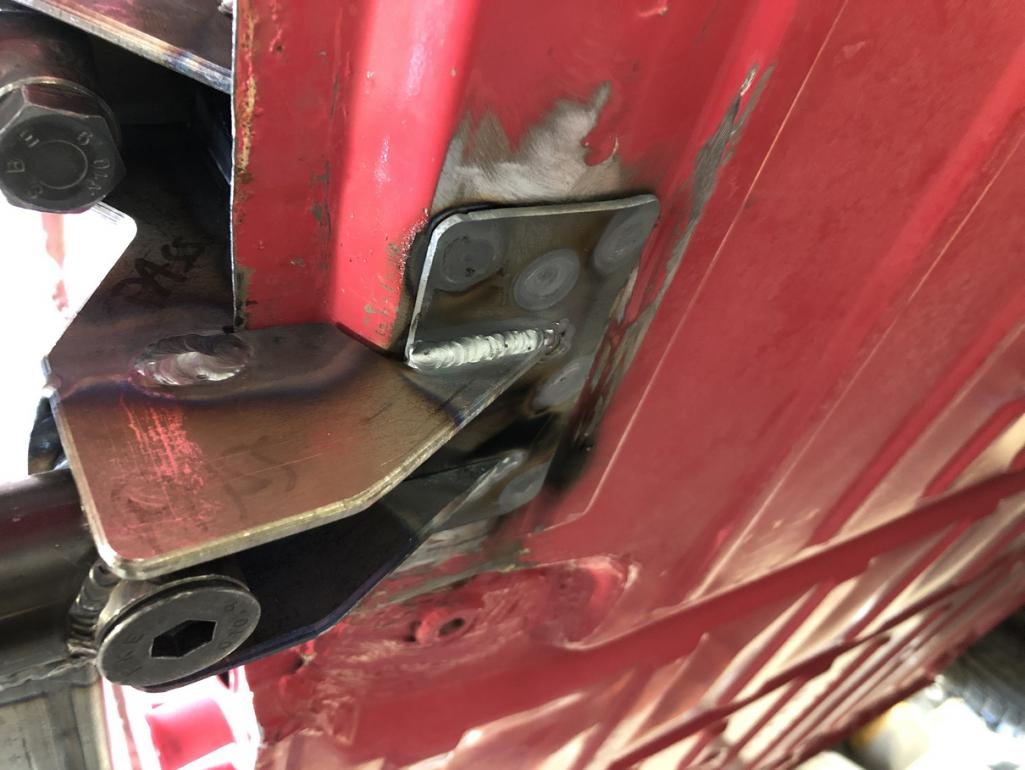
Posted by: Tferrer Dec 15 2022, 05:39 PM
Noodling on ideas for boxing, with this design leading at the moment. The height of the opening allows access to the mounting fastener. Looks kinda cool, too.
Looks like a good area for some of your beautiful dimpling /ribbing?
Posted by: Retroracer Dec 15 2022, 07:00 PM
@http://www.914world.com/bbs2/index.php?showuser=19241 Chris - the opposite of "clamp" is "pmalc". I believe its a silent "p".
I'm here to help.
- Tony
Posted by: cali914 Dec 16 2022, 01:24 PM
Looks great Chris
Posted by: Superhawk996 Dec 16 2022, 02:57 PM
Today was me welding on my own, rosetting the spreader plates to the chassis, then the tabs to the spreader plates.
It was extra challenging because it was out of position welding: upside down with the car only about 18" off the ground so I couldn't get my head to an optimal viewing distance from the work area. Such fun! But I got it done.
Nothing beats TIG for upside down welding. No shower of sparks or slag.
Posted by: tygaboy Dec 16 2022, 04:55 PM
Classic example of "why didn't I do this sooner?"
And yes, I'll run with jack stands in there, too. This was the first time all the way up. What's best is that in this position, the drive train slips under the bumper!
Life made a bit simpler.
Attached thumbnail(s)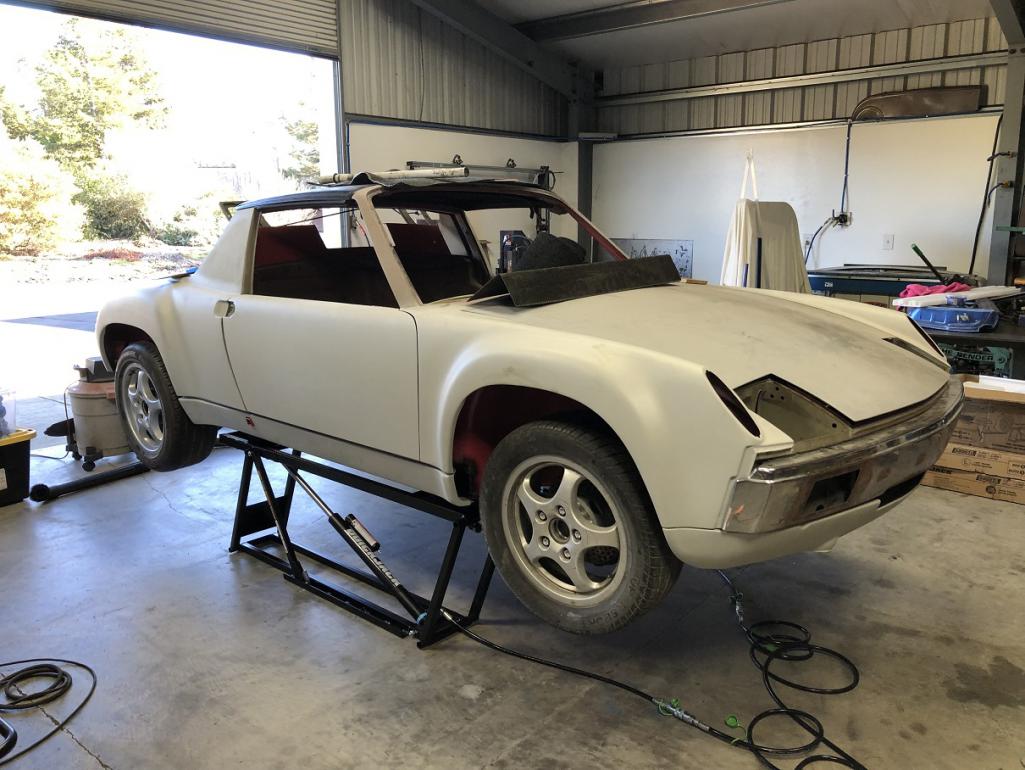
Posted by: BillC Dec 16 2022, 05:17 PM
Noodling on ideas for boxing, with this design leading at the moment. The height of the opening allows access to the mounting fastener. Looks kinda cool, too.
That looks great, but have you checked to see if you have clearance with the engine in place to put a socket on that bolt? If the engine is wider than the cradle at that point, you might not have room to get a wrench or socket in there.
Not saying I've ever been bitten by sorta detail before, but....
Posted by: Cairo94507 Dec 16 2022, 05:38 PM
Game changer for sure.
Posted by: tygaboy Dec 17 2022, 09:09 AM
Noodling on ideas for boxing, with this design leading at the moment. The height of the opening allows access to the mounting fastener. Looks kinda cool, too.
That looks great, but have you checked to see if you have clearance with the engine in place to put a socket on that bolt? If the engine is wider than the cradle at that point, you might not have room to get a wrench or socket in there.
Not saying I've ever been bitten by sorta detail before, but....
@http://www.914world.com/bbs2/index.php?showuser=18667 - As you can see from this "planning stage" pic, the engine width isn't a worry. The only thing that I expect could prevent accessing the rear cradle bolts from above would be the headers - which are yet to be developed. But you make a fair point, for sure. That said, worst case, I can make a custom tool that will allow me to get at that cradle nut. Or come up with some sort of captured nut/nut plate and eliminate the concern all together. All TBD at this point.
Attached thumbnail(s)
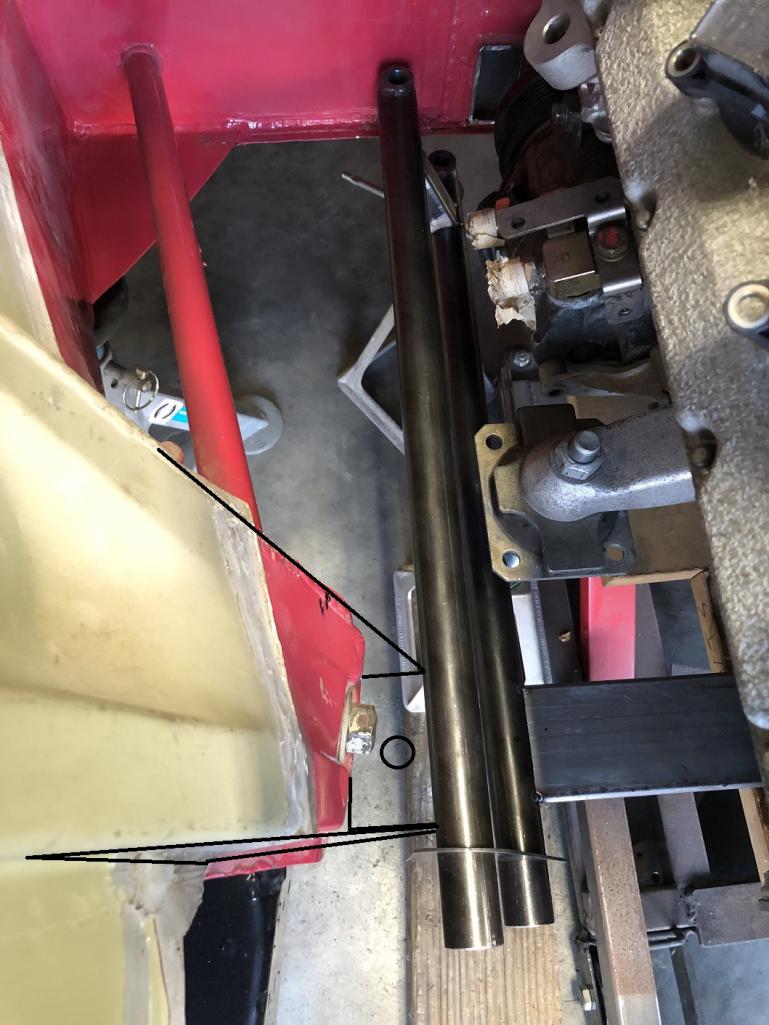
Posted by: tygaboy Dec 17 2022, 05:58 PM
Today was getting the cradle under the engine and jacking everything into position so I can locate the engine mounting side and main plates on the cradle.
This requires fully suspending the engine in the exact location I want it.
I ended up slinging the front from the the engine hoist while the rear is mounted at the trans. That right there is a Ferrari drive train held where it's gonna end up!
And OMG, the QuickJacks are awesome. All the way up and the motor slides under. Drop it to the low position and it's a perfect height to intall the drive train. So. Much. Better!
Attached thumbnail(s)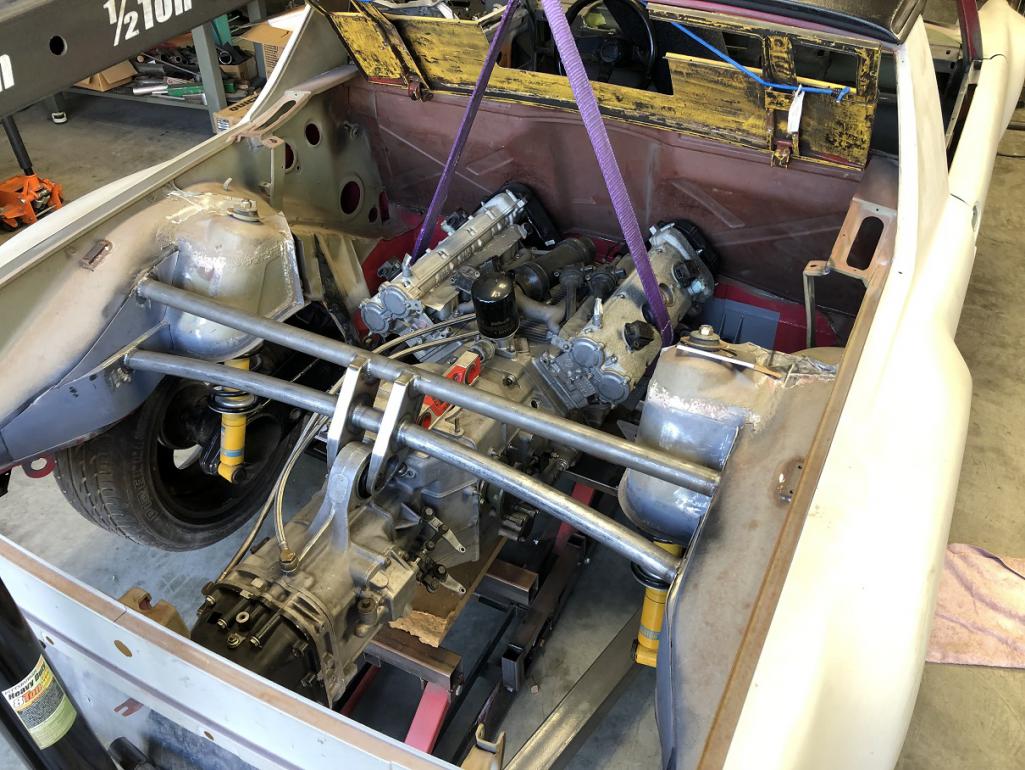
Posted by: tygaboy Dec 17 2022, 06:01 PM
And happiest of all it that my measurements were accurate: all clearances are just what I wanted - most critically, at the alternator.
Attached thumbnail(s)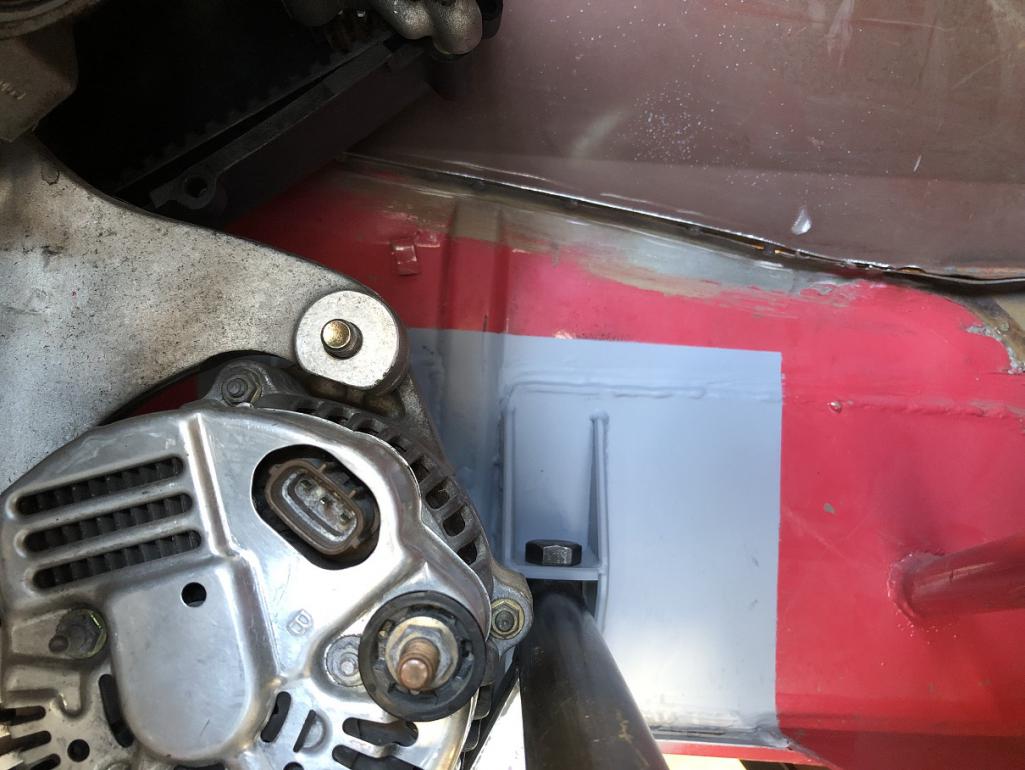
Posted by: tygaboy Dec 17 2022, 06:03 PM
Even the motor mount height inside the mount side plates is just where it's supposed to be! Probably only one more day of work and this first phase of "mount the drive train" will be concluded. It's been a long time coming, eh?
Attached thumbnail(s)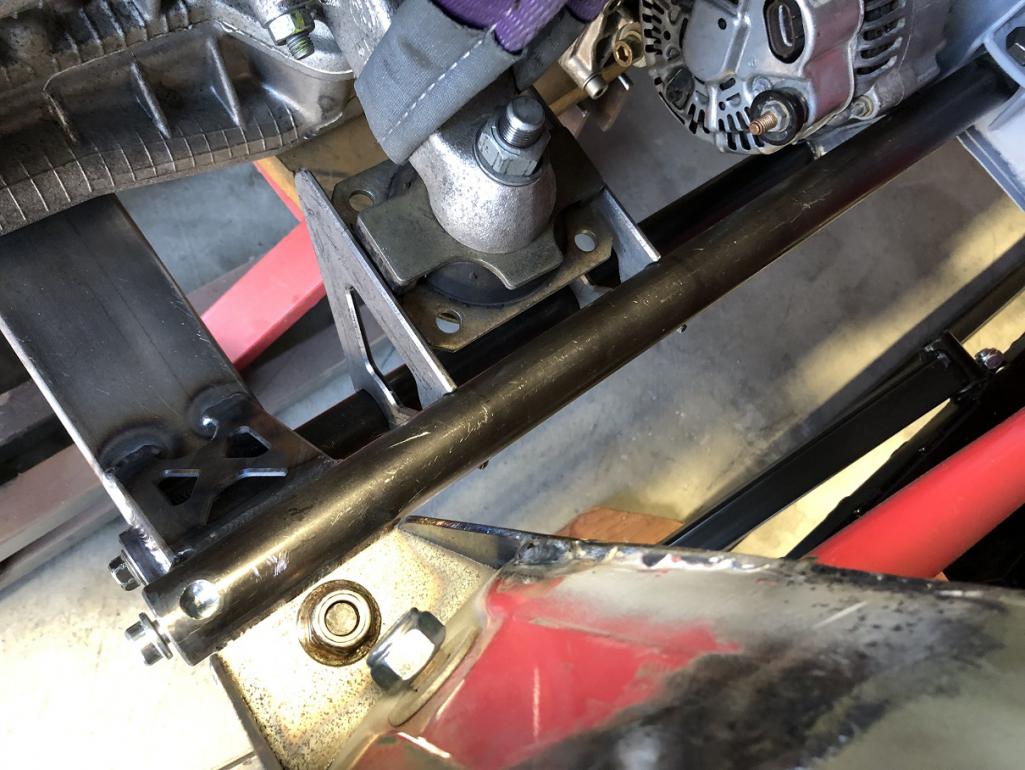
Posted by: SirAndy Dec 17 2022, 06:26 PM
How much clearance do you have on the firewall? Those valve covers look awfully close.
Posted by: tygaboy Dec 17 2022, 06:56 PM
How much clearance do you have on the firewall? Those valve covers look awfully close.
@http://www.914world.com/bbs2/index.php?showuser=179 Andy - It's a bit deceiving in the pics, there's plenty of room. I did have to "massage" the fire wall just ahead of the cover, but not too much.
Posted by: tygaboy Dec 18 2022, 02:10 PM
@http://www.914world.com/bbs2/index.php?showuser=179 - Andy - There's a bit more room than the tape shows but, yes, there's clearance.
Attached image(s)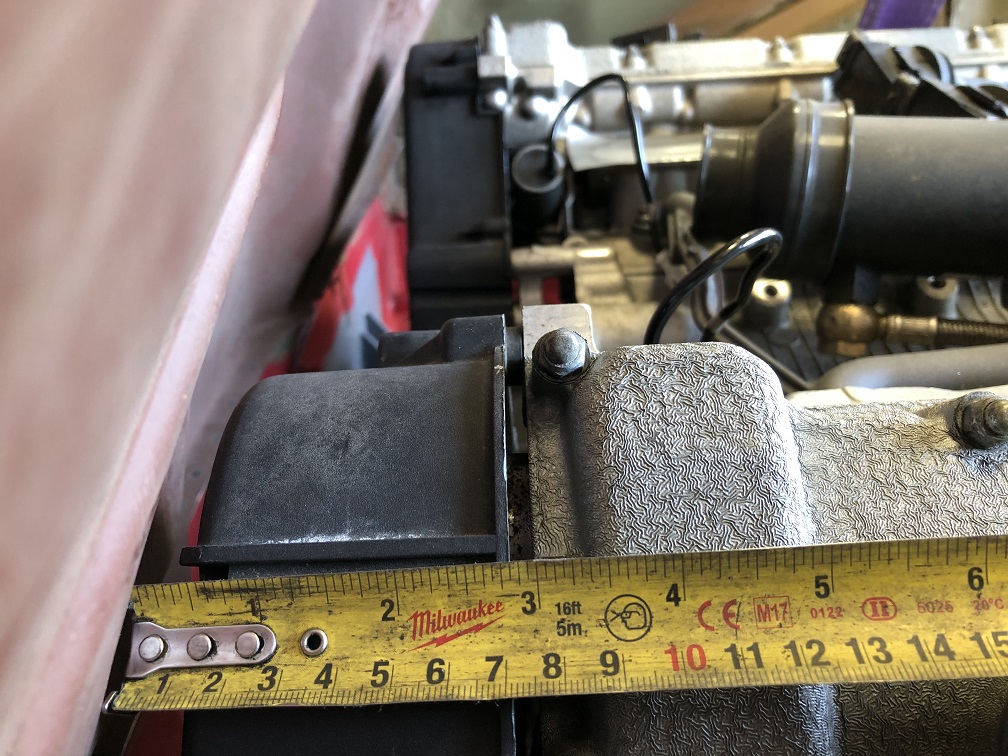
Posted by: tygaboy Dec 18 2022, 02:15 PM
Motor mount "top plates" are trimmed to size and everything is now nicely centered. Ahead of final positioning and welding, I'm going to substitute a metal spacer for the rubber mount so as to eliminate any deflection/out of plane caused by the rubber. This'll guarantee the top plates end up parallel to the cast aluminum engine mount surface.
Attached image(s)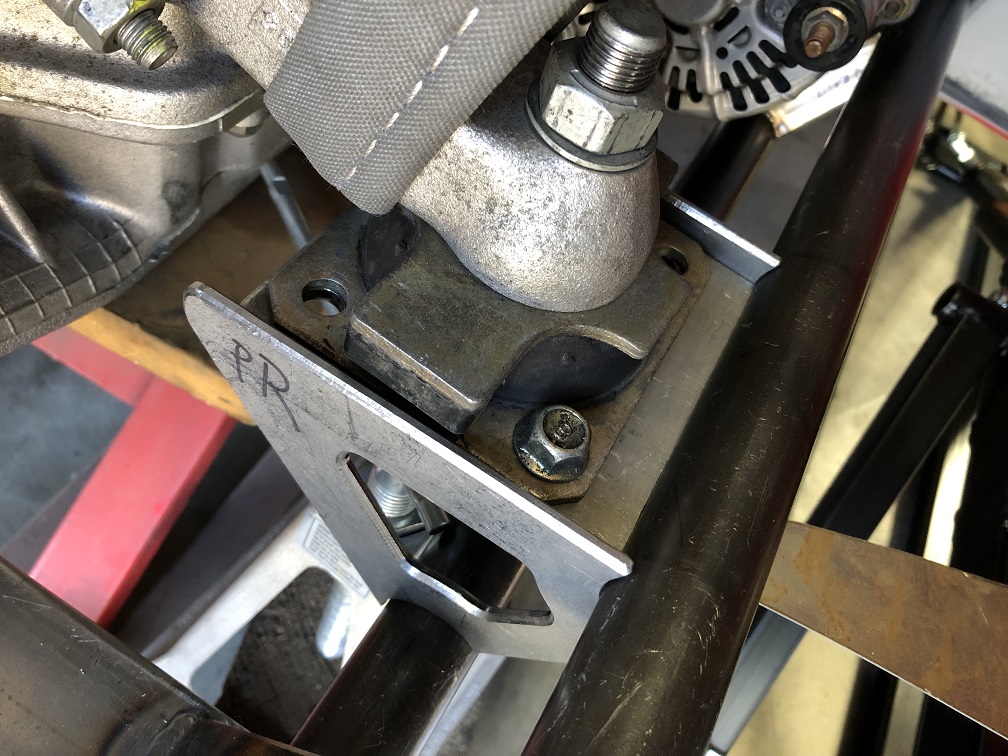
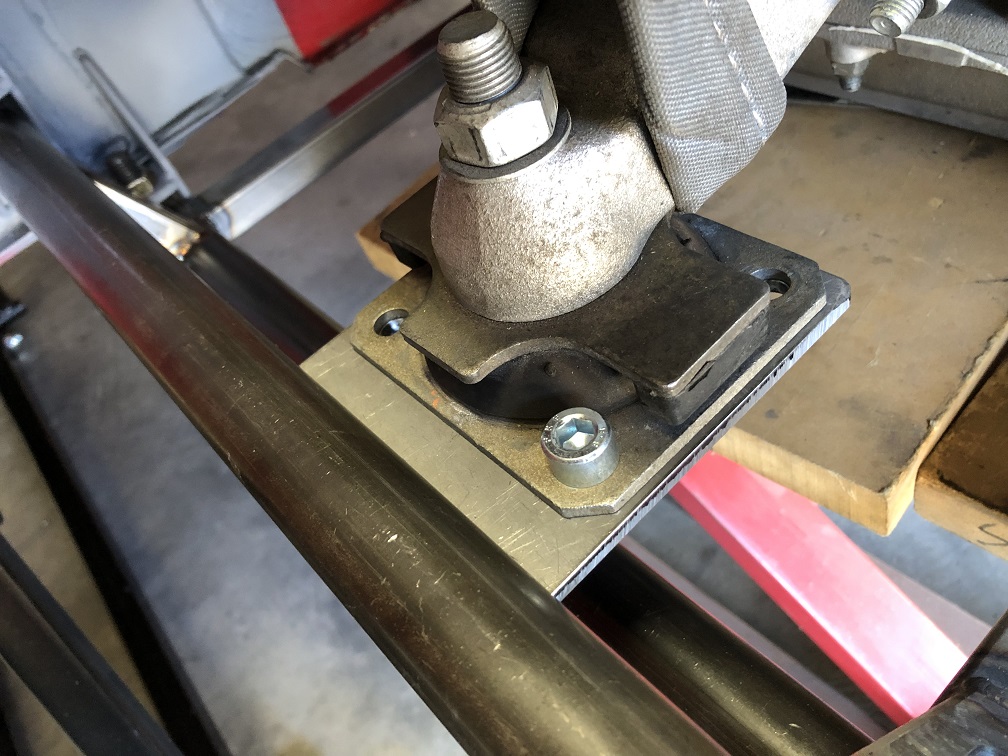
Posted by: mgp4591 Dec 18 2022, 03:01 PM
Chris, will substituting metal for the rubber isolator put more stress on the aluminum mounting ears and possibly cause cracks or failure in the castings?
Posted by: tygaboy Dec 18 2022, 04:03 PM
Chris, will substituting metal for the rubber isolator put more stress on the aluminum mounting ears and possibly cause cracks or failure in the castings?
@http://www.914world.com/bbs2/index.php?showuser=14748 - Sorry, I should have been more clear: I'm only substituting the metal to serve as a temporary fixture to locate and ensure the top plate is dead even with the base of the aluminum mounting ears. Once welding is complete on the cradle mounts, the spacer comes out and the factory rubber mounts go back in.
Posted by: tygaboy Dec 19 2022, 05:56 PM
Today was committing to the drive train position and getting the engine mounts welded to the cradle.
First up was making the above-mentioned spacer set up to substiture for the Ferrari engine mount and serve as the positioning fixture.
I plasma cut a couple appropriate plates and, unbelieveably, found the perfect sized spacer in the scrap pile! Karma, baby!
Here's the spacer set up next to the Ferrari mount. Note, both are upside down.
Attached image(s)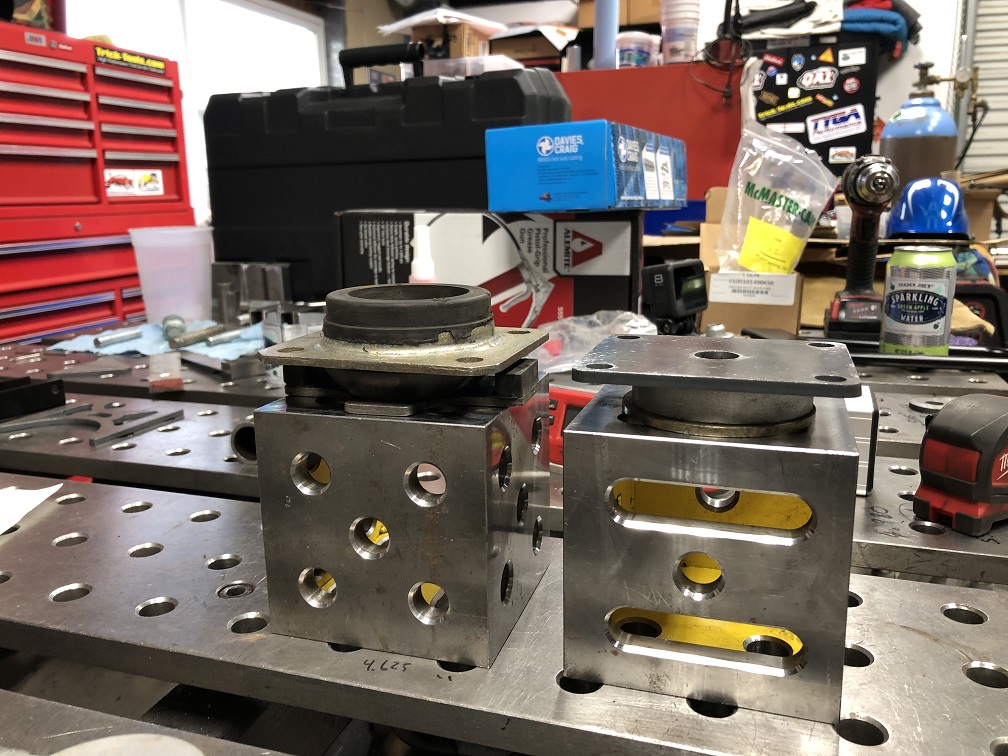
Posted by: tygaboy Dec 19 2022, 06:00 PM
Next was to get the drive train suspended in the proper location - that was fun...
Once that was set up and all levels and angles were checked and rechecked, the engine mount top plates were tacked to the upper cradle bars. Then the cradle was removed from the car for bench welding.
The first step there was to level the top plates to each other and verifiy them as level to the main cross bar. Yep, everything check out just as hoped expected.
Then the side plates got squared and clamped and all those parts tacked in place.
Attached image(s)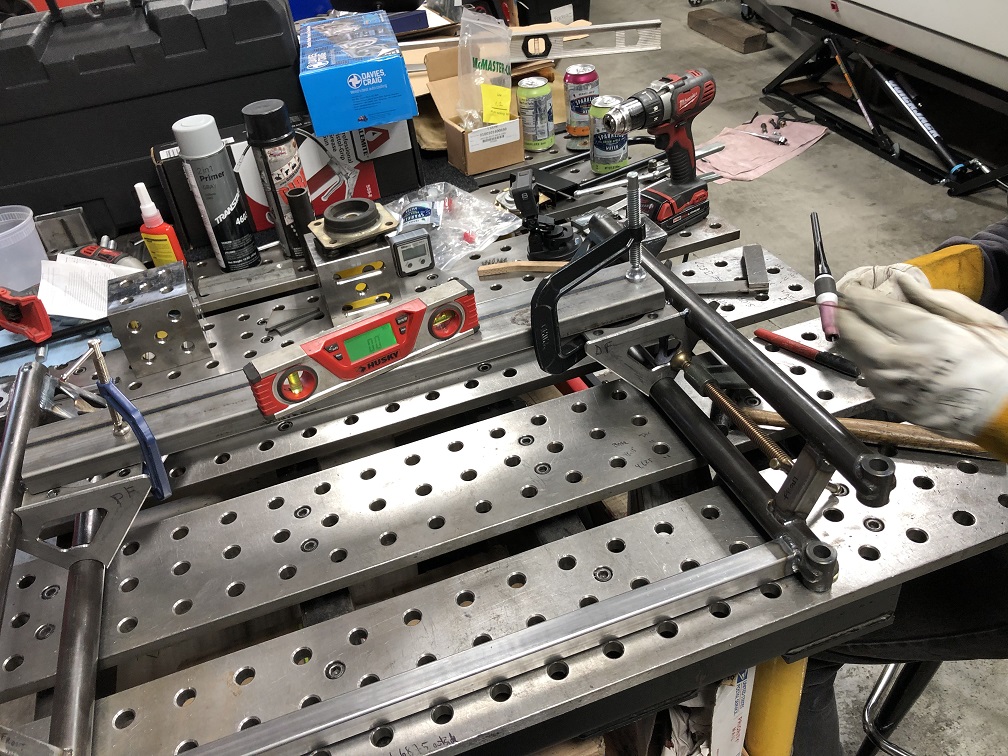
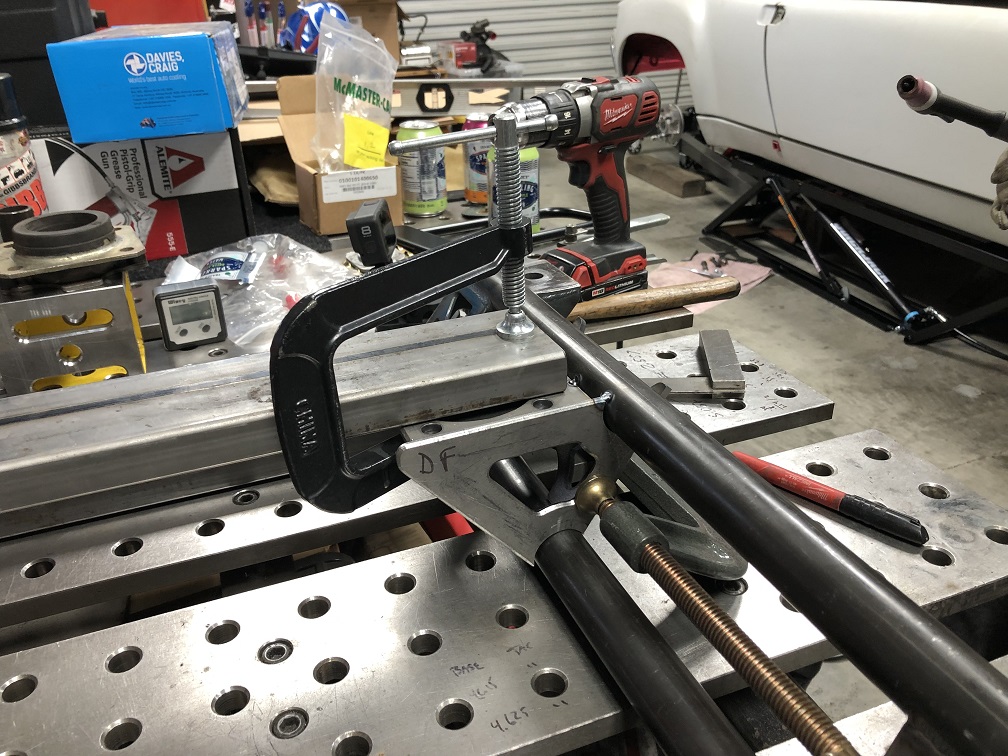
Posted by: tygaboy Dec 19 2022, 06:01 PM
On to making up some gussets for the side plates and fixturing them for tacking.
Attached image(s)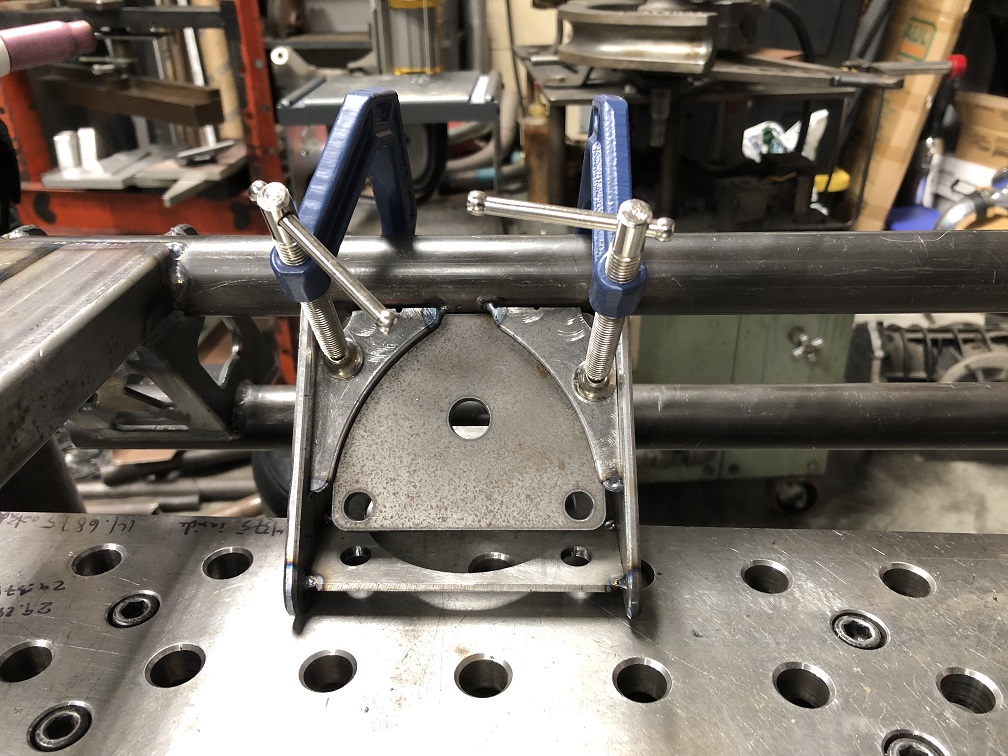
Posted by: tygaboy Dec 19 2022, 06:04 PM
The side plate gussets got the edge router treatment, as well as some corner cut outs to help prevent trapping stuff that may find it's way in there.
Yep, style points for stuff no one will ever see. It's how we do things "At the Red Barn".
(What could those quotes possibly imply...?)
Attached image(s)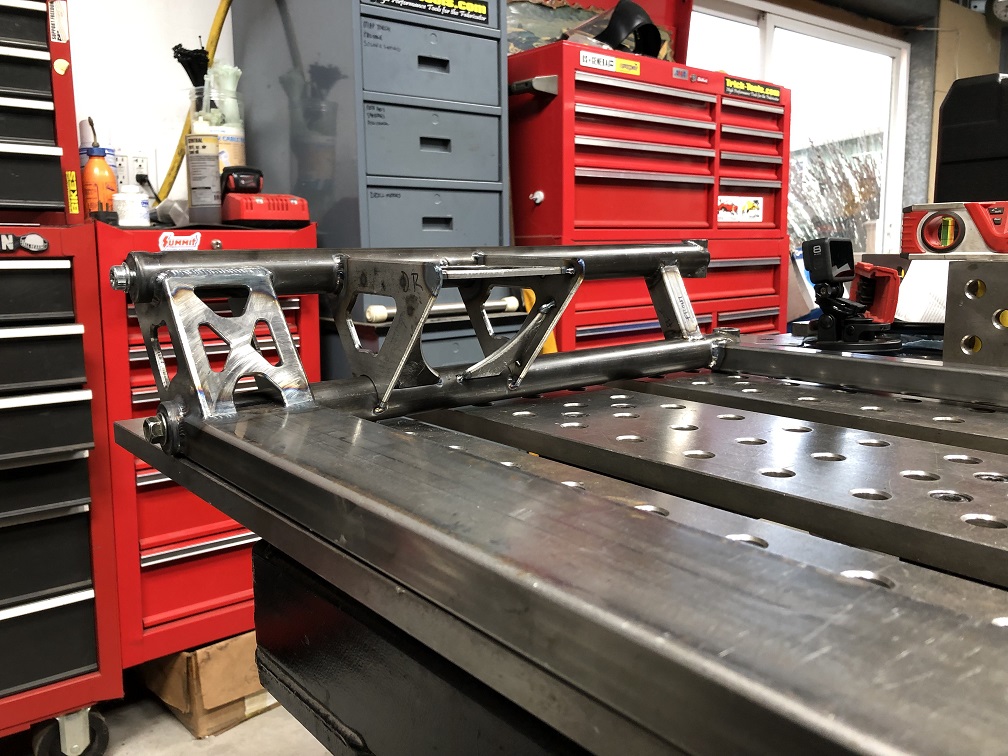
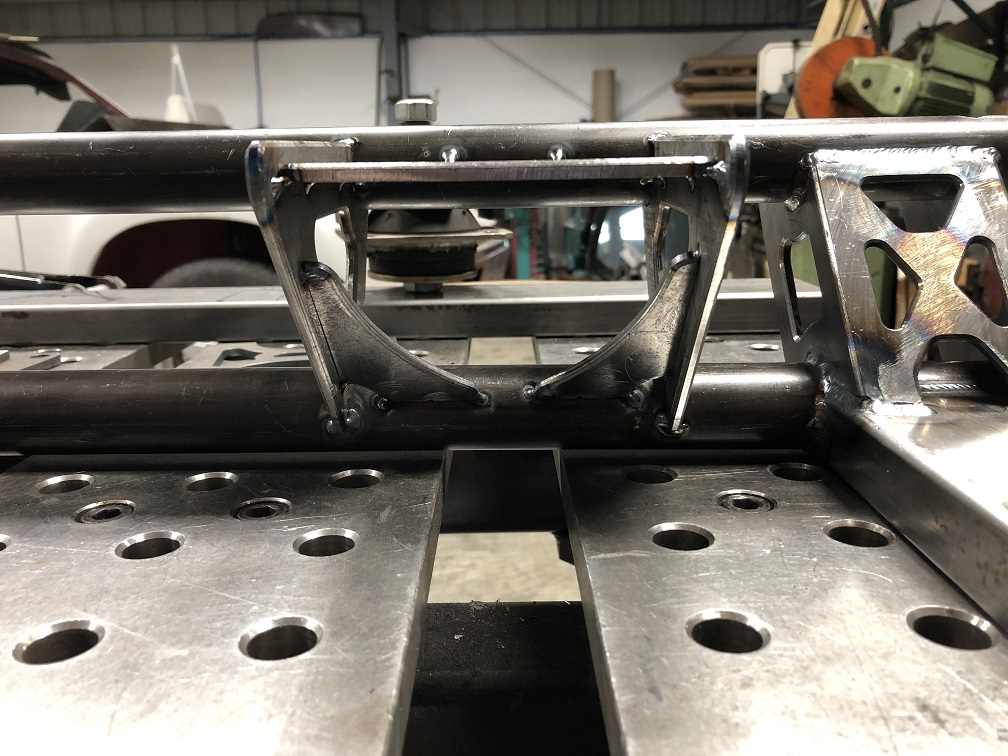
Posted by: tygaboy Dec 19 2022, 06:07 PM
Final welding yet to go but here it is: the Ferrari engine cradle.
That was WAY more complicated and WAY more work that I'd ever imagined it would be.
But the good news is this means that tomorrow, the drive train will be fully mounted in the chassis and it'll be on to the next chapter of the build!
Attached image(s)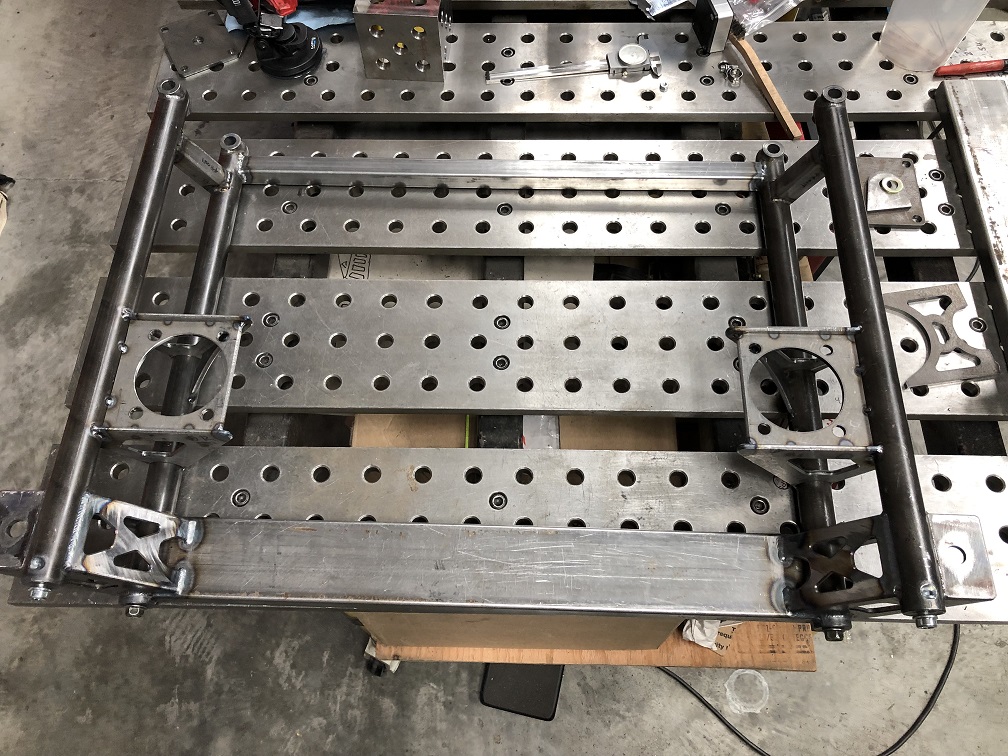
Posted by: Cairo94507 Dec 20 2022, 08:22 AM
Posted by: KELTY360 Dec 20 2022, 09:14 AM
DaVinci would approve.
Maybe the car should be named Leonardo.....or at least the drive train cradle.
Posted by: Tferrer Dec 20 2022, 10:13 AM
Beautiful work. You better be careful, Chris- Before you know it you'll have a wait list for folks wanting one of your builds! 
Posted by: Steve Dec 20 2022, 10:35 AM
Beautiful work. You better be careful, Chris- Before you know it you'll have a wait list for folks wanting one of your builds!
Sad... but that drive train is cheaper than a 993 3.6 motor and 915 trans.
https://www.ebay.com/itm/354286038626?hash=item527d17ee62:g:aawAAOSwca9jJsXP&amdata=enc%3AAQAHAAAA8PjFFMAseKGAe0TXUq62fxTCgA%2BjmOL%2FkV334Rgde% 2BoLtKsYwjM3UcS3jkgt7fiYNcwZWidM0yvFWluuAGbKBe0dfWjCi2F9GwOmw69DPKbYg7Fmx1L8EQ1H
087ExFa% 2Fi6VclwyQ1UAbVh5Bef3SrcqrJf8QUuslcGiHf7qbLRNhctzkPnnGLRfPjCukEMUl26MQcLV26RcLNe
H79nBaIAv82c1jqdNdJzqWnglIgfvUzEdGWoSvwIr8hEn02VxL7WNkcg1lPm%2Bbx8EIZYwvf2xoAtaZUmhgc5xmrY03EJLIUYw2SKlo7nEh%2BbqDwUN22w%3D%3D%7Ctkp%3ABFBM-O6ThqZh
Posted by: SirAndy Dec 20 2022, 01:16 PM
Posted by: NARP74 Dec 20 2022, 03:51 PM
I might have missed a page or 2, did you cover the metal router at all? Love the way it looks after you run it on some of the parts.
Posted by: tygaboy Dec 20 2022, 04:04 PM
Beautiful work. You better be careful, Chris- Before you know it you'll have a wait list for folks wanting one of your builds!
Sad... but that drive train is cheaper than a 993 3.6 motor and 915 trans.
https://www.ebay.com/itm/354286038626?hash=item527d17ee62:g:aawAAOSwca9jJsXP&amdata=enc%3AAQAHAAAA8PjFFMAseKGAe0TXUq62fxTCgA%2BjmOL%2FkV334Rgde% 2BoLtKsYwjM3UcS3jkgt7fiYNcwZWidM0yvFWluuAGbKBe0dfWjCi2F9GwOmw69DPKbYg7Fmx1L8EQ1H
087ExFa% 2Fi6VclwyQ1UAbVh5Bef3SrcqrJf8QUuslcGiHf7qbLRNhctzkPnnGLRfPjCukEMUl26MQcLV26RcLNe
H79nBaIAv82c1jqdNdJzqWnglIgfvUzEdGWoSvwIr8hEn02VxL7WNkcg1lPm%2Bbx8EIZYwvf2xoAtaZUmhgc5xmrY03EJLIUYw2SKlo7nEh%2BbqDwUN22w%3D%3D%7Ctkp%3ABFBM-O6ThqZh
Well, sorta/maybe. Not to argue price points but it's important to consider that particular trans is missing it's near-unobtainium shifter mechanism. NLA and the one company that makes the parts charges ~$20k +. It's missing its ECUs, yes, two of them. About $2500 each. Engine harnesses, etc. etc. So plan to add a lot to that $20K asking price. You may have seen the new 360 crate engine that just sold for $30K on BAT.
Then there's the fact that a whole lot more people want a 3.6/915 than want a 360! It's all about the market...
Posted by: siverson Dec 20 2022, 04:05 PM
"The item might not fit."
haha.
-Steve
Attached thumbnail(s)
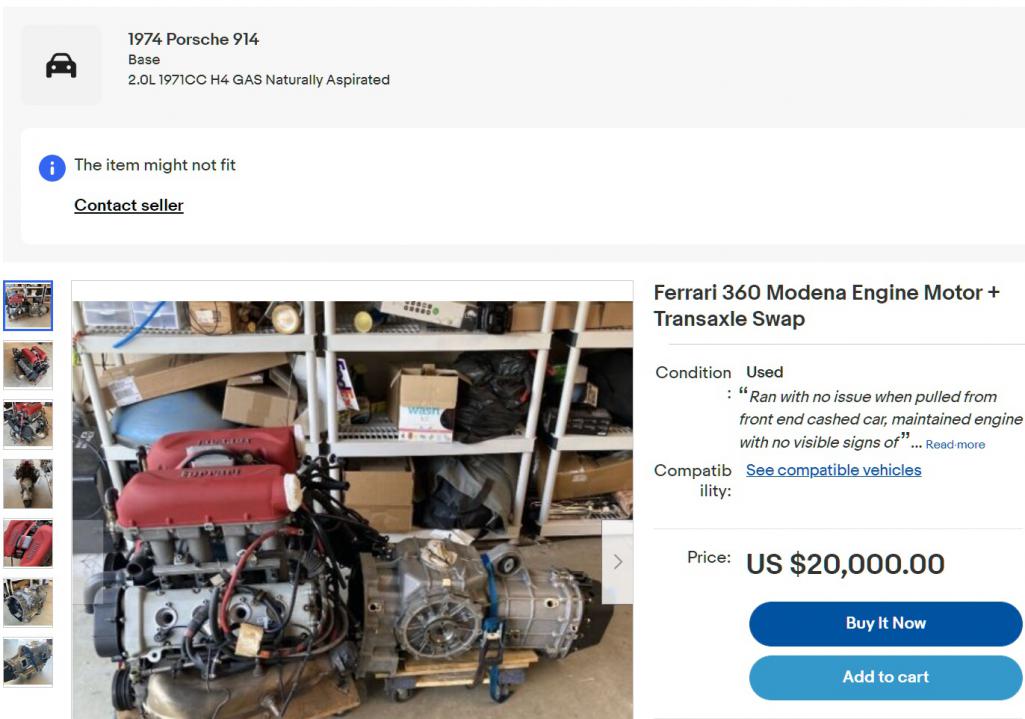
Posted by: tygaboy Dec 20 2022, 04:11 PM
Every weld matters. Credit where credit is due. This is Martin's work. And you wonder why I can't seem to say "no, I'll weld it..."
Attached image(s)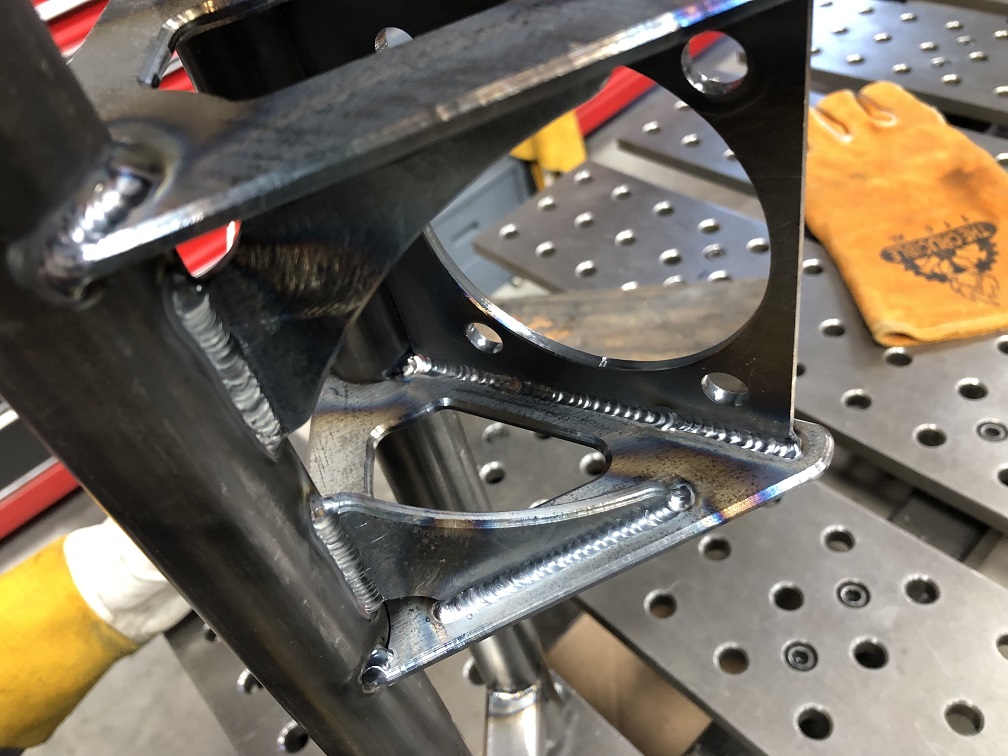
Posted by: tygaboy Dec 20 2022, 04:13 PM
Teaser shot: that right there is "in" the car, unsupported by anything but its fasteners.
Attached image(s)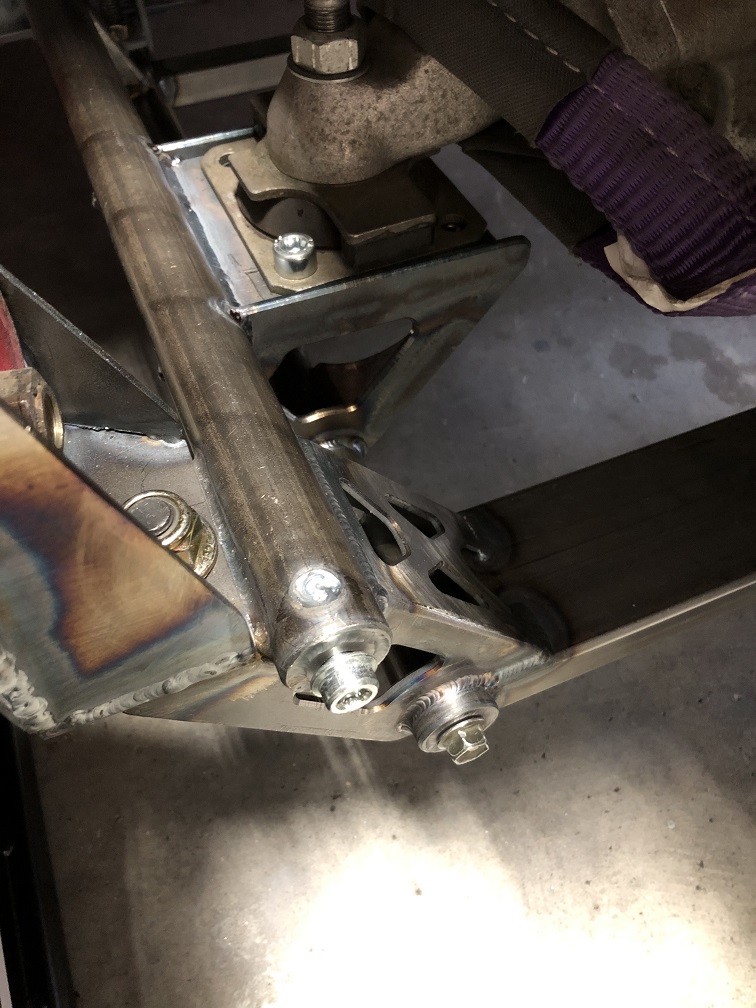
Posted by: tygaboy Dec 20 2022, 04:17 PM
It's official: The drive train is mounted in the car!
Holy Jebus, that was a ton more complicated than I ever imagined. But we got it done! A major milestone, for sure.
Anyway, may I present what I believe is the world's only 360 914.
Attached image(s)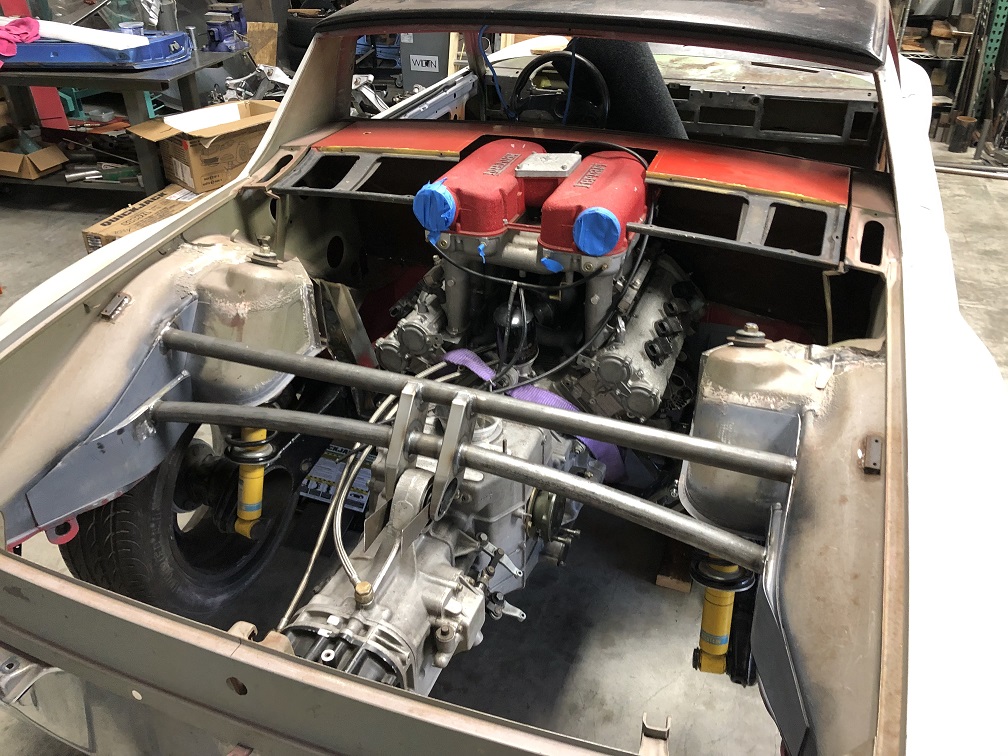
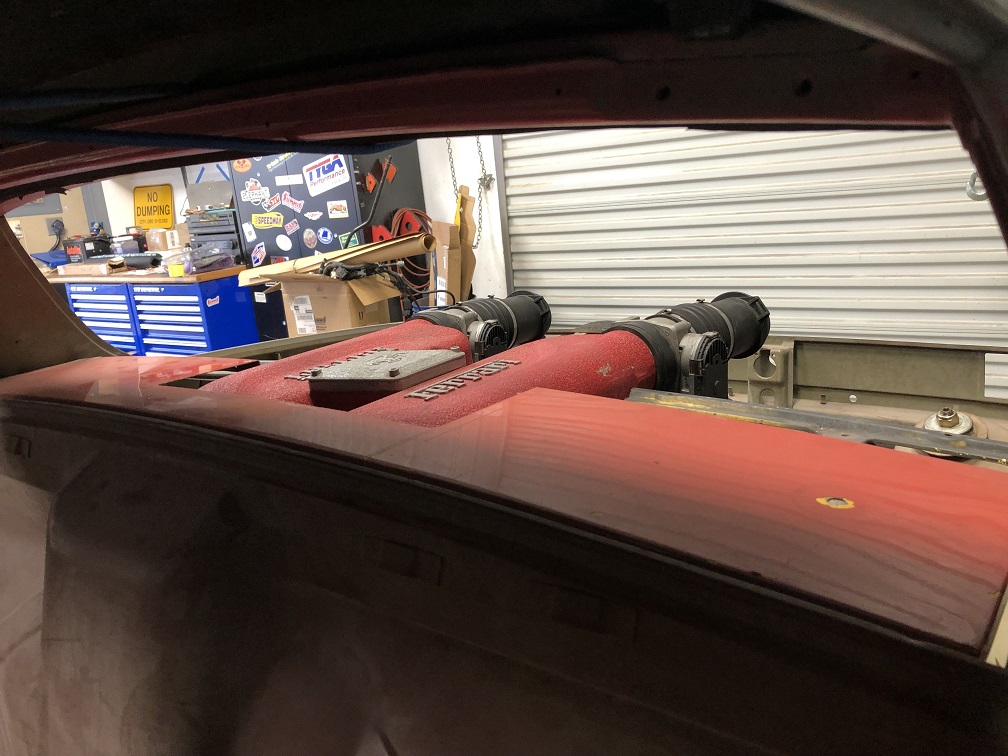
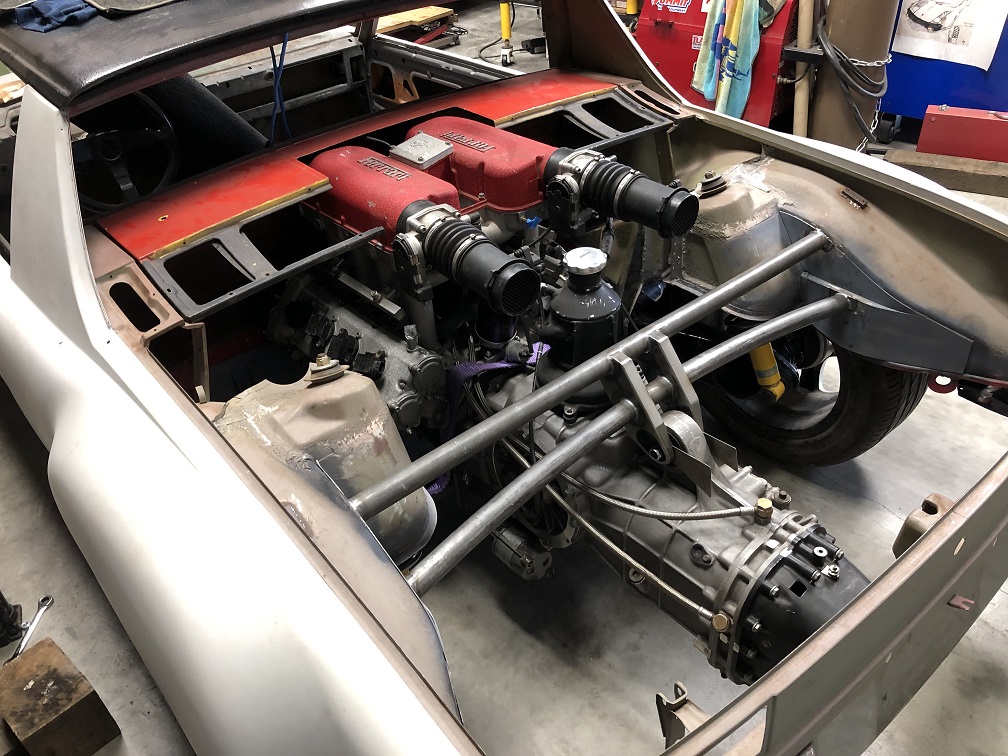
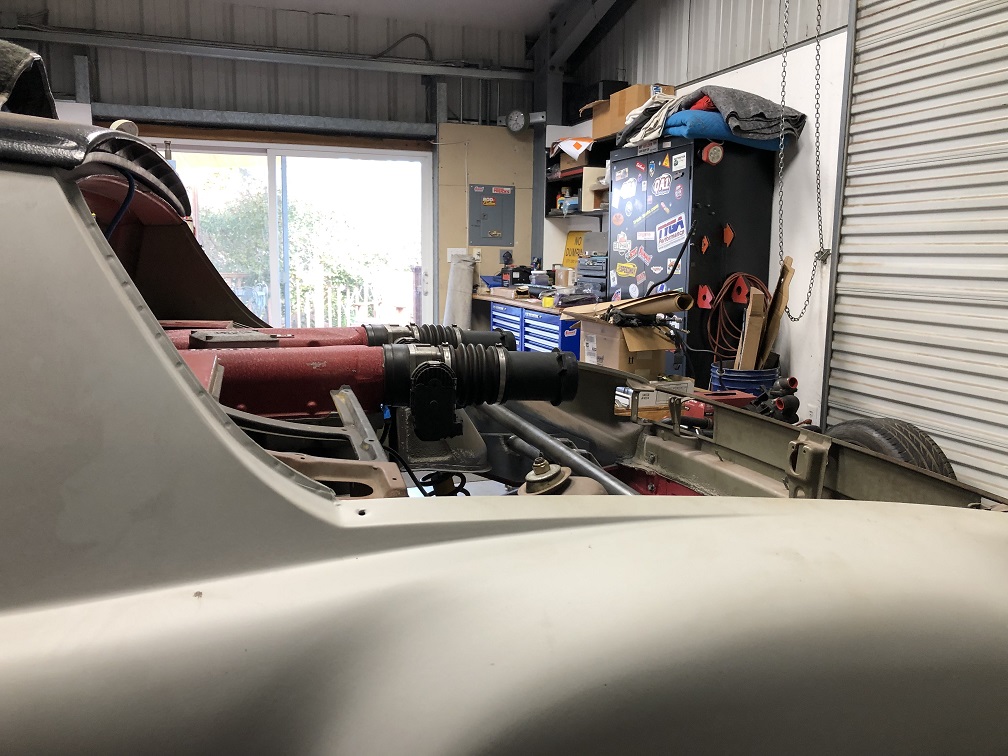
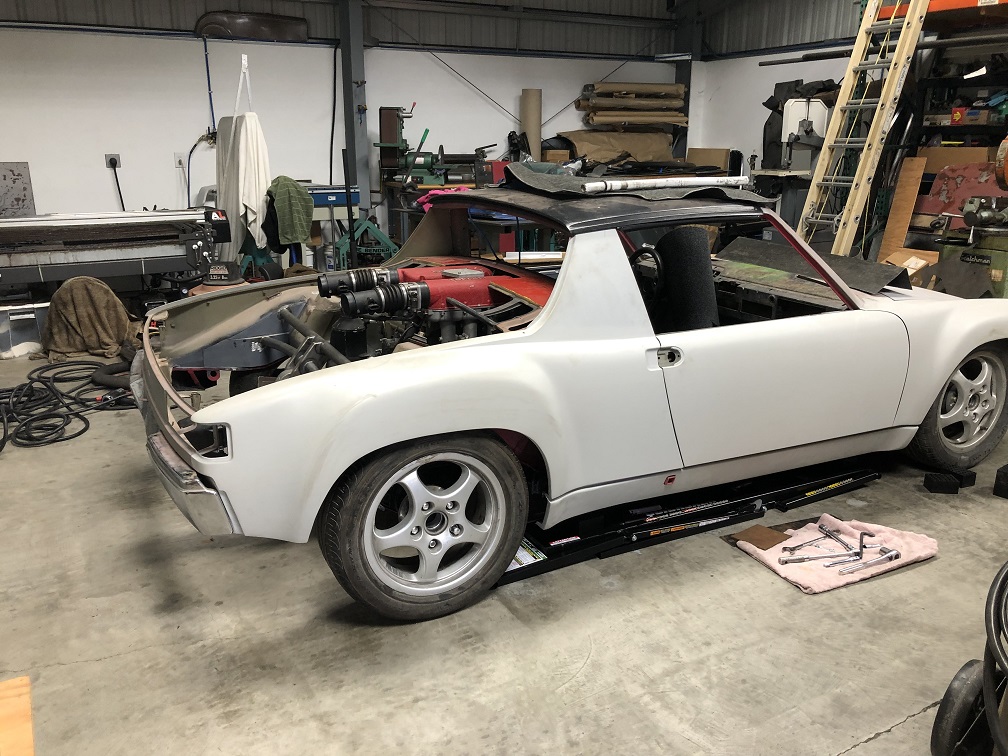
Posted by: tygaboy Dec 20 2022, 04:20 PM
The end. Currently my favorite view. I'll remove the paint from the script and the horse, just to make it a bit more visible. But what are the odds this is what peeks out from under the bumper when you mount it in a 914. Like it was made to be, I tell ya'!
Phase 1 done. On to the headers/exhaust.
Attached image(s)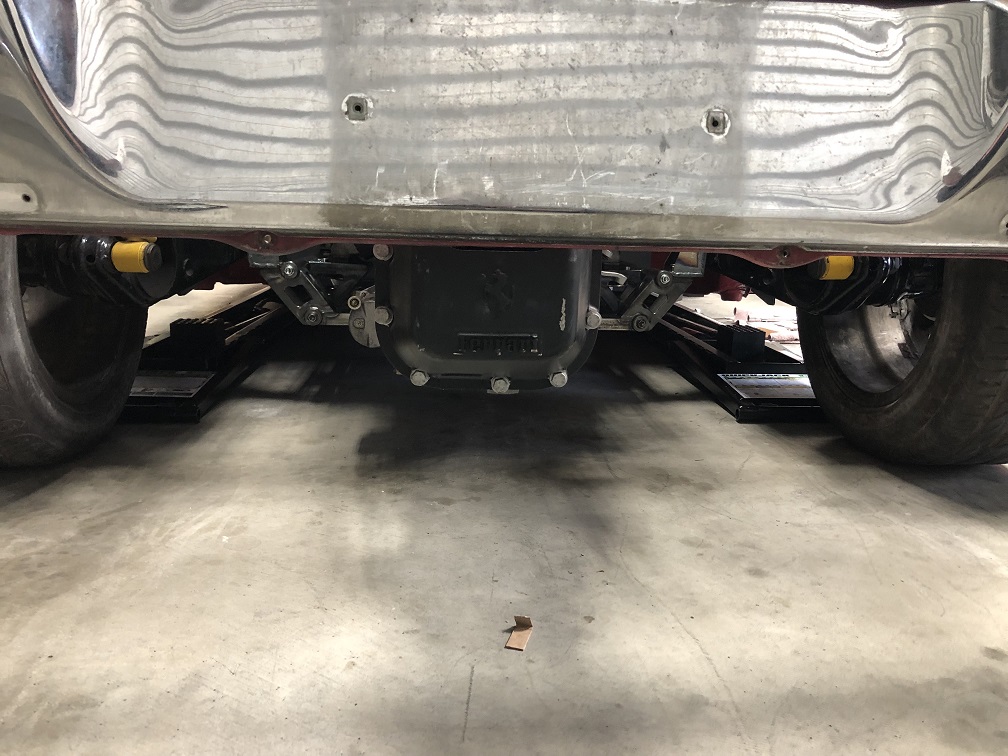
Posted by: NARP74 Dec 20 2022, 04:24 PM
Art takes time, no way to rush it. Fantastic!
Posted by: SirAndy Dec 20 2022, 04:29 PM
Clearly, the ebay algorithm isn't keeping up with 914world ...
Posted by: Krieger Dec 20 2022, 04:57 PM
freakin' A! I love it! Fantastic work Chris and Martin!
Posted by: markhoward Dec 20 2022, 05:21 PM
Congrats Chris! Major milestone indeed!!
Posted by: Krieger Dec 20 2022, 05:38 PM
freakin' A! I love it! Fantastic work Chris and Martin!
Posted by: slowrodent Dec 20 2022, 05:39 PM
Two words.... Rumble Seat
Posted by: tygaboy Dec 20 2022, 05:53 PM
I might have missed a page or 2, did you cover the metal router at all? Love the way it looks after you run it on some of the parts.
@http://www.914world.com/bbs2/index.php?showuser=24549 - Here's a pic of the router. This is from when I used it on my LS car's trans mount. Available on Amazon for not much!
https://www.amazon.com/gp/product/B08SBRZCRF/ref=ppx_yo_dt_b_asin_title_o06_s00?ie=UTF8&psc=1
Attached thumbnail(s)
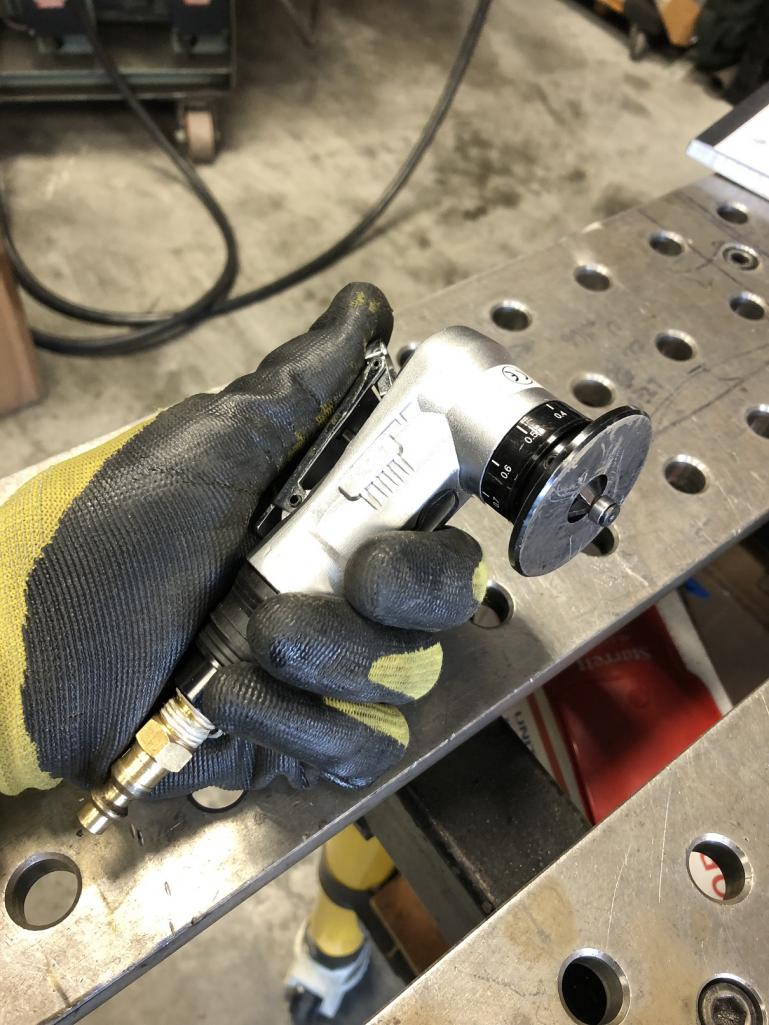
Posted by: decisive1 Dec 20 2022, 09:34 PM
Wow, just wow....
(subscribed needless to say, thanks for the stimulation)
Posted by: ManuFromParis Dec 21 2022, 02:24 AM
Amazing job, I was wondering how you mounted the front brackets, now I know. Great job !
I am still concerned with the exhaust since both side supports looks pretty much in the way. It will be 100% custom I assume. Can't wait.
Posted by: NARP74 Dec 21 2022, 09:45 AM
I might have missed a page or 2, did you cover the metal router at all? Love the way it looks after you run it on some of the parts.
@http://www.914world.com/bbs2/index.php?showuser=24549 - Here's a pic of the router. This is from when I used it on my LS car's trans mount. Available on Amazon for not much!
https://www.amazon.com/gp/product/B08SBRZCRF/ref=ppx_yo_dt_b_asin_title_o06_s00?ie=UTF8&psc=1
I love it, thanks for sharing.
Posted by: tygaboy Dec 21 2022, 10:12 AM
@http://www.914world.com/bbs2/index.php?showuser=3898 Robert timed his visit perfectly! He stopped by yesterday in time to witness the moment the car was lowered to the ground for the very first time with its drive train mounted. And then he forced us to pose for a pic.
For those of you who've not had the pleasure of meeting him, that's Martin on the right.
And can I just say what a great "partner in crime" he is? Always willing to help but equally important, he spends LOTS of time thinking about what I'm trying to do and offers tons of input (and his wonderfully inspired sketches!). He brings decades of motorsport-related design and fabrication experience to everything he does.
We make a great team in that our skill sets nicely compliment each other - I'm into the CAD/plasma table/modern electronic stuff and he sketches, old school, makes ridiculously cool stuff on a manual lathe and mill and, of course, TIG welds like no other. Yes, I admit it: his TIG welding is my personal form of crack - I want to stop using but I just can't!
But what knowing Martin has REALLY taught me is patience and a "do it right" approach. All of my fabrication skills have greatly improved watching and/or working with him over the years.
I'm proud to call Martin a trusted friend and he's certainly a key contributor to the madness that's always happening at The Red Barn.
Thanks Martin. It simply wouldn't be the same without you!
Attached thumbnail(s)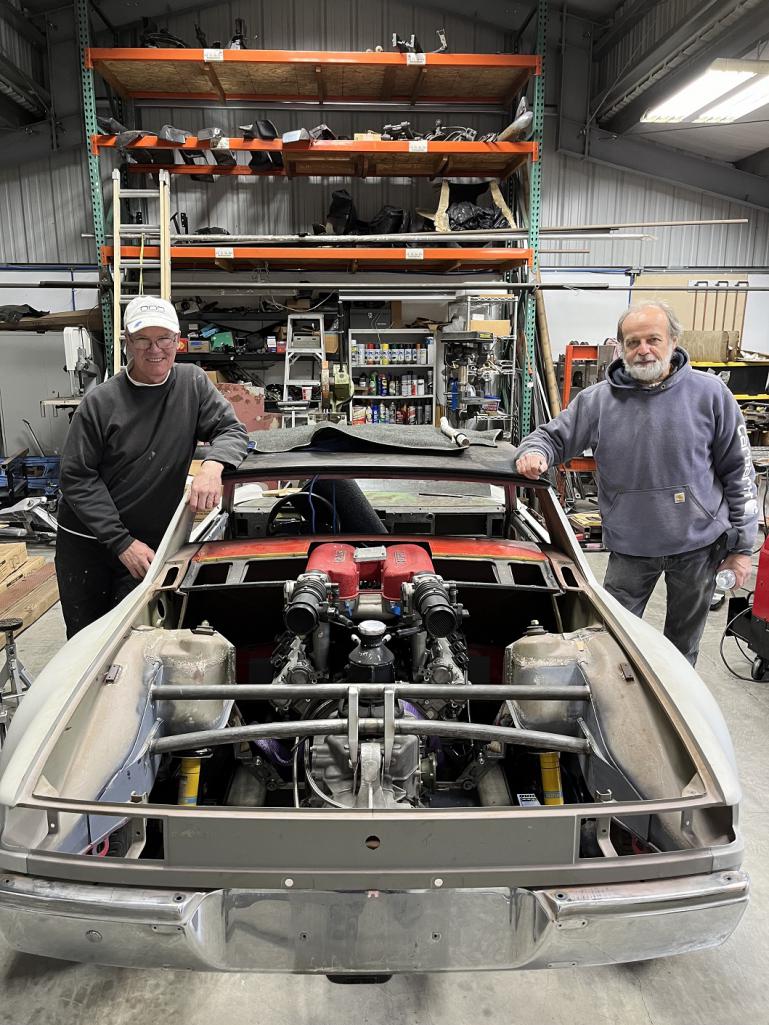
Posted by: SirAndy Dec 21 2022, 11:05 AM
Man, i hate my brain ...
Looks like the engine/trans is off to the left from the center line of the car.
I really hope that's just due to Roberts photography skills.
PS: And while i'm at it, that engine lid cutout should really follow the contour of the upper intake and not just be square like that.
PPS: Ok, i stop now
Posted by: NARP74 Dec 21 2022, 11:57 AM
Man, i hate my brain ...
Looks like the engine/trans is off to the left from the center line of the car.
I really hope that's just due to Roberts photography skills.
PS: And while i'm at it, that engine lid cutout should really follow the contour of the upper intake and not just be square like that.
PPS: Ok, i stop now
Parallax? Kindig just did a scalloped hood that followed the 8 stacks coming out of the hood on a CF1. I did not think I would like it until I saw the finished product and I did like it.
This is really picking nits...
Posted by: plymouth37 Dec 21 2022, 12:16 PM
It's official: The drive train is mounted in the car!
Amazing!
Posted by: tygaboy Dec 21 2022, 12:18 PM
Man, i hate my brain ...
Looks like the engine/trans is off to the left from the center line of the car.
I really hope that's just due to Roberts photography skills.
PS: And while i'm at it, that engine lid cutout should really follow the contour of the upper intake and not just be square like that.
PPS: Ok, i stop now
As always, 914 World proves to be a tough crowd!
But seriously, I'd expect nothing less. You know I welcome all input and observation.@http://www.914world.com/bbs2/index.php?showuser=179 Andy - The drive train and its mounts measure centered in the chassis. That said, interestingly, the trans mount bushing doesn't center in the trans bung and it's forcing the trans a tic to the left. You can see that in the gaps at the trans mount. I'll correct that when I replace that bushing. And it doesn't help that the back of the trans isn't symetric - from particular perspectives, things can look off. I'll get a top-down pic that'll really mess with you!
RE: the cut out, that was done months ago, just to get clearance and before I knew for sure where the engine would end up, height-wise.
I think we're well enough acquainted that I can say, "a little credit please. The final product will have an opening of approriate shape and size to earn the expected 'style points'."
Posted by: Montreal914 Dec 21 2022, 12:58 PM
Is the goal to show the Raspberry Porrari at RR-VII?
Fantastic work, and very nice stance as-is
Posted by: tygaboy Dec 21 2022, 02:05 PM
It's not a perfect representation, but...
When the trans hanger rubber mount is replaced and centered, it'll cause the drive train to rotate counter-clockwise around the engine mounts and move the trans to the right, nicely centering everything.
Here you can see how asymetric the trans tail cover is. Yes, that means the peek-a-boo view of the script and horse won't be under the center of the bumper. Just more stuff that'll mess with folks when they see the car.
And before you scratch your head too much, note that this part of the trans wasn't visible in the 360 - it was screened in.
Attached thumbnail(s)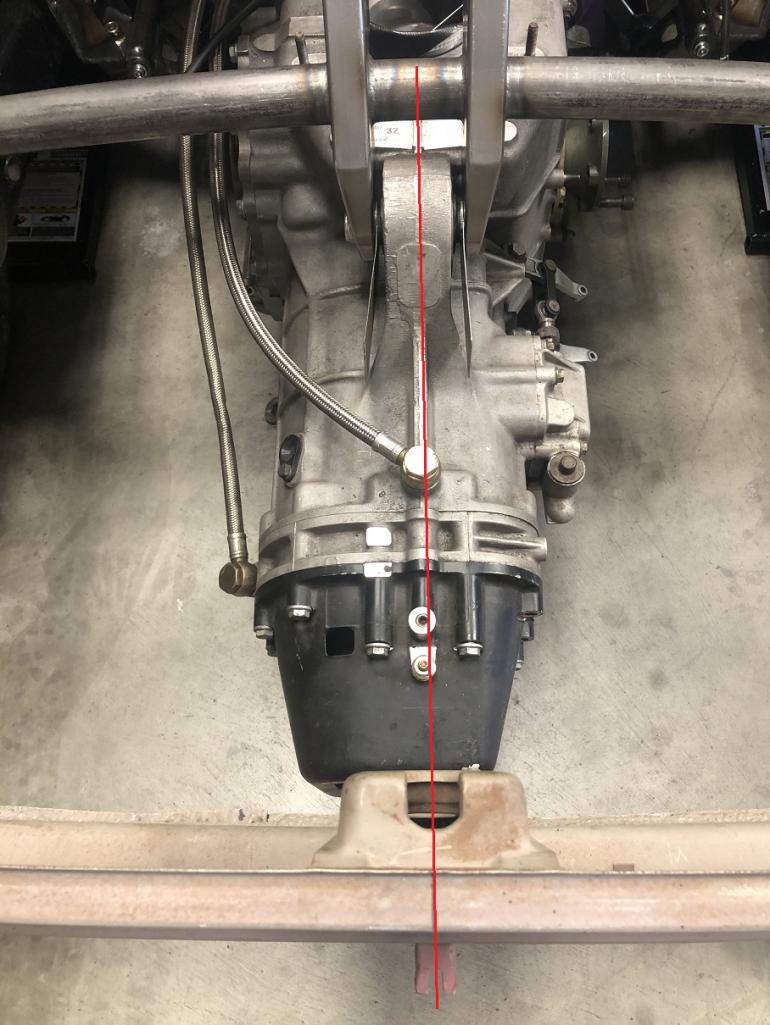
Attached image(s)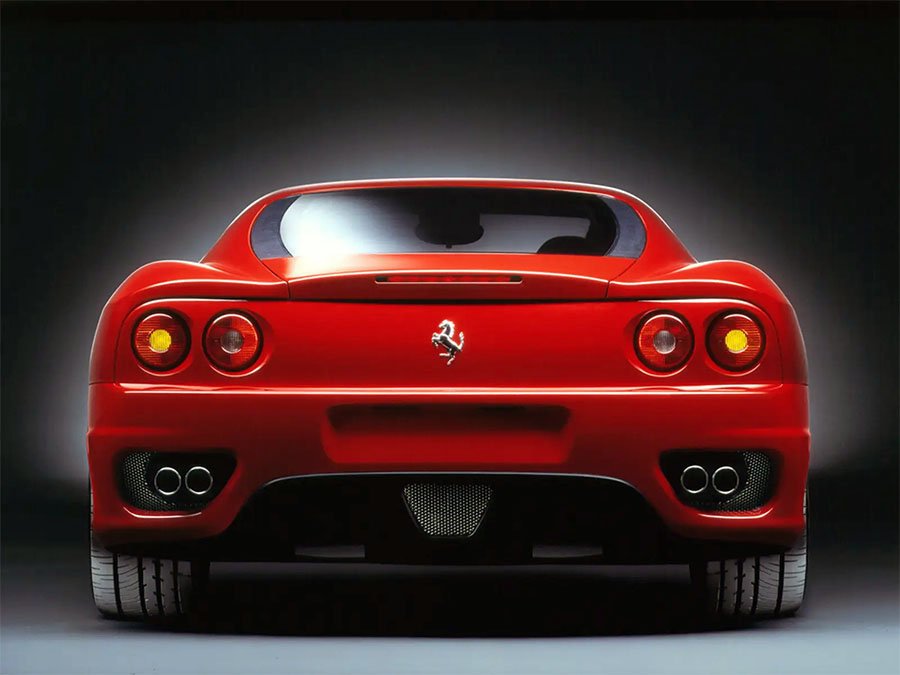
Posted by: tygaboy Dec 21 2022, 02:44 PM
Road's eye view.
All the eyeballing and guestimeasuring worked out. The cradle sits just a tic lower than the drive train, just as planned.
Attached thumbnail(s)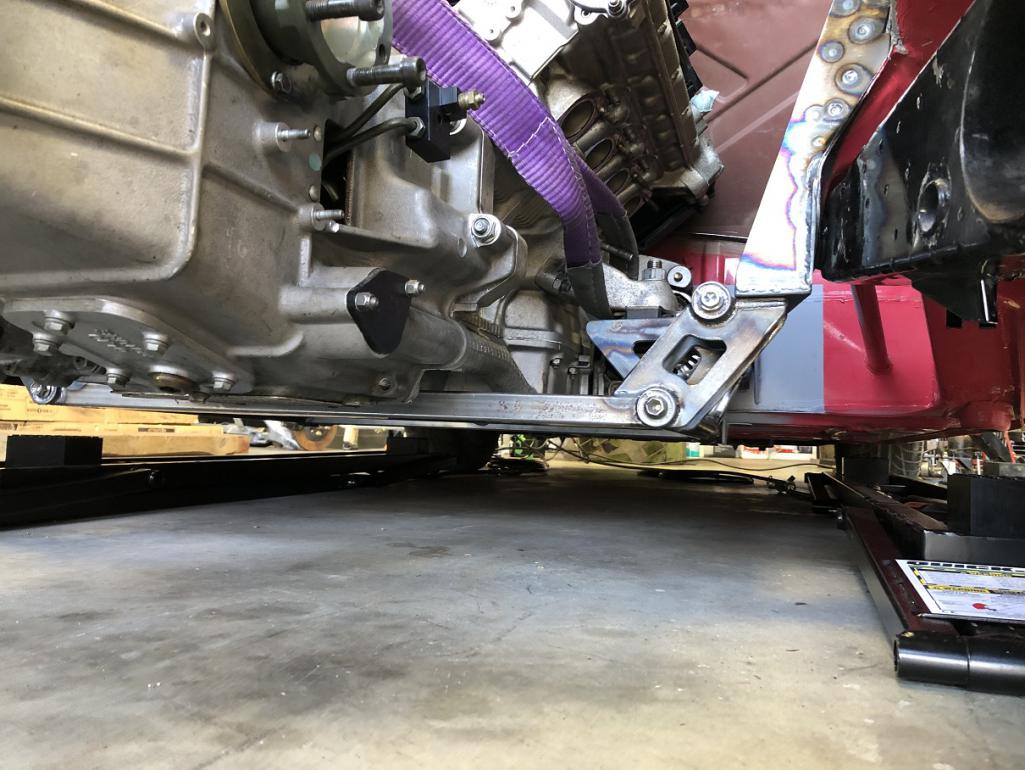
Posted by: tygaboy Dec 21 2022, 02:50 PM
OK, so I lied. The drive train isn't fully mounted.
I still need to work up an attachement point for the lower trans "pivot mount". The plan is it will be a separate piece that bolts to the rear of the cradle at the lower threaded bung, runs to a cross bar here where a set of tabs will pick up this mount, then back up the other side to the cradle. Triangulation will be added from this mount's cross bar to the chassis - exact location tbd.
Attached thumbnail(s)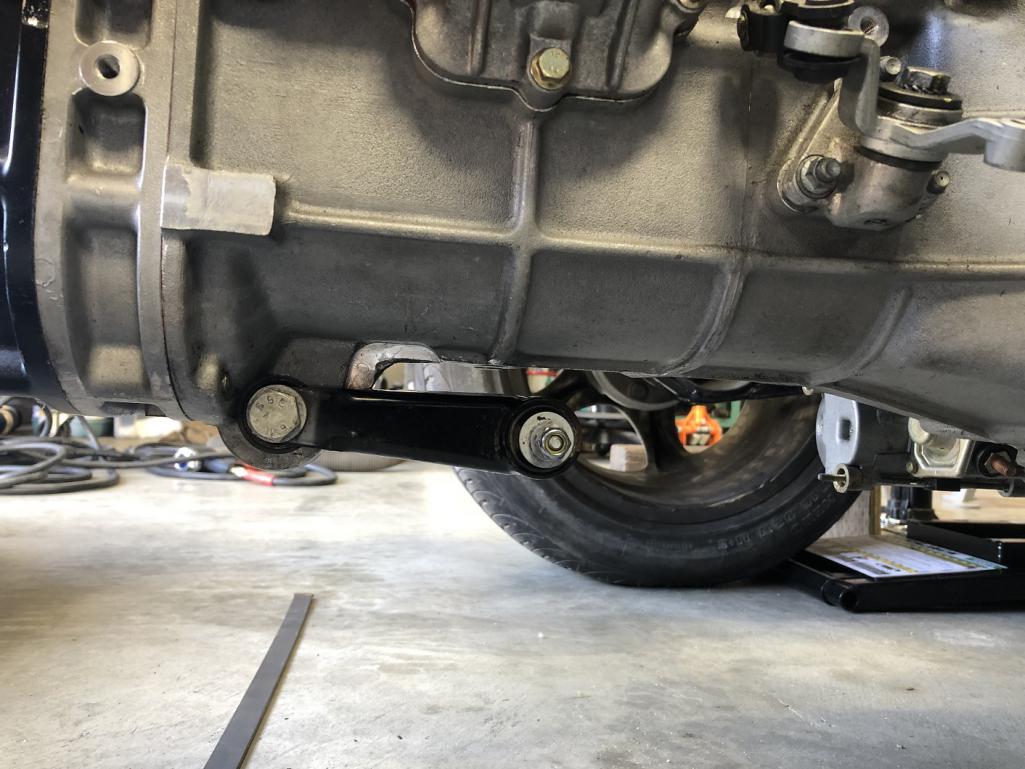
Posted by: mgarrison Dec 21 2022, 03:47 PM
Simply amazing...
Posted by: tygaboy Dec 21 2022, 05:42 PM
Amazing job, I was wondering how you mounted the front brackets, now I know. Great job !
I am still concerned with the exhaust since both side supports looks pretty much in the way. It will be 100% custom I assume. Can't wait.
@http://www.914world.com/bbs2/index.php?showuser=21433 - Fear not, my friend. Here's the slightly modified factory header mocked in place - plenty of room to get past the plate on the suspension consoles. And yes, it'll be 100% from scratch. Not really any other options.
Attached image(s)
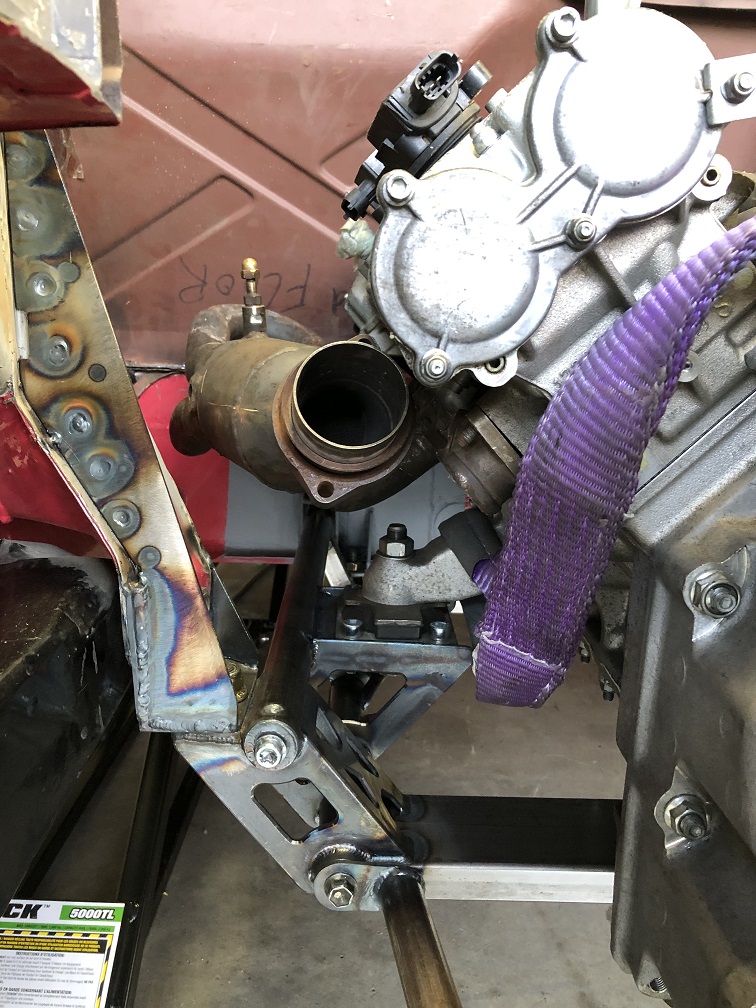
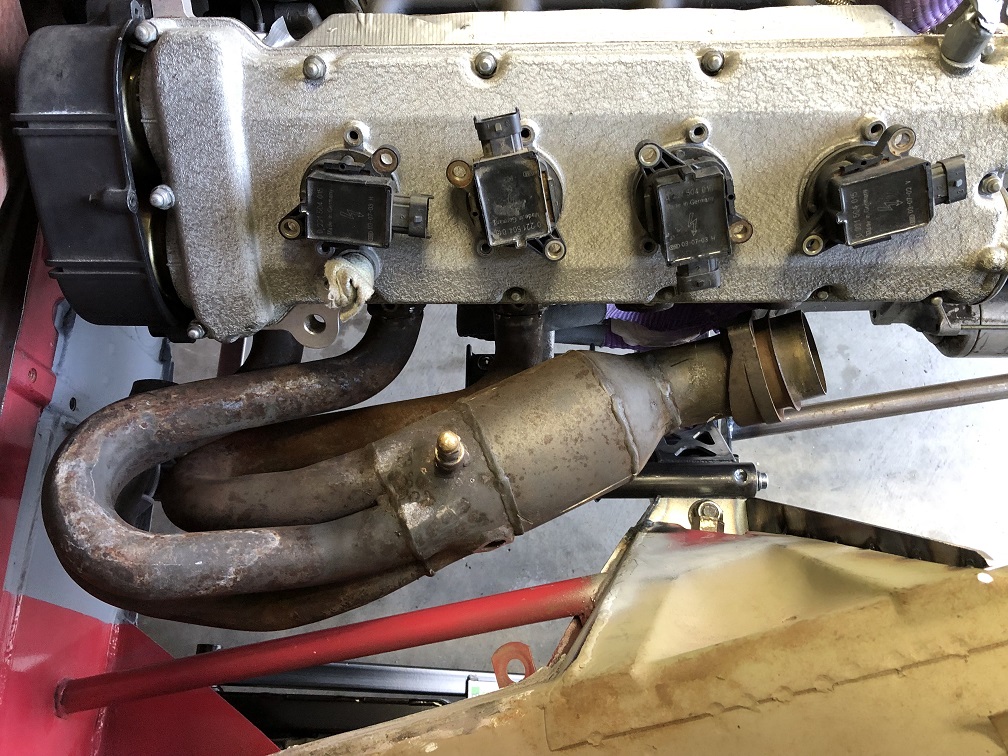
Posted by: tygaboy Dec 21 2022, 05:45 PM
Back to the pivot linkage's mount. Version 1 mock up, just to see what might work. Ideally, this piece will do double duty as a mount for the rear portion of the skid plate and the potential rear diffuser.
Attached image(s)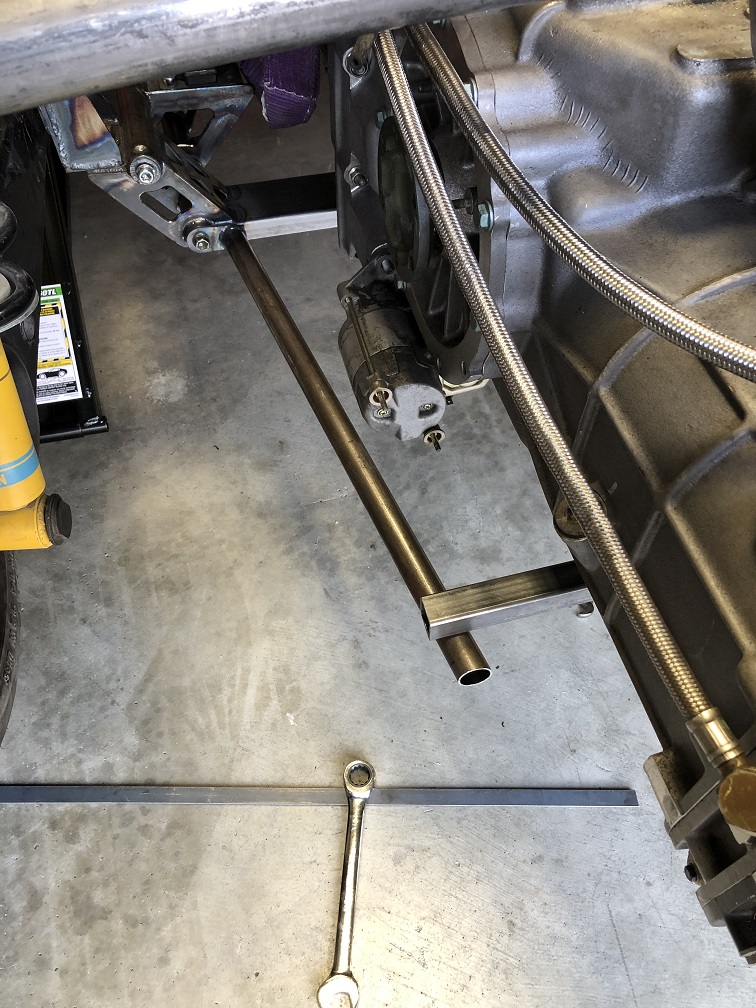
Posted by: BuddyV Dec 21 2022, 11:27 PM
Man, i hate my brain ...
Looks like the engine/trans is off to the left from the center line of the car.
I really hope that's just due to Roberts photography skills.
PS: And while i'm at it, that engine lid cutout should really follow the contour of the upper intake and not just be square like that.
PPS: Ok, i stop now
.... Germans.
Posted by: ClayPerrine Dec 22 2022, 03:04 PM

Congrats on a HUGE milestone.
Clay
Posted by: PlaysWithCars Dec 23 2022, 05:19 PM
@http://www.914world.com/bbs2/index.php?showuser=19241 Chris - the opposite of "clamp" is "pmalc". I believe its a silent "p".
I'm here to help.
- Tony
Couldn't let this go without acknowledgement. That there is funny. @http://www.914world.com/bbs2/index.php?showuser=16100
Everything in this build is moving so fast I think it got lost in the dust. impressive build.
Posted by: tygaboy Dec 25 2022, 09:07 AM
Merry, merry from the Red Barn! As we wrap up the year, can I just say how much I appreciate this community and each of its wacky and wonderful members?
And a quick heads up that 2023 will see the launch of "At The Red Barn", a bit more polished effort at a YouTube channel.
I've found I really enjoy the creative process of video-making. As with the other stuff you've seen me try and learn, the early stuff will likely be a bit bumpy, but I expect I'll get better as I go along.
If you've enjoyed my 914 World threads, I'm pretty sure you'll like what you see on At The Red Barn, too.
I'll post a link to the channel as soon as it's operational. Hope to hear from you there!
A safe and happy holiday to you and yours!
Attached thumbnail(s)
Posted by: FL000 Dec 25 2022, 01:57 PM
Looking forward to checking out the new channel. Need some good fabrication videos to binge on.
Posted by: Rleog Dec 25 2022, 02:17 PM
How steep is the learning curve on Wondershare Filmora?
Posted by: mgp4591 Dec 26 2022, 01:03 AM
Cool! Are you gonna have a live band too? Couldn't hurt your ratings...
Posted by: tygaboy Dec 26 2022, 09:27 AM
How steep is the learning curve on Wondershare Filmora?
@http://www.914world.com/bbs2/index.php?showuser=1239 - I found it super easy and intuitive. I like to think I'm pretty good figuring out software but this was pretty simple. For example, I'd think something like "It'd be really neat to separate the audio from the video..." A right click on the track and sure enough, there's "detach audio". Perfect!
I haven't yet needed it more than a couple times but there are a lots of YouTube tutorial vids on the product.
All that said, I'm also a newbie and I'm not looking to go too crazy and distract-y with fancy stuff. But for what I think I want to deliver, I'm really happy with the product.
The acid test will be what all y'all think of the end result once I launch! I hope to enjoy it and I look forward to your constructive critisism.
Posted by: tygaboy Dec 26 2022, 09:38 AM
Cool! Are you gonna have a live band too? Couldn't hurt your ratings...
@http://www.914world.com/bbs2/index.php?showuser=14748 - Funny you mention this! I was the lead singer / bass player in a couple bands, back in the day. Here we are rehearsing in the living room - me singing - before I'd officially taken over bass duty - and when I still had hair, lots and lots of hair!
I have a fun story about nearly becoming a rock star. If you can place the guitarist on the right, you'll have an idea of my near brush with fame...
Anyway, last week I mentioned to one of my musician buddies that we may need to create some original music for the channel. If we do, I'll get footage of that.
Attached image(s)
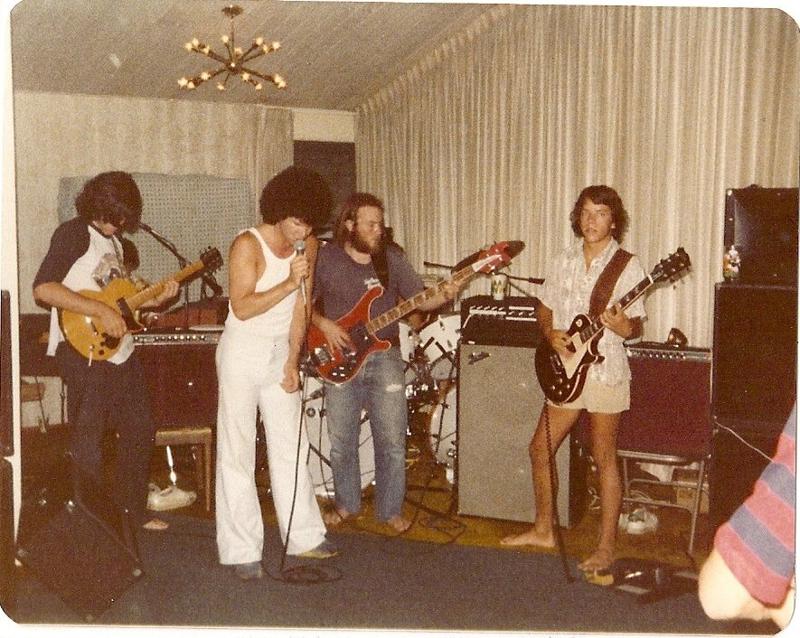
Posted by: mgp4591 Dec 26 2022, 02:00 PM
Chris, he looks familiar but I really can't place him...plus all you California teens looked alike! You've got some good gear there though...I'm jealous!
Posted by: Front yard mechanic Dec 26 2022, 04:23 PM
Bon Jovi
Posted by: mgp4591 Dec 27 2022, 12:10 AM
Cool! Are you gonna have a live band too? Couldn't hurt your ratings...
@http://www.914world.com/bbs2/index.php?showuser=14748 - Funny you mention this! I was the lead singer / bass player in a couple bands, back in the day. Here we are rehearsing in the living room - me singing - before I'd officially taken over bass duty - and when I still had hair, lots and lots of hair!
I have a fun story about nearly becoming a rock star. If you can place the guitarist on the right, you'll have an idea of my near brush with fame...
Anyway, last week I mentioned to one of my musician buddies that we may need to create some original music for the channel. If we do, I'll get footage of that.
Edit
Posted by: mgp4591 Dec 27 2022, 12:12 AM
Cool! Are you gonna have a live band too? Couldn't hurt your ratings...
@http://www.914world.com/bbs2/index.php?showuser=14748 - Funny you mention this! I was the lead singer / bass player in a couple bands, back in the day. Here we are rehearsing in the living room - me singing - before I'd officially taken over bass duty - and when I still had hair, lots and lots of hair!
I have a fun story about nearly becoming a rock star. If you can place the guitarist on the right, you'll have an idea of my near brush with fame...
Anyway, last week I mentioned to one of my musician buddies that we may need to create some original music for the channel. If we do, I'll get footage of that.
Edit
Posted by: tygaboy Dec 27 2022, 09:40 AM
OK, "At The Red Barn" is live on YouTube!
Here are links to a quick intro and the first two episodes of the 914 Ferrari build.
Hope you enjoy and if you do, please subscribe, like and share?
Feel free to add comments and ask questions there, too.
Intro to At The Red Barn:
https://www.youtube.com/watch?v=iP3GYAFsJmo
914 Ferrari Episode 1:
https://www.youtube.com/watch?v=zMj1Bq2IShw
914 Ferrari Episode 2:
https://www.youtube.com/watch?v=gAdV6dRyxfc
Posted by: SirAndy Dec 27 2022, 10:09 AM
You can directly embed YouTube videos (3rd topic under HELP):
http://www.914world.com/bbs2/index.php?showtopic=94568
Posted by: tygaboy Dec 27 2022, 10:15 AM
You can directly embed YouTube videos (3rd topic under HELP):
http://www.914world.com/bbs2/index.php?showtopic=94568
@http://www.914world.com/bbs2/index.php?showuser=179 Andy - yep, I usually do it that way. Corrected, thanks.
Posted by: tygaboy Dec 29 2022, 11:00 AM
Since this thread is ahead of the published videos - and I have a number of episodes "in the can" - I've decided to help the video viewers catch up. I'll be publishing everything I have over the next few days.
Here's the next episode and thanks for watching!
https://www.youtube.com/watch?v=LzxQ2l6qdis
Posted by: SirAndy Dec 29 2022, 12:54 PM
A few observations:
- The music is too loud when compared to the speech sections. I had to fiddle with the volume adjust every time you switched to music (yeah, i'm getting old).
- You are making this weird clicking sound between sentences. It's very distracting. Most noticeable in episode #1. I don't recall you doing this when talking to you in person. Maybe it's because you're nervous filming?
Posted by: infraredcalvin Dec 29 2022, 04:03 PM
Leave the links, as well as the embed, can’t see any videos on iPad….
Posted by: JeffBowlsby Dec 29 2022, 04:39 PM
These vids are great Chris. We have not met but deep respect coming your way for what you are attempting and achieving.
Posted by: Van B Dec 29 2022, 10:40 PM
You can directly embed YouTube videos (3rd topic under HELP):
http://www.914world.com/bbs2/index.php?showtopic=94568
@http://www.914world.com/bbs2/index.php?showuser=179 any idea why embeds don’t show up on an ipad?
Posted by: SirAndy Dec 29 2022, 11:33 PM
You can directly embed YouTube videos (3rd topic under HELP):
http://www.914world.com/bbs2/index.php?showtopic=94568
@http://www.914world.com/bbs2/index.php?showuser=179 any idea why embeds don’t show up on an ipad?
Yes. Apple has stopped being HTML compliant quite a few years ago. They are pushing their own proprietary implementations.
Posted by: nathanxnathan Dec 30 2022, 01:20 AM
You can directly embed YouTube videos (3rd topic under HELP):
http://www.914world.com/bbs2/index.php?showtopic=94568
@http://www.914world.com/bbs2/index.php?showuser=179 any idea why embeds don’t show up on an ipad?
It’s just Safari that doesn’t show them. Download chrome app and it works.
Posted by: tygaboy Dec 30 2022, 11:36 AM
The next episode is now available. Again, I'm playing catch up to bring the videos up to date with this build thread.
At over 20 minutes, this episode is a bit longer than the earlier ones. Reason is because I demo roll bending the trans mount tube. Some folks have asked that I detail more of the "how" so I'm giving it a go with this one. Hope you enjoy.
https://www.youtube.com/watch?v=rspEm9e8APc
Posted by: Craigers17 Dec 30 2022, 12:56 PM
Provided that it drains really well before you take it off, that seems like a great place for an oil filter. If it doesn't drain well, ...could be messy. The access is great though.
BTW....who's the mystery guitarist?...you can't leave us in suspense.
Posted by: tygaboy Dec 30 2022, 01:20 PM
These vids are great Chris. We have not met but deep respect coming your way for what you are attempting and achieving.
@http://www.914world.com/bbs2/index.php?showuser=104 - Jeff - Wow, I'm humbled. That's high praise coming from you, thanks! You're close enough to swing by some time and see all this stuff in person. If that's of interest, let me know and let's get something on calendar?
Posted by: tygaboy Dec 30 2022, 01:29 PM
Provided that it drains really well before you take it off, that seems like a great place for an oil filter. If it doesn't drain well, ...could be messy. The access is great though.
BTW....who's the mystery guitarist?...you can't leave us in suspense.
@http://www.914world.com/bbs2/index.php?showuser=21317 - The oil filters are made with an "anti-puke" tube inside them that retains the oil when removed. Special made for the upside down installation.
As to the guitarist, his name is Dave Bryson - he's a founding member of Counting Crows. We were room mates for a bit and played together in a number of bands. I sold out and got a corporate job. But let's be clear: I was never going to be a good enough bassist to play at that level. But what great time we had...
Posted by: Craigers17 Dec 30 2022, 04:33 PM
As to the guitarist, his name is Dave Bryson - he's a founding member of Counting Crows. We were room mates for a bit and played together in a number of bands. I sold out and got a corporate job. But let's be clear: I was never going to be a good enough bassist to play at that level. But what great time we had...
That's really cool! The Counting Crows were one of my favorite 90's bands. Pretty interesting on that oil filter too....I know the mess I normally make when I change the oil, and I was just picturing that spilling out onto that beautiful engine. I guess Ferrari had it all figured out....even if they never suspected their engine would end up in a 914.
Posted by: Geezer914 Jan 1 2023, 08:51 AM
This build is truly a work of art!!! The design and fabrication is over the top.
Posted by: 76-914 Jan 1 2023, 09:42 AM
Cold saw? Do tell. I missed class that day. Also, you mention that the suspension console ear interferes with the headers but on the previous page it "appears" that it clears. BTW, your "going into detail" makes the subject much more interesting. And that curvy tool could come in handy doing bodywork.
Posted by: tygaboy Jan 1 2023, 10:01 AM
Cold saw? Do tell. I missed class that day. Also, you mention that the suspension console ear interferes with the headers but on the previous page it "appears" that it clears. BTW, your "going into detail" makes the subject much more interesting. And that curvy tool could come in handy doing bodywork.
@http://www.914world.com/bbs2/index.php?showuser=9964 Kent - Glad you're enjoying. You better have "liked and subscribed"!
Based on additional feedback like yours, I'm going to start covering more detail about the "how" and show/describe the tools during use. But until then:
The cold saw uses a low rpm (like 65), fluid-cooled blade that makes a spark and burr-free, cut that, because of the coolant, essentially stays "cold".
And you're ahead on the header info because you've seen the build thread. Remember how I had to cut off the flange and move the primary tubes forward by two cylinders?
The video is from before doing that. Thanks for watching!
Posted by: 76-914 Jan 1 2023, 10:47 AM
Cold saw? Do tell. I missed class that day. Also, you mention that the suspension console ear interferes with the headers but on the previous page it "appears" that it clears. BTW, your "going into detail" makes the subject much more interesting. And that curvy tool could come in handy doing bodywork.
@http://www.914world.com/bbs2/index.php?showuser=9964 Kent - Glad you're enjoying. You better have "liked and subscribed"!
Based on additional feedback like yours, I'm going to start covering more detail about the "how" and show/describe the tools during use. But until then:
The cold saw uses a low rpm (like 65), fluid-cooled blade that makes a spark and burr-free, cut that, because of the coolant, essentially stays "cold".
And you're ahead on the header info because you've seen the build thread. Remember how I had to cut off the flange and move the primary tubes forward by two cylinders?
The video is from before doing that. Thanks for watching!
Oops!
![yellowsleep[1].gif](style_emoticons/default/yellowsleep[1].gif) And yes, subscribed.
And yes, subscribed.
Posted by: tygaboy Jan 3 2023, 05:56 PM
Back to some real work. Today I deceided to make the suspension console/rear cradle mount boxing panel.
First was to final check the cardboard template and remember to add some additional length so each lower leg reaches the bottom of the mount pickup point plate.
Some careful measuring and a bit of CAD work later and I had what I needed to cut the part on the plasma table.
Then it's measure to determine where that break needed to be added using the brake... wait, what?
Attached thumbnail(s)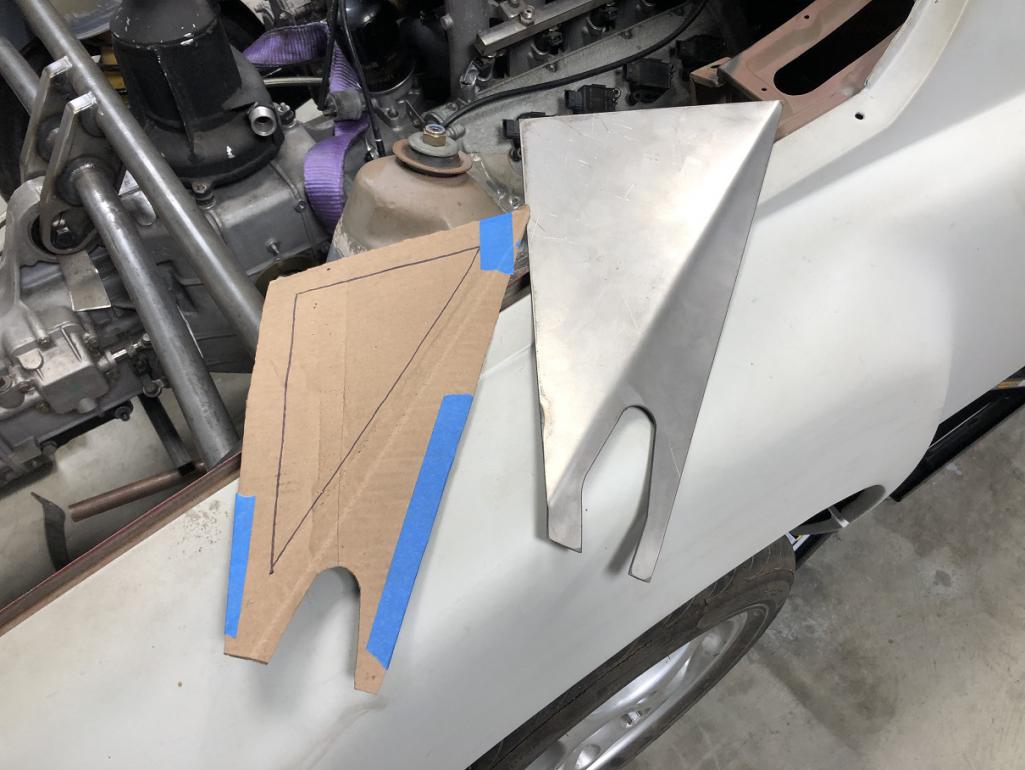
Posted by: tygaboy Jan 3 2023, 06:00 PM
Maybe a bit hard to tell from the pics but it fits really nicely and gives what I think is a nicely "completed" look of that area. I think I'll make a stamping die and add a relief that copies the look of those stamped into the shock tower sheet metal.
Attached thumbnail(s)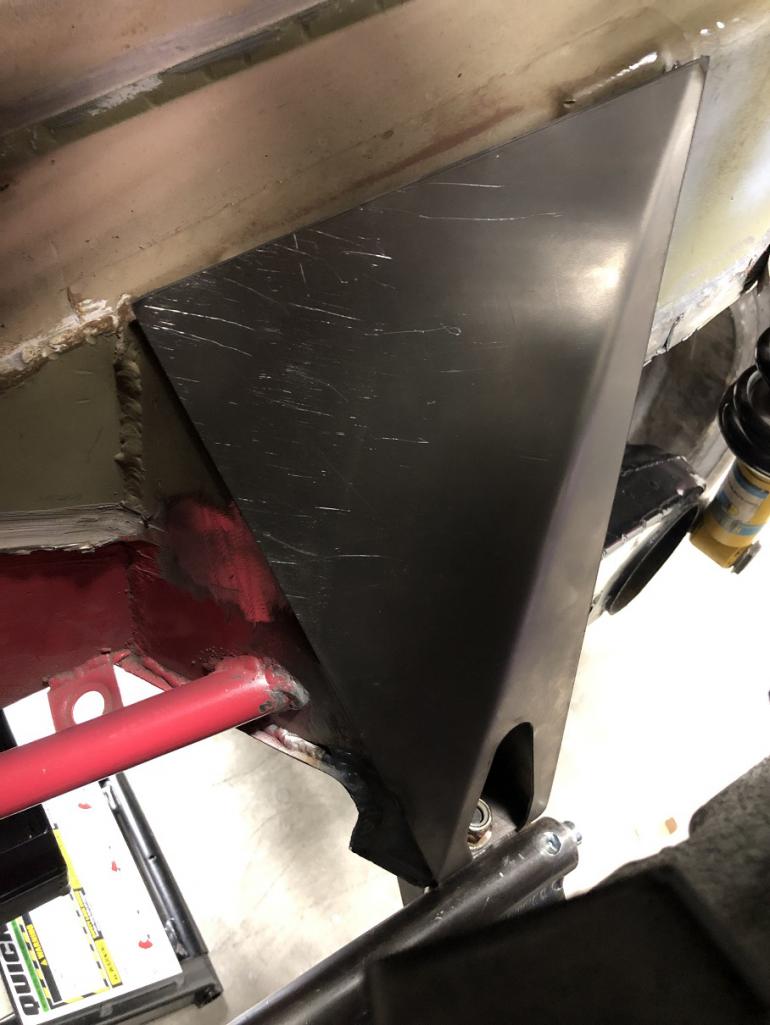
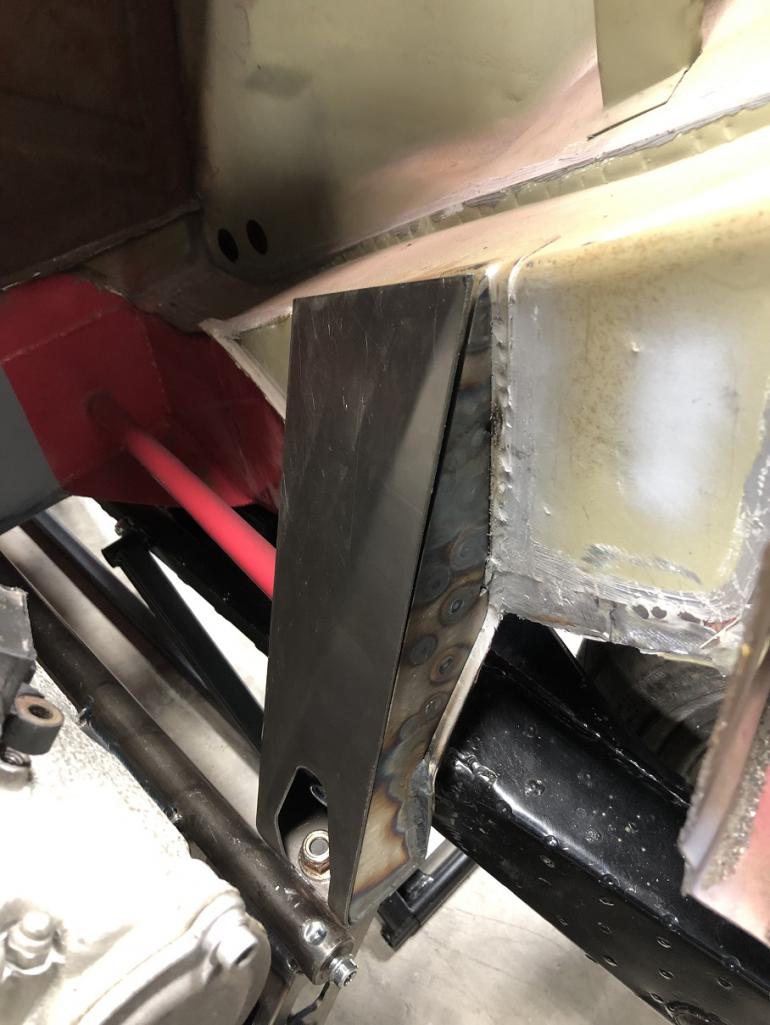
Posted by: Van B Jan 3 2023, 06:22 PM
You can directly embed YouTube videos (3rd topic under HELP):
http://www.914world.com/bbs2/index.php?showtopic=94568
@http://www.914world.com/bbs2/index.php?showuser=179 any idea why embeds don’t show up on an ipad?
It’s just Safari that doesn’t show them. Download chrome app and it works.
Trying to avoid a thread jack here, but chrome is what I use.
Posted by: Van B Jan 3 2023, 06:23 PM
@http://www.914world.com/bbs2/index.php?showuser=19241 what kind of a press break do you have? Those bends are super clean!
Posted by: tygaboy Jan 3 2023, 06:47 PM
@http://www.914world.com/bbs2/index.php?showuser=19241 what kind of a press break do you have? Those bends are super clean!
@http://www.914world.com/bbs2/index.php?showuser=26011 I have one of these: a 48" magnetic brake.
Attached image(s)
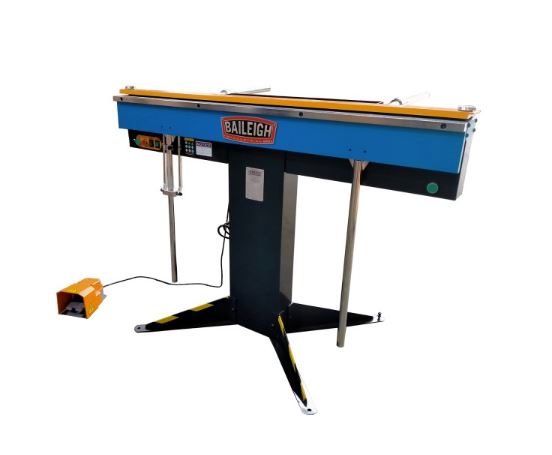
Posted by: Van B Jan 3 2023, 06:51 PM
Wow… I have never seen one of those! How thick of plate can it handle?
Edit: just looked it up. That is some impressive kit and not that expensive for what it can do. Now I see how those bends are so clean!
Posted by: tygaboy Jan 6 2023, 08:20 AM
Latest episode is up. I'm going to try and publish something once a week. Let's see how I do. Hope you enjoy, like and subscribe!
For those who need the direct link: https://youtu.be/kGh5oTXHk0s
https://www.youtube.com/watch?v=kGh5oTXHk0s
Posted by: tygaboy Jan 7 2023, 07:21 PM
Working up the design and components for that "pivoting link", underside/rear transaxle mount. It'll be a removable structure that utilizes these in-line tube connectors. These are generally used in roll cage construction when you want a bar to be removable. In this case, I found some for 1" OD tube - perfect for what I'm up to.
One half will weld to the end of the cradle's lower tube, the other, to the bracket tube. All in line, no wonky tabs.
A bit of lathe work and I have a lighter, custom fit set. I ran out of 1" tube so it'll be next week before I make any more progress.
Attached image(s)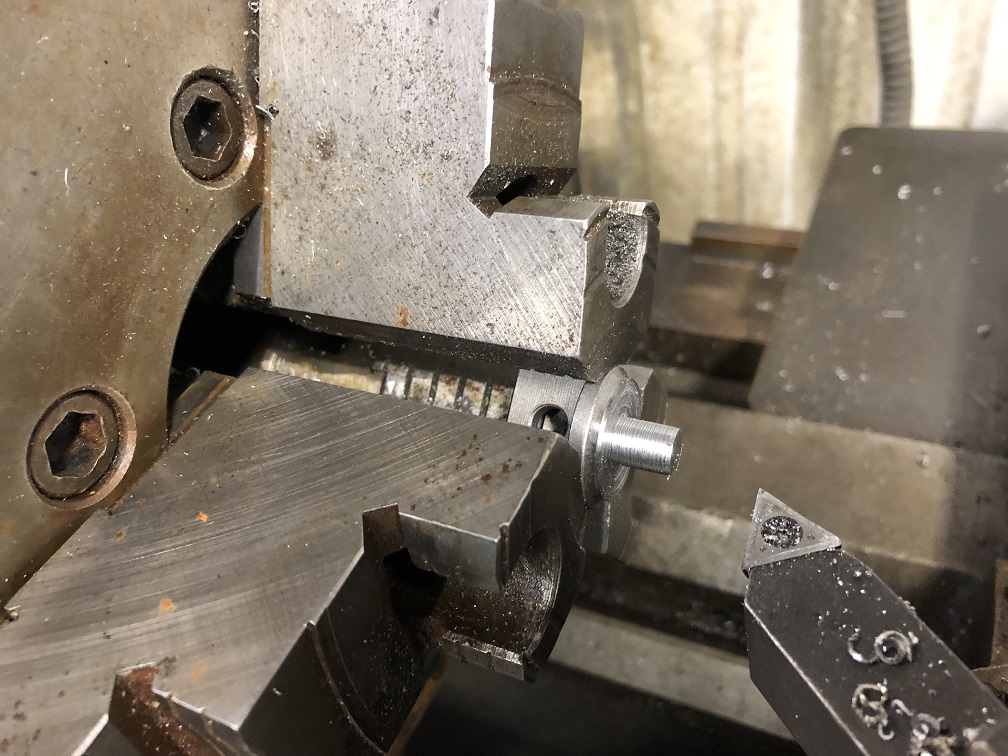
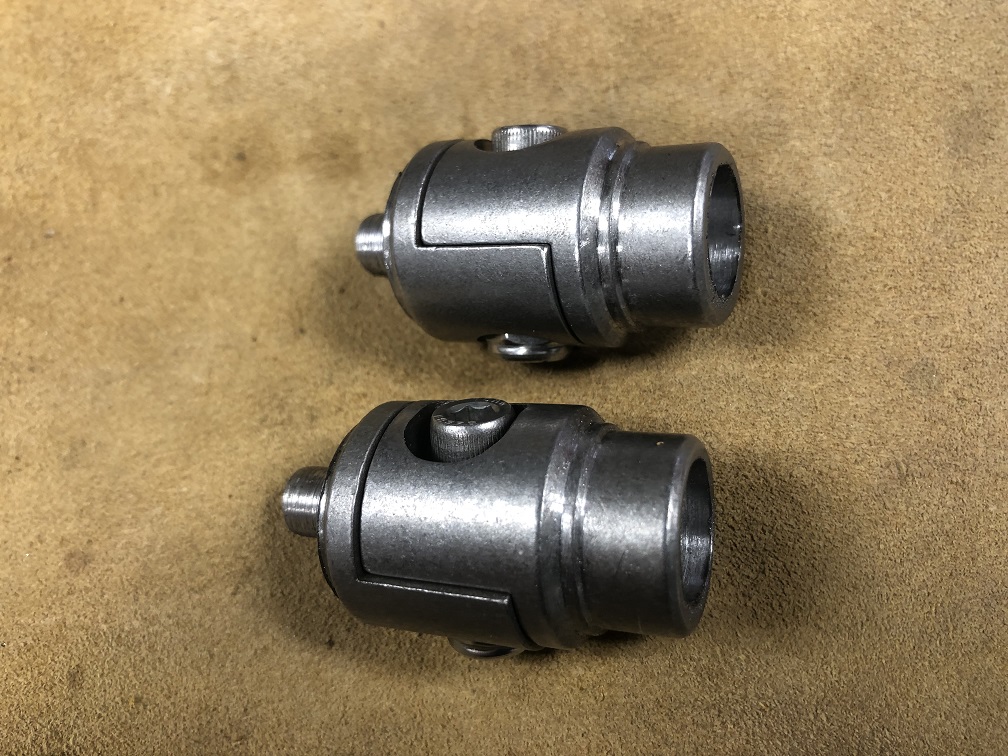
Posted by: tygaboy Jan 12 2023, 06:25 PM
Today I spent some time giving a go to bead rolling an embossing vs making a stamping die set. Sure is faster! I did mess up one corner but with a little practice, I think I could get a really nice result.
Next try, I'll tweak the settings so it better matches the inset in the shock tower: it needs to be a bit deeper/the "ramp" a bit longer.
And no, you probably won't be able to see much of it once the headers are there... but that's not going to stop me spending three days working up four different versions of it.
Attached thumbnail(s)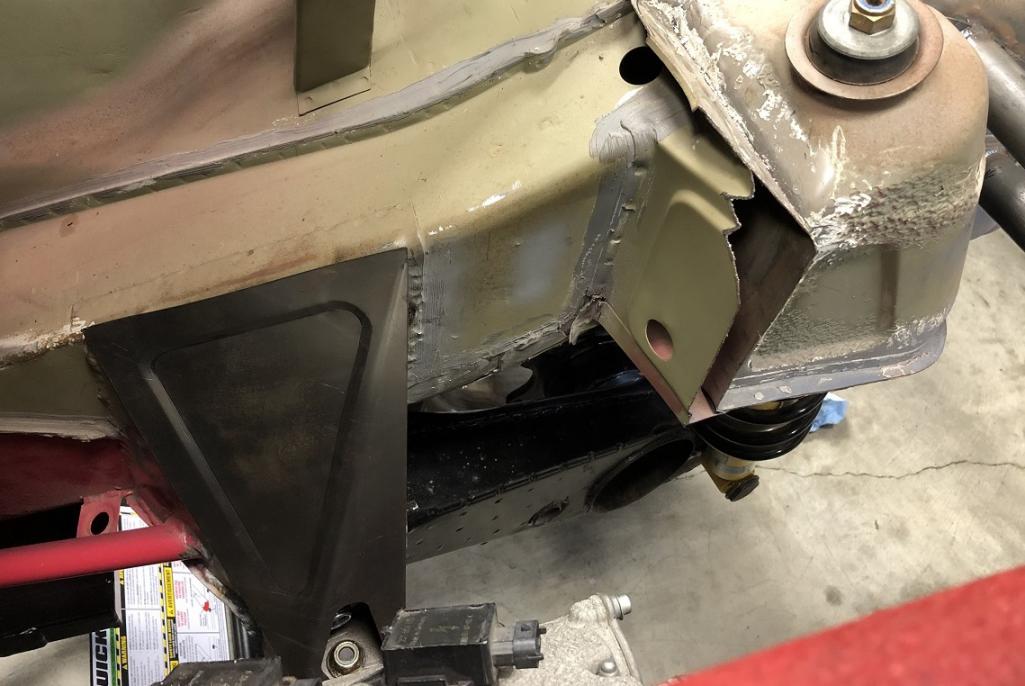
Attached image(s)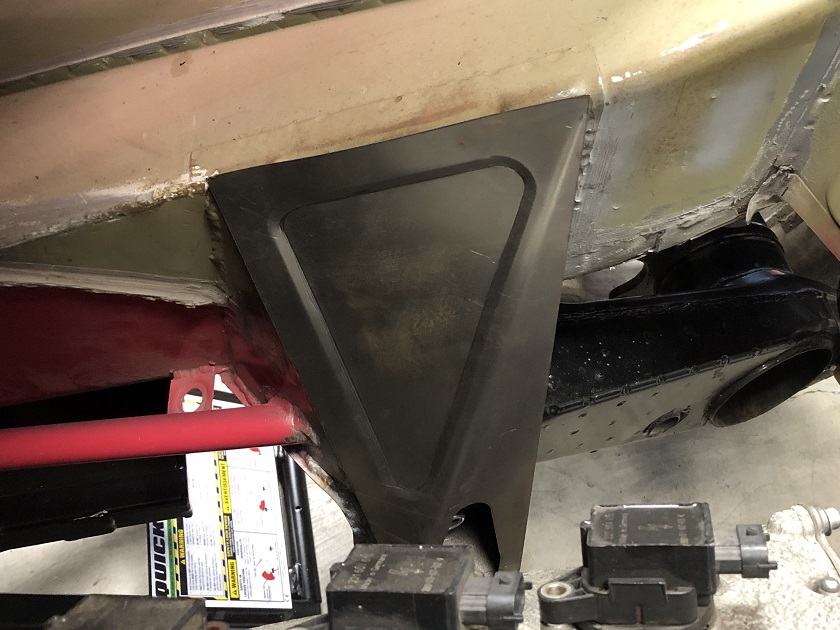
Posted by: Van B Jan 12 2023, 10:46 PM
So very cool! These are the details that make you just love to look at a build!
Posted by: tygaboy Jan 13 2023, 08:55 AM
The latest madness "At the Red Barn" is available! I'll be dropping an episode every Friday. Your likes, shares, comments and subscribes are always appreciated. Thanks for your support.
https://youtu.be/OgTZz2u6pMs
https://www.youtube.com/watch?v=OgTZz2u6pMs
Posted by: tygaboy Jan 14 2023, 05:54 PM
Needs a bit more tidying up, and the horse will get the same treatment, but you get the idea.
Attached thumbnail(s)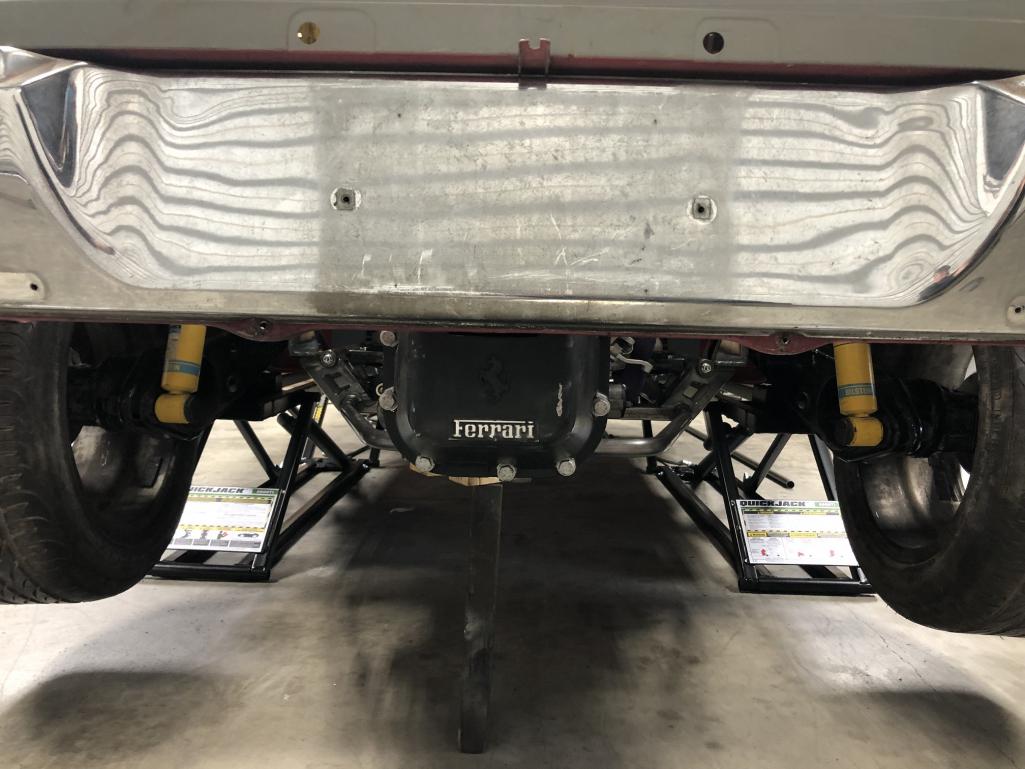
Posted by: SirAndy Jan 14 2023, 07:24 PM
You need to add a Fiat badge to the rear so you can really confused the heck out of people.
Attached thumbnail(s)
Posted by: roundtwo Jan 15 2023, 10:26 AM
Good times yesterday live on the set at the Red Barn. I always learn a couple dozen things from Chris while I’m there. And I walked away with an audience prize – a three-way Deutsch connector that I desperately needed. TY!
Very cool metal tube bending lesson to boot!
Posted by: tygaboy Jan 20 2023, 09:05 AM
Weekly video drop!
A little bit of "how the sausage is made" in this one.
Please like, subscribe (if you haven't) and share and leave a comment letting me know what you think, if you want more/less details, etc.
Thanks!
https://youtu.be/bQ_DZxxiPcw
https://www.youtube.com/watch?v=bQ_DZxxiPcw
Posted by: ClayPerrine Jan 20 2023, 11:50 AM
It looks like the oil filler on top of the tank will hit the trunk lid. Are you going to make an external filler hole, or are you going to shorten the tank?
Clay
Posted by: Tferrer Jan 20 2023, 12:29 PM
It looks like the oil filler on top of the tank will hit the trunk lid. Are you going to make an external filler hole, or are you going to shorten the tank?
Clay
That sump tank cap is a work of art. I'd make a cutout in the trunk lid the exact shape as the cap with a few mm standoff to allow the motor to move... Or a colab on a carbon trunk lid with a molded cut out... Ck out the IG page for The Son of Cobra
https://www.instagram.com/p/CiJerPuLwTG/?igshid=YmMyMTA2M2Y=
Posted by: tygaboy Jan 20 2023, 12:33 PM
It looks like the oil filler on top of the tank will hit the trunk lid. Are you going to make an external filler hole, or are you going to shorten the tank?
Clay
@http://www.914world.com/bbs2/index.php?showuser=1143 Clay - At this point, I really haven't focused on the whole "how will all this clear/not clear". I'll be hitting up @http://www.914world.com/bbs2/index.php?showuser=16100 Tony to help come up with a design for the overall opening/screened cover/who knows what.
I've still got to decide on the final position of the throttle bodies, as well as some sort of air cleaner setup so, clearly, a ways to go.
Posted by: tygaboy Jan 21 2023, 04:37 PM
Well, if they weren't mad yet, this should do it.
Attached image(s)
Posted by: cali914 Jan 22 2023, 12:22 AM
Well, if they weren't mad yet, this should do it.
Love it
Posted by: Rleog Jan 22 2023, 04:51 AM
Hopefully one of these will clearly be visible beneath the rear bumper.
http://www.914world.com/bbs2/uploads/post-19241-1671574855.jpg
Posted by: nivekdodge Jan 23 2023, 11:11 PM
A guy had me do a Harley circle emblem with "Honda Motorcycles". This may be the first I've said it
But the Cradle needs to be silver or Chromed because it looks "mavelous" peeking out under there
Posted by: tygaboy Jan 25 2023, 08:24 AM
Need a fabrication fix? Want to see the mighty, mighty bender in action? Wonder how I spend all my time? Your wait is over!
I feel like I'm making pretty good progress but there's still a loooooong way to go.
Thanks for watching and please like, subscribe and share?
https://youtu.be/IJwi7pNtPik
https://www.youtube.com/watch?v=IJwi7pNtPik
Posted by: tygaboy Jan 28 2023, 09:23 AM
What I like about the video medium is it provides a glimpse into what really happens as progress is made.
As I've always said: It's about the journey, not the destination. Hope you enjoy.
Let me know what you think?
https://youtu.be/XvVZP4Dc_D0
https://www.youtube.com/watch?v=XvVZP4Dc_D0
Posted by: mb911 Jan 28 2023, 09:51 AM
What I like about the video medium is it provides a glimpse into what really happens as progress is made.
As I've always said: It's about the journey, not the destination. Hope you enjoy.
Let me know what you think?
https://youtu.be/XvVZP4Dc_D0
https://www.youtube.com/watch?v=XvVZP4Dc_D0
I really like the videos Chris. Also enjoy all your fabrication over the years. One quick tip from a 30 year industry aircraft fabricator and welding instructor. Tacks like what you were doing under the car could have easily be done with MiG and then when your happy final tack with TIG on the bench and a quick grind off the MIG weld. Saves the hassle with the arch nemesis of a wood block from messing with you.
Posted by: tygaboy Jan 28 2023, 10:15 AM
I really like the videos Chris. Also enjoy all your fabrication over the years. One quick tip from a 30 year industry aircraft fabricator and welding instructor. Tacks like what you were doing under the car could have easily be done with MiG and then when your happy final tack with TIG on the bench and a quick grind off the MIG weld. Saves the hassle with the arch nemesis of a wood block from messing with you.
@http://www.914world.com/bbs2/index.php?showuser=9892 Ben - I totally agree! That said, I've been reading up on the process of how to improve at any skill. One common technique is to operate outside your comfort zone as a way to force an improved mind/body connection and help get to another level.
So I've made the (questionable
) decision to always use TIG as a way to force myself to improve, even at the cost of time and convenience. It's not like I've ever been effecient on any part of my builds!
Posted by: mb911 Jan 28 2023, 12:18 PM
I really like the videos Chris. Also enjoy all your fabrication over the years. One quick tip from a 30 year industry aircraft fabricator and welding instructor. Tacks like what you were doing under the car could have easily be done with MiG and then when your happy final tack with TIG on the bench and a quick grind off the MIG weld. Saves the hassle with the arch nemesis of a wood block from messing with you.
@http://www.914world.com/bbs2/index.php?showuser=9892 Ben - I totally agree! That said, I've been reading up on the process of how to improve at any skill. One common technique is to operate outside your comfort zone as a way to force an improved mind/body connection and help get to another level.
So I've made the (questionable
) decision to always use TIG as a way to force myself to improve, even at the cost of time and convenience. It's not like I've ever been effecient on any part of my builds!I get that. I do some of that as well. I have to be proficient in all welding processes including pipe welding for my day job. Gotta keep going until you master it.
Posted by: tygaboy Jan 29 2023, 05:20 PM
Some boring ol' pics of progress. Today was working up a set of tabs for the lower trans mount. I'll join them across the top with a plate. Once the skid plate gets attached to that hoop and the struts are final welded and bolted in up top, that lower mount should be all set.
Attached thumbnail(s)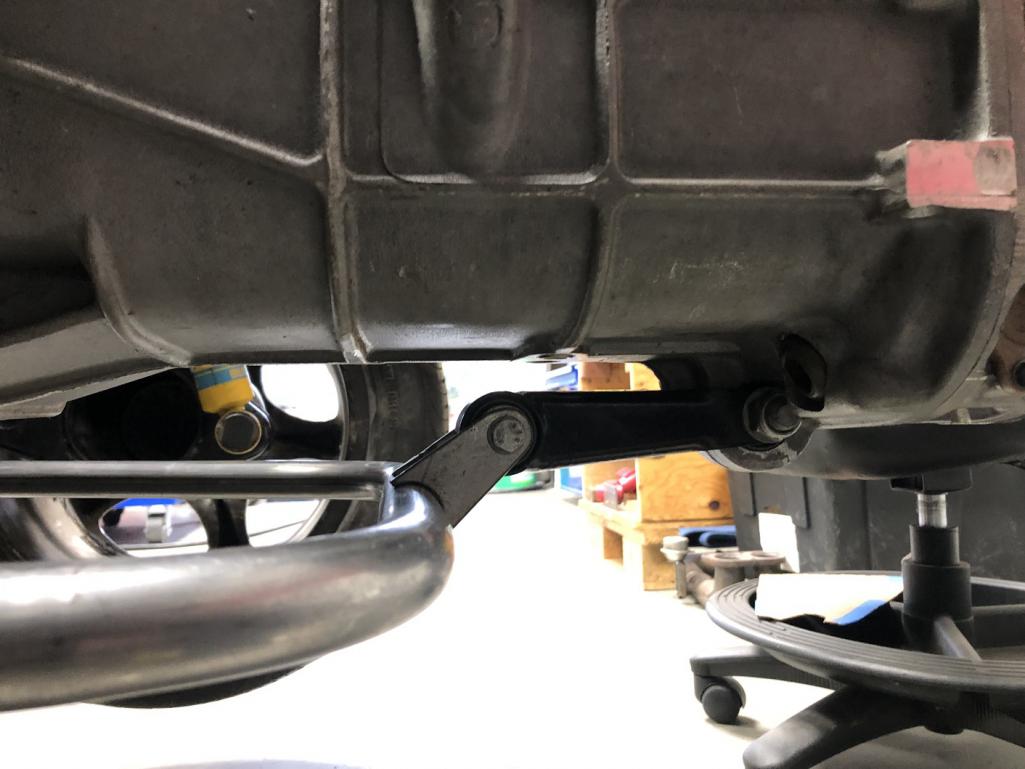
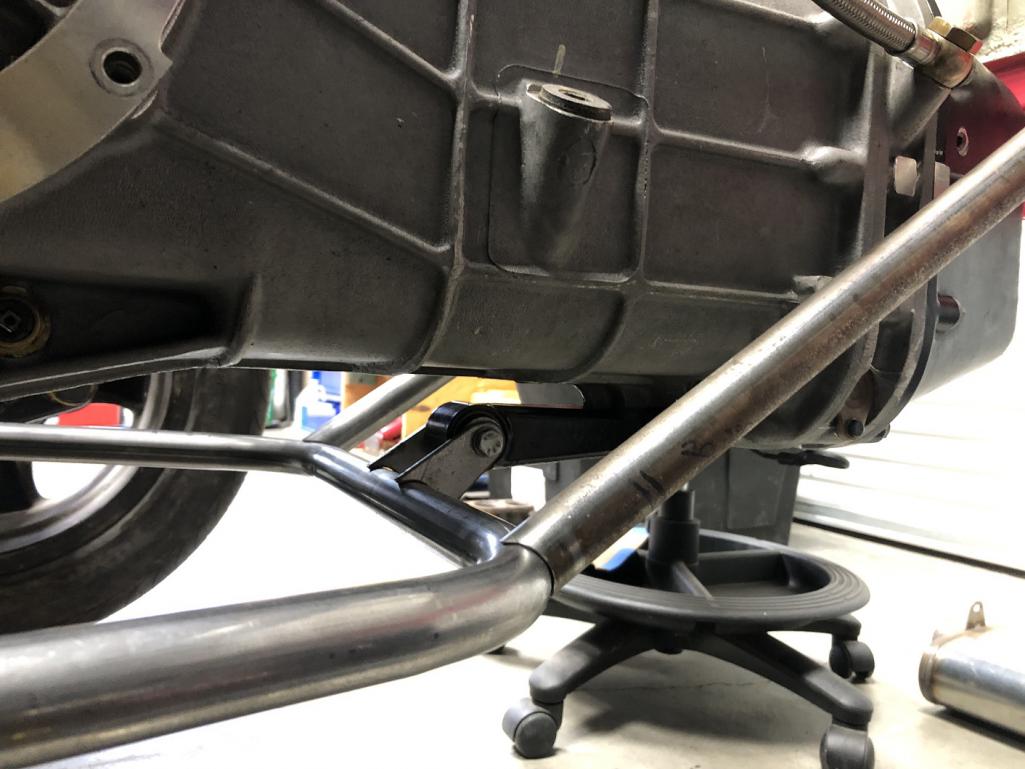
Posted by: tygaboy Feb 3 2023, 10:32 AM
GT40s get a "bundle of snakes". The 914 Ferrari gets a "bowl of spaghetti".
Here's Part I:
https://youtu.be/Ge9GNMK-0hE
https://www.youtube.com/watch?v=Ge9GNMK-0hE
Posted by: Cairo94507 Feb 3 2023, 10:58 AM
@http://www.914world.com/bbs2/index.php?showuser=19241 - Really looking forward to seeing the headers begin to emerge from the pieces.
Posted by: tygaboy Feb 5 2023, 04:43 PM
The next couple video episodes will cover building the entire rear cradle and this trans mount... in excruciating detail. Actually, anyone who likes fabrication stuff will probably enjoy them. Until then, enjoy these teaser pics.
Attached thumbnail(s)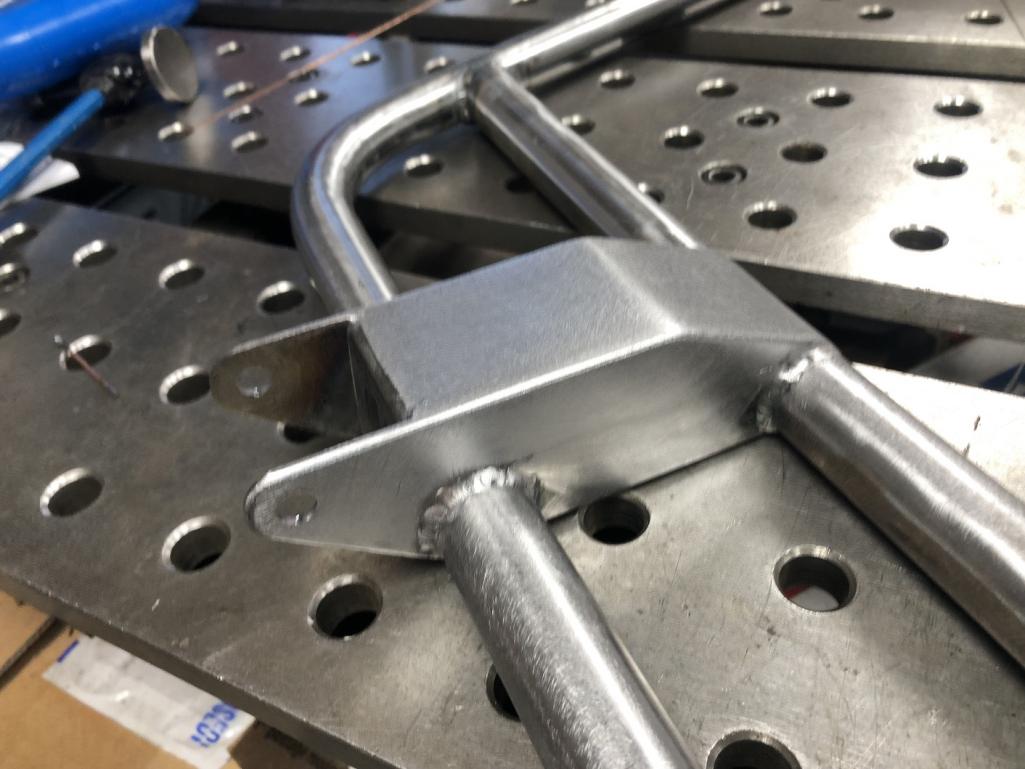
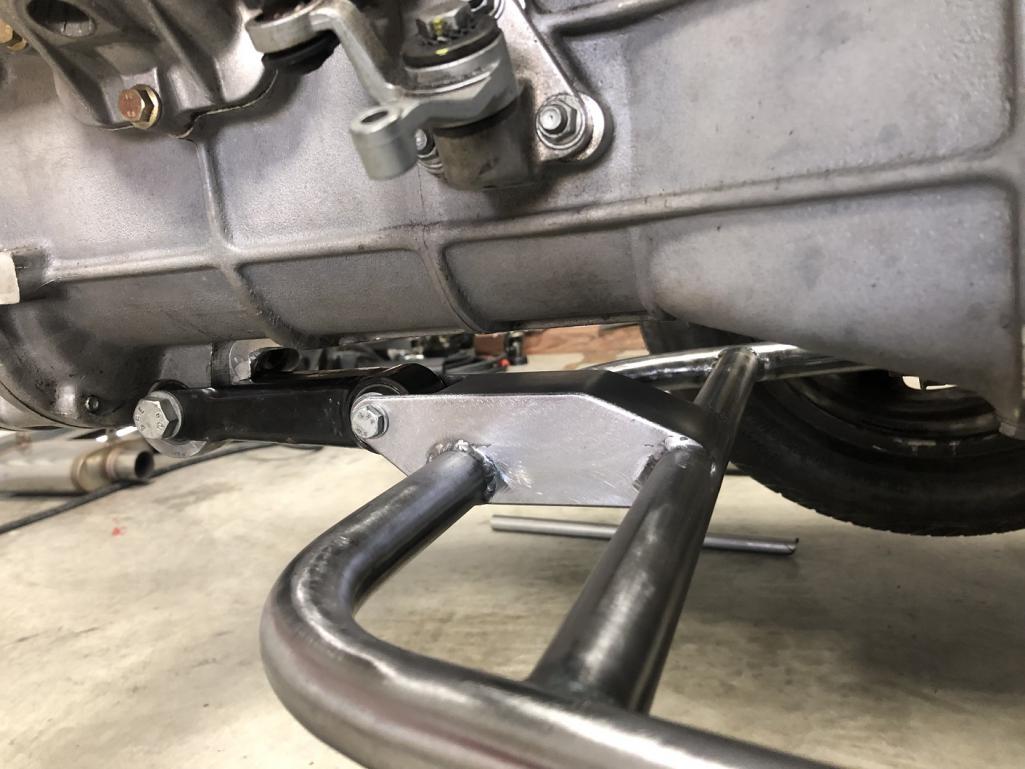
Posted by: Mayne Feb 5 2023, 08:20 PM
Nice! I’m enjoying the videos, and of course your bonkers vision and workmanship.
Posted by: tygaboy Feb 9 2023, 05:48 PM
First effort with the header modeling kit from Icengine Works.
Each primary is 21" long, same as the factory length of the Ferrari primaries.
I doubt this will be the final design as I'm learning as I go and I think I can go a tidier job. But what a cool way to work out a design!
Attached thumbnail(s)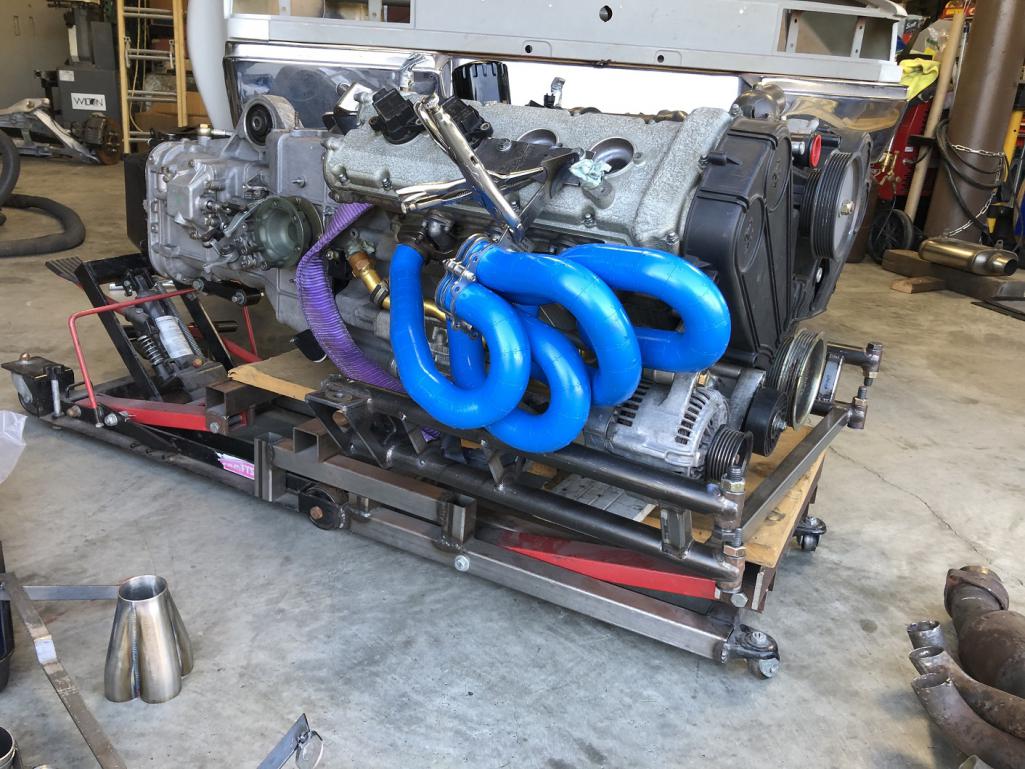
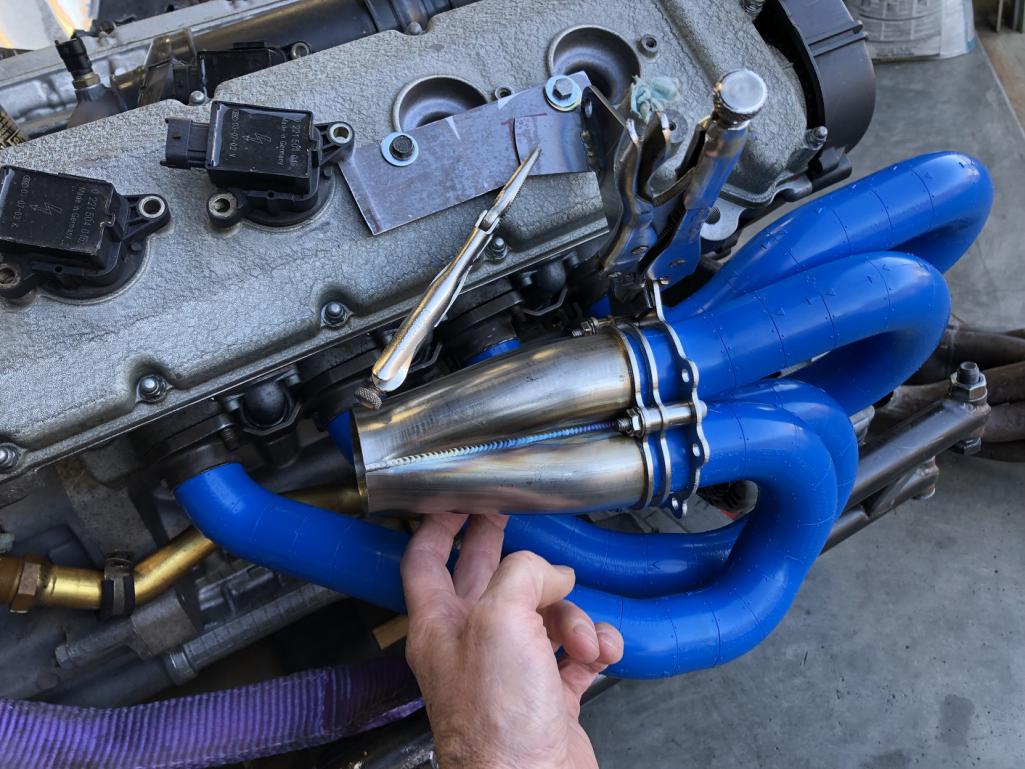
Posted by: Krieger Feb 9 2023, 09:13 PM
Header modeling kit? Like Lego tubing? How does that work?
Posted by: Van B Feb 9 2023, 09:34 PM
Header modeling kit? Like Lego tubing? How does that work?
Oh but you have to tune in to find out!
Posted by: tygaboy Feb 9 2023, 10:18 PM
Header modeling kit? Like Lego tubing? How does that work?
@http://www.914world.com/bbs2/index.php?showuser=2104 Andy - Yep, like Legos - they snap together. Each piece is a 1" centerline length in either straight, 2", 3" or 4" radius, just like mandrel-bent exhaust tubing. Use the same number of pieces in each primary and you get equal length headers - assuming that's the goal. If not, you just work out a design that fits.
Each piece has alignment marks (and the kit has a "build sheet" to record how the pieces align with each other) so once the design is finalized, you disassemble the logical sections, cut the exhaust tubing to match, replace the plastic pieces with tubing and weld it up.
It's pretty slick.
And yes, it'll all be featured in an upcoming video on "At The Red Barn". You won't want to miss it!
Posted by: Krieger Feb 9 2023, 11:52 PM
Header modeling kit? Like Lego tubing? How does that work?
@http://www.914world.com/bbs2/index.php?showuser=2104 Andy - Yep, like Legos - they snap together. Each piece is a 1" centerline length in either straight, 2", 3" or 4" radius, just like mandrel-bent exhaust tubing. Use the same number of pieces in each primary and you get equal length headers - assuming that's the goal. If not, you just work out a design that fits.
Each piece has alignment marks (and the kit has a "build sheet" to record how the pieces align with each other) so once the design is finalized, you disassemble the logical sections, cut the exhaust tubing to match, replace the plastic pieces with tubing and weld it up.
It's pretty slick.
And yes, it'll all be featured in an upcoming video on "At The Red Barn". You won't want to miss it!
That is soooo cool! I wonder how Enzo would react seeing Legos in his motor?
Posted by: horizontally-opposed Feb 10 2023, 09:27 AM
Chris is moving from coolest firewall to coolest engine bay…
The fabrication work on the cradle continues to amaze, and I cannot wait to see the real headers…they're gonna be super cool.
Posted by: KELTY360 Feb 10 2023, 09:30 AM
Header modeling kit? Like Lego tubing? How does that work?
@http://www.914world.com/bbs2/index.php?showuser=2104 Andy - Yep, like Legos - they snap together. Each piece is a 1" centerline length in either straight, 2", 3" or 4" radius, just like mandrel-bent exhaust tubing. Use the same number of pieces in each primary and you get equal length headers - assuming that's the goal. If not, you just work out a design that fits.
Each piece has alignment marks (and the kit has a "build sheet" to record how the pieces align with each other) so once the design is finalized, you disassemble the logical sections, cut the exhaust tubing to match, replace the plastic pieces with tubing and weld it up.
It's pretty slick.
And yes, it'll all be featured in an upcoming video on "At The Red Barn". You won't want to miss it!
That is soooo cool! I wonder how Enzo would react seeing Legos in his motor?
Really?? That’s your question about Enzo’s reaction to one of his engines in a 914?
Posted by: ClayPerrine Feb 10 2023, 11:20 AM
Header modeling kit? Like Lego tubing? How does that work?
@http://www.914world.com/bbs2/index.php?showuser=2104 Andy - Yep, like Legos - they snap together. Each piece is a 1" centerline length in either straight, 2", 3" or 4" radius, just like mandrel-bent exhaust tubing. Use the same number of pieces in each primary and you get equal length headers - assuming that's the goal. If not, you just work out a design that fits.
Each piece has alignment marks (and the kit has a "build sheet" to record how the pieces align with each other) so once the design is finalized, you disassemble the logical sections, cut the exhaust tubing to match, replace the plastic pieces with tubing and weld it up.
It's pretty slick.
And yes, it'll all be featured in an upcoming video on "At The Red Barn". You won't want to miss it!
That is soooo cool! I wonder how Enzo would react seeing Legos in his motor?
Really?? That’s your question about Enzo’s reaction to one of his engines in a 914?
Enzo always said "We sell you an engine, you get the rest of the car for free."
He would probably hate it because it is being installed in a cheap Porsche. Having worked on 80s Ferrari cars, I would say that the 914 is way better built.
Posted by: horizontally-opposed Feb 10 2023, 01:12 PM
^ 100%
Same goes for a Ferrari F50, in fact. You'd be shocked if you look at the taillight buckets, or the fact that it uses boat locker/Samsonite-looking outer door locks that have no connection whatsoever to the inner plunger locks. Although maybe it was intentional, so that your date can lock you out of the car if you're rude or you can lock them in if they are? Nah. It was cheap and easy, an afterthought.
Posted by: tygaboy Feb 11 2023, 11:13 AM
As you folks can tell, the videos lag reality by a week or two. So while I'm actually working out the header design, here's more detail about the lower trans mount/cradle. Enjoy!
And please consider subscribing, if you haven't yet?
https://youtu.be/BSthVYLVGqE
https://www.youtube.com/watch?v=BSthVYLVGqE
Posted by: ndfrigi Feb 11 2023, 11:28 AM
Wow sir Chris!
Amazing build
Amazing skills
Amazing tools
Amazing talent
Amazing mind
Amazing car
Congrats and hope to see it 100% finished
Posted by: nivekdodge Feb 11 2023, 10:31 PM
Chris,
If you insist on leaving the carbon fiber long cover hanging out on the hood of the blue car, would you consider selling them?
Kevin
Posted by: tygaboy Feb 12 2023, 08:54 AM
Chris,
If you insist on leaving the carbon fiber long cover hanging out on the hood of the blue car, would you consider selling them?
Kevin
@http://www.914world.com/bbs2/index.php?showuser=25860 Kevin - I've got plans for them. If you've ever worked with fiberglass, making these sorts of things is fairly straight forward. Here's what I did - start on post #75:
http://www.914world.com/bbs2/index.php?showtopic=296900&st=60
Posted by: tygaboy Feb 12 2023, 02:27 PM
Next version of the header design. Still 21" primary length.
I think this "down and out" is the winning design because there are some serious fit/clearance challenges with the "top exit" model.
All that said, there are some opportunities to tweak this design to improve the aesthetics so I'm moving forward with this approach - at least for now!
Attached thumbnail(s)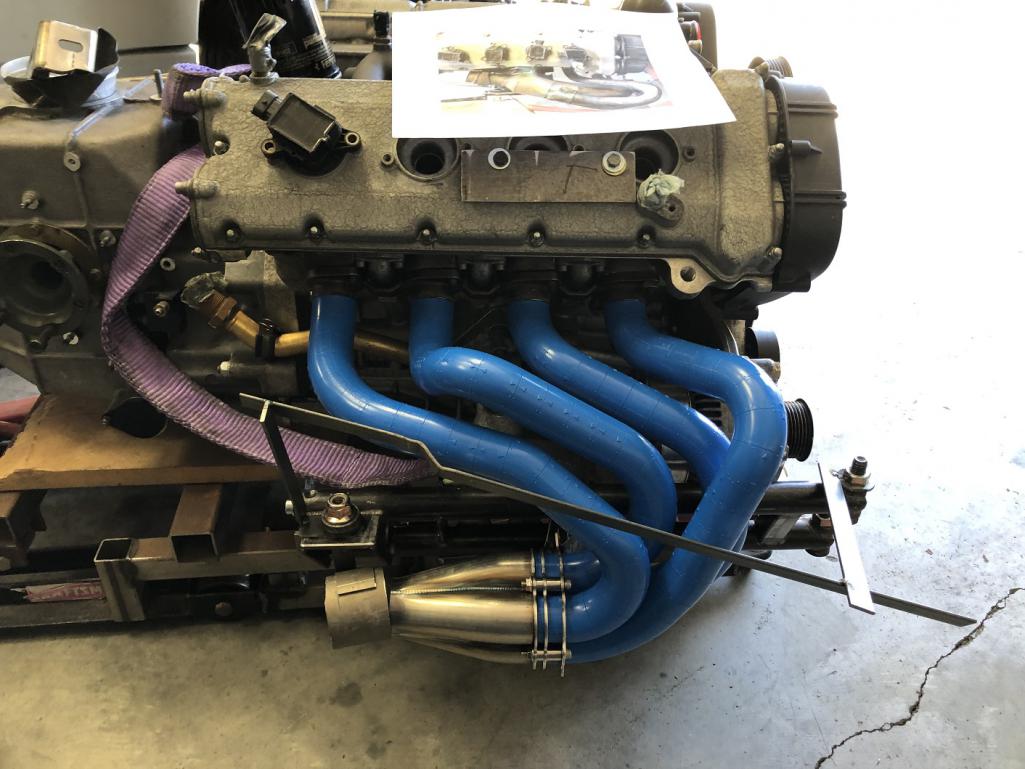
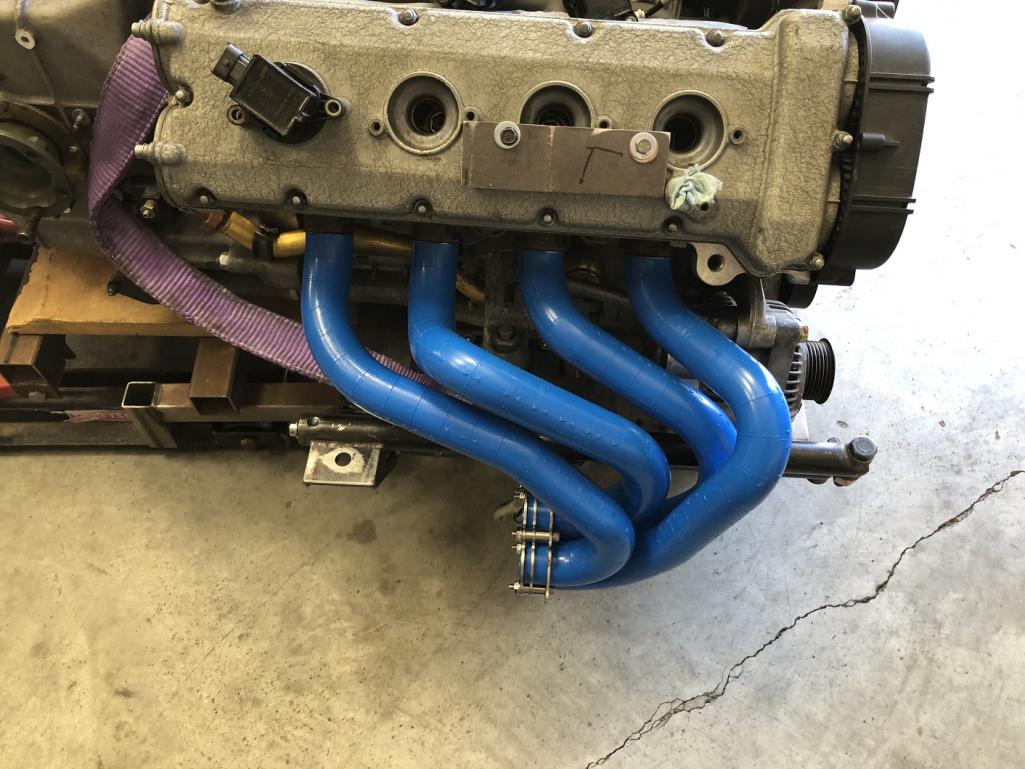
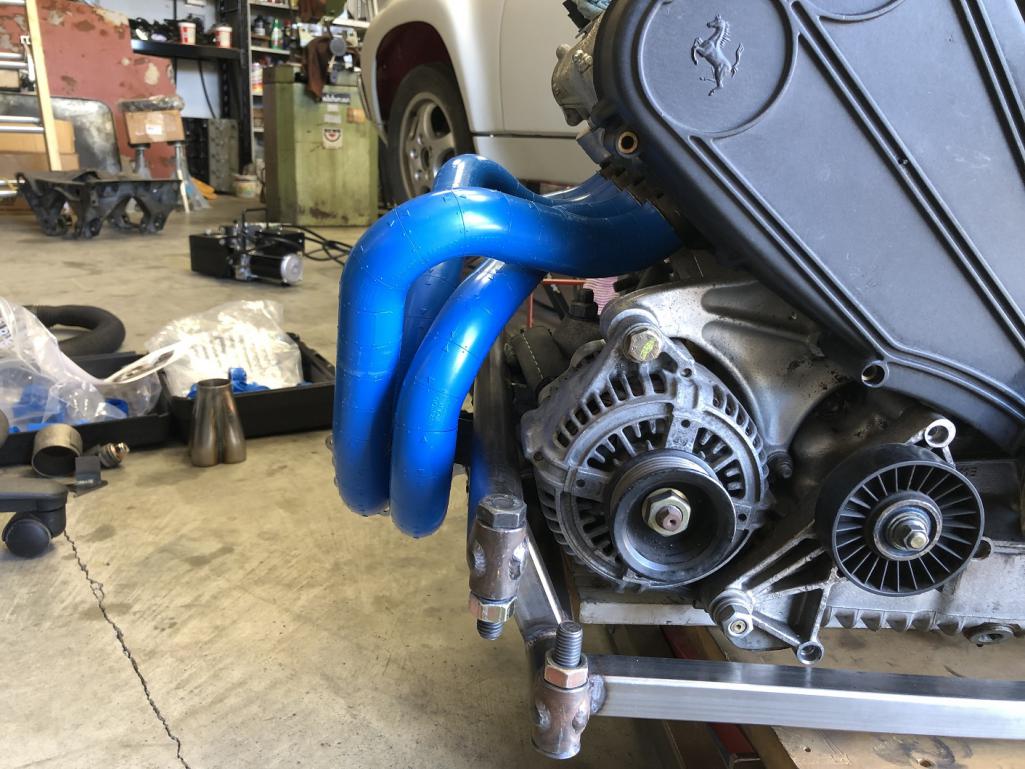
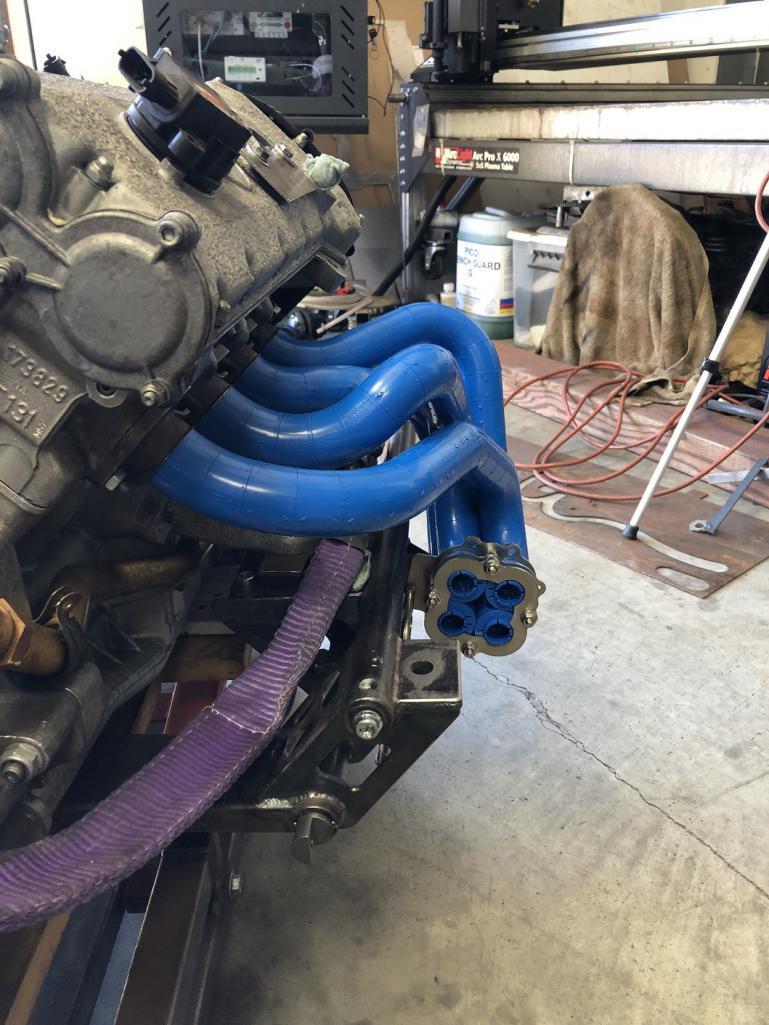
Posted by: tygaboy Feb 12 2023, 05:02 PM
A bit more time spent trying to tidy up the layout and still equal length at 21" - but a bit more less "bumpy". A couple likely changes:
- move the collector forward at least an inch to gain more working room / options for where I locate the V-band clamp
- swap the collector location of the two front cylinders. Just to see if it looks/fits better
In any case, I know enough to order the bends and I hope to see headers coming together in metal some time this week.
Attached thumbnail(s)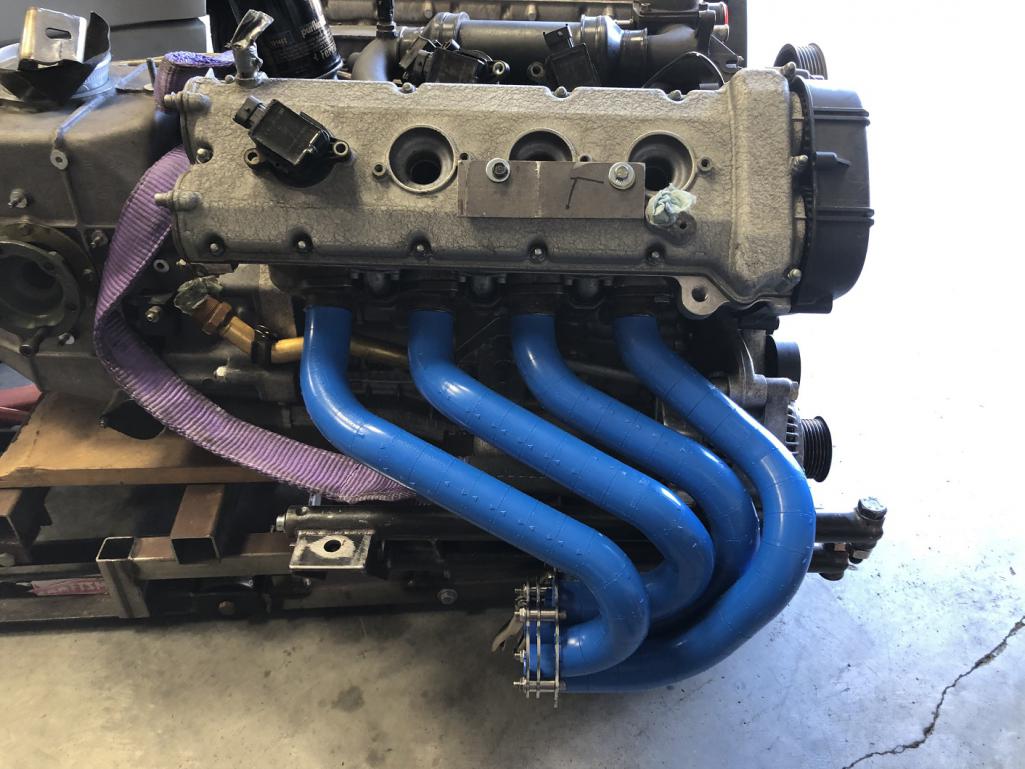
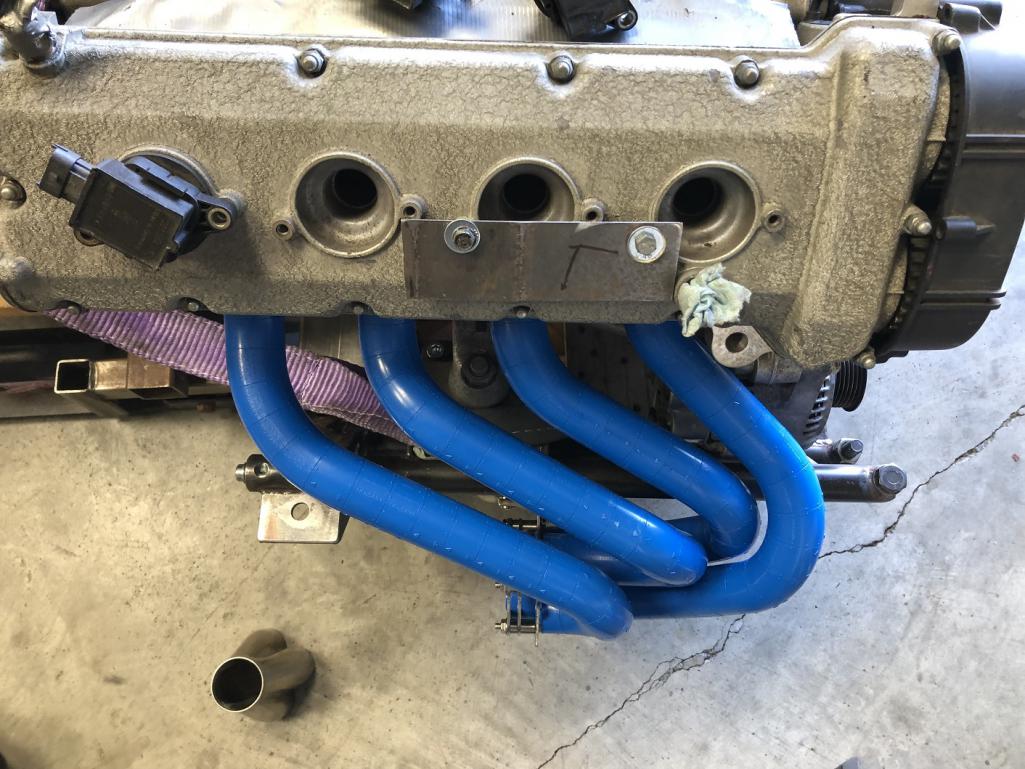
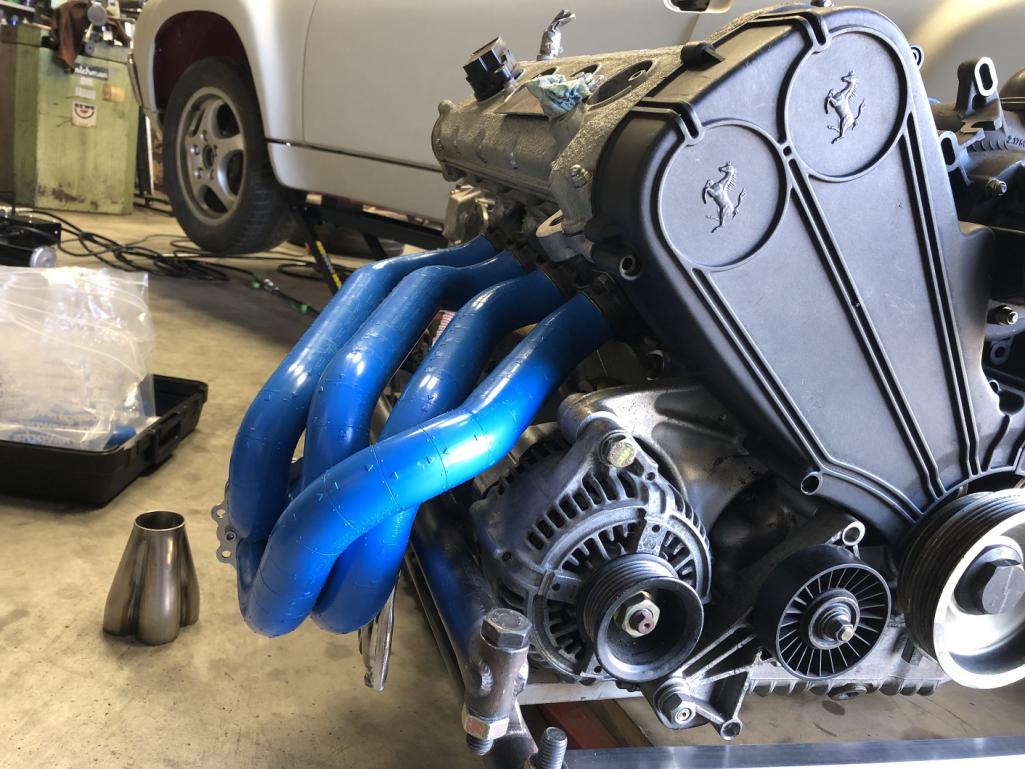
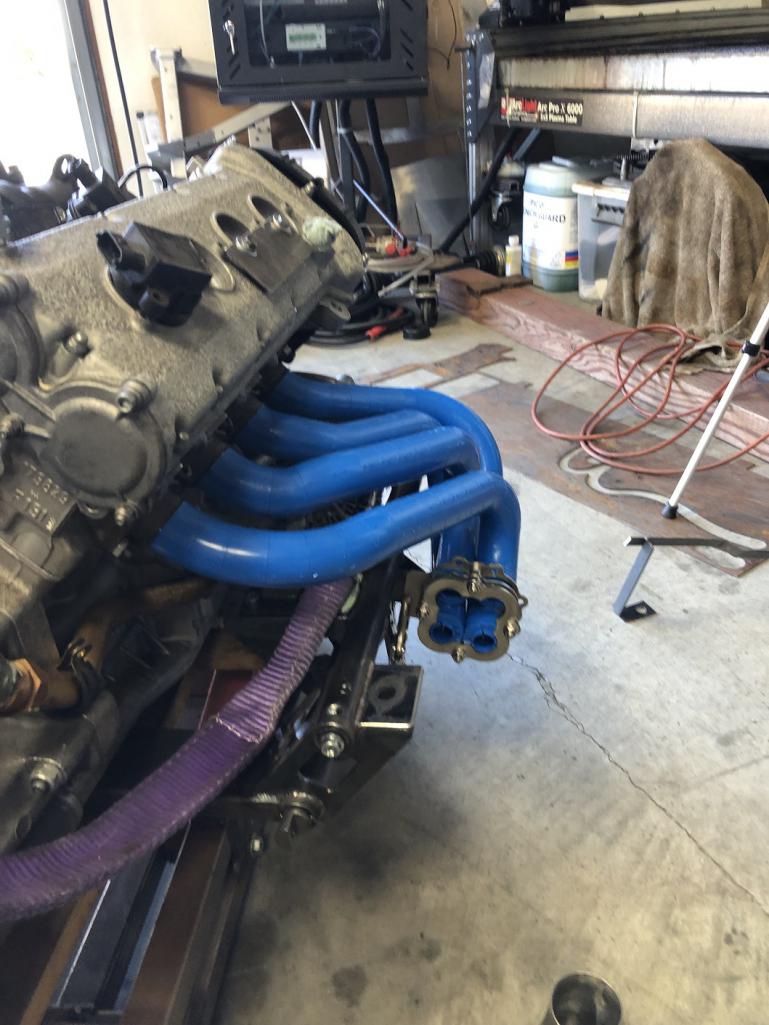
Posted by: roundtwo Feb 12 2023, 08:59 PM
Cool blue tool!
Posted by: Van B Feb 12 2023, 09:02 PM
That’s gonna be a great spot for cats on the collector too.
Posted by: Krieger Feb 12 2023, 11:00 PM
How long did it take to reconfigure the legos from your first setup to the second? What's it like to work with? Tedious?
Posted by: mgp4591 Feb 13 2023, 01:47 AM
Okay, if the final iteration is still fairly equal length and it fits well, go with it. That's a great configuration...
Posted by: Cairo94507 Feb 13 2023, 07:58 AM
Those are looking really nice Chris.
Posted by: nivekdodge Feb 13 2023, 01:48 PM
Chris,
If you insist on leaving the carbon fiber long cover hanging out on the hood of the blue car, would you consider selling them?
Kevin
@http://www.914world.com/bbs2/index.php?showuser=25860 Kevin - I've got plans for them. If you've ever worked with fiberglass, making these sorts of things is fairly straight forward. Here's what I did - start on post #75:
http://www.914world.com/bbs2/index.php?showtopic=296900&st=60
But if you have the steel made your halfway there
Kevin
Posted by: tygaboy Feb 13 2023, 05:44 PM
OK, looks like this is the one I'll execute in stainless. I moved the collector farther back, sorta like where it was in the first "down and out". This version is just a bit more refined.
Equal length at 21".
I'll add the 2.25" to 2.5" transition right at the collector, take the 2.5" past the end of the engine cradle and add the O2 bung, then a 2.5" V-band connector.
Really happy with the ICEngineworks modeling kit. There is NO WAY I could have gotten this without it. And don't overlook the ability to tryout a few different options before committing!
Too bad they don't make a 914 hood vent or firewall modelling kit.
Attached thumbnail(s)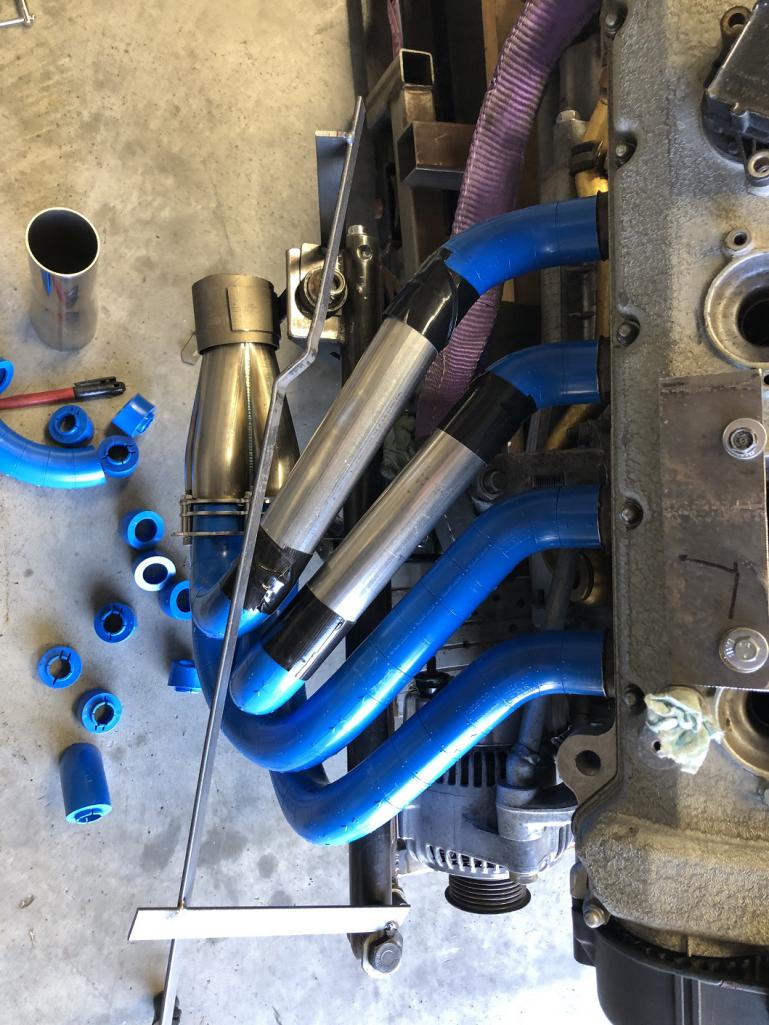
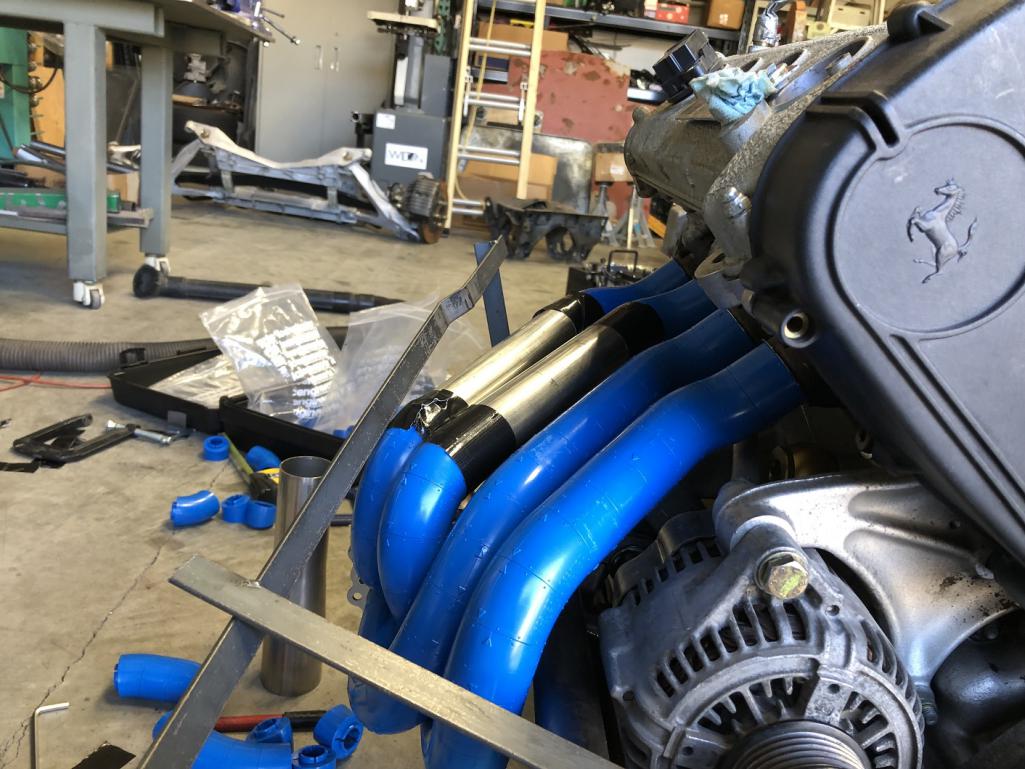
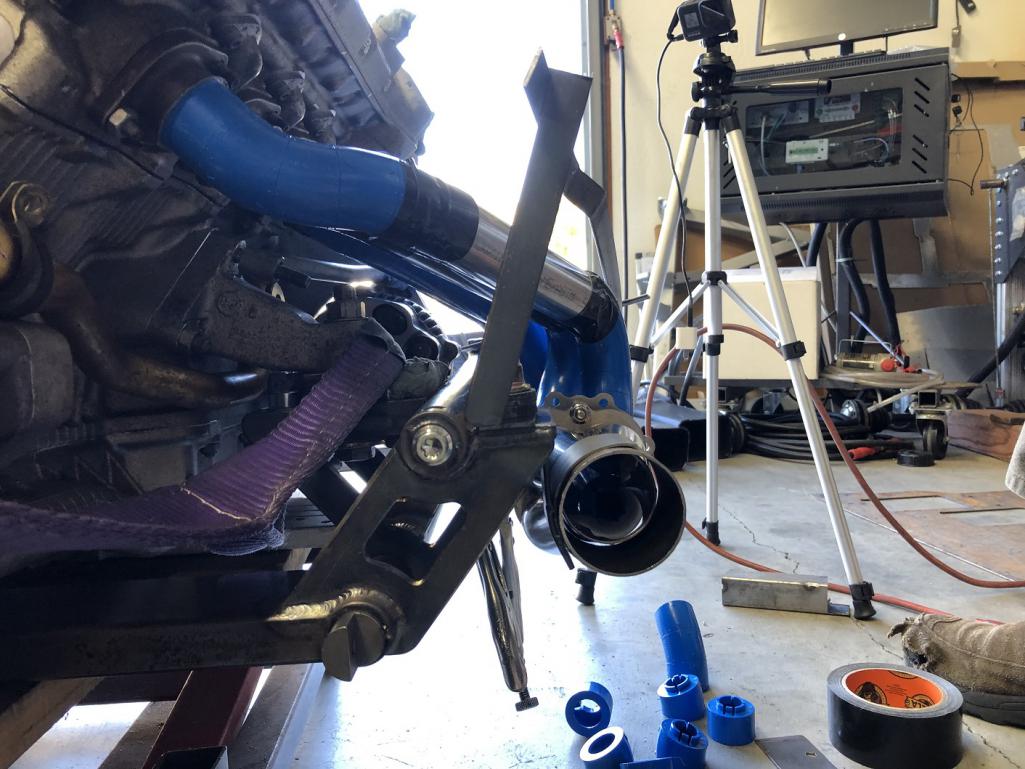
Posted by: mikey63 Feb 13 2023, 05:54 PM
Looks really good Chris!
Posted by: tygaboy Feb 16 2023, 06:35 PM
I think I've landed on a final design. This after only about six tries!
That missing section is a 2" straight. The "one side" kit I bought didn't have enough straights for this particular design, which uses A LOT of straight.
So now all I have to do is get the box of tubes into the same shapes as the header model. I mean, how hard can that be?
Attached thumbnail(s)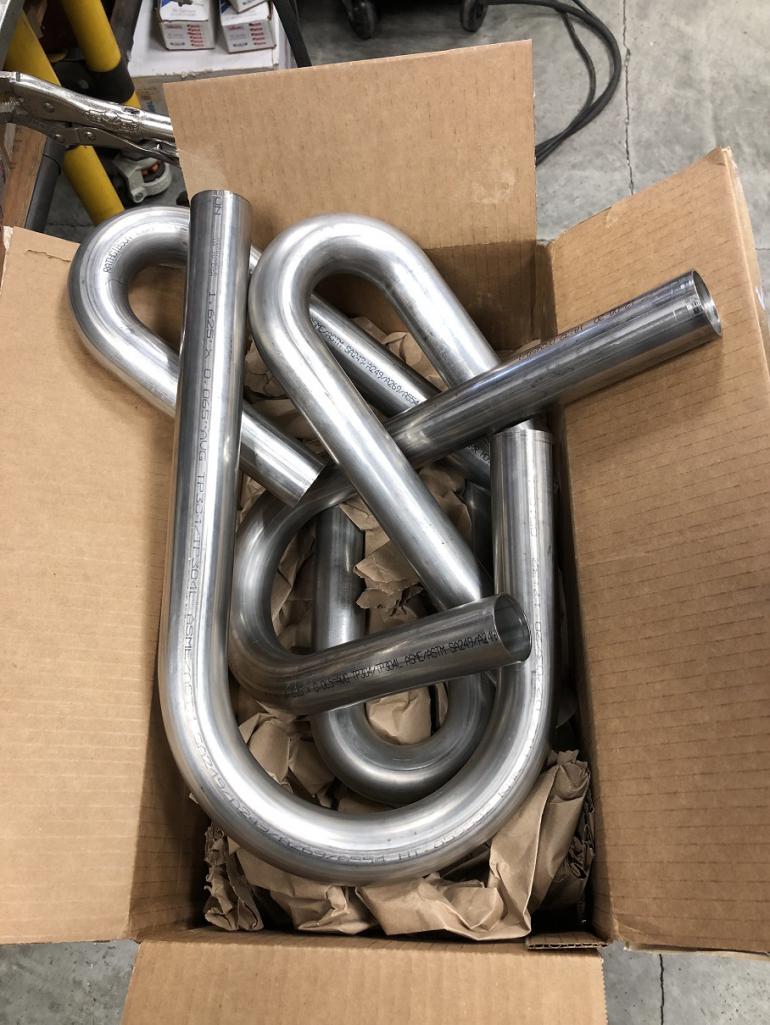
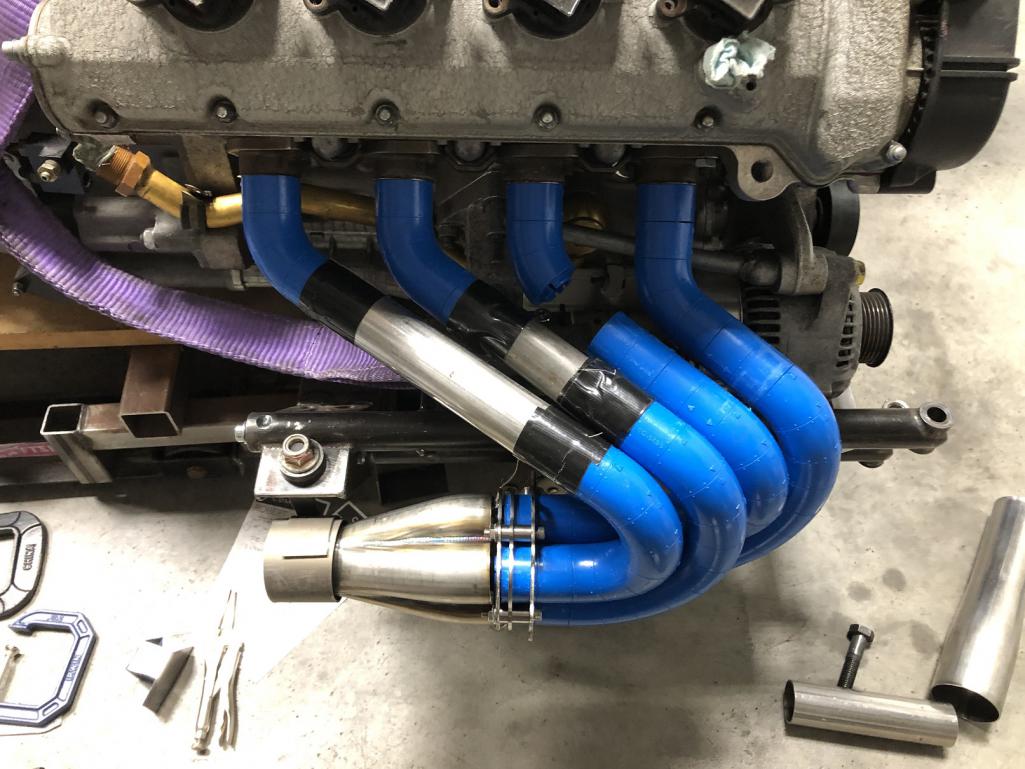
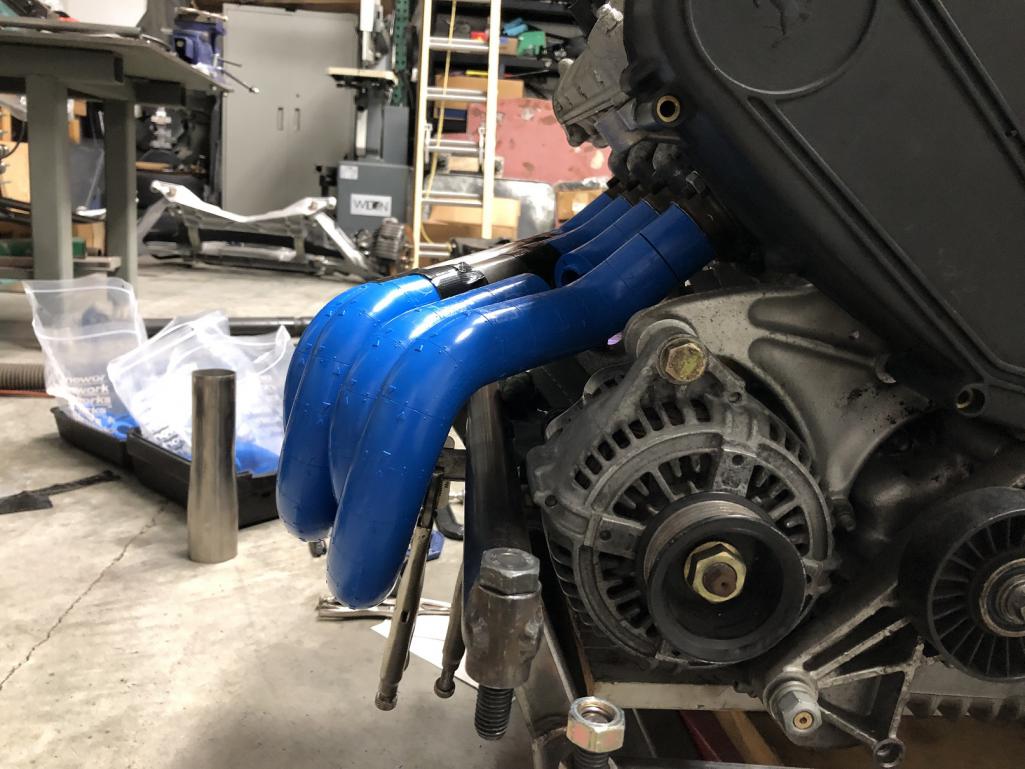
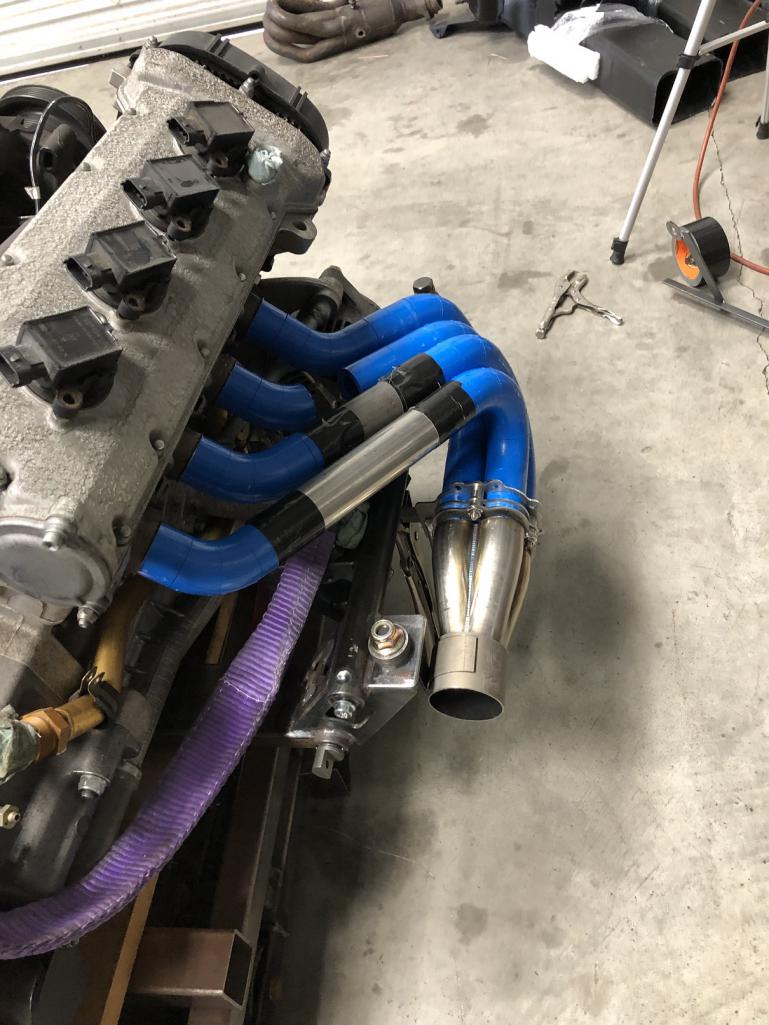
Posted by: tygaboy Feb 17 2023, 08:42 AM
This one should make you smile if you:
- enjoy fabrication stuff
- want more proof I really have no plan
- are under the impression I don't have lots to learn
Thanks for watching!
https://youtu.be/kaAiYWCoHC0
https://www.youtube.com/watch?v=kaAiYWCoHC0
Posted by: Cairo94507 Feb 18 2023, 09:05 AM
Another excellent video; the cradle looks bitchin. PS- I loved the music selection with the piano.
Posted by: KELTY360 Feb 18 2023, 11:02 AM
While watching this I couldn't help but think 20 years or so into the future when an owner tries to take his 914Ferrari to a Ferrari shop for a tranny rebuild and as the tech goes to pull it out he thinks, "damn, whoever built this sure believed in overkill.....but it's gorgeous. I wish they built them this nice nowadays."
Posted by: ClayPerrine Feb 18 2023, 07:21 PM
While watching this I couldn't help but think 20 years or so into the future when an owner tries to take his 914Ferrari to a Ferrari shop for a tranny rebuild and as the tech goes to pull it out he thinks, "damn, whoever built this sure believed in overkill.....but it's gorgeous. I wish they built them this nice nowadays."
Actually, the Ferrari shop will be "No way! We don't work on bastard cars like this!" Or more probably "We don't have anyone who knows how to work on a gasoline powered car anymore."
Posted by: tygaboy Feb 21 2023, 09:11 AM
With the drive train out, I gave a go to the console boxing plate. This time, via a stamping die set that adds a spot for a removable cover plate that closes off the fastener access area.
I tried a couple new techniques and, as always, now know I can do a tidier job.
- the main stamp area needs to be deeper to better match the factory stamping in the shock tower
- the cover plate stamp needs to be less deep
This means the die set needs to be made of two different thicknesses. Of course it does!
No, you won't be able to see much of this.
Yes, I'll know it's there.
Style points, at any cost!
Attached thumbnail(s)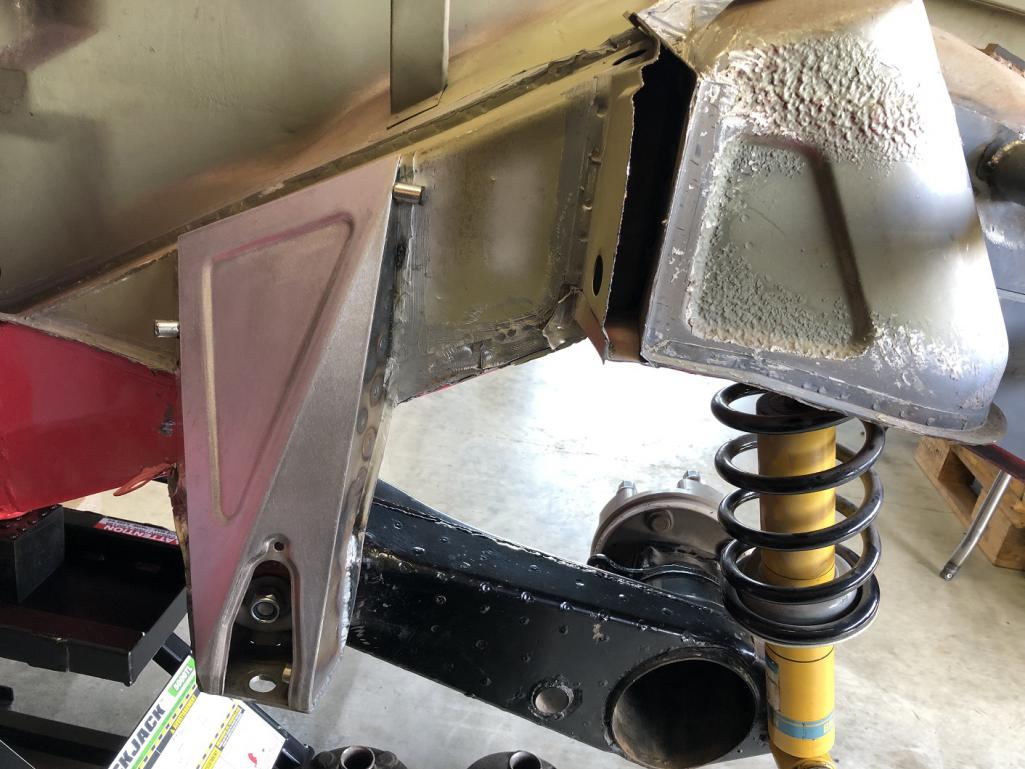
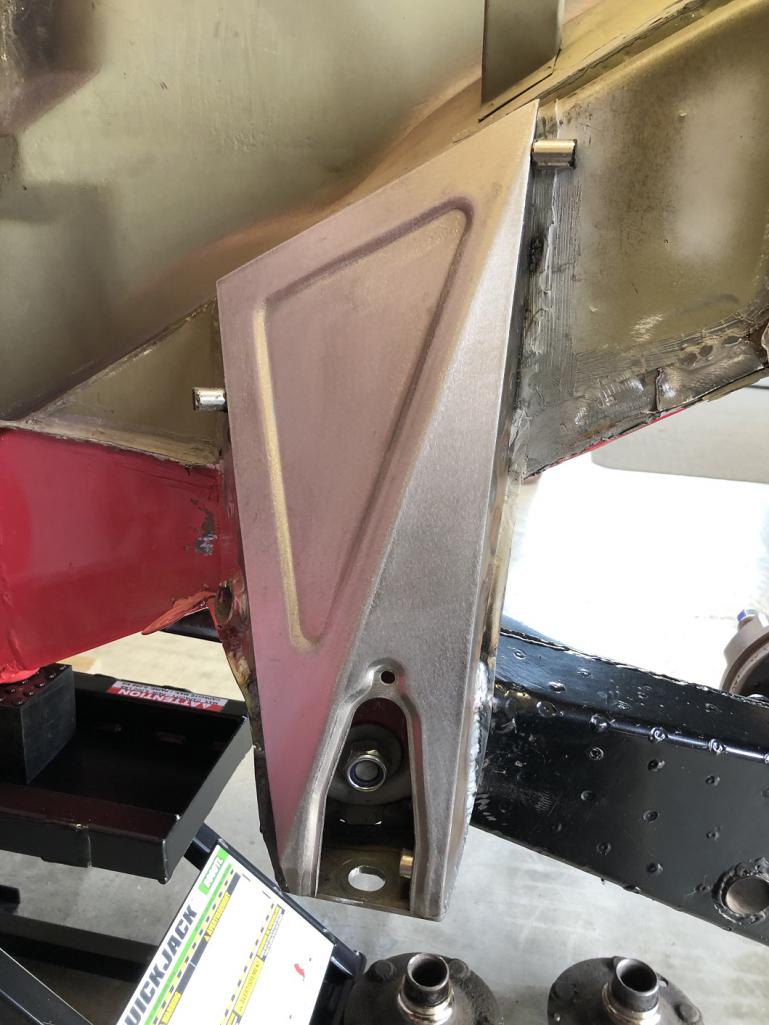
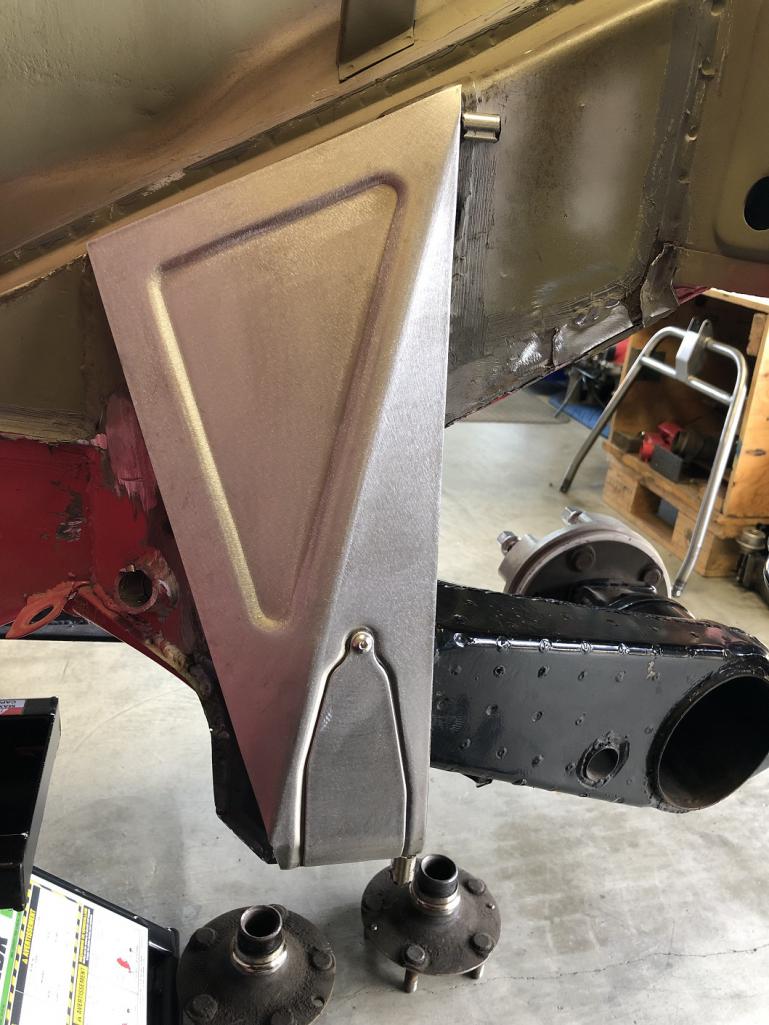
Posted by: Retroracer Feb 21 2023, 10:02 AM
wow. Really nice fabrication there.
- Tony
Posted by: SirAndy Feb 21 2023, 10:12 AM
You know it's there, that's all that really matters.
There are so many little things "wrong" with my car that annoy the heck out of me, yet you can't see them by just looking at it.
Posted by: Chris914n6 Feb 21 2023, 12:42 PM
The extra braces won't benefit anything if you don't strengthen the rail to match.
Posted by: ClayPerrine Feb 21 2023, 12:51 PM
You know it's there, that's all that really matters.
There are so many little things "wrong" with my car that annoy the heck out of me, yet you can't see them by just looking at it.
Everytime I take my car apart, I fix something small that annoys me. Sometimes its things that no one else would notice. But I know its there.
Posted by: East coaster Feb 21 2023, 06:16 PM
Great fab work!
Posted by: tygaboy Feb 21 2023, 09:55 PM
And now, the design moves to stainless.
Attached thumbnail(s)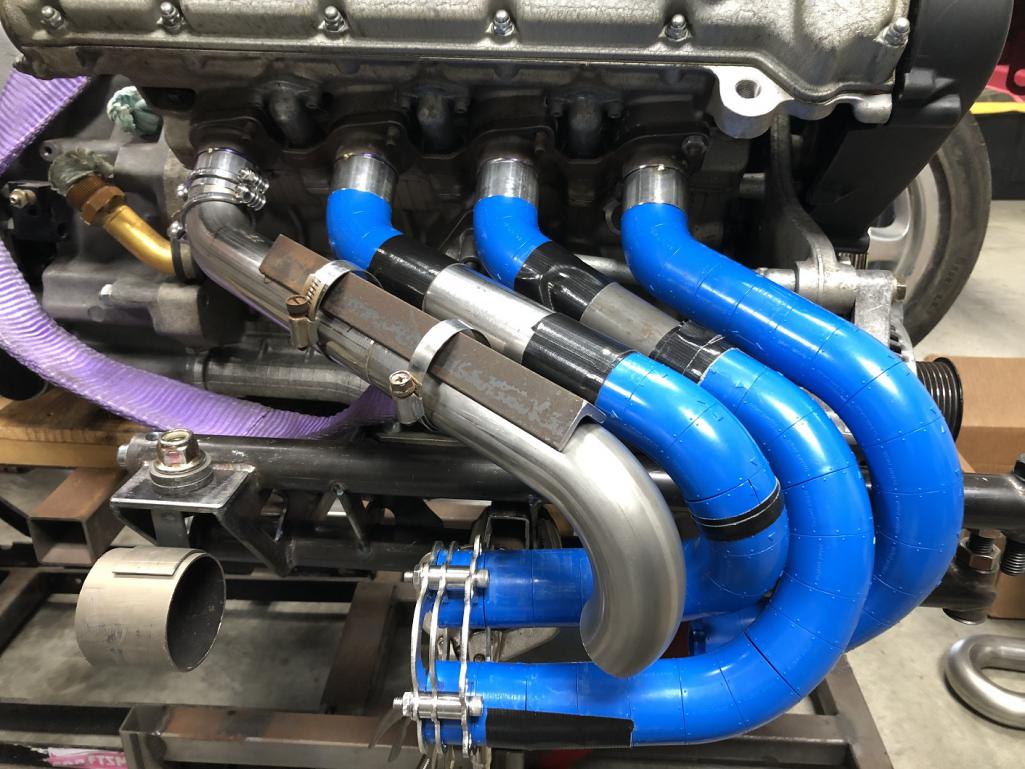
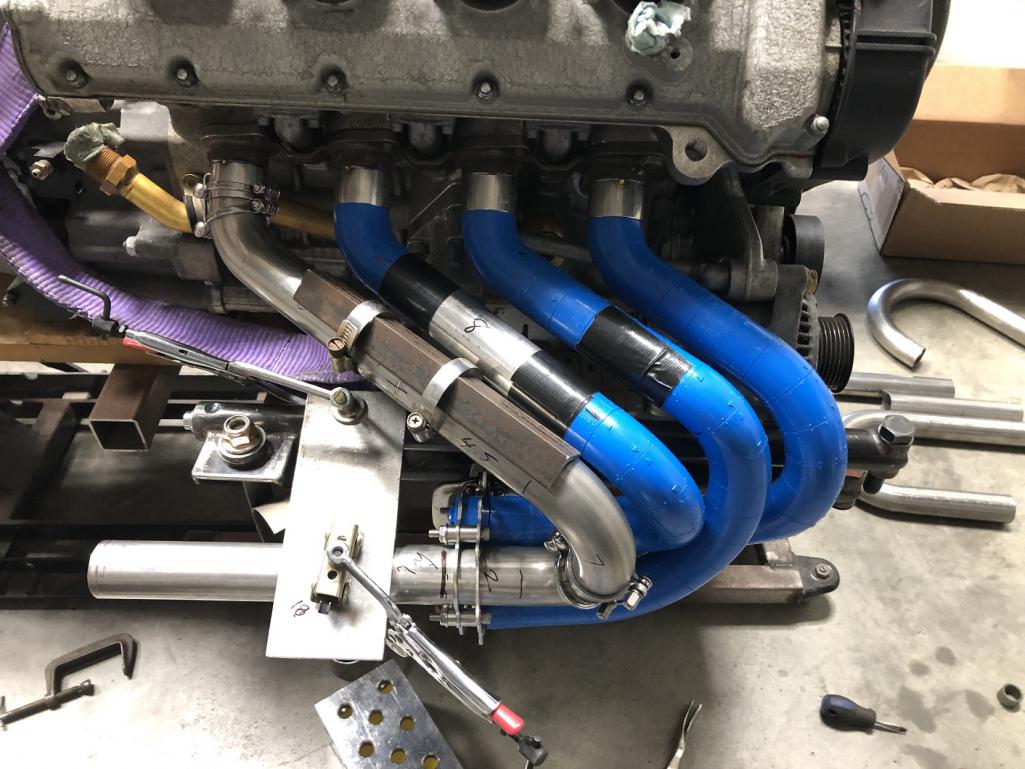
Posted by: BuddyV Feb 21 2023, 09:58 PM
Great work, Chris!!!!
Posted by: tygaboy Feb 24 2023, 09:04 AM
If me changing my mind and re-doing things bothers you, you may want to skip this one.
https://www.youtube.com/watch?v=Q0pFicgPA6o
Posted by: Cairo94507 Feb 24 2023, 10:04 AM
I love watching the various iterations as you come to a "final" design.
Posted by: tygaboy Feb 27 2023, 07:37 PM
A few days work to transition things from plastic to stainless steel. A few design changes had to be made because the plastic is able to flex just enough that when things go to metal, positions change enough to cause the dimensions to need tweaking.
But it got done. I'm really happy with how this turned out.
Now to duplicate it, mirror image - which should go quicker now that I know the specs for each piece.
Attached thumbnail(s)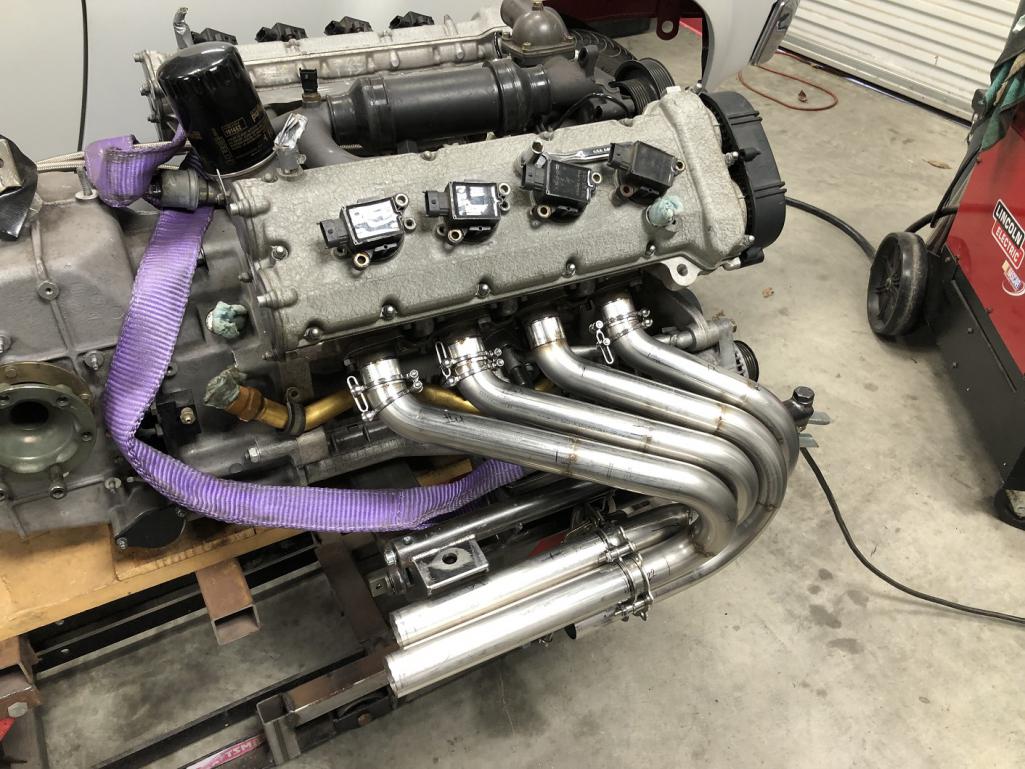
Posted by: tygaboy Feb 27 2023, 07:38 PM
A couple more...
Attached thumbnail(s)
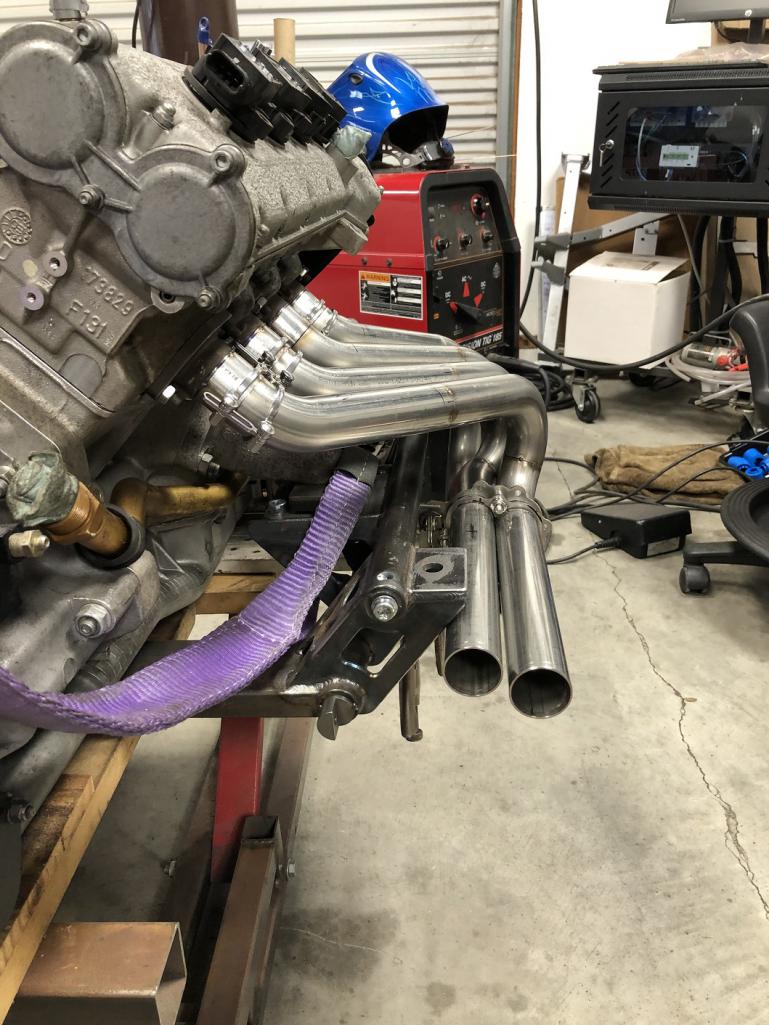
Posted by: rgalla9146 Feb 27 2023, 09:08 PM
WOW !
Posted by: markhoward Feb 27 2023, 09:15 PM
Sexy!
Posted by: Krieger Feb 27 2023, 11:44 PM
That came out really nice! Run it like that!
Posted by: Cairo94507 Feb 28 2023, 08:25 AM
That looks amazing Chris.
Posted by: NARP74 Feb 28 2023, 09:22 AM
These look amazing, can't wait to hear them!
Posted by: tygaboy Feb 28 2023, 01:50 PM
Thanks to everyone for the kind words. And sorry, @http://www.914world.com/bbs2/index.php?showuser=2104 Andy, but it's getting a collector and a muffler.
Here's a mock up before each tube is final welded, trimmed to length and the collector added.
Attached thumbnail(s)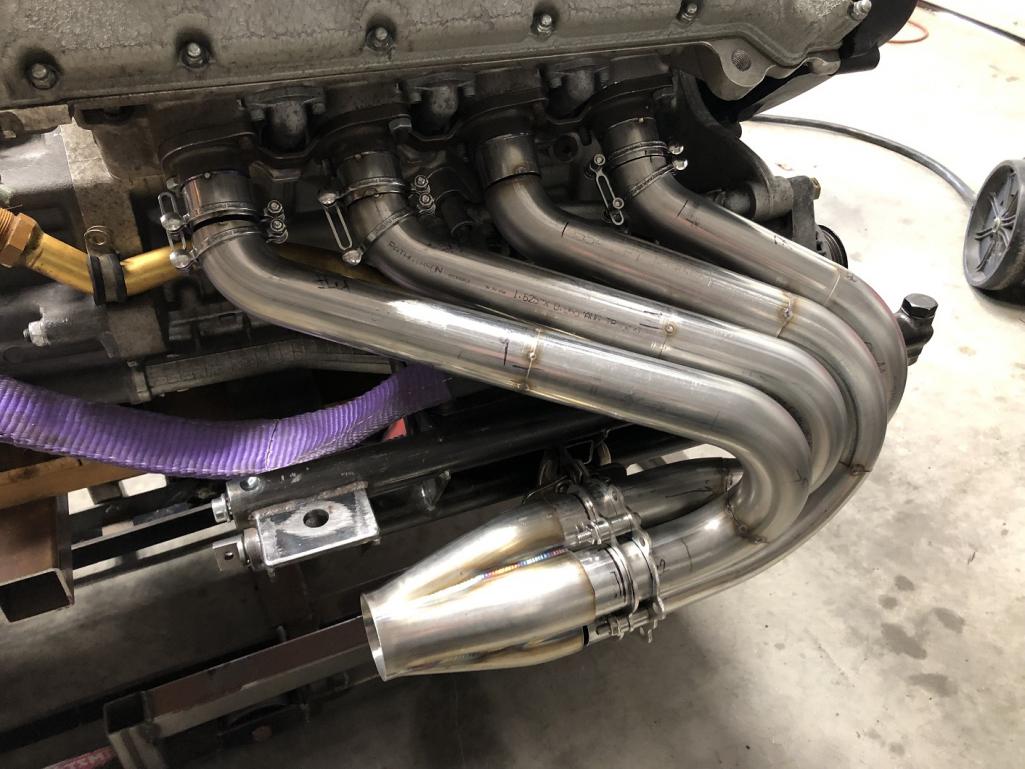
Posted by: JeffBowlsby Feb 28 2023, 02:00 PM
Sexy.
Posted by: ClayPerrine Feb 28 2023, 02:09 PM
Pasta Power!
The Flying Spaghetti Monster would approve!
You need that on the back window.
Posted by: Superhawk996 Feb 28 2023, 06:55 PM
Really impressive work on the exhaust
Posted by: BIGKAT_83 Feb 28 2023, 07:23 PM
Is that a Burns stainless collector?
Looks great!!!!
Posted by: Van B Feb 28 2023, 08:31 PM
I would like to double down on a 2.5” collector exit feeding directly to a high flow cat. That’s the one thing I would change on my 3.7L build for my 996.
Posted by: tygaboy Feb 28 2023, 11:33 PM
Is that a Burns stainless collector?
Looks great!!!!
@http://www.914world.com/bbs2/index.php?showuser=194 Bob, it's from SPD, a company near me in Nor Cal. But yes, it's B-uti-FULL!
Posted by: Jett Mar 1 2023, 09:49 AM
Impressive!
Posted by: KELTY360 Mar 1 2023, 01:18 PM
Superb! All those iterations must be exhausting.
Posted by: East coaster Mar 1 2023, 07:00 PM
Beautiful work!
Posted by: tygaboy Mar 1 2023, 07:16 PM
A bit more progress:
- 2.25"-to-2.5" transition tacked on to collector. It'll get an O2 sensor just after the rear mount of the engine cradle
- two of the tubes final welded with the main weld seam disappeared
This is just a mock up (the collector is just set on, not tacked) to see how things are fitting after welding. I'm sure some minor tweaking will be needed ahead of being "done".
Attached thumbnail(s)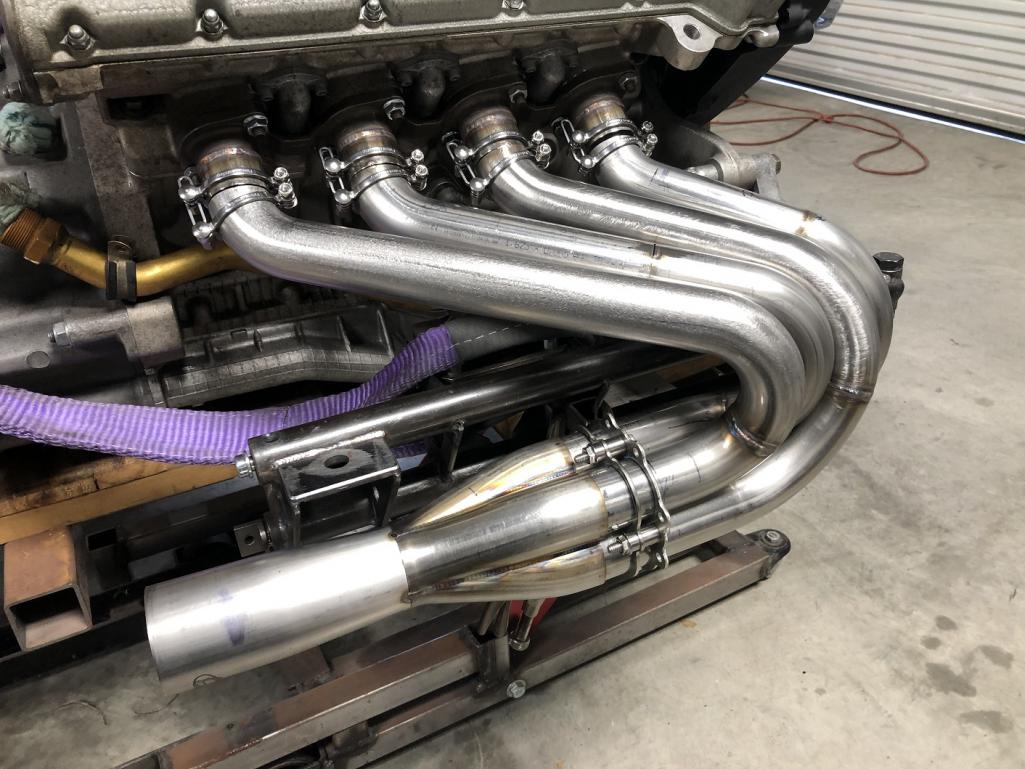
Posted by: BillJ Mar 1 2023, 08:19 PM
That. Is. Sexy.
Posted by: Krieger Mar 1 2023, 10:57 PM
Posted by: Cairo94507 Mar 2 2023, 07:59 AM
It blows my mind the stuff I see Chris fabricate.
Posted by: tygaboy Mar 2 2023, 06:04 PM
All main weld seams sanded. Hopefully, the other side will go much more quickly - this took a lot longer than I'd expected. You'd think I'd have learned by now...
Now to work out a finish. I'm considering white, as a nod to Ferrari's race cars. That or the same finish as my LS car's exhaust. That "titanium" cerakote tone would look pretty killer with the red plenum...
Attached thumbnail(s)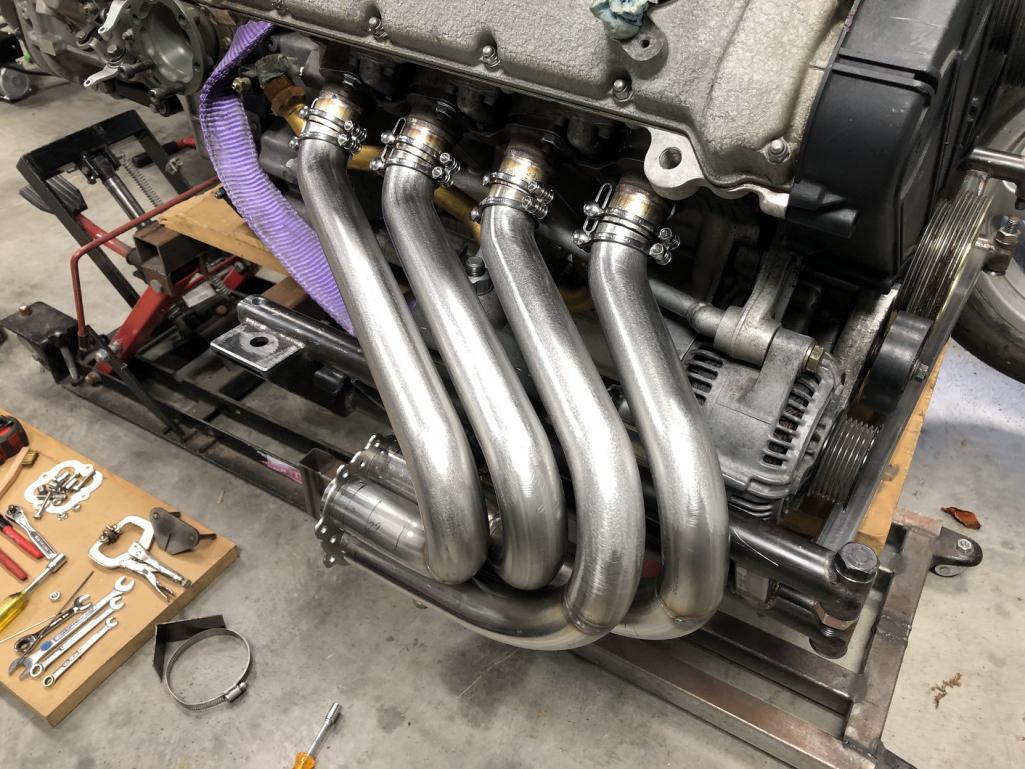
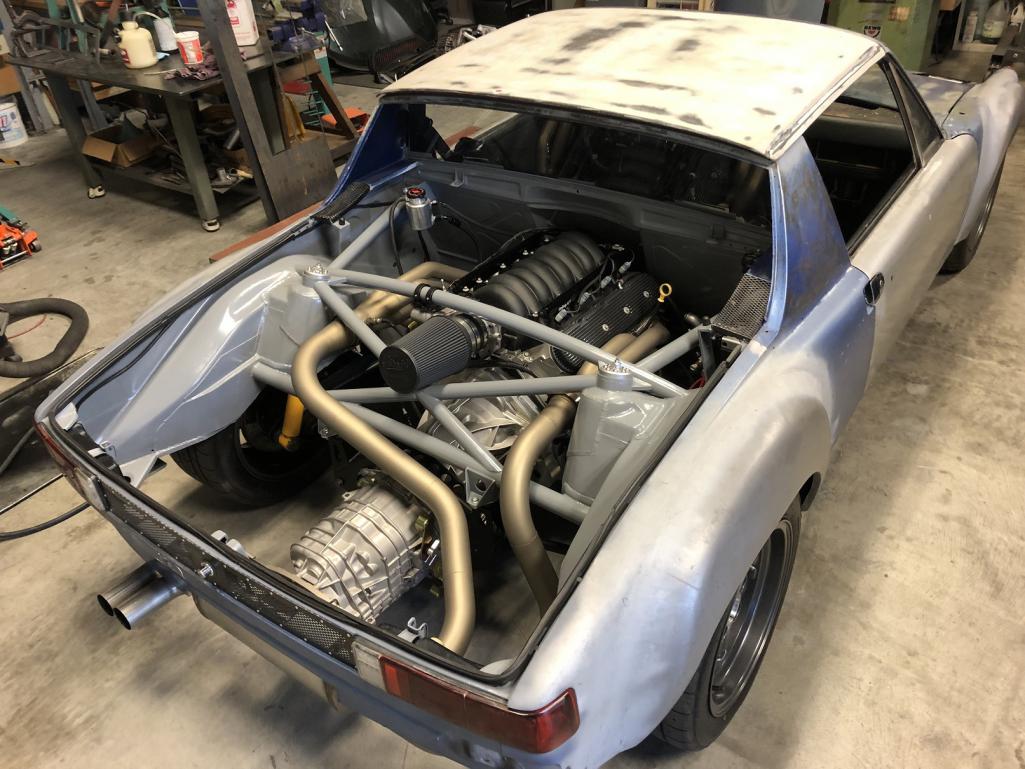
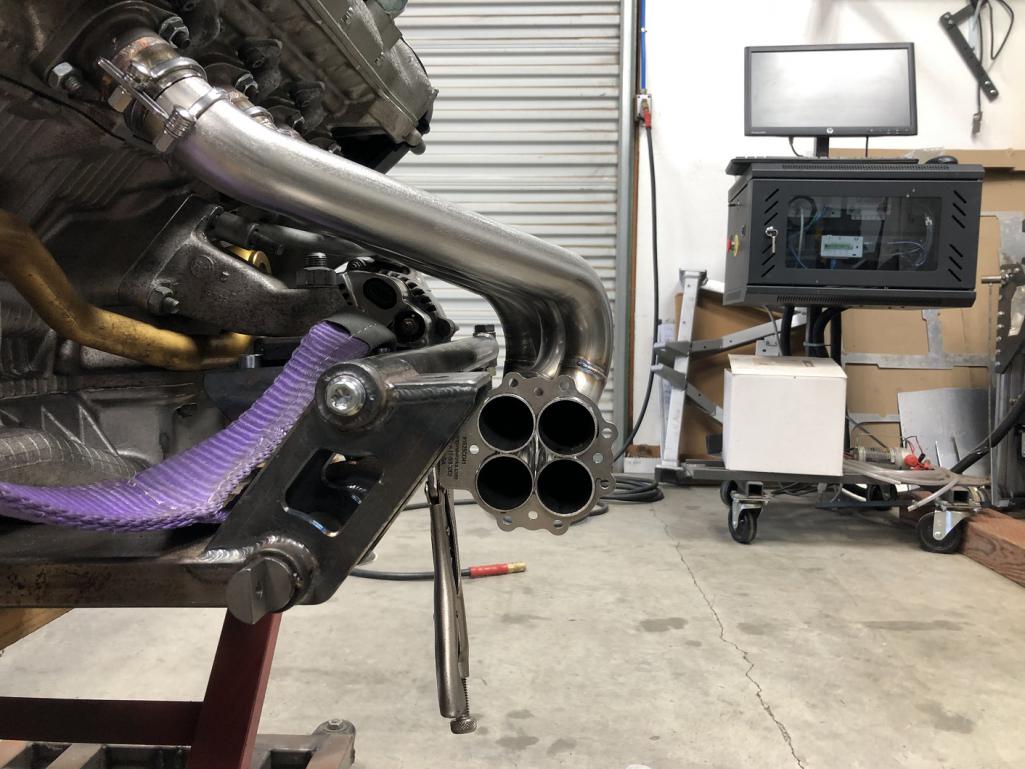
Posted by: Dion Mar 3 2023, 08:45 AM
Just beautiful exhaust craftsmanship!
Posted by: tygaboy Mar 3 2023, 09:16 AM
You folks are seeing progress/results ahead of the videos. But here's the latest - it covers the steps involved in getting to the past few pics. Enjoy!
And help a brother out? Like, subscribe and share...
https://www.youtube.com/watch?v=8D47Ji4OTig
Posted by: Cairo94507 Mar 3 2023, 09:53 AM
I enjoy watching the process. But, you know....in the back of my mind, I am wondering if Chris is now reimagining the LS headers.......
Posted by: tygaboy Mar 3 2023, 10:01 AM
I enjoy watching the process. But, you know....in the back of my mind, I am wondering if Chris is now reimagining the LS headers.......
@http://www.914world.com/bbs2/index.php?showuser=9712 Michael - You know me too well! On the LS car, it's not the headers. But I am likely updating the intake and the exhaust from the headers back. I have what I think is a very cool design that I'd like to try out. Watch for an update on the LS thread.
Posted by: Cairo94507 Mar 3 2023, 10:23 AM
Posted by: roundtwo Mar 3 2023, 05:44 PM
Wholly ^&*^%@!!!!!
I can't imagine how you can get into the junction of the 4 pipes to weld it all up! A tight fit. Incredible work Chris. WOW.
Hope to see it first hand this weekend if I can talk my way onto "the set". Perhaps the video production team will take the weekend off.
Posted by: tazz9924 Mar 3 2023, 10:43 PM
Attached image(s)
Posted by: tygaboy Mar 4 2023, 10:26 AM
It's a weekend 2-fer! Here's some panel stamping and fab fun for your Saturday enjoyment:
https://www.youtube.com/watch?v=0q3mnh0YrEg
Posted by: tazz9924 Mar 4 2023, 01:08 PM
Do you have a bead roller? it would expidite the process of adding a step to a panel.
Posted by: tygaboy Mar 4 2023, 02:18 PM
Do you have a bead roller? it would expidite the process of adding a step to a panel.
@http://www.914world.com/bbs2/index.php?showuser=18779 - I do have a bead roller. No way it/I could bead roll that recessed panel area. Plus, I've found the stamping approach totally eliminates any panel distortion.
To each, their own.
Posted by: tygaboy Mar 4 2023, 04:36 PM
Figured it'd be prudent to test fit the first header. The good news is it fits as planned. The less than good news is that it's all but invisible way down there.
Attached thumbnail(s)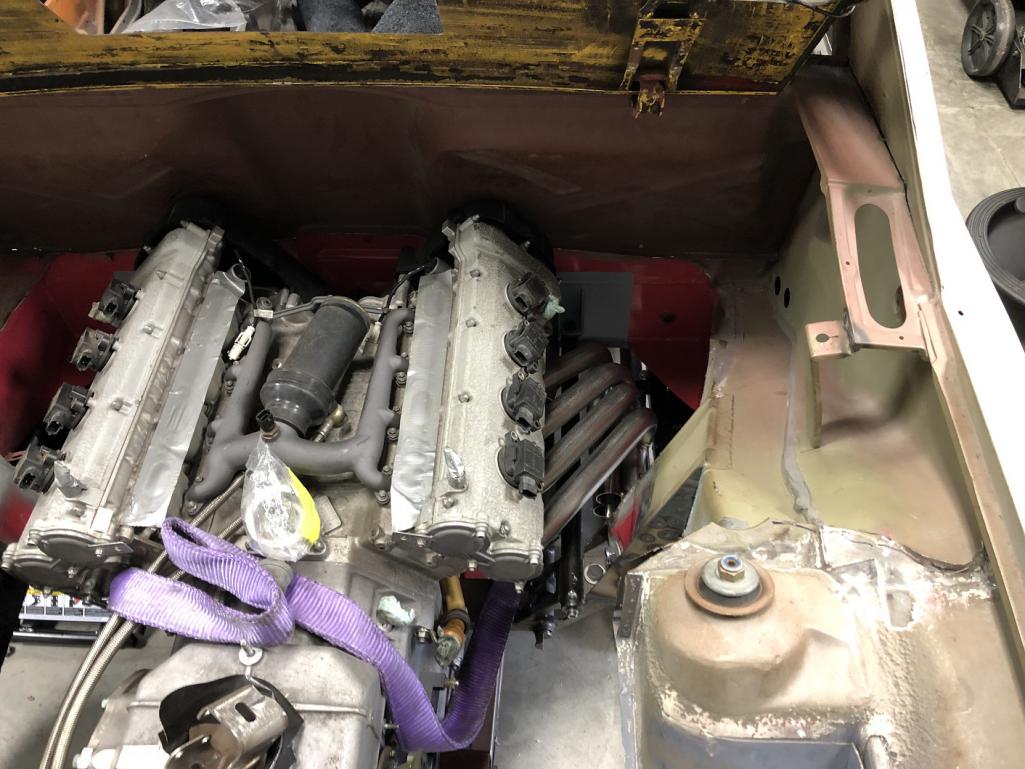
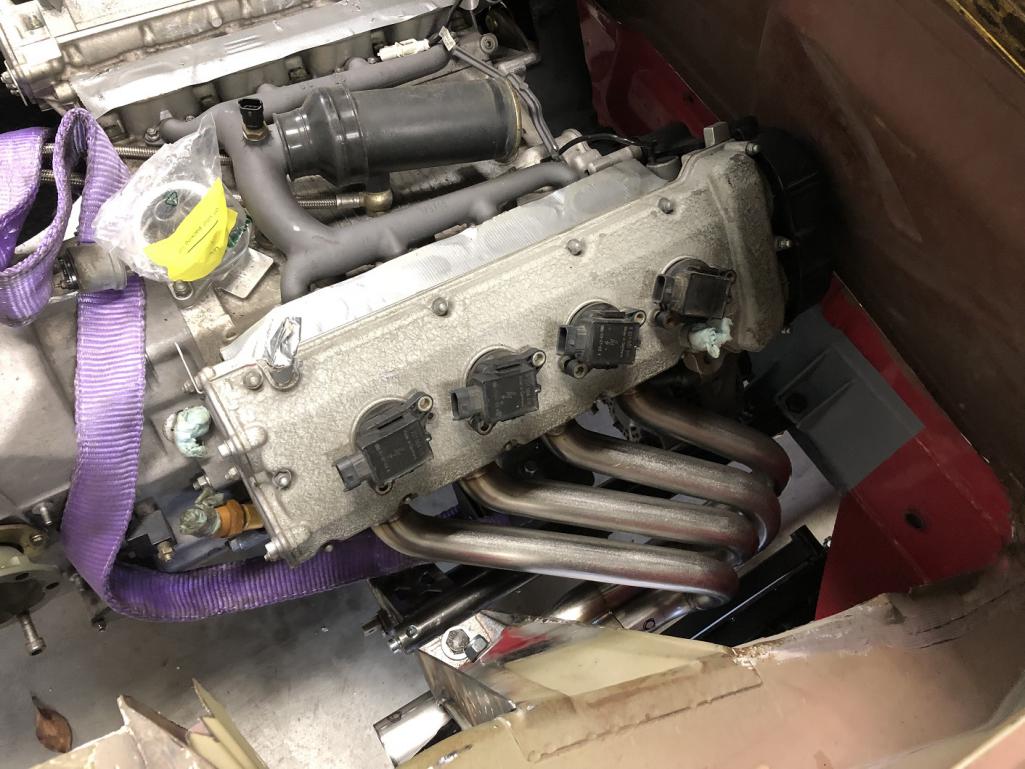
Posted by: tygaboy Mar 4 2023, 04:39 PM
Clearance with the stock suspension at full droop. I'll be running shortened shocks to help limit axle angle so this area will have even more room.
O2 sensor will live just past the rear engine cradle mount.
Attached thumbnail(s)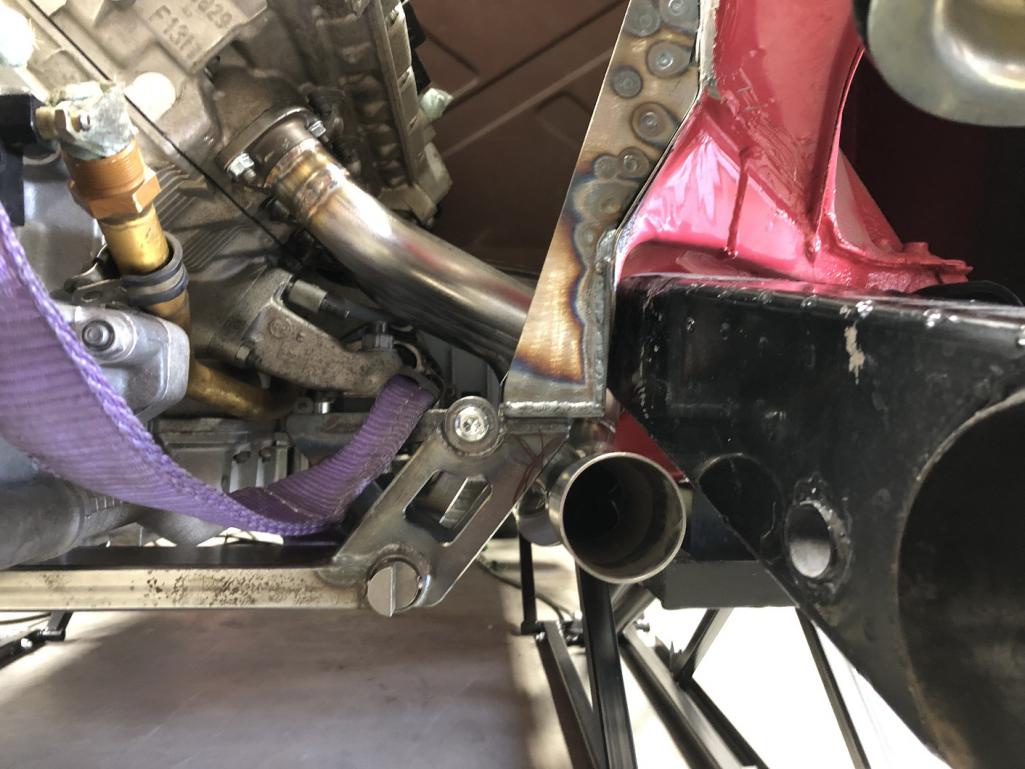
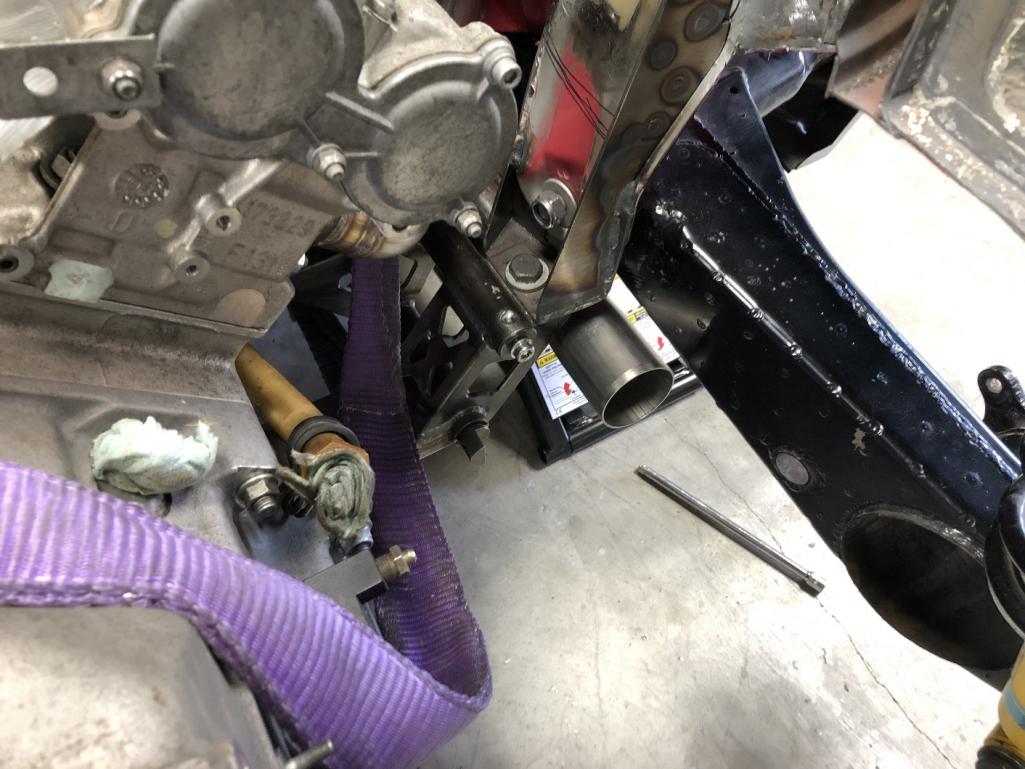
Posted by: tazz9924 Mar 4 2023, 08:39 PM
Do you have a bead roller? it would expidite the process of adding a step to a panel.
@http://www.914world.com/bbs2/index.php?showuser=18779 - I do have a bead roller. No way it/I could bead roll that recessed panel area. Plus, I've found the stamping approach totally eliminates any panel distortion.
To each, their own.
Thats fair, distortion is a problem i typically have, usually what i do is break the edges to straighten it out, it also helps weld it on. You could also be a savage and prestress it with a english wheel but im not going to pretend like id even try it. I like your stamping for its smaller detail and not accidentally messing up the corners like the bead roller.
Posted by: KELTY360 Mar 4 2023, 08:39 PM
Figured it'd be prudent to test fit the first header. The good news is it fits as planned. The less than good news is that it's all but invisible way down there.
Maybe some LED lighting would highlight them. You’re right, those pipes are way too cool to stay in the shadows. Style points, baby!
Posted by: SirAndy Mar 5 2023, 11:20 AM
Figured it'd be prudent to test fit the first header. The good news is it fits as planned. The less than good news is that it's all but invisible way down there.
Or maybe a few strategically placed mirrors in the engine compartment.
Posted by: technicalninja Mar 5 2023, 11:36 AM
Very nice!
Wouldn't surprise me if your conversion header flows better than the stock Ferrari part.
Just impressive!
Posted by: horizontally-opposed Mar 5 2023, 11:38 AM
^ You guys are adding weight.
But don't get Chris looking at F40 engine bays with all that Kevlar lest he consider…914 Firewall 3.0
Posted by: slowrodent Mar 5 2023, 01:20 PM
It really is a beautifully constructed item and you can see it just fine. It will be quite noticeable to anyone who cares to look. I'm very interested to see how the final exhaust system assembly will continue to differ from that of the LS motor...
Kevin
Posted by: tygaboy Mar 5 2023, 01:43 PM
Best view of the exhaust is had by the inside of the tire!
Attached thumbnail(s)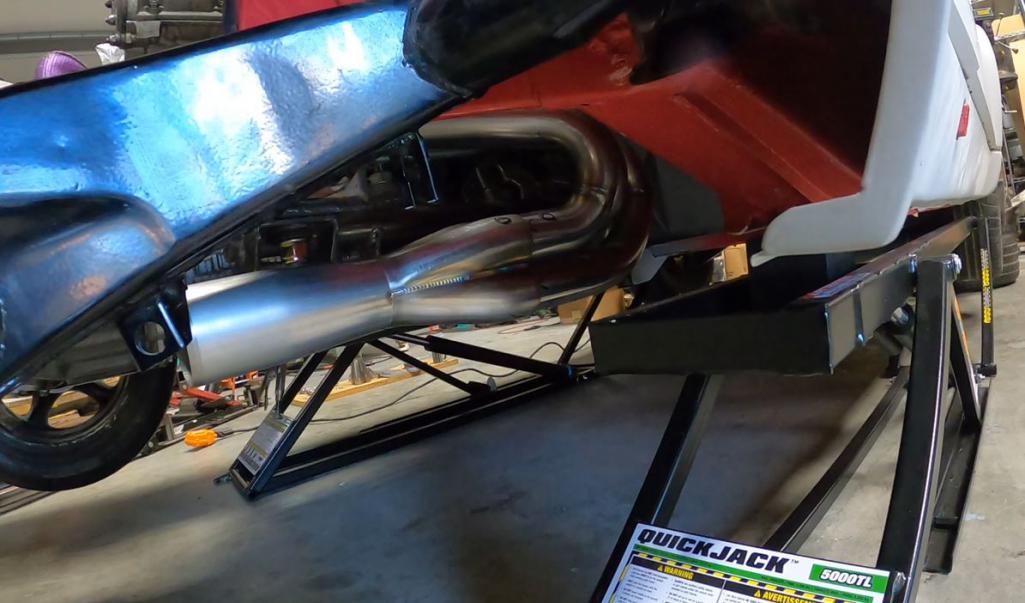
Posted by: tygaboy Mar 7 2023, 05:58 PM
I worked up a fixture to locate the collector so I could tack it in place
Attached image(s)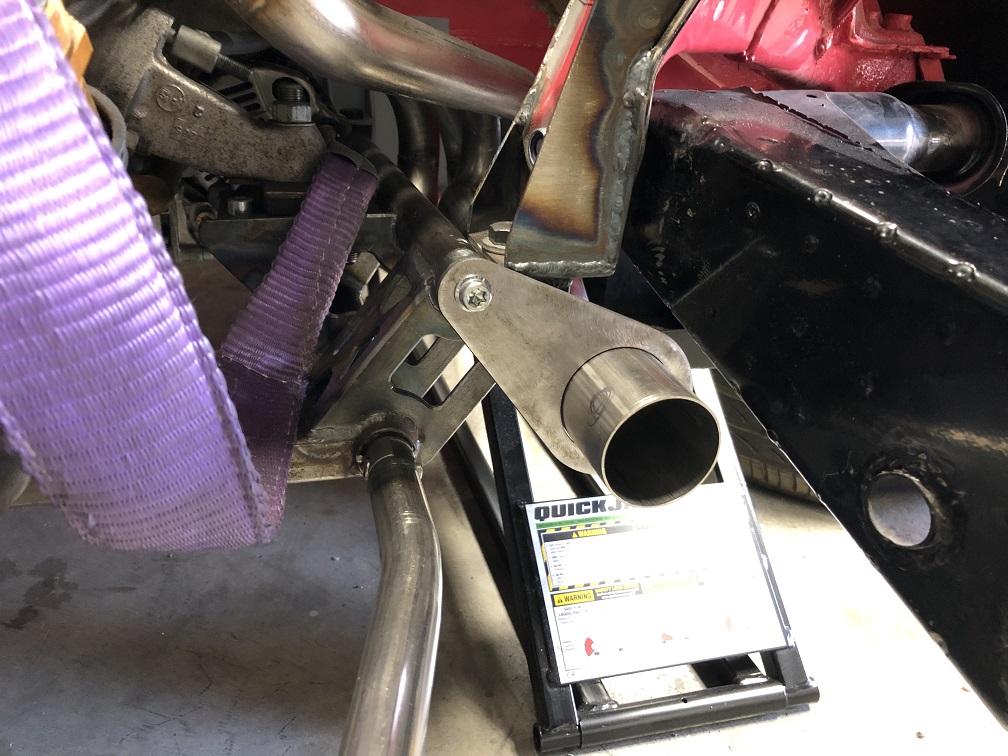
Posted by: tygaboy Mar 7 2023, 06:00 PM
Then everything was final welded. Still have the O2 bung to add, then it's work out the rest of the exhaust.
Attached thumbnail(s)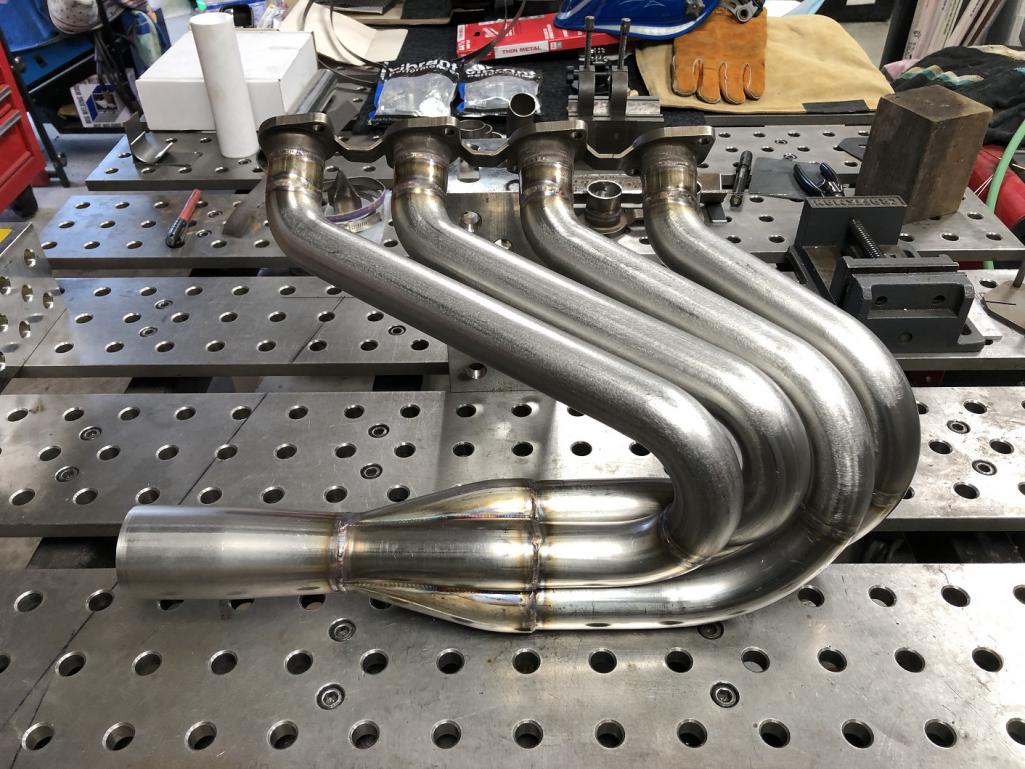
Posted by: Tferrer Mar 7 2023, 08:14 PM
Then everything was final welded. Still have the O2 bung to add, then it's work out the rest of the exhaust.
Wowza...beautiful!
Posted by: rgalla9146 Mar 8 2023, 08:55 AM
Your work is incredible. Gigantic props. Form AND function.
Is the support for the collector attached to the engine side of the motor mount
or to the chassis side ?
Posted by: tygaboy Mar 8 2023, 10:16 AM
Your work is incredible. Gigantic props. Form AND function.
Is the support for the collector attached to the engine side of the motor mount
or to the chassis side ?
@http://www.914world.com/bbs2/index.php?showuser=5176 That's not a support. It's a temporary fixture I made to hold the collector in position so I could tack it to the primaries. The engine and headers need to move independently from the engine cradle. I'll work out muffler hangers once I get to that point.
Posted by: rgalla9146 Mar 8 2023, 12:04 PM
Even your temporary supports are outstanding !
Can't wait to see the rest of the exhaust system and brackets
Posted by: RoadGlue Mar 8 2023, 02:13 PM
Posted by: tygaboy Mar 12 2023, 09:18 AM
Here's one about the final steps to getting that first side header completed.
Now Subscribe, you cheap bastards!
https://www.youtube.com/watch?v=MhuF25IIWxw
Posted by: Maltese Falcon Mar 12 2023, 12:01 PM
Chris, for the Enzo crowd at the Cars + Caffeine
'Reveal'...display a box of Velveeta + bottle of Night Train; you know for the hard core Wine & Cheese crowd
Posted by: Cairo94507 Mar 12 2023, 01:10 PM
This is just amazing work. For those who have not met Chris, he is one of the most humble, considerate guys you will ever meet. He would literally give you the shirt off his back, I believe. I am always in awe when I stop in at the Red Barn.
Posted by: mb911 Mar 12 2023, 01:57 PM
Chris those are f1 style merges and the term is the reverse cone as to what you referred to as the pickle if I heard that correctly.
Looking great
Posted by: mgp4591 Mar 12 2023, 05:10 PM
Chris, for the Enzo crowd at the Cars + Caffeine
'Reveal'...display a box of Velveeta + bottle of Night Train; you know for the hard core Wine & Cheese crowd
Or Cheeze-Whiz and a bottle of Thunderbird, just so they know that we're flexible like that!
Posted by: tygaboy Mar 12 2023, 05:43 PM
On to the other side. With it modeled, I got the the first tube fit and tacked. The overall model is slightly different, due to the cylinder bank offsets.
Attached thumbnail(s)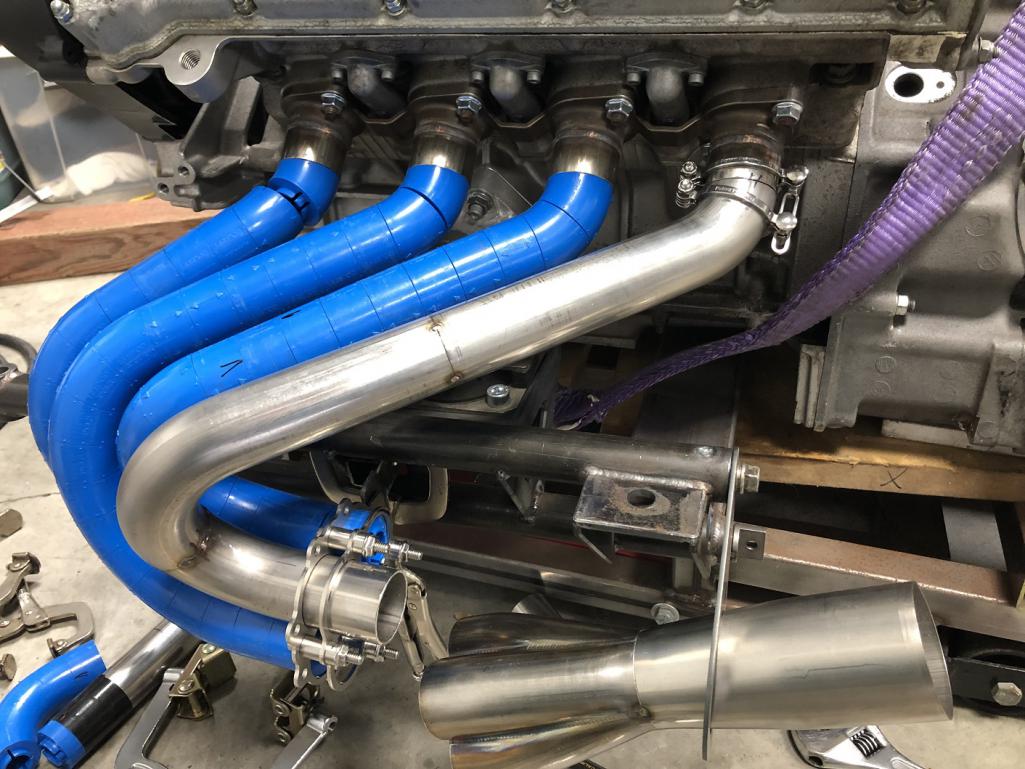
Posted by: tygaboy Mar 12 2023, 05:47 PM
More progress. Just a few tubes left and this side will be set to final weld. Note that the tubes are all cut long at the collector so pay no attention to its fore/aft location. It's positioned to help ensure the tubes stay where I want them. It'll be slid forward to ~1" behind where the collector dummy sits now.
Attached thumbnail(s)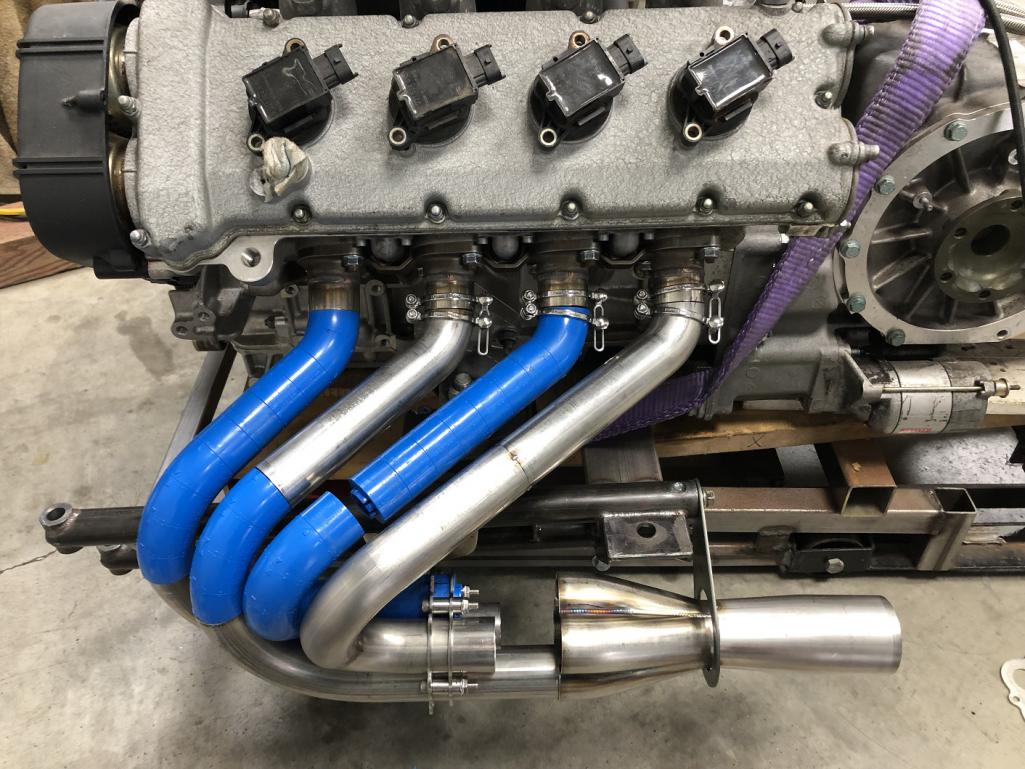
Posted by: tygaboy Mar 12 2023, 05:49 PM
Just a fun pic that makes the point of just how long the "air goes in here, through there and out that" path is on this thing.
Attached thumbnail(s)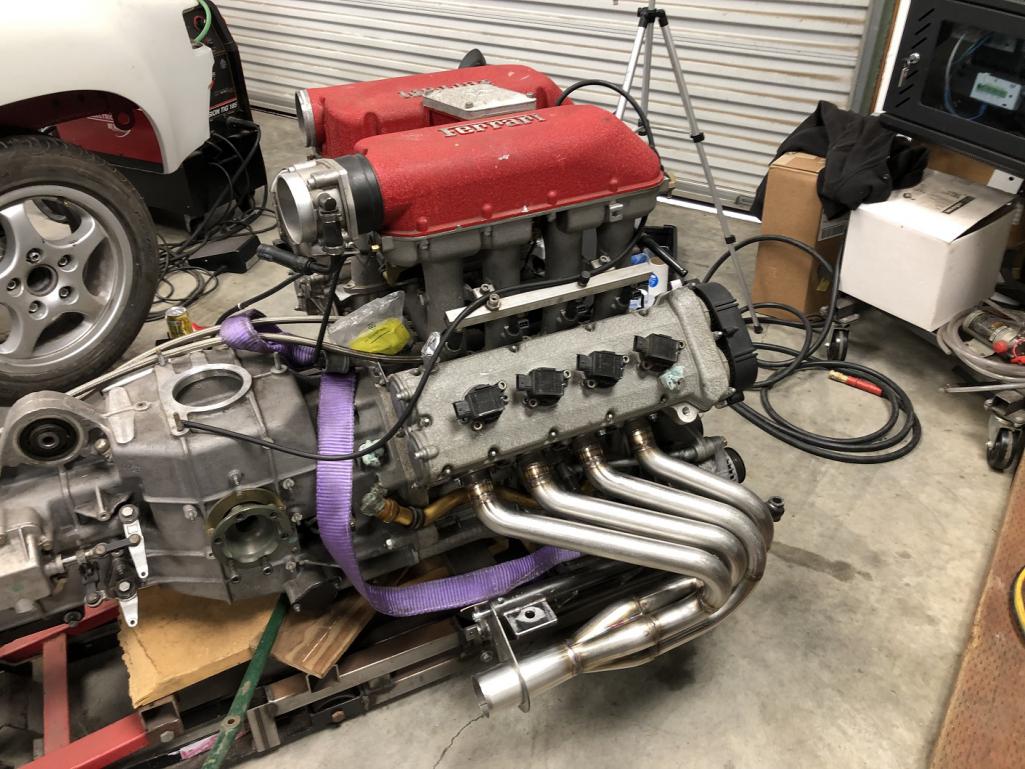
Posted by: tygaboy Mar 12 2023, 07:40 PM
Recommended reading for all 914 owners who work on their own cars...
Attached image(s)
Posted by: JmuRiz Mar 12 2023, 07:46 PM
I’ve mastered the book, now I need to start on the car
Posted by: tygaboy Mar 13 2023, 12:42 PM
Let me check the "How to put a Ferrari 360 Drive Train in Your 914" instruction manual.
"Next, just replace the plastic pieces with stainless." Right-O!
I ran out of 3" radius bends so it'll be a day or so before I can continue. I'm happy with how it's coming along.
Attached thumbnail(s)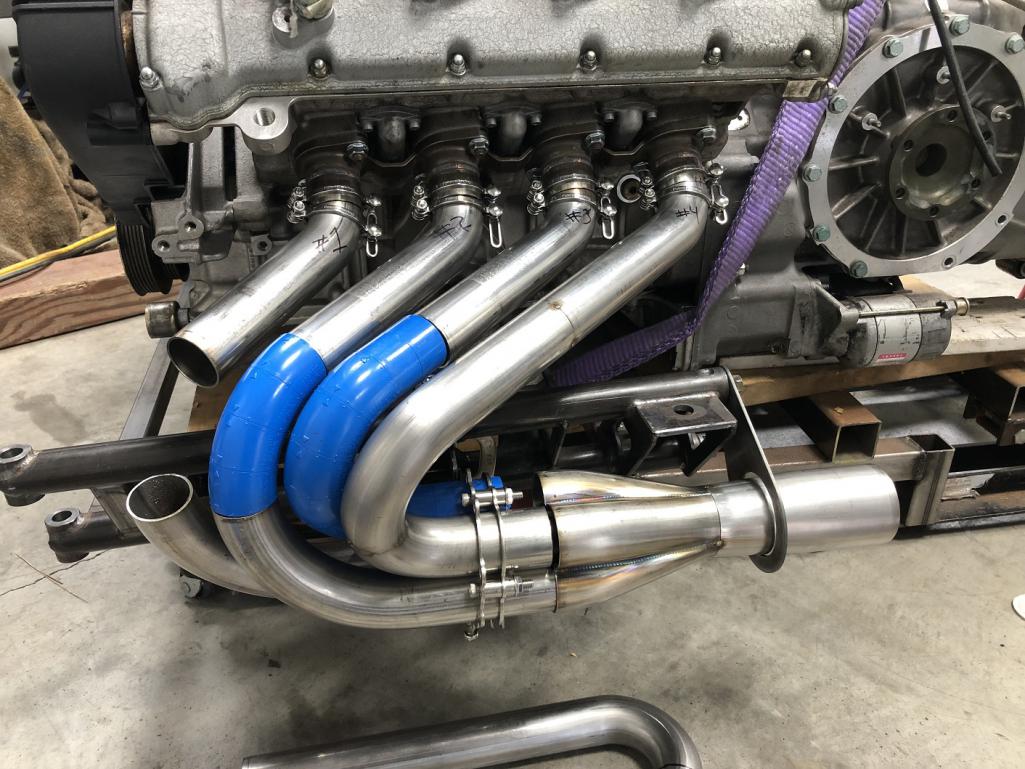
Posted by: roundtwo Mar 14 2023, 04:58 PM
Best view of the exhaust is had by the inside of the tire!
That's the MONEY shot right there.
Fantastic work Chris
Posted by: tygaboy Mar 14 2023, 05:07 PM
One more bend to trim and fit. Yes, I saved the tricky one for last. More practice ahead of tackling it? Sure, let's go with that!
Attached thumbnail(s)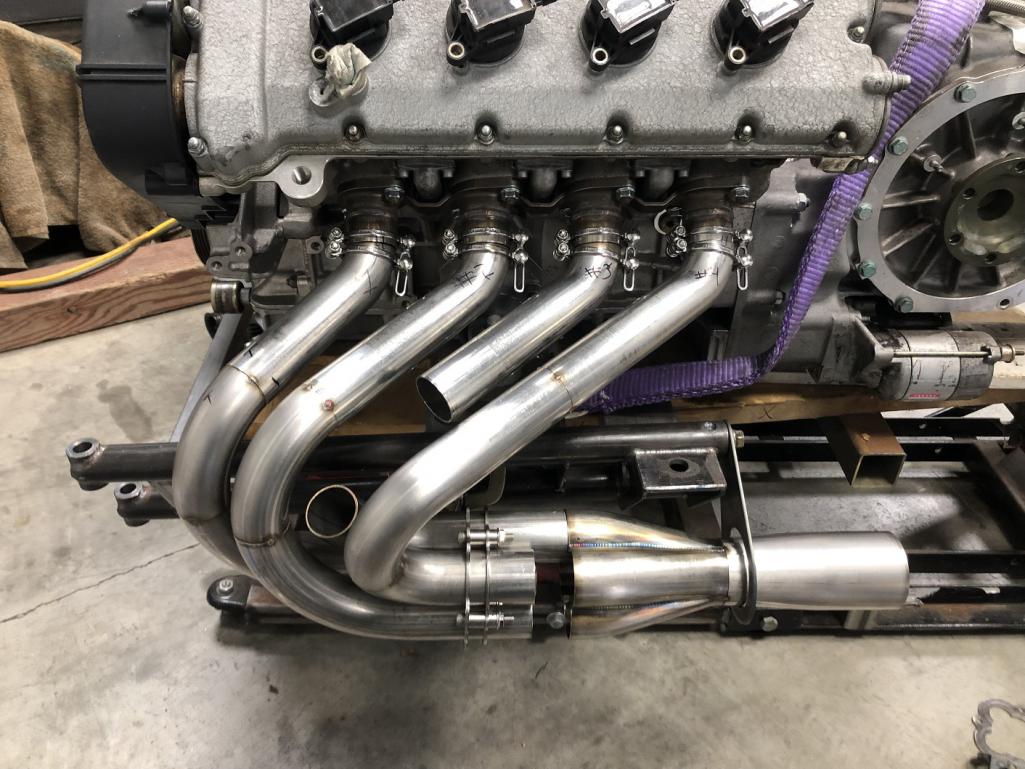
Posted by: tygaboy Mar 15 2023, 01:43 PM
One for the fabrication folks.
This is my first go at headers. I've really been working on a "slow down, be planful, think 2-3 moves ahead" mental state when I'm out in the Red Barn. But I was still pretty nervous about getting the cuts and angles to work out without being all gappy. It looks like a lot of the other metal fab I've been doing ends up translating over to this sort of work - I took my time: test fit, tune the piece A LITTLE, test again, repeat. Focus on sneaking up on the desired fit.
This pic highlights the "tricky" tube, mentioned above. It's the one in the middle. It worked out that it wasn't able to be modeled in plastic so it was all eye-balled and hand trimmed.
I have to say, I impressed myself on this project. No, not perfect. I learned a TON and could immediately do a better job were I to redo things but the errors are likely never going to be noticed without me pointing them out. I'm calling this a success.
Attached thumbnail(s)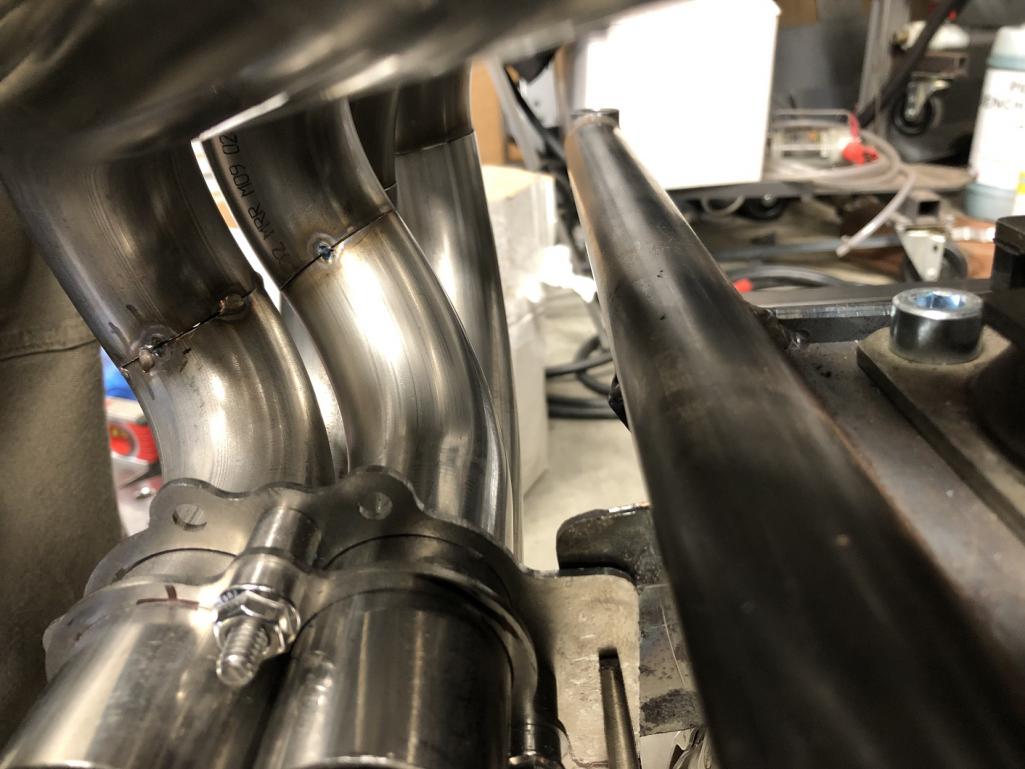
Posted by: tygaboy Mar 15 2023, 01:46 PM
All fit and tacked. Now it's pull things apart and final welding each primary on the bench.
As you saw in the last video, everything is being back-purged when welded.
Attached thumbnail(s)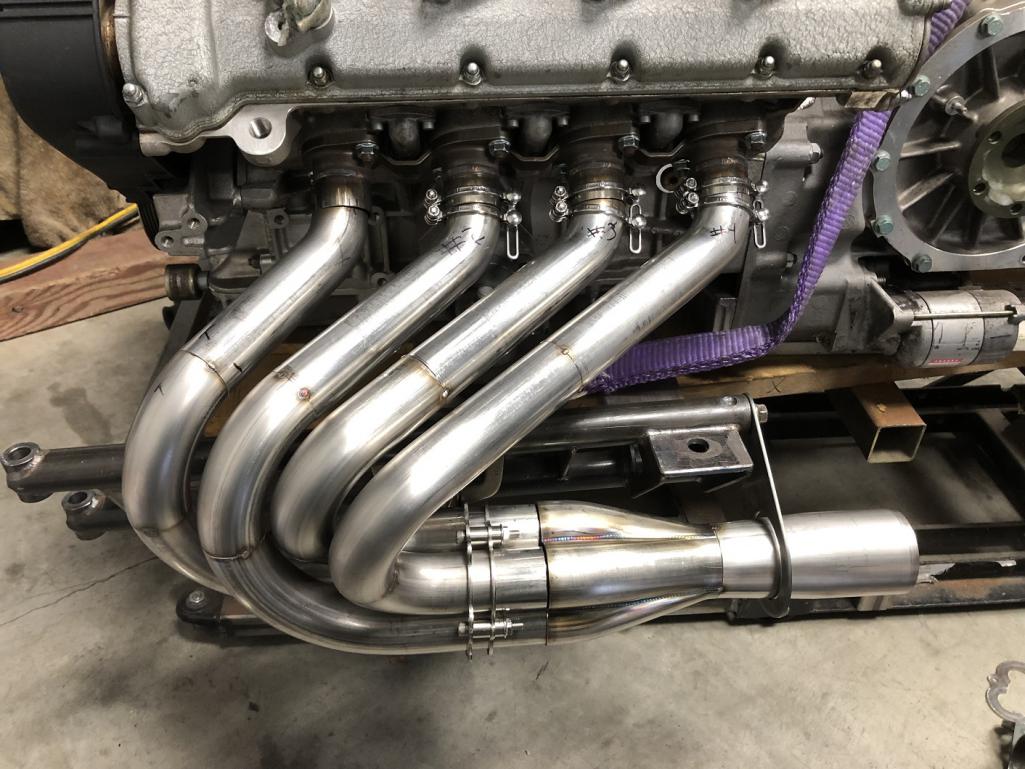
Posted by: Van B Mar 15 2023, 08:13 PM
Get that furick cup! You’ll love it! Weldmonger.com is run by Jody of welding tips and tricks on youtube. (I love his videos)
Posted by: altitude411 Mar 15 2023, 08:27 PM
Get that furick cup! You’ll love it! Weldmonger.com is run by Jody of welding tips and tricks on youtube. (I love his videos)
You'll use a bit more gas but so much better and versatile. Well worth it.
Posted by: tygaboy Mar 16 2023, 09:36 AM
@http://www.914world.com/bbs2/index.php?showuser=26011 @http://www.914world.com/bbs2/index.php?showuser=17932 - I have a gas lens set up. I went back to the regular set up to force me to improve my skills and be sure I wasn't just masking bad habits with the fancy stuff.
Yes, I watch Jody's stuff. And The Fabrication Series and Pacific Arc Tig Welding. Super helpful and between the three of them, and practice, I'm getting there...
Posted by: Van B Mar 16 2023, 10:00 AM
I should've guessed you were a masochist based on your project choices. But, I'd offer that while I agree skills are important, the quality of the product is still the end goal. And if a better tool helps me achieve that end, I'm going with the good stuff. I welded with the old pinkies of every shape and variety the whole time I worked as a welder through my pre-USAF life. But if these furicks had existed then, I would've had one in a heart beat.
Frankly, for being such a tool hound, I'm surprised at your resistance to the suggestion!
Posted by: Superhawk996 Mar 16 2023, 10:06 AM
Another vote for Furik cup- pricy as can be but they have their place when you need big shielded area and lots of electrode protrusion.
I love my BBW.
Having said that - your progress has been amazing on a very difficult part.
Posted by: tygaboy Mar 16 2023, 10:18 AM
I should've guessed you were a masochist based on your project choices. But, I'd offer that while I agree skills are important, the quality of the product is still the end goal. And if a better tool helps me achieve that end, I'm going with the good stuff. I welded with the old pinkies of every shape and variety the whole time I worked as a welder through my pre-USAF life. But if these furicks had existed then, I would've had one in a heart beat.
Frankly, for being such a tool hound, I'm surprised at your resistance to the suggestion!
@http://www.914world.com/bbs2/index.php?showuser=26011 - Let me clarify. I'm not resistant. I will be using the gas lens when I final weld the header. Maybe better stated is: First I need to know that I have the correct settings, am correctly managing heat and penetration to ensure I get the quality you mention. THEN I can move forward with confidence. Clearly, you have a ton more welding experience than I do. I want to be sure I develop the proper base and build on solid skills. And I do appreciate your input.
Posted by: tygaboy Mar 16 2023, 01:07 PM
For those who may care to understand why I'm approaching the welding the way I am, start at 10:35 and watch for about 8 mins. This is what motivated me to focus on basic skills ahead of upgrading the consumables.
https://www.youtube.com/watch?v=IfJG4cMhIOc
Posted by: tygaboy Mar 16 2023, 03:01 PM
Here's the set up I'm using: air cooled #17 torch, gas lens with a #8 cup. And there's the first tube done - the upper weld filed and sanded, the lower weld wire brushed.
Attached thumbnail(s)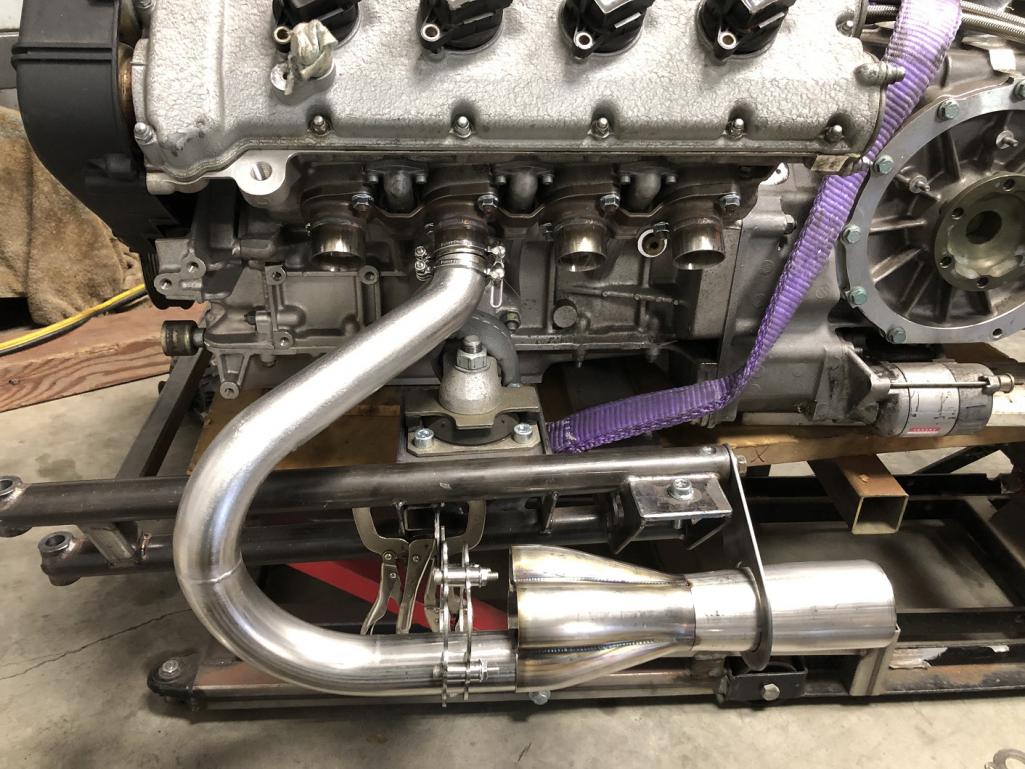
Attached image(s)
Posted by: tygaboy Mar 16 2023, 04:59 PM
2nd tube fully welded, "main" weld still yet to be dressed. I'm happy with how all this is going.
Attached thumbnail(s)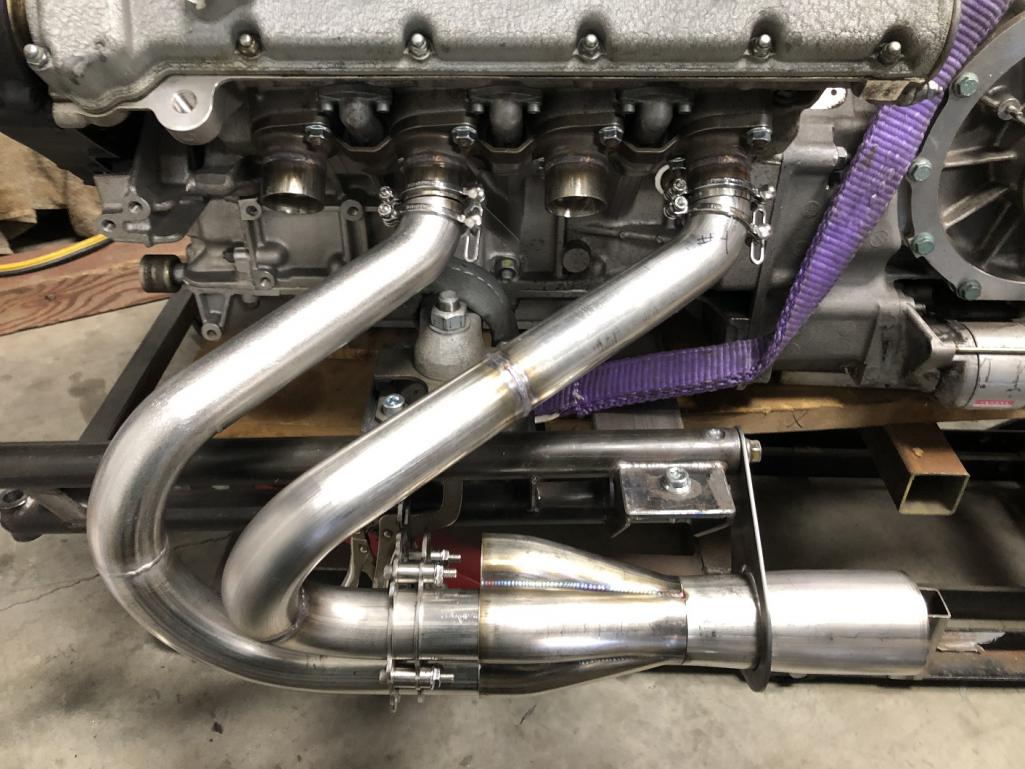
Posted by: Van B Mar 16 2023, 05:40 PM
So, first off, I’ve gathered from your videos that you’re excessively self critical… unfounded if you ask me.
Second, your welds are quality.
Third, that setup is not “basic”. That’s what I would use if I was cup walking an in-position large diameter stainless or inconel flange back in the day.
Fourth, either you buy the cup or I’m mailing you one… someone here will help me make that happen.
That is all.
Posted by: ClayPerrine Mar 17 2023, 05:29 AM
Why didn't you dress and "disappear" the second weld joint?
Posted by: tygaboy Mar 18 2023, 07:23 AM
Why didn't you dress and "disappear" the second weld joint?
@http://www.914world.com/bbs2/index.php?showuser=1143 Clay, I like some welds, just not all welds.
The main welds are all that can be seen when it's in the chassis and once I did the first one, I decided I was OK with the look. Less work, too.
Posted by: Shivers Mar 18 2023, 07:47 AM
I think it looks great. That tig is cool, my wire feed welds are train wreckish at best most of the time.
Posted by: mb911 Mar 18 2023, 09:25 AM
Get that furick cup! You’ll love it! Weldmonger.com is run by Jody of welding tips and tricks on youtube. (I love his videos)
You'll use a bit more gas but so much better and versatile. Well worth it.Sorry that is incorrect you will not use more gas. Lens allow lower flow rates and better distribution of the gas and that is the point of them.
Chris I use a #gas lens for everything I weld including, aluminum, steel, stainless. It is the most versatile setup you can have.
Posted by: mb911 Mar 18 2023, 09:29 AM
The best product Furick makes is the angled collet. For you that are welders by trade you will know how much that benefits the tightness of the tungsten in multiple heat cycles.
https://furickcup.com/furickshop/
Posted by: mb911 Mar 18 2023, 09:34 AM
Why didn't you dress and "disappear" the second weld joint?
@http://www.914world.com/bbs2/index.php?showuser=1143 Clay, I like some welds, just not all welds.
The main welds are all that can be seen when it's in the chassis and once I did the first one, I decided I was OK with the look. Less work, too.
Disappeared welds to your point Chris is for spots you don’t want to see. I caution people very often about do such a thing as when you are dealing with hi heat applications where there is quick bursts of heat and then cooling (think on throttle off throttle) they are more prone to cracking.
Posted by: Van B Mar 18 2023, 11:08 AM
The best product Furick makes is the angled collet. For you that are welders by trade you will know how much that benefits the tightness of the tungsten in multiple heat cycles.
https://furickcup.com/furickshop/
Oh man I love those angled collets! The best ideas are always the ones that as soon as you see it, you immediately wonder why it was ever done another way!
Regarding the gas usage, flow is definitely more correlated to stick out than cup size. But both are still interrelated.
Posted by: Superhawk996 Mar 18 2023, 11:30 AM
Why didn't you dress and "disappear" the second weld joint?
@http://www.914world.com/bbs2/index.php?showuser=1143 Clay, I like some welds, just not all welds.
The main welds are all that can be seen when it's in the chassis and once I did the first one, I decided I was OK with the look. Less work, too.
Disappeared welds to your point Chris is for spots you don’t want to see. I caution people very often about do such a thing as when you are dealing with hi heat applications where there is quick bursts of heat and then cooling (think on throttle off throttle) they are more prone to cracking.
 . . . Now he’s going to start all over again.
Posted by: mb911 Mar 18 2023, 12:05 PM
The best product Furick makes is the angled collet. For you that are welders by trade you will know how much that benefits the tightness of the tungsten in multiple heat cycles.
https://furickcup.com/furickshop/
Oh man I love those angled collets! The best ideas are always the ones that as soon as you see it, you immediately wonder why it was ever done another way!
Regarding the gas usage, flow is definitely more correlated to stick out than cup size. But both are still interrelated.
Exactly
Posted by: mb911 Mar 18 2023, 12:06 PM
Why didn't you dress and "disappear" the second weld joint?
@http://www.914world.com/bbs2/index.php?showuser=1143 Clay, I like some welds, just not all welds.
The main welds are all that can be seen when it's in the chassis and once I did the first one, I decided I was OK with the look. Less work, too.
Disappeared welds to your point Chris is for spots you don’t want to see. I caution people very often about do such a thing as when you are dealing with hi heat applications where there is quick bursts of heat and then cooling (think on throttle off throttle) they are more prone to cracking.
. . . Now he’s going to start all over again. Oh lol not my intention Chris is doing a great job. This was meant as a data point
Posted by: tygaboy Mar 18 2023, 01:10 PM
Disappeared welds to your point Chris is for spots you don’t want to see. I caution people very often about do such a thing as when you are dealing with hi heat applications where there is quick bursts of heat and then cooling (think on throttle off throttle) they are more prone to cracking.
@http://www.914world.com/bbs2/index.php?showuser=9892 Ben - I'm concerned about the possibility of cracking, too. The plan all along is to do the same thing as I did with my LS car: get it running, get some miles on it, be sure everything works, THEN do the finishes. This included the headers. I figure I'll get a couple thousand miles on them and see how they hold up. If any cracks appear, I'll weld them up and leave the welds.
As I've always said, I'm constantly learning. Let's see what this teaches me!
Thanks for your input, too.
Posted by: mb911 Mar 18 2023, 01:17 PM
You purged it so odds are with you.
Posted by: tygaboy Mar 19 2023, 07:53 AM
2nd side header gets done! Well, almost. And yes, I'm battling a strong desire to start over, knowing I could do a much better job. But I'm not going to. At least not right now...
If you do nothing else, watch from 13:40 - 13:50.
https://www.youtube.com/watch?v=BWm45vB5HqM
Posted by: Cairo94507 Mar 19 2023, 08:49 AM
(PS- Alien is still a movie that scares the bejesus out of me....)
Posted by: tygaboy Mar 19 2023, 09:15 AM
@http://www.914world.com/bbs2/index.php?showuser=26011 @http://www.914world.com/bbs2/index.php?showuser=9892 Your pressure was too much. I caved and ordered a set of Furik stuff. I'm such a conformist...
On another important front, I have appointments this coming week with two different tuners to talk ECU selection.
One that's in contention is the new ECU Master Pro series. The big add is they now support dual drive-by-wire throttle bodies - a requirement for the 360. I've been really happy with their PMU and ECU Master seem to be making inroads with the motorsport crowd as a budget-friendly option to the MoTec and Haltec product lines. We shall see.
Posted by: mb911 Mar 19 2023, 10:31 AM
@http://www.914world.com/bbs2/index.php?showuser=26011 @http://www.914world.com/bbs2/index.php?showuser=9892 Your pressure was too much. I caved and ordered a set of Furik stuff. I'm such a conformist...
On another important front, I have appointments this coming week with two different tuners to talk ECU selection.
One that's in contention is the new ECU Master Pro series. The big add is they now support dual drive-by-wire throttle bodies - a requirement for the 360. I've been really happy with their PMU and ECU Master seem to be making inroads with the motorsport crowd as a budget-friendly option to the MoTec and Haltec product lines. We shall see.
Did you happen to see what Furicks main business is? The TIG products are a sideline
Posted by: Van B Mar 19 2023, 11:41 AM
Conformist lol… that joke was so dry I need to go get a drink!
You’ll love it, I promise. The #12 has become my go to. I can do 25 cfh on the flow in just about every situation, up to 1.5x cup diameter stick out.
Watched your video before getting back on the sway bar configuration struggle bus this afternoon.
Your headers remind me of an X-29!
Posted by: tygaboy Mar 20 2023, 04:11 PM
2nd side all welded, along with a rear view.
This was quite the learning experience. My TIG skills improved an order of magnitude - maybe more.
Once I get the Furik stuff, I'm sure to be the next Instagram porn welder/influencer, right @http://www.914world.com/bbs2/index.php?showuser=26011 ?
Now to get the drive train back in the chassis and work out the rest of the exhaust.
Plans include leveraging the Ferrari muffler by-pass and trigger it via the ECU as well as having a "Sport Mode" button, just for Cars & Coffee! 
Attached thumbnail(s)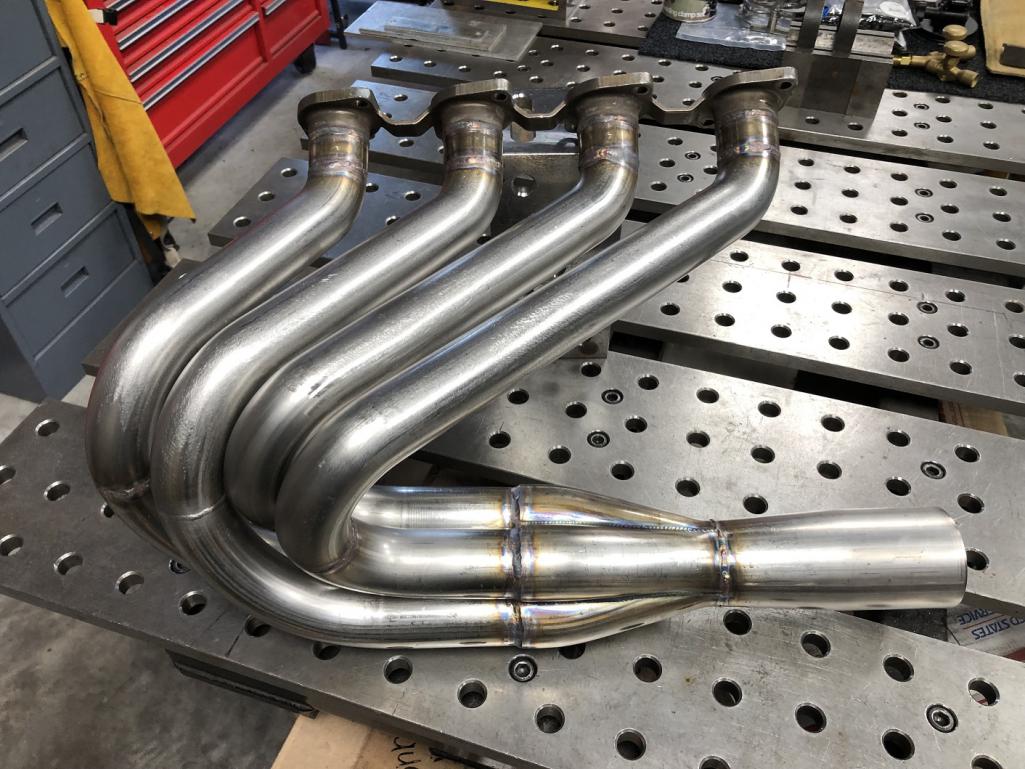
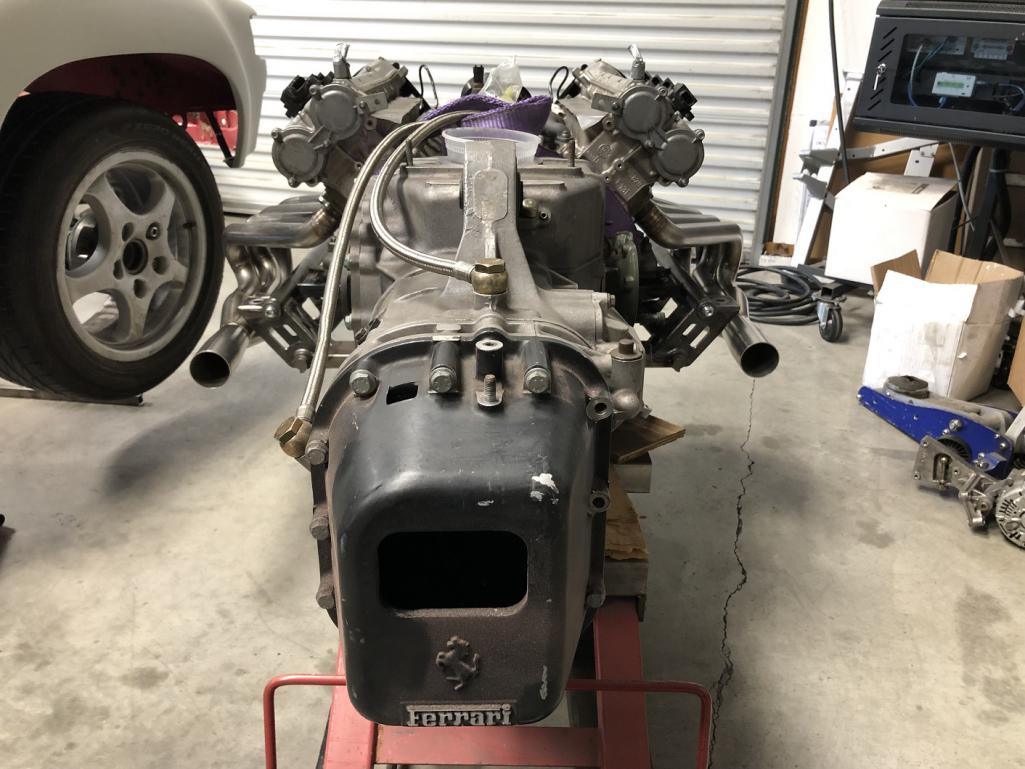
Posted by: Van B Mar 20 2023, 06:14 PM
Haha! No, you have to practice ridiculously close up photos at a 30 degree angle using 1/3 framing and portrait mode. And you can’t take pictures of actual parts with a purpose. Only pointless practice objects with no use in the real world.
So, basically, you can’t work on the Porarri anymore.
Posted by: Van B Mar 20 2023, 06:20 PM
Back to the project at hand, you nailed it on the header design. I understand the desire to improve execution, but I don’t think a better lay out is possible.
The symmetry and common design themes will take this to a whole new level!
Posted by: JmuRiz Mar 20 2023, 08:03 PM
Watched your latest video, very nice!
Posted by: jd74914 Mar 20 2023, 11:58 PM
On another important front, I have appointments this coming week with two different tuners to talk ECU selection.
One that's in contention is the new ECU Master Pro series. The big add is they now support dual drive-by-wire throttle bodies - a requirement for the 360. I've been really happy with their PMU and ECU Master seem to be making inroads with the motorsport crowd as a budget-friendly option to the MoTec and Haltec product lines. We shall see.
Fun!
Not sure who is out there, or the Ferrari presence, but I'd also recommend looking into if anyone locally will tune a Syvecs S8 or LR F88. They used to be slightly more cost effective than the MoTeC options, but I haven't bought one in a few years.
The ECU Master stuff is getting nicer, though it's still a bit out of the capability range of offerings from MoTeC/Syvecs/Haltec (the newer Nexus at least-brainchild of Andy Wyatt who is awesome). Perhaps not a big deal, but the big difference from the others to ECU Master is the lack of FPGA for engine speed tracking. Some people think that is really important for complex DBW, but who knows...
I think it's mostly down to the tuner anyways. Header looks awesome!! Really fantastic work! With the smoothed welds it looks like you had someone custom bend the start of the primaries.
Posted by: tygaboy Mar 21 2023, 12:42 PM
Drive train back in with both headers. They are pretty well hidden so they look better in real life where you can move around to get a look at them. But everything fits. On to working out the rest of the exhaust.
Attached thumbnail(s)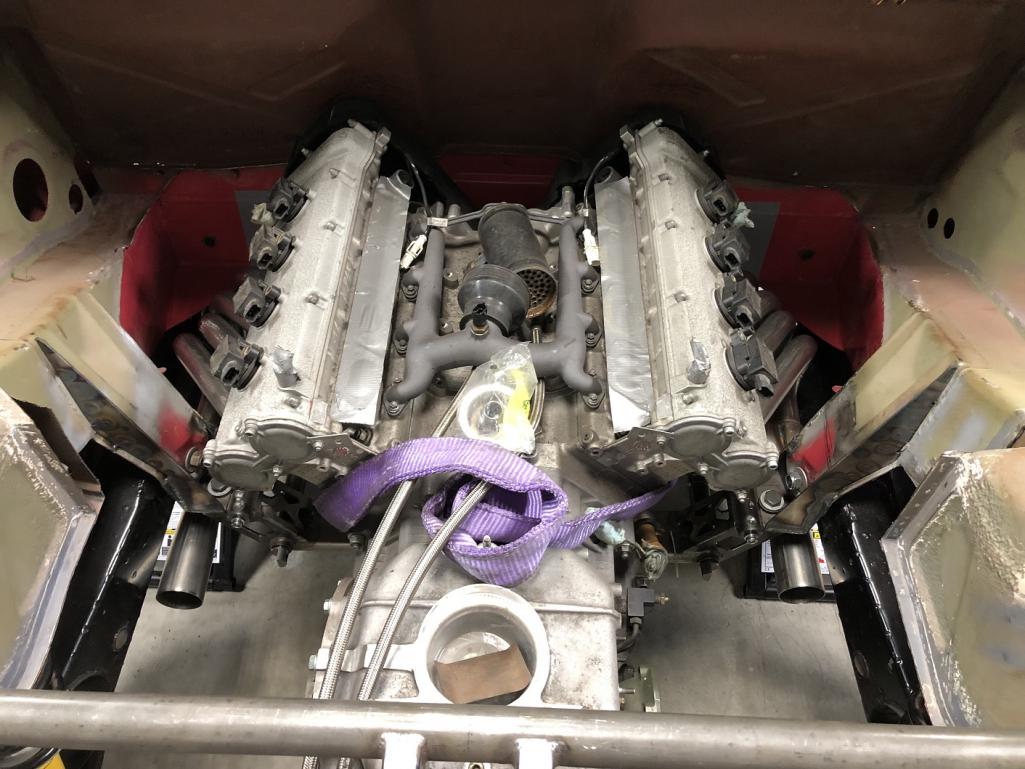
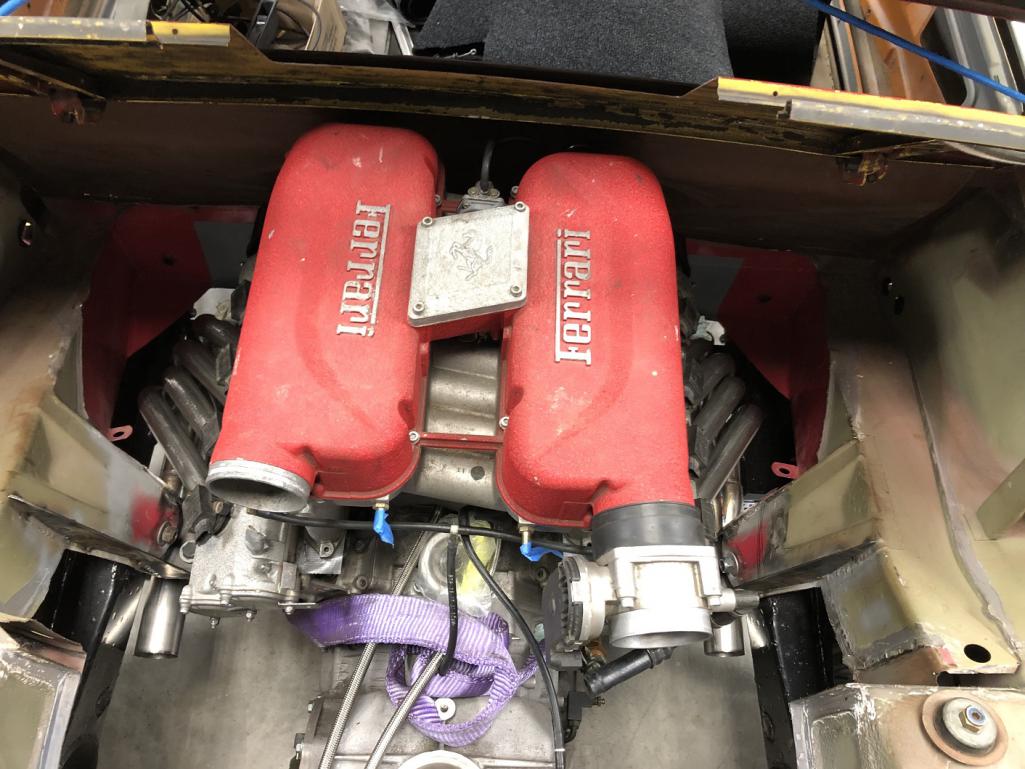
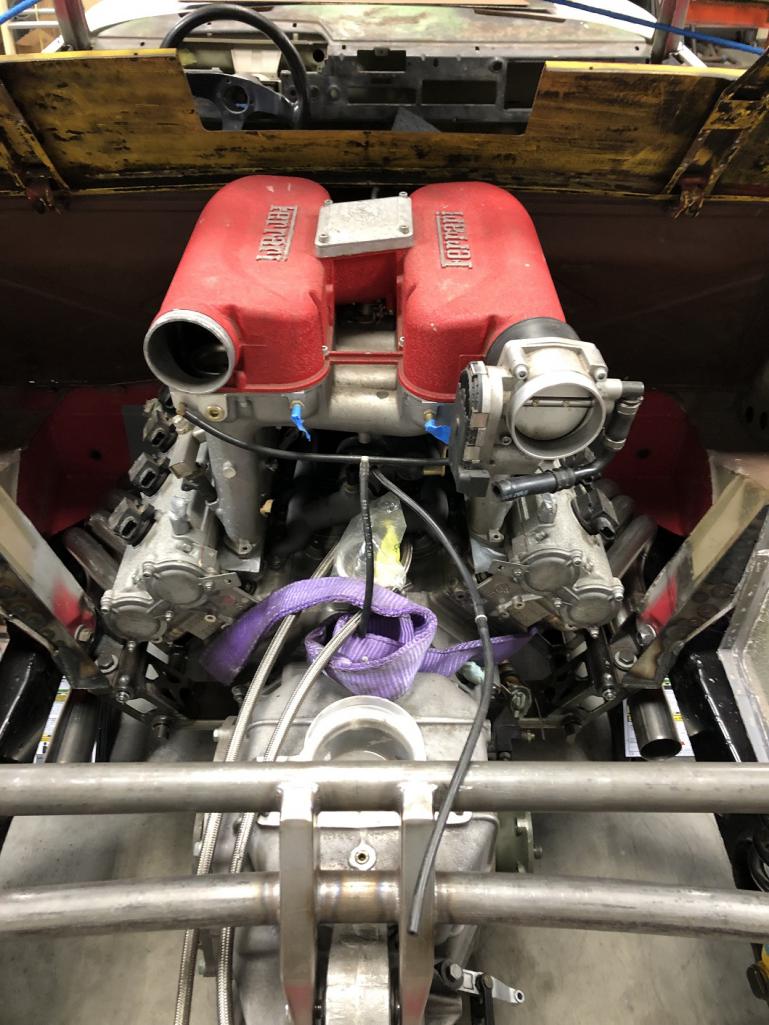
Posted by: Van B Mar 21 2023, 09:08 PM
That’s just right
Posted by: flat4guy Mar 22 2023, 08:25 PM
Should have made the headers come up and out like an old drag boat so everyone could see them. haha
Posted by: PlaysWithCars Mar 23 2023, 10:01 PM
Should have made the headers come up and out like an old drag boat so everyone could see them. haha
Or exit out the top like a Carrera GT. All the reports of great sound from reviewers of the day would be replicated plus some on this build.
Posted by: tygaboy Mar 28 2023, 08:33 AM
All this work on the exhaust had me ignoring the other end of the system. So... I found a damaged 360 intake manifold at a sorta local exotic car recycler.
Having a spare set up enables me to try out some modifications I'm considering while preserving a standard intake. If my ideas work, I can always sell the factory one.
Attached image(s)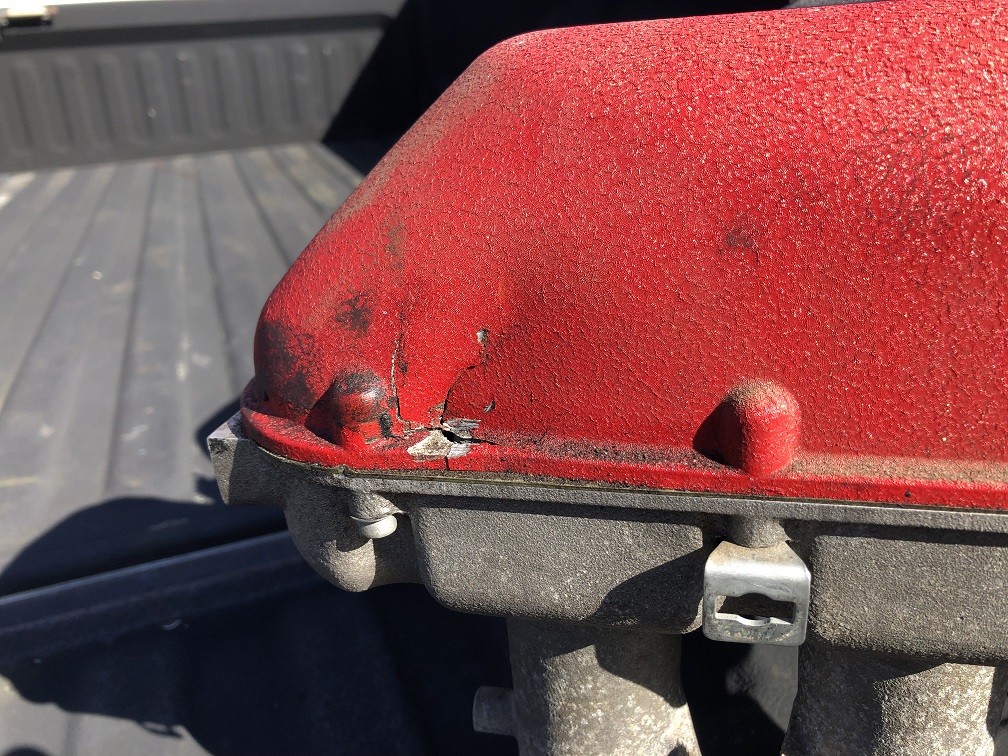
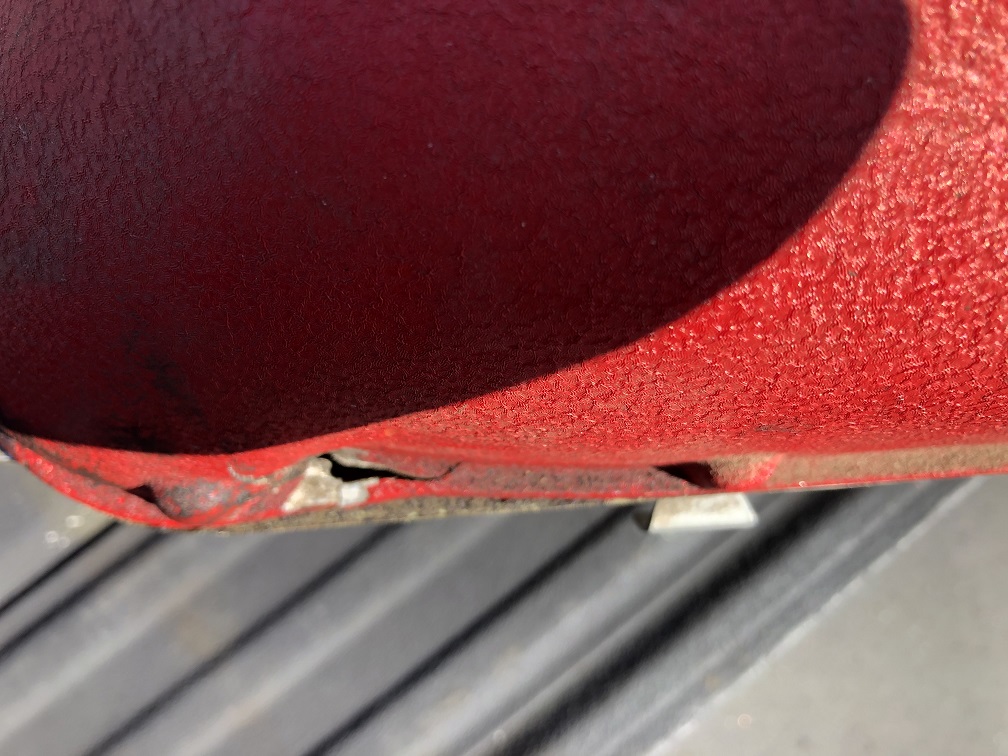
Posted by: tygaboy Mar 28 2023, 08:38 AM
First step was to anneal the area to soften the aluminum ahead of moving the dented area back into position. That's why the burned look.
Then it was: damage removed, cracks ground out, patch piece made and initial metal finishing underway. That area of weld yet to be addressed was a low spot that revealed itself during the filing process.
The lip at the mounting surface will be the trickiest. The damaged area is at the front of the engine so not the most visible area, but we'll see just how invisible the repair can be.
It'll be wrinkle finished so that'll help hide any minor flaws.
Attached image(s)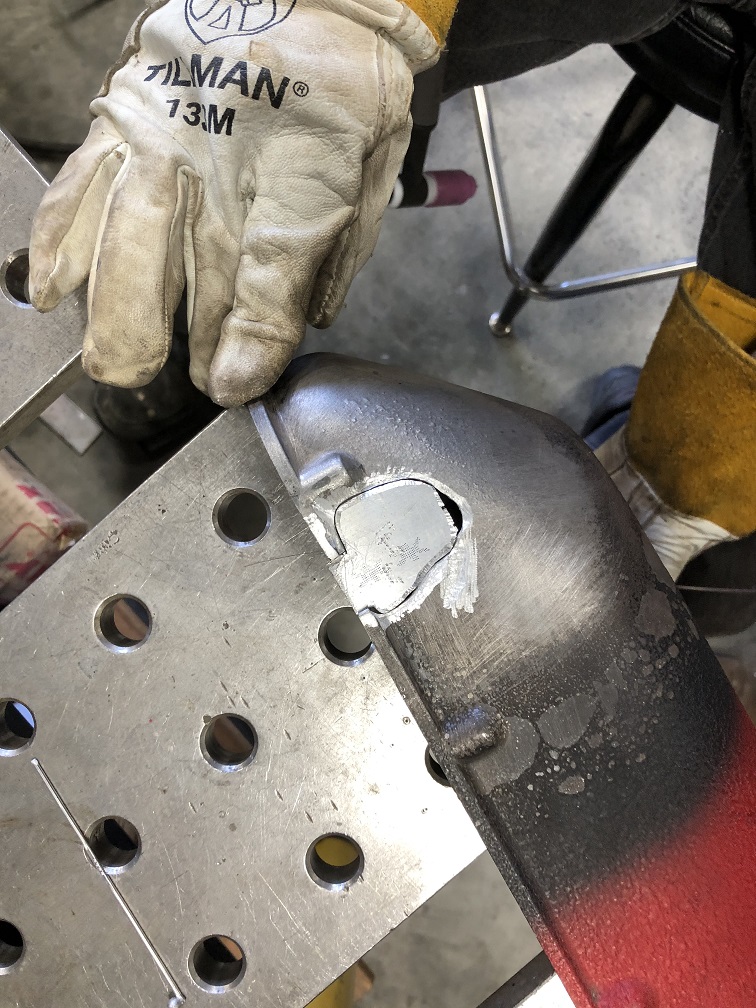
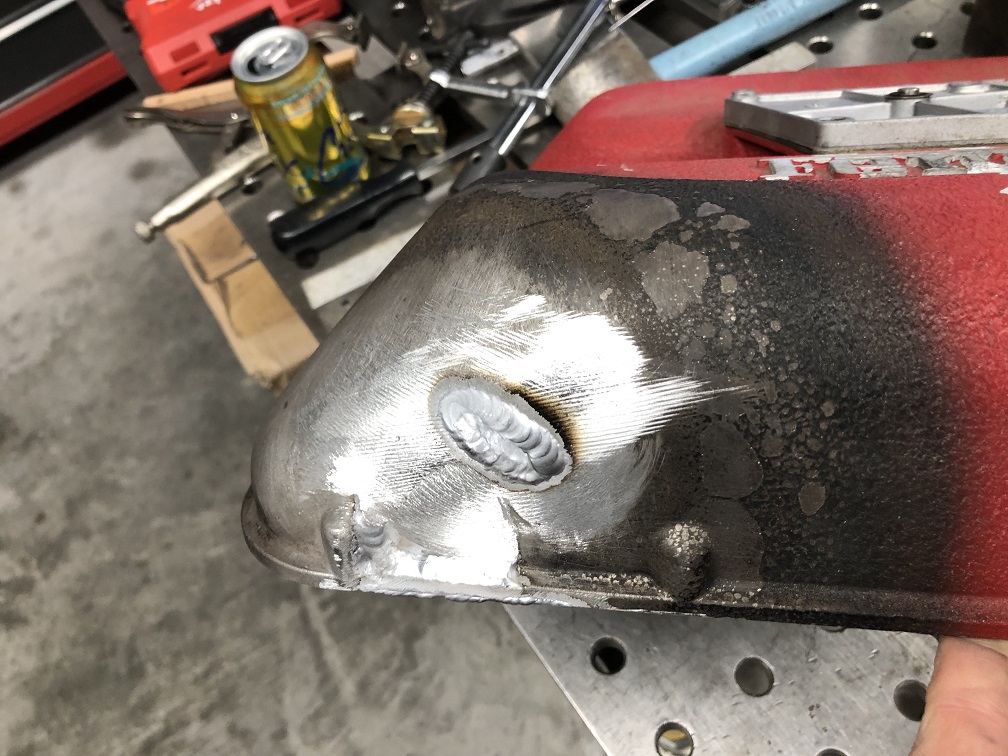
Posted by: technicalninja Mar 28 2023, 08:55 AM
Please, please include pictures of the interior of the plenum, both the air horns and the top section.
I've wanted to see the insides of that intake set up from the start.
I'm especially interested in the cross tubes near the air horns.
Thanks
Rick
Posted by: tygaboy Mar 28 2023, 09:12 AM
Please, please include pictures of the interior of the plenum, both the air horns and the top section.
I've wanted to see the insides of that intake set up from the start.
I'm especially interested in the cross tubes near the air horns.
Thanks
Rick
@http://www.914world.com/bbs2/index.php?showuser=27135 Rick - See post #106, earlier in this thread: http://www.914world.com/bbs2/index.php?showtopic=359314&st=100
Essentially, it's a set up that doubles the length of the intake runners to improve low RPM torque. The intake runner butterflies open at >45% throttle and >5500 RPM. There's a butterfly valve between the plenum chambers that opens at what I suspect is the same time.
I've been trying to educate myself on intake manifold theory and must say, this one is quite a marvel. 110 hp/liter is pretty impressive.
I'll get a pic of the inside of the upper plenum in a future post.
Posted by: technicalninja Mar 29 2023, 02:04 PM
Thank you! I haven't taken the time to go all the way through this thread and probably should have.
Variable intake length started in the late 80s and the "normal" path is long narrow tract below 60% of the RPM range and big, short tracts above that point.
Making the runners super long was an April Fool's joke for Holley but...
https://www.youtube.com/watch?v=y9IERetMoL4
It made a LS based engine into a diesel.
It was done as a joke but running it on a dyno provided really good data.
Those "Rat Fink" cartoons actually had a basis in reality.
I'd love to know the length of and diameter at both ends of the high-speed sections.
That Ferrari has far more taper than most and I'd love those numbers if possible.
It's a bit creepy but...
I want to fondle your intake
Posted by: tygaboy Mar 29 2023, 05:43 PM
The throttle bodies need to be tipped down to get them to end up under the height of the trunk lid. First step is to slice off the mounting flanges. This in prep for welding on a bit of curved tube. The flanges will then be welded to the end of the newly added tubes.
Attached image(s)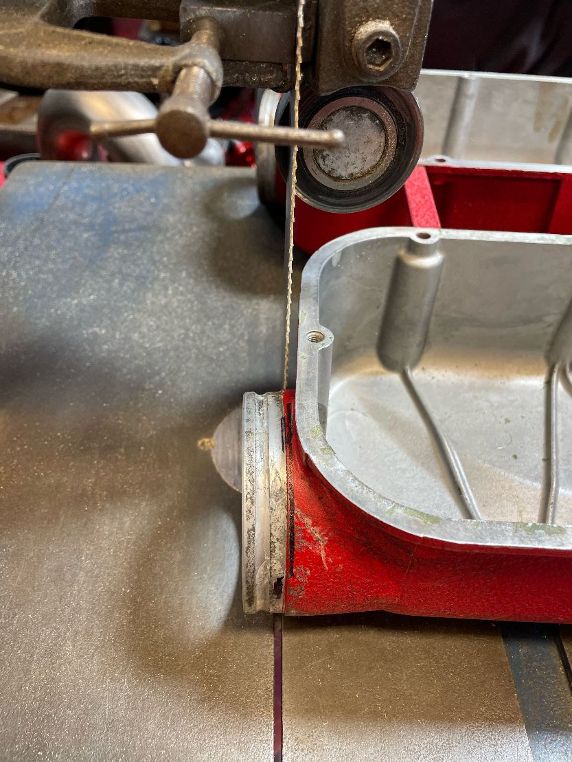
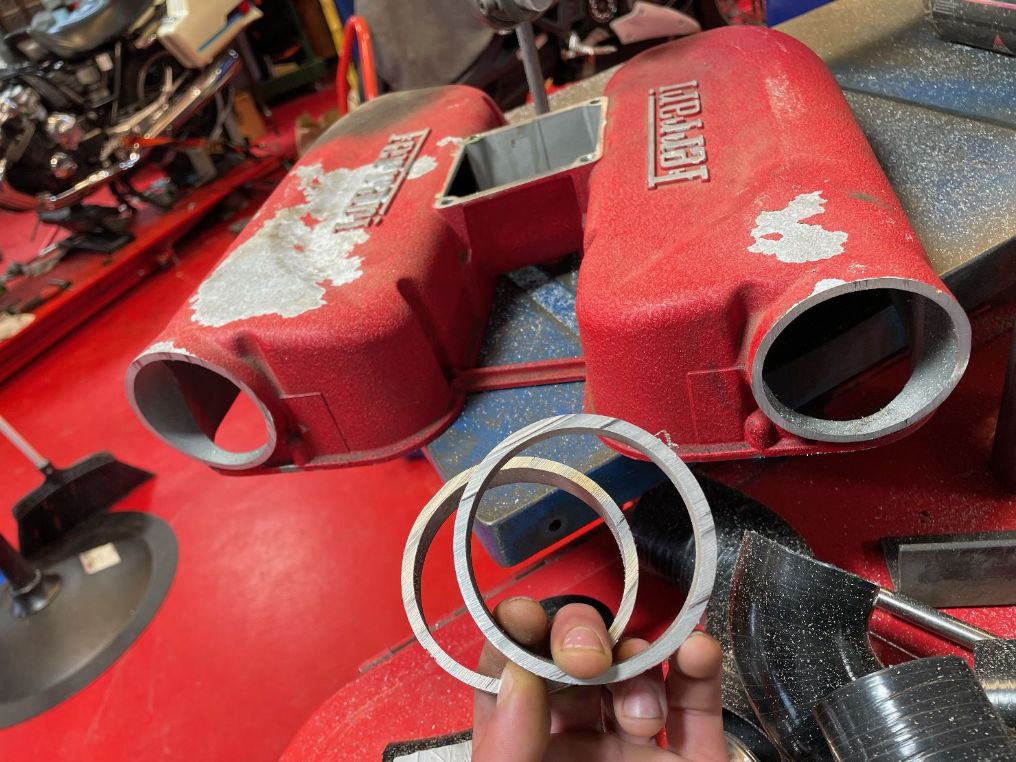
Posted by: Retroracer Mar 29 2023, 08:38 PM
- Tony
Posted by: tygaboy Mar 30 2023, 01:03 PM
Shuffling cars so I can work on the LS build while I wait for some parts for the Ferrari car.
This is the first time it's been outside since the drive train swap. Note the intake turn-downs won't be that severe - they'll be maybe about 45 degrees with just a bit of straight before the throttle bodies. But it'll look mostly like this.
It'll sit a bit lower, too.
Attached thumbnail(s)
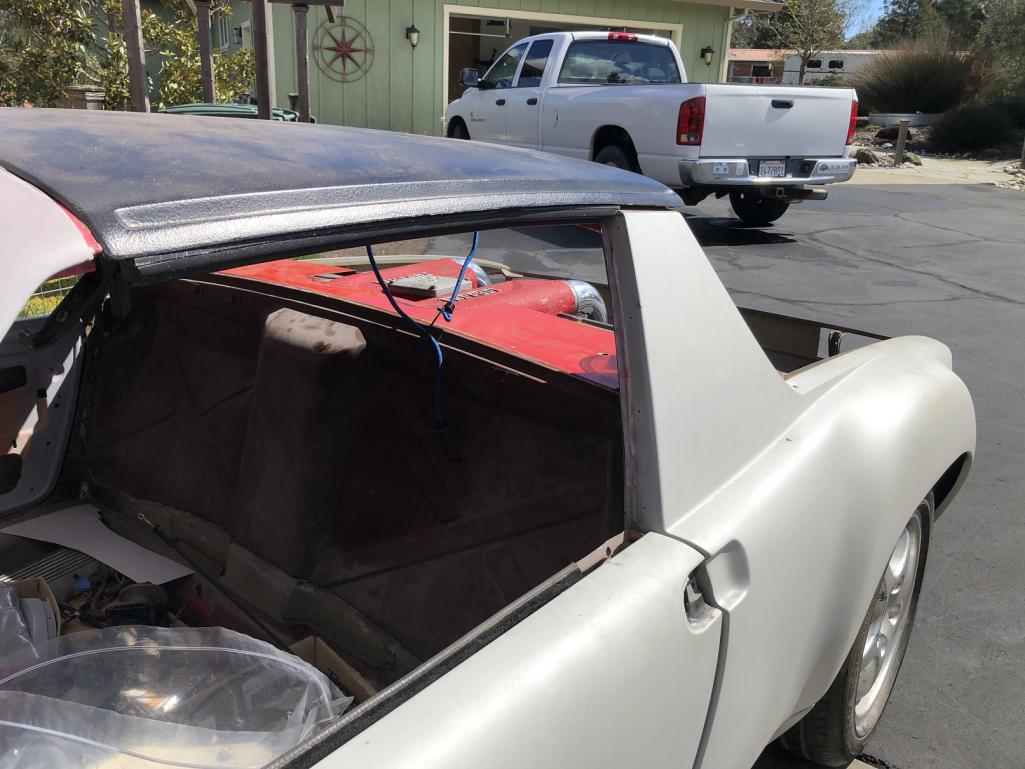
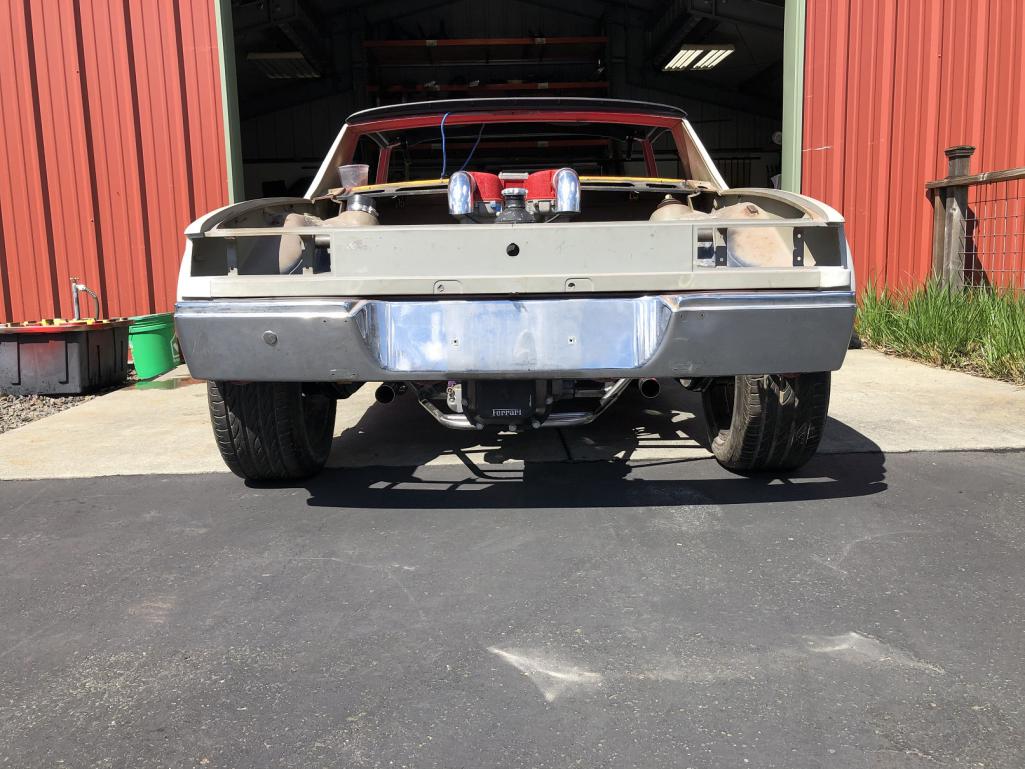
Posted by: mgarrison Mar 30 2023, 01:18 PM
Too cool for school....
Posted by: tygaboy Mar 30 2023, 04:47 PM
BACKGROUND: Martin, my buddy and shop co-conspirator went to art school. He worked in a foundry. He made jewelery. He designed and fabricated pro-stock drag racing motorcycle chassis. He worked as a motorsports fabricator. He restores 1/24 scale slot cars (where his driver now has a 5 o'clock shadow!)
He does incredible work. Actually, "incredible" doesn't do justice to his work. It's ridiculous how nice it is.
So, when he said, "Would you also like me to dress the repair area?" Ummm... yes, please?
The pics speak for themselves.
Martin provided the pic with the tools to show the various implements he used to finish the repair. I'm beyond fortunate to have him on the team.
Attached image(s)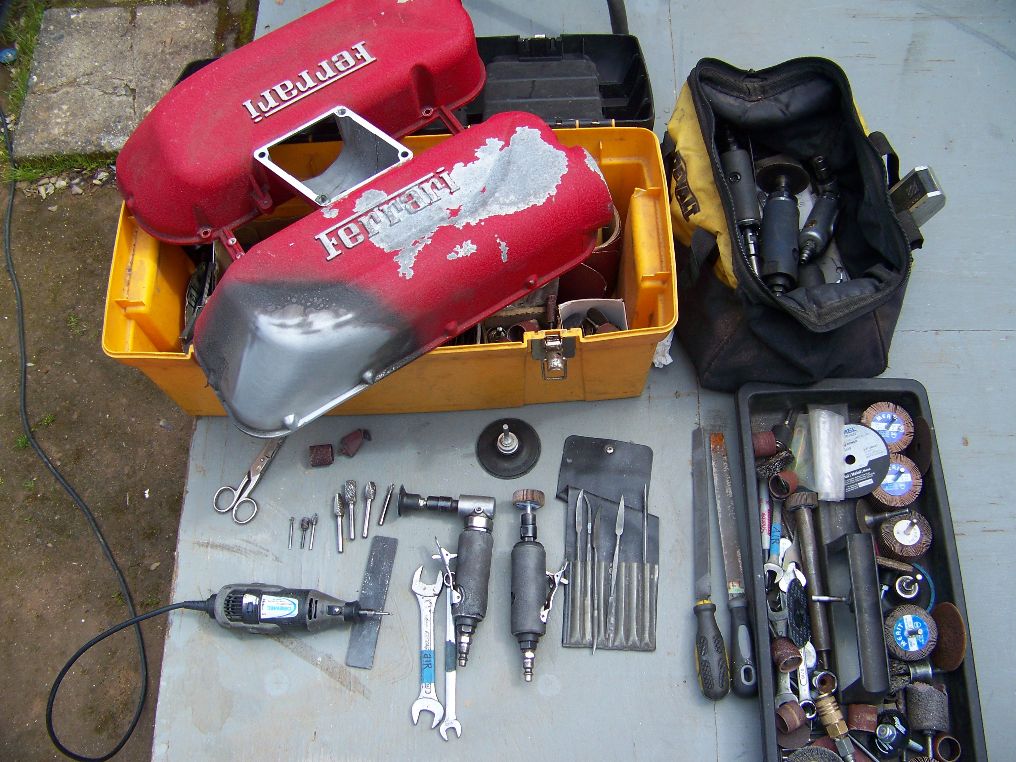
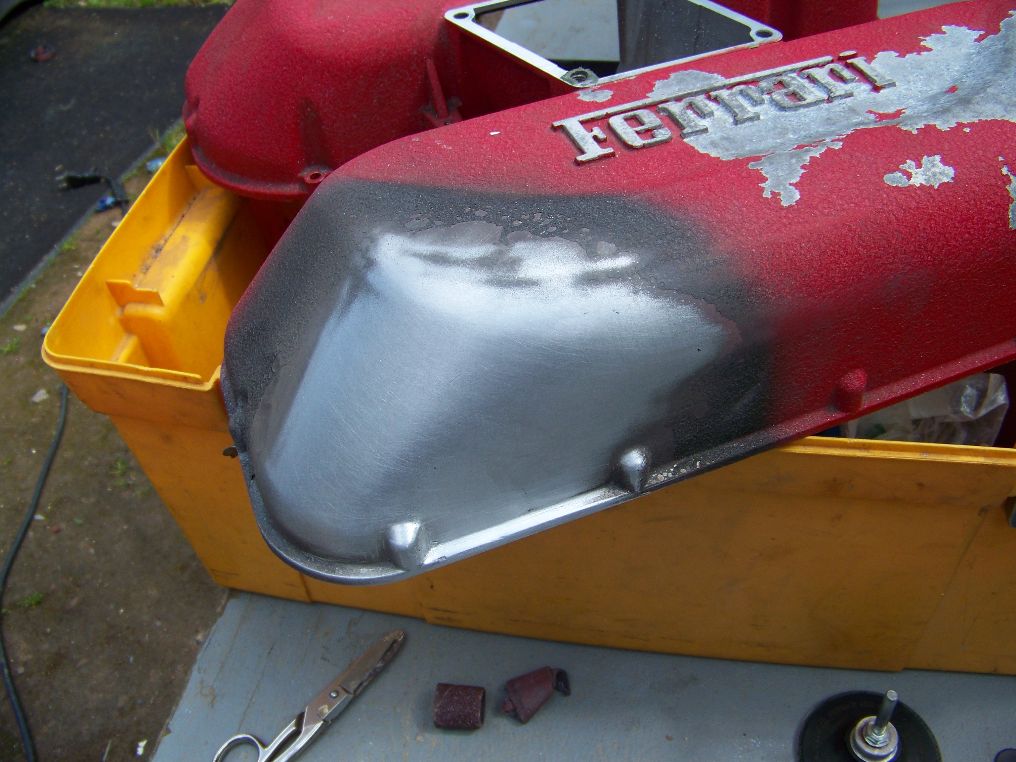
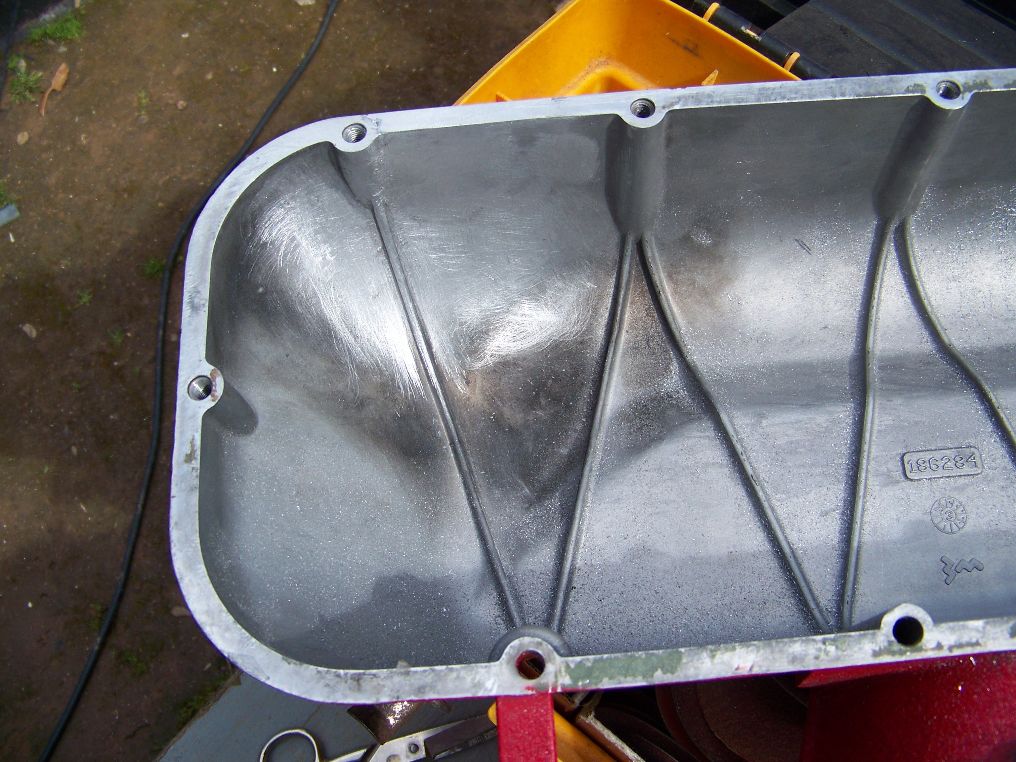
Posted by: technicalninja Mar 30 2023, 07:05 PM
Freaking magical!
Like it was never broken.
Only ONE problem...
Now, you have to re-create the red wrinkle finish to the same level of perfection!
Wouldn't want Martin to show you up would you?
I believe that is the single cleanest cast aluminum repair I've ever seen.
Now, I'm envious of both your water-jet and your friend.
Truly impressive!
Both of you...
Posted by: jd74914 Apr 7 2023, 05:02 PM
Saw this ad on FB marketplace and thought of you…
https://www.facebook.com/marketplace/item/522488536763592/?ref=browse_tab&referral_code=marketplace_general&referral_story_type=general&tracking=%7B%22qid%22%3A%22-4392703158531496726%22%2C%22mf_story_key%22%3A%22991868105779201452%22%2C%22commerce_rank_obj%22%3A%22%7B%5C%22target_id%5C%22%3A991868105779201452%2C%5C%22target_type%5C%22%3A6%2C%5C%22primary_position%5C%22%3A22%2C%5C%22ranking_signature%5C%22%3A5552299446982672384%2C%5C%22commerce_channel%5C%22%3A501%2C%5C%22value%5C%22%3A0.00019855155289984%2C%5C%22upsell_type%5C%22%3A3523%2C%5C%22candidate_retrieval_source_map%5C%22%3A%7B%5C%226042948562465456%5C%22%3A3001%2C%5C%225796844903759083%5C%22%3A3012%2C%5C%226676359359045826%5C%22%3A3001%2C%5C%226173961212692351%5C%22%3A3001%7D%2C%5C%22grouping_info%5C%22%3Anull%7D%22%2C%22lightning_feed_qid%22%3A%22-4392708930845218764%22%2C%22lightning_feed_ranking_signature%22%3A%225552299446982672384%22%2C%22ftmd_400706%22%3A%22111112l%22%7D
Posted by: tygaboy Apr 7 2023, 05:37 PM
Saw this ad on FB marketplace and thought of you…
https://www.facebook.com/marketplace/item/522488536763592/?ref=browse_tab&referral_code=marketplace_general&referral_story_type=general&tracking=%7B%22qid%22%3A%22-4392703158531496726%22%2C%22mf_story_key%22%3A%22991868105779201452%22%2C%22commerce_rank_obj%22%3A%22%7B%5C%22target_id%5C%22%3A991868105779201452%2C%5C%22target_type%5C%22%3A6%2C%5C%22primary_position%5C%22%3A22%2C%5C%22ranking_signature%5C%22%3A5552299446982672384%2C%5C%22commerce_channel%5C%22%3A501%2C%5C%22value%5C%22%3A0.00019855155289984%2C%5C%22upsell_type%5C%22%3A3523%2C%5C%22candidate_retrieval_source_map%5C%22%3A%7B%5C%226042948562465456%5C%22%3A3001%2C%5C%225796844903759083%5C%22%3A3012%2C%5C%226676359359045826%5C%22%3A3001%2C%5C%226173961212692351%5C%22%3A3001%7D%2C%5C%22grouping_info%5C%22%3Anull%7D%22%2C%22lightning_feed_qid%22%3A%22-4392708930845218764%22%2C%22lightning_feed_ranking_signature%22%3A%225552299446982672384%22%2C%22ftmd_400706%22%3A%22111112l%22%7D
@http://www.914world.com/bbs2/index.php?showuser=1659 Ha! You're one of a couple folks who have pointed that out to me! That said, Those are "Ferrari designed", not flat plane cranks, etc, etc. Cool, but not cool enough...
Posted by: Shivers Apr 7 2023, 06:41 PM
Shuffling cars so I can work on the LS build while I wait for some parts for the Ferrari car.
This is the first time it's been outside since the drive train swap. Note the intake turn-downs won't be that severe - they'll be maybe about 45 degrees with just a bit of straight before the throttle bodies. But it'll look mostly like this.
It'll sit a bit lower, too.
Hahaha
that trans hanging down there, just makes me chuckle.
Posted by: jd74914 Apr 10 2023, 07:51 PM
Saw this ad on FB marketplace and thought of you…
https://www.facebook.com/marketplace/item/522488536763592/?ref=browse_tab&referral_code=marketplace_general&referral_story_type=general&tracking=%7B%22qid%22%3A%22-4392703158531496726%22%2C%22mf_story_key%22%3A%22991868105779201452%22%2C%22commerce_rank_obj%22%3A%22%7B%5C%22target_id%5C%22%3A991868105779201452%2C%5C%22target_type%5C%22%3A6%2C%5C%22primary_position%5C%22%3A22%2C%5C%22ranking_signature%5C%22%3A5552299446982672384%2C%5C%22commerce_channel%5C%22%3A501%2C%5C%22value%5C%22%3A0.00019855155289984%2C%5C%22upsell_type%5C%22%3A3523%2C%5C%22candidate_retrieval_source_map%5C%22%3A%7B%5C%226042948562465456%5C%22%3A3001%2C%5C%225796844903759083%5C%22%3A3012%2C%5C%226676359359045826%5C%22%3A3001%2C%5C%226173961212692351%5C%22%3A3001%7D%2C%5C%22grouping_info%5C%22%3Anull%7D%22%2C%22lightning_feed_qid%22%3A%22-4392708930845218764%22%2C%22lightning_feed_ranking_signature%22%3A%225552299446982672384%22%2C%22ftmd_400706%22%3A%22111112l%22%7D
@http://www.914world.com/bbs2/index.php?showuser=1659 Ha! You're one of a couple folks who have pointed that out to me! That said, Those are "Ferrari designed", not flat plane cranks, etc, etc. Cool, but not cool enough...
I see how it is!
Posted by: targa72e Apr 10 2023, 10:28 PM
Yep, Maserati would be on my list to try it it had flat plane V8 just for the cool sound. But it has the standard lay out so no better than V8 Mustang or Camaro
john
Posted by: tygaboy Apr 21 2023, 08:15 AM
Got the throttle body (TB) "turn-downs" tacked on. These are 3.125 aluminum tubes typically used in boosted applications. Yes, they are WAAAAAY too long and will be trimmed back so the TBs angle downward and head under the trunk skin.
The factory set up has the TBs splayed outward a bit. Style-wise, I saw that as a bit out of place on the 914 so these are set to head straight back off the plenum.
Attached thumbnail(s)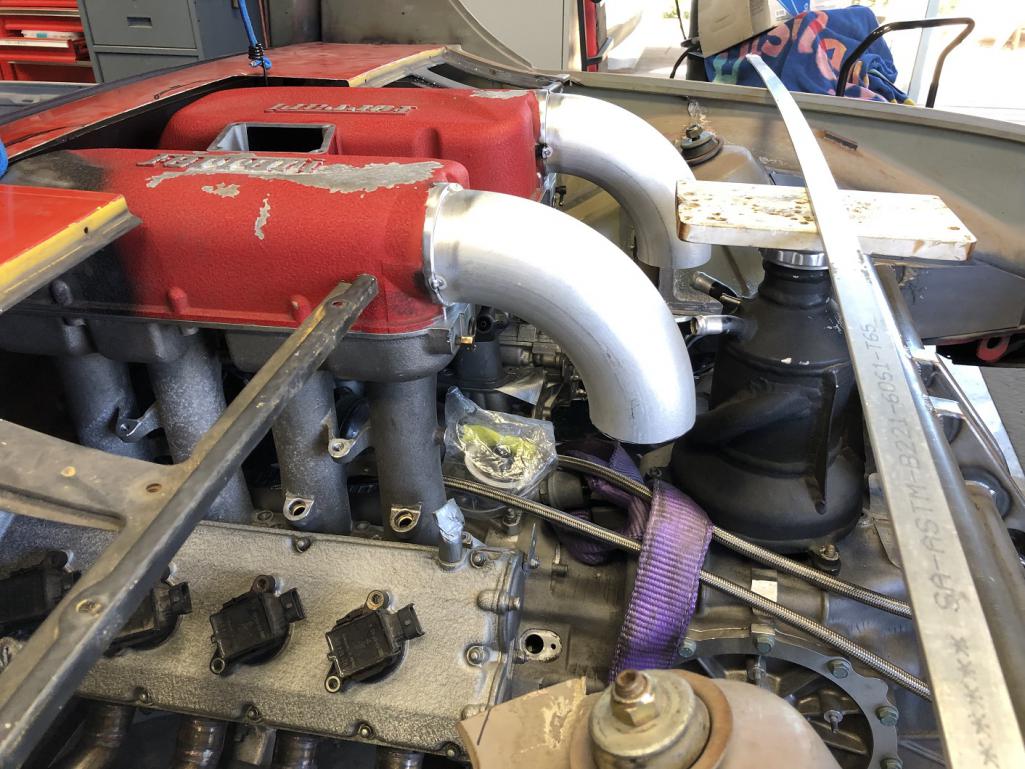
Posted by: tygaboy Apr 21 2023, 08:18 AM
With the turn-downs in place, I couldn't resist playing with some "what might this sorta look like?" mock up.
Yes, a trunk will be sactificed. Such is the "cost of cool". (Hmmm, that might have to go on a t-shirt!)
LOTS of things to work out, for sure. But I think I can come up with something I'll like!
Attached thumbnail(s)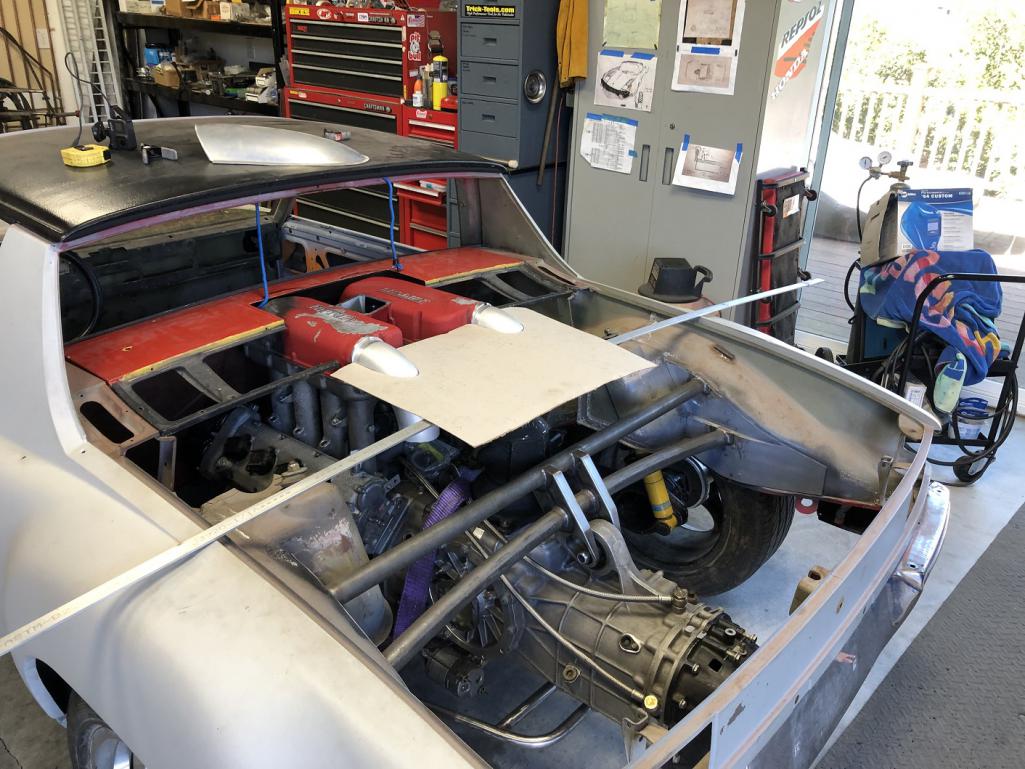
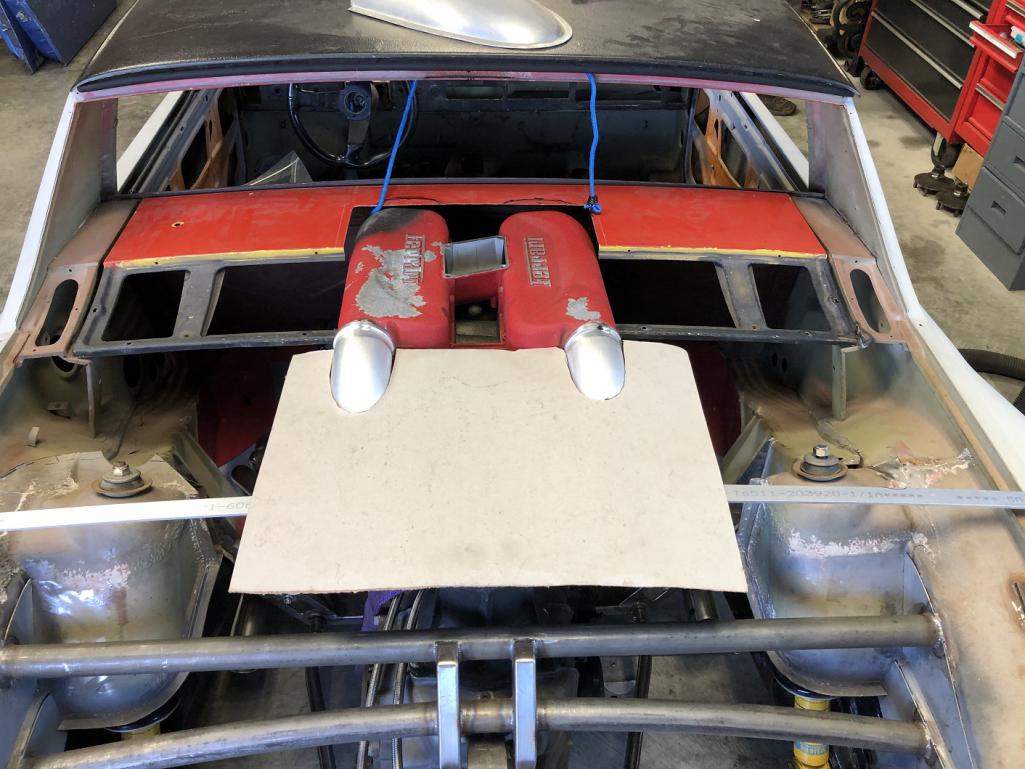
Posted by: tygaboy Apr 21 2023, 08:23 AM
Sharp eyes may have noticed the 914 Ferrari car is sitting where the fixture table used to be.
The past week or so was dedicated to a Spring Cleaning at Red Barn. Much crap was tossed, low use tools and storage sold or consolidated. Fab now happpens mostly in the same area on the far side of the shop.
The end result is I can now fit - and work on - two cars at the same time! Seriously, it feels like I doubled the size of the shop.
Those of you coming to the Luft BBQ will experience it for yourselves!
Attached thumbnail(s)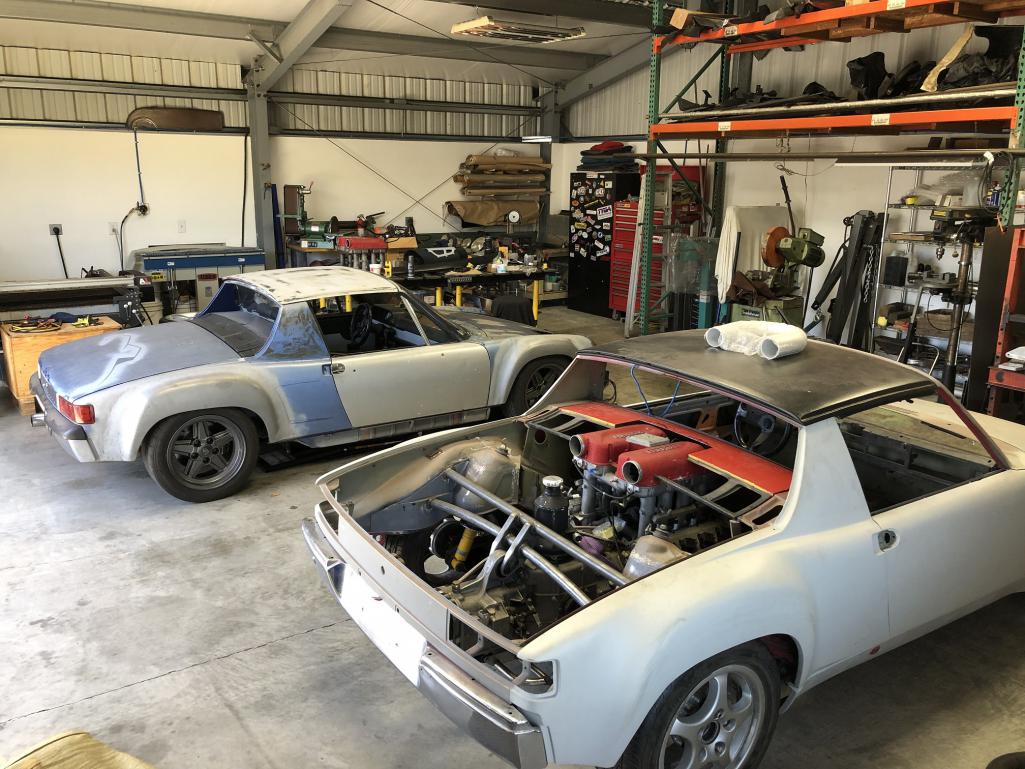
Posted by: Cairo94507 Apr 21 2023, 04:00 PM
@http://www.914world.com/bbs2/index.php?showuser=19241 Wow- you don't mess around when you do spring cleaning. That looks very nice. Looking forward to seeing you at Luftgekuhlt and then follow you back to your place for some good food and conversation.
Posted by: tygaboy Apr 21 2023, 05:48 PM
Turn-downs trimmed to length, fitted with the TB rings and everything fully welded.
Attached thumbnail(s)
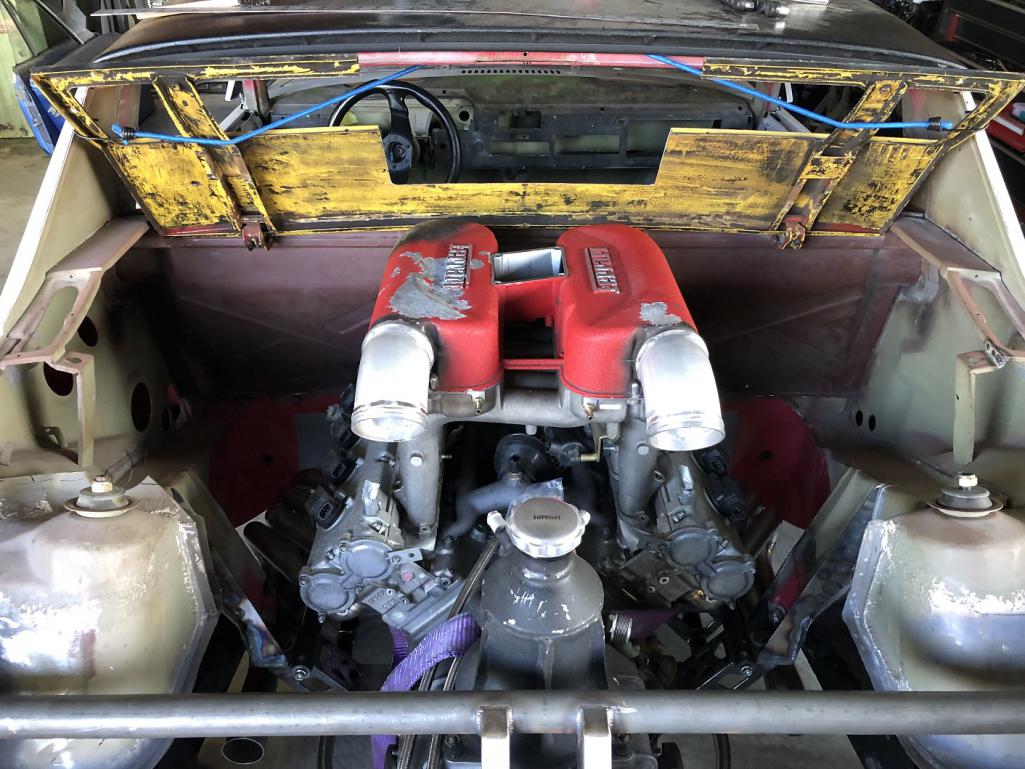
Posted by: tygaboy Apr 21 2023, 05:50 PM
And with the TBs. Next is noodle out an airbox and intake setup. I've got a few ideas that I think will be pretty neat...
Attached thumbnail(s)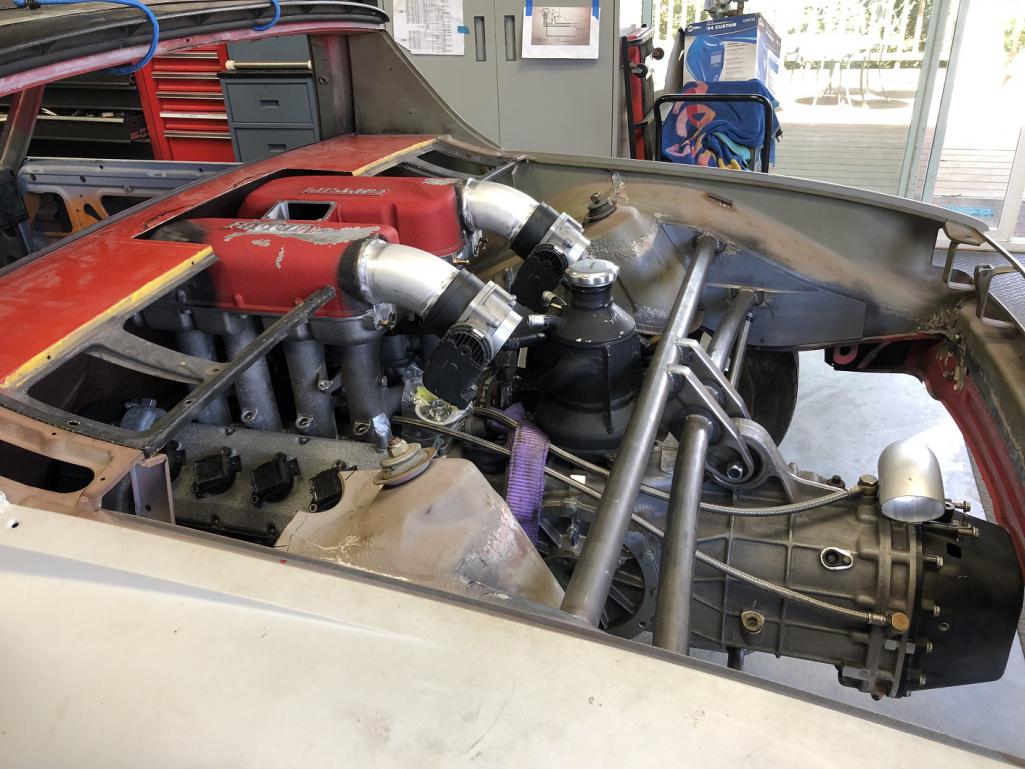
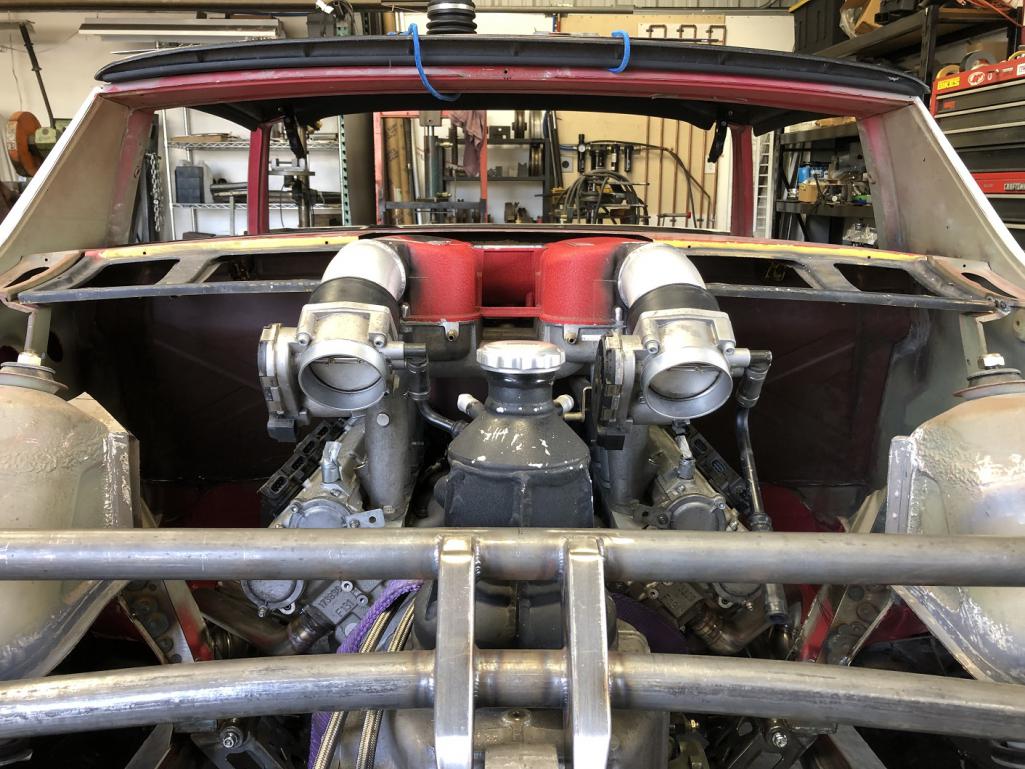
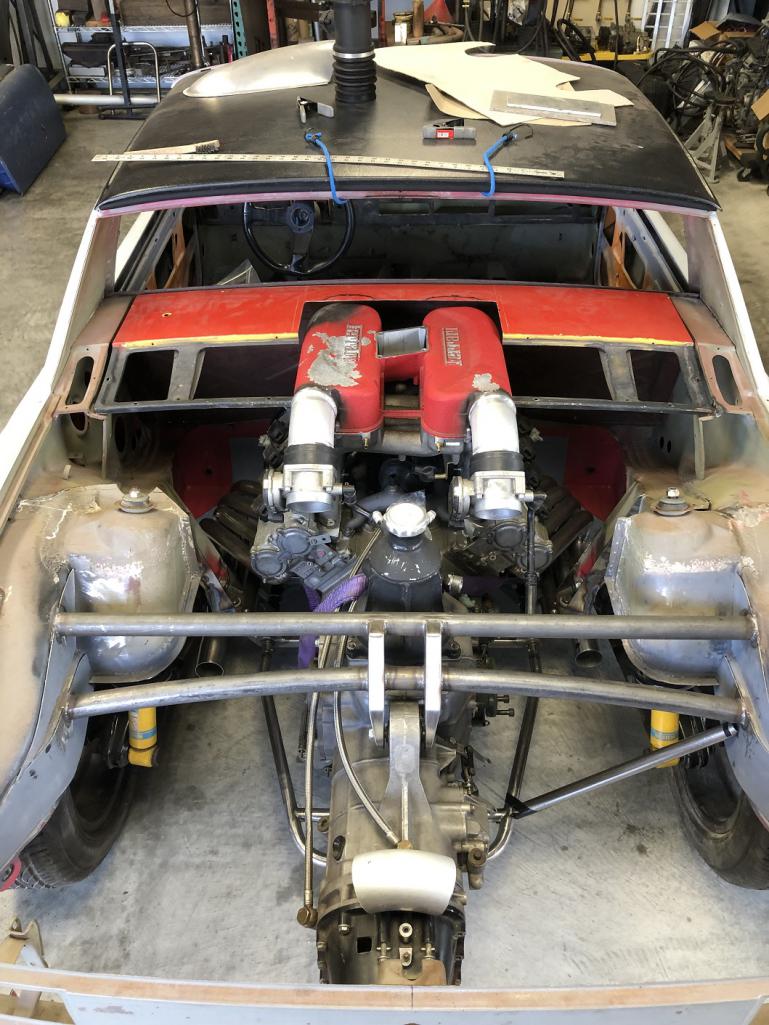
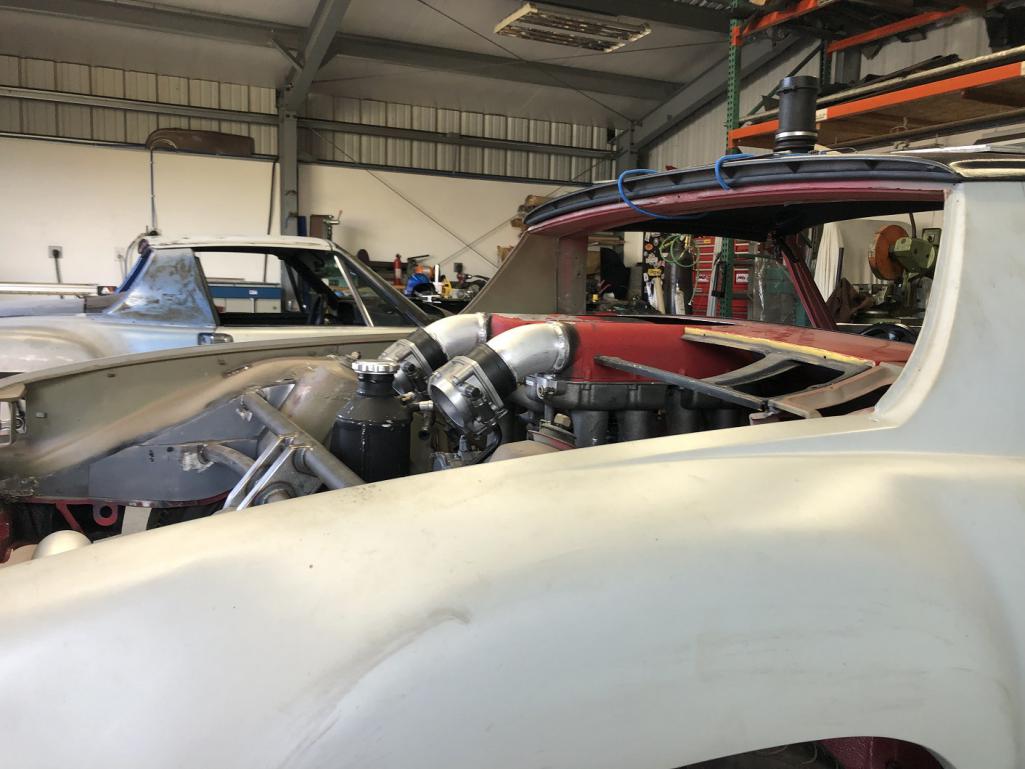
Posted by: East coaster Apr 21 2023, 07:20 PM
Airbox…….time to play with carbon again!
Posted by: BuddyV Apr 21 2023, 11:01 PM
Chris.... you are turning that Pink Butterfly into a DRAGON!
Posted by: tygaboy Apr 26 2023, 06:18 PM
Then there's these. Available with a DBW actuator, which is what I'd do.
It would mean I could fit everything under stock body work, which would be kinda cool - the only tell would be the trans peeking out under the bumper. Plus, I'd have all the "trunk" space, which would otherwise be partially occupied by the intake tract and air cleaners.
I'm communicating with the company to get all the details. We'll see.
Attached thumbnail(s)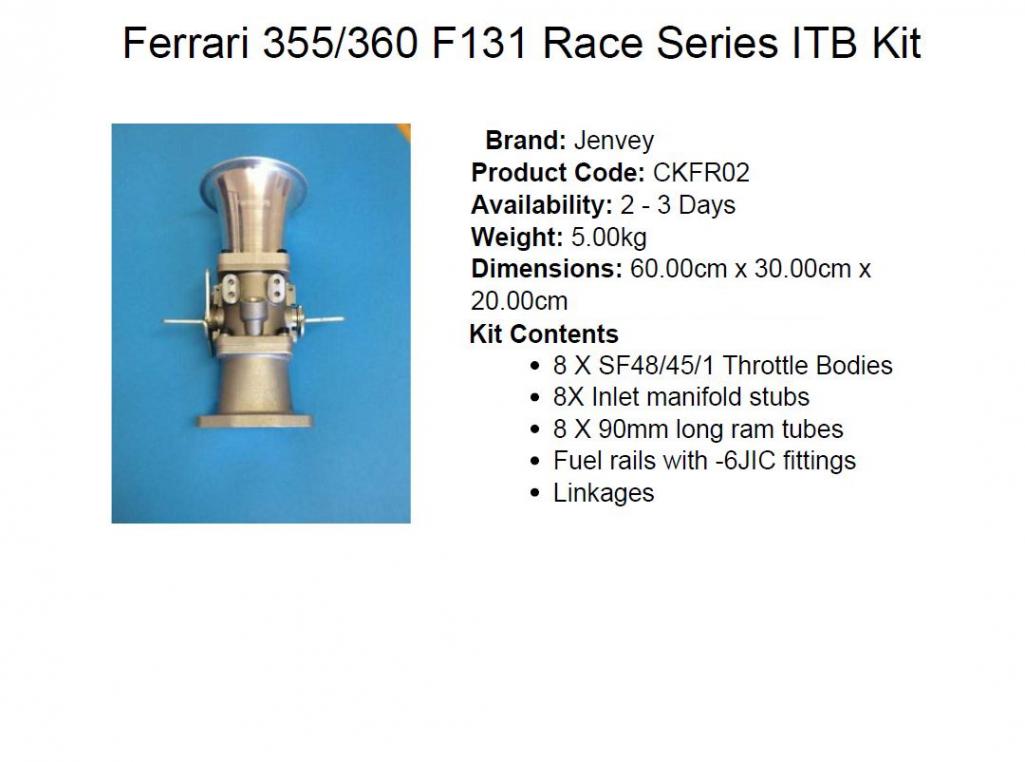
Posted by: KELTY360 Apr 26 2023, 08:33 PM
Would this mean you might have to re-do something?
Posted by: altitude411 Apr 26 2023, 08:41 PM
Would this mean you might have to re-do something?
Posted by: tygaboy Apr 26 2023, 09:20 PM
Would this mean you might have to re-do something?
@http://www.914world.com/bbs2/index.php?showuser=5344 - Let me correct your typo:
Would this mean you might
Posted by: horizontally-opposed Apr 26 2023, 09:37 PM
Do like the factory plenum/throttle, but could not believe how heavy it was.
People at Porsche would be fired.
Also…
Could not get over just how low the Italian V8 looked in a 914 without it.
Posted by: SirAndy Apr 26 2023, 10:10 PM
Then there's these. Available with a DBW actuator, which is what I'd do.
It would mean I could fit everything under stock body work, which would be kinda cool - the only tell would be the trans peeking out under the bumper. Plus, I'd have all the "trunk" space, which would otherwise be partially occupied by the intake tract and air cleaners.
I'm communicating with the company to get all the details. We'll see.
Probably not going to matter much but from the looks of it you'd give up low end torque for high rpm hp with those ITBs. Less driveability on the street.
Posted by: targa72e Apr 26 2023, 10:59 PM
might just be me but I love the Ferrari on the intakes sticking thru the deck lid. Leaves no question of what is in the engine bay and highlights the uniqueness. With ITB's could be anything from a Porsche/Chevy/Ford/Dodge/Subaru/Toyota/Honda swap, so not nearly as interesting with out a detailed conversation.
In that mind set I am building a ITB system for my -6 conversion that uses 996 manifolds over ITB's. It will be clear that its a Porsche engine but those in the know will scratch there heads with water cooled intake manifolds and air cooled fan on the engine.
john
Posted by: tygaboy May 12 2023, 09:14 AM
Latest update video available for your entertainment. And for those who haven't had the pleasure, you meet Martin in this one!
https://www.youtube.com/watch?v=0EJulpB0lrI
Posted by: Cairo94507 May 13 2023, 07:30 AM
Man oh man, the level of skill and expertise demonstrated in these 2 builds is beyond belief. Keep up the great work Chris and thanks for sharing the process.
Posted by: saladin May 13 2023, 11:22 AM
In the spirt of re-doing and for extra style points; I suggest sticking with the Ferrari original throttle body arrangement, no down turns, and focus on showcasing the engine like Ferrari likes to do. Combine the 914 engine lid and trunk lid into one...like a Ferrari spiderish engine lid. Diffidently a challenge style wise with the Ferrari engine above the 914 body lines...another level of metal fabrication and more tools... See below for inspiration.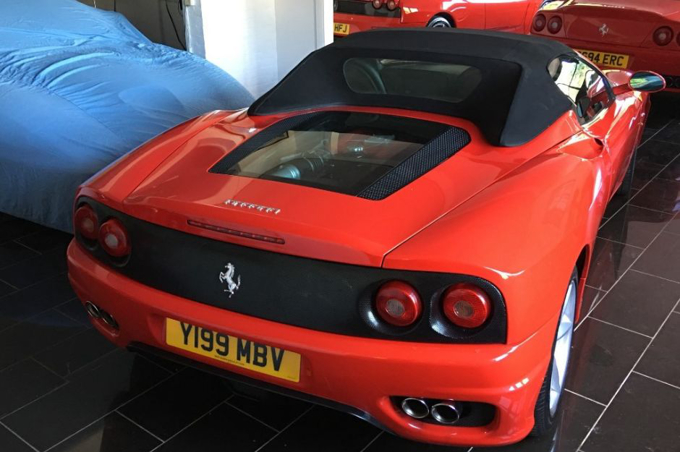
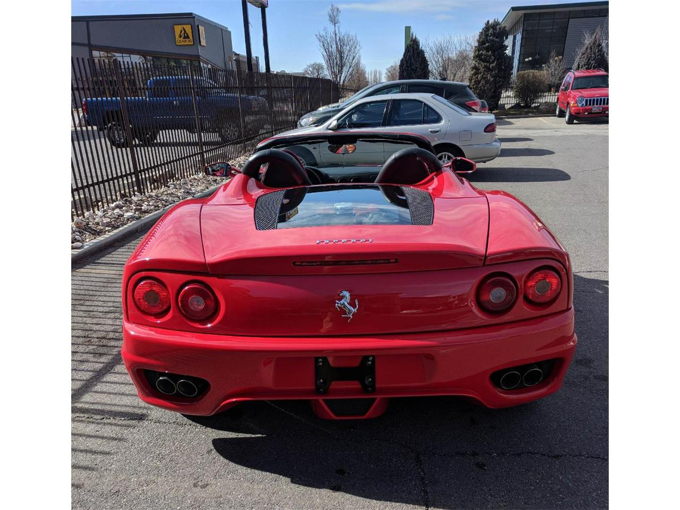
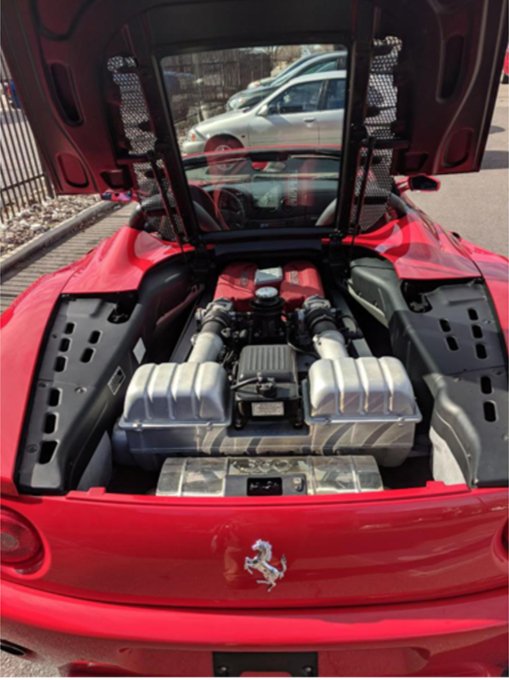
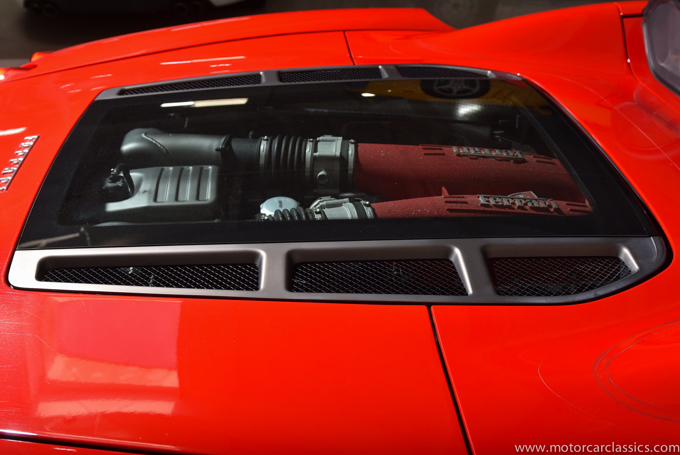
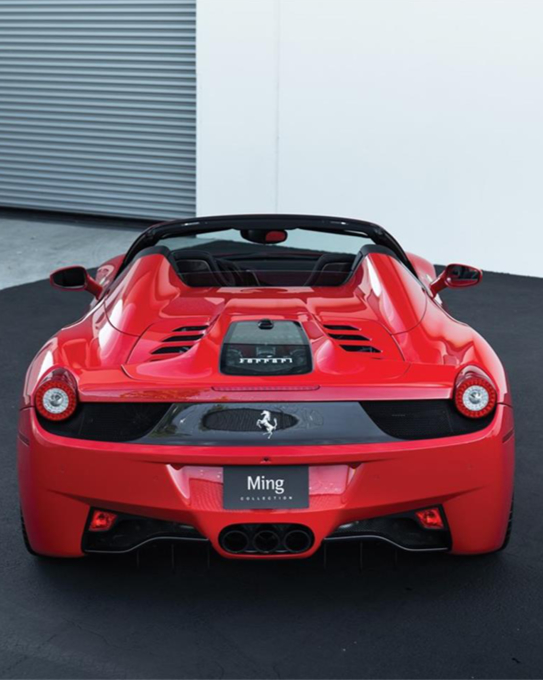
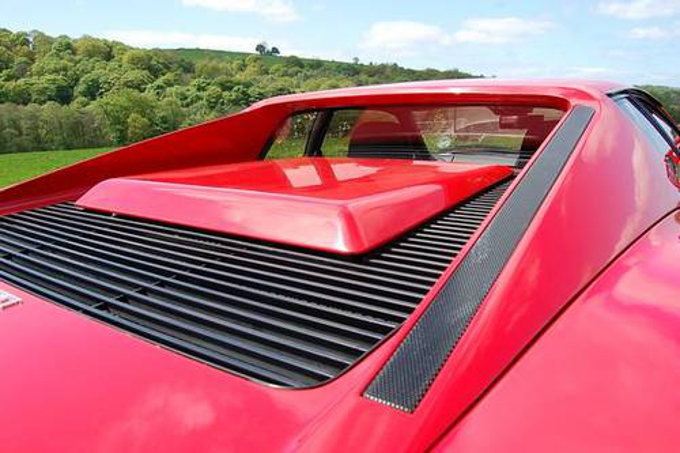
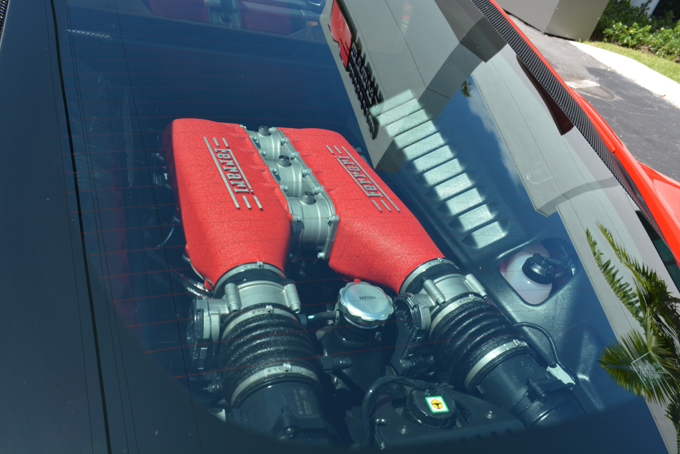
Posted by: tygaboy May 13 2023, 12:53 PM
@http://www.914world.com/bbs2/index.php?showuser=8125 - I appreciate your input but I'm not going to try that approach. It would impact the trunk nearly all the way back and IMO, that severe a change to an area that large would alter the look far more than I want to. If for some reason I don't like what I can achieve with the current intake mods, I'll look at ITBs.
Posted by: Superhawk996 May 13 2023, 01:22 PM
Posted by: tygaboy Jun 24 2023, 04:08 PM
Slight delay on this build so I could focus on RacerBenz. Or should I now call it "RollerBenz"! It looks so cool...
And yes, with the drive train and driver position moved to the middle, may I present "Stuck in the Middle Racing". C.LOWNS to the left, J.OKERS to the right...
Follow the build here, if you like this sort of thing:
https://grassrootsmotorsports.com/forum/build-projects-and-project-cars/racerbenz-my-cl500-track-day-car-build/182195/page1/
Attached thumbnail(s)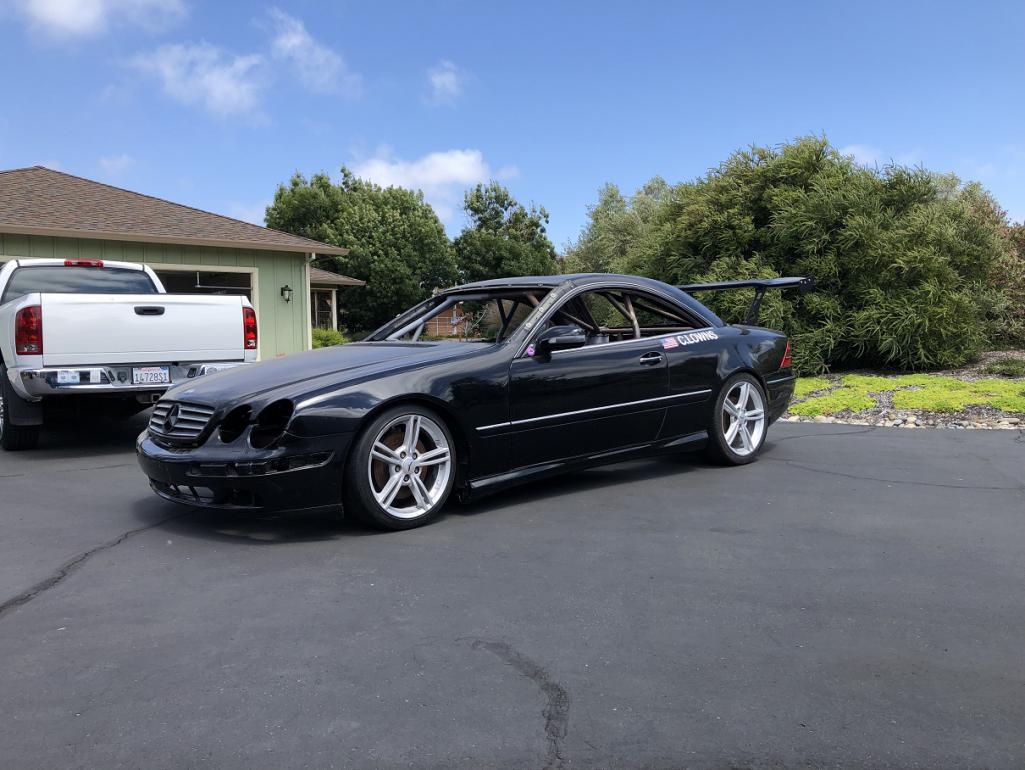
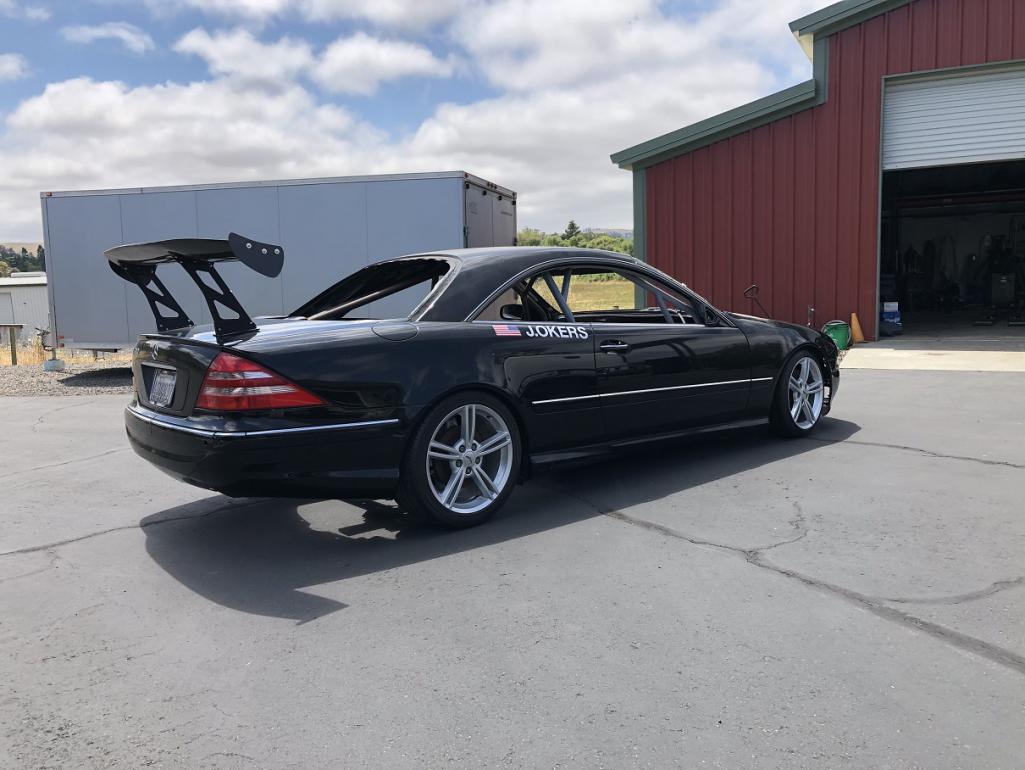
Posted by: KELTY360 Jun 24 2023, 09:48 PM
Damn you! I clicked on the thread hoping to get an update on the 914/Ferrari build and instead I get a link to the RacerBenz. Next thing I know I’m spending the afternoon reading the whole build thread…..spoiler alert…the imagination and fab skills just keep getting better. Well at least you help me keep my slacker status up to date.
Posted by: Dave_Darling Jun 25 2023, 04:36 AM
And yes, with the drive train and driver position moved to the middle, may I present "Stuck in the Middle Racing". C.LOWNS to the left, J.OKERS to the right...
Careful, some Stealer might get your Wheel...
--DD
Posted by: NARP74 Jun 25 2023, 10:35 AM
And yes, with the drive train and driver position moved to the middle, may I present "Stuck in the Middle Racing". C.LOWNS to the left, J.OKERS to the right...
Careful, some Stealer might get your Wheel...
--DD
Hopefully Gerry is not up in the Raffertys spying on you!
Posted by: tygaboy Aug 10 2023, 03:06 PM
So, I just got the quote for the complete Ferrari shifter assembly. 
Sorry, I'm gonna need a minute...
Actually, give me a few days.
Attached thumbnail(s)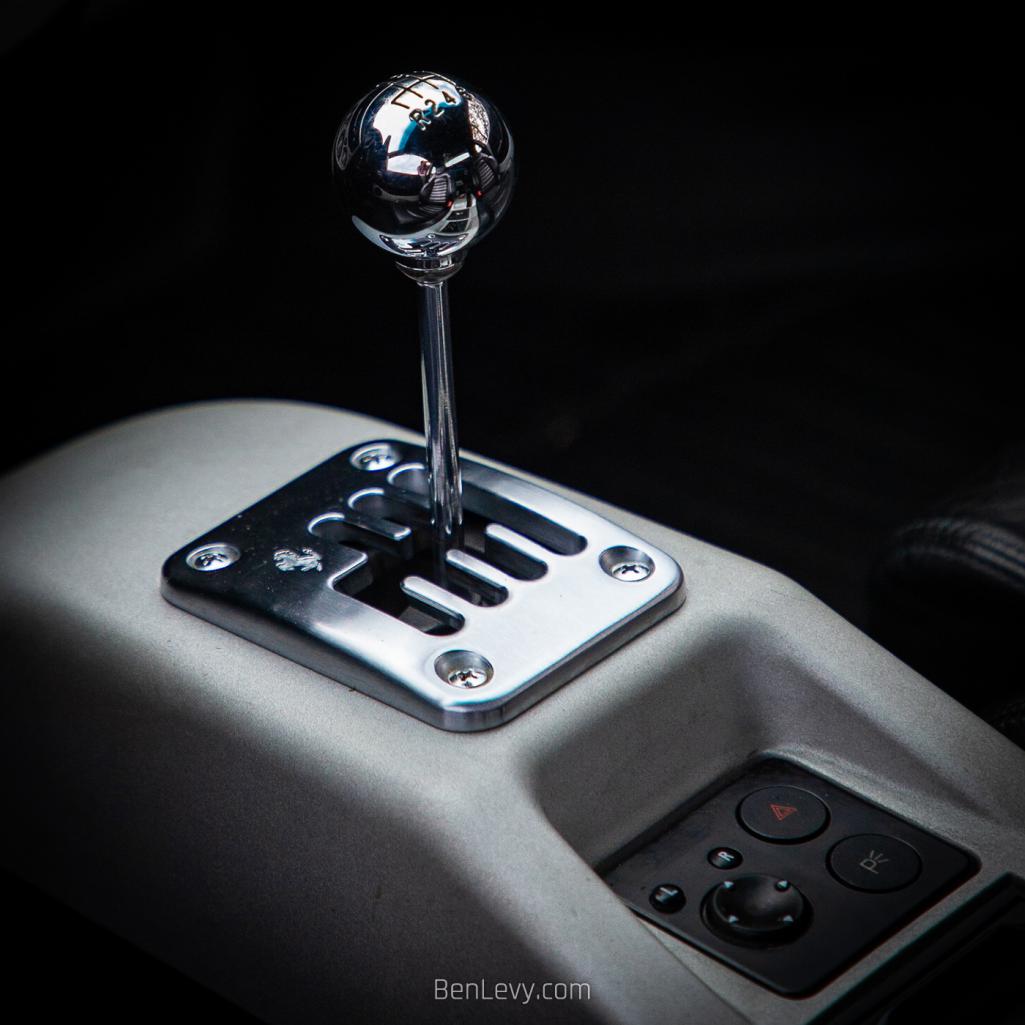
Attached image(s)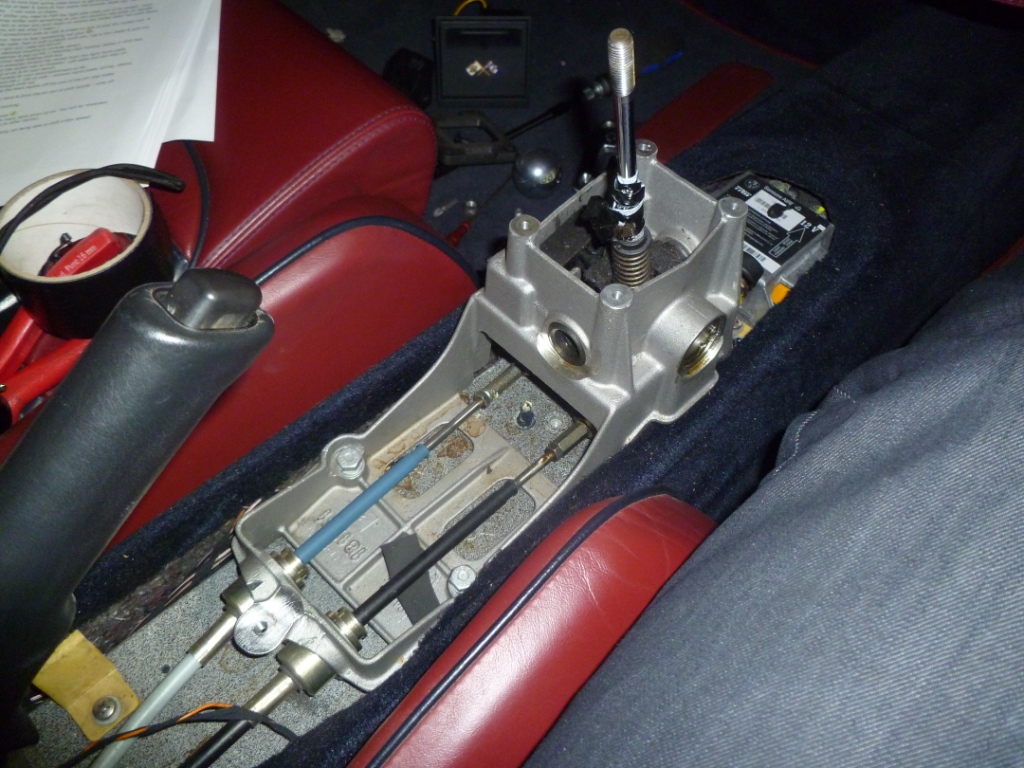
Posted by: Montreal914 Aug 10 2023, 03:19 PM
You are probably better off machining your own from scratch and pay a whole lot less…
$5,000? $10k?
Posted by: Front yard mechanic Aug 10 2023, 03:49 PM
Not appropriate
Posted by: SirAndy Aug 10 2023, 04:07 PM
Not to sound morbid but look in Honolulu for a toasted one
Might even find a radiator hose ...
Posted by: r_towle Aug 10 2023, 04:46 PM
Dubai has lots of parts cars….not kidding
Posted by: tygaboy Aug 10 2023, 05:11 PM
You are probably better off machining your own from scratch and pay a whole lot less…
$5,000? $10k?
I'm nowhere near smart enough to design/fab something this important. Plus, it is one of, if not THE, key focal points of the car and certainly the primary element of the driving experience. This build deserves the real deal.
Posted by: tygaboy Aug 10 2023, 05:41 PM
Dubai has lots of parts cars….not kidding
F1 to manual conversions have created a ridiculous supply/demand price curve for these parts. Dubai likely has folks (with more $) in line for the same parts I need.
I was fortunate enough to have a contact in the conversion business pull in a favor and make it so I even have the chance to buy one. I knew this was going to be a big expense so wasn't totally unpreparred but, holy jebus.
Posted by: KELTY360 Aug 10 2023, 05:44 PM
Might even find a radiator hose ...
Posted by: tygaboy Aug 15 2023, 05:20 PM
The bullet, she has been bitten: ordered the shifter today.
And about the price, just look at these components. This isn't all of it but Billet!
And my contact who helped facilitate this being available just drove a car with this shifter and repoted:
"I can honestly say the shift action is absolutely fantastic. Very rifle bolt action, far nicer feeling than the factory stock sloppy version."
And he has perhaps the world's most well developed 360. Good enough for me!
The pic is how it looks installed. Yes, it comes with that "pop up" area under the gate (that's for installing in a 430) Oh boy, I have options for how the console can look!
Attached thumbnail(s)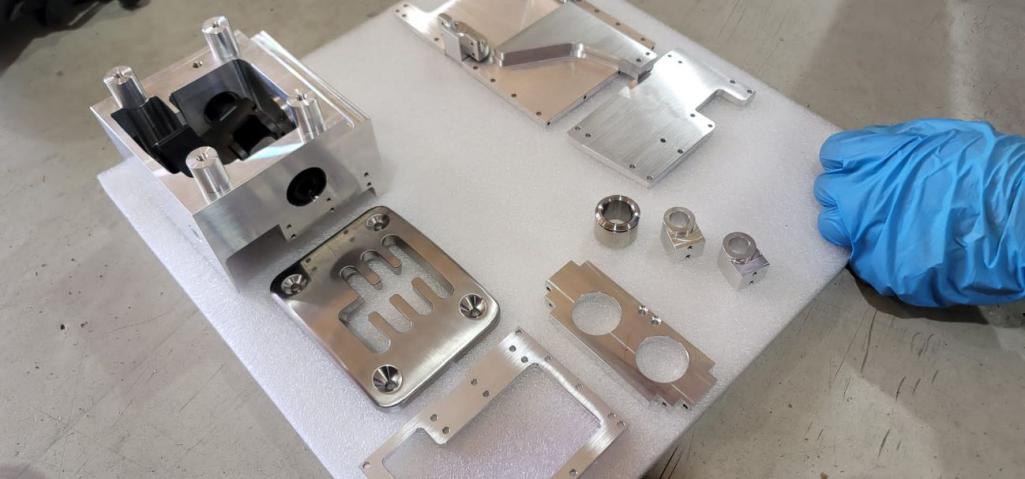
Attached image(s)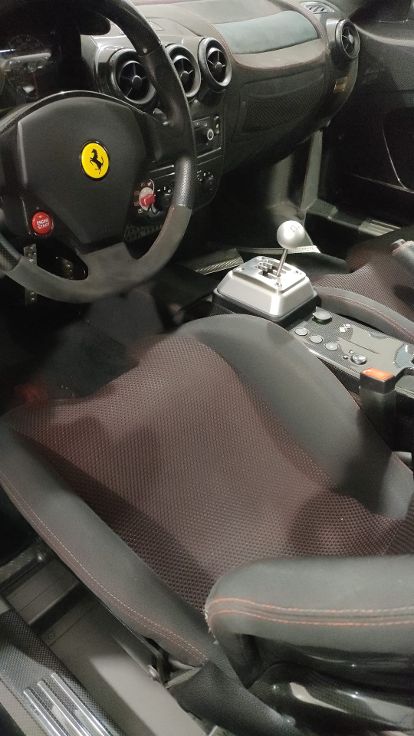
Posted by: East coaster Aug 15 2023, 06:28 PM
Incredible…..
Posted by: SirAndy Aug 15 2023, 06:37 PM
You should put one of these in the car when you're done ...
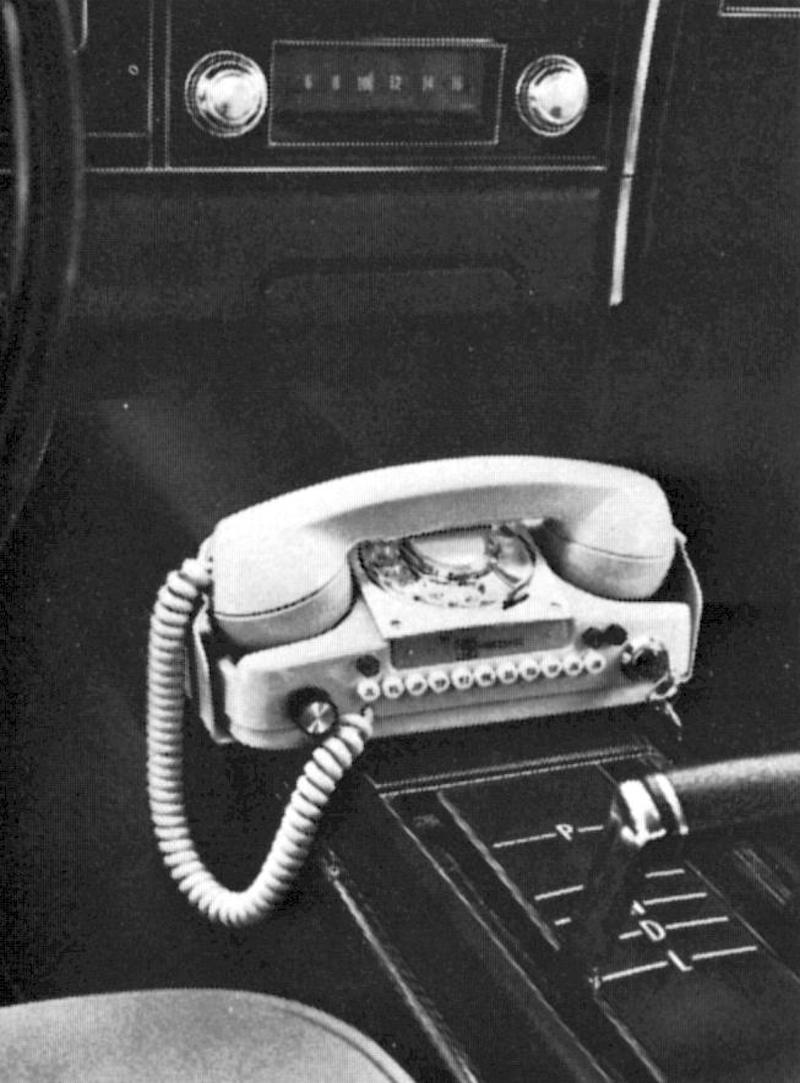
Posted by: bkrantz Aug 15 2023, 07:40 PM
Hmm, a 914 with precise shifting is almost as crazy as a 914 with Ferrari power.
Posted by: flat4guy Aug 15 2023, 08:41 PM
Chris - looking great. I have not seen the MB in a couple years - good to see you are biting off another project on top of the 914s. haha. Can't wait to stop by again for another look.
Posted by: tygaboy Aug 21 2023, 01:44 PM
No words needed. Well, OK. But just these words:
This thing is ridiculous. It's even better in real life.
Attached thumbnail(s)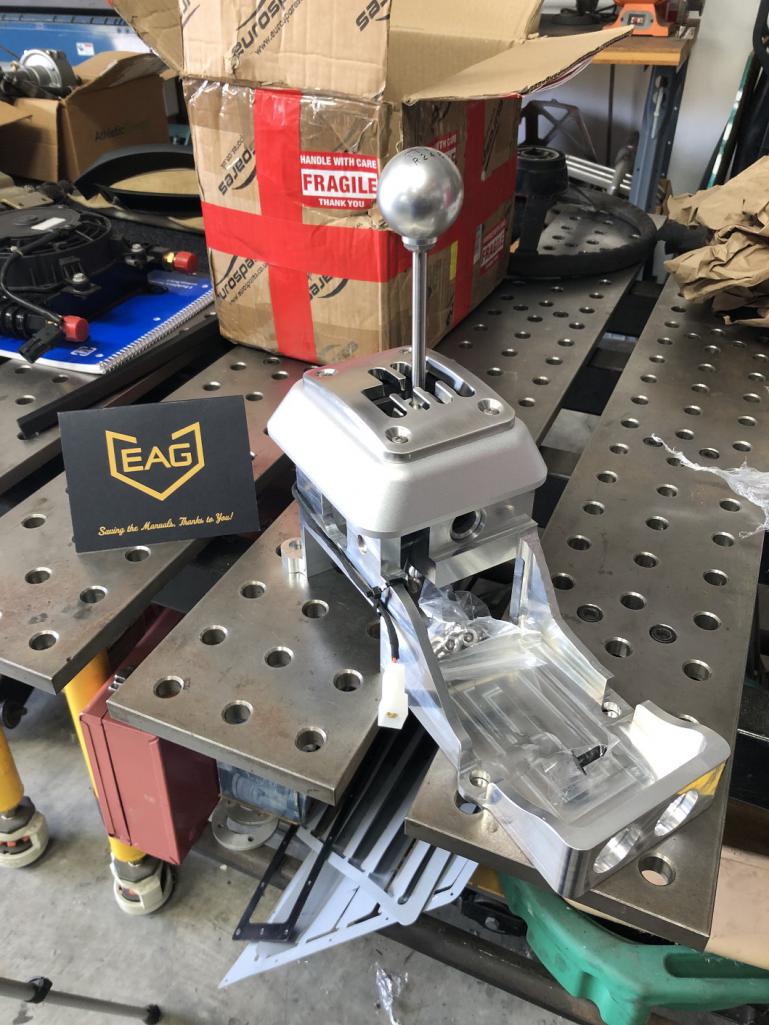
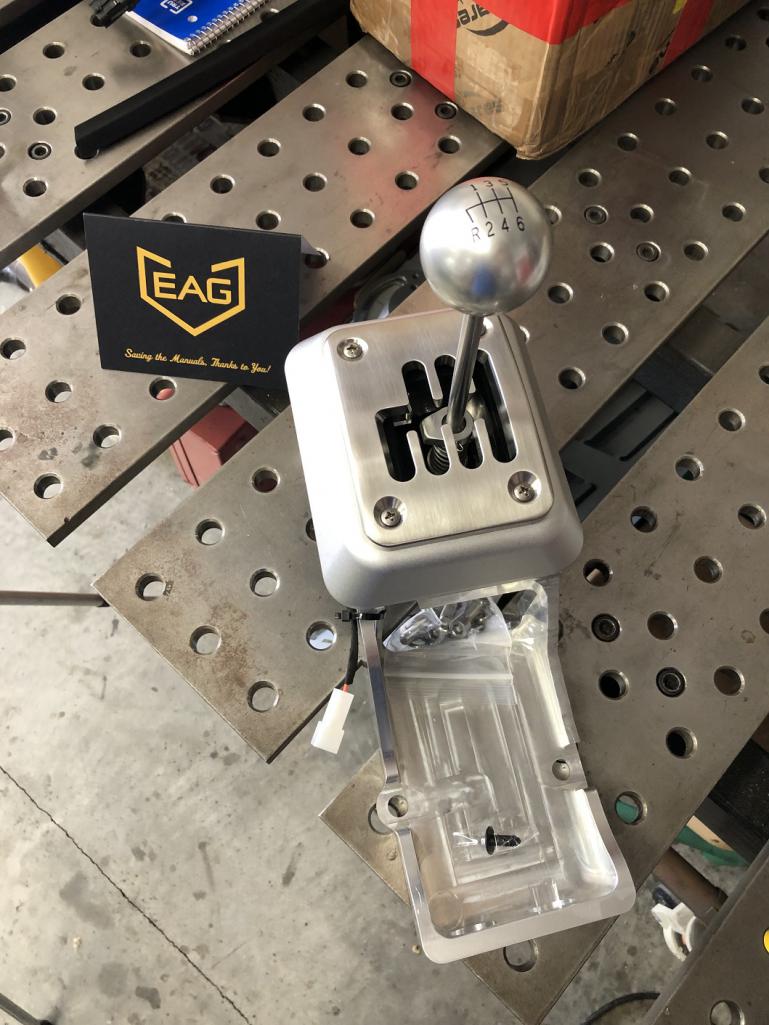
Posted by: rmarx Aug 21 2023, 02:38 PM
Shifter porn.
Posted by: Van B Aug 21 2023, 02:57 PM
I can’t understand why the aluminum is so thick! It looks like it should be a stressed member in the chassis lol!
Posted by: tygaboy Aug 21 2023, 05:49 PM
Official drop on "At the Red Barn" YouTube channel will happen Saturday AM but I thought some of you might enjoy seeing the shifter being unboxed. Yeah, I know, I'm a little bit excited...
Edit on 8/26: Updated link to "official" version:
https://www.youtube.com/watch?v=cRRDEX4xP5w
Posted by: Cairo94507 Aug 22 2023, 07:55 AM
I can't wait to see that shifter in person; it looks amazing in the video. I can imagine it will shift like a rifle bolt.
Posted by: jd74914 Aug 22 2023, 09:02 AM
That's the OEM part? :wow:
Posted by: tygaboy Aug 22 2023, 09:14 AM
That's the OEM part? :wow:
@http://www.914world.com/bbs2/index.php?showuser=1659 No. Finding OEM manual shifters/parts is essentially impossible. Ferrari no longer makes the components and not a lot of manuals were made back then. This is a billet aftermarket assembly from EAG out of Round Rock, TX. It's better than factory - so say the Ferraristas who know. It's spectacular.
Posted by: jd74914 Aug 22 2023, 09:20 AM
Ahh, interesting. Explains the EAG thank you next to it.
That is a beautiful looking part! I'm sure it is better than factory, really looks quite incredible.
Posted by: KELTY360 Aug 22 2023, 01:16 PM
Like a kid at Christmas.....surprised you didn't spend anytime playing with the box.
Posted by: tygaboy Aug 22 2023, 02:19 PM
Now to work out the location and orientation. I may add a bit of "up at the front" tilt. Among other things, that helps get the shift cables pointed where I want them. Once I'm settled on that, I'll work out a mounting system. And no, it won't include a headlight cover...
But this is where it starts getting fun: I need to think as many steps ahead as possible and account for all the other systems that need to live under this shifter and be accesible for installation/service/replacement once everything is "done".
I think I'd like to preserve the factory tunnel vs total replacement like I did in my LS car. We'll see.
Attached thumbnail(s)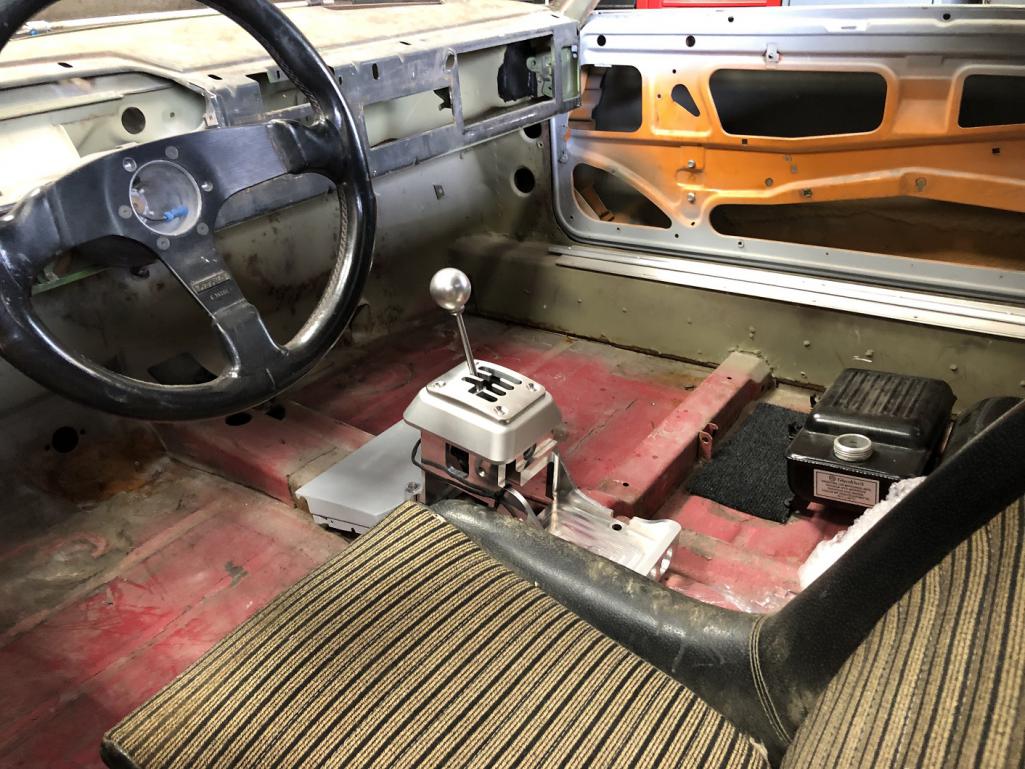
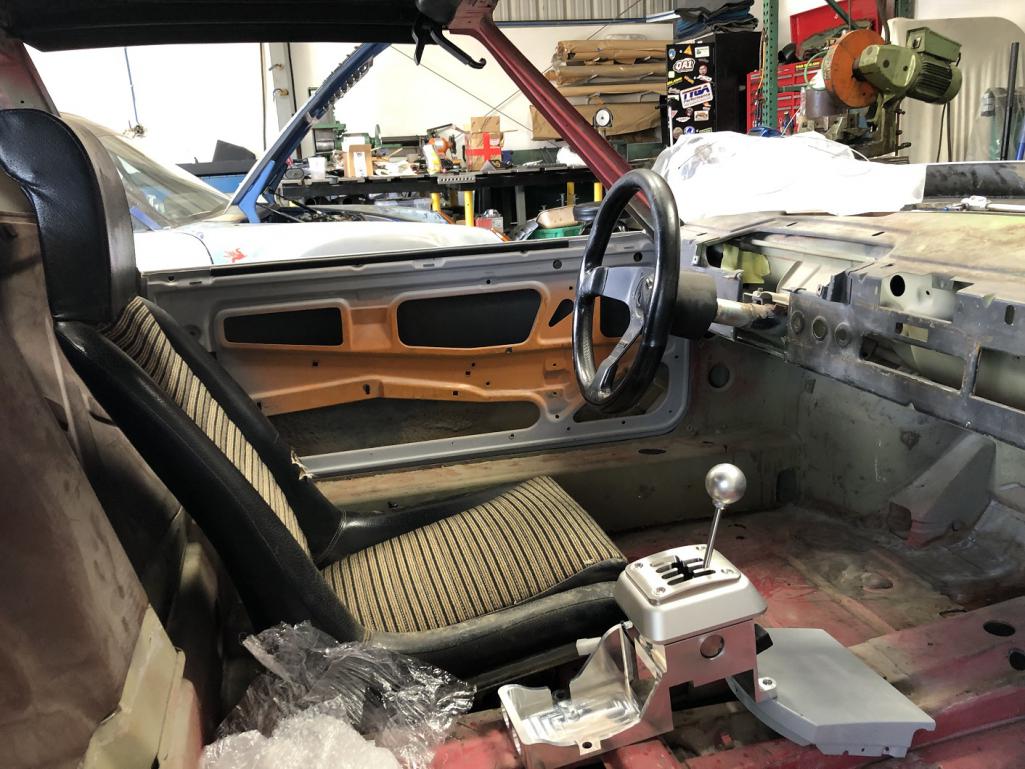
Posted by: ClayPerrine Aug 22 2023, 02:33 PM
Now to work out the location and orientation. I may add a bit of "up at the front" tilt. Among other things, that helps get the shift cables pointed where I want them. Once I'm settled on that, I'll work out a mounting system. And no, it won't include a headlight cover...
But this is where it starts getting fun: I need to think as many steps ahead as possible and account for all the other systems that need to live under this shifter and be accesible for installation/service/replacement once everything is "done".
I think I'd like to preserve the factory tunnel vs total replacement like I did in my LS car. We'll see.
You could do what I did and cut a hole in the top of the tunnel, then run the cables out the original holes for the shifter and the speedo cable.
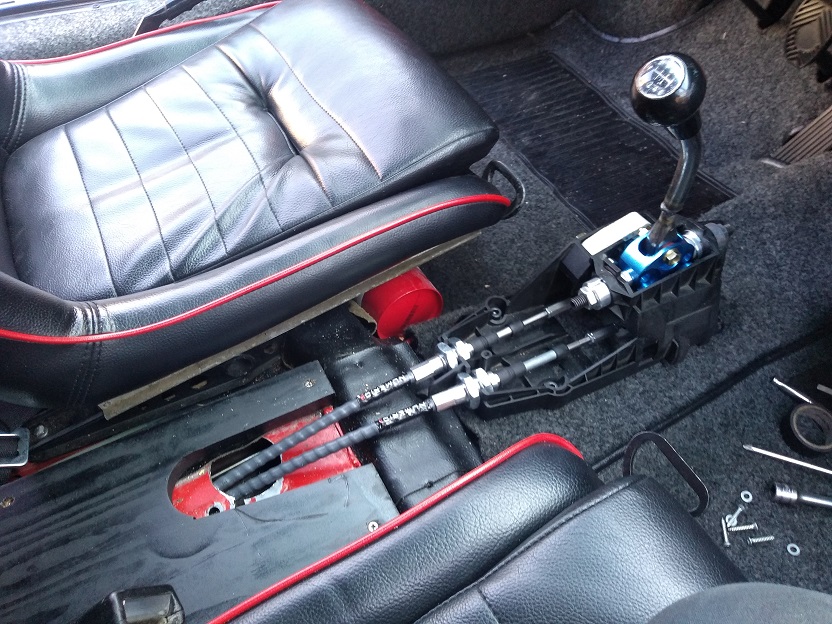
That makes it easy to get through the firewall.
Posted by: Cairo94507 Aug 22 2023, 03:57 PM
I love that shifter and Clay's idea for the cables.
Posted by: tygaboy Aug 22 2023, 04:10 PM
You could do what I did and cut a hole in the top of the tunnel, then run the cables out the original holes for the shifter and the speedo cable.
That makes it easy to get through the firewall.
@http://www.914world.com/bbs2/index.php?showuser=1143 Clay - The issue I (may) have is the Ferrari engine location requires I get the cables pointing to the right (passenger) side of the engine before they get through the firewall. I have to get back under the car and verify details now that the headers are in there but as I recall, I can't go under the engine. As with my LS car, the cables need to get past the crank pulley by going outside / above it. So now that I'm thinking about it, I may not want the front tilted up. It'll all work out, one way or another.
Posted by: East coaster Aug 22 2023, 05:04 PM
I like the re-use of the factory headlight cover
Posted by: tygaboy Aug 24 2023, 06:05 PM
Here's the plasma table earning it's keep cutting V1 of the shifter mount. Anyone surprised it looks a bit more complicated than "just a mount"?
Attached thumbnail(s)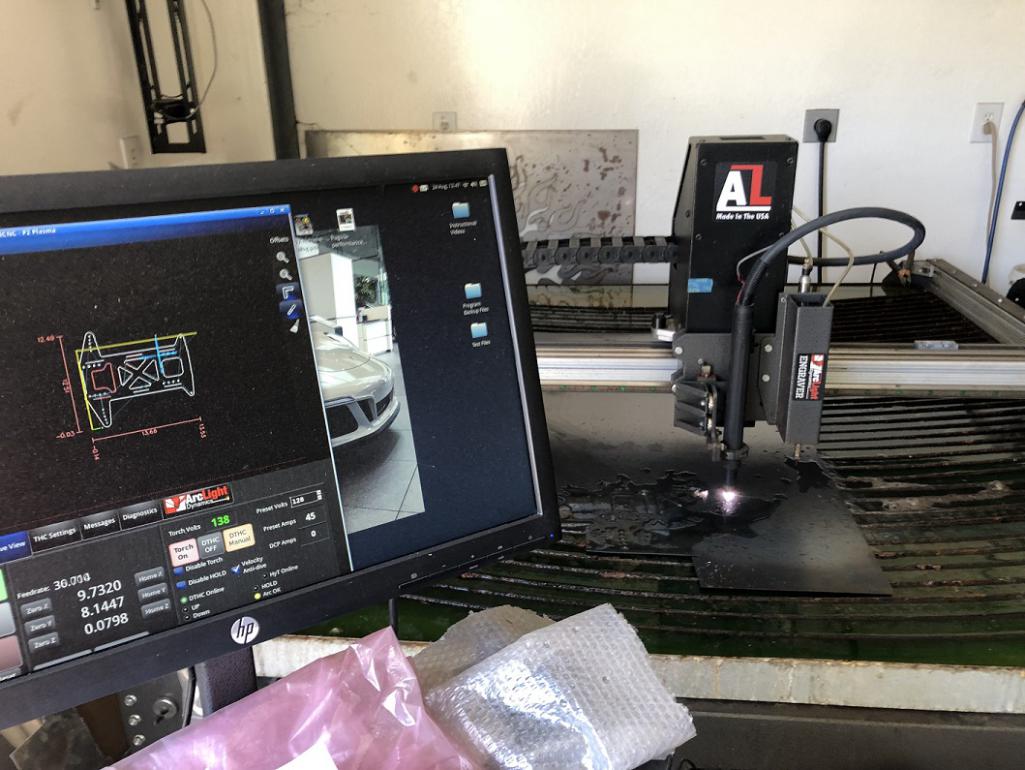
Posted by: tygaboy Aug 24 2023, 06:21 PM
Initial mock up of the shifter base mount.
I figured future drivers of this car may prefer a bit different shifter location so...
There will be tabs welded to the chassis but this mount can rotate around that tab at the rear and tilt from flat to about 2" up at the front, enabled by the series of holes in the front tab.
Of course, when it's tilted, the knob moves up and rearward. So the mount also has a series of holes (you can see them just behind the front shift block mount) that allow for the entire shifter assembly to move forward / back, to best suit the driver. Here it's approximating the highest/most forward position.
Version II is on the drawing table but it's a bit more complicated (and potentially impractical) so it may never happen. It adds knobs to enable real-time adustment of tilt and fore/aft positions. Again, don't hold your breath.
Attached thumbnail(s)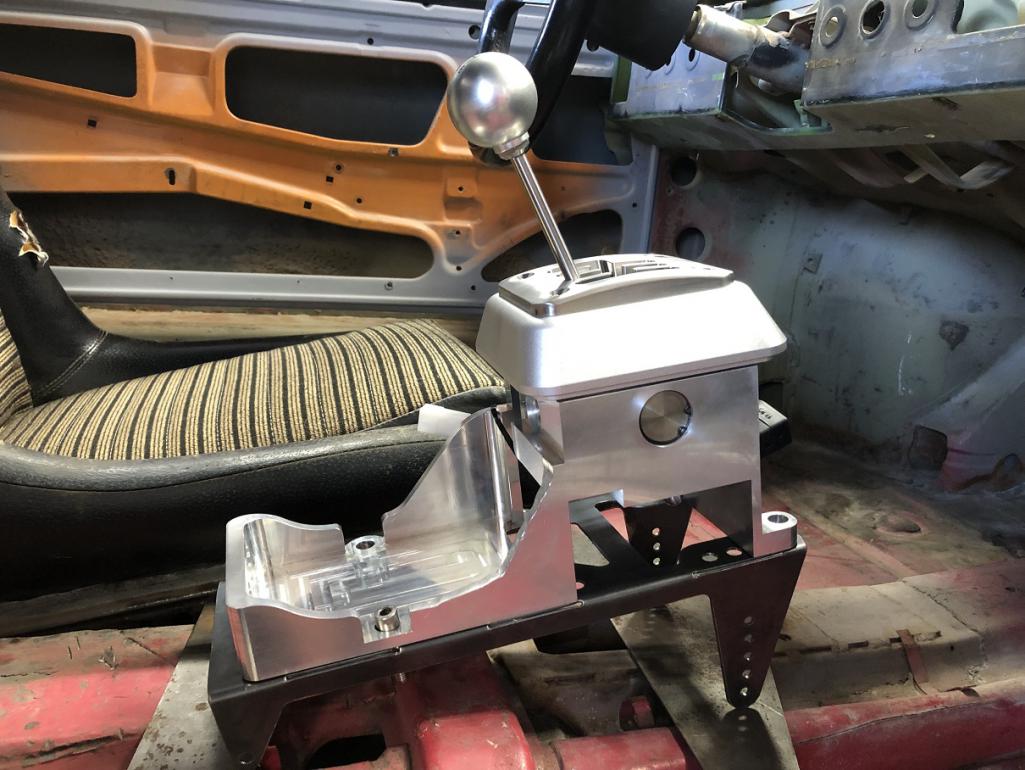
Posted by: Van B Aug 24 2023, 06:32 PM
Food for thought, I like my shifter to be on the same plane as the steering wheel. It makes movement between the two, smoother and more accurate.
Posted by: tygaboy Aug 24 2023, 07:02 PM
Food for thought, I like my shifter to be on the same plane as the steering wheel. It makes movement between the two, smoother and more accurate.
@http://www.914world.com/bbs2/index.php?showuser=8571 B Great minds... When it's in neutral, the knob is in plane with the wheel.
Posted by: Van B Aug 24 2023, 08:07 PM
Food for thought, I like my shifter to be on the same plane as the steering wheel. It makes movement between the two, smoother and more accurate.
@http://www.914world.com/bbs2/index.php?showuser=8571 B Great minds... When it's in neutral, the knob is in plane with the wheel.
Yes!
I did a mod to my 996 shifter to bring it up and in line… then immediately wondered why I had the car for 10yrs before I made the change
Posted by: tygaboy Sep 2 2023, 07:20 AM
It's just a mount for the shifter. I mean, how complicated could I make that?
https://www.youtube.com/watch?v=Kh0iLX7Aoak
Posted by: 76-914 Sep 2 2023, 07:27 AM
Food for thought, I like my shifter to be on the same plane as the steering wheel. It makes movement between the two, smoother and more accurate.
@http://www.914world.com/bbs2/index.php?showuser=8571 B Great minds... When it's in neutral, the knob is in plane with the wheel.
Hmmm. I located mine inline with the steering wheel too but I'm damn sure not going to claim a great mind on my part. It is more 914 like; rusty.
Posted by: Cairo94507 Sep 2 2023, 08:31 AM
Jesus, if Chris manufactured the "Red Barn" model 914 I have to believe there would be a line of customers. The attention to detail is mind boggling. Love the details and of course a wonderful message for people to adopt a kitty.
Posted by: Krieger Sep 2 2023, 10:00 AM
Nice work! Big step forward figuring all the little details that I am sure took many hours to figure out.
Posted by: Montreal914 Sep 2 2023, 11:43 AM
Cool shifter location study. The side views on the videos really show what is going on.
Posted by: tygaboy Nov 17 2023, 02:28 PM
I don't do the best at juggling multiple project but I am making progress. The past couple days has been noodling on the cooling system.
I've been looking at various mid- and rear-engined cars and how, in order to have some sort of frunk, they typically run a pair of radiators - one each in front of the front wheels.
Here's a 360 showing its rad.
I figure, if they can do it, I can do it!
After some closer eyeballing of the 914 chassis, I decided I'd give it a go.
Attached image(s)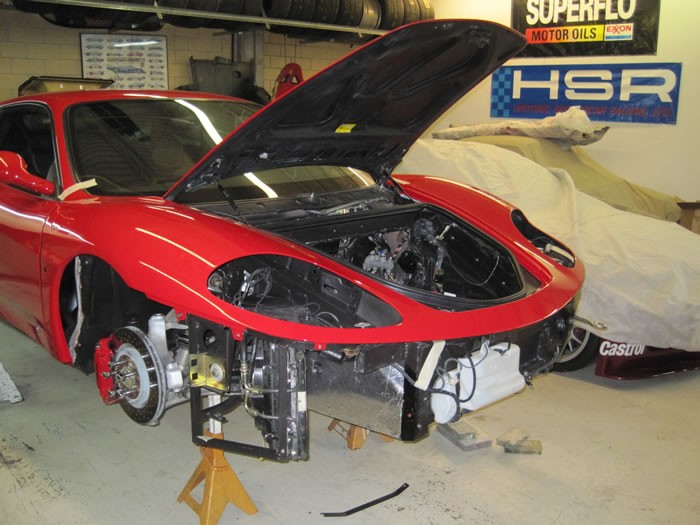
Posted by: Cairo94507 Nov 17 2023, 02:36 PM
Posted by: tygaboy Nov 17 2023, 02:47 PM
First step is a proof of concept. I decided to use a corner of the black donor chassis and started cutting. A few important points:
- I want to keep the pop-up look so no "lights in the turn signal buckets". I found a set of DOT legal hi/low LED lights that use 60mm beams in a 90 mm mount system. The plan is to mount them to the rear wall of what's left of the headlight bucket.
- this is a '75 BUB chassis but you can see that this approach preserves the area needed for the bumper mounts.
- looks like plenty of depth for a radiator and fan set up.
- the turn signal bucket is totally out of the way.
- depending of final available space, it looks like I can get maybe a 12x14 radiator in there.
The Renegade radiator in my LS car is 27" x 14" (378 sq. in.)
Let's go with worst case: I can only get two, 10"x12" or 240 sq. in. in there. I can get 5"x24" in the center for a total of 360 sq. in. So even worst case looks like it can work.
I'm enouraged! Now to find some radiators...
Attached thumbnail(s)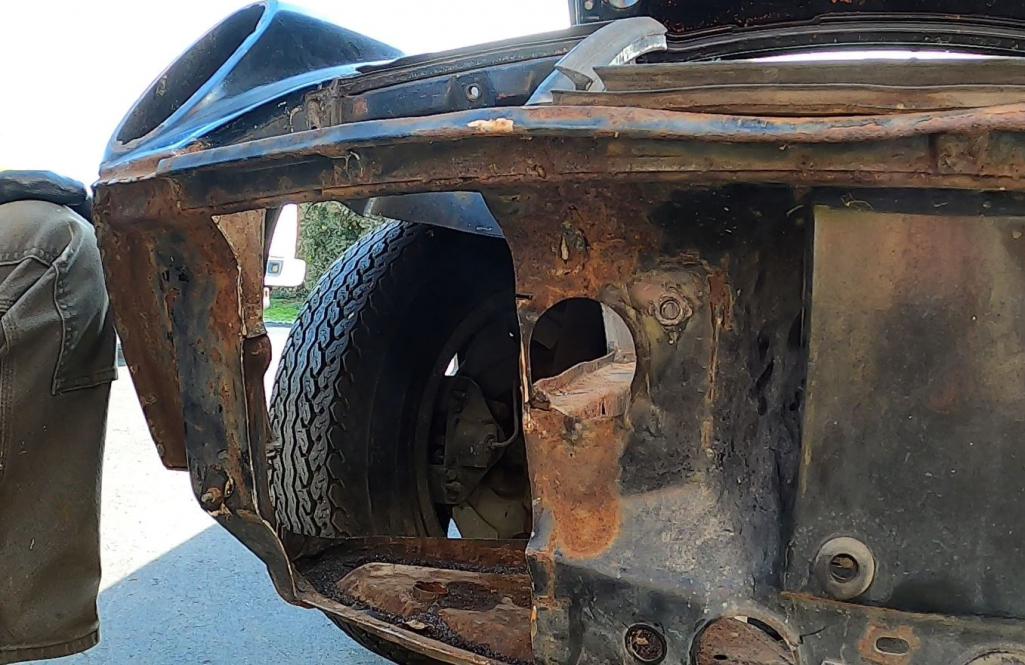
Posted by: Jett Nov 17 2023, 06:13 PM
First step is a proof of concept. I decided to use a corner of the black donor chassis and started cutting. A few important points:
- I want to keep the pop-up look so no "lights in the turn signal buckets". I found a set of DOT legal hi/low LED lights that use 60mm beams in a 90 mm mount system. The plan is to mount them to the rear wall of what's left of the headlight bucket.
- this is a '75 BUB chassis but you can see that this approach preserves the area needed for the bumper mounts.
- looks like plenty of depth for a radiator and fan set up.
- the turn signal bucket is totally out of the way.
- depending of final available space, it looks like I can get maybe a 12x14 radiator in there.
The Renegade radiator in my LS car is 27" x 14" (378 sq. in.)
Let's go with worst case: I can only get two, 10"x12" or 240 sq. in. in there. I can get 5"x24" in the center for a total of 360 sq. in. So even worst case looks like it can work.
I'm enouraged! Now to find some radiators...
996 turbo radiators?
Posted by: tygaboy Nov 18 2023, 07:09 AM
Just a quick update on the shifter install -
https://www.youtube.com/watch?v=Xk7GuevMZxg
Posted by: Cairo94507 Nov 18 2023, 09:20 AM
Just such great work happening at the Red Barn.
Posted by: Chris914n6 Nov 18 2023, 02:03 PM
You should base the cooling math on the Ferrari not the Chevy.... including air intake and exhaust hole sizes.
Also you don't have to see the rad from the front to cool it. Mine uses the horn grills as intakes plus most of the round holes from a spoiler trim, couple of additions to the back of the bumper to direct airflow, and I'm good. 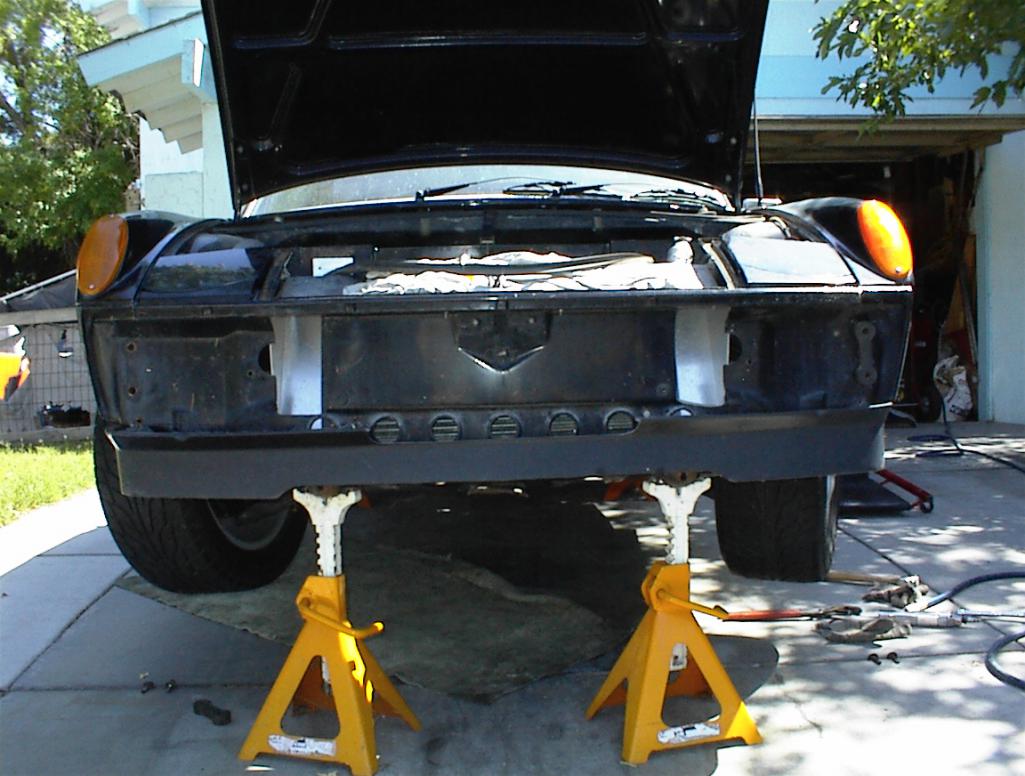
Posted by: flat4guy Nov 18 2023, 09:55 PM
Love watching your videos and drooling over your work. Looking forward to my next visit.
Posted by: BuddyV Nov 18 2023, 11:35 PM
I WANT TO SHIFT IT!!!!!!!!!
(Text me if the shifter is still attached)
Posted by: Retroracer Nov 19 2023, 09:08 PM
"I want to keep the pop-up look so no "lights in the turn signal buckets". I found a set of DOT legal hi/low LED lights that use 60mm beams in a 90 mm mount system. The plan is to mount them to the rear wall of what's left of the headlight bucket."
I've thought about this 996/987 style "side pod" radiator approach on and off - glad to see you noodling on it for this project. I think with the pop up lids and some physically smaller LED light units, you could get some extra ducted air in there at freeway vehlcle speeds - so the fan controller overrides the headlight lifter relay! (visual indicator for the driver to check engine temp!) . The fan loading might be eased a bit. Active aero, dude.....
Also the lift angle on the headlight covers could be restricted to create a less severe angle when open with the smaller diameter units - I seem to recall a post here that someone had done this.
Fun stuff Chris - keep the posts coming!
- Tony
Posted by: tygaboy Nov 20 2023, 04:19 PM
I cut a mock-up mount for the Hella LEDs I'm considering. Mounting info in the pics. They're 60mm lenses, DOT legal, separate hi and low beam units. Looks like they'll work.
Bonus idea, thanks to @http://www.914world.com/bbs2/index.php?showuser=2058 Pete, is that I think I can get them to sit fully behind the rear wall of the headlight bucket and rather than have the light covers pop up at the front, like stock, they'll hinge at the front and drop down at the back, exposing the bulbs.
Yes, it'll require permanently connecting the eyebrows to the covers and working up a new hinge system but, hey, if it were easy, everyone would be doing it.
Attached thumbnail(s)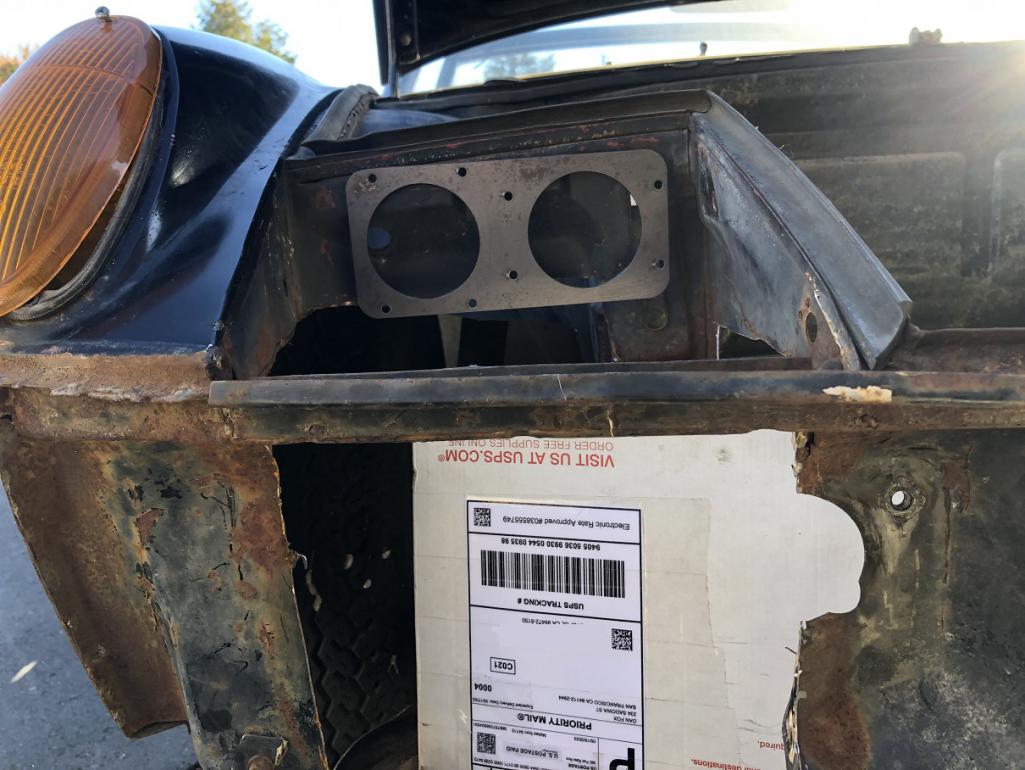
Attached image(s)
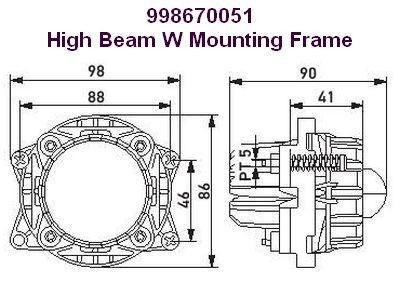
Posted by: Krieger Nov 20 2023, 04:46 PM
I cut a mock-up mount for the Hella LEDs I'm considering. Mounting info in the pics. They're 60mm lenses, DOT legal, separate hi and low beam units. Looks like they'll work.
Bonus idea, thanks to @http://www.914world.com/bbs2/index.php?showuser=2058 Pete, is that I think I can get them to sit fully behind the rear wall of the headlight bucket and rather than have the light covers pop up at the front, like stock, they'll hinge at the front and drop down at the back, exposing the bulbs.
Yes, it'll require permanently connecting the eyebrows to the covers and working up a new hinge system but, hey, if it were easy, everyone would be doing it.
That will be so cool! I love that idea!
Posted by: Retroracer Nov 20 2023, 06:30 PM
Hmm. Might have to watch the bumper top lip to make sure you get the beam close enough to the car? Like the idea though....
- Tony
Posted by: tygaboy Nov 20 2023, 06:55 PM
Hmm. Might have to watch the bumper top lip to make sure you get the beam close enough to the car? Like the idea though....
- Tony
@http://www.914world.com/bbs2/index.php?showuser=16100 Tony - That has been on the board as a possible challenge but I'm choosing to believe it won't be a show stopper. Partly because if it's dark a few feet in front of the car, I think I can live with that.
Plus, take a look at the 360 headlight position.
Attached thumbnail(s)
Posted by: tygaboy Nov 21 2023, 09:39 AM
This "corner radiator" requires significant modification so I have to be sure it'll work. I'd really prefer a larger, better directed opening for the radiator inlet...
So here's the latest bad idea: copy the 914/8 headlight size/shape and widen the fog light grill opening to match. This would allow fitment of a nicely sized radiator and tidier airflow.
Plus, being a V8 swap, it'd be a neat nod to the factory 8-cylinder car.
It'd requires fabricating a new headlight bucket and covers, as well as some sunstantial mods to the hood. I think I'll try this on the other side of the donor chassis and see how it goes.
Attached thumbnail(s)
Posted by: Cairo94507 Nov 21 2023, 09:42 AM
Would you then go with 2 5" headlights on each side?
Posted by: tygaboy Nov 21 2023, 11:44 AM
Would you then go with 2 5" headlights on each side?
@http://www.914world.com/bbs2/index.php?showuser=9712 Michael - no, I need all the space I can get for the radiators so no room to stow pop up headlights of any size. The plan would still be the small LEDs in the rear panel of the headlight bucket. The 914/8 design is about getting as much room for radiators and grill openings as I can. Plus the style points / tip o' the hat to the factory 8 car.
Posted by: East coaster Nov 21 2023, 12:51 PM
Love the thought process and the noodling through this. I had considered something similar for my Suby setup, but chickened out.
Posted by: burton73 Nov 21 2023, 01:46 PM
@http://www.914world.com/bbs2/index.php?showuser=19241 Thought’s on putting a clear Uvex or Lexan covers, somewhat like the Ferrari has?
If there is anything that I can help you with on the plastic, let me know. My Blue M Industrial oven is plenty big for these. Picture of Lambo with plex
Best Bob B
Posted by: Krieger Nov 21 2023, 02:55 PM
How about the cover panels sliding back under the hood?
Posted by: tygaboy Nov 21 2023, 04:22 PM
Now to start roughing out the size/shape. It's made a little more difficult because the factory car has those wonderfully unique turn signal lenses that change the perspective on where things are. I have a couple other pics I can reference and I have a ways to go before anything gets cut.
I think the covers are wider than what I've laid out - which is good because wider = more space for the radiators.
It's a process.
Attached thumbnail(s)
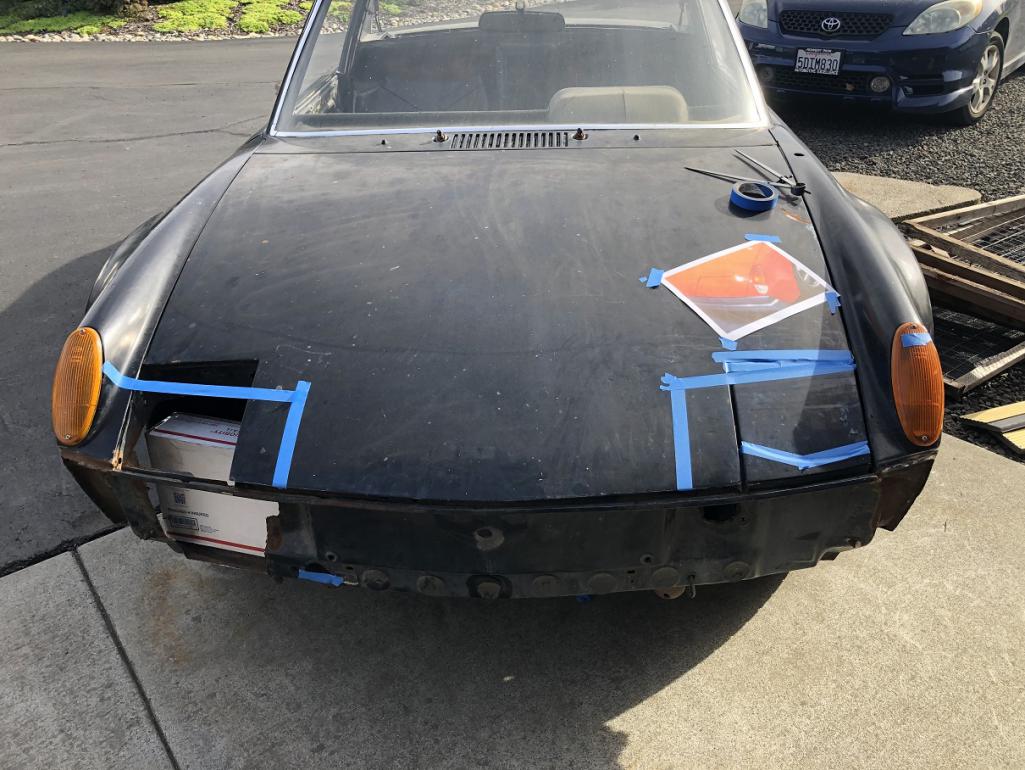
Posted by: tygaboy Nov 21 2023, 04:26 PM
@http://www.914world.com/bbs2/index.php?showuser=19241 Thought’s on putting a clear Uvex or Lexan covers, somewhat like the Ferrari has?
If there is anything that I can help you with on the plastic, let me know. My Blue M Industrial oven is plenty big for these. Picture of Lambo with plex
Best Bob B
@http://www.914world.com/bbs2/index.php?showuser=7414 Bob - thanks for the offer! I'm going to do all I can to keep the headlights covered and as 914-ish as possible. But I'll certainly keep you in mind. Thanks again.
Posted by: tygaboy Nov 21 2023, 04:29 PM
How about the cover panels sliding back under the hood?
@http://www.914world.com/bbs2/index.php?showuser=2104 Andy - interesting idea but the frunk needs to be sealed and I don't know if there's room enough for a channel and/or something that would allow the cover to drop, then slide back, etc.
After looking at things with this wider, shallower cover, it seems that pop up may be the way to go. But even as pedestrian as that is, I do have one pretty cool idea up my sleeve...
Posted by: Chris914n6 Nov 21 2023, 09:00 PM
1999 flash back
I did a one-off set for RH on a Rayco Boxster body. Had to trim the bumper to get a horizontal line to the lights. Haven't found pics yet if I even still have them. They were the 90mm Hella projectors so your 60mm would fit better.
A low profile popup is almost easier. Just change the lengths of the pivot arm and lever. The pivot is an awkward angle but you like that kind of challenge.
Last thing, that truck support you cut out to place the rad more inboard is an important structural component.
Couple pics http://www.914world.com/bbs2/index.php?showtopic=181457&hl=
Think about moving the bumper mount inboard, as it looks like it's in the way of what your trying to do. That part of the body is going to be weak anyways with the big holes in it.
I cut a mock-up mount for the Hella LEDs I'm considering. Mounting info in the pics. They're 60mm lenses, DOT legal, separate hi and low beam units. Looks like they'll work.
Bonus idea, thanks to @http://www.914world.com/bbs2/index.php?showuser=2058 Pete, is that I think I can get them to sit fully behind the rear wall of the headlight bucket and rather than have the light covers pop up at the front, like stock, they'll hinge at the front and drop down at the back, exposing the bulbs.
Yes, it'll require permanently connecting the eyebrows to the covers and working up a new hinge system but, hey, if it were easy, everyone would be doing it.
Posted by: Krieger Nov 21 2023, 11:49 PM
https://youtu.be/f-22ffmBUp8?feature=shared
Posted by: horizontally-opposed Nov 22 2023, 10:15 AM
Now to start roughing out the size/shape. It's made a little more difficult because the factory car has those wonderfully unique turn signal lenses that change the perspective on where things are. I have a couple other pics I can reference and I have a ways to go before anything gets cut.
I think the covers are wider than what I've laid out - which is good because wider = more space for the radiators.
It's a process.
Hm. Good point about the 914S's prototype turn signals, which I have always dug. They do change some of the perspective a bit, but maybe not all that much? Would be neat to measure them as well as the fender humps vs the production stuff…have never thought to do so.
Looking at your taping, I am wonder about headlight height, as the production opening looks like it will place your LEDs higher than the wider/lower openings, and then how to fill up the wider opening with LED lights—especially if you stick with just two headlights per side in a nod to the 914S.
It's always easy from a desk with a cup of tea nearby (right?), but I wonder about just how big the radiators need to be in the smaller/lighter 914 of if that's fundamentally irrelevant and it will all come down to efficient/tight ducting on the way in and easy venting on the way out.
It's actually more work to find images of Ferrari 360s without their front bumper than I would have thought, but the 360's intakes aren't all that big. If Tamiya is its usual self in terms of accuracy, the radiator angles and (apparent?) direct venting to the wheel wells is pretty interesting, and very different to the Porsche method employed on the 986/996. You might have more luck with the Ferrari method in a 914 due to the front fender space you mentioned when we were together…assuming the 914 wheel wells can be cut away in a similar fashion? Then maybe feed with the regular bumper vents and see if you need to add a third feed from the 914-6 "GT" setup? Or, maybe "cheat" a little more airflow between the bottom of the bumper and the top of the valance, as Porsche did on some of the later impact-bumper 911s.
With all that said, I do like that 914S front end...
Attached image(s)
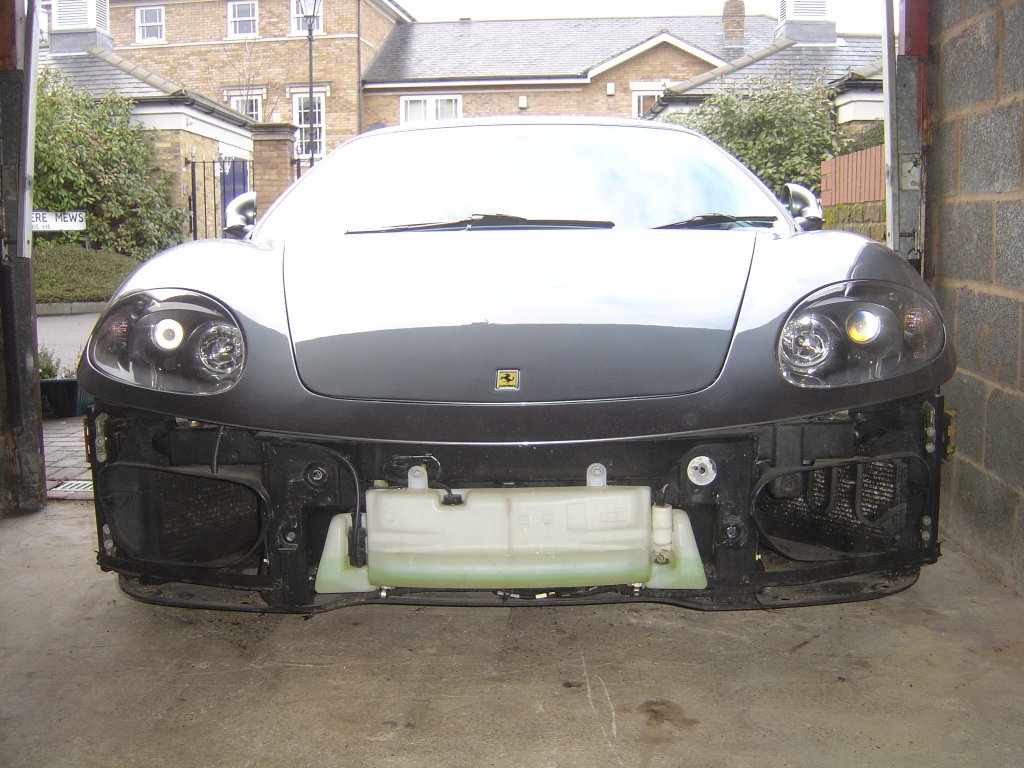
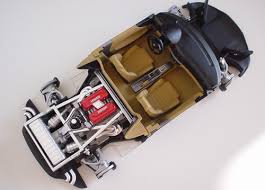
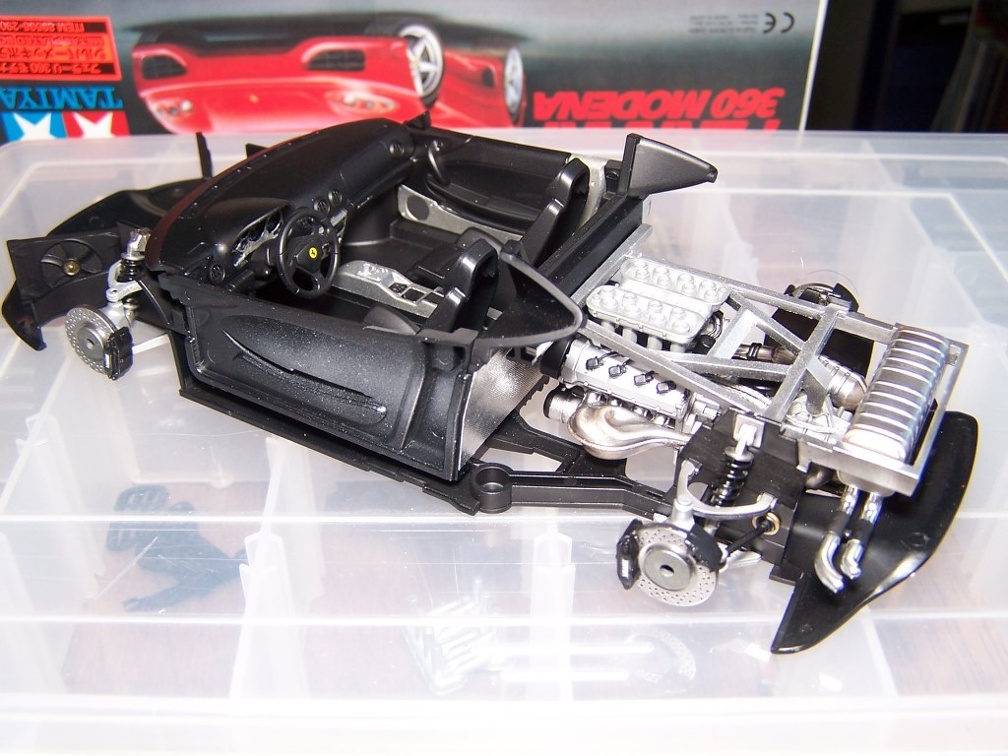
Posted by: tygaboy Nov 23 2023, 02:45 PM
After a bit more cutting/fitting/understanding on the donor chassis, I think it's now about how best to get the air to the radiators. This is a huge mod to the chassis and I won't feel comfortable until I have enough radiator area and frontal openings that pencil out and I know I can more than adequately cool the engine.
Today's exercise was seeing if I could avoid the 914/8 headlight mod and the required s*!+ ton of work and come up with a larger grill opening that I think looks good with the standard headlight cover size.
This is V1. Modeled on the black cars (with some "stretched" 914 bumper grills, one wide at the top, one wide at the bottom), then on my LS car in some scrap mesh. Both feature some bad photochoping, but it gives the idea.
I think it might work. And I like the look, particularly with the stretched factory grills. Perhaps some 3D printed items are in my future...
As always, I'll need to look at it for a while and see how it ages.
Attached thumbnail(s)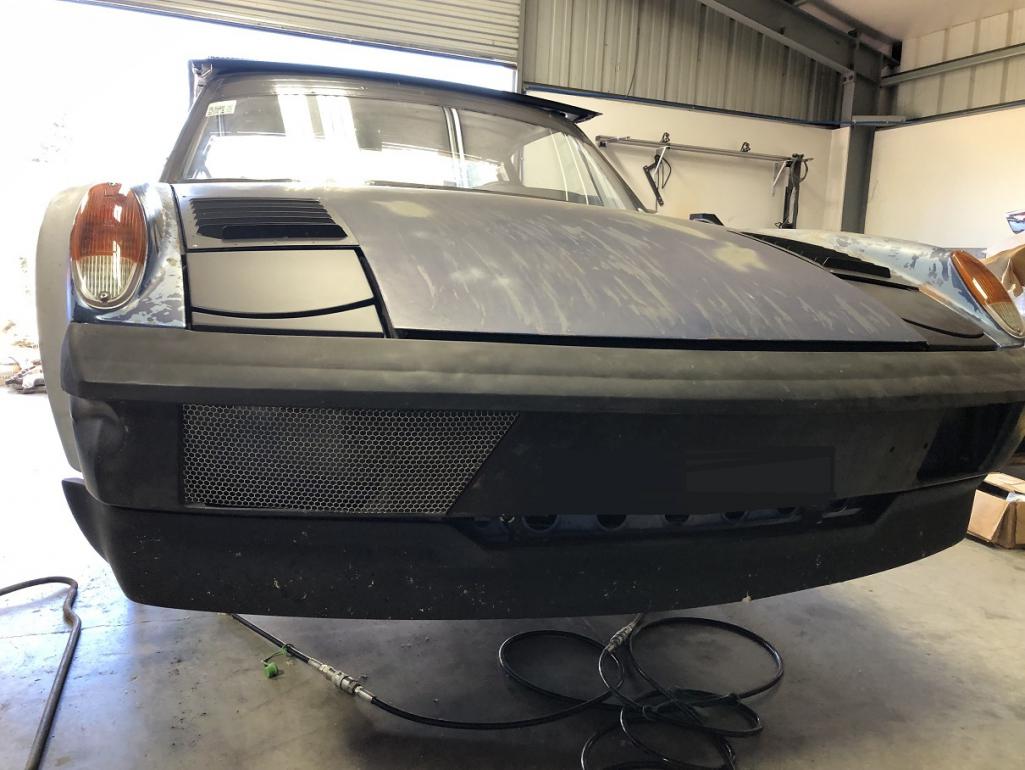
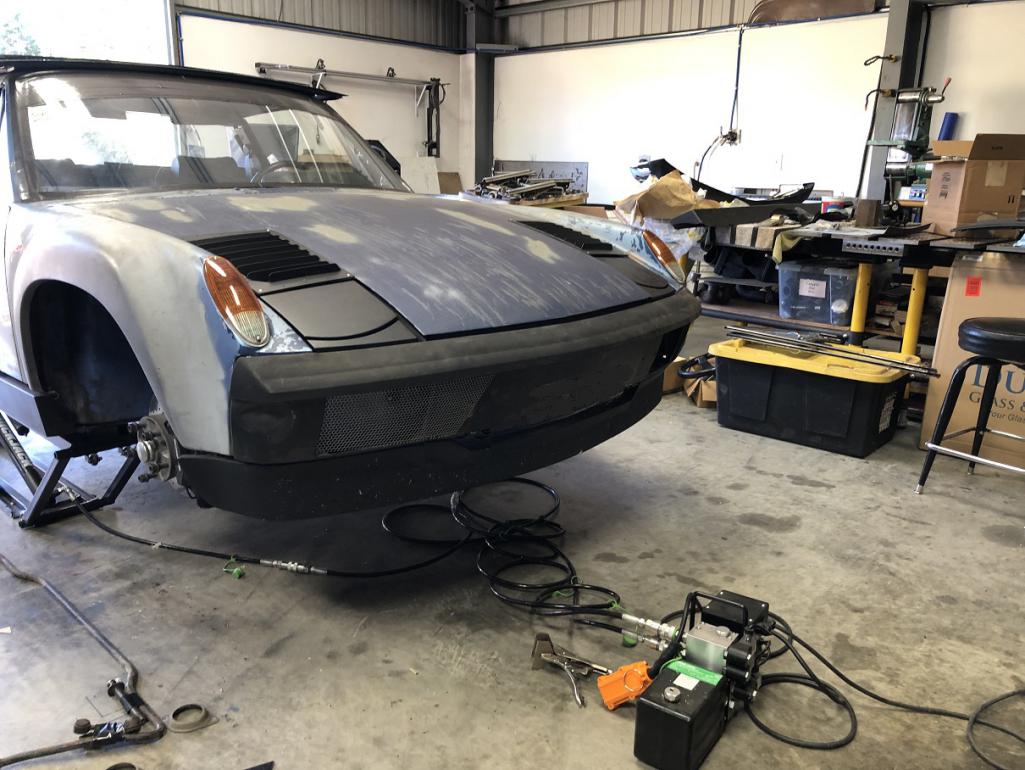
Attached image(s)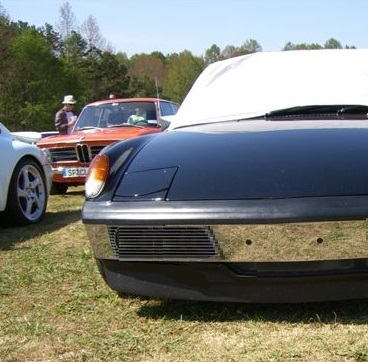
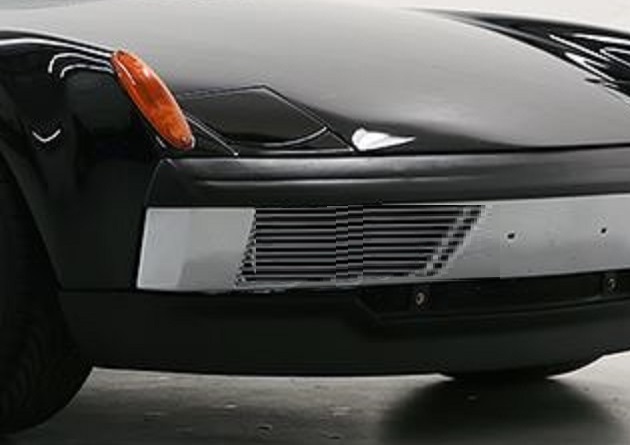
Posted by: horizontally-opposed Nov 24 2023, 05:56 PM
I think you are onto something here...
Posted by: East coaster Nov 25 2023, 02:58 AM
When I had contemplated this I was thinking of going down into the valance vs wider. My thought was 2 separate grills on each side joining into a common entrance plenum. Might be easier and keeping a sorta stock look? I’m sure you’ve already looked at that but figured I’d throw it out there anyway.
Posted by: tygaboy Nov 25 2023, 08:24 AM
And here's the Part 1 video on the corner radiators, if you're interested:
https://www.youtube.com/watch?v=uH3T6EjJMYk
Posted by: tygaboy Nov 25 2023, 08:25 AM
When I had contemplated this I was thinking of going down into the valance vs wider. My thought was 2 separate grills on each side joining into a common entrance plenum. Might be easier and keeping a sorta stock look? I’m sure you’ve already looked at that but figured I’d throw it out there anyway.
@http://www.914world.com/bbs2/index.php?showuser=487 - yep, you'll see I call out this very thing in the video. Keep the ideas coming; I need all the help I can get!
Posted by: Cairo94507 Nov 25 2023, 08:57 AM
I look forward to all of Chris' videos. He is a just so enjoyable to watch with my morning coffee.
@http://www.914world.com/bbs2/index.php?showuser=19241 -
Attached File(s) November_25__2023_Radiator_openings.pdf ( 1.34mb )
Number of downloads: 76
November_25__2023_Radiator_openings.pdf ( 1.34mb )
Number of downloads: 76
Posted by: Chris914n6 Nov 26 2023, 02:19 PM
And here's the Part 1 video on the corner radiators, if you're interested:
Well... that really jumped the shark
Couple of notes:
Dual core rads don't work much better. The air is already hot by the time it gets to the 2nd. IIRC 85-90% of the cooling happens from the first row. Modern car design is all single row.
The nose area is high pressure, so air will get pushed to wherever you want to move it. I mention this because the headlight can dip into the incoming rad air and not affect cooling.
You could do what Kent 76-914 did on his Suby then add 2 smaller rads under the headlights. You would still have half a frunk. I've got about a 1/3rd frunk with mine and the Toyota rad.
You won't need the floorpan under the headlight with that much cut out. I'd still think about modding a 73-74 bumper to use the inboard mounts. Or if you do fiberglass you can make a support beam however you want.
There are other small LED/HID units that are not Hella and DOT isn't necessarily a benefit. We all know the 7" e-code H4 is much better.
Mount a fat tire before you finalize a design.
Posted by: KELTY360 Nov 26 2023, 03:55 PM
Fascinating. Applaud your mission to retain front trunk. It's such a key 914 feature.
Could you fab the headlights to attach to the underside of the covers as a unit?
Posted by: tygaboy Nov 30 2023, 09:28 AM
I had a conversation with Griffin Radiator and was told that using their core - and assuming adequate/appropriate airflow and coolant flow - a 10" x 16" rad (10 x 12 core area) has the capacity to handle 240 hp.
By that math, I'd be more than covered with one of those in each corner. I have to say, that seems a little bit of a stretch. But it is encouraging. Add a center rad, just to be sure and I think I'm good.
I ordered some 60mm DOT halogens to prove out exactly what room I'll need for lighting. Once that's settled, I can get a final spec on the space for the radiators.
Attached image(s)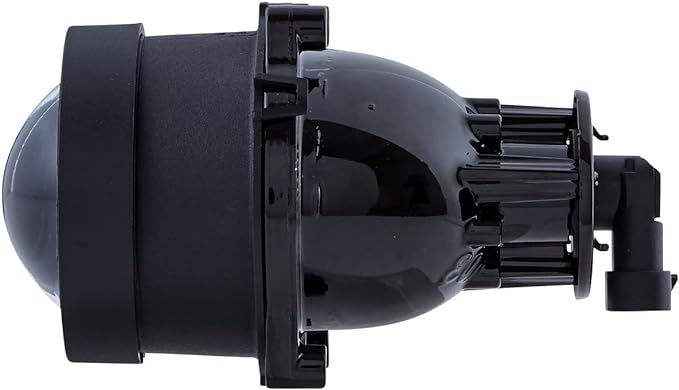
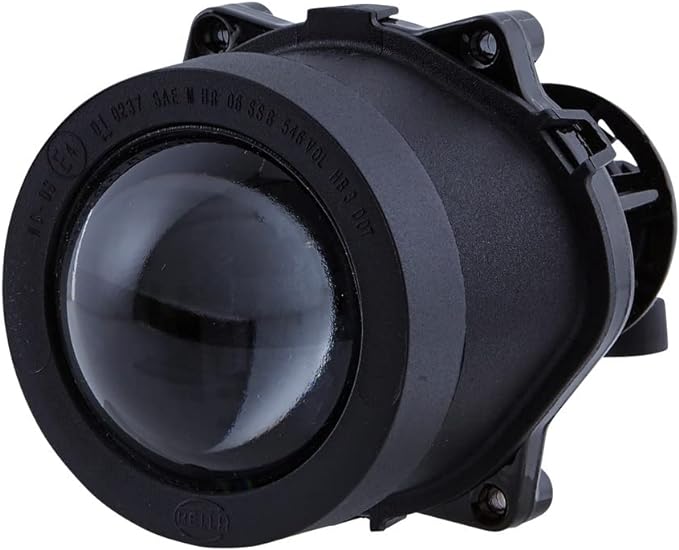
Posted by: tygaboy Feb 2 2024, 02:08 PM
Today was getting the shifter cables routed. A bit more clearancing needed to raise the opening on the inner firewall to but it looks like it's going to work routing through that large factory opening that's used for the wiring harness.
Attached thumbnail(s)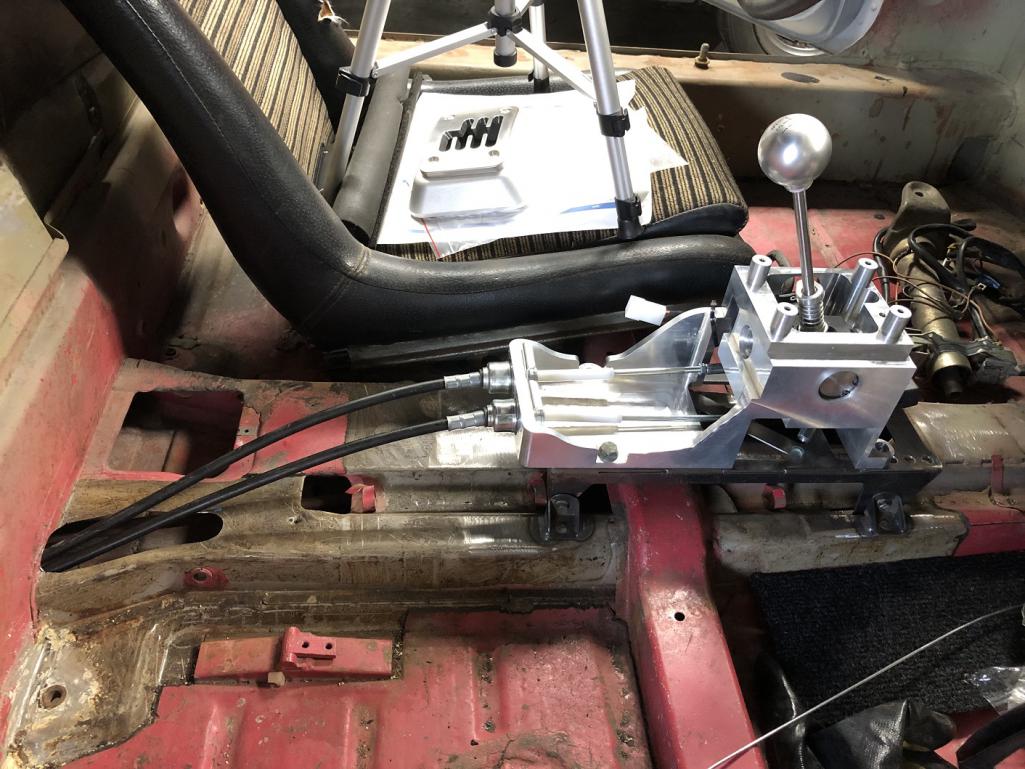
Posted by: ClayPerrine Feb 3 2024, 08:37 AM
Beautiful shifter.
I spy a 911 column in the driver's floor.
Looks like you are planning a left hand key conversion.
Posted by: Cairo94507 Feb 3 2024, 10:53 AM
Left side dash ignition definitely required for this project.
Posted by: tygaboy Feb 3 2024, 03:15 PM
Latest build video - for those who haven't yet subscribed
https://www.youtube.com/watch?v=7MxRN3KduwU
Posted by: Cairo94507 Feb 3 2024, 07:05 PM
Nice progress and very clean cable run.
Posted by: tygaboy Feb 6 2024, 07:47 PM
Waiting for the custom length shift cables so started rethinking the intake set up. I think I want to drop the whole thing so it fits under the stock sheet metal. Here it is dropped 1.5". Not quite enough. Looks like maybe 2.25" may do it.
The good news is I have two intake manifolds do I can play with one and if I don't like it, I'll use the other at stock height.
Not nearly as dramatic a look but more practical and a bigger surprise when things do get opened up.
Decisions, decisions...
Attached thumbnail(s)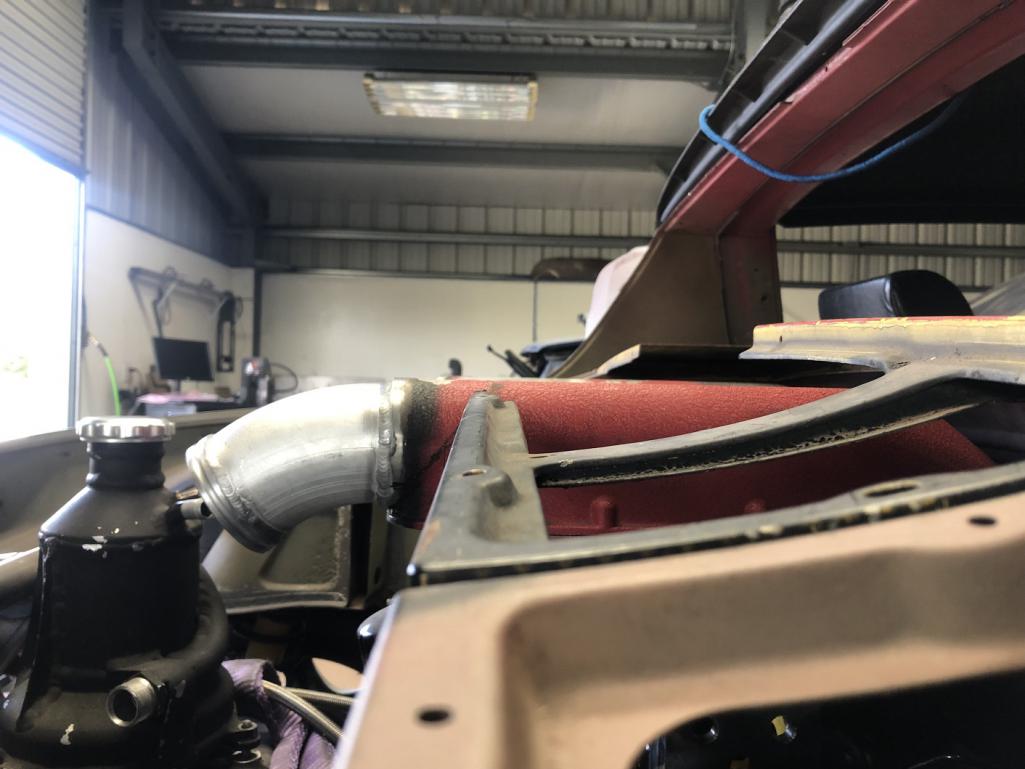
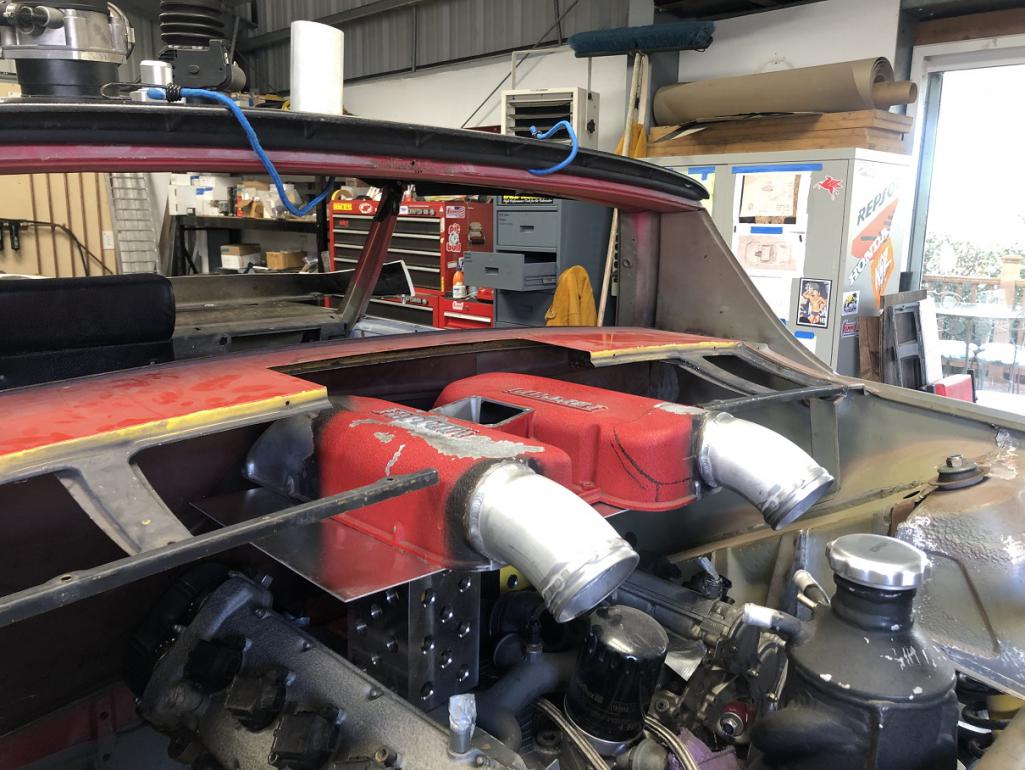
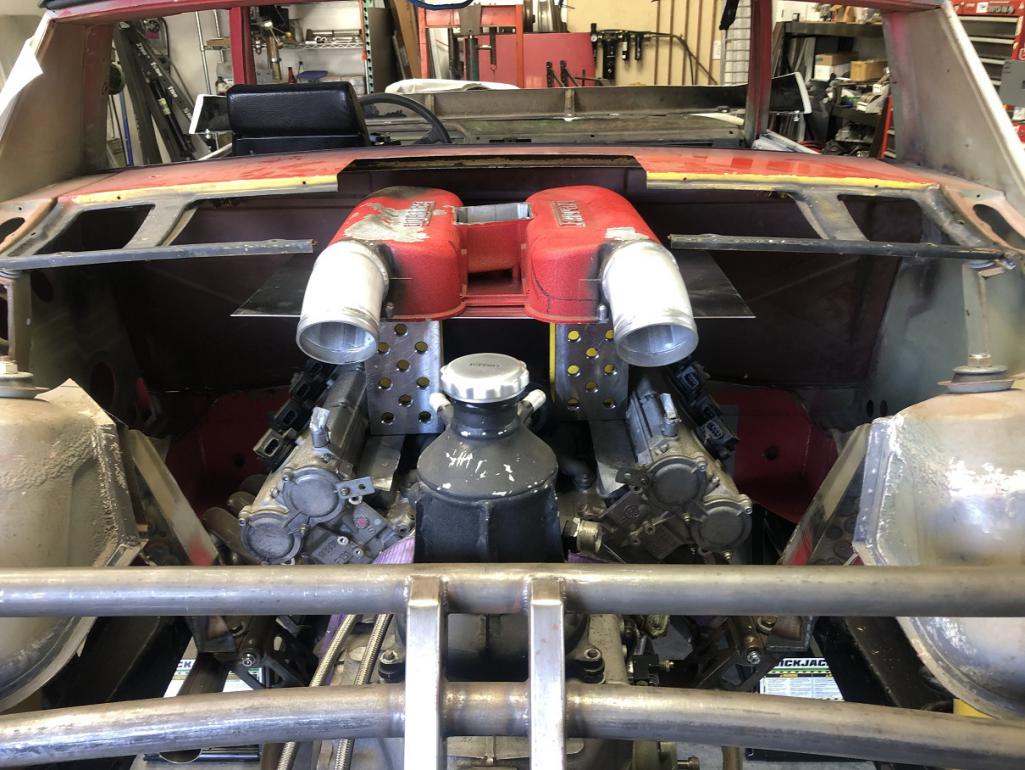
Posted by: Van B Feb 6 2024, 08:10 PM
Why do I feel like those fixture blocks are worth more than the manifold they’re holding up?
Posted by: Chris914n6 Feb 6 2024, 11:02 PM
Considering the engineering involved with the IM that you'd be messing with, I'd do a GT mesh lid and arch over it.
Posted by: SirAndy Feb 6 2024, 11:05 PM
I for one really liked how the manifold was sticking out the top. Hiding all that stuff under the lid just doesn't look right.
Posted by: Cairo94507 Feb 7 2024, 08:59 AM
I wish there was a middle ground for this. Kind of like the clear hood section on the hot rod Corvette hoods (I do not know which model that was). So the engine lid/trunk body lines remain stock but you see the intake when you walk up on it.
Posted by: ClayPerrine Feb 7 2024, 09:20 AM
Personally, I like the idea of hiding it beneath a GT engine grill. That way it looks like a flared 914 from the outside.. until you look through the mesh on the engine grill.
Posted by: tygaboy Feb 7 2024, 01:01 PM
While I appreciate the comments and opinions, there are other things I'm looking to deal with such as wanting as much trunk space as I can get.
The current "pointed straight back" TBs means I'd need to sacrifice trunk volume to some sort of air box - plus work out an intake location. And no, I don't want tubes running back and forth to feed the air box, I don't want an intake in the rear panel...
So. The current thinking is to reshape the rear of the upper pleunum so it essentially matches the angle of the front. Then shorten the manifold runners only as much as needed to get the intake under the engine grill. This also means no mods needed to the trunk lid.
Then, the TBs get relocated to the sides of the plenum, as pictured. This allows for air boxes that live right under the grill. And I get all the trunk space.
And before you get worked up about this sort of change, I've been in touch with one of the most respected 360 tuners to dicuss this. Part way through the conversation, he says "Let me text you a pic...". That's the first pic here. It's exactly what I'm talking about. He said it works fine - and referenced that this is the same approach Ferrari took with the Enzo. That's the 2nd pic.
Is it going to sacrifice power? Maybe. But also maybe not. And if it does, do I care? No. I was essentially assured driveability is retained, which is really the most important thing to me.
I do prefer the look of the initial version but after seeing the Enzo, I think I can come up with an attractive set up.
Attached thumbnail(s)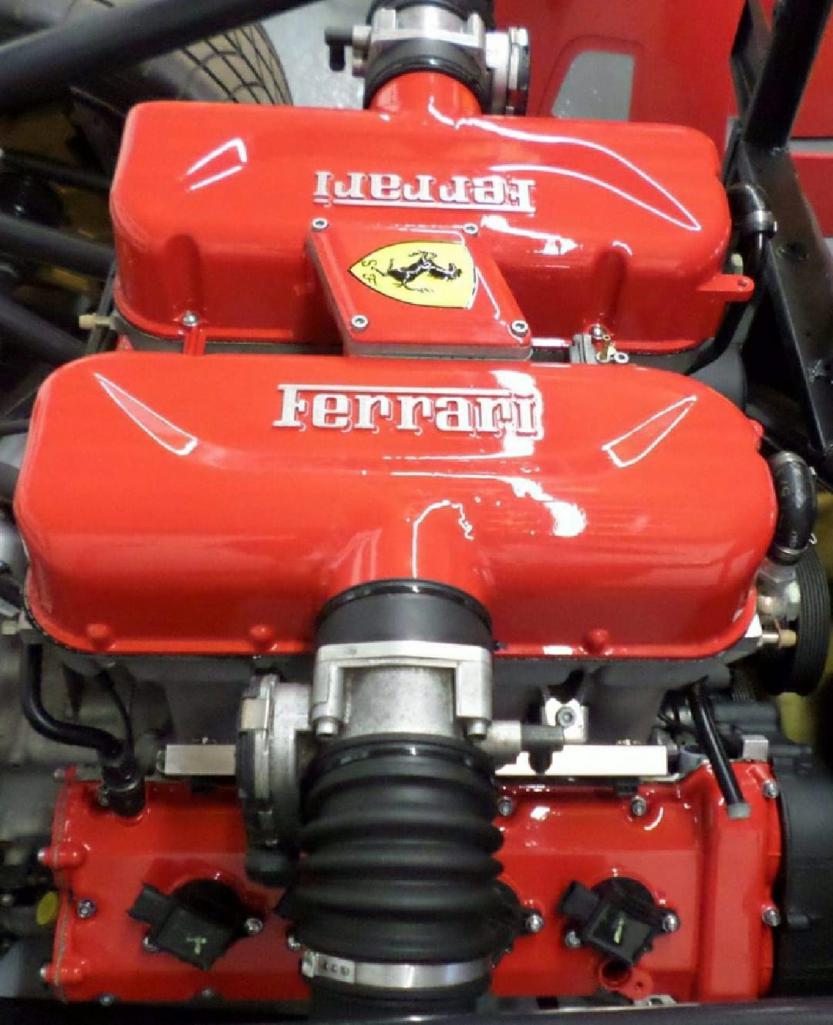
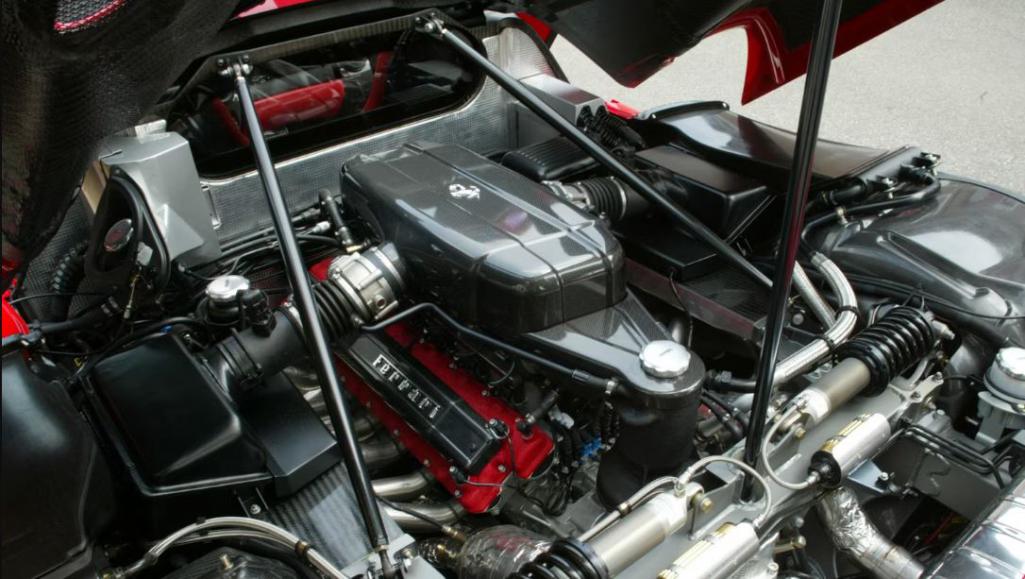
Posted by: Chris914n6 Feb 7 2024, 08:08 PM
Moving the inlets to the sides won't affect anything, but the runner length determines the power band. Longer for midrange torque - shorter for top end hp. Most modern cars have duel length runners to fatten the power curve.
Under no circumstances reduce the volume of the plenum.
Posted by: East coaster Feb 7 2024, 08:10 PM
Looks like a couple good options for a solution
Posted by: Van B Feb 7 2024, 08:30 PM
I’m gonna take all that to mean those blocks ARE more expensive than the manifold lol…
Posted by: Superhawk996 Feb 7 2024, 09:00 PM
I’m gonna take all that to mean those blocks ARE more expensive than the manifold lol…
All depends . . . China made or Starrett or maybe Brown & Sharpe? 
Posted by: tygaboy Feb 8 2024, 08:28 AM
I’m gonna take all that to mean those blocks ARE more expensive than the manifold lol…
@http://www.914world.com/bbs2/index.php?showuser=26011 I wish. And I bought my fixture table and goodie set many years ago. Was even less back then.
Attached thumbnail(s)

Posted by: ClayPerrine Feb 8 2024, 01:44 PM
While I appreciate the comments and opinions, there are other things I'm looking to deal with such as wanting as much trunk space as I can get.
The current "pointed straight back" TBs means I'd need to sacrifice trunk volume to some sort of air box - plus work out an intake location. And no, I don't want tubes running back and forth to feed the air box, I don't want an intake in the rear panel...
So. The current thinking is to reshape the rear of the upper pleunum so it essentially matches the angle of the front. Then shorten the manifold runners only as much as needed to get the intake under the engine grill. This also means no mods needed to the trunk lid.
Then, the TBs get relocated to the sides of the plenum, as pictured. This allows for air boxes that live right under the grill. And I get all the trunk space.
And before you get worked up about this sort of change, I've been in touch with one of the most respected 360 tuners to dicuss this. Part way through the conversation, he says "Let me text you a pic...". That's the first pic here. It's exactly what I'm talking about. He said it works fine - and referenced that this is the same approach Ferrari took with the Enzo. That's the 2nd pic.
Is it going to sacrifice power? Maybe. But also maybe not. And if it does, do I care? No. I was essentially assured driveability is retained, which is really the most important thing to me.
I do prefer the look of the initial version but after seeing the Enzo, I think I can come up with an attractive set up.
I like the idea of using that intake. It looks cool. You should make a plate that says Porsche to go below the Ferrari script on the intake.
Posted by: Van B Feb 8 2024, 06:51 PM
Ah they are welded then machined. Thats not a bad price for blocks that size!
Also, I try not to opinionate much on your build out of respect for the art, but I like the idea of side inlets and the carrera GT style wire humps.
But really, this build is fun for me because it doesn’t set off my LS allergy, and your need for truly novel solutions here is pretty cool.
Posted by: tygaboy Feb 8 2024, 07:03 PM
Another "Tygaboy Re-do"! Off come the turn downs, the intake manifold get turned 180 degrees (am I surprised that worked?) and we're set to add side TBs to the plenum.
The plan at this point is to keep the manifold at stock height and "embrace the bulge".
But it sure looks a bunch different that it did.
Attached thumbnail(s)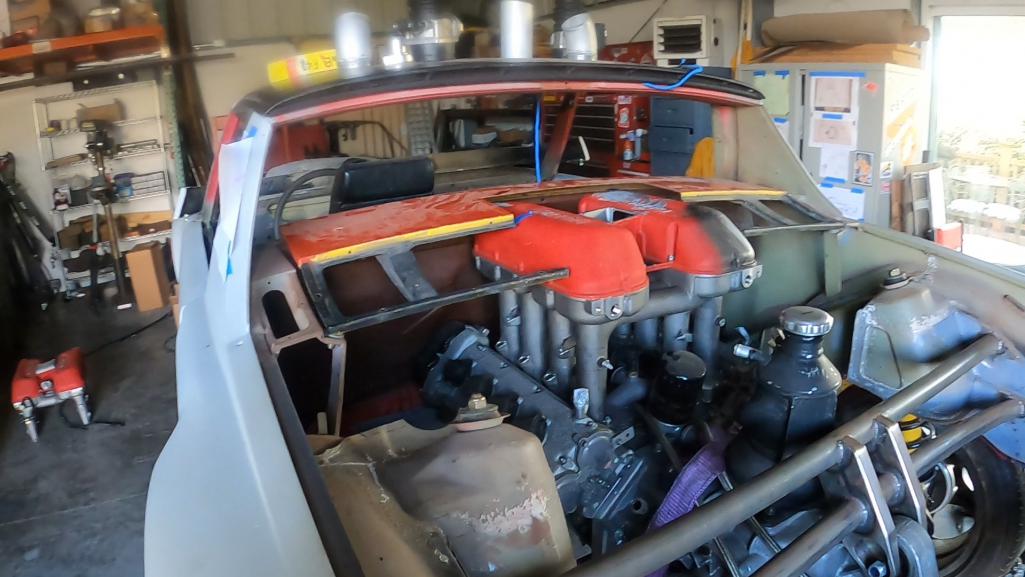
Posted by: tygaboy Feb 8 2024, 07:12 PM
The biggest change is how with the "ramp" now at the back, I won't need as dramatic a bulge at the trunk.
Here, I'm just playing with fit to get a feel for what sort of clearancing will be needed on the trunk. It's not much - looks like it needs about 1.5" to come into position - and I have a couple ideas for shape/function. Also note the engine lid isn't in position at the front as it fouls on the forward part of the plenum so a bit of rework needed there.
And I'll likely need a slight bulge to cover the TBs, outboard of each plenum. Yep, still a bunch of design and fab stuff to work out.
Attached thumbnail(s)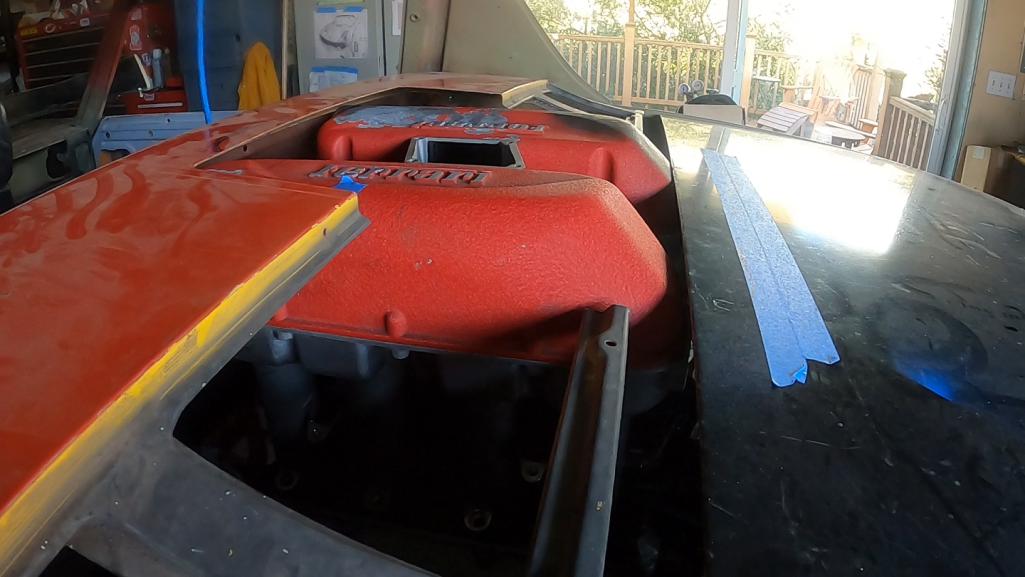
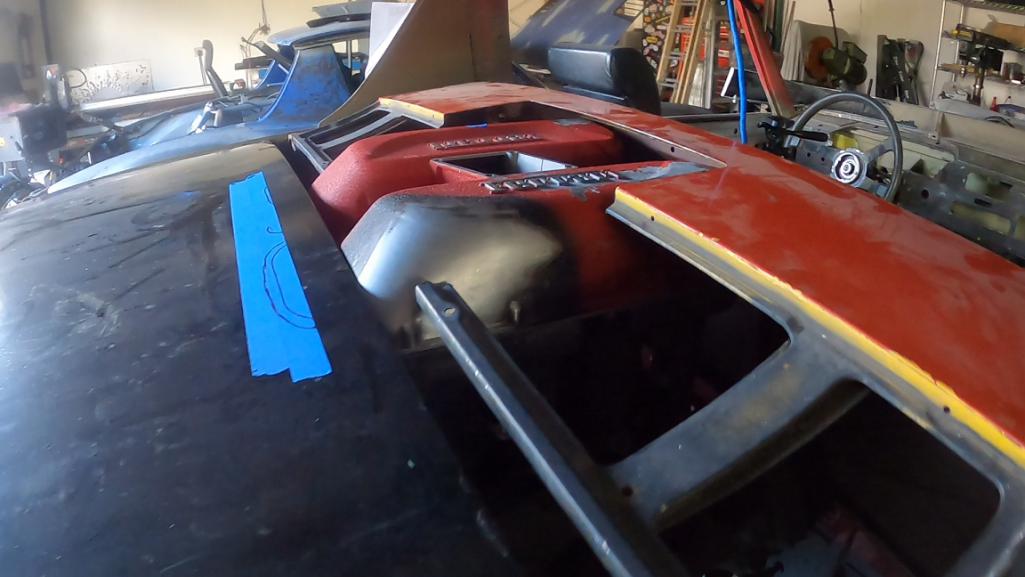
Posted by: tygaboy Feb 8 2024, 07:15 PM
Profile shot. Again, the engine lid will drop a bit at the front and expose more of the plenum.
Attached thumbnail(s)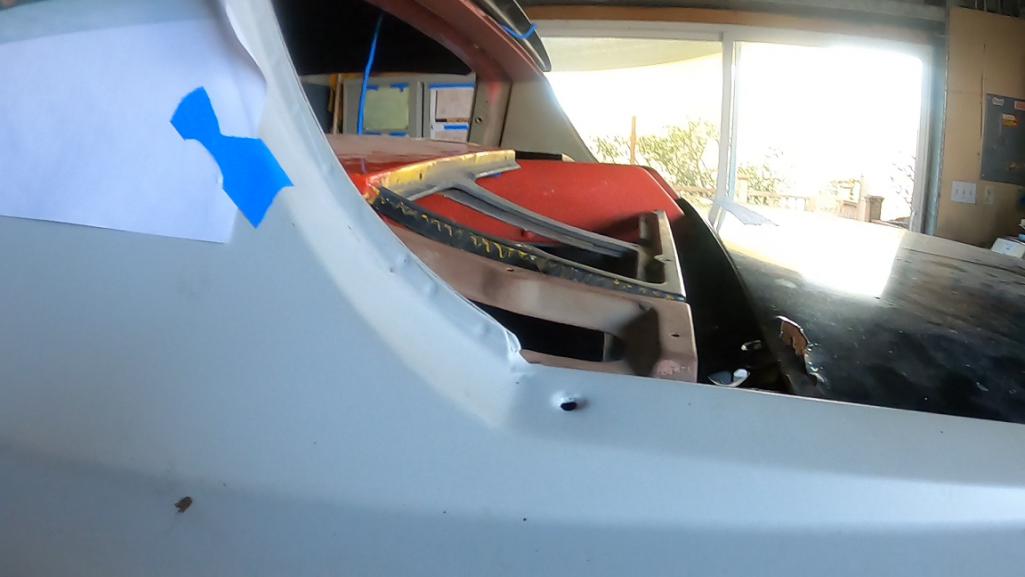
Posted by: SirAndy Feb 8 2024, 07:17 PM
Profile shot. Again, the engine lid will drop a bit at the front exposing more of the plenum.
I like it!
Posted by: bkrantz Feb 8 2024, 08:28 PM
Another "Tygaboy Re-do"!
Off come the turn downs, the intake manifold get turned 180 degrees (am I surprised that worked?) and we're set to add side TBs to the plenum.The plan at this point is to keep the manifold at stock height and "embrace the bulge".
But it sure looks a bunch different that it did.
At least you didn't have to turn the engine around.
Posted by: Van B Feb 8 2024, 08:43 PM
Uh yes please! Maybe an upward lip across the leading edge of the trunk? 30-45 degrees up and starting 1.5” back? Would allow you to merge the lines from bulge to trunk and give additional clearance for opening and closing.
Posted by: Chris914n6 Feb 8 2024, 11:02 PM
I'm glad that worked out fairly easily.
I'd be tempted to make the trunk shorter and the grille longer. Might get tight with the top in there but the lid frame is bigger than it needs to be.
Posted by: tygaboy Feb 10 2024, 08:53 AM
Making it up as I go along. As if you needed more proof. Enjoy!
https://www.youtube.com/watch?v=6MrHYmchDl4
Posted by: Krieger Feb 10 2024, 10:09 AM
Sweet! What about using a single large sheet of engine grill type material instead of reworking the lid.
Then press the dome shape into it. Trim it to fit engine compartment. Then make a functional frame for it?
Posted by: Chris914n6 Feb 10 2024, 03:23 PM
Couple notes.
I've got the same fitment issues you're dealing with. The issue with flipping the intake on mine was the injector rails didn't fit anymore. Also looks like they could be an issue if you splice the runners.
With the intakes on the sides you will want heat shields.
I'd try to copy the Ferrari side intake location if it fits well. It's not critical but I have decision making issues lol.
At this point ditch the stock engine lid.... at least the front pivot design. It's not going to open as wide with the bulge either.
Variable intake length on my Nissan:
idle to 1800 = short
1800 to 3600 = long
3600 to 6800 = short
I'd stick with the factory bellows for flexibility when the engine rocks back and forth.
I will likely have a 'beauty bump' too - the price of speed 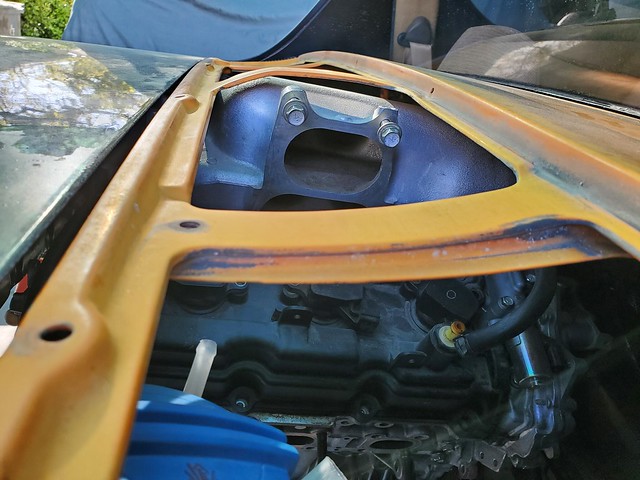
Posted by: tygaboy Feb 10 2024, 06:06 PM
Proof of concept/test fit. The top Juuuuuuust contacts that cap.
A couple things to note:
- the air/oil separater isn't fully seated. It'll drop about 3/8"
- the targa top is actually resting with its window seals against the inner fender so it'll lift by a bit.
In short, the roof will fit with no mods to the separater!
And yes, I have a rough plan for fabbing up the needed front mounts as part of new trunk sheet metal.
You'll have to check out the next video to see the overview...
Attached thumbnail(s)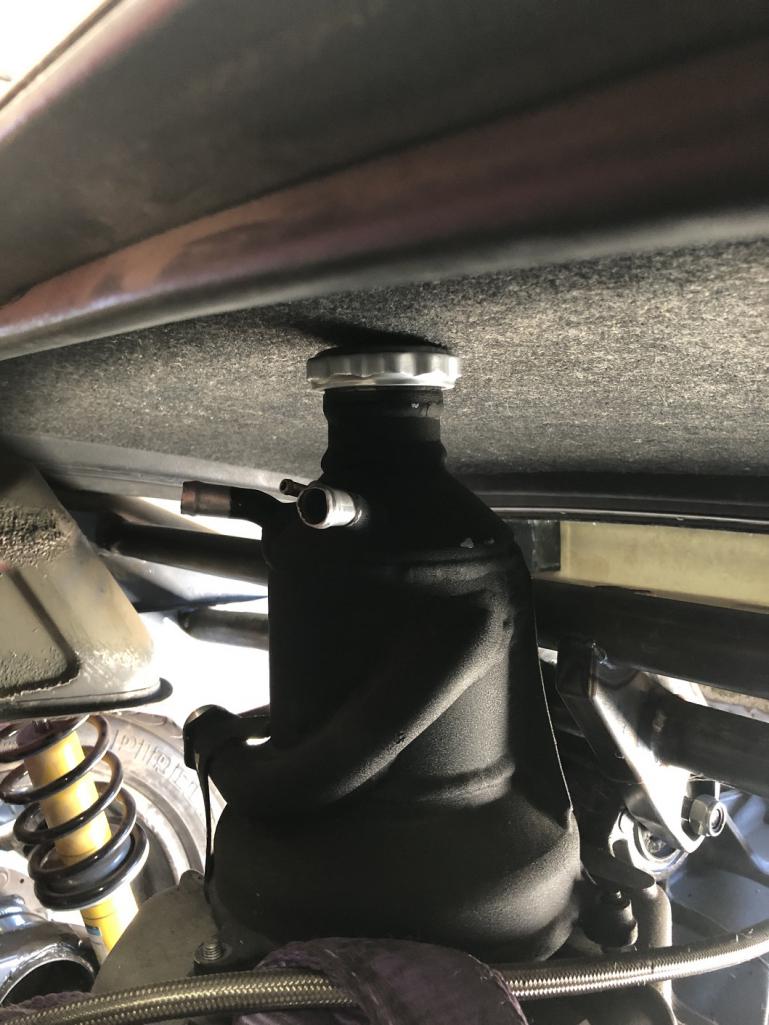
Posted by: tygaboy Feb 10 2024, 06:10 PM
A top view showing how the top clears the plenum.
Attached thumbnail(s)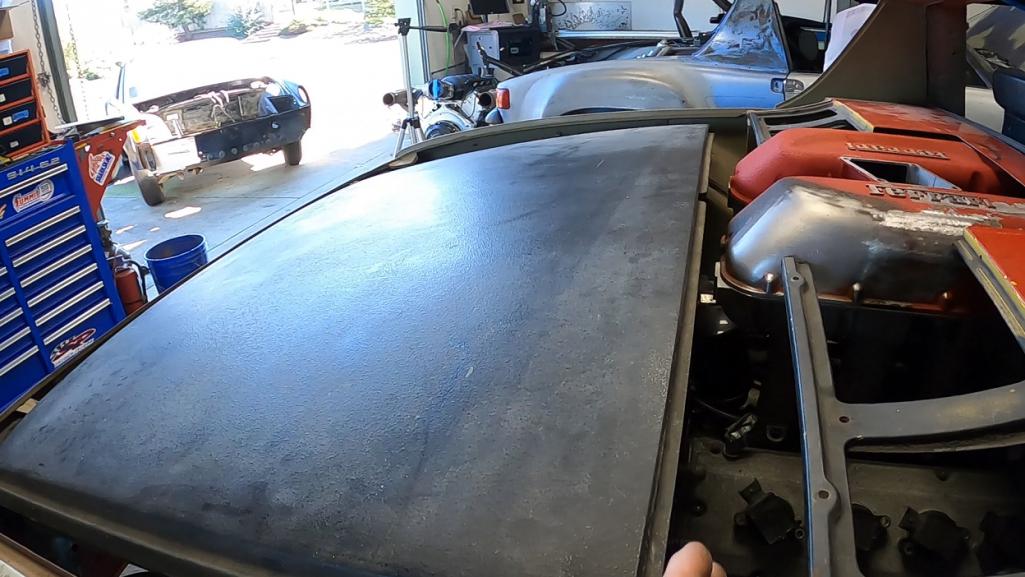
Posted by: East coaster Feb 11 2024, 06:13 AM
I like where this is going….
Posted by: tygaboy Feb 13 2024, 01:30 PM
Measure twice, cut once? Plan ahead? Lock down requirements before starting the build?
I'm no good at any of that which is a key reason for the "Tygaboy do-overs". In this case, it's fabbing a new trunk front wall. Ah, well.
But I mean, come on! Who would have guessed a Ferrari 360 drive train (albeit with a flipped intake) would fit inside a 914 with the trunk wall still in place? OK, to be fair, that wall is going to need a bit of a notch in the central area to clear the intake and oil supply/vent lines but, wow.
And to be fair, I want the entire trunk floor and front wall to be removable for servicability and Cars & Coffeee "look at that" sorts of events so it likely would have been cut out anyway.
Attached thumbnail(s)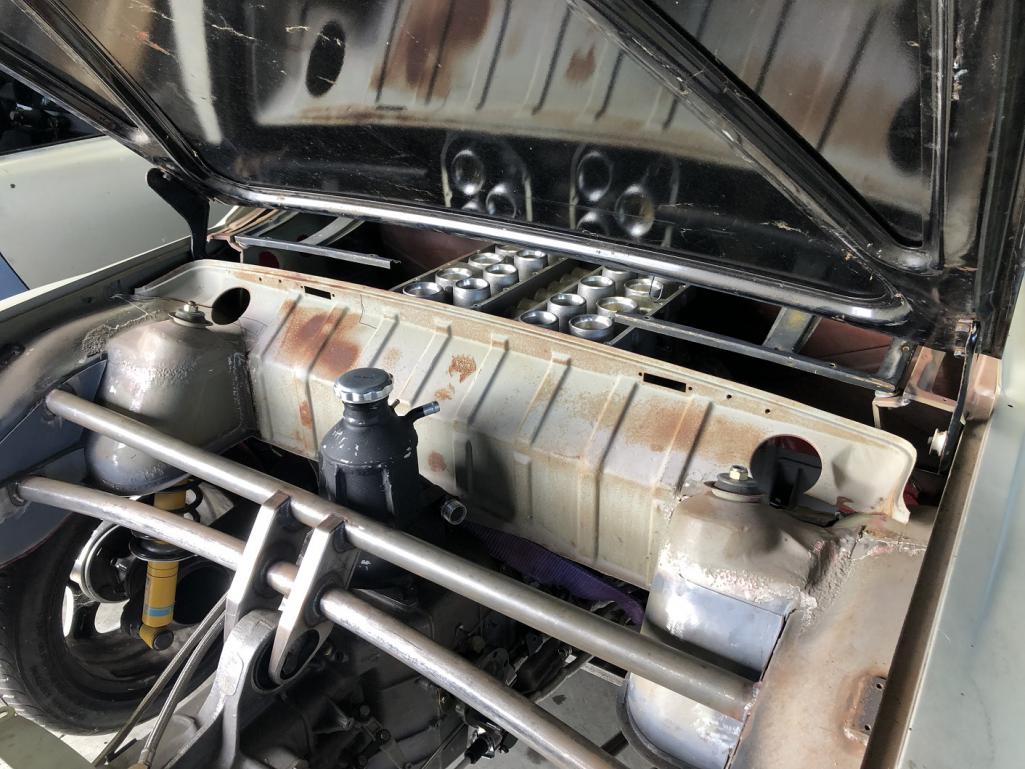
Posted by: tygaboy Feb 16 2024, 03:12 PM
The trunk lid was going to need a notch so I went ahead with that. This is a crappy lid with rust, a ton of bondo and damage at the hinge mount so I didn't feel bad sacrificing it to the cause.
I think the final version may have a bit tighter clearnace at the back but I won't really know until the TBs are in place and I can get a feel for what the overall shapes look like, how a plenum grill/cover may integrate, etc. But my first reaction is that it doesn't look too bad.
Attached thumbnail(s)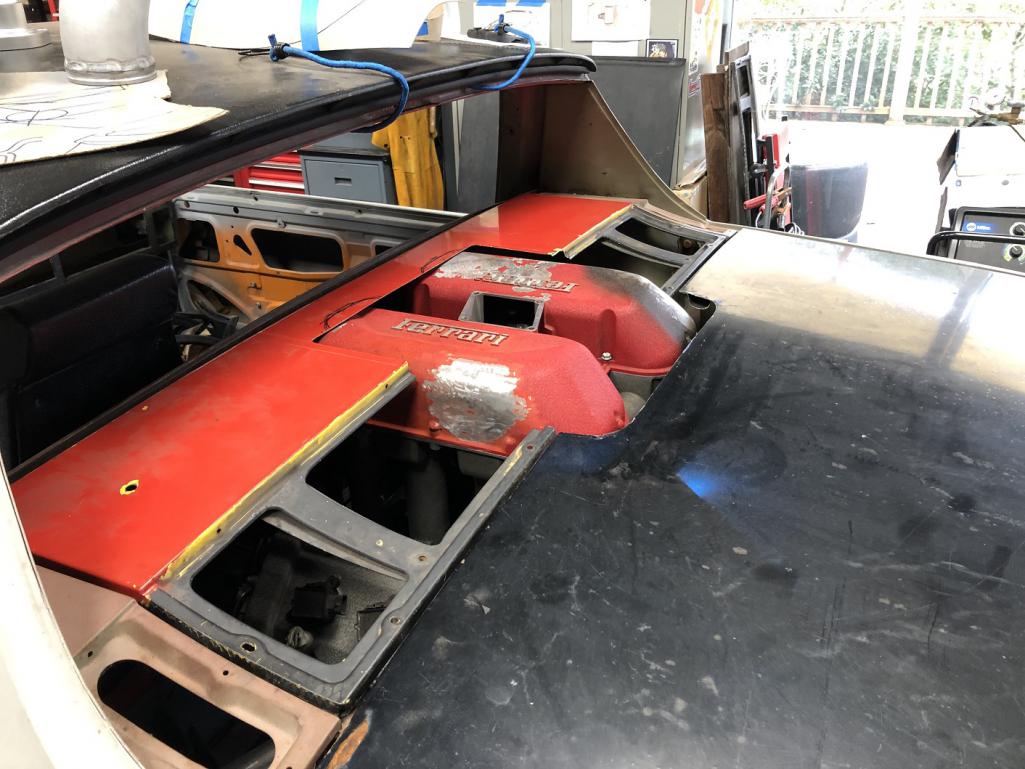
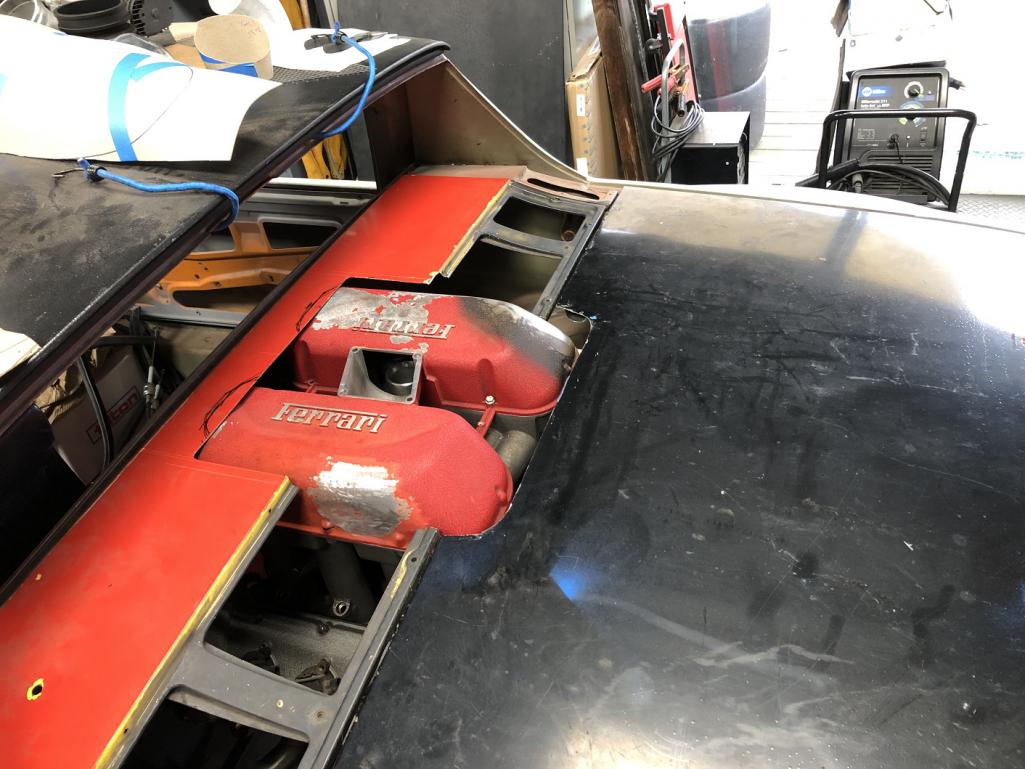
Posted by: rgalla9146 Feb 16 2024, 06:37 PM
Power Bulge ?
Posted by: Retroracer Feb 16 2024, 06:45 PM
Chris - at this point you might as well ditch the idea of an engine lid. Why not fab up two removable side / cover panels half metal, half mesh covered that have location pins at the back, some kind of quick connect fasteners near the trunk lip, so you can just lift them out when needed? Kind of ties in with your removable upper trunk panel.
Just a thought.
- Tony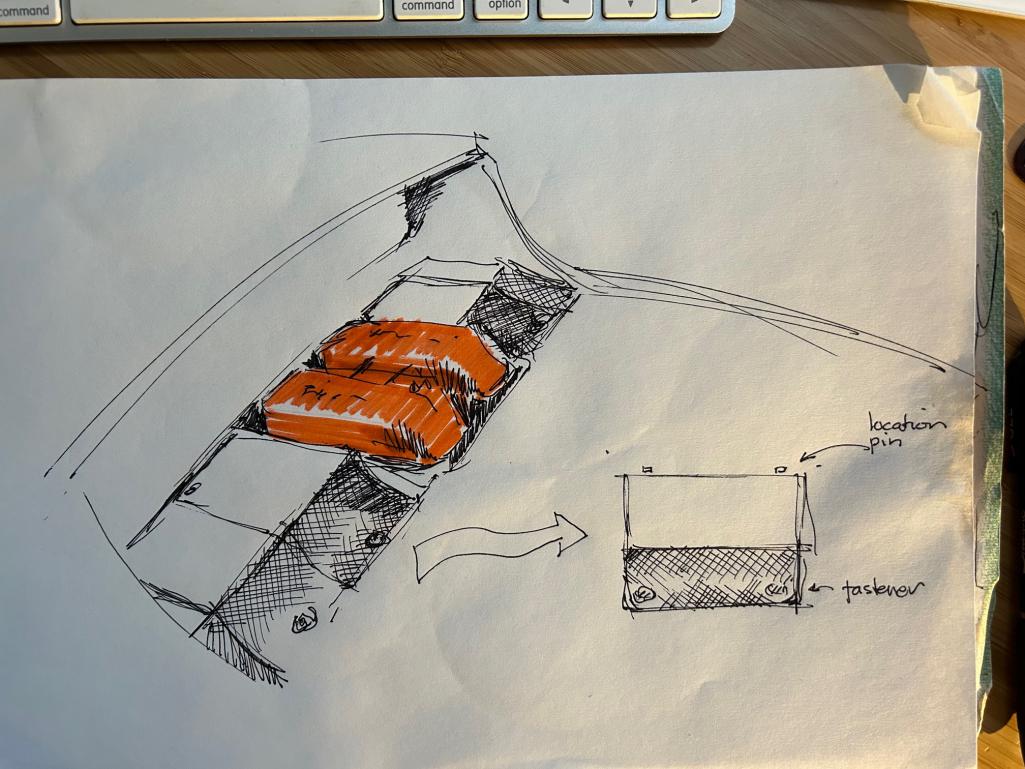
Posted by: Montreal914 Feb 16 2024, 07:17 PM
Pushing this concept ^^^ one step further, how about including the small part that is normally attached to the body and eliminate that panel gap.
Posted by: tygaboy Feb 16 2024, 07:35 PM
Pushing this concept ^^^ one step further, how about including the small part that is normally attached to the body and eliminate that panel gap.
@http://www.914world.com/bbs2/index.php?showuser=12023 You're talking about that outboard element of the engine lid? I made them removable, that might work. Interesting/great idea I may shamelessly steal... !
Posted by: Montreal914 Feb 16 2024, 09:49 PM
Pushing this concept ^^^ one step further, how about including the small part that is normally attached to the body and eliminate that panel gap.
@http://www.914world.com/bbs2/index.php?showuser=12023 You're talking about that outboard element of the engine lid? I made them removable, that might work. Interesting/great idea I may shamelessly steal... !
Right!
If you plan on something like Retroracer is suggesting, might as well combine with the outer section.
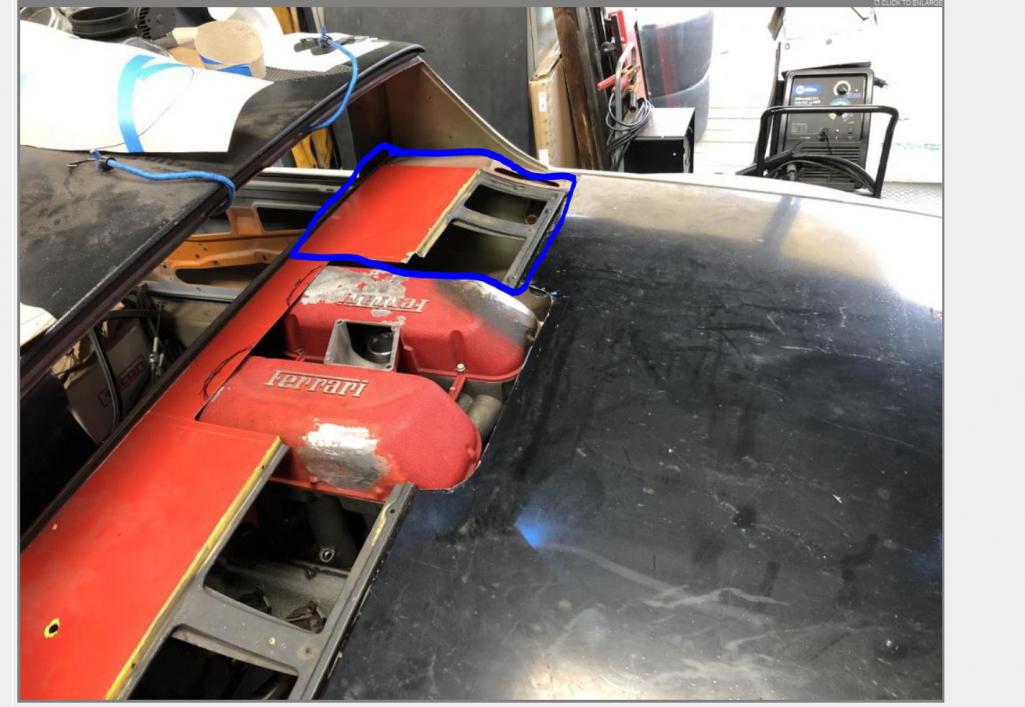
Posted by: campbellcj Feb 17 2024, 07:18 AM
I like the idea too - apples and oranges but FWIW I 'gutted' and made my GT-style lid fully removable years ago which removed weight and improved airflow in addition to improving engine access.
Posted by: tygaboy Feb 17 2024, 09:56 AM
And for those who'd like a bit more detail and add'l info on the latest progress, this'll catch you up:
https://www.youtube.com/watch?v=XjOBg3ZwyDE
Posted by: Chris914n6 Feb 17 2024, 01:13 PM
I'll save you a bunch of time.... no on the electronic actuators. It needs to be a quick change, slow will mess up the flow efficiency. It will likely activate dozens of times per mile. Also no on a solenoid as they are not meant to be 'held' and will overheat.
That vacuum canister is HUGE. The one on my Nissan does just a big butterfly and it's soup can sized. You will probably want 2 for the volume of both mechanisms. 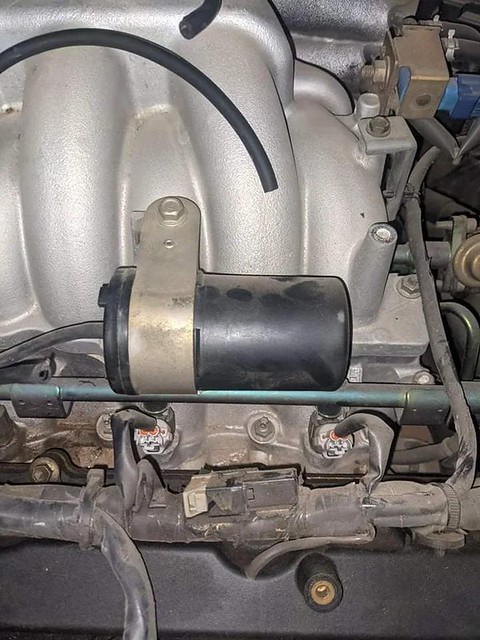
I think I would use the trunk torsen bar mounting points as a base point for the trunk wall jig as they will be on the backside of what you want to build.
Posted by: tygaboy Feb 23 2024, 05:30 PM
After a fair bit of tweaking to get turn downs to mate to the plenums at the target rotation, height and angle, everything is tacked in position, allowing a test fit of the throttle bodies. I couldn't be happier with how this is looking.
About all I could ask for would be mirror image throttle bodies to have total symmetry. But I think I can live with it!
Attached thumbnail(s)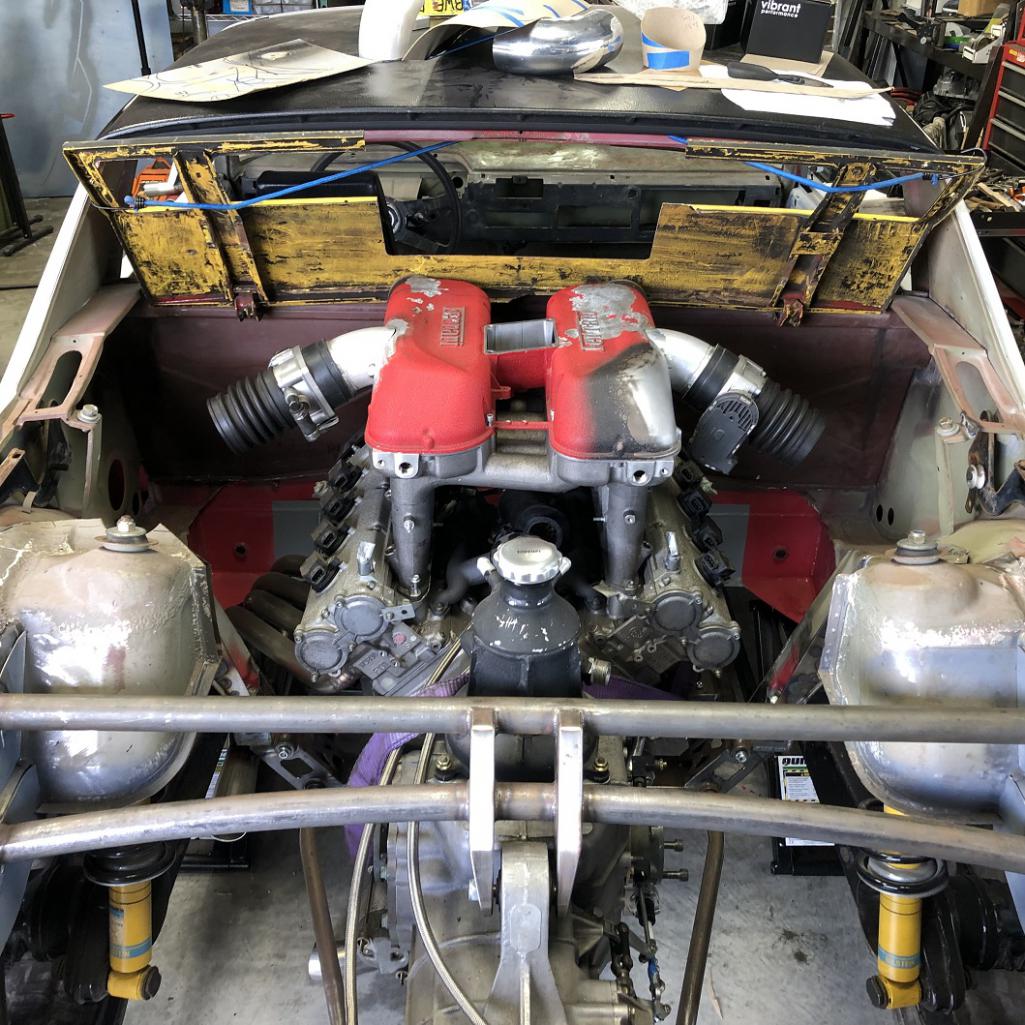
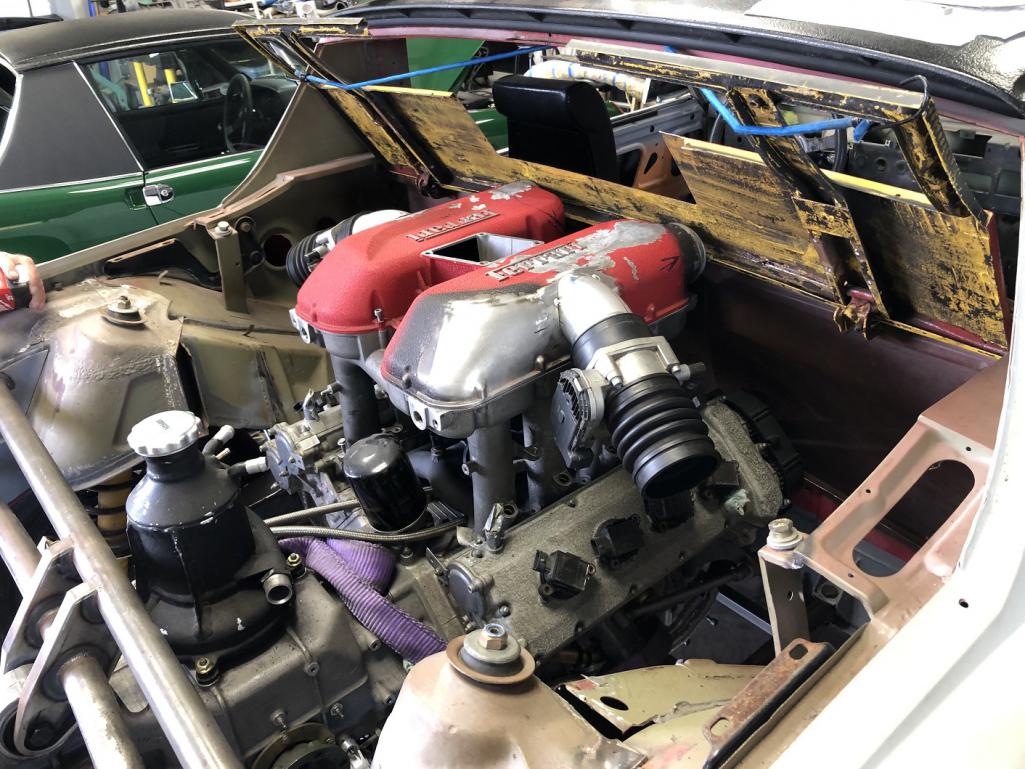
Posted by: tygaboy Feb 23 2024, 05:31 PM
And with the notched trunk lid. It's coming together...
Attached thumbnail(s)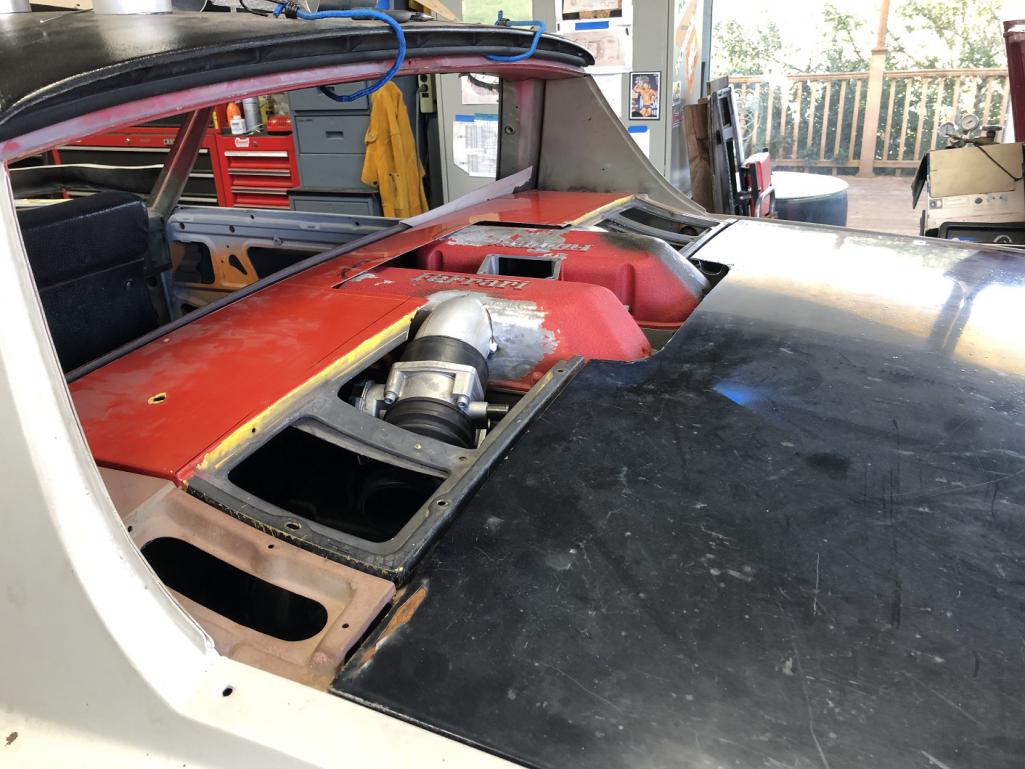
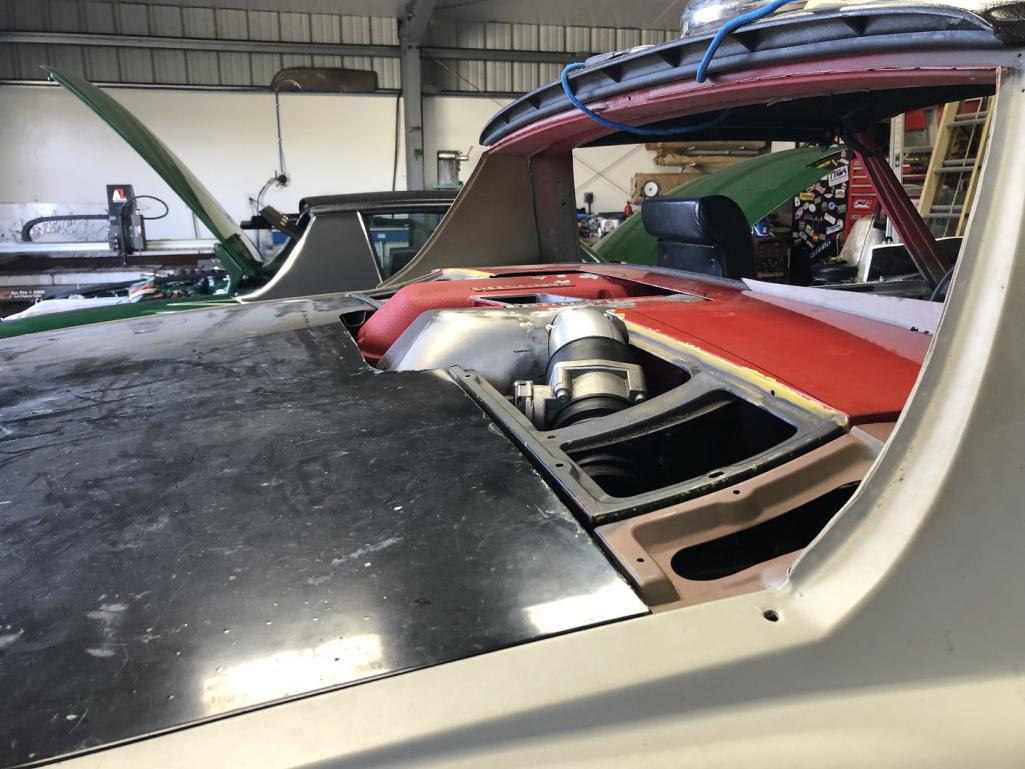
Posted by: Cairo94507 Feb 23 2024, 05:59 PM
That looks sweet; looking forward to seeing it in person tomorrow.
Posted by: r_towle Feb 23 2024, 06:40 PM
Very cool style.
If you can manage to just show those two covers….a sweet detail.
Looking forward to this project!
Posted by: East coaster Feb 23 2024, 07:29 PM
Nice!
Posted by: ClayPerrine Feb 24 2024, 07:40 AM
The world's car community: "You can't put a Ferrari drivetrain in a cheap pink 70s Porsche chassis! That would be sacrilegious!"
Tygaboy: "Hold my beer..."
I just figured out how to solve the world's energy crisis.
Hook a generator to Enzo Ferrari's body. Because the first time this thing drives down the road, he is going to start spinning in his grave at 20,000 RPM!
Keep up the good work. I love what you are doing.
Posted by: tygaboy Feb 24 2024, 07:50 AM
...and the footage of what led to the recent pics.
https://www.youtube.com/watch?v=QawHtPqzzrM
Posted by: Shivers Feb 24 2024, 11:56 AM
That looks nice
Posted by: roundtwo Feb 24 2024, 12:12 PM
After a fair bit of tweaking to get turn downs to mate to the plenums at the target rotation, height and angle, everything is tacked in position, allowing a test fit of the throttle bodies. I couldn't be happier with how this is looking.
About all I could ask for would be mirror image throttle bodies to have total symmetry. But I think I can live with it!
Wow, great progress since Wednesday. Really cool to see and hear the about all the dynamics going on in the different parts of the intake.
Posted by: tygaboy Feb 25 2024, 03:29 PM
With the intake flipped 180, the engine lid opening needed updating. Still lots to work out but it looks way mo' betta with the entire length of the plenums exposed.
Attached thumbnail(s)
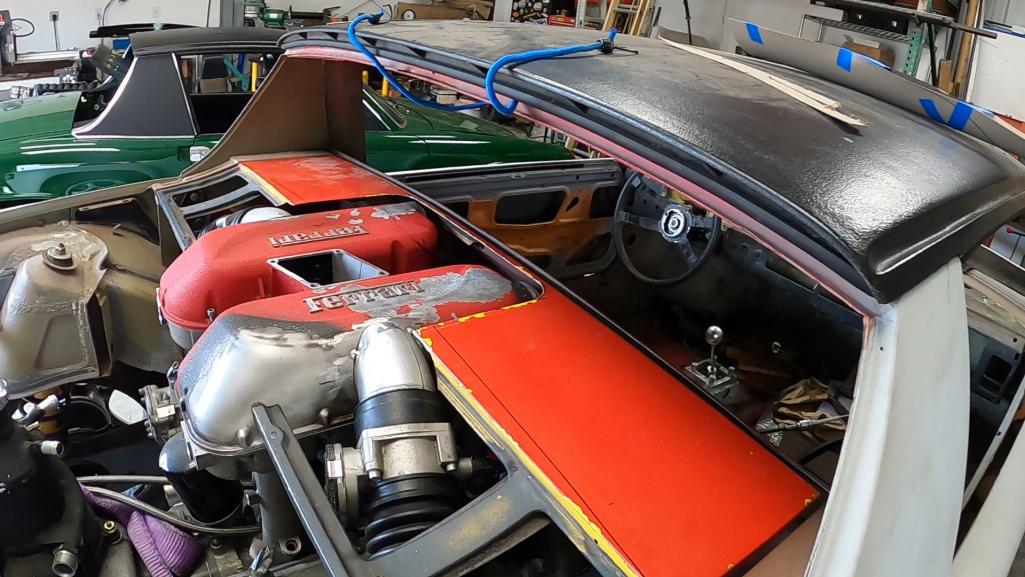
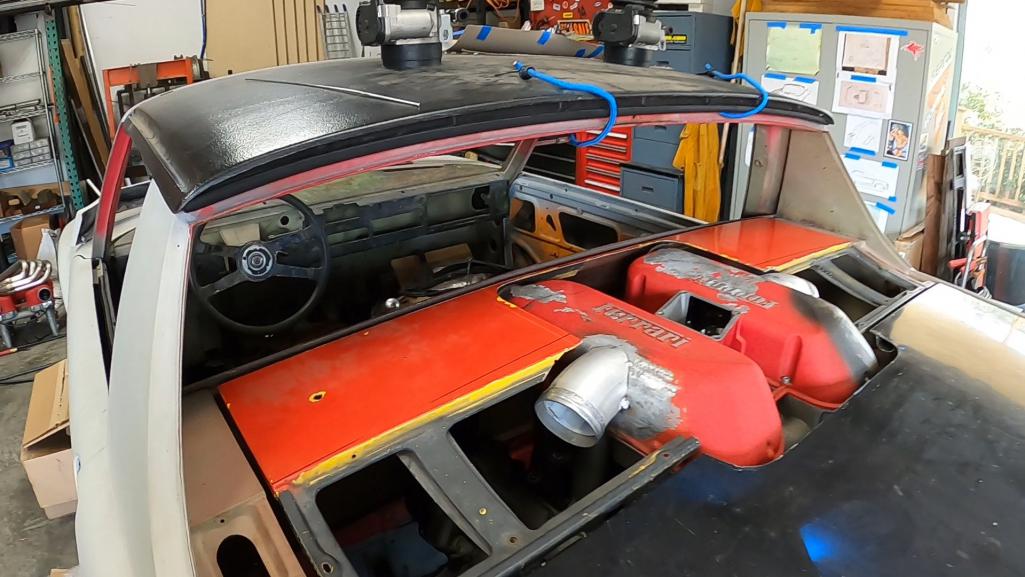
Posted by: tygaboy Feb 25 2024, 07:00 PM
And with everything in position, I have this much clearance from the air/oil separater to a stowed targa top.
Attached thumbnail(s)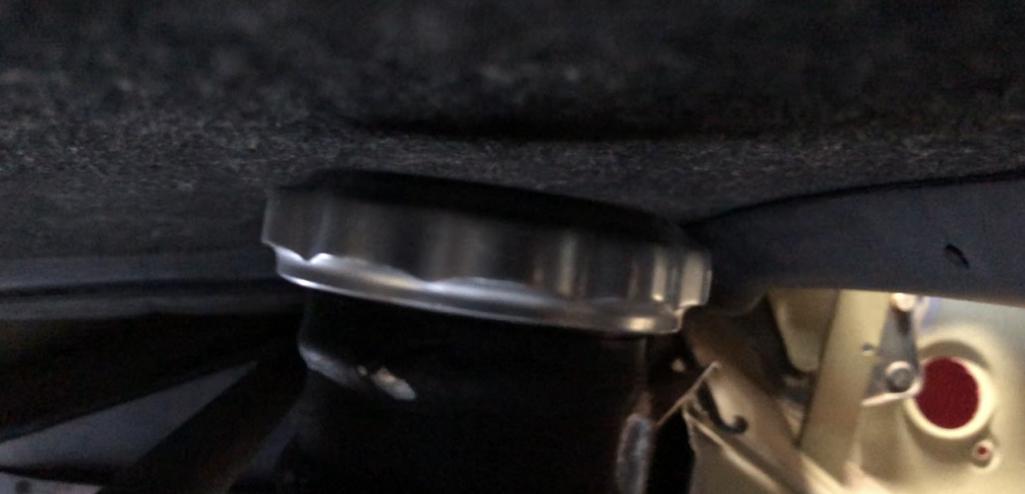
Posted by: East coaster Feb 25 2024, 07:18 PM
Have you considered cutting the trunk a little further and making a piece to connect the rear halves of the engine cover (following the lines of the plenums). I’m not sure if you have room for that and still clear the targa top though? It would put stability back into the engine lid and would look pretty cool.
Posted by: technicalninja Feb 25 2024, 08:01 PM
And with everything in position, I have this much clearance from the air/oil separater to a stowed targa top.
OK, I just have to ask...
Did you plan for this when you jigged up the subframe?
Or, did you absolutely flat luck out????
Posted by: ClayPerrine Feb 26 2024, 06:46 AM
And with everything in position, I have this much clearance from the air/oil separater to a stowed targa top.
Have you thought about the fact that with no trunk floor in the way, the headliner is going to get absolutely filthy with road grime every time you drive it with the top off?
If it were me, I would cut about 10mm out of the neck to provide clearance so it doesn't rub the headliner.
Posted by: tygaboy Feb 26 2024, 08:56 AM
And with everything in position, I have this much clearance from the air/oil separater to a stowed targa top.
OK, I just have to ask...
Did you plan for this when you jigged up the subframe?
Or, did you absolutely flat luck out????
@http://www.914world.com/bbs2/index.php?showuser=27135 - There was never a plan to stow the top. Totally got lucky.
But I choose to believe it's more a fate and karma thing so I'm going with:
It was meant to be.
Posted by: tygaboy Feb 26 2024, 09:03 AM
And with everything in position, I have this much clearance from the air/oil separater to a stowed targa top.
Have you thought about the fact that with no trunk floor in the way, the headliner is going to get absolutely filthy with road grime every time you drive it with the top off?
If it were me, I would cut about 10mm out of the neck to provide clearance so it doesn't rub the headliner.
@http://www.914world.com/bbs2/index.php?showuser=1143 - There is a plan for a removable trunk liner. I try to cover all the things I'm thinking/planning at some point in the various videos and I mentioned it at some point in a recent episode. But I do talk a lot in these and much of it is probably boring. I'm still working on how to improve my content, determine what's interesting vs. not, etc.
As to shortening the neck: it's not that simple as it's not just a neck. Lots of "stuff" happening in there and it runs all the way to the top. I'll try and remember to get a pic of the inside.
Posted by: tygaboy Feb 26 2024, 09:09 AM
Have you considered cutting the trunk a little further and making a piece to connect the rear halves of the engine cover (following the lines of the plenums). I’m not sure if you have room for that and still clear the targa top though? It would put stability back into the engine lid and would look pretty cool.
@http://www.914world.com/bbs2/index.php?showuser=487 - Yes, I have. If I go with a one-piece lid, there will have to be some sort of of connection at the back. I've got a few ideas. Here's a VERY early/simple one that Martin noodled up when I first cut the trunk notch, just to the ball rolling. Lot of detail missing, only 2D but you have to start somewhere.
Attached image(s)
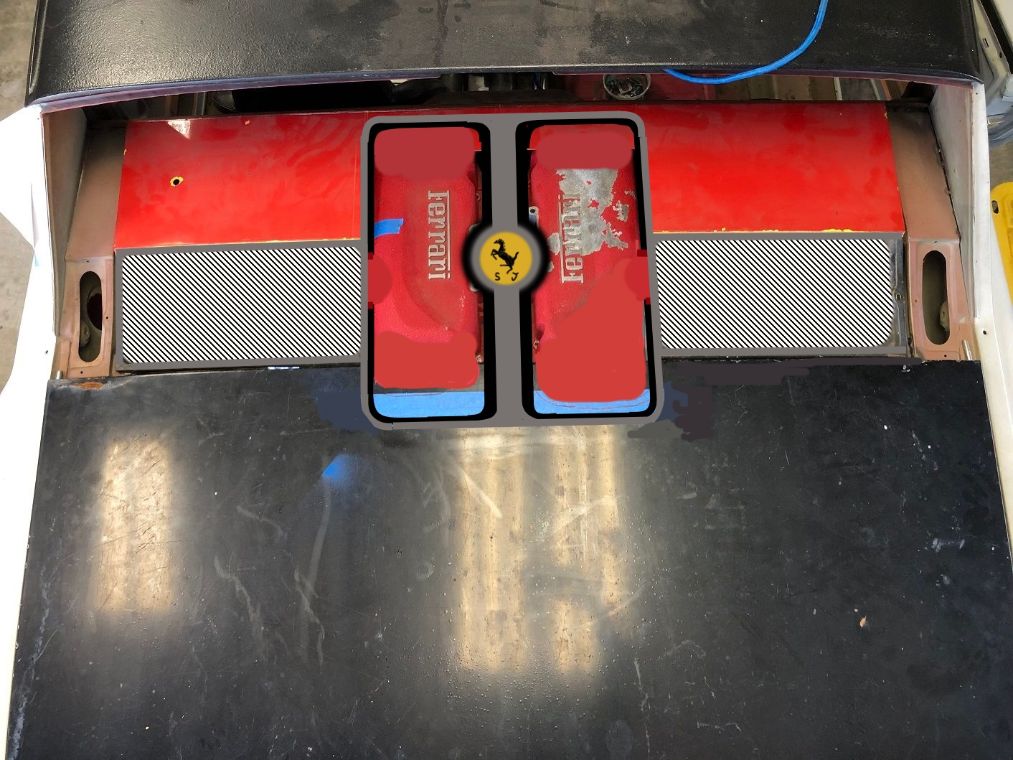
Posted by: East coaster Feb 26 2024, 09:30 AM
Have you considered cutting the trunk a little further and making a piece to connect the rear halves of the engine cover (following the lines of the plenums). I’m not sure if you have room for that and still clear the targa top though? It would put stability back into the engine lid and would look pretty cool.
@http://www.914world.com/bbs2/index.php?showuser=487 - Yes, I have. If I go with a one-piece lid, there will have to be some sort of of connection at the back. I've got a few ideas. Here's a VERY early/simple one that Martin noodled up when I first cut the trunk notch, just to the ball rolling. Lot of detail missing, only 2D but you have to start somewhere.
Bingo!
Posted by: Cairo94507 Feb 26 2024, 09:45 AM
For a first rendering, that looks great.
Posted by: KELTY360 Feb 26 2024, 10:18 AM
For a first rendering, that looks great.
But I'd ditch the prancing horse logo. It's a bit much and it detracts from that gorgeous plenum with the Ferrari script. After all, that's the real story. Maybe you should design your own logo and put it front and center. A Red Barn theme would be perfect. You could even cut a barn shape instead of the circle to add some intrigue.
Posted by: technicalninja Feb 26 2024, 10:54 AM
Someday I'll build an (oversized!) replica of a 57 pontoon fendered Testa Rossa.
I will DEFENITLEY not use any Ferrari insignia. I will not call it a Testa Rossa!
They (Ferrari) protect their brand VICIOUSLY!
Instant lawyers...
That IS NOT a Ferrari!
It is a "Red Barn" production, however!
You really should have a logo anyway...
Might modify a Porsche crest to fit in the yellow "flag".
I'd probably use another color other than yellow there.
Found this on the internet. Still too close to Ferrari for me but might give an idea.
https://www.etsy.com/listing/1313230570/stuttgart-the-home-of-porsche-magnetic?gpla=1&gao=1&&utm_source=google&utm_medium=cpc&utm_campaign=shopping_us_a-electronics_and_accessories-car_parts_and_accessories-car_accessories&utm_custom1=_k_EAIaIQobChMI6fGr6LvJhAMVyW5HAR1wNwFyEAQYBSABEgIWJ_D_BwE_k_&utm_content=go_1740024673_69271433958_338925190009_pla-354955384985_c__1313230570_12768591&utm_custom2=1740024673&gad_source=1&gclid=EAIaIQobChMI6fGr6LvJhAMVyW5HAR1wNwFyEAQYBSABEgIWJ_D_BwE
Posted by: tygaboy Feb 26 2024, 11:43 AM
@http://www.914world.com/bbs2/index.php?showuser=5344 @http://www.914world.com/bbs2/index.php?showuser=27135 - It absolutely won't have any Ferrari logo added anywhere.
That Ferrari cavallino badging was Martin playing with adding some style points to the middle spar, which probably won't be part of the design anyway.
But I may go with something like this on some custom center caps, which I think would be perfect. IYKYK sort of thing.
Attached image(s)
Posted by: technicalninja Feb 26 2024, 01:15 PM
That's KICK ASS!
Perfect.
Only problem...
ALL of the emblems need to match now!
Posted by: ClayPerrine Feb 26 2024, 05:48 PM
@http://www.914world.com/bbs2/index.php?showuser=5344 @http://www.914world.com/bbs2/index.php?showuser=27135 - It absolutely won't have any Ferrari logo added anywhere.
That Ferrari cavallino badging was Martin playing with adding some style points to the middle spar, which probably won't be part of the design anyway.
But I may go with something like this on some custom center caps, which I think would be perfect. IYKYK sort of thing.
If you want an example of how much F3RRARI protects their name, just google "site:914world.com 'Howard' '<insert Italian car company name here>' 'hose'
To make a long story short, one of our Late members, Howard Drainow, was present when an Enzo was totaled. He picked up a small hose from it that was laying on the ground. Howard had a wicked sense of humor, so he attempted to put the hose up for auction on Ebay. Very quickly he received a cease and desist letter from the house of Enzo telling him he could not use the F-Word in his auction or they would sue him for defamation.
The whole thing is documented on World. I can't find the thread where Howard posted the info about the cease and desist letter. But here is the link to the thread from before the letter: http://www.914world.com/bbs2/lofiversion/index.php?t46815.html
He ended up rewording the auction to not use the name of that Italian car company.
The funny part was that the auction was a joke to start with, and he actually planned on giving the hose to the winning bidder for nothing.
So be careful when referring to the overpriced FIAT company. They have lots of expensive lawyers.
Posted by: KELTY360 Feb 26 2024, 08:49 PM
@http://www.914world.com/bbs2/index.php?showuser=5344 @http://www.914world.com/bbs2/index.php?showuser=27135 - It absolutely won't have any Ferrari logo added anywhere.
That Ferrari cavallino badging was Martin playing with adding some style points to the middle spar, which probably won't be part of the design anyway.
But I may go with something like this on some custom center caps, which I think would be perfect. IYKYK sort of thing.
If you want an example of how much F3RRARI protects their name, just google "site:914world.com 'Howard' '<insert Italian car company name here>' 'hose'
To make a long story short, one of our Late members, Howard Drainow, was present when an Enzo was totaled. He picked up a small hose from it that was laying on the ground. Howard had a wicked sense of humor, so he attempted to put the hose up for auction on Ebay. Very quickly he received a cease and desist letter from the house of Enzo telling him he could not use the F-Word in his auction or they would sue him for defamation.
The whole thing is documented on World. I can't find the thread where Howard posted the info about the cease and desist letter. But here is the link to the thread from before the letter: http://www.914world.com/bbs2/lofiversion/index.php?t46815.html
He ended up rewording the auction to not use the name of that Italian car company.
The funny part was that the auction was a joke to start with, and he actually planned on giving the hose to the winning bidder for nothing.
So be careful when referring to the overpriced FIAT company. They have lots of expensive lawyers.
One of the funniest episodes in the history of 914World!
Posted by: rhodyguy Feb 27 2024, 12:53 PM
The ‘P’ word in the logo would go over like a fart in church. The attorneys on retainer love that stuff.
Posted by: Chris914n6 Feb 27 2024, 04:52 PM
The ‘P’ word in the logo would go over like a fart in church. The attorneys on retainer love that stuff.
You can make anything you want for personal use. The issue is selling it for personal gain.
Or whatever this is...

Posted by: tygaboy Feb 27 2024, 07:32 PM
Martin and I spent the afternoon working on closing the original TB openings. I cut the plenum to the desired shape, Martin worked up the paper template and cut the aluminum blank then we took turns working it into shape. Martin's aluminum welding is far better than mine so I happily videoed while he worked his magic. Super happy with how it's coming along.
One tricky piece left to do then repeat on the other side.
Attached thumbnail(s)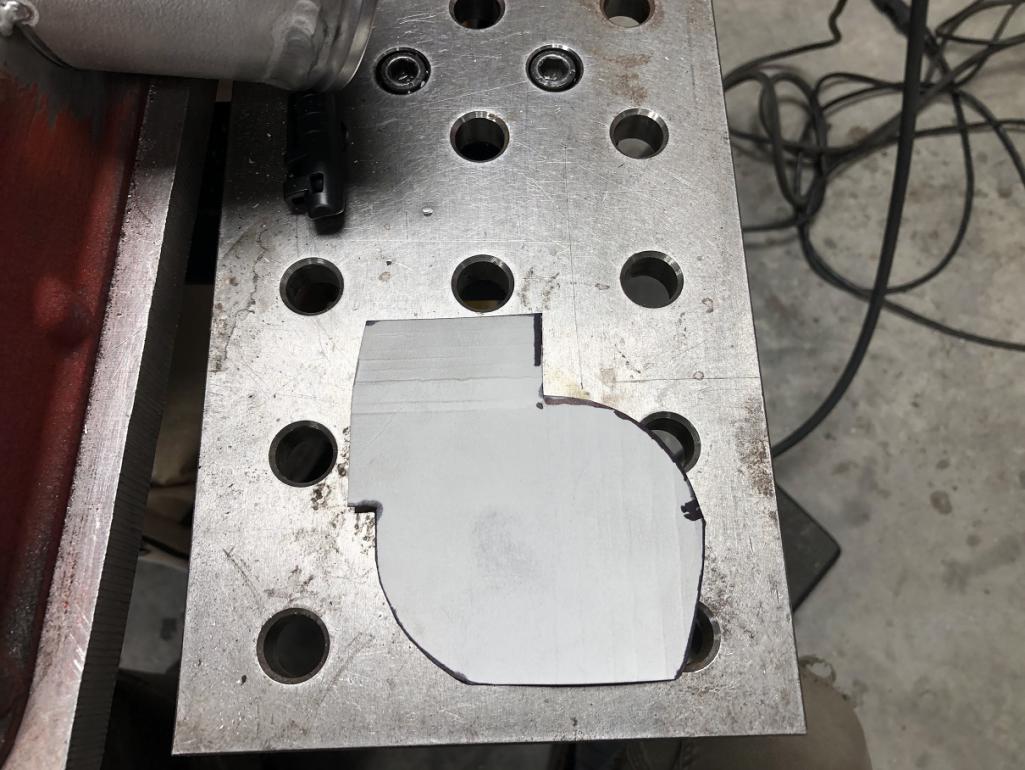

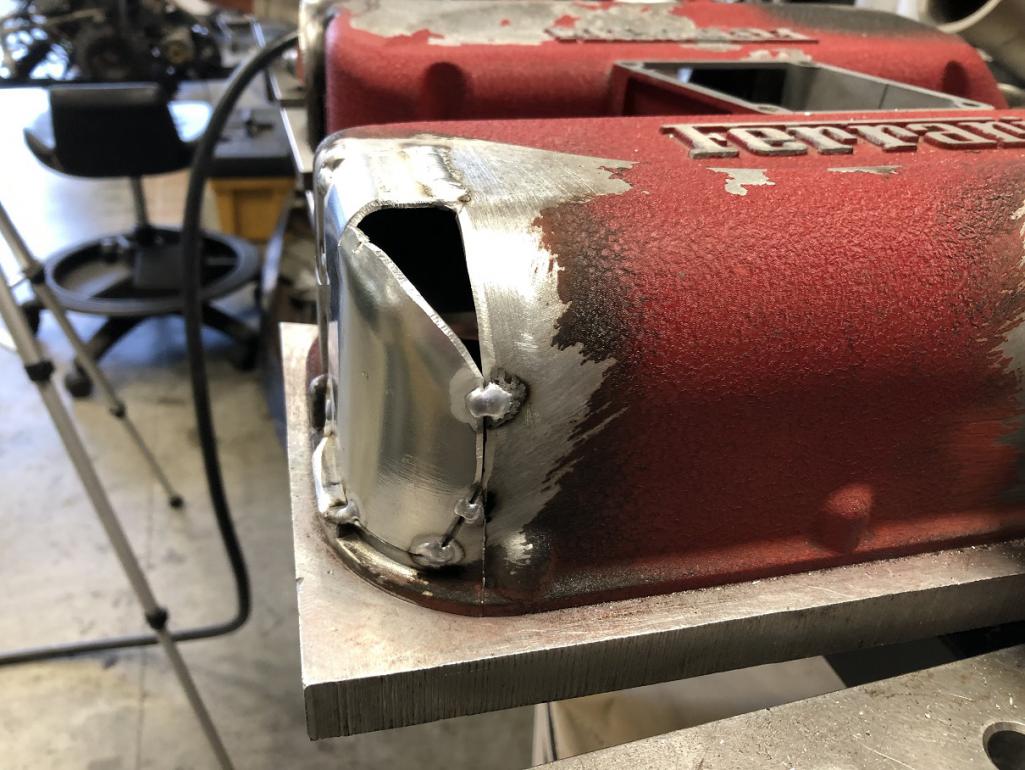
Posted by: tygaboy Feb 27 2024, 07:34 PM
The best part is how nice it's going to look in the car. Did I get lucky guestimating the radius I cut in the lid or what?
Attached thumbnail(s)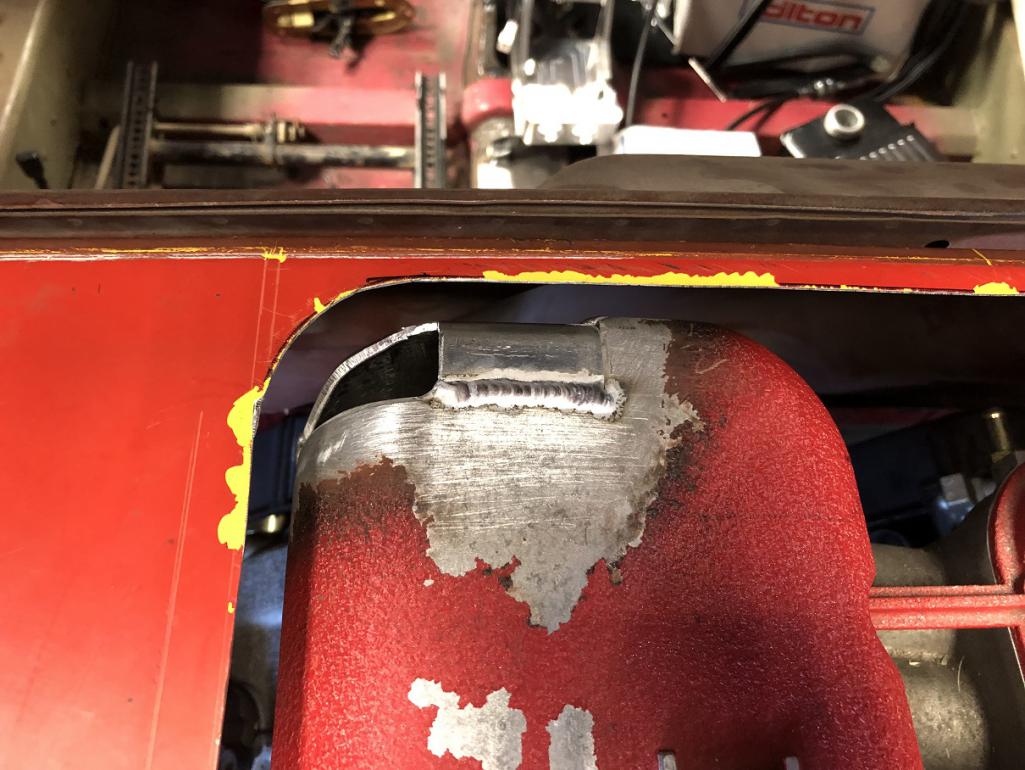
Posted by: davep Feb 27 2024, 07:36 PM
Nice work.
Posted by: bkrantz Feb 27 2024, 08:07 PM
For a first rendering, that looks great.
But I'd ditch the prancing horse logo. It's a bit much and it detracts from that gorgeous plenum with the Ferrari script. After all, that's the real story. Maybe you should design your own logo and put it front and center. A Red Barn theme would be perfect. You could even cut a barn shape instead of the circle to add some intrigue.
It could be fun to somehow combine Porsche and Ferrari horses.
Posted by: worn Feb 27 2024, 08:40 PM
The ‘P’ word in the logo would go over like a fart in church. The attorneys on retainer love that stuff.
Do you folks mean that I cannot put a dinner plate sized Fiat or subsidiary logo on the side of the car? It seems like so few people know what the car is when crossing the country that I might as well change the price range. Oh well. Another brilliant plan gone.
Posted by: technicalninja Feb 27 2024, 09:15 PM
Might be fun to try "Porrari" (never having the intentions to sell it) and see what that stirs up!
Might go viral...
I will have to say the crest that Chris came up with is perfect.
The Maranello is IN THE MIDDLE of the Porsche outline...
Posted by: tygaboy Feb 27 2024, 11:37 PM
I will have to say the crest that Chris came up with is perfect.
The Maranello is IN THE MIDDLE of the Porsche outline...
@http://www.914world.com/bbs2/index.php?showuser=27135 - Exactly. And sharp eyes will note that's the cavallino, not the Porsche horse. It's the little things...
Posted by: technicalninja Feb 28 2024, 08:25 AM
You do a bunch of stuff that way...
The engine lid release on the V8 car is another that I really liked.
Little tiny mods that appear "transparent" and MIGHT have been on the car from the get-go had Porsche been more astute!
I may be wrong, but I believe the Italian company got riled up over the Miami Vice Mc Burnie Daytona Spyder that was first used in the show. This appears to the start of automatic legal problems with the Company.
Story I heard/read had The Company (that cannot be named) tried to sue initially over it and they came to a resolution where The Company DONATED two brand new white Testa Rossas (late style, NOT real TRs in my book). One car got used for "glamor" shots and the other was used (as a personal vehicle) by one of the head honchos for Miami Vice.
The replicar Daytona HAD to be destroyed on the show!
I also heard/read that the action shots were done with a highly modified Pantera that had a replicar TR body and the camera car to get the shots was yet another Pantera all modified up to be a camera car.
So, action shots were still a replicar and the Company couldn't do shit about it...
Having experienced both late TRs and Panteras I'm counting the use of modified Panteras as a loss of two of the best 70s Italian cars.
IMO they should have trashed the TRs
Posted by: technicalninja Feb 28 2024, 08:31 AM
Oh, by the way...
It's probably a good thing I'm 2000 miles away from you.
If I lived close, I'd be a PEST!
I'd spend way too much time at the Red Barn...
Posted by: tygaboy Feb 29 2024, 07:10 AM
Here's a sneak peek at some content from the next video:
The driver side plenum partch was mostly in place and we couldn't resist seeing what it was going to look like once it's ready for new wrinkle finish. That top section got final welding, some file work then sanded. Yep, that'll work!
Attached thumbnail(s)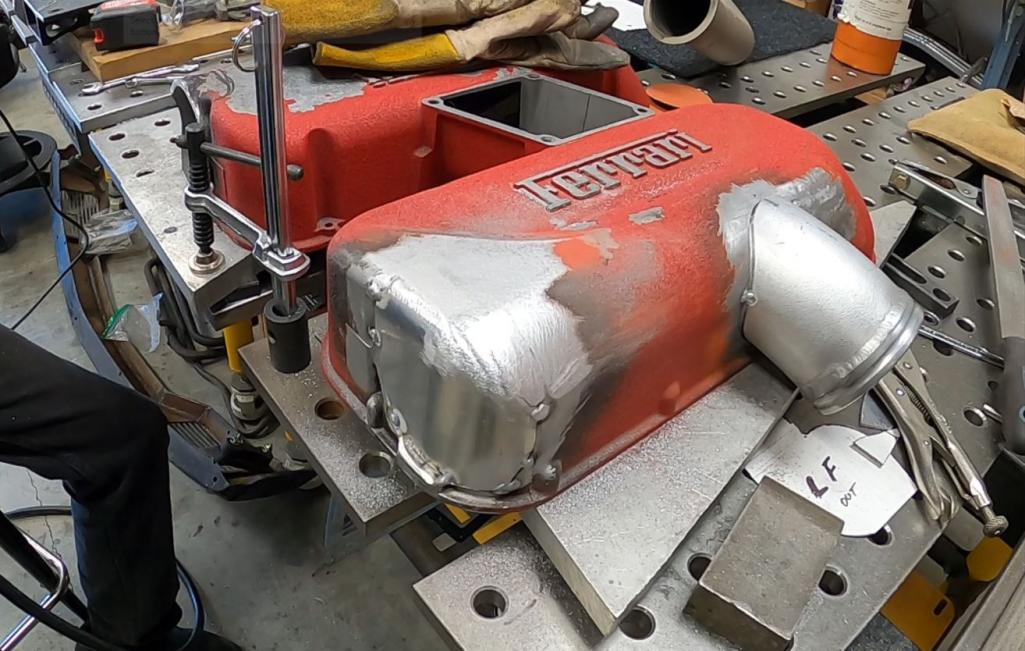
Posted by: tygaboy Feb 29 2024, 07:12 AM
Then it was on to patching the passenger side.
Attached thumbnail(s)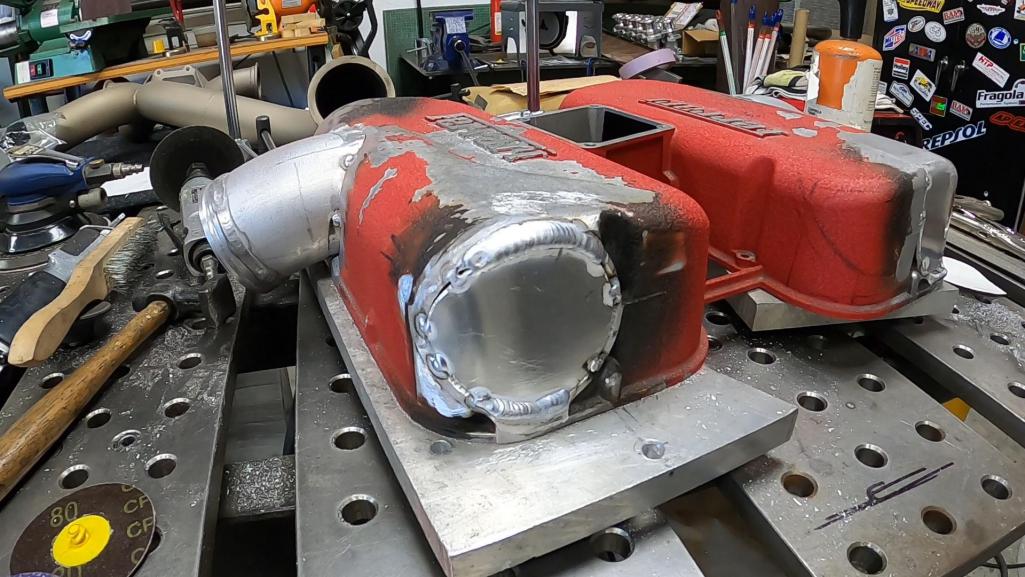
Posted by: Van B Feb 29 2024, 10:05 PM
FYI, I just watched the most recent Hoovie’s Garage video and he said EAG investors have started forfeiting assets…
So, you better get your cables quick!
Posted by: tygaboy Feb 29 2024, 11:39 PM
FYI, I just watched the most recent Hoovie’s Garage video and he said EAG investors have started forfeiting assets…
So, you better get your cables quick!
@http://www.914world.com/bbs2/index.php?showuser=8571 B - Yep, I'm aware and yes, it's looking like a bit of a shit show. I'm working with an ex-employee who may be able to help. I'm also in touch with another company that makes conversion kits as well as a custom cable company.
As I nearly always say: If it were easy, everyone would be doing it.
Posted by: Van B Mar 1 2024, 05:53 AM
Good, I'm glad you were tracking and have a backup in work! I literally paused the video to make that post lol...
Posted by: tygaboy Mar 1 2024, 08:21 AM
Martin is back at it! I serve as decision maker and Lovely Assistant when it comes to some aspects of my builds and this intake work falls into that category.
As you'll hear in the upcoming video, I'm good enough at enough skills that I'm OK when it comes to things I'm not good at! If I need help, I ask.
I can't afford to practice on parts that are this visible so I call in the expert!
Attached thumbnail(s)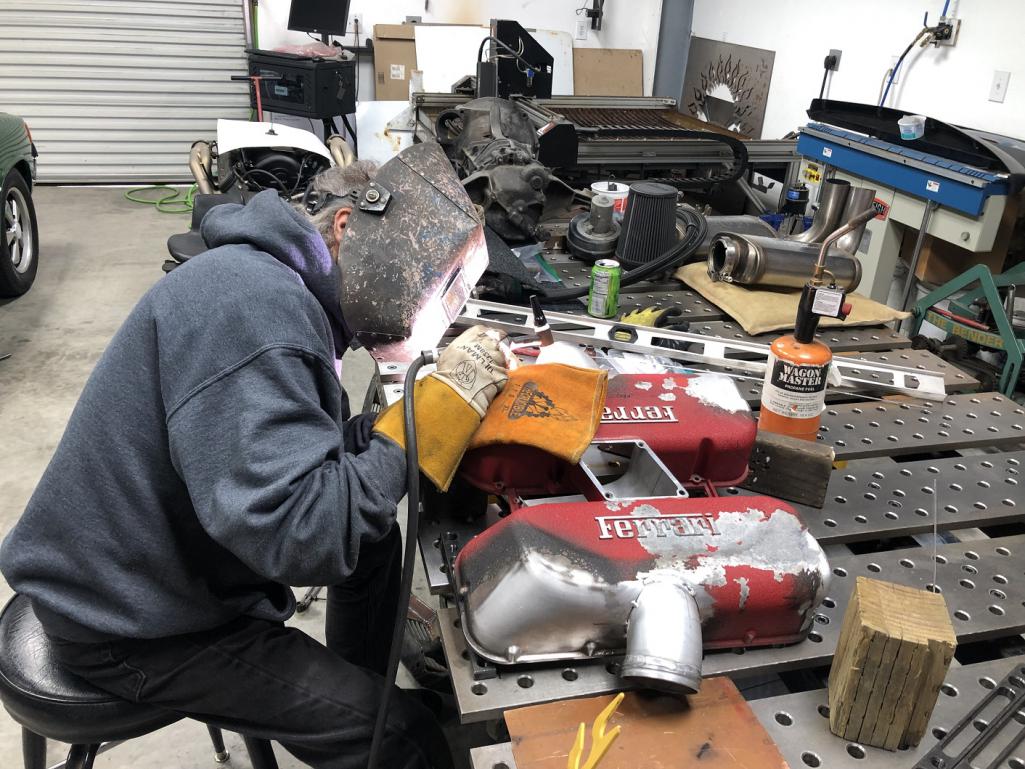
Posted by: sb914 Mar 1 2024, 08:28 AM
Better cover mikes car . I see lots of heavy sharp objects close by.
Posted by: tygaboy Mar 1 2024, 08:35 AM
And here you see why. Plus, it's great to take a break from working solo.
Point of clarification: I don't just call Martin and ask him to do all this. We've worked out a "bro deal" hourly rate. This works great because we can ask each other, "you feel like working today?" No one feels taken advantage of and while we are good friends, when he's At The Red Barn helping me or I'm helping him with his project, we focus on the job at hand. It's worked great for years.
Attached thumbnail(s)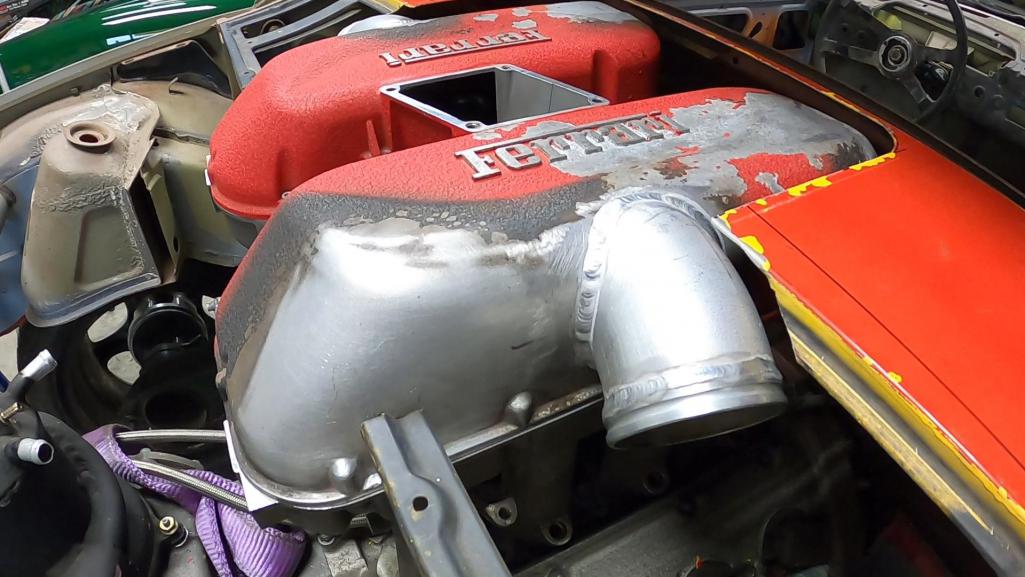
Posted by: Cairo94507 Mar 1 2024, 09:28 AM
That is amazing work-once painted it will look like it came from Ferrari like that.
Posted by: Krieger Mar 1 2024, 09:33 AM
Belisimo!
Posted by: tygaboy Mar 1 2024, 05:57 PM
I took a swing at what I may want to do to the engine lid to get the clearance I need for the throttle bodies: curving the leading edge of the grill area.
I started with the driver side, just to see what my immediate raction would be... and I think I like it!
I was worried that messing with that very straight edge would go horribly wrong but when I look at it, it seems to flow with the sail panels, the curve of the roof, the arch of the trunk lid, etc. Comparing it to the right side, I think it softens the look in that area and doesn't look out of place.
I'll cut the other side and tidy it up a bit more but I think this may work.
Attached thumbnail(s)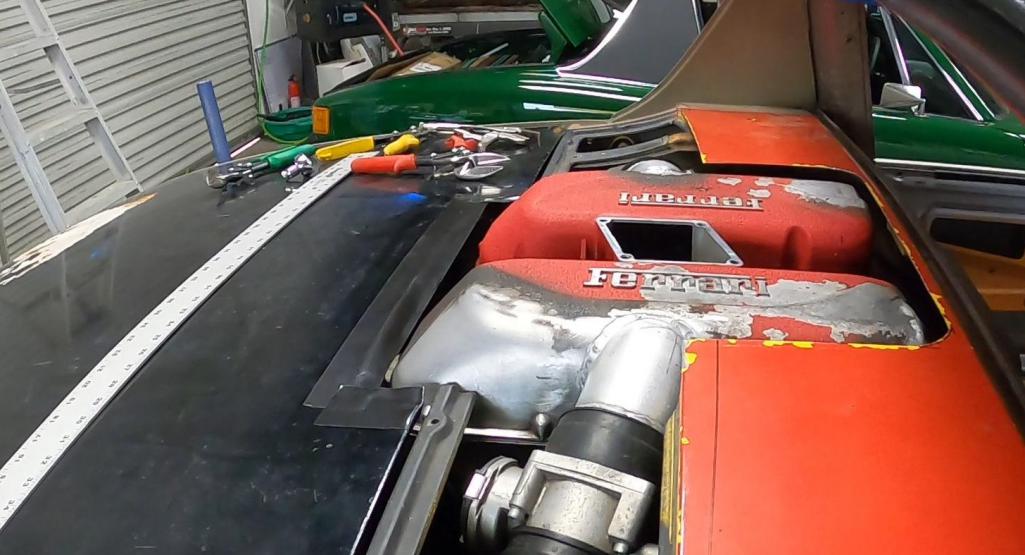
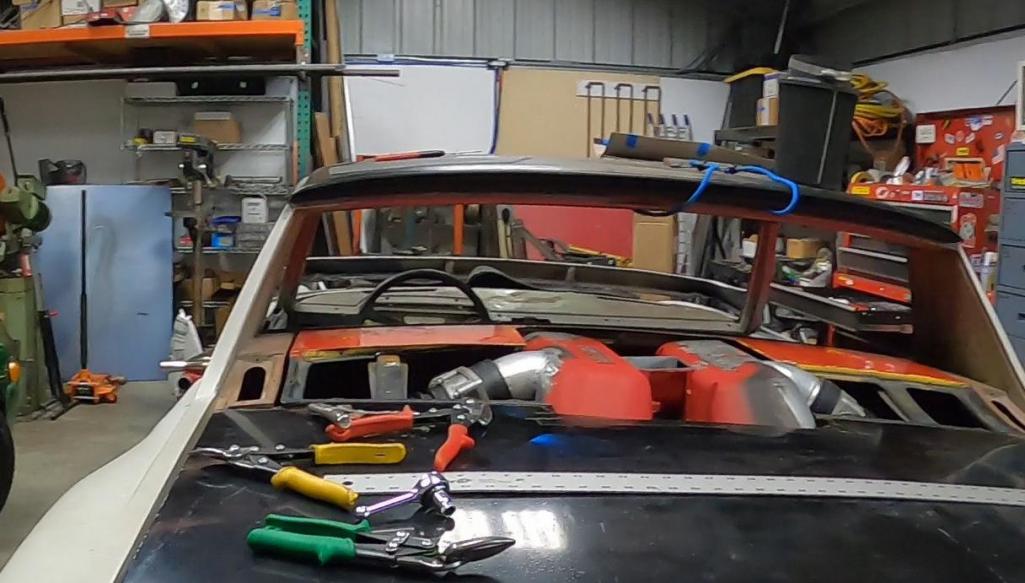
Posted by: Van B Mar 1 2024, 09:36 PM
Would you do a double mesh GT style grill covering all the way across if you go with the curved style?
Posted by: tygaboy Mar 2 2024, 08:08 AM
Would you do a double mesh GT style grill covering all the way across if you go with the curved style?
@http://www.914world.com/bbs2/index.php?showuser=26011 - If it's all mesh, the curved part would simply be some sort of support frame, since the standard diagonal brace no longer fits.
Posted by: tygaboy Mar 2 2024, 08:10 AM
Catch up on all the details in the latest video. And notice how much goes on during the time lapse sections.
https://www.youtube.com/watch?v=4VbQOzTQYVo
Posted by: Van B Mar 2 2024, 08:59 AM
Would you do a double mesh GT style grill covering all the way across if you go with the curved style?
@http://www.914world.com/bbs2/index.php?showuser=26011 - If it's all mesh, the curved part would simply be some sort of support frame, since the standard diagonal brace no longer fits.
Yeah… it’s just what I was picturing. The Ferrari manifolds kinda veiled, but visible.
With your idea of the bridging across the top vs cut out, I started picturing the ability to create an amalgam of porsche and Ferrari design cues.
Not trying to advocate for what your vision should be; rather, I’m just sharing what I started thinking.
Attached thumbnail(s)
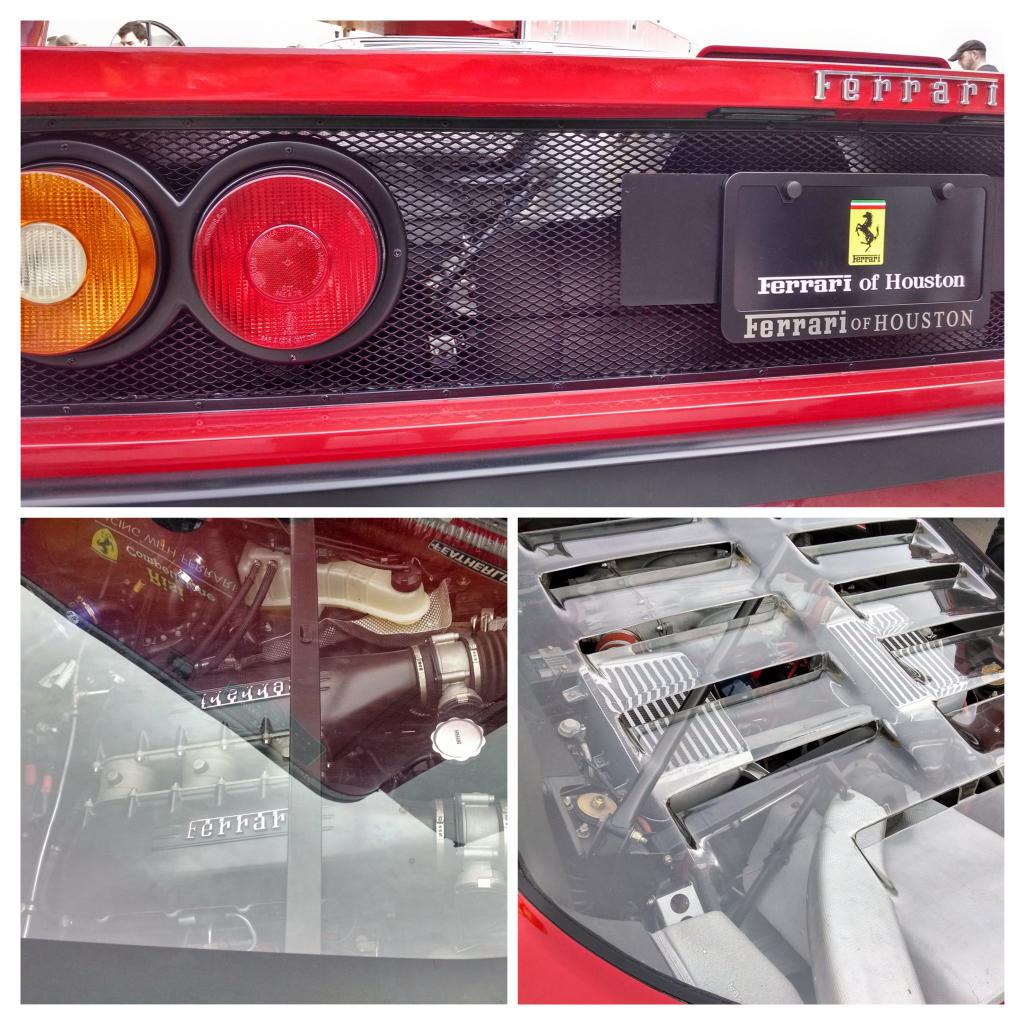
Posted by: technicalninja Mar 2 2024, 09:14 AM
Something I just noticed...
"Ferrari" and "Red Barn" have the same number of letters.
The F could easily be changed to an R. The second letter is an e already...
I'd contemplate changing the name on the top of the intakes to reduce possible litigation.
Not sure if they could pop you for using one of their engines in anything but avoiding this all together might be easier...
Might be better choices than "Red Barn", food for thought.
Case in point, the Maserati use of a Ferrari engine does not say Ferrari on it in big bold letters.
I believe Ferrari and Maserati are RELATED (stepsiblings maybe?) and they still don't say Ferrari...
Rick
Posted by: tygaboy Mar 2 2024, 01:20 PM
Something I just noticed...
"Ferrari" and "Red Barn" have the same number of letters.
The F could easily be changed to an R. The second letter is an e already...
Rick
@http://www.914world.com/bbs2/index.php?showuser=27135 Rick - That is hilarious! And so, OK. Issue solved!
Attached image(s)
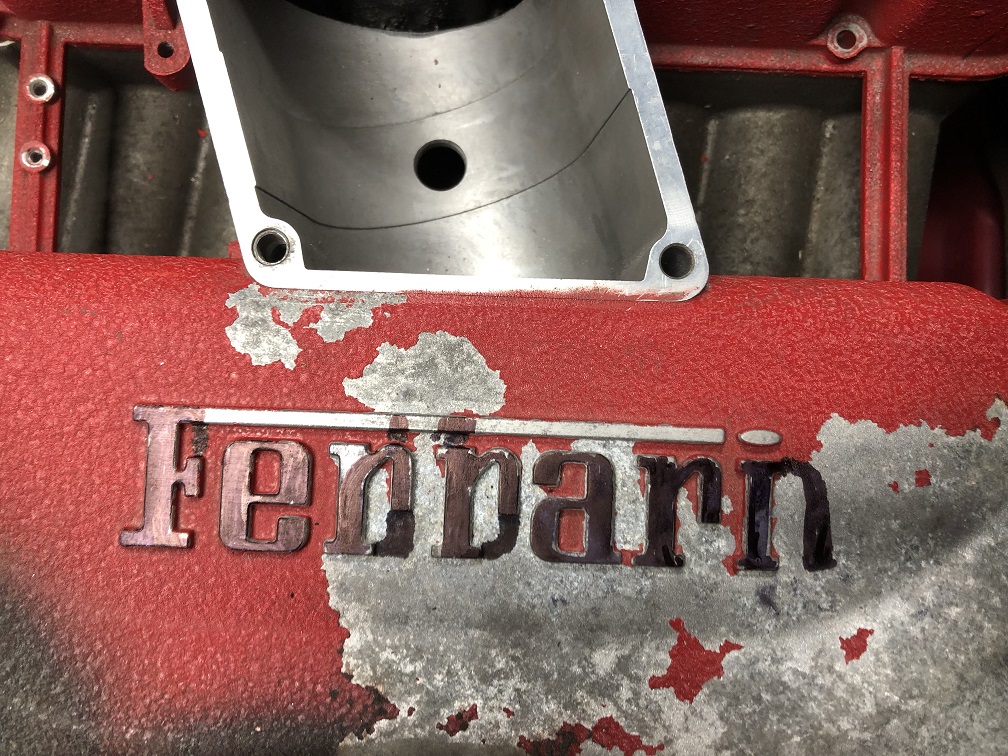
Posted by: technicalninja Mar 2 2024, 01:31 PM
WOW!
That looks better than I thought it would.
Some creative application of aluminum could make that "litigation proof" and still get the message across...
It would require a Master!
Luckily you have one...
I'd love to see the INSIDES of those plenums...
Posted by: tygaboy Mar 2 2024, 04:19 PM
In order to get a more accurate visual, I made a quickie return and clamped it onto the curve. With that dropped edge, it still looked crowded at the plenum so I moved that end of the curve forward maybe another .75".
That overhead shot shows just how much material has been removed but it's no where near as dramatic when viewed from the side. Of course, the car is on the Quick Jacks so much higher than it will be when typically seen.
But I think this curve idea works well and that return REALLY cleans things up and gives a better impression of how this is going to look.
Attached thumbnail(s)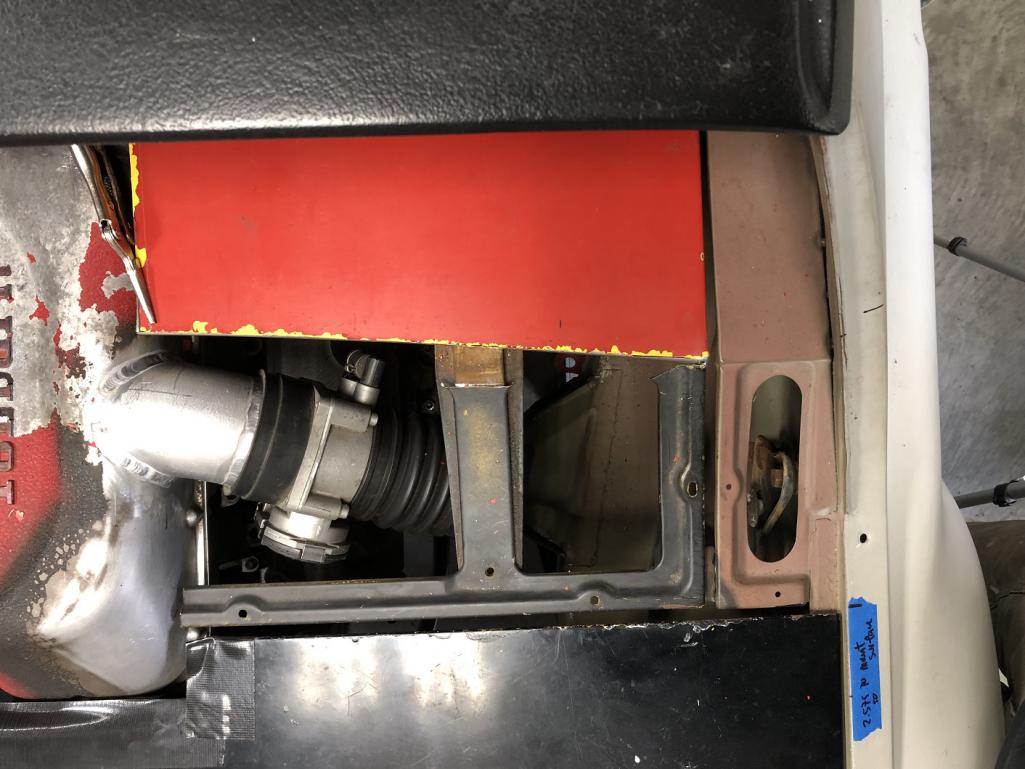
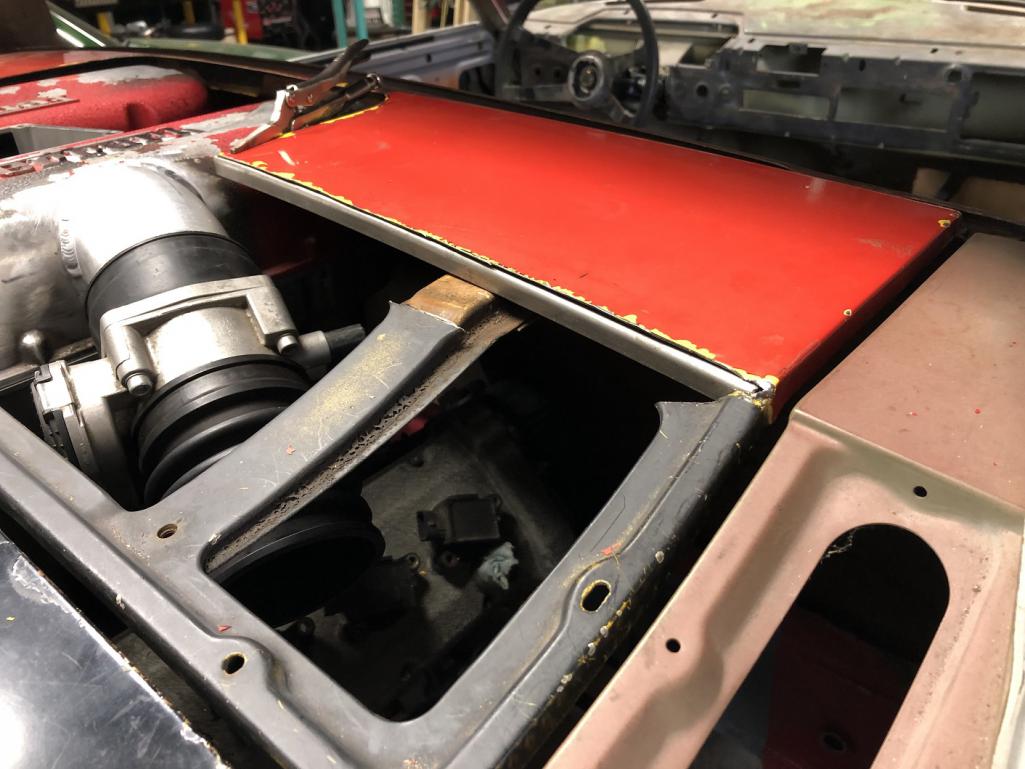
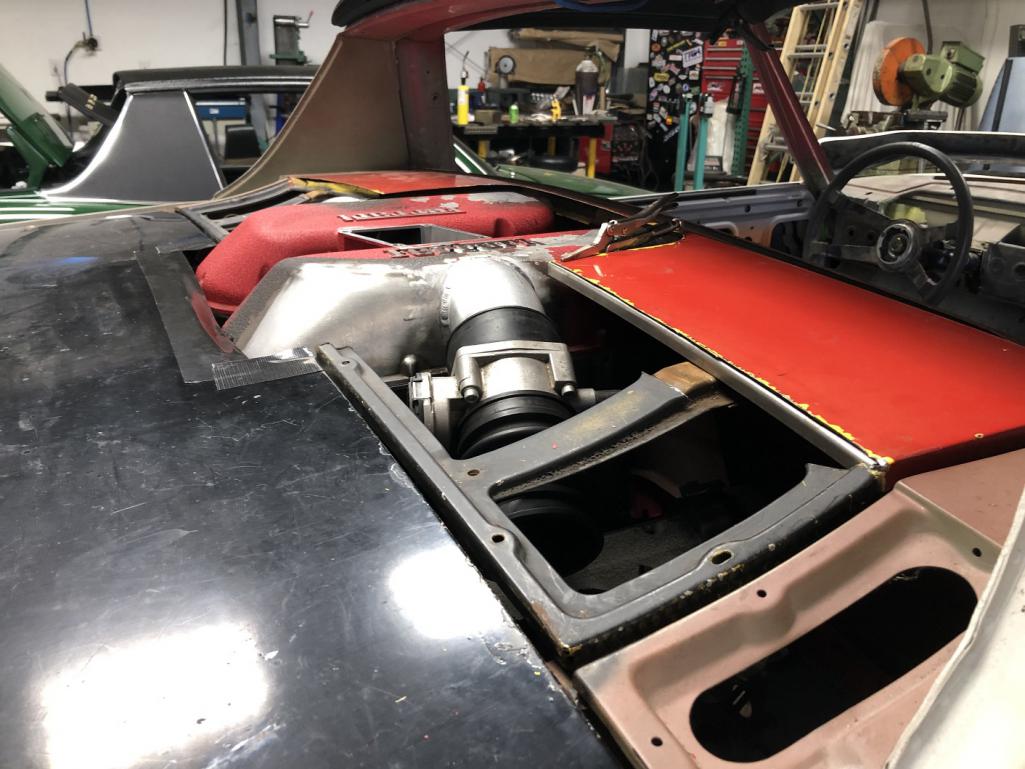
Posted by: technicalninja Mar 2 2024, 04:37 PM
You're going to need the Ferrari mesh in the first pic in Van B's post.
Wonder how much that stuff cost?
Just different enough from 914 mesh to be noticeable.
Almost looks like little slices of pie...
Nope, it's Italian, Pizza it is!
Posted by: technicalninja Mar 2 2024, 04:58 PM
In order to get a more accurate visual, I made a quickie return and clamped it onto the curve. With that dropped edge, it still looked crowded at the plenum so I moved that end of the curve forward maybe another .75".
That overhead shot shows just how much material has been removed but it's no where near as dramatic when viewed from the side. Of course, the car is on the Quick Jacks so much higher than it will be when typically seen.
But I think this curve idea works well and that return REALLY cleans things up and gives a better impression of how this is going to look.
That top view (pic didn't quote over, probably a mistake on my part) made me think an isosceles trapezoid with the same angle (in reverse) in the truck lid which will negate the curved cut out, might work too.
You've already ripped into the trunk lid; A little more "lightening" won't hurt.
Might be too much BS with the trunk floor but it was just a thought.
You could "try it out for size/look" with a bit of masking tape.
Super neat project!
Wish I lived closer...
Posted by: tygaboy Mar 4 2024, 12:57 PM
With EAG likely out of the picture, I contacted Control Cables and it looks like they can help. They make an end fitting that's dangerously close to what the Ferrari needs. What's awesome is that it's removable! Dimensionally, it's slightly undersized so I can maybe sleeve it or just make a new one that's "Control Cables" on the inside and "Ferrari" on the outside!
Here you can see the Ferrari cable (with the tape measure) and the Control Cable with its removable end fitting.
Attached image(s)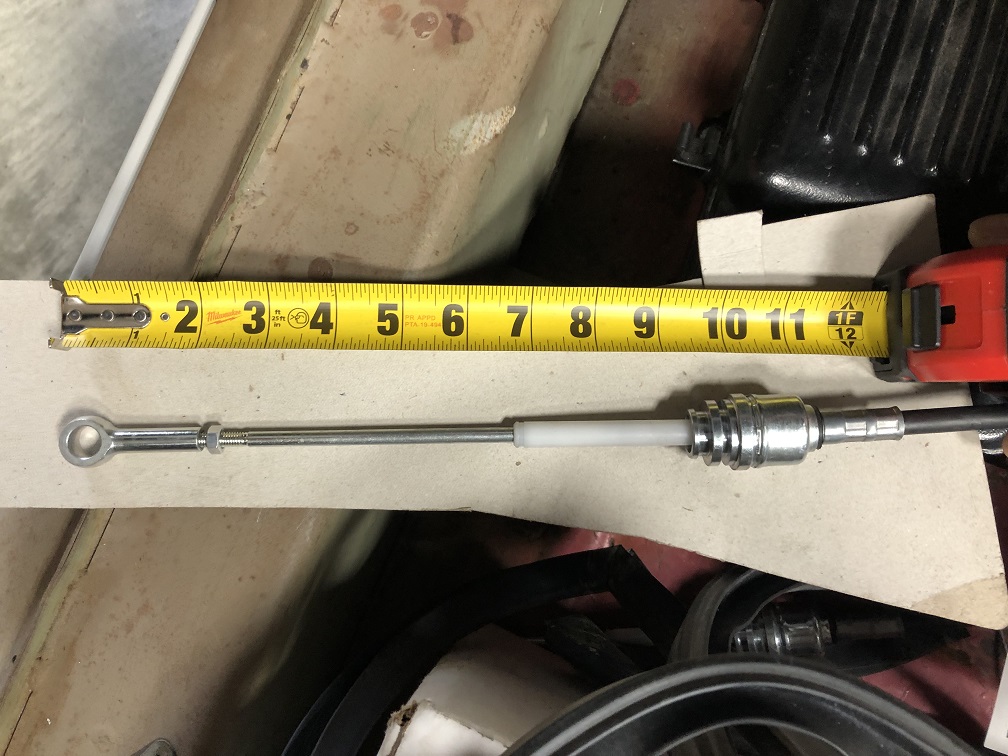
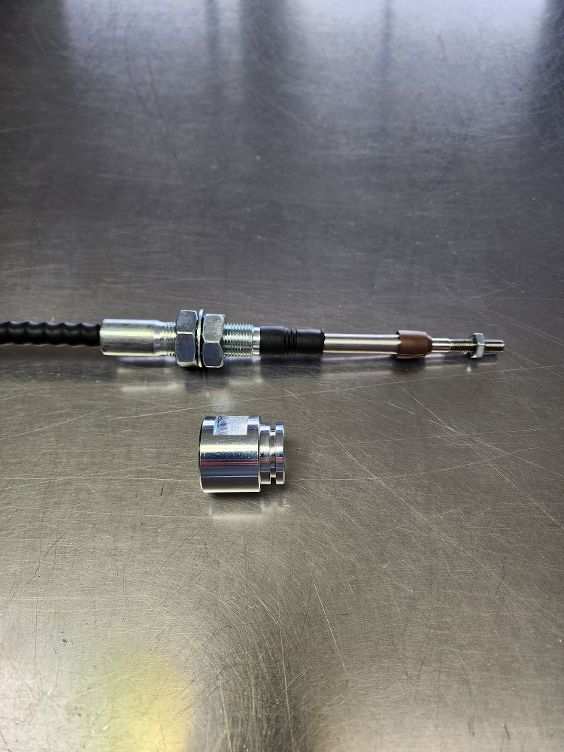
Posted by: tygaboy Mar 5 2024, 02:07 PM
Files + angle grinders + d/a + a bit of time and the plenum patches are nearly ready. Even though this end is entirely hidden once it's in the car - all that's visible are the top and side radii - a few spots still need a bit of tidying up.
Attached thumbnail(s)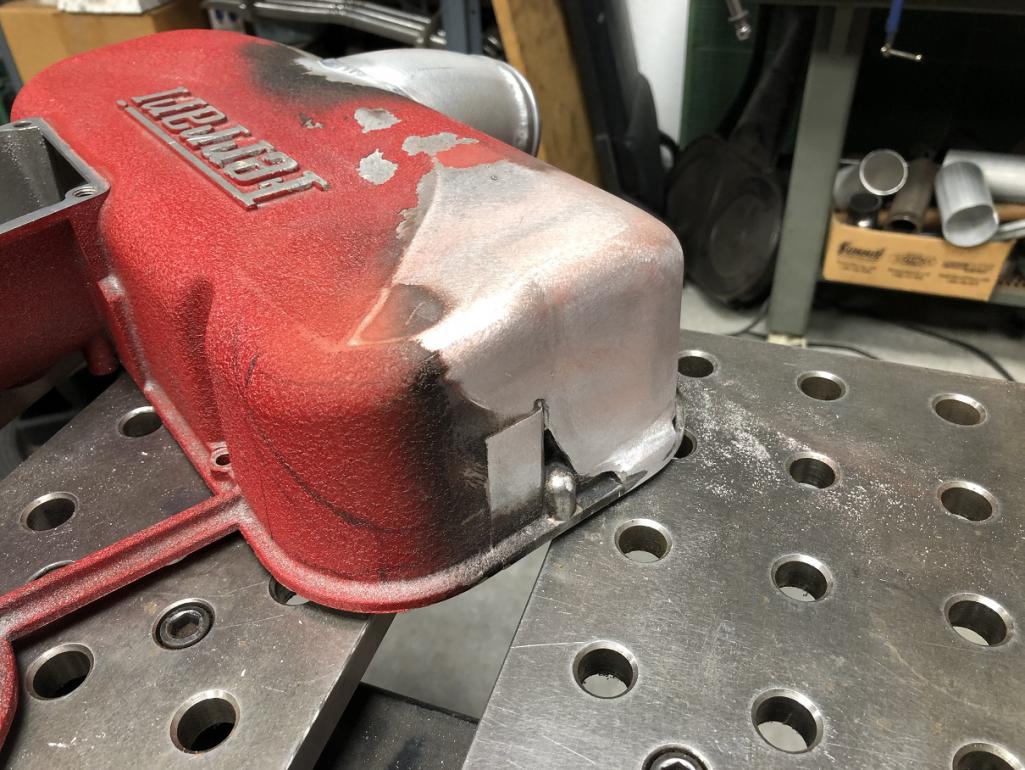
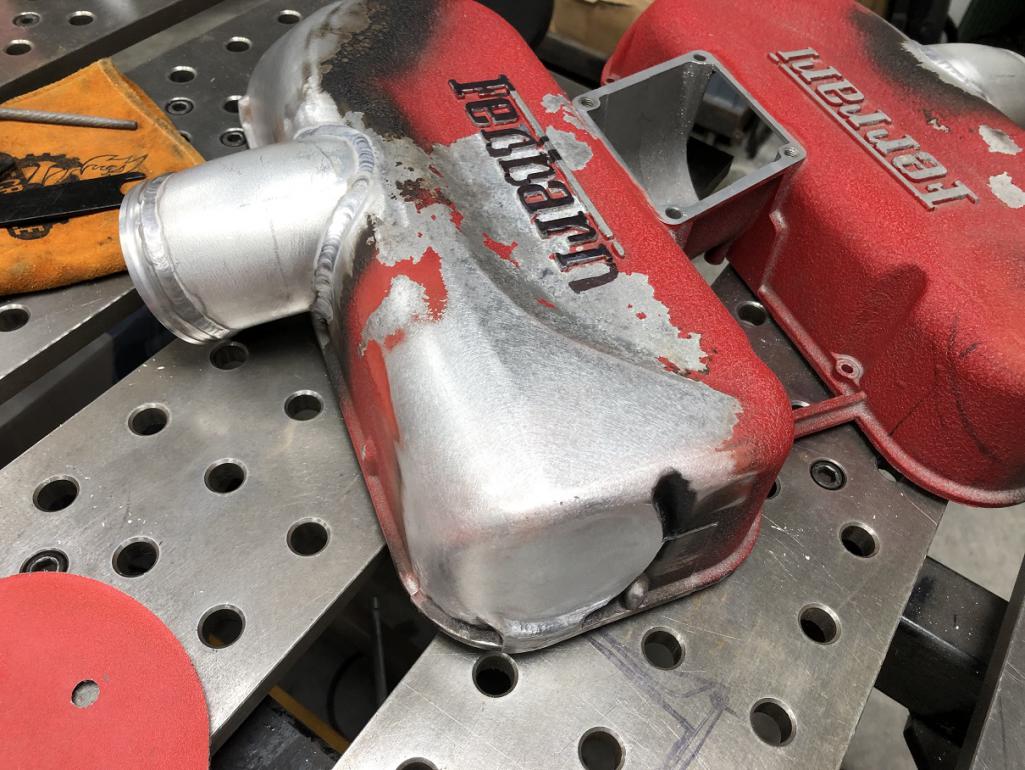
Posted by: JmuRiz Mar 5 2024, 03:28 PM
Nice! love the sharpie text too
Posted by: Van B Mar 5 2024, 09:09 PM
I’m pretty impressed with the quality of that sand cast aluminum. It welded really clean!
Posted by: tygaboy Mar 9 2024, 07:52 AM
OK, OK, here're the details about getting things to where they are now.
And how about supporting a fellow Worlder? Subscribe!
https://www.youtube.com/watch?v=GNMQuXrofcA
Posted by: Cairo94507 Mar 9 2024, 08:33 AM
Love "the curve"; flows nicely with the roof and sail panels.
Posted by: East coaster Mar 9 2024, 09:00 AM
Shaping up!….pun intended
Posted by: Chris914n6 Mar 9 2024, 04:53 PM
Knowing it's a tight fit between the IM and targa top I'm thinking doing the same curve but mirrored.
If you want to keep the endcap grills for looks, it would be easier to add a slice of solid on top of the mesh than to reshape the structure for a little extra mesh that you would then need to make.
...unless you want to do a 2 piece lid like the Fiero, which makes sense with what little room you have around the IM.
Window screen makes for cheap and easy mesh since you like to see things mocked up. 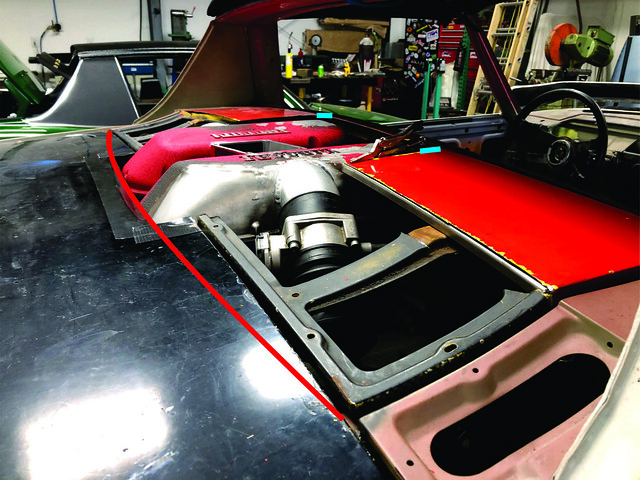
PS. Have you tried to open the trunk yet? That may change the cut size.
Posted by: technicalninja Mar 9 2024, 06:18 PM
See. someone else had the same idea...
Check my post 962.
That's actually a good post number to hit!
Better would have been post 914!
Posted by: Maltese Falcon Mar 9 2024, 07:23 PM
With EAG likely out of the picture, I contacted Control Cables and it looks like they can help. They make an end fitting that's dangerously close to what the Ferrari needs. What's awesome is that it's removable! Dimensionally, it's slightly undersized so I can maybe sleeve it or just make a new one that's "Control Cables" on the inside and "Ferrari" on the outside!
Here you can see the Ferrari cable (with the tape measure) and the Control Cable with its removable end fitting.
Greg over at Control Cable (Santa Fe Springs CA) is great. I can leave him a mock-up, usually a length of H/D extension cord with some blue tape at each end>marking the points where the type of end goes; and pick up a perfect operating Cable in about a week. He does mostly SAE, but has done some
metric ends for me as well
Posted by: tygaboy Mar 10 2024, 09:29 AM
It's not lost on me how fortunate I am. Yesterday I had a unique opportunity to hang out with a group of serious Porsche folks.
While I thought the Singer DLS would be the highlight of my day, it turns out it was when the owner of the 910 said, "You want to sit in it?". Uh... Yes! Yes I do!
That 910 was 2nd in class/4th overall at Sebring in '67.
Quite a day...
Attached thumbnail(s)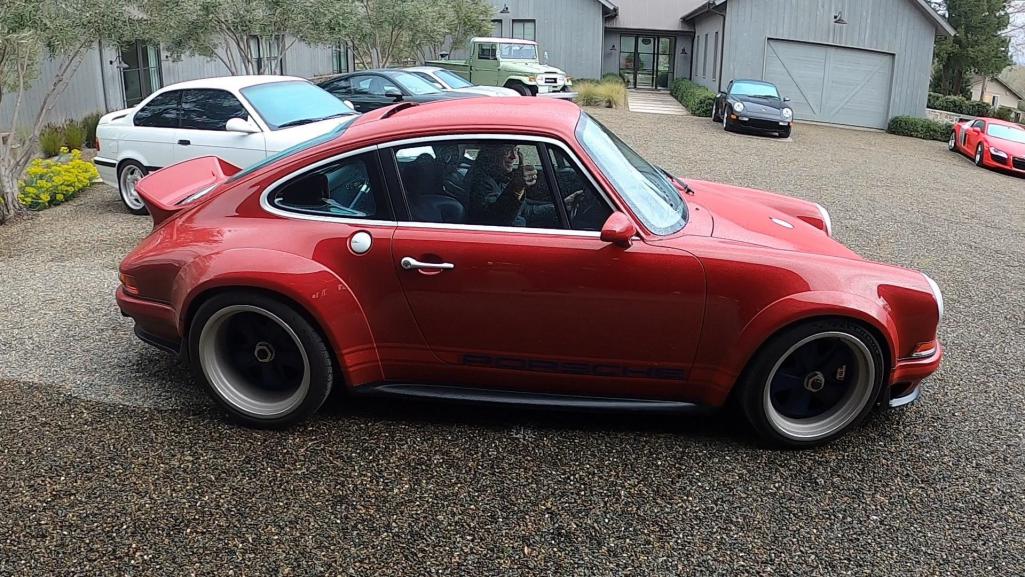
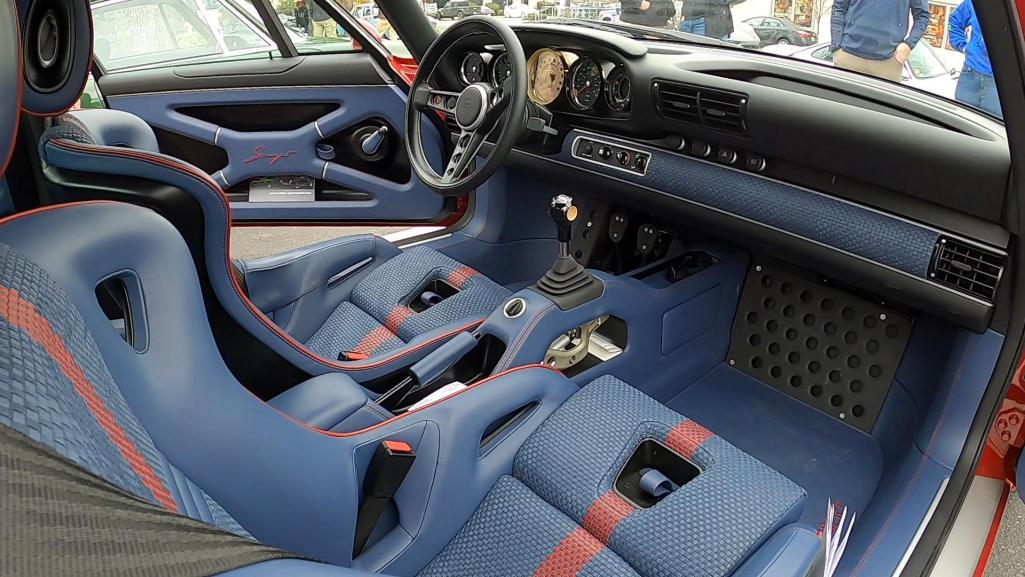
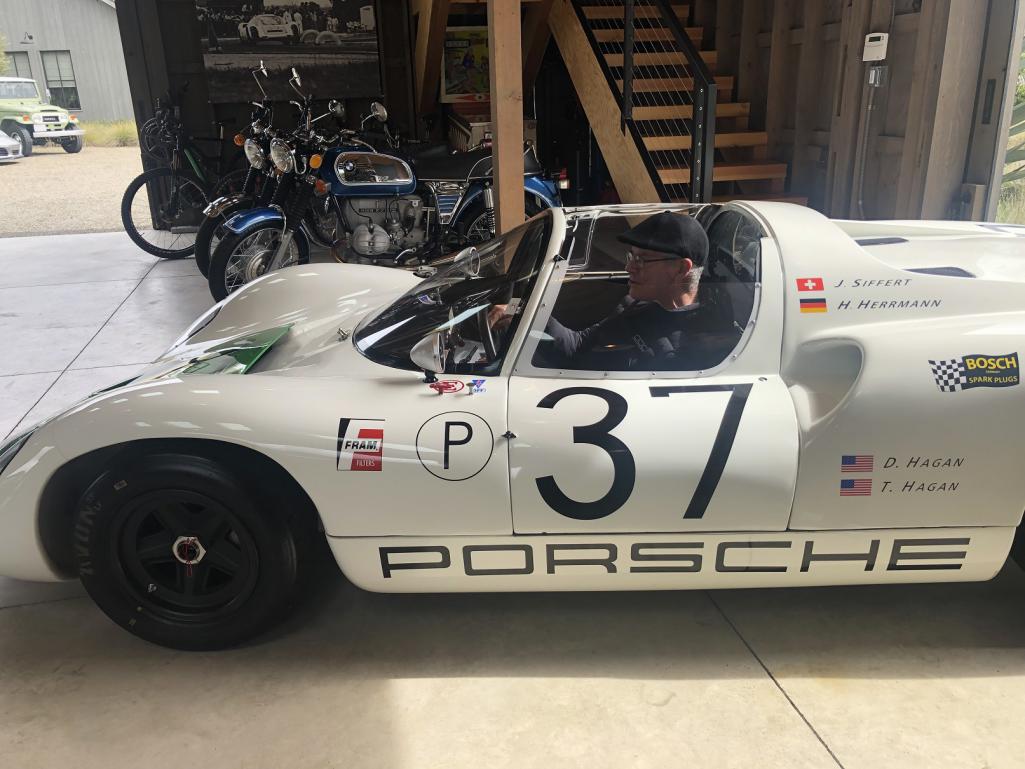
Posted by: Retroracer Mar 10 2024, 10:35 AM
The famous Siffert / Hermann / Baker car....!
What an opportunity!
- Tony
Posted by: Cairo94507 Mar 10 2024, 11:06 AM
Wow! Great opportunity and glad you got a photo.
Posted by: tygaboy Mar 13 2024, 08:05 AM
For others doing a 360 gated 6-speed swap, here are the specs for the shifter cables from Control Cables.
Feel free to PM me for the shifter mount CAD file.
At The Red Barn, we're all about giving back to the community!
Attached image(s)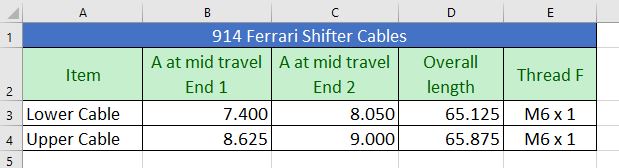
Posted by: SirAndy Mar 13 2024, 09:27 AM
It's easy to give back to a community of 1 ...

Posted by: gereed75 Mar 13 2024, 11:33 AM
The 910 is bad ass. Looks like a tight fit.
Posted by: tygaboy Mar 16 2024, 08:47 AM
Moving on to suspension and driveline stuff:
https://www.youtube.com/watch?v=YYWU_DcBAII
Posted by: tygaboy Mar 23 2024, 08:58 AM
Early review of this episode:
"Elements of this build are SHOCKING! Other times, it's all a bit shifty..."
Enjoy!
https://www.youtube.com/watch?v=6Gx3TvD_O24
Posted by: tygaboy Mar 23 2024, 09:47 AM
Well, the custom shifter cables arrived...
The less-than-good news is you can ignore those cable dimensions I posted earlier. I'm still working through things but the short story is:
Standard At The Red Barn process: Version n+1 required
They aren't the correct length/dimensions.
I think I know why but you'll have to wait for a future video episode to see if I get it right the 2nd time.
Posted by: Shivers Mar 23 2024, 10:03 AM
I did a screen shot of your graph. Thanks. You are working on a stock set up, so this should be the same numbers on mine. Yes? Thanks again
Posted by: tygaboy Mar 23 2024, 10:20 AM
I did a screen shot of your graph. Thanks. You are working on a stock set up, so this should be the same numbers on mine. Yes? Thanks again
@http://www.914world.com/bbs2/index.php?showuser=24781 - Yep, totally stock suspension set up so should apply to others, as well.
Posted by: Chris914n6 Mar 23 2024, 12:51 PM
Reminds me, rock crawlers use axle limiting straps. Not as pretty as rebuilding the shock but also not as involved.
Posted by: Chris914n6 Mar 30 2024, 01:28 PM
These are cables from a Mitsubishi 3000gt. Thought you might find it interesting... 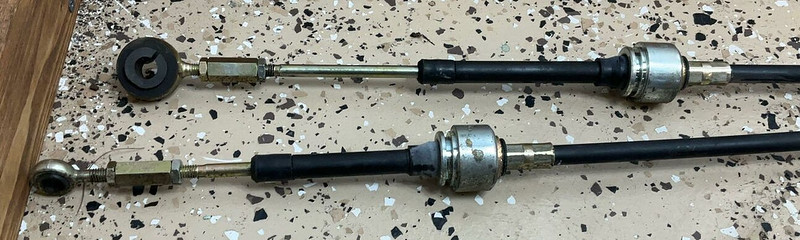
Hint: turnbuckles
Posted by: tygaboy Mar 30 2024, 03:14 PM
Speaking of shifter cables...
https://www.youtube.com/watch?v=TudujUzZ6bA
Posted by: Cairo94507 Mar 30 2024, 05:35 PM
That made my little brain hurt. I am sure you will get it sorted this time around. Hey, if it was easy, everyone would do it.
Posted by: rick 918-S Mar 30 2024, 07:03 PM
Geeze. That is tight.
Posted by: tygaboy Apr 6 2024, 07:19 AM
Don't miss what's become an all too common occurence:
Do-overs At The Red Barn!
As I've said before, it's a good thing I don't do this for a living... Enjoy!
https://www.youtube.com/watch?v=OyaF_1RImNg
Posted by: Cairo94507 Apr 6 2024, 08:03 AM
Love the videos.
Posted by: SirAndy Apr 6 2024, 09:19 AM
Do-overs At The Red Barn!
Maybe rename it "Groundhog Barn"?
Posted by: BillJ Apr 6 2024, 04:54 PM
Do-overs At The Red Barn!
Maybe rename it "Groundhog Barn"?
Lol. Dont drive angry!
Posted by: Chris914n6 Apr 6 2024, 05:20 PM
Red is short for Redondo (pronounced redo-n-do)
Posted by: KELTY360 Apr 6 2024, 07:52 PM
Red is short for Redondo (pronounced redo-n-do)
Now that's clever.
Posted by: tygaboy Apr 13 2024, 08:11 AM
Hey, I said I was just a guy with an opinion...
https://www.youtube.com/watch?v=B5OBK1VdTFk
Posted by: tygaboy Apr 16 2024, 08:52 AM
I'm back to working on a removable trunk insert. Martin helped and earned his keep by removing the trunk fire wall from the black parts car.
And these pics don't do justice to how cool this car looked with the back chopped off. All I could picture was a transverse drive train poking out, Lancia Stratos-ish.
Attached thumbnail(s)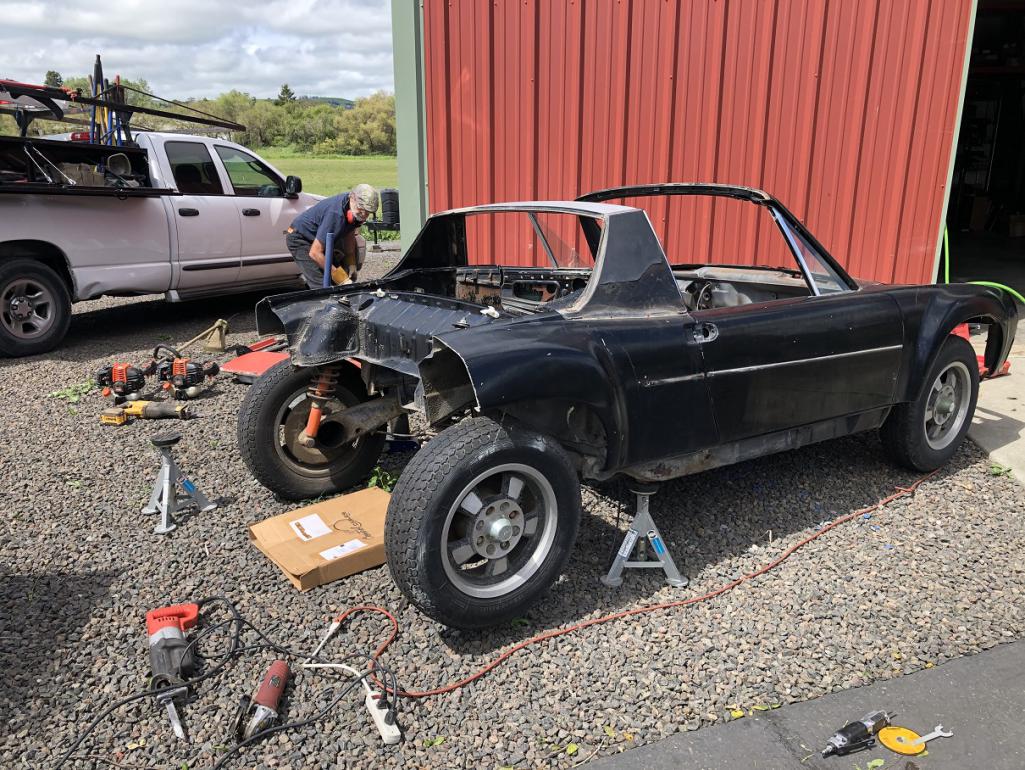
Posted by: tygaboy Apr 16 2024, 08:53 AM
Then it was hours of work removing spot welds and "extra" material to get the panel down to what I needed. But here it is in place. Just what I was hoping for...
Attached thumbnail(s)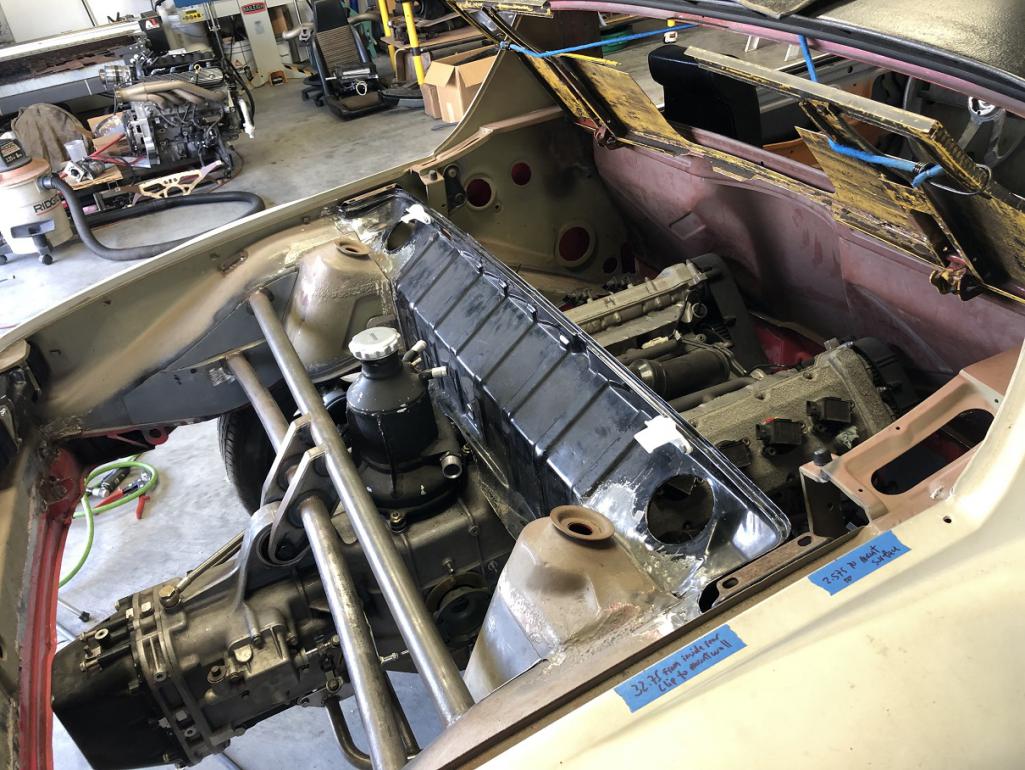
Posted by: tygaboy Apr 16 2024, 08:56 AM
And who'da thought: A Ferrari-swapped 914 can still store its targa top! Yes, the air/oil seperater clears the underside of the top.
There's a bit more clearance work needed so the intake manifold can fit, but fit it will.
Pretty cool, if you ask me.
Attached thumbnail(s)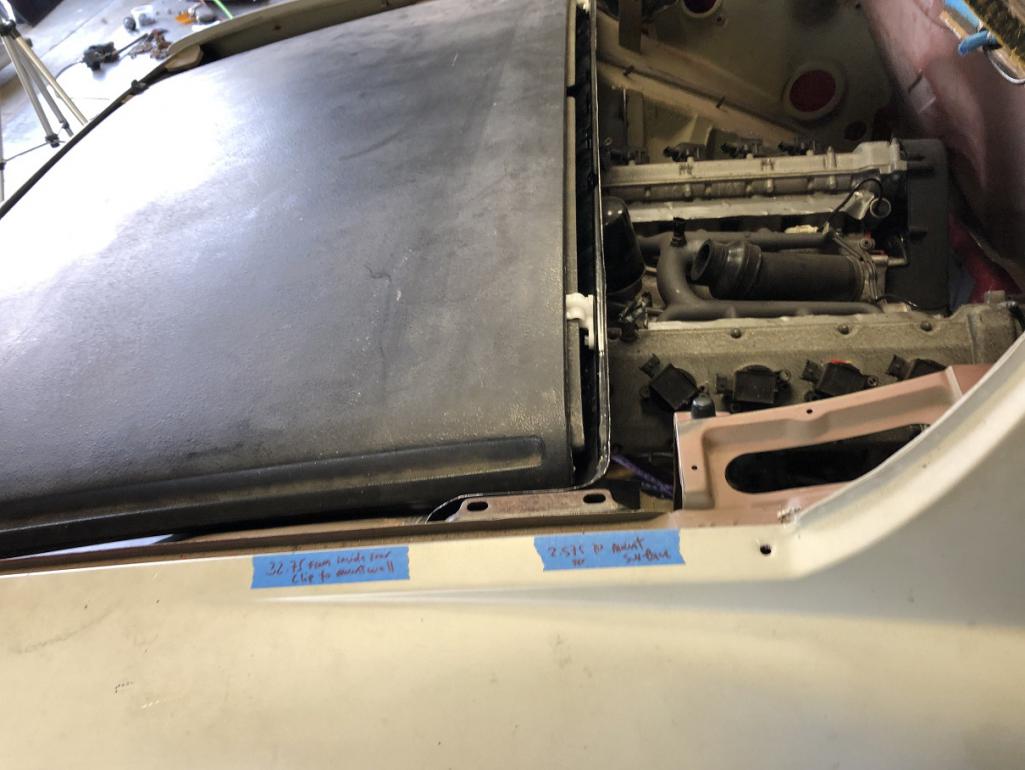
Posted by: Cairo94507 Apr 16 2024, 08:57 AM
Oh WOW! - That is going to look great.
Posted by: Steve Apr 16 2024, 11:39 AM

So when are we going to hear it run? Just kidding!! As Clint Eastwood says "A man's got to know his limitations". This project is beyond my pay grade!! Thanks for keeping us in the loop of your trials and tribulations! My 3.6 conversion is more than I would ever attempt by myself and its mostly plug and play. I can't imagine what your going through! My head would explode. I still think you will beat Marty on who's project will get done first. You can't rush perfection!
Posted by: tygaboy Apr 16 2024, 05:29 PM
So when are we going to hear it run? Just kidding!! As Clint Eastwood says "A man's got to know his limitations". This project is beyond my pay grade!! Thanks for keeping us in the loop of your trials and tribulations! My 3.6 conversion is more than I would ever attempt by myself and its mostly plug and play. I can't imagine what your going through! My head would explode. I still think you will beat Marty on who's project will get done first. You can't rush perfection!
@http://www.914world.com/bbs2/index.php?showuser=822 Hi Steve - I seem to have missed that part about limitations. It's bound to bite me at some point, hopefully not on this build!
I need to get on the "make it run" part. I've been working to decide which ECU to go with. I'm looking at Haltech and ECU Master Pro. It seems to be "go with what your tuner knows..." so I'm talking with tuners to try and find someone excited to try and help me.
I just need to make the decision and get started. Thanks for the encouragement - I need it!
Posted by: tygaboy Apr 16 2024, 05:33 PM
I said I'd make it fit! Now it's a simple matter of rebuilding that section so it sits back about .6" at the top and has clearance for the manifold below the seal. I mean, how hard can that be?
Attached thumbnail(s)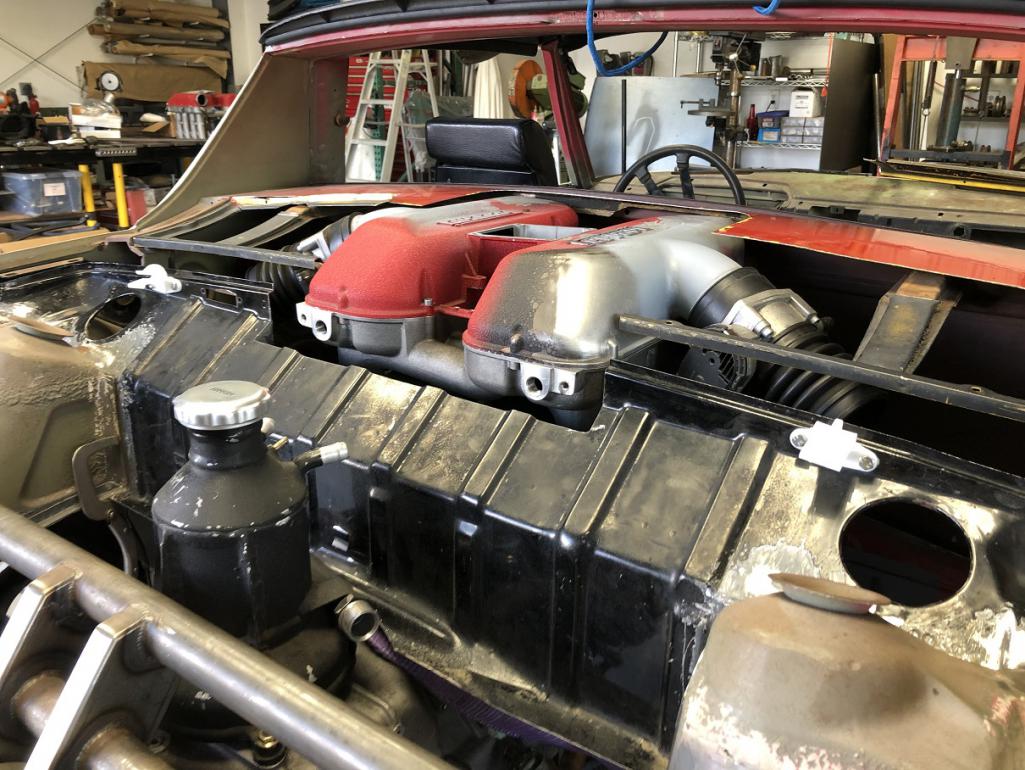
Posted by: Chris914n6 Apr 16 2024, 06:15 PM
I found something to make our lives easier...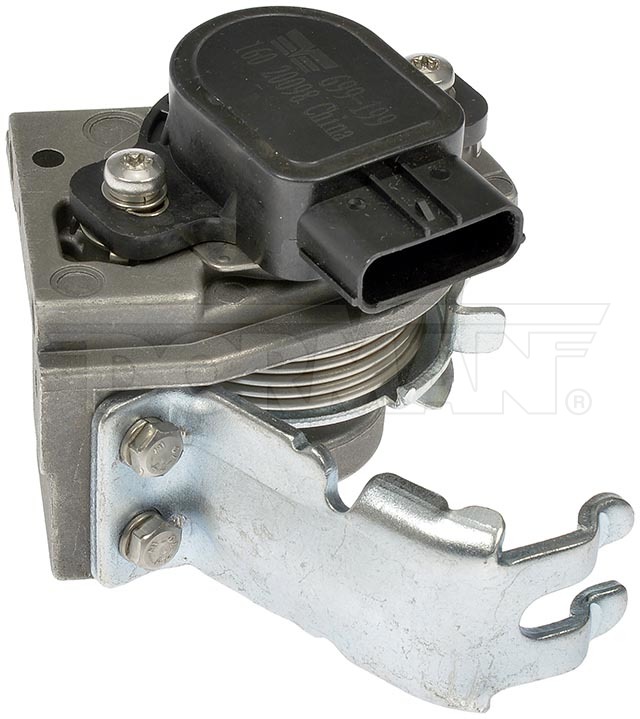
Converts cable to DBW
Beats trying to fit a floor mount eGas pedal and run wires.
Dorman 699-199
Accelerator Pedal Position Sensor
Application Summary: Acura 2008-03, Honda 2014-03
Luckily eGas is a Bosch tech so it's 99% all the same. 0-5v and 5-0v.
Posted by: technicalninja Apr 16 2024, 06:55 PM
I don't use ANY Dorman crap that has electronics in it.
Way too many failures...
Dorman is the lowest of the low!
Trash in my book.
Just get a used or new Honda part and you'll be golden...
I'd take a 200k used Honda part over a Dorman anyday.
Posted by: Shivers Apr 16 2024, 07:36 PM
I said I'd make it fit! Now it's a simple matter of rebuilding that section so it sits back about .6" at the top and has clearance for the manifold below the seal. I mean, how hard can that be?
Top still fits?
Posted by: tygaboy Apr 17 2024, 05:33 PM
I said I'd make it fit! Now it's a simple matter of rebuilding that section so it sits back about .6" at the top and has clearance for the manifold below the seal. I mean, how hard can that be?
Top still fits?
@http://www.914world.com/bbs2/index.php?showuser=24781 - It sure will. And here's the best part: To ensure it'll fit, I pulled the firewall panel out and clipped it to the roof! I'll can build that offset section with the roof in place, knowing everything will clear.
Attached thumbnail(s)
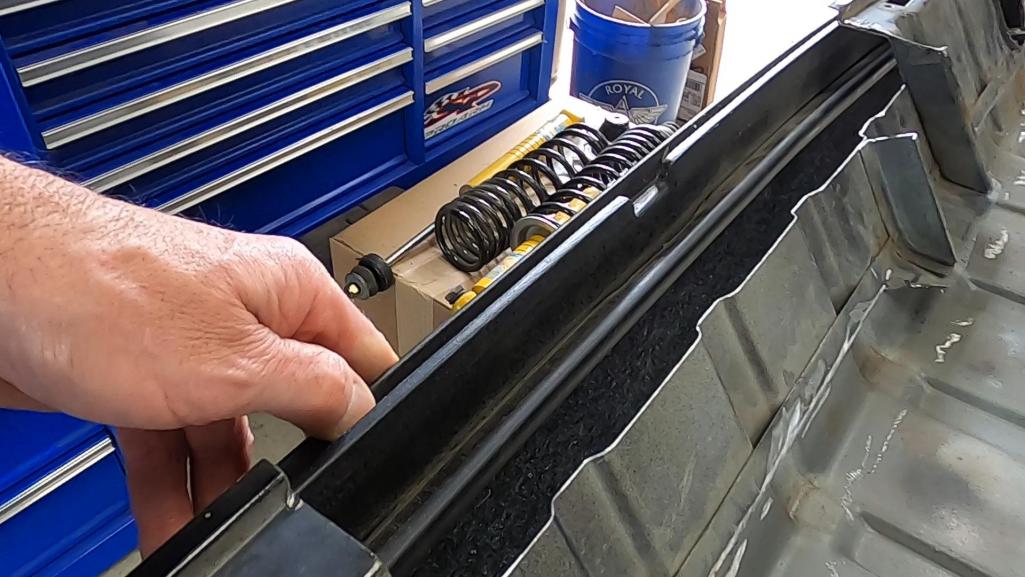
Attached image(s)

Posted by: tygaboy Apr 20 2024, 07:18 AM
For those of you who like to watch...
https://www.youtube.com/watch?v=GoKdIy88ptk
Posted by: Cairo94507 Apr 20 2024, 02:04 PM
Watched this most recent video this morning over coffee. As always, Chris does not disappoint.
Posted by: ClayPerrine Apr 21 2024, 06:37 AM
Somebody has to say it:
"We Have Clearance, Clarence"
Posted by: tygaboy Apr 27 2024, 07:51 AM
You Shifty Bastard...!
https://www.youtube.com/watch?v=1myq2SgFDgA
Posted by: Chris914n6 Apr 27 2024, 09:15 PM
All the Ferraris I've seen have flat shifters/consoles, but the Porsche Carrera GT and most of the new stuff have angled consoles. So I guess you will need to decide if you are building a Ferrari or a Porsche?
Posted by: Cairo94507 Apr 28 2024, 08:04 AM
Amazing work Chris as always. I like the shifter tilted somewhat up - maybe not all the way up. But I like the way it positions it for your hand and I have to believe with it slightly tilted it makes shifting more enjoyable.
I really like the air/oil separator "collar" in the trunk to focus attention. I am not sold on the clear panel; I would be concerned about being able to keep it clean. I think making it out of sheet metal and bead rolling a simple design that picks up the oil line angles would look good. I think a clear panel is trying too hard. Hey, you asked....
Love ya brother.
Posted by: tygaboy Apr 28 2024, 08:30 AM
Amazing work Chris as always. I like the shifter tilted somewhat up - maybe not all the way up. But I like the way it positions it for your hand and I have to believe with it slightly tilted it makes shifting more enjoyable.
I really like the air/oil separator "collar" in the trunk to focus attention. I am not sold on the clear panel; I would be concerned about being able to keep it clean. I think making it out of sheet metal and bead rolling a simple design that picks up the oil line angles would look good. I think a clear panel is trying too hard. Hey, you asked....
Love ya brother.
@http://www.914world.com/bbs2/index.php?showuser=9712 Michael - Yep, after noodling on it for a bit, the clear panel is out. I worked up some V1 elements of the trunk liner that are, I hope, a simpler design. It makes more sense to just have it be "a trunk liner". I really need to spend time on more important things!
Posted by: TC 914-8 Apr 28 2024, 09:03 AM
I have been following Chris and The Red Barn U-tube since the beginning. I love his shop, skills, and patience to do things twice or even three times to get it right (the way he wants it). This project is an evolution of ideas and vision.
Keep the videos coming and can’t wait to see her run I know it will never be “finished “ because Chris will always will be modifying something.
Great respect, rock on Chris !!!
Posted by: East coaster Apr 28 2024, 09:14 AM
Love the shifter, makes my MR2 shifter look really crude. Scotty suggests transparent aluminum for the clear panel
Posted by: tygaboy Apr 28 2024, 12:14 PM
Again, the clear panel and V shape are out (for now! ). Here's the initial mock up of the trunk liner. There'll be a raised section down the center of the trunk to clear the air/oil separator, the trans mount and the trans itself.
No, the rear portion hasn't been shaped. It'll be this 6" wide "bump" all the way down and back.
Attached thumbnail(s)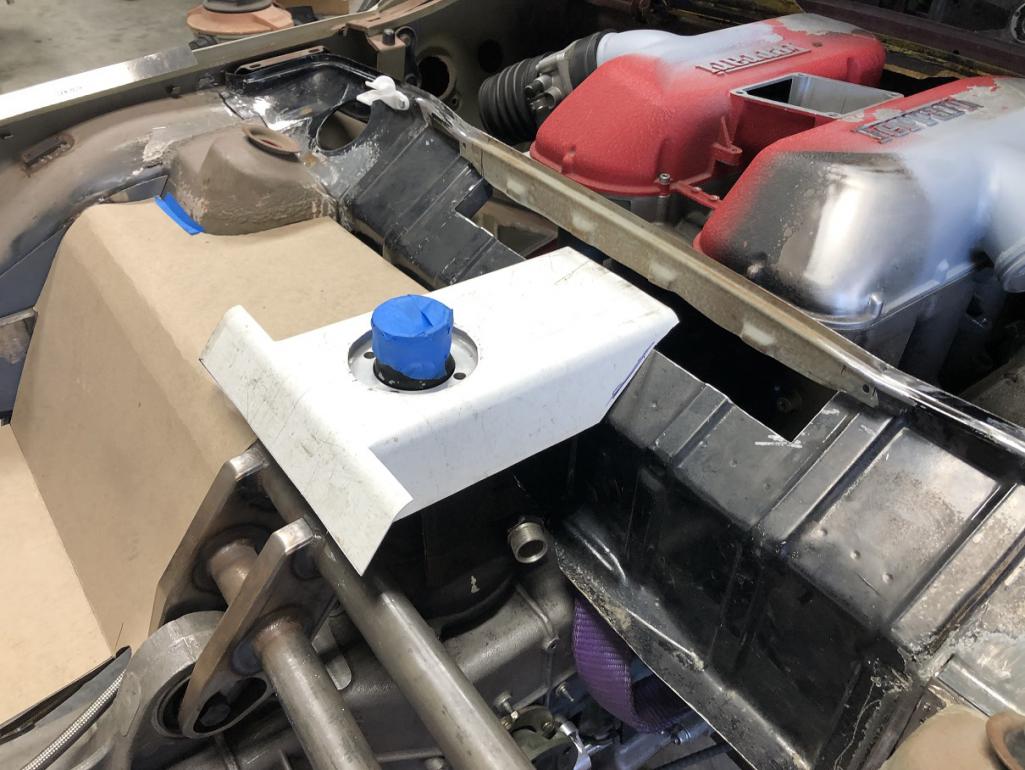
Posted by: tygaboy Apr 29 2024, 04:59 PM
More progress on the removable trunk liner. I'm pretty happy with where this looks like it's headed.
Attached thumbnail(s)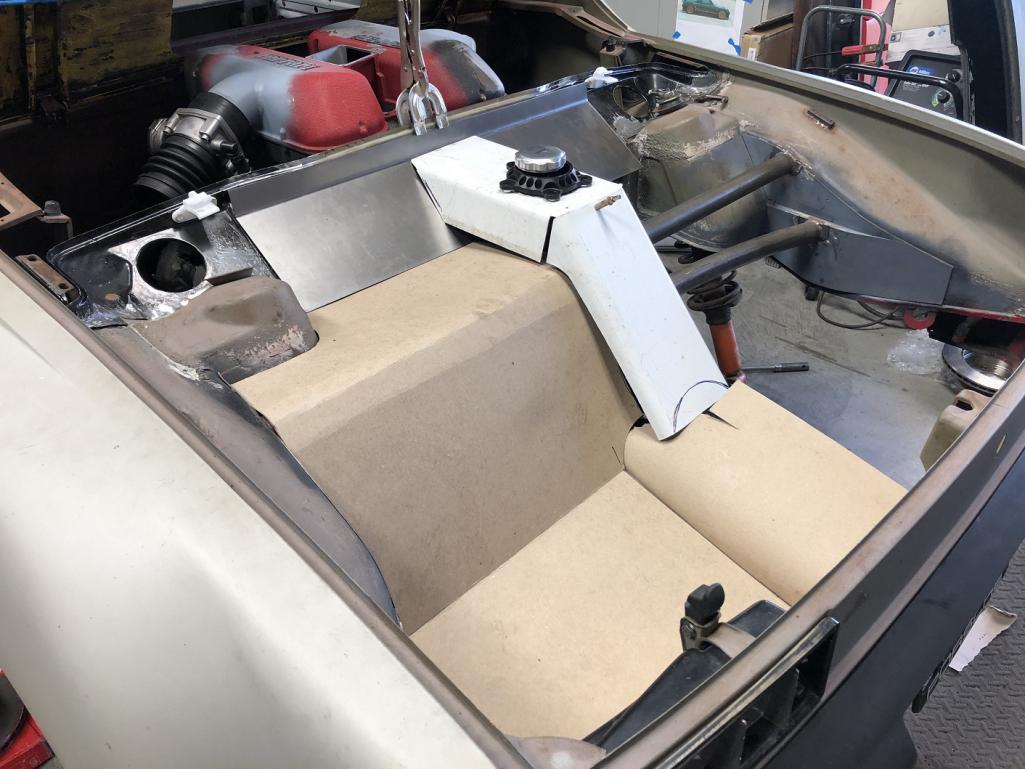
Posted by: East coaster Apr 29 2024, 05:43 PM
Nice! I love designing in CAD (Cardboard Aided Design)
Posted by: tygaboy Apr 29 2024, 06:02 PM
It's official! My recent video won YouTube's "Average View Duration " contest!
Attached image(s)
Posted by: Montreal914 Apr 30 2024, 08:07 AM
Maybe keep the hump the same width from front to rear to avoid the multiple humps look?
Definitely like the increased depth storage on the back end.
Posted by: tygaboy Apr 30 2024, 08:15 AM
Maybe keep the hump the same width from front to rear to avoid the multiple humps look?
@http://www.914world.com/bbs2/index.php?showuser=12023 - I want sort of a "shrink wrap" look that hints at what's under it. I'm also thinking of a smuggler's box in the upper area, next to the oil fill so I want as much room as possible there. And the trans requires a much wider bump-up. I think I can make it look good. And in the end, as you'll hear me say in the next video, "it's just a trunk".
(Kinda like my LS car's firewall is just a firewall!
)
Posted by: technicalninja Apr 30 2024, 08:50 AM
Ferrari drivetrain should include fitted luggage!
That will ALSO need to fit under the targa as well...
Posted by: horizontally-opposed May 1 2024, 09:38 PM
Ferrari drivetrain should include fitted luggage!
That will ALSO need to fit under the targa as well...
Oh dear. I'm afraid the ninja is right!
Posted by: nivekdodge May 2 2024, 09:04 PM
I can't believe you're hiding all that gorgeous Tubing work. Put the trunk back under it
Kevin
Posted by: tygaboy May 4 2024, 07:51 AM
I can't believe you're hiding all that gorgeous Tubing work. Put the trunk back under it
Kevin
The liner will be removable for that very reason. When it's out, I call it "Cars & Coffee" mode.
Posted by: tygaboy May 4 2024, 07:52 AM
For those interested in how the trunk liner mock up came together:
https://www.youtube.com/watch?v=Hithb4VMdBw
Posted by: technicalninja May 4 2024, 09:11 AM
"This is not the color palette I was looking for"...
Ya think?
You could do an "Art Car" and include the non-standard color selection ALL OVER the car.
Janice Joplin would appreciate that...
One thing I "saw" right off that I would do something about is the tank to floor interface.
The oil separator tank NEEDS to be isolated from the trunk floor in some manner.
The aluminum inner flange looks nice.
The black anodized upper part looks perfect!
I'd want to use it too.
That tank will most likely cause the trunk to become a NVH amplifier if it's mounted directly to the sheet metal.
How much will the engine/trans package move during operation?
You may have this accounted for already but it wasn't in the video...
Look at how Porsche does the late 911 and Boxster fill ports through the sheet metal for possible ideas.
I'd want at least 0.100" rubber and might need more depending on drivetrain torque movement.
Posted by: tygaboy May 4 2024, 11:16 AM
The oil separator tank NEEDS to be isolated from the trunk floor in some manner.
That tank will most likely cause the trunk to become a NVH amplifier if it's mounted directly to the sheet metal.
How much will the engine/trans package move during operation?
You may have this accounted for already but it wasn't in the video...
Look at how Porsche does the late 911 and Boxster fill ports through the sheet metal for possible ideas.
I'd want at least 0.100" rubber and might need more depending on drivetrain torque movement.
Yep, good point. I was planning a seal. But hadn't yet connected that the liner shouldn't come in direct contact with whatevers' connected to the separator. So something soft-ish and maybe .25" thick, just to be sure. Or a slip-over sorta rubber neck. Ideally, I don't want to have to remove the oil cap to get the liner out. As always, "we shall see."
Posted by: Chris914n6 May 25 2024, 02:15 PM
I think you are going to want more tire.
I had 205 & 225 on 6 & 7 x 16 (stock Boxster) on my 3.0 which is just 190 hp & 205 tq. I could roast tires in 1st & 2nd.
V2 I did 225 on 7 x 17 all around, mainly for the understeer issue. I don't think 225 will handle the 270+ tq of the 3.5L.
I picked up 2 pairs, 8.5 and 9.0 (box/996) with 255 tires, for the rear in anticipation that I can easily over-power the 225s. Yes I have a buy cheap wheels problem...
Your eng/trans combo weighs more than my 320 lb engine and stock 914 trans, so you would be inclined to fatten the rear more anyways.
Hard steering is more from the offset to fill the flares than tire size. My narrow body turns fine.
The wheels you're looking at look awesome. Nice find.
Posted by: tygaboy May 25 2024, 02:36 PM
With the LS car back in action, it's back to the 914 Ferrari. Well that and KITTIES!
https://www.youtube.com/watch?v=OVMmnzizH4c
Posted by: technicalninja May 25 2024, 03:30 PM
Nice!
I like the kitty "air lock" that you have around the exterior door.
It looks like Mama cat wants OUT!
She's had enough of her spawn.
The baby cage won't hold them much longer...
Chaos is in your future!
On car stuff:
Nothing says Ferrari mounted the drive train in the center of their car.
I see offset drivetrains more often than centered across manufactures.
The rolled metal caused by the stud installation would bug the shit out of me.
I see that as possibly compromised studs...
I like the wheel choice!
Those look great (and they're not the normal Fuchs).
Your RIGHT! It's time to hear the monster roar, make it run...
Have you seen/heard that specific engine run?
Posted by: BillC May 26 2024, 04:14 PM
My wife loves the kitties!
Only problem is now she wants one of them, and we already have two of the furry mosters -- I don't want any more!
Posted by: tygaboy May 31 2024, 05:01 PM
Teaser shot from tomorrow's video:
I'm pretty sure this is the world's only Ferrari gated 6-speed connected to a 914 trailing arm.
Attached thumbnail(s)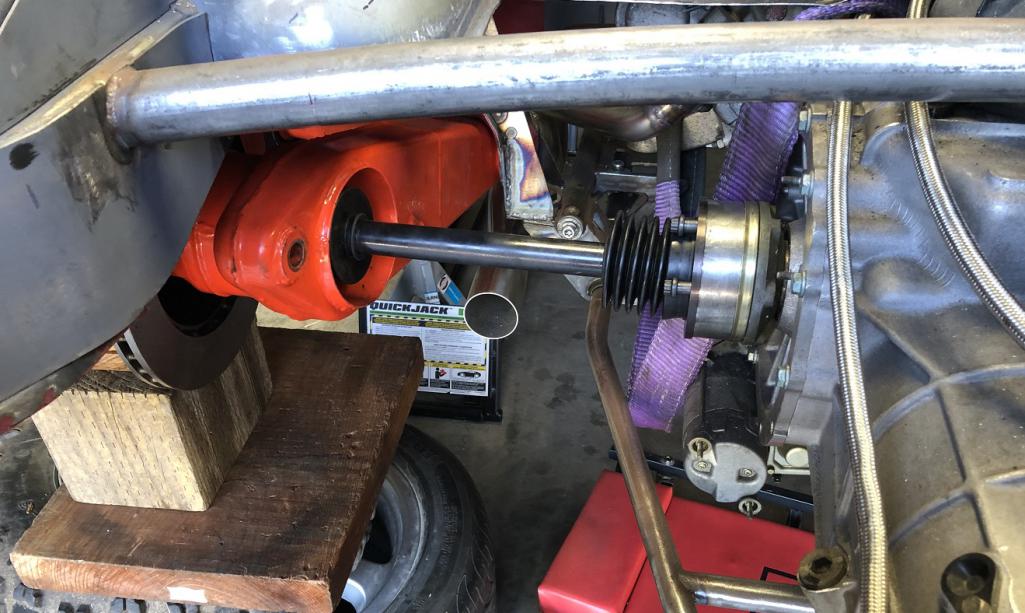
Posted by: East coaster May 31 2024, 06:02 PM
I think that’s a safe statement to make
Posted by: technicalninja May 31 2024, 08:56 PM
MORE KITTIES!
They should have escaped the playpen by now...
Posted by: ClayPerrine Jun 1 2024, 05:51 AM
Just to mess with the Ferrari guys more, you should use Ferrari labeled Brembo 4 piston calipers on it. If you find the right one they are the same as the Boxster calipers, so fitment is not an issue, and they say "Ferrari" on the visible face. 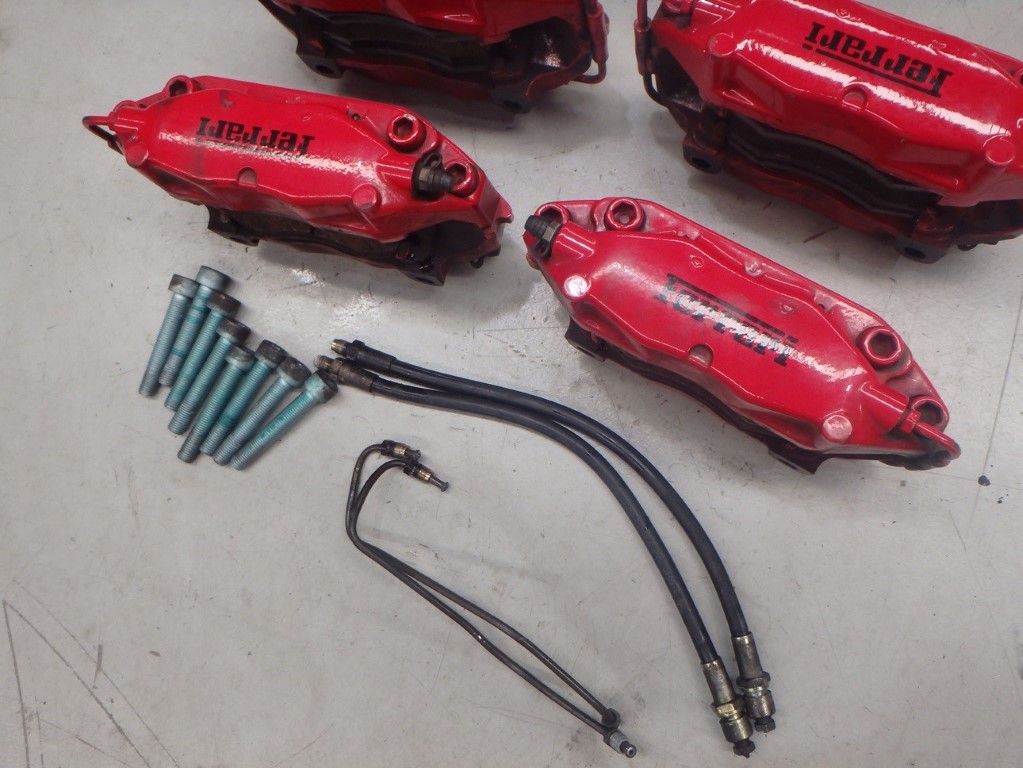
These are even 360 Modena calipers.
They would go well with the engine.
Posted by: tygaboy Jun 1 2024, 06:43 AM
And here's this week's update. I was so excited to get the axles built that I forgot to phase the CVs. I'll be going back to check/fix that.
https://www.youtube.com/watch?v=Re86R1IwXOk
Posted by: Cairo94507 Jun 1 2024, 07:26 AM
Amazing axles!!!
Posted by: tygaboy Jun 6 2024, 07:18 AM
Just to mess with the Ferrari guys more, you should use Ferrari labeled Brembo 4 piston calipers on it. If you find the right one they are the same as the Boxster calipers, so fitment is not an issue, and they say "Ferrari" on the visible face.
These are even 360 Modena calipers.
They would go well with the engine.
@http://www.914world.com/bbs2/index.php?showuser=1143 Clay - I'm zeroing in on the overall vibe of the build and I want to avoid the "everything is special" feel. I think it's going to be that the drive train and interior are the focus areas and everything else is super tidy but not really unexpected. So at this point, the plan is to run that model caliper but labeled "Brembo". Not a giant easter egg, just a tiny bit unique. They'll also likely be black.
Posted by: tygaboy Jun 6 2024, 07:21 AM
Well, it's official: I've gone big time.
I thought it'd be fun to make up some hoodies and t-shirts. The initial batch arrived yesterday!
Attached thumbnail(s)
Posted by: Cairo94507 Jun 6 2024, 11:44 AM
I would love a large hoodie!
Posted by: mikey63 Jun 6 2024, 01:31 PM
Would love a medium tee shirt.
Got to support the Barn!!
Posted by: Shivers Jun 6 2024, 02:31 PM
It has been fun and educational. Cool deal on the alternator. Axles came out nice, big CV’s
Posted by: tygaboy Jun 8 2024, 08:37 AM
Phasing CV joints. And boy, this project has legs!
https://www.youtube.com/watch?v=0C6gGdw9sto
Posted by: technicalninja Jun 8 2024, 10:06 AM
Nice!
I'd have been messing with kitten bellies when they climbed like that.
You didn't explain WHY phasing is important on German CV joints.
Phasing allows proper axial movement of the joint to account for axle length changes during suspension operation.
Most CV axles have a double sphere outer joint (that has no axial movement) and an inner joint that has 2" of in-and out" available. Often these are 3 lobed and called "tripod" joints.
The German design appears to be STRONGER as when folks get serious that is the direction they change too.
High end rock crawler stuff is almost always German style.
Now, you get an old school driveshaft (with standard u-joints) "out of phase" and the vibration gremlin you create will dive you "bat-shit" crazy.
Jaguar had multi-piece driveshafts with an elastomer between two fixed tubes for NVH.
Had a car once that 3 other shops tried to fix (to the tune of 5K worth of un-needed work) that twisted its driveshaft, and the u-joints no longer lined up.
Customer didn't believe it was just a driveshaft so I replaced it with another out of one of the "For Sale" cars at this shop and it SOLVED the "can't see out of the rearview mirror" vibrations.
An out of phase old school drive shaft is un-drivable.
An out of phase German shaft will still sort of work until it EATS the CV joints.
Most old school drive shafts are single piece and unless you actually twist the tube you cannot achieve out of phase. The problematic ones are either two piece like the Jag OR have a splined section (for axial movement) that someone didn't index before they took it apart.
The last one is SUPER COMMON to happen!
EDIT: Have another thought...
If you do the "floating axle" like Chris did there might be enough axial freedom that phasing the German style junk might be unnecessary!
I'd have still corrected it too but...
Maybe you didn't have too!
The whole "Floating Axle" thing is DEFINITELY Ninja approved! 
Posted by: ClayPerrine Jun 8 2024, 06:05 PM
One piece of information.
The plugged holes in the floor pan are used in the factory to hold the stamped floor pans to the assembly jig. There is a cam that sticks up from the jig and can be turned, kinda like an IKEA furniture lock cam. While on the jig, the stamped panels are all welded together and the plug cam is turned to release them from the jig.
This comes from an old 356 assembly video that Al Zim showed me one time. Karmann built bodies like that for years.
One question on the pedals.
How do you get the master cylinders off the pedals if you have to replace one? Do you completely unbolt the pedal assembly and take it out of the car?
Are you going to weld up the hole for the factory master cylinder?
I love the videos.. and I love the addition of the cat updates. Keep them coming.
Thanks!
Clay
Posted by: Maltese Falcon Jun 8 2024, 11:27 PM
Chris @http://www.914world.com/bbs2/index.php?showuser=19241 I phased these deep plunging 930 cv's (McKenzie Offroad Perf) and painted some gold colored dots to indicate the opposite ends;
2 dots = fat/wide section & 1 dot = skinny/narrow section... then index with a straight-edge. This reminds me that "It's done" way after the boot+flange+ lube is all set in place ...no re-thinking of missing an install step.
Also if using 930 CVs make sure that the outer circumference edge with the 'Groove faces outwards;
1 side faces trailing arm/ 1 side faces trans output flange.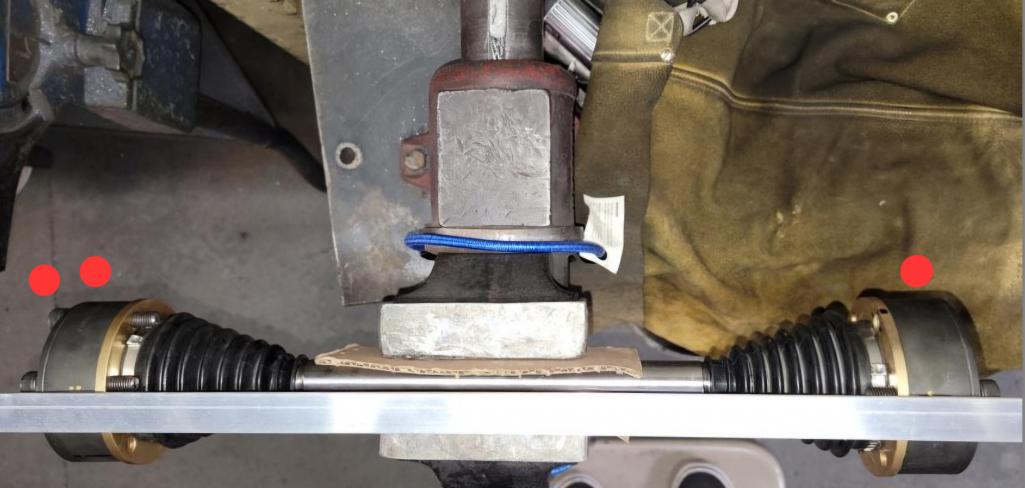
Posted by: Maltese Falcon Jun 8 2024, 11:34 PM
I also use a small length of (stranded) 12 or 14 ga. wire around the end of the cv boot, a bit of lube on the (300m SwayAway) axle...and using both hands simultaneously >>simple tugs on the wire brings the boot over the spline area and into place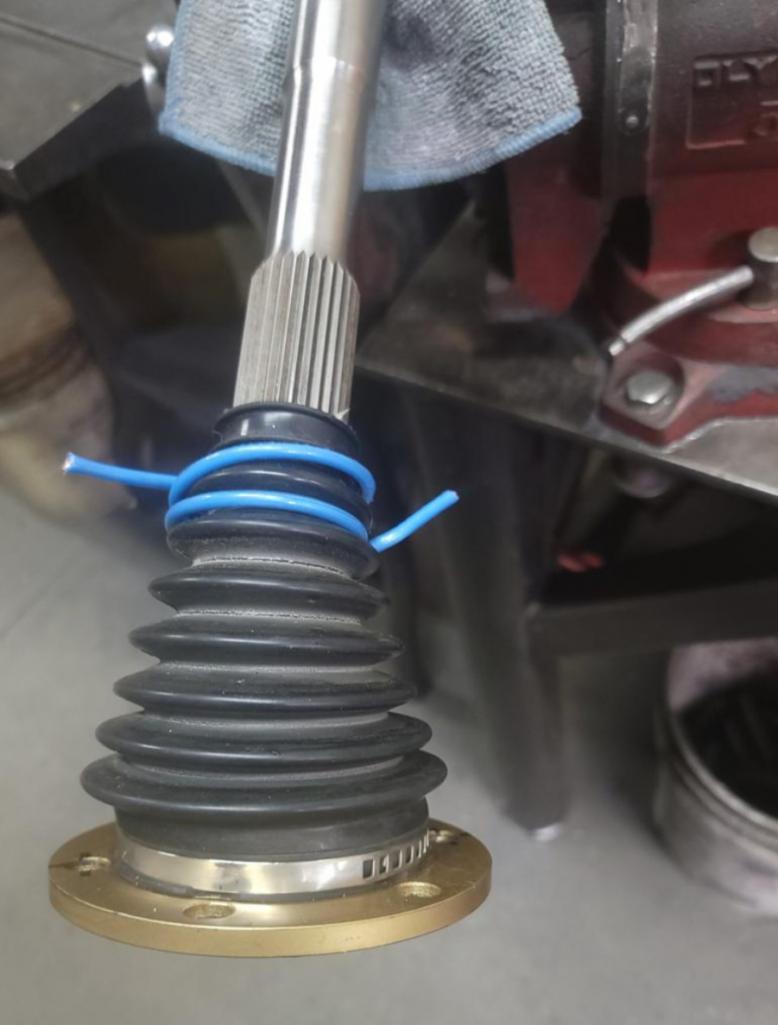
Posted by: tygaboy Jun 9 2024, 07:46 AM
Look at all the cool info, helpful hints and myth busting that gets shared on this awesome forum!
Thanks @http://www.914world.com/bbs2/index.php?showuser=2755 @http://www.914world.com/bbs2/index.php?showuser=27135 @http://www.914world.com/bbs2/index.php?showuser=1143
I'm going to add these clarifications to next week's episode. with full credit, of course!
Thanks again.
Posted by: Maltese Falcon Jun 9 2024, 08:28 AM
Look at all the cool info, helpful hints and myth busting that gets shared on this awesome forum!
Thanks @http://www.914world.com/bbs2/index.php?showuser=2755 @http://www.914world.com/bbs2/index.php?showuser=27135 @http://www.914world.com/bbs2/index.php?showuser=1143
I'm going to add these clarifications to next week's episode. with full credit, of course!
Thanks again.

Posted by: tygaboy Jun 9 2024, 08:46 AM
One question on the pedals.
How do you get the master cylinders off the pedals if you have to replace one? Do you completely unbolt the pedal assembly and take it out of the car?
Are you going to weld up the hole for the factory master cylinder?
Thanks!
Clay
@http://www.914world.com/bbs2/index.php?showuser=1143 - Well, not completely remove. I use a section of flexible hydraulic line between the M/Cs and the chassis that enables the pedals to be unbolted and slid back to allow removal of the M/Cs. It's not fun but it worked when I changed out the clutch master on my LS car.
And yes, the factory M/C holes will be closed up.
Great to hear you're enjoying the kitties!
Posted by: tygaboy Jun 15 2024, 05:01 PM
Pedal assembly in!
https://www.youtube.com/watch?v=U4sqnj592ys
Posted by: Cairo94507 Jun 16 2024, 08:30 AM
They grow up so fast.
Posted by: technicalninja Jun 16 2024, 09:16 AM
I've been "owned" by cats since I was 15.
Got subjugated by a male red tabby I named Maxx who showed up "out of the blue".
The very best cats have been the ones who magically appeared out of nowhere...
It was when I saw him ride a neighbor's dog like a bull rider that I thought cats are super cool.
But, when I saw him do that for a second time, to the same dog, that I knew cats were for me!
He did it "because he could" for sport!
I'm in for a "sporting" red tabby anytime...
Had the same sort of thing happen 11 years back.
Austin (middle son) had gotten a red kitten about 3 months old that he left with us for a ski trip. He named him Mufasa. Mufasa was asleep on my wife when I found "HIM" on the back porch!
I yelled at him "Mufasa, how did you get out" and he hauled ass.
Ran back into bedroom and found Mufasa still asleep on the wife.
It was a second one, same age and coloring, just showed up!
This kitten adopted my youngest son, Michael.
We called him "Echo" because doppelgänger or mirror image was too hard to yell...
Posted by: tygaboy Jun 22 2024, 08:02 AM
Someone said I should check the level of my master cylinders...
https://www.youtube.com/watch?v=g3wDV4gzVGY
Posted by: tygaboy Jun 23 2024, 04:40 PM
Both axles in and looking very cool! Next, I need to work out the bracing for that rear trans mount "pivot link" mount - that's what you're seeing with those two V-bars. I wish there were a more elegant solution but this one likely makes the most structurally sound sense.
On a different note, one of my buddies suggested I work some Japanese parts into the build "so it has full Axis representation..."
Attached thumbnail(s)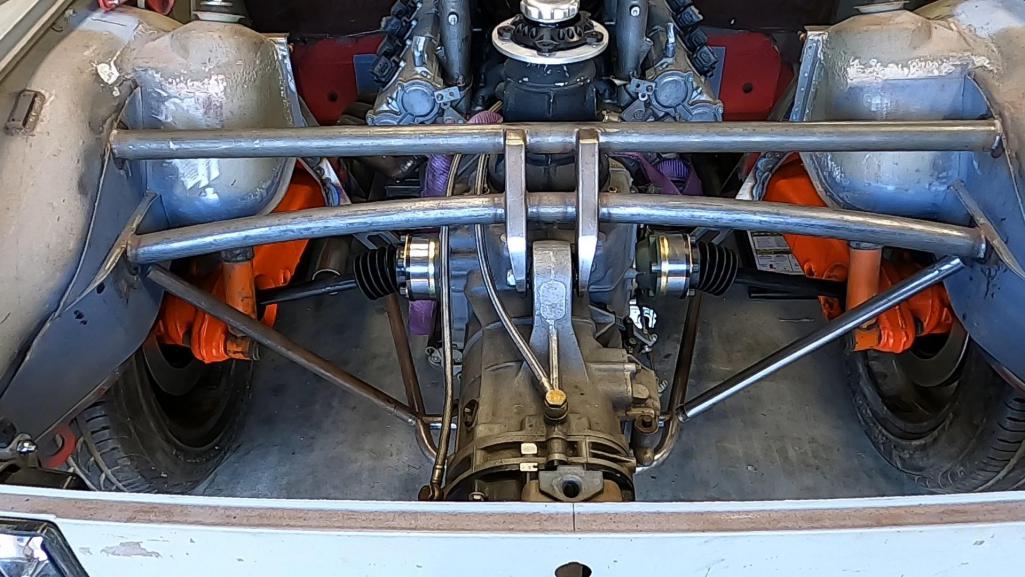
Posted by: technicalninja Jun 23 2024, 05:03 PM
I vote for a Denso AC system!
The old name was Nippon Denso
This translates to "Japanese Electrical Device" or "Japanese Electrical Motor" depending on the translator.
Trust the Japanese to "obviously" name their companies...
Posted by: tygaboy Jun 26 2024, 06:53 PM
Oil cooler solved! What? You think I should do something more elegant?
Another happy coincidence! Porsche trombone oil line fittings are the same as the Ferrari system. One less thing to chase down. Look closely, it's connected - well, one end anyway.
Attached thumbnail(s)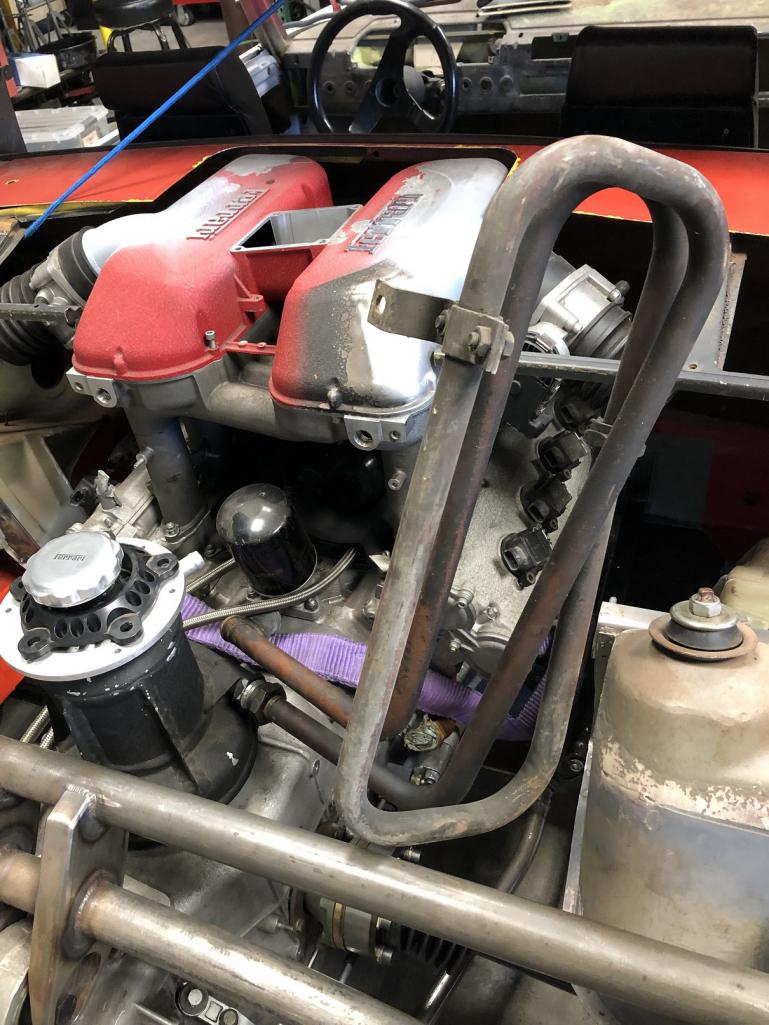
Posted by: bkrantz Jun 26 2024, 07:36 PM
Oil cooler solved! What? You think I should do something more elegant?
Another happy coincidence! Porsche trombone oil line fittings are the same as the Ferrari system. One less thing to chase down. Look closely, it's connected - well, one end anyway.
I like the location, but you might want to connect the outlet to something.
Posted by: bkrantz Jun 26 2024, 07:39 PM
BTW, that oil filler reminds me of old indy car pop-off valves.
Posted by: Shivers Jun 26 2024, 10:26 PM
BTW, that oil filler reminds me of old indy car pop-off valves.
I kinda thought it had a Mr Fusion look to it
Posted by: KELTY360 Jun 26 2024, 11:12 PM
BTW, that oil filler reminds me of old indy car pop-off valves.
I kinda thought it had a Mr Fusion look to it
Maybe a Doc Brown vibe.
Posted by: technicalninja Jun 27 2024, 12:31 AM
I see a redneck still...
Posted by: Maltese Falcon Jun 28 2024, 07:59 AM
I see a redneck still...
Posted by: Maltese Falcon Jun 28 2024, 08:00 AM
I see a redneck still...
Posted by: burton73 Jun 28 2024, 11:57 AM
My neighbor took me out for a ride in his Ferrari the other day, here is a look see of what a newer F car oil filler looks like.
Best Bob B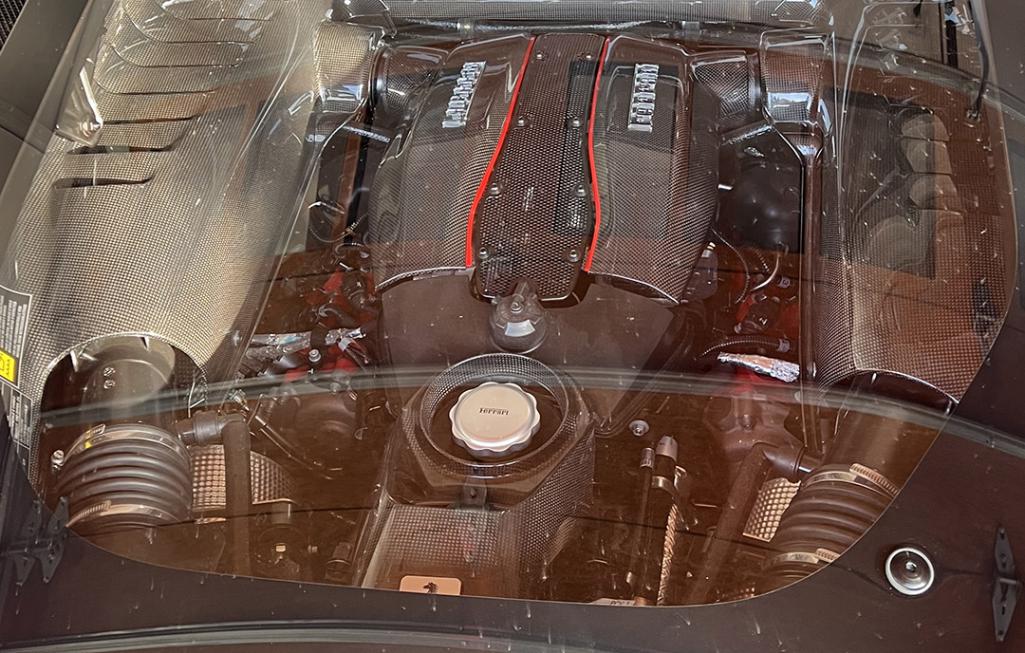
Posted by: sixnotfour Jun 28 2024, 11:49 PM
What about a 911 brass Jail bar cooler. ?
Attached image(s)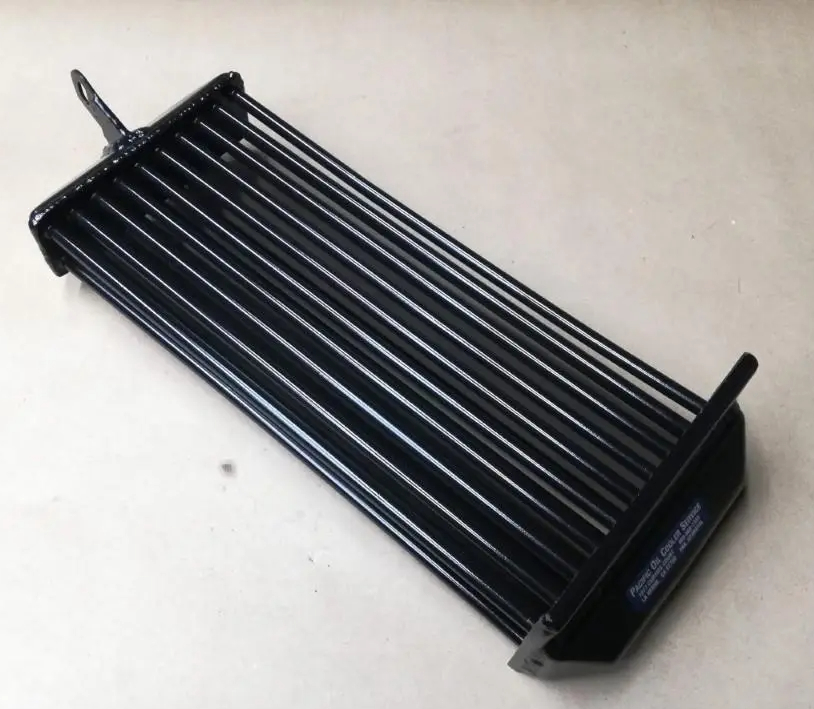
Posted by: tygaboy Jun 29 2024, 07:21 AM
Getting back to the serious stuff, I finished the transaxle pivoting link mount.
https://www.youtube.com/watch?v=UNhHocHu7Ck
Posted by: Shivers Jun 29 2024, 07:56 AM
Those came out nice. I was going to make a tube notcher with my pipe vise and my drill press. I like your design better. 
Posted by: sb914 Jun 29 2024, 08:34 AM
The work you do is unbelievable. So impressive. The details and thought process behind this are mind boggling. 
Posted by: East coaster Jun 29 2024, 09:36 AM
Very cool! I’ve got to get a plasma table
Posted by: tygaboy Jun 29 2024, 05:44 PM
Very cool! I’ve got to get a plasma table
@http://www.914world.com/bbs2/index.php?showuser=487 Yep, it really is awesome but if I didn't have one, I'd be all over Send Cut Send and probably not buy one. Certainly not one as big as the one I have. Maybe a 2x4 since nearly all the stuff I do could be done with a much smaller footprint machine.
Posted by: tygaboy Jun 29 2024, 05:46 PM
Speaking of plasma tables, I used it to whip up a muffler mounting fixture that locates the exit end of the mufflers.
Attached thumbnail(s)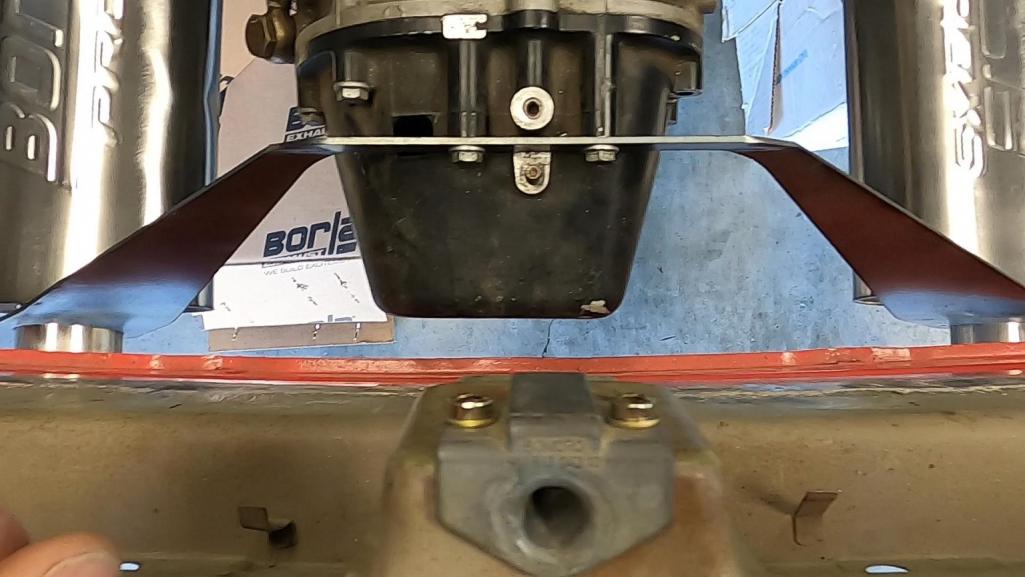
Posted by: tygaboy Jun 29 2024, 05:49 PM
And if the above pic didn't make it obvious, this one should:
As has been known since the drive train was mounted, the end of the trans is not symmetrical to the car.
It's actually one of my favorite parts of the build even though I'm sure some folks will assume I didn't get things put in correctly!
Attached thumbnail(s)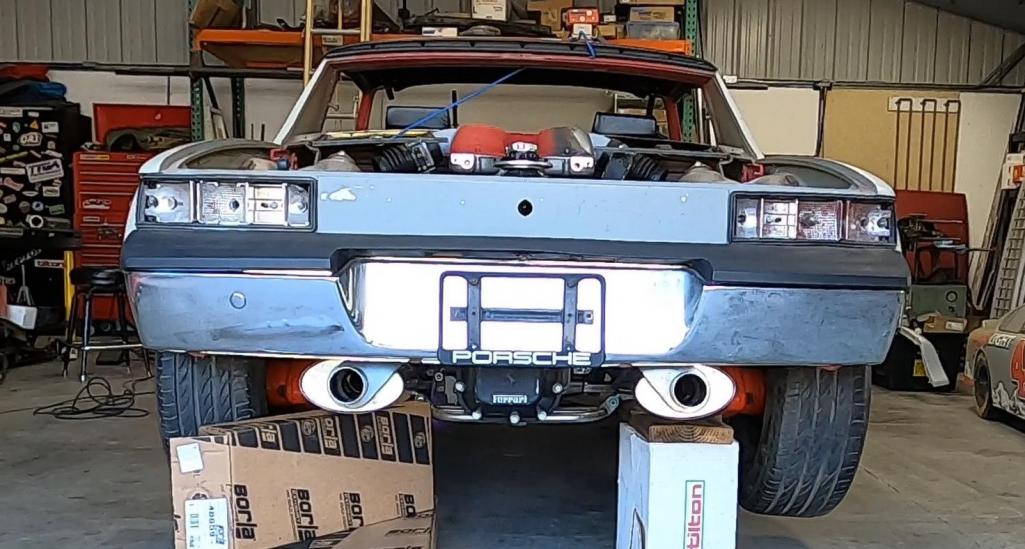
Posted by: Maltese Falcon Jun 29 2024, 06:32 PM
Things are challenging in these 'Hyper builds, and you def nailed it on the Muffler bracket
Posted by: Retroracer Jun 30 2024, 04:05 PM
Wait, I don't understand - no speed holes on the muffler bracket???
- Tony
Posted by: tygaboy Jun 30 2024, 04:38 PM
Version II of the muffler jig. This one is 4" narrower overall. It REALLY highlights the transaxle offset. I think I like this one.
Attached thumbnail(s)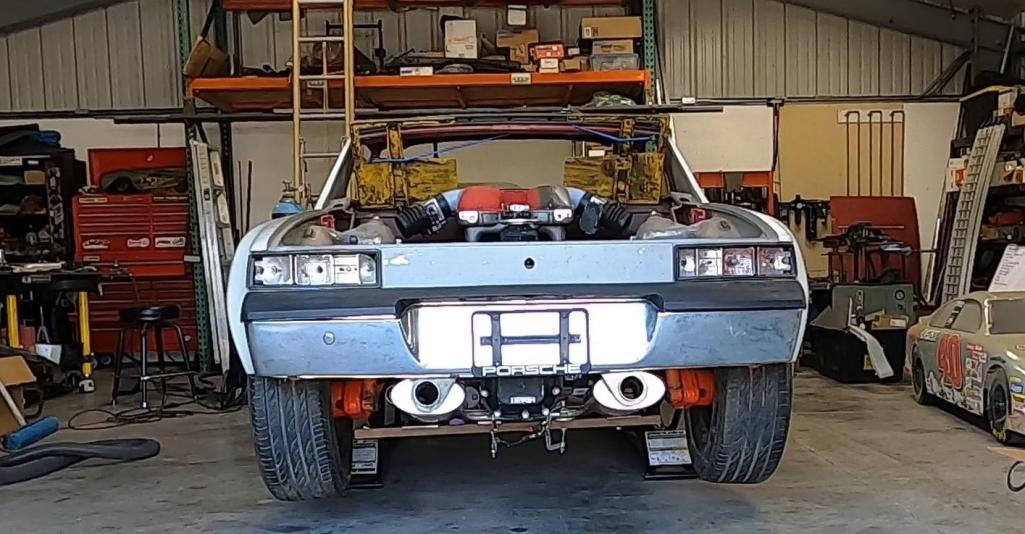
Posted by: tygaboy Jun 30 2024, 04:41 PM
And the up-angled mufflers are sure to get me a few more style points.
Yes, exhaust tips will be extended to beyond the bumper.
Attached thumbnail(s)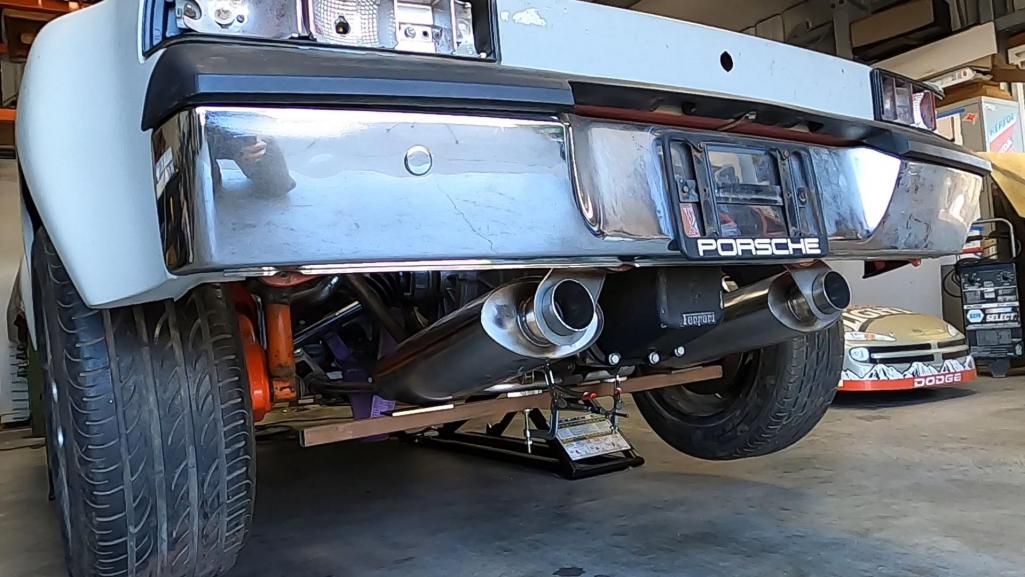
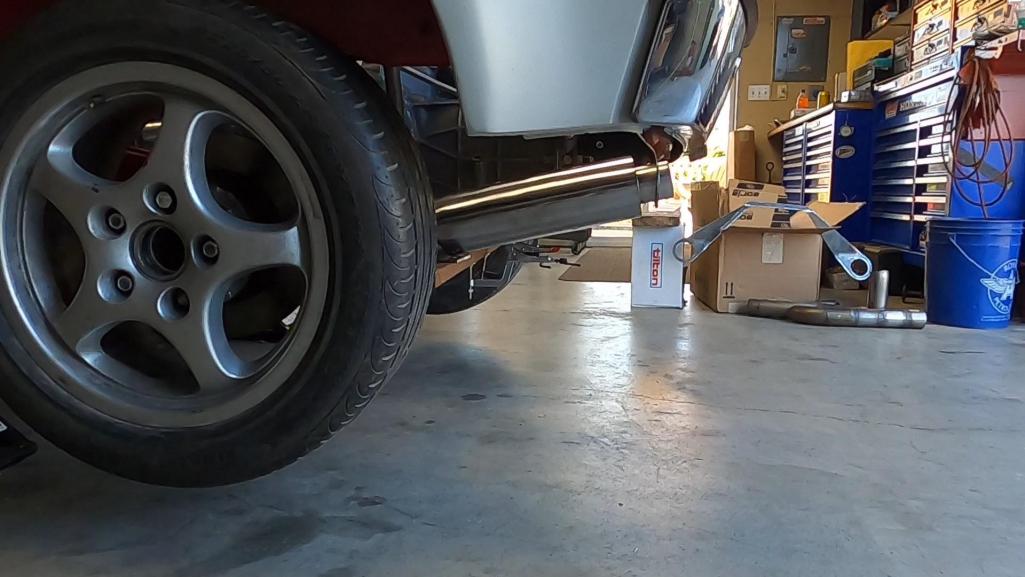
Posted by: Montreal914 Jun 30 2024, 05:25 PM
I definitly like seeing the Porsche on the licence plate frame and the Ferrari below
Are you considering a valance, or this will be without?
If you plan on installing an early valace, maybe go with a mesh design in the middle portion exposing the Ferrari tail end of the box. 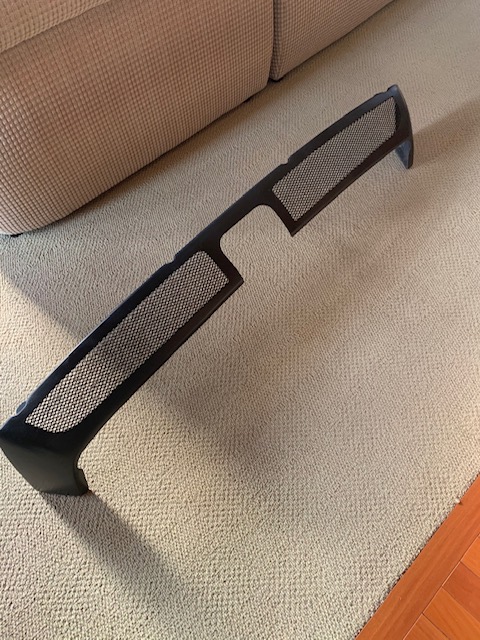
La Ferrari mesh rear end.
Posted by: tygaboy Jul 4 2024, 11:38 AM
Now what? Just a giant aluminum 1/2 donut a friend had stamped for his custom-built motorcycle's fender blanks.
Attached thumbnail(s)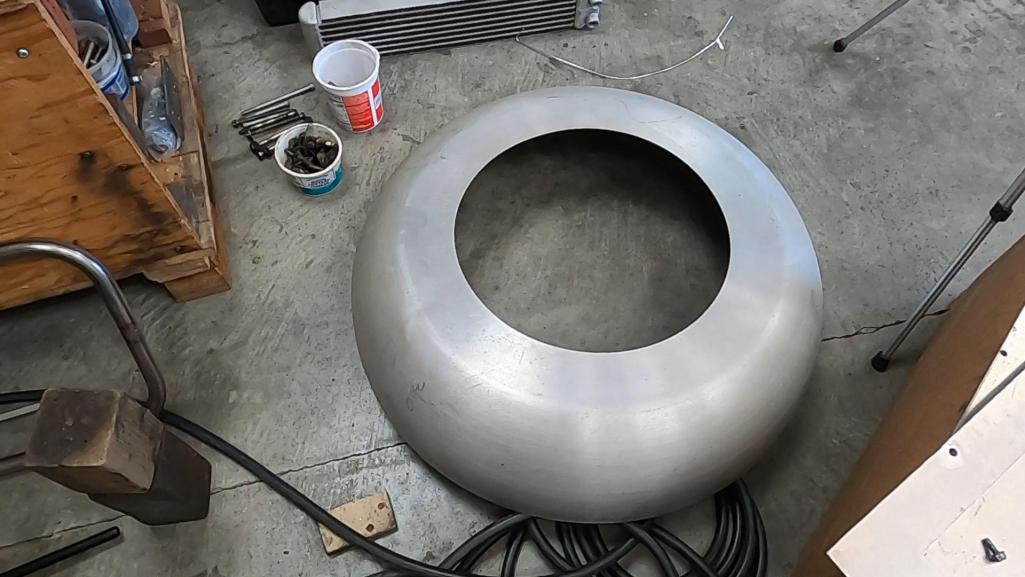
Attached image(s)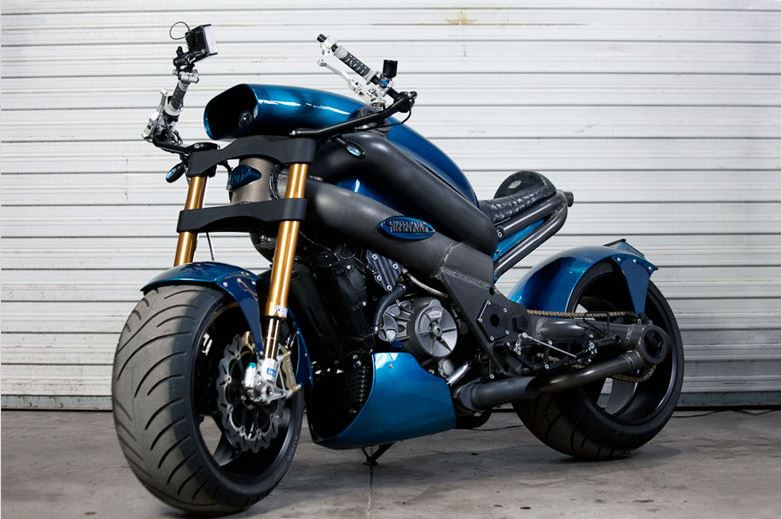
Posted by: tygaboy Jul 4 2024, 11:42 AM
OK, I'll tell you what!
Slice it into quarters and see if can be used as the basis for a radiator venting system!
Clearly a ways to go but, so far, I'm encouraged! It's nearly a perfect fit. What are the odds?
And no, that's not the radiator I'll be using - it's just a mock-up part.
Attached thumbnail(s)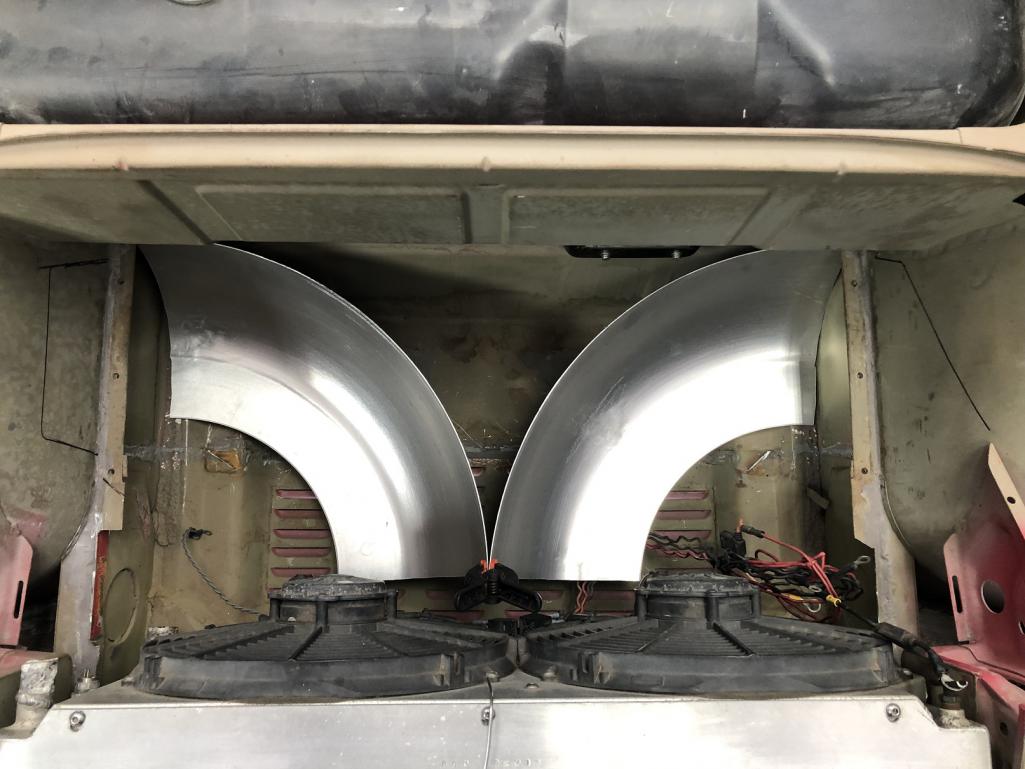
Posted by: Cairo94507 Jul 5 2024, 06:36 AM
I like venting into the wheel wells but what about the bottom louvers? Would you remove them and close that off?
Posted by: technicalninja Jul 5 2024, 06:55 AM
The BIGGEST problem with radiator shrouding is the amount of restriction that they create behind the radiator.
MOST (almost all) are too shallow. Like the one that is currently mounted to the radiator.
That one IS NOT!
Now ending it directly against a wall isn't good either but I'm betting you have a solution for that.
That looks beautiful!
High flow to the max!
Posted by: tygaboy Jul 5 2024, 07:53 AM
I like venting into the wheel wells but what about the bottom louvers? Would you remove them and close that off?
@http://www.914world.com/bbs2/index.php?showuser=9712 Michael - I'm still thinking about that. There's a possibility of splitting the bumper intake and running a false floor with an oil cooler venting through the floor louvers and the radiator venting out the fenders. I need to get the actual radiator I'll be running and work out if there's enough space to pull it off.
If not, I'll need to see if leaving the floor as is (for extra radiator venting) is a good idea or not.
Posted by: Chris914n6 Jul 5 2024, 03:58 PM
Exit holes only need to be 20% larger to accommodate the freshly heated air.
If you are going to cut holes into the wheel wells, which is ideal, then fill in the floor, which leads to rear end lift.
Also, I'd never run oil lines all the way to the front of the car. Get an oil-water cooler or a plain air-oil cooler and duct some air to it near the engine bay. Your engine isn't oil cooled so it's not vital like a big -6.
I only installed an oil cooler due to the lack of airflow compared to when it was a front mounted engine, and I needed a remote filter mount anyways. The stock cooler for my 3.5 is just an oil-water oil filter extension.
Posted by: tygaboy Jul 6 2024, 07:35 AM
5 minutes of interesting build info crammed into a 28 minute video!
https://www.youtube.com/watch?v=99m5HQFbx_w
Posted by: technicalninja Jul 6 2024, 08:56 AM
Thank you for 30 minutes of cool!
The mufflers arn't...
Those are modified glass packs!
It's NOT going to be quiet!
You can freaking see through them!
Might even get flames...
The radiator ducting is awesome!
And you have shitloads of room for a condenser...
A BIG one!
I'd build it out of something that has less heat transfer than aluminum.
I built a really tight aluminum block off "box" (air filter) for one of the Miatas.
I completely sealed the air filter from the engine compartment and fed the housing from clean frontal air. Worked great!
After a 15-minute drive you could BURN your hands on the air filter side of the aluminum.
Had to go back in with some of the gold foil on the engine side which helped but didn't completely solve the heat transfer.
Had I made it out of stainless or better yet, plastic, it would have worked better...
You're lucky on the midget NASCAR. The track needs to be an oval which is a bunch easier to build than the 917 shown.
I'd bet there are BUNCHES of NASCAR themed slot car too...
And then there were the DEMONS!
My favorite part.
Very telling that you DIDN"T open the door!
Posted by: Cairo94507 Jul 6 2024, 09:45 AM
Man, Chris just never ceases to amaze. I love the mock-up for the radiator cooling system. I have to agree with technicalninja, that exhaust system should be pretty loud, but it does look bitchin' from the rear. It sits nice and high. Are you going to run some sort of rear valance? A shortie?
Posted by: tygaboy Jul 6 2024, 10:05 AM
@http://www.914world.com/bbs2/index.php?showuser=27135 @http://www.914world.com/bbs2/index.php?showuser=9712 - That style muffler is the same as I'm running on my LS car and they aren't that loud. Granted, those are Magnaflow and these are Borla but same-ish design.
I was contemplating a rear valance but I REALLY like the view without one. We'll see.
Posted by: technicalninja Jul 6 2024, 10:13 AM
Your cooling system ducting has energized me!
I'm going the water-cooled route as well and the basically circular tubes offer another option.
Get rid of the piss poor efficient flat fans on the radiator and place ducted fans near the outlets!
At first, I disliked dumping hot air over the brakes; on a race car this might be a poor choice.
On a streetcar with performance brake pads, it might help them not get cold soaked from in-activity, long stints at cruise.
Might be a BETTER choice to have slightly pre-heated pads...
This gets deep quickly and is applicable to using ducted fans as a thrust source, but the math is good, worth reading.
https://www.mdpi.com/2076-3417/13/5/2787#:~:text=Compared%20to%20a%20propeller%20propulsion,itself%20and%20for%20the%20surroundings.
Here's a question about the V8 car. Did you ever notice excessive heat on the windshield/frontal sections of the car?
I'd expect the exits are far enough away that it wasn't a serious problem, but I'd like to know. The exit air is not stupid hot either.
Those stupid ass "exhaust through hood cars" will MELT the inner layer of goo between the dual pane front windshield.
While turbos prefer NO exhaust the rest of the car doesn't...
Posted by: technicalninja Jul 6 2024, 10:19 AM
@http://www.914world.com/bbs2/index.php?showuser=27135 @http://www.914world.com/bbs2/index.php?showuser=9712 - That style muffler is the same as I'm running on my LS car and they aren't that loud. Granted, those are Magnaflow and these are Borla but same-ish design.
I was contemplating a rear valance but I REALLY like the view without one. We'll see.
If you do a valence I'd make at least the center section out of mesh. You've had a couple of good examples hit this thread already
The "Ferrari" on the ass end of the transmission needs to SHOW right up to the point the Ferrari attorneys bitch about it.
At that point they need to be modified into "REDBARN" keeping the "font and style" identical.

I would add a tiny little LED to light that puppy UP at night...
If I did that I'd used a LED that had the ability to change color.
Imagine the letters mirror polished, on the jet-black housing, glowing RED!
Posted by: tygaboy Jul 9 2024, 04:52 PM
Version 1 of the header-to-muffler tube. I don't know...
Attached thumbnail(s)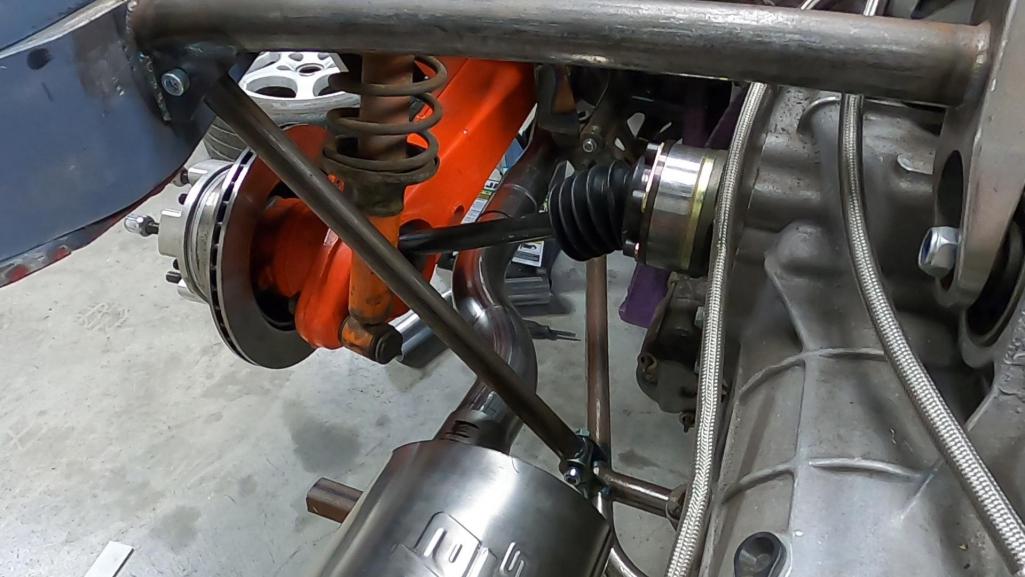
Posted by: tygaboy Jul 9 2024, 04:53 PM
Actually, I do know! I slept on the Version 1 design and decided it's a no. The s-bend doesn't relate to any othe shapes in the engine bay (plus it's fiddly to make).
So here's V2. Better IMO because:
- more cohesive w/the rest of the shapes
- moves the exhaust tips in-board, which I like better (I cheated the muffler tip fixture to the right so pay no attention to the location of the right side opening)
Attached thumbnail(s)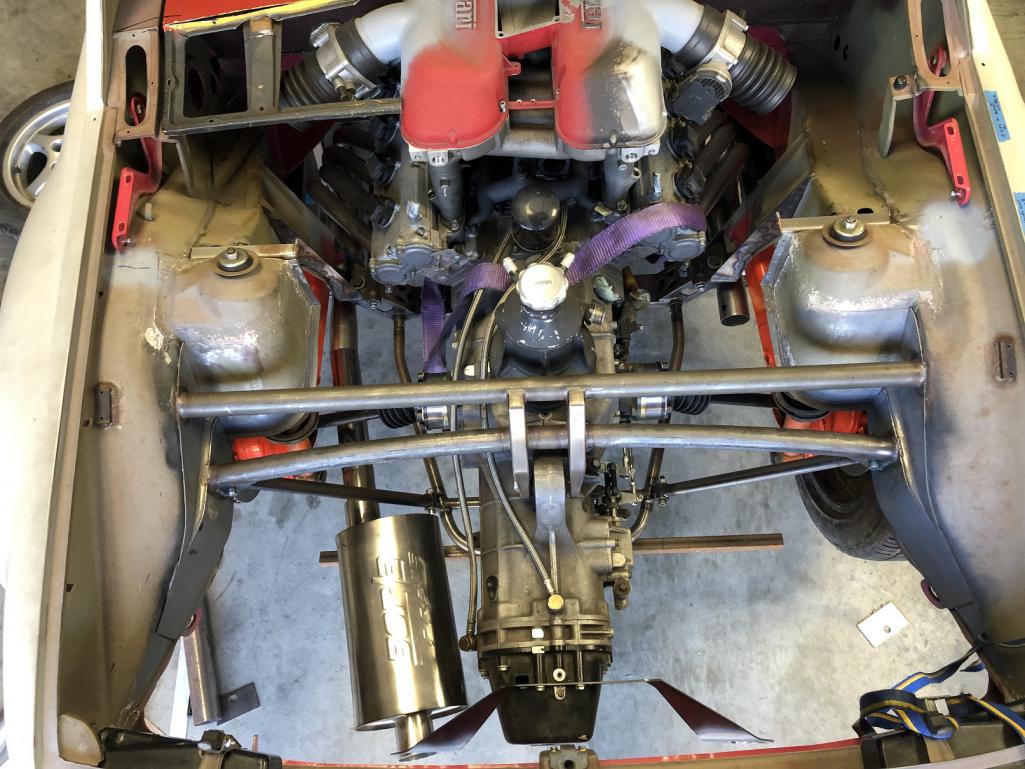
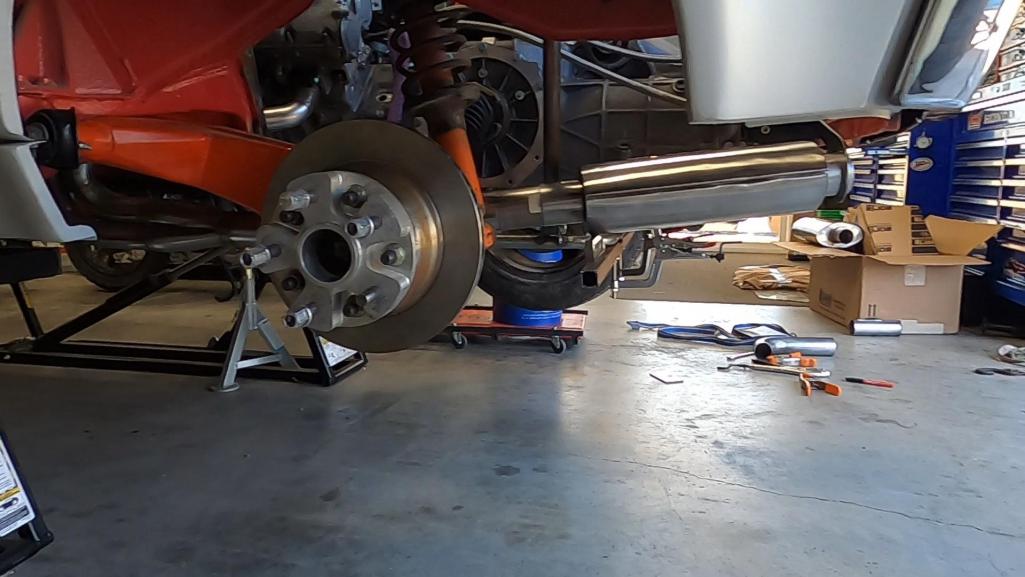
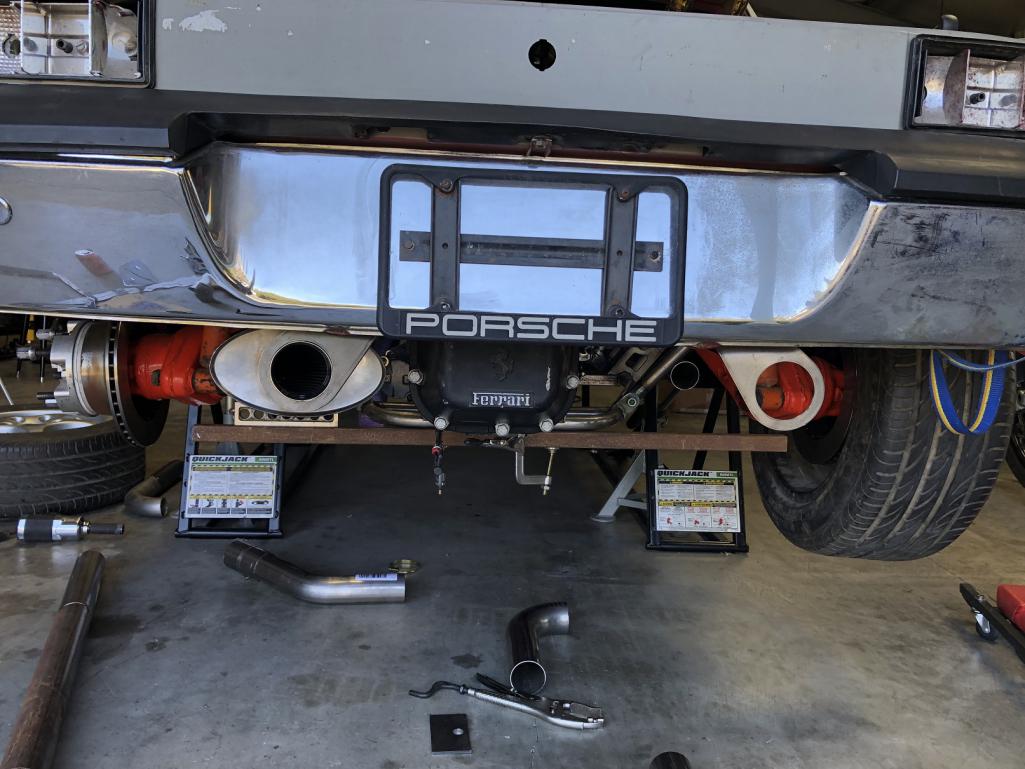
Posted by: SirAndy Jul 9 2024, 05:38 PM
My OCD is screaming inside my head ...
Posted by: ClayPerrine Jul 9 2024, 05:41 PM
My OCD is screaming inside my head ...
Mine too.... The muffler should be parallel to the transmission. I prefer version one.
Posted by: bkrantz Jul 9 2024, 07:42 PM
My OCD is screaming inside my head ...
Mine too.... The muffler should be parallel to the transmission. I prefer version one.
yup
Posted by: technicalninja Jul 9 2024, 08:05 PM
I LIKE #2!
Much straighter tubes, easier fab.
Now, I DO agree with the others as well. Where the exhaust tips exit should be parallel with each other.
Not pointed in like a cross-eyed Siamese cat!
Besides the tips no one will ever see the angle of the mufflers except you guys who have been able to see "under the skirt" from the start...
Posted by: technicalninja Jul 9 2024, 08:07 PM
It also aligns the exhaust tip exit with the license plate depression in the bumper.
Posted by: tygaboy Jul 9 2024, 09:40 PM
I LIKE #2!
Much straighter tubes, easier fab.
Now, I DO agree with the others as well. Where the exhaust tips exit should be parallel with each other.
Not pointed in like a cross-eyed Siamese cat!
Besides the tips no one will ever see the angle of the mufflers except you guys who have been able to see "under the skirt" from the start...
You guys need to give me a little more credit. The exhaust tips will curve right off the mufflers. They'll exit straight out the back.
Posted by: saladin Jul 9 2024, 10:25 PM
@http://www.914world.com/bbs2/index.php?showuser=19241 for kicks and giggles...and if I remember correctly you stated the muffler was reversible...why not reverse them to align the muffler with the trans and the header to muffler pipe more closely matching the angle of the lower trans support bar like the below photo...or flip the exit further out with the other mockup trans muffler mount bracket...
Ken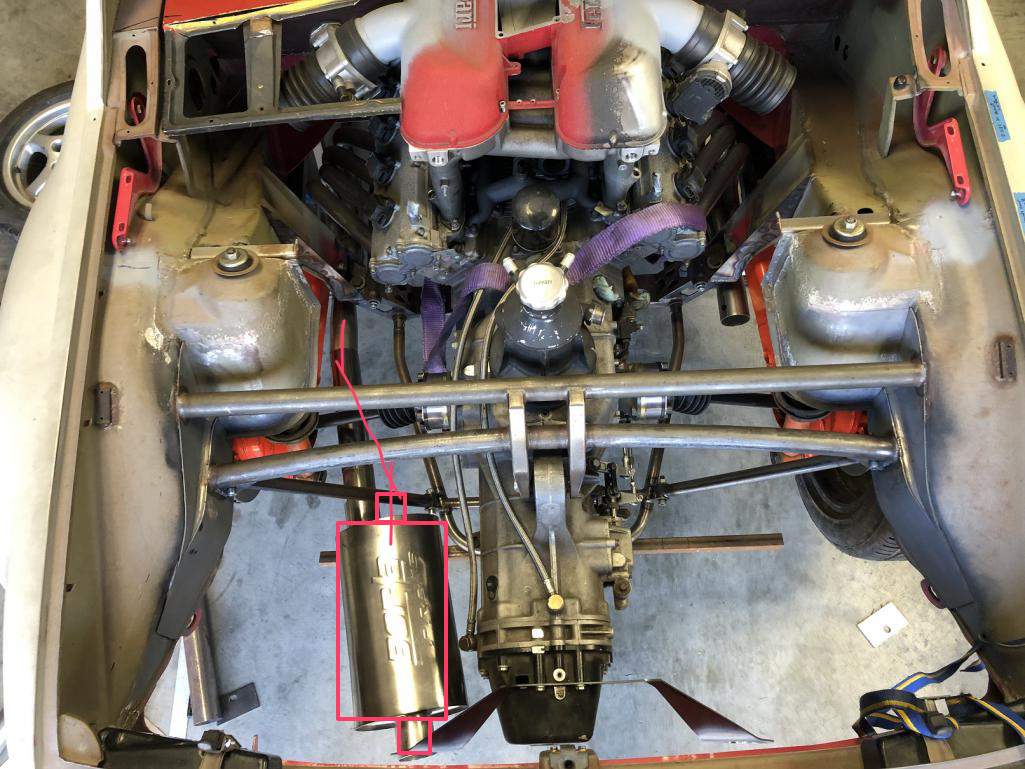
Posted by: Chris914n6 Jul 9 2024, 10:36 PM
Going to be interesting with no cross tube.
I'd do a partial valance, just the corners. Stockish sides and around to hide the tires. Leave the mufflers and trans showing.
Posted by: tygaboy Jul 10 2024, 07:42 AM
While I appreciate the input, it's a classic case of "it's not as simple as you may think".
Pictures don't convey all the challenges and with what I've posted, some of the design challenges aren't obvious:
1. there are space limitations that mean I really need to keep the exhaust outside of the rear trans mount support strut. Inside means its too close to the CV (heat).
2. the tube radii take up some distance so there's less distance available for the straight sections than you may think.
3. I want a design that allows for the both the lower shock bolt and the axles to be removed with the exhaust in place. This impacts tube location.
4. the V-band location helps with #3. Further forward sort of eliminates the issue as I wouldn't mind if I had to remove the muffler section for servicing the shock/axle. Not ideal but...
5. I want the system to slope up as it heads back because the V-band has a larger diameter than the tubing so I need to watch its location re: ground clearance.
6. it can't slope up too quickly because it has to clear the support strut.
7. I want to like how it looks.
I suppose I could take a swing at making a support strut that has a pass-through for the exhaust.
For now I'll close with: Anyone who'd like is welcome to come to The Red Barn and help a brother out.
Posted by: tygaboy Jul 10 2024, 07:50 AM
Going to be interesting with no cross tube.
I'd do a partial valance, just the corners. Stockish sides and around to hide the tires. Leave the mufflers and trans showing.
@http://www.914world.com/bbs2/index.php?showuser=431 - As I understand it, flat plane cranks produces more efficient exhaust scavenging without the need to have header primaries cross over from one bank to the other. Plus, the 360 Challenge cars run no post-header cross-over tube. Sure, race car so not as concerned with lower RPM stuff but I'm not after the last lb/ft or hp.
I talked with a buddy who builds and campaigns a number of successful race cars and owns both a 360 street car and a Challenge. He recommended no cross-over.
I'm no expert but all that, plus the easier packaging, is good enough for me. At least until I prove otherwise.
Posted by: JmuRiz Jul 10 2024, 08:37 AM
If it sounds anything like a Challenge car on track, it gets a thumbs up from me
Version 2 with the slight angle up could leave some room for a working diffuser, hmmmmm
Posted by: Chris914n6 Jul 10 2024, 12:23 PM
Going to be interesting with no cross tube.
I'd do a partial valance, just the corners. Stockish sides and around to hide the tires. Leave the mufflers and trans showing.
@http://www.914world.com/bbs2/index.php?showuser=431 - As I understand it, flat plane cranks produces more efficient exhaust scavenging without the need to have header primaries cross over from one bank to the other. Plus, the 360 Challenge cars run no post-header cross-over tube. Sure, race car so not as concerned with lower RPM stuff but I'm not after the last lb/ft or hp.
I talked with a buddy who builds and campaigns a number of successful race cars and owns both a 360 street car and a Challenge. He recommended no cross-over.
I'm no expert but all that, plus the easier packaging, is good enough for me. At least until I prove otherwise.
I was thinking that you essentially have 2 4 cylinder engines with that setup...
maybe it works, maybe it's ricey?
Posted by: tygaboy Jul 10 2024, 01:41 PM
Everyone can relax! Here's the going-forward design. I REALLY wanted the tube to be parallel to the trans mount frame so I put on my big boy pants and worked it out.
The tube at the header is a bend with a 1.46" extension added to make up for the cylinder offset and allow for symmetry from that point back. It turned out nicely and that's the actual part that'll be used.
The piece at the other end is a mock up piece I did just to prove out the fit. That end will be fabbed next.
I'll need to adjust the exhaust tip fixture to get the mufflers dead straight in the car but it's close enough for me to know I'm going with this layout.
Attached thumbnail(s)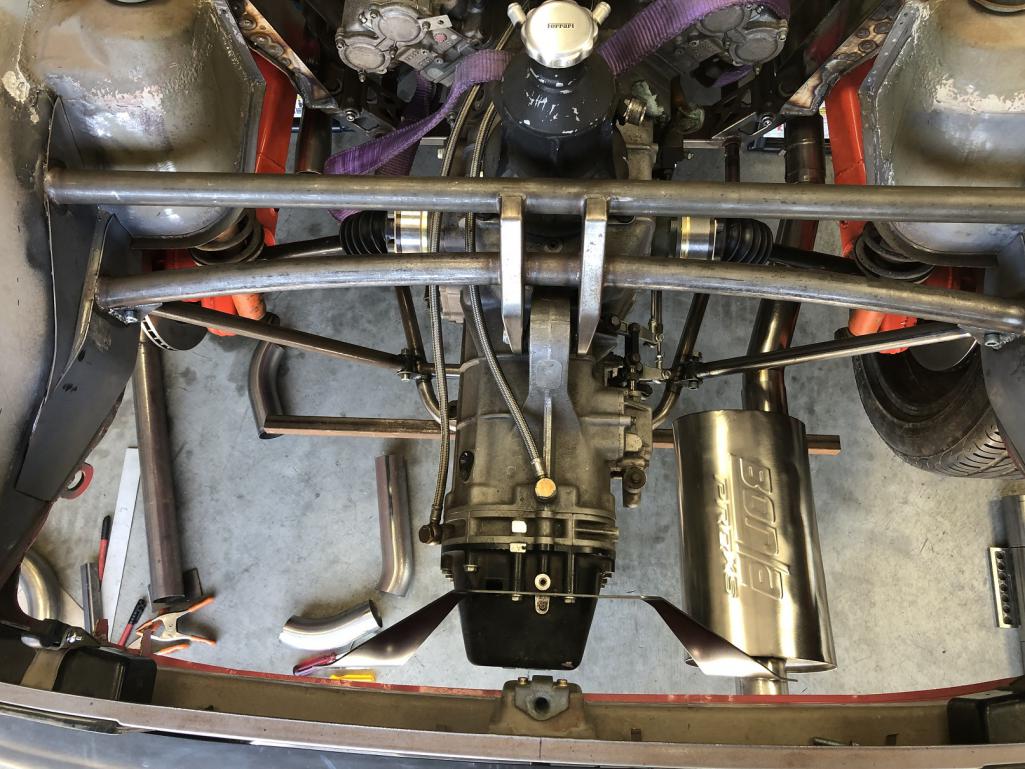
Posted by: bkrantz Jul 10 2024, 07:33 PM
Nice!
(and thanks)
Posted by: pfreiburger Jul 10 2024, 09:25 PM
That looks just right! Thanks so much for taking us along during the creative process. It is great to watch you work through ideas and versions – and end up in just the right place.
Funny thing, I generally don’t have much interest in 914 non-Porsche engine swaps – but this one I love!
The kitties are cool too.
Posted by: tygaboy Jul 11 2024, 06:28 PM
Like this.
Attached thumbnail(s)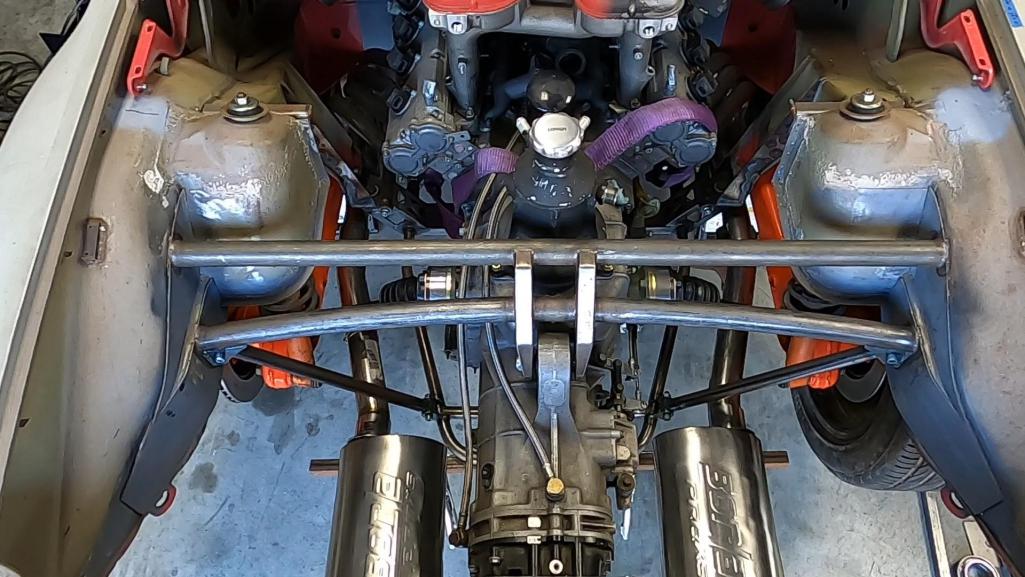
Posted by: bkrantz Jul 11 2024, 07:50 PM
Thinking about heat shielding (or exhaust wrap)?
Posted by: East coaster Jul 11 2024, 08:18 PM
Looks good, I like where you ended up.
Posted by: tygaboy Jul 13 2024, 07:38 AM
And for any interested parties, here's video of the exhaust evolution.
https://www.youtube.com/watch?v=qQ9FcldXOz4
Posted by: Cairo94507 Jul 13 2024, 08:09 AM
It never ceases to amaze me the work that goes into making it look right. I love the final exhaust look. Looking forward to seeing it all welded up and the spring clamp connection.
Posted by: technicalninja Jul 13 2024, 10:16 AM
I'd love to see a video of "Mortis" with your monsters meeting the other cats.
That looks like a place I would spend too much time in!
Posted by: tygaboy Jul 13 2024, 01:48 PM
The "double slip" connectors have arrived. Vibrant Performance pieces. REALLY nicely constructed.
Attached thumbnail(s)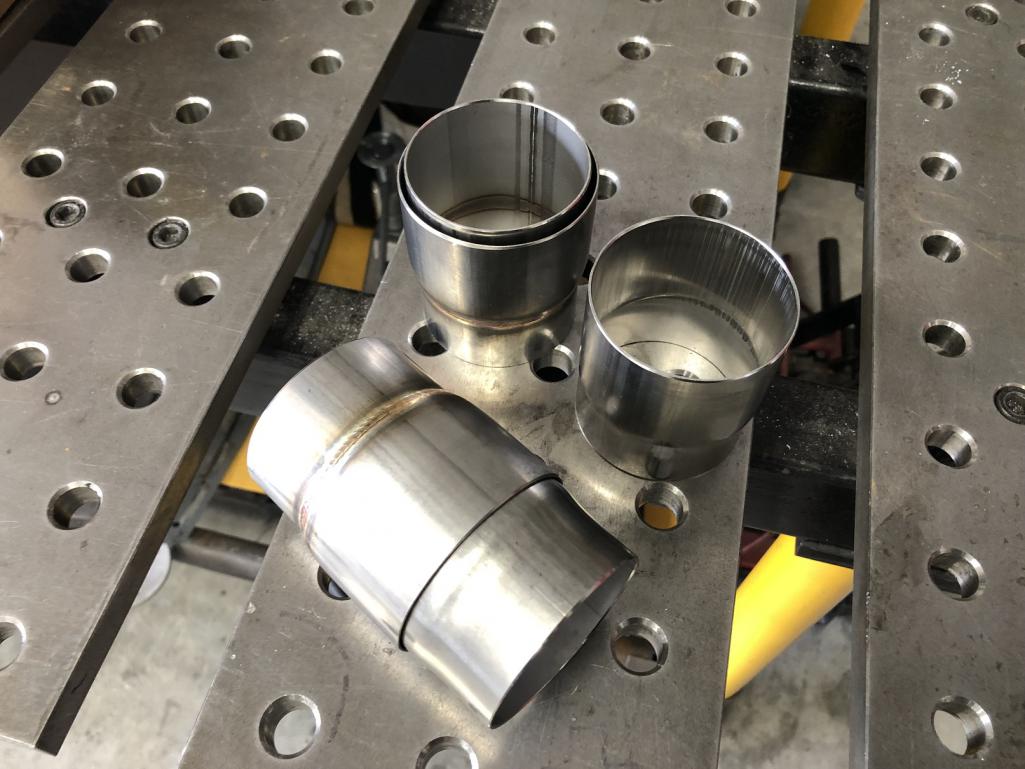
Posted by: tygaboy Jul 13 2024, 03:35 PM
And here's what they look like ready for final welding.
Attached thumbnail(s)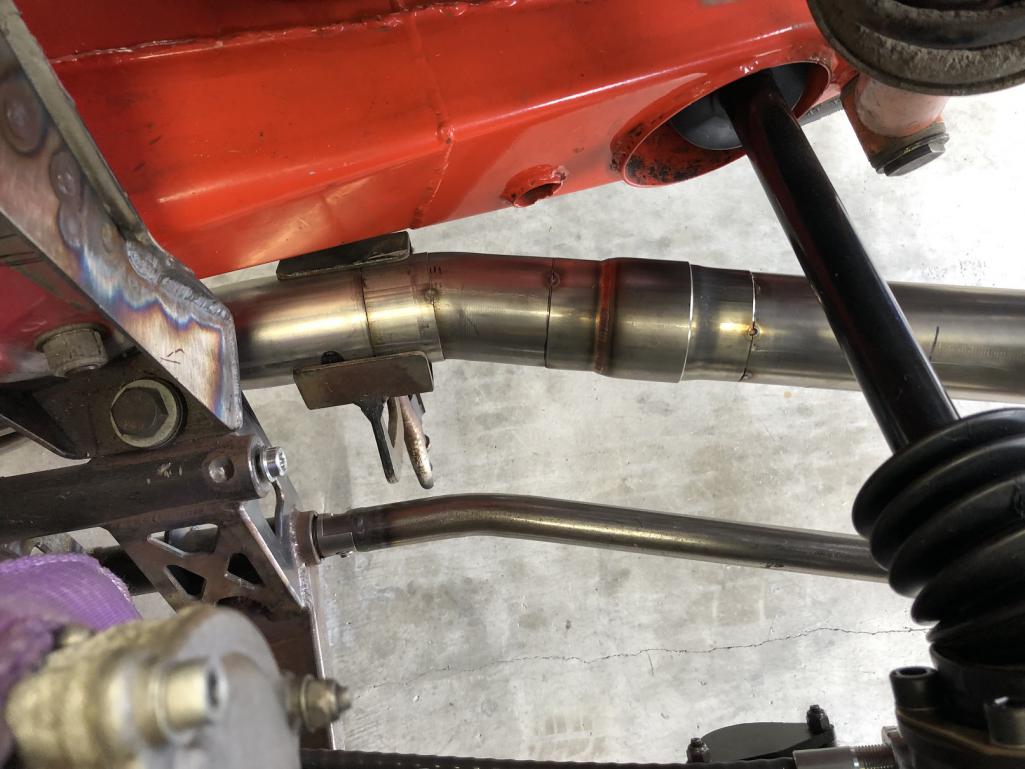
Posted by: tygaboy Jul 13 2024, 05:55 PM
Both fit.
Attached thumbnail(s)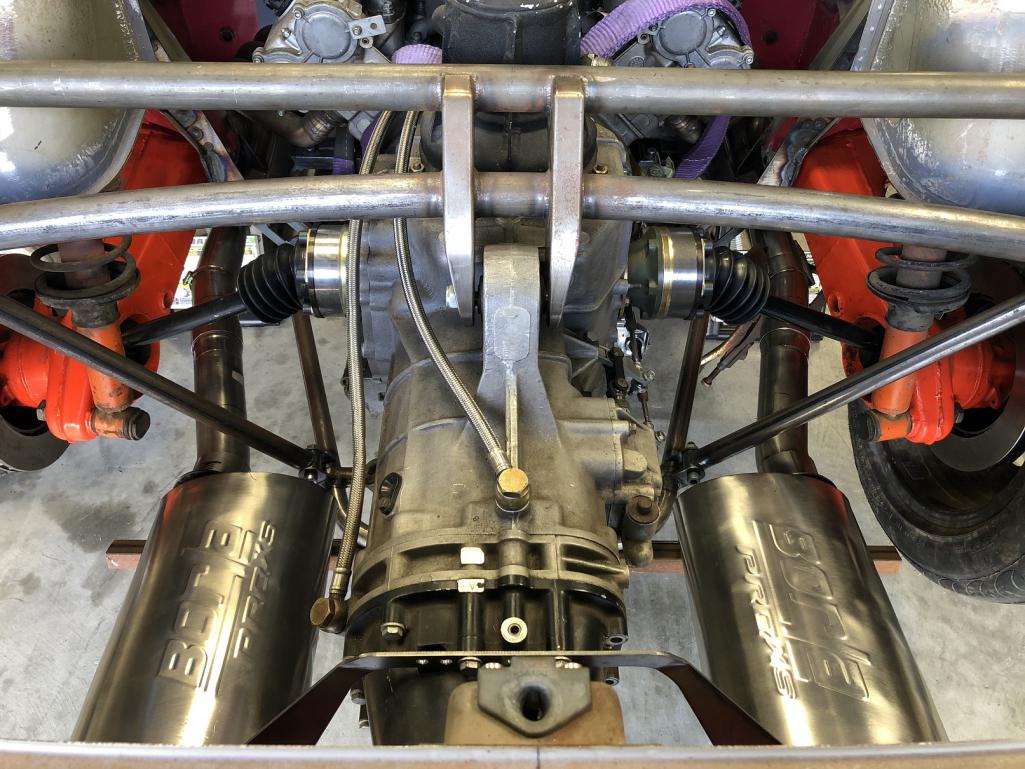
Posted by: tygaboy Jul 13 2024, 05:57 PM
I'm really happy with how this is turning out. Now squint and imagine it with all the finishes refreshed, etc.
Can't hardly wait.
Attached thumbnail(s)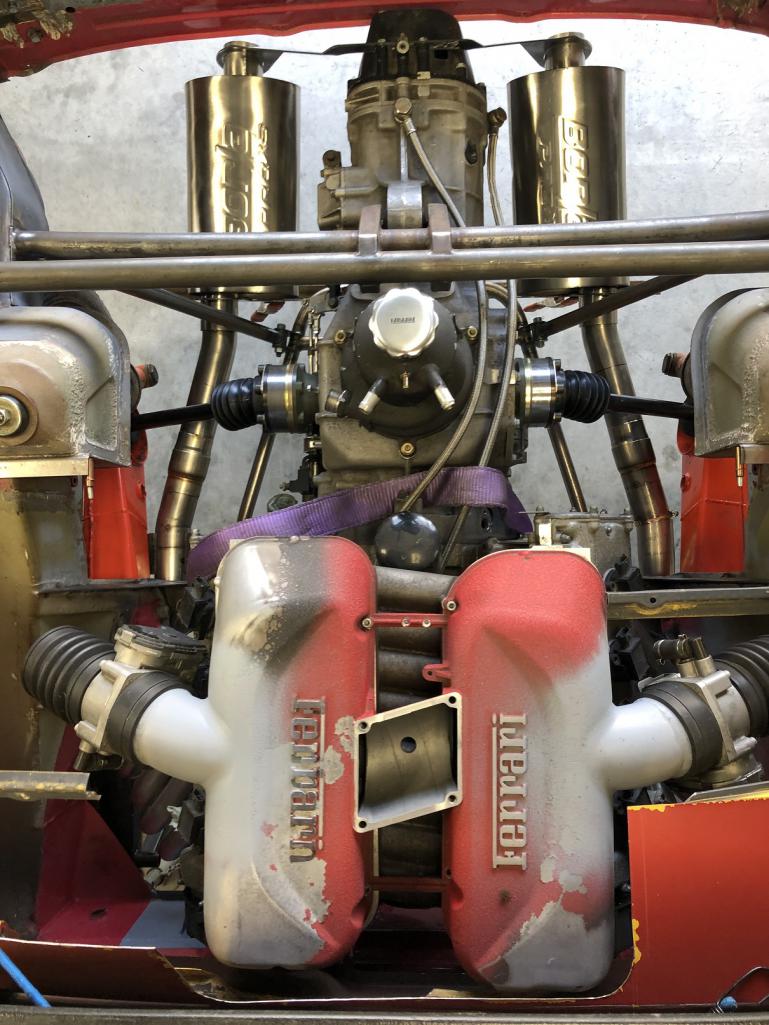
Posted by: KELTY360 Jul 13 2024, 06:21 PM
It’s all coming together like the factory couldn’t have imagined. A work of art and pristine mechanical excellence.
Posted by: bkrantz Jul 13 2024, 08:04 PM
The "double slip" connectors have arrived. Vibrant Performance pieces. REALLY nicely constructed.
Will you clamp these or just rely on slip-fit?
Posted by: tygaboy Jul 13 2024, 09:19 PM
The "double slip" connectors have arrived. Vibrant Performance pieces. REALLY nicely constructed.
Will you clamp these or just rely on slip-fit?
@http://www.914world.com/bbs2/index.php?showuser=23343 - They have no accomodation for clamping. The rear component essentially bottoms out on the turn down of the outer layer on the front piece. Apparently, that's all that's needed.
I may add a tab set so they can be bolted together, just to stabilize the joint/middle of that section of the exhaust. We'll see what happens as I work out the muffler mount.
Posted by: technicalninja Jul 13 2024, 11:34 PM
Adding springs between paired tabs is a very Italian way of doing things.
Most of the time three springs at 120 degrees increments.
Posted by: barefoot Jul 14 2024, 08:18 AM
And for any interested parties, here's video of the exhaust evolution.
https://www.youtube.com/watch?v=qQ9FcldXOz4
I'm really blown away with your shop capabilities. seems you have everything needed for fabing almost anything. As a retired design engineer I can appreciate what you have there.
Barefoot
Posted by: tygaboy Jul 14 2024, 06:05 PM
Everything tacked, ready for final welding. Note there's not yet a rear mount supporting the rear of the mufflers - they're only held in place by the double slips so things aren't completely in their exact, final location.
But I couldn't be happier with how this exhaust is turning out.
Attached thumbnail(s)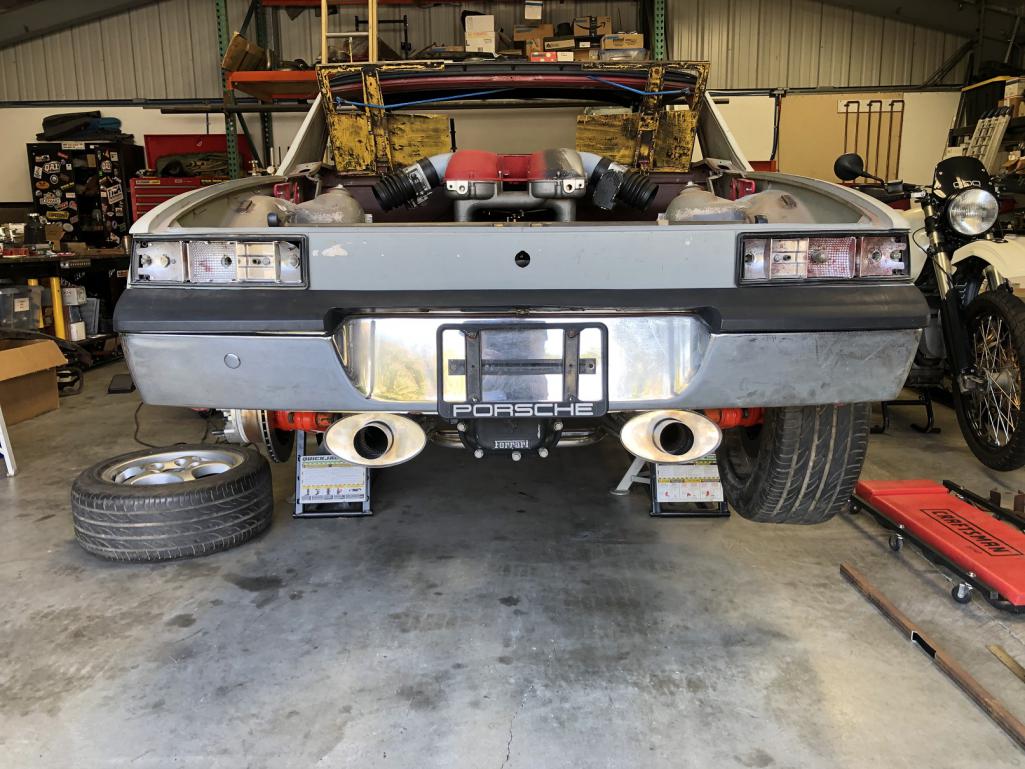
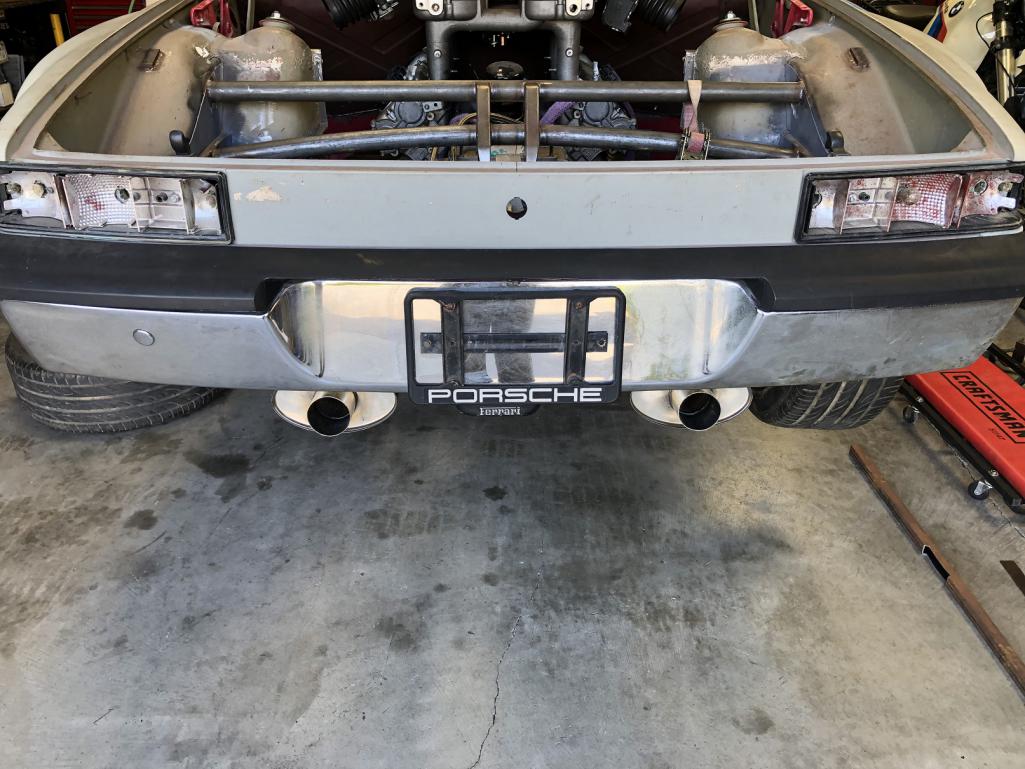
Posted by: bkrantz Jul 14 2024, 09:23 PM
The "double slip" connectors have arrived. Vibrant Performance pieces. REALLY nicely constructed.
Will you clamp these or just rely on slip-fit?
@http://www.914world.com/bbs2/index.php?showuser=23343 - They have no accomodation for clamping. The rear component essentially bottoms out on the turn down of the outer layer on the front piece. Apparently, that's all that's needed.
I may add a tab set so they can be bolted together, just to stabilize the joint/middle of that section of the exhaust. We'll see what happens as I work out the muffler mount.
Intereresting. I guess if there is no tension or torque on the slip joint it will stay tight, especially after a bit of heat cycle oxidation.
Posted by: mgp4591 Jul 14 2024, 10:47 PM
I'll second the suggestion of springs...very racing oriented, Italian and Porsche worthy!
Posted by: tygaboy Jul 17 2024, 05:34 PM
Getting started on the oil lines. First step was to install the weld-on -16 AN fittings on the air/oil separater and the low pressure return line. The oil cooler goes between these two fittings.
The line pictured is a spare I had, not the actual piece that'll be used.
Attached thumbnail(s)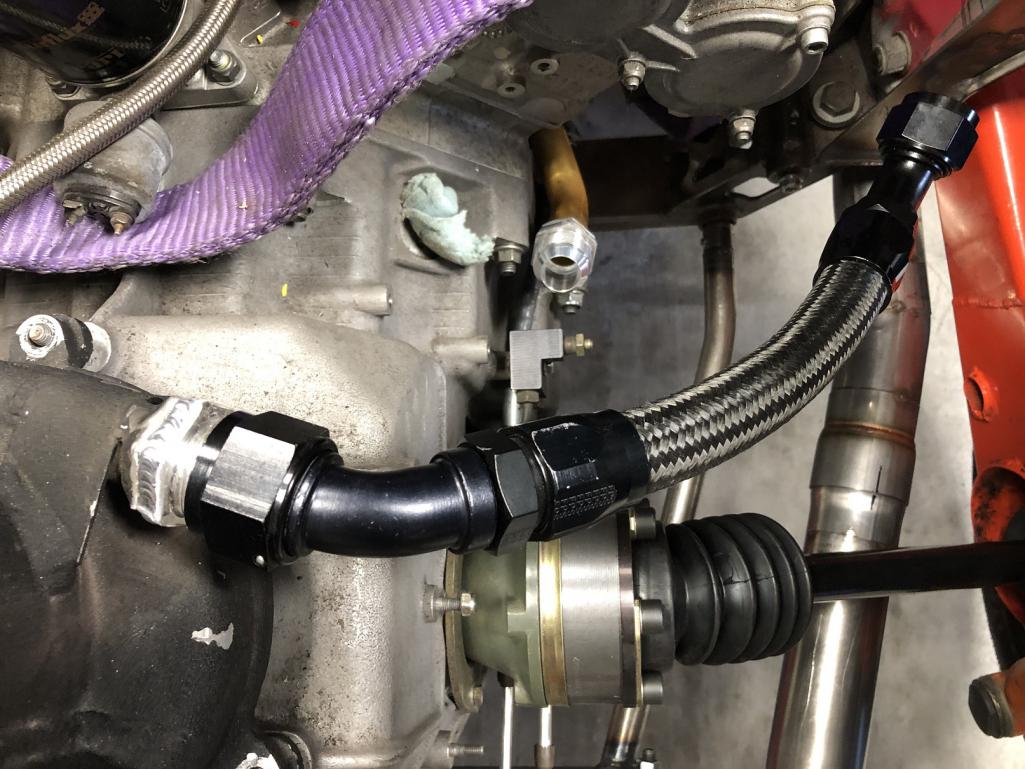
Posted by: tygaboy Jul 18 2024, 05:36 PM
The factory Ferrari muffler mount (upside down pic, sorry. It's all I could find) versus one that's been subjected to some At The Red Barn mods.
My version is lighter and prettier.
Yes, a little bit more tidying up to do but, as I regularly say: You get the idea.
Attached thumbnail(s)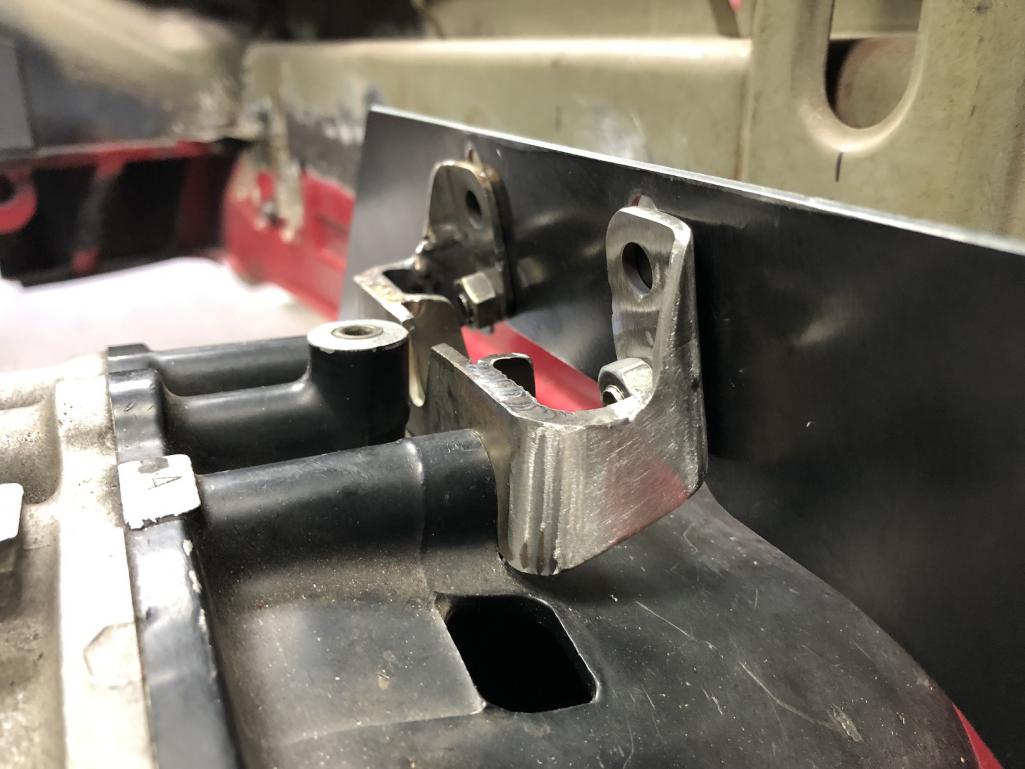
Attached image(s)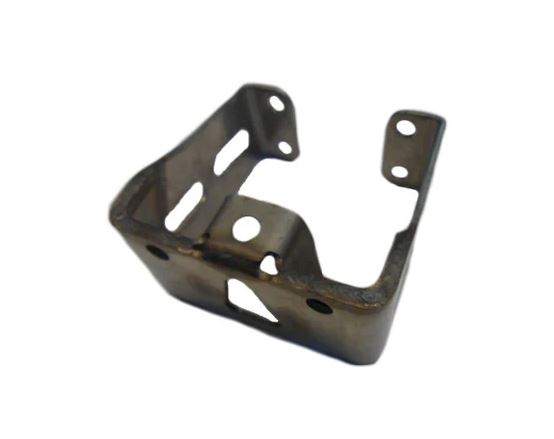
Posted by: tygaboy Jul 20 2024, 06:49 AM
I know you're dying to catch up on the exhaust build. This episode brings you current with progress through yesterday.
https://www.youtube.com/watch?v=Pgnf4-5OAyY
Posted by: Cairo94507 Jul 20 2024, 08:40 AM
The attention to detail is mind blowing. I am obviously a Red Barn fan; Chris is just the best. I would have a hard time letting those little kitties go; they are so cute and so well adjusted/socialized. I am sure wherever they end up, they will be loved and well cared for.
Posted by: tygaboy Jul 27 2024, 07:30 AM
Turns out I was wrong about not needing a cross-over. Shoulda listened to @http://www.914world.com/bbs2/index.php?showuser=431
And it seems the car itself was pissed at me for that, too!
https://www.youtube.com/watch?v=RigFn6UJN2E
Posted by: Cairo94507 Jul 27 2024, 08:36 AM
I hope your hand heals up quickly Chris; it sure does not look like it slowed you down at all. Stitches give you character. You and Martin are making great progress on the Ferrari car. Hopefully one day soon Bobby and I will be causing over to see you in my car. Those kitties are going to have wonderful lives because they are well socialized.
Posted by: East coaster Jul 27 2024, 11:59 AM
Ouch!
Posted by: tygaboy Jul 27 2024, 03:14 PM
No rest for the weary injured! For those who may not want to watch the videos, here's the radiator mount, ready for final welding. I'm happy with how it's turning out.
Attached thumbnail(s)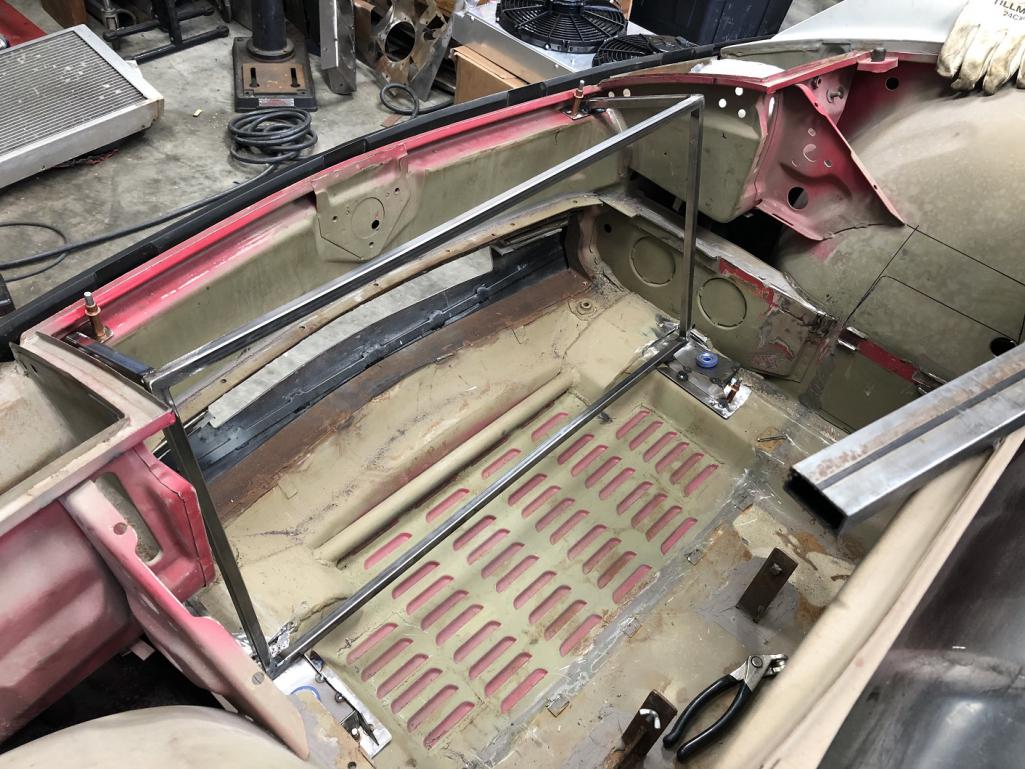
Posted by: tygaboy Jul 27 2024, 03:15 PM
And a final test fit. Yes, it'll have a foam seal between the mount and the rad.
Attached thumbnail(s)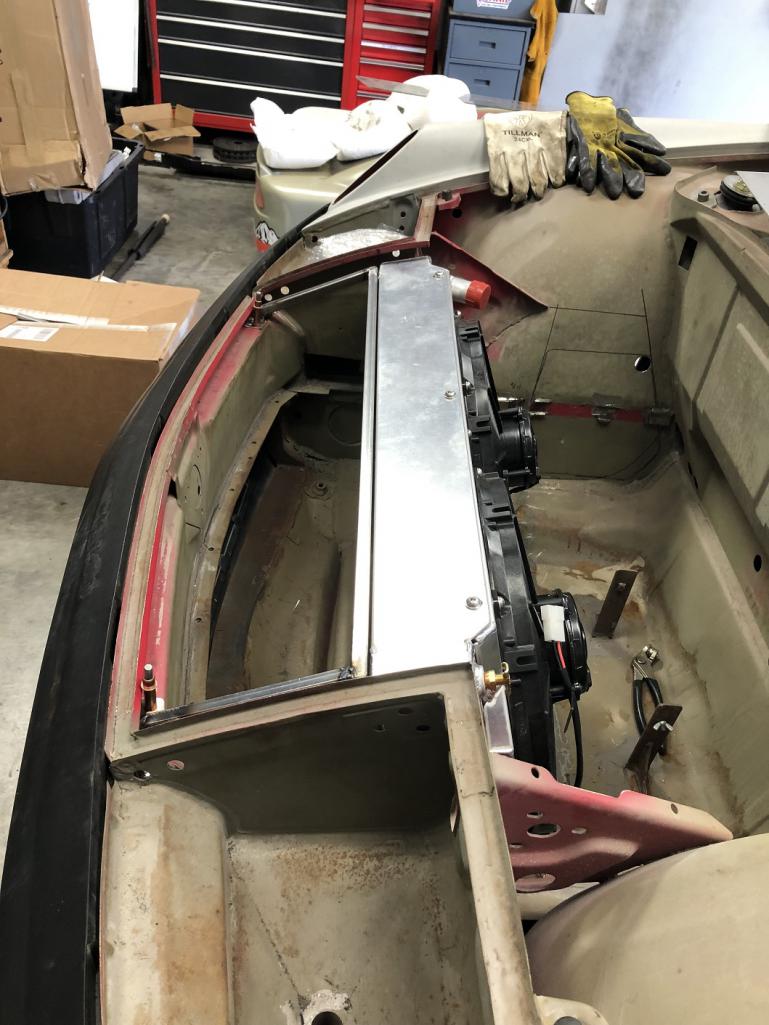
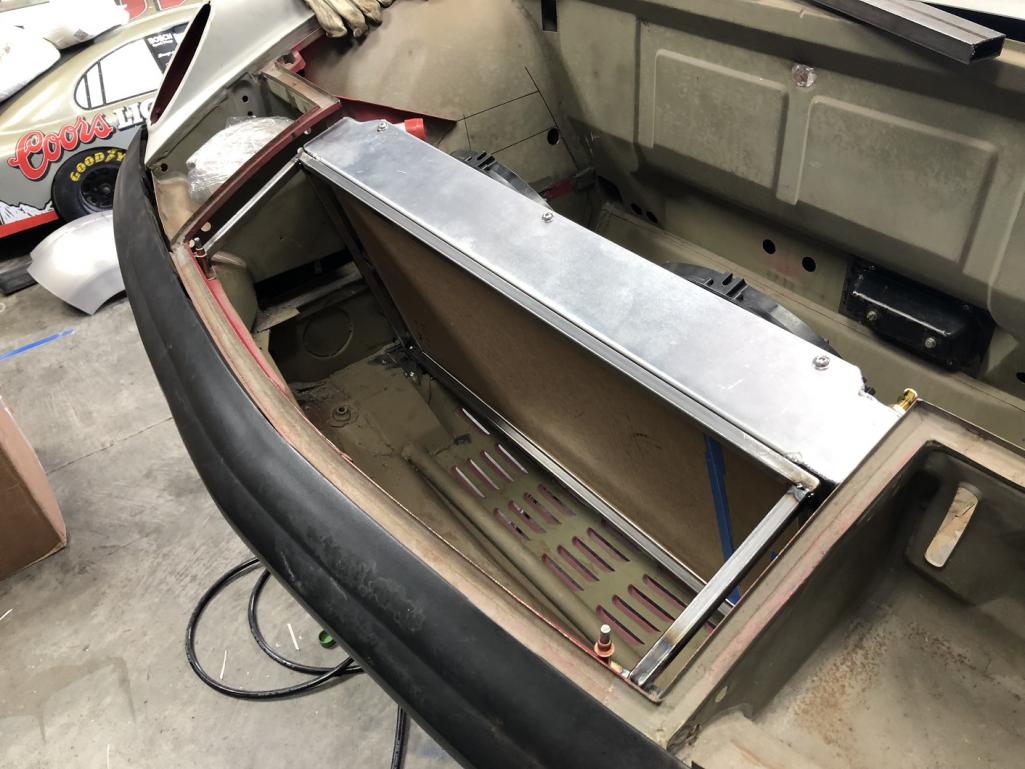
Posted by: ClayPerrine Jul 27 2024, 04:30 PM
Chris...
My wife Betty says "I'ts not a good job until you bleed on it and cuss at it." I just assume you have already cussed at it a few times, so it looks like this is going to be a good job.
And as a soft can opener, I appreciate all you do for the kitties. Thank you!
Posted by: technicalninja Jul 27 2024, 05:20 PM
The kitties are completely trained.
One of the first steps is to use Humans as furniture!
Best place to be in on the shoulders.
Closest to the brain for the "Power of Purr" to work properly.
"Total and Complete World Domination" via subconscious manipulation.
That little red one has you and you know it...
Now, car stuff!
Plenty of room for a big condenser.
It's properly ducted already...
I'd keep the original exhaust you made.
I'd want to try it out too...
Thanks for the update!
Posted by: Chris914n6 Jul 27 2024, 10:05 PM
Congrats on earning a demerit badge
Posted by: tazz9924 Jul 27 2024, 10:56 PM
And a final test fit. Yes, it'll have a foam seal between the mount and the rad.
I dont know if you plan to keep the louvered floor but make sure you cover it up before the radiator, dont want all that precious cooling air leaking out like a blood from a hand…..
Posted by: Shivers Jul 27 2024, 11:42 PM
Turns out I was wrong about not needing a cross-over. Shoulda listened to @http://www.914world.com/bbs2/index.php?showuser=431
And it seems the car itself was pissed at me for that, too!
https://www.youtube.com/watch?v=RigFn6UJN2E
I have U shaped and weird X shaped scars on my arms and hands. My darn skin changed and now a stern look seems to tear it. A lot of times I have no idea how I bloodied myself. I just pull the "flap" back to where is was, smother it with neosporin and slap a big bandaid on. I have a whole drawer in the bathroom just for my bandaid collection.
Can not wait to see what this X pipe version will look like, more so how it sounds. I think the X pipe gave the Anza/Monza exhaust a, what I used to refer to as a European sound. Like there is something angry in there
Rock on dude
Posted by: technicalninja Jul 28 2024, 07:07 AM
Congrats on earning a demerit badge
Freaking Perfect!
I've earned it and I want one of those "demerit" badges.
I've touched the trailing edges of electric fans many times.
Gives you the equivalent of a carpet burn on whatever touched the fan.
Yes, you can bleed but not badly.
I was working on a magazine worthy Ford Highboy roadster.
Some MORON wired the electric fan backwards. It was pushing the air FORWARD through the radiator.
I didn't notice (STUPID Ninja!) and got my left hand sucked into said fan on the "leading side".
The best description is "Food Processor"!
It sheared all of the meat on my little finger off of the outside and wacked the dog shit out of the second one.
Thank GOD it didn't just cut one OFF. I think it could have!
34 stiches on the little one, 19 on the second.
The first time in 37 years a car sent me DIRECTLY to the ER.
And I am NOW incredibly gun shy of electric fans...
And, I've earned my demerit badge!
Posted by: tygaboy Jul 28 2024, 07:17 AM
And a final test fit. Yes, it'll have a foam seal between the mount and the rad.
I dont know if you plan to keep the louvered floor but make sure you cover it up before the radiator, dont want all that precious cooling air leaking out like a blood from a hand…..
@http://www.914world.com/bbs2/index.php?showuser=18779 Yep, there's what I call a "lower shroud" that'll take care of that. Here's the similar set up in my LS car.
Attached thumbnail(s)
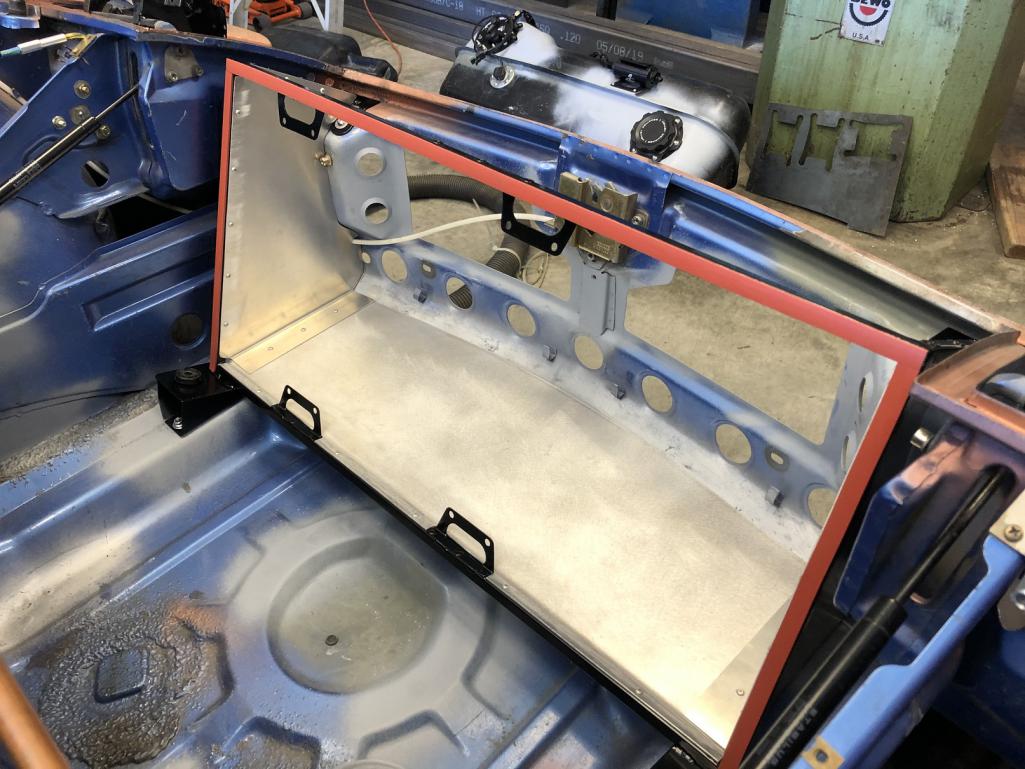
Posted by: technicalninja Jul 28 2024, 07:24 AM
SO NICE!
Monster air flow!
Posted by: tazz9924 Jul 28 2024, 07:41 AM
And a final test fit. Yes, it'll have a foam seal between the mount and the rad.
I dont know if you plan to keep the louvered floor but make sure you cover it up before the radiator, dont want all that precious cooling air leaking out like a blood from a hand…..
@http://www.914world.com/bbs2/index.php?showuser=18779 Yep, there's what I call a "lower shroud" that'll take care of that. Here's the similar set up in my LS car.
Very nice. What are your little tabs used for?
Posted by: tygaboy Jul 28 2024, 08:06 AM
And a final test fit. Yes, it'll have a foam seal between the mount and the rad.
I dont know if you plan to keep the louvered floor but make sure you cover it up before the radiator, dont want all that precious cooling air leaking out like a blood from a hand…..
@http://www.914world.com/bbs2/index.php?showuser=18779 Yep, there's what I call a "lower shroud" that'll take care of that. Here's the similar set up in my LS car.
Very nice. What are your little tabs used for?
AC/condensor mounts
Posted by: tygaboy Aug 3 2024, 06:43 AM
Back at it:
https://www.youtube.com/watch?v=o7dVboGTOwc
Posted by: Cairo94507 Aug 3 2024, 08:35 AM
Wow, that went fast. Coming along nicely Chris & Martin.
Posted by: mb911 Aug 3 2024, 08:41 AM
Looking good in retirement I imagine doing many of the same things. Enjoy
Posted by: technicalninja Aug 3 2024, 08:46 AM
Great episode!
One of the most common vehicle fabrication mistakes I see is hard mounting an aluminum radiator.
Works fine for a year, 18 months and then you have radiator tank failures.
Almost ALL the aftermarket aluminum radiators I've seen are done wrong.
"Floating" the radiator on pins and bushings at the bottom then an upper mount that doesn't lock the radiator down is the way to go.
Even stock OEM aluminum/plastic radiators are "floated" too!
Pre-radiator ducting (often left out) is Kick Ass!
Giving 1/8" for a foam seal is too.
This is another tiny little detail that the OEMs use and is not even thought about by most fabricators.
The way you are doing it is PERFECT IMO.
When I add the radiator to my car, I'm going to use your method as the template!
Master Fabricator there!
Then the X pipe...
I believe that is the best provisioned X cross over I've seen yet.
Nothing I've seen before makes as nice an X as yours does!
Just truly eXquisite!!!
I've been a little worried about room for such a pipe as I may need one too.
Looks like plenty of room using your method.
Target DOWN!
Posted by: Chris914n6 Aug 3 2024, 02:03 PM
That bottom trans mount isn't doing anything significant. But if you feel that you need the fore/aft dampening it can be moved to a better location.
I think it's purpose was to lock the drivetrain to the suspension subframe, which would have been rubber isolated also. Not a thing on your 914.
With a little more thought, I think I would cut it in half, rotate it down and weld it to the cradle (actually I'd make a bracket instead of cutting factory parts). It should help with any torque twist as it only has the one top mount.
Posted by: tygaboy Aug 7 2024, 10:13 AM
Preview of some stuff in the upcoming episode:
LOTS of work on the fixture table to get this latest exhaust worked out - and it's coming along nicely.
Attached thumbnail(s)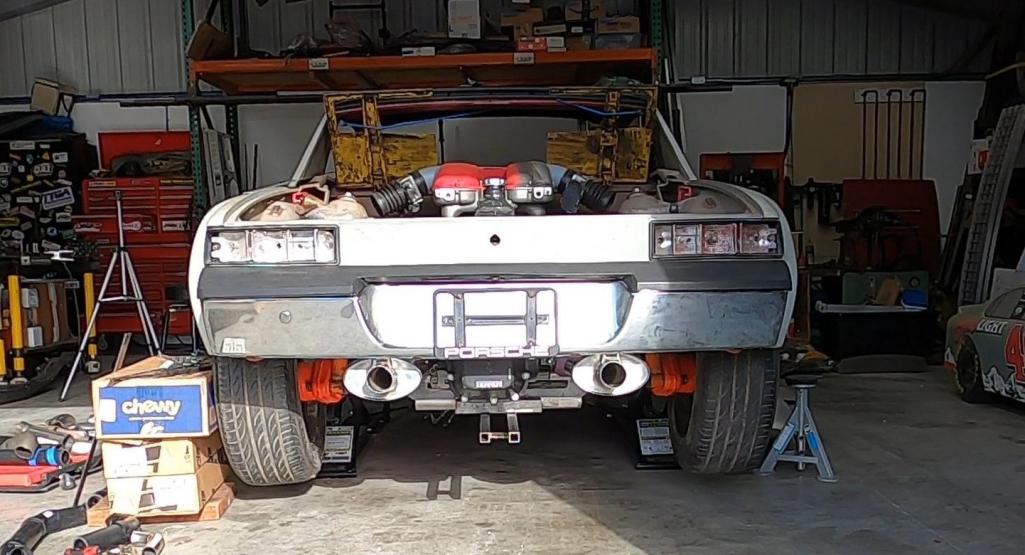
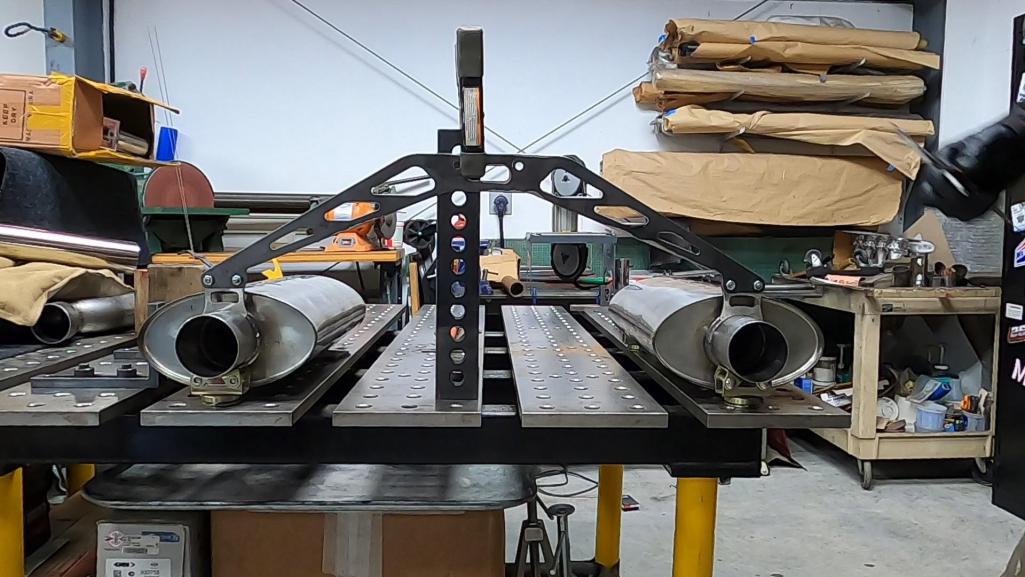
Posted by: Cairo94507 Aug 7 2024, 10:20 AM
Posted by: tygaboy Aug 7 2024, 06:21 PM
Like this. Still have the "header-to-rear-of-X" tubes to do.
Attached thumbnail(s)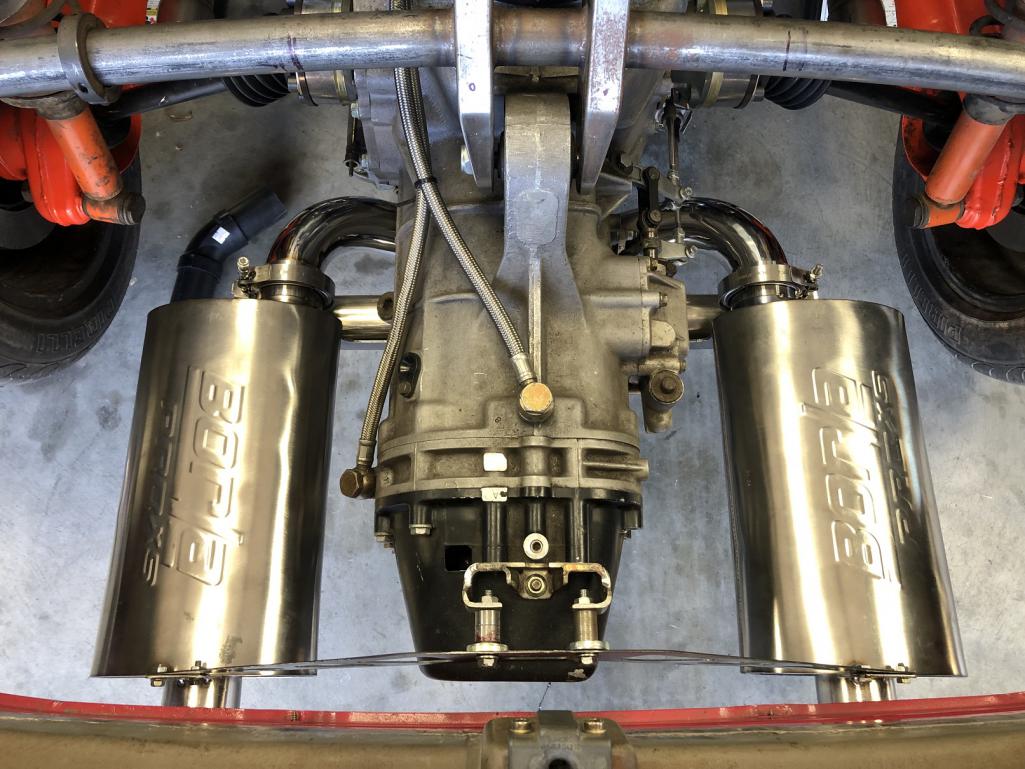
Posted by: Krieger Aug 7 2024, 06:25 PM
That looks clean!
Posted by: tygaboy Aug 7 2024, 09:27 PM
My "plus/minus less than yesterday" attitude is paying off. V-band square to the muffler in both directions.
Granted, the sand, fit, measure, sand fit measure process to get the muffler end trimmed to achieve this result probably took me 20 minutes.
And note the muffler ends are larger than the 2.5" tube so I don't benefit from the small locating recess the V-band has. It's butted to the muffler tube.
Attached image(s)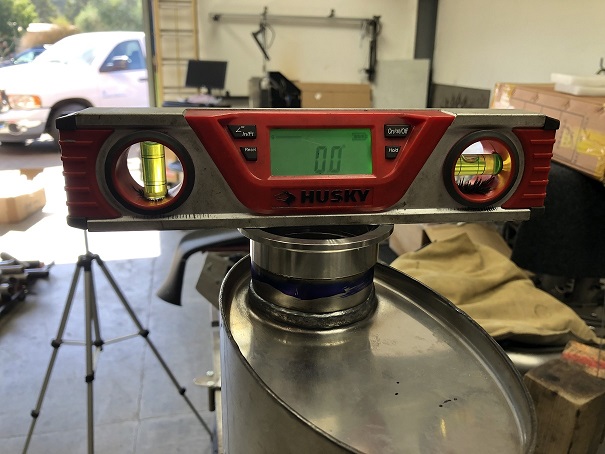
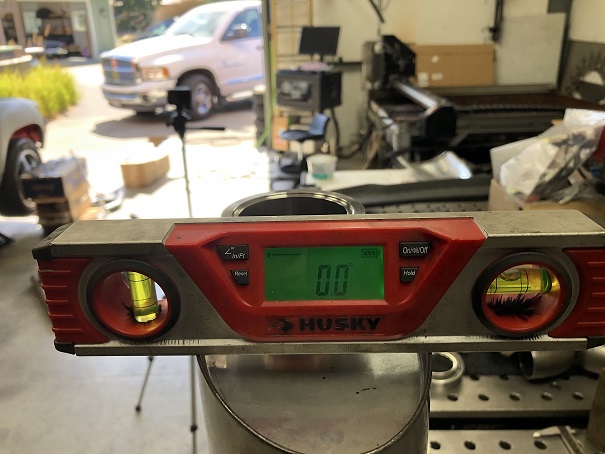
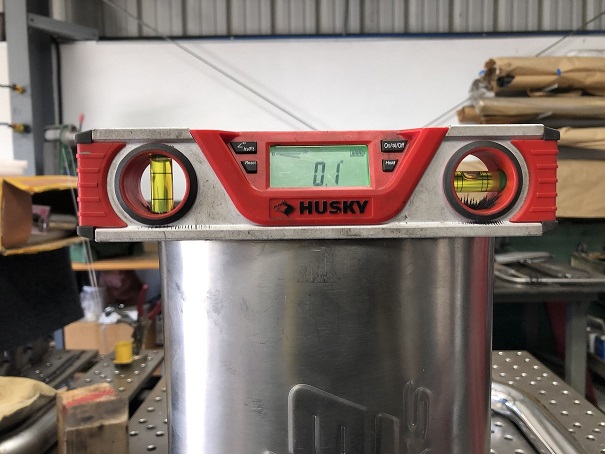
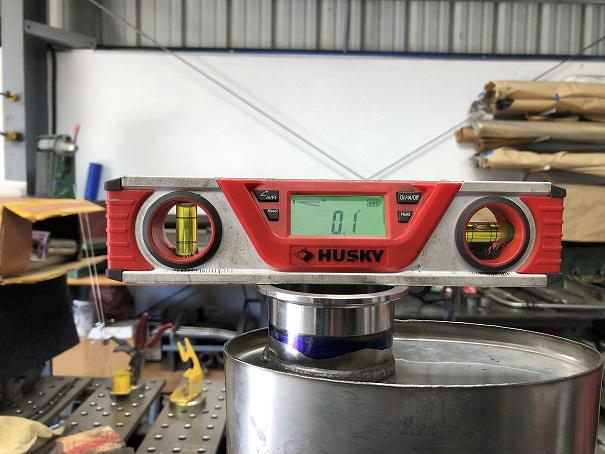
Posted by: tygaboy Aug 8 2024, 08:21 PM
The headers look better upside down than right side up.
Attached image(s)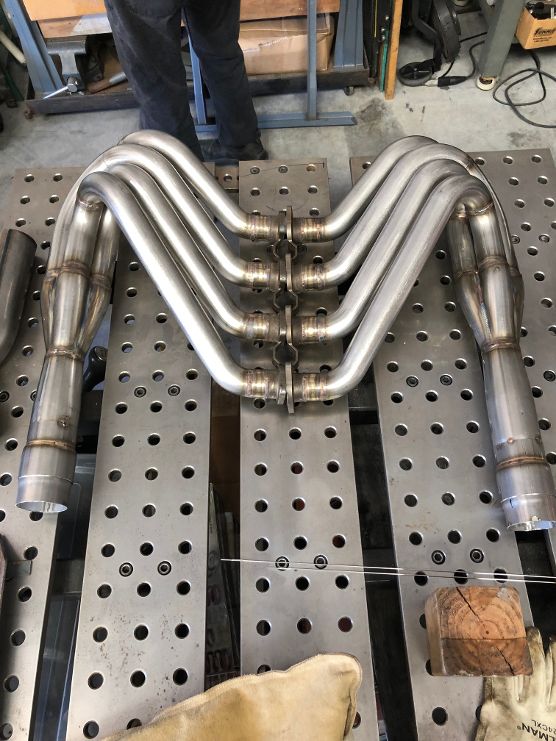
Posted by: NotLance Aug 8 2024, 08:54 PM
Got to see the build up close today during my visit - the vision is incredible, and I can't wait to see it progress further.
The attention to detail is off the charts, and is the kind of thing that highlights the incredible craftsmanship of the builder.
Thank you for being such a gracious host and keep the awe-inspiring work coming!
Posted by: Cairo94507 Aug 9 2024, 07:47 AM
@http://www.914world.com/bbs2/index.php?showuser=19241 - Chris, those headers look beautiful. You and Martin are killing it.
Posted by: bkrantz Aug 9 2024, 07:40 PM
The headers look better upside down than right side up.
Stainless?
Posted by: tygaboy Aug 9 2024, 10:04 PM
The headers look better upside down than right side up.
Stainless?
@http://www.914world.com/bbs2/index.php?showuser=23343 - You hurt my feelings. Clearly, you've not been watching the videos.
Yes, entire exhaust is 304 stainless. The header flanges are the original Ferrari cast stainless parts, sliced off the factory exhaust manifolds.
Posted by: East coaster Aug 10 2024, 05:25 AM
Headers are art!
Posted by: tygaboy Aug 10 2024, 07:18 AM
Some details of what it's taking to make this exhaust. The fixture table earns its keep in this episode!
https://www.youtube.com/watch?v=YvXQ0mzQBBM
Posted by: technicalninja Aug 10 2024, 09:43 AM
Outstanding!
We need a DNA sample from Martin!
Cloning should be investigated...
Are you planning a heat shield for the starter and tranny linkage?
I think you're going to need them.
I'd mount the starter shield to the starter and the tranny linkage shield to the exhaust pipe.
I believe the aluminum linkage bars will conduct heat bigtime into the cables themselves.
Might not be a problem but I'd test for temperature.
I'd expect the exhaust tubes to exceed 800 degrees at times.
Love the fixture table!
One thing I did notice...
You have an upright belt sander. This tool is my nemesis!
Yours is "beltless"!
Only way these puppies are safe IMO!
I've been whipped RAW and BLEEDING too many times by those...
We need a Kitty update!
Posted by: Montreal914 Aug 10 2024, 10:42 AM
My favorite Saturday morning art show.
Simply amazing how this is coming together.
Thank you for this great entertainment!
Posted by: Dion Aug 10 2024, 04:36 PM
The Chris & Martin show! Simply the best. The crossover pipe build and jig table segment is a pleasure to see come together. Agree Martin should be cloned!
Glad you’re healing well Chris!
Hope the kitties are well.
Posted by: bkrantz Aug 10 2024, 07:28 PM
The headers look better upside down than right side up.
Stainless?
@http://www.914world.com/bbs2/index.php?showuser=23343 - You hurt my feelings. Clearly, you've not been watching the videos.
Yes, entire exhaust is 304 stainless. The header flanges are the original Ferrari cast stainless parts, sliced off the factory exhaust manifolds.
Sorry, my bad. I guess I am old school and prefer old fashioned words and photos (and I usually browse 914World while watching TV with my wife). I promise to do better.
Posted by: tygaboy Aug 11 2024, 06:31 AM
Mocking up the header-to-X connection to verify clearance under the tube that runs to the muffler. I'm not wild about the look but I'm not sure I have much of a choice. I may play with a bit tighter radius at the header to see if like that any better.
The issue is that the quicker it turns at the front, the wider it has to be at the rear to get under the muffler tube as it drops.
Attached thumbnail(s)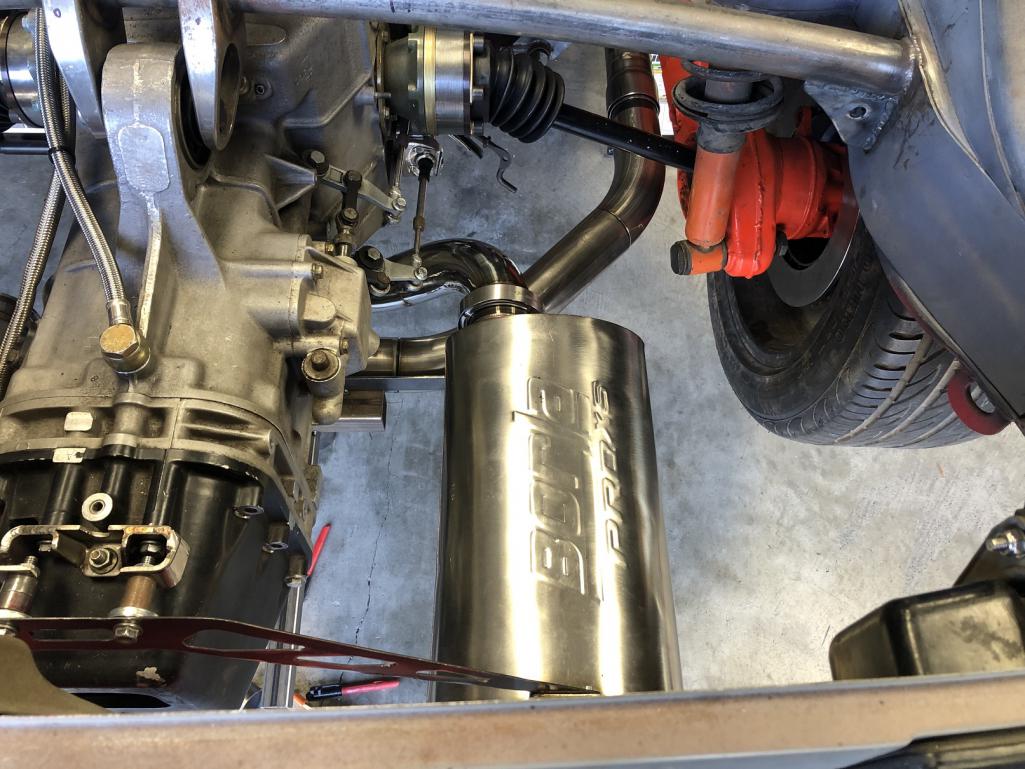
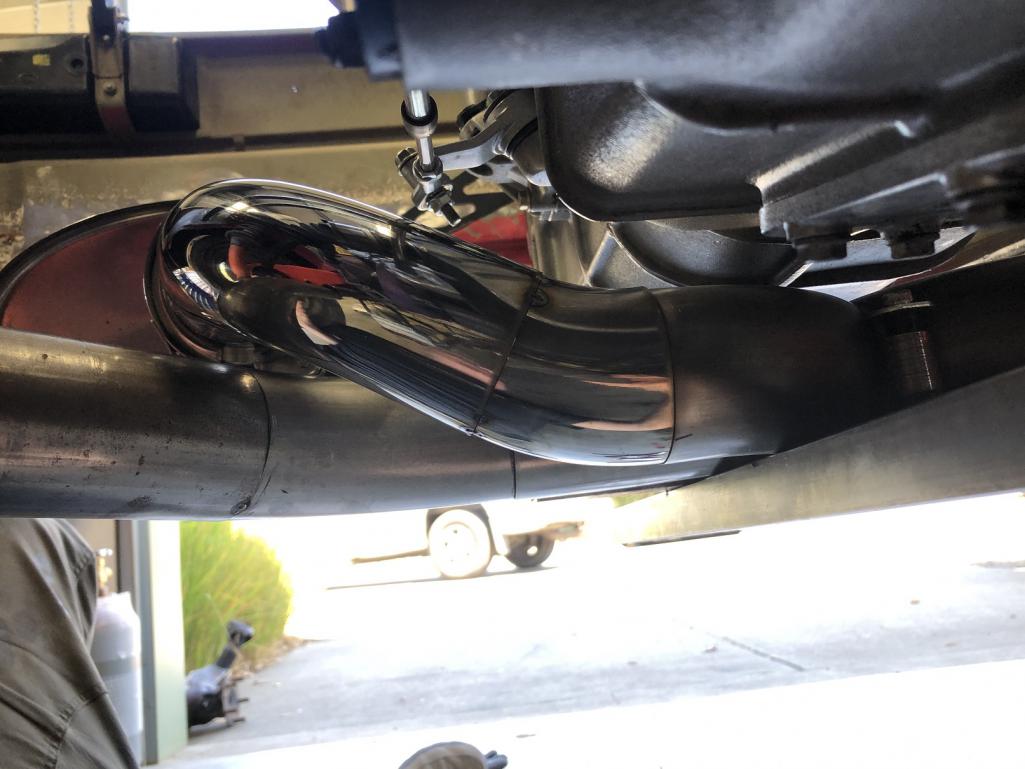
Posted by: tazz9924 Aug 11 2024, 07:29 AM
Some details of what it's taking to make this exhaust. The fixture table earns its keep in this episode!
https://www.youtube.com/watch?v=YvXQ0mzQBBM
Get yourself a gas lense for that stainless exhaust work! I use a 12 or a 14 cup on stainless, It keeps your welds from getting hot, reduces warping and makes it all look better. Plus ill do anything to avoid the look of burned stainless
Posted by: tygaboy Aug 13 2024, 10:09 PM
The X-pipe's connected to the mufflers. Unfortunately, this isn't the way it'll look when everything's in there. The tubes from the headers to the rear of the X-pipe will block part of this view. But you'll know it's there!
Attached thumbnail(s)
Posted by: rick 918-S Aug 14 2024, 04:57 AM
Nice Headers
Posted by: 930cabman Aug 14 2024, 04:59 AM
Headers are art!
Ferrari headers are always art
Posted by: tygaboy Aug 14 2024, 05:19 PM
The 914 Ferrari now has a crossover exhaust. It turned out great and I couldn't resist a few arsty fartsy shots.
Attached thumbnail(s)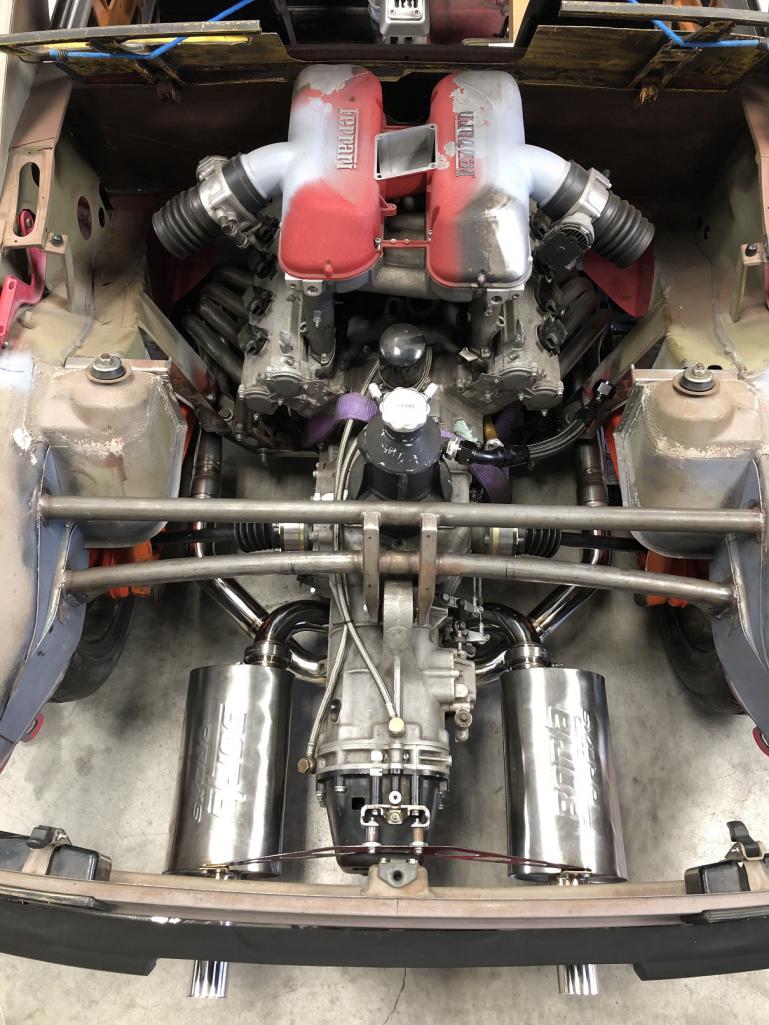
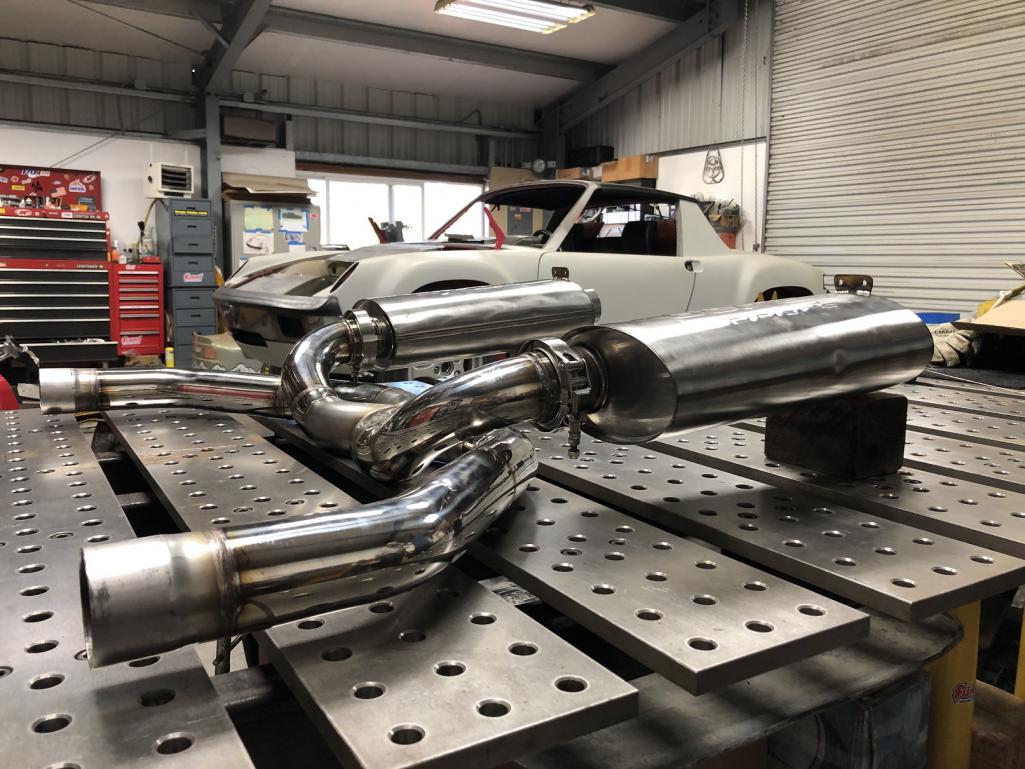
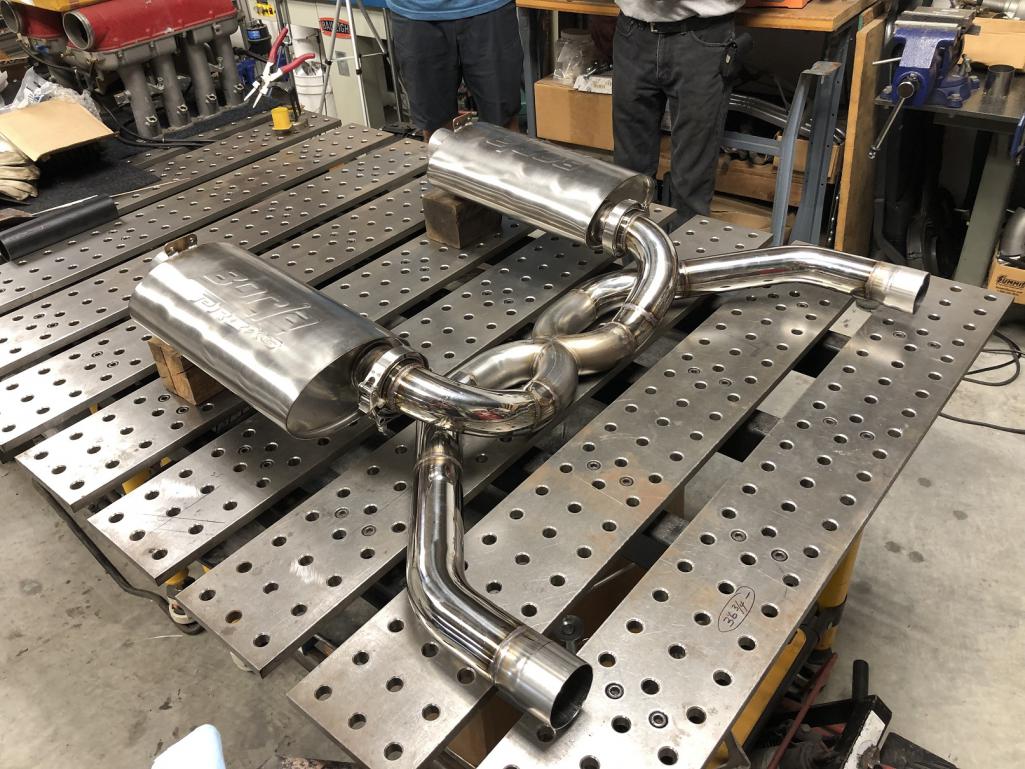
Posted by: flxzcat Aug 14 2024, 05:30 PM
Chris,
I know you are into the front end pretty deep, but you like doing things a couple of times so, I'll throw this idea out there.
Based on my Indy, IMSA, F1 and vintage racing fabricator experience I would tilt the radiator another 20-30 degrees forward and add diffuser surfaces to the top and bottom of the actual inlet area of the radiator that run all the way to the front sheet metal opening(s). This would improve and smooth the airflow to the radiator dramatically.
For air exit, I don't like the often-used holes in the wheel wells concept (though they are indiscrete). The aero is way too messy. So, I would also suggest tilting the trailing edge of the hood up 2 or 3 inches so that most of the air exits into the low-pressure area at the base of the windshield. Plus, hey, when your idling, hot air rises, right? Some of that hot air will also exit the sides. And some may sneak back in through the sides even at speed, but not much.
This also provides a unique (though pretty subtle) look to the front end.
Just my .02 worth.
Cheers, Paul VDL
Posted by: Shivers Aug 14 2024, 06:32 PM
Damn that is fine.
Posted by: bkrantz Aug 14 2024, 07:01 PM
Sweet
Posted by: Krieger Aug 14 2024, 09:25 PM
Dang, that is really tidy! Good work!
Posted by: napasteve Aug 14 2024, 09:41 PM
Wow. Artsy and fartsy. I can’t wait for the startup.
Posted by: Cairo94507 Aug 15 2024, 05:45 AM
Chris just keeps raising the bar; that looks beautiful Chris.
Posted by: technicalninja Aug 15 2024, 07:53 AM
Looks beautiful.
How does it SOUND?
We want the howl...
Posted by: cali914 Aug 15 2024, 08:34 AM
That is Ferrari worthy
Posted by: Dave_Darling Aug 15 2024, 01:46 PM
I thought that the base of the windshield was a high-pressure area? That's why the ventilation is there, and why "cowl induction" was a thing, right?
--DD
Posted by: JmuRiz Aug 15 2024, 02:59 PM
I thought that the base of the windshield was a high-pressure area? That's why the ventilation is there, and why "cowl induction" was a thing, right?
--DD
Posted by: flxzcat Aug 16 2024, 01:39 PM
My experience is that lifting the rear of the hood creates a low pressure area which pulls air out from underhood
Furthermore, A major difference is that the Porsche trunk is an enclosed box as apposed to a typical front engine car where the engine bay is open at the bottom for air extraction.
In any case, my experience racing Alfa GTA's back in the day is that they ran cooler with the hood kicked up 3 or 4 inches. Back then, we didn't run use radiator fans in order to gain free HP. The way I initially discovered this solution is that I forgot to latch my hood and noticed at speed that it remained open and fluctuated between 3 and 5 inches depending on the speed. I went to Pep Boys and got some hood pins. I liked the solution because I didn't have to cut up my aluminum hood.
Posted by: tygaboy Aug 17 2024, 07:44 AM
And here's how it got to where it is:
https://www.youtube.com/watch?v=iB_uIg8h_cw
Posted by: Cairo94507 Aug 19 2024, 07:52 AM
Just an amazing level of detail and fitment. I am really looking forward to you getting that engine fired. Great work Chris and Martin.
Posted by: tygaboy Aug 19 2024, 08:27 AM
Time to focus on firing the engine. So... the boring, technical stuff is about to start: Electronics and wiring!
I actually really enjoy this stuff. So I just ordered the Haltech ECU (Nexus R5) and power management unit, flying lead harnesses, new throttle bodies, DBW pedal, etc, etc.
I also have to service the engine. This means timing belts and a whole range of seals and gaskets. Should be... interesting! Sure. Let's go with that.
Attached image(s)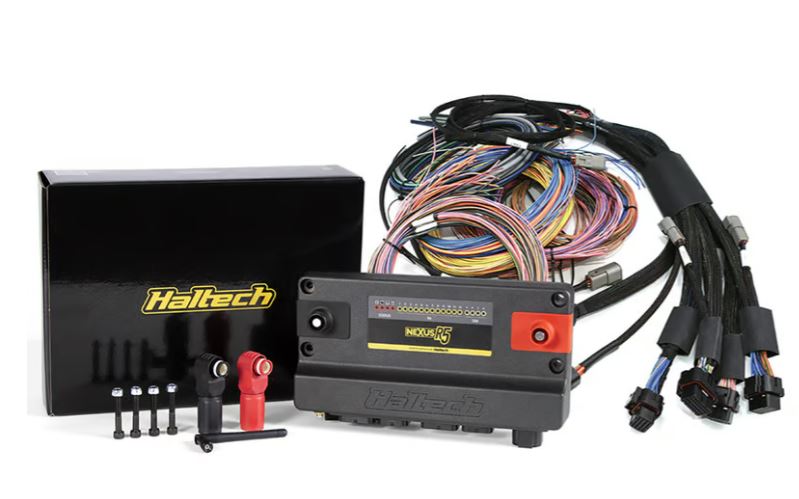
Posted by: Shivers Aug 19 2024, 08:39 AM
Time to focus on firing then engine. So... the boring, technical stuff is about to start: Electronics and wiring!
I actually really enjoy this stuff. So I just ordered the Haltech ECU (Nexus R5) and power management unit, flying lead harnesses, new throttle bodies, DBW pedal, etc, etc.
I also have to service the engine. This means timing belts and a whole range of seals and gaskets. Should be... interesting! Sure. Let's go with that.
I watched you do yours, I have faith. That was some of the nicest electrical work I have seen.
Posted by: rick 918-S Aug 19 2024, 09:01 AM
Careful not to let out the magic smoke.
Posted by: East coaster Aug 19 2024, 09:12 AM
First firing will be epic!
Posted by: tygaboy Aug 24 2024, 08:06 AM
While waiting for the electronics to arrive, I may as well get started on the updated transaxle mount. Plus, we check in on the kitties!
https://www.youtube.com/watch?v=jUbxvDGpplA
Posted by: tazz9924 Aug 24 2024, 01:26 PM
Time to focus on firing the engine. So... the boring, technical stuff is about to start: Electronics and wiring!
I actually really enjoy this stuff. So I just ordered the Haltech ECU (Nexus R5) and power management unit, flying lead harnesses, new throttle bodies, DBW pedal, etc, etc.
I also have to service the engine. This means timing belts and a whole range of seals and gaskets. Should be... interesting! Sure. Let's go with that.
Haltech doesn’t disappoint!
Posted by: Cairo94507 Aug 25 2024, 07:46 AM
Nice to see the kids growing up too.
Posted by: tygaboy Aug 31 2024, 08:12 AM
The saga continues with me wasting time building stuff I end up not using.
Who thinks this thing will make its debut at Monterey Car Week 2025? Yes, that's the target. You're free to stop in At The Red Barn and help me or simply send a non-tax deductable donation!
https://www.youtube.com/watch?v=-s8Xfhzu9Xw
Posted by: davep Aug 31 2024, 10:51 AM
I have to say that I continue to be impressed with the engineering. Yeah, quite a few do-overs, but that is a big part of the evolution of a system. Elegance is an objective since it tends to simplify things and make it stronger.
Dave
Posted by: bkrantz Aug 31 2024, 09:09 PM
The saga continues with me wasting time building stuff I end up not using.
Who thinks this thing will make its debut at Monterey Car Week 2025? Yes, that's the target. You're free to stop in At The Red Barn and help me or simply send a non-tax deductable donation!
How about useless suggestions and snide comments on 914World?
Posted by: Cairo94507 Sep 1 2024, 07:09 AM
I continue to be impressed with Chris' ability to build this stuff; he is an excellent teacher. My brother and I definitely need to take a ride to The Red Barn real soon just so I can lay under that car and check all of this stuff out in person to appreciate the top-shelf quality of the work.
Posted by: tygaboy Sep 1 2024, 08:10 AM
The saga continues with me wasting time building stuff I end up not using.
Who thinks this thing will make its debut at Monterey Car Week 2025? Yes, that's the target. You're free to stop in At The Red Barn and help me or simply send a non-tax deductable donation!
How about useless suggestions and snide comments on 914World?
@http://www.914world.com/bbs2/index.php?showuser=23343 - And yours is first! Well, first that's aware of its uselessness, anyway.
And yes, I'll take them! As P.T. Barnum said, "There's no such thing as bad publicity."
Posted by: tygaboy Sep 1 2024, 08:12 AM
I continue to be impressed with Chris' ability to build this stuff; he is an excellent teacher. My brother and I definitely need to take a ride to The Red Barn real soon just so I can lay under that car and check all of this stuff out in person to appreciate the top-shelf quality of the work.
@http://www.914world.com/bbs2/index.php?showuser=9712 - Hi Michael. Thanks for the kind words. Please do swing by. It's always good to see you and Bob and I really need to see your /6 in its latest form!
Posted by: Cairo94507 Sep 1 2024, 03:27 PM
I continue to be impressed with Chris' ability to build this stuff; he is an excellent teacher. My brother and I definitely need to take a ride to The Red Barn real soon just so I can lay under that car and check all of this stuff out in person to appreciate the top-shelf quality of the work.
@http://www.914world.com/bbs2/index.php?showuser=9712 - Hi Michael. Thanks for the kind words. Please do swing by. It's always good to see you and Bob and I really need to see your /6 in its latest form!
Chris- Sounds like a plan as soon as we can get clear of the construction for a day we will cruise on over. Cheers.
Posted by: tygaboy Sep 3 2024, 03:25 PM
Let the games begin!
This is my first exposure to Haltech and I have to say, it's REAALLLLY nice. Well packaged and lovely in every way. And little things like they include another main faceplate sticker so no matter the mounting orientation, the info on the units is correctly oriented.
If you need me, I'll be At The Red Barn, working to get this bad boy fired!
Wish me luck! Better yet, come over and help!
Attached thumbnail(s)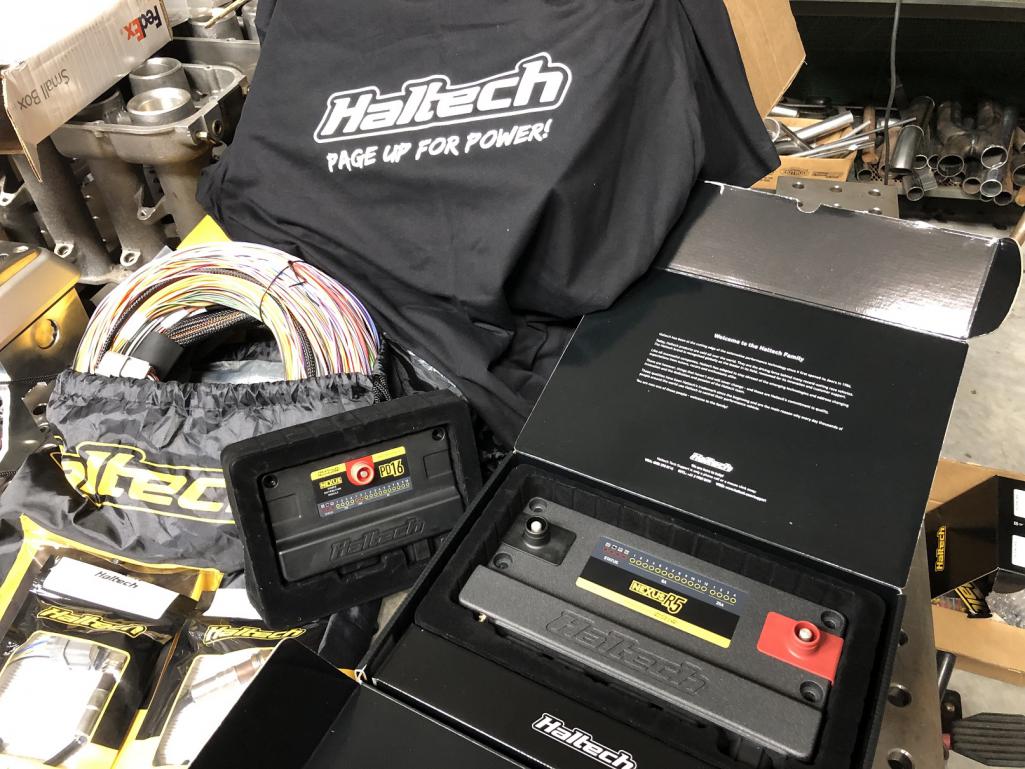
Posted by: jd74914 Sep 4 2024, 12:59 PM
Fancy stuff!! The R5 is pretty cool. Particularly in having the controller onboard to use the NTK O2 sensors and the onboard Wifi.
Posted by: tygaboy Sep 7 2024, 12:36 PM
The focus shifts to getting the various systems installed so I can get this thing running.
https://www.youtube.com/watch?v=Ht4hYmM4FII
Posted by: tygaboy Sep 12 2024, 04:28 PM
Getting ready to service the engine and I couldn't resist setting up the entire exhaust for some glamour shots. I couldn't be happier with how this turned out. I wish there was a way to see this whole thing when it's in the car.
Attached thumbnail(s)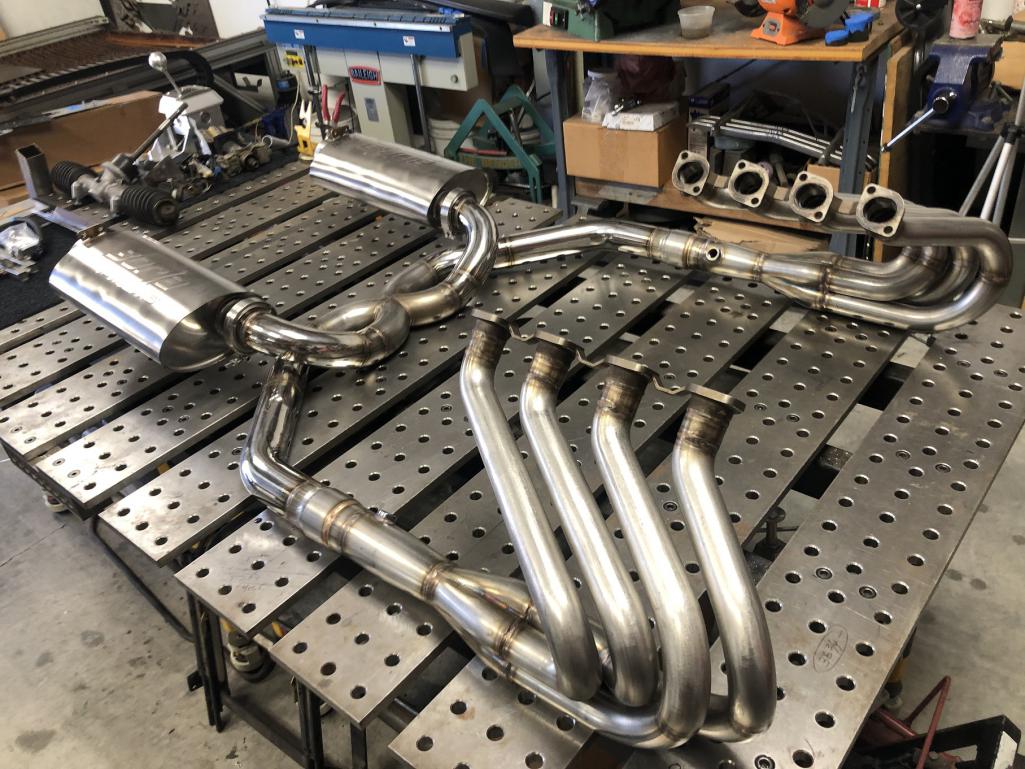
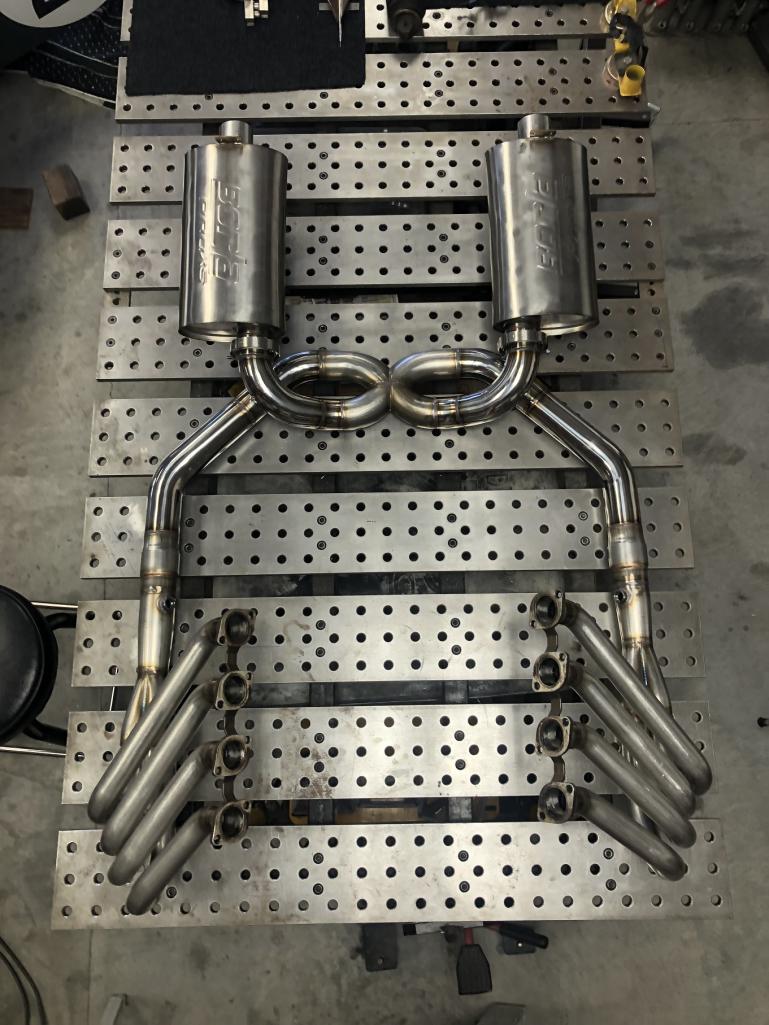
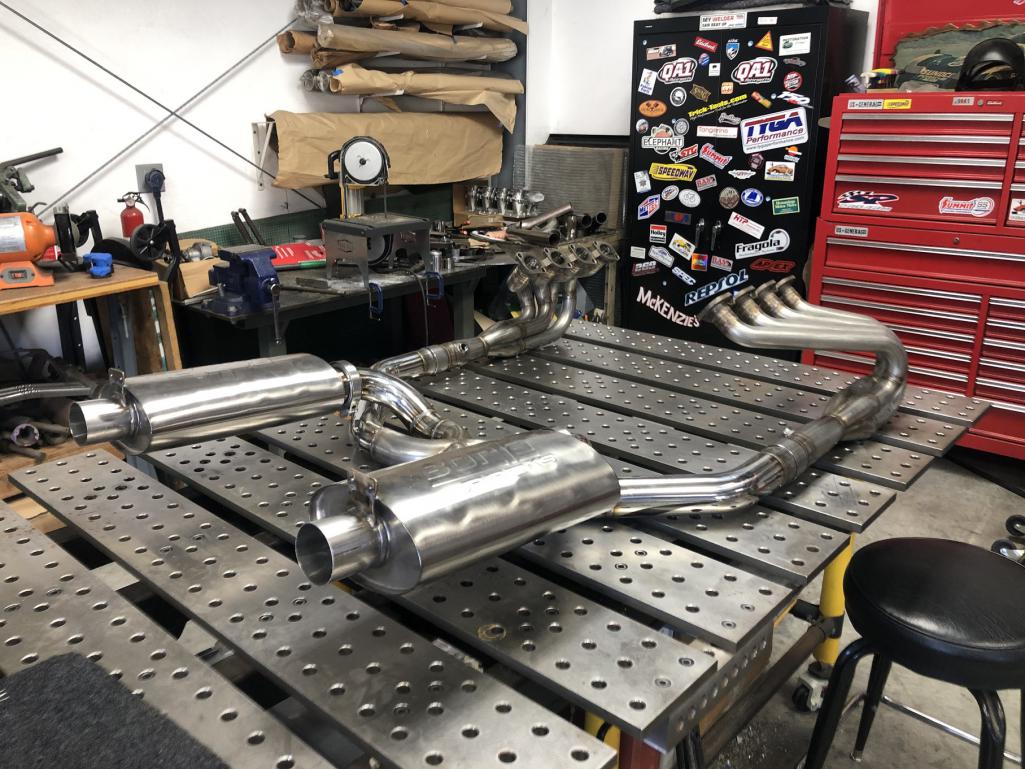
Posted by: rktmn247 Sep 13 2024, 12:03 AM
Those look great! Nice work!
Posted by: live free & drive Sep 13 2024, 08:44 AM
Send that beautiful exhaust to your local passivator for treatment
Posted by: Van914 Sep 16 2024, 06:58 PM
The focus shifts to getting the various systems installed so I can get this thing running.
https://www.youtube.com/watch?v=Ht4hYmM4FII
Have you seen this build? Sam Albert Rally on YouTube? He put a Ferrari motor in his Subaru Rally Car. There are videos where hi figured out the electronics to get it running.
I hope your car sounds as good. I enjoy watching your progress.
Van
Posted by: ClayPerrine Sep 17 2024, 10:05 AM
Nice work. The exhaust is a true work of art.
You are going to need a disconnect between the engine wiring and the chassis, unless you want to disconnect every connection on the engine before removing it for service.
I am using a 47 pin connector from Maven Performance. It is really nice and makes for a tidy way to disconnect the engine wiring.
https://mavenspeed.com/collections/b2t-engineering/products/single-connector-bulkhead-s24
Posted by: tygaboy Sep 17 2024, 05:27 PM
Nice work. The exhaust is a true work of art.
You are going to need a disconnect between the engine wiring and the chassis, unless you want to disconnect every connection on the engine before removing it for service.
I am using a 47 pin connector from Maven Performance. It is really nice and makes for a tidy way to disconnect the engine wiring.
https://mavenspeed.com/collections/b2t-engineering/products/single-connector-bulkhead-s24
@http://www.914world.com/bbs2/index.php?showuser=1143 Hi Clay - Yep, I used the same sort of approach on my LS build. This time, I'll probably go with multiple connectors. The ECU I'm running has built in power management capabilities so I need to pass a couple 20 amp circuits through one of the connectors.
Attached thumbnail(s)
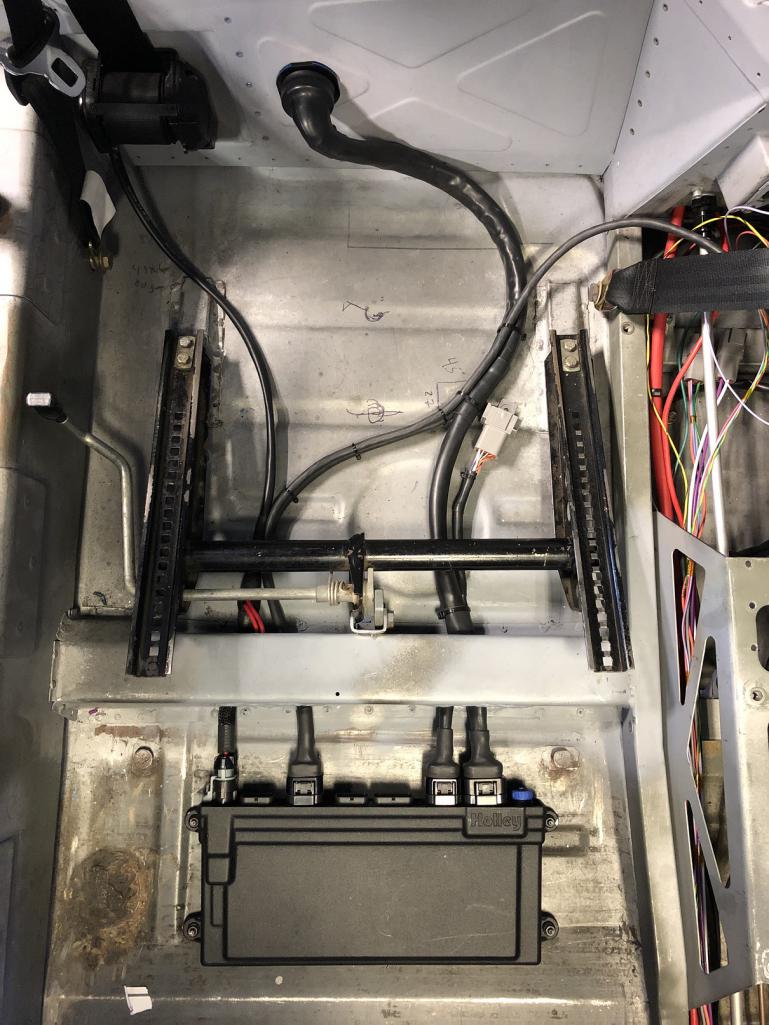
Posted by: mgp4591 Sep 17 2024, 06:09 PM
That exhaust system is just too damn sexy!
Posted by: jd74914 Sep 19 2024, 06:39 AM
Send that beautiful exhaust to your local passivator for treatment
Agree! Keep it looking that great forever. Passivation is usually pretty inexpensive. The best shops do food processing or aerospace work.
Posted by: tygaboy Sep 21 2024, 06:53 AM
Another week gone, a bit more progress. And stuff is about to get real as I prep to start the wiring.
https://www.youtube.com/watch?v=8hRrtnn3iDg
Posted by: Cairo94507 Sep 21 2024, 07:41 AM
It seems like the videos are only 2 minutes long; I really enjoy watching the process. Great work Chris.
Posted by: burton73 Sep 21 2024, 08:22 AM
Your skillset is amazing Chris, you amaze me over and over. Thank you for taking the time showing us your art. You are building a most incredible 914.
Best Bob B
Posted by: nivekdodge Sep 22 2024, 07:13 PM
https://www.google.com/aclk?sa=l&ai=DChcSEwj538SL8deIAxXpbUcBHUQlKlEYABAbGgJxdQ&co=1&sph=&sig=AOD64_3fMN8c4Lf-3j_ud_tbJb3XTgU6RQ&ctype=5&q=&ved=2ahUKEwjtmb-L8deIAxWpE1kFHd42Ni8Qwg8oAHoECAYQCQ&adurl=
Youlll wonder how you got along
Posted by: tygaboy Sep 22 2024, 07:39 PM
https://www.google.com/aclk?sa=l&ai=DChcSEwj538SL8deIAxXpbUcBHUQlKlEYABAbGgJxdQ&co=1&sph=&sig=AOD64_3fMN8c4Lf-3j_ud_tbJb3XTgU6RQ&ctype=5&q=&ved=2ahUKEwjtmb-L8deIAxWpE1kFHd42Ni8Qwg8oAHoECAYQCQ&adurl=
Youlll wonder how you got along
@http://www.914world.com/bbs2/index.php?showuser=25860 - That does look nice, what with the adjustable arm. I have a growing list of tools and machines I'm looking at so this sort of thing will be taking a back seat for a while. But thanks for the heads up!
Posted by: live free & drive Sep 23 2024, 06:08 PM
https://www.amazon.com/Makita-9032-4-4-Amp-8-Inch-Variable/dp/B0000614UT/ref=asc_df_B0000614UT?tag=bingshoppinga-20&linkCode=df0&hvadid=80745440604906&hvnetw=o&hvqmt=e&hvbmt=be&hvdev=c&hvlocint=&hvlocphy=&hvtargid=pla-4584345016420261&psc=1
Better tool and a really good price here.
I have one of the milwaukee grinders and it shuts down in overheat mode is you even think about bearing down; then its 3-5 minutes to wait for it to cool - rinse and repeat until you fling it across the room. You could cut a car in half with the Makita in one go.
Posted by: nivekdodge Sep 26 2024, 08:18 PM
https://www.amazon.com/Makita-9032-4-4-Amp-8-Inch-Variable/dp/B0000614UT/ref=asc_df_B0000614UT?tag=bingshoppinga-20&linkCode=df0&hvadid=80745440604906&hvnetw=o&hvqmt=e&hvbmt=be&hvdev=c&hvlocint=&hvlocphy=&hvtargid=pla-4584345016420261&psc=1
Better tool and a really good price here.
I have one of the milwaukee grinders and it shuts down in overheat mode is you even think about bearing down; then its 3-5 minutes to wait for it to cool - rinse and repeat until you fling it across the room. You could cut a car in half with the Makita in one go.
My meaning was more of the tool concept than make or model. I have a air powered 3M and even taking spot weld out it's unbelievable
Kevin
Posted by: tygaboy Sep 28 2024, 03:31 PM
Systems going in.
https://www.youtube.com/watch?v=J_l3cs4VCsU
Posted by: East coaster Sep 29 2024, 07:42 AM
Cool stuff!
Posted by: Cairo94507 Sep 29 2024, 08:26 AM
I look forward to the weekend videos with my coffee. Outstanding craftsmanship Chris.
Posted by: Shivers Sep 29 2024, 10:08 AM
I especially enjoyed the water pump delete plate. I always wondered who to talk to about
this, did a screen shot of their info while watching the video . My last experience with a machinist was
far from stellar. The “trough” was pretty cool too.
Posted by: technicalninja Sep 29 2024, 10:28 AM
I look forward to the weekend videos with my coffee. Outstanding craftsmanship Chris.
When I watch wrenching videos, I never watch the whole thing.
Most folks talk too much, waste time...
Chris's vids are the EXCEPTION!
I watch the whole thing!
What is REALLY weird is that a 20-minute vid seems to only take 5 minutes.
By the time he says "wrap up" I'm disappointed.
How could that have been 20 minutes?
Felt like 5...
WANT MORE!!!!!
Nice work, nice videos!
Posted by: tygaboy Oct 5 2024, 07:20 AM
This week was a bit of a challenge with much of my time spent trying to get the Mini finished, so not much to see in this episode. But hey, they can't all be Oscar-worthy!
https://www.youtube.com/watch?v=UkrjI5XdKlc
Posted by: TheRuttmeister Oct 5 2024, 02:01 PM
No bonus video with the work on the mini?!
Inspiring work as usual!
Posted by: Cairo94507 Oct 6 2024, 12:08 PM
Maybe Chris is dropping a 3.6 in the Mini....
Posted by: tygaboy Oct 6 2024, 12:33 PM
@http://www.914world.com/bbs2/index.php?showuser=9712 @http://www.914world.com/bbs2/index.php?showuser=27680 Cool as the Mini is, let me just say: SPOILER ALERT! Because once the Mini is gone, a VERY special car will be arriving At The Red Barn for some minor fab work. I plan to cover it in its own episode (assuming the owner is OK with that) but for now, I'll leave you with this teaser shot.
Details to follow...
Attached thumbnail(s)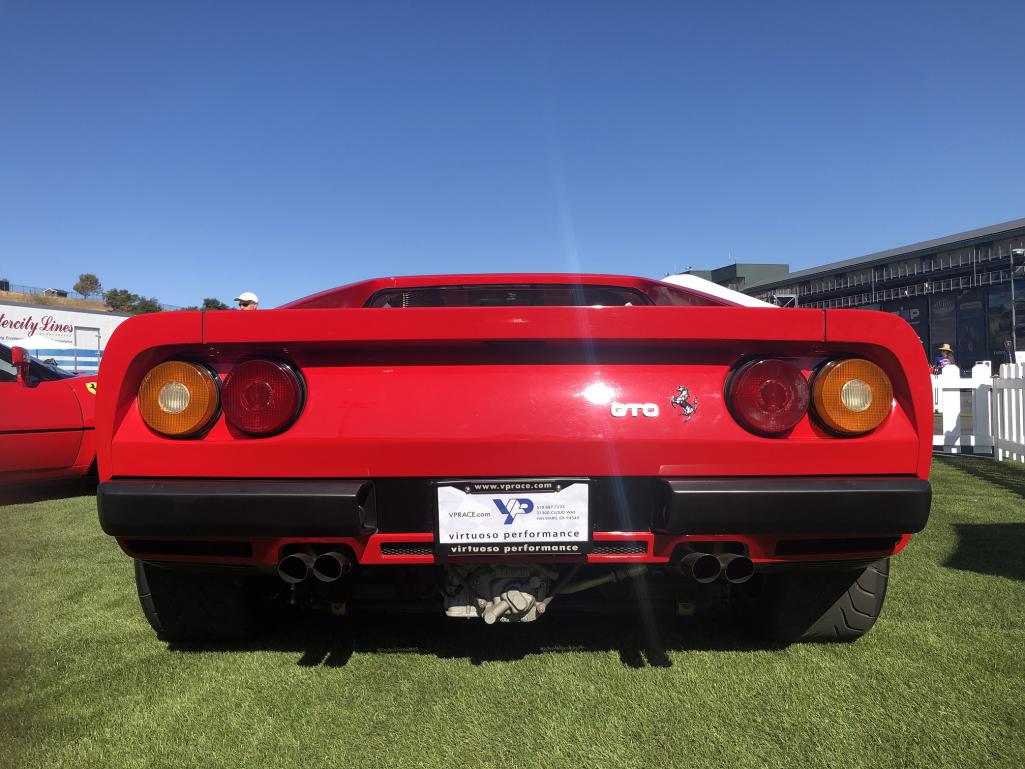
Posted by: SirAndy Oct 6 2024, 12:44 PM
Now if you really want to piss off some people, you get 3 x 2.0L T4 engines, weld them together at the crank and upgrade that thing to a flat 12 6.0L.
I would personally donate money/time to see that come to life.
Posted by: willieg Oct 6 2024, 01:15 PM
OT: Following up on @http://www.914world.com/bbs2/index.php?showuser=179 ’s thread, if you want to see some wild and crazy Frankenstein engines, go to YouTube and type in “Allen Millyard Kawasaki”. Incredible engineering and machinery using a hacksaw. You have to see it to believe it.
Posted by: JmuRiz Oct 6 2024, 02:38 PM
Made me think of Millyard too
I want to send my two 90cc Ducati 2-stokes and have him make me a 180cc v-twin
Posted by: napasteve Oct 6 2024, 05:20 PM
LS in a GTO??? WHAAAAAAT??? OMG??? OMG!!!
Posted by: nivekdodge Oct 6 2024, 06:38 PM
350 Facebook t shirt ads, and I missed Chris'??????
Kevin
Posted by: tygaboy Oct 7 2024, 05:48 PM
The first of the goodies from SendCutSend are here. @http://www.914world.com/bbs2/index.php?showuser=24781 They're real and they're spectacular!
The lower piece is .5" plate, upper is .125", annodized, with threaded inserts. $81.60 with tax and shipping. As you'll hear in this weekend's video: "5 Stars for SendCutSend!"
Martin welded on the 1.25" hose end so next it's flycut the rear face to ensure its flat after welding then cut the groove for the O-ring that seals between this plate and the block.
I'm going to countersink all the bolt holes and run socket-head allens, too. Style points, baby!
Attached thumbnail(s)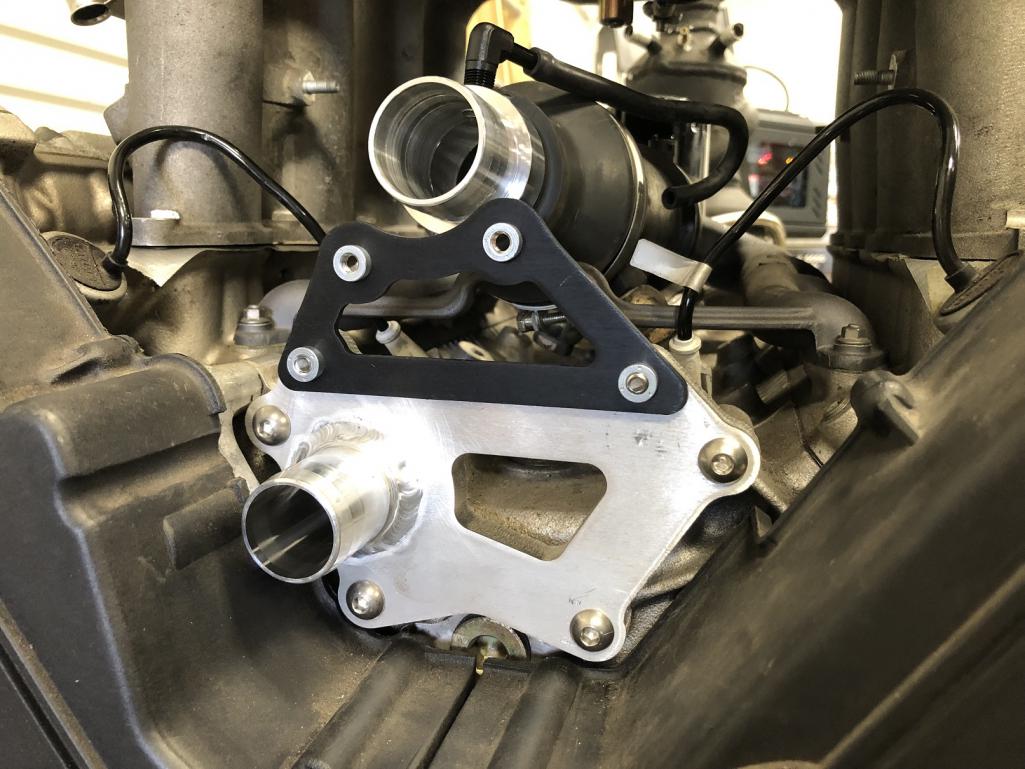
Posted by: Shivers Oct 7 2024, 06:44 PM
@http://www.914world.com/bbs2/index.php?showuser=19241
Yeah, those came out real nice.
Posted by: FL000 Oct 8 2024, 07:27 PM
I’m going to be using SendCutSend soon to make new brackets for my alternator and a/c compressor. Did you have to learn new software or were you able to use the same used for your plasma table?
Posted by: tygaboy Oct 8 2024, 09:07 PM
I’m going to be using SendCutSend soon to make new brackets for my alternator and a/c compressor. Did you have to learn new software or were you able to use the same used for your plasma table?
@http://www.914world.com/bbs2/index.php?showuser=14076 Josh - I used the same software (QCAD). All you need to do is upload a dxf, step or eps file. Then select the material and any other stuff you want done and you get an instant quote. It's pretty awesome.
Posted by: jd74914 Oct 10 2024, 06:03 AM
SendCutSend is awesome all around. And those parts look great!
Pro-tip: If you ever need cool engraved dash, switch, etc. panels https://www.frontpanelexpress.com/ is possibly even more awesome. We use them for all kinds of cool stuff [that I can't show unfortunately] at work.
Posted by: tygaboy Oct 12 2024, 08:57 AM
Check out the cool SendCutSend goodies, along with some other build progress:
https://www.youtube.com/watch?v=CAEUbqu0xMY
Posted by: technicalninja Oct 12 2024, 12:03 PM
I have a suggestion for your belt drive.
Don't overlook the availability of a "SF" belt for the alternator.
That pully looked like a non-adjustable idler.
Many new cars have changed to "stretch to fit" belts thus eliminating the spring-loaded tensioner.
They can be a PIA to install!
They ARE reliable...
I'd expect 100K service, even on a high RPM set up.
You would have to experiment on sizing but if you could find the right length, the belt drive could be finished without much fabrication.
2001-20011 V8 GM trucks/SUVs had a horrible AC belt tensioner (multiple TSBs regarding resonance). I used to modify originals to make them into a manually adjustable tensioner. Took about an hour, 7/16-wheel stud, and some friction washers.
Making them "fixed" solved ALL of the resonance issues.
GM used SF belts in the late model trucks, they fit the early trucks FINE!
I haven't modded a stock tensioner since!
I just chuck them in the trash now.
So much easier...
Posted by: tygaboy Oct 12 2024, 06:08 PM
I have a suggestion for your belt drive.
Don't overlook the availability of a "SF" belt for the alternator.
That pully looked like a non-adjustable idler.
@http://www.914world.com/bbs2/index.php?showuser=27135 - Rick - That's an adjustable idler. In fact, like the cam belts, to adjust it, I have to download an app from Gates that measures the frequency when one "plucks" the belts to get it tuned properly. An approach that's both "Cool!" and "Are you serious?" at the same time. The factory belt runs the alternator and the water pump, which I'm deleting, so I'll have to measure up and order a custom length belt. Well of course I will...
Posted by: technicalninja Oct 12 2024, 07:10 PM
That looked like a fixed idler, sorry!
On a serp the "safe" way is to be able to twist the belt 90 degrees with hand strength alone on its largest span between two pullies.
As you are only driving an alternator and both the alternator and the crank pully have a large amount of contact with the belt you can go lower tension.
Remarkably loose will probably work fine.
I'd cheat it to the loose side of things. Too loose means you get to re-adjust the belt, too tight means you get to replace the alternator or its bearings...
No way would I trust an audible check for belt tightness.
As for timing belts I have adjusted by ear before...
Some Chryslers (2.2L and variants) had a big access plug for the tensioner. You could remove it and place the adjuster tool on the tensioner. Get it running (without the serp belts on it) and loosen lock bolt. Tighten tension until belt noise was evident and back off till it disappeared.
Only way to do those IMO!
They were non-interference engines, so a screw up was not catastrophic.
As a serp starts getting loose, you WILL hear it chirp/squeal on start-up first.
Posted by: Spoke Oct 13 2024, 07:48 AM
@http://www.914world.com/bbs2/index.php?showuser=9712 @http://www.914world.com/bbs2/index.php?showuser=27680 Cool as the Mini is, let me just say: SPOILER ALERT! Because once the Mini is gone, a VERY special car will be arriving At The Red Barn for some minor fab work. I plan to cover it in its own episode (assuming the owner is OK with that) but for now, I'll leave you with this teaser shot.
Details to follow...
@http://www.914world.com/bbs2/index.php?showuser=19241
Your car looks fantastic. Great work.
I made some LED boards a while back for a guy with a 348. He may have done some customizing of the fixture on his car.
Attached thumbnail(s)
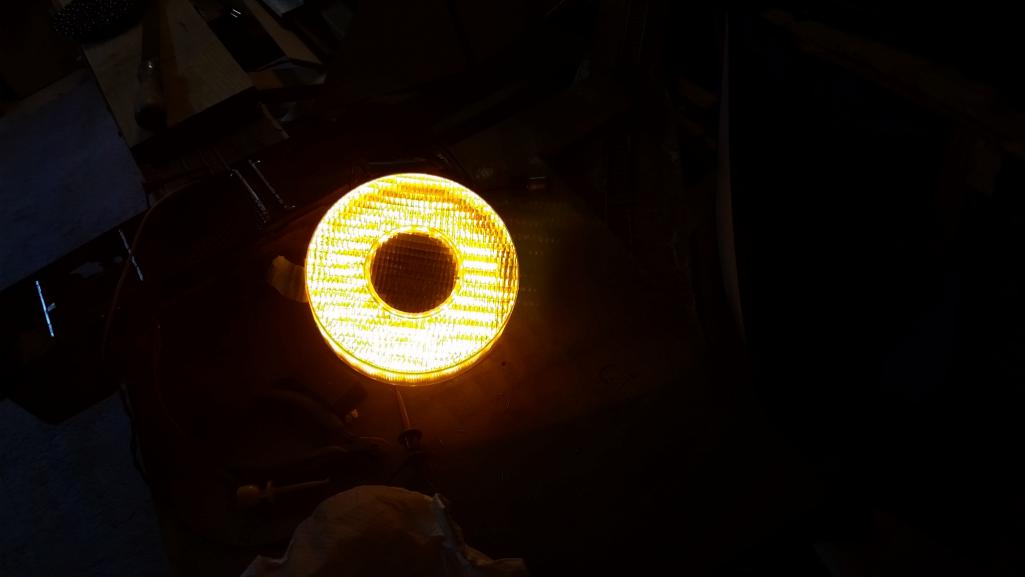
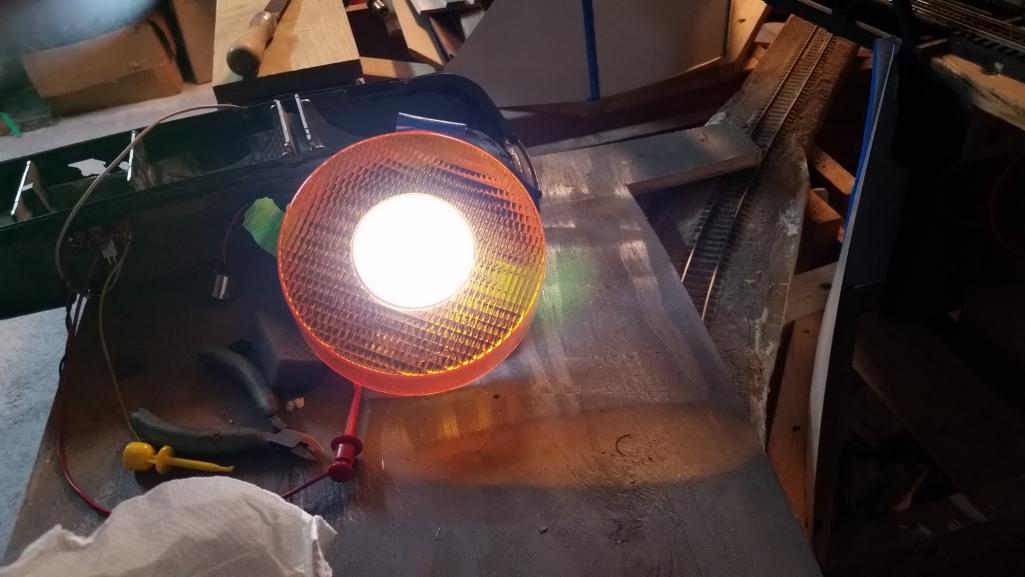
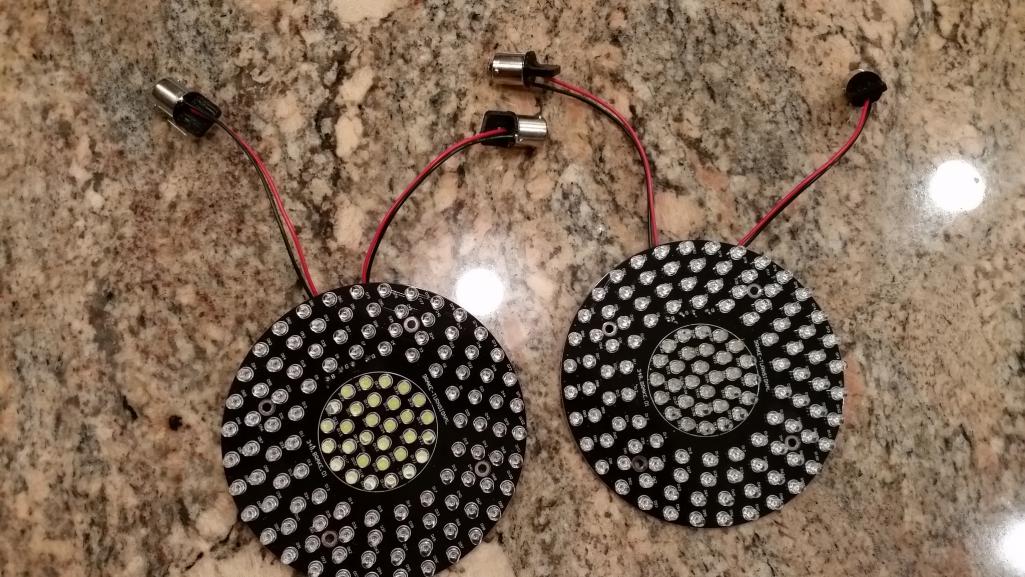
Attached image(s)
Posted by: Shivers Oct 13 2024, 11:47 AM
Never fails, I usually see some cool or unusual tool while
watching your video. And you did not disappoint.
Making up the fuel lines you went off to the vise and there was
a wonderful tool. Those vise jaws for the line fittings, had me forward
and reversing the video to get the perfect pause to study it. If there
is a tool God, one of those please
@http://www.914world.com/bbs2/index.php?showuser=19241
Posted by: tygaboy Oct 19 2024, 07:46 AM
A few steps closer, a lot more to do, including working on my Italian accent!
https://www.youtube.com/watch?v=YUSc_NPLsss
Posted by: Cairo94507 Oct 20 2024, 07:08 AM
I really look forward to and enjoy watching Chris at work; he makes this stuff look pretty easy. (I know it is not.)
Posted by: rick 918-S Oct 20 2024, 10:06 AM
Wish I had all the tool resources. I an doing the work of a machinist with cheap harbor freight router and a 20 year old worn out Chinese drill press.
Posted by: bkrantz Oct 20 2024, 06:44 PM
Wish I had all the tool resources. I an doing the work of a machinist with cheap harbor freight router and a 20 year old worn out Chinese drill press.
Just think, the guys that built rifles and watches 200 years ago did it all with hand files.
Posted by: tygaboy Oct 26 2024, 09:12 AM
Making some progress. Sure seems like slow going, and it all takes longer than I think, but we're getting there.
https://www.youtube.com/watch?v=So6EFr20Uak
Posted by: Cairo94507 Oct 27 2024, 06:05 AM
Outstanding!
Posted by: East coaster Oct 27 2024, 06:50 AM
All the little details make or break a build like this…..and you’re nailing’ it!
Posted by: tygaboy Oct 27 2024, 09:55 AM
This weekend's progress slowed due to helping out at the 000 Magazine "Turbo 50" event at Summit Skywalker Ranch. Celebrating 50 years of the boosted 911. @http://www.914world.com/bbs2/index.php?showuser=2058 Pete and the 000 crew did a spectacular job!
If you have the opportunity to attend anything 000, don't miss it. This was a simply incredible display of cars, milling about with super cool people and enjoying wonderful food and drink. My wife LOVED it and she's not much of a car person!
I got some video so watch for that but for now, just a few pics. And remember, these were all pics taken by me during set up. Larry Chen was there doing his usual incredible job so you'll find actual "photographs" of the event if you check Insta and other 000 Magazine social media channels.
Attached thumbnail(s)
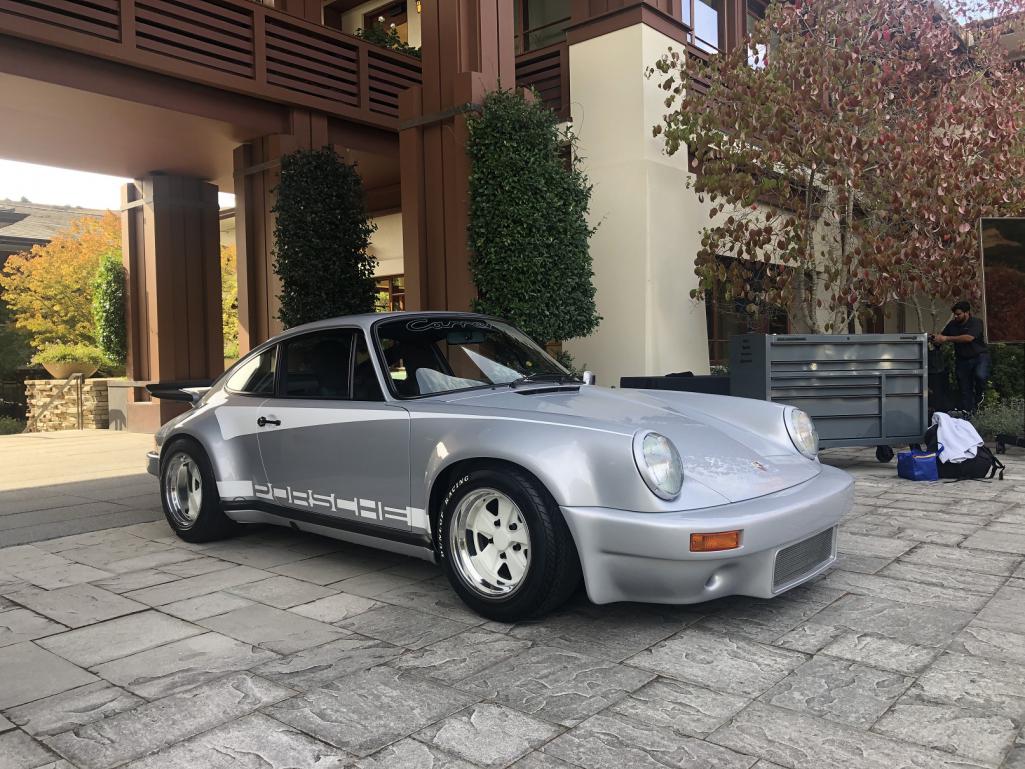
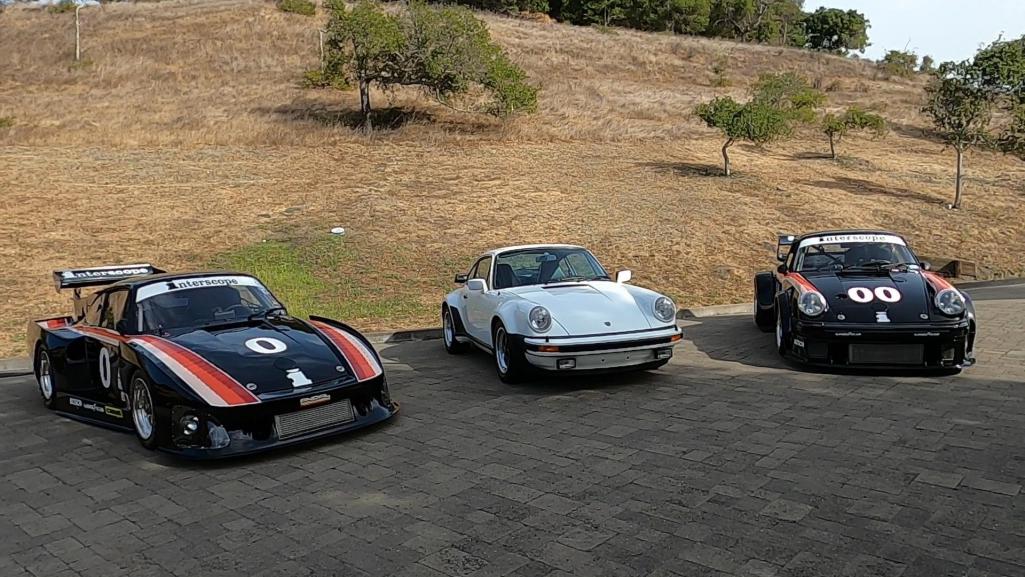
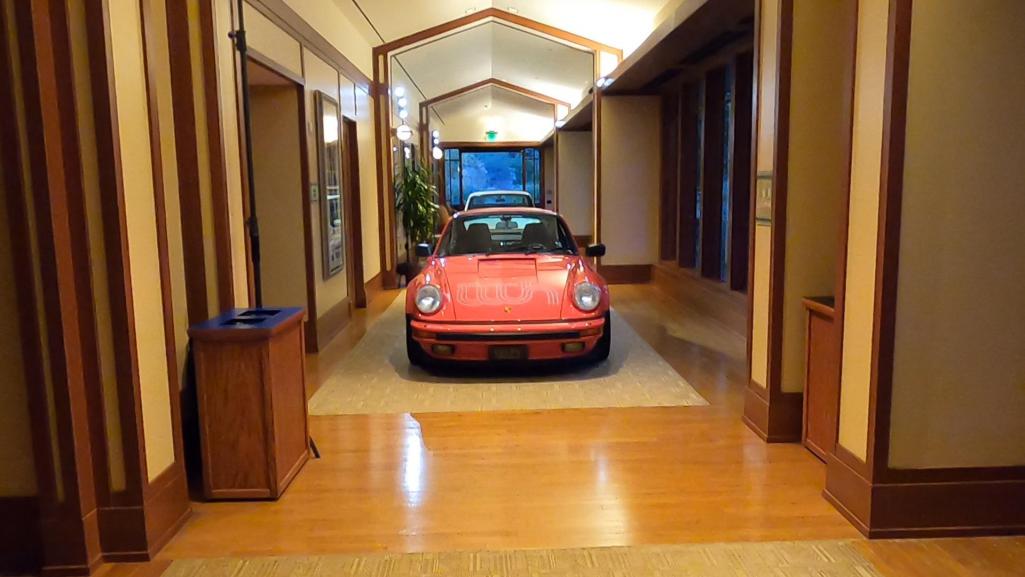
Posted by: tygaboy Oct 27 2024, 10:13 AM
A few more from the event.
Attached thumbnail(s)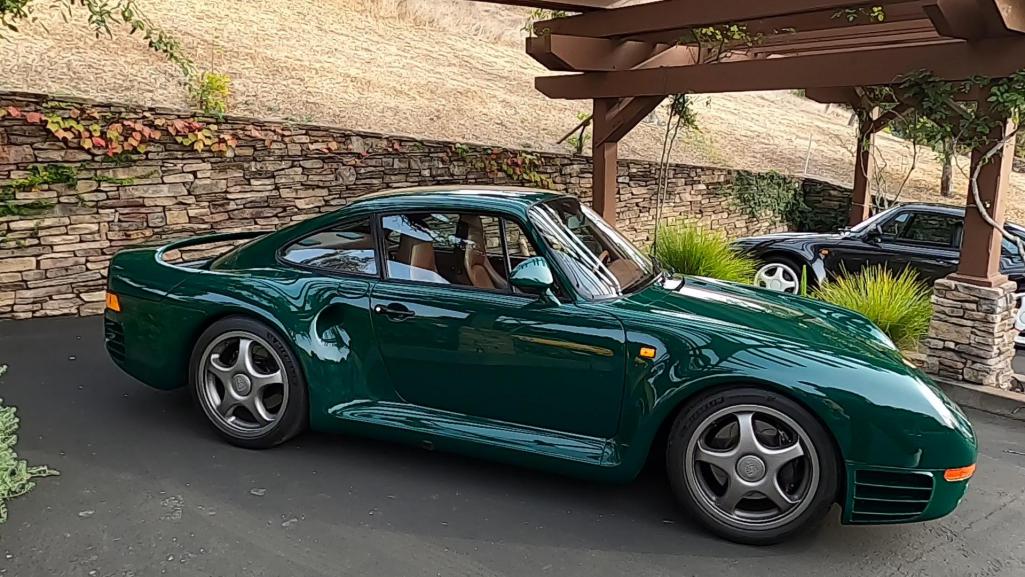
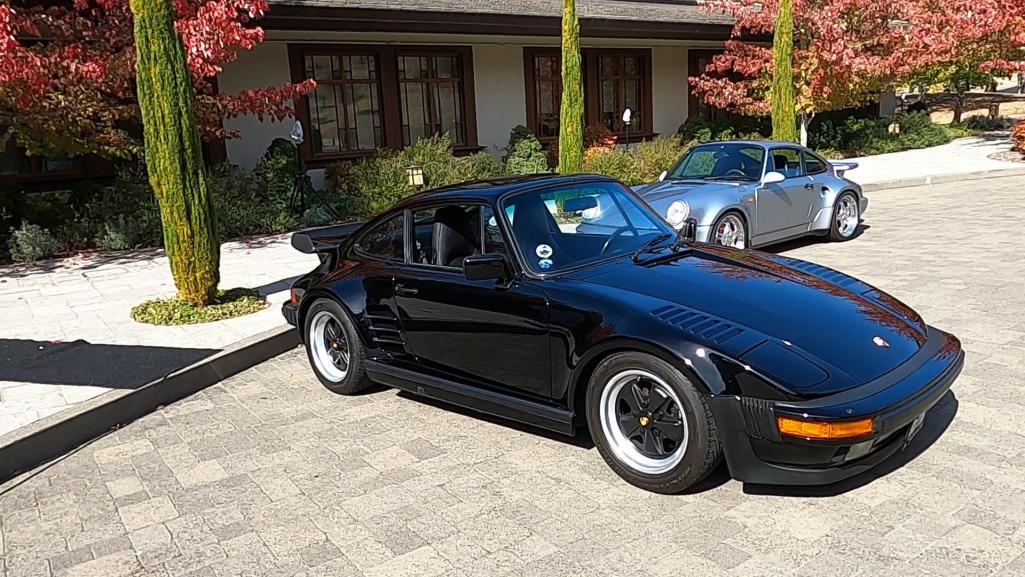

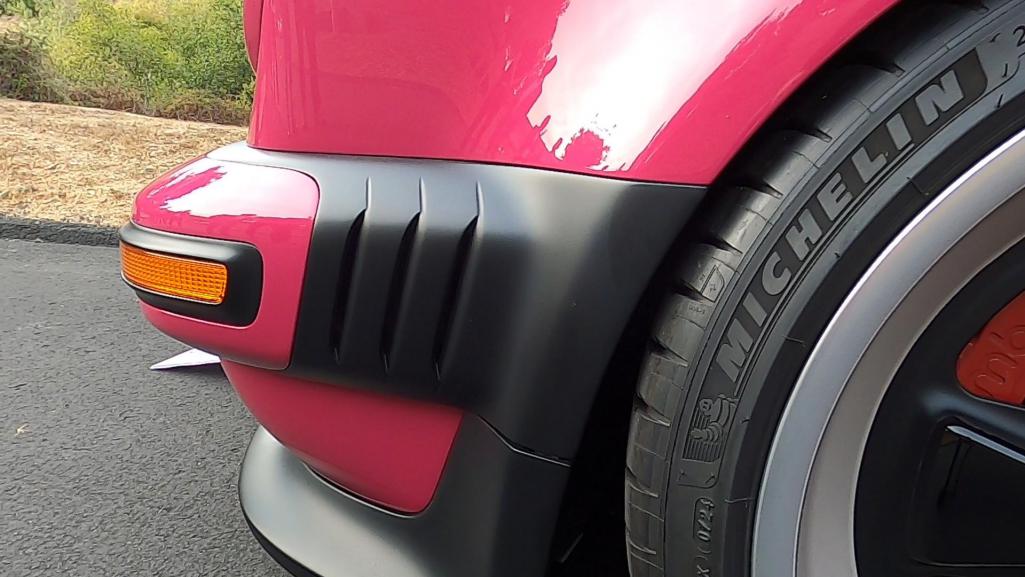
Posted by: tygaboy Oct 27 2024, 12:56 PM
Few more:
Attached image(s)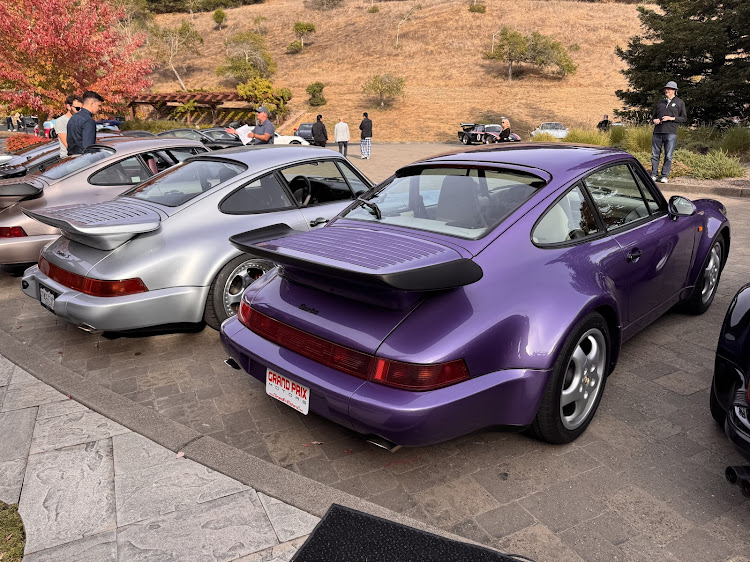
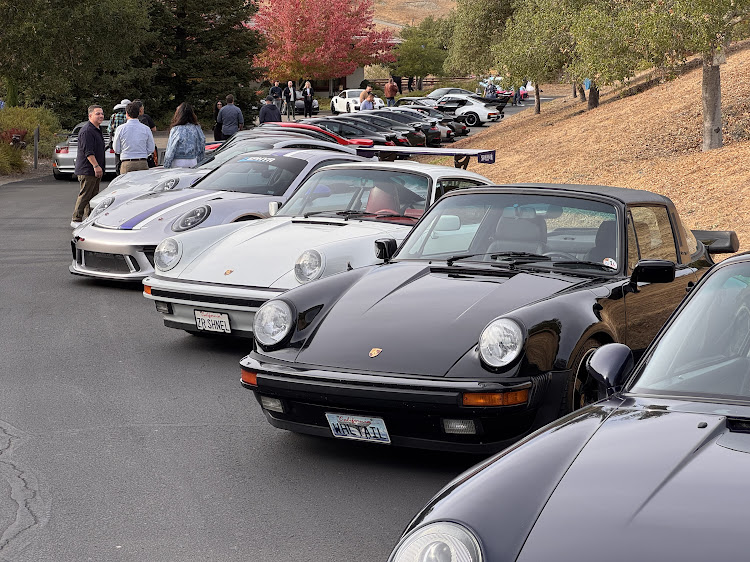
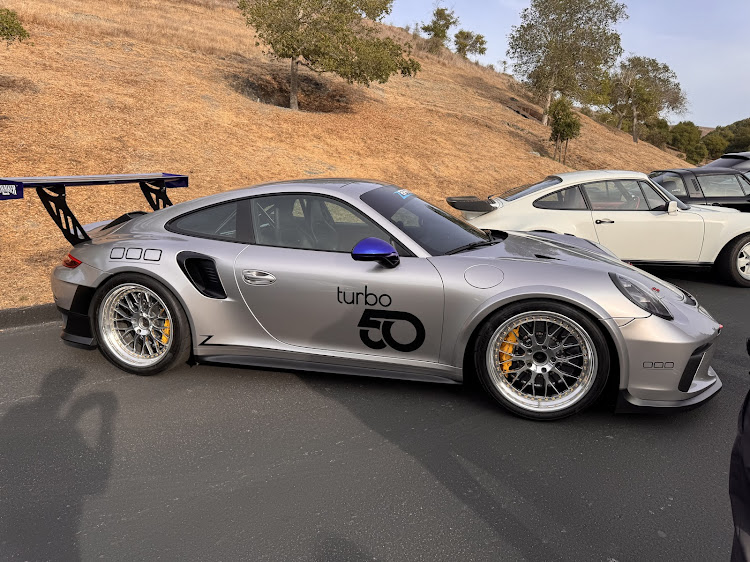
Posted by: bkrantz Oct 27 2024, 06:46 PM
Wow!
Posted by: Cairo94507 Oct 28 2024, 08:24 AM
Some nice pics for sure; that looked like a nice event.
Posted by: Dion Oct 29 2024, 09:34 AM
That Turbo 50 event looks awesome. Thanks for the pictures.
Keep those videos coming Chris. Living vicariously through you!
Posted by: cali914 Oct 31 2024, 09:05 AM
Wow Turbo City. Any Renegades and how much HP?
Posted by: gereed75 Oct 31 2024, 05:20 PM
Cool. You Cali guys get all the great events..
Posted by: tygaboy Nov 2 2024, 07:00 AM
A little progress on the build and an extra treat: Some details on 000 Magazine's Turbo 50 event. It was incredible!
https://www.youtube.com/watch?v=gtFToR7xFXY
Posted by: Cairo94507 Nov 2 2024, 08:18 AM
Amazing photos from the Turbo 50 event!
Posted by: ClayPerrine Nov 8 2024, 09:41 AM
Chris,
Thought you might like to see this before it happens to you.
https://www.youtube.com/watch?v=6AWlJFcZd1w?si
Remember what happened to Howard......
Posted by: technicalninja Nov 8 2024, 10:31 AM
I think the "Name" on the engine is the "litigation" point here.
Many different car companies have used Ferrari engines (all with the permission of Ferrari).
The latest use I am aware of is in the Maserati.
They have slightly less power than their Ferrari relatives.
And NO NAMES on the engine...
I'm still a proponent of "Red Barn" where the "Ferrari" monikers are.
And I'd stop using the Ferrari name all together...
All of the kit builders who made replicas FOR SALE got sued by Ferrari.
Miami Vice started this crap.
I want a 57 Teste Rossa. I will never be able to afford a real one.
If I ever build one, I will build ONLY 1 and it will never be "for sale".
I will NOT call it anything close to the correct name. As it will be 20% bigger than a real one and will have a slightly different shape, I might get away with it...
Many real Ferraris of that vintage ended up with other manufactures engines in them as the Ferrari parts were un-obtainium. Ferrari didn't sue those owners...
Posted by: tygaboy Nov 9 2024, 08:08 AM
Some fab stuff, a bit about the Haltech software and getting started on wiring. Then an update to the jack contraption that some of you have asked about.
https://www.youtube.com/watch?v=gkigb2DxPS4
Posted by: East coaster Nov 9 2024, 09:01 AM
Damn…….now I have a dimple die set on my wish list. Nice work!
Posted by: tygaboy Nov 9 2024, 09:40 AM
Damn…….now I have a dimple die set on my wish list. Nice work!
@http://www.914world.com/bbs2/index.php?showuser=487 - Get them. You'll love them and find many panels that suddenly REQUIRE some speed holes!
Posted by: live free & drive Nov 9 2024, 04:54 PM
Speaking of dimple dies, I just came across the below Youtube video of a poor-man's flow-forming method that I thought was really cool.
One could also assemble the guide dies right on a panel in a car and add beading in any fashion to stiffen structures.
Get your guide dies from send-cut-send
https://www.youtube.com/watch?v=_QgRs09NvBw
In car you'd probably need a big piece of wood for a bucking element.
Posted by: tygaboy Nov 16 2024, 09:03 AM
Anyone who wants to come help is more than welcome!
https://www.youtube.com/watch?v=IaJGVqXuEgA
Posted by: Cairo94507 Nov 16 2024, 09:34 AM
Love the wiring organizational aspects of this build.
Posted by: KELTY360 Nov 16 2024, 11:47 AM
I get it now. Herding the kitties was just a prelude to organizing the engine harness.
Yowsa!
Posted by: Maltese Falcon Nov 16 2024, 11:48 AM
Halltech Elite 2500 was threatening to look at when I first opened all of the boxes. Their detailed illustrations, instructions, every cable + connector marked, and some assistance from our engine builder LB Bros. Porting made it a lot easier !
This ecu layout in picture is just for engine management; basic (custom made) main chassis wiring harness not shown, it's already been pulled through the bulkhead.
I was also lucky enough to meet up with Ben Horton a Halltech technician from Oz, that just happened to be in SoCal for a few weeks. He brought his magic briefcase, laptop and ecu tools... which we made several corrections to my set up.
Amazing customer service !
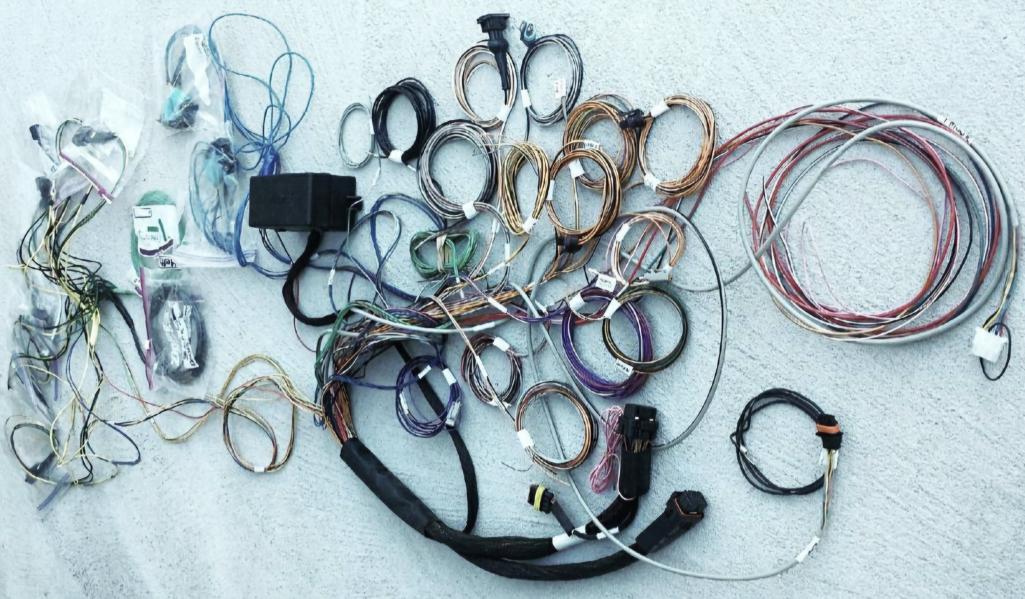
Posted by: Chris914n6 Nov 16 2024, 02:20 PM
RE- Analog gauges, or custom LCD gauges if you choose.
Arduino with a Canbus hat. You can break apart the canbus data, then output to analog gauges with the signal they need to read correctly.
Or if you want custom digital gauges, add a raspberry pi and compatible LCD display. Or you can use this for a data display.
Posted by: tygaboy Nov 30 2024, 08:16 AM
No video last week so I know you're jonesing for a fix!
Well, don't miss this one. Not a ton of progress but you will get a teaser about the crazy-cool project car that just showed up!
https://www.youtube.com/watch?v=8aKORofTCqg
Posted by: Cairo94507 Nov 30 2024, 09:45 AM
Not going to lie, I missed the weekly update last weekend. Glad you are back and I absolutely love those bulkhead wiring connectors. Just the best and how I wish we had done my 3.6 wiring into the passenger compartment. If my engine ever comes back out (hope not) that will be a wiring upgrade for sure.
Posted by: tygaboy Dec 7 2024, 07:52 AM
If you don't like wiring-related stuff, skip this one.
https://www.youtube.com/watch?v=TjZS6CwZLWY
Posted by: Cairo94507 Dec 7 2024, 10:48 AM
I love Saturday mornings; thanks Chris.
Posted by: tygaboy Dec 14 2024, 09:20 AM
The next installment in my series called "Content that will drive down your YouTube channel views."
https://www.youtube.com/watch?v=K5odzc_Uk5U
Posted by: Cairo94507 Dec 14 2024, 10:30 AM
Mind blowing... Chris is not someone I would characterize as an "amateur". Amazing skills.
Posted by: tygaboy Dec 15 2024, 07:14 PM
I figured some of you still like pics and words vs the video stuff and since I'm nothing if not considerate...
Let the connector connections begin! As I was getting started, I remembered that when I did the harness in my LS car, I struggled with change of direction when the harness went up and had to go the 90 degrees into the bulkhead connector.
The wires that were pinned into the upper positions of the connector need to be a bit longer than those in the lower positions. Mistakes in these lengths forces some wire length back into the main trunk and it just looks messy. I'm not doing service loops anywhere so I need to be as accurate as possible.
So I did some measuring and mocked up an in-space replica of the relationship between the ECU and the connector so I can "build to fit" and I should be good to go.
I started with the four, 25 amp, 12 ga wires that'll feed:
- coils
- injectors
- electric water pump
- starter
Attached thumbnail(s)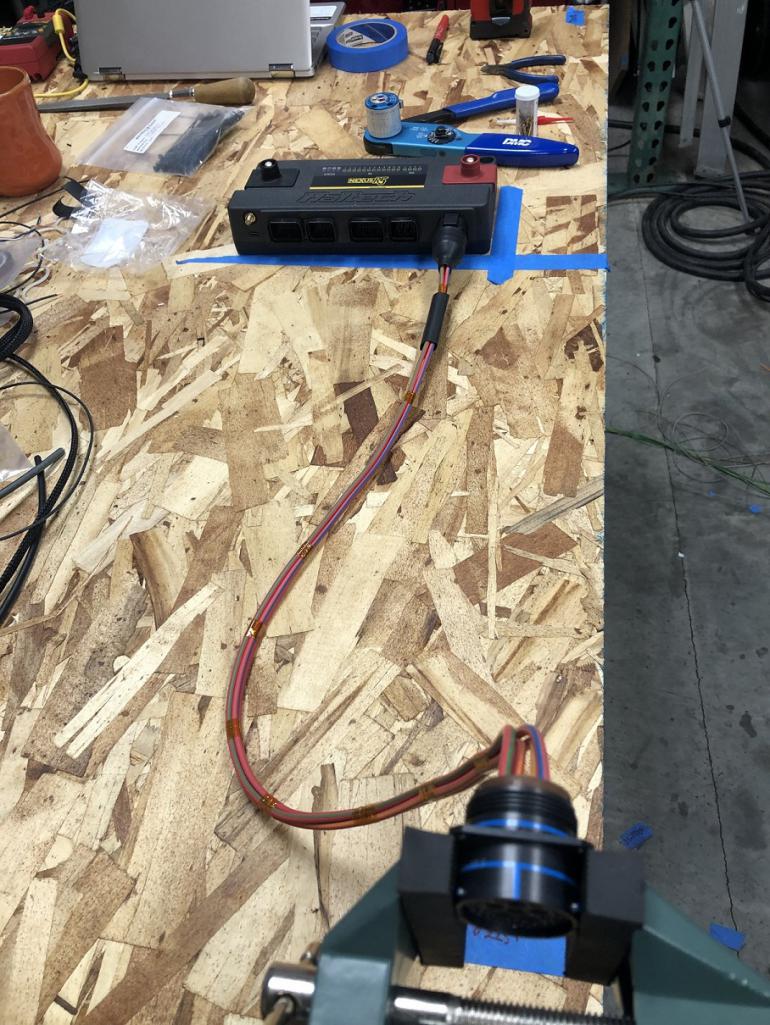
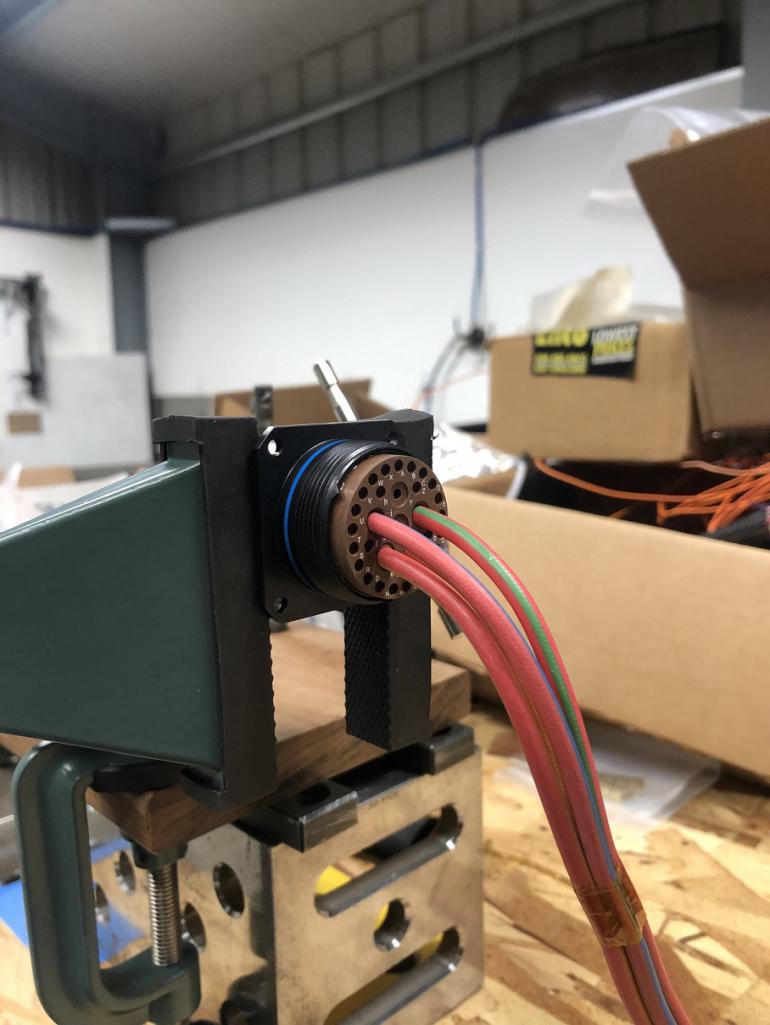
Posted by: BillC Dec 15 2024, 08:09 PM
If you're going to have two 90 degree bends the in harness, one from the floor-to-vertical and one from vertical-to-the-bulkhead, won't the two bends cancel out any length changes? You'd just have to make sure to keep the wires straight and untwisted while laying them out.
Posted by: tygaboy Dec 15 2024, 08:50 PM
If you're going to have two 90 degree bends the in harness, one from the floor-to-vertical and one from vertical-to-the-bulkhead, won't the two bends cancel out any length changes? You'd just have to make sure to keep the wires straight and untwisted while laying them out.
@http://www.914world.com/bbs2/index.php?showuser=18667 - If only it were that easy. Nearly every one of the 60+ wires starts in a different location relative to the bulkhead connectors and doesn't necessarily end up in the same relative location because (and this is just one reason) some wires that originate in the same ECU connector (there are 5 at the ECU) end up in different bulkhead connectors (there are 3 of those).
I could go on but let's just say, I know my approach works, even if it's more time consuming.
Posted by: mgp4591 Dec 16 2024, 02:24 AM
If you're going to have two 90 degree bends the in harness, one from the floor-to-vertical and one from vertical-to-the-bulkhead, won't the two bends cancel out any length changes? You'd just have to make sure to keep the wires straight and untwisted while laying them out.
@http://www.914world.com/bbs2/index.php?showuser=18667 - If only it were that easy. Nearly every one of the 60+ wires starts in a different location relative to the bulkhead connectors and doesn't necessarily end up in the same relative location because (and this is just one reason) some wires that originate in the same ECU connector (there are 5 at the ECU) end up in different bulkhead connectors (there are 3 of those).
I could go on but let's just say, I know my approach works, even if it's more time consuming.
Chris, that's why farmed out my wiring to a guy I met online to do mine and now we've got the EG33 bond. He wires and programs amusement rides around the world...you two would have fun together...
Posted by: KELTY360 Dec 16 2024, 09:18 AM
I haven't seen a smoke release switch anywhere. Am I missing something?
Posted by: tygaboy Dec 17 2024, 06:34 PM
Ignition, injection and one of the wide band O2 sensors pinned! It's coming along nicely.
Every measurement, wire cut, strip, crimp and insert is at once tedious and satisfying. I find I get into a mental zone where I think it's been 20 minutes but I look up and a couple hours have gone by.
It's easy to understand how motorsport-level harnesses cost ten$ of thou$and$. Parts are pricey, labor is intensive.
Attached thumbnail(s)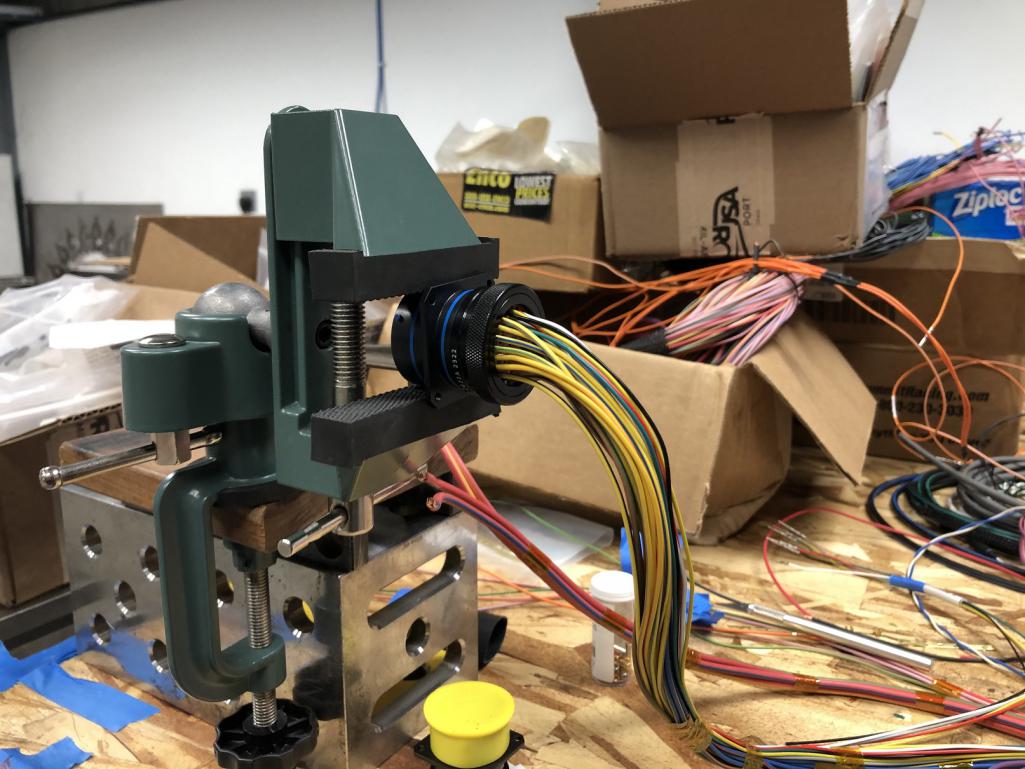
Posted by: tygaboy Dec 17 2024, 06:35 PM
Artsy shot I think I'll title "Anticipation".
Attached thumbnail(s)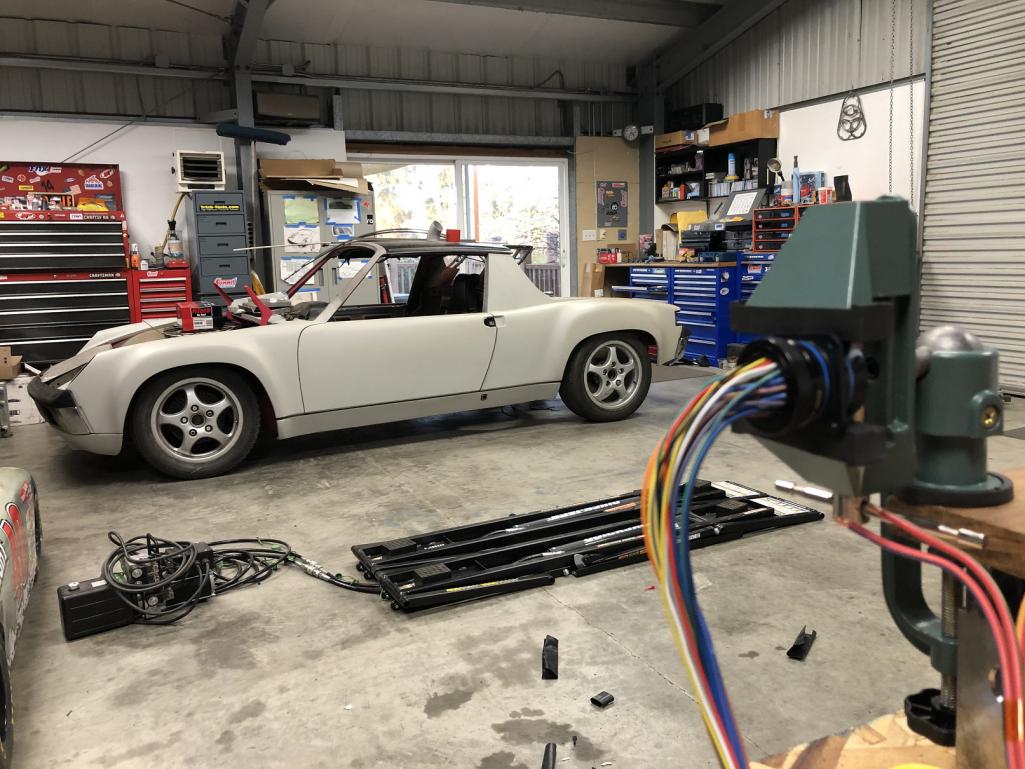
Posted by: Superhawk996 Dec 17 2024, 09:44 PM
It's easy to understand how motorsport-level harnesses cost ten$ of thou$and$. Parts are pricey, labor is intensive.
Now if you could just talk the rest of the community out of using wire nuts and hardware store electrical tape.
Posted by: mgp4591 Dec 18 2024, 12:05 AM
Artsy shot I think I'll title "Anticipation".
Looks like you're making electrical pasta... good eatin'!
Posted by: East coaster Dec 18 2024, 06:37 AM
Looking great! My wiring was a love/hate relationship……very satisfying but very glad to be done with it
Posted by: Maltese Falcon Dec 18 2024, 11:38 AM
@http://www.914world.com/bbs2/index.php?showuser=19241 Chris...Halltech guru Richard Nelson is my go to guy !
Will be speaking with him about interfacing my FIA approved engine kill system into the engine PDM module. There's an EFI College in Havasu that is very much into Haltech Systems. I thought about bringing the 8gtt there after wiring her up/ having them set the car up on their dyno...while taking the 1 week course
Marty
Posted by: tygaboy Dec 22 2024, 06:07 PM
No video this week as the wiring work doesn't really lend itself to being watched. So it's pics of this part of the build. I'll do a video "wrap up" once the work is something a bit less tedious and repetative.
Anyway, here's the "VCU" (Vehicle Control Unit = ECU + PDM) and main harness:
- the connectors section takes care of the engine and rear body electrics: lights, etc.
- there's a CAN section with three connections that'll live in the cabin (there will be a CAN connection in the engine compartment, just in case)
- the remainder of the harness supports all the switches and power for interior stuff - ignition, lights, wipers, signals, gauges, seat heat, power windows, and... wait for it... Cruise Control!
Yep, this ECU supports real deal cruise. I'm also future-proofing the harness by building in circuits for things I may add going forward, including a Sport Exhaust mode. I can have the ECU control it as well as have an override button.
The Haltech stuff is crazy capable.
Attached thumbnail(s)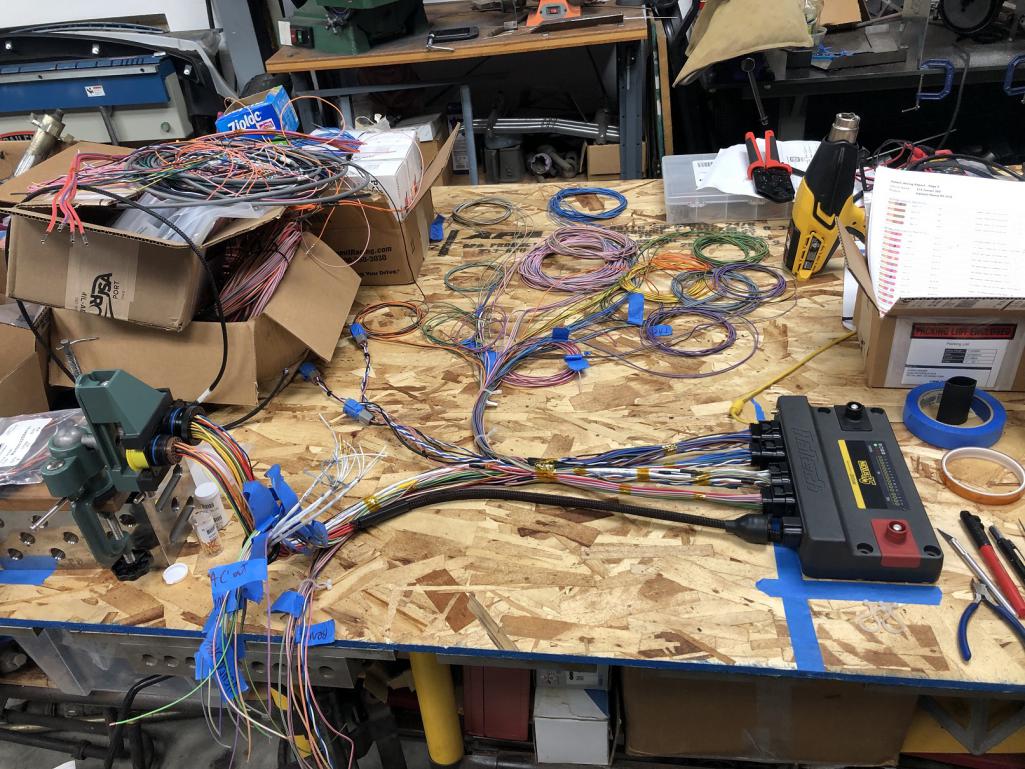
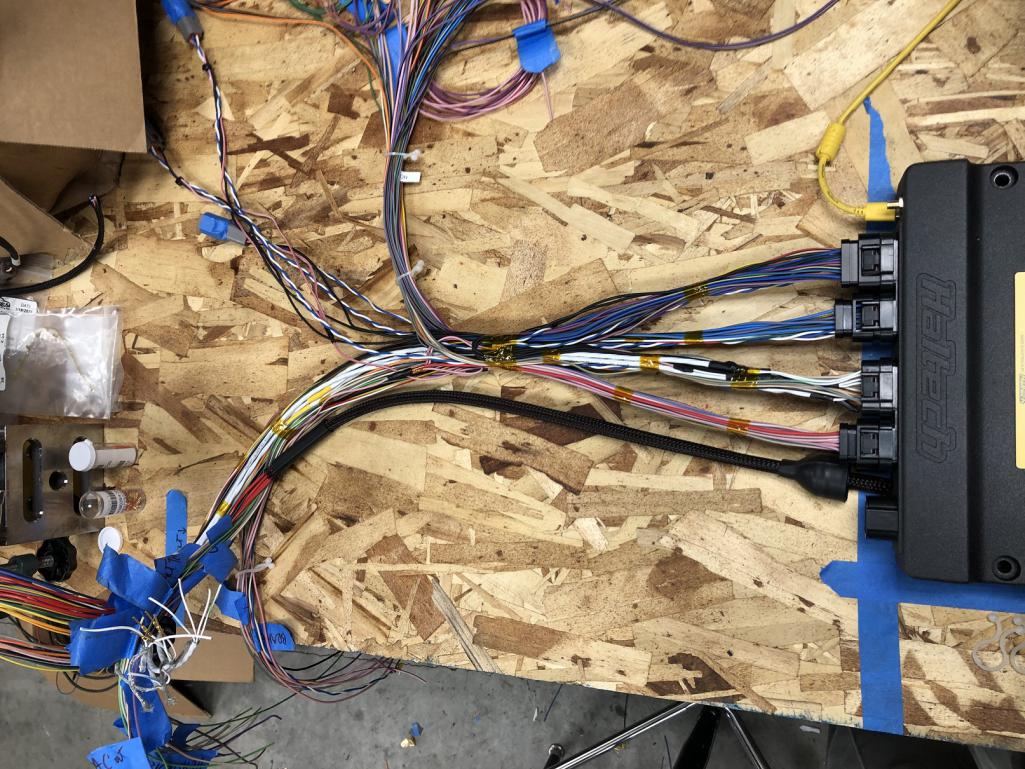
Posted by: BillC Dec 22 2024, 07:11 PM
Very nice!
Posted by: tygaboy Dec 25 2024, 09:10 AM
Interior side bulk head connectors completed. This takes care of the ECU connections to everything at the rear: all drive train functions, including a Hall-effect vehicle speed sendor and an engine compartment CAN connection, as well as all rear lighting. I'll sheath it once everthing is tested and working.
On to the engine harness.
Attached thumbnail(s)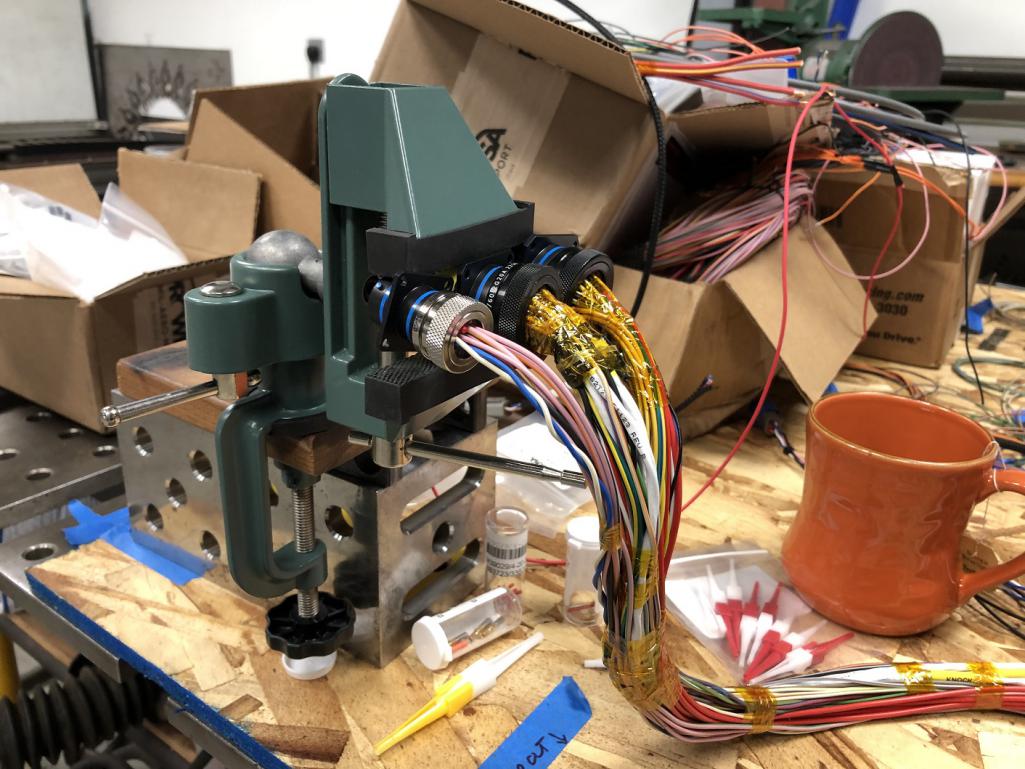
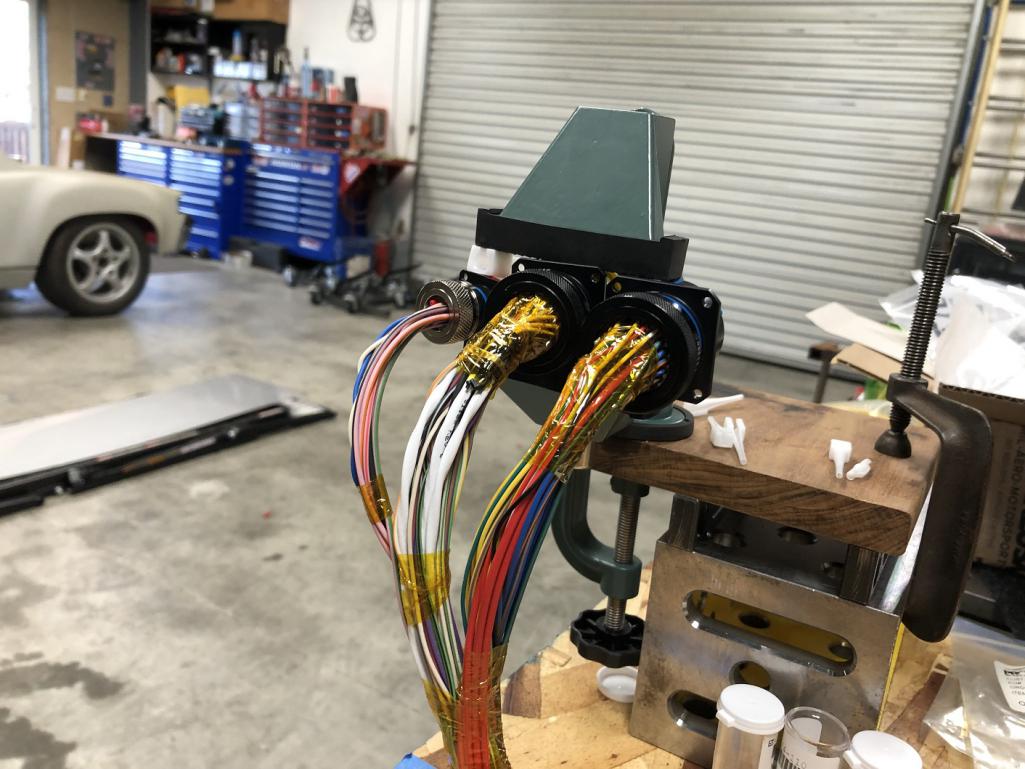
Posted by: Cairo94507 Dec 25 2024, 09:19 AM
Merry Christmas Chris.
Posted by: tygaboy Dec 29 2024, 10:25 AM
Wiring, continued. At least I get to drill some holes and mount the connectors.
There have been a few distractions around The Red Barn that kept me from the build: this Cayman GTS 4.0 followed me home and my wife said we could keep it!
OK, OK so we ordered it a while back and picked it up on 12/27.
And I can now safely state that all the review videos on these things are true. It is wonderful - and I can't rev it over 4k rpm yet!
https://www.youtube.com/watch?v=pc-2CS6HQO8
Attached thumbnail(s)
Posted by: Krieger Dec 29 2024, 12:46 PM
Oh, heck yes!!!
Posted by: Cairo94507 Dec 29 2024, 01:10 PM
@http://www.914world.com/bbs2/index.php?showuser=19241 - Congratulations Chris!!!! That is a perfect car. I wish I had one of those. Michael
Posted by: tygaboy Dec 29 2024, 02:32 PM
@http://www.914world.com/bbs2/index.php?showuser=19241 - Congratulations Chris!!!! That is a perfect car. I wish I had one of those.
Michael@http://www.914world.com/bbs2/index.php?showuser=9712 Michael - I call it the "any idiot with a checkbook" car. I did order what I think is the perfect spec: Vanadium Gray Metallic, manual, full leather with a few extra bits covered, those wheels (which look color-matched but aren't!) and a few other goodies. Most importantly, we now have a comfy road-trip car so I need to get on calendar to come visit you and Bob!
Posted by: bkrantz Dec 29 2024, 10:01 PM
Wiring, continued. At least I get to drill some holes and mount the connectors.
There have been a few distractions around The Red Barn that kept me from the build: this Cayman GTS 4.0 followed me home and my wife said we could keep it!
OK, OK so we ordered it a while back and picked it up on 12/27.
And I can now safely state that all the review videos on these things are true. It is wonderful - and I can't rev it over 4k rpm yet!
https://www.youtube.com/watch?v=pc-2CS6HQO8
But did your wife tell you how long you have to wait to modify it?
Posted by: technicalninja Dec 29 2024, 10:34 PM
His "comfy road trip car" is a Cayman GTS...
The HP/torque of that Cayman is similar to the HP/torque of the Ferrari.
The 914 should weigh 500 or so lbs. less.
The Cayman has a bunch of modern improvements.
It should be a GOOD race...
Posted by: 914-300Hemi Dec 29 2024, 10:34 PM
Wiring, continued. At least I get to drill some holes and mount the connectors.
There have been a few distractions around The Red Barn that kept me from the build: this Cayman GTS 4.0 followed me home and my wife said we could keep it!
OK, OK so we ordered it a while back and picked it up on 12/27.
And I can now safely state that all the review videos on these things are true. It is wonderful - and I can't rev it over 4k rpm yet!
https://www.youtube.com/watch?v=pc-2CS6HQO8
Congratulations she looks amazing
Posted by: mgp4591 Dec 30 2024, 12:24 AM
Is this the "S.E." you were telling me about last year?
Posted by: Cairo94507 Dec 30 2024, 07:29 AM
@http://www.914world.com/bbs2/index.php?showuser=19241 = You are always welcome; just let us know. You can check out the new garage, it is coming along nicely. The Cayman GTS 4.0 is the car I would buy if I bought a new Porsche
Posted by: Shivers Dec 30 2024, 12:10 PM
Nice car. Looks like you have the rainbow spaghetti maker
Working great now. My word.
Posted by: TC 914-8 Dec 31 2024, 08:44 AM
[quote name='tygaboy' date='Dec 29 2024, 08:25 AM' post='3183759']
Wiring, continued. At least I get to drill some holes and mount the connectors.
There have been a few distractions around The Red Barn that kept me from the build: this Cayman GTS 4.0 followed me home and my wife said we could keep it!
OK, OK so we ordered it a while back and picked it up on 12/27.
And I can now safely state that all the review videos on these things are true. It is wonderful - and I can't rev it over 4k rpm yet!
Wow Chris !!! congratulations on your new Cayman GTS !!! Hope it doesn’t distract you from your day job
Posted by: tygaboy Jan 23 2025, 06:55 PM
Back on the wiring after some other, short-term projects. Here's the first of the engine-side harness runs with the lengths rough trimmed. You can see the candy cane mock up that I use to set the base lengths of each circuit. Connections are end-to-end tested as I go and everything shown here is working as planned.
I needed to order a few additional bits that are due to arrive tomorrow so I should be good to complete the engine harness wiring in the next week or so.
Attached thumbnail(s)
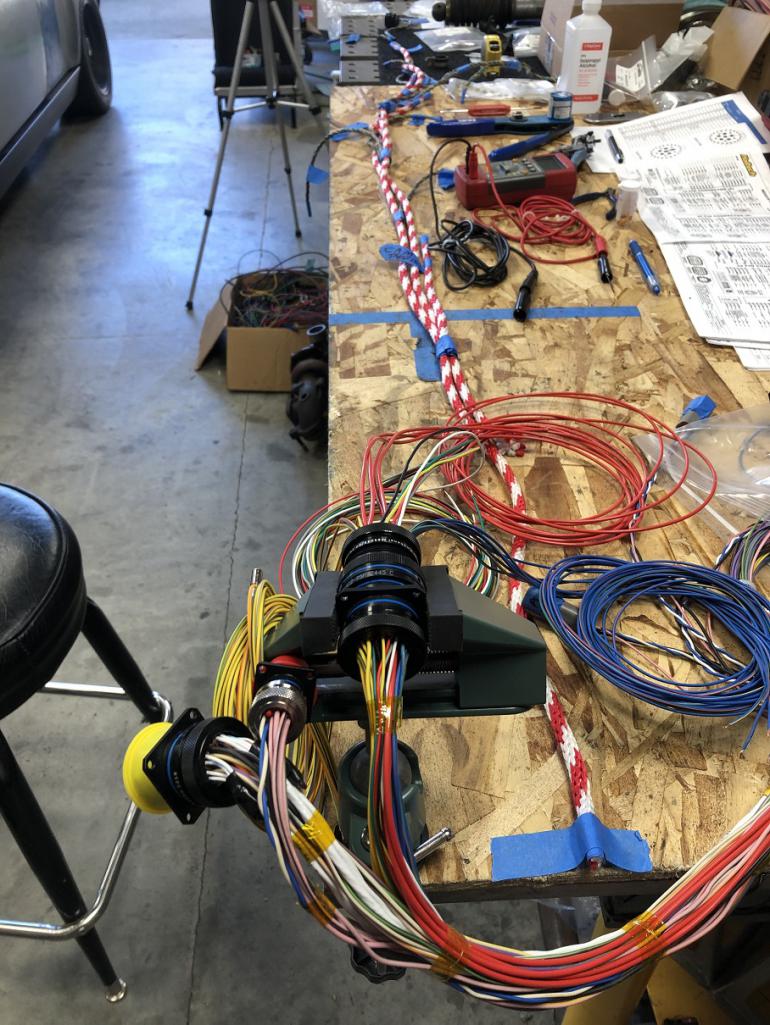
Posted by: bkrantz Jan 23 2025, 09:14 PM
That's a few more wires than in a Model T.
Posted by: Dion Jan 24 2025, 08:14 AM
Congrats on the Cayman Chris. Looks awesome. Keep the vids coming. Always learning something.
Posted by: Cairo94507 Jan 24 2025, 08:23 AM
Posted by: tygaboy Jan 24 2025, 09:38 AM
Congrats on the Cayman Chris. Looks awesome. Keep the vids coming. Always learning something.
@http://www.914world.com/bbs2/index.php?showuser=2766 - Thanks Dion! Gotta say, the Cayman is everthing the reviewers say it is. Driving it has been a contributing factor to the slow down on this build!
Posted by: Superhawk996 Jan 24 2025, 12:31 PM
I apologize if I’ve missed it in videos or other posts - what software (if any) are you using for wiring diagram and keeping track of circuit pin outs?
Posted by: tygaboy Jan 24 2025, 02:53 PM
I apologize if I’ve missed it in videos or other posts - what software (if any) are you using for wiring diagram and keeping track of circuit pin outs?
@http://www.914world.com/bbs2/index.php?showuser=22428 - Haltech does a great job providing easy access to the needed info. Beyond the expected generic wiring schematics, the ECU has a built-in I/O (input/output) report capability. Once you've set up which pins do what (outside of the hard coded stuff like ignition, injection, O2, etc.) you can generate a report. I find this REALLY handy when I'm building the harness as I can reference not just a pin # but an easy way to double check I'm working with the correct wire.
Then, for the specifics of my build, I simply created a spreadsheet to document the connections from the ECU to the bulk head.
Add up all these references and I have everything I need. And pretty much anyone who's done even a little wiring could look at all this and be able to understand it.
Attached thumbnail(s)
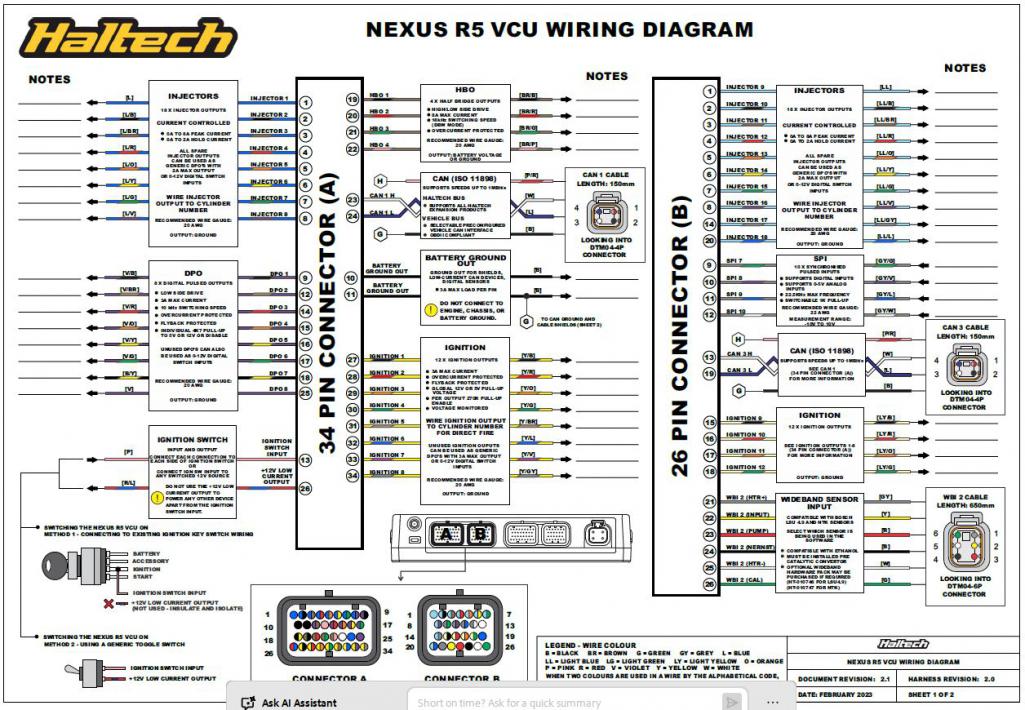
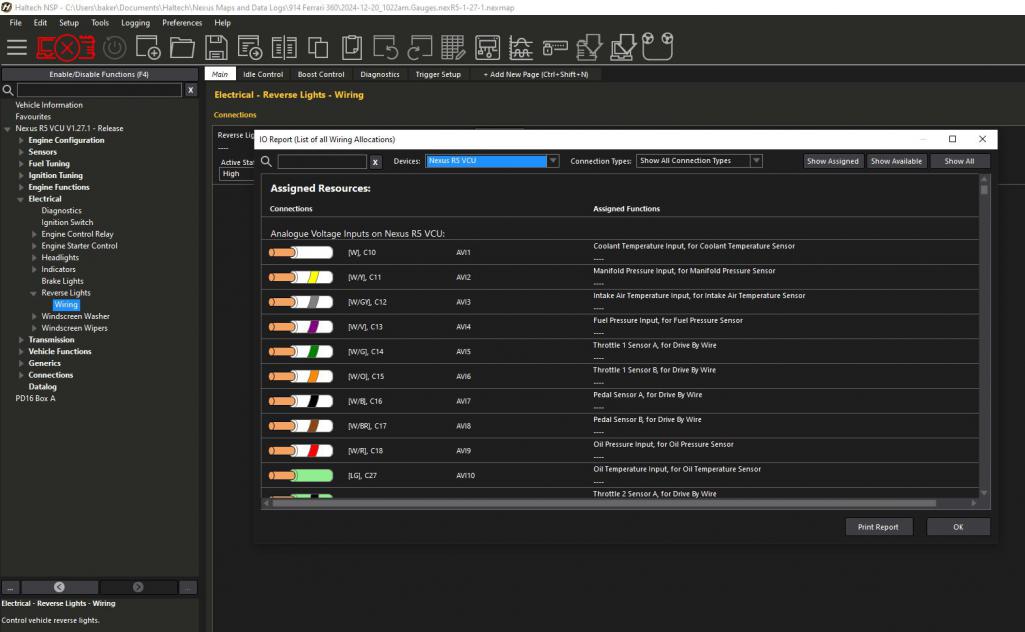
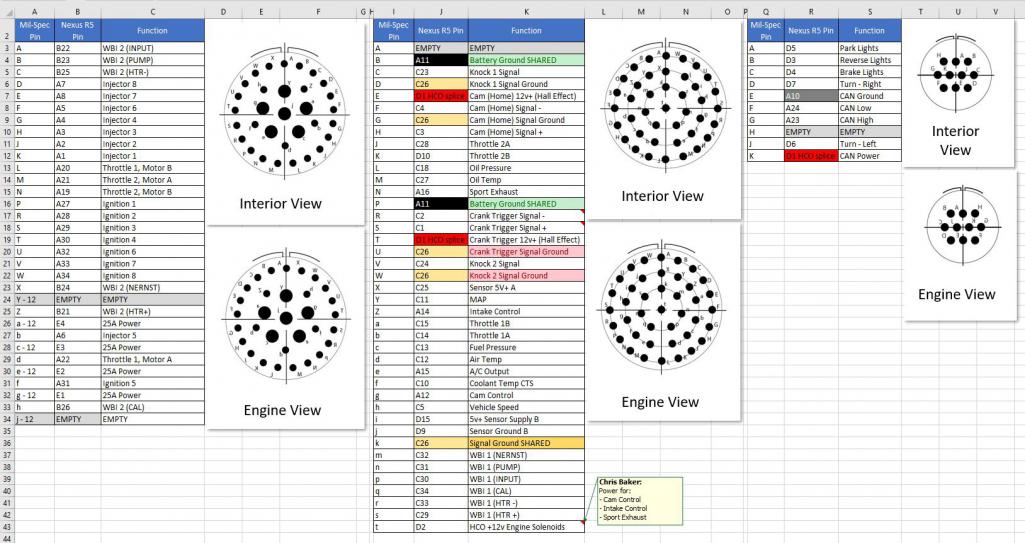
Posted by: ClayPerrine Jan 24 2025, 03:49 PM
Looks like you forgot the yellow wire to the starter.
Posted by: technicalninja Jan 24 2025, 04:52 PM
I apologize if I’ve missed it in videos or other posts - what software (if any) are you using for wiring diagram and keeping track of circuit pin outs?
@http://www.914world.com/bbs2/index.php?showuser=22428 - Haltech does a great job providing easy access to the needed info. Beyond the expected generic wiring schematics, the ECU has a built-in I/O (input/output) report capability. Once you've set up which pins do what (outside of the hard coded stuff like ignition, injection, O2, etc.) you can generate a report. I find this REALLY handy when I'm building the harness as I can reference not just a pin # but an easy way to double check I'm working with the correct wire.
Then, for the specifics of my build, I simply created a spreadsheet to document the connections from the ECU to the bulk head.
Add up all these references and I have everything I need. And pretty much anyone who's done even a little wiring could look at all this and be able to understand it.
Factory service manuals should be like that!
Super nice documentation!
Make DAMN sure to print hard copies occasionally.
If you have the information outside of digital storage, then you NEVER have a problem with the digital stuff.
If it's exclusively on digital...
Posted by: tygaboy Jan 24 2025, 07:22 PM
Looks like you forgot the yellow wire to the starter.
@http://www.914world.com/bbs2/index.php?showuser=1143 Clay, You need to give me a little more credit.
The wire to the starter is unlabeled in the current doc. It's one of the 12 ga, 25A wires. The other unlabeled 25A power wires are for the H2O pump, the coils and the injectors.
Posted by: tygaboy Jan 24 2025, 07:25 PM
Make DAMN sure to print hard copies occasionally.
If you have the information outside of digital storage, then you NEVER have a problem with the digital stuff.
If it's exclusively on digital...
@http://www.914world.com/bbs2/index.php?showuser=27135 - Yep, I print a copy or two of everything for the "user manual". Imagine the next person who works on this thing:
Posted by: ClayPerrine Jan 24 2025, 07:47 PM
If you really want it to be Ferrari authentic, the wiring diagrams need to be hand drawn in pencil, and labeled in Italian. Then they need to not match the car. That's how the Ferrari factory did it in the 308 I worked on years ago.
Oh.. and that starter wire needs to change color and gauge 3 times between the ignition switch and the starter. And it has to have a cold solder joint in it too.
Posted by: technicalninja Jan 24 2025, 10:53 PM
I was one of the last factory "authorized" Fiat technicians in the early 80's when they were getting the HELL out of the United States...
The "Authorization" included a Catholic like Blessing of the cross on your body.
Every bit as disturbing as it sounds, creepy as shit...
Ninja proverb:
The wire color actually installed in the harness was directly dependent on how much wine Luigi had the night before.
I learned to read wiring diagrams on incorrect diagrams in another language and possibly mislabeled from a completely different model...
When they look like Tygaboy's stuff 95% of that battle is AVOIDED!
Posted by: Superhawk996 Jan 25 2025, 12:00 AM
Very slick. Thank you for sharing that.
Posted by: KSCarrera Jan 25 2025, 04:40 AM
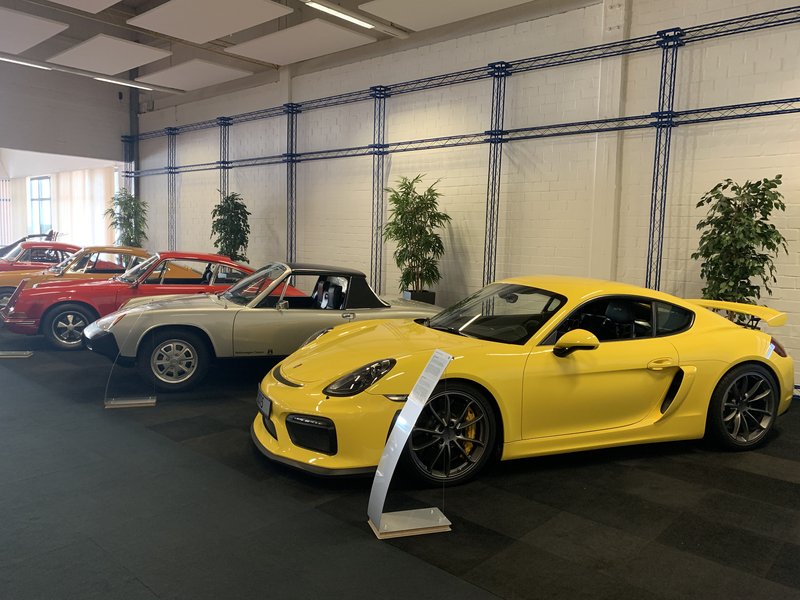
A nice aside is that the 4.0-litre Caymans are built at Osnabrück where our beloved 914s were assembled... Karmann is very proud of their links with Porsche and have an example of every car they've built in their factory museum.
Posted by: tygaboy Feb 6 2025, 06:41 PM
Making progress. I fabbed a recessed bulkhead connector panel to create more space for the harness. Then it was work up a pass-through for the 12v feeds for the ECU and the power distributon module. All the panels are just set in place so things aren't positioned exactly as they will be.
I'll be making a cover for all this that'll get upholstered and hide everyting.
Attached thumbnail(s)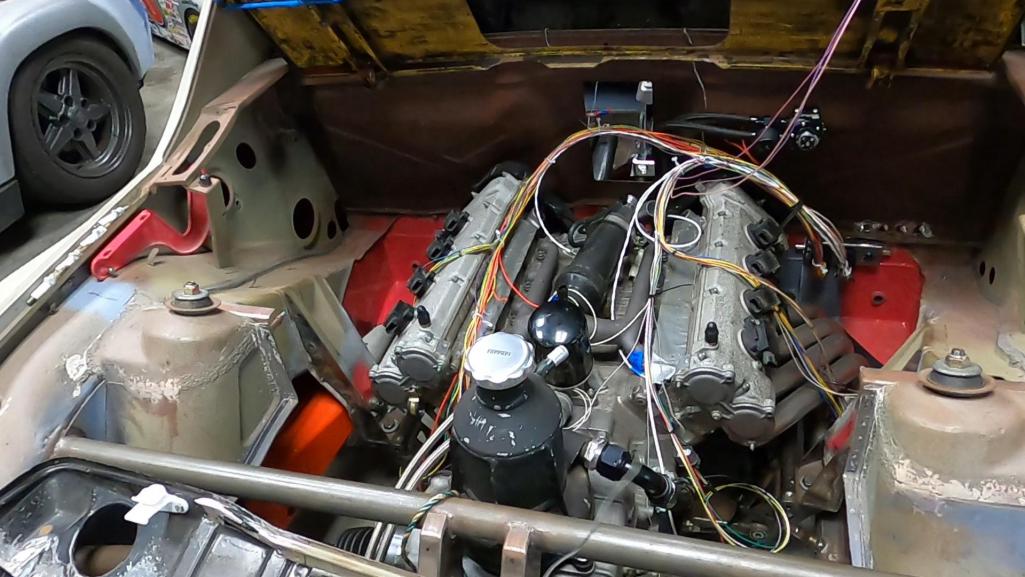
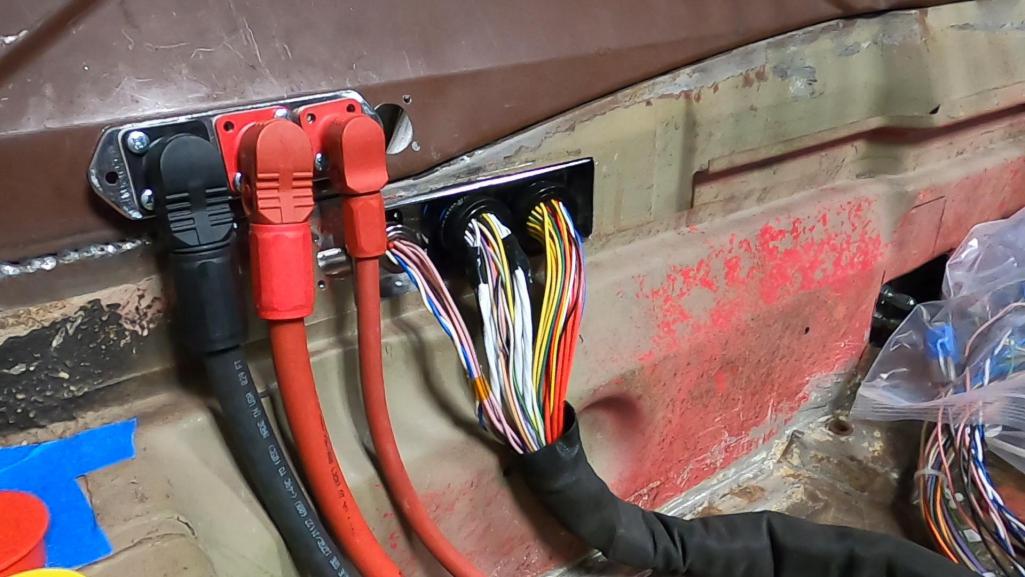
Posted by: East coaster Feb 7 2025, 05:54 AM
Nice and clean, I like it. I’m sure you’ll be glad to move on from wiring, I know I was. It does seem fitting to put the proper amount of attention on the pasta in this Italian dish!
Posted by: Lof8 Feb 7 2025, 07:18 AM
Looking real nice!
Posted by: Cairo94507 Feb 7 2025, 08:06 AM
That is looking so sweet! Of course, by now, we all know the extremely high standard Chris holds himself to in everything he does.
Posted by: jd74914 Feb 7 2025, 03:31 PM
What did you use for the 12V pass throughs? They look so clean!
Posted by: tygaboy Feb 8 2025, 09:14 AM
It's page 67 of the build so how about Episode 67 to match!
https://www.youtube.com/watch?v=jSzbjMKL4rE
Posted by: tygaboy Feb 8 2025, 09:17 AM
What did you use for the 12V pass throughs? They look so clean!
@http://www.914world.com/bbs2/index.php?showuser=1659 - Amphenol SurLok connectors. Available in a number of configs and amp ratings. They are very tidy and nicely scratched my OCD itch!
Posted by: Cairo94507 Feb 8 2025, 10:51 AM
That wiring is out of this world tidy.
Posted by: jd74914 Feb 10 2025, 12:54 PM
What did you use for the 12V pass throughs? They look so clean!
@http://www.914world.com/bbs2/index.php?showuser=1659 - Amphenol SurLok connectors. Available in a number of configs and amp ratings. They are very tidy and nicely scratched my OCD itch!
Locking too, even cooler than I thought, thank you! These look like they'd be pretty cool for someone who trades batteries between cars too.
Guess I've been out of the game too long, these look like they've been around a few years too.
Posted by: tygaboy Feb 13 2025, 06:59 PM
It may not look like it but that there wiring now has all the needed sensor wiring and is essentially ready to be sheathed. Then all the wires get pinned and connectors added.
After a LOT of time, I'm nearly there.
Attached thumbnail(s)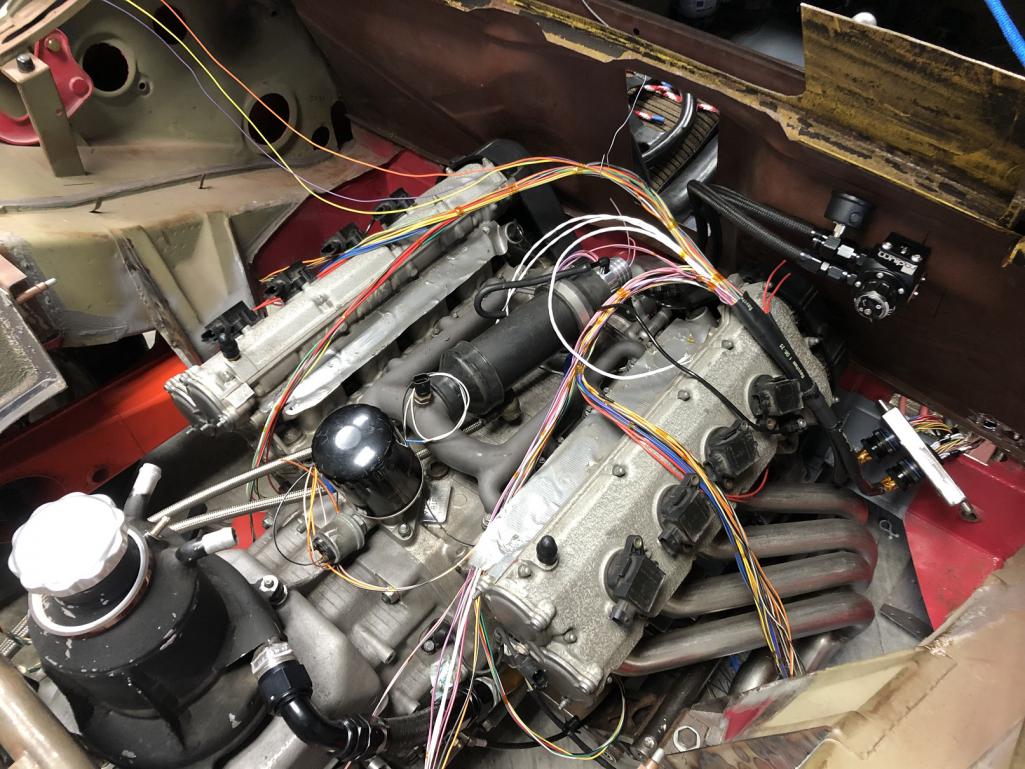
Posted by: tygaboy Feb 13 2025, 07:06 PM
Old meets new: That's a Ferrari 360 injector bank "connector" that I cut off the factory harness. Then I worked out the needed length and added a Deutsch connetor.
The close-up shows how the Raychem SCL heat shrink tubing adhesive seals once it's recovered.
Attached thumbnail(s)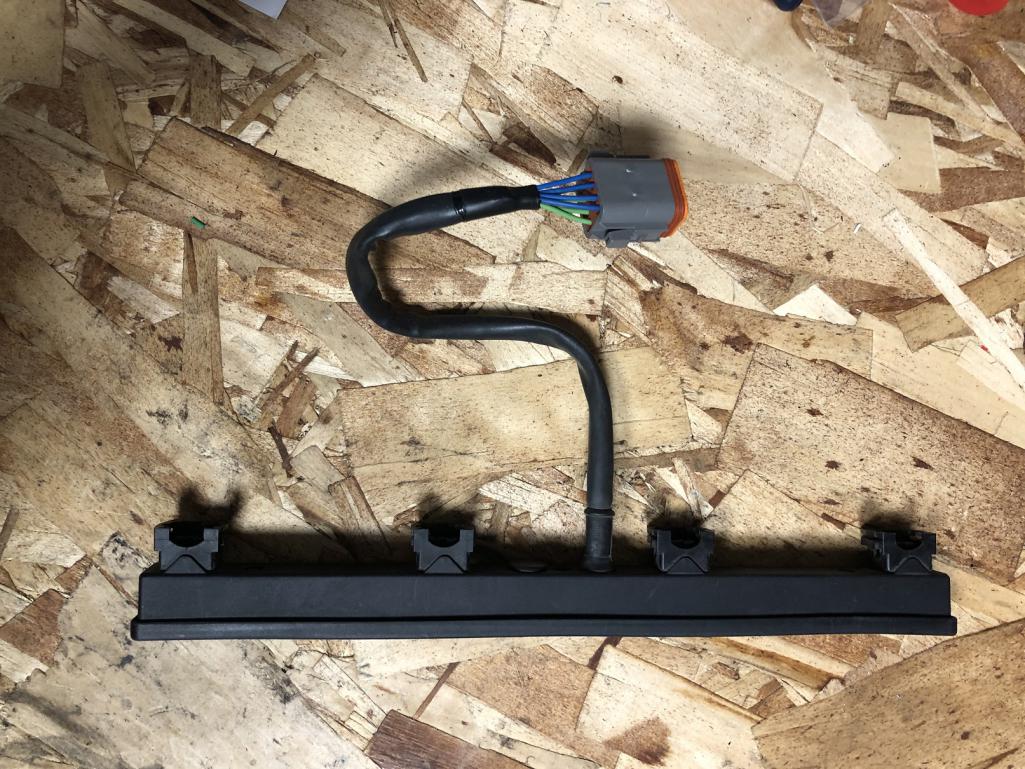
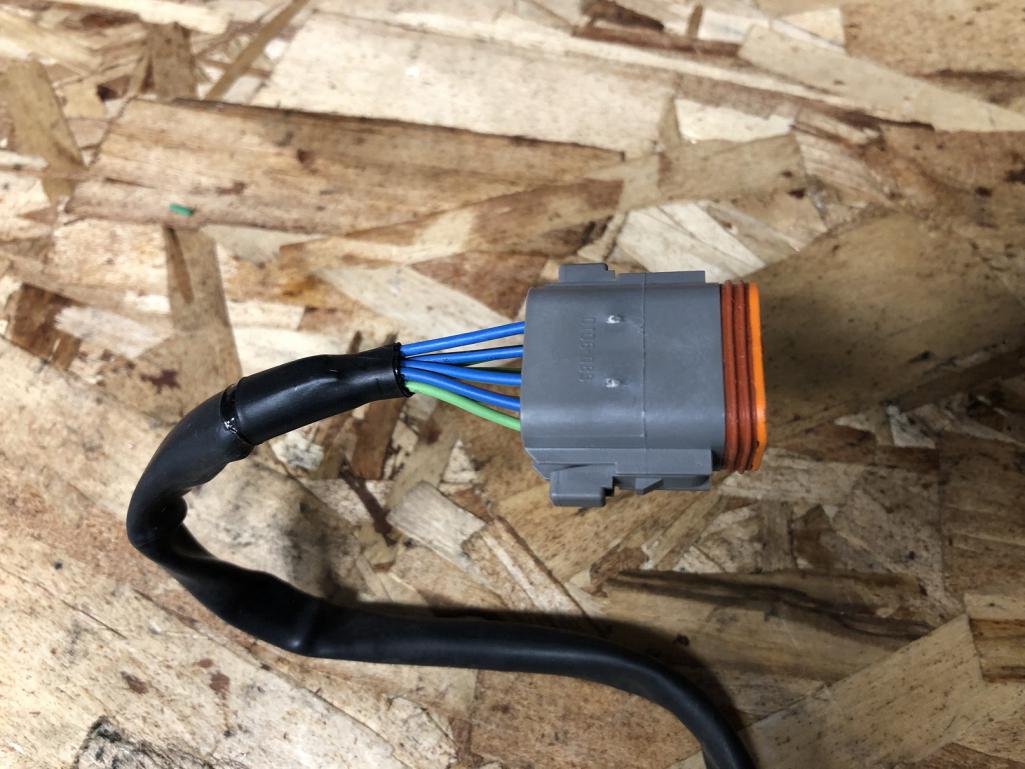
Posted by: JeffBowlsby Feb 13 2025, 07:40 PM
Are the exposed portions of the wires in a high heat environment?
Posted by: tygaboy Feb 13 2025, 10:47 PM
Are the exposed portions of the wires in a high heat environment?
@http://www.914world.com/bbs2/index.php?showuser=104 - Hey Jeff. No. In the case of the injector bank connector pictured, both those connectors will live under the intake plenum. The harness is supported by p-clamps that hold it off the inside of the intake manifold and I do all I can to route everything such that it's away from any high heat sources. If there's any question, that area gets wrapped in heat blanket and/or the source gets a shield.
Same approach as I used on the LS build and that's worked out well.
Posted by: JeffBowlsby Feb 14 2025, 11:36 AM
Are the exposed portions of the wires in a high heat environment?
@http://www.914world.com/bbs2/index.php?showuser=104 - Hey Jeff. No. In the case of the injector bank connector pictured, both those connectors will live under the intake plenum. The harness is supported by p-clamps that hold it off the inside of the intake manifold and I do all I can to route everything such that it's away from any high heat sources. If there's any question, that area gets wrapped in heat blanket and/or the source gets a shield.
Same approach as I used on the LS build and that's worked out well.
Awesome Chris...thank you for the response. Just wanted to be sure you were onto it.
Posted by: tygaboy Feb 15 2025, 06:23 PM
Cylinders 8, 7, 6, 5 (left to right). The ignition and injection branches are coming together nicely. But, man, is this taking a lot longer than I'd have imagined.
That said, I do find it a very Zen process, once I'm in the zone.
Attached thumbnail(s)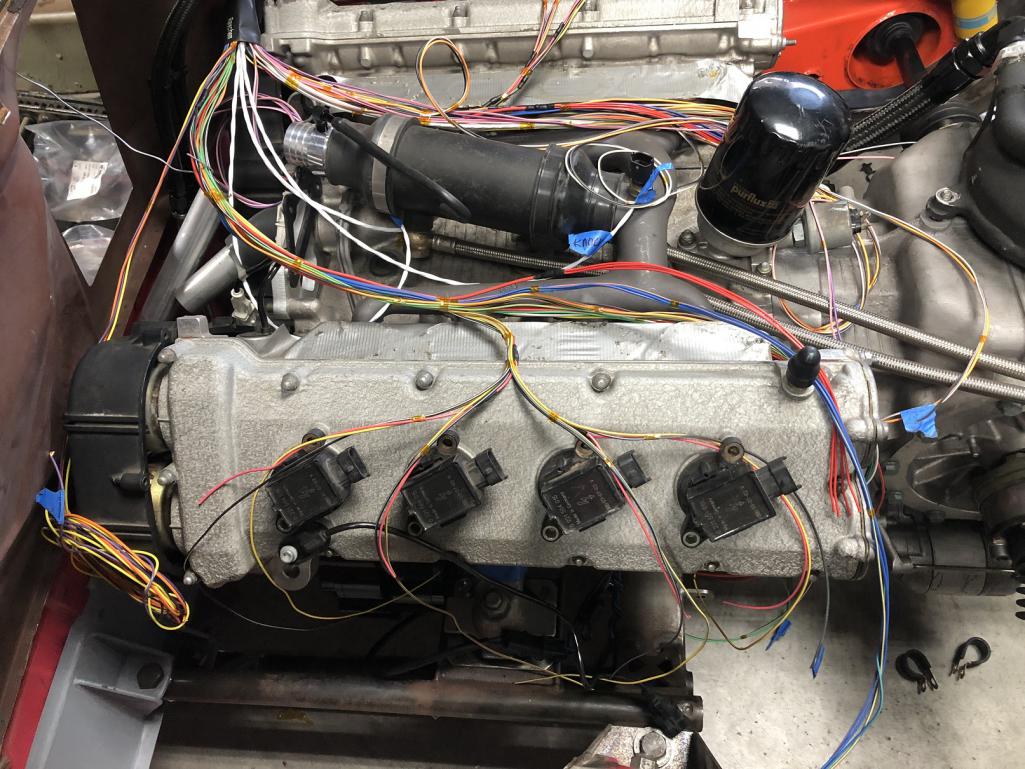
Posted by: tygaboy Feb 22 2025, 08:34 AM
You must be thinking the wiring will never be done. Me too!
https://www.youtube.com/watch?v=r4mQ8U33EPk
Posted by: Krieger Feb 22 2025, 09:39 AM
All I see is spaghetti!
Posted by: Cairo94507 Feb 23 2025, 09:55 AM
Posted by: tygaboy Mar 4 2025, 10:36 AM
Why yes, it is a 914. Why do you ask?
The engine harness is nearly complete. Well, version 1 anyway...
Attached thumbnail(s)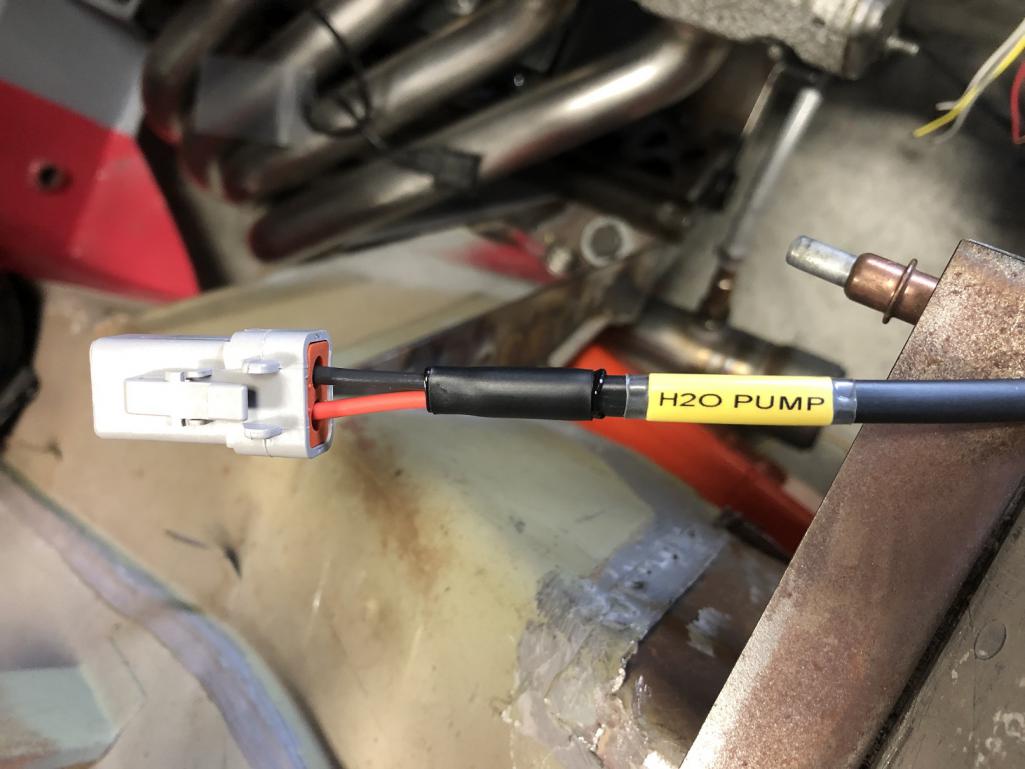
Posted by: bkrantz Mar 4 2025, 08:29 PM
Electric water pump? Don't them eye-talion motors come with a good ol' fan belt and pump on the front of the block?
Posted by: tygaboy Mar 6 2025, 09:51 AM
Electric water pump? Don't them eye-talion motors come with a good ol' fan belt and pump on the front of the block?
@http://www.914world.com/bbs2/index.php?showuser=23343 - They do. But I wanted that space at the top / front of the engine for routing other stuff. Freedom to mount the electric means it's a bit simpler and tidier to plumb, too.
Attached image(s)
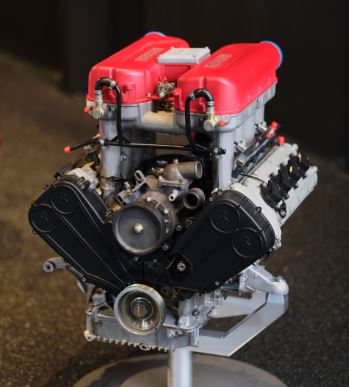
Posted by: Steve Mar 6 2025, 10:05 AM
Electric water pump? Don't them eye-talion motors come with a good ol' fan belt and pump on the front of the block?
@http://www.914world.com/bbs2/index.php?showuser=23343 - They do. But I wanted that space at the top / front of the engine for routing other stuff. Freedom to mount the electric means it's a bit simpler and tidier to plumb, too.
AC compressor is a common replacement for the stock water pump.
Posted by: bkrantz Mar 6 2025, 09:38 PM
Electric water pump? Don't them eye-talion motors come with a good ol' fan belt and pump on the front of the block?
@http://www.914world.com/bbs2/index.php?showuser=23343 - They do. But I wanted that space at the top / front of the engine for routing other stuff. Freedom to mount the electric means it's a bit simpler and tidier to plumb, too.
That looks a bit different from my Chevy small block.
Posted by: tygaboy Mar 6 2025, 10:52 PM
Engine harness Version 1 is nearly done and will be used to get the car running and dialed in. But those of you who know me know Version 2 can't be far behind. And it's not.
So, here I go: my first time building a full motorsport-level, concentric twist harness.
There are a host of formulas, measurements and general best-practices that need to be followed and they take 4-5 times as long to build as a conventional harness.
Today I started by constructing a test section that helps validate the design. This is only the core and initial layer. Pretty, no?
I'll be covering all the details of this effort in episodes At The Red Barn and posting occasional pics here. I'm really excited to try my hand at this.
Attached thumbnail(s)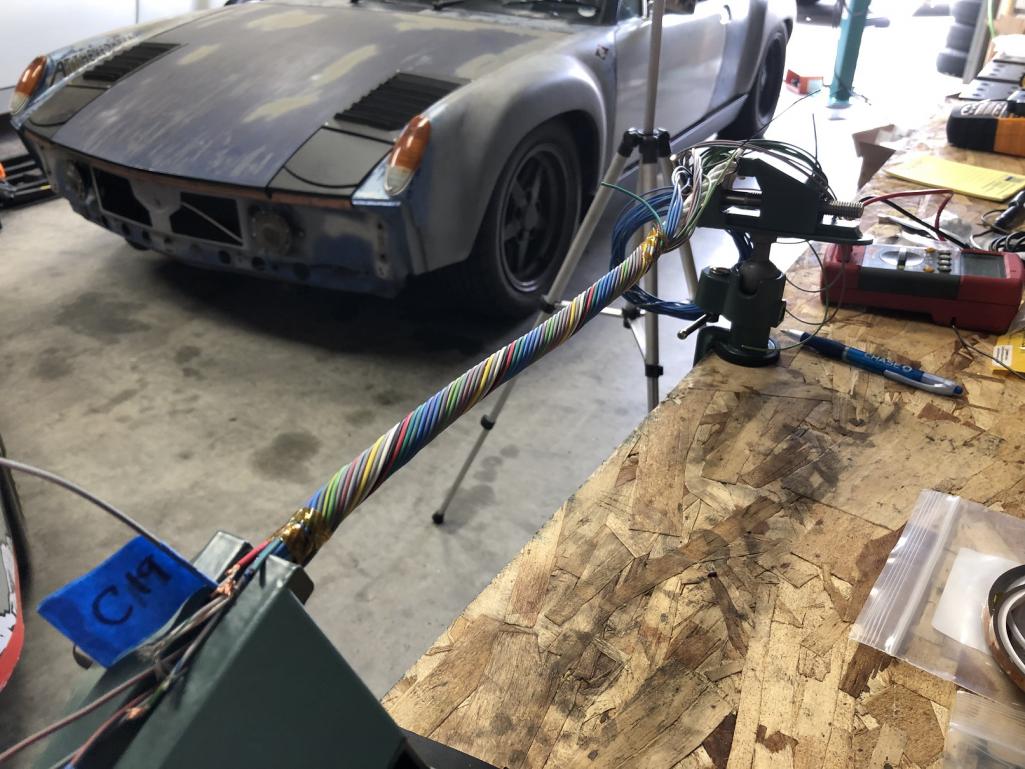
Posted by: Cairo94507 Mar 7 2025, 07:58 AM
That is pretty; can't wait to see this progress.
Posted by: tygaboy Mar 24 2025, 08:34 AM
The latest update:
https://www.youtube.com/watch?v=7vRsBe4UW5E
Posted by: JeffBowlsby Mar 24 2025, 09:01 AM
Why the concentric twist? Have not seen that before.
Posted by: tygaboy Mar 24 2025, 09:51 AM
Why the concentric twist? Have not seen that before.
@http://www.914world.com/bbs2/index.php?showuser=104 Jeff- there's a bunch of info available but in short, with this approach, the harness is as small as possible (due to the type of wire used), remains very flexible, it keeps everything neat and tidy and ensures none of the wires in the harness see more stress than others.
There are "service loops" (pictured) at the connectors to facilitate repair if that's ever needed.
Also, the entire harness is sealed - every connector is booted, every branch point epoxied and strain relieved. No exposed conductors anywhere. (also pictured)
Yes, it's totally unnecessary for what I'm up to with a street car. But as the saying goes:
There's no kill like overkill!
Attached thumbnail(s)
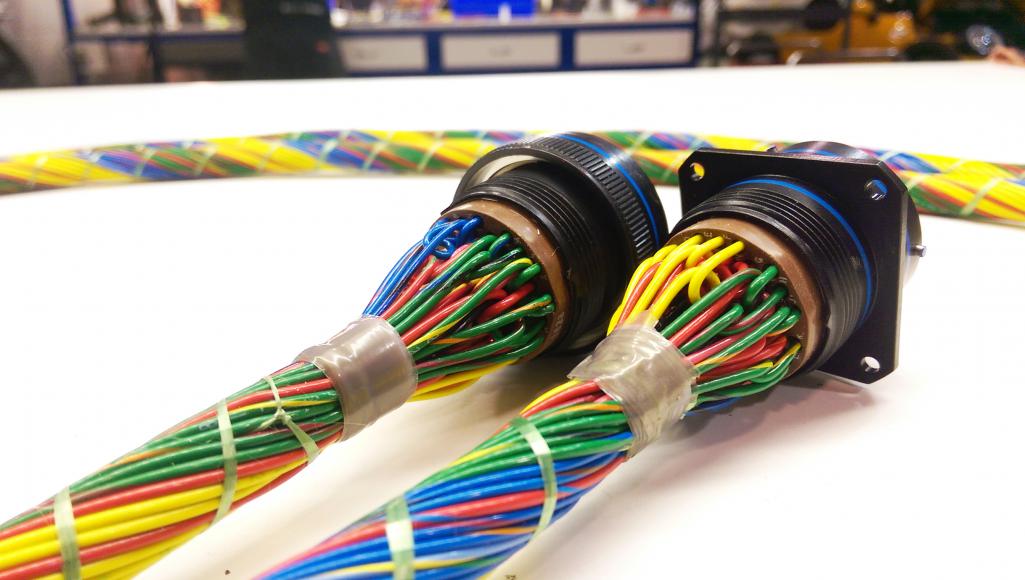
Attached image(s)
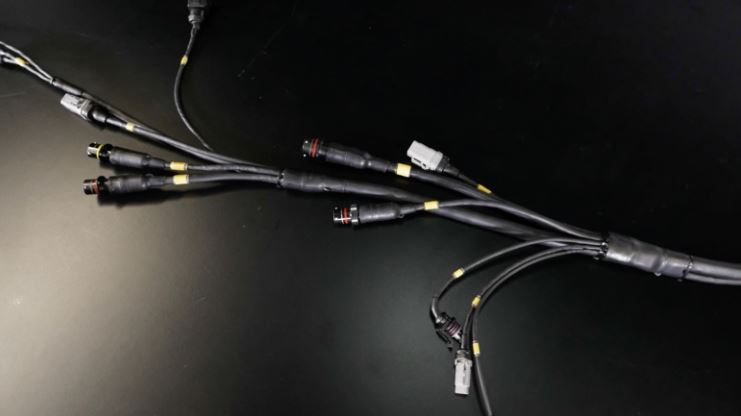
Posted by: davep Mar 24 2025, 07:31 PM
But how much does the concentric twist shorten the harness or did you add the extra length in to start with?
Posted by: bkrantz Mar 24 2025, 07:41 PM
But how much does the concentric twist shorten the harness or did you add the extra length in to start with?
That's my question. A straight wire is the shortest route, right?
But way cool.
Posted by: tygaboy Mar 24 2025, 08:51 PM
@http://www.914world.com/bbs2/index.php?showuser=1244 @http://www.914world.com/bbs2/index.php?showuser=23343 A concentric twist harness is built to the same dimension since it still has to connect to everything, but uses 15-20% more wire length. The twist and service loops takes some length and, depending on the branching approach, some extra length is used there, too.
But the wire that's typically used (Tefzel M22759/32) is smaller diameter and lighter, due to the type of insulation is uses.
Posted by: bkrantz Mar 25 2025, 07:18 PM
@http://www.914world.com/bbs2/index.php?showuser=1244 @http://www.914world.com/bbs2/index.php?showuser=23343 A concentric twist harness is built to the same dimension since it still has to connect to everything, but uses 15-20% more wire length. The twist and service loops takes some length and, depending on the branching approach, some extra length is used there, too.
But the wire that's typically used (Tefzel M22759/32) is smaller diameter and lighter, due to the type of insulation is uses.
And cool.
Posted by: tygaboy Mar 29 2025, 06:59 AM
Enough with the wiring! Well, at least for a bit. Let's work on the cooling system and learn about what NOT to do when welding aluminum.
https://www.youtube.com/watch?v=GsExTNbnSNQ
Posted by: Cairo94507 Mar 29 2025, 07:22 AM
Getting close to turning the key....
Posted by: East coaster Mar 29 2025, 09:36 AM
Nice progress! I’ve done the stainless rod mistake and it’s a mess when it happens.
Posted by: Superhawk996 Mar 29 2025, 10:59 AM
Always impressed with your craftsmanship on the wiring. 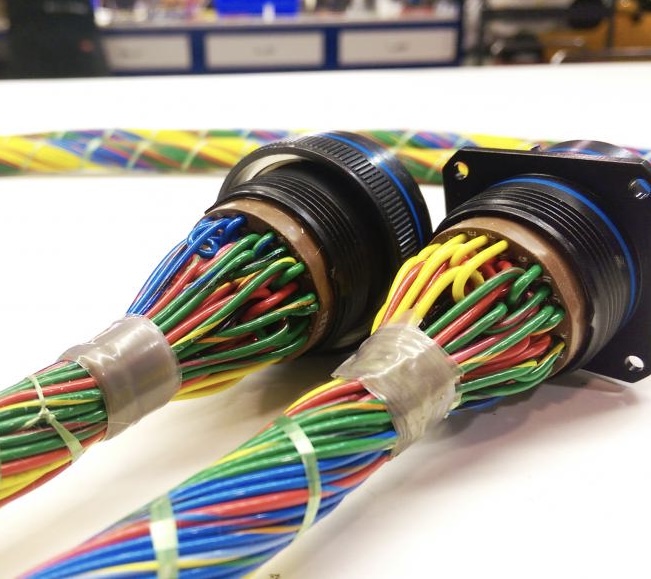
Posted by: tygaboy Mar 30 2025, 08:59 AM
Always impressed with your craftsmanship on the wiring.
@http://www.914world.com/bbs2/index.php?showuser=22428 - To be clear, that's an example of what I'm attempting but that's NOT my work! I aspire to that level of result but we'll have to wait to see how close I can get!
Posted by: Superhawk996 Mar 30 2025, 11:05 AM
@http://www.914world.com/bbs2/index.php?showuser=22428 - To be clear, that's an example of what I'm attempting but that's NOT my work! I aspire to that level of result but we'll have to wait to see how close I can get!
Appreciate the honesty! Based on the photo of your twisting work and what I’ve seen of your wiring on the V8, I assumed that was your work. I have no doubt you’ll pull it off!
Posted by: Dion Apr 3 2025, 07:15 AM
Loving the videos on the YouTube! Have to say I’m always learning something.
The Tig worked out in the end.
Look forward to more Chris.
Posted by: tygaboy Apr 6 2025, 08:17 AM
The coolant plumbing is coming along:
https://www.youtube.com/watch?v=hvvDfRKGELc
Posted by: Cairo94507 Apr 6 2025, 09:23 AM
I really enjoy the videos; Chris takes the time to explain everything as he walks us through his plan from beginning to end.
Posted by: tygaboy Apr 12 2025, 07:52 AM
More stuff getting done means less left to do before I try and start this thing!
https://www.youtube.com/watch?v=yiQ9OoCeNUU
Posted by: ConeDodger Apr 12 2025, 08:02 AM
@http://www.914world.com/bbs2/index.php?showuser=1244 @http://www.914world.com/bbs2/index.php?showuser=23343 A concentric twist harness is built to the same dimension since it still has to connect to everything, but uses 15-20% more wire length. The twist and service loops takes some length and, depending on the branching approach, some extra length is used there, too.
But the wire that's typically used (Tefzel M22759/32) is smaller diameter and lighter, due to the type of insulation is uses.
If you used Tefzel that harness is likely more expensive than my car was when I bought it!
I see signs that someone took the High Performance Academy Motorsports wiring course?
Posted by: tygaboy Apr 13 2025, 02:59 PM
I'm nothing if not ineffecient! It took me a full day to get the frunk hard lines fitted. Final welding of a few joints and this coolant system will be all set.
I'm happy with how it's turning out, especially now that I'm doing everything on my own, including the aluminum welding. Yes, I miss hanging out with Martin but I need to develop! Still a ways to go on that skill but the results are functional if not quite beautiful (yet!)
Attached thumbnail(s)
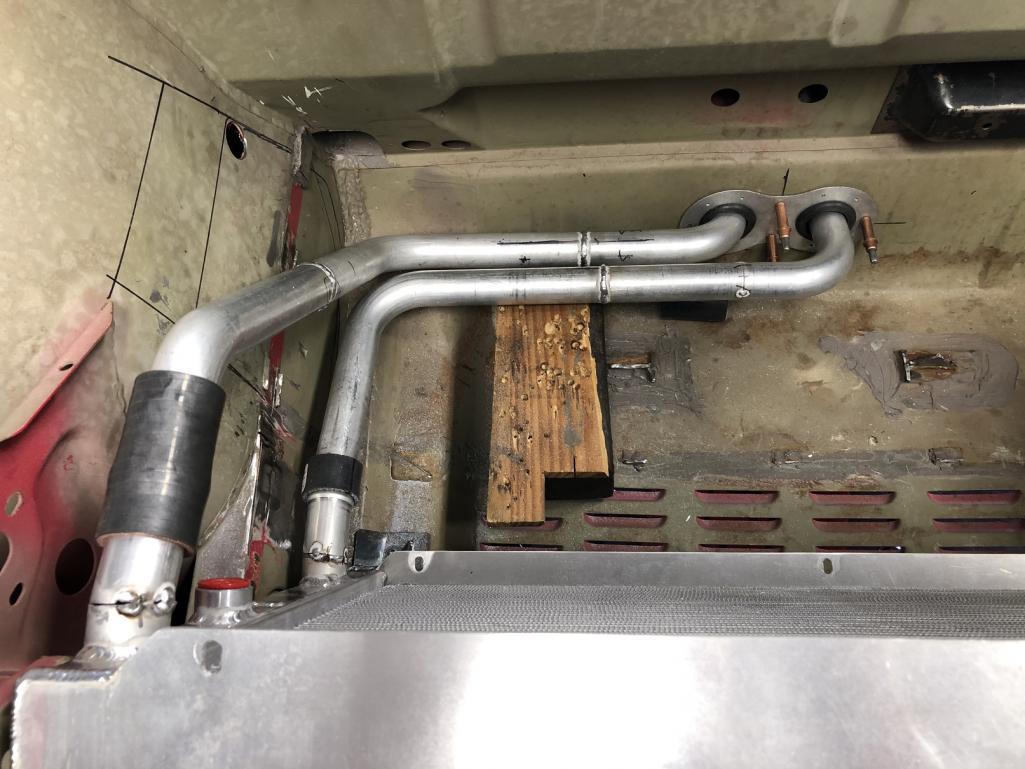
Posted by: roundtwo Apr 13 2025, 05:28 PM
Looking good with the aluminum welding training wheels off!
Curious how you’re going to insulate the tubing?
Making good progress, even if it’s painfully slow at times.
Posted by: tygaboy Apr 16 2025, 05:37 PM
Radiator hard lines all done. Amazing what a little Scotch-Brite can do to an aluminum tube. I'm happy with how these turned out.
Attached thumbnail(s)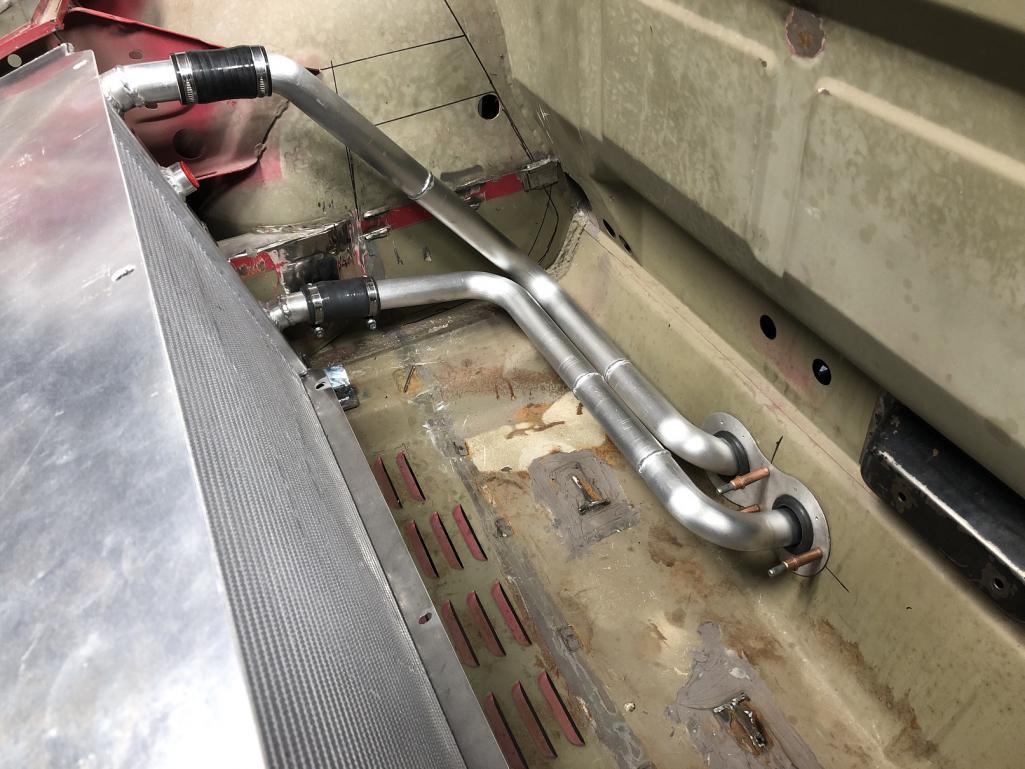
Posted by: Cairo94507 Apr 16 2025, 06:56 PM
Very nice looking. Pretty soon you will have nothing left but to turn the key.
Posted by: tygaboy Apr 20 2025, 09:22 AM
And here's the detail of getting to those hard lines pictured above.
https://www.youtube.com/watch?v=05oBjNGBSyQ
Posted by: tygaboy Apr 26 2025, 04:04 PM
I need an oil catch can.
I love symmetry.
Problem solved!
Yep, I picked up another Ferrari 360 coolant fill tank, made a mirror image bracket set and: done!
Well, almost done. I still need to add the appropriate fittings and lines but, come on! This looks so cool, it's all factory parts so I'm claiming I've earned solid style points on this one.
Attached thumbnail(s)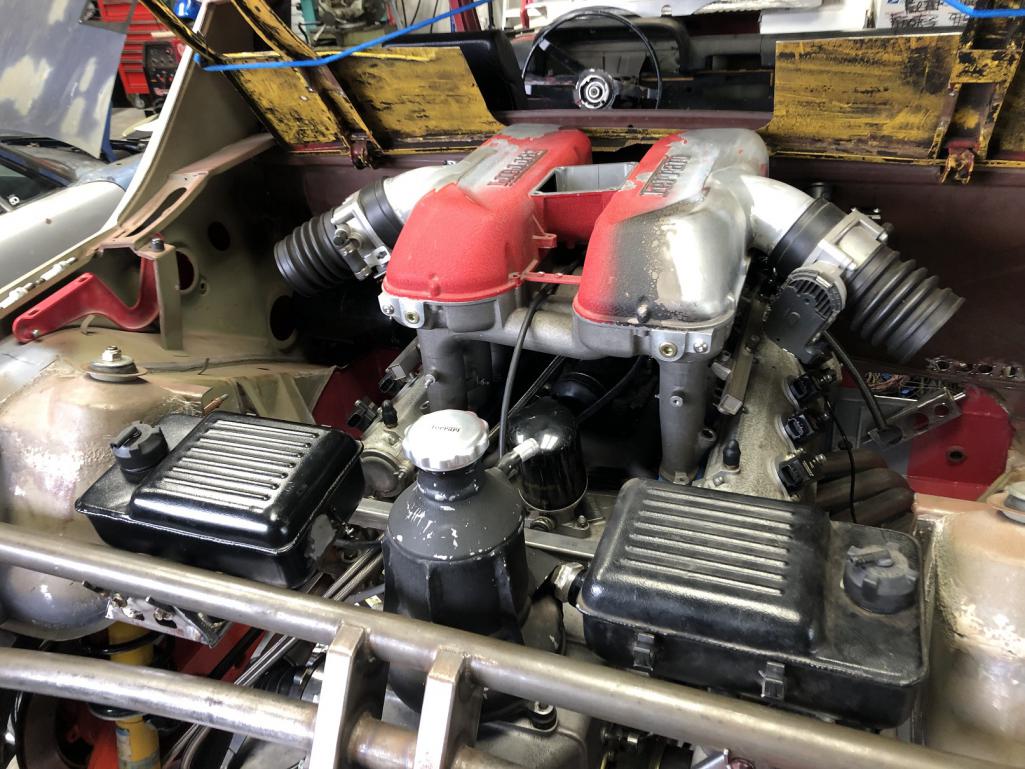
Posted by: East coaster Apr 26 2025, 08:07 PM
Nice!
Posted by: flipb May 2 2025, 02:12 PM
Something reminded me of this today and I realized it would be perfect for this project.
Posted by: tygaboy May 3 2025, 08:18 AM
Big changes At The Red Barn!
https://www.youtube.com/watch?v=PCVj71LYQKQ
Posted by: Cairo94507 May 3 2025, 09:31 AM
Definitely coming along. I really like the 3D printer thoughts. The Mickey Mouse ears on my 3.6 are 3D printed out of some special material (I don't recall what it was) and they are beautiful and strong. Keep up the great work Chris.
Posted by: Montreal914 May 3 2025, 09:40 AM
Thank you for the Saturday morning entertainment!
Always pleasant to see the enginnering and craftmanship!
Now, I have to ask. What's the deal with the "SMALL" engine valve on top of your tool box in the background at the end of the video?
Posted by: tygaboy May 3 2025, 11:09 AM
Thank you for the Saturday morning entertainment!
Always pleasant to see the enginnering and craftmanship!
Now, I have to ask. What's the deal with the "SMALL" engine valve on top of your tool box in the background at the end of the video?
@http://www.914world.com/bbs2/index.php?showuser=12023 - I was wondering if anyone would notice that! It came out of a 2-stroke diesel submarine engine. I use it as a shop towel roll holder...
Posted by: tygaboy Jun 2 2025, 08:18 AM
The drive train is out for the belt service, new clutch, etc. so it's time to wrap up the engine bay chassis updates. Here's the newly stamped console reinforcement tacked in. I updated the stamping die so the indent would more closely match the one on the shock tower. Not that you'll even be able to see them at the same time. Why do I insist on making everything a bigger production than it needs to be? Oh, right: Style Points!
And yep, the sockets fit just fine. I'm going to 3D print a cover for that area to prevent crap from getting in there.
Attached thumbnail(s)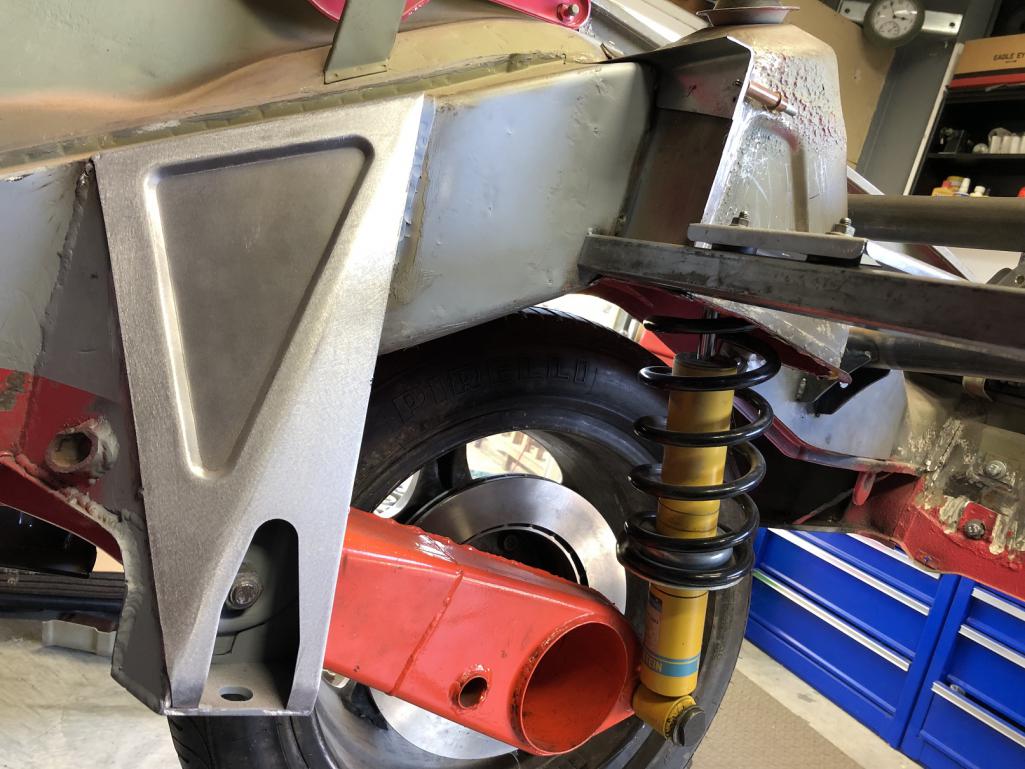
Attached image(s)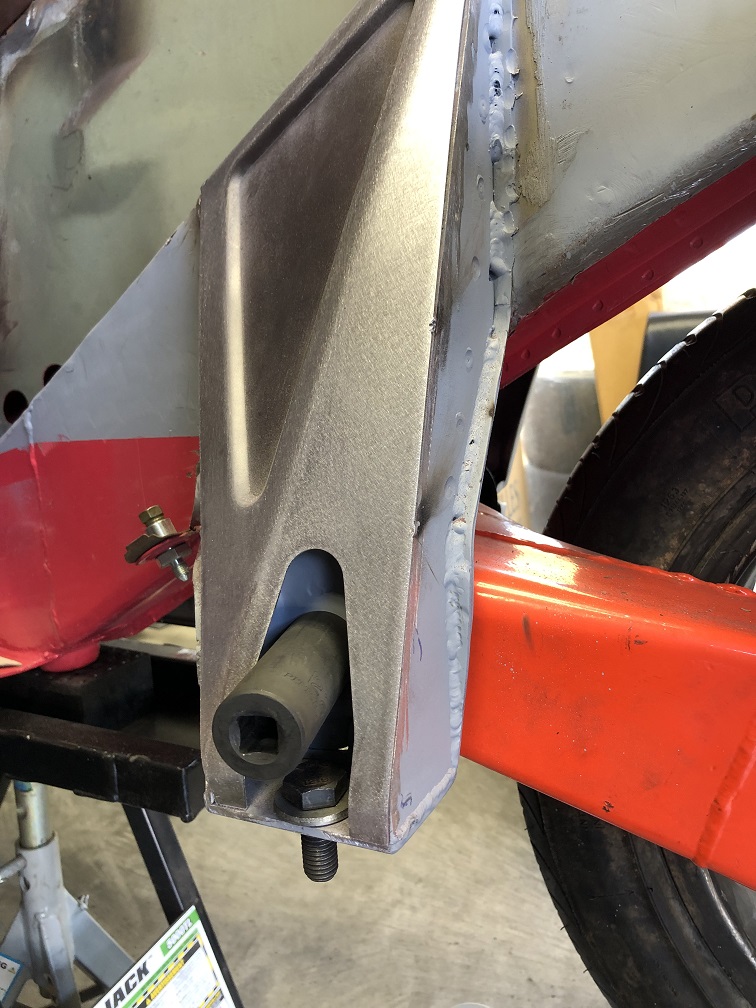
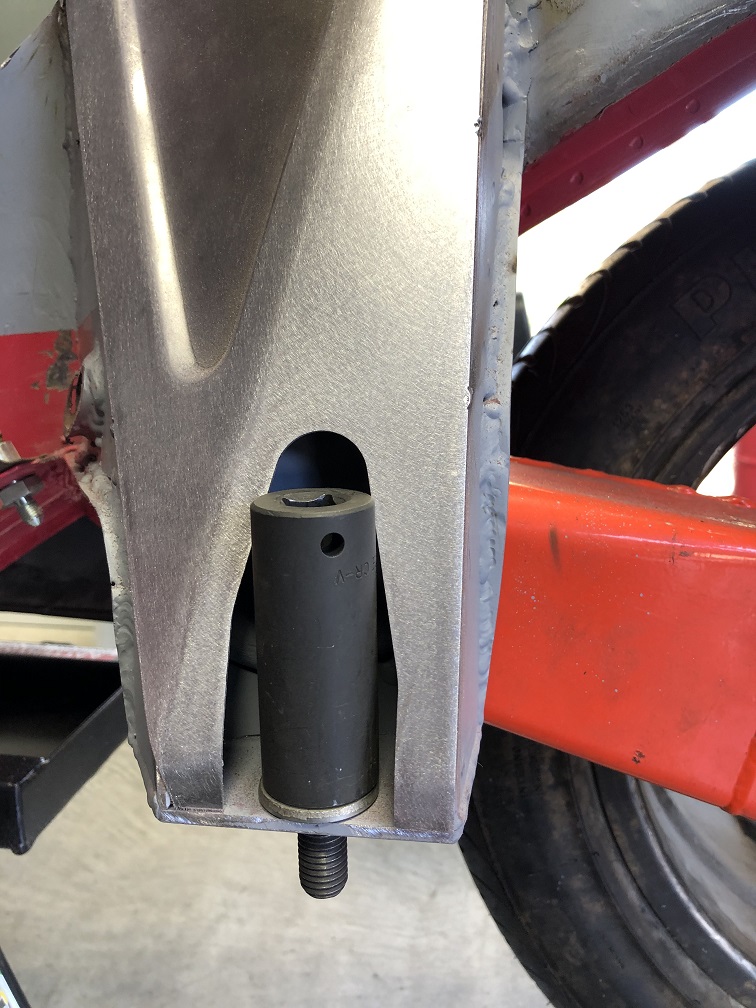
Posted by: Cairo94507 Jun 2 2025, 08:36 AM
OK, doing the engine service must mean you are getting close to turning the key....
Posted by: sb914 Jun 2 2025, 10:01 AM
Very nice as usual.
Posted by: tygaboy Jun 2 2025, 04:31 PM
Both sides fit and tacked in place. Now for final welding and adding the plating that ties these back to the shock tower.
Attached thumbnail(s)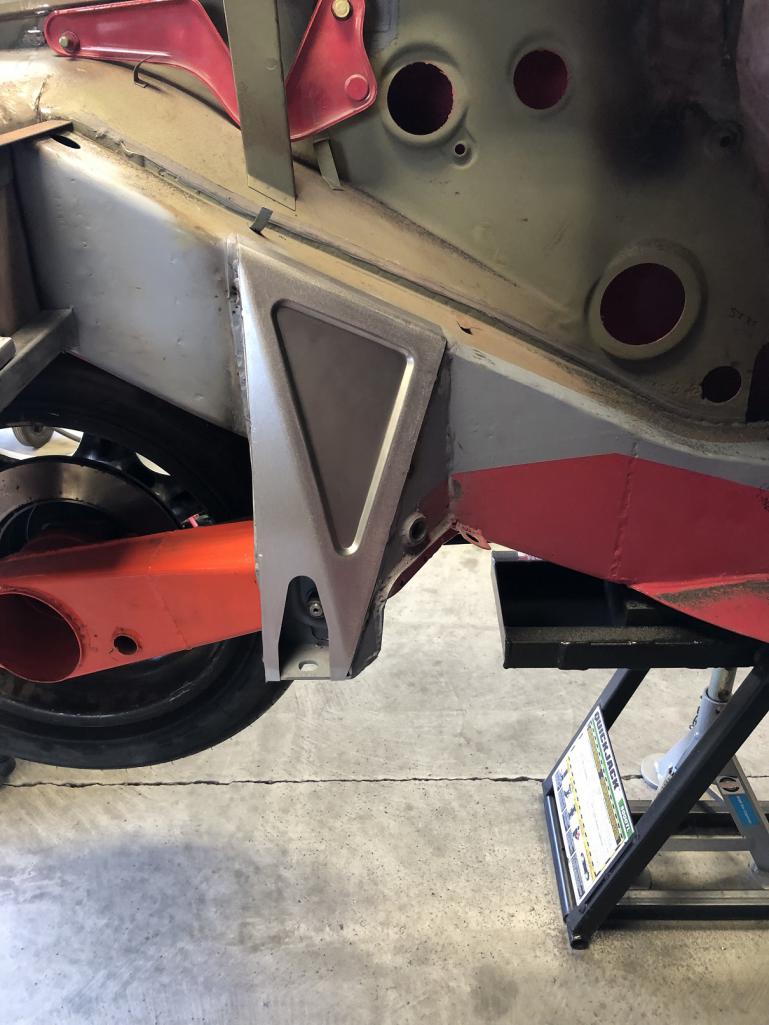
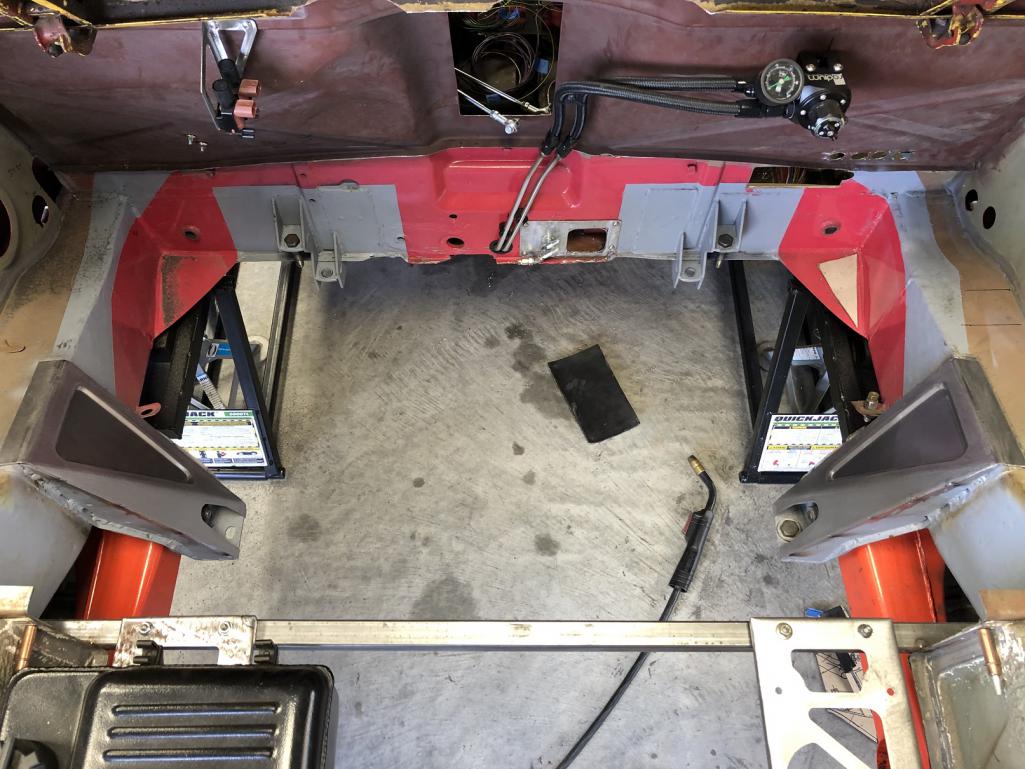
Posted by: Shivers Jun 2 2025, 06:00 PM
Beautiful.
Posted by: FL000 Jun 2 2025, 06:06 PM
You always find a way to add style points, while also making sure it fits, functions, and can be maintained. Not easy to hit all those marks so understandably it takes time.
Can’t wait to hear this thing fire up!
Posted by: East coaster Jun 2 2025, 08:31 PM
Very nice!
Posted by: Dion Jun 2 2025, 09:35 PM
I love this build. Look forward to every video.
Engine out eh? Hmmm you must be close like Michael said.
When is the next showing?
Looking spectabular as usual!
Posted by: Krieger Jun 2 2025, 11:05 PM
That turned out nicely!
Posted by: Montreal914 Jun 3 2025, 08:14 AM
Beautiful work as always.
I assume Send-Cut-Send did the cutting. The die work was done at your shop? What sheet metal thickness and what size press? Very nice!!!!!
BTW, I have been using SCS at work, great service! Thank you for sharing!
Posted by: tygaboy Jun 3 2025, 08:33 AM
Beautiful work as always.
I assume Send-Cut-Send did the cutting. The die work was done at your shop? What sheet metal thickness and what size press? Very nice!!!!!
BTW, I have been using SCS at work, great service! Thank you for sharing!
@http://www.914world.com/bbs2/index.php?showuser=12023 - I really don't need "instant" parts and SendCutSend is so good/fast/reasonably priced that I sold my plasma table! Watch the next episode and you'll learn that I also moved the bender/press to another shop but I still have access so yes, I did the pressing. It's a standard size H-press with a powered ram. Watch Episode 15 below and you'll see it in action stamping the initial panel with all the parts I cut on my plasma table.
The panel in the car is .048" and the die set is .188" thick with a .200" gap between the male/female components.
https://www.youtube.com/watch?v=0q3mnh0YrEg
Posted by: BillC Jun 3 2025, 05:13 PM
Very clever with the stamping dies.
Did you make another, opposite, set of dies for the other side, or did you drill out the spot welds and re-weld the small male parts on the other side of the large male part?
Posted by: tygaboy Jun 3 2025, 05:19 PM
Very clever with the stamping dies.
Did you make another, opposite, set of dies for the other side, or did you drill out the spot welds and re-weld the small male parts on the other side of the large male part?
@http://www.914world.com/bbs2/index.php?showuser=18667 - I drill the spot welds and flip things around to make the mirror image part.
Posted by: rick 918-S Jun 3 2025, 06:21 PM
Posted by: tygaboy Jun 8 2025, 07:59 AM
The latest status updates included a new crew of kitties! Enjoy...
https://www.youtube.com/watch?v=CdBVty1fgno
Posted by: Bullethead Jun 8 2025, 10:45 AM
Just wow.
Posted by: tygaboy Jun 8 2025, 10:56 AM
And here's a preview of what's coming in next week's episode. The upper section of the reinforcement is final welded, metal finished and ready for primer.
Attached thumbnail(s)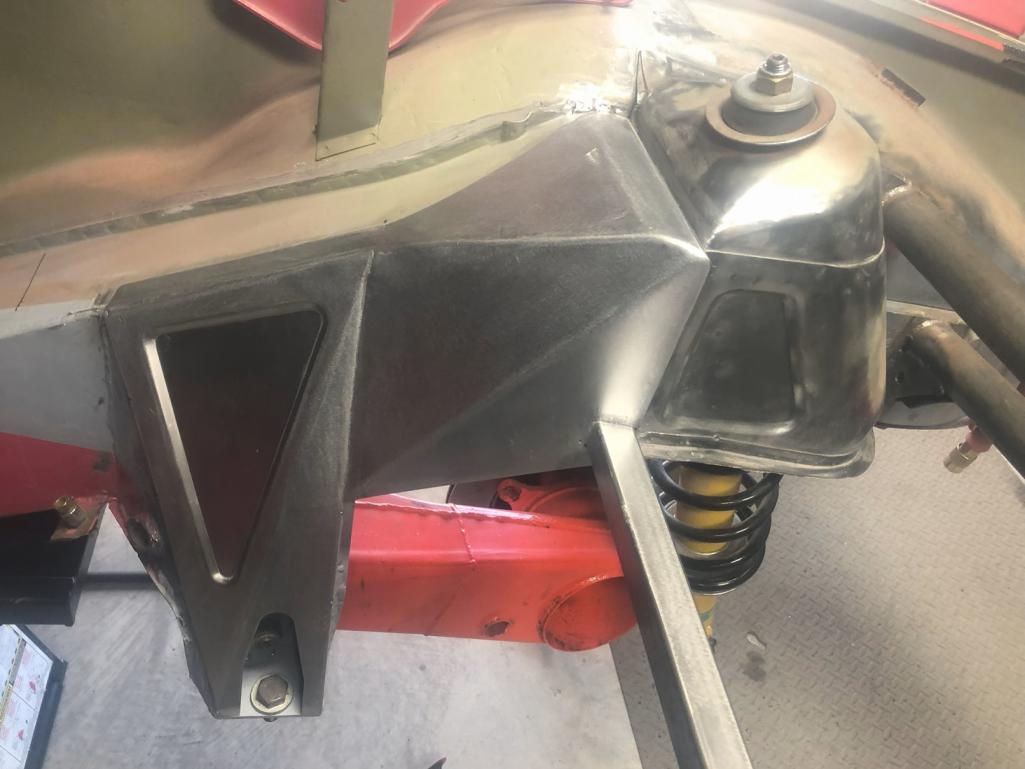
Posted by: BillC Jun 8 2025, 06:14 PM
Fantastic work on the car.
And Management loves the kitties. She keeps asking if we can foster some, but I know she'd never be able to give them up later.
Posted by: tygaboy Jun 21 2025, 07:10 AM
My engine compartment is looking less and less like a 914's every day. And don't miss the kitty content at the end!
https://www.youtube.com/watch?v=7oCYJ--XoNo
Posted by: tygaboy Jun 21 2025, 07:11 AM
delete
Posted by: Cairo94507 Jun 21 2025, 07:57 AM
Can't wait for the engine to be back in place.
Posted by: Superhawk996 Jun 21 2025, 10:15 AM
Did my first automotive engineering internship at Chrysler Mt. Elliot Tool and Die. They built the stamping dies and ran tryout presses for all kinds of body panels. The largest mill was an Ingersoll 5 axis CNC gantry mill with a bed that was about 12’ long. It’s for sale. It would look great in the Red Barn. 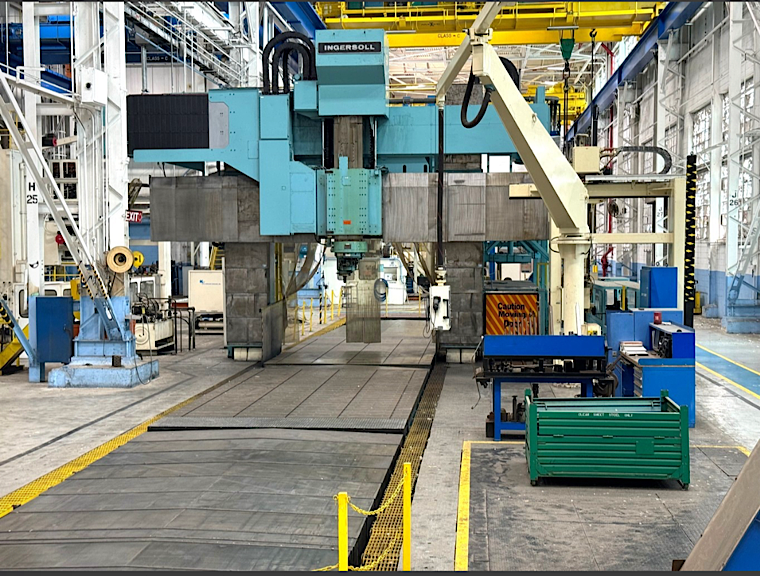
https://www.prestigeequipment.com/auction/mount-elliott-tool-die/
Impressive stuff you’re doing there in the Red Barn with pretty basic tools.
Don’t sell yourself short, those formations aren’t just “style points”. Those formations drastically increase the strength and rigidity vs a flat piece of sheet metal.
Posted by: tygaboy Jun 22 2025, 07:27 AM
@http://www.914world.com/bbs2/index.php?showuser=22428 Yep, I get the strength improvement of adding section to a panel and stronger is always better. Well, almost always, I suppose. In the LS car, I just did flat panels but used 16 ga. In the end, for my use cases, I'm sure everything is over-built.
And yes, I want that giant press! Just think of all the time and money I could waste with my do-overs on THAT thing!
Posted by: Superhawk996 Jun 22 2025, 09:46 AM
And yes, I want that giant press! Just think of all the time and money I could waste with my do-overs on THAT thing!
That picture is of the mill that would machine the dies.
The presses are way bigger.
Posted by: tygaboy Jul 1 2025, 02:52 PM
Tool Whore update:
With the plasma table gone, it was time to implement my plan for upping my fabrication game. I started by adding a Bambu Labs 3D printer to the mix. It arrived yesterday and took maybe 1.5 hours to get set up. As soon as it let me know it was ready, I sent the first job to it.
All I can say is: If you don't have one, you need one!
Virtually every review talks about how Bambu Labs' products just plain work and really are "ready to go" right out of the box. I can report that it's true! I sent my first job to it and it did a flawless job of printing it.
Next to arrive is a Creality Raptor Pro 3d scanner. Between these two new tools, some super cool things will be showing up soon!
Attached thumbnail(s)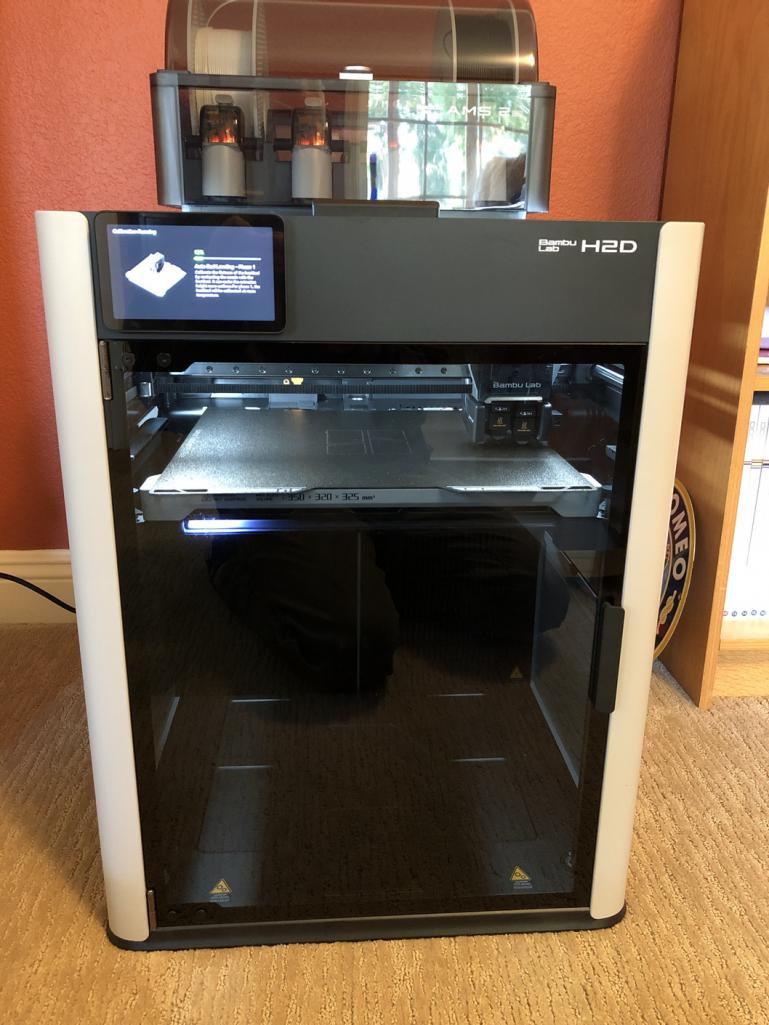
Posted by: Cairo94507 Jul 1 2025, 04:26 PM
Congratulations Chris; that is very very cool.
Powered by Invision Power Board (http://www.invisionboard.com)
© Invision Power Services (http://www.invisionpower.com)